CLICK FLASK FOR TUTORIAL

CLICK FLASK FOR TUTORIAL. Step 1 Know your equipment Back to TutorialClick for movie.
Dec 15, 2015
Welcome message from author
This document is posted to help you gain knowledge. Please leave a comment to let me know what you think about it! Share it to your friends and learn new things together.
Transcript

CLICK FLASK FOR TUTORIAL


Step 1Know your equipment
Back to TutorialClick for movie

Back to Tutorial
Step 1 Know your equipment
Next Step

Step 2
Shut the air control.
Back to TutorialClick for movie

Back to Tutorial
Step 2 Shut the gas control and open the wall valve
Next Step

Step 3
Shut the gas control and open
the wall valve
Back to TutorialClick for movie

Back to Tutorial
Step 3 Shut the gas control and open the wall valve
Next Step
Step 4
Carefully light the burner.
Always use the striker at a 45 degree angle
Back to TutorialClick for movie

Back to Tutorial
Step 4 Carefully light the burner
Next Step

Step 5
Control the flame by closing the wall valve until you have a 2 inch flame then begin opening the air valve
Back to Tutorial
Click for movie

Back to Tutorial
Step 5 Controlling the flame
Next Step
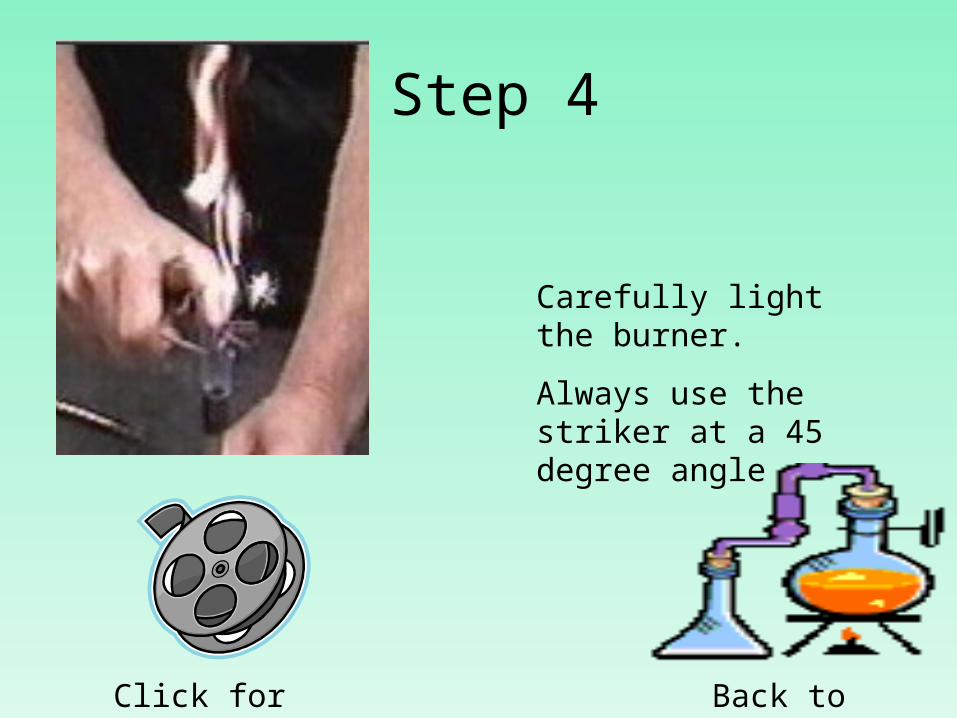
The hottest part of the flame is just above the central blue cone. (There is
no combustion inside the central cone.)
Back to Tutorial
Step 6 Conclusion
The initial flame is low on oxygen and not very hot.
When the hole is closed and air is excluded from mixing with the jet of gas,
a yellow, luminous flame is produced
Click for movie

Back to Tutorial
Step 6 Determining the hottest part of the flame
Click me for some lab
safety tips

Back to Tutorial
Lab Safety
Tip 1: Always tie long hair back, and do not light on fire.
Tip 2: Always turn air valve clockwise to close.

Back to Tutorial
Tip 1
Next Tip

Back to Tutorial
Tip 2
Back to lab safety
Related Documents