Centralized Risk Register User Guide Template i Rev A, 1/31/2010 U.S. Department of Energy Root Cause Analysis Contract and Project Management Corrective Measure 3 Centralized Risk Register Tools and Methods for DOE Projects and Programs User Guide Template Initial Issue – Draft for Comment 1/31/2010

Welcome message from author
This document is posted to help you gain knowledge. Please leave a comment to let me know what you think about it! Share it to your friends and learn new things together.
Transcript

Centralized Risk Register User Guide Template i Rev A, 1/31/2010
U.S. Department of Energy Root Cause Analysis
Contract and Project Management Corrective Measure 3
Centralized Risk Register Tools and Methods for DOE Projects
and Programs
User Guide Template
Initial Issue – Draft for Comment 1/31/2010
Centralized Risk Register User Guide Template ii Rev A, 1/31/2010
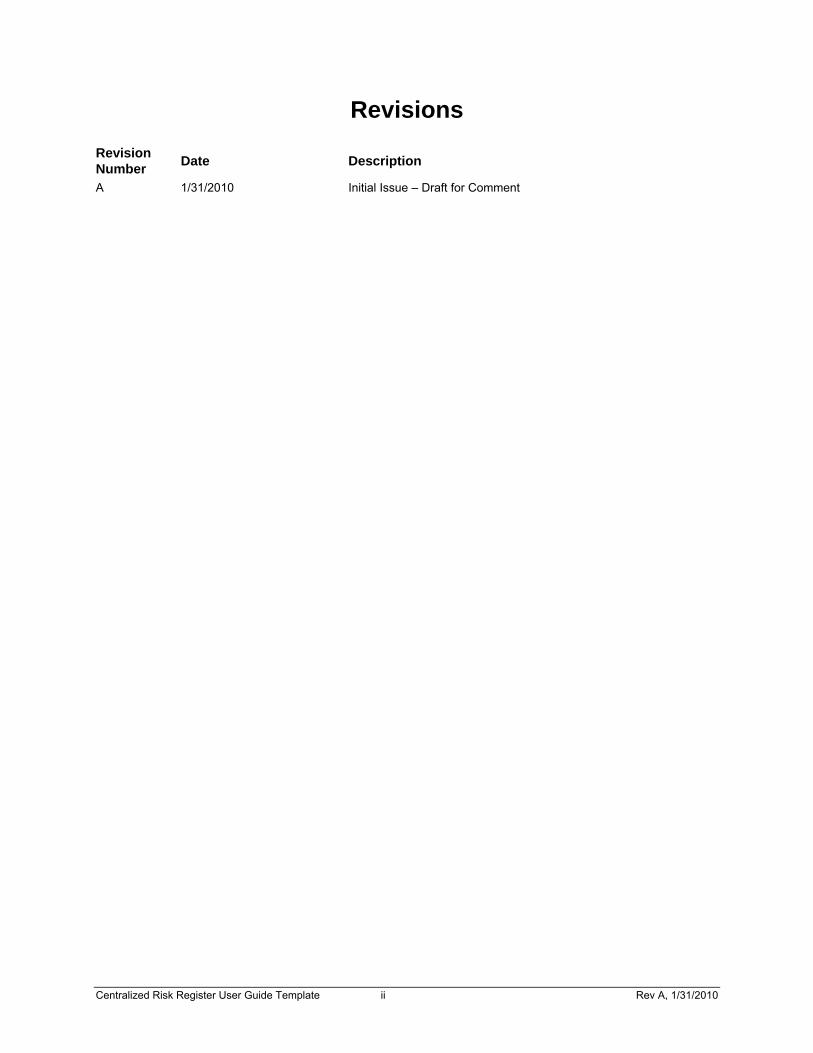
Revisions
Revision Number
Date Description
A 1/31/2010 Initial Issue – Draft for Comment
Centralized Risk Register User Guide Template iii Rev A, 1/31/2010
Table of Contents 1.0 Introduction ........................................................................................................................1 2.0 Desktop Requirements.......................................................................................................1 3.0 Installation ..........................................................................................................................2 3.1 Brainstorm Events..............................................................................................................4 3.2 Query of BrainStorming Forms ..........................................................................................7 3.3 Printing BrainStorming Forms ............................................................................................8 3.4 Evaluate Events .................................................................................................................9 3.4.1 Event Identification......................................................................................................10 3.4.2 Event Evaluation .........................................................................................................12 3.4.2.1 Evaluation Header.......................................................................................................12 3.4.2.2 Evaluation Tab ............................................................................................................14 3.4.2.3 Handling Strategy Tab.................................................................................................16 3.4.2.4 Residual Risk Tab .......................................................................................................17 3.4.2.5 Action Items Tab .........................................................................................................19 3.4.2.6 Comments and Trending Tab......................................................................................21 3.4.2.7 Status Summary Tab...................................................................................................21 3.5 View Reports....................................................................................................................24 3.6 Query Register .................................................................................................................27 3.6.1 Create a New T/O Query.............................................................................................27 3.6.2 View Results from Last Saved T/O Query...................................................................30
3.6.2.1 View Summary Report ................................................................................................30 3.6.2.2 View Monthly Report ...................................................................................................30 3.6.2.3 View Detail Report ......................................................................................................30
3.7 Selecting Limited Queries from Evaluate Events Form....................................................31 Appendix B – Threat & Opportunity Grading Guidelines ............................................................32 Appendix C – Forms and Fields..................................................................................................38
Centralized Risk Register User Guide Template iv Rev A, 1/31/2010
List of Figures Figure 1 – Main Menu ...................................................................................................................3 Figure 2 – BrainStorming Form (Read Only) ................................................................................4 Figure 3 – BrainStorming Form – Enabled for Data Entry ............................................................5 Figure 4 – BrainStorming Form – Example Data ..........................................................................7 Figure 5 – Query BrainStorming Forms ........................................................................................8 Figure 6 – Evaluate Events Form – Data Transfer .......................................................................9 Figure 7 – Evaluate Events Form – Event Identification .............................................................10 Figure 8 – Evaluate Events Form – Event Evaluation ................................................................12 Figure 9 – Event Evaluation - Header.........................................................................................12 Figure 10 – Email Notification .....................................................................................................13 Figure 11 – Acknowledgement Dialog Box .................................................................................13 Figure 12 – Event Evaluation – Evaluation Tab..........................................................................14 Figure 13 – Consequence Fields for Risk Events.......................................................................15 Figure 14 – Benefit Fields for Opportunity Events ......................................................................15 Figure 15 – Event Evaluation – Handling Strategy Tab ..............................................................16 Figure 16 – Event Evaluation – Residual Risk Tab.....................................................................17 Figure 17 – Event Evaluation – Action Items Tab.......................................................................19 Figure 18 – Event Evaluation – Comments and Trending Tab ...................................................21 Figure 19 – Event Evaluation – Status Summary Tab ................................................................21 Figure 20 – Event Evaluation - View Overall Rating ...................................................................23 Figure 21 – View Reports Menu .................................................................................................24 Figure 22 – Select a Tier Level Sub-Menu .................................................................................25 Figure 23 – Query Register Menu (Threat/Opportunity Register) ...............................................27 Figure 24 – T/O Query Form – Available Search Criteria (fix this -- T/O) ...................................28 Figure 25 – T/O Query Results ...................................................................................................29 Figure 26 – T/O Query Reports ..................................................................................................30 Figure 27 – Threat Grading Matrix..............................................................................................34 Figure 28 – Threat Handling Strategies ......................................................................................34 Figure 29 – Opportunity Grading Matrix......................................................................................37 Figure 30 – Opportunity Handling Strategies..............................................................................37 Figure 31 – Brainstorming Form .................................................................................................38 Figure 32 – Event Identification Form .........................................................................................40 Figure 33 – Event Evaluation Header .........................................................................................40 Figure 34 - Event Evaluation Tab ...............................................................................................41 Figure 35 – Event Evaluation Handling Strategy Tab .................................................................43 Figure 36 – Event Evaluation Residual Risk Tab........................................................................44 Figure 37 – Event Evaluation Action Item Tab............................................................................45 Figure 38 - Event Evaluation Comment and Trending Tab.........................................................46 Figure 39 - Event Evaluation Status Summary Tab....................................................................47
Centralized Risk Register User Guide Template v Rev A, 1/31/2010
List of Tables Table 1 – Data Transfer – BrainStorming Form to Evaluate Events Form....................................9 Table 2 – Guidelines for Assigning Threat Probability ................................................................32 Table 3 – Guidelines for Assigning Threat Consequences.........................................................33 Table 4 – Guidelines for Assigning Opportunity Probability........................................................35 Table 5 – Criteria for Assigning Opportunity Benefits .................................................................36 Table 6 – Brainstorming Field Description ..................................................................................39 Table 7 – Event Identification Form Field Description ................................................................40 Table 8 – Event Evaluation Field Description .............................................................................41 Table 9 – Event Evaluation Tab Field Description ......................................................................42 Table 10 – Event Evaluation Handling Strategy Tab Field Descriptions.....................................43 Table 11 - Event Evaluation Residual Risk Tab Field Description..............................................44 Table 12 - Event Evaluation Action Item Field Description .........................................................46 Table 13 - Event Evaluation Comment and Trending Tab Field Description ..............................47 Table 14 - Event Evaluation Status Summary Field Description ................................................47

Centralized Risk Register User Guide Template 1 Rev A, 1/31/2010
1.0 Introduction The purpose of the User Guide Template is to provide basic information to facilitate using the Centralized Risk Register (CRR) developed for use by DOE projects and programs as a result of Corrective Measure 3 to the Root Cause Analysis for Contract and Project Management. The Template is a starting point for a project or program team to use the tool and adapt the template to their activity. Companion training materials and a procedure are also provided for use by the team.
This register was developed for the UPF Project and is being made available for use by any DOE project or program on a voluntary basis. The CRR is a menu driven tool for managing risks and opportunities and has the capability for multiple users to access information simultaneously. The intent is to provide new users and those less experienced with sufficient information to effectively enable input and retrieval of information in support of the a Project Office or Program Office Risk Management program. The CRR is under the control of a CRR Administrator (hereafter referenced as Administrator).
It is important to understand that the CRR is tool designed to facilitate managing a project’s risk management business process. This tool stores information for management to make informed management business decisions. This tool does not replace the communication and interaction required to assure that a project has an effective Risk Management program. The business process for managing Risks—Threats and Opportunities (T&O) for a project should be described in an implementing procedure. NOTE: UPF used “Risks and Opportunities” or R&O. This terminology has been changed to T&O for the generic tool which is consistent terminology with DOE Guide 413.3-7, Risk Management Guide.
To obtain the Access database tools and related materials or for answers to questions not addressed in this User’s Guide contact:
Mike Shay, PNNL
509-375-6504
NOTE: While we have attempted to generalize this UG, UPF information is most likely still in this guide. We will find and update all those references before the next issue. Thanks again to UPF project for providing the tool and guide for the CM-3 team to use as the starting point for the CRR.
2.0 Desktop Requirements Running on the MS-Windows® environment (preferably Windows XP or higher), the CRR was developed and tested in MS-Access 2003.
PLEASE NOTE: Continue to use MS-ACCESS 2003 with the CRR. You will be notified when our UPF ROM Register database application can be used with MS-ACCESS 2007.
NOTE: The screen shots in this version are from UPF, along with their procedures to access the database and set up passwords, etc. These will be updated in the next version. We have highlighted material in Red text that we know will need to be modified for the user’s project or are notes to the reader/developer. The Red boxes with Black Text are cautions or warnings.

Centralized Risk Register User Guide Template 2 Rev A, 1/31/2010
3.0 Installation The process for installing the application on a desktop computer is as follows:
1. Ensure that the desktop computer (where the application is to be installed) meets the requirements described above.
2. Contact the Administrator to establish a CRR User ID and Password and to get the necessary files installed on the User’s desktop computer by IT Support.
3. As part of the installation, IT Support will create a shortcut to the newly installed file folder. This shortcut should be used for all future access to the Register.
4. Double-click the newly created shortcut to open the Register. A Security Warning may appear in the Register window; click Open to continue.
5. The User will be prompted to enter their User ID and Password. 6. First time Users will be prompted to enter the User ID and Password provided by the
Administrator and then to immediately change the Password (obtain an unmanaged CRR password from Administrator). Note! See Appendix A which contains the detailed steps to obtain the new unmanaged password from Administrator.
After entering your UID and password, hit the Enter key to continue.
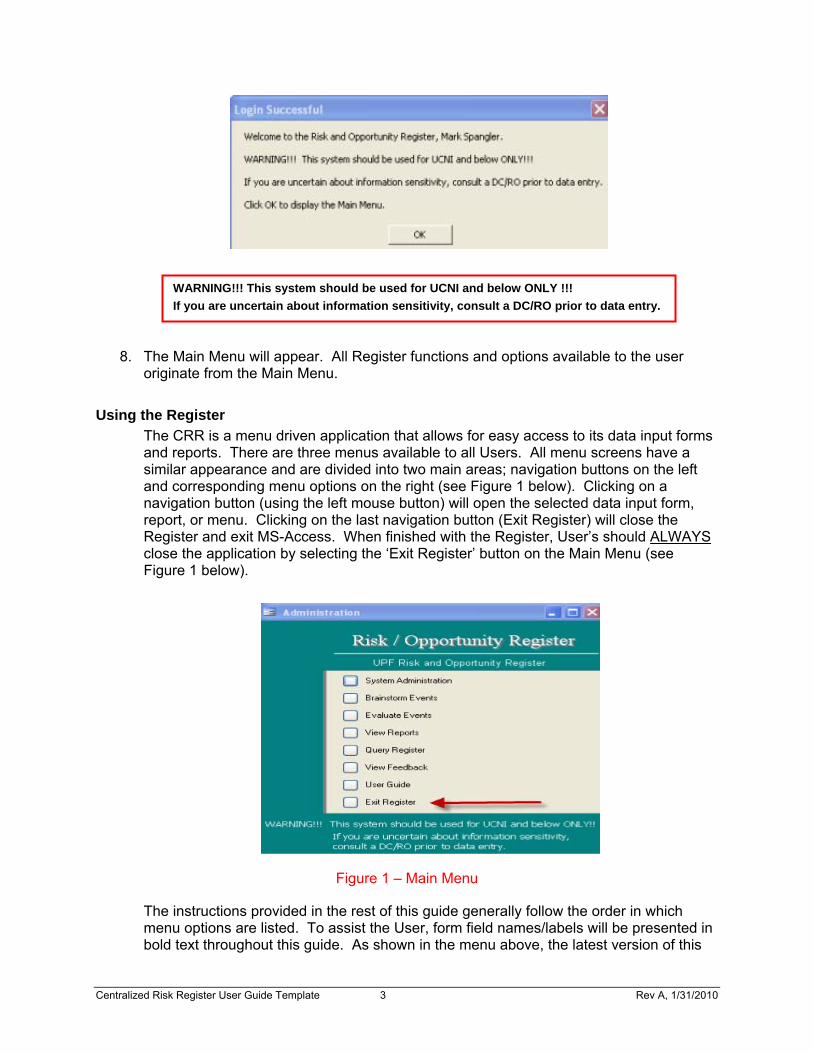
7. A Login Successful screen will appear; click OK to continue.
CAUTION: The file folder installed by IT Support includes two files (MS-Word templates) that must not be opened directly or modified with MS-Word; the two files must also remain in the installed client folder for the Register to perform properly on the User’s computer. Any corruption of these files will require a reinstallation of the application via the IT Support Help Desk.
Centralized Risk Register User Guide Template 3 Rev A, 1/31/2010
8. The Main Menu will appear. All Register functions and options available to the user originate from the Main Menu.
Using the Register
The CRR is a menu driven application that allows for easy access to its data input forms and reports. There are three menus available to all Users. All menu screens have a similar appearance and are divided into two main areas; navigation buttons on the left and corresponding menu options on the right (see Figure 1 below). Clicking on a navigation button (using the left mouse button) will open the selected data input form, report, or menu. Clicking on the last navigation button (Exit Register) will close the Register and exit MS-Access. When finished with the Register, User’s should ALWAYS close the application by selecting the ‘Exit Register’ button on the Main Menu (see Figure 1 below).
Figure 1 – Main Menu
The instructions provided in the rest of this guide generally follow the order in which menu options are listed. To assist the User, form field names/labels will be presented in bold text throughout this guide. As shown in the menu above, the latest version of this
WARNING!!! This system should be used for UCNI and below ONLY !!!
If you are uncertain about information sensitivity, consult a DC/RO prior to data entry.
Centralized Risk Register User Guide Template 4 Rev A, 1/31/2010
User’s Guide will always be available by selecting ‘User Guide’ from the Main Menu. The Main Menu includes an option for ‘Feedback’ that may be used to provide suggestions for improving the Register.
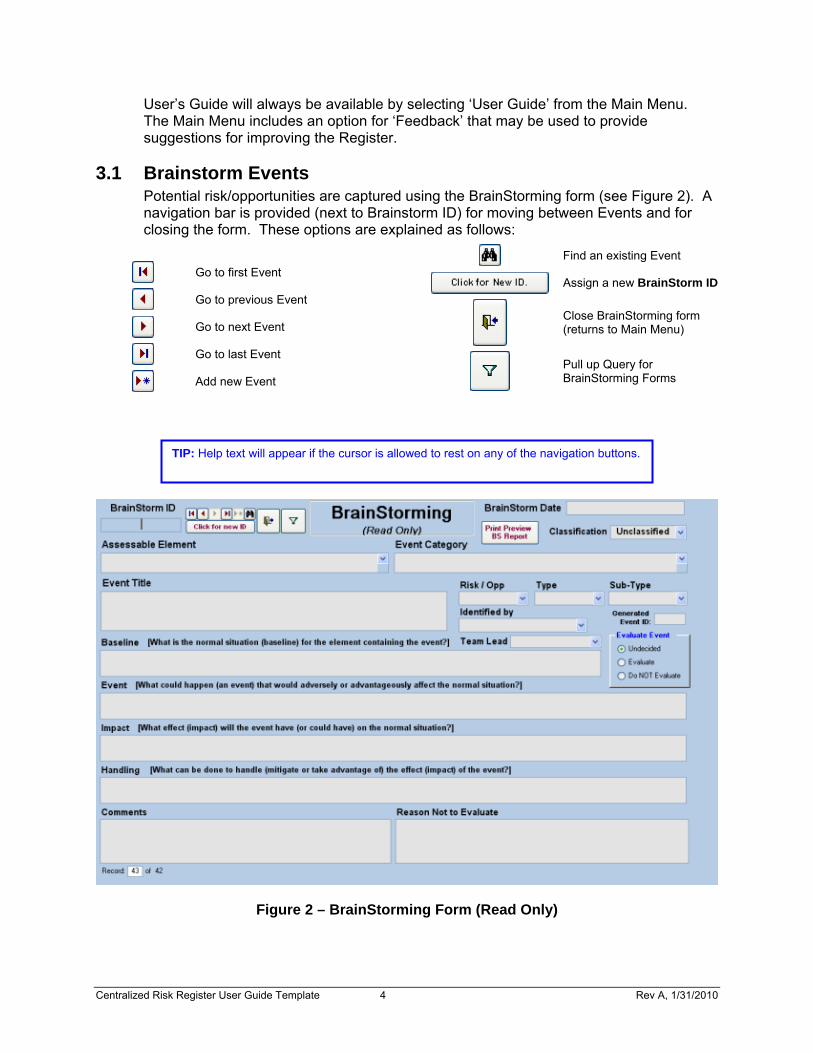
3.1 Brainstorm Events Potential risk/opportunities are captured using the BrainStorming form (see Figure 2). A navigation bar is provided (next to Brainstorm ID) for moving between Events and for closing the form. These options are explained as follows:
Go to first Event
Go to previous Event
Go to next Event
Go to last Event
Add new Event
Find an existing Event
Assign a new BrainStorm ID
Close BrainStorming form (returns to Main Menu)
Pull up Query for BrainStorming Forms
Figure 2 – BrainStorming Form (Read Only)
TIP: Help text will appear if the cursor is allowed to rest on any of the navigation buttons.
SD-IT-801768-A139, Rev.1
Centralized Risk Register User Guide Template 5 Rev A, 1/31/2010
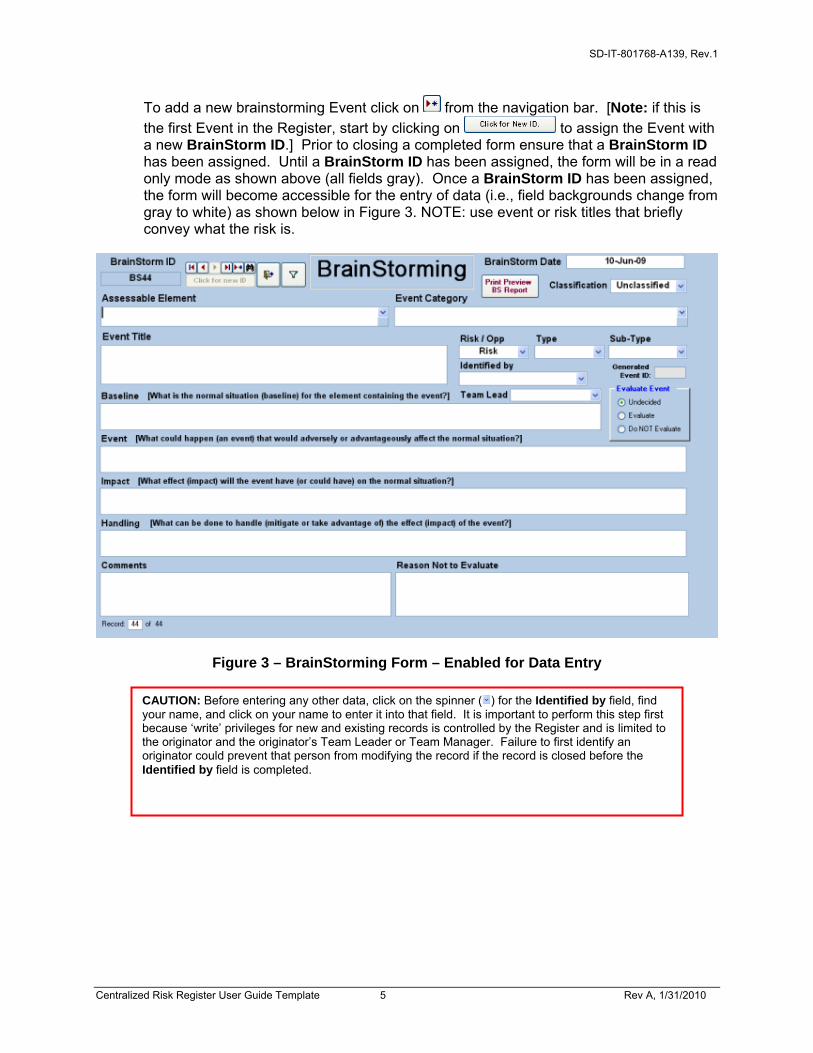
To add a new brainstorming Event click on from the navigation bar. [Note: if this is
the first Event in the Register, start by clicking on to assign the Event with a new BrainStorm ID.] Prior to closing a completed form ensure that a BrainStorm ID has been assigned. Until a BrainStorm ID has been assigned, the form will be in a read only mode as shown above (all fields gray). Once a BrainStorm ID has been assigned, the form will become accessible for the entry of data (i.e., field backgrounds change from gray to white) as shown below in Figure 3. NOTE: use event or risk titles that briefly convey what the risk is.
Figure 3 – BrainStorming Form – Enabled for Data Entry
CAUTION: Before entering any other data, click on the spinner ( ) for the Identified by field, find your name, and click on your name to enter it into that field. It is important to perform this step first because ‘write’ privileges for new and existing records is controlled by the Register and is limited to the originator and the originator’s Team Leader or Team Manager. Failure to first identify an originator could prevent that person from modifying the record if the record is closed before the Identified by field is completed.
SD-IT-801768-A139, Rev.1
Centralized Risk Register User Guide Template 6 Rev A, 1/31/2010
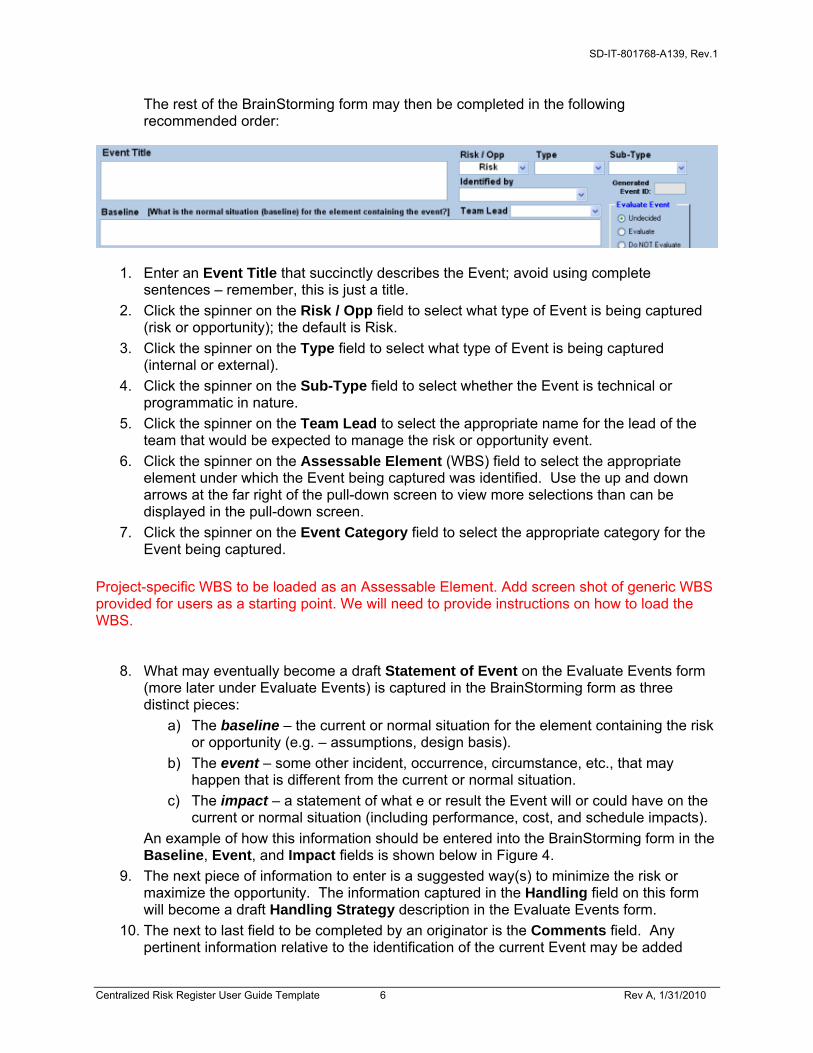
The rest of the BrainStorming form may then be completed in the following recommended order:
1. Enter an Event Title that succinctly describes the Event; avoid using complete sentences – remember, this is just a title.
2. Click the spinner on the Risk / Opp field to select what type of Event is being captured (risk or opportunity); the default is Risk.
3. Click the spinner on the Type field to select what type of Event is being captured (internal or external).
4. Click the spinner on the Sub-Type field to select whether the Event is technical or programmatic in nature.
5. Click the spinner on the Team Lead to select the appropriate name for the lead of the team that would be expected to manage the risk or opportunity event.
6. Click the spinner on the Assessable Element (WBS) field to select the appropriate element under which the Event being captured was identified. Use the up and down arrows at the far right of the pull-down screen to view more selections than can be displayed in the pull-down screen.
7. Click the spinner on the Event Category field to select the appropriate category for the Event being captured.
Project-specific WBS to be loaded as an Assessable Element. Add screen shot of generic WBS provided for users as a starting point. We will need to provide instructions on how to load the WBS.
8. What may eventually become a draft Statement of Event on the Evaluate Events form (more later under Evaluate Events) is captured in the BrainStorming form as three distinct pieces:
a) The baseline – the current or normal situation for the element containing the risk or opportunity (e.g. – assumptions, design basis).
b) The event – some other incident, occurrence, circumstance, etc., that may happen that is different from the current or normal situation.
c) The impact – a statement of what e or result the Event will or could have on the current or normal situation (including performance, cost, and schedule impacts).
An example of how this information should be entered into the BrainStorming form in the Baseline, Event, and Impact fields is shown below in Figure 4.
9. The next piece of information to enter is a suggested way(s) to minimize the risk or maximize the opportunity. The information captured in the Handling field on this form will become a draft Handling Strategy description in the Evaluate Events form.
10. The next to last field to be completed by an originator is the Comments field. Any pertinent information relative to the identification of the current Event may be added

SD-IT-801768-A139, Rev.1
Centralized Risk Register User Guide Template 7 Rev A, 1/31/2010
here. The information captured here becomes draft Event Comments in the Evaluate Events form.
11. The last field to be completed by an originator is the Classification field located in the upper right-hand corner of the BrainStorming form. Click on the spinner to select Unclassified (the default), OUO, or UCNI, depending on the content of the information presented on the BrainStorming form. If in doubt see DCRO
The remaining three fields on the BrainStorming form are completed by the originator’s Team Lead or Team Manager during a review of the completed form. If the Team Lead/Manager concurs that the Event needs to be evaluated than, the Evaluate Event radio button is selected as Evaluate and data from the BrainStorming form (the originator’s name plus items 1 through 9 above) will be transferred to a new Evaluate Events form for assessment by the Team when the BrainStorming form is closed with the Close Form button (reference Page 4). If the Team Lead/Manager believes assessment is not warranted (e.g., issue is something that is normally addressed with existing processes or procedures), then the Evaluate Event radio button is selected as Do Not Evaluate and the reason for not carrying the Event forward for an assessment is documented in the Reason Not to Evaluate field, and the form is closed with the Close Form button.
If the Evaluate Event box was checked, a cross reference to the Event ID created for Evaluate Events form generated by the BrainStorming form will appear in the Generated Event ID field the next time this particular BrainStorming form is opened. For the example shown below in Figure 4, this box was checked, and the information from BrainStorm BS41 was transferred to the Evaluate Events form and became Event ID 1163.
Figure 4 – BrainStorming Form – Example Data
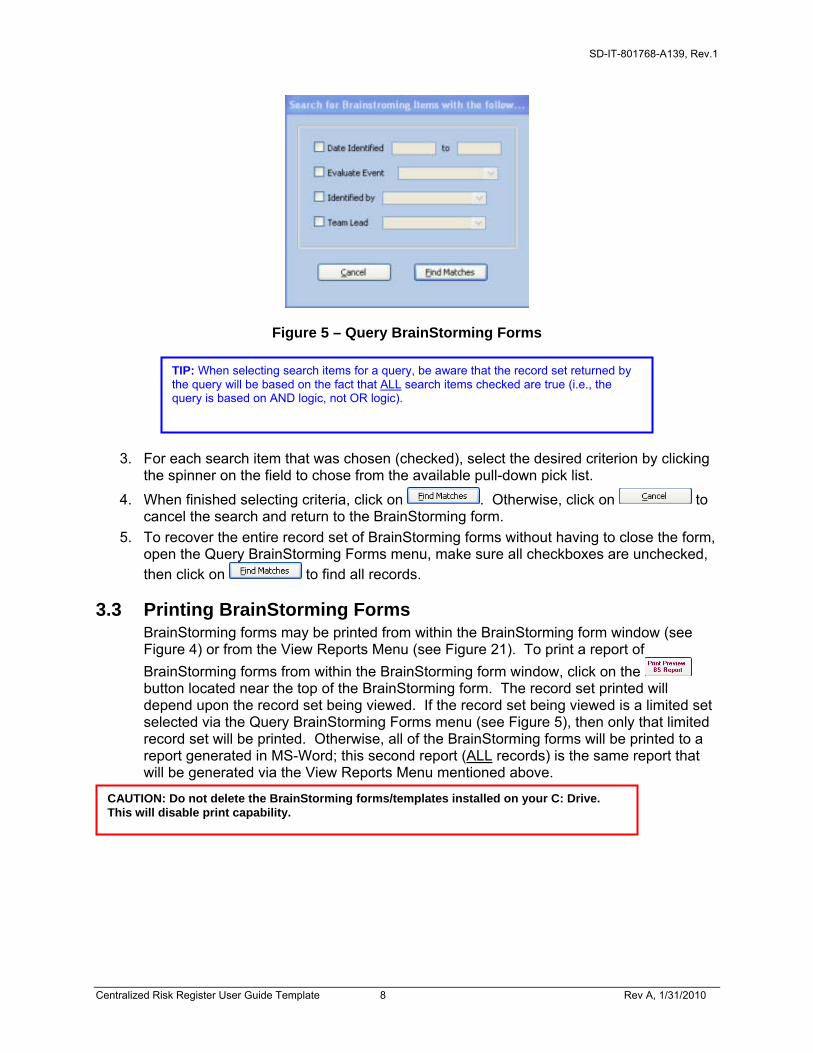
3.2 Query of BrainStorming Forms The Register includes the capability to query the BrainStorming Forms to return a selected record set. To initiate a new query:
1. Click on the navigation button for ‘Query BrainStorming Forms’ ( ).
2. A Query BrainStorming Forms menu will open (see Figure 5 below). Select the desired search items by clicking on the corresponding checkboxes (checkboxes that are checked can be unselected).
CAUTION: The transfer of data between a BrainStorming form and a newly created Evaluate Events form occurs only once – the first time the Evaluate Event box is checked and the BrainStorming form is closed. Once an Evaluate Events form is created, further modifications to the related BrainStorming form will have no impact on the Evaluate Events form. Furthermore, unchecking and rechecking the Evaluate Event box will not give the User a ‘second chance’ to create a new Evaluate Events form.
SD-IT-801768-A139, Rev.1
Centralized Risk Register User Guide Template 8 Rev A, 1/31/2010
Figure 5 – Query BrainStorming Forms
3. For each search item that was chosen (checked), select the desired criterion by clicking the spinner on the field to chose from the available pull-down pick list.
4. When finished selecting criteria, click on . Otherwise, click on to cancel the search and return to the BrainStorming form.
5. To recover the entire record set of BrainStorming forms without having to close the form, open the Query BrainStorming Forms menu, make sure all checkboxes are unchecked, then click on to find all records.
3.3 Printing BrainStorming Forms BrainStorming forms may be printed from within the BrainStorming form window (see Figure 4) or from the View Reports Menu (see Figure 21). To print a report of
BrainStorming forms from within the BrainStorming form window, click on the button located near the top of the BrainStorming form. The record set printed will depend upon the record set being viewed. If the record set being viewed is a limited set selected via the Query BrainStorming Forms menu (see Figure 5), then only that limited record set will be printed. Otherwise, all of the BrainStorming forms will be printed to a report generated in MS-Word; this second report (ALL records) is the same report that will be generated via the View Reports Menu mentioned above.
CAUTION: Do not delete the BrainStorming forms/templates installed on your C: Drive. This will disable print capability.
TIP: When selecting search items for a query, be aware that the record set returned by the query will be based on the fact that ALL search items checked are true (i.e., the query is based on AND logic, not OR logic).
SD-IT-801768-A139, Rev.1
Centralized Risk Register User Guide Template 9 Rev A, 1/31/2010
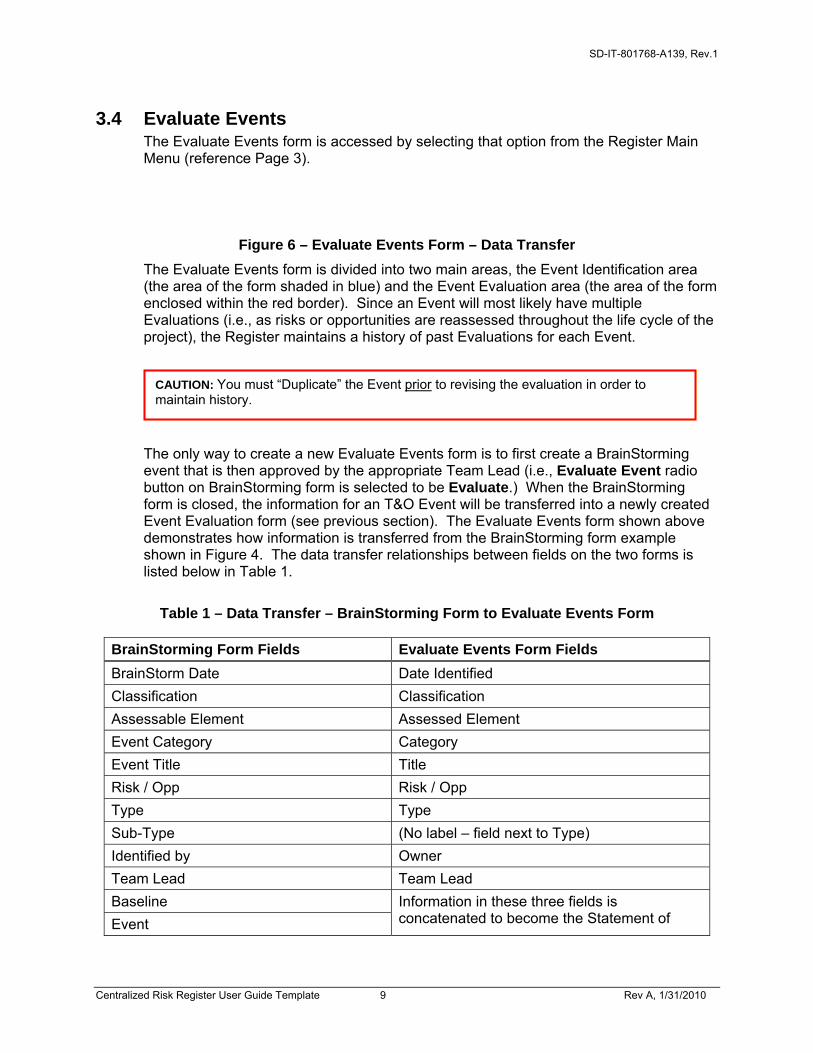
3.4 Evaluate Events The Evaluate Events form is accessed by selecting that option from the Register Main Menu (reference Page 3).
Figure 6 – Evaluate Events Form – Data Transfer
The Evaluate Events form is divided into two main areas, the Event Identification area (the area of the form shaded in blue) and the Event Evaluation area (the area of the form enclosed within the red border). Since an Event will most likely have multiple Evaluations (i.e., as risks or opportunities are reassessed throughout the life cycle of the project), the Register maintains a history of past Evaluations for each Event.
The only way to create a new Evaluate Events form is to first create a BrainStorming event that is then approved by the appropriate Team Lead (i.e., Evaluate Event radio button on BrainStorming form is selected to be Evaluate.) When the BrainStorming form is closed, the information for an T&O Event will be transferred into a newly created Event Evaluation form (see previous section). The Evaluate Events form shown above demonstrates how information is transferred from the BrainStorming form example shown in Figure 4. The data transfer relationships between fields on the two forms is listed below in Table 1.
Table 1 – Data Transfer – BrainStorming Form to Evaluate Events Form
BrainStorming Form Fields Evaluate Events Form Fields
BrainStorm Date Date Identified
Classification Classification
Assessable Element Assessed Element
Event Category Category
Event Title Title
Risk / Opp Risk / Opp
Type Type
Sub-Type (No label – field next to Type)
Identified by Owner
Team Lead Team Lead
Baseline
Event
Information in these three fields is concatenated to become the Statement of
CAUTION: You must “Duplicate” the Event prior to revising the evaluation in order to maintain history.
SD-IT-801768-A139, Rev.1
Centralized Risk Register User Guide Template 10 Rev A, 1/31/2010
BrainStorming Form Fields Evaluate Events Form Fields
Impact Event
Handling Handling Strategy Description
Comments Event Comments
3.4.1 Event Identification
Figure 7 – Evaluate Events Form – Event Identification
As shown above and noted earlier, fields associated with Event Identification are located in the blue area of the Evaluate Events form. Fields associated with Event Evaluation (not shown above) will be discussed later.
The Event Identification area includes a navigation bar (located under the Event ID) for moving between Events and for closing the form. These options are explained as follows:
Go to first Event
Go to previous Event
Go to next Event
Go to last Event
Find an existing Event
Print the latest revision of the current Event
Close form (returns to Main Menu)
SD-IT-801768-A139, Rev.1
Centralized Risk Register User Guide Template 11 Rev A, 1/31/2010
Fields in the Event Identification area (with the exception of Watch List Event and Include in MPR) are normally transferred from the BrainStorming form (reference Table 1). However, fields in the Event Identification area may be modified by the User who has been designated to be the Owner of the event or by any of the Team Leads.
Information in the Event Identification area may be added or modified as described below:
1. Enter an Event Title that succinctly describes the Event; avoid using complete sentences – remember, this is just a title.
2. Click the spinner on the Risk / Opp field to select what type of Event is being captured (risk or opportunity); the default is Risk.
3. Click the spinner on the Type field to select what type of Event is being captured (internal or external). Internal (internally influenced and managed) ; External (externally influenced)
4. Click the spinner on the field located to the right of the Type field to select whether the Event is technical or programmatic in nature.
5. Click the spinner on the left-most section of the Assessed Element field to select the appropriate element under which the Event being captured was identified. Use the up and down arrows at the far right of the pull-down screen to view more selections than can be displayed in the pull-down screen.
6. Click the spinner on the Category field to select the appropriate category for the Event being captured.
Add Generic or Project Specific screen shots showing the Assessed Element (WBS) and categories pull down list.
7. Any pertinent information relative to the identification of the current Event may be added in the Event Comments field located at the bottom of the Event Information area of the Evaluate Events form. This is intended for communicating perspectives to others
8. If the new Event is considered to be a ‘watch list item’, then the User should check the Watch List Item box located in the upper right-hand corner of the Evaluate Events form. Clicking on the box a second time will ‘uncheck’ the box.
9. If the new Event needs to be included on the Monthly Progress Report, then the User should check the Include in MPR box located in the upper right-hand corner of the Evaluate Events form. Clicking on the box a second time will ‘uncheck’ the box.
There are two other fields in the Event Information area that are normally completed automatically and do not require User action. The Date Identified field is filled with the current date when the new Event is created; however the field may be edited by the User. Enter dates as MM/DD/YY; the Register will convert dates to the DD-Mon-YY format.
TIP: Double-click the label for the Date Identified field to enter the current date.
SD-IT-801768-A139, Rev. 1
CRR User Guide Template 12 Rev A 1/31/10
The remaining field, BrainStorm ID, displays the corresponding BrainStorm ID from which the new Event was created by the automatic transfer of data from the BrainStorming form. This field cannot be edited by the User.
3.4.2 Event Evaluation
Add Screen Shot of Event Evaluation form with sample data
Figure 8 – Evaluate Events Form – Event Evaluation
The Event Evaluation area of the Evaluate Events form is used for grading and evaluating risks or opportunities. Throughout the life cycle of the project, it is very likely that each of the T&O Events will be reassessed periodically. Duplicating the event each time the evaluations is revised stores the revisions in the Register for historical purposes.
The Event Evaluation area displays a header and either six tabs (if the Event is a Risk) or five tabs (if the Event is an Opportunity) in the following order, left to right:
1. Evaluation
2. Handling Strategy
3. Residual Risk (displayed only when Events are identified as Threats)
4. Action Items
5. Comments and Trending
6. Status Summary
Information on each of the Event Evaluation area sections is provided below.
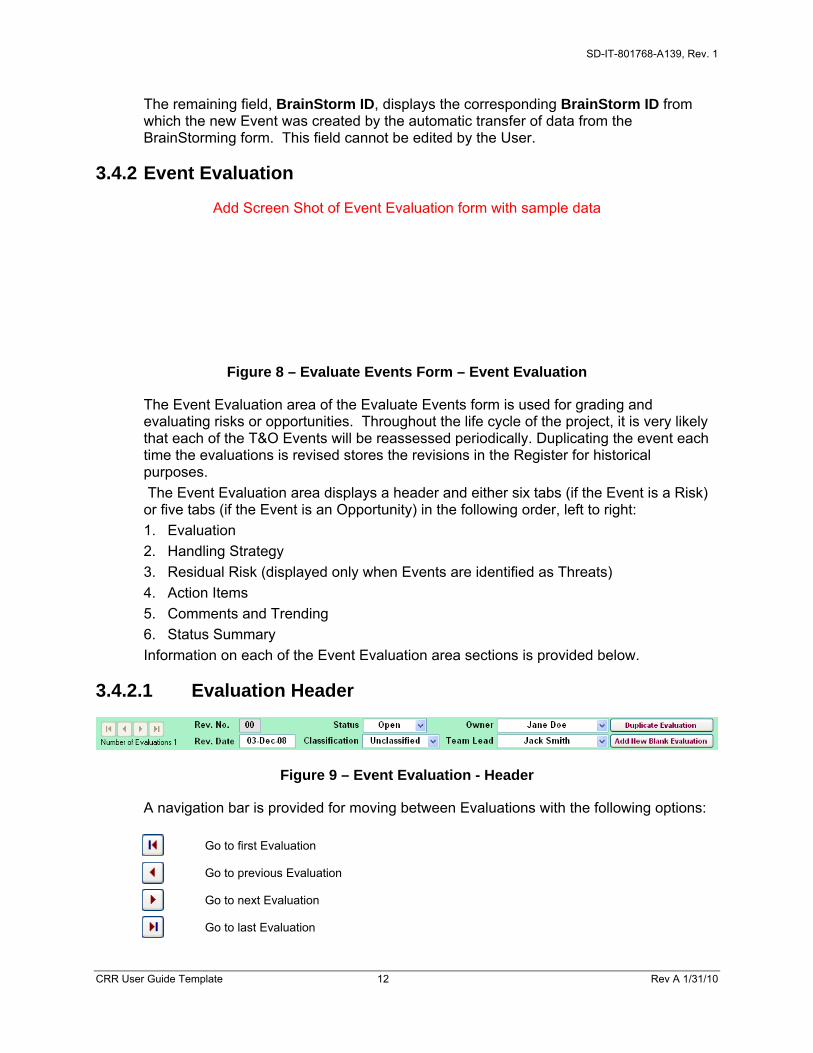
3.4.2.1 Evaluation Header
Figure 9 – Event Evaluation - Header
A navigation bar is provided for moving between Evaluations with the following options:
Go to first Evaluation
Go to previous Evaluation
Go to next Evaluation
Go to last Evaluation
SD-IT-801768-A139, Rev. 1
CRR User Guide Template 13 Rev A 1/31/10
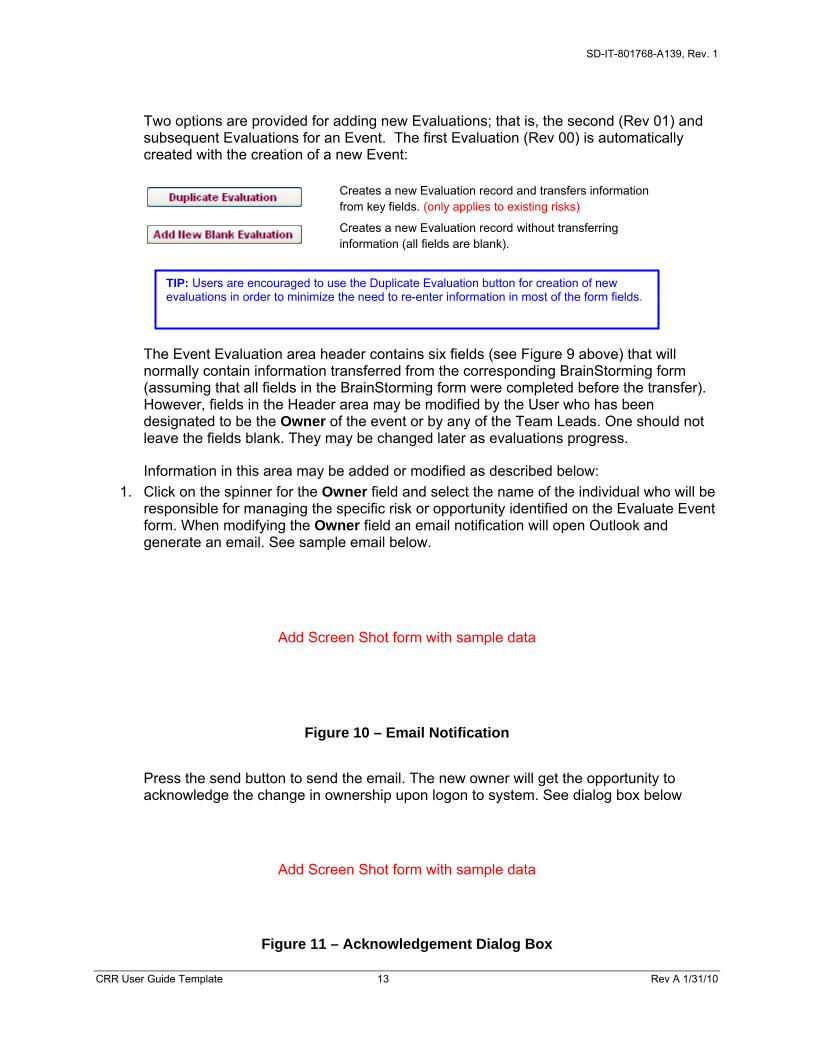
Two options are provided for adding new Evaluations; that is, the second (Rev 01) and subsequent Evaluations for an Event. The first Evaluation (Rev 00) is automatically created with the creation of a new Event:
Creates a new Evaluation record and transfers information from key fields. (only applies to existing risks)
Creates a new Evaluation record without transferring information (all fields are blank).
The Event Evaluation area header contains six fields (see Figure 9 above) that will normally contain information transferred from the corresponding BrainStorming form (assuming that all fields in the BrainStorming form were completed before the transfer). However, fields in the Header area may be modified by the User who has been designated to be the Owner of the event or by any of the Team Leads. One should not leave the fields blank. They may be changed later as evaluations progress.
Information in this area may be added or modified as described below:
1. Click on the spinner for the Owner field and select the name of the individual who will be responsible for managing the specific risk or opportunity identified on the Evaluate Event form. When modifying the Owner field an email notification will open Outlook and generate an email. See sample email below.
Add Screen Shot form with sample data
Figure 10 – Email Notification
Press the send button to send the email. The new owner will get the opportunity to acknowledge the change in ownership upon logon to system. See dialog box below
Add Screen Shot form with sample data
Figure 11 – Acknowledgement Dialog Box
TIP: Users are encouraged to use the Duplicate Evaluation button for creation of new evaluations in order to minimize the need to re-enter information in most of the form fields.
SD-IT-801768-A139, Rev. 1
CRR User Guide Template 14 Rev A 1/31/10
2. Click the spinner on the Team Lead to select the appropriate name for the lead of the team that would be expected to manage the risk or opportunity event.
3. Click on the spinner of the Classification field to select Unclassified (the default), OUO, or UCNI, depending on the content of the information to be presented on the Evaluate Events form.
4. The Status field for all new Events (or Evaluations) will default to OPEN. As new
Evaluations are created, the former Evaluation will automatically revert to a status of Superseded, and the new Evaluation will default to OPEN. The only other User selected option is CLOSED, which should only be used on the final Evaluation that effectively closes the Event.
The two remaining fields in the Evaluation Header, Rev. No. and Rev. Date, are automatically populated by the Register and normally require no input by the User. The Rev.No. field cannot be modified by the User. The Rev. Date field is filled with the current date when the new Evaluation is created; however the field may be edited by the User. Enter dates as MM/DD/YY; the Register will convert dates to the DD-Mon-YY format.
3.4.2.2 Evaluation Tab
Figure 12 – Event Evaluation – Evaluation Tab
The Evaluation Tab is used to capture the initial information about a specific risk or opportunity (an Event). This tab is also where the initial grading of the Event (i.e., prior to any handling) takes place. Data is normally entered in the following order:
1. Enter/update a Statement of Event that clearly and unambiguously defines the risk or opportunity Event to be graded. To help ensure that this happens, each Statement of Event must include the following three elements:
a. The baseline – the current or normal situation for the element containing the risk or opportunity (e.g. – assumptions, design basis).
b. The event – some other incident, occurrence, circumstance, etc., that may happen that is different from the current or normal situation.
c. The impact – a statement of what effect or result the Event will or could have on the current or normal situation (including performance, cost, and schedule impacts).
CAUTION: DO NOT insert classified material into the CRR.
TIP: Double-click the label for the Rev. Date field to enter the current date.
CAUTION: Once an Evaluation is marked as CLOSED and the record is exited using any of the navigation bar buttons (reference Page 17), the Evaluate Events form is locked for any additional editing. Once CLOSED, the Evaluate Events form can only be reset to OPEN by the Administrator.

SD-IT-801768-A139, Rev. 1
CRR User Guide Template 15 Rev A 1/31/10
Recall that these are the same three elements that were captured on the BrainStorming form. The Statement of Event field will normally already be populated by a concatenation of the information from the three separate fields of the BrainStorming form. However, the transferred Statement of Event may be modified by the User as appropriate.
Creating a good Statement of Event is probably one of the most difficult aspects of the T&O Management process. It is generally a compromise between being brief (minimize time required to enter data) and verbose (maximize understanding, even for those remotely connected to the project). A suggested criterion for judging the adequacy of a Statement of Event is: will someone who is unfamiliar with the Event but familiar with the project clearly understand why this Event is a threat to or opportunity for the project from the information captured in the Statement of Event?
2. Click the spinner on the right side of the Probability field to select the option that most appropriately represents the likelihood that the Event will occur. Available options are: Very Low, Low, Moderate, High, and Very High (these options are defined in Table 2 on Page 32 if the Event is a risk or in Table 4 on Page 35 if the Event is an opportunity). In the Basis field below Probability, provide a justification for the selected Probability option. The information provided in the Basis field should relate to the criteria provided in Table 2 or Table 4 for the Probability option selected.
3. Click the spinner on the right side of the Consequence field to select the option that most appropriately represents the magnitude of consequences if the risk Event occurs. Available options are Negligible, Marginal, Significant, Critical, and Crisis (these options are defined in Table 3 on Page 33). If the Event being evaluated is an opportunity, this field will be labeled Benefit and the available options are Negligible, Marginal, Significant, High Impact, and Very High Impact (these options are defined in Table 5 on Page 36). In the Basis field below Consequence (or Benefit), provide a justification for the selected Consequence (or Benefit) option. The information provided in the Basis field should relate to the criteria provided in Table 3 (or Table 5) for the Consequence (or Benefit) option selected. Note that labels for the Consequence/Benefit field as well as the Most Significant Cost Impact/Reduction ($K) and Most Significant Schedule Impact/Reduction (Weeks) fields depend on whether the Event being evaluated is a risk or an opportunity as shown below.
Figure 13 – Consequence Fields for Risk Events
Figure 14 – Benefit Fields for Opportunity Events
When the Probability and Consequence (or Benefit) fields are both populated, the Register will calculate an Event Level (High, Moderate, or Low) and an Event rating (located below the Event Level field) based on the risk grading matrix shown in Figure
SD-IT-801768-A139, Rev. 1
CRR User Guide Template 16 Rev A 1/31/10
27 on Page 34 or the opportunity grading matrix shown in Figure 29 on Page 37, whichever is appropriate.
4. Two fields related to the Event consequences/benefits are the Most Significant Cost Impact ($K) and Most Significant Schedule Impact (Weeks) fields if the event is a risk, or the Most Significant Cost Reduction ($K) and Most Significant Schedule Reduction (Weeks) fields if the Event is an opportunity (labels are automatically changed by the Register). Cost impact or reduction estimates should be based on anticipated capital expenditures only; hotel load cost impacts or reductions will be derived from the data provided in the schedule impacts or reductions fields. Data should be entered in these fields as whole numbers with no commas (the Register will add commas as appropriate). The data entered in these fields should also relate to the criteria provided in Table 3 (or Table 5) for the Consequence (or Benefit) option selected in Step 3 above.
5. If the Event being evaluated warrants review by the Tier 1 Team, click the spinner for the Tier Level field to select 1. Otherwise, do nothing and the Event will remain at the default of Tier Level 2.
6. Click the spinner for the Project Phase Impacted field to select the development phase of the project that would most likely be impacted by the Event being evaluated. If multiple project phases are impacted, the User may enter the data directly in the field with a comma between entries (e.g., CD3, CD4; in this case, the User is indicating that the event will most likely impact project phases CD3 and CD4).
7. In the Event Trigger field, provide a description of any activities or conditions that will serve as precursors to the occurrence of the Event being evaluated.
8. The Evaluation Complete box should be checked when the Evaluation Tab is completed to the satisfaction of the User. This field serves no purpose for the User but may be used by the Administrator in creating queries for ad-hoc reports.
3.4.2.3 Handling Strategy Tab
Add Screen Shot form with sample data
Figure 15 – Event Evaluation – Handling Strategy Tab
The Handling Strategy Tab is used to capture data regarding a specific strategy the User plans to implement that will minimize the risk or maximize the opportunity being evaluated. The fields under the Handling Strategy Tab enable the identification of a strategy and documentation of implementation cost and schedule impacts for the proposed strategy along with corresponding bases for the two estimates. Data is normally entered in the following order:
TIP: Either the risk grading tables or the opportunity grading tables may be viewed from within the Register by double-clicking the label for either the Probability field or the Consequence/Benefit field. The correct matrix will be displayed depending upon the type of event selected in the Risk/Opportunity field in the Event Identification area of the Evaluate Events form. To close the matrix view and return to the Evaluation Tab, click the Close Form symbol in the upper-right corner of the matrix view window. To see the Probability and Consequence Grading Guidelines go to Appendix A.
SD-IT-801768-A139, Rev. 1
CRR User Guide Template 17 Rev A 1/31/10
1. Click the spinner on the Strategy field to select an appropriate handling strategy for the Event. The options displayed will depend on whether the Event is a risk (displaying: Avoid, Transfer, Mitigate, or Accept) or opportunity (displaying: Exploit, Share, Enhance, Ignore). Brief definitions of the various handling strategy options are shown in Figure 28 for risk and in Figure 30 for opportunity.
2. Provide a brief Description of the activities and actions that must be planned and accomplished to minimize the risk or maximize the opportunity. The information provided here will eventually be developed into handling strategy action items that will be documented and tracked under the Action Items Tab. This field will normally already be populated with any information that was entered in the corresponding field in the BrainStorming form. This transferred information may be revised as required.
3. The Implementation Cost Impact ($K) and Implementation Cost Basis fields are provided for capturing an estimate of the capital cost expenditure required to implement the proposed handling strategy, and for providing a basis the estimate. Residual risks are not part of this cost.
4. The Implementation Schedule Impact (Weeks) and Implementation Schedule Basis fields are provided for capturing an estimate of the schedule duration required to implement the proposed handling strategy, and to provide basis for the estimate. Note that the data requested is for estimated schedule duration only. Whether or not the implementation of the handling strategy actually impacts the project schedule will have to be determined later during the analysis phase of the process. Residual risk is not part of this schedule.
5. Other handling strategies that may be considered should be captured in the Other Strategies field. These are typically fall-back or alternative strategies that may need to be considered if the handling strategy documented earlier is not effective.
6. The HS Evaluation Complete box should be checked when the Handling Strategy Tab is completed to the satisfaction of the User. This field serves no purpose for the User but may be used by the Administrator in creating queries for ad-hoc reports.
3.4.2.4 Residual Risk Tab
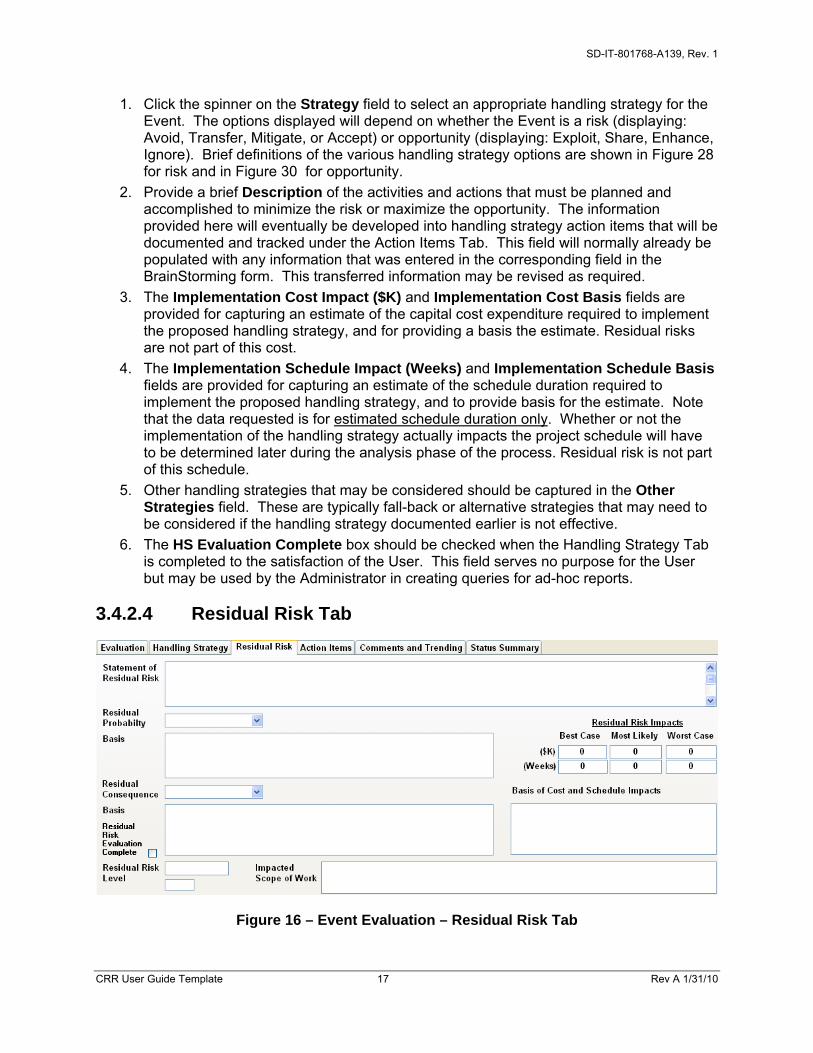
Figure 16 – Event Evaluation – Residual Risk Tab
SD-IT-801768-A139, Rev. 1
CRR User Guide Template 18 Rev A 1/31/10
The Residual Risk Tab is used to capture information regarding any residual risk that remains after the successful completion of the proposed handling strategy. The fields on this tab are very similar to those on the Evaluation Tab (reference Page 14) and are completed in much the same manner. Note that the Residual Risk Tab will not be available if the Event being evaluated is an opportunity since ‘residual’ opportunity is not assessed. In addition, if a risk handling strategy or Avoid or Transfer was selected for this Event, it is not necessary to complete the fields under this tab since those two strategies result in no residual risk. Otherwise, the fields in this tab are normally completed in the following order:
1. Provide a Statement of Residual Risk that is structured like the original Statement of Event on the Evaluation Tab (i.e., include the baseline, the Event, and the impact). This statement should reflect the assumption that the specified handling strategy will be successful.
2. Click the spinner on the right side of the Residual Probability field to select the option that most appropriately represents the likelihood that the residual risk Event will occur. Available options are the same as those on the Evaluation Tab: Very Low, Low, Moderate, High, and Very High. In the Basis field below Residual Probability, provide a justification for the selected Residual Probability option. The information provided in the Basis field should relate to the criteria provided in Table 2 for the Residual Probability option selected.
3. Click the spinner on the right side of the Residual Consequence field to select the option that most appropriately represents the magnitude of consequences if the residual risk Event occurs. Available options are the same as those on the Evaluation Tab: Negligible, Marginal, Significant, Critical, and Crisis. In the Basis field below Residual Consequence, provide a justification for the selected Residual Consequence option. The information provided in the Basis field should relate to the criteria provided in Table 3 for the Residual Consequence option selected.
When the Residual Probability and Residual Consequence fields are both populated, the Register will calculate Residual Risk Level (High, Moderate, or Low) and residual risk Event rating (located below the Residual Risk Level field) based on the risk grading matrix shown in Figure 27.
4. Six fields related to the residual risk Event consequences are the Best Case, Most Likely, and Worst Case Residual Risk Impacts for both cost ($K) and schedule (Weeks). Cost impact estimates should be based on anticipated capital expenditures only; hotel load cost impacts or reductions will be derived from the data provided in the schedule impact estimate fields. The data entered into these fields will be used to develop residual risk-based cost and schedule contingency estimates for the project, commonly referred to as T&P contingency.
Data should be entered in these fields as whole numbers with no commas (the Register will add commas as appropriate). The data entered in these fields should also relate to the criteria provided in Table 3 for the Residual Consequence option selected in Step 3 above. Note that Best Case cost ($K) and schedule (Weeks) estimates must be based upon the assumption that the residual risk does occur (i.e., do not state that Best Case cost ($K) and schedule (Weeks) estimates are zero because the residual risk does not occur). Whether or not the residual risk Event occurs is addressed in the contingency calculations by considering the Residual Probability selected earlier.
5. Provide the bases for the Residual Risk Impacts estimates in the Basis of Cost and Schedule Impacts field.
SD-IT-801768-A139, Rev. 1
CRR User Guide Template 19 Rev A 1/31/10
6. Provide a brief description of the scope of work that will be impacted by the residual risk in the Impacted Scope of Work field. This information may be beneficial in developing a T&P schedule contingency estimate by helping to identify where in the Project Integrated Schedule the residual risk is most likely to occur.
7. The Residual Risk Evaluation Complete box should be checked when the Residual Risk Tab is completed to the satisfaction of the User. This field serves no purpose for the User but may be used by the Administrator in creating queries for ad-hoc reports.
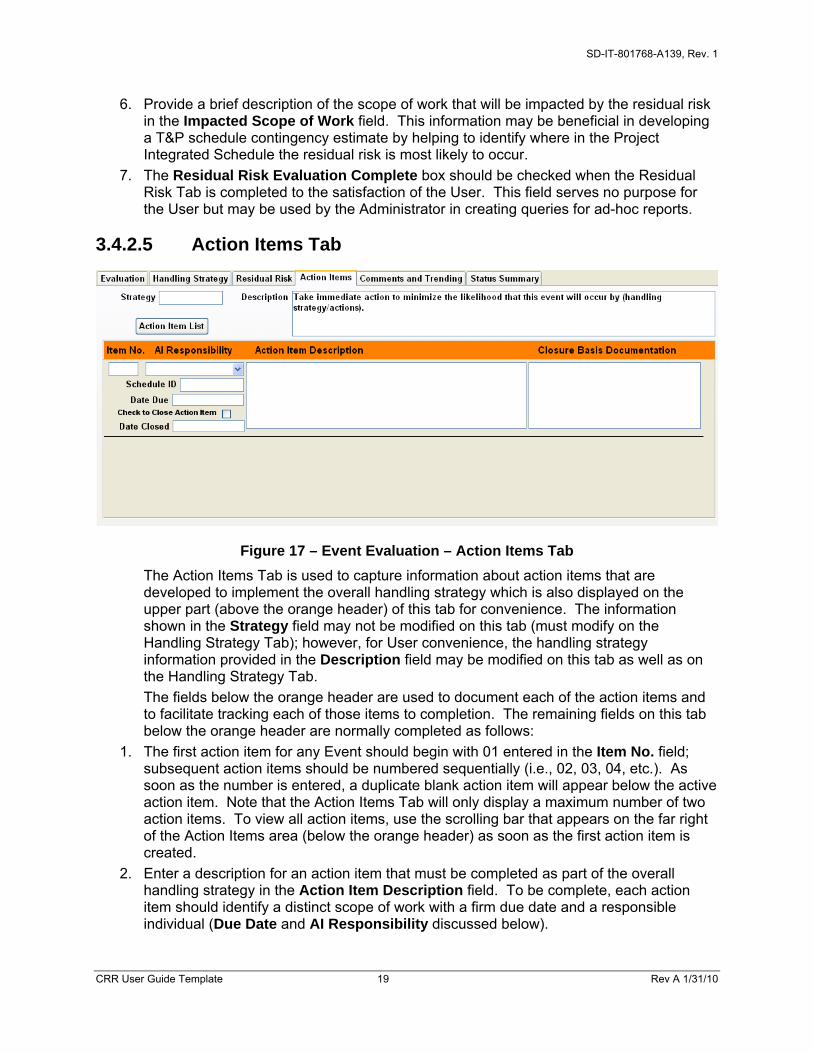
3.4.2.5 Action Items Tab
Figure 17 – Event Evaluation – Action Items Tab
The Action Items Tab is used to capture information about action items that are developed to implement the overall handling strategy which is also displayed on the upper part (above the orange header) of this tab for convenience. The information shown in the Strategy field may not be modified on this tab (must modify on the Handling Strategy Tab); however, for User convenience, the handling strategy information provided in the Description field may be modified on this tab as well as on the Handling Strategy Tab.
The fields below the orange header are used to document each of the action items and to facilitate tracking each of those items to completion. The remaining fields on this tab below the orange header are normally completed as follows:
1. The first action item for any Event should begin with 01 entered in the Item No. field; subsequent action items should be numbered sequentially (i.e., 02, 03, 04, etc.). As soon as the number is entered, a duplicate blank action item will appear below the active action item. Note that the Action Items Tab will only display a maximum number of two action items. To view all action items, use the scrolling bar that appears on the far right of the Action Items area (below the orange header) as soon as the first action item is created.
2. Enter a description for an action item that must be completed as part of the overall handling strategy in the Action Item Description field. To be complete, each action item should identify a distinct scope of work with a firm due date and a responsible individual (Due Date and AI Responsibility discussed below).
SD-IT-801768-A139, Rev. 1
CRR User Guide Template 20 Rev A 1/31/10
3. Document who will be responsible for the action item by selecting that person’s name from the pick list in the AI Responsibility field. Do not arbitrarily assign responsibility for action items to persons without first confirming that responsibility will be accepted by that person. If the person’s name is not contained in the AI Responsibility pick list, contact the Administrator to establish a Register account for that person.
4. Enter a Due Date for the action item in the MM/DD/YY format; the Register will convert dates to the DD-Mon-YY format.
5. If this action item is going to be tracked with the Integrated Project Schedule, enter an appropriate Schedule ID (e.g., UQSBAD22).
6. When the action item is completed, check the Check to Close Action Item box, and the Register will fill the Date Closed field with the current date. To complete the action item closure, document the basis for closing the action item (e.g., Alternative Study Report XXX-XXX-XXX issued DD/MM/YY, purchase order XX-XX-XX placed DD/MM/YY with certified vendor of specialty material) in the Closure Basis Documentation field.
Since multiple action items may be created and closed as the risk or opportunity Event progresses through multiple Evaluations (reference the Rev. No. field shown in the Evaluation Header on Page 12), the Register will not display action items that were closed in SUPERSEDED Evaluations; it will only display the action items that are opened, closed, or remain open under the current OPEN Evaluation. To view previously closed action items, use the navigation buttons in the Evaluation Header to view the appropriate SUPERSEDED Evaluations under which the action item was closed.
An Action Items report (see Error! Reference source not found.) can be generated from this screen by clicking on the button. This report will display all action items that are (or were) open or closed under the Evaluation revision that is being viewed, whether or not the Evaluation is OPEN (or SUPERSEDED, respectively). To close the report, move the cursor to File in the toolbar and select Close on the pull-down menu or click on the small “x” in the light blue part of the header near the top right corner.
CAUTION: Always close menus, forms, and reports using the navigation buttons provided on those menus, forms, and reports; DO NOT USE the button located in the upper right hand corner of the various MS-Access windows. Doing so will close the Register abnormally and could corrupt the application and require a reinstallation of the client files on your desktop computer.
SD-IT-801768-A139, Rev. 1
CRR User Guide Template 21 Rev A 1/31/10
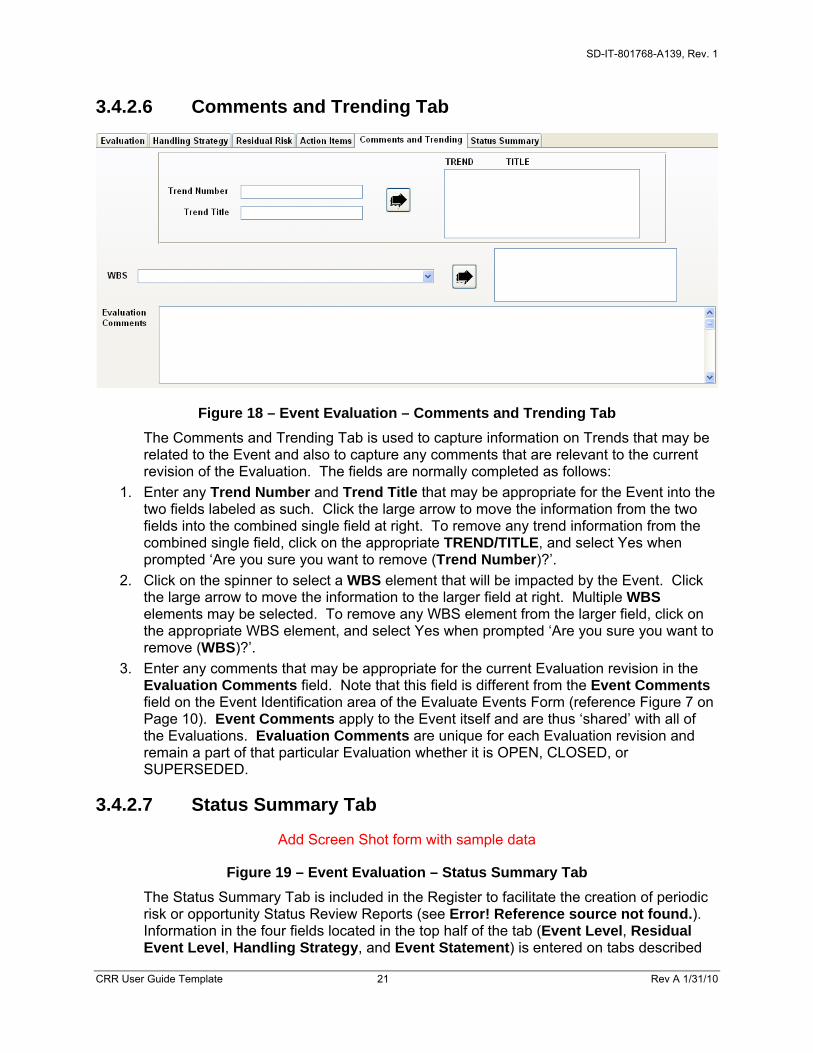
3.4.2.6 Comments and Trending Tab
Figure 18 – Event Evaluation – Comments and Trending Tab
The Comments and Trending Tab is used to capture information on Trends that may be related to the Event and also to capture any comments that are relevant to the current revision of the Evaluation. The fields are normally completed as follows:
1. Enter any Trend Number and Trend Title that may be appropriate for the Event into the two fields labeled as such. Click the large arrow to move the information from the two fields into the combined single field at right. To remove any trend information from the combined single field, click on the appropriate TREND/TITLE, and select Yes when prompted ‘Are you sure you want to remove (Trend Number)?’.
2. Click on the spinner to select a WBS element that will be impacted by the Event. Click the large arrow to move the information to the larger field at right. Multiple WBS elements may be selected. To remove any WBS element from the larger field, click on the appropriate WBS element, and select Yes when prompted ‘Are you sure you want to remove (WBS)?’.
3. Enter any comments that may be appropriate for the current Evaluation revision in the Evaluation Comments field. Note that this field is different from the Event Comments field on the Event Identification area of the Evaluate Events Form (reference Figure 7 on Page 10). Event Comments apply to the Event itself and are thus ‘shared’ with all of the Evaluations. Evaluation Comments are unique for each Evaluation revision and remain a part of that particular Evaluation whether it is OPEN, CLOSED, or SUPERSEDED.
3.4.2.7 Status Summary Tab
Add Screen Shot form with sample data
Figure 19 – Event Evaluation – Status Summary Tab
The Status Summary Tab is included in the Register to facilitate the creation of periodic risk or opportunity Status Review Reports (see Error! Reference source not found.). Information in the four fields located in the top half of the tab (Event Level, Residual Event Level, Handling Strategy, and Event Statement) is entered on tabs described
SD-IT-801768-A139, Rev. 1
CRR User Guide Template 22 Rev A 1/31/10
previously but displayed here for User convenience; none of these four fields may be edited on this tab.
The fields shown in the lower dark tan portion of the Status Summary Tab are used to generate status information for Events that may routinely change between reporting periods. It is important to note that while the status information fields are located on one of the tabs for the Event Evaluation Form, all status reviews are actually linked to the Event and to the OPEN/CLOSED Evaluation. While an Event can have multiple Status Reviews, only data associated with the most recent Date of Status Review will be displayed on the report shown in Error! Reference source not found..
A navigation bar is provided for moving between Status Reviews with the following options:
Go to first Status Review
Go to previous Status Review
Go to next Status Review
Go to last Status Review
Two options are provided for adding new Status Review records:
Creates a new Status Review record (all fields are blank) and inserts the current date in the Date of Status Review field.
Creates a duplicate of the Status Review being viewed (only the Remarks field is duplicated. The checkboxes are left blank and the current date is inserted in the Date of Status Review field).
The fields under the Status Summary Tab are normally completed as follows:
1. For the first Status Review, click the New Review button in the navigation bar to create a new blank Status Review record with the current date in the Date of Status Review field. For subsequent Status Reviews, depending upon how much of the information in the Remarks field is still valid, either click the New Review button or the Duplicate Review button to create a new Status Review record with the current date in the Date of Status Review field.
2. Add pertinent information regarding the current status of the Event in the Remarks field. Since the Status Review Report is primarily for management review, focus on comments that would be important from a management viewpoint, and keep the comments brief and to the point. If the Event is being CLOSED and the current Status Review will be the final one, provide a basis for the Event closure.
3. The remaining six fields that must be addressed for each Status Review relate to the level of concern regarding the current status of the event and the relative change in status from the previous review. There are three checkboxes for each of these two status conditions; only one checkbox from each row may be checked at one time. If a
CAUTION: Do not create more than one Status Review with the same Date of Status Review; otherwise, both Status Review records may appear on the report.

SD-IT-801768-A139, Rev. 1
CRR User Guide Template 23 Rev A 1/31/10
different checkbox from the same row needs to be selected, the checked box must first be unchecked to enable a different selection.
The three choices for the Current Status are:
– checking this box will display a predominantly green circle in the Current Status column of the Status Review Report and will imply that the Event is being managed as planned.
– checking this box will display a predominantly yellow circle in the Current Status column of the Status Review Report and will imply that the Event is not being managed as planned; management attention may be required.
– checking this box will display a predominantly red circle in the Current Status column of the Status Review Report and will imply that the Event is not being managed as planned; management attention is required.
The three choices for Status Change are:
– checking this box will display a yellow arrow in the Status Change column of the Status Review Report oriented to signify an unchanged status from the previous review and will imply that management attention may be required.
– checking this box will display a green arrow in the Status Change column of the Status Review Report oriented to signify an improving status from the previous review and will imply that management attention is not required.
– checking this box will display a red arrow in the Status Change column of the Status Review Report oriented to signify a deteriorating status from the previous review and will imply that management attention is required.
The Overall Rating check boxes can be seen in Figure 20 below.
Add Screen Shot form with sample data
Figure 20 – Event Evaluation - View Overall Rating
-A risk that has a low probability of occurrence and a low cost and/or schedule impact.
- Could be a risk with one of the following characteristics: 1. Moderate probability of occurrence and a moderate cost and/or schedule impact. 2. Low probability of occurrence with a moderate or high cost and/or schedule
impact. 3. Moderate or high probability of occurrence and a low cost and/or schedule
impact.
CAUTION: If the Event is being CLOSED and the current Status Review will be the final review, DO NOT CHECK ANY OF THE BOXES LISTED BELOW. Otherwise, the Status Review Report will not show the Event as being CLOSED.

SD-IT-801768-A139, Rev. 1
CRR User Guide Template 24 Rev A 1/31/10
- High probability of occurrence and a high (i.e. significant) cost and/or schedule impact.
See Attachment 10 - Sample Detail Status Review Report for an example of how the overall rating is displayed in a report.
3.5 View Reports Selecting ‘View Reports’ from the Main Menu (see Figure 1) opens the View Reports Menu shown in Figure 21 below. This menu lists the standard reports that can be generated from the Register. With the exception of the first two report options listed (‘Brainstormed Items Report’ and ‘Threat/Opportunity Assessment Report’), reports are generated internally within the Register and may be printed for hardcopy use. The remaining first two report options are created as MS-Word documents using template files that are located in the same folder as the Register client.
Figure 21 – View Reports Menu
Change to Threat/Opportunity throughout
CAUTION: The template files used to create the two MS-Word documents are named RO Brainstorm Form.dot and RO Assessment Form Matrix.dot. These two template files must not be opened directly or modified with MS-Word; the two files must also remain in the installed client folder for the Register to perform properly on the User’s computer. Any corruption of these files will require a reinstallation of the application via the IT Support Help Desk.
SD-IT-801768-A139, Rev. 1
CRR User Guide Template 25 Rev A 1/31/10
Clicking on the last navigation button will return the User to the Main Menu. Each of the available reports is described as follows:
Brainstormed Items – A report is generated in MS-Word providing details of all the items that have been brainstormed. The formatted report displays one brainstormed event per page (may run-over into additional page) and is sorted on BrainStorm ID. See Error! Reference source not found.. The format is not modifiable
Risk/Opportunity Assessment – A formatted report is generated in MS-Word providing a Risk/Opportunity Assessment Form for each Event ID. The report displays all OPEN Risk/Opportunity events, is sorted on Event ID, and displays one event per page (may run-over into additional page). The format is not modifiable
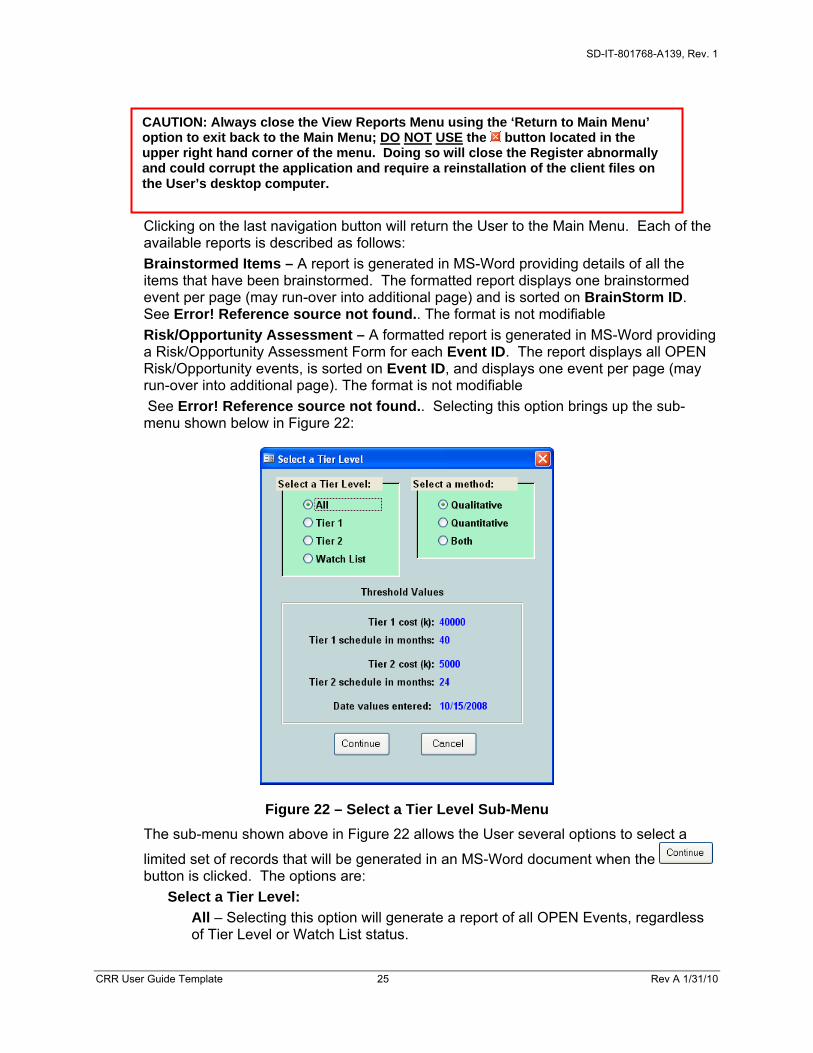
See Error! Reference source not found.. Selecting this option brings up the sub-menu shown below in Figure 22:
Figure 22 – Select a Tier Level Sub-Menu
The sub-menu shown above in Figure 22 allows the User several options to select a
limited set of records that will be generated in an MS-Word document when the button is clicked. The options are:
Select a Tier Level:
All – Selecting this option will generate a report of all OPEN Events, regardless of Tier Level or Watch List status.
CAUTION: Always close the View Reports Menu using the ‘Return to Main Menu’ option to exit back to the Main Menu; DO NOT USE the button located in the upper right hand corner of the menu. Doing so will close the Register abnormally and could corrupt the application and require a reinstallation of the client files on the User’s desktop computer.
SD-IT-801768-A139, Rev. 1
CRR User Guide Template 26 Rev A 1/31/10
Tier 1 – Selecting this option will generate a report of all OPEN Events that satisfy the Tier 1 criteria selected from the Select a method part of the sub-menu (see below for details).
Tier 2 – Selecting this option will generate a report of all OPEN Events that satisfy the Tier 2 criteria selected from the Select a method part of the sub-menu (see below for details).
Watch List – Selecting this options generate a report of all OPEN Events that have the Watch List Event field on the Evaluate Events form.
Select a method: (Only applicable if Tier 1 or Tier 2 is selected above)
Qualitative – Selecting this option will generate a report of all OPEN Tier 1 or Tier 2 Events based upon the information shown in the Tier Level field of the Evaluate Events form (see Page 41).
Quantitative – Selecting this option will generate a report of all OPEN Tier 1 or Tier 2 Events based upon the cost/schedule impact/reduction criteria displayed on the sub-menu. The criteria shown on the sub-menu apply to the information entered by the User in the Most Significant Cost Impact/Reduction (K) or Most Significant Schedule Impact/Reduction (Weeks) fields of the Evaluate Events form (see Page 41) for each Event.
Both – Selecting this option will generate a report of all OPEN Tier 1 or Tier 2 Events that meet either the Qualitative or Quantitative criteria described above.
Threat/Opportunity Index – An index report is generated providing a summary list of all Threat/Opportunity events. This report is sorted on Event ID. See Error! Reference source not found..
Action Items – A detailed Action Item report is generated for all Action Items and is sorted on Risk/Opportunity Event ID. This report is more detailed than the Action Item List that is available on the Action Items Tab (see Figure 17). See Attachment 6 –Sample Action items – Summary Report.
Status Review – A summary report for all Risk/Opportunity events based upon the latest (by Date of Status Review field) information provided on the Status Summary Tabs for each Event (see Figure 19). The report is sorted by OPEN risks (sub-sort by level/rating – High to Low), then by OPEN opportunities (sub-sort by level/rating – High to Low), then by CLOSED risks (sub-sort by level/rating – High to Low), and finally by CLOSED opportunities (sub-sort by level/rating – High to Low). See Error! Reference source not found..
Risk Assignment Reports – List all events that have changes in ownership that are unacknowledged or assigned. There are also reports that limit the unacknowledged or assigned to 30 days. See Attachment 7 for Sample Unacknowledged All Report. See Attachment 8 for Sample Assignment Activity All Report.
After completing any reporting options available on the View Reports Menu, the User should click on the ‘Return to Main Menu’ option to exit back to the Main Menu.
TIP: Note that most of these reports will include information for ALL events. Three of these reports, Risk/Opportunity Assessment, Action Items, and Status Review, may be generated for selected Register records using the built-in T/O Query. See instructions in the following section on Query Register.
SD-IT-801768-A139, Rev. 1
CRR User Guide Template 27 Rev A 1/31/10
3.6 Query Register The Register provides the capability for performing a detailed search for specific Events based upon criteria that are selected by the User. Selected Events returned by the User-specified query will be displayed in a special version of the Event Evaluation form which may then be viewed, printed as a Threat/Opportunity Assessment Report, or the data may be exported to an Excel spreadsheet for external review or analysis.
Selecting ‘Query Register’ from the Main Menu (see Figure 1) opens the Query Register Menu shown in Figure 23 below.
Figure 23 – Query Register Menu (Threat/Opportunity Register)
Clicking on the last navigation button will return the User to the Main Menu. Each of the two available query options is described as follows:
3.6.1 Create a New T/O Query To initiate a new query:
1. Click on the navigation button for ‘Create a New T/O Query’
CAUTION: DO NOT ATTEMPT to IMPORT data from Excel
CAUTION: Always close the Query Register Menu using the ‘Return to Main Menu’ option to exit back to the Main Menu; DO NOT USE the button located in the upper right hand corner of the menu. Doing so will close the Register abnormally and could corrupt the application and require a reinstallation of the client files on the User’s desktop computer.
SD-IT-801768-A139, Rev. 1
CRR User Guide Template 28 Rev A 1/31/10
2. An T/O Query Form will open (see Figure 24 below). On the T/O Query Form, select the desired search items by clicking on the corresponding checkboxes (checkboxes that are checked can be unselected).
Figure 24 – T/O Query Form – Available Search Criteria (fix this -- T/O)
3. For each search item that was chosen (checked), select the desired criterion by clicking the spinner on the field to chose from the available pull-down pick list.
4. When finished selecting criteria, click on . Otherwise, click on to cancel the search and return to the Query Register Menu.
TIP: When selecting search items for a query, be aware that the record set returned by the query will be based on the fact that ALL search items checked are true (i.e., the query is based on AND logic, not OR logic).
TIP: Note that the T/O Query Form is color coded and arranged in a manner similar to the layout of the Evaluate Events form (see Figure 6). Fields located in the Event Identification area, shaded blue on the Evaluate Events form, are also in the upper blue-shaded area of the T/O Query Form. Fields in the green shaded area of the T/O Query Form correspond to those located in the Event Evaluation Header (see Figure 9), while all of the remaining fields below the green shaded area correspond to fields located on the Evaluation, Handling Strategy, and Residual Risk tabs of the Event Evaluation area (see Figure 12, Figure 15, and Figure 16, respectively).
SD-IT-801768-A139, Rev. 1
CRR User Guide Template 29 Rev A 1/31/10
If was clicked, a slightly different version of the Evaluate Events form (see Figure 25 below) will open displaying the records that match the search criteria. The primary difference between this form and the normal Evaluate Events form (see Figure 6) is in the area of the navigation buttons in the upper left-hand corner of the form. The options are explained as follows:
Go to first Event
Go to previous Event
Go to next Event
Go to last Event
Close form (returns to Query Register Menu)
Print Risk/Opportunity Assessment Report for selected records
Find an existing Event
Export selected records to Excel
Print Status Review Report for selected records
Print Action Items Report for selected records
5. Clicking the various print buttons will create reports of the selected records only for the following report formats that are normally available for ALL records via the View Reports Menu (see Figure 21).
a. Clicking the print button in this form will create a Risk/Opportunity Assessment Report (MS-Word document) for only those Events that have been selected for display;
b. Clicking the print button in this form will create a Status Review Report for only those Events that have been selected for display;
c. Clicking the print button in this form will create a an Action Item Report for only those Events that have been selected for display;
6. Data for the Events returned by the User-generated T/O Query may also be exported directly to an Excel spreadsheet by clicking the navigation button.
Add Screen Shot form with sample data
Figure 25 – T/O Query Results
CAUTION: Excel will truncate data at a preset number of characters.
TIP: The ability to export selected records (Events) directly to an Excel spreadsheet is very useful for performing data analysis activities external to the CRR (e.g., performing Monte Carlo analysis required to develop a T&P cost contingency estimate).
SD-IT-801768-A139, Rev. 1
CRR User Guide Template 30 Rev A 1/31/10
7. When finished with the T/O Query results, click on the navigation button to return to the Query Register Menu.
3.6.2 View Results from Last Saved T/O Query Selecting this option will open the T/O Query Results (see Figure 25) based upon selection criteria from the last search that is ‘saved’ by the Register until a new T/O Query is created and executed.
After completing any query options available on the Query Register Menu, the User should click on the ‘Return to Main Menu’ option to exit back to the Main Menu.
To view different reports, select Summary, Monthly, or Detail Report from the drop-down list as indicated in the screenshot below.
Add Screen Shot form with sample data
Figure 26 – T/O Query Reports
Additional information regarding the Summary, Monthly, and Detail Reports is included below.
3.6.2.1 View Summary Report In the EVENT IDENTIFICATION area underneath the word “Title” there is a drop down box. Select Summary and click the print status report button directly to the left of the drop down box. For a sample report see Attachment 2 Sample Summary Status Review Report.
3.6.2.2 View Monthly Report In the EVENT IDENTIFICATION area underneath the word Title there is a drop down box. Select Monthly and click the print status report button directly to the left of the drop down box. For a sample report see Attachment 9 Sample Monthly Status Review Report.
3.6.2.3 View Detail Report In the EVENT IDENTIFICATION area underneath the word Title there is a drop down box. Select Detail and click the print status report button directly to the left of the drop down box. For a sample report see Attachment 10 Sample Detail Status Review Report.
TIP: Records retrieved via the T/O Query may be modified in the T/O Query results window shown in Figure 25 assuming that write privileges for that record normally exist for the User.
SD-IT-801768-A139, Rev. 1
CRR User Guide Template 31 Rev A 1/31/10
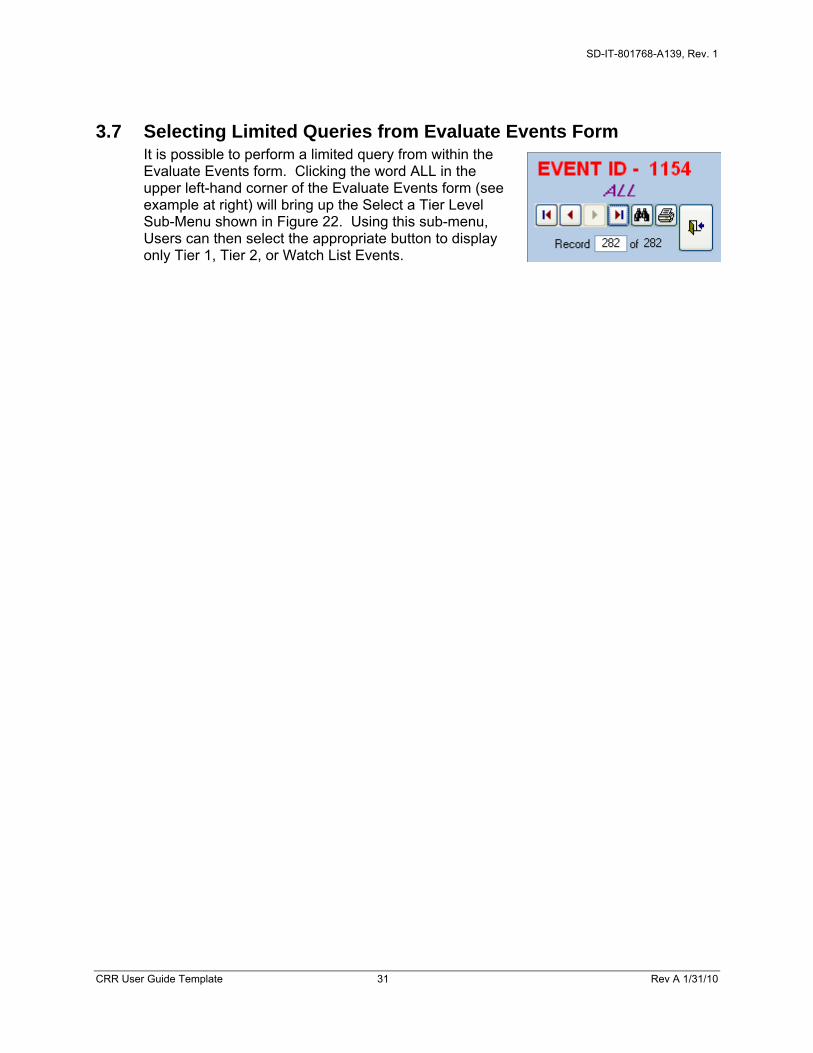
3.7 Selecting Limited Queries from Evaluate Events Form It is possible to perform a limited query from within the Evaluate Events form. Clicking the word ALL in the upper left-hand corner of the Evaluate Events form (see example at right) will bring up the Select a Tier Level Sub-Menu shown in Figure 22. Using this sub-menu, Users can then select the appropriate button to display only Tier 1, Tier 2, or Watch List Events.
SD-IT-801768-A139, Rev. 1
CRR User Guide Template 32 Rev A 1/31/10
Appendix B – Threat & Opportunity Grading Guidelinesa
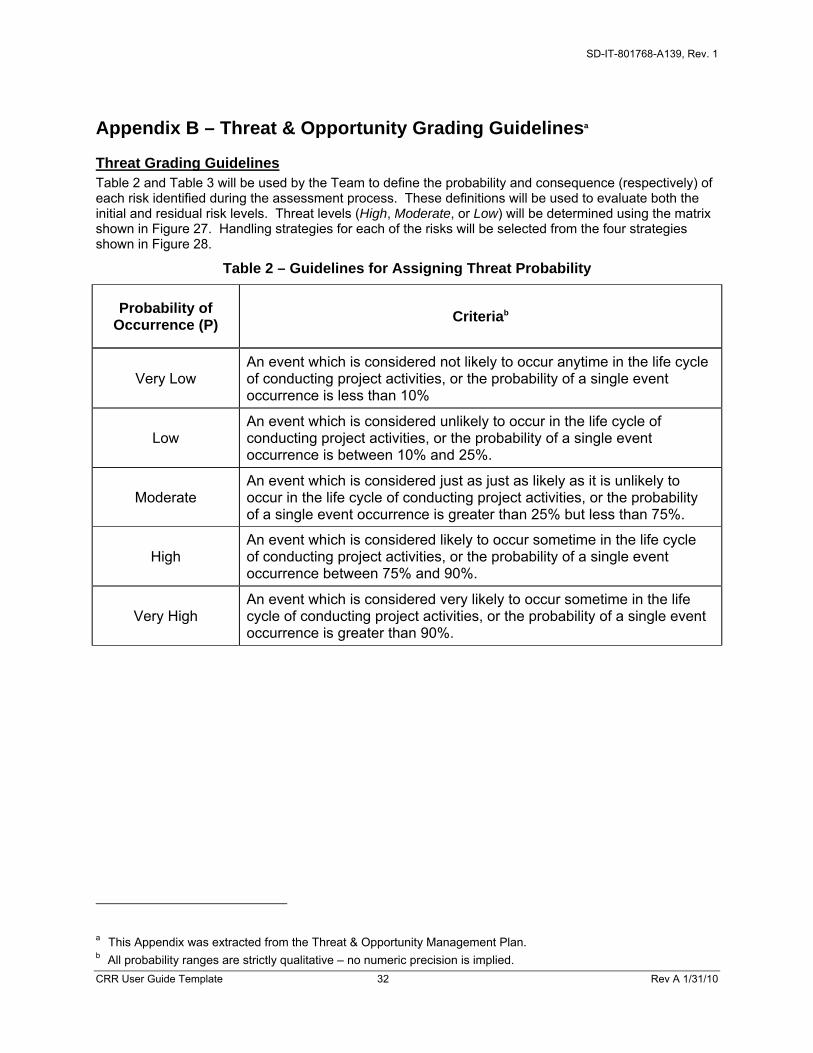
Threat Grading Guidelines Table 2 and Table 3 will be used by the Team to define the probability and consequence (respectively) of each risk identified during the assessment process. These definitions will be used to evaluate both the initial and residual risk levels. Threat levels (High, Moderate, or Low) will be determined using the matrix shown in Figure 27. Handling strategies for each of the risks will be selected from the four strategies shown in Figure 28.
Table 2 – Guidelines for Assigning Threat Probability
Probability of Occurrence (P)
Criteriab
Very Low An event which is considered not likely to occur anytime in the life cycle of conducting project activities, or the probability of a single event occurrence is less than 10%
Low An event which is considered unlikely to occur in the life cycle of conducting project activities, or the probability of a single event occurrence is between 10% and 25%.
Moderate An event which is considered just as just as likely as it is unlikely to occur in the life cycle of conducting project activities, or the probability of a single event occurrence is greater than 25% but less than 75%.
High An event which is considered likely to occur sometime in the life cycle of conducting project activities, or the probability of a single event occurrence between 75% and 90%.
Very High An event which is considered very likely to occur sometime in the life cycle of conducting project activities, or the probability of a single event occurrence is greater than 90%.
a This Appendix was extracted from the Threat & Opportunity Management Plan. b All probability ranges are strictly qualitative – no numeric precision is implied.
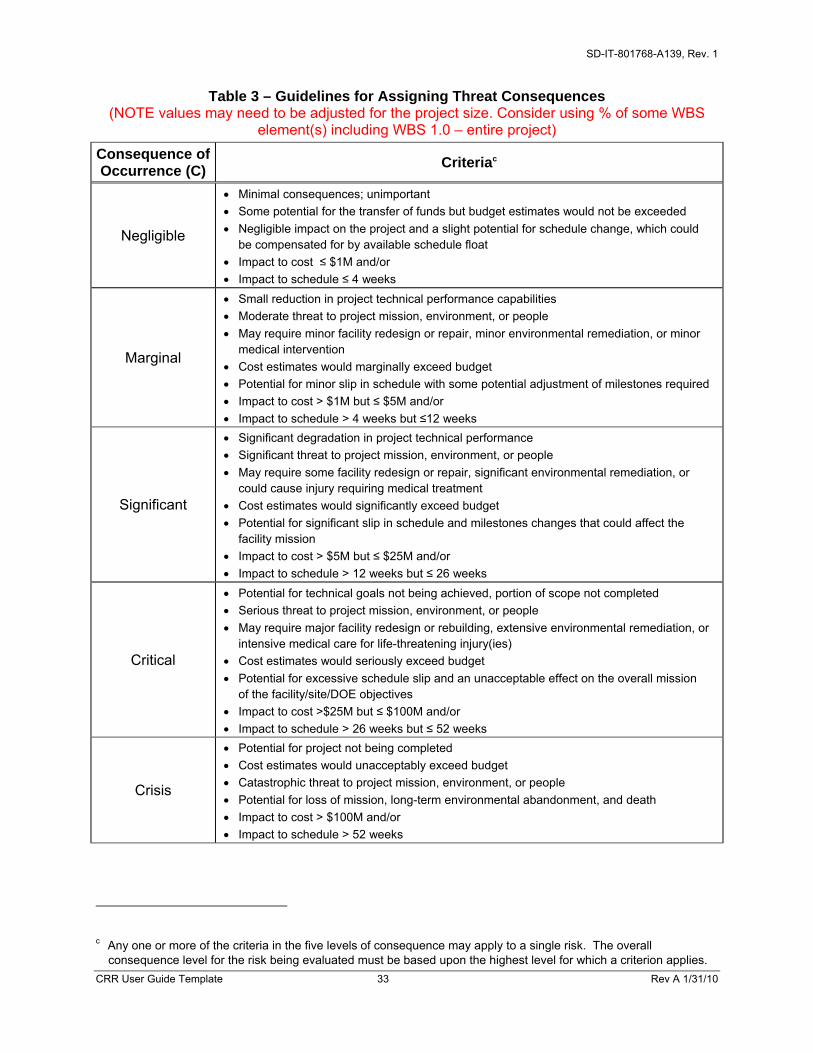
SD-IT-801768-A139, Rev. 1
CRR User Guide Template 33 Rev A 1/31/10
Table 3 – Guidelines for Assigning Threat Consequences (NOTE values may need to be adjusted for the project size. Consider using % of some WBS
element(s) including WBS 1.0 – entire project)
Consequence of Occurrence (C)
Criteriac
Negligible
Minimal consequences; unimportant
Some potential for the transfer of funds but budget estimates would not be exceeded
Negligible impact on the project and a slight potential for schedule change, which could be compensated for by available schedule float
Impact to cost ≤ $1M and/or
Impact to schedule ≤ 4 weeks
Marginal
Small reduction in project technical performance capabilities
Moderate threat to project mission, environment, or people
May require minor facility redesign or repair, minor environmental remediation, or minor medical intervention
Cost estimates would marginally exceed budget
Potential for minor slip in schedule with some potential adjustment of milestones required
Impact to cost > $1M but ≤ $5M and/or
Impact to schedule > 4 weeks but ≤12 weeks
Significant
Significant degradation in project technical performance
Significant threat to project mission, environment, or people
May require some facility redesign or repair, significant environmental remediation, or could cause injury requiring medical treatment
Cost estimates would significantly exceed budget
Potential for significant slip in schedule and milestones changes that could affect the facility mission
Impact to cost > $5M but ≤ $25M and/or
Impact to schedule > 12 weeks but ≤ 26 weeks
Critical
Potential for technical goals not being achieved, portion of scope not completed
Serious threat to project mission, environment, or people
May require major facility redesign or rebuilding, extensive environmental remediation, or intensive medical care for life-threatening injury(ies)
Cost estimates would seriously exceed budget
Potential for excessive schedule slip and an unacceptable effect on the overall mission of the facility/site/DOE objectives
Impact to cost >$25M but ≤ $100M and/or
Impact to schedule > 26 weeks but ≤ 52 weeks
Crisis
Potential for project not being completed
Cost estimates would unacceptably exceed budget
Catastrophic threat to project mission, environment, or people
Potential for loss of mission, long-term environmental abandonment, and death
Impact to cost > $100M and/or
Impact to schedule > 52 weeks
c Any one or more of the criteria in the five levels of consequence may apply to a single risk. The overall
consequence level for the risk being evaluated must be based upon the highest level for which a criterion applies.

SD-IT-801768-A139, Rev. 1
CRR User Guide Template 34 Rev A 1/31/10
Crisis
Moderate
Moderate
High
High
High
4
8
16
32
40
2
4
8
16
20
1
2
4
8
10
1
1
2
4
5
8LowLowLowLowVery Low
Critical
Moderate
Moderate
High
High 80HighModerateLowVery High
SignificantMarginalNegligible
16LowLowLowLow
32ModerateLowLowModerate
64ModerateModerateLowHigh
Crisis
Moderate
Moderate
High
High
High
4
8
16
32
40
2
4
8
16
20
1
2
4
8
10
1
1
2
4
5
8LowLowLowLowVery Low
Critical
Moderate
Moderate
High
High 80HighModerateLowVery High
SignificantMarginalNegligible
16LowLowLowLow
32ModerateLowLowModerate
64ModerateModerateLowHigh
Consequence
Pro
bab
ility
Figure 27 – Threat Grading Matrix
Figure 28 – Threat Handling Strategies
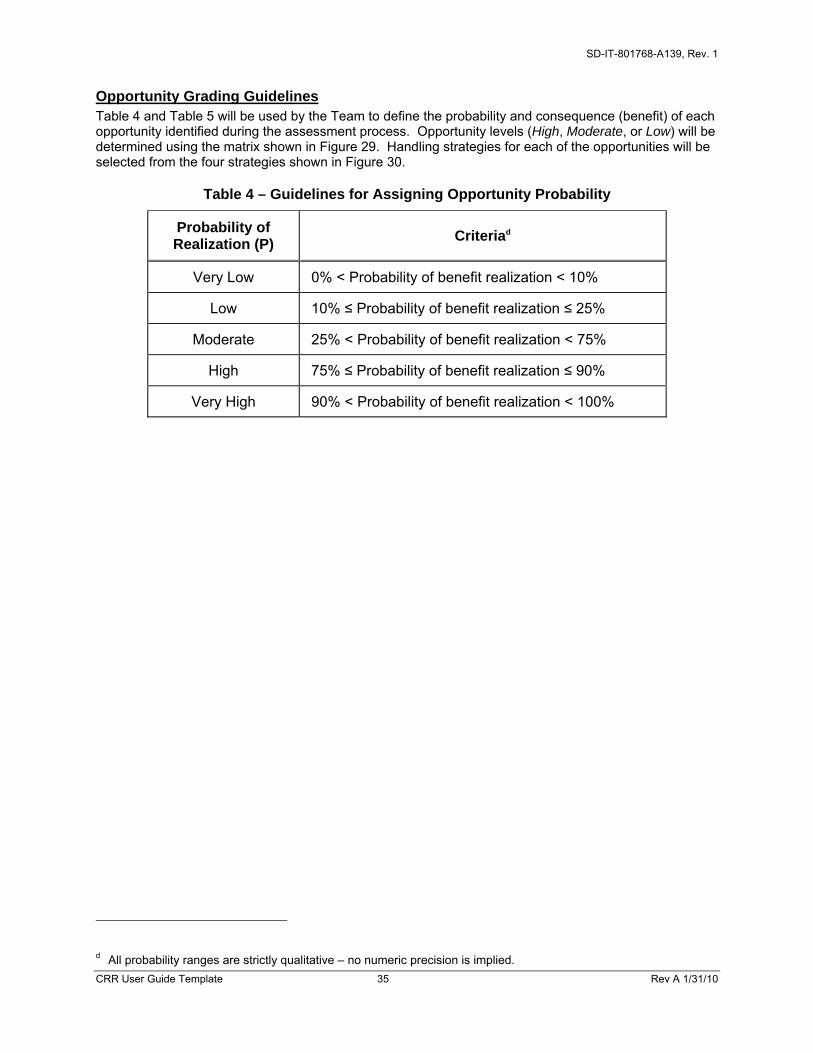
SD-IT-801768-A139, Rev. 1
CRR User Guide Template 35 Rev A 1/31/10
Opportunity Grading Guidelines Table 4 and Table 5 will be used by the Team to define the probability and consequence (benefit) of each opportunity identified during the assessment process. Opportunity levels (High, Moderate, or Low) will be determined using the matrix shown in Figure 29. Handling strategies for each of the opportunities will be selected from the four strategies shown in Figure 30.
Table 4 – Guidelines for Assigning Opportunity Probability
Probability of Realization (P)
Criteriad
Very Low 0% < Probability of benefit realization < 10%
Low 10% ≤ Probability of benefit realization ≤ 25%
Moderate 25% < Probability of benefit realization < 75%
High 75% ≤ Probability of benefit realization ≤ 90%
Very High 90% < Probability of benefit realization < 100%
d All probability ranges are strictly qualitative – no numeric precision is implied.
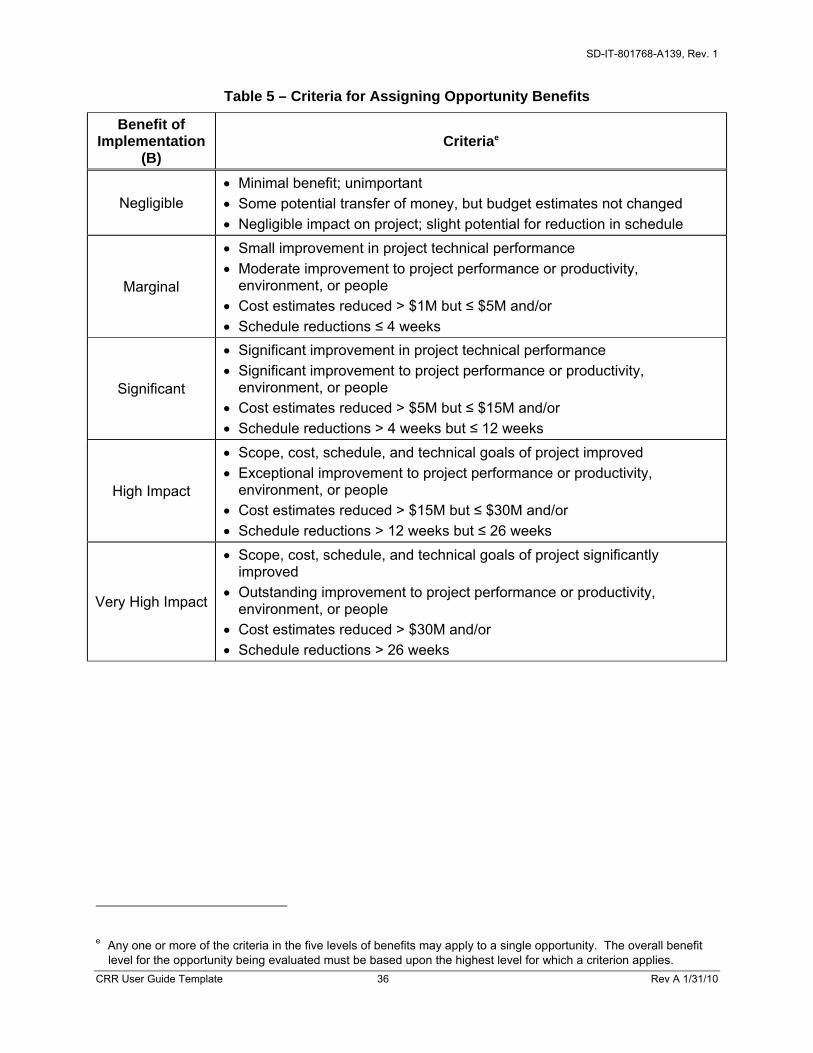
SD-IT-801768-A139, Rev. 1
CRR User Guide Template 36 Rev A 1/31/10
Table 5 – Criteria for Assigning Opportunity Benefits
Benefit of Implementation
(B) Criteriae
Negligible Minimal benefit; unimportant
Some potential transfer of money, but budget estimates not changed
Negligible impact on project; slight potential for reduction in schedule
Marginal
Small improvement in project technical performance
Moderate improvement to project performance or productivity, environment, or people
Cost estimates reduced > $1M but ≤ $5M and/or
Schedule reductions ≤ 4 weeks
Significant
Significant improvement in project technical performance
Significant improvement to project performance or productivity, environment, or people
Cost estimates reduced > $5M but ≤ $15M and/or
Schedule reductions > 4 weeks but ≤ 12 weeks
High Impact
Scope, cost, schedule, and technical goals of project improved
Exceptional improvement to project performance or productivity, environment, or people
Cost estimates reduced > $15M but ≤ $30M and/or
Schedule reductions > 12 weeks but ≤ 26 weeks
Very High Impact
Scope, cost, schedule, and technical goals of project significantly improved
Outstanding improvement to project performance or productivity, environment, or people
Cost estimates reduced > $30M and/or
Schedule reductions > 26 weeks
e Any one or more of the criteria in the five levels of benefits may apply to a single opportunity. The overall benefit
level for the opportunity being evaluated must be based upon the highest level for which a criterion applies.
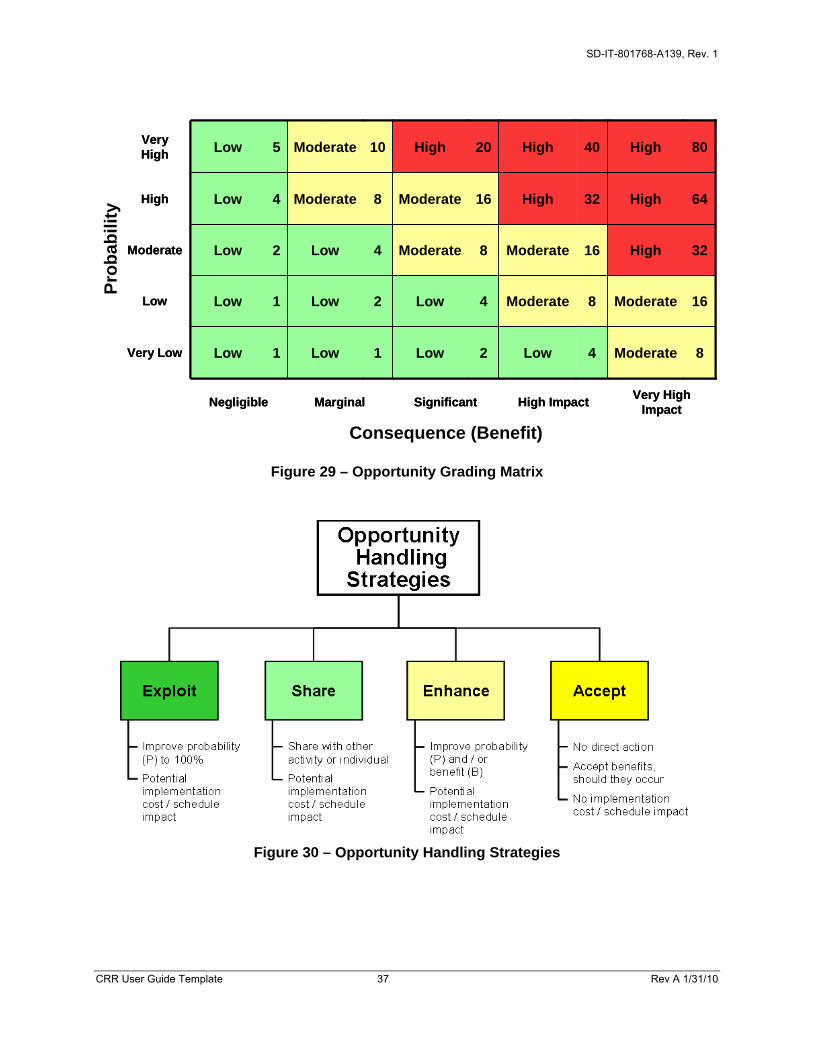
SD-IT-801768-A139, Rev. 1
CRR User Guide Template 37 Rev A 1/31/10
Very High Impact
Moderate
Moderate
High
High
High
4
8
16
32
40
2
4
8
16
20
1
2
4
8
10
1
1
2
4
5
8LowLowLowLowVery Low
High Impact
Moderate
Moderate
High
High 80HighModerateLowVery High
SignificantMarginalNegligible
16LowLowLowLow
32ModerateLowLowModerate
64ModerateModerateLowHigh
Very High Impact
Moderate
Moderate
High
High
High
4
8
16
32
40
2
4
8
16
20
1
2
4
8
10
1
1
2
4
5
8LowLowLowLowVery Low
High Impact
Moderate
Moderate
High
High 80HighModerateLowVery High
SignificantMarginalNegligible
16LowLowLowLow
32ModerateLowLowModerate
64ModerateModerateLowHigh
Consequence (Benefit)
Pro
bab
ility
Figure 29 – Opportunity Grading Matrix
Figure 30 – Opportunity Handling Strategies

SD-IT-801768-A139, Rev. 1
CRR User Guide Template 38 Rev A 1/31/10
Appendix C – Forms and Fields This appendix provides a summary of all CRR data entry forms and descriptions of the fields contained on those forms.
Figure 31 – Brainstorming Form
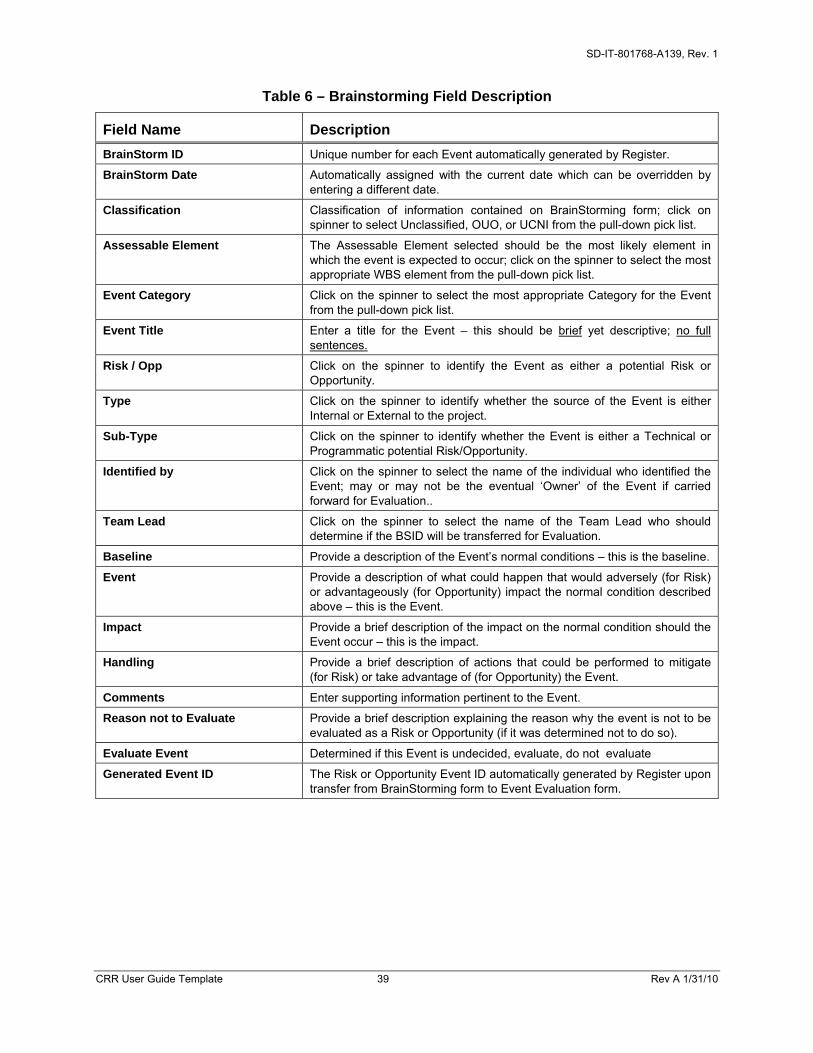
SD-IT-801768-A139, Rev. 1
CRR User Guide Template 39 Rev A 1/31/10
Table 6 – Brainstorming Field Description
Field Name Description
BrainStorm ID Unique number for each Event automatically generated by Register.
BrainStorm Date Automatically assigned with the current date which can be overridden by entering a different date.
Classification Classification of information contained on BrainStorming form; click on spinner to select Unclassified, OUO, or UCNI from the pull-down pick list.
Assessable Element The Assessable Element selected should be the most likely element in which the event is expected to occur; click on the spinner to select the most appropriate WBS element from the pull-down pick list.
Event Category Click on the spinner to select the most appropriate Category for the Event from the pull-down pick list.
Event Title Enter a title for the Event – this should be brief yet descriptive; no full sentences.
Risk / Opp Click on the spinner to identify the Event as either a potential Risk or Opportunity.
Type Click on the spinner to identify whether the source of the Event is either Internal or External to the project.
Sub-Type Click on the spinner to identify whether the Event is either a Technical or Programmatic potential Risk/Opportunity.
Identified by Click on the spinner to select the name of the individual who identified the Event; may or may not be the eventual ‘Owner’ of the Event if carried forward for Evaluation..
Team Lead Click on the spinner to select the name of the Team Lead who should determine if the BSID will be transferred for Evaluation.
Baseline Provide a description of the Event’s normal conditions – this is the baseline.
Event Provide a description of what could happen that would adversely (for Risk) or advantageously (for Opportunity) impact the normal condition described above – this is the Event.
Impact Provide a brief description of the impact on the normal condition should the Event occur – this is the impact.
Handling Provide a brief description of actions that could be performed to mitigate (for Risk) or take advantage of (for Opportunity) the Event.
Comments Enter supporting information pertinent to the Event.
Reason not to Evaluate Provide a brief description explaining the reason why the event is not to be evaluated as a Risk or Opportunity (if it was determined not to do so).
Evaluate Event Determined if this Event is undecided, evaluate, do not evaluate
Generated Event ID The Risk or Opportunity Event ID automatically generated by Register upon transfer from BrainStorming form to Event Evaluation form.
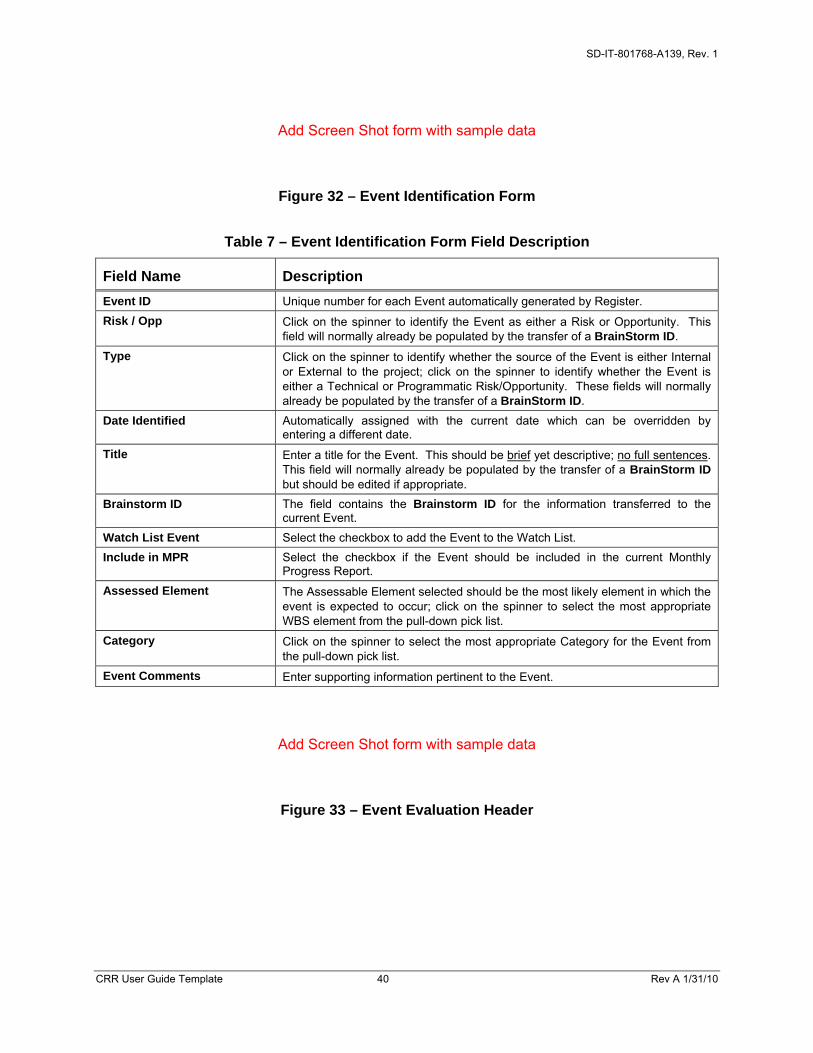
SD-IT-801768-A139, Rev. 1
CRR User Guide Template 40 Rev A 1/31/10
Add Screen Shot form with sample data
Figure 32 – Event Identification Form
Table 7 – Event Identification Form Field Description
Field Name Description
Event ID Unique number for each Event automatically generated by Register.
Risk / Opp Click on the spinner to identify the Event as either a Risk or Opportunity. This field will normally already be populated by the transfer of a BrainStorm ID.
Type Click on the spinner to identify whether the source of the Event is either Internal or External to the project; click on the spinner to identify whether the Event is either a Technical or Programmatic Risk/Opportunity. These fields will normally already be populated by the transfer of a BrainStorm ID.
Date Identified Automatically assigned with the current date which can be overridden by entering a different date.
Title Enter a title for the Event. This should be brief yet descriptive; no full sentences. This field will normally already be populated by the transfer of a BrainStorm ID but should be edited if appropriate.
Brainstorm ID The field contains the Brainstorm ID for the information transferred to the current Event.
Watch List Event Select the checkbox to add the Event to the Watch List.
Include in MPR Select the checkbox if the Event should be included in the current Monthly Progress Report.
Assessed Element The Assessable Element selected should be the most likely element in which the event is expected to occur; click on the spinner to select the most appropriate WBS element from the pull-down pick list.
Category Click on the spinner to select the most appropriate Category for the Event from the pull-down pick list.
Event Comments Enter supporting information pertinent to the Event.
Add Screen Shot form with sample data
Figure 33 – Event Evaluation Header
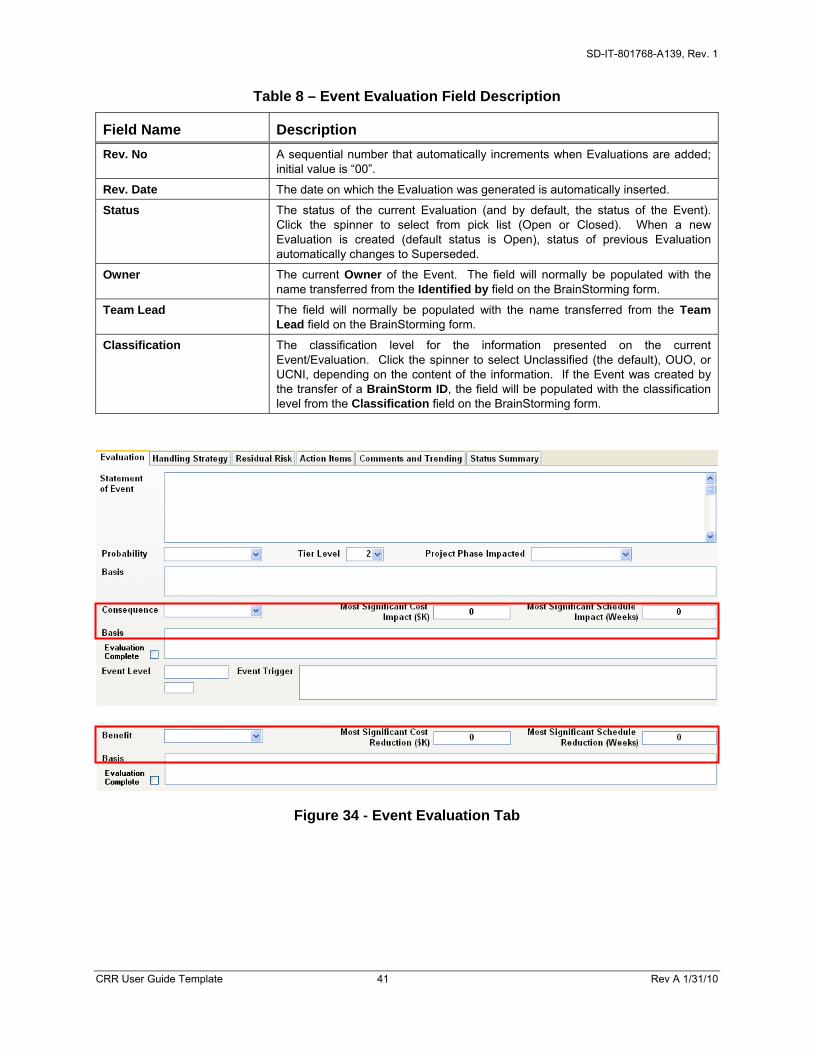
SD-IT-801768-A139, Rev. 1
CRR User Guide Template 41 Rev A 1/31/10
Table 8 – Event Evaluation Field Description
Field Name Description
Rev. No A sequential number that automatically increments when Evaluations are added; initial value is “00”.
Rev. Date The date on which the Evaluation was generated is automatically inserted.
Status The status of the current Evaluation (and by default, the status of the Event). Click the spinner to select from pick list (Open or Closed). When a new Evaluation is created (default status is Open), status of previous Evaluation automatically changes to Superseded.
Owner The current Owner of the Event. The field will normally be populated with the name transferred from the Identified by field on the BrainStorming form.
Team Lead The field will normally be populated with the name transferred from the Team Lead field on the BrainStorming form.
Classification The classification level for the information presented on the current Event/Evaluation. Click the spinner to select Unclassified (the default), OUO, or UCNI, depending on the content of the information. If the Event was created by the transfer of a BrainStorm ID, the field will be populated with the classification level from the Classification field on the BrainStorming form.
Figure 34 - Event Evaluation Tab

SD-IT-801768-A139, Rev. 1
CRR User Guide Template 42 Rev A 1/31/10
Table 9 – Event Evaluation Tab Field Description
Field Name Description
Statement of Event Enter a statement of event that includes the following three elements:
The baseline – the current or normal situation for the element containing the risk or opportunity (e.g. – assumptions, design basis).
The event – some other incident, occurrence, circumstance, etc., that may happen that is different from the current or normal situation.
The impact – a statement of what effect or result the Event will or could have on the current or normal situation (including performance, cost, and schedule impacts).
If the Event was created by the transfer of a BrainStorm ID, the field will ready be populated by a concatenation of the information from the three separate fields of the BrainStorming form. This transferred Statement of Event may be modified as required.
Tier Level Click the spinner to select Tier 1 or Tier 2, depending on the level of management review required for the Event being evaluated.
Project Phase Impacted Click the spinner and select the development phase of the project that would most likely be impacted by the Event being evaluated. Available options are CD1, CD2, CD3, CD4, or ALL. If multiple project phases are impacted, they may be entered manually, separated by a comma.
Probability Click on the spinner to select the most appropriate category for the Probability the Event will occur if a Risk, or can be made to occur if an Opportunity. See criteria in Table 2 for guidance if the Event is a Risk or Table 4 if the Event is an Opportunity. Available options are Very Low, Low, Moderate, High, or Very High.
Basis Provide a detailed description that supports the selected Probability category.
Consequence If the Event is a Risk, click on the spinner to select the most appropriate category for the Consequence (highlighted in the upper screenshot shown above), assuming the Event occurs. See criteria in Table 3 for guidance. Available options are Negligible, Marginal, Significant, Critical, or Crisis.
Benefit If the Event is an Opportunity, click on the spinner to select the most appropriate Benefit (highlighted in the lower screenshot shown above), assuming the Event can be made to occur. See criteria in Table 5 for guidance. Available options are Negligible, Marginal, Significant, High Impact, Very High Impact.
Basis Provide a detailed description that supports the selected Consequence (or Benefit) category.
Most Significant Cost Impact Provide a dollar value (in thousands) that represents the most significant cost impact (or reduction) assuming the Risk (or Opportunity) is realized. Cost is for capital expenditures only; hotel load costs derived from schedule impacts (or reductions) provided below.
Most Significant Schedule Impact
Provide a duration value (in weeks) that represents the most significant schedule impact (or reduction) assuming the Risk (or Opportunity) is realized.
Evaluation Complete Select this checkbox if the Evaluation Tab for this Evaluation is complete.
Event Level Risk or Opportunity Levels are automatically calculated and displayed based on the selected Probability and Consequence/Benefit. Relationships between Probability, Consequence/Benefit, and determination of Event Levels are shown on Figure 27 for Risks or on Figure 29 for Opportunities.
Event Trigger Provide a description of any activities or conditions that will serve as precursors to the occurrence of the Event being evaluated.
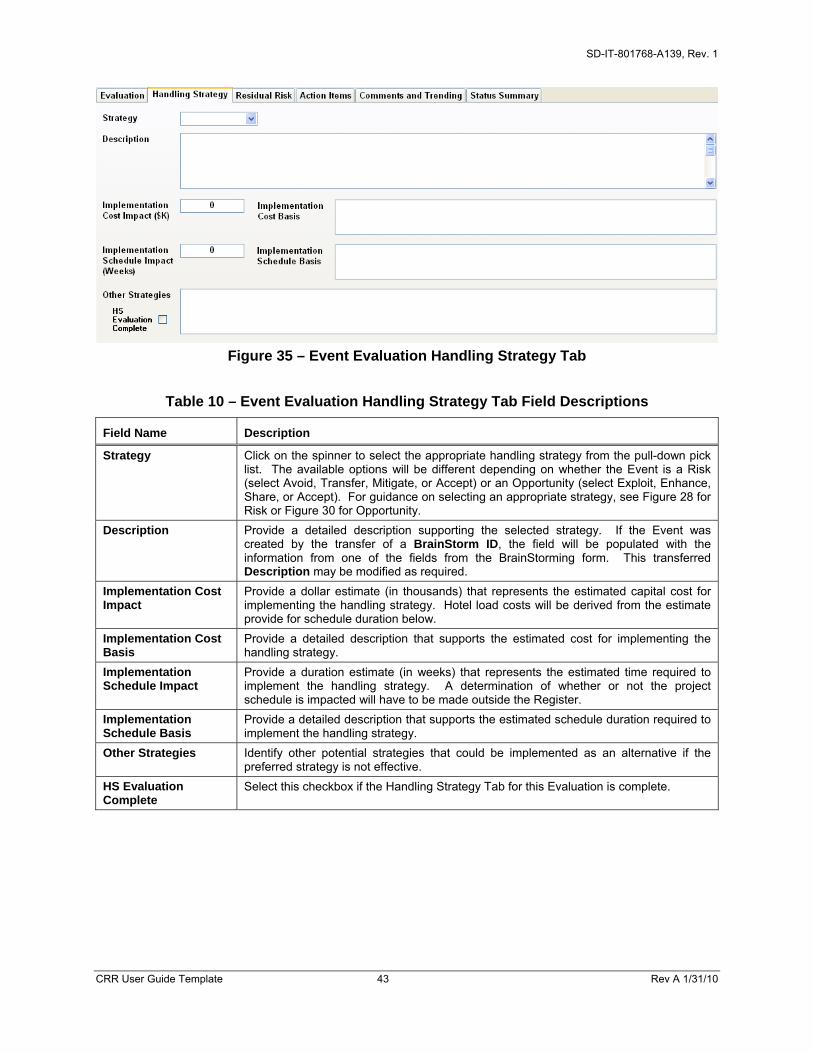
SD-IT-801768-A139, Rev. 1
CRR User Guide Template 43 Rev A 1/31/10
Figure 35 – Event Evaluation Handling Strategy Tab
Table 10 – Event Evaluation Handling Strategy Tab Field Descriptions
Field Name Description
Strategy Click on the spinner to select the appropriate handling strategy from the pull-down pick list. The available options will be different depending on whether the Event is a Risk (select Avoid, Transfer, Mitigate, or Accept) or an Opportunity (select Exploit, Enhance, Share, or Accept). For guidance on selecting an appropriate strategy, see Figure 28 for Risk or Figure 30 for Opportunity.
Description Provide a detailed description supporting the selected strategy. If the Event was created by the transfer of a BrainStorm ID, the field will be populated with the information from one of the fields from the BrainStorming form. This transferred Description may be modified as required.
Implementation Cost Impact
Provide a dollar estimate (in thousands) that represents the estimated capital cost for implementing the handling strategy. Hotel load costs will be derived from the estimate provide for schedule duration below.
Implementation Cost Basis
Provide a detailed description that supports the estimated cost for implementing the handling strategy.
Implementation Schedule Impact
Provide a duration estimate (in weeks) that represents the estimated time required to implement the handling strategy. A determination of whether or not the project schedule is impacted will have to be made outside the Register.
Implementation Schedule Basis
Provide a detailed description that supports the estimated schedule duration required to implement the handling strategy.
Other Strategies Identify other potential strategies that could be implemented as an alternative if the preferred strategy is not effective.
HS Evaluation Complete
Select this checkbox if the Handling Strategy Tab for this Evaluation is complete.
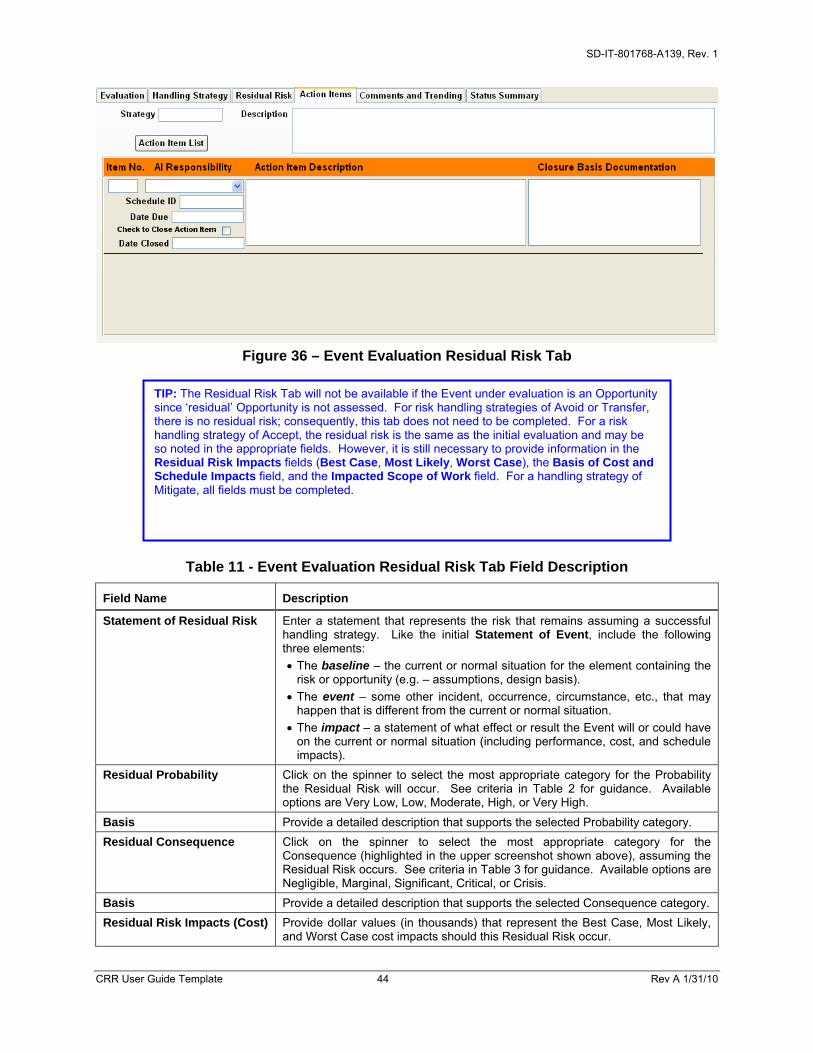
SD-IT-801768-A139, Rev. 1
CRR User Guide Template 44 Rev A 1/31/10
Figure 36 – Event Evaluation Residual Risk Tab
Table 11 - Event Evaluation Residual Risk Tab Field Description
Field Name Description
Statement of Residual Risk Enter a statement that represents the risk that remains assuming a successful handling strategy. Like the initial Statement of Event, include the following three elements:
The baseline – the current or normal situation for the element containing the risk or opportunity (e.g. – assumptions, design basis).
The event – some other incident, occurrence, circumstance, etc., that may happen that is different from the current or normal situation.
The impact – a statement of what effect or result the Event will or could have on the current or normal situation (including performance, cost, and schedule impacts).
Residual Probability Click on the spinner to select the most appropriate category for the Probability the Residual Risk will occur. See criteria in Table 2 for guidance. Available options are Very Low, Low, Moderate, High, or Very High.
Basis Provide a detailed description that supports the selected Probability category.
Residual Consequence Click on the spinner to select the most appropriate category for the Consequence (highlighted in the upper screenshot shown above), assuming the Residual Risk occurs. See criteria in Table 3 for guidance. Available options are Negligible, Marginal, Significant, Critical, or Crisis.
Basis Provide a detailed description that supports the selected Consequence category.
Residual Risk Impacts (Cost) Provide dollar values (in thousands) that represent the Best Case, Most Likely, and Worst Case cost impacts should this Residual Risk occur.
TIP: The Residual Risk Tab will not be available if the Event under evaluation is an Opportunity since ‘residual’ Opportunity is not assessed. For risk handling strategies of Avoid or Transfer, there is no residual risk; consequently, this tab does not need to be completed. For a risk handling strategy of Accept, the residual risk is the same as the initial evaluation and may be so noted in the appropriate fields. However, it is still necessary to provide information in the Residual Risk Impacts fields (Best Case, Most Likely, Worst Case), the Basis of Cost and Schedule Impacts field, and the Impacted Scope of Work field. For a handling strategy of Mitigate, all fields must be completed.
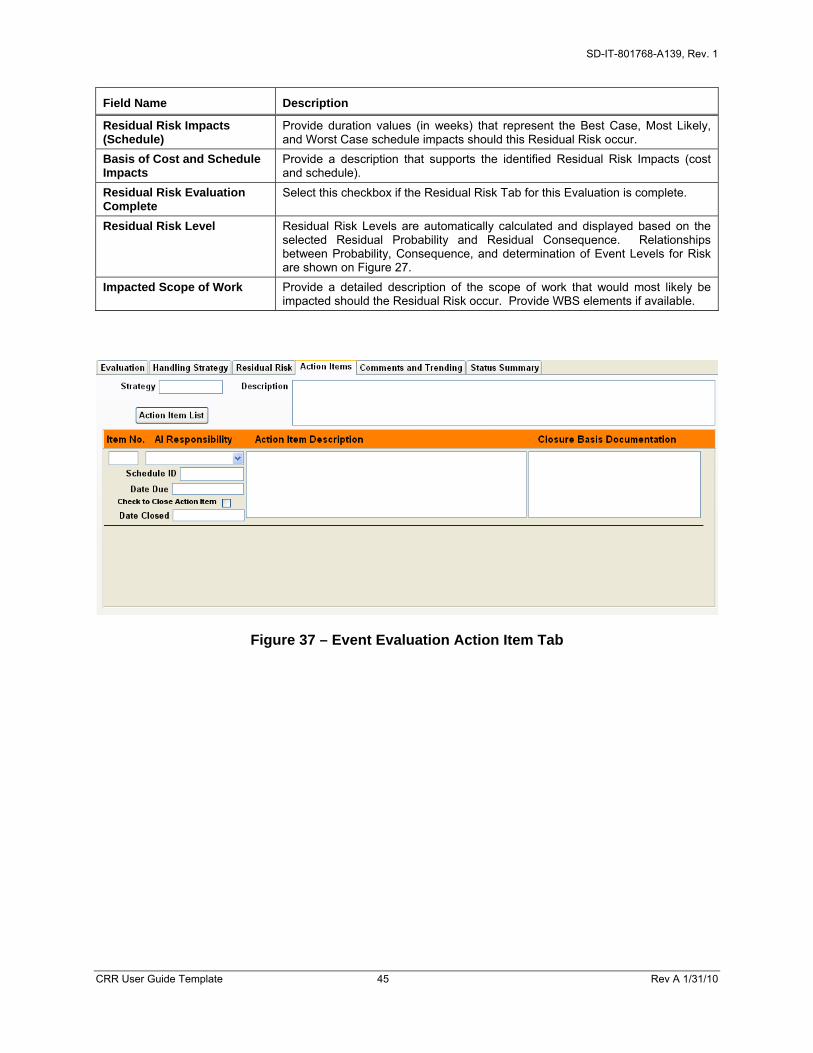
SD-IT-801768-A139, Rev. 1
CRR User Guide Template 45 Rev A 1/31/10
Field Name Description
Residual Risk Impacts (Schedule)
Provide duration values (in weeks) that represent the Best Case, Most Likely, and Worst Case schedule impacts should this Residual Risk occur.
Basis of Cost and Schedule Impacts
Provide a description that supports the identified Residual Risk Impacts (cost and schedule).
Residual Risk Evaluation Complete
Select this checkbox if the Residual Risk Tab for this Evaluation is complete.
Residual Risk Level Residual Risk Levels are automatically calculated and displayed based on the selected Residual Probability and Residual Consequence. Relationships between Probability, Consequence, and determination of Event Levels for Risk are shown on Figure 27.
Impacted Scope of Work Provide a detailed description of the scope of work that would most likely be impacted should the Residual Risk occur. Provide WBS elements if available.
Figure 37 – Event Evaluation Action Item Tab
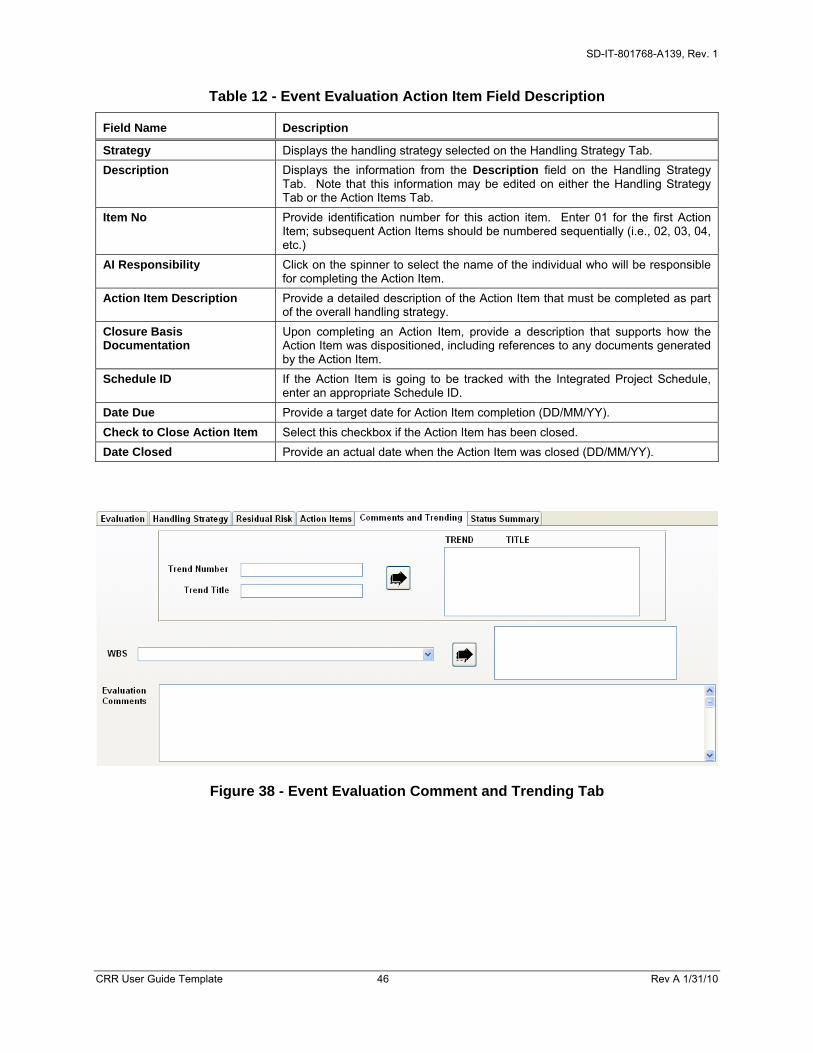
SD-IT-801768-A139, Rev. 1
CRR User Guide Template 46 Rev A 1/31/10
Table 12 - Event Evaluation Action Item Field Description
Field Name Description
Strategy Displays the handling strategy selected on the Handling Strategy Tab.
Description Displays the information from the Description field on the Handling Strategy Tab. Note that this information may be edited on either the Handling Strategy Tab or the Action Items Tab.
Item No Provide identification number for this action item. Enter 01 for the first Action Item; subsequent Action Items should be numbered sequentially (i.e., 02, 03, 04, etc.)
AI Responsibility Click on the spinner to select the name of the individual who will be responsible for completing the Action Item.
Action Item Description Provide a detailed description of the Action Item that must be completed as part of the overall handling strategy.
Closure Basis Documentation
Upon completing an Action Item, provide a description that supports how the Action Item was dispositioned, including references to any documents generated by the Action Item.
Schedule ID If the Action Item is going to be tracked with the Integrated Project Schedule, enter an appropriate Schedule ID.
Date Due Provide a target date for Action Item completion (DD/MM/YY).
Check to Close Action Item Select this checkbox if the Action Item has been closed.
Date Closed Provide an actual date when the Action Item was closed (DD/MM/YY).
Figure 38 - Event Evaluation Comment and Trending Tab
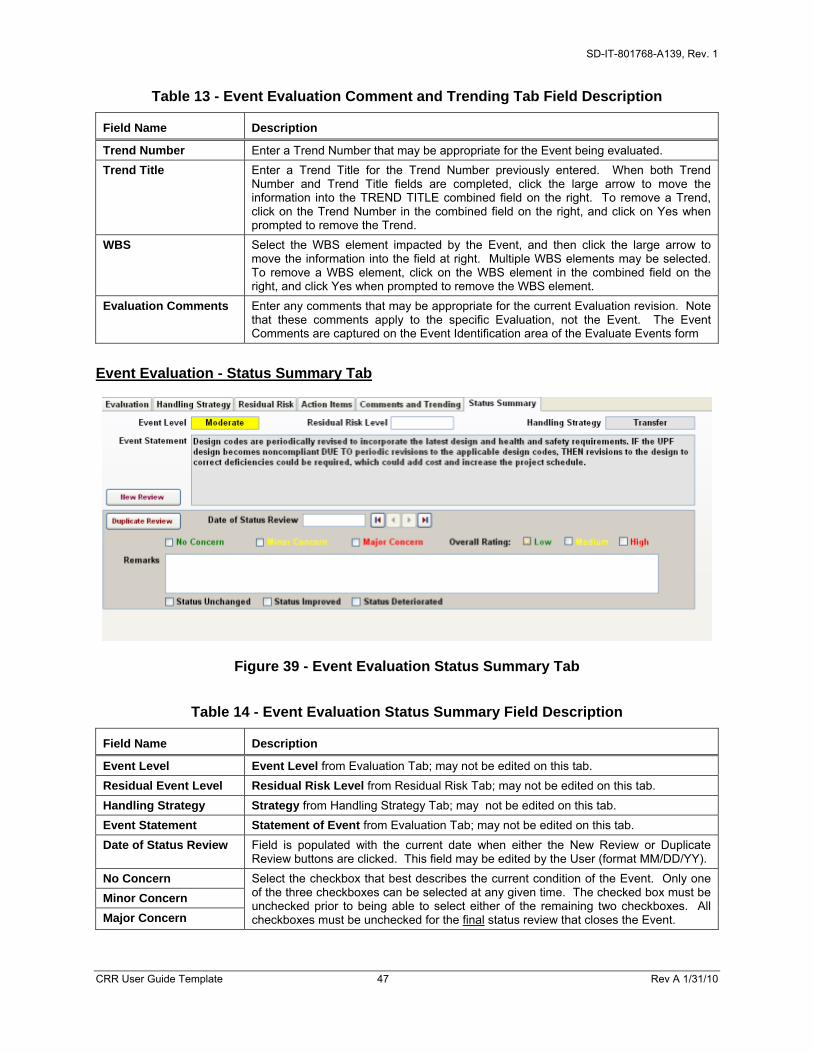
SD-IT-801768-A139, Rev. 1
CRR User Guide Template 47 Rev A 1/31/10
Table 13 - Event Evaluation Comment and Trending Tab Field Description
Field Name Description
Trend Number Enter a Trend Number that may be appropriate for the Event being evaluated.
Trend Title Enter a Trend Title for the Trend Number previously entered. When both Trend Number and Trend Title fields are completed, click the large arrow to move the information into the TREND TITLE combined field on the right. To remove a Trend, click on the Trend Number in the combined field on the right, and click on Yes when prompted to remove the Trend.
WBS Select the WBS element impacted by the Event, and then click the large arrow to move the information into the field at right. Multiple WBS elements may be selected. To remove a WBS element, click on the WBS element in the combined field on the right, and click Yes when prompted to remove the WBS element.
Evaluation Comments Enter any comments that may be appropriate for the current Evaluation revision. Note that these comments apply to the specific Evaluation, not the Event. The Event Comments are captured on the Event Identification area of the Evaluate Events form
Event Evaluation - Status Summary Tab
Figure 39 - Event Evaluation Status Summary Tab
Table 14 - Event Evaluation Status Summary Field Description
Field Name Description
Event Level Event Level from Evaluation Tab; may not be edited on this tab.
Residual Event Level Residual Risk Level from Residual Risk Tab; may not be edited on this tab.
Handling Strategy Strategy from Handling Strategy Tab; may not be edited on this tab.
Event Statement Statement of Event from Evaluation Tab; may not be edited on this tab.
Date of Status Review Field is populated with the current date when either the New Review or Duplicate Review buttons are clicked. This field may be edited by the User (format MM/DD/YY).
No Concern
Minor Concern
Major Concern
Select the checkbox that best describes the current condition of the Event. Only one of the three checkboxes can be selected at any given time. The checked box must be unchecked prior to being able to select either of the remaining two checkboxes. All checkboxes must be unchecked for the final status review that closes the Event.

SD-IT-801768-A139, Rev. 1
CRR User Guide Template 48 Rev A 1/31/10
Field Name Description
Remarks Provide information on current status of the Event appropriate for management review. If the Duplicate Review button was used to generate the new review, all of the information from the previous review will be copied into the new review where it may easily be edited.
Status Unchanged
Status Improved
Status Deteriorated
Select the checkbox that best describes the current status of the Event relative to the previous review. Only one of the three checkboxes can be selected at any given time. The checked box must be unchecked prior to being able to select either of the remaining two checkboxes. All checkboxes must be unchecked for the final status review that closes the Event.
Related Documents