Welcome message from author
This document is posted to help you gain knowledge. Please leave a comment to let me know what you think about it! Share it to your friends and learn new things together.
Transcript

by Bill Fane and
David Byrnes
AutoCAD® 2014

AutoCAD® 2014 For Dummies®
Published by John Wiley & Sons, Inc. 111 River Street Hoboken, NJ 07030-5774www.wiley.com
Copyright © 2013 by John Wiley & Sons, Inc., Hoboken, New JerseyPublished by John Wiley & Sons, Inc., Hoboken, New JerseyPublished simultaneously in CanadaNo part of this publication may be reproduced, stored in a retrieval system or transmitted in any form or by any means, electronic, mechanical, photocopying, recording, scanning or otherwise, except as permit-ted under Sections 107 or 108 of the 1976 United States Copyright Act, without either the prior written permission of the Publisher, or authorization through payment of the appropriate per-copy fee to the Copyright Clearance Center, 222 Rosewood Drive, Danvers, MA 01923, (978) 750-8400, fax (978) 646-8600. Requests to the Publisher for permission should be addressed to the Permissions Department, John Wiley & Sons, Inc., 111 River Street, Hoboken, NJ 07030, (201) 748-6011, fax (201) 748-6008, or online at http://www.wiley.com/go/permissions.Trademarks: Wiley, the Wiley logo, For Dummies, the Dummies Man logo, A Reference for the Rest of Us!, The Dummies Way, Dummies Daily, The Fun and Easy Way, Dummies.com, Making Everything Easier, and related trade dress are trademarks or registered trademarks of John Wiley & Sons, Inc. and/or its affiliates in the United States and other countries, and may not be used without written permission. AutoCAD is a registered trademark of Autodesk, Inc. All other trademarks are the property of their respective owners. John Wiley & Sons, Inc. is not associated with any product or vendor mentioned in this book.
LIMIT OF LIABILITY/DISCLAIMER OF WARRANTY: THE PUBLISHER AND THE AUTHOR MAKE NO REPRESENTATIONS OR WARRANTIES WITH RESPECT TO THE ACCURACY OR COMPLETENESS OF THE CONTENTS OF THIS WORK AND SPECIFICALLY DISCLAIM ALL WARRANTIES, INCLUDING WITH-OUT LIMITATION WARRANTIES OF FITNESS FOR A PARTICULAR PURPOSE. NO WARRANTY MAY BE CREATED OR EXTENDED BY SALES OR PROMOTIONAL MATERIALS. THE ADVICE AND STRATEGIES CONTAINED HEREIN MAY NOT BE SUITABLE FOR EVERY SITUATION. THIS WORK IS SOLD WITH THE UNDERSTANDING THAT THE PUBLISHER IS NOT ENGAGED IN RENDERING LEGAL, ACCOUNTING, OR OTHER PROFESSIONAL SERVICES. IF PROFESSIONAL ASSISTANCE IS REQUIRED, THE SERVICES OF A COMPETENT PROFESSIONAL PERSON SHOULD BE SOUGHT. NEITHER THE PUBLISHER NOR THE AUTHOR SHALL BE LIABLE FOR DAMAGES ARISING HEREFROM. THE FACT THAT AN ORGANIZA-TION OR WEBSITE IS REFERRED TO IN THIS WORK AS A CITATION AND/OR A POTENTIAL SOURCE OF FURTHER INFORMATION DOES NOT MEAN THAT THE AUTHOR OR THE PUBLISHER ENDORSES THE INFORMATION THE ORGANIZATION OR WEBSITE MAY PROVIDE OR RECOMMENDATIONS IT MAY MAKE. FURTHER, READERS SHOULD BE AWARE THAT INTERNET WEBSITES LISTED IN THIS WORK MAY HAVE CHANGED OR DISAPPEARED BETWEEN WHEN THIS WORK WAS WRITTEN AND WHEN IT IS READ.
For general information on our other products and services, please contact our Customer Care Department within the U.S. at 877-762-2974, outside the U.S. at 317-572-3993, or fax 317-572-4002.For technical support, please visit www.wiley.com/techsupport.Wiley publishes in a variety of print and electronic formats and by print-on-demand. Some material included with standard print versions of this book may not be included in e-books or in print-on-demand. If this book refers to media such as a CD or DVD that is not included in the version you purchased, you may download this material at http://booksupport.wiley.com. For more information about Wiley products, visit www.wiley.com.Library of Congress Control Number: 2013935678ISBN 978-1-118-60397-0 (pbk); ISBN 978-1-118-62786-0 (ebk); ISBN 978-1-118-65195-7 (ebk); ISBN 978-1-118-65215-2 (ebk)Manufactured in the United States of America10 9 8 7 6 5 4 3 2 1

About the AuthorsBill Fane is a recovering doorknob designer. He was a product engineer and then product engineering manager for Weiser Lock in Vancouver, Canada, for 27 years and holds 12 U.S. patents. He has been using AutoCAD for design work since Version 2.17g (1986) and Inventor since version 1.0 beta (1996). He is a retired professional engineer and an Autodesk Authorized Training Center (ATC) certified instructor.
He began teaching mechanical design in 1996 at the British Columbia Institute of Technology (BCIT) in Vancouver, including such courses as AutoCAD, Mechanical Desktop, Inventor, SolidWorks, machine design, term projects, manufacturing processes, and design procedures. He retired from this position in 2008.
He has lectured on a wide range of AutoCAD and Inventor subjects at Autodesk University since 1995 and at Destination Desktop since 2003. He is the AUGI CAD Camp National Team instructor for the manufacturing track. He has written over 220 “The Learning Curve” columns for CADalyst magazine since 1986 and claims to be a close personal friend of Captain LearnCurve. He also writes software product reviews for CADalyst, Design Product News, and Machine Design. He is an active member of the Vancouver AutoCAD Users Society, “the world’s oldest and most dangerous.”
In his spare time he skis, water-skis, windsurfs, scuba dives, sails a Hobie Cat, rides an off-road motorcycle, drives his ’37 Rolls-Royce limousine or his wife’s ’89 Bentley Turbo R, travels extensively with his wife, and plays with his grandchildren.
David Byrnes is one of those grizzled old-timers you’ll find mentioned every so often in AutoCAD 2014 For Dummies. He began his drafting career on the boards in 1979 and first learned AutoCAD with version 1.4. Dave is based in Vancouver, British Columbia, where he works as a civil/structural drafter. He taught AutoCAD for 15 years at Emily Carr University of Art + Design and British Columbia Institute of Technology in Vancouver. Dave has authored or coauthored over a dozen AutoCAD books and was sole author of this title from AutoCAD 2008 For Dummies to AutoCAD 2012 For Dummies.

Publisher’s AcknowledgmentsWe’re proud of this book; please send us your comments at http://dummies.custhelp.com. For other comments, please contact our Customer Care Department within the U.S. at 877-762-2974, outside the U.S. at 317-572-3993, or fax 317-572-4002.Some of the people who helped bring this book to market include the following:
Acquisitions and EditorialProject Editor: Rebecca SenningerAcquisitions Editor: Kyle LooperCopy Editor: Rebecca WhitneyTechnical Editor: Ralph GrabowskiEditorial Manager: Leah MichaelEditorial Assistant: Anne SullivanSr. Editorial Assistant: Cherie CaseCover Photo: Front cover © iStockphoto.com/
Sashkin
Composition ServicesSr. Project Coordinator: Kristie ReesLayout and Graphics: Carrie Cesavice,
Jennifer Creasey, Joyce Haughey, Christin Swinford
Proofreader: John GreenoughIndexer: BIM Indexing & Proofreading ServicesSpecial Help
Lee Ambrosius, Teresa Artman
Publishing and Editorial for Technology DummiesRichard Swadley, Vice President and Executive Group PublisherAndy Cummings, Vice President and PublisherMary Bednarek, Executive Acquisitions DirectorMary C. Corder, Editorial Director
Publishing for Consumer DummiesKathleen Nebenhaus, Vice President and Executive Publisher
Composition ServicesDebbie Stailey, Director of Composition Services

Contents at a GlanceIntroduction ................................................................ 1
Part I: Getting Started with AutoCAD 2014 ................... 7Chapter 1: Introducing AutoCAD and AutoCAD LT ....................................................... 9Chapter 2: The Grand Tour of AutoCAD 2014 .............................................................. 19Chapter 3: A Lap around the CAD Track....................................................................... 39Chapter 4: Setup for Success .......................................................................................... 65Chapter 5: A Zoom with a View ...................................................................................... 87
Part II: Let There Be Lines .......................................... 97Chapter 6: Along the Straight and Narrow ................................................................... 99Chapter 7: Dangerous Curves Ahead .......................................................................... 111Chapter 8: Preciseliness Is Next to CADliness ........................................................... 125Chapter 9: Manage Your Properties ............................................................................ 143Chapter 10: Grabbing Onto Object Selection ............................................................. 165Chapter 11: Edit for Credit ............................................................................................ 177Chapter 12: Planning for Paper .................................................................................... 209
Part III: If Drawings Could Talk ................................ 223Chapter 13: Text with Character .................................................................................. 225Chapter 14: Entering New Dimensions ........................................................................ 259Chapter 15: Down the Hatch! ........................................................................................ 285Chapter 16: The Plot Thickens ..................................................................................... 299
Part IV: Advancing with AutoCAD ............................. 327Chapter 17: The ABCs of Blocks .................................................................................. 329Chapter 18: Everything from Arrays to Xrefs............................................................. 347Chapter 19: Call the Parametrics! ................................................................................ 383Chapter 20: Drawing on the Internet ........................................................................... 409
Part V: On a 3D Spree .............................................. 427Chapter 21: It’s a 3D World After All ........................................................................... 429Chapter 22: From Drawings to Models ........................................................................ 449Chapter 23: It’s Showtime! ............................................................................................ 471

Part VI: The Part of Tens .......................................... 493Chapter 24: Ten AutoCAD Resources .......................................................................... 495Chapter 25: Ten System Variables to Make Your AutoCAD Life Easier .................. 499Chapter 26: Ten AutoCAD Secrets ............................................................................... 505
Index ...................................................................... 509
Table of ContentsIntroduction ................................................................. 1
About This Book .............................................................................................. 1Foolish Assumptions ....................................................................................... 2
Using the command line ....................................................................... 3Using aliases ........................................................................................... 3
Icons Used in This Book ................................................................................. 4Beyond the Book ............................................................................................. 4Where to Go from Here ................................................................................... 5
Part I: Getting Started with AutoCAD 2014 ................... 7
Chapter 1: Introducing AutoCAD and AutoCAD LT . . . . . . . . . . . . . . . . . .9Checking Out What AutoCAD Can Do for You ............................................. 9Opening AutoCAD .......................................................................................... 10Drawing in AutoCAD ...................................................................................... 12Understanding Pixels and Vectors .............................................................. 14The Cartesian Coordinate System ............................................................... 15The Importance of Being DWG ..................................................................... 16
Chapter 2: The Grand Tour of AutoCAD 2014 . . . . . . . . . . . . . . . . . . . . . .19Looking at AutoCAD’s Drawing Screen ....................................................... 19
InfoCenter and Quick Access toolbar................................................ 22Making choices from the Application Menu ..................................... 24Unraveling the Ribbon ........................................................................ 26
Getting with the Program ............................................................................. 29Looking for Mr. Status Bar .................................................................. 30Using Dynamic Input ........................................................................... 30Let your fingers do the talking: The command line ......................... 31The key(board) to AutoCAD success ................................................ 32Keeping tabs on palettes..................................................................... 36Down the main stretch: The drawing area ....................................... 36
Fun with F1 ..................................................................................................... 37
Chapter 3: A Lap around the CAD Track . . . . . . . . . . . . . . . . . . . . . . . . . .39A Simple Setup ............................................................................................... 40Drawing a (Base) Plate .................................................................................. 45Taking a Closer Look with Zoom and Pan .................................................. 54Modifying to Make It Merrier ....................................................................... 55
Crossing your hatches ........................................................................ 55Now that’s a stretch ............................................................................ 57
viii AutoCAD 2014 For Dummies
Following the Plot .......................................................................................... 60Plotting the drawing ............................................................................ 60Today’s layer forecast: Freezing ........................................................ 63
Chapter 4: Setup for Success . . . . . . . . . . . . . . . . . . . . . . . . . . . . . . . . . . .65A Setup Roadmap .......................................................................................... 66
Choosing your units ............................................................................ 66Weighing up your scales ..................................................................... 69Thinking about paper .......................................................................... 71Defending your border ........................................................................ 72
A Template for Success ................................................................................ 72Making the Most of Model Space ................................................................. 75
Setting your units ................................................................................. 75Making the drawing area snap-py (and grid-dy) .............................. 77Setting linetype and dimension scales .............................................. 80Entering drawing properties .............................................................. 81
Making Templates Your Own ....................................................................... 82
Chapter 5: A Zoom with a View . . . . . . . . . . . . . . . . . . . . . . . . . . . . . . . . .87Zooming and Panning with Glass and Hand ............................................... 88
The wheel deal ..................................................................................... 88Navigating a drawing ........................................................................... 89
Zooming, Zooming, Zooming ....................................................................... 91A View by Any Other Name . . . .................................................................... 93Degenerating and Regenerating ................................................................... 95
Part II: Let There Be Lines .......................................... 97
Chapter 6: Along the Straight and Narrow . . . . . . . . . . . . . . . . . . . . . . .99Drawing for Success .................................................................................... 100Introducing the Straight-Line Drawing Commands ................................. 101Drawing Lines and Polylines ...................................................................... 102
Toeing the line .................................................................................... 103Connecting the lines with polyline .................................................. 104
Squaring Off with Rectangles ..................................................................... 108Choosing Sides with POLygon ................................................................... 109
Chapter 7: Dangerous Curves Ahead . . . . . . . . . . . . . . . . . . . . . . . . . . .111(Throwing) Curves ...................................................................................... 111Going Full Circle ........................................................................................... 112Arc-y-ology .................................................................................................... 113Solar Ellipses ................................................................................................ 115Splines: The Sketchy, Sinuous Curves ...................................................... 116Donuts: The Circles with a Difference ...................................................... 118Revision Clouds on the Horizon ................................................................ 119Scoring Points .............................................................................................. 121
ix Table of Contents
Chapter 8: Preciseliness Is Next to CADliness . . . . . . . . . . . . . . . . . . .125Controlling Precision .................................................................................. 125Understanding the AutoCAD Coordinate Systems .................................. 129
Keyboard capers: Coordinate input ................................................ 129Introducing user coordinate systems ............................................. 130Drawing by numbers ......................................................................... 130
Grabbing an Object and Making It Snappy ............................................... 133Grabbing points with object snap overrides .................................. 133Running with object snaps ............................................................... 136
Other Practical Precision Procedures ...................................................... 138
Chapter 9: Manage Your Properties . . . . . . . . . . . . . . . . . . . . . . . . . . . .143Using Properties with Objects ................................................................... 144
Using the ByLayer approach ............................................................ 144Changing properties .......................................................................... 146
Working with Layers ................................................................................... 148Accumulating properties .................................................................. 150Creating new layers ........................................................................... 151Manipulating layers ........................................................................... 158Scaling an object’s linetype .............................................................. 160
Using Named Objects .................................................................................. 161Using AutoCAD DesignCenter .................................................................... 162
Chapter 10: Grabbing Onto Object Selection . . . . . . . . . . . . . . . . . . . .165Commanding and Selecting ........................................................................ 165
Command-first editing ....................................................................... 166Selection-first editing ......................................................................... 166Direct-object manipulation ............................................................... 166Choosing an editing style .................................................................. 166
Selecting Objects ......................................................................................... 168One-by-one selection ......................................................................... 168Selection boxes left and right ........................................................... 168
Perfecting Selecting ..................................................................................... 171AutoCAD Groupies ...................................................................................... 174Object Selection: Now You See It . . . ........................................................ 174
Chapter 11: Edit for Credit . . . . . . . . . . . . . . . . . . . . . . . . . . . . . . . . . . . . .177Assembling Your AutoCAD Toolkit ........................................................... 177The Big Three: Move, COpy, and Stretch ................................................. 180
Base points and displacements ....................................................... 180Move .................................................................................................... 181COpy .................................................................................................... 183Copy between drawings .................................................................... 184Stretch ................................................................................................. 184
More Manipulations .................................................................................... 188Mirror, mirror on the monitor.......................................................... 188ROtate .................................................................................................. 189
x AutoCAD 2014 For Dummies
SCale .................................................................................................... 190-ARray .................................................................................................. 191Offset ................................................................................................... 193
Slicing, Dicing, and Splicing ........................................................................ 195TRim and EXtend ............................................................................... 195BReak ................................................................................................... 197Fillet, CHAmfer, and BLEND .............................................................. 198Join....................................................................................................... 201Other editing commands .................................................................. 202
Getting a Grip ............................................................................................... 204When Editing Goes Bad ............................................................................... 206
Chapter 12: Planning for Paper . . . . . . . . . . . . . . . . . . . . . . . . . . . . . . . .209Setting Up a Layout in Paper Space .......................................................... 210
Will that be tabs or buttons? ............................................................ 210Viewing layouts Quick(View)ly ........................................................ 211
Creating a Layout ......................................................................................... 213Using the Create Layout Wizard ...................................................... 214Creating a view(port) to draw in ..................................................... 216
Working with Layouts ................................................................................. 218Copying and changing layouts ......................................................... 218Locking the viewport ......................................................................... 219Switching between layouts ............................................................... 220Keeping track of where you’re at ..................................................... 221
About Paper Space Layouts and Plotting ................................................. 221
Part III: If Drawings Could Talk ................................ 223
Chapter 13: Text with Character . . . . . . . . . . . . . . . . . . . . . . . . . . . . . . .225Getting Ready to Write ................................................................................ 226Creating Simply Stylish Text ...................................................................... 228
Font follies .......................................................................................... 229Get in style .......................................................................................... 230
Taking Your Text to New Heights .............................................................. 232Plotted text height ............................................................................. 232Calculating non-annotative AutoCAD text height .......................... 233
Entering Text ................................................................................................ 234Using the Same Old Line ............................................................................. 234Saying More in Multiline Text .................................................................... 238
Making it with mText ......................................................................... 238mText dons a mask ............................................................................ 242Insert Field .......................................................................................... 242Doing a number on your mText lists ............................................... 243Line up in columns — now! .............................................................. 245Modifying mText ................................................................................ 247
Turning On Annotative Objects ................................................................. 247
xi Table of Contents
Gather ’Round the Tables ........................................................................... 251Tables have style, too ....................................................................... 251Creating and editing tables ............................................................... 252
Take Me to Your Leader ............................................................................. 255Electing a leader ................................................................................. 255Multi options for multileaders ......................................................... 257
Chapter 14: Entering New Dimensions . . . . . . . . . . . . . . . . . . . . . . . . . .259Adding Dimensions to a Drawing .............................................................. 259A Field Guide to Dimensions ...................................................................... 262
Using the quick dimension commands ........................................... 264Opening the Dimension toolbar ....................................................... 265Where, oh where, do my dimensions go? ....................................... 266
The Latest Styles in Dimensioning ............................................................ 267Creating dimension styles ................................................................ 270Adjusting style settings ..................................................................... 273Changing styles .................................................................................. 276
Scaling Dimensions for Output .................................................................. 276Editing Dimensions ...................................................................................... 279
Editing dimension geometry ............................................................ 279Editing dimension text ...................................................................... 281Controlling and editing dimension associativity ........................... 282
Chapter 15: Down the Hatch! . . . . . . . . . . . . . . . . . . . . . . . . . . . . . . . . . .285Creating a Hatch .......................................................................................... 285Using the Hatches Tab ................................................................................ 288Scaling Hatches ............................................................................................ 291
Scaling the easy way .......................................................................... 292Annotative versus non-annotative ................................................... 293
Pushing the Boundary (of) Hatch .............................................................. 294Adding style ........................................................................................ 294Hatching from scratch....................................................................... 295
Editing Hatch Objects ................................................................................. 297
Chapter 16: The Plot Thickens . . . . . . . . . . . . . . . . . . . . . . . . . . . . . . . . .299You Say “Printing,” We Say “Plotting” ....................................................... 300The Plot Quickens ....................................................................................... 300
Plotting success in 16 steps.............................................................. 300Getting with the system .................................................................... 304Configuring your printer ................................................................... 305Preview one, two ................................................................................ 307Instead of fit, scale it.......................................................................... 307
Plotting the Layout of the Land ................................................................. 309Plotting Lineweights and Colors ................................................................ 312
Plotting with style .............................................................................. 312Plotting through thick and thin ........................................................ 316Plotting in color.................................................................................. 319
xii AutoCAD 2014 For Dummies
It’s a (Page) Setup! ....................................................................................... 321Continuing the Plot Dialog .......................................................................... 322The Plot Sickens .......................................................................................... 325
Part IV: Advancing with AutoCAD ............................. 327
Chapter 17: The ABCs of Blocks . . . . . . . . . . . . . . . . . . . . . . . . . . . . . . .329Rocking with Blocks .................................................................................... 330Creating Block Definitions .......................................................................... 332Inserting Blocks ........................................................................................... 336Attributes: Fill-in-the-Blank Blocks ............................................................ 339
Creating attribute definitions ........................................................... 340Defining blocks that contain attribute definitions ......................... 342Inserting blocks that contain attribute definitions ........................ 343Editing attribute values ..................................................................... 343Extracting data ................................................................................... 344
Exploding Blocks ......................................................................................... 344Purging Unused Block Definitions ............................................................. 345
Chapter 18: Everything from Arrays to Xrefs . . . . . . . . . . . . . . . . . . . . .347Arraying Associatively ................................................................................ 349
Comparing the old and new ARray commands.............................. 349Hip, hip, array! .................................................................................... 351Associatively editing ......................................................................... 357
Going External .............................................................................................. 359Becoming attached to your xrefs ..................................................... 361Layer-palooza ..................................................................................... 363Creating and editing an external reference file .............................. 363Forging an xref path........................................................................... 364Managing xrefs ................................................................................... 366
Blocks, Xrefs, and Drawing Organization ................................................. 368Mastering the Raster ................................................................................... 369
Attaching a raster image ................................................................... 370Maintaining your image..................................................................... 371
You Say PDF, We Say DWF .......................................................................... 372Theme and Variations: Dynamic Blocks ................................................... 374
Now you see it .................................................................................... 374Lights! Parameters!! Actions!!! .......................................................... 378Manipulating dynamic blocks .......................................................... 380
Chapter 19: Call the Parametrics! . . . . . . . . . . . . . . . . . . . . . . . . . . . . . .383Maintaining Design Intent ........................................................................... 384
Defining terms .................................................................................... 385Forget about drawing with precision! ............................................. 386Constrain yourself ............................................................................. 387

xiii Table of Contents
Understanding Geometric Constraints ..................................................... 387Applying a little more constraint ..................................................... 389Using inferred constraints ................................................................ 395AutoConstrain yourself! .................................................................... 396
Understanding Dimensional Constraints .................................................. 397Practice a little constraint ................................................................ 398Making your drawing even smarter ................................................. 401Using the Parameters Manager ........................................................ 402Dimensions or constraints? Have it both ways! ............................. 405
Chapter 20: Drawing on the Internet . . . . . . . . . . . . . . . . . . . . . . . . . . . .409The Internet and AutoCAD: An Overview ................................................. 409
You send me ....................................................................................... 409Send it with eTransmit ...................................................................... 410Rapid eTransmit ................................................................................. 411FTP for you and me............................................................................ 412Bad reception? ................................................................................... 413Help from the Reference Manager ................................................... 413
Design Web Format — Not Just for the Web ........................................... 415All about DWF and DWFx .................................................................. 415Autodesk Design Review 2014 .......................................................... 416
The Drawing Protection Racket ................................................................. 416Autodesk Weather Forecast: Increasing Cloud ........................................ 417
Free AutoCAD! .................................................................................... 418Going once, going twice, going 123D ............................................... 421Your head planted firmly in the cloud ............................................ 422
Cloudy with a Shower of DWGs: AutoCAD 360 ........................................ 423The optional extras............................................................................ 425Sharing and collaborating ................................................................. 426
Part V: On a 3D Spree .............................................. 427
Chapter 21: It’s a 3D World After All . . . . . . . . . . . . . . . . . . . . . . . . . . . .429Understanding 3D Digital Models .............................................................. 430Tools of the 3D Trade ................................................................................. 431
Warp speed ahead ............................................................................. 432Entering the third dimension ........................................................... 433Untying the Ribbon and opening some palettes ............................ 434
Modeling from Above .................................................................................. 435Using 3D coordinate input ................................................................ 435Using point filters ............................................................................... 436Object snaps and object snap tracking ........................................... 437
Changing Planes ........................................................................................... 437Displaying the UCS icon .................................................................... 438Adjusting the UCS .............................................................................. 438
xiv AutoCAD 2014 For Dummies
Navigating the 3D Waters ........................................................................... 443Orbit à go-go ....................................................................................... 444Taking a spin around the cube ......................................................... 445Grabbing the SteeringWheels ........................................................... 446
Visualizing 3D Objects ................................................................................ 447
Chapter 22: From Drawings to Models . . . . . . . . . . . . . . . . . . . . . . . . . .449Is 3D for Me? ................................................................................................. 450Getting Your 3D Bearings ........................................................................... 450
Creating a better 3D template .......................................................... 451Seeing the world from new viewpoints ........................................... 455
From Drawing to Modeling in 3D ............................................................... 457Drawing basic 3D objects.................................................................. 458Gaining a solid foundation ................................................................ 459Drawing solid primitives ................................................................... 461
Adding the Third Dimension to 2D Objects ............................................. 461Adding thickness to a 2D object ...................................................... 461Extruding open and closed objects ................................................. 462Pressing and pulling closed boundaries ......................................... 463Lofting open and closed objects ...................................................... 463Sweeping open and closed objects along a path ........................... 464Revolving open or closed objects around an axis ......................... 465
Modifying 3D Objects .................................................................................. 465Selecting subobjects .......................................................................... 465Working with gizmos ......................................................................... 466More 3D variants of 2D commands ................................................. 467Editing solids ...................................................................................... 468
Chapter 23: It’s Showtime! . . . . . . . . . . . . . . . . . . . . . . . . . . . . . . . . . . . .471Get the 2D Out of Here! ............................................................................... 472
A different point of view.................................................................... 476Additional 3D tricks ........................................................................... 477AutoCAD’s top model ........................................................................ 478
Visualizing the Digital World ...................................................................... 480Adding Lighting ............................................................................................ 480
Default lighting ................................................................................... 481User-defined lights ............................................................................. 481Sunlight ............................................................................................... 484
Creating and Applying Materials ............................................................... 485Defining a Background ................................................................................ 488Rendering a 3D Model ................................................................................. 490
Part VI: The Part of Tens ........................................... 493
Chapter 24: Ten AutoCAD Resources . . . . . . . . . . . . . . . . . . . . . . . . . . .495Autodesk Feedback Community ................................................................ 495Autodesk Discussion Groups ..................................................................... 495Autodesk’s Own Bloggers ........................................................................... 495Autodesk University .................................................................................... 496The Autodesk Channel on YouTube ......................................................... 496The World Wide (CAD) Web ...................................................................... 496Your Local Authorized Training Center ................................................... 497Your Local User Group ............................................................................... 497AUGI ............................................................................................................... 497Books ............................................................................................................. 498
Chapter 25: Ten System Variables to Make Your AutoCAD Life Easier . . . . . . . . . . . . . . . . . . . . . . . . . . . . . . . . . . . . . . . . . . . . . . . . . .499
APERTURE .................................................................................................... 500DIMASSOC ..................................................................................................... 500MENUBAR ..................................................................................................... 500MIRRTEXT .................................................................................................... 501OSNAPZ ......................................................................................................... 501PICKBOX ....................................................................................................... 501REMEMBERFOLDERS .................................................................................. 502ROLLOVERTIPS ............................................................................................ 502TOOLTIPS ..................................................................................................... 502VISRETAIN .................................................................................................... 503And the Bonus Round ................................................................................. 503
Chapter 26: Ten AutoCAD Secrets . . . . . . . . . . . . . . . . . . . . . . . . . . . . . .505Sheet Sets ..................................................................................................... 505Custom Tool Palettes .................................................................................. 505Ribbon Customization ................................................................................ 505Macro Recorder ........................................................................................... 506Programming Languages ............................................................................ 506Vertical Versions ......................................................................................... 506Language Packs ............................................................................................ 507Dynamic Blocks ........................................................................................... 507Data Extraction and Linking ....................................................................... 507
Index ....................................................................... 509
xv Table of Contents

xvi AutoCAD 2014 For Dummies

Introduction
W elcome to the wonderful world of AutoCAD and to the fame and fortune that awaits you (would we lie to you?) as an AutoCAD user.
Believe it or not, AutoCAD is 30 years old, having been born in December 1982, when most people thought that personal computers weren’t capable of industrial-strength tasks like CAD. (The acronym stands for Computer-Aided Drafting, Computer-Aided Design, or both, depending on whom you talk to.) What’s equally scary is that many of today’s hotshot AutoCAD users, and most of the readers of this book, weren’t even born when the program first hit the street and the grizzled old-timers writing these words began using it.
AutoCAD remains the king of the microcomputer CAD hill by a tall margin, making it one of the longest-lived computer programs ever. It’s conceivable that the long-term future of CAD may belong to special-purpose, 3D-based software such as the Autodesk Inventor and Revit programs, or to specialized market-specific variations built on top of AutoCAD. At any rate, AutoCAD’s DWG file format is the de facto standard, so AutoCAD will be where the CAD action is for the foreseeable future.
You may have heard that AutoCAD is complex and difficult to learn and use. Well, it has been our observation that the easier any software is to learn and use, the sooner you bump up against its limitations. A car with no accelera-tor, one forward gear, no steering, and no brakes would be easy to use until you reached a hill, a curve, or a stop sign or you needed to back out of a parking space.
Yes, AutoCAD is complex, but that’s the secret to its success. Some claim that few people use more than 10 percent of AutoCAD’s capabilities. Closer analysis reveals that most people use the same basic 5 percent and everyone else uses a different 5 percent after that. The trick is to find your 5 percent, the sweet spot that suits your particular industry. If you follow our advice, we think you will find that using AutoCAD is as simple and intuitive as driving a car.
It should also be perfectly clear that if your career path has put you in a posi-tion where you need to know how to use AutoCAD, you’re no dummy!
About This BookUnlike many other For Dummies books, this one often tells you to consult the official software documentation. AutoCAD is just too big and powerful for a single book to attempt to describe it completely. The book that ultimately
2 AutoCAD 2014 For Dummies
covers every AutoCAD topic would need a forklift to move it. Literally. They stopped shipping paper instruction manuals with the software somewhere around 1995, when the full documentation package grew to about a dozen volumes and more than 30 pounds.
In AutoCAD 2014 For Dummies, we occasionally mention differences from previous releases so that everyone gains some context and so that upgraders can more readily understand the differences; plus, you’re bound to encoun-ter a few of the billions and billions of drawings that were created using older methods. We also mention the important differences between AutoCAD and AutoCAD LT so that you’re aware of the LT-related topics that you (or your colleagues) won’t find in this book: AutoCAD LT has no programming language and is nearly devoid of 3D capabilities.
This book does not cover the discipline-specific features in AutoCAD-based nor vertical market products, such as AutoCAD Electrical or AutoCAD Mechanical, although most of the information in this book applies to the general-purpose features of those programs as well.
Foolish AssumptionsAutoCAD has a large, loyal, dedicated group of longtime users. AutoCAD 2014 For Dummies is not for you if you’ve been using AutoCAD for a decade or more, if you plan your vacation time around Autodesk University, if you use AutoCAD to create wedding invitations, or if you read 1,200-page technical tomes about AutoCAD for pleasure. This book is for you if you want to get going quickly with AutoCAD, and you understand the importance of develop-ing proper CAD techniques from the beginning.
However, you do need to have an idea of how to use your computer system before tackling AutoCAD and this book. You need to have a computer system with AutoCAD or AutoCAD LT (preferably the 2014 version). A printer or plot-ter and a connection to the Internet are helpful, too.
You also need to know how to use your version of Windows to copy and delete files, create a folder, and find a file. You need to know how to use a mouse to select (highlight) or to choose (activate) commands, how to close a window, and how to minimize and maximize windows. You should be familiar with the basics of your operating system before you start using AutoCAD.
Late in 2010, Autodesk released the first non–Microsoft Windows version of AutoCAD in 20 years. Although AutoCAD for Mac is now available, AutoCAD 2014 For Dummies covers only the Windows version. The two versions are
3 Introduction
file-compatible, but they differ in many ways in how they look and what they can do. If you have AutoCAD for Mac, you should be able to grasp basic con-cepts, but you might be better off with a Mac-specific book such as Mastering AutoCAD For Mac, by George Omura and Rick Graham (Sybex Publishing) or What’s Inside? AutoCAD for Macintosh, by Ralph Grabowski, available as an e-book at www.upfrontezine.com/wiam.
Here are some conventions that you’ll run across in this book.
Using the command lineText that we want you to type into the program at the command line, in a dialog box, in a text box, or elsewhere appears in boldface type, like the 0 at the end of the following line.
Specify starting width <0.0000>: 0
Examples of AutoCAD prompts appear in a special typeface, as does any other text in the book that replicates a message, a word, or text that appear onscreen. Sequences of prompts that appear on the AutoCAD command line have a shaded background, like this:
Specify lower left corner or [ON/OFF] <0.0000,0.0000>:
When there is a specific action we want you to take at one of these prompts, look for the italic passage at the end of this line, where we want you to press Enter:
Specify ending width <5.0000>: Press Enter
Many figures in this book also show AutoCAD command-line sequences that demonstrate AutoCAD’s prompts and sample responses.
Using aliasesMany AutoCAD commands have aliases — these shortcut versions have fewer letters than their full commands, in case you like to type commands at the AutoCAD command line. In this book, we show aliases in uppercase as part of the command names. To start a command, you have to type only its uppercase letters. For example, to draw a line, type either LINE (the official command for the Line command), or just L (its alias) and then press Enter to execute the command.
4 AutoCAD 2014 For Dummies
Icons Used in This BookThroughout this book, we point out certain morsels of particularly important or useful information by placing handy little icons in the margin. Naturally, different icons indicate different types of information:
Herein lies a pointed insight that can save you time and trouble as you use AutoCAD. In many cases, Tip information acts as a funnel on AutoCAD’s impressive but sometimes overwhelming flexibility: After telling you many of the ways that you can do something, we tell you the way that you should do it, in most cases.
The Technical Stuff icon points out places where we delve a little more deeply into AutoCAD’s inner workings or point out information that most people don’t need to know most of the time. These paragraphs definitely are not required reading, so if you see one at a point when you’ve reached your techie-detail threshold, feel free to skip it.
Warnings tells you how to stay out of trouble when living close to the edge. Failure to heed its message may have unpleasant consequences for you or your drawing — or both.
You have a lot to remember when you’re using AutoCAD, so we’ve remembered to remind you not to forget about some of those things that you should remember.
This icon points to new stuff in AutoCAD 2014 (and, sometimes, in AutoCAD LT 2014). It’s designed mostly for people who are somewhat familiar with an earlier version of AutoCAD and want to be alerted to what’s new or different in this release. New users of AutoCAD who are starting out their CAD working lives with AutoCAD 2014 will also find this information interesting, especially when they can show off their new book-learnin’ to those grizzled AutoCAD veterans in the office who don’t yet know about all the cool new features.
This icon highlights text that shows the differences between AutoCAD and AutoCAD LT. If you’re using AutoCAD LT, you’ll find out what you’re missing compared to the full version of AutoCAD. If your friend is using AutoCAD LT, you’ll know where to look to find features in AutoCAD to brag about.
Beyond the BookWe have written a lot of extra content that you won’t find in this book. Go online to find
✓ AutoCAD drawings that you can use in conjunction with this book at
www.dummies.com/go/autocad2014fd
5 Introduction
The drawings are posted to the website in Zip format; just download and unzip them and they’re ready to open in AutoCAD. The Zip files, which are named according to chapter, contain one or more drawing files. For example, afd03.zip contains the versions of the drawing in Chapter 3. Note that not all chapters have associated drawing files.
✓ Online articles covering additional topics at
www.dummies.com/extras/autocad2014
Here you’ll find out how to create a custom profile, discover the differ-ences between AutoCAD and AutoCAD LT, amid other details to aid you in your AutoCAD journey.
✓ The Cheat Sheet for this book is at
www.dummies.com/cheatsheet/autocad2014
Here you’ll find a roadmap to setting up your drawings and keyboard shortcuts.
✓ Updates to this book, if we have any, are at
www.dummies.com/go/autocad2014fdupdates
Where to Go from HereIf you’re reading this Introduction, you’re like us — you like to read. (The cut-to-the-chase people tend to flip to the index right away and look up what they need to know at that instant.) If you’re a total AutoCAD newbie, you can read this book in order, from front to back; it follows a straightforward route from setting up the drawing environment to outputting your masterworks on hard copy to sharing your work with others.
If you’re an experienced user, you’ll probably be an index-flipper who looks for the missing information needed to complete a specific task. You can prob-ably find the index on your own, but we encourage you to browse through this book anyway, with a highlighter or sticky notes in hand, so that you can find those particularly important places when you need them again. If you’re competent in most areas of AutoCAD and you’re familiar with the previous version, look for the New In 2014 icons in the margins to find out about the latest features that you never realized you can’t live without.
Whichever route you choose, we hope that you enjoy your time with AutoCAD 2014 For Dummies. A-a-and, you’re off!

6 AutoCAD 2014 For Dummies
Part IGetting Started with
AutoCAD 2014
AutoCAD
getting startedwith
D
Visit http://www.dummies.com for more great For Dummies content online.

In this part . . . ✓ Find your way around the AutoCAD screen, and see where the
tools you use most often, like the Ribbon, graphic screen, and command line, are at.
✓ Discover the half-dozen commands that account for much of your AutoCAD activities.
✓ See the big picture — start to finish — how to start a drawing to printing it.
✓ Correctly set up AutoCAD and create templates to have drawing success.
✓ Navigate through your drawing by panning and zooming.

1Introducing AutoCAD and
AutoCAD LTIn This Chapter▶ Determining what AutoCAD can do for you▶ Opening AutoCAD▶ Creating your first drawing in AutoCAD▶ The complete picture▶ The difference between pixels and vectors▶ Comprehending the Cartesian Coordinate System▶ The DWG file format
T his chapter helps ease you into using AutoCAD to create engineering drawings and how to get started. Although it’s not uncommon to feel
overwhelmed the first time you see AutoCAD, rest assured that you don’t need to learn all of the controls that you see in the default environment to be an efficient user of the program.
After a brief introduction of the program, we show you just how easy it can be to use AutoCAD with an exercise. The exercise is followed up with some key concepts that you should understand when using AutoCAD, including how it differs from most other computer applications.
When you’re starting out with AutoCAD, heed this quote from The Hitchhiker’s Guide to the Galaxy: Don’t panic!
Checking Out What AutoCAD Can Do for YouAutoCAD is, first and foremost, a program for creating two-dimensional techni-cal drawings — in which measurements and precision are important because these kinds of drawings are often used to build something. And AutoCAD’s 3D
10 Part I: Getting Started with AutoCAD 2014
capabilities have grown by leaps and bounds over the past several releases, with 3D modeling becoming a common way to check designs before they’re drafted.
The upfront investment to use AutoCAD (not only your money if you paid for it, but your time to learn it) is certainly more expensive than the investment needed to use pencil and paper, and the learning curve is much steeper, too. But this book is here to help you with that learning curve.
Whether you’re choosing to use AutoCAD for your computer-aided drafting (CAD) needs or the software was foisted upon you, you’ll appreciate these attributes, which make the program easier to use than the pencil and paper you may have used in the past:
✓ Precision: Creating lines, circles, and other shapes with exact dimen-sions is easier using AutoCAD than a pencil.
✓ Modifiability: Drawings are much easier to modify on the computer screen than on paper. CAD modifications are a lot cleaner, too.
✓ Efficiency: Creating many kinds of drawings is faster with a CAD pro-gram, especially drawings that involve repetition, such as floor plans in a multistory building.
✓ Popularity: Everyone is using it. Several flavors are available from Autodesk to suit specific markets such as mechanical, electrical, archi-tectural, and civil. There are far more copies of AutoCAD in use than all other CAD programs combined.
Opening AutoCADThe first thing you need to do to start using AutoCAD is launch AutoCAD (well, duh!) and, if necessary, maximize its screen display. AutoCAD has so many tools and palettes that you’ll always want to use it in full-screen mode. Follow these steps:
1. Double-click the AutoCAD shortcut on the Windows desktop.
If you don’t have an AutoCAD shortcut on your desktop, choose Start➪ [All] Programs➪Autodesk➪AutoCAD 2014 English➪AutoCAD 2014 English, if you are using Windows XP or Windows 7. If you’re using Windows 8, click AutoCAD 2014 – English on the start screen. The exact wording of the selections vary between the different versions of AutoCAD and Windows, but it isn’t difficult to figure out what you’re looking for.
2. Click the Close button in the lower-right corner of the Welcome screen.
If you don’t want to encounter the Welcome screen again, select the Display at Startup check box in the lower-left corner.
11 Chapter 1: Introducing AutoCAD and AutoCAD LT
3. Expand AutoCAD to full-screen mode by clicking the middle Windows button in the upper-right corner of the application window.
4. Expand the graphic area (the big, gray area in the middle) to full-screen size by clicking the middle button in the upper-right corner, near the compass rosette.
5. If the Design Feed palette is displayed, close it by clicking the X at its top-left corner.
AutoCAD remembers how it was last closed and opens the same way the next time you open it.
6. Place the cursor in the gray graphics area (midscreen) and then press the Esc key twice to make sure that no commands are active.
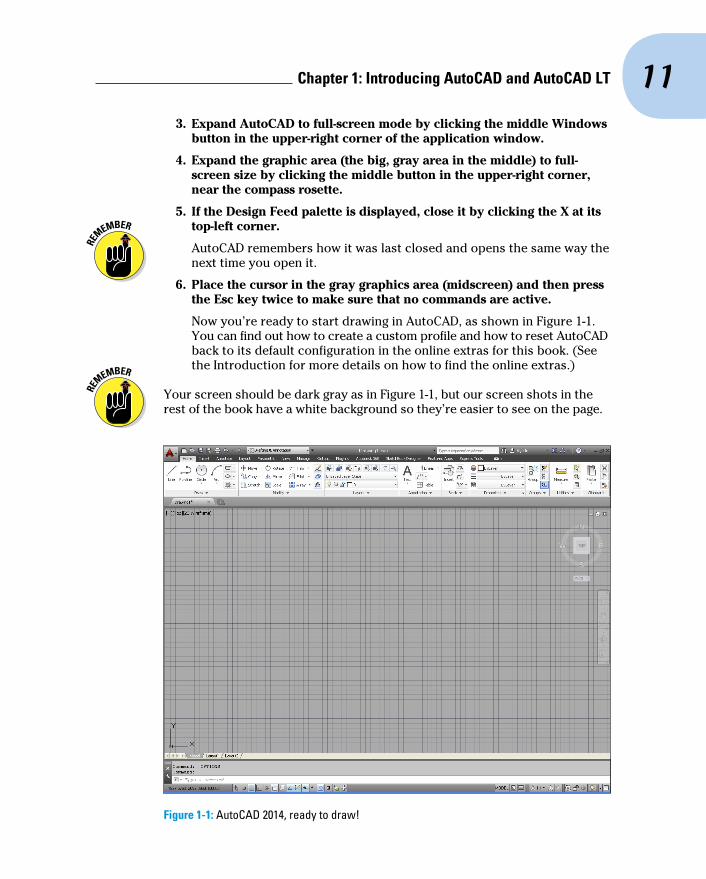
Now you’re ready to start drawing in AutoCAD, as shown in Figure 1-1. You can find out how to create a custom profile and how to reset AutoCAD back to its default configuration in the online extras for this book. (See the Introduction for more details on how to find the online extras.)
Your screen should be dark gray as in Figure 1-1, but our screen shots in the rest of the book have a white background so they’re easier to see on the page.
Figure 1-1: AutoCAD 2014, ready to draw!

12 Part I: Getting Started with AutoCAD 2014
Drawing in AutoCADAutoCAD offers a wide range of commands to create, modify, and annotate 2D designs. Don’t feel like you need to learn and master every command that AutoCAD offers to be a proficient drafter, as even the most veteran drafter will tell you that they only use around 50 commands to complete the most common drafting tasks.
The following exercise introduces a few of the commonly used commands to establish the size of the drawing area you will be working in, and then the commands you will use for creating straight line segments and circles. The lines and circles that you create will make up a simple bicycle.
You always start commands by clicking a button in the application window, or by entering its name in a text entry area called the command line.
In this exercise and others in this book, AutoCAD’s command line entries look like this, and you type the commands and responses shown in bold. Press Enter after each command or response that you type.
Don’t add spaces on either side of a commas! AutoCAD treats pressing the spacebar the same as pressing Enter in most situations. This makes keyboard entry fast and easy, but messes things up if you do it at the wrong time.
1. Set up an appropriate size for the drawing:LIMITSReset Model space limits:Specify lower left corner or [ON/OFF] <0.0000,0.0000>:
0,0Specify upper right corner <12.0000,9.0000>: 60,40
Zoom A
2. Disable Dynamic Input mode to work with the command line:DynmodeEnter new value for DYNMODE <3>: -3
3. Draw the frame and seat of the bicycle:LineSpecify first point: 26,12Specify next point or [Undo]: 13,12Specify next point or [Undo]: 22,24Specify next point or [Undo]: 40.5,24
Related Documents