Bl e nde r Mate rial Library UVMapping Te ch niq ue s Ge n3 - Tre e Ge ne rator Bl ue print Se tup Spin Mode l ing M M o o d d e e l l i i n n g g T T e e c c h h n n i i q q u u e e s s & & B B l l e e n n d d e e r r S S c c r r i i p p t t s s Issue5 Jul y 2006 | Bl e nde rart Bl ender l earning m ade easy

BlenderArt Magazine Issue 5 Modeling Techniques & Blender Scripts
Mar 09, 2016
Features Articles/Tutorials on Blender Material Library, Gen3 - Tree Generator, UV Mapping Techniques, Blueprint Setup, Spin Modeling, Modeling Rupert, A Sonorous Trip, and more…
Welcome message from author
This document is posted to help you gain knowledge. Please leave a comment to let me know what you think about it! Share it to your friends and learn new things together.
Transcript

Ble nde r Mate rial Library
UV Mapping Te ch niq ue s
Ge n3 - Tre e Ge ne rator
Blue print Se tup
Spin Mode ling
MMooddee lliinngg TTee cchh nniiqq uuee ss &&BBllee nnddee rr SSccrriippttss
Issue 5 July 2006 | Ble nde rart
Blende r learning m ade easy

Conte nts 2
EDITOR/DESIGNERGaurav Nawani gaurav@ ble nde rart.org
MANAGING EDITORSandra Gilbe rt sandra@ ble nde rart.org
W EBSITENam Ph am nam @ ble nde rart.org
PROOFREADINGKe rnon D illon
COVER IMAGEJason Pie rce
W RITERSMariano H idalgoEdouard de Mah ie uSe rge y Prok h orch ukRojaAndre ia Le al Sch e m id & Z agDie go Re stre po París
COPYRIGH T© 2006‘Ble nde rart Magaz ine ’, ‘ble nde rart’ and ble nde rart logo are copyrigh t Gaurav Nawani. ‘Iz z y’ and ‘Iz z y logo’ are copyrigh t Sandra Gilbe rt. All products and com pany nam e s fe ature d in th e publication are trade m ark or re giste re d trade m ark s of th e ir re spe ctive owne rs.
Blende rart Magazine - July 20 0 6
Ble nde r Mate rial Library (Script) Pg - 6
Ge n3 Tre e Ge ne rator (Script) Pg - 10
Modeling Rupe rt - "Th e Evil Monk e y" Pg - 13
Kitch e n W ork s (Spin Modeling) Pg - 21
UV Mapping Te ch niq ue s (Low -Poly) Pg - 28
Se tting Up Blue prints in Ble nde r Pg - 38
Click im age /page no to jum p to article .

Editorial 3
As I brow se th e forum s, th e one q ue stion I ofte n se e popping up from ne w com e rs, is alw ays som e variation of “W h at is th e be st w ay/m e th od/te ch niq ue to m odel . . . (inse rt relevant obje ct h e re )? Or e ve n m ore ge ne ric q ue stion lik e “W h at is th e be st w ay to m odel?” I re m e m be r m y ow n frustration in finding th e pe rfe ct answ e r to th at q ue stion and sym path ize w ith ne w com e rs w h o are curre ntly trying to find th e pe rfe ct m e th od and w ork flow.
Th e sh ort answ e r is . . . “w h ateve r m e th od w ork s be st for your purpose and pe rsonal w ork flow ” Not re al h elpful, now is it? Unfortunately, th e long answ e r is not m uch be tte r. Th e re ason be ing th at is tim e , e xpe rie nce and m assive e xpe rim e ntation is ge ne rally re q uire d in orde r to de cide on an obje ct by obje ct basis w h ich
m e th od w ork s be st for you. Not e xactly som e th ing a ne w com e r w ants to h e ar.
W ell in th is issue w e w ill sh e d a little ligh t on w h ich te ch niq ue s to use and w h e n, k e e ping in m ind th at anyth ing can be cre ate d using any of th e te ch niq ue s available in Ble nde r, but som e te ch niq ue s le nd th e m selve s m ore re adily to ce rtain type s of m odels. And w h ile th is is obviously h elpful to th e ne w com e r, e ve n th e m ore e xpe rie nce d am ong us w ill be ne fit from be ing re m inde d th at th e re is alw ays m ore th an one w ay to m odel an obje ct. As m uch as w e rely on favorite m odeling te ch niq ue s, w e ofte n find som e task s are e ith e r too daunting, re pe titive or just a pain to com ple te m anually. Ente r Pyth on scripts to th e re scue . Pyth on scripts allow
gre ate r fle xibility and add use ful functions and fe ature s to th e Ble nde r w ork flow. Th is issue w e w ill e xplore som e of th e se w onde rful little scripts and sh ow just h ow th e y can m ak e your life e asie r.
sandy@ ble nde rart.org
Blende rart Magazine - July 20 0 6
Sandra Gilbe rtManaging Editor

Lizzy K now s 4
Be fore you can de cide w h ich m e th od of m odeling w ork s for you, it h elps to k now e xactly w h at options are available and h ow th e y w ork . Ble nde r offe rs a gre at se t of core tools to m ak e w h ateve r m e th od you use as productive as possible . H e re is a list of m e th ods and tools for you to conside r as you start your ne xt proje ct:
Box Mode ling Ge ne rally th e e asie st m e th od w h e n you first start le arning. You'd be am aze d by h ow m any th ings ge t th e ir start as a cube . Start by adding a pre -m ade prim itive (usually a cube , but can be any of th e oth e r prim itive s i.e . Sph e re , Cone , Tube e tc). Th e n e xtrude , dele te e dge s and ve rtice s as ne e de d to ach ie ve your de sire d sh ape .
Th e use of Box Modeling is pre fe rable if you are able to conce ive th e de sire d sh ape in le sse r am ounts of de tail in th e be ginning.
Basically, you start by cre ating a basic box, th e n de fining de tails as you carry on.
Ve rte x Push ing Also re fe rre d to as point-to-point m odeling.Th is m e th od re q uire s m ore patie nce but allow s for gre ate r pre cision, e spe cially w h e n cre ating sm ooth Edge Loops for anim ation. Start w ith one ve rte x, e xtruding and/or adding ve rtice s one -by-one , adjusting and re fining your sh ape until your m odel is com ple te d.
Th is m e th od is in contrast to th e box m odeling te ch niq ue . It suits pe ople w h o are able to conce ive th e sh ape and de tails in advance , inste ad of adding de tails late r.
Curve sAllow s you to cre ate sm ooth sh ape s and com ple x ge om e try. Gre at for logos.
NurbsOne of th e m ore difficult m e th ods of m odeling. You cre ate patch e s th at are th e n stitch e d toge th e r to cre ate sm ooth se am le ss m odels. Gre at for organic m odeling.
Me taballsMuch lik e w ork ing w ith clay. You add additional m e taballs w ith varying influe nce (can be positive or ne gative influe nce ) to build up your m odel.
Tools th at can be use d in conjunction
w ith m ost m ode ling m e th ods.
Extrude : [E k e y] Ve rtice s, Edge s and Face s can all be e xtrude d to build your m odels.
Knife : [K k e y] can be use d to cre ate additional Edge s and Face s, use ful in adding m ore de tail once your basic m odel is cre ate d.Ve rte x/Edge /Face Sele ct: (Toggle buttons on th e 3D w indow H e ade r Bar [look s lik e dots/line /triangle ]) Use ful for sele cting just th e are a you ne e d.
Loop Select: [Alt + MMB] allow s you to sele ct an e ntire loop for m odification.Subsurf: (Subdivision Surface s found in th e Modifie rs panel of th e Edit buttons w indow ) Subsurf sm ooth s th e h ard angle s of your m odel, m aintaining low polygon counts w h ile m odeling.
Th e re are actually m any m ore use ful tools include d w ith in Ble nde r, but th e se are th e one s use d m ost ofte n. More inform ation on Ble nde r's tools and m e th ods, as w ell as various tutorials can, of course , be found in th e Ble nde r w ik ibook found at:
h ttp://m e diaw ik i.ble nde r.org/inde x.ph p/Main_Page
Blende rart Magazine - July 20 0 6
Izzy's Talk on Mode ling

Ne w s Flas h 5
A ne w e r ve rsion of Artw e ave r 0.4 w as rele ase d on July 18th . Th e ne w update brings
a lot of ch ange s to Artw e ave r. It now sports a m uch im prove d inte rface for h andling brush e s. Also, th e re are a fe w ne w tools in th is rele ase : Erase r, Stam p and Pe rspe ctive Grid.
Th e arrange m e nt of th e Tools and Options dialogs pre se nt a cle an inte rface com pare d to e arlie r ve rsions.
Also m ak ing an appe arance are a fe w ne w filte rs such as Ligh ting Effe cts, Fish Eye Le ns, and Drop Sh adow. Now , saving and loading of sele ctions is also possible . In addition to th e se fe ature s, a lot m ore are available (including a conside rable am ount of bug fixe s). Re ad th e Rele ase Log for de tails.
You can ge t th e late st copy at h ttp://artw e ave r.de
Earlie r th is m onth , th e Ink scape te am rele ase d one of th e ir m ost long-aw aite d rele ase s. It w as im portant be cause th e y h ave im prove d lots of
issue s th at h ad h ounde d Ink scape in th e past. Th e m ost prom ine nt be ing th e sluggish ne ss w h e n e diting obje cts at h igh e r zoom levels. Th is rele ase brings a re fre sh ing im prove m e nt in spe e d w h e n h andling large r and m ore com ple x obje cts. Th e node e diting is about 30% faste r and obje ct m ove m e nt on th e canvas h as also gotte n a boost in spe e d. Using th e calligraph ic pe n is also faste r in ce rtain case s.
Th is update also brings num e rous im prove m e nts to th e Ink scape UI. Notice able im prove m e nts are th e Color Pale tte Bar at th e bottom and an inclusion of m ore options on th e top toolbar. Also im ple m e nte d is th e Laye rs dialog box. Th e ove rh aul of th e Pre fe re nce s dialog box m ak e s m odifying pre fe re nce s a bre e ze . And, th e re 's th e addition of Ke yboard configuration.
Th e re are ple nty m ore im prove m e nts and lots and lots of ne w fe ature s pack e d into th is rele ase . Go to h ttp://ink scape .org and dow nload th e late st rele ase to le arn m ore about all th e ne w fe ature s.
Blende rart Magazine - July 20 0 6
Artw e ave r 0 .4 re le as e d
Fig. Artw e ave r 0 .4 Im prove d inte rface
Ink s cape 0 .44 re le as e
Fig. Ink scape 0 .44

3D W ork s h op - Using th e Blender Mate rial Library Script 6
Le ve l: Inte rm e diate
'Ble nde r Library' is a pyth on script for Ble nde r inte nde d to provide an e asy way to store , m anage and re trie ve fre q ue ntly us e d ite m s; such as m ate rials, te xture s, obje cts, e tc. It also trie s to de fine a standardiz e d way of s h aring stuff be tw e e n th e re st of th e Ble nde r com m unity, w ith built- in im port and e xport functionality (Th is fe ature ne e ds a full Pyth on installation for th e com pre s s e d s upport, ple as e re ad be low for work around).
Since th e script is m e re ly an inte rface built on top of th e curre nt Ble nde r appe nding syste m [Sh ift + F1] it w ill be m ost lik e ly com patible w ith all future e nh ance m e nts in upcom ing Ble nde r re le as e s. As an e xam ple th e m ate rial library was code d be fore th e de ve loping of th e ne w Mate rial Node s and w ith out ch ange s in th e script it can now store m ate rials w ith node s.
Se tting it up: Grab th e script from h e re . h ttp://us e le s s dre am e r.bye th os t32.com /s cripts /ble nde r_ library.py
O nce downloade d, just place th e script in your Ble nde r's scripts folde r and start or re start Ble nde r (you can also us e (Scripts >> Update Me nus ) to re fre s h your scripts). Th e script w ill now be liste d in th e (Scripts >> Obje ct>> Ble nde r Library) scripts m e nu.
O n th e first run it w ill as k you to ch oos e a location for th e library folde r. Ple as e try to ch oos e a dire ctory not too de e p in your file syste m , th is w ill avoid pos s ible proble m s w ith Pyth on's path h andling, e ve n th ough us e rs re port th at th is is no longe r an is s ue in late st ve rs ions of th e script.
Th at's it! your library is re ady to be fille d w ith ite m s.
Until you ge t com fortable w ith th e script th e re is a conte xt h e lp fe ature , and if you le ave it ope n it w ill constantly s h ow tips and advice as you ope n m e nus and navigate th e form s. O nce you h ave m aste re d e ve ryth ing, you can clos e it by Just click ing on th e little button on top w ith an inte rrogation m ark . So th e script w indow ge ts sm alle r and don't e at th at m uch space on your scre e n.
Firs t s te psTh e script starts in brow s ing m ode . At th e top, th e re are th re e drop-down m e nus. Th e uppe rm ost one is th e curre ntly brow s e d library, th e oth e r two are cate gorie s and sub-cate gorie s. Sub cate gorie s are optional, but th e y be com e us e ful once you start filling th e library w ith
lots of stuff. Th e little arrow s on th e s ide of th e m e nus allow to q uick ly brow s e th e conte nt.
Now you can start e xpe rim e nting w ith th e script. Eith e r add som e stuff you h ave (re ad be low), or go to Ble nde r Stuff (h ttp:\ \ ble nde r-stuff.bye th ost32.com ) and download som e re ady to us e ite m s. D ownloade d ite m s can be im porte d one by one or in a batch m ode . If you downloade d s e ve ral ite m s, just ch oos e "Im port a Folde r" acce s s ible from th e 'Righ t Click ' Me nu and point it to th e folde r w h e re th e ite m s re s ide .
O nce you re ach a cate gory w ith ite m s on it, a row w ith e xtra buttons w ill appe ar, along w ith a pre vie w im age and a drop- down m e nu to q uick ly jum p to oth e r ite m s in th e cate gory.
Blende rart Magazine - July 20 0 6
- by Mariano H idalgo
Fig1. Initial dialog.
Fig2. Th e Mate rial library in brow sing m ode .

3D W ork s h op - Using th e Blender Mate rial Library Script 7
Th e buttons above th e pre vie w are :• Th e LOAD button. It w ill pop a m e nu w ith diffe re nt loading options, de pe nding of th e type of ite m .• Th e INFO button, to display a m e nu w ith e xte nde d inform ation about th e curre nt ite m . If you [Ctrl + LMB] in ite m 's nam e or de scription you can ch ange th e m . Auth or's inform ation is displaye d be low and can't be ch ange d for th e m om e nt.
To m anage th e conte nt, th e script provide s s e ve ral options in th e MANAGE m e nu. You can re nam e , de le te or m ove th e conte nt to oth e r cate gorie s. You can also im port a custom pre vie w im age to re place th e curre nt one .
Afte r th e s e fist ste ps, it w ill be cool to ope n up th e pre fe re nce s dialog, w h e n you can e nte r your pe rsonal inform ation. Th e n, w h e n adding ite m s you can us e th e FILL button in th e AD D form to autom atically e nte r your data, saving you som e typing e ve ry tim e you m ak e ne w ite m .
Adding Ite m sTo add your own stuff to th e library, click in th e Add button at th e bottom of th e script. A form w ill s h ow up. Se le cting th e de s ire d ite m s work s a b it diffe re nt de pe nding on w h ich library your are on.
Th e 'O bje ct' and 'Lam p' librarie s can store s e ve ral Ble nde r's datablock s in th e sam e ite m , so you are not lim ite d to store s ingle m e s h e s . You can store and s h are a full ch aracte r, com ple te w ith props and arm ature , an e ve n s h ape k e ys attach e d. By storing s e ve ral lam ps in th e sam e ite m you can cre ate lam ps s e ts to ach ie ve re usable ligh ting e nvironm e nts or on click - to- s e tup fak e global illum ination. Ch oos e th e de s ire d obje cts or lam ps on th e 3D Vie w and th e n type a nam e for th e ite m in th e SET NAME: labe l.
For th e re st of th e librarie s you s e le ct th e de s ire d ite m from a m e nu acce s s e d from th e righ t pointing arrow ne xt to th e NAME labe l. In th is cas e th e labe l w ill be auto fille d w ith ch os e n datablock 's nam e . D e spite th is, all re late d stuff to th e ch os e n ite m is also adde d. If you add a m ate rial, it's te xture s and Ipos are also adde d, and so on.
For som e librarie s you can turn on th e ENABLE RAY button, in cas e you want a ray trace d pre vie w im age , and for m ate rials you can also ch oos e th e s h ape of th e pre vie w obje ct from a drop- down m e nu.
Now its tim e to click th e Add Ite m button to finis h th e proce s s. Th e script w ill warm you about th e ne e d to re ope n th e curre nt ble nd file afte r adding. Th is is a sm all lim itation (w h ich m ay disappe ar in future ve rs ions) so ple as e save your ble nd be fore adding stuff to th e library. If you accide ntally forgot to save and los e work , you can s e arch for th e q uit.ble nd file , th at is a Ble nde r fe ature to re cove r ble nd file , w h ich Ble nde r autom atically cre ate s for safe ty.
Afte r re load, run th e script again and th e ite m you h ave just adde d w ill be th e re for q uick re us e .
If you plan to s h are your ite m s, and to prote ct your righ ts as a cre ator it is pos s ible to bundle a Lice ns e Te xt w ith e ve ry ite m you add to th e library. To do th is, h ave your lice ns e te xt ope ne d in th e curre nt .ble nd and th e n s e le ct it from th e drop down m e nu. W h e n pe ople load your ite m , th e script w ill warn th e m about th e pre s e nce of th e lice ns e and its te xt w ill load into th e proje ct.
Exporting Ite m sIf you want to s h are your cre ations w ith oth e r pe ople , us e th e Export Ite m option in th e Manage m e nu. You can e xport com pre s s e d TAR pack age s only if you h ave a full Pyth on installation.
Blende rart Magazine - July 20 0 6
Fig3. Adding stuff to th e library

3D W ork s h op - Using th e Blender Mate rial Library Script 8
As an alte rnative you can run a s e arch on google or you favorite s e arch e ngine and look for th e s e two file s : s h util.py and tarfile .py; download and place in your Ble nde r's folde r. Now you can e xport and im port com pre s s e d ite m s.
W h e n you e xport com pre s s e d ite m s th e script give s you a JPG im age along w ith th e TAR pack age . Th e im age is not ne e de d to im port th e ite m back , rath e r it provide d snaps h ot w h ich you can s h ow as pre vie w in th e forum s or w e bs ite s w h e n you m ay be posting your stuff.
If you are e xporting uncom pre s s e d ite m s, th e n th e th re e re s ulting file s are ne e de d and you s h ould distribute th e m all. It would be a good ide a to pack th e m m anually as a TAR file by h and.
Th e Librarie sLe ts tak e a look at som e of th e librarie s.
Th e Mate rial and Te xture Libs Th e m ate rial library is th e star of th e s h ow. It can store re gular m ate rials, m ate rials w ith node s and e ve n m ate rials w ith IPO s attach e d. If th e m ate rial us e s Im age ' te xture s, th e im age file s w ill be autom atically pack e d. Th e te xture library is cool for storage of proce dural s e ttings and e nvironm e nt m aps. As a plus, te xture s of type Ble nd can be us e d to store color bands.
Th e (Gam e ) Logic Lib Th is is inte nde d for gam e de ve lope rs and is a q uick way to store logic brick s. Th is way you can store your k e yboard m appings or th e brick s ne e de d to m ak e a pan and rotate vie w tool and q uick ly re us e th e m late r. To store gam e m ode ls is be tte r to us e th e O bje ct library inste ad, th e TEXFACE button w ill allow you to ge t a righ t pre vie w for UV te xture d m ode ls.
Th e Sce ne Lib All th e tim e pe ople download from th e ne t ble nds w ith e xam ple s and conce pts, usually w ith a s ingle sce ne . W ith th is lib you can e as ily catalog th at file s and also its a good place to store s e ve ral as sorte d ite m s you m ay want to load at once .
Th e Particle Lib.Can store static (h air, fur, gras s ) or anim ate d particle syste m s, th e late r w ith attach e d force fie lds and de fle ctors.
For th e late r to work , you ne e d to nam e e ach force fie ld and de fle ctor be ginning w ith th e nam e of th e particle obje ct, plus a dot, plus th e ir nam e
(for e xam ple : PARTICLEO BJECT.FO RCEFIELD , PARTICLEO BJECT.D EFLECTO R.001)
Th e Arm ature , Action, Pos e and IPO Libs.Favorite s for anim ators, th e y store anim ation re late d datablock s and e ve n s ingle pos e s.Th e pos e library curre ntly doe sn't store th os e pos e s w h ich us e attach e d Targe t IKs, but th is m ay ch ange in future ve rs ions. Th e autom atic IK work s just fine .
Th e W orld LibIt is pos s ible to store anim ate d worlds, a ve ry cool fe ature for pe ople us ing Ble nde r for adve rtis ing or m ultim e dia de s ign. In th e late st ve rs ion of th e script, you can also ch oos e to just load Particle or Mist s e ttings, to m e rge w ith your curre nt world.
Blende rart Magazine - July 20 0 6
Fig4. Exporting item s
Fig5. A com plete anim ate d particle sy stem just one
click aw ay

3D W ork s h op - Using th e Blender Mate rial Library Script 9
Extra FunctionalityO nce you start colle cting ite m s, you'll ne e d th e Se arch function, w h ich can be acce s s e d from th e 'Righ t Click ' Me nu. It w ill le t you s e arch a spe cific library for m atch ing ite m s both by ite m 's nam e and auth or's nam e . O nce found, th e m atch ing ite m s w ill be s h own just lik e in th e brow s ing m ode , re ady to be loade d in your curre nt proje ct. Also re m e m be r th at m ost us e d ite m s can be adde d to favorite s for q uick acce s s and th e y w ill be liste d at th e bottom of th e LO AD m e nu. To re m ove a favorite just [Ctrl + LMB] on it's nam e .
Round D ownCurre nt ve rs ion of th e script is 1.3.4. For future ve rs ions th e sm all im ple m e ntational q uirk s m ay be gone and h ope fully th e re w ill be no longe r ne e d to re ope n th e .ble nd afte r adding stuff. Also, m aybe giving th e script a custom space w ill be a cool ide a.
You can vis it th e Ble nde r Library th re ad at Ble nde rArtists forum to post doubts q ue rie s or fe ature re q ue sts. You can also tak e a look at m y s ite h ttp://us e le s sdre am e r.bye th ost32.com for m ore scripts.
H ope th e Ble nde r H e ads around th e world find th is tool us e ful and w e 'll soon start cre ating a h uge com m unity of pe ople s h aring all k ind of gre at Ble nde r conte nt.
- Se e ya aroundMariano H idalgo
I'm a graph ic artist, de signe r and m usician from Bue nos Aire s, Arge ntina.
Som e tim e s I code for fun and I m anage to ge t aw ay w ith it ;)
Blende rart Magazine - July 20 0 6
Fig6. Look ing for m ate rials in th e se arch panel
Mariano H idalgo A.K.A. usele ssdre am e r

3D W ork s h op - Gen3 th e Tre e Model Gene rator (Script) 10
Le ve l - Inte rm e diate
Manually cre ating re alistic tre e m ode ls is a h ard tas k in 3D /CG. To s im plify th is tas k , various plug- ins and program s, w h ich can be us e d to cre ate 3D plant m ode ls autom atically, w e re cre ate d. Th e s e program s allow th e us e rs to de scribe plant structure by inputing som e param e te r s e ttings w h ich are us e d to ge ne rate th e 3D m ode l.
For Ble nde r us e rs, [LSyste m ] and [Arbaro], are th e two com m on plant ge ne rators. [LSyste m ] is a pyth on- bas e d script for Ble nde r w h ich ge ne rate s plant m ode ls bas e d on th e "L-syste m " algorith m - th at's w h y th e nam e "Lsyste m ". [Arbaro] is a stand- alone Java-application, w h ich ge ne rate s plants us ing th e m ode l de scribe d in [W e be r9 5].
Ge n3 is a re lative ly ne w tre e ge ne ration plug-in/script for Ble nde r. Its first ve rs ion (v0.1) was re le as e d on June 17th of 2006. To ge ne rate tre e structure s, it us e s m ode ls de scribe d in [W e be r9 5](th e sam e m ode l th at Arbaro us e s ).
Th e am ount of include d param e te rs de scrib ing tre e fe ature s are vast. Broadly, th e s e param e te rs allow th e us e r to de scribe th e trunk and branch e s s iz e s, th e ir split probabilitie s, branch locations re lative to e ach oth e r and so on. Curre ntly, th e inte rface is not us e r- frie ndly and m ay scare off ne w us e rs, but th e UI re -im ple m e ntation is a pos s ib ility for future re le as e s.
Ins tallationTo install Ge n3, you s h ould download th e late st ve rs ion of th e script from h e re [Ge n3]. (At th e tim e of th is w riting, th e late st ve rs ion available is 0.5)Unpack th e downloade d arch ive
to a te m porary dire ctory and copy th e file ge n3.py and th e “gt” s ub- dire ctory to your Ble nde r script dire ctory (W h ich can be locate d in th e Ble nde r installation path ). It is h igh ly re com m e nde d to e nsure th at th e ve rs ions of th e 'standalone Pyth on Installation' and th e Ble nde r Pyth on ve rs ions are th e sam e and w e re com pile d w ith th e sam e build options. Th is re q uire m e nt is ne ce s sary as Ge n3 us e s som e m odule s w h ich are part of th e Pyth on library.
Afte r copying th e file s, you are re ady to us e th e script.
Us ageYou can acce s s th e Ge n3 script via (Scripts >>Mis c>>Ge n3) s e e fig1. If you do not s e e "Ge n3" e ntry in th e Scripts m e nu th e n s e le ct (Scripts >>Update Me nus ) - it w ill update th e list of available scripts.
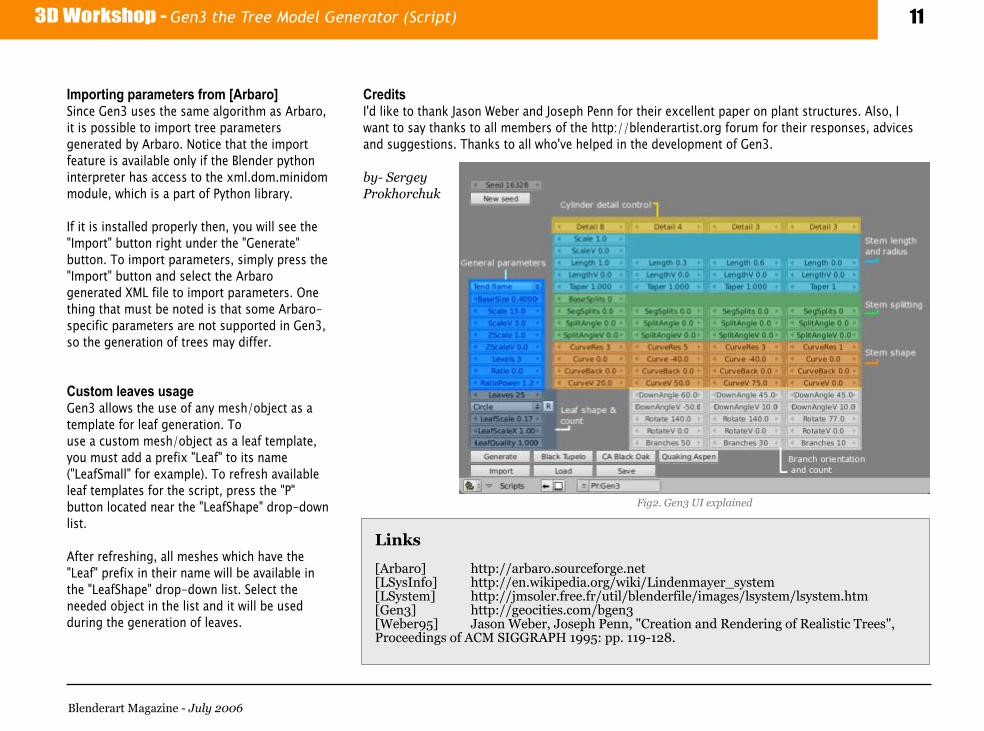
Afte r launch ing th e script, you w ill s e e all th e controls w h ich allow you to control param e te rs affe cting th e m ode l of th e tre e . You can find com ple te de scription of all th e s e param e te rs in th e [W e be r9 5] pape r.
Th e re are s e ve ral buttons at th e bottom part of script's GUI, of w h ich th e m ain button is th e "Ge ne rate " button. Upon click ing th is button, th e script starts ge ne rating a 3D m ode l. To m ak e th ings e as ie r for you, th e re are som e buttons w ith th e nam e of tre e type s on th e m . Th e s e buttons w ill fill up pre de fine d param e te rs for th e s e le cte d tre e w h ich can be a good place for you to start e xpe rim e nting.
For a q uick start, you can pre s s th e "Quak e Aspe n" button and th e n pre s s th e “Ge ne rate " button. Afte r a w h ile (tim e w ill vary de pe nding on your com pute r configuration), you w ill s e e a ge ne rate d tre e m ode l in th e 3D vie w w indow.
Blende rart Magazine - July 20 0 6
- by Se rge y Prok h orch uk
Fig1. Script acce ss m e nu
3D W ork s h op - Gen3 th e Tre e Model Gene rator (Script) 11
Im porting param e te rs from [Arbaro]Since Ge n3 us e s th e sam e algorith m as Arbaro, it is pos s ible to im port tre e param e te rs ge ne rate d by Arbaro. Notice th at th e im port fe ature is available only if th e Ble nde r pyth on inte rpre te r h as acce s s to th e xm l.dom .m inidom m odule , w h ich is a part of Pyth on library.
If it is installe d prope rly th e n, you w ill s e e th e "Im port" button righ t unde r th e "Ge ne rate " button. To im port param e te rs, s im ply pre s s th e "Im port" button and s e le ct th e Arbaro ge ne rate d XML file to im port param e te rs. O ne th ing th at m ust be note d is th at som e Arbaro-spe cific param e te rs are not supporte d in Ge n3, so th e ge ne ration of tre e s m ay diffe r.
Cus tom le ave s us ageGe n3 allow s th e us e of any m e s h /obje ct as a te m plate for le af ge ne ration. Tous e a custom m e s h /obje ct as a le af te m plate , you m ust add a pre fix "Le af" to its nam e ("Le afSm all" for e xam ple ). To re fre s h available le af te m plate s for th e script, pre s s th e "P" button locate d ne ar th e "Le afSh ape " drop- down list.
Afte r re fre s h ing, all m e s h e s w h ich h ave th e "Le af" pre fix in th e ir nam e w ill be available in th e "Le afSh ape " drop- down list. Se le ct th e ne e de d obje ct in th e list and it w ill be us e d during th e ge ne ration of le ave s.
Cre ditsI'd lik e to th ank Jason W e be r and Jos e ph Pe nn for th e ir e xce lle nt pape r on plant structure s. Also, I want to say th ank s to all m e m be rs of th e h ttp://ble nde rartist.org forum for th e ir re spons e s, advice s and sugge stions. Th ank s to all w h o've h e lpe d in th e de ve lopm e nt of Ge n3.
by - Se rge y Prok h orch uk
Blende rart Magazine - July 20 0 6
Fig2. Gen3 UI e xplaine d
Link s
[Arbaro] h ttp://arbaro.source forge .ne t[LSysInfo] h ttp://e n.w ik ipe dia.org/w ik i/Linde nm aye r_ syste m[LSyste m ] h ttp://jm sole r.fre e .fr/util/blende rfile/im age s/lsyste m /lsyste m .h tm[Ge n3] h ttp://ge ocitie s.com /bge n3[W e be r9 5] Jason W e be r, Jose ph Pe nn, "Cre ation and R e nde ring of R e alistic Tre e s", Proce e dings of ACM SIGGRAPH 19 9 5: pp. 119 -128.

3D W ork s h op - Gen3 th e Tre e Model Gene rator (Script) 12
Blende rart Magazine - July 20 0 6
Jas on W e be r and Jos e ph Pe nn's tre e ge ne ration m ode l inform ation box ---Th is m ode l, unlik e th e L-s ys te m , is orie nte d s pe cifically for 3D plant ge ne ration. In th is m ode l, tre e s are de s cribe d unde r trunk and s e ve ral le ve ls of branch e s . Th e m ode l de s cribe s param e te rs and form ulas w h ich are us e d to ge ne rate only tre e m ode ls . Som e param e te rs apply to m ode ls in ge ne ral, s om e to trunk , branch e s or le ave s only. Th e param e te r s e ttings are rich e nough for com ple x tre e fam ilie s .
Th e s e s e ttings allow configuration of s iz e s and orie ntations , trunk s and branch e s , s h ape s , probabilitie s of s te m s s plitting, le af s h ape s and s o on. Param e te rs de s cribing trunk flaring, lobe s and tre e s h ape pruning are als o pre s e nt. Since th is m ode l w as cre ate d s pe cially for tre e m ode l ge ne ration, it can be unde rs tood and m odifie d m ore e as ily th an m ode ls bas e d on th e L-s ys te m . A full m ode l de s cription can be found in [W e be r9 5].
Jas on W e be r and Jos e ph Pe nn's tre e ge ne ration m ode l
I am a softw are develope r at ViaSoft Ltd, Uk raine . Since I h ave som e e xpe rie nce in C/C+ + and Pyth on program m ing, I try to use it in diffe re nt are as of 3D-graph ic. Oth e r com pute r-relate d are as I'm inte re ste d in are : program m ing th e ory, artificial intellige nce and cryptograph y.
Se rge y Prok h orch uk
L-s ys te m is a m e th od of de s cribing s e lf-s im ilar s tructure s , it can be vague ly com pare d to fractals . L-s ys te m de finition cons is ts of: 1. Se t of s ym bols from s om e alph abe t. 2. Production rule s . 3. Me anings attach e d to e ach s ym bol from th e alph abe t.Th e m ain part of L-s ys te m is a s tring re w riting m odule , w h ich applie s production rule s to s om e initial s tring. Th e Re w riting proce dure is applie d to th e s tring in a re curs ive m anne r. Afte r s om e ite rations , re s ulting s trings can de s cribe ve ry com ple x s e lf-s im ilar s tructure s . Since m any plants h ave s e lf-s im ilar prope rtie s , L-s ys te m can be us e d to de s cribe th e m . Note , th at L-s ys te m can als o be us e d for ge ne rating m any oth e r com ple x s tructure s and th e re fore is not re s tricte d to jus t plants .
L-Sys te m
3D W ork s h op - Modeling Rupe rt th e "Evil Monk e y" 13
Le ve l - Inte rm e diate
Ch aracte r m ode ling is one of m y favorite activitie s in Ble nde r. I ge t th e b igge st k ick out of cre ating a ch aracte r and watch ing it com e to life . Since m y style of m ode ling le ans toward toon- style ch aracte rs (obviously I spe nt way too m uch tim e watch ing Loone y Tune s as a ch ild), and I adm itte dly don’t draw as w e ll as I want, I find m ost of m y inspiration for ch aracte rs in th e toy aisle of m y local de partm e nt store .
Ch ildre n’s toys m ak e wonde rful re fe re nce m ode ls for ch aracte rs. Th e y provide a w ide range of ch oice s from colorful fantasy type s to re alistic ch aracte rs and e ve ryth ing in be tw e e n. Eve n if th e ch aracte r you h ad in m ind isn’t to be found in th e toy aisle , m ost lik e ly you can find som e th ing clos e to ge t you starte d and th e n you can alte r it from th e re to m atch w h at you h ad in m ind.
In th is tutorial, I'm going to s h ow you h ow I w e nt about m ode ling an e vil m onk e y. Th e re fe re nce m ode l I'm us ing com e s from a ve ry popular line of toys by H asbro, “My Little st Pe t Sh op”. Th e y are ve ry s im ple ch aracte rs bas e d on a w ide range of anim als. (And ye s, I h ave m ost all of th e m , for m ode ling re fe re nce of cours e )
Th is tutorial is a be ginne r to inte rm e diate range tutorial. Alth ough I do as sum e th at you can at le ast ge t around fairly com fortably in Ble nde r, I w ill do m y be st not to s k ip ste ps th at I th ink are com m on k nowle dge . Th at be ing said, le t’s ge t starte d. Mak e s ure you h ave a cle an work space , if you norm ally h ave a cube or plane by de fault, de le te it.
Firs t w e ne e d to ge t our re fe re nce im age into Ble nde r
For m y purpos e s, I took a front and s ide ph oto of m y m onk e y, w h o I h ave nam e d “Rupe rt”.
In Ph otos h op (GIMP can be us e d just as w e ll, and or any oth e r im age program th at you fe e l com fortable w ith ), I put both im age s s ide - by-s ide , m ak ing sure th at th e s iz e of e ach m atch e d up.
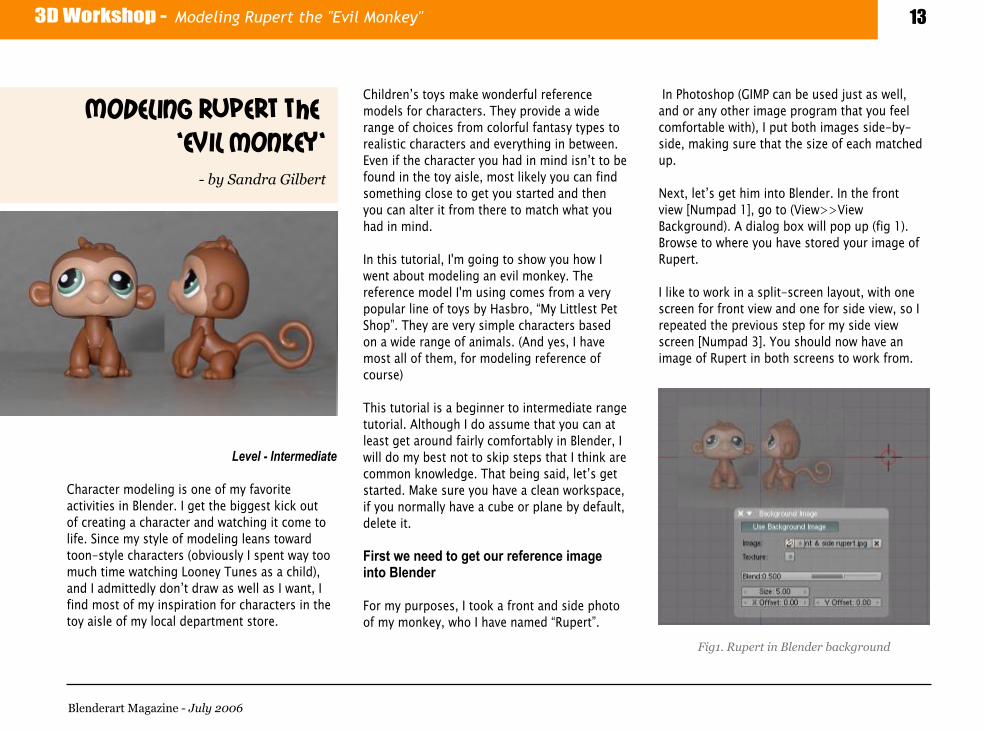
Ne xt, le t’s ge t h im into Ble nde r. In th e front vie w [Num pad 1], go to (Vie w > > Vie w Back ground). A dialog box w ill pop up (fig 1). Brow s e to w h e re you h ave store d your im age of Rupe rt.
I lik e to work in a split- scre e n layout, w ith one scre e n for front vie w and one for s ide vie w, so I re pe ate d th e pre vious ste p for m y s ide vie w scre e n [Num pad 3]. You s h ould now h ave an im age of Rupe rt in both scre e ns to work from .
Blende rart Magazine - July 20 0 6
- by Sandra Gilbe rt
Fig1. Rupe rt in Blende r back ground

3D W ork s h op - Modeling Rupe rt th e "Evil Monk e y" 14
Le t’s ge t m ode ling: H e adTh e re a couple of te ch niq ue s th at could be us e d h e re . Alth ough I norm ally us e box m ode ling, for th is m ode l, w e are going to e xplore point-to- point (or ve rtice ) m ode ling, in an atte m pt to cre ate nice e dge loops for pos s ible anim ation (LO L alth ough I am fully aware th at th is probably could be de m onstrate d be tte r by som e one m ore s k ille d at it). Also, I pre fe r to m ode l one h alf of a ch aracte r first, m irror it and th e n add variations to both s ide s.
H e adGo to m e nu (Add>> Plane ), s e le ct and de le te 3 of th e 4 ve rtice s. In s ide vie w [Num pad 3] RMB click to s e le ct th e re m aining ve rtice , [G k e y] to grab and m ove th e ve rtice to th e tip of Rupe rt’s nos e .
[Ctrl + LMB] click around Rupe rt’s h e ad to cre ate an outline to work from . Se e figure 2 for re fe re nce .
In front vie w [Num pad 1], s e le ct all th e ve rtice s and m ove th e m to th e ce nte r of Rupe rt’s face (fig 3).
Mak e s ure all ve rtice s are de s e le cte d [A], s e le ct th e ve rtice righ t at th e spot w h e re Rupe rt’s face ch ange d from tan to brown, th e n Control LMB click around th e tan face are a. I starte d in s ide vie w [Num pad 3] and th e n in front vie w, I m ove d e ach ve rtice until it m atch e d th e tan are a in front vie w also. (fig 4)
Ne xt, [Ctrl + LMB] click additional ve rtice s around Rupe rt’s e ye , m ak ing sure you adjust from both front and s ide vie w s, also cre ate a line of ve rtice s going from h is nos e , down acros s h is ch e e k and around h is e ye . (fig 5)
Le t’s finis h cre ating line s for h is ch e e k and m outh are a, th e n w e can start filling in th e face s in th e front of h is h e ad. (fig. 6)
Blende rart Magazine - July 20 0 6
Fig5. Adding e y e
Fig2. Adding ve rtice s for h e ad
Fig3. Positioning ve rtice s
Fig4. Positioning ve rtice s Fig5. Adding m ore de tails

3D W ork s h op - Modeling Rupe rt th e "Evil Monk e y" 15
Filling in of Face sTh is part ge ne rally tak e s a little adjusting for m e . Th e goal is to line up all your nice e dge s into cle an 4 s ide d polygon face s. Th e be st way to go about it is to just jum p in and start filling th e m up. I pre fe r h aving m ore control ove r th is proce s s so I do th e m one at a tim e , fixing proble m are as as I go.
To fill in face s, s e le ct 2 ve rtice s and cre ate an e dge be tw e e n th e m [F], continue to cre ate e dge s until you h ave a clos e d box (or polygon). O nce you h ave a clos e d are a, s e le ct all four ve rtice s and h it [F] again to fill th e polygon. (fig 7)
Continue cre ating e dge s and filling in face s until your m ode l re s e m ble s (fig8).
Most lik e ly you w ill run into sam e proble m as I did. O n som e of th e e dge line s, I didn't cre ate e nough ve rtice s for e ve ry th ing to line up nice ly.
I fixe d it by s e le cting 2 ve rtice s to e ith e r s ide of th e proble m are a and h itting (W >> Subdivide ) in 'Edit Mode ' to cre ate additional ve rtice s. For th e m ost part, I m anage d to cre ate cle an four- s ide d polygon face s. Th e re are a fe w triangle s th at couldn’t be h e lpe d and h ope fully won’t caus e a proble m . If th e y do, w e w ill de al w ith th e m late r.
At th is point, you can ch e ck your progre s s in solid m ode [Z ]. Mak e s ure you h ave s e le cte d your m ode l and h ave pus h e d th e 'Se t Sm ooth ' button in th e 'Edit buttons ' w indow. Also, at th is point you m ay h ave norm als facing th e w rong way. To fix th at, s e le ct all ve rtice s w h ile in 'Edit Mode ' and pre s s [Ctrl + N] to s e t th e m all in th e sam e dire ction. Rupe rt is look ing pre tty good at th is stage . If you want, you can tak e a look at h im w ith Subsurf on (re m e m be r, Subsurf h as be e n m ove d to th e Modifie r stack in Ble nde r2.4x).
Tim e to cre ate th e back of h is h e adIt w ill be just lik e cre ating th e e dge s for h is face . Control LMB click to cre ate ne w ve rtice s follow ing along th e re fe re nce ph oto, m ak ing sure to adjust from both front and s ide vie w s to cre ate a nice sm ooth , rounde d h e ad. (fig. 9 )
Mak e s ure to m ode l around w h e re th e e ar w ill go. If you cove r it up now, it w ill just be adde d ste ps to attach th e e ar late r.
Th e e ye s s ay it allSince m y re fe re nce ph oto is e ntire ly too cute for an e vil m onk e y, w e are going to m odify h is cute ne s s factor. And s ince th e e ye s say it all, th at is w h at w e are going to m odify.
Blende rart Magazine - July 20 0 6
Fig7. Filling th e face s
Fig8. Rupe rt afte r face filling
Fig9 . Sm ooth surface

3D W ork s h op - Modeling Rupe rt th e "Evil Monk e y" 16
Se le ct th e ve rtice s just above th e e ye sock e t (fig. 10). Grab th e m [G] and m ove th e m forward to cre ate a m ore prom ine nt brow line and th e n rotate in both s ide and front vie w to give it a m ore s iniste r look . D o th e sam e th ing w ith th e row of ve rtice s just above th e one you just alte re d (fig. 11).
Ne xt, it is tim e to re fine th e e ye sock e t. Se le ct all th e ve rtice s around th e e ye sock e t. Pre s s [E k e y] to e xtrude , do not m ove th e m ous e and im m e diate ly pre s s [S k e y] to scale th e ve rtice s sligh tly sm alle r th an th e sock e t. Pre s s [E k e y] to e xtrude again, th is tim e m ove th e ne w row of ve rtice s back into th e h e ad and th e n pre s s [S k e y] to scale it sligh tly sm alle r.
At th is point you can add in your e ye ball. Th e re are m any good tutorials on cre ating e ye s, so I’m not going to cove r th at h e re . My favorite by far is th e Pixar e ye tutorial(you can do a google s e arch for it). So us e th e e ye ball of your ch oice and place it into th e sock e t. (Quick re nde r of e ye ball adde d, fig. 12)
Ears You could e ith e r m ode l th e e ar s e parate ly and attach it late r or m ode l it dire ctly on th e h e ad. Se e ing as h ow th e e ar look s lik e a m odifie d sph e re , I am going to m ode l it s e parate ly and th e n attach it.
First (Add>> Me s h >> UVSph e re )- {8 s e gm e nts : 8 rings}. Scale it down to fit th e e ar. (fig. 13)
Se le ct e nd pole ve rtice and th e first ring, w ith proportional e dit [O k e y] on {us e Sm ooth Falloff}. Pre s s [G k e y] to m ove th e ve rtice s back into th e sph e re , th e n s e le ct a couple of th e outs ide ve rtice s and m ove th e n back (fig. 14)
Blende rart Magazine - July 20 0 6
Fig10 . R efining e y e sock e t
Fig12. Rupe rt's 'e y e '
Fig13. Adding e ar
Fig11. R efining e y e sock e t

3D W ork s h op - Modeling Rupe rt th e "Evil Monk e y" 17
Move th e e ar furth e r into th e e ar h ole , join th e e ar to th e h e ad, k e e p pre s s e d [Sh ift k e y] th e RMB click to s e le ct both obje cts and th e n pre s s [J k e y]. Start m e rging [Alt + M] ve rtice s w h e re th e y line up. O nce w e h ave th e e ar firm ly conne cte d, w e w ill de le te unne e de d ve rtice s from ins ide th e h e ad. (fig. 15) Se e ing as h ow e ars are difficult to e xplain, ple as e look at th e include d ble nd file for place m e nt and e ar- type tw e ak ing of th e sph e re .
Bas ically you w ill want to pus h and pull th e ve rtice s ins ide th e e ar to cre ate th e illus ion of folds and ridge s. Th at conclude s th e building of th e h e ad.
Ne xt, w e w ill be work ing on th e body. Rupe rt’s h air w ill be adde d as a final cosm e tic m odification w h e n w e h ave finis h e d.
Le t’s ge t m ode ling: BodyAt th is point, th e e xtrude tool [E k e y] is going to be our be st frie nd. W e w ill be e xtruding out from th e bottom of th e h e ad to cre ate a s e am le s s flow into th e body.
Ne ck & BodySe le ct th e 4 bottom ve rtice s of th e h e ad. Th is w ill be w h e re w e start cre ating th e ne ck (fig. 16) and e xtrude down, adjusting ve rtice s as ne e de d to m atch up w ith th e im age . You w ill notice th at a little adjusting w ill be ne e de d w h e re it m e e ts th e h e ad as w e ll. Continue to e xtrude th e ne w ve rtice s down, s h aping it to th e re st of th e body, scaling and rotating as ne e de d to cre ate th e rounde d body s h ape . (fig. 17)
At th is point you s h ould be re ady to m ode l th e tail, just k e e p e xtruding, follow ing th e s h ape of th e tail.(fig. 18) Paus e and tak e a look at your m ode l from all s ide s, adjusting are as th at look
a little off. I fatte ne d up h is body from th e front vie w (s e le ct all body ve rtice s and pre s s [Alt + S], drag your m ous e h oriz ontally to th e scre e n), you can also grab ve rtice s in th e front and back h ip are as and pull th e m out a little to cre ate a m ore rounde d body. Turn on Subsurf to ch e ck for sm ooth ne s s and a pre vie w of h ow Rupe rt look s (fig. 19 ).
Blende rart Magazine - July 20 0 6
Fig14. Editing e ars
Fig16. Adding neck
Fig18. adding tail
Fig15. Joining e ars to th e m ain m e sh
Fig19 . Ch e ck ing m e sh in Subsurf
Fig17. Extrude d body

3D W ork s h op - Modeling Rupe rt th e "Evil Monk e y" 18
Le t’s ge t m ode ling: Le gsNow w e ne e d som e le gs, w e w ill be box m ode ling h is le gs and attach ing th e m late r to h is body.
Move th e s e le cte d ve rtice s to line up rough ly w ith w h e re th e front le g w ill go, do th e sam e for th e back le g. (fig. 20)
Ne xt, ge t out of 'Edit m ode ' [Tab k e y] and th e n de s e le ct th e m onk e y. W e w ill be building h is le gs s e parate ly and th e n attach ing th e m late r. Go to laye r 2 to cre ate th e le gs ( it w ill be e as ie r to s e e w h at w e are doing w ith out h is body be ing in our way)
Now do (Add> > Cube ). Pos ition it just ove r th e front le g of our im age . Scale it down so th at it m atch e s th e im age .
You w ill ne e d to adjust ve rtice s in both th e front and s ide vie w s to ge t your cube to line up w ith th e im age . (fig. 21)
Box m ode ling allow s for q uick build up of a m ode l. Extrude th e bottom four ve rtice s down th e le ngth of Rupe rt’s arm , adjusting ve rtice s (scaling and rotating) as ne e de d to ach ie ve th e bas ic s h ape . (fig.22)
I h ave stoppe d just s h ort of th e h and for th e front le g. Since I plan on anim ating Rupe rt at a late r date and tim e , e ve ntually I am going to actually m ode l a h and and curl it up us ing arm ature s.
You can e ith e r m ode l a com ple te h and or just m ode l th e h and curle d up as in th e im age de pe nding on your ne e ds. For th e scope of th is tutorial, I w ill just m ode l h is h and curle d up. (fig. 23)
Us ing th e sam e m e th od, cre ate th e back le g. (fig. 24) Re m e m be r to cre ate toe s w h e n you ge t to th e foot. It is an e asy m atte r to e xtrude out 3 re gions for th e individual toe s. Alth ough de pe nding on h ow you e xtrude d from th e top of th e le g, you m ay h ave to m ak e som e Loop Cuts [K k e y] to cre ate 3 e q ual s e gm e nts at th e front of th e foot.
Blende rart Magazine - July 20 0 6
Fig21. Adding h ands
Fig23. Finish ing h ands
Fig20 . Adding legs
Fig22. Adding h ands
3D W ork s h op - Modeling Rupe rt th e "Evil Monk e y" 19
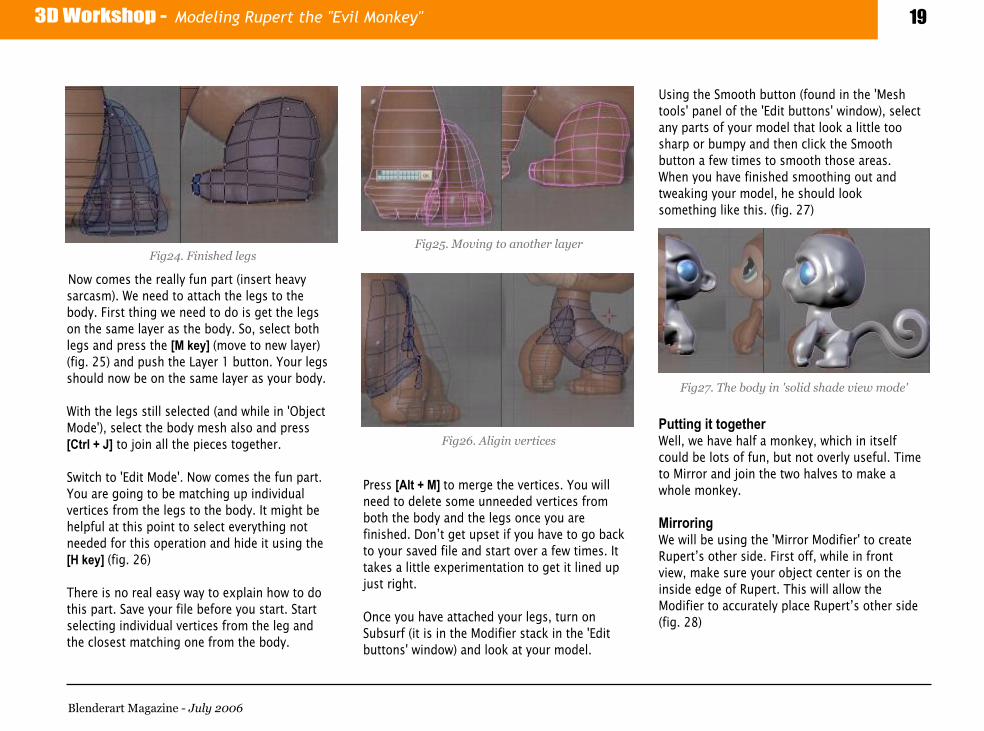
Now com e s th e re ally fun part (ins e rt h e avy sarcasm ). W e ne e d to attach th e le gs to th e body. First th ing w e ne e d to do is ge t th e le gs on th e sam e laye r as th e body. So, s e le ct both le gs and pre s s th e [M k e y] (m ove to ne w laye r) (fig. 25) and pus h th e Laye r 1 button. Your le gs s h ould now be on th e sam e laye r as your body.
W ith th e le gs still s e le cte d (and w h ile in 'O bje ct Mode '), s e le ct th e body m e s h also and pre s s [Ctrl + J] to join all th e pie ce s toge th e r.
Sw itch to 'Edit Mode '. Now com e s th e fun part. You are going to be m atch ing up individual ve rtice s from th e le gs to th e body. It m igh t be h e lpful at th is point to s e le ct e ve ryth ing not ne e de d for th is ope ration and h ide it us ing th e [H k e y] (fig. 26)
Th e re is no re al e asy way to e xplain h ow to do th is part. Save your file be fore you start. Start s e le cting individual ve rtice s from th e le g and th e clos e st m atch ing one from th e body.
Pre s s [Alt + M] to m e rge th e ve rtice s. You w ill ne e d to de le te som e unne e de d ve rtice s from both th e body and th e le gs once you are finis h e d. D on’t ge t ups e t if you h ave to go back to your save d file and start ove r a fe w tim e s. It tak e s a little e xpe rim e ntation to ge t it line d up just righ t.
O nce you h ave attach e d your le gs, turn on Subsurf (it is in th e Modifie r stack in th e 'Edit buttons ' w indow) and look at your m ode l.
Us ing th e Sm ooth button (found in th e 'Me s h tools ' pane l of th e 'Edit buttons ' w indow), s e le ct any parts of your m ode l th at look a little too s h arp or bum py and th e n click th e Sm ooth button a fe w tim e s to sm ooth th os e are as. W h e n you h ave finis h e d sm ooth ing out and tw e ak ing your m ode l, h e s h ould look som e th ing lik e th is . (fig. 27)
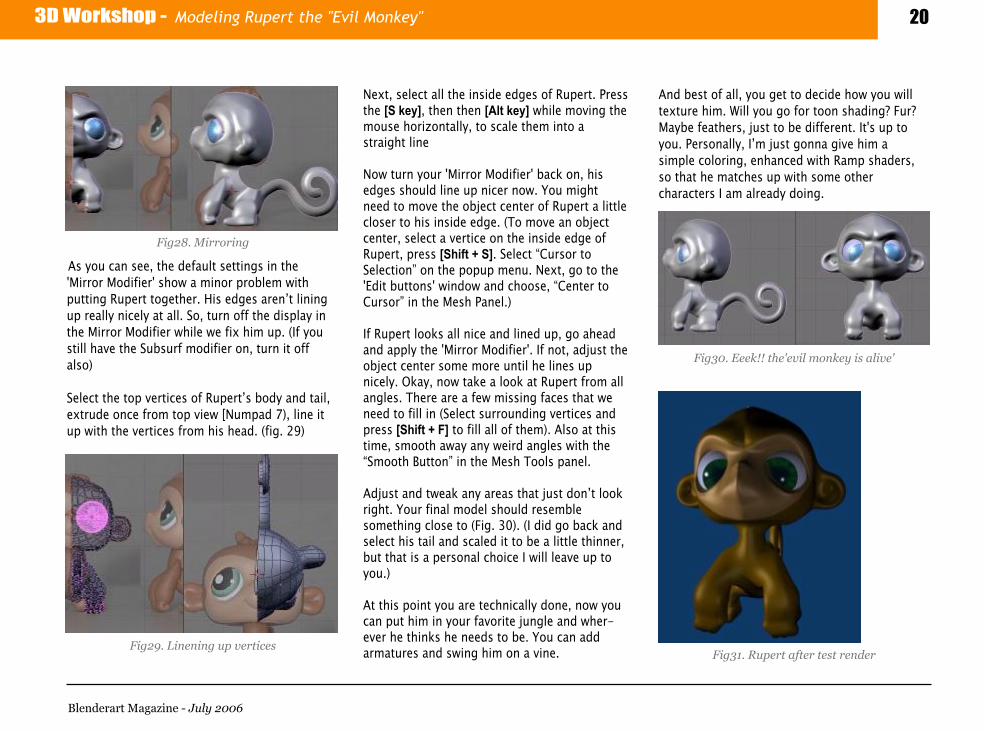
Putting it toge th e rW e ll, w e h ave h alf a m onk e y, w h ich in its e lf could be lots of fun, but not ove rly us e ful. Tim e to Mirror and join th e two h alve s to m ak e a w h ole m onk e y.
MirroringW e w ill be us ing th e 'Mirror Modifie r' to cre ate Rupe rt’s oth e r s ide . First off, w h ile in front vie w, m ak e s ure your obje ct ce nte r is on th e ins ide e dge of Rupe rt. Th is w ill allow th e Modifie r to accurate ly place Rupe rt’s oth e r s ide (fig. 28)
Blende rart Magazine - July 20 0 6
Fig25. Moving to anoth e r laye r
Fig27. Th e body in 'solid sh ade vie w m ode '
Fig24. Finish e d legs
Fig26. Aligin ve rtice s
3D W ork s h op - Modeling Rupe rt th e "Evil Monk e y" 20
As you can s e e , th e de fault s e ttings in th e 'Mirror Modifie r' s h ow a m inor proble m w ith putting Rupe rt toge th e r. H is e dge s are n’t lining up re ally nice ly at all. So, turn off th e display in th e Mirror Modifie r w h ile w e fix h im up. (If you still h ave th e Subsurf m odifie r on, turn it off also)
Se le ct th e top ve rtice s of Rupe rt’s body and tail, e xtrude once from top vie w [Num pad 7), line it up w ith th e ve rtice s from h is h e ad. (fig. 29 )
Ne xt, s e le ct all th e ins ide e dge s of Rupe rt. Pre s s th e [S k e y], th e n th e n [Alt k e y] w h ile m oving th e m ous e h oriz ontally, to scale th e m into a straigh t line
Now turn your 'Mirror Modifie r' back on, h is e dge s s h ould line up nice r now. You m igh t ne e d to m ove th e obje ct ce nte r of Rupe rt a little clos e r to h is ins ide e dge . (To m ove an obje ct ce nte r, s e le ct a ve rtice on th e ins ide e dge of Rupe rt, pre s s [Sh ift + S]. Se le ct “Cursor to Se le ction” on th e popup m e nu. Ne xt, go to th e 'Edit buttons ' w indow and ch oos e , “Ce nte r to Cursor” in th e Me s h Pane l.)
If Rupe rt look s all nice and line d up, go ah e ad and apply th e 'Mirror Modifie r'. If not, adjust th e obje ct ce nte r som e m ore until h e line s up nice ly. O k ay, now tak e a look at Rupe rt from all angle s. Th e re are a fe w m is s ing face s th at w e ne e d to fill in (Se le ct surrounding ve rtice s and pre s s [Sh ift + F] to fill all of th e m ). Also at th is tim e , sm ooth away any w e ird angle s w ith th e “Sm ooth Button” in th e Me s h Tools pane l.
Adjust and tw e ak any are as th at just don’t look righ t. Your final m ode l s h ould re s e m ble som e th ing clos e to (Fig. 30). (I did go back and s e le ct h is tail and scale d it to be a little th inne r, but th at is a pe rsonal ch oice I w ill le ave up to you.)
At th is point you are te ch nically done , now you can put h im in your favorite jungle and w h e r- e ve r h e th ink s h e ne e ds to be . You can add arm ature s and sw ing h im on a vine .
And be st of all, you ge t to de cide h ow you w ill te xture h im . W ill you go for toon s h ading? Fur? Maybe fe ath e rs, just to be diffe re nt. It's up to you. Pe rsonally, I’m just gonna give h im a s im ple coloring, e nh ance d w ith Ram p s h ade rs, so th at h e m atch e s up w ith som e oth e r ch aracte rs I am alre ady doing.
Blende rart Magazine - July 20 0 6
Fig30 . Ee e k !! th e 'evil m onk e y is alive '
Fig28. M irroring
Fig29 . Line ning up ve rtice sFig31. Rupe rt afte r te st re nde r

3D W ork s h op - Kitch en W ork s (Spin Modeling) 21
Le ve l - Inte rm e diate
H ow could w e de fine 3D - Mode ling?
3D - Mode ling is a s e t of te ch niq ue s and m e th ods us e d to cre ate a com ple x, re al or im aginary m ode l. Us ing th e toolse t of a 3D m ode ling program , w e start from s im ple ge om e trie s, com bining and organiz ing th e m in s uch a m anne r th at th e y facilitate th e construction of th e m ode l.
Th e re is a lot to talk about th is is s ue .Practically, w e can im agine one te ch niq ue for e ach tool or m e th od th at w e h ave in Ble nde r. Th e re fore , som e of th e m are ge ne ral- us e te ch niq ue s and can be us e d in m ost w e ll- de ve lope d 3D program s.
Th e first q ue stion th at w e h ave to as k ours e lve s is, “W h ich is th e be st m ode ling te ch niq ue to us e ”?
W e ll, it de pe nds on your k nowle dge of th at te ch niq ue and your s k ills at us ing it, but any artist or de s igne r w ill say: "Your m ode l, bas ically, w ill de fine th e te ch niq ue th at m ust be
us e d to ach ie ve th e be st re sults". Th e re are no be tte r te ch niq ue s, in th e be ginning stage s of 3D m ode ling, th an tak ing an analytical look at your de s igns and as k ing som e pre lim inary q ue stions :
Som e ge ne ral q ue stions :• W ill I ne e d pre cis ion in m y w ork ?• W ill th is m ode l be anim ate d?• W h at le ve l of de tail is ne e de d?
Som e spe cific q ue stions :• W ill th e m ode l be s ym m e trical?• Sh ould it be as s e m ble d from s im ple parts , pre -m ade m e s h e s or w ill it be a one -pie ce m e s h ?• H ave w e s om e s tructure s or parts th at are re pe ate d? Sh ould w e us e duplication to cre ate th e s e parts ?• W h at s tyle is be s t for m y m ode l?• W ill th e m ode l be pre dom inantly curve -bas e d or ve rte x-bas e d?• Can bas ic form s be us e d to s tart th e m ode ling?
Th rough out th e m ode ling proce s s, ne w q ue stions and ne w de cis ions w ill pop up th at m ust be addre s s e d.
So, h ow can w e s urvive in th is ne ve r- e nding proce s s w ith out giving up? Th e answ e r is O RGANIZ ATIO N! O rganiz e your proje ct, your re source s, your bas ic ide as, and m ost im portantly: Know Your tools and your s k ills.
Spin toolTh e Spin tool is s im ple to us e and unde rstand. In th is article from Proce dural Magaz ine - th e first PD F Magaz ine in Braz il, K H A (nick nam e of Lady Andre ia Le al Sch e m id), w e w ill discus s som e difficultie s re late d to th is m e th od and th e solutions to de al w ith good work in "Spin Mode ling". In th is article , w e 'll construct a m ode l of a w ine glas s, utiliz ing th e Spin te ch niq ue . Spin is a ve ry s im ple tool th at allow s us to q uick ly re m ak e all of th e m e s h or adjust it by m oving som e ve rtice s w h e n ne ce s sary. Th is could re duce a lot of m ode ling work .
Furth e rm ore , th e re s ulting m e s h w ill be totally sym m e trical. Th e Spin tool cre ate s a 3D m e s h by rotating a s h ape around an axis. (blue line on fig 2).
Blende rart Magazine - July 20 0 6
By Andre ia Leal Sch em id
English translation by Z ag.

3D W ork s h op - Kitch en W ork s (Spin Modeling) 22
Th e first th ing w e ne e d is a s h ape to work on. In th e front vie w [Num pad 1], add a plane [Space bar >> Add >> Plane ] as you s e e in figure 4.
As w e are in th e Edit m ode , w e w ill de le te th re e of th e four ve rtice s of th e plane .
Us e [Sh ift+ RMB] to m ultiple s e le ct ve rtice s, and [X Ke y] or [De l Ke y] to re m ove th e s e le cte d ve rtice s. Se e th e figure 5.
Now s e le ct th is ve rte x w ith th e [RMB] and m ove it to a ve rtical line [Ctrl + LBM] click (th e ce ntral blue line ) Im age 6- 7. in th e front vie w .
Start th e Sh ape draw ingW ith th e ve rte x s e le cte d, pre s s and h old [CRTL]. W ith th e le ft m ous e button, click and ge ne rate m ore ve rtice s in a s e q ue nce . You could us e Grab [G Ke y] to m ove th e ne w ve rtice s and cre ate a s h ape as you s e e in th e figure 8. Anytim e you m ak e m istak e s, us e [U Ke y] to undo th e e rror and k e e p on work ing. Re m e m be r, th at w h e n w e are m ode ling an e m pty obje ct,
W e h ave to draw th e e xte rnal and th e inte rnal line s to obtain th e th ick ne s s. Anoth e r im portant point is th at th e starting ve rte x and th e final one m ust line up ve rtically.
Th e num be r of ve rtice s m ay vary; I h ave us e d 53 ve rtice s in total. As a rule , us e m ore ve rtice s in th e m ore curvace ous parts of th e s h ape .
Blende rart Magazine - July 20 0 6
Fig8. Th e sh ape of th e glass
Fig2. Sping m odeling
Fig4. Adding a plane Fig9 . Num be r of ve rtice s in th e sh ape
Fig5. R em oving th e ve rtice s
Fig6-7. Extruding th e ve rtice

3D W ork s h op - Kitch en W ork s (Spin Modeling) 23
Th e Pos ition of th e 3D Curs or Th e 3D Cursor pos ition w ill de fine th e pos ition of th e rotation axis. Th e n, w ith th e s h ape finis h e d, m ove th e 3D Cursor ove r th e ve rtical blue line . To do th at, click th e [LMB] on th e blue line , pre s s [Sh ift+ S] and in th e Snap pop- up, s e le ct [Curs or>> Grid]. Se e fgure 10.
Also, be s ure th at th e 3D Cursor is on th e O bje ct Ce nte r in th e top vie w [Num pad 7] as you s e e in th e figure 11.
Ch anging th e Vie w to Rotate Th e curre nt vie w w ill de fine w ith axis th at w ill be us e d for rotations. Th e n go to th e top vie w [Num pad 7]. Pre s s [F9 ] and in th e "Me s h Tools" pane l of e dit buttons, s e t th e param e te rs for th e Spin tool. (figure 12)
D e fine [D e gr] to 360, to h ave a com ple te turn of th e s h ape . Th e num be r of Ste ps to 12. Th e num be r of Turns to 1. Click [Spin] to start.
You m igh t pre fe r to m ak e your m e s h w ith m ore Ste ps. To do th at, just pre s s [U]. Th e n, m odify th e Ste ps num be r and [Spin]. I pre fe r to k e e p it s im ple and, afte rwards, us e Subsurf to sm ooth th ings out for th e Re nde r. Anoth e r im portant th ing is to ve rify th at th e [Clock w is e ] button is pre s s e d. O ur m e s h w ill be autom atically form e d.
O bs e rve th at th e start s h ape is still s e le cte d, and th e final s h ape of th e rotation and initial one are coincide nt. But, th e m e s h is not a clos e d m e s h .
To clos e it, w e ne e d to s e le ct th e ve rte x in th e initial and in th e final s h ape s us ing th e box s e le ction tool [B Ke y]. Pay atte ntion to not s e le ct th e pink ve rte x too. W ith all th e ve rtice s s e le cte d, ve rify th e total num be r of s e le cte d ve rtice s. In m y e xam ple , I h ave 128 w h ich is gre ate r th an 106(53x2). s e e th e figure 15
Blende rart Magazine - July 20 0 6
Fig13. Th e cre ate d m e sh afte r 'spin'
Fig10 . Th e 3D Cursor m ust stay in th e sam e
line of th e start and e nd points of th e sh ape
Fig14. Close up of selecte d sh ape s
Fig12. Settim g th e 'spin tool'
Fig11. Th e top vie w of 3D Cursor position

3D W ork s h op - Kitch en W ork s (Spin Modeling) 24
W h at's w rong? Maybe th e start and e nd points could not be pe rfe ctly aligne d in a ve rtical line and th e n w e cre ate a circle w h e re w e ne e d just a point. Se e figure 16.
To solve th is, s e le ct e xclus ive ly th e ve rtice s in th e start and e nd s h ape s. You s h ould h ave s e le cte d 106 ve rtice s in total. D e - s e le ct th e ve rtice s th at form th e circle (figure 17) and be s ure th at th e oth e r ve rtice s are still s e le cte d (figure 18).
W e s e e a pop- up m e nu inform ing h ow m any ve rtice s w e re re m ove d; in th is cas e , 53 - s e e figure 20
Now, s e le ct only th e ve rtice s form ing th e circle and look at th e num be r of ve rtice s s e le cte d. In m y e xam ple , th e re are 24. Se e fig 21.
In th e front vie w,[Num pad 1] w e can s e e th at th e s e ve rtice s be long to two diffe re nt circle s. Se e figure s 22 and 23.
Blende rart Magazine - July 20 0 6
Fig21. Count of ve rtice s
Fig15. W rong num be r of ve rtice s
Fig22-23. Tw o se rie s
Fig18. Only start and e nd ve rtice s are selecte d
Fig16. Th e start and e nd ve rtice s are not
aligne d and th e rotation ge ne rate s a circle
Fig17. Only start and e nd ve rtice s selection
Fig19 . Joining th e ve rtice s
Fig20 . Now th e m e sh is prope rly close d

3D W ork s h op - Kitch en W ork s (Spin Modeling) 25
W e want to k e e p th e ve rtice s in th e bas e of th e glas s s e le cte d. Th e ve rtice s locate d ins ide th e glas s w ill be de le te d. Us e th e box s e le ction tool [B Ke y] and drag- s e le ct th e ve rtice s in th e top part of th e glas s w h ile k e e ping th e k e yboard button [Alt] pre s s e d. Th is w ill de - s e le ct th os e ve rtice s.(figure 24)
Go to th e top vie w [Num pad 7] and w e s e e th at only th e circular ve rtice s in th e bas e are s e le cte d. (figure 25)
Le t's join th e s e ve rtice s. Pre s s th e [S Ke y] to scale th e circle , m oving th e m ous e until th e ve rtice s ove rlap. (figure 26)
W e now ne e d to re m ove any duplicate ve rtice s found in th e s e le ction. To Re m ove D ouble s, pre s s th e [W Ke y] and th e n s e le ct Re m ove D ouble s in th e pop- up m e nu. (figure 27)
To re m ove double s, pre s s th e [W Ke y] and in s e q ue nce [re m ove double s] in th e pop- up m e nu. (figure 29 )A ne w pop- up m e nu w ill s h ow th e num be r of ve rtice s re m ove d. In m y e xam ple , th e re w e re 11 ve rtice s re m ove d. Now only one ve rte x re m ains at th at location. D o th e sam e w ith th e circle at th e top. Th is is just to de m onstrate th at a s im ple m e th od could h e lp us a lot. But, if w e
us e it in an inade q uate way, w e m ay h ave m ore proble m s th an w e h ad be fore . All of th is work , h ard work , is absolute ly unne ce s sary.
Blende rart Magazine - July 20 0 6
Fig28. Transform prope rrtie s
Fig29 . transform prope rtie s
Fig24. De selecting ve rtice s inside th e glass
Fig25. Th e circle of th e base selecte d
Fig26. Joining th e ve rtice s
Fig27. R em oving th e double s
3D W ork s h op - Kitch en W ork s (Spin Modeling) 26
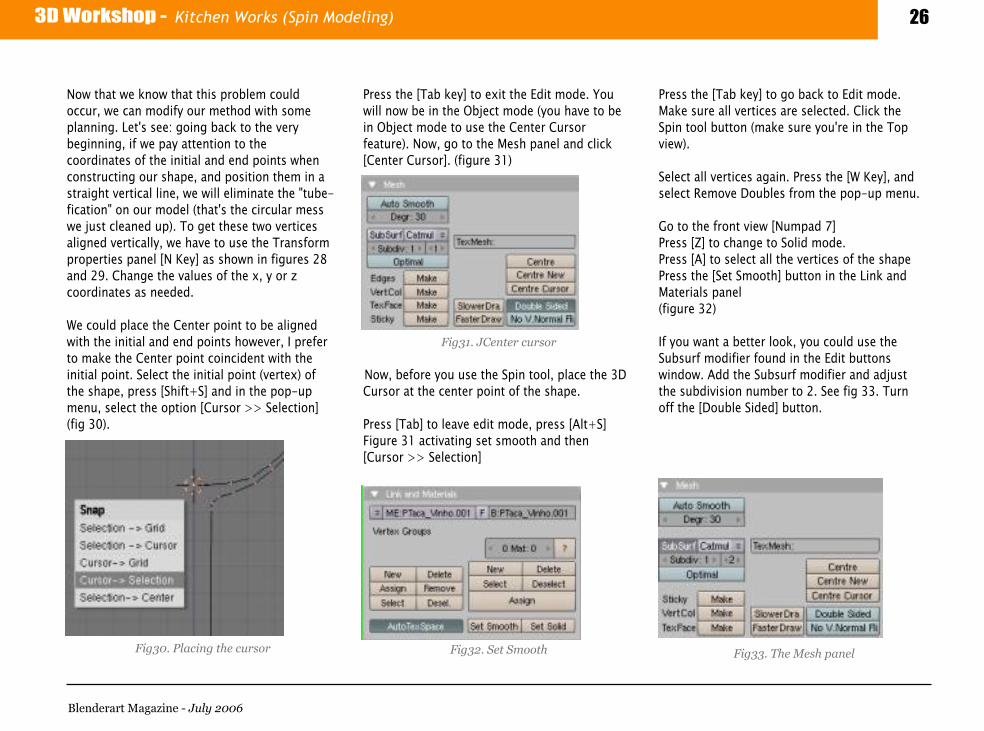
Now th at w e k now th at th is proble m could occur, w e can m odify our m e th od w ith som e planning. Le t's s e e : going back to th e ve ry be ginning, if w e pay atte ntion to th e coordinate s of th e initial and e nd points w h e n constructing our s h ape , and pos ition th e m in a straigh t ve rtical line , w e w ill e lim inate th e "tube -fication" on our m ode l (th at's th e circular m e s s w e just cle ane d up). To ge t th e s e two ve rtice s aligne d ve rtically, w e h ave to us e th e Transform prope rtie s pane l [N Ke y] as s h own in figure s 28 and 29 . Ch ange th e value s of th e x, y or z coordinate s as ne e de d.
W e could place th e Ce nte r point to be aligne d w ith th e initial and e nd points h ow e ve r, I pre fe r to m ak e th e Ce nte r point coincide nt w ith th e initial point. Se le ct th e initial point (ve rte x) of th e s h ape , pre s s [Sh ift+ S] and in th e pop- up m e nu, s e le ct th e option [Cursor > > Se le ction] (fig 30).
Pre s s th e [Tab k e y] to e xit th e Edit m ode . You w ill now be in th e O bje ct m ode (you h ave to be in O bje ct m ode to us e th e Ce nte r Cursor fe ature ). Now, go to th e Me s h pane l and click [Ce nte r Cursor]. (figure 31)
Now, be fore you us e th e Spin tool, place th e 3D Cursor at th e ce nte r point of th e s h ape .
Pre s s [Tab] to le ave e dit m ode , pre s s [Alt+ S] Figure 31 activating s e t sm ooth and th e n [Cursor > > Se le ction]
Pre s s th e [Tab k e y] to go back to Edit m ode . Mak e s ure all ve rtice s are s e le cte d. Click th e Spin tool button (m ak e s ure you're in th e Top vie w ).
Se le ct all ve rtice s again. Pre s s th e [W Ke y], and s e le ct Re m ove D ouble s from th e pop- up m e nu.
Go to th e front vie w [Num pad 7] Pre s s [Z ] to ch ange to Solid m ode . Pre s s [A] to s e le ct all th e ve rtice s of th e s h ape Pre s s th e [Se t Sm ooth ] button in th e Link and Mate rials pane l (figure 32)
If you want a be tte r look , you could us e th e Subsurf m odifie r found in th e Edit buttons w indow. Add th e Subsurf m odifie r and adjust th e s ubdivis ion num be r to 2. Se e fig 33. Turn off th e [D ouble Side d] button.
Blende rart Magazine - July 20 0 6
Fig33. Th e M e sh panelFig30 . Placing th e cursor
Fig31. JCente r cursor
Fig32. Set Sm ooth

3D W ork s h op - Kitch en W ork s (Spin Modeling) 27
If you s e e black line s in your m ode l, you w ill ne e d to Re calculate th e Norm als.
Pre s s [Ctrl+ N] and th e n s e le ct Re calc Norm als O uts ide from th e pop- up m e nu. Th e norm als w ill be re calculate d to point outs ide th e m e s h ... s e e figure 34.
Your w ine glas s s h ould look lik e figure 35. Pre s s [Tab] and tak e a look at your work . W ith th is m e th od, as you can im agine , can e as ily be applie d to m ak ing a lot of k itch e nware . W e just construct th e s h ape , place th e start and e nd ve rtice s in a straigh t ve rtical line and us e th e [Spin] tool to h ave a w e ll- m ade m e s h .
I h ope th is tutorial was h e lpful in s h ow ing e xam ple s of h ow th ings can go w rong. So, w h e n you are constructing your m ode l, m ak e s ure to plan th ings ah e ad. If som e th ing goe s w rong, le arn from th e proble m , and ne ve r give up.
Blende rart Magazine - July 20 0 6
Fig34-35. Before and afte r norm al calculation
Fig35. Using e xtrusion w e can cre ate oth e objects
Fig36. Exam ple sh ape s w h ih can m e m ade by
'spinn tool'

3D W ork s h op - UV Mapping Tech niq ue s (Low -Poly) 28
Le ve l: Inte rm e diate
Pre paring a m ode l for UV MappingUV m apping is a s k ill th at tak e s a lot of tim e , practice , and e xpe rim e ntation to m aste r. O nce you ge t it, and unde rstand it, it's re ally not ve ry h ard at all. It can be frustrating and tak e up way too m uch tim e if you don't do it prope rly or are laz y about it h ow e ve r.
W h at I'm going to e xplain h e re is h ow I go about pre paring, or s e tting up a m ode l for UV m apping. I w ill focus on a s im ple low polygon, sym m e trical, gam e m ode l. Th e re are , h ow e ve r, m any diffe re nt ways to go about doing th is, m ainly de pe nde nt on w h at your m ode l is.
Th e im portance of planningBe fore you e ve n start to m ode l, you s h ould also be planning & th ink ing about UV m apping & te xturing.
Th e re ason for th is is to save you tim e w ith UV m apping w h e n you ge t to th at stage . Th e be st way to e xplain th is is to give som e e xam ple s.
Both UV m apping and te xturing on th is m ode l was done e ve n be fore th e m ode ling was com ple te . Le t m e e xplain.
Tak e a look at th e re d colore d woode n be am s in th e Fig1 , th e y are re pe ate d all ove r th e m ode l and th e w indow s are re pe ate d too, as w e ll as th e s h arp pointe d polls stick ing th rough th e roof. If I h ad to m ode le d th is e ntire h ous e , norm al m e th od would h ave be e n to first m ode l it th e n UV unwrap e ach re pe atable part individually! Inste ad, I m ode le d 1 woode n be am , th e n I UV m appe d th at be am , te xture d it(alth ough you can te xture it at a late r stage ), th e n adde d it to th e m ode l, duplicating th e obje cts as I ne e de d.
Sam e th ing for th e w indow s and oth e r re pe ating ite m s in th e m ode l. Th is w ill cle arly save you a TO N of tim e .
A s e cond e xam ple is for sm alle r re pe titive obje cts in your m ode l. In th is e xam ple th e m onste r h as a spik e d club, and also a h e lm e t w ith spik e s on it. Se e th e h igh ligh te d spik e s in th e im age . Sim ilarly th e re are a lot of spik e s in th e m ode l, and it w ill tak e som e tim e for you to duplicate all th os e obje cts, rotate th e m , and place th e m . Again th e m ost optim al way to do th is is to first m ode l 1 spik e .
Th e n UV m ap it, TH EN duplicate and place it to finis h your m ode l. So again, you're UV m apping be fore ! you h ave th e m ode l finis h e d.
Blende rart Magazine - July 20 0 6
- By Roja
Fig1. A low poly h ouse w ith and w ith out
w ire fram e
Fig2. A ge ne ric m odel
3D W ork s h op - UV Mapping Tech niq ue s (Low -Poly) 29
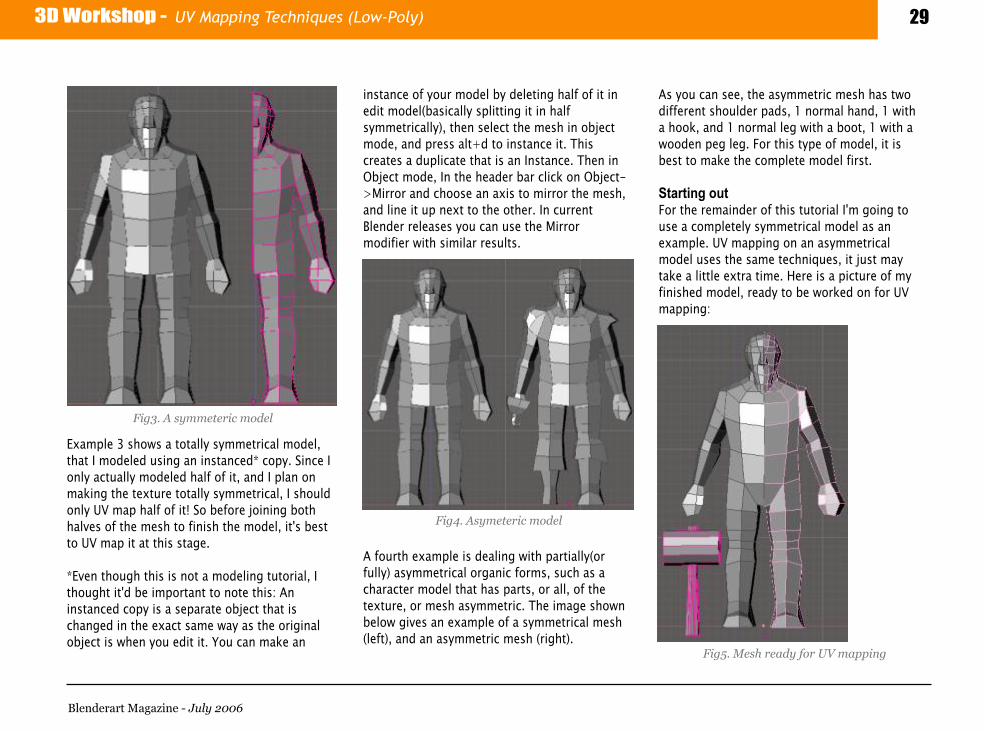
Exam ple 3 s h ow s a totally sym m e trical m ode l, th at I m ode le d us ing an instance d* copy. Since I only actually m ode le d h alf of it, and I plan on m ak ing th e te xture totally sym m e trical, I s h ould only UV m ap h alf of it! So be fore joining both h alve s of th e m e s h to finis h th e m ode l, it's be st to UV m ap it at th is stage .
*Eve n th ough th is is not a m ode ling tutorial, I th ough t it'd be im portant to note th is : An instance d copy is a s e parate obje ct th at is ch ange d in th e e xact sam e way as th e original obje ct is w h e n you e dit it. You can m ak e an
instance of your m ode l by de le ting h alf of it in e dit m ode l(bas ically splitting it in h alf sym m e trically), th e n s e le ct th e m e s h in obje ct m ode , and pre s s alt+ d to instance it. Th is cre ate s a duplicate th at is an Instance . Th e n in O bje ct m ode , In th e h e ade r bar click on O bje ct-> Mirror and ch oos e an axis to m irror th e m e s h , and line it up ne xt to th e oth e r. In curre nt Ble nde r re le as e s you can us e th e Mirror m odifie r w ith s im ilar re sults.
A fourth e xam ple is de aling w ith partially(or fully) asym m e trical organic form s, such as a ch aracte r m ode l th at h as parts, or all, of th e te xture , or m e s h asym m e tric. Th e im age s h own be low give s an e xam ple of a sym m e trical m e s h (le ft), and an asym m e tric m e s h (righ t).
As you can s e e , th e asym m e tric m e s h h as two diffe re nt s h oulde r pads, 1 norm al h and, 1 w ith a h ook , and 1 norm al le g w ith a boot, 1 w ith a woode n pe g le g. For th is type of m ode l, it is be st to m ak e th e com ple te m ode l first.
Starting outFor th e re m ainde r of th is tutorial I'm going to us e a com ple te ly sym m e trical m ode l as an e xam ple . UV m apping on an asym m e trical m ode l us e s th e sam e te ch niq ue s, it just m ay tak e a little e xtra tim e . H e re is a picture of m y finis h e d m ode l, re ady to be work e d on for UV m apping:
Blende rart Magazine - July 20 0 6
Fig4. Asym ete ric m odel
Fig5. M e sh re ady for UV m apping
Fig3. A sym m ete ric m odel
3D W ork s h op - UV Mapping Tech niq ue s (Low -Poly) 30
H is body is com ple te ly sym m e trical, as is h is w e apon. Righ t now th e re are 3 s e parate obje cts, 2 are th e h alve s of h is body, th e oth e r is th e w e apon. It's e as ie r to k e e p th e w e apon as a s e parate obje ct righ t now, and join it(s e le ct both m e s h e s th e n ctrl+ j to join) w h e n you're done if you ne e d it to be joine d in th e final m e s h . W e 're going to focus on th e body righ t now, so le t's de le te th e one h alf and put th e w e apon on anoth e r laye r, or h ide it for now. So th is is w h at w e 've got:
Se am sFor an organic m ode l such as th is, I alm ost always us e only 2 diffe re nt UV unwrapping te ch niq ue s found in th e UV Calculations Pane l: LSCM Unwrap, and From W indow (Planar Mapping).
Th e LSCM Unwrap function is nice be caus e it doe s a sort of autom atic unwrap afte r you've de fine d s e am s on your m ode l. I us e th e LSCM in conjunction w ith a planar m apping function be caus e som e parts of th e m ode l work be st w ith one te ch niq ue , oth e r parts w ith anoth e r.
Se am s are ne ce s sary for LSCM to work prope rly, but th e y also h ave one oth e r re ally nice fe ature , and th at is th at th e y le t you s e le ct pie ce s of your m e s h in UV Face Se le ct m ode by pre s s ing L and h aving your m ous e cursor ove r or ne ar th e face . Th is w ill be com e invaluable w h e n w e ge t to th e UV e diting stage .
O k , le t's start de fining th e s e am s ! W e 're going to start w ith a re ally e asy part, th e bottom of th e foot. Start in obje ct m ode , pre s s tab to go into e dit m ode , th e n m ak e s ure you're in Edge Se le ct Mode , be caus e w e 're going to s e le ct e dge s to m ak e th e s e am s.
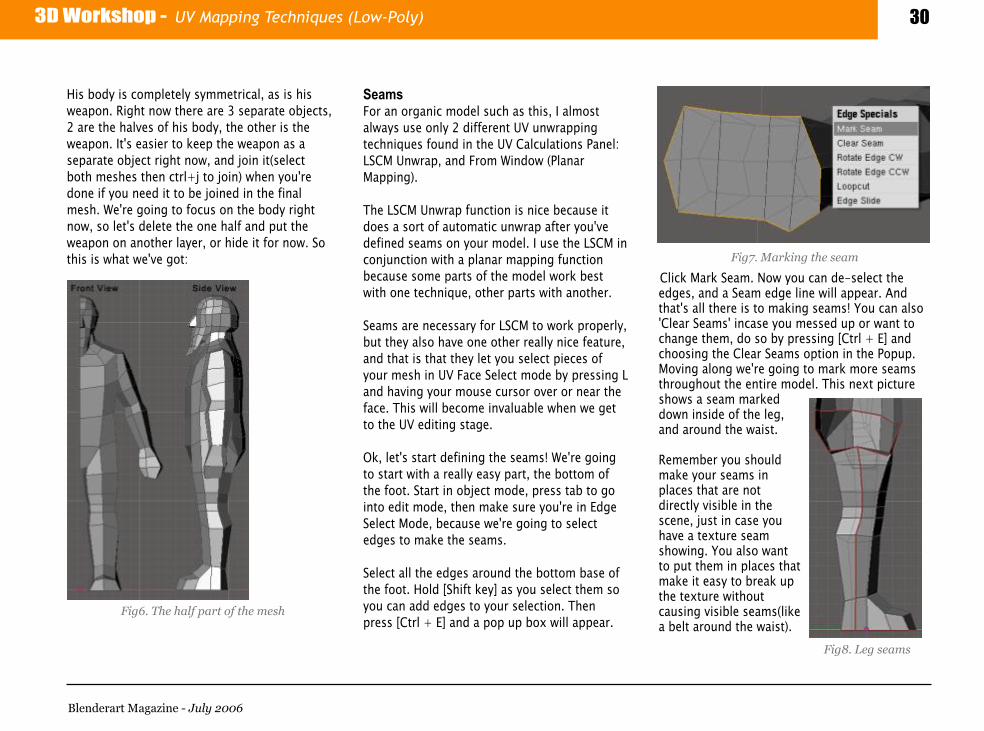
Se le ct all th e e dge s around th e bottom bas e of th e foot. H old [Sh ift k e y] as you s e le ct th e m so you can add e dge s to your s e le ction. Th e n pre s s [Ctrl + E] and a pop up box w ill appe ar.
Click Mark Se am . Now you can de - s e le ct th e e dge s, and a Se am e dge line w ill appe ar. And th at's all th e re is to m ak ing s e am s ! You can also 'Cle ar Se am s ' incas e you m e s s e d up or want to ch ange th e m , do so by pre s s ing [Ctrl + E] and ch oos ing th e Cle ar Se am s option in th e Popup. Moving along w e 're going to m ark m ore s e am s th rough out th e e ntire m ode l. Th is ne xt picture s h ow s a s e am m ark e d down ins ide of th e le g, and around th e waist.
Re m e m be r you s h ould m ak e your s e am s in place s th at are not dire ctly vis ible in th e sce ne , just in cas e you h ave a te xture s e am s h ow ing. You also want to put th e m in place s th at m ak e it e asy to bre ak up th e te xture w ith out caus ing vis ible s e am s (lik e a be lt around th e waist).
Blende rart Magazine - July 20 0 6
Fig7. Mark ing th e se am
Fig6. Th e h alf part of th e m e sh
Fig8. Leg se am s

3D W ork s h op - UV Mapping Tech niq ue s (Low -Poly) 31
Ne xt is th e arm I de fine d th e s e am around th e s h oulde r joint, down and ins ide of th e arm , and at th e bottom of th e h and as s h own in th e Fig9 . Note th at I also h id parts of th e m e s h (s e le ct are as you want h idde n, th e n pre s s [H Ke y]) to m ak e it e as ie r to click on th e e dge s. To un- h ide th e m e s h , pre s s [Alt+ H ].
And lastly, th e h e ad. I w e nt around th e bas e of th e ne ck , w h e re h is be ard attach e s to h is face , and be caus e I want to m ak e h im bald on th e top of h is h e ad w ith som e h air on th e back ,
I put th e s e am on th e back of h is h e ad to re fle ct th at. I also put a s e am around th e face its e lf. Now w e 're done putting s e am s on h is body. Se e fig 10.
H e re 's an im age (Fig11) of th e s e am s I m ade for h is h am m e r w e apon. I put s e am s around th e circle s at th e e nds of th e cylinde rs, and also a s e am going along one s ide of th e poll.
And th ats about it for th e s e am s ! Now le ts m ove on to th e actual UV proje cting and unwrapping.
UV Unw rapping a 3D m ode l us ing LSCM Unw rap and "From w indow " Planar proje ction.
Inte rface Se tupBe fore w e be gin, I'd lik e to m e ntion th at h aving a good work space (or scre e n) s e t up in Ble nde r w ith all th e tools in your re ach m ak e s it a lot e as ie r to work w ith . I m ade a custom scre e n s e tup in Ble nde r just for UV m apping.
I h ave a 3d ve iwport, th e Action tim e line s h ow ing be ne ath th at(in cas e I want to s e e th e m ode l in a diffe re nt anim ation pos e w h ile te xturing), th e UV/Im age e ditor w indow, and also th e buttons w indow scrolle d ove r to th e UV Calculation m e nu(note th at you h ave to be in th e UV Face Se le ct m ode , and th e Editing pane l to s e e it). H e re 's w h at m y UV m apping inte rface look s lik e :
Blende rart Magazine - July 20 0 6
Fig12. Th e UV m apping inte rface
Fig9 . Seam s for arm
Fig10 . Seam s for h e ad
Fig11. Seam s for h am m e r
3D W ork s h op - UV Mapping Tech niq ue s (Low -Poly) 32
Us ing LSCM Proje ction MappingSe le ct your m ode l, and go into UV Face Se le ct m ode by pre s s ing [F k e y], or by ch oos ing th at m ode from th e m e nu th e 3d Ve iwport pane l. Your m ode l w ill turn w h ite . Mak e s ure you h ave D raw Se am s, D raw Edge s, and D raw Face s all s e le cte d in th e UV Calculations m e nu, lik e th is :
Ne xt, w e ne e d to m ak e a ne w im age in th e UV/Im age Editor. Click Im age - > Ne w, th e n in th e box th at pops up type in a nam e if you want to, and also your te xture s iz e th e n pre s s ok .
Norm al te xture s iz e s for gam e s are s q uare and follow th e pow e rs of 2 i.e 64, 128, 256, 512, 1024. So ch oos e th e one th at work s be st for you. As a s ide note , I find it be st to work in a te xture s iz e th at is b igge r th an w h at w ill e ve ntually go in th e gam e . So if m y te xture s iz e is 256x256 in th e gam e , I'll work w ith one th at's 512x512, and re s iz e it w h e n th e tim e com e s. Th is is be caus e it's e as ie r to work w ith a large r s iz e (as long as it's not too large ), and it pre s e rve s m ore de tail if you e ve r want your te xture to be b igge r.
A black box w ill pop up in th e UV e ditor, you m ay h ave to z oom out a little to s e e th e w h ole th ing. Now, m ak ing sure you're still in UV Face Se le ct m ode w ith your m ode l, pre s s [A k e y] to s e le ct all th e face s.
Th e y s h ould all be com e h igh ligh te d, and you'll also s e e som e boxe s pop up in th e UV e ditor-th os e are th e face s th at w e h ave to unwrap.
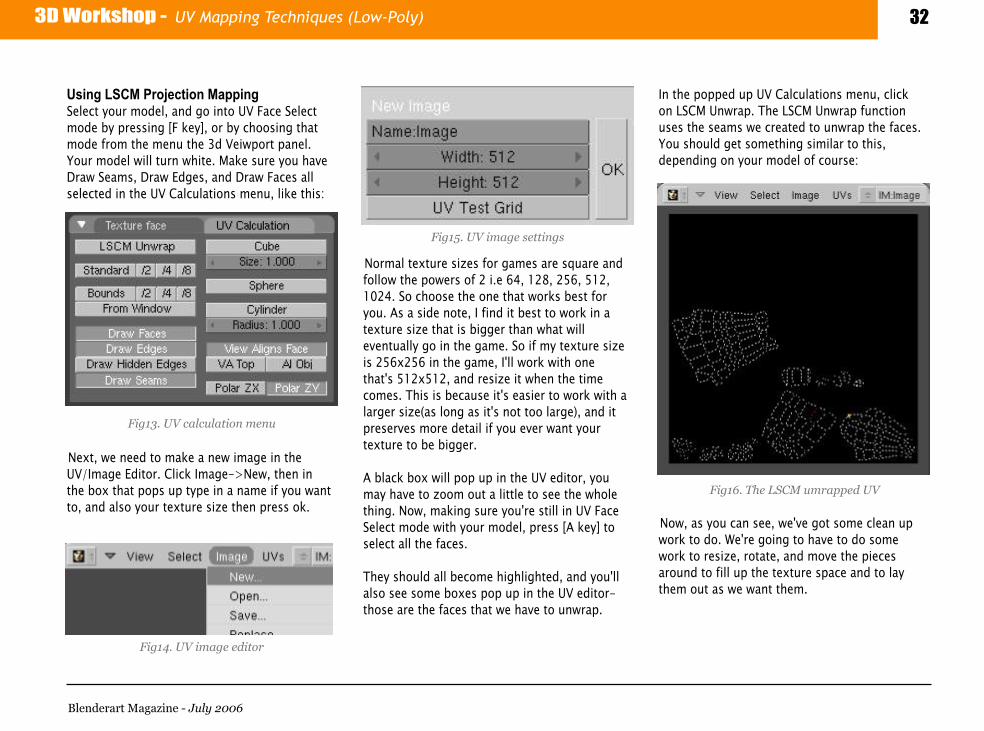
In th e poppe d up UV Calculations m e nu, click on LSCM Unwrap. Th e LSCM Unwrap function us e s th e s e am s w e cre ate d to unwrap th e face s. You s h ould ge t som e th ing s im ilar to th is, de pe nding on your m ode l of cours e :
Now, as you can s e e , w e 've got som e cle an up work to do. W e 're going to h ave to do som e work to re s iz e , rotate , and m ove th e pie ce s around to fill up th e te xture space and to lay th e m out as w e want th e m .
Blende rart Magazine - July 20 0 6
Fig16. Th e LSCM um rappe d UV
Fig13. UV calculation m e nu
Fig15. UV im age se ttings
Fig14. UV im age e ditor
3D W ork s h op - UV Mapping Tech niq ue s (Low -Poly) 33
Th e UV Te s t GridW h e n UV m apping a m ode l, you ge ne rally want to k e e p all pie ce s in proportion to e ach oth e r as m uch as pos s ible to pre ve nt te xture stre tch ing. So a good way to s e e if parts are be ing stre tch e d is to turn on th e UV Te st Grid. To do th is, Click on (Im age > > Ne w ), and m ak ing sure your te xture s iz e is corre ct, click on UV Te st Grid and click ok . Now you'll s e e som e th ing lik e th is :
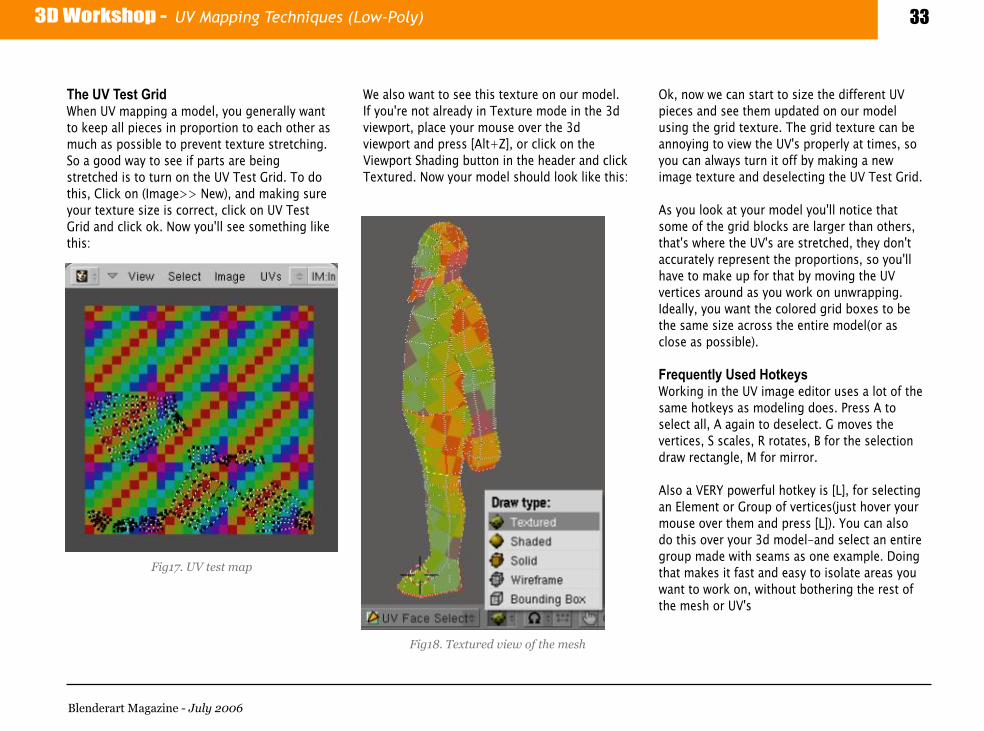
W e also want to s e e th is te xture on our m ode l. If you're not alre ady in Te xture m ode in th e 3d vie wport, place your m ous e ove r th e 3d vie wport and pre s s [Alt+ Z ], or click on th e Vie wport Sh ading button in th e h e ade r and click Te xture d. Now your m ode l s h ould look lik e th is :
O k , now w e can start to s iz e th e diffe re nt UV pie ce s and s e e th e m update d on our m ode l us ing th e grid te xture . Th e grid te xture can be annoying to vie w th e UV's prope rly at tim e s, so you can always turn it off by m ak ing a ne w im age te xture and de s e le cting th e UV Te st Grid.
As you look at your m ode l you'll notice th at som e of th e grid block s are large r th an oth e rs, th at's w h e re th e UV's are stre tch e d, th e y don't accurate ly re pre s e nt th e proportions, so you'll h ave to m ak e up for th at by m oving th e UV ve rtice s around as you work on unwrapping. Ide ally, you want th e colore d grid boxe s to be th e sam e s iz e acros s th e e ntire m ode l(or as clos e as pos s ible ).
Fre q ue ntly Us e d H otk e ysW ork ing in th e UV im age e ditor us e s a lot of th e sam e h otk e ys as m ode ling doe s. Pre s s A to s e le ct all, A again to de s e le ct. G m ove s th e ve rtice s, S scale s, R rotate s, B for th e s e le ction draw re ctangle , M for m irror.
Also a VERY pow e rful h otk e y is [L], for s e le cting an Ele m e nt or Group of ve rtice s (just h ove r your m ous e ove r th e m and pre s s [L]). You can also do th is ove r your 3d m ode l- and s e le ct an e ntire group m ade w ith s e am s as one e xam ple . D oing th at m ak e s it fast and e asy to isolate are as you want to work on, w ith out both e ring th e re st of th e m e s h or UV's
Blende rart Magazine - July 20 0 6
Fig17. UV te st m ap
Fig18. Texture d vie w of th e m e sh

3D W ork s h op - UV Mapping Tech niq ue s (Low -Poly) 34
In addition to th e h otk e ys m e ntione d above to place th e UV's into th is pos ition, I also us e a fe w oth e r functions to do diffe re nt th ings. To place 2 ve rtice s righ t on top of e ach oth e r(lik e m e rging th e m ), s e le ct th e m both , th e n pre s s S th e n 0 (th at is a z e ro). O r you can just Scale (S) th e m until th e y are as clos e as pos s ible .
In th e im age s be low, you can s e e th at I m ade th e ve rtice s of th e front and back e dge s of th e torso in a straigh t line . I did th at by s e le cting all of th e m on th e e dge , th e n pre s s ing S th e n X th e n 0. Th is aligns th e m all pe rfe ctly on th e X axis. Substitue X for Y if you want th e m line d up h oriz ontally.
Som e tim e s it's h ard to te ll w h at face line s up w ith th e conne cting face from anoth e r group. To do th is, go into Active Face Se le ct Mode by pre s s ing C in th e UV e ditor, or click ing Se le ct-> Active Face Se le ct, th e n click on one face from one group, and you w ill s e e it be com e s h igh ligh te d w ith 2 w h ite e dge s, one gre e n e dge , and one re d e dge .
Th is h igh ligh te d face is also s h own on th e 3d m ode l! So by s e le cting diffe re nt face s you can s e e w h at line s up w ith w h at! Th is also m ak e s it e asy to s e le ct and m ove one , or a group of face s at a tim e , inste ad of pick ing up ve rtice s.
Th e re are a lot of diffe re nt functions th at you s h ould try out and play around w ith locate d in th e UV/Im age Editor drop down m e nus.
Unw rapping & PlacingI start off by work ing w ith th e torso and le g UV's. I want to com bine th e m toge th e r so th at th e y w ill be s e am le s s along th e waist. As long as you're not wasting ne e de d te xture space , it's a good ide a to com bine 2 parts w h e ne ve r pos s ible .
Moving on to th e face , I'm not h appy w ith h ow th e LSCM unwrappe r m ade it. I rath e r paint it straigh t on, as it's m ore natural th at way. So w h at I'm going to do is to us e Planar m apping for th e diffe re nt pie ce s of th e h e ad, in addition to th e face , th e n attach as m any e dge s to e ach oth e r as pos s ible .
Blende rart Magazine - July 20 0 6
Fig19 . Active face s
Fig19 b. Unw rapping and placing
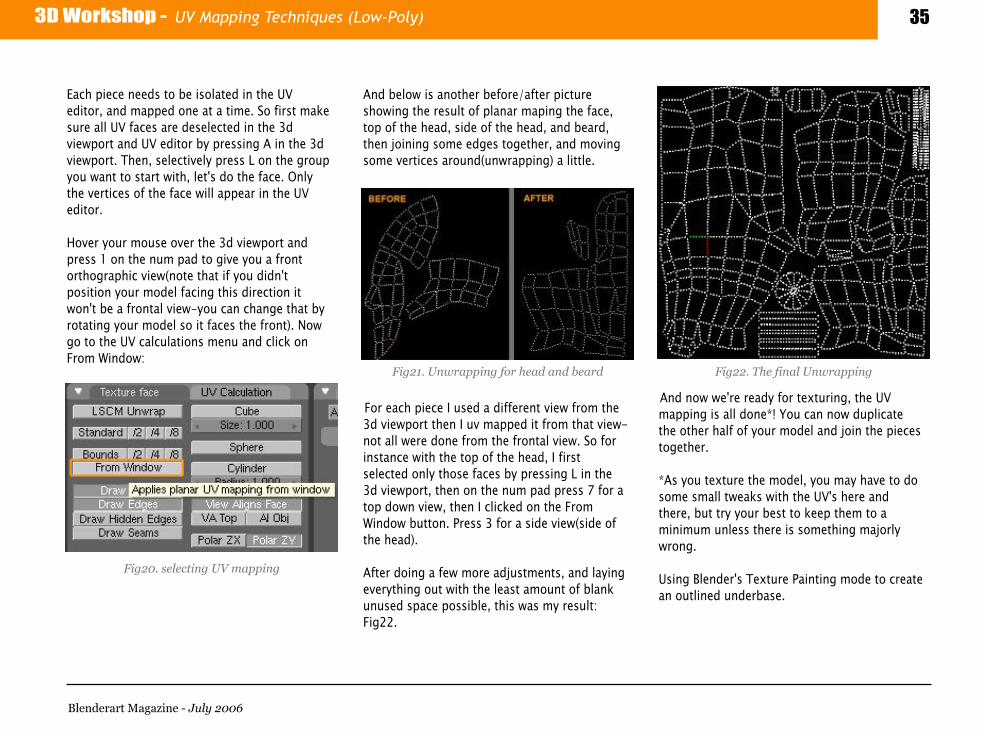
3D W ork s h op - UV Mapping Tech niq ue s (Low -Poly) 35
Each pie ce ne e ds to be isolate d in th e UV e ditor, and m appe d one at a tim e . So first m ak e s ure all UV face s are de s e le cte d in th e 3d vie wport and UV e ditor by pre s s ing A in th e 3d vie wport. Th e n, s e le ctive ly pre s s L on th e group you want to start w ith , le t's do th e face . O nly th e ve rtice s of th e face w ill appe ar in th e UV e ditor.
H ove r your m ous e ove r th e 3d vie wport and pre s s 1 on th e num pad to give you a front orth ograph ic vie w (note th at if you didn't pos ition your m ode l facing th is dire ction it won't be a frontal vie w - you can ch ange th at by rotating your m ode l so it face s th e front). Now go to th e UV calculations m e nu and click on From W indow :
And be low is anoth e r be fore /afte r picture s h ow ing th e re s ult of planar m aping th e face , top of th e h e ad, s ide of th e h e ad, and be ard, th e n joining som e e dge s toge th e r, and m oving som e ve rtice s around(unwrapping) a little .
For e ach pie ce I us e d a diffe re nt vie w from th e 3d vie wport th e n I uv m appe d it from th at vie w -not all w e re done from th e frontal vie w . So for instance w ith th e top of th e h e ad, I first s e le cte d only th os e face s by pre s s ing L in th e 3d vie wport, th e n on th e num pad pre s s 7 for a top down vie w, th e n I click e d on th e From W indow button. Pre s s 3 for a s ide vie w (s ide of th e h e ad).
Afte r doing a fe w m ore adjustm e nts, and laying e ve ryth ing out w ith th e le ast am ount of blank unus e d space pos s ible , th is was m y re sult: Fig22.
And now w e 're re ady for te xturing, th e UV m apping is all done *! You can now duplicate th e oth e r h alf of your m ode l and join th e pie ce s toge th e r.
*As you te xture th e m ode l, you m ay h ave to do som e sm all tw e ak s w ith th e UV's h e re and th e re , but try your be st to k e e p th e m to a m inim um unle s s th e re is som e th ing m ajorly wrong.
Us ing Ble nde r's Te xture Painting m ode to cre ate an outline d unde rbas e .
Blende rart Magazine - July 20 0 6
Fig21. Unw rapping for h e ad and be ard Fig22. Th e final Unw rapping
Fig20 . selecting UV m apping
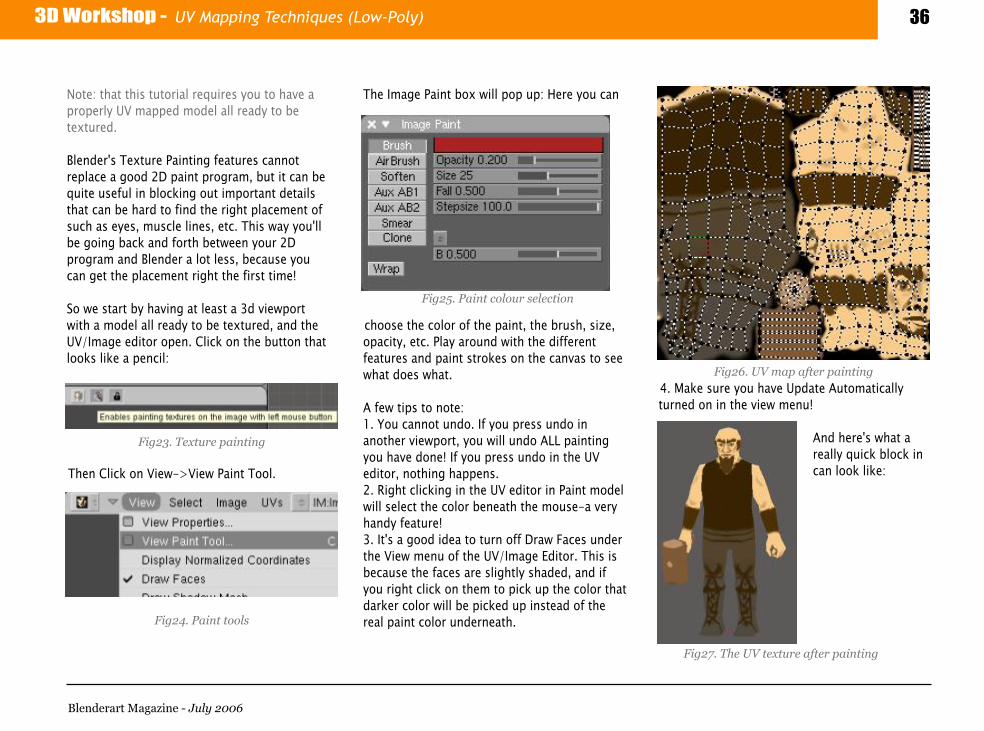
3D W ork s h op - UV Mapping Tech niq ue s (Low -Poly) 36
Note : th at th is tutorial re q uire s you to h ave a prope rly UV m appe d m ode l all re ady to be te xture d.
Ble nde r's Te xture Painting fe ature s cannot re place a good 2D paint program , but it can be q uite us e ful in block ing out im portant de tails th at can be h ard to find th e righ t place m e nt of such as e ye s, m uscle line s, e tc. Th is way you'll be going back and forth be tw e e n your 2D program and Ble nde r a lot le s s, be caus e you can ge t th e place m e nt righ t th e first tim e !
So w e start by h aving at le ast a 3d vie wport w ith a m ode l all re ady to be te xture d, and th e UV/Im age e ditor ope n. Click on th e button th at look s lik e a pe ncil:
Th e n Click on Vie w - > Vie w Paint Tool.
Th e Im age Paint box w ill pop up: H e re you can
ch oos e th e color of th e paint, th e brus h , s iz e , opacity, e tc. Play around w ith th e diffe re nt fe ature s and paint strok e s on th e canvas to s e e w h at doe s w h at.
A fe w tips to note :1. You cannot undo. If you pre s s undo in anoth e r vie wport, you w ill undo ALL painting you h ave done ! If you pre s s undo in th e UV e ditor, noth ing h appe ns.2. Righ t click ing in th e UV e ditor in Paint m ode l w ill s e le ct th e color be ne ath th e m ous e - a ve ry h andy fe ature !3. It's a good ide a to turn off D raw Face s unde r th e Vie w m e nu of th e UV/Im age Editor. Th is is be caus e th e face s are sligh tly s h ade d, and if you righ t click on th e m to pick up th e color th at dark e r color w ill be pick e d up inste ad of th e re al paint color unde rne ath .
4. Mak e s ure you h ave Update Autom atically turne d on in th e vie w m e nu!
And h e re 's w h at a re ally q uick block in can look lik e :
Blende rart Magazine - July 20 0 6
Fig25. Paint colour selection
Fig26. UV m ap afte r painting
Fig23. Texture painting
Fig24. Paint tools
Fig27. Th e UV texture afte r painting
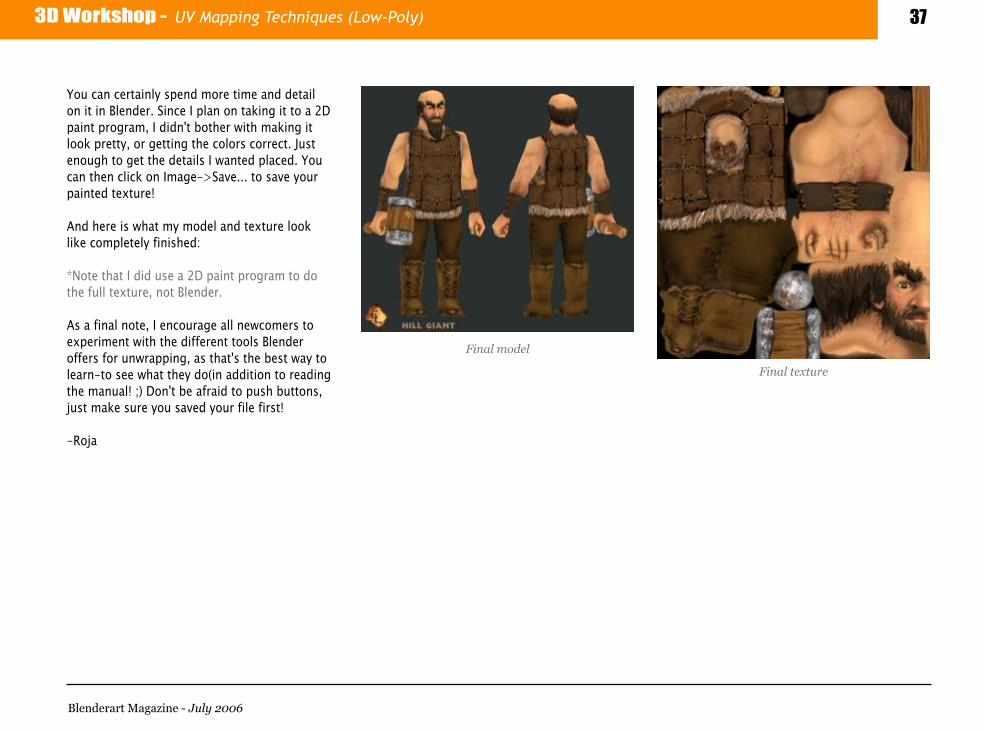
3D W ork s h op - UV Mapping Tech niq ue s (Low -Poly) 37
You can ce rtainly spe nd m ore tim e and de tail on it in Ble nde r. Since I plan on tak ing it to a 2D paint program , I didn't both e r w ith m ak ing it look pre tty, or ge tting th e colors corre ct. Just e nough to ge t th e de tails I wante d place d. You can th e n click on Im age - > Save ... to save your painte d te xture !
And h e re is w h at m y m ode l and te xture look lik e com ple te ly finis h e d:
*Note th at I did us e a 2D paint program to do th e full te xture , not Ble nde r.
As a final note , I e ncourage all ne wcom e rs to e xpe rim e nt w ith th e diffe re nt tools Ble nde r offe rs for unwrapping, as th at's th e be st way to le arn- to s e e w h at th e y do(in addition to re ading th e m anual! ;) D on't be afraid to pus h buttons, just m ak e s ure you save d your file first!
- Roja
Blende rart Magazine - July 20 0 6
Final texture
Final m odel

3D W ork s h op - Using Blueprints in Blende r 38
Le ve l: Inte rm e diate
Us ing Blue prints in Ble nde rMode ling com ple x s h ape s and m ode ls in Ble nde r, or in any oth e r 3D application, m ay s e e m lik e a daunting tas k if you do not k now w h e re and h ow to start. H ow are you suppos e d to m ode l a car w ith its com ple x h ood or fe nde r curve s? Th is is w h e re Blue prints com e in. Th e y w ill act as a m ode ling guide to h e lp m ak e th e s h ape s you would norm ally h ave trouble m ak ing w ith out blue prints. Th is article w ill start by e xplaining h ow to prope rly s e t up blue print guide line s in Ble nde r and th e n e xplain h ow to us e th e m for m ode ling.
Se t upTh e first ste p is obviously obtaining blue prints to work w ith . If you do not h ave th e m alre ady, th e n Google is your frie nd. You s h ould also ch e ck out h ttp://www.th e - blue prints.com . W e w ill be us ing th e blue prints of a Ford Escort us e d in rally racing.
Th e s e cond ste p is dividing your blue prints into s e parate im age s. You m ust tak e spe cial care to m ak e s ure th at th e s iz e s and dim e ns ions of an im age stay proportional to th e oth e r im age s oth e rw is e you w ill find th at th e y do not fit toge th e r in Ble nde r.
Th is re q uire s re s iz ing th e blue prints in th e Gim p or Ph otos h op but w ill not be e xplaine d in th is article . You s h ould, afte r th e m odifications, h ave an im age for e ach s ide /dire ction of your m ode l, in th is cas e , four (front, back , s ide , top).Se e fig2 blue prints w ith sam e dim e ns ions.
Blende rart Magazine - July 20 0 6
- By Edouard de Mah ie u
Fig1. Adding blueprint as back ground in Blende r
Fig2. Blueprint from diffe re nt side s

3D W ork s h op - Using Blueprints in Blende r 39
O nce th is is done , w e ne e d to s e t th e m up in Ble nde r. Th e advantage of th is s e tup is th at you can h ave s e ve ral blue prints on th e sam e scre e n and be able to vie w th e m at diffe re nt angle s w h ile giving you a be tte r ide a of de pth and m ak ing it e as ie r to m ode l th e pie ce s. To do th is, start Ble nde r and go to th e top vie wport and add th e first im age to th e back ground by: (Vie w >> Back ground Im age >> Us e Back ground Im age ) and s e le ct your im age . Your first im age , in th is cas e , th e top im age , appe ars in th e top vie wport. Th e n add a plane : (Add>> Me s h >> Plane ). And scale to fit your back ground e xactly us ing th e [S k e y]+ [X k e y, Y k e y or Z k e y].
Now go to th e m ate rial tab, add a ne w m ate rial and give it an appropriate nam e . Add a ne w Te xture and load th e sam e im age as be fore . In th e m ap input m e nu s e le ct UV. Split th e vie wport and ope n up th e UV/Im age Editor. Load up th e sam e im age . Se le ct your obje ct and go into th e UV Face Se le ct Mode . Pre s s th e [U k e y] and s e le ct Cube from th e m e nu. Th e plane UV coordinate s w ill now appe ar in th e UV/Im age Editor. Pos ition th e ve rtice s as be fore to m ap th e im age corre ctly on th e plane . Mak e s ure th e y fit corre ctly. Now go into th e (Draw Type >> Te xture d), us ing th e [ALT-Z ] s h ortcut. Th e te xture w ill appe ar m appe d on th e plane .
Re pe at w ith e ach of your im age s and pos ition th e plane s corre ctly as to h ave a re sult s im ilar to th e follow ing scre e ns h ot: Fig3.
You now h ave a strong blue print s e tup th at w ill e as e and guide your m ode ling. Now, if th is is done corre ctly, all th at is le ft to do is to actually m ode l. I w ill now try to e xplain, th rough an e xam ple , h ow to m ode l th e h ood of th e car us ing th is blue print s e tup.
Mode ling th e Pie ce sGo into top vie w [Num pad 7] and (Space bar>> Add>> Plane ). Place th e first four ve rtice s as s e e n in th e scre e ns h ot. Fig4
Th e first e dge goe s dire ctly in th e m iddle , as w e w ill be us ing a Mirror m odifie r for th e m ode l. Th e s e cond e dge s h ould be furth e r to th e righ t. W e w ill be e xtruding th is e dge of two ve rtice s, m ak ing sm all adjustm e nts to th e ir pos ition to follow th e blue prints. You s h ould now h ave a m e s h s im ilar to th e follow ing scre e ns h ot:Fig5.
Blende rart Magazine - July 20 0 6
Fig3. Blueprints projecte d on plain m e shFig4.Adding a plane
Fig5.Extruding th e m e sh
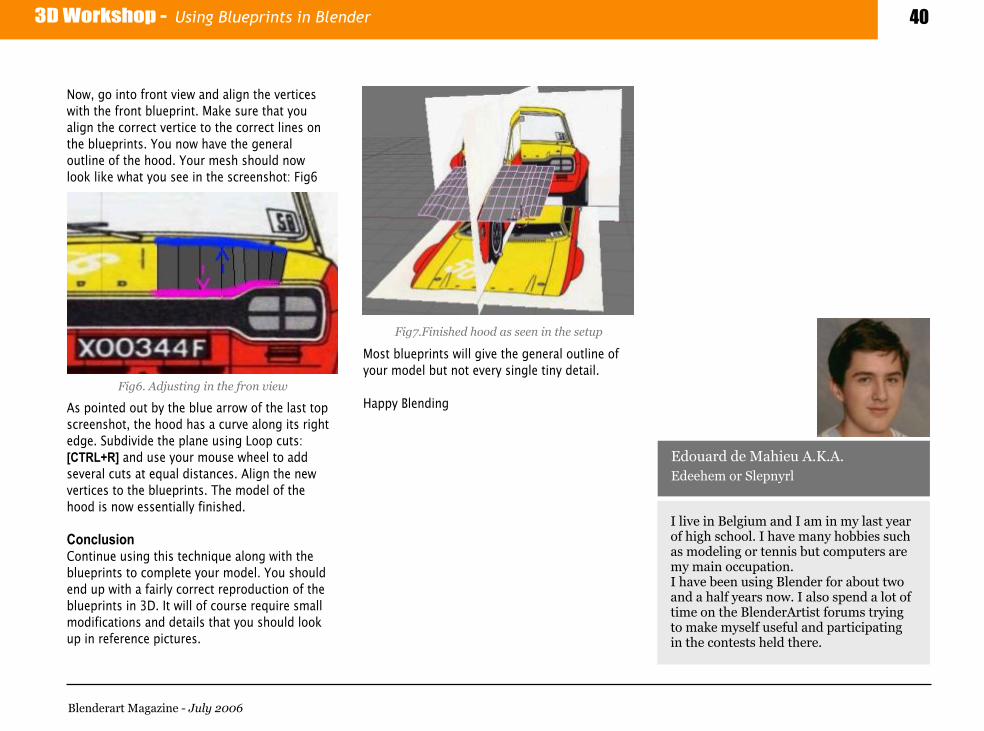
3D W ork s h op - Using Blueprints in Blende r 40
Now, go into front vie w and align th e ve rtice s w ith th e front blue print. Mak e s ure th at you align th e corre ct ve rtice to th e corre ct line s on th e blue prints. You now h ave th e ge ne ral outline of th e h ood. Your m e s h s h ould now look lik e w h at you s e e in th e scre e ns h ot: Fig6
As pointe d out by th e blue arrow of th e last top scre e ns h ot, th e h ood h as a curve along its righ t e dge . Subdivide th e plane us ing Loop cuts : [CTRL+ R] and us e your m ous e w h e e l to add s e ve ral cuts at e q ual distance s. Align th e ne w ve rtice s to th e blue prints. Th e m ode l of th e h ood is now e s s e ntially finis h e d.
Conclus ion Continue us ing th is te ch niq ue along w ith th e blue prints to com ple te your m ode l. You s h ould e nd up w ith a fairly corre ct re production of th e blue prints in 3D . It w ill of cours e re q uire sm all m odifications and de tails th at you s h ould look up in re fe re nce picture s.
Most blue prints w ill give th e ge ne ral outline of your m ode l but not e ve ry s ingle tiny de tail.
H appy Ble nding
Blende rart Magazine - July 20 0 6
Fig6. Adjusting in th e fron vie w
Fig7.Finish e d h ood as se e n in th e se tup
I live in Belgium and I am in m y last ye ar of h igh sch ool. I h ave m any h obbie s such as m odeling or te nnis but com pute rs are m y m ain occupation. I h ave be e n using Ble nde r for about tw o and a h alf ye ars now . I also spe nd a lot of tim e on th e Ble nde rArtist forum s trying to m ak e m yself use ful and participating in th e conte sts h eld th e re .
Edouard de Mah ie u A.K.A. Ede e h e m or Slepnyrl

Ble nding - A Sonorous Trip 41
ABSTRACTTh e m ain goal of th is proje ct w as to cre ate an im m e rsive virtual e nvironm e nt. An e nvironm e nt w h e re th e use r's body m ove m e nts, as se nse d by a dance pad, allow h im or h e r to e xplore and develop th e ge ne ral atm osph e re of its e nvironm e nt th rough th e m anipulation of a se rie s of sonorous and visual cue s. Se condary goal of th is proje ct w as to te st th e fle xibility of fre e softw are for cre ating a proje ct of th is k ind. Ble nde r w as use d to cre ate th e 3D e nvironm e nt and also as a re al-tim e 3D e ngine . Csound and Audacity w e re use d to e xpe rim e nt w ith sound ge ne ration and proce ssing. Th is last goal w as a ve ry im portant pe rsonal one as I use fre e softw are be cause of m y convictions: Th ough t m ust be ope n and fle xible . Art is fre e and ide as m ust be available for anyone outside th e artists' inne r space .
INTRODUCTIONI alw ays lik e d th e gam e s. My goal is to m ak e artistic gam e s base d on th e intelle ct. Som e of th e gam e s w ith th e se ch aracte ristics are MYST, Monk e y Island (1, 2, and 3), and Indiana Jone s of Lucas Arts Film s.
I th ink th at gam e s can h elp cre ate ne w ide as for artistic proje cts. I be gan to e njoy th e gam e s com bine d w ith art.
But h ow can I cre ate th is proje ct? My only basis is in m y ow n e xpe rie nce s w ith th e gam e s and artistic proje cts in 3D.
My w ork is innovative be cause it is a gam e base d on an e nvironm e nt m ade of artistic conce pts and be side s, be cause of th at, is not a com m on artw ork .
My palle t transform s in th e te xture s and th e diffe re nt com position in th e 3D space . Th e dance pad is innovative be cause it re q uire s a ne w function; you use your fe e t to m ove in a virtual e nvironm e nt and find diffe re nt sounds around you, e ve ry tim e th at you be gin th e gam e , th e e xpe rie nce w ill be diffe re nt.
I use th e traditional art form s of painting, sculpting and installations com bine d w ith synth e tic sounds and digital graph ics to m ak e a ne w art obje ct.
W h y is th is gam e artistic? Be cause I cre ate d a pe rce ption ove r th e re ality itself; th e goal is to unde rstand th e dynam ics of th e gam e , th at is w h y it is not e asy to go from on w orld to anoth e r.
H ow did I ge t th e ide a of th is proje ct? I se arch e d for a w ay to e xpre ss diffe re nt se nsation in th e body w ith re ality, so I taugh t in virtual form s. I didn't w ant just a virtual 3D space to m ove around in, I w ante d ne w w ays to relate w ith th e w orld th rough art. Th e ide a w as to m ak e a 3D e nvironm e nt th at involve s th e spe ctator.
A pe rson approach s th e w orld developm e nt by m e ans of its relationsh ip w ith sounds and obje cts. Th at's w h y th e inte rface be com e s so im portant; th e inte raction w ith th e pad de m ands a corpore al force . Th is pape r re q uire s basic k now le dge of th e th re e m e ntione d softw are tools use d to cre ate th e virtual e nvironm e nt.
CATEGORIES AND SUBJECT DESCRIPTORS
DESIGNING TH E W ORLDAll ele m e nts, artistic and synth e tic, de pe nd on e ach oth e r. First, you ne e d to h ave a good ide a about th e k ind of artistic and synth e tic conce pts you w ant to e xpre ss be fore th e sound and te xture librarie s can be built.
Blende rart Magazine - July 20 0 6
- By Die go R e stre po Paris
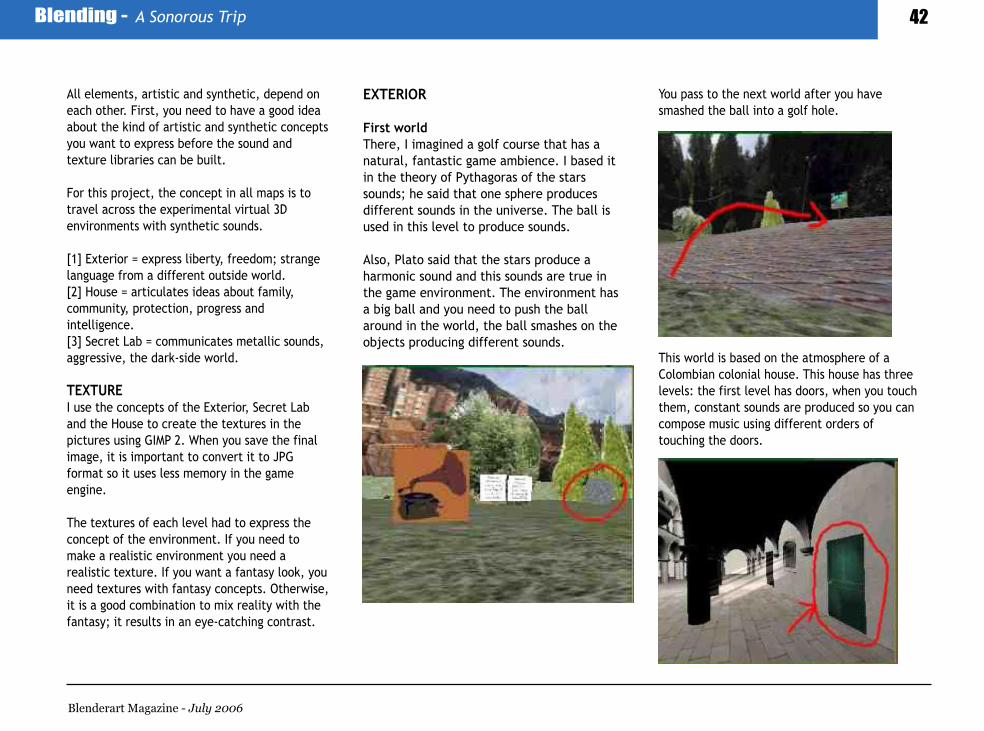
Ble nding - A Sonorous Trip 42
All ele m e nts, artistic and synth e tic, de pe nd on e ach oth e r. First, you ne e d to h ave a good ide a about th e k ind of artistic and synth e tic conce pts you w ant to e xpre ss be fore th e sound and te xture librarie s can be built.
For th is proje ct, th e conce pt in all m aps is to travel across th e e xpe rim e ntal virtual 3D e nvironm e nts w ith synth e tic sounds.
[1] Exte rior = e xpre ss libe rty, fre e dom ; strange language from a diffe re nt outside w orld.[2] H ouse = articulate s ide as about fam ily, com m unity, prote ction, progre ss and intellige nce .[3] Se cre t Lab = com m unicate s m e tallic sounds, aggre ssive , th e dark -side w orld.
TEXTUREI use th e conce pts of th e Exte rior, Se cre t Lab and th e H ouse to cre ate th e te xture s in th e picture s using GIMP 2. W h e n you save th e final im age , it is im portant to conve rt it to JPG form at so it use s le ss m e m ory in th e gam e e ngine .
Th e te xture s of e ach level h ad to e xpre ss th e conce pt of th e e nvironm e nt. If you ne e d to m ak e a re alistic e nvironm e nt you ne e d a re alistic te xture . If you w ant a fantasy look , you ne e d te xture s w ith fantasy conce pts. Oth e rw ise , it is a good com bination to m ix re ality w ith th e fantasy; it re sults in an e ye -catch ing contrast.
EXTERIOR
First w orldTh e re , I im agine d a golf course th at h as a natural, fantastic gam e am bie nce . I base d it in th e th e ory of Pyth agoras of th e stars sounds; h e said th at one sph e re produce s diffe re nt sounds in th e unive rse . Th e ball is use d in th is level to produce sounds.
Also, Plato said th at th e stars produce a h arm onic sound and th is sounds are true in th e gam e e nvironm e nt. Th e e nvironm e nt h as a big ball and you ne e d to push th e ball around in th e w orld, th e ball sm ash e s on th e obje cts producing diffe re nt sounds.
You pass to th e ne xt w orld afte r you h ave sm ash e d th e ball into a golf h ole .
Th is w orld is base d on th e atm osph e re of a Colom bian colonial h ouse . Th is h ouse h as th re e levels: th e first level h as doors, w h e n you touch th e m , constant sounds are produce d so you can com pose m usic using diffe re nt orde rs of touch ing th e doors.
Blende rart Magazine - July 20 0 6

Ble nding - A Sonorous Trip 43
On th e se cond floor, th e picture s m ak e th e e nvironm e nt; you ne e d to find th e picture s using th e clue s of th e diffe re nt paragraph s th at are all around th e place .
Th e th ird floor is a suicide prove base d in faith , you ne e d to de cide to go dow n to th e h ouse . I base d it on th e m ovie , Indiana Jone s (19 89 ).
SECRET GRAIL: Th ird w orldIn th is level, you h ave to find th e re al grail cup and liste n to th e e nvironm e nt. Th e grail is m ade of w ood be cause Je sus is a carpe nte r and norm ally th e cup is of w ood. I lik e d th e conce pt tak e n from th e m ovie be cause it e xpre sse s auth e ntic approach e s to th e w orld's de velopm e nt by its relation w ith sounds and obje cts. Th at's w h y th e inte rface be com e s so im portant; th e inte raction w ith rug de m ands a corporal force .
CONCLUSIONS & FUTURE W ORKYou can cre ate an artistic proje ct w ith a 3D e nvironm e nt, using fre e softw are . I w ork e d w ith conce pts about sounds and im aginary e nvironm e nts. It is im portant to m ak e a plan of w h at you w ant to do. But w h at is im portant w h e n you m ak e th e proje ct, is to ge ne rate th e ide as during th e building proce ss.
In th is w ay, you can e nrich your proce ss cre atively w ith your ow n stuff.
ACKNOW LEDGMENTS I w ould lik e to th ank th e follow ing pe rsons for th e ir support in m ak ing th is proje ct a re ality: C. Pinzón, Te ch nical and gam e e ngine support. L.M. Barre ro, (w riting h elp). D. Prie to and D. Doria sounds and m usic.
REFERENCESh ttp://w w w.e tc.cm u.e du/curriculum /bvw /h ttp://w w w.ble nde r.org/cm s/H om e .2.0.h tm lh ttp://w w w.its2.uidah o.e du/cti/h ttp://w w w.csounds.com /Giose ffo Z arlino, H arm onice s Mundi.Aristótele s, Del cielo .Pitágoras, La Re pública
Blende rart Magazine - July 20 0 6

Ble nding - A Sonorous Trip 44
ID 172609Tras 16#133-30 int 34 BogotáColom bia.Copyrigh t Die go Re stre po ParÃs, 2006+ (057)4832375, Colom bia arcanouv2@ h otm ail.comdie g-re s@ uniande s.e du.com
Blende rart Magazine - July 20 0 6
Die go R e stre po París is a 24 ye ar old art stude nt from "Unive rsidad de losande s" in Bogotá. You can contact h im at die g-re s@ unainde s.e du.com
Die go R e stre po Paris
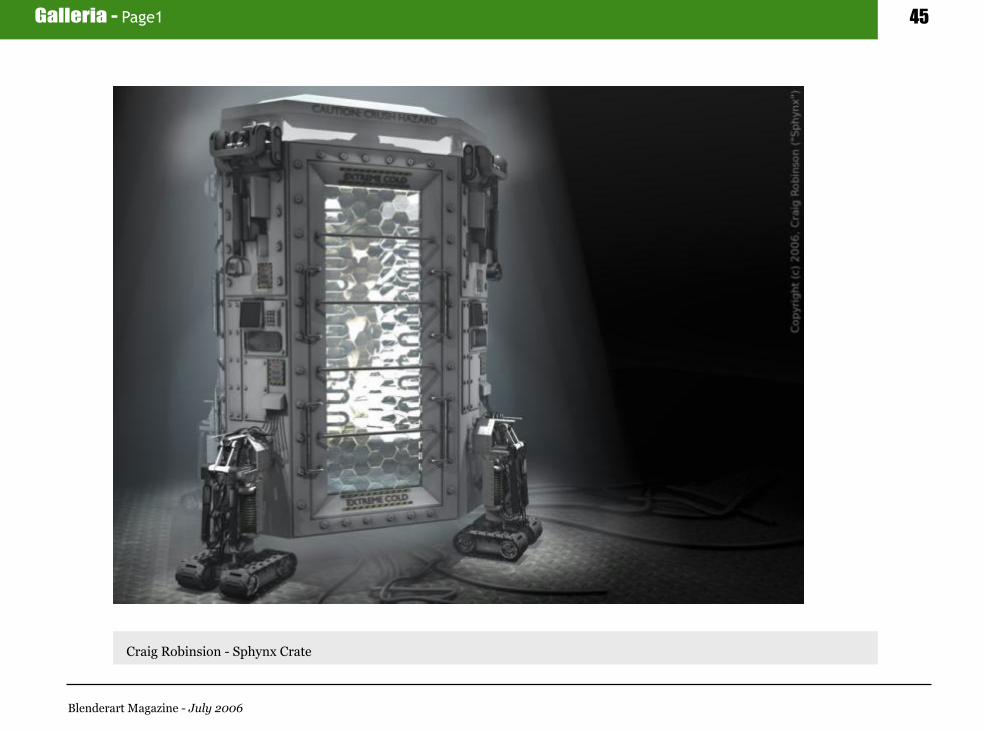
Galle ria - Page 1 45
Blende rart Magazine - July 20 0 6
Craig Robinsion - Sph ynx Crate

Galle ria - Page 2 46
Blende rart Magazine - July 20 0 6
Bullix - To th e com pe te tion
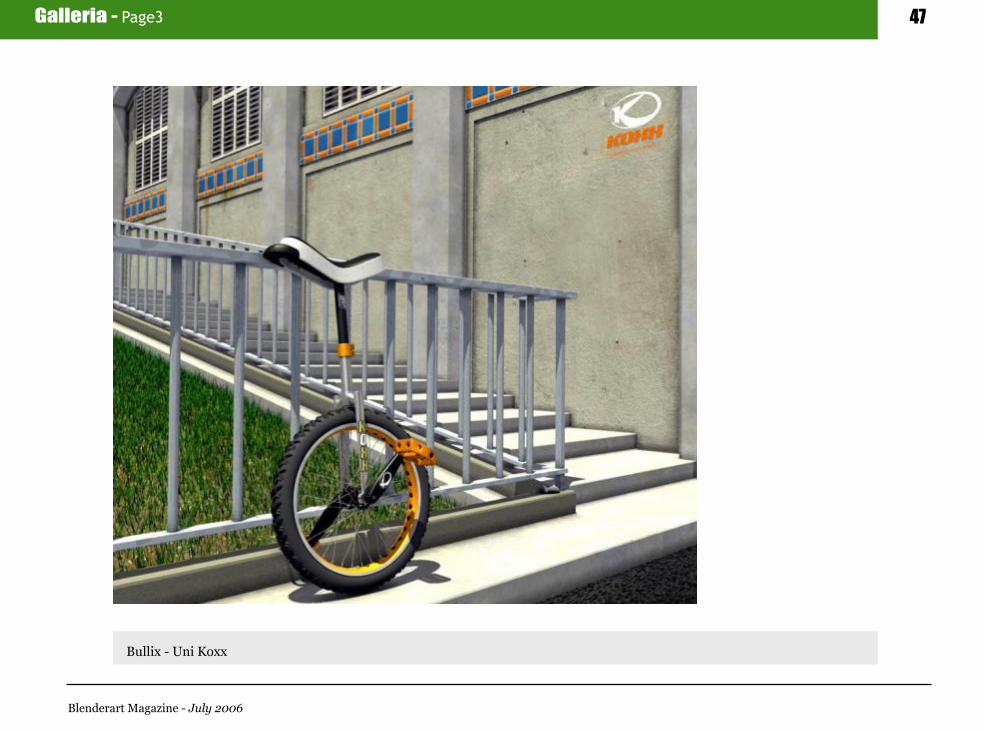
Galle ria - Page 3 47
Blende rart Magazine - July 20 0 6
Bullix - Uni Koxx

Galle ria - Page 4 48
Blende rart Magazine - July 20 0 6
Je sse Nelson - Bism ark

Galle ria - Page 5 49
Blende rart Magazine - July 20 0 6
Je sse Nelson - Obi F1

Galle ria - Page 6 50
Blende rart Magazine - July 20 0 6
Roge rio Pe driz - M ill's Z one - O rion Te ar

Galle ria - Page 7 51
Blende rart Magazine - July 20 0 6
Edouard - Sidi Bou Said

Galle ria - Page 8 52
Blende rart Magazine - July 20 0 6
Edouard - Aira com e t
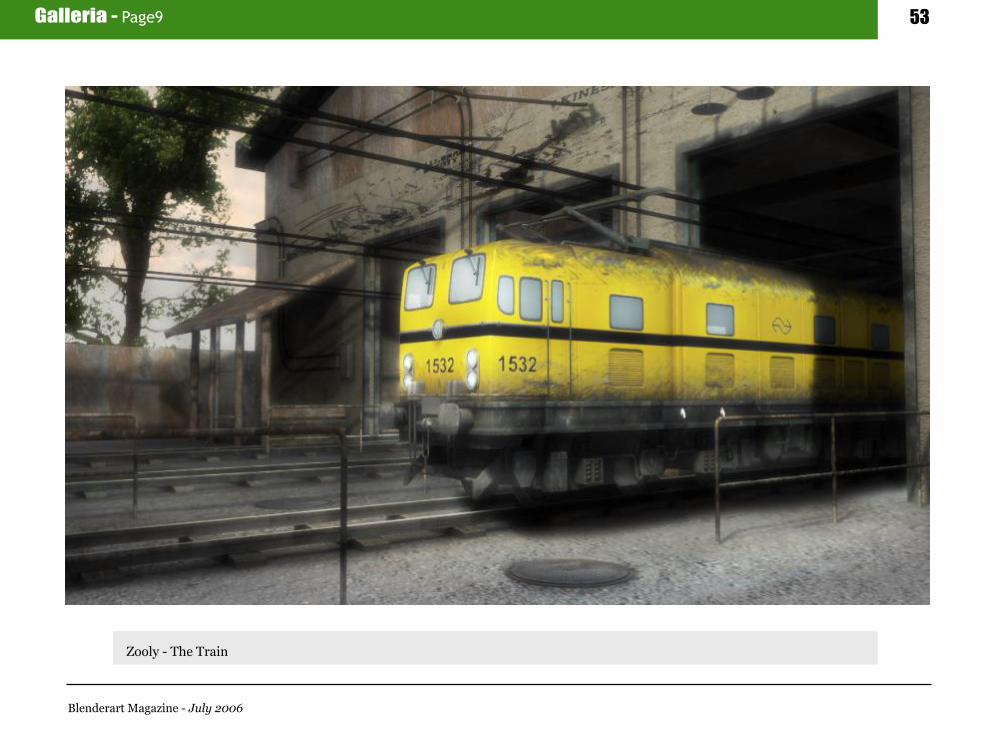
Galle ria - Page 9 53
Blende rart Magazine - July 20 0 6
Z ooly - Th e Train

Galle ria - Page 10 54
Blende rart Magazine - July 20 0 6
Z ooly - Potrait and Asian girl
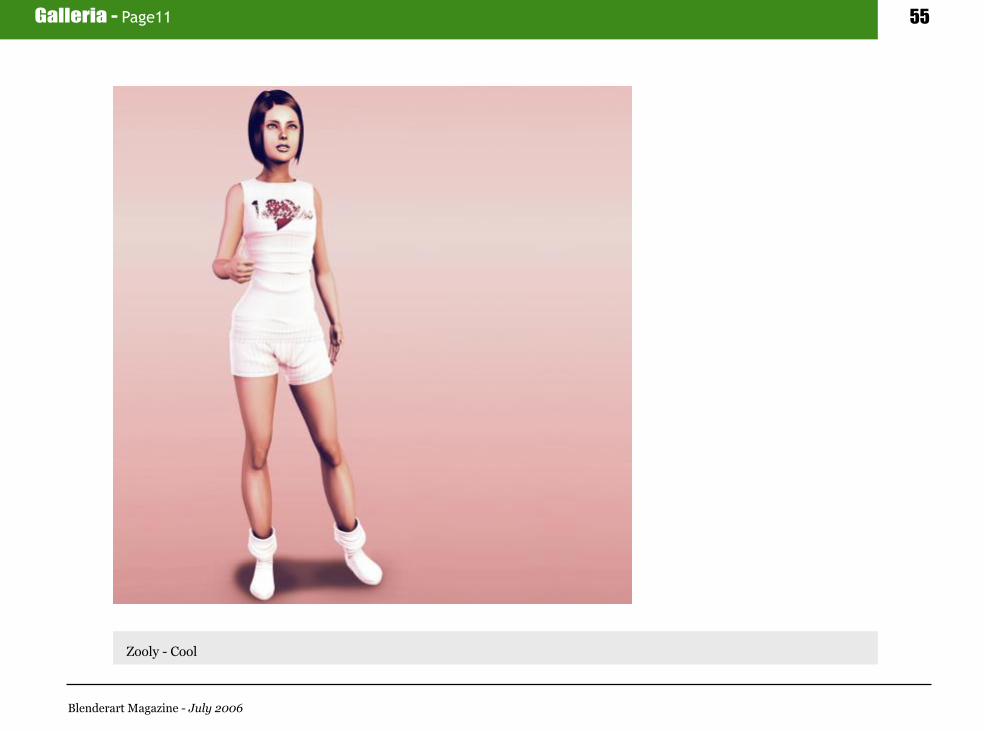
Galle ria - Page 11 55
Blende rart Magazine - July 20 0 6
Z ooly - Cool

Galle ria - Page 12 56
Blende rart Magazine - July 20 0 6
Salavador Gracia Be rnal - Ch ilm e spe rs
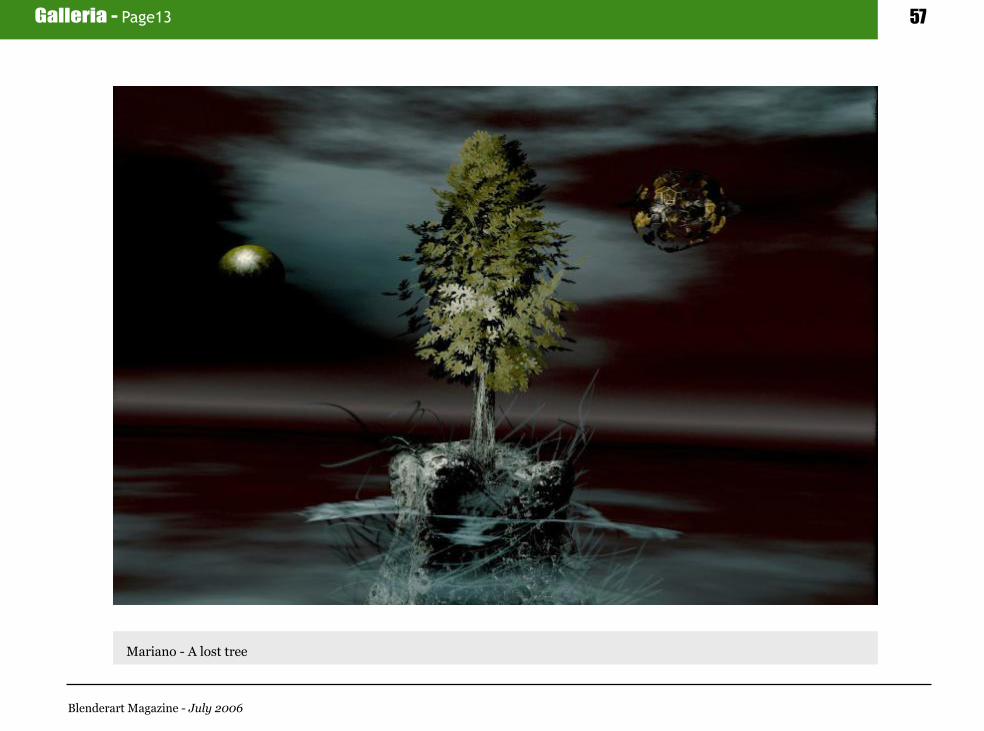
Galle ria - Page 13 57
Blende rart Magazine - July 20 0 6
Mariano - A lost tre e

Galle ria - Page 14 58
Blende rart Magazine - July 20 0 6
Dia'a el k h aw alde h - R e d h orizons
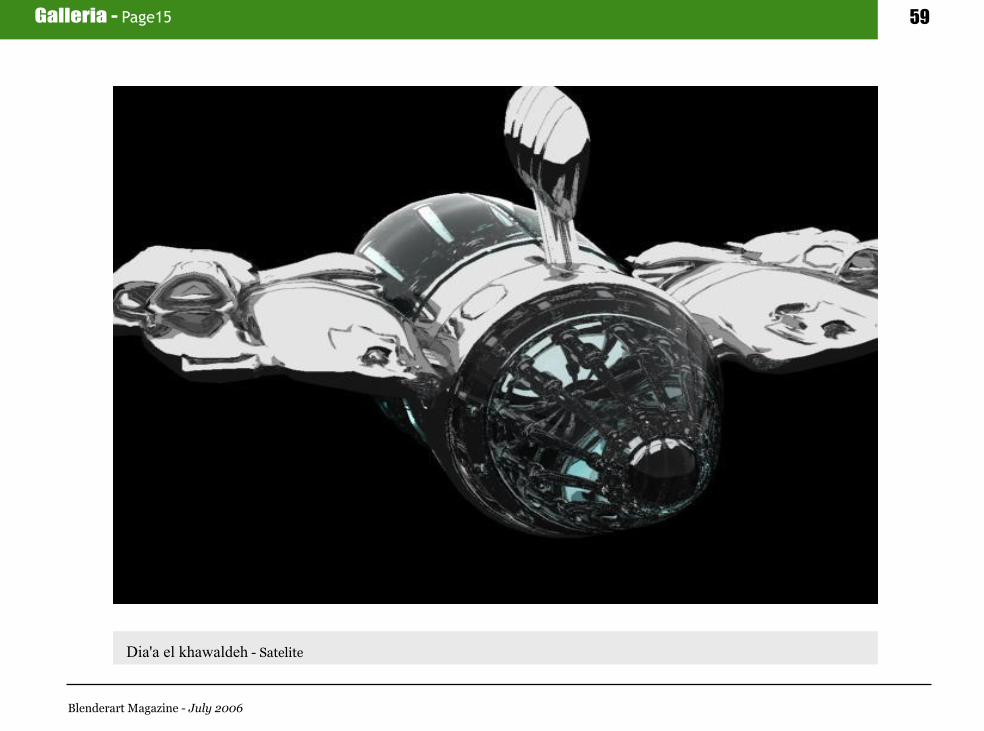
Galle ria - Page 15 59
Blende rart Magazine - July 20 0 6
Dia'a el k h aw alde h - Satelite

Galle ria - Page 16 6 0
Blende rart Magazine - July 20 0 6
Alh aith am Jas sar - Dolph ins

Galle ria - Page 17 6 1
Blende rart Magazine - July 20 0 6
Dh dew ey - Gh oul

Galle ria - Page 18 6 2
Blende rart Magazine - July 20 0 6
Jayson Allen Bayne - Robot

Galle ria - Page 19 6 3
Blende rart Magazine - July 20 0 6
Joh n Starr - Glass of w ate r

Galle ria - Page 20 6 4
Blende rart Magazine - July 20 0 6
Fabien Sanner - Tetec
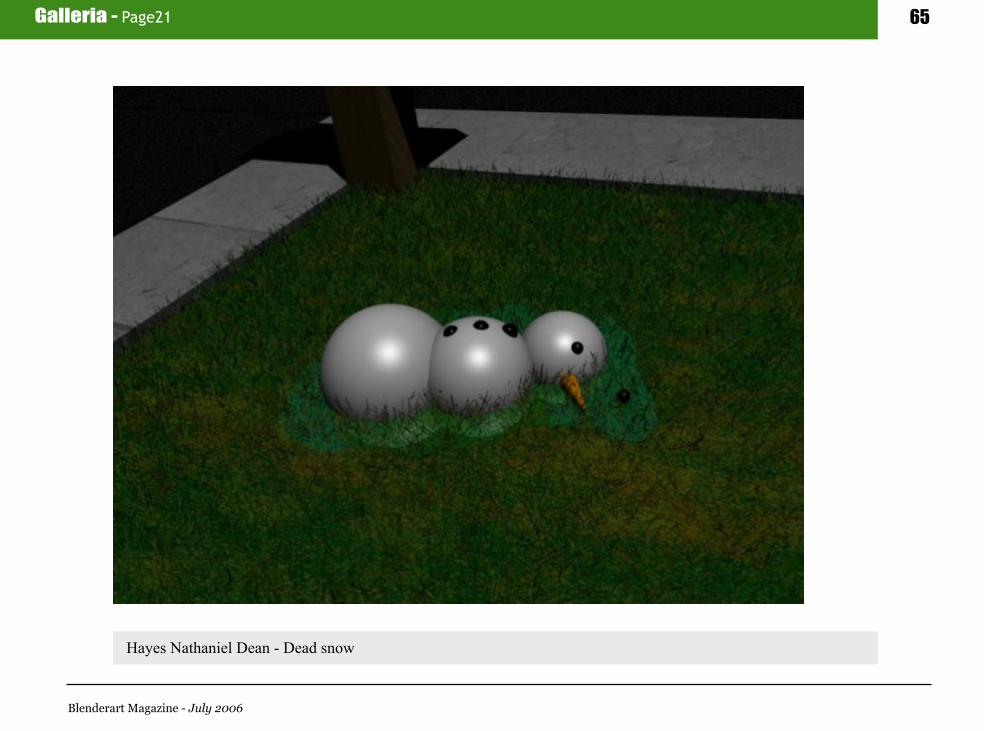
Galle ria - Page 21 6 5
Blende rart Magazine - July 20 0 6
H aye s Nath aniel Dean - Dead snow

Galle ria - Page 22 6 6
Blende rart Magazine - July 20 0 6
Jam e s Partak er - Ferrari 360 M odena

Galle ria - Page 23 6 7
Blende rart Magazine - July 20 0 6
Les s e burnts e - H eads h ot

Galle ria - Page 24 6 8
Blende rart Magazine - July 20 0 6
Nivik M asterton - GoCart

Galle ria - Page 25 6 9
Blende rart Magazine - July 20 0 6
Pavel Sh abanov - Th e cars

Galle ria - Page 26 70
Blende rart Magazine - July 20 0 6
Ram on cerrols - Urch opia
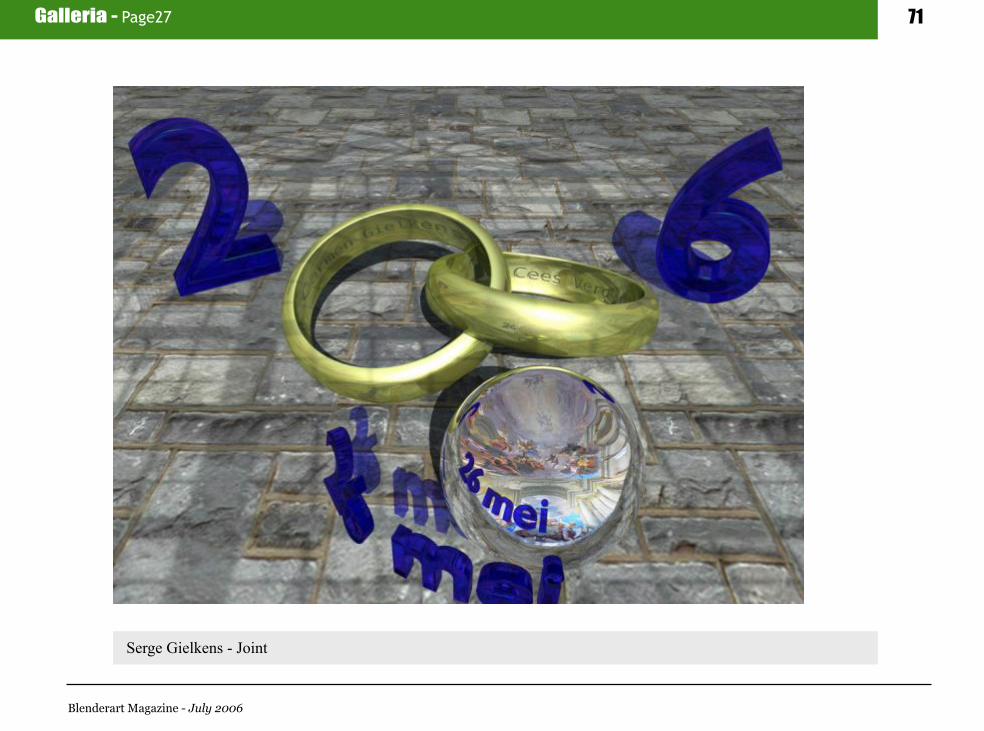
Galle ria - Page 27 71
Blende rart Magazine - July 20 0 6
Serge Gielk ens - Joint

Galle ria - Page 28
Blende rart Magazine - July 20 0 6
Th e Cytron - M eet Spik e
72

Galle ria - Page 29 73
Blende rart Magazine - July 20 0 6
Th isara Dh ananjaya - Th e w ooden h all

Galle ria - Page 30 74
Blende rart Magazine - July 20 0 6
V Gostyax - U Sk azk i
Galle ria - Page 31 75
Blende rart Magazine - July 20 0 6
Lizara - Carapelosojos

Galle ria - Page 32 76
Blende rart Magazine - July 20 0 6
Lizara - Carcel

Galle ria - Page 33 78
Blende rart Magazine - July 20 0 6
Lizara - Ejers ico & Plane

D is claim e r 79
Blende rart Magazine - July 20 0 6
Upcom ing Issue
Th e m e : Ble nde r in Arch ite cture and Gam e s
Ble nde r's Gam e Engine e xplaine dBle nde r in Arch ite cture article sBle nde r 2.42 Fe ature s
Disclaim e r
ble nde rart.org doe s not tak e s any re sponsibility both e xpre sse d or im plie d for th e m ate rial and its nature or accuracy of th e inform ation w h ich is publish e d in th is PDF m agazine . All th e m ate rials pre se nte d in th is PDF m agazine h ave be e n produce d w ith th e e xpre sse d pe rm ission of th e ir re spe ctive auth ors/ow ne rs. ble nde rart.org and th e contributors disclaim all w arrantie s, e xpre sse d or im plie d, including, but not lim ite d to im plie d w arrantie s of m e rch antability or fitne ss for a particular purpose . All im age s and m ate rials pre se nt in th is docum e nt are printe d/re -printe d w ith e xpre sse d pe rm ission from th e auth ors/ow ne rs.
Th is PDF m agazine is arch ive d and available from th e ble nde rart.org w e bsite . Th e ble nde rart m agazine is m ade available unde r Cre ative Com m ons ‘Attribution-NoDe rivs2.5’ lice nse .
Th e CC lice nse is available at h ttp://cre ative com m ons.org/lice nse s/by-nd/2.5/le galcode
Related Documents