( '\ BIOLOGY EXPERIMENTS FOR CHILDREN ETHEl HANAUER

Welcome message from author
This document is posted to help you gain knowledge. Please leave a comment to let me know what you think about it! Share it to your friends and learn new things together.
Transcript

('\BIOLOGY
EXPERIMENTSFOR
CHILDRENETHEl
HANAUER

81OLOGY EXPERIMENTS fOR CHILDREN[]H[LHANAUER
1\100, b.u", w-. , '" _ , __ 1:*:><IIoIol_ ",on"_.- n "' "'1"";_ . " ....1 _no-'l.Orrlulh '0 ij l tr~ ......."....." __ ...... (b<
-""'-' ""'"""" d...- .- ......._ ." _.11 _ '" _",..- "'n-r'-"'- <ajIO<t_ ...... _ ...._ _ ~ ,a holl ...
, 110<.....", .. d"oi<d ,....... , . ~ ,..... 110< ".,_ ." .\11 L;.-;"", _ i~,.......a.__ .>000<> _ ... _ _ '-.- ... -...• .....M,t • ." 1.,_ T il< _ , W..i<l." ""_ , ...W..l<lol .\ 1><1,... R_ _it.d<o ;" '............ Wo.•0_"\1: _ ....... _ .. ~b _ ..u..hIi........ _, vIo, In... . ,. ..-.lit loud I wb, .11 I"i" . ttli.,~ _ I _ _ .......... pl. I'" .,...,..,....", ,,, ooto , ","""-r w;1h "'_" .-llnl _ ~
butkll on,..; ; IMod;,,,, l.oft• ." .-~ "",WI' " 1. ;0•_. ""'" ""no , b, • l<oIo hoo , ;.. "'-, ,,, pb"l> b•• _ ;,_"- otI>rt 100<;"". " ", b . u .....'"" ,,1,0" mKI..., ' Ill< I pi<~ of "f'U_'" lor lItnr . '1"'- ;""""'" ...,,_.............. , " lor ;,.. ,;"" GUO It< I....ntl ;0 ..... . .-,od ,lo._,T b .. ,01" .... ,,11m "".... ...... d>oul, )" " '" h;.h .._ . >old hotlo ..._1>I,,"",,'" '<rl' .",,,,,.;n,,,, ""\ '0 .",;u, ,lIti r b.><~", ..,,_1 I" It;."• • • od;11 >N,Ii,. ,,,, ,,~ II i • • I><> . "". , ·.I".~Ir .;.) ttl 1''''''''' .. " be". " "I 0' 10.....~' I ., ~, ;. I, '" m.~. , I<or, lo, ,,,lul """""" ' ''' K'''' ", d, ikll.".
I'",,,,,,, lr ",,; ,1'" " Bioklon I" , Cr.,I,I...." ." Un,b, ;,lo«1 ' . I,,,I,I;,·" K,,, 01 1 96~
,..J" 'D" (j, .. IUU ,11",,,.. . ,,,,- 1,0.1. , . !l6 pp. ~ ' • • 9\~. Z~\m " ""I ><!I. ...",,,
(l, be" ;,, ,h" .... ;<> or 1).,,., .u.'I<O"""'". I.. " " kit On'
I'~"" , '.x,.,i_."/u, 0;/4",,, by M" 'Kl .\ 1,,0<1<11f :.....~lty ,.,." ....." 1_ U il d by V;tX;,, ", 1_ ,\ 1")11,,~ l<-" "" "" , .~._.h I- C' ,/d I.,- ("......;.. " ..1.0:"'1< ...0" '.x"'It_."'" ,I I- U./d". bt Our'" \" .."
\ DO\ ~ R ron 11) >0: U[SIGS I:O r O il \'L \ IU o r i -sa-•
\\'~ h.o ., ._ _lr tJIt> '''''' bool. po,ojw.. 0 • .._ .._ ", "'-' , " u do _ ..~ "to _. r _ ;n~ '0 -....,1" 11 .,. -:d ....tIor 1_ -' .;u _ <!top -. _ .,,_~ w"h 1>004 _~"" --.__ Il>t ......... :........... , ~~"'0<\" >plio. , __
T, i: \ . C ""( ~ /1
\ I (,I\i
BIOLOGYExperiments
for ChildrenFormerly titled BIOLOGY FOR CHILDREN
Written and Illustrated by
Ethel Hanauer
-, ~,
,<--~~~_.~-.-. '\)
Dover Publications, Inc., New York

Copyright © 1962 by Printed Arts Co., Inc.All rights reserved under Pan American
and International Copyright Conventions.
Published in Canada by General Publishing Company, Ltd.,30 Lesmill Road, Don Mills, Toronto, Ontario.
Published in the United Kingdom by Constable and Company, Ltd.,10 Orange Street, London WC 2.
This Dover edition, first published in 1968, is an unabridgedand unaltered republication of the work originally published in1962 under the title Biology tor Children. The work is reprintedby special arrangement with Printed Arts Company, Inc., pub.lisher of the original edition.
Standard Book Number: 486-22032-XLibrary of Congress Catalog Card Number: 68-9305
Manufactured in the United States of America
Dover Publications, Inc.180 Varick Street
New York, N. Y. 10014

CONTENTS
PART I: THE NATURE OF ALL LIVING THINGS............ 7Using Your Microscope ... Looking at Newsprint under aMicroscope . . . Observing a Single Human Hair . . . TheStructure of Cotton Fibres . . . The Intricate Structure of FishScales ... Typical Cell Structure-"Empty" Cork Cells ...Living Plant Cells from an Onion Skin . . . Examining GreenPlant Cells-Elodea ... Observing Cells of the Human Body-Cheek-Lining Cells
PART II: THE WORLD OF PLANTS.......................... 18Growing One-Celled Microscopic Organisms-Bacteria of Decay· .. Observing Bacteria of Decay ... Studying Simple Fresh-Water Plants-Algae ... Growing Yeast Plants ... ProducingSpores from Bread Mould ... Examining Edible Mushrooms· . . Building a Glass-Enclosed Garden or Terrarium . . .Growing Mosses in Your Terrarium ... Growing Ferns Indoors· . . Making a Collection of Dried Ferns . . . The Parts of aTypical Flowering Plant . . . Studying a Typical Root-aCarrot . . . The Binding Force of Roots . . . Observing theCirculation of Water from Roots to Leaves ... Studying theVein Structure of Various Leaves ... Making a Collectionof Tree-Leaves ... How a Green Leaf Produces Food-Photo-synthesis Isolating Chlorophyll and Testing for Starch ina Leaf The Undersurface of a Leaf-Stomates Showingthat Oxygen is a By-Product of Photosynthesis Showingthat Green Plants Give Off Water from Their Leaves ... HowGravity Affects Plant Growth ... Why Leaves Turn Color inthe Fall ... Studying a Flower-the Sweet Pea ... ExaminingSeed Pods-"Dry" Fruit ... Examining the Seeds of "Fleshy"Fruits The Structure of Seeds ... How Seeds Plant Them-selves Raising Seedlings in a Tumbler Garden ... GrowingSeedlings in a Sponge Garden . . . Observing Seeds Sown inDifferent Types of Soil . . . Growing Plants from Parts Otherthan Seeds-Vegetative Propagation ... Starting Seedlings in aPlastic Bag ... Adventures with Meat- and Insect-Eating Plants

PART III: THE WORLD OF ANIMALS........................ 57Making a Hay Infusion to Study Protozoa . . . ObservingProtozoa . . . Making a Collection of Sea Shells and Animals. . . Studying a Starfish . . . The Oyster and the Pearl . . .Studying a Grasshopper-a Typical Insect ... Watching aCaterpillar Become a Moth or Butterfly . . . How the FireflyGlows ... How the Spider Spins a Web ... How a FishBreathes . . . Studying the Skeleton of a Fish . . . ObservingCirculation of Blood in the Tail of a Goldfish ... The Elementsof a "Balanced" Aquarium ... Observing the Metamorphosisof a Frog . . . Raising Pet Turtles . . . The Structure of aChicken Egg ... Studying the Digestive Organs of the Chicken... Studying the Structure of a Chicken Leg
PART IV: THE HUMAN ANIMAL............................ 79The Human Mouth ... Identifying Foods by Taste Alone ...Distinguishing Taste Areas of the Tongue Observing aBeef Heart ... The Human Heart and Pulse Making aWorking Model of the Chest Cavity Showing that CarbonDioxide is a Product of Exhalation Showing that WaterVapor is Present in Exhaled Air Examining Lung Tissuefrom a Beef or Calf ... Using a Thermometer-Natural BodyHeat ... How the Skin Throws off Body Wastes ... The Skin-A Built-In Thermostat ... Studying a Lamb Kidney ... TheStrength of Habit ... Habit Formation ... Learning by Trialand-Error ... A Simple Lesson in "Learning"
INDEX........................................................ 96
To Richard and Billyfor their help, patience and understanding

Part I: THE NATURE OFALL LIVING THINGS
When you think of "living things," you probably think first of the animalsand people you are most familiar with. You might think of your pets-a dog,a cat, a hamster, a canary, a tank of tropical fish-or of the animals in thezoo, or of human animals, your parents and friends. Think about it somemore, and you will realize that plants are living, too. You might think of yourfavorite tree for climbing, of the leaves you gather during fall, or perhaps ofthe crocuses and snow drops which everyone is so glad to see pushing throughthe snow in early spring.
Remember, too, that many of the inert, lifeless things you use every dayoriginally had life. The wood in your desk came from a tree, as did the paperon which this book is printed. Threads for a pure silk tie or dress were spunby the caterpillars of silk moths. The wool in your winter coat once kept asheep warm. The coal we burn to provide heat had its origin in giant ferntrees which existed millions of years ago, and then disappeared from the earthas its climate changed.
These are the living things which come most readily to mind. But thereare thousands of other living organisms on the earth-in the air and in thewater. Look into a jar of water which you have taken from a pond. You willsee tiny water animals darting about, but there are others there, too, that aremuch too small to be visible to your "naked," or unaided eye. To see themyou will need a microscope. With its help, you will be able to watch minute,
7
unsuspected animals scooting through the water or oozing lazily along,according to their nature. You will also be able to see the tiny plants thatserve as food for these microscopic animals.
Equipment you will needFor your study of living things you will need a microscope. Good ones
are available at inexpensive prices. Your microscope will last for a very longtime if you take good care of it. It will be your basic tool, the most importantaid in your exploration of the nature of life. With its help you will be ableto see the simplest structures of which all life is composed, cells and tissues.Your microscope will open to you new worlds of life and exciting experiencesobserving living things both visible and invisible to your naked eye.
In addition, you will want to buy several glass slides and one or morecover slips, little round disks of glass or plastic which you will place over thetiny objects you will be examining under your microscope.
The object on a slide is called a "specimen." As for your specimens,most of them are easy to find. They are all around you. You need only walkaround your house, into your yard or to the neighborhood stores to gatherthe specimens you will study.
Now, you are ready to begin your fascinating explorations.
8

USING YOUR MICROSCOPEBefore you begin your venture into the world of living things, you will
need one important skill; you will need to know how to operate your microscope quickly and correctly.
No matter how inexpensive, a compound microscope usually looks likethe one shown in the illustration below.
ocularo
barrel
Learn the important parts of the microscope and the use of each partbefore you try to view something that is almost or completely invisible to yournaked eye. It is a good idea to refer to the illustration as you read theseinstructions.
Always carry your microscope upright by holding the arm with one handand supporting its weight under the base with your other hand. Set it downgently on a firm table top near a window, if possible. If that is not possible,use it near an electric light.
When you are ready to operate your microscope, align (get into a straightline) the low power objective with the tube. When it's aligned, you'll hear itclick into place.
9
Now move the curved side of the mirror until it catches the light anddirects it up into the tube, through the eyepiece or ocular into your eye.
Place your prepared slide in the center of the stage over the hole. As youwatch the shorter, low power objective, turn the larger wheel, or coarse adjustment, until it is about a quarter of an inch away from the slide on the stage.
Put your eye to the ocular. Slowly raise the tube, or barrel, by turningthe coarse adjustment toward you. The specimen on the slide will graduallycome into clear view or focus.
When the specimen is focused, switch to the fine adjustment. Keep youreye at the eyepiece. Turn the small wheel, or fine adjustment, very slowlyuntil the magnified specimen comes into view with increasing clearness.
The lens in the eyepiece, or ocular, of most microscopes will magnify anobject ten times. The lens in the low power objective will magnify ten times,also. Therefore, if you use the low power objective, the specimen on the slidewill appear 10 x 10 or 100 times its actual size.
The lens in the high power objective usually magnifies forty times. Therefore, if you use the high power objective, the specimen on the slide will appear10 x 40, or 400 times its actual size.
Work with your microscope until you can coordinate the movements ofits various parts. A good specimen for practice is a tiny scrap of newsprint.
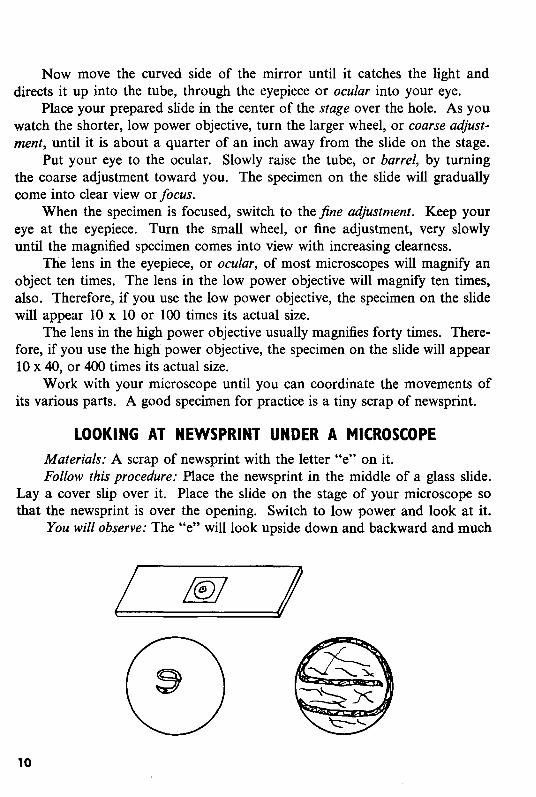
LOOKING AT NEWSPRINT UNDER A MICROSCOPEMaterials: A scrap of newsprint with the letter "e" on it.Follow this procedure: Place the newsprint in the middle of a glass slide.
Lay a cover slip over it. Place the slide on the stage of your microscope sothat the newsprint is over the opening. Switch to low power and look at it.
You will observe: The "e" will look upside down and backward and much
!
10

larger than it appears to your unaided eye. Under high power you won't evensee the "e" as a letter! It has been magnified so many times that it shows upas heavy black lines crossed with fibres of the paper.
As you already know, the "e" is magnified 100 times under low power ofthe microscope, 400 times under high power. It appears to be upside downand backwards because straight light rays from the "e" on the slide passthrough the double convex lens in the objective and are bent. (Lightwaves passing from a thinner medium, such as air, to a denser medium, in thiscase a solid glass lens, are always bent.)
top
bottom
bottom
top
eye
These bent light rays converge (come to a point) in the microscope tube.They then continue into the slightly curved lens in the ocular and up into youreye (see diagram).
OBSERVING A SINGLE HUMAN HAIRMaterials: All you will need besides your microscope, a glass slide and a
cover slip is a lone strand of hair.Follow this procedure: Pull a hair out of your scalp. Place it in the middle
of the glass slide and cover it with a cover slip. Put the prepared slide on thestage of your microscope.
Use low power first, and then high power.You will observe: A long shaft composed of two layers. The point at
which the hair was attached to the scalp is cuplike and is called a root.
11
The hairs on your head have their roots in the lower layer of the scalp.The root is actually a collection of cells in the scalp from which the hair grows.
The color of your hair is due to pigment, coloring matter in the cells ofyour scalp. Hair becomes grey when pigment fails to form at all.
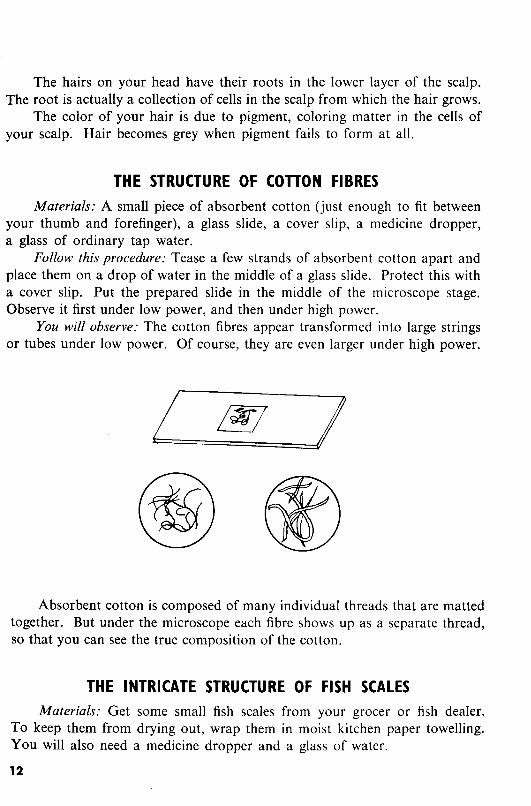
THE STRUCTURE OF COTTON FIBRESMaterials: A small piece of absorbent cotton (just enough to fit between
your thumb and forefinger), a glass slide, a cover slip, a medicine dropper,a glass of ordinary tap water.
Follow this procedure: Tease a few strands of absorbent cotton apart andplace them on a drop of water in the middle of a glass slide. Protect this witha cover slip. Put the prepared slide in the middle of the microscope stage.Observe it first under low power, and then under high power.
You will observe: The cotton fibres appear transformed into large stringsor tubes under low power. Of course, they are even larger under high power.
Absorbent cotton is composed of many individual threads that are mattedtogether. But under the microscope each fibre shows up as a separate thread,so that you can see the true composition of the cotton.
THE INTRICATE STRUCTURE OF FISH SCALESMaterials: Get some small fish scales from your grocer or fish dealer.
To keep them from drying out, wrap them in moist kitchen paper towelling.You will also need a medicine dropper and a glass of water.
12

Follow this procedure: Put two drops of water in the middle of a cleanglass slide. Put a fish scale in the water and hold in place with a cover glass.Observe first under low power, and then under high power.
You will observe: The dried fish scale that looks so tiny and unglamorousin your hand shows up under the microscope as a beautiful sculptured structure.Concentric ridges will appear, making this single scale resemble a complicatedabstract drawing by a modern artist.
Scales grow on a fish's body in the same manner as the overlappingshingles are placed on the roof of a house. The attachment of the scale istoward the head of the fish. The wider, overlapping part of the scale faces thetail of the fish. This overlapping arrangement of scales provides the fish witha coat of armor, as protection, and also with a hard, sleek covering for cuttingthrough the water as it swims.
Each species (closely related group) of fish produces scales that have acharacteristic pattern. If you wanted to observe hundreds of fish scales andcatalogue them, you could eventually tell the species of a fish just by examininga single scale under your microscope. The pattern of lines on the scale wouldreveal the fish's family to an experienced eye.
TYPICAL CELL STRUCTURE - "EMPTY" CORK CELLSMaterials: A thin piece of the rounded side of a bottle cork, a sharp,
single-edged razor or a paring knife (with Mother or Dad's permission), a glassof tap water and a medicine dropper.
Follow this procedure: Slice otT a very thin piece of the cork. Put this intwo drops of water on the slide and cover with the cover slip. Try to slide oneedge of the cover slip slowly on the slide, so it can settle; this will help preventbubbles forming on your slide. Place the prepared slide on the microscopestage.
13

Use your low power objective and get the specimen in focus just at theedge of the cork slice where it is likely to be the thinnest.
You will observe: Tiny empty "boxes" with stiff walls.
! itllJ\ 7
These "boxes" are cells. Everything living is composed of either one cellor of many cells, containing living matter called protoplasm. This is a thick,jelly-like fluid, and it is the physical basis of all life. But since the living matterof the cork has died, its cells are empty. They no longer contain the miraculousand still somewhat mysterious protoplasm.
In addition to protoplasm all cells have a nucleus, a dense round structureusually in the middle. This is the "heart" and "brains" of the cell, for it directsall of the cell's activities. A cell cannot live, nor can it divide or reproduceitself, without a nucleus.
LIVING PLANT CELLS FROM AN ONION SKINMaterials: Ask your mother for a small paring knife and permission to
use it. Get a small piece of fresh onion, a medicine dropper and mix a solutionof iodine and water, called "dilute iodine."
Follow this procedure: With the medicine dropper place a drop of diluteiodine in the middle of the glass slide. With the paring knife, carefully peel offa tissue-thin layer from the top piece of onion. Place this in the drop of iodineon the slide. Carefully put the cover slip over it.
Place the prepared slide on the stage of your microscope. Observe firstwith low power, and then with high power.
You will observe: Many rectangular boxes. These are the building blocksof all living plants and animals-the cells.
14

All the functions that are necessary to keep a plant alive are performedindividually in each cell and coordinately by all the cells working together.As you know, every cell is made up of living matter that we call protoplasm.The dark spot that you see in the middle of each cell is known as the nucleus.Without this nucleus the cell cannot function. The nucleus helps the cell togrow and is especially important in producing new cells of the same kind sothat the same kind of plant can grow.
EXAMINING GREEN PLANT CELLS - ELODEAMaterials: Besides a medicine dropper or pipette (a narrow glass tube
operated by suction), and a glass of tap water, you will need an aquariumplant called "elodea." This is a leafy aquatic plant which you can buy at anypet supply store.
Follow this procedure: Put two drops of water in the middle of a clean glassslide. Tear off one green leaf from the stem of a healthy elodea plant andcarefully place it in the water on the slide. (Make sure that the leaf is notfolded.) Cover with a cover slip. To keep bubbles from forming in the water,place the cover slip gently at one end, as you did in preparing empty corkcells as a specimen.
15

Put the slide under the microscope and observe under low power first, andthen under high power.
You will observe: Large brick-shaped cells containing small, oval greenbodies.
Elodea, like all other living plants, is made up of living cells. In additionto protoplasm and a nucleus, the cells of green plants contain green bodiescalled chloroplasts. In turn, chloroplasts contain a green substance calledchlorophyll. Green plants, both water-living and land-living, are able to manufacture their own food because they contain this valuable life-supportingchemical, chlorophyll.
Green plants are the original source of all our food. They provide fooddirectly for us and indirectly, too, because they provide food for the animalswe eat. It is the chlorophyll in green plants that makes possible a wonderfulprocess called photosynthesis, which you will learn more about on page 37.Bear in mind that all life depends on this green chemical-chlorophyll.
OBSERVING CELLS OF THE HUMAN BODY - CHEEK-LINING CELLSMaterials: A flat-ended toothpick, a pipette or medicine dropper and a
dilute iodine solution.Follow this procedure: Using the medicine dropper or pipette, place a
drop of iodine solution in the middle of a clean glass slide.Gently scrape the inside lining of your cheek with the flat end of a clean
toothpick. Put the scrapings in the drop of iodine solution on the slide.Observe first under low power, and then under high power of your
microscope.You will observe: Small cells, some folded and some flat, scattered either
by themselves or in groups in the microscope field. The nucleus, or organizingmechanism, of each cell will appear as a small brown spot in the middle.
16

0&.. :.:-,<0 ..
0'. 4'
r::;;;/11
The inside lining of your cheek is made up of a thin tissue composed ofliving cells. (Your entire body is made up of different kinds of tissues ofliving cells.) When you scraped them with the toothpick, the upper cellsseparated from the rest of the tissue.
New cells will grow to replace those that are scraped off whenever youeat or drink something.
17

Part II: THE WORLD OFPLANTS
By now you have examined the simplest structural units of living things,cells; you know something about the mysterious life-giving substance calledprotoplasm; you have seen chloroplasts containing chlorophyll, the equallymysterious substance in the leaves of green plants on which all life isdependent for food. You are well under way in your study of biology.
Now you will venture into the vast and varied world of plants. Of course,some plants are well known to you-the apples or oranges you eat, the seaweedwashed up on the beach, the sweet peas which may grow in your mother'sgarden or those energetic dandelions that make a nuisance of themselves bypopping up all over the lawn in spring and summer.
But there are hundreds and hundreds of other plants, less well knownthan these. Some grow low on the floor of woods and forests, or on the sidesof rocks and trees. Among these are the ferns, mosses and mushrooms whichyou will study soon. Some plants (elodea, for example) grow only in water;others, like the familiar oak, elm and maple trees, grow only on land. Itwon't surprise you to hear that plants vary in size, but do you know how muchthey vary? The giant redwood trees in California sometimes grow as high as300 feet. On the other hand, there are many plants so small that you cannotsee them without a microscope. Among these are various kinds of bacteriaand plants called "algae" which live in ponds and streams.
Many discoveries await you in the following pages. You will learn howgreen plants manufacture their own food and how they manage to reproduce
18
and replant themselves-by flying to their new homes on "wings," by stickingto the coats of animals and in countless other unique way". You will findout why the different parts of plants (roots, stems and leaves) grow as they doand what part each plays in the life of a plant. You will even be introducedto a strange, insect-eating plant called a Venus flytrap,
In these pages, too, you will find out how you can grow plants underunusual conditions. Surprising as it seems, a common bath sponge will supportpant life, as will an ordinary drinking glass or a plastic bag.
Equipment you will needTo carry out your investigation of the world of plants you will need very
little that cannot be found around your house. Besides your microscope, aninexpensive magnifying glass or hand lens will be valuable, as will several testtubes and a holder in which to keep them. A terrarium, a fish tank filled withearth and used for raising plants, will be useful for some of the studies describedin this section.
As the world of plants opens up under your careful and curious investigation, you will be more and more intrigued at the variety of forms plants takeand at the variety of ways in which they take care of themselves.
19
GROWING ONE-CELLED MICROSCOPIC ORGANISMS - BACTERIA OFDECAY
Materials: A piece of raw potato (peeled), a few seeds of either beans orpeas, two test tubes and a test tube holder, tap water.
Follow this procedure: Soak the small piece of potato in a test tube ofwater. Do the same with the bean or pea seeds. Leave the test tubes open andexposed to air for three days. Then put a plug of absorbent cotton looselyin each test tube. Keep the tubes in a comparatively warm place for the nextfew days.
Place a drop of the water from each test tube in the middle of a cleanglass slide. Carefully cover with a cover slip and observe, first under the lowpower of your microscope, then under high power.
You will observe: Hundreds of large, harmful bacteria. They will beespecially clear under high power.
Bacteria that cause the decay of dead plant and animal matter live asspores (masses of protoplasm with or without cell walls) in the air and evenon plants. When they get warmth and moisture, they become active and feedon dead plant or animal cells, actually breaking them down. This processresults in decay.
Some bacteria of decay are useful because they make soil rich for plantingpurposes by breaking down the cells of plants and animals that have died. Thematerials of which these cells had been composed return to the soil to be usedas nourishment by new growing plants. This is nature's means of fertilizingsoil. The action of bacteria in breaking down the cells of dead matter preventsthe waste of important minerals that all living plants need in order to growsuccessfully. In turn, plants provide animals, including human beings, withfood containing important minerals. All animals need minerals for the growthof different parts of the body.
OBSERVING BACTERIA OF DECAYMaterials: Dried lima beans, water, a jar with a tight-fitting cover and
a medicine dropper.Soak some beans in a glass of water for several days. Then cover the jar
and keep it in a comparatively warm place for the next few days. Use yourmedicine dropper and take off some of the fluid at the surface. Put a dropor two on a clean slide. Cover carefully with a cover slip. Focus and observe,first under low power of your microscope and then under high.
20

You will observe: Many large bacteria.
Bacteria that are inactive are always present in a spore form in the airand on objects both living and nonliving. The spore form is similar to thestate of hibernation that the bear and frog sink into to carry them over acold winter.
Bacteria of decay develop protective spore coats around themselves untilthe conditions for growing are good. To grow, bacteria need food, moisture,darkness and warmth. They find these conditions in living plants and animalsthat have died and have been buried in the ground, or in water.
The bacteria of decay then break through their hard, protective sporecoats and start to feed and grow. The dead plant and animal tissues uponwhich they feed are broken down into their original elements and compounds.This process is known as decay. Usually an offensive odor accompanies decay.This is due to gases that are given off during the breaking down process.
STUDYING SIMPLE FRESH-WATER PLANTS - ALGAEMaterials: A wide-mouthed glass jar, dilute iodine solution, and a medicine
dropper.Follow this procedure: Collect water from a pond in a wide-mouthed glass
jar. Keep this at room temperature. Expose the jar of pond water to thesunlight for several hours each day for a week.
Then place a drop of pond water culture in the middle of a clean glassslide. Add to it a drop of dilute iodine. Place a cover slip carefully over thedrops on the slide.
Observe first under low power, and then under high power of yourmicroscope.
21

You will observe: Several types of very simple green plants called algae.Many will be stained blue-black within their cells. Some will have only onecell and others will seem to live in groups or colonies or strands.
Algae are the simplest water plants which contain chlorophyll, thatchemical which is necessary in the production of food for all forms of life.Some algae live only in fresh water and others only in salt water. These plants(like all green plants) can manufacture food in the form of a simple sugar.But plants cannot store sugar in their cells. Within a cell, the sugar is miraculously changed by a chemical process into starch. Starch can be stored forfuture use. Dilute iodine stains the starch to a blue-black color.
Scientists have been seeking a way to strain large quantities of theseimportant green plants out of the water. It's possible that algae may somedaybe an important source of food for human beings.
GROWING YEAST PLANTSMaterials: A cake of yeast or a package of dried yeast powder, five tea
spoons of molasses, a half-pint jelly jar with a cover, tap water, a medicinedropper, a toothpick.
Follow this procedure: Fill the jar two-thirds full of tap water. Dissolvefive teaspoons of molasses in the water. If you use cake yeast, crumble onefourth of the cake in the molasses and water solution. If you use yeast powder,pour about one-fourth of the contents of the package into the solution. Putthe lid on the jar. Set it in a warm place for about 48 hours.
Then, with the medicine dropper, put a drop of the yeast-molasses mixturein the middle of a clean slide. Using the toothpick, spread the drop of wateron the slide so that it covers a space in the middle about the size of a smallcoin. Carefully cover this with a cover slip and observe under the microscope.
22

You will observe: Yeast cells with small "buds" growing from them.Some will grow as you watch them. Chains of buds will appear right beforeyour eyes.
Yeast is a plant whose body consists of only one cell. When there issufficient food (the molasses in this case), each yeast plant will grow to its fullsize. Then new little yeast cells will grow from the fully grown cell. The newsmall cell is called a "bud." Sometimes it remains attached to the parent cell,and itself produces buds. On the other hand, it may break off from the parentcell, but it will still produce buds of its own.
With only one parent yeast plant, you have grown new yeast plants. Themeans of reproduction you have observed is called "budding."
PRODUCING SPORES FROM BREAD MOULDMaterials: Half a slice of white bread, a pint jar with a cover, tap water,
dust from a window sill, a pair of tweezers.Follow this procedure: Thoroughly wet the piece of bread. Put it in the
jar. Sprinkle some dust on the surface of the moist bread. Screw the lid onthe jar and set it in a warm place for several days.
When "mould" appears, use the tweezers to transfer some of the greyfuzz and black spots from the bread to a drop of water in the middle of a glass
23

slide. Cover with a cover slip. Observe first under low power, and then underhigh power of your microscope.
You will observe: Under high power the black spots will appear as roundcases filled with smaller black spots. The grey fuzz is a branching stemlikegrowth that holds the black cases to the bread.
The balloon-like sacs containing the small black specks are spore cases.The tiny black spots are the actual spores of mould. They are very light andare carried about by air currents. They often settle in dust.
When a bread mould spore lands on a piece of moist bread, it will sendout tubelike stems (the grey fuzz) and will grow into a new mould plant.
The air is always filled with spores of bread mould. But they need foodand moisture for successful growth; a piece of moist bread provides just theconditions under which these spores thrive.
A strange and fascinating discovery was made by Sir Alexander Fleming,a Scottish scientist, before World War II. He found that a certain kind ofbread mould produces a liquid which has the power to destroy some diseasecausing bacteria. He called this liquid penicillin. The mould that producespenicillin and other "wonder drugs" is now grown in laboratories and used inmedicines to treat (and often to cure) such diseases as tuberculosis andpneumonia.
EXAMINING EDIBLE MUSHROOMSMaterials: Fresh mushrooms, a sharp paring knife (with permission to
use it), kitchen paper towelling.Follow this procedure: First observe the whole mushroom. Then cut off
the cap and turn it so that you can see the underside.You will observe: The entire mushroom is a shade ranging from tan to
brown. There are thin tissues that look like the separated pages of a book onthe undersurface of the cap.
The cap rests on a thick, fleshy, stem-like part that grows securely in rich,moist, leaf-covered soil in shaded forest land.
The mushroom is called a fungus. It contains no green coloring matter,or chlorophyll; therefore it cannot manufacture its own food. It gets its foodfrom the dead plant matter in which it grows. It also gets its moisture from therich soil in which it grows.
The page-like structures on the underside of the mushroom cap containsmall spores. When the mushroom is fully grown, these spores burst out of
24

their cases and are distributed by the wind. If the soil on which they land isrich and moist, each spore will take root and develop into a new mushroomplant.
There are many different kinds of "mushrooms." Some are the ediblekind which you are now observing. Mushrooms are fascinating plants, andthey grow in a variety of intriguing ways. There are some that grow like shelveson the cooler, shaded side of trees in moist wooded areas. These are called"shelf" or "bracket" mushrooms. Others are called "puffballs" because theircaps look like closed ball-like structures.
There are over 60 varieties of edible mushrooms. But there are also somewhich are poisonous to man as well as to insects and other animals. The mostcommon poisonous mushroom is known as the Amanita. It can easily bedistinguished from its edible relative for it has a cup-like structure at the bottomof the fleshy stem and a ring of tissue hanging just below its smoky brown orsmooth grey cap. One type of Amanita has a wart-like, yellowish-orange cap.
BUILDING A GLASS-ENCLOSED GARDEN OR TERRARIUMMaterials: An empty fish tank, coarse gravel or small pebbles, sand, rich
humus or leaf mould (sometimes bought under the name of "garden loam"),a glass sheet to cover the terrarium, tap water, various ferns, mosses and fungusplants you will collect yourself outdoors.
25

Follow this procedure: Place a layer of gravel or small pebbles about oneinch deep on the bottom of the tank. Over this spread about half an inch ofsand. Then, over the sand, spread a third layer of humus or garden loam aboutone inch deep. '
Collect low-growing plants from the rich, moist soil in a thick forest or,if you can't get to a real forest, from any local area that is thickly wooded.These will probably be mosses, ferns and other simple plants. When you picka fern or moss plant, include some of its native soil around its roots. If youwrap each plant lightly and carefully in wax paper, it will not dry up beforeyou are ready to plant it in your terrarium.
Firmly transplant or sod each little plant in the top loam layer. Wateryour terrarium generously so that the water level is about halfway up thegravel layer. Now, cover the tank with the sheet of glass.
Place your terrarium in partial light, never in direct sunlight. The glasscover helps to keep moisture in the tank but if you see evidence of dryness,add more water from time to time.
During the winter months, it is advisable to keep the tank under anincandescent or fluorescent light bulb for several hours each day.
You will observe: Your low-growing forest plants will thrive as long asthey have a rich soil, sufficient moisture and mild sunlight.
Best of all, when you lift the lid of your terrarium, you will smell thedelicious fresh fragrance of a forest after rain.
26

GROWING MOSSES IN YOUR TERRARIUMFollow this procedure: Collect moss plants from cracks in shaded walls
or moist ground under trees and from any cool, heavily wooded area. Lookfor low green plants that resemble a carpet of green. Wrap the moss plantswith a small amount of soil from around their roots in wax paper or newspaper.You can transplant these mosses in your terrarium.
You will observe: A moss plant can be identified by its tiny green stemwith a cluster of green leaves encircling it. At the tips of the leafy stems andhidden by the leaves are the plant's reproductive organs. Little tan spore caseson slender stalks grow from among the green leafy stalks.
The spore cases each contain tiny spores. Each spore, when it falls onrich, moist soil, will become a new moss plant.
Mosses are valuable to man primarily because they hold down soil in aforest and absorb water the way that a sponge does. Therefore, they preventthe soil from being washed away by hard rains. Peat moss, partly carbonizedvegetable tissue formed by the partial decomposition of moss, is valuable asa fuel when it is pressed and dried. It can then be used in place of coal. InIreland especially there are famous bogs from which peat moss is cut andused as fuel.
27

GROWING FERNS INDOORSFollow this procedure: Collect ferns from a moist wooded area. Uproot
them as you did mosses, keeping intact some of the soil around their roots.Be careful, and dig deeply; the fern's stem sometimes grows as deep as sixinches under the surface of the soil. Wrap each fern with its attached soil inmoist newspaper, wax paper or a plastic bag.
Transplant the ferns with their attached soil in your terrarium or in clayflower pots. If you use pots, prepare them first by covering the bottoms withone inch of coarse gravel and then adding an inch of garden loam, humus orleaf mould. Plant each fern on top of this and fill the rest of the pot with amixture consisting of equal parts of sand and garden loam.
Keep the plants and soil moist, but not wet. Ferns should be kept inpartial light, not in direct sunlight. Common ferns will grow well under theseconditions.
You will observe: Small dots, sometimes the shade of rust, will appear onthe backs of the fern leaves, which are also called "fronds." The presence ofthese dots indicates that a leaf is fertile, and if you examine them under amicroscope, you will see separate spores.
Ferns are among the oldest types of plants to appear on our earth. Theydo not produce true flowers. The dots on the backs of some fern leaves aresari (plural of sorus) and they contain spores. Each spore will grow into anew fern plant if it falls on moist, rich soil.
About 300 million years ago giant fern plants (fern trees) lived on the
28

earth when it was hot and swampy. They formed large forests that coveredmost of the earth. Giant tree ferns grew about 30 or 40 feet high.
During an ancient era called the Carboniferous Age, great layers of thesefern trees died and their remains accumulated in the swampy lands in whichthey grew. Still later, movements of the earth and the additional pressure oflayers of rock sediments (soil) on top of the ferns formed beds of coal. Scientistshave estimated that it took about 300 feet of compressed giant tree ferns toform 20 feet of the coal which we find in mines today.
MAKING A COLLECTION OF DRIED FERNSYou may want to make a collection of delicate fern plants to mount in an
album or scrapbook. If so, collect the ferns just as you did the ones youtransplanted to pots or to your terrarium. Remember, ferns grow in moist,wooded, shady areas.
Follow this procedure: To press or dry your collection of ferns, place eachone between sheets of newspaper and lay it between heavy books. After it
\ has dried, slip each fern inside a plastic envelope or between pieces of thesticky cellophane wrapping paper your mother probably uses in the kitchen.Using sticky cellophane tape, you can then mount each envelope on a separatepage in a scrapbook or on sheets of unlined paper in a notebook. You maywant to print some basic information about each fern underneath the appropriate envelope. A collection of dried ferns is fun to make, and you'll besurprised at how much you'll learn in the process of gathering and mountingyour ferns.
There are many varieties of ferns, but the most common are the Christmasfern, the cinnamon fern, the sensitive fern and the maidenhair. There are also
29

two attractive relatives of ferns. One is the horsetail rush, often found growingalong railroad tracks. The second is the club moss. This plant is often usedas a Christmas decoration because it resembles a miniature low-growing pinetree.
If you discover the horsetail rush and the club moss and decide to include
them in your fern display, take only one plant of each. Both these plants arepassing out of existence, or becoming "extinct" in some areas. As a beginningbiologist, you will want to be careful to preserve them.
THE PARTS OF A TYPICAL FLOWERING PLANTMaterials: Almost any common house or garden plant will be a fine
specimen for this study. Perhaps there is a flowering geranium growing in apot on your window sill, or a clump of African violets. A miniature rosebush is also a good subject, as are green pea or green bean plants. When youhave found a plant to study, look at it closely, without removing it fromwherever it is growing.
You will observe: The roots of the plant pushing down to grow beneaththe soil. Growing above the soil are the stems, the green leaves and the flowers.
30

All true flowering plants consist of roots, stems, leaves and flowers.The roots keep the plant anchored in the soil and provide it with nourish
ment, for they absorb water containing important minerals to be supplied tothe parts of the plant growing above the ground.
The stems support all the parts of the plant above soil. The water absorbedby the roots passes upward through tubes in the stem so that it can be used tofeed other parts of the plant.
A plant's green leaves "breathe" for the plant and they also manufactureits food. You will learn more about this on pages 39-40.
Flowers are the most attractive and, in a way, the most intriguing partof any plant because they produce "fruits" which, in turn, contain the seedsfrom which new plants of the same kind grow. Flowers contain the reproductive organs of the plant; both the fruit, which provides protection andnourishment for the seeds, and, of course, the seeds themselves, originate inthe female part of the flower.
Each seed contains a baby plant (known as an "embryo") as well as foodfor the embryo. If conditions are suitable, the embryo will grow into a newyoung plant.
31

STUDYING A TYPICAL ROOT-A CARROT,Materials: Three fresh carrots, a sharp knife, red ink or vegetable dye
(which you can get from your mother or at a nearby store), a glass of tapwater, medicine dropper.
Follow this procedure: Cut one carrot across in the middle. (You havemade a cross section.) Cut the second carrot in half vertically. (This time youhave made a longitudinal section.) Now, cut off the tip of the third carrot andplace the cut end in a solution of water containing a dropper full of red inkor vegetable dye. Let it soak for 24 hours; then make a longitudinal sectionof the soaked carrot.
You will observe: In the cross section small rootlets (or secondary roots)will radiate from the central core of the carrot toward the outside. In thelongitudinal section, you will see the central core and the secondary rootsextending the entire length of the carrot up toward the beginning of the stem.
When you examine the carrot which you stained, you will see the red colorin the tubes of the carrot's central cylinder extending from the tip end to thefatter top of the carrot root.
A carrot is actually a taproot (a major root which grows downwardvertically and gives off smaller roots growing from its sides). It not only storessome food for the plant (and for you, too), but it also absorbs soil watercontaining valuable minerals. This water travels up into the stems of thecarrot plant, and from there to the leaves. The leaves need water and mineralsso that they can manufacture food for the entire plant.
Radishes, turnips, parsnips and beets are also familiar taproots.
32

THE BINDING FORCE OF ROOTSMaterials: An envelope of radish or mustard seeds from your local variety
store, florist or nursery, two paper cups, about two cups of rich soil.Follow this procedure: Soak six seeds in water for several days until they
begin to sprout. (They are now called "seedlings.") Fill each paper cup with
soil to about three-quarters of its capacity. Plant the seedlings and let themgrow for two weeks. Careful! Water them sparingly.
You will observe: The extensive root systems of the seedlings. Try to pullup a shoot. All, or most of the soil in the cups will come loose with the roots,and the soil mass will have taken the shape of the paper cup.
The roots of plants hold down soil so that it cannot easily be blown awayby wind or washed away by rain or running water. The binding force of rootsprevents erosion, the loss by wearing away of precious top soil.
33

OBSERVING THE CIRCULATION OF WATER FROM ROOTS TO LEAVESMaterials: A stalk of celery with its leaves attached, a glass of tap water,
several drops of red ink or vegetable dye.Follow this procedure: Dissolve eight drops of red vegetable dye or red
ink in a half glass of water. Place a stalk of celery with its leaves attached inthis solution, and let it stand overnight.
In the morning, observe the leaves. Pull out a "string" from the celerystem, and make a cross section of the stalk.
You will observe: The leaves have red markings; the "strings" of thecelery stem are red, and there are red dots, too, along the outer edge of thecross section of the celery stem.
Here is your proof that the mineral-bearing water absorbed by a plant'sroots travels up the stem and into the leaves. The tubes through which thewater passes are called ducts. As you know, the leaves of a plant need waterand dissolved minerals as "raw materials" in the manufacture of food for theplant.
STUDYING THE VEIN STRUCTURE OF VARIOUS LEAVESMaterials: A stalk of white celery with its leaves attached, a blade of grass
(or a grass leaf), leaves from common trees such as oak, birch, chestnut ormaple; red ink or vegetable dye, a glass of tap water and a hand lens, sometimescalled a magnifying glass. (You can buy a hand lens at an art supply store,at a large bookshop or stationery store.)
Follow this procedure: Place the celery stalk in a glass of water in whichyou have dissolved about eight drops of red ink or dye. Let it stand overnight,so that you can examine the leaves the next day.
34

For studying the other leaves, use your hand lens. Notice how the veinsbranch out from the leaf stem to all parts of the leaf.
You will observe: In the celery leaf red color will appear in definite branchlike structures. The veins in the leaves of celery, as well as of oak, birch andchestnut, move from the leaf stem into a single main vein called a midvein.From here, branching veins spread to all other parts of the leaf.
However, the structure of veins in a grass leaf differs from that of a celeryleaf. Notice how the veins of a blade of grass are patterned in a parallelformation from the leaf stem throughout the leaf.
When you look at the maple leaf, you will see still another intriguingpattern. Here, the main veins seem to radiate from the leaf stem, much asyour fingers do from the palm of your hand. From these main veins brancheslead to all parts of the maple leaf.
The type of vein pattern that a leaf has is called "venation," and it ischaracteristic of the kind of tree on which the leaf grows. For example, alloak leaves have a similar shape and the same kind of venation. This is alsotrue of birch leaves, maple leaves, chestnut leaves and so on. The venationof oak leaves is different from that of maple leaves.
Leaf veins contain a set of tubes that conduct soil water (with its accompanying minerals) from the roots and stems of the plant to all the cells in theleaf. You know already that this water is used to manufacture food for theentire plant. The veins also contain a set of tubes that conduct the foodprepared in the leaf cells to all other parts of the plant for nourishment.
MAKING A COLLECTION OF TREE-LEAVESMaterials: An old newspaper, several small plastic envelopes or a roll of
sticky cellophane wrapping paper (the kind your mother uses in the kitchen),cellophane tape, a scrapbook and fresh green leaves from as many differenttrees as possible.
Follow this procedure: Dry or press the leaves as you did the plants inyour fern collection. Place each leaf between two pieces of newspaper andpress it for about a week under the weight of large books. When pressed, putit in an individual plastic envelope or cover it with a sheet of sticky cellophanewrapping paper.
Sort the leaves into groups. You can classify each according to the typeof venation (above), the general shape of the leaf's outline or accordingto whether it is simple or compound. A simple leaf has only one blade on aleaf stem. On a compound leaf, there are many blades on a single stem. If
35

you have difficulty sorting your leaves into categories, you may want to consulta handbook on botany.
After you have sorted them, use sticky cellophane tape to attach each leafin its proper place in a scrapbook or notebook. It's a good idea to use a looseleaf notebook, because you can add new specimens to each group wheneveryou like.
The variety of leaves on different types of trees is tremendous. Sometrees bear simple leaves, with only one blade to a leaf stem. Among these areoak, birch, maple, elm and sycamore. On the other hand, the locust, the ashand the horse chestnut have compound leaves, on which a single leaf stemcarries many leaf blades.
The general shape of a leaf is also a good means of classifying it. The
36

edges of some leaves are smooth, other are scalloped. Still others are jagged,or cut up like teeth.
The kind of leaf a tree bears, its type of venation and the character ofa leaf's edge all help to identify the type of tree on which the leaf grew.
HOW A GREEN LEAF PRODUCES FOOD - PHOTOSYNTHESISMaterials: A leaf from a silver geranium or a coleus plant, a double boiler,
a solution of dilute iodine (iodine mixed with water), a small amount ofalcohol, a saucer, a forceps or an old kitchen spoon. For this experiment,you will have to use the kitchen stove, but be sure to get your mother's permission first.
If you are lucky enough to own an alcohol burner, you can use it for thisstudy-along with a ring stand and an asbestos pad.
Follow this procedure: Fill the bottom of the double boiler with hot waterand bring it to a boil. Place a geranium or a coleus leaf in the top of the doubleboiler and cover it well with alcohol. Remember, though, since alcohol burnsquickly, you must never put a container of alcohol directly over a flame!
Set the top of the double boiler over the boiling water in the bottom pan.After a few minutes-as soon as the leaf loses its coloration-turn off theflame. Then, using your forceps or spoon, remove the leaf and put it on aplate. (If the leaf is still green, return it to the top of the double boiler andheat a few minutes more.)
Wash the boiled leaf carefully under slow-running tap water. Lay it flaton the plate and pour dilute iodine over it. After a few minutes pour off theiodine and wash the leaf again in tap water. Clean the plate.
37

You will observe: The leaf has become either greyish or completely withoutpigment. But after it was treated with dilute iodine, it turned blue-black. Thealcohol in which the leaf was boiled has turned green.
By boiling the leaf in alcohol, you removed its chlorophyll, or food-makingsubstance. And later, when you treated it with dilute iodine, you tested it forthe presence of starch. If iodine causes a blue-black shade to appear, youknow that the substance you tested contains starch.
You remember that a green leaf is a food-making factory for the entireplant, and that chlorophyll, which makes the leaf green, is the basic machineryof this factory. It puts together raw materials to make a finished product, inthis case starch. In the plant, the raw materials are water (which the plantgets from the soil through its roots) and the gas carbon dioxide. A leaf actuallybreathes through microscopic openings called stomates located on its undersurface; this is how a leaf takes in carbon dioxide from the air.
Every factory needs power, or energy, to run its machinery. Sunlight isthe source of power for every leaf factory. Without sunlight, leaves would notbe able to manufacture food for plants, nor, indirectly, for animals and humans.The first food product that a leaf manufactures is a form of sugar, but theplant changes this sugar to a type of starch for easier storage.
This miraculous food-making process-on which all life depends-iscalled photosynthesis. "Photo" refers to light (in this case, sunlight) and"synthesis" refers to the "manufacture of." The process of photosynthesisis the manufacture of simple sugars by the green plant in the presence ofsunlight.
38

ISOLATING CHLOROPHYLL AND TESTING FOR STARCH IN A LEAFMaterials: A leaffrom a green and white coleus plant or from a "wandering
Jew" plant (also called Tradescantia), alcohol, a double boiler, dilute iodine,a dish, a forceps or a large kitchen spoon.
Follow this procedure: Remove a green and white leaf from the plant youhave chosen. Using the method you just learned in studying how a green leafproduces food, boil the chlorophyll out of the leaf. (Again, be careful not toexpose the alcohol to direct flame!) Now, place the boiled leaf in a dish andtest it for starch with dilute iodine. Be sure you wash off the excess iodinesolution.
You will observe: The part of the leaf that originally was green becameblue-black. The part of the leaf that originally was white remained withoutpigment.
Only leaves or parts of leaves that contain chlorophyll are active inphotosynthesis. Therefore, the white part of the leaf you tested did not containstarch, proof that it was not part of the plant's food-making factory.
THE UNDERSURFACE OF A LEAF - STOMATESMaterials: A geranium leaf, a single-edged razor blade or sharp paring
knife, tap water, a medicine dropper.Follow this procedure: With the razor blade or sharp paring knife, peel
off as thin a piece of the underneath surface of a geranium leaf as you can.Place it in a drop of water in the middle of a slide. Carefully cover with acover slip. Observe first under low power of your microscope, and then underhigh power.
You will observe: Small openings appearing at intervals. Each opening isencircled by two kidney-shaped cells.
39
These tiny openings are the stomates, through which a leaf takes in carbondioxide from the air. There are about half a million stomates on an averagesized leaf. Each is controlled by two "guard" cells that regulate the size ofthe opening, depending upon how much carbon dioxide the leaf needs. Theguard cells close the opening to prevent the escape of water when the soil isdry due to lack of rain.
The stomates are on the undersurface rather than on the upper surface,so they will not become clogged by dust or insects. Also, if they were on theupper surface, the sun's direct light and heat would tend to cause great lossof water by evaporation, and the leaf would wilt and die.
But some leaves do have stomates on their upper surfaces. For example,leaves that grow upright have stomates on both upper and lower surfaces.Water lily leaves (called "pads") float on the surface of the water; they havetheir stomates on the upper surface. Otherwise the leaves would "drown"because their air spaces would become filled with water.
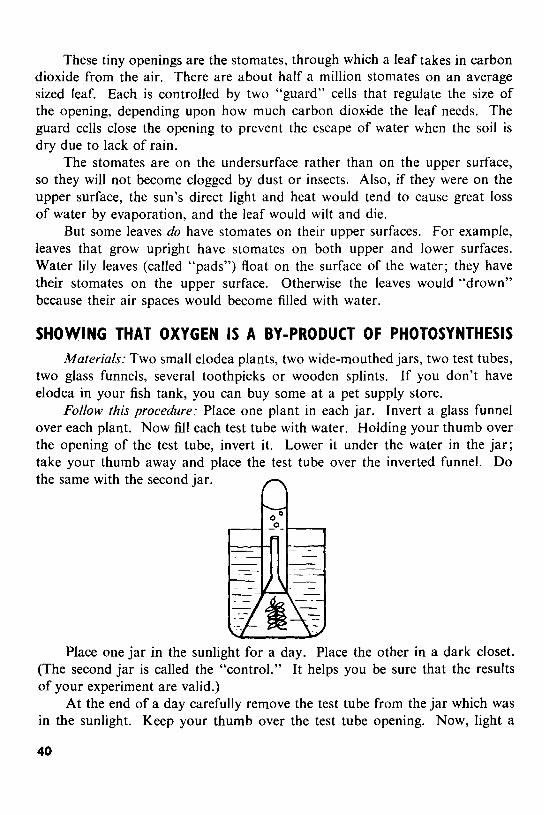
SHOWING THAT OXYGEN IS A BY-PRODUCT OF PHOTOSYNTHESISMaterials: Two small elodea plants, two wide-mouthed jars, two test tubes,
two glass funnels, several toothpicks or wooden splints. If you don't haveelodea in your fish tank, you can buy some at a pet supply store.
Follow this procedure: Place one plant in each jar. Invert a glass funnelover each plant. Now fill each test tube with water. Holding your thumb overthe opening of the test tube, invert it. Lower it under the water in the jar;take your thumb away and place the test tube over the inverted funnel. Dothe same with the second jar.
Place one jar in the sunlight for a day. Place the other in a dark closet.(The second jar is called the "control." It helps you be sure that the resultsof your experiment are valid.)
At the end of a day carefully remove the test tube from the jar which wasin the sunlight. Keep your thumb over the test tube opening. Now, light a
40
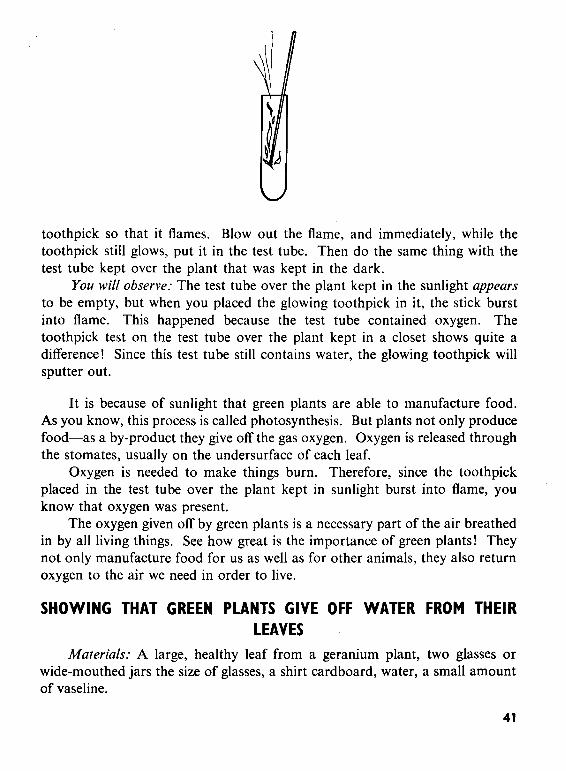
toothpick so that it flames. Blowout the flame, and immediately, while thetoothpick still glows, put it in the test tube. Then do the same thing with thetest tube kept over the plant that was kept in the dark.
You will observe: The test tube over the plant kept in the sunlight appearsto be empty, but when you placed the glowing toothpick in it, the stick burstinto flame. This happened because the test tube contained oxygen. Thetoothpick test on the test tube over the plant kept in a closet shows quite adifference! Since this test tube still contains water, the glowing toothpick willsputter out.
It is because of sunlight that green plants are able to manufacture food.As you know, this process is called photosynthesis. But plants not only producefood-as a by-product they give off the gas oxygen. Oxygen is released throughthe stomates, usually on the undersurface of each leaf.
Oxygen is needed to make things burn. Therefore, since the toothpickplaced in the test tube over the plant kept in sunlight burst into flame, youknow that oxygen was present.
The oxygen given off by green plants is a necessary part of the air breathedin by all living things. See how great is the importance of green plants! Theynot only manufacture food for us as well as for other animals, they also returnoxygen to the air we need in order to live.
SHOWING THAT GREEN PLANTS GIVE OFF WATER FROM THEIRLEAVES
Materials: A large, healthy leaf from a geranium plant, two glasses orwide-mouthed jars the size of glasses, a shirt cardboard, water, a small amountof vaseline.
41
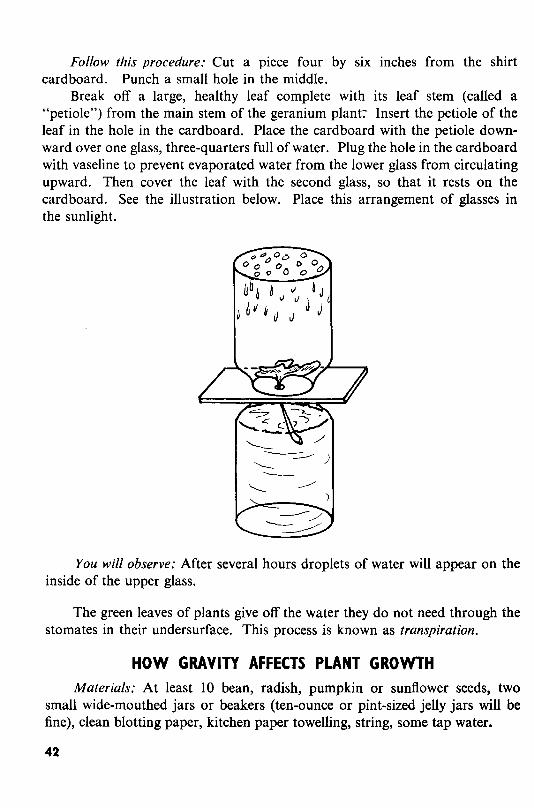
Follow this procedure: Cut a piece four by six inches from the shirtcardboard. Punch a small hole in the middle.
Break off a large, healthy leaf complete with its leaf stem (called a"petiole") from the main stem of the geranium plane Insert the petiole of theleaf in the hole in the cardboard. Place the cardboard with the petiole downward over one glass, three-quarters full of water. Plug the hole in the cardboardwith vaseline to prevent evaporated water from the lower glass from circulatingupward. Then cover the leaf with the second glass, so that it rests on thecardboard. See the illustration below. Place this arrangement of glasses inthe sunlight.
You will observe: After several hours droplets of water will appear on theinside of the upper glass.
The green leaves of plants give off the water they do not need through thestomates in their undersurface. This process is known as transpiration.
HOW GRAVITY AFFECTS PLANT GROWTHMaterials: At least 10 bean, radish, pumpkin or sunflower seeds, two
small wide-mouthed jars or beakers (ten-ounce or pint-sized jelly jars will befine), clean blotting paper, kitchen paper towelling, string, some tap water.
42

Follow this procedure: Soak eight seeds in water overnight. Now you willconstruct and plant a "tumbler garden." Line the insides of both jars with apiece of blotting paper cut to fit. Fill the middle of each jar with crumpledtowelling. Now, saturate both the blotting paper and the towelling with water.pour off the excess. Unless the blotting paper is kept moist, your seeds willnot grow.
Push four soaked seeds between the glass and blotting paper at the topof each jar.
After the seedlings have grown an inch above the top of the jars, set one"tumbler garden" on its side.
You will observe: The seeds will germinate. In less than a week they willgrow into baby plants with green leaves.
A few days after you have set one jar on its side, examine it. The littleseedlings will have turned on their stems so that they will be growing upwardagain.
Stems and leaves of plants tend to grow not only in the direction of thelight but also away from the center of the earth and the force ofgravity. Thispattern of growth has an interesting name. It is called negative geotropism,meaning "away from the force of gravity."
43

WHY LEAVES TURN COLOR IN THE FALLMaterials: All you need are several leaves from the same tree, but collected
at different times of the year. A botany handbook or a biology text-bookwill be helpful for identifying leaves you are not sure about. Then, too, youwill need the materials you used previously in making collections of pressedferns and leaves.
Follow this procedure: In summer collect the green leaves of maple, ash,elm, oak, sycamore, poplar and other trees. Carefully dry and press theseleaves between newspaper under heavy books. Collect fallen leaves of the sametrees in the early fall. Compare the colors of these leaves with those of thepressed green leaves. Make a third collection of fallen leaves in the late fall,and compare them to the others.
You will observe: The early fall leaves of elm, ash, sycamore and somemaple trees will be yellow or brilliant orange. Sugar and red maple leaves willbe deep, vivid red. Some oak leaves will be purple, others scarlet.
The late fall leaves of all these trees will be dull, dry, brown and will fallapart or crumble easily.
After a summer of manufacturing food, the chlorophyll bodies (chloroplasts) of green leaves die because they have completed their job. Excess foodmade during the summer is stored in the trunk and roots of the tree for useduring winter.
There are pigments other than green in most leaves, but they are hiddenunder the chlorophyll. However, when the green color dies, these otherpigments show up. This is what accounts for the vivid shades of autumn leaves.
Then, in late fall when the weather becomes cold, the other pigments andthe cells of the leaves die. Dry, crumbly brown leaves are actually "dead."The falling of these leaves from the tree in late fall prepares the tree for wintercold and for snow. Otherwise, winter temperatures would freeze the water inthe veins of the leaves, and this would eventually harm the tree itself.
Trees whose leaves die and fall off annually are known as deciduous trees.But the leaves of other trees, called evergreens, do not lose their leaves duringfall. The leaves of evergreens are more like needles, with a thick, protective,waterproof, waxy covering, than like what we usually think of as leaves. Somefamiliar evergreens are pines, firs, hemlocks, spruce and tamarack trees.
44

STUDYING A FLOWER-THE SWEET PEAMaterials: If there are no sweet peas in your garden, you can buy a spray
inexpensively at the florist's shop. Use a hand lens or magnifying glass toexamine the flower's lovely structure.
Follow this procedure: After you have carefully observed the flower, gentlypull the petals away from the center and expose the organs inside.
You will observe: Delicate white or pink petals that are mildly fragrant.These petals attract insects to the blossoms.
Tiny, green, leaf-like structures called sepals at the base of the petalsprotected the bud before it blossomed into a flower.
The reproductive organs that you exposed are protectively covered by thepetals. You will see a collar-like formation of stamens; these are the parts ofthe flower which give rise to male cells. Each stamen has a structure at its tipcalled an anther which provides the pollen.
Remove the collar of stamens, and you will see the pistil of the flower.The base of the pistil is called the ovary. If you split the ovary apart withyour fingernail and examine it with your hand lens, you will notice tiny ovules(egg cells) that may become future seeds-in fact, they may become green peas!
Its fragrant petals attract bees and other insects to the sweet pea flowerwhere they suck the flower's sweet nectar (a liquid produced by plants toattract insects). Ifa bee lands on a flower he accidentally gets pollen on his hairy
45

body. If he then flies to another flower of the same kind, he will transfer someof the pollen to it. This process is called pollination.
The pollen grains stick to the top-of the pistil. Each pollen grain containsa male cell. The male cell passes down a tube in the pistil until it reaches anovule (the female egg cell). The male cell combines with the female cell, resultingin a fertilized egg. Now the egg is capable of becoming a new sweet pea plant.
Each fertilized egg or ovule now becomes a seed. In the case of the sweetpea, the seed is a green pea. As the seeds grow, the ovary of the flower becomesincreasingly larger until, finally, the enlarged ovary in the pea flower becomesa pea pod, containing pea seeds.
All flowers contain the reproductive organs of the plant, usually surroundedby protective petals and sepals. If you examine a gladiolus, an apple blossomor a geranium, you will find the same parts as in the sweet pea, but they willbe arranged a little differently.
EXAMINING SEED PODS - "DRY" FRUITMaterials: Get whole string beans and green pea pods from the vegetable
store.Follow this procedure: Examine the unopened pods of the green pea and
the string bean. With your fingernail split the pods open down the bottomdivision or "seam."
You will observe: The "dry" fruits which contain the seeds of the pea andstring bean plants. The pea seeds and bean seeds are attached to the podsby a tiny stem-like part.
» ( )/ If ! If~ //;.-'-~
~;?-?//;:<-:///:///:7/./'///'/?C"/
Although you would never include pea pods and string beans in a fruitbowl, each of these is actually the fruit of the plant. Each contains seeds thatcan be planted to produce a new sweet pea or string bean plant.
46
They are called "dry" fruits because they do not contain the pulpy, fleshymaterial found in other fruits-apples, for example. All nuts, including thecoconut, and grain seeds such as wheat and rice are also known as "dry" fruits.
By a miraculous act of nature, the ripe pods spring open and "shoot" thegreen peas (seeds) and string bean seeds out and away from the parent plant.If the seeds fall to the ground, each may grow into a new plant.
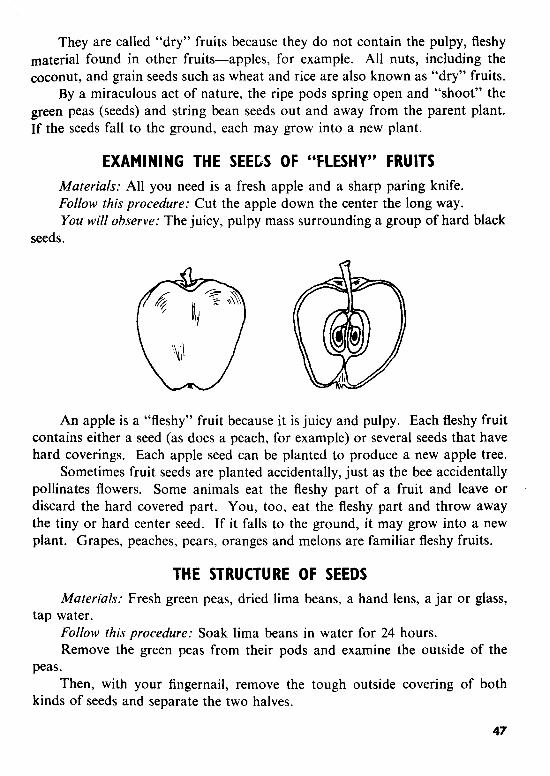
EXAMINING THE SEELS OF "FLESHY" FRUITSMaterials: All you need is a fresh apple and a sharp paring knife.Follow this procedure: Cut the apple down the center the long way.You will observe: The juicy, pulpy mass surrounding a group of hard black
seeds.
An apple is a "fleshy" fruit because it is juicy and pulpy. Each fleshy fruitcontains either a seed (as does a peach, for example) or several seeds that havehard coverings. Each apple seed can be planted to produce a new apple tree.
Sometimes fruit seeds are planted accidentally, just as the bee accidentallypollinates flowers. Some animals eat the fleshy part of a fruit and leave ordiscard the hard covered part. You, too, eat the fleshy part and throwawaythe tiny or hard center seed. If it falls to the ground, it may grow into a newplant. Grapes, peaches, pears, oranges and melons are familiar fleshy fruits.
THE STRUCTURE OF SEEDSMaterials: Fresh green peas, dried lima beans, a hand lens, a jar or glass,
tap water.Follow this procedure: Soak lima beans in water for 24 hours.Remove the green peas from their pods and examine the outside of the
peas.Then, with your fingernail, remove the tough outside covering of both
kinds of seeds and separate the two halves.
47
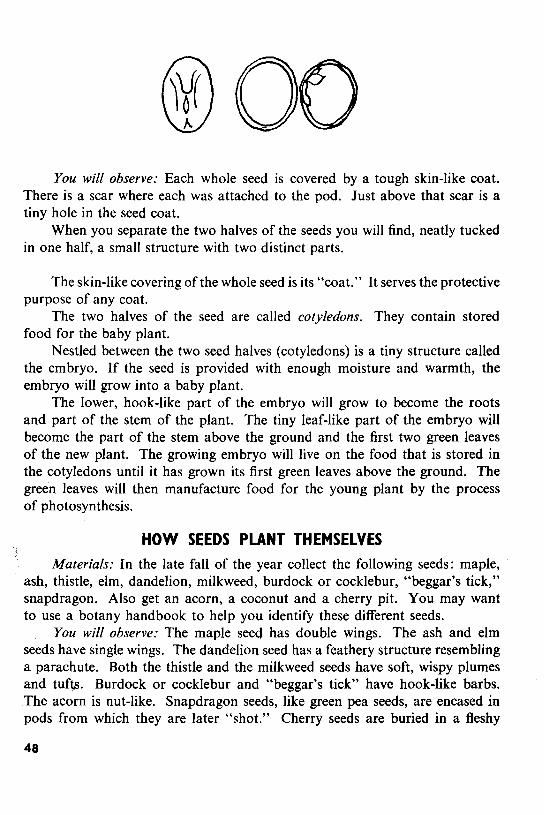
wooYou will observe: Each whole seed is covered by a tough skin-like coat.
There is a scar where each was attached to the pod. Just above that scar is atiny hole in the seed coat.
When you separate the two halves of the seeds you will find, neatly tuckedin one half, a small structure with two distinct parts.
The skin-like covering of the whole seed is its "coat." It serves the protectivepurpose of any coat.
The two halves of the seed are called cotyledons. They contain storedfood for the baby plant.
Nestled between the two seed halves (cotyledons) is a tiny structure calledthe embryo. If the seed is provided with enough moisture and warmth, theembryo will grow into a baby plant.
The lower, hook-like part of the embryo will grow to become the rootsand part of the stem of the plant. The tiny leaf-like part of the embryo willbecome the part of the stem above the ground and the first two green leavesof the new plant. The growing embryo will live on the food that is stored inthe cotyledons until it has grown its first green leaves above the ground. Thegreen leaves will then manufacture food for the young plant by the processof photosynthesis.
HOW SEEDS PLANT THEMSELVESMaterials: In the late fall of the year collect the following seeds: maple,
ash, thistle, elm, dandelion, milkweed, burdock or cocklebur, "beggar's tick,"snapdragon. Also get an acorn, a coconut and a cherry pit. You may wantto use a botany handbook to help you identify these different seeds.
You will observe: The maple seed has double wings. The ash and elmseeds have single wings. The dandelion seed has a feathery structure resemblinga parachute. Both the thistle and the milkweed seeds have soft, wispy plumesand tufts. Burdock or cocklebur and "beggar's tick" have hook-like barbs.The acorn is nut-like. Snapdragon seeds, like green pea seeds, are encased inpods from which they are later "shot." Cherry seeds are buried in a fleshy
48

fruit mass. The coconut seed is enclosed in a lightweight porous shell calleda "husk."
Nature has shaped seeds and given them special structures so that theycan be carried away from the parent plant to places where each can developinto a new plant.
If seeds were to fall too close to the parent plant, they would be crowdedout by the parent and would not get enough nourishment or space in whichto grow.
Seeds with double or single wings are carried by the wind and "sail" onair currents until they fall or are blown to the ground.
The dainty light, feathery parachute of the dandelion and the tufts ofmilkweed and thistle are moved or wafted by slightly moving air. Eventually,of course, they land on the ground.
The hooks on "beggar's tick" and burdock catch onto the fur or hidesof animals. They find earth in which to grow when they are brushed off or fall.
As you know, the seeds of fleshy fruits are distributed after animals orhumans eat the fruit, discarding the seeds.
The coconut palm drops its ripe seeds on the beach. When t~ tide comesin, they are picked up by ocean waves and deposited somewhere else on thebeach.
49
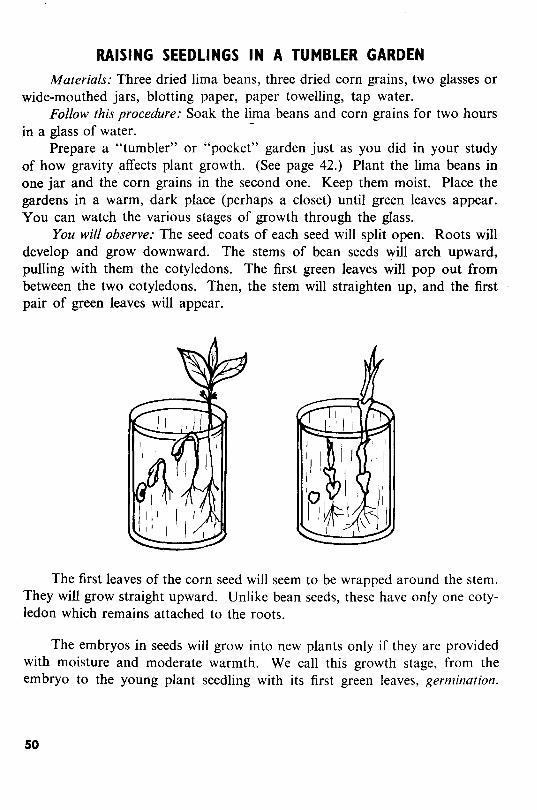
RAISING SEEDLINGS IN A TUMBLER GARDENMaterials: Three dried lima beans, three dried corn grains, two glasses or
wide-mouthed jars, blotting paper, paper towelling, tap water.Follow this procedure: Soak the lima beans and corn grains for two hours
in a glass of water. -Prepare a "tumbler" or "pocket" garden just as you did in your study
of how gravity affects plant growth. (See page 42.) Plant the lima beans inone jar and the corn grains in the second one. Keep them moist. Place thegardens in a warm, dark place (perhaps a closet) until green leaves appear.You can watch the various stages of growth through the glass.
You will observe: The seed coats of each seed will split open. Roots willdevelop and grow downward. The stems of bean seeds will arch upward,pulling with them the cotyledons. The first green leaves will pop out frombetween the two cotyledons. Then, the stem will straighten up, and the firstpair of green leaves will appear.
The first leaves of the corn seed will seem to be wrapped around the stem.They will grow straight upward. Unlike bean seeds, these have only one cotyledon which remains attached to the roots.
The embryos in seeds will grow into new plants only if they are providedwith moisture and moderate warmth. We call this growth stage, from theembryo to the young plant seedling with its first green leaves, germination.
50

GROWING SEEDLINGS IN A SPONGE GARDENMaterials: A natural bath sponge, a few radish or mustard seeds, tap
water, string, a clothes hanger, a drinking glass, an indoor clothesline or asuitable stand from which to suspend the sponge.
Follow this procedure: Soak seeds overnight at room temperature in aglass of water. Soak the sponge in water, too, and allow the excess to drainoff. Tie a string around the sponge and suspend it from something, perhapsan indoor clothesline. Now, place seeds in the holes of the sponge.
This is your garden. Keep it suspended at room temperature in moderatelight (away from the direct light of a window).
You will observe: In a few days each seed will begin to germinate. Rootswill be seen growing downward, and leaf stems growing upward from variousparts of the sponge.
A seed contains an embryo and stored food for the first stages of growthof the baby plant. If the embryo has the right conditions, moderate warmthand moisture, it will begin to grow. The roots will grow downward towardthe center of gravity (a "pulling" force in the center of the earth). The stemsand the new leaves will grow upward, away from the center of gravity andtoward the light.
The baby plant uses the food stored in the seed until it has developed itsfirst pair of green leaves. With these, it no longer has to rely on seed-storedfood. Now it can manufacture its own. ~.
/'"0. c. S,~".~\ 51
1'(370 .,.. ~
I . "~... ,t'. 2..,,*

OBSERVING SEEDS SOWN IN DIFFERENT TYPES OF SOILMaterials: At least 12 mustard or radish seeds, four small flower pots,
different kinds of soil containing gravel, sand, clay, and humus.Follow this procedure: Soak a dozen seeds in tap water overnight.Fill each of the flower pots with a different type of soil. Plant three seeds
in each prepared pot. Water each one until it is moist but not soaked. Everyother day you should water the seeds.
You will observe: In less than a week, seedlings will begin to grow in eachpot. If you have kept them in the light and given them sufficient water, theywill continue to grow, but the seedlings in the pot containing humus willgrow the fastest and will be the healthiest.
Before the seedling grows above the ground, the baby plant gets all thenourishment that it needs from the seed. But after the first green leaves appear,they need minerals as well as water and carbon dioxide to help them producefood for the plant. Of the four types of soil you used, only humus containsthe minerals that the growing plant needs.
GROWING PLANTS FROM PARTS OTHER THAN SEEDS - VEGETATIVEPROPAGATION
Materials: A white potato, a sweet potato, a carrot, an onion, a narcissusbulb, a garlic head, a four-inch branch of English ivy, philodendron or geranium. You will also need sand, toothpicks, a dark green jar, two saucers,two additional glass jars.
Follow this procedure: Cut the white potato into three parts; each partshould contain several "eyes." Plant each piece in wet sand.
Suspend a sweet potato by placing it in the neck of a jar of water. If youput several toothpicks in it, they will support the potato as they rest on therim of the jar. The water should cover the bottom of the potato.
Cut about one inch off the top of a carrot. Set this in a small saucer ofwater. As the water evaporates, add more-never let the dish get dry.
Place an onion and a head of garlic each in a separate jar or glass ofwater. Use toothpicks to keep them partially submerged, just as you did withthe sweet potato.
Place a narcissus bulb so that it rests partially in wet sand or pebbles.Cut off a small branch (about four inches) of ivy, philodendron, or ger
anium just below a node, the point where the leaves join the stem. Place thisin a dark green jar of water.
52

onion
rhizome
white potato garlic
strawberry runner
You will observe: Stems, leaves and roots will grow from the "eyes" ofthe white potato pieces. Stems and leaves will grow from the top of the sweetpotato and rootlets from the bottom. Lovely green stems and feathery leaveswill sprout from the top of the carrot slice. Long green leaves will grow outof the top of the onion, white roots from the bottom. From the top of eachgarlic clove, long green leaves will grow and from the bottom of each, whiteroots. The same type of growth will occur in the narcissus as in the onion.
After about a week, roots will begin to grow from the cut end of the ivy(philodendron or geranium) that is under water.
You can often grow an entirely new plant from a part of a plant otherthan its seed. Professional gardeners prefer this method because it is fasterthan raising plants from seeds, which are slow to germinate. In addition, youcan be more sure what will grow from a part of a known plant than fromcommercially packaged seeds. A new plant growing from a part of a plantother than the seed will be almost identical to the parent. Plants grown fromseeds may have unforeseen combinations of traits or even very undesirablefeatures.
A white potato is actually a thick underground stem. The eyes in thepotato are stem and leaf buds. Each piece of potato containing an eye hasenough stored food to nourish the buds until green leaves grow from them.Then the green leaves manufacture food for the new plant by the processof photosynthesis.
53

You probably remember that a carrot is a taproot. Like the potato, itcontains a great deal of stored food. The stems and leaves grow from the top,feeding on the stored food as they develop.
You started a narcissus from a bulb, but did you know that an onionand a garlic clove are bulbs, too ? Each is actualIy a mass of fleshy leavessurrounding a short, small stem. Each may grow small bulblets, and a newplant may result from each bulblet.
After roots appear at the cut end of the stem of ivy, philodendron orgeranium, you can plant the "cutting" in humus. An entire new plant willdevelop. From one ivy, geranium, or philodendron stem, you can have many.This is called propagating a plant with a cutting.
STARTING SEEDLINGS IN A PLASTIC BAGMaterials: Seeds, a drinking glass, tap water, a small flower pot, a plastic
bag (without ventilation holes), several paper clips.Follow this procedure: Soak the seeds in a glass of water for a day. Plant
or "sow" them in humus in the flower pot. Soak the soil thoroughly afteryou have put in the seeds.
Put the pot in a plastic bag and fold over the open end several times.Secure the folded opening with paper clips. Place the enclosed pot in a warm,dark part of your room.
You will observe: In a week or ten days the first green leaves will appear.
Now place the pot, still enclosed in its bag, in the sun. Do not remove theplastic bag for any reason, not even to water the plant.
After the seedling is about three inches high, remove the plastic bag andwater regularly. Keep the flower pot in the sunlight.
54

The plastic bag prevents moisture from escaping. There is enough air inthe bag to support the life of the germinating seeds. As it germinates theplant uses and re-uses the moisture originally provided it.
After the seedlings are established, about three inches high, the plant isready to manufacture its own food. Now it needs more carbon dioxide andmore water than when it was germinating.
The supply of carbon dioxide and of moisture within the plastic bag isno longer enough to support the plant's activities. The bag must be removedand the plant exposed to air and sunlight.
ADVENTURES WITH MEAT- AND INSECT-EATING PLANTSMaterials: Ask your florist for two bulbs of the Venus flytrap plant and
enough peat or sphagnum moss in which to raise them.
Follow this procedure: Plant the bulbs in a small fish bowl, an aquariumor a large brandy snifter containing peat moss or sphagnum moss. Keep it insunlight but away from extreme temperatures. Keep the moss moist (but notsoggy) all of the time. Use rain water or tap water that has been allowed tostand for a day or two. In warm weather, keep the plant near an open windowor outdoors. In cool weather, keep it indoors on a sunny window sill.
When the leaves are fully grown, "feed" them either a small insect thatyou have captured or a tiny piece of raw, chopped, lean meat.
You will observe: The leaves will snap shut when an insect or a piece ofmeat lands on them. After the plant is finished "eating," they will open slowly.
55

Charles Darwin called this strange, rare plant "the most wonderful plantin the world." The Venus flytrap grows with its light green leaves arrangedin rosette fashion. Each leaf has two sections which operate on a hinge. Thereare thorn-like spines at the edges of these leaves.
The Venus flytrap is an Insect-eating plant. We call it an insectivorousplant. It grows wild in bogs. The special trap leaves have tiny sensitive hairslining the inside. They also give forth ("secrete") a sticky odorous substancethat attracts insects.
An insect unfortunate enough to be lured to the plant lands on the leafand begins to eat the sticky substance. The tiny sensitive hairs act like triggers,causing the leaves to spring closed, trapping the insect.
Poor insect-it cannot escape. Gradually the soft parts of its body aredigested by juices prepared and secreted by the leaf. The plant uses thedigested insect body or meat to build protoplasm for cells and tissues.
If you feed the plant chopped meat, it will react the same way as with theinsect, and devour a hamburger dinner.
The pitcher plant and the sundew plant are two other fascinating insecteating plants. These plants grow naturally in the tropics, where there is extremeheat and an abundance of moisture.
56

Part III: THE WORLD OFANIMALS
You will not be surprised to hear that animal life is just as varied andjust as endlessly fascinating to observe as is the world of plants. You mayeven think animal life much more interesting than plants. The body organsand the life processes of animals are closer than those of plants to the waysin which we ourselves are built and function. And if you are like most people,you will want to know as much as possible about your own body.
Unlike plants, animals do not manufacture their own food. In one waythey are less self-sufficient than plants, but in another, they are more so, foranimals can move from one place to another under their own power. Andthere is tremendous variety in the ways they get around. Some hop, somefly, others swim and many others walk or run. Some animals use combinations of these methods. A frog, for example, is equally at home in the wateras he is on land. And although a chicken cannot fly for long distances, hetravels both by foot and by air.
Described in the following pages are many activities designed to revealthe wonders of the animal kingdom. You will see "invisible" animals, whosebodies consist of a single cell. These animals, protozoa, have to depend ona single cell to carry out all their life functions. This cell does everything, butof course in a much more simple way, that is done by the infinitely morecomplicated tissues and organs of frogs, birds and human beings. In protozoaa single cell eats, digests food, gets rid of wastes, breathes and reproduces.
57

Most animals are much more complex than the protozoa. Moths, butterflies and frogs mature in an unusual way; they pass through several distinctstages of development before becoming what we consider full-grown. Thespider is fascinating, too, for the many uses of his fragile web, as is the oyster,which has the gift of producing a gleaming pearl from a grain of sand.
You will study a typical insect, the grasshopper. You will observe theskeletal structure of a fish, you will learn how it is possible for a fluffy yellowchick to develop from an egg. You will collect and arrange your own displayof sea animals and sea shells and you will investigate the mysterious littlefirefly, who makes summer evenings so cheery by flashing his bluish lighton and off.
As for equipment, you may want to purchase an aquarium, if you do notalready have one, or perhaps a more specialized type of aquarium, a vivarium,especially designed for raising turtles and similar animals. But you alreadyhave most of the equipment you will need for the adventures described in thepages that follow.
58

MAKING A HAY INFUSION TO STUDY PROTOZOAMaterials: Dried timothy grass (a common wheat-like grass called "hay"
by farmers), a few dried leaves, a jar of pond water containing scum from thesurface of a pond, a small amount of silt or mud-like soil from the bottom ofa pond, some uncooked rice.
Follow this procedure: Fill a jar one-quarter full of pond water whichincludes both scum and silt. Add a few spears of timothy grass and severalleaves. Keep the jar uncovered in a warm part of your house for a few days.At the end of that time, add five or six grains of uncooked rice to the water.The combination of timothy grass, leaves and pond water is called an infusion.
You will observe: The dried grass and the leaves will begin to decay,perhaps making the water appear a little cloudy. More scum will appear onthe surface as time passes. Decayed parts of the hay and leaves will drop tothe bottom of the jar. You will probably notice the unpleasant odor of decaythat is characteristic of stagnant pools of water.
The plant matter in your jar contains spores of bacteria of decay (see page20) as well as some one-celled animals enclosed in cases called cysts. Cystsare similar to the spores you examined in your study of bacteria. Givenmoisture and warmth, the one-celled animals come out of their cysts, just asthe bacteria come out of their spore coats.
The bacteria feed on the vegetation in the jar and cause it to decay.Similarly, the one-celled animals feed on the decayed matter. As a result, theygrow and multiply rapidly. Some of them feed on the decaying rice grains.As long as there is food, the microscopic animals in the jar will thrive, but theywill die as soon as the decay on which they feed is used up.
The simple, one-celled animals living in your hay infusion are known asprotozoa.
59

OBSERVING PROTOZOAMaterials: Your hay infusion, a medicine dropper, a small piece of
absorbent cotton. This is a microscope study, so you will need a clean slideand a cover slip, too.
Follow this procedure: Place a few strands of absorbent cotton in the middleof a clean slide. The cotton strands will tend to keep the more active protozoaconfined so that you can observe them. Very carefully, so as not to stir upthe infusion, take some water from the bottom of the jar with your medicinedropper.
Place a drop of this water on the cotton lying on your slide. Cover carefully with a round cover slip. Observe first under low power, and then underhigh power of your microscope.
Now, prepare a second slide just as you did the first. There is one difference, though; this time take your specimen from the surface of the infusion.Compare what you see on the two slides.
You will observe: After your eye becomes accustomed to the lightness ofthe water, you will see tiny forms of moving animal life. Some protozoa willbe darting back and forth across your field of vision. Some will seem to betumbling over and over, like the rolling barrels in a "fun house." Otherswill glide lazily along, while still others will seem to ooze sluggishly. You willsee protozoa of many different shapes and sizes.
These tiny bits of independent life (protozoa) are animals whose bodiesconsist of only one cell. Varieties of these one-celled animals may be foundin pools, ponds, lakes, rivers, even in oceans and seas. Although many liveby themselves independently, some love company and exist in groups. Thereare types of protozoa who feel at home at the bottom of a body of water andother types who prefer the better lighted part of the water near the surface.However, all protozoa serve as food for larger, water-living animals.
The two best-known types of protozoa are the amoeba and the paramecium. The former resembles an irregularly shaped blob of protoplasm. Itchanges its shape constantly as it oozes slowly from one area to another. The
60

paramecium, on the other hand, never changes shape. It looks very much likethe sole of a shoe, and it darts swiftly around the water.
A particularly interesting type of protozoa has a tiny, chalk-like cellaround its one-celled body. The famous chalk cliffs of Dover, on the southerncoast of England, are made up of countless numbers of chalk-like cells thatwere washed up by the sea after the soft-bodied animals themselves died.
Some protozoa are disease-producing animals. We call them parasites.Malaria is one of several diseases caused by a parasitic protozoa.
MAKING A COLLECTION OF SEA SHELLS AND ANIMALSMaterials: The next time you go to the seashore make a collection of
interestingly shaped and tinted sea shells and of some of the small sea animalsyou may find washed up on the sand. When you are home again and want topreserve your collection of these objects, you will need sticky cellophane paper,a large roll of absorbent cotton and a cardboard box big enough to hold yourshells and sea animals.
clam
~1I0'Follow this procedure: Starfish should be weighted down in a flat position
and allowed to dry in the sun. Sand dollars will not have to be weighted, forthey are flat, but they, too, should be dried in the sun as should crabs andyoung crayfish. If you prefer, you can preserve crabs in a tightly covered jarcontaining alcohol. The shells of oysters, clams, mussels and snails should beboiled in water in an enamel pot for a short time, and then completely dried.
Label each specimen (you can attach a piece of paper to it with stickycellophane tape), cover it with transparent kitchen wrapping paper and placeit in a large cardboard box about half-filled with absorbent cotton.
Starfish, sand dollars, crabs, oysters, clams, mussels, snails and crayfishinhabit the relatively shallow areas of bodies of salt water. Since their bodies
61

are soft and they do not have internal skeletons or backbones, they are calledinvertebrate animals.
Naturally these animals need some means of protection, particularly sincetheir bodies are soft. To provide this, their body cells secrete the hard protective substances we call shells. Crabs and crayfish shed their outgrown shellsas their bodies grow larger and produce new and larger shells to fit as neededOn the other hand, clams, oysters, mussels and snails do not leave their shellsas they grow. Their bodies secrete new cells to add to the original ones andmore shell material to add to their size. When a crab has just formed a newshell that has not yet hardened, it is called a "soft-shelled crab." This termdesignates a stage in the development of a crab.
All over the world the sea animals you have collected are valued as asource of food.
STUDYING A STARFISHFollow this procedure: Examine the dried starfish In your collection of
shells and sea animals.You will observe: There is a round opening in the middle of the underside
of the starfish. Along the undersurface of each "arm" of the animal there aretwo rows of little stem-like suction cups.
The central opening in the underside of the starfish acts as a mouth thatpulls food directly into the sac-like stomach of the animal.
The suction cups along its arms help the animal stick to the hard surfaceof larger animals and to rocks as it moves its muscular arms in locomotion.
An oyster provides a delicious meal for a wily starfish. And the starfish'smeans of catching and devouring his prey is quite fascinating.
The starfish slowly moves up on the unsuspecting oyster who may be justrelaxing at the bottom of a shallow part of the sea. The starfish crawls overhis future meal and wraps himself firmly around the two-part shell of the
62

oyster. The oyster quickly snaps shut its double shell and holds it firmlyclosed. The muscles of the oyster are very strong, so the shell stays closedtightly. You might think that closing his shell would protect the haplessvictim, but eventually he has to open it so that he can "breathe." By takingin water and taking from it the oxygen he needs, the oyster stays alive.
As soon as the starfish feels the muscles of his future meal relaxing, herelaxes his own grip but still remains wrapped around the oyster. When the
i~ space between the two oyster shells is large enough, the starfish quickly inverts
r' (turns inside out) his stomach through his mouth opening and pushes it
between the parted shells. The strange "inside-out" stomach of the starfishproduces juices that quickly digest and absorb the soft body of the oyster.His meal completed, the starfish withdraws his stomach and crawls away toenjoy an after-dinner rest. All that remains of the oyster is a pair of emptyshells.
THE OYSTER AND THE PEARLMaterials: Get a live oyster from a fish market.Follow this procedure: Examine the oyster.You will observe: The living, fleshy part of an oyster is soft and boneless.
This is also true of the bodies of his close relatives, the clam, the scallop, themussel and the snail. The outer shells of these animals provide shelter andprotection against other sea animals.
Usually the oyster can wash out a grain of sand or the hard shell of amuch smaller animal that might be swept into his own shell by the water.But sometimes a grain of sand or a tiny hard shell gets stuck between his shelland the oyster's soft body. This irritates the oyster. The soft tissue aroundthe irritating object secretes a liquid called nacre or "mother-of-pearl." Thisliquid flows around the grain of sand and hardens to form a smooth protectivelayer over it.
The oyster continues secreting layer upon layer of mother-of-pearl untila mature pearl is formed. It takes a long time-perhaps as long as five to tenyears-for a pearl to be produced. Of course, the size of a pearl depends onhow long it remains among the secreting tissues of the oyster.
The hard, glistening, irridescent inner surface of the oyster's shell ismother-of-pearl, too. It provides a thick coating to protect the animal's softbody from what would otherwise be a rough shell surface.
63

STUDYING A GRASSHOPPER - A TYPICAL INSECTMaterials: A large jar, a square of cheesecloth, a rubber band-and a
grasshopper. You can catch one fairly easily in early summer in an emptylot or a field.
Follow this procedure: Place the grasshopper in a large jar with fresh grassand twigs. Cover the jar with a piece of cheesecloth secured by a rubber band.When you see that the grass is dying, add fresh grass with drops of water onit and fresh twigs. Grass growing in a piece of earth is good for this purposebecause it will stay fresh longer than cut grass.
Examine the grasshopper with your hand lens.
You will observe: The body of the grasshopper has three distinct parts.They are called the head, the thorax (the middle part) and the abdomen (therear section). All three sections are covered with a hard substance.
You will see a large pair of eyes and a pair of delicate "feelers" that arecalled antennae at the top of the head. The biting mouth parts are easy tofind just at the bottom of the insect's head.
Attached to the thorax are three pairs of legs and two pairs of wings.The third, thickest pair of legs is the jumping pair. The top pair of cover wingsare long and narrow and rather stiff. The lower wings are delicate, transparentand fan-like when they are open for flight.
If you look closely with your hand lens at the abdomen of the animal,you will see a tiny opening on each of the sections (segments) that make upthe rear. These openings exist in pairs, one on each side of a segment. Theyare called trachea, and it is through these openings that the grasshopperbreathes.
If the grasshopper is a female, she will have a long, pointed, dividedsegment at the end of her abdomen for depositing her eggs in the soft ground.If it is a male, the final segment will be bluntly rounded.
64
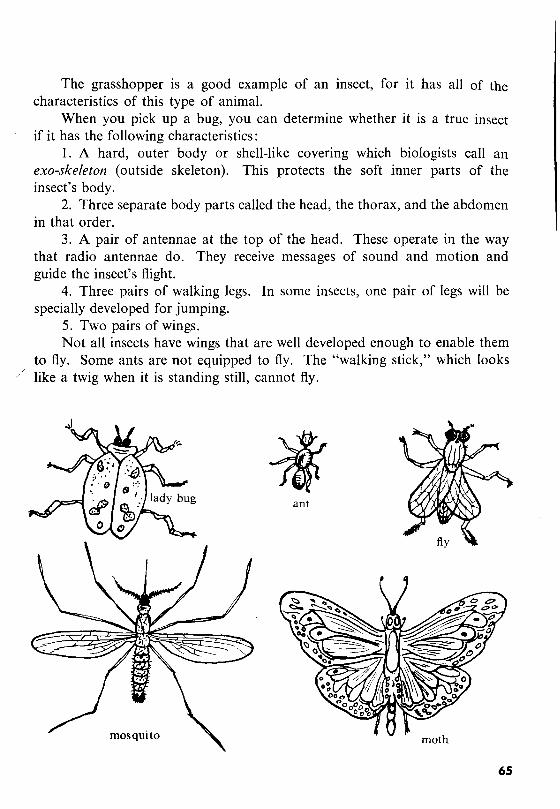
The grasshopper is a good example of an insect, for it has all of thecharacteristics of this type of animal.
When you pick up a bug, you can determine whether it is a true insectif it has the following characteristics:
1. A hard, outer body or shell-like covering which biologists call anexo-skeleton (outside skeleton). This protects the soft inner parts of theinsect's body.
2. Three separate body parts called the head, the thorax, and the abdomenin that order.
3. A pair of antennae at the top of the head. These operate in the waythat radio antennae do. They receive messages of sound and motion andguide the insect's flight.
4. Three pairs of walking legs. In some insects, one pair of legs will bespecially developed for jumping.
5. Two pairs of wings.Not all insects have wings that are well developed enough to enable them
to fly. Some ants are not equipped to fly. The "walking stick," which looks/
/ like a twig when it is standing still, cannot fly.
mosquito
ant
moth
6S

Some common insects that have all of the above characteristics are thehousefly, fruit fly, praying mantis, beetle, lady bug, bee, dragon-fly and themosquito.
As you know, many insects (bees, butterflies and moths) are useful toman because they help pollinate flowers. Others, like the silk worm moth,produce silk. Of course bees furnish us with honey.
On the other hand, some insects are harmful to man. Grasshoppers andlocusts destroy grain and other crops. The tussock, gypsy and leopard mothsdestroy our shade trees.
Termites cause a great deal of damage by eating through wooden buildings.Carpet beetles and clothes moths are well known pests. Fleas, lice, flies andmosquitoes carry disease-producing germs. Of course, insects such as mosquitoes, wasps, bees and gnats are nuisances because of their stings and bites.
WATCHING A CATERPILLAR BECOME A MOTH OR BUTTERFLYMaterials: A jar containing leaf-bearing twigs and fresh grass, preferably
still growing in sod, a square of cheesecloth, a rubber band or short lengthof string.
Follow this procedure: Catch a caterpi!lar and place it in the jar filled withfresh twigs and grass. Cover the jar with cheesecloth secured with a stringor a rubber band. Keep the jar at room temperature. Replace the twigswhile the caterpillar is still active.
You will observe: The caterpillar will eat the grass and the leaves on thetwig.
After a while, it will attach itself to the twig and if it is the caterpillar ofa moth, it will spin a cocoon of white silk threads around itself. If it is thecaterpillar of a butterfly, it will cover itself with a hard green or brown casecalled a chrysalis.
66

After several days the moth caterpillar will pull itself out of a hole atone end of the cocoon. If it is a butterfly, the chrysalis case will split Openand a lovely butterfly will emerge.
At first the wings of the moth or butterfly will appear to be folded aroundits body, but as the body dries, the wings will open and spread apart. Assoon as it emerges from its cocoon or chrysalis, put the insect in the sun.
Moth and butterfly "babies" pass through several stages of developmentbefore they become what we recognize as a moth or a butterfly. These differentstages are called metamorphosis.
The female moth and butterfly lay eggs on twigs, on leaves and sometimesin the ground. The eggs are very hard to find. They develop first into theworm-like animals which we call caterpillars.
Caterpillars eat ravenously of their favorite leaves and grass; of course,they become fat. Much of what they eat is stored for use during the metamorphosis into an adult moth or butterfly.
While the moth caterpillar is in its cocoon and the butterfly caterpillar isin its chrysalis, they do not eat. Although they seem inactive during this stage,they are turning into adult insects. In this final stage of development theirfunction is to produce more eggs, and they die as soon as they have completedthis task.
Moths are harmful only before they become adult moths, that is, whenthey are in the caterpillar stage. The worm-like caterpillar of the clothes moth,cabbage moth, tomato moth, cotton boll weevil and corn ear moth are alldamaging to objects man needs and values.
Most butterflies and moths are useful because they help pollinate flowers.
HOW THE FIREFLY GLOWSMaterials: A wide-mouthed jar containing grass or leaves, a piece of
cheesecloth, a short length of string or an elastic band.Follow this procedure: On a summer evening collect several fireflies.
Catch them carefully by cupping your hands over each insect. Put them inthe jar and cover the opening with cheesecloth secured by a string or rubberband. After half an hour or so, feel the outside of the jar.
You will observe: The insects have a bluish light that they can flash onand off. Since the light is on the undersurface at the tip end of the body,we might call it a "taillight."
When you touch it, the jar will not feel hot, as you would naturally expect.
67

Why the firefly's light does not produce heat-as do other lights-is still oneof nature's mysteries.
-,
Fireflies, sometimes called "glowworms," are not true flies. They areinsects belonging to the beetle family.
The light of a firefly flashes on and off in a definite rhythm, as it seeks itsmate in the dark. Recently, scientists have discovered the elements of thisinsect's strange cold glow. Oxygen, magnesium salts, adenosine triphosphateand two previously unknown substances combine in tiny quantities to formthe bluish light of the firefly. Today a few scientists can reproduce this lightchemically in their laboratories.
HOVV THE SPIDER SPINS A VVEBFollow this procedure: Watch a spider as it spins its web between branches
of a tree or from one blade of grass to another. Watch it, too, as it glidesover a strand of its web to capture a small fly or a gnat for its evening meal.
You will observe: A definite pattern to the web. Each species of spiderspins a particular web pattern slightly different from that of any other species.
You may also see the cocoon in which the female spider has laid hereggs either attached to the web or to the mother's body. In addition, youmay see the hard, outer skin of the spider that it shed as its soft body grewin size.
A spider is not an insect; it has four pairs of legs, whereas a typical insecthas only three. Spiders, scorpions and mites are called Arachnids to distinguish them from their relatives, the insects.
The scientific name Arachnid was derived from Greek mythology. A
68

young Greek peasant girl named Arachne had the audacity to challenge thegoddess Athena to a weaving contest. Young Arachne was most skillful, andin a fit of jealous rage, Athena changed the girl into a spider!
The female lays her eggs and wraps them up in a cocoon of silk threadwhich she herself spins. She uses the same thread as for her web. This ishow it is produced: A gland in the spider's abdomen produces a silk fluid.When this fluid is forced out of the spider's body, it hardens into a thin,delicate but strong thread of silk as soon as it comes into contact with the air.
Each kind of spider spins a web that is characteristic of its species. Somewebs are extremely elaborate with perfect architectural symmetry and form.
Many fine threads seem to radiate from a central point. Other webs are sosimple that they consist of only three or four supporting threads. A lovelysight is a dew-covered web sparkling in the morning sunlight.
An unusual type of web is a "nest" built in the soft earth by the trap-doorspider. It is a sac-like nest with a hinged lid that can only be opened by thespider who built it. The nest is so successfully camouflaged that when thetrap door is closed, it blends into the surrounding ground. The owner lurksbehind the door. When an unsuspecting insect crawls near it, the trap dooris quickly opened and then snapped shut behind the insect. Of course, hebecomes the spider's meal.
The spider's web serves many purposes. It is the home of the adults andthe birthplace of the young. It serves as a snare for the natural enemies whichthe spider kills and uses for food. A hungry spider will stand quietly at oneend of his web, waiting for a fly or mosquito to become trapped in its threads.While the insect struggles to free itself, the spider stings his victim, paralyzinghim, before sucking out the insect's life-fluids.
69

HOW A FISH BREATHESMaterials: A few gills from the head of a freshly caught fish, a dish of
water, a medicine dropper, your hand lens.Follow this procedure: Put the gills in a dish of water. Add a dropper
full of water from time to time to keep the gills moist while you are observingthem. Observe the feather-like structure of the inner curve of the fish gillswith your hand lens. Examine the tooth-like structure of the outer arch ofthe gills.
You will observe: Gills from freshly caught fish will appear bright red.There is usually a double row of filaments (feather-like threads) on the innercurve. The outer, more solid part of the gills, appears to have a row of finetooth-like structures.
The feathery filaments of the gills contain tiny blood vessels calledcapillaries. .When the fish opens his mouth, water which contains fluid oxygen(and usually some food in the form of tiny plants and animals), is drawn in.
The water passes back over the gills and out through the two flaps(opercula) on each side of the fish's head. As the water passes over the gills,oxygen enters the blood capillaries in the filaments. Thus, the gills are therespiratory (breathing) organs of the fish. Unlike human beings and othermammals, most fish have no lungs.
The tooth-like structures on the outer curve of the gills are called gillrakers. They strain out the tiny plants and animals in the water that the fishhas swallowed. These tiny forms of life are then directed, as food, into thefish's digestive system.
STUDYING THE SKELETON OF A FISHMaterials: Ask a clerk at a fish market for the backbone of a codfish.
Examine it with your hand lens.You will observe: Separate bones with long projections on each side
fitting like a chain, one into the other.
Unlike the sea animals you collected (snails, oysters, clams and the like),the fish is an animal with a backbone. It is called a vertebrate to distinguish itfrom animals that do not have backbones. The backbone is made up ofseparate small bones (vertebrae) which are separated by cushions of cartilage,soft bone-like material found, for example, in the human nose. (You mayknow cartilage as gristle.)
70

The backbone protects the fish's very delicate and important spinal cord.The spinal cord extends from the brain along the back of the fish to its tailand is made up of nerve fibres. The sensitive nerves and cells of the spinalcord are the fish's nervous system, the control center for all its body activities.
The long, sharp bones extending from each side of a vertebra help tohold the fish's muscles in place.
OBSERVING CIRCULATION OF BLOOD IN THE TAIL OF A GOLDFISHMaterials: If you have a fish tank with goldfish, you can carry out this
experiment easily. If not, you may want to buy one at a variety store or apet shop. You can see the circulation of blood in the tail of a goldfish withoutharming the little fish. Besides a fish, you will need a medicine dropper, asmall wad of absorbent cotton, a saucer, a small fish net and your microscope.
Follow this procedure: Soak the cotton in water from the aquarium.Carefully catch a goldfish in the net. While the fish is still in the net, verygently wrap the soaked cotton around the body of the fish, leaving only thetail uncovered. Place the wrapped fish on a saucer and gently cover theexposed tail with a glass slide.
71

Place the dish on the stage of your microscope so that the tail is underthe low power objective. Observe.
Keep the fish tail wet by putting a drop of aquarium water on it everyfew minutes. Be sure to return the fish to his home in the aquarium immediately after you have observed his tail under the microscope. Be very gentle.
You will observe: The blood flows in tiny tubes from the head regiontoward the tip of the tail and from the tip of the tail back toward the head.
The fish has a tube-like heart in its "throat" (just behind the gills) thatpumps blood to various parts of the body in tubes caJJed blood vessels. Thelarge blood vessels that carry blood away from the heart are called arteries.The smaller blood vessels that carry blood back to the heart are called veins.Still smaller blood vessels that branch all over the body are caJJed capillaries.Blood brings food and oxygen to all the cells of the body and carries awayfrom thes~ cells many waste products.
THE ELEMENTS OF A "BALANCED" AQUARIUMMaterials: Three large test tubes with rubber stoppers, adhesive tape, two
small common snails (Physa), two smaJJ water plants (elodea or cabomba),a large-mouthed pint jar.
Follow this procedure: Fill the jar with tap water and let it stand open andundisturbed for about 48 hours. (This is caJJed "aging.")
Fill one test tube two-thirds fuJJ of the aged water and place one snail init. Put the rubber stopper in place and wrap adhesive tape around the topso as to make the tube relatively airtight.
Fill the second test tube two-thirds full of the aged water. Place in itone snail and a sprig of elodea or cabomba. Seal it as you did the first tube.
Fill the third test tube two-thirds full of aged water and place in it onlyone smaJJ sprig of a water plant. Seal it as you did the others.
72
2 3

Let these test tubes stand in good light, but not in direct light, for severaldays.
You will observe: The lone snail in the first test tube will die as will theplant in the third test tube. Even though it is sealed, and therefore closed offfrom the oxygen in the air, the second test tube has provided conditions whichsustain life. Both the snail and the plant are alive and perhaps even thriving.
The plant supplies the snail with food and oxygen. In turn, the snailprovides the plant with minerals and carbon dioxide. The light providesenough energy for the plant to put together the carbon dioxide, water andcertain minerals to manufacture food for itself and for the snail. Now youcan see why it is so important to include green plants in your aquarium.
OBSERVING THE METAMORPHOSIS OF A FROGMaterials: Collect frog eggs from the shallow water of a pond early in
the spring. Put them in your aquarium or in a large jar of water containinga few pond weeds.
Follow this procedure: Keep the little black and white eggs that are surrounded by a mass of gelatin in the same water until they develop. See thatthey get sunshine or light from an electric bulb during the daytime hours.
After the fish-like young tadpoles develop from the eggs, feed them bitsof boiled lettuce leaf each morning. Be sure to remove the uneaten food atthe end of the day so that the tadpoles will not be killed by the decay productsof the leftover lettuce.
You will observe: The mass of eggs is surrounded by a transparent gelatinsubstance that keeps it floating near the surface of the water. The protectivegelatin also acts as a magnifying lens, for it concentrates the warm rays of thesun on each developing egg.
After a period of about 8 to 20 days, depending on the amount of sunshineor heat the eggs get, fish-like baby frogs, or tadpoles, will wiggle out of theeggs and gelatin mass. Tadpoles swim like fish.
After about 9 days, each tadpole will develop hind legs. Then, as thetadpoles continue to grow, their tails will become increasingly shorter andfront legs will appear. During this time the tadpoles' bodies will begin to lookmore frog-like.
Finally each tadpole will become an adult frog with two pairs of legs andno tail. Each will try to leave the water in search of a rock on which to sit.Be careful! They may jump right out of your aquarium! Now it's best totake your frogs to the woods and let them free near a pond.
73

Biologists call the development of frog eggs into frogs a metamorphosis.The process is similar to the transformation of a caterpillar into a moth orbutterfly described on pages 66-67.
As the tadpole is developing his legs, his tail gets shorter because it isbeing absorbed as food. He gets other kinds of food by scraping the leavesand stems of water plants.
In the process of becoming an adult frog, the tadpole lost his gills anddeveloped lungs to take their place. A tadpole breathes only in water, but afrog breathes on land. The frog is called an amphibian, a term given to animalswhich can live on land as well as in water.
It takes about 60 to 90 days for a tadpole to become a full-grown frog.If frog eggs develop into tadpoles in the early spring, it is usually about thefirst of July that they become frogs. However, the huge, deep-voiced bullfrogusually spends two winters as a tadpole. It takes three years for him todevelop fully.
RAISING PET TURTLESMaterials: An aquarium or vivarium (a container of plastic or glass
especially designed for raising animals such as turtles), a flat rock or a floatingcork, turtle food.
Follow this procedure: Buy two or three small turtles in a pet shop orbring home a small wood turtle from a pond.
If you use an aquarium, it should contain two to four inches of water.Add a cork float or place a flat rock in one corner of the tank as a restingplace for the turtles.
74

Change the water twice weekly to keep it clear and clean.Feed your turtles small bits of raw fish, ground raw meat or liver. Buy
a can of ant eggs and follow the feeding instructions printed on the can. Mostturtles will enjoy a small piece of hard-cooked egg, a bit of lettuce leaf, anda small thin slice of raw apple in addition to their regular meat and fish diet.
Both the small green turtles ordinarily available at pet shops and woodturtles will thrive in a well-kept aquarium or vivarium if they are fed properly.But if your turtles become sluggish and inactive toward winter, they may betrying to find a place to hibernate, or rest inactively, until summer. Put theirtank in a cool place at this time and do not be disappointed if they remainapathetic and do not eat much. Don't try to force them to eat. When springcomes, your turtles will become lively again and their appetites will returnto normal.
When a turtle feels the need to escape or to protect itself, it will pull itslegs and head into its hard double shell. This is its natural means of protection.
The shape of the undershell of the turtle is a guide to its sex. If theundersheIl (properly called the plastron) is slightly convex (curved outward) itis probably a female turtle. If the undershell is concave (curved inward), itis a male turtle. If you have a common box turtle, the male can be distinguishedfrom the female by his red eyes. By contrast, the female's eyes are yellow.All male turtles have long claws on their webbed toes, whereas female turtleshave short claws.
THE STRUCTURE OF A CHICKEN EGGMaterials: Ask the butcher for several unlaid chicken yolks from the
body of a chicken. In addition, you will need a whole chicken egg, a dessertdish, your hand lens.
Follow this procedure: Crack the egg carefuIly and pour the contents intoa dish.
75

Examine the opened shell and the contents of the egg with your hand lens.Examine the unlaid yolks too.
You will observe: The unlaid chicken eggs resemble clusters of yeIloworange grapes of different sizes.
The shell of the whole egg has the familiar hard outer surface which youhave seen in other shells, but there is a thin, tissue-papery membrane clingingto its inner surface. There is a space between the thin membrane and thehard shell at the rounded end of the egg, but at all other places the paperymembrane sticks close to the shell.
Now, look at the egg in the dish. You will see the familiar orange yolkin the middle surrounded by the thick, loose "white" of the egg. You willsee a white spot just about in the middle of the yolk.
Look hard at two ends of the yolk opposite each other; you will seetwisted threads of white, similar to but thicker than the white spot in themiddle of the yolk. Around this is the thick white of the egg.
The cluster of unlaid egg yolks was taken from the chicken by the butcherbefore the eggs were laid. These, of course, are egg yolks.
The white spot in each yolk is the egg nucleus from which a new babychick might have developed if the egg had been fertilized by a rooster. Eggsare produced in a pair of ovaries in the body of the mother hen.
The yolk surrounding the nucleus provides a supply of food for a developing baby chick. Of course, egg yolks are nourishing food for humans, too.
The white of the egg serves as protection, while the two twisted whitecords you saw on the yolk keep it attached to the shell. They act as hammockstrings for the developing baby chick.
The papery membrane under the brittle outer shell is also protective. Itis thin enough so that air can pass through for the developing baby chick. The
76

outer shell is porous so that air can pass through it to the paper membrane.The outer shell also provides protection for all the internal parts of the egg.
The various parts of the familiar chicken egg are secreted in the body ofthe hen and poured around the yolk as it is passing through a tube on its wayto the outside of the hen's body; the shell does not become hard until the eggreaches the air after leaving the body of the mother hen.
STUDYING THE DIGESTIVE ORGANS OF THE CHICKENMaterials: Ask the butcher to show you the digestive organs of a chicken.
The liver and the gizzard are easy to obtain because they are included amongthe edible parts of the chickens your mother buys.
You will observe: The tube through which the chicken's food passes beforeit is digested is similar to the human gullet. The liver, which we eat whencooked, is a brownish-red shade and consists of two sections. Unlike the softliver, the gizzard is very tough and looks like a thick bag. The intestineresembles a sleek coiled tube.
The chicken eats mostly corn and other grains and some small gravelstones. After being taken into the mouth, the chicken's food passes downthe gullet into the top of the stomach. It then moves on into the tough organcalled the gizzard or crop. There are, in the gizzard, stones or pebbles thatgrind up the food. Oddly, these stones serve the function of teeth. Thechicken's food is chewed after it is swallowed, for like other birds, chickenshave no true teeth.
Once it has been ground into a fine powder in the gizzard, the chicken'sfood passes on to the intestine. The liver and other glands supply digestivejuices to the small intestine where the food is digested.
If you have a pet parakeet or canary, it is wise to include in its diet tinypebbles that it can take into its gizzard to aid digestion.
77
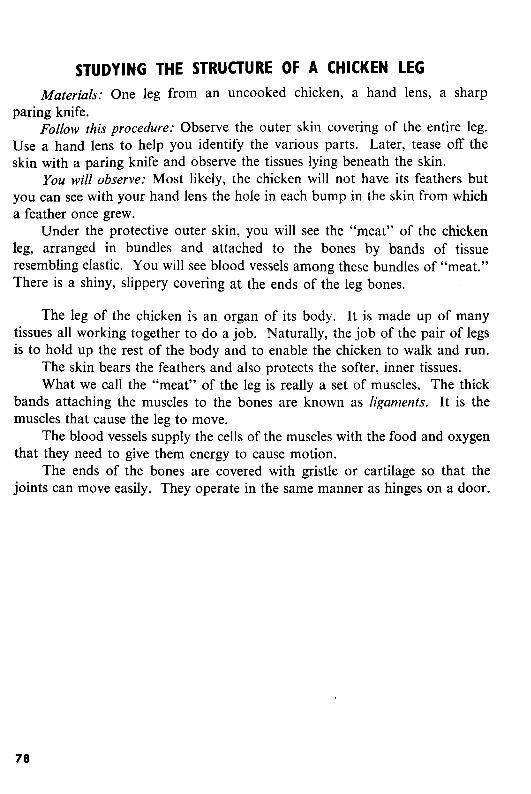
STUDYING THE STRUCTURE OF A CHICKEN LEGMaterials: One leg from an uncooked chicken, a hand lens, a sharp
paring knife.Follow this procedure: Observe the outer skin covering of the entire leg.
Use a hand lens to help you identify the various parts. Later, tease off theskin with a paring knife and observe the tissues lying beneath the skin.
You will observe: Most likely, the chicken will not have its feathers butyou can see with your hand lens the hole in each bump in the skin from whicha feather once grew.
Under the protective outer skin, you will see the "meat" of the chickenleg, arranged in bundles and attached to the bones by bands of tissueresembling elastic. You will see blood vessels among these bundles of "meat."There is a shiny, slippery covering at the ends of the leg bones.
The leg of the chicken is an organ of its body. It is made up of manytissues all working together to do a job. Naturally, the job of the pair of legsis to hold up the rest of the body and to enable the chicken to walk and run.
The skin bears the feathers and also protects the softer, inner tissues.What we call the "meat" of the leg is really a set of muscles. The thick
bands attaching the muscles to the bones are known as ligaments. It is themuscles that cause the leg to move.
The blood vessels supply the cells of the muscles with the food and oxygenthat they need to give them energy to cause motion.
The ends of the bones are covered with gristle or cartilage so that thejoints can move easily. They operate in the same manner as hinges on a door.
78
Part IV: THE HUMANANIMAL
It is exciting to pick up an oyster shell as you walk along the beach andto realize that this shell was once the home of a soft-bodied animal that wascapable of making a milky pearl to protect itself against an irritating grain ofsand. It is mystifying to watch a fluffy yellow chick crack through the shellof an egg. It is fun, too, to examine the amazingly varied and sometimescomical protozoa through your microscope. All life is fascinating and everlastingly miraculous.
But it is most thrilling of all to learn about your own body and hownature has adapted it to carryon all the necessary life functions, such asdigestion and respiration and the circulation of blood. Of course, it isn'tpossible for us to study the internal organs of the human body. This weleave to students of medicine. But we can achieve a good understanding ofour own bodies by studying the animals whose organs most closely resembleours.
In the experiments that follow, you will study the heart and lungs of acow and the kidneys of a lamb. In structure these organs are very similar tothe corresponding human organs, and they are identical in function. Youwill learn why you have different types of teeth and how it is that your tonguecan distinguish among various taste sensations. Those of you who want toinvest in some additional equipment can make a working model of the humanchest cavity. What better way to understand the way your lungs work!
Also included among the following experiments are some activities thatwill show you the differences between human beings and other animals. In theprocess of seeing how habits are formed and how we learn by a method called"trial-and-error" you will have a lot of fun.
The ability to learn new ways of doing things and to form habits is oneof the primary differences between human beings and other animals. Youwill see for yourself why man's brain makes him superior to all the otheranimals.
Many of these experiments call for companions. They make lively gamesfor parties or for any slow rainy afternoon-all you need are pencils and paper!
79

THE HUMAN MOUTHMaterials: A mirror.Follow this procedure: Open your mouth wide and examine your teeth.
Notice especially their different shapes and their positions in the upper andlower jaws.
Feel the inside of your cheeks on both sides with your tongue (just oppositethe second upper molar). You will feel a slight bump on each side and aliquid will flow onto your tongue.
Now feel the roof of your mouth with your tongue. Look at it in themirror. Examine your tongue in the mirror, too. Roll it around. With yourtongue, feel the lower surface of your mouth under the tongue. Look at thissection in the mirror.
You will observe: You have four essentially different kinds of teeth. Thefour front teeth in both the upper and lower jaws are square with knife-likeor chisel-shaped edges. These are called incisors. On each side of the incisorsare single, pointed teeth. These are commonly known as "eye" teeth becausethey are under the eyes, but they are officially called canines.
Next to the canines are larger teeth with hill-like projections called cuspson their surface. These are your molars.
By the time you are 8 or 9 years old, you will probably find 24 teeth inyour mouth. Between the ages of 18 and 24 you may develop additionalmolars called "wisdom teeth."
The slight bumps you felt when you passed your tongue across the insidesof your cheeks are the openings into glands called the salivary glands. The
80

liquid they secrete is the saliva which flows into your mouth through tubeslocated at each side of your upper jaw.
The roof of your mouth (called the upper palate) is hard when you runyour tongue over it and seems to have a slightly ridged bony structure underthe moist covering tissue.
Your tongue is muscular and has a rough surface due to the presence ofmany extremely tiny "bumps."
Each different kind of tooth has a certain shape and size so that it canperform a certain function.
The chisel-shaped incisors are adapted for biting and cutting food.The canines are especially fitted for holding and tearing certain kinds of
food such as meat. Beavers have sharp, ever-growing canines for gnawingwood. Dogs, wolves and similar animals are called "canines," because oftheir long, sharp teeth for tearing meat.
The large bumpy molars with their hill-like surfaces are adapted forgrinding and crushing food.
When you are between 18and 24 years old, you may develop two additionalpairs of molars, one in the upper and one in the lower back of each jaw.These are "wisdom" teeth, and if yours develop, you will have a total of 32teeth. There is so little room in the human jaw for these large teeth that oftenthey do not grow out of the jaw, but become lodged in the jawbone. Theyare then said to be impacted.
Your tongue is an aid to chewing, because it moves the food around themouth as it is broken down by the different kinds of teeth. It also helps thefood become mixed with the saliva, secreted by glands in both cheeks, so asto make swallowing easier. The rough surface of the tongue is caused by thepresence of many tiny "taste buds." Without these you would not be able todistinguish among sweet, sour, bitter and salty tasting foods.
IDENTIFYING FOODS BY TASTE ALONEMaterials: Small peeled cubes of raw apple, carrot, onion, potato, celery
and turnip, a pair of tweezers. Ask one of your parents or a friend to workwith you on this experiment.
Follow this procedure: If you are the taster, have your assistant blindfoldyou. Hold your nose (that is, pinch it closed with a thumb and forefinger)while tasting. Your assistant should place each sample food on your tongue,one at a time, and you should identify each one by taste alone. Have yourfriend make a record of your responses.
81

Now blindfold the other person taking part in the experiment and gothrough the same procedure.
You will observe: The taster will recognize several of the foods by tastealone, but not all of them. Some he will not be able to identify.
What we think of as the "taste" of most foods is really a combination oftaste and smell. When you hold your nose while tasting, of course you cannotexperience the characteristic smell of the food. Perhaps you have noticed thatwhen you have a cold-and your nasal passages are clogged-food seemstasteless. Now you understand why this is so.
DISTINGUISHING TASTE AREAS OF THE TONGUEMaterials: Sugar, salt, an aspirin tablet, four drinking glasses, a small
amount of vinegar, tap water, a box of toothpicks or cotton swabs.Follow this procedure: In each of four glasses prepare one of the following
mixtures: a 5% solution of sugar (sweet); salt solution; an aspirin tabletdissolved in half a glass of water (bitter); a 50%vinegar solution (sour).
Before you try this experiment, whether on yourself or a companion (it'smore fun to work with a friend than alone), wipe your tongue dry with a cleanpiece of paper tissue. This will prevent saliva from transferring test substancesfrom the spot where they are applied to other parts of the mouth.
First, dip a toothpick in the sugar solution. Before you taste, roll thetoothpick around the rim of the glass to remove excess solution. Touch thetoothpick to the tip, middle, the edges and the back of the dry tongue. Noteon a piece of paper on which part of the tongue the sensation of sweetnesswas strongest.
Now, rinse your mouth with cold tap water. Dry your tongue. Using anew toothpick apply the salt solution to the same areas of your tongue. Usethe same method for testing the aspirin and vinegar solutions.
Be sure to use a clean toothpick for each solution, to rinse your mouthand to dry your tongue after each taste.
You will observe: Sour tastes are strongest at the outer edges of the tongue,while the taste of salt is felt most sharply at the tip and at the edges. Bittertastes are sensed most keenly at the back of the tongue, and the sweet tasteis most noticeable at the tip.
Sweet, sour, bitter and salty are the only food tastes to which the tongueis sensitive. Certain areas of the tongue react to each, because the taste buds
82

sour salty biller s weet
in these areas contain nerve endings which respond strongly to a particulartaste. All taste sensations other than sweet, sour, bitter and salty are causedby a combination of odor and taste.
OBSERVING A BEEF HEARTMaterials: Ask your butcher for the heart of a steer (beef). Besides this,
all you need is a sharp knife. Be sure that you have permission to use the knife.Follow this procedure: Cut the beef heart down the center longitudinally
(the long way) so that you can see its four chambers and the blood vesselsleading from the broad end, or top, of the heart.
You will observe: The beef heart is a thick muscular organ with cut endsof blood vessels connected to the upper part. Like the hearts of all animalsin the group to which man belongs (mammals), the beef heart has four separatechambers. The two smaller upper chambers are called auricles, and the twolower chambers are called ventricles.
The left side of the heart is clearly separated from the right side. Theupper chamber of the right side is connected to the lower right chamber bya valve (a sort of "trap door"). The upper left side is connected to the lowerleft side by a similar valve.
Notice, too, that the lower half of the heart is thicker and more muscularthan the upper part and that tubes, the cut ends of blood vessels, all seem tocome from the upper part of the heart.
The beef heart is typical of the hearts of all mammals, a class of animalswhich includes man. The hearts of all mammals are divided into four chambers.The heart acts as a pump, receiving blood which it then pumps out to variousparts of the body through blood vessels.
The top right chamber, the right auricle, receives blood from all parts ofthe body. The blood which flows into the right auricle has been used; that is,it has already functioned in food digestion and in providing fresh oxygen for
83

right auricle -~r-'"
\~-- blood vessels
_~_~_Ieft auricle
....-~--'T-Ieft ventricle
right ventricle
the cells of the body. As a result, it has picked up waste substances. Eventuallythese wastes (mostly carbon dioxide) must go to the lungs to be eliminated byexhalation (breathing out) and to the kidneys where the liquid wastes areextracted, to be eliminated in urine. Liquid wastes are also eliminated by theskin, passing off as "sweat."
The blood passes from the right auricle through a valve into the lowerright chamber of the heart, the right ventricle. By muscular contractions ofthe thicker, lower part of the heart, this blood is pumped to the lungs.
In the lungs, the blood exchanges the waste gas, carbon dioxide, for freshoxygen from the air we inhale (breathe in). This fresh oxygen must be distributed to all the cells of the body.
Blood carrying fresh oxygen returns to the left upper chamber of theheart, the left auricle. From there, it passes through a valve into the leftventricle, the lower left part of the heart.
The thick muscular walls of the left ventricle contract rhythmically,sending the fresh, oxygen-carrying blood to all parts of the body.
In this way each cell of the body of the steer, and of our bodies, too, issupplied by the blood with the oxygen it needs in order to function. Eachcell has a means of getting rid of its waste matter, for the blood picks it upand takes it to organs of the body especially adapted to throwing off wasteproducts (the lungs, the kidneys and the skin).
84

'.r
THE HUMAN HEART AND PULSEMaterials: A stop watch or a watch with a second hand, paper and pencil.
For this experiment you will need a companion, either a parent or a friend.Follow this procedure: With the first two fingers (not the thumb) of your
right hand, hold the left wrist of your companion. Search for the pulse untilyou feel it and can count each distinct beat. Record the number of pulsebeats per minute while your companion is in each of the following situations:
lying down, at rest,sitting in a chairstandingafter jumping up and down in place to the count of 20after running up and back down a flight of stairs.
You will observe: The pulse beat is slowest when a person is lying down,and fastest after he has run up and down stairs.
The pulse that you felt when you held your companion's left wrist represents the beats of his heart. Heart beats are the contractions of the thick, leftventricle muscles of the heart as it directs blood to all parts of the body.
When the body is at rest, it requires relatively little nourishment andoxygen; therefore, the heart beats relatively slowly. It beats rapidly (asindicated by an accelerated pulse) when the body requires energy for suchactivities as running up and down stairs.
MAKING A WORKING MODEL OF THE CHEST CAVITYMaterials: A bell jar (a glass vessel open at the bottom and bell-shaped
at the top), a Y-shaped glass tube, a piece of rubber sheeting large enough tocover the open end of the bell jar, two identical rubber balloons, several elasticbands, a wooden button, either a rubber stopper or a cork with a hole through it.
Follow this procedure: Insert the tail of the Y-shaped tube in the corkor stopper. With an elastic band, attach a balloon to each "Y" projection ofthe glass tube.
Now, insert the stopper or cork, with the Y-shaped tube attached, in theneck of the bell jar. Place rubber sheeting across the broad end of the belljar and secure with a rubber band.
To make this mechanical breathing apparatus resemble the activity of thehuman chest, pinch the middle of the rubber sheeting with your thumb andforefinger and gently pull it downward. Then slowly release the sheeting andwatch it return to its original position.
85

You will observe: The bell jar represents the human chest cavity (the ribcage). The rubber sheeting across the bottom represents the flexible, musculardiaphragm. The balloons represent the human lungs.
When the rubber sheeting (the diaphragm) is pulled down, the chestcavity is made larger, and air rushes into the lungs. When we breathe in(inhale) the ribs in a normal chest cavity move outward and the diaphragmmoves downward. When the rubber sheeting is released it returns to itsoriginal position. This represents the return of the diaphragm (a muscle thatseparates the chest from the abdominal cavity) to its normal position. In thehuman body, the ribs move inward, back to place at the same time. Thisaction squeezes the air out of the lungs and we breathe out (exhale).
The waste carbon dioxide in the blood stimulates a breathing center inthe brain, the medulla. In turn, the medulla stimulates the muscles of thediaphragm to move back upward into their normal position. The ribs, too,move back into place, making the chest cavity decrease in size and puttingpressure on the filled lungs. When we breathe out or exhale, our lungs aresqueezed together (as illustrated by the collapse of the balloons on your model).
86

SHOWING THAT CARBON DIOXIDE IS A PRODUCT OF EXHALATIONMaterials: Buy a bottle of lime water at a drugstore or soda fountain.
You will also need a drinking straw and a tumbler.Follow this procedure: Take in a deep breath through your nose and
mouth. Let the air out by blowing through the straw into the glass of limewater.
You will observe: As the exhaled air bubbles through the straw, the clearlime water becomes milky.
Carbon dioxide, the waste gas given off in exhalation, causes a chemicalchange in lime water which results in a clouded appearance. Since this iswhat happened when you breathed through the straw into the lime water,you have proved that carbon dioxide is an element of exhaled air.
SHOWING THAT WATER VAPOR IS PRESENT IN EXHALED AIRMaterials: A mirror.Follow this procedure: Take a deep breath while standing before a mirror
or holding a hand mirror in front of your mouth. Now, exhale against thesurface of the mirror.
87
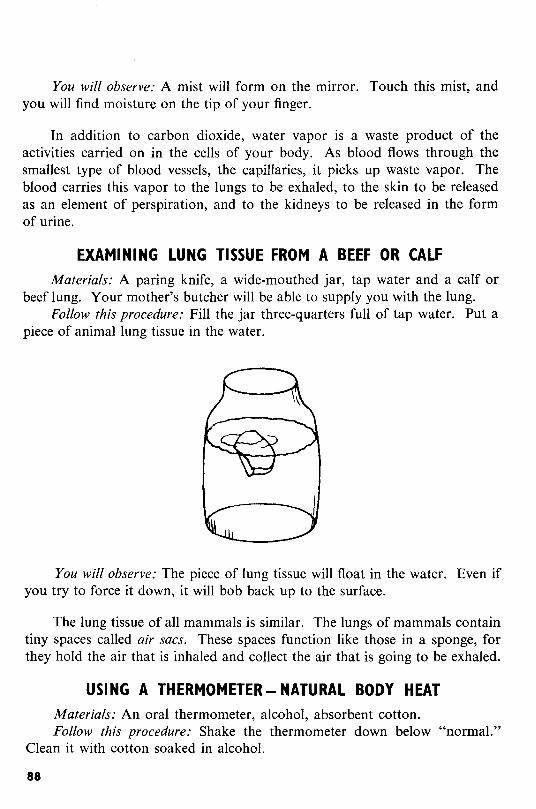
You will observe: A mist will form on the mirror. Touch this mist, andyou will find moisture on the tip of your finger.
In addition to carbon dioxide, water vapor is a waste product of theactivities carried on in the cells of your body. As blood flows through thesmallest type of blood vessels, the capillaries, it picks up waste vapor. Theblood carries this vapor to the lungs to be exhaled, to the skin to be releasedas an element of perspiration, and to the kidneys to be released in the formof urine.
EXAMINING LUNG TISSUE FROM A BEEF OR CALFMaterials: A paring knife, a wide-mouthed jar, tap water and a calf or
beef lung. Your mother's butcher will be able to supply you with the lung.Follow this procedure: Fill the jar three-quarters full of tap water. Put a
piece of animal lung tissue in the water.
You will observe: The piece of lung tissue will float in the water. Even ifyou try to force it down, it will bob back up to the surface.
The lung tissue of all mammals is similar. The lungs of mammals containtiny spaces called air sacs. These spaces function like those in a sponge, forthey hold the air that is inhaled and collect the air that is going to be exhaled.
USING A THERMOMETER- NATURAL BODY HEATMaterials: An oral thermometer, alcohol, absorbent cotton.Follow this procedure: Shake the thermometer down below "normal."
Clean it with cotton soaked in alcohol.
88

Place the thermometer bulb under your tongue. Keep your mouth closedand leave the thermometer in place for at least a minute. '
Remove it and read your temperature as indicated by the strip of mercuryrunning through the tube.
You will observe: If you are in good health, the thermometer will indicatea temperature of 98.6° Fahrenheit. It may be a few tenths of a degree aboveor below normal without being a signal of illness. A "normal" temperaturemay vary slightly among individuals.
In warm-blooded animals (mammals) each species maintains a normal,average body temperature. The normal, average body temperature of thehuman being is 98.6° F.
Body heat is produced in each cell when digested food combines withoxygen in a burning process known as oxidation. This burning process makesit possible for us to have the energy (heat is an important form of energy) touse our muscles and to perform all of the body activities necessary to maintainlife.
When you are ill, your temperature sometimes rises above 98.6° F. Thisindicates to the doctor that there may be an invasion of germs causing yourillness. The "soldier cells" and "antibodies" in your blood hasten to try tofight and kill these unwelcome intruders. Extra body heat is produced becausethe blood is working overtime in an emergency battle to overcome the germs.
HOW THE SKIN THROWS OFF BODY WASTESFollow this procedure: Observe the skin of your arm on a summer day
after you have perspired. Rub your finger tip over it and taste lightly with thetip of your tongue.
You will observe: The skin will be moist with perspiration, what many ofus call "sweat." This has a definite salty taste.
Like the lungs and the kidneys, the skin serves as a waste-collecting andwaste-ridding organ of the body. Liquid wastes, including water, urea andexcess salts, are brought to the skin by the circulating blood, which picked upthese waste materials from the cells of the body.
89

Certain glands in the lower layers of the skin extract these wastes fromthe blood. These are the sweat glands which collect waste products and sendthem to the surface of the skin through long tubes. The pores on the surfaceof your skin are the openings of the tubes, or ducts, of the sweat glands.
THE SKIN - A BUILT-IN THERMOSTATMaterials: Cold water, rubbing alcohol, absorbent cotton.Follow this procedure: Wet a piece of absorbent cotton with water and
sponge the inside of your left wrist with it. How does your wrist feel as thewater dries?
Immediately after, sponge your right wrist with another piece of absorbentcotton soaked in rubbing alcohol. How does your wrist feel after the alcoholhas dried?
Which liquid dries more rapidly?You will observe: The alcohol will dry more rapidly than the water.Your left wrist will feel cool as the water dries, but your right wrist will
feel even cooler.As water evaporates (dries) from the surface of the skin, it removes a
certain amount of body heat. Since alcohol evaporates faster than water, itcools the body faster than does water.
Your skin is a built-in thermostat. As perspiration, or sweat, evaporatesfrom your skin some body heat is driven off, making the body generally cooler.Therefore, it is to your advantage to perspire in the summer.
Since bathing the skin with alcohol hastens the loss of heat, doctorsrecommend alcohol baths when a person is ill and has a high fever. An alcoholbath will lower a "fever" somewhat. A high temperature causes the heart to
90

work much harder than usual, so it is important to keep body temperature asnear normal as possible.
In the summer the use of cologne or toilet water (both of which have ahigh alcohol content) helps make you feel cooler.
STUDYING A LAMB KIDNEYMaterials: Get a pair of Iamb kidneys at a butcher shop or supermarket.
Ask the butcher to cut one of them in half the long way. If you prefer, youcan do this yourself.
Follow this procedure: First examine the external structure. Then lookclosely at the internal structure of one of the two halves of the divided kidney.
You will observe: Lamb kidneys are kidney-bean shaped and dark red.In the middle area of each kidney are small coiled tubules that seem to emptyinto a funnel-like area. This leads into a tube extending from the inner sideof each kidney.
The Iamb kidneys are similar in size and shape to those of human beings.Like Iambs, we have a pair of kidneys located at the small of the back, one oneach side of the backbone.
Blood carrying liquid wastes from all parts of the body passes through thekidneys where excess water and a large quantity of liquid waste are strainedout and collected in the small tubules you observed. From these, waste matterpasses into the funnel-like area of each kidney through tubes into the storagebladder.
The bladder stores liquid wastes, now called urine, until they are eliminatedfrom the body.
91

THE STRENGTH OF HABITMaterials: You need several companions for this exercise. In fact, it makes
a lively game for a party. Provide each participant with pencil and paper.Follow this procedure: Read the following sentences rapidly to your
companions. Instruct them to write exactly what you read as fast as they canwithout crossing any t's or dotting any i's.
After you have finished, count up the number of t's crossed and the i'syour companions have dotted.
These are the sentences:Indians like kittens and little rabbits. They take tiny arrows to hunt
these animals with.The rain hit the window like soft tufts of cattails.Time and tide wait for no man.After tea for two the twins left the inn.You will observe: Even though they were instructed not to do so, most of
your companions will have crossed several t's and dotted several i's.
Dotting i's and crossing t's when writing is a deeply ingrained habit.A habit develops after you have repeated the same thing, in the same manner,over and over again.
Good habits are of great advantage to us. They save time and energy.They enable us to do certain things automatically so as to have time andenergy to concentrate on things which require a great deal of thought andjudgment.
HABIT FORMATIONMaterials: Pencils and sheets of paper. Ask several friends to participate
in this experiment. The more the merrier; this game would be a good onefor a party.
Follow this procedure: Ask your companions to divide their sheets of paperinto two columns headed A and B. Ask them to write their full names inColumn A, as many times as they can in a minute. At the end of this time,ask them to write their full names backward in Column B as many times asthey can. Again, call time at the end of a minute.
Count the number of times the name was written in each column.You will observe: Very few names will appear in Column B.
92

When you were very young you learned to write the combination of lettersthat is your name, and ever since you have written it in much the same way.Writing your name has become a habit, a good habit that is time-savingbecause it is automatic.
Since writing a name backward is not a habit, your companions had agreat deal of difficulty doing it quickly.
LEARNING BY TRIAL-AND-ERRORMaterials: A watch with a minute hand or a stop watch, several shirt
cardboards, a ruler, a pencil, a pair of scissors. Although you can perform thisexperiment by yourself, it's more fun when there are several participants. Thenit becomes a game.
Follow this procedure: Cut each cardboard in lengths measuring 2 x 4inches. Mark each 2 x 4-inch rectangle as shown in the illustration below andcut each into four pieces as indicated.
/1/ I
1 / I/ I
/ I/ I
/ 2 I
'" I" I'I
'J-----
'" 43 " -,-,
Scramble the four pieces you cut from each cardboard. At a given signal(marked by your watch), each person should arrange the scrambled pieces toform the letter L. Keep a record of each contestant's time.
93

As soon as each player has completed the letter L, have him rescramblethe pieces and put them together again five times. This time, each player shouldkeep his own record of the time required to make the letter L.
You will observe: The first time, it will take the longest to assemble the L.Each time thereafter it will take less time.
This is an example of the trial-and-error method of learning. Using thismethod you improve your ability to perform a given task by repetition. Babieslearn by trial-and-error, as do many animals.
A SIMPLE LESSON IN "LEARNING"Materials: Sharpened pencils and several sheets of paper. Again, you will
want to include friends in this experiment.Follow this procedure: Provide each person who is taking part with the
following three lists of words (some "nonsense" and some "sense").
A B c
vip shoe grasslor tub growstup house greenerjoz cat wherenem dish thehab dog soilmaf tag IS
cas school richAsk your companions to read over List A silently three times. Then cover
it with a piece of paper, and ask them to write the list of words on a new pieceof paper in the correct order. Do the same for List B and then for List C.Have each person score his own paper by allowing one credit for each correctword (in its proper place).
You will observe: Scores will be poorest for List A. They will be betterfor List B, but List C will show the highest scores.
The "words" in List A are really not words at all, but nonsense syllables.They will be unfamiliar to your friends and, therefore, very difficult toremember.
The words in List B are all familiar but the order in which they are listed
94

.f!\1
is not meaningful. Thus, they are easier to learn in proper order than thewords in List A, but more difficult than the ones in List C.
The third list (List C) is really a sensible sentence. Its meaning ties thewords together, making them relatively easy to remember even after the firstreading. The scores for List C will be high; some may be perfect.
Learning in school or from reading a book involves the same processes.When you study a vocabulary list, the words will be easier to remember if youmake up a sentence using the words.
When you read a paragraph in a book you may come across a word thatis unfamiliar. You may be able to guess the meaning of the word from itsrelationship to the rest of the paragraph with which you are familiar.
95
J
Related Documents