BASIC QUERY FOR HRMS - VERSION 9.1 S ELF -S TUDY G UIDE 2011

Welcome message from author
This document is posted to help you gain knowledge. Please leave a comment to let me know what you think about it! Share it to your friends and learn new things together.
Transcript

BASIC QUERY
FOR HRMS - VERSION 9.1
SELF-STUDY GUIDE 2011
Contents
___________________________________________
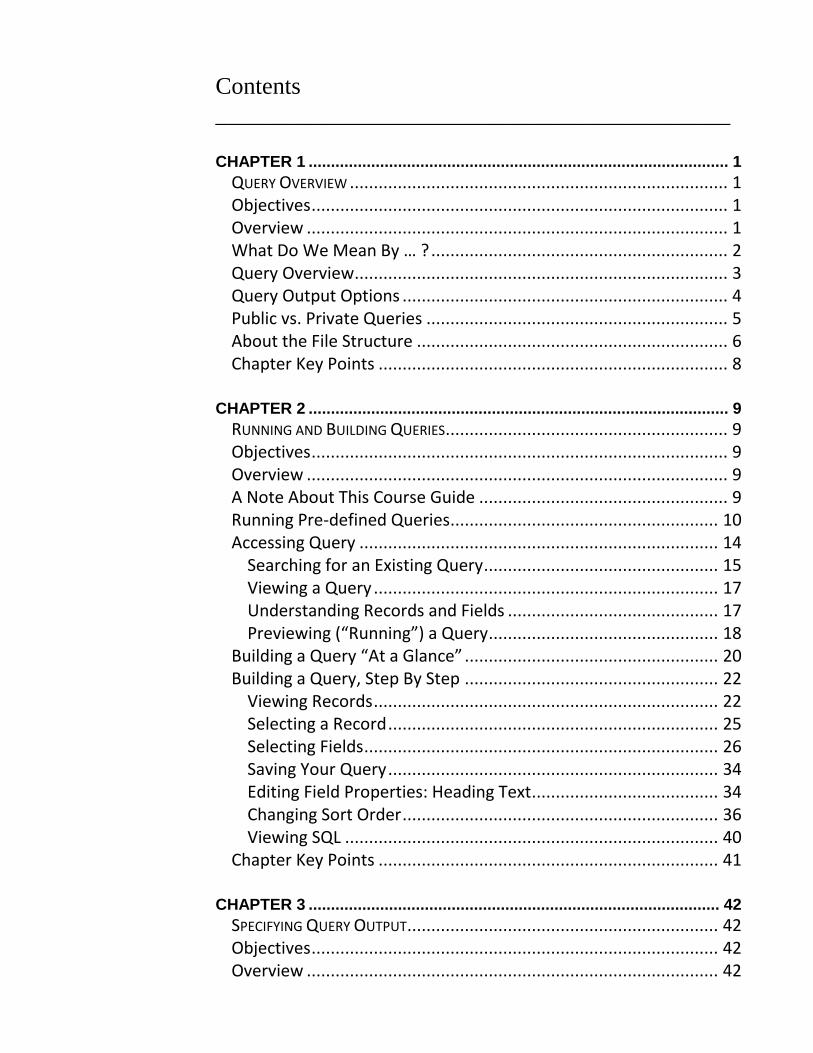
CHAPTER 1 .............................................................................................. 1
QUERY OVERVIEW ............................................................................... 1
Objectives ....................................................................................... 1
Overview ........................................................................................ 1
What Do We Mean By … ? .............................................................. 2
Query Overview .............................................................................. 3
Query Output Options .................................................................... 4
Public vs. Private Queries ............................................................... 5
About the File Structure ................................................................. 6
Chapter Key Points ......................................................................... 8
CHAPTER 2 .............................................................................................. 9
RUNNING AND BUILDING QUERIES ........................................................... 9
Objectives ....................................................................................... 9
Overview ........................................................................................ 9
A Note About This Course Guide .................................................... 9
Running Pre-defined Queries ........................................................ 10
Accessing Query ........................................................................... 14
Searching for an Existing Query ................................................. 15
Viewing a Query ........................................................................ 17
Understanding Records and Fields ............................................ 17
Previewing (“Running”) a Query ................................................ 18
Building a Query “At a Glance” ..................................................... 20
Building a Query, Step By Step ..................................................... 22
Viewing Records ........................................................................ 22
Selecting a Record ..................................................................... 25
Selecting Fields .......................................................................... 26
Saving Your Query ..................................................................... 34
Editing Field Properties: Heading Text ....................................... 34
Changing Sort Order .................................................................. 36
Viewing SQL .............................................................................. 40
Chapter Key Points ....................................................................... 41
CHAPTER 3 ............................................................................................ 42
SPECIFYING QUERY OUTPUT ................................................................. 42
Objectives ..................................................................................... 42
Overview ...................................................................................... 42
Displaying Translate Values .......................................................... 43
Entering Selection Criteria ............................................................ 46
Summary of Combinations ........................................................ 48
Equal To .................................................................................... 49
Like ............................................................................................ 54
Between .................................................................................... 56
Selection Criteria Order ............................................................. 58
In List ......................................................................................... 59
AND, AND NOT, OR, and OR NOT Operators ................................ 60
EXERCISE – Create a New Query, Specifying Selection Criteria ..... 63
Run-Time Prompts ........................................................................ 67
Multiple Prompts .......................................................................... 72
Simple Aggregate Functions in Query ........................................... 73
EXERCISE – Create a Query, Using an Aggregate Function ............ 78
Deleting Queries ........................................................................... 79
Chapter Key Points ....................................................................... 80

C I T Y O F M I L W A U K E E – Q U E R Y S E L F S T U D Y F O R H R M S V E R S I O N 8 .9 – P A G E 1
C H A P T E R 1
QUERY OVERVIEW
Objectives
By the end of this chapter, you will be able to:
Understand what is meant by basic database terms
Understand the basics of the Query reporting tool
Understand Query output options
Understand uses for HRMS queries
Overview The purpose of this course is to provide you with the basic skills you need to run and build queries using PeopleSoft’s Query reporting tool. In this chapter you will be introduced to Query, including Query output options and uses for queries. In Chapter 2, you will see how to build a simple query by selecting a record and specific fields. You will also modify column headings and reorder your output. In Chapter 3, you will use selection criteria to obtain precisely the information you need for your ad hoc queries.
C I T Y O F M I L W A U K E E – Q U E R Y S E L F S T U D Y F O R H R M S V E R S I O N 8 .9 – P A G E 2
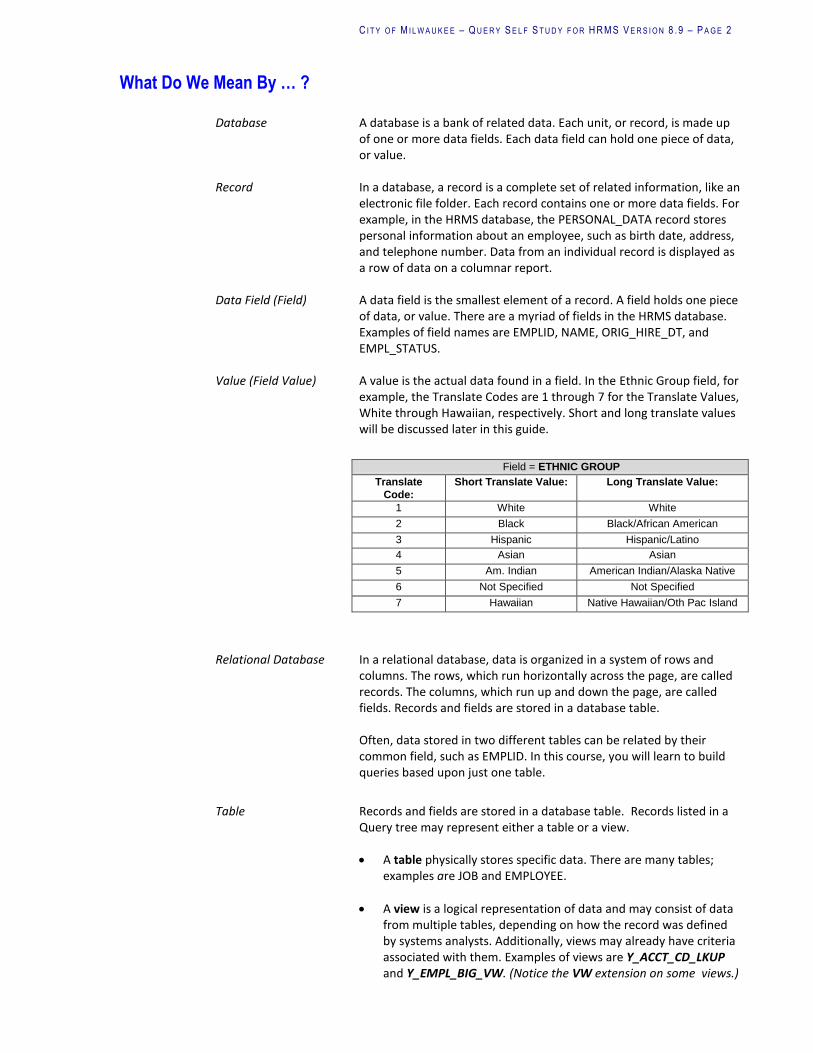
What Do We Mean By … ?
Database A database is a bank of related data. Each unit, or record, is made up of one or more data fields. Each data field can hold one piece of data, or value.
Record In a database, a record is a complete set of related information, like an
electronic file folder. Each record contains one or more data fields. For example, in the HRMS database, the PERSONAL_DATA record stores personal information about an employee, such as birth date, address, and telephone number. Data from an individual record is displayed as a row of data on a columnar report.
Data Field (Field) A data field is the smallest element of a record. A field holds one piece
of data, or value. There are a myriad of fields in the HRMS database. Examples of field names are EMPLID, NAME, ORIG_HIRE_DT, and EMPL_STATUS.
Value (Field Value) A value is the actual data found in a field. In the Ethnic Group field, for
example, the Translate Codes are 1 through 7 for the Translate Values, White through Hawaiian, respectively. Short and long translate values will be discussed later in this guide.
Field = ETHNIC GROUP
Translate
Code:
Short Translate Value: Long Translate Value:
1 White White
2 Black Black/African American
3 Hispanic Hispanic/Latino
4 Asian Asian
5 Am. Indian American Indian/Alaska Native
6 Not Specified Not Specified
7 Hawaiian Native Hawaiian/Oth Pac Island
Relational Database In a relational database, data is organized in a system of rows and
columns. The rows, which run horizontally across the page, are called records. The columns, which run up and down the page, are called fields. Records and fields are stored in a database table.
Often, data stored in two different tables can be related by their common field, such as EMPLID. In this course, you will learn to build queries based upon just one table.
Table Records and fields are stored in a database table. Records listed in a
Query tree may represent either a table or a view.
A table physically stores specific data. There are many tables; examples are JOB and EMPLOYEE.
A view is a logical representation of data and may consist of data from multiple tables, depending on how the record was defined by systems analysts. Additionally, views may already have criteria associated with them. Examples of views are Y_ACCT_CD_LKUP and Y_EMPL_BIG_VW. (Notice the VW extension on some views.)

C I T Y O F M I L W A U K E E – Q U E R Y S E L F S T U D Y F O R H R M S V E R S I O N 8 .9 – P A G E 3
Query A query is a request for information from a database. You can retrieve
the precise data you want and direct the output to a Grid Control (Grid), an Excel spreadsheet, or a Crystal Report.
Report A report is an organized presentation of data. Reports help an
organization’s management team make decisions.
Query Overview
This class will introduce you to Query, a tool that enables you to create queries, or requests for information, from a database. You can extract the precise data you want from the HRMS database. Queries can assist City employees with all kinds of decisions and reporting requirements. They can be as simple or as complex as necessary, and they can be one-time queries or queries you will use repeatedly. Query is read-only, meaning that you will not be able to change the actual data stored in the database.
Query Purposes
Query is a powerful tool used to create queries for a variety of purposes, among them, these: Results Grid: To display data in a grid (from the Run tab).
Preview queries within Query Manager and Query Viewer, displaying the result set in a grid for review. This option is useful as you refine your queries.
Spreadsheet: To download query results to an Excel spreadsheet. Choose to have the data downloaded and formatted as a Microsoft Excel spreadsheet. This option is available in your query search results or after you Preview or Schedule a query.
*HTML: To download query results in an HTML format.
Choose to generate an HTML version of the query. *Available from the Query Manager Search Results page.

C I T Y O F M I L W A U K E E – Q U E R Y S E L F S T U D Y F O R H R M S V E R S I O N 8 .9 – P A G E 4
Selecting Records and Fields
You will learn the basic functions of Query and how to create a simple query by selecting a record and specific fields. You will learn how to modify column headings and how to retrieve the short or long description for a translate value, rather than the code.
Entering Selection Criteria
Once you know the basics, you will learn how to retrieve information based on criteria requirements such as equal to, greater than, in list, between, and like.
Creating Run-time Prompts
You will also be introduced to run-time prompts. Run-time prompts give you the ability to enter specific values for a designated field at the time that a report is run. These values are then used as criteria for retrieving the information for your report.
Ordering Output
Ordering output is very important to the readability of your reports. You will learn how to change your column headings and sort your output.
Using Simple Functions
What is a report without subtotals and grand totals? Implementing these functions as well as other summarized functions will be covered in Chapter 3. Query is a powerful and useful tool!
Query Output Options You may direct query output to a Grid, to Excel, to HTML or XML. XML is not used by the City at this time. You will use the Grid output option throughout this course.
PeopleSoft Query Output
View via Grid on Screen Run to XML
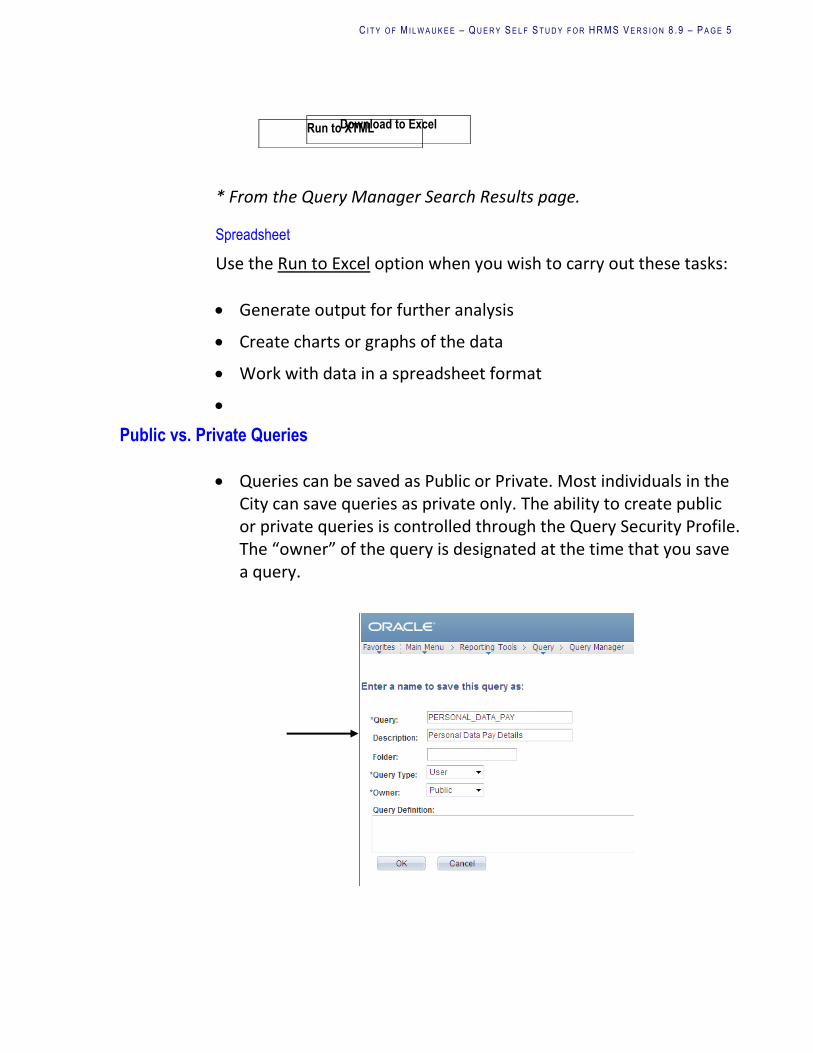
C I T Y O F M I L W A U K E E – Q U E R Y S E L F S T U D Y F O R H R M S V E R S I O N 8 .9 – P A G E 5
* From the Query Manager Search Results page.
Spreadsheet
Use the Run to Excel option when you wish to carry out these tasks:
Generate output for further analysis
Create charts or graphs of the data
Work with data in a spreadsheet format
Public vs. Private Queries
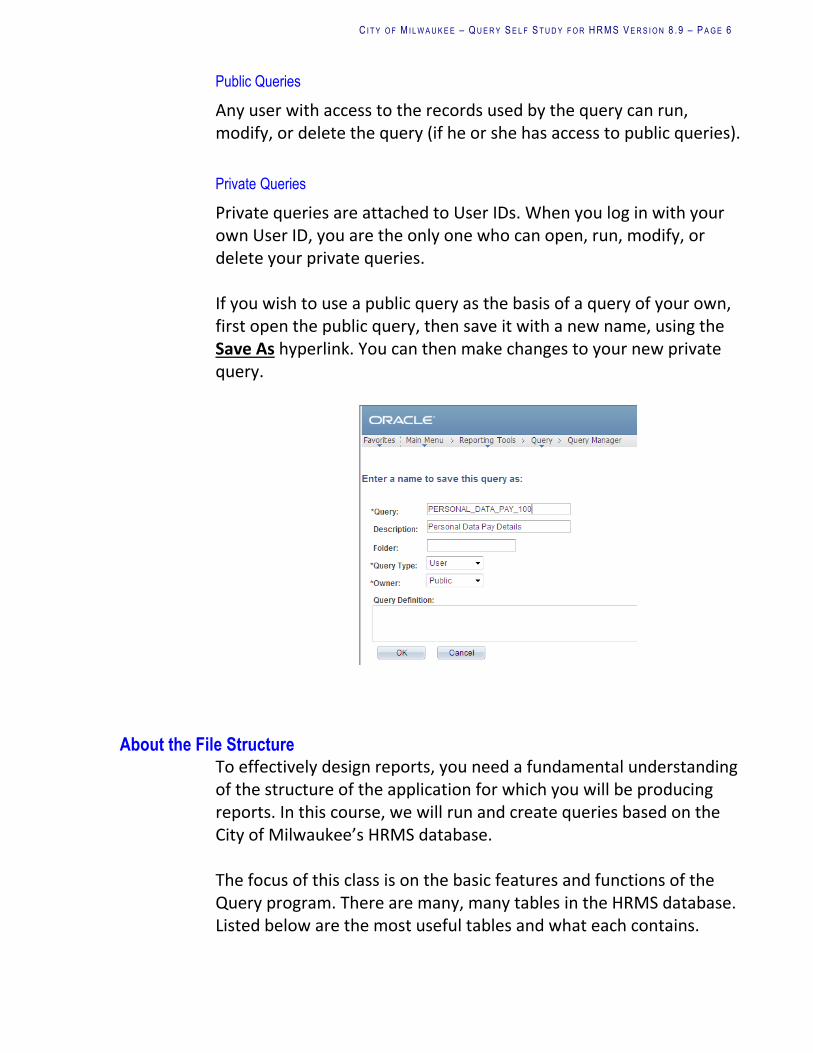
Queries can be saved as Public or Private. Most individuals in the City can save queries as private only. The ability to create public or private queries is controlled through the Query Security Profile. The “owner” of the query is designated at the time that you save a query.
Download to Excel Run to XTML
C I T Y O F M I L W A U K E E – Q U E R Y S E L F S T U D Y F O R H R M S V E R S I O N 8 .9 – P A G E 6
Public Queries
Any user with access to the records used by the query can run, modify, or delete the query (if he or she has access to public queries).
Private Queries
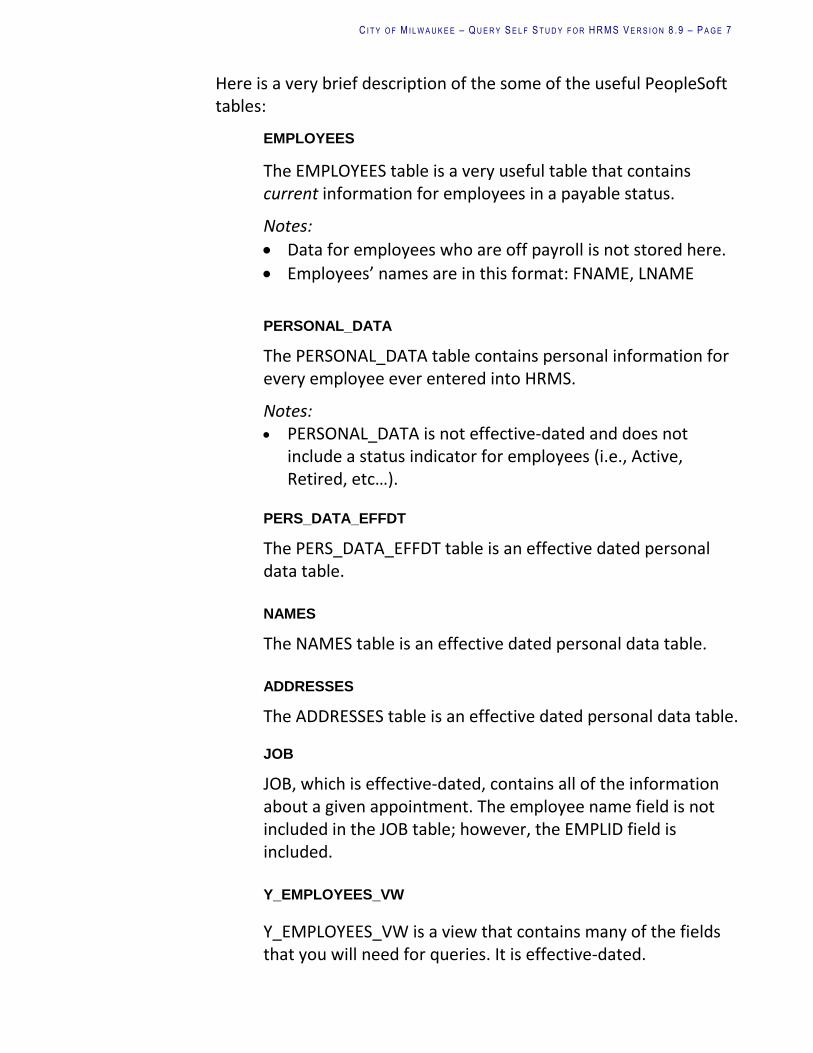
Private queries are attached to User IDs. When you log in with your own User ID, you are the only one who can open, run, modify, or delete your private queries. If you wish to use a public query as the basis of a query of your own, first open the public query, then save it with a new name, using the Save As hyperlink. You can then make changes to your new private query.
About the File Structure To effectively design reports, you need a fundamental understanding of the structure of the application for which you will be producing reports. In this course, we will run and create queries based on the City of Milwaukee’s HRMS database. The focus of this class is on the basic features and functions of the Query program. There are many, many tables in the HRMS database. Listed below are the most useful tables and what each contains.
C I T Y O F M I L W A U K E E – Q U E R Y S E L F S T U D Y F O R H R M S V E R S I O N 8 .9 – P A G E 7
Here is a very brief description of the some of the useful PeopleSoft tables:
EMPLOYEES
The EMPLOYEES table is a very useful table that contains current information for employees in a payable status.
Notes:
Data for employees who are off payroll is not stored here.
Employees’ names are in this format: FNAME, LNAME
PERSONAL_DATA
The PERSONAL_DATA table contains personal information for every employee ever entered into HRMS.
Notes: PERSONAL_DATA is not effective-dated and does not
include a status indicator for employees (i.e., Active, Retired, etc…).
PERS_DATA_EFFDT
The PERS_DATA_EFFDT table is an effective dated personal data table. NAMES
The NAMES table is an effective dated personal data table. ADDRESSES
The ADDRESSES table is an effective dated personal data table.
JOB
JOB, which is effective-dated, contains all of the information about a given appointment. The employee name field is not included in the JOB table; however, the EMPLID field is included. Y_EMPLOYEES_VW
Y_EMPLOYEES_VW is a view that contains many of the fields that you will need for queries. It is effective-dated.

C I T Y O F M I L W A U K E E – Q U E R Y S E L F S T U D Y F O R H R M S V E R S I O N 8 .9 – P A G E 8
To learn more about some of the key tables used in Query, visit the City of Milwaukee’s MINT (Milwaukee Intranet). Cl ick on FMIS/HRMS .
Cl ick on Query Table Def in i t ions , found under FAQs (F requent ly Asked
Quest ions) .
Next c l ick on HRMS .
There you will find table definitions for these tables:
Employees
Job
SAL GRADE
SAL STEP
Y_EMPLOYEES_VW
Chapter Key Points
A database is a bank of related data. Each database record is made up of one or more data fields. In turn, a data field holds one value – the actual data.
A query is a request for information from a database.
You can retrieve the data you want and direct the output to a Grid (using the Run tab), an Excel Spreadsheet or an HTML display.
Use the Grid Control output option when you want a quick and easy display of your Query results.
Use an Excel spreadsheet when you wish to manipulate and analyze data.
Most individuals in the City can save queries as private only.
However, if a query is public, all users who have security access to the records referenced by the query can go ahead and run it.
Of the many, many tables in HRMS, these are among those that will be used to create general queries in this course: EMPLOYEES, PERSONAL_DATA, PERSONNEL, PERSONNEL_HIST, JOB, and Y_EMPLOYEES_VW (which is not a table, but a view).
C I T Y O F M I L W A U K E E – Q U E R Y S E L F S T U D Y F O R H R M S V E R S I O N 8 .9 – P A G E 9
C H A P T E R 2
RUNNING AND BUILDING
QUERIES
Objectives By the end of this chapter, you will be able to:
Access Query and open an existing query
Run pre-defined queries and view the results online
Build queries, selecting records and fields for output
View and modify headings
Save and print queries
Change column order
Sort fields
Overview In this chapter, you will learn some of the basic concepts and features of Query, such as how to access Query, run and create a query, display your Query field definitions, and manipulate data in your query.
A Note About This Course Guide Throughout the course guide, the arrow shown to the left indicates that you should carry out the task described in the text.

C I T Y O F M I L W A U K E E – Q U E R Y S E L F S T U D Y F O R H R M S V E R S I O N 8 .9 – P A G E 1 0
Running Pre-defined Queries Use the navigation shown here – Main Menu > Reporting Tools > Query > Query Manager – to run a pre-defined query from HRMS. You are presented with a search page that defaults to the Find an Existing Query view of the page. To list the first 300 queries to which you have access, click the Search button.
Private queries are listed first, in alphabetical order. Note: Queries beginning with “Y” are custom queries created especially for the City.

C I T Y O F M I L W A U K E E – Q U E R Y S E L F S T U D Y F O R H R M S V E R S I O N 8 .9 – P A G E 1 1
Note: For future reference, from the Query Manager page you may also perform the following actions by accessing the Actions drop-down list:
Add a query to your Favorites
Copy a query to another user
Delete a query
Move a query to a folder
Rename a query
The first example that you will look at is called Y_EMPLOYEES_VW. Click the down arrow in the Search By box and click Uses Record Name option. Type Y_EMPLOYEES_VW in the begins with field, and click Search.
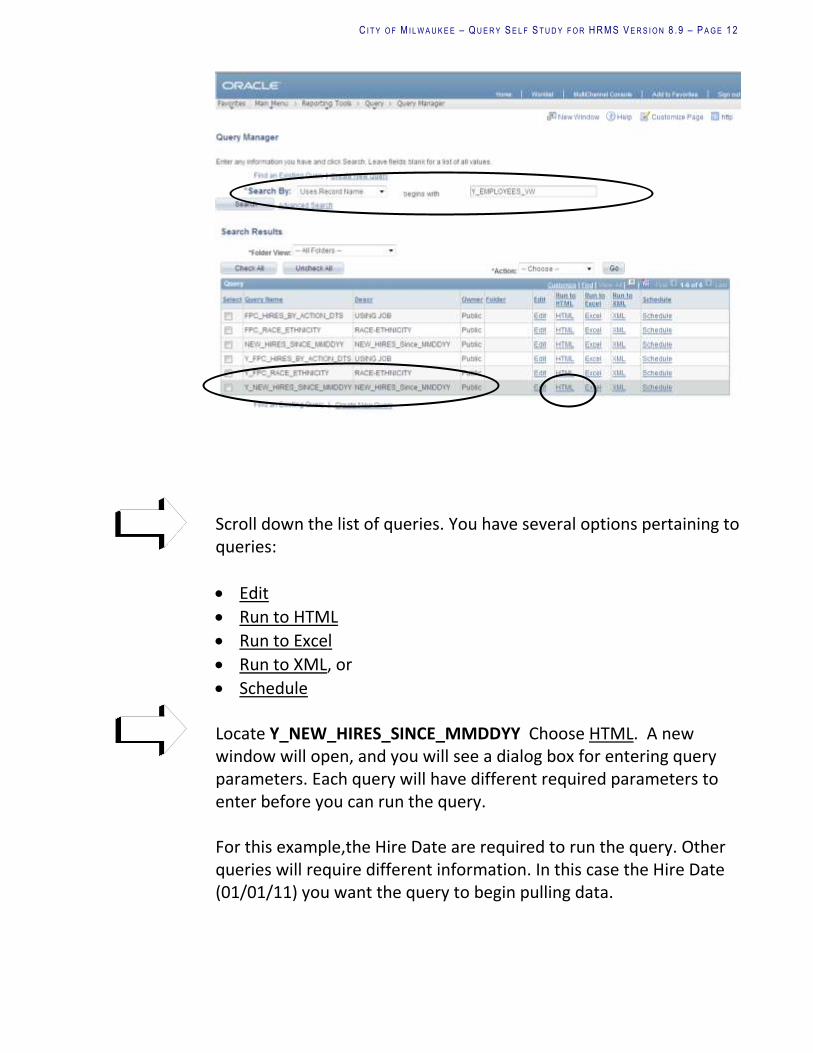
C I T Y O F M I L W A U K E E – Q U E R Y S E L F S T U D Y F O R H R M S V E R S I O N 8 .9 – P A G E 1 2
Scroll down the list of queries. You have several options pertaining to queries:
Edit
Run to HTML
Run to Excel
Run to XML, or
Schedule Locate Y_NEW_HIRES_SINCE_MMDDYY Choose HTML. A new window will open, and you will see a dialog box for entering query parameters. Each query will have different required parameters to enter before you can run the query. For this example,the Hire Date are required to run the query. Other queries will require different information. In this case the Hire Date (01/01/11) you want the query to begin pulling data.

C I T Y O F M I L W A U K E E – Q U E R Y S E L F S T U D Y F O R H R M S V E R S I O N 8 .9 – P A G E 1 3
To use a pop-up calendar instead of typing in the date, click on the Calendar button to the right of the date field, you will see the calendar shown to the right. Click on January 1, 2011 and 01/01/11 will display in the field.
Many times a icon appears next to the a parameter entry box.. If you Click on it and a Look Up window appears specific to the information needed. In this example, case Look Up Buisness Unit.
After completing the required field(s) for the query, Click the View Results button. Query will fetch the appropriate rows and display them.
Choose a Date button
C I T Y O F M I L W A U K E E – Q U E R Y S E L F S T U D Y F O R H R M S V E R S I O N 8 .9 – P A G E 1 4
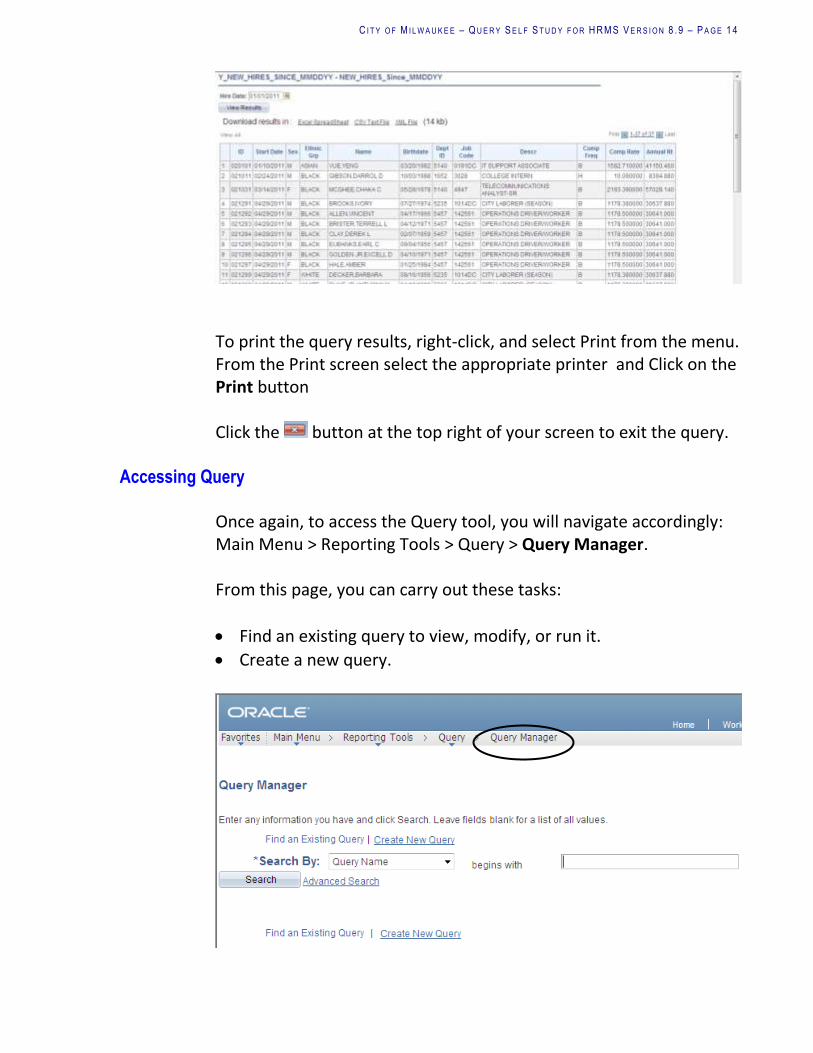
To print the query results, right-click, and select Print from the menu. From the Print screen select the appropriate printer and Click on the Print button Click the button at the top right of your screen to exit the query.
Accessing Query Once again, to access the Query tool, you will navigate accordingly: Main Menu > Reporting Tools > Query > Query Manager. From this page, you can carry out these tasks:
Find an existing query to view, modify, or run it.
Create a new query.

C I T Y O F M I L W A U K E E – Q U E R Y S E L F S T U D Y F O R H R M S V E R S I O N 8 .9 – P A G E 1 5
Navigate to the Query Manager search page
Searching for an Exist ing Query
Search for a query using the default (Basic) Search button or the Advanced Search hyperlink. Both search types allow you to use the following “search by” criteria: access group name, description, folder name, owner, query name, type, uses field name, and uses record name.
The (Basic) Search allows you to search using the begins with condition.
The Advanced Search allows you to perform a progressively narrower search by using one or more search by criteria and selecting from a broad choice of conditions.
If you know the name of the query you want to run (full or partial), select Query Name from the Search By drop-down list box. Then enter the query name (full or partial) in the field to the right of begins with.
If you do not know the name of the query and want to search through a list of queries, leave the field to the right of begins with blank, and click the Search button to display the first 300 queries. Note: To search using any other “search by” criteria, select the

C I T Y O F M I L W A U K E E – Q U E R Y S E L F S T U D Y F O R H R M S V E R S I O N 8 .9 – P A G E 1 6
appropriate item from the Search By drop-down list box, and then enter the search string in the field.
To perform an advanced search, click the Advanced Search hyperlink on the Query Manager search page. On the Advanced Search page, select the appropriate search by criteria and conditions, then enter a search string in each of the corresponding fields. Click the Search button to display a list of queries matching your search criteria.
The Search Results page appears. The results list all the queries that match the search criteria. The following information appears: query name, query description, owner (public or private), and folder. You will scroll to the name of the query that you want to open or run. By default, only the first 30 queries appear on the page. To see more of the list, click the navigation buttons and links located on the Header Bar. If there are more than 100 queries listed, select View
Header Bar

C I T Y O F M I L W A U K E E – Q U E R Y S E L F S T U D Y F O R H R M S V E R S I O N 8 .9 – P A G E 1 7
100 to view the first 100. Use the scrollbar to view the rest of the list. The View All option may also be available. You will use a public query to become familiar with the Query pages. You can run it, but you will be unable to change the query definition.
Search for the query called Y_EMPLOYEE_CNT_DEPT and click the Edit button. The query definition will be shown on your screen, as shown below.
From this page, you can study the query definition and also preview the results.
Viewing a Query
On this page is where you can select and view the fields, criteria, and other details associated with the current query. The tabs across the top of the page include Records, Query, Expressions, Prompts, Fields, Criteria, Having, View SQL, and Run. You will learn more about these as we proceed.
Understanding Records and Fields
Click on the Query tab. This public query is comprised of two records (tables). In this course, you will be generating queries based upon a single record.

C I T Y O F M I L W A U K E E – Q U E R Y S E L F S T U D Y F O R H R M S V E R S I O N 8 .9 – P A G E 1 8
Click on the (Expand All Records) button. Then press Ctrl-Home to go to the top of the page. The little key icons denote key fields. Key fields make database searching faster and more efficient.
Previewing (“Running”) a Query
Next you will learn how to preview a query. Click the Run tab. This query has no run-time prompts, so the data will appear after you click the Run tab. On many queries you will be prompted to enter data in one or more prompt fields. If so, enter the data as shown on the screen print below, and then click OK. The query results are displayed in the window.
Record(s)
Key Fields

C I T Y O F M I L W A U K E E – Q U E R Y S E L F S T U D Y F O R H R M S V E R S I O N 8 .9 – P A G E 1 9
Notice that under the folder tabs the number of rows that meets the criteria is displayed. Also notice that there are scroll bars along the bottom and the side of the screen to allow you to page up and down and side to side. Now that you are somewhat acquainted with running a query, you will build a new query from start to finish.

C I T Y O F M I L W A U K E E – Q U E R Y S E L F S T U D Y F O R H R M S V E R S I O N 8 .9 – P A G E 2 0
Building a Query “At a Glance” To give you a frame of reference, the steps for building a query are outlined below. Each step is explained in detail throughout the rest of this course guide.
To create a query: 1. SELECT RECORD DEFINITIONS
Your first step in creating a query is to select the database table (record) that contains the data you want. In the HRMS database, tables are represented as record definitions.
2. SELECT FIELDS Upon selecting the record definition(s) that contain the data you want, you will specify which fields you want to display in your query.
3. FORMAT THE QUERY OUTPUT Query offers a number of different options for formatting the query output. You can change the column headings and column order, specify a sort order for the result rows, and display Translate Table values in place of codes.
4. SPECIFY SELECTION CRITERIA
In most cases, you do not want all the rows of data from the table, just the rows that meet certain conditions. To limit the returned rows, you define selection criteria. To add a criterion, you will 1) select the field you will use in your selection criterion, 2) choose a comparison Condition Type, and 3) enter a value (or values) in the dialog box.
5. CHOOSE AN OUTPUT OPTION AND PREVIEW THE
QUERY Choose the Preview option while you are refining your query to ensure that you get the desired results. Query will retrieve the requested data from the database and display the results in the preview window.
If you find that the results are not exactly what you want, you can go back to the Fields and Criteria tabs to

C I T Y O F M I L W A U K E E – Q U E R Y S E L F S T U D Y F O R H R M S V E R S I O N 8 .9 – P A G E 2 1
C I T Y O F M I L W A U K E E – Q U E R Y S E L F S T U D Y F O R H R M S V E R S I O N 8 .9 – P A G E 2 2
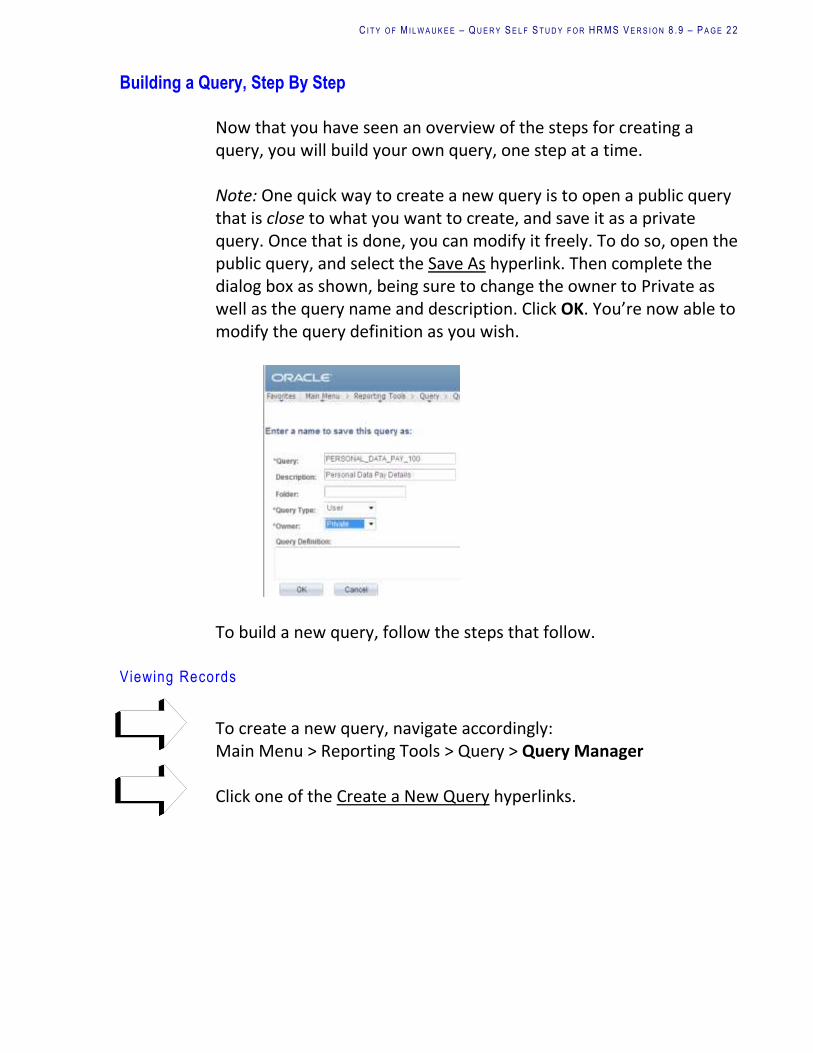
Building a Query, Step By Step Now that you have seen an overview of the steps for creating a query, you will build your own query, one step at a time. Note: One quick way to create a new query is to open a public query that is close to what you want to create, and save it as a private query. Once that is done, you can modify it freely. To do so, open the public query, and select the Save As hyperlink. Then complete the dialog box as shown, being sure to change the owner to Private as well as the query name and description. Click OK. You’re now able to modify the query definition as you wish.
To build a new query, follow the steps that follow.
Viewing Records
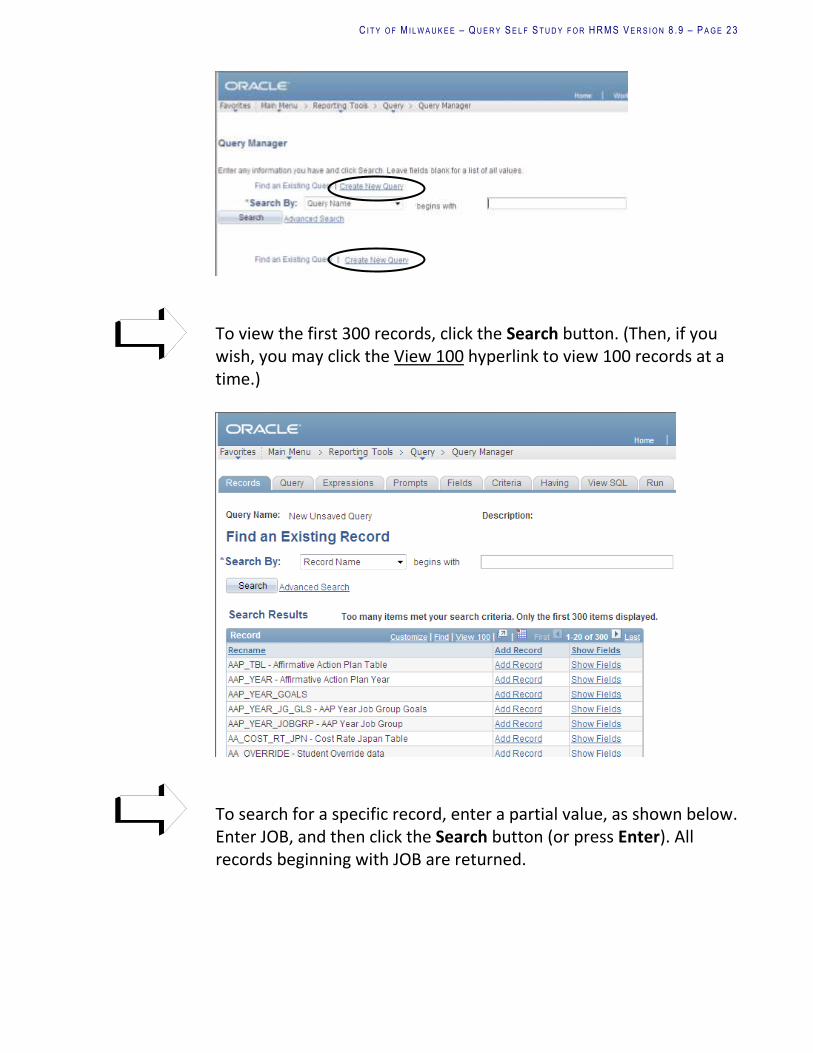
To create a new query, navigate accordingly: Main Menu > Reporting Tools > Query > Query Manager Click one of the Create a New Query hyperlinks.
C I T Y O F M I L W A U K E E – Q U E R Y S E L F S T U D Y F O R H R M S V E R S I O N 8 .9 – P A G E 2 3
To view the first 300 records, click the Search button. (Then, if you wish, you may click the View 100 hyperlink to view 100 records at a time.)
To search for a specific record, enter a partial value, as shown below. Enter JOB, and then click the Search button (or press Enter). All records beginning with JOB are returned.
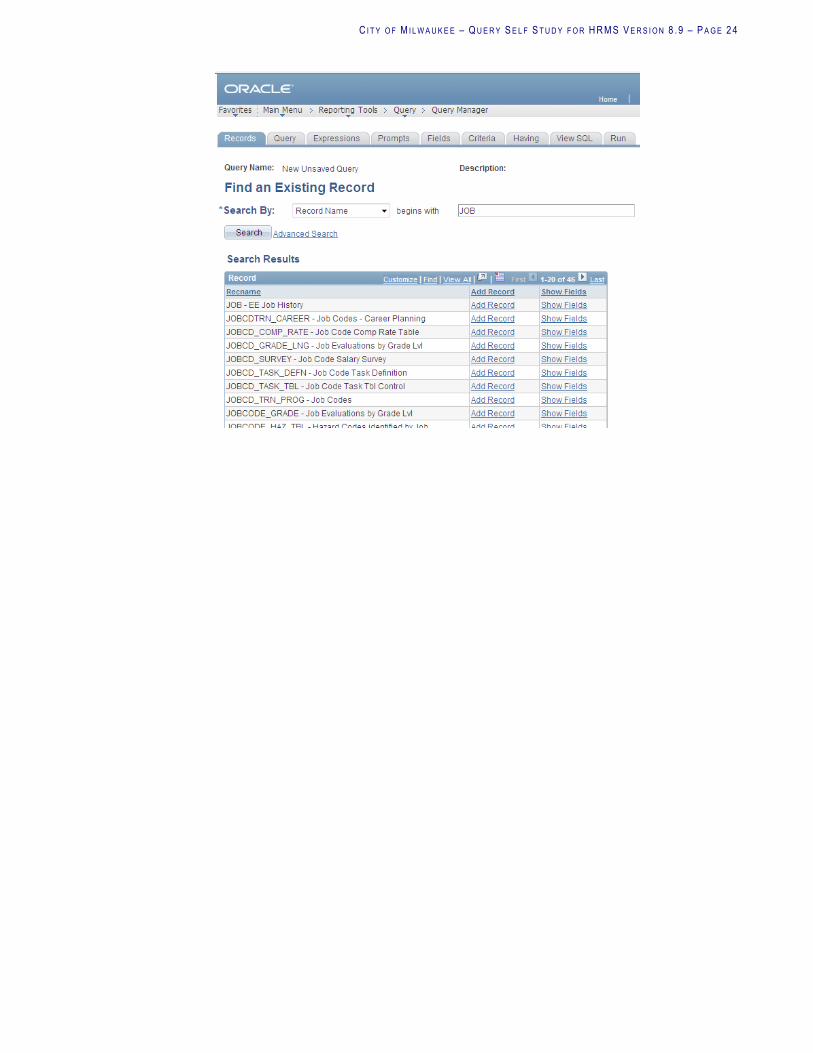
C I T Y O F M I L W A U K E E – Q U E R Y S E L F S T U D Y F O R H R M S V E R S I O N 8 .9 – P A G E 2 4

C I T Y O F M I L W A U K E E – Q U E R Y S E L F S T U D Y F O R H R M S V E R S I O N 8 .9 – P A G E 2 5
Select ing a Record
You select a record here that contains the data that is needed for your report. In this example, choose JOB and click the Show Fields hyperlink to see the fields for that record.
Then click the Return button to go back. The record you select establishes the primary focus of your query. To select a record, you will click the Add Record hyperlink.
Select and add the JOB record. The Query tab will be selected. (Note: Selecting an effective dated file will cause an effective date prompt to be added to the query – see message window.)

C I T Y O F M I L W A U K E E – Q U E R Y S E L F S T U D Y F O R H R M S V E R S I O N 8 .9 – P A G E 2 6
Select ing Fields
Next, you will select the fields that will be used in your report.
If you wish, click on the (Sort fields alphabetically) icon to see your fields listed in alphabetical order.
Choose the check boxes for the fields shown in this example.

C I T Y O F M I L W A U K E E – Q U E R Y S E L F S T U D Y F O R H R M S V E R S I O N 8 .9 – P A G E 2 7
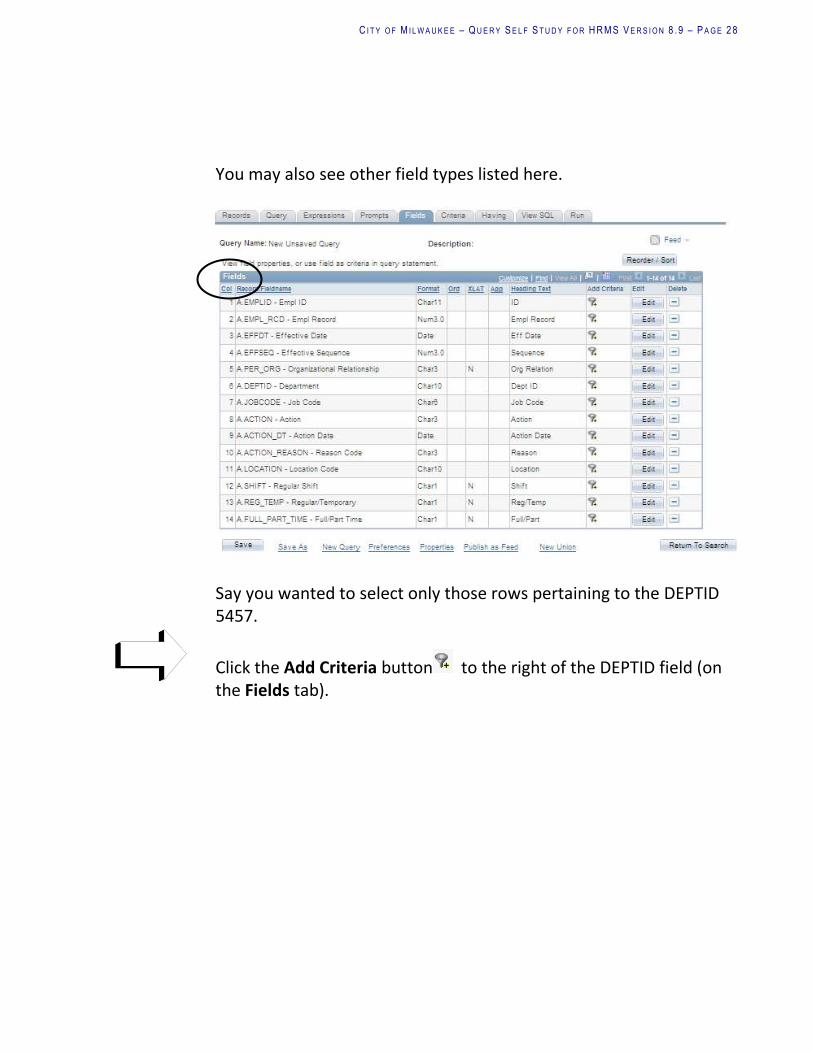
Next, click on the Fields tab. Your screen should look like that follows. Notice the Format column. While you cannot change the format of a field, you can learn about the field by looking in this column. For instance, EMPLID is a character field with eleven places. ACTION_DT is a date field (YYYY-MM-DD). EMPL_RCD is a numeric field with three spaces.
C I T Y O F M I L W A U K E E – Q U E R Y S E L F S T U D Y F O R H R M S V E R S I O N 8 .9 – P A G E 2 8
You may also see other field types listed here.
Say you wanted to select only those rows pertaining to the DEPTID 5457.
Click the Add Criteria button to the right of the DEPTID field (on the Fields tab).

C I T Y O F M I L W A U K E E – Q U E R Y S E L F S T U D Y F O R H R M S V E R S I O N 8 .9 – P A G E 2 9
Building a Query, Step By Step, continued
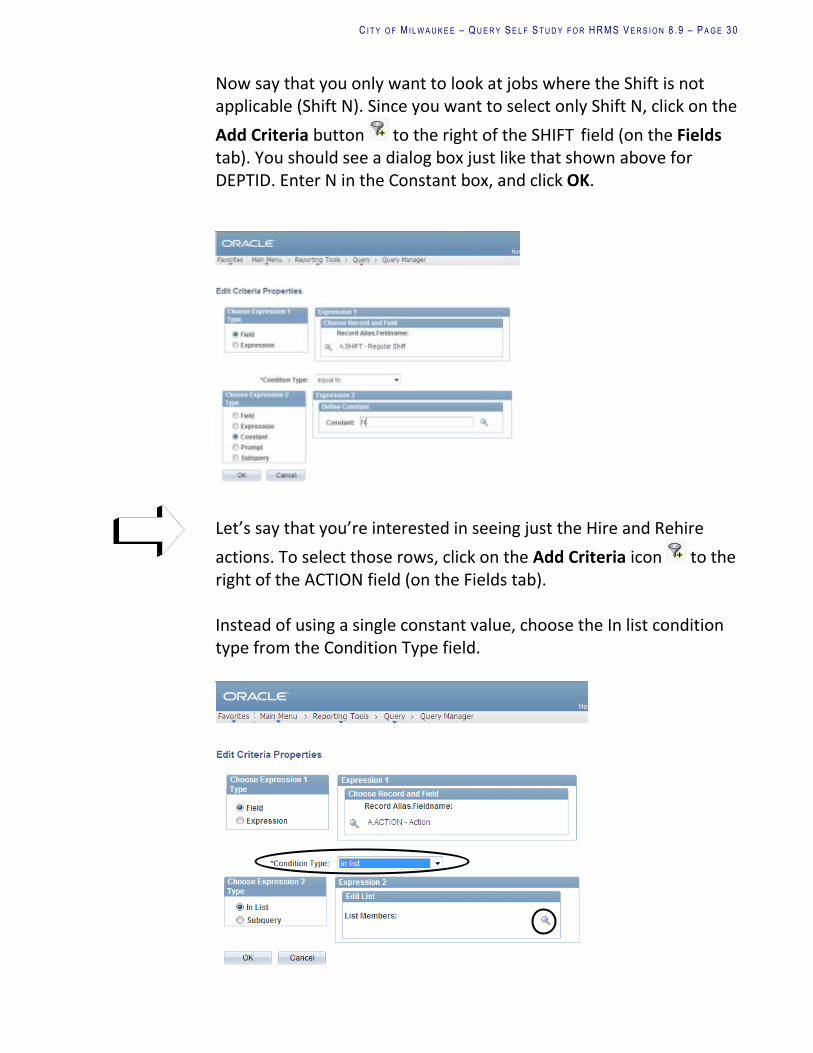
Enter 5457 in the Constant field (inside the Expression 2 box). Essentially, you have created a statement that reads “DEPTID is equal to 5457”. Click OK.
Next, you will add additional selection criteria to further refine your query.
C I T Y O F M I L W A U K E E – Q U E R Y S E L F S T U D Y F O R H R M S V E R S I O N 8 .9 – P A G E 3 0
Now say that you only want to look at jobs where the Shift is not applicable (Shift N). Since you want to select only Shift N, click on the
Add Criteria button to the right of the SHIFT field (on the Fields tab). You should see a dialog box just like that shown above for DEPTID. Enter N in the Constant box, and click OK.
Let’s say that you’re interested in seeing just the Hire and Rehire
actions. To select those rows, click on the Add Criteria icon to the right of the ACTION field (on the Fields tab). Instead of using a single constant value, choose the In list condition type from the Condition Type field.

C I T Y O F M I L W A U K E E – Q U E R Y S E L F S T U D Y F O R H R M S V E R S I O N 8 .9 – P A G E 3 1
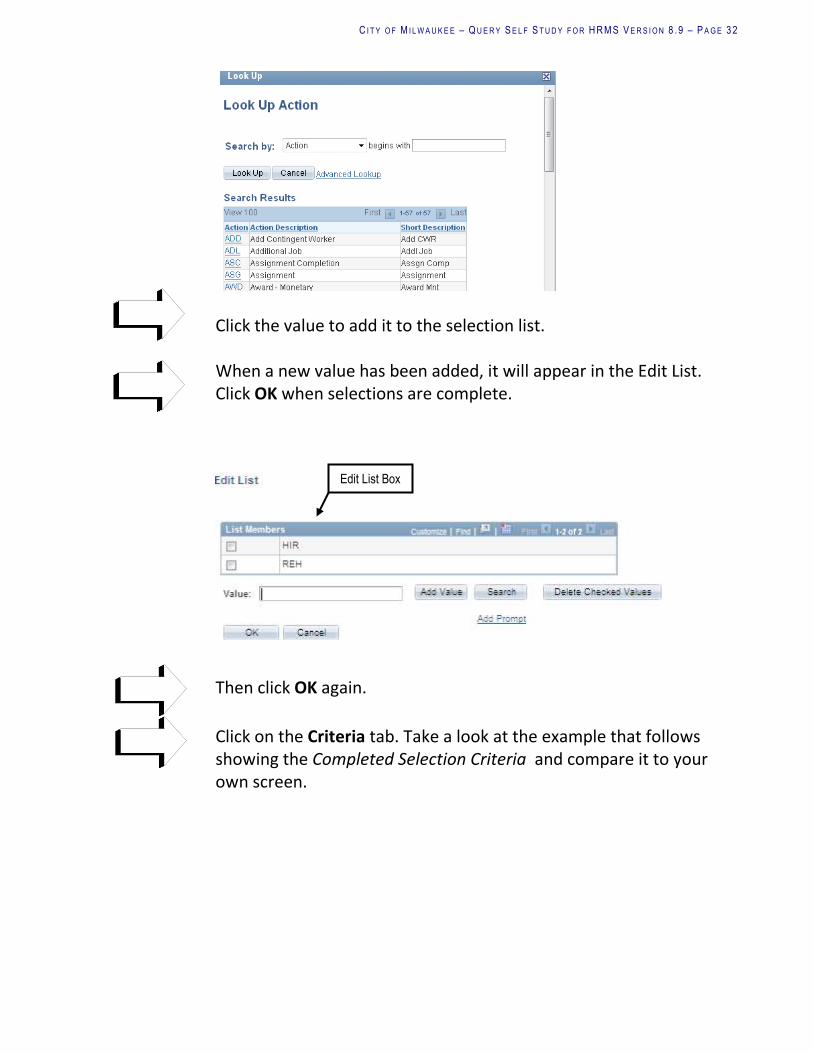
Next, click on the icon in the right side of the Edit List box List Members. When the codes for hire and rehire are known, enter them one at a time and click the Add Value button for each code to be selected. The values are placed in the upper list box. From this box they can be customized or deleted from the query selection.
If the codes are not known, click the icon in the Edit List box (see above). The Edit List screen will appear. Click the Search button.
When the Action screen appears, click the magnifying glass to display the list of values.
C I T Y O F M I L W A U K E E – Q U E R Y S E L F S T U D Y F O R H R M S V E R S I O N 8 .9 – P A G E 3 2
Click the value to add it to the selection list. When a new value has been added, it will appear in the Edit List. Click OK when selections are complete.
Then click OK again.
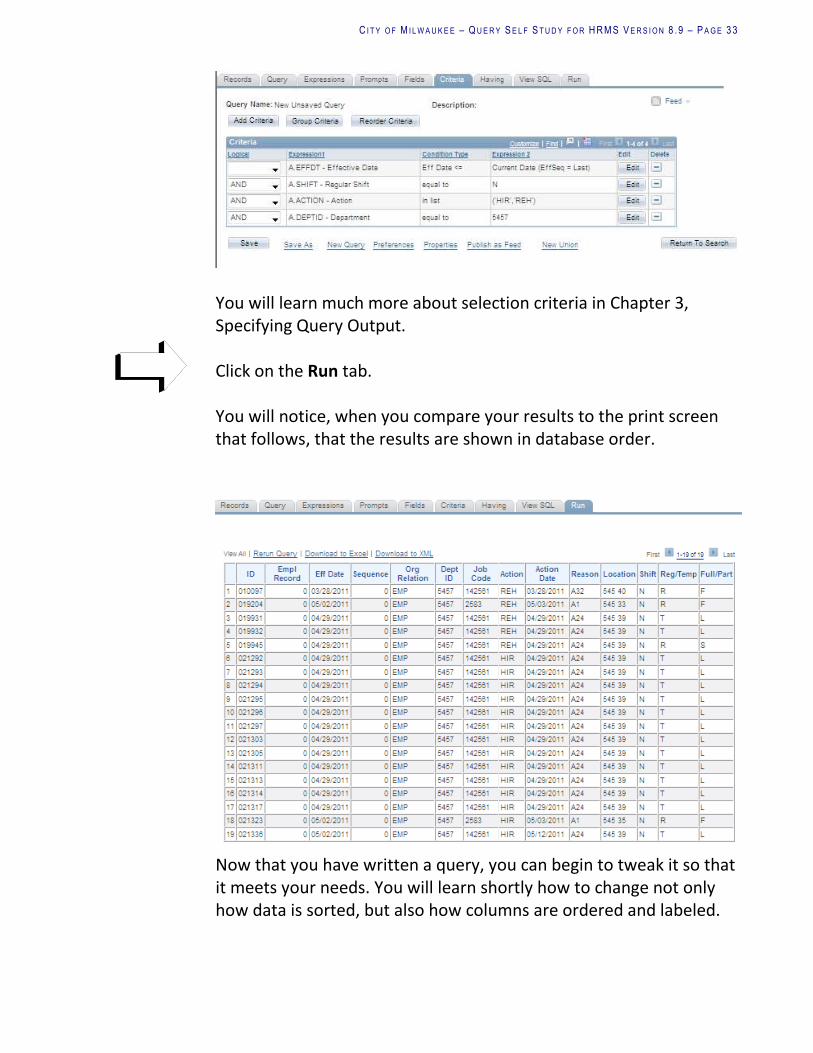
Click on the Criteria tab. Take a look at the example that follows showing the Completed Selection Criteria and compare it to your own screen.
Edit List Box
C I T Y O F M I L W A U K E E – Q U E R Y S E L F S T U D Y F O R H R M S V E R S I O N 8 .9 – P A G E 3 3
You will learn much more about selection criteria in Chapter 3, Specifying Query Output. Click on the Run tab. You will notice, when you compare your results to the print screen that follows, that the results are shown in database order.
Now that you have written a query, you can begin to tweak it so that it meets your needs. You will learn shortly how to change not only how data is sorted, but also how columns are ordered and labeled.

C I T Y O F M I L W A U K E E – Q U E R Y S E L F S T U D Y F O R H R M S V E R S I O N 8 .9 – P A G E 3 4
But first, it’s a good idea to save what you have built so far. Learn about saving queries next.
Saving Your Query
Once you have generated a query, often you will want to save it so you can execute it again at a later time without having to re-create it. Return to the Fields tab. Click the Save button to view the Save screen.
Save this query as 123. Click OK. This query will automatically be saved as a private query, since most City of Milwaukee Query users will not be able to save queries as public. The reason for this is that any user who can create a public query can modify any other public query. Only you, the person who created the query, will be able to open and execute this query. Next you will learn how to edit field properties.
Edit ing Field Propert ies: Heading Text
If you wish to modify a heading or an aggregate function for a field, click the Edit button to the right of the field.

C I T Y O F M I L W A U K E E – Q U E R Y S E L F S T U D Y F O R H R M S V E R S I O N 8 .9 – P A G E 3 5
Click Edit the PER_ORG field. If you wish to enter a heading of your own, such as Org Rel., click the radio button next to Text, and enter the new heading in the Heading Text field. Note: RFT means “Record Field Title.” The default heading is RFT Short.
Click OK to save the new column heading setting.
C I T Y O F M I L W A U K E E – Q U E R Y S E L F S T U D Y F O R H R M S V E R S I O N 8 .9 – P A G E 3 6
Preview the modified query, if you wish, by clicking the Run tab. Notice the changes that you made to the PER_ORG field. Then click the Fields tab once again.
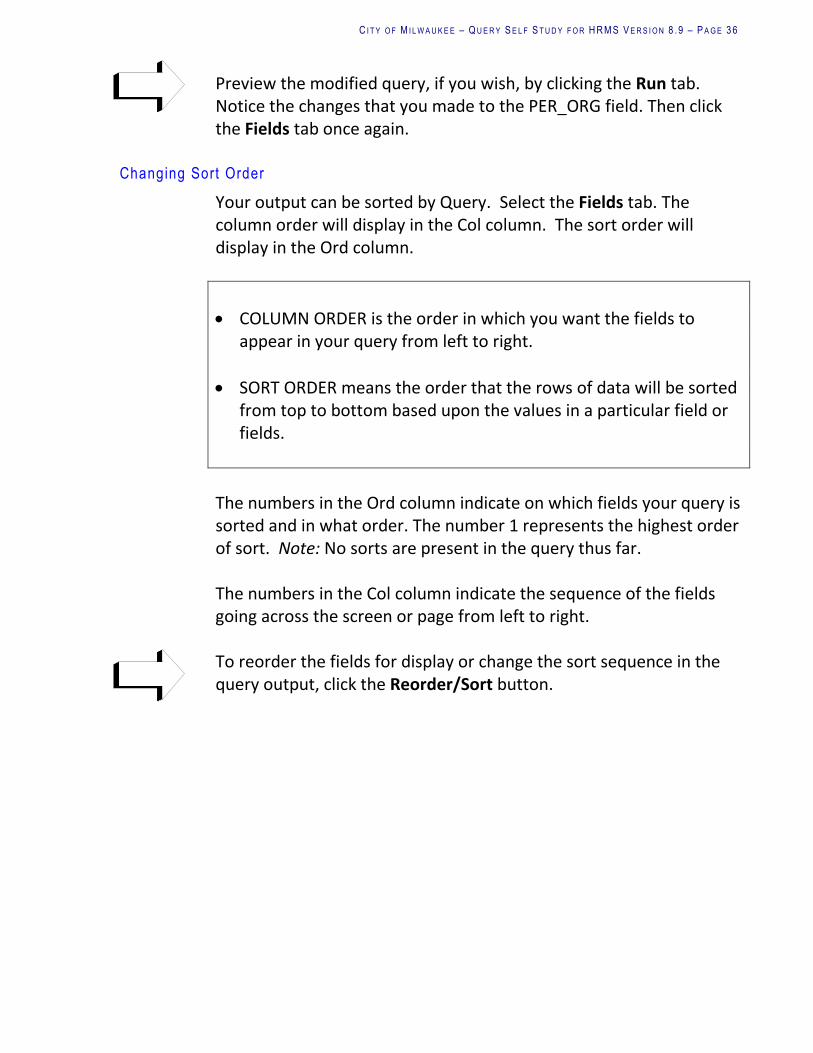
Changing Sort Order
Your output can be sorted by Query. Select the Fields tab. The column order will display in the Col column. The sort order will display in the Ord column.
COLUMN ORDER is the order in which you want the fields to appear in your query from left to right.
SORT ORDER means the order that the rows of data will be sorted from top to bottom based upon the values in a particular field or fields.
The numbers in the Ord column indicate on which fields your query is sorted and in what order. The number 1 represents the highest order of sort. Note: No sorts are present in the query thus far. The numbers in the Col column indicate the sequence of the fields going across the screen or page from left to right. To reorder the fields for display or change the sort sequence in the query output, click the Reorder/Sort button.
C I T Y O F M I L W A U K E E – Q U E R Y S E L F S T U D Y F O R H R M S V E R S I O N 8 .9 – P A G E 3 7
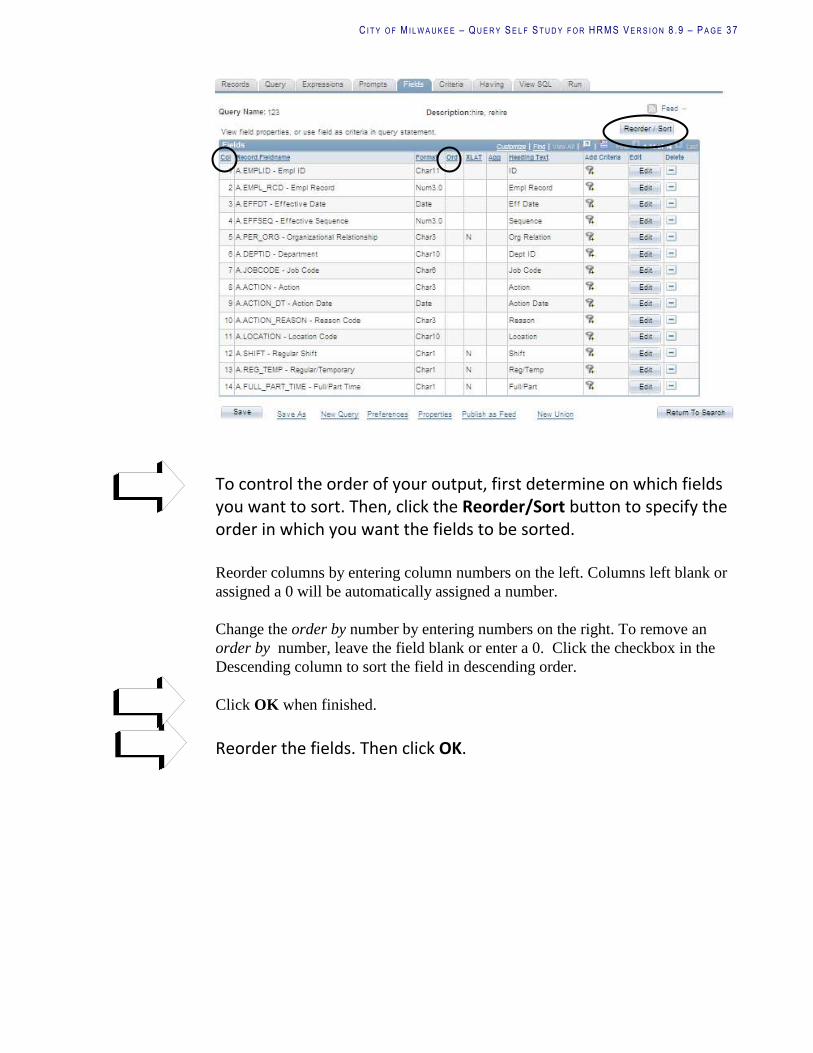
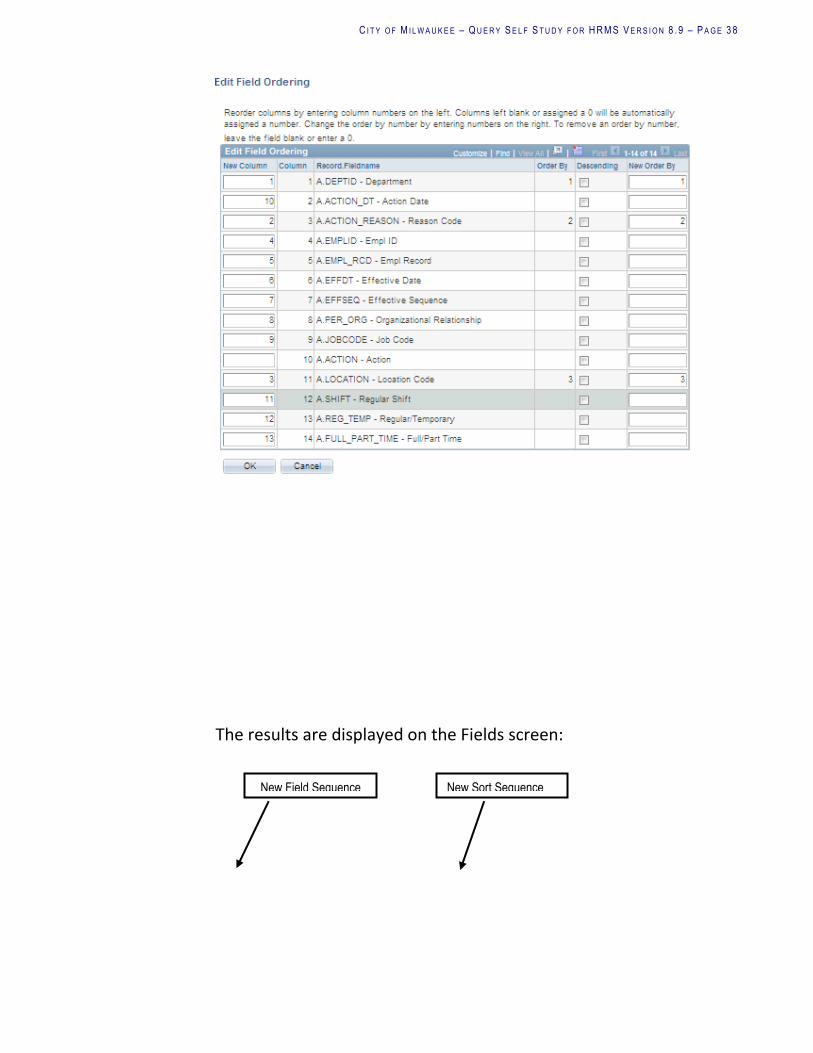
To control the order of your output, first determine on which fields you want to sort. Then, click the Reorder/Sort button to specify the order in which you want the fields to be sorted. Reorder columns by entering column numbers on the left. Columns left blank or
assigned a 0 will be automatically assigned a number.
Change the order by number by entering numbers on the right. To remove an
order by number, leave the field blank or enter a 0. Click the checkbox in the
Descending column to sort the field in descending order.
Click OK when finished. Reorder the fields. Then click OK.
C I T Y O F M I L W A U K E E – Q U E R Y S E L F S T U D Y F O R H R M S V E R S I O N 8 .9 – P A G E 3 8
The results are displayed on the Fields screen:
New Field Sequence New Sort Sequence
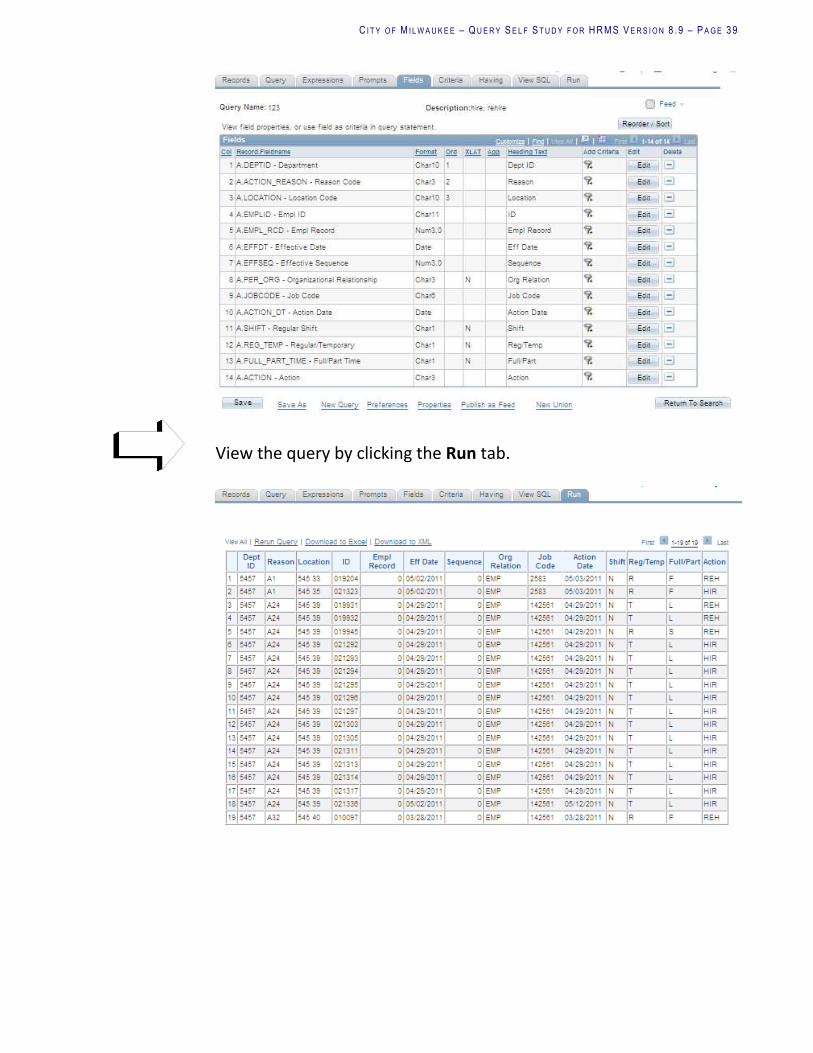
C I T Y O F M I L W A U K E E – Q U E R Y S E L F S T U D Y F O R H R M S V E R S I O N 8 .9 – P A G E 3 9
View the query by clicking the Run tab.

C I T Y O F M I L W A U K E E – Q U E R Y S E L F S T U D Y F O R H R M S V E R S I O N 8 .9 – P A G E 4 0
Viewing SQL
You can view and print your query definition, which documents the fields used in your query as well as other important information such as the selection criteria. SQL stands for “Structured Query Language.” Click the View SQL tab. To print the SQL, right-click on the page, and select Print.
To print the query results, right-click, and select Print from the menu. From the Print screen select the appropriate printer and Click on the Print button.

C I T Y O F M I L W A U K E E – Q U E R Y S E L F S T U D Y F O R H R M S V E R S I O N 8 .9 – P A G E 4 1
Chapter Key Points From the Query Manager page you may perform the following
actions by accessing the Actions drop-down list box:
o Add a query to your Favorites o Copy a query to another user o Delete a query o Move a query to a folder o Rename a query
Also from the Query Manager page, you can open an existing
query, run output to HTML or Excel, or schedule a query to run at another time.
The primary record for a query is selected from the Find an Existing Record page, which can be found by navigating accordingly: Main Menu > Reporting Tools > Query > Query Manager
Then click on the Create a New Query hyperlink.
Three output options when executing a query include previewing the results, sending the output to an Excel spreadsheet, and displaying results in HTML format.
When editing field properties, the text listed in the Headings column will be used for the column heading in the output to the Preview page.
To change column order for a field, click the Reorder/Sort button, and enter new column numbers to re-order the columns.
Likewise, you can sort and re-sort your Query output, depending on your wishes, using the Reorder/Sort button.
You can view and print your query definition, which documents the fields used in your query as well as other important information such as the selection criteria, by clicking the View SQL tab.

C I T Y O F M I L W A U K E E – Q U E R Y S E L F S T U D Y F O R H R M S V E R S I O N 8 .9 – P A G E 4 2
C H A P T E R 3
SPECIFYING QUERY OUTPUT
Objectives By the end of this chapter, you will be able to:
Understand Translate Table Values
Specify criteria for retrieving data by entering selection criteria
and selecting conditions
Use special logical operators in your selection criteria: AND, AND
NOT, OR, and OR NOT
Generate Query run-time prompts, both single and multiple
Use pre-defined aggregate functions in a query
Delete queries
Overview Next, you will explore the options for displaying the Translate Table fields: long descriptions, short descriptions, and the code values. You will also build upon your understanding of a key function: adding criteria clauses to a query to return specific rows of data. Within these criteria clauses you will compare fields to find data of equal values, values greater or less than the field, values in a list, values in a range, and more. You will also use the special logical operators AND, AND NOT, OR, and OR NOT.

C I T Y O F M I L W A U K E E – Q U E R Y S E L F S T U D Y F O R H R M S V E R S I O N 8 .9 – P A G E 4 3
You will learn another powerful function: setting up run-time prompts, which allow you to enter values for a specific field at the time the query is executed and to see how these values are then used as criteria for retrieving information. You will be shown how to use aggregate functions in a query. Instead of returning many rows of data, perhaps you are only interested in a count of rows or a sum of a numeric field. You can produce these results using Query. Finally, you will discover how to delete queries.
Displaying Translate Values You may come across records, such as EMPLOYEES, that contain translate values, which you can use in your queries. A table called the Translate Table stores the values for fields that contain a short list of codes that do not change. To illustrate, take a look at the charts below.
Field = ETHNIC GROUP
Translate Code: Short Translate Value: Long Translate Value:
1 White White
2 Black Black/African American
3 Hispanic Hispanic/Latino
4 Asian Asian
5 Am. Indian American Indian/Alaska Native
6 Not Specified Not Specified
7 Hawaiian Native Hawaiian/Oth Pac Island
Note: As you can see, sometimes the value of the short and long translate value is the same. You can direct Query to display the translate code, the short translate value, or the long translate value. First of all, open the public query:
DER_INFO_AGE_ACTIVE_DETAIL
C I T Y O F M I L W A U K E E – Q U E R Y S E L F S T U D Y F O R H R M S V E R S I O N 8 .9 – P A G E 4 4
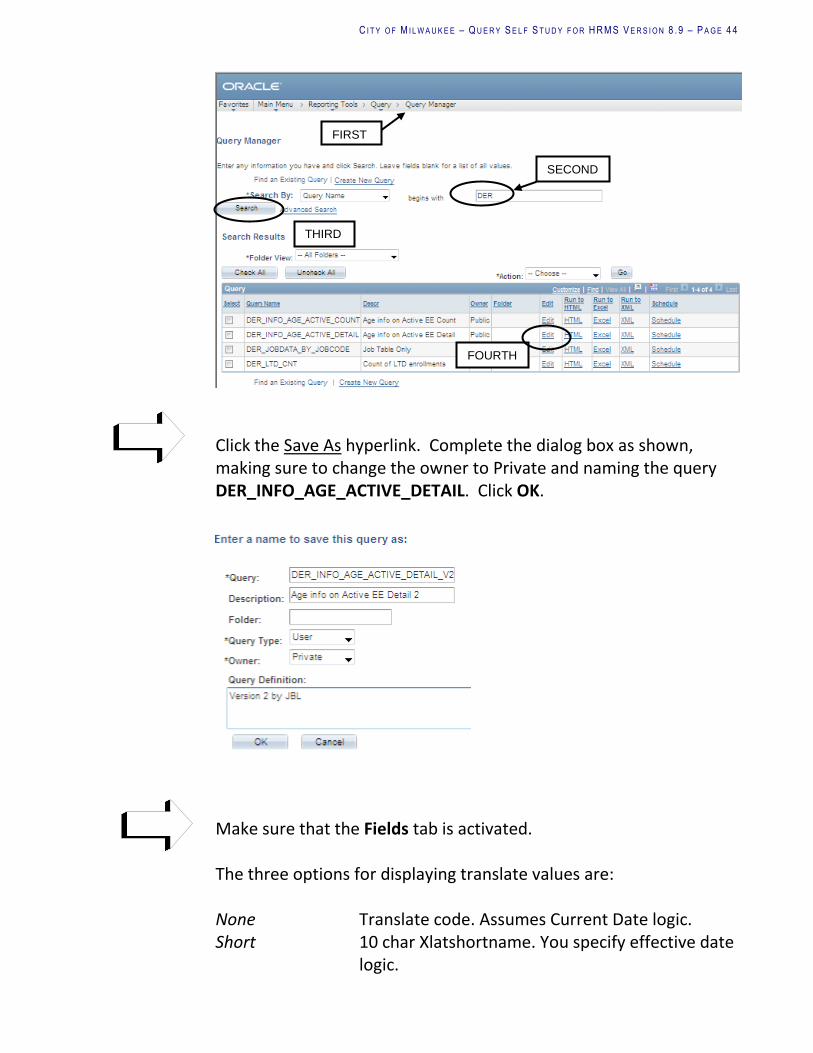
Click the Save As hyperlink. Complete the dialog box as shown, making sure to change the owner to Private and naming the query DER_INFO_AGE_ACTIVE_DETAIL. Click OK.
Make sure that the Fields tab is activated. The three options for displaying translate values are: None Translate code. Assumes Current Date logic. Short 10 char Xlatshortname. You specify effective date
logic.
FIRST
SECOND
THIRD
FOURTH

C I T Y O F M I L W A U K E E – Q U E R Y S E L F S T U D Y F O R H R M S V E R S I O N 8 .9 – P A G E 4 5
Long 30 char Xlatlongname. You specify effective date logic.
You will always know that a field is associated with a translate value if one of these characters appears in the XLAT column: N (None), S (Short), or L (Long). The EMPLOYEES table is shown on this page. Notice the value N under the XLAT column for the field BEN_PLAN and the N for the field EMPL_STATUS.
Click the Edit button to the right of the EMPL_STATUS field. The Edit Field Properties dialog box will appear. Now you see additional options in the Translate Value section of the box.
To modify a translate value, simply click on the radio button next to None, Short, or Long.

C I T Y O F M I L W A U K E E – Q U E R Y S E L F S T U D Y F O R H R M S V E R S I O N 8 .9 – P A G E 4 6
Click on the None radio button now.
Note: When choosing Short or Long, always remember to select Current Date for the Effective Date for Short/Long option.
Click OK. View the query results by clicking the Run tab. In this example, three parameter boxes appear: Begin Birthdate, End Birthdate and Benefit Plan. Enter or choose January 1, 1975 for the Begin Birthdate, December 31, 2000 for End Birthdate and leave the benefit plan blank. Here is a display of the results:
Notice that the Pay Status column contains the letter A (the “None” value) for each vendor, not the word Active, as would be shown if the short translate value had been used. When you run across translate values in a table, you now have an idea of how they can be used.
Entering Selection Criteria
Very often, you do not want to retrieve every row of data from the record you are accessing. By defining criteria expressions, you can selectively retrieve the desired information. To specify criteria expressions, select the Criteria tab.

C I T Y O F M I L W A U K E E – Q U E R Y S E L F S T U D Y F O R H R M S V E R S I O N 8 .9 – P A G E 4 7
Provided DER_INFO_AGE_ACTIVE_DETAIL V2 is still open, click the Criteria tab. You should see the page shown here.
Note: When a query contains fields from several records, the field name will be preceded by a letter that corresponds to its file. The “A” in this query refers to the record EMPLOYEES (see the Query tab). The ability to create queries using multiple records (in other words, the ability to “join records”) is limited to a small number of advanced users. However, all Query users have the ability to perform a “related record” join, discussed in the Query for HRMS Version 9.1 Beyond the Basics class. Based on the type of field for which you are adding criteria, you will have different options available. The options available are:
Logical Represents how criteria rows will be compared with each other. The first logical operator is blank, while each subsequent criterion defaults to AND. The other choices are AND NOT, OR, and OR NOT.
Logical Expression 1 Expression 2 Condition
C I T Y O F M I L W A U K E E – Q U E R Y S E L F S T U D Y F O R H R M S V E R S I O N 8 .9 – P A G E 4 8
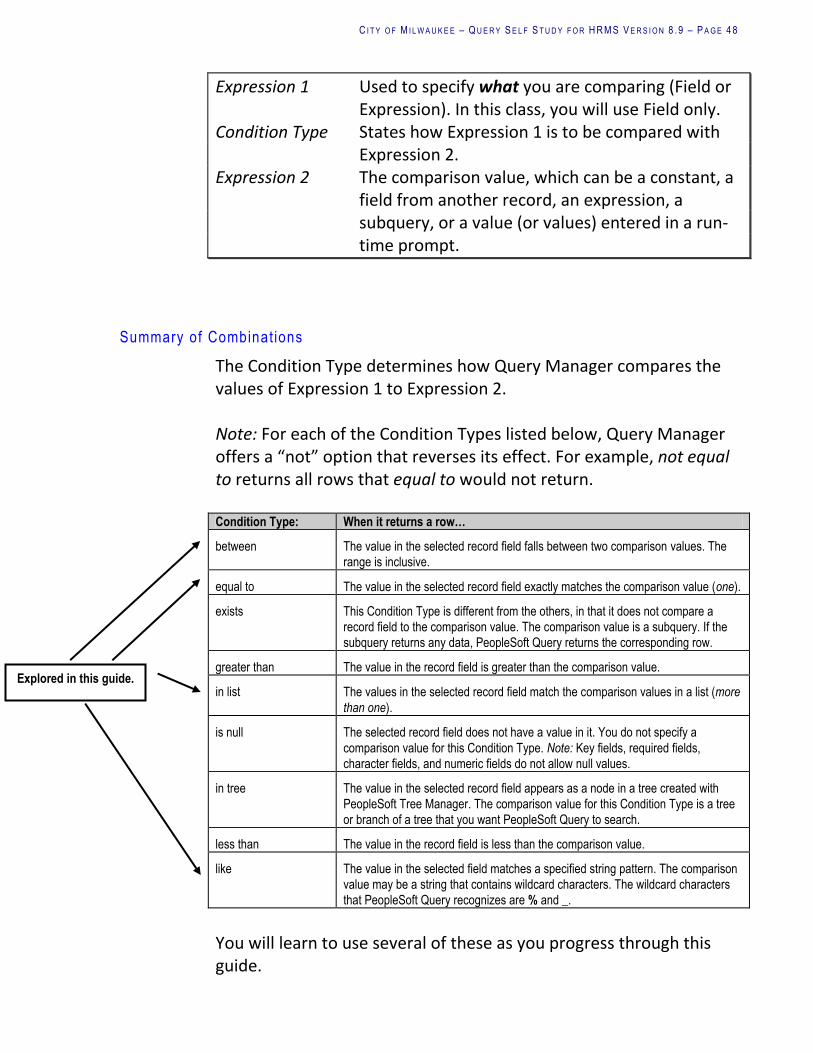
Expression 1 Used to specify what you are comparing (Field or Expression). In this class, you will use Field only.
Condition Type States how Expression 1 is to be compared with Expression 2.
Expression 2 The comparison value, which can be a constant, a field from another record, an expression, a subquery, or a value (or values) entered in a run-time prompt.
Summary of Combinat ions
The Condition Type determines how Query Manager compares the values of Expression 1 to Expression 2. Note: For each of the Condition Types listed below, Query Manager offers a “not” option that reverses its effect. For example, not equal to returns all rows that equal to would not return. Condition Type: When it returns a row…
between The value in the selected record field falls between two comparison values. The
range is inclusive.
equal to The value in the selected record field exactly matches the comparison value (one).
exists This Condition Type is different from the others, in that it does not compare a
record field to the comparison value. The comparison value is a subquery. If the
subquery returns any data, PeopleSoft Query returns the corresponding row.
greater than The value in the record field is greater than the comparison value.
in list The values in the selected record field match the comparison values in a list (more
than one).
is null The selected record field does not have a value in it. You do not specify a
comparison value for this Condition Type. Note: Key fields, required fields,
character fields, and numeric fields do not allow null values.
in tree The value in the selected record field appears as a node in a tree created with
PeopleSoft Tree Manager. The comparison value for this Condition Type is a tree
or branch of a tree that you want PeopleSoft Query to search.
less than The value in the record field is less than the comparison value.
like The value in the selected field matches a specified string pattern. The comparison
value may be a string that contains wildcard characters. The wildcard characters
that PeopleSoft Query recognizes are % and _.
You will learn to use several of these as you progress through this guide.
Explored in this guide.

C I T Y O F M I L W A U K E E – Q U E R Y S E L F S T U D Y F O R H R M S V E R S I O N 8 .9 – P A G E 4 9
Equal To
The equal to Condition Type finds fields having a value that exactly matches the value specified. The equal to Condition Type limits you to one value. Back to the DER_INFO_AGE_ACTIVE_DETAIL_V2 query. Make sure that the Criteria tab is selected.
Earlier you learned to add criteria by clicking the Add Criteria button from the Fields tab. Now you will learn to add criteria
from the Criteria tab. Click the Add Criteria button.
Click on the in the and choose the Select Record and Field box in the Expression 1 box.

C I T Y O F M I L W A U K E E – Q U E R Y S E L F S T U D Y F O R H R M S V E R S I O N 8 .9 – P A G E 5 0
In the Select a record to show fields for, box, click on the Show Fields button for the appropriate record. In this example, choose Health_Benefit. Select the PLAN_TYPE – Plan Type option from the menu. In the Select a field box, Click on Plan_Type – Plan Type.

C I T Y O F M I L W A U K E E – Q U E R Y S E L F S T U D Y F O R H R M S V E R S I O N 8 .9 – P A G E 5 1
The Edit Criteria Properties screen will appear again with B. PLAN_TYPE - Plan Type populated.
Then leave equal to as the Condition Type, and click on the icon in the Expression 2 Define Content box to select a constant. In this case
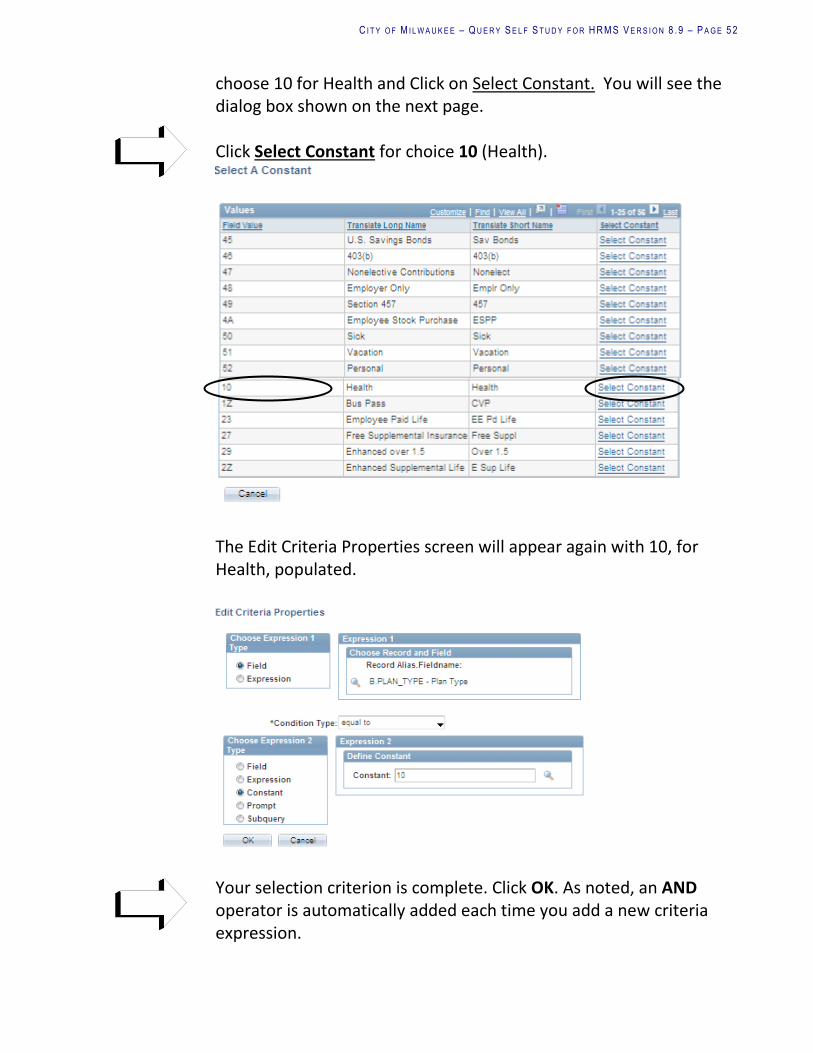
C I T Y O F M I L W A U K E E – Q U E R Y S E L F S T U D Y F O R H R M S V E R S I O N 8 .9 – P A G E 5 2
choose 10 for Health and Click on Select Constant. You will see the dialog box shown on the next page. Click Select Constant for choice 10 (Health).
The Edit Criteria Properties screen will appear again with 10, for Health, populated.
Your selection criterion is complete. Click OK. As noted, an AND operator is automatically added each time you add a new criteria expression.
C I T Y O F M I L W A U K E E – Q U E R Y S E L F S T U D Y F O R H R M S V E R S I O N 8 .9 – P A G E 5 3
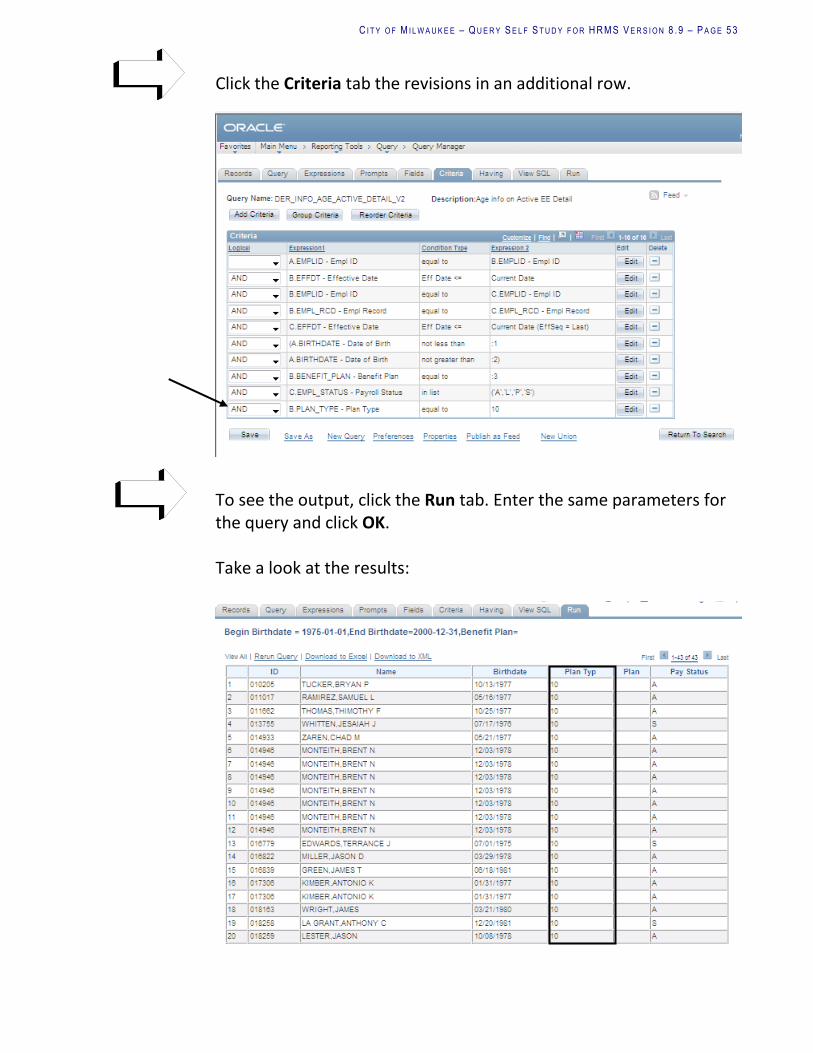
Click the Criteria tab the revisions in an additional row.
To see the output, click the Run tab. Enter the same parameters for the query and click OK. Take a look at the results:

C I T Y O F M I L W A U K E E – Q U E R Y S E L F S T U D Y F O R H R M S V E R S I O N 8 .9 – P A G E 5 4
Plan Type 10 is the only one listed for all selected employees. Adding selection criteria limits the number of rows that are retrieved. Notice that EmplIDs 014946 and 017306 each have more than one row with plan 10. This is due to being enrolled in multiple benefit periods in that plan.
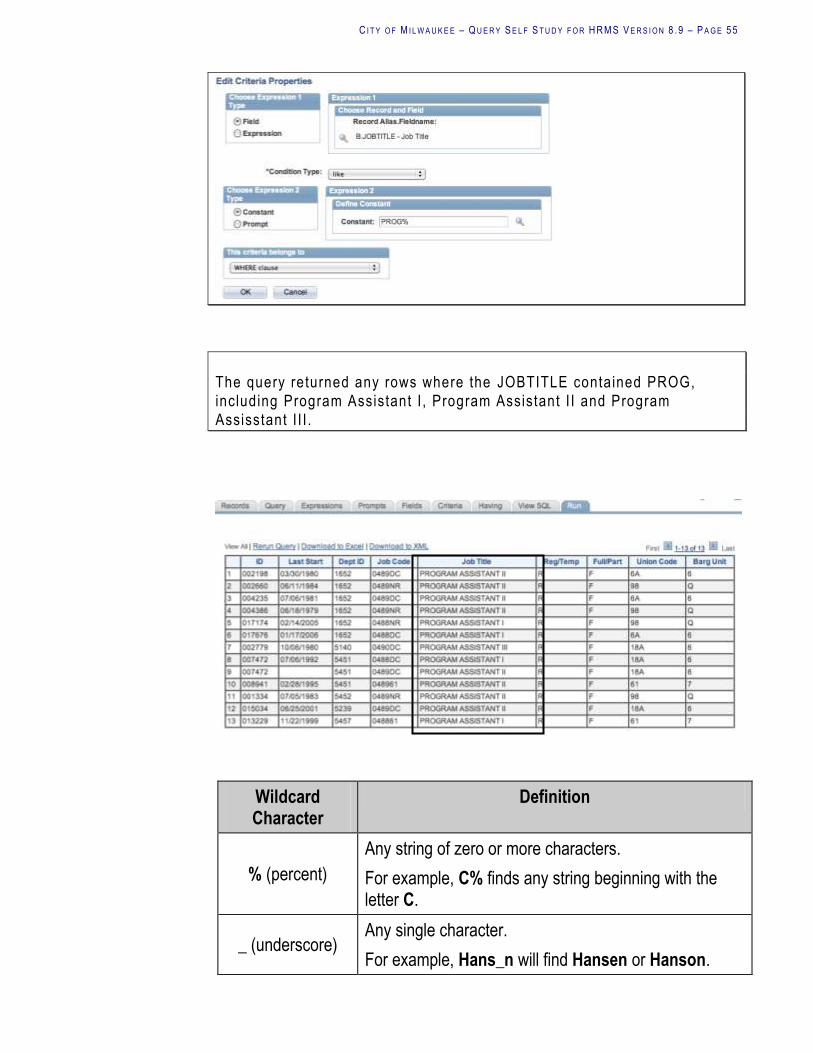
Like
“Like” retrieves data containing fields that match specified portions of a character string. The like Condition Type is case sensitive and uses wildcard characters to search for data. Following is output from a example query built to show this feature.
The Job Title column shows all job titles in the system meeting the other criteria set for collection such as Regular Employee for example. Wildcard A wildcard is a character that represents any
character or any group of characters in a search string.
I f you take a look at Edit Cri ter ia Propert ies screen, th is example shows
the l ike Condit ion Type selected with PROG plus the wi ldcard % typed into
the Expression 2 Def ine Constant box . We are looking for a l l Job Tit les
with Programer in the t i t le in some f orm.
C I T Y O F M I L W A U K E E – Q U E R Y S E L F S T U D Y F O R H R M S V E R S I O N 8 .9 – P A G E 5 5
The query returned any rows where the JOBTITLE contained PROG,
including Program Assistant I , Program Assistant I I and Program
Assisstant I I I .
Wildcard Character
Definition
% (percent)
Any string of zero or more characters.
For example, C% finds any string beginning with the letter C.
_ (underscore) Any single character.
For example, Hans_n will find Hansen or Hanson.
C I T Y O F M I L W A U K E E – Q U E R Y S E L F S T U D Y F O R H R M S V E R S I O N 8 .9 – P A G E 5 6
You can even “mix” wildcards, such as entering HANS_N% to look for rows such as HANSEN,JULIA M and HANSON,LARS. So, use the like Condition Type when you want to use wildcards to pull data from a record. Next, we’ll take a look at the between Condition Type.
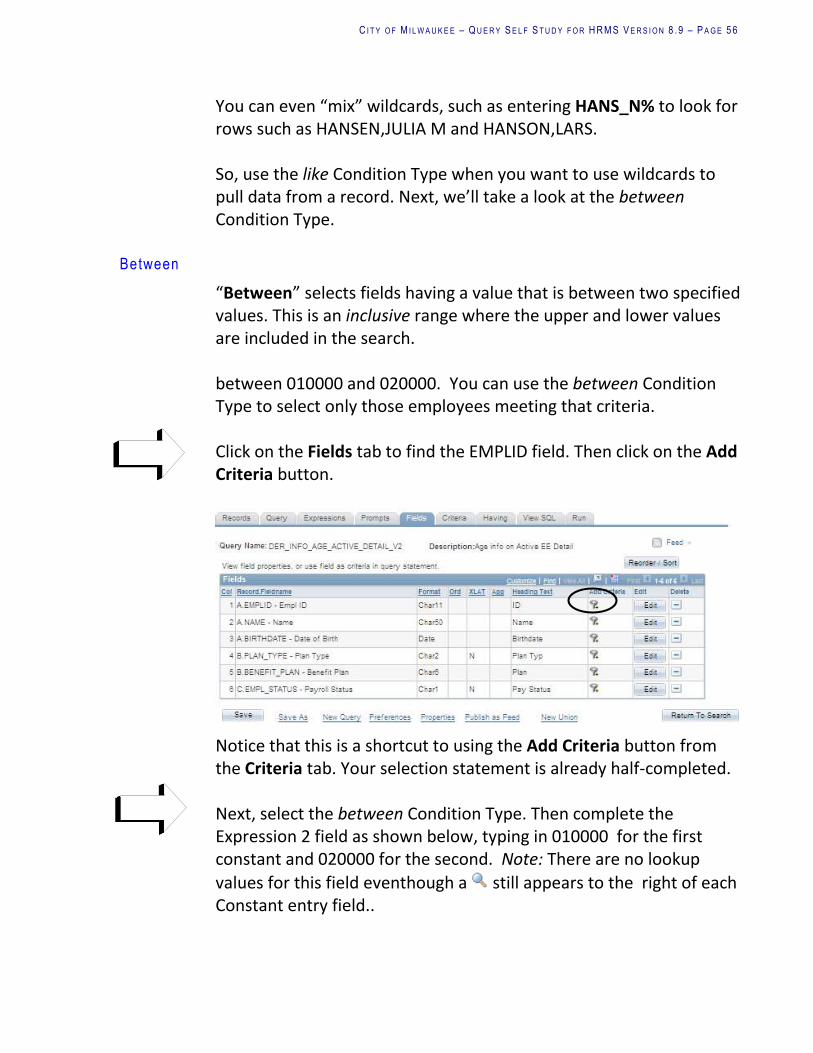
Between
“Between” selects fields having a value that is between two specified values. This is an inclusive range where the upper and lower values are included in the search. between 010000 and 020000. You can use the between Condition Type to select only those employees meeting that criteria. Click on the Fields tab to find the EMPLID field. Then click on the Add Criteria button.
Notice that this is a shortcut to using the Add Criteria button from the Criteria tab. Your selection statement is already half-completed. Next, select the between Condition Type. Then complete the Expression 2 field as shown below, typing in 010000 for the first constant and 020000 for the second. Note: There are no lookup
values for this field eventhough a still appears to the right of each Constant entry field..
C I T Y O F M I L W A U K E E – Q U E R Y S E L F S T U D Y F O R H R M S V E R S I O N 8 .9 – P A G E 5 7
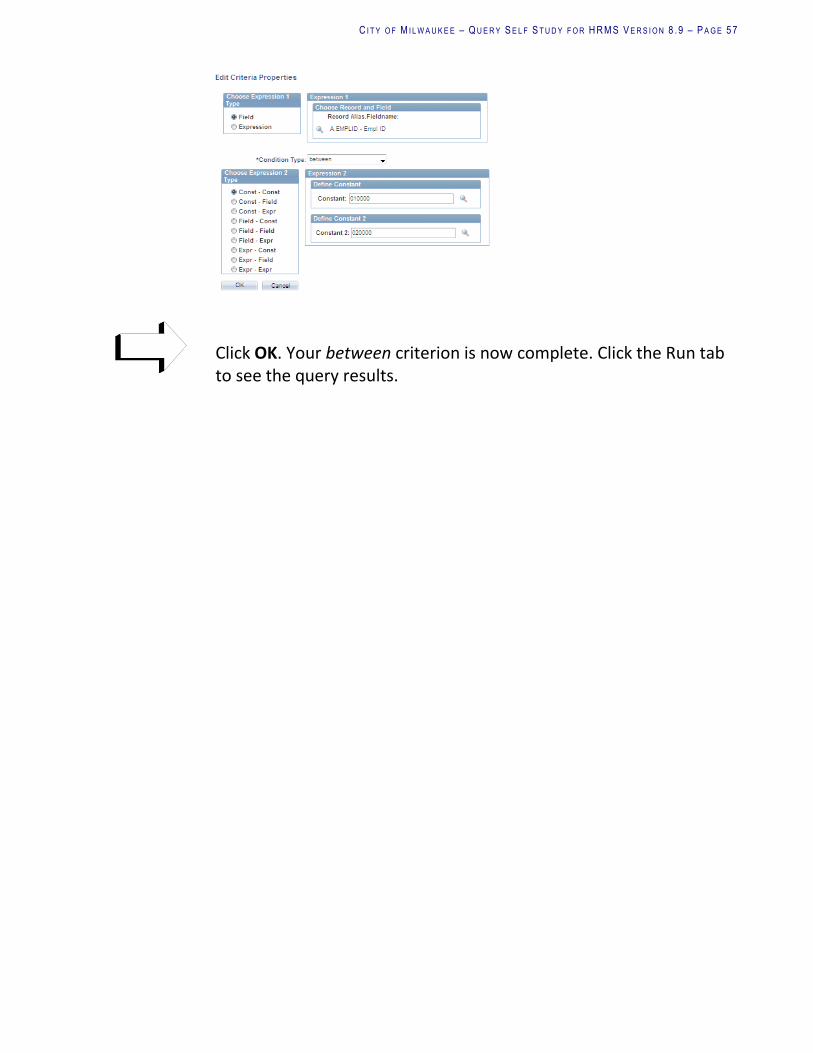
Click OK. Your between criterion is now complete. Click the Run tab to see the query results.

C I T Y O F M I L W A U K E E – Q U E R Y S E L F S T U D Y F O R H R M S V E R S I O N 8 .9 – P A G E 5 8
Select ion Cri ter ia Order
You can re-order your selection criteria for a query so that the system first selects rows based on one field, next another, and so on. Re-ordering criteria can increase system efficiency. Re-ordering your criteria is simple. Click on the Criteria tab. Then click on the Reorder Criteria button. Type the numbers for the new order in the New Position column. Then click OK.

C I T Y O F M I L W A U K E E – Q U E R Y S E L F S T U D Y F O R H R M S V E R S I O N 8 .9 – P A G E 5 9
You may wish to re-save your query. Since you have just saved the query that you have been building throughout this course, DER_INFO_AGE_ACTIVE_DETAIL_V2, why not pause for a moment and take a break! In a moment, you will create a brand-new query to review and practice some of the features you have learned so far as well as learn about a few nuances of Query.
In L ist
“In list” finds fields having values that match any one of the values in a list of values. With this option, you are prompted to create a list with the Edit List dialog box. You had an opportunity to use in list in Chapter 2. Key point to remember:
From the Edit List dialog box, peruse the list of values, and click the Add Value button to add a value to the list.
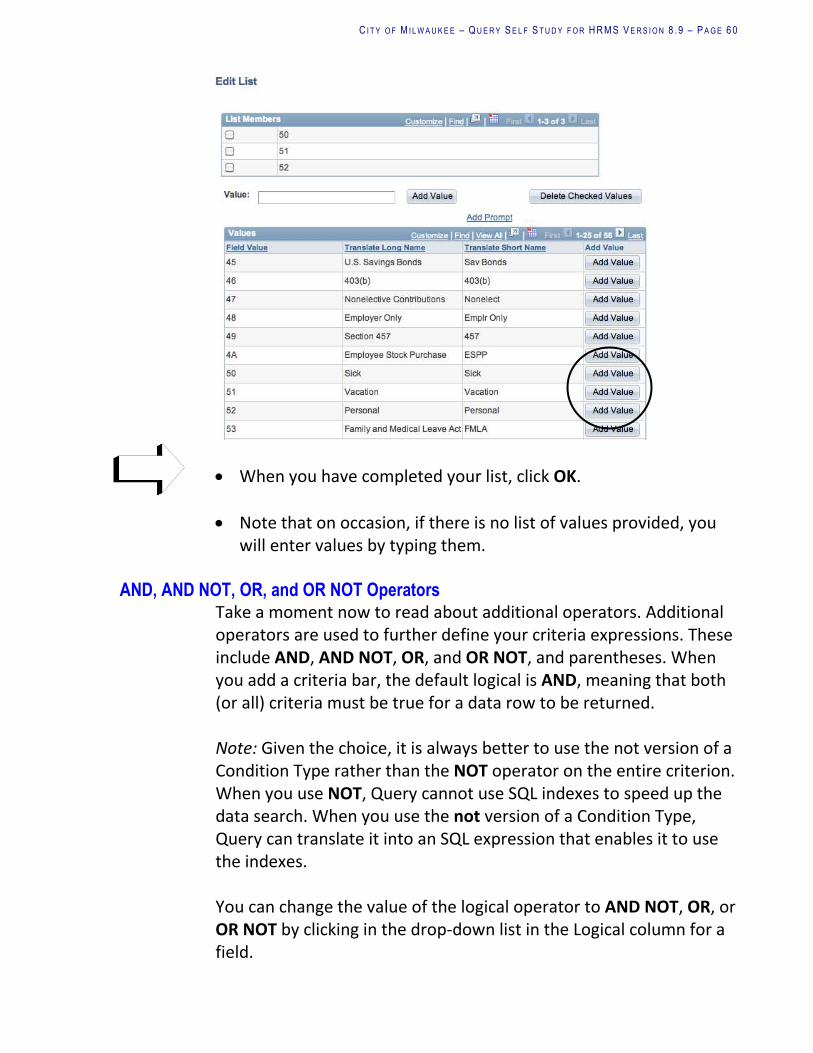
C I T Y O F M I L W A U K E E – Q U E R Y S E L F S T U D Y F O R H R M S V E R S I O N 8 .9 – P A G E 6 0
When you have completed your list, click OK.
Note that on occasion, if there is no list of values provided, you will enter values by typing them.
AND, AND NOT, OR, and OR NOT Operators Take a moment now to read about additional operators. Additional operators are used to further define your criteria expressions. These include AND, AND NOT, OR, and OR NOT, and parentheses. When you add a criteria bar, the default logical is AND, meaning that both (or all) criteria must be true for a data row to be returned. Note: Given the choice, it is always better to use the not version of a Condition Type rather than the NOT operator on the entire criterion. When you use NOT, Query cannot use SQL indexes to speed up the data search. When you use the not version of a Condition Type, Query can translate it into an SQL expression that enables it to use the indexes. You can change the value of the logical operator to AND NOT, OR, or OR NOT by clicking in the drop-down list in the Logical column for a field.

C I T Y O F M I L W A U K E E – Q U E R Y S E L F S T U D Y F O R H R M S V E R S I O N 8 .9 – P A G E 6 1
Say you had added a row of selection criteria to ask for records where the EMPL_RCD number for an employee is either 0 (primary) or 1.
You can group rows of criteria to ask for very specific information from the database. You will use the Group Criteria button. Parentheses are used to group and ungroup rows of selection criteria, and they control the order in which Query executes the criteria. To select several rows of criteria for grouping (or ungrouping), use the Group Criteria button. You will notice one set of parenthesis are used in the Criteria. Do not alter those. Instead, add an additional set for the appropriate fields shown in the example scree. Click OK.

C I T Y O F M I L W A U K E E – Q U E R Y S E L F S T U D Y F O R H R M S V E R S I O N 8 .9 – P A G E 6 2
In this example, your output would list only those rows that meet these criteria: Rows for the Employee IDs from Record A equal to the employee
IDs for Record B. and an effective date from Record B less than or equal to a
current date Rows for the Employee IDs from Record B equal to the employee
IDs for Record C. and an effective date from Record C less than or equal to a
current date and birthdate from Record A between two parameter values input
by the user to run the query. We used January 1, 1975 and December 31, 2000 in this example.
and a benefit plan entered as a parameter by the user to run the query. We chose to leave this parameter blank.
and an employee status in the list (values A , L, P and S) and an employee record number of either 0 or 1 It’s time to write a new query from beginning to end.

C I T Y O F M I L W A U K E E – Q U E R Y S E L F S T U D Y F O R H R M S V E R S I O N 8 .9 – P A G E 6 3
EXERCISE – Create a New Query, Specifying Selection Criteria
You have been asked to create a query that displays all records for employees that are married.
STEPS … USING …
1. Create a new query Main Menu > Reporting Tools > Query > Query Manager
Click the Create a New Query hyperlink.
2. Select the record EMPLOYEE
3. Select fields for display, and place them in this column order
EMPLID LAST_NAME FIRST_NAME MAR_STATUS
4. Verify the sort order for this field in ascending order. If not change it.
LAST_NAME
5. Change the heading for these fields as shown if required. *Reminder: Use the Edit button.
LAST_NAME Last Name FIRST_NAME First Name
6. Display the Long Description translate value for this field *Reminder: Use the Edit button.
MAR_STATUS
STEPS … USING …
7. Enter selection criteria for this field
Expression 1 Condition type Expression 2
MAR_STATUS equal to Married

C I T Y O F M I L W A U K E E – Q U E R Y S E L F S T U D Y F O R H R M S V E R S I O N 8 .9 – P A G E 6 4
8. Preview your query results Your results should be similar
to the the next screen..
Perhaps instead of retrieving all married employees, you are interested in looking at only those which have less than a high school diploma or GED.You can modify your query to get a “short” list of high school graduates by adding selection criteria.
View
C I T Y O F M I L W A U K E E – Q U E R Y S E L F S T U D Y F O R H R M S V E R S I O N 8 .9 – P A G E 6 5
STEPS … USING …
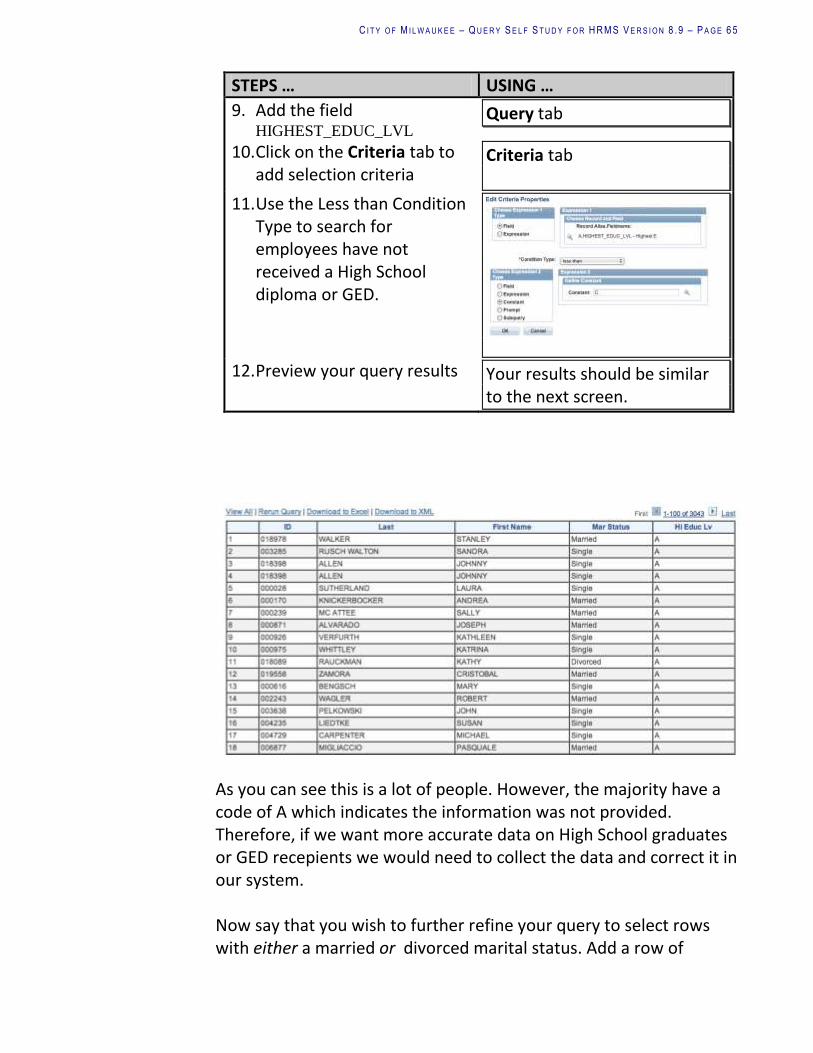
9. Add the field HIGHEST_EDUC_LVL
Query tab
10. Click on the Criteria tab to add selection criteria
Criteria tab
11. Use the Less than Condition Type to search for employees have not received a High School diploma or GED.
12. Preview your query results Your results should be similar to the next screen.
As you can see this is a lot of people. However, the majority have a code of A which indicates the information was not provided. Therefore, if we want more accurate data on High School graduates or GED recepients we would need to collect the data and correct it in our system. Now say that you wish to further refine your query to select rows with either a married or divorced marital status. Add a row of
C I T Y O F M I L W A U K E E – Q U E R Y S E L F S T U D Y F O R H R M S V E R S I O N 8 .9 – P A G E 6 6
selection criteria and group two of them using parentheses, as described in the following steps.
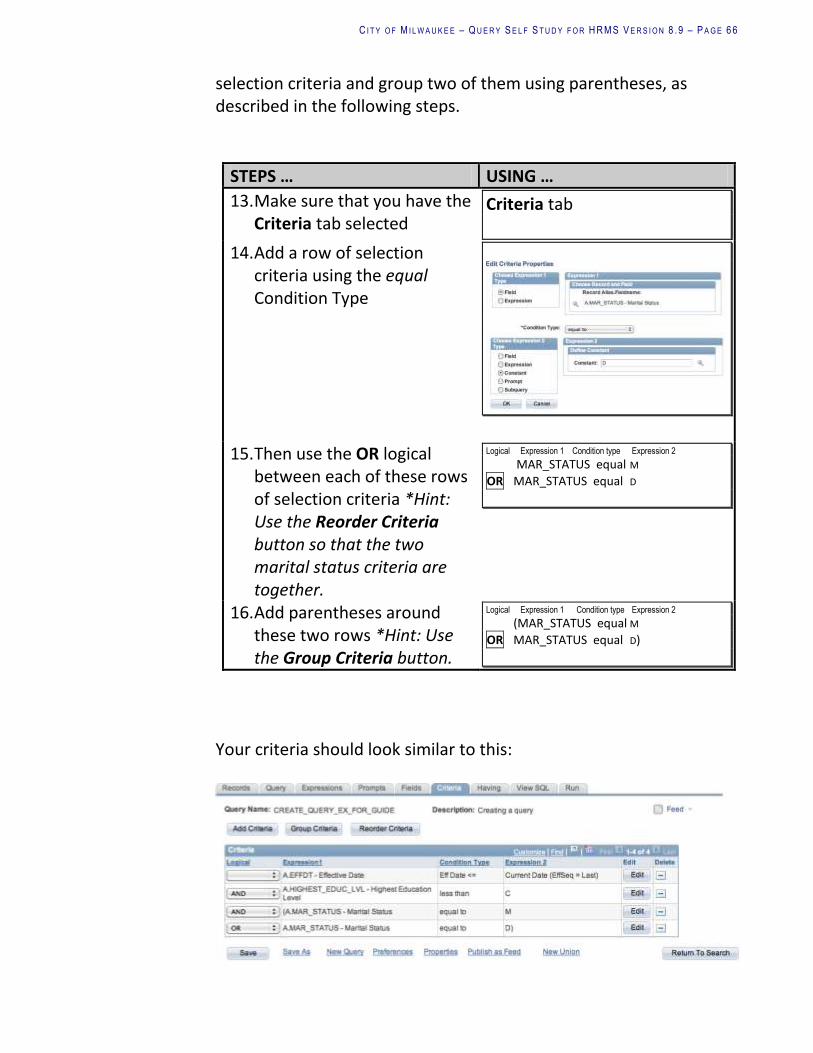
STEPS … USING …
13. Make sure that you have the Criteria tab selected
Criteria tab
14. Add a row of selection criteria using the equal Condition Type
15. Then use the OR logical between each of these rows of selection criteria *Hint: Use the Reorder Criteria button so that the two marital status criteria are together.
Logical Expression 1 Condition type Expression 2
MAR_STATUS equal M
OR MAR_STATUS equal D
16. Add parentheses around these two rows *Hint: Use the Group Criteria button.
Logical Expression 1 Condition type Expression 2
(MAR_STATUS equal M
OR MAR_STATUS equal D)
Your criteria should look similar to this:
C I T Y O F M I L W A U K E E – Q U E R Y S E L F S T U D Y F O R H R M S V E R S I O N 8 .9 – P A G E 6 7
STEPS … USING …
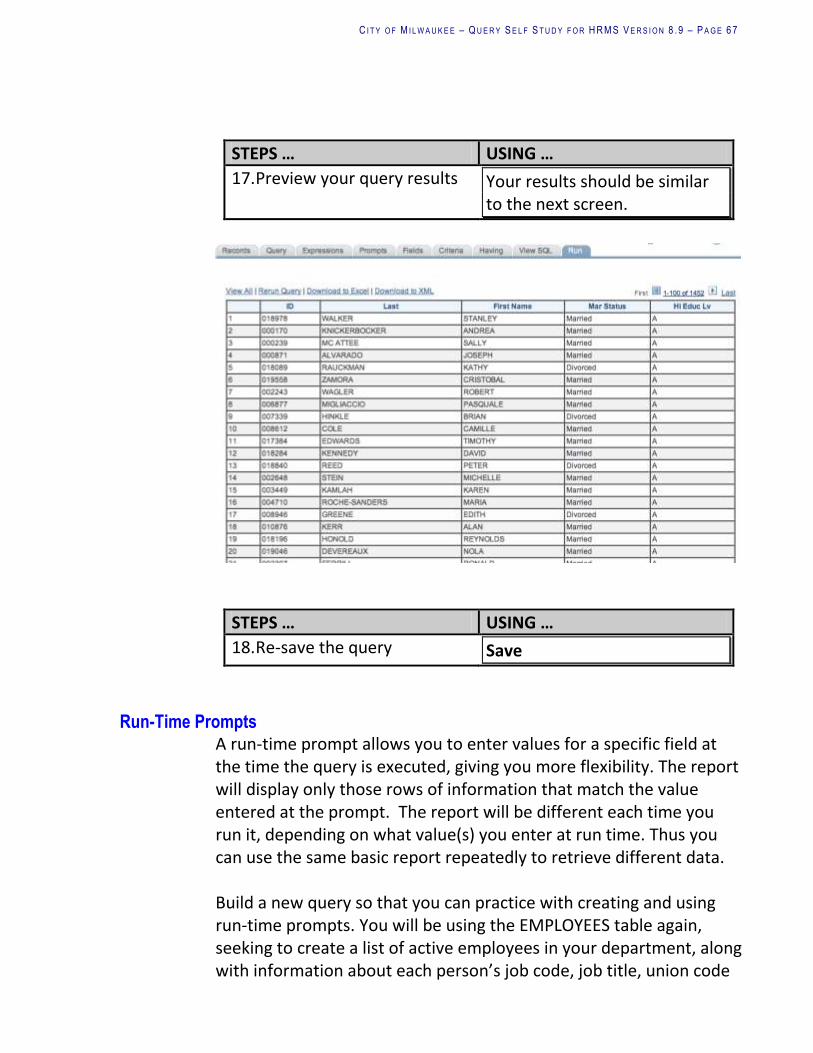
17. Preview your query results Your results should be similar to the next screen.
STEPS … USING …
18. Re-save the query Save
Run-Time Prompts
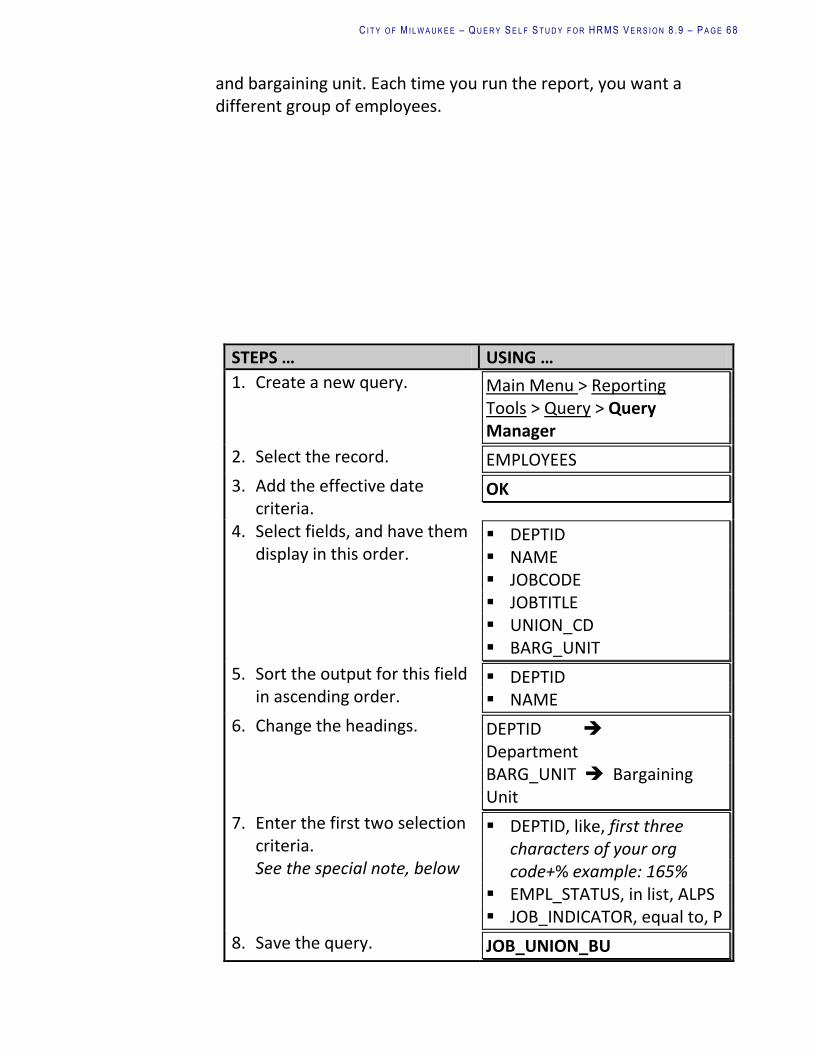
A run-time prompt allows you to enter values for a specific field at the time the query is executed, giving you more flexibility. The report will display only those rows of information that match the value entered at the prompt. The report will be different each time you run it, depending on what value(s) you enter at run time. Thus you can use the same basic report repeatedly to retrieve different data. Build a new query so that you can practice with creating and using run-time prompts. You will be using the EMPLOYEES table again, seeking to create a list of active employees in your department, along with information about each person’s job code, job title, union code
C I T Y O F M I L W A U K E E – Q U E R Y S E L F S T U D Y F O R H R M S V E R S I O N 8 .9 – P A G E 6 8
and bargaining unit. Each time you run the report, you want a different group of employees.
STEPS … USING …
1. Create a new query. Main Menu > Reporting Tools > Query > Query Manager
2. Select the record. EMPLOYEES
3. Add the effective date criteria.
OK
4. Select fields, and have them display in this order.
DEPTID NAME JOBCODE JOBTITLE UNION_CD BARG_UNIT
5. Sort the output for this field in ascending order.
DEPTID NAME
6. Change the headings. DEPTID Department BARG_UNIT Bargaining Unit
7. Enter the first two selection criteria. See the special note, below
DEPTID, like, first three characters of your org code+% example: 165%
EMPL_STATUS, in list, ALPS JOB_INDICATOR, equal to, P
8. Save the query. JOB_UNION_BU
C I T Y O F M I L W A U K E E – Q U E R Y S E L F S T U D Y F O R H R M S V E R S I O N 8 .9 – P A G E 6 9
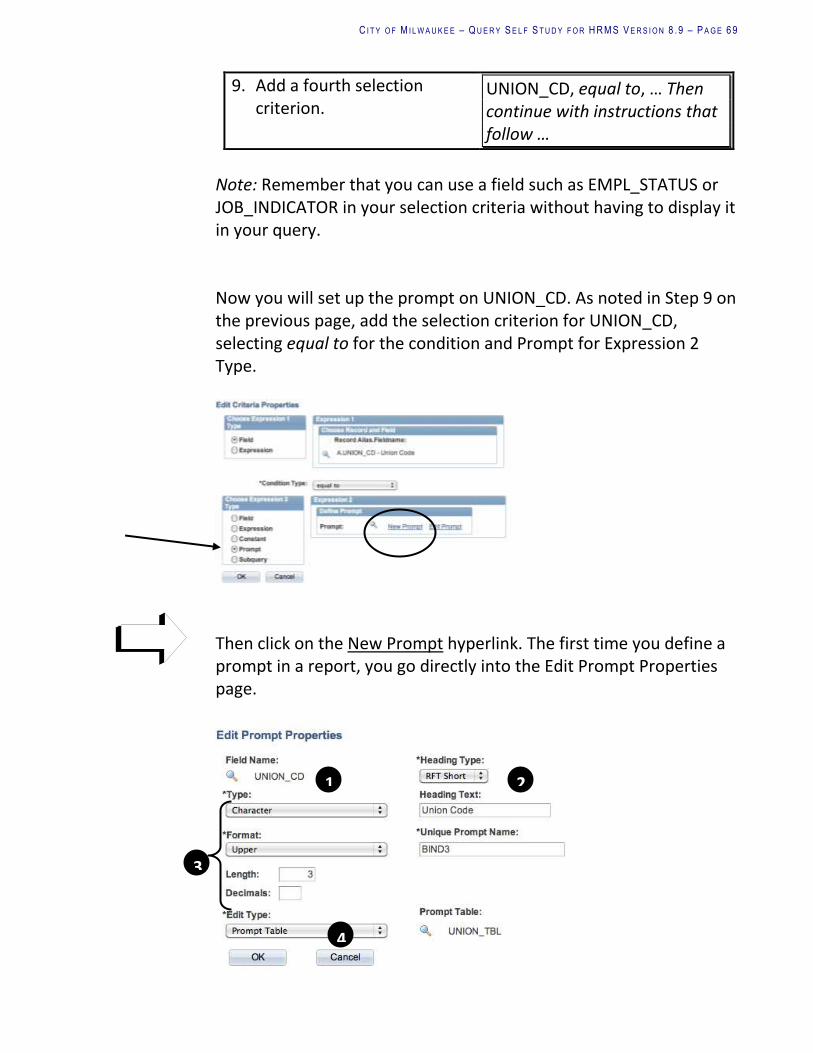
9. Add a fourth selection criterion.
UNION_CD, equal to, … Then continue with instructions that follow …
Note: Remember that you can use a field such as EMPL_STATUS or JOB_INDICATOR in your selection criteria without having to display it in your query. Now you will set up the prompt on UNION_CD. As noted in Step 9 on the previous page, add the selection criterion for UNION_CD, selecting equal to for the condition and Prompt for Expression 2 Type.
Then click on the New Prompt hyperlink. The first time you define a prompt in a report, you go directly into the Edit Prompt Properties page.
2 1
3
4

C I T Y O F M I L W A U K E E – Q U E R Y S E L F S T U D Y F O R H R M S V E R S I O N 8 .9 – P A G E 7 0
All of the information on this page defaults in. Each field is described in more detail below: Field value defaults from the selection criteria bar. Rft Long The long field name from the record definition. Rft Short The short field name from the record definition. Text Free-form text – enables you to assign your own
label. Type, format, length, and decimals default from the field definition in the database. The value in this field will default to No Table Edit, Prompt Table, Translate Table, or Yes/No Table, depending on which field value is shown in Field. Click OK to confirm your Prompt Properties. Then click OK again. Notice in the screen print shown here that it is represented on the criteria page as :1.
Click OK again to return to the Criteria screen.
Field:
Heading Type:
Type,
Format,
Length &
Decimals:
Edi t Type:
C I T Y O F M I L W A U K E E – Q U E R Y S E L F S T U D Y F O R H R M S V E R S I O N 8 .9 – P A G E 7 1
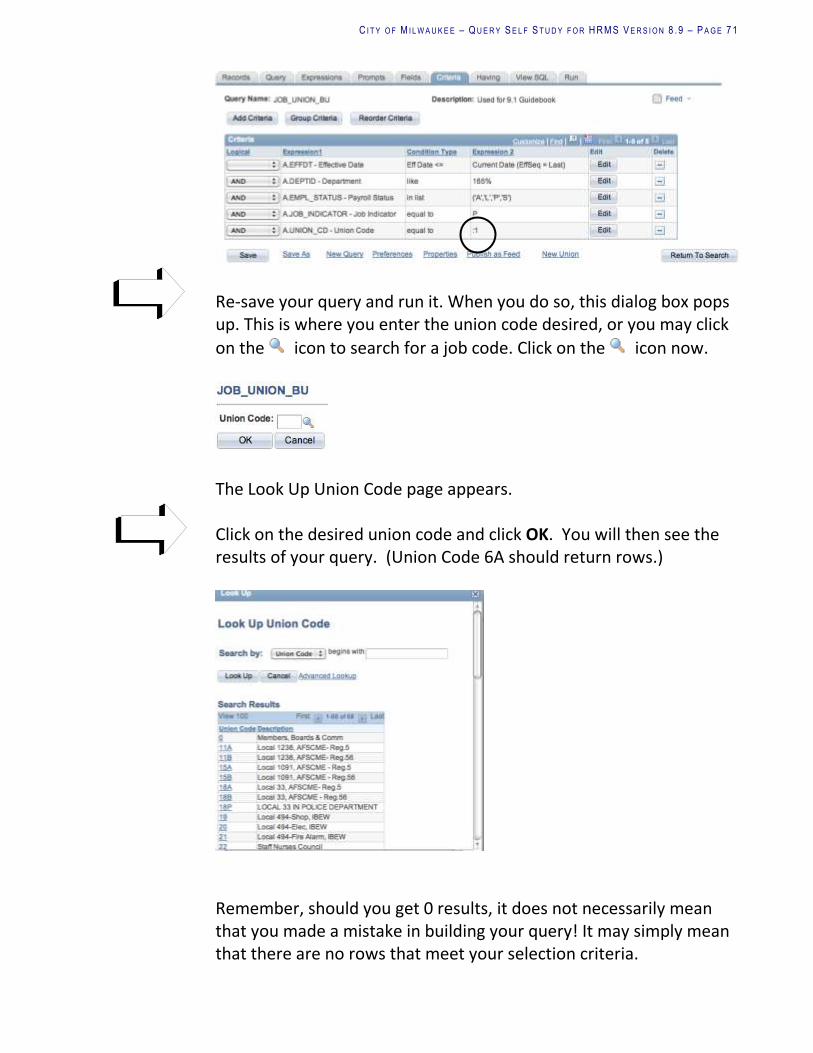
Re-save your query and run it. When you do so, this dialog box pops up. This is where you enter the union code desired, or you may click
on the icon to search for a job code. Click on the icon now.
The Look Up Union Code page appears. Click on the desired union code and click OK. You will then see the results of your query. (Union Code 6A should return rows.)
Remember, should you get 0 results, it does not necessarily mean that you made a mistake in building your query! It may simply mean that there are no rows that meet your selection criteria.

C I T Y O F M I L W A U K E E – Q U E R Y S E L F S T U D Y F O R H R M S V E R S I O N 8 .9 – P A G E 7 2
The next time you run this query, you may wish to view Staff Nurses Council employees or Non-management/Non-represented employees. Run-time prompts give you that flexibility. Click on the Criteria tab.
Multiple Prompts If you wish to have more than one prompt in a query, you simply define additional prompts by simply adding another row of criteria. Say you want to add ethnic group to the selection criteria as a run-time prompt. By modifying this query, you can have the system ask you for two values at run time.
Multiple Prompts
Add a prompt for ETHNIC_GROUP. To do so, add a criteria row for the field, using the condition equal to and Prompt for Expression 2. Click the New Prompt hyperlink. Then click OK, and then click OK again. Your resulting Criteria page will look like this:
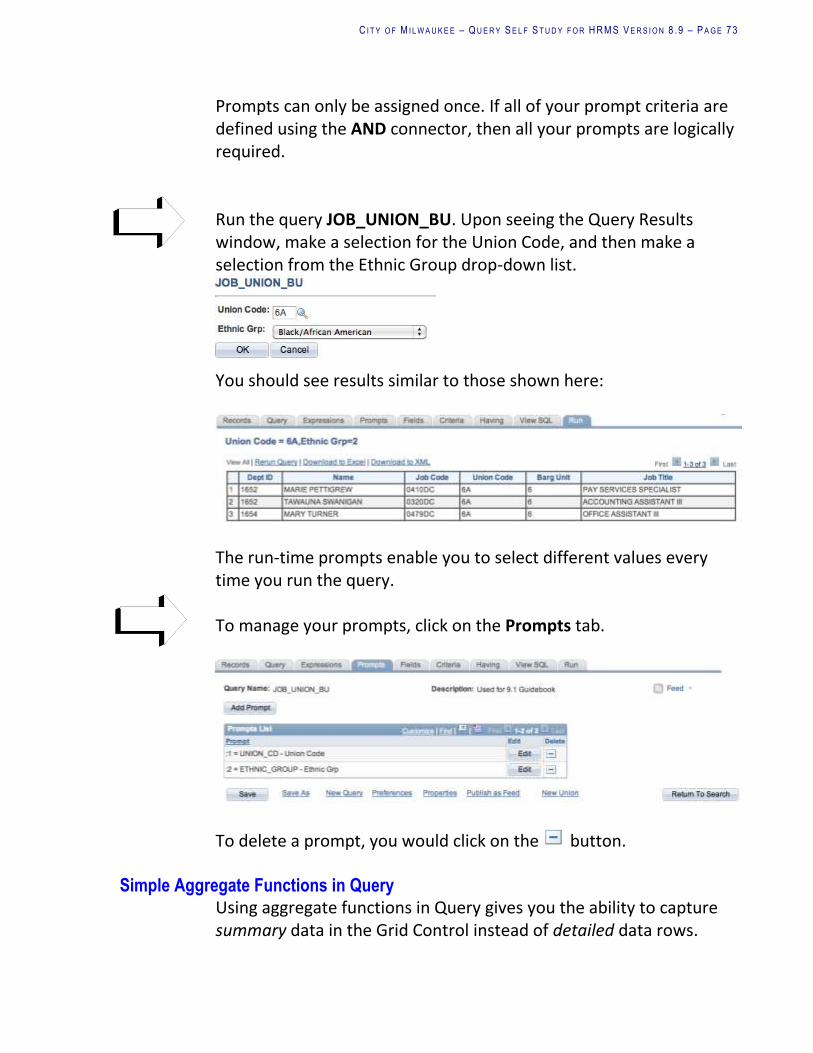
C I T Y O F M I L W A U K E E – Q U E R Y S E L F S T U D Y F O R H R M S V E R S I O N 8 .9 – P A G E 7 3
Prompts can only be assigned once. If all of your prompt criteria are defined using the AND connector, then all your prompts are logically required. Run the query JOB_UNION_BU. Upon seeing the Query Results window, make a selection for the Union Code, and then make a selection from the Ethnic Group drop-down list.
You should see results similar to those shown here:
The run-time prompts enable you to select different values every time you run the query. To manage your prompts, click on the Prompts tab.
To delete a prompt, you would click on the button.
Simple Aggregate Functions in Query Using aggregate functions in Query gives you the ability to capture summary data in the Grid Control instead of detailed data rows.
C I T Y O F M I L W A U K E E – Q U E R Y S E L F S T U D Y F O R H R M S V E R S I O N 8 .9 – P A G E 7 4
Aggregate Function An aggregate function is a pre-defined summary calculation in Query. It returns a single value for multiple rows of output. Operations that summarize data are these:
Avg (Average) Count Max (Maximum) Min (Minimum) Sum
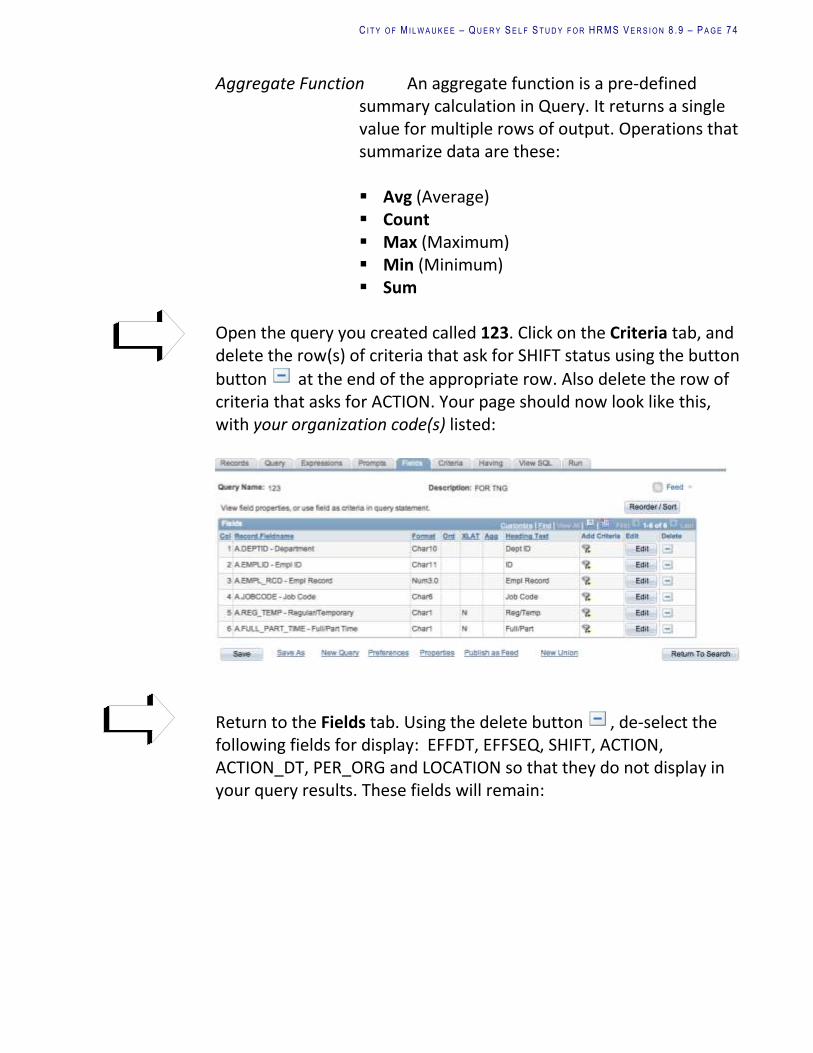
Open the query you created called 123. Click on the Criteria tab, and delete the row(s) of criteria that ask for SHIFT status using the button
button at the end of the appropriate row. Also delete the row of criteria that asks for ACTION. Your page should now look like this, with your organization code(s) listed:
Return to the Fields tab. Using the delete button , de-select the following fields for display: EFFDT, EFFSEQ, SHIFT, ACTION, ACTION_DT, PER_ORG and LOCATION so that they do not display in your query results. These fields will remain:

C I T Y O F M I L W A U K E E – Q U E R Y S E L F S T U D Y F O R H R M S V E R S I O N 8 .9 – P A G E 7 5
Save your query.
Simple Aggregate Functions in Query
To calculate a count for the number of employees your, click on the Edit button to the right of the EMPLID field. You will see the Edit Field Properties dialog box shown here. Choose the type of calculation you want to perform, which in this case is Count. Click OK.
You will now see the word “Count” under the Agg column:

C I T Y O F M I L W A U K E E – Q U E R Y S E L F S T U D Y F O R H R M S V E R S I O N 8 .9 – P A G E 7 6
Now change the sort for the report: click the Fields tab, then the Reorder/Sort button. In the New Order By column, type a 2 to the right of JOBCODE. Click OK. Click the Run tab for viewing.
C I T Y O F M I L W A U K E E – Q U E R Y S E L F S T U D Y F O R H R M S V E R S I O N 8 .9 – P A G E 7 7
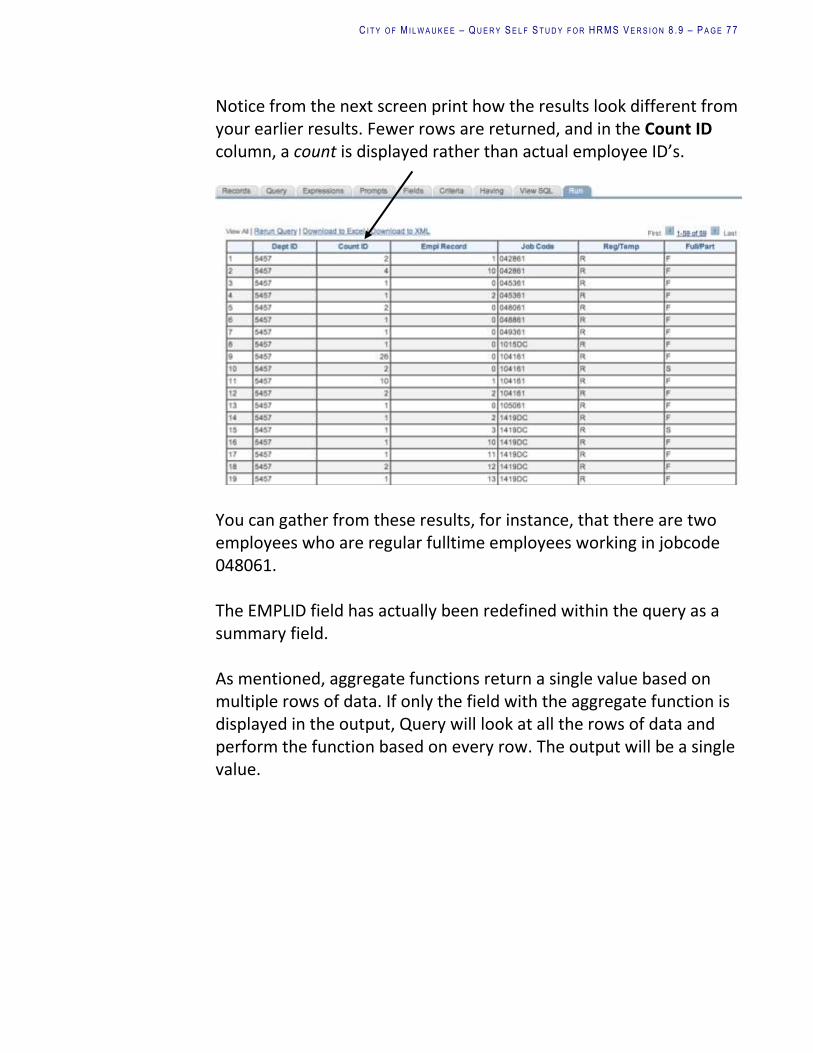
Notice from the next screen print how the results look different from your earlier results. Fewer rows are returned, and in the Count ID column, a count is displayed rather than actual employee ID’s.
You can gather from these results, for instance, that there are two employees who are regular fulltime employees working in jobcode 048061. The EMPLID field has actually been redefined within the query as a summary field. As mentioned, aggregate functions return a single value based on multiple rows of data. If only the field with the aggregate function is displayed in the output, Query will look at all the rows of data and perform the function based on every row. The output will be a single value.
C I T Y O F M I L W A U K E E – Q U E R Y S E L F S T U D Y F O R H R M S V E R S I O N 8 .9 – P A G E 7 8
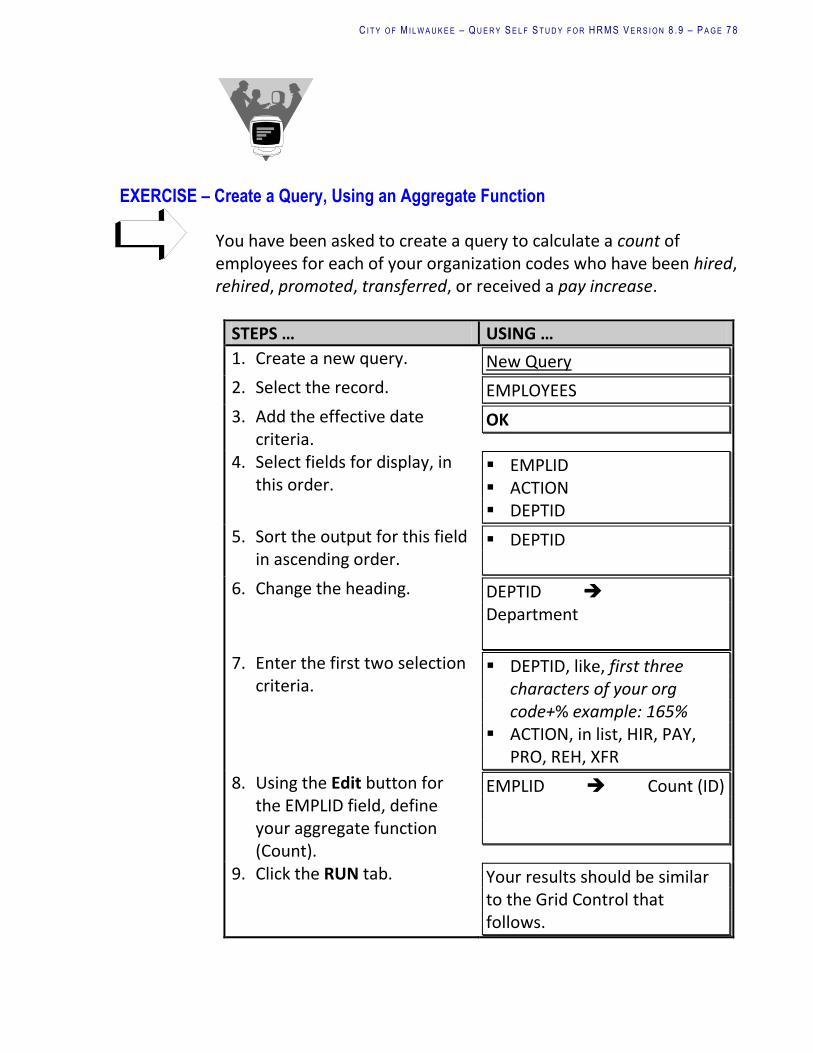
EXERCISE – Create a Query, Using an Aggregate Function
You have been asked to create a query to calculate a count of employees for each of your organization codes who have been hired, rehired, promoted, transferred, or received a pay increase.
STEPS … USING …
1. Create a new query. New Query
2. Select the record. EMPLOYEES
3. Add the effective date criteria.
OK
4. Select fields for display, in this order.
EMPLID ACTION DEPTID
5. Sort the output for this field in ascending order.
DEPTID
6. Change the heading. DEPTID Department
7. Enter the first two selection criteria.
DEPTID, like, first three characters of your org code+% example: 165%
ACTION, in list, HIR, PAY, PRO, REH, XFR
8. Using the Edit button for the EMPLID field, define your aggregate function (Count).
EMPLID Count (ID)
9. Click the RUN tab. Your results should be similar to the Grid Control that follows.

C I T Y O F M I L W A U K E E – Q U E R Y S E L F S T U D Y F O R H R M S V E R S I O N 8 .9 – P A G E 7 9
The field EMPLID has now been re-defined within the query, and for each unique combination of fields selected for display, you see a count. Next, from the Fields tab, de-select this field for display: ACTION by
using the Delete button . Run your query again, and notice how few rows are retrieved:
The reason fewer rows are displayed is that you have lost the detail for the ACTION field. The numbers in the Count ID field shown above include everyone in each of these organizations who was hired, rehired, promoted, transferred, or received a pay increase. You do not know the breakdown with this type of a summary report. Whether you choose to show detail or summary information depends on the purpose of the report.
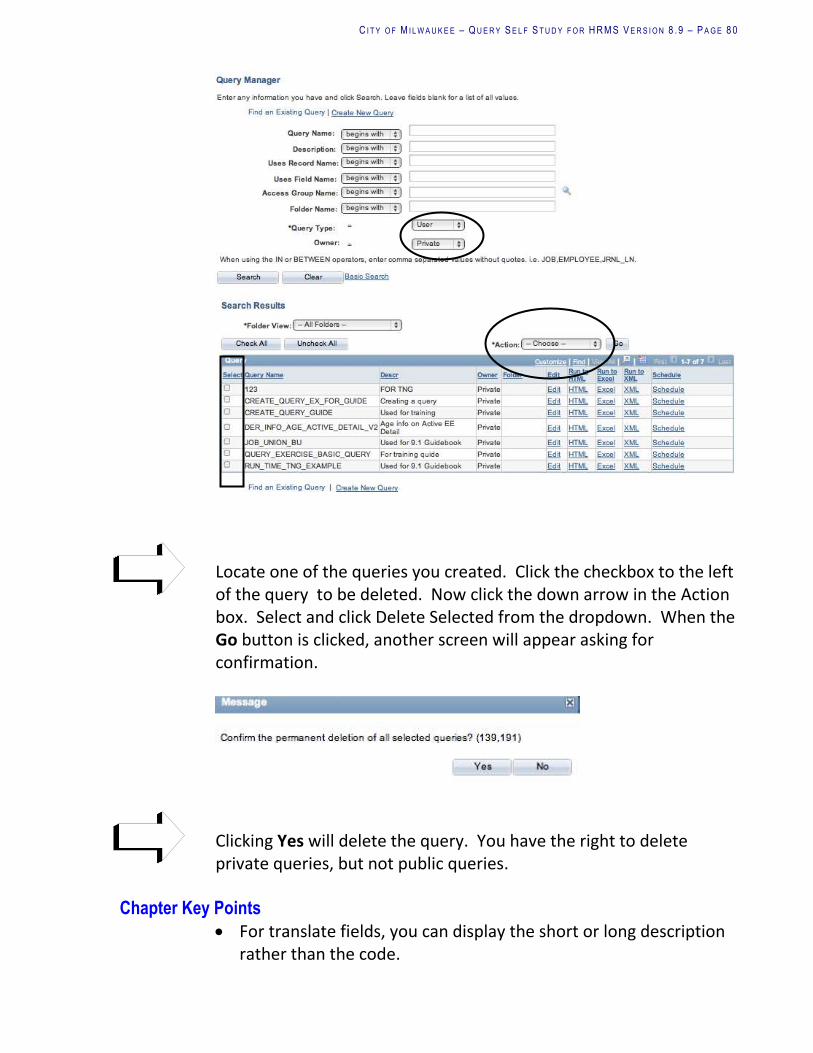
Deleting Queries From the main Query Manager menu, you can delete queries in addition to creating, opening, and renaming them. Navigate accordingly: Main Menu > Reporting Tools > Query > Query Manager. Click Advanced Search to search for your Private queries.
Grid Contro l
output :
C I T Y O F M I L W A U K E E – Q U E R Y S E L F S T U D Y F O R H R M S V E R S I O N 8 .9 – P A G E 8 0
Locate one of the queries you created. Click the checkbox to the left of the query to be deleted. Now click the down arrow in the Action box. Select and click Delete Selected from the dropdown. When the Go button is clicked, another screen will appear asking for confirmation.
Clicking Yes will delete the query. You have the right to delete private queries, but not public queries.
Chapter Key Points
For translate fields, you can display the short or long description rather than the code.

C I T Y O F M I L W A U K E E – Q U E R Y S E L F S T U D Y F O R H R M S V E R S I O N 8 .9 – P A G E 8 1
Specify selection criteria using the Query, Fields, or Criteria tabs.
Conditions allow you to compare fields of equal values, find values that are greater or less than the field, values in a list, values that are null, values like other values, values in a range, or values that exist in another query. With the like condition, you can use the wildcards % and _.
You can compare a field to a constant, a field from another record, an expression, a subquery, or values entered in a run-time prompt.
You can further define criteria expressions by the use of logical operators such as AND, AND NOT, OR, and OR NOT.
You create run-time prompts to build flexibility into your queries. Each time you execute a query, the output data will be different based on the values you enter at the prompt(s).
You can return a summarized value such as a Sum, Count, or Average using the aggregate function option.
Deleting a query is a simple matter of selecting the query to be deleted and choosing Delete Selected using the Delete Selected option from the main Query Manager page.
Related Documents