1 Basic NMR Operation Guide for the Bruker AV-III 400 MHz NMR Spectrometer using ICON NMR in Automation Dr. Yun Qu update 08/01/2018 Before You Start: NMR tube must be at least 7 inches in length and must have a top that is neither broken nor cracked. If your tube is shorter than 7 inches, it will not be grabbed fully by the sample changer and may fall and break on the floor or on the top of the magnet. Tubes with chipped tops may be broken by the sample pincers which grab the tube very firmly close to the top. Any tube shorter than 7 inches or with a chipped top is not allowed. NMR tube must not have any label (paper, tape, sticker etc....) attached to it. This will stop the sample pincher from working properly and may result in sample breakage and equipment damage. Tubes can be labeled on the glass or the cap with permanent marker. Any tube with an attached label submitted to the sample changer is not allowed. Sample tubes with screw caps or vacuum valves will not be handled by the sample changer. They will cause equipment damage. Approximate amount of middle-size compound (MW ~ 500) advisable for running following experiments: 1 H NMR, 19 F NMR, 31 P NMR experiments - about 3-5 mg 13 C NMR short run experiment (0.5-1 hr)-about 20-50 mg; long run experiment - about 5-10 mg 0.6-0.7 ml of NMR solvent is appropriate for the right solvent level in NMR tube. Unsuitable solvent level can lead to a bad shimming result and horrible looking spectrum. Never lean or exert any force on the sample changer or magnet. This may cause a magnet quench resulting in many weeks of down time and hundreds of thousands of $$ being spent. Users are asked to report improper sample tubes to the NMR Facility staff immediately in order to avoid needless down time and equipment damage! The 400 NMR uses the Sample Xpress Automatic Sample Changer, and it is extremely important that you pay attention to the holder number containing your sample, and to only remove your samples from your holder number, from the sample rack. It is possible that someone might have samples in the rack with longer experiments submitted in the Night Queue. You must be sure to not disturb samples left by other users. Labeling your NMR tubes (on the glass or the cap with permanent marker.) is STRONGLY recommended. 1. Start (1). Log-In Click on your account then enter password (2). Start ICON NMR click on the TopSpin launch TopSpin In the command line, type icona, start ICON NMR

Welcome message from author
This document is posted to help you gain knowledge. Please leave a comment to let me know what you think about it! Share it to your friends and learn new things together.
Transcript

1
Basic NMR Operation Guide for the Bruker AV-III 400 MHz NMR Spectrometer
using ICON NMR in Automation Dr. Yun Qu update 08/01/2018
Before You Start:
NMR tube must be at least 7 inches in length and must have a top that is neither broken nor cracked. If
your tube is shorter than 7 inches, it will not be grabbed fully by the sample changer and may fall and break on
the floor or on the top of the magnet. Tubes with chipped tops may be broken by the sample pincers which
grab the tube very firmly close to the top. Any tube shorter than 7 inches or with a chipped top is not allowed.
NMR tube must not have any label (paper, tape, sticker etc....) attached to it. This will stop the sample
pincher from working properly and may result in sample breakage and equipment damage. Tubes can be
labeled on the glass or the cap with permanent marker. Any tube with an attached label submitted to the
sample changer is not allowed.
Sample tubes with screw caps or vacuum valves will not be handled by the sample changer. They will
cause equipment damage.
Approximate amount of middle-size compound (MW ~ 500) advisable for running following experiments: 1H NMR, 19F NMR, 31P NMR experiments - about 3-5 mg 13C NMR short run experiment (0.5-1 hr)-about 20-50 mg; long run experiment - about 5-10 mg
0.6-0.7 ml of NMR solvent is appropriate for the right solvent level in NMR tube. Unsuitable solvent level can
lead to a bad shimming result and horrible looking spectrum.
Never lean or exert any force on the sample changer or magnet. This may cause a magnet quench
resulting in many weeks of down time and hundreds of thousands of $$ being spent.
Users are asked to report improper sample tubes to the NMR Facility staff immediately in order to avoid
needless down time and equipment damage!
The 400 NMR uses the Sample Xpress Automatic Sample Changer, and it is extremely important that
you pay attention to the holder number containing your sample, and to only remove your samples from your
holder number, from the sample rack. It is possible that someone might have samples in the rack with longer
experiments submitted in the Night Queue. You must be sure to not disturb samples left by other users.
Labeling your NMR tubes (on the glass or the cap with permanent marker.) is STRONGLY recommended.
1. Start
(1). Log-In
Click on your account
then enter password
(2). Start ICON NMR
click on the TopSpin
launch TopSpin
In the command line,
type icona,
start ICON NMR
2
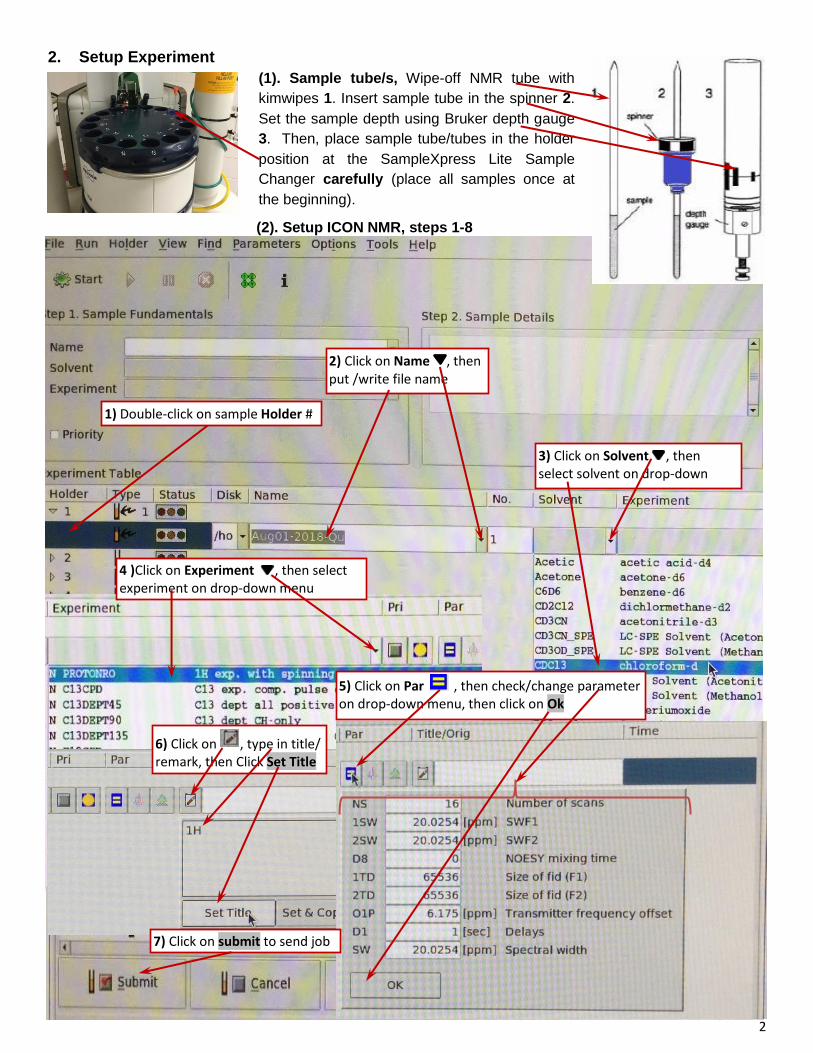
2. Setup Experiment
(1). Sample tube/s, Wipe-off NMR tube with
kimwipes 1. Insert sample tube in the spinner 2.
Set the sample depth using Bruker depth gauge
3. Then, place sample tube/tubes in the holder
position at the SampleXpress Lite Sample
Changer carefully (place all samples once at
the beginning).
(2). Setup ICON NMR, steps 1-8
1) Double-click on sample Holder #
2) Click on Name , then put /write file name
3) Click on Solvent , then select solvent on drop-down menu
4 )Click on Experiment , then select experiment on drop-down menu
5) Click on Par , then check/change parameter on drop-down menu, then click on Ok
6) Click on , type in title/ remark, then Click Set Title
7) Click on submit to send job

3
8). Click Start, and Start on popup box (start to run now or after all samples/experiments are setup)
1). Double-Click in the row of Holder #. The row will “open up”.
2). Click on the Name, then put /write file name.
3). Click on the Solvent, a pull-down menu will appear, then select a solvent from the pulldown Menu.
4). Click on the Experiment, select the experiment from the pulldown Menu.
5). Click on the icon, a dialog box popup, enter the new value to change basic parameters, then click [OK].
NS is the number of scans; D1 is the relaxation delay
SW is the spectral width in PPM; O1P is the center of the spectrum
6). Click on , the dialog box popup, add “title or remark”, then Click [Set Title] when everything is entered.
7). Double-Check that everything in the row is correct, confirm that sample is properly placed in the correctly
numbered holder in the sample-change. Then click the , the status indicator will turn yellow.
8). For the first sample click on Start on the left top corner button, then click on Start on popup box. The status
indicator light will turn green.
For steps 8, click on Start when the first sample is setup or skip step 8 now to setup all samples/experiments,
then do step 8.
Once green, SampleXpress Lite Sample Changer will insert the sample, tune the probe, lock on the solvent,
shim, and proceed with your experiment.
* Add another experiment for the same sample:
Select the row # containing a previously defined experiment, then click the Add button. Go through step
2-7 procedures above, then click Submit.
light Yellow
experiment in queue
Red light experiment completed
Green light expeiment in progress
lights
no experiment

4
3. Finish. After experiments are done, there are only Red and Dim lights, no Green and Yellow lights showing on ICON NMR, then remove all sample tubes from the SampleXpress Sample Changer, take sample tubes out from blue spinner, and place blue spinner in the box.
4. Data Processing
(1). Open Dataset, Dataset can be opened by a) or b).
a). Clicking on the Start in the TopSpin Menu bar, then click on Open Dataset, your dir/files will appear
select dir/file which you want to process, then click on Open
b). click on the Browser,
locate your data and right-click
on a dataset name,
and choose Display
from the drop down menu
(2). Process Spectrum,
Click on the Process
in the TopSpin Menu bar,
then click on Proc. Spectrum there are a few options to choose from the drop-down menu

5
a). Auto Process, for easy and quick, Select xaup to auto process spectrum with peak picking and integration.
b). Standard Process, Select proc 1d (2d, 3d), then fill in drop-down table to process spectrum
c). Manual Process, type efp apk in the command line to process data and execute automatic phase correction
(3). Phase Correction. The simplest procedure is automatic phase correction which is implemented using the command apk. For more corrections, click on Adjust Phase for manual phase by 0 and 1 (0 and first order)
c
efp apk
Highlight on 0 or 1, then press and hold the left mouse button move up/down to adjusted phase
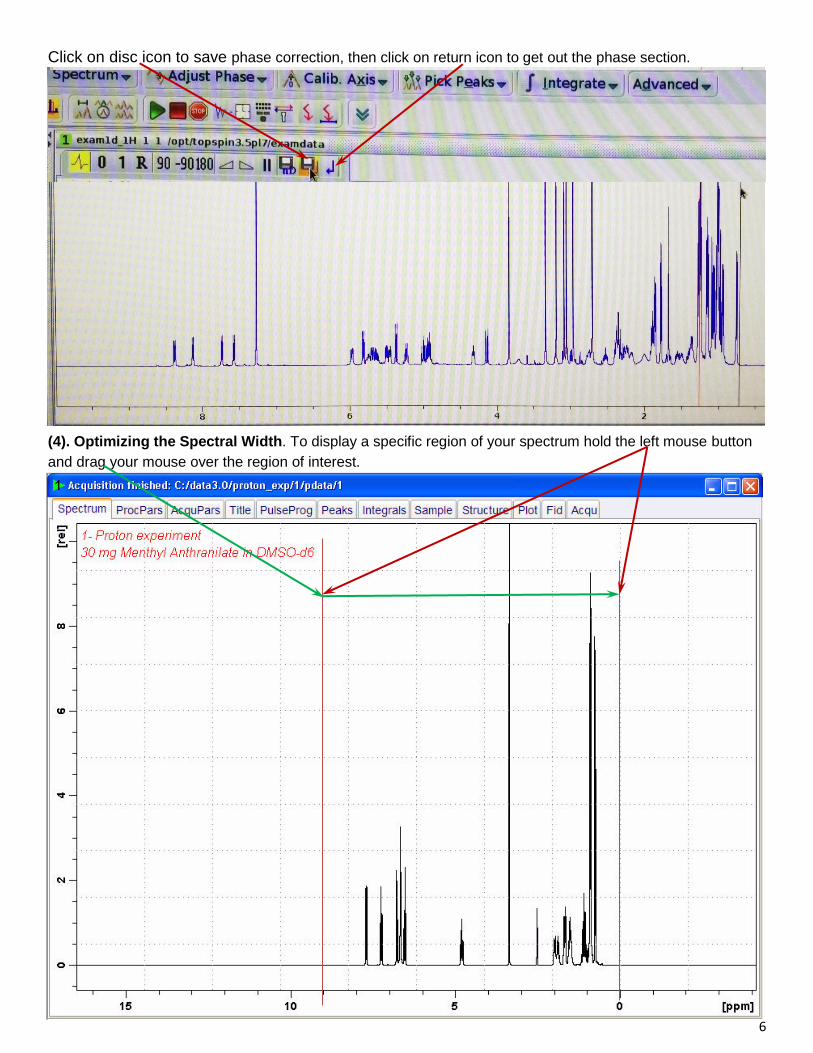
6
Click on disc icon to save phase correction, then click on return icon to get out the phase section.
(4). Optimizing the Spectral Width. To display a specific region of your spectrum hold the left mouse button
and drag your mouse over the region of interest.
c). Manual Process, in the command line, type efp apk to process data and execute automatic phase correction
efp apk

7
For exact chemical shift range, click…...
and specify the range you wish to
display. For example, to display the
region of the spectral window from 9 to
-1 ppm, put 9 and -1 in the From and
To fields, then click OK.
(5). Peak Picking. Click on Process, then Pick Peaks in the TopSpin Menu bar. Click on to define range
Press and hold the left mouse button over the peaks of interest. A green highlight will form, release the left
mouse button, all peaks in green area were picked. Repeat this process to pick all peaks of interest. Then click
to save and to get out the mode
Peak picking range by highlighting
8
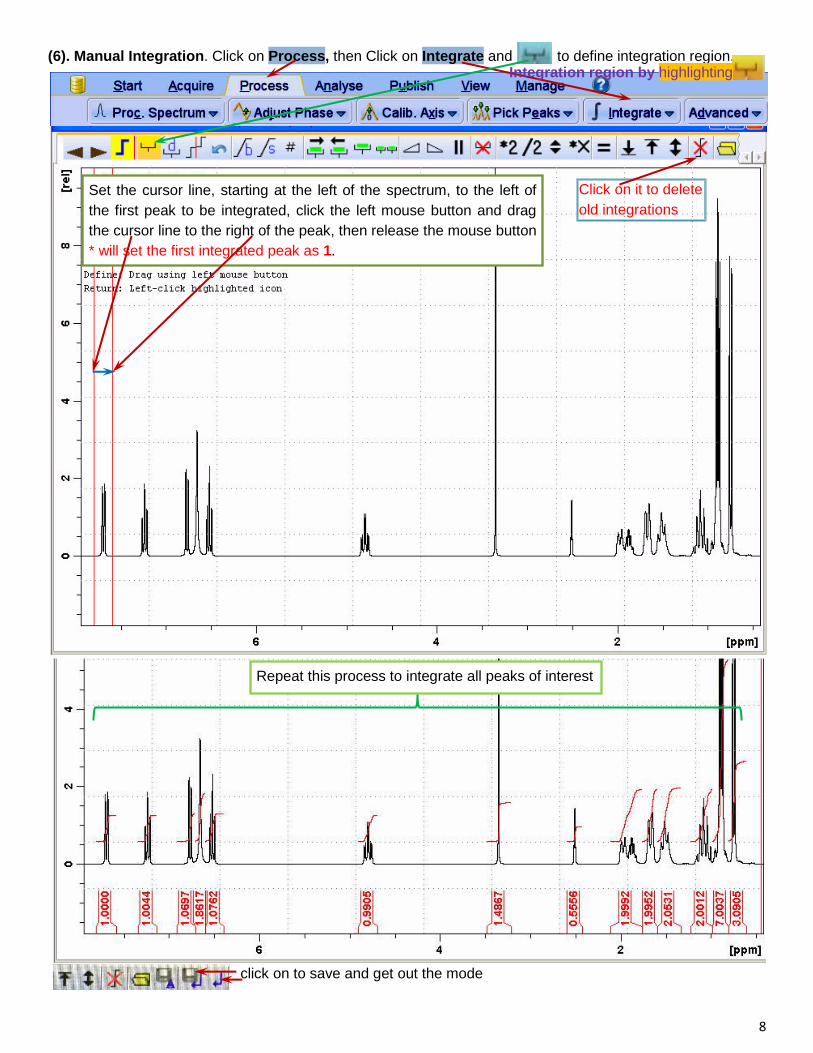
(6). Manual Integration. Click on Process, then Click on Integrate and to define integration region.
click on to save and get out the mode
Set the cursor line, starting at the left of the spectrum, to the left of
the first peak to be integrated, click the left mouse button and drag
the cursor line to the right of the peak, then release the mouse button
* will set the first integrated peak as 1.
Repeat this process to integrate all peaks of interest
Click on it to delete
old integrations
Integration region by highlighting
9
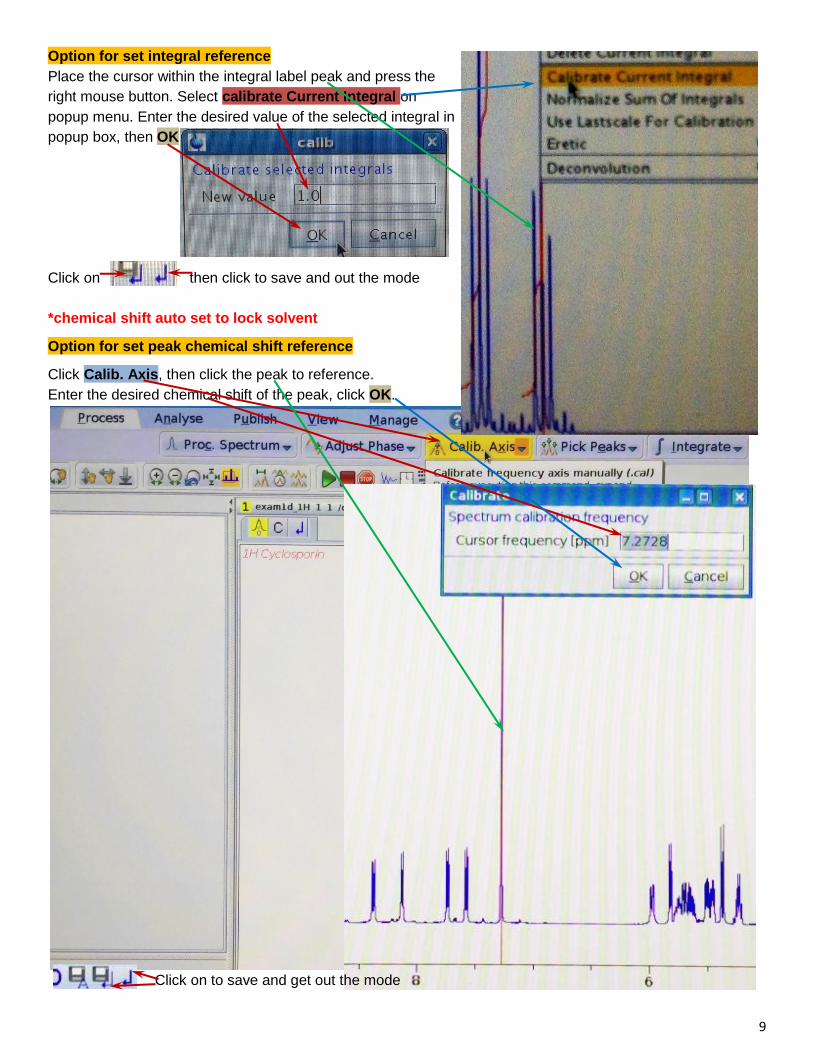
Option for set integral reference
Place the cursor within the integral label peak and press the
right mouse button. Select calibrate Current Integral on
popup menu. Enter the desired value of the selected integral in
popup box, then OK.
Click on then click to save and out the mode
*chemical shift auto set to lock solvent
Option for set peak chemical shift reference
Click Calib. Axis, then click the peak to reference.
Enter the desired chemical shift of the peak, click OK.
Click on to save and get out the mode

10
(7). Plotting a). Quick print, click on printer icon, then click ok on drop-down box, another Print box
popup, click on to select HP-Laserjet-P2035 in Name, then click on Print
b). Plot Editor, click on Publish, then click on Plot Layout. Editing by a panel at the left (active/select menu)
35
11
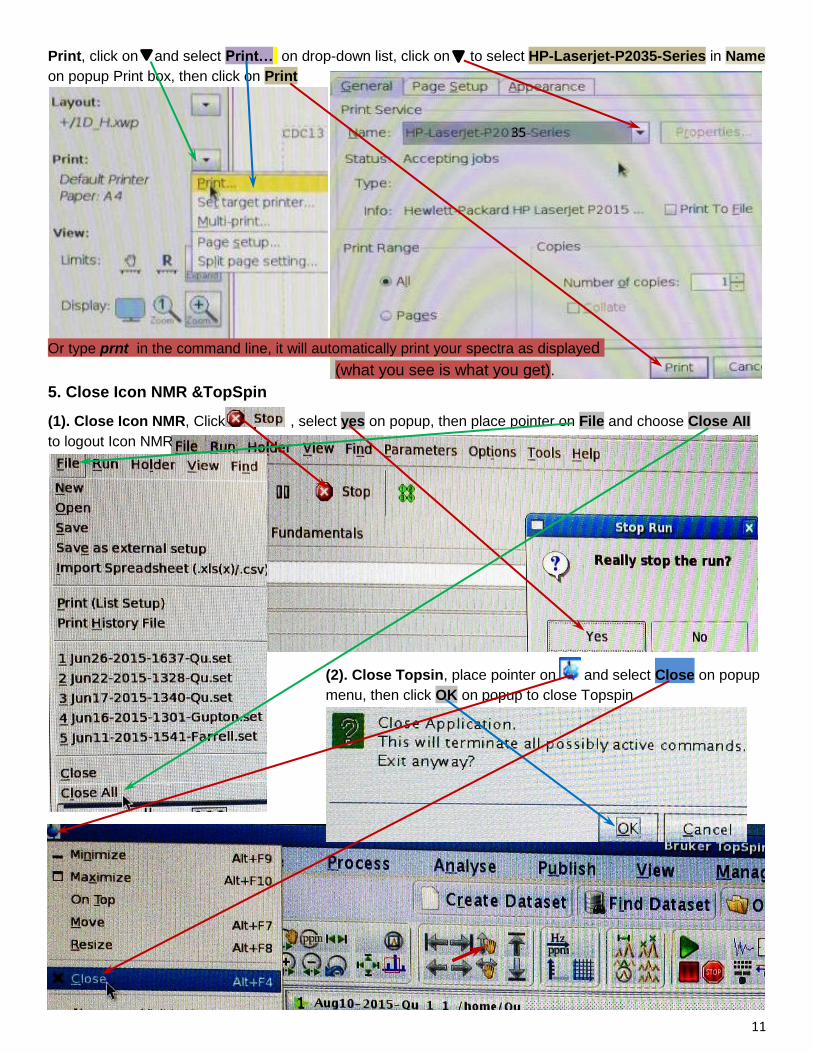
Print, click on and select Print… on drop-down list, click on to select HP-Laserjet-P2035-Series in Name
on popup Print box, then click on Print
Or type prnt in the command line, it will automatically print your spectra as displayed
(what you see is what you get).
5. Close Icon NMR &TopSpin
(1). Close Icon NMR, Click Stop , select yes on popup, then place pointer on File and choose Close AII
to logout Icon NMR
(2). Close Topsin, place pointer on and select Close on popup
menu, then click OK on popup to close Topspin
If you want an exact chemical shift range,
click on the “Exact Zoom” tab and specify
the range you wish to display. For
example, to display the region of the
spectral window from 9 to -1 ppm, put 9
and -1 in the From and To fields, then click
OK.
35

12
6. Copy/Transfer Files to USB Flash Drive
(1). Open USB, insert your USB flash drive to PC, icon appear, click on it to open USB DISK
(2). Copy files, click Home folder on desktop, select the
file/files to be copied, right-click and select Copy from the
drop-down menu. Move the mouse to USB DISK window,
right-click and select Paste from the drop-down menu.
13
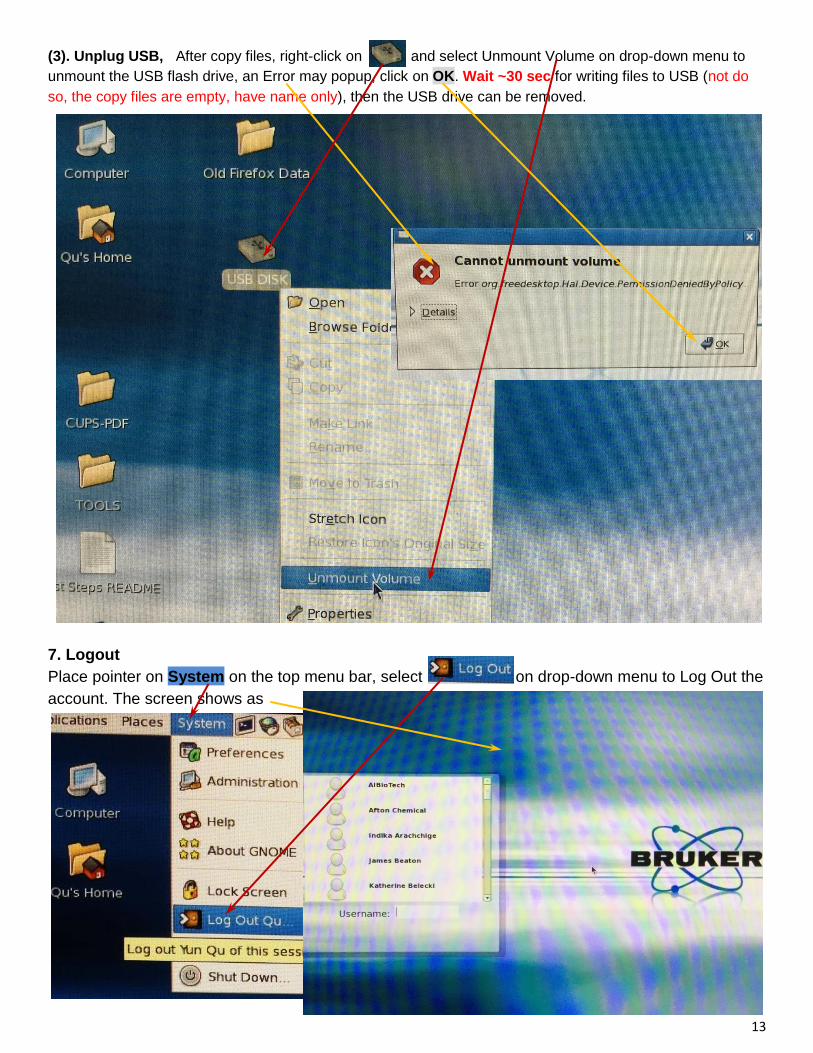
(3). Unplug USB, After copy files, right-click on and select Unmount Volume on drop-down menu to
unmount the USB flash drive, an Error may popup, click on OK. Wait ~30 sec for writing files to USB (not do
so, the copy files are empty, have name only), then the USB drive can be removed.
7. Logout
Place pointer on System on the top menu bar, select on drop-down menu to Log Out the
account. The screen shows as
Related Documents