Ayre DX-7 Owner’s Manual DVD Transport with Progressive Video TITLE DVD CHP A y r e

Welcome message from author
This document is posted to help you gain knowledge. Please leave a comment to let me know what you think about it! Share it to your friends and learn new things together.
Transcript

Ayre DX-7
Owner’s Manual
DVD Transport with Progressive Video
TITLE
DVD
CHP
A y r e


Table of
Contents
Welcome to Ayre . . . . . . . . . . . . . . . . . . . . . . . 2
Connections and Installation . . . . . . . . . . . . . . . . . . . . 3
Setup and Configuration . . . . . . . . . . . . . . . . . . . 8
Controls and Operation . . . . . . . . . . . . . . . . . . . . 15
Optimization and Customization . . . . . . . . . . . . . . . . . . 27
About Aspect Ratios . . . . . . . . . . . . . . . . . . 33
Advanced Features . . . . . . . . . . . . . . . . . . . . . 39
On-Screen Setup Menus. . . . . . . . . . . . . . . . . . . 49
Numbers and Specifications . . . . . . . . . . . . . . . . . . 68
Statement of Warranty . . . . . . . . . . . . . . . . . . . . 70
A Technical Glossary . . . . . . . . . . . . . . . . . . . . . 73
A Place for Notes . . . . . . . . . . . . . . . . . . . . . . 82

Welcome to
Ayre
Please send in your warrantyregistration card so we can
stay in contact with you.
Your Ayre DX-7 offers a significant advance in thevideo and audio performance of film reproductionequipment. The excitement and dimensionality ofyour favorite films are apparent from the firstviewing. The combination of superb resolution anda natural, relaxed quality will draw you back to yourhome theater, time and time again.
This level of performance has been implementedusing the highest level of workmanship andmaterials. You can be assured that the Ayre DX-7will provide you a lifetime of enjoyment.
Quick Start
The Ayre DX-7 is extremely flexible and versatile.However, many of the features are primarily ofinterest to the advanced user.
The information required to get started iscontained in the first three chapters of thismanual.
The remaining chapters cover additionalinformation that may be read at your leisure.
2
Connections and
Installation
The Ayre DX-7 is a DVD transport with digitalaudio outputs, requiring connection to an audioprocessor. It is easy to hook up and use. Thefollowing guidelines will ensure that the installationgoes smoothly.
Location
The infrared beam of theremote control will also travel
through glass.
A good location for your DVD player is at an easilyaccessible height in an open-backed cabinet or on ashelf. The receiver for the infrared remote control ismounted behind the display lens on the front panel.A direct line of sight from the listening positionwill ensure the maximum range.
Video Outputs
For additional information onconnecting multiple displays,
please refer to the section“Advanced Features”.
The progressive video option in your Ayre DX-7supports every type of video display device, as wellas all video standards around the world. All of thevideo outputs are active simultaneously. The DVIoutput is primarily intended for use with fixed pixel(i.e., digital) display devices or external video
3

processors. Analog display devices utilizing CRTsnormally achieve their highest performance whenusing an analog video output from the DX-7. Thevarious analog output options are listed below inorder of performance, from highest to lowest.Choose the highest performing connection that iscompatible with your video display.
DVI
There are two toggle switcheson the rear panel that
configure the DVI signal.Please refer to the section
“Setup and Configuration”.
DVI (Digital Visual Interface) provides a puredigital signal path from the DVD disc itself todigital (fixed pixel) display devices. This categoryincludes such technologies as plasma, DLP, D-ILA,LCD, and LCOS. The DVI connection is made via asingle multi-conductor cable equipped with arectangular multi-pin connector. Cable length isnormally limited to around 10’ (3 meters) unless anexpensive optical DVI cable is used.
The DVI signal from the Ayre DX-7 isunencrypted and therefore compatible with bothHDCP and non-HDCP capable displays.
Please note that some display devices using analogtechnology (i.e., CRTs) may have a DVI input. In
4
SyncroLink
Digital Audio Link
Digital Audio Outputs
PCM Only PCM & Compressed
Volts50/60 Hertz50 W Max
Control Port
Reserved BSL PC
M
Reserved D
IR Receiver
Reserved ASL C
omp
Reserved C
Control Port
Boulder, Colorado USA
DX-7 DVD Transport
S.N.
A y r e
DVI CompositeS-VideoG/YB/PbR/PrHsync Vsync
0255
-YC
bCr
Rsrv B
Rsrv D
7.5%
IntrlcY
PbPrSoG
16235
-RGB
Rsrv A
Rsrv C
0 %
ProgRG
BH
VSync

this situation it is usually preferable to use an analogcomponent connection rather than the DVIconnection. This is because the digital-to-analogconversion in the Ayre DX-7 will perform at ahigher level than the corresponding conversion inthe display device.
If in doubt about whichconnection to use, simply make
a visual comparison todetermine which offers better
performance.
However, a few of these CRT-based displays convertall incoming signals to digital for certain types ofvideo signal processing such as scaling. In this case,using the DVI conversion will be preferred as iteliminates two extra conversion steps. Consult theowner’s manual for your display for additionalinformation.
Component
The component interface is the highest performanceanalog interface. The component outputs can beconfigured in several ways:
• Interlaced or progressive
• YPbPr or RGB
• Embedded sync or external sync (RGB only)
There are three toggle switcheson the rear panel that
configure the componentsignal. Please refer to the
section “Setup andConfiguration”.
When configured as progressive RGB, the sync(timing) signals can either be added to the Greenconnection (Sync on Green, or SoG) for a total ofthree wires, or transmitted as separate horizontaland vertical sync signals (H+V Sync) for a total offive wires.
5

Please consult the owner’s manual for your displaydevice to determine which connections aresupported.
S-Video
There are two toggle switcheson the rear panel that
configure both the S-video andcomposite signals. Please refer
to the section “Setup andConfiguration”.
The S-video analog interface provides a good level ofperformance. The brightness signal is kept separatedfrom the color signal, but the color detail(bandwidth) is reduced from the componentconnection. S-video is commonly used forwhole-house distribution systems.
Composite
While the analog composite video signal from theAyre DX-7 offers higher performance than any otherDVD player, there are inherent performancerestrictions imposed by this connection. Thebrightness (black-and-white) and color signals aremixed together, and cannot be fully separated. Thisconnection is not recommended for critical viewing,especially when using a large video display.
Digital Audio Link
When the SyncroLinkinterface is connected, both
AES/EBU balanced digitalaudio outputs are
automatically turned off.
The Ayre DX-7 also includes a high performanceSyncroLink digital audio link. This link transmitsdigital audio data to an audio processor and also hasa separate master clock signal that is sent from thereceiver back to the DVD transport, completelyeliminating jitter. This interface is only compatiblewith SyncroLink-capable audio processors.
6

The SyncroLink interface automatically detectswhen a compatible SyncroLink device has beenconnected.
Digital Audio Outputs
An adapter is available fromAyre should you need to
connect one of the AES/EBUdigital outputs with an XLRconnector to an S/PDIF input
that uses an RCA connector.
The Ayre DX-7 features two digital audio outputs.Both are AES/ EBU balanced outputs to ensure thehighest possible level of sonic performance. One ofthese outputs will transmit both compressed formats(e.g., Dolby Digital and DTS) as well asuncompressed PCM formats (e.g., Compact Disc).This output should be connected to yoursurround-sound processor.
The other AES/EBU balanced output transmitsPCM only and is intended for use with atwo-channel digital-to-analog (D/A) converter. BothAES/EBU outputs may be used simultaneously.
AC Power
Connect the Ayre DX-7 to an unswitched powersource. The best performance is normally achievedwhen the DX-7 is plugged directly into the walloutlet, without using any power strips or power lineconditioners.
Break-In
Playing the unit for 100 to500 hours will ensure full
break-in.
Due to the manufacturing processes used for thewires and capacitors, a break-in period is necessaryfor the DVD player to reach its full performancepotential.
7

Setup and
Configuration
Once you have connected the Ayre DX-7 to yourhome theater system, you will need to configure itto ensure compatibility. There are two separateconfiguration steps – the video hardwareconfiguration using small toggle switches on therear of the unit, and the software configurationusing an on-screen Setup Navigator.
Perform the video hardware configuration first sothat the on-screen menus will display properly.
Video Hardware Configuration
Next to the DVI connector on the rear panel of theDVD player is a bank of eight small toggleswitches. These are used to configure the videooutput signal to properly match your display device.Two of these switches are used to configure the DVIoutput, three are used for the component output,and one is used for both the S-video and compositeoutputs. Two switches are reserved for future use.
8
0255
-YC
bCr
Rsrv B
Rsrv D
7.5%
IntrlcY
PbPrSoG
16235
-RGB
Rsrv A
Rsrv C
0%
ProgRG
BH
VSync

You only need to configure the switches thatapply to the connection(s) you are using.
DVI Configuration
All display devices with a DVI input support theRGB format for the DVI connection.
“RGB” is the normal setting that should be usedfor DVI in most situations.
A few displays also support the YCbCr formatallowed by the HDMI specification, which(depending on the display) may allow for addedflexibility in color adjustments. Please refer to theowner’s manual for your display for additionalinformation.
When using the RGB format for DVI, there are twopossible signal levels. Out of 256 possible signallevels, the video standard (as used on the DVD itselfand in most DVI-capable displays) sets black at level16 and white at level 235. This allows headroom foroccasional video signal excursions outside this range(due to video processing or noise).
“16 - 235” is the normal setting that should beused for DVI in most situations.
However, some display devices were originallydesigned for presentations in conjunction with apersonal computer (PC) instead of video signals froma DVD player. The PC standard sets black at level 0and white at level 255. If your display device is notcompatible with the correct video levels for the DVI
9
0255
-YC
bCr
Rsrv B
Rsrv D
7.5%
IntrlcY
PbPrSoG
16235
-RGB
Rsrv A
Rsrv C
0%
ProgRG
BH
VSync

input, set the level switch to the position labeled“0 - 255”.
Component Configuration
You must first determine what input signals aresupported by your display device. Please refer to theowner’s manual for your display for information.
If your display supports progressive inputs, thiswill provide significantly higher picture qualitythan an interlaced signal.
Select the desired signal by setting the toggle switchto either “Prog” or “Intrlc”.
RGB signals are commonlyonly used in the progressivemode. However, the DX-7will also output interlacedRGB signals if so desired.
The component outputs may also be configured foreither YPbPr signals or RGB signals. If your displayaccepts both types of signals, the RGB configurationnormally gives slightly better picture quality. Selectthe desired signal by setting the toggle switch toeither “YPbPr” or “RGB”.
When in RGB mode, there are two common ways ofsending the synchronization (”sync” or timing)signals — separate horizontal and vertical syncsignals, or a composite sync signal that is includedwith the Green signal. The former mode is calledRGB+HV and requires a five-wire connection. Thelatter mode is called SoG (Sync on Green) andrequires a three-wire connection. Select the desiredsignal by setting the toggle switch to either“HVSync” or “SoG”.
10
0255
-YC
bCr
Rsrv B
Rsrv D
7.5%
IntrlcY
PbPrSoG
16235
-RGB
Rsrv A
Rsrv C
0%
ProgRG
BH
VSync

S-Video and Composite Configuration
The S-video and composite outputs only outputinterlaced signals. There are different standards forthese signals in different parts of the world. Theswitch marked “0%” and “7.5%” controls whetherthe black level is changed by adding setup to theNTSC signals. PAL signals are unaffected by thesetting of this switch.
Setup is normally only used in North America. Ifyou live in the USA, Canada, or Mexico, settingthis switch to “7.5%” will produce a signal thatmatches your other video source components.Residents of other countries should set this switchto “0%”.
Please refer to the chapter “Optimization andCustomization” for additional information onplaying DVDs from other countries.
Setup Navigator
The Ayre DX-7 has a wide variety of system settingsthat may be configured via the On-Screen SetupMenus (page 49). To simplify the initial setup ofyour player, the Setup Navigator allows you toconfigure the basic settings via a series of on-screenquestions.
11
0255
-YC
bCr
Rsrv B
Rsrv D
7.5%
IntrlcY
PbPrSoG
16235
-RGB
Rsrv A
Rsrv C
0%
ProgRG
BH
VSync

Connect the video output of the DX-7 to your videodisplay. With the power turned on, press the“Setup” button located on the lower portion of theremote control.
The “Setup” button in the top leftcorner of the remote is only used tocustomize the remote control’sprogramming (page 15).
Use the cursor buttons on the remote control tonavigate the On-Screen Setup Menus. The arrowbuttons will move the highlighted cursor. Press theSelect button when your choice is highlighted.
Start
To use the Setup Navigator (recommended), press“Select”. If you do not want to use the SetupNavigator, select “Auto Start Off”. The systemsettings may also be configured directly using theOn-Screen Setup Menus as described on page 49.
OSD Language
Select your preference of languages to be used for theon-screen display (OSD). This is the language thatwill be used for the On-Screen Setup Menus andother messages. Additionally, this language will alsobe used for the default audio and subtitle languages(page 57).
12
Audio1 Audio2 GeneralLanguageVideo
Move Exit
Auto Start Off
SETUPSelectENTER
Setup Navigator
Setup Navigator
Start
SELECT
Audio1 Audio2 GeneralLanguageVideo
Language
Move ExitSETUPSelectENTER
OSD Language
Setup Navigator
EnglishfrançaisEspañol
Angle
Subtitle
Audio Step Light
Repeat
Random
Rpt A-B
Program
Setup
Search

TV Type
Select which type of video display you are using.The “Widescreen” setting is for modern displayswith an aspect ratio of 16:9, while the “Standard”setting is for conventional displays with an aspectratio of 4:3.
Digital Jack
This screen allows you to specify the types of digitalaudio signals that are sent to your audio processor.DVD discs may have one or more of several differenttypes of soundtracks available, including DolbyDigital, DTS, MPEG, and PCM. Your audioprocessor may not be capable of processing all ofthese soundtracks. Select the setting thatcorresponds to the capabilities of your audioprocessor. Please consult the owner’s manual foradditional information.
Most modern audio processors are capable ofdecoding both Dolby Digital and DTSsoundtracks. If your audio processor has bothDolby Digital and DTS logos on its front panel,select the setting “Dolby Digital/DTS”.
See page 51 for additional information on thevarious types of audio soundtracks that are found onDVDs.
13
Audio1 Audio2 GeneralLanguageVideo
Amp Connection
Move ExitSETUPSelectENTER
Digital Jack
Setup Navigator
Dolby D/DTS/MPEGDolby Digital/MPEGDolby Digital/DTSDolby Digital
PCMNot Connected
Audio1 Audio2 GeneralLanguageVideo
TV Connection
Move Exit
Standard (4:3)
SETUPSelectENTER
TV Type
Setup Navigator
Widescreen (16:9)

96 kHz PCM Audio
A few DVDs have a high resolution soundtrackusing 96 kHz PCM. If your audio processor iscapable of accepting 96 kHz PCM audio data, select“Yes”. Select “No” if your audio processor is notcapable of accepting 96 kHz PCM audio data. If youare not sure, select “Don’t Know”.
Exit Setup Navigator
This screen allows you to confirm your settingsbefore exiting the Setup Navigator. “Save Changes”will save the settings you have made and exit. Select“Delete Changes” to exit without changing any ofthe system settings. “Start Again” will return you tothe beginning of the Setup Navigator.
14
Audio1 Audio2 GeneralLanguageVideo
Move ExitSETUPSelectENTER
Exit Setup Navigator
Setup Navigator
Save ChangesDelete ChangesStart Again
Audio1 Audio2 GeneralLanguageVideo
Amp Connection
Move ExitSETUPSelectENTER
96 kHz PCM Audio
Setup Navigator
NoYesDon’t Know

Controls and
Operation
The front panel displaybrightness function is only
available at the front panel.
The Ayre DX-7 DVD transport may be controlledusing either the front panel buttons or the includedremote control. Basic functions are available at bothlocations, and many additional functions areavailable only at the remote control.
This chapter will provide you with all theinformation necessary to operate your DX-7. It isdivided into three sections:
• Basic Functions
• Important Functions for DVDs
• Useful Functions for CDs
In addition there a many other sophisticatedfunctions available for the advanced user. These aredescribed in a separate chapter, Advanced Features(page 39).
Press the “Aux” button on theremote control to control the
DVD player.
The remote control for the DX-7 is a backlighted,universal design that can control your entire hometheater system. Up to eight separate components canbe programmed for operation, either by enteringpreset configurations on the remote control’s
15

16
Angle
Subtitle
Audio Step Light
Repeat
Random
Rpt A-B
Program
Setup
Search
PWR
VOL CH
CBL AUX VCR TV
SAT CD AMP TNR
MUTE ENTER
LAST
SLEEP
INPUT
GUIDE EXIT
INFO MENU
SETUP
SELECT
1 2 3
4 5 6
7 8 9
0
A y r e
Toggles between “Standby” and“Operate” mode (page 19).
For remote controlcustomization only (page 15).
Select device to control here.Press “Aux” for DVD player
(page 15).Enter numerical values(page 23).
Controls volume of deviceprogrammed to “AMP” buttonwhen in DVD mode (page 18).
“+10” function (page 23).
“Clear” function (page 45).
“Last Memory” function(page 43).
“Next” function (page 21).
“Previous” function (page 20).
“Return” function (page 24).
“Menu” function (page 23).
“Condition Memory” function(page 44).
“Top Menu” function (page 47).
“Display” function (page 46).
“Cursor” buttons and “Enter”function (page 22).
“Forward Scan” function(page 21).
“Play” function (page 20).
“Reverse Scan” function(page 21).
“Stop” function (page 20).
“Open/Close” function(page 19).
“Pause” function (page 20).
“Rpt A-B” (page 40).
“Repeat” (page 25).
“Search” (page 40).
“Random” (page 26).
“Forward Step” (page 39).
“Light” (page 25).
“Angle” (page 48).
“Setup” (page 49).
“Subtitle” (page 24).
“Program” (page 41).
“Audio” (page 24).
“Reverse Step” (page 39).

17
TITLE
DVD
VCD CONDITION
TOTAL
REMAIN
LAST
MEMOTRK CHP
DOLBYDIGITAL
GUI
“CD” lights when an audio CD is loaded.“VCD” lights when a Video CD is loaded.
Indicates that multiple camera angles are available.
Indicates that the title number of a DVD is being displayed.
Indicates that the track number of a CD is being displayed.
indicates that the chapter number of a DVD is being displayed.
Indicates Dolby Digital audio playback.
Indicates that the currently loaded DVD’sCondition Memory settings are memorized.
Indicates that the disc is stopped and the Display function has been activated.
Indicates that the currently loaded DVD’s Last Memory location is memorized.
When a disc is playing, “�” lights .When a disc is paused, “ �” lights .
Displays the chapter/track numbers, etc.
Indicates that an on-screen menu operation is being performed.
Indicates that the remaining playback time is being displayed.
Indicates that a DVD is loaded.
Indicates Repeat mode.
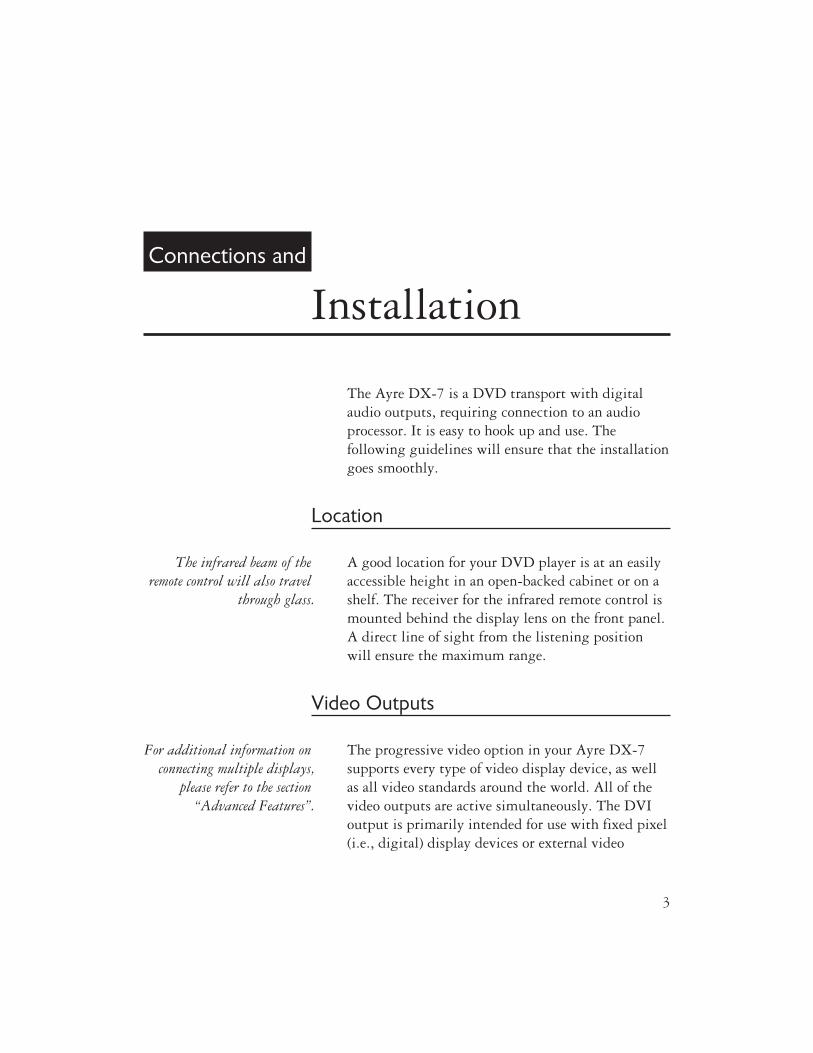
keypad, or by downloading custom configurationsfrom your PC with an optional cable. See theseparate remote control owner’s manual foradditional information.
The remote control is factory programmed so thatwhen the “Aux” button is pressed it will operate theAyre DX-7, when the “CD” button is pressed it willoperate an Ayre CD player, and when the “Amp”button is pressed it will operate an Ayrepreamplifier or integrated amplifier.
The remote control is factory programmed sothat the volume and mute buttons will alwaysoperate the device programmed to the “Amp”button, no matter which device is currentlyselected.
Since the remote control is capable of operatingmany different products, some of the button labelsmay not match the function names used for eachdevice.
18
TITLE
DVD
CHP
A y r e

Basic Functions
These basic functions apply to all discs, includingCDs, DVDs, and Video CDs.
Standby/Operate
The “Standby/Operate” button toggles the unitbetween normal operation and standby mode. Whenin standby mode a green status LED in the displaywindow is illuminated, and all internal circuitryremains powered. This ensures optimal performancewith a minimum of warm-up time.
Please note that the “Pwr” button on the remotecontrol corresponds to the “Standby/Operate”function on the DX-7.
Open/Close
The “Open/Close” button opens and closes the disctray. An open tray may also be closed by pressinggently on the front edge of the tray. When the trayis closed, almost all DVDs will automatically beginplaying. This is because the DVD format allows thedisc to send commands to the player.
Please note that the “Record” button on theremote control corresponds to the“Open/Close” function on the DX-7.
19
PWR

Play
Pressing the “Play” button initiates playback of thedisc. If the drawer is open, pressing “Play” will alsoclose the drawer.
Pause
Pressing the “Pause” button will pause the discplayback. Playback may be resumed either bypressing the “Pause” button again or the “Play”button.
Stop
Pressing the “Stop” button will stop disc playback.However, if you are playing a DVD, the displayshows “RESUME” and the position is memorized.Press “Play” to start from the memorized position,or press “Stop” a second time to clear the memorizedposition.
The resume position remains memorized as longas the disc is in the player, even if you switch thepower off. If you want to remove the disc, butstill want to resume playback from the laststopped position, use the “Last Memory” featureinstead (page 43).
Previous
Pressing the “Previous” button will back up to thestart of the current chapter (DVD) or track (CD).
20
CH

Additional presses will move to previous chapters ortracks.
Please note that the “CH-” button on the remotecontrol corresponds to the “Previous” functionon the DX-7.
Next
Pressing the “Next” button will move to the start ofthe next chapter (DVD) or track (CD). Additionalpresses will move to subsequent chapters or tracks.
Please note that the “CH+” button on the remotecontrol corresponds to the Next function on theDX-7.
Reverse Scan
Pressing and holding thefront panel “Previous” button
will engage the “ReverseScan” function.
The “Reverse Scan” mode scans backward throughthe disc. If the “Reverse Scan” mode has beenmaintained for more than five seconds, the unit willremain in the scan mode after the button has beenreleased. Press “Play” when the desired location hasbeen reached.
Forward Scan
Pressing and holding thefront panel “Next” buttonwill engage the “Forward
Scan” function.
The “Forward Scan” mode scans forward through thedisc. If the “Forward Scan” mode has beenmaintained for more than five seconds, the unit willremain in the scan mode after the button has beenreleased. Press “Play” when the desired location hasbeen reached.
21
CH

Display Brightness
The front panel display of the DX-7 has threebrightness settings, plus an “Off” position. Pressingthe front panel “Display Brightness” button willscroll through the four choices. A blue LED next tothe display illuminates when the display is turnedoff.
When the display is off, pressing any key willilluminate the display for a few seconds. If the discis playing when the display is off, pressing “Play”will illuminate the display without affectingplayback.
Important Functions for DVDs
The DVD format introduced many useful featuresbeyond the basic ability to simply play a movie.Using these additional features requires navigationaltools found on the remote control.
Cursor Buttons
Nearly all DVDs feature on-screen menus to accessthe various features found on the disc. These menususe a highlighted cursor that is controlled by usingthe “Cursor” buttons. When the desired selection ishighlighted, press the “Select” button on the remotecontrol.
Please note that the “Select” button on theremote control corresponds to the “Enter”function on the DX-7.
22
SELECT

Menu
The on-screen menus found on nearly all DVDs willnormally automatically display upon loading thedisc. Anytime you wish to return to the disc menu,press the “Menu” button on the remote control.
Number Buttons
The number buttons are used to directly inputnumeric values, as well as enter numbers for directtitle and chapter (track for CDs) searches. Directsearches will immediately take you to the desiredtitle or chapter (track for CDs).
To directly access a title on a DVD, press thenumber of the title while the DVD is stopped. Todirectly access the chapter (track for CDs), press thedesired number while the disc is playing.
Please note that the “Enter” button on theremote control corresponds to the “+10”function on the DX-7.
Various components use different methods to entervalues with more than two digits. When using theAyre DX-7, press the “Enter” key to increment by10. Then press the desired value of the final digit.For example, to enter the value “10”, press “Enter”,then “0” (where “Enter” corresponds to the “+10”function).
Direct searches cannot be performed fornumbers 20 or greater. To directly access thesetitles and chapters, use the Search mode (page40).
23
MENU
ENTER
1 2 3
4 5 6
7 8 9
0

Return Function
When you are using on-screen menus, the “Return”function allows you to go back one menu level.When you are using the On-Screen Setup Menus(page 49), changes to the system settings will not besaved.
Please note that the “Exit” button on the remotecontrol corresponds to the “Return” function onthe DX-7.
Audio
Most DVDs have multiple soundtracks. Theseusually these offer choices of different languages,although some discs will have a choice of differentencoding schemes (DTS or PCM). You can select apreferred language that will automatically playusing the On-Screen Setup Menus (page 56), or youcan scroll through the available soundtrack choicesusing the “Audio” button on the remote control.
Video CDs do not have the same capacity formultiple soundtracks found on DVDs. In order tooffer two languages, many Video CDs have onelanguage in one channel and second language onthe other channel. When playing Video CDs (oraudio CDs) the “Audio” function scrolls throughthe choices of stereo, left channel only (mono), orright channel only (mono).
Subtitle
Many DVDs offer a choice of subtitles. You canselect a preferred language that will automatically
24
Subtitle
Audio
EXIT

display using the on-screen setup menus (page 56),or you can scroll through the available subtitlechoices, or turn the subtitles off completely, usingthe “Subtitle” button on the remote control.
Pressing the “Subtitle” button once displays thecurrent setting. Additional presses will scrollthrough the available choices. One way to turnsubtitles off is to press the “Subtitle” button onceand then press the “Sleep” button to activate the“Clear” function (page 45).
Light
When any key is pressed on the remote control, thebacklight will illuminate the keys with a soft blueglow for a few seconds. Conveniently placed in thelower right corner, the “Light” button allows you toturn the backlight on without activating anyfunctions on the DVD player.
Convenient Functions for CDs
While the following functions also work withDVDs, they are most often used with audio CDs.
Repeat
Pressing the “Repeat” button selects betweennormal play mode, repeat track (or chapter on aDVD) mode, and repeat disc (or title on a DVD)mode. The status of the “Repeat” mode is shown onthe front panel display.
25
Repeat
Light

To exit the “Repeat” mode, either press the“Repeat” button to scroll through the modes, orsimply press the “Sleep” button, which activatesthe “Clear” function (page 45).
Random
Pressing the “Random” button will play the tracks(chapters on a DVD) in random order. Whenplaying a DVD, pressing the “Random” buttontwice will play the titles in random order.
To exit the “Random” mode, either press the“Random” button to scroll through the modes,or simply press the “Sleep” button, whichactivates the “Clear” function (page 45).
26
Random

Optimization and
Customization
The Ayre DX-7 offers many advanced features,especially when playing DVDs.
DVDs from Around the World
There are times when you may wish to play DVDsfrom other countries. In this situation there are twoitems that must be considered – whether the videostandards match between the disc and your videodisplay, and region coding issues.
World-Wide Video Standards
There are two commonly used video standardsaround the world, NTSC and PAL. NTSC is used inNorth America and Japan, while PAL is used inother areas, including Europe, Asia (except Japan),Australia, South America, and Africa.
There will be a label on the DVD package toindicate which video standard was used. The AyreDX-7 is compatible with both formats. Whenplaying an NTSC disc the player will output anNTSC signal, and when playing a PAL disc the
27

player will output a PAL signal.
However, many video displays will only accept onetype of signal and not the other. In order to viewDVDs using a different video standard, your displaymust be capable of accepting both types of signals.In general, most plasma displays and frontprojectors will accept both video standards, whilemost direct-view CRT televisions will only acceptone video standard. Please consult your owner’smanual for additional information.
Region Coding
In order to control distribution of DVDs, the DVDformat has incorporated region coding of both discsand players. There are six distinct regions that havebeen defined around the world. This coding systemnormally prevents you from playing discs fromanother region on your player, even if your videodisplay is compatible with the video standard on thedisc. However, the Ayre DX-7 has both automaticand manual region switching, so that DVDs fromany region may be easily played.
In nearly all cases, the automatic region switchingwill work perfectly. When the disc is loaded, theplayer queries the disc and temporarily adjusts itsown region setting to match the disc.
RCE Discs
There are some discs that attempt to prevent themfrom playing on region-free players, called RCE
28

(Region Coding Enhancement) discs. The AyreDX-7 can also play these, although you may need toset the region manually.
When the player queries these RCE discs, they tellthe player that they are from all regions. The playerthen cannot adjust itself automatically to the correctregion. The disc then queries the player to see if theplayer’s region matches the disc’s actual region.Playback is only allowed if the regions match.
To ensure proper playback of RCE discs, you mayneed to manually change the region of the player tomatch the RCE disc. This is accomplished via ahidden function in the On-Screen Setup Menus(page 63).
Since most RCE discs are Region 1, it is usuallyconvenient to leave the player set to Region 1also. Most RCE discs will then play automatically,and the player will automatically adjust to play theregion of non-RCE discs.
Multiple Video Displays
As all of the video outputs on the DX-7 are activesimultaneously, it is possible to connect more thanone video display at a time. This may be especiallyuseful in whole-house distribution systems.
Please note however that this practice may result ina slight decrease in your system’s performance. Thisis not due to any limitations of the DX-7; rather itis because modern video displays use switchingpower supplies that inject a level of noise into the
29

system’s ground connection that contaminates thesignals.
If you are using multiple video displays, you maywish to disconnect the auxiliary displays whencritically viewing the main display. Please note thatturning the auxiliary displays into Standby mode isnot helpful in this regard, as the switching powersupplies are still operating even when the videodisplay is in “Standby” mode. Instead you musteither disconnect the AC power completely from theauxiliary displays or disconnect the signal cablesjoining the auxiliary displays to your system.
Control Port
The Control Port on the rear panel of the DX-7allows the unit to communicate with a systemcontroller such as a Crestron or AMX. The ControlPort uses opto-isolators to ensure that there are nounwanted ground loops created when using a systemcontroller.
Pre-terminated cables, command files, anddetailed information regarding the Control Portare available upon request from the Ayre factory.
There are two separate functions performed by theControl Port; reception of commands andtransmission of the currently playing DVD’s aspectratio.
30
Control Port

Command Functions
The DX-7 may either be controlled by the remotecontrol via a receiver on the front panel or by asystem controller via the Control Port. A smalltoggle switch on the rear panel selects which modeis active.
For normal use, set this switch to “IR Receiver”.Set the switch to “Control Port” only when usinga custom programmed system controller.
Command files are available from the Ayre factoryin both Crestron and Pronto (CCF) format. Thesefiles include discrete on/off commands.
DVD Aspect Ratio Information
All DVDs use one of three aspect ratios; standard,widescreen, or letterbox. Each DVD has its aspectratio coded in the disc. The Control Port cantransmit this information to a system controller sothat the aspect of the video display can beautomatically adjusted to match the disc.
A few DVDs have incorrect aspect ratio codes.These discs will still require manual adjustment ofthe video display’s aspect ratio.
31
Control Port
Reserved BSL PC
M
Reserved D
IR Receiver
Reserved ASL C
omp
Reserved C

SyncroLink Configuration
The SyncroLink digital audio link can be configuredto match the capabilities of yourSyncroLink-equipped audio processor. If yourprocessor can decode compressed digital audioformats such as Dolby Digital and DTS, set the rearpanel configuration switch to “SL Comp”. If yourprocessor is only capable of decoding PCM data, setthe switch to “SL PCM”. Please consult the owner’smanual for information on your audio processor.
32
Control Port
Reserved BSL PC
M
Reserved D
IR Receiver
Reserved ASL C
omp
Reserved C

About
Aspect Ratios
The term aspect ratio simply refers to the ratio of anobjects’s width to its height. Nonetheless there issome room for confusion, as both the video displayitself and the picture stored on a disc have an aspectratio. Most viewers prefer to see the film in itsoriginal aspect ratio, which preserves the director’sintention for the composition of the film.
Aspect Ratios of Video Displays
Originally video displays were created with a 4:3aspect ratio, mimicking the original aspect ratioused in films. These types of displays are stillavailable today, and are often referred to as“standard” displays.
Most modern displays now use a 16:9 aspect ratioand are referred to as “widescreen” displays.Widescreen displays are preferred for displaying thewide aspect ratio movies that have been commonlymade for the last 40 years.
The aspect ratios of video displays are usually givenas a ratio of integers. However as noted below, the
33

aspect ratios of films are usually normalized to one.To make comparisons between video displays andfilms easier, the ratios for displays can also benormalized to one. Hence 16:9 becomes 1.78:1 and4:3 becomes 1.33:1.
Aspect Ratios of Films
Nearly all films made from the 1920s through theearly 1950s used an aspect ratio of 1.37:1. Tocompete against the threat of television, moviestudios began adding features such as color and awider (larger) picture.
Now nearly all films are made in a widescreenformat. The most commonly used aspect ratiostoday are 1.85:1 and 2.35:1. This wider pictureallows for more dramatic and creative visualcompositions.
Matching Film to Display
When the aspect ratio of the film closely matchesthe aspect ratio of the display, the film can easily beviewed as the director intended. This happens whenwatching a 1.37:1 film on a 1.33:1 standard videodisplay or when watching a 1.85:1 film on a 1.78:1widescreen video display, as there is only anegligible mismatch. But when there is a significantmismatch between the aspect ratios of the film andvideo display, some action must be taken to allowthe film to be viewed without distortion.
34

Widescreen Displays
Let’s start with a widescreen movie shot in 1.85:1and viewed on a 1.78:1 widescreen video display. Inthis case virtually the entire image can be seen withno adjustments required. The film is presented inthe same way as in a movie theater.
If we want to now watch a standard movie shot in1.37:1, we run into a problem. The narrower pictureautomatically fills up the screen, stretching anddistorting the image.
This is clearly unacceptable, so we use the “AspectRatio” control on the video display to shrink theimage horizontally, restoring the proper geometry.The display device also adds black (or sometimesgrey) vertical bars on each side of the picture. Thesecorrespond to the movable curtains used to blockpart of the screen in a movie theater.
A few widescreen displays erroneously lack an“Aspect Ratio” control when fed a progressivevideo signal. In this case, standard films areunavoidably stretched to fill the display. Oneworkaround for this problem is to feed bothprogressive and interlaced signals to the display.When watching a standard (1.37:1) film, selectthe interlaced input on the video display to allowadjustment of the aspect ratio.
35

Standard Displays
When watching a standard (1.37:1) film on astandard (1.33:1) display, we can see virtually thefull image without adjustments. Again, the film ispresented in the same way as it would be in a movietheater.
However if we watch a widescreen (1.85:1) film, wehave a new problem. The picture will be distorted asthe wide image is squeezed to fit the standarddisplay.
Again, this distorted image is unacceptable. A fewhigh-quality standard video displays will allow forthe vertical size of the picture to be decreased,restoring the proper image geometry. But sincenearly all standard displays lack any type of “AspectRatio” control, this capability is instead built intoall DVD players.
By selecting “4:3 (Letterbox)” for the “TV Screen”setting in the on-screen setup menus (see page 53),when a widescreen disc is played the player willautomatically squeeze the image vertically to restorethe correct geometry while adding black bars at thetop and bottom.
Additional Factors
So far everything has been relatively straightforward.However, there are a few more cases to consider thatintroduce some complexity to the situation.
36

Very Wide Films
Many films are made with aspect ratios even widerthan 1.85:1, such as 2.35:1. Even on a widescreen(1.78:1) video display these films would be distortedif they were simply allowed to fill the screen.Instead thin black bars are added to the top andbottom of the image on the disc itself when thetransfer from film to video is made.
On a widescreen display these will properly beshown as thin black bars. This is perfectly normaland there is no distortion of the image. On astandard display, additional black bars will be addedby the DVD player (or much less commonly by thedisplay itself). The end result will be thick blackbars at the top and bottom of the screen. Again thisis perfectly normal.
Pan and Scan Discs
Sometimes when a widescreen film is transferred toDVD, only the center portion is scanned. Thisprocess is called “pan and scan” and changes theaspect ratio to 1.33:1, allowing for viewing onstandard displays without the use of black bars.However this not only changes the film director’soriginal visual composition, but can even lead tocritical elements being left out of the pictureentirely.
These discs are often euphemistically called“fullscreen”. Most film enthusiasts prefer to watchthe film’s original aspect ratio and therefore avoidthese discs. As far as compatibility with either
37
widescreen or standard displays, pan and scan discswill work in the same way as standard 1.37:1 films.
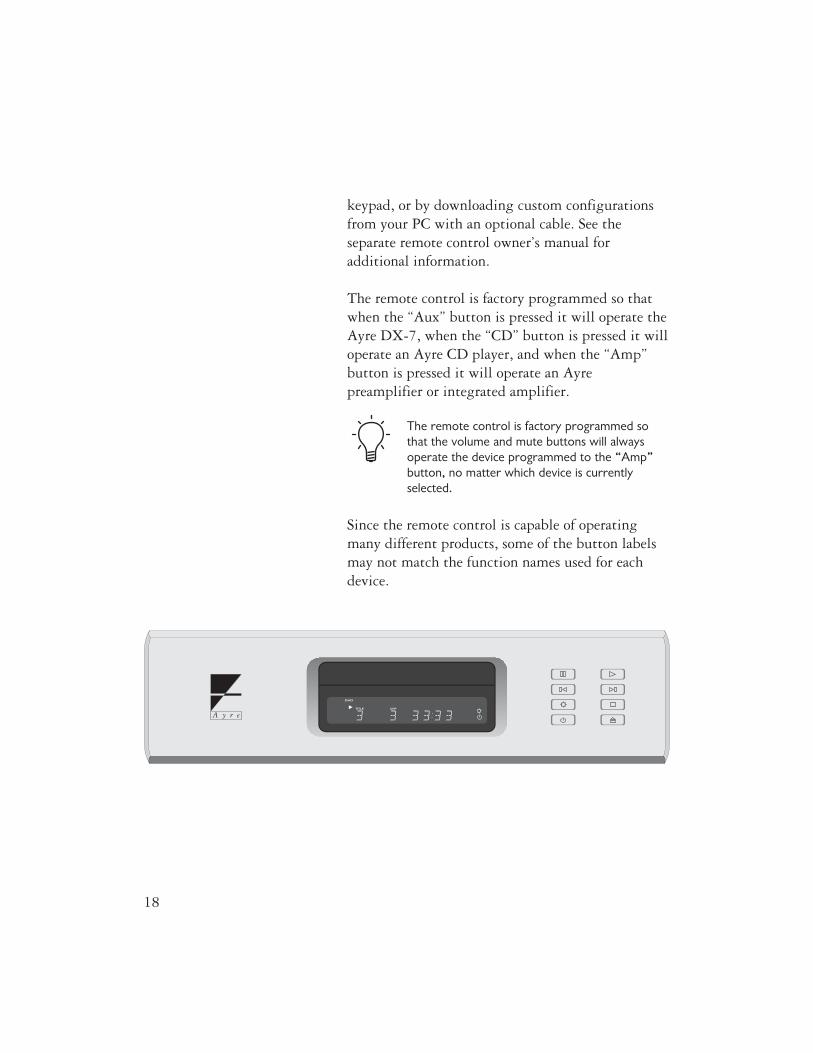
Letterboxed Discs
Since all DVD players can convert a widescreen discto display properly on a standard video display,there is no technical reason to make a letterboxeddisc. However in the early days of DVD, moviestudios were selling to a much smaller audience ofDVD player owners. Instead of making a newtransfer to DVD in widescreen format, to savemoney they would use an existing transfer that hadbeen made for the laser disc format. Since laser dischad no provision for widescreen films, these transferswere done in letterboxed format, where the blackbars at the top and bottom of the image were addedto the disc itself during the transfer process.
These letterboxed discs will display properly on astandard display. However, on a widescreen displayyou will not only see black bars at the top andbottom of the image from the letterboxing processon the disc itself, but the display will add additionalblack bars at the sides of the image to maintain thecorrect picture geometry. The final result is a verysmall picture centered on your screen.
Most widescreen displays have a “zoom” mode thatwill expand the image in all four directions to fillthe screen. However, the picture resolution suffers asmany of the available pixels on the disc have beendiscarded. Fortunately as the market for DVDs havegrown these types of discs are now rarely seen.
38

Advanced
Features
The Ayre DX-7 also has many advanced features.These functions are more complex to use, but can beuseful for the advanced user.
Slow Play Function
While the unit is playing, press and hold one of the“Step” buttons to engage slow playback. Whilethere is only one reverse playback speed, the forwardplayback speed can be adjusted from ½ speed to1/16 speed in four increments, using the “Step”buttons. To return to normal playback, press thePlay button.
Frame Advance Function
While a DVD is paused, the picture may beadvanced by pressing the “Step” buttons. Thepicture advances one frame each time the forwardbutton is pressed, and backwards several frames eachtime the reverse button is pressed.
39
Step
Step

Search
You may quickly find a specific location on the discby using the “Search” function. Pressing the“Search” button on the remote control scrollsthrough the choices of searching by title, chapter(track for CD), or time.
Enter the desired location using the numberbuttons, and then press “Play”.
When in “Search” mode, the “+10” function(“Enter button on the remote control) does notfunction. Instead enter numbers sequentially. Forexample, to enter “23”, press “2”, “3”.
Time search is not possible with CDs or withDVDs when the disc is stopped.
Repeat A-B
“Repeat A-B” allows two functions; repeating asection of the disc, or returning to a markedlocation. Press the “Repeat A-B” button at thebeginning and end of the section you wish to repeat.To return to a specified location, press “Repeat A-B”at the desired location. Press “Play” to return to thespecified location.
You can only perform “Repeat A-B” within thesame title, chapter, or track.
40
Rpt A-B
Search

To cancel repeat play or clear the specified location,press the “Sleep” button to activate the “Clear”function.
Program
To play only specific titles, chapters, or tracks in aspecific order, use the “Program” function. Inaddition, up to 24 programs for DVDs may be savedin memory for later use. The “Program” function isespecially useful for running planneddemonstrations using specific discs.
Many DVDs have UOPs (User OperationProhibitions) that don’t allow the Programfunction to be used.
To create a program, press the “Program” buttonwhile a disc is loaded. For DVDs you will have achoice of either “Program Chapter” or “ProgramTitle”. For CDs and Video CDs the screen willdisplay “Program Track”.
When using “Chapter Program” with DVDs, firstselect the desired title. Use the “Down” cursorbutton to enter the program window, then usethe “Up” cursor button to highlight “Title”. Usethe number buttons to enter the desired titlenumber. Only chapters within the same title canbe programmed during DVD chapterprogramming.
In the program window, use the number buttons toenter the numbers of titles, chapters, or tracks in thedesired playing order. Press “Play” to beginplayback.
41
Program Chapter ProgramTitle
Current: Title 7 Chapter 1Title 1 (Chapter 1~34)
PROGRAM ExitMove
Program Memory – Off
Program

To delete a number in the program, use the cursorbuttons to highlight the incorrect number. Thenpress the “Sleep” button to activate the “Clear”function.
To insert a number in the program, use the cursorbuttons to highlight the desired location. Press thenumber buttons of the number to be inserted. Thenew number is inserted before the previouslyhighlighted number.
You may also insert a pause in the program. Theplayer will pause when this point is reached in theprogram, and must be put into the play modemanually. Simply press the “Pause” button when thecursor is in the desired location. A pause cannot beprogrammed as the first or last position in theprogram, and two or more pauses may not beprogrammed in succession.
You may also create a program”on the fly” whileplaying a discs. Simply press and hold the Programbutton for at least two seconds at any point duringplayback of a title, chapter, or track, and it will beadded to a program without displaying the Programscreen. When a title, chapter, or track is successfullyadded to the program, it is shown momentarily inthe display, as well as its position in the program.
When using this function to program DVDs, firstuse the “Program” button to select either“Program Chapter” or “Program Title” asdesired.
42
Chapter 07 Program 03�

Programs for DVDs may be saved to memory. TheDX-7 can memorize the programs on up to 24DVDs. When in the “Program” menu, use thecursor buttons to highlight the “Program Memory”menu item. Select the “On” setting and then pressthe “Select” button to activate the “Enter” functionto save the program in memory.
When more than 24 programs are memorized,programs will automatically be erased inchronological order from the oldest program. Toprevent the player from erasing older programs thatyou still may use regularly, you may manually eraseunwanted programs stored in memory. Simply loada DVD that has a program stored in memory. Pressthe “Program” button to display the “Program”screen. Use the cursor buttons to highlight the“Program Memory” menu item. Select the “Off”setting and then press the “Select” button to activatethe “Enter” function to erase the program inmemory.
Last Memory Function
The “Last Memory” function allows you to resumewatching a disc from the point you left off. Unlikethe “Resume” function (page 20), the “LastMemory” function is effective even if the disc isremoved from the player. Up to five discs may havethe resume location memorized.
Pressing the “Last” button on the remote controlduring play will activate the “Last Memory”function to memorize the location to return to later.The front panel display will indicate “LAST”. When
43
LAST
Program Chapter ProgramTitle
Current: Title 7 Chapter 1Title 1 (Chapter 1~34)
PROGRAM ExitMoveOffOnProgram Memory

the disc is reloaded, the “LAST” indicator will againlight. To begin play at the memorized location,press “Last” on the remote control while the disc isstopped.
Nearly all DVDs will automatically begin playingwhen loaded. Be sure to press the “Stop” buttonbefore pressing the “Last” button.
Pressing “Play” will begin playback at the start ofthe disc.
Please note that the “Last” button on the remotecontrol corresponds to the “Condition Memory”function on the DX-7.
To clear the “Last Memory” location, press the“Sleep” button to activate the “Clear” function while“Last Memory” is displayed in the on-screen display.
“Last Memory” is only displayed for a fewseconds after the DVD is loaded. To clear the“Last Memory” location at any time, press “LastMemory” to mark a new location, and then pressthe “Sleep” button to activate the “Clear”function.
Condition Memory Function
The “Condition Memory” function allows you tomemorize four settings for each of up to 15 DVDs.These settings comprise:
• Soundtrack
• Subtitle
• Angle
44
INPUT

• OSD
To memorize the current settings, press the “Input”button on the remote control while the DVD isplaying.
Please note that the “Input” button on theremote control corresponds to the “ConditionMemory” function on the DX-7.
The next time the disc is loaded, “COND” appears inthe front panel display and “Condition Memory”appears in the on-screen display. To clear thememorized settings, press the “Sleep” button toactivate the “Clear” function while “ConditionMemory” is being displayed on the screen.
The “Condition Memory” function is especiallyuseful when you wish to have a specificsoundtrack (e.g., DTS or PCM) be the default fora particular DVD.
Clear Function
The “Clear” function works in conjunction with anumber of features. It is used to cancel “Repeat” and“Random” playback, erase “Last Memory” and“Condition Memory” settings, turn “Subtitles” off,and to edit “Programs”.
Please note that the “Sleep” button on theremote control corresponds to the “Clear”function on the DX-7.
45
SLEEP

Display Function
The “Display” function will show information aboutthe currently loaded disc on the on-screen display.
Please note that the “Info” button on the remotecontrol corresponds to the “Display” function onthe DX-7.
When a DVD is playing, pressing the “Info” buttonto activate the “Display” function will scrollthrough four different information displays. All ofthem will show the current title, chapter, and totalelapsed time.
• The first screen additionally shows theremaining time in the title and the total time inthe title.
• The second screen additionally shows the timein the current chapter and the total time of thechapter.
• The third screen additionally shows theremaining time in the chapter and the totaltime in the chapter.
• The fourth screen additionally shows thebitstream transmission rate.
Pressing and holding the “Info” button willdisplay only the first screen (as long as the buttonis held), without requiring you to scroll throughthe other three screens to exit.
When a DVD is stopped, pressing the “Info” buttonwill display a list of titles and chapters on the disc.
46
INFO
When a CD is playing, pressing the “Info” buttonwill scroll through two different informationdisplays.
• The first screen shows the track number, thetrack time, the remaining track time, and thetotal track time.
• The second screen shows the track number, thetotal number of tracks, the track time, theremaining time of the CD, and the total time ofthe CD.
Pressing and holding the “Info” button willdisplay only the first screen (as long as the buttonis held), without requiring you to scroll throughthe second screen to exit.
When a CD is stopped, pressing the “Info” buttonwill display the total time of the disc and the timeof each track.
Top Menu Function
A very few DVDs have a two-level menu system.The “Top Menu” (also called a “Title Menu” or“Disc Menu”) will show the titles available on thedisc. The normal menu (also somewhat confusinglycalled a “Root Menu”) will show the choicesavailable in a given title.
The normal menus are accessed with the “Menu”button, while the top menu is accessed by pressingthe “Guide” button to activate the “Top Menu”function. For most discs, the “Top Menu” function
47
GUIDE

either produces no action or duplicates the “Menu”function.
Please note that the “Guide” button on theremote control corresponds to the “Top Menu”function on the DX-7.
Angle
The DVD format allows for scenes to be filmed frommultiple camera angles. The viewer may selectbetween the different available camera angles bypressing the “Angle” button. A single press displaysthe current angle and total available angles.Additional presses will scroll through the availablechoices.
With the exception of adult entertainment titlesand a few music videos, almost no DVDs usemultiple angles.
System Reset
It is possible to perform a system reset. This willrestore all on-screen setup menu items to theiroriginal factory defaults, and clear all saved settingssuch as “Condition Memory”, “Last Memory”, and“Program” memory.
To reset the system, place the unit in “Standby”.Then press and hold the “Stop” button on the frontpanel while placing the unit in “Operate” modeusing the “Standby/Operate” button on the frontpanel.
48
Angle

On-Screen
Setup Menus
The Ayre DX-7 has on-screen setup menus thatallow you to adjust a variety of system settings toensure compatibility with your system. The basicmenu items have normally already been set up byusing the Setup Navigator (see page 11). Followingis information regarding the more detailed items.
To access these on-screen setup menus, press the“Setup” button located on the lower portion of theremote control.
The “Setup” button in the top leftcorner of the remote is only used tocustomize the remote control’sprogramming.
Use the cursor buttons on the remote control tonavigate the on-screen setup menus. Once you havemade the desired changes, press the “Setup” buttonagain to exit the on-screen setup menus.
If a disc is playing, some of the on-screen setupmenu choices will be unavailable and greyed-out.In this case, stop the disc before entering the“Setup” mode.
49
Angle
Subtitle
Audio Step Light
Repeat
Random
Rpt A-B
Program
Setup
Search
SELECT

Indicator Colors
Next to each option in the on-screen setup menus isa colored indicator that shows which setting iscurrently selected. The color of this indicatorcorresponds to which types of discs are affected byeach particular menu option.
• Blue DVD only
• Yellow DVD and Video CD
• Green All formats
If a setting applicable only to DVDs is changedwhile a Video CD or CD is loaded, a blue DVDicon appears in the upper right hand corner of thescreen to indicate that the setting does not applyto the currently loaded disc. The new setting willbe effective the next time a DVD is loaded.
Audio 1
The on-screen setup menu items listed under the tab“Audio 1” configure the Ayre DX-7 so that thedigital audio output will match the capabilities ofyour audio processor.
There are two digital audio outputs on the rearpanel of the DX-7. Some of these options only affectthe “Compressed + PCM” output, while othersettings affect both the “Compressed + PCM”output and the “PCM Only” output.
50

Dolby Digital
Nearly all DVDs have a Dolby Digital soundtrack(and optionally others as well). If your audioprocessor accepts Dolby Digital signals, set thisoption to “Dolby Digital”. The audio processor willdecode the Dolby Digital signal to recreate thesoundtrack.
If your audio processor does not accept DolbyDigital signals, set this option to“Dolby Digital > PCM”. The DX-7 will thendecode the Dolby Digital soundtrack and convertthe audio signal to two-channel PCM.
This setting only affects the “Compressed + PCM”output. The “PCM Only” output will alwaysconvert a Dolby Digital soundtrack totwo-channel PCM.
DTS
A few DVDs have a soundtrack using technologyfrom DTS in addition to the Dolby Digitalsoundtrack. When present, the DTS soundtrack willusually offer somewhat improved sound qualitycompared to the Dolby Digital soundtrack.
If your audio processor accepts a DTS signal, set theDTS option to “DTS”. Otherwise set the DTSoption to “Off”. The Ayre DX-7 will not convert aDTS soundtrack to PCM. If your audio processordoes not accept a DTS signal, instead select the“Dolby Digital” soundtrack.
51
Audio1 Audio2 GeneralLanguageVideo
DTS Out -96kHz PCM Out – 96kHz
MPEG Out – MPEG PCM�
Digital Out – On
Move Exit
Dolby Digital PCM�
Dolby Digital
SETUP
Dolby Digital Out
Audio1 Audio2 GeneralLanguageVideo
96kHz PCM Out -MPEG Out – MPEG PCM�
Dolby Digital Out – Dolby Digital
Digital Out – On
Move ExitSETUP
DTS OutDTSOff

The choice of which soundtrack is played can bemade either via the main menu of the DVD itself,or by scrolling through the soundtrack choicesusing the “Audio” button on the remote control(page 24).
This setting only affects the “Compressed + PCM”output. If a DTS soundtrack is selected, no signalwill be present at the “PCM Only” output.
96 kHz PCM
A few DVDs include a PCM soundtrack with asample rate of 96 kHz. This provides the highestpossible audio performance from DVD-Video discs.
If your audio processor will accept a 96 kHz PCMaudio signal, set this option to “96kHz”. If not, thenset this option to “96kHz > 48kHz”. In this case theoriginal soundtrack will be downsampled to thelower sample rate to allow compatibility.
This setting affects both the “Compressed +PCM” output and the “PCM Only” output.
MPEG Audio
Another technology used to store the audiosoundtrack on a DVD is MPEG audio. This wasproposed for use in Europe, but was quicklysupplanted by Dolby Digital by most film studios.Very few discs include an MPEG audio soundtrack.
If your audio processor accepts an MPEG audiosignal, select “MPEG”. Otherwise set the MPEGaudio option to “MPEG > PCM”.
52
Audio1 Audio2 GeneralLanguageVideo
Dolby Digital Out – Dolby DigitalDTS Out – DTS
Digital Out – On
Move ExitSETUP
MPEG Out -96kHz PCM Out
96kHz96kHz 48kHz�
Audio1 Audio2 GeneralLanguageVideo
96kHz PCM Out – 96kHz
Dolby Digital Out – Dolby DigitalDTS Out – DTS
Digital Out -
Move ExitSETUP
MPEG OutMPEG PCM�
MPEG

This setting only affects the “Compressed + PCM”output. The “PCM Only” output will alwaysconvert an MPEG audio soundtrack totwo-channel PCM.
Digital Output
The digital audio output may be turned off fordiagnostic purposes. It is normally recommended toset this option to “On”.
This setting affects both the “Compressed +PCM” output and the “PCM Only” output.
Audio 2
The Audio 2 setup tab only contains a single menuoption. This is not a one-time setting to match yoursystem, but rather an adjustment that can be madeto the audio playback.
“Audio DRC” stands for “Audio Dynamic RangeCompression”. Normally this option should be setto “Off”. However, if you are watching a film late atnight and wish to avoid disturbing other membersof your household, then Audio DRC may be turnedon. Soft sounds such as dialog can then be heardmore clearly without increasing the volume of theloud sounds.
Audio DRC only applies to discs with a DolbyDigital soundtrack.
53
Audio1 Audio2 GeneralLanguageVideo
96kHz PCM Out – 96kHzMPEG Out – MPEG PCM�
Dolby Digital Out – Dolby DigitalDTS Out – DTS
Move ExitSETUP
Digital OutOffOn
Audio1 Audio2 GeneralLanguageVideo
Move Exit
Medium
Off
High
Low
SETUP
Audio DRC

Video
The on-screen setup menu items listed under the“Video” tab configure the Ayre DX-7 so that thevideo output will match the capabilities of yourvideo display.
TV Screen
It is extremely important to select the “TV Screen”setting that matches your display device. DVDs aremanufactured with two different aspect ratios for thepicture information itself (although black bars maybe added to the top and bottom of the pictureinformation to create many different aspect ratios forthe final displayed picture).
Video displays are also manufactured with twodifferent aspect ratios, 16:9 (widescreen) and 4:3(standard). Nearly all widescreen displays allow theaspect ratio to be adjusted so that all DVDs aredisplayed in their correct original aspect ratio.However most standard displays do not allow theaspect ratio to be adjusted, instead requiring theDVD player to modify the picture signal to createthe proper aspect ratio.
When the DVD player changes the aspect ratio ofa widescreen DVD to match a standard 4:3display, there is an unavoidable loss of verticalresolution.
If your video display is a widescreen model,configure this setting to “16:9 (Wide)”. If your
54
Audio1 Audio2 GeneralLanguageVideo
Picture Quality -S-Video Out -
On Screen Display – Position - NormalStill Picture – Auto
Angle Indicator – On
Move Exit
4:3 (Pan & Scan)16:9 (Wide)
4:3 (Letterbox)
SETUP
TV Screen

display is a standard model, configure this setting to“4:3 (Letterbox)”.
It is recommended not to select the “4:3 (Pan &Scan” setting, as this only functions properly whenallowed by the DVD. To date there are virtuallyno widescreen DVDs that support the “Pan &Scan” setting.
Picture Quality
This setting has no effect on the operation of theAyre DX-7 with progressive scan video. Its originalpurpose was to change the interlaced video signalsto conform with the video standards used in variouscountries. Instead the DX-7 allows theseadjustments to the video signal to be made withswitches on the rear panel (page 11).
S-Video Out
This setting has no effect on the operation of theAyre DX-7 with progressive scan video. Its originalpurpose was to send aspect ratio information to thevideo display on the S-video connection. Instead theDX-7 outputs aspect ratio information via theControl Port (page 30).
55
Audio1 Audio2 GeneralLanguageVideo
S-Video Out -
On Screen Display – Position - NormalStill Picture -
TV Screen – 16:9 (Wide)
Angle Indicator – On
Move Exit
AnimationStandard
Cinema
SETUP
Picture Quality
Audio1 Audio2 GeneralLanguageVideo
On Screen Display – Position - NormalStill Picture -
TV Screen – 16:9 (Wide)Picture Quality – Standard
Angle Indicator – On
Move ExitSETUP
S-Video OutS2S1

Still Picture
This setting affects the appearance of the picturewhen the DVD is paused. Normally this should beset to “Auto”. The DVD player then usesinformation on the disc to determine if it was madewith an interlaced source (i.e., video) or aprogressive source (i.e., film) However some discsare incorrectly flagged, causing the appearance of apaused picture to be unsatisfactory. Temporarilychanging this setting may improve the appearanceof a paused picture.
On Screen Display
The operation indicators (“Play”, “Stop”, “Resume”,etc.) are normally displayed at the top of the screen.However, if you are watching a letterboxed DVD ona widescreen video display, it may be useful to usethe “Zoom” mode on the display to eliminate theblack bars at the top and bottom of the picture(page 38). However, the “Zoom” mode may alsoeliminate the operation indicators.
In this case, configure the “On Screen Display”setting for “Position - Wide”. This will lower theposition of the on-screen operation indicators so theyremain visible. Alternatively, you may choose toturn them off altogether by selecting the “Off”setting.
56
Audio1 Audio2 GeneralLanguageVideo
S-Video Out – S2Still Picture – Auto
TV Screen – 16:9 (Wide)Picture Quality – Standard
Angle Indicator -
Move ExitOff
SETUP
Position - NormalPosition - WideOn Screen Display
Audio1 Audio2 GeneralLanguageVideo
S-Video Out – S2
On Screen Display -
TV Screen – 16:9 (Wide)Picture Quality – Standard
Angle Indicator -
Move Exit
FrameAuto
Field
SETUP
Still Picture

Angle Indicator
A few DVDs will have certain scenes filmed frommultiple camera angles. In this situation, an icon inthe shape of a movie camera will be displayed onboth the front panel display and on your videodisplay. This will inform you that multiple viewingangles are available. Should you wish to turn off theon-screen angle indicator, change this setting to“Off”.
Language
The DVD format has the capability to provide manydifferent language options. However, most discsprovide only one or two language options. Many ofthe settings described in this section will only workwith those discs that provide the pertinent languageoptions.
OSD Language
The On-Screen Display (OSD) can use differentlanguages for the on-screen menus and operationindicators. Select the preferred language using thecursor keys of the remote control. In units shippedto most countries, the choices include English,French, and Spanish. However, units shipped toJapan offer the choice of English or Japanese.
57
Audio1 Audio2 GeneralLanguageVideo
Audio Language -Subtitle Language -
Auto Language – OnDVD Language – w/Subtitle Language
Subtitle Off – Selected SubtitleSubtitle Display – On
Move Exit
françaisEspañol
English
SETUP
OSD Language
Audio1 Audio2 GeneralLanguageVideo
S-Video Out – S2
On Screen Display – Position - NormalStill Picture – Auto
TV Screen – 16:9 (Wide)Picture Quality – Standard
Move ExitSETUP
Angle IndicatorOffOn

Audio Language
Many DVDs offer multiple language options for thesoundtrack. You can specify the desired defaultlanguage setting for the audio soundtrack. If thatsoundtrack exists on a DVD, it will automatically beselected for play. In units shipped to most countries,the choices include “English”, “French”, “Spanish”,and “Other”. However, units shipped to Japan offerthe choice of “English”, “Japanese”, and “Other”.
Regardless of the status of this setting, you canscroll through the available soundtrack choicesusing the “Audio” button on the remote control.
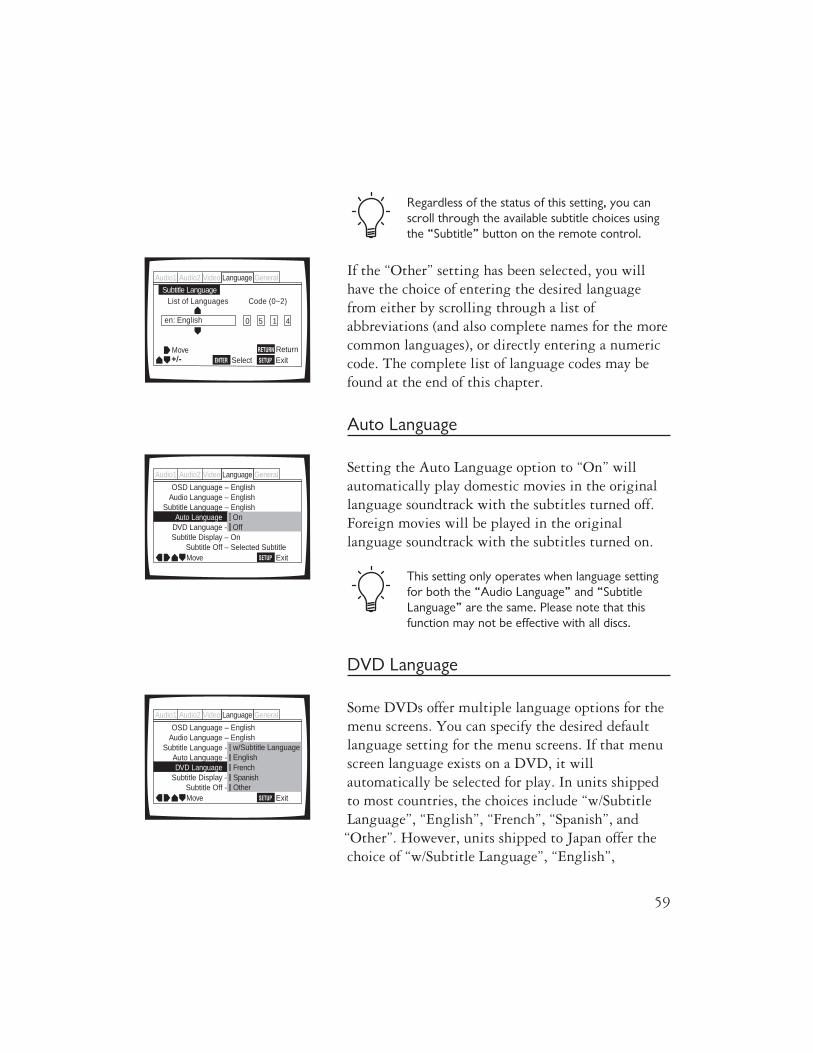
If the “Other” setting has been selected, you willhave the choice of entering the desired languagefrom either by scrolling through a list ofabbreviations (and also complete names for the morecommon languages), or directly entering a numericcode. The complete list of language codes may befound at the end of this chapter.
Subtitle Language
Many DVDs offer multiple language options for thesubtitles. You can specify the desired defaultlanguage setting for the subtitle. If that subtitlelanguage exists on a DVD, it will automatically beselected for play. In units shipped to most countries,the choices include “English”, “French”, “Spanish”,and “Other”. However, units shipped to Japan offerthe choice of “English”, “Japanese”, and “Other”.
58
GeneralVideo
+/-
Audio Language
SETUP
MoveExitENTER SelectReturn
en: English
List of Languages Code (0~2)
0 5 1 4
RETURN
LanguageAudio1 Audio2
Audio1 Audio2 GeneralLanguageVideo
Auto Language -DVD Language -
OSD Language – EnglishAudio Language – English
Subtitle Display -Subtitle Off – Selected SubtitleMove Exit
FrenchSpanishOther
English
SETUP
Subtitle Language
Audio1 Audio2 GeneralLanguageVideo
Subtitle Language -Auto Language -DVD Language -
OSD Language – English
Subtitle Display – OnSubtitle Off – Selected SubtitleMove Exit
FrenchSpanishOther
English
SETUP
Audio Language
Regardless of the status of this setting, you canscroll through the available subtitle choices usingthe “Subtitle” button on the remote control.
If the “Other” setting has been selected, you willhave the choice of entering the desired languagefrom either by scrolling through a list ofabbreviations (and also complete names for the morecommon languages), or directly entering a numericcode. The complete list of language codes may befound at the end of this chapter.
Auto Language
Setting the Auto Language option to “On” willautomatically play domestic movies in the originallanguage soundtrack with the subtitles turned off.Foreign movies will be played in the originallanguage soundtrack with the subtitles turned on.
This setting only operates when language settingfor both the “Audio Language” and “SubtitleLanguage” are the same. Please note that thisfunction may not be effective with all discs.
DVD Language
Some DVDs offer multiple language options for themenu screens. You can specify the desired defaultlanguage setting for the menu screens. If that menuscreen language exists on a DVD, it willautomatically be selected for play. In units shippedto most countries, the choices include “w/SubtitleLanguage”, “English”, “French”, “Spanish”, and“Other”. However, units shipped to Japan offer thechoice of “w/Subtitle Language”, “English”,
59
Audio1 Audio2 GeneralLanguageVideo
DVD Language -
OSD Language – EnglishAudio Language – English
Subtitle Language – English
Subtitle Display – OnSubtitle Off – Selected SubtitleMove ExitSETUP
Auto LanguageOffOn
Audio1 Audio2 GeneralLanguageVideo
Subtitle Language -Auto Language -
OSD Language – EnglishAudio Language – English
Subtitle Display -Subtitle Off -Move ExitSETUP
DVD Language FrenchSpanishOther
Englishw/Subtitle Language
GeneralVideo
+/-
Subtitle Language
SETUP
MoveExitENTER SelectReturn
en: English
List of Languages Code (0~2)
0 5 1 4
RETURN
LanguageAudio1 Audio2

“Japanese”, and “Other”.
Setting this option to “w/Subtitle Language”automatically assigns the language selected in theSubtitle Language setting. This is recommendedfor most situations.
If the “Other” setting has been selected, you willhave the choice of entering the desired languagefrom either by scrolling through a list ofabbreviations (and also complete names for the morecommon languages), or directly entering a numericcode. The complete list of language codes may befound at the end of this chapter.
Subtitle Display
This setting will determine if the subtitles areautomatically displayed or not. In addition, a fewDVDs have an additional subtitle selection that isintended for those viewers who are hard of hearing.In addition to the written transcription of thedialog, these subtitles also include writtendescriptions of other background sounds. Selecting“Assist Subtitle” for this setting will automaticallyselect these subtitles, if they exist on a particulardisc.
Regardless of the status of this setting, you canscroll through the available subtitle choices usingthe “Subtitle” button on the remote control.
60
Audio1 Audio2 GeneralLanguageVideo
Auto Language – OnDVD Language -
OSD Language – EnglishAudio Language – English
Subtitle Language – English
Subtitle Off -Move ExitSETUP
Subtitle Display OffAssist Subtitles
On
GeneralVideo
+/-
DVD Language
SETUP
MoveExitENTER SelectReturn
en: English
List of Languages Code (0~2)
0 5 1 4
RETURN
LanguageAudio1 Audio2

Subtitle Off
The DVD format allows the disc itself to issuecommands to the DVD player. Rarely, a disc mayautomatically display subtitles even when they havebeen turned off at the DVD player. This settingallows you to select the language of the subtitlesthat are displayed with this type of DVD.
Select “With Audio” to display the subtitles in thesame language as the “Audio Language” setting.Select “Subtitle Language” to display subtitles in thesame language as the “Subtitle Language” setting.
General
The on-screen setup menu items listed under the“General” tab configure a few miscellaneous settingsof the Ayre DX-7.
Setup Menu Mode
There are two choices for displaying the on-screensetup menus, “Basic” and “Expert”. Selecting“Expert” will display all of the availableconfiguration options. Selecting “Basic” will onlyshow the basic configuration options.
If “Basic” is selected and the “OSD Language” isset to “English”, on-screen help information willbe displayed for each menu option.
61
Audio1 Audio2 GeneralLanguageVideo
Setup NavigatorParental Lock – Level 8
Background Color – Blue
Move Exit
BasicExpert
SETUP
Setup Menu Mode
Audio1 Audio2 GeneralLanguageVideo
Auto Language – OnDVD Language – w/Subtitle Language
OSD Language – EnglishAudio Language – English
Subtitle Language – English
Subtitle Display -
Move ExitSETUP
Subtitle OffWith AudioSelected Subtitle

Setup Navigator
The Setup Navigator simplifies the process ofconfiguring the on-screen menu settings of the AyreDX-7. This process in normally performed when theDVD player is installed in your system. However,any time you wish you may run the Setup Navigatoragain. Normally this is done only when newequipment has been installed in your system, or youmay choose to change the settings directly via theon-screen menus.
Parental Lock
The DVD format allows the player to blockobjectionable scenes from discs, using auser-specified access code. However, virtually nodiscs have been made that use this feature.Furthermore, it is not particularly difficult to defeatthe parental lock. For these reasons it is notrecommended to use the “Parental Lock” feature.
If you have used the “Parental Lock” feature andforgotten your password, the password can becleared by resetting the system (page 48). Pleasenote that the reset procedure clears all savedsettings, and not just the password.
62
Audio1 Audio2 GeneralLanguageVideo
Setup NavigatorSetup Menu Mode – Expert
Background Color -
Move Exit
Password ChangeLevel Change
SETUP
Parental Lock
Audio1 Audio2 GeneralLanguageVideo
Setup NavigatorParental Lock – Level 8
Setup Menu Mode – Expert
Background Color – Blue
Move Exit
Start
SETUP
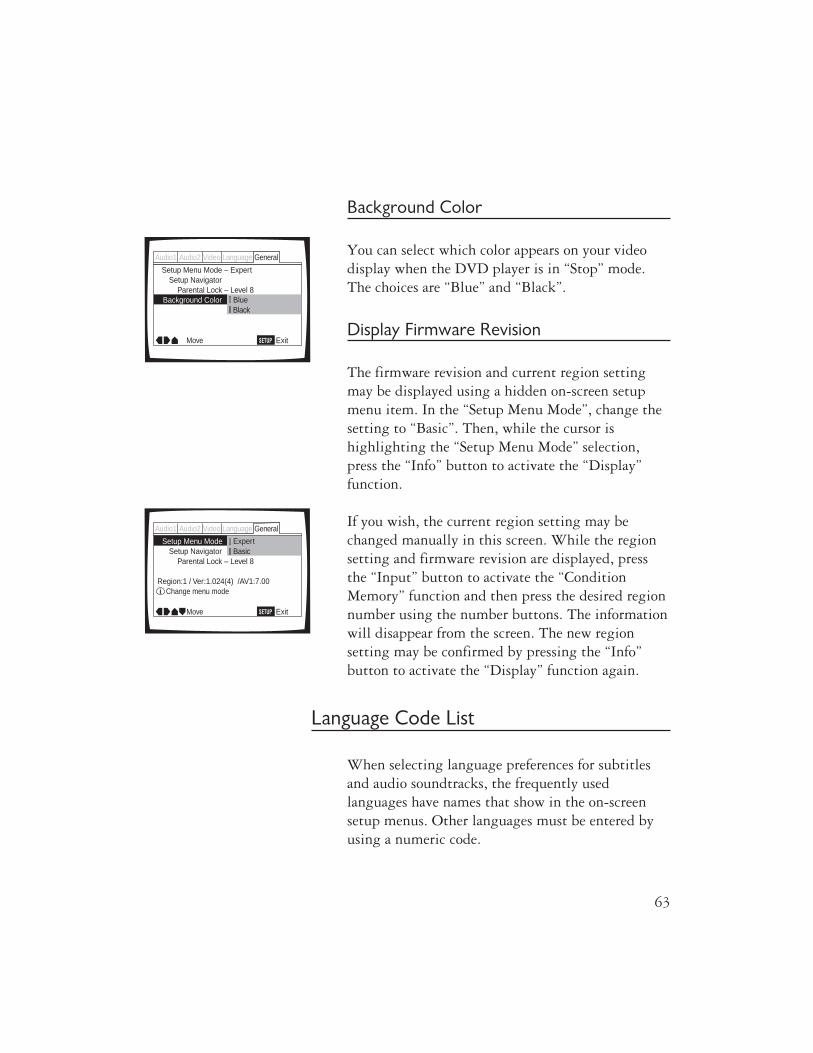
Background Color
You can select which color appears on your videodisplay when the DVD player is in “Stop” mode.The choices are “Blue” and “Black”.
Display Firmware Revision
The firmware revision and current region settingmay be displayed using a hidden on-screen setupmenu item. In the “Setup Menu Mode”, change thesetting to “Basic”. Then, while the cursor ishighlighting the “Setup Menu Mode” selection,press the “Info” button to activate the “Display”function.
If you wish, the current region setting may bechanged manually in this screen. While the regionsetting and firmware revision are displayed, pressthe “Input” button to activate the “ConditionMemory” function and then press the desired regionnumber using the number buttons. The informationwill disappear from the screen. The new regionsetting may be confirmed by pressing the “Info”button to activate the “Display” function again.
Language Code List
When selecting language preferences for subtitlesand audio soundtracks, the frequently usedlanguages have names that show in the on-screensetup menus. Other languages must be entered byusing a numeric code.
63
Audio1 Audio2 GeneralLanguageVideo
Setup NavigatorParental Lock – Level 8
Region:1 / Ver:1.024(4) /AV1:7.00
Move Exit
BasicExpert
SETUP
Setup Menu Mode
Change menu mode
Audio1 Audio2 GeneralLanguageVideo
Setup NavigatorParental Lock – Level 8
Setup Menu Mode – Expert
Move Exit
BlackBlue
SETUP
Background Color

Frequently Used Languages
Chinese (zh), 2608Dutch (nl), 1412English (en), 0514French (fr), 0618German (de), 0405Greek (el), 0512Italian (it), 0920Japanese (ja), 1001Korean (ko), 1115Portuguese (pt), 1620Russian (ru), 1821Spanish (es), 0519Swedish (sv), 1922
Complete Language List
Abkhazian (ab), 0102Afar (aa), 0101Afrikaans (af), 0106Albanian (sq), 1917Amharic (am), 0113Arabic (ar), 0118Armenian (hy), 0825Assamese (as), 0119Aymara (ay), 0125Azerbaijani (az), 0126Bashkir (ba), 0201Basque (eu), 0521Bengali (bn), 0214Bhutani (dz), 0426Bihari (bh), 0208Bislama (bi), 0209Breton (br), 0218Bulgarian (bg), 0207Burmese (my), 1325Byelorussian (be), 0205Cambodian (km), 1113Catalan (ca), 0301Chinese (zh), 2608
64

Corsican (co), 0315Croatian (hr), 0818Czech (cs), 0319Danish (da), 0401Dutch (nl), 1412English (en), 0514Esperanto (eo), 0515Estonian (et), 0520Faroese (fo), 0615Fiji (fj), 0610Finnish (fi), 0609French (fr), 0618Frisian (fy), 0625Galician (gl), 0712Georgian (ka), 1101German (de), 0405Greek (el), 0512Greenlandic (kl), 1112Guarani (gn), 0714Gujarati (gu), 0721Hausa (ha), 0801Hindi (hi), 0809Hungarian (hu), 0821Icelandic (is), 0919Indonesian (in), 0914Interlingua (ia), 0901Interlingue (ie), 0905Inupiak (ik), 0911Irish (ga), 0701Italian (it), 0920Hebrew (iw), 0923Japanese (ja), 1001Javanese (jw), 1023Kazakh (kk), 1111Kannada (kn), 1114Kashmiri (ks), 1119Kinyarwanda (rw), 1823Kirghiz (ky), 1125Kirundi (rn), 1814Korean (ko), 1115Kurdish (ku), 1121Laothian (lo), 1215Latin (la), 1201
65

Lingala (ln), 1214Lithuanian (lt), 1220Latvian (lv), 1222Macedonian (mk), 1311Malagasy (mg), 1307Malay (ms), 1319Malayalam (ml), 1312Maltese (mt), 1320Maori (mi), 1309Marathi (mr), 1318Moldavian (mo), 1315Mongolian (mn), 1314Nauru (na), 1401Nepali (ne), 1405Norwegian (no), 1415Occitan (oc), 1503Oriya (or), 1518Oromo (om), 1513Panjabi (pa), 1601Pashto, Pushto (ps), 1619Persian (fa), 0601Polish (pl), 1612Portuguese (pt), 1620Quechua (qu), 1721Rhaeto-Romance (rm), 1813Romanian (ro), 1815Russian (ru), 1821Samoan (sm), 1913Sangho (sg), 1907Sanskrit (sa), 1901Scots-Gaelic (gd), 0704Serbian (sr), 1918Serbo-Croatian (sh), 1908Sesotho (st), 1920Setswana (tn), 2014Shona (sn), 1914Sindhi (sd), 1904Sinhalese (si), 1909Siswati (ss), 1919Slovak (sk), 1911Slovenian (sl), 1912Somali (so), 1915Spanish (es), 0519
66

Sundanese (su), 1921Swahili (sw), 1923Swedish (sv), 1922Tagalog (tl), 2012Tajik (tg), 2007Tamil (ta), 2001Tatar (tt), 2020Telugu (te), 2005Thai (th), 2008Tibetan (bo), 0215Tigrinya (ti), 2009Tonga (to), 2015Tsonga (ts), 2019Turkish (tr), 2018Turkmen (tk), 2011Twi (tw), 2023Ukrainian (uk), 2111Urdu (ur), 2118Uzbek (uz), 2126Vietnamese (vi), 2209Volapük (vo), 2215Welsh (cy), 0325Wolof (wo), 2315Xhosa (xh), 2408Yiddish (ji), 1009Yoruba (yo), 2515Zulu (zu), 2621
67

Numbers and
Specifications
DVI Output Selectable output formats:
RGB, video levels (16 - 235) RGB, PC levels (0 - 255) YCbCr, 4:2:2, video levels (16 - 235)
(NTSC and PAL discs)
Progressive Component Output Selectable output formats:
YPbPr, 700 mV, 0% setup RGB, 700 mV, 0% setup
(NTSC and PAL discs)
Interlaced Component Output Selectable output formats:
YPbPr, 700 mV, 0% setup
(NTSC and PAL discs)
RGB, 714 mV, 7.5% setup RGB, 714 mV, 0% setup
(NTSC discs)
68

RGB, 700 mV, 0% setup
(PAL discs)
S-Video and CompositeOutputs
Selectable output formats:
714 mV, 7.5% setup 714 mV, 0% setup
(NTSC discs)
700 mV, 0% setup
(PAL discs)
Power Consumption 35 watts20 watts, standby mode
Dimensions 17-¼" W x 13-¾" D x 4-¾" H44 cm x 35 cm x 12 cm
Weight 15 pounds6.8 kg
69

Statement of
Warranty
Please take a moment to fillout and return the enclosedwarranty registration card.
Your Ayre DX-7 DVD player is warranted againstdefects in workmanship and materials for a period offive years from the date of purchase, except for thetransport mechanism. The warranty period for thetransport mechanism is two years from the date ofpurchase. This warranty is transferable tosubsequent purchasers within the original warrantyperiod. All warranty claims must be made throughan authorized Ayre dealer or distributor.
Warranty Statement
1. If any defects are found in the materials orworkmanship of this Ayre product within thewarranty period, the unit will be repaired orreplaced by Ayre Acoustics, Inc. (Ayre) or itsauthorized agent.
2. Purchaser must return the product, packed in theoriginal shipping carton, freight prepaid to:
Ayre Acoustics, Inc.2300-B Central AvenueBoulder, Colorado 80301
70

or to Ayre’s authorized agent.
3. Ayre reserves the right to inspect any productthat is the subject of any warranty claim prior torepairing or replacing it. Final determination ofwarranty coverage lies solely with Ayre.
Out-of-warranty claims will be billed for labor,materials, return freight, and insurance as required.Any product for which a warranty claim is acceptedwill be returned to the purchaser and the cost ofshipping and insurance will be factory prepaidwithin the boundaries of the USA. Units to beshipped outside of the USA will be shipped freightcollect only.
4. Ayre strives to manufacture the finest possibleequipment, and therefore reserves the right to makeimprovements on its products, without necessarilyassuming an obligation to retrofit such changesupon its previously manufactured models.
5. The above warranty is the sole warranty given byAyre, and is in lieu of all other warranties. Allimplied warranties, including warranties ofmerchantability or fitness for any particular purposeshall be strictly limited in duration to five yearsfrom the date of original purchase, and uponexpiration of the warranty period (five years), Ayreshall have no further obligation of any kind, whetherexpress or implied. Further, Ayre shall in no eventbe obligated for any incidental or consequentialdamages as a result of any defect or any warrantyclaim, whether express or implied.
71

6. Ayre does not authorize any third party,including any dealer or sales representative toassume any liability of Ayre or make any warrantyfor Ayre. The unit must not have been altered orimproperly serviced. The serial number on the unitmust not have been altered or removed.
7. Warranty registration cards must be completedand mailed to Ayre within 30 days of purchase. Ayremay, at its option, require from the purchaser validproof of purchase (dated copy or photocopy ofdealer's original invoice).
72

A Technical
Glossary
480i A shorthand way of referring to an interlaced NTSCsignal, where “480” refers to the number of actualpicture lines and “i” refers to Interlaced.
480p A shorthand way of referring to a progressive NTSCsignal, where “480” refers to the number of actualpicture lines and “p” refers to Progressive.
576i A shorthand way of referring to an interlaced PALsignal, where “576” refers to the number of actualpicture lines and “i” refers to Interlaced.
576p A shorthand way of referring to a progressive PALsignal, where “576” refers to the number of actualpicture lines and “p” refers to Progressive.
AES/EBU The Audio Engineering Society and EuropeanBroadcast Union are standards setting organizationsin the US and Europe, respectively. The term“AES/EBU” is commonly used to refer to the systemof transmitting digital audio signals used inprofessional studios. This format is very similar tothe S/PDIF digital audio standard, although theperformance is higher due to the use of balanced
73

interconnect cables employing three-pin XLRconnectors.
Aspect Ratio The ratio of the video display’s width to its height.The two common aspect ratios used for videodisplays are 16:9 (1.78:1), also known as“widescreen”, and 4:3 (1.33:1), also known as“standard”.
CRT The Cathode Ray Tube is the original analogtechnology used in video displays. It is still usedtoday in both direct-view displays as well as frontand rear projection systems. Although themaximum light output levels are limited,CRT-based displays are unrivaled for theirsmoothness and ability to accurately reproduce finegradations in dark areas of the image.
Component A video signal using three separate videocomponents, for example RGB or YPbPr.Component signals may be either Interlaced orProgressive.
Composite An Interlaced video signal that combines brightness(black-and-white) information together with colorinformation. Performance is reduced compared toComponent video or S-Video, as the video signalscannot be perfectly separated again as required bythe display device.
Compressed Audio To allow storage of more video information on aDVD, the digital audio soundtrack is compressed totake up less room. The PCM digital audio data iscompressed by discarding data that is deemed to beof less importance. Various companies havedeveloped proprietary schemes for reducing the
74

quantity of audio data while attempting tominimize the impact on sound quality. See alsoDolby Digital, DTS, and MPEG Audio.
D-ILA Digital-Imaging Light Amplifier is a type of LCOSvideo display technology developed by JVC. This isone example of a Fixed Pixel display.
DLP Digital Light Processing is the name of TexasInstrument’s movable micro-mirror technology usedin video displays. This is one example of a FixedPixel display.
Dolby Digital A Compressed Audio format developed by Dolby Labs,this is found on virtually all DVDs.
DTS A Compressed Audio format developed by DigitalTheater Systems. A DTS soundtrack is found onsome DVDs, and in generally considered to soundbetter than the Dolby Digital soundtrack, in partdue to the higher data rates used (less compression).
DVI The Digital Visual Interface was developed as a wayto send digital video signals to a Fixed-Pixel (i.e.,digital) display without any additional conversionsto or from analog.
Fixed Pixel In a CRT video display the cathode ray, or beam,can be focused at any arbitrary point on the viewingsurface. Thus multiple Resolutions are easilysupported. In contrast, Fixed Pixel (i.e., digital)displays have the individual Pixels in predeterminedlocations. Incoming signals must be converted tothe native resolution of the display element itself.This conversion process, called Scaling, can introducevisible artifacts if not performed at a high
75

performance level. All fixed pixel displays haveinternal scalers incorporated internally.
HDMI The High Definition Multimedia Interface is anextension of the DVI interface that adds HDCP,digital audio, and inter-device communication link,all in a smaller connector. The DVI output of theAyre DX-7 can be connected to an HDMI displayby using an adapter connector. In this situation thevideo is passed through to the display device, butthere is no digital audio or communication linkpresent.
HDCP High-bandwidth Digital Content Protection is amethod of scrambling the DVI or HDMI videosignal in an attempt to avoid copying of copyrightedmaterial. Only “authorized” devices have the key todescramble the signal so that it is viewable. TheAyre DX-7 does not use HDCP, so it is compatiblewith all DVI and HDMI displays, whether or notthey use HDCP.
Interlaced An interlaced video system draws half of the picturelines on the video display at a time. Theodd-numbered lines are displayed in one pass andthe even numbered lines in the next. The interlacedformat was developed as a means of reducing thebandwidth required for television broadcasting, butcan result in visible artifacts in the picture comparedto Progressive video.
LCD A Liquid Crystal Display is the familiar display asfound on laptop computers. These are most oftentransmissive displays, where a white light sourcebehind the display element shines through colored
76

Pixels to create an image. This is one example of aFixed Pixel display.
LCOS Liquid Crystal On Silicon places the LCD displayelement directly on the silicon wafer that forms theelectronic control circuitry. A transmissive displayelement cannot be used as the silicon is nottransparent. Instead, a reflective display element isused. This is one example of a Fixed Pixel display.
MPEG Moving Picture Experts Group is an internationalstandards organization that developed the MPEG-2video compression algorithm used in the DVDformat.
MPEG Audio One type of Compressed Audio developed by Philips.This was originally proposed as the audio format tobe used on European DVDs, in a politicalcompromise designed to share royalty revenuesbetween Philips and Dolby. Philips was late tomarket with this format, and it has now largely beensupplanted by Dolby Digital.
MPEG Decoder The MPEG decoder is a highly complex integratedcircuit that decodes the video and audio informationstored on the DVD.
NTSC The National Television Standards Committee is thebody defining the television video signal formatused in the North America. Japan also uses avariation of this signal. This format has a total of525 lines, of which 480 are used for the actualpicture information.
PAL Phase Alternating Line is the video signal formatused in Europe, Asia (except Japan), Australia,
77

Africa, and South America. This format has a totalof 625 lines, of which 576 are used for the actualpicture information.
PCM Pulse Code Modulation is the fundamental methodused to store audio or video as digital codes. This isthe highest performing method of storing audio,and is the system used on CDs. See also CompressedAudio.
Pixel As a digital format, DVD reproduces video image asa grid of very fine colored dots. The smallestelement of this video image is called a pixel, whichis a shortened form of Picture Element.
Plasma A plasma video display uses ionized gases to excitecolored phosphors, similar to the way that afluorescent light bulb operates. This is one exampleof a Fixed Pixel display.
Progressive A progressive video system draws all of the picturelines on the video display in one pass. Commonlyused for computer displays, progressive video resultsin a more stable, flicker-free picture than doesInterlaced video.
RCE Region Coding Enhancement is a moresophisticated system of Region Coding developed toenforce the playback of DVDs only in their intendedregion. Playback of RCE discs may require changingthe DVD players region setting manually.
Region Coding In an attempt to control the distribution of DVDs,the DVD forum has designated eight differentregions throughout the world. Discs from any givenregion are normally only playable on DVD players
78

purchased from that same region.
Resolution Every video display device or video format has amaximum number of Pixels that can be displayed.This resolution is specified as the number ofhorizontal pixels by the number of vertical pixels.The resolution of a DVD is 720x480 for NTSC discsand 720x576 for PAL discs. Scaling must be used toconvert this resolution to the resolution of a FixedPixel display. The horizontal resolution of a CRT(i.e., analog) is somewhat ambiguous, as there are nodiscrete pixels used in this technology.
RGB RGB is short for Red-Green-Blue. The human eyecan visualize all colors from various combinations ofred, green, and blue light. All color video displaysuse red, green, and blue to create color. Any signalsinput to a color display device that are not in RGBformat must be converted to RGB before being sentto the display element itself. Except for computermonitors, most video display contain this circuitryinternally. When making an RGB connection to adisplay device, synchronization (timing) signals arealso required. This can be accomplished either viaRGB+HV or SoG.
RGB+HV Red-Green-Blue + Horizontal-Vertical is onemethod of transferring RGB video signals. In thisconnection method, the horizontal and vertical sync(timing) signals are separated from the video signalsthemselves. Thus a total of five wires are required.
Scaling Scaling is the process of converting a video signalfrom one Resolution to another. As with any type ofsignal processing, care must be taken to ensure thatthe signal is not degraded by the processing itself.
79

SoG Sync-on-Green refers to an RGB video connectionthat has the sync (timing) signals combined withthe green signal. Only three wires are required forthis connection, compared with five wires for anRGB+HV video connection.
S/PDIF The Sony/Philips Digital Interface Format iscommonly used to transmit digital audioinformation from a source (such as a DVD player) toa receiver (such as an audio processor). Theconnectors used for S/PDIF are common RCA(Cinch) connectors. Also see AES/EBU.
S-Video An Interlaced video signal that has two components;one for brightness (black-and-white) informationand another for color information. Performance ismuch better than Composite video, but due tobandwidth restrictions, has less color detail thandoes interlaced Component video.
UOP The DVD format allows the disc itself to sendcommands to the player. A User OperationProhibition is a disc-based command that tells theDVD player to ignore commands issued by the user.For example, some DVDs will display the FBIwarning at the beginning of the disc and issue aUOP that temporarily disables most usercommands.
YCbCr A digital Component signal, where Y is the brightness(black-and-white) signal, and Cb and Cr are thecolor signals. The picture on a DVD is stored inYCbCr format, as it requires less storage space for agiven visible resolution than does RGB.
80

YPbPr An analog Component signal, where Y is thebrightness (black-and-white) signal, and Pb and Prare the color signals.
81

A Place for
Notes
82

83

84 Rev. 1.0b


Ayre Acoustics, Inc.2300-B Central Avenue
Boulder, Colorado 80301
www.ayre.com+1-303-442-7300
Related Documents