AssociateID:245217 Handout: Mainframe Testing Version: MFTESTING/Handout/0108/1.0 Date: 21-01-08 Cognizant 500 Glen Pointe Center West Teaneck, NJ 07666 Ph: 201-801-0233 www.cognizant.com

Welcome message from author
This document is posted to help you gain knowledge. Please leave a comment to let me know what you think about it! Share it to your friends and learn new things together.
Transcript
Associa
teID
:245
217
Handout: Mainframe Testing
Version: MFTESTING/Handout/0108/1.0 Date: 21-01-08
Cognizant 500 Glen Pointe Center West
Teaneck, NJ 07666
Ph: 201-801-0233
www.cognizant.com
Associa
teID
:245
217
Handout - Mainframe Testing
TABLE OF CONTENTS
Introduction ................................................................................................................................. 11
About this Module ....................................................................................................................... 11
Target Audience ......................................................................................................................... 11
Module Objectives ...................................................................................................................... 11
Pre-requisite ............................................................................................................................... 11
Chapter 1: Getting Started with Mainframes ............................................................................. 12
Learning Objective ...................................................................................................................... 12
How to Connect Mainframe ........................................................................................................ 12
Configuring Keyboard ................................................................................................................. 17
Saving the Session ..................................................................................................................... 18
Summary: ................................................................................................................................... 19
Test Your Understanding ............................................................................................................ 19
Chapter 2: TSO/ ISPF ................................................................................................................... 21
Learning Objective ...................................................................................................................... 21
TSO ............................................................................................................................................ 21
Line Mode TSO ........................................................................................................................... 21
ISPF/PDF .................................................................................................................................... 21
Logging on and Line Mode ......................................................................................................... 23
Features of ISPF......................................................................................................................... 25
Dataset and It’s Types ................................................................................................................ 25
Allocating a Dataset .................................................................................................................... 26
Space Allocation for Datasets .................................................................................................... 28
Move/Copy Utility ........................................................................................................................ 31
Dataset List Utility ....................................................................................................................... 33
Line Commands.......................................................................................................................... 34
Primary Commands .................................................................................................................... 34
Scrolling ...................................................................................................................................... 35
Basic Line Commands ................................................................................................................ 36
Basic Commands........................................................................................................................ 36
Copy/Move Commands .............................................................................................................. 37
Shifting Commands .................................................................................................................... 38
Exclude/Show Commands ......................................................................................................... 39
Text Handling Commands .......................................................................................................... 39
Page 2 ©Copyright 2007, Cognizant Technology Solutions, All Rights Reserved
C3: Protected

Associa
teID
:245
217
Handout - Mainframe Testing
Miscellaneous Commands ......................................................................................................... 39
SuperCE Compare ..................................................................................................................... 40
Specify Datasets for Compare .................................................................................................... 40
Interpreting SuperCE output ....................................................................................................... 42
Search-For Utility ........................................................................................................................ 43
Extended Search ........................................................................................................................ 45
Summary: ................................................................................................................................... 45
Test Your Understanding ............................................................................................................ 45
Chapter 3: JCL and VSAM ........................................................................................................... 47
Learning Objective ...................................................................................................................... 47
Job Control Language (JCL) ...................................................................................................... 47
Is JCL Difficult? ... Not Necessarily! ........................................................................................... 47
How do you Send Information to the Computer? ....................................................................... 48
Basic Syntax of JCL Statements ................................................................................................ 48
Continuation OF JCL Statements ............................................................................................... 49
Commenting JCL ........................................................................................................................ 49
Three Types of JCL Statements ................................................................................................. 49
The JOB Statement .................................................................................................................... 49
Additional Operands of the JOB Statement ............................................................................... 50
MSGCLASS ................................................................................................................................ 50
MSGLEVEL ................................................................................................................................ 50
JOBLIB ....................................................................................................................................... 51
STEPLIB ..................................................................................................................................... 51
JCLLIB ........................................................................................................................................ 51
The EXEC Statement ................................................................................................................. 52
Programs and Cataloged Procedures ........................................................................................ 52
Modifying Cataloged Procedures ............................................................................................... 52
Data Definition (DD) Statement .................................................................................................. 53
DD Statement for Instream Data ................................................................................................ 54
Data Definition (DD) Statement for Disk Datasets ..................................................................... 54
Data Definition (DD) Statement for Tape Datasets .................................................................... 55
Disposition (DISP) Parameters ................................................................................................... 55
Beginning Dispositions ............................................................................................................... 56
Normal Termination and Abnormal Termination Dispositions .................................................... 56
Examples of DISP parameters ................................................................................................... 56
SPACE Parameter ...................................................................................................................... 56
Partitioned Dataset vs. Sequential Dataset ................................................................................ 57
DFSMS (System Managed Datasets) ........................................................................................ 58
Page 3 ©Copyright 2007, Cognizant Technology Solutions, All Rights Reserved
C3: Protected
Associa
teID
:245
217
Handout - Mainframe Testing
SPACE Parameter (Partitioned Dataset) ................................................................................... 58
SPACE Parameter (Sequential Dataset) .................................................................................... 59
Data Set Attributes ..................................................................................................................... 59
Fixed Block ................................................................................................................................. 60
Variable Block ............................................................................................................................. 60
Null Statement ............................................................................................................................ 60
DCB and LABEL Parameters for Tapes ..................................................................................... 60
DD Statement for Printed Output ................................................................................................ 61
Output JCL Statement ................................................................................................................ 62
Examples of the Output Statement............................................................................................. 63
JES3 Control Statements ........................................................................................................... 63
Job Scheduling Specifications .................................................................................................... 64
Table of Resource Limitations for Job Scheduling ..................................................................... 64
*OPERATOR Statement ............................................................................................................. 64
Symbolic Prameters/Temporary Datasets .................................................................................. 65
JCL ABEND Codes .................................................................................................................... 66
What is VSAM? ........................................................................................................................... 66
File Access Methods .................................................................................................................. 66
VSAM Catalogs .......................................................................................................................... 67
Data Organization ....................................................................................................................... 67
Types of VSAM Data Sets .......................................................................................................... 68
Traditional Access Methods ....................................................................................................... 68
IDCAMS ...................................................................................................................................... 68
VSAM Data Set Organization ..................................................................................................... 68
Control Area (CA) ....................................................................................................................... 69
Index ........................................................................................................................................... 69
ESDS .......................................................................................................................................... 69
RBA ............................................................................................................................................ 70
RRDS .......................................................................................................................................... 70
KSDS .......................................................................................................................................... 70
VSAM Dataset Choice ................................................................................................................ 71
IDCAMS ...................................................................................................................................... 71
Basic IDCAMS Commands ........................................................................................................ 71
Basic Define Command Syntax for Cluster ................................................................................ 71
Record Size Parameter .............................................................................................................. 72
KEYS Parameter ........................................................................................................................ 72
Dataset Type Parameters ........................................................................................................... 72
Data and Index Components ...................................................................................................... 73
Page 4 ©Copyright 2007, Cognizant Technology Solutions, All Rights Reserved
C3: Protected
Associa
teID
:245
217
Handout - Mainframe Testing
AMS Performance Parameters ................................................................................................... 73
FREESPACE .............................................................................................................................. 73
BUFFERSPACE ......................................................................................................................... 73
RECOVERY / SPEED ................................................................................................................ 74
SPANNED .................................................................................................................................. 74
KEYRANGES ............................................................................................................................. 74
ORDERED .................................................................................................................................. 74
REUSE ....................................................................................................................................... 74
REPLICATE ................................................................................................................................ 74
VOLUMES .................................................................................................................................. 75
IMBED ........................................................................................................................................ 75
Share option ............................................................................................................................... 75
ERASE / NOERASE ................................................................................................................... 75
More AMS Commands ............................................................................................................... 75
EXPORT/IMPORT ...................................................................................................................... 77
VERIFY ....................................................................................................................................... 77
LISTCAT ..................................................................................................................................... 77
ALTER ........................................................................................................................................ 77
DELETE ...................................................................................................................................... 77
Some Common DELETE Parameters ........................................................................................ 78
ALTERNATE INDEX .................................................................................................................. 78
PATH .......................................................................................................................................... 79
Build Index .................................................................................................................................. 79
Summary: ................................................................................................................................... 80
Test Your Understanding ............................................................................................................ 80
Chapter 4: Batch Execution ........................................................................................................ 81
Learning Objective ...................................................................................................................... 81
z/OS (OS/390) Batch Jobs: ........................................................................................................ 81
Batch Job Submission ................................................................................................................ 81
Batch Job Processing ................................................................................................................. 81
How to Check Job Status ........................................................................................................... 82
Job Classes ................................................................................................................................ 82
Priority ......................................................................................................................................... 82
Table 1: Job Classes and Priorities ............................................................................................ 82
Job Classes and Priorities .......................................................................................................... 83
Computation of Execution Priority .............................................................................................. 84
Table 2: Entry Priorities of Class A Jobs .................................................................................... 84
Computation of Print Priority ....................................................................................................... 85
Page 5 ©Copyright 2007, Cognizant Technology Solutions, All Rights Reserved
C3: Protected
Associa
teID
:245
217
Handout - Mainframe Testing
Table 3: Print Priorities for Class A Jobs .................................................................................... 85
Hints for Improving Batch Job Turnaround Time ........................................................................ 85
Summary: ................................................................................................................................... 86
Test Your Understanding ............................................................................................................ 86
Chapter 5: COBOL BASICS ......................................................................................................... 87
Learning Objective ...................................................................................................................... 87
Features of COBOL .................................................................................................................... 87
Program Composition ................................................................................................................. 88
COBOL – Character Set ............................................................................................................. 89
IDENTIFICATION DIVISION ...................................................................................................... 89
ENVIRONMENT DIVISION ........................................................................................................ 90
DATA DIVISION ......................................................................................................................... 90
PROCEDURE DIVISION ............................................................................................................ 91
SECTIONS ................................................................................................................................. 91
PARAGRAPHS ........................................................................................................................... 91
SENTENCES and STATEMENTS ............................................................................................. 91
COBOL Coding Syntax ............................................................................................................... 92
The Minimum COBOL Program ................................................................................................. 92
Data Types in COBOL ................................................................................................................ 92
Literals ........................................................................................................................................ 92
Numeric Literals .......................................................................................................................... 92
Non-numeric Literals .................................................................................................................. 93
Figurative Constants ................................................................................................................... 93
Data Names ................................................................................................................................ 93
Description of Data Names ......................................................................................................... 94
Level Number SYNTAX .............................................................................................................. 94
PICTURE clause......................................................................................................................... 94
PROCEDURE DIVISION Verbs ................................................................................................. 95
Input -Output Verbs .................................................................................................................... 95
Data Movement Verb - MOVE Verb ........................................................................................... 95
JUSTIFIED RIGHT Clause ......................................................................................................... 96
Arithmetic VERBS....................................................................................................................... 96
STOP RUN ................................................................................................................................. 97
Sequence Control Verbs ............................................................................................................ 97
GO TO Verb ................................................................................................................................ 97
Classification of Conditions ........................................................................................................ 98
Relational Condition ................................................................................................................... 98
Sign Condition ............................................................................................................................ 98
Page 6 ©Copyright 2007, Cognizant Technology Solutions, All Rights Reserved
C3: Protected

Associa
teID
:245
217
Handout - Mainframe Testing
Class Condition ........................................................................................................................... 98
Compound Condition .................................................................................................................. 99
Condition Names ........................................................................................................................ 99
PERFORM Verb ......................................................................................................................... 99
REDEFINES Clause ................................................................................................................... 99
RENAMES Clause ....................................................................................................................100
USAGE Clause .........................................................................................................................101
Computational ...........................................................................................................................101
Binary ........................................................................................................................................101
COMPUTATIONAL or COMP ...................................................................................................102
COMPUTATIONAL-1 or COMP-1 (Floating-Point) ..................................................................102
COMPUTATIONAL-2 or COMP-2 (Long Floating-Point) .........................................................102
COMPUTATIONAL-3 or COMP-3 (Internal Decimal) ...............................................................102
COMPUTATIONAL-4 or COMP-4 (Binary) ..............................................................................102
DISPLAY ...................................................................................................................................102
INDEX .......................................................................................................................................103
POINTER ..................................................................................................................................103
SYNCHRONIZED .....................................................................................................................104
File Operations .........................................................................................................................104
File Position Indicators .............................................................................................................106
Input Procedure: .......................................................................................................................111
Output Procedure: ....................................................................................................................111
RELEASE .................................................................................................................................112
RETURN ...................................................................................................................................112
MERGE .....................................................................................................................................113
MERGE - Rules ........................................................................................................................113
INPUT/OUTPUT Error Handling Techniques ...........................................................................114
EXCEPTION/ERROR Declarative ............................................................................................114
FILE STATUS Key ....................................................................................................................114
INVALID KEY Phrase ...............................................................................................................114
Sub-Program ............................................................................................................................115
CALL – Rules ............................................................................................................................115
CANCEL ...................................................................................................................................116
EXIT Program ...........................................................................................................................116
STOP ........................................................................................................................................116
GOBACK ..................................................................................................................................116
END PROGRAM .......................................................................................................................117
Search ......................................................................................................................................117
Page 7 ©Copyright 2007, Cognizant Technology Solutions, All Rights Reserved
C3: Protected

Associa
teID
:245
217
Handout - Mainframe Testing
SEARCH ALL ...........................................................................................................................118
Compiler Directive - COPY .......................................................................................................119
Summary: .................................................................................................................................120
Test Your Understanding ..........................................................................................................120
Chapter 6: Introduction to CICS ................................................................................................122
Learning Objective ....................................................................................................................122
Introduction ...............................................................................................................................122
Basic Terminology in CICS .......................................................................................................122
Hierarchy of CICS Objects .......................................................................................................123
Naming Conventions ................................................................................................................123
Introduction to Creating Maps ..................................................................................................123
Creating Mapset .......................................................................................................................124
Creating Map ............................................................................................................................126
Creating Fields ..........................................................................................................................127
Sample Map ..............................................................................................................................128
Viewing a Map ..........................................................................................................................130
Embedding CICS in COBOL ....................................................................................................130
Sample CICS-COBOL Compile JCL ........................................................................................131
Summary: .................................................................................................................................133
Test Your Understanding ..........................................................................................................133
Chapter 7: Introduction to DB2 Basics ....................................................................................135
Learning Objective ....................................................................................................................135
An Overview of DB2 .................................................................................................................135
Example for Creating a Table in DB2 .......................................................................................135
INSERT, Execution and Output of DB2: ...................................................................................141
DB2 concepts ...........................................................................................................................142
Structured Query Language (SQL) ...........................................................................................142
Tables .......................................................................................................................................144
Indexes .....................................................................................................................................145
Keys ..........................................................................................................................................145
Views ........................................................................................................................................147
Table spaces ............................................................................................................................148
Segmented ...............................................................................................................................148
Partitioned .................................................................................................................................148
Large Object (LOB) ..................................................................................................................148
Universal Table Space .............................................................................................................148
XML Table Space .....................................................................................................................148
Page 8 ©Copyright 2007, Cognizant Technology Solutions, All Rights Reserved
C3: Protected

Associa
teID
:245
217
Handout - Mainframe Testing
Index Spaces ............................................................................................................................149
Databases .................................................................................................................................149
Summary: .................................................................................................................................149
Test Your Understanding ..........................................................................................................149
Chapter 8: REXX .........................................................................................................................151
Learning Objective ....................................................................................................................151
Introduction ...............................................................................................................................151
Writing a REXX Exec ................................................................................................................151
Executing a REXX Exec ...........................................................................................................152
REXX Syntax ............................................................................................................................153
Variables and Expressions .......................................................................................................153
Operators ..................................................................................................................................153
Parsing ......................................................................................................................................155
Conditional Statements ............................................................................................................156
Looping Statements ..................................................................................................................157
Interrupt Instructions .................................................................................................................159
Functions and Sub-routines ......................................................................................................160
Built-in Functions ......................................................................................................................162
Read a Dataset Using REXX ....................................................................................................163
Writing into a Dataset Using REXX ..........................................................................................164
Summary: .................................................................................................................................164
Test Your Understanding ..........................................................................................................165
Chapter 9: File-Aid ......................................................................................................................166
Learning Objective ....................................................................................................................166
What is FileAid? ........................................................................................................................166
Why FileAid? .............................................................................................................................166
How to Browse a Data File using FileAid? ...............................................................................168
Character Mode ........................................................................................................................169
Vertical Formatted Mode ..........................................................................................................169
Formatted Mode .......................................................................................................................169
Record layout Usage ................................................................................................................170
Selection Criteria usage ...........................................................................................................170
How to Edit a Data File using FileAid .......................................................................................174
How to Copy a Data File to Another Data File using FileAid ....................................................174
How to Compare two Data Files using File Aid ........................................................................178
Conclusion ................................................................................................................................182
Summary: .................................................................................................................................183
Page 9 ©Copyright 2007, Cognizant Technology Solutions, All Rights Reserved
C3: Protected
Associa
teID
:245
217
Handout - Mainframe Testing
Test Your Understanding ..........................................................................................................183
Chapter 10: Introduction to Mainframe Macros.......................................................................184
Learning objective ....................................................................................................................184
Introduction to Mainframe Macros ............................................................................................184
How to Record a Macro ............................................................................................................184
How to Playback a Macro .........................................................................................................185
Viewing a Recorded Macro ......................................................................................................185
Summary: .................................................................................................................................186
Test Your Understanding ..........................................................................................................186
Glossary ......................................................................................................................................187
References ..................................................................................................................................189
Books ........................................................................................................................................189
STUDENT NOTES: ......................................................................................................................190
Page 10 ©Copyright 2007, Cognizant Technology Solutions, All Rights Reserved
C3: Protected
Associa
teID
:245
217
Handout - Mainframe Testing
Introduction
About this Module
This module introduces the reader about the concepts of “Mainframe Testing”, various tools and technologies used in mainframes.
Target Audience
This module is for all those who will be enrolled in “Testing-track” in DoveTail.
Module Objectives
After completing this module, you will be able to: Define Mainframe Testing Describe the need of Mainframe Testing List all the Mainframe Languages Define Mainframe Macros Explain tools and technologies present in the Mainframe
Pre-requisite
A reader should have the Basic knowledge about testing
Page 11 ©Copyright 2007, Cognizant Technology Solutions, All Rights Reserved
C3: Protected
Associa
teID
:245
217
Handout - Mainframe Testing
Chapter 1: Getting Started with Mainframes
Learning Objective
After completing this chapter, you will be able to: Connect to Mainframes through Terminal Emulator Save a Mainframe Session Configure Key-Map in IBM Personal Communication.
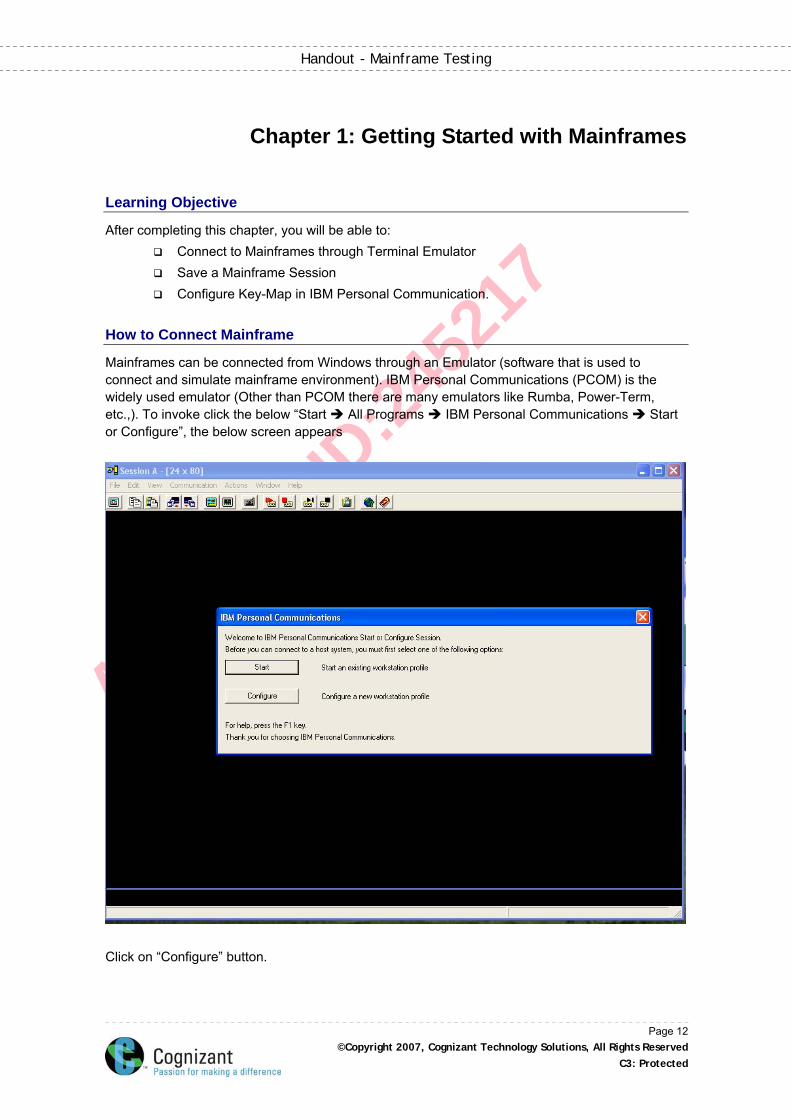
How to Connect Mainframe
Mainframes can be connected from Windows through an Emulator (software that is used to connect and simulate mainframe environment). IBM Personal Communications (PCOM) is the widely used emulator (Other than PCOM there are many emulators like Rumba, Power-Term, etc.,). To invoke click the below “Start All Programs IBM Personal Communications Start or Configure”, the below screen appears
Click on “Configure” button.
Page 12 ©Copyright 2007, Cognizant Technology Solutions, All Rights Reserved
C3: Protected
Associa
teID
:245
217
Handout - Mainframe Testing
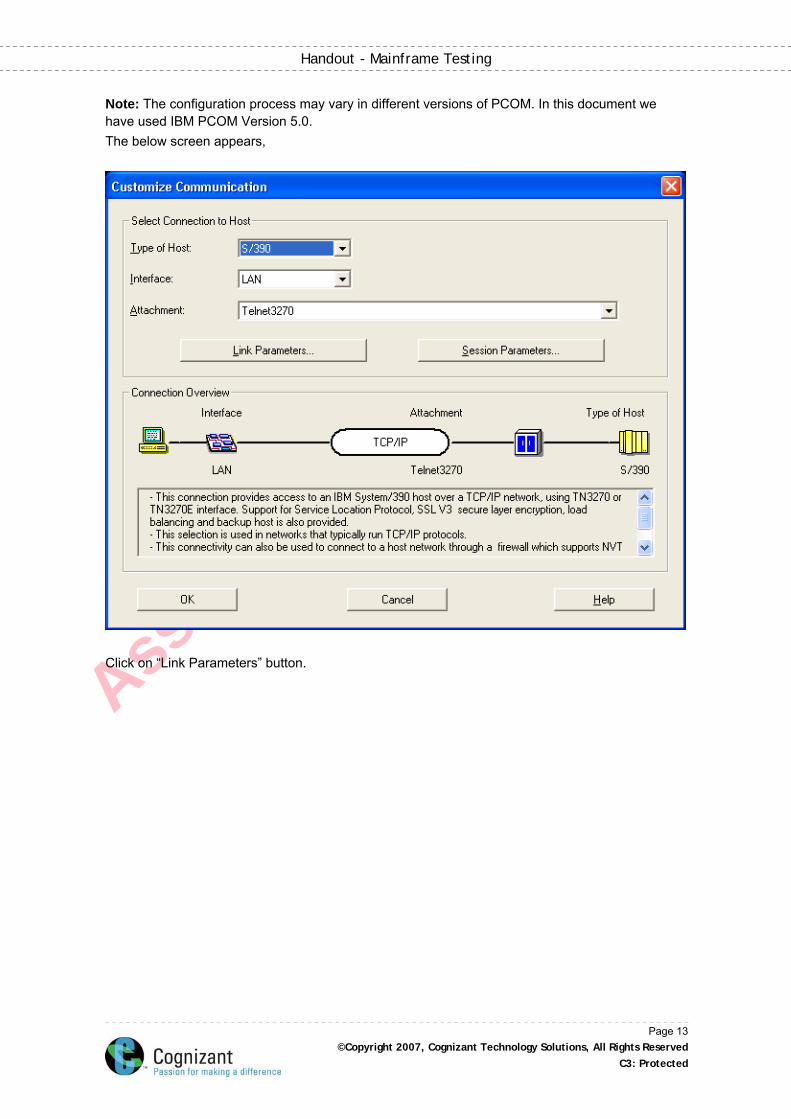
Note: The configuration process may vary in different versions of PCOM. In this document we have used IBM PCOM Version 5.0. The below screen appears,
Click on “Link Parameters” button.
Page 13 ©Copyright 2007, Cognizant Technology Solutions, All Rights Reserved
C3: Protected
Associa
teID
:245
217
Handout - Mainframe Testing
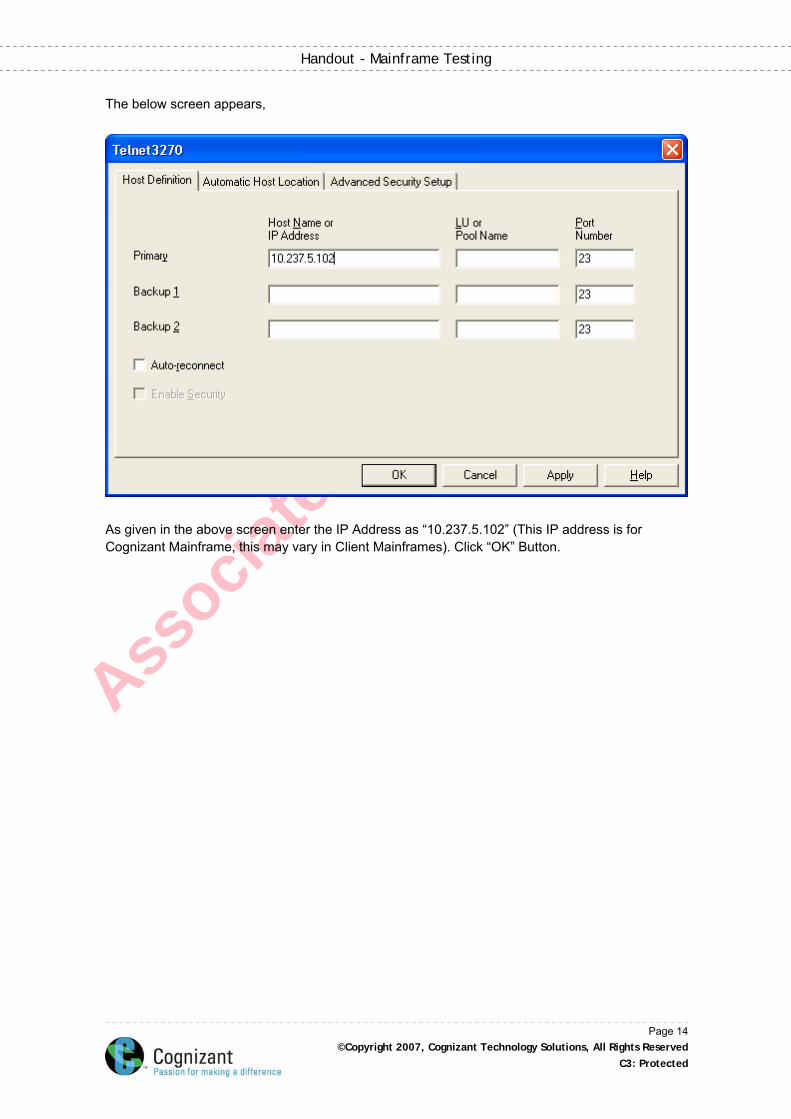
The below screen appears,
As given in the above screen enter the IP Address as “10.237.5.102” (This IP address is for Cognizant Mainframe, this may vary in Client Mainframes). Click “OK” Button.
Page 14 ©Copyright 2007, Cognizant Technology Solutions, All Rights Reserved
C3: Protected

Associa
teID
:245
217
Handout - Mainframe Testing
The below screen appears,
Click “OK” button to get connected to mainframe.
Page 15 ©Copyright 2007, Cognizant Technology Solutions, All Rights Reserved
C3: Protected
Associa
teID
:245
217
Handout - Mainframe Testing
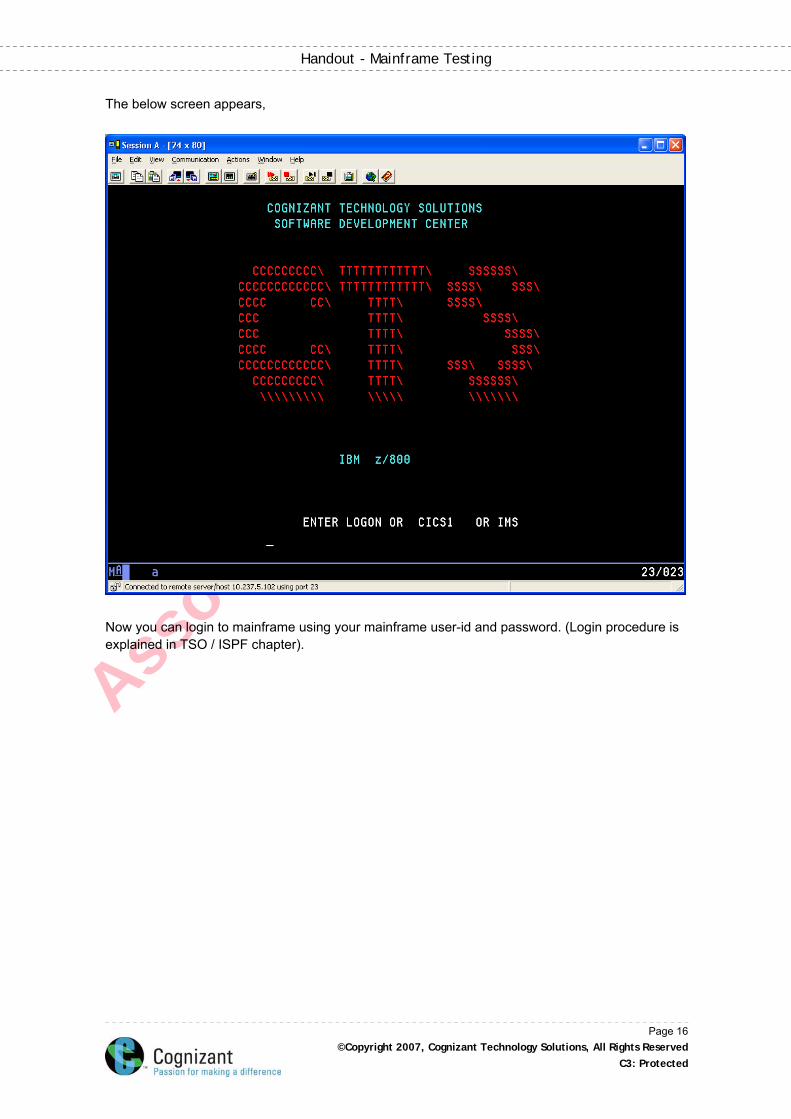
The below screen appears,
Now you can login to mainframe using your mainframe user-id and password. (Login procedure is explained in TSO / ISPF chapter).
Page 16 ©Copyright 2007, Cognizant Technology Solutions, All Rights Reserved
C3: Protected
Associa
teID
:245
217
Handout - Mainframe Testing
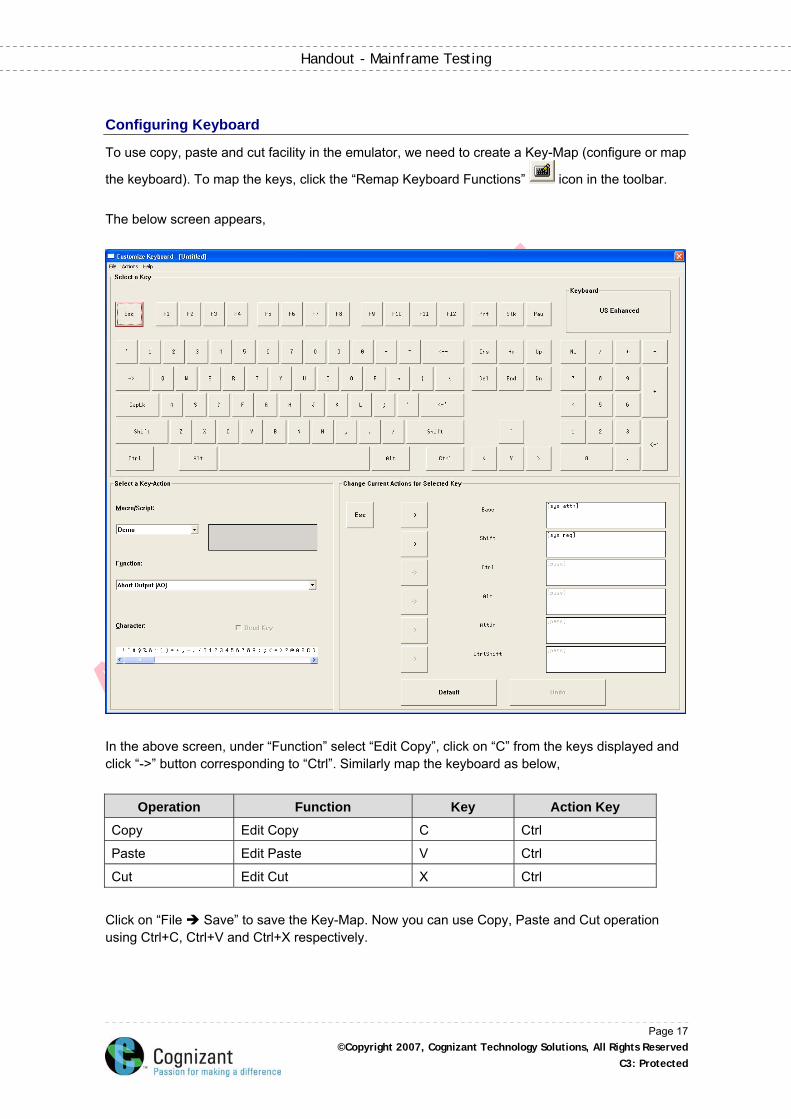
Configuring Keyboard
To use copy, paste and cut facility in the emulator, we need to create a Key-Map (configure or map
the keyboard). To map the keys, click the “Remap Keyboard Functions” icon in the toolbar. The below screen appears,
In the above screen, under “Function” select “Edit Copy”, click on “C” from the keys displayed and click “->” button corresponding to “Ctrl”. Similarly map the keyboard as below,
Operation Function Key Action Key
Copy Edit Copy C Ctrl
Paste Edit Paste V Ctrl
Cut Edit Cut X Ctrl
Click on “File Save” to save the Key-Map. Now you can use Copy, Paste and Cut operation using Ctrl+C, Ctrl+V and Ctrl+X respectively.
Page 17 ©Copyright 2007, Cognizant Technology Solutions, All Rights Reserved
C3: Protected
Associa
teID
:245
217
Handout - Mainframe Testing
Saving the Session
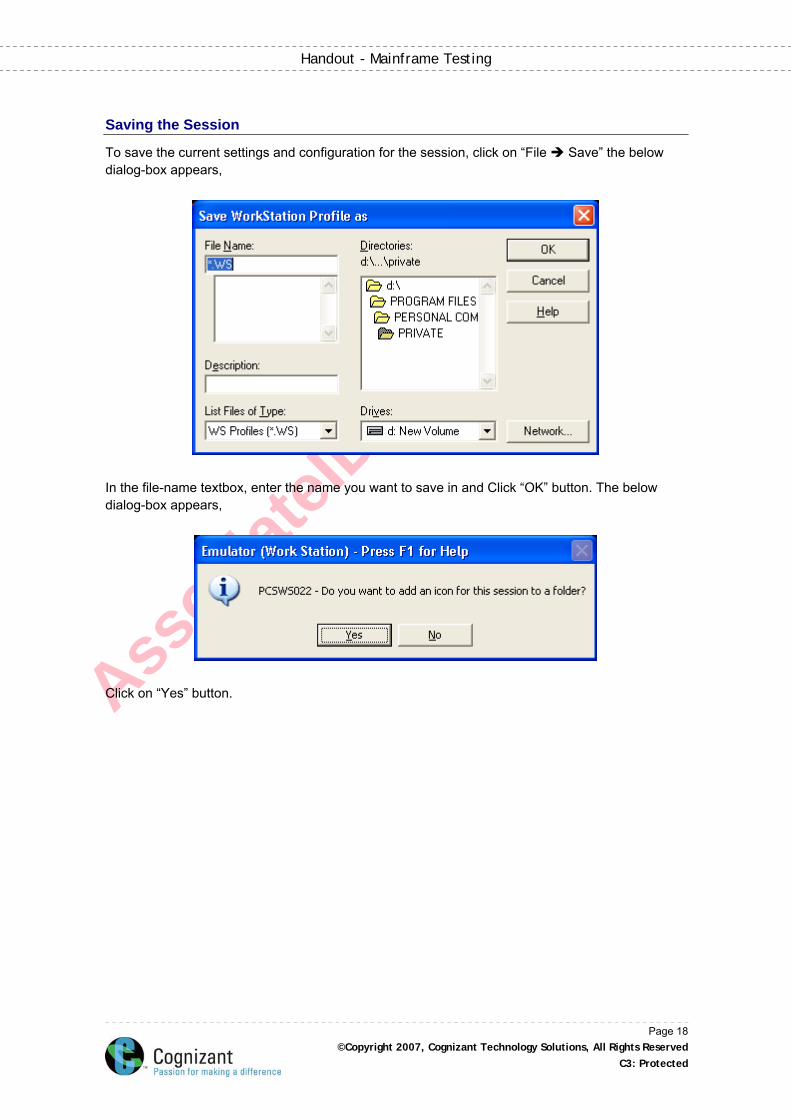
To save the current settings and configuration for the session, click on “File Save” the below dialog-box appears,
In the file-name textbox, enter the name you want to save in and Click “OK” button. The below dialog-box appears,
Click on “Yes” button.
Page 18 ©Copyright 2007, Cognizant Technology Solutions, All Rights Reserved
C3: Protected
Associa
teID
:245
217
Handout - Mainframe Testing
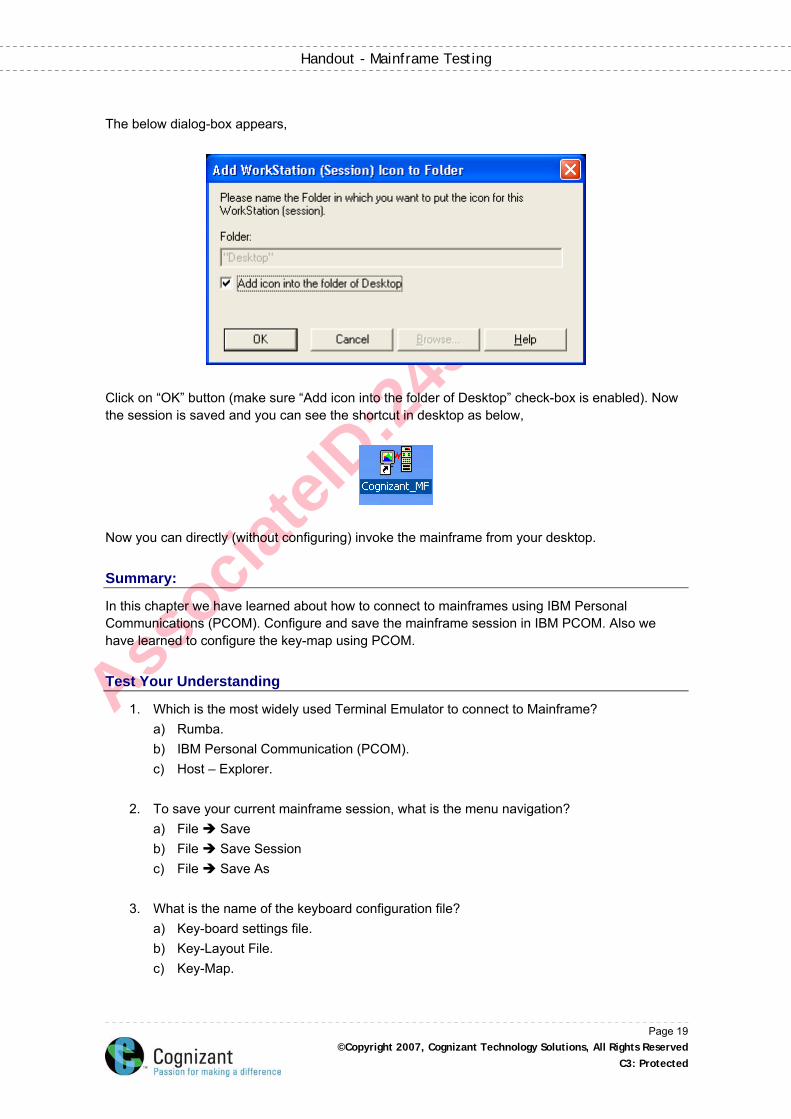
The below dialog-box appears,
Click on “OK” button (make sure “Add icon into the folder of Desktop” check-box is enabled). Now the session is saved and you can see the shortcut in desktop as below,
Now you can directly (without configuring) invoke the mainframe from your desktop.
Summary:
In this chapter we have learned about how to connect to mainframes using IBM Personal Communications (PCOM). Configure and save the mainframe session in IBM PCOM. Also we have learned to configure the key-map using PCOM.
Test Your Understanding
1. Which is the most widely used Terminal Emulator to connect to Mainframe? a) Rumba. b) IBM Personal Communication (PCOM). c) Host – Explorer.
2. To save your current mainframe session, what is the menu navigation?
a) File Save b) File Save Session c) File Save As
3. What is the name of the keyboard configuration file?
a) Key-board settings file. b) Key-Layout File. c) Key-Map.
Page 19 ©Copyright 2007, Cognizant Technology Solutions, All Rights Reserved
C3: Protected
Associa
teID
:245
217
Handout - Mainframe Testing
Answers: 1. b 2. a 3. c
Page 20 ©Copyright 2007, Cognizant Technology Solutions, All Rights Reserved
C3: Protected
Associa
teID
:245
217
Handout - Mainframe Testing
Chapter 2: TSO/ ISPF
Learning Objective
After completing this chapter, you will be able to: Log-in to Mainframes Define TSO / ISPF Define dataset List the types of dataset Allocate a dataset Work with Move / Copy Utility Work with DSLIST Utility Explain various modes of opening a dataset Work with basic commands used in edit panels List the features of SuperCE and SearchFor Utilities
TSO
Time Sharing Option, generally known as TSO, is a subsystem that runs on the MVS (Multiple Virtual Storage) operating system on an OS390 machine. This subsystem allows users to interactively work with the system in either of the following way.
Line Mode TSO
The way programmers originally communicated interactively with the MVS operating system was with TSO/E commands typed on a terminal, one line at a time. It is a quick and direct way to use TSO/E.
ISPF/PDF
The Interactive System Productivity Facility (ISPF) and its Program Development Facility (ISPF/PDF) work together with TSO/E to provide panels (screens) with which users can interact. ISPF provides the underlying dialog management service that displays panels and enables a user to navigate through the panels.
Page 21 ©Copyright 2007, Cognizant Technology Solutions, All Rights Reserved
C3: Protected
Associa
teID
:245
217
Handout - Mainframe Testing
Page 22 ©Copyright 2007, Cognizant Technology Solutions, All Rights Reserved
C3: Protected
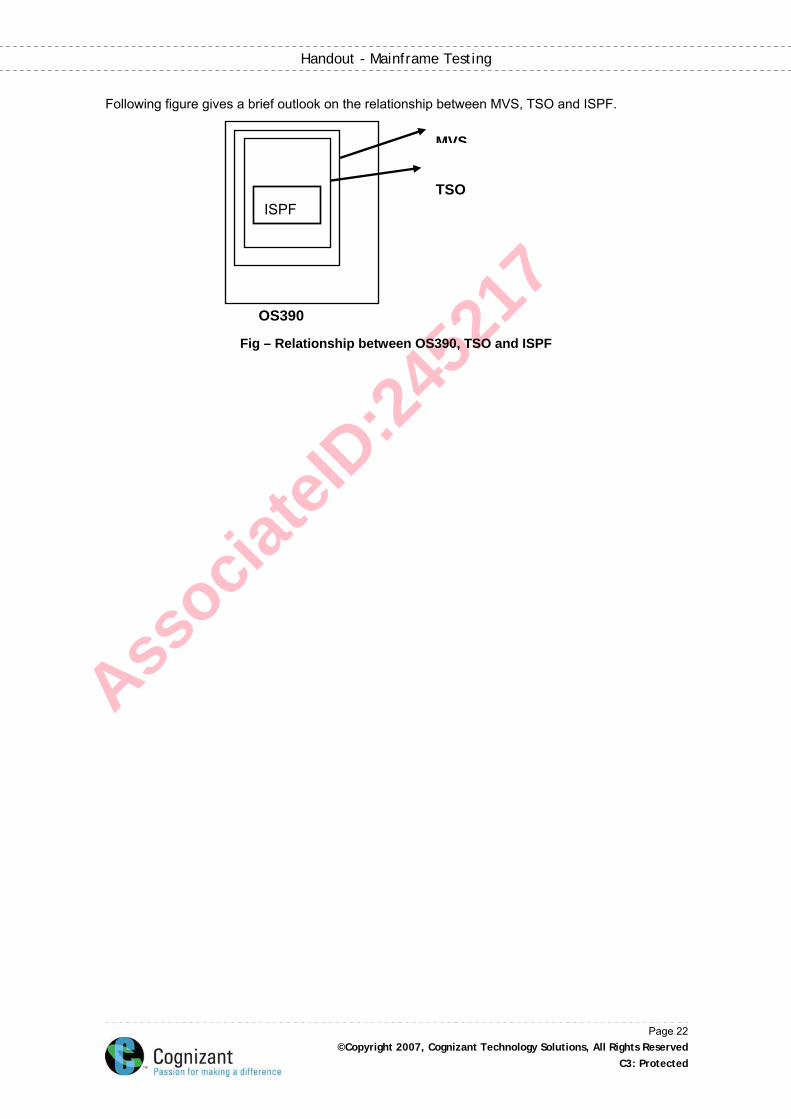
Following figure gives a brief outlook on the relationship between MVS, TSO and ISPF.
Fig – Relationship between OS390, TSO and ISPF
OS390
ISPF
MVS
TSO
Associa
teID
:245
217
Handout - Mainframe Testing
Logging on and Line Mode
Logging on The panel shown in Figure 2-1 is used to log on to the TSO session in CTS.
COGNIZANT TECHNOLOGY SOLUTIONS
CHENNAI SOFTWARE DEVELOPMENT CENTER
CCCCCCCCC\ TTTTTTTTTTTT\ SSSSSS\
CCCCCCCCCCCC\ TTTTTTTTTTTT\ SSSS\ SSS\
CCCC CC\ TTTT\ SSSS\
CCC TTTT\ SSSS\
CCC TTTT\ SSSS\
CCCC CC\ TTTT\ SSS\
CCCCCCCCCCCC\ TTTT\ SSS\ SSSS\
CCCCCCCCC\ TTTT\ SSSSSS\
\\\\\\\\\ \\\\\ \\\\\\\
IBM S/390
ENTER LOGON OR CICS1 OR IMS
LOGON <USERID>
Fig 2-1 – CTS Logon screen
Page 23 ©Copyright 2007, Cognizant Technology Solutions, All Rights Reserved
C3: Protected
Associa
teID
:245
217
Handout - Mainframe Testing
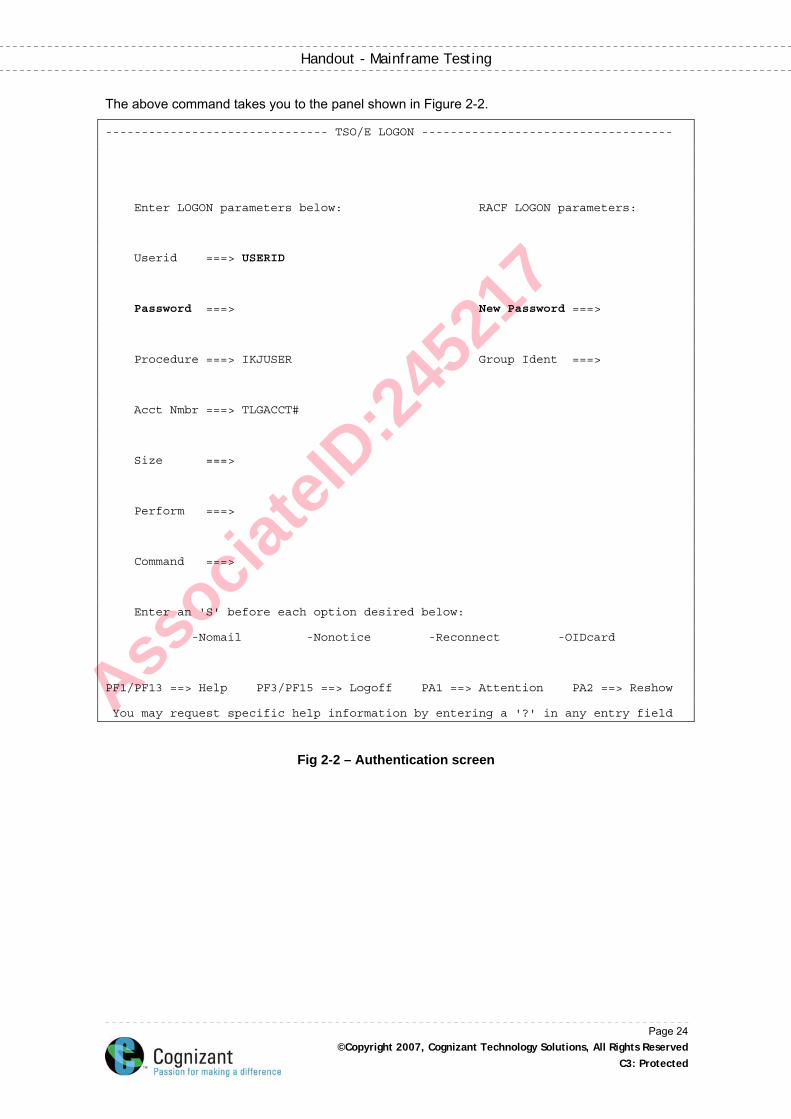
The above command takes you to the panel shown in Figure 2-2.
------------------------------- TSO/E LOGON -----------------------------------
Enter LOGON parameters below: RACF LOGON parameters:
Userid ===> USERID
Password ===> New Password ===>
Procedure ===> IKJUSER Group Ident ===>
Acct Nmbr ===> TLGACCT#
Size ===>
Perform ===>
Command ===>
Enter an 'S' before each option desired below:
-Nomail -Nonotice -Reconnect -OIDcard
PF1/PF13 ==> Help PF3/PF15 ==> Logoff PA1 ==> Attention PA2 ==> Reshow
You may request specific help information by entering a '?' in any entry field
Fig 2-2 – Authentication screen
Page 24 ©Copyright 2007, Cognizant Technology Solutions, All Rights Reserved
C3: Protected
Associa
teID
:245
217
Handout - Mainframe Testing
Let us take a brief look into the few fields in the above panel.
UserID The UserID should be specified here. The system fills this field with the information that is specified in the logon screen.
Password The user’s password has to be specified here. If you try to logon more than two times by giving an incorrect password, the system will revoke your password.
New Password The TSO password has to be changed periodically, depending on the duration set for that. When your password expires, the system will prompt you to enter your new password here. However, the system will not ask you to confirm or verify your new password. A few days before it is due to expire, the system will alert you to the fact that your password will expire.
Valid user-id and password in the above fields takes you to the ISPF/PDF facility.
Features of ISPF
The following are the salient features of the ISPF. Provides an on-line environment to interact with MVS. Provides Menu driven interface operation as opposed to TSO, which provides line
mode only. Provides facilities for Editing and Browsing data sets. ISPF uses panels to display and receive information, and allows customization of your
ISPF environment. Provides Program Function keys to avoid manual typing of commands. Provides for easy management of datasets through the Dataset menu. Provides extensive facilities for comparing datasets and searching for data. Provides facilities for executing programs in batch or foreground. Provides for debugging of advanced user written ISPF applications. Provides advanced facilities to Create, Delete and Display VSAM datasets. A GUI (Graphical User Interface) to allow a Client/Server Interface between an ISPF
Client at a workstation and a host TSO/ISPF session.
Dataset and It’s Types
Files in mainframes are referred as dataset. There are two types of dataset, they are as follows, PS (Physical Sequential) (or) Flat File. PDS (Partitioned DataSet).
Let us take a brief look at the above types of dataset, PS
PS files are flat files, similar to normal text files in windows. PDS
PDS files contains members in it, each member is similar to a PS. It is similar to a directory in windows with text files inside it.
Page 25 ©Copyright 2007, Cognizant Technology Solutions, All Rights Reserved
C3: Protected
Associa
teID
:245
217
Handout - Mainframe Testing
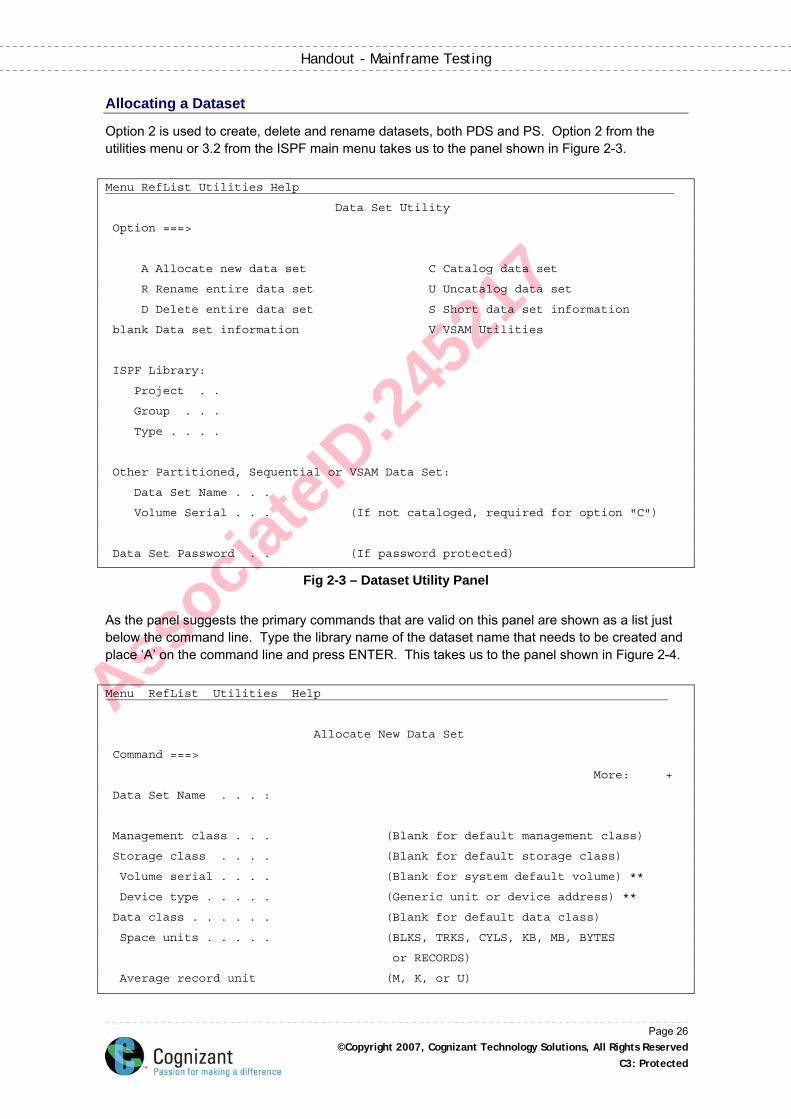
Allocating a Dataset
Option 2 is used to create, delete and rename datasets, both PDS and PS. Option 2 from the utilities menu or 3.2 from the ISPF main menu takes us to the panel shown in Figure 2-3. Menu RefList Utilities Help
Data Set Utility
Option ===>
A Allocate new data set C Catalog data set
R Rename entire data set U Uncatalog data set
D Delete entire data set S Short data set information
blank Data set information V VSAM Utilities
ISPF Library:
Project . .
Group . . .
Type . . . .
Other Partitioned, Sequential or VSAM Data Set:
Data Set Name . . .
Volume Serial . . . (If not cataloged, required for option "C")
Data Set Password . . (If password protected)
Fig 2-3 – Dataset Utility Panel As the panel suggests the primary commands that are valid on this panel are shown as a list just below the command line. Type the library name of the dataset name that needs to be created and place ‘A’ on the command line and press ENTER. This takes us to the panel shown in Figure 2-4. Menu RefList Utilities Help
Allocate New Data Set
Command ===>
More: +
Data Set Name . . . :
Management class . . . (Blank for default management class)
Storage class . . . . (Blank for default storage class)
Volume serial . . . . (Blank for system default volume) **
Device type . . . . . (Generic unit or device address) **
Data class . . . . . . (Blank for default data class)
Space units . . . . . (BLKS, TRKS, CYLS, KB, MB, BYTES
or RECORDS)
Average record unit (M, K, or U)
Page 26 ©Copyright 2007, Cognizant Technology Solutions, All Rights Reserved
C3: Protected
Associa
teID
:245
217
Handout - Mainframe Testing
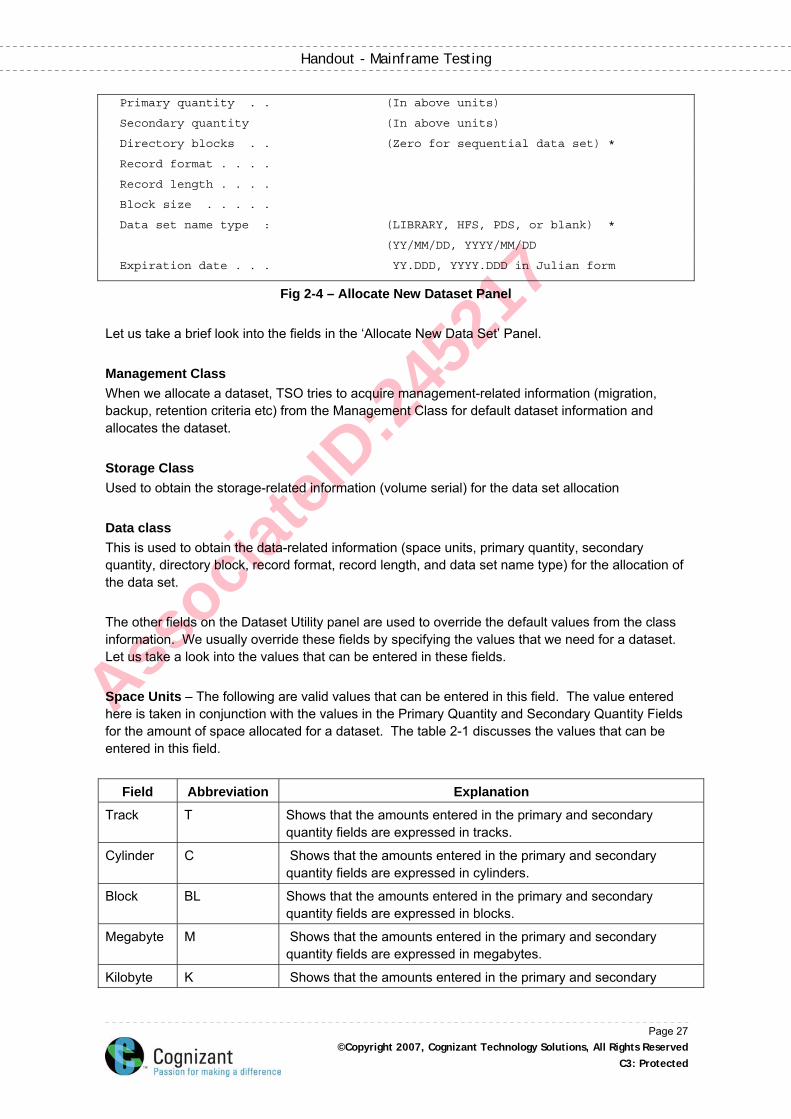
Primary quantity . . (In above units)
Secondary quantity (In above units)
Directory blocks . . (Zero for sequential data set) *
Record format . . . .
Record length . . . .
Block size . . . . .
Data set name type : (LIBRARY, HFS, PDS, or blank) *
(YY/MM/DD, YYYY/MM/DD
Expiration date . . . YY.DDD, YYYY.DDD in Julian form
Fig 2-4 – Allocate New Dataset Panel Let us take a brief look into the fields in the ‘Allocate New Data Set’ Panel. Management Class When we allocate a dataset, TSO tries to acquire management-related information (migration, backup, retention criteria etc) from the Management Class for default dataset information and allocates the dataset. Storage Class Used to obtain the storage-related information (volume serial) for the data set allocation Data class This is used to obtain the data-related information (space units, primary quantity, secondary quantity, directory block, record format, record length, and data set name type) for the allocation of the data set. The other fields on the Dataset Utility panel are used to override the default values from the class information. We usually override these fields by specifying the values that we need for a dataset. Let us take a look into the values that can be entered in these fields. Space Units – The following are valid values that can be entered in this field. The value entered here is taken in conjunction with the values in the Primary Quantity and Secondary Quantity Fields for the amount of space allocated for a dataset. The table 2-1 discusses the values that can be entered in this field.
Field Abbreviation Explanation
Track T Shows that the amounts entered in the primary and secondary quantity fields are expressed in tracks.
Cylinder C Shows that the amounts entered in the primary and secondary quantity fields are expressed in cylinders.
Block BL Shows that the amounts entered in the primary and secondary quantity fields are expressed in blocks.
Megabyte M Shows that the amounts entered in the primary and secondary quantity fields are expressed in megabytes.
Kilobyte K Shows that the amounts entered in the primary and secondary
Page 27 ©Copyright 2007, Cognizant Technology Solutions, All Rights Reserved
C3: Protected
Associa
teID
:245
217
Handout - Mainframe Testing
quantity fields are expressed in kilobytes.
Byte BY Shows that the amounts entered in the primary and secondary quantity fields are expressed in bytes.
Records R Specified by the block size field.
Table 2-1 – Valid values for Space Units Primary Quantity – The value specified in this field determines the amount of space allocated for the dataset. For example, a value of CYLS in the ‘Space units’ field, and a value of 5 in the Primary Quantity field directs the system to allocate a space of 5 cylinders at the first extent of allocation for the dataset. Secondary Quantity – The value in this field is used to allocate additional space to the dataset when the space allocated in the primary allocation is insufficient.
Space Allocation for Datasets
A total of 16 extents are available per dataset. The initial space allocated is the quantity in the Primary Quantity. When the primary is exhausted secondary space is obtained. Primary and secondary extents are allocated using seeks and 5 seeks allowed for one primary or secondary attempt For example, if 20 tracks of space are required, and this is available as 5 chunks of 4 tracks each, the attempt is successful. On the other hand, if these 20 tracks are available as 10 chunks of 2 tracks, this allocation attempt is not successful. A dataset is full when
All 16 extents are taken No space for extent on the volume.
Directory blocks – The value in this field determines the number of members in a PDS. A positive value in this field denotes that the dataset is a PDS and a 0 denotes that the dataset is a PS.
Each 256-byte block accommodates the following number of directory entries: o Data sets with ISPF statistics - 6 o Data sets without ISPF statistics - 21
Load module data sets - 4-7, depending on attributes Record Format – The value in this field determines the format of the PDS or PS being allocated. The PS and PDS datasets have the following record formats. Fixed – This means that all the records stored in these datasets have same length (RECFM=F). Variable – These datasets can store records that are different in length (RECFM=V). For example, an address file, which has three levels of addresses, can be allocated a variable length. If only two address levels are entered, the record can be stored with the available length, saving disk space.
Page 28 ©Copyright 2007, Cognizant Technology Solutions, All Rights Reserved
C3: Protected
Associa
teID
:245
217
Handout - Mainframe Testing
Undefined – Application Programmers use this record format to store load modules. Blocked – Blocking is the process of grouping records into blocks before they are written on a volume. A block consists of one or more logical records. Each block is written between consecutive inter-block gaps (IBG). Blocking conserves storage space on a volume by reducing the number of inter-block gaps in the data set, and increases processing efficiency by reducing the number of I/O operations required to process the data set. Blocking can be done for both Fixed Length records (RECFM=FB) and Variable length records (RECFM=VB). For a Record Format of ‘F’, each record is followed by an IBG. For a Record Format of FB, the LRECL is fixed, and there may be more than one record in a block. Thus, the BLKSIZE must be a multiple of the LRECL. For a Record Format of ‘V’, the LRECL is variable. Hence, the length of each record is stored with the record. Each record is followed by an IBG. In a ‘VB’ data set, the LRECL is not fixed, and more than one record is contained in a block. Hence, the LRECL and BLKSIZE are stored with the data. Record Length – The value of the length of the records stored in the dataset. This is read in conjunction with the Record Format. Block Size - The block size, also called physical record length, of the blocks to be stored in the data set. Use this field to specify how many bytes of data to put into each block, based on the record length. For example, if the record length is 80 and the block size is 3120, 39 records can be placed in each block. Please refer to the ‘Dataset Organization’ chapter of the ESA courseware for more details on RECFM, LRECL and Block Size. Please refer to the IBM manual on ISPF for details on other fields on this panel. We are not discussing them here, as we will not be using them on daily basis. Note: A data set that is allocated on a volume that is managed by the Storage Management Subsystem (SMS) is called a managed data set. A data set that is allocated on a volume that is not managed by the SMS is called a non-managed dataset.
Page 29 ©Copyright 2007, Cognizant Technology Solutions, All Rights Reserved
C3: Protected
Associa
teID
:245
217
Handout - Mainframe Testing
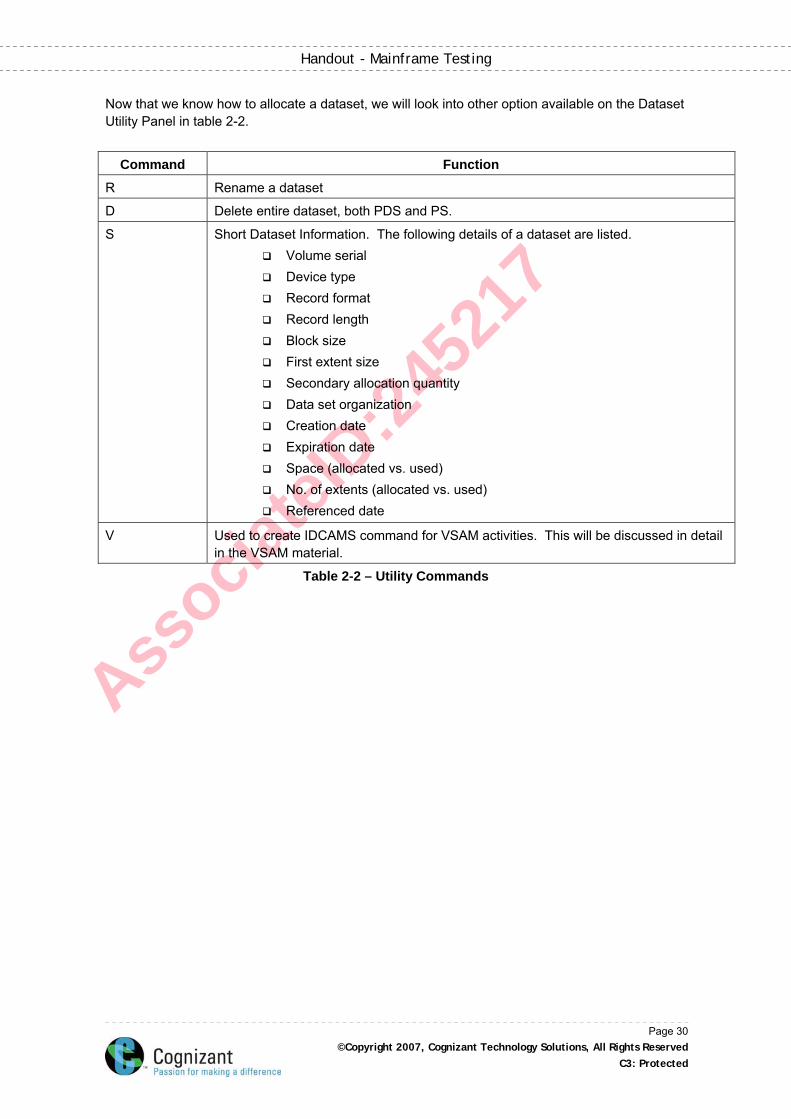
Now that we know how to allocate a dataset, we will look into other option available on the Dataset Utility Panel in table 2-2.
Command Function
R Rename a dataset
D Delete entire dataset, both PDS and PS.
S Short Dataset Information. The following details of a dataset are listed. Volume serial Device type Record format Record length Block size First extent size Secondary allocation quantity Data set organization Creation date Expiration date Space (allocated vs. used) No. of extents (allocated vs. used) Referenced date
V Used to create IDCAMS command for VSAM activities. This will be discussed in detail in the VSAM material.
Table 2-2 – Utility Commands
Page 30 ©Copyright 2007, Cognizant Technology Solutions, All Rights Reserved
C3: Protected
Associa
teID
:245
217
Handout - Mainframe Testing
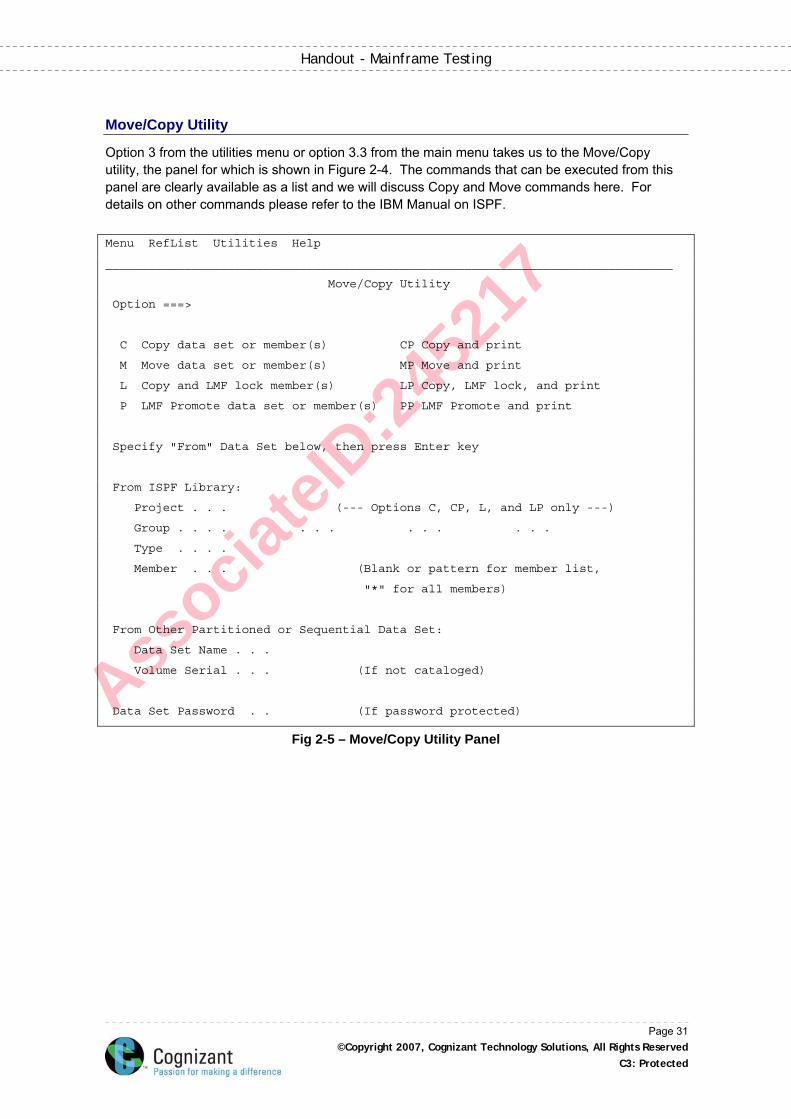
Move/Copy Utility
Option 3 from the utilities menu or option 3.3 from the main menu takes us to the Move/Copy utility, the panel for which is shown in Figure 2-4. The commands that can be executed from this panel are clearly available as a list and we will discuss Copy and Move commands here. For details on other commands please refer to the IBM Manual on ISPF. Menu RefList Utilities Help
_______________________________________________________________________________
Move/Copy Utility
Option ===>
C Copy data set or member(s) CP Copy and print
M Move data set or member(s) MP Move and print
L Copy and LMF lock member(s) LP Copy, LMF lock, and print
P LMF Promote data set or member(s) PP LMF Promote and print
Specify "From" Data Set below, then press Enter key
From ISPF Library:
Project . . . (--- Options C, CP, L, and LP only ---)
Group . . . . . . . . . . . . .
Type . . . .
Member . . . (Blank or pattern for member list,
"*" for all members)
From Other Partitioned or Sequential Data Set:
Data Set Name . . .
Volume Serial . . . (If not cataloged)
Data Set Password . . (If password protected)
Fig 2-5 – Move/Copy Utility Panel
Page 31 ©Copyright 2007, Cognizant Technology Solutions, All Rights Reserved
C3: Protected
Associa
teID
:245
217
Handout - Mainframe Testing
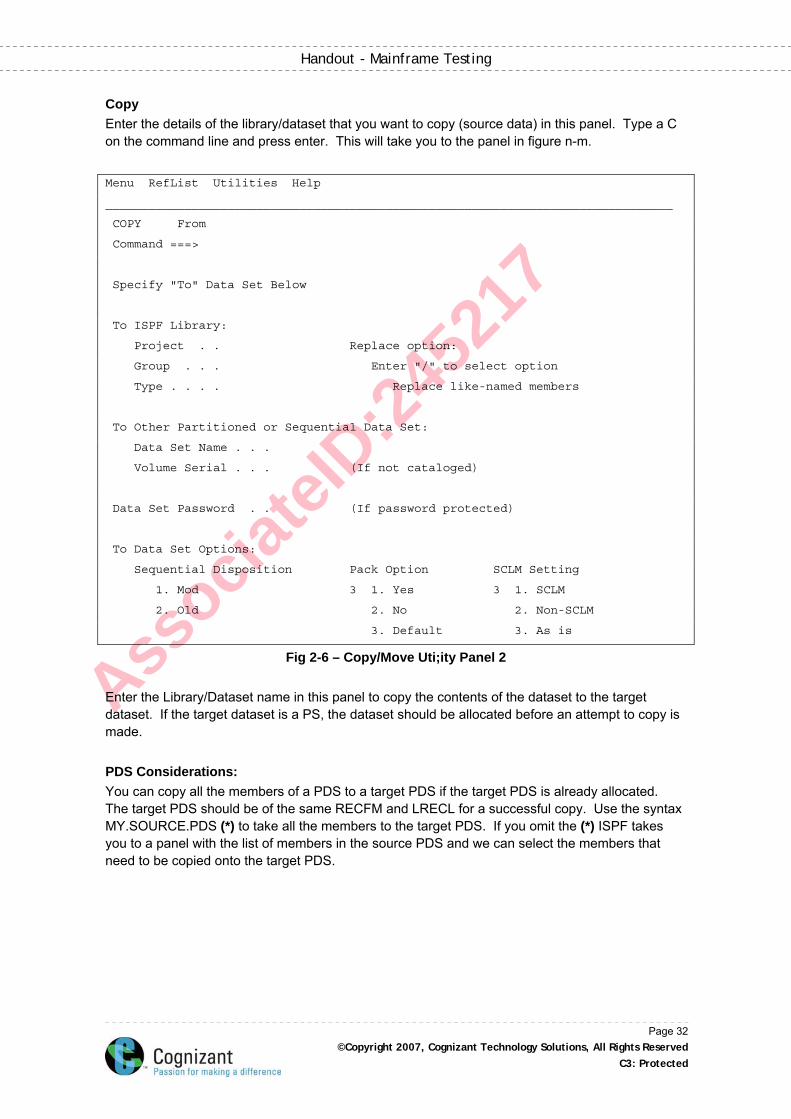
Copy Enter the details of the library/dataset that you want to copy (source data) in this panel. Type a C on the command line and press enter. This will take you to the panel in figure n-m.
Menu RefList Utilities Help
_______________________________________________________________________________
COPY From
Command ===>
Specify "To" Data Set Below
To ISPF Library:
Project . . Replace option:
Group . . . Enter "/" to select option
Type . . . . Replace like-named members
To Other Partitioned or Sequential Data Set:
Data Set Name . . .
Volume Serial . . . (If not cataloged)
Data Set Password . . (If password protected)
To Data Set Options:
Sequential Disposition Pack Option SCLM Setting
1. Mod 3 1. Yes 3 1. SCLM
2. Old 2. No 2. Non-SCLM
3. Default 3. As is
Fig 2-6 – Copy/Move Uti;ity Panel 2 Enter the Library/Dataset name in this panel to copy the contents of the dataset to the target dataset. If the target dataset is a PS, the dataset should be allocated before an attempt to copy is made. PDS Considerations: You can copy all the members of a PDS to a target PDS if the target PDS is already allocated. The target PDS should be of the same RECFM and LRECL for a successful copy. Use the syntax MY.SOURCE.PDS (*) to take all the members to the target PDS. If you omit the (*) ISPF takes you to a panel with the list of members in the source PDS and we can select the members that need to be copied onto the target PDS.
Page 32 ©Copyright 2007, Cognizant Technology Solutions, All Rights Reserved
C3: Protected

Associa
teID
:245
217
Handout - Mainframe Testing
Move Entering the primary command M in the command prompt moves a dataset to the target dataset. Move differs from the copy in that it deletes the source dataset after the command is executed while copy retains it. For information on other commands please refer to the IBM Manual on ISPF or online help in ISPF.
Dataset List Utility
You can get to this panel (Figure 2-7) by entering 4 on the Utilities panel or 3.4 from the Main Menu. This is the maximum used panel in the ISPF because of the following salient features available on this panel.
Search on dataset names Personalized settings Multiple operations on the datasets Dynamic List of datasets
Menu RefList RefMode Utilities Help
________________________________________________________________________________
Data Set List Utility
Option ===>
blank Display data set list P Print data set list
V Display VTOC information PV Print VTOC information
Enter one or both of the parameters below:
Dsname Level . . .
Volume serial . .
Data set list options
Initial View . . . 1 1. Volume Enter "/" to select option
2. Space / Confirm Data Set Delete
3. Attrib / Confirm Member Delete
4. Total
When the data set list is displayed, enter either:
"/" on the data set list command field for the command prompt pop-up,
an ISPF line command, the name of a TSO command, CLIST, or REXX exec, or
"=" to execute the previous command.
Fig 2-7 – Dataset List
Page 33 ©Copyright 2007, Cognizant Technology Solutions, All Rights Reserved
C3: Protected
Associa
teID
:245
217
Handout - Mainframe Testing
The following commands and features are available from this panel. Display Dataset List Print Dataset List Display VTOC information Print VTOC information
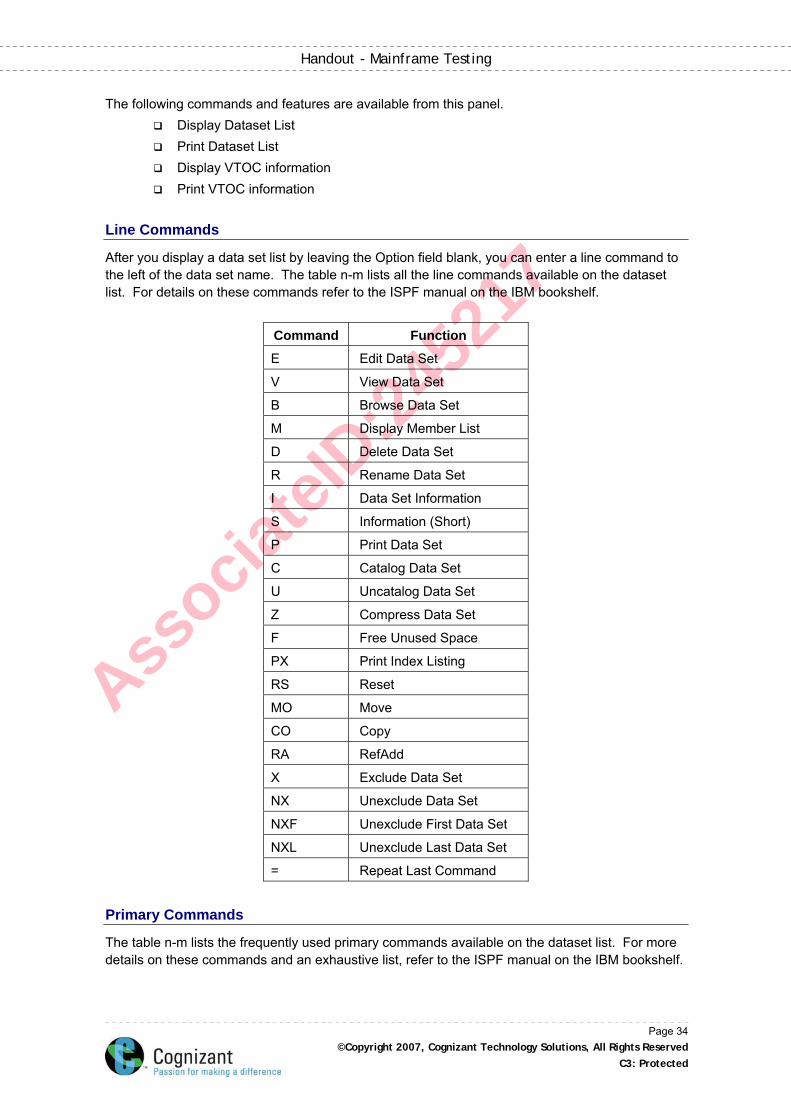
Line Commands
After you display a data set list by leaving the Option field blank, you can enter a line command to the left of the data set name. The table n-m lists all the line commands available on the dataset list. For details on these commands refer to the ISPF manual on the IBM bookshelf.
Command Function
E Edit Data Set
V View Data Set
B Browse Data Set
M Display Member List
D Delete Data Set
R Rename Data Set
I Data Set Information
S Information (Short)
P Print Data Set
C Catalog Data Set
U Uncatalog Data Set
Z Compress Data Set
F Free Unused Space
PX Print Index Listing
RS Reset
MO Move
CO Copy
RA RefAdd
X Exclude Data Set
NX Unexclude Data Set
NXF Unexclude First Data Set
NXL Unexclude Last Data Set
= Repeat Last Command
Primary Commands
The table n-m lists the frequently used primary commands available on the dataset list. For more details on these commands and an exhaustive list, refer to the ISPF manual on the IBM bookshelf.
Page 34 ©Copyright 2007, Cognizant Technology Solutions, All Rights Reserved
C3: Protected
Associa
teID
:245
217
Handout - Mainframe Testing
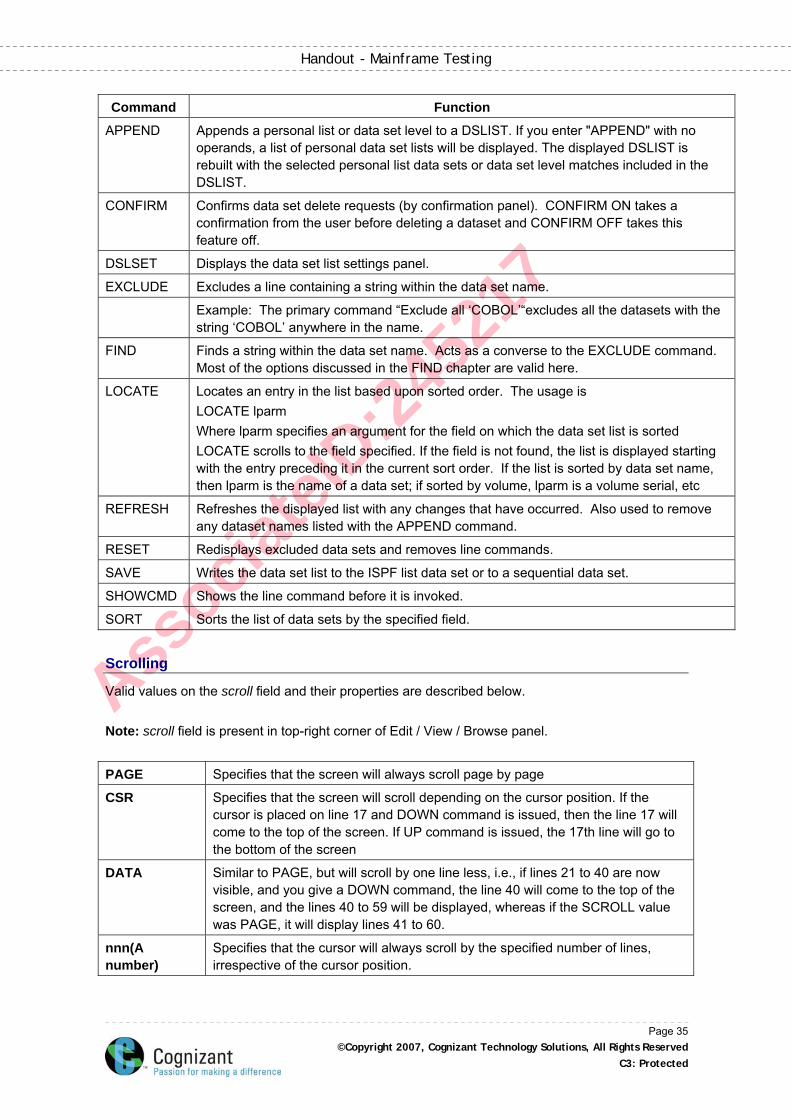
Command Function
APPEND Appends a personal list or data set level to a DSLIST. If you enter "APPEND" with no operands, a list of personal data set lists will be displayed. The displayed DSLIST is rebuilt with the selected personal list data sets or data set level matches included in the DSLIST.
CONFIRM Confirms data set delete requests (by confirmation panel). CONFIRM ON takes a confirmation from the user before deleting a dataset and CONFIRM OFF takes this feature off.
DSLSET Displays the data set list settings panel.
EXCLUDE Excludes a line containing a string within the data set name.
Example: The primary command “Exclude all ‘COBOL’“excludes all the datasets with the string ‘COBOL’ anywhere in the name.
FIND Finds a string within the data set name. Acts as a converse to the EXCLUDE command. Most of the options discussed in the FIND chapter are valid here.
LOCATE Locates an entry in the list based upon sorted order. The usage is LOCATE lparm Where lparm specifies an argument for the field on which the data set list is sorted LOCATE scrolls to the field specified. If the field is not found, the list is displayed starting with the entry preceding it in the current sort order. If the list is sorted by data set name, then lparm is the name of a data set; if sorted by volume, lparm is a volume serial, etc
REFRESH Refreshes the displayed list with any changes that have occurred. Also used to remove any dataset names listed with the APPEND command.
RESET Redisplays excluded data sets and removes line commands.
SAVE Writes the data set list to the ISPF list data set or to a sequential data set.
SHOWCMD Shows the line command before it is invoked.
SORT Sorts the list of data sets by the specified field.
Scrolling
Valid values on the scroll field and their properties are described below. Note: scroll field is present in top-right corner of Edit / View / Browse panel.
PAGE Specifies that the screen will always scroll page by page
CSR Specifies that the screen will scroll depending on the cursor position. If the cursor is placed on line 17 and DOWN command is issued, then the line 17 will come to the top of the screen. If UP command is issued, the 17th line will go to the bottom of the screen
DATA Similar to PAGE, but will scroll by one line less, i.e., if lines 21 to 40 are now visible, and you give a DOWN command, the line 40 will come to the top of the screen, and the lines 40 to 59 will be displayed, whereas if the SCROLL value was PAGE, it will display lines 41 to 60.
nnn(A number)
Specifies that the cursor will always scroll by the specified number of lines, irrespective of the cursor position.
Page 35 ©Copyright 2007, Cognizant Technology Solutions, All Rights Reserved
C3: Protected
Associa
teID
:245
217
Handout - Mainframe Testing
HALF Specifies that the screen will always scroll by half a page
Note 1: When you specify a scrolling command, you can also specify the number of lines by which you want the screen to scroll. If you specify DOWN 30, the screen will scroll down by 30 lines irrespective of the SCROLL field value. If you specify DOWN M or UP M, the screen will scroll to the bottom or top of the list. You can also type a number (or the letter m) and then press the PF keys for UP or DOWN. Note 2: A SCROLL value of CSR is preferred because it gives greater control over the data. These values are also valid on any SCROLL field anywhere in ISPF. All the above information is useful to get into a member or a sequential dataset for VIEW or EDIT. We shall continue our discussion on the features available to us once we start our VIEW/EDIT session.
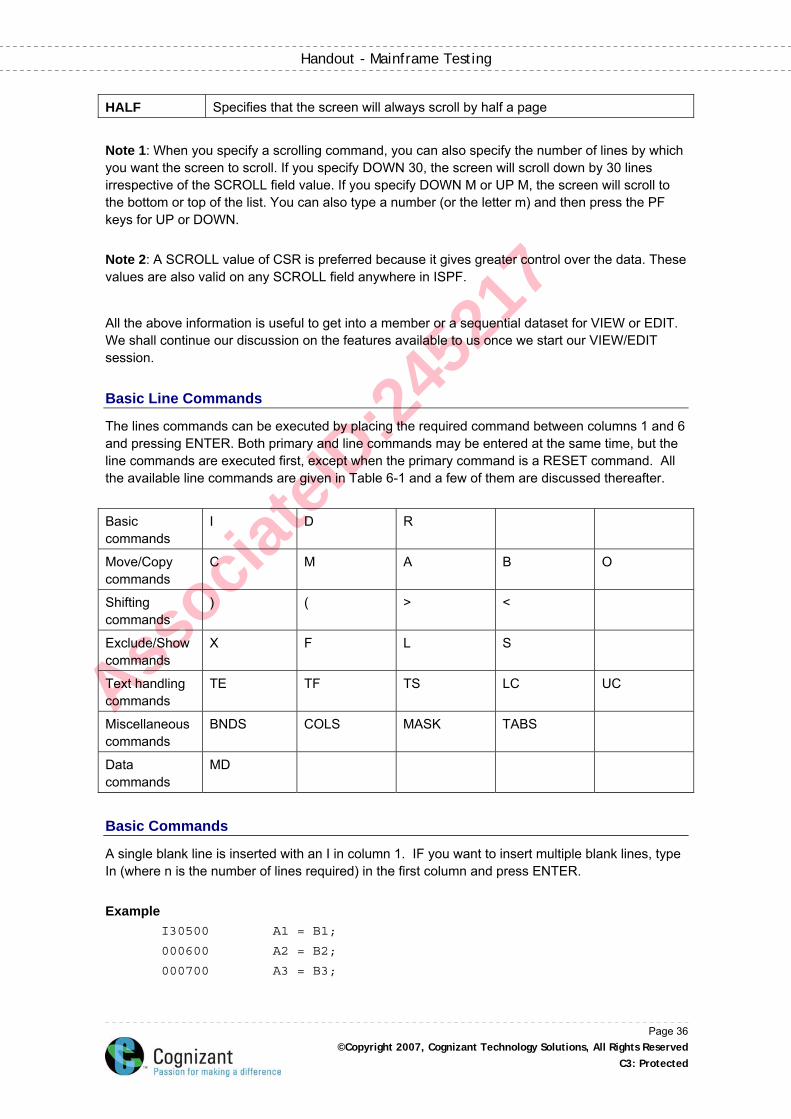
Basic Line Commands
The lines commands can be executed by placing the required command between columns 1 and 6 and pressing ENTER. Both primary and line commands may be entered at the same time, but the line commands are executed first, except when the primary command is a RESET command. All the available line commands are given in Table 6-1 and a few of them are discussed thereafter.
Basic commands
I D R
Move/Copy commands
C M A B O
Shifting commands
) ( > <
Exclude/Show commands
X F L S
Text handling commands
TE TF TS LC UC
Miscellaneous commands
BNDS COLS MASK TABS
Data commands
MD
Basic Commands
A single blank line is inserted with an I in column 1. IF you want to insert multiple blank lines, type In (where n is the number of lines required) in the first column and press ENTER. Example I30500 A1 = B1;
000600 A2 = B2;
000700 A3 = B3;
Page 36 ©Copyright 2007, Cognizant Technology Solutions, All Rights Reserved
C3: Protected
Associa
teID
:245
217
Handout - Mainframe Testing
000800 H1 = A1 * B2;
Result:
000500 A1 = B1;
000600
000700
000800
000900 A2 = B2;
001000 A3 = B3;
001100 H1 = A1 * B2; Enter D in the first column to delete a single line. If you know the exact number of lines to be deleted, use Dn (Where n is the number of lines to be deleted). A block of lines can be deleted by placing the lines to be deleted between a pair of DD commands. Place a DD on the first line of the block and a DD on the last line of the block and press ENTER. This deletes all the lines between the DDs. These features are available for the Repeat command also. Example 000500 A1 = B1;
D00600 A2 = B2;
000700 A3 = B3;
000800 H1 = A1 * B2;
Result:
000500 A1 = B1;
000600 A3 = B3;
000700 H1 = A1 * B2; Example 000500 A1 = B1;
0DD600 A2 = B2;
000700 A3 = B3;
0DD800 H1 = A1 * B2;
Result:
A1 = B1;
Copy/Move Commands
The copy and move commands are similar in execution but for the fact that the Copy command retains the original content but Move remove the content from its original location. To copy a single line from one location to another, place a C in the first column on the line to be copied and an A on the line previous to the line where you want the data to be placed and press ENTER. Placing a B instead of A, copies the information before the line. A combination of CC and A/B does the same for a block of lines. Use M and MM with A/B similarly to move the data.
Page 37 ©Copyright 2007, Cognizant Technology Solutions, All Rights Reserved
C3: Protected
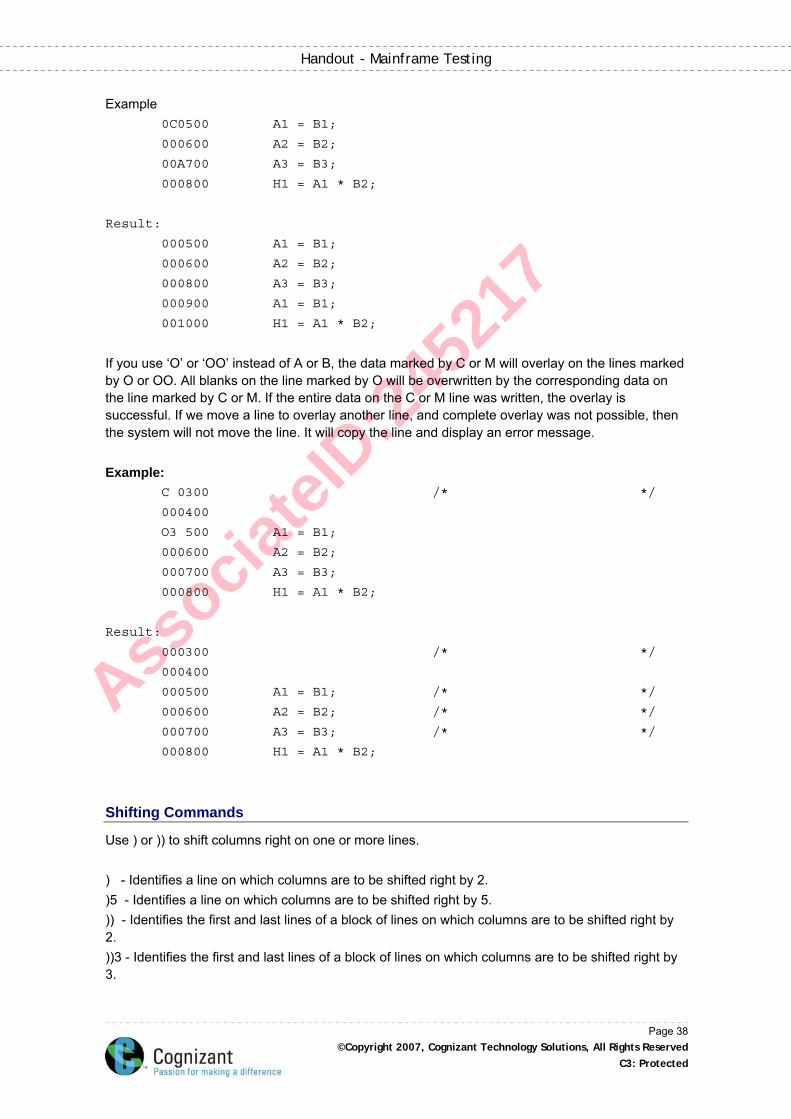
Associa
teID
:245
217
Handout - Mainframe Testing
Example 0C0500 A1 = B1;
000600 A2 = B2;
00A700 A3 = B3;
000800 H1 = A1 * B2;
Result:
000500 A1 = B1;
000600 A2 = B2;
000800 A3 = B3;
000900 A1 = B1;
001000 H1 = A1 * B2; If you use ‘O’ or ‘OO’ instead of A or B, the data marked by C or M will overlay on the lines marked by O or OO. All blanks on the line marked by O will be overwritten by the corresponding data on the line marked by C or M. If the entire data on the C or M line was written, the overlay is successful. If we move a line to overlay another line, and complete overlay was not possible, then the system will not move the line. It will copy the line and display an error message. Example: C 0300 /* */
000400
O3 500 A1 = B1;
000600 A2 = B2;
000700 A3 = B3;
000800 H1 = A1 * B2;
Result:
000300 /* */
000400
000500 A1 = B1; /* */
000600 A2 = B2; /* */
000700 A3 = B3; /* */
000800 H1 = A1 * B2;
Shifting Commands
Use ) or )) to shift columns right on one or more lines. ) - Identifies a line on which columns are to be shifted right by 2. )5 - Identifies a line on which columns are to be shifted right by 5. )) - Identifies the first and last lines of a block of lines on which columns are to be shifted right by 2. ))3 - Identifies the first and last lines of a block of lines on which columns are to be shifted right by 3.
Page 38 ©Copyright 2007, Cognizant Technology Solutions, All Rights Reserved
C3: Protected
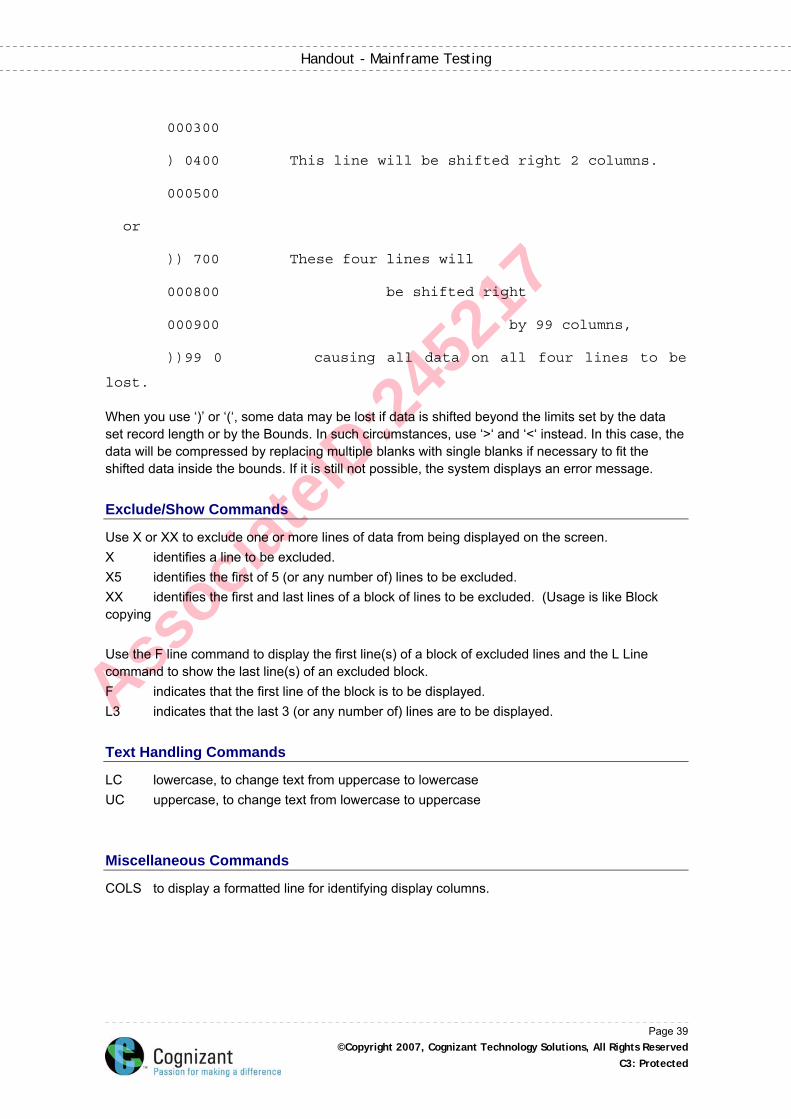
Associa
teID
:245
217
Handout - Mainframe Testing
000300
) 0400 This line will be shifted right 2 columns.
000500
or
)) 700 These four lines will
000800 be shifted right
000900 by 99 columns,
))99 0 causing all data on all four lines to be
lost.
When you use ‘)’ or ‘(‘, some data may be lost if data is shifted beyond the limits set by the data set record length or by the Bounds. In such circumstances, use ‘>‘ and ‘<‘ instead. In this case, the data will be compressed by replacing multiple blanks with single blanks if necessary to fit the shifted data inside the bounds. If it is still not possible, the system displays an error message.
Exclude/Show Commands
Use X or XX to exclude one or more lines of data from being displayed on the screen. X identifies a line to be excluded. X5 identifies the first of 5 (or any number of) lines to be excluded. XX identifies the first and last lines of a block of lines to be excluded. (Usage is like Block copying Use the F line command to display the first line(s) of a block of excluded lines and the L Line command to show the last line(s) of an excluded block. F indicates that the first line of the block is to be displayed. L3 indicates that the last 3 (or any number of) lines are to be displayed.
Text Handling Commands
LC lowercase, to change text from uppercase to lowercase UC uppercase, to change text from lowercase to uppercase
Miscellaneous Commands
COLS to display a formatted line for identifying display columns.
Page 39 ©Copyright 2007, Cognizant Technology Solutions, All Rights Reserved
C3: Protected

Associa
teID
:245
217
Handout - Mainframe Testing
SuperCE Compare
Super Compare Extended abbreviated to SuperCE is a versatile tool that helps us to compare PS datasets, complete PDS, members of PDS or concatenated datasets. The output listings can also be of varied requirements like Delta listings, Long listings and others as per the requirements. Option 12 in the Utilities Menu is a simple compare utility and option 13 from the Utilities Menu is the extended compare utility. We will discuss the options and features of the extended compare, which will cover the features of the base compare. Figure 2-8 shows the panel that is thrown on selecting option 13 from the Utilities panel (3.13 from the Main Menu). Menu Utilities Options Help
________________________________________________________________________________
SuperCE Utility
Command ===>
New DS Name . . .
Old DS Name . . .
PDS Member List (blank/pattern - member list, * - compare all)
(Leave New/Old DSN "blank" for concatenated-uncataloged-password panel)
Compare Type Listing Type Display Output
2 1. File 2 1. OVSUM 1 1. Yes
2. Line 2. Delta 2. No
3. Word 3. CHNG 3. Cond
4. Byte 4. Long 4. UPD
5. Nolist
Listing DSN . . . . SUPERC.LIST
Process Options . .
Statements Dsn . . .
Update DSN . . . . .
Enter "/" to select option Execution Mode Output Mode
Bypass selection list 1 1. Foreground 1 1. View
2. Batch 2. Browse
Fig 2-8 – SuperCE Compare Panel
Let us take a look at the fields available on this panel.
Specify Datasets for Compare
Use the fields New DS Name and Old DS Name in the space provided. Suppose you have modified the member report from a production dataset to change a few fields that are listed. Now,
Page 40 ©Copyright 2007, Cognizant Technology Solutions, All Rights Reserved
C3: Protected
Associa
teID
:245
217
Handout - Mainframe Testing
you have to compare the changed program with the program in production. To do this, specify the fully qualified PDS member with the changed member in the New DS Name and the fully qualified production dataset with the member name in the Old DS Name field as shown below.
New DS Name . . . ‘TLG1063.COBOL(REPORT)’
Old DS Name . . . ‘MSD.PROD.SOURCE(REPORT)
If the above fields are left blank, a concatenation panel is shown where you can specify a list of datasets to be compared. Please note that in case of concatenations of sequential datasets, the block size of the concatenated datasets must be the same and in case of PDS concatenation, the RECFM for all the datasets should be the same. Compare Types Datasets can be compared in the following four ways:
File Comparison Checks source datasets and lists the difference. Simplest and fastest method
Line Comparison Checks the differences at the line level. The output list contains reformatted lines and changed lines. Most frequently used comparison type and typically used for the source change compares.
Word Comparison
Checks the differences at the word level. A word is a string separated by one or more blanks or a line separator.
Byte Comparison
Byte level comparison with the output in HEX (Like a dump).
The Compare output can be listed in the following five ways
OVSUM Lists the Overall Summary of the changes. In case of PDS comparison the list contains a summary for each member compared.
Delta Frequently used Listing type. Lists the differences and the summary of each dataset compared. Differences are flagged at the left of each line of output.
CHNG Lists the differences with a specified number of lines before and after the changes. Makes the user comfortable in reading the output in case of a PDS comparison involving source changes.
Long Lists the complete new data set with the old data set deleted data Interspersed in the output listing. Both inserted and deleted output data is flagged. The format is the same as the DELTA with all matching data shown.
Nolist Generates no listing output. Used to quickly find if any data is changed between two datasets.
Listing dataset name – SuperCE places the result of the comparison in the dataset specified in this field. The listing dataset is created if it already does not exist. If the output is a PDS member, the PDS must exist.
Page 41 ©Copyright 2007, Cognizant Technology Solutions, All Rights Reserved
C3: Protected
Associa
teID
:245
217
Handout - Mainframe Testing
Process Options – You can specify keywords to customize the SuperCE compare on datasets. They can be specified by choosing ‘options’ from the pull down menu or they can be directly entered in the ‘process options’ field. Some examples of available process options are
Option name Function
SEQ Ignore FB 80/VB 255 standard sequence number columns
NOSEQ Process FB 80/VB 255 standard sequence number columns as data.
DPPLCMT Do not process /* ... */ comments and blank compare lines.
DPPSCMT Do not process (* ... *) comments and blank compare lines.
Statements Dsn – This dataset contains the optional process statements for the SuperCE utility. When you select the Edit Statements option from the SuperCE Utility pull-down menu, the SuperCE utility displays the statements data set you specified in the Statements Dsn field. This data set is always displayed in Edit mode, allowing you to add, change, or delete SuperCE process statements as needed. Only one process statement can appear on each line of the statements data set. Execution Mode – The option selected determines if the comparison is done in the foreground or batch mode. If ‘foreground’ is selected, the keyboard is locked until the comparison is done and the compare output (SUPERC.LIST, by default) is shown on the screen. If ‘batch’ option is chosen, a panel is thrown which allows us to edit the JCL that is created for this particular compare and submitting this job creates the compare output. Output Mode – If the foreground option is chosen in the execution mode, option chosen here determine the mode of display for the compare output. As discussed before, use browse if the output is to be viewed by multi-users.
Interpreting SuperCE output
SuperCE output lines are classified with flagging character(s) that appear under the column labeled ID. The flagging characters are described in table 2-3.
"blank" Matched. These lines are matching lines/data between both data sets. The new data set line is listed without flagging.
I Insert. Added to the new data set. Does not appear in old data set.
D Delete. Appears in the old data set but is absent (deleted) from the new data set.
DR Delete Replace. A composed line of bytes denoting the byte(s) that were replaced by byte(s) listed directly above in the preceding insert (I) line. Byte compares listings only.
RN Reformat New. A reformatted line appears in the new data set. This line contains the same information as the old data set line with different spacing between the words. Line compares listings only.
RO Reformat Old. Flags the same line in the old data set that was reformatted in the new data set. This line can be eliminated from the output listing by specifying the DLREFM Process Option.
Page 42 ©Copyright 2007, Cognizant Technology Solutions, All Rights Reserved
C3: Protected
Associa
teID
:245
217
Handout - Mainframe Testing
MC Match Compose. A WORD compare line composed of matching words. Spaces may be left between the words to display the matched words relative to any inserted and/or deleted words.
IC Insert Compose. A WORD compare line composed of words from the new data set that are not in the old data set. This line normally follows a Match Compose line.
DC Delete Compose. A WORD compare line composed of words from the old data set that are not in the new data set. This line normally follows a Match Compose or Insert Compose line.
IM Insert Matching. Only flagged if FMVLNS is specified as a process option. Flags the occurrence of a line in the new data set which also appears in the old data set, but has been "moved." The line may or may not have been reformatted. Reformatted moved lines are indicated by a flag at the right of the listing.
DM Delete Matching. Same as IM except flags old data set lines.
| Change-bar Indicates that a line has been changed by the insertion or deletion of words. Change Bars only appear in LINE and WORD compare listings that are generated with the GWCBL Process Option.
Table 2-3 – Flags in SuperCE output This fairly completes our discussion on the SuperCE compare utility provided by the ISPF. For any other details on SuperCE please refer to the ISPF manual on the IBM BookManager or the Online Help.
Search-For Utility
This option is used to search for a particular string in a dataset or members of a PDS. For example, if you want to know the list of programs that call a particular sub-program, say a currency conversion routine, you can use this utility to search for the sub-program name in the library where all the main programs are stored. Option 3.14 from the main menu or 14 from the Utilities Menu takes you to the panel shown in Figure 2-9.
Page 43 ©Copyright 2007, Cognizant Technology Solutions, All Rights Reserved
C3: Protected
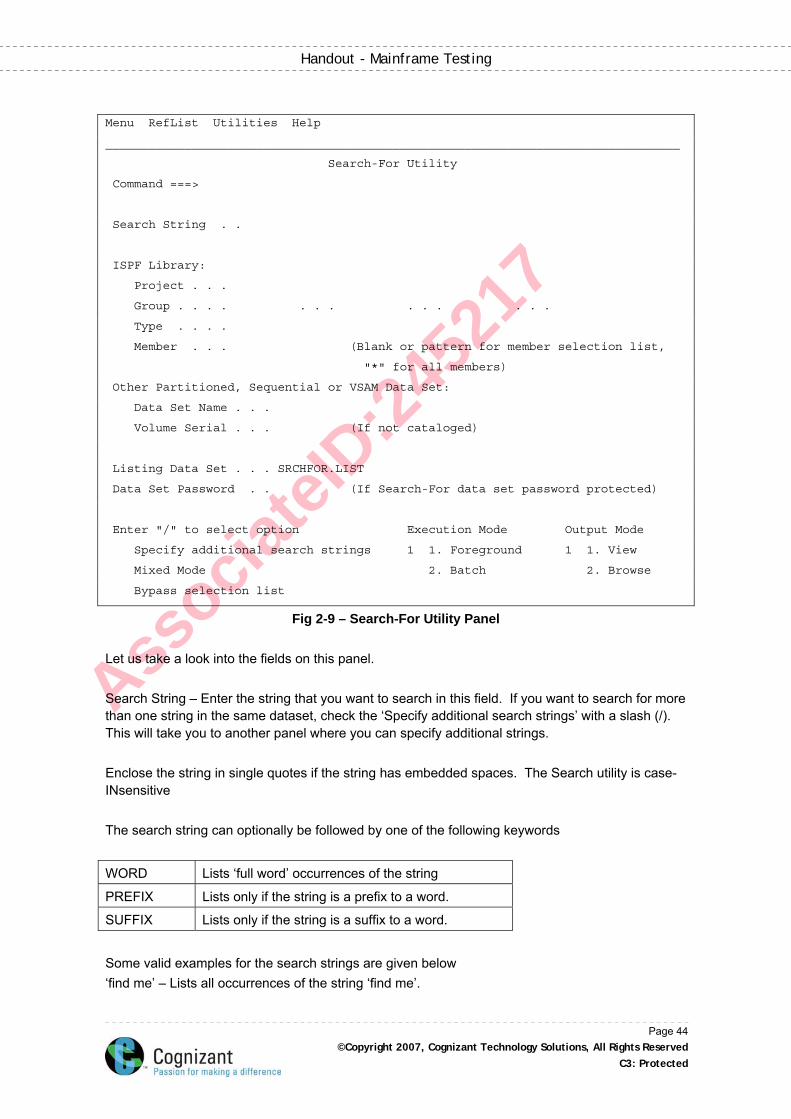
Associa
teID
:245
217
Handout - Mainframe Testing
Menu RefList Utilities Help
________________________________________________________________________________
Search-For Utility
Command ===>
Search String . .
ISPF Library:
Project . . .
Group . . . . . . . . . . . . .
Type . . . .
Member . . . (Blank or pattern for member selection list,
"*" for all members)
Other Partitioned, Sequential or VSAM Data Set:
Data Set Name . . .
Volume Serial . . . (If not cataloged)
Listing Data Set . . . SRCHFOR.LIST
Data Set Password . . (If Search-For data set password protected)
Enter "/" to select option Execution Mode Output Mode
Specify additional search strings 1 1. Foreground 1 1. View
Mixed Mode 2. Batch 2. Browse
Bypass selection list
Fig 2-9 – Search-For Utility Panel Let us take a look into the fields on this panel. Search String – Enter the string that you want to search in this field. If you want to search for more than one string in the same dataset, check the ‘Specify additional search strings’ with a slash (/). This will take you to another panel where you can specify additional strings. Enclose the string in single quotes if the string has embedded spaces. The Search utility is case-INsensitive The search string can optionally be followed by one of the following keywords
WORD Lists ‘full word’ occurrences of the string
PREFIX Lists only if the string is a prefix to a word.
SUFFIX Lists only if the string is a suffix to a word.
Some valid examples for the search strings are given below ‘find me’ – Lists all occurrences of the string ‘find me’.
Page 44 ©Copyright 2007, Cognizant Technology Solutions, All Rights Reserved
C3: Protected
Associa
teID
:245
217
Handout - Mainframe Testing
‘mis’ prefix – Lists all words with the prefix ‘mis’ in the dataset. X’7b00’ – Lists the occurrences of the hex value ‘7b00’. Change the profile to ‘HEX ON’ for the listing dataset to make any sense.
Extended Search
Similar to Compare and Extended Compare, we can specify process options and process DSNs for frequently used search options. COMMAND This option (Option 6 from ISPF Main Menu) is similar to the Shell in UNIX or the MS-DOS prompts in the MS-Windows environment. You can enter a TSO command or execute a REXX routine without exiting ISPF. Note 1: As discussed in earlier sessions, File transfer from the MF to a PC or Vice-versa is done with a TSO command. To transfer files while in ISPF, you must be at the command prompt. Note 2: Other way to execute a TSO command from ISPF is to prefix a ‘TSO’ with the command at any of the primary command field.
Summary:
In this chapter we have learned about how to browse through the mainframe main window,(i.e. option 3.2 and 3.4),how to use the options of that window and what are the procedures to create the pds,ps and how to use the utility options like suprece,superc etc,also the move/copy utility.It also let’s us know about the various line commands.
Test Your Understanding
1. _____________ is usedto obtain storage related information. a) storage class b) managemet class c) none d) data class
2. A dataset is full when it has got _________ extents.
a) 16 b) 12 c) none d) 15
3. _________ line command is used to uncatalog dataset.
a) U b) V c) B d) M
Page 45 ©Copyright 2007, Cognizant Technology Solutions, All Rights Reserved
C3: Protected
Associa
teID
:245
217
Handout - Mainframe Testing
4. _________ indicates a line on which columns are to be shifted right by5. a) ))5 b) ((5 c) )5 d) (5
Answers:
1. a 2. a 3. a 4. c
Page 46 ©Copyright 2007, Cognizant Technology Solutions, All Rights Reserved
C3: Protected
Associa
teID
:245
217
Handout - Mainframe Testing
Chapter 3: JCL and VSAM
Learning Objective
After completing this chapter, you will be able to: Explain what is JCL Write a batch job List the types of PROCs in JCL View the status of the job in SPOOL Identify and correct various Return-Codes (MAXCC – Maximum Condition Codes) and
ABENDs (ABnormal ENDs) Explain what is VSAM Explain types of VSAM datasets Allocate a VSAM dataset Delete a VSAM dataset Repro (load / unload) a VSAM dataset Explain Alternate Index (AIX) Explain how to build the path between AIX and cluster
Job Control Language (JCL)
It consists of control statements that: introduce a computer job to the operating system request hardware devices direct the operating system on what is to be done in terms of running applications and
scheduling resources JCL is not used to write computer programs. Instead it is most concerned with input/output--- telling the operating system everything it needs to know about the input/output requirements. It provides the means of communicating between an application program and the operating system and computer hardware.
Is JCL Difficult? ... Not Necessarily!
The role of JCL sounds complex and it is---JCL can be downright difficult. JCL can be difficult because of the way it is used. A normal programming language, however difficult, soon becomes familiar through constant usage. This contrasts with JCL in which language features are used so infrequently that many never become familiar. JCL can be difficult because of its design - JCL:
consists of individual parameters, each of which has an effect that may take pages to describe
has few defaults--must be told exactly what to do
Page 47 ©Copyright 2007, Cognizant Technology Solutions, All Rights Reserved
C3: Protected
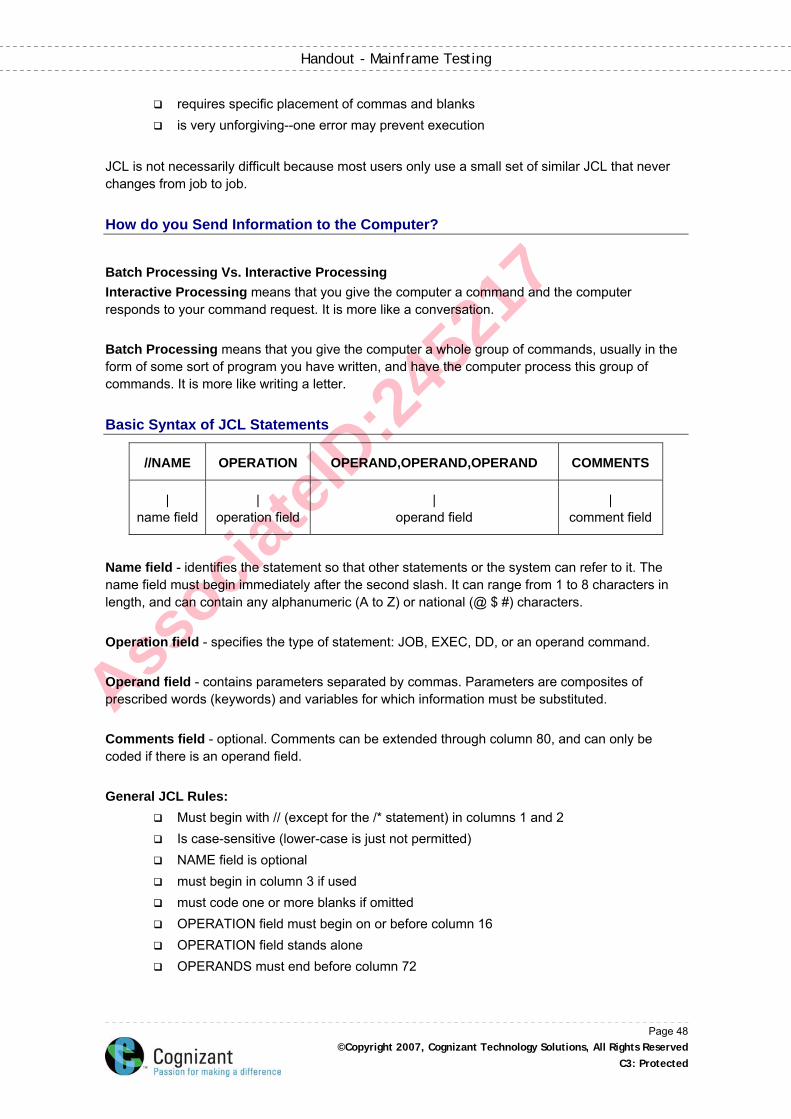
Associa
teID
:245
217
Handout - Mainframe Testing
requires specific placement of commas and blanks is very unforgiving--one error may prevent execution
JCL is not necessarily difficult because most users only use a small set of similar JCL that never changes from job to job.
How do you Send Information to the Computer?
Batch Processing Vs. Interactive Processing Interactive Processing means that you give the computer a command and the computer responds to your command request. It is more like a conversation. Batch Processing means that you give the computer a whole group of commands, usually in the form of some sort of program you have written, and have the computer process this group of commands. It is more like writing a letter.
Basic Syntax of JCL Statements
//NAME OPERATION OPERAND,OPERAND,OPERAND COMMENTS
| name field
| operation field
| operand field
| comment field
Name field - identifies the statement so that other statements or the system can refer to it. The name field must begin immediately after the second slash. It can range from 1 to 8 characters in length, and can contain any alphanumeric (A to Z) or national (@ $ #) characters. Operation field - specifies the type of statement: JOB, EXEC, DD, or an operand command. Operand field - contains parameters separated by commas. Parameters are composites of prescribed words (keywords) and variables for which information must be substituted. Comments field - optional. Comments can be extended through column 80, and can only be coded if there is an operand field. General JCL Rules:
Must begin with // (except for the /* statement) in columns 1 and 2 Is case-sensitive (lower-case is just not permitted) NAME field is optional must begin in column 3 if used must code one or more blanks if omitted OPERATION field must begin on or before column 16 OPERATION field stands alone OPERANDS must end before column 72
Page 48 ©Copyright 2007, Cognizant Technology Solutions, All Rights Reserved
C3: Protected
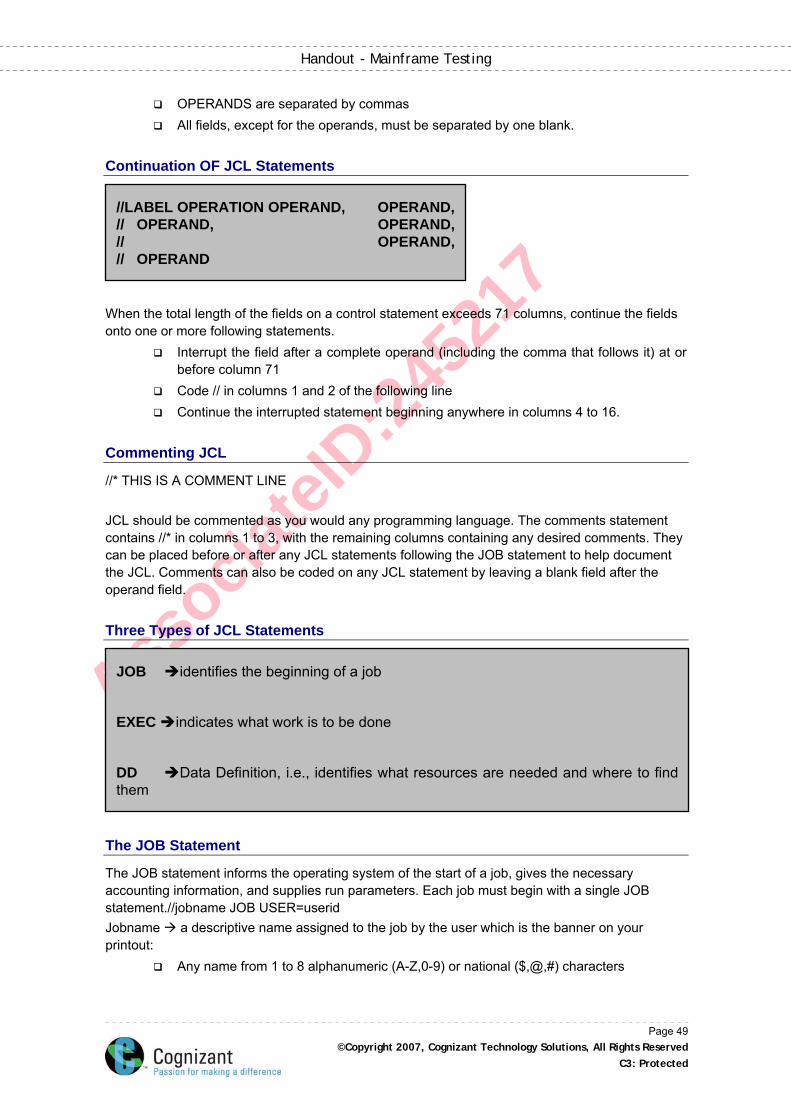
Associa
teID
:245
217
Handout - Mainframe Testing
OPERANDS are separated by commas All fields, except for the operands, must be separated by one blank.
Continuation OF JCL Statements
//LABEL OPERATION OPERAND, OPERAND, // OPERAND, OPERAND, // OPERAND, // OPERAND
When the total length of the fields on a control statement exceeds 71 columns, continue the fields onto one or more following statements.
Interrupt the field after a complete operand (including the comma that follows it) at or before column 71
Code // in columns 1 and 2 of the following line Continue the interrupted statement beginning anywhere in columns 4 to 16.
Commenting JCL
//* THIS IS A COMMENT LINE JCL should be commented as you would any programming language. The comments statement contains //* in columns 1 to 3, with the remaining columns containing any desired comments. They can be placed before or after any JCL statements following the JOB statement to help document the JCL. Comments can also be coded on any JCL statement by leaving a blank field after the operand field.
Three Types of JCL Statements
EXEC indicates what work is to be done
DD Data Definition, i.e., identifies what resources are needed and where to find them
JOB identifies the beginning of a job
The JOB Statement
The JOB statement informs the operating system of the start of a job, gives the necessary accounting information, and supplies run parameters. Each job must begin with a single JOB statement.//jobname JOB USER=userid Jobname a descriptive name assigned to the job by the user which is the banner on your printout:
Any name from 1 to 8 alphanumeric (A-Z,0-9) or national ($,@,#) characters
Page 49 ©Copyright 2007, Cognizant Technology Solutions, All Rights Reserved
C3: Protected
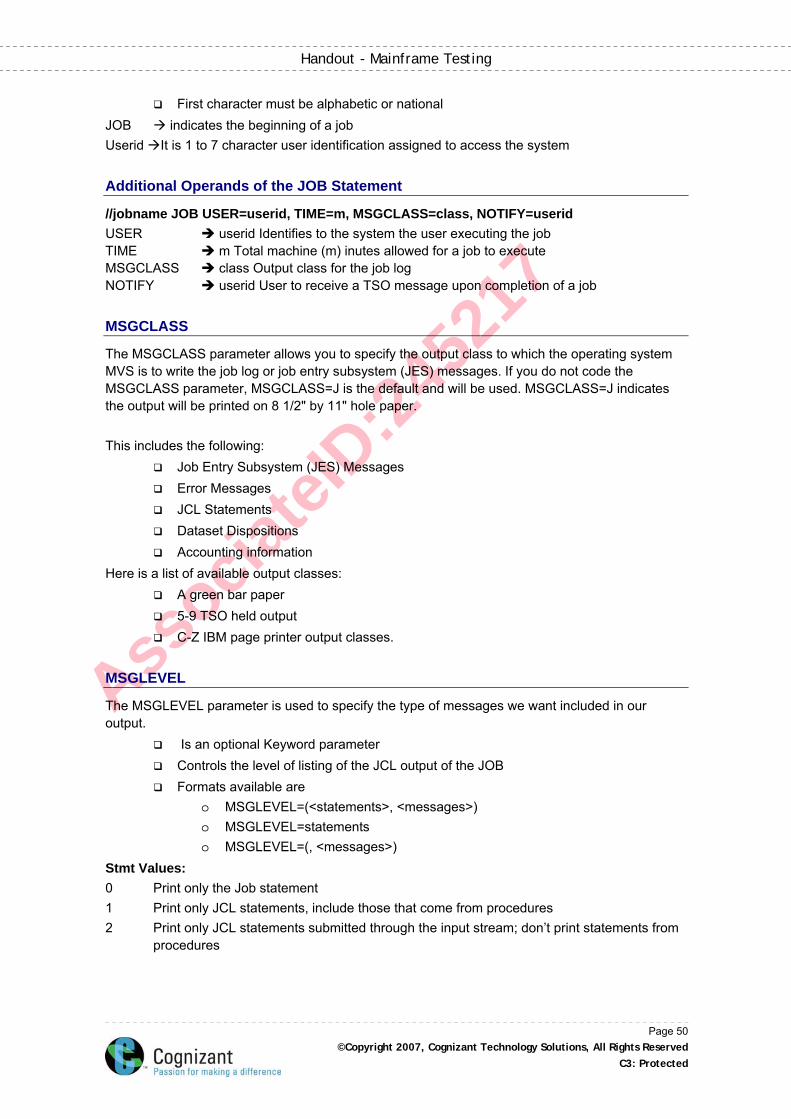
Associa
teID
:245
217
Handout - Mainframe Testing
First character must be alphabetic or national JOB indicates the beginning of a job Userid It is 1 to 7 character user identification assigned to access the system
Additional Operands of the JOB Statement
//jobname JOB USER=userid, TIME=m, MSGCLASS=class, NOTIFY=userid USER userid Identifies to the system the user executing the job TIME m Total machine (m) inutes allowed for a job to execute MSGCLASS class Output class for the job log NOTIFY userid User to receive a TSO message upon completion of a job
MSGCLASS
The MSGCLASS parameter allows you to specify the output class to which the operating system MVS is to write the job log or job entry subsystem (JES) messages. If you do not code the MSGCLASS parameter, MSGCLASS=J is the default and will be used. MSGCLASS=J indicates the output will be printed on 8 1/2" by 11" hole paper. This includes the following:
Job Entry Subsystem (JES) Messages Error Messages JCL Statements Dataset Dispositions Accounting information
Here is a list of available output classes: A green bar paper 5-9 TSO held output C-Z IBM page printer output classes.
MSGLEVEL
The MSGLEVEL parameter is used to specify the type of messages we want included in our output.
Is an optional Keyword parameter Controls the level of listing of the JCL output of the JOB Formats available are
o MSGLEVEL=(<statements>, <messages>) o MSGLEVEL=statements o MSGLEVEL=(, <messages>)
Stmt Values: 0 Print only the Job statement 1 Print only JCL statements, include those that come from procedures 2 Print only JCL statements submitted through the input stream; don’t print statements from procedures
Page 50 ©Copyright 2007, Cognizant Technology Solutions, All Rights Reserved
C3: Protected

Associa
teID
:245
217
Handout - Mainframe Testing
Msg Values: 0 Print step completion messages only; don’t print allocation and deallocation messages unless the job fails 1 Print all messages
JOBLIB
JobLib is used at the start of the JCL to specify an override library to use for the entire job it is placed immediately after the job statement and applies to the whole job A JobLib statement follows right after the job card and it applies to all steps within the JCL. Syntax of a JOBLIB STATEMENT is: //JOBLIB DD DSN= CTS.PROD. LOAD1,DISP=SHR Where the dataset specified in the DSN parameter is the load library. If we have multiple load library that needs to be searched one after another, we need to concatenate the libraries as shown below. //JOBLIB DD DSN=CTS.PROD. LOAD1.TEMP1,DISP=SHR // DD DSN= CTS.PROD. LOAD2,DISP=SHR // DD DSN= CTS.PROD. LOAD3,DISP=SHR
STEPLIB
It is also like JOBLIB. It is used to tell in which dataset the program resides, It will be coded in JOB STEP. It is only for that step instead of entire JOB. It can be placed any where in the job step. STEPLIB can be coded in cataloged procedures. A StepLib statement is coded after the EXEC Statement of the step that needs to refer the Load library. STEPLIB just applies to that particular step alone. Syntax -> //STEPLIB DD DSN=dataset Example JCL -> //MYJOB JOB ,,NOTIFY=&SYSUID //STEP1 EXEC PGM=COBPROG //STEPLIB DD DSN=TEST.MYPROD.LIB,DISP=SHR //STEP2 EXEC PGM=COBPROG2 //STEPLIB DD DSN=TEST.MYPROD.LIB1,DISP=SHR In above example, STEP1 is executing COBPROG which is member of TEST.MYPROD.LIB STEP2 is executing COBPROG2 which is member of TEST.MYPROD.LIB1
JCLLIB
JCLLIB is used to specify where PROC is to be loaded from rather than programs. JCLLIB is used with the INCLUDE MEMBER statement to specify the library where pieces of JCL (PROC) are held that can be included into a number of jobs. A JCLLIB statement applies to all the steps
Page 51 ©Copyright 2007, Cognizant Technology Solutions, All Rights Reserved
C3: Protected
Associa
teID
:245
217
Handout - Mainframe Testing
within a JCL and is coded right after the JOBLIB STATEMENT. A Catalog procedure can be stored in a PDS and can be called from a JCL. Once the PROCEDURE is called the Job search for the existence of the PROC in the Dataset given in the JCLLIB Statement. Syntax of a JCLLIB STATEMENT //PROC JCLLIB ORDER=PDS1,PDS2,…
The EXEC Statement
Use the EXEC (execute) statement to identify the application program or cataloged or in-stream procedure that this job is to execute and to tell the system how to process the job.
//stepname EXEC procedure, REGION=####K (Or)
//stepname EXEC PGM=program, REGION=####K
stepname an optional 1 to 8 character word used to identify the step EXEC indicates that you want to invoke a program or cataloged procedure procedure name of the cataloged procedure to be executed program name of the program to be executed REGION=####K amount of storage to allocate to the job
Programs and Cataloged Procedures
// EXEC PGM=pgmname A program referred to on the EXEC PGM= statement is a compiled and linked version of a set of source language statements that are ready to be executed to perform a designed task. It is also known as an executable load module. It must reside in a partitioned dataset. // EXEC cataloged-procedure-name Because the same set of JCL statements are often used repeatedly with little or no change they can be stored in cataloged procedures. JCL provides programmers with the option of coding these statements only once, recording and cataloging the statements under an appropriate name in a procedure library, and then invoking these statements through an EXEC statement. Such a previously established set of JCL statements is known as a "cataloged procedure." The effect of using a cataloged procedure is the same as if the JCL statements in the procedure appeared directly in the input stream in place of the EXEC statement calling the procedure. This saves the user from writing lengthy error-prone JCL statements. In short, this is JCL that does not have to be included in batch jobs. * Note that within cataloged procedures a program will be executed.
Modifying Cataloged Procedures
Additional statements may be added to the JCL comprising a cataloged procedure at the time of invocation. Also, operand values on existing JCL statements may be altered or parameters defined in the procedure may be substituted at invocation time.
Page 52 ©Copyright 2007, Cognizant Technology Solutions, All Rights Reserved
C3: Protected
Associa
teID
:245
217
Handout - Mainframe Testing
The value in the override statement replaces the value for the same parameter in the cataloged procedure. Cataloged procedure statements must be overridden in the same order as they appear in the procedure. //procstepname ddname DD parameter=value You can modify cataloged procedures by:
Overriding parameters in an existing DD statement Adding DD statements to the procedure. To add new DD statements let them follow
any changed DD cards for that step. To modify an existing DD statement, only those operands to be changed need be coded on the modifying DD statement. The remaining operands of the DD statement within the procedure will be unchanged. If more than one DD statement in a procedure is to be modified, the modifying DD statements must be placed in the same order as the original DD statements occur in the procedure.
To add a DD statement to an existing procedure, place the DD statement after the procedure invocation EXEC statement and any modified DD statements within the job step.
// EXEC SAS //NEWDD DD DSN=user.file, DISP=SHR When looking at your output, the following symbols will determine what kind of statement is indicated when your job runs: // Indicates JCL statements XX Indicates cataloged procedure statements X/ Indicates a modified cataloged procedures statement
Data Definition (DD) Statement
A DD (Data Definition) statement must be included after the EXEC statement for each data set used in the step. The DD statement gives the data set name, I/O unit, perhaps a specific volume to use, and the data set disposition. The system ensures that requested I/O devices can be allocated to the job before execution is allowed to begin. The DD statement may also give the system various information about the data set: its organization, record length, blocking, and so on. //ddname DD operand,operand,etc. ddname - a 1 to 8 character name given to the DD statement DD - DD statement identifier operand - parameters used to define the input or output dataset
Page 53 ©Copyright 2007, Cognizant Technology Solutions, All Rights Reserved
C3: Protected

Associa
teID
:245
217
Handout - Mainframe Testing
The DD Statement appears after an EXEC statement gives the system information on many things, including the dataset attributes, the
disposition of the dataset when the job completes, and which input/output device(s) to use
DD Statement for Instream Data
Instream data is perhaps the most common form of input. To include data in the input stream, code:
SYSIN is often used as a ddname for instream data. The /* marks the end of the data.
Data Definition (DD) Statement for Disk Datasets
//ddname DD UNIT=unittype, // DSN=userid.name, // DISP=(beginning,normal-end,abnormal-end), // SPACE=(TRK,(primary,secondary,directory)), // RECFM=xx,LRECL=yy,MGMTCLAS=retainx ddname: Data definition name; a 1-8 character word of your choice, must begin with a letter or $, @, # DD: DD statement identifier UNIT: Unittype - an I/O unit is a particular type of I/O device: a disk, tape, etc. (OR) UNIT SYSDA refers to the next available disk storage device. DSN: Userid.name DSN parameter names the data set. Data sets can be temporary or nontemporary. A temporary data set is created and deleted within the job, whereas nontemporary data sets can be retained after the job completes. A data set name can contain up to 44 characters including periods. Ex. UGIBM.DATA MGMTCLAS: MGMTCLAS specifies the name of the Management Class which is a set of specifications for the way the storage occupied by the data set should be treated by SMS. Generally, this deals with how long you want to keep this data set around. UCNS has set up the following management classes:
MGMTCLAS Days Retention MGMTCLAS Days Retention
RETAIN0 0 (DEFAULT) RETAIN8 8
RETAIN1 1 RETAIN9 9
RETAIN2 2 RETAIN10 10
RETAIN3 3 RETAIN14 14
//SYSIN DD * . . . /* (to specify end of data)
Page 54 ©Copyright 2007, Cognizant Technology Solutions, All Rights Reserved
C3: Protected
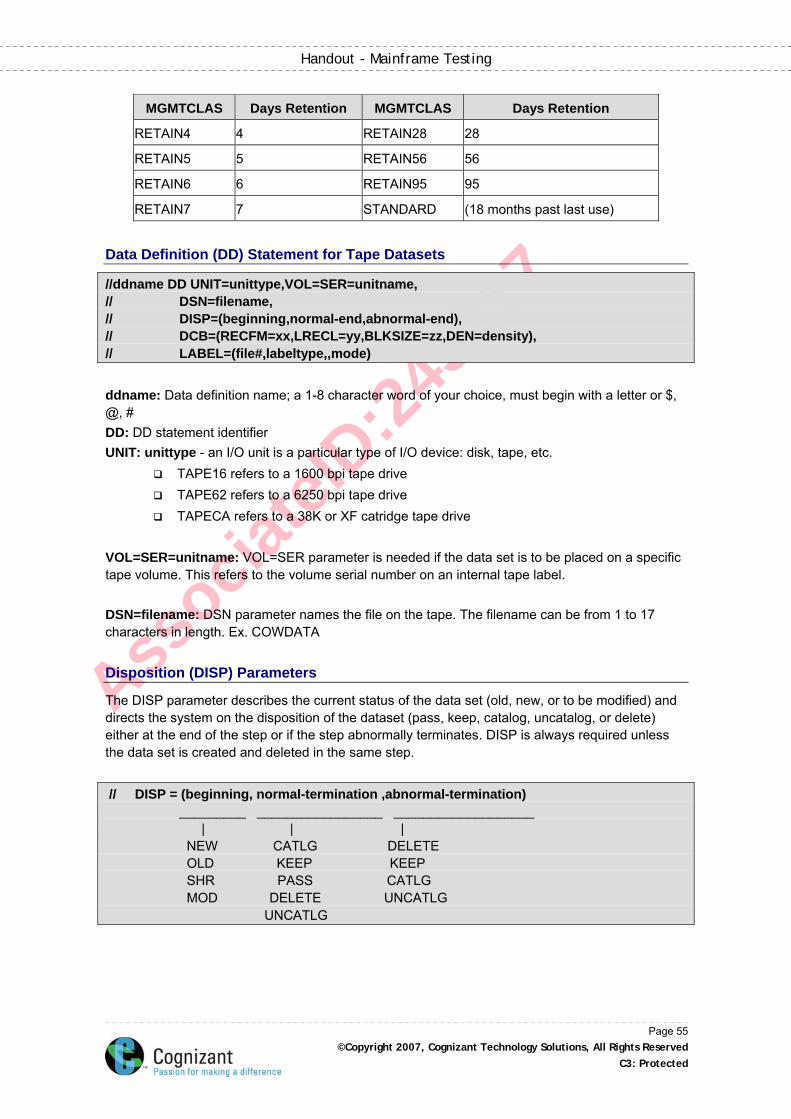
Associa
teID
:245
217
Handout - Mainframe Testing
Page 55 ©Copyright 2007, Cognizant Technology Solutions, All Rights Reserved
C3: Protected
MGMTCLAS Days Retention MGMTCLAS Days Retention
RETAIN4 4 RETAIN28 28
RETAIN5 5 RETAIN56 56
RETAIN6 6 RETAIN95 95
RETAIN7 7 STANDARD (18 months past last use)
Data Definition (DD) Statement for Tape Datasets
//ddname DD UNIT=unittype,VOL=SER=unitname, // DSN=filename, // DISP=(beginning,normal-end,abnormal-end), // DCB=(RECFM=xx,LRECL=yy,BLKSIZE=zz,DEN=density), // LABEL=(file#,labeltype,,mode) ddname: Data definition name; a 1-8 character word of your choice, must begin with a letter or $, @, # DD: DD statement identifier UNIT: unittype - an I/O unit is a particular type of I/O device: disk, tape, etc.
TAPE16 refers to a 1600 bpi tape drive TAPE62 refers to a 6250 bpi tape drive TAPECA refers to a 38K or XF catridge tape drive
VOL=SER=unitname: VOL=SER parameter is needed if the data set is to be placed on a specific tape volume. This refers to the volume serial number on an internal tape label. DSN=filename: DSN parameter names the file on the tape. The filename can be from 1 to 17 characters in length. Ex. COWDATA
Disposition (DISP) Parameters
The DISP parameter describes the current status of the data set (old, new, or to be modified) and directs the system on the disposition of the dataset (pass, keep, catalog, uncatalog, or delete) either at the end of the step or if the step abnormally terminates. DISP is always required unless the data set is created and deleted in the same step. // DISP = (beginning, normal-termination ,abnormal-termination) _________ _________________ ___________________ | | | NEW CATLG DELETE OLD KEEP KEEP SHR PASS CATLG MOD DELETE UNCATLG UNCATLG
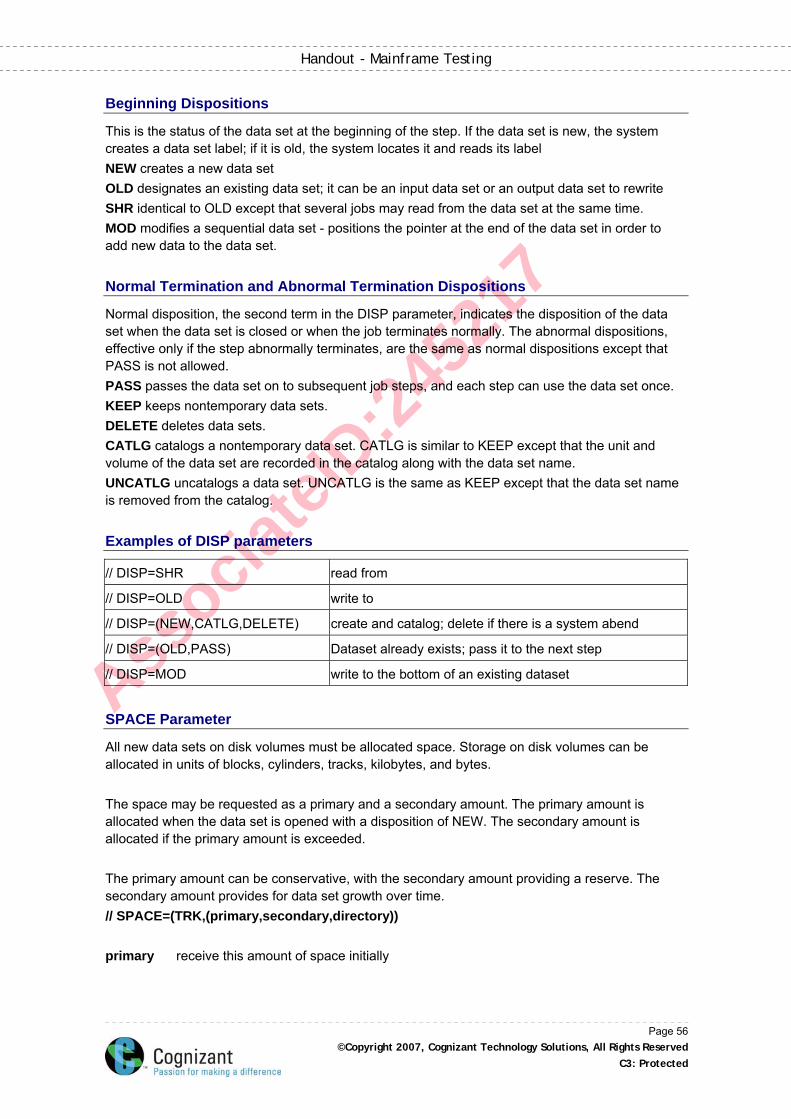
Associa
teID
:245
217
Handout - Mainframe Testing
Beginning Dispositions
This is the status of the data set at the beginning of the step. If the data set is new, the system creates a data set label; if it is old, the system locates it and reads its label NEW creates a new data set OLD designates an existing data set; it can be an input data set or an output data set to rewrite SHR identical to OLD except that several jobs may read from the data set at the same time. MOD modifies a sequential data set - positions the pointer at the end of the data set in order to add new data to the data set.
Normal Termination and Abnormal Termination Dispositions
Normal disposition, the second term in the DISP parameter, indicates the disposition of the data set when the data set is closed or when the job terminates normally. The abnormal dispositions, effective only if the step abnormally terminates, are the same as normal dispositions except that PASS is not allowed. PASS passes the data set on to subsequent job steps, and each step can use the data set once. KEEP keeps nontemporary data sets. DELETE deletes data sets. CATLG catalogs a nontemporary data set. CATLG is similar to KEEP except that the unit and volume of the data set are recorded in the catalog along with the data set name. UNCATLG uncatalogs a data set. UNCATLG is the same as KEEP except that the data set name is removed from the catalog.
Examples of DISP parameters
// DISP=SHR read from
// DISP=OLD write to
// DISP=(NEW,CATLG,DELETE) create and catalog; delete if there is a system abend
// DISP=(OLD,PASS) Dataset already exists; pass it to the next step
// DISP=MOD write to the bottom of an existing dataset
SPACE Parameter
All new data sets on disk volumes must be allocated space. Storage on disk volumes can be allocated in units of blocks, cylinders, tracks, kilobytes, and bytes. The space may be requested as a primary and a secondary amount. The primary amount is allocated when the data set is opened with a disposition of NEW. The secondary amount is allocated if the primary amount is exceeded. The primary amount can be conservative, with the secondary amount providing a reserve. The secondary amount provides for data set growth over time. // SPACE=(TRK,(primary,secondary,directory)) primary receive this amount of space initially
Page 56 ©Copyright 2007, Cognizant Technology Solutions, All Rights Reserved
C3: Protected
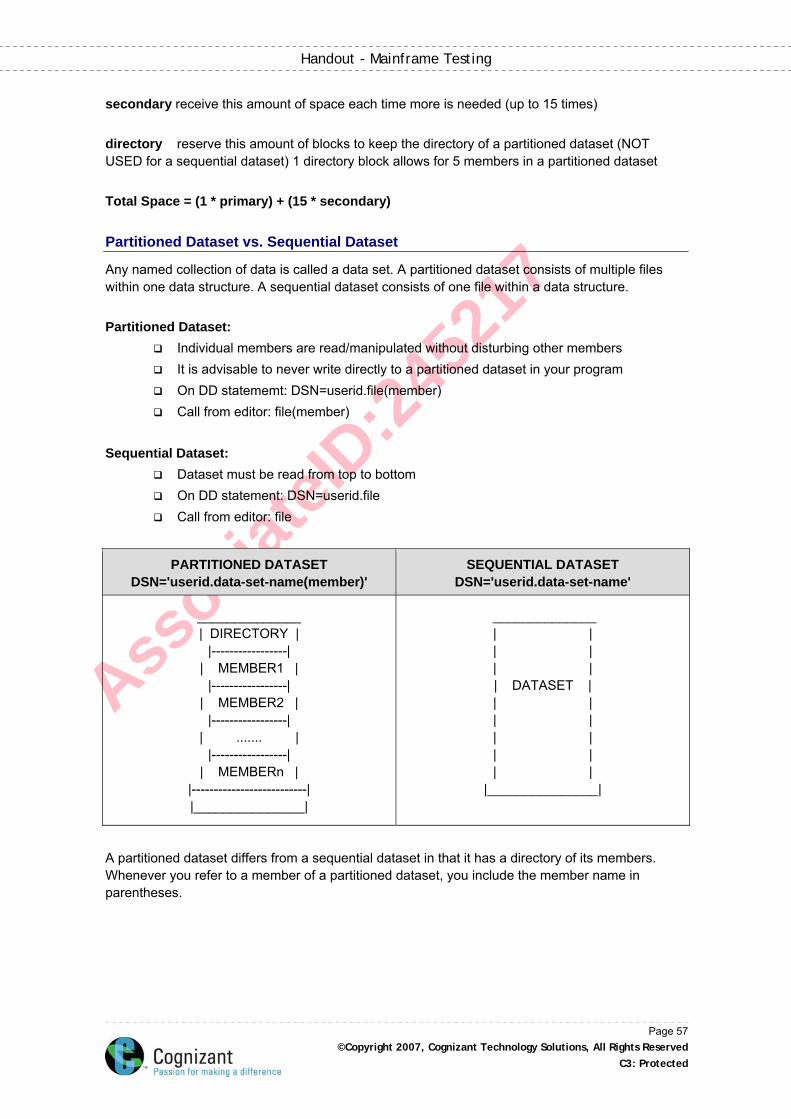
Associa
teID
:245
217
Handout - Mainframe Testing
secondary receive this amount of space each time more is needed (up to 15 times) directory reserve this amount of blocks to keep the directory of a partitioned dataset (NOT USED for a sequential dataset) 1 directory block allows for 5 members in a partitioned dataset Total Space = (1 * primary) + (15 * secondary)
Partitioned Dataset vs. Sequential Dataset
Any named collection of data is called a data set. A partitioned dataset consists of multiple files within one data structure. A sequential dataset consists of one file within a data structure. Partitioned Dataset:
Individual members are read/manipulated without disturbing other members It is advisable to never write directly to a partitioned dataset in your program On DD statememt: DSN=userid.file(member) Call from editor: file(member)
Sequential Dataset:
Dataset must be read from top to bottom On DD statement: DSN=userid.file Call from editor: file
PARTITIONED DATASET DSN='userid.data-set-name(member)'
SEQUENTIAL DATASET DSN='userid.data-set-name'
______________ | DIRECTORY |
|-----------------| | MEMBER1 |
|-----------------| | MEMBER2 |
|-----------------| | ....... |
|-----------------| | MEMBERn |
|--------------------------| |_______________|
______________ | | | | | | | DATASET | | | | | | | | | | |
|_______________|
A partitioned dataset differs from a sequential dataset in that it has a directory of its members. Whenever you refer to a member of a partitioned dataset, you include the member name in parentheses.
Page 57 ©Copyright 2007, Cognizant Technology Solutions, All Rights Reserved
C3: Protected
Associa
teID
:245
217
Handout - Mainframe Testing
DFSMS (System Managed Datasets)
On the TSO service, data sets are typically created and reside on disk volumes. A volume is a standard unit of storage. These disk volumes are referred to as DASD, which stands for Direct Access Storage Device. Each block of data on a DASD volume has a distinct location and a unique address, making it possible to find any record without extensive searching. One DASD volume can be used for many different data sets, and space on it can be reallocated and reused. At the University of Georgia, you are now required to utilize the Data Facilities Storage Management Subsystem (DFSMS) to establish permanent data sets. The Storage Management Subsystem (SMS) is an operating environment that automates the management of storage. With SMS, users can allocate data sets more easily. The data sets allocated through the Storage Management Subsystem are called system-managed. System-managed means that the system determines data placement and automatically manages data availability, performance, space, reclamation, and security. One of the most beneficial goals of System-managed storage is to relieve users of performance, availability, space, and device management details. DFSMS stores data in a device-independent format so that it can easily move the data to any of the following devices:
3490E Magnetic Catridge Tape DASD for models 3380 and 3390
The migration and movement of data depends on such factors as: Management Class Data set Usage Minimum percent free space on a DASD Volume Request by storage administrator or user
DFSMS records the location of each dataset it moves in a control data set. The actual migration is handled by DFHSM (Data Facilities Hierarchical Storage Manager). DFHSM is a DASD management product tool for managing low-activity and inactive data. Data sets that have reached the end of their retention period (expired) will be deleted. Data sets with a management class of STANDARD will be deleted if the data set has not been referenced for a period of eighteen months. A notification will be sent to the user after a STANDARD data set has not been referenced for six months informing the user of the STANDARD deletion policy. At this time the data set will be moved to tape. All data sets that have a management class of RETAIN95 or STANDARD will be automatically backed up by DFHSM. Two copies of each will be kept. The change indicator will trigger the backup after the first backup is made. A user can use the HBACK command to add non-STANDARD and non-RETAIN95 data sets to this.
SPACE Parameter (Partitioned Dataset)
// SPACE=(TRK,(primary,secondary,directory)) This SPACE example allows a total of 40 tracks for the dataset with 1 block of space reserved for the directory.
Page 58 ©Copyright 2007, Cognizant Technology Solutions, All Rights Reserved
C3: Protected
Associa
teID
:245
217
Handout - Mainframe Testing
// SPACE=(TRK,(10,2,1)) Total Space = (1*10) + (15*2) = 10 + 30 = 40 tracks Directory = (1*5) = 5 members/dataset This SPACE example allows a total of 100 tracks for the dataset with 8 blocks reserved for the directory. // SPACE=(TRK,(25,5,8)) Total Space = (1*25) + (15*5) = 25 + 75 = 100 tracks Directory = (8*5) = 40 members/dataset * Note that the track capacity for 3380 is 1 track = 47,476 characters.
SPACE Parameter (Sequential Dataset)
//SPACE=(TRK,(primary,secondary)) This SPACE example allows a total of 53 tracks for the dataset. // SPACE=(TRK,(8,3)) Total Space = (1*8) + (15*3) = 8 + 43 = 53 tracks This SPACE example allows a total of 520000 bytes for the dataset.
// SPACE=(80,(5000,100))
Total Space = (1*400000) + (15*8000) = 400000 + 120000 = 520000 bytes * Note that directory blocks are always 0 for sequential datasets; therefore, the directory parameter is NOT USED for sequential datasets.
Data Set Attributes
With SMS, you do not need to use the DCB parameter to specify data set attributes. ALL of the DCB keyword subparameters (record length, record format, and blocksize) can be specified without the need to code DCB=. For example, the following DD statement: // DCB=(RECFM=FB,LRECL=80,BLKSIZE=8000) can be specified as: // RECFM=FB,LRECL=80 The blocksize parameter can be omitted because SMS will select the optimum blocksize. RECFM=xx specifies the record format. The format can be one or more of the following characters: F fixed-length records V variable-length records U undefined-length records FB fixed and blocked FBA fixed, blocked, with ANSI carriage control characters
Page 59 ©Copyright 2007, Cognizant Technology Solutions, All Rights Reserved
C3: Protected
Associa
teID
:245
217
Handout - Mainframe Testing
VB variable and blocked VBA variable, blocked, with ANSI carriage control characters LRECL=yy specifies the length of records
Equal to the record length for fixed-length records Equal to the size of the largest record plus the 4 bytes describing the record's size for
variable-length records Omit the LRECL for undefined records
LRECL can range from 1 to 32760 bytes BLKSIZE=zz specifies the blocksize if you wish to block records
must be a multiple of LRECL for fixed-length records must be equal to or greater than LRECL for variable-length records must be as large as the longest block for undefined-length records BLKSIZE can range from 1 to 32760 bytes
Fixed Block
// RECFM=FB,LRECL=80,BLKSIZE=9040 This dataset will have fixed length records with a length of 80. There will be 113 records of data per block. BLKSIZE/LRECL = 9040/80 = 113 records of data per block
Variable Block
// RECFM=VB,LRECL=255,BLKSIZE=3120 This dataset will have variable length records with a maximum of 255 characters. The blocksize of the dataset will be 3120.
Null Statement
The null statement consists of slashes (//) in columns 1 and 2 and no other data in the rest of the record. The purpose of a null statement is to mark the end of a job. However, it is not required as MVS, by default, processes the JCL till the last record and then terminates. If a null statement is coded in between a JCL, the job would not identify any steps after that
DCB and LABEL Parameters for Tapes
The LABEL parameter tells the type of label, the relative file number on the tape, and whether the data set is to be protected for input or output. // LABEL= (file#, labeltype,, mode) file - the relative file number on the tape (1-4 digits) type - the type of label on the tape NL No Label SL Standard Label AL American National Standard Label BLP Bypass Label Processing
Page 60 ©Copyright 2007, Cognizant Technology Solutions, All Rights Reserved
C3: Protected
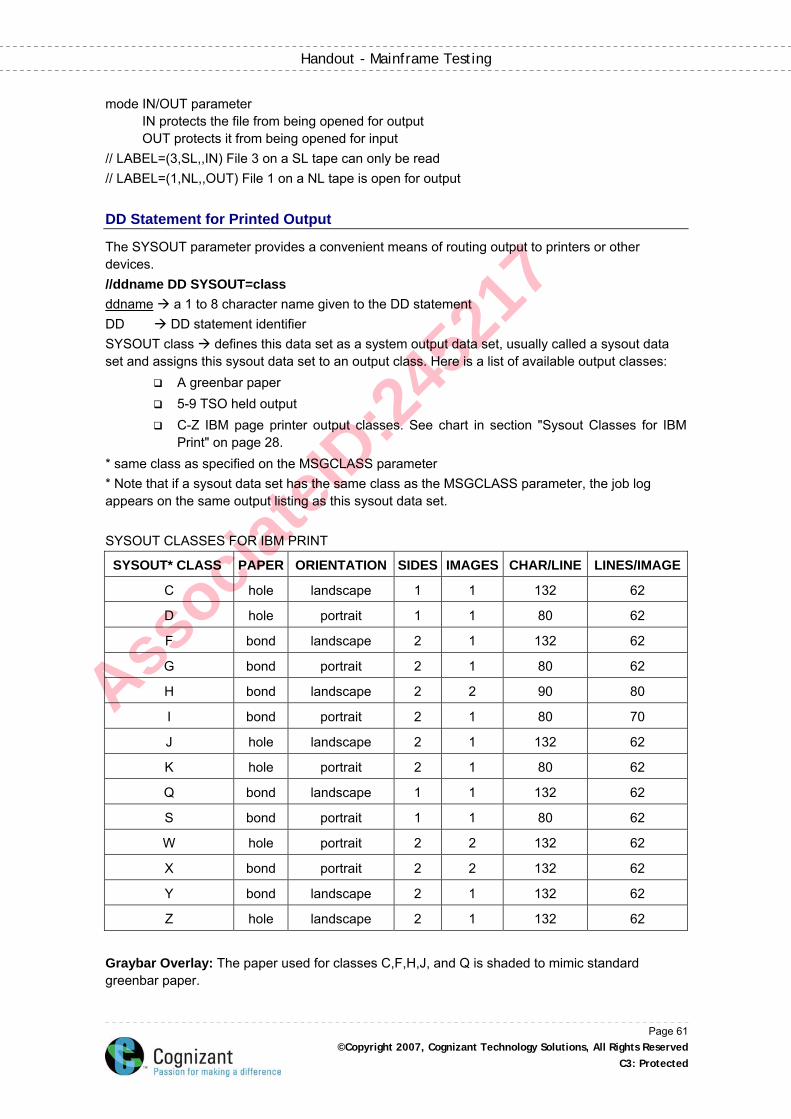
Associa
teID
:245
217
Handout - Mainframe Testing
mode IN/OUT parameter IN protects the file from being opened for output OUT protects it from being opened for input // LABEL=(3,SL,,IN) File 3 on a SL tape can only be read // LABEL=(1,NL,,OUT) File 1 on a NL tape is open for output
DD Statement for Printed Output
The SYSOUT parameter provides a convenient means of routing output to printers or other devices. //ddname DD SYSOUT=class ddname a 1 to 8 character name given to the DD statement DD DD statement identifier SYSOUT class defines this data set as a system output data set, usually called a sysout data set and assigns this sysout data set to an output class. Here is a list of available output classes:
A greenbar paper 5-9 TSO held output C-Z IBM page printer output classes. See chart in section "Sysout Classes for IBM
Print" on page 28. * same class as specified on the MSGCLASS parameter * Note that if a sysout data set has the same class as the MSGCLASS parameter, the job log appears on the same output listing as this sysout data set. SYSOUT CLASSES FOR IBM PRINT
SYSOUT* CLASS PAPER ORIENTATION SIDES IMAGES CHAR/LINE LINES/IMAGE
C hole landscape 1 1 132 62
D hole portrait 1 1 80 62
F bond landscape 2 1 132 62
G bond portrait 2 1 80 62
H bond landscape 2 2 90 80
I bond portrait 2 1 80 70
J hole landscape 2 1 132 62
K hole portrait 2 1 80 62
Q bond landscape 1 1 132 62
S bond portrait 1 1 80 62
W hole portrait 2 2 132 62
X bond portrait 2 2 132 62
Y bond landscape 2 1 132 62
Z hole landscape 2 1 132 62
Graybar Overlay: The paper used for classes C,F,H,J, and Q is shaded to mimic standard greenbar paper.
Page 61 ©Copyright 2007, Cognizant Technology Solutions, All Rights Reserved
C3: Protected
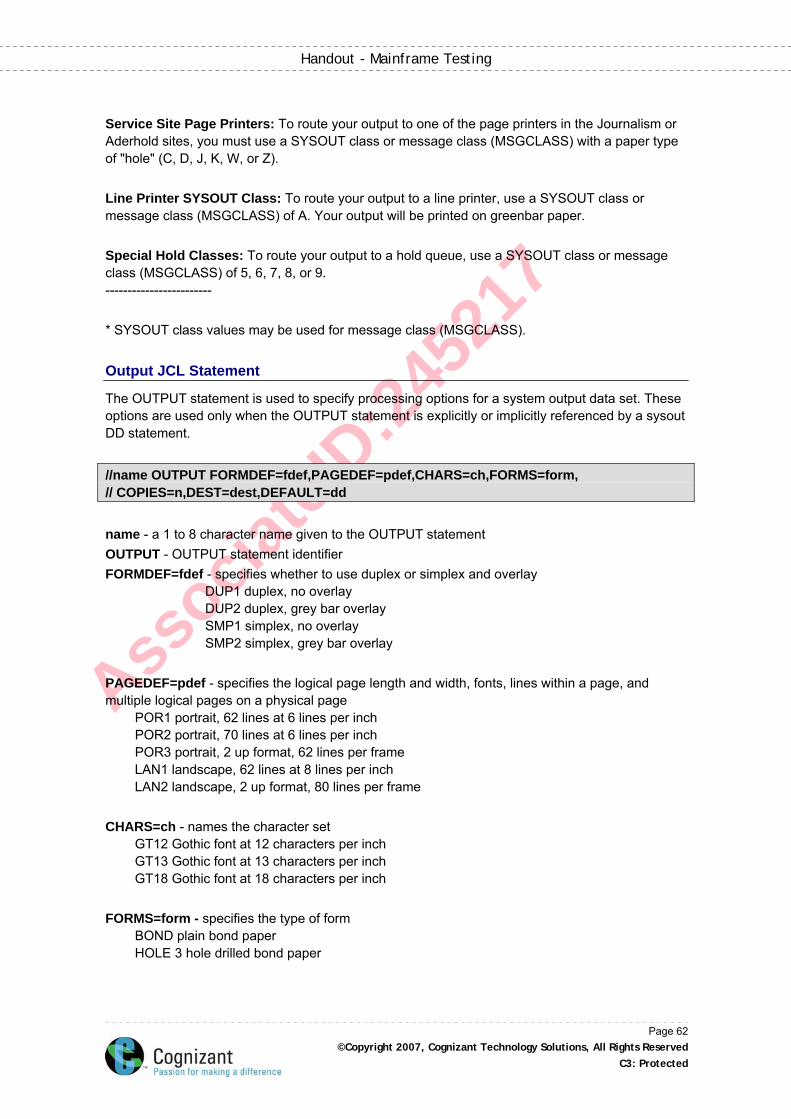
Associa
teID
:245
217
Handout - Mainframe Testing
Service Site Page Printers: To route your output to one of the page printers in the Journalism or Aderhold sites, you must use a SYSOUT class or message class (MSGCLASS) with a paper type of "hole" (C, D, J, K, W, or Z). Line Printer SYSOUT Class: To route your output to a line printer, use a SYSOUT class or message class (MSGCLASS) of A. Your output will be printed on greenbar paper. Special Hold Classes: To route your output to a hold queue, use a SYSOUT class or message class (MSGCLASS) of 5, 6, 7, 8, or 9. ------------------------ * SYSOUT class values may be used for message class (MSGCLASS).
Output JCL Statement
The OUTPUT statement is used to specify processing options for a system output data set. These options are used only when the OUTPUT statement is explicitly or implicitly referenced by a sysout DD statement. //name OUTPUT FORMDEF=fdef,PAGEDEF=pdef,CHARS=ch,FORMS=form, // COPIES=n,DEST=dest,DEFAULT=dd name - a 1 to 8 character name given to the OUTPUT statement OUTPUT - OUTPUT statement identifier FORMDEF=fdef - specifies whether to use duplex or simplex and overlay DUP1 duplex, no overlay DUP2 duplex, grey bar overlay SMP1 simplex, no overlay SMP2 simplex, grey bar overlay PAGEDEF=pdef - specifies the logical page length and width, fonts, lines within a page, and multiple logical pages on a physical page POR1 portrait, 62 lines at 6 lines per inch POR2 portrait, 70 lines at 6 lines per inch POR3 portrait, 2 up format, 62 lines per frame LAN1 landscape, 62 lines at 8 lines per inch LAN2 landscape, 2 up format, 80 lines per frame CHARS=ch - names the character set GT12 Gothic font at 12 characters per inch GT13 Gothic font at 13 characters per inch GT18 Gothic font at 18 characters per inch FORMS=form - specifies the type of form BOND plain bond paper HOLE 3 hole drilled bond paper
Page 62 ©Copyright 2007, Cognizant Technology Solutions, All Rights Reserved
C3: Protected
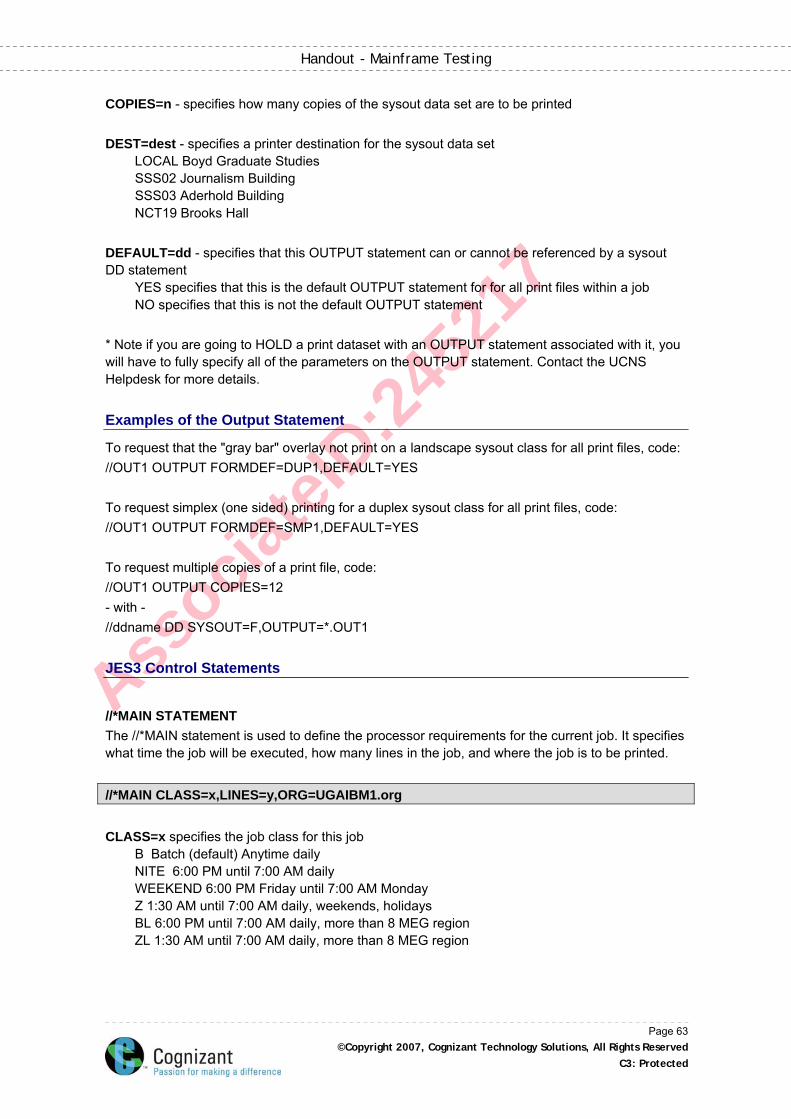
Associa
teID
:245
217
Handout - Mainframe Testing
COPIES=n - specifies how many copies of the sysout data set are to be printed DEST=dest - specifies a printer destination for the sysout data set LOCAL Boyd Graduate Studies SSS02 Journalism Building SSS03 Aderhold Building NCT19 Brooks Hall DEFAULT=dd - specifies that this OUTPUT statement can or cannot be referenced by a sysout DD statement YES specifies that this is the default OUTPUT statement for for all print files within a job NO specifies that this is not the default OUTPUT statement * Note if you are going to HOLD a print dataset with an OUTPUT statement associated with it, you will have to fully specify all of the parameters on the OUTPUT statement. Contact the UCNS Helpdesk for more details.
Examples of the Output Statement
To request that the "gray bar" overlay not print on a landscape sysout class for all print files, code: //OUT1 OUTPUT FORMDEF=DUP1,DEFAULT=YES To request simplex (one sided) printing for a duplex sysout class for all print files, code: //OUT1 OUTPUT FORMDEF=SMP1,DEFAULT=YES To request multiple copies of a print file, code: //OUT1 OUTPUT COPIES=12 - with - //ddname DD SYSOUT=F,OUTPUT=*.OUT1
JES3 Control Statements
//*MAIN STATEMENT The //*MAIN statement is used to define the processor requirements for the current job. It specifies what time the job will be executed, how many lines in the job, and where the job is to be printed. //*MAIN CLASS=x,LINES=y,ORG=UGAIBM1.org CLASS=x specifies the job class for this job B Batch (default) Anytime daily NITE 6:00 PM until 7:00 AM daily WEEKEND 6:00 PM Friday until 7:00 AM Monday Z 1:30 AM until 7:00 AM daily, weekends, holidays BL 6:00 PM until 7:00 AM daily, more than 8 MEG region ZL 1:30 AM until 7:00 AM daily, more than 8 MEG region
Page 63 ©Copyright 2007, Cognizant Technology Solutions, All Rights Reserved
C3: Protected

Associa
teID
:245
217
Handout - Mainframe Testing
LINES specifies the maximum number of lines of data to be printed from this job in multiples of a thousand (default = 5000) ORG=UGAIBM1.org specifies a printer destination for the sysout dataset LOCAL Boyd Graduate Studies SSS02 Journalism Building SSS03 Aderhold Building NCT19 Brooks Hall
Job Scheduling Specifications
Since TSO is a time sharing operating system, it allows many people to use the computer at the same time in such a way that each is unaware that the computer is being used by others. Time sharing attempts to to maximize an individuals use of the computer, not the efficiency of the computer itself. In order to do this, job scheduling is used to assign jobs to a certain class in order to maximize the resources available to each user. Any job can be scheduled to run at night or on the weekend by coding: //*MAIN CLASS=NITE or //*MAIN CLASS=WEEKEND
Table of Resource Limitations for Job Scheduling
Priority CPU Time (seconds)
Region (K) Estimated Lines Setups Required
6 0-30 0-2048 0-5000 0
4 32-120 2049-3072 5001-10000 0
3 121-300 3073-4096 10001-40000 1-3
2 301+ 4097+ 40000+ 4+
//*OPERATOR Statement
The //*OPERATOR statement is primarily used to issue a message to the operator requesting that the tape with the specific VRN, VSN and KEYWORD is to be mounted for the job. //*OPERATOR VRN=#9999 VSN=U9999 KEY=HELP VRN will be assigned when the tape is checked in. This identifies the tape in the tape library. Cartridge Tapes must have #C in the first two column positions on the vrn parameter. VSN the volume serial number on the the internal label of a standard labeled tape. This must be the actual internal label. For non-labeled tapes, this can be any arbitrary name. In both cases, the VSN must match the VOL=SER parameter on the DD card.
Page 64 ©Copyright 2007, Cognizant Technology Solutions, All Rights Reserved
C3: Protected
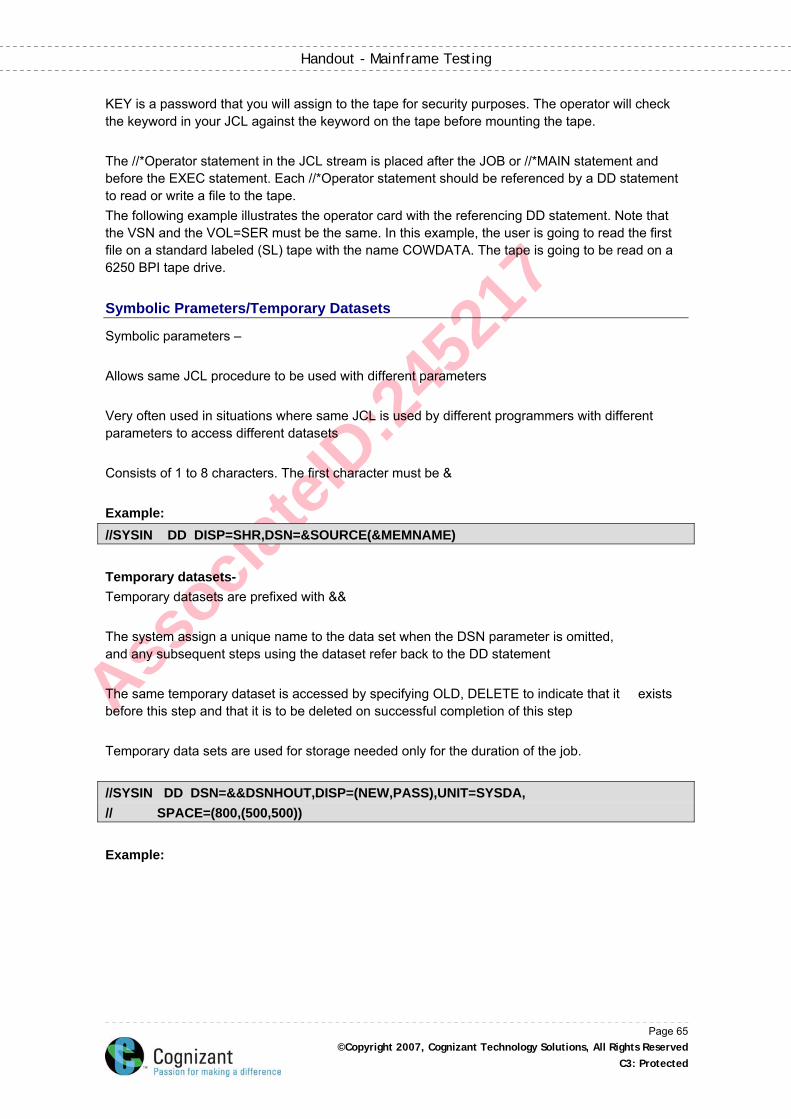
Associa
teID
:245
217
Handout - Mainframe Testing
KEY is a password that you will assign to the tape for security purposes. The operator will check the keyword in your JCL against the keyword on the tape before mounting the tape. The //*Operator statement in the JCL stream is placed after the JOB or //*MAIN statement and before the EXEC statement. Each //*Operator statement should be referenced by a DD statement to read or write a file to the tape. The following example illustrates the operator card with the referencing DD statement. Note that the VSN and the VOL=SER must be the same. In this example, the user is going to read the first file on a standard labeled (SL) tape with the name COWDATA. The tape is going to be read on a 6250 BPI tape drive.
Symbolic Prameters/Temporary Datasets
Symbolic parameters – Allows same JCL procedure to be used with different parameters Very often used in situations where same JCL is used by different programmers with different parameters to access different datasets Consists of 1 to 8 characters. The first character must be & Example: //SYSIN DD DISP=SHR,DSN=&SOURCE(&MEMNAME) Temporary datasets- Temporary datasets are prefixed with && The system assign a unique name to the data set when the DSN parameter is omitted, and any subsequent steps using the dataset refer back to the DD statement The same temporary dataset is accessed by specifying OLD, DELETE to indicate that it exists before this step and that it is to be deleted on successful completion of this step Temporary data sets are used for storage needed only for the duration of the job. //SYSIN DD DSN=&&DSNHOUT,DISP=(NEW,PASS),UNIT=SYSDA, // SPACE=(800,(500,500)) Example:
Page 65 ©Copyright 2007, Cognizant Technology Solutions, All Rights Reserved
C3: Protected
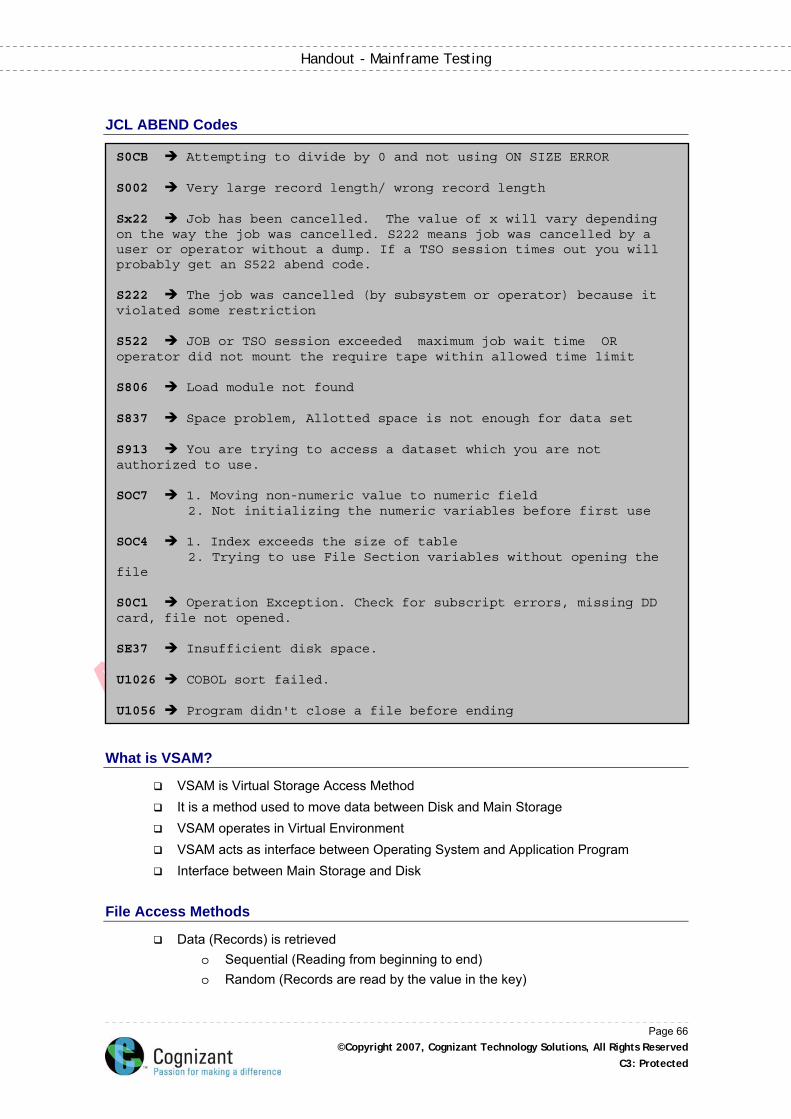
Associa
teID
:245
217
Handout - Mainframe Testing
JCL ABEND Codes
U1056 Program didn't close a file before ending
S0C1 Operation Exception. Check for subscript errors, missing DD card, file not opened. SE37 Insufficient disk space. U1026 COBOL sort failed.
S0CB Attempting to divide by 0 and not using ON SIZE ERROR S002 Very large record length/ wrong record length Sx22 Job has been cancelled. The value of x will vary depending on the way the job was cancelled. S222 means job was cancelled by a user or operator without a dump. If a TSO session times out you will probably get an S522 abend code. S222 The job was cancelled (by subsystem or operator) because it violated some restriction S522 JOB or TSO session exceeded maximum job wait time OR operator did not mount the require tape within allowed time limit S806 Load module not found S837 Space problem, Allotted space is not enough for data set S913 You are trying to access a dataset which you are not authorized to use. SOC7 1. Moving non-numeric value to numeric field 2. Not initializing the numeric variables before first use SOC4 1. Index exceeds the size of table 2. Trying to use File Section variables without opening the file
What is VSAM?
VSAM is Virtual Storage Access Method It is a method used to move data between Disk and Main Storage VSAM operates in Virtual Environment VSAM acts as interface between Operating System and Application Program Interface between Main Storage and Disk
File Access Methods
Data (Records) is retrieved o Sequential (Reading from beginning to end) o Random (Records are read by the value in the key)
Page 66 ©Copyright 2007, Cognizant Technology Solutions, All Rights Reserved
C3: Protected
Associa
teID
:245
217
Handout - Mainframe Testing
o Direct (Records are read based on their physical location/address on disk)
VSAM provides all these methods One access method supporting all types of data retrieval
VSAM Catalogs
All VSAM objects must be cataloged. o Unlike non-vsam datasets which can be stored in the DASD without a catalog
entry and can be accessed by specifying the VOLUME in which they reside All access on a VSAM object is via the catalog.
o So, it provides means to implement good control over all VSAM objects. Catalog contains all information about the dataset
o Like space, security, access criteria, attributes, processing statistics. Non-vsam objects can also be defined within VSAM catalog (Including GDGs) VSAM objects are portable from one system to another. There are two types of catalog
o VSAM catalog o ICF catalog
Under ICF o Each VSAM dataset has VTOC entry o Space managed by OS space manager o One primary and 122 secondary allocation
Under VSAM catalog o Either unique or suballocated
Suballocated dataset o Managed by VSAM space manager and can have 123 extents o No VTOC entry. Only original VSAM space has VTOC entry
Unique allocation o Space managed by OS - Only 16 extents allowed on the VSAM cluster o VTOC entry for each
Data Organization
In early days books were sequential from Start to End with no breaks (corresponds to Linear Dataset)
Afterwards, organized into chapters and paragraphs (corresponds to Entry Sequenced Dataset)
Page numbers were introduced to identify a page (corresponds to Relative Record Dataset)
Indexed were later introduced to locate a topic directly (corresponds to key sequenced Dataset)
Page 67 ©Copyright 2007, Cognizant Technology Solutions, All Rights Reserved
C3: Protected

Associa
teID
:245
217
Handout - Mainframe Testing
Page 68 ©Copyright 2007, Cognizant Technology Solutions, All Rights Reserved
C3: Protected
Types of VSAM Data Sets
ESDS Entry Sequenced Data Set KSDS Key Sequenced Data Set RRDS Relative Record Data Set LDS Linear Data Set
Traditional Access Methods
QSAM (Queried Sequential Access Method) BSAM (Basic Sequential Access Method)
o for ‘flat’ files ISAM (Index Sequential Access Method)
o for Index files BDAM (Basic Direct Access Method)
o for direct access files
IDCAMS
Handles VSAM data sets (exclusively) Some of the functions
o Creates (DEFINE) o Copies (REPRO) o Prints (PRINT) o Delete (DELETE) o Lists Characteristics (LISTCAT)
VSAM Data Set Organization
VSAM Data Set can contain three major components o CLUSTER (Catalog entry) o INDEX o DATA (Actual data)
Data Set is referred by cluster name in JCL
INDEX DATA
CLUSTER
Associa
teID
:245
217
Handout - Mainframe Testing
Control Area (CA)
CIs are grouped into CA Can have more than one CA in a VSAM data set CA is VSAMs internal unit for allocating space Smallest is a TRACK, and the largest is a CYLINDER VSAM determines CA size & number of CIs in CA based on
o CI size specified o Record size
Index
Separate entity Organized similar to Data component (CI & CA) Has different CI size VSAM builds Index when data is loaded Index is organised as Inverted Binary Tree VSAM compresses keys to conserve space Can have several Levels of Indexes Lowest level of index is called ‘Sequence set’
o One sequence set for one Contol Area o Are always in the key order whereas data CI need not be in key order o Each entry has the highest key(or “one” less than the 1st key of the next CI
sothat the sequence set need not be updated when higher key added to the CI) in the CI and points to the RBA of the CI (Vertical Pointer)
Next level is called index set o Contains Primary keys and pointers to the sequence set o More than one level of Index set based on number of Sequence set records o Top level index always one record
ESDS
Similar to Sequential File Sequenced by the order in which data is entered/loaded New Records are added at the end only (chronological order) Supports both Fixed and Variable formats Contains only CLUSTER & DATA components Only sequential access in Batch Cobol Programs Random access is supported in on-line applications (CICS) using Relative Byte
Address (RBA) Alternate Index is supported in on-line applications (CICS) No primary index
Page 69 ©Copyright 2007, Cognizant Technology Solutions, All Rights Reserved
C3: Protected

Associa
teID
:245
217
Handout - Mainframe Testing
RBA
Record location relative to the beginning of the file (Relative Byte Address) CI
A 80
B 40
C 60
RBA of B is 80
RRDS
Has only CLUSTER and DATA components Records are stored in numbered, fixed length slots Each slot is given a number ‘Relative Record Number (RRN)’ VSAM determines the number of slots by Size of CI Length of Record Records can be deleted physically Empty slots are filled up with new records without shifting existing records No primary Index or Alternate Index Supports Fixed and Variable formats From Ver 3 Rel 3 RRN cannot be changed Each slot has RDF and RDF indicates Full/Empty
KSDS
Has all three components of VSAM (CLUSTER, INDEX and DATA) Key sequenced Primary key should be Unique Same position in every record Is not split (has to be contiguous) Records can be deleted physically Primary key cannot be changed Allows Alternate Index Has all the access methods Sequential Random Dynamic (SKIP sequential)
Page 70 ©Copyright 2007, Cognizant Technology Solutions, All Rights Reserved
C3: Protected
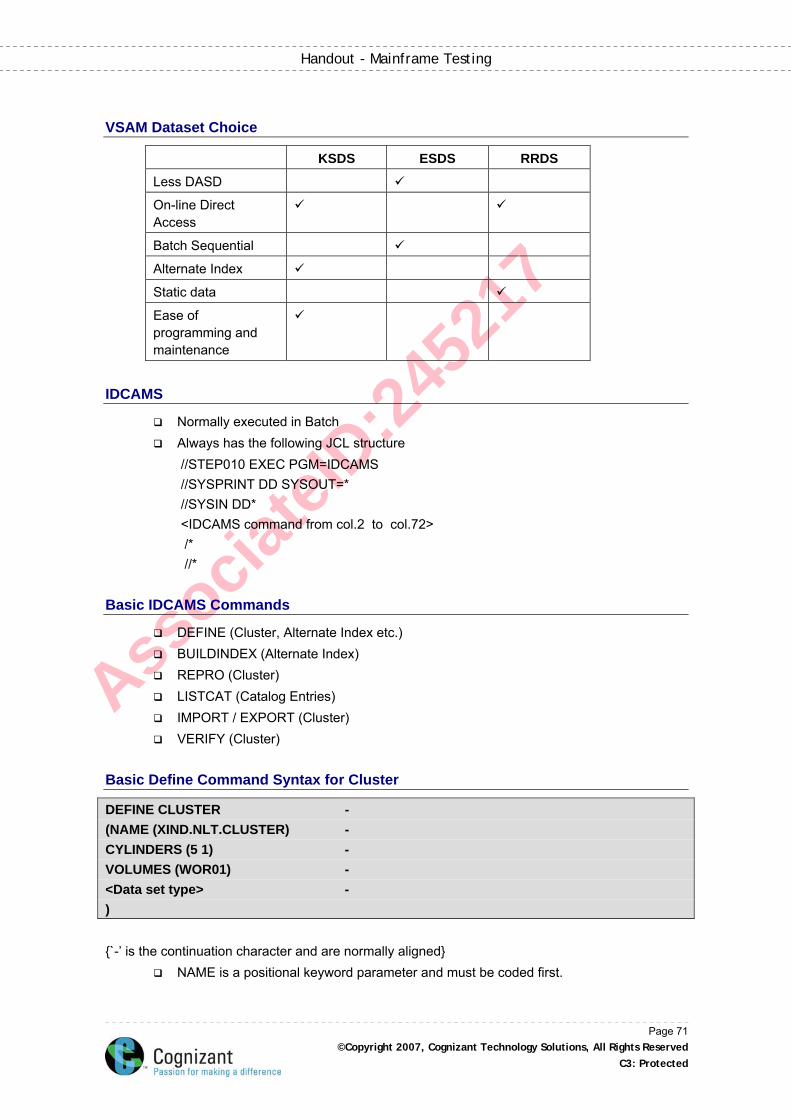
Associa
teID
:245
217
Handout - Mainframe Testing
VSAM Dataset Choice
KSDS ESDS RRDS
Less DASD
On-line Direct Access
Batch Sequential
Alternate Index
Static data
Ease of programming and maintenance
IDCAMS
Normally executed in Batch Always has the following JCL structure
//STEP010 EXEC PGM=IDCAMS //SYSPRINT DD SYSOUT=* //SYSIN DD* <IDCAMS command from col.2 to col.72> /* //*
Basic IDCAMS Commands
DEFINE (Cluster, Alternate Index etc.) BUILDINDEX (Alternate Index) REPRO (Cluster) LISTCAT (Catalog Entries) IMPORT / EXPORT (Cluster) VERIFY (Cluster)
Basic Define Command Syntax for Cluster
DEFINE CLUSTER - (NAME (XIND.NLT.CLUSTER) - CYLINDERS (5 1) - VOLUMES (WOR01) - <Data set type> - ) {`-’ is the continuation character and are normally aligned}
NAME is a positional keyword parameter and must be coded first.
Page 71 ©Copyright 2007, Cognizant Technology Solutions, All Rights Reserved
C3: Protected
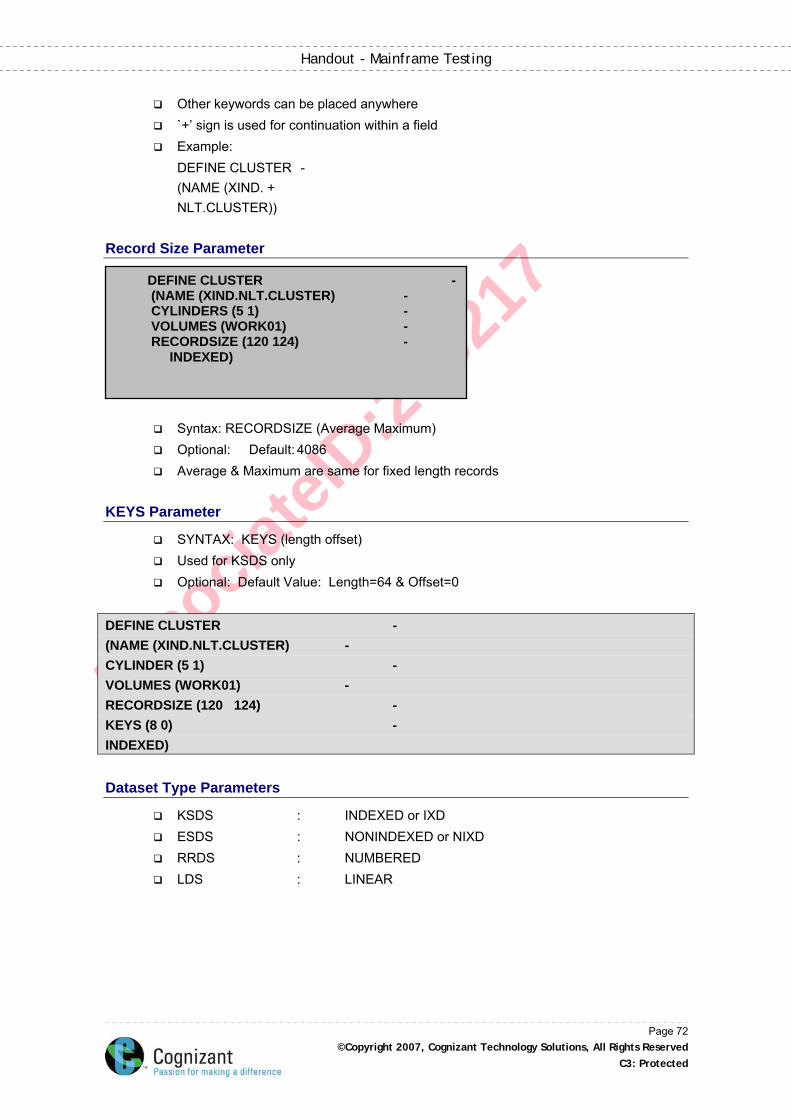
Associa
teID
:245
217
Handout - Mainframe Testing
Other keywords can be placed anywhere `+’ sign is used for continuation within a field Example:
DEFINE CLUSTER - (NAME (XIND. + NLT.CLUSTER))
Record Size Parameter
DEFINE CLUSTER - (NAME (XIND.NLT.CLUSTER) - CYLINDERS (5 1) - VOLUMES (WORK01) - RECORDSIZE (120 124) - INDEXED)
Syntax: RECORDSIZE (Average Maximum) Optional: Default: 4086 Average & Maximum are same for fixed length records
KEYS Parameter
SYNTAX: KEYS (length offset) Used for KSDS only Optional: Default Value: Length=64 & Offset=0
DEFINE CLUSTER - (NAME (XIND.NLT.CLUSTER) - CYLINDER (5 1) - VOLUMES (WORK01) - RECORDSIZE (120 124) - KEYS (8 0) - INDEXED)
Dataset Type Parameters
KSDS : INDEXED or IXD ESDS : NONINDEXED or NIXD RRDS : NUMBERED LDS : LINEAR
Page 72 ©Copyright 2007, Cognizant Technology Solutions, All Rights Reserved
C3: Protected
Associa
teID
:245
217
Handout - Mainframe Testing
Data and Index Components
Required when installation default names are to be overridden DEFINE CLUSTER - (NAME (XIND.NLT.CLUSTER) - CYLINDER (5 1) VOLUMES (WORK01) - RECORDSIZE (120 124) KEYS (8 0) INDEXED) - DATA - (NAME (XIND.NLT.CLUSTER.DATA)) - INDEX - (NAME (XIND.NLT.CLUSTER.INDEX)) -
AMS Performance Parameters
CONTROL INTERVAL SIZE Syntax : CONTROLINTERVALSIZE (bytes) Abbr : CISZ or CISIZE Default: Calculated by VSAM Control Interval size (CIDF & RDF) & FREESPACE must be taken into account Thumb Rule for CISIZE
o If the record length is <8192, multiples of 512, o >=8192, multiples of 2048
FREESPACE
Syntax : FREESPACE (CI% CA %) Default : FREESPACE (0 0) High Freespace results in more I/O & consumes larger DASD space Very low FREESPACE results in CI splits and degrades performance Amount of FREESPACE depends on
o Rate of growth of records o Expected number of records to be deleted o Reorganization frequency o Performance consideration
BUFFERSPACE
Syntax : BUFFERSPACE (bytes) Abbr : BUFSP Default : Two data buffers plus one additional index buffer for
KSDS Used to improve Input/output performance Can also be specific in JCL EXEC parameter
//DD1 DD DSNAME=ANYVSAM1,
Page 73 ©Copyright 2007, Cognizant Technology Solutions, All Rights Reserved
C3: Protected
Associa
teID
:245
217
Handout - Mainframe Testing
// AMP= ('BUFND=4, BUFNI=4, STRNO=2')
RECOVERY / SPEED
Mutually Exclusive RECOVERY allows you to recover if the job initially loading the dataset fails SPEED is faster, but does not provide restart feature Default: RECOVERY
SPANNED
Syntax : SPANNED/NONSPANNED Default : NONSPANNED Allows large records to span more than one Control Interval
o However, the records cannot span across Control areas RRDS does not support spanned records.
KEYRANGES
Syntax : KEYRANGES (Low - Val; High - Val) Default : None (No range assumed) Example :
KEYRANGES ((000001 100000) + 100001 200000)) The Key Ranges correspond to VOLUMES if ORDERED clause is specified.
ORDERED
Syntax : ORDERED / UNORDERED Default : UNORDERED Goes together with KEYRANGES clause specifies the volume to which the key values
should go.
REUSE
Syntax : REUSE/NOREUSE Default : NOREUSE REUSE specifies that the cluster can be loaded with fresh records with an implicit
delete of existing records. REUSE cannot be used under following circumstances and hence not recommended
o When KEYRANGES parameter is coded o When alternate indexed are defined
REPLICATE
Directs the VSAM to duplicate each index as many times as it will fit on its assigned track
Applies only to KSDS index component
Page 74 ©Copyright 2007, Cognizant Technology Solutions, All Rights Reserved
C3: Protected
Associa
teID
:245
217
Handout - Mainframe Testing
To reduce rotational delay and to make I/O faster Syntax : Replicate / No replicate Default : No replicate
VOLUMES
Can specify different volumes for o Data component o Index component
IMBED
Directs the VSAM to place the sequence set (the lowest level of index next to the data component) on the first track of the data control area and duplicate it as many times as it will fit
This process will reduce rotational delay because the desired sequence set record is found faster
Default: NO IMBED Syntax : IMBED / NO IMBED
Share option
Syntax : SHAREOPTIONS (Cross-region-value Cross-system-val) Cross-region :Concurrent data access on a standalone
system (ex: TSO&CICS accessing same data) Cross-system : Data access for multiple computers
(Two different computers that are inter-connected) Default : SHAREOPTIONS (1 3)
o Multiple jobs can read only if no update takes place - Complete data integrity o Multiple jobs can read and at the same time one job can update - Write, but
not read integrity o Multiple jobs can read & write simultaneously - No integrity o Same as option 3, but refreshes buffer after every read
Share options 1 & 2 are not allowed for cross-system For cross region sharing, each batch job must have DISP=SHR For cross system sharing DISP parameter in the JCL is immaterial
ERASE / NOERASE
Default : NOERASE ERASE instructs VSAM to move zeroes to all the bytes once the cluster is deleted
More AMS Commands
REPRO
All purpose load and backup utility command
Page 75 ©Copyright 2007, Cognizant Technology Solutions, All Rights Reserved
C3: Protected

Associa
teID
:245
217
Handout - Mainframe Testing
Can be used against empty / loaded VSAM file with another VSAM file or sequential file
Much easier to use than IEBGENER Can be used against all four types of VSAM datasets
REPRO INDATASET (DSN) or INFILE (DD1) OUTDATASET (DSN) or OUTFILE (DD2) SKIP (count) COUNT (count) FROMKEY FROMADDRESS FROMNUMBER TOKEY TOADDRESS TONUMBER REUSE/REPLACE
o INFILE or INDATASET parameter is mandatory, similarly OUTFILE or OUTDATASET is mandatory
All other parameters are optional SKIP specifies number of input records to skip before beginning to copy COUNT specifies number of output records to copy REUSE parameter
o Can be used only if the VSAM dataset was originally defined with REUSE option
o Has the effect of logically deleting records before loading REPLACE parameter
o Replaces the records for which primary keys are matching between input and output records
o If not specified, the matching key records are untouched o If the target is ESDS the records are appended and REPLACE is
inappropriate. Repro - Example // REPRO EXEC PGM=IDCAMS // SYSPRINT DD SYSOUT=* // DD2 DD DSN=CTS.NLT.CLUSTER.BACKUP, // DISP= (NEW, CATLG, CATLG), UNIT=TAPE, // VOL= (SER=121213, LABEL=(1,SL), // DCB= (RECFM=FB, LRECL=80) //DD1 DD DSN=CTS.NLT.CLUSTER, DISP=SHR // SYSIN DD* REPRO INFILE (DD1) OUTFILE (DD2) REUSE / *
Page 76 ©Copyright 2007, Cognizant Technology Solutions, All Rights Reserved
C3: Protected
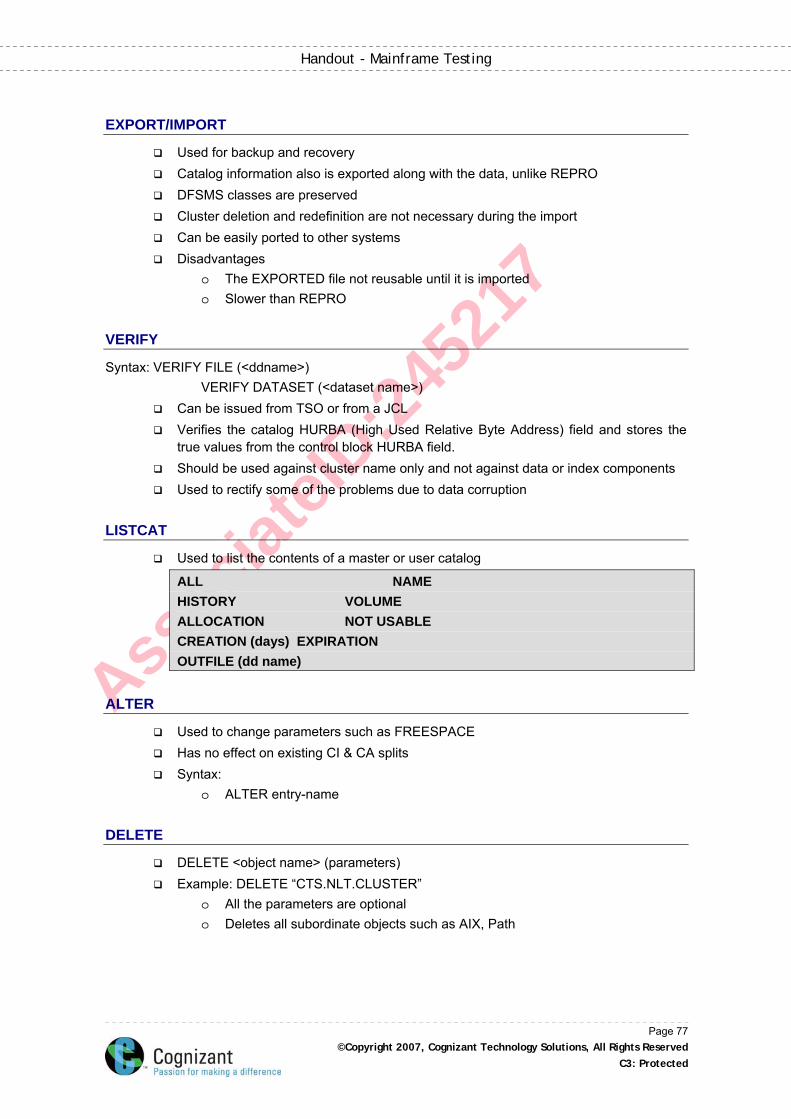
Associa
teID
:245
217
Handout - Mainframe Testing
EXPORT/IMPORT
Used for backup and recovery Catalog information also is exported along with the data, unlike REPRO DFSMS classes are preserved Cluster deletion and redefinition are not necessary during the import Can be easily ported to other systems Disadvantages
o The EXPORTED file not reusable until it is imported o Slower than REPRO
VERIFY
Syntax: VERIFY FILE (<ddname>) VERIFY DATASET (<dataset name>)
Can be issued from TSO or from a JCL Verifies the catalog HURBA (High Used Relative Byte Address) field and stores the
true values from the control block HURBA field. Should be used against cluster name only and not against data or index components Used to rectify some of the problems due to data corruption
LISTCAT
Used to list the contents of a master or user catalog
ALL NAME HISTORY VOLUME ALLOCATION NOT USABLE CREATION (days) EXPIRATION OUTFILE (dd name)
ALTER
Used to change parameters such as FREESPACE Has no effect on existing CI & CA splits Syntax:
o ALTER entry-name
DELETE
DELETE <object name> (parameters) Example: DELETE “CTS.NLT.CLUSTER”
o All the parameters are optional o Deletes all subordinate objects such as AIX, Path
Page 77 ©Copyright 2007, Cognizant Technology Solutions, All Rights Reserved
C3: Protected
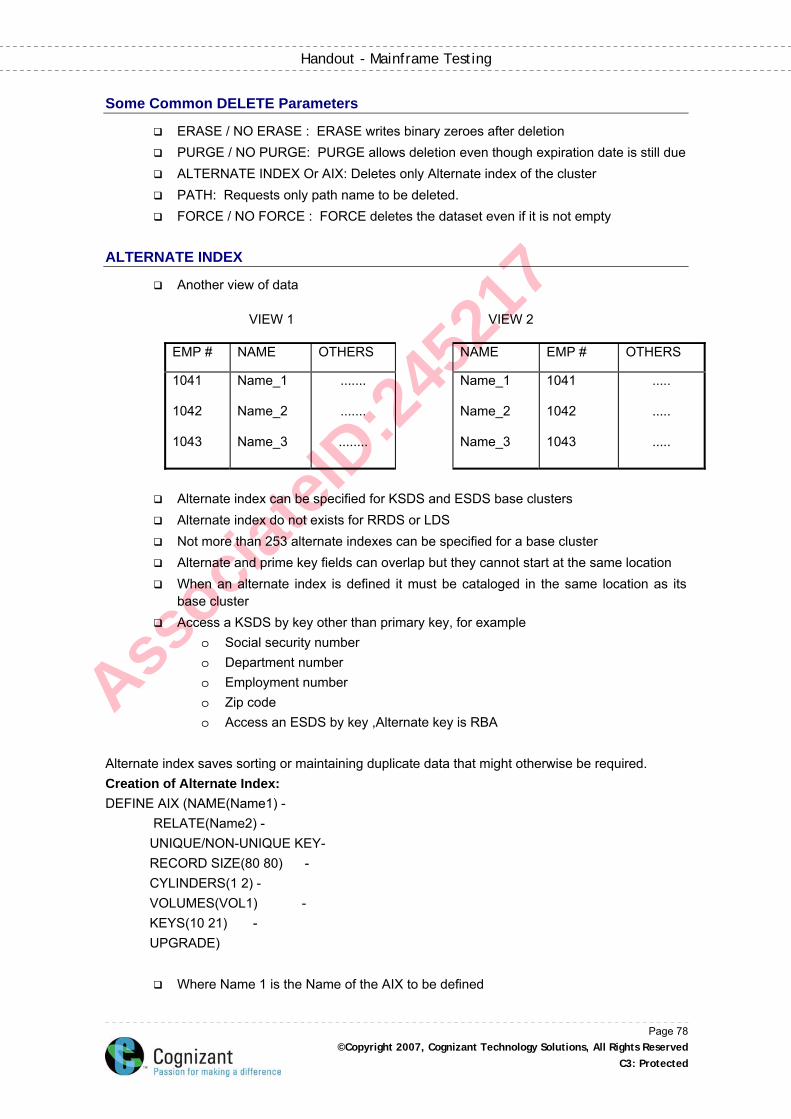
Associa
teID
:245
217
Handout - Mainframe Testing
Some Common DELETE Parameters
ERASE / NO ERASE : ERASE writes binary zeroes after deletion PURGE / NO PURGE: PURGE allows deletion even though expiration date is still due ALTERNATE INDEX Or AIX: Deletes only Alternate index of the cluster PATH: Requests only path name to be deleted. FORCE / NO FORCE : FORCE deletes the dataset even if it is not empty
ALTERNATE INDEX
Another view of data VIEW 1 VIEW 2
EMP # NAME OTHERS NAME EMP # OTHERS
1041 1042 1043
Name_1 Name_2 Name_3
.......
.......
........
Name_1 Name_2 Name_3
1041 1042 1043
.....
.....
.....
Alternate index can be specified for KSDS and ESDS base clusters Alternate index do not exists for RRDS or LDS Not more than 253 alternate indexes can be specified for a base cluster Alternate and prime key fields can overlap but they cannot start at the same location When an alternate index is defined it must be cataloged in the same location as its
base cluster Access a KSDS by key other than primary key, for example
o Social security number o Department number o Employment number o Zip code o Access an ESDS by key ,Alternate key is RBA
Alternate index saves sorting or maintaining duplicate data that might otherwise be required. Creation of Alternate Index: DEFINE AIX (NAME(Name1) - RELATE(Name2) - UNIQUE/NON-UNIQUE KEY- RECORD SIZE(80 80) - CYLINDERS(1 2) - VOLUMES(VOL1) - KEYS(10 21) - UPGRADE)
Where Name 1 is the Name of the AIX to be defined
Page 78 ©Copyright 2007, Cognizant Technology Solutions, All Rights Reserved
C3: Protected
Associa
teID
:245
217
Handout - Mainframe Testing
Name 2 is the Name of the BASE Cluster this AIX to be related to UNIQUE/NON-UNIQUE key refers whether the AIX to be unique or Non-Unique Record size is similar to the base cluster defenition where it defines the AVERAGE
and the MAXIMUM length of the records CYLINDERS refer primary and Secondary value Volumes refer the volume where the AIX to be stored KEYS refers the Length and the offset of the AIX key. UPGRADE specify to update the AIX whenever there is a change in the BASE cluster.
PATH
Path results in the establishment of a logical link between the alternate and base index clusters in the VSAM catalog. An actual record is not created, instead, only a relationship is established Creation of Path: //TRAIN01A JOB (ACCTNO),’user name’ //STEP01 EXEC PGM=IDCAMS //SYSPRINT DD SYSOUT=A //SYSIN DD * DEFINE PATH - (NAME(NAME3) - PATHENTRY(NAME1) - UPDATE ) /* // NAME3 is the name of the PATH that connects the AIX and the BASE CLUSTER. NAME1 is the name of the AIX that needs to be populated by the PATH. UPDATE indicate to update the Path whenever a BASE Cluster is changed.
Build Index
BLDINDEX command to build the alternate keys and load the alternate indexes defined by the previous example job-stream
A BLDINDEX can be defined by giving the following in an IDCAMS SYSIN Card BLDINDEX INDATASET(NAME2) - OUTDATASET(NAME1) Where NAME2 is the BASE Cluster name. NAME1 is the AIX name.
Page 79 ©Copyright 2007, Cognizant Technology Solutions, All Rights Reserved
C3: Protected
Associa
teID
:245
217
Handout - Mainframe Testing
Summary:
In this chapter we have learned, what is JCL and the syntax of JCL. The various steps and parameters used in writing a batch job. The types of PROCs (procedures), like catalogued PROCs and in-stream PROCs. The types of VSAM like, KSDS, ESDS, RRDS, and LDS. Create VSAM datasets and Alternate Index (AIX) using IDCAMS utility. Build the path between AIX and cluster using IDCAMS.
Test Your Understanding
1. What is the first statement in a batch job? a) Job – Header b) Job – Title c) Job – Card
2. Which statement in a batch job is used to specify the program that will be executed in the
step? a) JOB Statement b) EXEC Statement c) DD Statement
3. Which statement in a batch job is used to specify the datasets required by the program in
the step? a) JOB Statement b) EXEC Statement c) DD Statement
4. Which VSAM dataset has a Key field?
a) KSDS b) ESDS c) RRDS
5. Which utility is used to perform operations in a VSAM dataset?
a) IEBGENR b) IDCAMS c) IEBFEBR14
Answers:
1. c 2. b 3. c 4. a 5. b
Page 80 ©Copyright 2007, Cognizant Technology Solutions, All Rights Reserved
C3: Protected
Associa
teID
:245
217
Handout - Mainframe Testing
Chapter 4: Batch Execution
Learning Objective
After completing this chapter, you will be able to: Submit a batch job in mainframe Explain the various job priorities
z/OS (OS/390) Batch Jobs:
A job is a set of data and the instructions that tell the system what you want it to do with that data. You may perform a task interactively by submitting the instructions one at a time. A batch job is submitted to the system in its entirety, including instructions and data.
Batch Job Submission
The SUBMIT command in TSO sends jobs to z/OS (OS/390). Both of these commands have HELP files in their respective systems. In addition, many of the other computer systems on campus and throughout the State University System network provide commands to submit batch jobs to CNS. To determine how to submit a job to CNS from other systems on the UF campus, refer to the local documentation for that system, or contact the consultants for that system.
Batch Job Processing
When a job arrives at the z/OS (OS/390) system, the system assigns it a five-digit JES2 job number, which is associated with the job until it leaves the system. Whenever you submit a job to z/OS (OS/390), you should make a note of this number because it uniquely identifies your job, and you will need it in order to inquire about any problems which might occur during the execution of your batch job. JES2 controls the processing of batch jobs. When a job is submitted, the userid and password are checked. Jobs are submitted in job classes, which specify the type of job, and help determine the priority in which your job runs. Some job classes are restricted to certain account types and some resources (for example, the use of magnetic tapes) are restricted to certain job classes. JES2 checks the JCL for invalid combinations. If your JCL passes this initial scan, JES2 places the job in a queue of jobs awaiting execution. The job's position in the queue depends upon several factors:
job class the job's size the amount of time the job is in the system
While some jobs are in the queue awaiting execution, their priority is periodically incremented. We call this "aging." JES2 selects for execution the job with the highest priority that can be run with available resources. When the job finishes executing, it is placed into a queue of jobs waiting to be printed. This queue is divided into local or remote according to the destinations of the jobs in it. Priorities within this queue are determined by the amount of output for the job. Larger jobs have
Page 81 ©Copyright 2007, Cognizant Technology Solutions, All Rights Reserved
C3: Protected
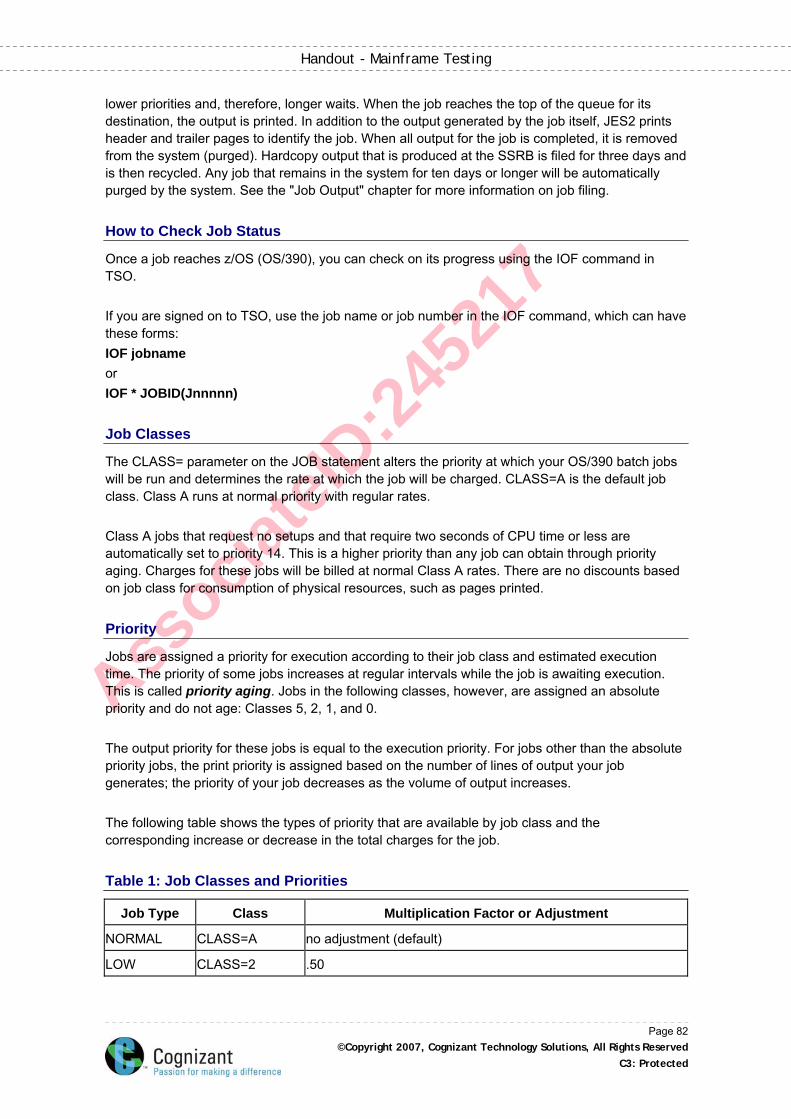
Associa
teID
:245
217
Handout - Mainframe Testing
lower priorities and, therefore, longer waits. When the job reaches the top of the queue for its destination, the output is printed. In addition to the output generated by the job itself, JES2 prints header and trailer pages to identify the job. When all output for the job is completed, it is removed from the system (purged). Hardcopy output that is produced at the SSRB is filed for three days and is then recycled. Any job that remains in the system for ten days or longer will be automatically purged by the system. See the "Job Output" chapter for more information on job filing.
How to Check Job Status
Once a job reaches z/OS (OS/390), you can check on its progress using the IOF command in TSO. If you are signed on to TSO, use the job name or job number in the IOF command, which can have these forms: IOF jobname or IOF * JOBID(Jnnnnn)
Job Classes
The CLASS= parameter on the JOB statement alters the priority at which your OS/390 batch jobs will be run and determines the rate at which the job will be charged. CLASS=A is the default job class. Class A runs at normal priority with regular rates. Class A jobs that request no setups and that require two seconds of CPU time or less are automatically set to priority 14. This is a higher priority than any job can obtain through priority aging. Charges for these jobs will be billed at normal Class A rates. There are no discounts based on job class for consumption of physical resources, such as pages printed.
Priority
Jobs are assigned a priority for execution according to their job class and estimated execution time. The priority of some jobs increases at regular intervals while the job is awaiting execution. This is called priority aging. Jobs in the following classes, however, are assigned an absolute priority and do not age: Classes 5, 2, 1, and 0. The output priority for these jobs is equal to the execution priority. For jobs other than the absolute priority jobs, the print priority is assigned based on the number of lines of output your job generates; the priority of your job decreases as the volume of output increases. The following table shows the types of priority that are available by job class and the corresponding increase or decrease in the total charges for the job.
Table 1: Job Classes and Priorities
Job Type Class Multiplication Factor or Adjustment
NORMAL CLASS=A no adjustment (default)
LOW CLASS=2 .50
Page 82 ©Copyright 2007, Cognizant Technology Solutions, All Rights Reserved
C3: Protected
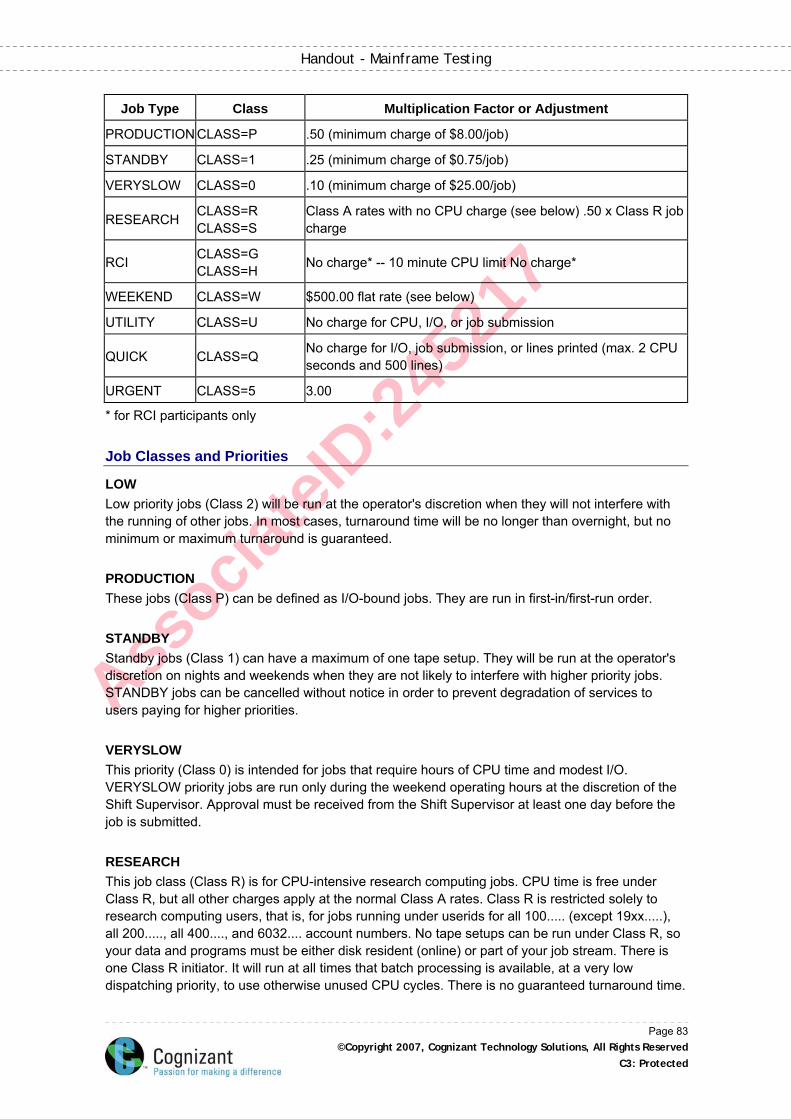
Associa
teID
:245
217
Handout - Mainframe Testing
Page 83 ©Copyright 2007, Cognizant Technology Solutions, All Rights Reserved
C3: Protected
Job Type Class Multiplication Factor or Adjustment
PRODUCTION CLASS=P .50 (minimum charge of $8.00/job)
STANDBY CLASS=1 .25 (minimum charge of $0.75/job)
VERYSLOW CLASS=0 .10 (minimum charge of $25.00/job)
RESEARCH CLASS=R CLASS=S
Class A rates with no CPU charge (see below) .50 x Class R job charge
RCI CLASS=G CLASS=H No charge* -- 10 minute CPU limit No charge*
WEEKEND CLASS=W $500.00 flat rate (see below)
UTILITY CLASS=U No charge for CPU, I/O, or job submission
QUICK CLASS=Q No charge for I/O, job submission, or lines printed (max. 2 CPU seconds and 500 lines)
URGENT CLASS=5 3.00
* for RCI participants only
Job Classes and Priorities
LOW Low priority jobs (Class 2) will be run at the operator's discretion when they will not interfere with the running of other jobs. In most cases, turnaround time will be no longer than overnight, but no minimum or maximum turnaround is guaranteed. PRODUCTION These jobs (Class P) can be defined as I/O-bound jobs. They are run in first-in/first-run order. STANDBY Standby jobs (Class 1) can have a maximum of one tape setup. They will be run at the operator's discretion on nights and weekends when they are not likely to interfere with higher priority jobs. STANDBY jobs can be cancelled without notice in order to prevent degradation of services to users paying for higher priorities. VERYSLOW This priority (Class 0) is intended for jobs that require hours of CPU time and modest I/O. VERYSLOW priority jobs are run only during the weekend operating hours at the discretion of the Shift Supervisor. Approval must be received from the Shift Supervisor at least one day before the job is submitted. RESEARCH This job class (Class R) is for CPU-intensive research computing jobs. CPU time is free under Class R, but all other charges apply at the normal Class A rates. Class R is restricted solely to research computing users, that is, for jobs running under userids for all 100..... (except 19xx.....), all 200....., all 400...., and 6032.... account numbers. No tape setups can be run under Class R, so your data and programs must be either disk resident (online) or part of your job stream. There is one Class R initiator. It will run at all times that batch processing is available, at a very low dispatching priority, to use otherwise unused CPU cycles. There is no guaranteed turnaround time.
Associa
teID
:245
217
Handout - Mainframe Testing
EVENING RESEARCH Like Class R, Evening Research (Class S) is for CPU-intensive research computing jobs. Class S is run on weekends, holidays, and after 6:00 P.M. on weekdays. The class R charge is multiplied by .5 to determine the Class S charge. Class S limitations are the same as those for Class R. RCI RCI jobs (classes G and H) are reserved for special Research Computing Initiative (RCI) userids, which are provided free to qualifying SUS faculty members to support the enhancement of numerically intensive computing in higher education. Use of computing resources is restricted to the amount awarded under the RCI. No tape setup is permitted under classes G and H. Class G jobs are limited to 10 minutes CPU time. WEEKEND (W) To obtain approval for use of Class W, contact Bill Carr, Operations Manager. Class W is for research applications only and is available on weekends and holidays. Userids with jobs run under Class W will be billed a flat $500.00 for the weekend, regardless of the number of jobs run. No tape setups are allowed. CNS UTILITIES (U) Class U is limited to certain CNS utilities such as CHRGLIST and XFER3 (funds transfer). FAST BATCH (Q) Class Q is limited to specific educational applications with a maximum of 2 seconds of CPU time. The SAS and SPSSQ processors are charged for CPU usage at normal Class A rates. There is no CPU charge for the ASSIST, PLC, SPITBOL, WATBOL, WATFIV, and WPASCAL processors. URGENT (5) These jobs (Class 5) are for fast processing. Because of the quick turnaround time, Class 5 jobs carry a 200% surcharge.
Computation of Execution Priority
The execution priority of a Class A job is based on estimated execution time. As the job awaits execution, its priority ages every hour. The following priorities are never changed while the job is in the system. LOW (Class 2) priority jobs are assigned a priority of 1, STANDBY (Class 1) and VERYSLOW (Class 0) priority jobs get a priority of 0. Those with URGENT (Class 5) priority get a priority of 14. The following table shows how the entry priority of normal priority (Class A) jobs is computed. Entry priorities vary for jobs with special setups that execute in two CPU seconds or less.
Table 2: Entry Priorities of Class A Jobs
CPU Seconds on JOB Statement Entry Priority
<= 1 12
<= 3 10
Page 84 ©Copyright 2007, Cognizant Technology Solutions, All Rights Reserved
C3: Protected
Associa
teID
:245
217
Handout - Mainframe Testing
Page 85 ©Copyright 2007, Cognizant Technology Solutions, All Rights Reserved
C3: Protected
CPU Seconds on JOB Statement Entry Priority
<= 6 9
<= 10 8
<= 30 6
<= 100 4
> 100 3
Computation of Print Priority
Priority for printing is based on the actual number of lines of output a job produces, NOT the number of lines estimated. The print priority of LOW, STANDBY, VERYSLOW, or URGENT jobs does not age, but stays at 1, 0, 0, or 14, respectively. The following table shows how the print priority for normal priority (Class A) jobs is computed.
Table 3: Print Priorities for Class A Jobs
Lines to be Printed Print Priority
<= 50 12
<= 200 11
<= 500 10
<= 1000 9
<= 2000 8
<= 5000 7
<= 10000 6
<= 30000 5
> 30000 4
Hints for Improving Batch Job Turnaround Time
Job turnaround time is influenced by many factors, such as the amount of CPU time required by a job, the number and type of resources a job needs (tapes, printers, etc.), the class under which a job is run, and the system load or number of jobs in the system at one time. Because of all these variables, there is no "average" turnaround time. Also, turnaround time is typically longer at the beginning of a month, the end of an academic semester, or the end of the fiscal year. The following hints can help you improve turnaround time:
Submit your batch jobs late in the day, at nights, on weekends, or on holidays, when the demand for resources is lower.
Invest some time in desk-checking your programs before you submit them. You might be able to identify problems and not have to wait for your output to find that you left out a comma or space in your program.
Use Class Q compilers or Class U utilities whenever possible.
Associa
teID
:245
217
Handout - Mainframe Testing
Analyze your program's needs and accurately estimate your CPU request in your JCL. These parameters directly affect priorities. If you can limit your CPU time to two seconds or less and your job requires no tape setups, the job will execute much sooner.
If you are going to use a program repeatedly, compile and link-edit it so you do not have to wait for it to be compiled and link-edited each time you run it.
Summary:
In this chapter we have learned, about how to submit a batch job in mainframe. We have also covered the various priorities for a batch job and checking the status of the batch job.
Test Your Understanding
1. What is the command to trigger a batch job in mainframe? a) Trigger b) Submit c) Invoke
Answer:
1. b
Page 86 ©Copyright 2007, Cognizant Technology Solutions, All Rights Reserved
C3: Protected
Associa
teID
:245
217
Handout - Mainframe Testing
Chapter 5: COBOL Basics
Learning Objective
After completing this chapter, you will be able to: Explain the various DIVISIONs and SECTIONs in COBOL Explain the usage and syntax of IDENTIFICATION DIVISION Explain the usage and syntax of ENVIRONMENT DIVISION Explain the usage and syntax of DATA DIVISION Explain the usage and syntax of PROCEDURE DIVISION Explain the various Control Statements in COBOL Explain the various Operators in COBOL Explain the usage and syntax of SORT statement in COBOL Explain the usage and syntax of MERGE statement in COBOL
Features of COBOL
COBOL is English like language and hence is easy to learn can be used with any database like VSAM or DB2, IDMS can handle huge volumes of Data COBOL applications can be easily maintained
Page 87 ©Copyright 2007, Cognizant Technology Solutions, All Rights Reserved
C3: Protected
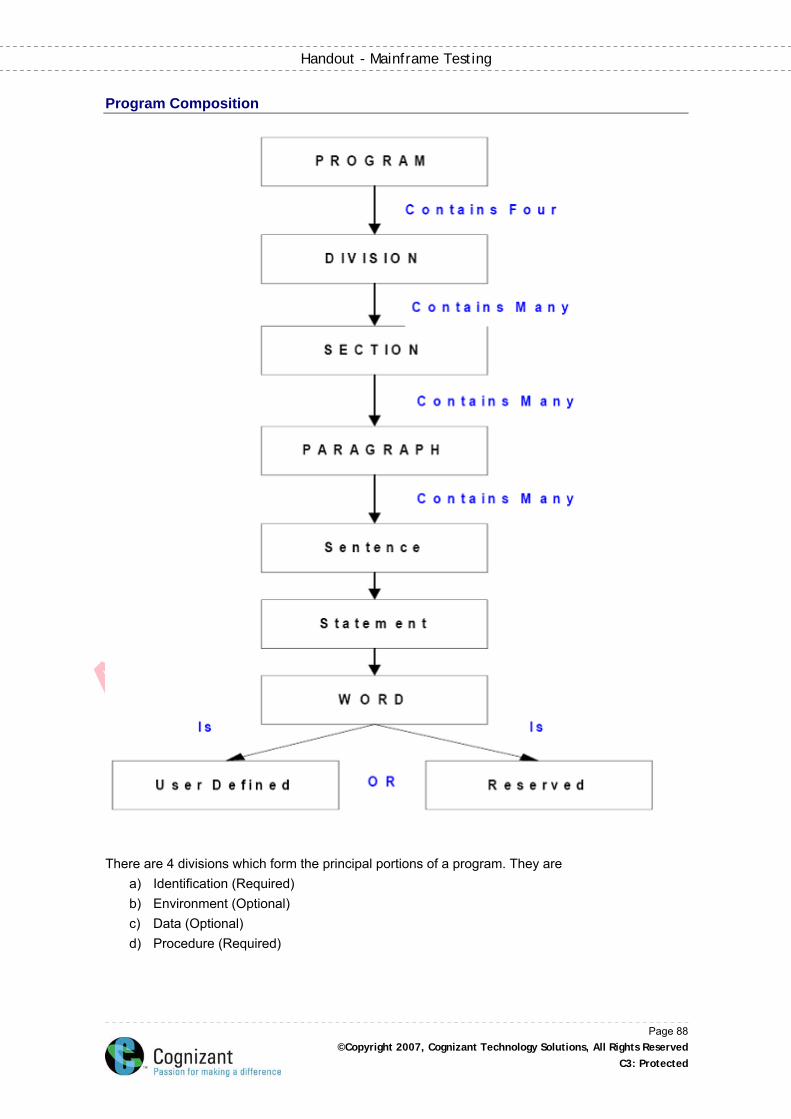
Associa
teID
:245
217
Handout - Mainframe Testing
Program Composition
There are 4 divisions which form the principal portions of a program. They are a) Identification (Required) b) Environment (Optional) c) Data (Optional) d) Procedure (Required)
Page 88 ©Copyright 2007, Cognizant Technology Solutions, All Rights Reserved
C3: Protected
Associa
teID
:245
217
Handout - Mainframe Testing
COBOL – Character Set
Character Meaning
Space
+ Plus sign
- Minus sign or hyphen
* Asterisk
/ Forward slash or solidus
= Equal sign
$ Currency sign1
, Comma
; Semicolon
. Decimal point or period
" Quotation mark2
( Left parenthesis
) Right parenthesis
> Greater than
< Less than
: Colon
' Apostrophe
A-Z Alphabet (uppercase)
a-z Alphabet (lowercase)
0-9 Numeric characters
IDENTIFICATION DIVISION
The Identification Division names the program and, optionally, documents the date the Program was written, the compilation date and other pertinent information. Syntax IDENTIFICATION DIVISION. PROGRAM-ID. PGM-NAME. [AUTHOR. Comment Entry] [INSTALLATION. Comment Entry] [DATE-WRITTEN. Comment Entry] [DATE-COMPILED. Comment Entry] Example IDENTIFICATION DIVISION.
Page 89 ©Copyright 2007, Cognizant Technology Solutions, All Rights Reserved
C3: Protected

Associa
teID
:245
217
Handout - Mainframe Testing
PROGRAM-ID. NEWPGM. AUTHOR. MFCOE, CHENNAI. INSTALLATION. MFCOE, CHENNAI. DATE-WRITTEN. 25 OCTOBER 2007. DATE-COMPILED. 25 OCTOBER 2007.
ENVIRONMENT DIVISION
This division contains machine dependent details such as Computer(s) used and peripheral devices. It has got two sections CONFIGURATION SECTION- Identifies the computer used for compiling of programs INPUT-OUTPUT SECTION - Identifies the files and the input-output resources used by the program Syntax ENVIRONMENT DIVISION. CONFIGURATION SECTION. [SOURCE-COMPUTER. Comments.] [OBJECT-COMPUTER. Comments.] INPUT-OUTPUT SECTION. [FILE-CONTROL.] [File control entries] [I-O CONTROL.] [I-O control entries]
DATA DIVISION
The Data Division defines the nature and characteristics of all data the program is to process. This includes both Input/Output data and data used for internal processing. Data Division has the following section FILE SECTION – This describes most of the data that is sent to, or coming from, the computer’s peripherals WORKING-STORAGE SECTION – This describes the general variables used in the program LINKAGE SECTION - This establishes link between two programs Coding of Data Division is optional.
Page 90 ©Copyright 2007, Cognizant Technology Solutions, All Rights Reserved
C3: Protected
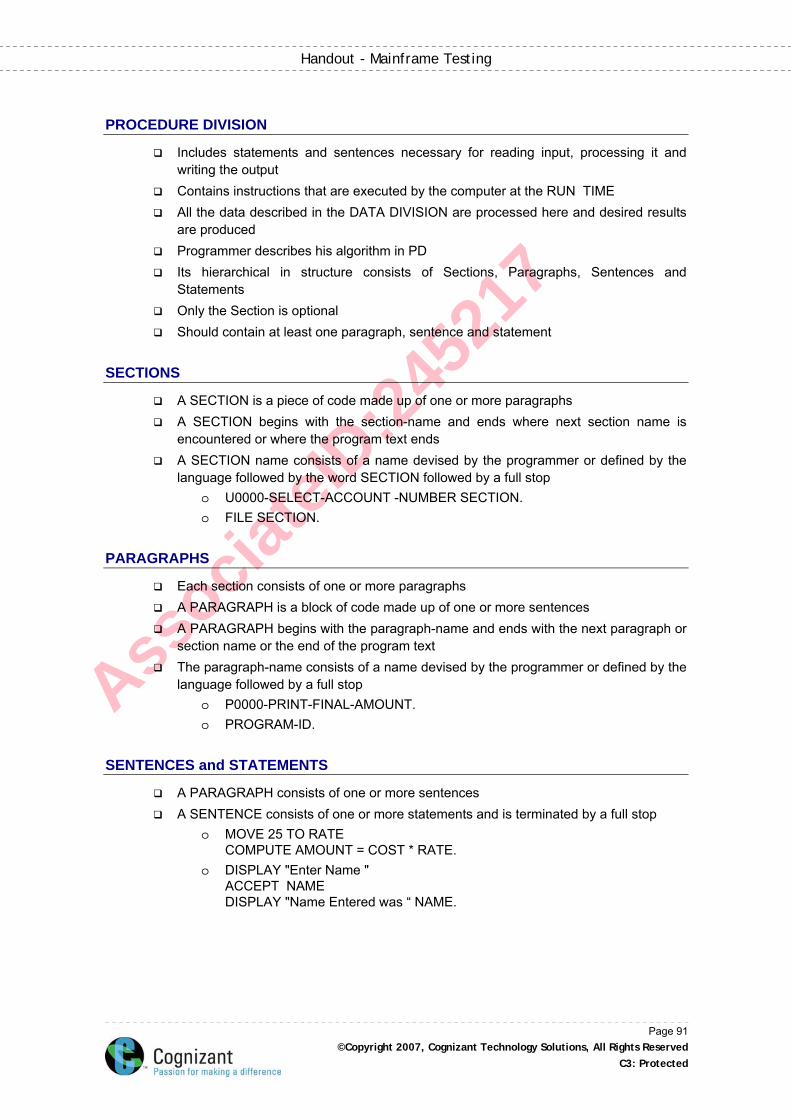
Associa
teID
:245
217
Handout - Mainframe Testing
PROCEDURE DIVISION
Includes statements and sentences necessary for reading input, processing it and writing the output
Contains instructions that are executed by the computer at the RUN TIME All the data described in the DATA DIVISION are processed here and desired results
are produced Programmer describes his algorithm in PD Its hierarchical in structure consists of Sections, Paragraphs, Sentences and
Statements Only the Section is optional Should contain at least one paragraph, sentence and statement
SECTIONS
A SECTION is a piece of code made up of one or more paragraphs A SECTION begins with the section-name and ends where next section name is
encountered or where the program text ends A SECTION name consists of a name devised by the programmer or defined by the
language followed by the word SECTION followed by a full stop o U0000-SELECT-ACCOUNT -NUMBER SECTION. o FILE SECTION.
PARAGRAPHS
Each section consists of one or more paragraphs A PARAGRAPH is a block of code made up of one or more sentences A PARAGRAPH begins with the paragraph-name and ends with the next paragraph or
section name or the end of the program text The paragraph-name consists of a name devised by the programmer or defined by the
language followed by a full stop o P0000-PRINT-FINAL-AMOUNT. o PROGRAM-ID.
SENTENCES and STATEMENTS
A PARAGRAPH consists of one or more sentences A SENTENCE consists of one or more statements and is terminated by a full stop
o MOVE 25 TO RATE COMPUTE AMOUNT = COST * RATE.
o DISPLAY "Enter Name " ACCEPT NAME DISPLAY "Name Entered was “ NAME.
Page 91 ©Copyright 2007, Cognizant Technology Solutions, All Rights Reserved
C3: Protected
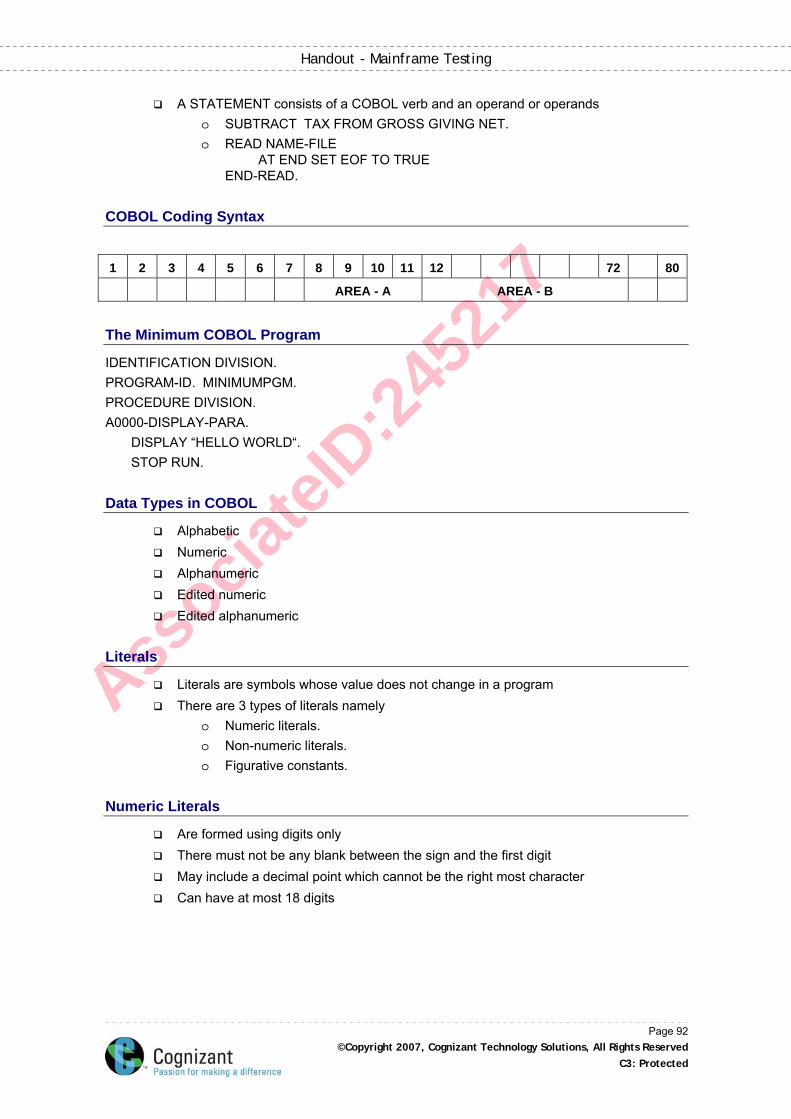
Associa
teID
:245
217
Handout - Mainframe Testing
A STATEMENT consists of a COBOL verb and an operand or operands o SUBTRACT TAX FROM GROSS GIVING NET. o READ NAME-FILE
AT END SET EOF TO TRUE END-READ.
COBOL Coding Syntax
1 2 3 4 5 6 7 8 9 10 11 12 72 80
AREA - A AREA - B
The Minimum COBOL Program
IDENTIFICATION DIVISION. PROGRAM-ID. MINIMUMPGM. PROCEDURE DIVISION. A0000-DISPLAY-PARA. DISPLAY “HELLO WORLD“. STOP RUN.
Data Types in COBOL
Alphabetic Numeric Alphanumeric Edited numeric Edited alphanumeric
Literals
Literals are symbols whose value does not change in a program There are 3 types of literals namely
o Numeric literals. o Non-numeric literals. o Figurative constants.
Numeric Literals
Are formed using digits only There must not be any blank between the sign and the first digit May include a decimal point which cannot be the right most character Can have at most 18 digits
Page 92 ©Copyright 2007, Cognizant Technology Solutions, All Rights Reserved
C3: Protected
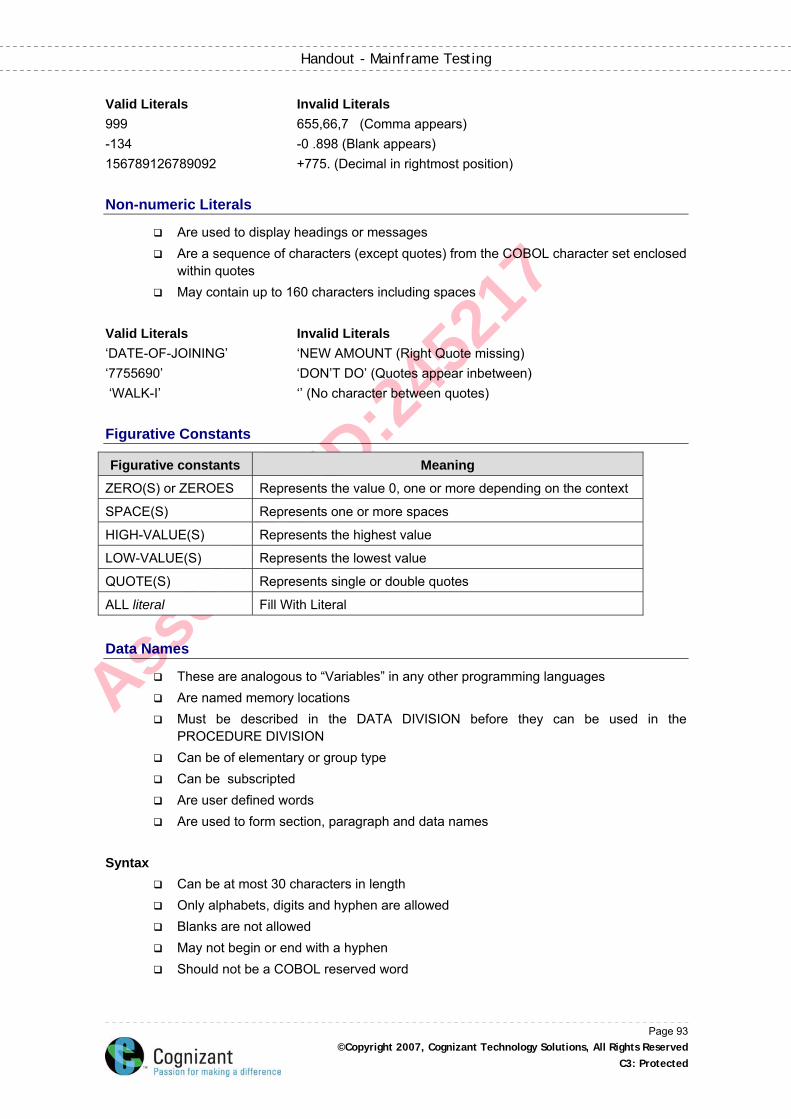
Associa
teID
:245
217
Handout - Mainframe Testing
Valid Literals Invalid Literals 999 655,66,7 (Comma appears) -134 -0 .898 (Blank appears) 156789126789092 +775. (Decimal in rightmost position)
Non-numeric Literals
Are used to display headings or messages Are a sequence of characters (except quotes) from the COBOL character set enclosed
within quotes May contain up to 160 characters including spaces
Valid Literals Invalid Literals ‘DATE-OF-JOINING’ ‘NEW AMOUNT (Right Quote missing) ‘7755690’ ‘DON’T DO’ (Quotes appear inbetween) ‘WALK-I’ ‘’ (No character between quotes)
Figurative Constants
Figurative constants Meaning
ZERO(S) or ZEROES Represents the value 0, one or more depending on the context
SPACE(S) Represents one or more spaces
HIGH-VALUE(S) Represents the highest value
LOW-VALUE(S) Represents the lowest value
QUOTE(S) Represents single or double quotes
ALL literal Fill With Literal
Data Names
These are analogous to “Variables” in any other programming languages Are named memory locations Must be described in the DATA DIVISION before they can be used in the
PROCEDURE DIVISION Can be of elementary or group type Can be subscripted Are user defined words Are used to form section, paragraph and data names
Syntax
Can be at most 30 characters in length Only alphabets, digits and hyphen are allowed Blanks are not allowed May not begin or end with a hyphen Should not be a COBOL reserved word
Page 93 ©Copyright 2007, Cognizant Technology Solutions, All Rights Reserved
C3: Protected
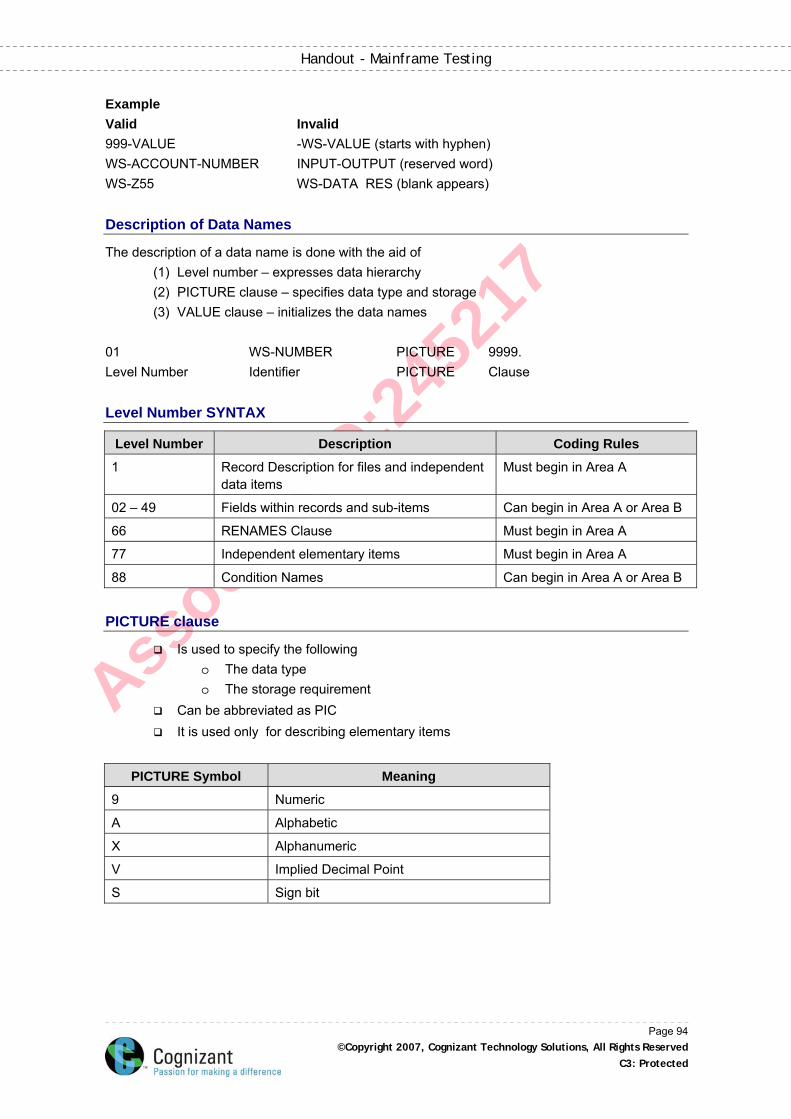
Associa
teID
:245
217
Handout - Mainframe Testing
Example Valid Invalid 999-VALUE -WS-VALUE (starts with hyphen) WS-ACCOUNT-NUMBER INPUT-OUTPUT (reserved word) WS-Z55 WS-DATA RES (blank appears)
Description of Data Names
The description of a data name is done with the aid of (1) Level number – expresses data hierarchy (2) PICTURE clause – specifies data type and storage (3) VALUE clause – initializes the data names
01 WS-NUMBER PICTURE 9999. Level Number Identifier PICTURE Clause
Level Number SYNTAX
Level Number Description Coding Rules
1 Record Description for files and independent data items
Must begin in Area A
02 – 49 Fields within records and sub-items Can begin in Area A or Area B
66 RENAMES Clause Must begin in Area A
77 Independent elementary items Must begin in Area A
88 Condition Names Can begin in Area A or Area B
PICTURE clause
Is used to specify the following o The data type o The storage requirement
Can be abbreviated as PIC It is used only for describing elementary items
PICTURE Symbol Meaning
9 Numeric
A Alphabetic
X Alphanumeric
V Implied Decimal Point
S Sign bit
Page 94 ©Copyright 2007, Cognizant Technology Solutions, All Rights Reserved
C3: Protected

Associa
teID
:245
217
Handout - Mainframe Testing
Examples Numeric Data item 01 WS-NUMBER PIC 9(3). Alphabetic Data-item 01 WS-NAME PIC A(30). Alphanumeric Data-item 01 WS-REGNO PIC X(4).
PROCEDURE DIVISION Verbs
Data movement Verb Arithmetic Verbs Input / Output Verbs Sequence control Verbs File handling Verbs
Input -Output Verbs
ACCEPT Verb Syntax ACCEPT identifier [ FROM { DATE, DAY, TIME, mnemonic-name }]. Examples
(1) ACCEPT WS-NUMBER-1. (2) ACCEPT WS-TODAY-DATE FROM DATE.
DISPLAY Verb Syntax DISPLAY { identifier-1, literal-1 } , . . . Examples
(1) DISPLAY WS-VARIABLE-PAY (2) DISPLAY ‘The sum is : ’ WS-SUM
Data Movement Verb - MOVE Verb
Move copies data from the source identifier or literal to one or more destination identifiers
Page 95 ©Copyright 2007, Cognizant Technology Solutions, All Rights Reserved
C3: Protected
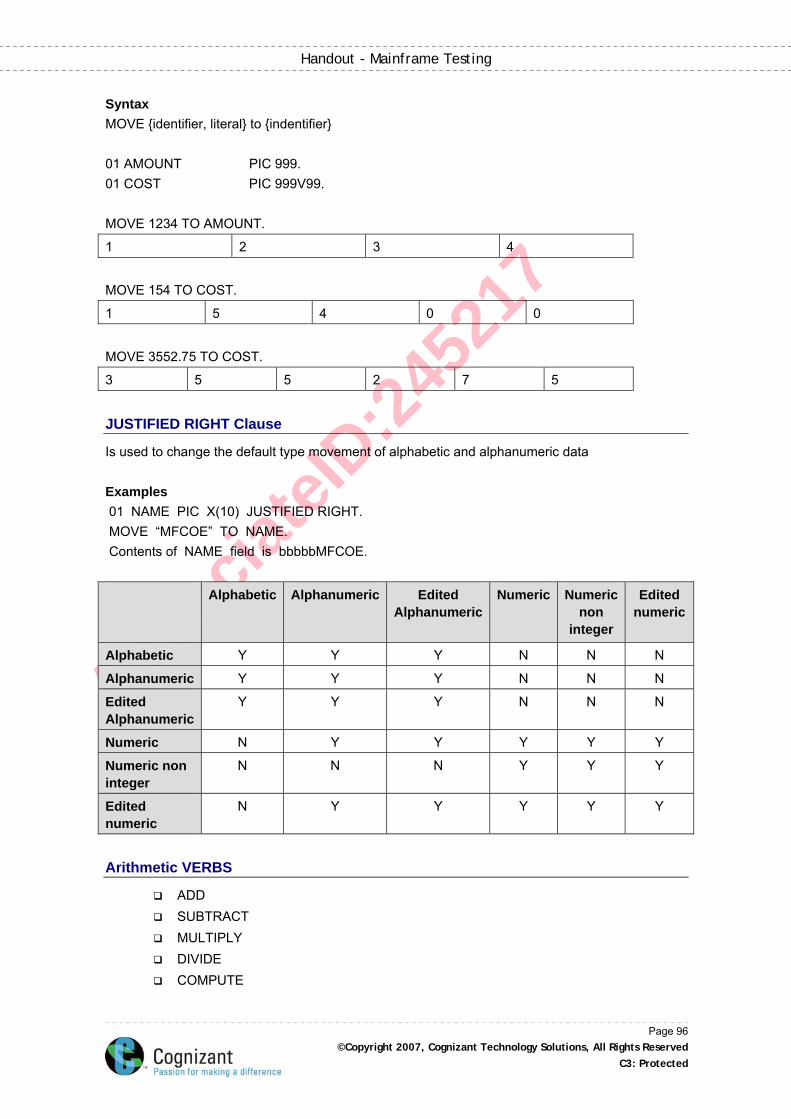
Associa
teID
:245
217
Handout - Mainframe Testing
Syntax MOVE {identifier, literal} to {indentifier} 01 AMOUNT PIC 999. 01 COST PIC 999V99. MOVE 1234 TO AMOUNT.
1 2 3 4
MOVE 154 TO COST.
1 5 4 0 0
MOVE 3552.75 TO COST.
3 5 5 2 7 5
JUSTIFIED RIGHT Clause
Is used to change the default type movement of alphabetic and alphanumeric data Examples 01 NAME PIC X(10) JUSTIFIED RIGHT. MOVE “MFCOE” TO NAME. Contents of NAME field is bbbbbMFCOE.
Alphabetic Alphanumeric Edited Alphanumeric
Numeric Numeric non
integer
Edited numeric
Alphabetic Y Y Y N N N
Alphanumeric Y Y Y N N N
Edited Alphanumeric
Y Y Y N N N
Numeric N Y Y Y Y Y
Numeric non integer
N N N Y Y Y
Edited numeric
N Y Y Y Y Y
Arithmetic VERBS
ADD SUBTRACT MULTIPLY DIVIDE COMPUTE
Page 96 ©Copyright 2007, Cognizant Technology Solutions, All Rights Reserved
C3: Protected
Associa
teID
:245
217
Handout - Mainframe Testing
Syntax and Examples Num01- 10 Num02 –20 Num03 – 30 Num04 pic 9(4) Value zeroes. ADD Num01 to Num02 now Num02 has the value 30 ADD Num01, 100 to Num02 now Num02 has the value 130 ADD Num01, Num03 GIVING Num04 now Num04 has the value 0040 SUBTRACT Num01 FROM Num02 now Num02 has the value 10 SUBTRACT Num01, 5 FROM Num02 now Num02 has the value 5 SUBTRACT Num01 FROM Num03 GIVING Num04 now Numb04 has the value 0020 MULTIPLY Num01 BY Num02 now Num02 has the value 200 MULTIPLY Num01 BY Num03 GIVING Num04 now Num04 has the value 0300 DIVIDE Num01 BY 2 GIVING Num04 now Num04 has the value 0005 COMPUTE Num04 = Num01 * Num02 + Num01 now Num04 has the value 0210
STOP RUN
Instructs the computer to terminate the program. Closes all the files that were opened for file operations. The STOP RUN is usually the last statement in the main paragraph
Sequence Control Verbs
GO TO IF . . . THEN . . . EVALUATE STOP RUN PERFORM
GO TO Verb
GO TO verb is used to transfer control from one part of the Procedure Division to another GO TO paragraph-name.- GO TO 100-PROCESS-PARA IF ….THEN…. IF condition [ THEN ] {statement-1, NEXT SENTENCE } [ ELSE {statement-2, NEXT SENTENCE}]
Page 97 ©Copyright 2007, Cognizant Technology Solutions, All Rights Reserved
C3: Protected

Associa
teID
:245
217
Handout - Mainframe Testing
[ END-IF ]. IF MARKS >= 80 THEN MOVE ‘A’ TO GRADE ELSE MOVE ‘B’ TO GRADE END-IF.
Classification of Conditions
Relational condition Sign condition Class condition Compound condition Condition-name
Relational Condition
[ ][ ][ ][ ][ ][ ]
<=TO EQUAL OR THAN LESS
>=TO EQUAL OR THAN GREATER
= NOTTO EQUAL NOT
< NOTTHAN LESS NOT
> NOTTHAN GREATER NOT
Sign Condition
POSITIVE NEGATIVE ZERO If ANSWER is POSITIVE then Display “Roots are not imaginary”
Class Condition
NUMERIC ALPHABETIC If ACCOUNT NO is NOT NUMERIC THEN DISPLAY “Cannot be processed”
Page 98 ©Copyright 2007, Cognizant Technology Solutions, All Rights Reserved
C3: Protected
Associa
teID
:245
217
Handout - Mainframe Testing
Compound Condition
Condition-1 { AND, OR } Condition-2 IF PERCENT > 80 AND TOTAL > 480 THEN MOVE ‘A’ TO GRADE.
Condition Names
Are essentially boolean variables Are always associated with data names called condition variables Is defined in the DATA DIVISION with level number 88
SYNTAX 88 condition-name {VALUE IS, VALUES ARE } literal-1 [{ THRU, THROUGH } literal-2 ].
PERFORM Verb
Iteration construct is used to repeat the same instructions over and over again COBOL has only one iteration construct - PERFORM PERFORM has several variations to simulate WHILE/DO-WHILE/FOR etc in other
languages
REDEFINES Clause
The REDEFINES clause allows the same area to be referred by more than one data name with different sizes and pictures. Syntax: Level-number data-name-1 REDEFINES data-name-2 For example, 01 SALES-RECORD. 05 SALES-TYPE PIC X(01). 05 SALES-BY-UNIT. 10 QTY PIC 9(04). 10 UNIT-PRICE PIC 9(08)V99. 05 TOTAL-SALES REDEFINES SALES-BY-UNIT. 10 AMOUNT PIC 9(10)V99. 10 FILLER PIC X(02). Rules
The level-number of data-name-1 and data-name-2 must be identical When the REDEFINES clause is used to 01 level, data-name-1 and data-name-2 must be of same size but the size can be varying for data-name-1 and
data- name-2 for other levels.
Page 99 ©Copyright 2007, Cognizant Technology Solutions, All Rights Reserved
C3: Protected
Associa
teID
:245
217
Handout - Mainframe Testing
Multiple redefinitions are allowed. This clause must not be used for level-number 66 or 88 The redefining entry (data-name-1) and any sub-ordinate entries must not contain any
VALUE clauses OCCURS and REDEFINE clause cannot be specified at a time in the same entry. REDEFINE not used in CORRESPONDING options. The REDEFINES clause must not be used for records (01 level) described in the FILE SECTION. The appearance of multiple 01 entry in the record description is
implicitly assumed to be the redefinition of the first 01 level record. Advantage: Conservation of Storage space
RENAMES Clause
RENAMES allows re-grouping of elementary data items in a record so that they can belong to the original as well as to the new group . Syntax 66 data-name-1 RENAMES data-name-2 THRU data-name-3 Examnple: 01 PAY-REC. 5 FIXED-PAY. 10 BASIC-PAY PIC 9(6)V99. 10 DEARNESS-ALLOWANCE PIC 9(6)V99. 5 ADDITIONAL-PAY. 10 HOUSE-RENT PIC 9(4)V99. 10 MNTHLY-INCENTIVE PIC 9(3)V99. 5 DEDUCTIONS. 10 PF-DEDUCT PIC 9(3)V99. 10 IT-DEDUCT PIC 9(4)V99. 10 OTHER-DEDUCT PIC 9(3)V99. 66 PAY-OTHER-THAN-BASIC RENAMES DEARNESS-ALLOWANCE THRU MNTHLY-INCENTIVE Rules
All RENAMES entries must be written only after the last record description entry The RENAMES clause must be used only with the special level number 66 Cannot Rename 77 ,88, 66 or 01 levels. RENAME not used in CORRESPONDING options. Data-name-2 and data-name-3 can be the names of elementary items or group items.
They however can’t be items of levels 01,66,77 or 88 Neither data-name-2 nor data-name-3 can have an OCCURS clause in its description
entry, nor can they be subordinate to an item that has an occurs clause in its data description entry
Page 100 ©Copyright 2007, Cognizant Technology Solutions, All Rights Reserved
C3: Protected
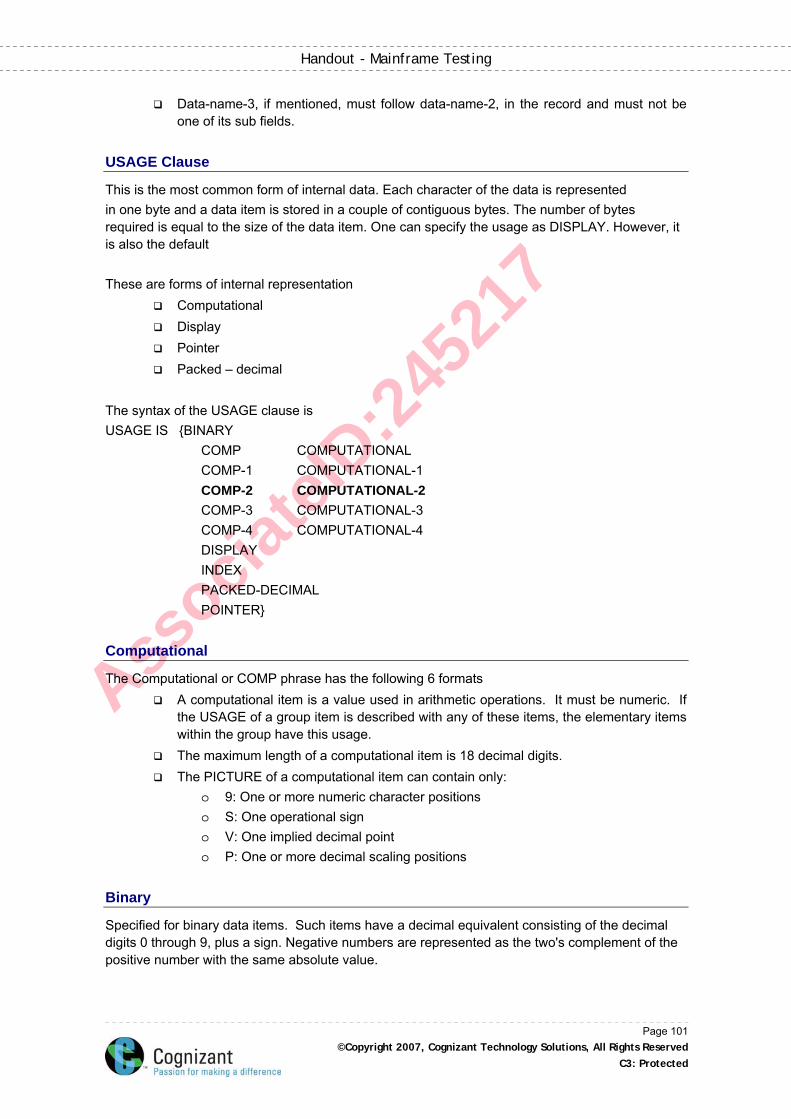
Associa
teID
:245
217
Handout - Mainframe Testing
Data-name-3, if mentioned, must follow data-name-2, in the record and must not be one of its sub fields.
USAGE Clause
This is the most common form of internal data. Each character of the data is represented in one byte and a data item is stored in a couple of contiguous bytes. The number of bytes required is equal to the size of the data item. One can specify the usage as DISPLAY. However, it is also the default These are forms of internal representation
Computational Display Pointer Packed – decimal
The syntax of the USAGE clause is USAGE IS {BINARY COMP COMPUTATIONAL COMP-1 COMPUTATIONAL-1 COMP-2 COMPUTATIONAL-2 COMP-3 COMPUTATIONAL-3 COMP-4 COMPUTATIONAL-4 DISPLAY INDEX PACKED-DECIMAL POINTER}
Computational
The Computational or COMP phrase has the following 6 formats A computational item is a value used in arithmetic operations. It must be numeric. If
the USAGE of a group item is described with any of these items, the elementary items within the group have this usage.
The maximum length of a computational item is 18 decimal digits. The PICTURE of a computational item can contain only:
o 9: One or more numeric character positions o S: One operational sign o V: One implied decimal point o P: One or more decimal scaling positions
Binary
Specified for binary data items. Such items have a decimal equivalent consisting of the decimal digits 0 through 9, plus a sign. Negative numbers are represented as the two's complement of the positive number with the same absolute value.
Page 101 ©Copyright 2007, Cognizant Technology Solutions, All Rights Reserved
C3: Protected
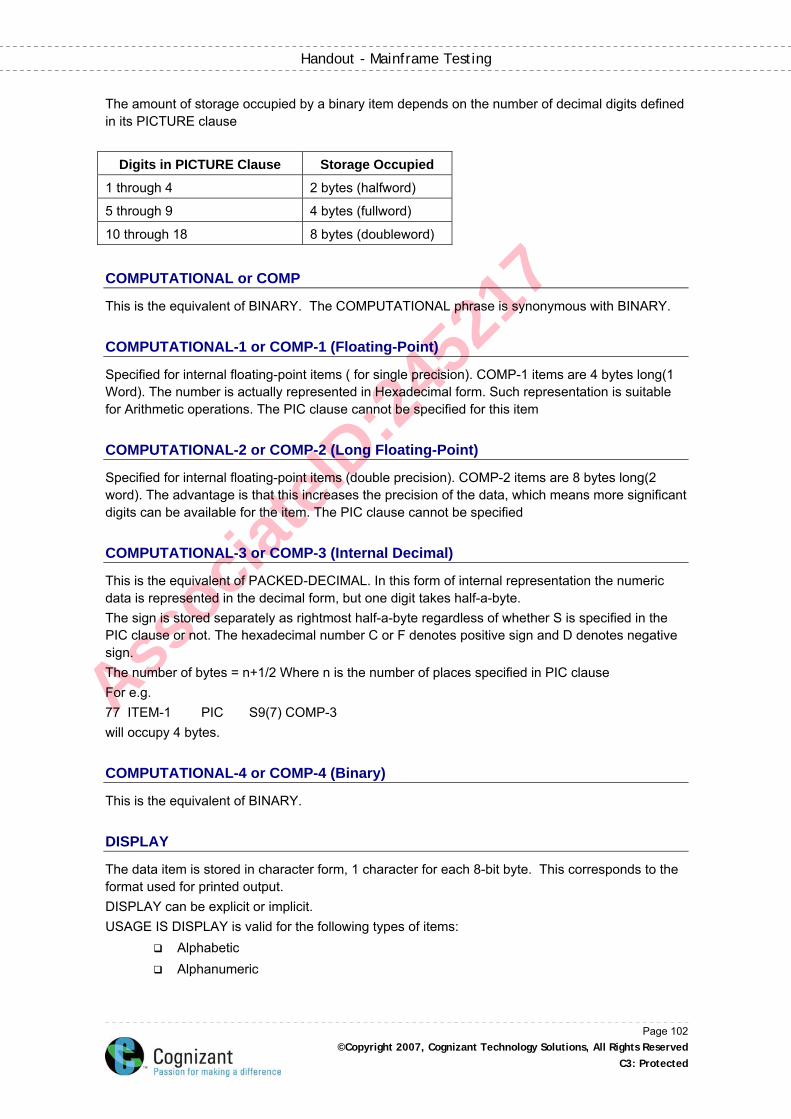
Associa
teID
:245
217
Handout - Mainframe Testing
The amount of storage occupied by a binary item depends on the number of decimal digits defined in its PICTURE clause
Digits in PICTURE Clause Storage Occupied
1 through 4 2 bytes (halfword)
5 through 9 4 bytes (fullword)
10 through 18 8 bytes (doubleword)
COMPUTATIONAL or COMP
This is the equivalent of BINARY. The COMPUTATIONAL phrase is synonymous with BINARY.
COMPUTATIONAL-1 or COMP-1 (Floating-Point)
Specified for internal floating-point items ( for single precision). COMP-1 items are 4 bytes long(1 Word). The number is actually represented in Hexadecimal form. Such representation is suitable for Arithmetic operations. The PIC clause cannot be specified for this item
COMPUTATIONAL-2 or COMP-2 (Long Floating-Point)
Specified for internal floating-point items (double precision). COMP-2 items are 8 bytes long(2 word). The advantage is that this increases the precision of the data, which means more significant digits can be available for the item. The PIC clause cannot be specified
COMPUTATIONAL-3 or COMP-3 (Internal Decimal)
This is the equivalent of PACKED-DECIMAL. In this form of internal representation the numeric data is represented in the decimal form, but one digit takes half-a-byte. The sign is stored separately as rightmost half-a-byte regardless of whether S is specified in the PIC clause or not. The hexadecimal number C or F denotes positive sign and D denotes negative sign. The number of bytes = n+1/2 Where n is the number of places specified in PIC clause For e.g. 77 ITEM-1 PIC S9(7) COMP-3 will occupy 4 bytes.
COMPUTATIONAL-4 or COMP-4 (Binary)
This is the equivalent of BINARY.
DISPLAY
The data item is stored in character form, 1 character for each 8-bit byte. This corresponds to the format used for printed output. DISPLAY can be explicit or implicit. USAGE IS DISPLAY is valid for the following types of items:
Alphabetic Alphanumeric
Page 102 ©Copyright 2007, Cognizant Technology Solutions, All Rights Reserved
C3: Protected
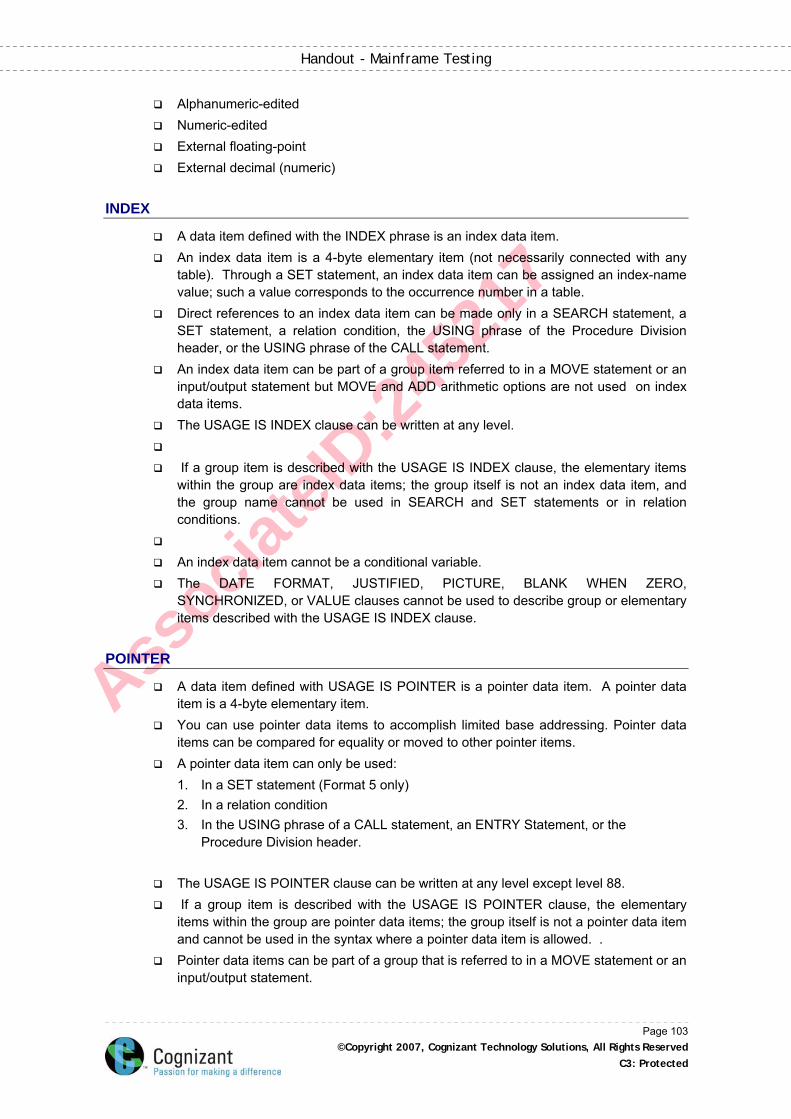
Associa
teID
:245
217
Handout - Mainframe Testing
Alphanumeric-edited Numeric-edited External floating-point External decimal (numeric)
INDEX
A data item defined with the INDEX phrase is an index data item. An index data item is a 4-byte elementary item (not necessarily connected with any
table). Through a SET statement, an index data item can be assigned an index-name value; such a value corresponds to the occurrence number in a table.
Direct references to an index data item can be made only in a SEARCH statement, a SET statement, a relation condition, the USING phrase of the Procedure Division header, or the USING phrase of the CALL statement.
An index data item can be part of a group item referred to in a MOVE statement or an input/output statement but MOVE and ADD arithmetic options are not used on index data items.
The USAGE IS INDEX clause can be written at any level. If a group item is described with the USAGE IS INDEX clause, the elementary items
within the group are index data items; the group itself is not an index data item, and the group name cannot be used in SEARCH and SET statements or in relation conditions.
An index data item cannot be a conditional variable. The DATE FORMAT, JUSTIFIED, PICTURE, BLANK WHEN ZERO,
SYNCHRONIZED, or VALUE clauses cannot be used to describe group or elementary items described with the USAGE IS INDEX clause.
POINTER
A data item defined with USAGE IS POINTER is a pointer data item. A pointer data item is a 4-byte elementary item.
You can use pointer data items to accomplish limited base addressing. Pointer data items can be compared for equality or moved to other pointer items.
A pointer data item can only be used: 1. In a SET statement (Format 5 only) 2. In a relation condition 3. In the USING phrase of a CALL statement, an ENTRY Statement, or the
Procedure Division header.
The USAGE IS POINTER clause can be written at any level except level 88. If a group item is described with the USAGE IS POINTER clause, the elementary
items within the group are pointer data items; the group itself is not a pointer data item and cannot be used in the syntax where a pointer data item is allowed. .
Pointer data items can be part of a group that is referred to in a MOVE statement or an input/output statement.
Page 103 ©Copyright 2007, Cognizant Technology Solutions, All Rights Reserved
C3: Protected
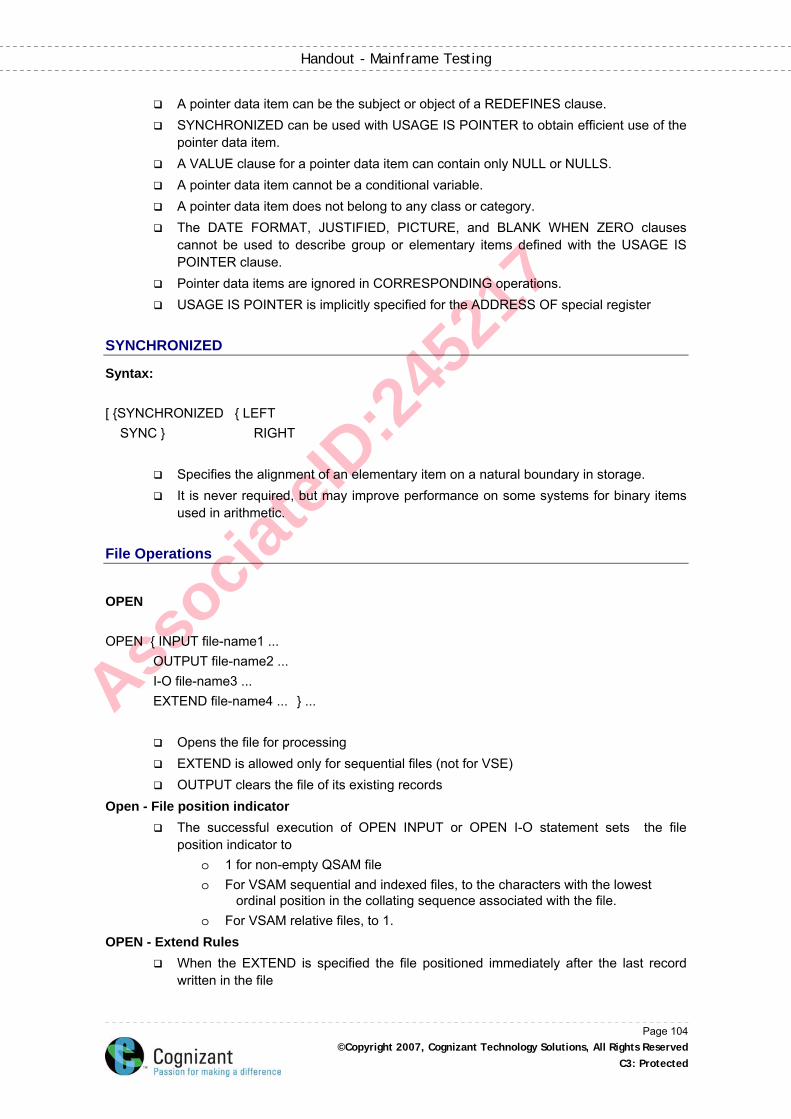
Associa
teID
:245
217
Handout - Mainframe Testing
A pointer data item can be the subject or object of a REDEFINES clause. SYNCHRONIZED can be used with USAGE IS POINTER to obtain efficient use of the
pointer data item. A VALUE clause for a pointer data item can contain only NULL or NULLS. A pointer data item cannot be a conditional variable. A pointer data item does not belong to any class or category. The DATE FORMAT, JUSTIFIED, PICTURE, and BLANK WHEN ZERO clauses
cannot be used to describe group or elementary items defined with the USAGE IS POINTER clause.
Pointer data items are ignored in CORRESPONDING operations. USAGE IS POINTER is implicitly specified for the ADDRESS OF special register
SYNCHRONIZED
Syntax: [ {SYNCHRONIZED { LEFT SYNC } RIGHT
Specifies the alignment of an elementary item on a natural boundary in storage. It is never required, but may improve performance on some systems for binary items
used in arithmetic.
File Operations
OPEN OPEN { INPUT file-name1 ... OUTPUT file-name2 ... I-O file-name3 ... EXTEND file-name4 ... } ...
Opens the file for processing EXTEND is allowed only for sequential files (not for VSE) OUTPUT clears the file of its existing records
Open - File position indicator The successful execution of OPEN INPUT or OPEN I-O statement sets the file
position indicator to o 1 for non-empty QSAM file o For VSAM sequential and indexed files, to the characters with the lowest
ordinal position in the collating sequence associated with the file. o For VSAM relative files, to 1.
OPEN - Extend Rules When the EXTEND is specified the file positioned immediately after the last record
written in the file
Page 104 ©Copyright 2007, Cognizant Technology Solutions, All Rights Reserved
C3: Protected
Associa
teID
:245
217
Handout - Mainframe Testing
For ESDS or RRDS file the added records are placed after the last existing records
For KSDS your add must have a record key higher than the highest record in the file
CLOSE CLOSE file-name1 ...
Closes the open file Terminates the file processing
READ Format-1 - Sequential Read READ file-name-1 NEXT RECORD [ INTO identifier-1 ] [ AT END imperative-stmt-1] [ NOT AT END imperative-stmt-2 ] [ END-READ ]
NEXT phrase is optional for SEQUENTIAL access mode & a must for DYNAMIC When the READ NEXT statement is the first statement to be executed after the OPEN
statement on the file, the next record is the first record in the file When the READ NEXT statement is the first statement to be executed after the READ
statement on the file, the next record is the record processed after the READ statement.in the file
When the READ NEXT statement is the first statement to be executed after the START statement in the file, the next record is the record pointed by the start statement.
The sequential read is used when the exact key value is not known and if we want to search the vsam file for a particular key for processing.
This sequential read is also used when Alternate key is used as key to the indexed file. This is because the alternate key may not be unique.
Format-2 - Random read READ file-name-1 RECORD [ INTO identifier-1 ] [ KEY IS data-name-1 ] [ INVALID KEY imperative-stmt-3 ] [ NOT INVALID KEY imperative-stmt-4 ] [ END-READ ]
Data-name-1 is either a RECORD KEY or ALTERNATE RECORD KEY of the Indexed file
Page 105 ©Copyright 2007, Cognizant Technology Solutions, All Rights Reserved
C3: Protected
Associa
teID
:245
217
Handout - Mainframe Testing
The result of the execution of a READ statement with the INTO phrase is equivalent to the application of the following rules in the order specified:
The current record is moved from the record area to the area specified by identifier-1 according to the rules for the MOVE statement without the CORRESPONDING phrase.
The size of the current record is determined by rules specified for the RECORD clause. If the file description entry contains a RECORD IS VARYING clause, the implied move is a group move. The implied MOVE statement does not occur if the execution of the READ statement was unsuccessful.
Any subscripting or reference modification associated with identifier-1 is evaluated after the record has been read and immediately before it is moved to the data item. The record is available in both the record area and the data item referenced by identifier-1.
This format of READ is used when the ACCESS mode is either random or dynamic USAGE:- The random reading of indexed file is used when the key value for the file is
exactly known.. The random read of indexed file is faster.
READ Random - Indexed file
Key of reference : o Data name specified in KEY phrase o The prime RECORD KEY data name is taken if KEY phrase not specified
The KEY IS phrase can be specified only for indexed files. Data-name-1 must identify a record key associated with file-name-1
When dynamic access is specified, this key of reference is used for subsequent executions of sequential READ
READ Random - Relative file
Execution of a Format 2 READ statement reads the record whose relative record number is contained in the RELATIVE KEY data item,
The KEY phrase must not be specified
File Position Indicators
The file position indicator is a conceptual entity used to facilitate exact specification of the next record to be accessed within a given file during certain sequences of input-output operations.
Only the OPEN, CLOSE, READ and START statements affect the setting of the file position indicator.
The concept of a file position indicator has no meaning for a file opened in the output or extends mode.
It is set by successful OPEN, START, READ, and READ NEXT statements The successful execution of an OPEN INPUT or OPEN I-O statement for sequential
files sets the file position indicator to 1. For VSAM sequential and indexed files, the file position indicator is set to the
characters with the lowest ordinal position in the collating sequence associated with the file.
Page 106 ©Copyright 2007, Cognizant Technology Solutions, All Rights Reserved
C3: Protected
Associa
teID
:245
217
Handout - Mainframe Testing
For VSAM relative files, to 1. It is not used or affected by the output statements :WRITE, REWRITE, or DELETE. The file position indicator has no meaning for random processing
START
Enables the positioning of the pointer at a specific point in an indexed or relative file File should be opened in Input or I-O mode Access mode must be Sequential or Dynamic
START file-name [ KEY IS { EQUAL TO data-name] = GREATER THAN > NOT LESS THAN NOT < THAN } [ INVALID KEY imperative-stmt-1 ] [ NOT INVALID KEY imperative-stmt-2 ] [ END-START ] START - Rules
Invalid Key arises if the record position is empty When KEY phrase is not specified KEY EQUAL TO primary key is implied File position indicator points to the first record in the file whose key field satisfies the
comparison When the KEY phrase is specified, the file position indicator is positioned at the logical
record in the file whose key field satisfies the comparison. When the KEY phrase is not specified, KEY IS EQUAL (to the prime record key) is
implied. When the START statement is executed, a comparison is made between the current
value in the key data-name and the corresponding key field in the file's index. PROGRAM COLLATING SEQUENCE clause, if specified, has no effect
WRITE
WRITE rec-name [FROM id-1] [ { BEFORE ADVANCING AFTER } { int-1 { LINE id-2 LINES } mnemonic-name PAGE } ]
Page 107 ©Copyright 2007, Cognizant Technology Solutions, All Rights Reserved
C3: Protected
Associa
teID
:245
217
Handout - Mainframe Testing
[AT { END-OF-PAGE stmt-1 EOP } [NOT AT { END-OF-PAGE stmt-2 EOP } [END-WRITE]
Releases a record onto the output file ADVANCING phrase is only for Printer Files when this phrase is specified, the following rules apply:
1. When BEFORE ADVANCING is specified, the line is printed before the page is advanced.
2. When AFTER ADVANCING is specified, the page is advanced before the line is printed.
3. When identifier-2 is specified, the page is advanced the number of lines equal to the current value in identifier-2. Identifier-2 must name an elementary integer data item.
File Position is not affected by this statement When END-OF-PAGE is specified, and the logical end of the printed page is reached
during execution of the WRITE statement, the END-OF-PAGE imperative-statement is executed
WRITE for Seq. Files
From its Record Area defined at 01 Level Eg. WRITE ASSOC-REC First Copy into File Area and then Write Eg.WRITE ASSOC-REC FROM COPY-REC Note that File Name is not mentioned in the Write Statement The WRITE statement can only be executed for a sequential file opened in OUTPUT
or EXTEND mode for a sequential file.
WRITE for Printer Files
Facilities for Paper Movement are provided o Print and Advance o Advance and Print o Position to New Page o Advance by given number of lines o End of Page Logic (FD entry for this file must contain a LINAGE clause)
When ADVANCING option is used o First char of record reserved for printer control o If compile has ADV the LRECL of file should be one more than FD entry
record area length o If compile option is NOADV then LRECL of file is same as FD entry record
area length
Page 108 ©Copyright 2007, Cognizant Technology Solutions, All Rights Reserved
C3: Protected
Associa
teID
:245
217
Handout - Mainframe Testing
leave the 1st char for printer control
WRITE for Disk Files
WRITE record-name [ FROM id-1 ] [ INVALID KEY imperative-stmt-1 ] [ NOT INVALID KEY imperative-stmt-2 ] [ END-WRITE ] WRITE - Invalid key
Not Allowed for ESDS FROM phrase: -the result of the execution of the WRITE statement with the FROM
identifier-1 phrase is equivalent to the execution of the following statements in the order specified.
MOVE identifier-1 TO record-name-1. WRITE record-name-1.
WRITE - Rules for VSAM
When access is sequential o For KSDS, records must be released in ascending order of RECORD KEY
values Else INVALID KEY condition will be raised
o For RRDS system returns the RELATIVE KEY if clause is specified in SELECT stmt
When access is random or dynamic o For KSDS populate RECORD key data item and ALTERNATE key data item
(if any) For RRDS populate the RELATIVE key data item When an attempt is made to write beyond the externally defined boundaries of the file,
the execution of the WRITE statement is unsuccessful, and an EXCEPTION/ERROR condition exists.
The contents of record-name are unaffected. If specified, the status key is updated, and, if an explicit or implicit EXCEPTION/ERROR procedure is specified for the file, the procedure is then executed; if no such procedure is specified, the results are unpredictable.
REWRITE
REWRITE record-name [ FROM id-1] [ INVALID KEY imperative-stmt-1] [ NOT INVALID KEY imperative-stmt-2 ] [ END-REWRITE ]
Page 109 ©Copyright 2007, Cognizant Technology Solutions, All Rights Reserved
C3: Protected
Associa
teID
:245
217
Handout - Mainframe Testing
Updates an existing record in a file File should be opened in I-O mode
REWRITE - Invalid Key
When access mode is sequential, and the value of RECORD KEY of the record to be replaced not = RECORD KEY data item of the last-retrieved record
Value contained in RECORD KEY not = any record in file Duplicate ALTERNATE RECORD KEY when duplicates are not allowed
REWRITE - Rules
File should be opened in I-O After REWRITE record is not available in the rec area After a REWRITE statement with the FROM phrase is executed, the information is still
available in identifier-1 File position indicator not affected For Sequential files
o INVALID KEY not allowed o Record length can’t change
DELETE
DELETE file-name-1 RECORD [ INVALID KEY imperative-stmt-1] [ NOT INVALID KEY imperative-stmt-2] [ END-DELETE ]
Removes a record from an indexed or relative file For indexed files, the key can then be reused for record addition. For relative files, the space is then available for a new record with the same
RELATIVE KEY value. If the FILE STATUS clause is specified in the File-Control entry, the associated status
key is updated when the DELETE statement is executed. The file position indicator is not affected by execution of the DELETE statement. For a file in sequential access mode, the last input/output statement must have been a
successfully executed READ statement. When the DELETE statement is executed, the system removes the record retrieved by that READ statement.
For a file in sequential access mode, the INVALID KEY and NOT INVALID KEY phrases must not be specified. However, an EXCEPTIONERROR procedure can be specified.
When the DELETE statement is executed, the system removes the record identified by the contents of the prime RECORD KEY data item for VSAM indexed files, or the RELATIVE KEY data item for VSAM relative files. If the file does not contain such a record, an INVALID KEY condition exists.
Page 110 ©Copyright 2007, Cognizant Technology Solutions, All Rights Reserved
C3: Protected

Associa
teID
:245
217
Handout - Mainframe Testing
DELETE - Rules
File should opened for I-O In sequential access mode, the last input/output statement must have been a
successfully executed READ o INVALID key not allowed
For Random or Dynamic access system removes record pointed by the RECORD key(KSDS) or RELATIVE key(RRDS)
SORT
While processing sequential files, it is sometimes necessary that the records should appear in some predetermined sequence. The process of sequencing records in file in some predetermined order on some fields is called SORTING
The fields based on which the records are sequenced are called SORT KEYS. The sequencing can be ascending or descending order of the KEY.
Syntax: SORT file-1 {ON {ASCENDING DESCENDING} KEY id-1... } ... {USING file-2 {GIVING file-3
This is a simple sort verb that accepts a input file and creates a sorted output file. The Sort verb needs a work file for sorting the given input file. Hence this sort requires 3 files for processing – unsorted input file, works file and sorted output file.
In the above format file-1 is the work file , file-2 is the unsorted input file, file-3 is the sorted output file
File-2 and file-3 are defined in the FD section The work file File-1 is defined in the file section as SD entry sort description entry The format of SD entry is same as the FD entry The sort verb opens input, output and the work files before the sorting begins and
closed these files when sorting is over.
Input Procedure:
The sort statement before the start of the sorting process implicitly performs the specified input procedure.
This procedure reads the records from input file, performs the necessary processing and then release the records to Sorting operation by RELEASE statement
Output Procedure:
The output procedure is performed implicitly by sort statement in order to perform editing on the sorted records.
The output procedure gets the sorted records by means of RETURN statement that is discussed later in this chapter.
Page 111 ©Copyright 2007, Cognizant Technology Solutions, All Rights Reserved
C3: Protected
Associa
teID
:245
217
Handout - Mainframe Testing
Syntax: SORT file-1 { ON {ASCENDING DESCENDING} KEY id-1... } ... [WITH DUPLICATES IN ORDER] [COLLATING SEQUENCE IS alphabet-name-1] {USING file-2 INPUT PROCEDURE IS proc-nm-1 [THRU proc-nm-2]} {GIVING file-3 OUTPUT PROCEDURE IS proc-nm-3 [THRU proc-nm-4]}
RELEASE
Transfers records to the initial phase of sort operation It’s like WRITE statement
Syntax: RELEASE sort-rec-name-1 [FROM id-1] If INPUT PROCEDURE is used, at-least one RELEASE stmt must be executed Examples
1. MOVE emp-rec TO sort-emp-rec RELEASE sort-emp-rec
2. RELEASE sort-emp-rec FROM emp-rec
RETURN
Transfers records from the final phase of a sorting or merging operation to an OUTPUT PROCEDURE.
It’s like READ statement Syntax: RETURN sort-file-name-1 [RECORD INTO id-1] [AT END imperative stmt1 ] [NOT AT END imperative stmt2] [END-RETURN]
If OUTPUT PROCEDURE is used, at-least one RETURN stmt must be executed
Page 112 ©Copyright 2007, Cognizant Technology Solutions, All Rights Reserved
C3: Protected
Associa
teID
:245
217
Handout - Mainframe Testing
Examples: read-sorted-rec. RETURN sorted-emp-file AT END SET c-sort-eof TO TRUE END-RETURN . read-sorted-rec-exit. EXIT.
MERGE
Sometimes it becomes necessary to create a new output file from 2 input files. These 2 files needs to be merged and new file needs to be created
The MERGE verb is used to merge 2 or more identical files sorted on the same field Syntax: MERGE file-1 { ON {ASCENDING DESCENDING} KEY id-1... } ... [COLLATING SEQUENCE IS alphabet-name-1] USING file-2 [file-3 ...] {GIVING file-4 OUTPUT PROCEDURE IS proc-nm-1 [THRU proc-nm-2]} The input files to be merged through MERGE statement are file-2, file-3. The file-1 is the work file, which should be defined in the SD entry. The file-2 and file-3 should be sorted on the key used to merge these 2 files.
MERGE - Rules
When USING / GIVING option is specified the input / output file(s) to merge must not be open
The key used in the MERGE statement cannot be variably located. When the file referenced by filename-1 is merged control passes to first stmt in the
OUTPUT PROCEDURE. Collating Sequences
o COLLATING SEQUENCE option of MERGE statement that is defined in SPECIAL-NAMES paragraph
o PROGRAM COLLATING SEQUENCE specified in the Configuration Section o Default is EBCDIC
Page 113 ©Copyright 2007, Cognizant Technology Solutions, All Rights Reserved
C3: Protected

Associa
teID
:245
217
Handout - Mainframe Testing
INPUT/OUTPUT Error Handling Techniques
The following are techniques of intercepting and Handling input/output Errors. The end-of-file phrase (AT END) The EXCEPTION/ERROR declarative The FILE STATUS key The INVALID KEY phrase
EXCEPTION/ERROR Declarative
You can code one or more ERROR declarative procedures in your program that will be given control if an input/output error occurs. You can have:
A single, common procedure for the entire program Group procedures for each file open mode (whether INPUT, OUTPUT, I-O, or
EXTEND) Individual procedures for each particular file
FILE STATUS Key
The system updates the FILE STATUS key after each input/output statement executed for a file placing values in the two digits of the file status key.
In general, a zero in the first digit indicates a successful operation, and a zero in both digits means "nothing abnormal to report".
Establish a FILE STATUS key using the FILE STATUS clause in the FILE-CONTROL and data definitions in the Data Division.
INVALID KEY Phrase
This phrase will be given control in the event that an input/output error occurs because of a faulty index key.
You can include INVALID KEY phrases on READ, START, WRITE, REWRITE, and DELETE requests for indexed and relative files.
You can also include INVALID KEY on WRITE requests for QSAM files. In the case of QSAM files, however, the INVALID KEY phrase has limited meaning. It is used only when you attempt to write to a disk that is full.
INVALID KEY phrases differ from ERROR declaratives in three ways:
1. INVALID KEY phrases operate for only limited types of errors, whereas the ERROR declarative encompasses all forms.
2. INVALID KEY phrases are coded directly onto the input/output verb, whereas ERROR declaratives are coded separately.
3. INVALID KEY phrases are specific for one single input/output operation, whereas ERROR declaratives are more general.
Page 114 ©Copyright 2007, Cognizant Technology Solutions, All Rights Reserved
C3: Protected
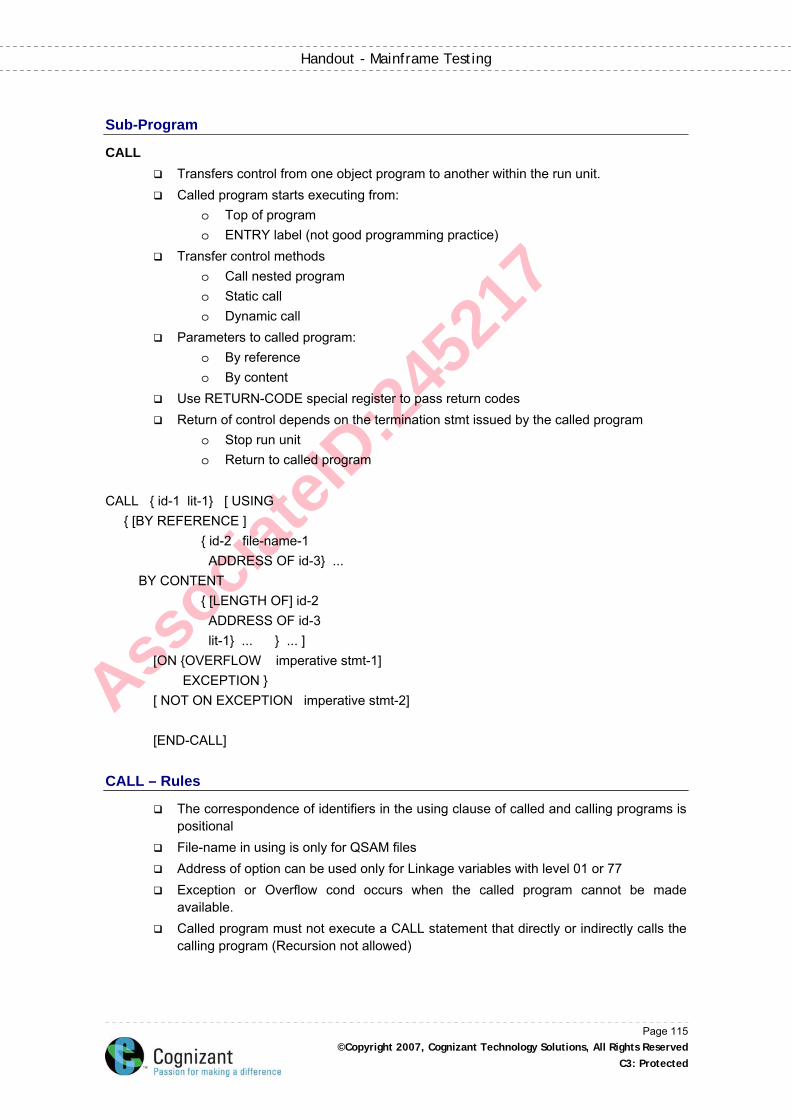
Associa
teID
:245
217
Handout - Mainframe Testing
Sub-Program
CALL Transfers control from one object program to another within the run unit. Called program starts executing from:
o Top of program o ENTRY label (not good programming practice)
Transfer control methods o Call nested program o Static call o Dynamic call
Parameters to called program: o By reference o By content
Use RETURN-CODE special register to pass return codes Return of control depends on the termination stmt issued by the called program
o Stop run unit o Return to called program
CALL { id-1 lit-1} [ USING { [BY REFERENCE ] { id-2 file-name-1 ADDRESS OF id-3} ... BY CONTENT { [LENGTH OF] id-2 ADDRESS OF id-3 lit-1} ... } ... ] [ON {OVERFLOW imperative stmt-1] EXCEPTION } [ NOT ON EXCEPTION imperative stmt-2] [END-CALL]
CALL – Rules
The correspondence of identifiers in the using clause of called and calling programs is positional
File-name in using is only for QSAM files Address of option can be used only for Linkage variables with level 01 or 77 Exception or Overflow cond occurs when the called program cannot be made
available. Called program must not execute a CALL statement that directly or indirectly calls the
calling program (Recursion not allowed)
Page 115 ©Copyright 2007, Cognizant Technology Solutions, All Rights Reserved
C3: Protected
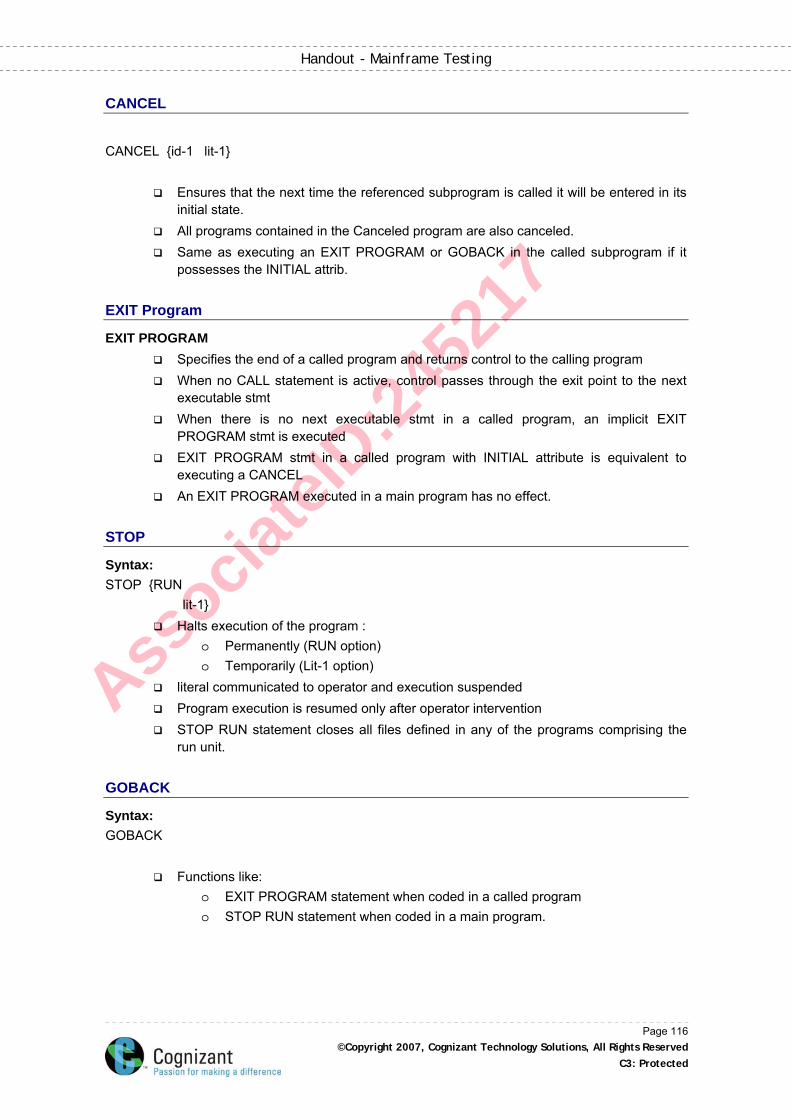
Associa
teID
:245
217
Handout - Mainframe Testing
CANCEL
CANCEL {id-1 lit-1}
Ensures that the next time the referenced subprogram is called it will be entered in its initial state.
All programs contained in the Canceled program are also canceled. Same as executing an EXIT PROGRAM or GOBACK in the called subprogram if it
possesses the INITIAL attrib.
EXIT Program
EXIT PROGRAM Specifies the end of a called program and returns control to the calling program When no CALL statement is active, control passes through the exit point to the next
executable stmt When there is no next executable stmt in a called program, an implicit EXIT
PROGRAM stmt is executed EXIT PROGRAM stmt in a called program with INITIAL attribute is equivalent to
executing a CANCEL An EXIT PROGRAM executed in a main program has no effect.
STOP
Syntax: STOP {RUN lit-1}
Halts execution of the program : o Permanently (RUN option) o Temporarily (Lit-1 option)
literal communicated to operator and execution suspended Program execution is resumed only after operator intervention STOP RUN statement closes all files defined in any of the programs comprising the
run unit.
GOBACK
Syntax: GOBACK
Functions like: o EXIT PROGRAM statement when coded in a called program o STOP RUN statement when coded in a main program.
Page 116 ©Copyright 2007, Cognizant Technology Solutions, All Rights Reserved
C3: Protected
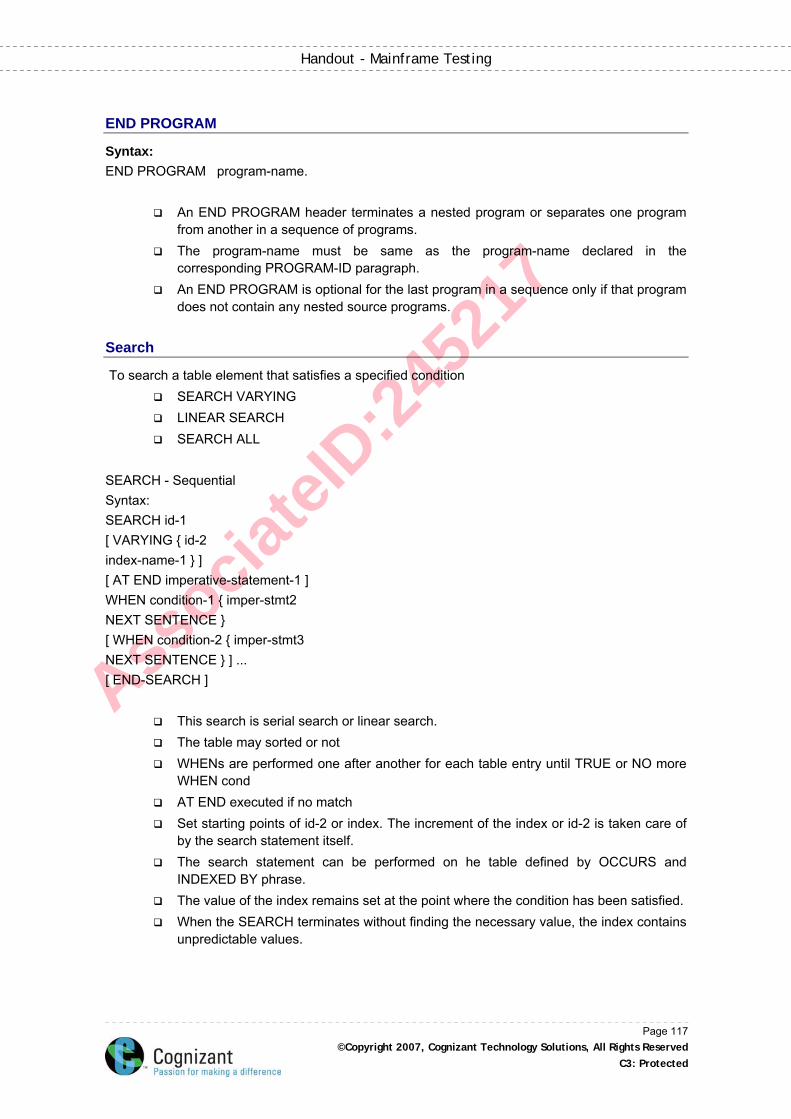
Associa
teID
:245
217
Handout - Mainframe Testing
END PROGRAM
Syntax: END PROGRAM program-name.
An END PROGRAM header terminates a nested program or separates one program from another in a sequence of programs.
The program-name must be same as the program-name declared in the corresponding PROGRAM-ID paragraph.
An END PROGRAM is optional for the last program in a sequence only if that program does not contain any nested source programs.
Search
To search a table element that satisfies a specified condition SEARCH VARYING LINEAR SEARCH SEARCH ALL
SEARCH - Sequential Syntax: SEARCH id-1 [ VARYING { id-2 index-name-1 } ] [ AT END imperative-statement-1 ] WHEN condition-1 { imper-stmt2 NEXT SENTENCE } [ WHEN condition-2 { imper-stmt3 NEXT SENTENCE } ] ... [ END-SEARCH ]
This search is serial search or linear search. The table may sorted or not WHENs are performed one after another for each table entry until TRUE or NO more
WHEN cond AT END executed if no match Set starting points of id-2 or index. The increment of the index or id-2 is taken care of
by the search statement itself. The search statement can be performed on he table defined by OCCURS and
INDEXED BY phrase. The value of the index remains set at the point where the condition has been satisfied. When the SEARCH terminates without finding the necessary value, the index contains
unpredictable values.
Page 117 ©Copyright 2007, Cognizant Technology Solutions, All Rights Reserved
C3: Protected
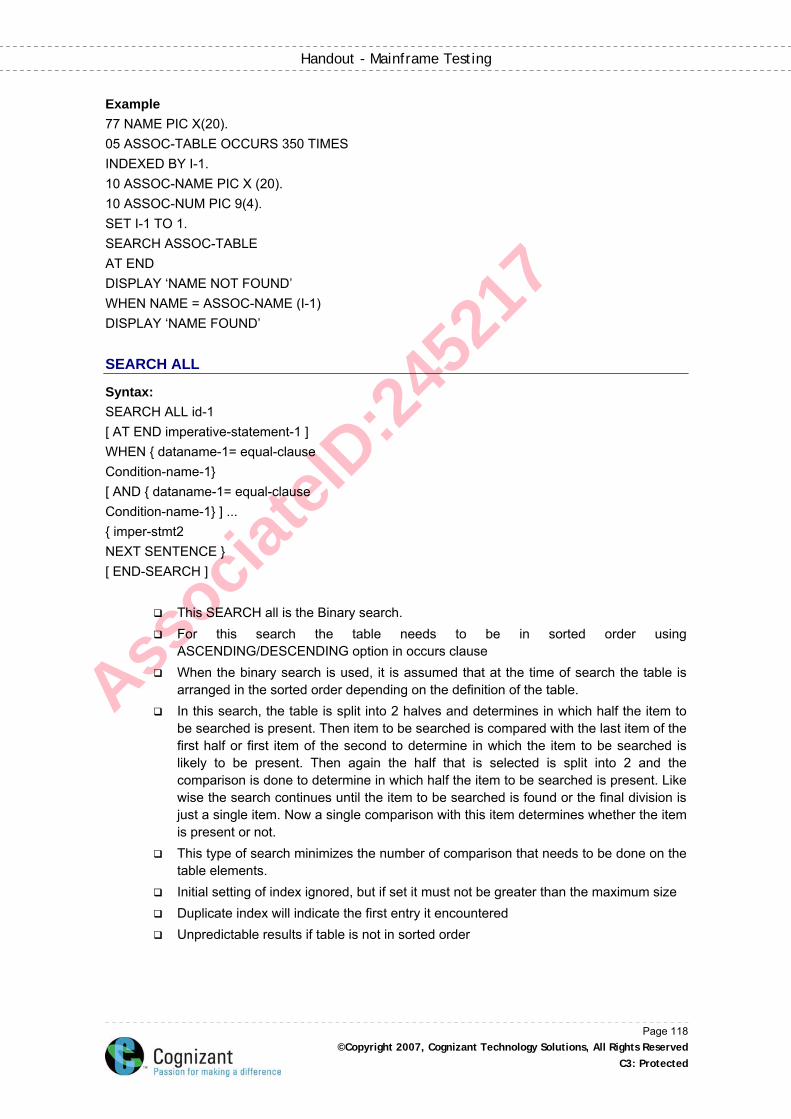
Associa
teID
:245
217
Handout - Mainframe Testing
Example 77 NAME PIC X(20). 05 ASSOC-TABLE OCCURS 350 TIMES INDEXED BY I-1. 10 ASSOC-NAME PIC X (20). 10 ASSOC-NUM PIC 9(4). SET I-1 TO 1. SEARCH ASSOC-TABLE AT END DISPLAY ‘NAME NOT FOUND’ WHEN NAME = ASSOC-NAME (I-1) DISPLAY ‘NAME FOUND’
SEARCH ALL
Syntax: SEARCH ALL id-1 [ AT END imperative-statement-1 ] WHEN { dataname-1= equal-clause Condition-name-1} [ AND { dataname-1= equal-clause Condition-name-1} ] ... { imper-stmt2 NEXT SENTENCE } [ END-SEARCH ]
This SEARCH all is the Binary search. For this search the table needs to be in sorted order using
ASCENDING/DESCENDING option in occurs clause When the binary search is used, it is assumed that at the time of search the table is
arranged in the sorted order depending on the definition of the table. In this search, the table is split into 2 halves and determines in which half the item to
be searched is present. Then item to be searched is compared with the last item of the first half or first item of the second to determine in which the item to be searched is likely to be present. Then again the half that is selected is split into 2 and the comparison is done to determine in which half the item to be searched is present. Like wise the search continues until the item to be searched is found or the final division is just a single item. Now a single comparison with this item determines whether the item is present or not.
This type of search minimizes the number of comparison that needs to be done on the table elements.
Initial setting of index ignored, but if set it must not be greater than the maximum size Duplicate index will indicate the first entry it encountered Unpredictable results if table is not in sorted order
Page 118 ©Copyright 2007, Cognizant Technology Solutions, All Rights Reserved
C3: Protected
Associa
teID
:245
217
Handout - Mainframe Testing
Example: 77 NAME PIC X(20). 05 ASSOC-TABLE OCCURS 350 TIMES ASCENDING KEY IS A-NAME INDEXED BY I-1. 10 A-NAME PIC X(20). 10 A-NUM PIC 9(4). SEARCH ALL ASSOC-TABLE AT END DISPLAY ‘NAME NOT FOUND’ WHEN NAME = A-NAME(I-1) DISPLAY ‘NAME FOUND’
Compiler Directive - COPY
The COPY statement is a library statement that places prewritten text in a COBOL program.
Prewritten source program entries can be included in a source program at compile time. Thus, an installation can use standard file descriptions, record descriptions, or procedures without re-coding them. These entries and procedures can then be saved in user-created libraries; they can then be included in the source program by means of the COPY statement.
Compilation of the source program containing COPY statements is logically equivalent to processing all COPY statements before processing the resulting source program.
The effect of processing a COPY statement is that the library text associated with text-name is copied into the source program, logically replacing the entire COPY statement, beginning with the word COPY and ending with the period, inclusive. When the REPLACING phrase is not specified, the library text is copied unchanged
Each COPY statement must be preceded by a space and ended with a separator period.
A COPY statement can appear in the source program anywhere a character string or a separator can appear.
COPY { text-name lit-1 } [ { OF { lib-name IN } lit-2 } ] [ SUPPRESS ] [ REPLACING ( op-1 BY op-2 ) ... ] .
op-1 and op-2 can be either pseudo-text, an identifier, a literal, or a COBOL word
(except COPY). Compiler Directive COPY – Example 01 :TAG:. 02 :TAG:-WEEK PIC S99.
Page 119 ©Copyright 2007, Cognizant Technology Solutions, All Rights Reserved
C3: Protected
Associa
teID
:245
217
Handout - Mainframe Testing
02 :TAG:-GROSS-PAY PIC 9(5)V99. 02 :TAG:-HOURS PIC S999 OCCURS 1 TO 52 TIMES DEPENDING ON :TAG:-WEEK OF :TAG:. COPY PAYLIB REPLACING ==:TAG:== BY ==Payroll==. 01 PAYROLL. 02 PAYROLL-WEEK PIC S99. 02 PAYROLL-GROSS-PAY PIC S9(5)V99. 02 PAYROLL-HOURS PIC S999 OCCURS 1 TO 52 TIMES DEPENDING ON PAYROLL-WEEK OF PAYROLL. Compiler Directive COPY - Rules
Copy statement can be nested but o Can’t contain REPLACING option
Should not cause recursion If SUPPRESS
o Specified then listing will not contain the statement within the COPY member o If not then listing will contain the statements with a C after the source program
line number
Summary:
In this chapter we have learned about, the various divisions and sections in COBOL. Identification Division is used to provide the COBOL program-id. Environment division is used to provide the system specific details and it is optional. Data division is used to declare all the data-items used in the COBOL program. Procedure division is used to specify the program logic. Control statements like PERFORM, IF-ENDIF are used to transfer control within the program. Sub-programs can be called using CALL statement.
Test Your Understanding
1. Which division in COBOL is used to declare all the data-items used in a COBOL program? a) IDENTIFICATION DIVISION b) ENVIRONMENT DIVISION c) DATA DIVISION
2. Which division in COBOL is used to provide the program-id?
a) IDENTIFICATION DIVISION b) ENVIRONMENT DIVISION c) DATA DIVISION
3. Which keyword is used to specify the picture clause of a data-item?
a) PIC b) PICT c) All the above
Page 120 ©Copyright 2007, Cognizant Technology Solutions, All Rights Reserved
C3: Protected
Associa
teID
:245
217
Handout - Mainframe Testing
4. Which statement is used to call a sub-program ? a) CALL ‘sub-program-name’ b) INVOKE ‘sub-program-name’ c) INITIATE ‘sub-program-name’
5. Which statement is used to terminate a COBOL program?
a) EXIT b) TERMINATE c) STOP-RUN
Answers:
1. c 2. a 3. a 4. a 5. c
Page 121 ©Copyright 2007, Cognizant Technology Solutions, All Rights Reserved
C3: Protected
Associa
teID
:245
217
Handout - Mainframe Testing
Chapter 6: Introduction to CICS
Learning Objective
After completing this chapter, you will be able to: Explain the various terminology like Field,map,mapset etc Explain how to create maps using BMS Explain the DFHMSD, DFHMDI, DFHMDF Explain the SYSPUNCH,SYSLMOD Explain how to embed CICS in COBOL
Introduction
CICS (Customer Information Control System) is the font-end or online system for mainframes. CICS is an IBM product, introduced in 1970’s. It is a separate sub-system in MVS operating system. It supports large number of concurrent users accessing the online programs.
Basic Terminology in CICS
Field is basic element in CICS UI (User Interface). Each and every option available in the screen is called as a field. Similar to Textbox, Label, etc., in windows operating system Map is the Representation of one screen format. It is a collection of fields. It is synonymous to screens / windows in Windows operating system. Mapset is a collection of maps linked together. It is used to logically group the maps. Transaction-ID is the unique four digit number assi ned to each online program. Symbolic Map is the copybook generated after compilation of a map. Physical Map is the load-module (binary file) generated after compilation of a map.
Page 122 ©Copyright 2007, Cognizant Technology Solutions, All Rights Reserved
C3: Protected
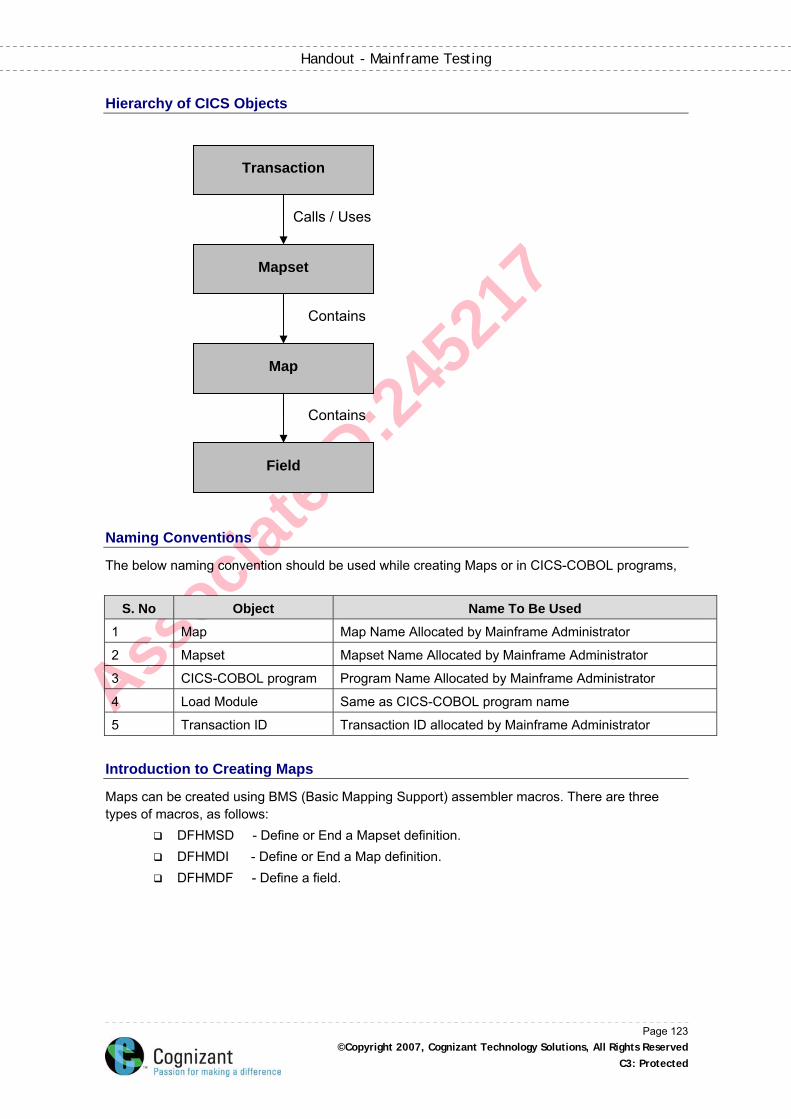
Associa
teID
:245
217
Handout - Mainframe Testing
Hierarchy of CICS Objects
Mapset
Map
Field
Transaction
Calls / Uses
Contains
Contains
Naming Conventions
The below naming convention should be used while creating Maps or in CICS-COBOL programs,
S. No Object Name To Be Used
1 Map Map Name Allocated by Mainframe Administrator
2 Mapset Mapset Name Allocated by Mainframe Administrator
3 CICS-COBOL program Program Name Allocated by Mainframe Administrator
4 Load Module Same as CICS-COBOL program name
5 Transaction ID Transaction ID allocated by Mainframe Administrator
Introduction to Creating Maps
Maps can be created using BMS (Basic Mapping Support) assembler macros. There are three types of macros, as follows:
DFHMSD - Define or End a Mapset definition. DFHMDI - Define or End a Map definition. DFHMDF - Define a field.
Page 123 ©Copyright 2007, Cognizant Technology Solutions, All Rights Reserved
C3: Protected
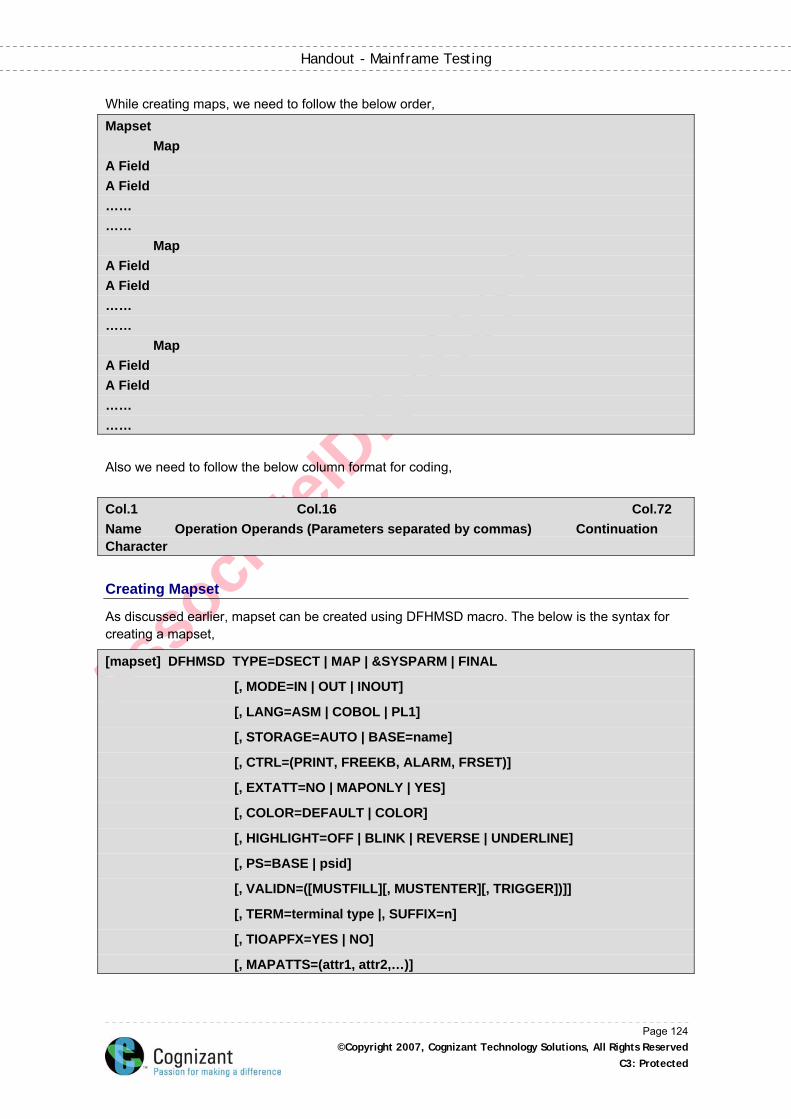
Associa
teID
:245
217
Handout - Mainframe Testing
While creating maps, we need to follow the below order, Mapset Map A Field A Field …… …… Map A Field A Field …… …… Map A Field A Field …… …… Also we need to follow the below column format for coding, Col.1 Col.16 Col.72 Name Operation Operands (Parameters separated by commas) Continuation Character
Creating Mapset
As discussed earlier, mapset can be created using DFHMSD macro. The below is the syntax for creating a mapset,
[mapset] DFHMSD TYPE=DSECT | MAP | &SYSPARM | FINAL
[, MODE=IN | OUT | INOUT]
[, LANG=ASM | COBOL | PL1]
[, STORAGE=AUTO | BASE=name]
[, CTRL=(PRINT, FREEKB, ALARM, FRSET)]
[, EXTATT=NO | MAPONLY | YES]
[, COLOR=DEFAULT | COLOR]
[, HIGHLIGHT=OFF | BLINK | REVERSE | UNDERLINE]
[, PS=BASE | psid]
[, VALIDN=([MUSTFILL][, MUSTENTER][, TRIGGER])]]
[, TERM=terminal type |, SUFFIX=n]
[, TIOAPFX=YES | NO]
[, MAPATTS=(attr1, attr2,…)]
Page 124 ©Copyright 2007, Cognizant Technology Solutions, All Rights Reserved
C3: Protected
Associa
teID
:245
217
Handout - Mainframe Testing
[, DSATTS=(attr1, attr2,…)]
[, OUTLINE=BOX | ([LEFT][, RIGHT][, OVER][, UNDER])]
[, SOSI=NO | YES]
[, TRANSP=YES | NO]
[, PARTN=(name [, ACTIVATE])]
[, LDC=MNEMONIC]
[, OBFMT=YES | NO]
[, HTAB=tab [, tab]…]
[, VTAB=tab [, tab]…]
[, DATA=FIELD | BLOCK]
[, FLDSEP=char | X ‘hex-char’]]
The below is the example,
Mapset1 DFHMSD TYPE=&&SYSPARM, X
CTRL=(FREEKB,FRSET), X
LANG=COBOL, X
STORAGE=AUTO, X
TIOAPFX=YES, X
MODE=INOUT, X
TERM=3270 …………………
Map Definitions
…………………
DFHMSD TYPE=FINAL
END
In the above example,
“Mapset1” is the mapset name. Mapset name cannot be more than 8 characters, and should start in the first column.
“CTRL=(FREEKB,FRSET)” are the control parameters, FREEKB is used to free the keyboard when an ABEND occurs.
“LANG=COBOL” denotes that we are going to use this map in COBOL program, so the symbolic map (copybook) will be generated in COBOL format.
“STORAGE=AUTO” denotes the memory will allocated by CICS. “TYPE=FINAL” denotes the end of the mapset.
Page 125 ©Copyright 2007, Cognizant Technology Solutions, All Rights Reserved
C3: Protected
Associa
teID
:245
217
Handout - Mainframe Testing
Creating Map
As discussed earlier, map can be created using DFHMDI macro. A map must be defined within a mapset definition. The below is the syntax for creating a map, mapname DFHMDI [, SIZE=(line,column)] [, CTRL=(PRINT, FREEKB, ALARM, FRSET)] [, EXTATT=NO | MAPONLY | YES] [, COLOR=DEFAULT | COLOR] [, HIGHLIGHT=OFF | BLINK | REVERSE | UNDERLINE] [, PS=BASE | psid] [, VALIDN=([MUSTFILL][, MUSTENTER][, TRIGGER])]] [, COLUMN=number | NEXT | SAME] [, LINE=number | NEXT | SAME] [,FILELDS=NO] [, MAPATTS=(attr1, attr2,…)] [, DSATTS=(attr1, attr2,…)] [, OUTLINE=BOX | ([LEFT][, RIGHT][, OVER][, UNDER])] [, SOSI=NO | YES] [, TRANSP=YES | NO] [, JUSTIFY=([LEFT | RIGHT][, FIRST | LAST])] [, PARTN=(name [, ACTIVATE])] [, OBFMT=YES | NO] [, DATA=FIELD | BLOCK] [, FLDSEP=char | X ‘hex-char’]] [, TIOAPFX=YES | NO] [, HEADER=YES] [, TRAILER=YES] The below is the example, MAPNAME DFHMDI SIZE=(24,80), X LINE=01, X COLUMN=01, X CTRL=(FREEKB,FRSET) ……………………. FIELD Definitions …………………….
Page 126 ©Copyright 2007, Cognizant Technology Solutions, All Rights Reserved
C3: Protected
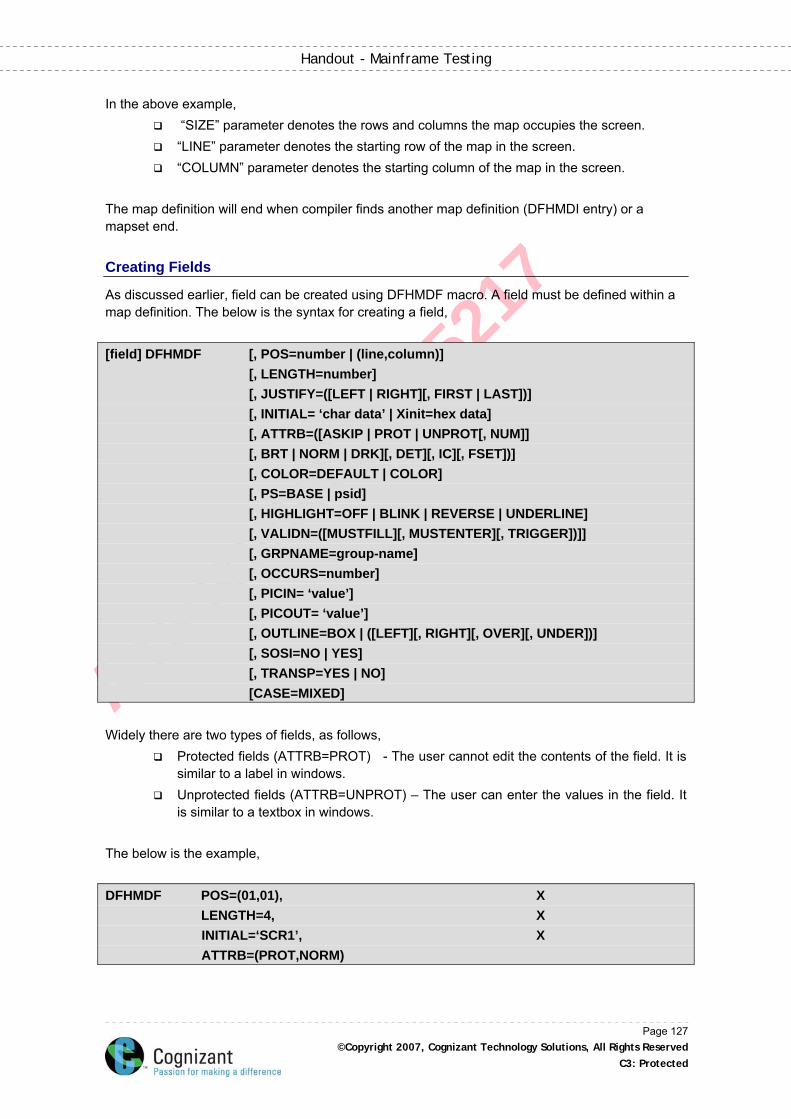
Associa
teID
:245
217
Handout - Mainframe Testing
In the above example, “SIZE” parameter denotes the rows and columns the map occupies the screen. “LINE” parameter denotes the starting row of the map in the screen. “COLUMN” parameter denotes the starting column of the map in the screen.
The map definition will end when compiler finds another map definition (DFHMDI entry) or a mapset end.
Creating Fields
As discussed earlier, field can be created using DFHMDF macro. A field must be defined within a map definition. The below is the syntax for creating a field, [field] DFHMDF [, POS=number | (line,column)] [, LENGTH=number] [, JUSTIFY=([LEFT | RIGHT][, FIRST | LAST])] [, INITIAL= ‘char data’ | Xinit=hex data] [, ATTRB=([ASKIP | PROT | UNPROT[, NUM]] [, BRT | NORM | DRK][, DET][, IC][, FSET])] [, COLOR=DEFAULT | COLOR] [, PS=BASE | psid] [, HIGHLIGHT=OFF | BLINK | REVERSE | UNDERLINE] [, VALIDN=([MUSTFILL][, MUSTENTER][, TRIGGER])]] [, GRPNAME=group-name] [, OCCURS=number] [, PICIN= ‘value’] [, PICOUT= ‘value’] [, OUTLINE=BOX | ([LEFT][, RIGHT][, OVER][, UNDER])] [, SOSI=NO | YES] [, TRANSP=YES | NO] [CASE=MIXED] Widely there are two types of fields, as follows,
Protected fields (ATTRB=PROT) - The user cannot edit the contents of the field. It is similar to a label in windows.
Unprotected fields (ATTRB=UNPROT) – The user can enter the values in the field. It is similar to a textbox in windows.
The below is the example, DFHMDF POS=(01,01), X LENGTH=4, X INITIAL=‘SCR1’, X ATTRB=(PROT,NORM)
Page 127 ©Copyright 2007, Cognizant Technology Solutions, All Rights Reserved
C3: Protected
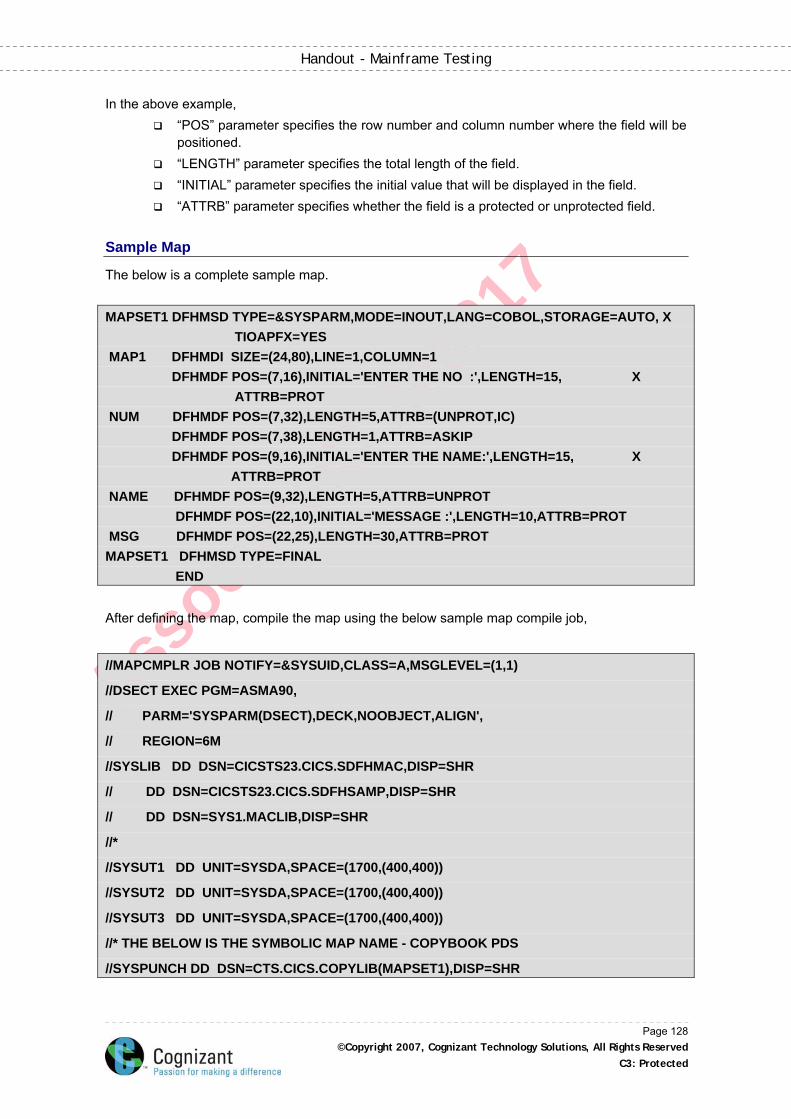
Associa
teID
:245
217
Handout - Mainframe Testing
In the above example, “POS” parameter specifies the row number and column number where the field will be
positioned. “LENGTH” parameter specifies the total length of the field. “INITIAL” parameter specifies the initial value that will be displayed in the field. “ATTRB” parameter specifies whether the field is a protected or unprotected field.
Sample Map
The below is a complete sample map. MAPSET1 DFHMSD TYPE=&SYSPARM,MODE=INOUT,LANG=COBOL,STORAGE=AUTO, X TIOAPFX=YES MAP1 DFHMDI SIZE=(24,80),LINE=1,COLUMN=1 DFHMDF POS=(7,16),INITIAL='ENTER THE NO :',LENGTH=15, X ATTRB=PROT NUM DFHMDF POS=(7,32),LENGTH=5,ATTRB=(UNPROT,IC) DFHMDF POS=(7,38),LENGTH=1,ATTRB=ASKIP DFHMDF POS=(9,16),INITIAL='ENTER THE NAME:',LENGTH=15, X ATTRB=PROT NAME DFHMDF POS=(9,32),LENGTH=5,ATTRB=UNPROT DFHMDF POS=(22,10),INITIAL='MESSAGE :',LENGTH=10,ATTRB=PROT MSG DFHMDF POS=(22,25),LENGTH=30,ATTRB=PROT MAPSET1 DFHMSD TYPE=FINAL END After defining the map, compile the map using the below sample map compile job,
//MAPCMPLR JOB NOTIFY=&SYSUID,CLASS=A,MSGLEVEL=(1,1)
//DSECT EXEC PGM=ASMA90,
// PARM='SYSPARM(DSECT),DECK,NOOBJECT,ALIGN',
// REGION=6M
//SYSLIB DD DSN=CICSTS23.CICS.SDFHMAC,DISP=SHR
// DD DSN=CICSTS23.CICS.SDFHSAMP,DISP=SHR
// DD DSN=SYS1.MACLIB,DISP=SHR
//*
//SYSUT1 DD UNIT=SYSDA,SPACE=(1700,(400,400))
//SYSUT2 DD UNIT=SYSDA,SPACE=(1700,(400,400))
//SYSUT3 DD UNIT=SYSDA,SPACE=(1700,(400,400))
//* THE BELOW IS THE SYMBOLIC MAP NAME - COPYBOOK PDS
//SYSPUNCH DD DSN=CTS.CICS.COPYLIB(MAPSET1),DISP=SHR
Page 128 ©Copyright 2007, Cognizant Technology Solutions, All Rights Reserved
C3: Protected

Associa
teID
:245
217
Handout - Mainframe Testing
//SYSPRINT DD SYSOUT=*
//SYSIN DD DSN=CTS. CICS.MAPLIB(MAPSET1),DISP=SHR
//ASMMAP EXEC PGM=ASMA90,
// PARM='SYSPARM(MAP),DECK,NOOBJECT,ALIGN',
// REGION=4M
//SYSLIB DD DSN=CICSTS23.CICS.SDFHMAC,DISP=SHR
// DD DSN=CICSTS23.CICS.SDFHSAMP,DISP=SHR
// DD DSN=SYS1.MACLIB,DISP=SHR
//*
//SYSUT1 DD UNIT=SYSDA,SPACE=(1700,(400,400))
//SYSUT2 DD UNIT=SYSDA,SPACE=(1700,(400,400))
//SYSUT3 DD UNIT=SYSDA,SPACE=(1700,(400,400))
//SYSPUNCH DD DSN=&&OBJMOD,
// DISP=(,PASS),UNIT=SYSDA,
// DCB=(RECFM=FB,LRECL=80,BLKSIZE=400),
// SPACE=(400,(100,100))
//SYSPRINT DD SYSOUT=*
//SYSIN DD DSN=CTS. CICS.MAPLIB(MAPSET1),DISP=SHR
//LNKEDT EXEC PGM=IEWL,
// PARM='NORENT,LIST,XREF,LET,NCAL',
// COND=((3,LT,DSECT),(3,LT,ASMMAP))
//SYSUT1 DD UNIT=SYSDA,SPACE=(1024,(100,50))
//SYSPRINT DD SYSOUT=*
//SYSLMOD DD DSN=TIG06431.CICS.LOAD(MAPSET1),DISP=SHR
//SYSLIN DD DSN=&&OBJMOD,DISP=(OLD,PASS)
In the above JCL, change the following,
In “SYSPUNCH” DD statement enter the copy-library name. In “SYSIN” DD statement enter the map-library name. In “SYSLMOD” DD statement enter the load-library name.
Page 129 ©Copyright 2007, Cognizant Technology Solutions, All Rights Reserved
C3: Protected
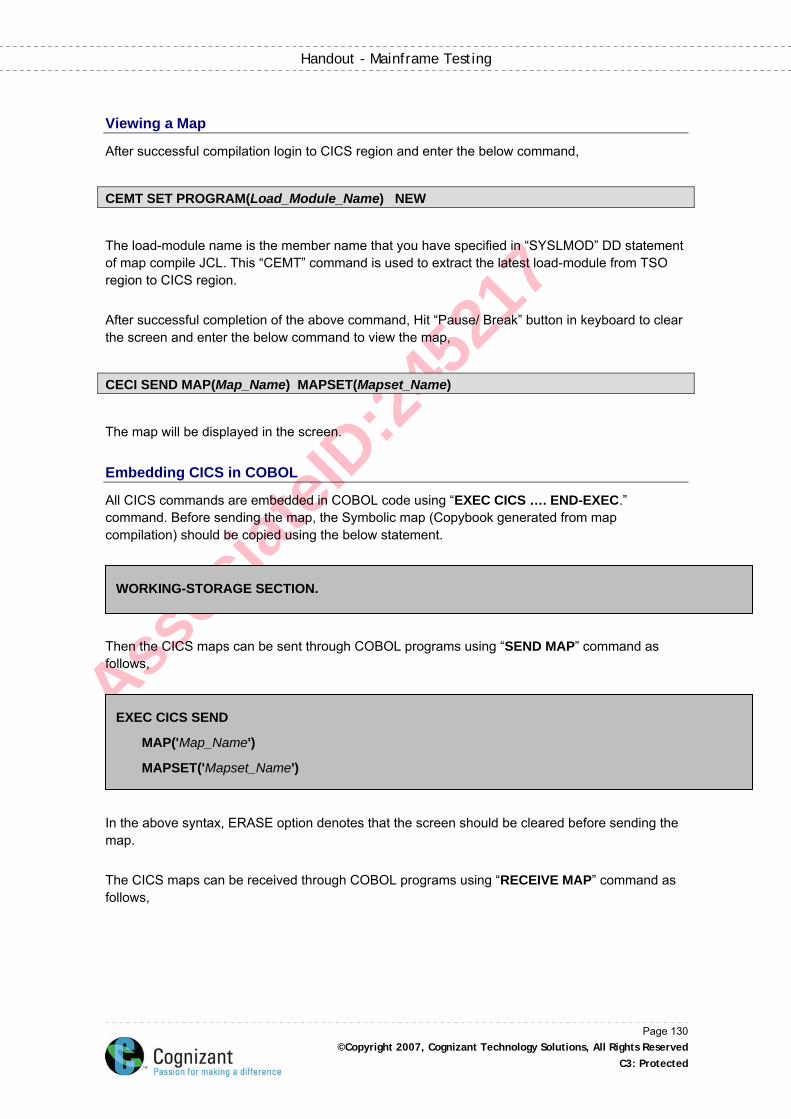
Associa
teID
:245
217
Handout - Mainframe Testing
Viewing a Map
After successful compilation login to CICS region and enter the below command,
CEMT SET PROGRAM(Load_Module_Name) NEW
The load-module name is the member name that you have specified in “SYSLMOD” DD statement of map compile JCL. This “CEMT” command is used to extract the latest load-module from TSO region to CICS region. After successful completion of the above command, Hit “Pause/ Break” button in keyboard to clear the screen and enter the below command to view the map,
CECI SEND MAP(Map_Name) MAPSET(Mapset_Name)
The map will be displayed in the screen.
Embedding CICS in COBOL
All CICS commands are embedded in COBOL code using “EXEC CICS …. END-EXEC.” command. Before sending the map, the Symbolic map (Copybook generated from map compilation) should be copied using the below statement.
Then the CICS maps can be sent through COBOL programs using “SEND MAP” command as follows,
WORKING-STORAGE SECTION.
EXEC CICS SEND
MAP('Map_Name')
MAPSET('Mapset_Name')
In the above syntax, ERASE option denotes that the screen should be cleared before sending the map. The CICS maps can be received through COBOL programs using “RECEIVE MAP” command as follows,
Page 130 ©Copyright 2007, Cognizant Technology Solutions, All Rights Reserved
C3: Protected
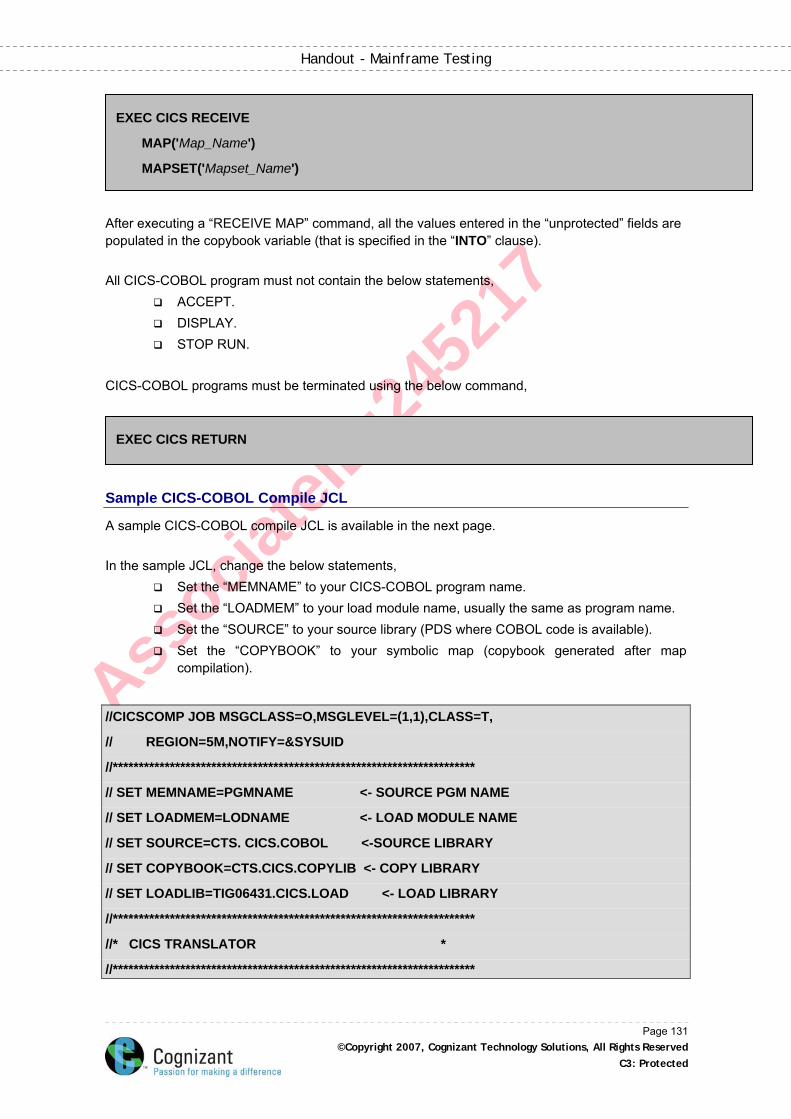
Associa
teID
:245
217
Handout - Mainframe Testing
After executing a “RECEIVE MAP” command, all the values entered in the “unprotected” fields are populated in the copybook variable (that is specified in the “INTO” clause). All CICS-COBOL program must not contain the below statements,
ACCEPT. DISPLAY. STOP RUN.
CICS-COBOL programs must be terminated using the below command,
Sample CICS-COBOL Compile JCL
A sample CICS-COBOL compile JCL is available in the next page. In the sample JCL, change the below statements,
Set the “MEMNAME” to your CICS-COBOL program name. Set the “LOADMEM” to your load module name, usually the same as program name. Set the “SOURCE” to your source library (PDS where COBOL code is available). Set the “COPYBOOK” to your symbolic map (copybook generated after map
compilation).
//CICSCOMP JOB MSGCLASS=O,MSGLEVEL=(1,1),CLASS=T,
// REGION=5M,NOTIFY=&SYSUID
//**********************************************************************
// SET MEMNAME=PGMNAME <- SOURCE PGM NAME
// SET LOADMEM=LODNAME <- LOAD MODULE NAME
// SET SOURCE=CTS. CICS.COBOL <-SOURCE LIBRARY
// SET COPYBOOK=CTS.CICS.COPYLIB <- COPY LIBRARY
// SET LOADLIB=TIG06431.CICS.LOAD <- LOAD LIBRARY
//**********************************************************************
//* CICS TRANSLATOR *
//**********************************************************************
EXEC CICS RETURN
MAPSET('Mapset_Name')
EXEC CICS RECEIVE
MAP('Map_Name')
Page 131 ©Copyright 2007, Cognizant Technology Solutions, All Rights Reserved
C3: Protected
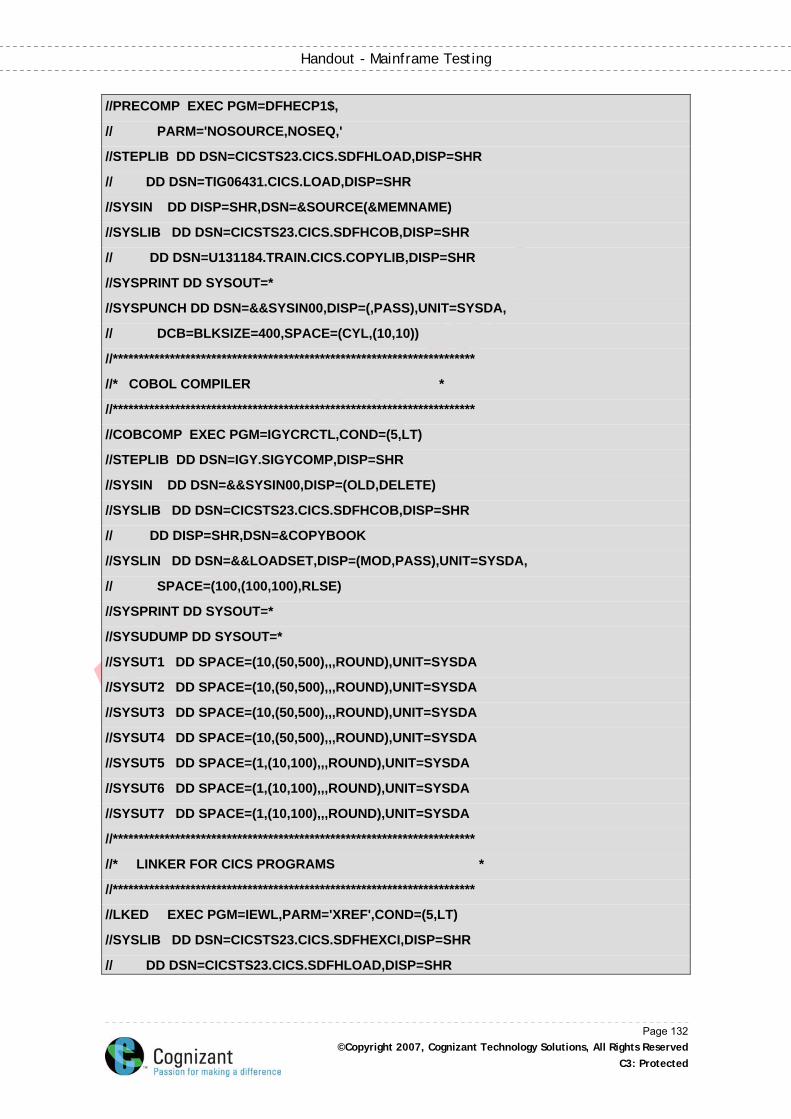
Associa
teID
:245
217
Handout - Mainframe Testing
//PRECOMP EXEC PGM=DFHECP1$,
// PARM='NOSOURCE,NOSEQ,'
//STEPLIB DD DSN=CICSTS23.CICS.SDFHLOAD,DISP=SHR
// DD DSN=TIG06431.CICS.LOAD,DISP=SHR
//SYSIN DD DISP=SHR,DSN=&SOURCE(&MEMNAME)
//SYSLIB DD DSN=CICSTS23.CICS.SDFHCOB,DISP=SHR
// DD DSN=U131184.TRAIN.CICS.COPYLIB,DISP=SHR
//SYSPRINT DD SYSOUT=*
//SYSPUNCH DD DSN=&&SYSIN00,DISP=(,PASS),UNIT=SYSDA,
// DCB=BLKSIZE=400,SPACE=(CYL,(10,10))
//**********************************************************************
//* COBOL COMPILER *
//**********************************************************************
//COBCOMP EXEC PGM=IGYCRCTL,COND=(5,LT)
//STEPLIB DD DSN=IGY.SIGYCOMP,DISP=SHR
//SYSIN DD DSN=&&SYSIN00,DISP=(OLD,DELETE)
//SYSLIB DD DSN=CICSTS23.CICS.SDFHCOB,DISP=SHR
// DD DISP=SHR,DSN=©BOOK
//SYSLIN DD DSN=&&LOADSET,DISP=(MOD,PASS),UNIT=SYSDA,
// SPACE=(100,(100,100),RLSE)
//SYSPRINT DD SYSOUT=*
//SYSUDUMP DD SYSOUT=*
//SYSUT1 DD SPACE=(10,(50,500),,,ROUND),UNIT=SYSDA
//SYSUT2 DD SPACE=(10,(50,500),,,ROUND),UNIT=SYSDA
//SYSUT3 DD SPACE=(10,(50,500),,,ROUND),UNIT=SYSDA
//SYSUT4 DD SPACE=(10,(50,500),,,ROUND),UNIT=SYSDA
//SYSUT5 DD SPACE=(1,(10,100),,,ROUND),UNIT=SYSDA
//SYSUT6 DD SPACE=(1,(10,100),,,ROUND),UNIT=SYSDA
//SYSUT7 DD SPACE=(1,(10,100),,,ROUND),UNIT=SYSDA
//**********************************************************************
//* LINKER FOR CICS PROGRAMS *
//**********************************************************************
//LKED EXEC PGM=IEWL,PARM='XREF',COND=(5,LT)
//SYSLIB DD DSN=CICSTS23.CICS.SDFHEXCI,DISP=SHR
// DD DSN=CICSTS23.CICS.SDFHLOAD,DISP=SHR
Page 132 ©Copyright 2007, Cognizant Technology Solutions, All Rights Reserved
C3: Protected
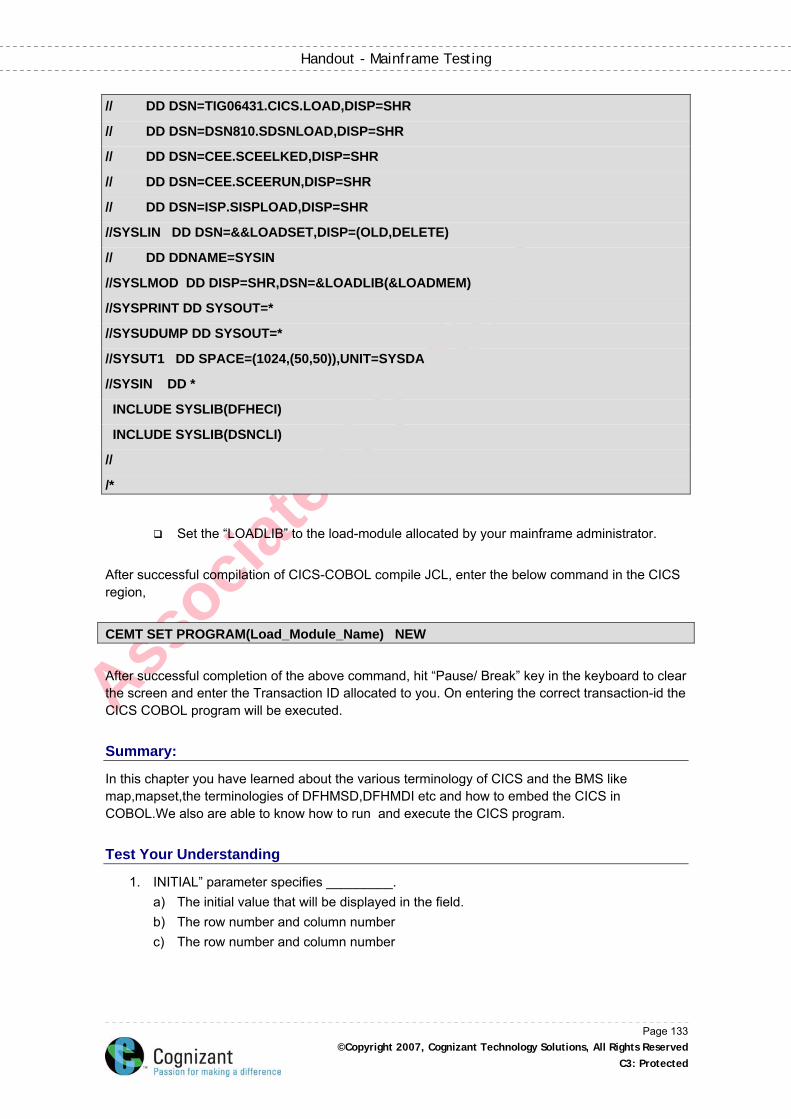
Associa
teID
:245
217
Handout - Mainframe Testing
// DD DSN=TIG06431.CICS.LOAD,DISP=SHR
// DD DSN=DSN810.SDSNLOAD,DISP=SHR
// DD DSN=CEE.SCEELKED,DISP=SHR
// DD DSN=CEE.SCEERUN,DISP=SHR
// DD DSN=ISP.SISPLOAD,DISP=SHR
//SYSLIN DD DSN=&&LOADSET,DISP=(OLD,DELETE)
// DD DDNAME=SYSIN
//SYSLMOD DD DISP=SHR,DSN=&LOADLIB(&LOADMEM)
//SYSPRINT DD SYSOUT=*
//SYSUDUMP DD SYSOUT=*
//SYSUT1 DD SPACE=(1024,(50,50)),UNIT=SYSDA
//SYSIN DD *
INCLUDE SYSLIB(DFHECI)
INCLUDE SYSLIB(DSNCLI)
//
/*
Set the “LOADLIB” to the load-module allocated by your mainframe administrator.
After successful compilation of CICS-COBOL compile JCL, enter the below command in the CICS region, CEMT SET PROGRAM(Load_Module_Name) NEW After successful completion of the above command, hit “Pause/ Break” key in the keyboard to clear the screen and enter the Transaction ID allocated to you. On entering the correct transaction-id the CICS COBOL program will be executed.
Summary:
In this chapter you have learned about the various terminology of CICS and the BMS like map,mapset,the terminologies of DFHMSD,DFHMDI etc and how to embed the CICS in COBOL.We also are able to know how to run and execute the CICS program.
Test Your Understanding
1. INITIAL” parameter specifies _________. a) The initial value that will be displayed in the field. b) The row number and column number c) The row number and column number
Page 133 ©Copyright 2007, Cognizant Technology Solutions, All Rights Reserved
C3: Protected
Associa
teID
:245
217
Handout - Mainframe Testing
2. All CICS-COBOL program must not contain the below statements. a) ACCEPT. b) DISPLAY. c) STOP RUN. d) All
3. ________ command is used to extract the latest load-module from TSO region to CICS
region a) CEMT b) CEST c) CISM
Answers:
1. a 2. d 3. a
Page 134 ©Copyright 2007, Cognizant Technology Solutions, All Rights Reserved
C3: Protected

Associa
teID
:245
217
Handout - Mainframe Testing
Chapter 7: Introduction to DB2 Basics
Learning Objective
After completing this chapter, you will be able to: Explain DB2 Relational Database Differentiate between keys Describe Table space List the functionality of Indexes List the differences between table and View Explain the Use of SQL and few steps to execute SQL queries
An Overview of DB2
You are probably reading this information because you are new to DB2 for z/OS or perhaps you just want to know more about it. (This information sometimes uses the shorter name of DB2® when the context makes the meaning clear.) You want and need to know about this product as quickly and efficiently as possible. One good way to start learning about a software product is to observe how real organizations use it. In the case of DB2, thousands of companies around the world use this database management system to run their businesses. For you to observe even a small percentage of those businesses would be impractical. This information provides scenarios that illustrate how some organizations might successfully use DB2.
Example for Creating a Table in DB2
----------------------- ISPF/PDF PRIMARY OPTION MENU ----------------
OPTION ===>
0 ISPF PARMS - Specify terminal and user parameters
1 BROWSE - Display source data or output listings
2 EDIT - Create or change source data
3 UTILITIES - Perform utility functions
4 FOREGROUND- Invoke language processors in foreground
5 BATCH - Submit job for language processing
6 COMMAND - Enter TSO command or CLIST
7 DIALOG TEST - Perform dialog testing
8 DB2 - Perform DATABASE 2 Interactive Functions
9 MQSeries - Web sphere MQ Interactive Functions
Page 135 ©Copyright 2007, Cognizant Technology Solutions, All Rights Reserved
C3: Protected
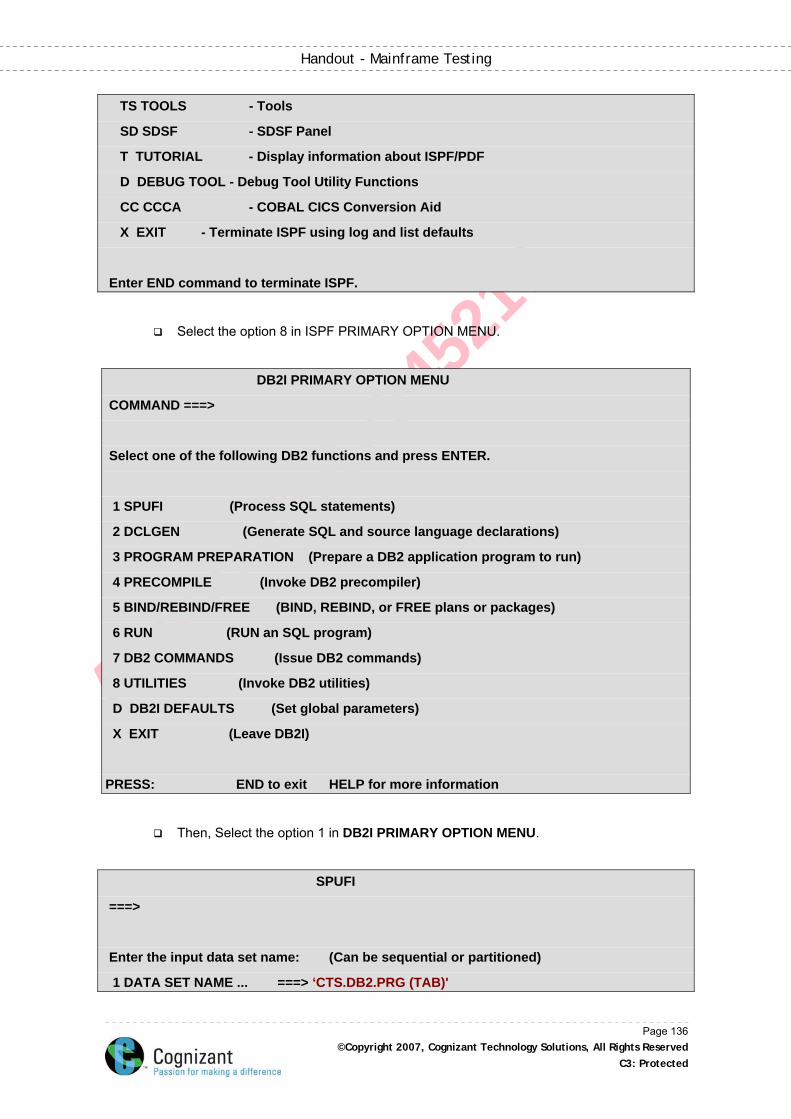
Associa
teID
:245
217
Handout - Mainframe Testing
TS TOOLS - Tools
SD SDSF - SDSF Panel
T TUTORIAL - Display information about ISPF/PDF
D DEBUG TOOL - Debug Tool Utility Functions
CC CCCA - COBAL CICS Conversion Aid
X EXIT - Terminate ISPF using log and list defaults
Enter END command to terminate ISPF.
Select the option 8 in ISPF PRIMARY OPTION MENU.
DB2I PRIMARY OPTION MENU
COMMAND ===>
Select one of the following DB2 functions and press ENTER.
1 SPUFI (Process SQL statements)
2 DCLGEN (Generate SQL and source language declarations)
3 PROGRAM PREPARATION (Prepare a DB2 application program to run)
4 PRECOMPILE (Invoke DB2 precompiler)
5 BIND/REBIND/FREE (BIND, REBIND, or FREE plans or packages)
6 RUN (RUN an SQL program)
7 DB2 COMMANDS (Issue DB2 commands)
8 UTILITIES (Invoke DB2 utilities)
D DB2I DEFAULTS (Set global parameters)
X EXIT (Leave DB2I)
PRESS: END to exit HELP for more information
Then, Select the option 1 in DB2I PRIMARY OPTION MENU.
SPUFI
===>
Enter the input data set name: (Can be sequential or partitioned)
1 DATA SET NAME ... ===> ‘CTS.DB2.PRG (TAB)'
Page 136 ©Copyright 2007, Cognizant Technology Solutions, All Rights Reserved
C3: Protected
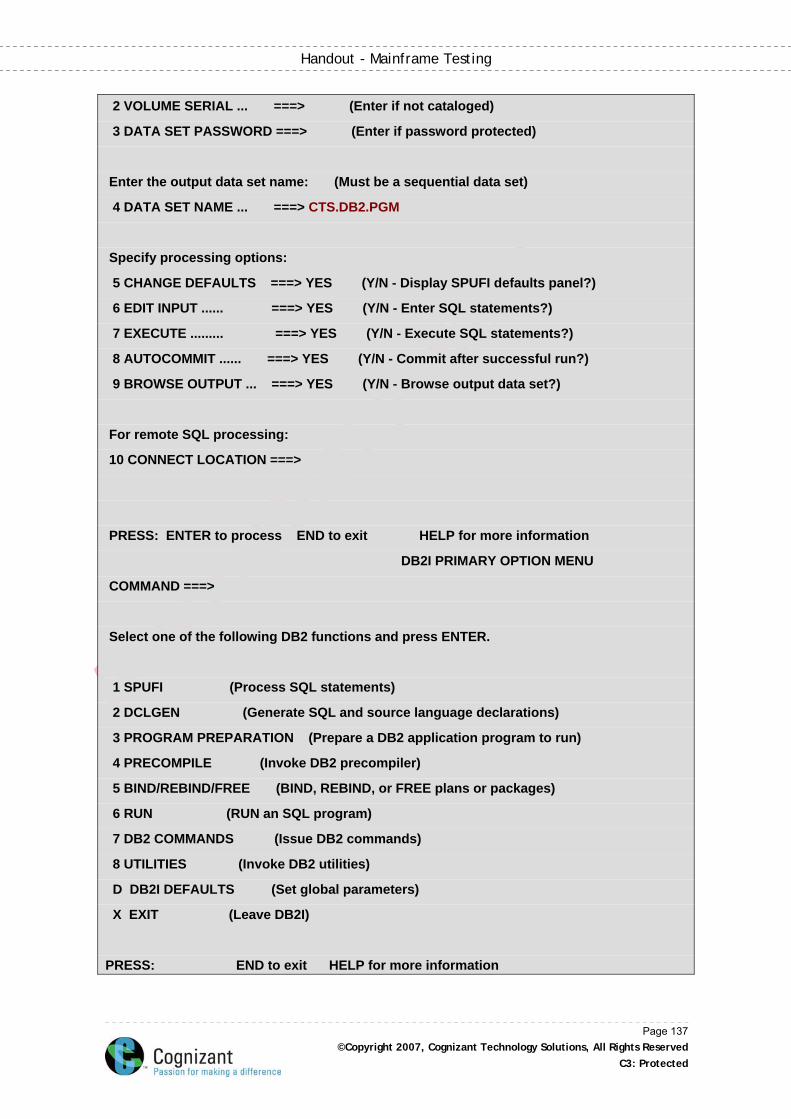
Associa
teID
:245
217
Handout - Mainframe Testing
2 VOLUME SERIAL ... ===> (Enter if not cataloged)
3 DATA SET PASSWORD ===> (Enter if password protected)
Enter the output data set name: (Must be a sequential data set)
4 DATA SET NAME ... ===> CTS.DB2.PGM
Specify processing options:
5 CHANGE DEFAULTS ===> YES (Y/N - Display SPUFI defaults panel?)
6 EDIT INPUT ...... ===> YES (Y/N - Enter SQL statements?)
7 EXECUTE ......... ===> YES (Y/N - Execute SQL statements?)
8 AUTOCOMMIT ...... ===> YES (Y/N - Commit after successful run?)
9 BROWSE OUTPUT ... ===> YES (Y/N - Browse output data set?)
For remote SQL processing:
10 CONNECT LOCATION ===>
PRESS: ENTER to process END to exit HELP for more information
DB2I PRIMARY OPTION MENU
COMMAND ===>
Select one of the following DB2 functions and press ENTER.
1 SPUFI (Process SQL statements)
2 DCLGEN (Generate SQL and source language declarations)
3 PROGRAM PREPARATION (Prepare a DB2 application program to run)
4 PRECOMPILE (Invoke DB2 precompiler)
5 BIND/REBIND/FREE (BIND, REBIND, or FREE plans or packages)
6 RUN (RUN an SQL program)
7 DB2 COMMANDS (Issue DB2 commands)
8 UTILITIES (Invoke DB2 utilities)
D DB2I DEFAULTS (Set global parameters)
X EXIT (Leave DB2I)
PRESS: END to exit HELP for more information
Page 137 ©Copyright 2007, Cognizant Technology Solutions, All Rights Reserved
C3: Protected

Associa
teID
:245
217
Handout - Mainframe Testing
CURRENT SPUFI DEFAULTS
===>
Enter the following to control your SPUFI session:
1 SQL TERMINATOR .. ===> ; (SQL Statement Terminator)
2 ISOLATION LEVEL ===> RR (RR=Repeatable Read, CS=Cursor Stability)
3 MAX SELECT LINES ===> 250 (Maximum number of lines to be
returned from a SELECT)
Output data set characteristics:
4 RECORD LENGTH ... ===> 4092 (LRECL=Logical record length)
5 BLOCK SIZE ...... ===> 4096 (Size of one block)
6 RECORD FORMAT ... ===> VB (RECFM=F, FB, FBA, V, VB, or VBA)
7 DEVICE TYPE ..... ===> SYSDA (Must be DASD unit name)
Output format characteristics:
8 MAX NUMERIC FIELD ===> 33 (Maximum width for numeric fields)
9 MAX CHAR FIELD .. ===> 80 (Maximum width for character fields)
10 COLUMN HEADING .. ===> NAMES (NAMES, LABELS, ANY or BOTH)
PRESS: ENTER to process END to exit HELP for more information
SPUFI SSID: DSN1
===>
Enter the input data set name: (Can be sequential or partitioned)
1 DATA SET NAME ... ===> ‘CTS.DB2.PRG (TAB)'
2 VOLUME SERIAL ... ===> (Enter if not cataloged)
3 DATA SET PASSWORD ===> (Enter if password protected)
Enter the output data set name: (Must be a sequential data set)
4 DATA SET NAME ... ===> CTS.DB2.PGM
Page 138 ©Copyright 2007, Cognizant Technology Solutions, All Rights Reserved
C3: Protected
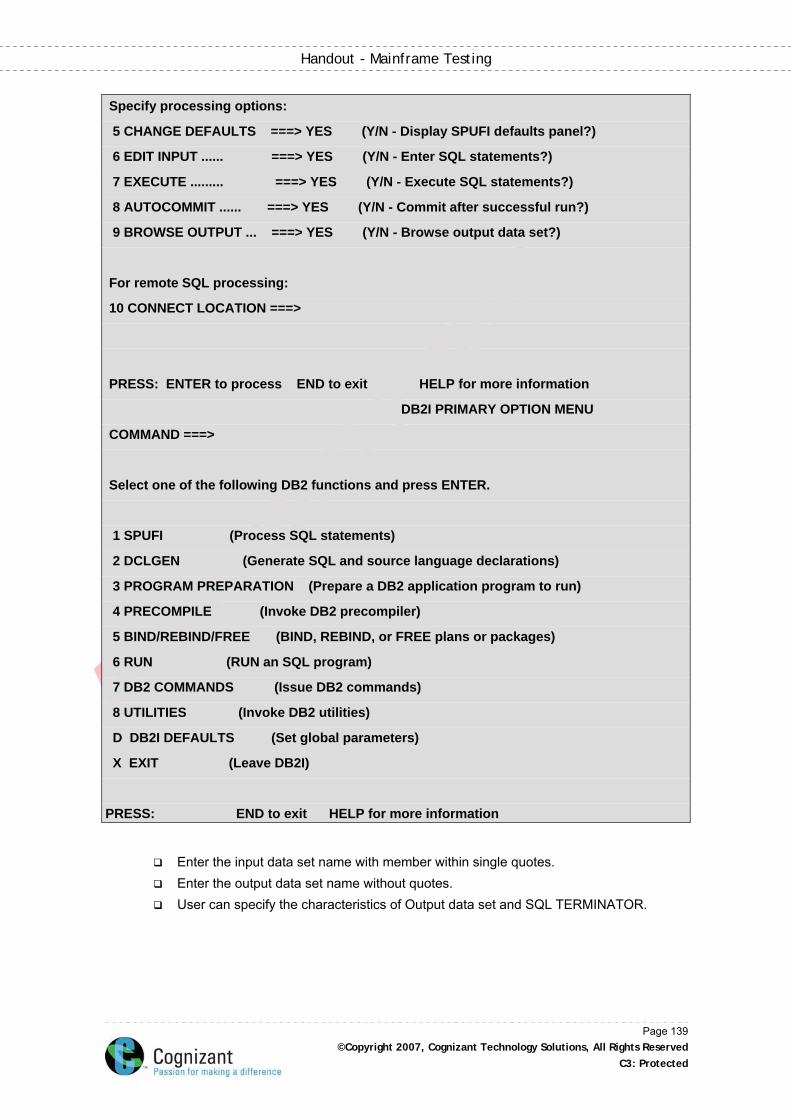
Associa
teID
:245
217
Handout - Mainframe Testing
Specify processing options:
5 CHANGE DEFAULTS ===> YES (Y/N - Display SPUFI defaults panel?)
6 EDIT INPUT ...... ===> YES (Y/N - Enter SQL statements?)
7 EXECUTE ......... ===> YES (Y/N - Execute SQL statements?)
8 AUTOCOMMIT ...... ===> YES (Y/N - Commit after successful run?)
9 BROWSE OUTPUT ... ===> YES (Y/N - Browse output data set?)
For remote SQL processing:
10 CONNECT LOCATION ===>
PRESS: ENTER to process END to exit HELP for more information
DB2I PRIMARY OPTION MENU
COMMAND ===>
Select one of the following DB2 functions and press ENTER.
1 SPUFI (Process SQL statements)
2 DCLGEN (Generate SQL and source language declarations)
3 PROGRAM PREPARATION (Prepare a DB2 application program to run)
4 PRECOMPILE (Invoke DB2 precompiler)
5 BIND/REBIND/FREE (BIND, REBIND, or FREE plans or packages)
6 RUN (RUN an SQL program)
7 DB2 COMMANDS (Issue DB2 commands)
8 UTILITIES (Invoke DB2 utilities)
D DB2I DEFAULTS (Set global parameters)
X EXIT (Leave DB2I)
PRESS: END to exit HELP for more information
Enter the input data set name with member within single quotes. Enter the output data set name without quotes. User can specify the characteristics of Output data set and SQL TERMINATOR.
Page 139 ©Copyright 2007, Cognizant Technology Solutions, All Rights Reserved
C3: Protected
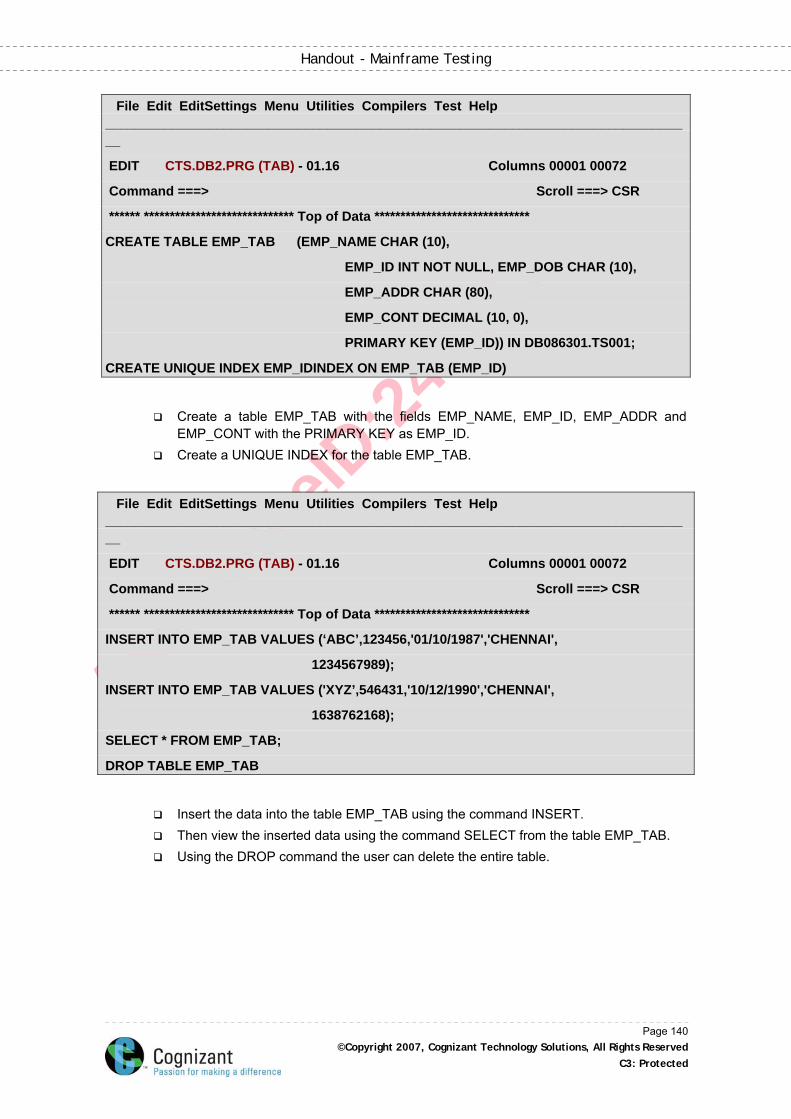
Associa
teID
:245
217
Handout - Mainframe Testing
File Edit EditSettings Menu Utilities Compilers Test Help ________________________________________________________________________________
EDIT CTS.DB2.PRG (TAB) - 01.16 Columns 00001 00072
Command ===> Scroll ===> CSR
****** ***************************** Top of Data ******************************
CREATE TABLE EMP_TAB (EMP_NAME CHAR (10),
EMP_ID INT NOT NULL, EMP_DOB CHAR (10),
EMP_ADDR CHAR (80),
EMP_CONT DECIMAL (10, 0),
PRIMARY KEY (EMP_ID)) IN DB086301.TS001;
CREATE UNIQUE INDEX EMP_IDINDEX ON EMP_TAB (EMP_ID)
Create a table EMP_TAB with the fields EMP_NAME, EMP_ID, EMP_ADDR and
EMP_CONT with the PRIMARY KEY as EMP_ID. Create a UNIQUE INDEX for the table EMP_TAB.
File Edit EditSettings Menu Utilities Compilers Test Help ________________________________________________________________________________
EDIT CTS.DB2.PRG (TAB) - 01.16 Columns 00001 00072
Command ===> Scroll ===> CSR
****** ***************************** Top of Data ******************************
INSERT INTO EMP_TAB VALUES (‘ABC’,123456,'01/10/1987','CHENNAI',
1234567989);
INSERT INTO EMP_TAB VALUES ('XYZ’,546431,'10/12/1990','CHENNAI',
1638762168);
SELECT * FROM EMP_TAB;
DROP TABLE EMP_TAB
Insert the data into the table EMP_TAB using the command INSERT. Then view the inserted data using the command SELECT from the table EMP_TAB. Using the DROP command the user can delete the entire table.
Page 140 ©Copyright 2007, Cognizant Technology Solutions, All Rights Reserved
C3: Protected
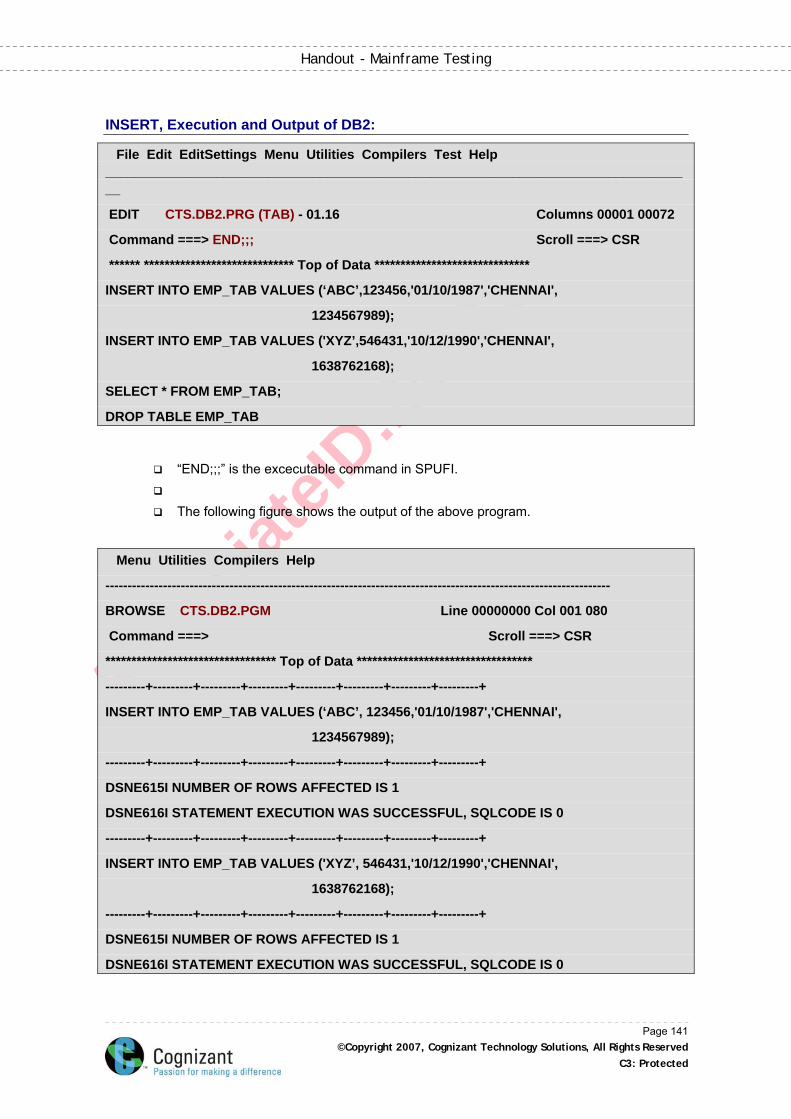
Associa
teID
:245
217
Handout - Mainframe Testing
INSERT, Execution and Output of DB2:
File Edit EditSettings Menu Utilities Compilers Test Help ________________________________________________________________________________
EDIT CTS.DB2.PRG (TAB) - 01.16 Columns 00001 00072
Command ===> END;;; Scroll ===> CSR
****** ***************************** Top of Data ******************************
INSERT INTO EMP_TAB VALUES (‘ABC’,123456,'01/10/1987','CHENNAI',
1234567989);
INSERT INTO EMP_TAB VALUES ('XYZ’,546431,'10/12/1990','CHENNAI',
1638762168);
SELECT * FROM EMP_TAB;
DROP TABLE EMP_TAB
“END;;;” is the excecutable command in SPUFI. The following figure shows the output of the above program.
Menu Utilities Compilers Help
------------------------------------------------------------------------------------------------------------------
BROWSE CTS.DB2.PGM Line 00000000 Col 001 080
Command ===> Scroll ===> CSR
********************************* Top of Data **********************************
---------+---------+---------+---------+---------+---------+---------+---------+
INSERT INTO EMP_TAB VALUES (‘ABC’, 123456,'01/10/1987','CHENNAI',
1234567989);
---------+---------+---------+---------+---------+---------+---------+---------+
DSNE615I NUMBER OF ROWS AFFECTED IS 1
DSNE616I STATEMENT EXECUTION WAS SUCCESSFUL, SQLCODE IS 0
---------+---------+---------+---------+---------+---------+---------+---------+
INSERT INTO EMP_TAB VALUES ('XYZ’, 546431,'10/12/1990','CHENNAI',
1638762168);
---------+---------+---------+---------+---------+---------+---------+---------+
DSNE615I NUMBER OF ROWS AFFECTED IS 1
DSNE616I STATEMENT EXECUTION WAS SUCCESSFUL, SQLCODE IS 0
Page 141 ©Copyright 2007, Cognizant Technology Solutions, All Rights Reserved
C3: Protected
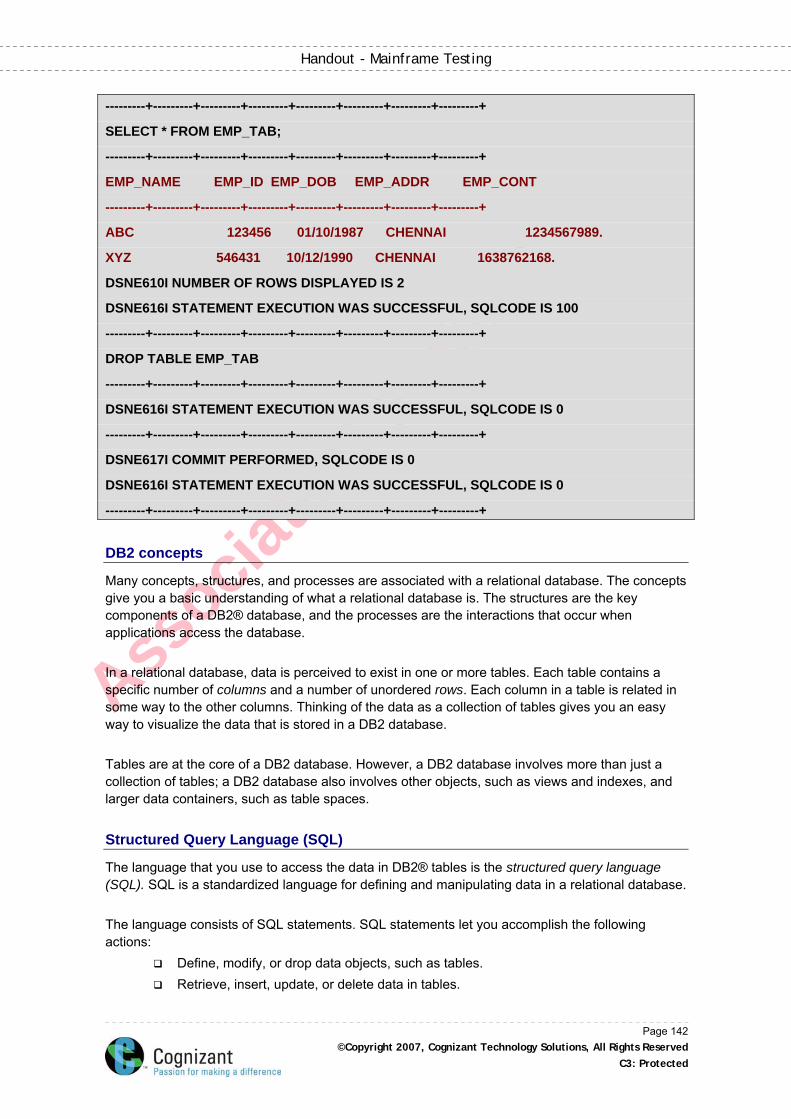
Associa
teID
:245
217
Handout - Mainframe Testing
---------+---------+---------+---------+---------+---------+---------+---------+
SELECT * FROM EMP_TAB;
---------+---------+---------+---------+---------+---------+---------+---------+
EMP_NAME EMP_ID EMP_DOB EMP_ADDR EMP_CONT
---------+---------+---------+---------+---------+---------+---------+---------+
ABC 123456 01/10/1987 CHENNAI 1234567989.
XYZ 546431 10/12/1990 CHENNAI 1638762168.
DSNE610I NUMBER OF ROWS DISPLAYED IS 2
DSNE616I STATEMENT EXECUTION WAS SUCCESSFUL, SQLCODE IS 100
---------+---------+---------+---------+---------+---------+---------+---------+
DROP TABLE EMP_TAB
---------+---------+---------+---------+---------+---------+---------+---------+
DSNE616I STATEMENT EXECUTION WAS SUCCESSFUL, SQLCODE IS 0
---------+---------+---------+---------+---------+---------+---------+---------+
DSNE617I COMMIT PERFORMED, SQLCODE IS 0
DSNE616I STATEMENT EXECUTION WAS SUCCESSFUL, SQLCODE IS 0
---------+---------+---------+---------+---------+---------+---------+---------+
DB2 concepts
Many concepts, structures, and processes are associated with a relational database. The concepts give you a basic understanding of what a relational database is. The structures are the key components of a DB2® database, and the processes are the interactions that occur when applications access the database. In a relational database, data is perceived to exist in one or more tables. Each table contains a specific number of columns and a number of unordered rows. Each column in a table is related in some way to the other columns. Thinking of the data as a collection of tables gives you an easy way to visualize the data that is stored in a DB2 database. Tables are at the core of a DB2 database. However, a DB2 database involves more than just a collection of tables; a DB2 database also involves other objects, such as views and indexes, and larger data containers, such as table spaces.
Structured Query Language (SQL)
The language that you use to access the data in DB2® tables is the structured query language (SQL). SQL is a standardized language for defining and manipulating data in a relational database. The language consists of SQL statements. SQL statements let you accomplish the following actions:
Define, modify, or drop data objects, such as tables. Retrieve, insert, update, or delete data in tables.
Page 142 ©Copyright 2007, Cognizant Technology Solutions, All Rights Reserved
C3: Protected
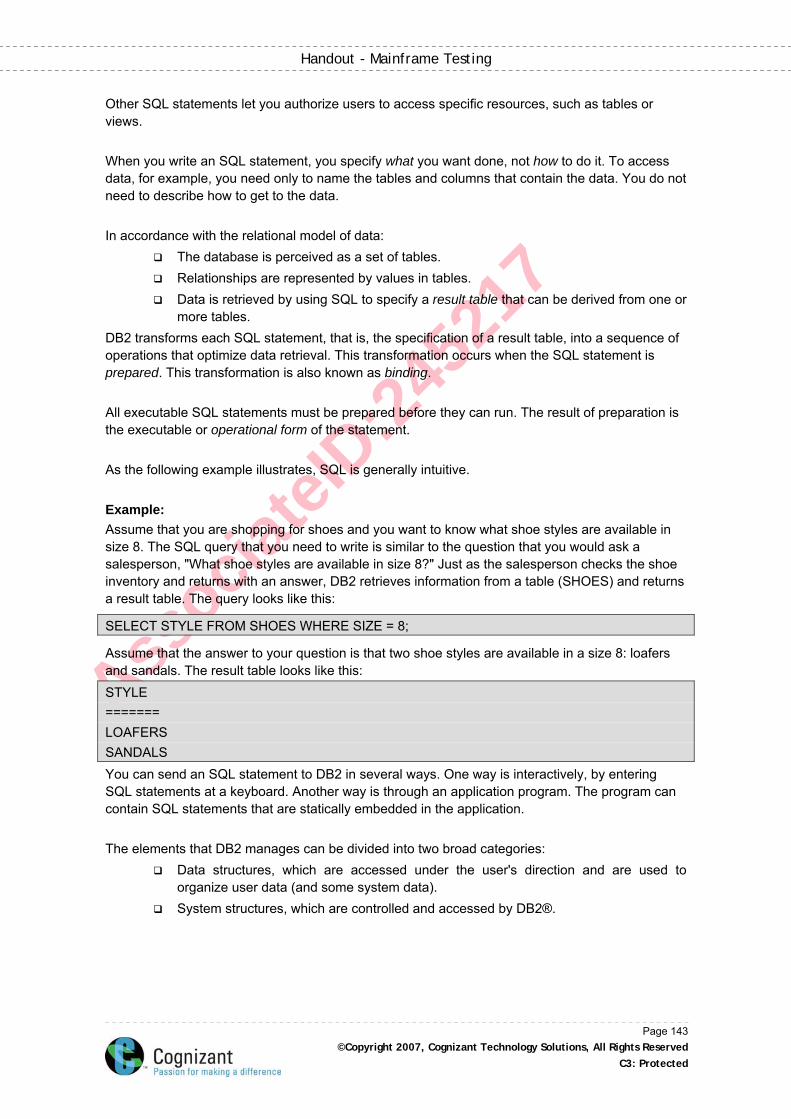
Associa
teID
:245
217
Handout - Mainframe Testing
Other SQL statements let you authorize users to access specific resources, such as tables or views. When you write an SQL statement, you specify what you want done, not how to do it. To access data, for example, you need only to name the tables and columns that contain the data. You do not need to describe how to get to the data. In accordance with the relational model of data:
The database is perceived as a set of tables. Relationships are represented by values in tables. Data is retrieved by using SQL to specify a result table that can be derived from one or
more tables. DB2 transforms each SQL statement, that is, the specification of a result table, into a sequence of operations that optimize data retrieval. This transformation occurs when the SQL statement is prepared. This transformation is also known as binding. All executable SQL statements must be prepared before they can run. The result of preparation is the executable or operational form of the statement. As the following example illustrates, SQL is generally intuitive. Example: Assume that you are shopping for shoes and you want to know what shoe styles are available in size 8. The SQL query that you need to write is similar to the question that you would ask a salesperson, "What shoe styles are available in size 8?" Just as the salesperson checks the shoe inventory and returns with an answer, DB2 retrieves information from a table (SHOES) and returns a result table. The query looks like this:
SELECT STYLE FROM SHOES WHERE SIZE = 8;
Assume that the answer to your question is that two shoe styles are available in a size 8: loafers and sandals. The result table looks like this: STYLE ======= LOAFERS SANDALS You can send an SQL statement to DB2 in several ways. One way is interactively, by entering SQL statements at a keyboard. Another way is through an application program. The program can contain SQL statements that are statically embedded in the application. The elements that DB2 manages can be divided into two broad categories:
Data structures, which are accessed under the user's direction and are used to organize user data (and some system data).
System structures, which are controlled and accessed by DB2®.
Page 143 ©Copyright 2007, Cognizant Technology Solutions, All Rights Reserved
C3: Protected
Associa
teID
:245
217
Handout - Mainframe Testing
Tables
Tables are logical structures that DB2® maintains.Tables are made up of columns and rows. The rows of a relational table have no fixed order. The order of the columns, however, is always the order in which you specified them when you defined the table. At the intersection of every column and row is a specific data item called a value. A column is a set of values of the same type. A row is a sequence of values such that the nth value is a value of the nth column of the table. Every table must have one or more columns, but the number of rows can be zero. DB2 accesses data by referring to its content instead of to its location or organization in storage. DB2 supports several different types of tables, some of which are listed here: base table A table that is created with the SQL statement CREATE TABLE and that holds persistent user data. temporary table A table that is defined by the SQL statement CREATE GLOBAL TEMPORARY TABLE or DECLARE GLOBAL TEMPORARY TABLE to hold data temporarily. Temporary tables are especially useful when you need to sort or query intermediate result tables that contain a large number of rows, but you want to store only a small subset of those rows permanently. materialized query table A table that is created by the SQL statement CREATE TABLE to contain materialized data that is derived from one or more source tables. A materialized query table can be user-maintained or system-maintained. |Materialized query tables are useful for complex queries that run on very large amounts of data. DB2 can precompute all or part of such queries and use the precomputed, or materialized, results to answer the queries more efficiently. Also, materialized query tables are commonly used in data warehousing and business intelligence applications. result table A table that contains a set of rows that DB2 returns when you use an SQL statement to query the tables in the database. Unlike a base table or a temporary table, a result table is not an object that you define using a CREATE statement. Example tables The examples in this information are based on two example tables: a department (DEPT) table and an employee (EMP) table. The tables represent information about the employees of a computer company. The following table represents the DEPT table. Each row in the DEPT table contains data for a single department: its number, its name, the employee number of its manager, and the administrative department number. Notice that department E21 has no manager. In this case, the dashes represent a null value, a special value that indicates the absence of information.
Page 144 ©Copyright 2007, Cognizant Technology Solutions, All Rights Reserved
C3: Protected
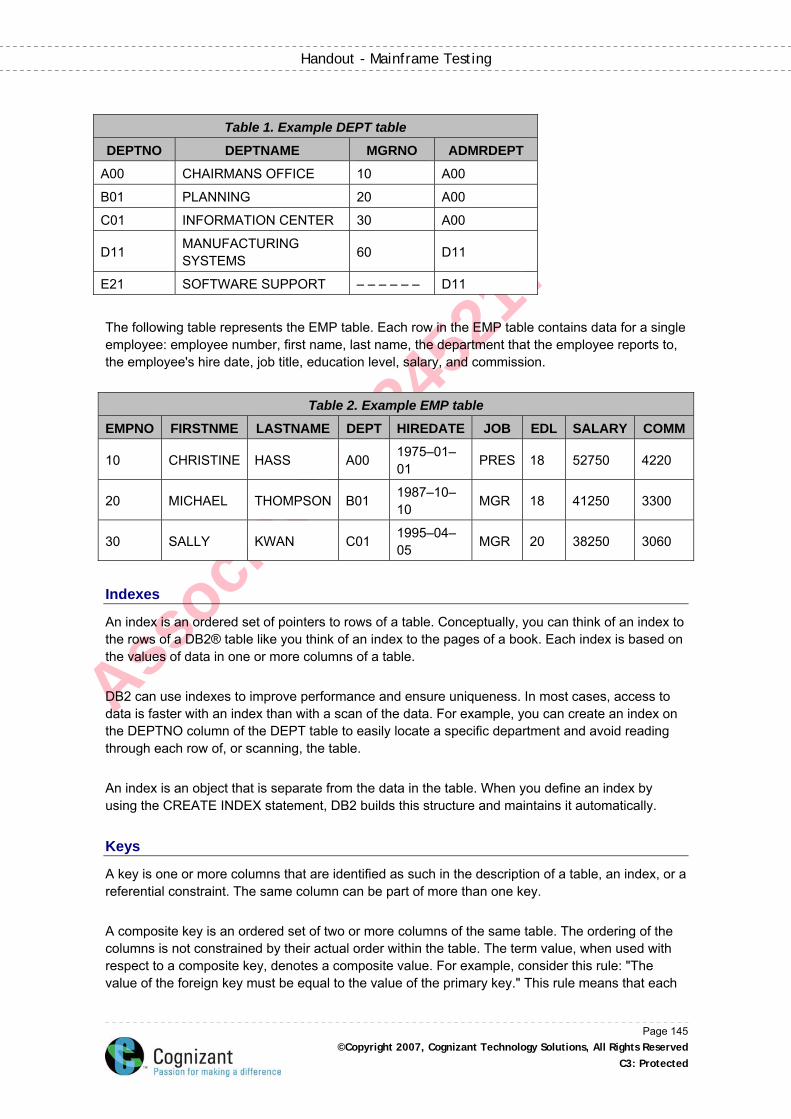
Associa
teID
:245
217
Handout - Mainframe Testing
Table 1. Example DEPT table
DEPTNO DEPTNAME MGRNO ADMRDEPT
A00 CHAIRMANS OFFICE 10 A00
B01 PLANNING 20 A00
C01 INFORMATION CENTER 30 A00
D11 MANUFACTURING SYSTEMS 60 D11
E21 SOFTWARE SUPPORT – – – – – – D11
The following table represents the EMP table. Each row in the EMP table contains data for a single employee: employee number, first name, last name, the department that the employee reports to, the employee's hire date, job title, education level, salary, and commission.
Table 2. Example EMP table
EMPNO FIRSTNME LASTNAME DEPT HIREDATE JOB EDL SALARY COMM
10 CHRISTINE HASS A00 1975–01–01 PRES 18 52750 4220
20 MICHAEL THOMPSON B01 1987–10–10 MGR 18 41250 3300
30 SALLY KWAN C01 1995–04–05 MGR 20 38250 3060
Indexes
An index is an ordered set of pointers to rows of a table. Conceptually, you can think of an index to the rows of a DB2® table like you think of an index to the pages of a book. Each index is based on the values of data in one or more columns of a table. DB2 can use indexes to improve performance and ensure uniqueness. In most cases, access to data is faster with an index than with a scan of the data. For example, you can create an index on the DEPTNO column of the DEPT table to easily locate a specific department and avoid reading through each row of, or scanning, the table. An index is an object that is separate from the data in the table. When you define an index by using the CREATE INDEX statement, DB2 builds this structure and maintains it automatically.
Keys
A key is one or more columns that are identified as such in the description of a table, an index, or a referential constraint. The same column can be part of more than one key. A composite key is an ordered set of two or more columns of the same table. The ordering of the columns is not constrained by their actual order within the table. The term value, when used with respect to a composite key, denotes a composite value. For example, consider this rule: "The value of the foreign key must be equal to the value of the primary key." This rule means that each
Page 145 ©Copyright 2007, Cognizant Technology Solutions, All Rights Reserved
C3: Protected
Associa
teID
:245
217
Handout - Mainframe Testing
component of the value of the foreign key must be equal to the corresponding component of the value of the primary key.
Unique keys
A unique constraint is a rule that the values of a key are valid only if they are unique. A key that is constrained to have unique values is a unique key. DB2® uses a unique index to enforce the constraint during the execution of the LOAD utility and whenever you use an INSERT, UPDATE, or MERGE statement to add or modify data. Every unique key is a key of a unique index. You can define a unique key by using the UNIQUE clause of the CREATE TABLE or the ALTER TABLE statement. A table can have any number of unique keys. The columns of a unique key cannot contain null values.
Primary keys
A primary key is a special type of unique key and cannot contain null values. For example, the DEPTNO column in the DEPT table is a primary key. A table can have no more than one primary key. Primary keys are optional and can be defined in CREATE TABLE or ALTER TABLE statements. The unique index on a primary key is called a primary index. When a primary key is defined in a CREATE TABLE statement or ALTER TABLE statement, DB2 automatically creates the primary index if one of the following conditions is true:
DB2 is operating in new-function mode, and the table space is implicitly created. DB2 is operating in new-function mode, the table space is explicitly created, and the
schema processor is running. DB2 is operating in compatibility mode, and the schema processor is running.
If a unique index already exists on the columns of the primary key when it is defined in the ALTER TABLE statement, this unique index is designated as the primary index when DB2 is operating in new-function mode and implicitly created the table space.
Parent keys
A parent key is either a primary key or a unique key in the parent table of a referential constraint. The values of a parent key determine the valid values of the foreign key in the constraint.
Foreign keys
A foreign key is a key that is specified in the definition of a referential constraint in a CREATE or ALTER TABLE statement. A foreign key refers to or is related to a specific parent key. Unlike other types of keys, a foreign key does not require an index on its underlying column or columns. A table can have zero or more foreign keys. The value of a composite foreign key is null if any component of the value is null. The following figure shows the relationship between some columns in the DEPT table and the EMP table.
Page 146 ©Copyright 2007, Cognizant Technology Solutions, All Rights Reserved
C3: Protected
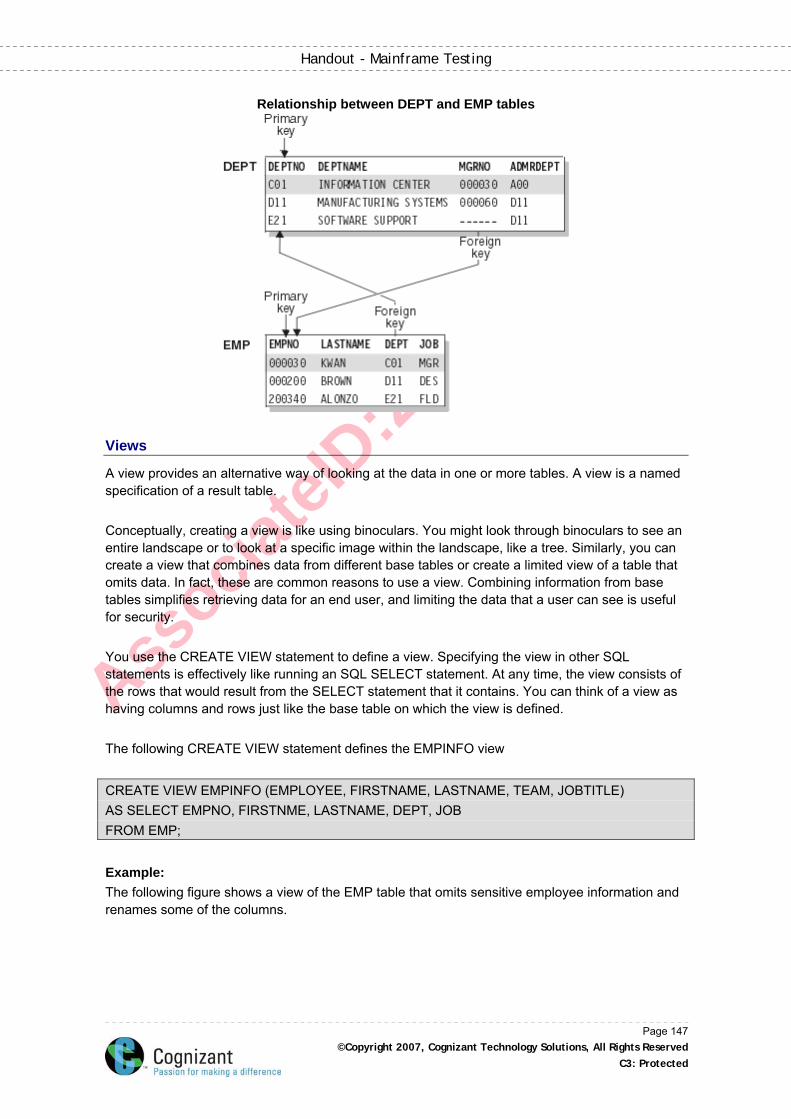
Associa
teID
:245
217
Handout - Mainframe Testing
Relationship between DEPT and EMP tables
Views
A view provides an alternative way of looking at the data in one or more tables. A view is a named specification of a result table. Conceptually, creating a view is like using binoculars. You might look through binoculars to see an entire landscape or to look at a specific image within the landscape, like a tree. Similarly, you can create a view that combines data from different base tables or create a limited view of a table that omits data. In fact, these are common reasons to use a view. Combining information from base tables simplifies retrieving data for an end user, and limiting the data that a user can see is useful for security. You use the CREATE VIEW statement to define a view. Specifying the view in other SQL statements is effectively like running an SQL SELECT statement. At any time, the view consists of the rows that would result from the SELECT statement that it contains. You can think of a view as having columns and rows just like the base table on which the view is defined. The following CREATE VIEW statement defines the EMPINFO view CREATE VIEW EMPINFO (EMPLOYEE, FIRSTNAME, LASTNAME, TEAM, JOBTITLE) AS SELECT EMPNO, FIRSTNME, LASTNAME, DEPT, JOB FROM EMP; Example: The following figure shows a view of the EMP table that omits sensitive employee information and renames some of the columns.
Page 147 ©Copyright 2007, Cognizant Technology Solutions, All Rights Reserved
C3: Protected

Associa
teID
:245
217
Handout - Mainframe Testing
Table spaces
All tables are kept in table spaces. Table spaces, which are DB2® storage structures, are one or more data sets that store one or more tables. The primary types of table spaces are described below:
Segmented
A table space that can contain more than one table. The space is composed of groups of pages called segments. Each segment is dedicated to holding rows of a single table.
Partitioned
A table space that can contain only a single table. The space is divided into separate units of storage called partitions. Each partition belongs to a range of key values, and each partition can be processed concurrently by utilities and SQL.
Large Object (LOB)
A table space in an auxiliary table that contains all the data for a particular LOB column in the related base table.
Universal Table Space
A combination of partitioned and segmented table space schemes that provides better space management as it relates to varying-length rows and improved mass delete performance. Universal table space types include range-partitioned and partition-by-growth table spaces. A universal table space is a good choice for tables that are larger than 1 GB.
XML Table Space
A table space that is implicitly created when, an XML column is added to a base table. The table space stores the XML table. If the base table is partitioned, one partitioned table space exists for each XML column of data. You can explicitly define a table space by using the CREATE TABLESPACE statement. DB2 implicitly creates a table space when you execute a CREATE TABLE statement that does not specify an existing table space. If DB2 is operating in compatibility mode, a segmented table space is created. In new-function mode, DB2 creates a partition-by-growth table space.
Page 148 ©Copyright 2007, Cognizant Technology Solutions, All Rights Reserved
C3: Protected
Associa
teID
:245
217
Handout - Mainframe Testing
Index Spaces
An index space, which is another DB2® storage structure, contains a single index. When you create an index by using the CREATE INDEX statement, an index space is automatically defined in the same database as the table. You can define a unique name for the index space, or DB2 can derive a unique name for you. Under certain circumstances, DB2 implicitly creates indexes.
Databases
In DB2® for z/OS, a database is a set of table spaces and index spaces. These index spaces contain indexes on the tables in the table spaces of the same database. You define databases by using the CREATE DATABASE statement. Whenever a table space is created, it is explicitly or implicitly assigned to an existing database. If the table space is implicitly created, and you do not specify the IN clause in the CREATE TABLE statement, DB2 implicitly creates the database to which the table space is assigned. A single database, for example, can contain all the data that is associated with one application or with a group of related applications. Collecting that data into one database allows you to start or stop access to all the data in one operation. You can also grant authorization for access to all the data as a single unit. Assuming that you are authorized to access data, you can access data that is stored in different databases.
Summary:
This chapter tells you what id actually database. It’s not only storage it gives us lots of constraints.Db2 is the relational database. It tells about index and use of indexes. It focuses on the difference between table space and index space. Why we create view, what is the use for views all are in this chapter. How to create tables in DB@ on the mainframe platform been discussed in a details manner.
Test Your Understanding
1. Characteristics of a Relational Database a) It supports many to many relationships b) Child Tables were allowed to have more than one parent c) Represented in terms of Entities and attributes d) A single table acts as a root
2. In Dynamic SQL
a) Access Path is not determined before execution b) Hard coded in the application program c) Statements can change throughout the program execution d) Option 1 & 3
Page 149 ©Copyright 2007, Cognizant Technology Solutions, All Rights Reserved
C3: Protected
Associa
teID
:245
217
Handout - Mainframe Testing
3. Column used to uniquely identify a Tuple a) Composite Key b) Alternate Key c) Primary Key d) Foreign Key
Answers
1. c 2. d 3. c
Page 150 ©Copyright 2007, Cognizant Technology Solutions, All Rights Reserved
C3: Protected
Associa
teID
:245
217
Handout - Mainframe Testing
Chapter 8: REXX
Learning Objective
After completing this chapter, you will be able to: Explain Features and syntax of REXX Explain the various methods of executing REXX Explain the various control statements and it’s syntax Explain the various operators in REXX Explain the usage and syntax PARSE statement Explain the various Interrupt statements in REXX Explain how to create a call user-defined functions Explain few common built-in functions Explain how to read a dataset using REXX.
Introduction
REXX is a programming language that is extremely flexible. REXX is the abbreviation of Restructured EXtended eXecutor. It can be used to link various environments like TSO, ISPF, etc., It is the widely used programming language for developing tools in mainframes. Various features of REXX are as follows,
Ease of Use o The REXX language is easy to read and write because many instructions are
meaningful English words. Free format
o You need not start an instruction in a particular column, you can skip spaces in a line or skip entire lines, you can have an instruction span many lines or have multiple instructions on one line, variables do not need to be predefined, and you can type instructions in upper, lower, or mixed case.
Debugging capabilities o When a REXX exec is running in TSO encounters an error, messages
describing the error are displayed on the screen. Interpreted language
o REXX exec (program) need not be compiled before execution. When a REXX exec runs, the language processor directly processes each language statement.
Writing a REXX Exec
Before you can write a REXX program, called an exec, you need to create a data set to contain the exec. The data set can be either sequential or partitioned, but if you plan to create more than one exec, it is easier to create a REXX library as a partitioned data set (PDS) with execs as members. A REXX exec consists of REXX language instructions that are interpreted directly by the REXX interpreter. An exec can also contain commands that are executed by the host environment.
Page 151 ©Copyright 2007, Cognizant Technology Solutions, All Rights Reserved
C3: Protected
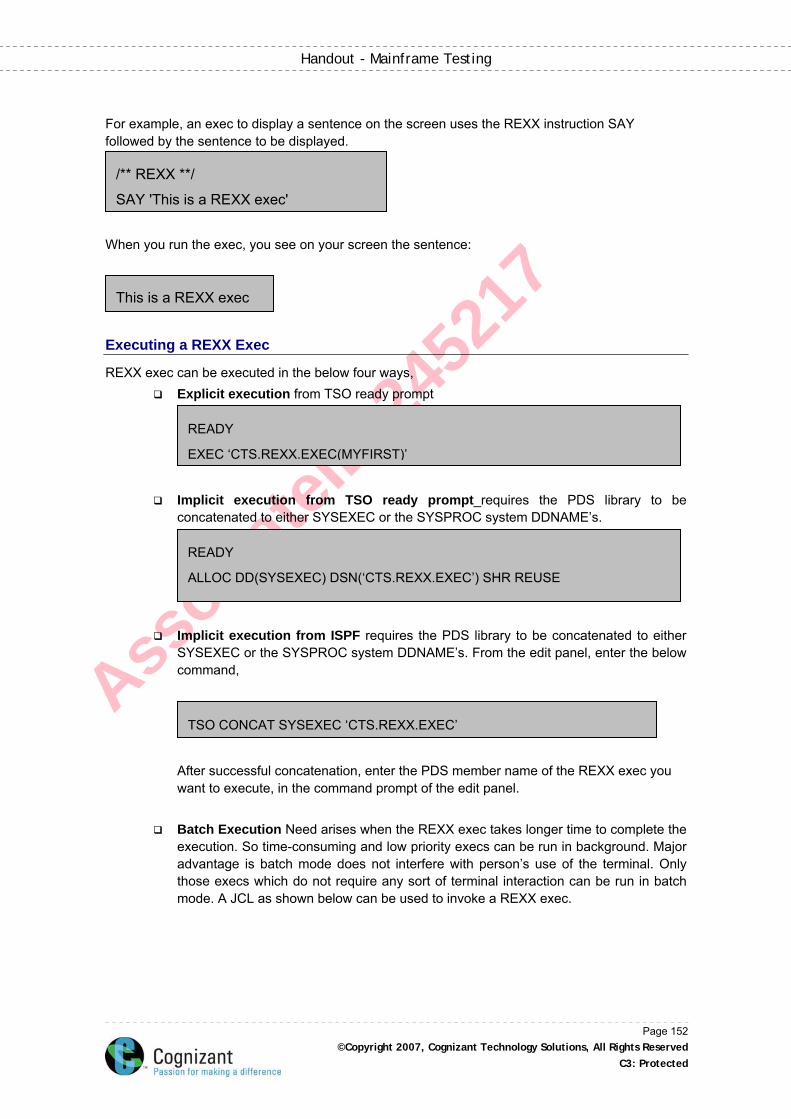
Associa
teID
:245
217
Handout - Mainframe Testing
For example, an exec to display a sentence on the screen uses the REXX instruction SAY followed by the sentence to be displayed.
/** REXX **/
SAY 'This is a REXX exec'
When you run the exec, you see on your screen the sentence:
This is a REXX exec
Executing a REXX Exec
REXX exec can be executed in the below four ways, Explicit execution from TSO ready prompt
READY
EXEC ‘CTS.REXX.EXEC(MYFIRST)’
Implicit execution from TSO ready prompt_requires the PDS library to be
concatenated to either SYSEXEC or the SYSPROC system DDNAME’s.
ALLOC DD(SYSEXEC) DSN(‘CTS.REXX.EXEC’) SHR REUSE
READY
Implicit execution from ISPF requires the PDS library to be concatenated to either
SYSEXEC or the SYSPROC system DDNAME’s. From the edit panel, enter the below command,
TSO CONCAT SYSEXEC ‘CTS.REXX.EXEC’
After successful concatenation, enter the PDS member name of the REXX exec you want to execute, in the command prompt of the edit panel.
Batch Execution Need arises when the REXX exec takes longer time to complete the
execution. So time-consuming and low priority execs can be run in background. Major advantage is batch mode does not interfere with person’s use of the terminal. Only those execs which do not require any sort of terminal interaction can be run in batch mode. A JCL as shown below can be used to invoke a REXX exec.
Page 152 ©Copyright 2007, Cognizant Technology Solutions, All Rights Reserved
C3: Protected
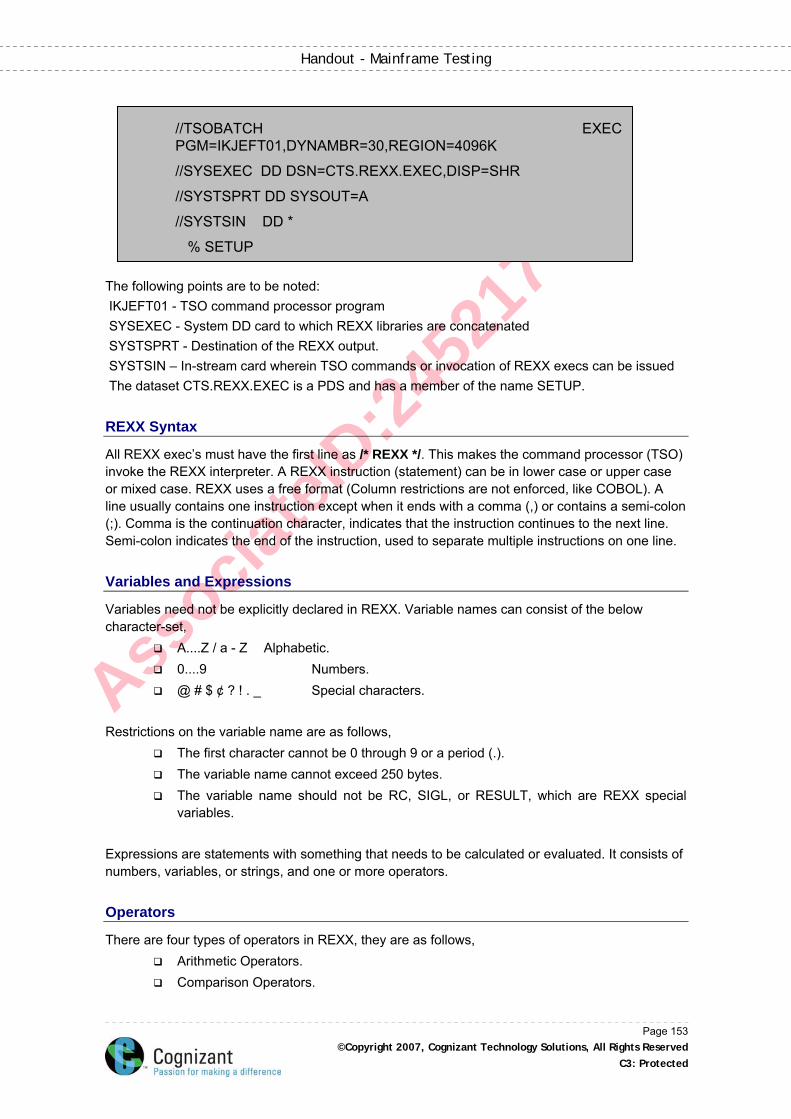
Associa
teID
:245
217
Handout - Mainframe Testing
//SYSTSPRT DD SYSOUT=A
//SYSTSIN DD *
% SETUP
//TSOBATCH EXEC PGM=IKJEFT01,DYNAMBR=30,REGION=4096K
//SYSEXEC DD DSN=CTS.REXX.EXEC,DISP=SHR
The following points are to be noted: IKJEFT01 - TSO command processor program SYSEXEC - System DD card to which REXX libraries are concatenated SYSTSPRT - Destination of the REXX output. SYSTSIN – In-stream card wherein TSO commands or invocation of REXX execs can be issued The dataset CTS.REXX.EXEC is a PDS and has a member of the name SETUP.
REXX Syntax
All REXX exec’s must have the first line as /* REXX */. This makes the command processor (TSO) invoke the REXX interpreter. A REXX instruction (statement) can be in lower case or upper case or mixed case. REXX uses a free format (Column restrictions are not enforced, like COBOL). A line usually contains one instruction except when it ends with a comma (,) or contains a semi-colon (;). Comma is the continuation character, indicates that the instruction continues to the next line. Semi-colon indicates the end of the instruction, used to separate multiple instructions on one line.
Variables and Expressions
Variables need not be explicitly declared in REXX. Variable names can consist of the below character-set,
A....Z / a - Z Alphabetic. 0....9 Numbers. @ # $ ¢ ? ! . _ Special characters.
Restrictions on the variable name are as follows,
The first character cannot be 0 through 9 or a period (.). The variable name cannot exceed 250 bytes. The variable name should not be RC, SIGL, or RESULT, which are REXX special
variables. Expressions are statements with something that needs to be calculated or evaluated. It consists of numbers, variables, or strings, and one or more operators.
Operators
There are four types of operators in REXX, they are as follows, Arithmetic Operators. Comparison Operators.
Page 153 ©Copyright 2007, Cognizant Technology Solutions, All Rights Reserved
C3: Protected

Associa
teID
:245
217
Handout - Mainframe Testing
Logical Operators. Concatenation Operators.
Arithmetic Operators works on valid numeric constants or on variables that represent valid numeric constants. The various arithmetic operators are as follows,
+ Add. - Subtract. -number Negate the number. * Multiply. ** Raise a number to a whole number power. / Divide. % Divide and return a whole number without a remainder (quotient only). // Divide and return the remainder only.
Comparison Operators returns either a true or false response in terms of 1 or 0 respectively. The various comparison operators are as follows,
== Strictly Equal (everything including the blanks and case is exactly the same). = Equal. > Greater than. < Less than. >= Greater than or equal to. <= Less than or equal to. \== Not strictly equal. \= Not equal. >< Greater than or less than (same as not equal). \< Not less than. \> Not greater than.
Logical Operators combines two comparisons and return the true (1) or false (0) value depending on the results of the comparisons. The various logical operators are as follows,
& AND (Returns 1 if both comparisons are true). | Inclusive OR (Returns 1 if at least one comparison is true). && Exclusive OR (Returns 1 if only one comparison (but not both) is true). Prefix \ Logical NOT (Returns the opposite response).
Concatenation Operators combines two strings into one. The below are the various concatenation operators,
blank concatenate strings, one blank in between example Cognizant Technology results is Cognizant Technology
|| concatenate strings, no blanks in between example “a”||”.b” result is a.b
abuttal concatenate strings, no blanks in between example per_cent‘%’, if per_cent = 90, result is 90%
Operator Priority is as follows,
Page 154 ©Copyright 2007, Cognizant Technology Solutions, All Rights Reserved
C3: Protected
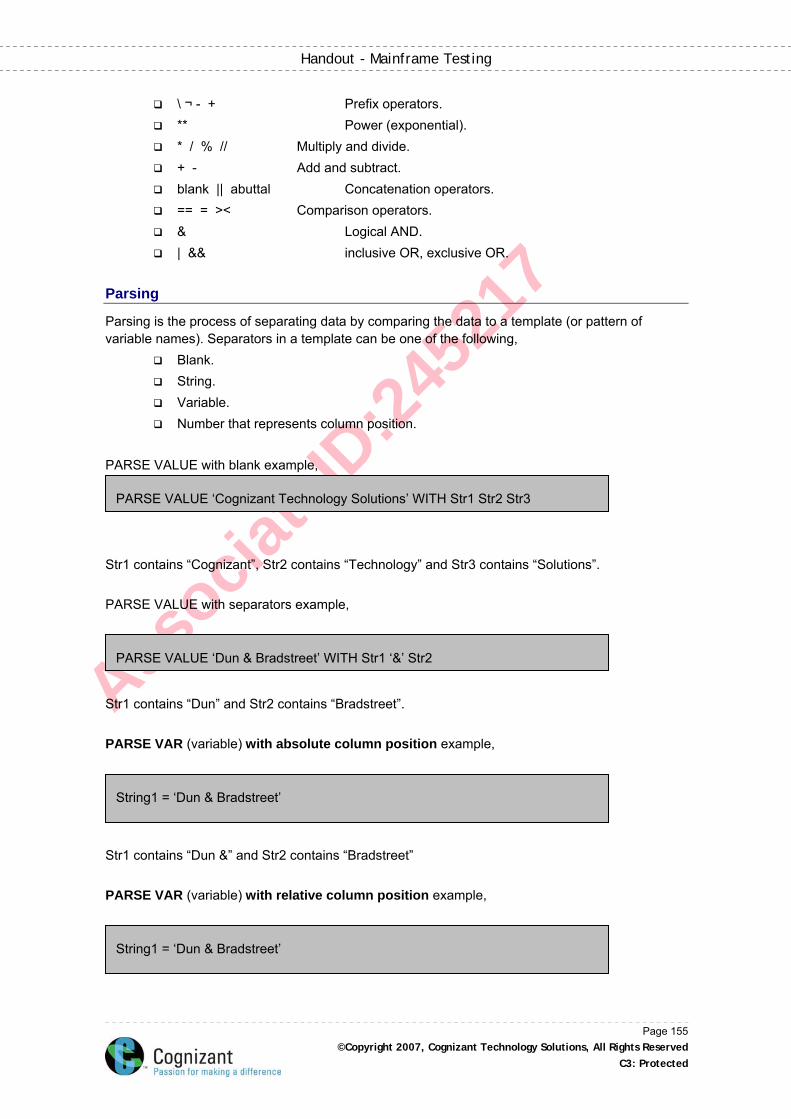
Associa
teID
:245
217
Handout - Mainframe Testing
\ ¬ - + Prefix operators. ** Power (exponential). * / % // Multiply and divide. + - Add and subtract. blank || abuttal Concatenation operators. == = >< Comparison operators. & Logical AND. | && inclusive OR, exclusive OR.
Parsing
Parsing is the process of separating data by comparing the data to a template (or pattern of variable names). Separators in a template can be one of the following,
Blank. String. Variable. Number that represents column position.
PARSE VALUE with blank example,
PARSE VALUE ‘Cognizant Technology Solutions’ WITH Str1 Str2 Str3
Str1 contains “Cognizant”, Str2 contains “Technology” and Str3 contains “Solutions”. PARSE VALUE with separators example,
Str1 contains “Dun” and Str2 contains “Bradstreet”. PARSE VAR (variable) with absolute column position example,
PARSE VALUE ‘Dun & Bradstreet’ WITH Str1 ‘&’ Str2
String1 = ‘Dun & Bradstreet’
Str1 contains “Dun &” and Str2 contains “Bradstreet” PARSE VAR (variable) with relative column position example,
String1 = ‘Dun & Bradstreet’
Page 155 ©Copyright 2007, Cognizant Technology Solutions, All Rights Reserved
C3: Protected
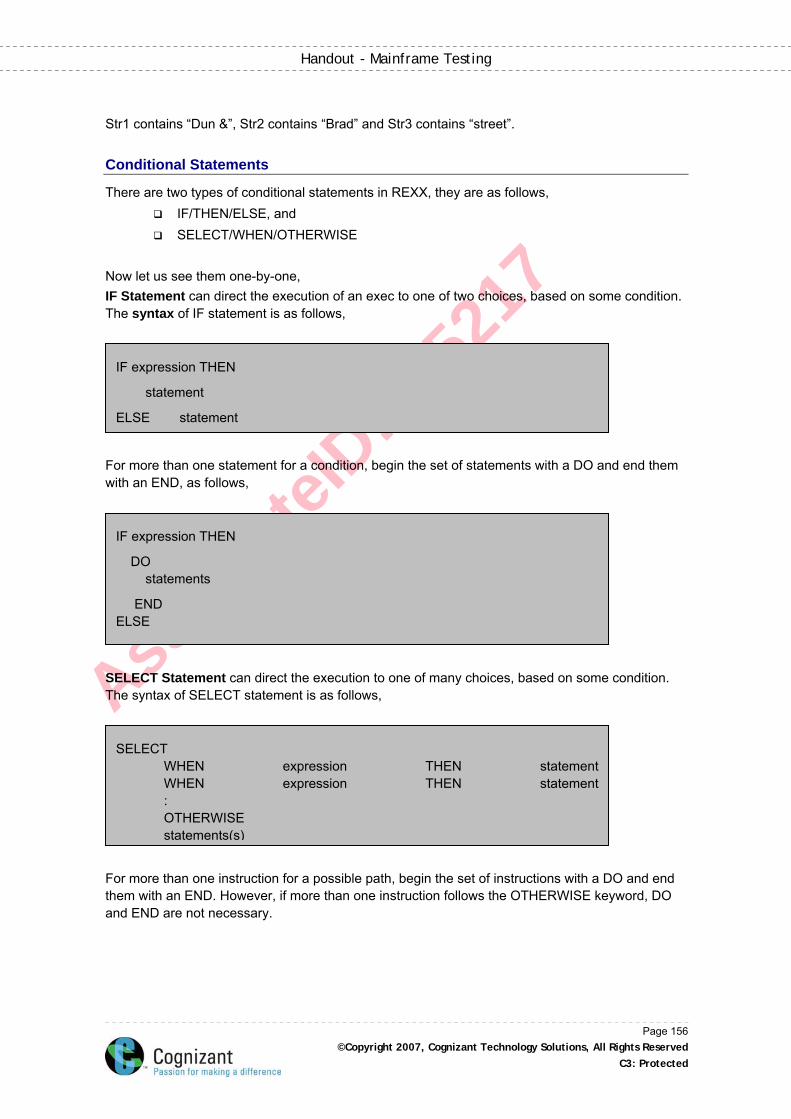
Associa
teID
:245
217
Handout - Mainframe Testing
Str1 contains “Dun &”, Str2 contains “Brad” and Str3 contains “street”.
Conditional Statements
There are two types of conditional statements in REXX, they are as follows, IF/THEN/ELSE, and SELECT/WHEN/OTHERWISE
Now let us see them one-by-one, IF Statement can direct the execution of an exec to one of two choices, based on some condition. The syntax of IF statement is as follows,
IF expression THEN
statement
ELSE statement
For more than one statement for a condition, begin the set of statements with a DO and end them with an END, as follows,
DO statements
END ELSE
IF expression THEN
SELECT Statement can direct the execution to one of many choices, based on some condition. The syntax of SELECT statement is as follows,
SELECT WHEN expression THEN statement WHEN expression THEN statement : OTHERWISE statements(s)
For more than one instruction for a possible path, begin the set of instructions with a DO and end them with an END. However, if more than one instruction follows the OTHERWISE keyword, DO and END are not necessary.
Page 156 ©Copyright 2007, Cognizant Technology Solutions, All Rights Reserved
C3: Protected
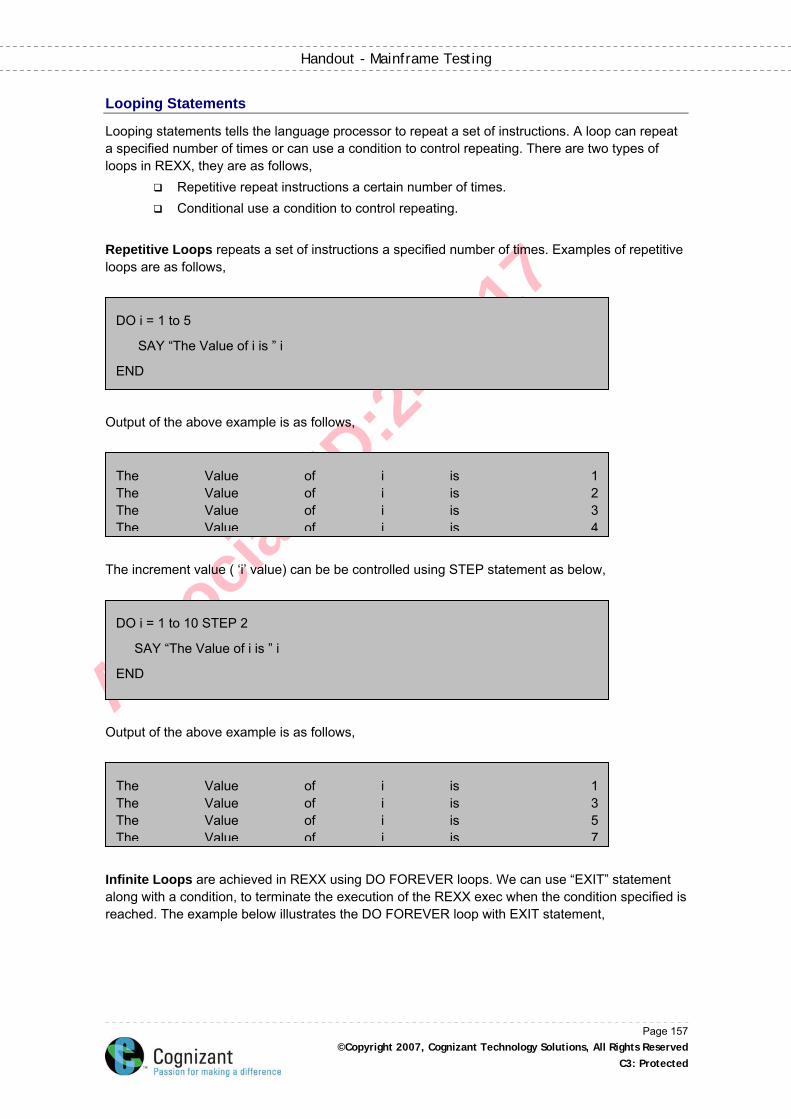
Associa
teID
:245
217
Handout - Mainframe Testing
Looping Statements
Looping statements tells the language processor to repeat a set of instructions. A loop can repeat a specified number of times or can use a condition to control repeating. There are two types of loops in REXX, they are as follows,
Repetitive repeat instructions a certain number of times. Conditional use a condition to control repeating.
Repetitive Loops repeats a set of instructions a specified number of times. Examples of repetitive loops are as follows,
END
DO i = 1 to 5
SAY “The Value of i is ” i
Output of the above example is as follows,
The increment value ( ‘i’ value) can be be controlled using STEP statement as below,
The Value of i is 1 The Value of i is 2 The Value of i is 3 The Value of i is 4
DO i = 1 to 10 STEP 2
SAY “The Value of i is ” i
END
Output of the above example is as follows,
The Value of i is 1 The Value of i is 3 The Value of i is 5 The Value of i is 7
Infinite Loops are achieved in REXX using DO FOREVER loops. We can use “EXIT” statement along with a condition, to terminate the execution of the REXX exec when the condition specified is reached. The example below illustrates the DO FOREVER loop with EXIT statement,
Page 157 ©Copyright 2007, Cognizant Technology Solutions, All Rights Reserved
C3: Protected

Associa
teID
:245
217
Handout - Mainframe Testing
DO FOREVER
IF X = 10 THEN
EXIT
The above exec will execute till the value of X becomes 10. The next statement (SAY) will not be executed. We can use “LEAVE” statement along with a condition, to terminate the execution of the loop when the condition specified is reached. The example below illustrates the DO FOREVER loop with LEAVE statement,
IF X = 10 THEN
LEAVE
DO FOREVER
The above loop will execute till the value of X becomes 10, after that the next statement (SAY) will be executed. Conditional Loops are achieved in REXX using DO WHILE and DO UNTIL statements. Now let us see them one-by-one, DO WHILE Statement syntax is as follows,
DO WHILE statement tests the expression before the loop executes the first time and repeat only when the expression is true. DO UNTIL Statement syntax is as follows,
DO WHILE expression
statement(s)
END
DO UNTIL expression statement(s)
END
Page 158 ©Copyright 2007, Cognizant Technology Solutions, All Rights Reserved
C3: Protected
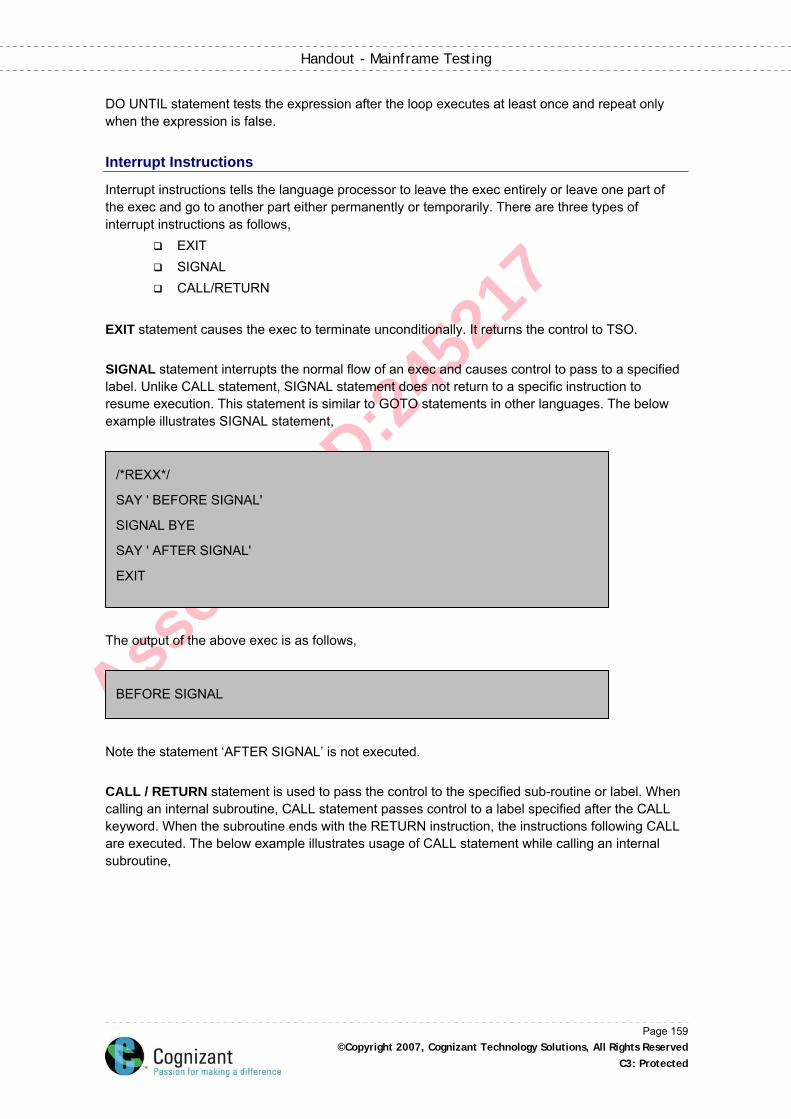
Associa
teID
:245
217
Handout - Mainframe Testing
DO UNTIL statement tests the expression after the loop executes at least once and repeat only when the expression is false.
Interrupt Instructions
Interrupt instructions tells the language processor to leave the exec entirely or leave one part of the exec and go to another part either permanently or temporarily. There are three types of interrupt instructions as follows,
EXIT SIGNAL CALL/RETURN
EXIT statement causes the exec to terminate unconditionally. It returns the control to TSO. SIGNAL statement interrupts the normal flow of an exec and causes control to pass to a specified label. Unlike CALL statement, SIGNAL statement does not return to a specific instruction to resume execution. This statement is similar to GOTO statements in other languages. The below example illustrates SIGNAL statement,
The output of the above exec is as follows,
EXIT
BEFORE SIGNAL
SIGNAL BYE
SAY ' AFTER SIGNAL'
/*REXX*/
SAY ' BEFORE SIGNAL'
Note the statement ‘AFTER SIGNAL’ is not executed. CALL / RETURN statement is used to pass the control to the specified sub-routine or label. When calling an internal subroutine, CALL statement passes control to a label specified after the CALL keyword. When the subroutine ends with the RETURN instruction, the instructions following CALL are executed. The below example illustrates usage of CALL statement while calling an internal subroutine,
Page 159 ©Copyright 2007, Cognizant Technology Solutions, All Rights Reserved
C3: Protected
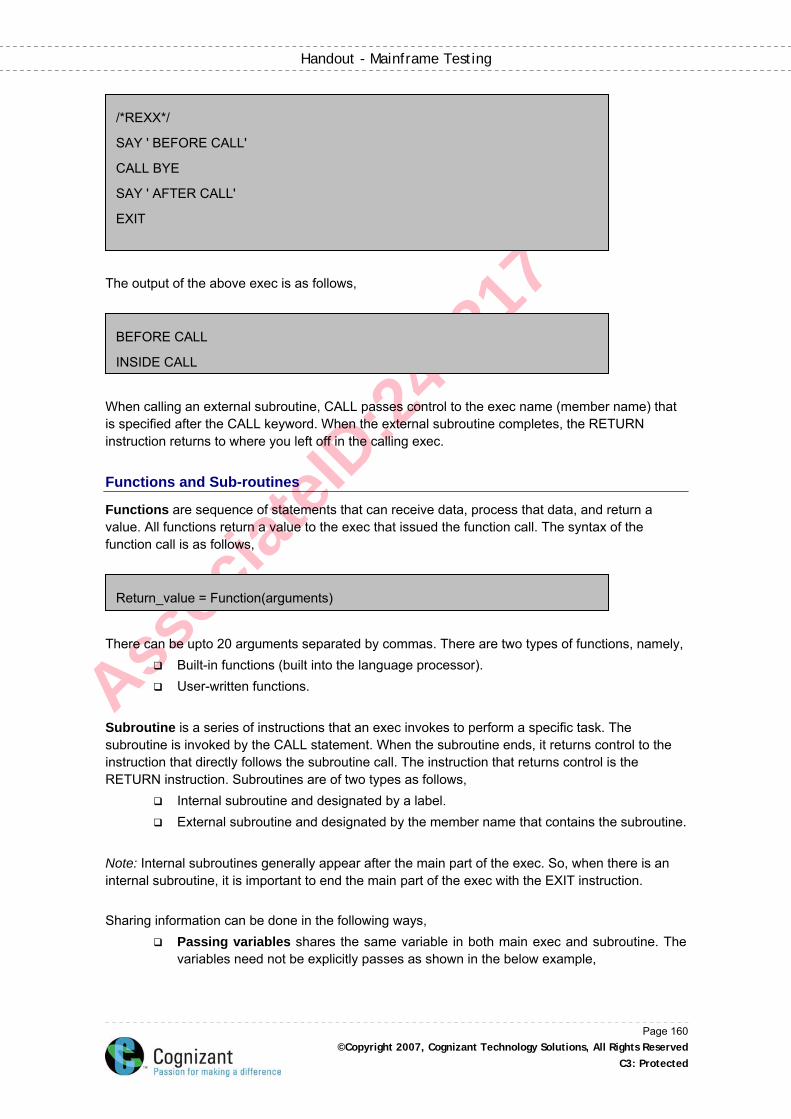
Associa
teID
:245
217
Handout - Mainframe Testing
CALL BYE
SAY ' AFTER CALL'
EXIT
/*REXX*/
SAY ' BEFORE CALL'
The output of the above exec is as follows,
When calling an external subroutine, CALL passes control to the exec name (member name) that is specified after the CALL keyword. When the external subroutine completes, the RETURN instruction returns to where you left off in the calling exec.
Functions and Sub-routines
Functions are sequence of statements that can receive data, process that data, and return a value. All functions return a value to the exec that issued the function call. The syntax of the function call is as follows,
BEFORE CALL
INSIDE CALL
Return_value = Function(arguments)
There can be upto 20 arguments separated by commas. There are two types of functions, namely,
Built-in functions (built into the language processor). User-written functions.
Subroutine is a series of instructions that an exec invokes to perform a specific task. The subroutine is invoked by the CALL statement. When the subroutine ends, it returns control to the instruction that directly follows the subroutine call. The instruction that returns control is the RETURN instruction. Subroutines are of two types as follows,
Internal subroutine and designated by a label. External subroutine and designated by the member name that contains the subroutine.
Note: Internal subroutines generally appear after the main part of the exec. So, when there is an internal subroutine, it is important to end the main part of the exec with the EXIT instruction. Sharing information can be done in the following ways,
Passing variables shares the same variable in both main exec and subroutine. The variables need not be explicitly passes as shown in the below example,
Page 160 ©Copyright 2007, Cognizant Technology Solutions, All Rights Reserved
C3: Protected

Associa
teID
:245
217
Handout - Mainframe Testing
We can prevent all the main exec variables from being exposed to subroutines by using PROCEDURE statement, as shown below,
We can expose only few main exec variables to subroutines by using PROCEDURE statement with EXPOSE, as shown below,
CALL sub1
SAY answer /** (Displays 50) **/
EXIT
/**REXX**/
number1 = 20
CALL sub2
SAY number1 /** (displays 20) **/
EXIT
/**REXX**/
number1 = 10
number2 = 20
CALL sub3
SAY number1 “,” number2 /** (displays 5 , 20) **/
EXIT
/**REXX**/
number1 = 20
number2 = 30
Passing arguments can be done by calling the subroutine from the main exec as follows,
CALL subroutine_name argument1, argument2, argument3, etc
Upto 20 arguments can be passed. Receiving arguments in the subroutine is as follows,
ARG arg1, arg2, arg3, etc
Page 161 ©Copyright 2007, Cognizant Technology Solutions, All Rights Reserved
C3: Protected
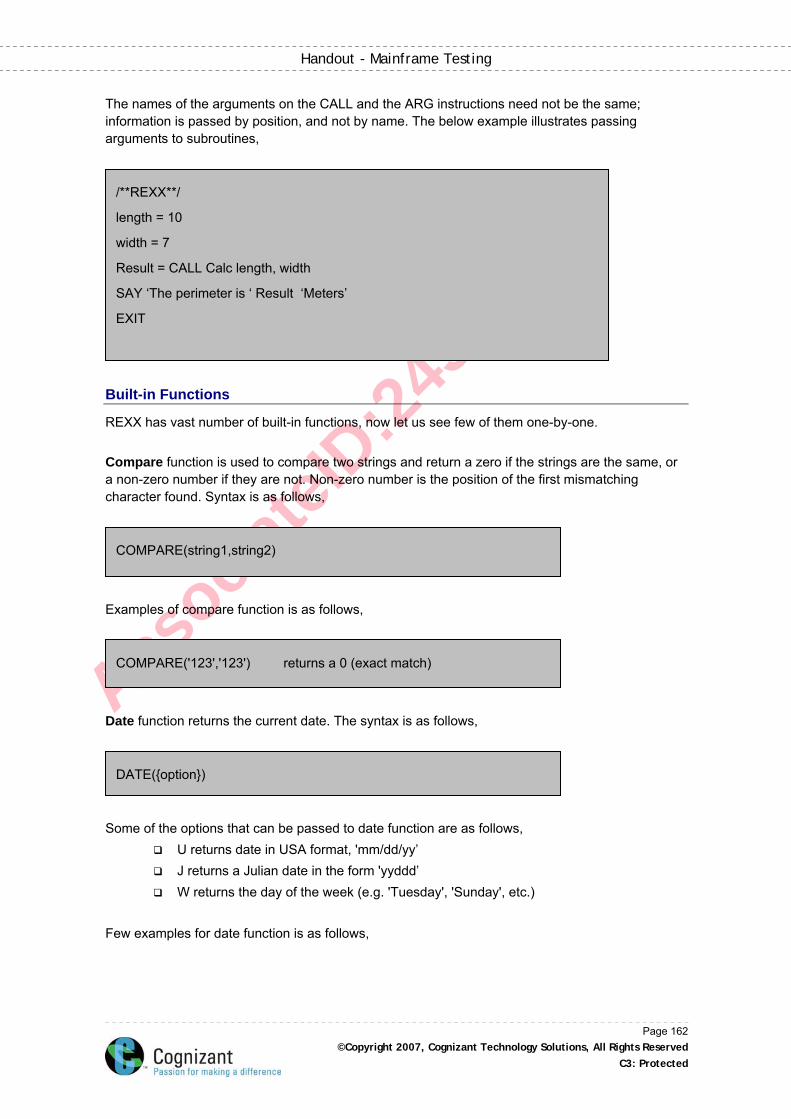
Associa
teID
:245
217
Handout - Mainframe Testing
The names of the arguments on the CALL and the ARG instructions need not be the same; information is passed by position, and not by name. The below example illustrates passing arguments to subroutines,
SAY ‘The perimeter is ‘ Result ‘Meters’
EXIT
/**REXX**/
length = 10
width = 7
Result = CALL Calc length, width
Built-in Functions
REXX has vast number of built-in functions, now let us see few of them one-by-one. Compare function is used to compare two strings and return a zero if the strings are the same, or a non-zero number if they are not. Non-zero number is the position of the first mismatching character found. Syntax is as follows,
Examples of compare function is as follows,
COMPARE(string1,string2)
COMPARE('123','123') returns a 0 (exact match)
Date function returns the current date. The syntax is as follows,
DATE({option})
Some of the options that can be passed to date function are as follows,
U returns date in USA format, 'mm/dd/yy’ J returns a Julian date in the form 'yyddd’ W returns the day of the week (e.g. 'Tuesday', 'Sunday', etc.)
Few examples for date function is as follows,
Page 162 ©Copyright 2007, Cognizant Technology Solutions, All Rights Reserved
C3: Protected
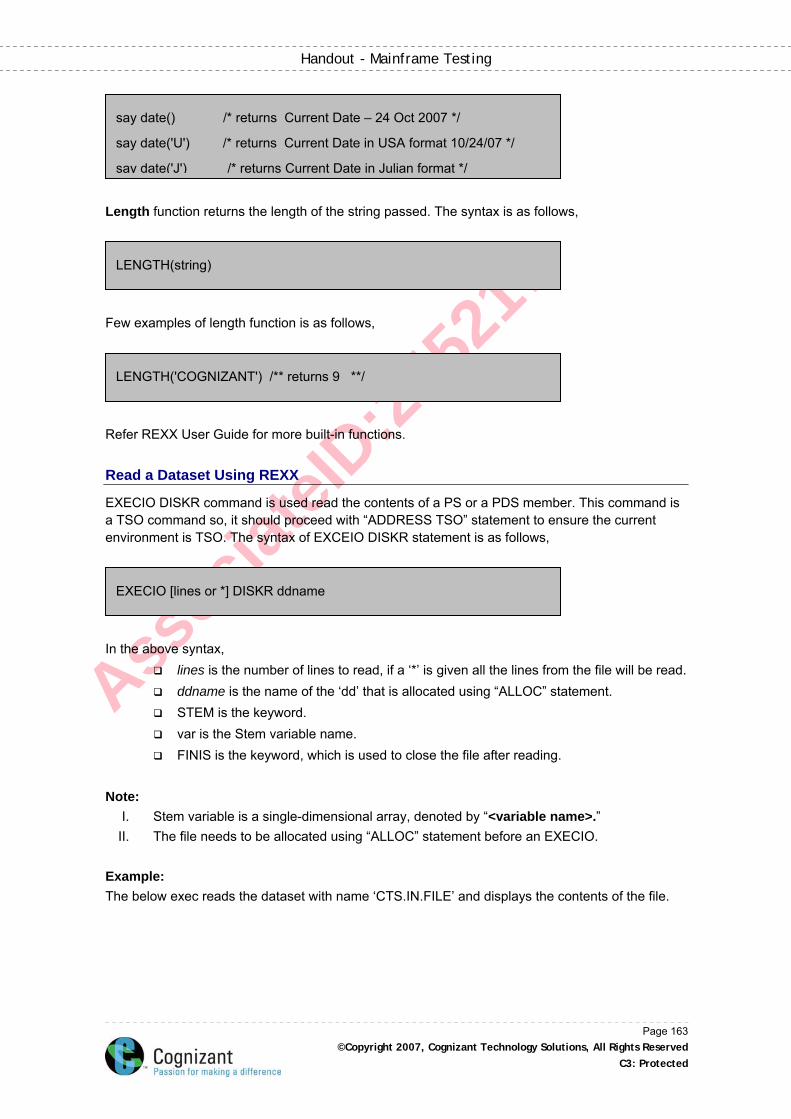
Associa
teID
:245
217
Handout - Mainframe Testing
say date('U') /* returns Current Date in USA format 10/24/07 */
say date('J') /* returns Current Date in Julian format */
say date() /* returns Current Date – 24 Oct 2007 */
Length function returns the length of the string passed. The syntax is as follows,
Few examples of length function is as follows,
Refer REXX User Guide for more built-in functions.
Read a Dataset Using REXX
EXECIO DISKR command is used read the contents of a PS or a PDS member. This command is a TSO command so, it should proceed with “ADDRESS TSO” statement to ensure the current environment is TSO. The syntax of EXCEIO DISKR statement is as follows,
LENGTH(string)
LENGTH('COGNIZANT') /** returns 9 **/
EXECIO [lines or *] DISKR ddname
In the above syntax,
lines is the number of lines to read, if a ‘*’ is given all the lines from the file will be read. ddname is the name of the ‘dd’ that is allocated using “ALLOC” statement. STEM is the keyword. var is the Stem variable name. FINIS is the keyword, which is used to close the file after reading.
Note:
I. Stem variable is a single-dimensional array, denoted by “<variable name>.” II. The file needs to be allocated using “ALLOC” statement before an EXECIO.
Example: The below exec reads the dataset with name ‘CTS.IN.FILE’ and displays the contents of the file.
Page 163 ©Copyright 2007, Cognizant Technology Solutions, All Rights Reserved
C3: Protected
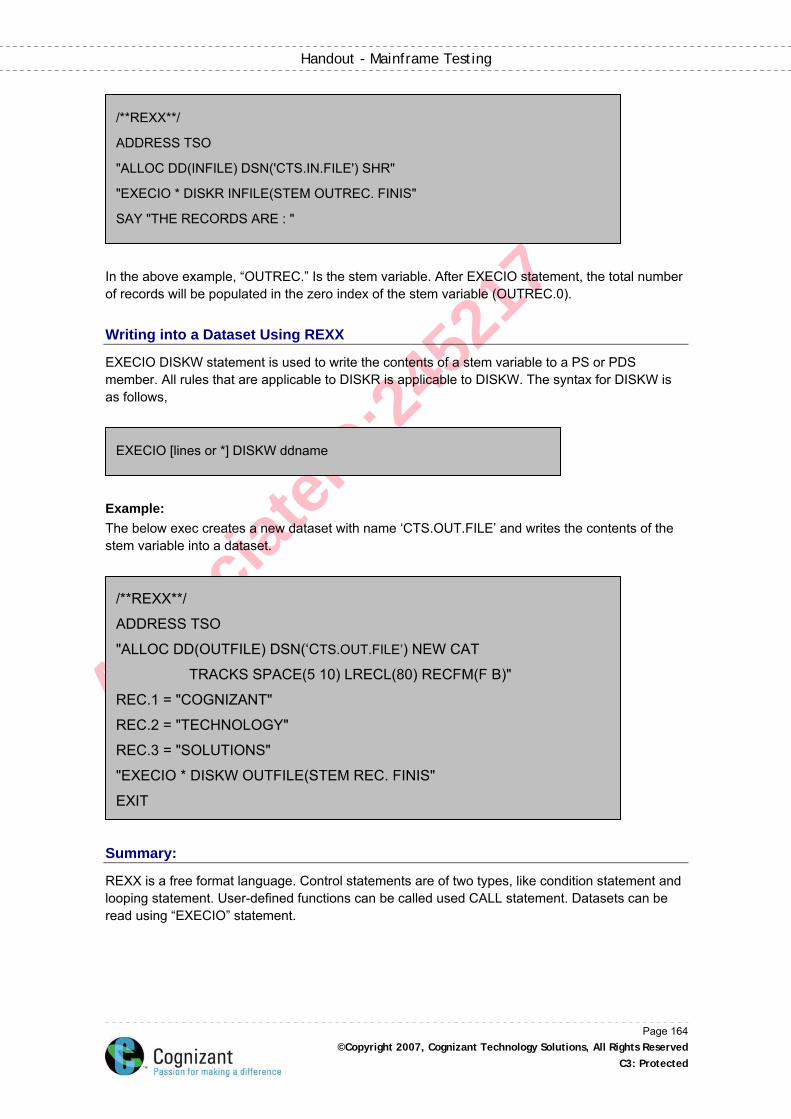
Associa
teID
:245
217
Handout - Mainframe Testing
In the above example, “OUTREC.” Is the stem variable. After EXECIO statement, the total number of records will be populated in the zero index of the stem variable (OUTREC.0).
Writing into a Dataset Using REXX
EXECIO DISKW statement is used to write the contents of a stem variable to a PS or PDS member. All rules that are applicable to DISKR is applicable to DISKW. The syntax for DISKW is as follows,
Example: The below exec creates a new dataset with name ‘CTS.OUT.FILE’ and writes the contents of the stem variable into a dataset.
SAY "THE RECORDS ARE : "
EXECIO [lines or *] DISKW ddname
/**REXX**/
ADDRESS TSO
"EXECIO * DISKW OUTFILE(STEM REC. FINIS"
EXIT
REC.1 = "COGNIZANT"
REC.2 = "TECHNOLOGY"
REC.3 = "SOLUTIONS"
TRACKS SPACE(5 10) LRECL(80) RECFM(F B)"
"ALLOC DD(OUTFILE) DSN(‘CTS.OUT.FILE’) NEW CAT
"ALLOC DD(INFILE) DSN('CTS.IN.FILE') SHR"
"EXECIO * DISKR INFILE(STEM OUTREC. FINIS"
/**REXX**/
ADDRESS TSO
Summary:
REXX is a free format language. Control statements are of two types, like condition statement and looping statement. User-defined functions can be called used CALL statement. Datasets can be read using “EXECIO” statement.
Page 164 ©Copyright 2007, Cognizant Technology Solutions, All Rights Reserved
C3: Protected
Associa
teID
:245
217
Handout - Mainframe Testing
Test Your Understanding
1. What should be the first statement of a REXX EXEC? a) REXX b) /*REXX*/ c) //REXX
2. Which in-built function is used to find the current user-id?
a) GETUSERID() b) SAYUSERID() c) USERID()
3. Which statement is used to read a dataset?
a) EXECIO b) READ c) GETDATA
Answers:
1. b 2. c 3. a
Page 165 ©Copyright 2007, Cognizant Technology Solutions, All Rights Reserved
C3: Protected
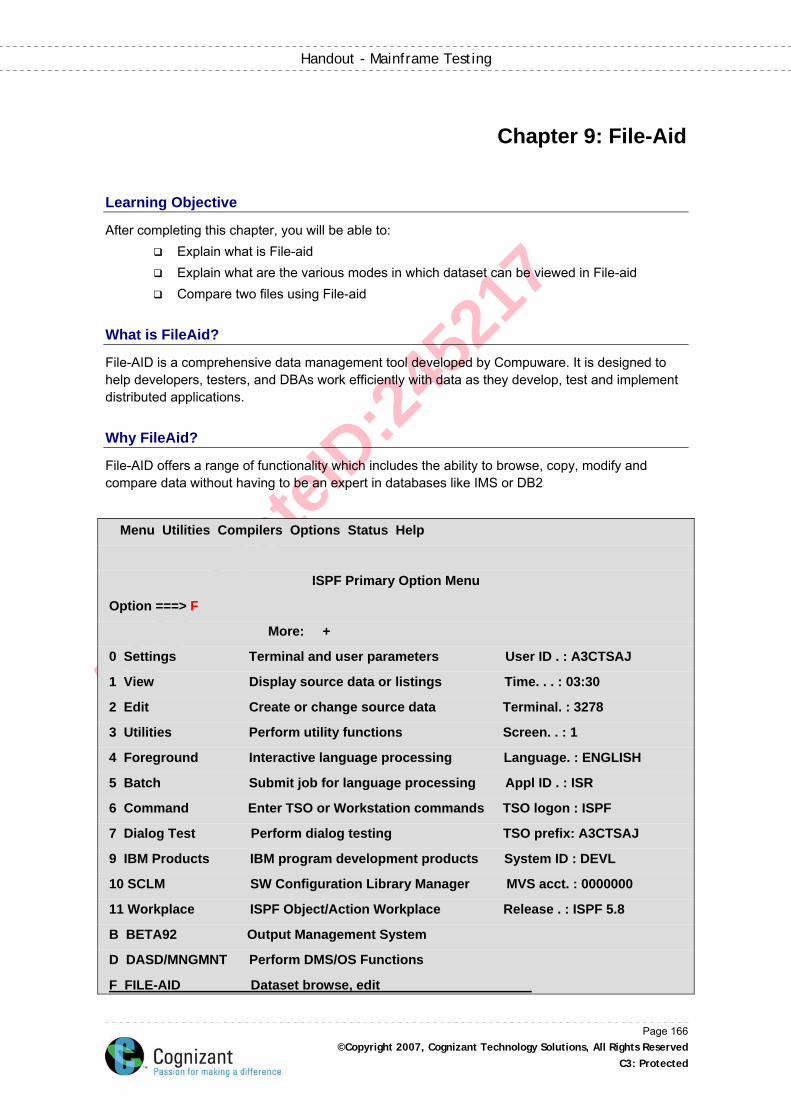
Associa
teID
:245
217
Handout - Mainframe Testing
Chapter 9: File-Aid
Learning Objective
After completing this chapter, you will be able to: Explain what is File-aid Explain what are the various modes in which dataset can be viewed in File-aid Compare two files using File-aid
What is FileAid?
File-AID is a comprehensive data management tool developed by Compuware. It is designed to help developers, testers, and DBAs work efficiently with data as they develop, test and implement distributed applications.
Why FileAid?
File-AID offers a range of functionality which includes the ability to browse, copy, modify and compare data without having to be an expert in databases like IMS or DB2
Menu Utilities Compilers Options Status Help
ISPF Primary Option Menu
Option ===> F
More: +
0 Settings Terminal and user parameters User ID . : A3CTSAJ
1 View Display source data or listings Time. . . : 03:30
2 Edit Create or change source data Terminal. : 3278
3 Utilities Perform utility functions Screen. . : 1
4 Foreground Interactive language processing Language. : ENGLISH
5 Batch Submit job for language processing Appl ID . : ISR
6 Command Enter TSO or Workstation commands TSO logon : ISPF
7 Dialog Test Perform dialog testing TSO prefix: A3CTSAJ
9 IBM Products IBM program development products System ID : DEVL
10 SCLM SW Configuration Library Manager MVS acct. : 0000000
11 Workplace ISPF Object/Action Workplace Release . : ISPF 5.8
B BETA92 Output Management System
D DASD/MNGMNT Perform DMS/OS Functions
F FILE-AID Dataset browse, edit
Page 166 ©Copyright 2007, Cognizant Technology Solutions, All Rights Reserved
C3: Protected
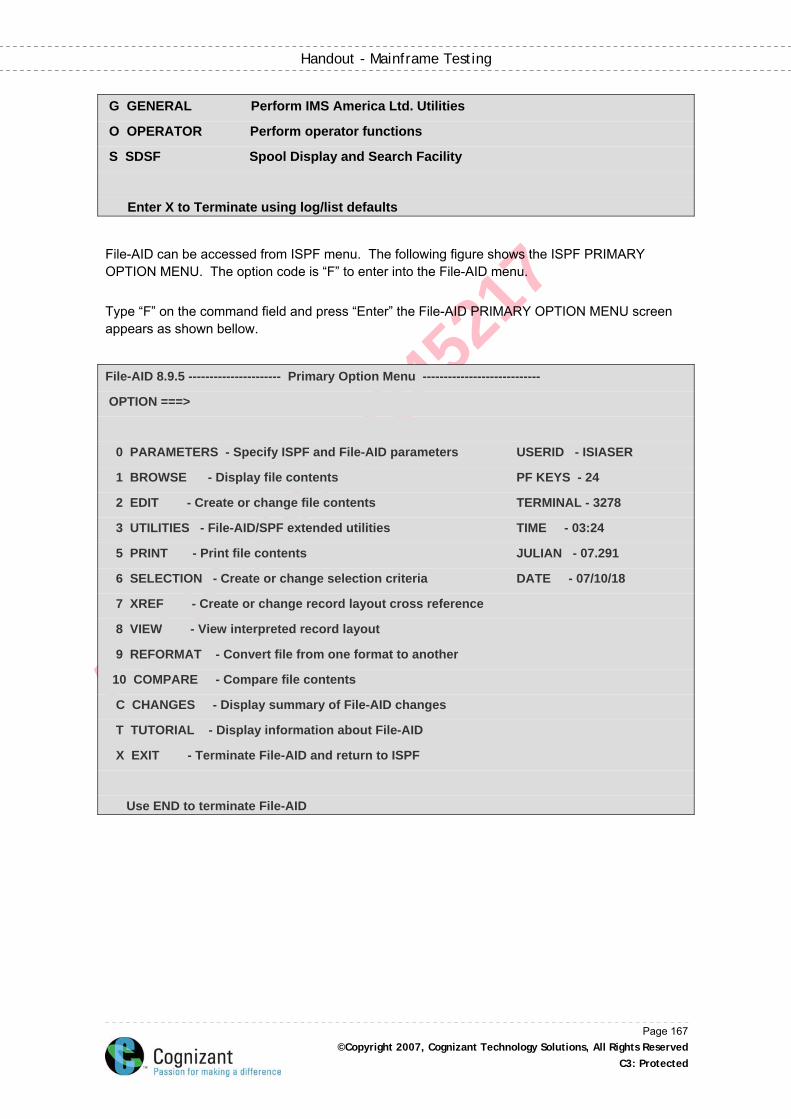
Associa
teID
:245
217
Handout - Mainframe Testing
G GENERAL Perform IMS America Ltd. Utilities
O OPERATOR Perform operator functions
S SDSF Spool Display and Search Facility
Enter X to Terminate using log/list defaults
File-AID can be accessed from ISPF menu. The following figure shows the ISPF PRIMARY OPTION MENU. The option code is “F” to enter into the File-AID menu. Type “F” on the command field and press “Enter” the File-AID PRIMARY OPTION MENU screen appears as shown bellow.
File-AID 8.9.5 ---------------------- Primary Option Menu ----------------------------
OPTION ===>
0 PARAMETERS - Specify ISPF and File-AID parameters USERID - ISIASER
1 BROWSE - Display file contents PF KEYS - 24
2 EDIT - Create or change file contents TERMINAL - 3278
3 UTILITIES - File-AID/SPF extended utilities TIME - 03:24
5 PRINT - Print file contents JULIAN - 07.291
6 SELECTION - Create or change selection criteria DATE - 07/10/18
7 XREF - Create or change record layout cross reference
8 VIEW - View interpreted record layout
9 REFORMAT - Convert file from one format to another
10 COMPARE - Compare file contents
C CHANGES - Display summary of File-AID changes
T TUTORIAL - Display information about File-AID
X EXIT - Terminate File-AID and return to ISPF
Use END to terminate File-AID
Page 167 ©Copyright 2007, Cognizant Technology Solutions, All Rights Reserved
C3: Protected
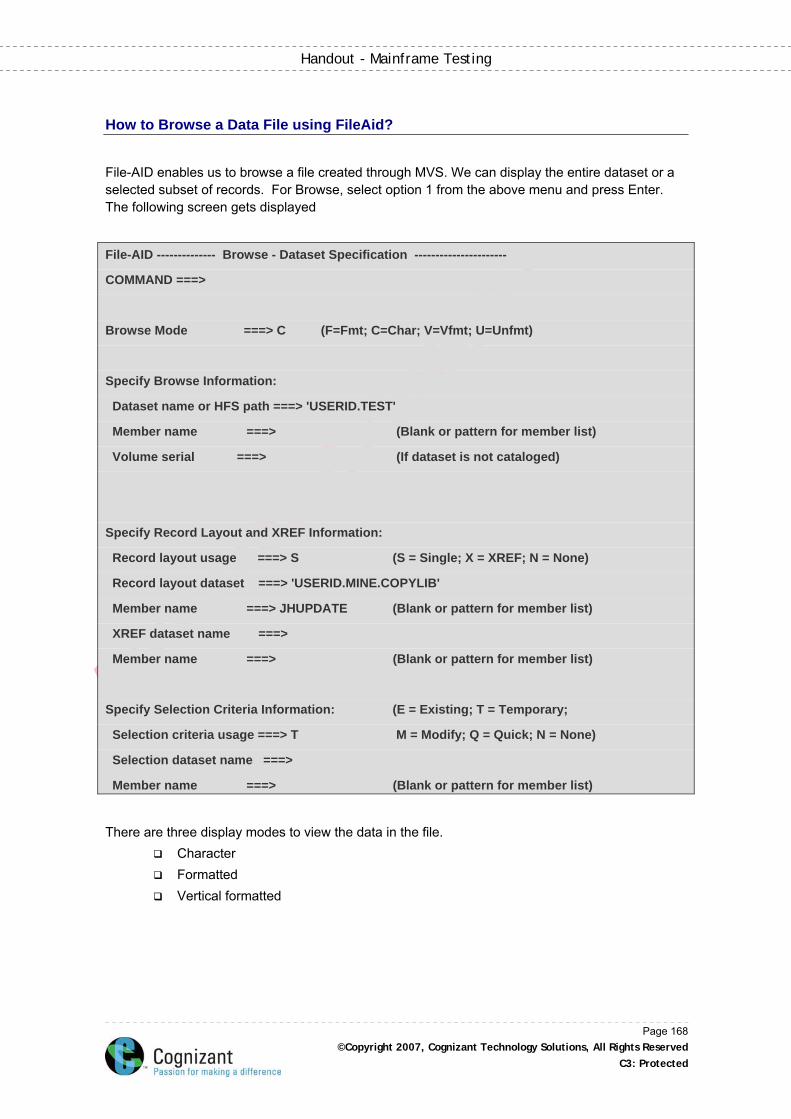
Associa
teID
:245
217
Handout - Mainframe Testing
How to Browse a Data File using FileAid?
File-AID enables us to browse a file created through MVS. We can display the entire dataset or a selected subset of records. For Browse, select option 1 from the above menu and press Enter. The following screen gets displayed
File-AID -------------- Browse - Dataset Specification ----------------------
COMMAND ===>
Browse Mode ===> C (F=Fmt; C=Char; V=Vfmt; U=Unfmt)
Specify Browse Information:
Dataset name or HFS path ===> 'USERID.TEST'
Member name ===> (Blank or pattern for member list)
Volume serial ===> (If dataset is not cataloged)
Specify Record Layout and XREF Information:
Record layout usage ===> S (S = Single; X = XREF; N = None)
Record layout dataset ===> 'USERID.MINE.COPYLIB'
Member name ===> JHUPDATE (Blank or pattern for member list)
XREF dataset name ===>
Member name ===> (Blank or pattern for member list)
Specify Selection Criteria Information: (E = Existing; T = Temporary;
Selection criteria usage ===> T M = Modify; Q = Quick; N = None)
Selection dataset name ===>
Member name ===> (Blank or pattern for member list)
There are three display modes to view the data in the file.
Character Formatted Vertical formatted
Page 168 ©Copyright 2007, Cognizant Technology Solutions, All Rights Reserved
C3: Protected
Associa
teID
:245
217
Handout - Mainframe Testing
Character Mode
The character browse mode provides a full-screen view of the data. From character mode, it is possible to go to the FMT primary command to redisplay the data in formatted mode or use the VFMT primary command to redisplay the data in vertical formatted mode.
Vertical Formatted Mode
A data set can be opened only with a copybook in vertical formatted mode. This shows data in column wise with corresponding variable from copybook. This is the best one to see COMP or COMP3 values in the file with the layout. This option can be used when we want to see set of records in the file. Even if we are in different format of viewing the file, it can be changed to vertical format mode, by typing VFMT on command line and pressing enter. Another feature in VFMT mode is that we can view select variables in a single window. (Without scrolling back and forth). Type DISP OFF and the field -numbers separated by space [displayed for different variables in the copybook’s record layout] on the command line, this would remove the unwanted variables from display. This would prove very handy when it is required to know values for a particular combination of variables and these are far apart in a copybook. Example: DISP OFF 1-3 8 12 The above would remove variables with offset number 1,2,3,8, & 12. If we have more variables to be removed, type DISPLAY (field-numbers separated by space) ONLY on the command line. Example: DISPLAY 1-3 8 12 ONLY The above would show only variables with offset number 1,2,3,8, & 12. If we want to see the HEX value for a variable, we can give DISP HEX (field number). This could in handy when to query this value in some other file in which it is stored as packed decimal. To bring to normal view of the variable, type DISP (field number) RESET. If we want to get some other fields after giving a DISP OFF or DISP ONLY, type DISP (field-number) ON. If we want to get all the fields after giving a DISP OFF or DISP ONLY, type DISP ALL.
Formatted Mode
A data set can be opened only with a copybook in formatted mode. This option is almost similar to VFMT, except that it can show only one record at a time. Even if we are in different format of viewing the file, it can be changed to unformatted mode, by typing FMT on command line and pressing enter.
Page 169 ©Copyright 2007, Cognizant Technology Solutions, All Rights Reserved
C3: Protected
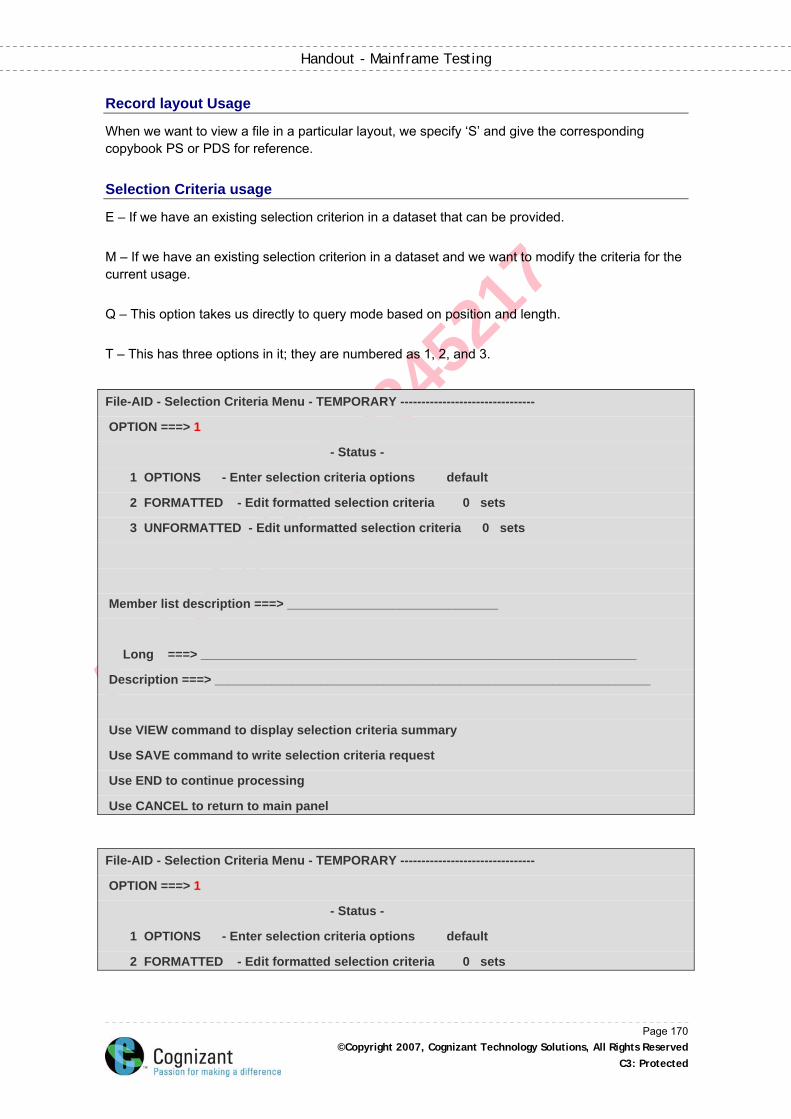
Associa
teID
:245
217
Handout - Mainframe Testing
Record layout Usage
When we want to view a file in a particular layout, we specify ‘S’ and give the corresponding copybook PS or PDS for reference.
Selection Criteria usage
E – If we have an existing selection criterion in a dataset that can be provided. M – If we have an existing selection criterion in a dataset and we want to modify the criteria for the current usage. Q – This option takes us directly to query mode based on position and length. T – This has three options in it; they are numbered as 1, 2, and 3.
File-AID - Selection Criteria Menu - TEMPORARY --------------------------------
OPTION ===> 1
- Status -
1 OPTIONS - Enter selection criteria options default
2 FORMATTED - Edit formatted selection criteria 0 sets
3 UNFORMATTED - Edit unformatted selection criteria 0 sets
Member list description ===> ______________________________
Long ===> ______________________________________________________________
Description ===> ______________________________________________________________
Use VIEW command to display selection criteria summary
Use SAVE command to write selection criteria request
Use END to continue processing
Use CANCEL to return to main panel
File-AID - Selection Criteria Menu - TEMPORARY --------------------------------
OPTION ===> 1
- Status -
1 OPTIONS - Enter selection criteria options default
2 FORMATTED - Edit formatted selection criteria 0 sets
Page 170 ©Copyright 2007, Cognizant Technology Solutions, All Rights Reserved
C3: Protected
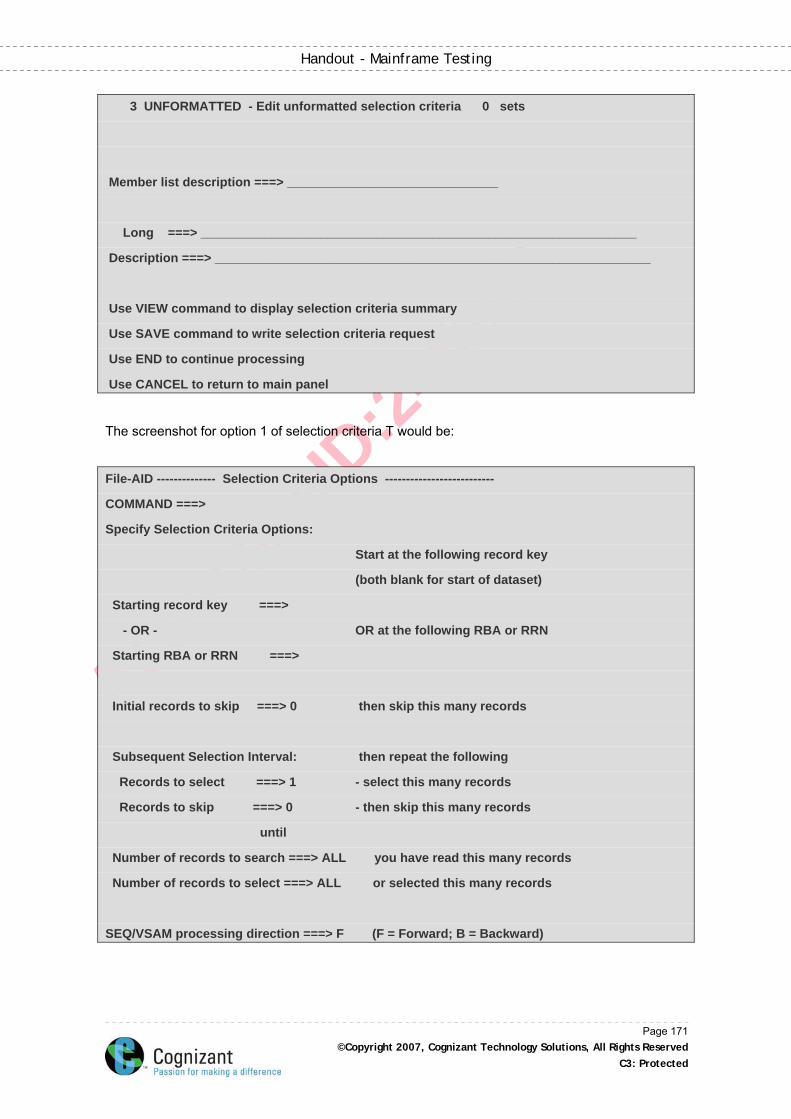
Associa
teID
:245
217
Handout - Mainframe Testing
3 UNFORMATTED - Edit unformatted selection criteria 0 sets
Member list description ===> ______________________________
Long ===> ______________________________________________________________
Description ===> ______________________________________________________________
Use VIEW command to display selection criteria summary
Use SAVE command to write selection criteria request
Use END to continue processing
Use CANCEL to return to main panel
The screenshot for option 1 of selection criteria T would be:
File-AID -------------- Selection Criteria Options --------------------------
COMMAND ===>
Specify Selection Criteria Options:
Start at the following record key
(both blank for start of dataset)
Starting record key ===>
- OR - OR at the following RBA or RRN
Starting RBA or RRN ===>
Initial records to skip ===> 0 then skip this many records
Subsequent Selection Interval: then repeat the following
Records to select ===> 1 - select this many records
Records to skip ===> 0 - then skip this many records
until
Number of records to search ===> ALL you have read this many records
Number of records to select ===> ALL or selected this many records
SEQ/VSAM processing direction ===> F (F = Forward; B = Backward)
Page 171 ©Copyright 2007, Cognizant Technology Solutions, All Rights Reserved
C3: Protected
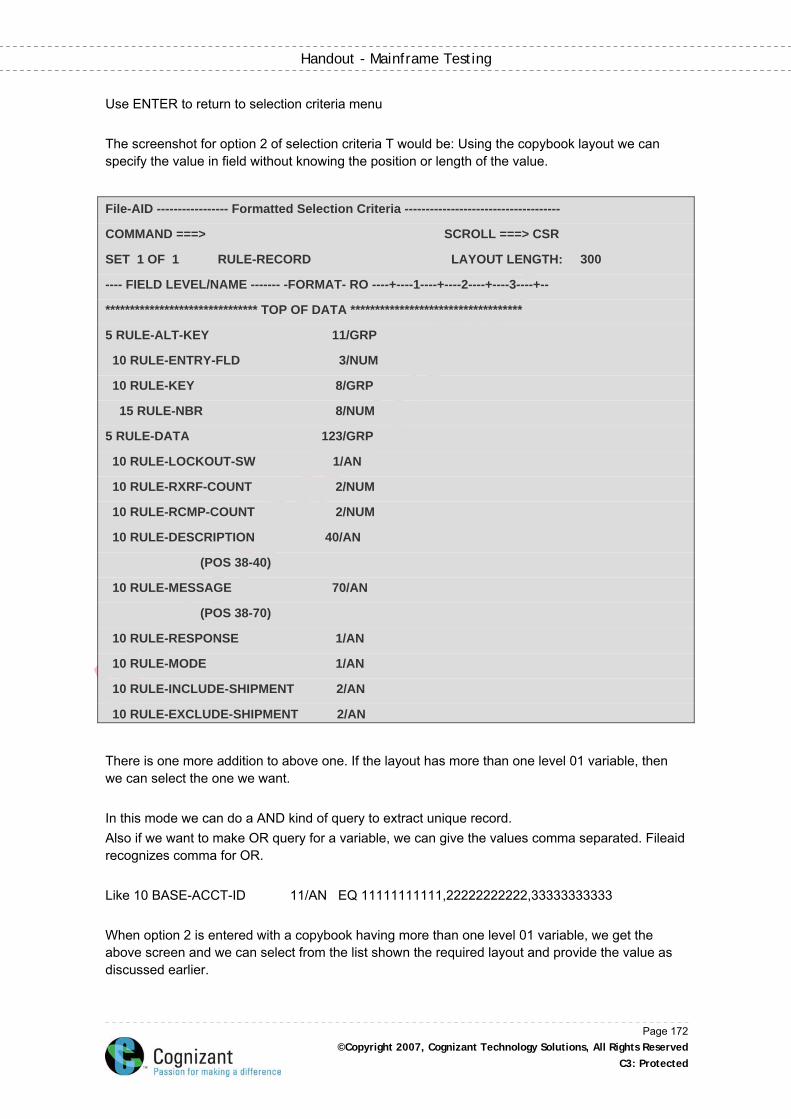
Associa
teID
:245
217
Handout - Mainframe Testing
Use ENTER to return to selection criteria menu The screenshot for option 2 of selection criteria T would be: Using the copybook layout we can specify the value in field without knowing the position or length of the value.
File-AID ----------------- Formatted Selection Criteria -------------------------------------
COMMAND ===> SCROLL ===> CSR
SET 1 OF 1 RULE-RECORD LAYOUT LENGTH: 300
---- FIELD LEVEL/NAME ------- -FORMAT- RO ----+----1----+----2----+----3----+--
******************************* TOP OF DATA ***********************************
5 RULE-ALT-KEY 11/GRP
10 RULE-ENTRY-FLD 3/NUM
10 RULE-KEY 8/GRP
15 RULE-NBR 8/NUM
5 RULE-DATA 123/GRP
10 RULE-LOCKOUT-SW 1/AN
10 RULE-RXRF-COUNT 2/NUM
10 RULE-RCMP-COUNT 2/NUM
10 RULE-DESCRIPTION 40/AN
(POS 38-40)
10 RULE-MESSAGE 70/AN
(POS 38-70)
10 RULE-RESPONSE 1/AN
10 RULE-MODE 1/AN
10 RULE-INCLUDE-SHIPMENT 2/AN
10 RULE-EXCLUDE-SHIPMENT 2/AN
There is one more addition to above one. If the layout has more than one level 01 variable, then we can select the one we want. In this mode we can do a AND kind of query to extract unique record. Also if we want to make OR query for a variable, we can give the values comma separated. Fileaid recognizes comma for OR. Like 10 BASE-ACCT-ID 11/AN EQ 11111111111,22222222222,33333333333 When option 2 is entered with a copybook having more than one level 01 variable, we get the above screen and we can select from the list shown the required layout and provide the value as discussed earlier.
Page 172 ©Copyright 2007, Cognizant Technology Solutions, All Rights Reserved
C3: Protected
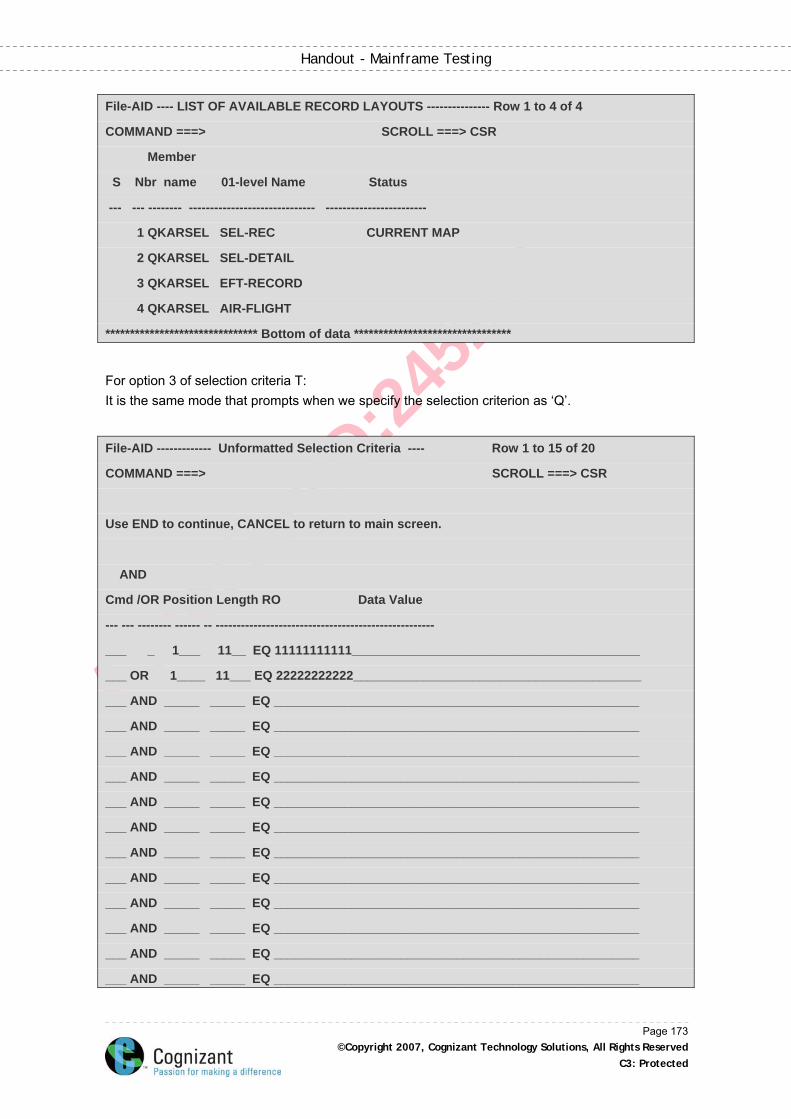
Associa
teID
:245
217
Handout - Mainframe Testing
File-AID ---- LIST OF AVAILABLE RECORD LAYOUTS --------------- Row 1 to 4 of 4
COMMAND ===> SCROLL ===> CSR
Member
S Nbr name 01-level Name Status
--- --- -------- ------------------------------ ------------------------
1 QKARSEL SEL-REC CURRENT MAP
2 QKARSEL SEL-DETAIL
3 QKARSEL EFT-RECORD
4 QKARSEL AIR-FLIGHT
******************************* Bottom of data ********************************
For option 3 of selection criteria T: It is the same mode that prompts when we specify the selection criterion as ‘Q’.
File-AID ------------- Unformatted Selection Criteria ---- Row 1 to 15 of 20
COMMAND ===> SCROLL ===> CSR
Use END to continue, CANCEL to return to main screen.
AND
Cmd /OR Position Length RO Data Value
--- --- -------- ------ -- ----------------------------------------------------
___ _ 1___ 11__ EQ 11111111111_________________________________________
___ OR 1____ 11___ EQ 22222222222_________________________________________
___ AND _____ _____ EQ ____________________________________________________
___ AND _____ _____ EQ ____________________________________________________
___ AND _____ _____ EQ ____________________________________________________
___ AND _____ _____ EQ ____________________________________________________
___ AND _____ _____ EQ ____________________________________________________
___ AND _____ _____ EQ ____________________________________________________
___ AND _____ _____ EQ ____________________________________________________
___ AND _____ _____ EQ ____________________________________________________
___ AND _____ _____ EQ ____________________________________________________
___ AND _____ _____ EQ ____________________________________________________
___ AND _____ _____ EQ ____________________________________________________
___ AND _____ _____ EQ ____________________________________________________
Page 173 ©Copyright 2007, Cognizant Technology Solutions, All Rights Reserved
C3: Protected
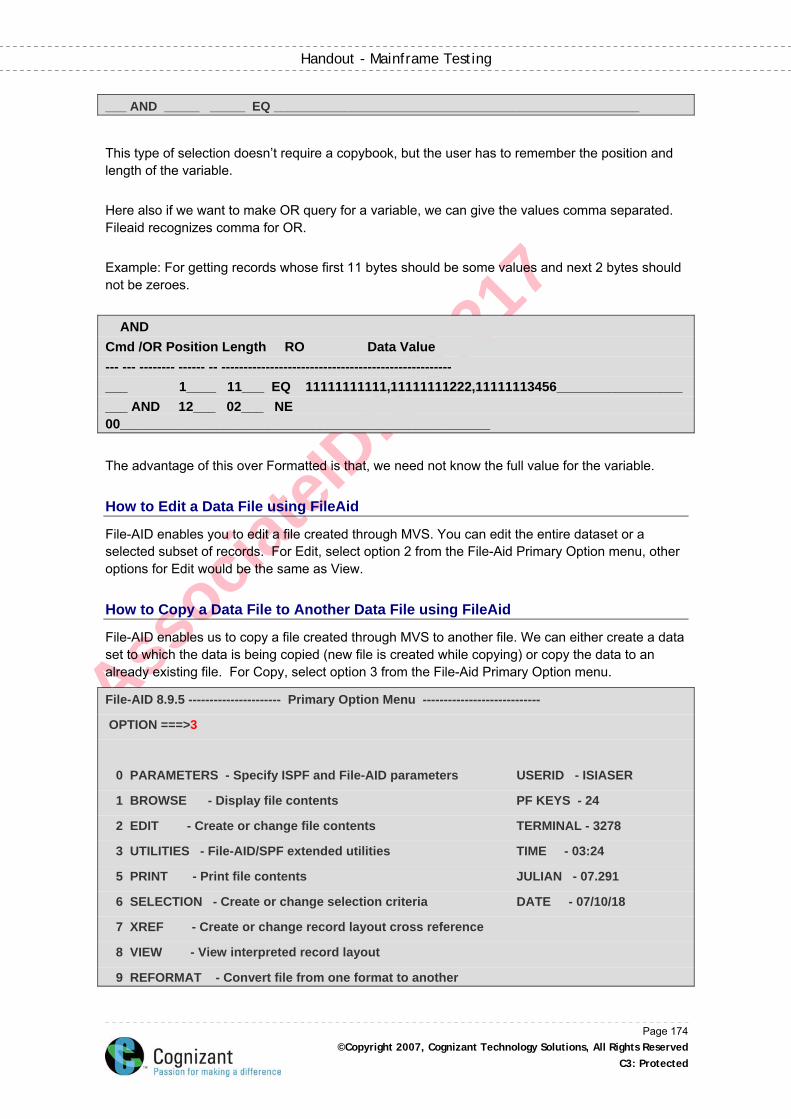
Associa
teID
:245
217
Handout - Mainframe Testing
___ AND _____ _____ EQ ____________________________________________________
This type of selection doesn’t require a copybook, but the user has to remember the position and length of the variable. Here also if we want to make OR query for a variable, we can give the values comma separated. Fileaid recognizes comma for OR. Example: For getting records whose first 11 bytes should be some values and next 2 bytes should not be zeroes. AND Cmd /OR Position Length RO Data Value --- --- -------- ------ -- ---------------------------------------------------- ___ 1____ 11___ EQ 11111111111,11111111222,11111113456_________________ ___ AND 12___ 02___ NE 00__________________________________________________ The advantage of this over Formatted is that, we need not know the full value for the variable.
How to Edit a Data File using FileAid
File-AID enables you to edit a file created through MVS. You can edit the entire dataset or a selected subset of records. For Edit, select option 2 from the File-Aid Primary Option menu, other options for Edit would be the same as View.
How to Copy a Data File to Another Data File using FileAid
File-AID enables us to copy a file created through MVS to another file. We can either create a data set to which the data is being copied (new file is created while copying) or copy the data to an already existing file. For Copy, select option 3 from the File-Aid Primary Option menu.
File-AID 8.9.5 ---------------------- Primary Option Menu ----------------------------
OPTION ===>3
0 PARAMETERS - Specify ISPF and File-AID parameters USERID - ISIASER
1 BROWSE - Display file contents PF KEYS - 24
2 EDIT - Create or change file contents TERMINAL - 3278
3 UTILITIES - File-AID/SPF extended utilities TIME - 03:24
5 PRINT - Print file contents JULIAN - 07.291
6 SELECTION - Create or change selection criteria DATE - 07/10/18
7 XREF - Create or change record layout cross reference
8 VIEW - View interpreted record layout
9 REFORMAT - Convert file from one format to another
Page 174 ©Copyright 2007, Cognizant Technology Solutions, All Rights Reserved
C3: Protected

Associa
teID
:245
217
Handout - Mainframe Testing
10 COMPARE - Compare file contents
C CHANGES - Display summary of File-AID changes
T TUTORIAL - Display information about File-AID
X EXIT - Terminate File-AID and return to ISPF
Use END to terminate File-AID
Press Enter. The following screen appears
File-AID ------------------ Extended Utilities ------------------------------
OPTION ===> 3
1 LIBRARY - Display and modify directory entries; display load
module CSECT maps; browse, delete, rename PDS members
2 DATASET - Display dataset information; allocate non-VSAM datasets
and GDGs; catalog, uncatalog, delete, or rename datasets
3 COPY - Copy entire datasets; copy selected records; copy PDS
members based on name, statistics and/or content
4 CATALOG - Display generic catalog entries or VSAM datasets on a
volume in list form and do dataset list processing
5 VSAM - Allocate, display, delete, modify, or rename VSAM clusters,
alternate indexes, or paths; manage IAM files
6 SEARCH/UPDATE - FIND and CHANGE across PDS members. Search for and/or
update data globally in any type of dataset.
7 VTOC - Display and process datasets on a volume(s)
8 INTERACTIVE - Execute File-AID/Batch
9 BATCH SUBMIT - Build batch jobstreams
G XMLGEN - Generate an XML tagged document from data file
Page 175 ©Copyright 2007, Cognizant Technology Solutions, All Rights Reserved
C3: Protected
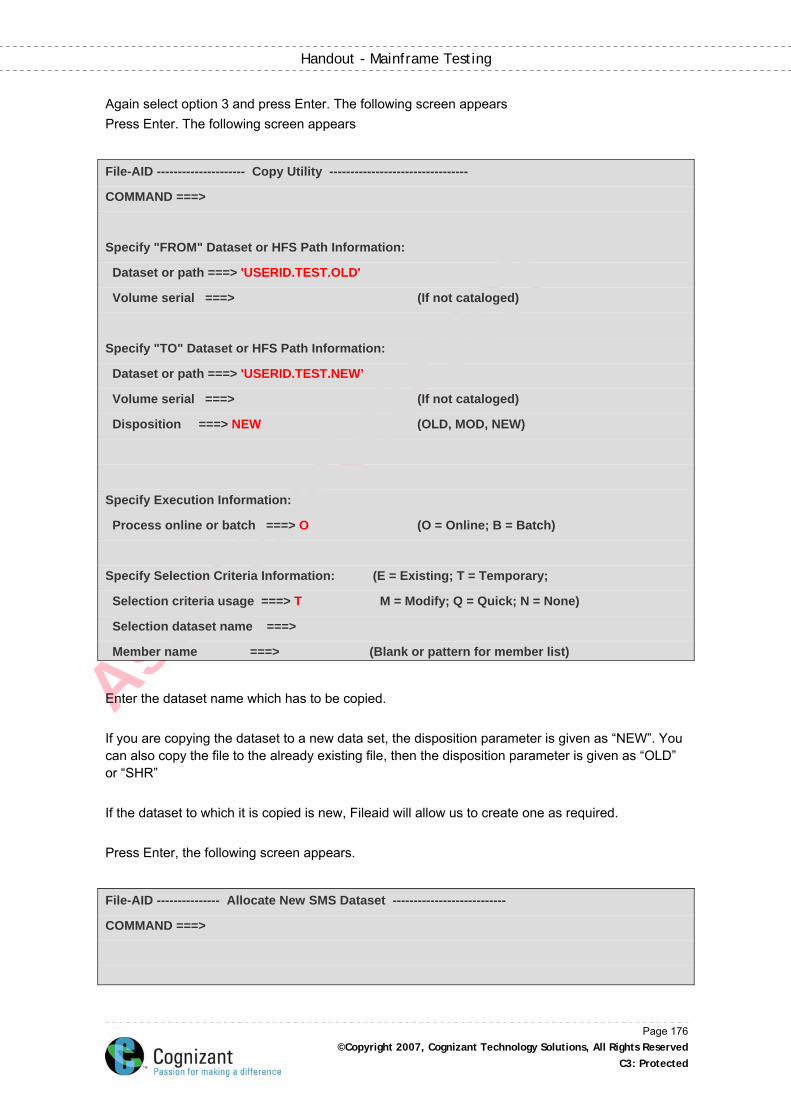
Associa
teID
:245
217
Handout - Mainframe Testing
Again select option 3 and press Enter. The following screen appears Press Enter. The following screen appears
File-AID --------------------- Copy Utility ---------------------------------
COMMAND ===>
Specify "FROM" Dataset or HFS Path Information:
Dataset or path ===> 'USERID.TEST.OLD'
Volume serial ===> (If not cataloged)
Specify "TO" Dataset or HFS Path Information:
Dataset or path ===> 'USERID.TEST.NEW’
Volume serial ===> (If not cataloged)
Disposition ===> NEW (OLD, MOD, NEW)
Specify Execution Information:
Process online or batch ===> O (O = Online; B = Batch)
Specify Selection Criteria Information: (E = Existing; T = Temporary;
Selection criteria usage ===> T M = Modify; Q = Quick; N = None)
Selection dataset name ===>
Member name ===> (Blank or pattern for member list)
Enter the dataset name which has to be copied. If you are copying the dataset to a new data set, the disposition parameter is given as “NEW”. You can also copy the file to the already existing file, then the disposition parameter is given as “OLD” or “SHR” If the dataset to which it is copied is new, Fileaid will allow us to create one as required. Press Enter, the following screen appears.
File-AID --------------- Allocate New SMS Dataset ---------------------------
COMMAND ===>
Page 176 ©Copyright 2007, Cognizant Technology Solutions, All Rights Reserved
C3: Protected
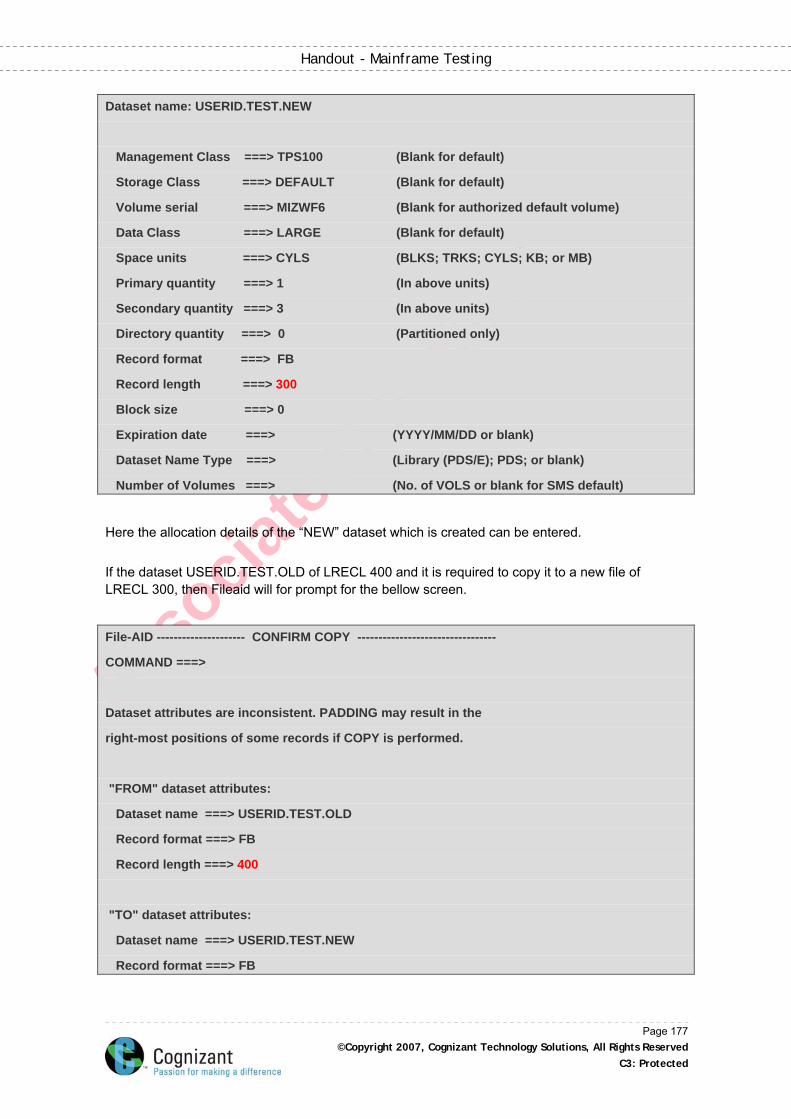
Associa
teID
:245
217
Handout - Mainframe Testing
Dataset name: USERID.TEST.NEW
Management Class ===> TPS100 (Blank for default)
Storage Class ===> DEFAULT (Blank for default)
Volume serial ===> MIZWF6 (Blank for authorized default volume)
Data Class ===> LARGE (Blank for default)
Space units ===> CYLS (BLKS; TRKS; CYLS; KB; or MB)
Primary quantity ===> 1 (In above units)
Secondary quantity ===> 3 (In above units)
Directory quantity ===> 0 (Partitioned only)
Record format ===> FB
Record length ===> 300
Block size ===> 0
Expiration date ===> (YYYY/MM/DD or blank)
Dataset Name Type ===> (Library (PDS/E); PDS; or blank)
Number of Volumes ===> (No. of VOLS or blank for SMS default)
Here the allocation details of the “NEW” dataset which is created can be entered. If the dataset USERID.TEST.OLD of LRECL 400 and it is required to copy it to a new file of LRECL 300, then Fileaid will for prompt for the bellow screen.
File-AID --------------------- CONFIRM COPY ---------------------------------
COMMAND ===>
Dataset attributes are inconsistent. PADDING may result in the
right-most positions of some records if COPY is performed.
"FROM" dataset attributes:
Dataset name ===> USERID.TEST.OLD
Record format ===> FB
Record length ===> 400
"TO" dataset attributes:
Dataset name ===> USERID.TEST.NEW
Record format ===> FB
Page 177 ©Copyright 2007, Cognizant Technology Solutions, All Rights Reserved
C3: Protected
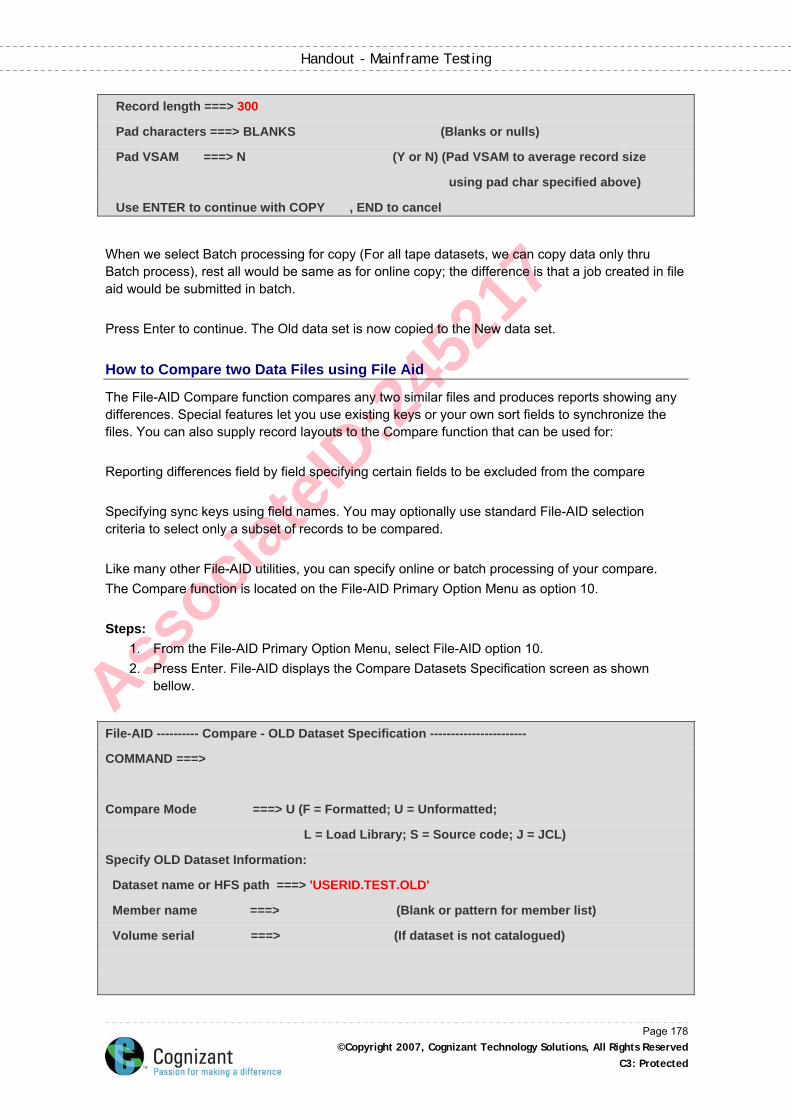
Associa
teID
:245
217
Handout - Mainframe Testing
Record length ===> 300
Pad characters ===> BLANKS (Blanks or nulls)
Pad VSAM ===> N (Y or N) (Pad VSAM to average record size
using pad char specified above)
Use ENTER to continue with COPY , END to cancel
When we select Batch processing for copy (For all tape datasets, we can copy data only thru Batch process), rest all would be same as for online copy; the difference is that a job created in file aid would be submitted in batch. Press Enter to continue. The Old data set is now copied to the New data set.
How to Compare two Data Files using File Aid
The File-AID Compare function compares any two similar files and produces reports showing any differences. Special features let you use existing keys or your own sort fields to synchronize the files. You can also supply record layouts to the Compare function that can be used for: Reporting differences field by field specifying certain fields to be excluded from the compare Specifying sync keys using field names. You may optionally use standard File-AID selection criteria to select only a subset of records to be compared. Like many other File-AID utilities, you can specify online or batch processing of your compare. The Compare function is located on the File-AID Primary Option Menu as option 10. Steps:
1. From the File-AID Primary Option Menu, select File-AID option 10. 2. Press Enter. File-AID displays the Compare Datasets Specification screen as shown
bellow.
File-AID ---------- Compare - OLD Dataset Specification -----------------------
COMMAND ===>
Compare Mode ===> U (F = Formatted; U = Unformatted;
L = Load Library; S = Source code; J = JCL)
Specify OLD Dataset Information:
Dataset name or HFS path ===> 'USERID.TEST.OLD'
Member name ===> (Blank or pattern for member list)
Volume serial ===> (If dataset is not catalogued)
Page 178 ©Copyright 2007, Cognizant Technology Solutions, All Rights Reserved
C3: Protected
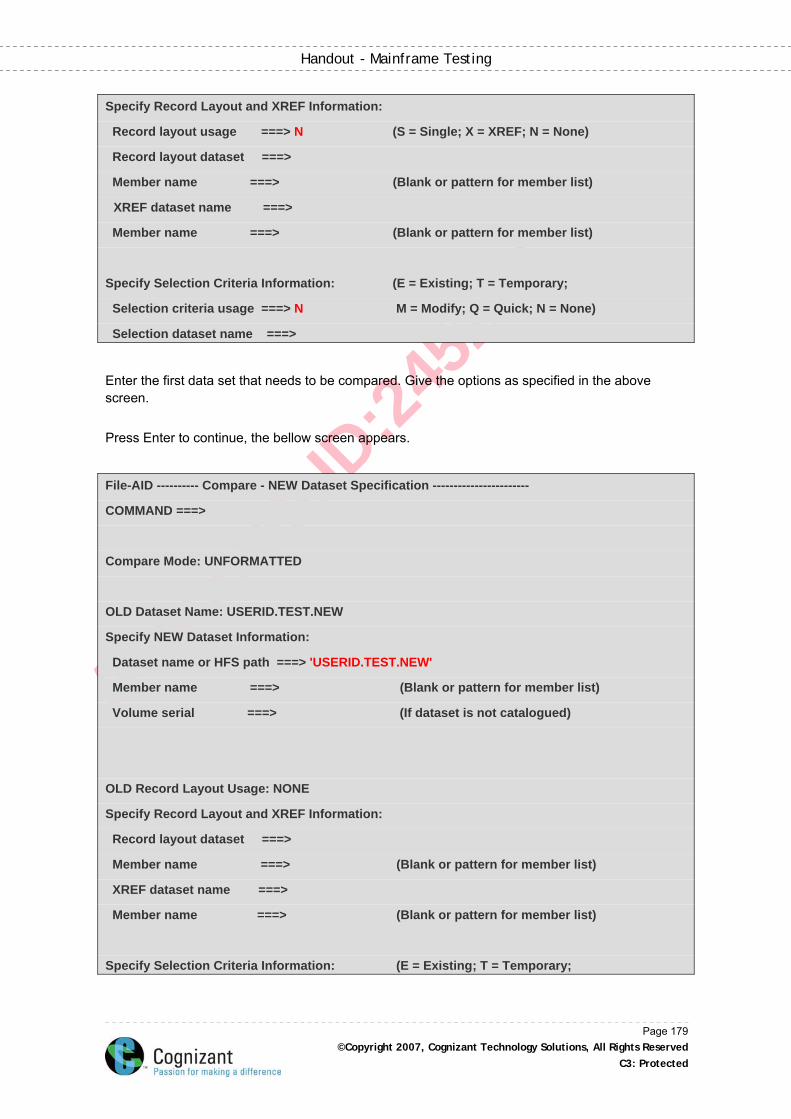
Associa
teID
:245
217
Handout - Mainframe Testing
Specify Record Layout and XREF Information:
Record layout usage ===> N (S = Single; X = XREF; N = None)
Record layout dataset ===>
Member name ===> (Blank or pattern for member list)
XREF dataset name ===>
Member name ===> (Blank or pattern for member list)
Specify Selection Criteria Information: (E = Existing; T = Temporary;
Selection criteria usage ===> N M = Modify; Q = Quick; N = None)
Selection dataset name ===>
Enter the first data set that needs to be compared. Give the options as specified in the above screen. Press Enter to continue, the bellow screen appears.
File-AID ---------- Compare - NEW Dataset Specification -----------------------
COMMAND ===>
Compare Mode: UNFORMATTED
OLD Dataset Name: USERID.TEST.NEW
Specify NEW Dataset Information:
Dataset name or HFS path ===> 'USERID.TEST.NEW'
Member name ===> (Blank or pattern for member list)
Volume serial ===> (If dataset is not catalogued)
OLD Record Layout Usage: NONE
Specify Record Layout and XREF Information:
Record layout dataset ===>
Member name ===> (Blank or pattern for member list)
XREF dataset name ===>
Member name ===> (Blank or pattern for member list)
Specify Selection Criteria Information: (E = Existing; T = Temporary;
Page 179 ©Copyright 2007, Cognizant Technology Solutions, All Rights Reserved
C3: Protected
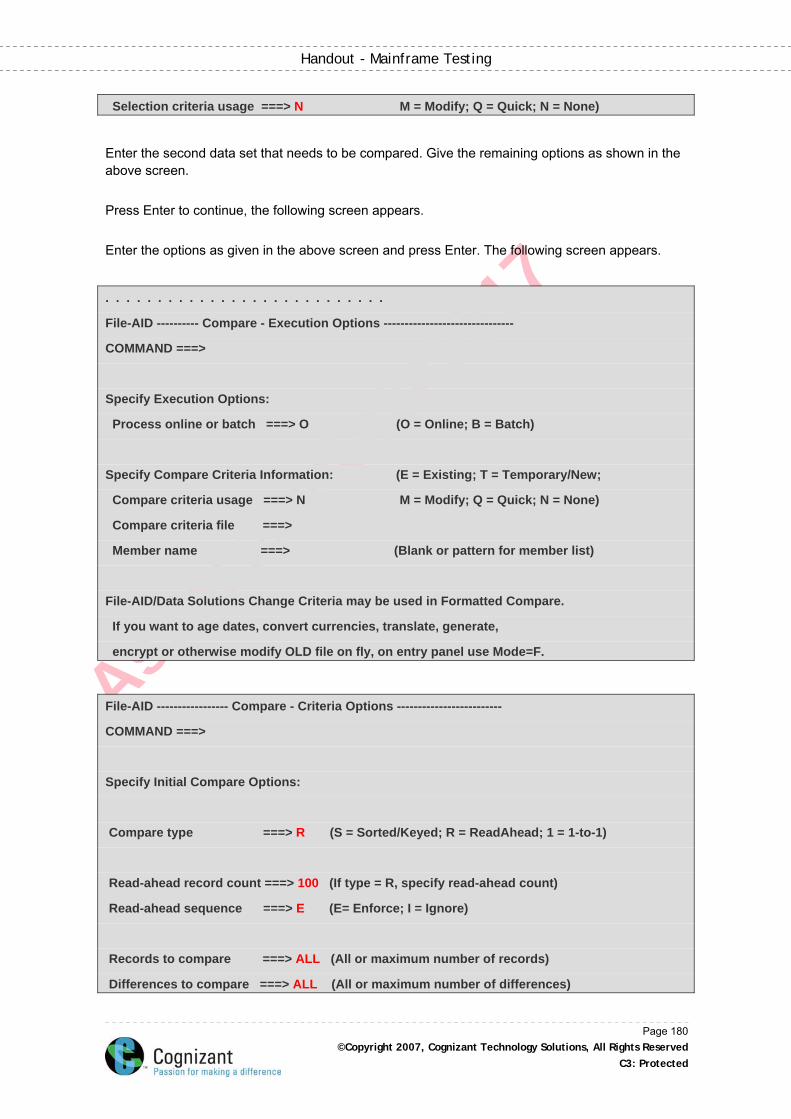
Associa
teID
:245
217
Handout - Mainframe Testing
Selection criteria usage ===> N M = Modify; Q = Quick; N = None)
Enter the second data set that needs to be compared. Give the remaining options as shown in the above screen. Press Enter to continue, the following screen appears. Enter the options as given in the above screen and press Enter. The following screen appears.
. . . . . . . . . . . . . . . . . . . . . . . . . . .
File-AID ---------- Compare - Execution Options -------------------------------
COMMAND ===>
Specify Execution Options:
Process online or batch ===> O (O = Online; B = Batch)
Specify Compare Criteria Information: (E = Existing; T = Temporary/New;
Compare criteria usage ===> N M = Modify; Q = Quick; N = None)
Compare criteria file ===>
Member name ===> (Blank or pattern for member list)
File-AID/Data Solutions Change Criteria may be used in Formatted Compare.
If you want to age dates, convert currencies, translate, generate,
encrypt or otherwise modify OLD file on fly, on entry panel use Mode=F.
File-AID ----------------- Compare - Criteria Options -------------------------
COMMAND ===>
Specify Initial Compare Options:
Compare type ===> R (S = Sorted/Keyed; R = ReadAhead; 1 = 1-to-1)
Read-ahead record count ===> 100 (If type = R, specify read-ahead count)
Read-ahead sequence ===> E (E= Enforce; I = Ignore)
Records to compare ===> ALL (All or maximum number of records)
Differences to compare ===> ALL (All or maximum number of differences)
Page 180 ©Copyright 2007, Cognizant Technology Solutions, All Rights Reserved
C3: Protected
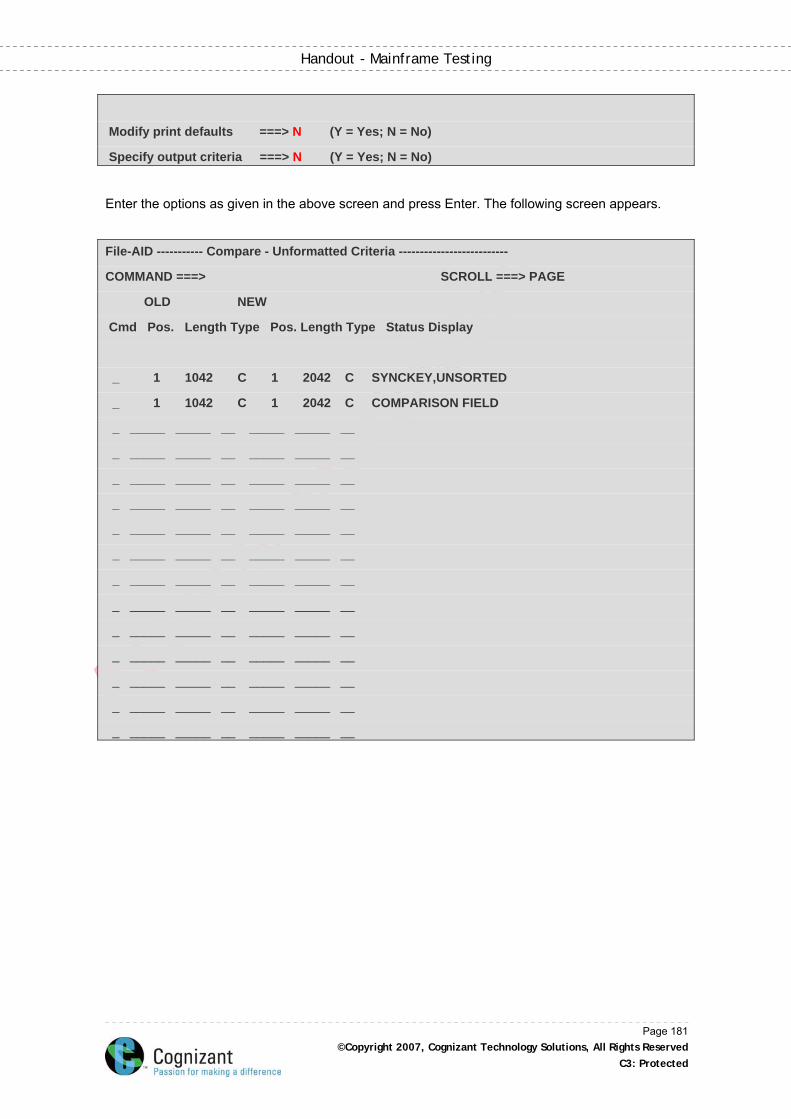
Associa
teID
:245
217
Handout - Mainframe Testing
Modify print defaults ===> N (Y = Yes; N = No)
Specify output criteria ===> N (Y = Yes; N = No)
Enter the options as given in the above screen and press Enter. The following screen appears.
File-AID ----------- Compare - Unformatted Criteria --------------------------
COMMAND ===> SCROLL ===> PAGE
OLD NEW
Cmd Pos. Length Type Pos. Length Type Status Display
_ 1 1042 C 1 2042 C SYNCKEY,UNSORTED
_ 1 1042 C 1 2042 C COMPARISON FIELD
_ _____ _____ __ _____ _____ __
_ _____ _____ __ _____ _____ __
_ _____ _____ __ _____ _____ __
_ _____ _____ __ _____ _____ __
_ _____ _____ __ _____ _____ __
_ _____ _____ __ _____ _____ __
_ _____ _____ __ _____ _____ __
_ _____ _____ __ _____ _____ __
_ _____ _____ __ _____ _____ __
_ _____ _____ __ _____ _____ __
_ _____ _____ __ _____ _____ __
_ _____ _____ __ _____ _____ __
_ _____ _____ __ _____ _____ __
Page 181 ©Copyright 2007, Cognizant Technology Solutions, All Rights Reserved
C3: Protected
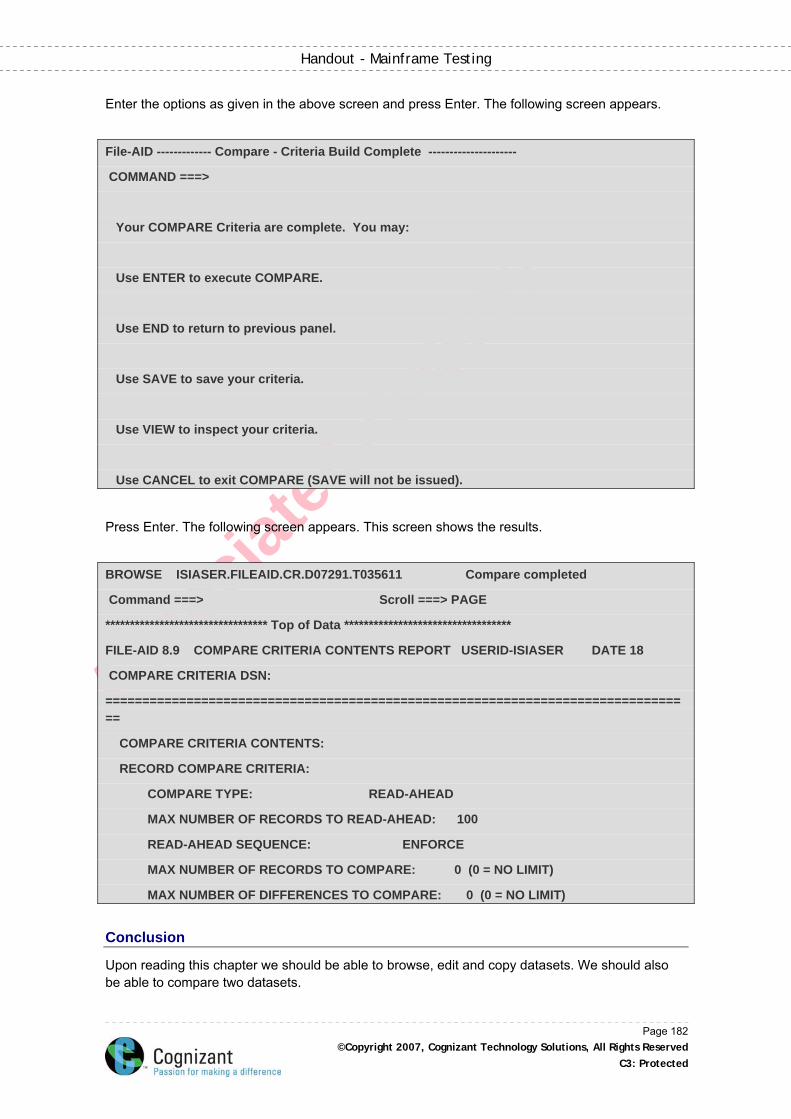
Associa
teID
:245
217
Handout - Mainframe Testing
Enter the options as given in the above screen and press Enter. The following screen appears.
File-AID ------------- Compare - Criteria Build Complete ---------------------
COMMAND ===>
Your COMPARE Criteria are complete. You may:
Use ENTER to execute COMPARE.
Use END to return to previous panel.
Use SAVE to save your criteria.
Use VIEW to inspect your criteria.
Use CANCEL to exit COMPARE (SAVE will not be issued).
Press Enter. The following screen appears. This screen shows the results.
BROWSE ISIASER.FILEAID.CR.D07291.T035611 Compare completed
Command ===> Scroll ===> PAGE
********************************* Top of Data **********************************
FILE-AID 8.9 COMPARE CRITERIA CONTENTS REPORT USERID-ISIASER DATE 18
COMPARE CRITERIA DSN:
================================================================================
COMPARE CRITERIA CONTENTS:
RECORD COMPARE CRITERIA:
COMPARE TYPE: READ-AHEAD
MAX NUMBER OF RECORDS TO READ-AHEAD: 100
READ-AHEAD SEQUENCE: ENFORCE
MAX NUMBER OF RECORDS TO COMPARE: 0 (0 = NO LIMIT)
MAX NUMBER OF DIFFERENCES TO COMPARE: 0 (0 = NO LIMIT)
Conclusion
Upon reading this chapter we should be able to browse, edit and copy datasets. We should also be able to compare two datasets.
Page 182 ©Copyright 2007, Cognizant Technology Solutions, All Rights Reserved
C3: Protected
Associa
teID
:245
217
Handout - Mainframe Testing
Summary:
In this chapter we have learned, Option 1 is used to browse a dataset using File-aid. Option 2 is used to edit a dataset using File-aid. The various formats you can view a dataset is character mode, formatted mode and vertical formatted mode.
Test Your Understanding
1. What is the option used to Edit a dataset using File-aid? a) Option 1 b) Option 2 c) Option 3
2. What is the command to view the mode to Vertical Formatted mode?
a) VFMT b) VFormat c) VertForm
Answers:
1. b 2. a
Page 183 ©Copyright 2007, Cognizant Technology Solutions, All Rights Reserved
C3: Protected
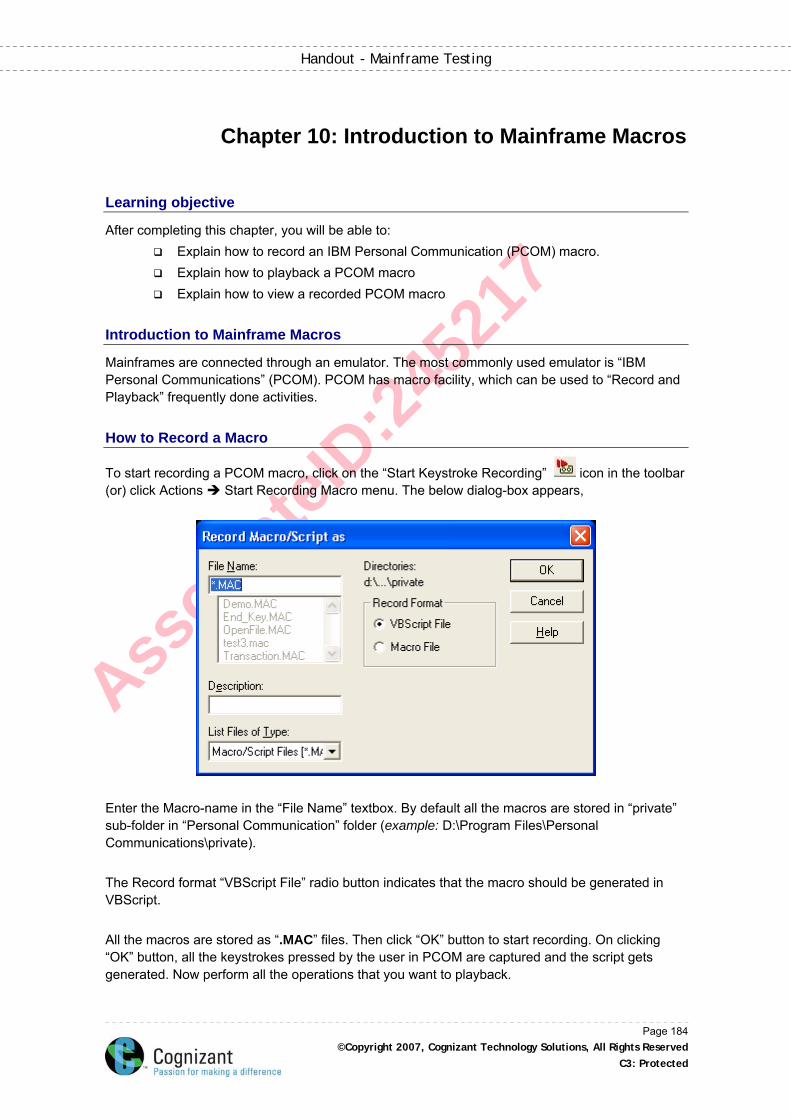
Associa
teID
:245
217
Handout - Mainframe Testing
Chapter 10: Introduction to Mainframe Macros
Learning objective
After completing this chapter, you will be able to: Explain how to record an IBM Personal Communication (PCOM) macro. Explain how to playback a PCOM macro Explain how to view a recorded PCOM macro
Introduction to Mainframe Macros
Mainframes are connected through an emulator. The most commonly used emulator is “IBM Personal Communications” (PCOM). PCOM has macro facility, which can be used to “Record and Playback” frequently done activities.
How to Record a Macro
To start recording a PCOM macro, click on the “Start Keystroke Recording” icon in the toolbar (or) click Actions Start Recording Macro menu. The below dialog-box appears,
Enter the Macro-name in the “File Name” textbox. By default all the macros are stored in “private” sub-folder in “Personal Communication” folder (example: D:\Program Files\Personal Communications\private). The Record format “VBScript File” radio button indicates that the macro should be generated in VBScript. All the macros are stored as “.MAC” files. Then click “OK” button to start recording. On clicking “OK” button, all the keystrokes pressed by the user in PCOM are captured and the script gets generated. Now perform all the operations that you want to playback.
Page 184 ©Copyright 2007, Cognizant Technology Solutions, All Rights Reserved
C3: Protected
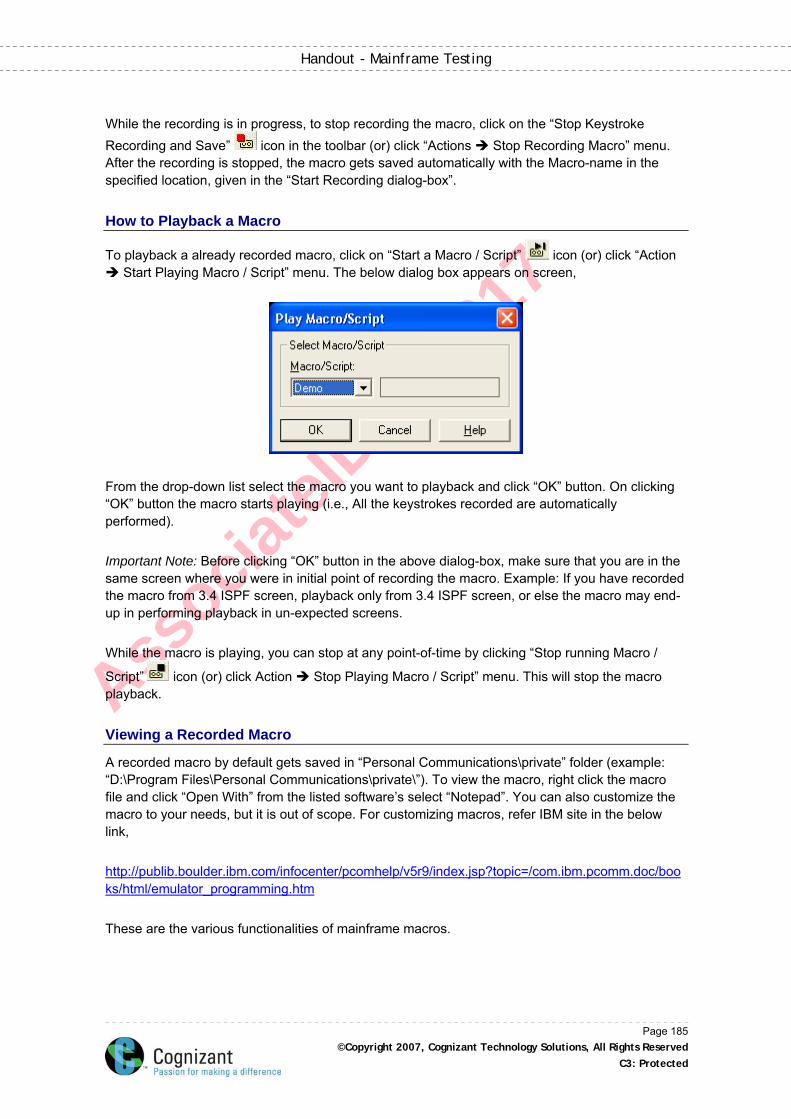
Associa
teID
:245
217
Handout - Mainframe Testing
While the recording is in progress, to stop recording the macro, click on the “Stop Keystroke Recording and Save” icon in the toolbar (or) click “Actions Stop Recording Macro” menu. After the recording is stopped, the macro gets saved automatically with the Macro-name in the specified location, given in the “Start Recording dialog-box”.
How to Playback a Macro
To playback a already recorded macro, click on “Start a Macro / Script” icon (or) click “Action Start Playing Macro / Script” menu. The below dialog box appears on screen,
From the drop-down list select the macro you want to playback and click “OK” button. On clicking “OK” button the macro starts playing (i.e., All the keystrokes recorded are automatically performed). Important Note: Before clicking “OK” button in the above dialog-box, make sure that you are in the same screen where you were in initial point of recording the macro. Example: If you have recorded the macro from 3.4 ISPF screen, playback only from 3.4 ISPF screen, or else the macro may end-up in performing playback in un-expected screens. While the macro is playing, you can stop at any point-of-time by clicking “Stop running Macro /
Script” icon (or) click Action Stop Playing Macro / Script” menu. This will stop the macro playback.
Viewing a Recorded Macro
A recorded macro by default gets saved in “Personal Communications\private” folder (example: “D:\Program Files\Personal Communications\private\”). To view the macro, right click the macro file and click “Open With” from the listed software’s select “Notepad”. You can also customize the macro to your needs, but it is out of scope. For customizing macros, refer IBM site in the below link, http://publib.boulder.ibm.com/infocenter/pcomhelp/v5r9/index.jsp?topic=/com.ibm.pcomm.doc/books/html/emulator_programming.htm These are the various functionalities of mainframe macros.
Page 185 ©Copyright 2007, Cognizant Technology Solutions, All Rights Reserved
C3: Protected
Associa
teID
:245
217
Handout - Mainframe Testing
Summary:
“Action Start Recording Macro” menu is used to record a macro. “Action Start Playing Macro Script” menu is used to playback a macro.
Test Your Understanding
1. What is the default extension of the macro file? a) .MACRO b) .MAC c) .MACR
2. In which directory will be the macro saved by default?
a) Macro folder b) Script folder c) Private folder
Answers:
1. b 2. c
Page 186 ©Copyright 2007, Cognizant Technology Solutions, All Rights Reserved
C3: Protected
Associa
teID
:245
217
Handout - Mainframe Testing
Glossary
TSO Time Sharing Option is an environment in mainframe. It has only command interface. ISPF Interactive Service Provider Facility is an environment in mainframe. It provides the user interface (panels) in mainframe environment. PF-Keys are the functions keys from F1 to F12 and F13 to F24 (use Shift F1 for F13, Shift F2 for F14 and goes on) Dataset is the files in mainframes. PS Physical Sequential dataset is a flat file, similar to a text file in windows. PDS Partitioned DataSet is a collection of members (flat text files), similar to a directory in windows. JCL Job Control Language is used to submit batch jobs in mainframe. SPOOL is the place where all the batch job-logs are logged. ABEND ABnormalEND is the runtime errors or exceptions in mainframe batch environments. Return Code is the error code returned by each step in a batch job. MAXCC Maximum Condition Code is the maximum value of the return codes in a single job VSAM Virtual Storage Access Method is the access method where we can access the mainframe files using index or relative record number. Cluster is the combination of data and index components in a VSAM file. Offset is the starting position of the key field in a KSDS. Area A column numbers from 1 to 7 in a COBOL program is called Area A. Area B column numbers from 8 to 72 in a COBOL program is called Area B. Paragraph or Para is a named block of code in a COBOL program. CICS Customer Information Control System is the environment in mainframe, which is used for online processing.
Page 187 ©Copyright 2007, Cognizant Technology Solutions, All Rights Reserved
C3: Protected
Associa
teID
:245
217
Handout - Mainframe Testing
BMS Basic Mapping System is used to design maps in CICS. Map is the screen designed using BMS code for CICS. SPFUI is the tool used to query mainframe DB2 database. Table-Space is the physical space where the tables are allocated in DB2 database. Parse is used to split the values of variables in REXX. Stem Variable is a collection of variables with common naming convention, which is used in REXX. It is similar to an array. Macro is a code or script which is used to “Record & Playback” repeated actions in mainframe.
Page 188 ©Copyright 2007, Cognizant Technology Solutions, All Rights Reserved
C3: Protected
Associa
teID
:245
217
Handout - Mainframe Testing
References
Books
Academy Documents
Page 189 ©Copyright 2007, Cognizant Technology Solutions, All Rights Reserved
C3: Protected
Associa
teID
:245
217
Handout - Mainframe Testing
Page 190 ©Copyright 2007, Cognizant Technology Solutions, All Rights Reserved
C3: Protected
STUDENT NOTES:
Related Documents