apulSoft apTrigga v2.3.3 Manual audio sample trigger plugin (VST/AU Mac OSX, VST win) c 2004-2008 by apulSoft http://www.apulsoft.ch VST plugin technology by Steinberg. AU plugin Technology by Apple. Manual written with L A T E X on June 21, 2008

Welcome message from author
This document is posted to help you gain knowledge. Please leave a comment to let me know what you think about it! Share it to your friends and learn new things together.
Transcript
apulSoft apTrigga v2.3.3 Manualaudio sample trigger plugin
(VST/AU Mac OSX, VST win)
c©2004-2008 by apulSofthttp://www.apulsoft.ch
VST plugin technology by Steinberg.AU plugin Technology by Apple.
Manual written with LATEX on June 21, 2008

Introduction
apulSoft apTrigga is an audio plugin (VST/AU mac OSX, VST win) to generate atrigger signal from an audio source. This signal is used to trigger mono or stereosamples (aiff, wav & sd2), which can be dropped directly onto the plugin interface.apTrigga features a filter section to extract specific frequencies from the sourcematerial. Volume, pitch, a 4-pole low-pass filter and multi sample selection can bemodulated by the trigger intensity.
apTrigga can be used to replace recorded drum instruments with sampled drums,to extract rhythmical elements from drumloops or to spice up drum mixes with shortattack samples. Due to its zero sample latency apTrigga works great for live drumtriggering.
2

Contents
1 End User License Agreement 5
2 System Requirements 6
3 Installation 7
4 Controls Description 8
5 Plug-In-Sections Description 125.1 Filter Section . . . . . . . . . . . . . . . . . . . . . . . . . . . . . . . 125.2 Trigger Section . . . . . . . . . . . . . . . . . . . . . . . . . . . . . . 125.3 Sample Section . . . . . . . . . . . . . . . . . . . . . . . . . . . . . . 135.4 Out Section . . . . . . . . . . . . . . . . . . . . . . . . . . . . . . . . 14
6 Midi Input 156.1 Supported Midi Commands . . . . . . . . . . . . . . . . . . . . . . . 156.2 How To Send Midi To apTrigga2 . . . . . . . . . . . . . . . . . . . . . 15
7 CPU Usage 16
8 Sample File Formats 17
9 Sample File Organization 18
10 apTrigga Usage Examples 1910.1 Replacing Drums Sounds . . . . . . . . . . . . . . . . . . . . . . . . 1910.2 Adding Sounds To Loops . . . . . . . . . . . . . . . . . . . . . . . . 1910.3 Using apTrigga With apulSoft spikeGen . . . . . . . . . . . . . . . . 1910.4 Using The Multisample Modes . . . . . . . . . . . . . . . . . . . . . 19
10.4.1 Dynamic Mode . . . . . . . . . . . . . . . . . . . . . . . . . . 1910.4.2 Sequential Mode . . . . . . . . . . . . . . . . . . . . . . . . . 2010.4.3 Random Mode . . . . . . . . . . . . . . . . . . . . . . . . . . 2010.4.4 Stack Mode . . . . . . . . . . . . . . . . . . . . . . . . . . . . 2010.4.5 Dynamical Stack Mode . . . . . . . . . . . . . . . . . . . . . 2010.4.6 Manual Mode . . . . . . . . . . . . . . . . . . . . . . . . . . . 21
10.5 Weird Things To Do With apTrigga . . . . . . . . . . . . . . . . . . . 2110.5.1 Using apTrigga2 Just As A Filter . . . . . . . . . . . . . . . . 2110.5.2 Waveform Distortion . . . . . . . . . . . . . . . . . . . . . . . 2110.5.3 Generating Strange Bass Lines . . . . . . . . . . . . . . . . . 2110.5.4 Using apTrigga And spikeGen As A Multisample Drummachine 2210.5.5 Playing back samples with realtime pitch control . . . . . . . 22
11 Authorizing apTrigga2 23
3

12 Frequently Asked Questions (FAQ) 24
13 Changelog 25
4

1 End User License Agreement
END-USER LICENSE AGREEMENT FOR apulSoft
This apulSoft End-User License Agreement ("EULA") is a legal agreement between you (either an individual
or a single entity) and apulSoft for the software accompanying this EULA, which includes computer
software and electronic documentation ("SOFTWARE PRODUCT" or "SOFTWARE"). By exercising your rights
to make and use copies of the SOFTWARE PRODUCT, you agree to be bound by the terms of this EULA.
If you do not agree to the terms of this EULA, you may not use the SOFTWARE PRODUCT.
DISCLAIMER OF WARRANTY
This product is provided on an "AS IS" basis, without warranty of any kind, expressed or implied,
including any warranties of fitness for a particular purpose. The authors shall not be liable
for damages of any kind. Use of this software indicates you agree to this.
SOFTWARE PRODUCT LICENCE
The SOFTWARE PRODUCT is protected by copyright laws and international copyright treaties, as well
as other intellectual property laws and treaties. The SOFTWARE PRODUCT is licensed, not sold.
GRANT OF LICENSE
Installation and Use:
You may install and use copies of the SOFTWARE PRODUCT on all computers you own.
Reproduction and Distribution:
You may not reproduce or distribute the SOFTWARE PRODUCT except to make backup copies, or to install
as provided for above.
DESCRIPTION OF OTHER RIGHTS AND LIMITATIONS
Limitations on Reverse Engineering, Decompilation and Disassembly:
You may not reverse engineer, decompile, or disassemble this SOFTWARE PRODUCT.
Software Transfer:
You may permanently transfer all of your rights under this EULA, provided you retain no copies,
you transfer all of the SOFTWARE PRODUCT, and the recipient agrees to the terms of this EULA.
Termination:
Without prejudice to any other rights, apulSoft may terminate this EULA if you fail to comply with
the terms and conditions of this EULA. In such event, you must destroy all copies of the SOFTWARE
PRODUCT and all of its component parts.
COPYRIGHT
All title and copyrights in and to the SOFTWARE PRODUCT (including any images, text, and "applets"
incorporated into the SOFTWARE PRODUCT), the accompanying printed materials, and any copies of
the SOFTWARE PRODUCT are owned by apulSoft or its suppliers.
5
2 System Requirements
• Mac OS X
– Mac OS X 10.2.6 or better, 10.3 recommended.
– An AU or VST host.
– Samples in .WAV, .AiFF, SD2 format.
• Windows
– Windows 98 SE of better, Windows 2000 & XP recommended.
– A VST host.
– Samples in .WAV or .AiFF format.
– An application to view pdf files to read the manual (Acrobat Reader).
6
3 Installation
• Mac OS X
– There is no need to delete apTrigga v1.0 or v1.1! Both versions (1&2)can be used at the same time.
– If you previously installed apTriggaDemo or apTrigga2demo, erase all in-stalled parts. These can be found in the ”/Library/Audio/Plug-Ins/Components”and ”/Library/Audio/Plug-Ins/VST” folders.
– Close all AU/VST hosts.
– Mount the disc image by double-clicking ”apTrigga2***.dmg”.
– Double-click ”Install apTrigga2.mpkg” or ”Install apTrigga2demo.mpkg”.Follow the standard OSX installation procedure.
– Open a host and open apTrigga2!
– (Full Version) Enter your ID/serial in the edit fields (copy/paste might notwork in all hosts)
• Windows
– Close all VST hosts.
– Open the ”apTrigga2***.zip” folder by double-clicking it.
– Launch the apTrigga2 installer by double-clicking ”apTrigga2-setup.exe”and follow the installation procedure.
– Open a host and open apTrigga2.
– (Full Version) Enter your ID/serial in the edit fields (copy/paste might notwork in all hosts)
7
4 Controls Description
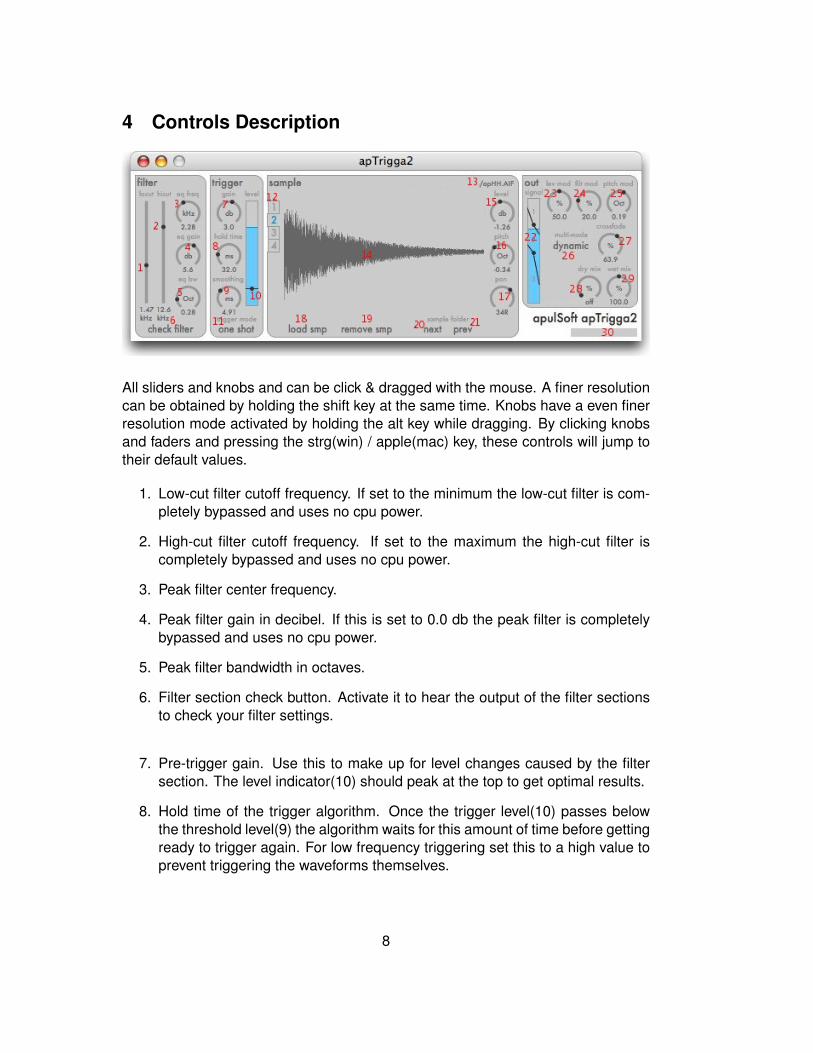
All sliders and knobs and can be click & dragged with the mouse. A finer resolutioncan be obtained by holding the shift key at the same time. Knobs have a even finerresolution mode activated by holding the alt key while dragging. By clicking knobsand faders and pressing the strg(win) / apple(mac) key, these controls will jump totheir default values.
1. Low-cut filter cutoff frequency. If set to the minimum the low-cut filter is com-pletely bypassed and uses no cpu power.
2. High-cut filter cutoff frequency. If set to the maximum the high-cut filter iscompletely bypassed and uses no cpu power.
3. Peak filter center frequency.
4. Peak filter gain in decibel. If this is set to 0.0 db the peak filter is completelybypassed and uses no cpu power.
5. Peak filter bandwidth in octaves.
6. Filter section check button. Activate it to hear the output of the filter sectionsto check your filter settings.
7. Pre-trigger gain. Use this to make up for level changes caused by the filtersection. The level indicator(10) should peak at the top to get optimal results.
8. Hold time of the trigger algorithm. Once the trigger level(10) passes belowthe threshold level(9) the algorithm waits for this amount of time before gettingready to trigger again. For low frequency triggering set this to a high value toprevent triggering the waveforms themselves.
8

9. Trigger signal smoothing. This adjusts how fast the trigger reacts to signalchanges such as the end of the trigger period in gate mode. If you noticeclicks in the apTrigga output signal, try a higher setting. For very percussivesounds it’s best to use a low value.
10. Trigger level meter and threshold level. This control shows the input level ofthe trigger section (the plugin input converted to mono and then processedby the filter section). The handle is used to set the minimal trigger thresholdlevel.
11. Trigger mode. Clicking this will open a pop-up menu to make a selection. oneshot means samples are always played to their ends unless they are triggeredagain. gate means the sample is cut off once the trigger level passes belowthe threshold and if at least hold time has passed since triggering occured.loop is an experimental mode similar to gate but loops the entire sample aslong as the gate is open.
12. Sample select. Use this control to click through the 9 sample panes. Ev-ery time the lowest slot is filled with a sample, another number is added tothe control. For the dynamic modes, sample 1 always has to be the loudestsample. In manual multi mode, this control selects the sample to be played.
13. Sample filename and path. The path and file name of the currently viewedsample. If a sample can’t be loaded its filename and path will still appear here.The demo version does not store the paths and places a reminder here.
14. Sample display. Here you see an overview of the sample loaded into the cur-rently selected pane. If there is no sample loaded, if a file can’t be found orif a file is not in a supported format this will read: ”sample not loaded!”. Youcan drag & drop files onto this display to load them. If a sample is stereo, twowaveforms are displayed. The display accounts for changes in sample leveland can thus be used to graphically match the volumes of several samples ina set.If the display is clicked with the mouse, the selected sample will be playedwithout any out-section modulation. If you shift-click the display, you can gen-erate a dynamic trigger event. The higher you click the ”louder” the triggerevent will be. This event is processed like any trigger input and can thus beused to check the complete plugin settings.
15. Sample level. The volume of the selected sample can be adjusted with thisknob.
16. Sample pitch. The pitch of the selected sample can be adjusted with thisknob.
9

17. Sample pan. The panorama of the selected sample can be adjusted with thisknob. This works for both mono and stereo samples if the plugin is insertedin a stereo channel. If apTrigga is used on a mono channel, this control wouldhave no effect and thus the handle is hidden.
18. Load sample. Click on this control to open a file selector to select an AiFF,WAV or SD2 (mac only) sample file. The same can be done by dragging anddropping a file onto the sample display (14).
19. Remove sample. This removes the selected sample and decreases the num-ber of samples by one.
20. Next sample in folder. The directory of the selected sample is scanned andthe next loadable file is loaded. If no sample is loaded in the selected slot orif there is only one sample inside a folder, this control does nothing. Use thisto quickly scan through folders of samples. This control does not switch tothe next sample pane!
21. Previous sample in folder. Similar to the last control described, but the pre-vious file inside the folder is searched and loaded. This control does notswitch to the previous sample pane!
22. Signal meter & dynamic levels. This control shows the signal generated bythe trigger section. It is used for all the modulations possible with apTrigga2.If multiple samples are loaded and a dynamical mode is used, the control alsofeatures adjustable level handles to set up the dynamical multi-sample modes.The steepness of the handle lines represents the amount of crossfade (26)used in dynamic mode. By watching the peak of the signal (dark blue line),the numbers of the triggered samples and their ratio can be determined.
23. Amount of level modulation. This control indicates how much the level of thetriggered sample is modulated by the trigger section output signal. A settingof 100% can lead to muted samples, a setting of 0% means all triggeredsamples have the same volume.
24. Amount of filter modulation. This control determines the maximum amount ofcutoff frequency modulation of the 4pole output filter. 100% means the filtercutoff is set to 0 Hz if the signal reaches its lowest level. The top level alwaysopens the filter completely. By setting this to zero the filter can be turned offand cpu usage can be lowered.
25. Amount of pitch modulation. This control determines the maximum amountof pitch modulation. The shown value is multiplied by the trigger signal andadded to the sample pitch level(16) of any played sample.
26. Multisample mode. This control only works if more than one sample is loaded.Clicking on it will open the pop-up menu with the available modes:
10

dynamic: The samples are played and crossfaded according to the levels setup in the signal meter(21).sequence: Every time the trigger is activated, the next sample is played.If you need to make sure the first sample is played at some specific point ofan arrangement (the counter is reseted), automate this control and set it tosequence.random: A random sample is played everytime a trigger event occurs. Thiscannot be controlled, it’s not possible to get the same order twice.stack: All samples are mixed together and played back at the same time.dynastack: Samples are stacked up and mixed together according to thelevels set up in the signal meter. The higher the trigger intensity, the moresamples are played back, starting from the sample with the highest number.manual: The currently selected sample is always played. The sample selec-tion control(12) can be automated. That way the manual mode can be usedto change the played back sample during a song.
27. Crossfade. If multiple samples are loaded and a dynamical mode is activated,this knob controls how much crossfading is applied.
28. Dry signal percentage. This specifies the amount of the unprocessed inputsignal mixed to the output of the plugin. The input filter section has no effecton this signal.
29. Wet signal percentage. This stands for the level of the triggered samplesmixed to the plugin output. If this is set to zero, you won’t hear any sampleeven if you trigger manually!
30. A text field. The demo version will output demo version. The full versionoutputs unauthorized before being registered and your email address onceit is registered on a machine. If you click on apulSoft apTrigga2, a splashscreen will be displayed.
11

5 Plug-In-Sections Description
5.1 Filter Section
The apTrigga filter section is designed to prepare the inputaudio signal for triggering. It is possible to cut high or lowfrequencies and to boost or dampen frequency region using apeak filter. These filters will not affect the output of the plugin!The filtered input signal can be checked (heard) by activatingthe check filter button.
Please consider that cutting high frequencies can affectthe trigger precision as any fast transients (attacks) include asignificant amount of high frequencies.
Cutting low frequencies however is recommended in most cases as low frequenciescan’t be used as a precise source of rhythmic information. Low frequencies some-times confuse the trigger algorithm as they are the largest waves in a graphical wayof looking at things. Unless there is a desperate need for processing power, the lowcut fader should be set to 80-200 Hz.
To save processing power, the three filters can be completely bypassed by mov-ing the faders to extreme positions (high- and lowcut) and/or by moving gain to 0db (peak-eq). This can be achieved by reseting the knobs/faders (apple-click/strg-click).
5.2 Trigger Section
The level of the signal leaving the filter section in displayed in thetrigger meter. Use the gain control to make up for level changescaused by filtering. To get the best results the level should justtouch the top of the meter on the loudest peaks.
The threshold level is marked by a handle inside the triggermeter. It is the minimal level which will trigger samples. Move it tothe desired position. The lower the threshold is set, the larger thedynamic range gets to be used to modulate the output of apTrigga
12

The hold time control displays how long a maximal modulation signal is held. Thiscorresponds to the minimal time interval between two trigger events. It does not af-fect latency in any way. If you want to trigger on low frequency content (bass drumtrack,...) use a high hold time to prevent stuttering. If you need to trigger very fastmaterial (up tempo high-hats, snare rolls), use a low hold time. Generally spoken,use a hold time as low as possible which doesn’t produce wrong triggering. Some-times some low-cutting helps to get rid of unwanted trigger events.
Trigger smoothing represents the amount of time the trigger algorithm uses toadjust to dynamic changes. It does not affect latency. The more percussive thesounds used with apTrigga are, the shorter this time should be chosen. In conjunc-tion with the gate trigger mode, smoothing is similar to a AHR(attack-hold-release)envelope, where smoothing is both the attack and the release time. If clicks areheard in the trigger output, smoothing time should be increased.Note: If smoothing is set to a higher value than hold time, fast sequences of triggerevents can lead to non-linear output-signals (clicks)!
The trigger mode setting can be either one shot, gate or loop. With one shot,samples are always played to their ends unless the threshold is surpassed again.gate mode cuts off triggered samples once the hold time has passed since thesignal dropped below the threshold. loop also cuts off trigger samples the sameway as gate but loop the entire sample in case it is shorter than the triggered timeinterval.
5.3 Sample Section
apTrigga’s sample section consists of up to nine sample panes which can be filledwith sample files in AiFF, wav or sd2 (mac) format. Panes are added as samplesare loaded. All the controls inside the sample section only affect the currently se-
13
lected sample. For a detailed description of the controls refer to the controls sectionof this manual.
The sample section responds to drag and drop and it can be clicked to manuallytrigger a selected sample.
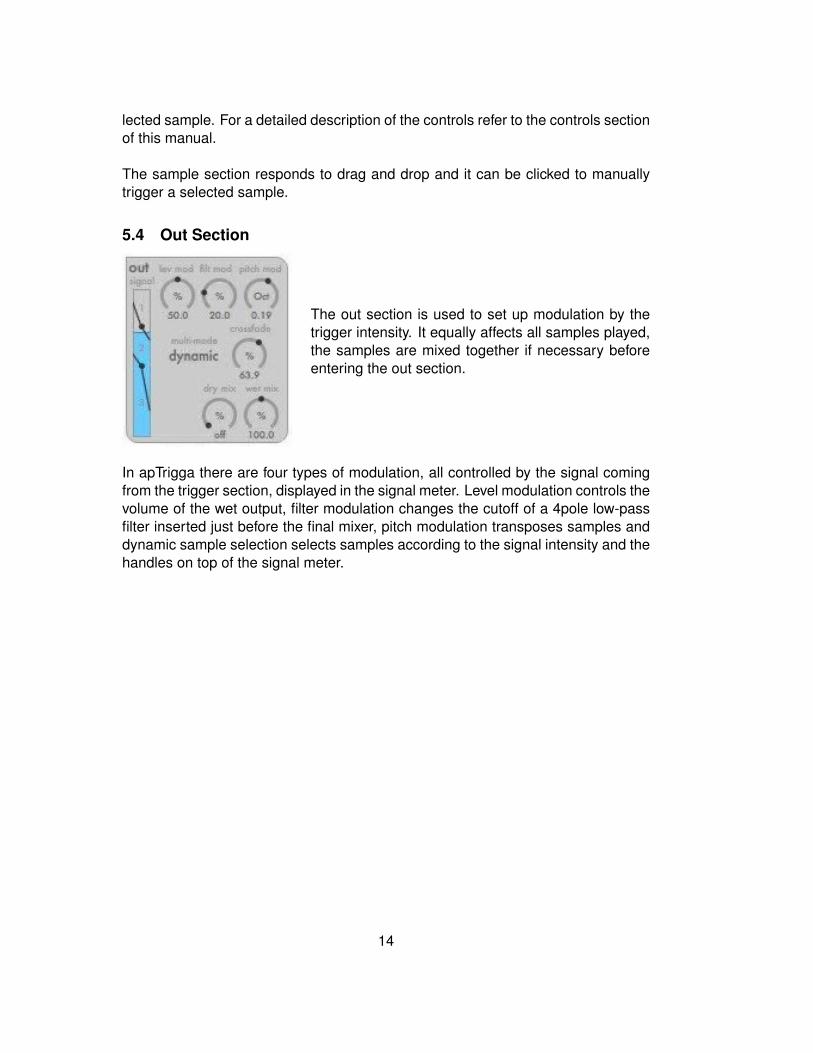
5.4 Out Section
The out section is used to set up modulation by thetrigger intensity. It equally affects all samples played,the samples are mixed together if necessary beforeentering the out section.
In apTrigga there are four types of modulation, all controlled by the signal comingfrom the trigger section, displayed in the signal meter. Level modulation controls thevolume of the wet output, filter modulation changes the cutoff of a 4pole low-passfilter inserted just before the final mixer, pitch modulation transposes samples anddynamic sample selection selects samples according to the signal intensity and thehandles on top of the signal meter.
14
6 Midi Input
6.1 Supported Midi Commands
Starting from v2.2 apTrigga supports midi input. Note-On messages are convertedto trigger events which makes it possible to play samples with apTrigga and a midi-keyboard. Please consult the manual of your DAW to find out how to send midi datato a VST/AU plugin. Note: Not all hosts support this feature .
As a special feature it’s also possible to realtime modulate apTrigga2’s engine withthe pitch-bend. The pitch-bend value is added to the signal level which is usedto modulate the playback according to the modulation knobs. This means you cancontrol volume/filter cutoff/pitch/dynamic sample selection with the pitch-bend whilethe sample is being played back.
Additionally, some midi controllers are built into apTrigga for real-time performance.
CC70: Samplepane-select. Useful in combination with the manual multi-modeCC71: Dry Level percentage.CC72: Wet Level percentage.CC73: Dry-Wet crossfade with a sum of 100% for the two values.
6.2 How To Send Midi To apTrigga2
Obviously, apulSoft can’t provide a manual for all the possible hosts out there.Here’s how to do it for some major hosts:
In Logic, apTrigga2 can be inserted into an instrument slot. Audio needs then to besent to apTrigga via the sidechain menu and midi comes from the instrument trackit is inserted into.In Cubase SX there will be an additional virtual midi output as soon as apTrigga2 isinserted anywhere. It can be used with any midi track after that.In Ableton Live 4, apTrigga2 can be dropped onto a midi track and receives midifrom that track. As long as there is no Instrument inserted, it will also receive No-teOn/Off Information. To get audio into the track, live’s track input menu has to beused.In DP4, midi does not work with the AU version as DP4 does not support midi inputfor AU Plugins yet. (4.12) It is possible to use AudioEase’s VST2MAS adapter withapTrigga2. In that case, DP will create a virtual midi port for the plugin.
15
7 CPU Usage
Depending on how it is used, apTrigga uses different amounts of processing power.
Less CPU usage More CPU usagemono samples stereo samples
fewer samples loaded more samples loadedfilter section bypassed filter section on
filter modulation bypassed filter modulation onsamples use original pitch samples transposed, pitch modulation on
random/seq./manual multimode dynamical/stack multimodegate/loop trigger mode one shot trigger mode
inserted in mono channel inserted in stereo channelmidi pitch bend not used midi pitch bend used
Note: Transposing samples via the sample pitch control and using pitch modu-lation uses a high quality sample rate conversion algorithm. This requires heavycalculating, but the load does not add up if both those options are used.
The biggest cpu usage is caused by the dynastack multimode with many samplesand heavy crossfading, as this mode requires the plugin to transpose and crossfadeall samples at the same time.
16
8 Sample File Formats
apTrigga accepts uncompressed WAV, AiFF and SD2(mac) files with bitdepths of8, 16, 24, 32 and 64 bits, mono and stereo. If you try to load an unsupported file, itspath and name will still be displayed, but there will be no waveform overview. Thesame thing happens if a file can’t be found anymore.
If samples with sample rates different from the host’s sample rate are loaded, ap-Trigga2 will try to make up with the sample pitch setting to ensure the sample isplayed back at correct pitch.Example: If a 22.05 kHz sample is loaded into a 44.1 kHz project, the sample’spitch setting will be set to -1.0 octaves.
17
9 Sample File Organization
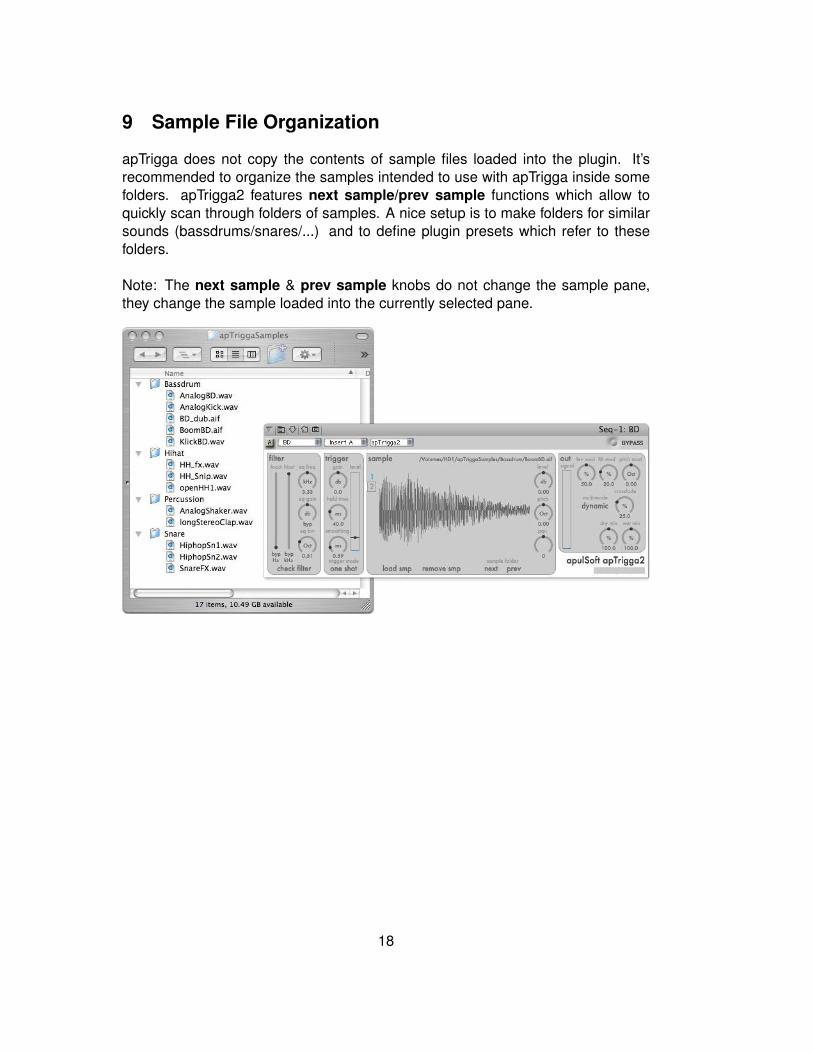
apTrigga does not copy the contents of sample files loaded into the plugin. It’srecommended to organize the samples intended to use with apTrigga inside somefolders. apTrigga2 features next sample/prev sample functions which allow toquickly scan through folders of samples. A nice setup is to make folders for similarsounds (bassdrums/snares/...) and to define plugin presets which refer to thesefolders.
Note: The next sample & prev sample knobs do not change the sample pane,they change the sample loaded into the currently selected pane.
18
10 apTrigga Usage Examples
10.1 Replacing Drums Sounds
Replacing drum sounds on separately recorded drum parts (bassdrum/snare/..) isa thing very easy to do with apTrigga. First click the check filter button to hearthe recorded sound. Often there is not much filtering needed. If the bassdrum canbe heard quite loudly on another track, use some low-cutting. Also try to bring outthe attack of the sound by using the peak filter with low bandwidth (0.2 oct) andhigh gain(+10db) and by scanning through the frequencies. Bassdrums have theirattacks usually between 500 Hz and 1 kHz, for instants.
In the trigger section, use the one shot mode and a hold time related to the speedat which attacks occur. Move the threshold to the lowest possible position justabove the unwanted ”noise” on a track, to get the best dynamic response.
Then load a sample and move dry mix to 0% and wet mix to 100% in the outsection. Modulate the level and the out-filter as you like it for a specific sound.
10.2 Adding Sounds To Loops
Sometimes it can be fun to add a sound to a complete stereo loop, for instants arimshot on top of the loudest snares. To do that, aggressive filtering of the sourcematerial is necessary. Try to find a filter setting which makes the peaks you want touse stand out in the trigger meter. If you filter aggressively, you’ll need to make upfor the level changes with the peak gain knob.
10.3 Using apTrigga With apulSoft spikeGen
spikeGen is a free plugin included with apTrigga. For information about spikeGen,please read the separate spikeGen manual. To set up apTrigga, just select thepreset called ”spikeGen” in your host.
10.4 Using The Multisample Modes
10.4.1 Dynamic Mode
The dynamic multisample mode of apTrigga is its most complex feature. Thus ituses a lot more cpu resources than the other modes. To use the dynamic modeyou have to load multiple samples. The sample in slot 1 has to be the one usedfor the loudest peaks, the one with the highest number is to be used for the softestpeaks. There is no direct way to change the order of samples loaded! If the sam-ples are in the same folder, it can be done quite quickly with the next sample/prevsample buttons.
19

In most cases it’s a good idea to adjust the levels of the loaded samples with thesample level knob. They should all look similarly ”loud” in the overview, as levelmodulation is done in the out section of apTrigga.
Once all sounds are ready, the handles on top of the signal meter in the out sectionallow to control the distribution of the samples over the dynamic range. With thecrossfade knob, ranges can be set to overlap and two samples will be accordinglymixed. If crossfade is set to 100%, there will always be two samples played.
10.4.2 Sequential Mode
The sequential mode plays the samples in the order they are loaded. It starts withthe sample in slot 1 and increases the slot number with every trigger event.
If you use apTrigga in an arrangement it might be necessary to reset the sequentialmode counter to make sure the first sample is played first when the arrangementstarts. To achieve this use your hosts automation and automate the multi-modeswitch in the out-section. Just set it to sequence with the automation and thecounter will be reseted at that point.
10.4.3 Random Mode
apTrigga’s random mode selects a random sample of the loaded samples every-time the trigger is activated. There is no way to influence the behaviour and anarrangment may sound different every time it is played if random mode is used.This mode is intended to be used for natural-feel drum triggering, to simulate thefact that a drummer can’t hit a drum exactly the same way every time.
10.4.4 Stack Mode
The stack mode just plays back all the samples together. It is useful if you wantto create sounds by adding samples. With the controls on the right side of thesample section, the sounds can be altered to create interesting layers (For instantspanoramically spread layer sounds).
10.4.5 Dynamical Stack Mode
The dynastack mode adds samples dynamically, at maximum trigger intensity allsamples are mixed together, at lower levels, samples are added according to thelevels displayed on the signal meter. The higher the intensity the more samples areplayed. This mode can for instants be used to trigger a sample and add a rim shotat the highest peaks while still playing back the snare at full level.
20
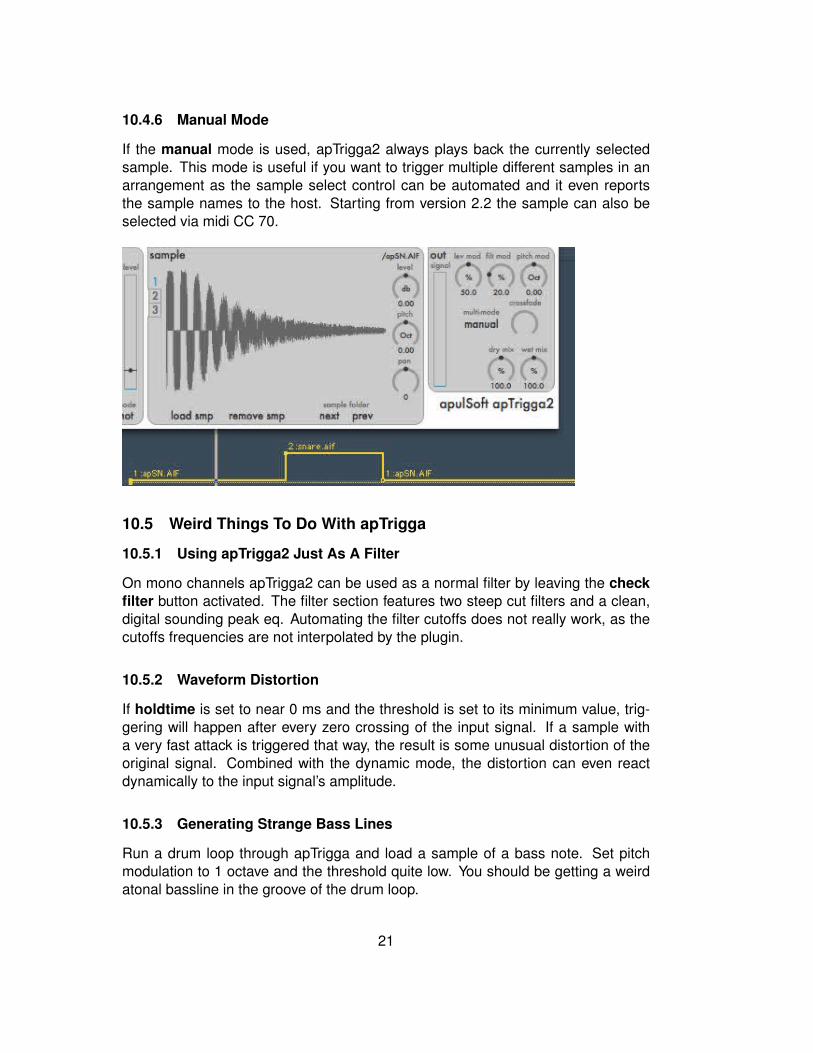
10.4.6 Manual Mode
If the manual mode is used, apTrigga2 always plays back the currently selectedsample. This mode is useful if you want to trigger multiple different samples in anarrangement as the sample select control can be automated and it even reportsthe sample names to the host. Starting from version 2.2 the sample can also beselected via midi CC 70.
10.5 Weird Things To Do With apTrigga
10.5.1 Using apTrigga2 Just As A Filter
On mono channels apTrigga2 can be used as a normal filter by leaving the checkfilter button activated. The filter section features two steep cut filters and a clean,digital sounding peak eq. Automating the filter cutoffs does not really work, as thecutoffs frequencies are not interpolated by the plugin.
10.5.2 Waveform Distortion
If holdtime is set to near 0 ms and the threshold is set to its minimum value, trig-gering will happen after every zero crossing of the input signal. If a sample witha very fast attack is triggered that way, the result is some unusual distortion of theoriginal signal. Combined with the dynamic mode, the distortion can even reactdynamically to the input signal’s amplitude.
10.5.3 Generating Strange Bass Lines
Run a drum loop through apTrigga and load a sample of a bass note. Set pitchmodulation to 1 octave and the threshold quite low. You should be getting a weirdatonal bassline in the groove of the drum loop.
21
10.5.4 Using apTrigga And spikeGen As A Multisample Drummachine
Create an audio channel with spikeGen and apTrigga as insert effects. In apTrigga,activate the dynamic mode and load nine samples of different drums. Move cross-fade and all modulations to 0%. By entering rhythms in spikeGen while pressingthe shift key, you get quantized values which happen to just trigger one of the ninesamples thus allowing you to program drum patterns in spikeGen.
10.5.5 Playing back samples with realtime pitch control
If you use apTrigga2.2 as a midi-effect, you can send pitch-bend information to theplugin. Load a long sample and set modulation to 0% lev mod, 0% filter mod and 1oct pitch mod. Start the sample with a soft note on and you’ll be able to control thepitch in realtime with the pitch-bend information.
22
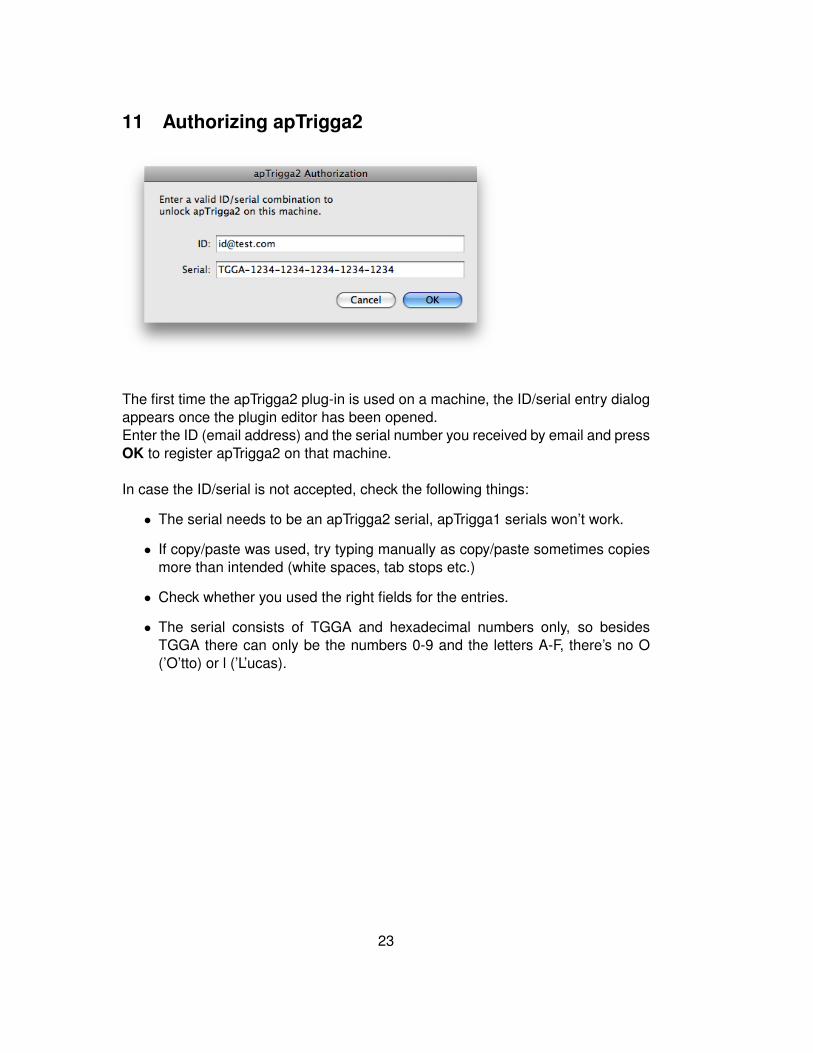
11 Authorizing apTrigga2
The first time the apTrigga2 plug-in is used on a machine, the ID/serial entry dialogappears once the plugin editor has been opened.Enter the ID (email address) and the serial number you received by email and pressOK to register apTrigga2 on that machine.
In case the ID/serial is not accepted, check the following things:
• The serial needs to be an apTrigga2 serial, apTrigga1 serials won’t work.
• If copy/paste was used, try typing manually as copy/paste sometimes copiesmore than intended (white spaces, tab stops etc.)
• Check whether you used the right fields for the entries.
• The serial consists of TGGA and hexadecimal numbers only, so besidesTGGA there can only be the numbers 0-9 and the letters A-F, there’s no O(’O’tto) or l (’L’ucas).
23

12 Frequently Asked Questions (FAQ)
• Can apTrigga v1.1 still be used (in old projects) if apTrigga2 is installed?Yes. If apTrigga v1.1 is properly authorized, apTrigga2 will run totally inde-pendently.
• A sample dropped onto the sample view does not load. What is the problem?apTrigga handles uncompressed WAV, AiFF & SD2 (on mac) files with bit-depths of 8, 16, 24 and 32 Bits. Your file probably has another format or iscorrupted. Try converting it to a 24 bit AiFF for smoothest operation.Sometimes the plugin window just is not truly activated by the system. Justclick on the plugin window to make it the topmost window and drag and dropthe sample again.
• I can’t hear a sample! Even if I click on the overview! What shall I do?Maybe the check filter button is activated. Or the wet level is at its zero po-sition (off). Deactivate the check filter button and move the wet control to themid-position and try clicking the overview again. Maybe your host currentlymuted the plugin. Make sure audio is being run through the plugin and tryagain.
• No text shows up in the plugin! What’s wrong?This can be caused by missing fonts in your system. Please verify whetheryou have the Helvetica font on your machine. On mac, the Futura font is usedif present and Helvetica if there’s no Futura.
• No controls show up and there’s a red unauthorized on the right bottom. Whatgives?The apTrigga plugin has not yet been registered on the machine or non-validdata was stored. Starting from v2.3 the ID/serial entry box should appear.
• Why is noise added to the signal every some seconds?This is a restriction of the demo version of apTrigga. Buy the full version athttp://www.apulsoft.ch.
• Why do the samples disappear if a project is reloaded in a host?This is a restriction of the demo version of apTrigga. Buy the full version athttp://www.apulsoft.ch.
24
13 Changelog
• Version 1.0
– Initial release.
• Version 1.1
– AU support.
– Manual uses hyperreferences.
– A lot more AiFF and WAV files are handled correctly.
– Distributed as .dmg.sit for users of internet explorer.
– No more mouse hiding in the GUI.
– Nicer handles in the GUI.
– spikeGen included.
• Version 2.0
– VST Win support.
– New GUI.
– Stereo file support.
– No more internet authorization.
– Faster and more stable file loading.
– Plugin uses less CPU for filtering.
– Sample rate conversion.
– Pitch modulation.
– Multisample modes (dynamic with crossfade, sequencial, random).
– Sample adjustments (level, pitch, pan).
– CPU usage improvements.
– Added next/previous sample in folder functions.
– Added default values (ctrl+Click/apple+Click).
– Overview drawing optimized.
– The load sample button disappears less often.
– Factory presets implemented.
25
• Version 2.1
– Less noise at startup of the demo version.
– Softer noise in the demo version.
– Corrections to the manual.
– AU graphics optimized.
– Three new multi-modes (stack, dynastack, manual)
– Non-active controls hide handles.
– Names, vendor strings & version numbers implemented.
– AU automation improved.
– Plugin passes AUValidation.
– Experimental loop mode implemented.
– More contrast in the GUI.
– CPU usage improvements.
– Complete plugin configuration can be tested by shift-clicking the sampledisplay (a dynamical trigger event is produced).
– Got rid of some interference between the demo and the full AU version.
• Version 2.2
– Better AU Implementation. (bypass works now, presets work better).
– Workaround for automation problem in DP4.1x.
– Improved apTrigga2Auth to check entries better.
– Support for wave extensible format (uncompressed) added
– Support for aiff-c format (uncompressed) added
– Support for 32 bit int, 32 bit float and 64 bit float samples
– Low and high cut filters now are as steep as originally planned
– Added a splash screen :)
– Added a finer resolution mode to the knobs, for precise filtering. (Pressalt while dragging)
– Improved the knob handling, parameters don’t jump anymore.
– Added midi input.
– Added support for sd2 files.
– Fixed graphic issues with Logic.
– Fixed a crash with Logic 6.
– Browsing sample folders is faster now.
– Switched positions for prev/next sample buttons. (thx OS)
26
– Moved knob labels and values.
• Version 2.3
– Universal Binary for ppc and intel macs.
– Now uses pop-up menus for trigger mode and multi mode selection.
– AU compatibility improvements.
– Serial entry now included in plug-in.
– Performance improvements, especially on windows machines.
– Fixed fonts sizes on mac.
– Fixed the sample path display update on sample pane changes.
• Version 2.3.1
– Fixed a compiler-related issue on Mac OS X leading to crashes on somemachines.
• Version 2.3.2
– Less dll dependencies for the windows version.
– apTrigga2 now has installers.
– Fixed a bug in the AU version that was preventing loading of old presets.
– Fixed compatibility with OSX older than 10.3.9
• Version 2.3.3
– New way of entering the serial info to work around problems in Logic 8.
– Factory preset names now show up in Digital Performer.
27
Related Documents