AppSpace Training DESIGNER FALL 2011 New User Training

Welcome message from author
This document is posted to help you gain knowledge. Please leave a comment to let me know what you think about it! Share it to your friends and learn new things together.
Transcript

AppSpace Training
DESIGNER
FALL 2011 New User Training
SUMMARY
Fall 2011 • nexusondemand.com 2
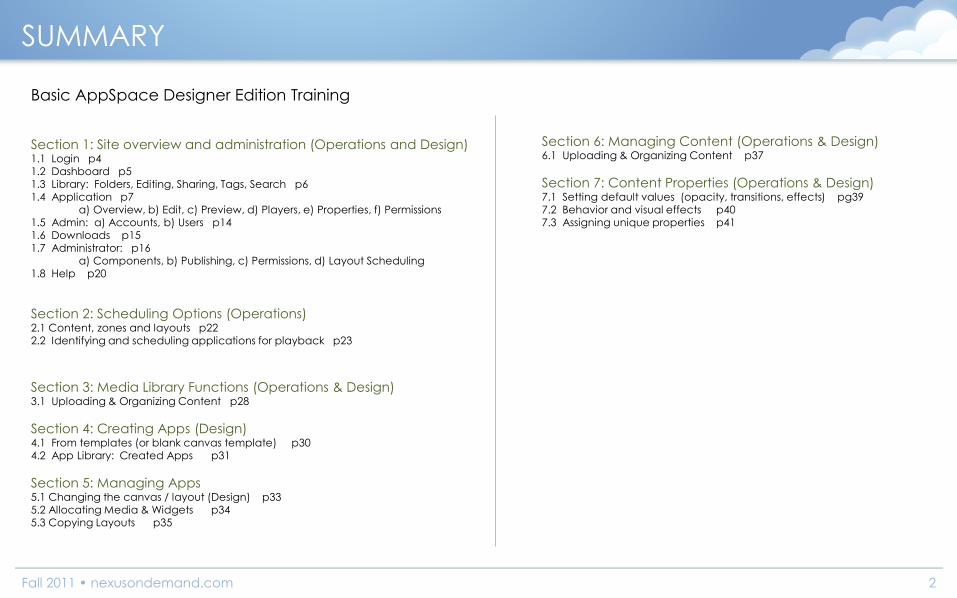
Basic AppSpace Designer Edition Training
Section 1: Site overview and administration (Operations and Design) 1.1 Login p4 1.2 Dashboard p5 1.3 Library: Folders, Editing, Sharing, Tags, Search p6 1.4 Application p7 a) Overview, b) Edit, c) Preview, d) Players, e) Properties, f) Permissions 1.5 Admin: a) Accounts, b) Users p14 1.6 Downloads p15 1.7 Administrator: p16 a) Components, b) Publishing, c) Permissions, d) Layout Scheduling 1.8 Help p20
Section 2: Scheduling Options (Operations) 2.1 Content, zones and layouts p22
2.2 Identifying and scheduling applications for playback p23
Section 3: Media Library Functions (Operations & Design) 3.1 Uploading & Organizing Content p28
Section 4: Creating Apps (Design) 4.1 From templates (or blank canvas template) p30 4.2 App Library: Created Apps p31
Section 5: Managing Apps 5.1 Changing the canvas / layout (Design) p33 5.2 Allocating Media & Widgets p34 5.3 Copying Layouts p35
Basic AppSpace Designer Edition Training
Section 6: Managing Content (Operations & Design) 6.1 Uploading & Organizing Content p37
Section 7: Content Properties (Operations & Design) 7.1 Setting default values (opacity, transitions, effects) pg39 7.2 Behavior and visual effects p40 7.3 Assigning unique properties p41

SITE OVERVIEW & ADMINISTRATION Section 1

Section 1.1: LOGIN
Fall 2011 • nexusondemand.com 4
1 2
3
1. Logging in is the first step to access your account applications and content. Enter your username and Password.
2. Click LOG IN
3. Alternatively, if you do not have credentials, create a trial account by selecting Sign up for a free trial.
LOGIN

Section 1.2: DASHBOARD
Fall 2011 • nexusondemand.com 5
1
2
3
1. AppSpace Announcements are where all users can see news from Nexus On-Demand concerning AppSpace or other Nexus notifications.
2. Alerts & Notifications will show system events specific to your account.
3. Applications Updates are a list of
most recent actions done in this account, the user who made the change and the date on which this change occurred.
DASHBOARD

Section 1.3: LIBRARY
Fall 2011 • nexusondemand.com 6
1
2 3
1. Folders allow you to manage and organize your library content as you
wish.
2. Select a folder and click Edit to rename the folder.
3. Share With will let you choose Users in your account to share (or un-share) folders with.
4. Tagging lets you further organize your library content for quicker search results.
5. When Searching, enter the file name or assigned tag to quickly locate content.
NOTE: It is best practice to always upload the content to the media library
and use descriptively named folders. This will allow allocation to multiple apps or zones with only 1 upload. It is also ideal for sharing and collaboration with others.
LIBRARY
5 4

Section 1.4a: OVERVIEW
Fall 2011 • nexusondemand.com 7
1
2
3
1. Overview Tab shows a thumbnail preview of the application.
2. Share the Preview with direct URLs, E-
mail Link or Embed HTML.
3. Application Updates (recent history) also appear in the Overview section.
OVERVIEW

Section 1.4b: EDIT
Fall 2011 • nexusondemand.com 8
Application > Edit
1
2
3
5
4
1. Layouts are like slides in PowerPoint. They are used to to organize the order in which your content is displayed. Each layout holds a series of layered Widgets.
2. Creating a New Layout allows you to add a layout to your application.
3. Manage your current layouts here with the checkbox to disable / enable. You can also drag and drop layouts higher and lower to change their order.
4. Layout Controls 1. Edit 2. Copy 3. Delete 4. Play out properties
5. Widget List is here, a Widget holds all your content. Select one to manage the content and settings for that Widget.
LAYOUTS

Section 1.4c: PREVIEW
Fall 2011 • nexusondemand.com 9
Application > Preview
1
2
3
4
1. In the Preview window, you can view your layouts similar to the Edit window.
2. Choose which layout you wish to preview or watch the entire application play out as created.
3. Preview Pane is where the rendered application preview displays. Resizing your browser window will
also resize the preview pane accordingly.
4. Pause, Play or Track through the Application Preview. This is similar to video controls found in most media players.
PREVIEWING
Section 1.4d: PLAYERS
Fall 2011 • nexusondemand.com 10
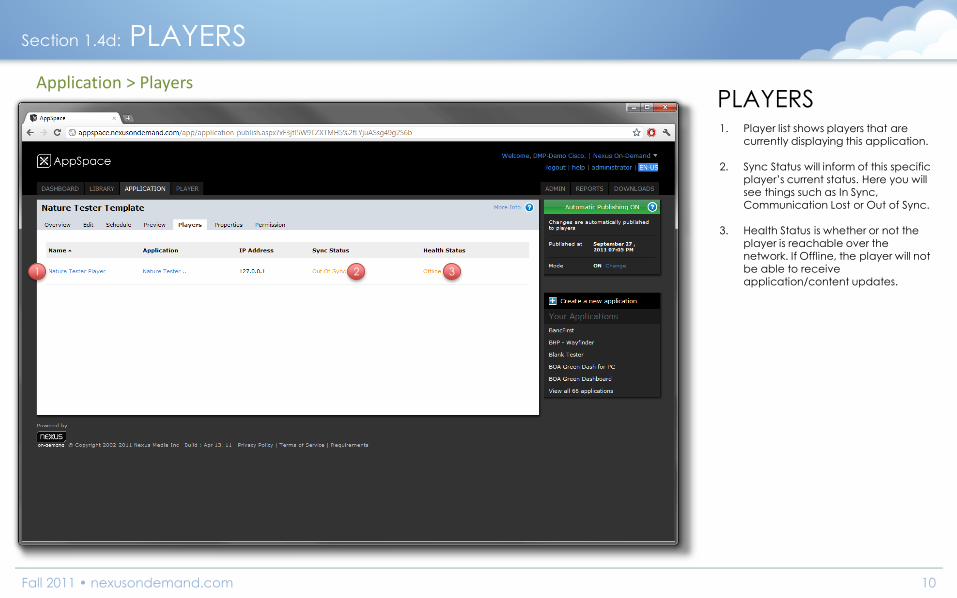
Application > Players
1 2 3
1. Player list shows players that are currently displaying this application.
2. Sync Status will inform of this specific player’s current status. Here you will see things such as In Sync, Communication Lost or Out of Sync.
3. Health Status is whether or not the player is reachable over the network. If Offline, the player will not
be able to receive application/content updates.
PLAYERS

Section 1.4e: PROPERTIES
Fall 2011 • nexusondemand.com 11
Application > Properties
1
2
3
1. App Name is the name that shows up in the player list.
2. Qualified Name is used for player searching, here you can use descriptive internal-use naming that may include static IP addresses or other relevant information.
3. Resolution of the application can be changed here. Choose standards such as 1080p or 720p. Alternatively, select Custom to enter a non-standard resolution.
4. Schedule mode will allow you to
day-part your layouts. This is useful for advanced application displaying.
APP PROPERTIES
4

Section 1.4f: PERMISSIONS
Fall 2011 • nexusondemand.com 12
Application > Permission
1
2
3
1. Setting Custom allows you to manage permissions per each
individual User.
2. Set your Permissions with the check-boxes. Manage Content, Manage Schedule, or Both (Manage Application).
3. Account Administrators will not have options to set, only non-admin users can have their permissions managed.
PERMISSIONS
Section 1.5a: ACCOUNT
Fall 2011 • nexusondemand.com 13
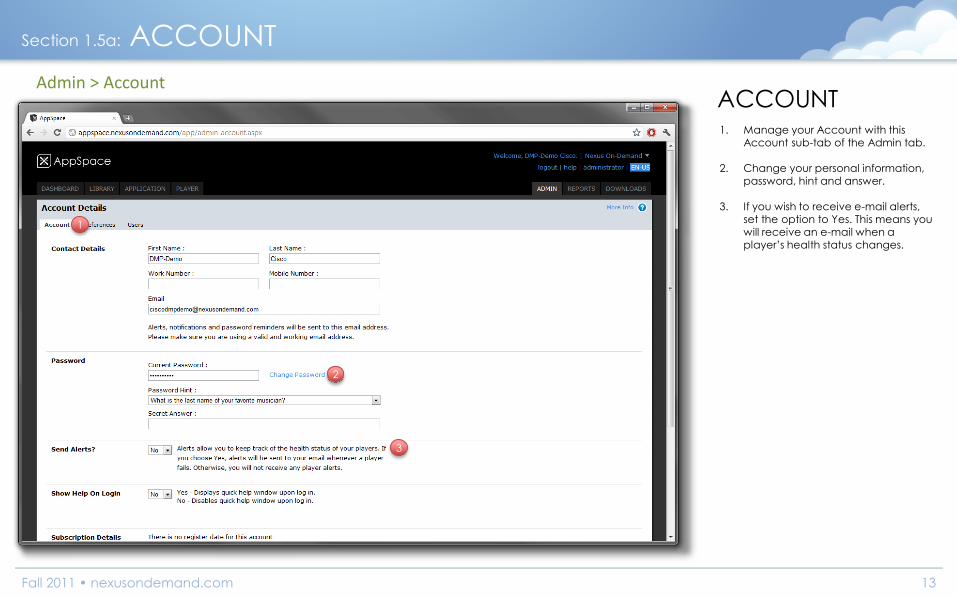
Admin > Account
1
2
3
1. Manage your Account with this Account sub-tab of the Admin tab.
2. Change your personal information, password, hint and answer.
3. If you wish to receive e-mail alerts, set the option to Yes. This means you will receive an e-mail when a player’s health status changes.
ACCOUNT

Section 1.5b: USERS
Fall 2011 • nexusondemand.com 14
Admin > Users
1
2
3
1. Manage the Users in your account here, the Users sub-tab of the Admin
tab.
2. Add New User lets you create a new user account.
3. Selecting a Role sets that specific user’s permission. Manager has full control, Standard has limited control.
USERS

Section 1.6: DOWNLOADS
Fall 2011 • nexusondemand.com 15
Downloads
1
2
3
1. Nexus Media Player (or NCS Player) is the Player Software to turn a
Windows based PC into a Player.
2. Nexus DMP Wizard is the interface to install an application to a Cisco DMP (4400 or 4310).
3. Nexus SmartHub is the installer software to turn a Windows Server (2003 or 2008) into a SmartHub. SmartHub is a Nexus tool which allows custom plug-in development to achieve tasks such as database integration and more.
4. AppSpace Uploader is a tool that allows the uploading to your Library of large files that may time out if allocated normally.
DOWNLOADS
4

Section 1.7a: COMPONENTS
Fall 2011 • nexusondemand.com 16
Administrator Mode
1 2
3
1. Application Drop-down, choose your application here.
2. Layout list, similar to Designer Mode.
3. Schedule mode, select this to modify
schedule if layout scheduling is enabled.
4. Edit Layout, similar pop-up dialog to Designer mode.
5. Content Zones list, similar to the Widget List in Designer mode.
6. Designer link, back to Designer mode.
COMPONENTS
4 5
6

Section 1.7b: PUBLISHING
Fall 2011 • nexusondemand.com 17
Automatic Publishing vs. Manual Publishing
1
2
3
4
5
Automatic Publishing ON
1. This denotes Auto Publishing is enabled. Any changes made to the application will be immediately sent to associated players.
2. Selecting Change will disable auto-publishing.
Automatic Publishing OFF
3. This denotes Auto Publishing is enabled. Any changes made to the application will be immediately sent to associated players. 4. Selecting Change will enable auto-publishing.
5. Select Publish Now to push changes to
associated players.

Section 1.7c: PERMISSIONS
Fall 2011 • nexusondemand.com 18
Administrator Mode > Network > Portal Permission
1
2
3
1. Select the NETWORK tab.
2. Then the Portal Permission link, to view portal permissions – a more advanced permissions modification tool than the Designer mode permissions.
3. Add new user role lets you add an already created user to the portal permission list. This enables their use of Administrator mode and which Admin mode permissions they have available to them.
4. The Administrator mode tabs show user lists. If a user is displayed under the selected tab, they belong to that permission group.
5. User information shows in Rows with the options to receive email updates
or Delete their permissions.
PERMISSIONS
4
5
Section 1.7d: LAYOUT SCHEDULING
Fall 2011 • nexusondemand.com 19
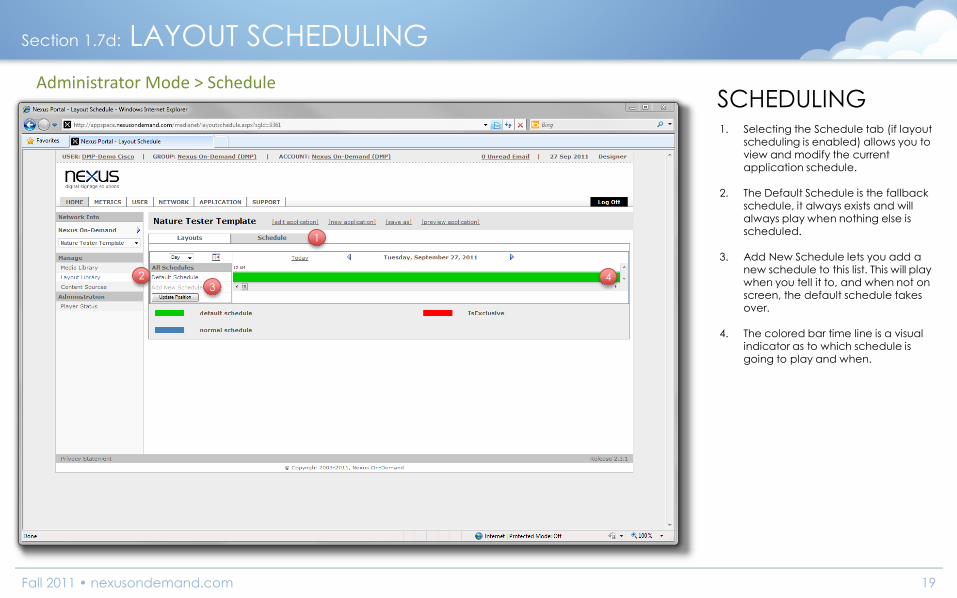
Administrator Mode > Schedule
1
2 3
1. Selecting the Schedule tab (if layout scheduling is enabled) allows you to
view and modify the current application schedule.
2. The Default Schedule is the fallback schedule, it always exists and will always play when nothing else is scheduled.
3. Add New Schedule lets you add a new schedule to this list. This will play when you tell it to, and when not on screen, the default schedule takes over.
4. The colored bar time line is a visual indicator as to which schedule is going to play and when.
SCHEDULING
4

Section 1.8: HELP/SUPPORT
Fall 2011 • nexusondemand.com 20
Administrator Mode > Support
1
2 3
1. The Support tab contains a series of PDFs that will assist you at your
convenience.
2. Select the topic you wish to read about.
3. The PDFs are named so you instantly know what the topic will cover.
SUPPORT

SCHEDULING OPTIONS Section 2

Section 2.2: IDENTIFYING APPS FOR SCHEDULING
Fall 2011 • nexusondemand.com 22
Application (Layout) & Widget Scheduling Scheduling is a powerful tool to take advantage of for efficiency and ease of use. Scheduling allows the user to take control of future playback by creating content in a layout or playlist and scheduling it to be on screen during certain dates or times. Examples of scheduling use that best benefits the user would be holiday themed layouts of the “everyday” application. Another would be scheduling a visiting company’s logos or client photos on screen during the hours/days they are on site.

Section 2.1a: CONTENT, ZONES AND LAYOUTS
Fall 2011 • nexusondemand.com 23
Scheduling Options
LAYOUT SCHEDULING (a)
1. Add Schedule brings up the new schedule dialog.
2. Name your new schedule here.
3. Select whether this schedule will run forever or between certain dates.
4. Normal Schedule or Exclusive – exclusive means no matter the schedules position in the priority list, it will run if it is scheduled to do so.
5. Recurrence is where the schedule is set for day-parting. Such as M W F 8AM through Noon.
6. Select Add to List when your day/times are set.
7. Don’t forget to Apply your changes. This brings us to the next slide, 2.1b
1
2
3
4
5
6
7

Section 2.1b: CONTENT, ZONES AND LAYOUTS
Fall 2011 • nexusondemand.com 24
Scheduling Options
LAYOUT SCHEDULING (b)
1. Now that your schedule is created, you need to select which Layouts will be played during this time. Select Add Layout.
2. Check the boxes next to the layout(s) you wish to use here.
3. Select Apply to add this layout.
4. Select Close Window to move back to the schedule list as shown in the next slide, 2.1c
1
2
3
4

Section 2.1c: CONTENT, ZONES AND LAYOUTS
Fall 2011 • nexusondemand.com 25
Scheduling Options
LAYOUT SCHEDULING (c)
1. As shown in the list, the new schedule is now #1 over the Default Schedule.
2. The Red Bar denotes “Is Exclusive” was checked on this schedule and it overrides any other schedules. If another schedule was added to take the #1 spot, if “Is Exclusive” is not checked, the #2 spot will still take over if both schedules are set to play during the same times.
1 2
Section 2.1c: CONTENT, ZONES AND LAYOUTS
Fall 2011 • nexusondemand.com 26
Scheduling Options
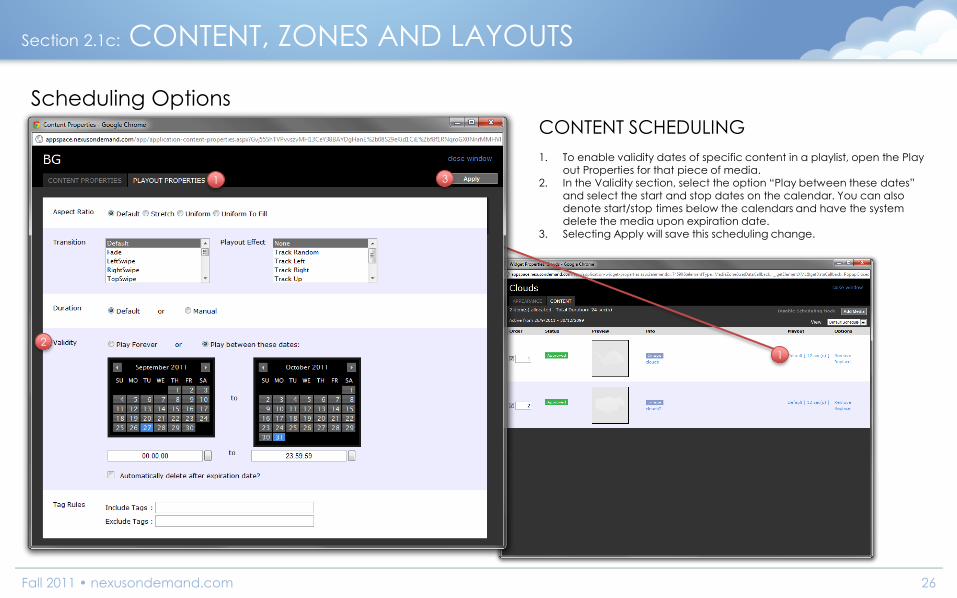
CONTENT SCHEDULING
1. To enable validity dates of specific content in a playlist, open the Play out Properties for that piece of media.
2. In the Validity section, select the option “Play between these dates” and select the start and stop dates on the calendar. You can also denote start/stop times below the calendars and have the system delete the media upon expiration date.
3. Selecting Apply will save this scheduling change.
1
2
3
1

MEDIA LIBRARY FUNCTIONS Section 3

Section 3.1: UPLOADING & ORGANIZING CONTENT
Fall 2011 • nexusondemand.com 28
Adding to the Library
1
1. Once in your Content Library, select the folder (or create a new one) where your new content will reside.
2. Once the folder is selected, click “Add” to bring up the upload dialog.
3. Select the Browse button to browse your local disk(s) and locate the media you wish to upload. Once uploaded, your new media is set in the library. You can now add Tags
for easier searching.
NOTE: It is best practice to always upload the content to the media library and use descriptively named folders. This will allow allocation to multiple apps or zones with only 1 upload. It is also ideal for sharing and collaboration with others.
2
3
UPLOAD

CREATING APPS Section 4

Section 4.1: CREATE FROM TEMPLATES
Fall 2011 • nexusondemand.com 30
Creating an App from a Template
1. Select Create a New Application
2. Choose a Template or Blank Canvas
3. Preview and Verify
4. Name and Continue
2
3
4
1

Section 4.2: APP LIBRARY – SELECT AN APPLICATION
Fall 2011 • nexusondemand.com 31
Selecting a Pre-Created
Application
1. Select your application from the app list.
2. If your application isn’t immediately visible, expand the app list by selecting “View all ## applications”.
1
2

MANAGING APPS Section 5

Section 5.1: ALLOCATIONS & CHANGING THE CANVAS
Fall 2011 • nexusondemand.com 33
Application > Edit > Edit Layout
1 2
3
4
1. Add a Widget lets you add a new widget from multiple widget types such as Weather, RSS Ticker or Media Widget.
2. Add Media is a shortcut to adding a new Media
Widget with content you upload or choose from your media library.
3. Wireframe Editor allows you to position and re-size your widgets on screen.
4. Name your layout here, be as descriptive as you like.
5. Widgets List shows current Widgets. The higher they are in the list, the farther they are in the Foreground. Move them down the list to layer Widgets behind other Widgets.
6. Properties for the Selected Widget 1. Set Top/Left Position 2. Set Widget Resolution 3. Set Opacity
7. Transitions, how the Widget acts on Layout load or
unload.
8. Selected Widget Properties such as default backgrounds and borders.
9. Selected Widget Actions for interactivity or advanced controls.
5
6
7
8
9
EDITING A LAYOUT

Section 5.2: ALLOCATIONS & CHANGING THE CANVAS
Fall 2011 • nexusondemand.com 34
Allocating Media & Widgets
1
2
1. When Adding a Widget, use the Widget Types list to pin-point what you’re looking for specifically.
2. Select the Widget name to preview and verify you wish to save it to your application.
3. For blank Widgets, select Custom and choose from there.
EDITING A LAYOUT
3

Section 5.3: COPY LAYOUTS
Fall 2011 • nexusondemand.com 35
1
2
3
Application > Edit > Copy
COPY A LAYOUT 1. Copying a layout is accomplished
via the Edit sub-tab, in the Application tab.
2. Select the layout you want as your source, this is the layout that will be copied.
3. Select the Copy link under the selected layout section.
4. Name your new layout, select your options and click Yes to continue.
4

UPLOADING & ORGANIZING CONTENT Section 6

Section 6.1: UPLOADING & ORGANIZING CONTENT
Fall 2011 • nexusondemand.com 37
Media Widget Content Playlist
1
4 5 6
PLAYLIST WIDGET
1. Content Tab, where the playlists are managed.
2. Scheduling mode allows the ability to day-part schedule your content.
3. Add Media to add new content to this playlist.
4. Disable/Enable via Check-Box. Numbered order list, can also drag and drop items to change order in which they are played.
5. If the Media is not Approved, an Administrator must approve before playback is allowed.
6. Media Preview/Thumbnail
7. Media Information and Name
8. Play out Options, select to modify.
9. Remove or Replace the content. Items that are replacing other media keep the properties of the media they replace.
8 9
3 2
7

CONTENT PROPERTIES Section 7

Section 7.1: SETTING DEFAULT VALUES
Fall 2011 • nexusondemand.com 39
Media Widget Properties
1
4
WIDGET PROPERTIES
1. Select the Widget you wish to set Default properties on.
2. The Properties below the widget list change according to which Widget type you have selected. Choose a Transition for this widget and it will apply when the layout is loaded.
3. Selecting Properties will bring up the dialog allowing you to set this Widget’s Default properties as detailed in 7.2
4. Click SAVE to save your widget
3
2

Section 7.2: BEHAVIOR & VISUAL EFFECTS
Fall 2011 • nexusondemand.com 40
Media Widget Properties
1
4
WIDGET PROPERTIES
1. Common properties are ones such as Background Color, Border Color and Border Width. You can also add a Margin to this Widget. Backgrounds are useful when your image has transparency and you do not want black behind the image, you can set a color.
2. Other Properties are those such as Default Aspect Ratio (whether or not to Letterbox), Transitions (when the content of this Widget transitions between each other) and Default Duration of content to stay on screen.
3. If you are allocating Video that has Audio, you can Mute or lower the volume.
4. Don’t forget to hit Apply or your changes will be lost. 3
2

Section 7.2: BEHAVIOR & VISUAL EFFECTS
Fall 2011 • nexusondemand.com 41
Media Widget Properties
1
PLAYOUT PROPERTIES
1. Select the Content tab of your Widget Properties window to see the allocated Content.
2. Select the “Default” text in the Play-out column to bring up the unique properties dialog. These properties are unique to the single piece of media in the row you clicked the default text for.
3. Here you can set unique properties that override the Widget’s default properties. This is useful when you want a single image in a Widget to be on
screen longer than default duration. You can also set unique transitions, validity dates and Tags.
4. Don’t forget to hit Apply or your changes will be lost.
2
3 4

CONTACT US
www.nexusondemand.com
NORTH AMERICA
Heritage Square 1
Suite 200
4835 LBJ Freeway
Dallas, Texas 75244 United States
T: +1.214.233.7114
EUROPE, MIDDLE EAST, AFRICA
Creative Industries Centre
Wolverhampton Science Park
Wolverhampton
WV10 9TG United Kingdom
T: +44.845.299.7717
ASIA PACIFIC
Level 14
Kompleks Antarabangsa
Jalan Sultan Ismail
50250 Kuala Lumpur Malaysia
T: +60.3.2142.2320
Fall 2011 • nexusondemand.com 42
Related Documents