Avaya Solution & Interoperability Test Lab Application Notes for Integrating CA eHealth for Voice with Avaya Modular Messaging - Issue 1.0 Abstract These Application Notes describe the configuration steps required to allow CA eHealth for Voice to monitor and analyze the Avaya Modular Messaging system by collecting performance data, events and administration information. The eHealth for Voice performs data collection, storage, analysis of performance data and allows reports to be generated that can be useful to all levels of organization. Information in these Application Notes has been obtained through DeveloperConnection compliance testing and additional technical discussions. Testing was conducted via the DeveloperConnection Program at the Avaya Solution and Interoperability Test Lab. UA; Reviewed: SPOC 8/27/2007 Solution & Interoperability Test Lab Application Notes ©2007 Avaya Inc. All Rights Reserved. 1 of 26 ehv-mm

Welcome message from author
This document is posted to help you gain knowledge. Please leave a comment to let me know what you think about it! Share it to your friends and learn new things together.
Transcript

Avaya Solution & Interoperability Test Lab
Application Notes for Integrating CA eHealth for Voice with Avaya Modular Messaging - Issue 1.0
Abstract These Application Notes describe the configuration steps required to allow CA eHealth for Voice to monitor and analyze the Avaya Modular Messaging system by collecting performance data, events and administration information. The eHealth for Voice performs data collection, storage, analysis of performance data and allows reports to be generated that can be useful to all levels of organization. Information in these Application Notes has been obtained through DeveloperConnection compliance testing and additional technical discussions. Testing was conducted via the DeveloperConnection Program at the Avaya Solution and Interoperability Test Lab.
UA; Reviewed: SPOC 8/27/2007
Solution & Interoperability Test Lab Application Notes ©2007 Avaya Inc. All Rights Reserved.
1 of 26 ehv-mm
1. Introduction These Application Notes describe the configuration steps required to allow CA eHealth for Voice to monitor and analyze the Avaya Modular Messaging system by collecting performance data, events and administration information. The eHealth for Voice can be a centralized data collection system for a network of Avaya Modular Messaging systems. The eHealth for Voice performs data collection, storage, analysis of performance data and allows reports to be generated that can be useful for various levels of organization. The eHealth for Voice supports data collection from Avaya Modular Messaging systems that consists of Avaya Message Application Server (MAS) and Avaya Message Storage Server (MSS). The eHealth for Voice Modular Messaging module is designed to collect key operational data elements for alarms, events, configuration, system and user traffic, and presents a unified and comprehensive reporting platform. The eHealth for Voice uses LDAP and HTTP protocols to collect data elements from Avaya MSS, and native Win32 and ODBC to collect data elements from Avaya MAS. The eHealth for Voice automates data collection by allowing a schedule to be setup for each data element. The eHealth for Voice automatically retrieves and processes data from all servers in the Avaya Modular Messaging system simultaneously and then “pushes” reports and other information to destinations including email and web servers. This information is used for management reporting, capacity planning, grade of service tabulation, and system optimization.
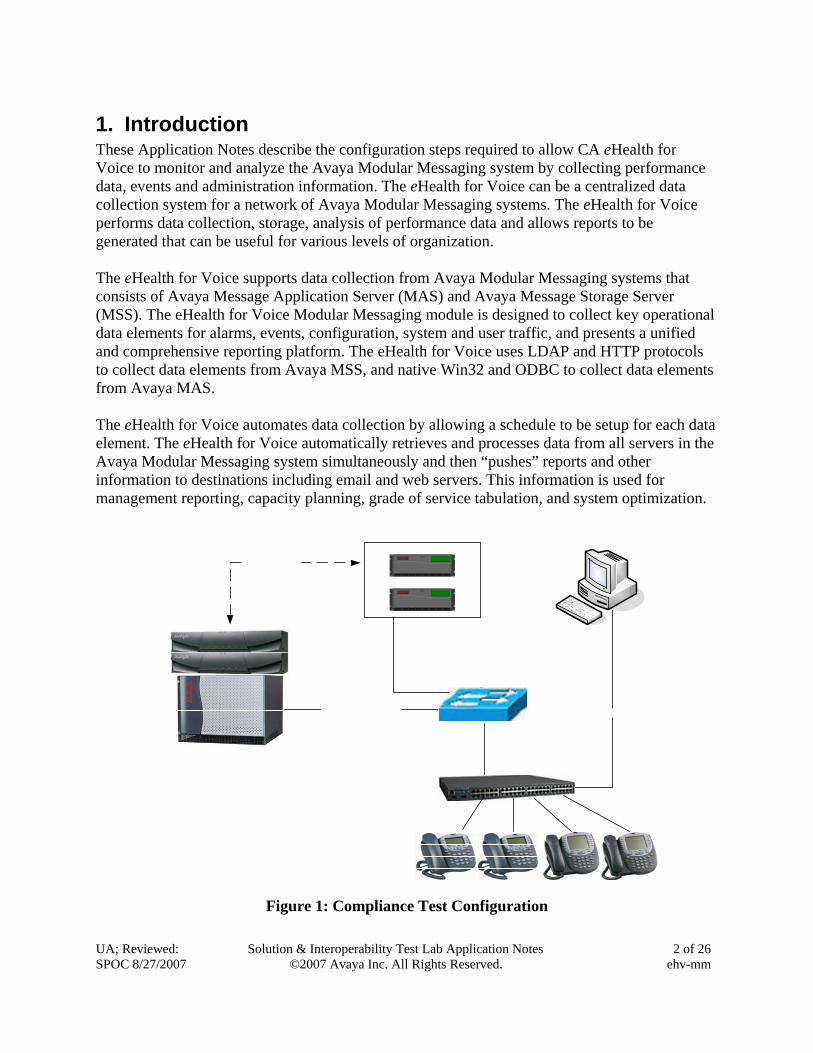
Figure 1: Compliance Test Configuration
UA; Reviewed: SPOC 8/27/2007
Solution & Interoperability Test Lab Application Notes ©2007 Avaya Inc. All Rights Reserved.
2 of 26 ehv-mm

UA; Reviewed: SPOC 8/27/2007
Solution & Interoperability Test Lab Application Notes ©2007 Avaya Inc. All Rights Reserved.
3 of 26 ehv-mm
Figure 1 displays the network configuration that was utilized for compliance testing. In the test configuration Avaya Modular Messaging system uses an H.323 IP trunk to communicate with Avaya Communication Manager. Note that the eHealth for Voice server requires a static IP address. Also, the Microsoft SQL server needs to be in place prior to installing eHealth for Voice software. In the configuration, all of the eHealth for Voice software components were installed on the same server with the Microsoft SQL database.
2. Equipment and Software Validated The following equipment and software/firmware were used for the test configuration.
Equipment Software/Firmware Avaya S8700 Servers Avaya Communication Manager 4.0, Load
730.5 Avaya G650 Media Gateway
• TN2312BP IPSI Circuit Packs • TN799DP C-LAN Circuit Pack • TN2302AP MedPro Circuit Packs
- HW02 FW031 HW01 FW017 HW03 FW093
Avaya Modular Messaging system • Avaya S3400 MAS • Avaya S3400 MSS
Modular Messaging 3.1 Patch 6
Avaya IP telephones: • 4610SW • 4620SW
2.8 (H.323) 2.8 (H.323)
CA eHealth for Voice running on IBM eServer xSeries 306
eHealth for Voice 4.0.1 Microsoft Windows 2003 Server - Enterprise
Edition Microsoft SQL Sever 2000 Service Pack 1 -
8.0.2039 with Hotfix 2040

3. Configure Avaya MSS This section covers the configuration of Avaya MSS. The Avaya MSS web interface was used to configure the Avaya MSS. This web interface can be accessed by entering http://<IP address of MSS>. This configuration covers the following areas:
• Administer trusted server on MSS • Administer local administrator on MSS
In order to allow data polling and collection on Avaya MSS server, the eHealth for Voice server is administer as a trusted server. Also, a local administrator account is administered for the eHealth for Voice application server. It is assumed that the Avaya Modular Messaging system is operational with subscribers administration in place.
3.1. Administer Trusted Server on MSS In the left pane, navigate to Messaging Administration Trusted Servers. In the right pane, the Manage Trusted Servers window appears. Click Add a New Trusted Server.
UA; Reviewed: SPOC 8/27/2007
Solution & Interoperability Test Lab Application Notes ©2007 Avaya Inc. All Rights Reserved.
4 of 26 ehv-mm

In the right pane, the Add Trusted Server window appears. Enter values for the following fields. Click Save.
• Trusted Server Name: Enter a descriptive name for the eHealth for Voice server. • Password: Enter a desired password. • Confirm Password: Enter the password to confirm. • Machine Name / IP Address: Enter the IP address of the eHealth for Voice server. • Service Name: Enter a descriptive service name.
In the Windows Internet Explorer pop up, click OK.
UA; Reviewed: SPOC 8/27/2007
Solution & Interoperability Test Lab Application Notes ©2007 Avaya Inc. All Rights Reserved.
5 of 26 ehv-mm

3.2. Administer Local Administrator on MSS In the left pane, navigate to Security Local Administrators. In the right pane, the Manage Local Administration Accounts window appears. Click Add a New Admin.
In the right pane, the Add Local Administration Account window appears. Enter values for the following fields. Click Save.
• User Name: Enter a desired user name. • Password: Enter a desired password. Note that by default this password expires after
168 days. • Confirm Password: Enter the password to confirm.
UA; Reviewed: SPOC 8/27/2007
Solution & Interoperability Test Lab Application Notes ©2007 Avaya Inc. All Rights Reserved.
6 of 26 ehv-mm

4. Avaya MAS This section covers the obtainment of required information from Avaya MAS. This section covers the following areas:
• Obtain Modular Messaging Voice Domain name • Administer system administrator account
In order to allow data polling and collection on Avaya MAS, the eHealth for Voice server needs to know the Avaya Modular Messaging Voice Mail Domain and a system administrator account in Windows domain. The integration between Avaya Modular Messaging system and Avaya Communication Manager are assumed to be in place.
4.1. Obtain Modular Messaging Voice Mail Domain Name From Avaya MAS, right click My Computer and click Properties. The System Properties window appears. Note the domain name in the Domain field. Click Cancel to close this window.
UA; Reviewed: SPOC 8/27/2007
Solution & Interoperability Test Lab Application Notes ©2007 Avaya Inc. All Rights Reserved.
7 of 26 ehv-mm

4.2. Administer System Administrator Account A system administrator account is administered for the eHealth for Voice to access ODBC on Avaya MAS. In the testing, an existing system administrator account was used. To obtain existing system administrator accounts, start the Voice Mail System Configuration by launching Programs Avaya Modular Messaging Voice Mail System Configuration. Expand Security and double click on System Administration (not shown here). The Permissions for System Administration window appears. The eHealth for Voice uses an account in this group to access Avaya MAS. In the test configuration, the “mmacct” account was used.
UA; Reviewed: SPOC 8/27/2007
Solution & Interoperability Test Lab Application Notes ©2007 Avaya Inc. All Rights Reserved.
8 of 26 ehv-mm

5. Configure eHealth for Voice Server This section covers configuration required on the eHealth for Voice server for data collection. This configuration covers the following areas:
• Administer eHealth for Voice console • Administer company name • Administer group name • Administer collector • Install license for Modular Messaging module • Administer voice messaging node for Avaya MSS • Administer voice messaging node for Avaya MAS • Activate data elements collection • Start eHealth services
The eHealth for Voice server requires a static IP address, and installation of Microsoft SQL server prior to the installation of the eHealth for Voice application. It is assumed that eHealth for Voice installation was completed successfully and linked to the Microsoft SQL database. Refer to eHealth for Voice documentation for detailed installation information.
5.1. Administer eHealth for Voice Console From the eHealth for Voice server, start the eHealth for Voice console by launching All Programs eHealth for Voice eHealth for Voice.
UA; Reviewed: SPOC 8/27/2007
Solution & Interoperability Test Lab Application Notes ©2007 Avaya Inc. All Rights Reserved.
9 of 26 ehv-mm
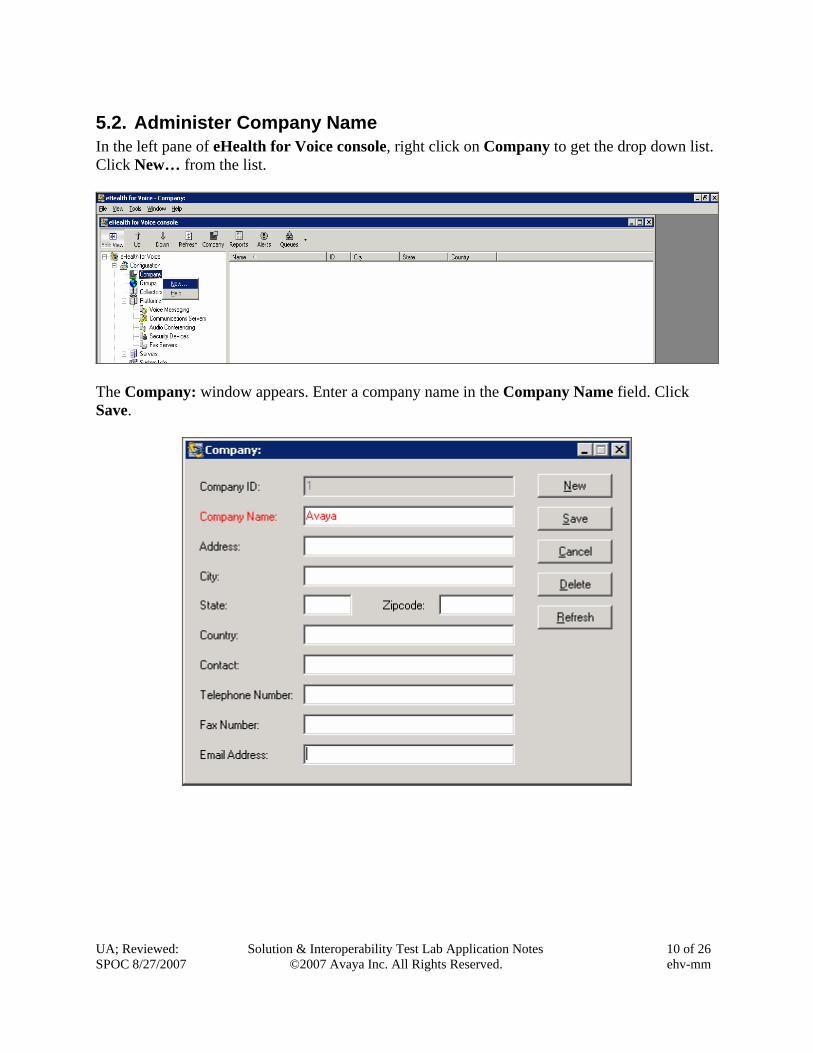
5.2. Administer Company Name In the left pane of eHealth for Voice console, right click on Company to get the drop down list. Click New… from the list.
The Company: window appears. Enter a company name in the Company Name field. Click Save.
UA; Reviewed: SPOC 8/27/2007
Solution & Interoperability Test Lab Application Notes ©2007 Avaya Inc. All Rights Reserved.
10 of 26 ehv-mm

5.3. Administer Group Name In the left pane of eHealth for Voice console, right click on Groups to get the drop down list. Click New… from the list.
The Group: window appears. Enter a descriptive group name in the Group field. Click Save.
5.4. Administer Collector In the left pane of eHealth for Voice console, right click on Collector to get the drop down list. Click New… from the list.
UA; Reviewed: SPOC 8/27/2007
Solution & Interoperability Test Lab Application Notes ©2007 Avaya Inc. All Rights Reserved.
11 of 26 ehv-mm

The Collector: window appears. Enter a descriptive collector name in the Collector Name field. Click Get IP to populate the IP Address field with the IP address of the eHealth for Voice server. Click TCP/IP….
The IP Settings window appears. Enter a desired name in the IP Group Name field. Note that the IP group name must be unique across all collectors. Enter the maximum number of connections allowed at a time in the Max # of IP Connections field. Click Save.
UA; Reviewed: SPOC 8/27/2007
Solution & Interoperability Test Lab Application Notes ©2007 Avaya Inc. All Rights Reserved.
12 of 26 ehv-mm

5.5. Install License for Modular Messaging Module In the left pane of eHealth for Voice console, select System Info. Double click on Licenses in the right pane. The eHealth for Voice Licenses window appears. Click in the License Number column to enter the license for Modular Messaging provided by CA. Click Save.
5.6. Administer Voice Messaging Node for Avaya MSS In the left pane of eHealth for Voice console, right click on Voice Messaging to get the drop list. Click New…from the list.
UA; Reviewed: SPOC 8/27/2007
Solution & Interoperability Test Lab Application Notes ©2007 Avaya Inc. All Rights Reserved.
13 of 26 ehv-mm

The Node: window appears. Enter values for the following fields. Click Save.
• Name: Enter a descriptive name. • Time Zone: Select a time zone, in which the node resides, from the drop down list. For
data integrity, it is crucial that the time zone be set correctly to match the time zone of the node.
• Group: Select a group name administered in Section 5.3 from the drop down list. • Version: Select “Message Storage Server 3.1”. • Collector: Select a group name administered in Section 5.4 from the drop down list. • Resource Group: Select the IP group name administered in Section 5.4 from the drop
down list. • IP Address: Enter the IP address of Avaya MSS. • Connection Attempts Select desired connection attempts. Note that in a large
environment more than 1 connection attempts may degrade performance. • Login: Enter the user name administered in Section 3.2. • Password: Enter the password administered in Section 3.2. • Confirm: Enter the password to confirm. • Trusted Server Name: Enter the trusted server name administered in Section 3.1. • Password: Enter the password administered in Section 3.1. • Confirm: Enter the password to confirm.
UA; Reviewed: SPOC 8/27/2007
Solution & Interoperability Test Lab Application Notes ©2007 Avaya Inc. All Rights Reserved.
14 of 26 ehv-mm

5.7. Administer Voice Messaging Node for Avaya MAS Follow steps from Section 5.6 to add a new node and enter values as shown below:
• Version: Select “Message Application Server 3.1”. • IP Address: Enter the IP address of Avaya MAS. • Login: Enter the user name verified in Section 4.2. • Password: Enter the password associated with user name “mmacct”. • Confirm: Enter the password to confirm.
Click MAS Settings.
UA; Reviewed: SPOC 8/27/2007
Solution & Interoperability Test Lab Application Notes ©2007 Avaya Inc. All Rights Reserved.
15 of 26 ehv-mm

The Message Application Server Settings window appears. Enter values for the following fields. Click on Apply.
• MSS Node: Select the MSS node name administered in Section 5.6. • VMD Name: Enter the Voice Mail Domain name verified in Section 4.1. • Primary MAS: Check the checkbox to notify eHealth for Voice that this is the primary
MAS node. The primary MAS server would have the MM Tracing Server service running, and collects transaction information from all MAS in the voice mail domain. Note that if this check box is not checked, the eHealth for Voice cannot obtain transaction information.
• Transaction database server: Enter the IP address of Avaya MAS that is running MM Tracing Server service.
UA; Reviewed: SPOC 8/27/2007
Solution & Interoperability Test Lab Application Notes ©2007 Avaya Inc. All Rights Reserved.
16 of 26 ehv-mm

5.8. Activate Data Elements Collection In the left pane of eHealth for Voice console, when Voice Messaging is selected all the configured nodes appear in the right pane.
5.8.1. Avaya MSS Double click the MSS node name administered in Section 5.6. The Node: mss window appears. Select the Schedule tab to select data elements to be collected and to define collection frequency. Note that the available data elements will depend on the particular platform. Check the Activated checkboxes for the data elements that need to be collected. Click Save.
UA; Reviewed: SPOC 8/27/2007
Solution & Interoperability Test Lab Application Notes ©2007 Avaya Inc. All Rights Reserved.
17 of 26 ehv-mm

5.8.2. Avaya MAS Double click the MAS node name administered in Section 5.7. The Node: mas window appears. Select the Schedule tab to select data elements to be collected and to define collection frequency. Check the Activated checkboxes for the data elements that need to be collected. Click Save. If the MAS node is not designated as the Primary MAS, then Operation History and Transaction Database will be unavailable.
UA; Reviewed: SPOC 8/27/2007
Solution & Interoperability Test Lab Application Notes ©2007 Avaya Inc. All Rights Reserved.
18 of 26 ehv-mm

5.9. Start eHealth Services To start the eHealth services, navigate to All Programs eHealth for Voice Service Setup. The eHealth for Voice Service Setup window appears. Check the checkboxes as shown below and click Start, all the buttons becomes green if services are started successfully.
UA; Reviewed: SPOC 8/27/2007
Solution & Interoperability Test Lab Application Notes ©2007 Avaya Inc. All Rights Reserved.
19 of 26 ehv-mm

UA; Reviewed: SPOC 8/27/2007
Solution & Interoperability Test Lab Application Notes ©2007 Avaya Inc. All Rights Reserved.
20 of 26 ehv-mm
6. Interoperability Compliance Testing The interoperability compliance test included feature and serviceability testing. Feature testing focused on verifying eHealth for Voice collecting data from Avaya Modular Messaging as scheduled for each data element. Also, feature testing included verifying the collected data and compared the data with Avaya Modular Messaging. Serviceability testing focused on verifying that the eHealth for Voice server can resume data collection after failure recovery.
6.1. General Test Approach The general test approach was to set data collection frequency for Avaya MSS and MAS data elements on eHealth for Voice and verify the operation of task scheduler, data collector, and data loader. The collected data were verified by using reports from eHealth for Voice and Avaya Modular Messaging. Serviceability testing scenarios included rebooting eHealth for Voice and Avaya MAS/MSS, disconnecting the Ethernet cable of eHealth for Voice and Avaya MAS/MSS, and taking action such as leaving voice mail during the interval to generate data.
6.2. Test Results All feature and serviceability test cases were completed successfully.

7. Verification This section describes verification steps that can be used on the eHealth for Voice server to verify processes status, data collection status, and data validation. In the left pane of eHealth for Voice console, expand Current Activity and select Services to verify the status Data Collector, Data Loader, and Task Scheduler services are “Running”.
UA; Reviewed: SPOC 8/27/2007
Solution & Interoperability Test Lab Application Notes ©2007 Avaya Inc. All Rights Reserved.
21 of 26 ehv-mm

To verify data collection, select Queues in the left pane. Double click on Closed (not shown here). The Closed Queue window appears. Verify that the Status of each task displays “Task completed”.
UA; Reviewed: SPOC 8/27/2007
Solution & Interoperability Test Lab Application Notes ©2007 Avaya Inc. All Rights Reserved.
22 of 26 ehv-mm

To validate data, generate a report from eHealth for Voice and compare the data with Avaya Modular Messaging. Note that the data collection has to be completed successfully before generating a report for any data element. For example, these Application Notes show data comparison for a listing of the trusted servers. In the left pane of eHealth for Voice console, select Reports. Double click Platform Reports. Make the following selections and click Preview.
• Platform: Select “Modular Messaging”. • Category: Select “Configuration” from the drop down list. • Report Name: Select “Trusted Server List”. • Nodes: Check the checkbox for the node, where the trusted server list is obtained.
UA; Reviewed: SPOC 8/27/2007
Solution & Interoperability Test Lab Application Notes ©2007 Avaya Inc. All Rights Reserved.
23 of 26 ehv-mm

The Reports: Trusted Server List window appears. Verify the Name, Ip Address, and Service Name field values with the trusted server list from Avaya Modular Messaging.
To get the trusted server list on Avaya Modular Messaging, use the Avaya MSS web interface and in the left pane navigate to Messaging Administration Trusted Servers. The Manage Trusted Servers appears in the right pane. Verify the Trusted Server, IP Addr/Name, and Service Name field values with the Trusted Server List report from eHealth for Voice.
8. Support Technical support on CA eHealth for Voice can be obtained through the following:
• Web: www.supportconnect.ca.com • Phone: (888) 832-4340 • Email: [email protected]
9. Conclusion These Application Notes describe the configuration steps required for eHealth for Voice 4.0.1 to interoperate with the Avaya Modular Messaging 3.1 system. The eHealth for Voice supports data collection from the Avaya Modular Messaging system that consists of Avaya MAS and Avaya MSS. The eHealth for Voice Modular Messaging module is designed to collect key operational data elements for alarms, events, configuration, system and user traffic, and presents a unified and comprehensive reporting platform. The eHealth for Voice successfully collected data from the Avaya Modular Messaging system as scheduled. In addition, data validation completed successfully using reports from eHealth for Voice and Avaya MSS/MAS.
UA; Reviewed: SPOC 8/27/2007
Solution & Interoperability Test Lab Application Notes ©2007 Avaya Inc. All Rights Reserved.
24 of 26 ehv-mm

UA; Reviewed: SPOC 8/27/2007
Solution & Interoperability Test Lab Application Notes ©2007 Avaya Inc. All Rights Reserved.
25 of 26 ehv-mm
10. Reference Product documentation for Avaya products may be found at http://support.avaya.com.
• Avaya Modular Messaging Release 3.1 Documentation - Modular Messaging with the Avaya MAS and MSS ONLY (CD Collections), February 2007.
Product documentation for CA products may be found on the software installation CD.
• eHealth for Voice Platform Guide – Avaya Modular Messaging Servers, Document ehvamm1012007724, July 2007.
• eHealth for Voice Technote 421 – Guide to the Installation of Microsoft SQL Server 2000, January 3, 2006.
• eHealth for Voice – Operation Guide, Document ehvog1022006b15, November 2006.

UA; Reviewed: SPOC 8/27/2007
Solution & Interoperability Test Lab Application Notes ©2007 Avaya Inc. All Rights Reserved.
26 of 26 ehv-mm
©2007 Avaya Inc. All Rights Reserved. Avaya and the Avaya Logo are trademarks of Avaya Inc. All trademarks identified by ® and ™ are registered trademarks or trademarks, respectively, of Avaya Inc. All other trademarks are the property of their respective owners. The information provided in these Application Notes is subject to change without notice. The configurations, technical data, and recommendations provided in these Application Notes are believed to be accurate and dependable, but are presented without express or implied warranty. Users are responsible for their application of any products specified in these Application Notes. Please e-mail any questions or comments pertaining to these Application Notes along with the full title name and filename, located in the lower right corner, directly to the Avaya DeveloperConnection Program at [email protected].
Related Documents