1 A PPLICATION INSTRUCTIONS SELF-ADHESIVE WATERPROOFING MEMBRANE 21 November 2014 2:50 PM WEATHERTEX USES : • For new roofing and reroofing with tear-off ; • Seals against water damage from ice dams and wind driven rain ; • Ideal protection on eaves, in valleys, along ridges, around chimneys, windows and skylights, at roof perimeters (rake edge) and as joint flashings ; • For maximum protection, WEATHERTEX can be applied over the whole roof deck. STORAGE : • Store inside or under cover ; • Avoid storage over 32°C (90°F) ; • Stand upright. SURFACE PREPARATION : • New Construction : Deck must be dry and frost- free. All dirt, dust and protrusions must be removed ; • Reroofing : Remove all shingles, felts, nails and metal from roof deck area. Deck must be dry and frost-free. All dirt, dust and protrusions must be removed. PRECAUTIONS : • Always apply WEATHERTEX directly to the wood deck. Do not apply over shingles, felt or insulation ; • Do not leave exposed to the sun for more than seven days ; • Use on dry decks when air and surface temperatures are over 4°C (40°F) ; • The space under the roof deck must be properly ventilated ; • The roof can be a dangerous place to work. Ensure that you are fastened safely at all times. Do not walk on WEATHERTEX when wet or covered with frost. INSTALLATION : Eaves : 1] Unroll WEATHERTEX on 2 m (6 ft.) ; 2] Align this material along the edge of the roof and reroll ; 3] Peel back about 30.5 cm (12”) of release film backing and bring this portion of the film under the roll. Adhere the peeled area and center one nail. Reroll to the adhered portion ; 4] Pull on the release film backing to unroll WEATHERTEX and press the material into place to ensure tight bond. If the membrane deviates from the roof line, cut and start as above mentioned procedure ensuring there will be a 15.2 cm (6”) side lap ; 5] Starting at the low point of the roof, work upward. Apply WEATHERTEX by laying the roll horizontally and extending up the roof, from the eaves, to a point at least 30.5 cm (12”) beyond the interior wall line. On low slope roofs (2-4 in/ft. or 2/12 to 4/12) WEATHERTEX must be extended a minimum of 61 cm (24”) beyond the inside surface of the exterior wall. This requirement may vary depending on location. Check your local building code for minimum requirements ; 6] End laps must be a minimum of 15.2 cm (6”) ; 7] For multiple courses (horizontal joint) overlap product by 7.6 cm (3”) in the non sanded area.

Welcome message from author
This document is posted to help you gain knowledge. Please leave a comment to let me know what you think about it! Share it to your friends and learn new things together.
Transcript
1
ApplicAtion instructionsSELF-ADHESIVE WATERPROOFING MEMBRANE
21 November 2014 2:50 PM
WEATHERTEX
USES :
• For new roofing and reroofing with tear-off ;
• Seals against water damage from ice dams and wind driven rain ;
• Ideal protection on eaves, in valleys, along ridges, around chimneys, windows and skylights, at roof perimeters (rake edge) and as joint flashings ;
• For maximum protection, WEATHERTEX can be applied over the whole roof deck.
STORAGE :
• Store inside or under cover ;
• Avoid storage over 32°C (90°F) ;
• Stand upright.
SURFACE PREPARATION :
• New Construction : Deck must be dry and frost-free. All dirt, dust and protrusions must be removed ;
• Reroofing : Remove all shingles, felts, nails and metal from roof deck area. Deck must be dry and frost-free. All dirt, dust and protrusions must be removed.
PRECAUTIONS :
• Always apply WEATHERTEX directly to the wood deck. Do not apply over shingles, felt or insulation ;
• Do not leave exposed to the sun for more than seven days ;
• Use on dry decks when air and surface temperatures are over 4°C (40°F) ;
• The space under the roof deck must be properly ventilated ;
• The roof can be a dangerous place to work. Ensure that you are fastened safely at all times. Do not walk on WEATHERTEX when wet or covered with frost.
INSTALLATION :
Eaves :
1] Unroll WEATHERTEX on 2 m (6 ft.) ;
2] Align this material along the edge of the roof and reroll ;
3] Peel back about 30.5 cm (12”) of release film backing and bring this portion of the film under the roll. Adhere the peeled area and center one nail. Reroll to the adhered portion ;
4] Pull on the release film backing to unroll WEATHERTEX and press the material into place to ensure tight bond. If the membrane deviates from the roof line, cut and start as above mentioned procedure ensuring there will be a 15.2 cm (6”) side lap ;
5] Starting at the low point of the roof, work upward. Apply WEATHERTEX by laying the roll horizontally and extending up the roof, from the eaves, to a point at least 30.5 cm (12”) beyond the interior wall line. On low slope roofs (2-4 in/ft. or 2/12 to 4/12) WEATHERTEX must be extended a minimum of 61 cm (24”) beyond the inside surface of the exterior wall. This requirement may vary depending on location. Check your local building code for minimum requirements ;
6] End laps must be a minimum of 15.2 cm (6”) ;
7] For multiple courses (horizontal joint) overlap product by 7.6 cm (3”) in the non sanded area.
2
ApplicAtion instructionsSELF-ADHESIVE WATERPROOFING MEMBRANE
21 November 2014 2:50 PM
WEATHERTEX
Roof Perimeter (rake edge) :
1] Apply as on eaves, aligning material along the edge of the roof ;
2] On slopes, always start at the low point of the roof and work upwards ;
3] Only one width of WEATHERTEX is required for perimeter protection ;
4] End laps must be a minimum of 15.2 cm (6”).
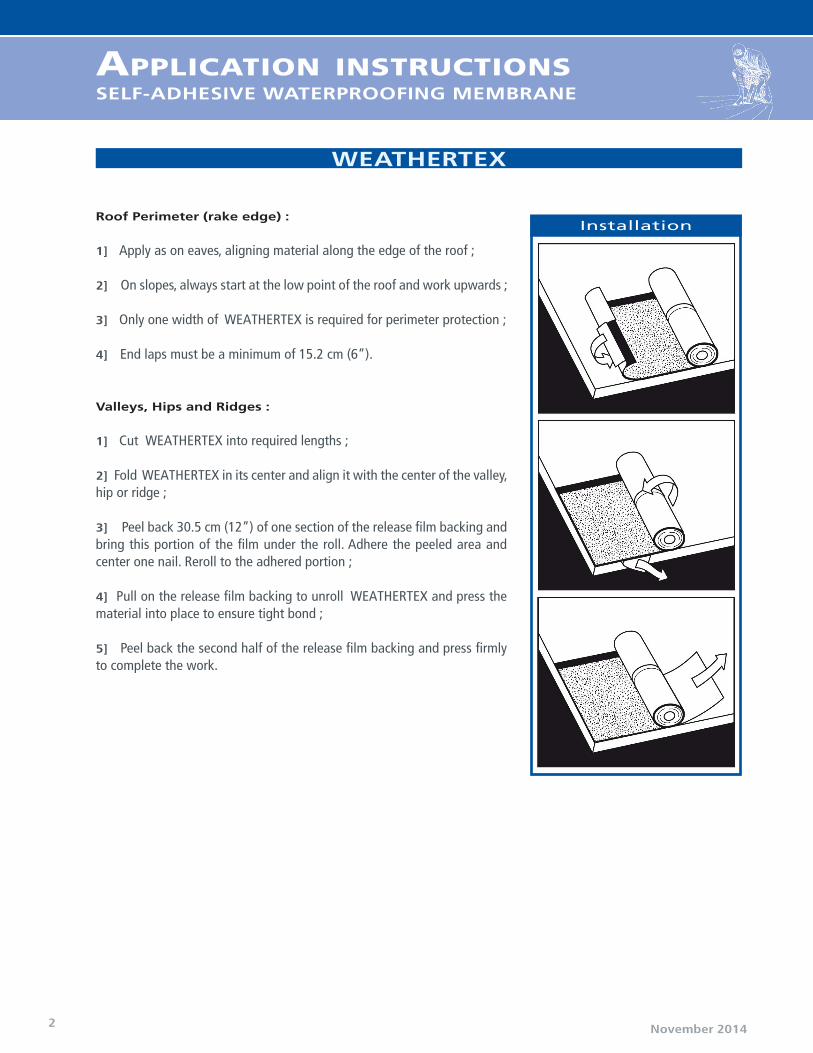
Valleys, Hips and Ridges :
1] Cut WEATHERTEX into required lengths ;
2] Fold WEATHERTEX in its center and align it with the center of the valley, hip or ridge ;
3] Peel back 30.5 cm (12”) of one section of the release film backing and bring this portion of the film under the roll. Adhere the peeled area and center one nail. Reroll to the adhered portion ;
4] Pull on the release film backing to unroll WEATHERTEX and press the material into place to ensure tight bond ;
5] Peel back the second half of the release film backing and press firmly to complete the work.
Installation
Related Documents