1 Ansys Tutorial: Plate with a Hole 1. This tutorial will perform a 2D linear elastic static analysis of a plate with a hole. The geometry is shown below a. b. The plate is very thin (plane stress analysis applies) c. The Young’s modulus is 200e3 MPa and Poisson’s ratio is 0.3 2. To open ANSYS, go to the Window Menu and select: a. ANSYS 19.0> Workbench 19.0 b. Note the version number might be different (Workbench is usually at the bottom of the menu) 3. A Workbench project will open

Welcome message from author
This document is posted to help you gain knowledge. Please leave a comment to let me know what you think about it! Share it to your friends and learn new things together.
Transcript

1
Ansys Tutorial: Plate with a Hole
1. This tutorial will perform a 2D linear elastic static analysis of a plate with a hole. The geometry is shown below
a. b. The plate is very thin (plane stress analysis applies) c. The Young’s modulus is 200e3 MPa and Poisson’s ratio is 0.3
2. To open ANSYS, go to the Window Menu and select: a. ANSYS 19.0> Workbench 19.0 b. Note the version number might be different (Workbench is usually at the bottom of the
menu) 3. A Workbench project will open

2
a. 4. In the toolbox > Analysis systems menu drag Static Structural into the project schematic window
a. b. Save your workbench project
5. Double-click Engineering Data to open the Engineering Data Tab
a.

3
b. 6. You generally will have your own materials data or values from handbooks and will not use the
pre-programmed generic materials data. a. Below Structural Steel type a new material name: for this example call it “inco625”. Hit
Enter.
b. 7. Select Inco625
a. on the left double click Isotropic Elastic
b. c. Now define the Young’s Modulus (E) as 200e3 MPa and Poisson’s ratio as 0.3 d. In the right corner see Youngs Modulus and Poisons ratio text boxes

4
e. f. Use the Dropdown menu to change the units of Young’s Modulus to 200 MPa and insert
the values of Youngs Modulus and Poisson's Ratio
g. h. No temperature is needed as this analysis will be only at one temperature i. Close the engineering data tab
j. k. Note that we only defined materials properties that we needed for linear elastic
analysis. Other properties, such as density, thermal expansion coefficient, yield strength, etc can be supplied but will not be used in a linear elastic static analysis
8. Choose 2D analysis a. In the project schematic right click on Geometry > Properties
b. c. In the menu to the right use the dropdown to change Analysis Type to 2D
5
d.
e. f. Close the Properties of Schematic: Geometry window
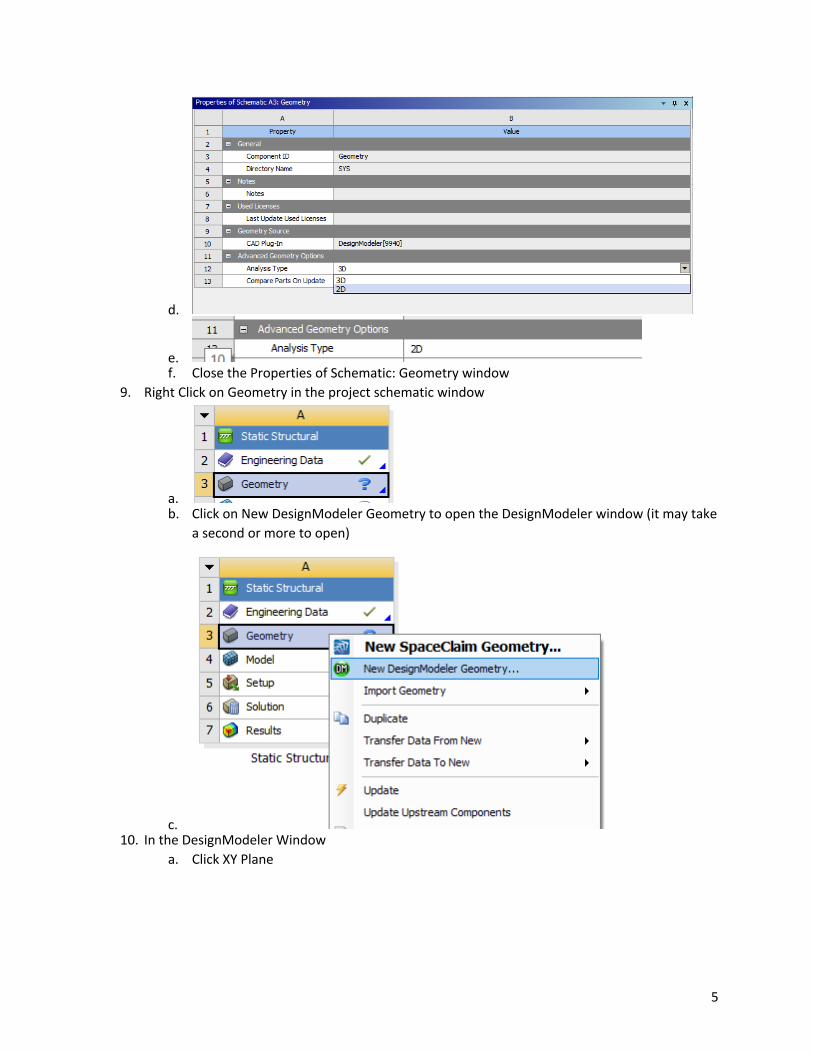
9. Right Click on Geometry in the project schematic window
a. b. Click on New DesignModeler Geometry to open the DesignModeler window (it may take
a second or more to open)
c. 10. In the DesignModeler Window
a. Click XY Plane

6
b. c. Then click on the z arrow in the coordinate system to align with the XY plane
d.
e. f. Change your units to millimeters
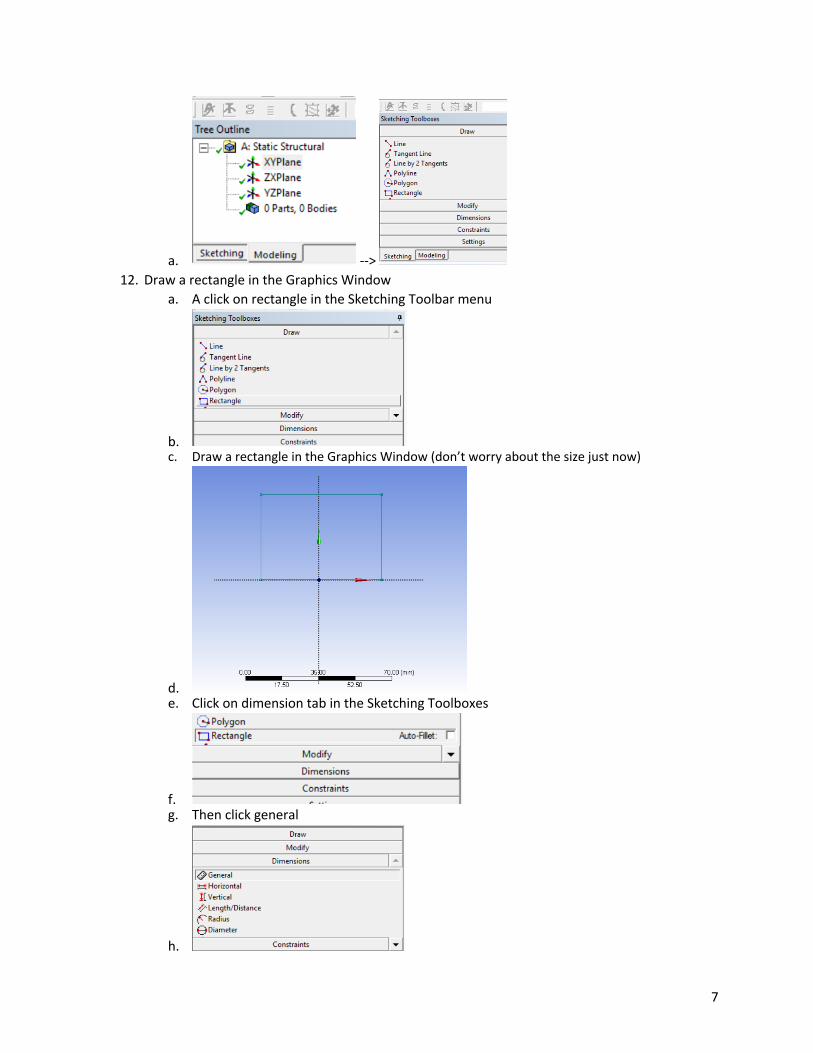
g. 11. Click on the Sketch Tab of the Tree Outline Menu
7
a. --> 12. Draw a rectangle in the Graphics Window
a. A click on rectangle in the Sketching Toolbar menu
b. c. Draw a rectangle in the Graphics Window (don’t worry about the size just now)
d. e. Click on dimension tab in the Sketching Toolboxes
f. g. Then click general
h.

8
13. Dimension the rectangle a. Now click on the upper edge of the rectangle and drag the dimension label out to your
desired location
b. c. In the details view change the dimension of H1 to 10 mm
d. e. Repeat this process for the left side dimension changing V2 to 10 mm
f.
g.
h. Use the Zoom to Fit tool in the upper toolbar to center the image 14. Add the hole
a. Click on the circle icon in the Sketching toolbox Draw tab (you may have to scroll down using the down arrow to the right)

9
b. c. Draw a circle inside of the rectangle
d. 15. Dimension the hole
a. Click on Diameter in the Dimensions Tab
b. c. Click on the circle and drag the dimension to your desired location
d. e. On the left change the diameter D3 to 2 mm

10
f. g. Now we will position the circle in space. Click on Horizontal in the Dimensions Tab
h. i. Click on the left edge of the rectangle and then click on the left of the circle and then
drag the dimension label to your desired location
j. k. Now change H4 in the menu on the left to 4 mm
l. m. Click on Vertical in the Dimensions Tab
n. o. Click on the top edge of the rectangle and then click on the top of the circle and then
drag the dimension label to your desired location

11
p. q. Now change V6 in the menu on the left to 4 mm (It might be labeled V5, but that’s ok)
r. s. Now the whole is centered
t. 16. Generate the sketch
a. On the upper toolbar click on Concept > Surface from Sketches
b. c. In the details view click on Base Object > Apply

12
d. e. Now we want to select the entire sketch f. Select the Box Select from the Select menu
g. h. You can now draw a box around the sketch
i. j. Base Object should say “1 Sketch”, if it does not try Apply and select again
k. l. Now click generate (in the upper 3rd of the screen)
m. n. The sketch should change color

13
o. p. Save our project and close Design Modeler
17. Open the Modeler a. Double click on Model in the Project Schematic Window
b. c. It may take a couple seconds to open, but should load your sketch geometry

14
d. 18. Model Geometry
a. Expand the Geometry option in the project outline
b. c. Click on Surface Body
d. e. In the Details of the Surface Body window click on Assignment
f. g. Assign Inco625 Material to the Geometry
h. i. Below Assignment change Nonlinear Effects and Thermal Strain Effects both to NO

15
j. k. Under Details of Geometry>definition keep the 2D behavior as plane stress (as the plate
is very thin) 19. Finite Element Mesh
a. Click on Mesh in the project outline
b. c. In the Details of Mesh menu you could change the Physics Preference to other types of
systems but DO NOT, leave it as Mechanical
d. e. In the Details of Mesh menu change the element order (I.e., the order of the element
shape function) to linear
f. g. Right Click on Mesh and select Method
h. i. In the Details of Automatic Method Menu click geometry, select the plate to the right,
then click apply
j. k. The plate should change color and say Automatic Method in the upper left corner

16
l. m. For method select Quadrilateral dominant
n. o. For Free Face Mesh Type select All Quad
p. q. We will now set an approximate element size r. Right click mesh and select sizing
s. t. Under body sizing select the plate to the right then click Geometry Apply
u. v. Change element size to 0.0001
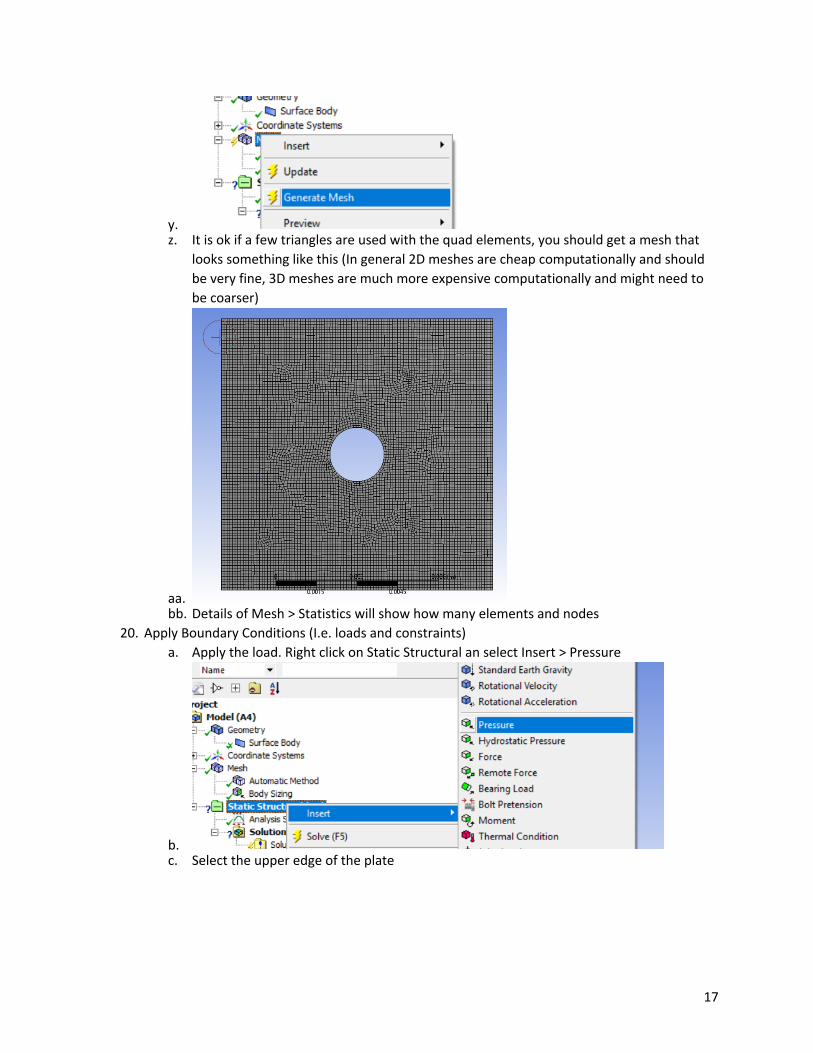
w. x. Right click on mesh and select Generate Mesh (this may take a second or two)
17
y. z. It is ok if a few triangles are used with the quad elements, you should get a mesh that
looks something like this (In general 2D meshes are cheap computationally and should be very fine, 3D meshes are much more expensive computationally and might need to be coarser)
aa. bb. Details of Mesh > Statistics will show how many elements and nodes
20. Apply Boundary Conditions (I.e. loads and constraints) a. Apply the load. Right click on Static Structural an select Insert > Pressure
b. c. Select the upper edge of the plate

18
d. e. Click Geometry > Apply (if it does not work, try it again)
f. g. Change the magnitude to –100e6 Pa (a ramped load is ok for this analysis)
h. i. Apply a y-constraint on the bottom. Right click on Static Structural an select Insert >
Displacement
j. k. Select the lower edge of the plate l. Click Geometry > Apply (if it does not work, try it again)
19
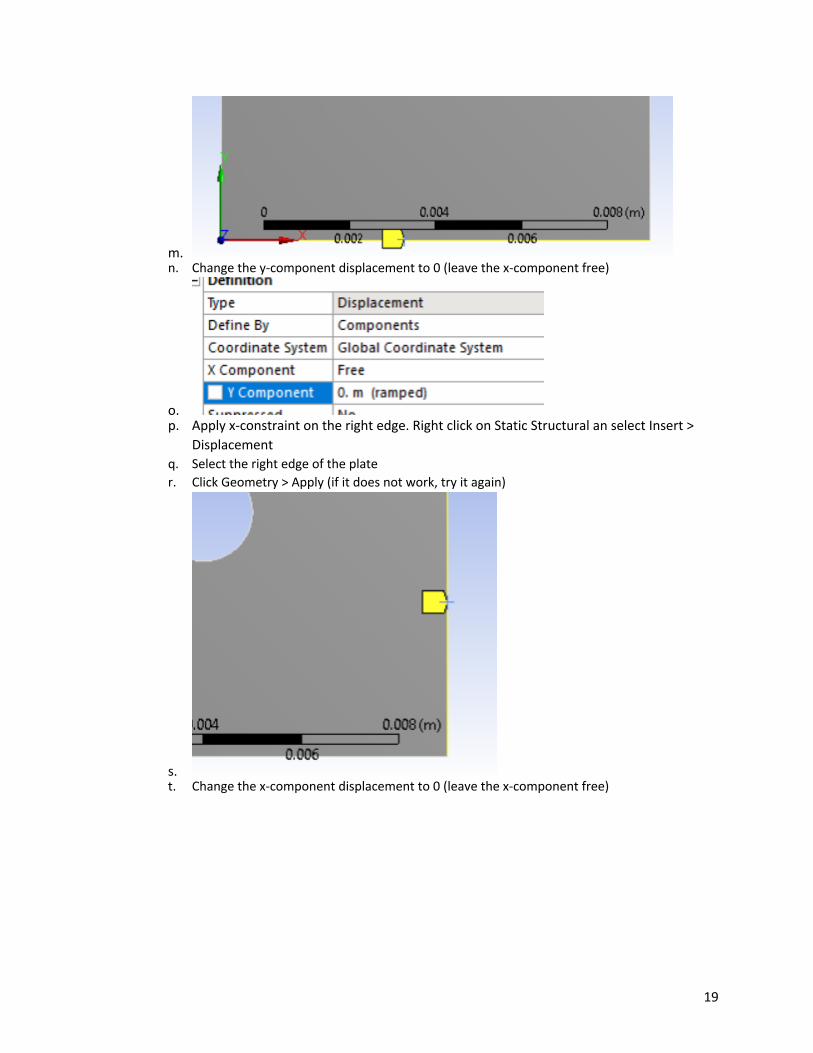
m. n. Change the y-component displacement to 0 (leave the x-component free)
o. p. Apply x-constraint on the right edge. Right click on Static Structural an select Insert >
Displacement q. Select the right edge of the plate r. Click Geometry > Apply (if it does not work, try it again)
s. t. Change the x-component displacement to 0 (leave the x-component free)

20
u. v. Intersection of bottom and left edge. The intersection of the bottom and left edge must
have both an x-constraint and y-constraint w. Right click on Static Structural an select Insert > Fixed Support (I.e. no displacement in
any direction)
x. y. Change the selection method to Vertex
z. aa. Select the lower right corner
bb. cc. Click Geometry > Apply (if it does not work, try it again
21. Solve a. Now tell ANSYS what results you want. Lets select y-displacement, y-normal stress, and
Equivalent (I.e. von Mises) stress b. Right click on Solution and select Directional Displacement

21
c. d. Change Orientation to Y-Axis
e. f. Right click on Solution and select Stress > Normal
g. h. Change Orientation to Y-Axis i. Right click on Solution and select Stress > Equivalent (von Mises) j. Right Click on Solution and select Solve
k. 22. Results
a. Click on each result to displace the contour
b.

22
c. d. For a cleaner plot without elements click Edges and changes to No Wireframe
e. f. Use the Pan button to move the plate near the legend

23
g. h. The analytical solution is a stress concentration factor of 3.0, so the peak stress should
be 300 MPa, the predicted stress is 311 MPa.
Related Documents