LESSON 5 AN INTRODUCTION TO LASER SCANNING Introduction The creation of a digital terrain model (DTM)/digital elevation model (DEM) can be performed in a number of ways. These include: • Direct measurement onsite using conventional surveying, including the global positioning system (GPS), • Photogrammetric techniques, • IFSAR (I nterF erometric S ynthetic A perture R adar), and • Lidar (Li ght D etection A nd R anging) Lidar is one of the newer technologies in use today. Not only can it be used for DTM/DEM data collection, it has been used for a myriad of other studies including determining vegetation volume and atmospheric studies to feature extraction. Figure 1. Lidar sensing system geometry.

An Introduction to Laser Scanning
Nov 01, 2014
Welcome message from author
This document is posted to help you gain knowledge. Please leave a comment to let me know what you think about it! Share it to your friends and learn new things together.
Transcript

LESSON 5 AN INTRODUCTION TO LASER SCANNING
Introduction
The creation of a digital terrain model (DTM)/digital elevation model (DEM) can be performed in a number of ways. These include:
• Direct measurement onsite using conventional surveying, including the global positioning system (GPS),
• Photogrammetric techniques, • IFSAR (InterFerometric Synthetic Aperture Radar), and • Lidar (Light Detection And Ranging)
Lidar is one of the newer technologies in use today. Not only can it be used for
DTM/DEM data collection, it has been used for a myriad of other studies including determining vegetation volume and atmospheric studies to feature extraction.
Figure 1. Lidar sensing system geometry.

Lesson 5 SURE 382 Geographic Information Systems II Page 2
Lidar is also referred to as laser1 ranging, laser altimetry, laser scanning, and LADAR (LAser Detection And Ranging). While airborne laser ranging systems are not new2, development of a system comprised of a laser scanner, global positioning system (GPS), and an inertial measuring unit (IMU) that can meet map accuracy guidelines has been a relatively recent occurrence (see figure 1). This is a technology at its infancy and as such it will probably experience rapid evolution as the market for this technology grows.
Laser altimetry has been used in photogrammetry for decades. In the early years, the laser was used to record ground profiles along the flight path in a near nadir view. These profiles were used in photogrammetric processing to strengthen the solution to the adjustment of photogrammetric measurements.
There are basically two types of laser scanning systems: pulsed laser and waveform. The pulsed laser system is the predominant form used for topographic mapping. A discrete signal is emitted from the laser and one or more return signals are recorded. Waveform systems use a continuous signal and a continuous, or nearly so, signal is received.
Figure 2. AeroScan lidar System.
Different scan frequencies can be used by lidar scan systems (see figure 2 for an example
system). The selected frequency will depend on the application. Project requirements as well as eye safety will determine the flight altitude. Typically this falls within a range of 100 to 5,000 meters at speeds of 75 to 250 kilometers per hour.3
1 Laser is an acronym for Light Amplification by Stimulated Emission of Radiation. 2 In fact the technology used in lidar has been used for numerous scientific studies for over 20 years. 3 http://www.airborne1.com/Pages/technology.htm accessed 5/31/2001.

Lesson 5 SURE 382 Geographic Information Systems II Page 3
Basic Principles
Lidar, as it has been already pointed out, is really a system, which integrates three basic data collection tools: laser scanner, GPS, and IMU.4 The laser scanner is mounted in an aircraft just like an aerial camera. It sends out an infrared laser signal (actually there can be anywhere from 10,000 – 100,0005 pulses per second) to the ground that is then reflected back to the instrument. The number of pulses sent out by the scanner is referred to as the pulse repetition rate (PRF) and is measured in kHz. Thus, 10 kHz means that 10,000 pulses are being emitted per second. The time it takes the laser light to complete this trip is recorded. Hence, objects closer to the aircraft will return faster than the signals that are reflected from objects farther away from the vehicle. Since the signal made the trip from the vehicle to the ground twice (once to the ground and then back to the aircraft), the total distance is divided by two and this is then multiplied by the speed of light to obtain the distance.
There are two different kinds of lasers used in laser altimetry, depending on the surface being measured. Systems used over ground, so called typographic lasers, utilize the infrared portion of the electro-magnetic (EM) energy spectrum. For bathymetric laser altimetry surveys, the blue/green portion of the EM spectrum is used. The reason is that little or no reflectance would be sensed by the lidar unit. Another difference is that the blue/green laser usually frequency-double the wavelength. This makes the determination of the bathymetric depth easy to calculate since one pulse is reflected off the surface and the other off the seabed floor. The depth of the water is the difference in the two returns [Maume, 2001].
There are several types of scanners used in the industry today. Wehr and Lohr [1999] describe four such systems as shown in figure 3. These include the oscillating mirror (figure 3a), the nutating mirror, which is also called the Palmer scan (figure 3b), the fiber scan (figure 3c) and the rotating polygon (figure 3d).
The nutating mirror (Palmer scan) consists of a deflecting mirror oriented such that the angle between the laser beam and the scanner shaft is oriented at 45o (see figure 4) [from Wehr and Lohr, 1999].
The mirror is attached to the scanner shaft but at an angle, SN. As the scanner shaft rotates, the mirror is nutated. The result is an elliptical scan pattern on the ground. The size of the scan is also shown in figure 4 where the units are based on the angle SN. By multiplying the coordinate by SN one can obtain the actual angle. The advantages of the nutating mirror is that most of the ground points are scanned twice, which adds redundancy. The ground point is imaged in the forward and backwards view. This is very useful in calibrating the scanner and the sensor orientation.
4 An important piece of equipment used by the scanner is a cooling system, which is sometimes identified as the fourth component of a lidar system. 5 These latter values are the expected sampling rates from systems in development.

Lesson 5 SURE 382 Geographic Information Systems II Page 4
Fiber
SignalEmitted
FiberSwitch
(c)
SignalEmitted
EmittedReflected
(a)Signal
Mirror
Rotation
Reflected Emitted Signal
(d)
Signal
EmittedPolygonRotating
SignalEmitted
(b)
EmittedSignal
Reflected
Mirror
Figure 3. Mirror scan systems for laser scanning [from Wehr and Lohr, 1999].
RangingUnit
DR
X
YZ SN = 7o
AN = 45 o
R
s
n
Figure 4. Palmer scanner and scan pattern [from Wehr and Lohr, 1999].
Most lidar systems utilize a rotating mirror to collect their scanned data. The mirror sits in front of the laser and rotates in a sweep motion perpendicular to the direction of flight. When the mirror rotates left to right and then back, it is referred to as a sawtooth scanner. One of the disadvantages of the moving mirror is that the rate of movement is not a constant. As the mirror nears the end of the scan it slows down, then stops, reverses direction, and finally speeds up. This type of movement, besides adding strain to the mechanics of the system, affects the positional accuracy of the system [Fowler, 2001].

Lesson 5 SURE 382 Geographic Information Systems II Page 5
One way around this problem is to use a rotating polygon, which moves only in one direction thereby fixing the speed of the prism movement at a constant rate (see figure 3). The disadvantage of the rotating prism is timing when the data are to be collected since there are no fixed stop positions to indicate the extent of the swath. Additionally, since all the data are collected in one direction there might be a bias in the measurement that would not be distinguishable unless there was a field check [Fowler, 2001].
We should recognize that the lidar signal is not a point but rather is an area. One of the advantages of a laser signal is that the beam is very narrow, but it does get larger the farther away the system is from the source. Moreover, it also becomes distorted, taking on an ellipsoidal shape, as it travels along the scan. Thus, the density of a scan will relate to the size of the signal on the ground. This is typically 2 to 10 feet. The collected data will consist of a “herringbone” pattern of spot elements (figure 5).6 The scan rate must be sufficiently fast to prevent any unwanted gaps in the data. This allows for a good uniform distribution of data over the project site.
Figure 5. Sample lidar scan.
Many vendors feel that the mirror-type laser scanning system yields more accurate
results. To compensate for the slowing down effect, software is used to correct for this effect and to disregard data at the end of the swath. For example, most data providers may advertise that they have a swath width of 3,000’ but use only the middle 2,500’ [Fowler, 2001].
For a lidar system to function properly, it is important that accurate timing devices be employed by each component [Turner, 2001] and that they be integrated together during the data collection process. It is important to know the time when the GPS position was measured, what time the IMU data was recorded, and the time that the laser signal was sent, and of course returned. Since lidar consists of three separate and distinct components, it will be impossible to set the timing of each component to match the other components. This will require processing.
6 http://www.airborne1.com/Pages/technology.htm accessed 5/31/2001.

Lesson 5 SURE 382 Geographic Information Systems II Page 6
The GPS receiver will generally use a 1-second sampling rate, meaning that the location
of the receiver will be determined every second during the flight. But the aircraft could be traveling more than 50 m per second. This means that the location of the laser scan must be interpolated between the sample intervals. The same situation will occur with the inertial measuring unit, although the sampling rate will be much higher. The IMU provides the sensor orientation data, namely the pitch, roll and yaw angular values.
The problem with using three different components in the measuring process is exacerbated by the fact that they measure in different reference frames while results need to be reported in a ground reference frame. It is beyond the scope of this course to discuss these differences. Suffice it to say that data can be transformed to the ground reference frame provided that control exists on the ground. This is used to determine the parameters required in transforming the airborne coordinates to the ground system. Laser Scanner
The laser is an important component of the lidar system. It takes electrical and chemical
energy to create an “optical” energy output. The biggest problem in this conversion is the loss of energy since the outputted laser signal will represent only 1-10% of the inputted energy. Nonetheless, it will produce a signal with several desired properties. These include [Sizgoric, 2002]:
• L – high radiance (high energy density/highly collimated) • λ - short wavelength • ∆λ ℓ - narrow spectral width (pure color) • τ - short pulse duration • PRF – high pulse repetition rate • θt = laser beam divergence
The advantages of these properties for lidar are [Sizgoric, 2002] as follows. A large L
and small wavelength yields a small sample target area. A large L also results in a higher flying height. Higher vertical accuracy is a product of the shorter pulse duration or small τ. A high pulse repetition rate provides a high sampling density. Finally, using the narrow spectrum width, ∆λℓ, and controlling the radiation source yields the ability to operate either during the day or night. Processing
Raw lidar data are post processed after the initial aerial flight is completed. The slant distance, as described above, is calculated for each returned signal. This data is then corrected for atmospheric effects. The roll, pitch and yaw are determined from the IMU and these angles are then applied to the slant distances to correct for the orientation of the scanner during data

Lesson 5 SURE 382 Geographic Information Systems II Page 7
collection. The GPS data are processed separately and are then imported into the lidar processing system. Using the position of the sensor and the swath angle during the individual scan, the elevation of the ground point can be easily computed. For example, look at the geometry in figure 6.
Figure 6. Geometry of laser scan pulse.
Lets assume that the laser signal was sent out at a 10o angle from the nadir along the
swath width (α = 10o). Further, assume that the sensor orientation is perfect (no pitch, roll, or yaw effects) and that the distance measured by the laser scanner was found to be 1,387.50 m. Then, using simple trigonometry, the vertical distance from the sensor to the ground at the elevation of A (VA) is
m42.366,110cosm50.387,1
cosDVo
AAA
==
α=
If the GPS on board the aircraft determined the location of the sensor at that instant the
signal was sent with state plane coordinates and orthometric height as: XSensor = 1,268,471.13 m YSensor = 588,614.47 m ZSensor = 1,806.59 m then the ground elevation of point A is
m17.440m42.366,1m59.806,1
VHElev ASensorA
=−=
−=

Lesson 5 SURE 382 Geographic Information Systems II Page 8
In a similar fashion, the X and Y state plane coordinates can also be determined. For example, the horizontal distance, HA, from the vertical line to the ground point can be computed using basic trigonometry.
AAA sinDH α= which for our example becomes,
m94.24010sinm50.387,1H o
A
==
If we assume that the aircraft is flying due north (along the Y-axis) and the scan angle is to the right (to the east of the vertical line), then the Y-coordinate would remain the same and the X-coordinate would become
m07.712,268,1m94.240m13.471,268,1
HXX ASensorA
=+=
+=
The X, Y, H coordinates of ground point A are then 1,268,471.13 m, 588,614.47 m, and 240.94 m respectively. Hence, each return has been georeferenced. Most of the time, the aircraft is not necessarily flying in a cardinal direction. In this case, the ∆X and ∆Y coordinates that would be applied to the sensor coordinates is found using simple latitude and departure (easting and northing) computations. This example of how the imaged point is georeferenced is a very simplistic view of what is happening within this measurement system. The reality can be shown in figure 7. The coordinates x’, y’, z’ represent the laser beam coordinate system. The origin is at the point where the laser signal was emitted (firing point) and the z’-axis is defined as being in the opposite direction of the emitted laser beam to the ground point [Schenk, 1999]. The distance from the laser to the ground point is the range, which can be defined by the range vector
=
r00
r
This relationship would be fine if the laser measurement system was fixed. Since it moves for every range measurement, one needs to define the laser reference system as x, y, z. As with the laser beam system, the origin of the laser reference system is the firing point of the laser. The orientation of the laser reference system depends upon the type of scanner being used. For example, with the nutating mirror system the z-axis is defined as being collinear to the scanner shaft rotation axis. The x-axis is defined as the direction towards the starting position of the rotating mirror. With an oscillating mirror scanner, the x-z plane is defined by the scan plane where the z-axis defines the line where the scan angles is zero [Schenk, 1999].

Lesson 5 SURE 382 Geographic Information Systems II Page 9
"Zer
o Po
sit io
n"
z'y'
x'
z
y
x
X
Y
Z P
r
P
c
SystemCoordinateMapping FrameOrigin of
Ground Point
Laser Scanner
Figure 7. Relationship between the laser scanner and ground point [from Schenk, 1999]. Transforming the data from the laser beam system to the laser reference system is performed using the rotation matrix Ri. No translation is required because both systems share the same origin. The scan angle at the instant the laser pulse is emitted defines the rotation angle for Ri. For the nutating mirror system, two angles are required [Schenk, 1999]. The final process is to locate the center of the footprint of the laser signal on the ground (point P in figure 7). This is done by another rotation matrix, Re, that defines the angular components of the exterior orientation of the laser. This is the same as the exterior orientation used in photogrammetry. Therefore, one takes the vector from the laser to the ground point and transforms this into the laser reference system and then transforms this into the ground coordinate system. This is then added to the vector between the origin of the ground coordinate system and the laser to obtain the vector from the origin of the ground reference system to the point. This is represented mathematically as
rcp ie RR+= where c is the positional component of the exterior orientation of the laser that represents the vector between the origin of the ground reference system and the laser platform. The exterior orientation elements are usually known from GPS and inertial measurements [Schenk, 1999]. This equation for reconstructing the surface point P is almost identical to how photogrammetry solves the same problem. Without derivation, the mathematical expression using photogrammetry can be shown to be [Schenk, 1999]:
dcp ie RRλ+= Thus, the only difference is the scale factor λ.

Lesson 5 SURE 382 Geographic Information Systems II Page 10
When a laser signal is sent to the earth it can easily hit more than one object. For example, figure 8 shows a laser pulse heading towards the ground. A part of the signal first encounters a part of the foliage while the rest of the signal hits the ground. Depending on how the system is set up, the sensor can, as an example, collect both of these data pulses. This is commonly called the first pulse or first return (the portion of the signal striking the foliage) and the last pulse or last return (the portion of the signal hitting the ground). In some systems it is possible to collect up to 5 different returns. For topographic mapping purposes, it is generally the last return that is provided to the client.
Figure 8. Laser signal hitting multiple objects during its travel.
Collecting just the first return can lead to problems. For example, figure 9.a shows the
situation where laser data are collected over bare ground. The corresponding elevation data is depicted in figure 9.b and a surface is fit through the data points using a fitting algorithm as shown in figure 9.c. Finally, figure 9.d shows the comparison of this fitted surface to the original geometry. Now assume that there is a forest canopy where some of the returns are from the canopy and other obstructions. The elevation data are shown in figure 10.b and the surface is fit to the points as indicted in figure 10.c. The comparison (figure 10.d) shows that the fitted surface does not match the original geometry.
For DEM/DTM data products, a “bare earth” or “bald earth” ground surface is desired. To arrive at this surface, it is necessary to remove the effects of vegetation and some of the man-made objects from the data. This is not a trivial problem. In many instances, it has been reported that automated removal of data points that are above the ground can be up to 90% effective. This would represent somewhat ideal situations since steep terrain with a lot of vegetation is much more time consuming to “train” the software. To remove point data after the automatic cleaning has been performed may require upwards to 90% of the post processing time.
Not only can a laser altimetry system measure multiple signal returns, some are even capable of measuring the intensity of the return signal. The significance of this capability is that

Lesson 5 SURE 382 Geographic Information Systems II Page 11
the user can now determine how much energy an object reflects. Since different features reflect different proportions of energy, it could be possible to use the intensity to differentiate different features. This could be an important component of automated feature extraction.
Figure 9. Lidar data collected over bare ground7.
7 This excellent depiction , at least from my perspective, and that shown in figure 10comes from http://depts.washington.edu/feprojec/lidar/intro.htm.

Lesson 5 SURE 382 Geographic Information Systems II Page 12
Figure 10. Lidar data collected over tree canopy.8
8 This excellent depiction , at least from my perspective, and that shown in figure 9comes from http://depts.washington.edu/feprojec/lidar/intro.htm.
Lesson 5 SURE 382 Geographic Information Systems II Page 13
Advantages and Disadvantages of Lidar
There are several advantages of lidar data. First, it is a very versatile technology that has been used for many uses such as atmospheric studies, bathymetric surveys, glacial ice investigations, just to mention a few. It is finding a lot of application in terrain mapping. Here we see that this technology is a very cost effective method of terrain data collection. It offers high precision and high point density data for DTM modeling. Moreover, it has been shown to accelerate the project schedule, upwards to 30% because the DTM data processing can begin almost immediately. It is, theoretically, not restricted to daylight nor cloud cover like aerial photography, although if aerial imagery is being collected simultaneously, as it is commonly done, then those limitation will affect the particular project. Unlike photogrammetric methods, it is capable of mapping areas characterized as low contrast, low relief and relatively dense vegetation [Flood, 2002]. In coastal zones and forest areas, lidar is considered as a superior data collection tool over conventional photogrammetric techniques where it is extremely difficult to locate terrain points in the imagery.
There are several disadvantages as well. While the data collection appears to be cost competitive, the upfront cost of equipment acquisition is very significant, on the order of $1 million. This could be a hard sell since amortization would have to be spread over a very short period since the technology, like that of computers, will probably experience a lot of change over the next two to three years. That is a lot of imagery to collect over a short period of time. On a project basis, this means it is a relatively high cost method of terrain data collection.
Being a relatively new terrain measurement tool, no real industry standards exist, although there are currently efforts under the American Society of Photography and Remote Sensing to define a set of best practices. The Federal Emergency Management Agency (FEMA) has developed guidelines and specifications for the use of laser altimetry in their Flood Hazard Mapping program [FEMA, 2003].
Moreover there is a general lack of knowledge of the technology, especially of its
capabilities and limitations, although this is changing as the technology matures. For example, lidar provides surface data at a regular sampling rate9. In other words, it is not possible for the user to point the laser towards a predefined area to collect the data. The implication is that shorelines, stream channels, ridge lines and other types of breaklines within the terrain may be missed which, if not accounted for in post processing, could yield a surface that departs from the true terrain characteristics. In terms of processing, there are some problems related to robust, efficient feature extraction such as bald earth and breaklines [Flood, 2002]. For example, if there is a lot of vegetation on the terrain, point removal of last return data that are not on the bald earth will be required. This will create holes within the terrain model. This will result in an even more irregular ground point spacing.
9 A regular sampling rate does not equate to a regular interval on the ground.

Lesson 5 SURE 382 Geographic Information Systems II Page 14
Misconceptions
Lidar is, in some respects, similar to RADAR and some have attributed characteristics associated with radar to lidar systems. While lidar data, like RADAR, can be collected 24 hours a day, very often aerial photography is collected simultaneously which limits the time in which data collection can take place. While both RADAR and lidar are active sensing systems, they use different signals. Therefore, atmospheric conditions will affect the two different sensors in totally different manners. Hence, laser altimetry is not an all-weather data collection system. In other words, the terrain must be “visible” within the electromagnetic range of the scanner. While some fog is manageable, generally it is not usable under heavy fog or extended cloud cover.
It is often stated that lidar can see through vegetation. This is not true at all. What it can do very well is see around the vegetation by exploiting holes that may exist within the canopy. It is important to recognize that a hole in the canopy may exist at one angle but can be completely blocked only a few inches off in any direction. As the laser system becomes inclined, it is more likely that branches and tree trunks will be encountered thereby blocking the signal to the bare earth [Turner 2001]. As a general rule of thumb, if a person can stand below the tree canopy and “see” sky through the foliage then there is a good possibility that a laser measurement can be made through that “hole in the trees”. Laser Altimetry Errors
Schenk [1999] presents a very good look at the effects of systematic errors on a laser system. While the approach he uses is “grossly simplified”, it provides an excellent conceptualization and visualization of how these errors affect surface reconstruction. He looks at two systematic errors: a positional error, which he defines as q and an attitude error (figure 11). This latter error involves two angles, ω and ϕ, which are utilized to form the rotation matrix, Ra. An example source of a positional error is the error in time synchronization between the GPS clock and the laser signal generator. For example, an aircraft traveling at 100 m/s with a 5 msec timing error will introduce a positional error of 0.5 m. An example of an angular error is the mounting bias. The effects of these errors are also shown in figure 11. The angular error is shown by the vector a. It will move the laser footprint from A to B. The positional error is depicted by the vector q. As one can see from the figure, it will move the footprint from B to C. The vector e is the error due to both of these effects [Schenk, 1999].
The total error can be shown to be
aqe +=
Defining the angular error as
ra aR= Then the total error becomes

Lesson 5 SURE 382 Geographic Information Systems II Page 15
p e
aq
p'C
BAZY
X
Figure 11. Effects of positional and angular error on lidar footprint [from Schenk, 1999].
rqe aR+=
The reconstructed ground point can now be defined using the formula presented earlier as
rqpp' iea RRR++=
Timing BiasResults Due to
DepictionReal World
s
Figure 12. Effect of a timing bias in the laser measurements [from Schenk, 1999].
Lesson 5 SURE 382 Geographic Information Systems II Page 16
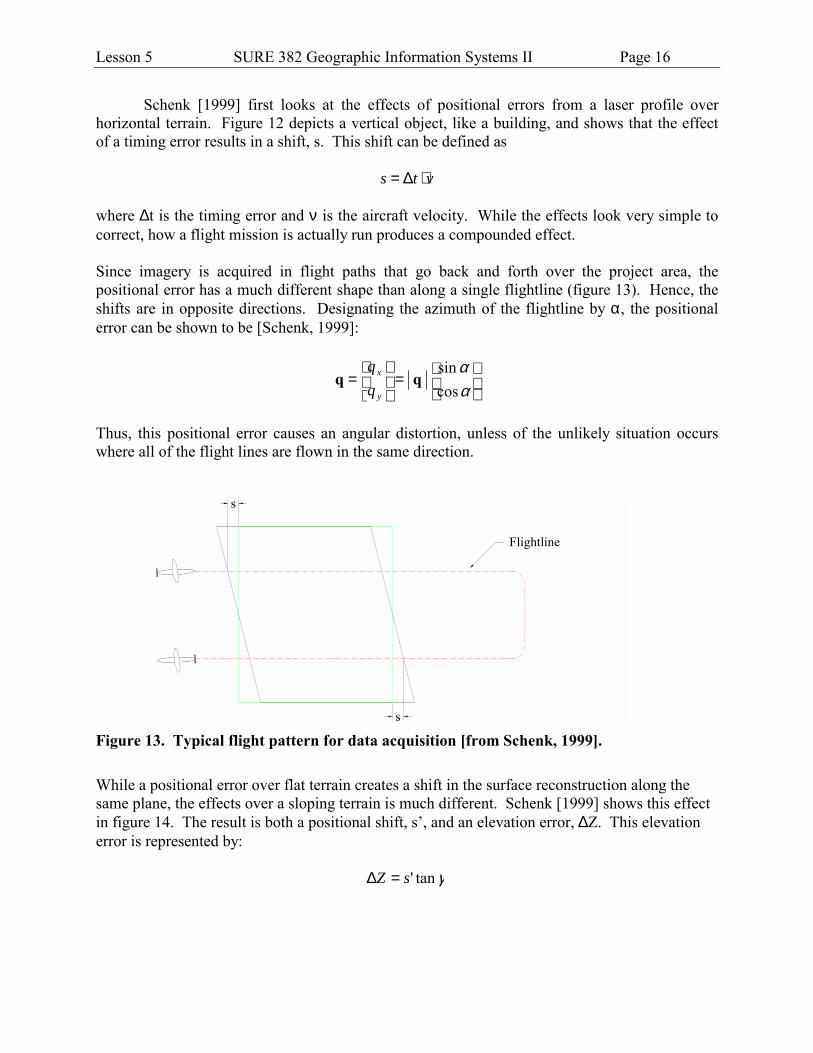
Schenk [1999] first looks at the effects of positional errors from a laser profile over horizontal terrain. Figure 12 depicts a vertical object, like a building, and shows that the effect of a timing error results in a shift, s. This shift can be defined as
vts ⋅∆= where ∆t is the timing error and ν is the aircraft velocity. While the effects look very simple to correct, how a flight mission is actually run produces a compounded effect. Since imagery is acquired in flight paths that go back and forth over the project area, the positional error has a much different shape than along a single flightline (figure 13). Hence, the shifts are in opposite directions. Designating the azimuth of the flightline by α, the positional error can be shown to be [Schenk, 1999]:
=
=
αα
cossin
qqy
x
Thus, this positional error causes an angular distortion, unless of the unlikely situation occurs where all of the flight lines are flown in the same direction.
Flightline
Figure 13. Typical flight pattern for data acquisition [from Schenk, 1999]. While a positional error over flat terrain creates a shift in the surface reconstruction along the same plane, the effects over a sloping terrain is much different. Schenk [1999] shows this effect in figure 14. The result is both a positional shift, s’, and an elevation error, ∆Z. This elevation error is represented by:
γtan'sZ =∆

Lesson 5 SURE 382 Geographic Information Systems II Page 17
where γ is the slope gradient. In this situation, the positional shift is along the slope of maximum gradient. When the flight is along any line oblique to the line of maximum gradient (figure 15), the positional error can be expressed as
( )αβ −= cos' qs
Z
s'
Figure 14. Effects in surface reconstruction over sloping terrain [from Schenk, 1999].
X
Y
Z
Slope Gradient
Flight Trajectory
Figure 15. Flight trajectory and slope gradient relationship [from Schenk, 1999].

Lesson 5 SURE 382 Geographic Information Systems II Page 18
where α is the azimuth of the flight line and β is the azimuth of the slope gradient. The elevation error becomes
( ) γαβ tancos −=∆ qZ
As Schenk [1999] points out, when ( ) 1cos ±=−αβ , one would find the greatest elevation error. This happens when the flight line coincides with the maximum slope gradient. Additionally, as one would intuitively suspect, when the flight direction is perpendicular to the maximum slope gradient then the elevation error would be zero.
As with the positional error, Schenk [1999] evaluated the effects of angular error for laser systems by looking at the laser profile. The effects on a horizontal surface are shown in figure 16. The angular error is designated as δ and the range is r. If we assume that the angular error is a constant throughout the flight then the magnitude of the positional change, depicted by the vector a, will depend on the range. In other words, the magnitude of a will be greater for distances farther away from the laser system. Thus we see that the shift in figure 16(b) will be less for points on the top of the building than for those at ground level. This means that the reconstructed flight path is not a straight line [Schenk, 1999]. It should also be evident that the direction of the shift in the reconstructed surface will be a function of the flight direction.
a
r
(b)(a) Figure 16. Effects from a systematic angular error [from Schenk, 1999].
In figure 17, the effects of an angular error from a laser scanner profile is depicted as the
aircraft flies uphill over a sloping surface. The aircraft maintains a constant flying height during the flight. The direction of flight is along the maximum gradient of the slope. The effect is that the range measurements become smaller. The angular error, δ’, becomes smaller. The effect is that the elevation error also gets smaller and this results in a slope error, ∆γ. This is found from the following relationship [Schenk, 1999]

Lesson 5 SURE 382 Geographic Information Systems II Page 19
δγ+δγ=γ
sintan1'costan'tan
The slope error becomes,
δγ+δ−γ=
γ−γ=γ∆
'sintan1'cos1tan
'tantan
If we assume that the angular error is very small, then one can use the approximations 1'cos ≈δ and ''sin δ=δ . As Schenk [1999] indicates, there are no additional errors introduced with this approximation.
'tan1'tan 2
δ⋅γ+δ⋅γ≈γ∆
Reconstructed Surface
Figure 17. As a profile laser scanner moves uphill, a slope error ∆γγγγ in the reconstructed surface is created by an angular error δ’ [from Schenk, 1999].
The effects of an angular error shown on a horizontal surface is given in figure 18. This angular error, δ, is defined as the angle measured in the error plane, which is comprised of the range vector and the displacement vector. This angular error is shown geometrically in figure

Lesson 5 SURE 382 Geographic Information Systems II Page 20
19. Designating the azimuth of the trace of the error plane by ε and the azimuth of the scan direction asτ, the effective angular error is defined as “the projection of the error plane into the scan plane” [Schenk, 1999]. Mathematically, this is defined as
a'
a'
Figure 18. Slope error due to angular error in the scanner [from Schenk, 1999].
( )τ+εδ=δ cos'
Referring to figure 18, the displacement vector is shown by the vector a’. As one can see, as the range becomes longer, the corresponding displacement vector also increases. The error is nearly perpendicular to the range vector. Therefore, the slope error, ∆γ, can be shown to be [Schenk, 1999]
'sin δ=γ∆
The last example that Schenk [1999] discusses is the effect of a systematic error over a tilted surface (figure 20.a). The amount of displacement, designated by a’, is a function of the range, r, and angular error, δ’. The problem is that the error is not a constant but changes from point to point. This means that the slope of the reconstructed surface is incorrect (figure 10.a). The displacement error can be depicted as
( ) 'tancosr'a δτ−ε=

Lesson 5 SURE 382 Geographic Information Systems II Page 21
Scan Plane
Error Plane
Flight Trajectory
Y
X Figure 19. Relationship between the error plane and scan plane [from Schenk, 1999].
True SurfaceReconstructed Surface
r
a'
a'
a'
a'
Figure 20. Angular error effect on tilted ground [from Schenk, 1999]. From this equation it should be evident that the maximum error will occur when the angular offset coincides with the scan plane (ε - τ). Similarly, when the angular offset and the scan plane
Lesson 5 SURE 382 Geographic Information Systems II Page 22
are perpendicular to each other then there is no slope error. Figure 20 (b) shows the effect of the reconstructed surface when the slope on the ground changes direction.
Since the magnitude of the error is a function of range, one can see from figure 20 that as the range increases the amount of error increases. The slope error can be defined as [Schenk, 1999]
γδ=γ∆ 2tan'tan
From this discussion, Schenk [1999] drew the following conclusions:
The simplest situation involves a profiling system and horizontal surfaces. Intuition tells that causes a horizontal shift that has no influence on the reconstructed surface. The positional error is a vector quantity and as such depends on the flight direction. This, in turn, causes shift errors of variable direction and magnitude. That is, reconstructed horizontal surfaces are distorted. We also recognized that horizontal surfaces, reconstructed from a scanning system with angular errors (mounting bias), have a slope error. Sloped surfaces present a more complex scenario. Here, the reconstruction error depends on several factors, such as slope gradient, its spatial orientation, flight direction, and systematic positional and/or angular error. In most cases, the errors cause a deformation of the surface. That is, the relationship between the true and reconstructed surface cannot be described by a simple similarity transformation.
Calibration
In order to provide an accurate and acceptable product, it is essential that the errors within the lidar system be known and accounted for in the processing of the data. This is achieved through calibration. The importance of calibration is very evident once one realizes that the system has no inherent redundancies. The INS/GPS provides the position and orientation of the lidar system. A single range measurement is then used to georeference the ground point.
Accuracies
There are a number of very optimistic claims as to the accuracy of lidar data. To fully assess the accuracy one must consider the errors inherent in the three components of the system (laser scan, GPS, and IMU). It is conservatively estimated that the accuracy of lidar, as determined from error propagation, is about 15 centimeters in elevation. It is very difficult to assess horizontal accuracy with laser altimetry, but the general thought within the industry is that it is about 1.5 times the vertical accuracy. This can be thought of as typical results from lidar

Lesson 5 SURE 382 Geographic Information Systems II Page 23
surveys assuming that the system is properly calibrated and functioning correctly and that the surface terrain conditions are ideal. This latter assumption is almost never correct. As a rule of thumb, horizontal accuracy is often claimed to be 1/2,000th of the flying height. Vertical accuracies of better than 15 cm are obtainable when the sensor altitude is below 1,200 m and up to 25 cm when the operating altitude is between 1,200 m and 2,500 m [Brinkman and O’Neill, 2000].
There are some additional general rules that pertain to the accuracy of lidar [Brinkman and O’Neill, 2000]:
• The spot spacing is much denser for slower aircraft. • A more reliable or accurate DTM is available through a denser spot spacing since there is
more data collected by the system. • The highest accuracy heights occur at the nadir and decrease as the swath angle increases. • A smaller width will yield a denser spot spacing problem.
But, the fact of the matter is that lidar does not give the user any redundant information.
This means that the accuracy of a point can only be inferred. Thus, it is critical that the system is well calibrated and that errors are understood and taken into account in the post-processing [Schenk, 1999].
In the last section, lidar errors were discussed. Here, we will look at the errors found in a DTM/DEM derived from lidar measurements. There are basically two sources of error [Raber et al, 2002]: data interpolation and the effects on non-terrain points on the digital terrain model. As it relates to interpolation error, there are two major sources of this error: post spacing and vegetation point removal.
Post spacing pertains to the distance between lidar returns. This is a semi-systematic error [Raber et al, 2002]. This distance is a result of the flying height of the aircraft, velocity of the aircraft, laser pulse rate, and the laser scan angle.
Interpolation errors are also affected through the vegetation point removal process. Raber et al [2002] indicate that many of the algorithms used for removal of vegetation points use a statistical trend surface to remove the cover. The process implies that the interaction is with the vegetation cover instead of the bald earth, which is the desired output of the laser survey. The point removal means that data voids are present in the terrain data thereby making the interpolation process weaker. This can become even more uncertain when terrain points are mistakenly removed from the data set if the algorithm mistakenly classifies that terrain point as a vegetation point. The result of the interpolation usually results in an under-prediction of the elevations since high slopes become smooth and small peaks are removed. Additionally, these errors exhibit a systematic form due to the smoothing. Finally, if vegetation points are not removed from the data set then the reconstructed DTM will be overestimated [Raber et al, 2002].

Lesson 5 SURE 382 Geographic Information Systems II Page 24
Lidar Products Level Name Description
1 Basic or “All Point”
All of post-processed lidar data properly geo-referenced but with no additional filtering or analysis. Suitable for those organizations with in-house data processing tools and capabilities or who work with third-party data processing service bureau. Cheapest and fastest produced.
2 Low Fidelity Or “First Pass”
Using either proprietary algorithm or third-party software tools, the data provider will automatically filter the point cloud into points on the ground, the “bare earth”, and points that are not ground. There is generally no classification of the non-ground points into separate feature types (buildings, trees, etc.) and the ground points generally include some percentage of residual features not extracted by automated classification algorithms. Suitable for those organizations with in-house data processing tools and capabilities or who work with a third-party data processing service bureau. Common deliverable. Usually same cost/schedule as All-Points
3 High Fidelity Or “Cleaned”
A fully edited data set that has been extensively reviewed by an experienced data analyst to remove any artifacts by the automated classification routine and provide a “99%” clean terrain model. The low fidelity data are analyzed and classified manually usually with supporting imagery. Labor intensive product. Moderate cost but with longer delivery schedules, especially on larger projects.
4 Feature Layers
Further processing using a combination of automated and manual classification to identify features of interest such as power lines or building footprints. Generally completed in-house or using a service bureau or third-party data processor that specializes in the desired application and has experience or has developed customized tools for specific types of feature extraction. Usually more expensive product than high fidelity terrain model.
5 Fused A further refinement of the lidar data product achieved by the fusion of the lidar-derived elevation data set with information from other sensors. This can include digital imagery, hyperspectral data, thermal imagery, planimetric data or similar sources. Generally the most information-rich product with the highest cost.
Table 1. Lidar products (from Flood, 2002).
Flood [2002] has stated that there are no currently accepted definitions of data products for laser scan data. Nonetheless, he has defined five different standard lidar products identified according to the level of processing performed for product delivery (see table 1).
The Level 1 data product is the most basic data set consisting of all the points collected in the lidar project. The client receives a data set consisting of point clouds that have been georeferenced. No other processing is performed on the data. This data type is finding increased usage due to the fact that a number of software packages are available to give the user the

Lesson 5 SURE 382 Geographic Information Systems II Page 25
opportunity to manipulate and extract information from the point cloud data. In the past this capability was only possible through proprietary software controlled by either the instrument manufacturer or the data collector. As Flood [2002] indicates, this product should find more appeal once a binary data exchange format and analysis are adopted as industry standards.
The next class is Level 2 data described as being a low fidelity or “first pass” data. Here the data collector will perform a preliminary classification on the point cloud data. The client receives two data sets: ground (also called “bare earth” or “bald earth”) and non-ground. Generally the non-ground data set does not contain any further classification of feature type like buildings, vegetation, etc. This data product is considered low fidelity because data classification anomalies could still exist within the data.
Since this level is almost fully automated, this type of processing is more efficiently done by the data provider. There is a lot of effort within the industry to create algorithms that are more robust and efficient. Therefore, the automated filtering often look at integrating object information such as the “intensity of the laser pulse return, simultaneously acquired digital imagery or direct spectral tagging of elevation data” [Flood, 2002]. An additional issue related to the filtering is the aggressiveness. For example, a more aggressive filter setting will result in a cleaner data set and hence a higher level of fidelity in the terrain data. The price of this is a higher level of misclassification. On the other hand, a less aggressive filtering value will decrease the misclassification errors but create a lower level of fidelity in the terrain data. If the user will be performing a lot of processing in-house then Flood [2002] recommends this last level of data processing. He also recommends that the client request documentation on the filter settings. Without this data, it would be very difficult to repeat the results of the processing.
Unless the area contains only a minimum amount of ground cover or man-made features, artifacts and data misclassification will exist within the data. Thus, Level 3 pertains to the high fidelity or cleaned data. Flood [2002] states that “common problems remaining in the preliminary product include poor ground model fidelity in areas of low, dense ground cover, the inability to accurately capture sharp grade breaks such as low ridges or sharp cuts, misclassification of man-made features such as bridges, and an inability to discriminate tree cover from topography in areas of sharp relief”. Correcting for these problems is a very labor intensive operation. While 80-90% of the automated lidar processing is possible, what remains takes the bulk of the effort to clean. This requires either ancillary data or a highly trained technician. This level will not only increase the cost of the project and add to the schedule, but it can easily create an impediment to the throughput of lidar data.
The next level is Level 4 – Feature Extraction. Upon completion of Level 3 processing, important above ground information can be extracted from the point cloud data. This is done using automated and/or manual application specific feature extraction tools. As Flood [2002] indicates, it is important to specify in the contract what the deliverables will be and to specify the data collector’s capabilities and experience.
The Level 5 processing stage is called Fused. This is the most information-rich product where lidar data are fused with other sensor data [Flood, 2002].
Lesson 5 SURE 382 Geographic Information Systems II Page 26
Comparison of Lidar with Photogrammetry
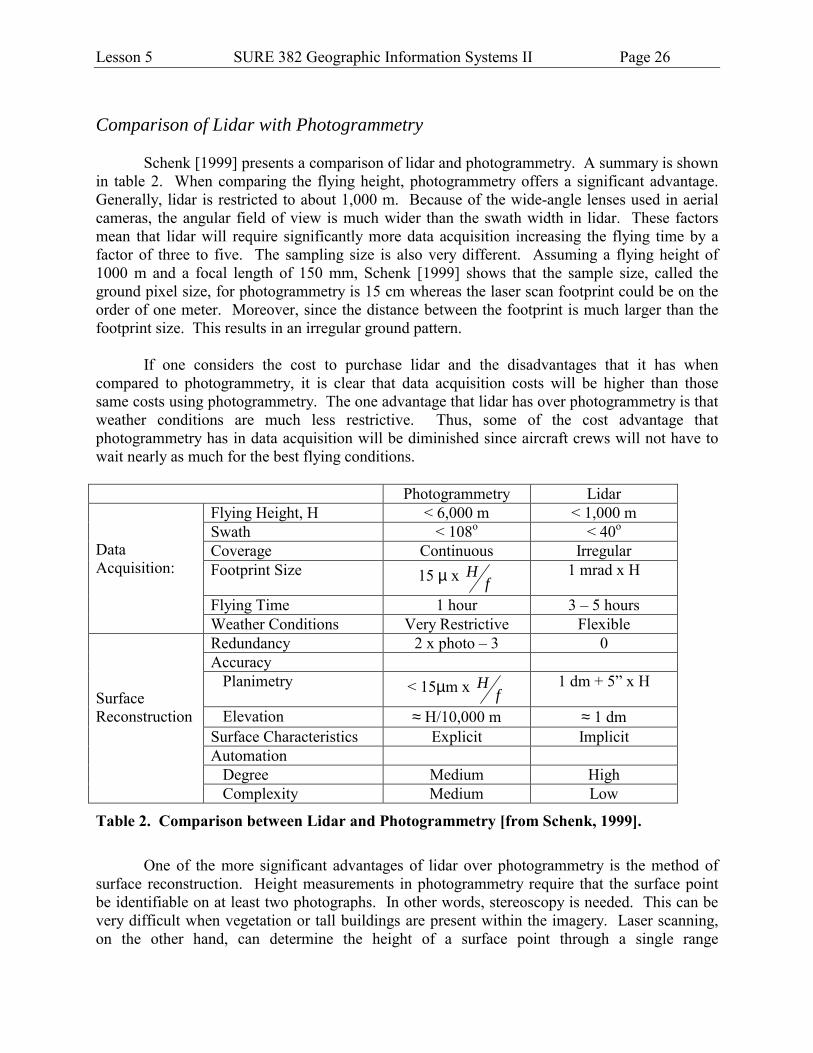
Schenk [1999] presents a comparison of lidar and photogrammetry. A summary is shown in table 2. When comparing the flying height, photogrammetry offers a significant advantage. Generally, lidar is restricted to about 1,000 m. Because of the wide-angle lenses used in aerial cameras, the angular field of view is much wider than the swath width in lidar. These factors mean that lidar will require significantly more data acquisition increasing the flying time by a factor of three to five. The sampling size is also very different. Assuming a flying height of 1000 m and a focal length of 150 mm, Schenk [1999] shows that the sample size, called the ground pixel size, for photogrammetry is 15 cm whereas the laser scan footprint could be on the order of one meter. Moreover, since the distance between the footprint is much larger than the footprint size. This results in an irregular ground pattern.
If one considers the cost to purchase lidar and the disadvantages that it has when compared to photogrammetry, it is clear that data acquisition costs will be higher than those same costs using photogrammetry. The one advantage that lidar has over photogrammetry is that weather conditions are much less restrictive. Thus, some of the cost advantage that photogrammetry has in data acquisition will be diminished since aircraft crews will not have to wait nearly as much for the best flying conditions. Photogrammetry Lidar
Flying Height, H < 6,000 m < 1,000 m Swath < 108o < 40o Coverage Continuous Irregular Footprint Size 15 µ x f
H 1 mrad x H
Flying Time 1 hour 3 – 5 hours
Data Acquisition:
Weather Conditions Very Restrictive Flexible Redundancy 2 x photo – 3 0 Accuracy Planimetry < 15µm x f
H 1 dm + 5” x H
Elevation ≈ H/10,000 m ≈ 1 dm Surface Characteristics Explicit Implicit Automation Degree Medium High
Surface Reconstruction
Complexity Medium Low
Table 2. Comparison between Lidar and Photogrammetry [from Schenk, 1999].
One of the more significant advantages of lidar over photogrammetry is the method of surface reconstruction. Height measurements in photogrammetry require that the surface point be identifiable on at least two photographs. In other words, stereoscopy is needed. This can be very difficult when vegetation or tall buildings are present within the imagery. Laser scanning, on the other hand, can determine the height of a surface point through a single range

Lesson 5 SURE 382 Geographic Information Systems II Page 27
measurement. This means that the object point needs only to have a “view” along a single line. This difference is a double-edged sword in that photogrammetry inherently provides redundancy whereas there is no redundancy using lidar. On the other hand, measuring surface points by photogrammetry requires reasonably good contrast or texture to make the measurement. As Schenk [1999] points out, surfaces like sand, snow, ice and water bodies can create formidable obstacles for surface measurements using photogrammetry. Lidar works very well under these types of conditions.
Photogrammetry can employ two different methods for determining the exterior orientation of the camera. Traditionally, ground control points are established on and around the project area. New points can be determined in the object space through an essential interpolation process (Schenk, 1999, calls this indirect orientation). Today, many photogrammetric flights, direct sensor orientation is employed. Here the GPS and INS are used to measure the exterior orientation. Determination of new control points using the direct orientation without ground control can be considered as an extrapolation process. The significance is in the error propagation where extrapolation is much worse than interpolation [Schenk, 1999]. Another important factor between these two methods is the effect of interior orientation. In the conventional approach, the adjustment of the observations partially compensates for the interior orientation effects. This is not true with direct orientation where the results are fully affected by the interior orientation [Schenk, 1999].
Both photogrammetry and laser altimetry are competitive in many ways since both are used for building and road extraction, open field detection and a host of other tasks. But, neither by themselves are useful in all situations. For example, difficulties encountered when using imagery include:
• Colors of certain features may not be distinguishable from the background colors thereby making feature identification difficult.
• Shadows can hide features. • The extracted features are often incomplete • Grouping of extracted features can be very hard. • It can be difficult to create a stereo or 3D relationship.
Similarly, difficulties in using lidar include:
• Trees can mess up road and building shapes. • Resolution may not be high enough. • The extracted features are often incomplete. • Certain objects like roads show no unique characteristics.
Conclusion
By all indications, lidar appears to be a technology that will considerably change mapping in the future. While it has been around for a long time, from a commercial applications point of view, it is at its infancy. As such, it is difficult to gauge how it will impact geospatial
Lesson 5 SURE 382 Geographic Information Systems II Page 28
data collection. Some liken this to the early 1980s when GPS was beginning to grow as a technology. The myriad of application of GPS in 2000 were probably not even envisioned by system developers in 1980. Lidar has this same potential.
There are a lot of unknowns facing this technology in the future. Right now it is very difficult to compare systems since we see differences in wavelength and laser frequency as well as proprietary processing. But this is like any new technology.
References Brinkman, R. and C. O’Neill, 2000. “LIDAR and Photogrammetric Mapping”, The Military Engineer, No. 605. FEMA (Federal Emergency Management Agency), 2003. “Flood Hazard Mapping – Appendix 4B. Airborne Light Detection and Ranging System”, http://www.fema.gov/fhm/lidar_4b.shtm, accessed 5/20/2003. Flood, M., 2002. “Product Definitions and Guidelines for Use in Specifying Lidar Deliverables”, Photogrammetric Engineering and Remote Sensing, 68(12):1230-1234. Fowler, R., 2001. “The Thorny Problem of LIDAR Specifications”, EOM, 10(4):25-28. Maume, D. (editor), 2001. Digital Elevation Model Technologies and Applications: The DEM Users Manual, The American Society of Photogrammetry and Remote Sensing, Bethesda, MD, 539 p. Raber, G., J. Jensen, S. Schill and K. Schuckman, 2002. “Creation of Digital Terrain Models Using an Adaptive Lidar Vegetation Point Removal Process”, Photogrammetric Engineering and Remote Sensing, 68(12): 1307-1315. Schenk, T., 1999. “Photogrammetry and Laser Altimetry”, Proceedings of the Workshop on Mapping Surface Structure and Topography by Airborne and Spaceborne Lasers, La Jolla, CA, November 9-11. Sizgoric, S., 2002. “Laser Altimetry Systems”, Lecture notes from the 2nd Duane Brown International Summer School in Geomatics, Columbus, OH, October 3-5. Turner, A., 2001. “Discover the Importance of LIDAR Technology”, GEOWorld, 13(12):30-31. Wehr, A. and U. Lohr, 1999. “Airborne Laser Scanning – An Introduction and Overview”, ISPRS Journal of Photogrammetry and Remote Sensing, V.54, pp 68-82.

Lesson 5 SURE 382 Geographic Information Systems II Page 29
Review Questions 1. Explain how the components complement each other within a lidar system. 2. Describe how one could obtain “bare earth” digital terrain data over areas with trees,
buildings and other types of features. 3. What are the advantages of lidar? 4. What is the real problem with the IMU in airborne measurement and how do we correct for
this problem within a lidar system? 5. How could an intensity signal be an important development in lidar technology? 6. At first glance, lidar (or Airborne Laser Swath Mapping) and photogrammetry appear to be
overlapping technologies. Since photogrammetry is a mature technology, what is the benefit of developing lidar theory if it does not provide any new application?
7. What are artifacts and how does the FEMA standard address them? 8. Describe how the FEMA standard addresses lidar quality control/quality assurance
requirements. 9. What are the advantages of the properties if the laser scanner? 10. Discuss the accuracy of laser scanning. 11. How does the vegetation point removal process affect the reconstructed DTM/DEM surface? 12. Describe how “filter aggressiveness” affects a lidar-derived surface model.
Related Documents