AE PRO 4.0 Addendum
Dec 11, 2015
AE PRO 4.0 Addendum
Welcome message from author
This document is posted to help you gain knowledge. Please leave a comment to let me know what you think about it! Share it to your friends and learn new things together.
Transcript
Zaxwerks 3D Invigorator for After Effects - 4.0 PRO Addendum 1

Zaxwerks 3D Invigorator for After Effects - 4.0 PRO Addendum2
Zaxwerks Inc.5724 Camellia Ave.Temple City, CA 91780(626) 309-9102 phone(626) 309-9142 faxhttp://www.zaxwerks.com
Sales: [email protected] Support: [email protected]
© 1996 - 2004 Zaxwerks Inc. All rights reserved.
This manual, as well as the software described in it, is furnished under license and may only be used or copiedin accordance with the terms of such license. The information in this manual is furnished for informational useonly, is subject to change without notice, and does not represent product specifications or commitment on thepart of Zaxwerks. Zaxwerks assumes no responsibility or liability for any error or inaccuracies that may appearin this document.
The Zaxwerks 3D Invigorator is a trademark of Zaxwerks Inc. After Effects, Illustrator and Photoshop are trade-marks of Adobe Systems Inc. FreeHand is a trademark of Macromedia Inc. Apple and Macintosh are regis-tered trademarks of Apple Computer, Inc. Windows 2000 and Windows XP are registered trademarks ofMicrosoft, Inc. OpenGL is a trademark of Silicon Graphics Inc. All other product names or trademarks are theproperty of their respective owners.
Zaxwerks 3D Invigorator for After Effects - 4.0 PRO Addendum 3
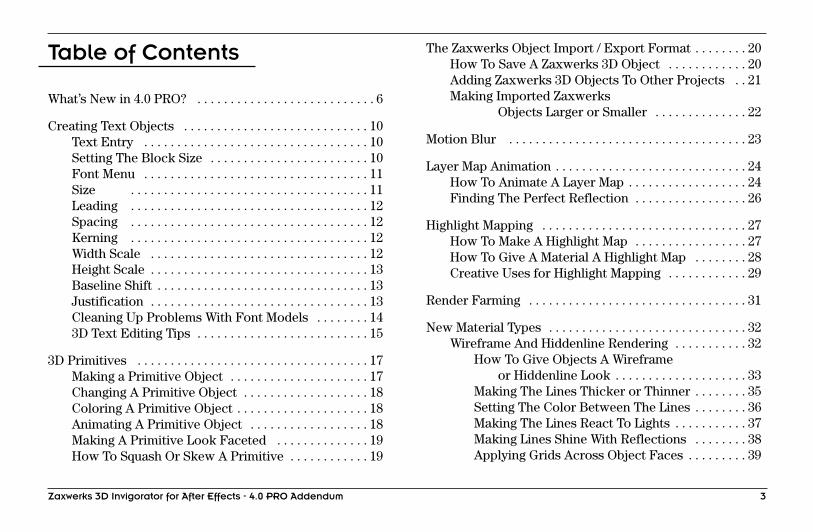
Table of Contents
What’s New in 4.0 PRO? . . . . . . . . . . . . . . . . . . . . . . . . . . . 6
Creating Text Objects . . . . . . . . . . . . . . . . . . . . . . . . . . . . 10Text Entry . . . . . . . . . . . . . . . . . . . . . . . . . . . . . . . . . . 10Setting The Block Size . . . . . . . . . . . . . . . . . . . . . . . . 10Font Menu . . . . . . . . . . . . . . . . . . . . . . . . . . . . . . . . . . 11Size . . . . . . . . . . . . . . . . . . . . . . . . . . . . . . . . . . . . 11Leading . . . . . . . . . . . . . . . . . . . . . . . . . . . . . . . . . . . . 12Spacing . . . . . . . . . . . . . . . . . . . . . . . . . . . . . . . . . . . . 12Kerning . . . . . . . . . . . . . . . . . . . . . . . . . . . . . . . . . . . . 12Width Scale . . . . . . . . . . . . . . . . . . . . . . . . . . . . . . . . . 12Height Scale . . . . . . . . . . . . . . . . . . . . . . . . . . . . . . . . . 13Baseline Shift . . . . . . . . . . . . . . . . . . . . . . . . . . . . . . . . 13Justification . . . . . . . . . . . . . . . . . . . . . . . . . . . . . . . . . 13Cleaning Up Problems With Font Models . . . . . . . . 143D Text Editing Tips . . . . . . . . . . . . . . . . . . . . . . . . . . 15
3D Primitives . . . . . . . . . . . . . . . . . . . . . . . . . . . . . . . . . . . 17Making a Primitive Object . . . . . . . . . . . . . . . . . . . . . 17Changing A Primitive Object . . . . . . . . . . . . . . . . . . . 18Coloring A Primitive Object . . . . . . . . . . . . . . . . . . . . 18Animating A Primitive Object . . . . . . . . . . . . . . . . . . 18Making A Primitive Look Faceted . . . . . . . . . . . . . . 19How To Squash Or Skew A Primitive . . . . . . . . . . . . 19
The Zaxwerks Object Import / Export Format . . . . . . . . 20How To Save A Zaxwerks 3D Object . . . . . . . . . . . . 20Adding Zaxwerks 3D Objects To Other Projects . . 21Making Imported Zaxwerks
Objects Larger or Smaller . . . . . . . . . . . . . . 22
Motion Blur . . . . . . . . . . . . . . . . . . . . . . . . . . . . . . . . . . . . 23
Layer Map Animation . . . . . . . . . . . . . . . . . . . . . . . . . . . . . 24How To Animate A Layer Map . . . . . . . . . . . . . . . . . . 24Finding The Perfect Reflection . . . . . . . . . . . . . . . . . 26
Highlight Mapping . . . . . . . . . . . . . . . . . . . . . . . . . . . . . . . 27How To Make A Highlight Map . . . . . . . . . . . . . . . . . 27How To Give A Material A Highlight Map . . . . . . . . 28Creative Uses for Highlight Mapping . . . . . . . . . . . . 29
Render Farming . . . . . . . . . . . . . . . . . . . . . . . . . . . . . . . . . 31
New Material Types . . . . . . . . . . . . . . . . . . . . . . . . . . . . . . 32Wireframe And Hiddenline Rendering . . . . . . . . . . . 32
How To Give Objects A Wireframeor Hiddenline Look . . . . . . . . . . . . . . . . . . . . 33
Making The Lines Thicker or Thinner . . . . . . . . 35Setting The Color Between The Lines . . . . . . . . 36Making The Lines React To Lights . . . . . . . . . . . 37Making Lines Shine With Reflections . . . . . . . . 38Applying Grids Across Object Faces . . . . . . . . . 39
Zaxwerks 3D Invigorator for After Effects - 4.0 PRO Addendum4
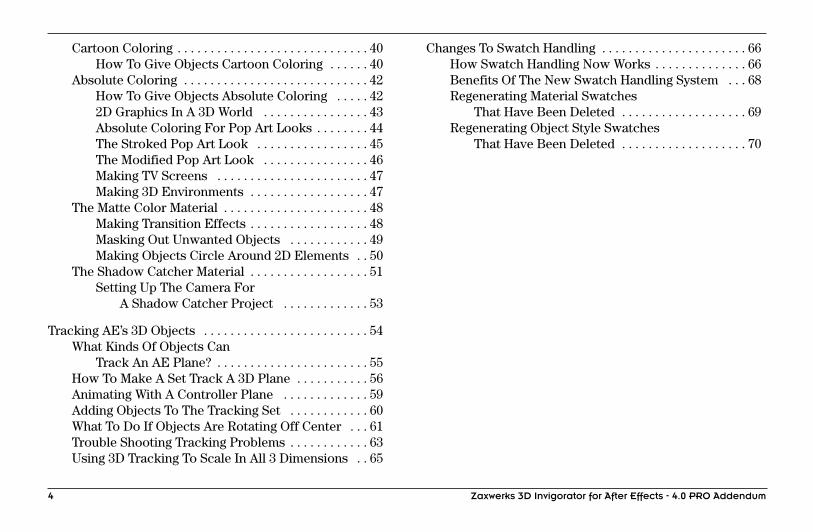
Cartoon Coloring . . . . . . . . . . . . . . . . . . . . . . . . . . . . . 40How To Give Objects Cartoon Coloring . . . . . . 40
Absolute Coloring . . . . . . . . . . . . . . . . . . . . . . . . . . . . 42How To Give Objects Absolute Coloring . . . . . 422D Graphics In A 3D World . . . . . . . . . . . . . . . . 43Absolute Coloring For Pop Art Looks . . . . . . . . 44The Stroked Pop Art Look . . . . . . . . . . . . . . . . . 45The Modified Pop Art Look . . . . . . . . . . . . . . . . 46Making TV Screens . . . . . . . . . . . . . . . . . . . . . . . 47Making 3D Environments . . . . . . . . . . . . . . . . . . 47
The Matte Color Material . . . . . . . . . . . . . . . . . . . . . . 48Making Transition Effects . . . . . . . . . . . . . . . . . . 48Masking Out Unwanted Objects . . . . . . . . . . . . 49Making Objects Circle Around 2D Elements . . 50
The Shadow Catcher Material . . . . . . . . . . . . . . . . . . 51Setting Up The Camera For
A Shadow Catcher Project . . . . . . . . . . . . . 53
Tracking AE’s 3D Objects . . . . . . . . . . . . . . . . . . . . . . . . . 54What Kinds Of Objects Can
Track An AE Plane? . . . . . . . . . . . . . . . . . . . . . . . 55How To Make A Set Track A 3D Plane . . . . . . . . . . . 56Animating With A Controller Plane . . . . . . . . . . . . . 59Adding Objects To The Tracking Set . . . . . . . . . . . . 60What To Do If Objects Are Rotating Off Center . . . 61Trouble Shooting Tracking Problems . . . . . . . . . . . . 63Using 3D Tracking To Scale In All 3 Dimensions . . 65
Changes To Swatch Handling . . . . . . . . . . . . . . . . . . . . . . 66How Swatch Handling Now Works . . . . . . . . . . . . . . 66Benefits Of The New Swatch Handling System . . . 68Regenerating Material Swatches
That Have Been Deleted . . . . . . . . . . . . . . . . . . . 69Regenerating Object Style Swatches
That Have Been Deleted . . . . . . . . . . . . . . . . . . . 70
Zaxwerks 3D Invigorator for After Effects - 4.0 PRO Addendum 5

Zaxwerks 3D Invigorator for After Effects - 4.0 PRO Addendum6
What’s New In 4.0 PRO?
Version 4.0 PRO of the 3D Invigorator for After Effects containsmany new features that will appeal to the designer and the fastpaced production artist alike.
Following is a short overview of the new additions. Be sure toread the rest of the manual as each chapter explains the featurein detail and includes many creative ideas and suggestions.
3D Text CreationVersion 4.0 PRO contains a full-featured text editor. Each lettercan have its own font, size, kerning, tracking, baseline shift,horizontal and vertical scale, color, bevel, position and depth.Building editable text into the plug-in means that changes to thespelling of a title, adding words or creating multiple versions canbe done without ever leaving After Effects.
Motion BlurVersion 4.0 PRO brings 3D motion blur to After Effects. Anythingthat can be created or imported into the Invigorator PRO can bemotion blurred. This includes models made in other programssuch as Maya, 3D Studio and LightWave.

Zaxwerks 3D Invigorator for After Effects - 4.0 PRO Addendum 7
3D PrimitivesSpheres, cubes, planes and cylinders can be created withoutleaving After Effects and images can be mapped onto theirsurfaces to create effects like spinning globes, and video boxes.
The Zaxwerks Object Import/Export FormatThe addition of this new file format enables you to create 3Ddesign elements which can be reused over and over in newprojects.
Layer Map AnimationThere is a new Layer Map Offset control that enables you to keepreflection maps moving even once the objects have come to rest.This keep graphics “alive” and interesting.
Render FarmingVersion 4.0 PRO supports render farming using the standard AfterEffects render engine. This gives you unlimited rendering powerwithout having to buy additional licenses.
Highlight MappingHighlight (or Specular) mapping is a professional level featurethat brings enhanced photo-realism to the final rendering. High-light mapping shows surface texture in the glare and hot spotsthat appear on objects.
Zaxwerks 3D Invigorator for After Effects - 4.0 PRO Addendum8
Wireframe And Hidden Line ColoringThese new types of materials make objects look like they aredrawn by lines rather than solid 3D objects. The lines can besingle-colored or they can be affected by the lights and reflectionsin the scene. You can even texture map them if you want multi-colored lines. The Wireframe style shows all of the lines in anobject. The Hidden Line style only shows the lines that are facingthe viewer.
Cartoon ColoringThis new material type paints objects with a bold graphic looksimilar to how cell animators paint their artwork.
Absolute ColoringThis new material type paints objects a single color that isunaffected by light or shadow. It is very useful for creating 2D-colored graphics out of 3D models. Also good for giving acorporate client the company’s colors exactly per spec.
Matte ColoringMatte Coloring makes a 3D object act like a mask. This is usefulfor creating 3D transitions, and 3D traveling mattes.

Zaxwerks 3D Invigorator for After Effects - 4.0 PRO Addendum 9
The Shadow Catcher MaterialThe Shadow Catcher material option makes the shadows fromyour 3D objects appear to fall onto the objects in a piece ofbackground video. It is very useful for merging 3D imagery withexisting footage.
Tracking AE’s 3D ObjectsInvigorator objects can now track, or mimic, what an AE 3Dplane is doing. This enables all of AE’s manipulation tools,velocity graphs, animation assistants and expression scripts to beused to control Invigorator objects.
Changes To Swatch HandlingVersion 4.0 has made significant changes to the way swatches arehandled. Swatches are now based on a global library systemwhich keeps the file size down and speeds up the save process.It also means that once a material or object style is saved it isimmediately available to use in all other Invigorator plug-ins,which is great for keeping projects consistent and speeding upwork.
Zaxwerks 3D Invigorator for After Effects - 4.0 PRO Addendum10
Creating Text Objects
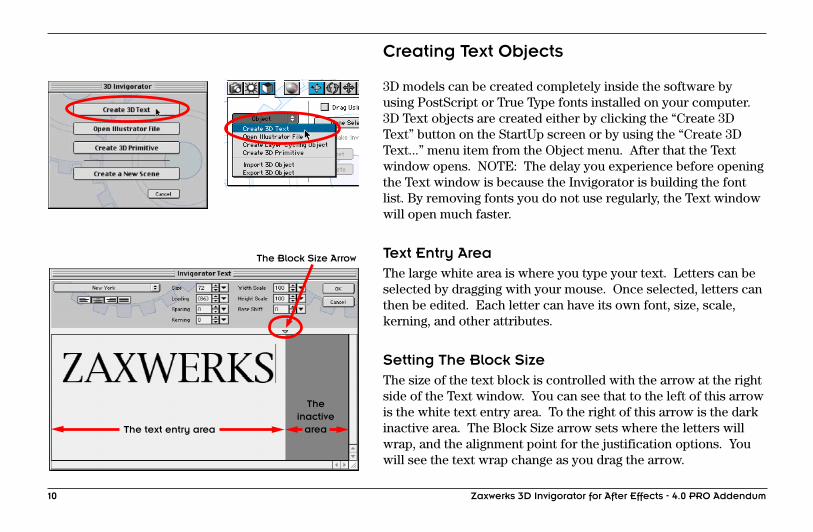
3D models can be created completely inside the software byusing PostScript or True Type fonts installed on your computer.3D Text objects are created either by clicking the “Create 3DText” button on the StartUp screen or by using the “Create 3DText...” menu item from the Object menu. After that the Textwindow opens. NOTE: The delay you experience before openingthe Text window is because the Invigorator is building the fontlist. By removing fonts you do not use regularly, the Text windowwill open much faster.
Text Entry AreaThe large white area is where you type your text. Letters can beselected by dragging with your mouse. Once selected, letters canthen be edited. Each letter can have its own font, size, scale,kerning, and other attributes.
Setting The Block SizeThe size of the text block is controlled with the arrow at the rightside of the Text window. You can see that to the left of this arrowis the white text entry area. To the right of this arrow is the darkinactive area. The Block Size arrow sets where the letters willwrap, and the alignment point for the justification options. Youwill see the text wrap change as you drag the arrow.
The text entry area
Theinactive
area
The Block Size Arrow

Zaxwerks 3D Invigorator for After Effects - 4.0 PRO Addendum 11
It is usually a good idea to adjust the Block Size arrow so theBlock Size is as small as possible. Extra white space on the rightside of the block may force your models off center.
Font MenuThe Invigorator can use almost any font that is installed andrecognized by your system. Both True Type and Type 1 Postscriptfonts can be used. To change the font, first select the charactersthat you want to change, then select the new font from the fontmenu. Each character can use a different font.
After a new font is selected you can use the up and down arrowkeys on your keyboard to step through the font list. Each clickdown will apply the next font down on the list to the selectedcharacters. This is an extremely useful feature! It means youdon’t have to know what a font looks like to use it. Just type thetext, and step through the font list until you find a typeface thatlooks good to you.
SizeThis sets the size of the text objects. It is best to make the textlarge, like you would if you were setting type for large displays.The default size is 72 points. 72 is the smallest we recommendthat you make the type. Sizes smaller than 72 can be used but themodels may require extra fussing to make them look right. Eachletter can have a different size.
Click the large arrow to the right of the Size field to selectfrom a list of popular presets.
Move the Block Size Arrow to the edge of theletters for the best fit.

Zaxwerks 3D Invigorator for After Effects - 4.0 PRO Addendum12
LeadingLeading is the amount of space between the baseline of one lineof text and the baseline of the line of text above it. If you set theleading for a single character it will influence the whole line thatthat character is on.
When Leading is set to “Automatic”, the leading value is writtenwith parentheses around the numbers. Automatic Leading willset the leading to 120% of the Size value.
SpacingLetter Spacing is also known as Tracking. It is extra space that isinserted between the letters. The letter spacing applied in thetext window does not animate. If you want to animate lettersgetting closer together or spreading apart, use the Spread/Bunchslider in the Transition controls of the ProAnimator.
KerningKerning is letter spacing that is applied between individualcharacters. Negative values move letters closer to each other.Positive values move them away from each other.
Width ScaleThe Width Scale enables you to make a character fatter or thinnerwithout changing its height. The value is in percentage, so a scaleof 100% keeps the character its original size. A scale of 50%makes the letter half the width that it normally is, and 200%makes it twice as wide.
Kerning and Leading can be done from thekeyboard. Click the cursor between two letters,then hold down the Option (ALT) key and pressyour keyboard’s left/right arrow keys to adjustKerning, and the Up/Down arrow keys to adjustLeading.
The little up/down arrows next to the edit fieldscan help you fine tune the values. Each clickon one of these arrows will increase or de-crease the value by one. If you hold the Shiftkey down each click changes the value by alarger amount.
Zaxwerks 3D Invigorator for After Effects - 4.0 PRO Addendum 13
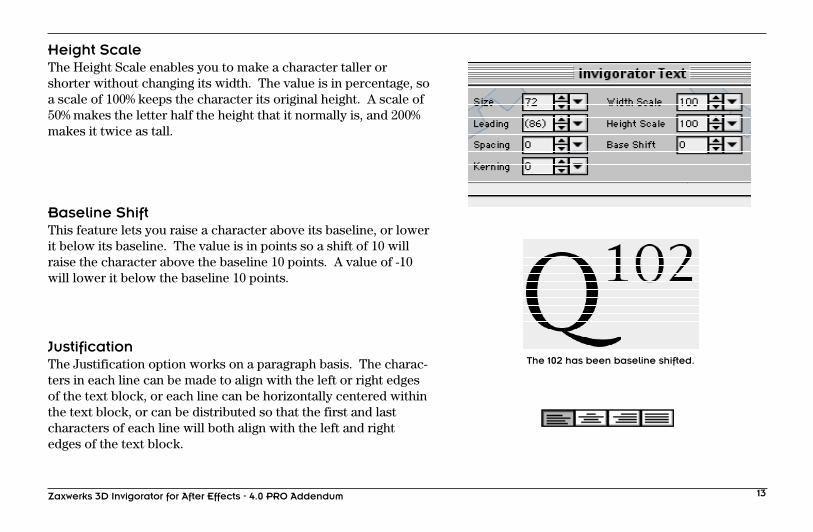
Height ScaleThe Height Scale enables you to make a character taller orshorter without changing its width. The value is in percentage, soa scale of 100% keeps the character its original height. A scale of50% makes the letter half the height that it normally is, and 200%makes it twice as tall.
Baseline ShiftThis feature lets you raise a character above its baseline, or lowerit below its baseline. The value is in points so a shift of 10 willraise the character above the baseline 10 points. A value of -10will lower it below the baseline 10 points.
JustificationThe Justification option works on a paragraph basis. The charac-ters in each line can be made to align with the left or right edgesof the text block, or each line can be horizontally centered withinthe text block, or can be distributed so that the first and lastcharacters of each line will both align with the left and rightedges of the text block.
The 102 has been baseline shifted.

Zaxwerks 3D Invigorator for After Effects - 4.0 PRO Addendum14
Cleaning Up Problems With Font ModelsSometimes fonts can create problems when turned into 3Dmodels. For example here is a letter “k” from the font New York.You can see that part of the letter looks goofed up. This isbecause some paths were left open when the font was created.The Invigorator has a way to fix this that works automaticallymost of the time.
When you see this type of problem all you have to do is to set theEdge Offset slider to a small positive value, such as +0.1. Thiswill cause the internal boolean engine to clean up the overlaps,loops and missing parts of the vector paths. Sometimes a differ-ent value will do the trick, such as -0.5, or -0.1. Depending on thesize of the font you will find a range of values that don’t appear tohave much affect on the font but may help clean up the problemof a poorly created font.
If the Edge Offset technique doesn’t fix the problem, try changingthe setting for Object Faceting.
This same technique can be used to clean up problems withpoorly created Illustrator artwork too.
The Edge Offset slider often fixes problems automatically.
Poorly created fonts can cause this type of problem.
Zaxwerks 3D Invigorator for After Effects - 4.0 PRO Addendum 15
3D Text Editing Tips
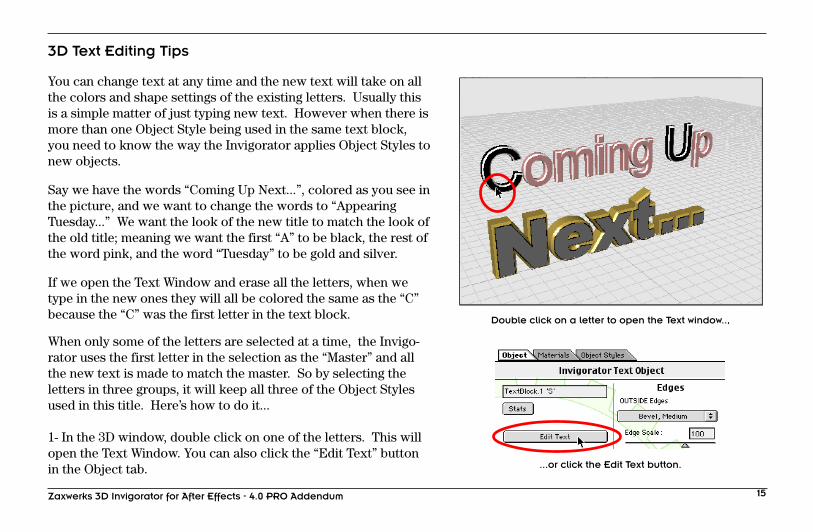
You can change text at any time and the new text will take on allthe colors and shape settings of the existing letters. Usually thisis a simple matter of just typing new text. However when there ismore than one Object Style being used in the same text block,you need to know the way the Invigorator applies Object Styles tonew objects.
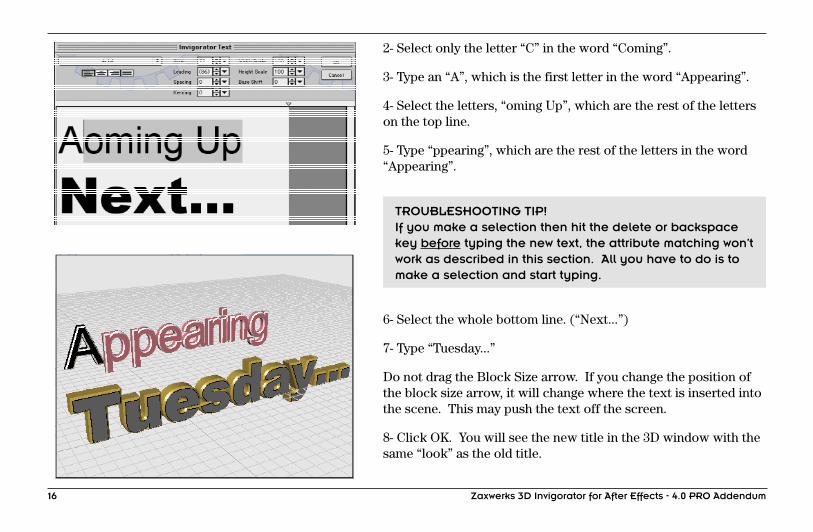
Say we have the words “Coming Up Next...”, colored as you see inthe picture, and we want to change the words to “AppearingTuesday...” We want the look of the new title to match the look ofthe old title; meaning we want the first “A” to be black, the rest ofthe word pink, and the word “Tuesday” to be gold and silver.
If we open the Text Window and erase all the letters, when wetype in the new ones they will all be colored the same as the “C”because the “C” was the first letter in the text block.
When only some of the letters are selected at a time, the Invigo-rator uses the first letter in the selection as the “Master” and allthe new text is made to match the master. So by selecting theletters in three groups, it will keep all three of the Object Stylesused in this title. Here’s how to do it...
1- In the 3D window, double click on one of the letters. This willopen the Text Window. You can also click the “Edit Text” buttonin the Object tab.
Double click on a letter to open the Text window..,
...or click the Edit Text button.
Zaxwerks 3D Invigorator for After Effects - 4.0 PRO Addendum16
2- Select only the letter “C” in the word “Coming”.
3- Type an “A”, which is the first letter in the word “Appearing”.
4- Select the letters, “oming Up”, which are the rest of the letterson the top line.
5- Type “ppearing”, which are the rest of the letters in the word“Appearing”.
TROUBLESHOOTING TIP!If you make a selection then hit the delete or backspacekey before typing the new text, the attribute matching won’twork as described in this section. All you have to do is tomake a selection and start typing.
6- Select the whole bottom line. (“Next...”)
7- Type “Tuesday...”
Do not drag the Block Size arrow. If you change the position ofthe block size arrow, it will change where the text is inserted intothe scene. This may push the text off the screen.
8- Click OK. You will see the new title in the 3D window with thesame “look” as the old title.

Zaxwerks 3D Invigorator for After Effects - 4.0 PRO Addendum 17
3D PrimitivesPrimitives are simple geometric shapes such as spheres, cubes,planes and cylinders. The Invigorator PRO can create theseshapes all by itself. Images can be mapped onto primitives tocreate things like spinning globes, and video boxes. You can alsocreate planes to be used for shadow catcher objects which helpto merge 3D objects into live video footage. (See the section on
The Shadow Catcher Material for more on this.)
Making A Primitive ObjectPrimitive objects are created by using the Create 3D Primitivebutton, or the Create 3D Primitive menu item.
When you use this feature a sphere is created at the center of thescene.
Materials can be drag and dropped onto Primitive objects, butObject Styles cannot be used as they are only for text objects andobjects created from Illustrator files.
The dimensions of the Primitive can be adjusted in the ObjectTab. The dimension sliders will appear below the Primitive Typepopup and change based on which Primitive is selected.
Creating a Primitive. Adjusting a Primitive’sdimensions.
Cubes, Spheres, Cylinders and Planes are all 3D Primitives.
Zaxwerks 3D Invigorator for After Effects - 4.0 PRO Addendum18
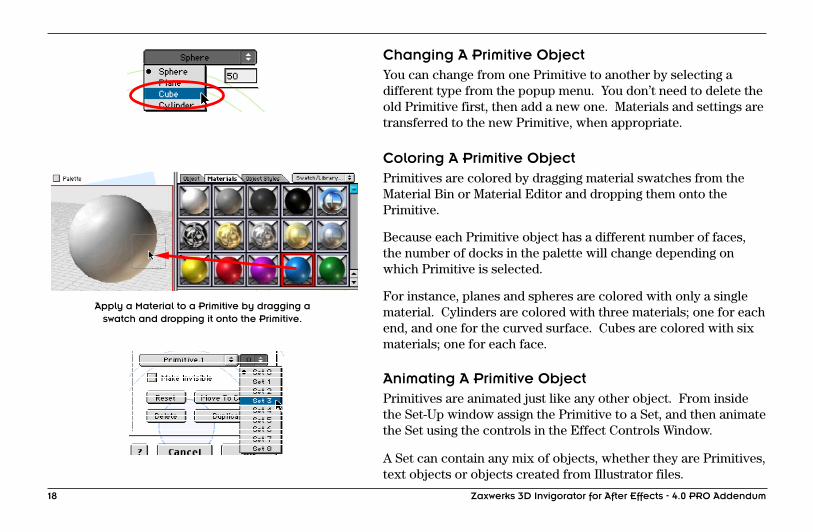
Changing A Primitive ObjectYou can change from one Primitive to another by selecting adifferent type from the popup menu. You don’t need to delete theold Primitive first, then add a new one. Materials and settings aretransferred to the new Primitive, when appropriate.
Coloring A Primitive ObjectPrimitives are colored by dragging material swatches from theMaterial Bin or Material Editor and dropping them onto thePrimitive.
Because each Primitive object has a different number of faces,the number of docks in the palette will change depending onwhich Primitive is selected.
For instance, planes and spheres are colored with only a singlematerial. Cylinders are colored with three materials; one for eachend, and one for the curved surface. Cubes are colored with sixmaterials; one for each face.
Animating A Primitive ObjectPrimitives are animated just like any other object. From insidethe Set-Up window assign the Primitive to a Set, and then animatethe Set using the controls in the Effect Controls Window.
A Set can contain any mix of objects, whether they are Primitives,text objects or objects created from Illustrator files.
Apply a Material to a Primitive by dragging aswatch and dropping it onto the Primitive.

Zaxwerks 3D Invigorator for After Effects - 4.0 PRO Addendum 19
Making a Primitive Look FacetedOne of the cool things you can do to change the look of yourobjects is to make them look faceted rather than smooth. Forinstance, usually a sphere is smooth. By making a sphere facetedit will look like it was carved with a knife.
To do this select the sphere and then press the Stats button on theObject Tab. In the Object Stats window you will see a field calledHard Shading Angle. Enter a small number such as 5 and hit theApply button. You should see the sphere become faceted. Clickthe OK button to exit the Stats dialogue.
Now you can play with the Draft Faceting slider to add or removefacets. Once you have it the way you like it, set the Best Facetingslider to match the Preview slider so that the final renderinglooks the same as what you are seeing in preview window.
How To Squash Or Skew A PrimitiveThe way the Invigorator works with After Effects enables someinteresting uses. For instance if you want to squash or skew oneof your Primitives all you have to do is to assign it to its own Set,rotate it off axis and then use the Depth Scale feature, located inthe AE Effect Controls Window, to scale the objects. Since thePrimitive has been rotated off axis the scale function will skew acube, or squash a sphere into an ovoid shape. (See the section on
Tracking AE’s 3D Objects for information on squash and stretch
and multi-axis scaling.)
Click the Stats button. Enter a 5 in the HardShading Angle field.
When a low value is used for Hard Shading,the facets appear on an object.

Zaxwerks 3D Invigorator for After Effects - 4.0 PRO Addendum20
The Zaxwerks Object Import/Export FormatVersion 4.0 PRO adds a new file format for importing and export-ing 3D objects. The “Zaxwerks Object.zxo” format enables you tosave model files containing 3D logos, live text and other 3Dobjects, complete with all colors, materials and object settings.These model files can be reused over and over in all your otherZaxwerks projects. This is a huge time saver for repetitive work.
How To Save A Zaxwerks 3D Object
To save Zaxwerks Object files:
1- Set up your 3D objects exactly the way you want them to besaved. Colors, textures, and positions will all be saved into thefile.
2- Select the objects you want to save.
3- Choose the Export 3D Object command, and choose the .zxofile format in the Export window.
4- Name and save the file.
Start with everything in its final form.
Zaxwerks 3D Invigorator for After Effects - 4.0 PRO Addendum 21
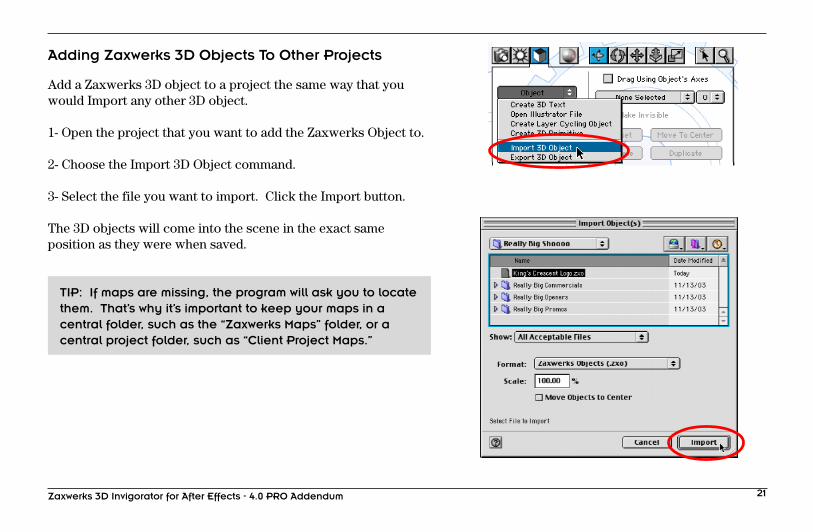
Adding Zaxwerks 3D Objects To Other Projects
Add a Zaxwerks 3D object to a project the same way that youwould Import any other 3D object.
1- Open the project that you want to add the Zaxwerks Object to.
2- Choose the Import 3D Object command.
3- Select the file you want to import. Click the Import button.
The 3D objects will come into the scene in the exact sameposition as they were when saved.
TIP: If maps are missing, the program will ask you to locatethem. That’s why it’s important to keep your maps in acentral folder, such as the “Zaxwerks Maps” folder, or acentral project folder, such as “Client Project Maps.”

Zaxwerks 3D Invigorator for After Effects - 4.0 PRO Addendum22
Making Imported Zaxwerks Objects Larger Or SmallerWhen you combine objects from different scenes sometimes theirsizes don’t match. You have to scale one set of objects to matchthe size of the other objects. To do this...
1- Open the Invigorator’s Set-Up window.
2- Import the objects.
When objects are imported they will all be selected. Leave themselected. (If they have become unselected you will need to selectthem before going to step 3.)
3- Switch to Object Mode, and select the Scale tool.
4- Click in the preview window and drag to scale the objects.
Hold the Shift key and drag along a 45 degree angle toscale in the X and Y directions proportionally.
Hold the Shift+Control keys and drag along a 45 degreeangle to scale in the X, Y and Z directions proportionally.
Dragging close to the horizontal or vertical directions willconstrain the scaling to horizontal or vertical only.
To scale objects, switch to Objectmode and select the Scale tool.

Zaxwerks 3D Invigorator for After Effects - 4.0 PRO Addendum 23
Motion Blur
When objects are moving fast, motion blur is used to fill in thegaps between successive frames in an animation. In AfterEffects, 2D motion blur looks like the pixels have been smeared,but 3D motion blur looks like eight in-between images. This isn’treally a blur but it does a great job of smoothing out the motionanyway. The Invigorator creates motion blur the same way asAfter Effects.
There are no buttons in the Invigorator to turn motion blur on.The Invigorator looks at the After Effects settings for Motion Blurand if they are turned on in After Effects then the Invigoratorturns them on automatically.
The amount of blur is taken from the After Effects settings. Tomake the blur longer go to the Composition Settings> AdvancedTab and increase the Shutter Angle.
The smoothness of the blur is controlled from inside theInvigorator’s Set-Up window. The Motion Blur popup, located onthe Camera Tab, lets you choose how many “passes” or steps areused to create the blurred image. The more passes, the longer therendering will take, but the smoother the blur will be.
Choose the smoothness of the Motion Blur from this menu.
Zaxwerks 3D Invigorator for After Effects - 4.0 PRO Addendum24
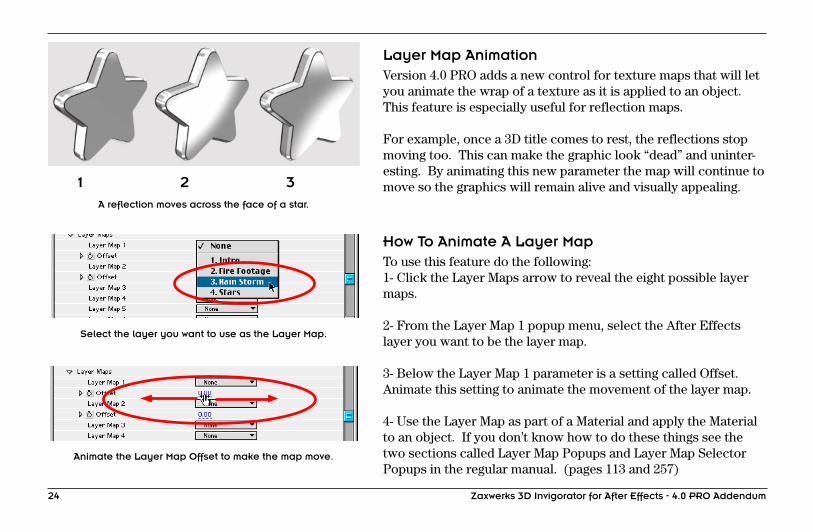
Layer Map AnimationVersion 4.0 PRO adds a new control for texture maps that will letyou animate the wrap of a texture as it is applied to an object.This feature is especially useful for reflection maps.
For example, once a 3D title comes to rest, the reflections stopmoving too. This can make the graphic look “dead” and uninter-esting. By animating this new parameter the map will continue tomove so the graphics will remain alive and visually appealing.
How To Animate A Layer MapTo use this feature do the following:1- Click the Layer Maps arrow to reveal the eight possible layermaps.
2- From the Layer Map 1 popup menu, select the After Effectslayer you want to be the layer map.
3- Below the Layer Map 1 parameter is a setting called Offset.Animate this setting to animate the movement of the layer map.
4- Use the Layer Map as part of a Material and apply the Materialto an object. If you don’t know how to do these things see thetwo sections called Layer Map Popups and Layer Map SelectorPopups in the regular manual. (pages 113 and 257)
A reflection moves across the face of a star.
1 2 3
Select the layer you want to use as the Layer Map.
Animate the Layer Map Offset to make the map move.
Zaxwerks 3D Invigorator for After Effects - 4.0 PRO Addendum 25
NOTE 1:The Offset parameter only moves the layer map horizontally.
NOTE 2:The Offset parameter is a percentage of the map being used. Avalue of 25 will offset the map 25% of its width, not 25 pixels.Doing offsets by percentage enables you to change maps at anytime during the production process and not have to change theanimation values of the map Offset, even when the dimensions ofthe maps change.
NOTE 3:The Offset feature can only be done to Layer Maps 1 and 2. So ifyou plan on using this feature be sure to leave these slots avail-able. It’s perfectly fine to skip Layer Maps 1 and 2 and use otherLayer Maps for general purpose mapping. That way you alwayshave 1 and 2 available when you need them.
Zaxwerks 3D Invigorator for After Effects - 4.0 PRO Addendum26
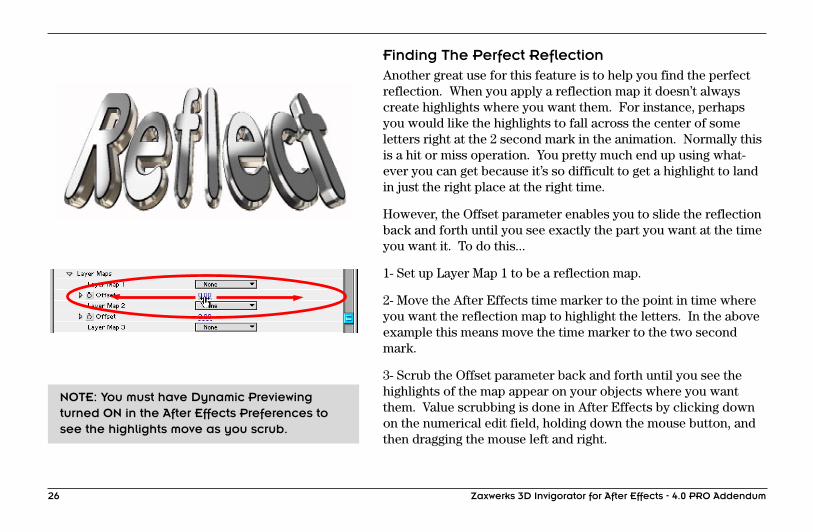
Finding The Perfect ReflectionAnother great use for this feature is to help you find the perfectreflection. When you apply a reflection map it doesn’t alwayscreate highlights where you want them. For instance, perhapsyou would like the highlights to fall across the center of someletters right at the 2 second mark in the animation. Normally thisis a hit or miss operation. You pretty much end up using what-ever you can get because it’s so difficult to get a highlight to landin just the right place at the right time.
However, the Offset parameter enables you to slide the reflectionback and forth until you see exactly the part you want at the timeyou want it. To do this...
1- Set up Layer Map 1 to be a reflection map.
2- Move the After Effects time marker to the point in time whereyou want the reflection map to highlight the letters. In the aboveexample this means move the time marker to the two secondmark.
3- Scrub the Offset parameter back and forth until you see thehighlights of the map appear on your objects where you wantthem. Value scrubbing is done in After Effects by clicking downon the numerical edit field, holding down the mouse button, andthen dragging the mouse left and right.
NOTE: You must have Dynamic Previewingturned ON in the After Effects Preferences tosee the highlights move as you scrub.
Zaxwerks 3D Invigorator for After Effects - 4.0 PRO Addendum 27
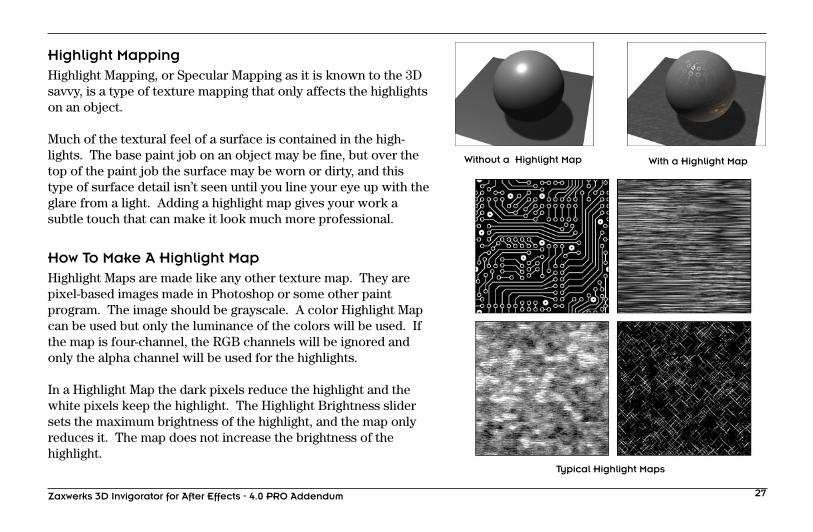
Highlight MappingHighlight Mapping, or Specular Mapping as it is known to the 3Dsavvy, is a type of texture mapping that only affects the highlightson an object.
Much of the textural feel of a surface is contained in the high-lights. The base paint job on an object may be fine, but over thetop of the paint job the surface may be worn or dirty, and thistype of surface detail isn’t seen until you line your eye up with theglare from a light. Adding a highlight map gives your work asubtle touch that can make it look much more professional.
How To Make A Highlight MapHighlight Maps are made like any other texture map. They arepixel-based images made in Photoshop or some other paintprogram. The image should be grayscale. A color Highlight Mapcan be used but only the luminance of the colors will be used. Ifthe map is four-channel, the RGB channels will be ignored andonly the alpha channel will be used for the highlights.
In a Highlight Map the dark pixels reduce the highlight and thewhite pixels keep the highlight. The Highlight Brightness slidersets the maximum brightness of the highlight, and the map onlyreduces it. The map does not increase the brightness of thehighlight.
Typical Highlight Maps
Without a Highlight Map With a Highlight Map

Zaxwerks 3D Invigorator for After Effects - 4.0 PRO Addendum28
How To Give A Material A Highlight Map
An image is applied as a Highlight Map in the same way that allother surface attributes are assigned a map.
1- Find the Highlight Map thumbnail box, located next to theHighlight Brightness and Highlight Sharpness sliders.
2- Click on the thumbnail box to open a file picker.
3- Find the image you want to use as the Highlight Map and clickOpen.
4- Adjust the Highlight Brightness and Sharpness sliders. Thelower the Sharpness value the wider and more obvious thehighlight will be.
5- Apply the Material to the object.
NOTE: Since Highlights are dependent on the angle that the lightis bouncing off of an object’s surface, you may have to move thelights around to find the best effect.
By turning on the Use Comp Lights feature you can keyframe thepositions of After Effects lights, and make the highlights sweepacross your objects at just the right time.
Highlight maps only affect the highlights.
Zaxwerks 3D Invigorator for After Effects - 4.0 PRO Addendum 29
Creative Uses For Highlight Mapping
• Mixed Surface Types. If the surface is constructed of twodifferent materials, such as Tile and Grout, one surface may bevery shiny and the other may not catch highlights at all. In theabove case the highlight map is white for the tile and black forthe grout.
Another case of mixed surfaces is where there are rivets andwelds on metal. Rivets and welds don’t show highlights the sameway the base metal does because the surface is uneven. In thiscase if you don’t use a highlight map, the shine will slide rightacross the rivets making it look like a glossy clear coat waspoured over the rivets and polished to a smooth finish.
• Hidden Messages. By starting with a black background andwriting a message in white letters, the message won’t be seenuntil the highlight passes over the object.
• Wear And Tear. Chips, dings, scratches, scuff marks and dentsdo not show highlights. By putting these details into the highlightmap a surface will show wear and tear.
• Fingerprints, Hand prints And Smudges. Start with a whitebackground, then add fingerprints and smudges in black. Whenthe highlight passes over the object the highlight won’t appearwhere the surface is smudged or printed.
Zaxwerks 3D Invigorator for After Effects - 4.0 PRO Addendum30
• Streaks. The surface paint job may be fine, but a streakyhighlight map gives the surface a rained-on appearance.
• Unfinished Patches. If there is a “repair” area on a picture ofsome metal plating, the patch is usually done with a darkerhighlight map so the highlights don’t shine off of it. This ispopular for spacecraft surfaces.
• Wood Grain. Another example of mixed surface type is thedark and light areas of a wood grain. Usually the dark linesshine more than the lighter ones.
Zaxwerks 3D Invigorator for After Effects - 4.0 PRO Addendum 31
Render Farming
Version 4.0 PRO supports render farming using the standard AfterEffects render engine. To use this feature refer to the instruc-tions in your After Effects manual about installing and renderingon remote computers. Then install the Zaxwerks folder on theremote machines the same way you installed it on your mainmachine. That is, copy the Zaxwerks folder from the CD into thePlug-ins folder. The Zaxwerks folder contains the plug-in and allof the factory preset support files.
One extra bit of information you need to know is that AfterEffects does not automatically copy source files, that the Invigo-rator plug-in may be using, onto the remote machines during farmrendering.
This means that if you have used a picture or a movie as part of amaterial, and that picture or movie is not one of the factorypresets or is a layer map, then you will need to copy that pictureor movie to the Zaxwerks folder prior to rendering the finalmovie.
Pictures and movies are the only source files you need to remem-ber to copy to the farm computers. The data used to create themodels such as Illustrator files, fonts and imported 3D models iscarried inside of the project.

Zaxwerks 3D Invigorator for After Effects - 4.0 PRO Addendum32
New Material Types
For the visual designer, Version 4.0 PRO has many new ways topaint the final picture and broaden your options for being visuallycreative. The new types of materials include the ability to drawyour objects out of lines or paint them like cartoons in addition tothe traditional photo-real rendering styles.
Other material options include features for advanced compositingeffects such as making the shadows from 3D objects appear tofall onto the objects in another piece of footage, and the ability tocreate traveling mattes out of 3D objects in your scene.
Wireframe And Hidden Line Rendering
Wireframe rendering is that “Techno-looking” style where 3Dobjects are rendered only as the lines that define their shape.This has a unique appeal because objects look like 2D drawingsrather than big clunky 3D objects.
Hidden Line rendering is a special kind of wireframe where youonly see the lines that define the visible parts of the objects. Instandard Wireframe you see all of the lines no matter if they areon the front or the back of the objects. But with Hidden Line theback lines are hidden and you only see the lines that fall on thepart of the object facing you.
The new material types.
A Wireframe Sphere. A Hidden Line Sphere.
Zaxwerks 3D Invigorator for After Effects - 4.0 PRO Addendum 33
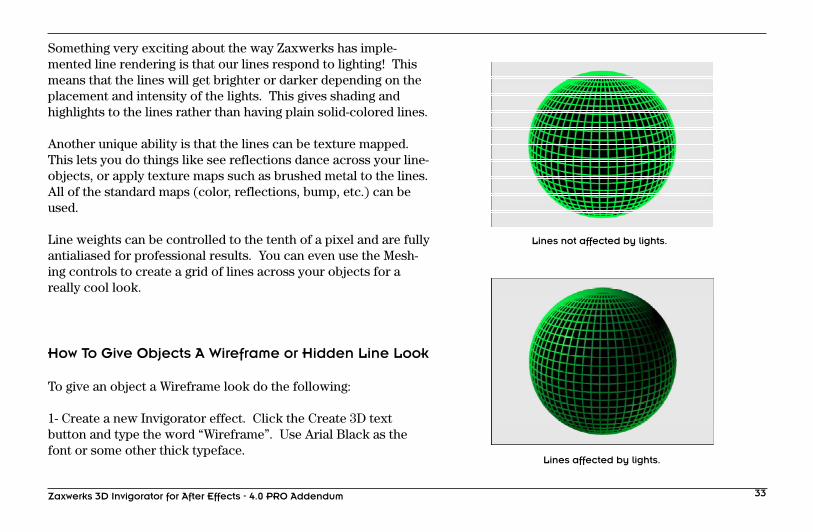
Something very exciting about the way Zaxwerks has imple-mented line rendering is that our lines respond to lighting! Thismeans that the lines will get brighter or darker depending on theplacement and intensity of the lights. This gives shading andhighlights to the lines rather than having plain solid-colored lines.
Another unique ability is that the lines can be texture mapped.This lets you do things like see reflections dance across your line-objects, or apply texture maps such as brushed metal to the lines.All of the standard maps (color, reflections, bump, etc.) can beused.
Line weights can be controlled to the tenth of a pixel and are fullyantialiased for professional results. You can even use the Mesh-ing controls to create a grid of lines across your objects for areally cool look.
How To Give Objects A Wireframe or Hidden Line Look
To give an object a Wireframe look do the following:
1- Create a new Invigorator effect. Click the Create 3D textbutton and type the word “Wireframe”. Use Arial Black as thefont or some other thick typeface.
Lines affected by lights.
Lines not affected by lights.
Zaxwerks 3D Invigorator for After Effects - 4.0 PRO Addendum34
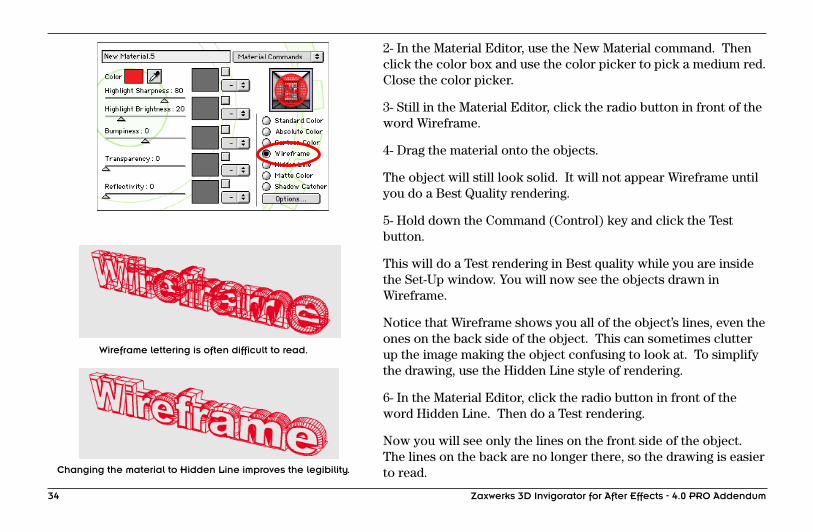
2- In the Material Editor, use the New Material command. Thenclick the color box and use the color picker to pick a medium red.Close the color picker.
3- Still in the Material Editor, click the radio button in front of theword Wireframe.
4- Drag the material onto the objects.
The object will still look solid. It will not appear Wireframe untilyou do a Best Quality rendering.
5- Hold down the Command (Control) key and click the Testbutton.
This will do a Test rendering in Best quality while you are insidethe Set-Up window. You will now see the objects drawn inWireframe.
Notice that Wireframe shows you all of the object’s lines, even theones on the back side of the object. This can sometimes clutterup the image making the object confusing to look at. To simplifythe drawing, use the Hidden Line style of rendering.
6- In the Material Editor, click the radio button in front of theword Hidden Line. Then do a Test rendering.
Now you will see only the lines on the front side of the object.The lines on the back are no longer there, so the drawing is easierto read.Changing the material to Hidden Line improves the legibility.
Wireframe lettering is often difficult to read.
Zaxwerks 3D Invigorator for After Effects - 4.0 PRO Addendum 35
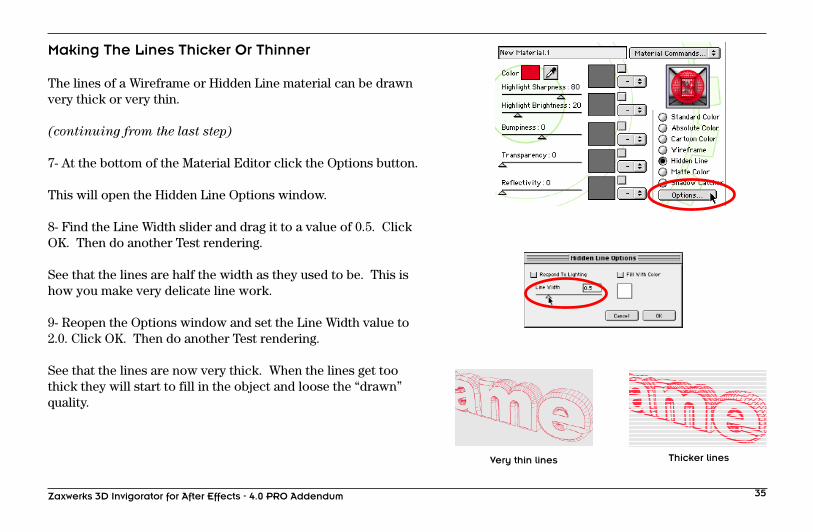
Making The Lines Thicker Or Thinner
The lines of a Wireframe or Hidden Line material can be drawnvery thick or very thin.
(continuing from the last step)
7- At the bottom of the Material Editor click the Options button.
This will open the Hidden Line Options window.
8- Find the Line Width slider and drag it to a value of 0.5. ClickOK. Then do another Test rendering.
See that the lines are half the width as they used to be. This ishow you make very delicate line work.
9- Reopen the Options window and set the Line Width value to2.0. Click OK. Then do another Test rendering.
See that the lines are now very thick. When the lines get toothick they will start to fill in the object and loose the “drawn”quality.
Very thin lines Thicker lines
Zaxwerks 3D Invigorator for After Effects - 4.0 PRO Addendum36
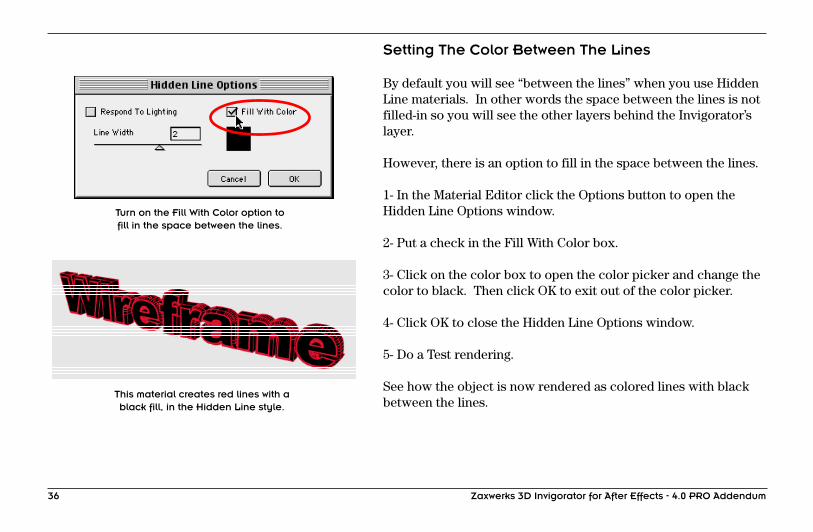
Setting The Color Between The Lines
By default you will see “between the lines” when you use HiddenLine materials. In other words the space between the lines is notfilled-in so you will see the other layers behind the Invigorator’slayer.
However, there is an option to fill in the space between the lines.
1- In the Material Editor click the Options button to open theHidden Line Options window.
2- Put a check in the Fill With Color box.
3- Click on the color box to open the color picker and change thecolor to black. Then click OK to exit out of the color picker.
4- Click OK to close the Hidden Line Options window.
5- Do a Test rendering.
See how the object is now rendered as colored lines with blackbetween the lines.
Turn on the Fill With Color option tofill in the space between the lines.
This material creates red lines with ablack fill, in the Hidden Line style.
Zaxwerks 3D Invigorator for After Effects - 4.0 PRO Addendum 37
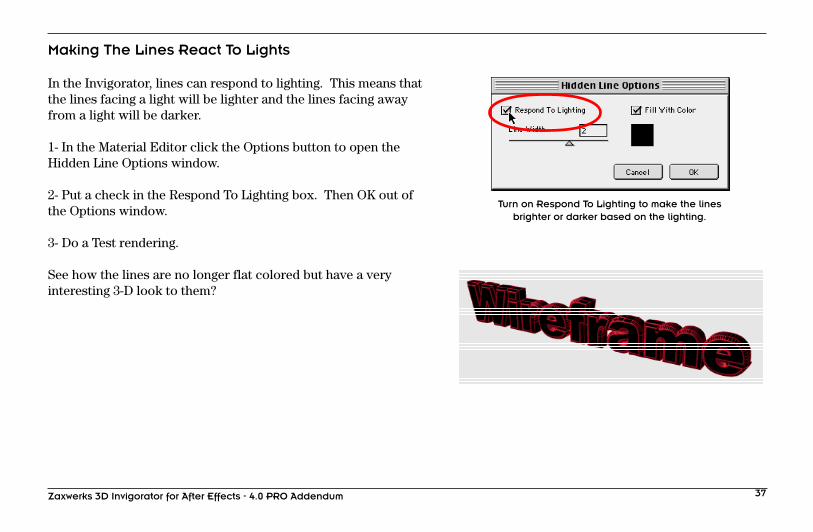
Making The Lines React To Lights
In the Invigorator, lines can respond to lighting. This means thatthe lines facing a light will be lighter and the lines facing awayfrom a light will be darker.
1- In the Material Editor click the Options button to open theHidden Line Options window.
2- Put a check in the Respond To Lighting box. Then OK out ofthe Options window.
3- Do a Test rendering.
See how the lines are no longer flat colored but have a veryinteresting 3-D look to them?
Turn on Respond To Lighting to make the linesbrighter or darker based on the lighting.
Zaxwerks 3D Invigorator for After Effects - 4.0 PRO Addendum38
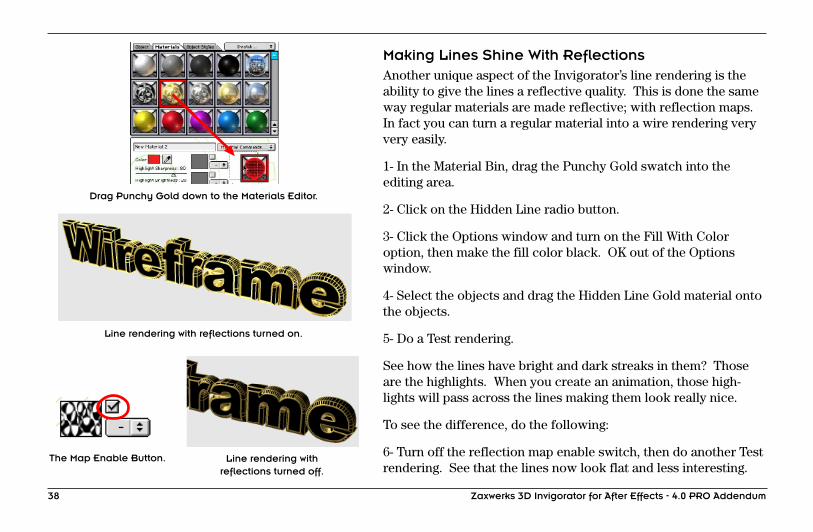
Making Lines Shine With ReflectionsAnother unique aspect of the Invigorator’s line rendering is theability to give the lines a reflective quality. This is done the sameway regular materials are made reflective; with reflection maps.In fact you can turn a regular material into a wire rendering veryvery easily.
1- In the Material Bin, drag the Punchy Gold swatch into theediting area.
2- Click on the Hidden Line radio button.
3- Click the Options window and turn on the Fill With Coloroption, then make the fill color black. OK out of the Optionswindow.
4- Select the objects and drag the Hidden Line Gold material ontothe objects.
5- Do a Test rendering.
See how the lines have bright and dark streaks in them? Thoseare the highlights. When you create an animation, those high-lights will pass across the lines making them look really nice.
To see the difference, do the following:
6- Turn off the reflection map enable switch, then do another Testrendering. See that the lines now look flat and less interesting.
Line rendering with reflections turned on.
Line rendering withreflections turned off.
Drag Punchy Gold down to the Materials Editor.
The Map Enable Button.

Zaxwerks 3D Invigorator for After Effects - 4.0 PRO Addendum 39
Applying Grid Lines Across Object FacesYou may have noticed that lines are drawn around the front facesbut no lines appear on the front faces themselves. It does nothave to be this way. To create a grid of lines that appear on thefront faces, use the Meshing controls.
1- Select the objects and click the Stats button on the Object tab.
2- Turn ON the meshing option, then set Meshing for Best to 5 forall three directions. OK out of the Stats window.
3- Make a blue, hidden line Material and apply it to the objects.
4- Do a Test rendering.
See that there is now a grid pattern of lines across the faces of allthe objects. However, since the lines of the faces are the samecolor as the lines of the sides it is a bit hard to read. We can fixthat by giving the faces a different color.
5- Make a red, hidden line Material and apply it only to the facesof the objects. Do this the standard way, by clicking on theMaterial Set-Up button, loading the red material into dock 2 andthen dragging the red swatch up to the color chip next to thefront face.
6- Do a Test rendering.
Now the grid lines across the faces are red and the bevels andsides are blue. This makes it much easier to read the words.
When all wires are one color it can be difficult to read.
Making the front face wires a different color adds to the legibility.

Zaxwerks 3D Invigorator for After Effects - 4.0 PRO Addendum40
Cartoon ColoringThe Cartoon Color type of Material renders 3D objects as thoughthey were drawn by a poster artist or an animator paintinganimation cells.
Standard 3D rendering has a smooth, photo-real look. Smoothshading paints the objects in continuous tones so curved objectsgradually get brighter or darker. But Cartoon Coloring shadesthe objects in bands of color. The bands block-in the color of thehighlights, shadows and base, giving you a big bold look with lotsof punch.
How To Give Objects Cartoon ColoringTo give objects a Cartoon Colored look do the following:
1- In the Material Editor, create a new material. Then click thecolor box and use the color picker to pick a medium blue. Closethe color picker.
2- Click the radio button in front of the words Cartoon Color.
3- Drag the Material onto the objects.
The objects will immediately change to Cartoon Colored shading.Draft mode Cartoon Coloring has only three levels of shading.During Best quality rendering, a fourth is added where highlightsappear.
Cartoon Coloring gives objects a punchy, graphic look.
Cartoon colored objects in draft mode have three colors.

Zaxwerks 3D Invigorator for After Effects - 4.0 PRO Addendum 41
4- Hold down the Command (Control) key and click the Testbutton.
This will do a Test rendering in Best quality while you are insidethe Set-Up window. You will now see the objects drawn with fullquality Cartoon Coloring. Notice how there is a dominant basecolor, which is the medium blue you chose earlier, then there is alight, highlight shade of blue and a darker shadow shade of blue.This is the basic cartoon coloring look. It gives the final images avery graphic punch. If you don’t want the extra highlight shadejust set the Highlight Brightness slider to 0.
Cartoon Color responds to lighting so multiple lights can createmultiple highlights. Too many lights can also wash out the imageso if an image looks overly bright and washed out, turn off someof the lights in the scene.
Cartoon Coloring also supports all levels of texture mapping soyou can do bump mapping, and reflection mapping to createcartoon versions of your regular photo-real renderings.
It is so easy to turn your regular materials into cartoon versions(just click the Cartoon Color button) that you can try it out just tosee if the design would look better using the more graphic look ofthe cartoon style of rendering.
TIPWhen using Cartoon Coloring it is recommendedthat you only use one light source in the scene.

Zaxwerks 3D Invigorator for After Effects - 4.0 PRO Addendum42
Absolute ColoringThe Absolute Color material type is useful when you want a colorto be absolutely what you specify. For instance use AbsoluteColoring when you are doing a job for a corporate client whodemands that their exact corporate colors be used. The colorscan’t get lighter as the objects turn toward the lights and theycan’t get darker when the objects turn away from the lights. Theycan’t have highlights, shadows or reflections on them. The colorsare absolutely, 100%, the exact color specified. Got it?
How To Give Objects Absolute ColoringCreating an Absolute Color material is very easy.
1- In the Material Editor, use the New Material command. Thenclick the color box and use the color picker to pick a mediumgreen. Close the color picker.
2- Click the radio button in front of the words Absolute Color.
3- Drag the material onto the objects.
Notice that when you apply Absolute Coloring to 3D objects, theywill look flat, as though you cut colored paper in the shape of thesilhouette of the 3D objects. For instance a sphere will stoplooking like a sphere and just look like a circle of color. By itself,Absolute Color is pretty boring. The real treat comes in how youuse it.
Make a material render with Absolute Coloring byturning on the proper option.
Zaxwerks 3D Invigorator for After Effects - 4.0 PRO Addendum 43
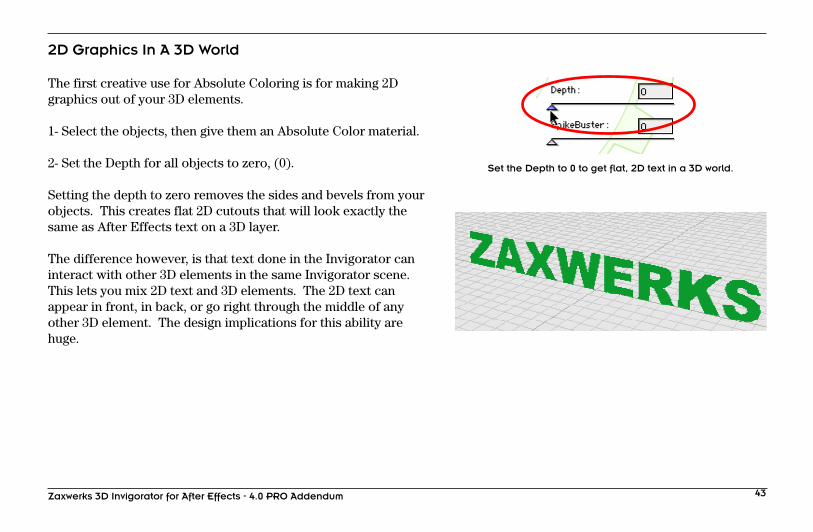
2D Graphics In A 3D World
The first creative use for Absolute Coloring is for making 2Dgraphics out of your 3D elements.
1- Select the objects, then give them an Absolute Color material.
2- Set the Depth for all objects to zero, (0).
Setting the depth to zero removes the sides and bevels from yourobjects. This creates flat 2D cutouts that will look exactly thesame as After Effects text on a 3D layer.
The difference however, is that text done in the Invigorator caninteract with other 3D elements in the same Invigorator scene.This lets you mix 2D text and 3D elements. The 2D text canappear in front, in back, or go right through the middle of anyother 3D element. The design implications for this ability arehuge.
Set the Depth to 0 to get flat, 2D text in a 3D world.

Zaxwerks 3D Invigorator for After Effects - 4.0 PRO Addendum44
Absolute Coloring For Pop Art LooksYou can use Absolute Color materials to create cool Pop Artlooks.
1- Create a new project.
2- Create a text object and type the word “Pop Art”. Use ArialBold Italic as the font. If you don’t have Arial, any San Serif fontwill work. Click OK.
3- Create bright yellow and medium orange materials and setthem to Absolute Color.
4- Apply the yellow to the faces of the letters and the orange tothe sides.
Examine what you’ve created. The bevels no longer look likebevels. they make the letters get fatter and thinner in someplaces but they loose some of their effect.
5- Set the bevel for all objects to Bevels> Basic, Flat Sides.
Now you have the traditional Pop Art 3D look. Orbit the cameraaround the objects to get a feel for this very graphic look. Noticethat although there is no shading you really get a sense of the 3Dnature because of the perspective. Use a wide angle camera lensto really push the perspective.Use a wide angle lens to push the perspective.
The Pop Art look without bevels.
The Pop Art look with bevels.
Zaxwerks 3D Invigorator for After Effects - 4.0 PRO Addendum 45
The Stroked Pop Art LookContinuing from the last project. Do the following...
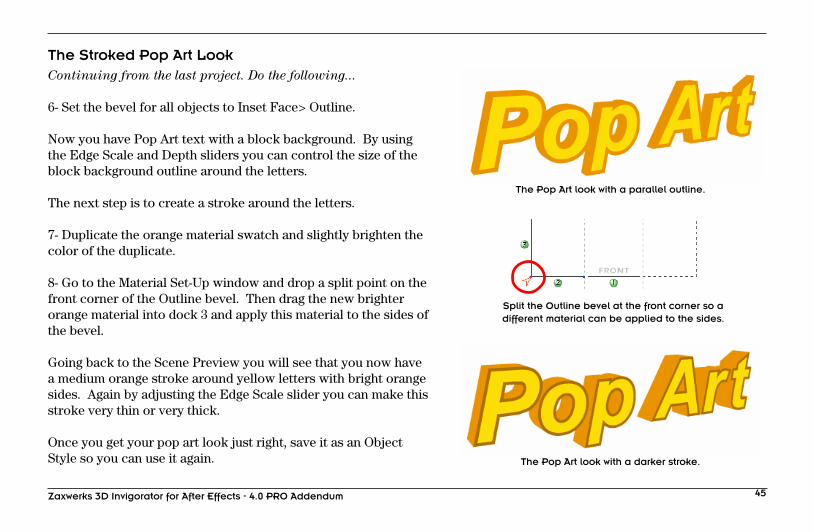
6- Set the bevel for all objects to Inset Face> Outline.
Now you have Pop Art text with a block background. By usingthe Edge Scale and Depth sliders you can control the size of theblock background outline around the letters.
The next step is to create a stroke around the letters.
7- Duplicate the orange material swatch and slightly brighten thecolor of the duplicate.
8- Go to the Material Set-Up window and drop a split point on thefront corner of the Outline bevel. Then drag the new brighterorange material into dock 3 and apply this material to the sides ofthe bevel.
Going back to the Scene Preview you will see that you now havea medium orange stroke around yellow letters with bright orangesides. Again by adjusting the Edge Scale slider you can make thisstroke very thin or very thick.
Once you get your pop art look just right, save it as an ObjectStyle so you can use it again.
Split the Outline bevel at the front corner so adifferent material can be applied to the sides.
The Pop Art look with a darker stroke.
The Pop Art look with a parallel outline.

Zaxwerks 3D Invigorator for After Effects - 4.0 PRO Addendum46
The Modified Pop Art Look
The Modified Pop Art look combines absolute coloring andregular photo-real shading.
Continuing from the last project...
9- In the Material Set-Up window, double click on the darker ofthe two orange materials to load it into the Material Editor.
10- Click the Standard Color button.
This will make the darker orange respond to the lighting.
11- Change the bevel to Bevels> Medium Front. Then adjust theEdge Scale so you can easily see the bevel.
12- Do a Test rendering.
What you have now is a combination effect. The front and sidesare absolute colored, but the bevels are shaded with highlightsand shadows. This can be a very interesting alternative to thestandard Pop Art look.
The Modified Pop Art look has Absolute Coloredfront and sides, but Standard Colored bevels.
Zaxwerks 3D Invigorator for After Effects - 4.0 PRO Addendum 47
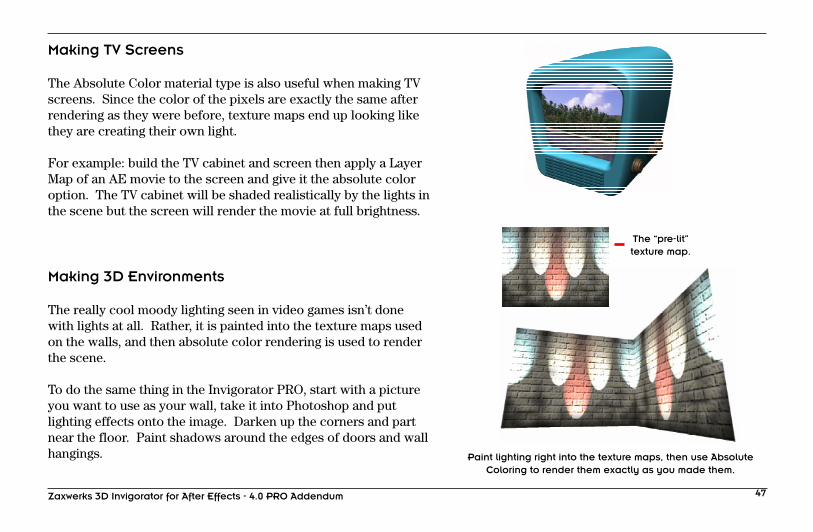
Paint lighting right into the texture maps, then use AbsoluteColoring to render them exactly as you made them.
Making TV Screens
The Absolute Color material type is also useful when making TVscreens. Since the color of the pixels are exactly the same afterrendering as they were before, texture maps end up looking likethey are creating their own light.
For example: build the TV cabinet and screen then apply a LayerMap of an AE movie to the screen and give it the absolute coloroption. The TV cabinet will be shaded realistically by the lights inthe scene but the screen will render the movie at full brightness.
Making 3D Environments
The really cool moody lighting seen in video games isn’t donewith lights at all. Rather, it is painted into the texture maps usedon the walls, and then absolute color rendering is used to renderthe scene.
To do the same thing in the Invigorator PRO, start with a pictureyou want to use as your wall, take it into Photoshop and putlighting effects onto the image. Darken up the corners and partnear the floor. Paint shadows around the edges of doors and wallhangings.
The “pre-lit”texture map.
Zaxwerks 3D Invigorator for After Effects - 4.0 PRO Addendum48
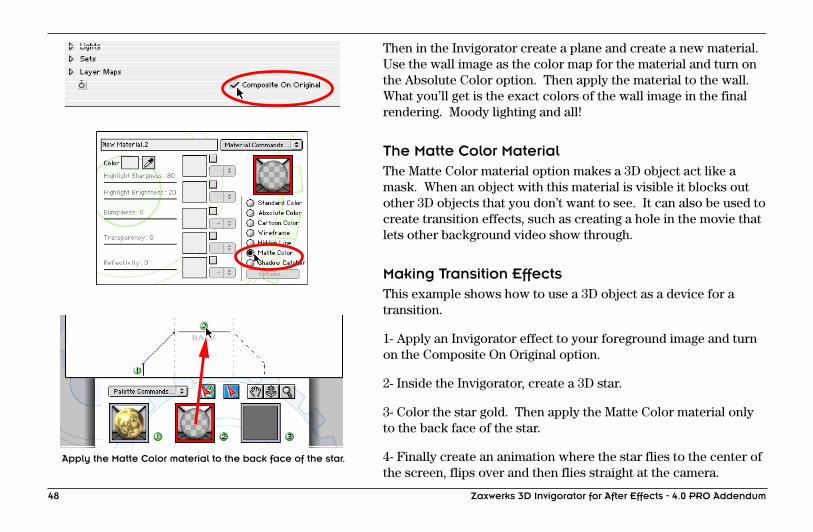
Then in the Invigorator create a plane and create a new material.Use the wall image as the color map for the material and turn onthe Absolute Color option. Then apply the material to the wall.What you’ll get is the exact colors of the wall image in the finalrendering. Moody lighting and all!
The Matte Color MaterialThe Matte Color material option makes a 3D object act like amask. When an object with this material is visible it blocks outother 3D objects that you don’t want to see. It can also be used tocreate transition effects, such as creating a hole in the movie thatlets other background video show through.
Making Transition EffectsThis example shows how to use a 3D object as a device for atransition.
1- Apply an Invigorator effect to your foreground image and turnon the Composite On Original option.
2- Inside the Invigorator, create a 3D star.
3- Color the star gold. Then apply the Matte Color material onlyto the back face of the star.
4- Finally create an animation where the star flies to the center ofthe screen, flips over and then flies straight at the camera.
Apply the Matte Color material to the back face of the star.
Zaxwerks 3D Invigorator for After Effects - 4.0 PRO Addendum 49
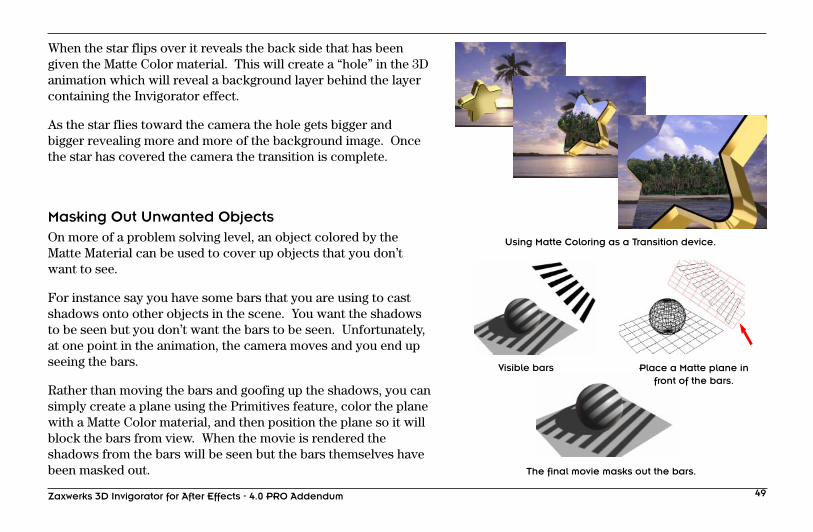
When the star flips over it reveals the back side that has beengiven the Matte Color material. This will create a “hole” in the 3Danimation which will reveal a background layer behind the layercontaining the Invigorator effect.
As the star flies toward the camera the hole gets bigger andbigger revealing more and more of the background image. Oncethe star has covered the camera the transition is complete.
Masking Out Unwanted ObjectsOn more of a problem solving level, an object colored by theMatte Material can be used to cover up objects that you don’twant to see.
For instance say you have some bars that you are using to castshadows onto other objects in the scene. You want the shadowsto be seen but you don’t want the bars to be seen. Unfortunately,at one point in the animation, the camera moves and you end upseeing the bars.
Rather than moving the bars and goofing up the shadows, you cansimply create a plane using the Primitives feature, color the planewith a Matte Color material, and then position the plane so it willblock the bars from view. When the movie is rendered theshadows from the bars will be seen but the bars themselves havebeen masked out.
Using Matte Coloring as a Transition device.
The final movie masks out the bars.
Visible bars Place a Matte plane infront of the bars.

Zaxwerks 3D Invigorator for After Effects - 4.0 PRO Addendum50
Making 3D Objects Circle Around 2D Elements
Another use for 3D masking is when you want a 3D element tointeract with a 2D element. For instance, say you have a pictureof a wooden mask and you want to make some 3D stars tumbleonto the screen and circle around it. Since the wooden mask is a2D element, and the stars are on a separate layer, there is no 2Dcompositing trick to make the 3D stars appear to circle aroundthe mask.
To do this effect, just make a 3D cylinder and place it in registerwith the wooden mask. Then give the cylinder the Matte Colormaterial. Finally animate the stars to circle around the cylinder.When the movie is rendered the stars will disappear as they gobehind the cylinder, and reappear when they come out the otherside.
This technique enables you to put 3D elements both in front ofand behind another layer at the same time.
A wooden mask plus a background image.
3D stars plus a 3D cylinder in register with the wooden mask.
When the layers are composited together the 3D stars appearto be circling the wooden mask.

Zaxwerks 3D Invigorator for After Effects - 4.0 PRO Addendum 51
The Shadow Catcher Material
The Shadow Catcher material option enables you to create visualmagic. It makes the shadows from your 3D objects appear to fallonto the objects in a piece of background video. The magic hereis that the background footage has already been shot and theobjects in it are only pictures, so how can the shadows fall ontothose objects in a realistic manner?
The way you do this is to build 3D objects that mimic the shapesof the objects in the background footage then give those objectsthe Shadow Catcher material.
For instance say you have a video of a package on a table, andyou want to animate a title that flies in and lands on the tablenext to the package. As the title comes near the table, you wantthe shadows to fall onto both the package and the table top.
Normally this is an impossible problem. If the title, the table andthe package were actually in the same space at the same time, theshadows from the title would bend as they crossed over the edgesof the package. If the shadows landed only on the table youcould fake a fairly realistic shadow, but when the shadow has tobend there is no way to stretch and warp it that will look realistic.
There is a solution, however, and that is to use the Invigorator’sShadow Catcher Material.
The original image in need of titles.
A flat shadow doesn’t take the packageinto consideration and looks “pasted-on”.

Zaxwerks 3D Invigorator for After Effects - 4.0 PRO Addendum52
Start by building objects that mimic the shapes of the packageand table top. The Primitives modeler built into PRO 4.0 workswell for this example, but you can always build fancier objectsout of Illustrator objects.
Create a rectangular shape out of the cube primitive. Adjust thecube to match the size of the package. Create a plane as aplaceholder for the table top. Then position the placeholders inregister with the background image of the real package and table.
The last step is to give these placeholder objects the ShadowCatcher material. Now when you render the animation, theshadows from the title will fall onto the placeholder objectswhich will “catch” their shadows. The placeholders themselveswon’t be seen. Only the shadows that fall onto them will be seen.When composited with the background video, the shadows of the3D objects will look as though they are falling onto the objects inthe video, merging the two images into one very realistic image!
Important Note: Read the next section on Setting Up The
Camera For A Shadow Catching Project.
Position placeholder objects in registerwith the objects in the picture.
The final shadow flows over the package making the twoelements look like they are part of the same scene.
Zaxwerks 3D Invigorator for After Effects - 4.0 PRO Addendum 53
Setting Up The Camera For A Shadow-Catching Project
When doing a shadow-catching project the position, angle andlens of the camera are very important.
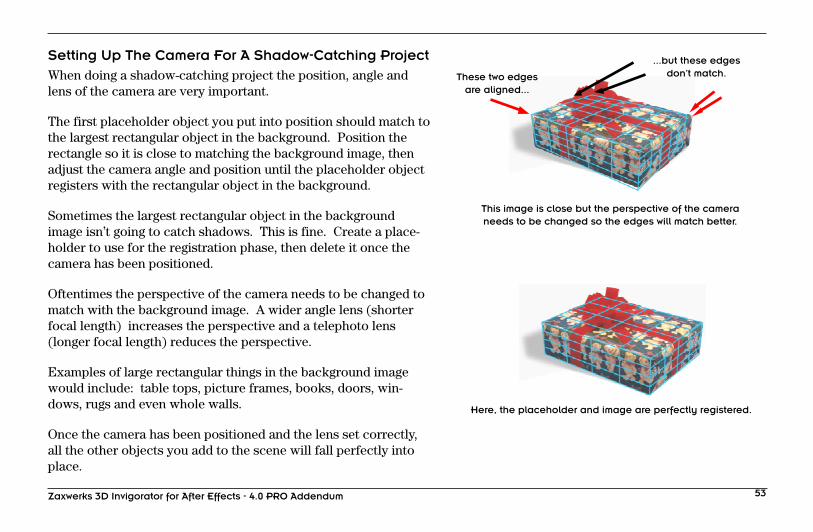
The first placeholder object you put into position should match tothe largest rectangular object in the background. Position therectangle so it is close to matching the background image, thenadjust the camera angle and position until the placeholder objectregisters with the rectangular object in the background.
Sometimes the largest rectangular object in the backgroundimage isn’t going to catch shadows. This is fine. Create a place-holder to use for the registration phase, then delete it once thecamera has been positioned.
Oftentimes the perspective of the camera needs to be changed tomatch with the background image. A wider angle lens (shorterfocal length) increases the perspective and a telephoto lens(longer focal length) reduces the perspective.
Examples of large rectangular things in the background imagewould include: table tops, picture frames, books, doors, win-dows, rugs and even whole walls.
Once the camera has been positioned and the lens set correctly,all the other objects you add to the scene will fall perfectly intoplace.
This image is close but the perspective of the cameraneeds to be changed so the edges will match better.
Here, the placeholder and image are perfectly registered.
These two edgesare aligned...
...but these edgesdon’t match.
Zaxwerks 3D Invigorator for After Effects - 4.0 PRO Addendum54
Tracking AE’s 3D Objects
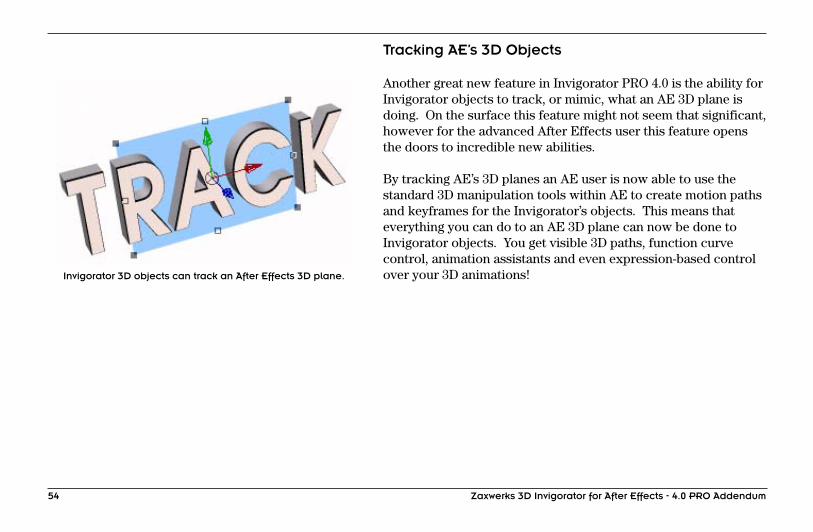
Another great new feature in Invigorator PRO 4.0 is the ability forInvigorator objects to track, or mimic, what an AE 3D plane isdoing. On the surface this feature might not seem that significant,however for the advanced After Effects user this feature opensthe doors to incredible new abilities.
By tracking AE’s 3D planes an AE user is now able to use thestandard 3D manipulation tools within AE to create motion pathsand keyframes for the Invigorator’s objects. This means thateverything you can do to an AE 3D plane can now be done toInvigorator objects. You get visible 3D paths, function curvecontrol, animation assistants and even expression-based controlover your 3D animations!Invigorator 3D objects can track an After Effects 3D plane.

Zaxwerks 3D Invigorator for After Effects - 4.0 PRO Addendum 55
Tracking - Imported objects
What Kinds Of 3D Objects Can Track An AE Plane?
Any 3D object that you can get into the Invigorator can track anAE 3D plane. If you use the Primitives generator to create cubes,spheres, or cylinders, they will perfectly track along with an AEplane. You can also make regular Invigorator objects out of fontsor Illustrator files, or you can import 3D models and track themtoo.
When you look closely at it, the tracking is being done by Sets notindividual objects, and since a Set can have any number ofobjects in it you can have more than one thing tracking the sameplane. This enables you to do things like set up an entire logo,put the whole logo into a Set, and then track the Set to an AEplane. This will make the whole logo move around as one biggroup. Another use would be to put a sphere in Set 1, and thewords Universal Pictures in Set 2 and have the letters all orbitaround the sphere in the middle.
Many many uses will come to mind once you get a handle on howtracking works.
Tracking - Illustrator logos
Tracking - 3D text

Zaxwerks 3D Invigorator for After Effects - 4.0 PRO Addendum56
How To Make A Set Track A 3D PlaneIt is important for you to understand how this works before youtry to use it in a real project. The first time you try this, start witha new AE project containing the following: - A camera - A Solid that is Comp size. Name it “Zaxwerks Objects” - A Solid that is 150 pixels by 100 pixels. Name it “Controller”.
The small plane, named “Controller”, is going to be the thing thatgets animated. The Invigorator objects are going to track themotion of the small plane.
1- Add an Invigorator PRO effect to the large solid. Choose toCreate a 3D Primitive.
A sphere will be created and placed into Set 1 at the center of theworld. Let’s change the sphere into a cube.
2- Click on the Red Ball in the Effect Controls Window to openthe Invigorator’s Set-Up window. Select the sphere and on theobject tab change the Primitive type to Plane.
The plane is centered on the origin (the 0,0,0 point). This isimportant. Moving a 3D object in this window will move it offcenter from the Set causing it to not track the Controller planecorrectly.
3- Click OK to close the Set-Up window.
Change the default sphere to a plane.
Create a Primitive.
Leave the plane centered on the origin.

Zaxwerks 3D Invigorator for After Effects - 4.0 PRO Addendum 57
4- In the Effect Controls Window, click the triangle in front of“Sets”, then click the triangle in front of “Set 1”.
5- The first parameter under Set 1 is called “Set 1 Track 3DLayer”. Click on the popup menu next to this parameter andselect the “Controller” layer.
6- Also in the Effect Controls Window you will see the checkboxcalled “Use Comp Camera”. Turn it ON.
This is also important. If you don’t do this, the objects won’t looklike they are tracking each other because each object is beingviewed from a different camera.
7- Turn on the 3D switch for the Controller solid.
At this point, if you look in the Comp window, the Invigoratorplane and the AE controller plane should be centered on eachother.
8- Select the Controller plane and use the tools to drag it aroundin the Comp window. Rotate it. Move it. The two planes will belocked together!
Notice that the Zaxwerks objects don’t update until you releasethe mouse button. Once you’ve released the mouse sometimesyou have to click on the Effect Controls Window, or even flip thevisibility switch OFF and back ON again to get the Comp windowto update. This can get annoying but it is a limitation of theinteraction between After Effects and plug-ins.
Tell Set 1 to track the Controller layer.
Turn on the 3D switch to make the Controller a 3D layer.
Turn on the Use Comp Camera option.

Zaxwerks 3D Invigorator for After Effects - 4.0 PRO Addendum58
9- Open the Invigorator’s Set-Up window and change the plane toa cube. (Be sure not to drag the object while you are inside of the
Set-Up area!) Click the OK button to close the Set-Up window.
10- Drag the Controller object to manipulate the cube.
Since the Invigorator’s layer is always in front of the Controller’slayer it will look a little strange at times. The cube has thicknessand the Controller plane doesn’t.
One thing that people do is to make the Controller layer 20 x 20pixels rather than 150 x 100. Then they only pay attention to theXYZ crosshairs because the image of the Controller is mostlyhidden behind any Zaxwerks objects. Once you’ve done a fewprojects you’ll find your own best working method.
By the way, we suggest that you do NOT use a Null as the Con-troller. With a Null it is very easy to accidentally drag on a scalehandle which will also scale the Zaxwerks objects.
If you have After Effects 6.5 or higher you can use theGuide Layer feature which will prevent the Controller objectfrom rendering in the final movie, but keep it visible whensetting keyframes in Draft mode.
Change the Plane to a Cube.
Moving the plane will move the cube.
Turn the Controller layer into a Guide Layer(in AE 6.5) so it won’t render in the final movie.
Zaxwerks 3D Invigorator for After Effects - 4.0 PRO Addendum 59
Animating With A Controller Plane
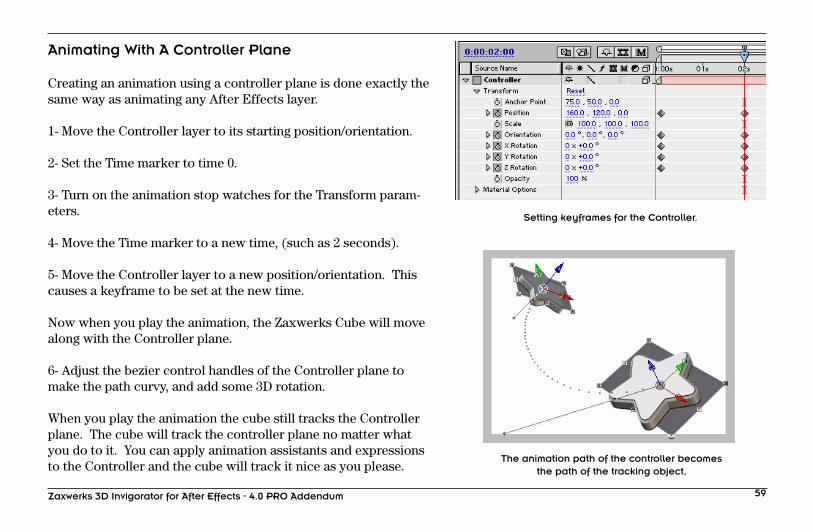
Creating an animation using a controller plane is done exactly thesame way as animating any After Effects layer.
1- Move the Controller layer to its starting position/orientation.
2- Set the Time marker to time 0.
3- Turn on the animation stop watches for the Transform param-eters.
4- Move the Time marker to a new time, (such as 2 seconds).
5- Move the Controller layer to a new position/orientation. Thiscauses a keyframe to be set at the new time.
Now when you play the animation, the Zaxwerks Cube will movealong with the Controller plane.
6- Adjust the bezier control handles of the Controller plane tomake the path curvy, and add some 3D rotation.
When you play the animation the cube still tracks the Controllerplane. The cube will track the controller plane no matter whatyou do to it. You can apply animation assistants and expressionsto the Controller and the cube will track it nice as you please.
Setting keyframes for the Controller.
The animation path of the controller becomesthe path of the tracking object,
Zaxwerks 3D Invigorator for After Effects - 4.0 PRO Addendum60
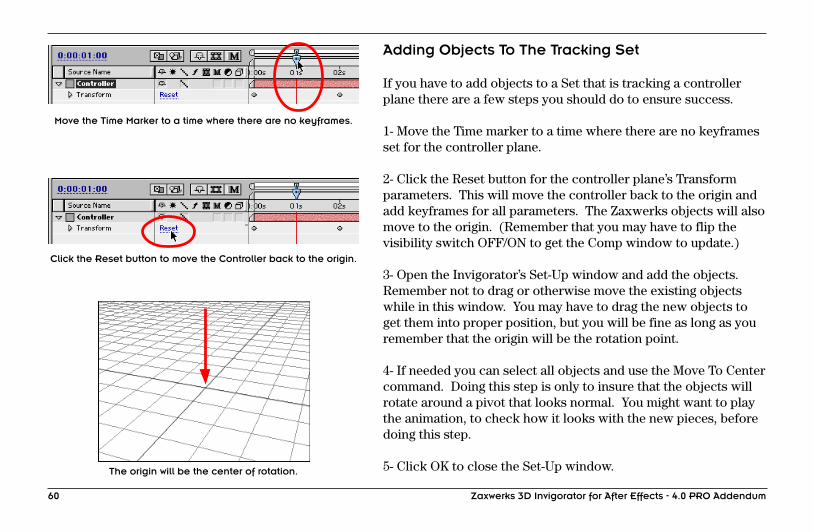
Adding Objects To The Tracking Set
If you have to add objects to a Set that is tracking a controllerplane there are a few steps you should do to ensure success.
1- Move the Time marker to a time where there are no keyframesset for the controller plane.
2- Click the Reset button for the controller plane’s Transformparameters. This will move the controller back to the origin andadd keyframes for all parameters. The Zaxwerks objects will alsomove to the origin. (Remember that you may have to flip thevisibility switch OFF/ON to get the Comp window to update.)
3- Open the Invigorator’s Set-Up window and add the objects.Remember not to drag or otherwise move the existing objectswhile in this window. You may have to drag the new objects toget them into proper position, but you will be fine as long as youremember that the origin will be the rotation point.
4- If needed you can select all objects and use the Move To Centercommand. Doing this step is only to insure that the objects willrotate around a pivot that looks normal. You might want to playthe animation, to check how it looks with the new pieces, beforedoing this step.
5- Click OK to close the Set-Up window.
Click the Reset button to move the Controller back to the origin.
The origin will be the center of rotation.
Move the Time Marker to a time where there are no keyframes.
Zaxwerks 3D Invigorator for After Effects - 4.0 PRO Addendum 61
6- Select the keyframes that were created during Step 2 (whenyou clicked Reset) and delete them. The objects will snap backto their proper positions in the animation.
Play the animation to make sure that nothing got goofed up andthat the objects are rotating around the correct center point.
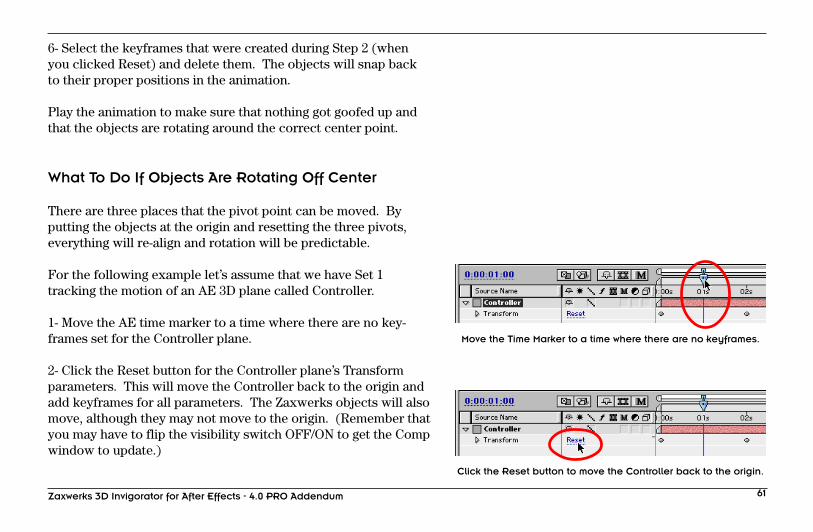
What To Do If Objects Are Rotating Off Center
There are three places that the pivot point can be moved. Byputting the objects at the origin and resetting the three pivots,everything will re-align and rotation will be predictable.
For the following example let’s assume that we have Set 1tracking the motion of an AE 3D plane called Controller.
1- Move the AE time marker to a time where there are no key-frames set for the Controller plane.
2- Click the Reset button for the Controller plane’s Transformparameters. This will move the Controller back to the origin andadd keyframes for all parameters. The Zaxwerks objects will alsomove, although they may not move to the origin. (Remember thatyou may have to flip the visibility switch OFF/ON to get the Compwindow to update.)
Click the Reset button to move the Controller back to the origin.
Move the Time Marker to a time where there are no keyframes.
Zaxwerks 3D Invigorator for After Effects - 4.0 PRO Addendum62
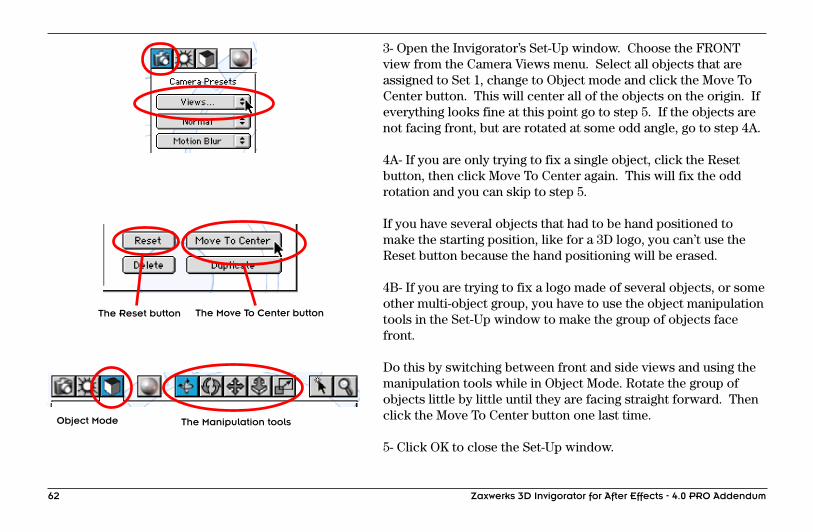
3- Open the Invigorator’s Set-Up window. Choose the FRONTview from the Camera Views menu. Select all objects that areassigned to Set 1, change to Object mode and click the Move ToCenter button. This will center all of the objects on the origin. Ifeverything looks fine at this point go to step 5. If the objects arenot facing front, but are rotated at some odd angle, go to step 4A.
4A- If you are only trying to fix a single object, click the Resetbutton, then click Move To Center again. This will fix the oddrotation and you can skip to step 5.
If you have several objects that had to be hand positioned tomake the starting position, like for a 3D logo, you can’t use theReset button because the hand positioning will be erased.
4B- If you are trying to fix a logo made of several objects, or someother multi-object group, you have to use the object manipulationtools in the Set-Up window to make the group of objects facefront.
Do this by switching between front and side views and using themanipulation tools while in Object Mode. Rotate the group ofobjects little by little until they are facing straight forward. Thenclick the Move To Center button one last time.
5- Click OK to close the Set-Up window.
Object Mode The Manipulation tools
The Reset button The Move To Center button

Zaxwerks 3D Invigorator for After Effects - 4.0 PRO Addendum 63
The Reset button The Move To Center button
6- In the Effect Controls Window select Set 1, then choose theRecenter Pivot command at the bottom of the Set popup menu.This will place the pivot point at the center of the objects in caseit had been moved to a different location.
7- In the AE time line select the keyframes that were createdduring Step 2 (when you clicked Reset) and delete them. Theobjects will snap back to their proper positions in the animation,and the Zaxwerks objects should now be in register with theController plane.
NOTE: You MUST do the steps in order to get the desiredresults.
Trouble Shooting Tracking Problems
Here is a list of tips and possible problems that you may run intowhen tracking.
• Be sure that the transforms for the Controller layer are all Resetto zeros when you begin to set up the tracking. If not then thecenter of the Set won’t match the center of the Controller causingthe objects to rotate off center.

Zaxwerks 3D Invigorator for After Effects - 4.0 PRO Addendum64
The Reset button The Move To Center button
• Be sure to have all Zaxwerks Objects set up and sitting in theirbeginning positions, centered around the Invigorator’s origin,before you tell the Set to track a controller plane. If you moveobjects inside the Set-Up window once tracking has begun,objects can start to rotate off center.
• The workflow to insure the best results is this...
1- Start the project and immediately set up all colors, bevels,depths, etc. inside the Invigorator’s Set-Up window.
2- Also inside the Set-Up window, position all Zaxwerks Objectsrelative to each other. In other words if you need to move objectsforward or back to make a nice looking starting position, do itbefore you turn on tracking.
3- Select all objects and use the Move To Center command.
4- Keep the objects selected and assign them to the same Set.
This will center the objects on the Invigorator’s origin, which isgoing to be the rotational pivot for the Set. You are still in theSet-Up window when doing steps 3 and 4. The objects shouldnow be in their starting positions.
5- In the Effect Controls Window, choose the Controller layerfrom the tracking popup menu.

Zaxwerks 3D Invigorator for After Effects - 4.0 PRO Addendum 65
If you followed the above steps the objects will rotate around thecenter of the controller plane. If they don’t then perhaps theController plane was not Reset before tracking was enabled.
• If the Invigorator’s image is not updating in the Comp windowcheck for the following:1- The Invigorator’s Preview in the Effect Controls Window mustbe open.2- You may have to flip the visibility switch OFF/ON for theInvigorator’s layer.3- The Set-Up window must be closed.4- Tracking must be turned ON, and the proper controller layermust be used. In other words, if you are moving Controller LayerA and the Invigorator is set to track Controller Layer B, then it’sno wonder why the Invigorator’s objects are not moving.
Using 3D Tracking To Scale In All 3 DimensionsThere is a nice by-product of the 3D tracking feature. You canuse 3D tracking to animate object scale as well as position andorientation. Using the base Invigorator parameters you can onlyanimate the Depth Scale. But when you tell a Set to track an AEplane, you can use the scale parameters of that controller planeto animate the scale of the Invigorator objects.
This enables you to do things like animate the width over time,make objects bounce, or even do squash and stretch effects. Anydirection, X, Y or Z can be animated.
When Tracking is turned ON you canscale Invigorator objects by scaling the
Controller plane.
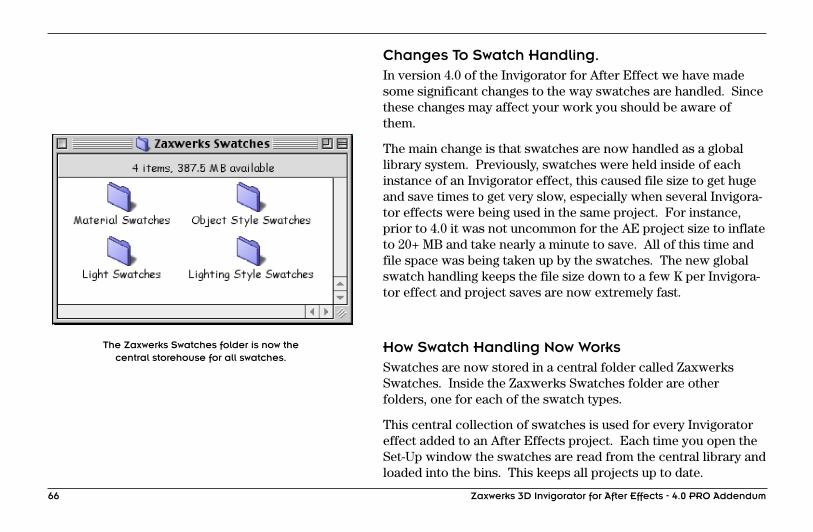
Zaxwerks 3D Invigorator for After Effects - 4.0 PRO Addendum66
Changes To Swatch Handling.In version 4.0 of the Invigorator for After Effect we have madesome significant changes to the way swatches are handled. Sincethese changes may affect your work you should be aware ofthem.
The main change is that swatches are now handled as a globallibrary system. Previously, swatches were held inside of eachinstance of an Invigorator effect, this caused file size to get hugeand save times to get very slow, especially when several Invigora-tor effects were being used in the same project. For instance,prior to 4.0 it was not uncommon for the AE project size to inflateto 20+ MB and take nearly a minute to save. All of this time andfile space was being taken up by the swatches. The new globalswatch handling keeps the file size down to a few K per Invigora-tor effect and project saves are now extremely fast.
How Swatch Handling Now WorksSwatches are now stored in a central folder called ZaxwerksSwatches. Inside the Zaxwerks Swatches folder are otherfolders, one for each of the swatch types.
This central collection of swatches is used for every Invigoratoreffect added to an After Effects project. Each time you open theSet-Up window the swatches are read from the central library andloaded into the bins. This keeps all projects up to date.
The Zaxwerks Swatches folder is now thecentral storehouse for all swatches.
Zaxwerks 3D Invigorator for After Effects - 4.0 PRO Addendum 67
Every time you save or delete a swatch it affects this centrallibrary of files. For instance, if you save a new Object Style it getsadded to the Object Styles folder. This makes that Object Styleavailable for every other Invigorator.
Likewise, if you delete an Object Style swatch it is deleted fromthe Object Styles folder, meaning that that swatch is not justdeleted from one project, it is deleted from all Invigoratorprojects.
This last statement sounds dangerous. However, you don’t haveto worry about deleting swatches and hurting your existingprojects. Materials and Object Styles that are actually used byobjects in a project, not just sitting in the swatch bins, are alwayscarried as part of the project’s data. Think of a swatch bin like anartist’s palette full of paint waiting to be applied... and think of the3D objects in a scene as the artist’s canvas. Once the paint hasbeen applied to the canvas, throwing the palette into the trashdoes nothing to hurt the picture.
For more information see the section below on Regenerating
Material Swatches That Have Been Deleted.

Zaxwerks 3D Invigorator for After Effects - 4.0 PRO Addendum68
Benefits Of The New Swatch Handling SystemSo all of this “behind the scenes” information is nice, but whatdoes it mean for YOU? Well there are some significant benefits.The first ones we’ve already discussed: AE file sizes are muchsmaller, and the time to save a project is much faster.
Here are others...
1- When swatches are saved, they are immediately available to allother Invigorator effects.
This is probably the best benefit. In the past if you saved anObject Style in one Invigorator effect you had to go through aprocess of saving it to a library, and then appending the newlibrary to all other Invigorator effects. Now all you do is save theObject Style and you’re done. As soon as you open the Set-Upwindow in another Invigorator effect, even if it is in a differentAE project, that Object Style is sitting in the bin waiting for you touse.
2- Swatches can be easily shared between users and computers.
Each swatch is a single file, and those files are located in theappropriate swatch folders. All you need to do to share a swatchwith a friend is to find the swatch, attach it to an email or copy itto disk, and give the copy to your friend. If you have used mapsas part of the swatch, you will have to give those maps to yourfriend too.

Zaxwerks 3D Invigorator for After Effects - 4.0 PRO Addendum 69
Regenerating Material Swatches That Have Been Deleted
Sometimes swatches will get deleted accidentally. Or sometimesthey get deleted from one project but then you open a differentproject and wish you had something back.
No worries, mate. Swatches that have been applied to objectscan always be regenerated. Just do the following...
1- Select the object that has the Material applied to it.
2- Click the Palette checkbox to show the Material Palette.
All Materials used on that object will regenerate and be displayedin the docks.
3- Drag the swatches from the docks into the Materials Bin.
This will save the swatches to disk and they will hereafter appearin the bin.
When the active material palette is displayed, all swatchesapplied to the selected object will be regenerated.
Click the Palette or Material Set-Upbutton to display the palette.

Zaxwerks 3D Invigorator for After Effects - 4.0 PRO Addendum70
Regenerating Object Style Swatches That HaveBeen Deleted
Like with Materials, Object Style swatches that have been appliedto objects can be regenerated, just do the following...
1- Select an object that has the Object Style applied to it.
2- In the Object Style tab, find the Swatch popup menu and usethe Save Object Style command.
The Object Style used on that object will regenerate. The imagewill be displayed at the bottom of the bin. This process will savethe swatch to disk and it will hereafter appear in the bin.
Related Documents