Oracle ® Cloud Administering and Working with FreeForm F51503-06

Welcome message from author
This document is posted to help you gain knowledge. Please leave a comment to let me know what you think about it! Share it to your friends and learn new things together.
Transcript
Oracle® CloudAdministering and Working with FreeForm
F51503-06
Oracle Cloud Administering and Working with FreeForm,
F51503-06
Copyright © 2022, Oracle and/or its affiliates.
Primary Author: EPM Information Development Team
This software and related documentation are provided under a license agreement containing restrictions onuse and disclosure and are protected by intellectual property laws. Except as expressly permitted in yourlicense agreement or allowed by law, you may not use, copy, reproduce, translate, broadcast, modify, license,transmit, distribute, exhibit, perform, publish, or display any part, in any form, or by any means. Reverseengineering, disassembly, or decompilation of this software, unless required by law for interoperability, isprohibited.
The information contained herein is subject to change without notice and is not warranted to be error-free. Ifyou find any errors, please report them to us in writing.
If this is software or related documentation that is delivered to the U.S. Government or anyone licensing it onbehalf of the U.S. Government, then the following notice is applicable:
U.S. GOVERNMENT END USERS: Oracle programs (including any operating system, integrated software,any programs embedded, installed or activated on delivered hardware, and modifications of such programs)and Oracle computer documentation or other Oracle data delivered to or accessed by U.S. Government endusers are "commercial computer software" or "commercial computer software documentation" pursuant to theapplicable Federal Acquisition Regulation and agency-specific supplemental regulations. As such, the use,reproduction, duplication, release, display, disclosure, modification, preparation of derivative works, and/oradaptation of i) Oracle programs (including any operating system, integrated software, any programsembedded, installed or activated on delivered hardware, and modifications of such programs), ii) Oraclecomputer documentation and/or iii) other Oracle data, is subject to the rights and limitations specified in thelicense contained in the applicable contract. The terms governing the U.S. Government’s use of Oracle cloudservices are defined by the applicable contract for such services. No other rights are granted to the U.S.Government.
This software or hardware is developed for general use in a variety of information management applications.It is not developed or intended for use in any inherently dangerous applications, including applications thatmay create a risk of personal injury. If you use this software or hardware in dangerous applications, then youshall be responsible to take all appropriate fail-safe, backup, redundancy, and other measures to ensure itssafe use. Oracle Corporation and its affiliates disclaim any liability for any damages caused by use of thissoftware or hardware in dangerous applications.
Oracle, Java, and MySQL are registered trademarks of Oracle and/or its affiliates. Other names may betrademarks of their respective owners.
Intel and Intel Inside are trademarks or registered trademarks of Intel Corporation. All SPARC trademarks areused under license and are trademarks or registered trademarks of SPARC International, Inc. AMD, Epyc,and the AMD logo are trademarks or registered trademarks of Advanced Micro Devices. UNIX is a registeredtrademark of The Open Group.
This software or hardware and documentation may provide access to or information about content, products,and services from third parties. Oracle Corporation and its affiliates are not responsible for and expresslydisclaim all warranties of any kind with respect to third-party content, products, and services unless otherwiseset forth in an applicable agreement between you and Oracle. Oracle Corporation and its affiliates will not beresponsible for any loss, costs, or damages incurred due to your access to or use of third-party content,products, or services, except as set forth in an applicable agreement between you and Oracle.
Contents
Documentation Accessibility
Documentation Feedback
1 Creating a FreeForm App
Understanding FreeForm 1-1
FreeForm App Sources 1-3
Important Considerations for FreeForm Apps 1-4
Creating a FreeForm App 1-5
Creating a FreeForm App Using an Outline File or Snapshot 1-6
Creating a FreeForm App Using the Application Creation Wizard 1-7
Managing Application Ownership 1-9
FreeForm Apps FAQ 1-9
2 Getting Started
About the Home Page 2-1
Using Dynamic Tabs in Redwood Experience 2-6
3 Setting Up Access Permissions
About User and Role Management 3-1
Application Artifacts That Can Be Assigned Permissions 3-1
Types of Access Permissions 3-2
Managing Permissions to Artifacts 3-4
About Assigning Permissions to Artifacts, Rules, and Folders 3-4
Adding, Changing, and Removing Permissions to Artifacts and Folders 3-5
Adding, Changing, and Removing Permissions to Rules and Rules Folders 3-5
Reporting on Access Permissions 3-6
Working with Access Permissions Reports 3-7
iii
Retrieving Changed Information from Access Control 3-7
4 Managing Applications
Application Overview 4-2
Refreshing the Application 4-2
Managing Cubes 4-3
Viewing and Managing Cubes 4-3
Adding Cubes 4-3
Clearing Cubes 4-4
About Clearing Cubes 4-4
Creating Clear Cube Jobs 4-4
Starting and Deleting Clear Cube Jobs 4-5
Scheduling Clear Cube Jobs 4-6
Improving Cube Performance 4-6
Managing Dimensions 4-7
Filtering the Dimension View by Cube 4-8
Creating Dimensions 4-8
Setting User Preferences 4-9
Administering Variables 4-9
Working with Substitution Variables 4-9
About Substitution Variables 4-9
Creating and Assigning Values to Substitution Variables 4-10
Deleting Substitution Variables 4-10
Working with User Variables 4-11
About User Variables 4-11
Creating User Variables 4-11
Managing User Variables 4-12
Setting Limits for User Variables on Forms 4-13
Deleting User Variables 4-13
Viewing Activity Reports 4-13
Importing and Exporting Data and Metadata 4-14
Importing Metadata 4-14
Creating the Metadata Import File 4-15
Loading the Metadata Import File 4-18
Exporting Metadata 4-20
Importing and Exporting Data 4-21
Importing Data 4-21
Driver Member Casting Errors 4-24
Exporting Data 4-25
Viewing Data Import and Export Status 4-27
iv
Importing Exchange Rates for a Simplified Multicurrency Application 4-27
Creating and Refreshing Application Databases 4-28
Creating Application Databases 4-29
Before Refreshing the Database 4-29
Refreshing Application Databases 4-29
Adding an Aggregate Storage Outline to an Application 4-29
About Aggregate Storage 4-30
Aggregate Storage Outline Cube Characteristics 4-30
Process for Adding an Aggregate Storage Database to an Application 4-30
Converting to a Standard Application 4-31
Converting a Standard or Reporting Application to an Enterprise Application 4-31
Conversion Considerations 4-32
Removing an Application 4-33
Setting the Daily Maintenance Process Start Time 4-33
Uploading and Downloading Files Using the Inbox/Outbox Explorer 4-34
5 Using the Member Selector
Working with Members 5-1
Making Selections 5-1
Member Relationships 5-5
Using Wildcards in Searches 5-6
Selecting Attribute Values as Members 5-7
Selecting Members for Forms 5-9
Selecting Substitution Variables as Members 5-10
Selecting User Variables as Members 5-12
Selecting UDAs as Members 5-12
6 Connecting Environments in EPM Cloud
About Connecting EPM Cloud Environments 6-1
Considerations for Migrating EPM Cloud Connections 6-3
Creating, Editing, and Deleting Connections to Other EPM Cloud Environments 6-4
Connecting to External Web Services 6-5
Specifying Advanced Options for External Connections 6-6
Navigating Across EPM Cloud Environments 6-7
Customizing Navigation Flows to Access Other EPM Cloud Environments 6-8
Grouping Cards from Other EPM Cloud Environments into Clusters 6-9
Configuring Cards with Tabs from Multiple EPM Cloud Environments 6-12
Using Direct URLs to Integrate Connected Environments 6-15
v
7 Designing Custom Navigation Flows
Understanding Navigation Flows 7-1
What Can Be Customized in the Business Process Interface? 7-1
Navigation Flow Customization Categories 7-2
Navigation Flow Permissions 7-2
Predefined Navigation Flows 7-2
Viewing and Working with Navigation Flows 7-3
Navigation Flow Design Best Practices and Naming Considerations 7-3
Creating and Duplicating Navigation Flows 7-4
Editing a Navigation Flow 7-5
Activating and Deactivating Navigation Flows 7-6
Resolving Navigation Flows that Display a Warning Icon 7-6
Customizing Labels for Cards, Tabs, and Clusters 7-7
Customizing Icons for Cards and Vertical Tabs 7-7
Hiding and Unhiding Clusters, Cards, and Tabs 7-8
Changing the Display Order of Cards on the Home Page 7-8
Adding Cards 7-9
Adding Tabs to a Tabular Page 7-11
About Using URLs to Embed Third-Party Pages in EPM Cloud Applications 7-13
Removing Navigation Flows, Cards, and Tabs 7-14
Grouping Cards into Clusters 7-15
Reloading a Navigation Flow 7-17
Switching Navigation Flows at Runtime 7-17
8 Editing Dimensions in the Simplified Dimension Editor
About Editing Dimensions in the Simplified Dimension Editor 8-1
Dimension Overview 8-2
About Dimensions and Members 8-2
About Sparse and Dense Dimensions 8-2
About Dimension Hierarchies 8-2
About Custom Dimensions 8-3
Aggregation Options 8-3
Storage Options 8-3
About Entities 8-5
About Accounts 8-5
Account Types 8-6
Saved Assumptions 8-9
Data Type and Exchange Rate Type 8-10
Accounts, Entities, Periods, and Cubes 8-10
Accessing the Simplified Dimension Editor 8-11
vi
Working with the Simplified Dimension Editor Grid 8-11
Switching to Another Dimension 8-11
Customizing the Column Layout 8-12
Viewing Ancestors 8-13
Showing Member Usage in an Application 8-13
Focusing Your Editing 8-13
Finding Members 8-14
Moving Members 8-14
Sorting Members 8-14
Moving Members to Another Hierarchy 8-15
Working with Member Formulas 8-15
Copying Member Names from Microsoft Excel 8-16
Editing Dimension Properties in the Simplified Dimension Editor 8-16
Editing Member Properties in the Simplified Dimension Editor 8-18
Accessing Edit Member Properties 8-18
Adding Members in the Simplified Dimension Editor 8-22
Editing Members in the Simplified Dimension Editor 8-24
Deleting Members in the Simplified Dimension Editor 8-25
Adding Shared Members in the Simplified Dimension Editor 8-25
Assigning Access to Dimension Members 8-26
Adding, Editing, and Removing Access to Members 8-27
About Effective Access Permissions to Shared Members 8-27
Working with Attributes in the Simplified Dimension Editor 8-28
Deleting Attributes in the Simplified Dimension Editor 8-30
Working with UDAs in the Simplified Dimension Editor 8-30
Working with Attribute Values in the Simplified Dimension Editor 8-32
9 Designing Dashboards
The Power of Dashboards 9-1
Creating and Managing Dashboards 9-3
About Dashboard Versions 9-3
Creating and Managing Dashboards 1.0 9-4
Concepts in Designing 1.0 Dashboards 9-4
Creating Dashboards 1.0 9-6
Creating Dashboards Containing Master Forms and Details 9-8
About Your Dashboard's Layout - Version 1.0 9-9
About the Gauge Chart Type 9-9
About the Tile Chart Type 9-12
Customizing Dashboard Colors 9-13
About Global and Local POVs in 1.0 Dashboards 9-14
vii
Dashboard POVs and Valid Intersections 9-16
Creating and Managing Dashboards 2.0 9-16
Concepts in Designing 2.0 Dashboards 9-17
Creating Dashboards 2.0 9-23
About the Geomap Chart Type 9-24
About the Pyramid Chart Type 9-26
About the Waterfall Chart Type 9-28
Using Tables in Dashboards 9-30
About the Gauge Chart Type for Dashboard 2.0 9-32
About the Radar Chart Type for Dashboard 2.0 9-34
About the Combination Chart Type for Dashboard 2.0 9-36
About Global and Local POVs in 2.0 Dashboards 9-38
About Quick Analysis 9-40
10
Designing Infolets
About Infolets 10-1
Anatomy of an Infolet 10-3
Determining Infolet Content 10-6
Designing Forms for Infolets 10-7
Designing Charts for Infolets 10-7
Using the Infolets Designer 10-8
Creating Infolets 10-10
Working with Infolets 10-11
Customizing the Interface to Access Infolets 10-12
11
Defining Valid Intersections and Cell-Level Security
Defining Valid Intersections 11-1
Understanding Valid Intersections 11-1
Valid Intersection Groups 11-2
Valid Intersection Rules 11-2
Anchor and Nonanchor Dimensions 11-3
Valid Intersection Examples 11-3
Redundancy or Overlap in Valid Intersection Rules 11-6
Shared Members and Valid Intersection Rules 11-6
Substitution Variables and Valid Intersection Rules 11-6
Evaluation Order 11-7
Creating Valid Intersections 11-7
Managing Valid Intersections 11-8
Viewing Valid Intersections 11-8
viii
Filtering Valid Intersections 11-9
Importing and Exporting Intersections 11-10
Changing the Valid Intersection Group Evaluation Order 11-12
Disabling and Enabling Valid Intersection Groups 11-12
Editing Details for a Valid Intersection Group 11-13
Duplicating Valid Intersection Groups 11-14
Deleting a Valid Intersection Group 11-14
Suppressing Invalid Data in Forms 11-15
Clearing Invalid Data 11-15
About Invalid Data 11-15
Working With Invalid Intersection Reports 11-16
Clearing Data at Invalid Intersections 11-17
Working with Valid Intersections 11-17
Working with Valid Intersections in Application Forms 11-17
Working with Valid Intersections in Calculation Manager Rule Runtime Prompts 11-18
Defining Cell-Level Security 11-19
Understanding Cell-Level Security 11-19
Creating Cell-Level Security Definitions 11-20
Viewing Cell-Level Security Definitions 11-21
Filtering Cell-Level Security Definitions 11-22
Importing and Exporting Cell-Level Security Definitions 11-23
Testing Cell-Level Security 11-25
Reordering the Cell-Level Security Definitions List 11-25
12
Defining Data Maps and Creating File-Based Integrations
13
Managing Jobs
How Jobs Save You Time 13-1
Viewing Pending Jobs and Recent Activity 13-1
Scheduling Jobs 13-2
Job Types 13-3
Scheduling Jobs to Run Later 13-6
Scheduling Hourly Jobs 13-8
Editing and Canceling Jobs 13-10
Canceling Rules Jobs and Ruleset Jobs 13-11
Downloading Export Files From Your Outbox 13-11
ix
14
Auditing Tasks and Data
Auditing Overview 14-1
Enabling Audit Tracking 14-3
Viewing Audit Details 14-3
15
Managing Data Validation
Creating and Updating Data Validation Rules 15-1
Formatting Cells and Setting the Promotional Path 15-4
Viewing Data Validation Rules 15-5
Order of Evaluation and Execution for Data Validation Rules 15-5
Conditions Supported by the Rule Builder 15-6
If Condition Values 15-6
Then Condition Values 15-13
Range Condition Values 15-14
Data Validation Conditional Operators 15-15
Data Validation Rule Scenarios 15-16
16
Managing Application and System Settings
What Application and System Settings Can I Specify? 16-1
Defining User Variables 16-7
Customizing Your Display 16-7
Announcing Upcoming Events 16-8
Specifying Artifact Labels 16-9
Which Artifact Labels Can be Localized? 16-9
Working With the Artifact Labels Grid 16-10
Adding Languages and Defining Localized Artifact Labels 16-10
Exporting and Importing Artifact Labels for Editing 16-11
17
Accessing More Administrative Tasks
About the Navigator Menu 17-1
Administering Data Load Settings 17-1
Importing Using Data Management 17-2
Importing Data Using Data Management 17-3
Import Scenario Case 1: Importing Data when Member Names Match 17-3
Import Scenario Case 2: Importing Data when Member Names Do Not Match 17-3
Scheduling Jobs in Data Management 17-7
Drilling Through to Source Data 17-8
For More Information 17-8
x
Administering Action Menus 17-10
Creating and Updating Action Menus 17-10
Working with Action Menu Items 17-11
Defining Action Menu Items 17-11
Administering Alias Tables 17-15
About Aliases 17-16
About Alias Tables 17-16
Working with Alias Tables 17-17
Specifying a Default Alias Table and Setting Member and Alias Display Options 17-18
Administering Dimensions 17-18
About Dimensions 17-19
Working with Dimension Hierarchies 17-19
About Custom Dimensions, Entities, Accounts, Periods, and Cubes 17-20
Adding or Editing User-Defined Custom Dimensions 17-20
Working with Members 17-23
Working with Attributes 17-33
Working with Attribute Values 17-37
Customizing Calendars 17-39
Setting Up Currencies 17-43
Setting up Dynamic Time Series Members 17-52
Working with UDAs 17-55
Working with Member Formulas 17-56
Administering Forms 17-61
About Forms 17-62
Form Components 17-62
Form Design Considerations 17-64
Understanding Implied Sharing in Forms 17-65
Creating Forms 17-66
Defining the Layout 17-67
About Precision Settings 17-80
Setting Form Precision and Other Options 17-80
Creating Asymmetric Rows and Columns 17-81
Adding Formula Rows and Columns 17-81
Defining Form Page and Point of View 17-82
Designing Specific Types of Forms 17-82
Designing Forms for Multiple Currencies 17-83
Designing Forms with Formula Rows and Columns 17-83
Designing Forms with Data Validation 17-83
Designing Forms with Global Assumptions 17-83
Designing Forms for Rolling Forecasts 17-83
Designing Flex Forms 17-87
xi
Working with Forms and Form Components 17-88
Selecting and Opening Forms and Folders 17-88
Previewing Forms 17-89
Printing Form Definitions 17-89
Searching for Forms 17-90
Editing Forms 17-90
Moving, Deleting, and Renaming Forms 17-91
How Cell Formatting in Smart View Persists in the Business Process 17-91
Managing Forms and Folders 17-91
Creating Folders 17-92
Working with Folders 17-92
Administering Rules 17-93
About Rules 17-93
Adding and Removing Rules in Forms 17-94
Setting Business Rule Properties 17-95
Viewing Rules Usage 17-96
About Runtime Prompts 17-99
Understanding Runtime Prompts 17-99
Designing Secure Runtime Prompts 17-103
Using Groovy Rules 17-104
About Creating a Groovy Business Rule 17-105
Java API Reference for Groovy Rules 17-106
Groovy Business Rule Examples 17-106
Groovy Business Rule Tutorial Videos 17-107
Groovy Rule Business Scenarios 17-107
Administering Rules Security 17-119
Assigning Access to Rules 17-119
Adding, Editing, and Removing Access to Rules 17-119
Assigning Access to Groovy Templates 17-120
Administering Smart Lists 17-120
Working with Smart Lists 17-121
Synchronizing Smart Lists in Reporting Applications 17-122
Setting Smart List Properties 17-123
Defining Smart List Entries 17-124
Previewing Smart Lists 17-125
Displaying #MISSING with Smart Lists 17-125
Administering Task Lists 17-125
Working with Task Lists 17-126
Adding Instructions to Task Lists 17-126
Adding Tasks to Task Lists 17-127
Editing Task Lists 17-130
xii
Editing Tasks 17-130
Copying and Moving Tasks 17-131
Moving and Reordering Task Lists 17-131
Clearing Task Lists 17-132
Deleting Tasks and Task Lists 17-132
Assigning Access to Task Lists 17-133
Adding Access to Task Lists 17-133
Changing and Removing Access to Task Lists 17-133
Clearing Cell Details 17-134
Copying Data 17-135
Administering Application Diagnostics 17-137
About Application Diagnostics 17-137
Assumptions 17-137
How Application Diagnostics Works 17-137
Using Application Diagnostics Graphs 17-138
Launching Application Diagnostics 17-139
Modifying Artifacts for Optimal Performance 17-140
A Naming Restrictions
Naming Restrictions for Applications and Databases A-1
Naming Restrictions for Dimensions, Members, and Aliases A-2
Dimension and Member Names in Calculation Scripts, Report Scripts, Formulas, Filters,and Substitution Variables A-5
Restrictions for User and Group Names A-6
B Form Formula Functions
About Form Formula Functions B-1
Working with Formulas B-1
Creating Formulas B-1
Editing Formulas B-2
Deleting Formulas B-2
Formula Functions B-2
Arguments B-4
Numeric Arguments B-4
Row, Column, or Cell Reference Arguments B-4
Property Arguments B-6
Embedded Functions as Arguments B-9
Abs B-9
Average B-10
AverageA B-11
xiii
Count B-12
CountA B-13
Difference B-14
Eval B-15
IfThen, If B-15
Notes on Conditions B-18
Complex Conditions B-18
Max B-19
Min B-19
Mod B-20
PercentOfTotal B-21
Pi B-22
Product B-22
Random B-23
Round B-23
Sqrt B-24
Sum B-24
Truncate/Trunc B-25
Variance/Var B-26
VariancePercent/VarPer B-28
C Using Smart View to Manage Applications
About Managing Applications in Smart View C-1
Installing Smart View and the Admin Extension C-2
Controlling the Display of Application Management Options in Smart View C-3
Downloading the Application Templates C-4
Downloading the Template in Smart View C-4
Downloading the Application Template Zip File from the Web Interface C-5
Creating an Application C-6
Working with Artifacts in the Application Template C-7
About Working with Artifacts in the Application Template C-7
Application Definition C-7
Dimension Definition C-12
Attribute Dimension Definition C-17
Data Definition C-18
Substitution Variable Definition C-20
Security Definition C-21
Advanced Settings Definition C-23
Updating an Application in Smart View C-27
Deleting an Application C-28
xiv

Planning Admin Extension and Office AutoCorrect C-28
xv
Documentation Accessibility
For information about Oracle's commitment to accessibility, visit the OracleAccessibility Program website at http://www.oracle.com/pls/topic/lookup?ctx=acc&id=docacc.
Access to Oracle Support
Oracle customers that have purchased support have access to electronic supportthrough My Oracle Support. For information, visit http://www.oracle.com/pls/topic/lookup?ctx=acc&id=info or visit http://www.oracle.com/pls/topic/lookup?ctx=acc&id=trsif you are hearing impaired.
Documentation Accessibility
xvi
Documentation Feedback
To provide feedback on this documentation, click the feedback button at the bottom of thepage in any Oracle Help Center topic. You can also send email to [email protected].
xvii
1Creating a FreeForm App
FreeForm apps use an open dimensional cube construct allowing you to create cubes withany dimension combination you need.
Related Topics
• Understanding FreeForm
• FreeForm App Sources
• Important Considerations for FreeForm Apps
• Creating a FreeForm App
• Managing Application Ownership
• FreeForm Apps FAQ
Understanding FreeFormFreeForm enables you to create an application with the cubes and dimensions of your choicewithout being constrained by the cube and dimension limitations imposed by standardapplications. With FreeForm, you can model and build your own cubes while preserving theability to leverage business process functionalities.
FreeForm can be accessed using Oracle Smart View for Office or Oracle EnterprisePerformance Management Cloud screens; they support Groovy scripts for custom functions,and business rules for calculations.
Note:
The following features are not available in FreeForm because these featuresrequire the provided Scenario, Version, Period, and Year dimensions to be present:
• Predictive Planning
• Auto-Predict
• IPM Insights
In FreeForm, the Scenario, Version, Period, and Year dimensions can be defined ascustom dimensions.
You can create applications with multiple cubes or you can create an application with a singlecube and then add more cubes later (up to 12 cubes total). See the table below for a featurecomparison of a single cube FreeForm app to a multi-cube FreeForm app.
1-1
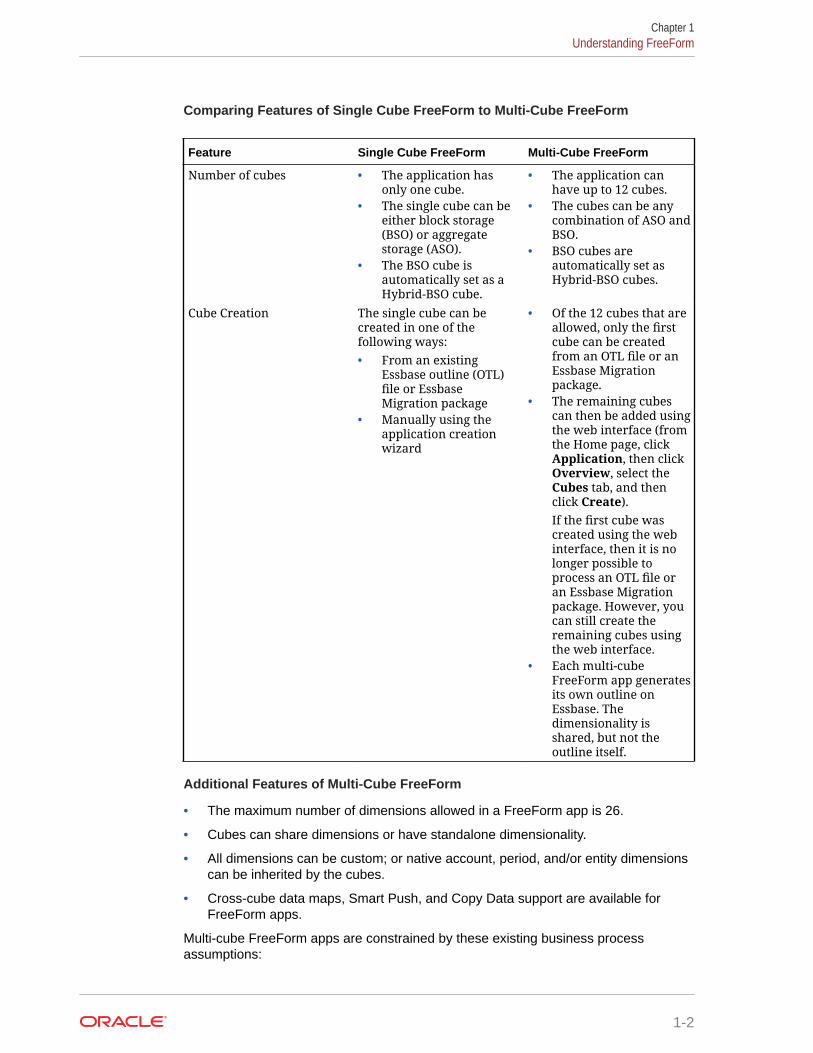
Comparing Features of Single Cube FreeForm to Multi-Cube FreeForm
Feature Single Cube FreeForm Multi-Cube FreeForm
Number of cubes • The application hasonly one cube.
• The single cube can beeither block storage(BSO) or aggregatestorage (ASO).
• The BSO cube isautomatically set as aHybrid-BSO cube.
• The application canhave up to 12 cubes.
• The cubes can be anycombination of ASO andBSO.
• BSO cubes areautomatically set asHybrid-BSO cubes.
Cube Creation The single cube can becreated in one of thefollowing ways:• From an existing
Essbase outline (OTL)file or EssbaseMigration package
• Manually using theapplication creationwizard
• Of the 12 cubes that areallowed, only the firstcube can be createdfrom an OTL file or anEssbase Migrationpackage.
• The remaining cubescan then be added usingthe web interface (fromthe Home page, clickApplication, then clickOverview, select theCubes tab, and thenclick Create).If the first cube wascreated using the webinterface, then it is nolonger possible toprocess an OTL file oran Essbase Migrationpackage. However, youcan still create theremaining cubes usingthe web interface.
• Each multi-cubeFreeForm app generatesits own outline onEssbase. Thedimensionality isshared, but not theoutline itself.
Additional Features of Multi-Cube FreeForm
• The maximum number of dimensions allowed in a FreeForm app is 26.
• Cubes can share dimensions or have standalone dimensionality.
• All dimensions can be custom; or native account, period, and/or entity dimensionscan be inherited by the cubes.
• Cross-cube data maps, Smart Push, and Copy Data support are available forFreeForm apps.
Multi-cube FreeForm apps are constrained by these existing business processassumptions:
Chapter 1Understanding FreeForm
1-2
• Members must be unique across all the cubes within FreeForm.
• Governors are applicable at the application level and not at the cube level.
Videos
Your Goal Learn How
Get an introduction to FreeForm.
Introduction to FreeForm Apps in CloudEPM
Create FreeForm apps from on-premisesEssbase outline (OTL) files and snapshots. Creating FreeForm applications from on-
premises Essbase outline files and snapshots
Create multi-cube FreeForm apps with anEssbase outline Creating Multi-Cube FreeForm Apps from
Essbase Outlines
Create FreeForm apps with a Hybrid BSOcube Creating FreeForm Applications with a
Hybrid BSO Cube
Create FreeForm apps with an ASO orreporting cube Creating FreeForm Applications with a
Reporting/ASO Cube
Create multi-cube FreeForm apps with a BSOor ASO cube Creating Multi-Cube FreeForm Apps from
BSO and ASO Cubes
Learn how to create FreeForm apps using anExcel template. Using the Excel template, youlearn how to define application properties,manage cubes, create dimensions andmembers, attributes, access permissions, andload data into the FreeForm application.
Creating Multi-Cube FreeFormApplications with an Excel Template - Part 1
Learn how to update FreeForm apps using anExcel template and verifying changes in theweb interface. After creating your FreeFormapplication using an Excel template, learnhow you can use the same template to makemodifications to dimensions, members,substitution variables, and security. Then, inthe Planning web interface, assignApplication Management options, review theapplication properties and definition, and thedata you imported.
Creating Multi-Cube FreeFormApplications with an Excel Template - Part 2
FreeForm App SourcesYou can build FreeForm apps by creating dimensions using the application creation wizard.Alternatively, you can use an outline (OTL) file or snapshot from an on-premises release11.1.2.4.xxx (or later) single cube Essbase application to create a FreeForm app.
When you use an Essbase cube OTL file or Essbase application snapshot as the source for aFreeForm app, Account, Period (time), and Entity (country) dimensions are created andmapped automatically. Additionally, Version and Scenario dimensions of the Essbase
Chapter 1FreeForm App Sources
1-3
application are created as custom dimensions. As a result, out of the box Workflowfunctionality is not supported in FreeForm apps.
Service Administrators build a FreeForm app using the application creation wizard orthese sources:
• An Outline file from on-premises release 11.1.2.4.xxx (or later) single cubeEssbase application
You may use an OTL file from an on-premises release 11.1.2.4.xxx (or later) singlecube Essbase application to create the structure of the FreeForm app. New cubesmay be added or created for this FreeForm app at a later time.
Because the OTL file name is assigned to the cube created for the FreeForm app,the file name must be eight characters or less. Longer file names will cause theprocess to fail.
Generally, the OTL file is available in the EssbaseServer/essbaseserver1/app/<app_Name> directory within your on-premises Essbase deployment.
Because the OTL file does not contain application data, you must extract Essbasedata to a file. Use MaxL, Essbase Studio, or another tool to export data from anEssbase application. The data must be exported in an Essbase data file format.
After creating the application, import the extracted data, selecting Essbase as thesource type. You can import from a locally stored data file or from a file that wasuploaded to the Oracle Enterprise Performance Management Cloud inbox. Fordetailed instructions, see Importing Data in Administering Planning.
• An application snapshot from an on-premises release 11.1.2.4.xxx (or later)single cube Essbase application
This option simplifies application creation by migrating an existing Essbaseapplication snapshot (ZIP file) that was created using Migration. This processautomates dimensions loading, substitution variables creation, calculation scriptsconversion as graphical rules, and data load. New cubes may be added or createdfor this FreeForm app at a later time.
Important Considerations for FreeForm Apps
Note:
Do not attempt to create FreeForm apps by importing Essbase Migrationsnapshots into an Oracle Enterprise Performance Management Cloudenvironment. Importing snapshots using Migration is supported only forsnapshots created from a previous FreeForm app.
• Data maps and other multi-cube features are unavailable if you create a singlecube FreeForm app using the application creation wizard.
• Essbase snapshots with Custom Defined Functions (CDF) and CDF referencescannot be used to create FreeForm apps.
• Make sure that the OTL file or Essbase application snapshot that you are usingdoes not contain objects with system restricted names; for example, a membernamed FY02 in the Year dimension. You must rename or remove such restricted
Chapter 1Important Considerations for FreeForm Apps
1-4
names before generating the OTL file or snapshot that you plan to use to create theapplication. See Naming Restrictions in Administering Planning.
• Ensure that the OTL file or Essbase application snapshot that you are using does nothave member and alias names that are longer than 80 characters. If member and aliasnames are longer than 80 characters, you must remove or shorten them or the import willnot be successful. See Naming Restrictions in Administering Planning.
• If the OTL file that you are using contains Year Total and Beginning Balance members,the Beginning Balance member must be the first child under the Period dimension, andYear Total must be the second child under Period dimension. These members requirespecial handling and can be moved to appropriate positions by modifying the .csv files inthe Migration snapshot before restoring the snapshot.
• If you plan to use an OTL file or snapshot stored in your EPM Cloud environment as thesource, upload the file before starting the application creation process.
Use the uploadFile EPM Automate Utility command or Migration to upload the OTL fileor snapshot to an EPM Cloud environment.
• Imported data may not be editable in FreeForm apps. At times, the data is set as Read-only.
• Member outline must be unique in the application.
• If you create a FreeForm app by importing an OTL or snapshot, you can add or createnew cubes for this FreeForm app at a later time.
• If you create a FreeForm app by adding new cubes in the application creation wizard, anEssbase cube OTL or Essbase application snapshot cannot be imported into thisFreeForm app at a later time to create new cubes.
Do not use the following reserved words to name dimensions and members in FreeForm:
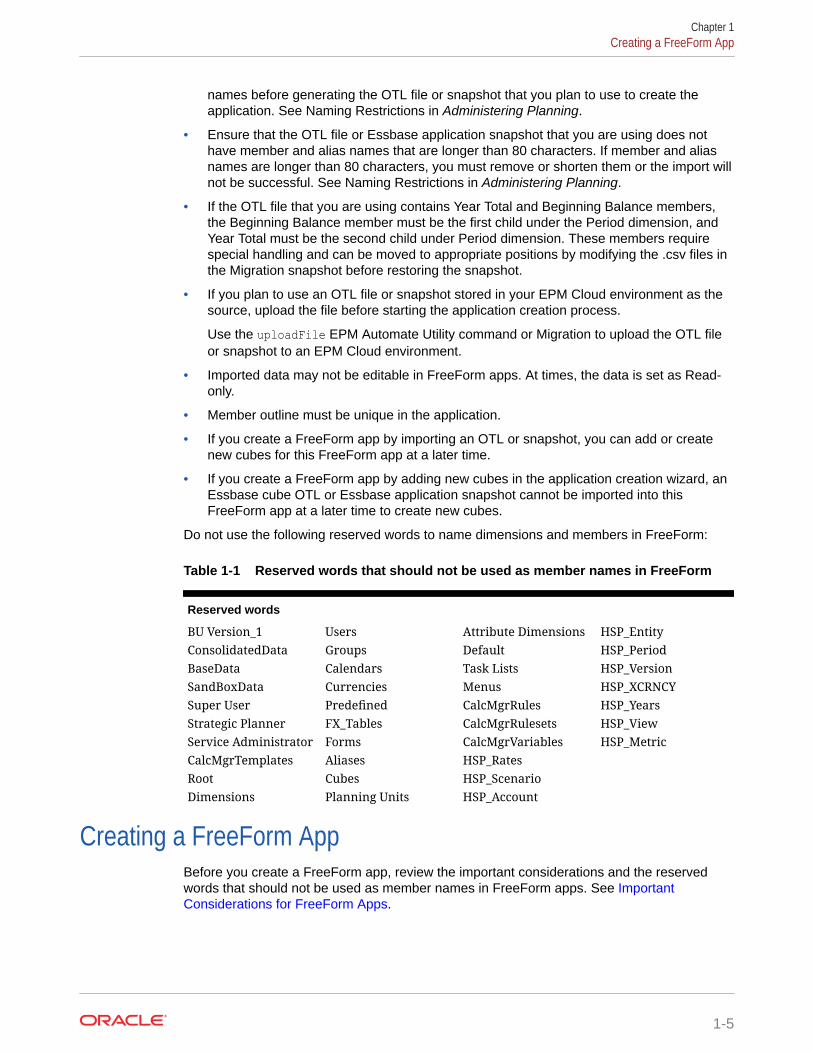
Table 1-1 Reserved words that should not be used as member names in FreeForm
Reserved words
BU Version_1 Users Attribute Dimensions HSP_EntityConsolidatedData Groups Default HSP_PeriodBaseData Calendars Task Lists HSP_VersionSandBoxData Currencies Menus HSP_XCRNCYSuper User Predefined CalcMgrRules HSP_YearsStrategic Planner FX_Tables CalcMgrRulesets HSP_ViewService Administrator Forms CalcMgrVariables HSP_MetricCalcMgrTemplates Aliases HSP_RatesRoot Cubes HSP_ScenarioDimensions Planning Units HSP_Account
Creating a FreeForm AppBefore you create a FreeForm app, review the important considerations and the reservedwords that should not be used as member names in FreeForm apps. See ImportantConsiderations for FreeForm Apps.
Chapter 1Creating a FreeForm App
1-5
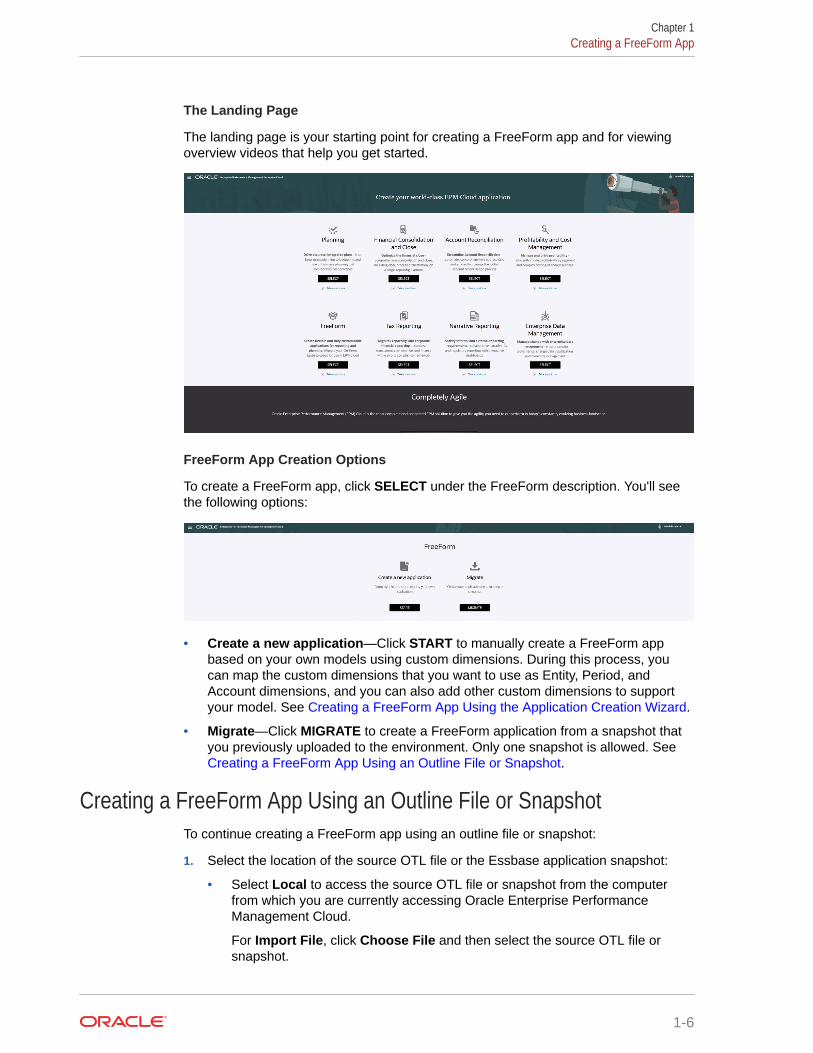
The Landing Page
The landing page is your starting point for creating a FreeForm app and for viewingoverview videos that help you get started.
FreeForm App Creation Options
To create a FreeForm app, click SELECT under the FreeForm description. You'll seethe following options:
• Create a new application—Click START to manually create a FreeForm appbased on your own models using custom dimensions. During this process, youcan map the custom dimensions that you want to use as Entity, Period, andAccount dimensions, and you can also add other custom dimensions to supportyour model. See Creating a FreeForm App Using the Application Creation Wizard.
• Migrate—Click MIGRATE to create a FreeForm application from a snapshot thatyou previously uploaded to the environment. Only one snapshot is allowed. See Creating a FreeForm App Using an Outline File or Snapshot.
Creating a FreeForm App Using an Outline File or SnapshotTo continue creating a FreeForm app using an outline file or snapshot:
1. Select the location of the source OTL file or the Essbase application snapshot:
• Select Local to access the source OTL file or snapshot from the computerfrom which you are currently accessing Oracle Enterprise PerformanceManagement Cloud.
For Import File, click Choose File and then select the source OTL file orsnapshot.
Chapter 1Creating a FreeForm App
1-6
• Select Inbox to access the source OTL file or snapshot from your EPM Cloudenvironment.
From Select One, select the source OTL file or snapshot.
2. Click Next.
3. Review application information and then click Create.
When application creation is complete, EPM Cloud Home page is displayed.
4. Make sure that errors were not reported during application creation.
• Open the Jobs console by clicking Application, and then Jobs
• Verify that the Create Database and Process Outline activities finished withouterrors. Correct any reported errors.
5. Optional: If you created the application using an OTL file as the source, importapplication data. See Importing Data in Administering Planning.
If you used a snapshot as the application source, the application creation processautomatically imports data.
6. Create application users in identity domain and assign predefined roles as needed. See Managing Users and Roles in Getting Started with Oracle Enterprise PerformanceManagement Cloud for Administrators .
7. Set up access permissions as needed. See Setting Up Access Permissions inAdministering Planning.
Creating a FreeForm App Using the Application Creation WizardTo continue creating a FreeForm app using the application creation wizard:
1. For No. Of Cubes, select the number of cubes you'd like to use to create your FreeFormapp. You can add up to 12 cubes now, or you can start with one cube and then add morecubes later on the Application Overview page.
Note:
If you create a single cube FreeForm app, data maps and other multi-cubefeatures are unavailable until you add cubes to the FreeForm app. Also for adata map to work there needs to be at least one block storage (BSO) cube, andthe source for the data map needs to be a BSO cube.
2. In Cube Name, enter a name for each cube, maximum eight characters.
3. Select Is ASO, if the cube is an aggregate storage cube. If the Is ASO checkbox iscleared, then the cube is a Hybrid block storage cube.
Note:
Reporting applications that use ASO cubes, generally, store data in aggregateviews and can handle a higher number of dimensions than BSO withoutadversely affecting performance.
Chapter 1Creating a FreeForm App
1-7
4. Click Next.
The Create Dimensions page is displayed. From this screen, you can create upto three dimensions and assign one each to Account, Entity, and Period defaultdimension types. Additional dimensions can be added later in the web interface.
Note:
FreeForm apps do not require standard dimensions. You can create anapplication with only custom dimensions containing members of yourchoice. The dimensions you create and its structure are not governed bythe constraints imposed on standard application dimensions.
5. In Create Dimensions, create and map default application dimensions. Completea step:
• To create dimensions and map them to default dimension types, select theEnabled check box and then type in dimension names.
Note:
Enabling dimensions is not automatic. Just like custom applications,you must manually enable dimensions for FreeForm apps. You cando this now, or you can enable them later.
• To create a dimension and assign a dimension type, select the check box in arow and then type in a dimension name.
• To create a shell application, do not change anything in this screen.
You can add and map dimensions to shell applications after the applicationcreation process is complete.
6. Click Next.
7. In Review, verify the settings that you selected and then click Create.
The application creation process may take a few minutes.
8. In the Application Creation Status screen, click OK.
The Home page is displayed.
9. Optional: Create custom dimensions, if needed.
a. Click Application, then Overview, and then select the Dimensions tab.
b. For Cube, select a cube that you created for your FreeForm app or select All.
c. Click Create.
d. Complete the dimension details for each dimension you want to add, and thenclick Done. For descriptions of the dimension properties, see EditingDimension Properties in the Simplified Dimension Editor in AdministeringPlanning.
Select Enabled to indicate whether the dimension is to be used in this cube.
Chapter 1Creating a FreeForm App
1-8

Note:
Enabling dimensions is not automatic. Just like custom applications, youmust manually enable dimensions for FreeForm apps.
e. Click Action and then Refresh Database to refresh the cube.
10. Optional: Import application data. See Importing Data in Administering Planning.
11. Optional: If you created a shell application with a view to import a snapshot, accessMigration, then delete the application, and then complete the import process.
a. Upload a snapshot from a FreeForm app to your environment. See UploadingArchives to the Service in Administering Migration for Oracle Enterprise PerformanceManagement Cloud for detailed instructions.
b. Import the snapshot. See "Importing a Backup to Create a Clone of AnotherEnvironment" in Importing Artifacts and Application from a Snapshot in AdministeringMigration for Oracle Enterprise Performance Management Cloud for detailedinstructions.
12. Create application users in identity domain and assign predefined roles as needed. See Manage Users and Roles in Getting Started with Oracle Enterprise PerformanceManagement Cloud for Administrators .
13. Set up access permissions as needed. See Setting Up Access Permissions inAdministering Planning.
Managing Application OwnershipThe Service Administrator who creates the application is auto-assigned the ApplicationOwner function. When a Service Administrator with the Application Owner function is deletedor when the user’s predefined role assignment is downgraded (for example, from ServiceAdministrator to Power User), the Application Owner function is reassigned to the nextavailable Service Administrator user (in alphabetical order) for the application, and then roleof the current Application Owner user is deleted or changed to sync up with Access Control.
If there are no available Service Administrators, then the Service Administrator user is notdeleted or the role is not changed. Oracle will contact you with next steps to resolve theissue.
Any Service Administrator can use System Settings to take over or reassign the ApplicationOwner role to any available Service Administrator.
See What Application and System Settings Can I Specify?.
FreeForm Apps FAQRelated Links
General:
• What is the difference between Essbase and an EPM Cloud FreeForm app?
• When will current Essbase 21c versions be adopted in EPM Cloud?
Chapter 1Managing Application Ownership
1-9
• What is the impact of having EPM Cloud + Essbase 21c? How will they worktogether? Data movement, reporting, Smart View connections, and so on.
• What is the recommendation for customers for their Essbase cubes whenmigrating from On-premise EPM to EPM Cloud?
• What are the default hardware settings that will limit processing? What tuningcapabilities will be made available for FreeForm apps?
• What EPM license do I need to have to get multi-cube FreeForm?
FreeForm App Details:
• Are all FreeForm apps considered custom applications?
• Does multi-cube FreeForm app mean that I can have 12 cubes, each with only 2or 3 dimensions?
• What kind of Administration Interface is available in FreeForm apps?
• Does Cube Refresh refresh all cubes at once?
• What about size thresholds?
• Will slow changing attributes be supported in FreeForm apps?
• Is there direct access to FreeForm cubes through Smart View and OracleAnalytics Cloud and Data Visualization?
• Are hybrid cubes supported with FreeForm apps?
• Do FreeForm apps offer a repository of multiple applications?
• Is load of metadata through Data Management available with FreeForm apps?
• Do we lose any Planning Custom App Type related functionality in FreeFormapps?
• Can you use Groovy if you select FreeForm apps?
• Can you remove a dimension after adding it?
• Can you use Planning Migration files to create an application similar to the OTL orthe Migration zip files?
• Can you import multiple outline or Migration files?
• Is FreeForm only available with the Enterprise version of EPM (vs. what waspreviously called PBCS)?
• How do you upload dimensions (and hierarchies) from a legacy Hyperion Planningapplication into EPM using FreeForm?
• Can we refresh the database from Smart View?
• Are partitions enabled?
• How can we configure the security filters?
• Is the task management feature similar to Financial Consolidation and Closewhere it can be integrated, or is it just basic tasks? Can you please comment onthis feature?
• How do you manage dimensions for FreeForm?
• Can I take a backup of a FreeForm app and then migrate it to a FinancialConsolidation and Close or Planning Modules Cloud application?
Chapter 1FreeForm Apps FAQ
1-10
• What about the business rules script, will they be migrated properly? And theconfigurable consolidation rule with regard to the Financial Consolidation and Closeapplication?
• Does migration of an OTL work with all versions of Essbase?
• Is there no restriction for Data Integration in FreeForm that needs Scenario/Time perioddimensions?
• Can we import data if the application is already created?
• Could you provide information about how the EPM Integration Agent feature is beingused in Data Exchange?
• Is there the capability to create custom dimensions and business rules?
Essbase Migration Technical Questions:
• What other tuning capabilities, if any, will be made available for FreeForm apps?
• Is partitioning supported? Transparent, Linked, Replicated?
• What about the MaxL Language for Admins, Automation, Shell integration?
• Are the MDX functions going to be supported?
• Aside from Data Management/ETL how else can we recreate rules files in FreeFormapps? This could be cumbersome in Data Management.
• For large scale ASO databases, what is the preferred data load mechanism in FreeFormapps?
• Any plans to create a CDF to Groovy migration tool?
• What Essbase artifacts can I migrate into FreeForm apps and how?
• What objects are skipped when Essbase outline files or Migration files are imported intoFreeForm apps?
• How do Essbase features map to FreeForm apps in EPM Cloud?
What is the difference between Essbase and an EPM Cloud FreeForm app?
Essbase is an Oracle offering available for deployment on-premises or in Oracle CloudInfrastructure (OCI). It is deployed as an OCI solution with the customer having fulldeployment control of the cubes. FreeForm apps are a SaaS solution offered by OracleEnterprise Performance Management Cloud that allows Essbase cubes to be imported intoEPM Cloud and deployed standalone. FreeForm apps have a hybrid architecture with arelational component beyond the Essbase cubes. FreeForm apps can have up to 12 cubesand up to 29 dimensions across all cubes.
When will current Essbase 21c versions be adopted in EPM Cloud?
Adoption of the latest Essbase versions into EPM Cloud is based on the impact on ourcustomers – functional and performance. We are currently evaluating 21c for EPM Cloudadoption, and FreeForm apps will be one of the early adopters.
What is the impact of having EPM Cloud + Essbase 21c? How will they work together?Data movement, reporting, Smart View connections, and so on.
Essbase 21c on OCI is an IaaS deployment. FreeForm is a SaaS deployment. Data will needto be extracted from either environment or moved to the other. Oracle Smart View for Officeshared connections can connect within the same platform so you can connect multipleFreeForm apps using one shared EPM connection. Essbase 21c on OCI would be a private
Chapter 1FreeForm Apps FAQ
1-11
connection when FreeForm is a shared connection in Smart View. Any data exchangebetween FreeForm apps and Essbase 21c on OCI or on-premise will be an export-import of data.
What is the recommendation for customers for their Essbase cubes whenmigrating from On-premise EPM to EPM Cloud?
On-premise customers migrating their on-premise EPM instances to EPM Cloudshould migrate their Essbase reporting or planning cube instances into FreeForm appsin EPM Cloud. This will ensure consistent access to EPM business processes allwithin SaaS EPM Cloud. This also avoids data latency and data movement acrossenvironments. Also, it will ensure there is one place to maintain access rights andsecurity. Customers can leverage all the latest features in theEPM Cloud platform andfuture enhancements on an ongoing basis.
What are the default hardware settings that will limit processing? What tuningcapabilities will be made available for FreeForm apps?
There is no need for customers to configure tuning or resource settings. It is one of thebenefits of Oracle EPM Cloud. Environments are pre-configured to an optimizedstandard, where performance tuning and resource allocation selections have beenmade based on every provisioned environment across the globe. Performance andresource utilization for each environment are continually monitored and history ismaintained. Health checks are executed at Daily Maintenance. Data cache isregulated with algorithms so that customers should never need to manual adjust them.The cache settings are checked and adjusted at Daily Maintenance. In the unlikelyevent that performance metrics begin to trend unfavorably, alerts are triggered so thatOracle can investigate and address before the customer is even aware.
What EPM license do I need to have to get multi-cube FreeForm?
FreeForm apps are available with EPM Enterprise Cloud.
Are all FreeForm apps considered custom applications?
Yes. All FreeForm apps are fully custom with no out-of-box content. You have fullflexibility in dimensions and members. You can create cubes of any dimensioncombination as long as the total cubes are less than 26 custom dimensions. You canmap Account, Period, or Entity dimensions if they are part of the cube dimensionalityto the default dimension types. We automatically map these dimensions if they exist inthe source outline or Migration file.
Does multi-cube FreeForm app mean that I can have 12 cubes, each with only 2or 3 dimensions?
Up to 12 cubes are allowed in a FreeForm app, in any combination of BSO and ASOcubes. Each cube can have the exact needed dimensions without requiring anyrequired dimensions or members.
What kind of Administration Interface is available in FreeForm apps?
Essbase admin console features to the extent relevant in SaaS are available throughCalculation Manager or the dimension editor in the FreeForm app. Since it is a web-based application there are other admin interfaces in EPM web applications that allowadministrators to manage EPM applications.
Chapter 1FreeForm Apps FAQ
1-12
Does Cube Refresh refresh all cubes at once?
FreeForm deployments are cubes contained within one FreeForm app. You can have up to12 cubes. Refresh is by application across all cubes. There is no concept of cube-specificrefresh in EPM Cloud.
What about size thresholds?
There are no file size limits in the new EPM Enterprise Cloud where FreeForm is available.Dimension size and data volumes are handled on a case-by-case basis. There is a standardwell established support protocol for upscaling the thresholds.
Will slow changing attributes be supported in FreeForm apps?
Some customers have asked for this, but the demand for it is not high enough. We willinvestigate it based on customer connect feedback in Cloud Customer Connect.
Is there direct access to FreeForm cubes through Smart View and Oracle AnalyticsCloud and Data Visualization?
Smart View connections to FreeForm apps goes through the standard Smart View EPMCloud interface. FreeForm apps can be accessed from Oracle Analytics Cloud and usingData Visualization using the direct connect capability in Oracle Analytics Cloud.
Are hybrid cubes supported with FreeForm apps?
FreeForm apps support creation of Hybrid BSO cubes and ASO cubes
Do FreeForm apps offer a repository of multiple applications?
Repository is by application but can be connected into from another application. Data acrossapplications can be blended in web and Smart View.
Is load of metadata through Data Management available with FreeForm apps?
Yes. Data Management metadata load is supported where there is at least one BSO cube.We will be supporting FreeForm apps with only ASO cubes through Data Management in thenear term. The import of metadata using the Outline Load Utility (OLU) is an option.
Do we lose any Planning Custom App Type related functionality in FreeForm apps?
Common platform functionality which does not depend on required Planning dimensions is allavailable. Open dimensional approvals is on the roadmap.
Can you use Groovy if you select FreeForm apps?
Yes. All platform features are available with FreeForm apps. All business rules, includingGroovy rules, are supported with FreeForm apps.
Can you remove a dimension after adding it?
You can unselect the dimension from the cube and the next cube refresh will remove thedimension association from that cube.
Chapter 1FreeForm Apps FAQ
1-13
Can you use Planning Migration files to create an application similar to the OTLor the Migration zip files?
FreeForm apps are meant for Essbase outline/Migration imports or as build-from-scratch applications. On-premise Planning applications map to custom applicationtypes in EPM Enterprise Cloud.
Can you import multiple outline or Migration files?
FreeForm only accepts one outline or Migration file to create an application. Additionalcubes can be created in the interface and associated to this outline. We don’t importmultiple outline or Migration files into a single application.
Is FreeForm only available with the Enterprise version of EPM (vs. what waspreviously called PBCS)?
FreeForm apps are available with EPM Enterprise Cloud.
How do you upload dimensions (and hierarchies) from a legacy HyperionPlanning application into EPM using FreeForm?
Options are to load using an Essbase outline file (OTL), dimension extracts fromsource and import, manage using web interface/Smart View extension, or manuallycreate.
Can we refresh the database from Smart View?
Yes, a refresh from Smart View is possible. Right-click on Dimensions, and thenRefresh Databases.
Are partitions enabled?
No. Partitions are not required within FreeForm since it is a SaaS deployment in EPMCloud where alternate solutions are available. Data maps and Smart Push can beused to feed data across cubes. Partitioning requires both Disk I/O and networkaccess, both of which are not allowed by Oracle SaaS Cloud. In Cloud, the disk andnetwork have been virtualized. With a mixture of ASO and BSO cubes in the sameFreeForm app and with use of Hybrid BSO, data maps, Smart Push, and Groovy,partitioning is not necessary.
How can we configure the security filters?
Security is controlled through access controls, users are granted access to anapplication and then objects from there. In addition, cell-level security exists inFreeForm.
Is the task management feature similar to Financial Consolidation and Closewhere it can be integrated, or is it just basic tasks? Can you please comment onthis feature?
FreeForm uses task lists. The Task Manager feature is now available in Planningapplications, but not in FreeForm.
How do you manage dimensions for FreeForm?
Dimension management can be completed in a number of ways:
• Manually in the solution using the web interface and Smart View
Chapter 1FreeForm Apps FAQ
1-14
• Integrated from a source solution using Data Management and import dimension jobs
• Using an integration tool such as Oracle Cloud Infrastructure (OCI)
• From Oracle Data Relationship Management (DRM) with integration
• Using Oracle Enterprise Data Management Cloud, part of the EPM Enterprise solution,which provides a full enterprise data governance and control capability
Can I take a backup of a FreeForm app and then migrate it to a Financial Consolidationand Close or Planning Modules Cloud application?
No, FreeForm is a different business process and, as such, is not portable to other businessprocesses.
What about the business rules script, will they be migrated properly? And theconfigurable consolidation rule with regard to the Financial Consolidation and Closeapplication?
No, FreeForm is a different business process and, as such, is not portable to other businessprocesses.
Does migration of an OTL work with all versions of Essbase?
You can use an outline (OTL) file or snapshot from an on-premises release 11.1.2.4.xxx (orlater) single cube Essbase application to create a FreeForm app. For more information, see FreeForm App Sources.
Is there no restriction for Data Integration in FreeForm that needs Scenario/Timeperiod dimensions?
To use Data Management in FreeForm you must have a minimum of Account, Period, andScenario dimension types defined. For more information, see Loading Data to a Free FormApplication in Administering Data Integration for Oracle Enterprise Performance ManagementCloud.
Can we import data if the application is already created?
Data can be imported using the data import capability. For more information, see ImportingData in Administering Planning. Migration-based data imports can only be used duringapplication creation.
Could you provide information about how the EPM Integration Agent feature is beingused in Data Exchange?
The EPM Integration Agent is a fully unified solution for extracting and transforming data andmetadata from your on-premises or any system such as a third-party cloud, and delivering itto the Oracle Enterprise Performance Management Cloud.
You can connect to and load data from on-premises data sources using custom SQL queriesor pre-packaged queries to import data from sources such as EBS and the PeopleSoftGeneral Ledger.
For more information, see EPM Cloud to On-premises Connectivity Using the EPMIntegration Agent in Administering Data Integration for Oracle Enterprise PerformanceManagement Cloud.
Chapter 1FreeForm Apps FAQ
1-15
Is there the capability to create custom dimensions and business rules?
Yes. FreeForm, by design, is a completely open business process and, as such,dimensions and business rules would all be custom built.
What other tuning capabilities, if any, will be made available for FreeForm apps?
Since FreeForm apps are a SaaS application, tuning is managed by Oracle. To theextent needed, database properties are available within the Calculation Managerinterface.
Is partitioning supported? Transparent, Linked, Replicated?
No. Partitions are not required within FreeForm since it is a SaaS deployment in EPMCloud where alternate solutions are available. Data maps and Smart Push can beused to feed data across cubes. Partitioning requires both Disk I/O and networkaccess, both of which are not allowed by Oracle SaaS Cloud. In Cloud, the disk andnetwork have been virtualized. With a mixture of ASO and BSO cubes in the sameFreeForm app and with use of Hybrid BSO, data maps, Smart Push, and Groovy,partitioning is not necessary.
What about the MaxL Language for Admins, Automation, Shell integration?
Direct scripting is prevented for SaaS Cloud security reasons. Given it is a SaaSplatform, we don’t allow open ended scripts. There are other alternatives available inEPM Cloud for MaxL. EPM Automate, EPM Agent, and Groovy are good alternatives.
Are the MDX functions going to be supported?
MDX is already supported to some extent for ASO in FreeForm apps. MDX scriptingfor custom calc and allocation is exposed since 20.05 through Groovy scripts.
Aside from Data Management/ETL how else can we recreate rules files inFreeForm apps? This could be cumbersome in Data Management.
Currently we support import of Essbase format data into FreeForm apps. See DefiningData Load Rule Details in Administering Data Management for Oracle EnterprisePerformance Management Cloud .
For large scale ASO databases, what is the preferred data load mechanism inFreeForm apps?
Use the Essbase file format or use Data Management.
Any plans to create a CDF to Groovy migration tool?
There are no plans for CDF migration to Groovy. Given Java security considerations,CDF migration cannot be done. Groovy is a good modern alternative.
What Essbase artifacts can I migrate into FreeForm apps and how?
Essbase Artifact FreeForm Import File? Notes
Application and cubemetadata
Yes Cubes and outline metadataare imported.
Chapter 1FreeForm Apps FAQ
1-16

Essbase Artifact FreeForm Import File? Notes
Calculation scripts Yes Imported into CalculationManager and used asbusiness rules
Data Yes Level zero import fromsource or using Migration
Disk volumes NADrill through definitions No Managed through Data
ManagementExcel workbooks and files NA Remapped with EPM
Connections in Smart ViewFilters No Metadata security is
maintained in relationalschema.
Linked Reporting Objects(LROs)
No Attachments and commentsare managed separately inEPM.
Location aliases NALog files NoOutlines and formulas YesPartitions No Alternatives with data maps
and Smart Push acrosscubes are available.
Report scripts No Other export alternativesare available.
Rule files, text files, .csv files YesScenarios NASubstitution variables YesUsers No Managed separately in IDM
in EPM SaaS CloudUser roles No Managed separately in IDM
in EPM SaaS Cloud
What objects are skipped when Essbase outline files or Migration files are importedinto FreeForm apps?
Essbase Artifact Reason object was skipped during import
Custom Defined Function (CDF) CDFs are possible, but given Java securityconsideration, cannot be done now. Groovy isa good alternative.
Custom Defined Macro (CDM) CDMs in Essbase are old artifacts. Using aCalculation Manager design time prompt on arule is a better implementation of that sameconcept.
Location Alias Location Alias is a short-cut name that allowsyou to reference a physical Essbase databasethrough its server name, app name, databasename, username, and password. FreeFormapps are self-contained within a singleapplication with multiple databases. Datamaps and Smart Push can be used within theapplication for this.
Chapter 1FreeForm Apps FAQ
1-17
Essbase Artifact Reason object was skipped during import
Report Scripts Alternatives for data import and export areavailable in EPM Cloud through Groovy andEPM Automate.
Load Rules Data Management offers the ability to pick upload rules, which can be done separately.
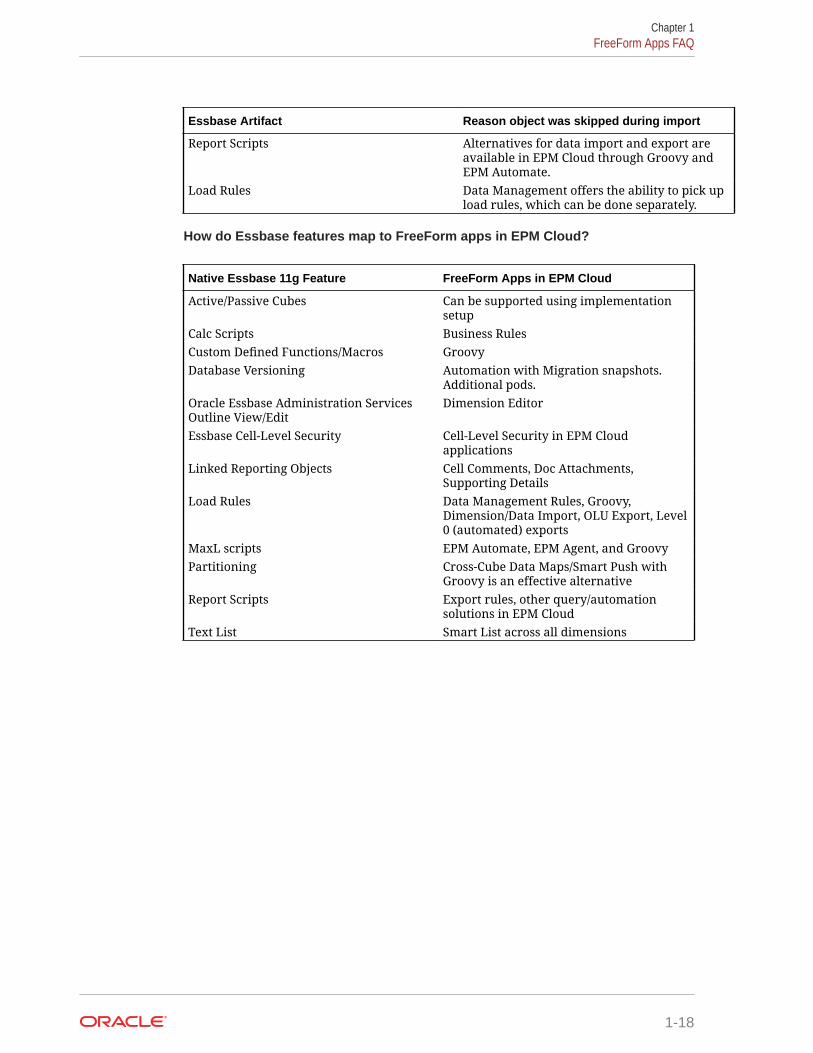
How do Essbase features map to FreeForm apps in EPM Cloud?
Native Essbase 11g Feature FreeForm Apps in EPM Cloud
Active/Passive Cubes Can be supported using implementationsetup
Calc Scripts Business RulesCustom Defined Functions/Macros GroovyDatabase Versioning Automation with Migration snapshots.
Additional pods.Oracle Essbase Administration ServicesOutline View/Edit
Dimension Editor
Essbase Cell-Level Security Cell-Level Security in EPM Cloudapplications
Linked Reporting Objects Cell Comments, Doc Attachments,Supporting Details
Load Rules Data Management Rules, Groovy,Dimension/Data Import, OLU Export, Level0 (automated) exports
MaxL scripts EPM Automate, EPM Agent, and GroovyPartitioning Cross-Cube Data Maps/Smart Push with
Groovy is an effective alternativeReport Scripts Export rules, other query/automation
solutions in EPM CloudText List Smart List across all dimensions
Chapter 1FreeForm Apps FAQ
1-18
2Getting Started
Related Topics
• About the Home PageAfter you create the business process, the Home page is the launch point for accessingyour business process tasks.
• Using Dynamic Tabs in Redwood ExperienceWork on related artifacts within tabs without having to navigate away from a parentartifact.
About the Home PageAfter you create the business process, the Home page is the launch point for accessing yourbusiness process tasks.
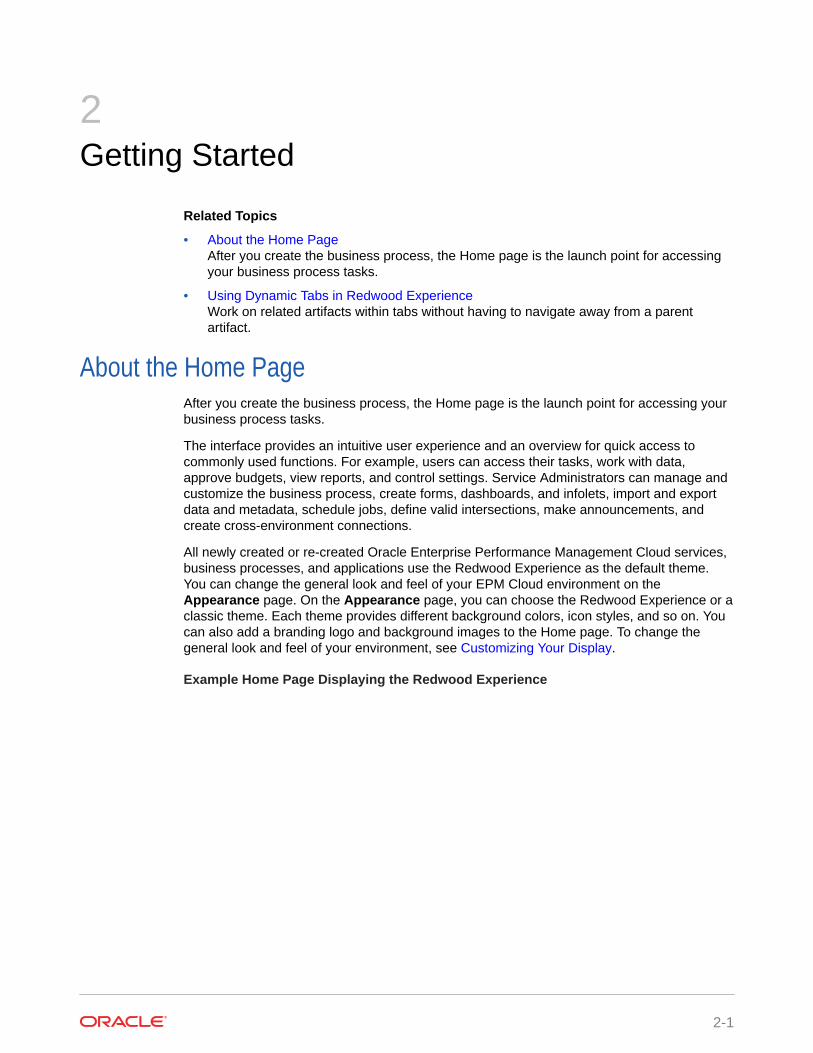
The interface provides an intuitive user experience and an overview for quick access tocommonly used functions. For example, users can access their tasks, work with data,approve budgets, view reports, and control settings. Service Administrators can manage andcustomize the business process, create forms, dashboards, and infolets, import and exportdata and metadata, schedule jobs, define valid intersections, make announcements, andcreate cross-environment connections.
All newly created or re-created Oracle Enterprise Performance Management Cloud services,business processes, and applications use the Redwood Experience as the default theme.You can change the general look and feel of your EPM Cloud environment on theAppearance page. On the Appearance page, you can choose the Redwood Experience or aclassic theme. Each theme provides different background colors, icon styles, and so on. Youcan also add a branding logo and background images to the Home page. To change thegeneral look and feel of your environment, see Customizing Your Display.
Example Home Page Displaying the Redwood Experience
2-1
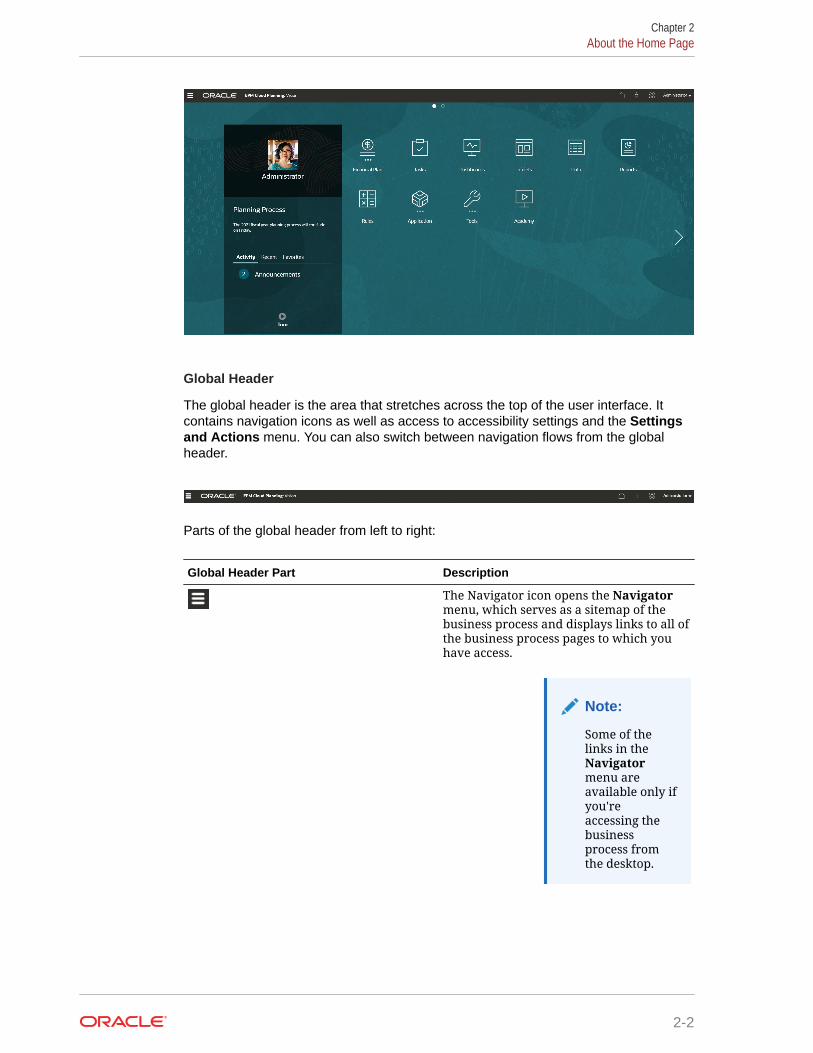
Global Header
The global header is the area that stretches across the top of the user interface. Itcontains navigation icons as well as access to accessibility settings and the Settingsand Actions menu. You can also switch between navigation flows from the globalheader.
Parts of the global header from left to right:
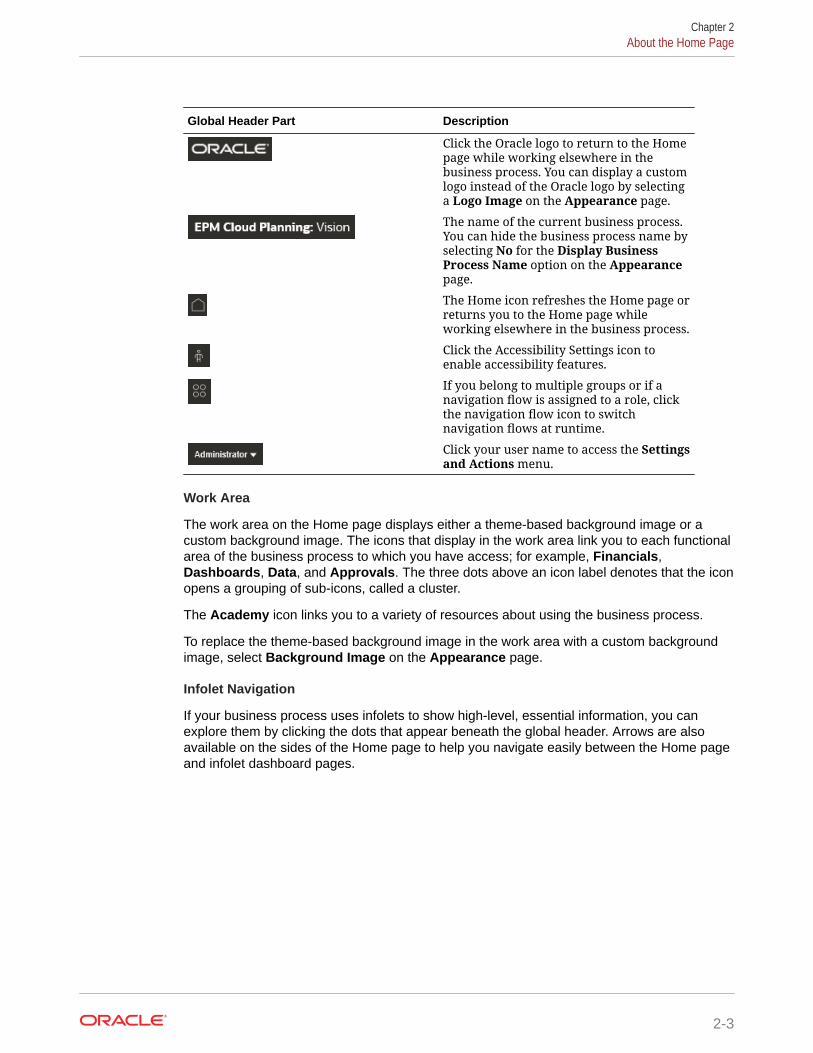
Global Header Part Description
The Navigator icon opens the Navigatormenu, which serves as a sitemap of thebusiness process and displays links to all ofthe business process pages to which youhave access.
Note:
Some of thelinks in theNavigatormenu areavailable only ifyou'reaccessing thebusinessprocess fromthe desktop.
Chapter 2About the Home Page
2-2
Global Header Part Description
Click the Oracle logo to return to the Homepage while working elsewhere in thebusiness process. You can display a customlogo instead of the Oracle logo by selectinga Logo Image on the Appearance page.
The name of the current business process.You can hide the business process name byselecting No for the Display BusinessProcess Name option on the Appearancepage.
The Home icon refreshes the Home page orreturns you to the Home page whileworking elsewhere in the business process.
Click the Accessibility Settings icon toenable accessibility features.
If you belong to multiple groups or if anavigation flow is assigned to a role, clickthe navigation flow icon to switchnavigation flows at runtime.
Click your user name to access the Settingsand Actions menu.
Work Area
The work area on the Home page displays either a theme-based background image or acustom background image. The icons that display in the work area link you to each functionalarea of the business process to which you have access; for example, Financials,Dashboards, Data, and Approvals. The three dots above an icon label denotes that the iconopens a grouping of sub-icons, called a cluster.
The Academy icon links you to a variety of resources about using the business process.
To replace the theme-based background image in the work area with a custom backgroundimage, select Background Image on the Appearance page.
Infolet Navigation
If your business process uses infolets to show high-level, essential information, you canexplore them by clicking the dots that appear beneath the global header. Arrows are alsoavailable on the sides of the Home page to help you navigate easily between the Home pageand infolet dashboard pages.
Chapter 2About the Home Page
2-3
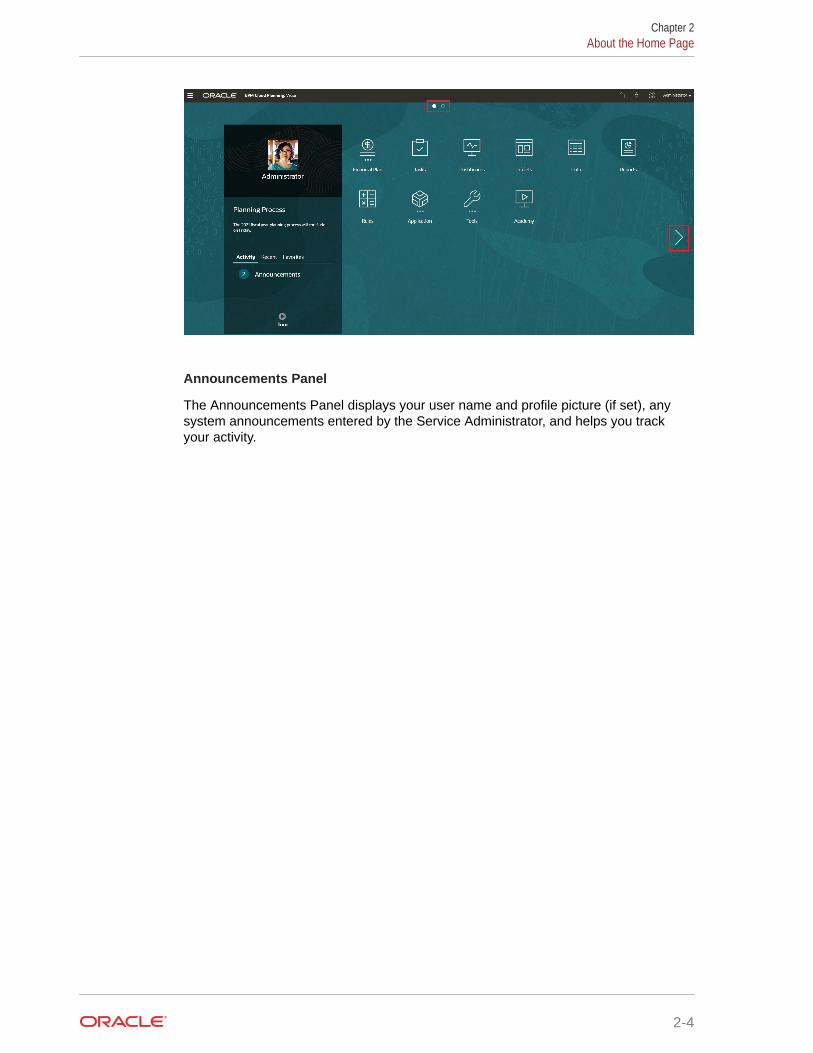
Announcements Panel
The Announcements Panel displays your user name and profile picture (if set), anysystem announcements entered by the Service Administrator, and helps you trackyour activity.
Chapter 2About the Home Page
2-4
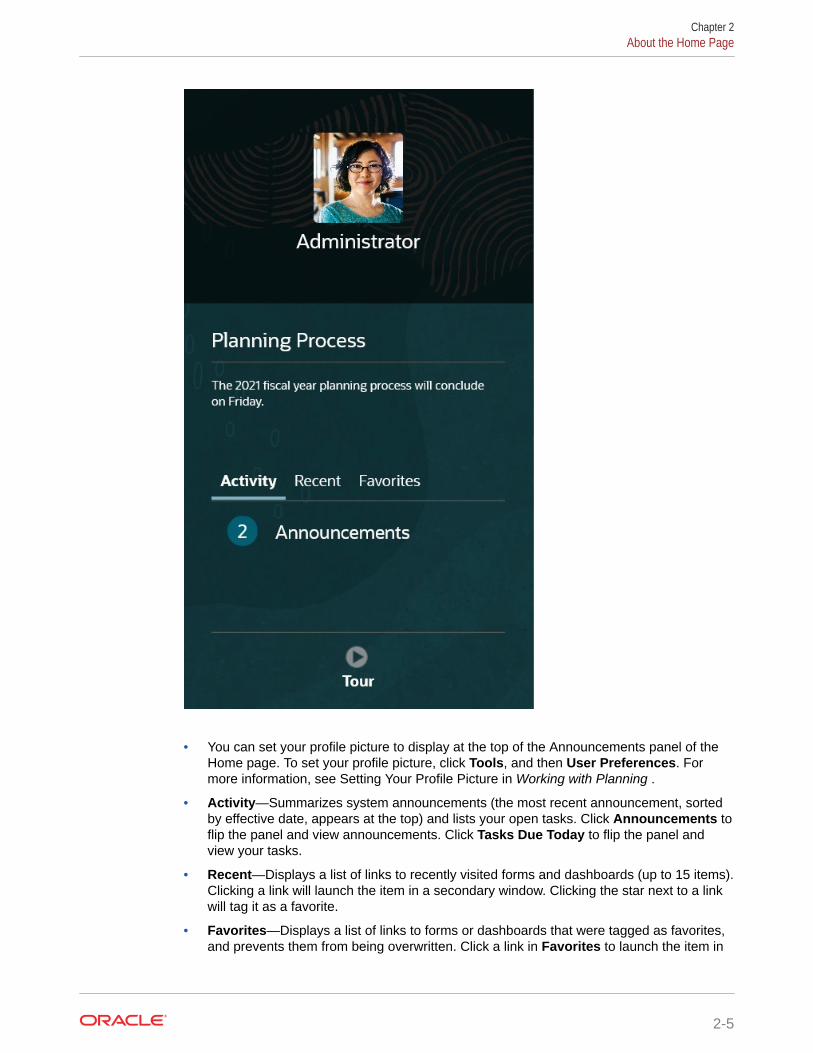
• You can set your profile picture to display at the top of the Announcements panel of theHome page. To set your profile picture, click Tools, and then User Preferences. Formore information, see Setting Your Profile Picture in Working with Planning .
• Activity—Summarizes system announcements (the most recent announcement, sortedby effective date, appears at the top) and lists your open tasks. Click Announcements toflip the panel and view announcements. Click Tasks Due Today to flip the panel andview your tasks.
• Recent—Displays a list of links to recently visited forms and dashboards (up to 15 items).Clicking a link will launch the item in a secondary window. Clicking the star next to a linkwill tag it as a favorite.
• Favorites—Displays a list of links to forms or dashboards that were tagged as favorites,and prevents them from being overwritten. Click a link in Favorites to launch the item in
Chapter 2About the Home Page
2-5
a secondary window. To add items to Favorites, click Recent to view your recentuser activity, and then click the star to the right of the item.
• —Click the Tour icon to launch a video about key features in the businessprocess.
Videos
Your Goal Watch This Video
Explore the default Redwood theme. Overview: Announcing EPM Cloud's
new Redwood Theme
Learn how to customize the interface tostreamline workflow. Overview: Customizing Workflow in
Enterprise Performance Management Cloud
Using Dynamic Tabs in Redwood ExperienceWork on related artifacts within tabs without having to navigate away from a parentartifact.
About Dynamic Tabs
Dynamic tabs enable you to view multiple artifacts on a single page. For example, ifyou have a form open, you can open other related forms, and you can also opendashboards. These additional artifacts are denoted by horizontal tabs at the bottom ofthe page. This feature is for users who do want to view multiple artifactssimultaneously, but don't want to have multiple browser windows open. The dynamictabs feature is available only with the Redwood theme.
Note:
You can set the theme of your Oracle Enterprise Performance ManagementCloud environment to Redwood on the Appearance page of your businessprocess.
Chapter 2Using Dynamic Tabs in Redwood Experience
2-6
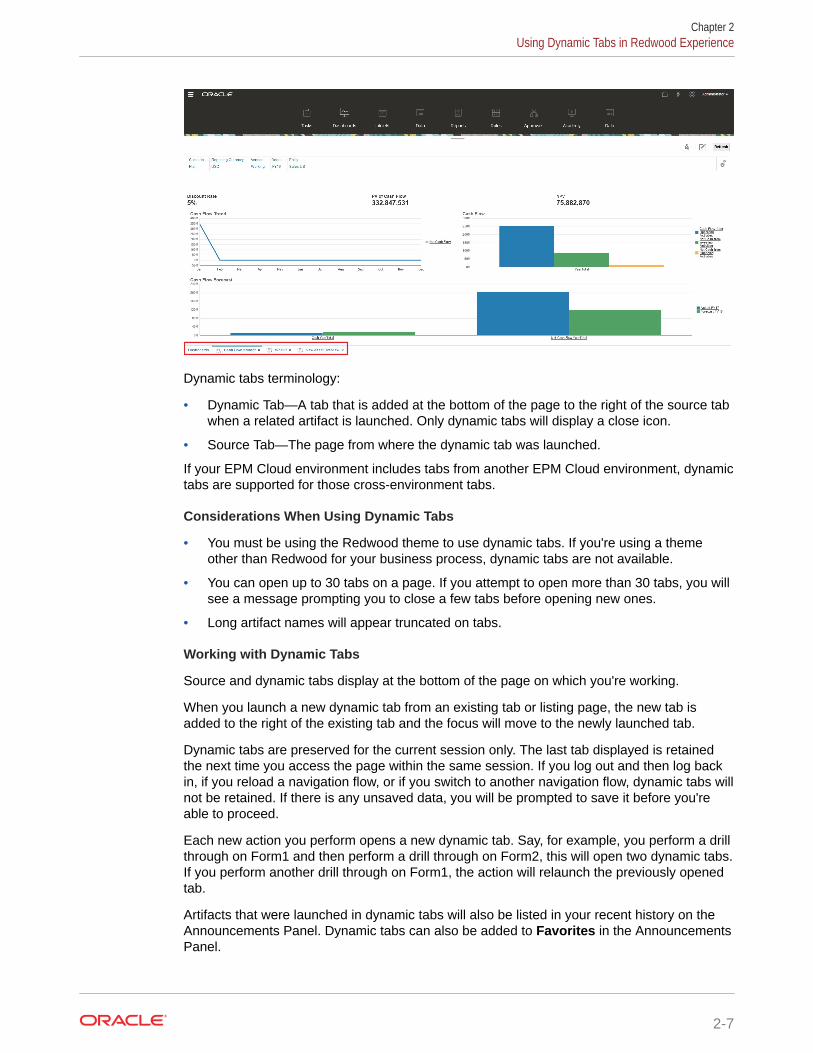
Dynamic tabs terminology:
• Dynamic Tab—A tab that is added at the bottom of the page to the right of the source tabwhen a related artifact is launched. Only dynamic tabs will display a close icon.
• Source Tab—The page from where the dynamic tab was launched.
If your EPM Cloud environment includes tabs from another EPM Cloud environment, dynamictabs are supported for those cross-environment tabs.
Considerations When Using Dynamic Tabs
• You must be using the Redwood theme to use dynamic tabs. If you're using a themeother than Redwood for your business process, dynamic tabs are not available.
• You can open up to 30 tabs on a page. If you attempt to open more than 30 tabs, you willsee a message prompting you to close a few tabs before opening new ones.
• Long artifact names will appear truncated on tabs.
Working with Dynamic Tabs
Source and dynamic tabs display at the bottom of the page on which you're working.
When you launch a new dynamic tab from an existing tab or listing page, the new tab isadded to the right of the existing tab and the focus will move to the newly launched tab.
Dynamic tabs are preserved for the current session only. The last tab displayed is retainedthe next time you access the page within the same session. If you log out and then log backin, if you reload a navigation flow, or if you switch to another navigation flow, dynamic tabs willnot be retained. If there is any unsaved data, you will be prompted to save it before you'reable to proceed.
Each new action you perform opens a new dynamic tab. Say, for example, you perform a drillthrough on Form1 and then perform a drill through on Form2, this will open two dynamic tabs.If you perform another drill through on Form1, the action will relaunch the previously openedtab.
Artifacts that were launched in dynamic tabs will also be listed in your recent history on theAnnouncements Panel. Dynamic tabs can also be added to Favorites in the AnnouncementsPanel.
Chapter 2Using Dynamic Tabs in Redwood Experience
2-7
Dynamic tabs display a close icon. If there is any unsaved data on a tab, you will beprompted to save it before closing the tab. After a tab is closed the focus will move tothe tab that is to the left of the closed tab. If you are closing a tab that is not in focus,the focus remains on the tab that is currently in view. To close all dynamic tabs, right-click any horizontal tab displayed at the bottom of the page and click Close All Tabs.
Videos
Your Goal Watch This Video
Learn how to navigate with dynamic tabsto multi-task with different artifacts. Withdynamic tabs, you can open relatedartifacts while keeping the originalartifacts open.
Navigating with Dynamic Tabs
Chapter 2Using Dynamic Tabs in Redwood Experience
2-8
3Setting Up Access Permissions
Assign access permissions to application artifacts such as dimensions, forms, dashboards,and task lists.
Related Topics
• About User and Role Management
• Application Artifacts That Can Be Assigned Permissions
• Types of Access Permissions
• Managing Permissions to Artifacts
• Reporting on Access Permissions
• Retrieving Changed Information from Access Control
About User and Role ManagementThis business process employs several security layers to ensure security. Infrastructurecomponents, which are implemented and managed by Oracle, create a secure environmentfor the application.
Business process-level security is ensured by using the following mechanisms that permitonly authorized users to access the application:
• Single Sign-on (SSO)
• Role-based access to the business process
Global roles are granted through the Oracle Cloud Identity Console. See Getting Started withOracle Enterprise Performance Management Cloud for Administrators .
Access permissions are granted through the application interface and are described in thischapter.
Tutorials
Tutorials provide instructions with sequenced videos and documentation to help you learn atopic.
Your Goal Learn How
Learn how to manage security in Access Controland set up access permissions in Planning. TheBackground and Planning Security Overviewsections in this tutorial describes the layers ofPlanning security.
Setting Up Security in Planning
Application Artifacts That Can Be Assigned PermissionsYou can assign permissions to:
3-1
• Dimensions, including user-defined dimensions
Note:
You can assign permissions to members by selecting the dimensionproperty Apply Security. If you omit or clear the Apply Security setting,all users can access the dimension's members.
See Editing Dimension Properties in the Simplified Dimension Editor.
• Launch privileges to rules
• Rule folders
• Forms
• Dashboards
• Infolets
• Reports, Books, and Bursting Definitions
• Form folders
• Dashboard folders
• Infolet folders
• Reports and Documents folders
• Task lists
• Groovy templates
Types of Access PermissionsAccess permissions include Read, Write, and None. You can also set who can launchwhich rules.
• Launch: Allow launch privileges
Note:
View user types have no Write permission to dimension members, socan't launch rules having runtime prompts that include members,dimensions, member ranges, or cross-dimension runtime prompt types.They can, however, launch rules having runtime prompts of other types(for example, date type).
• No Launch: Disallow launch privileges
Chapter 3Types of Access Permissions
3-2

Note:
If a user inherits Launch permission to a rule by belonging to a group, and isalso assigned No Launch permissions by belonging to another group, the morerestrictive No Launch assignment takes precedence.
You can specify access permission for individual users and each group. When you assign auser to a group, that user acquires the group's access permissions. If an individual's accesspermissions conflict with those of a group the user belongs to, user access permissions takeprecedence.
Inheriting Permissions
Inheritance determines the user or group’s access permissions. You can specify an attributethat causes the children or descendants of that member to inherit its permissions. Assignedpermissions take precedence over inherited permissions. You can include or exclude themember from the permissions setting.
Table 3-1 Options for Inheriting Access Permissions
Inheritance Option Permission Assignment
Member Only to the currently selected member
Children To all children members in the level below thecurrently selected member
iChildren To the currently selected member and all childrenmembers in the level below it
Descendant To all descendant members below the currentlyselected member
iDescendant To the currently selected member and alldescendant members below it
How Permissions are Evaluated
When evaluating permissions, the application gives precedence in this order:
1. Role-level security. Users with the Service Administrator role have permissions to allapplication elements.
2. For Power User, User, and Viewer user types, permissions that are specifically assignedto users.
3. Permission assignments that are acquired by belonging to a group.
Note:
If one member belongs to two groups with different permissions assigned togroup members, the least restrictive permission takes precedence. Forexample, if one group assigns the member Read permission and another groupassigns the same member Write permission, Write takes precedence. Howeverif one of the groups assigns no permission (None) to its members, None takesprecedence over Read and Write.
Chapter 3Types of Access Permissions
3-3
4. Parent-level assignments (for example, to parent members or folders).
Managing Permissions to ArtifactsRelated Topics
• About Assigning Permissions to Artifacts, Rules, and Folders
• Adding, Changing, and Removing Permissions to Artifacts and Folders
• Adding, Changing, and Removing Permissions to Rules and Rules Folders
About Assigning Permissions to Artifacts, Rules, and FoldersService Administrators can assign permissions to artifacts (forms, dashboards,infolets, reports, books, and bursting definitions), rules, and folders.
For information on assigning permissions to dimension members, see Types of AccessPermissions and Assigning Access to Dimension Members.
Principles:
• Artifacts (Forms, Dashboards, Infolets, Reports, Books, and BurstingDefinitions):
– Users and Power Users can view or enter data only into forms to which theyhave permissions (and can work only with members to which they havepermissions).
– Service Administrators and Power Users can design artifacts.
– Power Users can access artifacts they created or to which a ServiceAdministrator assigned them permissions.
– Service Administrators have Write permissions to all dimension members andto all artifacts.
• Rules:
– Users and Power Users can see and launch only rules to which they areassigned Launch permission.
– Rulesets inherit launch permissions from the rules included in the ruleset.
• Folders:
– Users who are assigned permissions to a folder can access the items in thatfolder, unless they are assigned more specific permissions. Likewise, Usershave Launch permission to the Calculation Manager rules in folders to whichthey are assigned permissions, unless they are assigned more specificpermissions.
– When you assign permissions to a folder, all folders under it inherit thatpermission.
– If you assign specific permissions (for example, None or Write) to a folder, thatpermission takes precedence over its parent folder's permissions. Forexample, if a user has Write permission to Folder1 that contains Folder2 towhich the user has None permission, the user can open Folder1, but doesn'tsee Folder2.
Chapter 3Managing Permissions to Artifacts
3-4
– If you assign specific permissions (for example, Launch) to a Calculation Managerfolder, that permission takes precedence over its parent folder's permissions. Forexample, if a user has Launch permission to RulesFolder1 that containsRulesFolder2 to which the user has No Launch permission, the user can openRulesFolder1, but doesn't see RulesFolder2.
– If a user has None permission to a folder called Folder1 that contains a form calledForm1 to which the user has Write permission, the user can see Folder1 and Form1.
– If a user has No Launch permission to a Calculation Manager folder calledRulesFolder1 that contains a rule called Rule1 to which the user has Launchpermission, the user can see RulesFolder1 and Rule1.
For procedures, see Adding, Changing, and Removing Permissions to Artifacts and Foldersand Adding, Changing, and Removing Permissions to Rules and Rules Folders.
Adding, Changing, and Removing Permissions to Artifacts and FoldersThe permissions assigned to artifacts (forms, dashboards, infolets, and reports, books, andbursting definitions) and folders refer to the ability to modify the artifact and folder definitionsand not the underlying data.
To assign permissions to artifacts and folders:
1. Navigate to the artifact (Data, Dashboards, Infolets, Reports, or Documents) listing page.
2. Click the Actions icon next to the artifact or folder, and then click Assign Permission.
Note:
You can assign permissions to only one artifact or folder at a time.
3. Click Permissions.
4. Perform a task:
• To add permissions, click Add User/Group, and then select from the list of availableusers and groups.
• To edit the type of permissions, select an option:
– Click Read to allow the selected users and groups to view the artirfact or folder inthe listing, but not allow them to create, edit, or delete the artifact or folderinformation.
– Click Write to allow the selected users and groups to view the artifact or folder inthe listing, and to create, edit, or delete the artifact or folder information.
– Click None if you don't want the selected users or groups to view the artifact orfolder in the listing.
• To remove permissions, click next to the user or group.
Adding, Changing, and Removing Permissions to Rules and Rules FoldersTo assign permissions to rules and rules folders:
1. Click Rules.
Chapter 3Managing Permissions to Artifacts
3-5
2. Select the rule or rule folder, click , and then click Assign Permission.
Note:
You can assign permissions to only one rule or folder at a time.
3. Click Permissions.
4. Perform a task:
• To add permissions, click Add User/Group, and then select from the list ofavailable users and groups.
• To edit the type of permissions, select an option:
– Click Launch to allow the selected users and groups to launch theselected rules.
– Click No Launch to prevent the selected users and groups from launchingthe selected rules.
• To remove permissions, click next to the user or group.
Reporting on Access PermissionsYou can view current access permissions and print reports.
To report on current access permissions for users and groups in the application:
1. From the Home page, click Navigator , and then under Monitor and Explore,click System Reports.
2. Click Access Control.
3. On Select User or Group, select from the available options.
4. From the left Available panel, select and move users or groups on which to reportto the Selected panel.
5. From the left Available Objects panel, select and move objects on which to reportto the Selected Objects panel.
6. Select reporting options:
• For Show Matching Access of Type, select the access to view: Read, Write,or None.
• For Group the Results By, select how to view the report: Users or Objects.
• From the Report Type sections, select Assigned Access or EffectiveAccess:
Chapter 3Reporting on Access Permissions
3-6
Table 3-2 Access Report Types
Report Type Description Options
Assigned Access Summarizes access permissions thatService Administrators assign
Specify whether access permissionsare assigned by member selectionrelation or group membership:
• Show matching access ofrelation: Member, Children,Children (inclusive),Descendants, or Descendants(inclusive).
• Show Inherited From Group:Shows access permissionsinherited by users in a group.
Effective Access
Note:
Effective Access reportscan't be generated forgroups.
Summarizes access permissionassignments as the applicationevaluates them (for example, bymember selection relation, such aschildren, or group membership). Thisis useful if there are conflicts inaccess permissions.
Describe the origin of the effectiveaccess permissions by selectingShow effective access origin. Forexample, a user named JSomebodymay be assigned Write accesspermissions to Entity1 and belong toa group named Sales that isassigned Read access permissionsto Entity1. This setting would showthat JSomebody has Write accesspermissions to Entity1 becauseindividual assigned accesspermissions supersede accesspermissions inherited by groupmembership.
7. Click Create Report.
Working with Access Permissions ReportsThe report on access permissions displays in Adobe Acrobat. You can use the AdobeAcrobat toolbar to work with the report.
Retrieving Changed Information from Access ControlChanges to group names or group membership from Access Control are not reflected in theapplication. To apply changes, you must reimport security artifacts.
To synchronize information after modifying group properties:
1. Access the environment as a Service Administrator.
2. Click Tools, and then Migration.
3. Export Security artifacts:
a. Click Core, and then select Security.
b. Click Export.
c. Enter a file name and click OK.
d. Review the Migration Status Report to ensure that the export is successful.
e. Click Close.
Chapter 3Retrieving Changed Information from Access Control
3-7
4. Import the snapshot that you created:
a. On the Migration page, click Snapshots.
b. Under Actions, click next to the snapshot that you created in thepreceding step, and then click Import.
c. Click OK.
d. Review the Migration Status Report to ensure that the import is successful.
e. Click Close.
Chapter 3Retrieving Changed Information from Access Control
3-8
4Managing Applications
View and manage applications, cubes, and dimensions using the application console.
Related Topics
• Application OverviewStart here to learn about managing applications, dimensions, and dimension members.
• Refreshing the ApplicationRefresh the application whenever you make changes to the application structure.
• Managing Cubes
• Managing DimensionsStart here to learn how to manage dimensions and dimension members.
• Setting User Preferences
• Administering Variables
• Viewing Activity ReportsMonitor user activities with activity reports.
• Importing and Exporting Data and Metadata
• Importing Exchange Rates for a Simplified Multicurrency ApplicationImport exchange rates for a simplified multiple currency application using a template.
• Creating and Refreshing Application DatabasesThings you need to know before you refresh the application database.
• Adding an Aggregate Storage Outline to an ApplicationUnderstand what aggregate storage is and how to use it in an application.
• Converting to a Standard ApplicationTo increase the number of cubes and use the logic required to support more extensivecalculations, convert a Reporting application to a Standard application.
• Converting a Standard or Reporting Application to an Enterprise ApplicationLearn about converting an application in this topic.
• Conversion Considerations
• Removing an ApplicationProceed with caution when removing an application.
• Setting the Daily Maintenance Process Start TimeUnderstand how to determine and set the most convenient time to start the hour-longdaily maintenance process.
• Uploading and Downloading Files Using the Inbox/Outbox ExplorerUse the Inbox/Outbox Explorer to upload files to the server or download them to yourcomputer.
4-1
Application OverviewStart here to learn about managing applications, dimensions, and dimensionmembers.
An application is a related set of dimensions and dimension members used to meet aset of business process needs. Each application has its own accounts, entities,scenarios, and other data elements.
After an application is created, you can view and manage it using the applicationconsole. To view the application console, click Application, and then click Overview.
The application console shows the application properties (including the applicationtype) and application statistics, such as the number of tasks, plans, rules, andapproval hierarchies in your application. It also lists the cubes (for Standardapplications) and dimensions (for Reporting applications) used by the application.
• To view the application overview, click Overview.
• To manage cubes, click Cubes. See Managing Cubes.
• To manage dimensions, click Dimensions. See Managing Dimensions.
• To view activity reports, click Activity. See Viewing Activity Reports.
Refreshing the ApplicationRefresh the application whenever you make changes to the application structure.
Changes you've made to the application are not reflected to users performing dataentry and approvals tasks until you refresh the application. For example, if you modifyproperties of a dimension member, or add a member, or change access permissions,users will not see the updates you've made until you refresh the application.
To refresh the application:
1. Click Application, and then click Overview.
2. Click Refresh.
Note:
The application is automatically refreshed during an application update.Information about the refresh is captured in a job called Content Update. Toview the progress and details of the content update process, use the Jobsconsole, which you can access by clicking Jobs in the Application cluster inthe Home page. See Viewing Pending Jobs and Recent Activity in this guidefor information on how to view jobs, and Setting Content Update Start Timein Getting Started with Oracle Enterprise Performance Management Cloudfor Administrators for information about setting the Content Update start time.
Chapter 4Application Overview
4-2
Managing CubesRelated Topics
• Viewing and Managing Cubes
• Adding Cubes
• Clearing Cubes
• Improving Cube Performance
Viewing and Managing CubesTo view and manage cubes:
1. Click Application, and then click Overview.
2. Click Cubes.
3. Perform one task:
• To view the details of a cube, click the name of the cube that you want to view.
• To add a cube, click Create, then complete the cube details, and then click Done.
For cube details, see Adding Cubes.
Note:
You can rename a cube only during application creation. After a cube is added,you can't rename or delete it.
Adding CubesYou can add up to seven total cubes—three block storage cubes and three correspondingaggregate storage cubes plus one consolidating aggregate storage cube, each with a uniqueaggregate storage application name.
After a cube is added, it behaves like any other application cube. If the cube maps to anaggregate storage database, then aggregate storage limitations apply.
Note:
For an aggregate storage cube, you must specify an application name to containthe database since an aggregate storage database must reside in its ownapplication.
Chapter 4Managing Cubes
4-3
Clearing CubesRelated Topics
• About Clearing Cubes
• Creating Clear Cube Jobs
• Starting and Deleting Clear Cube Jobs
• Scheduling Clear Cube Jobs
About Clearing CubesThe application enables you to clear specific data within input and reporting cubes.You can start the Clear Cube job right away or schedule it to run later.
Note:
The Clear Cube job deletes the data you specify within input and reportingcubes, but it doesn't delete the cube definition in the application's relationaltables.
Creating Clear Cube JobsTo create a Clear Cube job:
1. Click Application, and then click Overview.
2. Click Actions, and then Clear Cube.
3. On the Clear Cube page, click Create, complete the job name, select the cube,then select a clear option:
• Clear All—For both block storage and aggregate storage cubes, delete alldata within a cube that is associated with the entities you select:
– Supporting Details
– Comments
– Attachments
– Essbase Data
• For block storage cubes only:
– Upper-level blocks—Delete data in upper-level blocks
– Non-input blocks—Delete data in non-input blocks
– Dynamic blocks—Delete data in dynamic blocks
– Empty blocks—Delete blocks with #MISSING values
• For aggregate storage cubes only:
– All Aggregations—Delete all aggregate views
Chapter 4Managing Cubes
4-4
– Partial Data (Basic Mode)—Clear the data in the specified region. You can
select the point of view using the member selector .
* Supporting Details
* Comments
* Attachments
* Essbase Data Logical—In which the input cells in the specified region arewritten to a new data slice with negative, compensating values that result in avalue of zero for the cells you want to clear. The process for logically clearingdata completes in a length of time that is proportional to the size of the databeing cleared. Because compensating cells are created, this optionincreases the size of the database.
* Essbase Data Physical—In which the input cells in the specified region arephysically removed from the aggregate storage database. The process forphysically clearing data completes in a length of time that is proportional tothe size of the input data, not the size of the data being cleared. Therefore,you might typically use this method only when you need to remove largeslices of data.
– Partial Data (Advanced Mode)—Clear Essbase data only by using an MDXexpression in the text box provided.
* Essbase Data Logical—In which the input cells in the specified region arewritten to a new data slice with negative, compensating values that result in avalue of zero for the cells you want to clear. The process for logically clearingdata completes in a length of time that is proportional to the size of the databeing cleared. Because compensating cells are created, this optionincreases the size of the database.
* Essbase Data Physical—In which the input cells in the specified region arephysically removed from the aggregate storage database. The process forphysically clearing data completes in a length of time that is proportional tothe size of the input data, not the size of the data being cleared. Therefore,you might typically use this method only when you need to remove largeslices of data.
4. Click Save and Close.
5. To view the job on the Clear Cube listing page, click Refresh.
To start the Clear Cube job right away or to delete a job, see Starting and Deleting ClearCube Jobs.
To schedule a Clear Cube job to run immediately, later, or at intervals, go to the Jobs page.See Scheduling Jobs .
Starting and Deleting Clear Cube JobsTo start a Clear Cube job right away or to delete a job:
1. Click Application, and then click Overview.
2. Click Actions, and then Clear Cube.
3. On the Clear Cube listing page, click next to the Clear Cube job that you want tostart or delete, and then select one of the following options:
• Click Submit to start the job right away.
Chapter 4Managing Cubes
4-5
• Click Delete to delete the job.
Scheduling Clear Cube JobsYou can schedule a Clear Cube job to run later or at intervals. To schedule a ClearCube job, go to the Jobs page. See Scheduling Jobs.
Improving Cube PerformanceThe application enables you to schedule jobs that improve cube performance. Thesejobs include:
• Restructure Cube—Performs a full restructure of a block storage cube toeliminate or reduce fragmentation. This will also remove empty blocks. Runningthis job won't push any changes from the business process to Essbase.
• Compact Outline—Compacts the outline file of an aggregate storage cube.Compaction helps keep the outline file at an optimal size. Compacting the outlinedoesn't clear the data. Running this job won't push any changes from the businessprocess to Essbase.
• Merge Data Slices—Merges incremental data slices of an aggregate storagecube. Fewer slices improve a cube’s performance. You can merge all incrementaldata slices into the main database slice or merge all incremental data slices into asingle data slice without changing the main database slice. You can optionallyremove cells that have a value of zero.
• Optimize Aggregation—Generates optimized views based on collected querytracking information in an aggregate storage cube. This job has two actions:
– Enable Query Tracking—Records a meaningful set of queries, and then usesthe recorded query data to select the most appropriate set of aggregate viewsto materialize for that database. You must enable query tracking and allow itsufficient time to collect data before executing the aggregation process basedon query data.
Once enabled, query tracking continues until query tracking is disabled, thecube is reloaded or refreshed, the outline is compacted, the application is shutdown, or additional aggregate views are materialized for the database. Querytracking does not resume automatically after these actions occur.
Note:
The following actions clear the stored query tracking informationfrom the aggregate storage cube, but they do not disable querytracking:
* Merging incremental data slices
* Clearing data
* Clearing existing aggregations
* Clearing partial data
* Loading data into the aggregate storage cube
Chapter 4Managing Cubes
4-6
– Execute Aggregation Process—Calculates aggregations for aggregate storagedatabases that contain data and to which you are granted Calculation permission. Toperform an aggregation, you use system recommended views. The selection of viewsand aggregation processes are combined into one, non-configurable operationperformed by the server. You can optionally specify the maximum disk space for theresulting files, base the view selection on user querying patterns, and include rolluphierarchies in the view selection. Select one or more of the following options:
* Based on query data?—Aggregate the views the server selects, based oncollected user querying patterns. This option is only available if query tracking isturned on.
* Include rollup option?—Include secondary hierarchies (with default levelusage) in the view selection process.
* Include growth size option?—Aggregate the views the server selects, until themaximum growth of the aggregated database exceeds limits you specify. Enterthe size (in ratio) beyond which the server should stop the aggregation.
You can start the jobs right away or schedule them to run later.
Note:
Users can stay logged in during these actions.
To create a job that improves cube performance, see Scheduling Jobs.
Managing DimensionsStart here to learn how to manage dimensions and dimension members.
Dimensions categorize data values.
Dimensions on the Dimensions page are listed in order of precedence. The order ofdimensions is critical for the structure and performance of an application. The order of yourdimensions determines how your data calculations will perform. Evaluation Order enablesyou to specify which data type prevails when a data intersection has conflicting data types.For example, if Account members are set to the Currency data type, and Product membersare set to the Smart List data type, you can set whether the Currency or Smart List data typeprevails at an intersection.
Note:
For a Smart List to be viewable in forms, the dimension to which the Smart List typemember belongs must be first in the evaluation order. See Working with SmartLists.
To manage dimensions:
1. Click Application, click Overview, and then click Dimensions.
2. Perform a task:
Chapter 4Managing Dimensions
4-7

• To filter the dimensions by cube, see Filtering the Dimension View by Cube.
• To view and edit the properties of dimensions and their members, click thename of the dimension. See Editing Dimensions in the Simplified DimensionEditor.
• To reorder the dimensions, click the up or down arrow in the Order columnnext to the dimension that you want to move.
• To set a different evaluation order, click the Evaluation Order field next to thedimension that you want to update.
• To rename a dimension, click the name of the dimension that you want torename, select the Edit Dimension Properties tab, and then enter a newname in the Dimension field. See Editing Dimension Properties in theSimplified Dimension Editor.
• To create a dimension, click Create. See Creating Dimensions.
• To import metadata, click Import. See Importing Metadata.
• To export metadata, click Export. See Exporting Metadata.
Filtering the Dimension View by CubeFor a Standard application, you can filter the dimension view by cube. When youselect a cube, only dimensions used in that cube are displayed.
To filter the dimension view by cube:
1. Click Application, click Overview, and then click Dimensions.
2. Click the down arrow to the right of Cube to filter the list of dimensions by cube.
By default, the application displays all cubes for a standard application. If thedimension list is filtered, the application displays only the dimensions used in theselected cube.
Filtering by cube (rather than viewing all cubes) also enables you to view these detailsabout a dimension:
• Order of precedence
• Dimension density
Note:
The Dense column is hidden for applications that contain only ASOcubes. If an application contains a BSO cube or a BSO and an ASOcube, the Dense column displays for both cubes.
• Evaluation order
For information about editing dimensions, see Editing Dimensions in the SimplifiedDimension Editor.
Creating DimensionsCreating a dimension adds it to the list of dimensions in the dimension view.
Chapter 4Managing Dimensions
4-8
To create a dimension:
1. Click Application, click Overview, and then click Dimensions.
2. Click Create.
3. On the Create Dimension page, enter or select values for the properties that aredisplayed.
For descriptions of the properties, see Editing Member Properties in the SimplifiedDimension Editor.
For information about editing dimensions, see Editing Dimensions in the SimplifiedDimension Editor.
Setting User PreferencesService Administrators specify defaults for the current application. However, users canoverride these application defaults by setting preferences to control many aspects of theapplication, such as their profile photo and how numbers display in the application.
To learn more about user preferences options, see Setting Your Preferences in Working withPlanning .
Administering VariablesRelated Topics
• Working with Substitution Variables
• Working with User Variables
Working with Substitution VariablesRelated Topics
• About Substitution Variables
• Creating and Assigning Values to Substitution Variables
• Deleting Substitution Variables
About Substitution VariablesSubstitution variables act as global placeholders for information that changes regularly. Forexample, you could set the current month member to the substitution variable CurMnth so thatwhen the month changes, you need not update the month value manually in the form or thereport script. You create and assign values to substitution variables within the application.These substitution variables are then available in the application when you select membersfor a form.
For more information about selecting substitution variables, see Selecting SubstitutionVariables as Members.
Chapter 4Setting User Preferences
4-9
Note:
If you migrated an application that uses Global variables, you can view, butnot edit, them in the application.
Creating and Assigning Values to Substitution VariablesTo create a substitution variable and assign values to it:
1. From the Home page, click Tools, and then click Variables.
2. Select the Substitution Variables tab.
3. Click .
A new variable is added to the bottom of the list.
4. Scroll to the bottom of the list, click the down arrow next to the Cube name for thenewly added variable, and then select the cube.
5. For Name, enter the name of the substitution variable (up to 80 characters).
6. For Value, enter a value for the substitution variable (up to 255 characters).
Note:
• You can specify a range of values when defining substitutionvariables; for example, FY16:FY18.
You can define a substitution variable range for base members andparent members. For base members, you can use a single colon (:)or a double colon (::) as delimiters; for example, SunEnT 110::111.However for parent members, you can only use a single colon (:).
• If the substitution variable will be used in data export job definitionsfor block storage cubes and the member name is numeric only, themember name must be placed in double quotation marks in theValue field; for example, "1100" or "000". The double quotationmarks aren't necessary for alphanumeric member names; forexample, a1110. However if this variable will be selected in dataexport job definitions for aggregate storage cubes, you can't placethe member name in double quotation marks in the Value field.Therefore if you need to use the same member name in substitutionvariables for data export jobs defined for both types of cubes, youmust define two different substitution variables; one with quotes andone without
7. Click Save.
Deleting Substitution VariablesTo delete substitution variables:
Chapter 4Administering Variables
4-10
1. From the Home page, click Tools, and then click Variables.
2. Select the Substitution Variables tab.
3. Next to the substitution variable you want to delete, click .
4. To confirm deletion, click Yes.
Working with User VariablesRelated Topics
• About User Variables
• Creating User Variables
• Managing User Variables
• Setting Limits for User Variables on Forms
• Deleting User Variables
About User VariablesUser variables act as filters in forms, enabling users to focus only on certain members, suchas a department. Before you can associate a user variable with a form, you must create theuser variable. When you create forms with user variables, users must first select values inpreferences for the variable before opening forms. Afterward, users can change the variableon the form only if it's a dynamic user variable. Otherwise, they must continue to set thevariable in preferences. For example, if you create a user variable called Division, users mustselect a division before working in the form.
Tip:
Attributes are another way to filter forms. But instead of explicitly filtering by anattribute (like Red), you can create a user variable for the attribute dimension, andthen use the user variable as the filter. Then you can enable the user variable as adynamic user variable which allows users to change the value of the filter atruntime. This is a useful technique that allows for dynamic filtering.
The first time users select a variable for a form, they must do so in preferences. After that,they can update the variable in preferences or in the form. For information about selectinguser variables as members, see Selecting User Variables as Members.
Creating User VariablesTo create user variables:
1. From the Home page, click Tools, and then click Variables.
2. Select the User Variables tab.
3. Click .
A new variable is added to the bottom of the list.
Chapter 4Administering Variables
4-11
4. Scroll to the bottom of the list and click the down arrow next to the Dimensionname for the newly added variable. For Select Dimension, select the dimensionfor which to create a user variable (including attribute dimensions).
5. In the User Variable Name column, enter the name of the user variable.
6. Click to select dimension members.
Note:
The Use Context setting means the value can't be chosen by the userfrom user preferences. Instead, the value is passed from another formbased on its Point of View context and the value will change dynamicallybased on the context of the form. However if the user variable is usedelsewhere, such as in rows and columns, you must create a differentuser variable so the user can set its own value for it because it won’t beset dynamically.
7. Click OK.
You can now associate the user variable with a form. See Selecting User Variablesas Members. You can also set limits for user variables on forms. See SettingLimits for User Variables on Forms.
Afterward, users can select members for the user variable. See Working withPlanning .
Managing User VariablesYou can set user variables to limit the number of members displayed on a form,helping users focus on certain members. For example, if you create a user variablecalled Division for the Entity dimension, users can select a member for their owndivision. You can create any number of user variables for each dimension (includingattribute dimensions), and select user variables for any axis in the form. See DefiningForm Page and Point of View.
The typical sequence of steps:
1. If necessary, create the appropriate parent-level members in the dimensionoutline.
2. Define user variables for each dimension you want users to be able to filter(including attribute dimensions).
See Creating User Variables.
3. When designing the form, associate the user variable with the form.
See Selecting User Variables as Members.
4. Instruct users to select a member for the user variable associated with the form.
Before users can open forms that have user variables, they must select a memberfor User Variable Options in preferences. After selecting an initial value, they canchange it in the form or in preferences. See Working with Planning .
Chapter 4Administering Variables
4-12
Setting Limits for User Variables on FormsYou can limit which members users can see or select on individual forms by limiting theirmember selections for a user variable. The user variable limit applies the restriction to allusers at the form level, regardless of their access permissions. In addition to setting the limitsby members, Service Administrators can select limits by function (for example,"IChildren(Existing Employees)".
To set up user variable limits:
1. During form design, select Enable Dynamic User Variables to allow dynamic uservariables in the form.
See Setting Form Precision and Other Options.
2. Create a user variable.
See Creating User Variables.
3. In the User Variable Definition field on the Variables page under the User Variables
tab, click , and add or remove members to set limits.
To select members by function, click and select from the available options.
4. In the form designer, assign the user variable to the page axis.
See Defining Form Page and Point of View.
Deleting User VariablesYou can delete user variables if they are not associated with a form. If you attempt to delete auser variable that is used in a form, you'll see an error message saying it cannot be deleted.The message will also provide the names of the forms where the user variable is used.
To delete user variables not associated with forms:
1. From the Home page, click Tools, and then click Variables.
2. Select the User Variables tab.
3. Next to the user variable you want to delete, click .
4. To confirm deletion, click Yes.
Viewing Activity ReportsMonitor user activities with activity reports.
The Activity Report enables Service Administrators to understand application usage. It alsohelps streamline application design by identifying user requests, calculation scripts, forms,reports, and so on. Two versions of the report; an HTML version and a JSON version, areavailable.
Oracle Enterprise Performance Management Cloud retains Activity Reports for the last 60days only. Oracle recommends that you download and create backup copies on a localcomputer to analyze them for historical trends.
The Activity Report is automatically generated in these situations:
Chapter 4Viewing Activity Reports
4-13
• Every day during daily maintenance of the service
• Each time you submit a Provide Feedback submission
• Every time you execute the resetService EPM Automate command to restart anenvironment.
For details about the information that is provided in activity reports, see Activity ReportContents in Getting Started with Oracle Enterprise Performance Management Cloudfor Administrators.
To view activity reports:
1. Click Application, and then click Overview.
2. Click Activity Reports.
3. To view the report details, click View next to the name of the report that you wantto view.
Importing and Exporting Data and MetadataRelated Topics
• Importing MetadataYou can import metadata from a flat file in a comma-delimited, tab-delimited, orother format.
• Exporting MetadataYou can export metadata to a flat file in a .csv (comma-delimited) or .txt (tab-delimited or other delimiter character) format.
• Importing and Exporting Data
Importing MetadataYou can import metadata from a flat file in a comma-delimited, tab-delimited, or otherformat.
These artifacts are supported in the imports:
• Dimensions
• Smart Lists
• Exchange rate tables
To import metadata, perform these tasks:
• Create an import file for each artifact that you want to import. See Creating theMetadata Import File.
• Load the import file or files (you can import multiple dimension files at the sametime). See Loading the Metadata Import File.
Chapter 4Importing and Exporting Data and Metadata
4-14
Note:
• You cannot rename members of attribute dimensions during a metadata import.Renaming of members will be ignored.
• You cannot delete attribute dimensions while importing metadata.
Videos
Your Goal Watch This Video
Learn how to import metadata. Importing Metadata in Oracle Planning and
Budgeting Cloud
Creating the Metadata Import FileRelated Topics
• About the Metadata Import File
• Example Entity Dimension Import File
• Other Supported Delimiter Characters
About the Metadata Import FileBefore you begin loading, you must create an import file for each artifact you want to import(dimensions, smart lists, and exchange rate tables). The import file must contain a headerrecord, and then below the header record, a list of metadata records that you want to importor update. The file format can be .csv (comma-delimited) or .txt (tab-delimited or otherdelimiter characters).
1. A header record, the first line in the file:
• Lists the dimension and any member properties used by subsequent metadatarecords; the header record and subsequent records don't need to include allproperties; properties that are not included are inherited from the correspondingparent's default property value
• Is case sensitive
• Can list properties in any order, as long as the subsequent metadata records are inthe same order
• Can use comma or tab delimiters. Other delimiter characters can be used if they aresupported and the same delimiter character is used throughout the file. For a list ofsupported delimiter characters and exceptions, see Other Supported DelimiterCharacters.
2. After the header record, a list of metadata records that you want to import or update.Each metadata record contains a delimited list (comma, tab, or other) of property valuesthat matches the order designated in the header record. A metadata record can skip aproperty that is specified in the header record; in this case, the default property isassumed.
Chapter 4Importing and Exporting Data and Metadata
4-15
Note:
Only characters that are included in the UTF-8 character set are supported inimport or export files. Characters that aren't included in the UTF-8 characterset are considered invalid. For dimension name restrictions, see NamingRestrictions for Dimensions, Members, and Aliases.
For an example import file, see Example Entity Dimension Import File.
Example Entity Dimension Import File
In this example, the import file loads an Entity dimension with the required headerrecord and three data records. This example is comma-delimited. The header recordspecifies the member to be imported (Entity), the parent member (Parent) into which toimport the member, and the Data Storage property to assign to the member.
Entity, Parent, Data Storagee1, Entity,e2, ,e1, e2, Shared
Using this import file would result in this outline, assuming that no other membersexist:
Entitye1e2 e1(Shared)
The first data record (e1, Entity) imports Entity member e1 as a child under the rootmember Entity. Unspecified values assume the default. For example, if data storageisn't specified, it assumes the default value, Never Share. The next data record (e2, ,)imports Entity member e2 under the dimension root member because no parent isspecified, and sets data storage to Never Share. The last data record (e1, e2,Shared) imports a shared member of e1 under member e2, and sets data storage toShared.
Chapter 4Importing and Exporting Data and Metadata
4-16
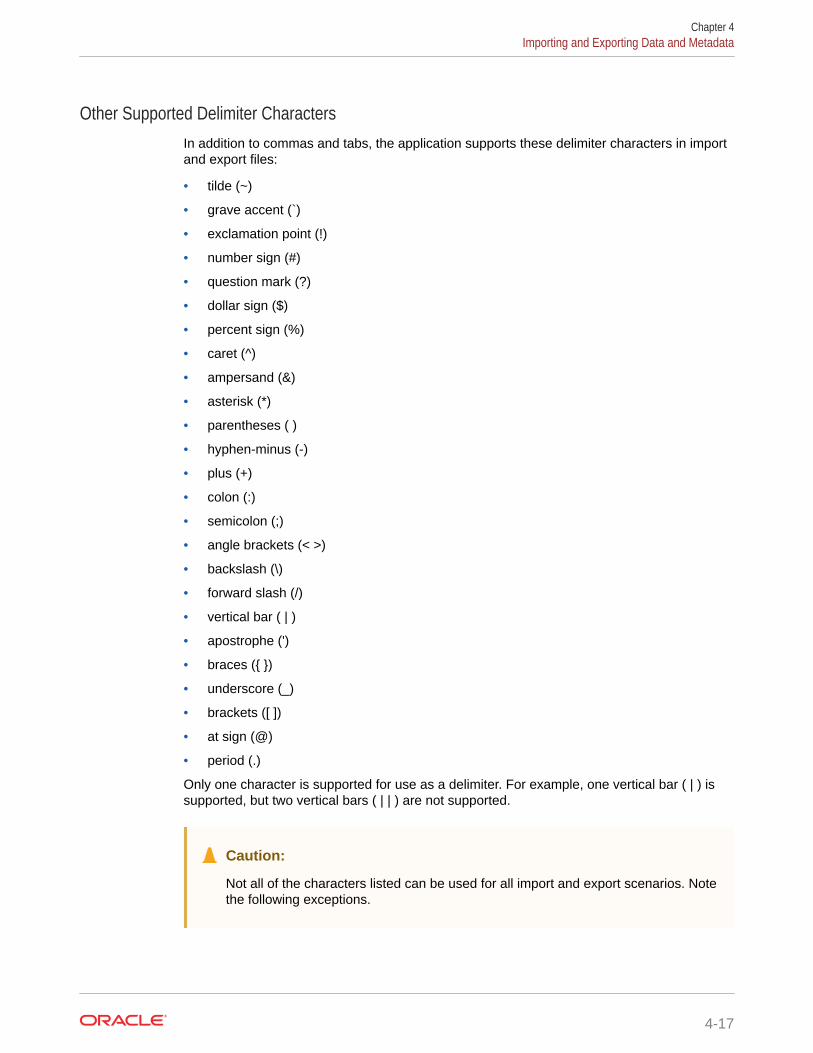
Other Supported Delimiter CharactersIn addition to commas and tabs, the application supports these delimiter characters in importand export files:
• tilde (~)
• grave accent (`)
• exclamation point (!)
• number sign (#)
• question mark (?)
• dollar sign ($)
• percent sign (%)
• caret (^)
• ampersand (&)
• asterisk (*)
• parentheses ( )
• hyphen-minus (-)
• plus (+)
• colon (:)
• semicolon (;)
• angle brackets (< >)
• backslash (\)
• forward slash (/)
• vertical bar ( | )
• apostrophe (')
• braces ({ })
• underscore (_)
• brackets ([ ])
• at sign (@)
• period (.)
Only one character is supported for use as a delimiter. For example, one vertical bar ( | ) issupported, but two vertical bars ( | | ) are not supported.
Caution:
Not all of the characters listed can be used for all import and export scenarios. Notethe following exceptions.
Chapter 4Importing and Exporting Data and Metadata
4-17
Import and Export Metadata Delimiter Exceptions
Don't use these delimiter characters in metadata import and export files.
Table 4-1 Import and Export Metadata Delimiter Exceptions
Delimiter Character Reason for Exception
double quotation mark ("") Creates an empty fileplus (+)minus (-)forward slash (/)percent sign (%)
Causes an error if the metadata import filecontains consolidation properties that usethese characters
angle brackets (< >) Causes an error if a property uses the value<none>
Note:
Any character that conflicts with a character in a member name will cause anerror.
Import and Export Data Delimiter Exceptions
Table 4-2 Import and Export Data Delimiter Exceptions
Delimiter Character Reason for Exception
apostrophe (') Causes an error if used in a cube nameparentheses ( ) Causes an error if used in a data import filedouble quotation mark ("") Creates an empty filehyphen-minus (-) Causes an error if used in a data import file
Loading the Metadata Import FileTo load the metadata import file:
1. Create a metadata import file for each artifact (dimensions, smart lists, andexchange rate tables) that you want to import. See Creating the Metadata ImportFile.
2. Click Application, and then click Overview.
3. Click Dimensions, and then click Import.
4. On the Import Metadata page, click Create.
5. Select the location of the metadata import file or files:
• Local—Loads the import file or files from a location on your computer. ForImport File, click Browse to select the import file on your computer for theartifact you're importing.
Chapter 4Importing and Exporting Data and Metadata
4-18
• Inbox—Loads the import file or files from the server. Enter the name of the file inImport File. See Uploading and Downloading Files Using the Inbox/Outbox Explorer.
6. For File Type, select Comma delimited, Tab delimited, or Other.
If Other is selected, enter the delimiter character that is used in the import file. For a listof supported delimiter characters and exceptions, see Other Supported DelimiterCharacters.
7. Select Clear Members to delete members not explicitly specified in the load file beforeperforming the import.
Note:
• Any member not specified is deleted from the application outline afterimporting the dimension unless it's an ancestor of a member that wasspecified, or it's a base member of a shared member that was specified.
• If Clear Members isn't selected, the import will only add or update existingmembers. Oracle recommends loading the metadata file without selectingClear Members to make sure the file loads successfully. Then, select ClearMembers and execute the import again
• Clear Members is unavailable in certain dimensions where members mustexist and are critical to the application. Currently, these dimensions areCurrency, Period, Scenario, Version, and Years.
• Members that can't be deleted in the dimension editor for any reason (forexample, because they're used in a form or in a validation rule) won't bedeleted.
8. Optional: If the location selected is Inbox, click Save as Job to save the importoperation as a job, which you can schedule to run right away or at a later time. You can'tselect this option if Local is selected. See Managing Jobs.
Note:
• Saving an import operation as a job is useful to batch a load sequence; forexample, import metadata, then import data, then run rules when the dataload is complete.
• You can run up to five import jobs at one time.
• If you want to review the data that was rejected during the metadata importjob, you can specify an Error File on the Save as Job dialog. This file willprovide information about the metadata records that were not imported foreach dimension. If an error zip file is specified, a separate error file iscreated for each dimension, then the error files are zipped together, and thezip file is stored in the Outbox where you can download the file using Inbox/Outbox Explorer. See Uploading and Downloading Files Using the Inbox/Outbox Explorer.
9. Optional: If the location selected is Local, click Validate to test whether the import fileformat is correct.
Chapter 4Importing and Exporting Data and Metadata
4-19
10. Click Import to run the import operation.
If the cubes listed in the import file don't match the cube names in the application, theapplication will ignore unrecognized cube columns.
If the import fails, a Failed status will display in the Last Validate/Import column. ClickFailed to view the detailed status. If the import is successful, a Completed status willdisplay in the Last Validate/Import column. To view details about the successfulimport, click Completed, and then in the Show drop-down, select All.
Exporting MetadataYou can export metadata to a flat file in a .csv (comma-delimited) or .txt (tab-delimitedor other delimiter character) format.
These artifacts are supported in the exports:
• Dimensions
• Smart Lists
• Exchange rates
The application creates an export file for each artifact (.txt or .csv, depending on thefile type), and all export files are consolidated into one zip file. You must extractthe .csv or .txt files from the zip file if you want to use the files as import files (forexample, when importing into another application).
Note:
Only characters that are included in the UTF-8 character set are supported inexport or import files. Characters that aren't included in the UTF-8 characterset are considered invalid. For dimension name restrictions, see NamingRestrictions for Dimensions, Members, and Aliases.
Videos
Your Goal Watch This Video
Learn how to export metadata. Exporting Metadata in Oracle Planning
and Budgeting Cloud
To export metadata to a flat file:
1. Click Application, and then click Overview.
2. Click Dimensions, and then click Export.
3. On the Export Metadata page, click Create.
4. Select the target environment of the export file:
• Local—Saves the export file to a location on your local computer.
• Outbox—Saves the export file to the server where you can use it to schedulethe export job. See Uploading and Downloading Files Using the Inbox/OutboxExplorer.
Chapter 4Importing and Exporting Data and Metadata
4-20
Note:
– You can run up to five export jobs at one time.
– When scheduling export jobs, you can specify a unique output filename for each job.
– For more information about scheduling jobs, see Managing Jobs.
5. Select the artifact or artifacts to export.
6. Select an option:
• Comma delimited—Creates a comma-delimited .csv file for each artifact.
• Tab delimited—Creates a tab-delimited .txt file for each artifact.
• Other—Creates a .txt file for each artifact. Enter the delimiter character that you wantto use in the export file. For a list of supported delimiter characters and exceptions,see Other Supported Delimiter Characters.
7. Click Export, and then specify where to save the export file.
Importing and Exporting DataAfter the dimensions are imported, you can populate the application data. You can't do adirect data load. You must import data from a file.
Videos
Your Goal Watch This Video
Learn how to export and import data in Planning. Exporting and Importing Data in Oracle
Planning and Budgeting Cloud
Related Topics
• Importing Data
• Driver Member Casting Errors
• Exporting Data
• Viewing Data Import and Export Status
Importing DataAfter the dimensions are imported, you can populate the application with data from a dataimport file.
Chapter 4Importing and Exporting Data and Metadata
4-21
Note:
When importing data, no validation is performed on intersections todetermine which are valid, and data is loaded to all intersections. To reviewdata that has been loaded into invalid intersections, run the InvalidIntersection report before importing data to see and clear invalidintersections. See Working With Invalid Intersection Reports.
To import data:
1. Click Application, and then click Overview.
2. Click Actions, and then click Import Data.
3. Click Create.
4. Select the location of the data import file:
• Local—Imports the data import file from a location on your computer.
• Inbox—Imports the data import file from the server. See Uploading andDownloading Files Using the Inbox/Outbox Explorer.
Note:
Valid data import file types are .csv, .txt, or .zip.
5. Select the Source Type of the data import file:
• Default—Select this source type to load data in a business process-specificdata file format. If you select this option, you must choose between Commadelimited, Tab delimited, or Other.
Note:
– If an import error occurs during a business process-specific dataload, the import will continue to load valid data (partial load). Anyerrors will be noted in the import and export status. See ViewingData Import and Export Status.
– For a list of supported delimiter characters and exceptions, see Other Supported Delimiter Characters.
– If data is exported to a file in a business process-specific format,you can use Notepad to change the database name in the file;for example, ASOCube, and then import the data file into theaggregate storage outline (provided all dimensions exist in theaggregate storage outline).
• Essbase—Select this source type to load data in an Essbase data file format.If you select this option, you must choose a cube.
Chapter 4Importing and Exporting Data and Metadata
4-22
For Delimiter, specify the delimiter for the Essbase data; options are Space or Tab.
Note:
Stop In Case of Error is selected by default. If this option is selected andany import errors occur during an Essbase data load, the import will quitand no data will be loaded. If this option is cleared, data will continue toload even if there are errors.
6. Enter or select the source file:
• If you selected Local, click Browse to navigate to the source file.
• If you selected Inbox, enter the name of the file in Source File.
7. Optional: Clear Include Metadata to improve data import performance and to preventmembers from changing position in the outline during data import. Regardless of thisoption setting, the required metadata must already exist in the business process and inthe Essbase outline before you can load the application data.
8. Click Save as Job to save the import operation as a job, which you can schedule to runlater.
Note:
• Save as Job is available only when Inbox is selected.
• Saving an import operation as a job is useful to batch a load sequence, forexample, import metadata, then import data, then run rules when the dataload is complete. See Managing Jobs.
• You can run up to five import jobs at one time.
• If you want to review the data that was rejected during the data import job,you can specify an Error File on the Save as Job dialog. This file willprovide information about the data records that were not imported. If anerror zip file is specified, the zip file is stored in the Outbox where you candownload the file using Inbox/Outbox Explorer. See Uploading andDownloading Files Using the Inbox/Outbox Explorer.
9. Optional: Click Validate to test whether the import file format is correct.
10. Click Import to run the import operation.
Chapter 4Importing and Exporting Data and Metadata
4-23
Note:
There is no import option in this business process to clear data beforeimport. Therefore, the import will not overwrite existing data values with#MISSING values. However, you can run a clear cube job prior to import, orclear data with a script/rule or using the REST API:
• You can run a Clear Cube job that enables you to clear specific businessprocess data within input and reporting cubes. See Clearing Cubes.
• You can write a business rule that uses the CLEARDATA Essbasecommand to clear specific data values. See CLEARDATA in TechnicalReference for Oracle Analytics Cloud - Essbase .
• You can use the Clear Data Slices REST API to clear business processand Essbase data for a specified region. See "Clear Data Slices" inREST API for Enterprise Performance Management Cloud.
Caution:
If the evaluation order in the application is changed after exporting data, theimport may have unexpected results.
If a value in a data load input file doesn't match the evaluated driver member type; forexample, if the evaluated type of a driver member is "date" and it's corresponding inputvalue isn't a valid date format, a driver member casting error occurs. See DriverMember Casting Errors.
Table 4-3 Videos
Your Goal Watch This Video
Learn the highlights of loading data intoPlanning. Overview: Loading Data in Planning
and Budgeting Cloud
Table 4-4 Tutorials
Your Goal Learn How
Learn how to import and export data inPlanning, including importing exchange ratesinto multicurrency business processes.
Loading Data in Planning
Driver Member Casting ErrorsA driver member casting error occurs when a value in a data load input file doesn'tmatch the evaluated driver member type. Here are some examples of driver membercasting errors:
• If a driver member is of type "Date" and it's corresponding input value isn't a validdate format
Chapter 4Importing and Exporting Data and Metadata
4-24
• If a nonexistent Smart List value is specified for a driver member of type "Smart List"
• If a nonnumeric value is supplied for a member of type "Currency," "Data," or "Percent."
A casting error can occur for each driver member specified in the input file and for everyoccurrence in a data record, so the number of casting errors for a given input record rangesfrom 0 to the number of drivers. Because successful driver member bindings can occur alongwith driver member binding errors, the application will not reject the entire input record, butthe error will be noted in the import and export status. See Viewing Data Import and ExportStatus.
Consider the following data record input file where a bad date value is specified:
Entity, aDate, aSl, aText, aCurr, aPercent, Point-of-View,Data Load Cube Namee1, exampleBadDateValue, sl1, text11, 888, 0.99, "FY15,Current,""BUVersion_1"",Local,u1,Jan",Plan1
Error messages displayed:
• After loading the data, the status window will read:
Outline data store load process finished (Invalid data values were notloaded). 7 data records were read, 7 data records were processed, 7 wereaccepted for loading (verify actual load with Essbase log files), 0 wererejected.
• The error is noted as an error in the import and export status with the following entrydetails:
Category: Data recordRecord Index: 2Message: Unable to load specified data value in Record 2: (aDate:exampleBadDateValue)
• If multiple casting errors occur, each error is recorded in the same error message:
Unable to load specified data values in Record 2: (aSl: aaaaaaasl1),(aPercent: cc), (aDate: exampleBadDateValue), (aCurr: bb)
• If the error message count exceeds the maximum limit, it will issue the followingmessage:
The warning [Unable to load specified data values] message count limit (100)exceeded: no more warnings of this type will be issued.
Exporting DataTo export data to a file:
1. Click Application, and then click Overview.
2. Click Actions, and then click Export Data.
3. Click Create.
4. On the Export Data page, select the target environment of the data export file:
• Local—Saves the data export file to a location on your local computer.
• Outbox—Saves the data export file to the server. See Uploading and DownloadingFiles Using the Inbox/Outbox Explorer.
Chapter 4Importing and Exporting Data and Metadata
4-25
5. Select the cube.
Note:
The driver/column dimension in the Export Data job definition needs tobe dense.
6. Select the file type:
• Comma delimited—Creates a comma-delimited .csv file for each artifact.
• Tab delimited—Creates a tab-delimited .txt file for each artifact.
• Other—Creates a .txt file for each artifact. Enter the delimiter character thatyou want to use in the export file. For a list of supported delimiter charactersand exceptions, see Other Supported Delimiter Characters.
7. For Smart Lists, specify Export Labels or Export Names.
8. For Dynamic Members, select whether to Include or Exclude dynamiccalculation members during export.
Note:
Excluding dynamic members from exported data improves performanceduring data exports.
9. For Decimals, specify the number of decimal positions (0-16) to format the dataafter export, or select the default None to use the default precision formatting. Forexample, specifying a decimal value of 3 in the Decimals field will result in theexported data displaying three digits to the right of the decimal point, whereverapplicable.
Note:
Selecting None formats the decimal number as specified in the defaultprecision settings, whereas selecting 0 formats the data to display awhole number. For example, if the data value you are exporting is123.45678, selecting 0 will export the data as 123 and selecting Nonewill export the data as 123.45678.
10. Select the slice of data to be exported.
Chapter 4Importing and Exporting Data and Metadata
4-26
Note:
If you're exporting data from an aggregate storage cube and you're exportingmultiple members simultaneously, make sure that at least one of the membersyou select is a non-shared member. You can export shared membersindividually because it's equivalent to selecting a base member. However,selecting level 0 descendants of a parent member whose descendants are allshared members is equivalent to not selecting any members from a dimensionand the export will not run. Therefore, you must ensure that one of themembers selected is a non-shared member.
11. Optional: Click Save as Job to save the export operation as a job, which you canschedule to run immediately or at a later time.
Note:
• Save as Job is available only when Outbox is selected.
• You can run up to five export jobs at one time.
• When scheduling export jobs, you can specify a unique output file name foreach job.
• For more information about scheduling jobs, see Managing Jobs.
12. Click Export, and then specify where to save the data export file.
Note:
To reduce the size of data export files, if a form has an entire row of #MISSINGvalues, the row will be omitted from the data export file.
Viewing Data Import and Export StatusTo view the status of a data import and export:
1. Click Application, and then click Jobs.
2. Click the name of the import or export job under Recent Activity.
The status page displays messages for Errors, Warnings, Info, and All. If there are errorsand you specified an error file name while defining the job, you can download the generatederror file using the Error File link.
Importing Exchange Rates for a Simplified MulticurrencyApplication
Import exchange rates for a simplified multiple currency application using a template.
Chapter 4Importing Exchange Rates for a Simplified Multicurrency Application
4-27
To simplify managing exchange rates for a simplified multiple currency application, youcan export the provided template, enter exchange rates in a spreadsheet, and importthe rates to your application. You can import exchange rates right away or schedule anImport Exchange Rates job to run later.
Note:
To view the exchange rates options, the application must have been createdwith the Multicurrency option enabled and the Multicurrency Type must beSimplified. A Currency dimension is then created. If you're unsure whetheryour multicurrency application is simplified, the existence of a Currencydimension will confirm it. See About Simplified Multicurrency in AdministeringPlanning.
To import exchange rates using a template:
1. From the Home page, click Application, and then Overview.
2. From the Actions menu, select Export Exchange Rate Template, and then openExchangeRateTemplate.csv or save it locally.
3. In the template file, enter average and ending currency exchange rates for eachperiod and each currency, specify members for the POV, and then save the file.
Note:
The number 1 represents the exchange rate for the default currency inthe application. Enter rates relative to the default currency.
4. From the Actions menu, select Import Exchange Rates, click Create, browse forthe file, and then click Import.
Note:
You can schedule the import to run as a job that runs right away or at alater time. To schedule an Import Exchange Rates job, select the Inboxoption, point to an import file that is located in the Inbox, and then clickSave as Job. See Scheduling Jobs.
Creating and Refreshing Application DatabasesThings you need to know before you refresh the application database.
Related Topics
• Creating Application Databases
• Before Refreshing the Database
• Refreshing Application Databases
Chapter 4Creating and Refreshing Application Databases
4-28
Creating Application DatabasesThe application database, which stores data for each cube in the application, is created whenthe application is created.
If you need to clear the data, you can do so using Calculation Manager. To refresh the data,see Refreshing Application Databases.
Before Refreshing the DatabaseYou must refresh the database after changing the application structure, and modifyingartifacts such as dimensions and members. Oracle recommends that you notify all users,asking them to save their work and close the application, before you refresh the database.
Before refreshing the database:
• Back up your application and export data from all databases.
• Decide if you want to enable all users or just the current Service Administrator to use theapplication in administration mode during the refresh
• Decide if you want to log off all users
• Terminate any active application requests
Refreshing Application DatabasesTo refresh the database:
1. See Before Refreshing the Database.
2. Click Application, and then click Overview.
3. Click Actions, and then Refresh Database.
4. On the Refresh Database page, click Create, and then select from the following options:
Before Refresh Database
• Enable use of the application for—Lets All users or Administrators (or thecurrent logged in Service Administrator) access the application in administrationmode during the refresh
• Log off all users—Logs off all application users before starting the refresh
• Stop all active requests—Terminates any active requests in the Essbaseapplication before starting the refresh
After Refresh Database
Enable use of the application for—Lets All users or Administrators use theapplication after the refresh
5. To refresh the database now, click Refresh Database. To run the refresh later, as a job,click Save as Job. See Managing Jobs.
Adding an Aggregate Storage Outline to an ApplicationUnderstand what aggregate storage is and how to use it in an application.
Chapter 4Adding an Aggregate Storage Outline to an Application
4-29
Related Topics
• About Aggregate Storage
• Aggregate Storage Outline Cube Characteristics
• Process for Adding an Aggregate Storage Database to an Application
About Aggregate StorageAggregate storage is the database storage model that supports large-scale, sparselydistributed data that is categorized into many, potentially large dimensions. Selecteddata values are aggregated and stored, typically with improvements in aggregationtime. Aggregate storage is an alternative to block storage (dense-sparseconfiguration).
Aggregate Storage Outline Cube Characteristics• The application doesn't generate XREFs on aggregate storage databases. XREFs
can only be generated on block storage databases.
• Dynamic time series members are not applicable for the Period dimension in anaggregate storage application.
• Creating and refreshing security filters are not applicable for aggregate storagedatabases.
Process for Adding an Aggregate Storage Database to an ApplicationTo add an aggregate storage database to an application:
1. Create an aggregate storage cube. Perform one task:
• Create an aggregate storage cube during application creation.
• Add a new cube using the cube editor.
See Managing Cubes.
2. Add dimensions to the aggregate storage cube.
See Editing Dimensions in the Simplified Dimension Editor.
• If a Currency, Years, Scenario, or Version dimension is valid for an aggregatestorage cube, the dimension members are also valid for an aggregate storagecube.
• To perform currency calculations in a simplified multiple currency applicationfor a custom aggregate storage cube, you must enable the Account, Period,and Currency dimensions for the aggregate storage cube. These dimensionsin default aggregate storage cubes are enabled by default, but you mustenable them manually for custom aggregate storage cubes. To enableAccount, Period, and Currency dimensions for custom aggregate storagecubes, edit dimension properties for each dimension and select to enablethem for the aggregate storage cube. See Editing Dimension Properties in theSimplified Dimension Editor.
3. Add dimension members. See Adding Members in the Simplified DimensionEditor.
4. Refresh the outline for the application. See Refreshing Application Databases.
Chapter 4Adding an Aggregate Storage Outline to an Application
4-30
5. Create a form using the dimensions associated with the aggregate storage database.See Administering Forms
Converting to a Standard ApplicationTo increase the number of cubes and use the logic required to support more extensivecalculations, convert a Reporting application to a Standard application.
During conversion, one cube, and the associated dimensions are added to your application.After conversion, you can add up to six additional cubes (three aggregate storage outlinecubes and three block storage outline cubes).
Caution:
Converting an application can't be undone. Be sure you back up your data beforeconverting.
To convert to a Standard application:
1. Click Application, and then click Overview.
2. Click Actions, and then select Convert to Standard.
Converting a Standard or Reporting Application to an EnterpriseApplication
Learn about converting an application in this topic.
• If you purchased EPM Cloud after June 4, 2019, see New EPM Cloud Services in GettingStarted with Oracle Enterprise Performance Management Cloud for Administrators tolearn about migrating an application to the new services.
• If you purchased EPM Cloud before June 4, 2019, you can convert a Standard orReporting application to an Enterprise application.
To convert a Standard or Reporting application:
1. Review the conversion considerations. See Conversion Considerations.
2. Back up the Standard or Reporting application.
3. Open the application, and then click Application , and then Overview
.
4. Click Actions, then Convert to Enterprise, and then Continue to proceed. A messagelets you know if the application is converted to Enterprise. If successful, log off.
Chapter 4Converting to a Standard Application
4-31
The application type is changed to "Enterprise", which includes options to enableand configure the Planning modules, and enables Groovy scripting. Metadata anddata isn't changed during the conversion.
5. Log on and enable features that you need.
These validations are performed when you enable features:
• There can't be a member that already exists with the same name as any of thecustom and base dimensions you specify in Map/Rename Dimensions. Forexample, if you create a custom dimension called Market in Financials, therecan't be a member called Market in any other dimension.
• There can't be a member with the name NO_<<customDimension>>,Total_<Dimension>>, All_<<Dimension>>, where <<Dimension>> isthe actual dimension name you specified. For example, if you rename PlanElement in Financials to Element for a custom dimension, there can't be NoElement, Total Element. This is specific to modules that depend on anynon-prefixed member.
• The data storage for the Period and Account dimensions must be set to NeverShare.
• The Year dimension name must be Years.
• 18 alias tables are predefined. The maximum supported is 32 (1 usedinternally). The conversion process attempts to merge the predefined aliastables with the alias tables in the existing application; if the count goes above30, you get a validation error.
• The conversion process calculates the number of existing dimensions in theapplication and the number of new dimensions that would be created if themodule is initialized. If resulting sum of both is greater than 32 (the maximumallowed), you'll see a validation error.
• For Projects, the name you specify for Program (a custom dimension option)shouldn’t already exist as a non-attribute dimension.
• For Workforce, none of the version members can be Label only.
6. Recreate any user defined navigation flows.
When you convert an on-premises Oracle Hyperion Planning R11.1.2.1 (supportedversion) application to Planning using Migration, the same rules above apply.
Conversion ConsiderationsYou can convert a Standard or Reporting application to an Enterprise application if:
• You are commercially authorized to implement an application of type "Enterprise".
• It does not use weekly, quarterly, or custom time periods.
• You rename the Year dimension to Years prior to converting.
• It uses simplified multicurrency (that is, it's not a standard currency application), ifit's a multicurrency application.
• Artifact names don't use these prefixes:
– oep_—Prefix for common artifacts
– ofs_—Prefix for Financials artifacts
Chapter 4Conversion Considerations
4-32
– owp_—Prefix for Workforce artifacts
– opf_—Prefix for Projects artifacts
– ocx_—Prefix for Capital artifacts
Note that custom navigation flows are not converted. You need to recreate them after youconvert the application.
Removing an ApplicationProceed with caution when removing an application.
Because removing an application will delete all of its contents and any scheduled jobs, makea backup of your application.
To remove an application:
1. Click the Application, then click Overview.
2. Click Actions, and then Remove Application.
Setting the Daily Maintenance Process Start TimeUnderstand how to determine and set the most convenient time to start the hour-long dailymaintenance process.
A business process instance requires one hour every day to perform routine maintenance.Service Administrators can select (and change) the most convenient time to start the hour-long daily maintenance process. In addition to routine maintenance, Oracle applies requiredpatches to the business process instance during the maintenance process.
Because the business process instance isn't available to users during the maintenanceprocess, the Service Administrator should identify a one-hour period when no one uses thebusiness process. Any connected user will be logged off and will lose unsaved data.
The default maintenance start time is midnight Pacific Standard Time (PST). If you don't resetthe default start time for your instance, Oracle resets it to a random time between 10:00 p.m.and 2:00 a.m. PST to reduce the business process maintenance duration.
Note:
If you really want the maintenance time to start at midnight PST, you should select itusing this procedure. In such cases, Oracle will not change your selection.
To manage the automated maintenance window:
1. Access a business process instance.
2. Tap or click Tools and then Daily Maintenance.
3. In Start Time, select the time at which the daily maintenance process should start. Also,select your time zone from the drop-down list.
4. Click Apply.
Chapter 4Removing an Application
4-33
Note:
There is a system setting called Export EPM Cloud Smart List textual dataduring daily maintenance for incremental data import that, depending onif this setting is enabled, could impact the duration of the export. For moreinformation and for recommendations about using this setting, see thefollowing topics:
• Exporting Smart List Textual Data During Daily Maintenance forIncremental Data Import in Oracle Enterprise Performance ManagementCloud Operations Guide
• What Application and System Settings Can I Specify? in AdministeringPlanning
Uploading and Downloading Files Using the Inbox/OutboxExplorer
Use the Inbox/Outbox Explorer to upload files to the server or download them to yourcomputer.
To schedule an import or export job, see Scheduling Jobs.
To upload or download files:
1. Click Application, and then click Overview.
2. Click Actions, and then Inbox/Outbox Explorer.
3. Optional: Filter by name, refresh the listing, and upload files from the server.
4. To upload a file from the server, click Upload. In the Upload File dialog box, clickBrowse, select the file to upload, and then click Upload File.
5. To download a file from the server, select the desired file, then click , and thenclick Download File.
6. Click Close to close the Inbox/Outbox Explorer and return to the Overview tab.
Note:
There is an upload file size limit of 2GB. If your upload file exceeds the sizelimit, either select a smaller file or use EPM Automate to upload the largerfile. For information about EPM Automate, see Working with EPM Automatefor Oracle Enterprise Performance Management Cloud .
Chapter 4Uploading and Downloading Files Using the Inbox/Outbox Explorer
4-34
5Using the Member Selector
Related Topics
• Working with Members
• Making Selections
• Member Relationships
• Using Wildcards in Searches
• Selecting Attribute Values as Members
• Selecting Members for Forms
• Selecting Substitution Variables as Members
• Selecting User Variables as Members
• Selecting UDAs as Members
Working with MembersUse the Select Members dialog box to select the members to use with the following features:
• Business rule runtime prompts
• User variables
• Dynamic variables
• Data export
• Ad hoc grids
• Point of view and page axis where valid intersection rules are applied
• Valid intersections
If variables and attributes are defined, you can select variables and attributes. You candisplay and select members by member name or alias. The display options that you definefor the Member Selection dialog box override those defined as an application default by aService Administrator, and those specified as an application preference.
If drop-down member selectors are defined for row dimensions on a form, you can selectmembers directly from the list, enter data, and add rows to a form. See Entering Data forSuppressed or Excluded Members in Working with Planning .
Making SelectionsOnly members, substitution variables, and attributes to which you have access are displayed.The Selections pane only displays if you invoke the member selector for multiple memberselection.
If valid intersection rules are used, only valid members are displayed in application forms andin runtime prompts for Calculation Manager rules. In ad hoc forms, both on the Web and in
5-1
Oracle Smart View for Office, the application doesn't filter by valid intersections rules inpoint of view and page axis. Only cells in grids honor valid intersection rules in ad hocforms.
To make selections:
1. Click .
2. Optional: Perform these tasks:
• To enter search criteria (member name or alias only), press Enter (from thedesktop) or click Search (on mobile).
Note:
The search isn't case-sensitive. You can search for a word, multiplewords, or wildcard characters. See Using Wildcards in Searches.
• To change display options such as viewing variables and attributes, showingalias names, showing member counts, sorting alphabetically, refreshing the
member list, or clearing selections, click next to Search, and then selectfrom the list of display options.
• To filter the members that are displayed in the member list, under next toSearch, select Add Filter, and then select from the list of filter options.
Note:
Android users can click to view and select filter options.
3. Make selections by clicking a member in the member list.
To understand how related members are selected, see Member Relationships.
Chapter 5Making Selections
5-2
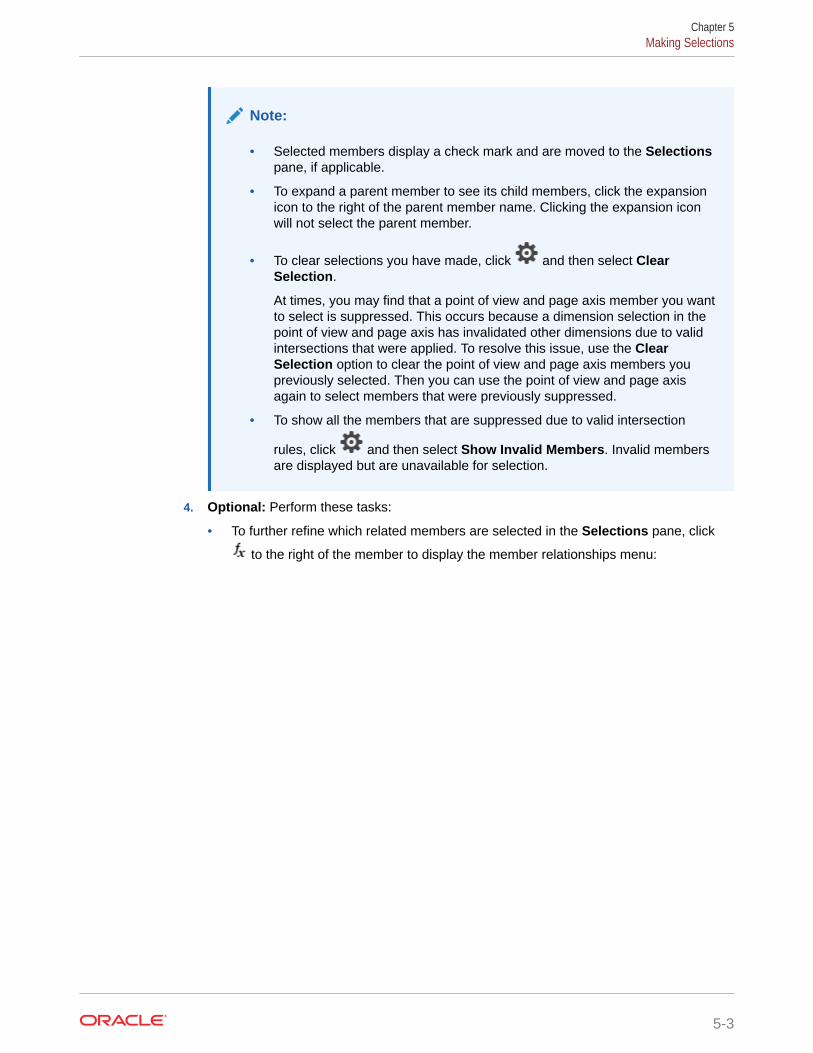
Note:
• Selected members display a check mark and are moved to the Selectionspane, if applicable.
• To expand a parent member to see its child members, click the expansionicon to the right of the parent member name. Clicking the expansion iconwill not select the parent member.
• To clear selections you have made, click and then select ClearSelection.
At times, you may find that a point of view and page axis member you wantto select is suppressed. This occurs because a dimension selection in thepoint of view and page axis has invalidated other dimensions due to validintersections that were applied. To resolve this issue, use the ClearSelection option to clear the point of view and page axis members youpreviously selected. Then you can use the point of view and page axisagain to select members that were previously suppressed.
• To show all the members that are suppressed due to valid intersection
rules, click and then select Show Invalid Members. Invalid membersare displayed but are unavailable for selection.
4. Optional: Perform these tasks:
• To further refine which related members are selected in the Selections pane, click
to the right of the member to display the member relationships menu:
Chapter 5Making Selections
5-3
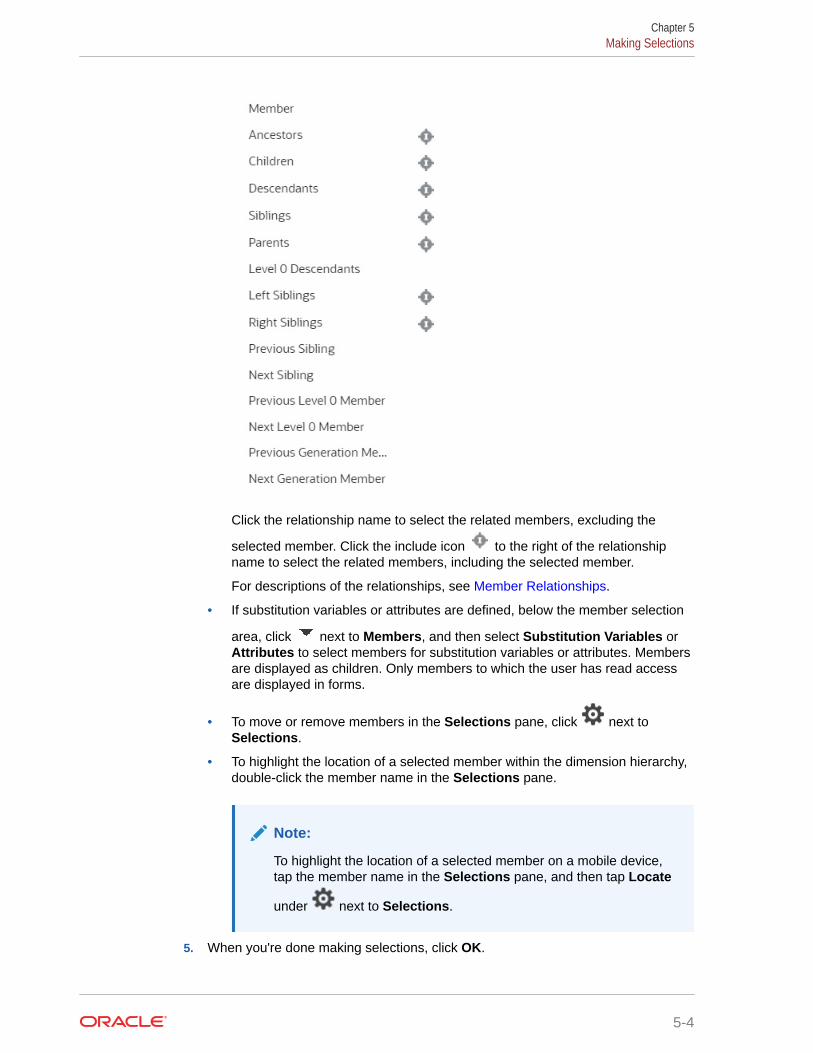
Click the relationship name to select the related members, excluding the
selected member. Click the include icon to the right of the relationshipname to select the related members, including the selected member.
For descriptions of the relationships, see Member Relationships.
• If substitution variables or attributes are defined, below the member selection
area, click next to Members, and then select Substitution Variables orAttributes to select members for substitution variables or attributes. Membersare displayed as children. Only members to which the user has read accessare displayed in forms.
• To move or remove members in the Selections pane, click next toSelections.
• To highlight the location of a selected member within the dimension hierarchy,double-click the member name in the Selections pane.
Note:
To highlight the location of a selected member on a mobile device,tap the member name in the Selections pane, and then tap Locate
under next to Selections.
5. When you're done making selections, click OK.
Chapter 5Making Selections
5-4

Member RelationshipsThis table describes which members and related members are included during memberselection.
Table 5-1 Member Relationships
Relationship Members Included
Member The selected member
Ancestors All members above the selected member,excluding the selected member
Ancestors (inc) The selected member and its ancestors
Children All members in the level immediately below theselected member
Children (inc) The selected member and its children
Descendants All descendants of the selected member,excluding the selected member
Descendants (inc) The selected member and its descendants
Siblings All members from the same level in the hierarchyas the selected member, excluding the selectedmember
Siblings (inc) The selected member and its siblings
Parents The member in the level above the selectedmember
Parents (inc) The selected member and its parent
Level 0 Descendants All descendants of the selected member that haveno children
Left Siblings The members that appear before the selectedmember with the same parent
Left Siblings (inc) The selected member and its left siblings
Right Siblings The members that appear after the selectedmember with the same parent
Right Siblings (inc) The selected member and its right siblings
Previous Sibling The member that appears immediately before theselected member with the same parent
Next Sibling The member that appears immediately after theselected member with the same parent
Previous Level 0 Member The previous level zero member that appearsbefore the selected member
Examples: PrevLvl0Mbr(Jan) returns BegBalance;PrevLvl0Mbr(Jul) returns Jun;PrevLvl0Mbr(BegBalance) returns an empty result
Next Level 0 Member The next level zero member that appears after theselected member
Examples: NextLvl0Mbr(Mar) returns Apr;NextLvl0Mbr(Dec) returns an empty result
Chapter 5Member Relationships
5-5
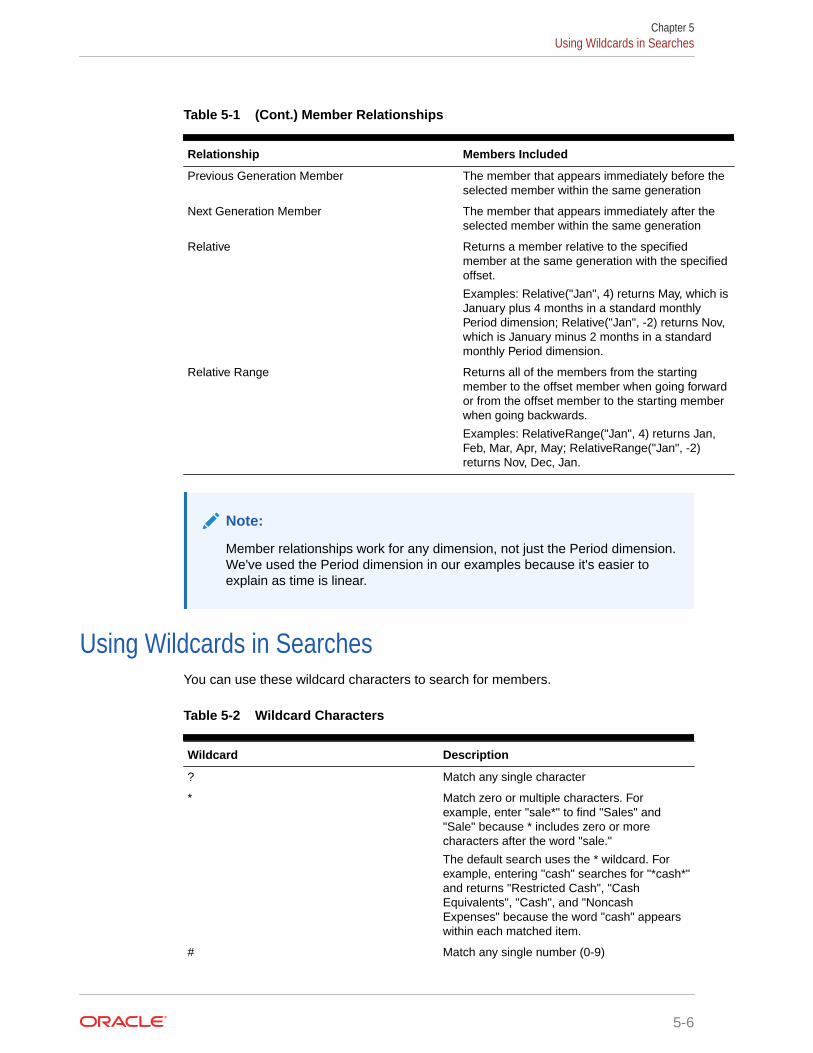
Table 5-1 (Cont.) Member Relationships
Relationship Members Included
Previous Generation Member The member that appears immediately before theselected member within the same generation
Next Generation Member The member that appears immediately after theselected member within the same generation
Relative Returns a member relative to the specifiedmember at the same generation with the specifiedoffset.
Examples: Relative("Jan", 4) returns May, which isJanuary plus 4 months in a standard monthlyPeriod dimension; Relative("Jan", -2) returns Nov,which is January minus 2 months in a standardmonthly Period dimension.
Relative Range Returns all of the members from the startingmember to the offset member when going forwardor from the offset member to the starting memberwhen going backwards.
Examples: RelativeRange("Jan", 4) returns Jan,Feb, Mar, Apr, May; RelativeRange("Jan", -2)returns Nov, Dec, Jan.
Note:
Member relationships work for any dimension, not just the Period dimension.We've used the Period dimension in our examples because it's easier toexplain as time is linear.
Using Wildcards in SearchesYou can use these wildcard characters to search for members.
Table 5-2 Wildcard Characters
Wildcard Description
? Match any single character
* Match zero or multiple characters. Forexample, enter "sale*" to find "Sales" and"Sale" because * includes zero or morecharacters after the word "sale."
The default search uses the * wildcard. Forexample, entering "cash" searches for "*cash*"and returns "Restricted Cash", "CashEquivalents", "Cash", and "NoncashExpenses" because the word "cash" appearswithin each matched item.
# Match any single number (0-9)
Chapter 5Using Wildcards in Searches
5-6
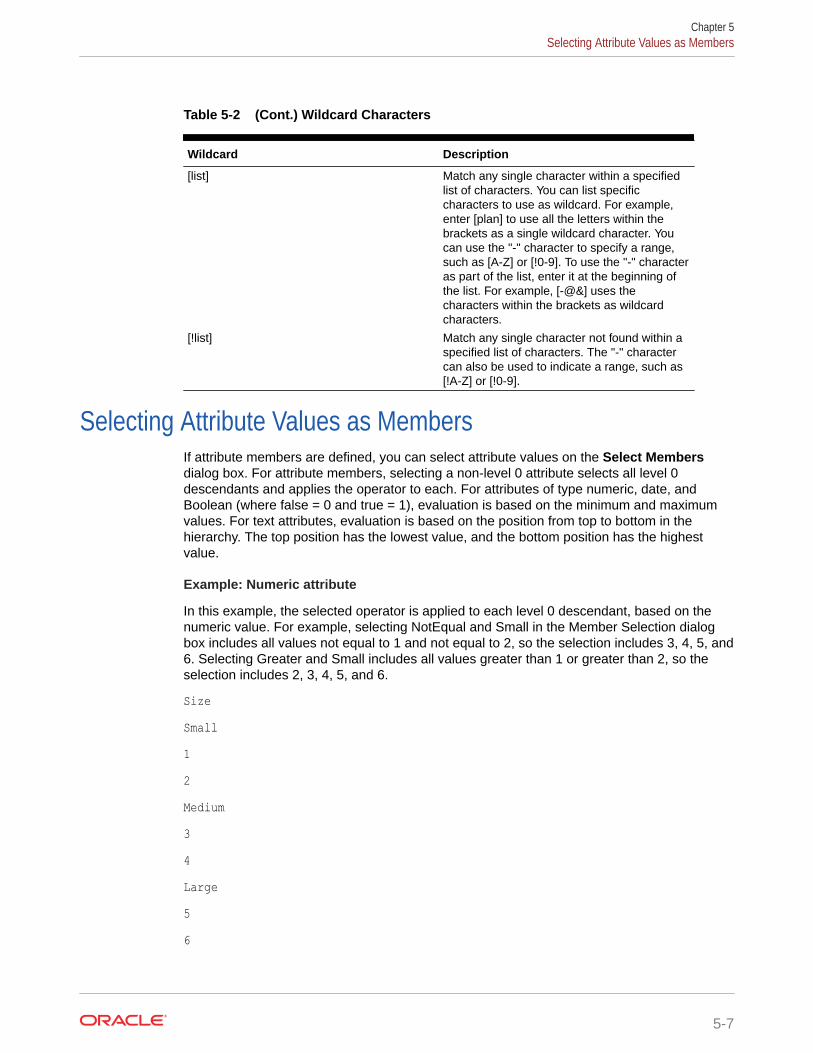
Table 5-2 (Cont.) Wildcard Characters
Wildcard Description
[list] Match any single character within a specifiedlist of characters. You can list specificcharacters to use as wildcard. For example,enter [plan] to use all the letters within thebrackets as a single wildcard character. Youcan use the "-" character to specify a range,such as [A-Z] or [!0-9]. To use the "-" characteras part of the list, enter it at the beginning ofthe list. For example, [-@&] uses thecharacters within the brackets as wildcardcharacters.
[!list] Match any single character not found within aspecified list of characters. The "-" charactercan also be used to indicate a range, such as[!A-Z] or [!0-9].
Selecting Attribute Values as MembersIf attribute members are defined, you can select attribute values on the Select Membersdialog box. For attribute members, selecting a non-level 0 attribute selects all level 0descendants and applies the operator to each. For attributes of type numeric, date, andBoolean (where false = 0 and true = 1), evaluation is based on the minimum and maximumvalues. For text attributes, evaluation is based on the position from top to bottom in thehierarchy. The top position has the lowest value, and the bottom position has the highestvalue.
Example: Numeric attribute
In this example, the selected operator is applied to each level 0 descendant, based on thenumeric value. For example, selecting NotEqual and Small in the Member Selection dialogbox includes all values not equal to 1 and not equal to 2, so the selection includes 3, 4, 5, and6. Selecting Greater and Small includes all values greater than 1 or greater than 2, so theselection includes 2, 3, 4, 5, and 6.
SizeSmall12Medium34Large56
Chapter 5Selecting Attribute Values as Members
5-7
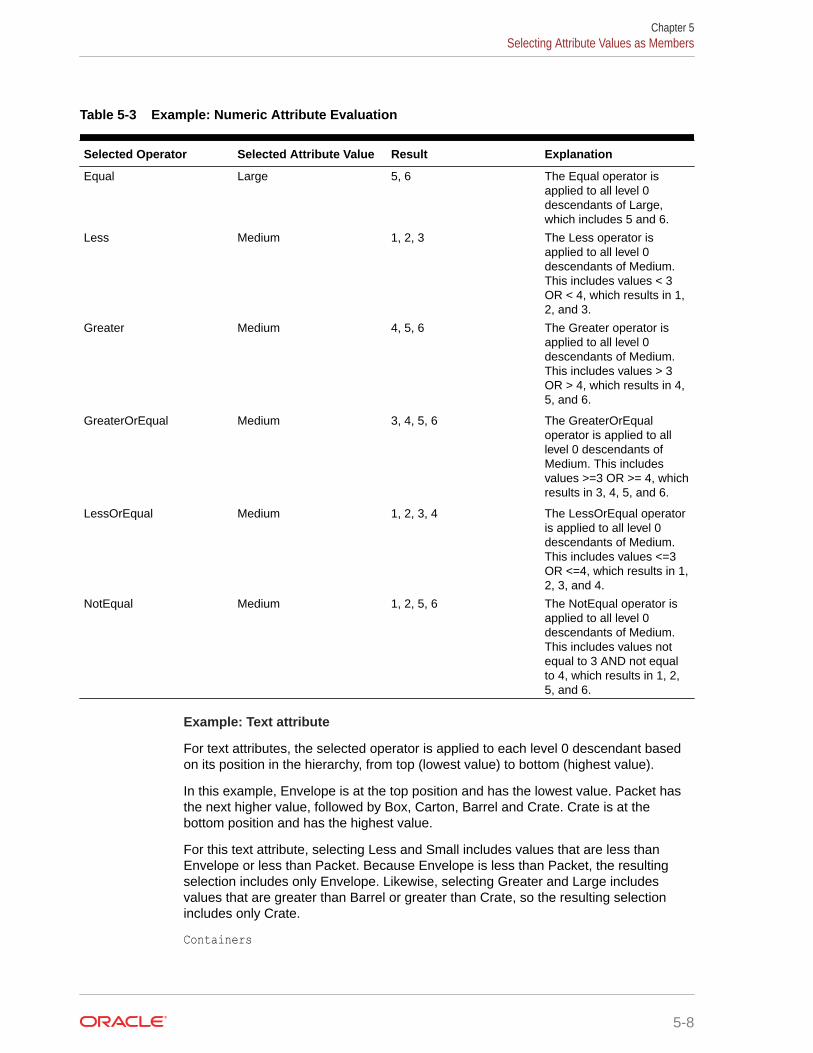
Table 5-3 Example: Numeric Attribute Evaluation
Selected Operator Selected Attribute Value Result Explanation
Equal Large 5, 6 The Equal operator isapplied to all level 0descendants of Large,which includes 5 and 6.
Less Medium 1, 2, 3 The Less operator isapplied to all level 0descendants of Medium.This includes values < 3OR < 4, which results in 1,2, and 3.
Greater Medium 4, 5, 6 The Greater operator isapplied to all level 0descendants of Medium.This includes values > 3OR > 4, which results in 4,5, and 6.
GreaterOrEqual Medium 3, 4, 5, 6 The GreaterOrEqualoperator is applied to alllevel 0 descendants ofMedium. This includesvalues >=3 OR >= 4, whichresults in 3, 4, 5, and 6.
LessOrEqual Medium 1, 2, 3, 4 The LessOrEqual operatoris applied to all level 0descendants of Medium.This includes values <=3OR <=4, which results in 1,2, 3, and 4.
NotEqual Medium 1, 2, 5, 6 The NotEqual operator isapplied to all level 0descendants of Medium.This includes values notequal to 3 AND not equalto 4, which results in 1, 2,5, and 6.
Example: Text attribute
For text attributes, the selected operator is applied to each level 0 descendant basedon its position in the hierarchy, from top (lowest value) to bottom (highest value).
In this example, Envelope is at the top position and has the lowest value. Packet hasthe next higher value, followed by Box, Carton, Barrel and Crate. Crate is at thebottom position and has the highest value.
For this text attribute, selecting Less and Small includes values that are less thanEnvelope or less than Packet. Because Envelope is less than Packet, the resultingselection includes only Envelope. Likewise, selecting Greater and Large includesvalues that are greater than Barrel or greater than Crate, so the resulting selectionincludes only Crate.
Containers
Chapter 5Selecting Attribute Values as Members
5-8

SmallEnvelopePacketMediumBoxCartonLargeBarrelCrate
Table 5-4 Example: Text Attribute Evaluation
Selected Operator Selected Attribute Value Result Explanation
Equal Medium Box, Carton The Equal operator isapplied to all level 0descendants of Medium,which includes Box andCarton.
NotEqual Medium Envelope, Packet, Barrel,Crate
The NotEqual operator isapplied to all level 0descendants of Medium.This includes values notequal to Box AND notequal to Carton, whichresults in Envelope, Packet,Barrel, and Crate.
Less Medium Box, Packet, Envelope The Less operator isapplied to all level 0descendants of Medium.This includes everything ata lower position thanCarton OR a lower positionthan Box, which results inBox, Packet, and Envelope.
LessOrEqual Medium Envelope, Packet, Box,Carton
The LessOrEqual operatoris applied to all level 0descendants of Medium.This includes everything atthe same position asCarton OR at a lowerposition than Carton, whichresults in Envelope, Packet,Box, and Carton.
Selecting Members for FormsWhen selecting members for forms:
• To filter members from certain users, restrict their access permissions to members, andthen refresh the plan.
Chapter 5Selecting Members for Forms
5-9
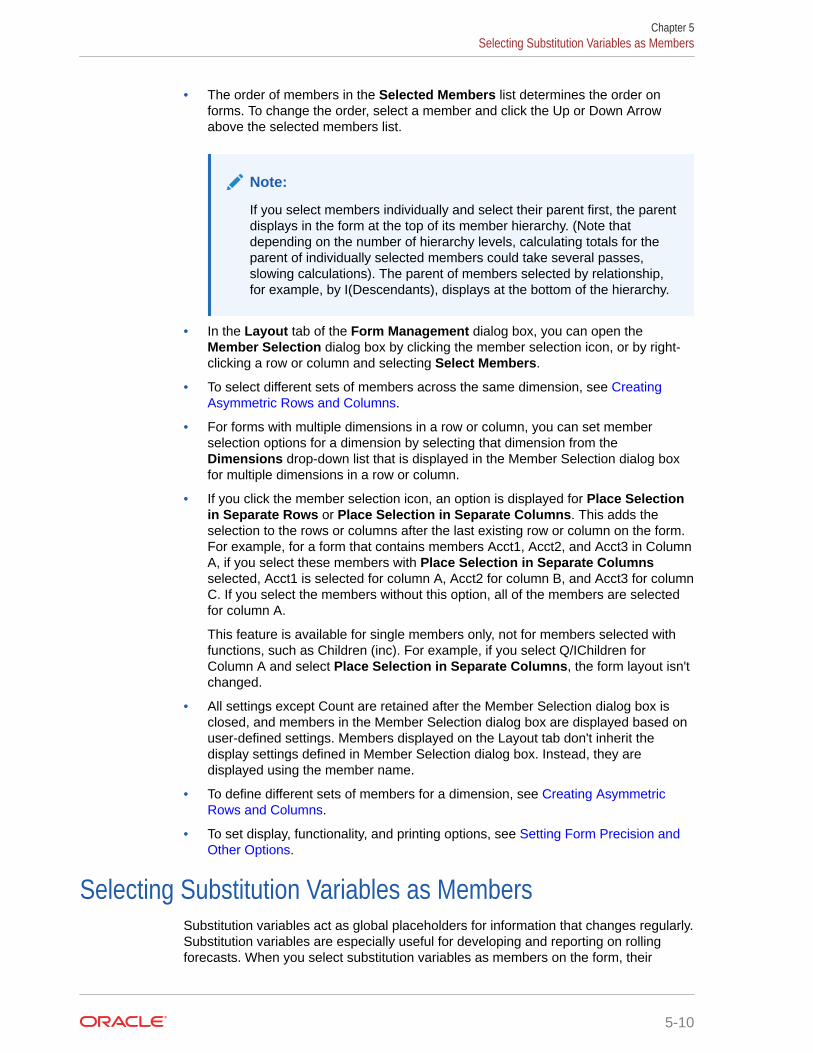
• The order of members in the Selected Members list determines the order onforms. To change the order, select a member and click the Up or Down Arrowabove the selected members list.
Note:
If you select members individually and select their parent first, the parentdisplays in the form at the top of its member hierarchy. (Note thatdepending on the number of hierarchy levels, calculating totals for theparent of individually selected members could take several passes,slowing calculations). The parent of members selected by relationship,for example, by I(Descendants), displays at the bottom of the hierarchy.
• In the Layout tab of the Form Management dialog box, you can open theMember Selection dialog box by clicking the member selection icon, or by right-clicking a row or column and selecting Select Members.
• To select different sets of members across the same dimension, see CreatingAsymmetric Rows and Columns.
• For forms with multiple dimensions in a row or column, you can set memberselection options for a dimension by selecting that dimension from theDimensions drop-down list that is displayed in the Member Selection dialog boxfor multiple dimensions in a row or column.
• If you click the member selection icon, an option is displayed for Place Selectionin Separate Rows or Place Selection in Separate Columns. This adds theselection to the rows or columns after the last existing row or column on the form.For example, for a form that contains members Acct1, Acct2, and Acct3 in ColumnA, if you select these members with Place Selection in Separate Columnsselected, Acct1 is selected for column A, Acct2 for column B, and Acct3 for columnC. If you select the members without this option, all of the members are selectedfor column A.
This feature is available for single members only, not for members selected withfunctions, such as Children (inc). For example, if you select Q/IChildren forColumn A and select Place Selection in Separate Columns, the form layout isn'tchanged.
• All settings except Count are retained after the Member Selection dialog box isclosed, and members in the Member Selection dialog box are displayed based onuser-defined settings. Members displayed on the Layout tab don't inherit thedisplay settings defined in Member Selection dialog box. Instead, they aredisplayed using the member name.
• To define different sets of members for a dimension, see Creating AsymmetricRows and Columns.
• To set display, functionality, and printing options, see Setting Form Precision andOther Options.
Selecting Substitution Variables as MembersSubstitution variables act as global placeholders for information that changes regularly.Substitution variables are especially useful for developing and reporting on rollingforecasts. When you select substitution variables as members on the form, their
Chapter 5Selecting Substitution Variables as Members
5-10
values are based on dynamically generated information. For example, you could set thecurrent month member to the substitution variable CurMnth so that when the month changes,you need not update the month value manually in the form or the report script.
Note:
• When you open or calculate values on forms, the application replacessubstitution variables with values assigned to them.
• You create and assign values to substitution variables within the application.These substitution variables are then available in the application when youselect members for a form. For instructions on creating and assigning values tosubstitution variables using the application, see Working with SubstitutionVariables.
• Substitution variables must be appropriate for the context in forms. Forexample, you could select a substitution variable named CurrQtr with a valueof Qtr2 as a member of the Time Period dimension. It's not valid to select asubstitution variable named CurrYr for the Years dimension if its value is Feb.You can set substitution variables at the application or database level.
The same substitution variable can exist on multiple levels; the application usesthe first one it finds as it searches in this order:
1. Database
2. Application
• You can select from substitution variables if they are enabled for runtimeprompts in business rules, and their values match a member set in the runtimeprompt for a business rule.
• The application checks the validity of substitution variables when they are used(for example, when the form is opened). It doesn't check when you designforms, so you should test substitution variables by saving and opening forms.
• If you migrated an application that uses Global variables, you can view, but notedit, them in this business process.
To specify substitution variables in forms:
1. Create the form (see Creating Forms).
2. In Member Selection, click the Variables tab, expand Substitution Variables, and thenselect substitution variables the same way you select members, to move substitutionvariables to and from Selected Members.
When selected, a substitution variable is preceded by an ampersand (&). For example:
&CurrentScenario3. Click OK.
Chapter 5Selecting Substitution Variables as Members
5-11
Selecting User Variables as MembersUser variables act as filters in forms, enabling users to focus only on certain members,such as a department. Before you can associate a user variable with a form, you mustcreate the user variable. See Managing User Variables.
When you create forms with user variables, users must select values for the variablebefore opening forms. For example, if you create a user variable called Division, usersmust select a division before working in the form. The first time you select a variablefor a form, you do it in preferences. Afterward, you can update the variable inpreferences or in the form.
To select user variables for forms:
1. Create the form (see Creating Forms).
2. On Member Selection, click the Variables tab, expand User Variables, and thenselect user variables the same way you select members, using the arrows to moveuser variables to and from Selected Members.
User variables are displayed for the current dimension. For example, uservariables for the Entity dimension might display as follows:
Division = [User Variable]When selected, a user variable is preceded by an ampersand. For example:
Idescendants(&Division)3. Click OK.
Selecting UDAs as MembersYou can select members for forms based on a common attribute, which you havedefined as a user-defined attribute (UDA). Before you can associate the UDA with aform, you must create the UDA. See Working with UDAs.
When you create forms with UDAs, any members that are assigned to the UDA aredynamically added to the form. For example, if you create a UDA called New Productsand assign this UDA to the new products in the Product dimension hierarchy, the formwill automatically display the new products at runtime.
To select UDAs for forms:
1. Create the form (see Creating Forms).
2. On Member Selection, click the Variables tab, expand the UDAs, and then selectthe UDAs the same way you select members, using the arrows to move UDAs toand from the Selected Members.
UDAs are displayed for the current dimension only. When selected, a UDA ispreceded by UDA. For example:
UDA(New Products)3. Click OK.
Chapter 5Selecting User Variables as Members
5-12
6Connecting Environments in EPM Cloud
Related Topics
• About Connecting EPM Cloud Environments
• Considerations for Migrating EPM Cloud Connections
• Creating, Editing, and Deleting Connections to Other EPM Cloud Environments
• Connecting to External Web Services
• Specifying Advanced Options for External Connections
• Navigating Across EPM Cloud Environments
• Customizing Navigation Flows to Access Other EPM Cloud Environments
• Using Direct URLs to Integrate Connected Environments
About Connecting EPM Cloud EnvironmentsOverview
Service Administrators can connect multiple EPM Cloud environments of the following types:
• Planning
• FreeForm
• Financial Consolidation and Close
• Tax Reporting
• Profitability and Cost Management
• Enterprise Profitability and Cost Management
• Account Reconciliation
• Narrative Reporting
• Oracle Strategic Workforce Planning Cloud
Once Service Administrators set up the connections, users who have access across EPMCloud environments can navigate across them from a single access point with one login. Alsoartifacts such as forms and dashboards, from across environments can be co-mingled withina cluster or within tabs on a card in navigation flows. Artifacts in the target environment areaccessible based on the user's role.
6-1
Note:
You can also connect directly Oracle Analytics Cloud Enterprise Edition orProfessional Edition 5.6 to EPM Cloud Platform, provided you have bothservices. When you've configured the connection, you can visualize datafrom EPM Cloud business processes in Oracle Analytics Cloud. You nolonger have to model EPM data in a metadata repository (RPD) file to createvisualizations and dashboards in Oracle Analytics Cloud. For moreinformation, see the Oracle Analytics Cloud documentation.
Which EPM Cloud environments can I connect?
The source environment is the environment from which you're creating the connection.The target environment is the environment to which you're connecting from the sourceenvironment.
You can connect these source environments (these environments can also be targetenvironments):
• Planning
• FreeForm
• Financial Consolidation and Close
• Tax Reporting
Source environments can also connect to these target environments (theseenvironments can't be source environments):
• Account Reconciliation
• Profitability and Cost Management
• Enterprise Profitability and Cost Management
• Narrative Reporting
• Strategic Workforce Planning
What are the ways I can connect to other EPM Cloud environments?
• Toggle between the source environment and the target environment on the
Navigator menu. See Navigating Across EPM Cloud Environments.
• Customize navigation flows in the source environment to access clusters, cards,and artifacts in other target environments from the Home page. See CustomizingNavigation Flows to Access Other EPM Cloud Environments.
• Use direct URLs to seamlessly integrate connected environments. See UsingDirect URLs to Integrate Connected Environments.
Considerations
• Only Service Administrators create cross-environment connections.
Users click a navigation link to open the linked environment. Access within thelinked environment is determined by the predefined role and access permissions,if any, assigned to the user.
Chapter 6About Connecting EPM Cloud Environments
6-2
• For cross-environment navigation to be seamless, all environment instances to whichcross-environment navigation flows are setup must belong to the same identity domain.
Note:
If the target and source environment instances are not on the same identitydomain, then you'll not be able to establish a connection between them.
• Service Administrators cannot configure cross-environment connections using corporateSSO (identity provider) credentials.
If your environments are configured for SSO, ensure that identity domain credentials aremaintained for the Service Administrators who configure cross-environment connections.See Enabling Sign In With Identity Domain Credentials.
• Migrating cross-environment connections between test and production environments cancause issues in certain use case scenarios. For more information, see Considerations forMigrating EPM Cloud Connections.
• Vanity URLs are not supported in cross-environment connections.
Videos
Your Goal Watch This Video
Watch this video to learn how to customize anEPM Cloud workflow. Overview: Customizing Workflow in EPM
Cloud
Considerations for Migrating EPM Cloud ConnectionsOracle recognizes that it's common practice for Service Administrators to try out newfeatures, such as connecting environments, on test environments and then migrate toproduction environments. However, in doing so, it could cause some issues after migration.Here are some use case scenarios that you need to be aware of.
In the following scenarios, assume you have environments for Financial Consolidation andClose and Planning.
Use Case Scenario 1: Test to Production
When migrating connections from test environments to production environments, ensure thatconnections that were defined in the test environment are changed to point to thecorresponding production environments.
For example, a Service Administrator has defined a connection between the testenvironments of Planning and Financial Consolidation and Close. The Service Administratorthen uses this connection to build a navigation flow in Planning that refers to a card in theFinancial Consolidation and Close. The snapshot that the Service Administrator creates formigrating the Planning test environment will include connections and navigation flows,including the connection to Financial Consolidation and Close test environment.
On migrating the snapshot into the Planning production environment, Planning will have anundesirable connection to the Financial Consolidation and Close test environment. You mustmanually change undesirable connections to point to the corresponding productionenvironment either before or after migrating the environment.
Chapter 6Considerations for Migrating EPM Cloud Connections
6-3

Use Case Scenario 2: Production to Production or Test to Test
This scenario doesn't have any caveats.
Use Case Scenario 3: Production to Test
In this scenario, the Service Administrator might be trying to migrate a snapshot from aproduction environment into a test environment to resolve an issue. Because theconnections created in the test environment still points to a production environment, itis important for the Service Administrator to modify connections so that they point to atest environment. Connections in test environments that point to a productionenvironment may inadvertently tamper with the production environment.
Creating, Editing, and Deleting Connections to Other EPMCloud Environments
Before you can create connections to other EPM Cloud environments, you mustensure you have access to the source and target environments you're connecting. Youmust also have URLs for the other environments you're connecting and login detailsfor each environment such as user ID (Service Administrator) and password.
To create, edit, duplicate, and delete connections:
1. Login to the source environment.
2. From the Home page, click Tools, and then click Connections.
3. Choose an action:
• To add a connection:
a. On the Manage Connections page, click Create.
b. On the Select Provider to Create Connection page, select the targetenvironment you want to add.
c. Enter the target environment connection details:
– Click Change Provider to select a different target environment.
– In Connection Name enter name for this navigation link; for example,Consolidation Application.
– Enter an optional description for the link.
– In URL, enter the URL of the target environment instance; forexample, http(s)://your-target-host-url.com. This is the URLthat you normally use to sign in to the target environment instance.
– Use Service Administrator and Password to specify the credentialsof a Service Administrator.
Note:
These credentials are used only to define and validate thenavigation link. When a user logs in, their own role andaccess will be applied to access the target environment.
Chapter 6Creating, Editing, and Deleting Connections to Other EPM Cloud Environments
6-4
– The Domain field is automatically populated based on the URL you enter. Ifthere is no domain in the URL, then the Domain field is left blank.
d. Click Validate.
e. If the validation is successful, click Save and Close.
• To edit connections:
a. On the Manage Connections page, click the name of a connection.
b. Edit connection details.
Note:
If you edit the URL to connect to a new service type, you could causenavigation flows to break. If you want to connect to a different service,Oracle recommends creating a new connection instead.
c. Click Validate.
d. If the validation is successful, click Save and Close.
• To duplicate a connection:
a. On the Manage Connections page, in the Action column next to the connectionyou want to duplicate, click .
b. Click Duplicate.
c. Enter a name for the duplicate connection, then click OK.
• To delete a connection:
a. On the Manage Connections page, in the Action column next to the connectionyou want to delete, click .
b. Click Delete.
When target environments are connected to an EPM Cloud source environment, they are
listed in the My Connections pane on the Navigator menu of the source environment.
The My Connections pane on the Navigator menu is where you can navigate acrossenvironments. See Navigating Across EPM Cloud Environments.
For troubleshooting assistance, see Handling Issues with Navigation Flows in OracleEnterprise Performance Management Cloud Operations Guide .
If you are configuring an Enterprise Journals connection for Financial Consolidation andClose, see Creating Connections for Enterprise Journals in Administering FinancialConsolidation and Close.
Connecting to External Web ServicesService Administrators can also connect to external Web services for the purpose of readingdata from and writing to an external Web service.
This connection can be referenced or used in a Groovy script to create a communications linkbetween the Groovy script and the external HTTP/HTTPS resource. For more details andexamples of how this connection can be used in a Groovy script, see the Java API
Chapter 6Connecting to External Web Services
6-5
documentation for the Connection and the HttpRequest objects in the EPM Groovyobject model.
Note:
The Other Web Service Provider connection type is only available for usewith those business processes that allow Groovy Rules to be created. Seethe Oracle Enterprise Performance Management Cloud, Groovy Rules JavaAPI Reference.
Before you can create connections to external Web services, you must ensure youhave access to the Web service you're connecting. You must also have URLs for theWeb service and any login details, if required.
To create a connection to an external Web service:
1. Login to the source environment.
2. From the Home page, click Tools, and then click Connections.
3. On the Manage Connections page, click Create.
4. Click Other Web Service Provider.
5. Enter a Connection Name and a Description for the connection.
6. Enter the URL for the target connection.
7. Enter optional advanced options for the URL.
Note:
The optional advanced options enable you to specify query or headerparameters when defining an external connection. See SpecifyingAdvanced Options for External Connections.
8. Enter User and Password login credentials for the connection, if required. Insome cases, such as connecting to Oracle Cloud services, the domain name mayneed to be prefixed to the user name; for example, <Identity Domain>.<UserName>.
9. Click Save and Close.
Specifying Advanced Options for External ConnectionsThe optional advanced options enable you to specify query or header parameterswhen defining an external connection.
Chapter 6Specifying Advanced Options for External Connections
6-6
Note:
The ability to define query parameters for an external connection is only availablefor use with those business processes that allow Groovy Rules to be created. Seethe Oracle Enterprise Performance Management Cloud, Groovy Rules Java APIReference.
To specify advanced options for external connections:
1. Create an external connection or open an existing external connection.
See Connecting to External Web Services.
2. Enter connection details, and then click Show Advanced Options.
3. Specify query details as follows:
• —Add query
• —Delete query
• Type—Select Header or Parameter.
Header sets a default header that will be sent on every request made for thisconnection. Parameter sets a default query parameter that will be sent on everyrequest made for this connection.
• Secure—If selected, the value entered in the Value field will be encrypted. Clearingthe Secure check box for a row will remove the value.
An example header that one would secure is the Bearer Token for external Webservices that supports Bearer Authentication, or the API Key query parameter forexternal Web services that supports API keys for authentication.
• Name—Enter a name for the header or query parameter.
• Value—Enter the value for the header or query parameter.
Navigating Across EPM Cloud EnvironmentsOnce a Service Administrator creates connections to other EPM Cloud environments, the
connections are listed in the My Connections pane on the Navigator menu.
Chapter 6Navigating Across EPM Cloud Environments
6-7
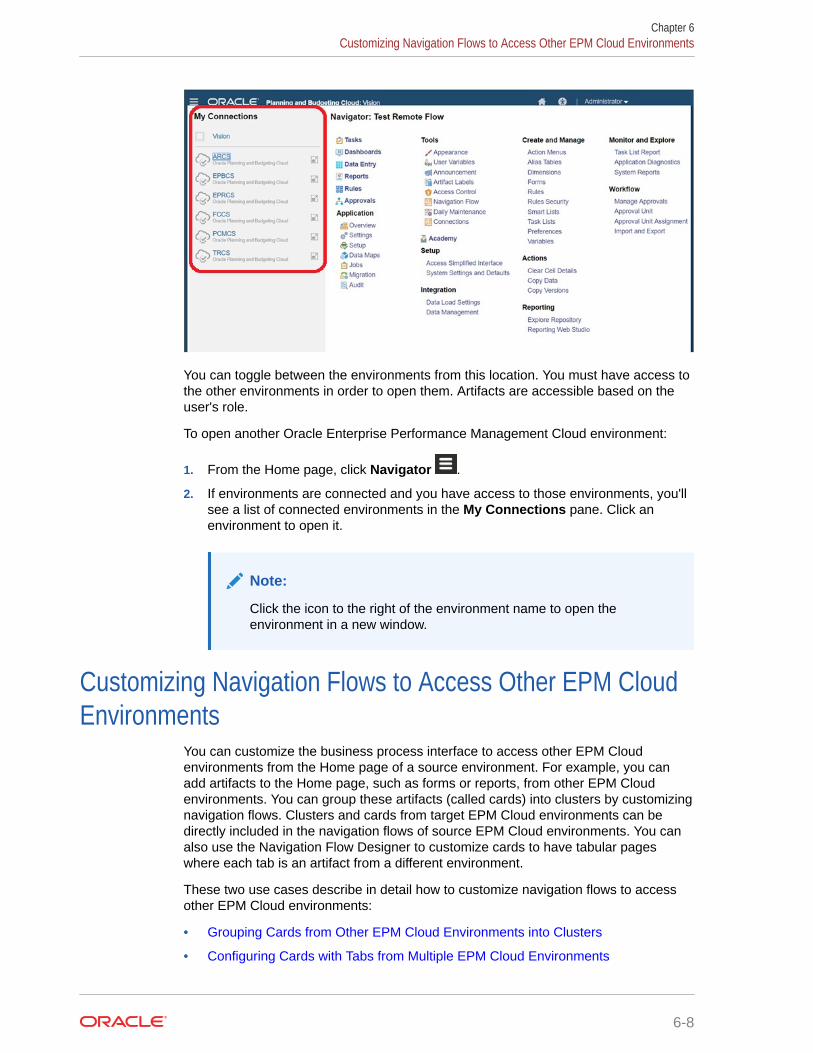
You can toggle between the environments from this location. You must have access tothe other environments in order to open them. Artifacts are accessible based on theuser's role.
To open another Oracle Enterprise Performance Management Cloud environment:
1. From the Home page, click Navigator .
2. If environments are connected and you have access to those environments, you'llsee a list of connected environments in the My Connections pane. Click anenvironment to open it.
Note:
Click the icon to the right of the environment name to open theenvironment in a new window.
Customizing Navigation Flows to Access Other EPM CloudEnvironments
You can customize the business process interface to access other EPM Cloudenvironments from the Home page of a source environment. For example, you canadd artifacts to the Home page, such as forms or reports, from other EPM Cloudenvironments. You can group these artifacts (called cards) into clusters by customizingnavigation flows. Clusters and cards from target EPM Cloud environments can bedirectly included in the navigation flows of source EPM Cloud environments. You canalso use the Navigation Flow Designer to customize cards to have tabular pageswhere each tab is an artifact from a different environment.
These two use cases describe in detail how to customize navigation flows to accessother EPM Cloud environments:
• Grouping Cards from Other EPM Cloud Environments into Clusters
• Configuring Cards with Tabs from Multiple EPM Cloud Environments
Chapter 6Customizing Navigation Flows to Access Other EPM Cloud Environments
6-8
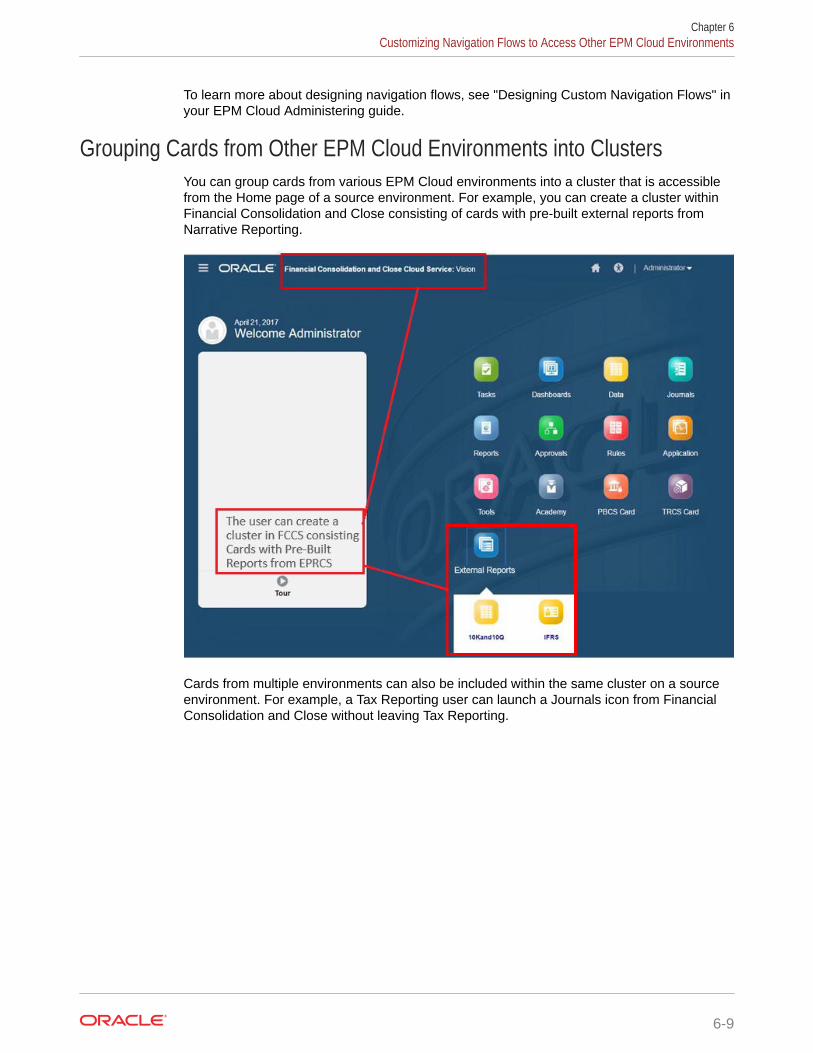
To learn more about designing navigation flows, see "Designing Custom Navigation Flows" inyour EPM Cloud Administering guide.
Grouping Cards from Other EPM Cloud Environments into ClustersYou can group cards from various EPM Cloud environments into a cluster that is accessiblefrom the Home page of a source environment. For example, you can create a cluster withinFinancial Consolidation and Close consisting of cards with pre-built external reports fromNarrative Reporting.
Cards from multiple environments can also be included within the same cluster on a sourceenvironment. For example, a Tax Reporting user can launch a Journals icon from FinancialConsolidation and Close without leaving Tax Reporting.
Chapter 6Customizing Navigation Flows to Access Other EPM Cloud Environments
6-9
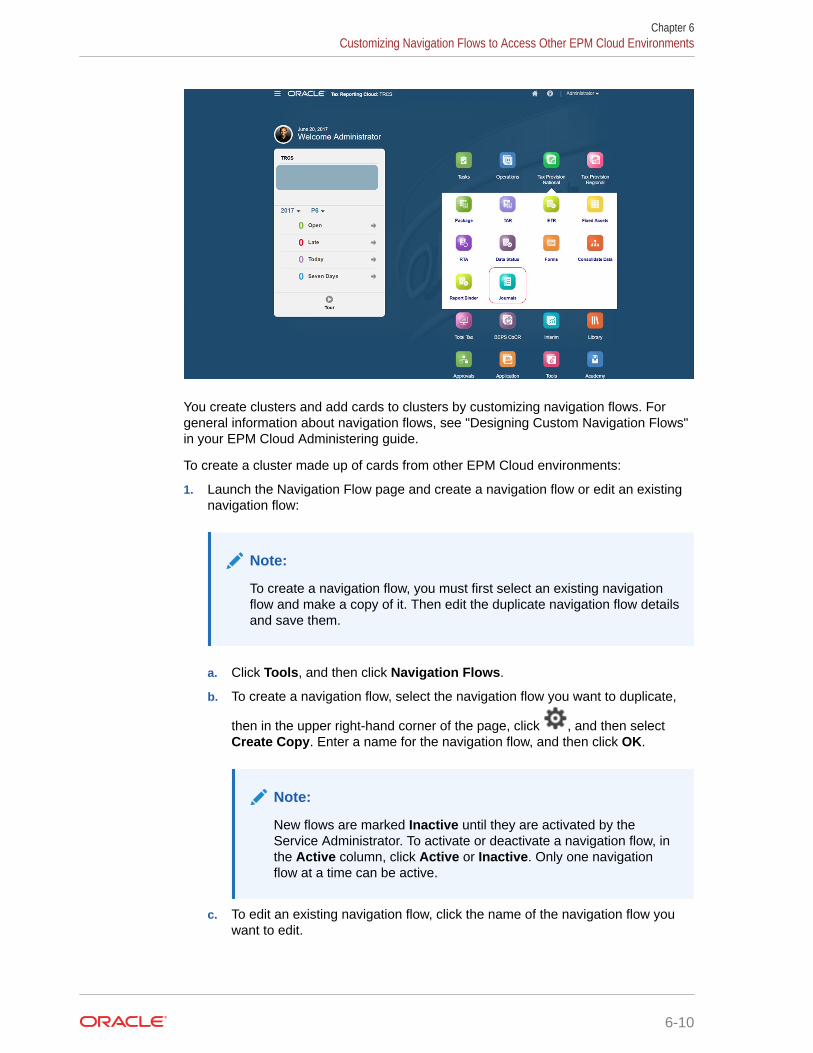
You create clusters and add cards to clusters by customizing navigation flows. Forgeneral information about navigation flows, see "Designing Custom Navigation Flows"in your EPM Cloud Administering guide.
To create a cluster made up of cards from other EPM Cloud environments:
1. Launch the Navigation Flow page and create a navigation flow or edit an existingnavigation flow:
Note:
To create a navigation flow, you must first select an existing navigationflow and make a copy of it. Then edit the duplicate navigation flow detailsand save them.
a. Click Tools, and then click Navigation Flows.
b. To create a navigation flow, select the navigation flow you want to duplicate,
then in the upper right-hand corner of the page, click , and then selectCreate Copy. Enter a name for the navigation flow, and then click OK.
Note:
New flows are marked Inactive until they are activated by theService Administrator. To activate or deactivate a navigation flow, inthe Active column, click Active or Inactive. Only one navigationflow at a time can be active.
c. To edit an existing navigation flow, click the name of the navigation flow youwant to edit.
Chapter 6Customizing Navigation Flows to Access Other EPM Cloud Environments
6-10
Note:
Editing is only possible if the navigation flow is inactive. If the navigationflow you want to edit is active, ensure you mark it Inactive before editing.
2. Create a cluster or add an existing cluster:
a. If it isn't already open, from the Navigation Flow page, click the name of thenavigation flow in which you want to add a cluster.
b. To create a new cluster, right-click a card or cluster (or click ), click Add Cluster,enter or select the cluster details, and then choose an icon for the cluster.
c. If there is an existing cluster you want to add from another environment, right-click acard or cluster (or click Add Existing Card/Cluster), select the target environmentunder My Connections, and then choose the cluster you want to add to yournavigation flow.
Note the following:
• Clusters can't be directly selected from Narrative Reporting and Profitability andCost Management using the Add Existing Card/Cluster option.
• Clusters that are added from another navigation flow or from anotherenvironment will display the localized labels that were defined in the sourcenavigation flow. To update the cluster labels in your navigation flow, on the Homepage, click Tools, and then click Artifact Labels. See "Specifying ArtifactLabels" in your EPM Cloud Administering guide.
3. Select the cards to include in the cluster using one of these options:
• Navigate to the card you want to add to the cluster. If the card is within anotherenvironment, first select the environment under My Connections, and then navigateto the card in that environment. Assign the card to a cluster using one of theseoptions:
– To the right of the card that you want to move, in the Order column, click .Select the cluster, and then click OK.
– Click the name of the card to view the card details, then for Cluster select acluster for the card, and then click OK.
• Navigate to the cluster in which you want to add the new card. If the cluster is withinanother environment, first select the environment under My Connections, and then
navigate to the cluster in that environment. Right-click the cluster (or click ), clickAdd Card In Cluster, and then select an option:
– Select Add Existing Card, to select an existing card or to add existing cardsfrom another cluster to the selected cluster.
– Select Add Card, and then enter card details to add a new card to the selectedcluster.
Chapter 6Customizing Navigation Flows to Access Other EPM Cloud Environments
6-11
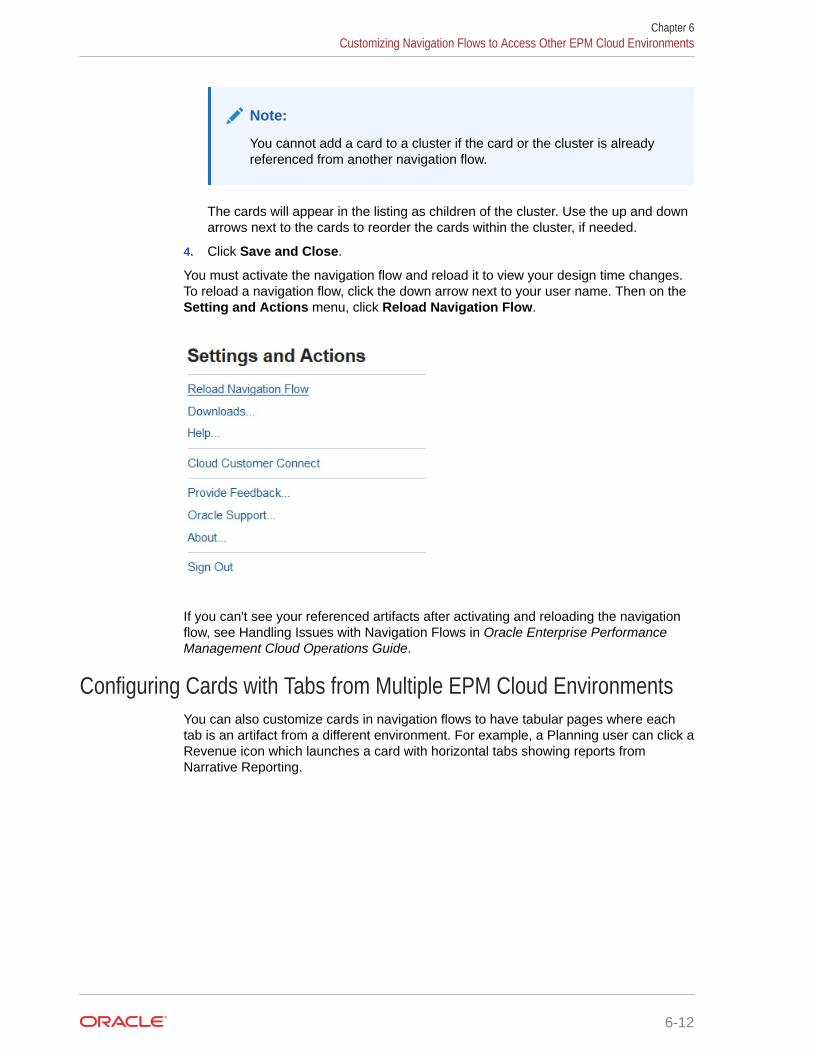
Note:
You cannot add a card to a cluster if the card or the cluster is alreadyreferenced from another navigation flow.
The cards will appear in the listing as children of the cluster. Use the up and downarrows next to the cards to reorder the cards within the cluster, if needed.
4. Click Save and Close.
You must activate the navigation flow and reload it to view your design time changes.To reload a navigation flow, click the down arrow next to your user name. Then on theSetting and Actions menu, click Reload Navigation Flow.
If you can't see your referenced artifacts after activating and reloading the navigationflow, see Handling Issues with Navigation Flows in Oracle Enterprise PerformanceManagement Cloud Operations Guide.
Configuring Cards with Tabs from Multiple EPM Cloud EnvironmentsYou can also customize cards in navigation flows to have tabular pages where eachtab is an artifact from a different environment. For example, a Planning user can click aRevenue icon which launches a card with horizontal tabs showing reports fromNarrative Reporting.
Chapter 6Customizing Navigation Flows to Access Other EPM Cloud Environments
6-12
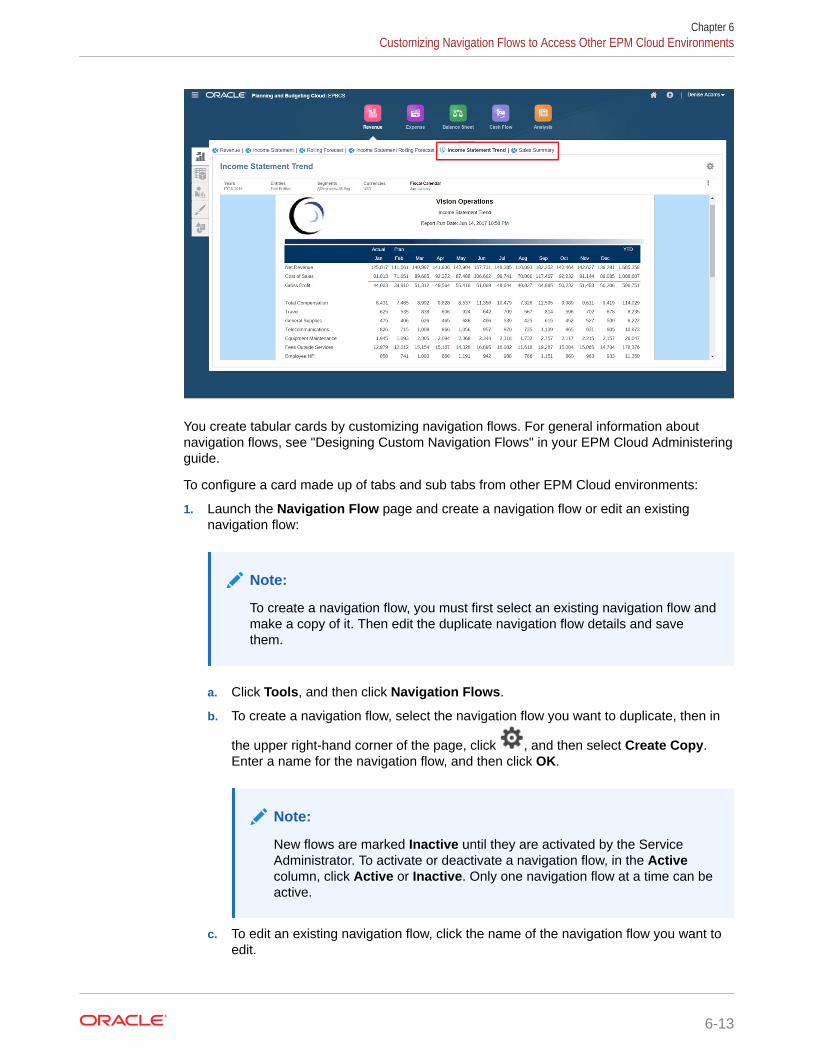
You create tabular cards by customizing navigation flows. For general information aboutnavigation flows, see "Designing Custom Navigation Flows" in your EPM Cloud Administeringguide.
To configure a card made up of tabs and sub tabs from other EPM Cloud environments:
1. Launch the Navigation Flow page and create a navigation flow or edit an existingnavigation flow:
Note:
To create a navigation flow, you must first select an existing navigation flow andmake a copy of it. Then edit the duplicate navigation flow details and savethem.
a. Click Tools, and then click Navigation Flows.
b. To create a navigation flow, select the navigation flow you want to duplicate, then in
the upper right-hand corner of the page, click , and then select Create Copy.Enter a name for the navigation flow, and then click OK.
Note:
New flows are marked Inactive until they are activated by the ServiceAdministrator. To activate or deactivate a navigation flow, in the Activecolumn, click Active or Inactive. Only one navigation flow at a time can beactive.
c. To edit an existing navigation flow, click the name of the navigation flow you want toedit.
Chapter 6Customizing Navigation Flows to Access Other EPM Cloud Environments
6-13
2. Add a tabular card with artifacts from various target environments:
a. If there is an existing card you want to add from another environment, from the
Navigation Flow page, right-click a card or cluster (or click ), click AddExisting Card/Cluster, select the target environment under My Connections,and then choose the card you want to add to your navigation flow.
Note the following:
• Cards can't be directly selected from Narrative Reporting and Profitabilityand Cost Management using the Add Existing Card/Cluster option.
• Cards that are added from another navigation flow or from anotherenvironment will display the localized labels that were defined in thesource navigation flow. To update the card labels in your navigation flow,on the Home page, click Tools, and then click Artifact Labels. See"Specifying Artifact Labels" in your EPM Cloud Administering guide.
b. To add a new tabular card to the navigation flow, from the Navigation Flow
page, right-click a card or cluster (or click ), click Add Card, and thenselect details for the card:
• Name—Enter a label for the card.
• Visible—Select whether the card is visible to users on the Home page.
• Cluster—If clusters exist, select a cluster for the card or select None.
• Icon—Select the icon that will be displayed for the card you're creating.Choose from the available icons provided in the icon library.
• Content—Select from the following options:
– Page Type—Select a multiple page (tabular) format.
– Orientation—Select Vertical or Horizontal.
3. Add tabs and sub tabs to the tabular card:
a. To add an existing tab, right-click a tab, click Add Existing Tab (or click theAdd Existing Tab button), and then select a tab from the Object Library.
b. To add a new tab, right-click a tab, click Add New Tab (or click the Add NewTab button), and then edit tab details.
c. Right-click a tab, click Add New Sub Tab or Add Existing Sub Tab (or clickthe Add New Sub Tab or Add Existing Sub Tab buttons), and then choose asub tab from the Object Library or edit sub tab details.
d. For Artifact, click to select an artifact in the Artifact Library; for example,if the artifact is a form, then select the specific form from the artifact listing.Available artifacts include forms, dashboards, and reports. To select an artifactfrom another environment, select the target environment under MyConnections, and then choose the artifact you want to add to your sub tab.
e. Repeat adding tabs and sub tabs until the card is complete.
4. Click Save and Close.
Chapter 6Customizing Navigation Flows to Access Other EPM Cloud Environments
6-14
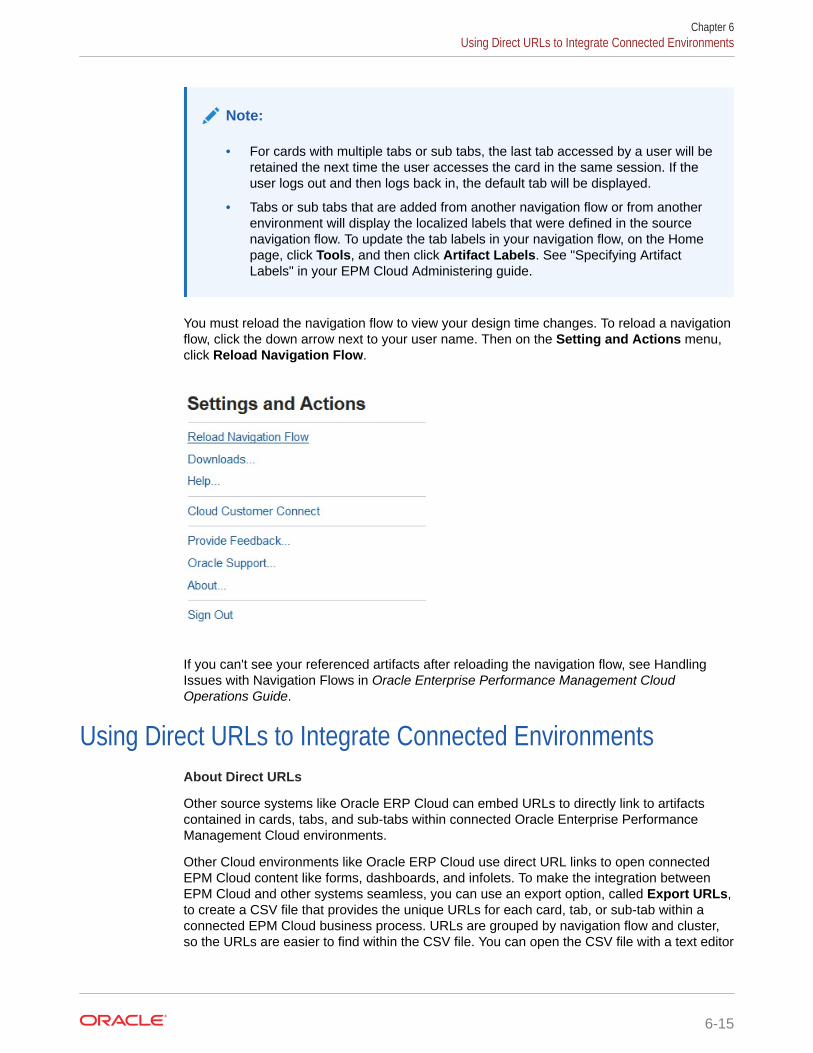
Note:
• For cards with multiple tabs or sub tabs, the last tab accessed by a user will beretained the next time the user accesses the card in the same session. If theuser logs out and then logs back in, the default tab will be displayed.
• Tabs or sub tabs that are added from another navigation flow or from anotherenvironment will display the localized labels that were defined in the sourcenavigation flow. To update the tab labels in your navigation flow, on the Homepage, click Tools, and then click Artifact Labels. See "Specifying ArtifactLabels" in your EPM Cloud Administering guide.
You must reload the navigation flow to view your design time changes. To reload a navigationflow, click the down arrow next to your user name. Then on the Setting and Actions menu,click Reload Navigation Flow.
If you can't see your referenced artifacts after reloading the navigation flow, see HandlingIssues with Navigation Flows in Oracle Enterprise Performance Management CloudOperations Guide.
Using Direct URLs to Integrate Connected EnvironmentsAbout Direct URLs
Other source systems like Oracle ERP Cloud can embed URLs to directly link to artifactscontained in cards, tabs, and sub-tabs within connected Oracle Enterprise PerformanceManagement Cloud environments.
Other Cloud environments like Oracle ERP Cloud use direct URL links to open connectedEPM Cloud content like forms, dashboards, and infolets. To make the integration betweenEPM Cloud and other systems seamless, you can use an export option, called Export URLs,to create a CSV file that provides the unique URLs for each card, tab, or sub-tab within aconnected EPM Cloud business process. URLs are grouped by navigation flow and cluster,so the URLs are easier to find within the CSV file. You can open the CSV file with a text editor
Chapter 6Using Direct URLs to Integrate Connected Environments
6-15
or Microsoft Excel and embed the relevant URL within the source system pages toserve as a launch point into EPM Cloud.
Videos
Your Goal Watch This Video
Learn how to use direct links to embedEPM Cloud content in other systems suchas ERP Cloud and NetSuite. This lets yourepresent EPM Cloud artifacts alongsideother source system pages, enhancingexisting processes with functionally -tailored forms, grids, reports, anddashboards for seamless cross-systemnavigation. Also, learn the new appearanceoptions to enjoy the highly efficientRedwood experience, apply custom logosand watermarks, and remove businessprocess names from pages.
Overview: Embedded Direct Links andAppearance Optimization
Exporting URLs
To export EPM Cloud URLs to a CSV file:
1. Log into an EPM Cloud environment.
2. From the Home page, click the down arrow next to the user name (upper rightcorner of the screen).
3. On the Settings and Actions menu, click Export URLs, and then click Save.
The system saves a CSV file to the default download folder on your local machine,and the filename is automatically generated with the current date and time of theserver; for example, 19_Feb_2021 13_15_38 Navigation Flow URLs.csv. Find the filein your download folder, and open it with a text editor or with Microsoft Excel.
Viewing the Exported URLs File
The CSV file lists all of the URLs in the business process. Each card, tab (vertical tab),and sub-tab (horizontal tab) has a unique URL. When viewed in a text editor likeNotepad or in Microsoft Excel, it identifies the unique URL for each card, tab, and sub-tab, so the URLs for each artifact can be more easily found. URLs are grouped bynavigation flow and by cluster.
Note:
Only cards, tabs, and sub-tabs have URLs. Navigation flows and clustersdon't have URLs.
Table 6-1 Direct URLs Export File Headers
Header Description
Navigation Flow Name The name of the navigation flow; forexample, Default or Financial Flow.
Chapter 6Using Direct URLs to Integrate Connected Environments
6-16
Table 6-1 (Cont.) Direct URLs Export File Headers
Header Description
Status Status of the navigation flow; for example,Active or Inactive.
Type Type of entry; for example, cluster, card,tab, or sub tab
Name The cluster, card, tab or sub-tab namewhere the artifact is contained. This entrywill be empty for clusters or cards whichdo not contain an artifact directly.
Artifact Type The type of artifact; for example, Form,Dashboards, Financial Reports, and URLtype artifacts.
Artifact Name The name of the artifact or, in the case ofan URL type artifact, the direct URL of thetarget page.
Caution:
If a direct URLis displayed, donot confuse thisURL with theunique URLyou'll use tointegrate theconnectedenvironments.
URL This is the unique URL you will use tointegrate connected environments.
Visible Indicates whether the artifact in thenavigation flow is visible on the Homepage to users or groups; for example, Y orN.
Role/Group The role or group who can view thenavigation flow. If a navigation flow isGlobal, then it can be seen by all users.
Description The description of the navigation flow, ifprovided.
The URLs export file provides the information separated by a vertical bar or pipe ( | ) delimitercharacter. See the following example direct URLs export file as viewed in Notepad:
Chapter 6Using Direct URLs to Integrate Connected Environments
6-17
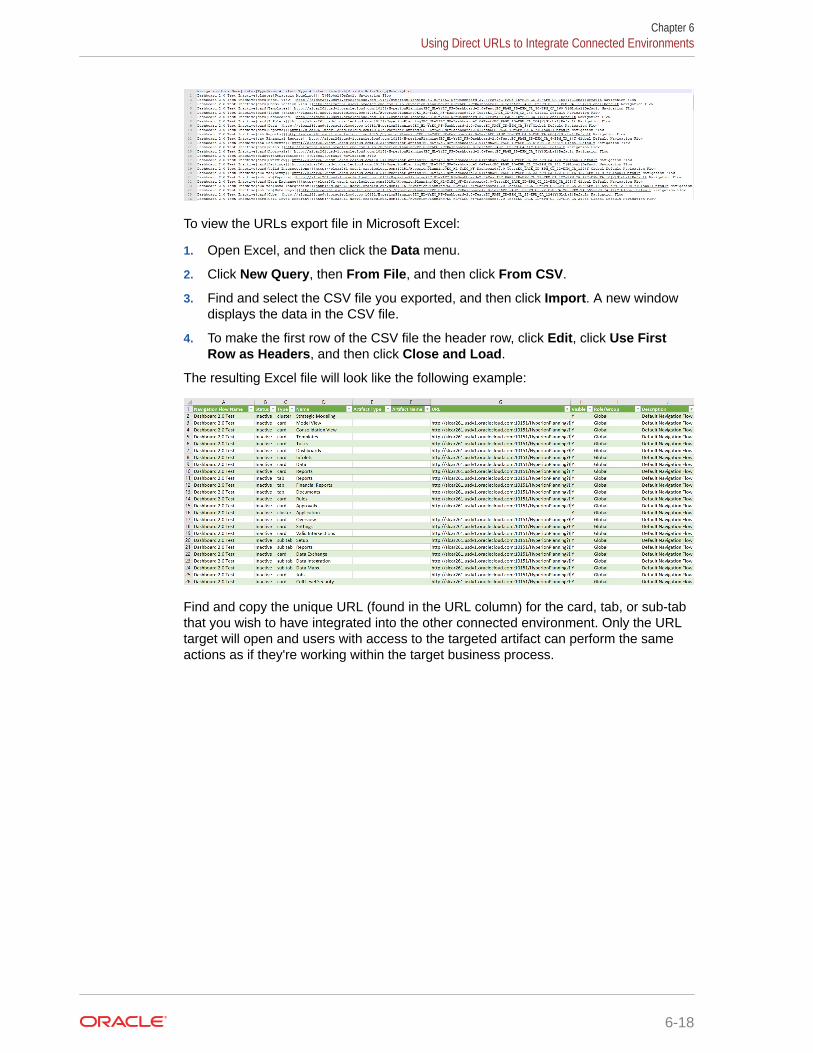
To view the URLs export file in Microsoft Excel:
1. Open Excel, and then click the Data menu.
2. Click New Query, then From File, and then click From CSV.
3. Find and select the CSV file you exported, and then click Import. A new windowdisplays the data in the CSV file.
4. To make the first row of the CSV file the header row, click Edit, click Use FirstRow as Headers, and then click Close and Load.
The resulting Excel file will look like the following example:
Find and copy the unique URL (found in the URL column) for the card, tab, or sub-tabthat you wish to have integrated into the other connected environment. Only the URLtarget will open and users with access to the targeted artifact can perform the sameactions as if they're working within the target business process.
Chapter 6Using Direct URLs to Integrate Connected Environments
6-18
7Designing Custom Navigation Flows
Customize the business process interface using navigation flows. Navigation flows enabledesigners to control how roles or groups interact with the business process.
Related Topics
• Understanding Navigation Flows
• Viewing and Working with Navigation Flows
Understanding Navigation FlowsNavigation flows give business process designers control over how various roles, or groups,interact with the business process. The Navigation Flow Designer enables you to customizethe business process interface. For example, you can change the names of the cards andclusters that display on the Home page and the order in which they are displayed. You canhide cards, create new cards, and group cards into clusters. You can also customize thevertical and horizontal tabs that display on a card.
Videos
Your Goal Watch This Video
Learn how to customize navigation flows. Designing Navigation Flows in Planning
View the highlights of customizing workflows. Overview: Customizing Workflow in EPM
Cloud
Related Topics
• What Can Be Customized in the Business Process Interface?
• Navigation Flow Customization Categories
• Navigation Flow Permissions
• Predefined Navigation Flows
• Viewing and Working with Navigation Flows
What Can Be Customized in the Business Process Interface?• Labels for cards or tabs
• Icons that are used for cards or tabs
• Hide and unhide cards and tabs
• Display order of cards and tabs
• Add new cards
• Add existing cards
7-1
• Add new horizontal or vertical tabs
• Remove navigation flows, cards, and tabs
• Group cards into clusters
• Add existing clusters
See Viewing and Working with Navigation Flows.
Navigation Flow Customization CategoriesNavigation flows are categorized as follows for customization:
1. Global—Navigation flows are seen by all users
2. Role—Navigation flows are seen only by users in a specific role; for example, Useror Power User
3. Group—Navigation flows are seen only by users belonging to a specific group
Navigation flows can be defined at any of these levels. In cases where navigationflows exist at multiple levels, updates are applied in the order of highest (global) tolowest (groups).
For example, if you create a navigation flow that displays an icon on the Home pagenamed "My Tasks", and then another Service Administrator duplicates the navigationflow, makes the following changes to the card, and then associates the navigation flowwith a group:
• At the global level, they rename "My Tasks" to "Company Tasks"
• At the group level, for a group named Sales, they rename "My Tasks" to "SalesTasks"
Users who belong to the group called Sales will see the label "Sales Tasks" in thenavigation flow instead of "My Tasks," and all other users will see the label "CompanyTasks".
Navigation Flow PermissionsThe business process offers three levels of permissions for navigation flows:
• Role-based—Permissions are granted to users or groups assigned to a specificrole; for example, a User will see different cards displayed on the Home page thana Service Administrator
• Artifact-based—Permissions are granted to users or groups who can see certainartifacts; for example, a User will see only the forms to which they have beenassigned permission
• Global—Permissions are granted to all users
Predefined Navigation FlowsThe business process comes with one predefined navigation flow, called Default. TheDefault navigation flow is read only; therefore, you can't make any modifications to it.
These are the operations you can and cannot perform on the Default navigation flow:
• Name—You can't modify the name.
Chapter 7Understanding Navigation Flows
7-2
• Delete—You can't delete the navigation flow.
• Edit—You can view the navigation flow details, but you can't change anything.
• Activate or Deactivate—You can activate or deactivate the navigation flow.
• Duplicate—You can make a copy of the navigation flow.
Viewing and Working with Navigation FlowsService Administrators can view a list of navigation flows, including the predefined navigationflow, within the Navigation Flow page.
The Navigation Flow page lists each navigation flow by name, indicates the role or the groupthat has access to the navigation flow (if assigned), and provides a description of thenavigation flow (if provided). The listing also indicates whether the navigation flow is active ornot.
To view the navigation flow:
1. Click Tools, and then click Navigation Flows.
2. To work with a navigation flow, perform an action:
• For design best practices and considerations, see Navigation Flow Design BestPractices and Naming Considerations.
• To create and duplicate navigation flows, see Creating and Duplicating NavigationFlows.
• To edit a navigation flow, see Editing a Navigation Flow.
• To activate or deactivate a navigation flow, see Activating and DeactivatingNavigation Flows.
• To resolve a navigation flow in the listing that is displaying a warning icon , see Resolving Navigation Flows that Display a Warning Icon.
• To rename cards and tabs, see Customizing Labels for Cards, Tabs, and Clusters.
• To customize the graphics used for cards and tabs, see Customizing Icons for Cardsand Vertical Tabs.
• To hide and unhide cards and tabs, see Hiding and Unhiding Clusters, Cards, andTabs.
• To change the display order of cards on the Home page, see Changing the DisplayOrder of Cards on the Home Page.
• To add cards, see Adding Cards.
• To add tabs, see Adding Tabs to a Tabular Page.
• To remove navigation flows, cards, and tabs, see Removing Navigation Flows, Cards,and Tabs.
• To group cards into clusters, see Grouping Cards into Clusters.
Navigation Flow Design Best Practices and Naming ConsiderationsTo provide an optimal user experience and to avoid excessive scrolling on the Home pageand within cards and tabs, you must adhere to the following guidelines when designingnavigation flows:
Chapter 7Viewing and Working with Navigation Flows
7-3
• Keep the top level items (cards and clusters) to no more than 16 visible items.
• Add no more than 16 visible cards to a cluster.
• Add no more than 10 visible vertical tabs within a card.
• Add no more than 20 visible sub tabs (horizontal tabs) within a vertical tab.
• Label names on sub tabs (horizontal tabs) display only the first 30 characters atruntime. Hovering your cursor over the tab reveals the entire label.
Note:
If you attempt to exceed the visibility limits, you will see a warning messagetelling you that you've exceeded the limit.
There are naming restrictions for navigation flows, cards, clusters, tabs, and infolets (ifyour business process uses infolets) in navigation flows. You cannot use these specialcharacters:
• ampersand ( & )
• less than sign ( < )
• greater than sign ( > )
• quotation mark ( " )
• backslash ( \ )
• plus sign ( + )
Creating and Duplicating Navigation FlowsTo create a navigation flow, you must first select an existing navigation flow and makea copy of it. Then edit the duplicate navigation flow details and save them.
To create and duplicate a navigation flow:
1. Open the Navigation Flow page. See Viewing and Working with NavigationFlows.
2. In the upper right-hand corner of the page, click , and then select CreateCopy.
3. Enter a name for the navigation flow, and then click OK.
Note:
Ensure that you adhere to the navigation flow naming restrictionsoutlined in Navigation Flow Design Best Practices and NamingConsiderations.
4. Edit details for the navigation flow. See Editing a Navigation Flow.
Chapter 7Viewing and Working with Navigation Flows
7-4
Note:
New flows are marked Inactive until they are activated by the ServiceAdministrator. To activate a navigation flow, see Activating and DeactivatingNavigation Flows.
To reload a navigation flow to view design time changes, see Reloading a Navigation Flow.
Editing a Navigation FlowTo edit a navigation flow:
1. Open the Navigation Flow page. See Viewing and Working with Navigation Flows.
2. Click the name of the navigation flow you want to edit.
Note:
The predefined navigation flow isn't editable. However, you can create a copy ofa predefined navigation flow and edit the copy. See Predefined NavigationFlows.
You'll see a page listing the cards and clusters in the navigation flow. On this page youcan edit the role or goup assignation, designate which clusters and cards are visible onthe Home page, change the order in which the navigation flow clusters and cards aredisplayed, add cards to clusters or remove them, and remove clusters and cards from thenavigation flow.
• Assign To—Click to assign the navigation flow to a group of users or to a role.
• Visible—Edit the visibility of the navigation flow clusters and cards on the Homepage by selecting or deselecting them in the Visible column.
Note:
Ensure that you adhere to the navigation flow guidelines for visibilityoutlined in Navigation Flow Design Best Practices and NamingConsiderations.
• Order—Clusters and cards are listed in the order in which they are displayed on theHome page, if visible. Selecting an up or down arrow option repositions the clustersand cards in the listing and changes the display order of the clusters and cards onthe Home page. Selecting the right arrow moves a card into a cluster.
• Remove—Removes the cluster or card from the navigation flow.
3. Click a cluster or card to edit details. For descriptions of card details, see the followingtopics:
• Adding Cards
Chapter 7Viewing and Working with Navigation Flows
7-5
• Adding Tabs to a Tabular Page
To reload a navigation flow to view design time changes, see Reloading a NavigationFlow.
Activating and Deactivating Navigation FlowsYou can create multiple navigation flows for each category (global, role, or group), butonly one navigation flow can be active in each category. Whenever you make anavigation flow active, the other navigation flows in the same category will becomeinactive.
Note:
Each business process requires one active global navigation flow. To make adifferent global navigation flow active, select another global navigation flowand activate it.
For information about categories, see Navigation Flow Customization Categories.
These are the operations users can and cannot perform on an active navigation flow:
• Name—Users can't modify the name.
• Delete—Users can't delete the navigation flow.
• Edit:
– Users can view the navigation flow definition, but they can't change anything.
– If the business process is in administration mode, then users can save anymodifications.
• Activate or Deactivate—Users can activate or deactivate a navigation flow.
• Duplicate—Users can make a copy of a navigation flow.
To activate or deactivate a navigation flow:
1. Open the Navigation Flow page. See Viewing and Working with NavigationFlows.
2. In the Active column, click Active or Inactive. An active flow will be markedinactive. Conversely, an inactive flow will be marked active.
Resolving Navigation Flows that Display a Warning IconWhile viewing the Navigation Flow listing, you might see a navigation flow displaying a
warning icon . This occurs because the group that was associated with thenavigation flow was deleted. You'll need to edit the navigation flow to associate it witha group or role before you can activate the navigation flow.
To resolve the navigation flow:
1. Open the Navigation Flow page. See Viewing and Working with NavigationFlows.
Chapter 7Viewing and Working with Navigation Flows
7-6

2. Click the name of the navigation flow displaying the warning icon .
3. For Assign To, click to assign the navigation flow to a group of users or to a role,then click Save and Close.
4. Activate the navigation flow. See Activating and Deactivating Navigation Flows.
To reload a navigation flow to view design time changes, see Reloading a Navigation Flow.
Customizing Labels for Cards, Tabs, and ClustersYou can customize the labels for cards (the icons that display on the Home page), tabs, andclusters. Labels are limited to 25 characters or less. For vertical tabs, there is no characterlimitation since the label for vertical tabs displays as hover text.
To customize labels for cards, tabs, and clusters:
1. Open the Navigation Flow page and click the name of the navigation flow you want toedit. See Viewing and Working with Navigation Flows.
2. If customizing the label for a card or cluster:
a. Click the name of the card or cluster you want to edit.
b. Enter a new name and save it.
Note:
• You can edit the label here. However, if the label is defined in theArtifact Labels page on the Tools cluster, that definition will takeprecedence and will display during runtime. To change a labelpermanently, redefine it in the Artifact Labels page. See "SpecifyingArtifact Labels" in your EPM Cloud Administering guide.
• Ensure that you adhere to the naming restrictions outlined in NavigationFlow Design Best Practices and Naming Considerations.
3. If customizing the label for a tab:
a. Click the name of the card you want to edit.
b. In the tab listing on the Manage Tab page, click the name of the tab you want to edit.
c. Enter a new name for the tab and save it.
To reload a navigation flow to view design time changes, see Reloading a Navigation Flow.
Customizing Icons for Cards and Vertical TabsYou can change the icons used for cards and vertical tabs. You must pick from the availableicons provided in the icon library.
To customize the icons for cards and vertical tabs:
1. Open the Navigation Flow page and click the name of the navigation flow you want toedit. See Viewing and Working with Navigation Flows.
Chapter 7Viewing and Working with Navigation Flows
7-7
2. If customizing the icon for a card:
a. Click the name of the card you want to edit.
b. Click the icon for the card, select a new icon from the library, and then save it.
3. If customizing the icon for a tab:
a. Click the name of the icon you want to edit.
b. In the tab listing on the Manage Tab page, click the name of the tab you wantto edit.
c. Click the icon for the tab, select a new icon from the library, and then save it.
To reload a navigation flow to view design time changes, see Reloading a NavigationFlow.
Hiding and Unhiding Clusters, Cards, and TabsYou cannot hide the following navigation elements:
• The Application cluster and the Settings icon in the Application cluster.
• The Tools cluster and these icons in the Tools cluster:
– Access Control
– Navigation Flows
– Daily Maintenance
– Migration
Ensure that you adhere to the navigation flow guidelines for visibility outlined in Navigation Flow Design Best Practices and Naming Considerations.
To hide and unhide clusters, cards, and tabs:
1. Click the Navigation Flow icon and click the name of the navigation flow you wantto edit. See Viewing and Working with Navigation Flows.
2. Edit the Home page visibility of the navigation flow clusters and cards by selectingor deselecting them in the Visible column.
3. If hiding or unhiding a tab:
a. Click the name of the card you want to edit.
b. In the tab listing on the Manage Tab page, select or deselect the check box inthe Visible column.
To reload a navigation flow to view design time changes, see Reloading a NavigationFlow.
Changing the Display Order of Cards on the Home PageYou can change the display order of cards in the Navigation Flow Designer. Cardsdisplay on the Home page in the order they appear within the listing
To change the display order of the cards on the Home page:
1. Open the Navigation Flow page. See Viewing and Working with NavigationFlows.
Chapter 7Viewing and Working with Navigation Flows
7-8
2. In the listing, use the up and down arrows in the Order column to move cards up or downin the navigation flow order.
To reload a navigation flow to view design time changes, see Reloading a Navigation Flow.
Adding CardsThe icons you see on the Home page represent cards. Cards are specific to each functionalarea of the business process. Each card navigates users to the corresponding area, whereother information is displayed as one or more tabbed pages. You can create single page ormultiple page (tabular) cards.
To ensure an optimal user experience, review the navigation flow design best practices. See Navigation Flow Design Best Practices and Naming Considerations.
You can also group cards into clusters. See Grouping Cards into Clusters.
To add cards to a navigation flow:
1. Open the Navigation Flow page and click the name of the navigation flow you want toedit. See Viewing and Working with Navigation Flows.
2. To add an existing card to the navigation flow, right-click a card or cluster in the list (or
click ), click Add Existing Card/Cluster, and then select a card. If there is an existingcard you want to add from another environment, right-click a card or cluster in the list (or
click ), click Add Existing Card/Cluster, select the target environment under MyConnections, and then choose the card you want to add to your navigation flow.
Note the following:
• Cards can't be directly selected from Narrative Reporting and Profitability and CostManagement using the Add Existing Card/Cluster option.
• Cards that are added from another navigation flow or from another environment willdisplay the localized labels that were defined in the source navigation flow. To updatethe card labels in your navigation flow, on the Home page, click Tools, and then clickArtifact Labels. See "Specifying Artifact Labels" in your EPM Cloud Administeringguide.
• A reference card is a card that is already referenced from another navigation flow.References to already referenced cards are not supported in navigation flows and willnot be available for selection in the Object Library when adding an existing card; forexample:
– A card referring to a remote artifact or remote tab will not be available from theObject Library when adding an existing card.
– A card referring to a tab from another navigation flow will not be available fromthe Object Library when adding an existing card.
A card is added to the list as a sibling under the card or cluster that is currently selected.To add a card to a cluster, see Grouping Cards into Clusters.
Note:
Cards that are added without first selecting a card or cluster are added to theend of the list.
Chapter 7Viewing and Working with Navigation Flows
7-9
3. To add a new card to the navigation flow, right-click a node in the list (or click ),click Add Card, and then select details for the new card:
Table 7-1 New Card Details
Label Description
Name Enter a label for the card.Ensure that you adhere to the namingrestrictions outlined in Navigation FlowDesign Best Practices and NamingConsiderations.
Visible Select whether the card is visible to userson the Home page.
Cluster If clusters exist, select a cluster for thecard or select None.
Icon Select the graphic that will be displayedfor the card you're creating. Choose fromthe available graphics provided in thegraphics library.
Page Type Select Single Page or Tabular Pageformat.
Content Source If you selected the Single Page format,select Artifact or URL:
• For Artifact, click to select anartifact in the Artifact Library; forexample, if the artifact is a form,then select the specific form from theartifact listing. Available artifactsinclude forms, dashboards, andreports. To select an artifact fromanother environment, select thetarget environment under MyConnections, and then choose theartifact you want to add.
• For URL, enter a complete URL; forexample, a URL to embed an OracleAnalytics Cloud dashboard in a card,then click Preview to validate theURL in a popup window.Insert only external site URLsstarting with the https:// securityprotocol. Don't use internal orrelative URLs or URLs forunconsenting third-party sites. See About Using URLs to Embed Third-Party Pages in EPM Cloud Applications.
Orientation If you selected the Tabular Page format,select Vertical or Horizontal, and thenadd new or existing tabs and sub tabs.See Adding Tabs to a Tabular Page.
A card is added to the list as a sibling under the card or cluster that is currentlyselected. To add a card to a cluster, see Grouping Cards into Clusters.
Chapter 7Viewing and Working with Navigation Flows
7-10
Note:
Cards that are added without first selecting a card or cluster are added to theend of the list.
4. Click Save and Close.
To reload a navigation flow to view design time changes, see Reloading a Navigation Flow.
Adding Tabs to a Tabular PageTabs can be horizontal or vertical. For example, the Valid Intersections card (under theApplication cluster) is a tabular page with two horizontal tabs: Setup and Reports.
Note:
If your environment uses the default Redwood Experience theme, the Setup andReports tabs are at the bottom of the page.
You can also create tabular pages with vertical tabs. Vertical tabs display a graphic and textappears when the cursor is hovered over the tab. Horizontal tabs display labels with text onlyor text with icons.
To ensure an optimal user experience, review the navigation flow design best practices. See Navigation Flow Design Best Practices and Naming Considerations.
To add tabs to a tabular page:
1. Open the Navigation Flow page and click the name of the navigation flow you want toedit. See Viewing and Working with Navigation Flows.
2. Edit an existing card by clicking the name of the card you want to edit, or add a new card
by right-clicking a card (or clicking ), and then clicking Add Card.
3. On the Manage Card page, select the following options:
• For Page Type, select Tabular Page.
• For Orientation, select Vertical or Horizontal.
A tab listing displays at the bottom of the Manage Card page.
4. To edit an existing tab, click a tab name from the tab listing, and edit tab details.
5. To add a new or existing tab:
a. To add an existing tab, right-click a tab in the listing at the bottom of the ManageCard page, click Add Existing Tab (or click the Add Existing Tab button), select atab from the Object Library, and then click OK.
Chapter 7Viewing and Working with Navigation Flows
7-11
Note:
A reference tab is a tab that is already referenced from anothernavigation flow. References to already referenced tabs are notsupported in navigation flows and will not be available for selection inthe Object Library when adding an existing tab; for example:
• A tab referring to a remote artifact or remote sub-tab will not beavailable from the Object Library when adding an existing tab.
• A tab referring to a sub tab from another navigation flow will notbe available from the Object Library when adding an existing tab.
b. To add a new tab, right-click a tab, click Add New Tab (or click the Add NewTab button), and then edit tab details.
c. Select the content for the new tab:
• For Artifact, click to select an artifact in the Artifact Library; forexample, if the artifact is a form, then select the specific form from theartifact listing. Available artifacts include forms, dashboards, and reports.To select an artifact from another environment, select the targetenvironment under My Connections, and then choose the artifact youwant to add.
• For URL, enter a complete URL; for example, a URL to embed an OracleAnalytics Cloud dashboard in a tab, then click Preview to validate theURL in a popup window.
Insert only external site URLs starting with the https:// securityprotocol. Don't use internal or relative URLs or URLs for unconsentingthird-party sites. See About Using URLs to Embed Third-Party Pages inEPM Cloud Applications.
A tab is added to the list as a sibling under the tab that is currently selected.
Note:
Tabs that are added without first selecting a tab are added to the endof the list.
6. To add new or existing sub tabs to a tab:
a. Click the name of a tab in the in the tab listing.
b. For Page Type, select Tabular Page.
c. Right-click a tab, and click Add New Sub Tab or Add Existing Sub Tab (orclick the Add New Sub Tab or Add Existing Sub Tab button), and then editsub tab details.
d. Select the content for the new sub tab:
• For Artifact, click to select an artifact in the Artifact Library; forexample, if the artifact is a form, then select the specific form from theartifact listing. Available artifacts include forms, dashboards, and reports.
Chapter 7Viewing and Working with Navigation Flows
7-12
To select an artifact from another environment, select the target environmentunder My Connections, and then choose the artifact you want to add.
• For URL, enter a complete URL; for example, a URL to embed an OracleAnalytics Cloud dashboard in a sub tab. Click Preview to validate the URL in apopup window.
Insert only external site URLs starting with the https:// security protocol. Don'tuse internal or relative URLs or URLs for unconsenting third-party sites. See About Using URLs to Embed Third-Party Pages in EPM Cloud Applications.
A sub tab is added to the list as a sibling under the tab that is currently selected.
Note:
Sub tabs that are added without first selecting a tab are added to the end ofthe list.
7. Click Save and Close.
To reload a navigation flow to view design time changes, see Reloading a Navigation Flow.
Note:
• For cards with multiple tabs or sub tabs, the last tab accessed by a user will beretained the next time the user accesses the card in the same session. If theuser logs out and then logs back in, the default tab will be displayed.
• Tabs or sub tabs that are added from another navigation flow or from anotherenvironment will display the localized labels that were defined in the sourcenavigation flow. To update the tab labels in your navigation flow, on the Homepage, click Tools, and then click Artifact Labels. See "Specifying ArtifactLabels" in your EPM Cloud Administering guide.
About Using URLs to Embed Third-Party Pages in EPM Cloud ApplicationsOracle Enterprise Performance Management Cloud uses IFrame to embed third-party URLs.IFrame requires that the page that is being embedded must give approval to the page that isembedding it. For example, if we want to embed a page from sharepoint.com into an EPMCloud application, then sharepoint.com must allow oraclecloud.com to embed the page fromsharepoint.com.
This can be achieved by adding oraclecloud.com in the Content Security Policy of the webapplication whose page you need to embed.
When embedding a third-party page you also must consider if the page is available to thepublic or if it requires a login. For example, pages from wikipedia.org do not need anyauthentication.
If you are embedding a page that requires authentication, you need to see if SSO can beenabled for the page. If not, then your page may not load inside IFrame. As a workaround,log in to that web application in another browser tab, and then if you access the same pagefrom the EPM Cloud application, it will open.
Chapter 7Viewing and Working with Navigation Flows
7-13
This URL support feature allows you to embed the following types of pages:
• Other Oracle products (would need to enable SSO)
• Web applications owned by customer (would need to allow the EPM Cloudapplication by updating the Content Security Policy and enabling SSO, or likewise)
• Pages from the public domain (for example, wikipedia.org)
Removing Navigation Flows, Cards, and TabsYou can't remove the following navigation elements:
• The Application cluster and the Settings icon in the Application cluster.
• The Tools cluster and these icons in the Tools cluster:
– Access Control
– Navigation Flows
– Daily Maintenance
– Migration
To remove navigation flows, cards, and tabs:
1. Open the Navigation Flow page. See Viewing and Working with NavigationFlows.
2. If removing a navigation flow:
a. Select the navigation flow you want to remove.
b. In the upper right-hand corner of the page, click , and then select Delete.
Note:
You can't delete the predefined navigation flow, called Default.
3. If removing a card:
a. Click the name of the navigation flow you want to edit.
b. In the Remove column for the card you want to remove, click .
4. If removing a tab:
a. Click the name of the navigation flow you want to edit.
b. Click the name of the card you want to edit.
c. In the tab listing at the bottom of the Manage Tab page, in the Remove
column for the tab you want to remove, click .
To reload a navigation flow to view design time changes, see Reloading a NavigationFlow.
Chapter 7Viewing and Working with Navigation Flows
7-14
Grouping Cards into ClustersA cluster is a grouping of cards. You must first create a cluster and then you can assign cardsto it. You can also add existing clusters to navigation flows.
To ensure an optimal user experience, review the navigation flow design best practices. See Navigation Flow Design Best Practices and Naming Considerations.
To assign cards to clusters:
1. Create a new cluster or add an existing cluster:
a. Open the Navigation Flow page and click the name of the navigation flow in whichyou want to add a cluster. See Viewing and Working with Navigation Flows.
b. To create a new cluster, right-click a card or cluster in the list (or click ), click AddCluster, enter or select the cluster details, and then choose a graphic for the cluster.
Note:
Ensure that you adhere to the visibility and naming restrictions outlined in Navigation Flow Design Best Practices and Naming Considerations.
A cluster is added to the list as a sibling under the cluster that is currently selected.
Note:
Clusters that are added without first selecting a card or cluster are added tothe end of the list.
c. To add an existing cluster, right-click a card or cluster in the list (or click ), clickAdd Existing Card/Cluster. If there is an existing cluster you want to add from
another environment, right-click a card or cluster in the list (or click ), click AddExisting Card/Cluster, select the target environment under My Connections, andthen choose the cluster you want to add to your navigation flow.
Chapter 7Viewing and Working with Navigation Flows
7-15
Note:
• Clusters can't be directly selected from Narrative Reporting andProfitability and Cost Management using the Add ExistingCard/Cluster option.
• Clusters that are added from another navigation flow or fromanother environment will display the localized labels that weredefined in the source navigation flow. To update the clusterlabels in your navigation flow, on the Home page, click Tools,and then click Artifact Labels. See "Specifying Artifact Labels"in your EPM Cloud Administering guide.
• A reference cluster is a cluster that is already referenced fromanother navigation flow. References to already referencedclusters are not supported in navigation flows and will not beavailable for selection in the Object Library when adding anexisting cluster.
A cluster is added to the list as a sibling under the card or cluster that iscurrently selected.
Note:
Clusters that are added without first selecting a card or cluster areadded to the end of the list.
d. Click Save and Close.
2. Select the cards to include in the cluster using one of these options:
a. Navigate to the card you want to add. If the card is within anotherenvironment, first select the environment under My Connections, and thennavigate to the card in that environment. Assign the card to a cluster using oneof these options:
• To the right of the card in the Order column, click , select the cluster,and then click OK.
• Click the name of the card to view the card details, then for Cluster selecta cluster for the card, and then click OK.
b. Navigate to the cluster in which you want to add a card, then right-click the
cluster (or click ), click Add Card In Cluster, and then select an option:
• Select Add Existing Card, to select an existing card or to add existingcards from another cluster to the selected cluster.
• Select Add Card, and then enter card details to add a new card to theselected cluster.
Chapter 7Viewing and Working with Navigation Flows
7-16
Note:
You cannot add a card to a cluster if the card or the cluster is alreadyreferenced from another navigation flow.
c. Click Save and Close.
The cards will appear in the listing as children of the cluster. Use the up and down arrowsnext to the cards to reorder the cards within the cluster, if needed.
To reload a navigation flow to view design time changes, see Reloading a Navigation Flow.
Reloading a Navigation FlowTo display design changes while you're working with a navigation flow, you can reload thenavigation flow.
To reload a navigation flow after making design changes:
1. From the Home page, click the down arrow next to the user name (upper right corner ofthe screen).
2. On the Settings and Actions menu, click Reload Navigation Flow.
Switching Navigation Flows at RuntimeIf you belong to multiple groups or if a navigation flow is assigned to a role, you might haveaccess to more than one navigation flow.
To switch navigation flows at runtime:
1. From the Home page, click .
2. Select the navigation flow you want to view.
Chapter 7Viewing and Working with Navigation Flows
7-17
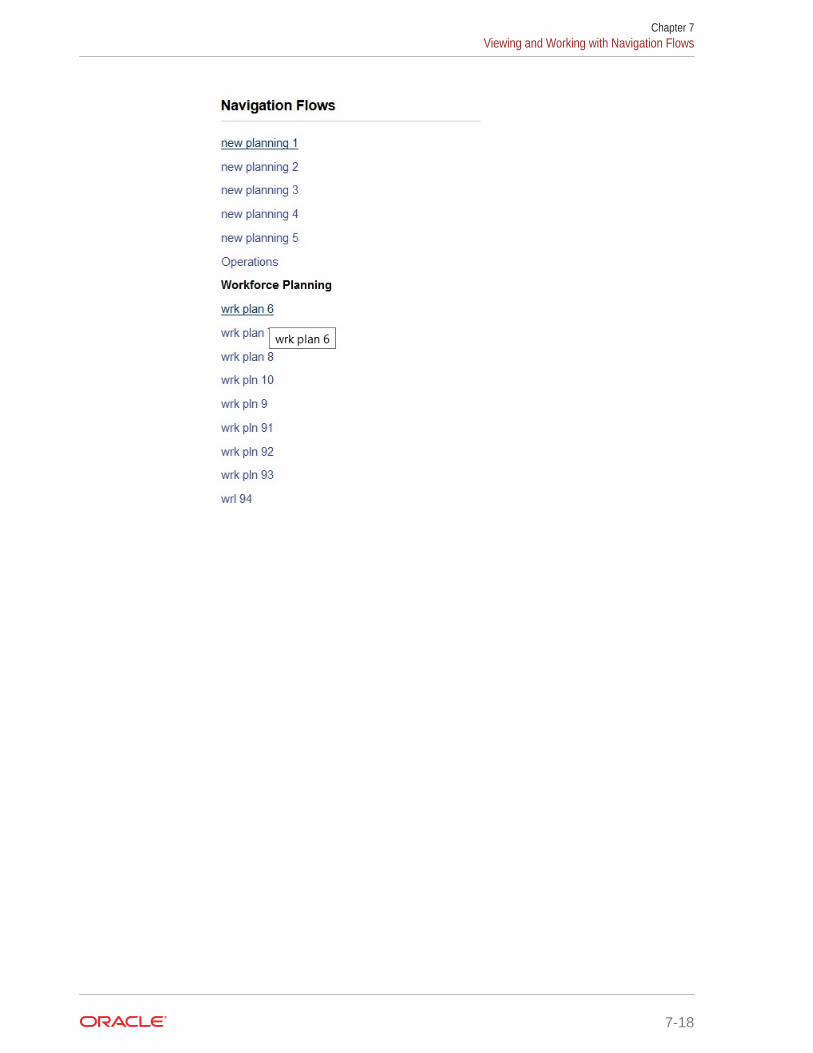
Chapter 7Viewing and Working with Navigation Flows
7-18
8Editing Dimensions in the SimplifiedDimension Editor
Work with application dimensions and members in the simplified grid interface.
Related Topics
• About Editing Dimensions in the Simplified Dimension Editor
• Dimension Overview
• Accessing the Simplified Dimension Editor
• Working with the Simplified Dimension Editor Grid
• Editing Dimension Properties in the Simplified Dimension Editor
• Editing Member Properties in the Simplified Dimension Editor
About Editing Dimensions in the Simplified Dimension EditorThe Simplified dimension editor displays dimensions and members in a grid format. With thegrid format, dimensions and members are editable on a single page. You can edit memberproperties directly on the grid and you can perform ad hoc operations such as zooming in,zooming out, keep selected, remove selected, and freeze.
Videos
Your Goal Watch This Video
Get an introduction to the Simplifieddimension editor. Overview: Dimension Editor in Planning
Tutorials
Tutorials provide instructions with sequenced videos and documentation to help you learn atopic.
Your Goal Learn How
Learn how to add and edit dimensions andmembers in the Simplified dimension editor. Managing Dimensions in Planning
Related Topics
• Creating Dimensions
• Dimension Overview
• Accessing the Simplified Dimension Editor
• Working with the Simplified Dimension Editor Grid
8-1
• Editing Dimension Properties in the Simplified Dimension Editor
• Editing Member Properties in the Simplified Dimension Editor
Dimension OverviewRelated Topics
• About Dimensions and Members
• About Sparse and Dense Dimensions
• About Dimension Hierarchies
• About Custom Dimensions
• About Entities
• About Accounts
• Accounts, Entities, Periods, and Cubes
About Dimensions and MembersDimensions categorize data values.
Members are components of dimensions.
About Sparse and Dense DimensionsSparse dimensions lack data values for the majority of member combinations. Densedimensions have data values for the majority of member combinations. At least onedense dimension is required. Custom attributes can't be assigned to densedimensions. The application designates the Account and Period dimensions as dense,and the remaining dimensions as sparse. To optimize performance for sparsedimensions, the application searches for and calculates only occupied data values ineach dimension combination, reducing calculation time and disk usage. You canmodify these settings.
About Dimension HierarchiesDimension hierarchies define structural and mathematical relationships, andconsolidations between members in the application. Relationships are representedgraphically in a collapsible hierarchy diagram. The levels below the cube name aredimensions, and the levels below each dimension are members.
The Period dimension can contain the member YearTotal, which contains membersQ1, Q2, Q3, and Q4. Members Q1, Q2, Q3, and Q4 contain their own members for thecorresponding months in the year. To consolidate data values in the Period dimension,roll up monthly data values to get quarterly data values, and quarterly data values toget yearly data values.
Members of the same level that belong to the same dimension or member are calledsiblings. For example, Q1, Q2, Q3, and Q4 are siblings because they are at the samelevel in the hierarchy, and are members of the same member, YearTotal.
The members of a dimension are called children of the dimension. Members thatbelong to a member are called children of that member. The member YearTotal is a
Chapter 8Dimension Overview
8-2

child of Period, the members of Q1, Q2, Q3, and Q4 are children of YearTotal, and Jan, Feb,and Mar are children of Q1. Q1 is the parent of Jan, Feb, and Mar, YearTotal is the parent ofQ1, Q2, Q3, and Q4, and Period is the parent of YearTotal.
About Custom DimensionsThe application includes two custom dimensions: Account and Entity. You can edit the namesof these dimensions, and create up to 32 user-defined dimensions.
Caution:
You can't delete custom dimensions after you create them.
Use Account and user-defined dimensions to specify data to gather from users. Use Entity tomodel the flow of planning information in the organization and establish the plan review path.
• Aggregation Options
• Storage Options
Aggregation OptionsYou can define calculations within dimension hierarchies using aggregation options.Aggregation options determine how child member values aggregate to parent members:
• + Addition
• - Subtraction
• * Multiplication
• / Division
• % Percent
• ~ Ignore
• Never (don't aggregate, regardless of hierarchy)
Storage Options
Table 8-1 Storage Options
Option Impact
Dynamic Calc and Store Calculates data values of members, and storesvalues.
Store Stores data values of members.
Dynamic Calc Calculates data values of members, anddisregards the values.
Never Share Prohibits members in the same dimension fromsharing data values.
Shared Allows members in the same dimension to sharedata values.
Chapter 8Dimension Overview
8-3
Table 8-1 (Cont.) Storage Options
Option Impact
Label Only Has no data associated with the member.
About Dynamic Calc
With dynamically calculated members, the application calculates data values ofmembers, and disregards these values. As a best practice, Oracle recommends a limitof 100 children under a Dynamic Calc parent. Changing a member's storage toDynamic Calc may result in loss of data, depending on how the data was originallyderived. You may need to update outlines, calculations, or both to get the dynamicallycalculated value.
Dynamic Calc Versus Dynamic Calc and Store
In most cases, you can optimize calculations and lower disk usage by using DynamicCalc instead of Dynamic Calc and Store when calculating members of sparsedimensions. Use Dynamic Calc and Store for members of sparse dimensions withcomplex formulas, or that users retrieve frequently.
For members of dense dimensions, use Dynamic Calc. Dynamic Calc and Storeprovides only a small decrease in retrieval time and regular calculation time, anddoesn't significantly lower disk usage. For data values accessed concurrently by manyusers, use Dynamic Calc. Retrieval time may be significantly lower than for DynamicCalc and Store.
Note:
• Don't use Dynamic Calc for base-level members for which users enterdata.
• Don't use Dynamic Calc for a parent member if you enter data for thatmember in a target version. Parent members set to Dynamic Calc areread-only in target versions.
• Data values are not saved for Dynamic Calc members.
About Store Data Storage
Don't set parent members to Store if their children are set to Dynamic Calc. With thiscombination, new totals for parents are not calculated when users save and refreshforms.
About Shared Data Storage
Use Shared to allow alternate rollup structures in the application.
About Never Share Data Storage
The default data storage type is Never Share when you add user-defined customdimensions. You can use Never Share for parent members with only one childmember that aggregates to the parent, to apply access to the child member.
Chapter 8Dimension Overview
8-4
About Label Only Data Storage
Label Only members are virtual members; they are typically used for navigation and have noassociated data.
Note:
• You can't assign level 0 members as Label Only.
• Label Only members can display values.
• Making dimension members Label Only minimizes database space bydecreasing block size.
• You can't assign attributes to Label Only members.
• In a multicurrency application, you can't apply Label Only storage to membersof these dimensions: Entity, Versions, Currencies, and user-defined customdimensions. To store exchange rates, use Never Share.
• Data storage for children of Label Only parents is set to Never Share bydefault.
Caution:
Don't design forms in which Label Only parents follow their first childmember, as you can't save data in the first child member. Instead,create forms with Label Only parents selected before their children,or don't select Label Only parents for forms.
About EntitiesEntities typically match your organization’s structure, such as geographical regions,departments, or divisions. Create entity members for groups that submit plans for approval.Entity members help define budget review, or approvals.
For example, you may have regional centers preparing budgets for country headquarters.The country headquarters may prepare plans for corporate headquarters. To match thisstructure, create members for the regions, countries and headquarters. Specify regions aschildren of country members, and country members as children of headquarters.
Forms support multiple currencies per entity, enabling data entry for multiple currencies andreporting against one currency. However, the application supports a base entity for eachentity. You can set the currency for entered values, which are converted to other currencieshaving defined exchange rates.
About AccountsAccount dimension members specify the information needed from users. Create an accountstructure that lets budget preparers input data for budget items. You can define calculations inthe account structure.
Chapter 8Dimension Overview
8-5
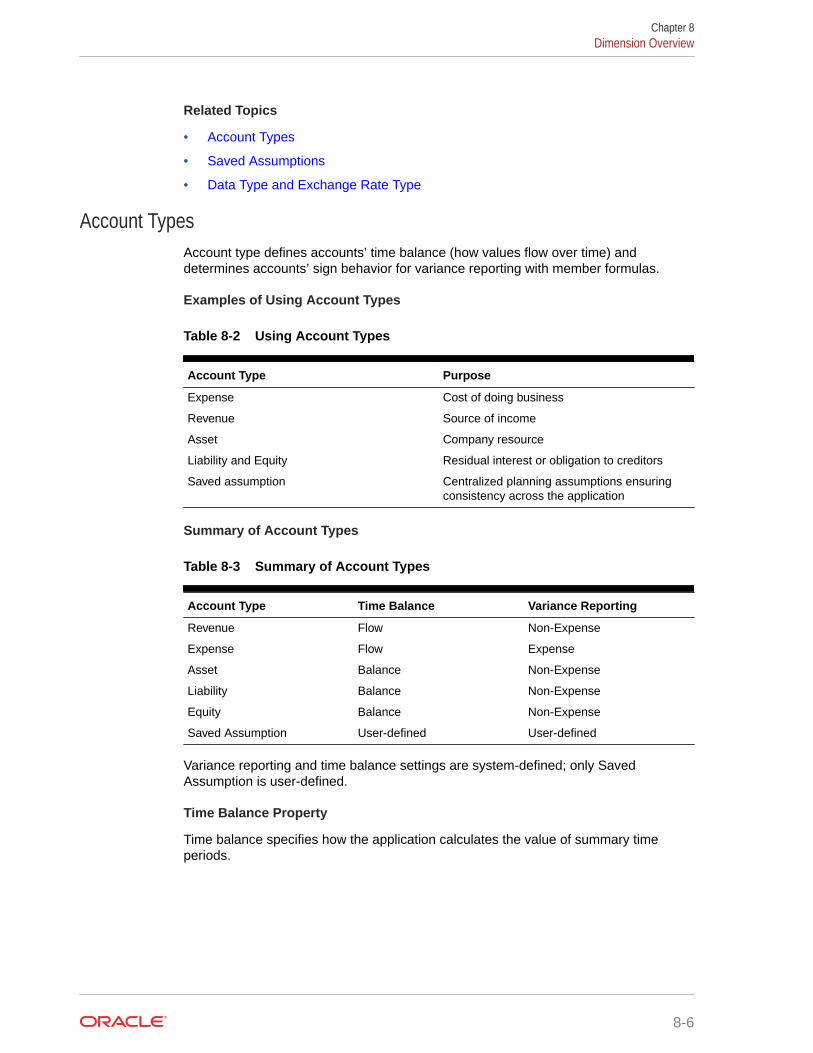
Related Topics
• Account Types
• Saved Assumptions
• Data Type and Exchange Rate Type
Account TypesAccount type defines accounts’ time balance (how values flow over time) anddetermines accounts’ sign behavior for variance reporting with member formulas.
Examples of Using Account Types
Table 8-2 Using Account Types
Account Type Purpose
Expense Cost of doing business
Revenue Source of income
Asset Company resource
Liability and Equity Residual interest or obligation to creditors
Saved assumption Centralized planning assumptions ensuringconsistency across the application
Summary of Account Types
Table 8-3 Summary of Account Types
Account Type Time Balance Variance Reporting
Revenue Flow Non-Expense
Expense Flow Expense
Asset Balance Non-Expense
Liability Balance Non-Expense
Equity Balance Non-Expense
Saved Assumption User-defined User-defined
Variance reporting and time balance settings are system-defined; only SavedAssumption is user-defined.
Time Balance Property
Time balance specifies how the application calculates the value of summary timeperiods.
Chapter 8Dimension Overview
8-6
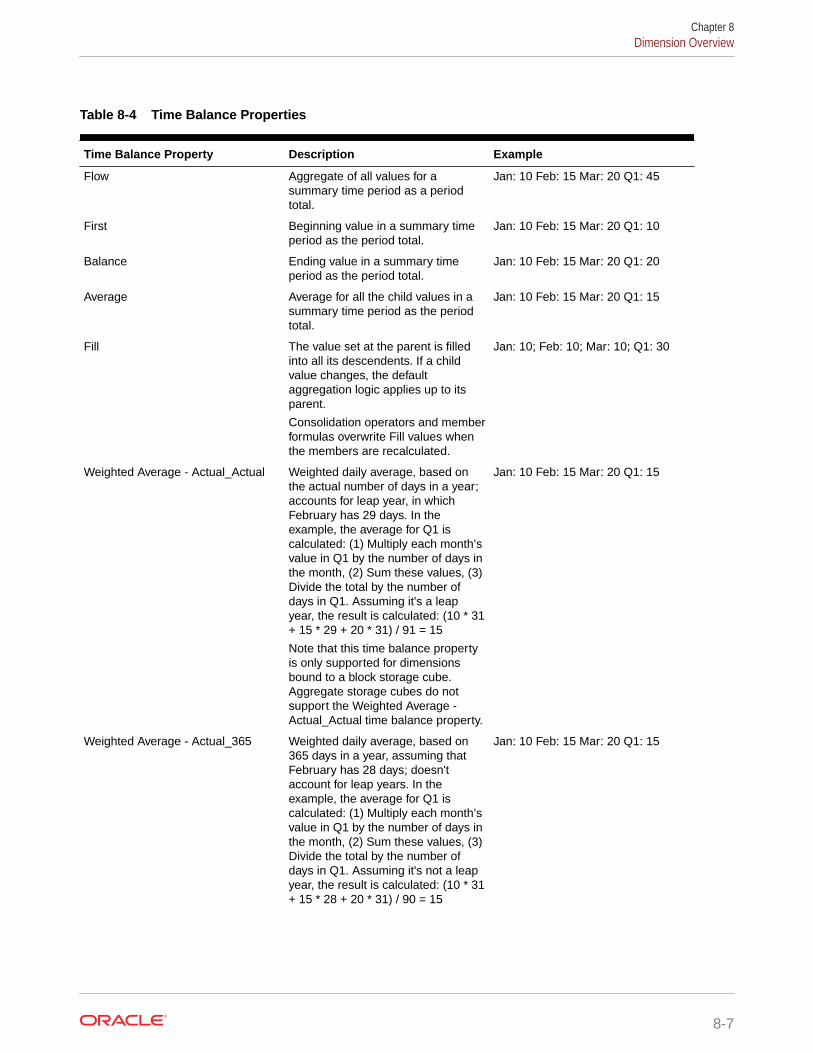
Table 8-4 Time Balance Properties
Time Balance Property Description Example
Flow Aggregate of all values for asummary time period as a periodtotal.
Jan: 10 Feb: 15 Mar: 20 Q1: 45
First Beginning value in a summary timeperiod as the period total.
Jan: 10 Feb: 15 Mar: 20 Q1: 10
Balance Ending value in a summary timeperiod as the period total.
Jan: 10 Feb: 15 Mar: 20 Q1: 20
Average Average for all the child values in asummary time period as the periodtotal.
Jan: 10 Feb: 15 Mar: 20 Q1: 15
Fill The value set at the parent is filledinto all its descendents. If a childvalue changes, the defaultaggregation logic applies up to itsparent.
Consolidation operators and memberformulas overwrite Fill values whenthe members are recalculated.
Jan: 10; Feb: 10; Mar: 10; Q1: 30
Weighted Average - Actual_Actual Weighted daily average, based onthe actual number of days in a year;accounts for leap year, in whichFebruary has 29 days. In theexample, the average for Q1 iscalculated: (1) Multiply each month’svalue in Q1 by the number of days inthe month, (2) Sum these values, (3)Divide the total by the number ofdays in Q1. Assuming it's a leapyear, the result is calculated: (10 * 31+ 15 * 29 + 20 * 31) / 91 = 15
Note that this time balance propertyis only supported for dimensionsbound to a block storage cube.Aggregate storage cubes do notsupport the Weighted Average -Actual_Actual time balance property.
Jan: 10 Feb: 15 Mar: 20 Q1: 15
Weighted Average - Actual_365 Weighted daily average, based on365 days in a year, assuming thatFebruary has 28 days; doesn'taccount for leap years. In theexample, the average for Q1 iscalculated: (1) Multiply each month’svalue in Q1 by the number of days inthe month, (2) Sum these values, (3)Divide the total by the number ofdays in Q1. Assuming it's not a leapyear, the result is calculated: (10 * 31+ 15 * 28 + 20 * 31) / 90 = 15
Jan: 10 Feb: 15 Mar: 20 Q1: 15
Chapter 8Dimension Overview
8-7
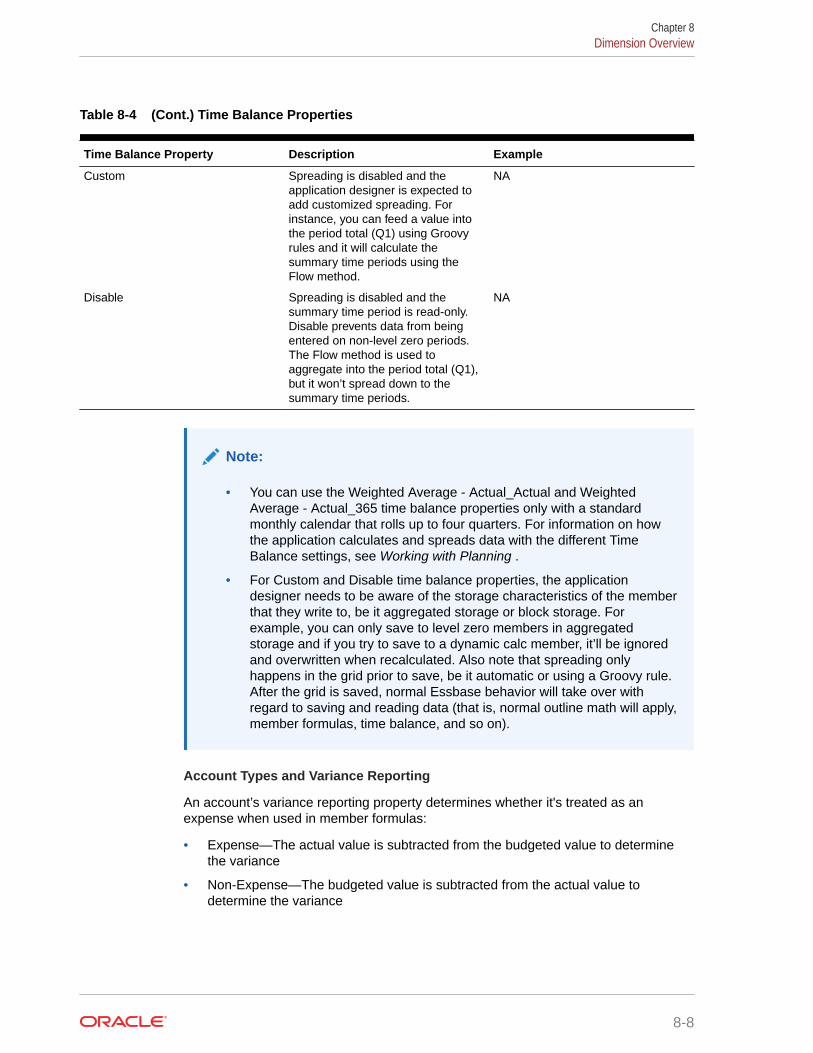
Table 8-4 (Cont.) Time Balance Properties
Time Balance Property Description Example
Custom Spreading is disabled and theapplication designer is expected toadd customized spreading. Forinstance, you can feed a value intothe period total (Q1) using Groovyrules and it will calculate thesummary time periods using theFlow method.
NA
Disable Spreading is disabled and thesummary time period is read-only.Disable prevents data from beingentered on non-level zero periods.The Flow method is used toaggregate into the period total (Q1),but it won’t spread down to thesummary time periods.
NA
Note:
• You can use the Weighted Average - Actual_Actual and WeightedAverage - Actual_365 time balance properties only with a standardmonthly calendar that rolls up to four quarters. For information on howthe application calculates and spreads data with the different TimeBalance settings, see Working with Planning .
• For Custom and Disable time balance properties, the applicationdesigner needs to be aware of the storage characteristics of the memberthat they write to, be it aggregated storage or block storage. Forexample, you can only save to level zero members in aggregatedstorage and if you try to save to a dynamic calc member, it’ll be ignoredand overwritten when recalculated. Also note that spreading onlyhappens in the grid prior to save, be it automatic or using a Groovy rule.After the grid is saved, normal Essbase behavior will take over withregard to saving and reading data (that is, normal outline math will apply,member formulas, time balance, and so on).
Account Types and Variance Reporting
An account’s variance reporting property determines whether it's treated as anexpense when used in member formulas:
• Expense—The actual value is subtracted from the budgeted value to determinethe variance
• Non-Expense—The budgeted value is subtracted from the actual value todetermine the variance
Chapter 8Dimension Overview
8-8
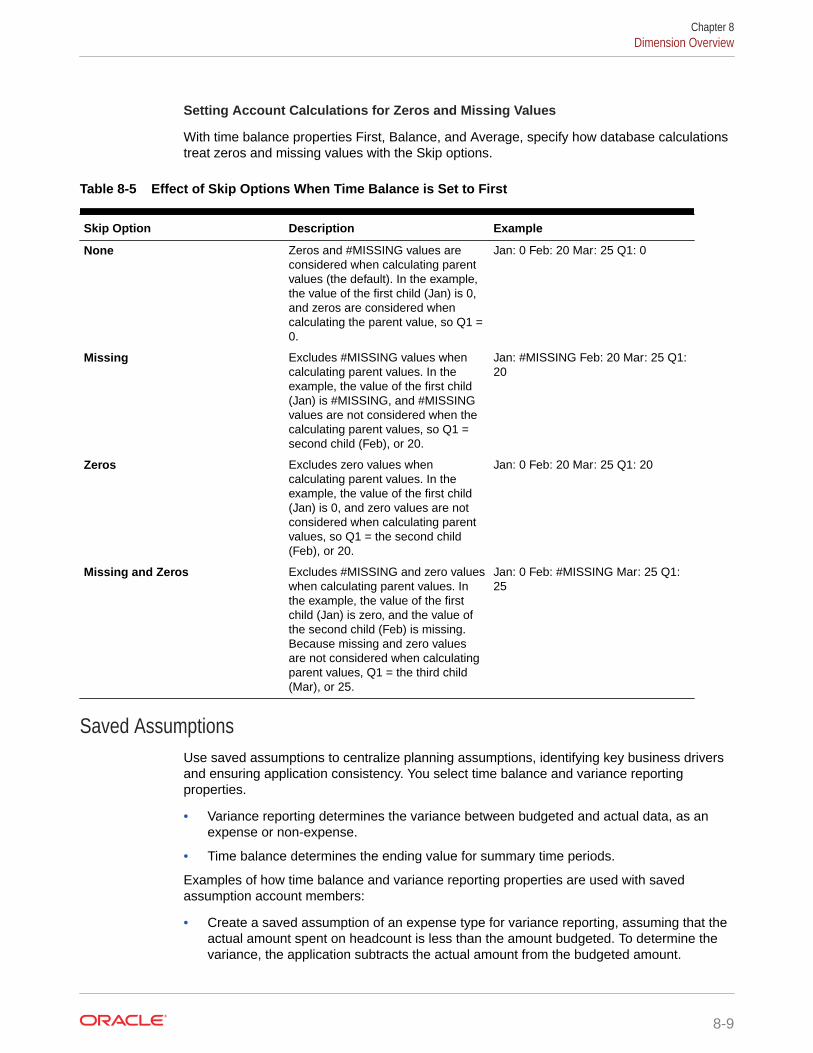
Setting Account Calculations for Zeros and Missing Values
With time balance properties First, Balance, and Average, specify how database calculationstreat zeros and missing values with the Skip options.
Table 8-5 Effect of Skip Options When Time Balance is Set to First
Skip Option Description Example
None Zeros and #MISSING values areconsidered when calculating parentvalues (the default). In the example,the value of the first child (Jan) is 0,and zeros are considered whencalculating the parent value, so Q1 =0.
Jan: 0 Feb: 20 Mar: 25 Q1: 0
Missing Excludes #MISSING values whencalculating parent values. In theexample, the value of the first child(Jan) is #MISSING, and #MISSINGvalues are not considered when thecalculating parent values, so Q1 =second child (Feb), or 20.
Jan: #MISSING Feb: 20 Mar: 25 Q1:20
Zeros Excludes zero values whencalculating parent values. In theexample, the value of the first child(Jan) is 0, and zero values are notconsidered when calculating parentvalues, so Q1 = the second child(Feb), or 20.
Jan: 0 Feb: 20 Mar: 25 Q1: 20
Missing and Zeros Excludes #MISSING and zero valueswhen calculating parent values. Inthe example, the value of the firstchild (Jan) is zero, and the value ofthe second child (Feb) is missing.Because missing and zero valuesare not considered when calculatingparent values, Q1 = the third child(Mar), or 25.
Jan: 0 Feb: #MISSING Mar: 25 Q1:25
Saved AssumptionsUse saved assumptions to centralize planning assumptions, identifying key business driversand ensuring application consistency. You select time balance and variance reportingproperties.
• Variance reporting determines the variance between budgeted and actual data, as anexpense or non-expense.
• Time balance determines the ending value for summary time periods.
Examples of how time balance and variance reporting properties are used with savedassumption account members:
• Create a saved assumption of an expense type for variance reporting, assuming that theactual amount spent on headcount is less than the amount budgeted. To determine thevariance, the application subtracts the actual amount from the budgeted amount.
Chapter 8Dimension Overview
8-9

• Determine the value for office floor space by using the time period’s last value.
• Make an assumption about the number of product units sold at the end of the timeperiod. Determine the final value for the summary time period by aggregating thenumber of units sold across time periods.
Data Type and Exchange Rate TypeData type and exchange rate type determine how values are stored in accountmembers, and the exchange rates used to calculate values. Available data type foraccount members’ values:
• Currency—Stores and displays in the default currency.
• Non-currency—Stores and displays as a numeric value.
• Percentage—Stores a numeric value and displays as a percent.
• Date—Displays as a date.
• Text—Displays as text.
In a multiple currency application, for accounts with the Currency data type, availableExchange Rate types (valid for any time period):
• Average—Average exchange rate
• Ending—Ending exchange rate
• Historical—Exchange rate in effect when, for example, earnings for a RetainedEarnings account were earned or assets for a Fixed Assets account werepurchased.
In a Simplified multiple currency application, for accounts with the Currency data type,available Exchange Rate types (valid for any time period):
• FX Rates - Average
• FX Rates - Ending
Accounts, Entities, Periods, and CubesBy assigning cubes for Account, Entity, and Period members, you set to which cubesthe members’ children have access. For example, Total Sales Account may be validfor Revenue and P&L, but Fixed Assets Account may be valid for only Balance Sheet.Not assigning a cube to a member prevents that member’s children from accessingthat cube.
When moving members, if the new parent is valid for different cubes, members remainvalid only for cubes they have in common with the new parent. If the new parent of anaccount member has another source cube, the member’s source cube is set to the firstnew valid cube of that member.
Entities and Cubes
Typically, entity members prepare different plans. When defining entity members,specify cubes for which they are valid. Because forms are associated with cubes, youcan control which entity members can enter data for each cube.
Chapter 8Dimension Overview
8-10

Accounts and Cubes
If accounts are valid for multiple cubes, specify the source cube to determine which cube’sdatabase stores the account value for them.
Accessing the Simplified Dimension EditorTo access the Simplified dimension editor:
1. From the Home page, click Application, and then click Overview.
2. Click Dimensions.
3. Click the down arrow to the right of Cube to filter the list of dimensions by cube.
4. Click the name of the dimension that you want to view.
5. Select from the following tabs:
• Edit Dimension Properties—Click to view and edit dimension details. See EditingDimension Properties in the Simplified Dimension Editor.
• Edit Member Properties—Click to view and edit dimension members. See EditingMember Properties in the Simplified Dimension Editor.
Working with the Simplified Dimension Editor GridWork with grid elements in the simplified grid interface.
Related Topics
• Switching to Another Dimension
• Customizing the Column Layout
• Viewing Ancestors
• Showing Member Usage in an Application
• Focusing Your Editing
• Finding Members
• Moving Members
• Sorting Members
• Moving Members to Another Hierarchy
• Working with Member Formulas
• Copying Member Names from Microsoft Excel
Switching to Another DimensionTo switch to another dimension while viewing the Simplified dimension editor grid:
1. View Edit Member Properties.
See Accessing the Simplified Dimension Editor.
2. Click the down arrow next to the dimension name at the top of the page.
Chapter 8Accessing the Simplified Dimension Editor
8-11
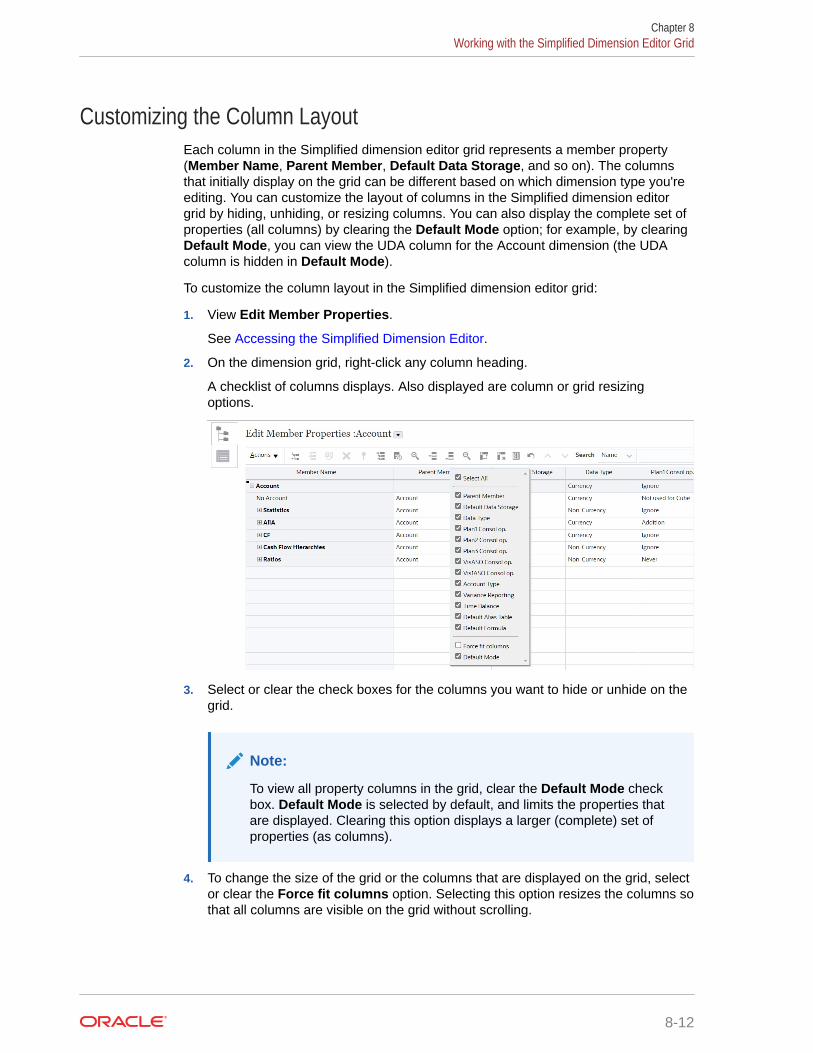
Customizing the Column LayoutEach column in the Simplified dimension editor grid represents a member property(Member Name, Parent Member, Default Data Storage, and so on). The columnsthat initially display on the grid can be different based on which dimension type you'reediting. You can customize the layout of columns in the Simplified dimension editorgrid by hiding, unhiding, or resizing columns. You can also display the complete set ofproperties (all columns) by clearing the Default Mode option; for example, by clearingDefault Mode, you can view the UDA column for the Account dimension (the UDAcolumn is hidden in Default Mode).
To customize the column layout in the Simplified dimension editor grid:
1. View Edit Member Properties.
See Accessing the Simplified Dimension Editor.
2. On the dimension grid, right-click any column heading.
A checklist of columns displays. Also displayed are column or grid resizingoptions.
3. Select or clear the check boxes for the columns you want to hide or unhide on thegrid.
Note:
To view all property columns in the grid, clear the Default Mode checkbox. Default Mode is selected by default, and limits the properties thatare displayed. Clearing this option displays a larger (complete) set ofproperties (as columns).
4. To change the size of the grid or the columns that are displayed on the grid, selector clear the Force fit columns option. Selecting this option resizes the columns sothat all columns are visible on the grid without scrolling.
Chapter 8Working with the Simplified Dimension Editor Grid
8-12
Viewing AncestorsAncestors are all the members above the selected member in the dimension hierarchy.
To view the ancestors for the selected member in the Simplified dimension editor grid:
1. View Edit Member Properties.
See Accessing the Simplified Dimension Editor.
2. Select a member on the dimension editor grid.
3. Click Actions, and then select Show Ancestors.
Showing Member Usage in an ApplicationBefore performing such operations as deleting members, it's important to understand wherein the application the members are used (in which forms, approval units, exchange rates, andso on) by using Show Usage.
To view where members are used in an application using the Simplified dimension editor:
1. View Edit Member Properties.
See Accessing the Simplified Dimension Editor.
2. Select a member on the dimension editor grid.
3. Click Actions, and then Show Usage.
Focusing Your EditingUse zoom in, zoom out, keep selected, remove selected, and freeze to focus your editingwhile working in the Simplified dimension editor grid.
To perform these operations while viewing the dimension editor grid:
1. View Edit Member Properties.
See Accessing the Simplified Dimension Editor.
2. To focus your editing on specific members in the grid, select a member, and then clickone of the following zoom operations:
• Zoom In Next level—Displays all members one level below the selected member
• Zoom In All levels—Displays all descendant members below the selected member
• Zoom In Bottom level—Displays all descendant members of the selected memberthat have no children
• Zoom Out—Displays the member one level above the selected member
3. To focus your editing on specific rows or columns in the grid, select a row or column, andthen choose from the following operations:
• Keep Selected—Displays only the selected row or column on the grid
• Remove Selected—Removes the selected row or column from the grid
• Freeze (Columns only)—Keeps the selected column and all columns to the left of theselected column stationary so the column or columns can't be scrolled. Only columnsto the right of the frozen column can be scrolled. For example, you can freeze the
Chapter 8Working with the Simplified Dimension Editor Grid
8-13
first column that includes the member name so that you can scroll and editthat member's properties and still see the member name. To unfreezecolumns, click Freeze once again.
Finding MembersTo find dimension members in the Simplified dimension editor grid:
1. View Edit Member Properties for a dimension.
See Accessing the Simplified Dimension Editor.
2. For Search, select Name, Alias, or Both.
3. Enter the search text (member name, alias, or partial string) for which to search.
4. Click Search Up or Search Down.
Moving MembersTo move members:
1. View Edit Member Properties.
See Accessing the Simplified Dimension Editor.
2. Select the member to move.
3. To move the member up one position, click . To move the member down oneposition, click .
Sorting MembersYou can sort members in ascending or descending order, by children or descendants.Sorting members affects the outline. For example, you can alphabetize a list of childmembers by sorting in descending order to help users quickly locate members inhierarchies in the Simplified dimension editor.
To sort members using the Simplified dimension editor:
1. View Edit Member Properties.
See Accessing the Simplified Dimension Editor.
2. On the dimension grid, select the members whose children or descendants youwant to sort.
3. For Sort, select Children or Descendants.
Note:
• If you do not see the Sort options at the top of the page, click .
• Sorting by children affects only members in the level immediatelybelow the selected member. Sorting by descendants affects alldescendants of the selected member.
Chapter 8Working with the Simplified Dimension Editor Grid
8-14
4. Click or .
Moving Members to Another HierarchyTo move members to another hierarchy in the Simplified dimension editor:
1. View Edit Member Properties.
See Accessing the Simplified Dimension Editor.
2. In the Parent Member column of the grid, type a new parent name for the member youwant to move.
3. Click Save.
Working with Member FormulasYou can define or edit member formulas directly in the Simplified dimension editor grid, in theformula bar, or in the Member Formula dialog where you can validate member formulas.
You can define member formulas to combine operators, calculation functions, dimension andmember names, and numeric constants to perform calculations on members. Memberformulas can also include:
• Operator type, function, value, member name, UDA, and so on allowed in formulas.
• Predefined formula expressions, including Smart List values, that expand into a formulaor value upon database refresh.
To define or edit member formulas in the Simplified dimension editor:
1. View Edit Member Properties.
See Accessing the Simplified Dimension Editor.
2. In the Default Formula column of the grid, select the member for which you want todefine or edit a formula. Define or edit the formula for the member using one of thefollowing options:
• Click the cell once more in the dimension editor grid to enter or edit the formula.
• Click within the formula bar above the dimension editor grid, and then enter or editthe formula.
• Click next to the formula bar, and then enter or edit the formula.
Tip:
To include member names in formulas, keep the focus on the formula cell in thegrid. Press Ctrl while clicking the member name you want to include in theformula. The member name will display in the formula bar.
3. Optional: To check the validity of a member formula, click next to the formula bar,and then click Validate.
4. Click Save.
Chapter 8Working with the Simplified Dimension Editor Grid
8-15
Copying Member Names from Microsoft ExcelTo copy and paste member names from Microsoft Excel:
1. In Excel, highlight the member names in one cell or in a range of cells, and pressCtrl+C to copy the data onto the clipboard.
2. Highlight and select the target cell or cells in the Simplified dimension editor, andthen press Ctrl+V.
3. When the Clipboard helper is displayed, press Ctrl+V again. The data is pasted tothe Clipboard helper.
4. Click Paste to paste the data into the Simplified dimension editor.
Editing Dimension Properties in the Simplified DimensionEditor
To access the properties of a dimension in the Simplified dimension editor:
1. From the Home page, click Application, and then click Overview.
2. Click the Dimensions tab, and then click the name of the dimension for which youwant to view dimension properties.
3. Click the Edit Dimension Properties tab .
Dimension properties must conform to guidelines listed in Naming Restrictions.
Table 8-6 Dimension Properties
Property Value
Dimension Enter a name that is unique across alldimensions.
Description Optional: Enter a description.
Alias Table and Alias Optional: Select an alias table. Enter analternate name for the dimension. See Administering Alias Tables.
Cube Select the cubes for which the dimension isenabled. Clearing this option disables allmembers of the dimension for thedeselected cube.
Two Pass Calculation Recalculate values of members based onvalues of parent members or othermembers. Available for Account and Entitymembers with Dynamic Calc or DynamicCalc and Store properties.
Chapter 8Editing Dimension Properties in the Simplified Dimension Editor
8-16
Table 8-6 (Cont.) Dimension Properties
Property Value
Apply Security Allow security to be set on the dimensionmembers; must be selected beforeassigning access rights to dimensionmembers. Otherwise, dimensions have nosecurity and users can access memberswithout restriction. See Assigning Access toDimension Members.
Data Storage Select a data storage option. The default isNever Share.• Store—Stores data values of members.• Dynamic Calc and Store—Calculates
data values of members, and storesvalues.
• Dynamic Calc—Calculates data valuesof members, and disregards the values.
• Never Share—Prohibits members inthe same dimension from sharing datavalues.
• Label Only—Has no data associatedwith the member.
• Shared—Allows members in the samedimension to share data values.
See Storage Options.
Display Option Set application default display options forthe Member Selection dialog box. SelectMember Name or Alias to displaymembers or aliases. Member Name:Aliasdisplays members on the left and aliases onthe right. Alias:Member Name displaysaliases on the left and members on theright.
Hierarchy Type Available for dimensions bound to anaggregate storage cube. Aggregate storagedimensions are automatically enabled tosupport multiple hierarchies. The firsthierarchy in a multiple hierarchydimension must be Stored.For members with a Stored hierarchy type,the only valid cube aggregation options areAddition or Ignore. In a stored hierarchy,the first member must be set to Addition.For members with a Dynamic hierarchytype, all cube aggregation options are valid.Stored hierarchy members that are notchildren of Label Only members musthave Addition set as the consolidationoperator. Children of Label Only memberscan be set to Ignore.
Custom Attributes Click to Create or Synchronize customattributes for a dimension.
Chapter 8Editing Dimension Properties in the Simplified Dimension Editor
8-17
Editing Member Properties in the Simplified DimensionEditor
Related Topics
• Accessing Edit Member Properties
• Adding Members in the Simplified Dimension Editor
• Editing Members in the Simplified Dimension Editor
• Deleting Members in the Simplified Dimension Editor
• Adding Shared Members in the Simplified Dimension Editor
• Assigning Access to Dimension Members
Accessing Edit Member PropertiesTo access the Edit Member Properties tab in the Simplified dimension editor:
1. From the Home page, click Application, and then click Overview.
2. Click Dimensions, and then click the name of the dimension for which you want toview member properties.
3. Click Edit Member Properties.
4. To edit member properties in the Simplified dimension editor grid, click within agrid cell to edit text or to view a drop-down menu from which you can choosemember properties. You can also drag and drop member property values over torows and columns to fill in properties that are the same. See the MemberProperties table below for property options and descriptions.
See Working with the Simplified Dimension Editor Grid
Note:
Each column in the Simplified dimension editor grid represents a memberproperty. The list of properties (columns) that initially displays on the grid canbe different based on which dimension type you're editing. You cancustomize the layout of columns by hiding, unhiding, or resizing columns.You can also display the complete set of properties (all columns) by clearingthe Default mode option. To customize the column layout in the Simplifieddimension editor grid, see Customizing the Column Layout.
Members must conform to guidelines listed in Naming Restrictions. Shared membersmust be consistent with Adding Shared Members in the Simplified Dimension Editor.
Chapter 8Editing Member Properties in the Simplified Dimension Editor
8-18
Table 8-7 Member Properties
Property Value
Member Name A name that is unique across all dimensionmembers
Parent Member If the member has a parent in the hierarchy,the parent name.
Description Optional: A description of the member (youcan use the same description for multiplemembers)
Note:
Editing thedescription of aseeded member isnot allowed.Descriptions for allother membersadded by users canbe edited.
Alias Table Optional: The alias table which stores the aliasname. Enter an alternate name for themember in Alias. See Administering Alias Tables.
For Account members only: Account Type Select Expense, Revenue, Asset, Liability,Equity, or Saved Assumption.For descriptions, see Account Types.
For Account members only: VarianceReporting
If the account type is Saved Assumption,select Expense or Non-Expense. Designate thesaved assumption as a revenue, asset, liability,or equity account.
For Account members only: Time Balance Select Flow, First, Balance, Average, Fill,Weighted Average - Actual_Actual, orWeighted Average - Actual_365.For descriptions, see Time Balance Property.
For Account members only: Skip If the account type is Asset, Equity, orLiability, select None, Missing, Zeros, orMissing and Zeros.For descriptions, see Setting AccountCalculations for Zeros and Missing Values.
For Account members only: Exchange RateType
Select Average, Ending, or Historical.For descriptions, see Data Type and ExchangeRate Type.
Data Type Select Currency, Non-currency, Percentage,Date, or Text.For descriptions, see Data Type and ExchangeRate Type.
Chapter 8Editing Member Properties in the Simplified Dimension Editor
8-19
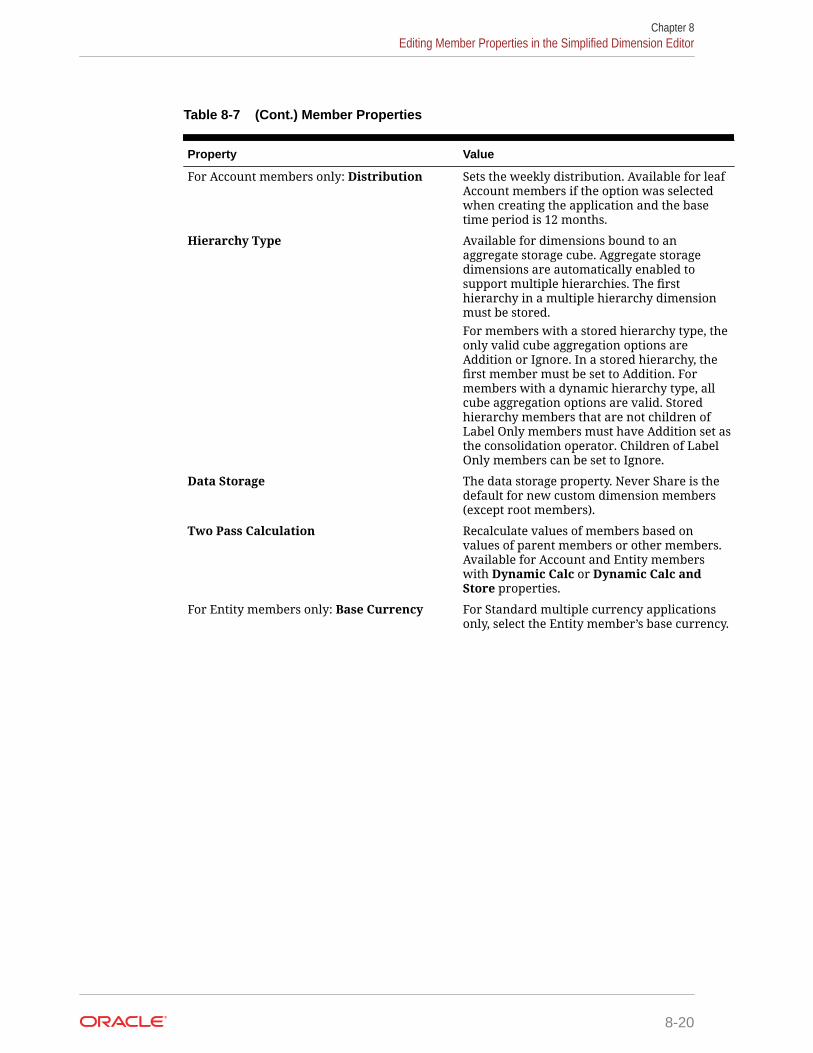
Table 8-7 (Cont.) Member Properties
Property Value
For Account members only: Distribution Sets the weekly distribution. Available for leafAccount members if the option was selectedwhen creating the application and the basetime period is 12 months.
Hierarchy Type Available for dimensions bound to anaggregate storage cube. Aggregate storagedimensions are automatically enabled tosupport multiple hierarchies. The firsthierarchy in a multiple hierarchy dimensionmust be stored.For members with a stored hierarchy type, theonly valid cube aggregation options areAddition or Ignore. In a stored hierarchy, thefirst member must be set to Addition. Formembers with a dynamic hierarchy type, allcube aggregation options are valid. Storedhierarchy members that are not children ofLabel Only members must have Addition set asthe consolidation operator. Children of LabelOnly members can be set to Ignore.
Data Storage The data storage property. Never Share is thedefault for new custom dimension members(except root members).
Two Pass Calculation Recalculate values of members based onvalues of parent members or other members.Available for Account and Entity memberswith Dynamic Calc or Dynamic Calc andStore properties.
For Entity members only: Base Currency For Standard multiple currency applicationsonly, select the Entity member’s base currency.
Chapter 8Editing Member Properties in the Simplified Dimension Editor
8-20
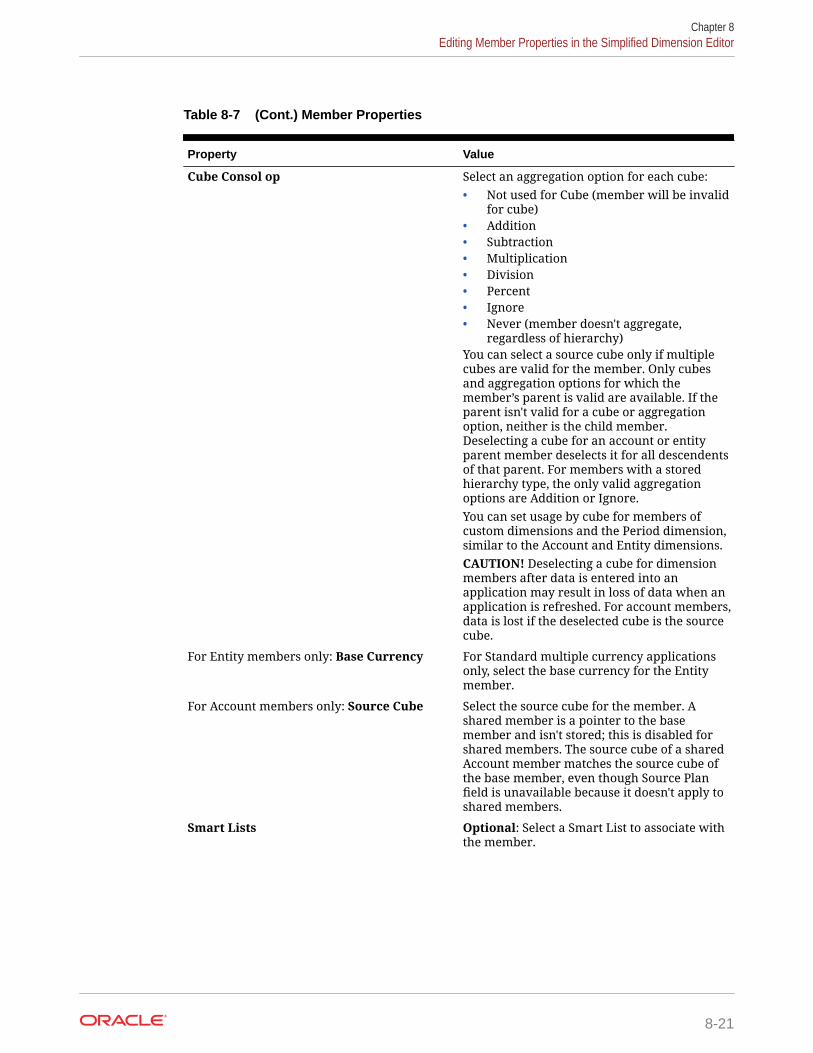
Table 8-7 (Cont.) Member Properties
Property Value
Cube Consol op Select an aggregation option for each cube:• Not used for Cube (member will be invalid
for cube)• Addition• Subtraction• Multiplication• Division• Percent• Ignore• Never (member doesn't aggregate,
regardless of hierarchy)You can select a source cube only if multiplecubes are valid for the member. Only cubesand aggregation options for which themember’s parent is valid are available. If theparent isn't valid for a cube or aggregationoption, neither is the child member.Deselecting a cube for an account or entityparent member deselects it for all descendentsof that parent. For members with a storedhierarchy type, the only valid aggregationoptions are Addition or Ignore.You can set usage by cube for members ofcustom dimensions and the Period dimension,similar to the Account and Entity dimensions.CAUTION! Deselecting a cube for dimensionmembers after data is entered into anapplication may result in loss of data when anapplication is refreshed. For account members,data is lost if the deselected cube is the sourcecube.
For Entity members only: Base Currency For Standard multiple currency applicationsonly, select the base currency for the Entitymember.
For Account members only: Source Cube Select the source cube for the member. Ashared member is a pointer to the basemember and isn't stored; this is disabled forshared members. The source cube of a sharedAccount member matches the source cube ofthe base member, even though Source Planfield is unavailable because it doesn't apply toshared members.
Smart Lists Optional: Select a Smart List to associate withthe member.
Chapter 8Editing Member Properties in the Simplified Dimension Editor
8-21
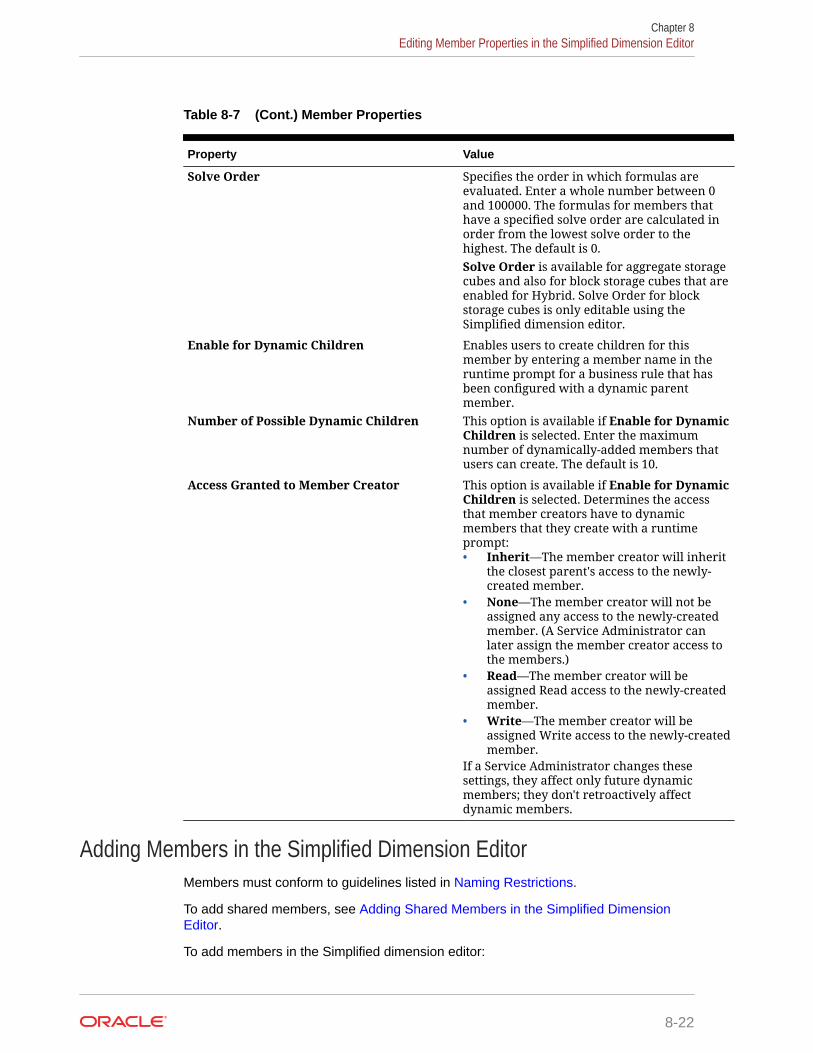
Table 8-7 (Cont.) Member Properties
Property Value
Solve Order Specifies the order in which formulas areevaluated. Enter a whole number between 0and 100000. The formulas for members thathave a specified solve order are calculated inorder from the lowest solve order to thehighest. The default is 0.Solve Order is available for aggregate storagecubes and also for block storage cubes that areenabled for Hybrid. Solve Order for blockstorage cubes is only editable using theSimplified dimension editor.
Enable for Dynamic Children Enables users to create children for thismember by entering a member name in theruntime prompt for a business rule that hasbeen configured with a dynamic parentmember.
Number of Possible Dynamic Children This option is available if Enable for DynamicChildren is selected. Enter the maximumnumber of dynamically-added members thatusers can create. The default is 10.
Access Granted to Member Creator This option is available if Enable for DynamicChildren is selected. Determines the accessthat member creators have to dynamicmembers that they create with a runtimeprompt:• Inherit—The member creator will inherit
the closest parent's access to the newly-created member.
• None—The member creator will not beassigned any access to the newly-createdmember. (A Service Administrator canlater assign the member creator access tothe members.)
• Read—The member creator will beassigned Read access to the newly-createdmember.
• Write—The member creator will beassigned Write access to the newly-createdmember.
If a Service Administrator changes thesesettings, they affect only future dynamicmembers; they don't retroactively affectdynamic members.
Adding Members in the Simplified Dimension EditorMembers must conform to guidelines listed in Naming Restrictions.
To add shared members, see Adding Shared Members in the Simplified DimensionEditor.
To add members in the Simplified dimension editor:
Chapter 8Editing Member Properties in the Simplified Dimension Editor
8-22
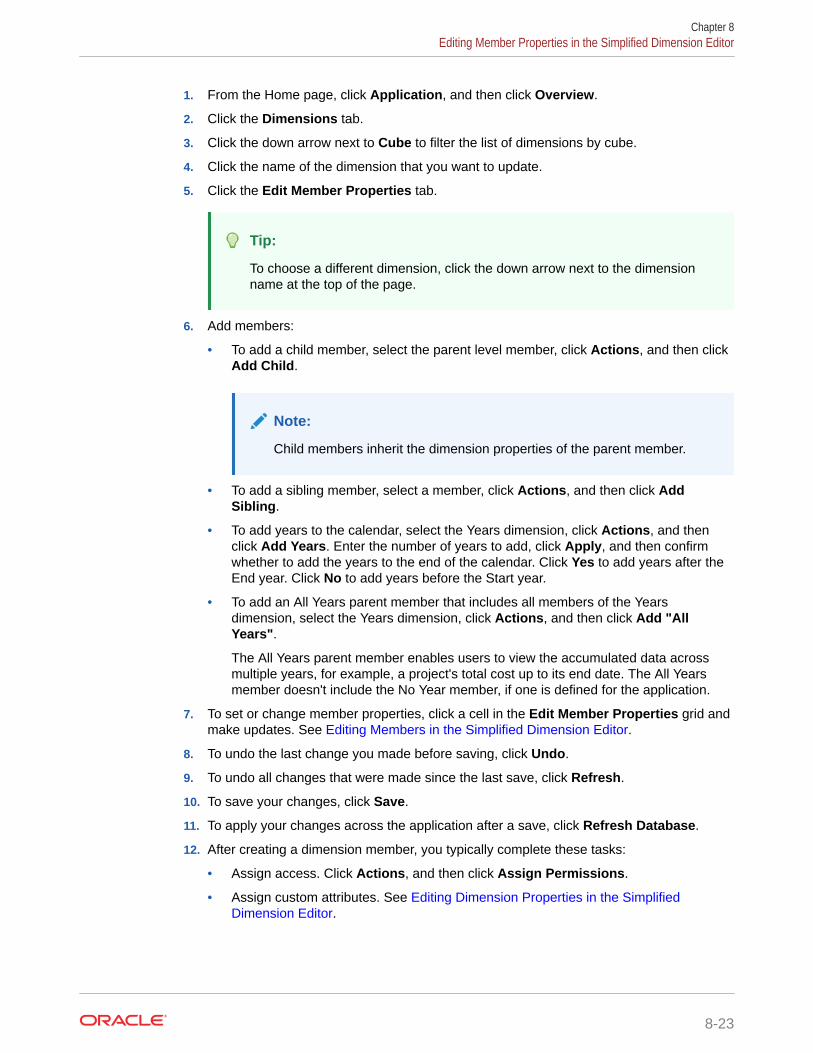
1. From the Home page, click Application, and then click Overview.
2. Click the Dimensions tab.
3. Click the down arrow next to Cube to filter the list of dimensions by cube.
4. Click the name of the dimension that you want to update.
5. Click the Edit Member Properties tab.
Tip:
To choose a different dimension, click the down arrow next to the dimensionname at the top of the page.
6. Add members:
• To add a child member, select the parent level member, click Actions, and then clickAdd Child.
Note:
Child members inherit the dimension properties of the parent member.
• To add a sibling member, select a member, click Actions, and then click AddSibling.
• To add years to the calendar, select the Years dimension, click Actions, and thenclick Add Years. Enter the number of years to add, click Apply, and then confirmwhether to add the years to the end of the calendar. Click Yes to add years after theEnd year. Click No to add years before the Start year.
• To add an All Years parent member that includes all members of the Yearsdimension, select the Years dimension, click Actions, and then click Add "AllYears".
The All Years parent member enables users to view the accumulated data acrossmultiple years, for example, a project's total cost up to its end date. The All Yearsmember doesn't include the No Year member, if one is defined for the application.
7. To set or change member properties, click a cell in the Edit Member Properties grid andmake updates. See Editing Members in the Simplified Dimension Editor.
8. To undo the last change you made before saving, click Undo.
9. To undo all changes that were made since the last save, click Refresh.
10. To save your changes, click Save.
11. To apply your changes across the application after a save, click Refresh Database.
12. After creating a dimension member, you typically complete these tasks:
• Assign access. Click Actions, and then click Assign Permissions.
• Assign custom attributes. See Editing Dimension Properties in the SimplifiedDimension Editor.
Chapter 8Editing Member Properties in the Simplified Dimension Editor
8-23
Editing Members in the Simplified Dimension EditorYou can edit members directly in the Simplified dimension editor grid.
To edit members:
1. From the Home page, click Application, and then click Overview.
2. Click the Dimensions tab.
3. Click the down arrow next to Cube to filter the list of dimensions by cube.
4. Click the name of the dimension that you want to edit.
5. Click the Edit Member Properties tab.
Tip:
To choose a different dimension, click the down arrow next to thedimension name at the top of the page.
6. Take an action:
• To add members, see Adding Members in the Simplified Dimension Editor
• To navigate the dimension editor grid and to focus your editing on certainmembers, rows, or columns, see Working with the Simplified Dimension EditorGrid.
• To modify member properties, click within a cell on the dimension editor gridand select an option from the drop-down list. For example, to edit the AccountType for an Account dimension member, click within a cell in the Account Typecolumn. Click the down arrow that appears within the cell, and then select anAccount Type option. For descriptions of member properties, see EditingMember Properties in the Simplified Dimension Editor.
Note:
To view all property columns in the grid, right-click any heading onthe grid and scroll down until you see the Default mode check box.Clear the Default mode check box to view all the property columnsin the grid.
• To delete members, see Deleting Members in the Simplified Dimension Editor.
7. To undo the last change you made before saving, click Undo.
8. To undo all changes that were made since the last save, click Refresh.
9. To save your changes, click Save.
10. To apply your changes across the application after a save, click RefreshDatabase.
Chapter 8Editing Member Properties in the Simplified Dimension Editor
8-24
Deleting Members in the Simplified Dimension EditorEach data value is identified by a set of dimension member values and a cube. Deletingdimension members or deselecting the cube results in data loss when refreshing anapplication. Deleting entity members deletes all approval units (including data) associatedwith them.
Before deleting members, understand where in the application they are used (in which forms,approval units, exchange rates, and so on) by using Show Usage. See Showing MemberUsage in an Application.
You must delete the entity member throughout the application before deleting it fromdimension. For example, if the entity member is used in a form, you must delete it from theform before deleting it from dimensions.
To delete members:
1. From the Home page, click Application, and then click Overview.
2. Click Dimensions.
3. Click the down arrow next to Cube to filter the list of dimensions by cube.
4. Click the name of the dimension that contains the member you want to delete.
5. Click Edit Member Properties.
Tip:
To choose a different dimension, click the down arrow next to the dimensionname at the top of the page.
6. From the dimension editor grid, select the member to delete.
7. Click Delete Member.
Note:
Deleting a base member also deletes its shared members.
8. In the Delete Member query, click OK.
9. Update and validate business rules and reports.
Adding Shared Members in the Simplified Dimension EditorSharing members allow alternate rollup structures within an application. A base member mustexist before you can create a shared member. You can create multiple shared members forthe base member. A base member must display before its shared members in position fromtop to bottom.
Shared members are available for Entity, Account, and user-defined custom dimensions.Shared member values can be ignored to avoid double-counting values when you roll up theoutline.
Chapter 8Editing Member Properties in the Simplified Dimension Editor
8-25
Shared members share some property definitions with base members, such asmember name, alias name, base currency, and cubes for which members are valid.Shared members must have unique parent members and different rollup aggregationsettings. Custom attributes, custom attribute values, and member formulas are notallowed for shared members. Renaming base members renames all shared members.
Note:
Shared members must have the same names as their base member. Also,base and shared member names are case-sensitive.
Shared members can't be moved to another parent member. You must delete sharedmembers and recreate them under different parent members. The base member neednot be level zero. You can enter data in shared members, and values are stored withbase members.
To add shared members in the Simplified dimension editor:
1. View Edit Member Properties.
See Accessing the Simplified Dimension Editor.
2. Add shared members:
a. Add a child member with the same name as the base member.
b. For Parent Name of the new member, type a new parent name.
c. For Default Data Storage of the new member, select Shared.
3. Click Save.
Data storage properties for all other cubes will automatically be set to Shared.
Assigning Access to Dimension MembersBefore you can assign access to members of user-defined custom dimensions, youmust select the Apply Security check box on the dimension’s Edit DimensionProperties page. See Editing Dimension Properties in the Simplified DimensionEditor.
To assign access to dimension members:
1. View Edit Member Properties.
See Accessing the Simplified Dimension Editor.
2. Select the member, and then click .
3. Click Permissions.
4. Add, edit, or remove permissions.
• Adding, Editing, and Removing Access to Members
• About Effective Access Permissions to Shared Members
Chapter 8Editing Member Properties in the Simplified Dimension Editor
8-26
Adding, Editing, and Removing Access to MembersYou can specify which users and groups can access the selected member.
To assign, edit, and remove access permissions to members:
1. View Edit Member Properties.
See Accessing the Simplified Dimension Editor.
2. Select the member, and then click .
3. Click Permissions.
4. Click Add User/Group.
5. To add access:
a. Click to select the users and groups to access the selected member.
Click Users to display all user names; click Groups to display all groups.
b. Optional: Select a relationship.
For example, select Children to assign access to the children of the selectedmember.
6. To modify access:
a. Select the access type for the displayed users or groups.
Click Users to display all user names; click Groups to display all groups.
b. Optional: Select a relationship.
For example, select Children to assign access to children of the selected member.
7. To remove access, click .
8. Click OK.
9. Click Close.
About Effective Access Permissions to Shared MembersYou can't assign access directly to a shared member. A shared member inherits accesspermissions from its base member, parent, or ancestor.
The application checks access permissions at each level, first by user, then by group, basedon the member’s access permissions inheritance relationship. If multiple access permissionsexist, the least restrictive access permission is applied (for example, Write access takesprecedence over Read access).
Chapter 8Editing Member Properties in the Simplified Dimension Editor
8-27
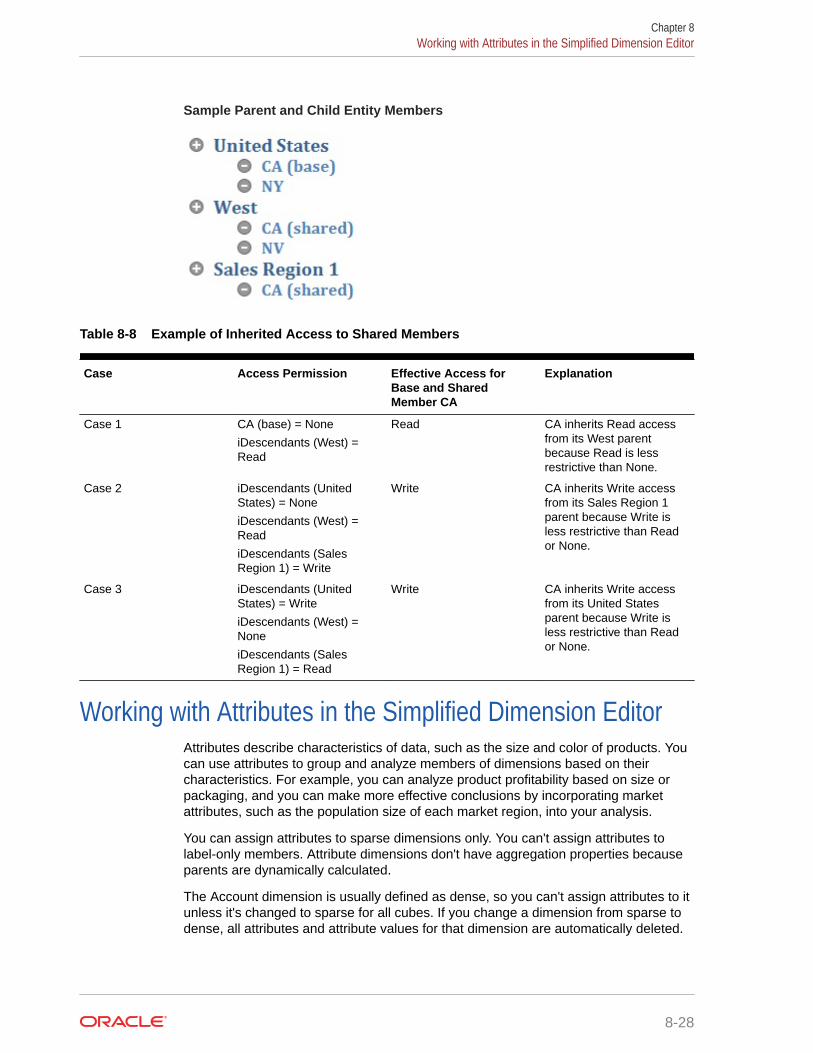
Sample Parent and Child Entity Members
Table 8-8 Example of Inherited Access to Shared Members
Case Access Permission Effective Access forBase and SharedMember CA
Explanation
Case 1 CA (base) = None
iDescendants (West) =Read
Read CA inherits Read accessfrom its West parentbecause Read is lessrestrictive than None.
Case 2 iDescendants (UnitedStates) = None
iDescendants (West) =Read
iDescendants (SalesRegion 1) = Write
Write CA inherits Write accessfrom its Sales Region 1parent because Write isless restrictive than Reador None.
Case 3 iDescendants (UnitedStates) = Write
iDescendants (West) =None
iDescendants (SalesRegion 1) = Read
Write CA inherits Write accessfrom its United Statesparent because Write isless restrictive than Reador None.
Working with Attributes in the Simplified Dimension EditorAttributes describe characteristics of data, such as the size and color of products. Youcan use attributes to group and analyze members of dimensions based on theircharacteristics. For example, you can analyze product profitability based on size orpackaging, and you can make more effective conclusions by incorporating marketattributes, such as the population size of each market region, into your analysis.
You can assign attributes to sparse dimensions only. You can't assign attributes tolabel-only members. Attribute dimensions don't have aggregation properties becauseparents are dynamically calculated.
The Account dimension is usually defined as dense, so you can't assign attributes to itunless it's changed to sparse for all cubes. If you change a dimension from sparse todense, all attributes and attribute values for that dimension are automatically deleted.
Chapter 8Working with Attributes in the Simplified Dimension Editor
8-28
Attributes can have data types of text, date, Boolean, and numeric, as described in Understanding Attribute Data Types in Administering Planning. Attribute names must conformto guidelines listed in Naming Restrictions in Administering Planning.
To create or edit attributes in the Simplified dimension editor:
1. From the Home page, click Application, click Overview, and then click Dimensions.
2. Select a sparse dimension for the attribute.
Note:
Only sparse dimensions can contain attributes.
3. Click the Edit Dimension Properties tab.
4. Select options:
• To create an attribute, next to Custom Attributes, click Create. Type an attributename, and select a data type: Text, Date, Boolean, or Numeric.
Note:
– You can't modify the type after the attribute is created.
– Before working with date attributes, you must select the AttributeDimension Date Format in Application Settings and save it.
See Understanding Attribute Data Types in Administering Planning.
• To modify attributes, under Custom Attributes, click
next to the attribute you want to modify, select Edit, and then update the attributename.
• To set aliases for attributes, select an attribute and an attribute value, click . Selectan alias table, type an alias name, and click Save.
5. Click Close.
When you click Close, the hierarchy is validated and an error displays if issues aredetected. For example, date attribute values must be entered in the correct format, andnumeric and date attribute dimensions must have at least one attribute value defined.
6. Update and validate business rules and reports.
Related topics:
• Deleting Attributes in the Simplified Dimension Editor
• Working with UDAs in the Simplified Dimension Editor
• Working with Attribute Values in the Simplified Dimension Editor
Chapter 8Working with Attributes in the Simplified Dimension Editor
8-29
Note:
Instead of explicitly filtering by an attribute (like Red, for instance), you cancreate a user variable for the attribute dimension, and then use the uservariable as the filter. Then you can enable the user variable as a dynamicuser variable which would allow users to change the value of the filter atruntime. This is a useful technique that allows for dynamic filtering. See Managing User Variables in Administering Planning.
Deleting Attributes in the Simplified Dimension EditorWhen you delete an attribute, all attribute values associated with the attribute are alsodeleted. Attribute values are removed from members to which they had beenassigned, and the attribute is removed from dimensions to which it was assigned.
To delete attributes in the Simplified dimension editor:
1. From the Home page, click Application, click Overview, and then clickDimensions.
2. Click the name of the dimension with the attribute you want to delete, and thenclick the Edit Dimension Properties tab.
3. Under Custom Attributes, click
next to the attribute you want to edit, and then select Delete.
4. Click Yes.
5. Update and validate business rules and reports.
Working with UDAs in the Simplified Dimension EditorYou can use user-defined attributes (UDAs), descriptive words or phrases, within calcscripts, member formulas, reports, and forms. UDAs return lists of membersassociated with the UDA. For example:
• For a Product dimension with several product members, you can create a UDAcalled New Products and assign this UDA to the new products in the Productdimension hierarchy. Then you can base certain calculations on the designationNew Products.
• For the budget review process, rather than creating a data validation rule for eachowner in a product line (some product lines can have hundreds of owners), youcan create a UDA containing the user names that apply to members using theapproval unit hierarchy. Then in the data validation rule, you can enter a lookupfunction which will return the user names stored in the UDA for the currentmember. For example, create a UDA for each user in the promotional path andassign a prefix to the UDA name (for example, ProdMgr:Kim).
• When designing forms, you can use a UDA to select members for forms based ona common attribute. When you create forms with UDAs, any members that areassigned to the UDA are dynamically added to the form. For example, if youcreate a UDA called New Products and assign this UDA to the new products in theProduct dimension hierarchy, the form will automatically display the new products
Chapter 8Working with Attributes in the Simplified Dimension Editor
8-30
at runtime. When selected in the form designer, a UDA is preceded by UDA; for example,UDA(New Products).
• You can use the HSP_UDF UDA to prevent a formula from being overwritten when theapplication is refreshed. You must log on to each database associated with the businessprocess and create the member formula with a UDA. The syntax for this UDA is: (UDAs:HSP_UDF).
• If you use the @XREF function to look up a data value in another database to calculate avalue from the current database, you can add the HSP_NOLINK UDA to members toprevent the @XREF function from being created on all cubes that are not the source cubeselected for that member.
UDAs are specific to dimensions. For example, creating a UDA for an Account membermakes it available for non-shared Account members. Deleting it removes it for all Accountmembers. To make UDAs available for multiple dimensions, create the same UDA formultiple dimensions. For example, create a UDA named New for Account and Entitydimensions to make the UDA named New available for Account and Entity members.
To work with UDAs in the Simplified dimension editor:
1. From the Home page, click Application, click Overview, and then click Dimensions.
2. Click on the name of the dimension for whose members to associate the UDA.
3. Select the Edit Member Properties tab.
4. On the dimension grid, right-click any column heading, and then clear the Default Modeoption to make the UDA column visible.
5. Locate the member to add the UDA, and then scroll to the UDA column.
6. Click in the UDA cell to display the UDA management dialog.
7. Select a task:
• To create a UDA, click
, enter a name, and then click Save.
Note:
Use no more than 60 characters when naming UDAs.
• To modify a UDA, select the UDA, click
, change the name, and then click Save.
• To delete a UDA, select the UDA, click
, and then confirm deletion.
Chapter 8Working with Attributes in the Simplified Dimension Editor
8-31
Note:
Deleting the UDA removes it for the whole dimension. If you deleteUDAs, you must update all member formulas, calc scripts, andreports that reference them.
• To clear UDA selections, click
.
8. To add or remove UDAs for the member, use the arrows to move UDAs to andfrom the Selected UDA panel.
9. Click OK.
Working with Attribute Values in the Simplified Dimension EditorAttribute values provide users with another way to select dimension members whenusing forms. Data values for attributes are dynamically calculated but not stored.
You can define attribute values for sparse dimensions, which are typically the Entityand user-defined custom dimensions. After you define an attribute value for adimension, you can assign it to members of that dimension.
Creating Attribute Values in the Simplified Dimension Editor
To create attribute values in the Simplified Dimension Editor:
1. On the Home page, click Application, and then click Overview.
2. Click the Dimensions tab.
3. For Cube, select All.
4. Select an attribute dimension.
5. In Edit Member Properties, add members:
• To add a child member, select the parent level member, click Actions, andthen click Add Child.
Note:
Child members inherit the dimension properties of the parentmember.
• To add a sibling member, select a member, click Actions, and then click AddSibling.
6. To set or change member properties, click a cell in the Edit Member Propertiesgrid and make updates. See Editing Member Properties in the SimplifiedDimension Editor in Administering Planning.
7. To save your changes, click Save.
Chapter 8Working with Attributes in the Simplified Dimension Editor
8-32
Assigning Attribute Values to Base Dimensions
When an attribute dimension is associated with a base dimension, it displays in the SimplifiedDimension Editor in the same way as a regular dimension. To view attribute dimensions in thelisting, select All in the Cube drop-down list on the main dimension page. Then you canselect the attribute dimension to add values to the grid.
To assign attribute values to base dimensions:
1. Open the Edit Member Properties page for the base dimension and find the column withthe name of the attribute dimension.
2. Click within the grid for a specific member to display a drop-down list with attributevalues, and then select an attribute value from the list.
3. Click Save on the Edit Member Properties page to assign the value to the basemember.
Chapter 8Working with Attributes in the Simplified Dimension Editor
8-33
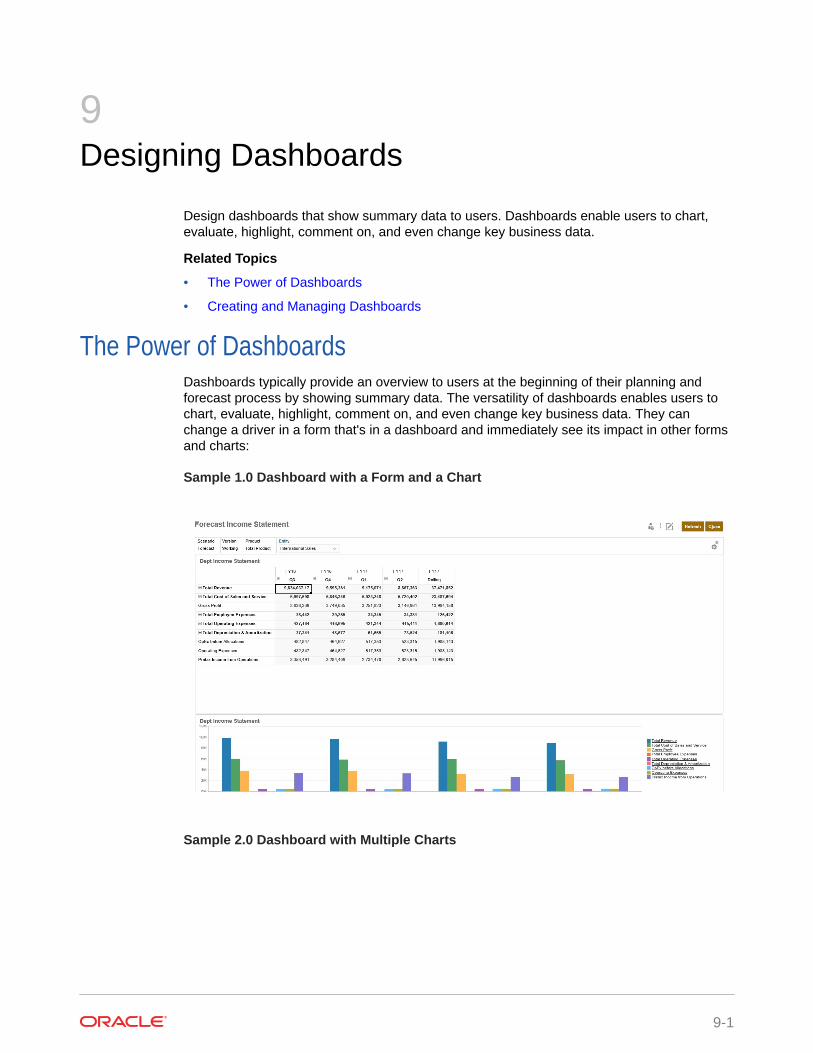
9Designing Dashboards
Design dashboards that show summary data to users. Dashboards enable users to chart,evaluate, highlight, comment on, and even change key business data.
Related Topics
• The Power of Dashboards
• Creating and Managing Dashboards
The Power of DashboardsDashboards typically provide an overview to users at the beginning of their planning andforecast process by showing summary data. The versatility of dashboards enables users tochart, evaluate, highlight, comment on, and even change key business data. They canchange a driver in a form that's in a dashboard and immediately see its impact in other formsand charts:
Sample 1.0 Dashboard with a Form and a Chart
Sample 2.0 Dashboard with Multiple Charts
9-1
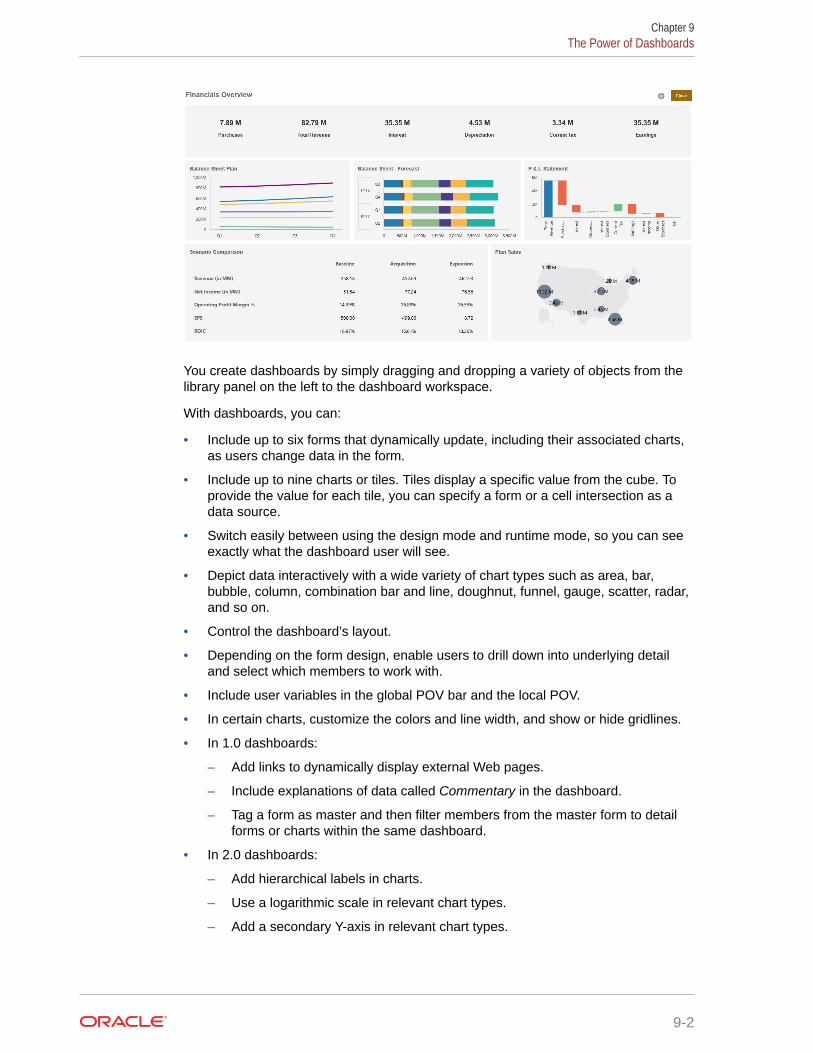
You create dashboards by simply dragging and dropping a variety of objects from thelibrary panel on the left to the dashboard workspace.
With dashboards, you can:
• Include up to six forms that dynamically update, including their associated charts,as users change data in the form.
• Include up to nine charts or tiles. Tiles display a specific value from the cube. Toprovide the value for each tile, you can specify a form or a cell intersection as adata source.
• Switch easily between using the design mode and runtime mode, so you can seeexactly what the dashboard user will see.
• Depict data interactively with a wide variety of chart types such as area, bar,bubble, column, combination bar and line, doughnut, funnel, gauge, scatter, radar,and so on.
• Control the dashboard’s layout.
• Depending on the form design, enable users to drill down into underlying detailand select which members to work with.
• Include user variables in the global POV bar and the local POV.
• In certain charts, customize the colors and line width, and show or hide gridlines.
• In 1.0 dashboards:
– Add links to dynamically display external Web pages.
– Include explanations of data called Commentary in the dashboard.
– Tag a form as master and then filter members from the master form to detailforms or charts within the same dashboard.
• In 2.0 dashboards:
– Add hierarchical labels in charts.
– Use a logarithmic scale in relevant chart types.
– Add a secondary Y-axis in relevant chart types.
Chapter 9The Power of Dashboards
9-2
When users use a dashboard (referred to as runtime), they can set many aspects of theobject, such as the type of chart displayed, the dashboard’s title, and so on. A toolbar isavailable for each object type. Dashboard users can change and save data, run rules, and soon. However, changes made in runtime to the chart type options aren't saved for the nextsession. Clicking Save in runtime saves the data, but not the dashboard definition.
Service Administrators create, redesign, delete, and assign permissions to dashboards anddashboard folders.
Videos
Your Goal Watch This Video
Learn how to create 1.0 dashboards. Creating Dashboards in Oracle Planning
and Budgeting Cloud
Learn how to create 2.0 dashboards. Designing Dashboards 2.0 in EPM Cloud
Planning
Related Topics
• About Dashboard Versions
• Concepts in Designing 1.0 Dashboards
• Concepts in Designing 2.0 Dashboards
• Creating and Managing Dashboards
Creating and Managing Dashboards• About Dashboard Versions
• Creating and Managing Dashboards 1.0
• Creating and Managing Dashboards 2.0
About Dashboard VersionsDashboards are currently available in two versions:
• Dashboard—Uses Oracle ADF technology
• Dashboard 2.0—Uses Oracle JET technology
Both dashboard versions currently coexist in the same business process at the same time.Existing dashboards (Dashboard) use ADF technology and the behavior of the ADF-baseddashboards remains unchanged. You can still create and update these dashboards in yourbusiness process as you did before. Dashboard 2.0 uses the existing dashboard functionalityand enhances it with Oracle JET technology for faster rendering, sophistication, ease of use,improved flexibility, better visualization, and additional designs.
Dashboard 2.0 supports new chart types like Waterfall, Pyramid, and Geomap and new sub-chart types for Radar, Combination, and Gauge charts. It also supports creating tables indashboards with visual inline views of data, called Spark Charts.
To help you differentiate between the dashboard versions on the Dashboards listing page,we've provided an icon in front of each dashboard:
Chapter 9Creating and Managing Dashboards
9-3
•—Dashboard (1.0)
If you open a dashboard with a Dashboard (1.0) icon, you'll be working with theADF functionality to edit the dashboard.
•—Dashboard 2.0
If you open a dashboard with a Dashboard 2.0 icon, you'll be working with the JETfunctionality to edit the dashboard.
When you create a new dashboard, select from the following dashboard versions:
• Dashboard
• Dashboard 2.0
Related Topics
• Creating and Managing Dashboards 1.0
• Creating and Managing Dashboards 2.0
Creating and Managing Dashboards 1.0• Concepts in Designing 1.0 Dashboards
• Creating Dashboards 1.0
• Creating Dashboards Containing Master Forms and Details
• About Your Dashboard's Layout - Version 1.0
• About the Gauge Chart Type
• About the Tile Chart Type
• Customizing Dashboard Colors
• About Global and Local POVs in 1.0 Dashboards
• Dashboard POVs and Valid Intersections
Concepts in Designing 1.0 DashboardsHelpful information as you design 1.0 dashboards:
Chapter 9Creating and Managing Dashboards
9-4
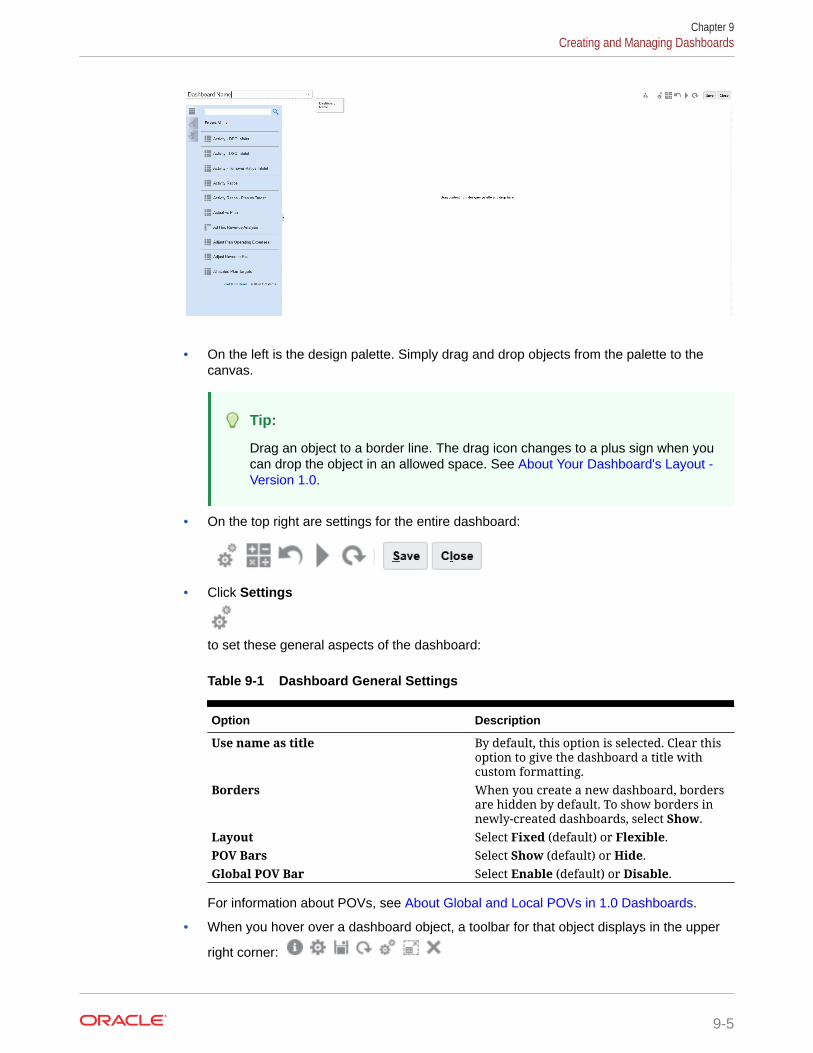
• On the left is the design palette. Simply drag and drop objects from the palette to thecanvas.
Tip:
Drag an object to a border line. The drag icon changes to a plus sign when youcan drop the object in an allowed space. See About Your Dashboard's Layout -Version 1.0.
• On the top right are settings for the entire dashboard:
• Click Settings
to set these general aspects of the dashboard:
Table 9-1 Dashboard General Settings
Option Description
Use name as title By default, this option is selected. Clear thisoption to give the dashboard a title withcustom formatting.
Borders When you create a new dashboard, bordersare hidden by default. To show borders innewly-created dashboards, select Show.
Layout Select Fixed (default) or Flexible.POV Bars Select Show (default) or Hide.Global POV Bar Select Enable (default) or Disable.
For information about POVs, see About Global and Local POVs in 1.0 Dashboards.
• When you hover over a dashboard object, a toolbar for that object displays in the upper
right corner:
Chapter 9Creating and Managing Dashboards
9-5
Note:
Dashboard (1.0) hover icons provide options such as Instructions(available only if instructions are configured for a form), Actions, Save,Refresh, Settings, and Maximize, depending on the type of object.
• As you create a dashboard, click Runtime so that you can immediately seehow the dashboard looks and works to a dashboard user. To return to designer
mode to continue designing the dashboard, click .
• By default, missing or suppressed data is plotted as zeros in graphs. You can clearthe Plot Missing Values as Zero setting to ignore missing or suppressed data incertain chart types so it's no longer plotted as zeros.
• The listing page for dashboards supports folders. Folders enable you to assignpermissions to all dashboards within a folder rather than assigning permissions toeach individual dashboard. The dashboard listing page uses the same folderhierarchy as infolets and data entry forms and all artifacts and folders reside undera root folder called Library.
Note:
Only administrators can add files (for example, dashboards, infolets,forms, reports, and so on) to the Library root folder.
• On the listing page for dashboards, you can toggle between viewing dashboards
by a flat view or a tree view:
Then you can search for dashboards using Search . The flat view displaysonly the dashboards that meet the search criteria, not the folders that containthem. The tree (or hierarchical) view displays dashboards in the context of thefolders that contain them.
To search on another keyword, clear the search criteria by clicking in theSearch box.
Creating Dashboards 1.0Need help deciding which dashboard version to choose? See About DashboardVersions.
Note:
To create a version 2.0 dashboard, see Creating Dashboards 2.0.
1. From the Home page, click Dashboards, and then click Create.
Chapter 9Creating and Managing Dashboards
9-6
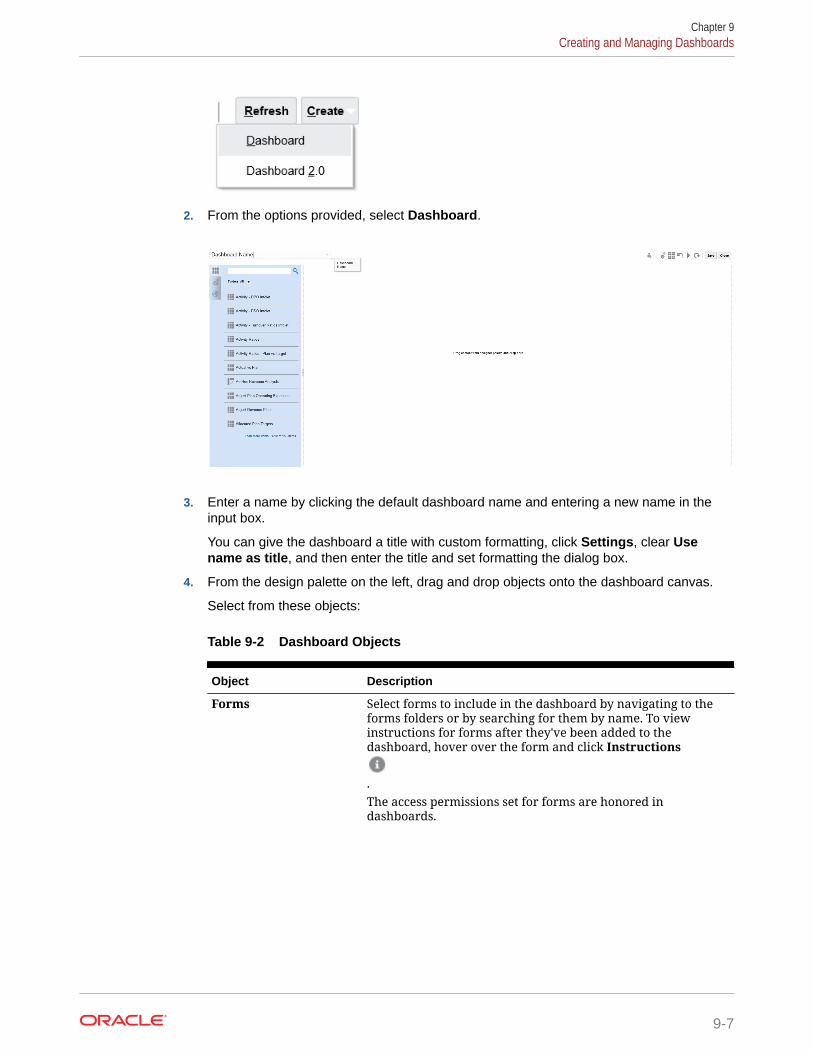
2. From the options provided, select Dashboard.
3. Enter a name by clicking the default dashboard name and entering a new name in theinput box.
You can give the dashboard a title with custom formatting, click Settings, clear Usename as title, and then enter the title and set formatting the dialog box.
4. From the design palette on the left, drag and drop objects onto the dashboard canvas.
Select from these objects:
Table 9-2 Dashboard Objects
Object Description
Forms Select forms to include in the dashboard by navigating to theforms folders or by searching for them by name. To viewinstructions for forms after they've been added to thedashboard, hover over the form and click Instructions
.The access permissions set for forms are honored indashboards.
Chapter 9Creating and Managing Dashboards
9-7
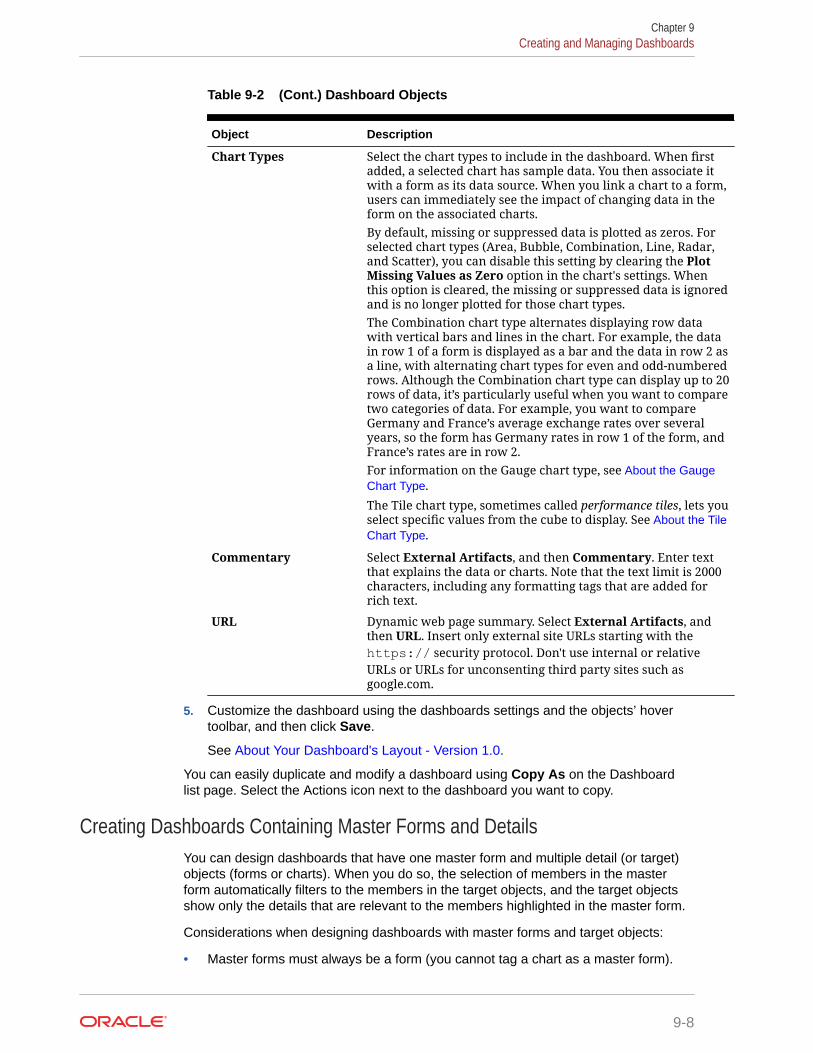
Table 9-2 (Cont.) Dashboard Objects
Object Description
Chart Types Select the chart types to include in the dashboard. When firstadded, a selected chart has sample data. You then associate itwith a form as its data source. When you link a chart to a form,users can immediately see the impact of changing data in theform on the associated charts.By default, missing or suppressed data is plotted as zeros. Forselected chart types (Area, Bubble, Combination, Line, Radar,and Scatter), you can disable this setting by clearing the PlotMissing Values as Zero option in the chart's settings. Whenthis option is cleared, the missing or suppressed data is ignoredand is no longer plotted for those chart types.The Combination chart type alternates displaying row datawith vertical bars and lines in the chart. For example, the datain row 1 of a form is displayed as a bar and the data in row 2 asa line, with alternating chart types for even and odd-numberedrows. Although the Combination chart type can display up to 20rows of data, it’s particularly useful when you want to comparetwo categories of data. For example, you want to compareGermany and France’s average exchange rates over severalyears, so the form has Germany rates in row 1 of the form, andFrance’s rates are in row 2.For information on the Gauge chart type, see About the GaugeChart Type.
The Tile chart type, sometimes called performance tiles, lets youselect specific values from the cube to display. See About the TileChart Type.
Commentary Select External Artifacts, and then Commentary. Enter textthat explains the data or charts. Note that the text limit is 2000characters, including any formatting tags that are added forrich text.
URL Dynamic web page summary. Select External Artifacts, andthen URL. Insert only external site URLs starting with thehttps:// security protocol. Don't use internal or relativeURLs or URLs for unconsenting third party sites such asgoogle.com.
5. Customize the dashboard using the dashboards settings and the objects’ hovertoolbar, and then click Save.
See About Your Dashboard's Layout - Version 1.0.
You can easily duplicate and modify a dashboard using Copy As on the Dashboardlist page. Select the Actions icon next to the dashboard you want to copy.
Creating Dashboards Containing Master Forms and DetailsYou can design dashboards that have one master form and multiple detail (or target)objects (forms or charts). When you do so, the selection of members in the masterform automatically filters to the members in the target objects, and the target objectsshow only the details that are relevant to the members highlighted in the master form.
Considerations when designing dashboards with master forms and target objects:
• Master forms must always be a form (you cannot tag a chart as a master form).
Chapter 9Creating and Managing Dashboards
9-8
• The target objects can be forms or charts.
• The dashboard containing a master form must always contain more than one object.
• Only one form on a dashboard can be tagged as master. If you want to tag a differentform on a dashboard as master, you must first untag the existing master form.
To create a dashboard containing a master form and target objects:
1. Create a dashboard with at least one form and one or more target objects.
See Creating and Managing Dashboards.
2. Ensure the dashboard is in designer mode by clicking Actions, and then clicking Edit.
3. Select the form on the dashboard that you want to designate as master, click the Settingsicon for that form, and then select Tag as Master.
To filter the data in the target forms or charts that is relevant to the data in a master form,right-click the relevant data in the master form and select Apply Context.
About Your Dashboard's Layout - Version 1.0About setting up a dashboard layout in version 1.0:
• The first object you drag occupies the whole canvas.
• Then drag objects to the left, the right, the top, or the bottom of the existing object.
• The dashboard canvas provides two types of drop zones: One to place two objects nextto each other, each occupying half the space, and the other to place three objects, eachoccupying a third of the space.
• You can design a dashboard with objects to display vertically, horizontally, and each canhave its own size.
• To resize an object that uses Flexible layout, drag the object’s border. You can also clickan object's handle to expand it, and then click the handle again to restore the object to itsoriginal size.
• To resize an object that uses Fixed layout, set its width or height percentage in Settings.
• The form layout can be asymmetric.
• In runtime mode, if a user doesn't have access to a form or if the form is missing, then anadjacent object takes its space. In designer mode, all empty objects are displayed so thatthe designer can choose to remove them.
About the Gauge Chart TypeGauge chart types are handy for showing whether data values fall within an acceptable rangeor not. You set the maximum value, the range maximums, and the gauge displays ranges asred, yellow, and green to help you quickly assess a current value. So, gauge chart types helpyou identify problems in important data points or measures. For example, you could use agauge to display the current sales, where the thresholds are set to represent the salestargets.
If the form has multiple values, you can display multiple gauges, up to a maximum of 36 (thevalues in the first 6 rows and the first 6 columns in the form). The remaining values in theform are ignored. If you want the gauge chart to display only one value, then associate it witha form that has only one cell value.
Chapter 9Creating and Managing Dashboards
9-9
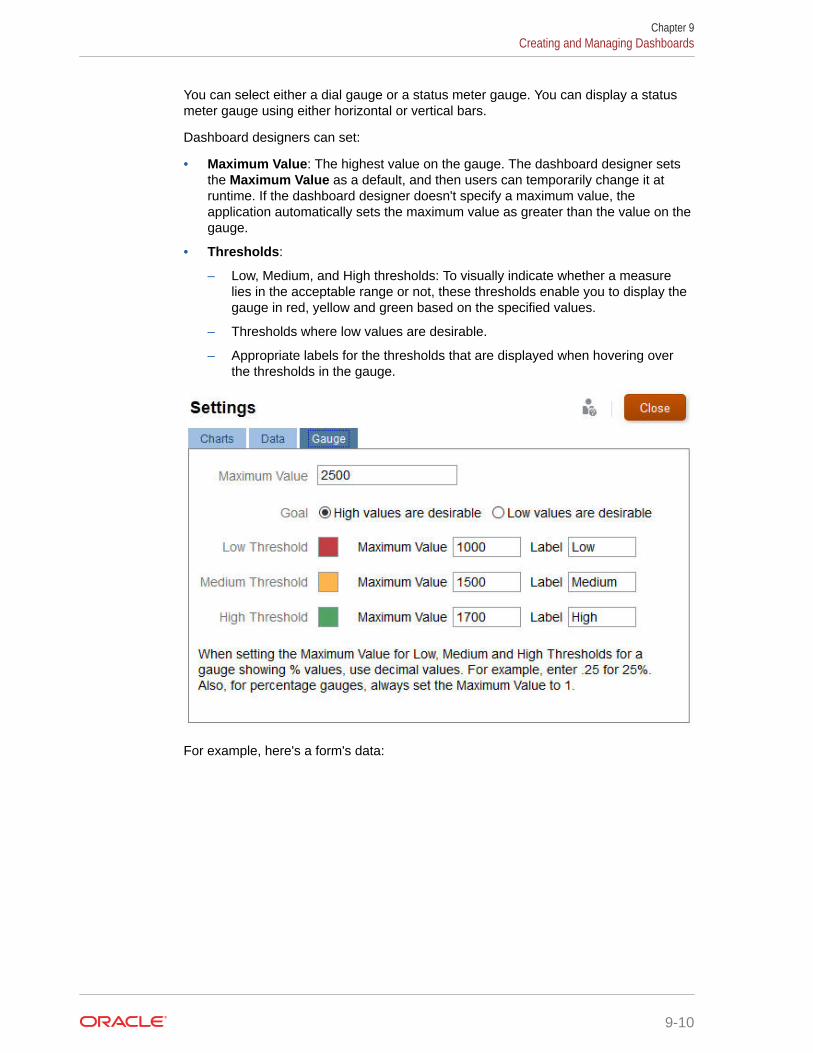
You can select either a dial gauge or a status meter gauge. You can display a statusmeter gauge using either horizontal or vertical bars.
Dashboard designers can set:
• Maximum Value: The highest value on the gauge. The dashboard designer setsthe Maximum Value as a default, and then users can temporarily change it atruntime. If the dashboard designer doesn't specify a maximum value, theapplication automatically sets the maximum value as greater than the value on thegauge.
• Thresholds:
– Low, Medium, and High thresholds: To visually indicate whether a measurelies in the acceptable range or not, these thresholds enable you to display thegauge in red, yellow and green based on the specified values.
– Thresholds where low values are desirable.
– Appropriate labels for the thresholds that are displayed when hovering overthe thresholds in the gauge.
For example, here's a form's data:
Chapter 9Creating and Managing Dashboards
9-10
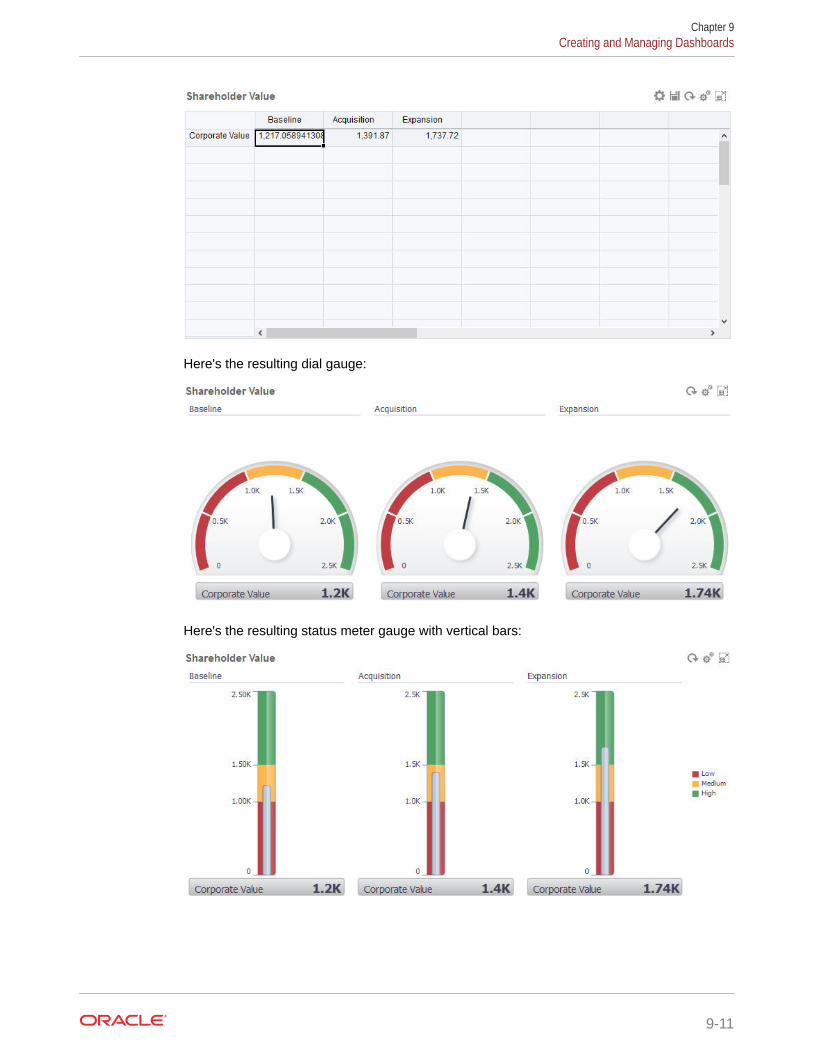
Here's the resulting dial gauge:
Here's the resulting status meter gauge with vertical bars:
Chapter 9Creating and Managing Dashboards
9-11
Note:
If a cell in the form is missing a value, no gauge is displayed for that cell.Also, you must specify at least 2 consecutive thresholds. The applicationneeds the middle threshold value to calculate the chart.
About the Tile Chart TypeA tile is a chart type that lets you select specific values from the cube to display. Inaddition to using a form as a data source, you can directly enter a cell intersection thatprovides the value for a tile. You can have up to 6 tiles across, and 4 rows down in adashboard, and give them a title. Until you associate a tile with data, it displays sampledata.
With a form as the data source for a tile:
• You can have up to six tiles per object.
• The values in the first column (up to the sixth row) are used to create the tiles.
Note:
Sometimes in a form, the first column may be collapsed (hidden) whenviewed as a grid. But the collapsed column is still considered when thetile gets its values from the form.
• The tile’s title is the row’s title, and it gets its values from the first column, then byrow.
• You can set the tile’s title, the tile’s height percentage, legend, and can selectwhich axes from the form to include. For example, if you select a form with threerows, the tile displays three values.
With a cell intersection as the data source for a tile, you can have only one tile perobject.
Tip:
To select a tile chart type, expand the list of chart types by clicking the link atthe bottom of the list.
Here are options you can set for a tile chart type. Note that you can set whether thedisplayed value is horizontally aligned in the tile to the left, the center, or the right.
Chapter 9Creating and Managing Dashboards
9-12
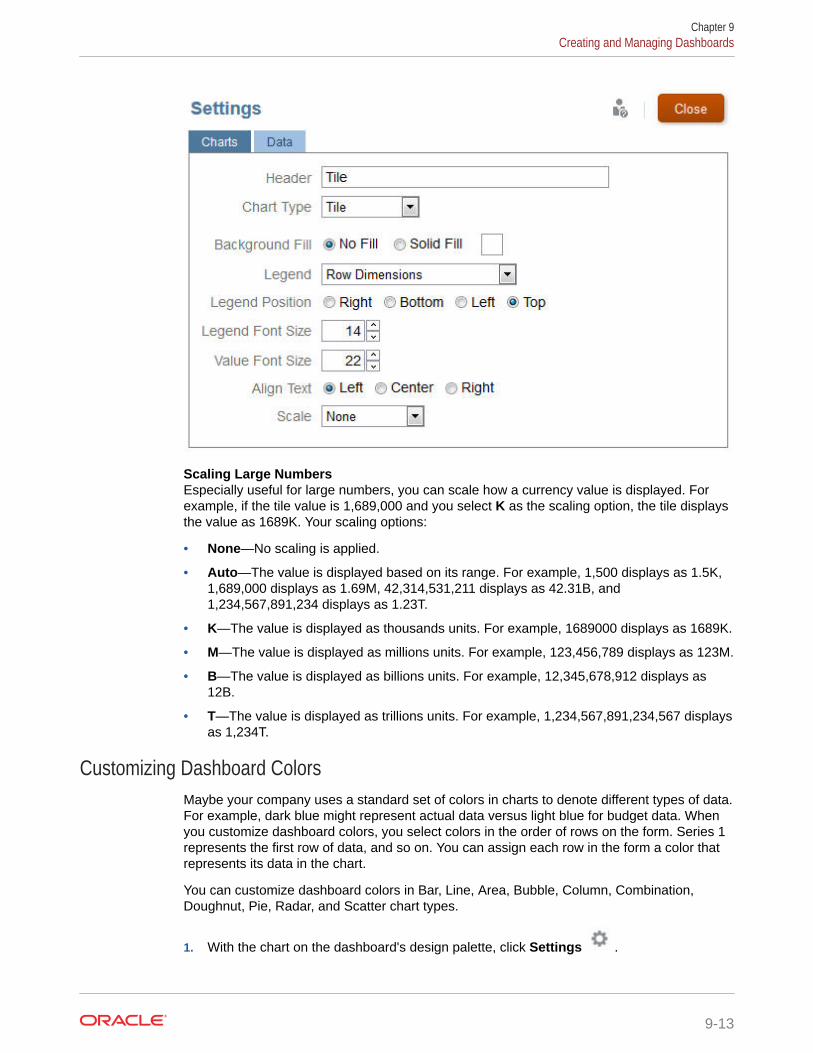
Scaling Large NumbersEspecially useful for large numbers, you can scale how a currency value is displayed. Forexample, if the tile value is 1,689,000 and you select K as the scaling option, the tile displaysthe value as 1689K. Your scaling options:
• None—No scaling is applied.
• Auto—The value is displayed based on its range. For example, 1,500 displays as 1.5K,1,689,000 displays as 1.69M, 42,314,531,211 displays as 42.31B, and1,234,567,891,234 displays as 1.23T.
• K—The value is displayed as thousands units. For example, 1689000 displays as 1689K.
• M—The value is displayed as millions units. For example, 123,456,789 displays as 123M.
• B—The value is displayed as billions units. For example, 12,345,678,912 displays as12B.
• T—The value is displayed as trillions units. For example, 1,234,567,891,234,567 displaysas 1,234T.
Customizing Dashboard ColorsMaybe your company uses a standard set of colors in charts to denote different types of data.For example, dark blue might represent actual data versus light blue for budget data. Whenyou customize dashboard colors, you select colors in the order of rows on the form. Series 1represents the first row of data, and so on. You can assign each row in the form a color thatrepresents its data in the chart.
You can customize dashboard colors in Bar, Line, Area, Bubble, Column, Combination,Doughnut, Pie, Radar, and Scatter chart types.
1. With the chart on the dashboard's design palette, click Settings .
Chapter 9Creating and Managing Dashboards
9-13
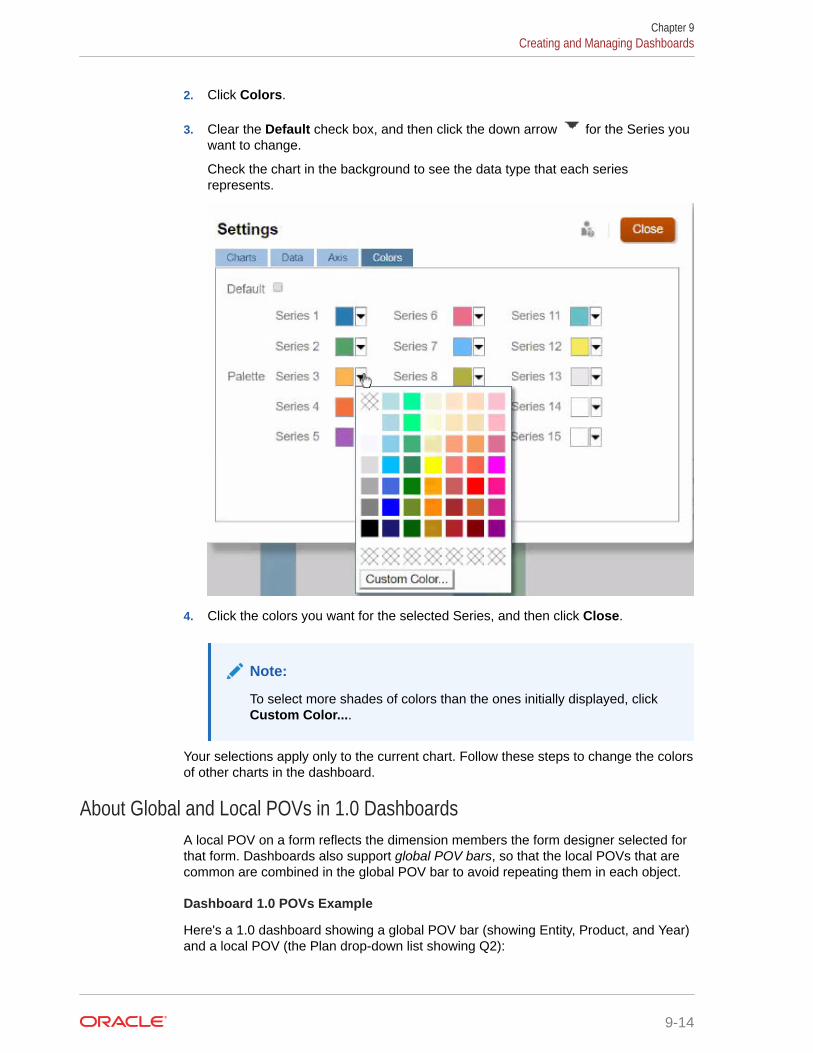
2. Click Colors.
3. Clear the Default check box, and then click the down arrow for the Series youwant to change.
Check the chart in the background to see the data type that each seriesrepresents.
4. Click the colors you want for the selected Series, and then click Close.
Note:
To select more shades of colors than the ones initially displayed, clickCustom Color....
Your selections apply only to the current chart. Follow these steps to change the colorsof other charts in the dashboard.
About Global and Local POVs in 1.0 DashboardsA local POV on a form reflects the dimension members the form designer selected forthat form. Dashboards also support global POV bars, so that the local POVs that arecommon are combined in the global POV bar to avoid repeating them in each object.
Dashboard 1.0 POVs Example
Here's a 1.0 dashboard showing a global POV bar (showing Entity, Product, and Year)and a local POV (the Plan drop-down list showing Q2):
Chapter 9Creating and Managing Dashboards
9-14
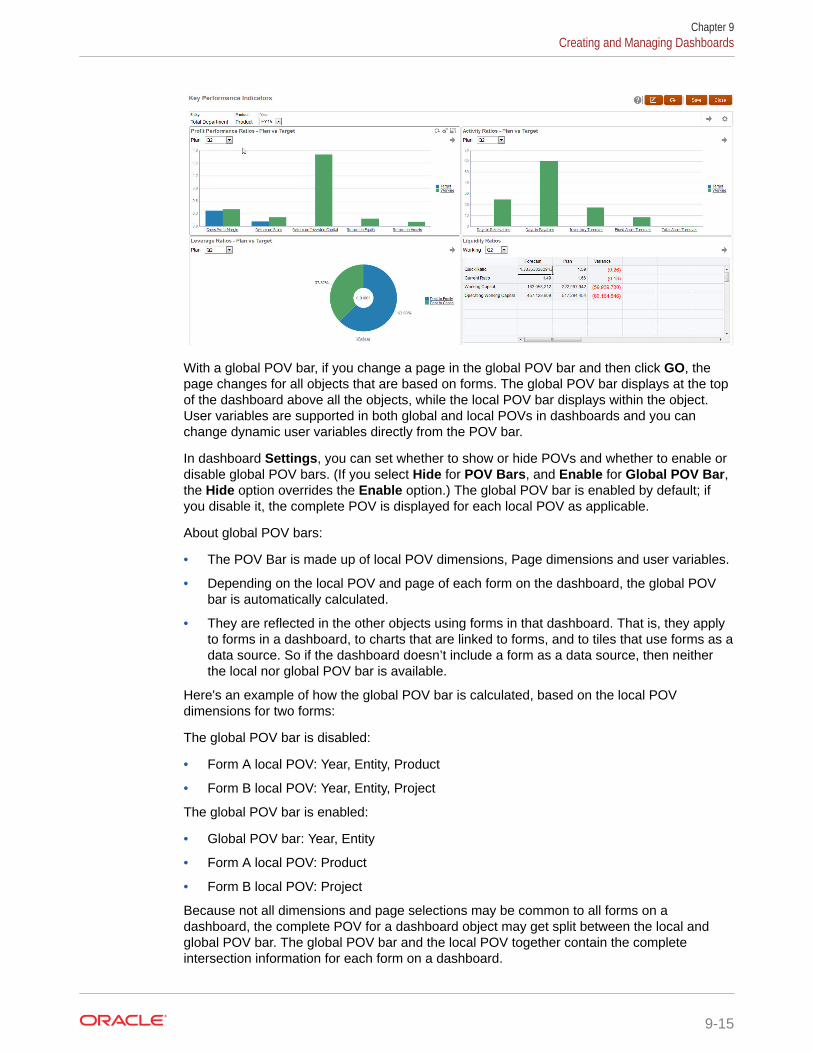
With a global POV bar, if you change a page in the global POV bar and then click GO, thepage changes for all objects that are based on forms. The global POV bar displays at the topof the dashboard above all the objects, while the local POV bar displays within the object.User variables are supported in both global and local POVs in dashboards and you canchange dynamic user variables directly from the POV bar.
In dashboard Settings, you can set whether to show or hide POVs and whether to enable ordisable global POV bars. (If you select Hide for POV Bars, and Enable for Global POV Bar,the Hide option overrides the Enable option.) The global POV bar is enabled by default; ifyou disable it, the complete POV is displayed for each local POV as applicable.
About global POV bars:
• The POV Bar is made up of local POV dimensions, Page dimensions and user variables.
• Depending on the local POV and page of each form on the dashboard, the global POVbar is automatically calculated.
• They are reflected in the other objects using forms in that dashboard. That is, they applyto forms in a dashboard, to charts that are linked to forms, and to tiles that use forms as adata source. So if the dashboard doesn’t include a form as a data source, then neitherthe local nor global POV bar is available.
Here's an example of how the global POV bar is calculated, based on the local POVdimensions for two forms:
The global POV bar is disabled:
• Form A local POV: Year, Entity, Product
• Form B local POV: Year, Entity, Project
The global POV bar is enabled:
• Global POV bar: Year, Entity
• Form A local POV: Product
• Form B local POV: Project
Because not all dimensions and page selections may be common to all forms on adashboard, the complete POV for a dashboard object may get split between the local andglobal POV bar. The global POV bar and the local POV together contain the completeintersection information for each form on a dashboard.
Chapter 9Creating and Managing Dashboards
9-15
If there is only one object on the dashboard that uses a form as a data source, thenthe entire POV/page of the form can be moved to the global POV bar.
If there is more than one object on a dashboard that use forms as a data source, thenthis is how the application determines which dimensions go in the global POV bar orstay in the local POV:
• If the dimension is in the POV or page of all the forms, and the member selectionis the same in all the forms, the dimension goes in the global POV bar.
• If the dimension is in the POV on one form and in the page of another form, thenthe dimension stays in the local POV.
• If the dimension is in the POV, then the same members must be selected in all theforms for the dimension.
• If the dimension is a page dimension, then the selected page members must bethe same and display in the same order in all the forms.
The POVs in 1.0 dashboards honor valid intersections by hiding invalid Pagemembers. See Dashboard POVs and Valid Intersections.
Dashboard POVs and Valid IntersectionsThe POVs in dashboards honor the valid intersections by hiding invalid Pagemembers. Just like in forms, the Page drop-down list is filtered for all selectedmembers in the POV and Page dimensions. Because dashboards support both globaland local POVs, the context for filtering the Page drop-down list depends on whichPOV the members are located. If the Page drop-down list is on a global POV, thefiltering context is only the global POV dimensions. If the Page drop-down list is on thelocal POV, the filtering context is all the global dimensions plus the dimensions on achart’s local POV.
See also About Global and Local POVs in 1.0 Dashboards.
Creating and Managing Dashboards 2.0Related Topics
• Concepts in Designing 2.0 Dashboards
• Creating Dashboards 2.0
• About the Geomap Chart Type
• About the Pyramid Chart Type
• About the Waterfall Chart Type
• Using Tables in Dashboards
• About the Gauge Chart Type for Dashboard 2.0
• About the Radar Chart Type for Dashboard 2.0
• About the Combination Chart Type for Dashboard 2.0
• About Global and Local POVs in 2.0 Dashboards
• About Quick Analysis
Chapter 9Creating and Managing Dashboards
9-16
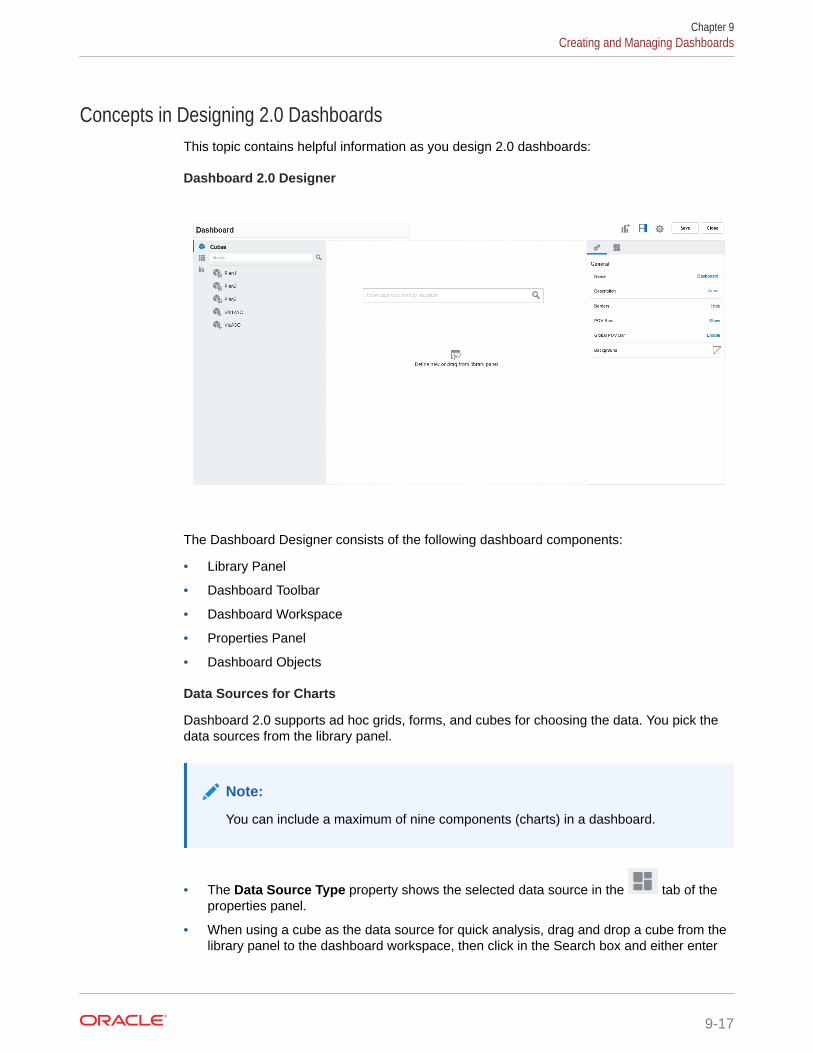
Concepts in Designing 2.0 DashboardsThis topic contains helpful information as you design 2.0 dashboards:
Dashboard 2.0 Designer
The Dashboard Designer consists of the following dashboard components:
• Library Panel
• Dashboard Toolbar
• Dashboard Workspace
• Properties Panel
• Dashboard Objects
Data Sources for Charts
Dashboard 2.0 supports ad hoc grids, forms, and cubes for choosing the data. You pick thedata sources from the library panel.
Note:
You can include a maximum of nine components (charts) in a dashboard.
• The Data Source Type property shows the selected data source in the tab of theproperties panel.
• When using a cube as the data source for quick analysis, drag and drop a cube from thelibrary panel to the dashboard workspace, then click in the Search box and either enter
Chapter 9Creating and Managing Dashboards
9-17
the member name or launch the member selector to choose members. The tab will then display in the properties panel where you can pivot the dimensionsand choose which dimensions appear on the POV, row, or column axis. See AboutQuick Analysis.
Note:
There is an upper limit of 50 members across all dimensions that can beselected to create a chart using quick analysis. This limit together withthe number of dimensions in the cube will determine the maximum sizeof the grid that is supported for a chart based on quick analysis.
• When the data source is a form or an ad hoc grid, the data is fetched using theform definition. You can change the source form by clicking the Form property in
the tab of the properties panel.
Note:
Only forms with a maximum of 100 cells on a column and 100 cells onrow for a total of 10,000 cells, including row and column header cells,can be visualized in a chart.
Library Panel
On the left side of the Dashboard Designer is the library panel where you select thecontent for dashboard objects. Simply drag and drop objects from the library panel tothe workspace or search for content using the Search box. Content in the library panelis grouped into these categories:
Table 9-3 Library Panel Content Categories
Icon Description
Cubes
Library (ad hoc and standard forms)
Visualizations (charts)
Tip:
You can minimize and maximize the library panel by hovering over the paneland clicking the horizontal bar that displays on the middle right.
Chapter 9Creating and Managing Dashboards
9-18
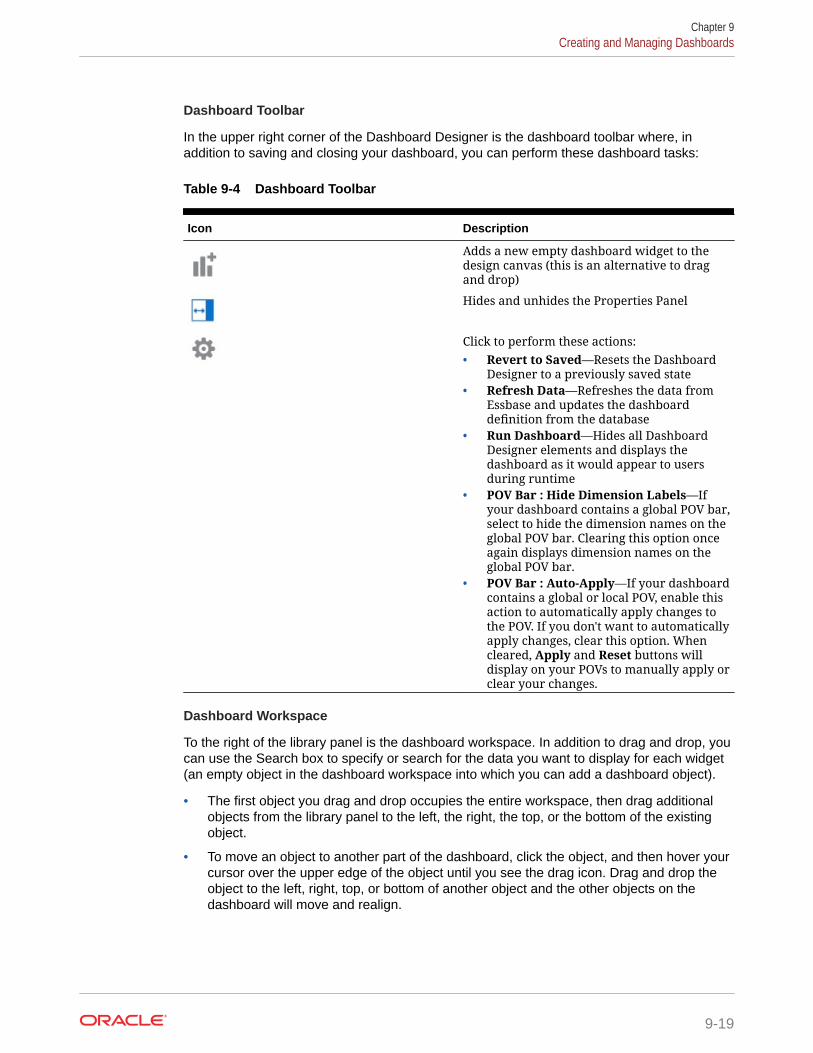
Dashboard Toolbar
In the upper right corner of the Dashboard Designer is the dashboard toolbar where, inaddition to saving and closing your dashboard, you can perform these dashboard tasks:
Table 9-4 Dashboard Toolbar
Icon Description
Adds a new empty dashboard widget to thedesign canvas (this is an alternative to dragand drop)
Hides and unhides the Properties Panel
Click to perform these actions:• Revert to Saved—Resets the Dashboard
Designer to a previously saved state• Refresh Data—Refreshes the data from
Essbase and updates the dashboarddefinition from the database
• Run Dashboard—Hides all DashboardDesigner elements and displays thedashboard as it would appear to usersduring runtime
• POV Bar : Hide Dimension Labels—Ifyour dashboard contains a global POV bar,select to hide the dimension names on theglobal POV bar. Clearing this option onceagain displays dimension names on theglobal POV bar.
• POV Bar : Auto-Apply—If your dashboardcontains a global or local POV, enable thisaction to automatically apply changes tothe POV. If you don't want to automaticallyapply changes, clear this option. Whencleared, Apply and Reset buttons willdisplay on your POVs to manually apply orclear your changes.
Dashboard Workspace
To the right of the library panel is the dashboard workspace. In addition to drag and drop, youcan use the Search box to specify or search for the data you want to display for each widget(an empty object in the dashboard workspace into which you can add a dashboard object).
• The first object you drag and drop occupies the entire workspace, then drag additionalobjects from the library panel to the left, the right, the top, or the bottom of the existingobject.
• To move an object to another part of the dashboard, click the object, and then hover yourcursor over the upper edge of the object until you see the drag icon. Drag and drop theobject to the left, right, top, or bottom of another object and the other objects on thedashboard will move and realign.
Chapter 9Creating and Managing Dashboards
9-19
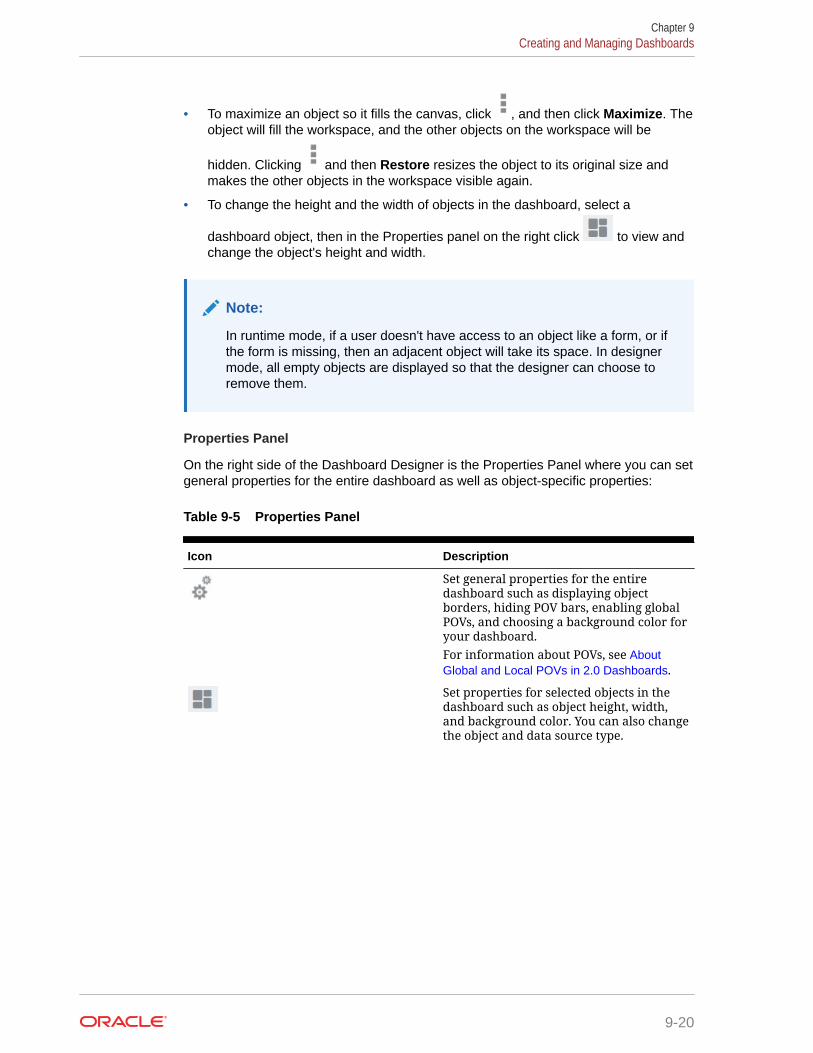
• To maximize an object so it fills the canvas, click , and then click Maximize. Theobject will fill the workspace, and the other objects on the workspace will be
hidden. Clicking and then Restore resizes the object to its original size andmakes the other objects in the workspace visible again.
• To change the height and the width of objects in the dashboard, select a
dashboard object, then in the Properties panel on the right click to view andchange the object's height and width.
Note:
In runtime mode, if a user doesn't have access to an object like a form, or ifthe form is missing, then an adjacent object will take its space. In designermode, all empty objects are displayed so that the designer can choose toremove them.
Properties Panel
On the right side of the Dashboard Designer is the Properties Panel where you can setgeneral properties for the entire dashboard as well as object-specific properties:
Table 9-5 Properties Panel
Icon Description
Set general properties for the entiredashboard such as displaying objectborders, hiding POV bars, enabling globalPOVs, and choosing a background color foryour dashboard.For information about POVs, see AboutGlobal and Local POVs in 2.0 Dashboards.
Set properties for selected objects in thedashboard such as object height, width,and background color. You can also changethe object and data source type.
Chapter 9Creating and Managing Dashboards
9-20
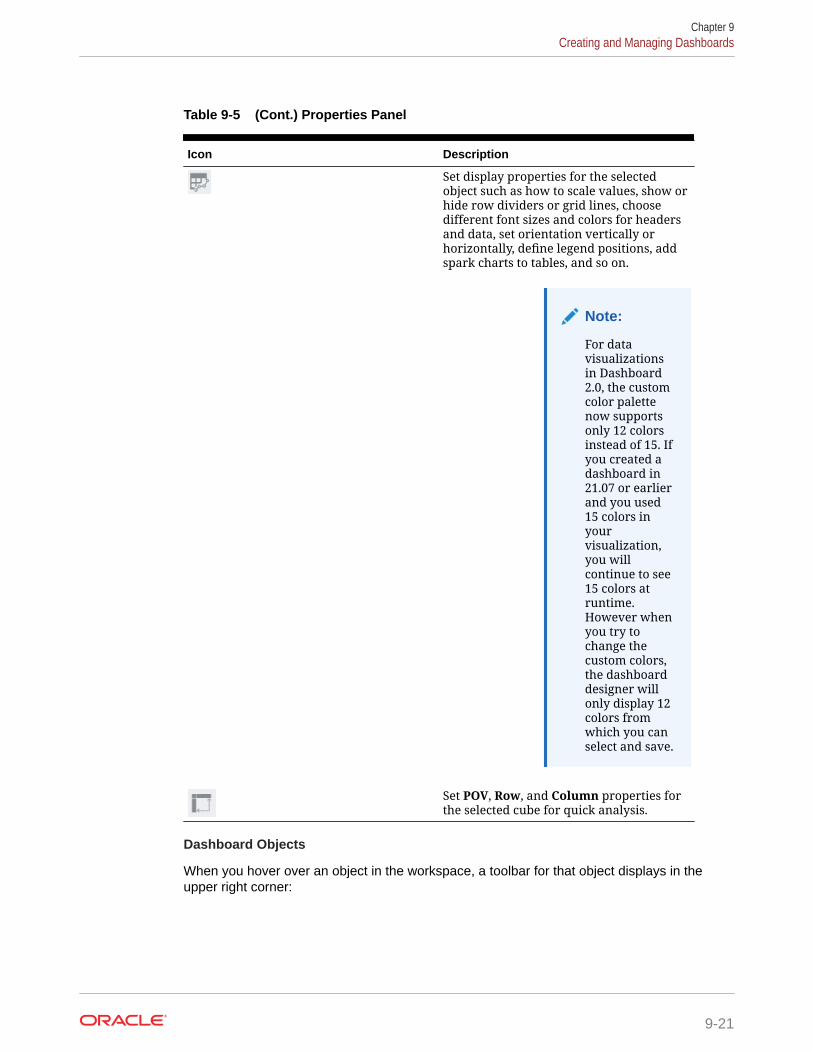
Table 9-5 (Cont.) Properties Panel
Icon Description
Set display properties for the selectedobject such as how to scale values, show orhide row dividers or grid lines, choosedifferent font sizes and colors for headersand data, set orientation vertically orhorizontally, define legend positions, addspark charts to tables, and so on.
Note:
For datavisualizationsin Dashboard2.0, the customcolor palettenow supportsonly 12 colorsinstead of 15. Ifyou created adashboard in21.07 or earlierand you used15 colors inyourvisualization,you willcontinue to see15 colors atruntime.However whenyou try tochange thecustom colors,the dashboarddesigner willonly display 12colors fromwhich you canselect and save.
Set POV, Row, and Column properties forthe selected cube for quick analysis.
Dashboard Objects
When you hover over an object in the workspace, a toolbar for that object displays in theupper right corner:
Chapter 9Creating and Managing Dashboards
9-21
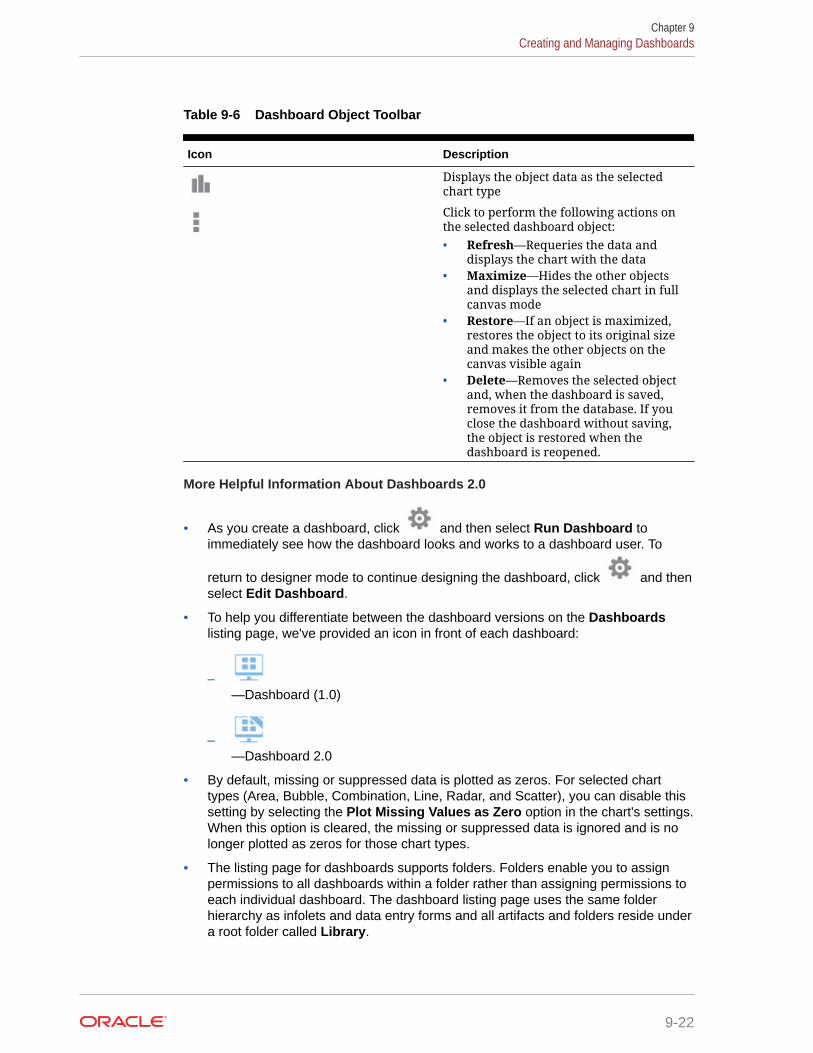
Table 9-6 Dashboard Object Toolbar
Icon Description
Displays the object data as the selectedchart type
Click to perform the following actions onthe selected dashboard object:• Refresh—Requeries the data and
displays the chart with the data• Maximize—Hides the other objects
and displays the selected chart in fullcanvas mode
• Restore—If an object is maximized,restores the object to its original sizeand makes the other objects on thecanvas visible again
• Delete—Removes the selected objectand, when the dashboard is saved,removes it from the database. If youclose the dashboard without saving,the object is restored when thedashboard is reopened.
More Helpful Information About Dashboards 2.0
• As you create a dashboard, click and then select Run Dashboard toimmediately see how the dashboard looks and works to a dashboard user. To
return to designer mode to continue designing the dashboard, click and thenselect Edit Dashboard.
• To help you differentiate between the dashboard versions on the Dashboardslisting page, we've provided an icon in front of each dashboard:
–—Dashboard (1.0)
–—Dashboard 2.0
• By default, missing or suppressed data is plotted as zeros. For selected charttypes (Area, Bubble, Combination, Line, Radar, and Scatter), you can disable thissetting by selecting the Plot Missing Values as Zero option in the chart's settings.When this option is cleared, the missing or suppressed data is ignored and is nolonger plotted as zeros for those chart types.
• The listing page for dashboards supports folders. Folders enable you to assignpermissions to all dashboards within a folder rather than assigning permissions toeach individual dashboard. The dashboard listing page uses the same folderhierarchy as infolets and data entry forms and all artifacts and folders reside undera root folder called Library.
Chapter 9Creating and Managing Dashboards
9-22
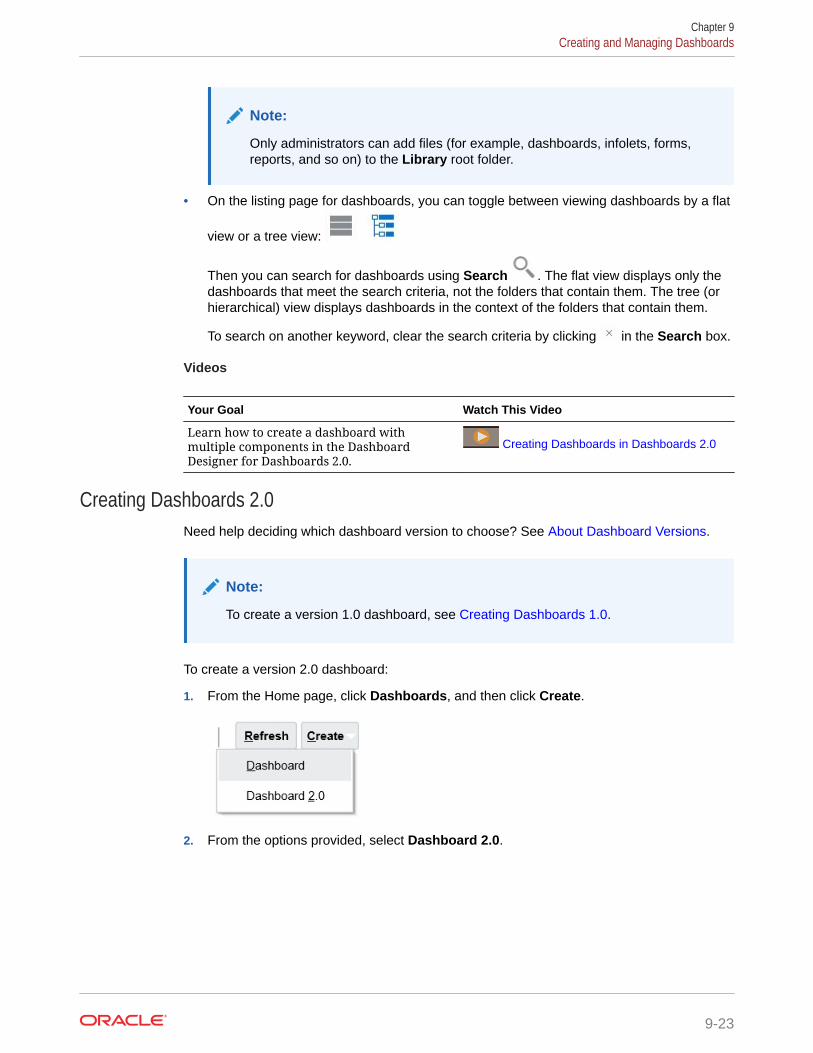
Note:
Only administrators can add files (for example, dashboards, infolets, forms,reports, and so on) to the Library root folder.
• On the listing page for dashboards, you can toggle between viewing dashboards by a flat
view or a tree view:
Then you can search for dashboards using Search . The flat view displays only thedashboards that meet the search criteria, not the folders that contain them. The tree (orhierarchical) view displays dashboards in the context of the folders that contain them.
To search on another keyword, clear the search criteria by clicking in the Search box.
Videos
Your Goal Watch This Video
Learn how to create a dashboard withmultiple components in the DashboardDesigner for Dashboards 2.0.
Creating Dashboards in Dashboards 2.0
Creating Dashboards 2.0Need help deciding which dashboard version to choose? See About Dashboard Versions.
Note:
To create a version 1.0 dashboard, see Creating Dashboards 1.0.
To create a version 2.0 dashboard:
1. From the Home page, click Dashboards, and then click Create.
2. From the options provided, select Dashboard 2.0.
Chapter 9Creating and Managing Dashboards
9-23
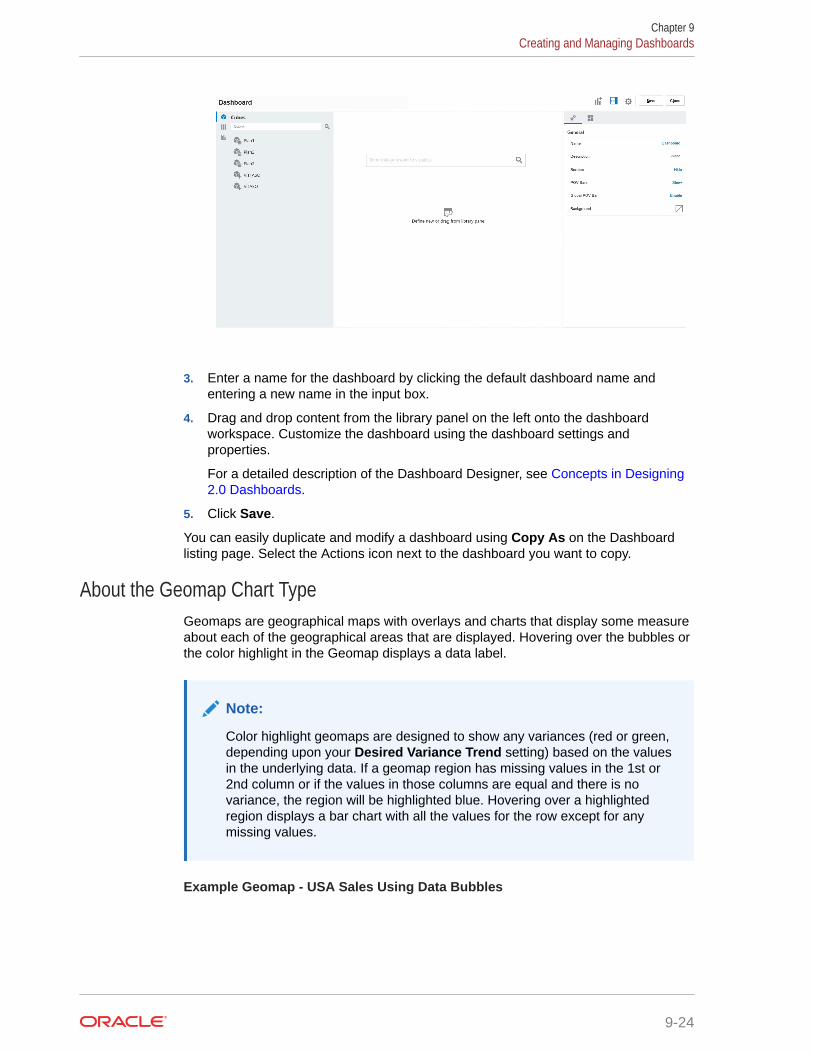
3. Enter a name for the dashboard by clicking the default dashboard name andentering a new name in the input box.
4. Drag and drop content from the library panel on the left onto the dashboardworkspace. Customize the dashboard using the dashboard settings andproperties.
For a detailed description of the Dashboard Designer, see Concepts in Designing2.0 Dashboards.
5. Click Save.
You can easily duplicate and modify a dashboard using Copy As on the Dashboardlisting page. Select the Actions icon next to the dashboard you want to copy.
About the Geomap Chart TypeGeomaps are geographical maps with overlays and charts that display some measureabout each of the geographical areas that are displayed. Hovering over the bubbles orthe color highlight in the Geomap displays a data label.
Note:
Color highlight geomaps are designed to show any variances (red or green,depending upon your Desired Variance Trend setting) based on the valuesin the underlying data. If a geomap region has missing values in the 1st or2nd column or if the values in those columns are equal and there is novariance, the region will be highlighted blue. Hovering over a highlightedregion displays a bar chart with all the values for the row except for anymissing values.
Example Geomap - USA Sales Using Data Bubbles
Chapter 9Creating and Managing Dashboards
9-24

Example Geomap - World Sales Using Color Highlight
Dashboard designers can set these geomap chart properties:
Table 9-7 Geomap Chart Properties
Setting Description
Map Layer Select World or narrow the scope of the mapto a continent such as Asia, North America, orAfrica.
Chapter 9Creating and Managing Dashboards
9-25
Table 9-7 (Cont.) Geomap Chart Properties
Setting Description
Type The Data Bubbles geomap displays data assized bubbles over the map layer. The ColorHighlight geomap compares two data values,displaying geographical areas that have anincrease in green, and those with a decrease inred.Select Data Bubbles or Color Highlight andthen specify the following additional options:• For Data Bubbles, select the desired
settings for Label (Show or Hide), LabelColor, and Bubble Color.
• For Color Highlight, specify the DesiredVariance Trend (Increase or Decrease).
Geography Names We've provided you with a metadata load filethat contains the geographical elements thegeomap uses like countries, states, and cities.Click to download a CSV file which you canthen upload into a dimension as new membersor (with some manual changes) as aliases toexisting members in your application.Note that geomaps only work if the geographynames in the forms match exactly thegeography names that Dashboard 2.0 uses forits map layers. So if your entity/geographydimension says, for example, USA, that won'tbe recognized as a valid name in the maplayer, which uses United States.
Videos
Your Goal Watch This Video
Learn how to download geographymembers for geomap charts, then importthem into your dimension. You learn howto set up both data bubble and colorhighlight geomap charts.
Creating Geomaps in Dashboards 2.0
About the Pyramid Chart TypePyramid chart types use a triangle diagram to represent hierarchies visually. Thetriangle is divided into sections, illustrating vertically top-down and broad-narrowstructures and processes.
Example 3D Pyramid Chart
Chapter 9Creating and Managing Dashboards
9-26
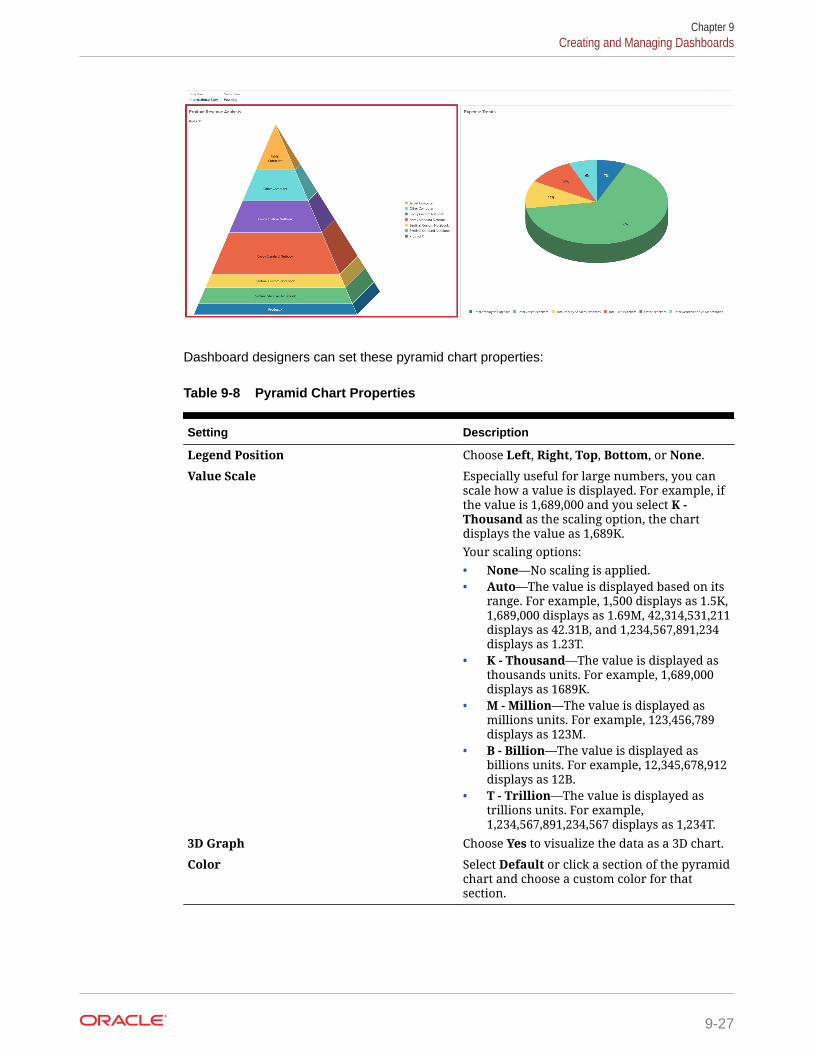
Dashboard designers can set these pyramid chart properties:
Table 9-8 Pyramid Chart Properties
Setting Description
Legend Position Choose Left, Right, Top, Bottom, or None.
Value Scale Especially useful for large numbers, you canscale how a value is displayed. For example, ifthe value is 1,689,000 and you select K -Thousand as the scaling option, the chartdisplays the value as 1,689K.Your scaling options:• None—No scaling is applied.• Auto—The value is displayed based on its
range. For example, 1,500 displays as 1.5K,1,689,000 displays as 1.69M, 42,314,531,211displays as 42.31B, and 1,234,567,891,234displays as 1.23T.
• K - Thousand—The value is displayed asthousands units. For example, 1,689,000displays as 1689K.
• M - Million—The value is displayed asmillions units. For example, 123,456,789displays as 123M.
• B - Billion—The value is displayed asbillions units. For example, 12,345,678,912displays as 12B.
• T - Trillion—The value is displayed astrillions units. For example,1,234,567,891,234,567 displays as 1,234T.
3D Graph Choose Yes to visualize the data as a 3D chart.
Color Select Default or click a section of the pyramidchart and choose a custom color for thatsection.
Chapter 9Creating and Managing Dashboards
9-27
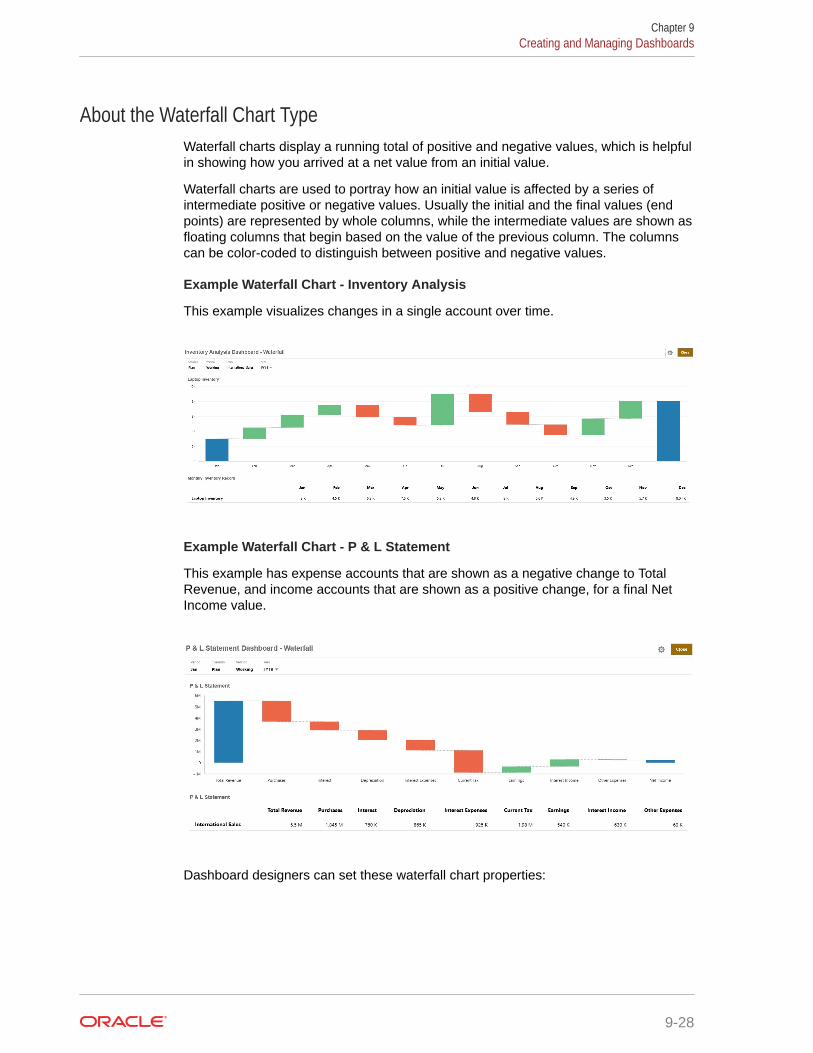
About the Waterfall Chart TypeWaterfall charts display a running total of positive and negative values, which is helpfulin showing how you arrived at a net value from an initial value.
Waterfall charts are used to portray how an initial value is affected by a series ofintermediate positive or negative values. Usually the initial and the final values (endpoints) are represented by whole columns, while the intermediate values are shown asfloating columns that begin based on the value of the previous column. The columnscan be color-coded to distinguish between positive and negative values.
Example Waterfall Chart - Inventory Analysis
This example visualizes changes in a single account over time.
Example Waterfall Chart - P & L Statement
This example has expense accounts that are shown as a negative change to TotalRevenue, and income accounts that are shown as a positive change, for a final NetIncome value.
Dashboard designers can set these waterfall chart properties:
Chapter 9Creating and Managing Dashboards
9-28
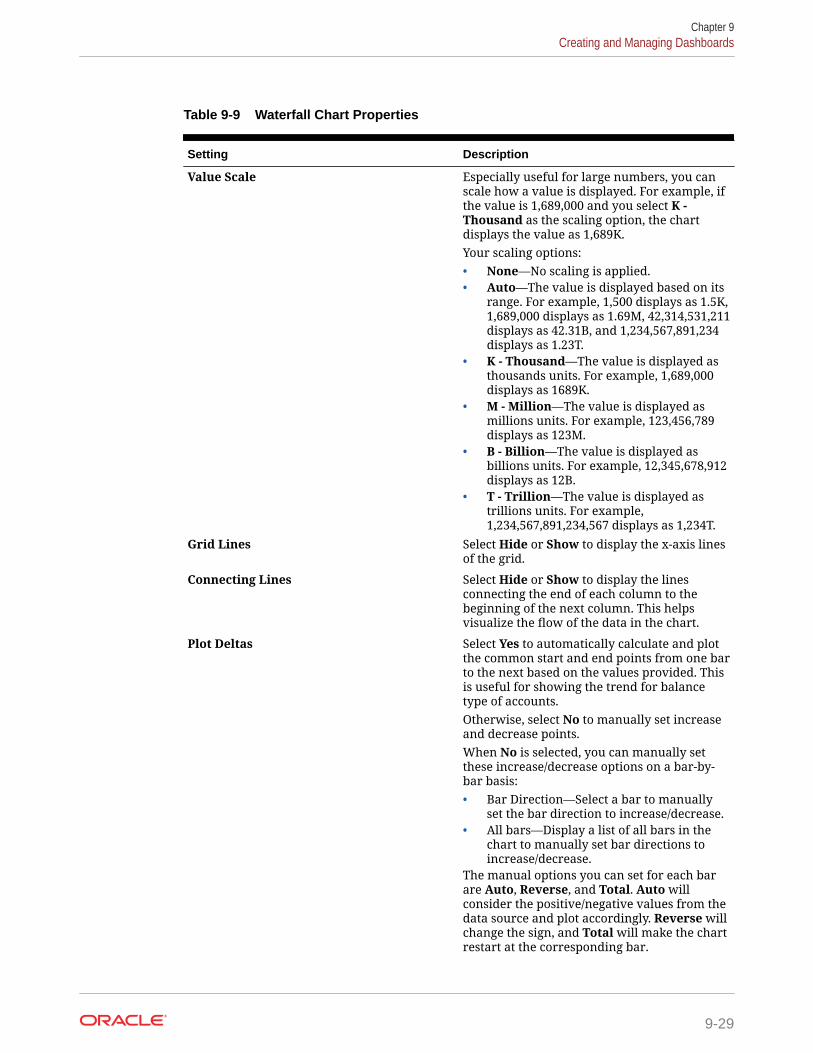
Table 9-9 Waterfall Chart Properties
Setting Description
Value Scale Especially useful for large numbers, you canscale how a value is displayed. For example, ifthe value is 1,689,000 and you select K -Thousand as the scaling option, the chartdisplays the value as 1,689K.Your scaling options:• None—No scaling is applied.• Auto—The value is displayed based on its
range. For example, 1,500 displays as 1.5K,1,689,000 displays as 1.69M, 42,314,531,211displays as 42.31B, and 1,234,567,891,234displays as 1.23T.
• K - Thousand—The value is displayed asthousands units. For example, 1,689,000displays as 1689K.
• M - Million—The value is displayed asmillions units. For example, 123,456,789displays as 123M.
• B - Billion—The value is displayed asbillions units. For example, 12,345,678,912displays as 12B.
• T - Trillion—The value is displayed astrillions units. For example,1,234,567,891,234,567 displays as 1,234T.
Grid Lines Select Hide or Show to display the x-axis linesof the grid.
Connecting Lines Select Hide or Show to display the linesconnecting the end of each column to thebeginning of the next column. This helpsvisualize the flow of the data in the chart.
Plot Deltas Select Yes to automatically calculate and plotthe common start and end points from one barto the next based on the values provided. Thisis useful for showing the trend for balancetype of accounts.Otherwise, select No to manually set increaseand decrease points.When No is selected, you can manually setthese increase/decrease options on a bar-by-bar basis:• Bar Direction—Select a bar to manually
set the bar direction to increase/decrease.• All bars—Display a list of all bars in the
chart to manually set bar directions toincrease/decrease.
The manual options you can set for each barare Auto, Reverse, and Total. Auto willconsider the positive/negative values from thedata source and plot accordingly. Reverse willchange the sign, and Total will make the chartrestart at the corresponding bar.
Chapter 9Creating and Managing Dashboards
9-29
Table 9-9 (Cont.) Waterfall Chart Properties
Setting Description
IncreaseDecreaseTotal
Select a color for each property.
End Bar Select whether to Hide or Show the end bar onthe chart. In the preceding example, the endbar is shown. If the end bar is shown, you canspecify a label.
Axes Select a Custom Range for the X-Axis and theY-Axis, or select Off.
Videos
Your Goal Watch This Video
Learn how to create waterfall charts totrack the changes in a single account overtime and to track how multiple accountsinteract to produce a final total.
Creating Waterfall Charts inDashboards 2.0
Using Tables in DashboardsTables in dashboards provide a list view of the data showing multiple values from aform or grid. You can embed mini-charts into each row of the table, called SparkCharts, which plot column data. Tables are also searchable.
Example Dashboard Showing Plain Tables
Example Dashboard Showing a Table With a Spark Chart
Chapter 9Creating and Managing Dashboards
9-30
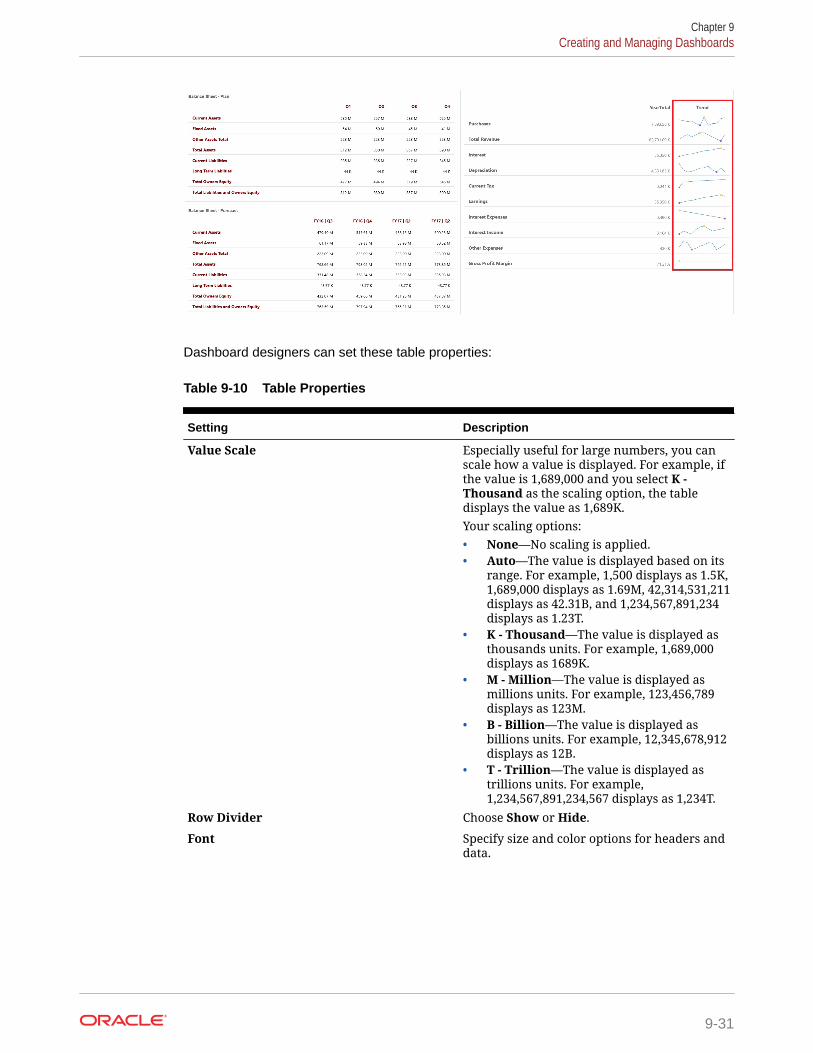
Dashboard designers can set these table properties:
Table 9-10 Table Properties
Setting Description
Value Scale Especially useful for large numbers, you canscale how a value is displayed. For example, ifthe value is 1,689,000 and you select K -Thousand as the scaling option, the tabledisplays the value as 1,689K.Your scaling options:• None—No scaling is applied.• Auto—The value is displayed based on its
range. For example, 1,500 displays as 1.5K,1,689,000 displays as 1.69M, 42,314,531,211displays as 42.31B, and 1,234,567,891,234displays as 1.23T.
• K - Thousand—The value is displayed asthousands units. For example, 1,689,000displays as 1689K.
• M - Million—The value is displayed asmillions units. For example, 123,456,789displays as 123M.
• B - Billion—The value is displayed asbillions units. For example, 12,345,678,912displays as 12B.
• T - Trillion—The value is displayed astrillions units. For example,1,234,567,891,234,567 displays as 1,234T.
Row Divider Choose Show or Hide.
Font Specify size and color options for headers anddata.
Chapter 9Creating and Managing Dashboards
9-31
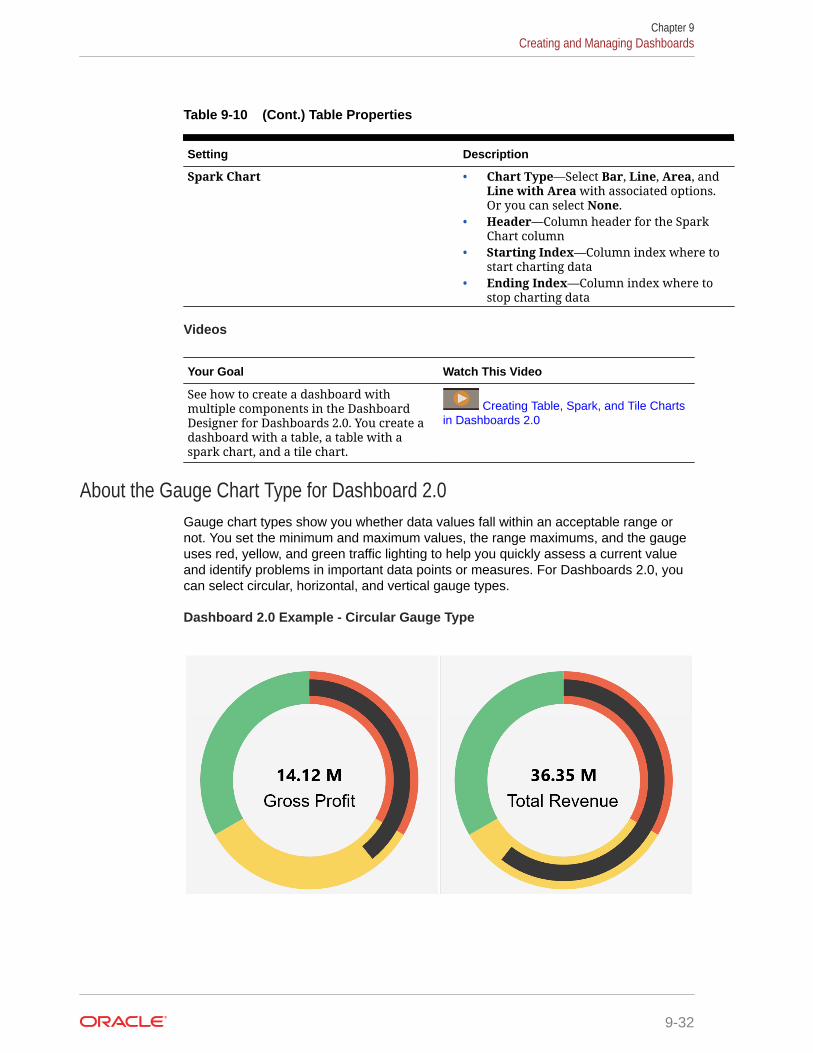
Table 9-10 (Cont.) Table Properties
Setting Description
Spark Chart • Chart Type—Select Bar, Line, Area, andLine with Area with associated options.Or you can select None.
• Header—Column header for the SparkChart column
• Starting Index—Column index where tostart charting data
• Ending Index—Column index where tostop charting data
Videos
Your Goal Watch This Video
See how to create a dashboard withmultiple components in the DashboardDesigner for Dashboards 2.0. You create adashboard with a table, a table with aspark chart, and a tile chart.
Creating Table, Spark, and Tile Chartsin Dashboards 2.0
About the Gauge Chart Type for Dashboard 2.0Gauge chart types show you whether data values fall within an acceptable range ornot. You set the minimum and maximum values, the range maximums, and the gaugeuses red, yellow, and green traffic lighting to help you quickly assess a current valueand identify problems in important data points or measures. For Dashboards 2.0, youcan select circular, horizontal, and vertical gauge types.
Dashboard 2.0 Example - Circular Gauge Type
Chapter 9Creating and Managing Dashboards
9-32
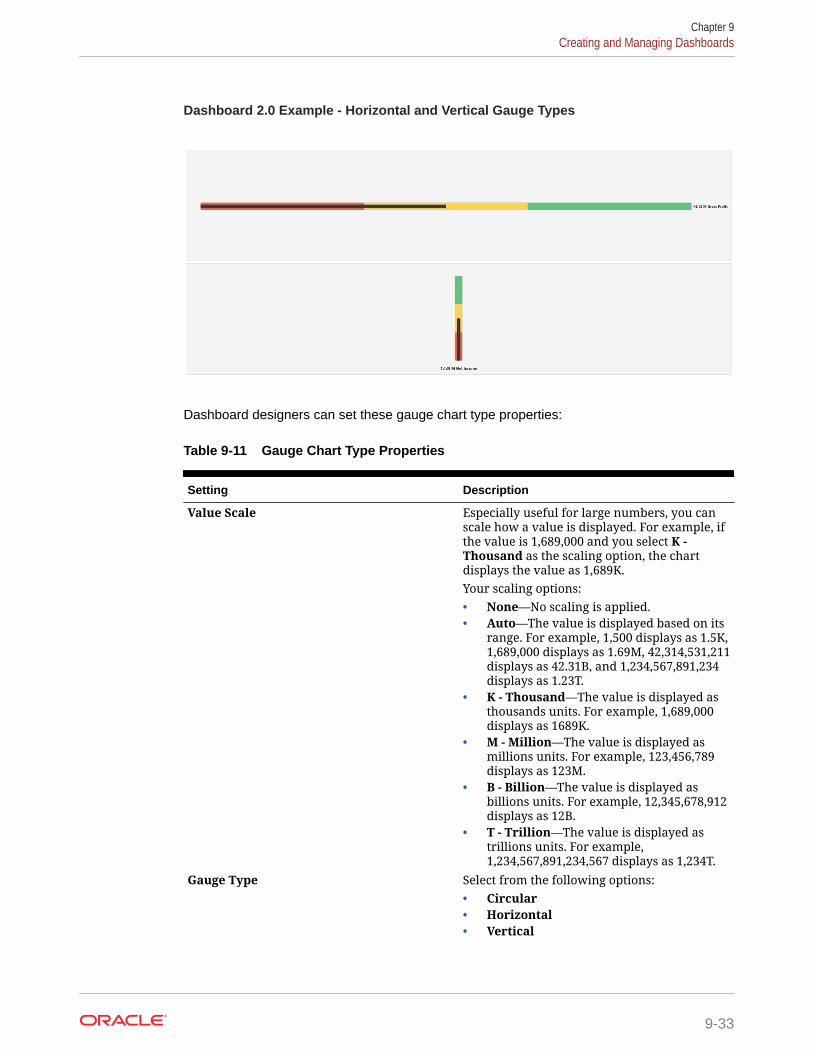
Dashboard 2.0 Example - Horizontal and Vertical Gauge Types
Dashboard designers can set these gauge chart type properties:
Table 9-11 Gauge Chart Type Properties
Setting Description
Value Scale Especially useful for large numbers, you canscale how a value is displayed. For example, ifthe value is 1,689,000 and you select K -Thousand as the scaling option, the chartdisplays the value as 1,689K.Your scaling options:• None—No scaling is applied.• Auto—The value is displayed based on its
range. For example, 1,500 displays as 1.5K,1,689,000 displays as 1.69M, 42,314,531,211displays as 42.31B, and 1,234,567,891,234displays as 1.23T.
• K - Thousand—The value is displayed asthousands units. For example, 1,689,000displays as 1689K.
• M - Million—The value is displayed asmillions units. For example, 123,456,789displays as 123M.
• B - Billion—The value is displayed asbillions units. For example, 12,345,678,912displays as 12B.
• T - Trillion—The value is displayed astrillions units. For example,1,234,567,891,234,567 displays as 1,234T.
Gauge Type Select from the following options:• Circular• Horizontal• Vertical
Chapter 9Creating and Managing Dashboards
9-33
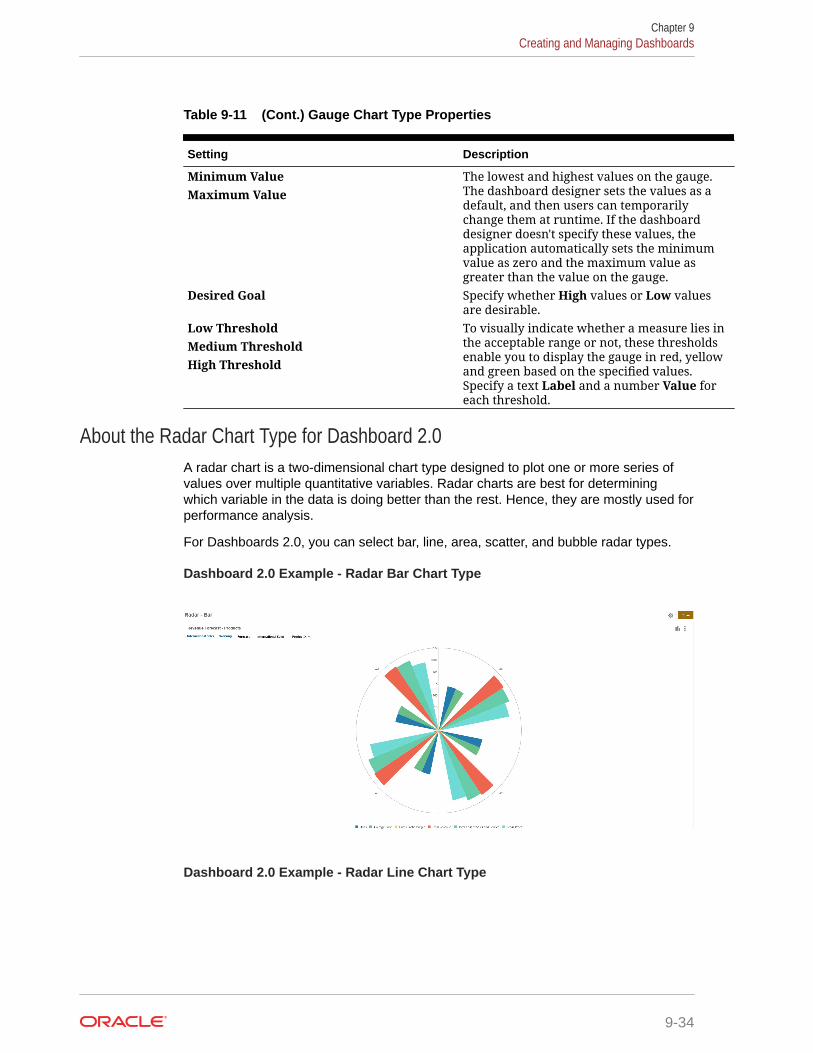
Table 9-11 (Cont.) Gauge Chart Type Properties
Setting Description
Minimum ValueMaximum Value
The lowest and highest values on the gauge.The dashboard designer sets the values as adefault, and then users can temporarilychange them at runtime. If the dashboarddesigner doesn't specify these values, theapplication automatically sets the minimumvalue as zero and the maximum value asgreater than the value on the gauge.
Desired Goal Specify whether High values or Low valuesare desirable.
Low ThresholdMedium ThresholdHigh Threshold
To visually indicate whether a measure lies inthe acceptable range or not, these thresholdsenable you to display the gauge in red, yellowand green based on the specified values.Specify a text Label and a number Value foreach threshold.
About the Radar Chart Type for Dashboard 2.0A radar chart is a two-dimensional chart type designed to plot one or more series ofvalues over multiple quantitative variables. Radar charts are best for determiningwhich variable in the data is doing better than the rest. Hence, they are mostly used forperformance analysis.
For Dashboards 2.0, you can select bar, line, area, scatter, and bubble radar types.
Dashboard 2.0 Example - Radar Bar Chart Type
Dashboard 2.0 Example - Radar Line Chart Type
Chapter 9Creating and Managing Dashboards
9-34
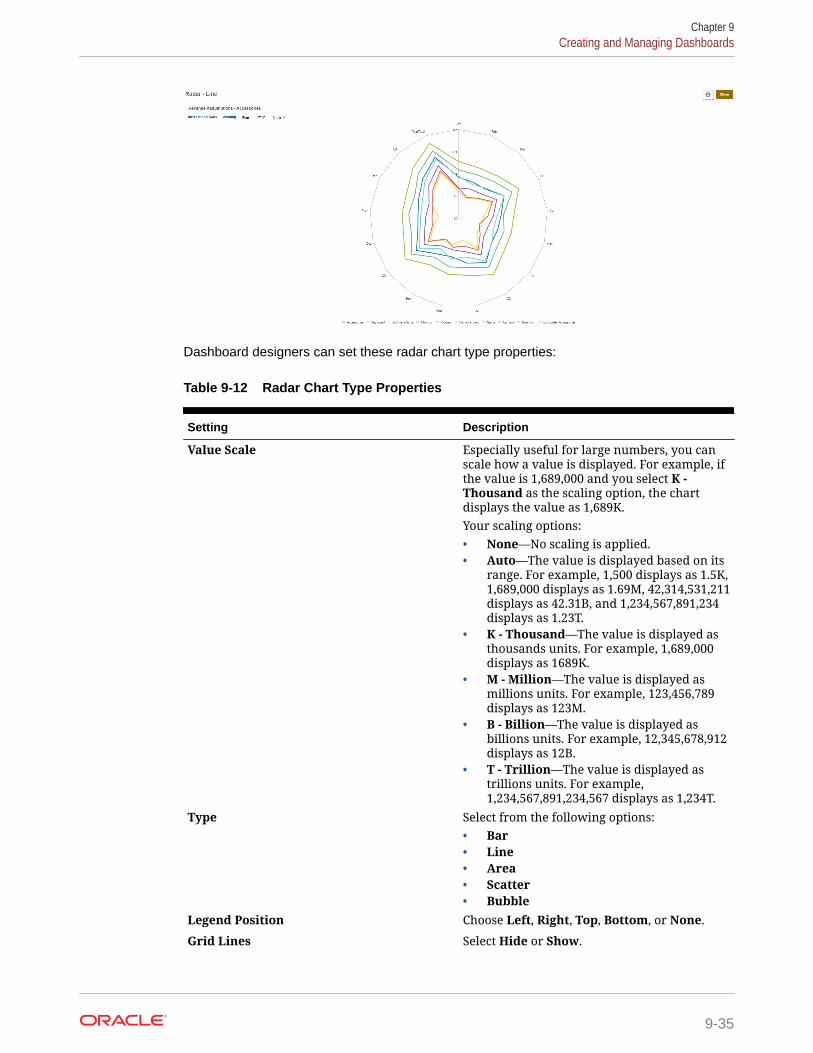
Dashboard designers can set these radar chart type properties:
Table 9-12 Radar Chart Type Properties
Setting Description
Value Scale Especially useful for large numbers, you canscale how a value is displayed. For example, ifthe value is 1,689,000 and you select K -Thousand as the scaling option, the chartdisplays the value as 1,689K.Your scaling options:• None—No scaling is applied.• Auto—The value is displayed based on its
range. For example, 1,500 displays as 1.5K,1,689,000 displays as 1.69M, 42,314,531,211displays as 42.31B, and 1,234,567,891,234displays as 1.23T.
• K - Thousand—The value is displayed asthousands units. For example, 1,689,000displays as 1689K.
• M - Million—The value is displayed asmillions units. For example, 123,456,789displays as 123M.
• B - Billion—The value is displayed asbillions units. For example, 12,345,678,912displays as 12B.
• T - Trillion—The value is displayed astrillions units. For example,1,234,567,891,234,567 displays as 1,234T.
Type Select from the following options:• Bar• Line• Area• Scatter• Bubble
Legend Position Choose Left, Right, Top, Bottom, or None.
Grid Lines Select Hide or Show.
Chapter 9Creating and Managing Dashboards
9-35
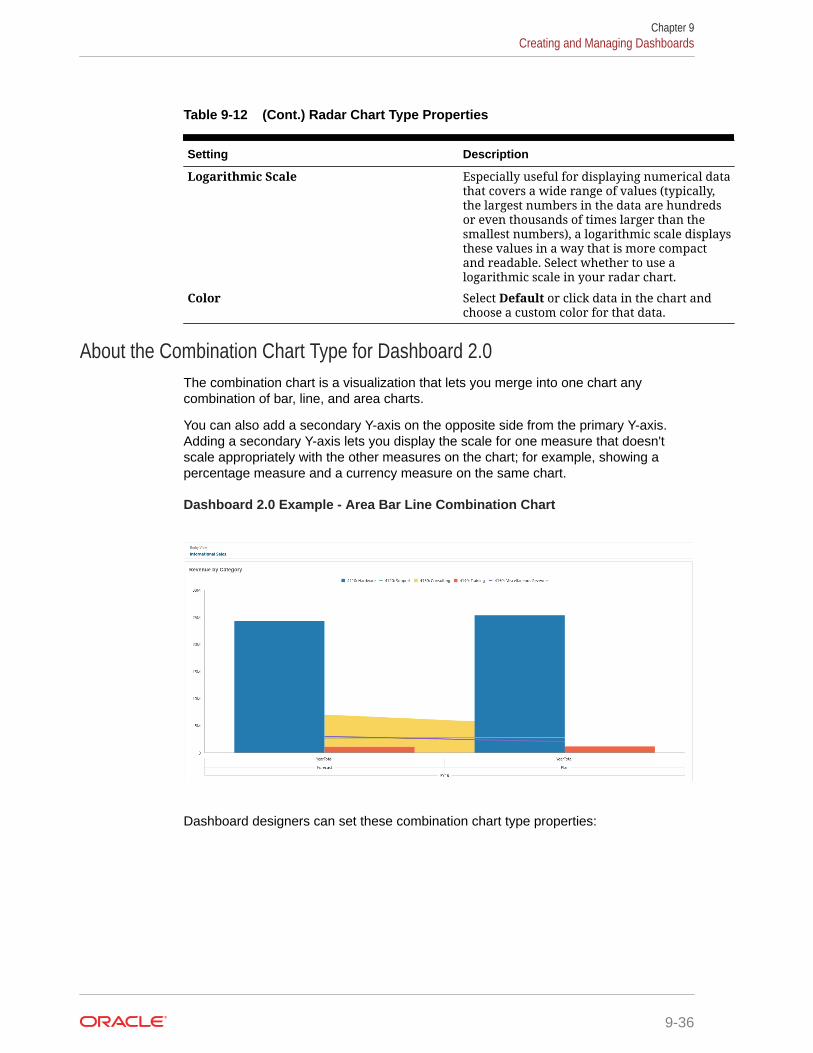
Table 9-12 (Cont.) Radar Chart Type Properties
Setting Description
Logarithmic Scale Especially useful for displaying numerical datathat covers a wide range of values (typically,the largest numbers in the data are hundredsor even thousands of times larger than thesmallest numbers), a logarithmic scale displaysthese values in a way that is more compactand readable. Select whether to use alogarithmic scale in your radar chart.
Color Select Default or click data in the chart andchoose a custom color for that data.
About the Combination Chart Type for Dashboard 2.0The combination chart is a visualization that lets you merge into one chart anycombination of bar, line, and area charts.
You can also add a secondary Y-axis on the opposite side from the primary Y-axis.Adding a secondary Y-axis lets you display the scale for one measure that doesn'tscale appropriately with the other measures on the chart; for example, showing apercentage measure and a currency measure on the same chart.
Dashboard 2.0 Example - Area Bar Line Combination Chart
Dashboard designers can set these combination chart type properties:
Chapter 9Creating and Managing Dashboards
9-36
Table 9-13 Combination Chart Type Properties
Setting Description
Value Scale Especially useful for large numbers, you canscale how a value is displayed. For example, ifthe value is 1,689,000 and you select K -Thousand as the scaling option, the chartdisplays the value as 1,689K.Your scaling options:• None—No scaling is applied.• Auto—The value is displayed based on its
range. For example, 1,500 displays as 1.5K,1,689,000 displays as 1.69M, 42,314,531,211displays as 42.31B, and 1,234,567,891,234displays as 1.23T.
• K - Thousand—The value is displayed asthousands units. For example, 1,689,000displays as 1689K.
• M - Million—The value is displayed asmillions units. For example, 123,456,789displays as 123M.
• B - Billion—The value is displayed asbillions units. For example, 12,345,678,912displays as 12B.
• T - Trillion—The value is displayed astrillions units. For example,1,234,567,891,234,567 displays as 1,234T.
Line Weight Click the counter to set the line width.Note that the default width of a line is 5 pixels.You can select from 1 to 12 pixels.
Legend Position Choose Left, Right, Top, Bottom, or None.
Label Position Set the position of the data labels on the chart.Choose Outside Bar Edge, Center, Inside BarEdge, or None.
Grid Lines Select Hide or Show.
Logarithmic Scale Especially useful for displaying numerical datathat covers a wide range of values (typically,the largest numbers in the data are hundredsor even thousands of times larger than thesmallest numbers), a logarithmic scale displaysthese values in a way that is more compactand readable. Select whether to use alogarithmic scale in your combination chart.
Chapter 9Creating and Managing Dashboards
9-37
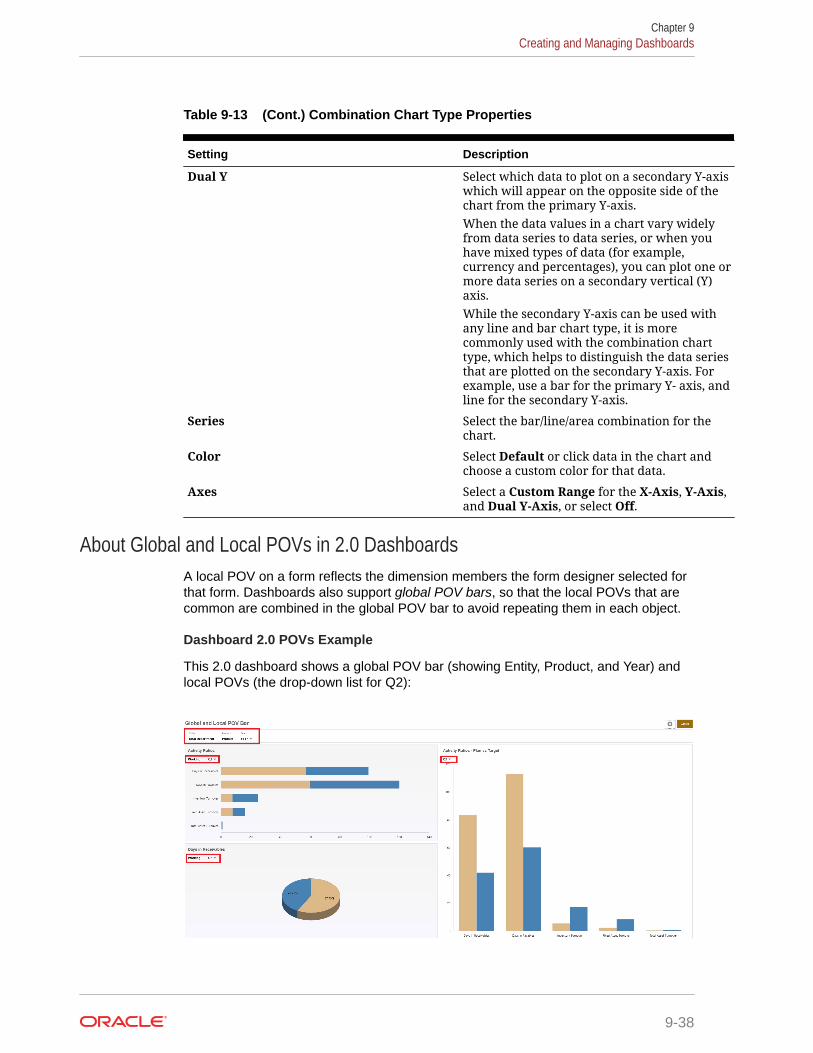
Table 9-13 (Cont.) Combination Chart Type Properties
Setting Description
Dual Y Select which data to plot on a secondary Y-axiswhich will appear on the opposite side of thechart from the primary Y-axis.When the data values in a chart vary widelyfrom data series to data series, or when youhave mixed types of data (for example,currency and percentages), you can plot one ormore data series on a secondary vertical (Y)axis.While the secondary Y-axis can be used withany line and bar chart type, it is morecommonly used with the combination charttype, which helps to distinguish the data seriesthat are plotted on the secondary Y-axis. Forexample, use a bar for the primary Y- axis, andline for the secondary Y-axis.
Series Select the bar/line/area combination for thechart.
Color Select Default or click data in the chart andchoose a custom color for that data.
Axes Select a Custom Range for the X-Axis, Y-Axis,and Dual Y-Axis, or select Off.
About Global and Local POVs in 2.0 DashboardsA local POV on a form reflects the dimension members the form designer selected forthat form. Dashboards also support global POV bars, so that the local POVs that arecommon are combined in the global POV bar to avoid repeating them in each object.
Dashboard 2.0 POVs Example
This 2.0 dashboard shows a global POV bar (showing Entity, Product, and Year) andlocal POVs (the drop-down list for Q2):
Chapter 9Creating and Managing Dashboards
9-38
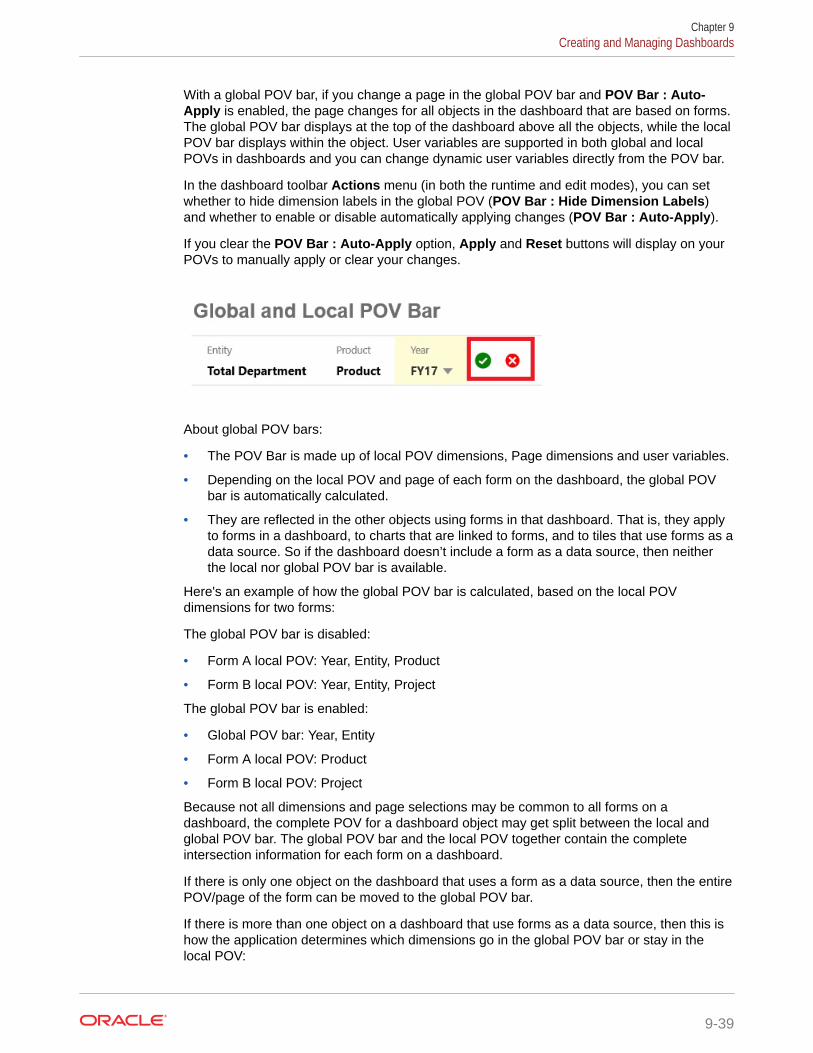
With a global POV bar, if you change a page in the global POV bar and POV Bar : Auto-Apply is enabled, the page changes for all objects in the dashboard that are based on forms.The global POV bar displays at the top of the dashboard above all the objects, while the localPOV bar displays within the object. User variables are supported in both global and localPOVs in dashboards and you can change dynamic user variables directly from the POV bar.
In the dashboard toolbar Actions menu (in both the runtime and edit modes), you can setwhether to hide dimension labels in the global POV (POV Bar : Hide Dimension Labels)and whether to enable or disable automatically applying changes (POV Bar : Auto-Apply).
If you clear the POV Bar : Auto-Apply option, Apply and Reset buttons will display on yourPOVs to manually apply or clear your changes.
About global POV bars:
• The POV Bar is made up of local POV dimensions, Page dimensions and user variables.
• Depending on the local POV and page of each form on the dashboard, the global POVbar is automatically calculated.
• They are reflected in the other objects using forms in that dashboard. That is, they applyto forms in a dashboard, to charts that are linked to forms, and to tiles that use forms as adata source. So if the dashboard doesn’t include a form as a data source, then neitherthe local nor global POV bar is available.
Here's an example of how the global POV bar is calculated, based on the local POVdimensions for two forms:
The global POV bar is disabled:
• Form A local POV: Year, Entity, Product
• Form B local POV: Year, Entity, Project
The global POV bar is enabled:
• Global POV bar: Year, Entity
• Form A local POV: Product
• Form B local POV: Project
Because not all dimensions and page selections may be common to all forms on adashboard, the complete POV for a dashboard object may get split between the local andglobal POV bar. The global POV bar and the local POV together contain the completeintersection information for each form on a dashboard.
If there is only one object on the dashboard that uses a form as a data source, then the entirePOV/page of the form can be moved to the global POV bar.
If there is more than one object on a dashboard that use forms as a data source, then this ishow the application determines which dimensions go in the global POV bar or stay in thelocal POV:
Chapter 9Creating and Managing Dashboards
9-39
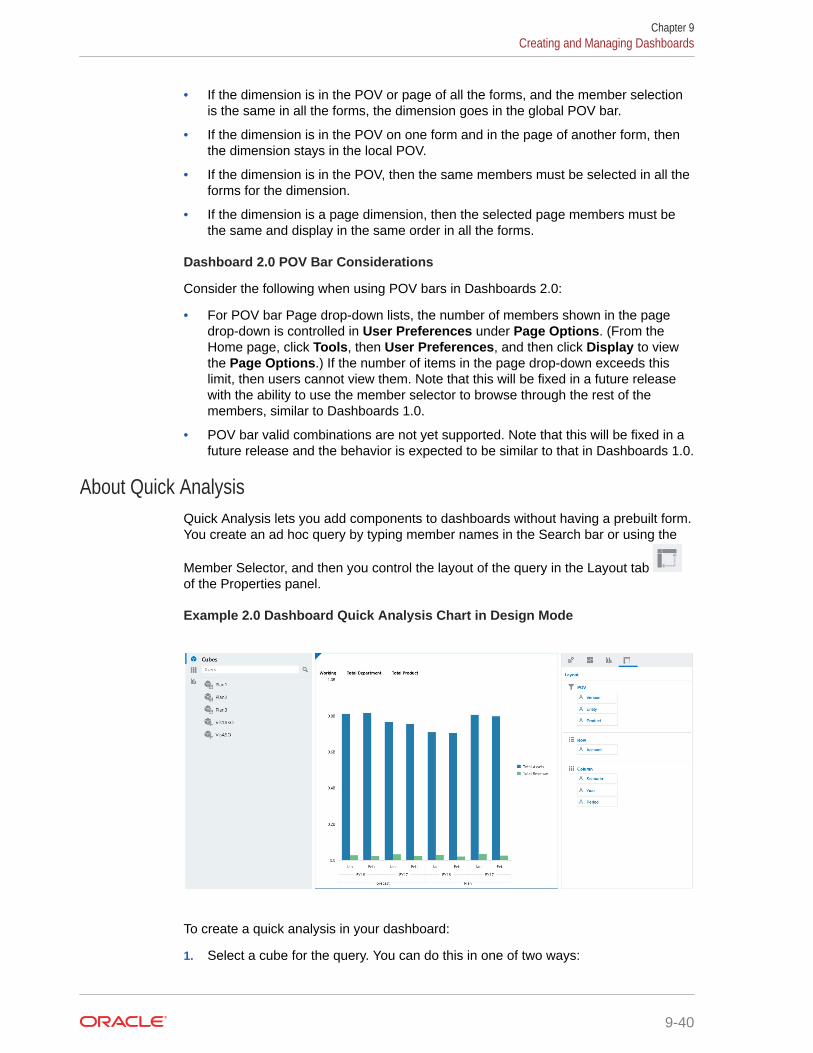
• If the dimension is in the POV or page of all the forms, and the member selectionis the same in all the forms, the dimension goes in the global POV bar.
• If the dimension is in the POV on one form and in the page of another form, thenthe dimension stays in the local POV.
• If the dimension is in the POV, then the same members must be selected in all theforms for the dimension.
• If the dimension is a page dimension, then the selected page members must bethe same and display in the same order in all the forms.
Dashboard 2.0 POV Bar Considerations
Consider the following when using POV bars in Dashboards 2.0:
• For POV bar Page drop-down lists, the number of members shown in the pagedrop-down is controlled in User Preferences under Page Options. (From theHome page, click Tools, then User Preferences, and then click Display to viewthe Page Options.) If the number of items in the page drop-down exceeds thislimit, then users cannot view them. Note that this will be fixed in a future releasewith the ability to use the member selector to browse through the rest of themembers, similar to Dashboards 1.0.
• POV bar valid combinations are not yet supported. Note that this will be fixed in afuture release and the behavior is expected to be similar to that in Dashboards 1.0.
About Quick AnalysisQuick Analysis lets you add components to dashboards without having a prebuilt form.You create an ad hoc query by typing member names in the Search bar or using the
Member Selector, and then you control the layout of the query in the Layout tab of the Properties panel.
Example 2.0 Dashboard Quick Analysis Chart in Design Mode
To create a quick analysis in your dashboard:
1. Select a cube for the query. You can do this in one of two ways:
Chapter 9Creating and Managing Dashboards
9-40
• Click in the workspace Search box to display a list of cubes, then select a cube.
• Drag and drop a cube from the library panel to the dashboard workspace.
Note:
With either method, the system starts with a default query; a single intersectionin the cube driven from your Most Recently Used, or MRU. The default queryvaries based on what you've recently been looking at in the cube.
2. Refine the query by specifying members for the query:
• In the Search box, type member names to display an auto-complete list from thecube.
• Launch the member selector to select members, and then click OK.
Note:
When using the Search box to find members for quick analysis and more than25,000 members are present in a cube, the Search box only searches the first3000 members in the dimension for the cube. If the cube contains less than25,000 members, then the Search box will search through all members. Tosearch a cube with more than 25,000 members, launch the member selector tomake your quick analysis selections.
3. Select a chart type for the query.
Click to select a chart type; for example, Bar .
4. In the Properties panel, click the Layout tab .
5. Drag and drop the dimensions in the Layout tab of the Properties panel to other sectionsof the Layout tab to change the POV, Row, and Column layout of the dashboard object.
Videos
Your Goal Watch This Video
Discover how to add quick analysiscomponents to dashboards without having aprebuilt form. You learn how to create an adhoc query in the Dashboard Designer andformat the results by changing the dimensionlayout and applying visualizations.
Creating Quick Analyses in Dashboards2.0
Chapter 9Creating and Managing Dashboards
9-41
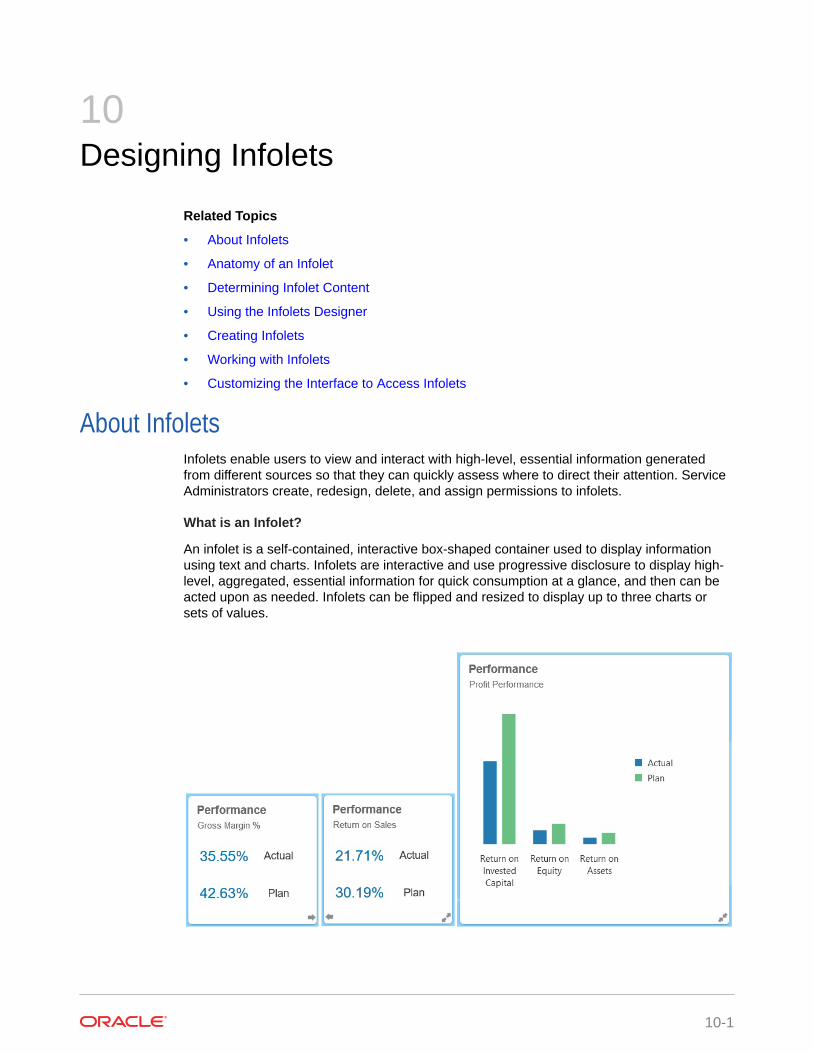
10Designing Infolets
Related Topics
• About Infolets
• Anatomy of an Infolet
• Determining Infolet Content
• Using the Infolets Designer
• Creating Infolets
• Working with Infolets
• Customizing the Interface to Access Infolets
About InfoletsInfolets enable users to view and interact with high-level, essential information generatedfrom different sources so that they can quickly assess where to direct their attention. ServiceAdministrators create, redesign, delete, and assign permissions to infolets.
What is an Infolet?
An infolet is a self-contained, interactive box-shaped container used to display informationusing text and charts. Infolets are interactive and use progressive disclosure to display high-level, aggregated, essential information for quick consumption at a glance, and then can beacted upon as needed. Infolets can be flipped and resized to display up to three charts orsets of values.
10-1
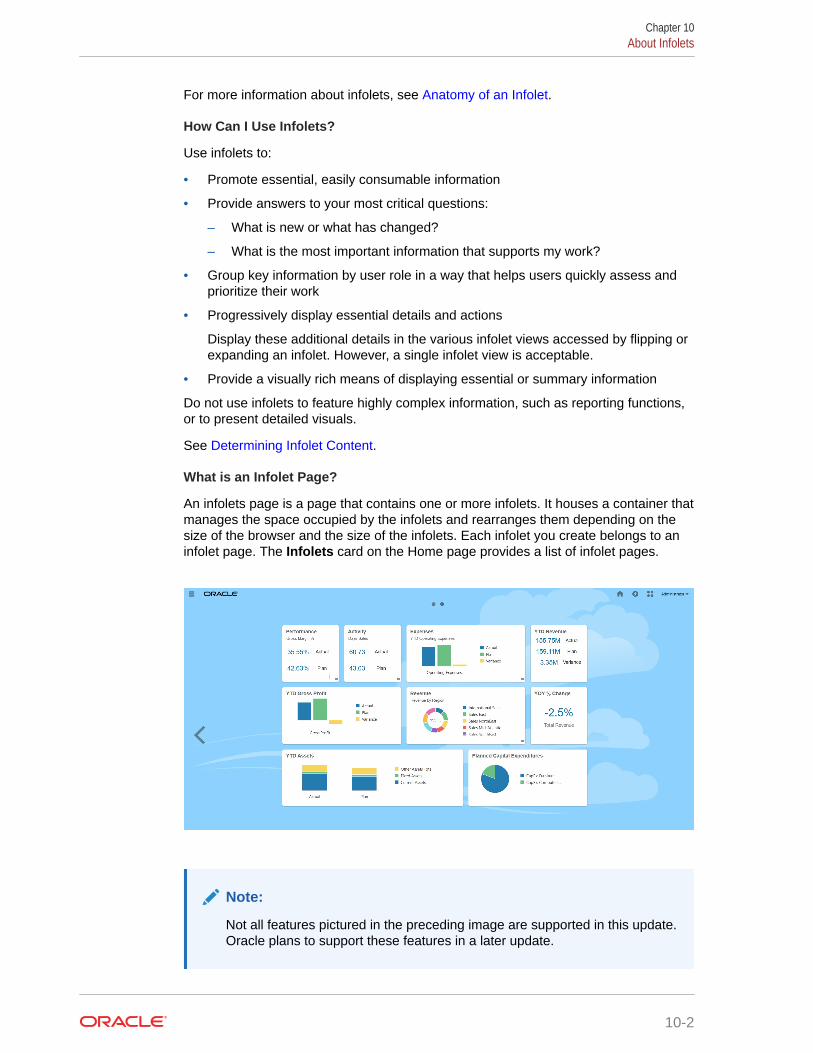
For more information about infolets, see Anatomy of an Infolet.
How Can I Use Infolets?
Use infolets to:
• Promote essential, easily consumable information
• Provide answers to your most critical questions:
– What is new or what has changed?
– What is the most important information that supports my work?
• Group key information by user role in a way that helps users quickly assess andprioritize their work
• Progressively display essential details and actions
Display these additional details in the various infolet views accessed by flipping orexpanding an infolet. However, a single infolet view is acceptable.
• Provide a visually rich means of displaying essential or summary information
Do not use infolets to feature highly complex information, such as reporting functions,or to present detailed visuals.
See Determining Infolet Content.
What is an Infolet Page?
An infolets page is a page that contains one or more infolets. It houses a container thatmanages the space occupied by the infolets and rearranges them depending on thesize of the browser and the size of the infolets. Each infolet you create belongs to aninfolet page. The Infolets card on the Home page provides a list of infolet pages.
Note:
Not all features pictured in the preceding image are supported in this update.Oracle plans to support these features in a later update.
Chapter 10About Infolets
10-2
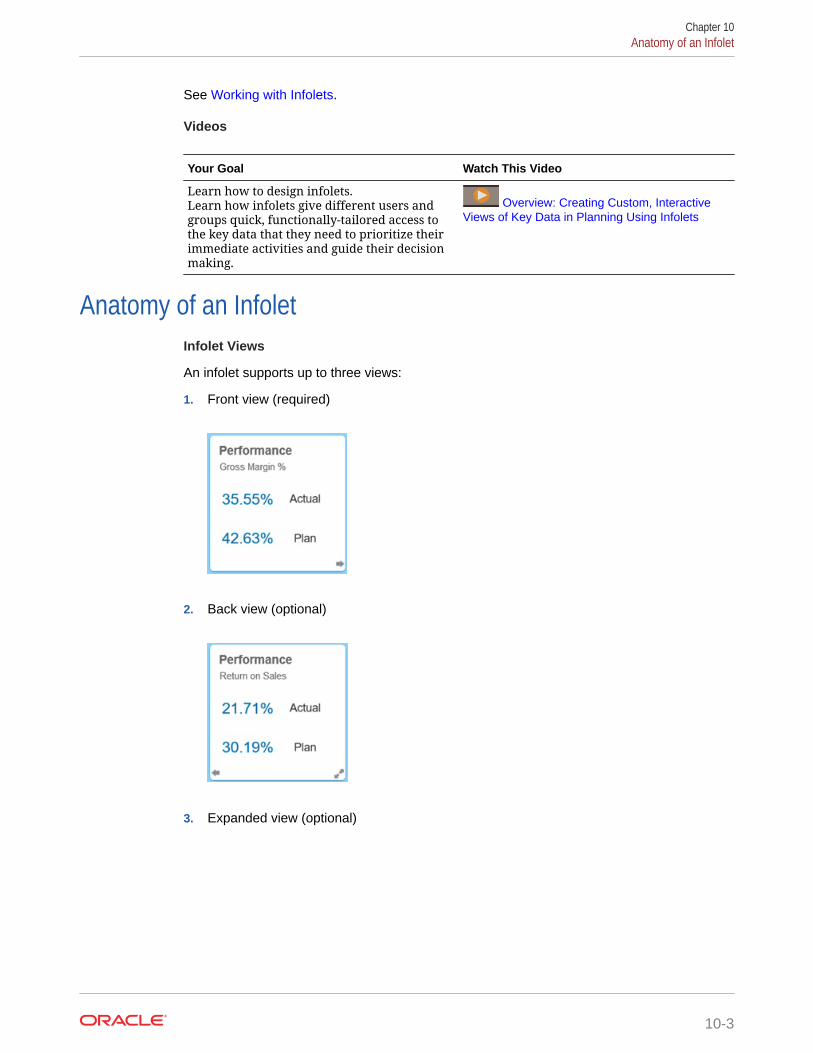
See Working with Infolets.
Videos
Your Goal Watch This Video
Learn how to design infolets.Learn how infolets give different users andgroups quick, functionally-tailored access tothe key data that they need to prioritize theirimmediate activities and guide their decisionmaking.
Overview: Creating Custom, InteractiveViews of Key Data in Planning Using Infolets
Anatomy of an InfoletInfolet Views
An infolet supports up to three views:
1. Front view (required)
2. Back view (optional)
3. Expanded view (optional)
Chapter 10Anatomy of an Infolet
10-3
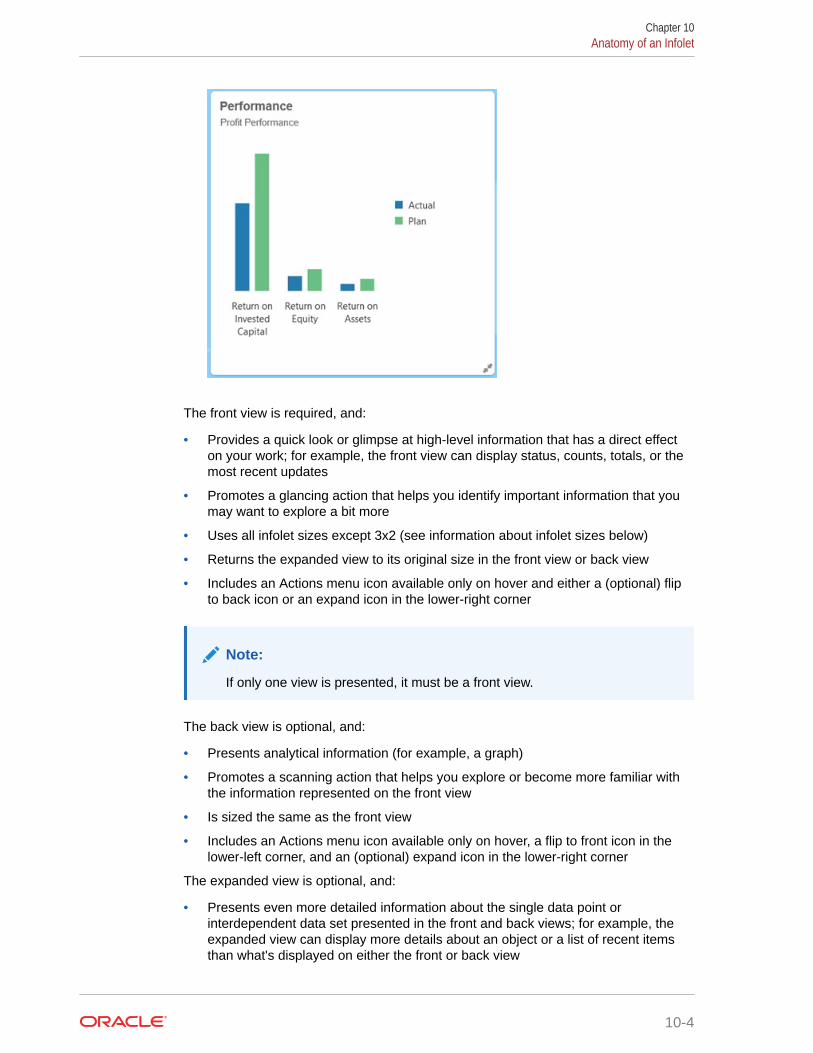
The front view is required, and:
• Provides a quick look or glimpse at high-level information that has a direct effecton your work; for example, the front view can display status, counts, totals, or themost recent updates
• Promotes a glancing action that helps you identify important information that youmay want to explore a bit more
• Uses all infolet sizes except 3x2 (see information about infolet sizes below)
• Returns the expanded view to its original size in the front view or back view
• Includes an Actions menu icon available only on hover and either a (optional) flipto back icon or an expand icon in the lower-right corner
Note:
If only one view is presented, it must be a front view.
The back view is optional, and:
• Presents analytical information (for example, a graph)
• Promotes a scanning action that helps you explore or become more familiar withthe information represented on the front view
• Is sized the same as the front view
• Includes an Actions menu icon available only on hover, a flip to front icon in thelower-left corner, and an (optional) expand icon in the lower-right corner
The expanded view is optional, and:
• Presents even more detailed information about the single data point orinterdependent data set presented in the front and back views; for example, theexpanded view can display more details about an object or a list of recent itemsthan what's displayed on either the front or back view
Chapter 10Anatomy of an Infolet
10-4
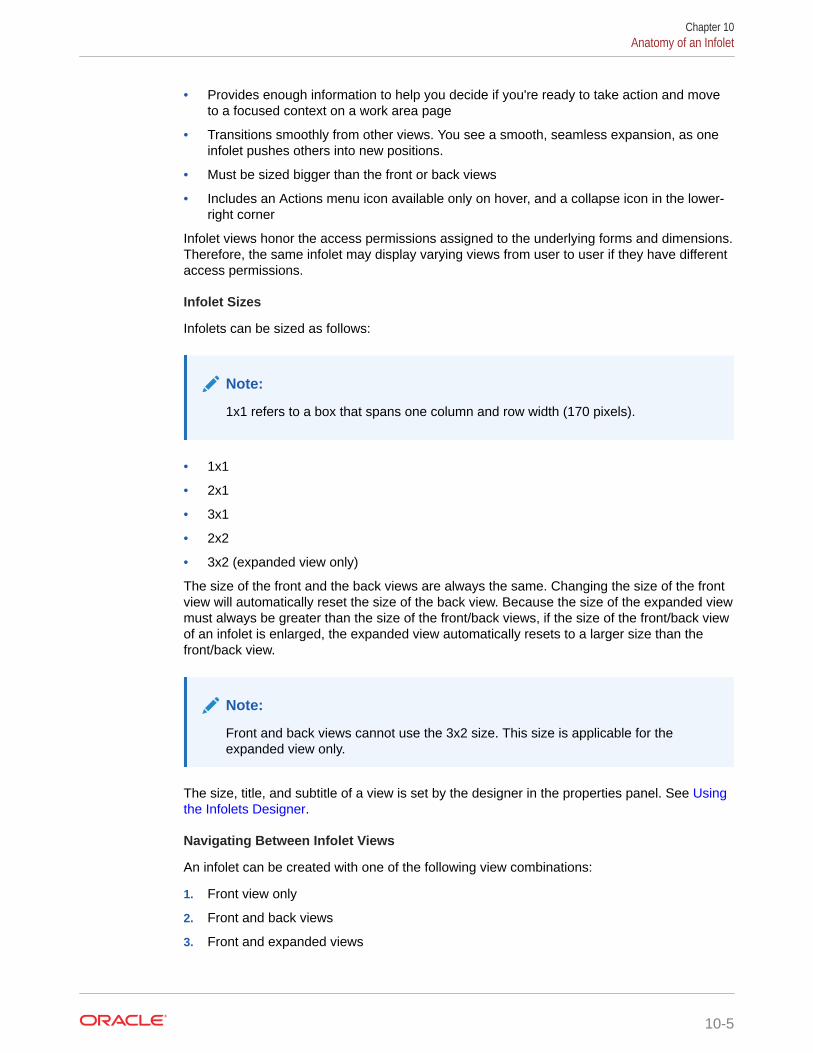
• Provides enough information to help you decide if you're ready to take action and moveto a focused context on a work area page
• Transitions smoothly from other views. You see a smooth, seamless expansion, as oneinfolet pushes others into new positions.
• Must be sized bigger than the front or back views
• Includes an Actions menu icon available only on hover, and a collapse icon in the lower-right corner
Infolet views honor the access permissions assigned to the underlying forms and dimensions.Therefore, the same infolet may display varying views from user to user if they have differentaccess permissions.
Infolet Sizes
Infolets can be sized as follows:
Note:
1x1 refers to a box that spans one column and row width (170 pixels).
• 1x1
• 2x1
• 3x1
• 2x2
• 3x2 (expanded view only)
The size of the front and the back views are always the same. Changing the size of the frontview will automatically reset the size of the back view. Because the size of the expanded viewmust always be greater than the size of the front/back views, if the size of the front/back viewof an infolet is enlarged, the expanded view automatically resets to a larger size than thefront/back view.
Note:
Front and back views cannot use the 3x2 size. This size is applicable for theexpanded view only.
The size, title, and subtitle of a view is set by the designer in the properties panel. See Usingthe Infolets Designer.
Navigating Between Infolet Views
An infolet can be created with one of the following view combinations:
1. Front view only
2. Front and back views
3. Front and expanded views
Chapter 10Anatomy of an Infolet
10-5
4. Front, back, and expanded views
Switching from one view to another is controlled by clicking a flip icon, an expand icon,or a collapse icon available in the bottom-right or bottom-left corner of the infolet.Hovering your cursor over the bottom corners reveals a flip, expand, or collapse icon.
Determining Infolet ContentConsider the following general tips when determining infolet content:
• Look to existing dashboards and work area pages.
Dashboards and work area pages are excellent starting points because theydisplay collections of information summaries.
• Apply the 10/90/90 principle.
Seek out the most essential, easily consumable information that addressesfrequently asked questions garnered from the top 10 percent of use cases. Theseuse cases can come from across your enterprise—from business intelligence,social, transactional, external, and so on.
Then focus this information to reveal what 90 percent of your users would benefitfrom viewing 90 percent of the time. You can apply this 10/90/90 percent principleto existing dashboard content, to existing work area page content, or generally, topercolate eligible information for an infolet.
• Restate your top use cases in the form of frequently asked business questions.
Present the corresponding infolet content in such a way as to answer thesebusiness questions; for example, how many orders are in jeopardy, listed bystatus?
• Look for one point or a tightly related, interdependent set of points, instead ofmultiple points of information.
The process of determining content for an infolet is similar to the process that isused to yield dashboard content—but to a deeper level of analysis. Look forinformation within a data point or data set that is suitable to be displayed in nomore than three views of information hierarchy and that answers a criticalbusiness question.
• Start with the single most important point.
An infolet displays aggregated information about a single data aspect or point ofinformation in relation to an event that the user needs to know about or a task thatthe user needs to address.
If a dashboard contains multiple aspects about one or more objects (for example,numeric totals and currency totals), start with the single most important point andadd that as a simple overview (for example, as a total using a stylized numericvalue) to the front view of an infolet. Then determine the content for the back view,if needed. Finally, determine the content for the expanded view, if needed.
An infolet should have no more than three views. If there is only a single data pointor only one tightly related, interdependent data set to display on an infolet, useonly the front view.
Related Links
Designing Forms for Infolets
Chapter 10Determining Infolet Content
10-6
Designing Charts for Infolets
Designing Forms for InfoletsUse only forms with small data sets in infolets. Permissions that are set for forms are honoredin infolets.
You can create forms that are specifically used in infolets:
• Forms used in infolets should have fewer cells than a traditional data entry form; forexample, forms used in infolets should only have up to 12 cells.
• Forms used in infolets should have no more than 12 rows and columns. If a form hasmore than 12 rows and columns, the infolet will only display the first 12 rows andcolumns.
• Infolets currently don't support Page dimensions or POVs, therefore forms used ininfolets should not contain Page dimensions.
• If a form that is used in infolets contains a grid with members that expand, the infolet willdisplay all the members in the form, including the expanded members.
Designing Charts for InfoletsUse the title and subtitle in charts to show static context.
There are six types of charts that you can use in infolets:
• Bar—Displays a graphical summary of multiple data values for comparison purposes. Barcharts can be plotted vertically or horizontally. Up to eight bars are recommended for barchart infolets.
• Column—Displays stacked bars that represent different data sets on top of each other.The height of the resulting bar shows the combined result of the data sets.
• Doughnut—A circular graph which is divided into segments to compare data sets to oneanother. The blank center displays the sum of all data sets. Up to six segment values arerecommended for doughnut chart infolets.
• Line—Use to visualize a trend in data over intervals of time.
• Pie—A circular graph which is divided into slices to compare data sets to one another. Upto six slices are recommended for pie chart infolets.
• Tile—Lets you select specific values from a data set to display. No more than threevalues are recommended for tile chart infolets.
Note:
Tile charts can only use the 1x1 size. You cannot resize an infolet using the tilechart until the chart type is changed. If you drag and drop a tile chart to aninfolet that is greater than 1x1, you will be prompted to change either the size ofthe infolet or the chart type.
Chapter 10Determining Infolet Content
10-7
Using the Infolets DesignerService Administrators use the Infolets Designer to create infolets and infolet pages.The Infolets Designer enables easy toggling between runtime and designer views. Toaccess the Infolets Designer, launch the Infolets icon on the Home page and clickCreate, or click the Actions icon next to an infolets page in the listing, and then clickEdit. Clicking the infolet name in the listing, launches the runtime version of the infolet
page. You can toggle from runtime view to designer view by clicking .
Infolets Designer
Infolets Toolbar
On the upper right is the Infolets Toolbar.
—Adds a new infolet to the Infolets Designer
—Hides and unhides the Properties panel
—Click to perform these actions:
• Reset—Resets the Infolets Designer to a previously saved state
• Refresh—Refreshes the data from Essbase and updates the infolet definition fromthe database
• Runtime—Hides all Infolets Designer elements and displays the infolet as it wouldappear to users during runtime
Chapter 10Using the Infolets Designer
10-8
—From runtime mode, displays the Infolets Designer
Infolets Designer Palette
On the left is the Designer Palette. The Designer Palette has two tabs: Forms and ChartTypes. Highlight objects in the Designer Palette and then drag and drop them onto the dropzone.
Designer Palette objects:
• Forms—Select forms to include in the infolet by scrolling through the forms or bysearching for them by name. For details about forms, see Designing Forms for Infolets.
Note:
The access permissions set for forms are honored in infolets.
• Chart Types—Select the chart types to include in the infolet. Infolets display sample datain the charts until you associate the chart with a form as its data source. When you link a
Chapter 10Using the Infolets Designer
10-9
chart to a form, users can see the impact of changing data in the form on theassociated charts. To associate a chart with a form, highlight a chart and drag anddrop it onto the drop zone, in the Properties panel, click Sample, and then clickForms to select the data source. For details about charts, see Designing Chartsfor Infolets.
Infolet Menu
The infolet menu contains the infolet delete and clear actions. To view the infoletmenu, hover over the upper right corner of the infolet, and then click the down arrow todisplay the menu options:
• Delete—Removes the infolet from the page
• Clear—Clears infolet details
Properties Panel
The properties panel on the right side of the Infolets Designer enables you view andwork with these infolet properties:
Note:
The header you specify is the same for all views of an infolet, but you canspecify a different subtitle for each view; for example, the front, back, andexpanded views of an infolet can each have different subtitles, but they musthave the same header.
• Header
• Subtitle
• Size—Displays the infolet in the selected size
• Chart Type—Displays the infolet data as the selected chart type
• Data—Displays the associated data source (Sample or Form)
• Form—Displays the selected infolet form
Actions such as delete and clear are on the infolet menu.
By default, the front view of an infolet is displayed in the properties panel. You can seethe other views by selecting them from the drop-down. If you flip or expand an infoletto view the back or expanded views, the properties for those views display in theproperties panel. In addition, the properties for the corresponding chart type are alsodisplayed in the properties panel.
Creating InfoletsTo create infolets:
1. From the Home page, click Infolets, and then click Create.
2. Click Untitled Infolets Page, and enter a title for the new infolets page you arecreating.
Chapter 10Creating Infolets
10-10
3. From the designer palette on the left, choose either the Library tab or the Visualizationstab, highlight an object, and then drag and drop it onto the infolets drop zone.
Alternatively, you can click
at the top of the page to add a new infolet to the workspace.
4. If the Properties panel isn't already displaying, click
at the top of the page to reveal it. Customize the highlighted infolet using selections madein the Properties panel.
5. Click Save.
You can easily duplicate and modify an infolet using the Copy As action on the Infolet listpage. From the list page, click the Actions icon next to the infolet you want to copy, and thenclick Copy As.
Working with InfoletsOnce you've created an infolets page, it is displayed in the infolets listing on the Infoletscard.
The listing page for infolets supports folders. Folders enable you to assign permissions to allinfolets within a folder rather than assigning permissions to each individual infolet. Theinfolets listing page uses the same folder hierarchy as dashboards and data entry forms andall artifacts and folders reside under a root folder called Library.
Note:
Only administrators can add files (for example, dashboards, infolets, forms, reports,and so on) to the Library root folder.
To view and work with infolets:
1. From the Home page, click Infolets.
2. To work with infolets, perform an action:
• On the listing page for infolets, you can toggle between viewing infolets by a flat view
or a tree view:
Then you can search for infolets using Search . The flat view displays only theartifacts that meet the search criteria, not the folders that contain them. The tree (orhierarchical) view displays artifacts in the context of the folders that contain them.
To search on another keyword, clear the search criteria by clicking X in the Searchbox.
• To refresh the infolets listing, click Refresh.
• To create infolets, click Create. See Creating Infolets.
Chapter 10Working with Infolets
10-11
• To perform the following actions on infolet pages, click the Actions icon nextto the infolet page, and then select:
– Create Folder—Creates a folder in the listing
– Edit—Opens the infolet page in the Infolets Designer
– Rename—Renames the infolet page
– Copy As—Duplicates an infolet page
– Delete—Deletes the infolet page from the listing
– Move To—Moves an infolet page to another folder
– Default or Unmark—Default marks an infolet page as default and makesit accessible directly from the Home page by clicking the second infolet dotthat is displayed beneath the global header on the Home page. Only oneinfolet page can be marked as default, and a "(Default)" prefix displaysbefore the name of that infolet in the listing. Unmark removes the defaultdesignation from the infolet page.
Note:
You can no longer mark a dashboard page as default. Only aninfolet page can be marked as default.
– Assign Permission—Enables you to assign Read, Write, and Noneaccess permissions to infolet pages and folders for individual users orgroups
Customizing the Interface to Access InfoletsYou can customize the business process interface to add links to infolet pages fromthe Home page using the Navigation Flow Designer. When you customize yourinterface to access infolet pages, dots will appear on the Home page beneath theglobal header and arrows will display to help you navigate easily between the HomePage and infolet dashboard pages. Each dot that appears on the Home pagerepresents an infolet page and hovering over each dot displays the name of the infoletpage. Clicking an infolet dot launches the infolet page associated with that dot. Youcan define up to seven infolet dots on the Home page. If you've created connections toother EPM Cloud environments, you can also add links to infolet pages in other EPMCloud environments.
Chapter 10Customizing the Interface to Access Infolets
10-12
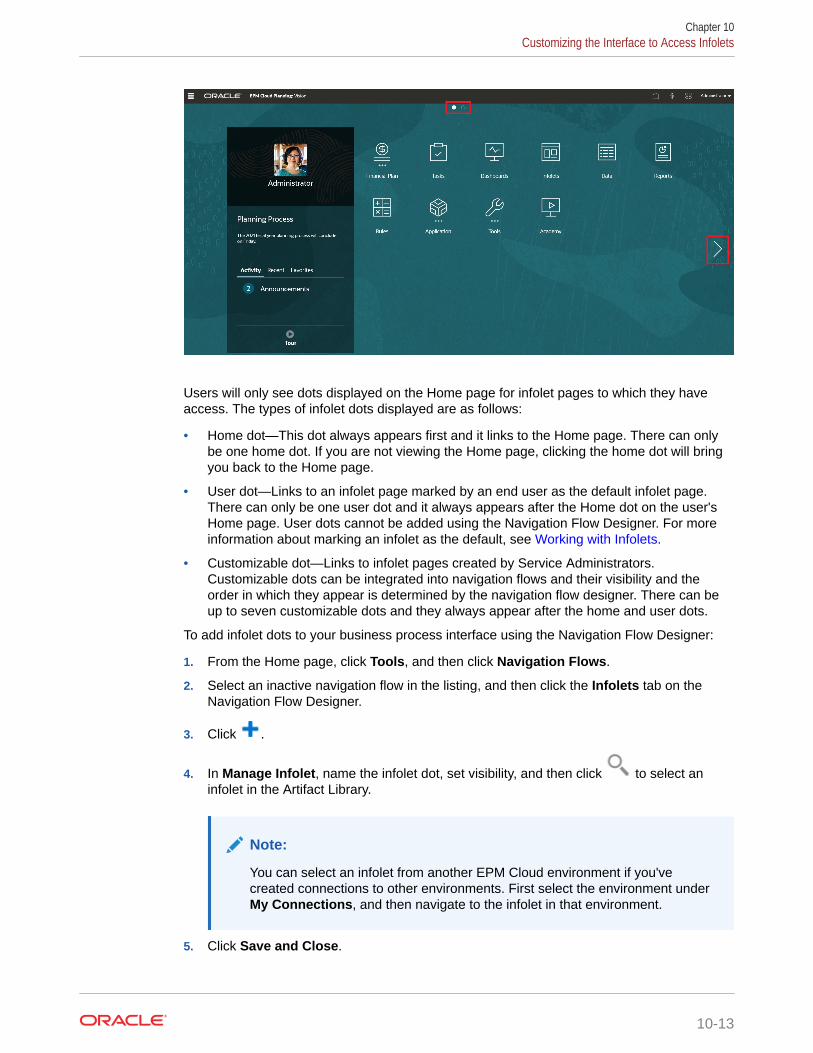
Users will only see dots displayed on the Home page for infolet pages to which they haveaccess. The types of infolet dots displayed are as follows:
• Home dot—This dot always appears first and it links to the Home page. There can onlybe one home dot. If you are not viewing the Home page, clicking the home dot will bringyou back to the Home page.
• User dot—Links to an infolet page marked by an end user as the default infolet page.There can only be one user dot and it always appears after the Home dot on the user'sHome page. User dots cannot be added using the Navigation Flow Designer. For moreinformation about marking an infolet as the default, see Working with Infolets.
• Customizable dot—Links to infolet pages created by Service Administrators.Customizable dots can be integrated into navigation flows and their visibility and theorder in which they appear is determined by the navigation flow designer. There can beup to seven customizable dots and they always appear after the home and user dots.
To add infolet dots to your business process interface using the Navigation Flow Designer:
1. From the Home page, click Tools, and then click Navigation Flows.
2. Select an inactive navigation flow in the listing, and then click the Infolets tab on theNavigation Flow Designer.
3. Click .
4. In Manage Infolet, name the infolet dot, set visibility, and then click to select aninfolet in the Artifact Library.
Note:
You can select an infolet from another EPM Cloud environment if you'vecreated connections to other environments. First select the environment underMy Connections, and then navigate to the infolet in that environment.
5. Click Save and Close.
Chapter 10Customizing the Interface to Access Infolets
10-13
Note:
Infolets can also be associated with a tab or a card in a navigation flow.While adding or updating a tab or a card, select an infolet in the ArtifactLibrary.
To view design time changes to the navigation flow, activate the navigation flow, andthen from the Home page, click the down arrow next to the user name (upper rightcorner of the screen) and click Reload Navigation Flow.
To learn more about designing navigation flows, see "Designing Custom NavigationFlows" in your EPM Cloud Administering guide.
To learn more about connecting EPM Cloud environments, see "ConnectingEnvironments in EPM Cloud" in your EPM Cloud Administering guide.
Chapter 10Customizing the Interface to Access Infolets
10-14
11Defining Valid Intersections and Cell-LevelSecurity
Define rules that restrict who can enter or view data in your application.
You can restrict who can enter data in your application by creating rules that mark certainmember intersections as valid (or invalid) for data entry. These rules are called validintersections. You can also restrict who can view data in your application by creating rulesthat remove read or write access to cells that a user would normally have access to due totheir regular security. These rules are called cell-level security.
• To define valid intersections, see Defining Valid Intersections.
• To define cell-level security, see Defining Cell-Level Security
Defining Valid IntersectionsDefine valid intersection rules which filter certain cell intersections to users when they enterdata or select runtime prompts.
Related Topics
• Understanding Valid Intersections
• Creating Valid Intersections
• Managing Valid Intersections
• Suppressing Invalid Data in Forms
• Clearing Invalid Data
• Working with Valid Intersections
Understanding Valid IntersectionsValid intersections are cell intersections that are filtered based on rules you define, calledvalid intersection rules, which filter certain cell intersections to users when they enter data orselect runtime prompts. For example, you can specify that certain programs are valid only forsome periods or departments. After valid intersections are defined, cells containing invaliddata are read-only. This restriction speeds the planning process and optimizes theinformation available to users.
Conversely, you might have a use case where data entry is allowed in most cell combinationsand you only need to prevent data entry to a select few cell combinations. In this case youcan ease the definition process by defining invalid intersections. You define invalidintersections in the same way that you define valid intersections except you can specify theinvalid intersection definition type while creating the intersection group.
To better understand how valid intersections affect behavior in forms and in runtime prompts,see Working with Valid Intersections.
11-1
Videos
Your Goal Watch This Video
Learn how to manage valid intersections. Managing Valid Intersections in Oracle
Planning and Budgeting Cloud
Related Topics
• Valid Intersection Groups
• Valid Intersection Rules
• Anchor and Nonanchor Dimensions
• Valid Intersection Examples
• Redundancy or Overlap in Valid Intersection Rules
• Shared Members and Valid Intersection Rules
• Substitution Variables and Valid Intersection Rules
• Evaluation Order
Valid Intersection GroupsValid intersection groups define:
• Dimensions to be included
• One of those dimensions as the anchor dimension
• Whether nonanchor dimensions are required or not
• Whether the anchor dimension members not specified or referenced will be validor invalid
Valid Intersection RulesValid intersection rules:
• Must use the same dimensions that were defined within their valid intersectiongroup
• Valid intersection rules within the same valid intersection group that produce anapparent conflict or overlap, are marked valid if either valid intersection rulecondition is met
• Valid intersection rules in different valid intersection groups that produce anapparent redundancy or overlap, are marked valid if they satisfy the requirementsof all valid intersection groups
Thus, if any valid intersection group marks an intersection invalid, regardless ofother valid intersection groups making it valid, the system will mark the intersectioninvalid. Invalid groups override valid group results.
Chapter 11Defining Valid Intersections
11-2
Note:
If you want to remove valid intersections regardless of what other validintersection groups allow, then this rule must be in a different valid intersectiongroup.
See Valid Intersection Examples.
Anchor and Nonanchor DimensionsAnchor and nonanchor dimensions:
• Anchor dimensions are always required dimensions in the cube that is used in the validintersection evaluation.
• Nonanchor dimensions are either required or not:
– If a nonanchor dimension is required, any cube that doesn't use that dimension willignore any valid intersection group where that dimension is tagged as required as itevaluates the valid intersections.
– If a nonanchor dimension isn't required, any cube that doesn't use that dimension willstill evaluate any valid intersection group that includes that dimension as not requiredand evaluate the intersections of any other dimensions in the valid intersection groupin use in the cube.
• Unselected anchor dimension members are valid by default, but you can mark theminvalid by clearing the Unselected Members are Valid option. This option marks allintersections with anchor dimension members not selected in this rule as invalid.
See Valid Intersection Examples.
Valid Intersection ExamplesThis section provides valid intersection group and valid intersection rule examples to illustratea few simple, complex, and edge-case scenarios.
Example: Anchor and Nonanchor Dimensions
The choice of the anchor dimension is critical. Consider the following example, whichproduces a different result based on the anchor dimension definition:
• Valid intersection group 1 defines Entity as the anchor dimension and Product as anonanchor dimension.
• Valid intersection group 2 reverses this definition with Product as the anchor dimensionand Entity as the nonanchor dimension.
Table 11-1 Example - Anchor Dimension is Entity
Valid Intersection Group Anchor Dimension - Entity Nonanchor Dimension -Product
1 DESC(500 - Manufacturing) -Unselected members are valid
DESC(P_TP1 - ComputerEquipment)
Chapter 11Defining Valid Intersections
11-3
Group 1 means entities that are descendants of Manufacturing are valid only withdescendant products of Computer Equipment. No other products are valid withdescendants of Manufacturing. All other entities besides descendants ofManufacturing are valid with all products, including descendants of ComputerEquipment.
Table 11-2 Example - Anchor Dimension is Product
Valid Intersection Group Anchor Dimension -Product
Nonanchor Dimension -Entity
2 DESC(P_TP1 - ComputerEquipment) - Unselectedmembers are valid
DESC(500 - Manufacturing)
Group 2 means products that are descendants of Computer Equipment are only validwith descendant entities of Manufacturing. No other entities are valid with descendantsof Computer Equipment. All other products besides descendants of ComputerEquipment are valid with all entities, including descendants of Manufacturing.
Caution:
The choice of anchor dimension is significant. You'll get dramatically differentresults if you choose the wrong anchor dimension.
Example: Required Dimension
In the following example, if a nonanchor dimension isn't required, then the applicationevaluates all remaining dimension intersections in the valid intersection group for acube that doesn't contain the nonrequired dimension. This behavior could result in theevaluation of a valid intersection group with only one effective dimension.
Table 11-3 Example - Required vs. Non-Required Nonanchor Dimensions
Valid Intersection Group Anchor Dimension - Entity Nonanchor Dimension -Product
1 DESC(500 - Manufacturing) -Unselected members are valid
DESC(P_TP1 - ComputerEquipment) - Not required
In Group 1, the product dimension isn't required, and unselected entities are valid.Therefore, if the cube of the form or business rule, at runtime, doesn't include theproduct dimension, the application evaluates the entity dimension selections to markall entities as valid for a cube that doesn't contain the product dimension.
Table 11-4 Example - Required vs. Non-Required Nonanchor Dimensions
Valid Intersection Group Anchor Dimension - Entity Nonanchor Dimension -Product
2 DESC(500 - Manufacturing) -Unselected members areinvalid
DESC(P_TP1 - ComputerEquipment) - Not required
Chapter 11Defining Valid Intersections
11-4
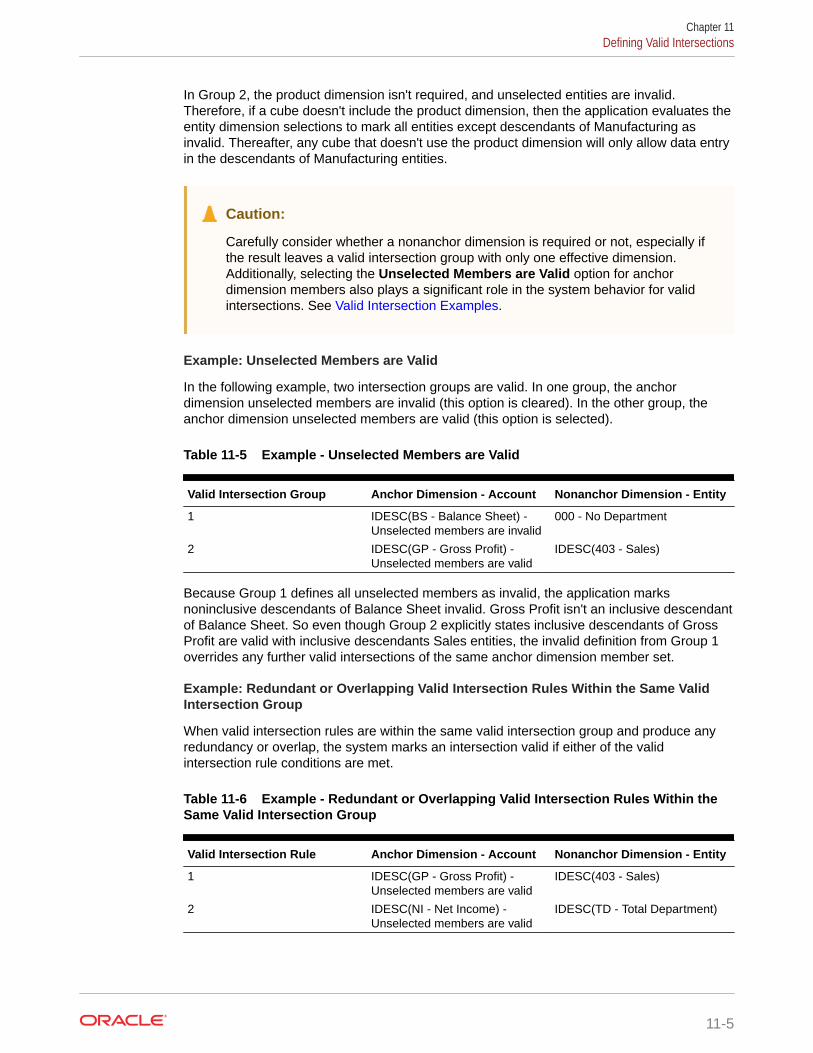
In Group 2, the product dimension isn't required, and unselected entities are invalid.Therefore, if a cube doesn't include the product dimension, then the application evaluates theentity dimension selections to mark all entities except descendants of Manufacturing asinvalid. Thereafter, any cube that doesn't use the product dimension will only allow data entryin the descendants of Manufacturing entities.
Caution:
Carefully consider whether a nonanchor dimension is required or not, especially ifthe result leaves a valid intersection group with only one effective dimension.Additionally, selecting the Unselected Members are Valid option for anchordimension members also plays a significant role in the system behavior for validintersections. See Valid Intersection Examples.
Example: Unselected Members are Valid
In the following example, two intersection groups are valid. In one group, the anchordimension unselected members are invalid (this option is cleared). In the other group, theanchor dimension unselected members are valid (this option is selected).
Table 11-5 Example - Unselected Members are Valid
Valid Intersection Group Anchor Dimension - Account Nonanchor Dimension - Entity
1 IDESC(BS - Balance Sheet) -Unselected members are invalid
000 - No Department
2 IDESC(GP - Gross Profit) -Unselected members are valid
IDESC(403 - Sales)
Because Group 1 defines all unselected members as invalid, the application marksnoninclusive descendants of Balance Sheet invalid. Gross Profit isn't an inclusive descendantof Balance Sheet. So even though Group 2 explicitly states inclusive descendants of GrossProfit are valid with inclusive descendants Sales entities, the invalid definition from Group 1overrides any further valid intersections of the same anchor dimension member set.
Example: Redundant or Overlapping Valid Intersection Rules Within the Same ValidIntersection Group
When valid intersection rules are within the same valid intersection group and produce anyredundancy or overlap, the system marks an intersection valid if either of the validintersection rule conditions are met.
Table 11-6 Example - Redundant or Overlapping Valid Intersection Rules Within theSame Valid Intersection Group
Valid Intersection Rule Anchor Dimension - Account Nonanchor Dimension - Entity
1 IDESC(GP - Gross Profit) -Unselected members are valid
IDESC(403 - Sales)
2 IDESC(NI - Net Income) -Unselected members are valid
IDESC(TD - Total Department)
Chapter 11Defining Valid Intersections
11-5

Because Gross Profit is a descendant of Net Income and Sales is a descendant ofTotal Department, inclusive descendants of Gross Profit are valid with any inclusiveDescendant of Total Department. Rule 1 is a subset of Rule 2, so Rule 1 is effectivelya "No operation" rule and is unnecessary. There is no restriction on inclusivedescendants of Gross Profit accounts only being valid for inclusive descendants ofSales Entities.
Example: Redundant or Overlapping Valid Intersection Rules in Different ValidIntersection Groups
When valid intersection rules are in different valid intersection groups and produce anyredundancy or overlap, the system marks an intersection valid only if it satisfies therequirements of all valid intersection groups.
In the following example, there are redundant or overlapping rules in different groups:
Table 11-7 Example - Redundant or Overlapping Valid Intersection Rules inDifferent Valid Intersection Groups
Valid Intersection Group Anchor Dimension -Account
Nonanchor Dimension -Entity
1 IDESC(GP - Gross Profit) -Unselected members are valid
IDESC(403 - Sales) -Required
2 IDESC(NI - Net Income) -Unselected members are valid
IDESC(TD - Total Department)- Not required
Because Group 1 is further restrictive for inclusive descendants of Gross Profitaccounts being valid with inclusive descendants of Sales entities, the applicationenforces this group for these intersections. Other, non-Gross Profit accounts can stilluse all inclusive descendants of Total Department entities, but inclusive descendantsof Gross Profit accounts must use inclusive descendants of Sales entities.
Redundancy or Overlap in Valid Intersection RulesValid intersection rules within the same valid intersection group, which produce anyapparent conflict or overlap, are marked valid if either valid intersection rule conditionis met.
If different valid intersection groups share the same attributes, including the anchordimension, required and not required nonanchor dimensions, and UnselectedMembers are Valid attribute, they will be treated as rules of the same validintersection group.
Shared Members and Valid Intersection RulesShared members are supported in valid intersection rules. If a base member isselected for a valid intersection rule, any shared members are also included in therule. Conversely, if a shared member is selected for a valid intersection rule, the basemember is also included in the rule.
Substitution Variables and Valid Intersection RulesYou can use substitution variables in valid intersection rules. User variables are notsupported. Substitution variables can be set on the Essbase server, application, or
Chapter 11Defining Valid Intersections
11-6
database level. The same substitution variable can exist on multiple levels; the applicationuses the first one it finds as it searches in this order:
1. Database (cube)
2. Application
3. Server
Evaluation OrderEvaluation order for valid intersection groups orders invalid results sets as quickly aspossible, increasing the speed and efficiency of the overall valid intersection evaluation.
For example, the application evaluates the first valid intersection group in the list, then thesecond group, and so on. If the application finds an invalid intersection in the second group inthe list, it will stop evaluating the rest of the list because, once an intersection is defined asinvalid, it will override other valid intersection rule results.
To change the order in which the groups are evaluated, see Changing the Valid IntersectionGroup Evaluation Order.
Creating Valid IntersectionsYou can define rules to filter certain cell intersections to users when they enter data, selectmembers, or select runtime prompts.
To create a valid intersection:
1. Click Application, and then click Valid Intersections.
2. If it isn't already selected, click the Setup tab.
Note:
If your environment uses the default Redwood Experience theme, the Setuptab is at the bottom of the page.
3. Create the valid intersection group:
a. Click Create.
b. Enter a name and description for the new intersection.
c. The Enabled checkbox is selected by default. To disable the valid intersection group,clear the Enabled checkbox. You can also enable or disable a valid intersectiongroup directly on the Valid Intersections page. See Disabling and Enabling ValidIntersection Groups.
d. For Definition Type, select one of the following:
• Valid Intersection
• Invalid Intersection
e. To select the anchor dimension for the intersection group, click next to SelectAnchor Dimension.
Chapter 11Defining Valid Intersections
11-7
f. Optional: By default, the anchor dimension members that are not specified in
the valid intersection rule are marked valid. To clear this option, click nextto the anchor dimension, and then click Unselected members are valid.
For an explanation of this option and for an example of how it's used, see Anchor and Nonanchor Dimensions.
g. To select additional dimensions (called nonanchor dimensions), click AddDimension.
h. Optional: By default, nonanchor dimensions are not required. To make a
nonanchor dimension required, click next to the nonanchor dimension,and click Required.
4. Define the valid intersection rule:
a. Click Add Rule.
b. To select the range of members to include, exclude, or remove in the valid
intersection, click next to the dimensions in the new rule:
• Click Edit to open the Select Members page and select the members,substitution variables, and attributes to include in the valid intersectionrule. See Using the Member Selector.
• Click Add Exclusion to define an exclusion in the rule. You can exclude asubset of what is included for that dimension.
• Click Clear to clear the selection.
To delete a rule, click .
5. Click Save and Close.
The new valid intersection group is added to the end of the valid intersections list. Toreorder the rules in the list, see Changing the Valid Intersection Group EvaluationOrder.
Managing Valid IntersectionsRelated Topics
• Viewing Valid Intersections
• Filtering Valid Intersections
• Importing and Exporting Intersections
• Changing the Valid Intersection Group Evaluation Order
• Disabling and Enabling Valid Intersection Groups
• Editing Details for a Valid Intersection Group
• Duplicating Valid Intersection Groups
• Deleting a Valid Intersection Group
Viewing Valid IntersectionsTo view valid intersections:
Chapter 11Defining Valid Intersections
11-8
1. Click Application, and then click Valid Intersections.
2. If it isn't already selected, click the Setup tab.
Note:
If your environment uses the default Redwood Experience theme, the Setuptab is at the bottom of the page.
3. To search the entire listing for certain intersections, enter search criteria in the Search
box and then click to display only the intersections that meet the search criteria.
4. To filter the listing so it displays only the intersections that meet the filter criteria, specifythe following filter options:
• —Click to display the Filter page where you can select from a robust list of filteroptions. For a complete list of filter options and their descriptions, see Filtering ValidIntersections.
• —Click to clear all filters.
• Enabled—Filters the list so you view only the intersections that are enabled (Yes),not enabled (No), or select All.
• Definition Type—Filters the list so you view only the intersections that are the ValidIntersection or Invalid Intersection types, or select All.
5. You can also perform these tasks on the Valid Intersections page:
• Actions menu—To import and export valid intersections, see Importing andExporting Intersections .
• Create—See Creating Valid Intersections.
• Refresh—Click to refresh the intersections listing.
6. For each listing on the intersections page you can perform the following tasks:
• Enabled column—Indicates whether an intersection is enabled. Click the check marknext to the intersection to disable or enable it. A green check mark indicates that thedefinition is enabled. See Disabling and Enabling Valid Intersection Groups.
• Action column—Click to edit, duplicate, or delete an intersection, or to move itup or down in the listing order. See the following topics:
– Changing the Valid Intersection Group Evaluation Order
– Editing Details for a Valid Intersection Group
– Duplicating Valid Intersection Groups
– Deleting a Valid Intersection Group
Filtering Valid IntersectionsYou can filter the list of intersections by certain criteria such as whether the intersection isenabled or not, whether the definition is valid or invalid, when it was modified, and by whom.When you filter, only the intersections that meet the filter criteria are displayed on the ValidIntersections page.
Chapter 11Defining Valid Intersections
11-9
To filter intersections:
1. Click Application, and then click Valid Intersections.
2. Click to specify filter criteria:
• Enabled—View only the intersections that are enabled (Yes), not enabled(No), or select All.
• Definition Type—View only the intersections that are the Valid Intersectionor Invalid Intersection types, or select All.
• Modified—View only the intersections that were modified before or after acertain date and time, or the intersections modified within a range of dates or
times. Select After, Before, or Between and then click to specify the dateand time criteria.
• Modified By—View only the intersections modified by selected users.
3. Click More to further refine the filter criteria:
• Dimensions
• Anchor Dimensions
• Unselected members are valid—Choose Yes, No, or All.
• Additional Dimensions Required—Choose Yes, No, or All.
4. Click Apply.
Importing and Exporting Intersections
About Importing and Exporting Valid Intersections
You can export the filtered list of valid intersections from the listing page to a locationon your local computer, or you can export them to the server. If no filter is defined onthe listing page, then all intersections are exported.
Use the Import action to import intersections into the application from a location onyour local computer or import them from the server. When you perform an import, thesystem tests the import file for anything that might break a definition; for example, if acube is missing, or if an anchor dimension doesn't exist, or if a subrule is not found,errors are logged in the error file. Import jobs will only complete successfully if theimport has no errors.
Depending on the export or import location you choose, the intersections are exportedor imported in either an Excel file format (XLSX) or a zip file format.
Valid Intersections Import File
The Excel import file must have two sheets with the following names for the first andsecond sheets:
1. Rules2. Sub RulesThe Rules sheet has the following column headings:
• Name
Chapter 11Defining Valid Intersections
11-10
• Position
• Description
• Enabled
• Definition Type
• Anchor Dim Name
• Anchor Dimension Apply to Selected Members
• Dim1
• Dim1 Required
• Dim2
• Dim2 Required
• Dim X
• Dim X Required
The Sub Rules sheet must have the following column headings:
• Name - This column must contain the name of the Rule from the first sheet
• Anchor Members
• Anchor Exclusion
• Dim1 Members
• Dim1 Exclusion
• Dim2 Members
• Dim2 Exclusion
• Dim X Members
• Dim X Exclusion
Exporting and Importing Valid Intersections
To export and import intersections:
1. Click Application, and then click Valid Intersections.
2. Apply filters to the listing, as needed. See Filtering Valid Intersections.
3. To export, click Actions, then Export, and then select the target location for the exportfile:
• Local—Saves the export file to a location on your local computer. If you choose thisoption, click Export, and then specify where to save the export file.
• Outbox—Runs a job that saves the export file in a zip format to the server which youcan download now or use to schedule an export job later. If you choose this option,click Save and Run Job.
To download the export file from the Outbox:
a. Click Application, and then click Jobs.
b. Under Recent Activity click the export job.
Chapter 11Defining Valid Intersections
11-11
c. On the Job Details page, click to select a download location for theexport file.
4. If editing the export file in Excel, note that the Excel file has two sheets: Rules andSub Rules.
5. To import, click Actions, then Import, and then select the location of the importsource file:
• Local—Loads the import file from a location on your computer. For SourceFile, click Browse to select the import file on your computer, and then clickImport.
• Inbox—Runs a job that loads the import file from the server. The import filemust be in a zip file format. Enter the name of the file in Source File, clickSave and Run Job, and then specify the Name and Error File on the Saveas Job dialog. The error file provides information about the intersections thatwere not imported. You can download the error file from the Inbox/OutboxExplorer for your business process.
Changing the Valid Intersection Group Evaluation OrderEvaluation order for intersection groups orders invalid results sets as quickly aspossible, increasing the speed and efficiency of the overall intersection evaluation.
To learn more about evaluation order, see Evaluation Order.
To change the position of a valid intersection group in a list:
1. Click Application, and then click Valid Intersections.
2. If it isn't already selected, click the Setup tab.
Note:
If your environment uses the default Redwood Experience theme, theSetup tab is at the bottom of the page.
3. To the right of the intersection group in the listing, click .
4. Select Move Up or Move Down.
Tip:
You can also drag intersection groups to move them up and down in thelist.
Disabling and Enabling Valid Intersection GroupsIntersection groups, by default, are enabled at the time of creation. If you don't want anintersection group to be evaluated or used, you can disable it on the ValidIntersections page. When an intersection group is disabled, the intersection rule forthat group no longer applies when viewing application forms, business rules, orruntime prompts. You can also reenable a disabled intersection group.
Chapter 11Defining Valid Intersections
11-12
To disable and enable an intersection group:
1. Click Application, and then click Valid Intersections.
2. If it isn't already selected, click the Setup tab.
Note:
If your environment uses the default Redwood Experience theme, the Setuptab is at the bottom of the page.
3. In the Enabled column of the intersection list, click the check mark next to the intersectiongroup that you're disabling or enabling.
Note:
The check mark is green if the group is enabled.
4. Ensure that any remaining groups that are enabled are still listed in the correct evaluationorder in the intersections list. If they are not, then move them up or down in the order.
See Changing the Valid Intersection Group Evaluation Order.
Editing Details for a Valid Intersection GroupTo edit intersection group details, you work with dimension members in the member selector.You can also define exclusions in intersection rules.
To edit intersection group details:
1. Click Application, and then click Valid Intersections.
2. If it isn't already selected, click the Setup tab.
Note:
If your environment uses the default Redwood Experience theme, the Setuptab is at the bottom of the page.
3. Click the name of the intersection group you want to edit.
Note:
A pagination bar displays at the bottom of the rules page. If you have a largenumber of rules, you can use the pagination bar to easily navigate between therules pages and to jump to a specific page. The page size options (number ofrules per page), which you can select on the pagination bar, are 25, 50, 100,and All. (Note that the All option isn't available if you have more than 300rules.)
Chapter 11Defining Valid Intersections
11-13
• To edit dimension details, next to the dimension, click to select themembers to include, exclude, or remove in the intersection rule:
– Click Edit to open the Select Members page and select members,substitution variables, and attributes to include in the intersection rule. Youcan also type in the members or functions. See Using the MemberSelector.
– Click Add Exclusion to define an exclusion in the rule. You can selectmembers to exclude; for example, you can select or include all children ofYearTotal except children of Q1 by excluding children of Q1.
– Click Clear to clear the selection.
• To delete a dimension from an intersection group, next to the dimension, click
, and then click .
• To remove a rule from an intersection group, click .
• To add a dimension or a rule to an intersection group, click Add Rule or AddDimension.
4. Click Save and Close.
Duplicating Valid Intersection GroupsTo speed intersection group creation, you can duplicate an existing intersection groupand then edit it.
To duplicate an intersection group:
1. Click Application, and then click Valid Intersections.
2. If it isn't already selected, click the Setup tab.
3. Click to the right of the intersection group you want to duplicate, and thenselect Duplicate.
The duplicate group is added to the end of the intersections list with the word"Copy" appended to the name.
4. Open the intersection group and edit it.
5. Reorder the intersection groups, if needed. See Changing the Valid IntersectionGroup Evaluation Order.
Deleting a Valid Intersection GroupAfter a group is deleted, the intersection groups are reordered. If there are threeintersection groups, and the second one in the order is deleted, the third intersectiongroup becomes number two.
To delete an intersection group:
1. Click Application, and then click Valid Intersections.
2. If it isn't already selected, click the Setup tab.
Chapter 11Defining Valid Intersections
11-14
Note:
If your environment uses the default Redwood Experience theme, the Setuptab is at the bottom of the page.
3. Click to the right of the intersection group that you want to remove, and then selectDelete.
4. Reorder the remaining intersections, if needed. See Changing the Valid IntersectionGroup Evaluation Order.
To delete an intersection rule from an intersection group, see Editing Details for a ValidIntersection Group.
Suppressing Invalid Data in FormsSuppressing invalid data hides rows or columns in application forms that contain invalid data.If this option isn't selected, then the application displays rows or columns that contain cellswith data that are invalid. Cells with invalid data are read-only.
To suppress invalid data in forms:
1. From the Home page, click Navigator , and then under Create and Manage, clickForms.
2. Select the form, click , and then click Layout.
3. Under Grid Properties, select Suppress invalid data - Rows and/or Suppress invaliddata - Columns.
4. Click Save.
Clearing Invalid DataRelated Topics
• About Invalid Data
• Working With Invalid Intersection Reports
• Clearing Data at Invalid Intersections
About Invalid DataIf data already exists at intersections, then adding or modifying valid intersections invalidatesthe existing data. Creating a valid intersection rule or modifying an existing valid intersectionrule doesn't clear data in the invalid intersections. You must generate a valid intersection rulereport, which will show where data exists at invalid intersections, and then determine whetherto clear the data.
Chapter 11Defining Valid Intersections
11-15
Note:
Data may remain at an invalid intersection for historical purposes or for usein forward looking scenarios. Therefore, it's not a requirement to clear data atinvalid intersections.
Working With Invalid Intersection ReportsYou can view reports that show data at invalid intersections on the Reports tab of theValid Intersections page. Invalid Intersection Reports lists existing reports, theirstatus, and the last time they were run.
To work with invalid intersection reports:
1. Click Application, then Valid Intersections, and then click the Reports tab.
Note:
If your environment uses the default Redwood Experience theme, theReports tab is at the bottom of the page.
2. Perform a task:
• To refresh the listing, click Refresh.
• To create a report, click Create, name the report, select the cube, choose thescope of the report, and then select when to run the report. You can run thereport now or run the report later by saving it as a job. To save a report withoutrunning it, click Save and Close. To remove a report after it's run, clickRemove Reports.
Note:
Invalid intersection reports are not supported for aggregate storagecubes. Aggregate storage cubes are not listed in the Cube drop-down list.
• To edit a report, click , and then Edit.
• To copy a report, click , and then Duplicate.
• To run a report, click , and then Run.
• To delete a report, click , and then Delete.
Chapter 11Defining Valid Intersections
11-16
Clearing Data at Invalid IntersectionsUsers with appropriate permissions can clear the invalid data if the data isn't needed. To clearinvalid data, run the report, and then click Clear Invalid Intersections.
Working with Valid IntersectionsRelated Topics
• Working with Valid Intersections in Application Forms
• Working with Valid Intersections in Calculation Manager Rule Runtime Prompts
Working with Valid Intersections in Application FormsUsing valid intersections prevents data entry for invalid intersections as defined in theapplicable valid intersection group. The affected cells in the form display as read-onlyfollowing standard, read-only color coding. If you hover the cursor over an invalid intersection,a tool tip displays indicating the cell is read-only because it's defined as an invalidintersection.
The valid intersection group applies first to the form point of view and page axis. If the point ofview intersections are all invalid, then a warning message is displayed, and the form doesn'trender a data grid until a valid intersection is selected.
If the point of view has valid intersections, then the rows and columns are filtered to restrictdata entry at invalid intersections. If the Suppress Invalid Data option for the form isenabled, then the form suppresses invalid rows, columns, or both, as appropriate.
Any rows or columns, which consist of a mix of valid and invalid intersections, display thoseintersections as valid or invalid, as appropriate. Invalid intersections are displayed withstandard, read-only shading and preclude data entry.
Application users can reset the point of view to the default, unfiltered list without closing andreopening the form by clearing the selections. Application users can also clear a selection,thus opening up more selections for other dimensions. They will not be able to render a formwith a dimension cleared, because valid members must be selected for each dimension.
In the member selector, invalid members are suppressed due to valid intersection rules.Application users can display invalid members in the member selector using the ShowInvalid Members option. Invalid members are displayed but are unavailable for selection.
Note:
Valid intersection groups don't grant access to dimension members. Validintersection groups further restrict the valid intersections of dimension membersalready granted to an application user.
Chapter 11Defining Valid Intersections
11-17

Table 11-8 Form Behavior if Valid Intersections are Applied
Action Behavior
Open a form The form renders with member selections asdefined in the form definition, adhering to theuser's access rights for dimensions, andapplies valid intersection groups with the mostrecently used as current selections.
Select members from a point of viewdimension
The application:
• Enables users to select a member on thepoint of view
• In the member selector for a point of viewdimension, enables users to select from afiltered list of remaining valid intersections,which is based on the members that wereselected for the other point of viewdimensions
• Ignores the order in which point of viewdimension members are selectedbecause selecting a member from anydimension included in a valid intersectiongroup dynamically filters the remainingdimension members lists for thosedimensions included in the validintersection group, as appropriate, whenthat dimension is selected
• Provides the option to hide invalidmembers from dimension lists or displaythem as unselectable in the point of view
• Provides the ability to reset the point ofview to the fully unfiltered list withoutclosing and reopening the form byclearing the selections
Note that ad hoc forms, both in Web andOracle Smart View for Office, will not filterpage or point of view members according tovalid intersection groups.
Select Go to render a form based on point ofview selections. You can also click the rightarrow in the form point of view.
The form renders as defined based on thevalid point of view intersections.
Enter and save data The form data is entered and saved.
Working with Valid Intersections in Calculation Manager Rule Runtime PromptsValid intersection groups apply to runtime prompts when launched from within thecontext of the application. Runtime prompts will prevent users from selecting invalidintersections as defined in the valid intersection groups.
Filtering according to valid intersection groups isn't supported in Oracle Smart View forOffice forms. The rule, however, will not launch if you choose an invalid intersection inthe runtime prompts both in the Web and in Smart View.
Chapter 11Defining Valid Intersections
11-18
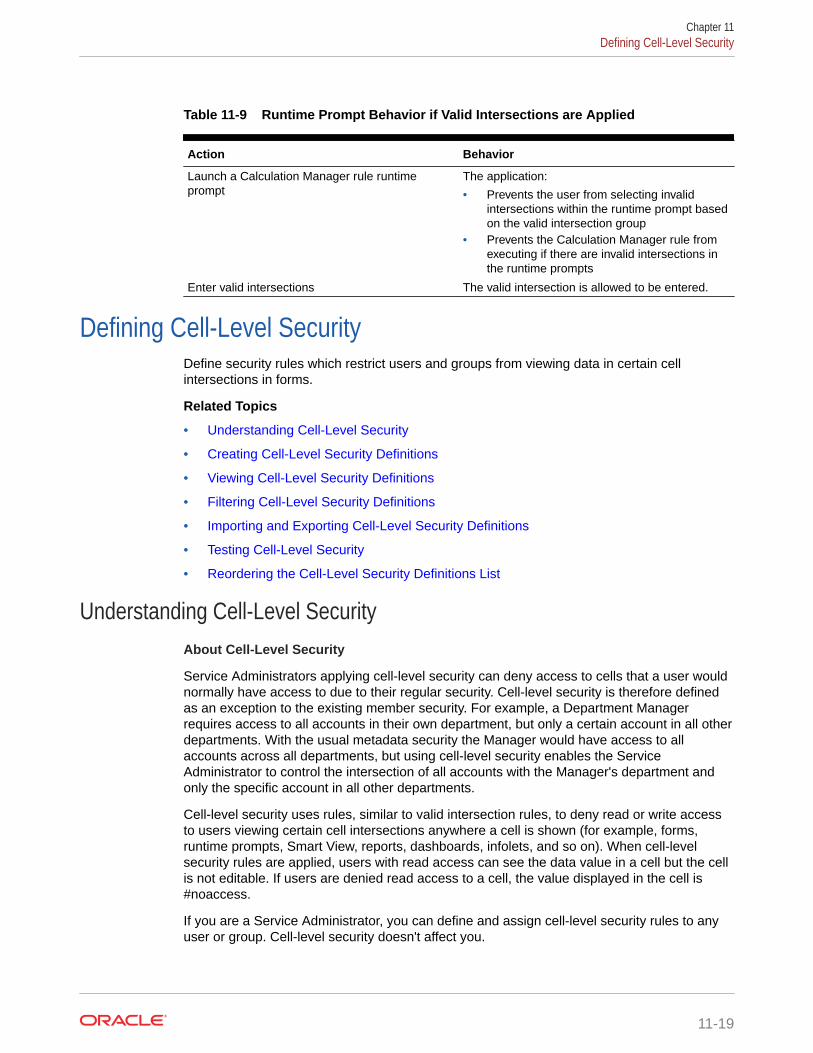
Table 11-9 Runtime Prompt Behavior if Valid Intersections are Applied
Action Behavior
Launch a Calculation Manager rule runtimeprompt
The application:
• Prevents the user from selecting invalidintersections within the runtime prompt basedon the valid intersection group
• Prevents the Calculation Manager rule fromexecuting if there are invalid intersections inthe runtime prompts
Enter valid intersections The valid intersection is allowed to be entered.
Defining Cell-Level SecurityDefine security rules which restrict users and groups from viewing data in certain cellintersections in forms.
Related Topics
• Understanding Cell-Level Security
• Creating Cell-Level Security Definitions
• Viewing Cell-Level Security Definitions
• Filtering Cell-Level Security Definitions
• Importing and Exporting Cell-Level Security Definitions
• Testing Cell-Level Security
• Reordering the Cell-Level Security Definitions List
Understanding Cell-Level SecurityAbout Cell-Level Security
Service Administrators applying cell-level security can deny access to cells that a user wouldnormally have access to due to their regular security. Cell-level security is therefore definedas an exception to the existing member security. For example, a Department Managerrequires access to all accounts in their own department, but only a certain account in all otherdepartments. With the usual metadata security the Manager would have access to allaccounts across all departments, but using cell-level security enables the ServiceAdministrator to control the intersection of all accounts with the Manager's department andonly the specific account in all other departments.
Cell-level security uses rules, similar to valid intersection rules, to deny read or write accessto users viewing certain cell intersections anywhere a cell is shown (for example, forms,runtime prompts, Smart View, reports, dashboards, infolets, and so on). When cell-levelsecurity rules are applied, users with read access can see the data value in a cell but the cellis not editable. If users are denied read access to a cell, the value displayed in the cell is#noaccess.
If you are a Service Administrator, you can define and assign cell-level security rules to anyuser or group. Cell-level security doesn't affect you.
Chapter 11Defining Cell-Level Security
11-19

Anchor and Nonanchor Dimensions
Cell-level security definitions use anchor and nonanchor dimensions:
• Anchor dimensions are always required dimensions in the cube that is used in thecell-level security definition.
• Nonanchor dimensions are either required or not:
– If a nonanchor dimension is required, any cube that doesn't use thatdimension will ignore any cell-level security definitions where that dimension istagged as required.
– If a nonanchor dimension isn't required, any cube that doesn't use thatdimension will still evaluate any cell-level security definition that includes thatdimension as not required and evaluate the definitions of any otherdimensions in the definition in use in the cube.
– By default, nonanchor dimensions aren't required. To make a nonanchor
dimension required, click next to the nonanchor dimension, and clickRequired.
• By default, the anchor dimension members that are not specified in the rule are
included in the security definition, but you can clear this option by clicking nextto the anchor dimension, and then clicking Apply to Selected Members Only.
Creating Cell-Level Security DefinitionsTo create a cell-level security definition:
1. Click Application, and then click Cell-Level Security.
2. Create the definition:
a. Click Create.
b. Enter a name and description for the definition.
c. The Enabled checkbox is selected by default. To disable the definition, clearthe Enabled checkbox. You can also enable or disable a definition directly onthe Cell-Level Security Definitions page.
d. To define cube-specific security, click Cubes and select from the list of cubesor select All.
e. An anchor dimension is required. To select the anchor dimension, click SelectAnchor Dimension. For information about anchor and nonanchordimensions, see Understanding Cell-Level Security
f. Optional: By default, the anchor dimension members that are not specified in
the rule are included in the security definition. To clear this option, click next to the anchor dimension, and then click Apply to Selected MembersOnly.
g. To select additional dimensions (called nonanchor dimensions), click AddDimension.
Chapter 11Defining Cell-Level Security
11-20
h. Optional: By default, nonanchor dimensions are not required. To make a nonanchor
dimension required, click next to the nonanchor dimension, and click Required.
3. Define the cell-level security rule:
a. Click Add Rule.
b. In the Users, Groups column, click to find the users and groups to include inthe cell-level security rule.
c. For Restriction, choose Deny Read (default) or Deny Write. Deny Read is thedefault option because it is the most restrictive. If users are denied read access to acell, the value displayed in the cell is #noaccess. Users with Deny Write access cansee the data value in a cell but the cell is not editable.
d. Click next to the dimensions in the new rule:
• Click Edit to open the Select Members page and select the members,substitution variables, and attributes to include in the cell-level security rule.
• Click Add Exclusion to define an exclusion in the rule. You can exclude a subsetof what is included for that dimension.
• Click Clear to clear the selection.
To delete a rule, click .
4. Click Save.
The new cell-level security definition is added to the end of the list. Definitions are evaluatedin the order they appear in the list. To reorder the definitions list, see Reordering the Cell-Level Security Definitions List.
After a definition is created, you can test it in a form to see how the form will look from auser's perspective. See Testing Cell-Level Security.
Viewing Cell-Level Security DefinitionsTo view cell-level security definitions:
1. Click Application, and then click Cell-Level Security.
2. To search the entire listing for certain definitions, enter search criteria in the Search box
and then click to display only the definitions that meet the search criteria.
3. To filter the listing so it displays only the definitions that meet the filter criteria, specify thefollowing filter options:
• —Click to display the Filter page where you can select from a robust list of filteroptions. For a complete list of filter options and their descriptions, see Filtering Cell-Level Security Definitions.
• —Click to clear all filters for Effective Assignment, Enabled, and Restriction.
• Effective Assignment—Filters the list so you view only the definitions that effectcertain users or groups.
• Enabled—Filters the list so you view only the definitions that are enabled (Yes), notenabled (No), or select All.
Chapter 11Defining Cell-Level Security
11-21
• Restriction—Filters the list so you view only the definitions that are assignedthe Deny Read or Deny Write restriction, or select All.
4. You can also perform these tasks on the Cell-Level Security Definitions page:
• Actions menu—To import and export definitions, see Importing and ExportingCell-Level Security Definitions.
• Test—See Testing Cell-Level Security.
• Create—See Creating Cell-Level Security Definitions.
• Refresh—Click to refresh the definitions listing.
5. For each listing on the definitions page you can perform the following tasks:
• Enabled column—Indicates whether a definition is enabled. Click the checkmark next to the definition to disable or enable it. A green check markindicates that the definition is enabled.
• Action column—Click to edit, duplicate, or delete a definition, or to move itup or down in the listing order.
Filtering Cell-Level Security DefinitionsYou can filter the list of cell-level security definitions by certain criteria such as by cube,by restriction, or by date. When you filter, only the definitions that meet the filter criteriaare displayed on the Cell-Level Security Definitions page.
To filter cell-level security definitions:
1. Click Application, and then click Cell-Level Security.
2. Click to specify filter criteria:
• Cubes—View only the definitions in the selected cube or cubes, or select All.
• Enabled—View only the definitions that are enabled (Yes), not enabled (No),or select All.
• Restriction—View only the definitions that are assigned the Deny Read orDeny Write restriction, or select All.
• Modified—View only the definitions that were modified before or after acertain date and time, or the definitions modified within a range of dates or
times. Select After, Before, or Between and then click to specify the dateand time criteria.
• Modified By—View only the definitions modified by selected users.
• Effective Assignment—View only the definitions that effect the selectedusers or groups.
3. Click More to further refine the filter criteria:
• Dimensions
• Anchor Dimensions
• Anchor Dimension: Apply to Selected Members Only—Choose Yes, No,or All.
• Additional Dimensions Required—Choose Yes, No, or All.
Chapter 11Defining Cell-Level Security
11-22
4. Click Apply.
Importing and Exporting Cell-Level Security DefinitionsAbout Importing and Exporting Cell-Level Security Definitions
You can export the filtered list of cell-level security definitions from the listing page to alocation on your local computer, or you can export them to the server. If no filter is defined onthe listing page, then all cell-level security definitions are exported.
Use the Import action to import cell-level security definitions into the application from alocation on your local computer or import them from the server. When you perform an import,the system tests the import file for anything that might break a definition; for example, if acube is missing, or if an anchor dimension doesn't exist, or if a subrule is not found, errors arelogged in the error file. Import jobs will only complete successfully if the import has no errors.
Depending on the export or import location you choose, the application definitions areexported or imported in either an Excel file format (XLSX) or a zip file format.
Cell-Level Security Import File
The Excel import file must have two sheets with the following names for the first and secondsheets:
1. Rules2. Sub RulesThe Rules sheet has the following column headings:
• Name
• Position
• Description
• Enabled
• Valid Cubes - This column can contain either All or a list of comma-separate names ofcubes, such as Plan1, Plan2
• Anchor Dim Name
• Anchor Dimension Apply to Unselected Members
• Dim1
• Dim1 Required
• Dim2
• Dim2 Required
• Dim X
• Dim X Required
The Sub Rules sheet must have the following column headings:
• Name - This column must contain the name of the Rule from the first sheet
• Users
• User Groups
• Restriction This column can contain Deny Read or Deny Write
Chapter 11Defining Cell-Level Security
11-23
• Anchor Members
• Anchor Exclusion
• Dim1 Members
• Dim1 Exclusion
• Dim2 Members
• Dim2 Exclusion
• Dim X Members
• Dim X Exclusion
Exporting and Importing Cell-Level Security Definitions
To export and import cell-level security definitions:
1. Click Application, and then click Cell-Level Security.
2. Apply filters to the listing, as needed. See Filtering Cell-Level Security Definitions.
3. To export, click Actions, then Export, and then select the target location for theexport file:
• Local—Saves the export file to a location on your local computer. If youchoose this option, click Export, and then specify where to save the XLSXexport file.
• Outbox—Runs a job that saves the export file in a zip format to the serverwhich you can download now or use to schedule an export job later. If youchoose this option, click Save and Run Job.
To download the export file from the Outbox:
a. Click Application, and then click Jobs.
b. Under Recent Activity click the Export CLS job.
c. On the Job Details page, click to select a download location for thecell-level security export file.
4. If editing the export file in Excel, note that the Excel file has two sheets: Rules andSub Rules.
5. To import, click Actions, then Import, and then select the location of the importsource file:
• Local—Loads the import file from a location on your computer. For SourceFile, click Browse to select the import file on your computer, and then clickImport.
• Inbox—Runs a job that loads the import file from the server. The import filemust be in a zip file format. Enter the name of the file in Source File, clickSave and Run Job, and then specify the Name and Error File on the Saveas Job dialog. The error file provides information about the definitions thatwere not imported. You can download the error file from the Inbox/OutboxExplorer for your business process.
Chapter 11Defining Cell-Level Security
11-24
Testing Cell-Level SecurityAfter defining cell-level security and enabling it, you can test it to see what an effected userwould see when they view a form. Testing ensures that users are seeing only the cell valuesthey are allowed to see and nobody is seeing more than they should. To test a definition, youmust enable it.
To test cell-level security:
1. Click Application, and then click Cell-Level Security.
2. Enable the definition you want to test.
3. Click Test, and then select the form that you want to test.
4. In the Select or Enter a User Name text box, specify a user name or click to selecta user, and then click OK.
Note:
You can test only one user at a time.
The form displays the user access to each cell as Read, Write, or None.
Reordering the Cell-Level Security Definitions ListCell-level security definitions are evaluated in the order they appear on the definitions list; forexample, the application evaluates the first cell-level security definition in the list, then thesecond definition, and so on.
To change the position of a cell-level security definition in the list:
1. Click Application, and then click Cell-Level Security.
2. To the right of the cell-level security definition, click .
3. Select Move Up or Move Down.
Tip:
You can also drag cell-level security definitions to move them up and down inthe list.
Chapter 11Defining Cell-Level Security
11-25
12Defining Data Maps and Creating File-BasedIntegrations
Data Integration is the mechanism by which integration processes are performed in OracleEnterprise Performance Management Cloud. You can define file-based and direct integrationsources, create mapping rules to translate source data in the required target format, andexecute and manage the periodic data loading process. To learn how to create a file-basedintegration see Creating File-Based Integrations in Administering Data Integration for OracleEnterprise Performance Management Cloud.
Define data maps to move data, comments, attachments, and supporting detail from sourcecubes and Smart Lists to target reporting cubes to consolidate data. To learn how to definedata maps, see Defining Data Maps in Administering Data Integration for Oracle EnterprisePerformance Management Cloud.
12-1
13Managing Jobs
Schedule jobs to perform common administrative tasks and lighten your workload. You canstart jobs right away or schedule jobs to run later at intervals.
Related Topics
• How Jobs Save You Time
• Viewing Pending Jobs and Recent Activity
• Scheduling Jobs
• Editing and Canceling Jobs
• Canceling Rules Jobs and Ruleset Jobs
• Downloading Export Files From Your Outbox
How Jobs Save You TimeJobs are actions such as exporting data or refreshing the database, which you can start rightaway or schedule to run later at intervals. To lighten your workload, define jobs to performcommon administrative tasks such as:
• Importing and exporting metadata and data
• Refreshing the database
• Mapping cubes
Viewing Pending Jobs and Recent ActivityTo view the job listings in the Jobs console:
1. Click Application, and then click Jobs.
2. Perform any task:
• To filter jobs and activity by criteria such as date or job type, click
• To search for job by name, enter text in the Search, and then click .
• To view a job's details, click the job.
13-1
Note:
• The application is automatically refreshed during an application upgrade.If any refresh errors occur during an application upgrade, you can viewthe errors on the Jobs page. These errors are captured in the job calledContent Update.
• If a scheduled job execution is terminated because of automated dailymaintenance, or EPM Automate resetService, or due to an unforeseenoutage, the job will be restarted when the environment comes backonline.
• Jobs older than 90 days are purged.
Scheduling JobsTo schedule jobs:
1. Click Application, then Jobs, and then click Schedule Jobs.
2. Specify the following:
• The type of job you're creating. For a list of jobs and descriptions, see JobTypes.
• When to run the job. You can schedule a job to run now or to run later. Ifscheduling the job to run later, see Scheduling Jobs to Run Later.
3. Click Next.
4. Select a job from the job list. Depending on the job type, there may be additionaloptions and considerations. See Job Types.
Note:
• You can run up to five import or export jobs at one time.
• For export jobs, you can specify a unique output file name for each
job. From the job listing page, click next to the selected job andspecify the output file name with a zip extension. The unique filename you specify will override the default export file name when thejob runs.
5. Click Next.
6. Review your choices. If satisfactory, click Finish.
To edit or cancel a job after scheduling it, see Editing and Canceling Jobs.
Chapter 13Scheduling Jobs
13-2
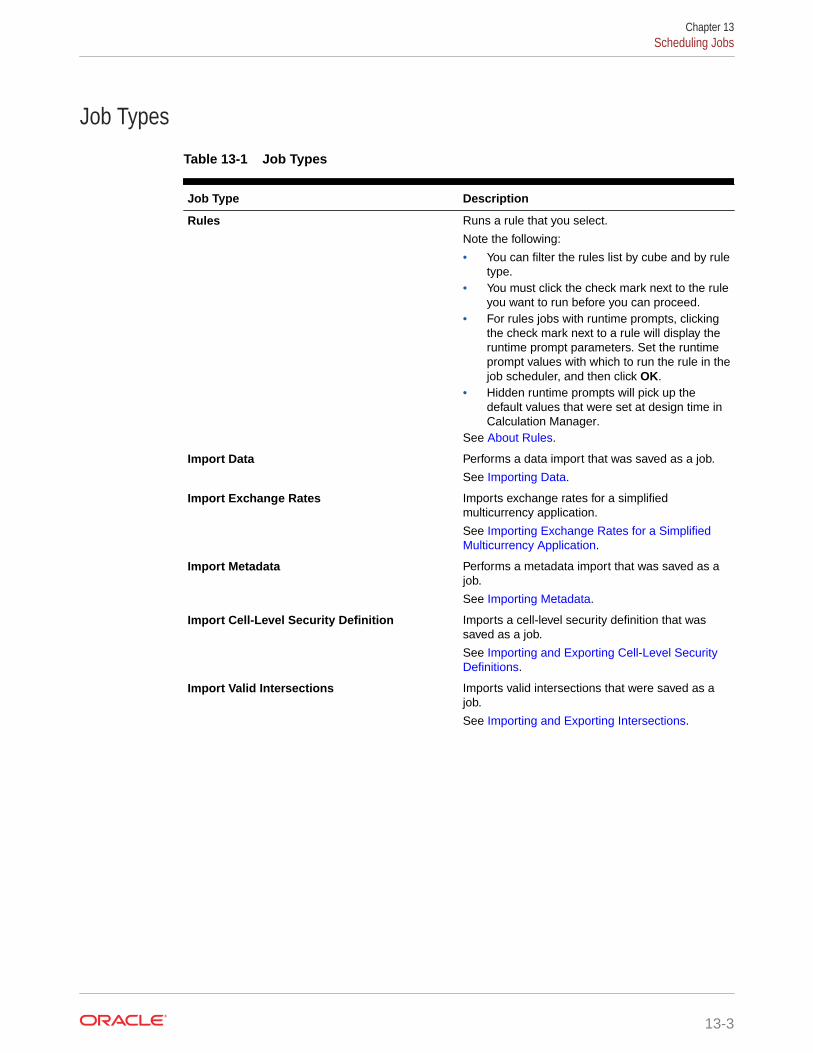
Job Types
Table 13-1 Job Types
Job Type Description
Rules Runs a rule that you select.
Note the following:
• You can filter the rules list by cube and by ruletype.
• You must click the check mark next to the ruleyou want to run before you can proceed.
• For rules jobs with runtime prompts, clickingthe check mark next to a rule will display theruntime prompt parameters. Set the runtimeprompt values with which to run the rule in thejob scheduler, and then click OK.
• Hidden runtime prompts will pick up thedefault values that were set at design time inCalculation Manager.
See About Rules.
Import Data Performs a data import that was saved as a job.
See Importing Data.
Import Exchange Rates Imports exchange rates for a simplifiedmulticurrency application.
See Importing Exchange Rates for a SimplifiedMulticurrency Application.
Import Metadata Performs a metadata import that was saved as ajob.
See Importing Metadata.
Import Cell-Level Security Definition Imports a cell-level security definition that wassaved as a job.
See Importing and Exporting Cell-Level SecurityDefinitions.
Import Valid Intersections Imports valid intersections that were saved as ajob.
See Importing and Exporting Intersections.
Chapter 13Scheduling Jobs
13-3
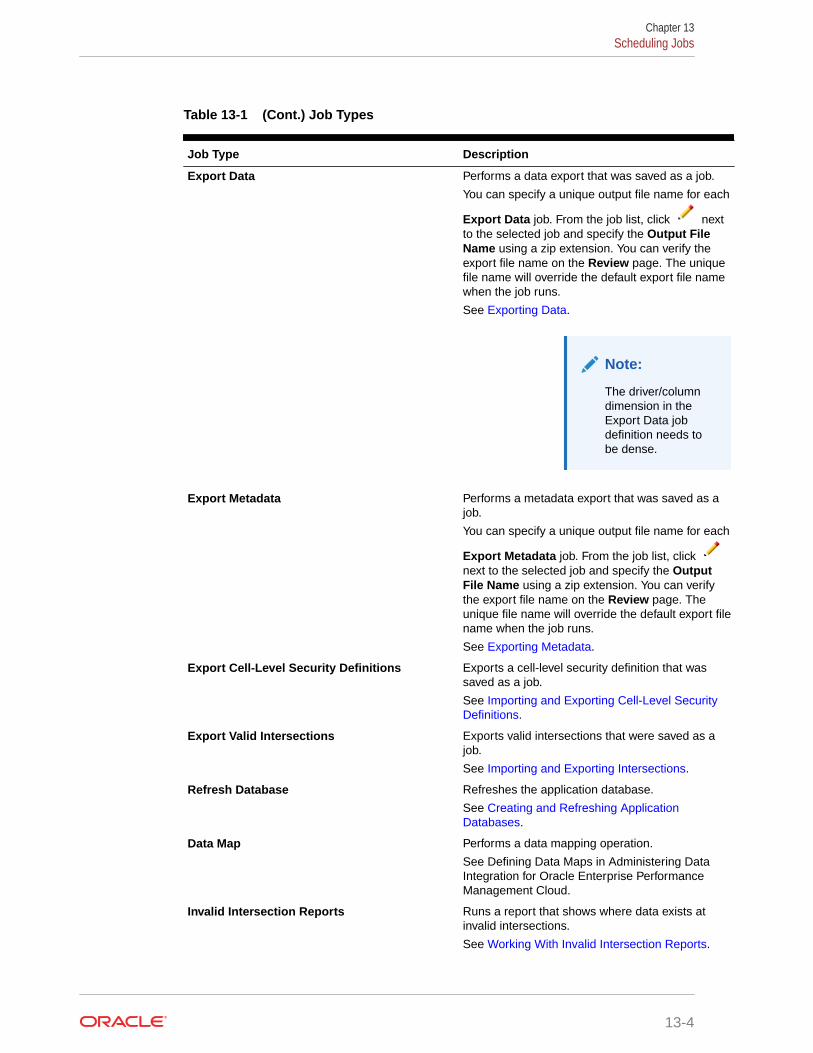
Table 13-1 (Cont.) Job Types
Job Type Description
Export Data Performs a data export that was saved as a job.
You can specify a unique output file name for each
Export Data job. From the job list, click nextto the selected job and specify the Output FileName using a zip extension. You can verify theexport file name on the Review page. The uniquefile name will override the default export file namewhen the job runs.
See Exporting Data.
Note:
The driver/columndimension in theExport Data jobdefinition needs tobe dense.
Export Metadata Performs a metadata export that was saved as ajob.
You can specify a unique output file name for each
Export Metadata job. From the job list, click next to the selected job and specify the OutputFile Name using a zip extension. You can verifythe export file name on the Review page. Theunique file name will override the default export filename when the job runs.
See Exporting Metadata.
Export Cell-Level Security Definitions Exports a cell-level security definition that wassaved as a job.
See Importing and Exporting Cell-Level SecurityDefinitions.
Export Valid Intersections Exports valid intersections that were saved as ajob.
See Importing and Exporting Intersections.
Refresh Database Refreshes the application database.
See Creating and Refreshing ApplicationDatabases.
Data Map Performs a data mapping operation.
See Defining Data Maps in Administering DataIntegration for Oracle Enterprise PerformanceManagement Cloud.
Invalid Intersection Reports Runs a report that shows where data exists atinvalid intersections.
See Working With Invalid Intersection Reports.
Chapter 13Scheduling Jobs
13-4
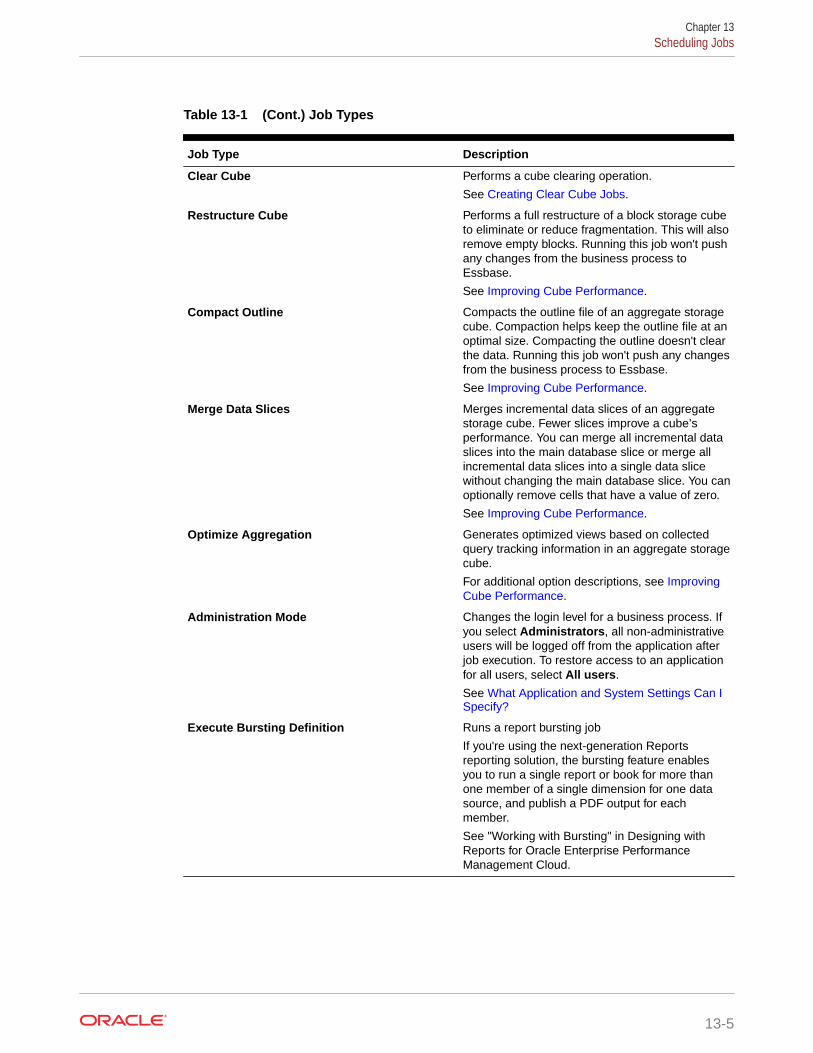
Table 13-1 (Cont.) Job Types
Job Type Description
Clear Cube Performs a cube clearing operation.
See Creating Clear Cube Jobs.
Restructure Cube Performs a full restructure of a block storage cubeto eliminate or reduce fragmentation. This will alsoremove empty blocks. Running this job won't pushany changes from the business process toEssbase.
See Improving Cube Performance.
Compact Outline Compacts the outline file of an aggregate storagecube. Compaction helps keep the outline file at anoptimal size. Compacting the outline doesn't clearthe data. Running this job won't push any changesfrom the business process to Essbase.
See Improving Cube Performance.
Merge Data Slices Merges incremental data slices of an aggregatestorage cube. Fewer slices improve a cube’sperformance. You can merge all incremental dataslices into the main database slice or merge allincremental data slices into a single data slicewithout changing the main database slice. You canoptionally remove cells that have a value of zero.
See Improving Cube Performance.
Optimize Aggregation Generates optimized views based on collectedquery tracking information in an aggregate storagecube.
For additional option descriptions, see ImprovingCube Performance.
Administration Mode Changes the login level for a business process. Ifyou select Administrators, all non-administrativeusers will be logged off from the application afterjob execution. To restore access to an applicationfor all users, select All users.
See What Application and System Settings Can ISpecify?
Execute Bursting Definition Runs a report bursting job
If you're using the next-generation Reportsreporting solution, the bursting feature enablesyou to run a single report or book for more thanone member of a single dimension for one datasource, and publish a PDF output for eachmember.
See "Working with Bursting" in Designing withReports for Oracle Enterprise PerformanceManagement Cloud.
Chapter 13Scheduling Jobs
13-5
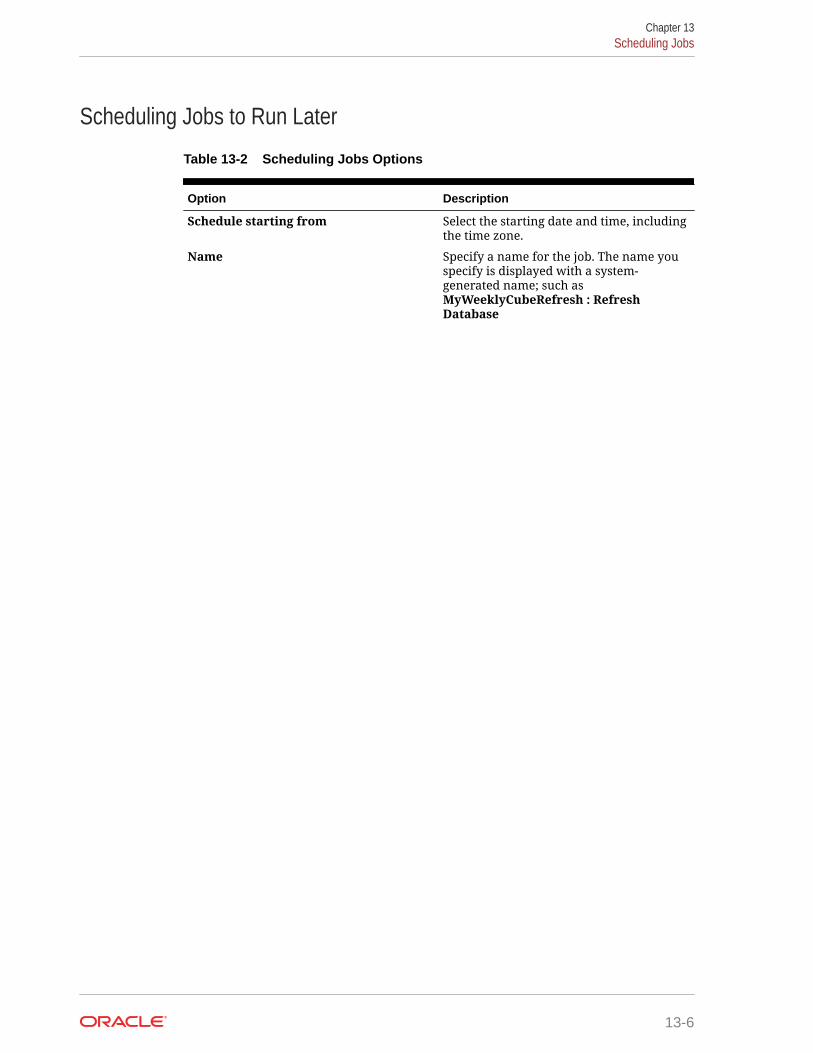
Scheduling Jobs to Run Later
Table 13-2 Scheduling Jobs Options
Option Description
Schedule starting from Select the starting date and time, includingthe time zone.
Name Specify a name for the job. The name youspecify is displayed with a system-generated name; such asMyWeeklyCubeRefresh : RefreshDatabase
Chapter 13Scheduling Jobs
13-6
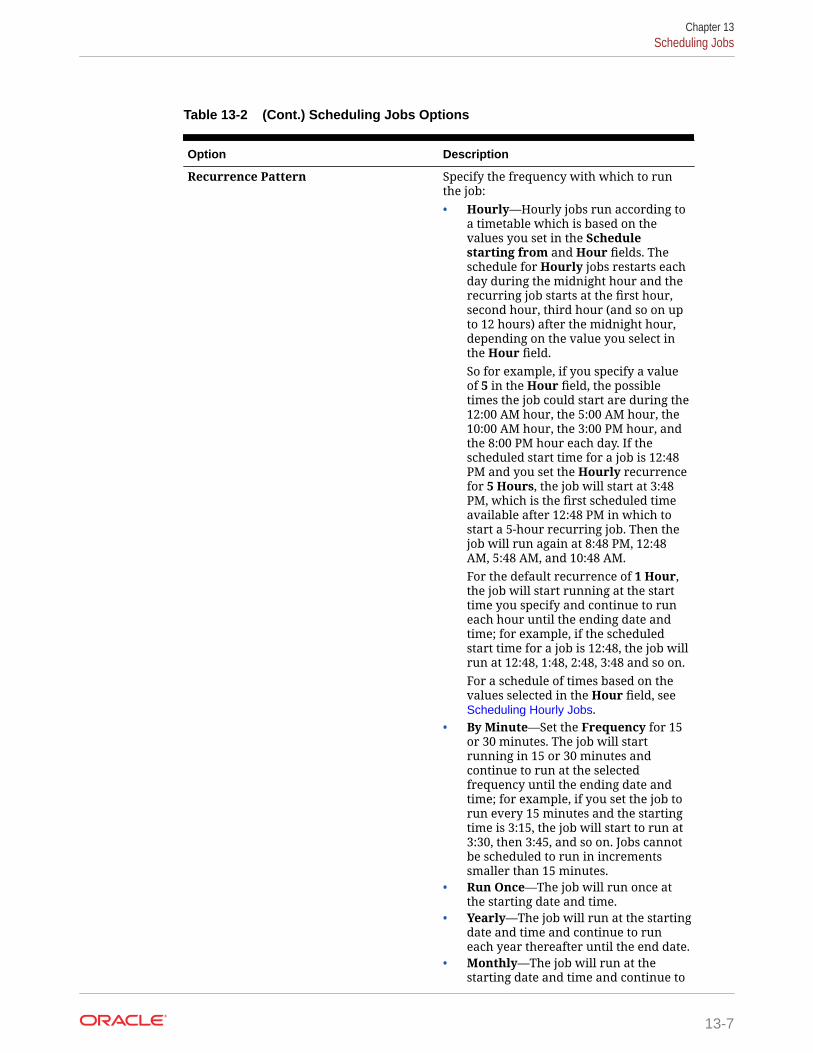
Table 13-2 (Cont.) Scheduling Jobs Options
Option Description
Recurrence Pattern Specify the frequency with which to runthe job:• Hourly—Hourly jobs run according to
a timetable which is based on thevalues you set in the Schedulestarting from and Hour fields. Theschedule for Hourly jobs restarts eachday during the midnight hour and therecurring job starts at the first hour,second hour, third hour (and so on upto 12 hours) after the midnight hour,depending on the value you select inthe Hour field.So for example, if you specify a valueof 5 in the Hour field, the possibletimes the job could start are during the12:00 AM hour, the 5:00 AM hour, the10:00 AM hour, the 3:00 PM hour, andthe 8:00 PM hour each day. If thescheduled start time for a job is 12:48PM and you set the Hourly recurrencefor 5 Hours, the job will start at 3:48PM, which is the first scheduled timeavailable after 12:48 PM in which tostart a 5-hour recurring job. Then thejob will run again at 8:48 PM, 12:48AM, 5:48 AM, and 10:48 AM.For the default recurrence of 1 Hour,the job will start running at the starttime you specify and continue to runeach hour until the ending date andtime; for example, if the scheduledstart time for a job is 12:48, the job willrun at 12:48, 1:48, 2:48, 3:48 and so on.For a schedule of times based on thevalues selected in the Hour field, see Scheduling Hourly Jobs.
• By Minute—Set the Frequency for 15or 30 minutes. The job will startrunning in 15 or 30 minutes andcontinue to run at the selectedfrequency until the ending date andtime; for example, if you set the job torun every 15 minutes and the startingtime is 3:15, the job will start to run at3:30, then 3:45, and so on. Jobs cannotbe scheduled to run in incrementssmaller than 15 minutes.
• Run Once—The job will run once atthe starting date and time.
• Yearly—The job will run at the startingdate and time and continue to runeach year thereafter until the end date.
• Monthly—The job will run at thestarting date and time and continue to
Chapter 13Scheduling Jobs
13-7

Table 13-2 (Cont.) Scheduling Jobs Options
Option Description
run each month thereafter until theend date.
• Weekly—The job will run at thestarting date and time and continue torun each week until the end date.
• Daily—The job will run at the startingdate and time and continue to runeach day until the end date.
End Date If the job is recurring, select an ending dateand time.
Scheduling Hourly JobsHourly jobs run according to a timetable which is based on the values you set in theSchedule starting from and Hour fields. The schedule for Hourly jobs restarts eachday during the midnight hour and the recurring job starts at the first hour, second hour,third hour (and so on up to 12 hours) after the midnight hour, depending on the valueyou select in the Hour field.
For example, if you specify a value of 5 in the Hour field, the hours during which thejob will run each day are 12 AM, 5 AM, 10 AM, 3 PM, and 8 PM. The start timeindicates the hour and minute when the system should start honoring the schedule,and the end time indicates when the system should stop. So if the start time is 12:48PM on 11/18, then that means 12:48 AM, 5:48 AM, and 10:48 AM have alreadyoccurred on the current day (11/18) and the next available timeslot is 3:48 PM, whichis when the scheduled job will run for the first time. After that it will run at 8:48 PM on11/18. However on 11/19 it starts over again and will run at 12:48 AM, 5:48 AM, 10:48AM, and so on until the system reaches the specified end time (in this case, 12:48 PMon 11/19).
Note:
When a job spans two days, the job runs during the midnight hour the nextday and re-sets the recurrence pattern.
Chapter 13Scheduling Jobs
13-8
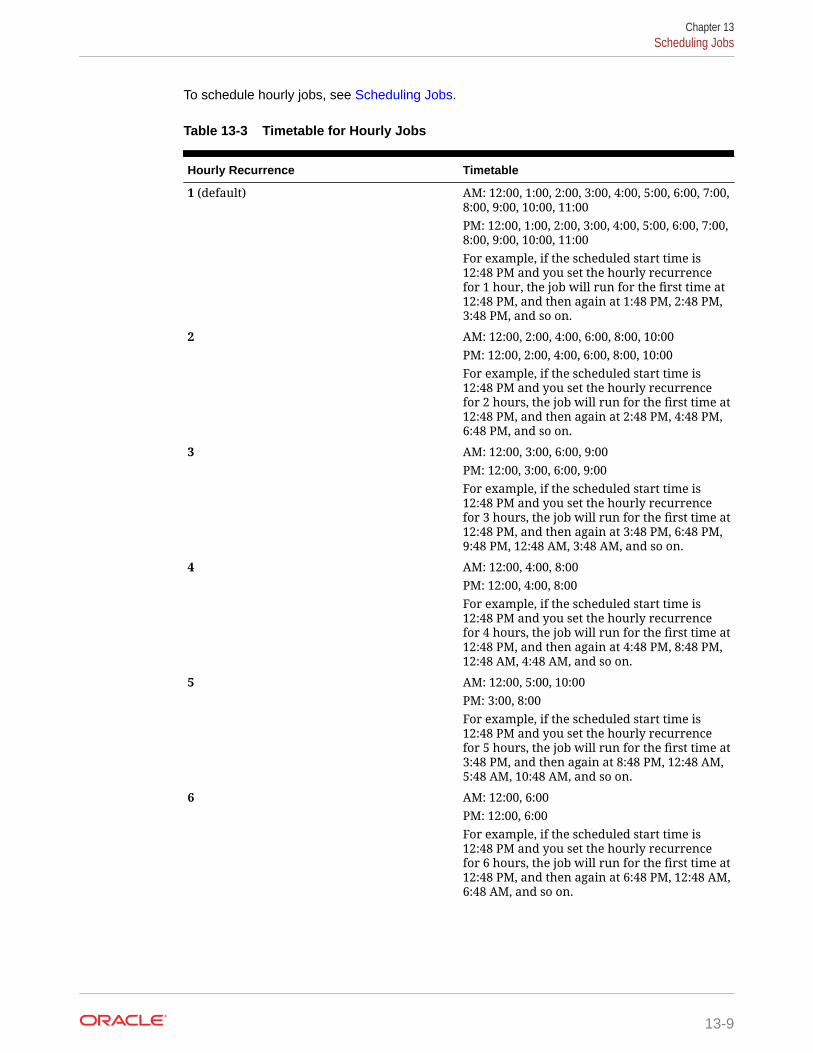
To schedule hourly jobs, see Scheduling Jobs.
Table 13-3 Timetable for Hourly Jobs
Hourly Recurrence Timetable
1 (default) AM: 12:00, 1:00, 2:00, 3:00, 4:00, 5:00, 6:00, 7:00,8:00, 9:00, 10:00, 11:00PM: 12:00, 1:00, 2:00, 3:00, 4:00, 5:00, 6:00, 7:00,8:00, 9:00, 10:00, 11:00For example, if the scheduled start time is12:48 PM and you set the hourly recurrencefor 1 hour, the job will run for the first time at12:48 PM, and then again at 1:48 PM, 2:48 PM,3:48 PM, and so on.
2 AM: 12:00, 2:00, 4:00, 6:00, 8:00, 10:00PM: 12:00, 2:00, 4:00, 6:00, 8:00, 10:00For example, if the scheduled start time is12:48 PM and you set the hourly recurrencefor 2 hours, the job will run for the first time at12:48 PM, and then again at 2:48 PM, 4:48 PM,6:48 PM, and so on.
3 AM: 12:00, 3:00, 6:00, 9:00PM: 12:00, 3:00, 6:00, 9:00For example, if the scheduled start time is12:48 PM and you set the hourly recurrencefor 3 hours, the job will run for the first time at12:48 PM, and then again at 3:48 PM, 6:48 PM,9:48 PM, 12:48 AM, 3:48 AM, and so on.
4 AM: 12:00, 4:00, 8:00PM: 12:00, 4:00, 8:00For example, if the scheduled start time is12:48 PM and you set the hourly recurrencefor 4 hours, the job will run for the first time at12:48 PM, and then again at 4:48 PM, 8:48 PM,12:48 AM, 4:48 AM, and so on.
5 AM: 12:00, 5:00, 10:00PM: 3:00, 8:00For example, if the scheduled start time is12:48 PM and you set the hourly recurrencefor 5 hours, the job will run for the first time at3:48 PM, and then again at 8:48 PM, 12:48 AM,5:48 AM, 10:48 AM, and so on.
6 AM: 12:00, 6:00PM: 12:00, 6:00For example, if the scheduled start time is12:48 PM and you set the hourly recurrencefor 6 hours, the job will run for the first time at12:48 PM, and then again at 6:48 PM, 12:48 AM,6:48 AM, and so on.
Chapter 13Scheduling Jobs
13-9
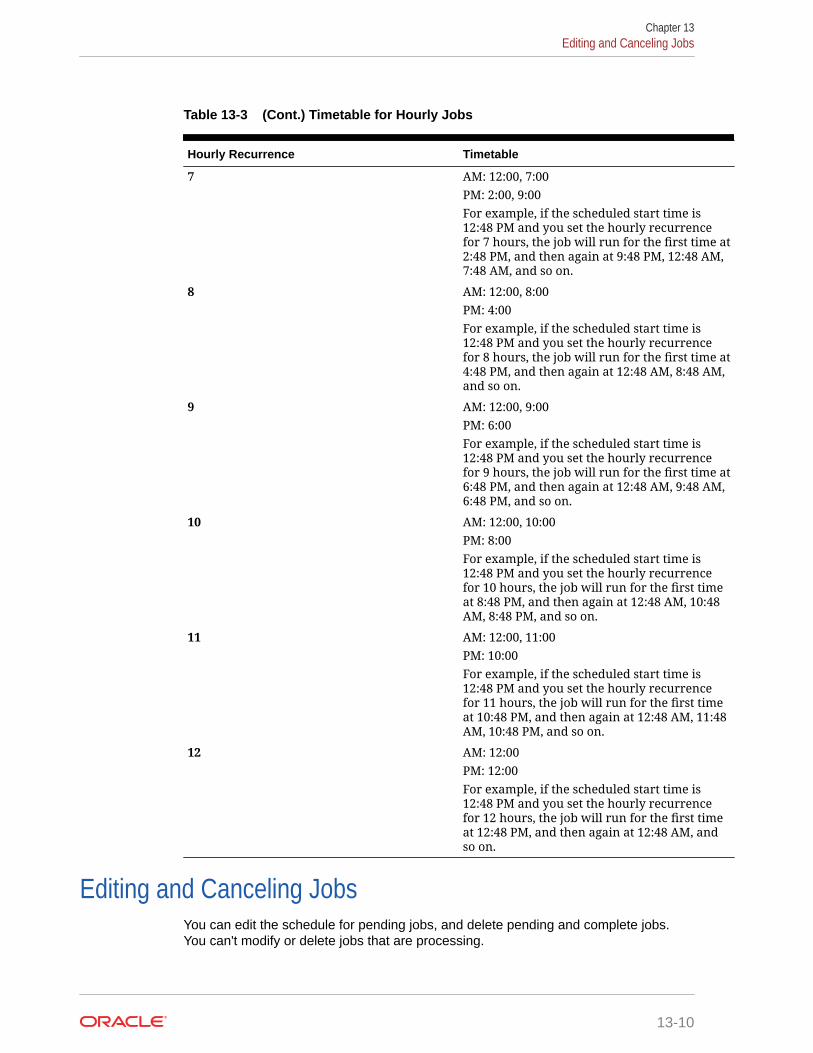
Table 13-3 (Cont.) Timetable for Hourly Jobs
Hourly Recurrence Timetable
7 AM: 12:00, 7:00PM: 2:00, 9:00For example, if the scheduled start time is12:48 PM and you set the hourly recurrencefor 7 hours, the job will run for the first time at2:48 PM, and then again at 9:48 PM, 12:48 AM,7:48 AM, and so on.
8 AM: 12:00, 8:00PM: 4:00For example, if the scheduled start time is12:48 PM and you set the hourly recurrencefor 8 hours, the job will run for the first time at4:48 PM, and then again at 12:48 AM, 8:48 AM,and so on.
9 AM: 12:00, 9:00PM: 6:00For example, if the scheduled start time is12:48 PM and you set the hourly recurrencefor 9 hours, the job will run for the first time at6:48 PM, and then again at 12:48 AM, 9:48 AM,6:48 PM, and so on.
10 AM: 12:00, 10:00PM: 8:00For example, if the scheduled start time is12:48 PM and you set the hourly recurrencefor 10 hours, the job will run for the first timeat 8:48 PM, and then again at 12:48 AM, 10:48AM, 8:48 PM, and so on.
11 AM: 12:00, 11:00PM: 10:00For example, if the scheduled start time is12:48 PM and you set the hourly recurrencefor 11 hours, the job will run for the first timeat 10:48 PM, and then again at 12:48 AM, 11:48AM, 10:48 PM, and so on.
12 AM: 12:00PM: 12:00For example, if the scheduled start time is12:48 PM and you set the hourly recurrencefor 12 hours, the job will run for the first timeat 12:48 PM, and then again at 12:48 AM, andso on.
Editing and Canceling JobsYou can edit the schedule for pending jobs, and delete pending and complete jobs.You can't modify or delete jobs that are processing.
Chapter 13Editing and Canceling Jobs
13-10
To edit or delete jobs:
1. Click Application, and then click Jobs.
2. To change when a job runs, click , then Edit and modify the schedule.
Note:
When changing the frequency of a job, the job will not run at the new frequencyuntil the next time it runs at the previous frequency; for example, if the job is setup to recur daily and you change the frequency to hourly, the job won't startrunning at the new hourly frequency until after the scheduled daily job runs thenext day. If you want the job to begin running at the new frequency sooner,Oracle recommends that you delete the scheduled job and create a new one.
3. To delete jobs, select them, click , and then Delete.
Canceling Rules Jobs and Ruleset JobsYou can cancel ruleset or rule jobs that are processing and display in Recent Activity. Tocancel these jobs, click Application, then click Jobs.
To cancel a rules job, click beside the job, then , and then Cancel.
To cancel a ruleset, click , then on Job Details, and then Cancel.
Downloading Export Files From Your OutboxAfter running a metadata or data export job, you can download the export file from theOutbox.
To download files:
1. Click Application, and then click Jobs.
2. Under Recent Activity, click the job.
3. At the top of Job Details, click the export file option to select a download location.
Chapter 13Canceling Rules Jobs and Ruleset Jobs
13-11
14Auditing Tasks and Data
Related Topics
• Auditing Overview
• Enabling Audit Tracking
• Viewing Audit Details
Auditing OverviewUse the Audit feature to view data tasks performed by users. You can filter audited tasks byaudit type (example, Data, Approvals, or Clear Cell Details), date range (for example,Yesterday or Last 60 Days), and user name.
You must be a Service Administrator to enable audit tracking, and to view and export auditinformation.
These are the types of user activities the system can log in the task audit:
Table 14-1 Tasks That Can be Audited
Audit Types Tracked Changes
Dimension Administration • Dimension hierarchy: Adding a member ordimension; moving, deleting, and changingproperties; renaming a member anddimension
• Performance settings: Resetting adimension's dense or sparse setting,changing the order of dimensions
• Currencies: Adding or deleting currencies,setting a triangulation or reporting currency
Alias Table Administration Changes to alias tables: Creating, copying,renaming, deleting, and clearing
Data • Cell values• Supporting detail• Account annotations• Cell-level documents
Launch Business Rules Updates from calculation scripts and businessrules (including runtime prompts)
Form Definition Forms: Creating, moving, deleting forms (Theaudit record doesn't record how the designchanged.)
Form Folder Administration Folders: Created, moved, and deleted
Approvals Approvals: Approval unit owners and status
14-1
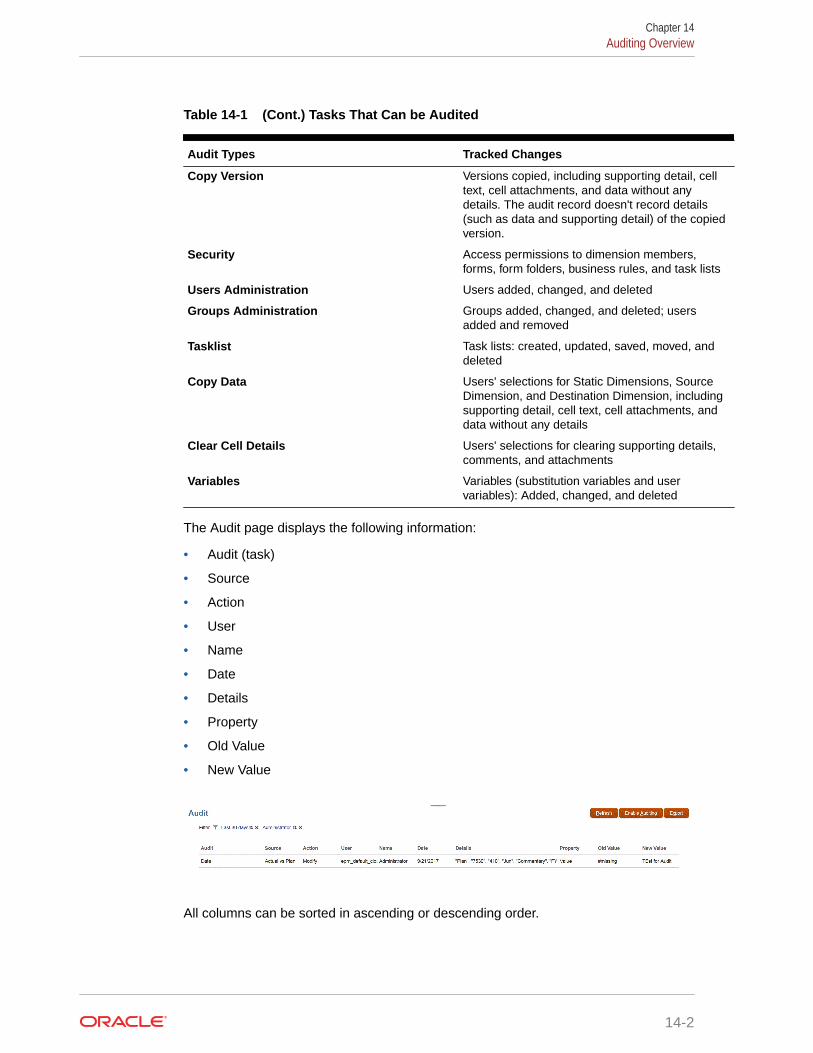
Table 14-1 (Cont.) Tasks That Can be Audited
Audit Types Tracked Changes
Copy Version Versions copied, including supporting detail, celltext, cell attachments, and data without anydetails. The audit record doesn't record details(such as data and supporting detail) of the copiedversion.
Security Access permissions to dimension members,forms, form folders, business rules, and task lists
Users Administration Users added, changed, and deleted
Groups Administration Groups added, changed, and deleted; usersadded and removed
Tasklist Task lists: created, updated, saved, moved, anddeleted
Copy Data Users' selections for Static Dimensions, SourceDimension, and Destination Dimension, includingsupporting detail, cell text, cell attachments, anddata without any details
Clear Cell Details Users' selections for clearing supporting details,comments, and attachments
Variables Variables (substitution variables and uservariables): Added, changed, and deleted
The Audit page displays the following information:
• Audit (task)
• Source
• Action
• User
• Name
• Date
• Details
• Property
• Old Value
• New Value
All columns can be sorted in ascending or descending order.
Chapter 14Auditing Overview
14-2

Enabling Audit TrackingAudit tracking isn't enabled by default. Service Administrators must enable auditing so datachanges can be tracked.
To enable auditing:
1. On the Home page, click Tools, and then click Audit.
2. From the Audit page, click Enable Auditing.
3. From the Enable Auditing page, select an audit task or tasks, and then click Save andClose.
Viewing Audit DetailsYou can view and export up to 180 days of audit details in the business process interface.
To view audit details:
1. On the Home page, click Tools, and then click Audit.
If auditing is enabled, by default the Audit page displays the audit records for Data tasksfor the Last 7 Days. To enable auditing, see Enabling Audit Tracking.
2. To filter, click , and select filter criteria:
• Audit Types—Select one or more, or All. For a list of audit types and descriptions,see Auditing Overview.
• Date Range—Select Today, Yesterday, Last 7 Days, Last 30 Days, Last 60 Days,or Last 180 Days.
Note:
– You can't select a date range prior to 180 days from today. The daterange you select must occur between today and 180 days prior to today(including today).
– The business process retains up to 365 days of audit details from thecurrent system date. To export more than 180 days of audit details, youcan use the EPM Automate exportAppAudit command or the RESTAPI Export Audit job. See Working with EPM Automate for OracleEnterprise Performance Management Cloud or REST API for OracleEnterprise Performance Management Cloud .
• User Name—Enter a user name or click to search for the user.
3. When you're done selecting filter criteria, click Apply.
The grid displays the first 200 records from the audit table that match the filter criteria.You can view a legend at the bottom of the table if the filter criteria has more than 200records in it.
Chapter 14Enabling Audit Tracking
14-3
4. To export the audit information to a Microsoft Excel spreadsheet, click Export, andfollow the download instructions.
When you select the Export option, the system exports all of the records matchingthe filter criteria to an xlsx file (format for Microsoft Excel versions 2007 and later).
Note:
If data auditing is enabled, users can see what data has changed byselecting Actions, and then Change History.
Chapter 14Viewing Audit Details
14-4
15Managing Data Validation
Related Topics
• Creating and Updating Data Validation Rules
• Formatting Cells and Setting the Promotional Path
• Viewing Data Validation Rules
• Order of Evaluation and Execution for Data Validation Rules
• Conditions Supported by the Rule Builder
• Data Validation Conditional Operators
• Data Validation Rule Scenarios
Creating and Updating Data Validation RulesTo implement business policies and practices, you can build data validation rules that arechecked when conditions are met in forms. Validation messages can be generated if entereddata violates validation rules. You can also build limits on submitted approval unit data usingvalidation rules, and designate a reviewer, owner, or notifier to review data that meets somecondition.
For example, data validation can ensure that a department’s capital expenses adhere tocompany policies by preventing users from submitting budgets that contain capitalexpenditures that fall outside the company’s guidelines. Sample scenarios that can beaddressed using data validation rules are described in Data Validation Rule Scenarios.
Defining data validation rules involves these main tasks:
• Identifying the data cells or location that you want to display with validation messages orin different colors when conditions are met.
• Identifying the cells that need to participate during rule evaluation, and defining the ruleaccordingly.
• Creating the data validation rule at the location identified, as described in this topic.
To create and update validation rules:
1. On the Home page, click Navigator , and then under Create and Manage, clickForms.
2. Create or edit a form, and then on the Form and Ad Hoc Grid Management page, clickLayout.
3. In Layout, right-click the grid, row heading, column heading, or cell for which you want toadd or update the validation rule.
15-1
Note:
When you hover the cursor over cells in Layout, a context menudisplays whether the cell contains a validation rule. To view the validationmessage, select Show Data Validation Messages. The context menualso displays when a single cell is selected.
4. Select Add/Edit Validation Rules to create or update rules.
5. To add a rule, click and enter a name and description for the rule.
If necessary, move the rule by selecting an option from Location. To create a rule
similar to an existing rule, click and then update the rule. To view rules, clickView Rule. See Viewing Data Validation Rules.
6. Update the rule.
a. For Condition, select an option to begin the condition statement: If, Else If,Else, Then, Check Range, or Range.
The first part of a rule must include an If condition. Rules must also containsome form of Then condition. See Conditions Supported by the Rule Builder.
b. For Source Type, select an option for evaluation by the rule.
The Source Type list displays the appropriate options for the Condition. Forexample, If conditions can include Current Cell Value, Cell Value, ColumnValue, Row Value, Member Name, Member, Cross-Dim Member, AccountType, Version Type, Var Reporting Type, UDA, or Attribute. For detailedinformation about each type of condition, see Conditions Supported by theRule Builder.
c. If applicable for the selected Source Type, enter a value in Source Value byselecting an option or entering a free form value.
d. Select an operator for the evaluation: =, !=, <, <=, >, >=, Equals, Not Equals,Contains, Starts With, or Ends With, In, or Not In.
For examples, see Data Validation Conditional Operators.
e. Select an option for the appropriate Target Type for the rule.
f. Update conditions by clicking an icon in the Actions column to the right of thecondition builder:
• —Add a condition next to the current row.
• —Delete a condition at the current row.
g. Select conditions or condition blocks to update.
To update condition blocks, click an icon in the Condition area, at the top ofthe condition builder:
• —Add a condition block within the validation rule starting with If. Youcan expand or collapse the condition. See Conditions Supported by theRule Builder.
• —Delete the selected condition block.
Chapter 15Creating and Updating Data Validation Rules
15-2
• —Delete selected conditions, and copy them to paste in a new location.
• —Copy selected conditions.
• —Paste selected conditions to a new location.
• —Group the selection within a condition, and add a grouping parenthesis. Inaddition to groupings that you set, the If statement in the grouping block isgrouped when a condition is grouped, and the Custom Grouping option isenabled.
• —Ungroup the selected conditions. The grouping parentheses are removedfrom the selected condition. One grouping is removed from the condition eachtime Ungroup is selected.
You can also set your own grouping for conditions by selecting CustomGrouping, then setting up the grouping in the rule definition area.
Selected conditions are displayed as shaded. To clear selected conditions, clickonce more to the left of the Condition column.
7. Click in the rightmost column to add processing instructions.
Note:
If the icon isn't displayed, ensure that the rule is valid and that it permits cellprocessing instructions. For example, cell processing instructions are includedfor Else, Range, and Then conditions. The icon isn't displayed until all requiredcolumns are selected for a rule.
See Formatting Cells and Setting the Promotional Path.
8. When you're ready to enable the rule to make it available in the form, select EnableValidation Rule.
Tip:
While you're building a rule, you can save the rule without enabling it. After anyerrors are resolved and the rule is ready to be validated and used, you canenable and save the rule to make it available in the form. You can temporarilydisable a rule by clearing Enable Validation Rule.
9. When you finish updating the rule, validate the rule:
a. Click Validate.
The validation status displays at the top of the dialog box. You must correct errorsbefore you save changes. If you close the dialog box without validating rules andfixing errors noted during validation, updates are not saved.
b. After fixing any errors noted during validation, ensure that Enable Validation Rule isselected above the rule definition area to enable the rule for the application.
Chapter 15Creating and Updating Data Validation Rules
15-3

c. After the rule is validated, click OK.
10. Optional: In the Form and Ad Hoc Grid Management page, view and updaterules:
• In the Validation Rules pane on the right side of the Form and Ad Hoc Grid
Management page, add, edit, or delete rules by clicking , , or .
• If multiple rules are defined at the same location, you can change the order inwhich rules are processed when rules have the same precedence. To move arule up, down, or to the top or bottom of the list, select the rule and click thearrows. See Order of Evaluation and Execution for Data Validation Rules.
• Select form validation rules options:
Table 15-1 Form Validation Rules Options
Option Description
Validate only for users with access tothis form
If the currently logged-in user does nothave access to the form, do not executevalidations associated with the form whenvalidating the Approval unit.
Validate only for pages with existingblocks
When enabled, the system figures outwhich page combinations have potentialblocks and runs the validations only forthose page combinations. There are a fewexceptions to this. If a page combinationhas any Dynamic Calc, Dynamic Calc andStore, Label only, or Store with one childmember, then that page is always loaded.
Validate only for cells and pages theuser has access to
When enabled, validations are run as thecurrently logged-in user and not as theService Administrator, which means theuser’s security will be applied to the formmembers.
11. In the Form and Ad Hoc Grid Management page, preview and validate the form,resolve any validation errors, and then save changes.
For forms that have data validation rules enabled, rules are validated when theform is loaded or saved. Data validation rules are saved when the form is saved.See Creating Forms.
When users open the form, they can view and resolve validation messages usingthe Data Validation Messages pane. See Working with Planning .
Formatting Cells and Setting the Promotional PathAfter a rule is set up, use the Process Cell dialog box to set how cells display in forms,and update the promotional path based on data validations.
To format cells and set the promotional path:
1. In the Data Validation Rule Builder dialog box, click in the right-most column.
Chapter 15Formatting Cells and Setting the Promotional Path
15-4
Note:
If the icon isn't displayed, ensure that the rule is valid and that it permits cellprocessing instructions. For example, cell processing instructions are includedfor Else, Range, and Then conditions. The icon isn't displayed until all requiredcolumns are selected for a rule. See Creating and Updating Data ValidationRules.
2. In the Process Cell dialog box, set how the cell should appear in forms if the conditionsdefined by this rule are fulfilled.
When the rule is enabled, it doesn't validate unless you specify at least one of theseoptions: a cell background color, a validation message, or a promotional path option.
• To add or update the cell background color, click . To remove the cell background
color, click .
• To display a validation message for the cell, enter the message in the ValidationMessage field. Users see this text when they select Show Data ValidationMessages in the context menu that appears when you hover over the cell in theform. It also appears as a link in the Data Validation Messages pane if data cells areflagged by the validation rules and the Display message in the Data ValidationMessages pane check box is selected. For information on viewing and resolvingdata validation errors, see Working with Planning .
3. Click OK.
Updates for the rule are displayed in the Process column for the rule. If you specified acell color, that color is displayed. You can preview a validation message by hovering thecursor over the Process column.
Viewing Data Validation RulesAfter data validation rules are set up with processing instructions, you can use the View Ruledialog box to view all rules that apply to the selected grid, row, column, or cell.
To view data validation rules:
1. In the Data Validation Rule Builder dialog box, click View Rule to view all the rules atthis level (grid, row, column, cell) for this location in the form.
2. Select the rule name, and then double-click the rule or click OK to view details.
Order of Evaluation and Execution for Data Validation RulesFor data validation rules in forms, the precedence for rule evaluation depends on conditionpriority, location of the rule, and position of the rule in the rule list (if multiple rules exist in thesame location). First, cell-level rules are processed. Next, rules at the column level areprocessed, and then row-level rules are processed. Finally, rules at the grid level areprocessed. The rules are evaluated based on their position in the rule list within each level.
Location and position determine the order in which the rule will be processed. However, thepriority of the processing instructions determines which rule is applied to the data cell. So, if acell-level rule contains processing instructions with priority 4 and a grid-level rule containsprocessing instructions with priority 5, the grid-level rule is applied to the data cell. If all rules
Chapter 15Viewing Data Validation Rules
15-5
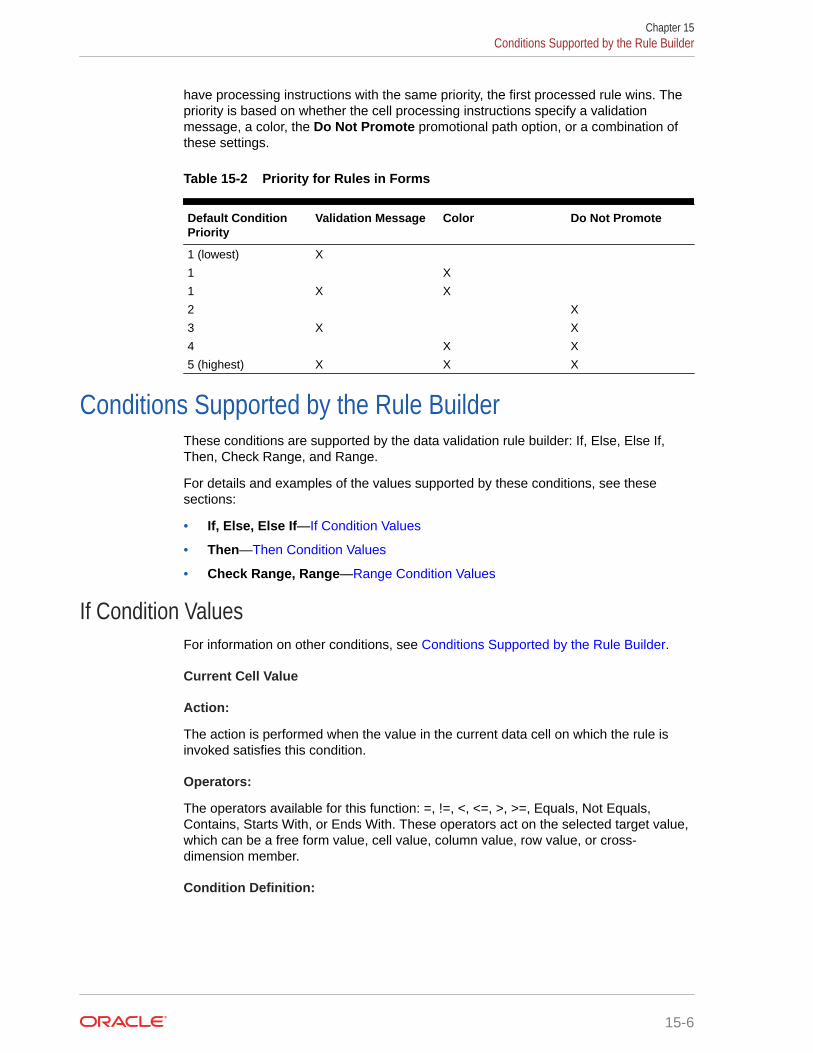
have processing instructions with the same priority, the first processed rule wins. Thepriority is based on whether the cell processing instructions specify a validationmessage, a color, the Do Not Promote promotional path option, or a combination ofthese settings.
Table 15-2 Priority for Rules in Forms
Default ConditionPriority
Validation Message Color Do Not Promote
1 (lowest) X
1 X
1 X X
2 X
3 X X
4 X X
5 (highest) X X X
Conditions Supported by the Rule BuilderThese conditions are supported by the data validation rule builder: If, Else, Else If,Then, Check Range, and Range.
For details and examples of the values supported by these conditions, see thesesections:
• If, Else, Else If—If Condition Values
• Then—Then Condition Values
• Check Range, Range—Range Condition Values
If Condition ValuesFor information on other conditions, see Conditions Supported by the Rule Builder.
Current Cell Value
Action:
The action is performed when the value in the current data cell on which the rule isinvoked satisfies this condition.
Operators:
The operators available for this function: =, !=, <, <=, >, >=, Equals, Not Equals,Contains, Starts With, or Ends With. These operators act on the selected target value,which can be a free form value, cell value, column value, row value, or cross-dimension member.
Condition Definition:
Chapter 15Conditions Supported by the Rule Builder
15-6
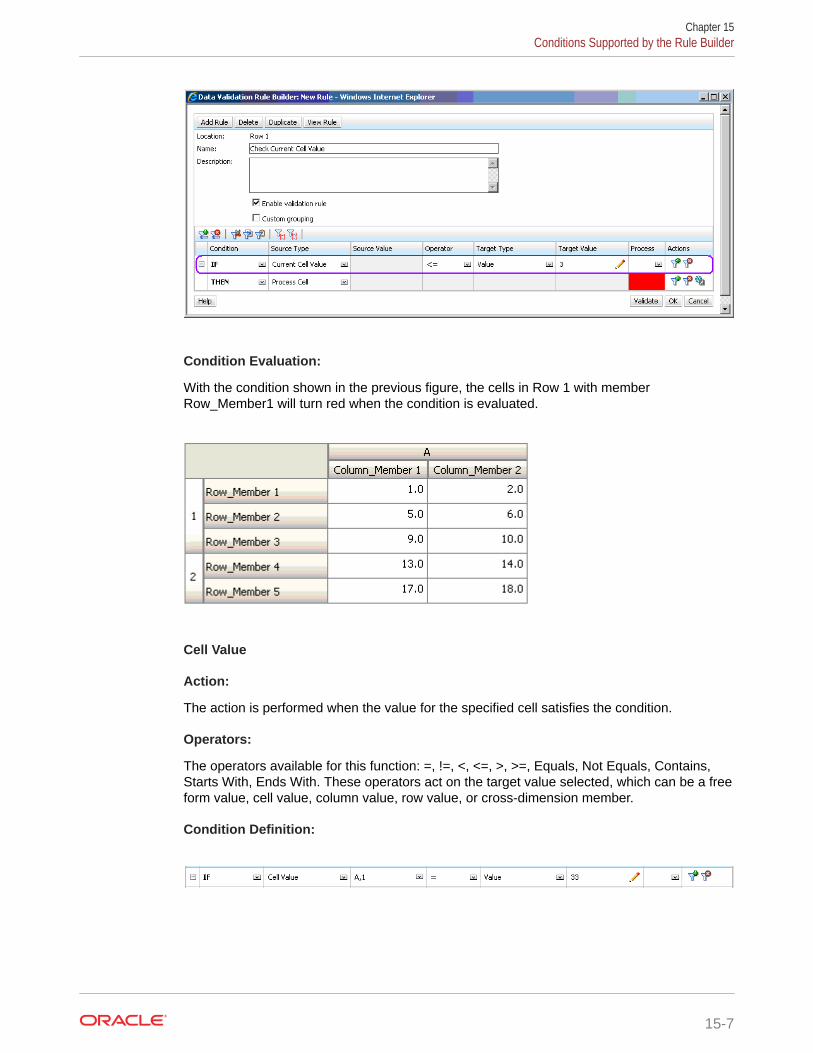
Condition Evaluation:
With the condition shown in the previous figure, the cells in Row 1 with memberRow_Member1 will turn red when the condition is evaluated.
Cell Value
Action:
The action is performed when the value for the specified cell satisfies the condition.
Operators:
The operators available for this function: =, !=, <, <=, >, >=, Equals, Not Equals, Contains,Starts With, Ends With. These operators act on the target value selected, which can be a freeform value, cell value, column value, row value, or cross-dimension member.
Condition Definition:
Chapter 15Conditions Supported by the Rule Builder
15-7
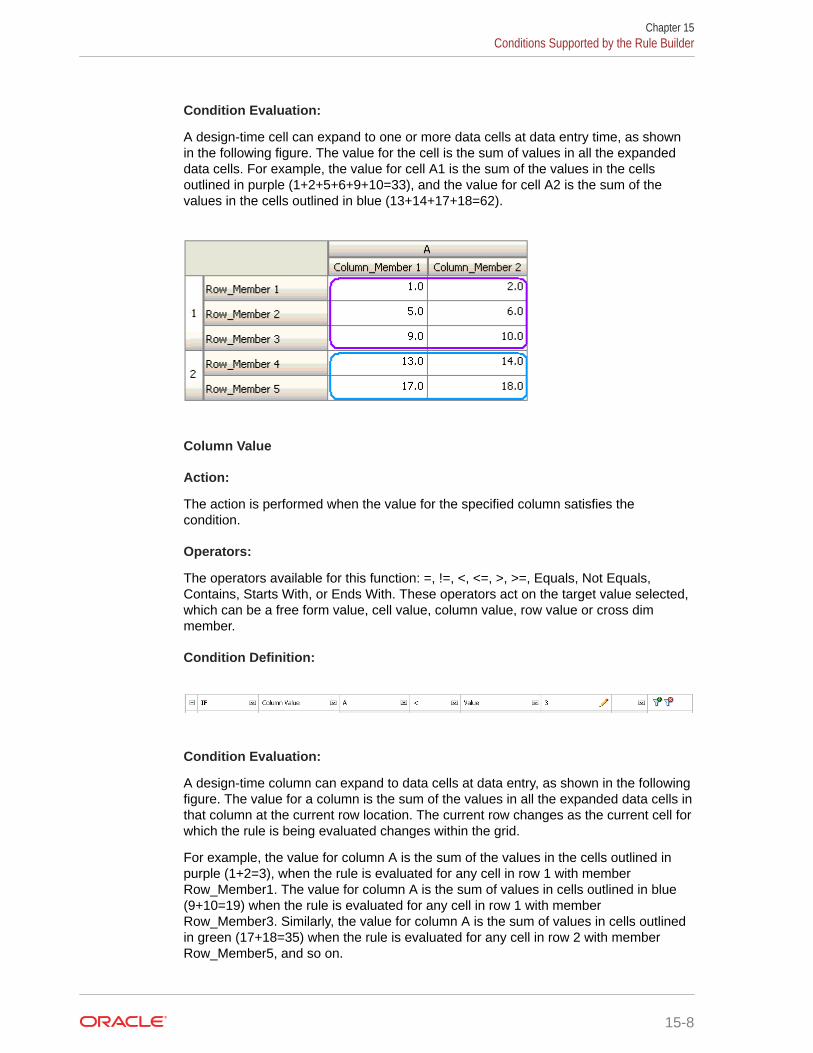
Condition Evaluation:
A design-time cell can expand to one or more data cells at data entry time, as shownin the following figure. The value for the cell is the sum of values in all the expandeddata cells. For example, the value for cell A1 is the sum of the values in the cellsoutlined in purple (1+2+5+6+9+10=33), and the value for cell A2 is the sum of thevalues in the cells outlined in blue (13+14+17+18=62).
Column Value
Action:
The action is performed when the value for the specified column satisfies thecondition.
Operators:
The operators available for this function: =, !=, <, <=, >, >=, Equals, Not Equals,Contains, Starts With, or Ends With. These operators act on the target value selected,which can be a free form value, cell value, column value, row value or cross dimmember.
Condition Definition:
Condition Evaluation:
A design-time column can expand to data cells at data entry, as shown in the followingfigure. The value for a column is the sum of the values in all the expanded data cells inthat column at the current row location. The current row changes as the current cell forwhich the rule is being evaluated changes within the grid.
For example, the value for column A is the sum of the values in the cells outlined inpurple (1+2=3), when the rule is evaluated for any cell in row 1 with memberRow_Member1. The value for column A is the sum of values in cells outlined in blue(9+10=19) when the rule is evaluated for any cell in row 1 with memberRow_Member3. Similarly, the value for column A is the sum of values in cells outlinedin green (17+18=35) when the rule is evaluated for any cell in row 2 with memberRow_Member5, and so on.
Chapter 15Conditions Supported by the Rule Builder
15-8
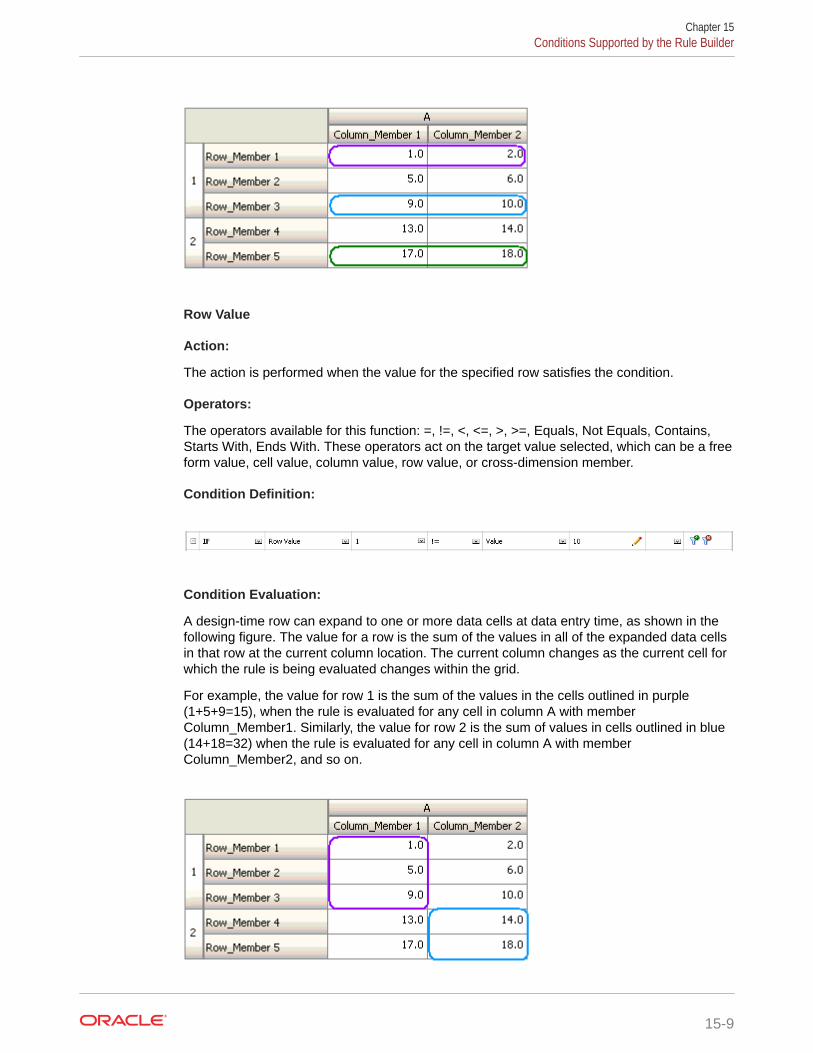
Row Value
Action:
The action is performed when the value for the specified row satisfies the condition.
Operators:
The operators available for this function: =, !=, <, <=, >, >=, Equals, Not Equals, Contains,Starts With, Ends With. These operators act on the target value selected, which can be a freeform value, cell value, column value, row value, or cross-dimension member.
Condition Definition:
Condition Evaluation:
A design-time row can expand to one or more data cells at data entry time, as shown in thefollowing figure. The value for a row is the sum of the values in all of the expanded data cellsin that row at the current column location. The current column changes as the current cell forwhich the rule is being evaluated changes within the grid.
For example, the value for row 1 is the sum of the values in the cells outlined in purple(1+5+9=15), when the rule is evaluated for any cell in column A with memberColumn_Member1. Similarly, the value for row 2 is the sum of values in cells outlined in blue(14+18=32) when the rule is evaluated for any cell in column A with memberColumn_Member2, and so on.
Chapter 15Conditions Supported by the Rule Builder
15-9
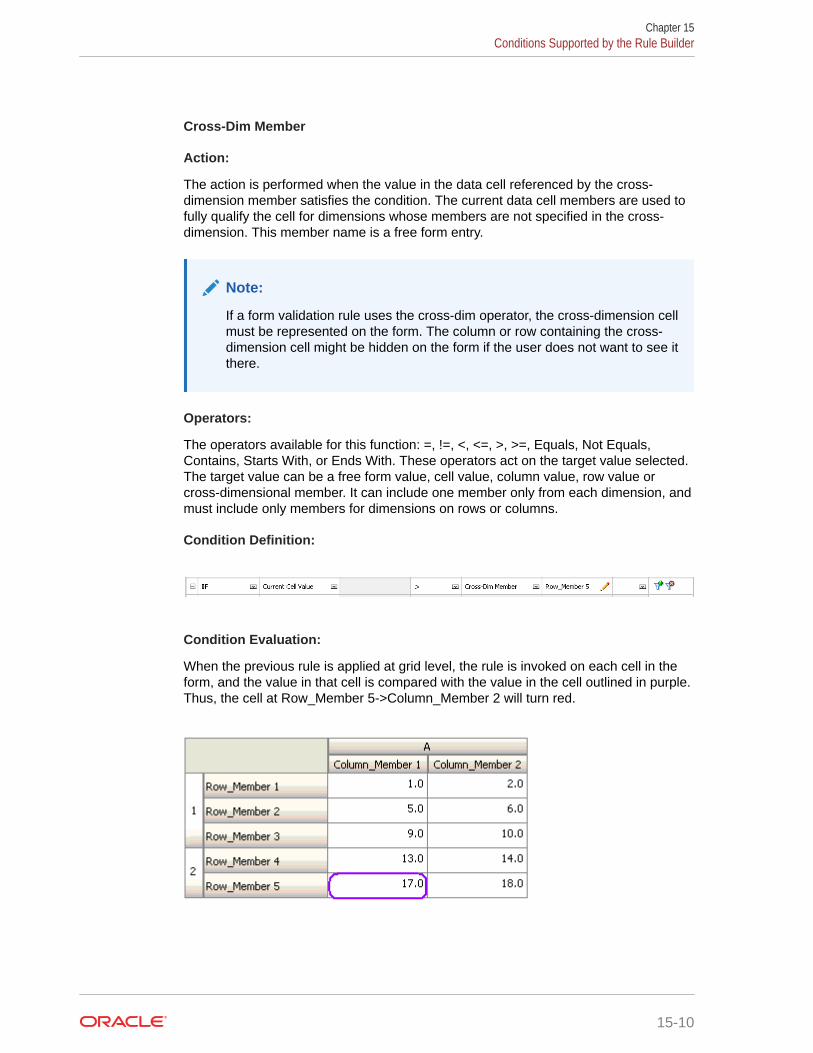
Cross-Dim Member
Action:
The action is performed when the value in the data cell referenced by the cross-dimension member satisfies the condition. The current data cell members are used tofully qualify the cell for dimensions whose members are not specified in the cross-dimension. This member name is a free form entry.
Note:
If a form validation rule uses the cross-dim operator, the cross-dimension cellmust be represented on the form. The column or row containing the cross-dimension cell might be hidden on the form if the user does not want to see itthere.
Operators:
The operators available for this function: =, !=, <, <=, >, >=, Equals, Not Equals,Contains, Starts With, or Ends With. These operators act on the target value selected.The target value can be a free form value, cell value, column value, row value orcross-dimensional member. It can include one member only from each dimension, andmust include only members for dimensions on rows or columns.
Condition Definition:
Condition Evaluation:
When the previous rule is applied at grid level, the rule is invoked on each cell in theform, and the value in that cell is compared with the value in the cell outlined in purple.Thus, the cell at Row_Member 5->Column_Member 2 will turn red.
Chapter 15Conditions Supported by the Rule Builder
15-10
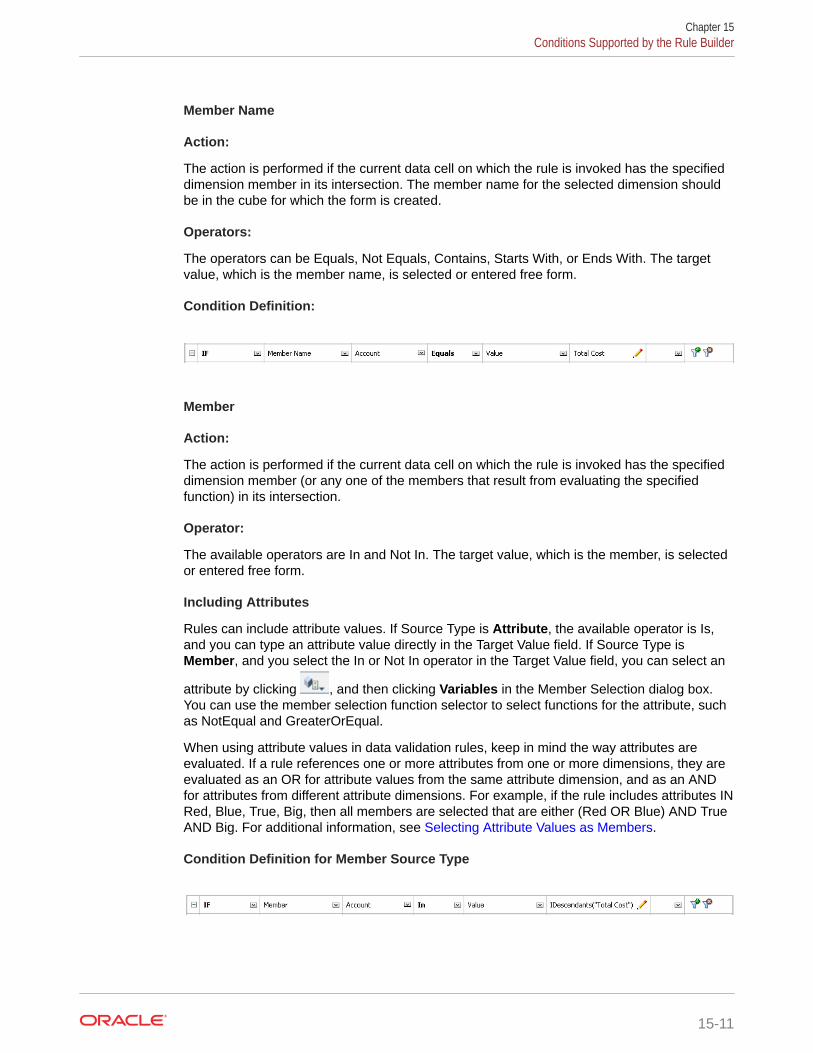
Member Name
Action:
The action is performed if the current data cell on which the rule is invoked has the specifieddimension member in its intersection. The member name for the selected dimension shouldbe in the cube for which the form is created.
Operators:
The operators can be Equals, Not Equals, Contains, Starts With, or Ends With. The targetvalue, which is the member name, is selected or entered free form.
Condition Definition:
Member
Action:
The action is performed if the current data cell on which the rule is invoked has the specifieddimension member (or any one of the members that result from evaluating the specifiedfunction) in its intersection.
Operator:
The available operators are In and Not In. The target value, which is the member, is selectedor entered free form.
Including Attributes
Rules can include attribute values. If Source Type is Attribute, the available operator is Is,and you can type an attribute value directly in the Target Value field. If Source Type isMember, and you select the In or Not In operator in the Target Value field, you can select an
attribute by clicking , and then clicking Variables in the Member Selection dialog box.You can use the member selection function selector to select functions for the attribute, suchas NotEqual and GreaterOrEqual.
When using attribute values in data validation rules, keep in mind the way attributes areevaluated. If a rule references one or more attributes from one or more dimensions, they areevaluated as an OR for attribute values from the same attribute dimension, and as an ANDfor attributes from different attribute dimensions. For example, if the rule includes attributes INRed, Blue, True, Big, then all members are selected that are either (Red OR Blue) AND TrueAND Big. For additional information, see Selecting Attribute Values as Members.
Condition Definition for Member Source Type
Chapter 15Conditions Supported by the Rule Builder
15-11
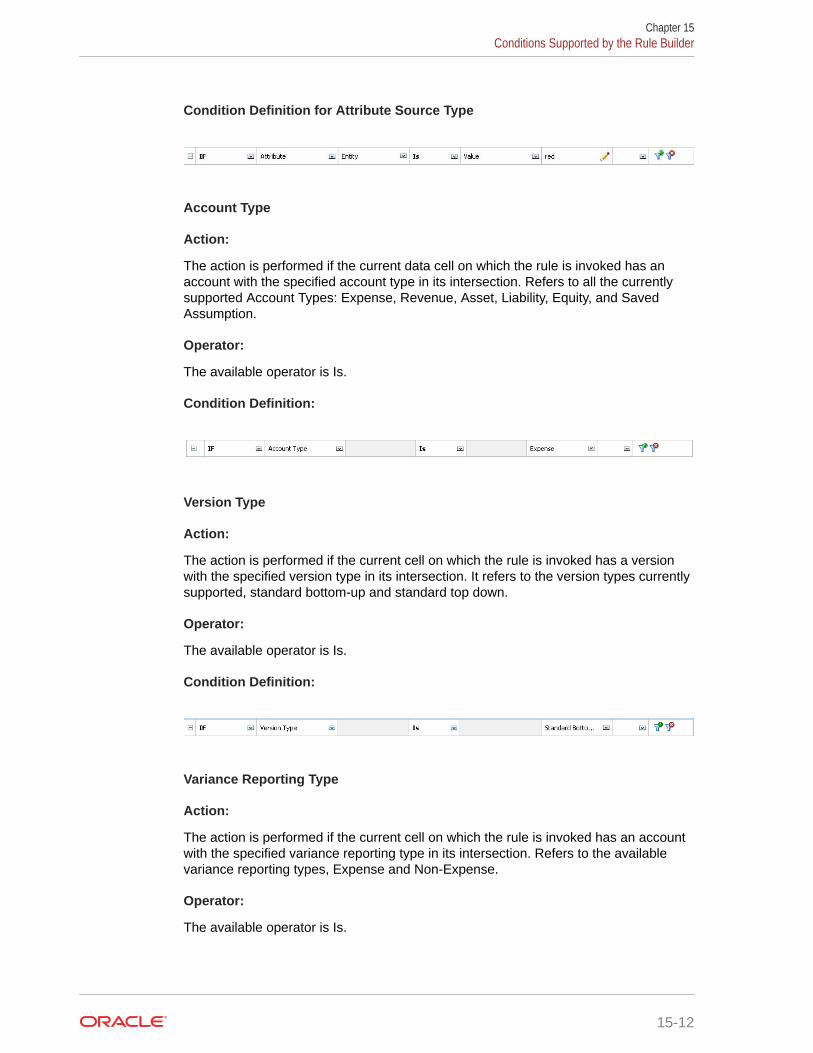
Condition Definition for Attribute Source Type
Account Type
Action:
The action is performed if the current data cell on which the rule is invoked has anaccount with the specified account type in its intersection. Refers to all the currentlysupported Account Types: Expense, Revenue, Asset, Liability, Equity, and SavedAssumption.
Operator:
The available operator is Is.
Condition Definition:
Version Type
Action:
The action is performed if the current cell on which the rule is invoked has a versionwith the specified version type in its intersection. It refers to the version types currentlysupported, standard bottom-up and standard top down.
Operator:
The available operator is Is.
Condition Definition:
Variance Reporting Type
Action:
The action is performed if the current cell on which the rule is invoked has an accountwith the specified variance reporting type in its intersection. Refers to the availablevariance reporting types, Expense and Non-Expense.
Operator:
The available operator is Is.
Chapter 15Conditions Supported by the Rule Builder
15-12
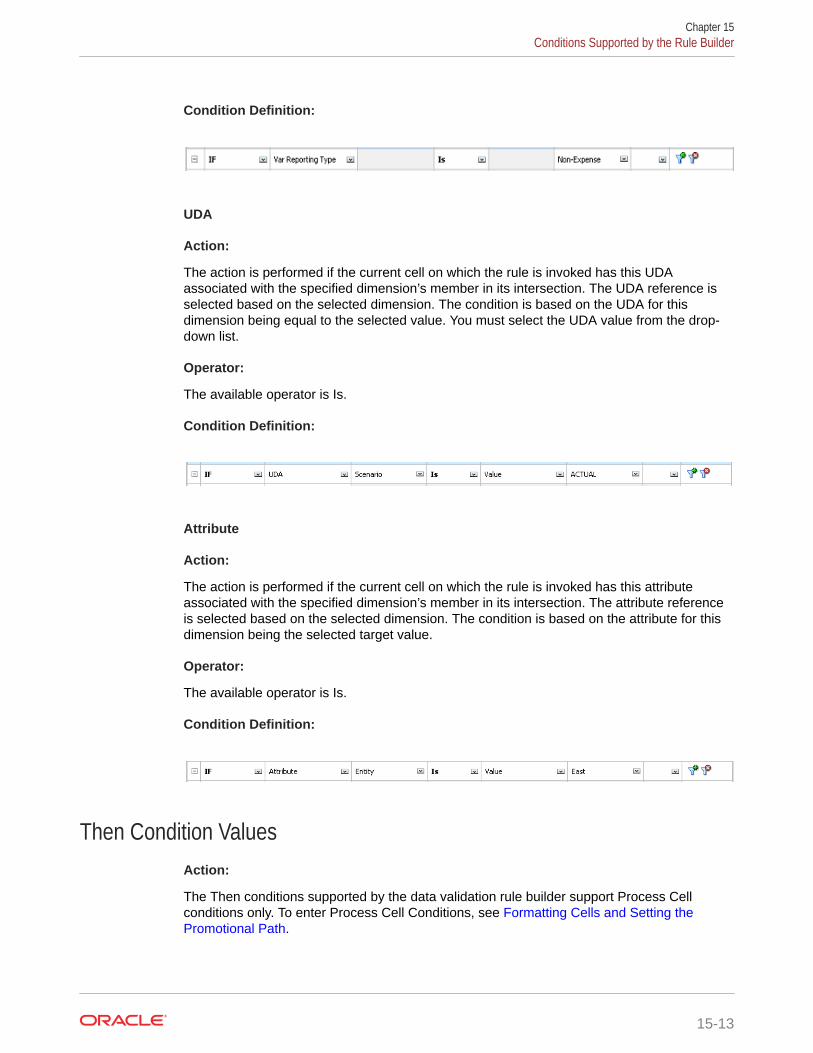
Condition Definition:
UDA
Action:
The action is performed if the current cell on which the rule is invoked has this UDAassociated with the specified dimension’s member in its intersection. The UDA reference isselected based on the selected dimension. The condition is based on the UDA for thisdimension being equal to the selected value. You must select the UDA value from the drop-down list.
Operator:
The available operator is Is.
Condition Definition:
Attribute
Action:
The action is performed if the current cell on which the rule is invoked has this attributeassociated with the specified dimension’s member in its intersection. The attribute referenceis selected based on the selected dimension. The condition is based on the attribute for thisdimension being the selected target value.
Operator:
The available operator is Is.
Condition Definition:
Then Condition ValuesAction:
The Then conditions supported by the data validation rule builder support Process Cellconditions only. To enter Process Cell Conditions, see Formatting Cells and Setting thePromotional Path.
Chapter 15Conditions Supported by the Rule Builder
15-13
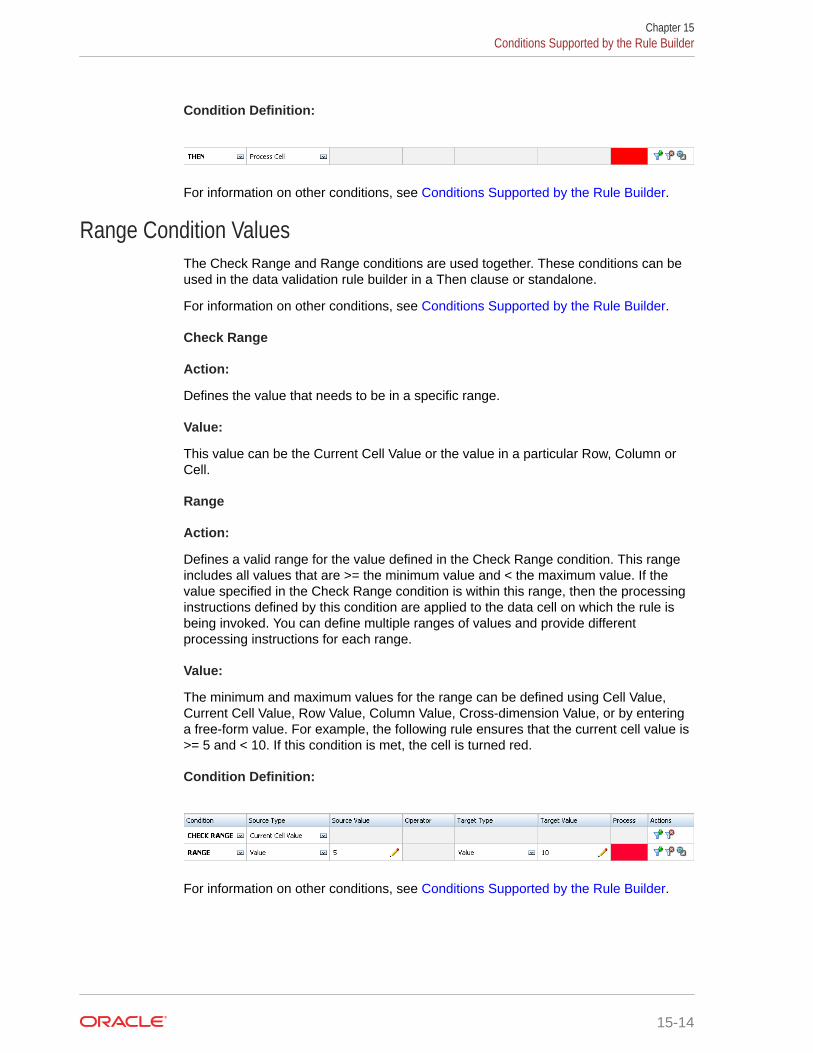
Condition Definition:
For information on other conditions, see Conditions Supported by the Rule Builder.
Range Condition ValuesThe Check Range and Range conditions are used together. These conditions can beused in the data validation rule builder in a Then clause or standalone.
For information on other conditions, see Conditions Supported by the Rule Builder.
Check Range
Action:
Defines the value that needs to be in a specific range.
Value:
This value can be the Current Cell Value or the value in a particular Row, Column orCell.
Range
Action:
Defines a valid range for the value defined in the Check Range condition. This rangeincludes all values that are >= the minimum value and < the maximum value. If thevalue specified in the Check Range condition is within this range, then the processinginstructions defined by this condition are applied to the data cell on which the rule isbeing invoked. You can define multiple ranges of values and provide differentprocessing instructions for each range.
Value:
The minimum and maximum values for the range can be defined using Cell Value,Current Cell Value, Row Value, Column Value, Cross-dimension Value, or by enteringa free-form value. For example, the following rule ensures that the current cell value is>= 5 and < 10. If this condition is met, the cell is turned red.
Condition Definition:
For information on other conditions, see Conditions Supported by the Rule Builder.
Chapter 15Conditions Supported by the Rule Builder
15-14
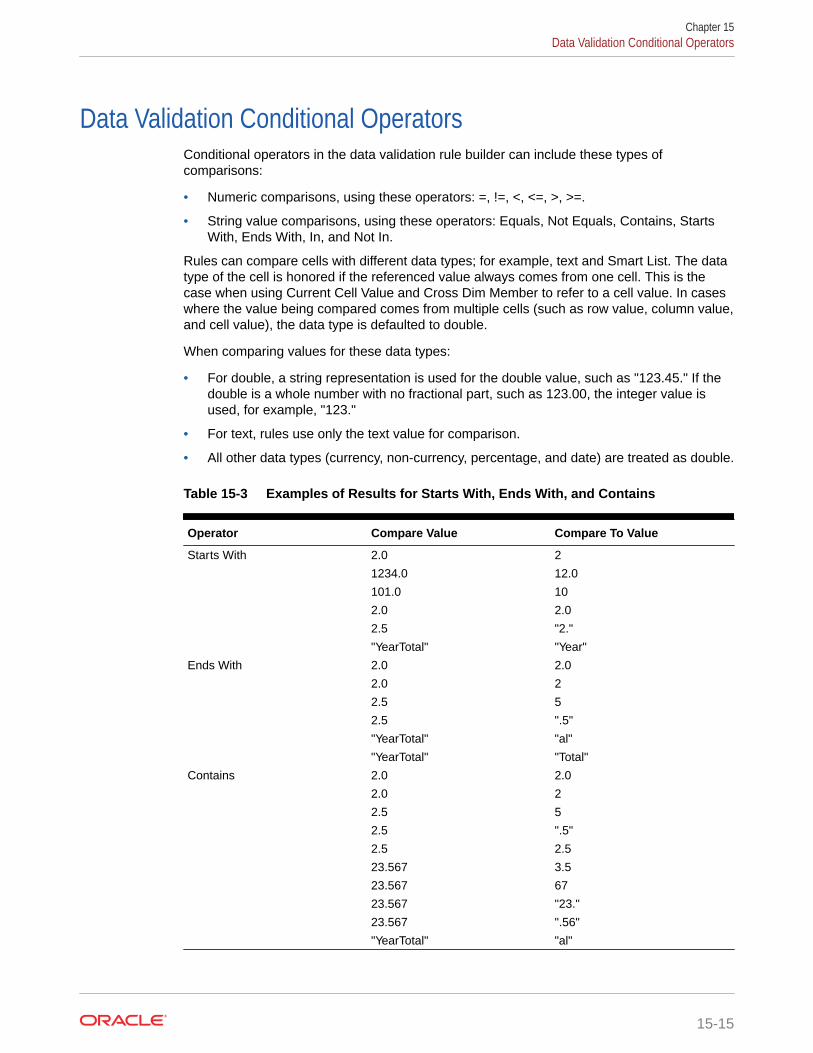
Data Validation Conditional OperatorsConditional operators in the data validation rule builder can include these types ofcomparisons:
• Numeric comparisons, using these operators: =, !=, <, <=, >, >=.
• String value comparisons, using these operators: Equals, Not Equals, Contains, StartsWith, Ends With, In, and Not In.
Rules can compare cells with different data types; for example, text and Smart List. The datatype of the cell is honored if the referenced value always comes from one cell. This is thecase when using Current Cell Value and Cross Dim Member to refer to a cell value. In caseswhere the value being compared comes from multiple cells (such as row value, column value,and cell value), the data type is defaulted to double.
When comparing values for these data types:
• For double, a string representation is used for the double value, such as "123.45." If thedouble is a whole number with no fractional part, such as 123.00, the integer value isused, for example, "123."
• For text, rules use only the text value for comparison.
• All other data types (currency, non-currency, percentage, and date) are treated as double.
Table 15-3 Examples of Results for Starts With, Ends With, and Contains
Operator Compare Value Compare To Value
Starts With 2.0 2
1234.0 12.0
101.0 10
2.0 2.0
2.5 "2."
"YearTotal" "Year"
Ends With 2.0 2.0
2.0 2
2.5 5
2.5 ".5"
"YearTotal" "al"
"YearTotal" "Total"
Contains 2.0 2.0
2.0 2
2.5 5
2.5 ".5"
2.5 2.5
23.567 3.5
23.567 67
23.567 "23."
23.567 ".56"
"YearTotal" "al"
Chapter 15Data Validation Conditional Operators
15-15
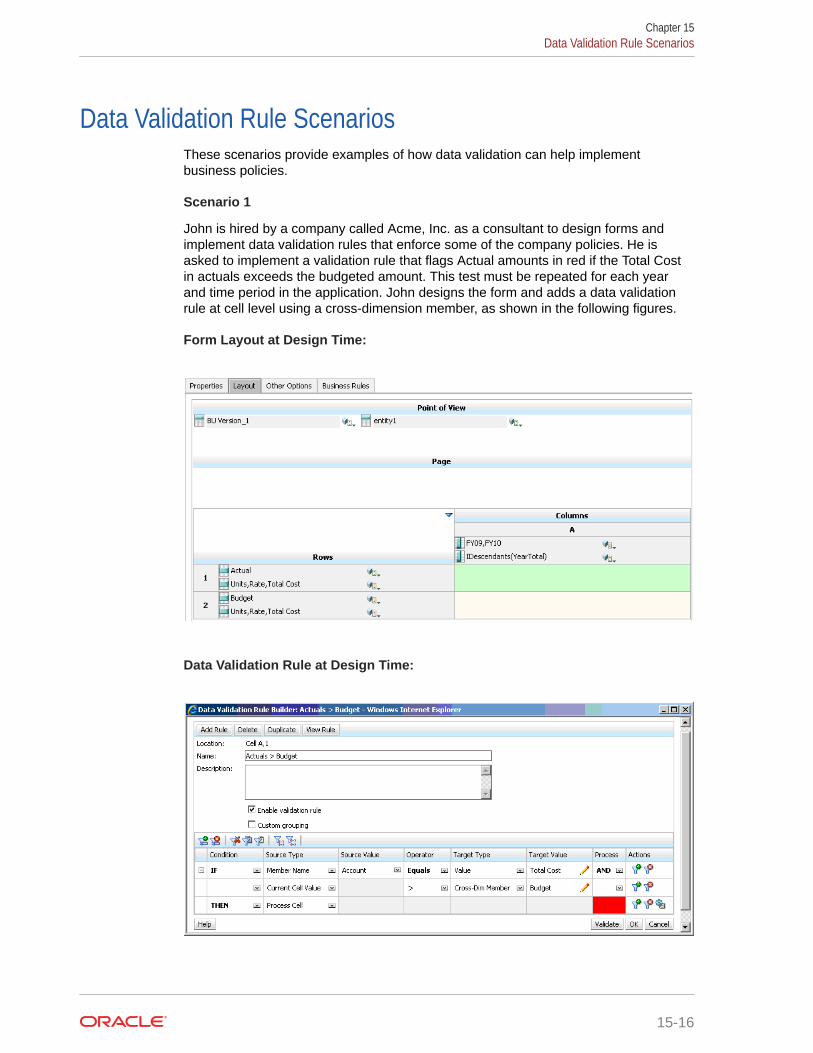
Data Validation Rule ScenariosThese scenarios provide examples of how data validation can help implementbusiness policies.
Scenario 1
John is hired by a company called Acme, Inc. as a consultant to design forms andimplement data validation rules that enforce some of the company policies. He isasked to implement a validation rule that flags Actual amounts in red if the Total Costin actuals exceeds the budgeted amount. This test must be repeated for each yearand time period in the application. John designs the form and adds a data validationrule at cell level using a cross-dimension member, as shown in the following figures.
Form Layout at Design Time:
Data Validation Rule at Design Time:
Chapter 15Data Validation Rule Scenarios
15-16
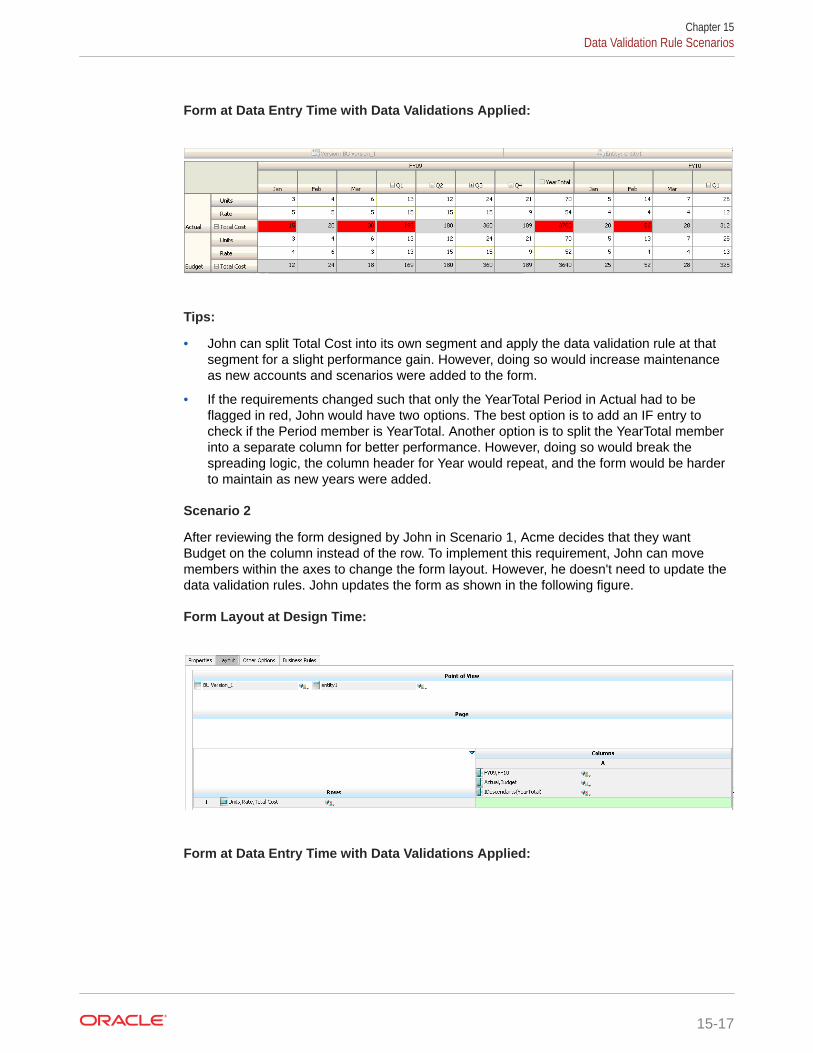
Form at Data Entry Time with Data Validations Applied:
Tips:
• John can split Total Cost into its own segment and apply the data validation rule at thatsegment for a slight performance gain. However, doing so would increase maintenanceas new accounts and scenarios were added to the form.
• If the requirements changed such that only the YearTotal Period in Actual had to beflagged in red, John would have two options. The best option is to add an IF entry tocheck if the Period member is YearTotal. Another option is to split the YearTotal memberinto a separate column for better performance. However, doing so would break thespreading logic, the column header for Year would repeat, and the form would be harderto maintain as new years were added.
Scenario 2
After reviewing the form designed by John in Scenario 1, Acme decides that they wantBudget on the column instead of the row. To implement this requirement, John can movemembers within the axes to change the form layout. However, he doesn't need to update thedata validation rules. John updates the form as shown in the following figure.
Form Layout at Design Time:
Form at Data Entry Time with Data Validations Applied:
Chapter 15Data Validation Rule Scenarios
15-17
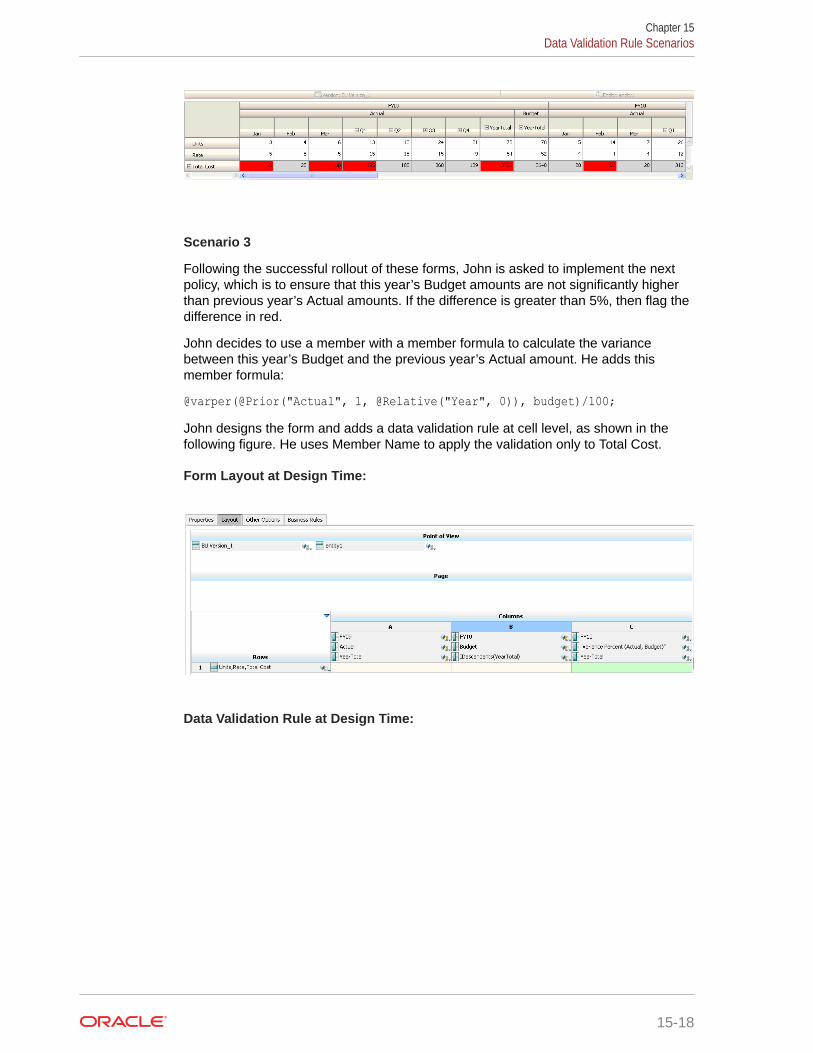
Scenario 3
Following the successful rollout of these forms, John is asked to implement the nextpolicy, which is to ensure that this year’s Budget amounts are not significantly higherthan previous year’s Actual amounts. If the difference is greater than 5%, then flag thedifference in red.
John decides to use a member with a member formula to calculate the variancebetween this year’s Budget and the previous year’s Actual amount. He adds thismember formula:
@varper(@Prior("Actual", 1, @Relative("Year", 0)), budget)/100;John designs the form and adds a data validation rule at cell level, as shown in thefollowing figure. He uses Member Name to apply the validation only to Total Cost.
Form Layout at Design Time:
Data Validation Rule at Design Time:
Chapter 15Data Validation Rule Scenarios
15-18
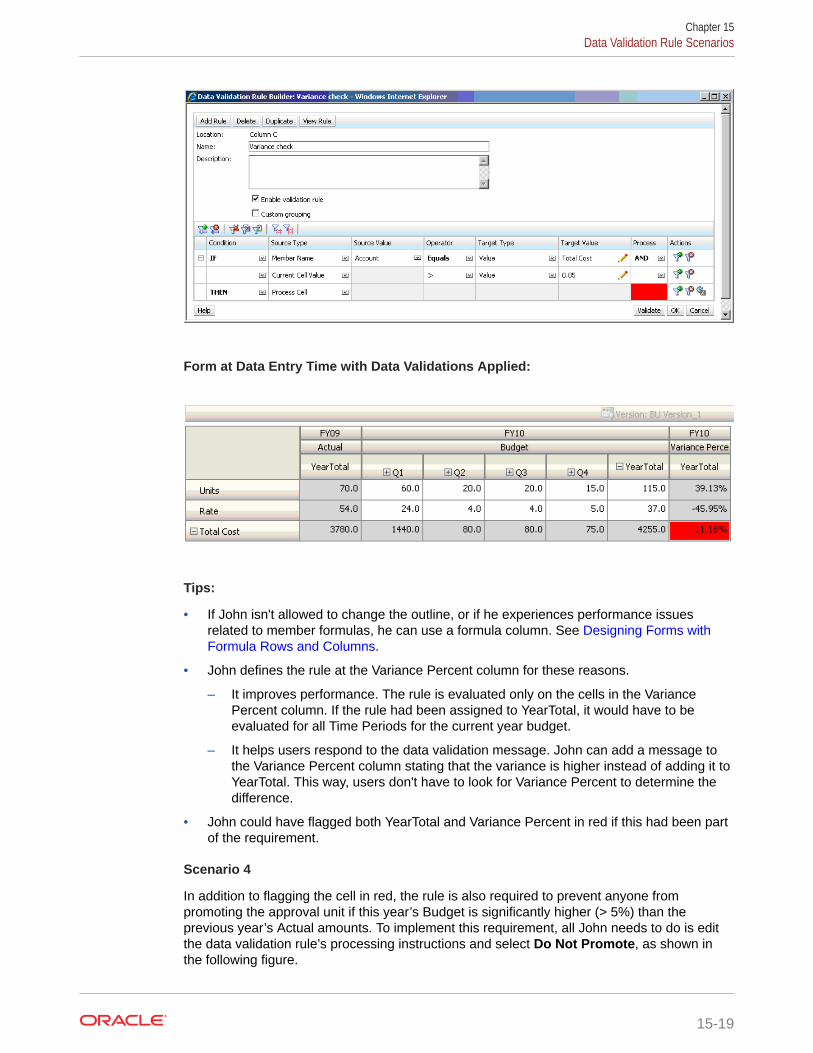
Form at Data Entry Time with Data Validations Applied:
Tips:
• If John isn't allowed to change the outline, or if he experiences performance issuesrelated to member formulas, he can use a formula column. See Designing Forms withFormula Rows and Columns.
• John defines the rule at the Variance Percent column for these reasons.
– It improves performance. The rule is evaluated only on the cells in the VariancePercent column. If the rule had been assigned to YearTotal, it would have to beevaluated for all Time Periods for the current year budget.
– It helps users respond to the data validation message. John can add a message tothe Variance Percent column stating that the variance is higher instead of adding it toYearTotal. This way, users don't have to look for Variance Percent to determine thedifference.
• John could have flagged both YearTotal and Variance Percent in red if this had been partof the requirement.
Scenario 4
In addition to flagging the cell in red, the rule is also required to prevent anyone frompromoting the approval unit if this year’s Budget is significantly higher (> 5%) than theprevious year’s Actual amounts. To implement this requirement, all John needs to do is editthe data validation rule’s processing instructions and select Do Not Promote, as shown inthe following figure.
Chapter 15Data Validation Rule Scenarios
15-19
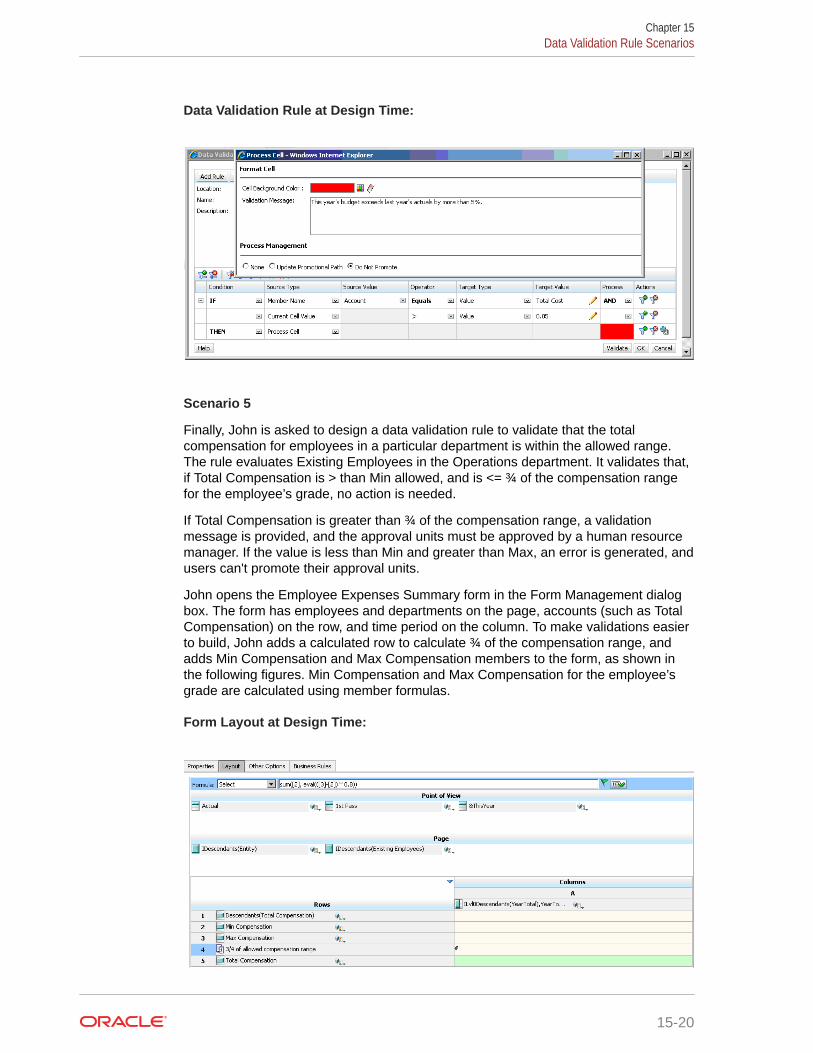
Data Validation Rule at Design Time:
Scenario 5
Finally, John is asked to design a data validation rule to validate that the totalcompensation for employees in a particular department is within the allowed range.The rule evaluates Existing Employees in the Operations department. It validates that,if Total Compensation is > than Min allowed, and is <= ¾ of the compensation rangefor the employee’s grade, no action is needed.
If Total Compensation is greater than ¾ of the compensation range, a validationmessage is provided, and the approval units must be approved by a human resourcemanager. If the value is less than Min and greater than Max, an error is generated, andusers can't promote their approval units.
John opens the Employee Expenses Summary form in the Form Management dialogbox. The form has employees and departments on the page, accounts (such as TotalCompensation) on the row, and time period on the column. To make validations easierto build, John adds a calculated row to calculate ¾ of the compensation range, andadds Min Compensation and Max Compensation members to the form, as shown inthe following figures. Min Compensation and Max Compensation for the employee’sgrade are calculated using member formulas.
Form Layout at Design Time:
Chapter 15Data Validation Rule Scenarios
15-20
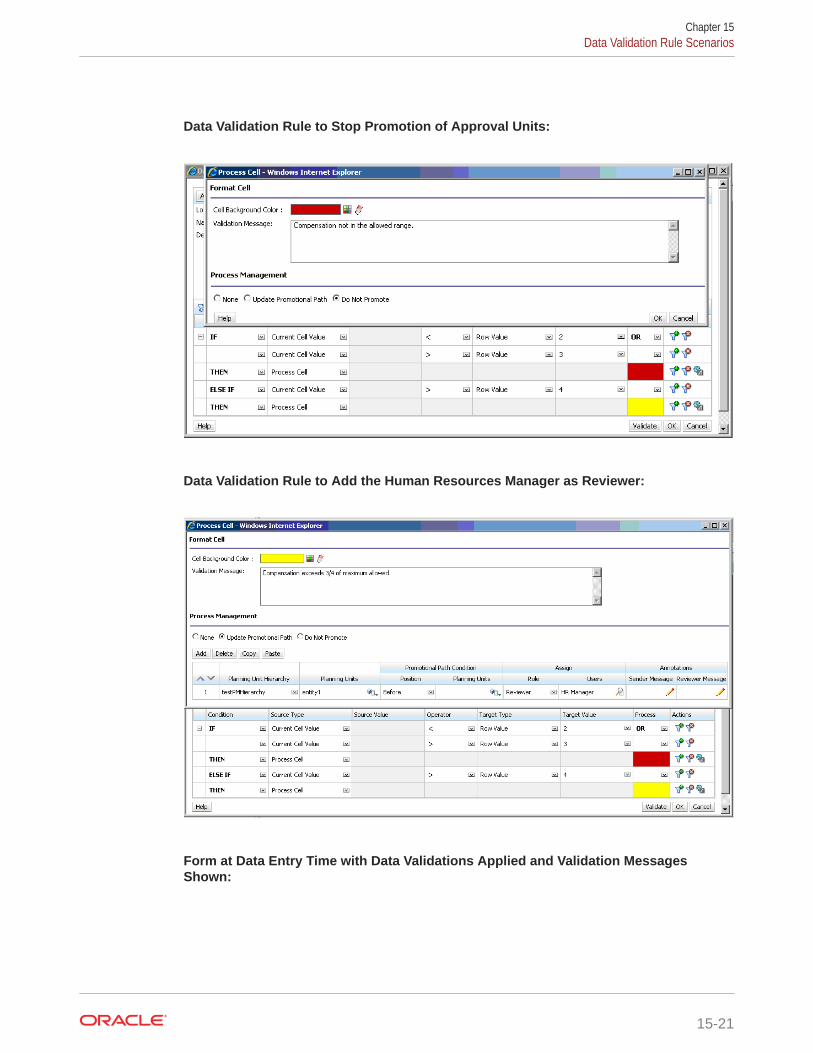
Data Validation Rule to Stop Promotion of Approval Units:
Data Validation Rule to Add the Human Resources Manager as Reviewer:
Form at Data Entry Time with Data Validations Applied and Validation MessagesShown:
Chapter 15Data Validation Rule Scenarios
15-21

Chapter 15Data Validation Rule Scenarios
15-22

16Managing Application and System Settings
Set application defaults and system settings such as number formatting, notifications, numberof items displayed on a page, aliases, date formatting, and assigning application ownership.
Related Topics
• What Application and System Settings Can I Specify?
• Defining User Variables
• Customizing Your DisplayChange the theme of your display or add your company logo or a background image tothe Home page.
• Announcing Upcoming Events
• Specifying Artifact Labels
What Application and System Settings Can I Specify?You can control many aspects of the application and the system, such as:
• How to display thousands, decimals, and negative numbers in forms
• Define the actions about which you want to be notified
• Display the full names of users rather than user IDs
• Set reporting options
• Assign application ownership to another Service Administrator
To change application and system settings:
1. Click Application, and then click Settings.
2. Specify defaults for the current application. For descriptions of the settings, see theApplication Settings table below.
3. Specify system settings. For descriptions of the settings, see the System Settings tablebelow.
4. Click Save.
Table 16-1 Application Settings
Application Setting Description
Alias Setting For option descriptions, see Specifying a DefaultAlias Table and Setting Member and Alias DisplayOptions.
Number Formatting For option descriptions, see Number Formatting.
Notifications Enable notifications for task lists, approvals, andjob console.
16-1
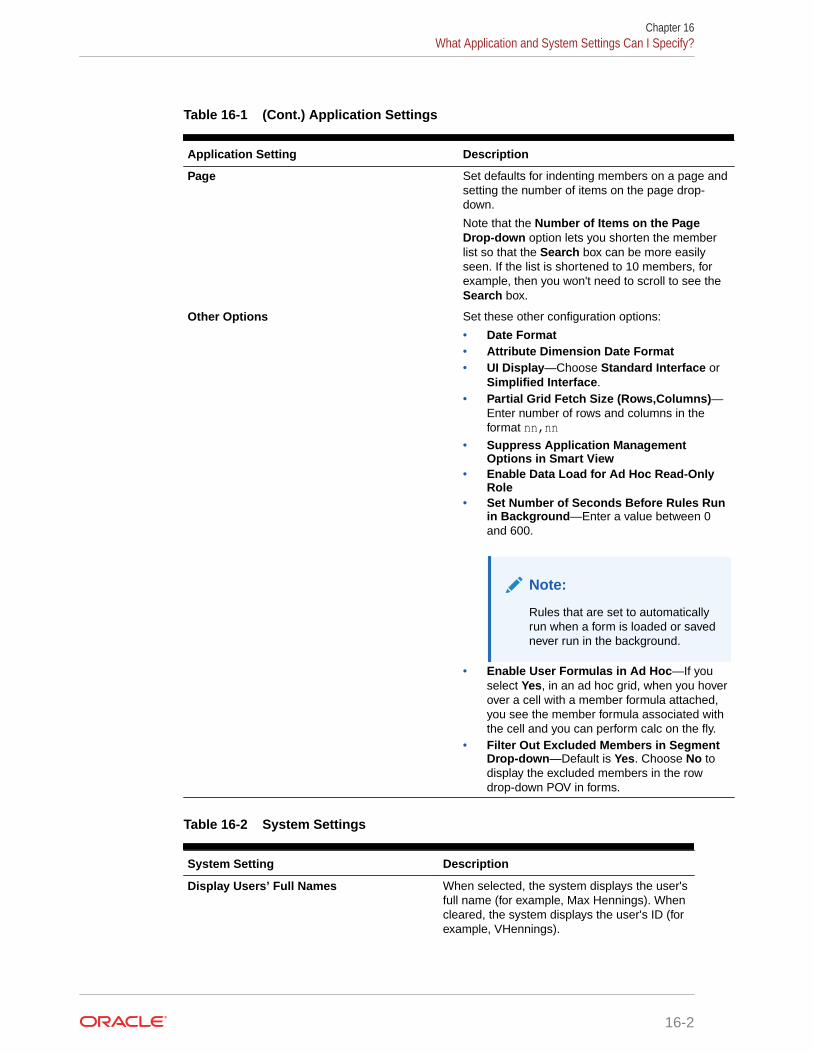
Table 16-1 (Cont.) Application Settings
Application Setting Description
Page Set defaults for indenting members on a page andsetting the number of items on the page drop-down.
Note that the Number of Items on the PageDrop-down option lets you shorten the memberlist so that the Search box can be more easilyseen. If the list is shortened to 10 members, forexample, then you won't need to scroll to see theSearch box.
Other Options Set these other configuration options:
• Date Format• Attribute Dimension Date Format• UI Display—Choose Standard Interface or
Simplified Interface.• Partial Grid Fetch Size (Rows,Columns)—
Enter number of rows and columns in theformat nn,nn
• Suppress Application ManagementOptions in Smart View
• Enable Data Load for Ad Hoc Read-OnlyRole
• Set Number of Seconds Before Rules Runin Background—Enter a value between 0and 600.
Note:
Rules that are set to automaticallyrun when a form is loaded or savednever run in the background.
• Enable User Formulas in Ad Hoc—If youselect Yes, in an ad hoc grid, when you hoverover a cell with a member formula attached,you see the member formula associated withthe cell and you can perform calc on the fly.
• Filter Out Excluded Members in SegmentDrop-down—Default is Yes. Choose No todisplay the excluded members in the rowdrop-down POV in forms.
Table 16-2 System Settings
System Setting Description
Display Users’ Full Names When selected, the system displays the user'sfull name (for example, Max Hennings). Whencleared, the system displays the user's ID (forexample, VHennings).
Chapter 16What Application and System Settings Can I Specify?
16-2
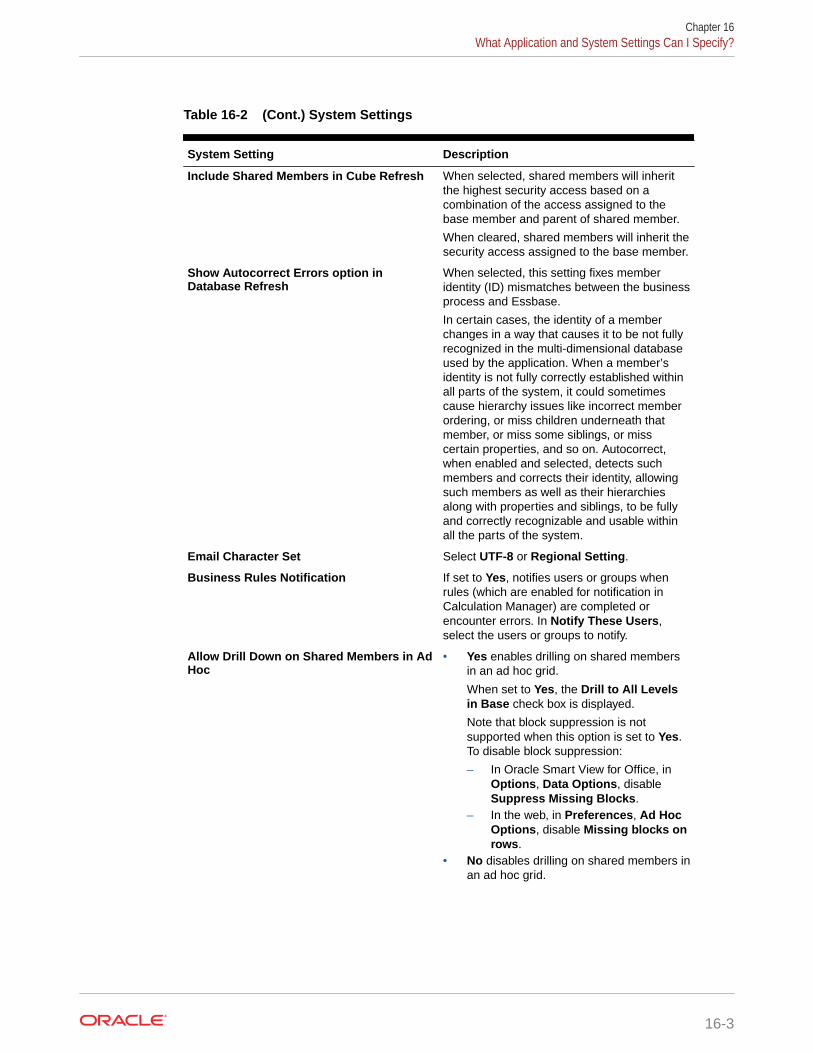
Table 16-2 (Cont.) System Settings
System Setting Description
Include Shared Members in Cube Refresh When selected, shared members will inheritthe highest security access based on acombination of the access assigned to thebase member and parent of shared member.
When cleared, shared members will inherit thesecurity access assigned to the base member.
Show Autocorrect Errors option inDatabase Refresh
When selected, this setting fixes memberidentity (ID) mismatches between the businessprocess and Essbase.
In certain cases, the identity of a memberchanges in a way that causes it to be not fullyrecognized in the multi-dimensional databaseused by the application. When a member’sidentity is not fully correctly established withinall parts of the system, it could sometimescause hierarchy issues like incorrect memberordering, or miss children underneath thatmember, or miss some siblings, or misscertain properties, and so on. Autocorrect,when enabled and selected, detects suchmembers and corrects their identity, allowingsuch members as well as their hierarchiesalong with properties and siblings, to be fullyand correctly recognizable and usable withinall the parts of the system.
Email Character Set Select UTF-8 or Regional Setting.
Business Rules Notification If set to Yes, notifies users or groups whenrules (which are enabled for notification inCalculation Manager) are completed orencounter errors. In Notify These Users,select the users or groups to notify.
Allow Drill Down on Shared Members in AdHoc
• Yes enables drilling on shared membersin an ad hoc grid.
When set to Yes, the Drill to All Levelsin Base check box is displayed.
Note that block suppression is notsupported when this option is set to Yes.To disable block suppression:
– In Oracle Smart View for Office, inOptions, Data Options, disableSuppress Missing Blocks.
– In the web, in Preferences, Ad HocOptions, disable Missing blocks onrows.
• No disables drilling on shared members inan ad hoc grid.
Chapter 16What Application and System Settings Can I Specify?
16-3
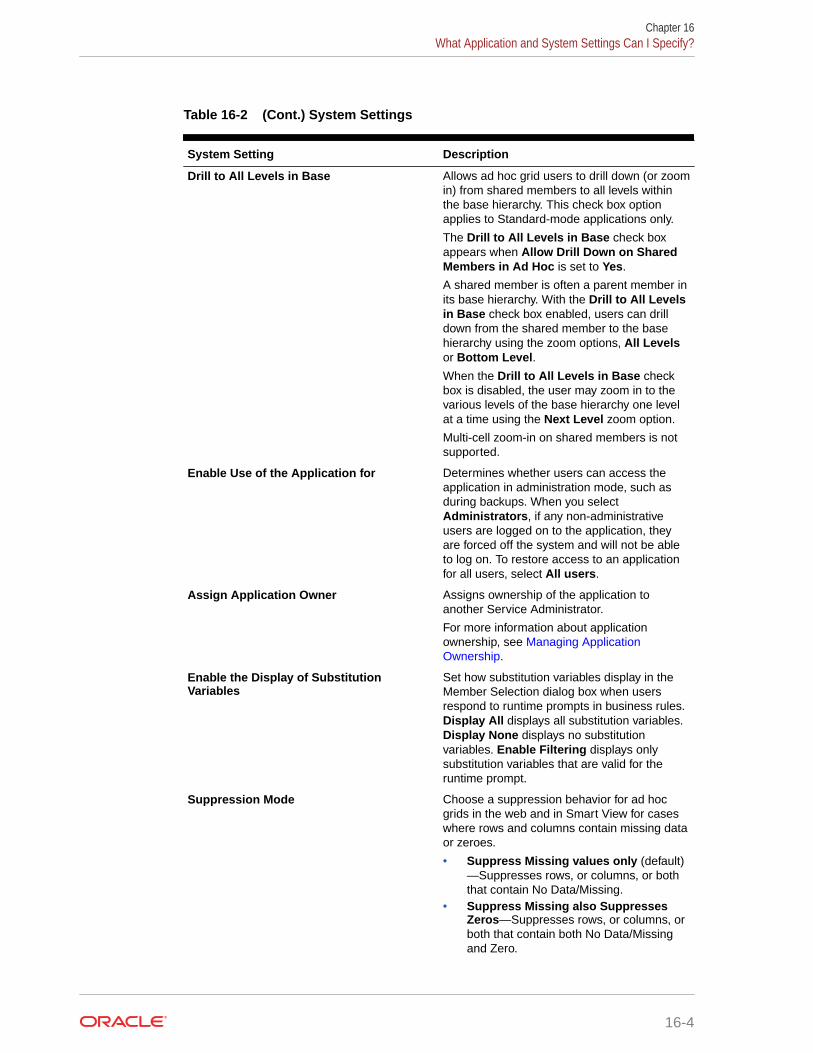
Table 16-2 (Cont.) System Settings
System Setting Description
Drill to All Levels in Base Allows ad hoc grid users to drill down (or zoomin) from shared members to all levels withinthe base hierarchy. This check box optionapplies to Standard-mode applications only.
The Drill to All Levels in Base check boxappears when Allow Drill Down on SharedMembers in Ad Hoc is set to Yes.
A shared member is often a parent member inits base hierarchy. With the Drill to All Levelsin Base check box enabled, users can drilldown from the shared member to the basehierarchy using the zoom options, All Levelsor Bottom Level.
When the Drill to All Levels in Base checkbox is disabled, the user may zoom in to thevarious levels of the base hierarchy one levelat a time using the Next Level zoom option.
Multi-cell zoom-in on shared members is notsupported.
Enable Use of the Application for Determines whether users can access theapplication in administration mode, such asduring backups. When you selectAdministrators, if any non-administrativeusers are logged on to the application, theyare forced off the system and will not be ableto log on. To restore access to an applicationfor all users, select All users.
Assign Application Owner Assigns ownership of the application toanother Service Administrator.
For more information about applicationownership, see Managing ApplicationOwnership.
Enable the Display of SubstitutionVariables
Set how substitution variables display in theMember Selection dialog box when usersrespond to runtime prompts in business rules.Display All displays all substitution variables.Display None displays no substitutionvariables. Enable Filtering displays onlysubstitution variables that are valid for theruntime prompt.
Suppression Mode Choose a suppression behavior for ad hocgrids in the web and in Smart View for caseswhere rows and columns contain missing dataor zeroes.
• Suppress Missing values only (default)—Suppresses rows, or columns, or boththat contain No Data/Missing.
• Suppress Missing also SuppressesZeros—Suppresses rows, or columns, orboth that contain both No Data/Missingand Zero.
Chapter 16What Application and System Settings Can I Specify?
16-4
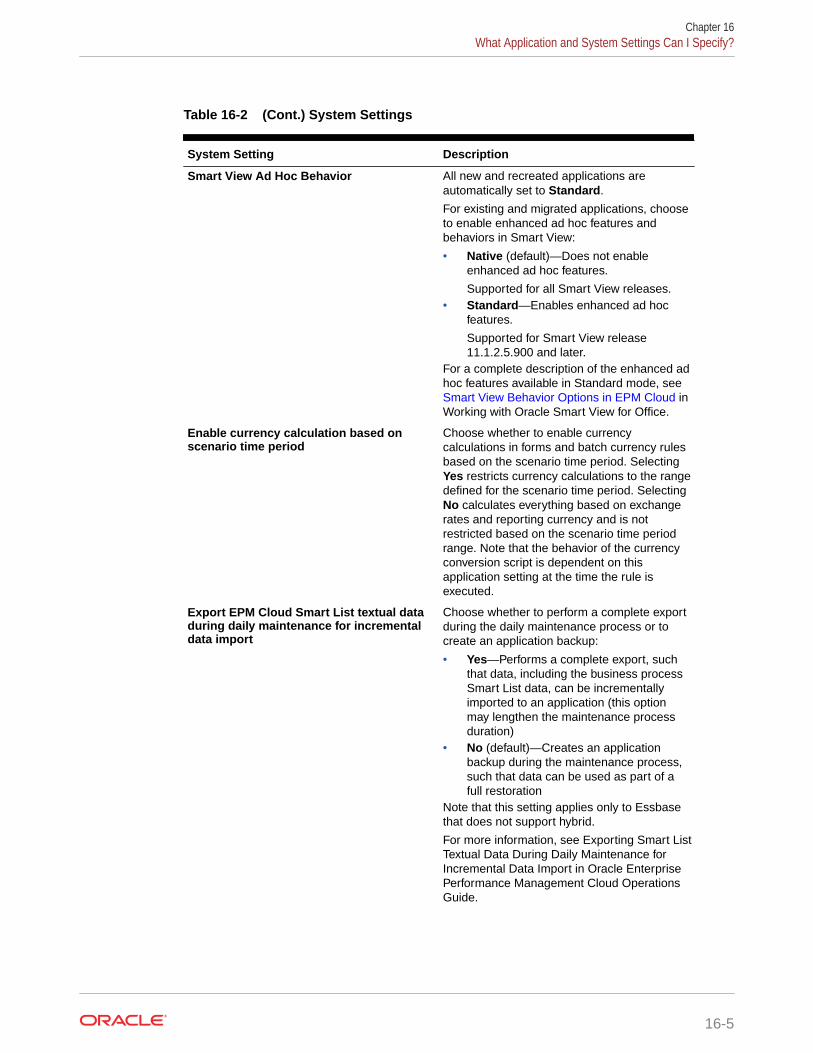
Table 16-2 (Cont.) System Settings
System Setting Description
Smart View Ad Hoc Behavior All new and recreated applications areautomatically set to Standard.
For existing and migrated applications, chooseto enable enhanced ad hoc features andbehaviors in Smart View:
• Native (default)—Does not enableenhanced ad hoc features.
Supported for all Smart View releases.• Standard—Enables enhanced ad hoc
features.
Supported for Smart View release11.1.2.5.900 and later.
For a complete description of the enhanced adhoc features available in Standard mode, see Smart View Behavior Options in EPM Cloud inWorking with Oracle Smart View for Office.
Enable currency calculation based onscenario time period
Choose whether to enable currencycalculations in forms and batch currency rulesbased on the scenario time period. SelectingYes restricts currency calculations to the rangedefined for the scenario time period. SelectingNo calculates everything based on exchangerates and reporting currency and is notrestricted based on the scenario time periodrange. Note that the behavior of the currencyconversion script is dependent on thisapplication setting at the time the rule isexecuted.
Export EPM Cloud Smart List textual dataduring daily maintenance for incrementaldata import
Choose whether to perform a complete exportduring the daily maintenance process or tocreate an application backup:
• Yes—Performs a complete export, suchthat data, including the business processSmart List data, can be incrementallyimported to an application (this optionmay lengthen the maintenance processduration)
• No (default)—Creates an applicationbackup during the maintenance process,such that data can be used as part of afull restoration
Note that this setting applies only to Essbasethat does not support hybrid.
For more information, see Exporting Smart ListTextual Data During Daily Maintenance forIncremental Data Import in Oracle EnterprisePerformance Management Cloud OperationsGuide.
Chapter 16What Application and System Settings Can I Specify?
16-5
Table 16-2 (Cont.) System Settings
System Setting Description
Link Accounts by Default For block storage (input) cubes, select whetherto XREF linked account members by default:
• Yes (default)—XREFs will be created onaccount members, and the application willwork the same way it has in earlierreleases.
• No—XREFs will not be created foraccount members, which may improve theapplication’s performance. With Noselected, after Cube Refresh is run, allexisting XREFs on account members willbe deleted, and non-source cubes will nolonger show data from the source cube.
Note that HSP_LINK and HSP_NOLINK UDAson specific account members override theXREF setting for those account members. Forexample, if this option is set to No and you usethe @XREF function to look up a data value inanother cube to calculate a value from thecurrent cube, you can add theHSP_LINK UDAto such members to create the @XREF functiononly for these specific members. If this optionis set to Yes, HSP_NOLINK works the sameway it worked in earlier releases and preventsXREFs from being created on specificmembers.
Attribute Dimension Reorder Threshold Enter a threshold value between 0 and 500(500 is the default value).
For attribute dimensions, when the number ofmembers under a given parent exceeds thespecified threshold value, then the memberswill be reordered at the end of a metadata loadinstead of during the load. Depending on thespecific shape of the attribute dimension,adjusting this number can sometimes have animpact on performance. In general, this settingcan be ignored unless attribute dimension loadtimes degrade beyond acceptable levels.
Set Reporting Options If you're using the next-generation Reportsreporting solution, Oracle recommends youuse this setting to upload any TrueType fontsthat your company uses to produce reports.
To upload TrueType fonts, click Report
Settings, click Manage Fonts, click , andthen select the font files to upload.
See Working with the Reports ReportingSolution in Working with Planning .
Chapter 16What Application and System Settings Can I Specify?
16-6
Defining User VariablesYou can define user variables to help users focus on particular members, such as theirdepartment's expenses. For example, you can create a form with entities on the rows, and auser variable called Department. You can limit the number of rows displayed on the form byselecting a member for the Department user variable, such as Sales. Later, you can selectanother value for Department, such as Marketing.
To update user variables:
1. Click Tools, and then click Variables.
2. Click the User Variables tab.
3. Click next to the variable to change.
4. On Member Selection, select members.
Customizing Your DisplayChange the theme of your display or add your company logo or a background image to theHome page.
On the Appearance page, you can change the general look and feel of your OracleEnterprise Performance Management Cloud environment. All newly created or re-createdEPM Cloud services, business processes, and applications use the Redwood Experience asthe default theme. The Redwood Experience not only provides an attractive look and feel, butit also includes certain features, such as dynamic tabs, that are not available in the otherthemes. If you opt not to use the Redwood Experience, you can choose instead from a list ofpredefined classic themes with different background colors, icon styles, and so on. You canalso add a branding logo and background images to the Home page and hide the businessprocess name. For general information about using the Home page, see About the HomePage.
Note:
You can set your profile picture to display at the top of the Announcements panel ofthe Home page in User Preferences. Click Tools, and then User Preferences. Formore information, see Setting Your Profile Picture in Working with Planning .
To customize your display:
1. Click Tools, and then click Appearance.
2. Choose from the following customization options:
• Enable Redwood Experience—Select to enjoy our default user experience and totake advantage of features only available in the Redwood experience. If this option isdisabled, the Theme option is displayed.
• Theme—Only available if you clear the Enable Redwood Experience option. Selectan option from the list of predefined classic themes.
Chapter 16Defining User Variables
16-7
• Logo Image and Background Image—Replace the predefined Oracle logoand theme-based background image with your own images. Select File tochoose a locally stored custom image file, or select URL to choose a customimage URL. Supported graphic formats are .jpg, .png, or .gif and the fileupload is limited to 5MB. Select Predefined to choose the theme-based logoand background images.
Note:
Only secured URLs are supported. The URL must begin with "https"rather than "http."
• Display Business Process Name—By default, the business process name isdisplayed next to the logo on the Home page and on the tab when a browsertab is opened. If No is selected, the business process name is hidden on theHome page and Oracle Applications is displayed on browser tabs.
Note the following:
• You can't edit or delete predefined themes or create custom themes.
• Both the logo and background image can be customized. To avoid distortion,the logo image must be 113px by 32px or an equivalent ratio.
The default size for the background image is 1024x768. You can use a largerbackground image, however the image is scaled to fit the resolution setting ofyour display and the image is centered horizontally. If you want yourbackground image to fit both a browser and a mobile device, Oraclerecommends that you size the image so that it fits your biggest screen (orhighest resolution device).
• When switching to a new theme, customers using a custom background imagemight need to ensure that the color contrast for icons and labels is appropriate.To remedy, consider choosing a different theme or a suitable background.
Announcing Upcoming EventsCreate and send announcements to alert users about upcoming events, such assystem maintenance or the running of jobs. Announcements are displayed in theAnnouncements area on the application's Home page.
For more information about the Announcements area, see About the Home Page
To create an announcement:
1. Click Tools, and then click Announcement.
2. Click Create, and enter information such as:
• A subject that summarizes the purpose of the announcement
• The start date; when to send the announcement. The end date is optional.
• The content. You may need to select an editing mode (rich text or sourcecode) first.
Chapter 16Announcing Upcoming Events
16-8
Specifying Artifact LabelsThe Artifact Labels page on the Tools cluster enables Service Administrators to customizeartifact labels (artifact names, descriptions, and so on) based on the user's browser locale.
A few examples:
• If you create a form with a cryptic name that you don't want displayed to the user, youcan define a meaningful name for the form that is displayed in the language of the user.
• If you want to create a useful instruction for an artifact that only displays in the languageof the user, for example:
"This formula calculates the number of regular employees away on a Leave of Absence."
Related Links
• Which Artifact Labels Can be Localized?
• Working With the Artifact Labels Grid
• Adding Languages and Defining Localized Artifact Labels
• Exporting and Importing Artifact Labels for Editing
Which Artifact Labels Can be Localized?The application supports changing the language for the following artifacts:
• Card
• Cluster
• Dashboard
• Data Map
• Data Validation Rule
• Dimension
• Folder
• Form
• Member
• Menu
• Menu Item
• Navigation Flow
• Cube
• Approval Unit Hierarchy
• Report
• Rule
• Ruleset
• Smart List
• Smart List Entry
Chapter 16Specifying Artifact Labels
16-9
• Tab
• Task
• Task List
• Template
• User Variable
• Valid Intersection
Working With the Artifact Labels GridThe Artifact Labels page displays an Excel-style spreadsheet grid that is filtered byartifact and property type.
The row axis of the grid displays the artifacts and their properties.
The column axis of the grid displays the following columns:
• Artifact—The type of artifact (for example, Task List or Rule)
• Property—The artifact's property type (for example, Name, Description, and soon)
• Default—Displays the artifact labels that were defined when the artifact wascreated.
When a language is added, a new column displays to the right of the Default column.
To view and filter the Artifact Labels grid:
1. Click Tools, and then click Artifact Labels.
2. To filter:
a. Click , and then select the artifacts you want to work with. For someartifacts, you can further filter by property type.
b. Click Apply to close the Filter window and display the artifact grid filtered byartifact type and property type.
Adding Languages and Defining Localized Artifact LabelsService Administrators can add a language for a given artifact to the Artifact Labelsgrid from a list of supported languages. You can select only one language at a time.When you add a language, a new column for that language is added to the grid to theright of the Default column. The cells in the language-specific column are editable.
Tip:
Use this method to add labels directly in the artifact labels grid. This methodis ideal if you only need to add or update a few labels at a time. For bulkchanges or edits on artifact labels; for example, terminology changes thataffect multiple labels, use the export feature to edit in Excel, then import. See Exporting and Importing Artifact Labels for Editing.
Chapter 16Specifying Artifact Labels
16-10
To add a language:
1. Click Tools, and then click Artifact Labels.
2. Click , and then select the artifacts you want to work with. For some artifacts, youcan further filter by property type.
3. Click Apply.
4. Click Add Language.
5. Select from the list of supported languages.
6. In the language-specific column, enter artifact labels into the editable cells for eachartifact property (Name, Description, and so on).
Note:
Using Ctrl+C (Copy) and Ctrl+V (Paste) are not supported in the artifact labelsgrid.
7. Click Save.
Note:
When you define a localized artifact label for the Default navigation flow (forexample, editing the name of an icon on the Home page), your update willautomatically propagate to all navigation flows. However, if you define a localizedartifact label for another navigation flow that isn't the Default flow, then that updatewill override the label coming from the Default flow.
Exporting and Importing Artifact Labels for EditingYou can export all the artifact labels in a given language to edit them. Only artifacts thatalready have labels will be exported. The labels are exported in an Excel file format (XLSX).After you edit the labels, you can import them back into the application.
Tip:
Use this method for bulk changes or edits on artifact labels by language; forexample, terminology changes that affect multiple labels. For updates to individualartifact labels, you can edit them directly in the artifact grid. See Adding Languagesand Defining Localized Artifact Labels.
To export all artifact labels by language for editing and then import them:
1. Click Tools, and then click Artifact Labels.
2. Export the XLSX file containing all of the artifact labels:
a. Click Actions, and then Export.
Chapter 16Specifying Artifact Labels
16-11
b. Select the target location for the export file:
• Local—Saves the export file to a location on your local computer.
• Outbox—Saves the export file to the server. See Uploading andDownloading Files Using the Inbox/Outbox Explorer.
c. Choose a language.
d. Click Export.
3. Edit the labels in the XLSX file.
4. Import the XLSX file:
a. Click Actions, and then Import.
b. Select the location of the import file:
• Local—Loads the import file from a location on your computer. ForSource File, click Browse to select the import file on your computer forthe artifact you're importing.
• Inbox—Loads the import file from the server. Enter the name of the file inSource File. See Uploading and Downloading Files Using the Inbox/Outbox Explorer.
c. Click Import.
Chapter 16Specifying Artifact Labels
16-12
17Accessing More Administrative Tasks
Related Links
• About the Navigator Menu
• Administering Data Load Settings
• Importing Using Data Management
• Administering Action Menus
• Administering Alias Tables
• Administering Dimensions
• Administering Forms
• Administering Rules
• Administering Rules Security
• Administering Smart Lists
• Administering Task Lists
• Setting User Preferences
• Administering Variables
• Clearing Cell Details
• Copying Data
• Administering Application Diagnostics
About the Navigator MenuYou can access additional administrative tasks from the Navigator Menu.
Clicking Navigator on the Home page displays a list of links that connect you to morebusiness process functionality.
Note:
Some of the links are available only if you're accessing the business process fromthe desktop.
Administering Data Load SettingsSpecify parameters to enable data to be loaded directly into an application database.Optionally, you can use advanced settings if you want to load details to child members ofparent dimension members based on unique identifiers for the driver dimension.
17-1
For example, a company might load the Employee dimension member with accountdata for Start Date, Position, Salary Basis, and Pay Type. Because the humanresource data includes placeholders for new and existing employees, the companycould set up the following advanced settings:
• Data load dimension parents: New Employees, Existing Employees
• New Employees unique identifiers: Start Date, Position
• Existing Employees unique identifiers: Salary Basis, Pay Type
During data load, child members of New Employees and Existing Employees areevaluated for data updates. The unique identifiers Start Date, Position, Salary Basis,and Pay Type determine if existing data load dimension values are updated, or if newvalues are added: If the unique identifier's data values are the same, data is updated.If the data value is different, the next available child member is used.
To specify parameters for loading data:
1. From the Home page, click Navigator , and then under Integration, click DataLoad Settings.
2. For Data Load Dimension, select the dimension (such as Employee) for whichdata is loaded for the application.
3. For Driver Dimension, click to select the dimension into which data isloaded.
For example, if you're loading data to Employee, the driver dimension might beAccount.
4. Select the members of the driver dimension.
For example, if the driver dimension is Account, driver dimension members mightinclude Start Date, Grade, Position, Salary Basis, and Pay Type.
5. Optional: To use advanced settings, complete these steps.
a. Add a row by clicking .
b. To the right of the new field, click and select a parent member.
For information about selecting members, see Using the Member Selector.
c. To the right of the parent member, under Driver Dimension UniqueIdentifiers, select members as unique identifiers. (Members selected for thisfield must be included in the list of selected Driver Dimension members at thetop of the page.)
Each parent member must include at least one unique identifier member.These members determine if existing data load dimension values are updated,or if new values are added.
d. If necessary, continue adding rows by repeating the previous steps.
e. To duplicate or delete a row, click within a row, and click or .
Importing Using Data ManagementThe basic process for importing data using Data Management includes:
Chapter 17Importing Using Data Management
17-2
1. Exporting data from the source system to a CSV file
2. Defining the relationship between the source system data to members using data loadmappings
3. Defining data load rules for the Location; you can create multiple data load rules for theapplication so that you can import data from multiple sources into a target application
4. Importing the data into the application by executing the data load rules
Tutorials
Tutorials provide instructions with sequenced videos and documentation to help you learn atopic.
Your Goal Learn How
Learn how to define and run file-based dataintegrations in Planning. Loading Data Into Planning Using Data
Integration
Importing Data Using Data ManagementTo import data using Data Management:
1. From the Home page, click Navigator , and then under Integration, click DataManagement.
2. Import data into the application, using the information in the following sections and theAdministering Data Management for Oracle Enterprise Performance ManagementCloud .
See these examples:
• Import Scenario Case 1: Importing Data when Member Names Match
• Import Scenario Case 2: Importing Data when Member Names Do Not Match
Import Scenario Case 1: Importing Data when Member Names MatchThis example walks you through the steps to importing data into an application when themember names in the source system match the member names in the application.
See Review the Import Format.
Import Scenario Case 2: Importing Data when Member Names Do Not MatchWhen there are differences between the source dimensions and the target dimensions, usethe mapping feature to relate the dimensions. Examples where source data and target dataare in different formats:
• The source Chart of Account structure consists of Company, Account, Sub Account,Department, and Product whereas the target application uses only Department, Account,and Product.
• The source Chart of Accounts has multiple levels in a Division, whereas the targetapplication uses only the Division level.
Chapter 17Importing Using Data Management
17-3
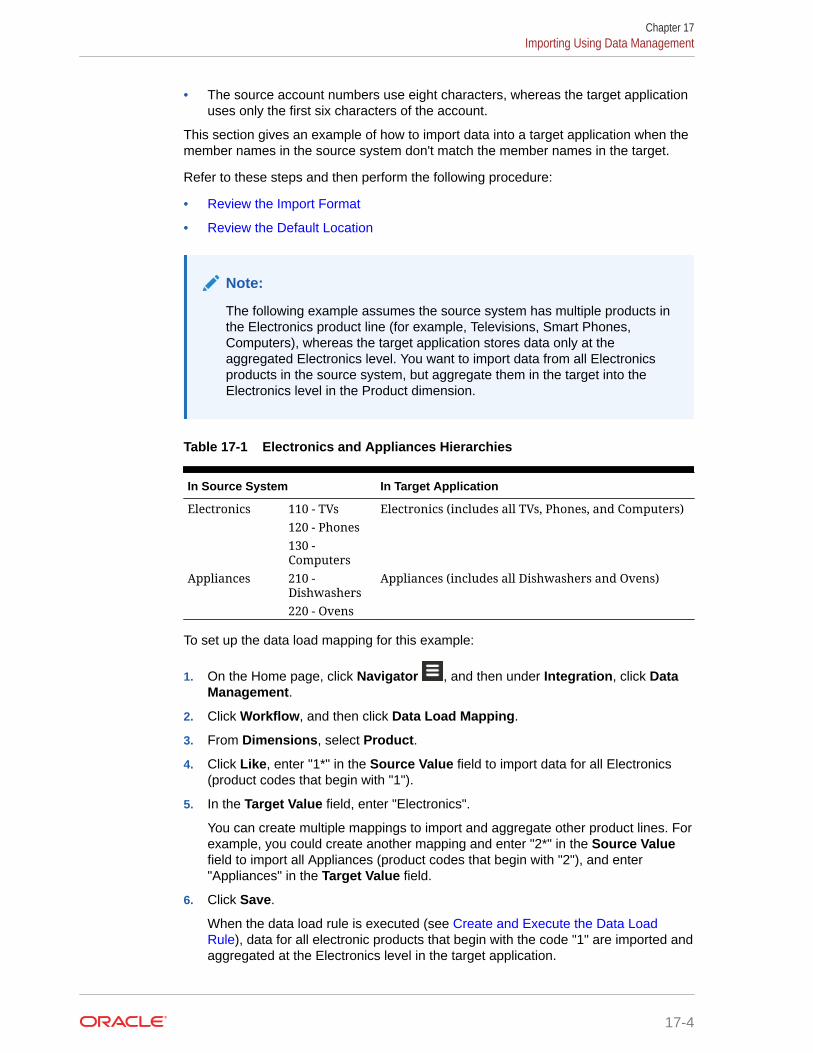
• The source account numbers use eight characters, whereas the target applicationuses only the first six characters of the account.
This section gives an example of how to import data into a target application when themember names in the source system don't match the member names in the target.
Refer to these steps and then perform the following procedure:
• Review the Import Format
• Review the Default Location
Note:
The following example assumes the source system has multiple products inthe Electronics product line (for example, Televisions, Smart Phones,Computers), whereas the target application stores data only at theaggregated Electronics level. You want to import data from all Electronicsproducts in the source system, but aggregate them in the target into theElectronics level in the Product dimension.
Table 17-1 Electronics and Appliances Hierarchies
In Source System In Target Application
Electronics 110 - TVs Electronics (includes all TVs, Phones, and Computers)120 - Phones130 -Computers
Appliances 210 -Dishwashers
Appliances (includes all Dishwashers and Ovens)
220 - Ovens
To set up the data load mapping for this example:
1. On the Home page, click Navigator , and then under Integration, click DataManagement.
2. Click Workflow, and then click Data Load Mapping.
3. From Dimensions, select Product.
4. Click Like, enter "1*" in the Source Value field to import data for all Electronics(product codes that begin with "1").
5. In the Target Value field, enter "Electronics".
You can create multiple mappings to import and aggregate other product lines. Forexample, you could create another mapping and enter "2*" in the Source Valuefield to import all Appliances (product codes that begin with "2"), and enter"Appliances" in the Target Value field.
6. Click Save.
When the data load rule is executed (see Create and Execute the Data LoadRule), data for all electronic products that begin with the code "1" are imported andaggregated at the Electronics level in the target application.
Chapter 17Importing Using Data Management
17-4
Review the Import FormatWhen you create an application, a default import format is automatically created with thename appname_1. You use this import format to map a source data file to the application.This import format assumes that the order of dimensions in the CSV file are: Account, Entity,Amount, and then any custom dimensions in alphabetical order. If you want to use a differentfile format, adjust the format.
To review the default import format:
1. On the Home page, click Navigator , and then under Integration, click DataManagement.
2. Click Setup, and then click Import Format.
3. Confirm the settings.
Note:
• Under Details, File Delimiter specifies the character that separates valuesin the file.
• Under Mappings, Field Number specifies the order of fields in the load file.The import format assumes the order of dimensions are Account, Entity,Amount, and then any user defined dimensions. All dimensions must be inalphabetical order.
4. Click Save.
See Review the Default Location.
Review the Default LocationThe location is used as a container to load data from Data Management. When you create anapplication, a default location is automatically created with the name appname_1.
To review the default location:
1. On the Home page, click Navigator , and then under Integration, click DataManagement.
2. Click Setup, and then click Location.
3. Review the Location settings. For example:
Chapter 17Importing Using Data Management
17-5
You can update the location as needed to include different selections for suchaspects as the check rule. For more information, see Administering DataManagement for Oracle Enterprise Performance Management Cloud .
4. Click Save.
See Create the Data Load Mapping.
Create the Data Load MappingData load mappings define relationships between source dimension member valuesand target dimension members in one dimension. The mappings are used to derivethe target members for each dimension based on the source value. Data Managementuses the data load mappings during the data load to dimensionalize the data that isloaded to the target dimension. You must create a data load mapping for each targetdimension.
To create the data load mapping:
1. From the Home page, click Navigator , and then under Integration, click DataManagement.
2. Select the Workflow tab, and then click Data Load Mapping.
3. From the Dimensions drop-down list, select and then define the relationshipbetween the Source Value and the Target Value for each dimension.
You must specify the dimensional intersection for every data value that you want toimport.
For example:
a. Because the source and target member names match in this example, on theLike tab, enter * in the Source Value and Target Value text boxes.
b. Under Rule Name, enter the name of the rule.
Chapter 17Importing Using Data Management
17-6
c. Click Save.
See Create and Execute the Data Load Rule.
Create and Execute the Data Load RuleAfter creating a data load mapping, you define a data load rule. Data load rules are definedwithin locations.
To create and execute the data load rule:
1. From the Home page, click Navigator , and then under Integration, click DataManagement.
2. On the Workflow tab, click Data Load Rule.
3. Click Add.
4. Under Details on the Data Load Rule window, you define the rule.
5. In this example, you'll browse to a file:
a. Name and describe the rule.
b. For Category, select the application scenario.
Note:
When you create an application, a default Category mapping is created tomap to the Scenario dimension and a default Period mapping is createdbased on the Period dimension.
c. Select the Cube for which you want to load data.
d. Click Select to browse to the data load file.
e. Click Save.
6. To run the data load rule, using the mapping that you created, click Execute.
Scheduling Jobs in Data ManagementYou can set execution times for data load rules by scheduling them. For example, you maywant actual revenue data to be imported into the application on Friday of each week.
To schedule a job:
1. From the Home page, click Navigator , and then under Integration, click DataManagement.
2. Select Workflow and click Data Load Rule.
3. Complete the load rule information.
4. Click Schedule.
5. Specify the type of scheduling and select the associated date and time parameters.
Chapter 17Importing Using Data Management
17-7
Table 17-2 Schedule Details and Parameters
Schedule Details Data and Time Parameters
Simple DateHoursMinutesSecondsSelect (AM/PM)
Hourly MinutesSeconds
Daily HoursMinutesSecondsSelect (AM/PM)
Weekly Monday-SundayHoursMinutesSecondsSelect (AM/PM)
Monthly (day of month) Monthly DateHoursMinutesSecondsSelect (AM/PM)
Monthly (week day) Day of MonthDayHoursMinutesSecondsSelect (AM/PM)
6. Click OK.
Drilling Through to Source DataYou can drill through on values from the application to the Data Management landingpage. This landing page displays General Ledger accounts and the hyperlinkedbalances that were used to populate the cells in the application. If a URL has beenspecified in the Import Format option for the application, data is displayed in thegranularity with which it was loaded in your browser. Drill through based on a URLrequires that users be connected to the server on which the data resides.
For More InformationFor more information, see the following sections in Administering Data Managementfor Oracle Enterprise Performance Management Cloud .
Chapter 17Importing Using Data Management
17-8
Defining Category Mappings
When you create the application, a default Category mapping is created to map the Scenariodimension to a Data Management category. To update the default mapping, seeAdministering Data Management for Oracle Enterprise Performance Management Cloud .
Defining Periods
When you create the application, a default Period mapping is created based on the Period forthe application. To update the default mapping, see Administering Data Management forOracle Enterprise Performance Management Cloud .
Creating Data Load Mappings
See Administering Data Management for Oracle Enterprise Performance Management Cloudfor information on the following topics:
• Creating Mappings Using the Explicit Method
• Creating Mappings Using the Between Method
• Using Special Characters in the Source Value Expression for Like Mappings
• Using Special Characters in the Target Value Expression
• Ignoring Member Mappings
• Importing Member Mappings
• Exporting Member Mappings
Defining Data Load Rules
After you define data load mappings, you define data load rules for the application. Data loadrules are defined for locations.
See Administering Data Management for Oracle Enterprise Performance Management Cloudfor information on the following topics:
• Creating the Data Load Rule
• Defining the Data Load Rule Details
• Defining Data Load Rule Details for a File-Based Source System
Managing Data Load Rules
After data load rules are created, you can edit, run, or delete them.
See Administering Data Management for Oracle Enterprise Performance Management Cloudfor information on the following topics:
• Editing Data Load Rules
• Running Data Load Rules
• Checking the Data Load Rules
• Deleting Data Load Rules
Chapter 17Importing Using Data Management
17-9
Using the Data Load Workbench
Data Load Workbench enables you to perform the data load processes interactivelyfrom sources in Data Management. In addition, users can view and review the dataimported from the source system.
Key features include:
• Interactive Load Process with options for import and export (a 4-step wizard thatperforms import, validate, export, and check)
• Provision to view Source (All)/Source (Mapped)/Target/Source and Target values
• PTD YTD Value display for ready reference
• Display options for Valid, Invalid, Ignored, and All Data
• Online and Offline Load process
• Export to Excel
• Drill through to source from the Data Load Workbench
For more information, see Administering Data Management for Oracle EnterprisePerformance Management Cloud .
Administering Action MenusRelated Topics
• Creating and Updating Action Menus
• Working with Action Menu Items
• Defining Action Menu Items
Creating and Updating Action MenusService Administrators can create right-click (or action) menus and associate themwith forms, enabling users to click rows or columns in forms and select menu items to:
• Launch another application, URL, or business rule, with or without runtimeprompts
• Move to another form
• Open Job
The context of the right-click is relayed to the next action: the POV and the Page, themember the user clicked on, the members to the left (for rows), or above (forcolumns).
When designing forms, use Other Options to select menus available for Form menuitem types. As you update an application, update the appropriate menus. For example,if you delete a business rule referenced by a menu, remove it from the menu.
To create, edit, or delete action menus:
1. From the Home page, click Navigator , and then under Create and Manage,click Action Menus.
2. Perform an action:
Chapter 17Administering Action Menus
17-10
• To create an action menu, click , enter the menu's name, and then click OK.
• To edit details of an action menu, select it, and then click . See Working withAction Menu Items.
• To delete action menus, select them, click , and then click OK.
Working with Action Menu ItemsThe Edit Menu page displays menu items on the current action menu, including names,labels, required dimensions, icon, and type, such as URL, Form, Business Rule, ManageApprovals, Menu Header, Form, and Job.
To work with action menu items:
1. From the Home page, click Navigator , and then under Create and Manage, clickAction Menus.
2. Select a menu, and then click .
3. First time only: To add the first item to the menu, click Add Child and Save.
4. Select a menu item and:
• To add menu items below the selected item, click Add Child (available for MenuHeader menu types).
• To add menu items at the same level as the selected item, click Add Sibling.
• To edit menu items and define the menu item properties, click Edit Menu Item.
• To delete menu items, click Delete Menu Item.
• To change the order of menu items within the same level, click Move Up or MoveDown. You can move multiple items.
5. Click Save.
Click Save As to save the current selections under a new menu name.
Defining Action Menu ItemsTo define action menu items:
1. From the Home page, click Navigator , and then under Create and Manage, clickAction Menus.
2. Select a menu and then click .
3. Select the menu item, and then click Edit Menu Item or Add Sibling.
4. Define the menu item:
Chapter 17Administering Action Menus
17-11
Table 17-3 Edit Menu Item Options
Item Description
Menu Item Enter a unique name containing onlyalphanumeric and underscore characters,with no special characters or spaces
Label Enter text to be displayed when the menu isselected. Spaces and special characters areallowed. Menu labels display in the userinterface. Labels can be text or canreference a resource variable by name. Forexample, to set a menu’s label to File, set itto File directly or to the name of aresource, such as LABEL_FILE, which canbe localized.
Icon This option is not currently supported.
Chapter 17Administering Action Menus
17-12
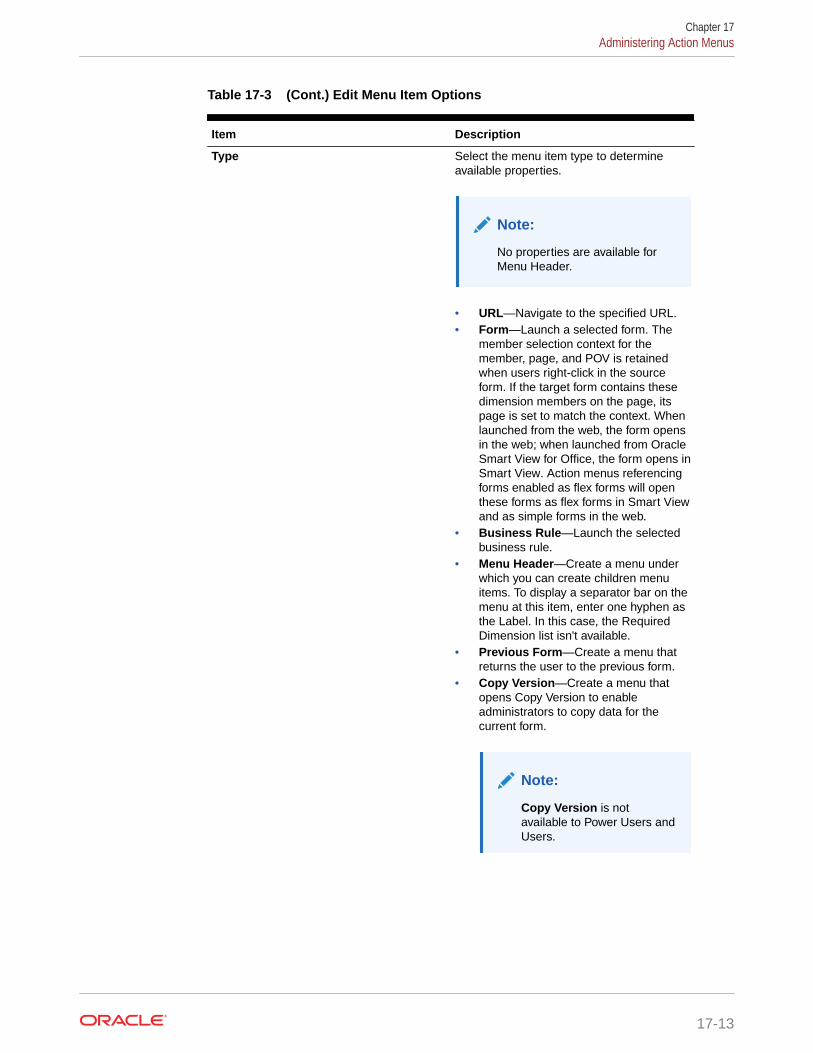
Table 17-3 (Cont.) Edit Menu Item Options
Item Description
Type Select the menu item type to determineavailable properties.
Note:
No properties are available forMenu Header.
• URL—Navigate to the specified URL.• Form—Launch a selected form. The
member selection context for themember, page, and POV is retainedwhen users right-click in the sourceform. If the target form contains thesedimension members on the page, itspage is set to match the context. Whenlaunched from the web, the form opensin the web; when launched from OracleSmart View for Office, the form opens inSmart View. Action menus referencingforms enabled as flex forms will openthese forms as flex forms in Smart Viewand as simple forms in the web.
• Business Rule—Launch the selectedbusiness rule.
• Menu Header—Create a menu underwhich you can create children menuitems. To display a separator bar on themenu at this item, enter one hyphen asthe Label. In this case, the RequiredDimension list isn't available.
• Previous Form—Create a menu thatreturns the user to the previous form.
• Copy Version—Create a menu thatopens Copy Version to enableadministrators to copy data for thecurrent form.
Note:
Copy Version is notavailable to Power Users andUsers.
Chapter 17Administering Action Menus
17-13
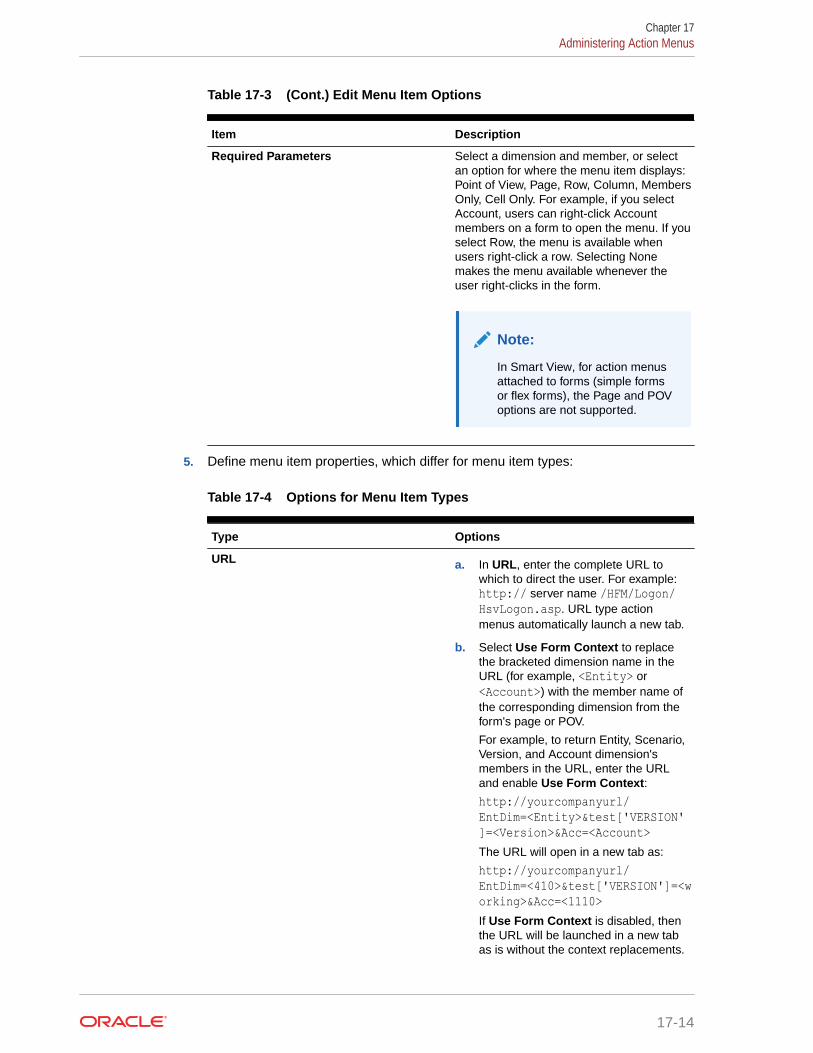
Table 17-3 (Cont.) Edit Menu Item Options
Item Description
Required Parameters Select a dimension and member, or selectan option for where the menu item displays:Point of View, Page, Row, Column, MembersOnly, Cell Only. For example, if you selectAccount, users can right-click Accountmembers on a form to open the menu. If youselect Row, the menu is available whenusers right-click a row. Selecting Nonemakes the menu available whenever theuser right-clicks in the form.
Note:
In Smart View, for action menusattached to forms (simple formsor flex forms), the Page and POVoptions are not supported.
5. Define menu item properties, which differ for menu item types:
Table 17-4 Options for Menu Item Types
Type Options
URL a. In URL, enter the complete URL towhich to direct the user. For example:http:// server name /HFM/Logon/HsvLogon.asp. URL type actionmenus automatically launch a new tab.
b. Select Use Form Context to replacethe bracketed dimension name in theURL (for example, <Entity> or<Account>) with the member name ofthe corresponding dimension from theform's page or POV.
For example, to return Entity, Scenario,Version, and Account dimension'smembers in the URL, enter the URLand enable Use Form Context:
http://yourcompanyurl/EntDim=<Entity>&test['VERSION']=<Version>&Acc=<Account>The URL will open in a new tab as:
http://yourcompanyurl/EntDim=<410>&test['VERSION']=<working>&Acc=<1110>If Use Form Context is disabled, thenthe URL will be launched in a new tabas is without the context replacements.
Chapter 17Administering Action Menus
17-14
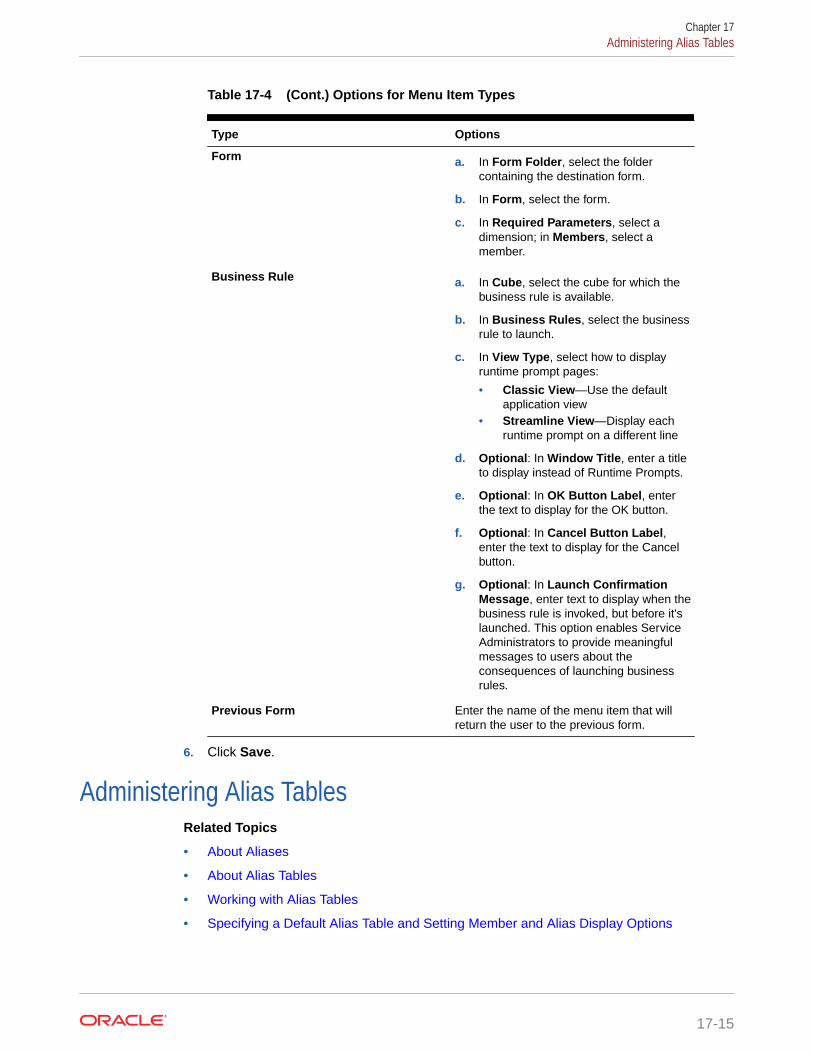
Table 17-4 (Cont.) Options for Menu Item Types
Type Options
Form a. In Form Folder, select the foldercontaining the destination form.
b. In Form, select the form.
c. In Required Parameters, select adimension; in Members, select amember.
Business Rule a. In Cube, select the cube for which thebusiness rule is available.
b. In Business Rules, select the businessrule to launch.
c. In View Type, select how to displayruntime prompt pages:
• Classic View—Use the defaultapplication view
• Streamline View—Display eachruntime prompt on a different line
d. Optional: In Window Title, enter a titleto display instead of Runtime Prompts.
e. Optional: In OK Button Label, enterthe text to display for the OK button.
f. Optional: In Cancel Button Label,enter the text to display for the Cancelbutton.
g. Optional: In Launch ConfirmationMessage, enter text to display when thebusiness rule is invoked, but before it'slaunched. This option enables ServiceAdministrators to provide meaningfulmessages to users about theconsequences of launching businessrules.
Previous Form Enter the name of the menu item that willreturn the user to the previous form.
6. Click Save.
Administering Alias TablesRelated Topics
• About Aliases
• About Alias Tables
• Working with Alias Tables
• Specifying a Default Alias Table and Setting Member and Alias Display Options
Chapter 17Administering Alias Tables
17-15
About AliasesYou can assign alternate names, or aliases, to Account, Currency, Entity, Scenario,Period, Version, Years, and user-defined dimension members. The application allowsup to 30 aliases per dimension member, including the default alias. Aliases can havethe same name within an alias table and across alias tables.
Aliases can also have:
• The same name as a member
• The same alias on members that are parent and child
• The same name for members from different dimensions or from the samedimension
Note:
• You can't have the same alias for two members that are siblings becausethere would be no way to uniquely identify the member. This rule isenforced by the application for base members, but not for sharedmembers.
This rule isn't enforced for shared members because you can't directlyset aliases for shared members; shared member aliases are inheritedfrom the alias of their base member. It's possible to create an alternativehierarchy where you can have two shared members that have the samealias and are siblings. However, this situation is discouraged if you wantto reference these members by their aliases from an adhoc gridbecause, when you type the alias into the grid and submit it to theapplication, the application can't uniquely resolve this member and it willreturn an error. If you're using the alias for display purposes only thenthere will be no issue, but this design is discouraged because, visually,there is no way to differentiate between these two members.
• Although aliases can have the same name as a member, be careful notto set the alias of member1 to be the same name as member2. This canlead to unintended results and will cause confusion on the form grids.
• Member names must be unique so that they can be used in rules andform designs.
About Alias TablesYou can create and update alias tables, and set a default alias table for the application.Follow naming conventions in Naming Restrictions.
Multiple alias tables support, for example, these language combinations:
• English, French, German, Spanish, and Italian
• Japanese and English
• Korean and English
Chapter 17Administering Alias Tables
17-16
• Turkish and English
Note:
Alias table support isn't restricted to these language combinations.
You can set alias tables to display members in an application. Users can set alias tables inpreferences.
Working with Alias TablesYou can add, edit, rename, and delete alias tables or clear alias table values. You can alsocopy alias table content from one table to another.
To work with alias tables:
1. From the Home page, click Navigator , and then under Create and Manage, clickAlias Tables.
2. Choose a task:
• If adding an alias table, click , and then in Add - Alias Table, enter a name.
• If editing or renaming alias tables, select the alias table, then click , and then forEdit - Alias Table, enter a name.
• If deleting alias tables, select the alias table, and then click Delete.
Note:
You can't delete the Default alias table.
• If clearing the values in an alias table, select the alias table to clear, then click ClearValues.
Note:
Clearing the alias table removes the content of the table, but doesn'tremove the table.
• If copying alias table content, select the alias table, click Copy, then select thedestination alias table, and then click Copy.
Note:
The destination alias table must exist. Copying doesn't create tables.
3. Click OK.
Chapter 17Administering Alias Tables
17-17
Specifying a Default Alias Table and Setting Member and Alias DisplayOptions
If you create alias tables with aliases for Account, Currency, Entity, Scenario, Period,Version, Years, and user-defined dimensions and members, you can select a defaultalias table for the application. Users can set preferences for which set of aliases(stored in an alias table) to use for displaying member and dimension names.
To select the application’s default alias table:
1. From the Home page, click Application, and then click Settings.
2. For Alias Table, select an alias table.
3. For Display Member Label as, select the option that enables the kind of memberdata to be displayed in the member selector throughout the application:
• Default—The data determined by the form, grid, or dimension settings
• Member Name —Just member names
• Alias—Just member aliases, if defined
• Member Name:Alias—Names followed by aliases, if defined
• Alias:Member Name—Alias, if defined, followed by the names
4. Click Save or Reset.
Administering DimensionsThis section documents how to edit dimensions using the Classic Dimension Editorwhich is accessed by using the Dimensions link in the Navigator menu. In the 17.05(May 2017) update, we released the Simplified Dimension Editor.
For detailed information about using the Simplified Dimension Editor, see EditingDimensions in the Simplified Dimension Editor.
Related Links
About Dimensions
Working with Dimension Hierarchies
About Custom Dimensions, Entities, Accounts, Periods, and Cubes
Adding or Editing User-Defined Custom Dimensions
Working with Members
Working with Attributes
Working with Attribute Values
Customizing Calendars
Setting Up Currencies
Setting up Dynamic Time Series Members
Working with UDAs
Chapter 17Administering Dimensions
17-18
Working with Member Formulas
About DimensionsDimensions categorize data values. Seven dimensions are included with the application:Account, Entity, Scenario, Version, Period, Years, and Currency. You can create up to 32user-defined custom dimensions.
Members are components of dimensions.
For complete information about dimensions, see Dimension Overview.
Working with Dimension HierarchiesRelated Topics
• Filtering the Dimension View by Cube
• Sorting Members
• Viewing a Member’s Ancestors
• Determining Where Members Are Used in an Application
Filtering the Dimension View by CubeYou can filter the dimension view by cube. When you select a cube, only dimensions used inthat cube are displayed on the Dimensions page.
To filter the dimension view by cube:
1. From the Home page, click Navigator , and then under Create and Manage, clickDimensions.
2. For Cube, select the cube.
The application displays only the dimensions used in the selected cube.
Sorting MembersYou can sort members in ascending or descending order, by children or descendants. Sortingmembers affects the outline.
To sort members:
1. From the Home page, click Navigator , and then under Create and Manage, clickDimensions.
2. For Dimension, select the dimension for the members.
3. On Dimensions, select the members whose children or descendants you want to sort.
4. For Sort, select children or descendants.
Sorting by children affects only members in the level immediately below the selectedmember. Sorting by descendants affects all descendants of the selected member.
5. Click to sort by ascending order or to sort by descending order.
6. Click OK.
Chapter 17Administering Dimensions
17-19
The next time you create or refresh the database, the outline is generated withmembers in the order that is displayed.
Viewing a Member’s AncestorsTo view a member’s ancestors:
1. From the Home page, click Navigator , and then under Create and Manage,click Dimensions.
2. For Dimension, select a dimension.
3. Select the member in the dimension hierarchy.
4. Click .
5. Click OK.
Determining Where Members Are Used in an ApplicationTo view where members are used in an application:
1. From the Home page, click Navigator , and then under Create and Manage,click Dimensions.
2. Select the dimension whose member’s usage you want to view.
3. Click .
About Custom Dimensions, Entities, Accounts, Periods, and CubesSee the following topics for more information:
• About Custom Dimensions
• About Entities
• About Accounts
• Accounts, Entities, Periods, and Cubes
Adding or Editing User-Defined Custom DimensionsUser-defined custom dimensions must conform to guidelines listed in NamingRestrictions.
Table 17-5 Properties for User-Defined Custom Dimensions
Property Value
Dimension Enter a name that is unique across alldimensions.
Alias Optional: Select an alias table. Enter analternate name for the dimension. See AboutAliases.
Description Optional: Enter a description.
Chapter 17Administering Dimensions
17-20
Table 17-5 (Cont.) Properties for User-Defined Custom Dimensions
Property Value
Valid for Cubes Select cubes for which the dimension is valid.Clearing this option makes all members of thedimension invalid for the deselected cube.
Apply Security Allow security to be set on the dimensionmembers; must be selected before assigningaccess rights to dimension members.Otherwise, dimensions have no security andusers can access members without restriction.
Data Storage Select a data storage option. The default isNever Share.
To add or change user-defined dimensions:
1. From the Home page, click Navigator , and then under Create and Manage, clickDimensions.
2. Click or select an existing dimension and click .
3. Specify any of the properties listed above.
4. Click Save.
5. Click OK.
Click Refresh to revert to the previous values and keep the page open.
• Setting Dimension Properties
• Setting Dimension Density and Order
• Setting the Evaluation Order
Setting Dimension PropertiesDimension properties must conform to guidelines listed in Naming Restrictions.
Table 17-6 Dimensions Properties
Property Value
Dimension Enter a name that is unique across all dimensions.
Description Optional: Enter a description.
Alias Table and Alias Optional: Select an alias table. Enter an alternatename for the dimension. See Administering AliasTables.
Valid for Cubes Select cubes for which the dimension is valid.Clearing this option makes all members of thedimension invalid for the deselected cube.
Two Pass Calculation Recalculate values of members based on valuesof parent members or other members. Availablefor Account and Entity members with DynamicCalc or Dynamic Calc and Store properties.
Chapter 17Administering Dimensions
17-21
Table 17-6 (Cont.) Dimensions Properties
Property Value
Apply Security Allow security to be set on the dimensionmembers; must be selected before assigningaccess rights to dimension members. Otherwise,dimensions have no security and users canaccess members without restriction.
Data Storage Select a data storage option. The default is NeverShare.
Display Option Set application default display options for theMember Selection dialog box. Select MemberName or Alias to display members or aliases.Member Name:Alias displays members on theleft and aliases on the right. Alias:Member Namedisplays aliases on the left and members on theright.
Setting Dimension Density and OrderThe Performance Settings tab enables you to set dimensions as sparse or denseand set their order of precedence.
To manage performance settings:
1. From the Home page, click Navigator , and then under Create and Manage,click Dimensions.
2. Select the Performance Settings tab.
3. For each dimension, set its Density as Dense or Sparse.
See About Sparse and Dense Dimensions.
Note:
The Density column is hidden for applications that contain only ASOcubes. If an application contains a BSO cube or a BSO and an ASOcube, the Density column displays for both cubes.
4. Set the order of precedence by selecting a dimension and clicking or nextto the Position column heading.
See About Reordering Dimensions in Administering Planning.
Setting the Evaluation OrderThe Evaluation Order tab enables you to specify which data type prevails when adata intersection has conflicting data types. For example, if Account members are setto the Currency data type, and Product members are set to the Smart List data type,you can set whether the Currency or Smart List data type prevails at an intersection.
To set evaluation order:
Chapter 17Administering Dimensions
17-22
1. From the Home page, click Navigator , and then under Create and Manage, clickDimensions.
2. Select Evaluation Order, and then select the cube.
3. From Available Dimensions, select dimensions and move them to SelectedDimensions:
• moves selected dimensions
• moves all dimensions
• removes selected dimensions
• removes all dimensions
You need select only dimensions whose members have specific data types (that is, theirdata type isn't "Unspecified"). The data type "Unspecified" doesn't conflict with anotherdata type.
4. If you select multiple dimensions, set the order of precedence by clicking or .
5. Click Save.
Working with MembersYou can assign access rights to members, rearrange the dimension member hierarchy, sharemembers of the Entity, Account, and user-defined custom dimensions, and enable creation ofdynamic members "on-the-fly."
• Finding Dimension Members
• About Assigning Access to Members
• Adding or Editing Members
• Deleting Members
• Deleting Parent Members
• Working with Shared Members
• Creating Shared Members
• About Dynamic Members
Finding Dimension MembersTo find dimension members in dimension hierarchies:
1. From the Home page, click Navigator , and then under Create and Manage, clickDimensions.
2. For Dimension, select the dimension for the member.
3. For Search, select Name, Alias, or Both.
4. Enter the search text (member name, alias, or partial string) for which to search.
5. Click or .
Chapter 17Administering Dimensions
17-23
About Assigning Access to MembersService Administrators can assign permissions to members.
You can assign permissions to members by selecting the dimension property ApplySecurity. If you omit or clear the Apply Security setting, all users can access thedimension's members. By default, the Account, Entity, Scenario, and Versiondimensions are enabled for access permissions. Optionally, you can enable this optionfor Period, Years, and Custom dimensions.
For complete information, see Assigning Access to Dimension Members. To enableaccess to members, see Editing Dimension Properties in the Simplified DimensionEditor.
Adding or Editing MembersMembers must conform to guidelines listed in Naming Restrictions. Shared membersmust be consistent with Working with Shared Members.
Table 17-7 Member Properties
Property Value
Name Enter a name that is unique across alldimension members.
Description Optional: Enter a description.
Alias Table Optional: Select the alias table to store thealias name. Enter an alternate name for themember in Alias. See Administering AliasTables.
For Account members only: Account Type Select Expense, Revenue, Asset, Liability,Equity, or Saved Assumption.
For descriptions, see Account Types.
For Account members only: VarianceReporting
If the account type is Saved Assumption,select Expense or Non-Expense. Designatethe saved assumption as a revenue, asset,liability, or equity account.
For Account members only: Time Balance Select Flow, First, Balance, Average, Fill,Weighted Average - Actual_Actual, orWeighted Average - Actual_365.
For descriptions, see Time Balance Property.
For Account members only: Skip If the account type is Asset, Equity, orLiability, select None, Missing, Zeros, orMissing and Zeros.
For descriptions, see Setting AccountCalculations for Zeros and Missing Values.
For Account members only: Exchange RateType
Select Average, Ending, or Historical.
For descriptions, see Data Type and ExchangeRate Type.
Chapter 17Administering Dimensions
17-24
Table 17-7 (Cont.) Member Properties
Property Value
For Account members only: Data Type Select Currency, Non-currency, Percentage,Date, or Text.
For descriptions, see Data Type and ExchangeRate Type.
For Account members only: Distribution Sets the weekly distribution. Available for leafAccount members if the option was selectedwhen creating the application and the basetime period is 12 months.
Hierarchy Type Hierarchy Type is available for dimensionsbound to an aggregate storage cube.Aggregate storage dimensions areautomatically enabled to support multiplehierarchies. The first hierarchy in a multiplehierarchy dimension must be stored.
Note:
For memberswith a storedhierarchy type,the only validcubeaggregationoptions areAddition orIgnore. In astored hierarchy,the first membermust be set toAddition. Formembers with adynamichierarchy type,all cubeaggregationoptions are valid.Stored hierarchymembers thatare not childrenof Label Onlymembers musthave Addition setas theconsolidationoperator.Children of LabelOnly memberscan be set toIgnore.
Chapter 17Administering Dimensions
17-25
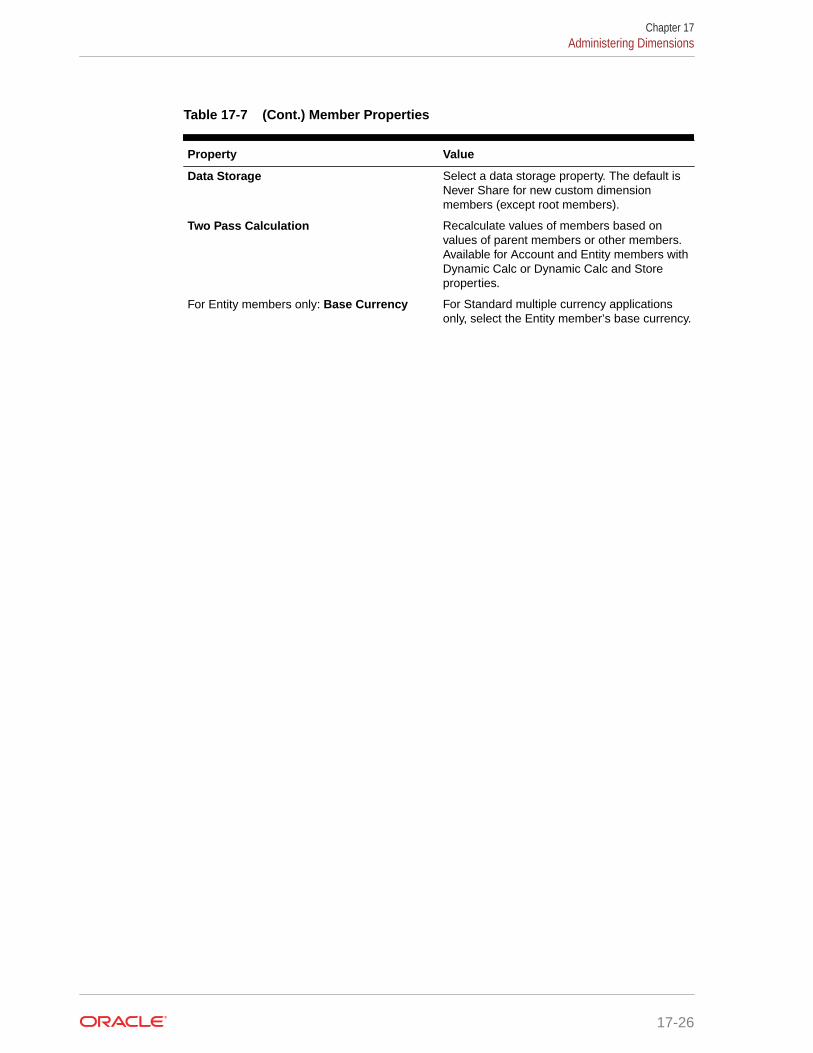
Table 17-7 (Cont.) Member Properties
Property Value
Data Storage Select a data storage property. The default isNever Share for new custom dimensionmembers (except root members).
Two Pass Calculation Recalculate values of members based onvalues of parent members or other members.Available for Account and Entity members withDynamic Calc or Dynamic Calc and Storeproperties.
For Entity members only: Base Currency For Standard multiple currency applicationsonly, select the Entity member’s base currency.
Chapter 17Administering Dimensions
17-26
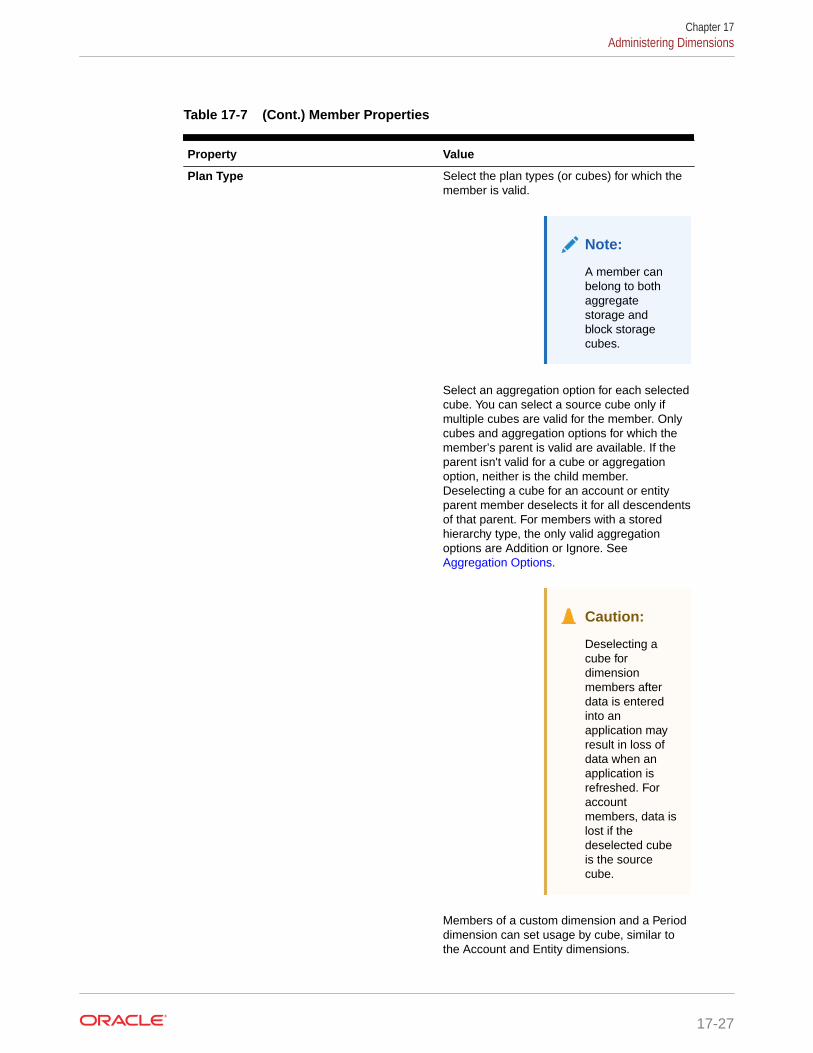
Table 17-7 (Cont.) Member Properties
Property Value
Plan Type Select the plan types (or cubes) for which themember is valid.
Note:
A member canbelong to bothaggregatestorage andblock storagecubes.
Select an aggregation option for each selectedcube. You can select a source cube only ifmultiple cubes are valid for the member. Onlycubes and aggregation options for which themember’s parent is valid are available. If theparent isn't valid for a cube or aggregationoption, neither is the child member.Deselecting a cube for an account or entityparent member deselects it for all descendentsof that parent. For members with a storedhierarchy type, the only valid aggregationoptions are Addition or Ignore. See Aggregation Options.
Caution:
Deselecting acube fordimensionmembers afterdata is enteredinto anapplication mayresult in loss ofdata when anapplication isrefreshed. Foraccountmembers, data islost if thedeselected cubeis the sourcecube.
Members of a custom dimension and a Perioddimension can set usage by cube, similar tothe Account and Entity dimensions.
Chapter 17Administering Dimensions
17-27
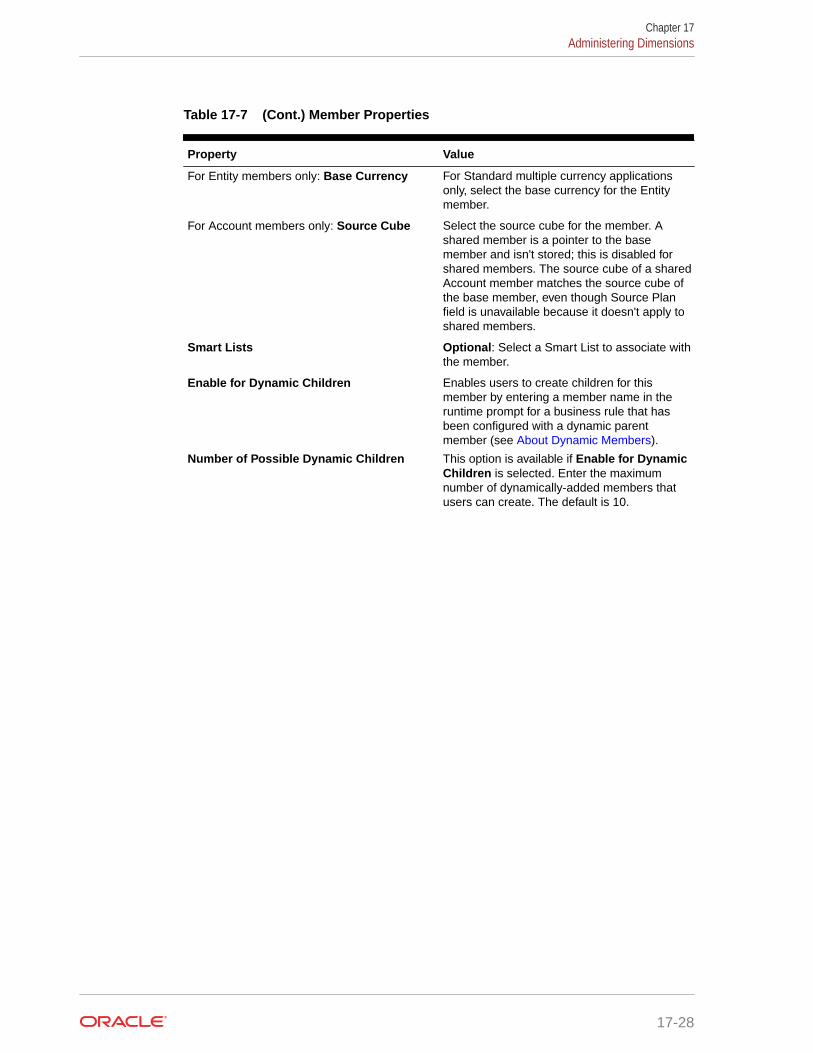
Table 17-7 (Cont.) Member Properties
Property Value
For Entity members only: Base Currency For Standard multiple currency applicationsonly, select the base currency for the Entitymember.
For Account members only: Source Cube Select the source cube for the member. Ashared member is a pointer to the basemember and isn't stored; this is disabled forshared members. The source cube of a sharedAccount member matches the source cube ofthe base member, even though Source Planfield is unavailable because it doesn't apply toshared members.
Smart Lists Optional: Select a Smart List to associate withthe member.
Enable for Dynamic Children Enables users to create children for thismember by entering a member name in theruntime prompt for a business rule that hasbeen configured with a dynamic parentmember (see About Dynamic Members).
Number of Possible Dynamic Children This option is available if Enable for DynamicChildren is selected. Enter the maximumnumber of dynamically-added members thatusers can create. The default is 10.
Chapter 17Administering Dimensions
17-28
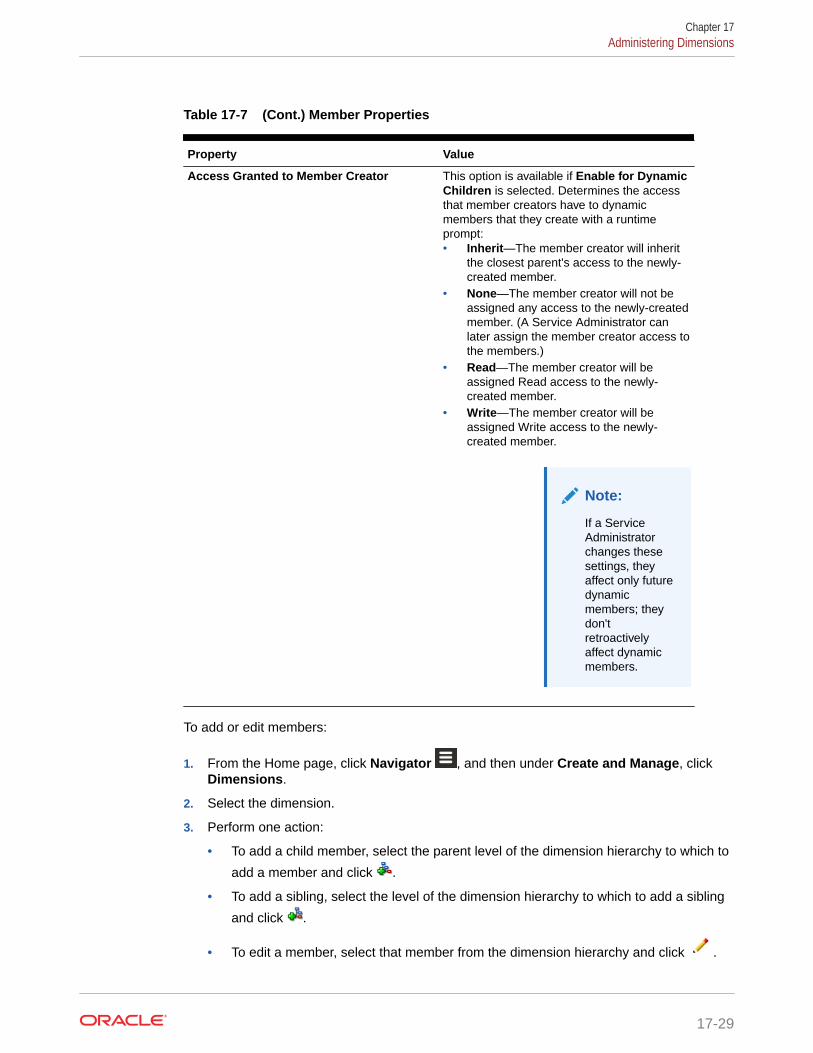
Table 17-7 (Cont.) Member Properties
Property Value
Access Granted to Member Creator This option is available if Enable for DynamicChildren is selected. Determines the accessthat member creators have to dynamicmembers that they create with a runtimeprompt:• Inherit—The member creator will inherit
the closest parent's access to the newly-created member.
• None—The member creator will not beassigned any access to the newly-createdmember. (A Service Administrator canlater assign the member creator access tothe members.)
• Read—The member creator will beassigned Read access to the newly-created member.
• Write—The member creator will beassigned Write access to the newly-created member.
Note:
If a ServiceAdministratorchanges thesesettings, theyaffect only futuredynamicmembers; theydon'tretroactivelyaffect dynamicmembers.
To add or edit members:
1. From the Home page, click Navigator , and then under Create and Manage, clickDimensions.
2. Select the dimension.
3. Perform one action:
• To add a child member, select the parent level of the dimension hierarchy to which to
add a member and click .
• To add a sibling, select the level of the dimension hierarchy to which to add a sibling
and click .
• To edit a member, select that member from the dimension hierarchy and click .
Chapter 17Administering Dimensions
17-29
Note:
To add an All Years parent member that includes all members of the
Years dimension, select the Years dimension and then click . The AllYears parent member enables users to view the accumulated dataacross multiple years, for example, a project's total cost up to its enddate. The All Years member doesn't include the No Year member, if oneis defined for the application.
4. On Member Properties, set or change member properties described in Table 1.
If you don't see the new member on the page, click Next.
5. Click Save to save information to the relational database and see changes in thedimension hierarchy.
6. Refresh the database so edited members are visible to users entering data.
7. After creating a dimension member, you typically complete these tasks:
• Assign access. See Assigning Access to Dimension Members.
• Specify attributes.
Deleting MembersEach data value is identified by a set of dimension member values and a cube.Deleting dimension members or deselecting the cube results in data loss whenrefreshing an application. Deleting entity members deletes all approval units (includingdata) associated with them.
Before deleting members, understand where in the application they are used (in whichforms, approval units, exchange rates, and so on) by using Show Usage. See Determining Where Members Are Used in an Application.
You must delete the entity member throughout the application before deleting it fromDimensions. For example, if the entity member is used in a form, you must delete itfrom the form before deleting it from Dimensions.
To delete members:
1. From the Home page, click Navigator , and then under Create and Manage,click Dimensions.
2. Select the dimension whose member you want to delete.
3. From the dimension hierarchy, select the entity member to delete.
4. Click .
Deleting a base member also deletes its shared members.
5. Click Yes.
6. Update and validate business rules and reports.
Chapter 17Administering Dimensions
17-30
Deleting Parent MembersData values are identified by a set of dimension member values and a cube. Deletingdimension members or deselecting the cube results in data loss when refreshing theapplication.
To delete a parent member and all its descendants from the dimension hierarchy:
1. From the Home page, click Navigator , and then under Create and Manage, clickDimensions.
2. Select the dimension whose member and descendants you want to delete.
3. Select the member whose branch to delete.
4. Click .
5. Click Yes.
Working with Shared MembersSharing members allow alternate rollup structures within an application. A base member mustexist before you can create a shared member. You can create multiple shared members forthe base member. A base member must display before its shared members in position fromtop to bottom.
Shared members are available for Entity, Account, and user-defined custom dimensions.Shared member values can be ignored to avoid double-counting values when you roll up theoutline.
Shared members share some property definitions with base members, such as membername, alias name, base currency, and cubes for which members are valid. Shared membersmust have unique parent members and different rollup aggregation settings. Customattributes, custom attribute values, and member formulas are not allowed for sharedmembers. Renaming base members renames all shared members.
Shared members can't be moved to another parent member. You must delete sharedmembers and recreate them under different parent members. The base member need not belevel zero. You can enter data in shared members, and values are stored with basemembers.
Shared members are displayed similarly to base members in the dimension hierarchy formember selection in Oracle Smart View for Office.
Creating Shared MembersYou create shared members the same way as other members, with these differences:
• The base member can't be the parent of the shared member.
• You can't add a shared member as a sibling to the base member.
• You must give the shared member the same name as its base member. It can have adifferent description.
• You must select Shared as the Data Storage for the shared member.
Chapter 17Administering Dimensions
17-31
About Dynamic MembersDynamic members are members that users can create when working with businessrules. They're sometimes referred to as "on the fly members." A Service Administratorenables end users to create dynamic members under a parent member and mustrefresh the database to create the required placeholders in Essbase. In business ruleswith runtime prompts, users can then create members by entering desired membernames in the runtime prompts. Subsequent database refreshes will rename useddynamic children to the names specified by the end users and recreate the requiredplaceholders in Essbase. For information about working with business rules anddynamic members, see Designing with Calculation Manager for Oracle EnterprisePerformance Management Cloud .
If a parent member is enabled for adding dynamic children, users can create newmembers by entering their name in the runtime prompt.
Enabling Parent Members for Adding Dynamic Children
To enable a parent member for adding dynamic children:
1. From the Home page, click Navigator , and then under Create and Manage,click Dimensions.
2. Edit the parent member and select the option Enable for Dynamic Children (see Adding or Editing Members).
• Optional: Set the member property Number of Possible Dynamic Children(the default is 10). This setting determines the number of placeholders that arecreated for dynamically adding or loading members under the parent. If allplaceholders are used, subsequently added children are added as normalmembers and can't be used until the database is refreshed.
• Optional: Set the member property Access Granted to Member Creator (thedefault is Inherit).
3. Refresh the database to create the placeholders for dynamic members in thedatabases for the cubes in which the members are used.
4. In Calculation Manager:
a. Create a business rule with a runtime prompt (of the Variable type Member).Under the Dynamic Member Parent column, use the Member Selector toselect the parent member that you enabled for dynamic children in theapplication.
b. Select the option Create dynamic members.
c. Deploy the business rule.
For information about working with business rules, see Designing withCalculation Manager for Oracle Enterprise Performance Management Cloud .
Chapter 17Administering Dimensions
17-32
Note:
• In Calculation Manager, selecting both the Create dynamic members andthe Delete dynamic members options enables temporary dynamicmembers to be created for calculations, and those temporary dynamicmembers will be deleted after the business rule completes.
• Selecting the Delete dynamic members option alone presents you withthe Member Selector in the runtime prompt so you can delete any memberthat you created dynamically under the parent (if you have write access tothat member). This enables you to have full control over cleaning up andmanaging the members under the parent. The key is proper design to fityour requirements, setting the appropriate access rights to dynamicchildren with the Access Granted to Member Creator member property.
Results
If all the above conditions are met, when users run the business rule with the runtime prompt,they enter the name of the dynamic member, and then click Launch. If the business rule runssuccessfully, the member is created in the dimension hierarchy under the dynamic member'sparent.
Child members that you import under parent members enabled for dynamic children areadded as dynamic child members if there are dynamic member placeholders in Essbase.After the placeholders are full, any remaining children are added as normal members, andcan't be used until the database is refreshed.
Note:
If you load a parent member that is enabled for dynamic children and its childmembers during the same import, the child members are loaded as normalmembers. This is because the database must be refreshed to create theplaceholders in Essbase.
Considerations
When you create a dynamic member and data is captured against that member in multiplecubes (either through direct data entry, through calculations, data load, or data maps/SmartPush), then you must ensure that you clear the data from each of these areas before youremove the member using the Delete dynamic members operation. Performing the Deletedynamic members operation does not remove the data; the member is removed but thecube(s) will retain the data without the member showing up in the interface, and any rollup onthe cube will reflect incorrect totals.
Working with AttributesUse attributes to group members using the same criterion. You can assign attributes tosparse dimensions only. You can't assign attributes to label-only members. Attributedimensions don't have aggregation properties because parents are dynamically calculated.
Chapter 17Administering Dimensions
17-33
The Account dimension is usually defined as dense, so you can't assign attributes to itunless it's changed to sparse for all cubes. If you change a dimension from sparse todense, all attributes and attribute values for that dimension are automatically deleted.
Attributes can have data types of text, date, Boolean, and numeric, as described in Understanding Attribute Data Types. Attribute names must conform to guidelines listedin Naming Restrictions. When attributes are defined, you can use the MemberSelection dialog box to select attribute functions, such as Equal andGreaterOrEqual.
Note:
This topic documents how to work with attributes using the ClassicDimension Editor. For information about using the Simplified DimensionEditor to work with attributes, see Working with Attributes in the SimplifiedDimension Editor.
To create and change attributes, attribute values, and aliases:
1. From the Home page, click Navigator , and then under Create and Manage,click Dimensions.
2. Select a sparse dimension for which to define an attribute, attribute value, or alias.
Note:
Only sparse dimensions can contain attributes.
3. Click .
Note:
If the dimension isn't sparse, Custom Attributes isn't available.
4. Select options.
• To create attributes, click . Type an attribute name, and select a data type:Text, Date, Boolean, or Numeric.
Note:
– You can't modify the type after the attribute is created.
– Before working with date attributes, you must select theAttribute Dimension Date Format in Application Settings andsave it.
Chapter 17Administering Dimensions
17-34
See Understanding Attribute Data Types.
• To modify attributes, click , and update the attribute name.
• To set aliases for attributes, select an attribute and an attribute value, click . Selectan alias table, type an alias name, and click Save.
5. Click Close.
When you click Close, the hierarchy is validated and an error displays if issues aredetected. For example, date attribute values must be entered in the correct format, andnumeric and date attribute dimensions must have at least one attribute value defined.
6. Update and validate business rules and reports.
Related topics:
• Understanding Attribute Data Types
• Deleting Attributes
Note:
Instead of explicitly filtering by an attribute (like Red, for instance), you can create auser variable for the attribute dimension, and then use the user variable as the filter.Then you can enable the user variable as a dynamic user variable which wouldallow users to change the value of the filter at runtime. This is a useful techniquethat allows for dynamic filtering. See Managing User Variables.
Understanding Attribute Data TypesAttribute dimensions can have a data type of text, numeric, Boolean, or date that enablesdifferent functions for grouping, selecting, or calculating data. The attribute type applies onlyto level 0 members of the attribute dimension.
• Text attributes enable basic attribute member selection and attribute comparisons incalculations. When you perform such comparisons, characters are compared. Forexample, a package type Bottle is less than a package type Can because B precedes Cin the alphabet.
• Numeric attribute dimensions use numeric values for the names of level 0 members. Youcan include the names (values) of numeric attribute dimension members in calculations.For example, you can use the number of ounces specified in an Ounces attribute tocalculate profit per ounce for each product. You can also associate numeric attributeswith ranges of base dimension values, for example, to analyze product sales by marketpopulation groupings.
• Boolean attribute dimensions in a database contain only two members. When a Booleanattribute dimension is added in the business process, two attribute values, True andFalse, are created for this attribute dimension by default. A base dimension, such asAccount or Entity, can be associated with only one attribute dimension that has theBoolean data type.
• Date attributes can specify the date format as month-day-year or day-month-year, andsequence information accordingly. You can use date attributes in calculations, forexample, comparing dates in a calculation that selects product sales since 12-22-1998.
Chapter 17Administering Dimensions
17-35
Users can set the date format by selecting an option in Attribute Dimension DateFormat in Application Settings.
Caution:
Before you can work with date attributes, you must toggle the AttributeDimension Date Format selection in Application Settings and save it.From the Home page, click Application, and then click Settings. InAttribute Dimension Date Format, select a date format (MM-dd-yyyyor dd-MM-yyyy), and then click Save. After you select and save the dateformat, you must manually change any existing attribute date values tothe supported format. If any date attributes in your application use anunsupported format, the system will provide you with a list of dimensionattribute values that you will need to fix.
Also, if the Attribute Dimension Date Format setting is changed in theapplication settings, you must change any date attributes in the originalformat to the new format before you can add or save a new attribute.
Deleting AttributesWhen you delete an attribute, all attribute values associated with the attribute are alsodeleted. Attribute values are removed from members to which they had beenassigned, and the attribute is removed from dimensions to which it was assigned.
Note:
This topic documents how to delete attributes using the Classic DimensionEditor which is accessed by using the Dimensions link in the Navigatormenu. In a previous update, we released the Simplified Dimension Editor.
For information about using the Simplified Dimension Editor to deleteattributes, see Deleting Attributes in the Simplified Dimension Editor.
To delete attributes:
1. From the Home page, click Navigator , and then under Create and Manage,click Dimensions.
2. Select the sparse dimension for which to delete an attribute, and click .
3. Select the attribute to delete.
4. Above the Attributes column, click .
5. Click OK.
6. Update and validate business rules and reports.
Chapter 17Administering Dimensions
17-36
Working with Attribute ValuesAttribute values provide users with another way of selecting dimensions members whenusing forms. Data values for attribute values are dynamically calculated but not stored.
Note:
This topic documents how to work with attribute values using the Classic DimensionEditor. For information about using the Simplified Dimension Editor to work withattribute values, see Working with Attribute Values in the Simplified DimensionEditor.
• Creating Attribute Values
• Assigning Attribute Values to Members
• Editing and Deleting Attribute Values
Creating Attribute ValuesYou can define attribute values for sparse dimensions, which are typically the Entity and user-defined custom dimensions. After you define an attribute value for a dimension, you canassign it to members of that dimension.
To create attribute values:
1. From the Home page, click Navigator , and then under Create and Manage, clickDimensions.
2. Select the sparse dimension for which to create an attribute value.
3. Select the top level in the dimension hierarchy.
4. Click .
5. On the Manage Attributes and Values page, select the attribute for which to specify avalue.
6. Above the Attribute Values column, click . If the options are available, you can click
or .
7. Enter a name and choose a data type.
8. Click Save.
Assigning Attribute Values to MembersYou can assign attribute values members of a dimension that are defined as sparse for allcubes. Attribute values must be assigned to the same-level sparse dimension members.Otherwise, errors display during refresh.
To assign attribute values to members:
1. From the Home page, click Navigator , and then under Create and Manage, clickDimensions.
Chapter 17Administering Dimensions
17-37
2. Select the sparse dimension for whose member you want to assign an attributevalue.
3. In the Dimension hierarchy, select a member to which to assign an attributevalue.
4. Click .
5. For members assigned attribute values, click to change a member’s attributevalue.
6. Select attribute values to assign to the member.
7. Perform an action:
• To assign the value to the selected member, click .
• To remove a value from the selected member, select the value to remove and
click .
• To remove all values from the selected member, click .
8. Click Save.
Editing and Deleting Attribute Values
Note:
When you delete an attribute value, it's removed from custom dimensionmembers to which it's assigned.
To edit or delete attribute values:
1. From the Home page, click Navigator , and then under Create and Manage,click Dimensions.
2. Select the sparse dimension containing the attribute value you want to modify ordelete.
3. Select the top level in the dimension hierarchy.
4. Click .
5. For Attributes, select the attribute containing the value to modify or delete, andthen select the attribute value.
6. Above Attribute Values, click or .
7. If editing, enter a name. If deleting, confirm the deletion.
8. Click Save.
9. Update and validate business rules and reports.
Chapter 17Administering Dimensions
17-38
Customizing CalendarsUse the Period dimension to work with the yearly calendar rollup structure. When creating theapplication, the Service Administrator specifies the base time periods that span theapplication database. Use the Years dimension to add years to the calendar.
Related Topics
• Defining How Calendars Roll Up
• Creating and Editing Summary Time Periods
• Deleting Summary Time Periods
• Working with the Years Dimension
• Adding Years to the Calendar
• Editing Year Information
• Renaming Time Periods
• Assigning Aliases to Summary Time Periods
• Editing the BegBalance Member
Defining How Calendars Roll Up
Table 17-8 Calendar Roll Up
Base Time Period Roll Up
12 Months Four quarters are created per year. Months roll upinto parent quarters and quarters roll up intoyears.
Quarters Quarters roll up into years.
Custom No default rollup structures. A flat list of thecustom base time periods displays.
After the application calendar is created, you can't change the base time period or reduce thenumber of years in the calendar. Service Administrators can change the names, descriptions,aliases, and ranges of the summary time periods in the hierarchy.
Creating and Editing Summary Time PeriodsYou can change such aspects as name, description, alias, starting period, and ending period.However, you can't change the order of base time periods or skip base time periods. Therange can't extend beyond the current fiscal year.
You must work from the top of the hierarchy to the bottom when creating summary timeperiods. (Otherwise, the application views the rollup structure as asymmetrical and you can'tcontinue.) The summary time period displays in the hierarchy as a parent of the selecteditem. To enforce a balanced hierarchy, all base members must be the same number of levelsfrom the root.
To create or edit summary time periods:
Chapter 17Administering Dimensions
17-39
1. From the Home page, click Navigator , and then under Create and Manage,click Dimensions.
2. For Dimension, select Period.
3. Perform one action:
• To add a time period, select the time period in the dimension hierarchy to
which you want to add a child or sibling, and then click or .
• To edit a time period, select the time period and click .
4. For Name, enter or change the name for the summary time period.
5. Optional: For Description, enter a description.
6. Optional: For Alias Table and Alias, select an alias table to use. Enter an aliasname.
The default table is used if you don't select one.
7. For Start Period, select the starting period.
The range can't extend beyond the current fiscal year. For summary time periods,Start Period displays the first child, or all children except the first child of thesibling above it.
8. For End Period, select the ending period.
For summary time periods, End Period displays the last child, or all children fromthe Start Period through the next sibling’s children, except the last child.
9. Click Save.
Deleting Summary Time PeriodsWhen you remove a summary time period from the hierarchy, its children are movedinto another summary time period:
• If you delete the first summary time period, children are moved into the next siblingof the summary time period.
• If you delete the last summary time period, children are moved into the previoussibling of the summary time period.
• If you delete a summary time period from the middle of a hierarchy, children aremoved into the previous sibling of the summary time period.
To delete summary time periods:
1. Click the Navigator icon , and then under Create and Manage, clickDimensions.
2. For Dimension, select Period.
3. In the dimension hierarchy, select the summary time period to delete.
You can't delete base time periods.
4. Click .
5. Click OK.
Chapter 17Administering Dimensions
17-40
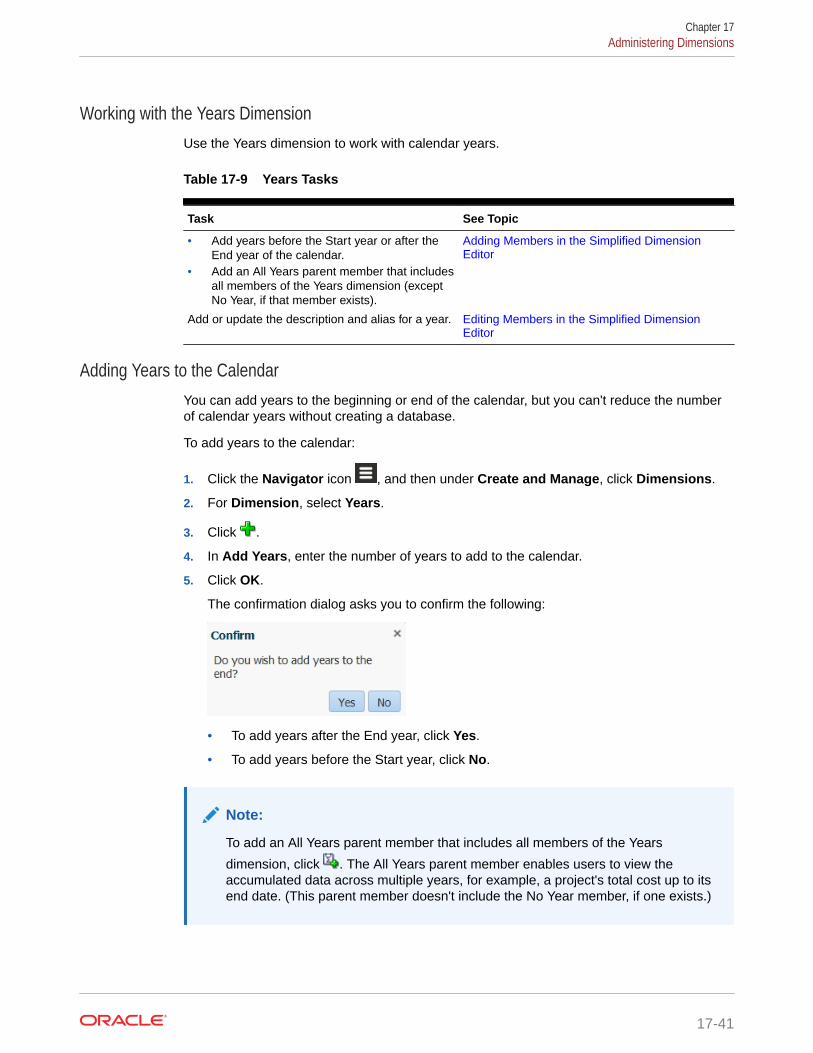
Working with the Years DimensionUse the Years dimension to work with calendar years.
Table 17-9 Years Tasks
Task See Topic
• Add years before the Start year or after theEnd year of the calendar.
• Add an All Years parent member that includesall members of the Years dimension (exceptNo Year, if that member exists).
Adding Members in the Simplified DimensionEditor
Add or update the description and alias for a year. Editing Members in the Simplified DimensionEditor
Adding Years to the CalendarYou can add years to the beginning or end of the calendar, but you can't reduce the numberof calendar years without creating a database.
To add years to the calendar:
1. Click the Navigator icon , and then under Create and Manage, click Dimensions.
2. For Dimension, select Years.
3. Click .
4. In Add Years, enter the number of years to add to the calendar.
5. Click OK.
The confirmation dialog asks you to confirm the following:
• To add years after the End year, click Yes.
• To add years before the Start year, click No.
Note:
To add an All Years parent member that includes all members of the Years
dimension, click . The All Years parent member enables users to view theaccumulated data across multiple years, for example, a project's total cost up to itsend date. (This parent member doesn't include the No Year member, if one exists.)
Chapter 17Administering Dimensions
17-41
Editing Year InformationYou can add or update the description and alias for a member of the Years dimension.
To edit a member of the Years dimension:
1. Click the Navigator icon , and then under Create and Manage, clickDimensions.
2. For Dimension, select Years.
3. Select the year you want to edit, and then click .
4. Update the information for that year, and then click Save.
Renaming Time PeriodsYou can rename root-level, base time periods, and user-defined summary timeperiods.
To rename time periods:
1. Click the Navigator icon , and then under Create and Manage, clickDimensions.
2. For Dimension, select Period.
3. Select the time period you want to rename, and then click .
4. Rename the time period, and then click Save.
Assigning Aliases to Summary Time PeriodsYou can assign and change aliases to base time periods and summary time periods.
To assign or change the alias:
1. Click the Navigator icon , and then under Create and Manage, clickDimensions.
2. For Dimension, select Period.
3. Select the summary time period.
4. Click .
5. For Alias Table, select the alias table to use.
6. For Alias, enter an alias name.
7. Click Save.
Editing the BegBalance MemberYou can edit the BegBalance member of the Period dimension. As the first time periodin the application, the BegBalance member is useful for entering beginning data whenyou start a new application, fiscal year, or calendar year. You can rename and describeBegBalance and give it an alias.
Chapter 17Administering Dimensions
17-42
To edit the BegBalance member:
1. Click the Navigator icon , and then under Create and Manage, click Dimensions.
2. For Dimension, select Period.
3. Select the first member, BegBalance.
4. Click .
5. For Edit Period:
• Enter a name.
• Enter a description.
• Select an alias table to use for the BegBalance member, and enter an alias.
6. Click Save.
Setting Up CurrenciesYou can plan, forecast, and analyze financial information in one or more currencies. You cancreate, edit, and delete currencies. Service Administrators control:
• Which currencies an application uses, including for reporting
• How currencies display in reports and forms
• How currencies convert to other currencies
• For Standard multiple currency applications, whether a triangulation currency convertscurrencies
• When currency conversions occur
Enabling Multiple CurrenciesIn a Standard multiple currency application only, you can enable multiple currencies per entityon forms. See Defining the Layout.
When selecting business rules for forms, you can select the Calculate Currencies businessrule to convert values among the available currencies. See Adding and Removing Rules inForms.
• Working with Currencies in a Standard Multicurrency Application
• About the Calculate Currencies Business Rule
• Exchange Rate Types
• Scaling
• Number Formatting
• Reporting Currencies for Standard Multicurrency Applications
• Checking How Currencies are Used
• Creating Currencies
• Editing Currencies
• Deleting Currencies
Chapter 17Administering Dimensions
17-43
Base Currency
For a Standard multiple currency application, specify each entity member’s basecurrency. The default base currency for entity members is the currency specified whencreating the application. For example, if U.S. Dollars is the default currency, you mayspecify Yen as the base currency for the Japan entity and U.S. Dollars for the UnitedStates entity. When using forms having values for the Japan entity, if the displaycurrency is set to U.S. Dollars, values are converted to U.S. Dollars using the rates inthe exchange rate table (assuming Yen is the local currency and U.S. Dollars is thereporting currency).
Note:
If the Simplified multiple currency option was selected during applicationcreation, you don't need to specify a base currency for entity members. See About Simplified Multicurrency in Administering Planning.
Working with Currencies in a Standard Multicurrency Application
Note:
This topic assumes the Standard multiple currency option was selectedduring application creation. If the Simplified multiple currency option wasselected, see About Simplified Multicurrency in Administering Planning.
If multiple currencies are enabled, users can see values converted from the localcurrency to a reporting currency and can override a cell’s base currency.
Chapter 17Administering Dimensions
17-44
Note:
• When the local currency is selected on forms, the default stored and displayedcurrency for cells is the entity’s base currency (which you specify). Users canenter data values only into local currency members. If the local currencymember is selected, all currencies specified for the application are available asinput types.
• You can set dimension properties for each currency in the Edit Currency dialogbox. In preferences, users can select different display options, and can selectCurrency Setting to apply the properties set by the Service Administrator.
• Currencies can be converted only to reporting currencies. Users can't enterdata into cells displayed in reporting currencies. The application’s maincurrency is by default a reporting currency. You can change which currenciesare reporting currencies.
• Currencies defined for the application are valid currencies for data entry. Validcurrencies for data entry are displayed in a list that users access by clicking theCurrency link during data entry.
• To get meaningful results, roll up values in one common reporting currency. Ifmembers of a subtotal have mixed currencies, the currency type is blank andthe currency symbol doesn't display. For example, adding 10 US dollars and 10Japanese yen to a value of 20 makes no sense.
• An application with 500 time periods can successfully run currency conversioncalculation scripts only if the time periods have default names, TP 1 through500. Otherwise, the conversion calculation script you try to create exceeds the64K limit.
• User-defined currency conversion calculation scripts created when a databaseis created or refreshed may be available in Oracle Smart View for Office,depending on user access. When using user-defined currency conversioncalculation scripts, Oracle recommends changing the order so the currencyconversion calculation script is first, before Calculate Form.
• Currency codes associated with input values are stored as numeric values.These codes are calculated in dimension formulas, calculation scripts, andbusiness rules. The calculated values of these currency codes may translate tocurrency codes that are incorrect or invalid. Where there are children withmixed currencies, review calculated results on the upper levels.
• If a parent has multiple children, of whom only one child has an overriddencurrency, the parent inherits the overridden currency code (which isn't displayedon forms).
• In certain cases, parent entities display #MISSING when trying to convert to aselected currency. Ensure that a currency rate is entered for each combinationof local currencies and selected currencies on forms or reports. Currencycombinations must exist for all mixed-currency children entities and parentmembers.
• Input of multiple currencies to one entity isn't supported in Smart View. Ifworksheets include mixed currency types, users could inadvertently entervalues in the wrong currency.
Chapter 17Administering Dimensions
17-45
About the Calculate Currencies Business Rule
Note:
This topic assumes the Standard multiple currency option was selectedduring application creation. If the Simplified multiple currency option wasselected, see About Simplified Multicurrency in Administering Planning.
The Calculate Currencies business rule is based on the dimensions and members onthe form. It converts data from the local currency to the reporting currency specified onthe form, applying the exchange rate conversions. It:
• Doesn't calculate subtotals. To subtotal values, run the Calculate Form businessrule (or a customized business rule that includes aggregation) after convertingcurrencies.
• Ignores #MISSING values.
• Can be turned on or off by associating or disassociating it with forms during formdesign.
• Is set by default to not run when saving data.
Exchange Rate Types
Exchange Rate Types for Standard Multicurrency Applications
For Standard multiple currency applications, these are the exchange rate types thatare associated with currencies: Historical, Average, and Ending.
The exchange rate type for each account is specified in the Member Property dialogbox. For average and ending rate types, enter values for all time periods. For historicalrate types, enter one rate value that is used for all time periods, including theBeginning Balance period. For the Beginning Balance period, enter one rate valueused for that time period for average and ending rate types.
A Standard multiple currency application supports currency conversion by triangulationthrough a triangulation currency.
Exchange Rate Types for Simplified Multicurrency Applications
For Simplified multiple currency applications, these are the exchange rate types thatare associated with currencies: FX Rates-Average and FX Rates-Ending. See AboutSimplified Multicurrency in Administering Planning.
Scaling
You can specify scaling data values when displayed in certain currencies. Forexample, you can set the scaling for Yen to Thousands, then enter 10,000 as a valuefor the Japan entity on a form with the Local member selected for the Currencydimension. When you select Yen as the currency member for the form, the scaling isapplied and 10 displays as the value for Japan.
Chapter 17Administering Dimensions
17-46
Number Formatting
You can determine the initial display of numerical values for non-currency and currency datatypes in forms:
• Thousands separator:
– None—1000
– Comma—1,000
– Dot—1.000
– Space—1 000
• Decimal separator:
– Dot—1000.00
– Comma—1000,00
• Negative number sign:
– Prefixed minus— -1000
– Suffixed minus—1000-
– Parentheses—(1000)
• Negative number color:
– Black
– Red
Reporting Currencies for Standard Multicurrency Applications
Note:
This topic assumes the Standard multiple currency option was selected duringapplication creation. If the Simplified multiple currency option was selected, see About Simplified Multicurrency in Administering Planning.
A reporting currency is the currency in which your company prepares financial statements.The application supports currency conversion from local currencies to one or more reportingcurrencies. Converted reporting currency values are stored and read-only for all users. Anapplication’s default currency is the default reporting currency. You can disable a currency asa reporting currency.
Checking How Currencies are Used
You can view how an application uses currency: whether a currency is the default, is used fortriangulation currency or by an entity (for Standard multicurrency applications), or has aconversion or exchange relationship with other currencies.
To see how currencies are used:
1. From the Home page, click Application, and then click Overview.
2. Click the Dimensions tab, and then select the Currency dimension.
Chapter 17Administering Dimensions
17-47
3. Select the currency for which you want information.
4. Click Actions, and then click Show Usage.
Creating Currencies
Select from a predefined list or create your own. You can specify:
• The three-letter code
• The symbol
• A description of up to 256 characters
• The scaling factor to use when values are displayed
• For Standard multicurrency applications, the triangulation currency to use forcurrency conversion
• The alias table to use to display aliases
• Number formatting, including thousands separator, decimal separator, negativesign, and color
• Whether it's a reporting currency
To create currencies:
1. From the Home page, click Application, and then click Overview.
2. Click the Dimensions tab, and then select the Currency dimension.
3. Create a currency:
• To add a predefined currency, click Actions, then click Add StandardCurrency, select from a list of standard currencies, and then click OK.
• To create a currency, click Actions, then click Add Currency and specifyproperties:
– For Member Name, enter an abbreviation or identifier of up to threecharacters.
– Optional: For Description, enter a name, such as Japanese yen.
Note:
To view all property columns in the grid, including theDescription column, right-click any heading on the grid andscroll down until you see the Default mode check box. Clear theDefault mode check box to view all the property columns in thegrid.
– For Symbol, enter a symbol, or select a symbol from the PredefinedSymbol column.
– Optional: For Scale, select how to enter and display the currency. Forexample, 3 yen represents 3000 yen if scaling is set to thousands.
– Optional: For Triangulation Currency (for Standard multicurrencyapplications), select the currency to use as the common third currency forconversion.
Chapter 17Administering Dimensions
17-48
– Optional: For Alias Table, select the alias table to use.
– Optional: For Alias, enter a name for the currency alias.
4. Optional: Select Reporting Currency (see Working with Currencies in a StandardMulticurrency Application).
5. Optional: For Thousands Separator, select how to display the thousands separator (itmust differ from the decimal separator).
6. Optional: For Decimal Separator, select how to display numbers with decimal values (itmust differ from the thousands separator).
7. Optional: For Negative Sign, select how to display negative numbers:
• Prefixed minus— -1000
• Suffixed minus—1000-
• Parentheses—(1000)
8. Optional: For Negative Color, select the display color.
9. Optional: Select the type of Data Storage.
10. Optional: Select Two Pass Calculation.
11. Optional: Select the Data Type.
12. Optional: Select a Smart List.
13. Click Save.
Editing Currencies
To edit currencies:
1. Click the Navigator icon , and then under Create and Manage, click Dimensions.
2. From Dimension, select Currency.
3. Select the currency to edit.
4. Click .
5. Click the Currency tab.
6. Modify properties:
• To select from the predefined symbols, select one from the Select from PredefinedSymbols drop-down list.
• To change the currency’s symbol, for Symbol, enter or select the symbol.
• For Scale, set how to enter and display the currency.
• For set currency precision (the number of digits to the right of the decimal place),select a number from 1 to 10 from the Precision drop-down list.
None is the default.
Chapter 17Administering Dimensions
17-49
Note:
Service Administrators can override this setting for forms. See Setting Form Precision and Other Options.
• To specify the currency as a reporting currency, select Reporting Currency.
See Working with Currencies in a Standard Multicurrency Application.
• For Thousands Separator, select how to display the thousands separator (itmust differ from the decimal separator).
• For Decimal Separator, select how to display numbers with decimal values (itmust differ from the thousands separator).
• For Negative Sign, select how to display negative numbers:
– Prefixed Minus— -1000
– Suffixed Minus—1000-
– Parentheses—(1000)
– Use Default Setting—Apply the display setting for the currency (see Creating Currencies).
• For Negative Color, select the display color.
7. Click Save.
Deleting Currencies
You can't delete the default currency.
To delete currencies:
1. Click the Navigator icon , and then under Create and Manage, clickDimensions.
2. From Dimension, select Currency.
3. Select the currency to delete.
4. For multiple currency applications, click to determine if the currency is thedefault currency. If a Standard multicurrency application is used, determine if thecurrency is a triangulation currency, or if the currency is associated with an entity.You can't delete a currency that meets these criteria.
Note:
For Standard multiple currency applications, if you delete a currencydefined in the exchange rate table, it's deleted from the table.
5. Click Close.
6. Click , and then click OK.
7. Update and validate business rules and reports.
Chapter 17Administering Dimensions
17-50
Specifying Exchange Rates
Note:
This topic assumes the multiple currency option was selected during applicationcreation. If the Simplified multiple currency option was selected, see AboutSimplified Multicurrency in Administering Planning.
Use exchange rates to convert values from one currency to another. You can:
• Enable budget preparers in various countries to create plans in other currencies
• Show summary report data in a currency
• Summarize values from multiple currencies into one currency
For example, you might specify yen as the base currency for the Japan entity and US dollarsfor the United States entity. When you display a form having values for the Japan entity andthe form’s display currency is set to US dollars, the exchange rates for the yen is used toconvert the values for Japan to US dollars. If the display currency is set to yen, the exchangerates for US dollars converts values for the United States entity to yen.
To specify exchange rates, you must set up multiple currencies when creating an application.
• About Exchange Rate Tables for Standard Multicurrency Applications
• Hsp_Rates Dimension for Standard Multicurrency Applications
• Triangulation
• Calculation Method
About Exchange Rate Tables for Standard Multicurrency Applications
Note:
This topic assumes the Standard multiple currency option was selected duringapplication creation. If the Simplified multiple currency option was selected, see About Simplified Multicurrency in Administering Planning.
Each application has a default currency specified when the application is created. When youspecify exchange rate tables, only the default currency and triangulation currencies areavailable as destination currencies. You can enter exchange rates from source currencies todefault or triangulation currencies.
You can create multiple exchange rate tables. Each table is typically associated with multiplescenarios, but each scenario can be associated with only one exchange rate table. Whencreating scenarios, select the exchange rate table for converting currencies.
Enter conversion values between the default currency and currencies defined in theExchange Rates page. Exchange rate tables span all application time periods, so you canapply exchange rates to all scenarios. When creating or modifying exchange rate tables, you
Chapter 17Administering Dimensions
17-51
must refresh the application to store them in the cubes. See Refreshing ApplicationDatabases.
Hsp_Rates Dimension for Standard Multicurrency Applications
Note:
This topic assumes the Standard multiple currency option was selectedduring application creation. If the Simplified multiple currency option wasselected, see About Simplified Multicurrency in Administering Planning.
A Standard multiple currency application includes the Hsp_Rates dimension for storingexchange rates. It includes these members and others that store currency rates:
• Hsp_InputValue—Stores data values
• Hsp_InputCurrency—Stores currency types for data values
When generating reports or loading data, refer to the Hsp_InputValue member. Whenloading data, you must load data against the local currency. You need not refer to theHsp_InputCurrency member.
By default, the Hsp_Rates dimension is set to Sparse. You can change this (see Setting Dimension Density and Order).
Triangulation
Note:
This topic assumes the multiple currency option was selected duringapplication creation. If the Simplified multiple currency option was selected,see About Simplified Multicurrency in Administering Planning.
A multiple currency application supports currency conversion by triangulation throughan interim currency called the triangulation currency. If you modify a currency’striangulation currency, you must re-enter exchange rates for the triangulation currencyproperty and refresh the application to transfer and store the exchange rates. You can'tselect the application’s default currency as a triangulation currency.
Calculation Method
When you input exchange rates for converting between currencies, you can selectMultiply or Divide as the calculation method. For example, if you select 1.5 as the ratefor converting British Pounds to US dollars, and select multiply as the calculationmethod, 1 British Pound is converted to 1.5 US dollars.
Setting up Dynamic Time Series MembersYou can use Dynamic Time Series members to create reports that show period-to-datedata, such as quarter-to-date expenses. Dynamic Time Series members are createdautomatically during application creation, and can be used with members of the Period
Chapter 17Administering Dimensions
17-52
dimension. To set up Dynamic Time Series, you enable a predefined Dynamic Time Seriesmember and associate it with a generation number (and, optionally, an alias table and aliasname). For example, to calculate quarter-to-date values, you can enable the Q-T-D (quarter-to-date) member and associate it with generation number 2. You can then use the Q-T-DDynamic Time Series member to calculate monthly values up to the current month in thequarter.
Note:
Dynamic Time Series isn't supported for the Period dimension in an aggregatestorage application.
The Dynamic Time Series members provide up to eight levels of period-to-date reporting.Your data and database outline determine which members you can use. For example, if thedatabase contains hourly, daily, weekly, monthly, quarterly, and yearly data, you can report D-T-D (day-to date), W-T-D (week-to-date), M-T-D (month-to-date), Q-T-D, and Y-T-Dinformation. If the database contains monthly data for the past 5 years, you can report Y-T-Dand H-T-D (history-to-date) information, up to a specific year. If the database tracks data forseasonal time periods, you can report P-T-D or S-T-D (season-to-date) information.
Oracle recommends that you avoid assigning time balance properties (such as First andAverage) to members set for dynamic calculations if you plan to use the members in DynamicTime Series calculations. Doing so may retrieve incorrect values for parent members in youraccounts dimension.
To set up Dynamic Time Series members:
1. Click the Navigator icon , and then under Create and Manage, click Dimensions.
2. Select the Period dimension, and then click .
3. Select Enabled for the DTS series to use:
• Y-T-D: Year-to-date
• H-T-D: History-to-date
• S-T-D: Season-to-date
• Q-T-D: Quarter-to-date
• P-T-D: Period-to-date
• M-T-D: Month-to-date
• W-T-D: Week-to-date
• D-T-D: Day-to-date
4. Select a generation.
The number of generations displayed depends on the number of generations in the timedimension. You can't associate Dynamic Time Series members with the highestgeneration (the dimension root).
5. Optional: Add an alias name. In the Edit Alias Name column, click , enter an aliasname, and then click OK.
6. Click Save.
Chapter 17Administering Dimensions
17-53
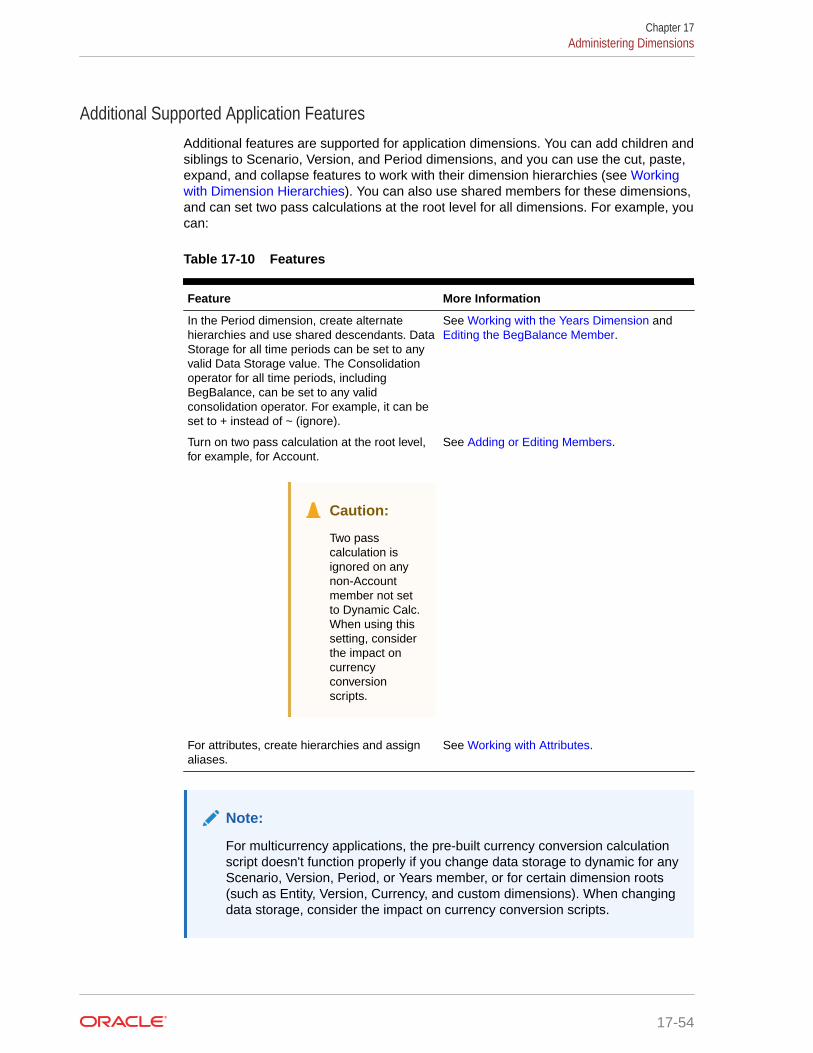
Additional Supported Application FeaturesAdditional features are supported for application dimensions. You can add children andsiblings to Scenario, Version, and Period dimensions, and you can use the cut, paste,expand, and collapse features to work with their dimension hierarchies (see Workingwith Dimension Hierarchies). You can also use shared members for these dimensions,and can set two pass calculations at the root level for all dimensions. For example, youcan:
Table 17-10 Features
Feature More Information
In the Period dimension, create alternatehierarchies and use shared descendants. DataStorage for all time periods can be set to anyvalid Data Storage value. The Consolidationoperator for all time periods, includingBegBalance, can be set to any validconsolidation operator. For example, it can beset to + instead of ~ (ignore).
See Working with the Years Dimension and Editing the BegBalance Member.
Turn on two pass calculation at the root level,for example, for Account.
Caution:
Two passcalculation isignored on anynon-Accountmember not setto Dynamic Calc.When using thissetting, considerthe impact oncurrencyconversionscripts.
See Adding or Editing Members.
For attributes, create hierarchies and assignaliases.
See Working with Attributes.
Note:
For multicurrency applications, the pre-built currency conversion calculationscript doesn't function properly if you change data storage to dynamic for anyScenario, Version, Period, or Years member, or for certain dimension roots(such as Entity, Version, Currency, and custom dimensions). When changingdata storage, consider the impact on currency conversion scripts.
Chapter 17Administering Dimensions
17-54
Considerations for Alternate Hierarchies in Period DimensionsIf you create an alternate hierarchy in the Period dimension, the alternate hierarchy mustfollow the YearTotal member in the outline.
Working with UDAsYou can use user-defined attributes (UDAs), descriptive words or phrases, within calc scripts,member formulas, reports, and forms. UDAs return lists of members associated with theUDA. For example:
• You can use the HSP_UDF UDA to prevent a formula from being overwritten when theapplication is refreshed. You must log on to each database associated with the businessprocess and create the member formula with a UDA. The syntax for this UDA is: (UDAs:HSP_UDF).
• If you use the @XREF function to look up a data value in another database to calculate avalue from the current database, you can add the HSP_NOLINK UDA to members toprevent the @XREF function from being created on all cubes that are not the source cubeselected for that member.
• For a Product dimension with several product members, you can create a UDA calledNew Products and assign this UDA to the new products in the Product dimensionhierarchy. Then you can base certain calculations on the designation New Products.
• For the budget review process, rather than creating a data validation rule for each ownerin a product line (some product lines can have hundreds of owners), you can create aUDA containing the user names that apply to members using the approval unit hierarchy.Then in the data validation rule, you can enter a lookup function which will return the usernames stored in the UDA for the current member. For example, create a UDA for eachuser in the promotional path and assign a prefix to the UDA name (for example,ProdMgr:Kim).
• When designing forms, you can use a UDA to select members for forms based on acommon attribute. When you create forms with UDAs, any members that are assigned tothe UDA are dynamically added to the form. For example, if you create a UDA calledNew Products and assign this UDA to the new products in the Product dimensionhierarchy, the form will automatically display the new products at runtime. When selectedin the form designer, a UDA is preceded by UDA; for example, UDA(New Products).
UDAs are specific to dimensions. For example, creating a UDA for an Account membermakes it available for non-shared Account members. Deleting it removes it for all Accountmembers. To make UDAs available for multiple dimensions, create the same UDA formultiple dimensions. For example, create a UDA named New for Account and Entitydimensions to make the UDA named New available for Account and Entity members.
To work with UDAs:
1. Click the Navigator icon , and then under Create and Manage, click Dimensions.
2. Select the dimension for whose members to associate the UDA.
3. From the dimension hierarchy, select a member and click .
4. Select UDA.
5. Select a task:
Chapter 17Administering Dimensions
17-55
• To create a UDA, click , enter a name, and then click Save.
Note:
Use no more than 60 characters when naming UDAs.
• To modify a UDA, click , change the name, and then click Save.
• To delete a UDA, select the UDA, click , and then confirm deletion.
Note:
Deleting the UDA removes it for the whole dimension. If you deleteUDAs, you must update all member formulas, calc scripts, andreports that reference them.
• To clear UDA selections, click .
6. To add or remove UDAs for the member, use the arrows to move UDAs to andfrom the Selected UDA panel.
7. Click Save.
Working with Member FormulasYou can define member formulas to combine operators, calculation functions,dimension and member names, and numeric constants to perform calculations onmembers. Member formulas can also include:
• Operator type, function, value, member name, UDA, and so on allowed informulas.
• Predefined formula expressions, including Smart List values, that expand into aformula or value upon database refresh.
To define member formulas:
1. Click the Navigator icon , and then under Create and Manage, clickDimensions.
2. Select the dimension for whose member to add or change a formula.
3. Select the member and click Edit.
4. Select the Member Formula tab.
5. Select options for the following fields:
• Cube
Chapter 17Administering Dimensions
17-56

Note:
With the exception of Account formulas, a formula entered for the defaultcube will be applied to all cubes unless it's overridden by a different formulaentered for a specific cube.
Also, a default formula on Account members will only be transferred toEssbase for the source cube and not for any of the other cubes. A defaultformula won't be transferred to any aggregate storage cubes.
• Data Storage—Select a data storage option. The default is Store.
Note:
The cube specific data storage field will not display the Shared or LabelOnly options. This is because a member can't be set to Shared or LabelOnly in one cube and not another.
• Solve Order—Specifies the order in which formulas are evaluated. Enter a wholenumber between 0 and 100000 (or use arrows to increase or decrease the number).The formulas for members that have a specified solve order are calculated in orderfrom the lowest solve order to the highest. The default is 0.
Note:
Solve order is available for aggregate storage cubes and also for blockstorage cubes that are enabled for Hybrid. Solve order for block storagecubes is only editable using the Simplified dimension editor. See AccessingEdit Member Properties.
6. In the text box, define formulas for the member.
7. Optional: To check the validity of the member formula, click Validate.
8. Click Save.
Before you click Save, clicking Reset restores the previous member formula information.
Viewing Details of Formula ValidationTo view details of the member formula validation:
1. On Member Formula, click Validate.
2. Click Save.
Working with Formula ExpressionsIn the text box on the Member Formula tab, you can include predefined formula expressionsin member formulas, and test them with the Validate button. You can also load them.
You can update the dimension outline without updating the business rules and calc scriptsthat depend on the outline. Calculations become more independent of specifics in the outline.
Chapter 17Administering Dimensions
17-57
You can use Smart Lists as objects in calculations. Performance isn't decreased whenyou use formula expressions because they are run only when you refresh thedatabase.
To use a formula expression in a member formula:
1. Click the Navigator icon , and then under Create and Manage, clickDimensions.
2. Select the dimension with which you want to work.
3. Select the member and click Edit.
4. Select Member Formula.
5. Select options for the following fields:
• Cube
Note:
With the exception of Account formulas, a formula entered for thedefault cube will be applied to all cubes unless it's overridden by adifferent formula entered for a specific cube.
Also, a default formula on Account members will only be transferredto Essbase for the source cube and not for any of the other cubes. Adefault formula won't be transferred to any aggregate storage cubes.
• Data Storage—Select a data storage option. The default is Store.
Note:
The cube specific data storage field will not display the Shared orLabel Only options. This is because a member can't be set toShared or Label Only in one cube and not another.
• Solve Order—Specifies the order in which formulas are evaluated. Enter awhole number between 0 and 100000 (or use arrows to increase or decreasethe number). The formulas for members that have a specified solve order arecalculated in order from the lowest solve order to the highest. The default is 0.
Note:
Solve order is available for aggregate storage cubes and also forblock storage cubes that are enabled for Hybrid. Solve order forblock storage cubes is only editable using the Simplified dimensioneditor. See Accessing Edit Member Properties.
6. In the text box, define formulas for the member.
You can include business process formula expressions and Essbase nativeformulas in the member formula.
Chapter 17Administering Dimensions
17-58
The business process provides predefined formula expressions that you can use inmember formulas. You can't edit or create your own formula expressions.
7. Optional: To check the validity of the member formula, click Validate.
8. Optional: If there are errors in the member formula, click Show Details to view adescription.
9. Optional: Click Reset to restore the previous member formula if you don't want to savethe changes you made to the member formula.
10. Click Save.
Syntax
Member formula expressions support functions and variables. Follow these syntax rules forfunctions and variables when you create formula expressions:
• Enclose variables or properties with square brackets, [ ]. If you omit square brackets, thevariable is treated as a native variable.
• Enclose member names with quotation marks.
• Characters in variables are case-insensitive, but can't have extra spaces or characterssuch as underscore ( _ ).
• You can include subcalls to other functions within an expression.
• Don't enter text where a number is required.
• The order of the outline is important in a member formula. For example, don't reference avalue that has not been calculated yet.
Including Smart List Values as Variables
You can include a Smart List as a variable in a formula expression, such as the formulaexpression, "Status"= [Status.Departed].
"Status" is the member name, Status is the Smart List name, and Departed is a Smart Listentry. If the Smart List ID for Departed is 2, Status.Departed is replaced with a 2 in themember formula (the application treats Smart Lists as numbers). If the Smart List ID forDeparted is 2, 2 is put in the calculation and 2 is stored in the database.
Write Smart Lists in this format: [SmartListName.SmartListEntry]
Formula Expressions
Formula expressions can include these predefined variables and functions.
Table 17-11 Variables in Formula Expressions
Variable Description
OpenInputValueBlock Generates an IF statement if the application is amulticurrency application, or an empty string if it'sone currency application. Used withClosedInputValueBlock.
CloseInputValueBlock Generates an End IF statement if the applicationis a multicurrency application, or an empty string ifit's one currency application. Used withOpenInputValueBlock.
Chapter 17Administering Dimensions
17-59
Table 17-11 (Cont.) Variables in Formula Expressions
Variable Description
NumberOfPeriodsInYear Returns the number of time periods in the year
NumberOfYears Returns the number of years in the application
Table 17-12 Functions in Formula Expressions
Function Description
Dimension(dimTag) Returns the name of a predefined dimension.The dimtags are:
• DIM_NAME_PERIOD• DIM_NAME_YEAR• DIM_NAME_ACCOUNT• DIM_NAME_ENTITY• DIM_NAME_SCENARIO• DIM_NAME_VERSION• DIM_NAME_CURRENCY
Period(periodName) Returns the specified period. The periodNameoptions are:
• FIRST_QTR_PERIOD• SECOND_QTR_PERIOD• THIRD_QTR_PERIOD• FOURTH_QTR_PERIOD• FIRST_PERIOD• LAST_PERIOD
CrossRef(accountName) Generates a cross-reference by adding thedefault prefix of "No" to each dimension name(except Currency, Period and Year), followedby the specified account.
For example, in an application with thefollowing dimensions: Account, Period,HSP_View, Year, Scenario, Version, Entity, andProduct
CrossRef("5800") returns:
"BegBalance"->"No HSP_View"->"NoScenario"->"No Version"->"No Entity"->"NoProduct"->"5800";
CrossRef(accountName, prefix) Generates a cross-reference by adding thespecified prefix to each dimension name(except Currency, Period and Year), followedby the specified account. The prefix should bein double quotes.
For example, in an application with thefollowing dimensions: Account, Period,HSP_View, Year, Scenario, Version, Entity, andProduct
CrossRef("5800", "NoX") returns:
"BegBalance"->"NoX HSP_View"->"NoXScenario"->"NoX Version"->"NoX Entity"->"NoX Product"->"5800";
Chapter 17Administering Dimensions
17-60
Table 17-12 (Cont.) Functions in Formula Expressions
Function Description
CrossRef(accountName, prefix, true) Generates a cross-reference by adding thespecified prefix to each dimension name,including Year (except Currency and Period),followed by the specified account.
For example, CrossRef("5800", "NoX", true)returns:
"BegBalance"->"NoX HSP_View"->"NoXYear"->"NoX Scenario"->"NoX Version"->"NoXEntity"->"NoX Product"->"5800";
getCalendarTPIndex() Generates a member formula that returns anindex for the time period; the index is based onthe calendar year.
getFiscalTPIndex() Generates a member formula that returns anindex for the time period; the index is based onthe fiscal year.
CYTD(memberName) Generates a calendar year-to-date formula forthe member
CYTD(memberName, calTpIndexName,fiscalTpIndexName)
Generates a calendar year-to-date formula forthe member, and the time period index basedon the calendar year and fiscal year. Use whenmembers are renamed. The default membernames are "Cal TP-Index" and "Fiscal TP-Index."
Understanding Common Errors
Follow the rules of syntax carefully. If formula expression syntax contains errors, errormessages are returned after you validate the member formula. To get information about errormessages, review the formula details on the Member Formula tab. The most common errormessage is "Failed to execute." This occurs when you use parameters in the expressionincorrectly. These actions cause "Failed to execute" error messages:
• Entering the wrong number of parameters in the formula expression
• Misspelling member names, functions, or variable names
• Not surrounding member names with quotation marks
• Including numbers where text is required
Administering FormsCreate forms for entering data based on your planning needs.
Related Topics
• About Forms
• Understanding Implied Sharing in Forms
• Creating Forms
• Designing Specific Types of Forms
Chapter 17Administering Forms
17-61
• Working with Forms and Form Components
• Managing Forms and Folders
About FormsForms are grids for entering data. You can create forms to meet your needs and thenyou can use the forms and other artifacts to design dashboards to summarize thedata.
See Designing Dashboards.
Note:
Previously, you could create composite forms (forms that comprise multiplesimple forms) to summarize data. Oracle has since stopped supportingcomposite forms, however your existing composite forms will continue towork. Oracle recommends that you shift your usage to dashboards instead ofcomposite forms.
Videos
Your Goal Watch This Video
Learn how to design Planning forms. Designing Forms in Cloud EPM
Planning
Tutorials
Tutorials provide instructions with sequenced videos and documentation to help youlearn a topic.
Your Goal Learn How
Learn how to how to design forms andmanage task lists in Planning. Designing Forms and Managing
Task Lists in Planning
Form Components
Point of View
Select point of view (POV) dimensions such as year, scenario, and version to definethe context for pages, rows, and columns. For example, if Scenario is Budget, all datadisplayed and entered in pages, rows, and columns is written to the Budget scenariodimension member. Each POV dimension is set to one member, which users can'tchange.
To simplify a form’s POV, or better tailor it to the needs and roles of users, you specifyonly relevant members or define user variables. See Defining Form Page and Point ofView and Managing User Variables.
Chapter 17Administering Forms
17-62
Page Axis
Use the page axis to specify member combinations that may span dimensions so that userscan work with data in smaller, logical views. Each page axis item can have members selectedfrom different dimensions. Users see only members they can access.
You can specify multiple page drop-down lists, and select members using relationshipfunctions or attributes. Switch between member sets by selecting them from the page axis.
You display member names or aliases on the page axis. You can specify the number ofmembers in a page dimension that enables a search drop-down list on the data entry page,useful if dimensions contain many members. See Defining Form Page and Point of View.
Rows and Columns
Rows and columns define the grid into which users enter data. For example, you can assignUnit Sales to the row axis and January to the column axis. When users access forms, theycan enter data into the cell where the Unit Sales row intersects with the January column.
By default, forms have one set of rows and columns. You can add rows and columns tocreate asymmetrical combinations of members. See Creating Asymmetric Rows andColumns.
Attribute Dimensions
In addition to using attribute dimensions as filters, you can define attributes as uniquedimensions within the application so that they can be placed on an axis other than theirassociated base dimension. This enables you to perform cross-dimensional rollups acrossattribute members.
Attribute dimensions are optional on form grids and are listed separately on the Layout tab ofthe Form Designer. To use an attribute dimension in a form, drag the attribute dimension tothe point of view, page, row, or column.
Caution:
Don't drag the attribute on any axis when using it as a filter as you'll cause a cross-dimensional reference which will have a performance impact. When using anattribute dimension as a filter, there is a form option that shows the associatedattribute (just like there is an option to show alias). See Defining the Layout.
Chapter 17Administering Forms
17-63
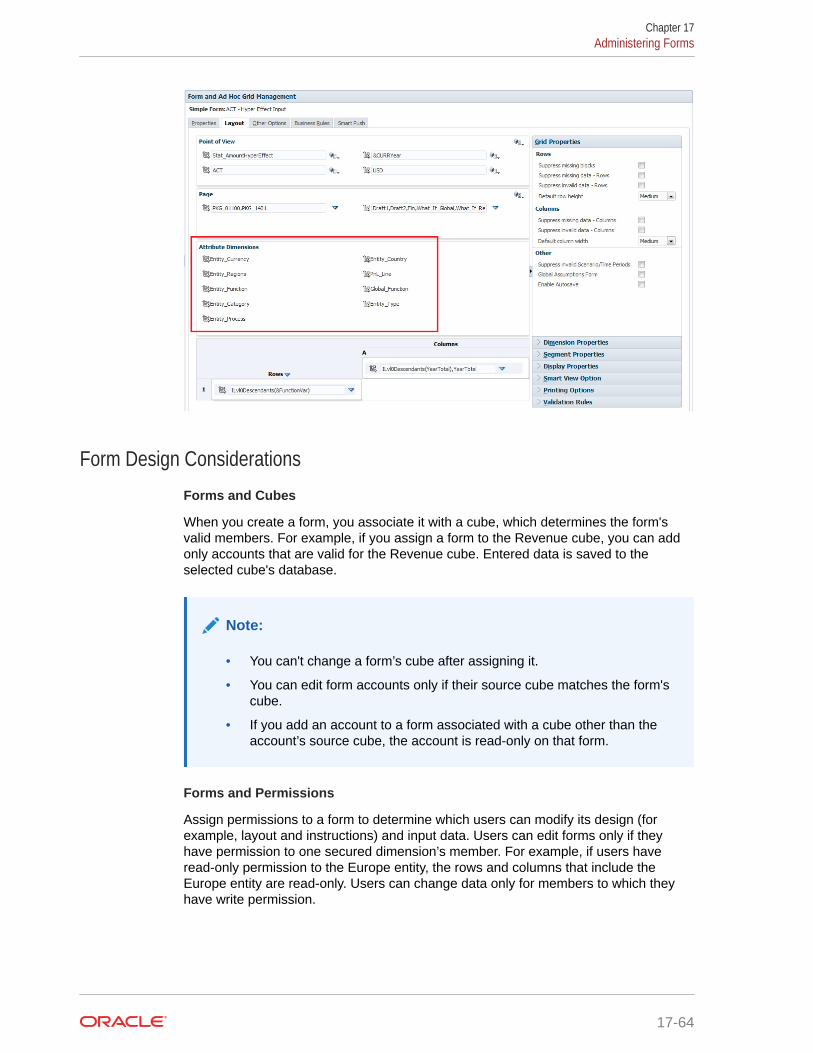
Form Design Considerations
Forms and Cubes
When you create a form, you associate it with a cube, which determines the form'svalid members. For example, if you assign a form to the Revenue cube, you can addonly accounts that are valid for the Revenue cube. Entered data is saved to theselected cube's database.
Note:
• You can't change a form’s cube after assigning it.
• You can edit form accounts only if their source cube matches the form'scube.
• If you add an account to a form associated with a cube other than theaccount’s source cube, the account is read-only on that form.
Forms and Permissions
Assign permissions to a form to determine which users can modify its design (forexample, layout and instructions) and input data. Users can edit forms only if theyhave permission to one secured dimension’s member. For example, if users haveread-only permission to the Europe entity, the rows and columns that include theEurope entity are read-only. Users can change data only for members to which theyhave write permission.
Chapter 17Administering Forms
17-64

Forms and Currencies
For a single-currency application, all entities use the currency selected when the applicationwas created. For a Standard multicurrency application, the selected Currency member onforms determines the currency in which values display. If the Currency member is Local, nocurrency conversion occurs, and users can enter data in their native currency. If a currencymember other than Local is selected, values are converted to the currency selected for thatrow or column, and the form is read-only. You can enter data in rows or columns that haveCurrency or Local as the selected member. See Designing Forms for Multiple Currencies.
Forms and Versions
For bottom-up versions, rows and columns with level 0 members allow data entry. Rows orcolumns set to a parent member are read-only. The point of view must also be set to the level0 member to allow data entry on a bottom-up version. Target versions allow data entry inparent and children members.
Filtering Form Members by Attributes
You can select members by using attributes. For example, on the Entity dimension you canselect members by a specific Region such as South. The resulting grid will only containmembers that have the South attribute (for example, TX, NM, and so on). Values can beentered and saved into rows and columns filtered by attributes.
Forms and Shared Members
Because you can't select shared members individually, select them using a relationshipfunction. For example, select an alternate functional rollup to include all members under thatrollup. Users can enter values in rows or columns that display shared members, and data issaved to the base members in the database.
Forms and Calculations
To optimize calculations, select row members using relationships (such as Descendants orChildren) instead of selecting individual children. For example, calculating individual parent-level totals could take several passes, so use a relationship instead.
Understanding Implied Sharing in FormsSome members are shared even if you don't explicitly set them as shared. These membersare implied shared members.
When an implied share relationship is created, each implied member assumes the othermember’s value. The application assumes shared member relationships in these situations:
• A parent has only one child
• A parent has only one child that consolidates to the parent
• The data type of the parent is Label Only. The parent inherits the value of the first child,regardless of the child’s aggregation settings.
In a form that contains members with an implied sharing relationship, when a value is addedfor the parent, the child assumes the same value after the form is saved. Likewise, if a valueis added for the child, the parent usually assumes the same value after a form is saved.
For example, when a calculation script or load rule populates an implied share member, theother implied share member assumes the value of the member populated by the calculation
Chapter 17Administering Forms
17-65
script or load rule. The last value calculated or imported takes precedence. The resultis the same whether you refer to the parent or the child as a variable in a calculationscript.
Creating Forms
Table 17-13 Form Creation Checklist
Task Want to Know More?
Define the layout, including:• Adding rows and columns• Assigning dimensions to columns and
rows• Assigning attribute dimensions to the
point of view, page, columns, and rows• Selecting dimension members for users to
work with• Setting grid properties• Setting dimension properties• Adding formula rows and columns• Setting Smart View form display options• Setting display properties• Setting printing options• Adding and updating validation rules
See Defining the Layout.
Define page axis and point of view See Defining Form Page and Point of View.
Select members See Using the Member Selector.
Set form precision, context menusassociations, and whether to enable dynamicuser variables
See Setting Form Precision and OtherOptions.
Select business rules and set properties See About Rules.
Define access permissions See Setting Up Access Permissions.
Design formula rows and columns See Designing Forms with Formula Rows andColumns.
Design data validation rules See Designing Forms with Data Validation.
To create forms:
1. Click the Navigator icon , then under Create and Manage, click Forms.
2. Click .
3. On the Properties tab, enter a name of up to 80 characters, and an optionaldescription of up to 255 characters.
4. Select the Cube associated with the form. See Forms and Cubes.
5. Optional: Enter instructions describing for users how to work with the form.
6. Click Next, and see Defining the Layout.
Chapter 17Administering Forms
17-66
Defining the LayoutWhen you create forms, they initially only contain one row and column, and all dimensions,except for the optional attribute dimensions, are in Point of View. Add rows and columns asneeded. When setting row and column layout:
• Assign at least one dimension to the row and column axis.
• You can't select the same dimension for multiple axes. To use dimensions on multipleaxes, set user variables in the point of view.
• You can select a dimension from any axis and drag it to another
• You can exclude members of dimensions from the form after a dimension is assigned to arow or column.
Note:
Attribute dimensions are optional and are displayed in their own area on the Layouttab. Drag the attribute dimension to the point of view, page, row, or column to use itin the form.
Caution:
When working with attributes as filters, don't drag the attribute on any axis as you'llcause a cross-dimensional reference which will have a performance impact. Whenusing an attribute dimension as a filter, there is a form option that shows theassociated attribute (just like there is an option to show alias).
To define the layout:
1. Open the form, and click Layout.
See Selecting and Opening Forms and Folders.
2. Click the icon next to a dimension on the Layout tab, and then drag it to the desiredaxis (Rows or Columns). Optionally, you can also select the attribute dimensions to useon Point of View, Page, Rows, and Columns.
3. To edit dimensions added to rows and columns, click
next to a dimension:
• Select Edit to launch the member selector and define the dimension members andvariables you want to include on the form.
Chapter 17Administering Forms
17-67
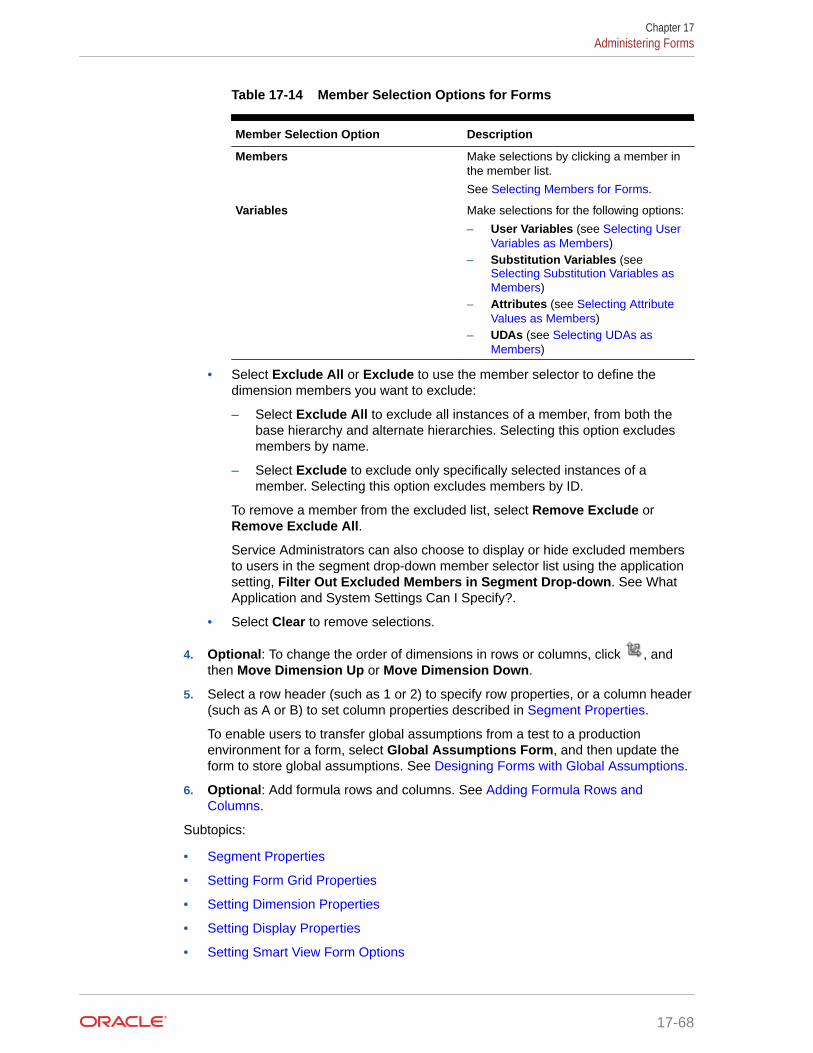
Table 17-14 Member Selection Options for Forms
Member Selection Option Description
Members Make selections by clicking a member inthe member list.
See Selecting Members for Forms.
Variables Make selections for the following options:
– User Variables (see Selecting UserVariables as Members)
– Substitution Variables (see Selecting Substitution Variables asMembers)
– Attributes (see Selecting AttributeValues as Members)
– UDAs (see Selecting UDAs asMembers)
• Select Exclude All or Exclude to use the member selector to define thedimension members you want to exclude:
– Select Exclude All to exclude all instances of a member, from both thebase hierarchy and alternate hierarchies. Selecting this option excludesmembers by name.
– Select Exclude to exclude only specifically selected instances of amember. Selecting this option excludes members by ID.
To remove a member from the excluded list, select Remove Exclude orRemove Exclude All.
Service Administrators can also choose to display or hide excluded membersto users in the segment drop-down member selector list using the applicationsetting, Filter Out Excluded Members in Segment Drop-down. See WhatApplication and System Settings Can I Specify?.
• Select Clear to remove selections.
4. Optional: To change the order of dimensions in rows or columns, click , andthen Move Dimension Up or Move Dimension Down.
5. Select a row header (such as 1 or 2) to specify row properties, or a column header(such as A or B) to set column properties described in Segment Properties.
To enable users to transfer global assumptions from a test to a productionenvironment for a form, select Global Assumptions Form, and then update theform to store global assumptions. See Designing Forms with Global Assumptions.
6. Optional: Add formula rows and columns. See Adding Formula Rows andColumns.
Subtopics:
• Segment Properties
• Setting Form Grid Properties
• Setting Dimension Properties
• Setting Display Properties
• Setting Smart View Form Options
Chapter 17Administering Forms
17-68
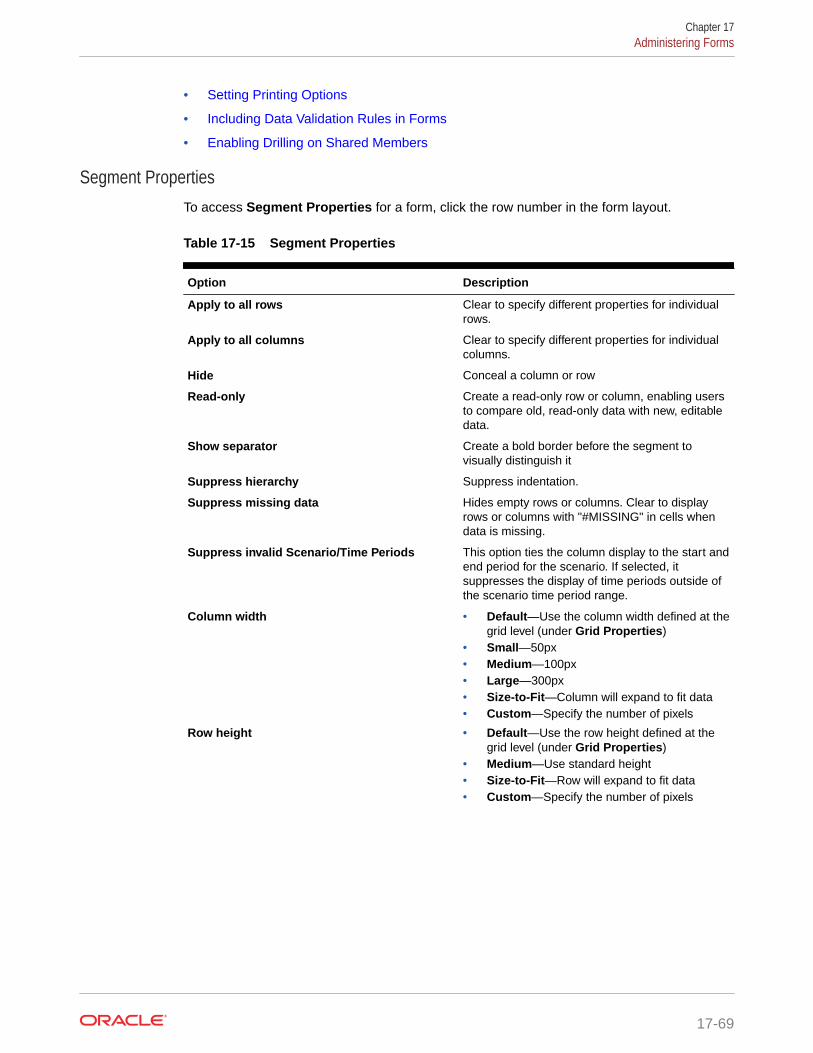
• Setting Printing Options
• Including Data Validation Rules in Forms
• Enabling Drilling on Shared Members
Segment PropertiesTo access Segment Properties for a form, click the row number in the form layout.
Table 17-15 Segment Properties
Option Description
Apply to all rows Clear to specify different properties for individualrows.
Apply to all columns Clear to specify different properties for individualcolumns.
Hide Conceal a column or row
Read-only Create a read-only row or column, enabling usersto compare old, read-only data with new, editabledata.
Show separator Create a bold border before the segment tovisually distinguish it
Suppress hierarchy Suppress indentation.
Suppress missing data Hides empty rows or columns. Clear to displayrows or columns with "#MISSING" in cells whendata is missing.
Suppress invalid Scenario/Time Periods This option ties the column display to the start andend period for the scenario. If selected, itsuppresses the display of time periods outside ofthe scenario time period range.
Column width • Default—Use the column width defined at thegrid level (under Grid Properties)
• Small—50px• Medium—100px• Large—300px• Size-to-Fit—Column will expand to fit data• Custom—Specify the number of pixels
Row height • Default—Use the row height defined at thegrid level (under Grid Properties)
• Medium—Use standard height• Size-to-Fit—Row will expand to fit data• Custom—Specify the number of pixels
Chapter 17Administering Forms
17-69
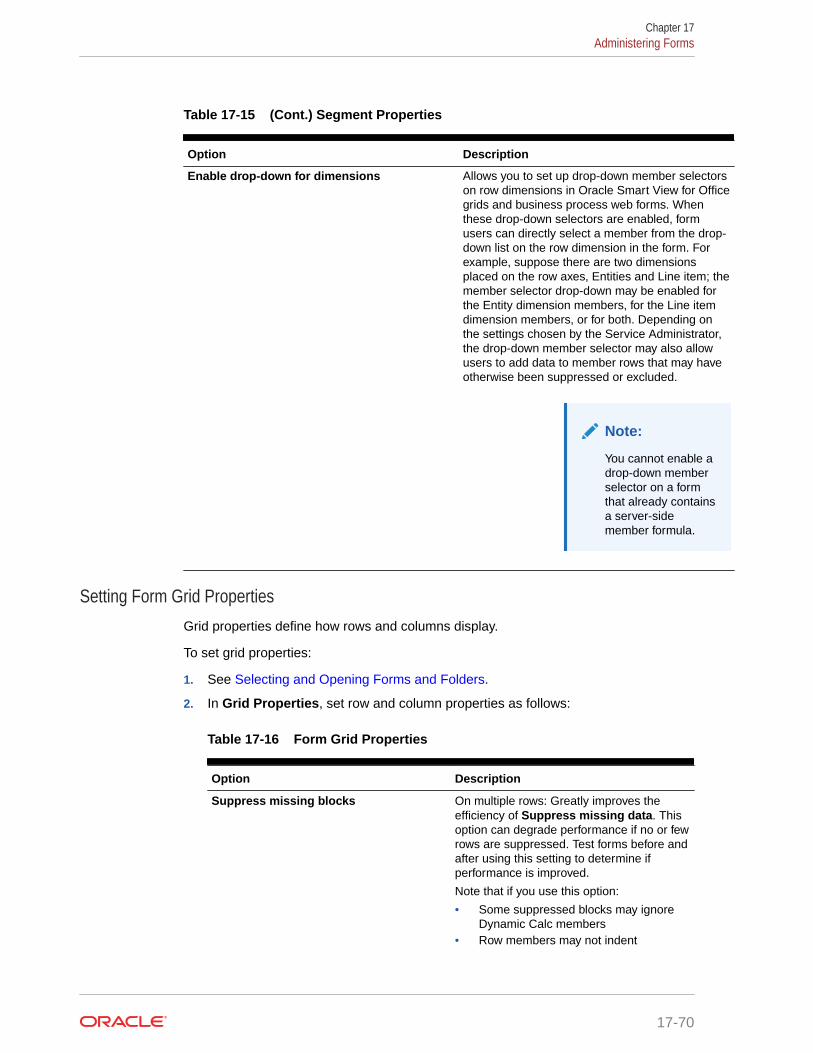
Table 17-15 (Cont.) Segment Properties
Option Description
Enable drop-down for dimensions Allows you to set up drop-down member selectorson row dimensions in Oracle Smart View for Officegrids and business process web forms. Whenthese drop-down selectors are enabled, formusers can directly select a member from the drop-down list on the row dimension in the form. Forexample, suppose there are two dimensionsplaced on the row axes, Entities and Line item; themember selector drop-down may be enabled forthe Entity dimension members, for the Line itemdimension members, or for both. Depending onthe settings chosen by the Service Administrator,the drop-down member selector may also allowusers to add data to member rows that may haveotherwise been suppressed or excluded.
Note:
You cannot enable adrop-down memberselector on a formthat already containsa server-sidemember formula.
Setting Form Grid PropertiesGrid properties define how rows and columns display.
To set grid properties:
1. See Selecting and Opening Forms and Folders.
2. In Grid Properties, set row and column properties as follows:
Table 17-16 Form Grid Properties
Option Description
Suppress missing blocks On multiple rows: Greatly improves theefficiency of Suppress missing data. Thisoption can degrade performance if no or fewrows are suppressed. Test forms before andafter using this setting to determine ifperformance is improved.
Note that if you use this option:
• Some suppressed blocks may ignoreDynamic Calc members
• Row members may not indent
Chapter 17Administering Forms
17-70
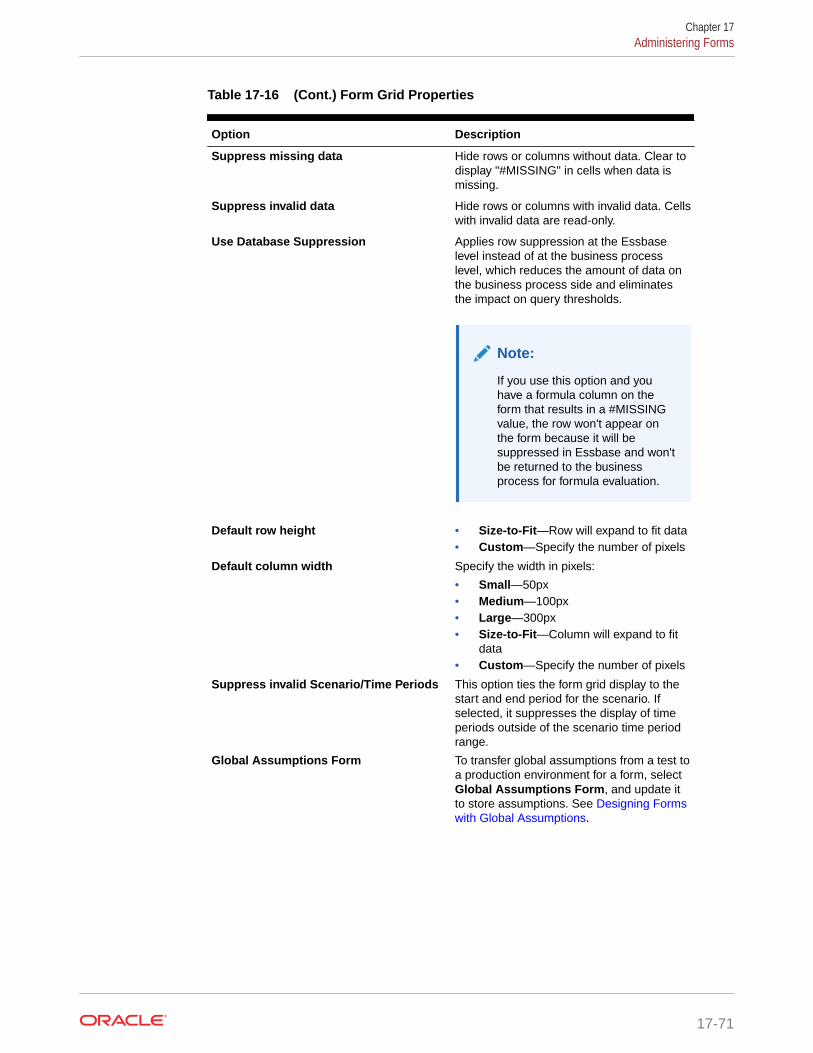
Table 17-16 (Cont.) Form Grid Properties
Option Description
Suppress missing data Hide rows or columns without data. Clear todisplay "#MISSING" in cells when data ismissing.
Suppress invalid data Hide rows or columns with invalid data. Cellswith invalid data are read-only.
Use Database Suppression Applies row suppression at the Essbaselevel instead of at the business processlevel, which reduces the amount of data onthe business process side and eliminatesthe impact on query thresholds.
Note:
If you use this option and youhave a formula column on theform that results in a #MISSINGvalue, the row won't appear onthe form because it will besuppressed in Essbase and won'tbe returned to the businessprocess for formula evaluation.
Default row height • Size-to-Fit—Row will expand to fit data• Custom—Specify the number of pixels
Default column width Specify the width in pixels:
• Small—50px• Medium—100px• Large—300px• Size-to-Fit—Column will expand to fit
data• Custom—Specify the number of pixels
Suppress invalid Scenario/Time Periods This option ties the form grid display to thestart and end period for the scenario. Ifselected, it suppresses the display of timeperiods outside of the scenario time periodrange.
Global Assumptions Form To transfer global assumptions from a test toa production environment for a form, selectGlobal Assumptions Form, and update itto store assumptions. See Designing Formswith Global Assumptions.
Chapter 17Administering Forms
17-71
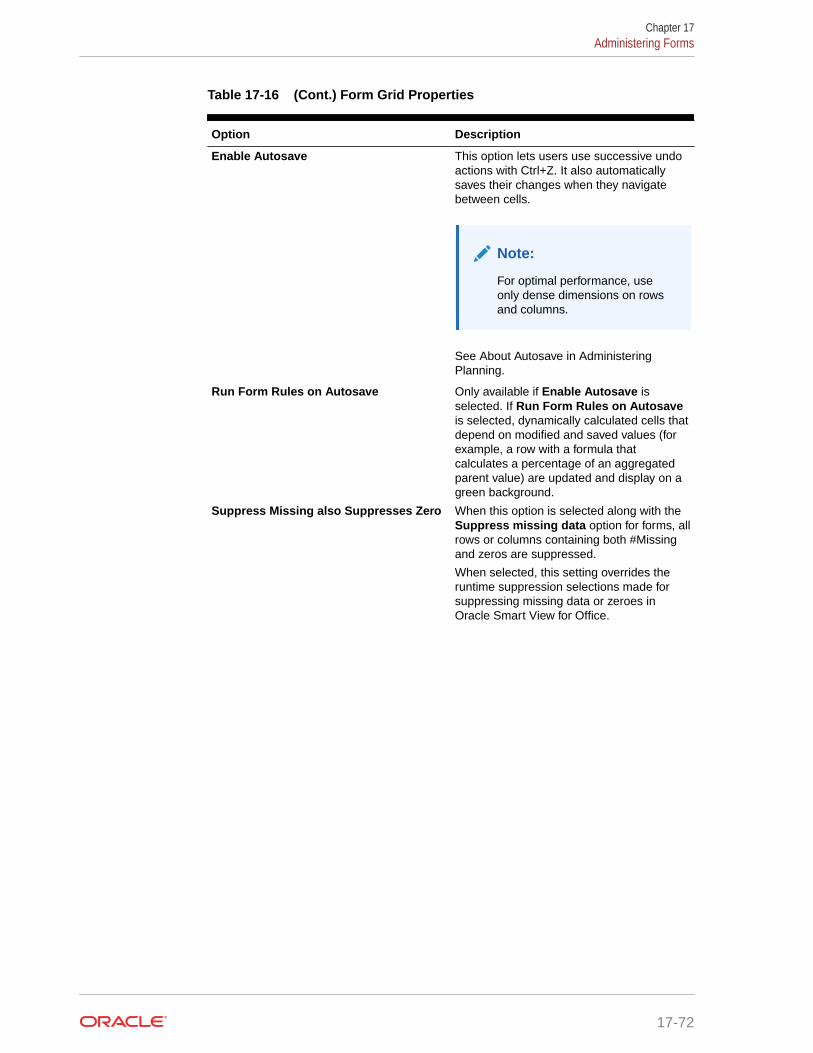
Table 17-16 (Cont.) Form Grid Properties
Option Description
Enable Autosave This option lets users use successive undoactions with Ctrl+Z. It also automaticallysaves their changes when they navigatebetween cells.
Note:
For optimal performance, useonly dense dimensions on rowsand columns.
See About Autosave in AdministeringPlanning.
Run Form Rules on Autosave Only available if Enable Autosave isselected. If Run Form Rules on Autosaveis selected, dynamically calculated cells thatdepend on modified and saved values (forexample, a row with a formula thatcalculates a percentage of an aggregatedparent value) are updated and display on agreen background.
Suppress Missing also Suppresses Zero When this option is selected along with theSuppress missing data option for forms, allrows or columns containing both #Missingand zeros are suppressed.
When selected, this setting overrides theruntime suppression selections made forsuppressing missing data or zeroes inOracle Smart View for Office.
Chapter 17Administering Forms
17-72
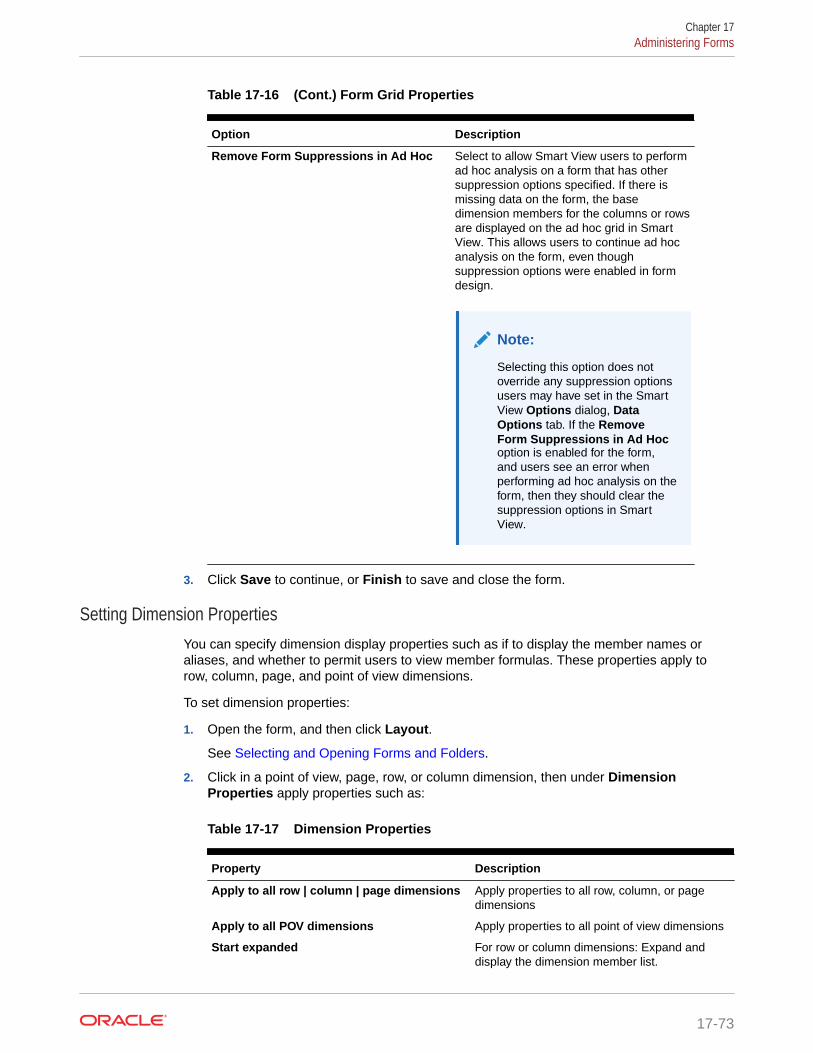
Table 17-16 (Cont.) Form Grid Properties
Option Description
Remove Form Suppressions in Ad Hoc Select to allow Smart View users to performad hoc analysis on a form that has othersuppression options specified. If there ismissing data on the form, the basedimension members for the columns or rowsare displayed on the ad hoc grid in SmartView. This allows users to continue ad hocanalysis on the form, even thoughsuppression options were enabled in formdesign.
Note:
Selecting this option does notoverride any suppression optionsusers may have set in the SmartView Options dialog, DataOptions tab. If the RemoveForm Suppressions in Ad Hocoption is enabled for the form,and users see an error whenperforming ad hoc analysis on theform, then they should clear thesuppression options in SmartView.
3. Click Save to continue, or Finish to save and close the form.
Setting Dimension PropertiesYou can specify dimension display properties such as if to display the member names oraliases, and whether to permit users to view member formulas. These properties apply torow, column, page, and point of view dimensions.
To set dimension properties:
1. Open the form, and then click Layout.
See Selecting and Opening Forms and Folders.
2. Click in a point of view, page, row, or column dimension, then under DimensionProperties apply properties such as:
Table 17-17 Dimension Properties
Property Description
Apply to all row | column | page dimensions Apply properties to all row, column, or pagedimensions
Apply to all POV dimensions Apply properties to all point of view dimensions
Start expanded For row or column dimensions: Expand anddisplay the dimension member list.
Chapter 17Administering Forms
17-73
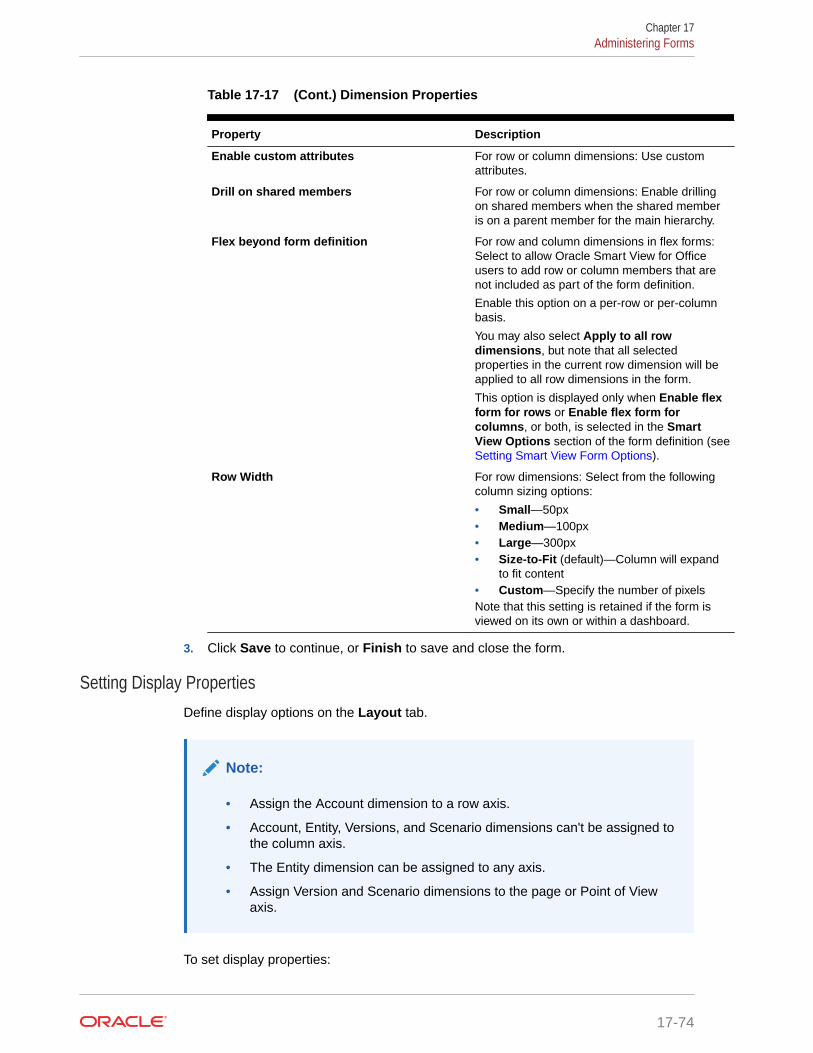
Table 17-17 (Cont.) Dimension Properties
Property Description
Enable custom attributes For row or column dimensions: Use customattributes.
Drill on shared members For row or column dimensions: Enable drillingon shared members when the shared memberis on a parent member for the main hierarchy.
Flex beyond form definition For row and column dimensions in flex forms:Select to allow Oracle Smart View for Officeusers to add row or column members that arenot included as part of the form definition.
Enable this option on a per-row or per-columnbasis.
You may also select Apply to all rowdimensions, but note that all selectedproperties in the current row dimension will beapplied to all row dimensions in the form.
This option is displayed only when Enable flexform for rows or Enable flex form forcolumns, or both, is selected in the SmartView Options section of the form definition (see Setting Smart View Form Options).
Row Width For row dimensions: Select from the followingcolumn sizing options:
• Small—50px• Medium—100px• Large—300px• Size-to-Fit (default)—Column will expand
to fit content• Custom—Specify the number of pixelsNote that this setting is retained if the form isviewed on its own or within a dashboard.
3. Click Save to continue, or Finish to save and close the form.
Setting Display PropertiesDefine display options on the Layout tab.
Note:
• Assign the Account dimension to a row axis.
• Account, Entity, Versions, and Scenario dimensions can't be assigned tothe column axis.
• The Entity dimension can be assigned to any axis.
• Assign Version and Scenario dimensions to the page or Point of Viewaxis.
To set display properties:
Chapter 17Administering Forms
17-74
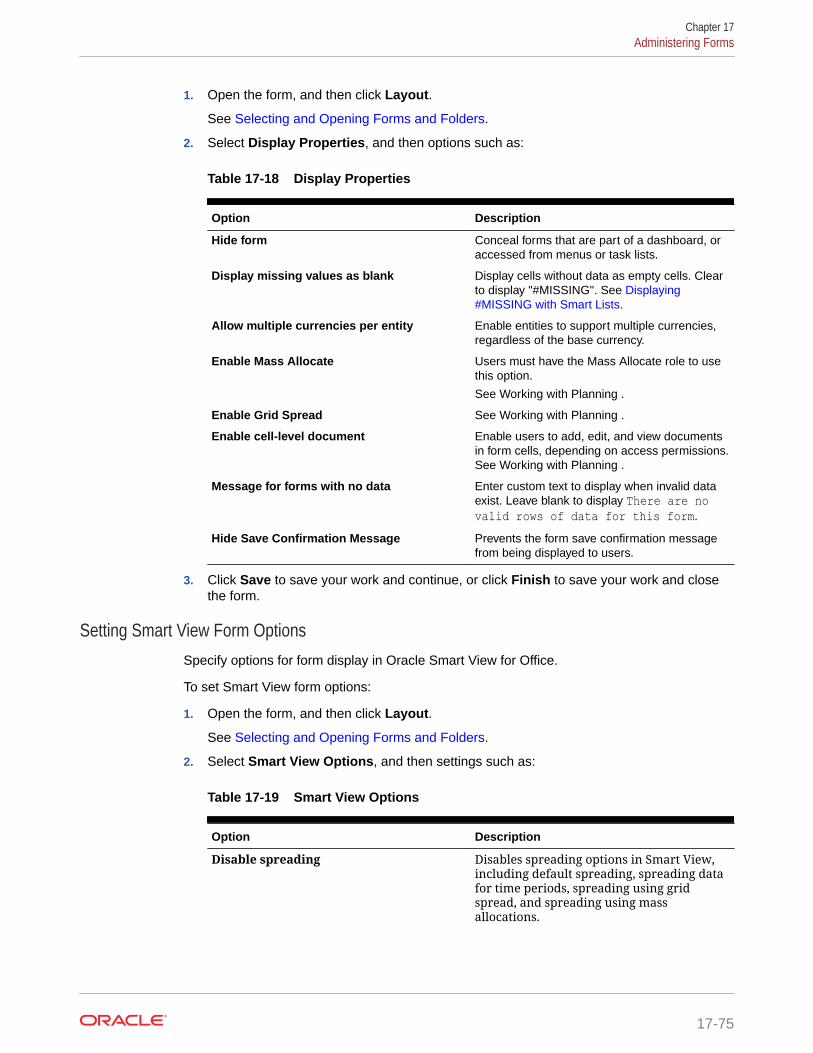
1. Open the form, and then click Layout.
See Selecting and Opening Forms and Folders.
2. Select Display Properties, and then options such as:
Table 17-18 Display Properties
Option Description
Hide form Conceal forms that are part of a dashboard, oraccessed from menus or task lists.
Display missing values as blank Display cells without data as empty cells. Clearto display "#MISSING". See Displaying#MISSING with Smart Lists.
Allow multiple currencies per entity Enable entities to support multiple currencies,regardless of the base currency.
Enable Mass Allocate Users must have the Mass Allocate role to usethis option.
See Working with Planning .
Enable Grid Spread See Working with Planning .
Enable cell-level document Enable users to add, edit, and view documentsin form cells, depending on access permissions.See Working with Planning .
Message for forms with no data Enter custom text to display when invalid dataexist. Leave blank to display There are novalid rows of data for this form.
Hide Save Confirmation Message Prevents the form save confirmation messagefrom being displayed to users.
3. Click Save to save your work and continue, or click Finish to save your work and closethe form.
Setting Smart View Form OptionsSpecify options for form display in Oracle Smart View for Office.
To set Smart View form options:
1. Open the form, and then click Layout.
See Selecting and Opening Forms and Folders.
2. Select Smart View Options, and then settings such as:
Table 17-19 Smart View Options
Option Description
Disable spreading Disables spreading options in Smart View,including default spreading, spreading datafor time periods, spreading using gridspread, and spreading using massallocations.
Chapter 17Administering Forms
17-75
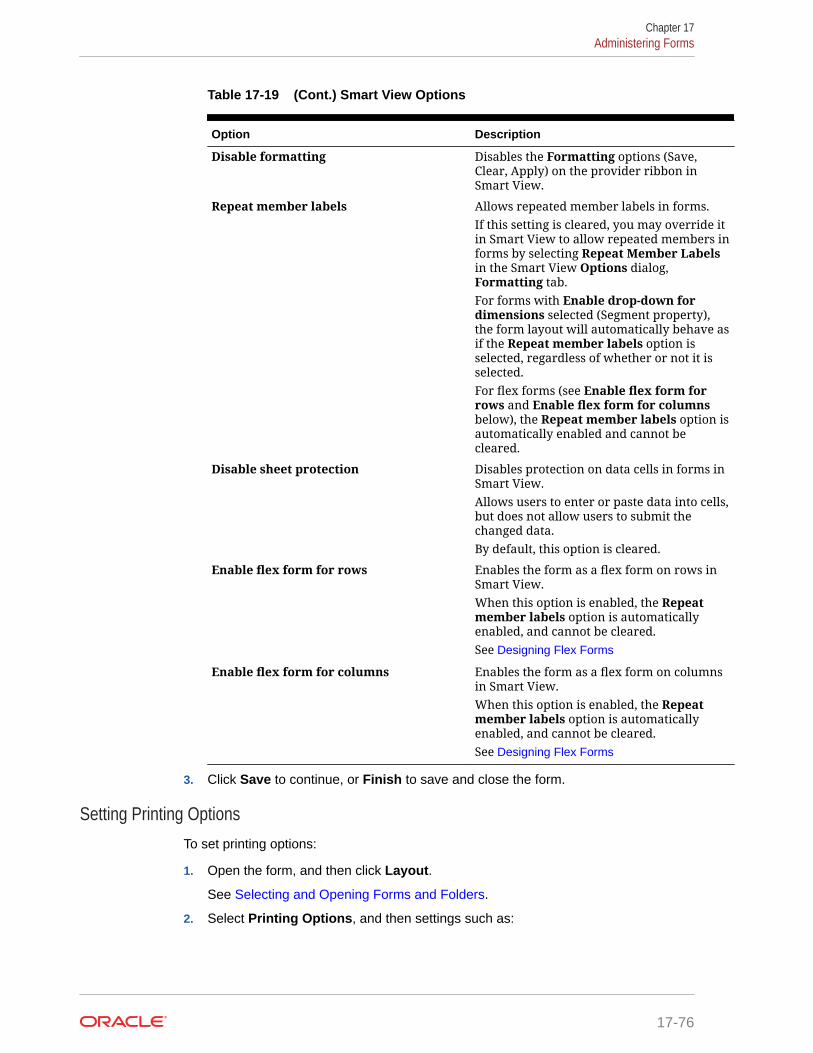
Table 17-19 (Cont.) Smart View Options
Option Description
Disable formatting Disables the Formatting options (Save,Clear, Apply) on the provider ribbon inSmart View.
Repeat member labels Allows repeated member labels in forms.If this setting is cleared, you may override itin Smart View to allow repeated members informs by selecting Repeat Member Labelsin the Smart View Options dialog,Formatting tab.For forms with Enable drop-down fordimensions selected (Segment property),the form layout will automatically behave asif the Repeat member labels option isselected, regardless of whether or not it isselected.For flex forms (see Enable flex form forrows and Enable flex form for columnsbelow), the Repeat member labels option isautomatically enabled and cannot becleared.
Disable sheet protection Disables protection on data cells in forms inSmart View.Allows users to enter or paste data into cells,but does not allow users to submit thechanged data.By default, this option is cleared.
Enable flex form for rows Enables the form as a flex form on rows inSmart View.When this option is enabled, the Repeatmember labels option is automaticallyenabled, and cannot be cleared.See Designing Flex Forms
Enable flex form for columns Enables the form as a flex form on columnsin Smart View.When this option is enabled, the Repeatmember labels option is automaticallyenabled, and cannot be cleared.See Designing Flex Forms
3. Click Save to continue, or Finish to save and close the form.
Setting Printing OptionsTo set printing options:
1. Open the form, and then click Layout.
See Selecting and Opening Forms and Folders.
2. Select Printing Options, and then settings such as:
Chapter 17Administering Forms
17-76
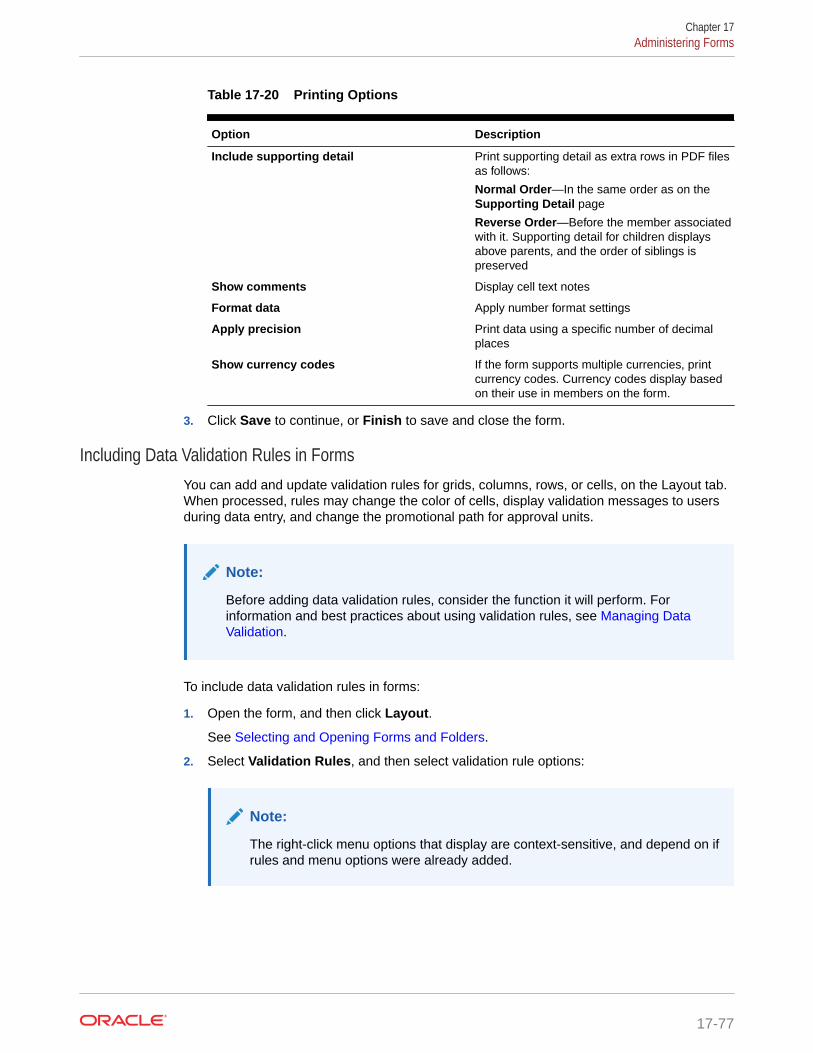
Table 17-20 Printing Options
Option Description
Include supporting detail Print supporting detail as extra rows in PDF filesas follows:
Normal Order—In the same order as on theSupporting Detail page
Reverse Order—Before the member associatedwith it. Supporting detail for children displaysabove parents, and the order of siblings ispreserved
Show comments Display cell text notes
Format data Apply number format settings
Apply precision Print data using a specific number of decimalplaces
Show currency codes If the form supports multiple currencies, printcurrency codes. Currency codes display basedon their use in members on the form.
3. Click Save to continue, or Finish to save and close the form.
Including Data Validation Rules in FormsYou can add and update validation rules for grids, columns, rows, or cells, on the Layout tab.When processed, rules may change the color of cells, display validation messages to usersduring data entry, and change the promotional path for approval units.
Note:
Before adding data validation rules, consider the function it will perform. Forinformation and best practices about using validation rules, see Managing DataValidation.
To include data validation rules in forms:
1. Open the form, and then click Layout.
See Selecting and Opening Forms and Folders.
2. Select Validation Rules, and then select validation rule options:
Note:
The right-click menu options that display are context-sensitive, and depend on ifrules and menu options were already added.
Chapter 17Administering Forms
17-77
Table 17-21 Validation Rules Options
Option Description
Add/Edit Validation Rules Create or modify existing rules in the DataValidation Rule Builder dialog box.
Copy | Paste Validation Rules Copy selected rules and paste them in anew location.
Validate only for users with access tothis form
If the current user doesn't have access tothe form, don't run form validations whenvalidating the approval unit.
Validate only for pages with existingblocks
Run validations only on page combinationsthat have potential blocks. The onlyexceptions being page combination havingany Dynamic Calc, Dynamic Calc and Store,Label only, or Store with one child membersettings. In this case, the page is loaded.
Validate only for cells and pages the userhas access to
Run validations as the current user, usingtheir security, and, not a ServiceAdministrator.
3. Build and validate the rules. See Creating and Updating Data Validation Rules.
4. In the form, click Next to continue building the form, and then validate and save it.
Enabling Drilling on Shared MembersForm designers often use shared members to create alternate rollup structures withinan application. To increase usability for these alternative hierarchies, the applicationprovides the ability to drill on a shared member for a given dimension. The option todrill is a dimension property which provides the flexibility to focus the drill behavior to aparticular dimension. The drilling option is only available for dimensions placed on therow or column axis during form design. Page or POV dimensions don't have drillcapability.
For example, using the following hierarchy representing the Entity dimension:
Chapter 17Administering Forms
17-78
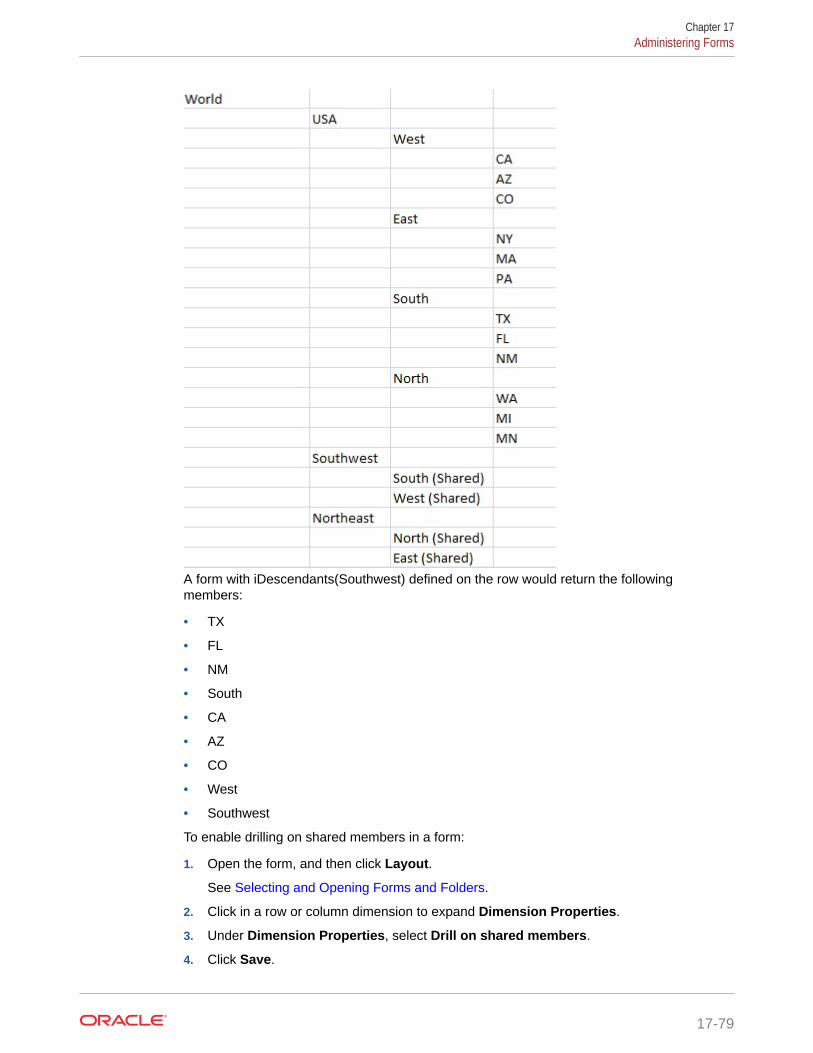
A form with iDescendants(Southwest) defined on the row would return the followingmembers:
• TX
• FL
• NM
• South
• CA
• AZ
• CO
• West
• Southwest
To enable drilling on shared members in a form:
1. Open the form, and then click Layout.
See Selecting and Opening Forms and Folders.
2. Click in a row or column dimension to expand Dimension Properties.
3. Under Dimension Properties, select Drill on shared members.
4. Click Save.
Chapter 17Administering Forms
17-79
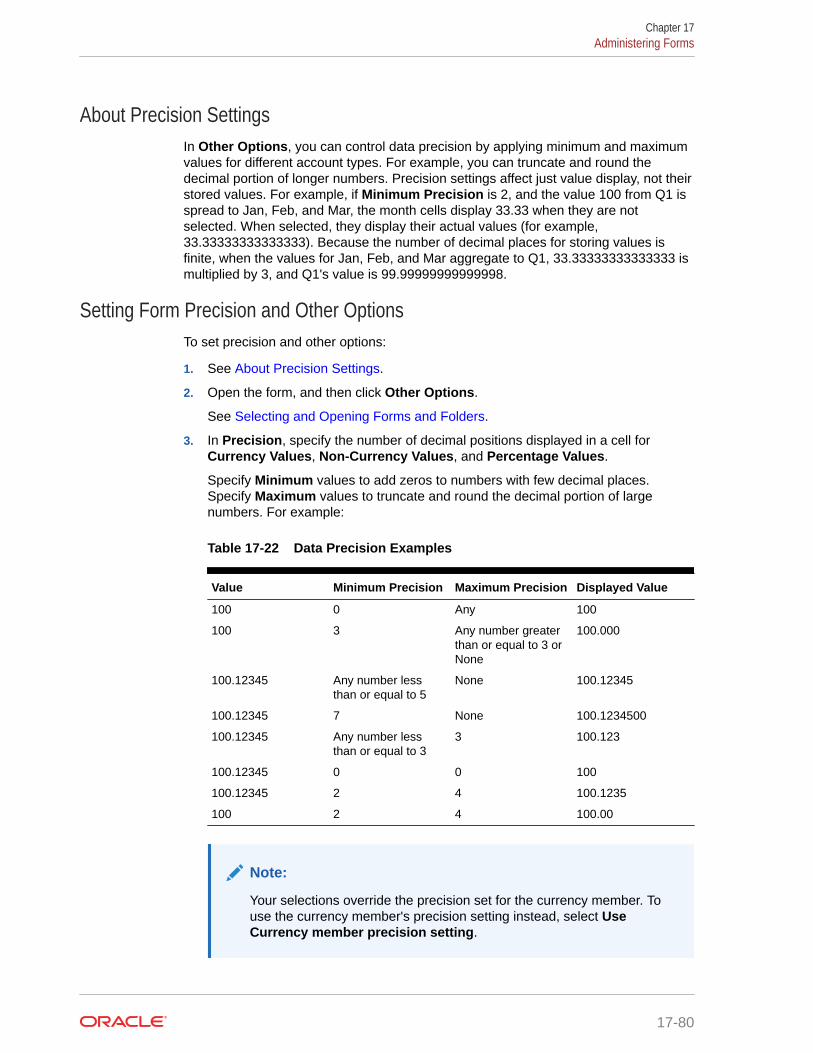
About Precision SettingsIn Other Options, you can control data precision by applying minimum and maximumvalues for different account types. For example, you can truncate and round thedecimal portion of longer numbers. Precision settings affect just value display, not theirstored values. For example, if Minimum Precision is 2, and the value 100 from Q1 isspread to Jan, Feb, and Mar, the month cells display 33.33 when they are notselected. When selected, they display their actual values (for example,33.33333333333333). Because the number of decimal places for storing values isfinite, when the values for Jan, Feb, and Mar aggregate to Q1, 33.33333333333333 ismultiplied by 3, and Q1's value is 99.99999999999998.
Setting Form Precision and Other OptionsTo set precision and other options:
1. See About Precision Settings.
2. Open the form, and then click Other Options.
See Selecting and Opening Forms and Folders.
3. In Precision, specify the number of decimal positions displayed in a cell forCurrency Values, Non-Currency Values, and Percentage Values.
Specify Minimum values to add zeros to numbers with few decimal places.Specify Maximum values to truncate and round the decimal portion of largenumbers. For example:
Table 17-22 Data Precision Examples
Value Minimum Precision Maximum Precision Displayed Value
100 0 Any 100
100 3 Any number greaterthan or equal to 3 orNone
100.000
100.12345 Any number lessthan or equal to 5
None 100.12345
100.12345 7 None 100.1234500
100.12345 Any number lessthan or equal to 3
3 100.123
100.12345 0 0 100
100.12345 2 4 100.1235
100 2 4 100.00
Note:
Your selections override the precision set for the currency member. Touse the currency member's precision setting instead, select UseCurrency member precision setting.
Chapter 17Administering Forms
17-80
4. Associate menus with the form by moving them from Available Menus to SelectedMenus. For multiple menus, click a "move" options on the right to specify the displayorder
5. Select Enable dynamic user variables to allow dynamic user variables in the form (seeWorking with Planning .)
Creating Asymmetric Rows and ColumnsAsymmetric rows and columns contain different sets of members selected across the samedimensions. For example:
Row/Column A—Scenario = Actual, Time Period = Q1
Row/Column B—Scenario = Budget, Time Period = Q2, Q3, Q4
To create asymmetric rows or columns:
1. Open the form, and then click Layout.
See Selecting and Opening Forms and Folders.
2. Click to select the dimension to modify.
3. Click to the right of the dimension name, and then modify the members selected forthis dimension. See Using the Member Selector.
4. Click Save to continue, or click Finish to save and close.
Adding Formula Rows and ColumnsYou can define formulas for rows and columns. For example, you can create a formulacolumn to calculate the percentage variance between monthly sales columns. The formula fora row or column applies to all row or column dimensions. To define or assign existingformulas to forms, select the row or column on the Layout tab, and use the options underSegment Properties. See Creating Formulas.
Tip:
Consider adding a formula row between two other rows to create a blank row. Blankrows help you visually separate subtotals and totals in a form.
To add formula rows and columns:
1. Open the form, and then click Layout.
See Selecting and Opening Forms and Folders.
2. On the Layout tab, right-click Rows or Columns.
3. Select Add Formula Row or Add Formula Column.
4. Click the new Formula Label, and then enter the formula name.
5. Click the row or column number and specify Segment Properties, such as Display
formula on form so users can view the formula when they click .
Chapter 17Administering Forms
17-81
6. For each dimension in Formula Data Type, select how to display the formularesult, such as a percentage or in date format.
7. Enter the formula, and then click . See Editing Formulas.
8. Click Validate to find and fix any errors.
Defining Form Page and Point of ViewYou can select dimensions and members for the page axis and point of view (POV).POV dimensions and members must be valid for the form cube, and not assigned to apage, column, or row axis. The POV sets the members that define data intersectionsand the form’s context. If you use user variables, variable names displays in the POV.See Managing User Variables
To define page axis and point of view:
1. Open the form, and then click Layout.
See Selecting and Opening Forms and Folders.
2. Click and then drag that dimension to Page .
3. Click for each page axis dimension and select members. See Using theMember Selector.
Note:
To shorten the number of members displayed in the member list so thatthe Search box can be easily seen, from the Home page, clickApplication, and then click Settings. For the Number of Items on thePage Drop-down option, enter a lower value.
4. Repeat Steps 2 and 3 as needed. Assign multiple dimensions to the page axis toenable users to change dimensionality while entering data. They can use DisplayOptions to use the most recent selection.
5. Specify Dimension Properties. See Editing Dimension Properties in theSimplified Dimension Editor.
6. Click and drag a dimension to Point of View to add them, or members, to theform’s point of view .
7. Specify Dimension Properties. See Editing Dimension Properties in theSimplified Dimension Editor.
8. Click Save to continue, or Finish to save and close.
Designing Specific Types of FormsRelated Topics
• Designing Forms for Multiple Currencies
• Designing Forms with Formula Rows and Columns
• Designing Forms with Data Validation
Chapter 17Administering Forms
17-82
• Designing Forms with Global Assumptions
• Designing Forms for Rolling Forecasts
• Designing Flex Forms
Designing Forms for Multiple CurrenciesTo allow users to work with currencies other than entities’ base currencies, perform one task:
• Select members from at least two currencies to compare converted currencies in thesame form.
• Assign the Currency dimension to the page axis and select reporting currencies asmembers to convert currencies for all the members in the form. Users can then select acurrency member from the page axis and launch the Calculate Currencies business ruleto view values in that currency.
Designing Forms with Formula Rows and ColumnsFormula rows and columns contain formulas that perform mathematical calculations on gridmembers. For example, you might want to rank values in a particular column or calculatevariance between two rows. A formula consists of grid references, arithmetic operators, andmathematical functions. To define or assign existing formulas to forms, select the appropriaterow or column on the Layout tab and then make selections under Segment Properties.
See Adding Formula Rows and Columns. For information about creating formulas and usingthe mathematical functions, see Form Formula Functions.
Designing Forms with Data ValidationYou can design forms that include predefined data validation rules that help implementbusiness policies and practices. You can specify cell colors and data validation messagesthat are generated on the form if entered data violates a validation rule. Data validation rulesare saved as part of the form. See Including Data Validation Rules in Forms and ManagingData Validation.
Designing Forms with Global AssumptionsForm designers typically create a specific-purpose form that stores global assumptions (alsocalled "drivers" or "driver data"), such as a depreciation value, tax rate, or unit price. This isuseful if you want to migrate the form’s driver data using Migration, for example, from a testenvironment to a production environment. Such forms are typically small, and are used as"lookup tables" that drive calculations.
To enable transferring global assumptions from a test to production environment, during formdesign in the Layout tab, select Grid Properties and Global Assumptions Form. Thenupdate the form to store driver data such as a tax rate. When migrating with Migration, thisenables migrating the driver data contained in the tagged form. Note that global assumptionscan't be used with dashboards or forms with multiple segments.
Designing Forms for Rolling ForecastsRelated Topics
• About Rolling Forecasts
Chapter 17Administering Forms
17-83
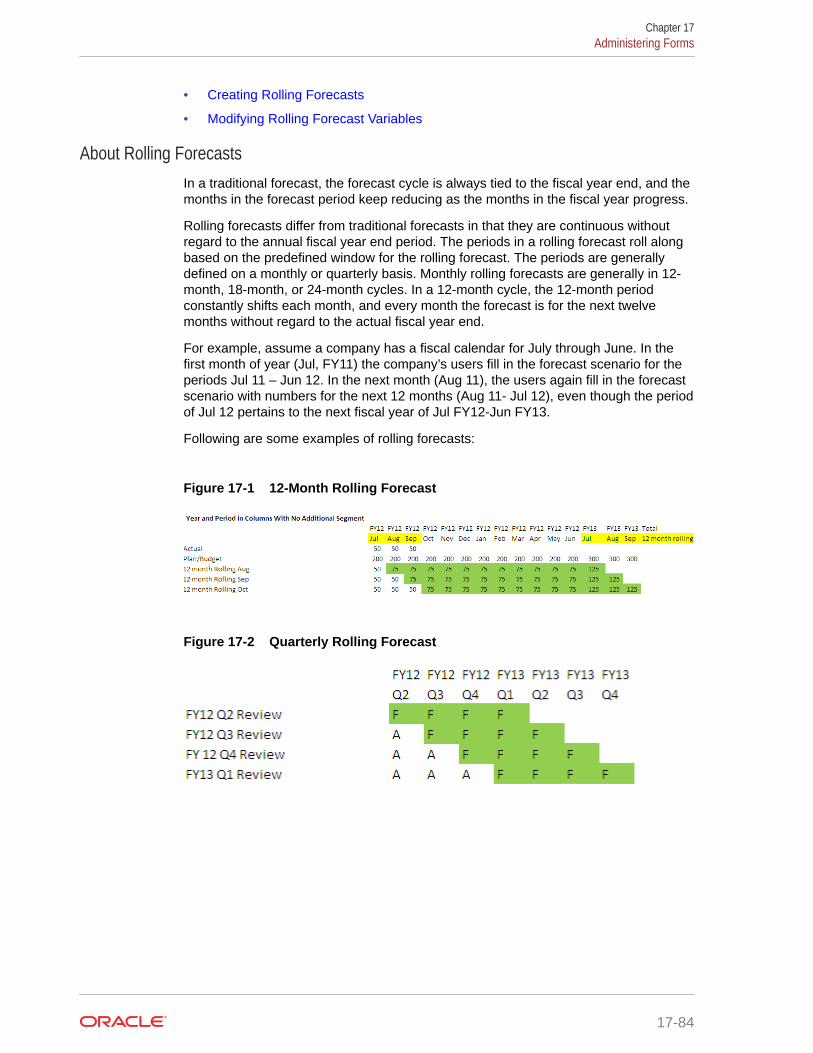
• Creating Rolling Forecasts
• Modifying Rolling Forecast Variables
About Rolling ForecastsIn a traditional forecast, the forecast cycle is always tied to the fiscal year end, and themonths in the forecast period keep reducing as the months in the fiscal year progress.
Rolling forecasts differ from traditional forecasts in that they are continuous withoutregard to the annual fiscal year end period. The periods in a rolling forecast roll alongbased on the predefined window for the rolling forecast. The periods are generallydefined on a monthly or quarterly basis. Monthly rolling forecasts are generally in 12-month, 18-month, or 24-month cycles. In a 12-month cycle, the 12-month periodconstantly shifts each month, and every month the forecast is for the next twelvemonths without regard to the actual fiscal year end.
For example, assume a company has a fiscal calendar for July through June. In thefirst month of year (Jul, FY11) the company’s users fill in the forecast scenario for theperiods Jul 11 – Jun 12. In the next month (Aug 11), the users again fill in the forecastscenario with numbers for the next 12 months (Aug 11- Jul 12), even though the periodof Jul 12 pertains to the next fiscal year of Jul FY12-Jun FY13.
Following are some examples of rolling forecasts:
Figure 17-1 12-Month Rolling Forecast
Figure 17-2 Quarterly Rolling Forecast
Chapter 17Administering Forms
17-84
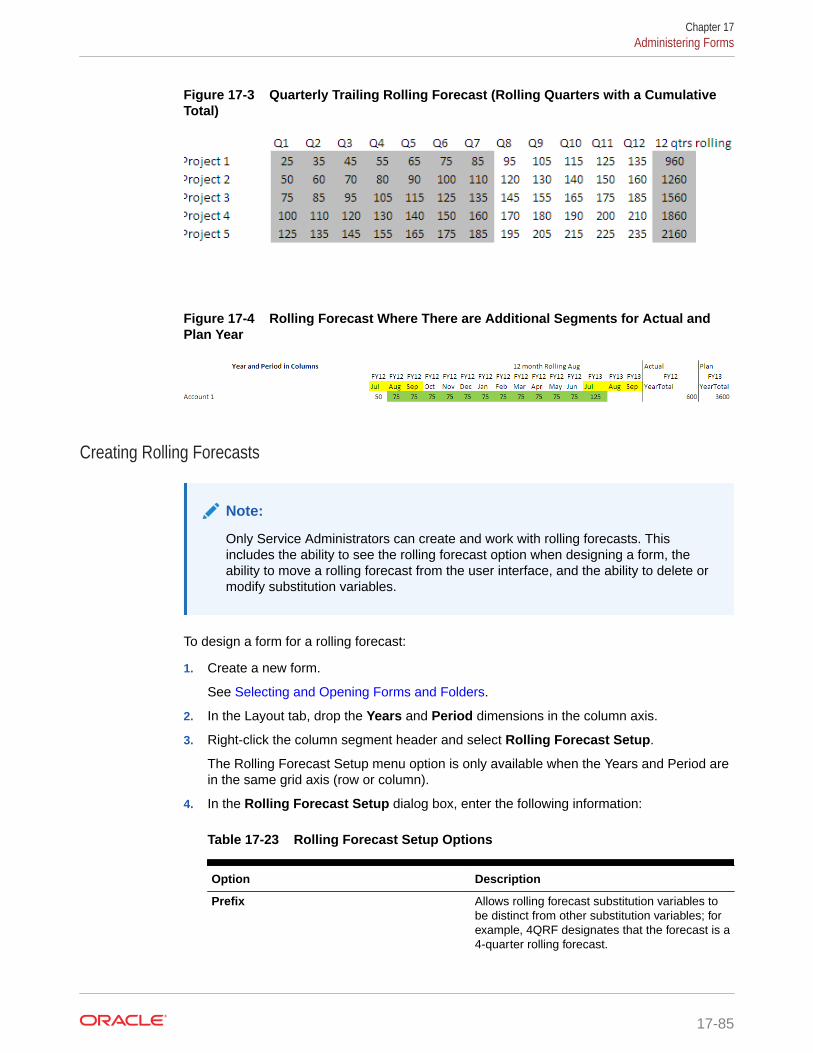
Figure 17-3 Quarterly Trailing Rolling Forecast (Rolling Quarters with a CumulativeTotal)
Figure 17-4 Rolling Forecast Where There are Additional Segments for Actual andPlan Year
Creating Rolling Forecasts
Note:
Only Service Administrators can create and work with rolling forecasts. Thisincludes the ability to see the rolling forecast option when designing a form, theability to move a rolling forecast from the user interface, and the ability to delete ormodify substitution variables.
To design a form for a rolling forecast:
1. Create a new form.
See Selecting and Opening Forms and Folders.
2. In the Layout tab, drop the Years and Period dimensions in the column axis.
3. Right-click the column segment header and select Rolling Forecast Setup.
The Rolling Forecast Setup menu option is only available when the Years and Period arein the same grid axis (row or column).
4. In the Rolling Forecast Setup dialog box, enter the following information:
Table 17-23 Rolling Forecast Setup Options
Option Description
Prefix Allows rolling forecast substitution variables tobe distinct from other substitution variables; forexample, 4QRF designates that the forecast is a4-quarter rolling forecast.
Chapter 17Administering Forms
17-85
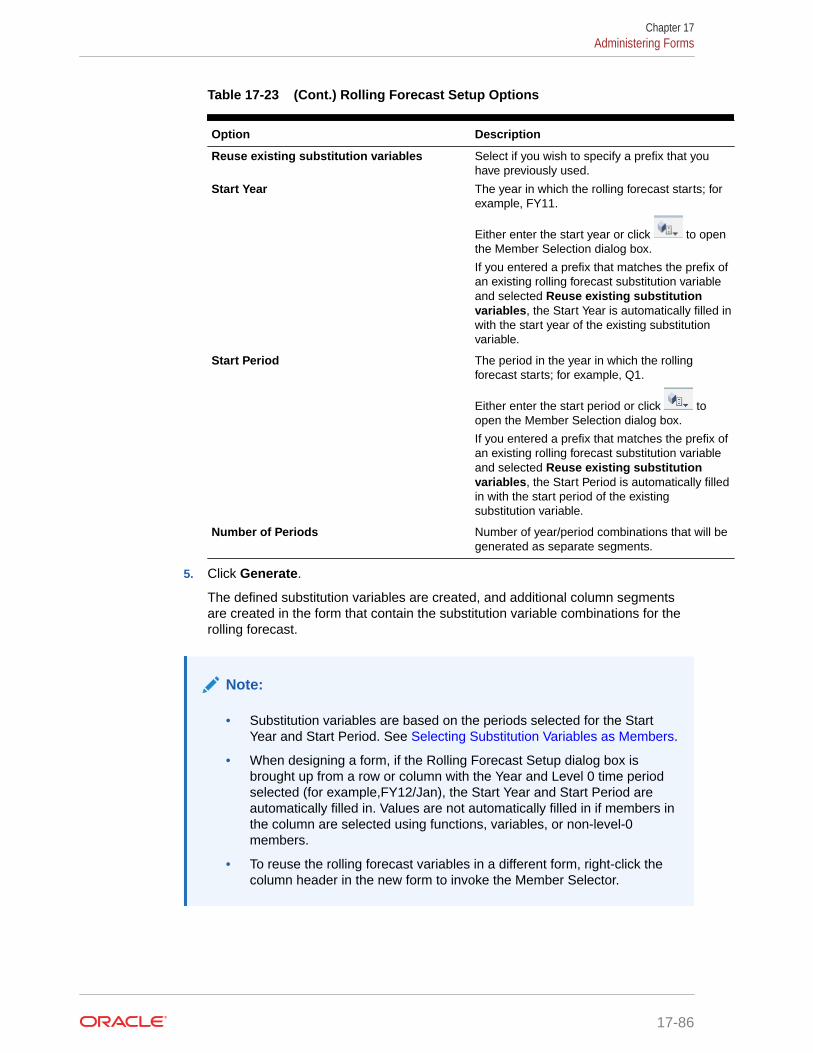
Table 17-23 (Cont.) Rolling Forecast Setup Options
Option Description
Reuse existing substitution variables Select if you wish to specify a prefix that youhave previously used.
Start Year The year in which the rolling forecast starts; forexample, FY11.
Either enter the start year or click to openthe Member Selection dialog box.
If you entered a prefix that matches the prefix ofan existing rolling forecast substitution variableand selected Reuse existing substitutionvariables, the Start Year is automatically filled inwith the start year of the existing substitutionvariable.
Start Period The period in the year in which the rollingforecast starts; for example, Q1.
Either enter the start period or click toopen the Member Selection dialog box.
If you entered a prefix that matches the prefix ofan existing rolling forecast substitution variableand selected Reuse existing substitutionvariables, the Start Period is automatically filledin with the start period of the existingsubstitution variable.
Number of Periods Number of year/period combinations that will begenerated as separate segments.
5. Click Generate.
The defined substitution variables are created, and additional column segmentsare created in the form that contain the substitution variable combinations for therolling forecast.
Note:
• Substitution variables are based on the periods selected for the StartYear and Start Period. See Selecting Substitution Variables as Members.
• When designing a form, if the Rolling Forecast Setup dialog box isbrought up from a row or column with the Year and Level 0 time periodselected (for example,FY12/Jan), the Start Year and Start Period areautomatically filled in. Values are not automatically filled in if members inthe column are selected using functions, variables, or non-level-0members.
• To reuse the rolling forecast variables in a different form, right-click thecolumn header in the new form to invoke the Member Selector.
Chapter 17Administering Forms
17-86
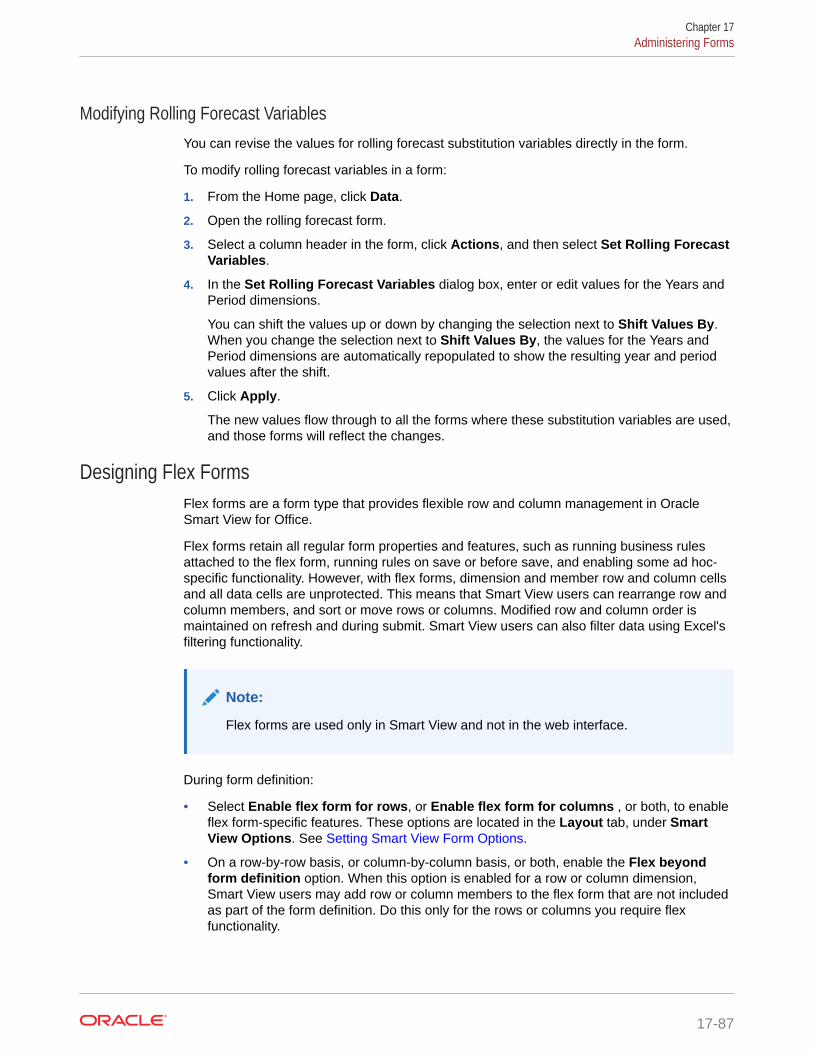
Modifying Rolling Forecast VariablesYou can revise the values for rolling forecast substitution variables directly in the form.
To modify rolling forecast variables in a form:
1. From the Home page, click Data.
2. Open the rolling forecast form.
3. Select a column header in the form, click Actions, and then select Set Rolling ForecastVariables.
4. In the Set Rolling Forecast Variables dialog box, enter or edit values for the Years andPeriod dimensions.
You can shift the values up or down by changing the selection next to Shift Values By.When you change the selection next to Shift Values By, the values for the Years andPeriod dimensions are automatically repopulated to show the resulting year and periodvalues after the shift.
5. Click Apply.
The new values flow through to all the forms where these substitution variables are used,and those forms will reflect the changes.
Designing Flex FormsFlex forms are a form type that provides flexible row and column management in OracleSmart View for Office.
Flex forms retain all regular form properties and features, such as running business rulesattached to the flex form, running rules on save or before save, and enabling some ad hoc-specific functionality. However, with flex forms, dimension and member row and column cellsand all data cells are unprotected. This means that Smart View users can rearrange row andcolumn members, and sort or move rows or columns. Modified row and column order ismaintained on refresh and during submit. Smart View users can also filter data using Excel'sfiltering functionality.
Note:
Flex forms are used only in Smart View and not in the web interface.
During form definition:
• Select Enable flex form for rows, or Enable flex form for columns , or both, to enableflex form-specific features. These options are located in the Layout tab, under SmartView Options. See Setting Smart View Form Options.
• On a row-by-row basis, or column-by-column basis, or both, enable the Flex beyondform definition option. When this option is enabled for a row or column dimension,Smart View users may add row or column members to the flex form that are not includedas part of the form definition. Do this only for the rows or columns you require flexfunctionality.
Chapter 17Administering Forms
17-87
The Flex beyond form definition property is located under DimensionPropertiesin the Layout tab when a row or column is selected. See SettingDimension Properties.
• Define action menus to open another flex form in Smart View. To define actionmenus, see Administering Action Menus. To attach an action menu to a flex form,see Setting Form Precision and Other Options.
For information on using flex forms, see Flex Forms in Working with Oracle SmartView for Office.
Videos
Your Goal Watch This Video
Learn how to enable and work with flex forms. Planning with Flex Forms in EPM
Cloud Planning
Working with Forms and Form ComponentsRelated Topics
• Selecting and Opening Forms and Folders
• Previewing Forms
• Printing Form Definitions
• Searching for Forms
• Editing Forms
• Moving, Deleting, and Renaming Forms
• How Cell Formatting in Smart View Persists in the Business Process
Selecting and Opening Forms and FoldersUse these procedures to select and open form folders and the forms they contain.
To select and open forms or form folders:
1. Click the Navigator icon , and then under Create and Manage, click Forms.
2. Perform one of the following steps:
• To open a folder, select a form folder beneath Folders.
• To open a form, select a form from the list displayed beneath Library when theappropriate form folder is open.
3. After you select a form folder, use the buttons next to Folders to create, rename,and assign access to the folder. After displaying a form, use the buttons aboveForm to create, edit, move, delete, and assign access to forms. The icon next tothe form name indicates the type of form:
• Simple form
• Composite form
Chapter 17Administering Forms
17-88

Note:
Oracle has stopped supporting composite forms, however your existingcomposite forms will continue to work. Oracle recommends that you shiftyour usage to dashboards instead of composite forms.
• Ad hoc grid
For information about setting up ad hoc grids, see Working with Planning .
Previewing FormsWhile you're designing forms, you can preview the dimensions that are assigned to the Pointof View, columns, rows, and page axes. Previewing displays member attributes, alias, anddata associated with forms, although new data can't be entered.
Previewing completes regular form design validation checks, and checks for properevaluation of any data validation rules included in the form. Data validation rules must beproperly completed before the form can be saved. In addition, data validation rules are savedas part of the form. If you don't save changes to a form, any data validation rule changesmade after the form was last saved are lost.
To preview a form’s design:
1. With a form open, click Preview.
The form opens in edit mode in a new tab.
2. Resolve any issues reported during the design validation checks, including any issueswith data validation rules.
3. Save the form to ensure that updates are saved, including any changes to data validationrules.
Printing Form DefinitionsService Administrators can print form definition reports that include information on dimensionmembers, business rules, access permissions, and other form components.
To create and print form definition reports:
1. Click the Navigator icon , and then under Monitor and Explore, click SystemReports.
2. Select the Forms tab.
3. Select the form definitions to print by moving them from Available Forms to SelectedForms.
4. Optional: Select Include Member Selection List to include column and row memberson the report.
5. Optional: Select Include Business Rules to include associated business rules.
6. Click Create Report.
Adobe Acrobat generates a consolidated report, including:
• Cube
Chapter 17Administering Forms
17-89
• Description
• Column dimension and members and additional column definitions
• Row dimension and members and additional row definitions
• Page and Point of View dimensions
• Form access permissions
• Associated business rules
7. To print the report, select File, and then Print on the Adobe toolbar.
Searching for FormsTo search for forms:
1. Click the Navigator icon , and then under Create and Manage, click Forms.
2. For Search, enter part or all the form name.
Ignoring capitalization, Search finds the next match.
3. Click to search forward (down) or to search backwards (up).
Editing FormsYou can edit the layout, members, and properties of forms. For example, you can addformula rows or columns to a form.
Note:
Previously, you could create composite forms (forms that comprise multiplesimple forms) to summarize data. Oracle has since stopped supportingcomposite forms, however your existing composite forms will continue towork. Oracle recommends that you shift your usage to dashboards instead ofcomposite forms. See Designing Dashboards.
To edit forms:
1. Select the form, then click (see Selecting and Opening Forms and Folders).
2. Select:
a. Properties to edit the form name, description and instructions. See CreatingForms.
b. Layout to edit form layout. See Defining the Layout.
c. Other Options to edit form precision and to change which context menus areassociated with the form. See Setting Form Precision and Other Options.
d. Business Rules to change which business rules are associated with the form,or modify business rule properties. See Administering Rules.
3. Click Finish to save your work and close the form.
Chapter 17Administering Forms
17-90
Moving, Deleting, and Renaming FormsTo move, delete, and rename forms:
1. Select the form.
See Selecting and Opening Forms and Folders.
2. Select a task:
• To move a form, click Move, and then select the destination folder.
Note:
You can move multiple forms simultaneously if they are in the same folder.
• To delete a form, click Delete.
• To rename a form, click Rename, and then enter the new name.
3. Click OK.
How Cell Formatting in Smart View Persists in the Business ProcessTo select the formatting for a form:
1. In the form, right-click, and then select Apply.
2. Select:
• Cell Styles—To use the business process formatting
• Custom Styles—To use the formatting saved in Oracle Smart View for Office
For more information:
• On which Microsoft Excel formatting features are supported in Smart View and Planning,see "About Smart View Formatting in Planning Forms" in Working with Planning .
• On saving Excel formatting, see the Oracle Smart View for Office User's Guide .
Managing Forms and FoldersUse the Form Management and the Business Rule Folders pages to manage folders andforms.
Table 17-24 Tasks
Task Topic
Create folders Creating Folders
Move, delete, or rename folders Working with Folders
Create forms Creating Forms
Assign permissions to forms and folders About Assigning Permissions to Artifacts, Rules,and Folders
Move and delete forms Moving, Deleting, and Renaming Forms
Chapter 17Administering Forms
17-91
To view all forms or business rules in a folder, click the folder’s name in the left-handfolders area. To select all the forms, select the check box at the top of the forms list.
Creating FoldersUse folders to hierarchically organize forms and Calculation Manager business rulesecurity. You can move folders within the hierarchy, and give folders the same name ifthey are on different hierarchical levels. You can't:
• Delete folders unless they are empty
• Select multiple folders
• Rename, move, or delete the top-level folder called, respectively, Library andCalcMgrRules
• Add files to the top-level folder unless you're an administrator
To create folders:
1. Perform an action:
• For form folders: Click the Navigator icon , and then under Create andManage, click Forms.
• For Calculation Manager business rule folders: Click the Navigator icon ,and then under Create and Manage, click Rules Security.
2. Select the folder under which to create the folder.
3. Above the folders list, click Create.
4. Enter the folder name.
5. Click OK.
Working with FoldersTo move, delete, or rename folders:
1. For form folders: Click the Navigator icon , and then under Create andManage, click Forms.
For business rule folders: Click the Navigator icon , and then under Createand Manage, click Rules Security.
2. Select the folder to move, delete, or rename.
3. Perform a task:
• To move, click Move. Select the destination folder to which to move theselected folder.
Note:
When you move folders, all nested folders, forms, and CalculationManager business rules within them are also moved.
Chapter 17Administering Forms
17-92
• To delete, click Delete.
• To rename, click Rename, and then enter the new name.
4. Click OK.
Tip:
Did you know that folder names can be localized based on the user's browserlocale? To localize a folder name (for example, from English to Japanese), you cancustomize the folder name on the Artifact Labels page in the Tools cluster. Formore information, see Specifying Artifact Labels.
Administering Rules• About Rules
• Adding and Removing Rules in Forms
• Setting Business Rule Properties
• Viewing Rules Usage
• About Runtime Prompts
• Using Groovy Rules
About RulesWith appropriate access, users can launch business rules from the application. Rules canalso prompt users for input when rules are launched.
To launch business rules from within data forms or independently from the Launch menu, therules must be deployed from Calculation Manager. For optimum performance, business rulesthat run in forms should be designed to execute within three minutes. For rules with a longerexecution time, you can schedule batch processing or run the rules during non-peak hours.
You can diagnose performance issues with business rules and pinpoint and address anyissues using activity reports. Activity reports identify which business rules are taking thelongest to execute. You can then open the rules in Calculation Manager, review the log, andoptimize the steps within the rule to improve performance.
For information on:
• Creating, updating, and deploying business rules, see Deploying Business Rules andBusiness Rulesets from the Deployment View in Designing with Calculation Manager forOracle Enterprise Performance Management Cloud
• Using runtime prompts, see About Runtime Prompts
• Generating a report that details where rules are used, see Viewing Rules Usage
• Viewing an activity report to diagnose rules performance issues, see Viewing ActivityReports
• Optimizing business rules, see Optimizing Business Rules in Designing with CalculationManager for Oracle Enterprise Performance Management Cloud
Chapter 17Administering Rules
17-93
Adding and Removing Rules in FormsYou can associate one or more rules with a form, by cube. Users can launchassociated rules from the form to calculate and allocate values. You can set whethereach rule associated with a form automatically launches when the form is opened orsaved. You can also change the order in which the rules are launched or remove rulesfrom a form.
Note the following:
• Rules must be deployed to the business process from Calculation Manager beforeyou can add rules to business process forms. See About Rules.
• Likewise, if a rule is deleted in Calculation Manager, the rules must be redeployedto the business process in order for them to no longer be used in the businessprocess. Optionally, you can manually remove a rule from a form using theprocedure in this topic.
• Rules that are set to automatically run when a form is loaded or saved never run inthe background.
To add, update, or remove business rules in forms:
1. Take an action:
• To update the current form, click Actions, and then click Business Rules.
• To open a form for editing so you can associate rules, go to the Home page
and click the Navigator icon , and then under Create and Manage, click
Forms. Select the form, click , and then click Business Rules.
2. From the Cube drop-down menu, select the cube.
3. From the Business Rules list, select the rules to associate with the form, and addthem to Selected Business Rules. To remove associated rules, select the rulesunder Selected Business Rules and remove them. See Using the MemberSelector.
By default, the Calculate Form and Calculate Currencies rules are selected.Calculate Form is automatically created for forms to calculate subtotals. CalculateCurrencies is created for forms that include multiple currencies in a row, column,or page, to enable converting values among the available currencies. You canremove Calculate Currencies if you use customized calculation scripts to calculatecurrency conversions. You can remove Calculate Form to prevent users fromcalculating data in forms.
4. To change the order of selected business rules (the order in which rules displayand launch), select a business rule in Selected Business Rules and click the upor down arrow to move it up or down in the list. The rule listed first displays andlaunches first; the rule at the bottom of the list displays and launches last.
Caution:
The order in which business rules launch is important and may affectdata. For example, it's important to convert currencies first, beforesubtotaling.
Chapter 17Administering Rules
17-94
5. To set business rule properties, click Properties. See Setting Business Rule Properties.
6. Click Save to save your work and continue creating or editing the form, or click Finish tosave your work and close the form.
Setting Business Rule PropertiesYou can specify whether business rules associated with forms launch automatically whenusers load (open) or save the form. If business rules have runtime prompts, you can setwhether the default members in the runtime prompt match the members selected in the pageand Point of View axes.
To set business rule properties:
1. Take an action:
• To update the current form, click Actions, and then click Business Rules.
• To open a form for editing, go to the Home page and click the Navigator icon ,
and then under Create and Manage, click Forms. Select the form, click , andthen click Business Rules.
2. There are four phases in a form where a rule can be assigned and each may haveinformation relevant to that phase. Select from the following:
• Run Before Load
• Run After Load
• Run Before Save
• Run After Save
Note:
• Run After Load and Run Before Save are enabled only for Groovy rules.You can't select these options for calc scripts or graphical rules. For moreinformation about Groovy rules, see Using Groovy Rules.
• Some actions such as saving the grid, changing the page, or launching anaction menu item will also reload the page after the operation completes.This ensures the grid contains the newest data. When this happens, thebefore and after load actions will run as they do in normal page loads.
• While hidden runtime prompts are not supported for calc script rules on thebefore and after load options, they are supported for Groovy rules.
• Regarding Groovy rules:
– Groovy is available with EPM Enterprise Cloud. You can create and editGroovy rules in all of the application types (Custom, Module, andFreeForm).
– You can also use Groovy rules with Enterprise PBCS and PBCS PlusOne.
– In addition, you can use Groovy rules with Oracle Strategic WorkforcePlanning Cloud and Oracle Sales Planning Cloud.
Chapter 17Administering Rules
17-95
3. Optional: If a business rule has runtime prompts, select Use Members on Formto match the default member selection on the runtime prompt window to thecurrent members in the page and Point of View axes of the open form.
To learn how this option interacts with other settings and conditions, see Understanding Runtime Prompts.
4. Optional: To hide the runtime prompt value from the user, select Hide Prompt,which automatically selects Use Members on Form.
After saving the form, the next time you return to this page, Use Members onForm displays as selected.
You can hide runtime prompts if:
• All runtime prompt member values are filled in (appropriate dimensionmembers can be read from form's Page/Point of View)
• No dimensions are repeated in the runtime prompt
5. Click OK.
Viewing Rules UsageBusiness rules can be used in the following artifacts:
• Forms
• Rulesets
• Menus
• Task lists
Service Administrators can generate a report, called the Rules Usage Report, thatdetails where rules are used. Filters enable you to refine the details by rule name, ruletype, and cube.
Note:
The only rules listed in the Rules Usage Report are those rules that aredeployed in the business process.
To view rules usage:
1. Click the Navigator icon , and then under Monitor and Explore, click SystemReports.
2. Click the Rules Details tab.
3. If filtering, select filter criteria, and then click Apply Filter:
• Rule Type—Choose one or more options: All, Rules, and Rulesets
• Cube—Choose from a list of available cubes.
• Name Filter—Enter a rule or ruleset name. Optionally, you can use wildcardcharacters.
Chapter 17Administering Rules
17-96
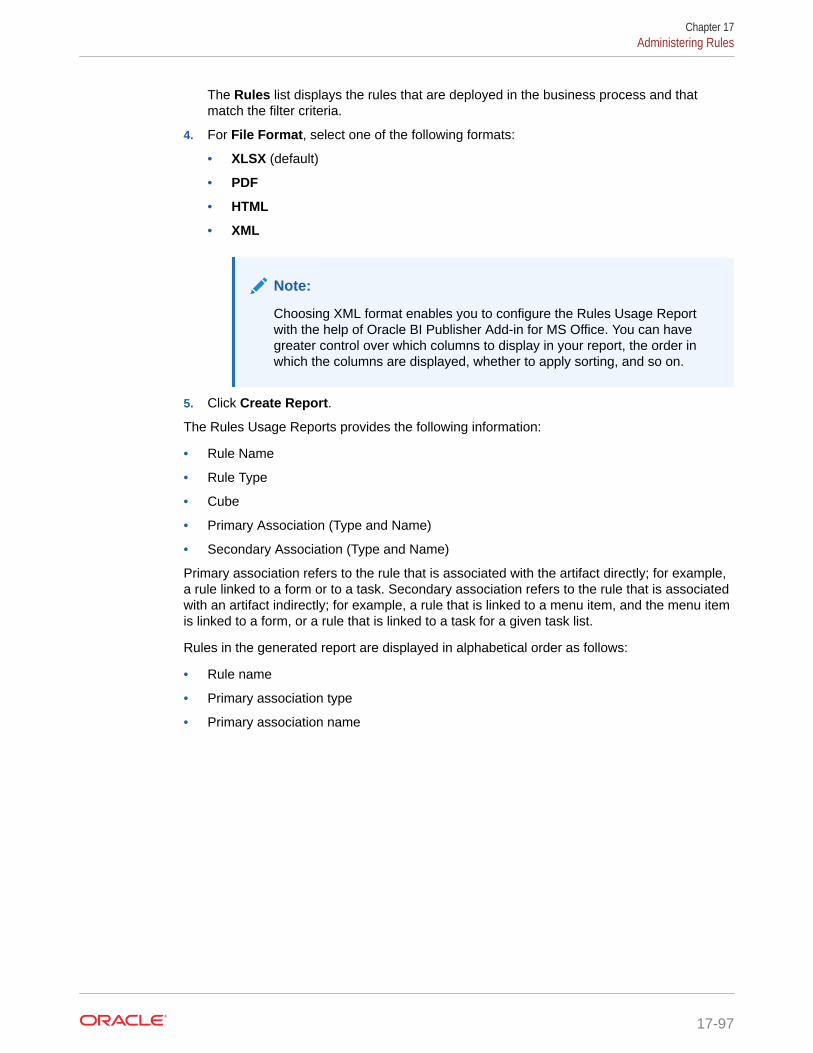
The Rules list displays the rules that are deployed in the business process and thatmatch the filter criteria.
4. For File Format, select one of the following formats:
• XLSX (default)
• HTML
• XML
Note:
Choosing XML format enables you to configure the Rules Usage Reportwith the help of Oracle BI Publisher Add-in for MS Office. You can havegreater control over which columns to display in your report, the order inwhich the columns are displayed, whether to apply sorting, and so on.
5. Click Create Report.
The Rules Usage Reports provides the following information:
• Rule Name
• Rule Type
• Cube
• Primary Association (Type and Name)
• Secondary Association (Type and Name)
Primary association refers to the rule that is associated with the artifact directly; for example,a rule linked to a form or to a task. Secondary association refers to the rule that is associatedwith an artifact indirectly; for example, a rule that is linked to a menu item, and the menu itemis linked to a form, or a rule that is linked to a task for a given task list.
Rules in the generated report are displayed in alphabetical order as follows:
• Rule name
• Primary association type
• Primary association name
Chapter 17Administering Rules
17-97
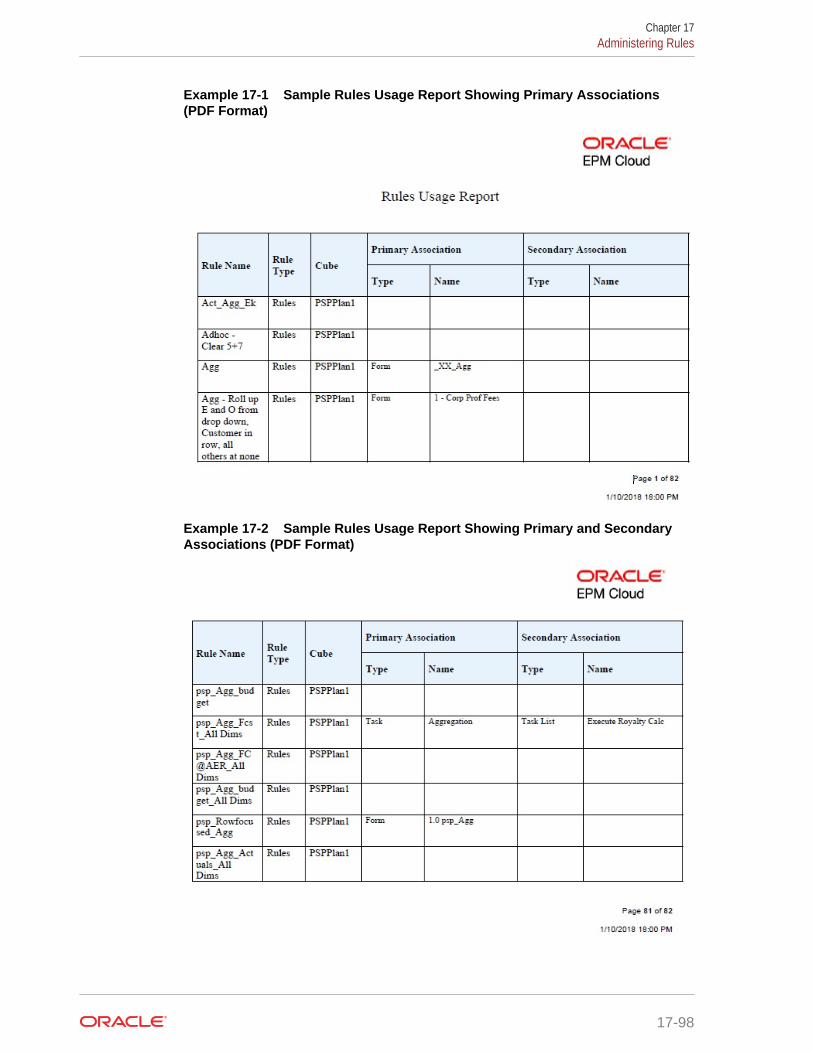
Example 17-1 Sample Rules Usage Report Showing Primary Associations(PDF Format)
Example 17-2 Sample Rules Usage Report Showing Primary and SecondaryAssociations (PDF Format)
Chapter 17Administering Rules
17-98
About Runtime PromptsWhen launched, business rules can prompt users for such variables as members, text, dates,or numbers. Prompts should be specific and tell users what type of data is expected. Forexample:
• Select a month.
• Enter the expected number of customer visits per quarter.
• What percentage change in earnings do you expect next month?
If, in Calculation Manager, the option Create dynamic members is selected for the businessrule and the parent member is enabled for adding dynamic children, then users can createnew members by entering their name in the runtime prompt.
When launching business rules with runtime prompts, the application validates the valueentered, but not the business rule. To set the default member selection in a runtime prompt,see Setting Business Rule Properties. To understand how other settings and conditions affectruntime prompts, see Understanding Runtime Prompts.
Understanding Runtime PromptsThe display and values of runtime prompts are affected by such aspects as:
• Whether the Use as Override Value property is set at the rule or the ruleset level atdesign-time
• Whether there are valid members on the form's Page/Point of View and whether the UseMembers on Form and Hide Prompt options on the Business Rule Properties tab areselected (see Setting Business Rule Properties)
• Whether the Runtime Prompt option is set during form design or set when designing theruntime prompt (see Designing with Calculation Manager for Oracle EnterprisePerformance Management Cloud )
• Whether the Use Last Value property is set when designing the business rule
• Whether, in Calculation Manager, the option Create dynamic members is selected forthe business rule and the parent member is enabled for adding dynamic children. If yes,then users can create new members by entering their name in the runtime prompt.
Note:
In the business process, runtime prompt values aren't replaced inside doublequoted text. Alternately, you can use Groovy rules to achieve the same. However,launching a rule from Calculation Manager will replace runtime prompt values indouble quoted text.
Principles:
1. If the Use as Override Value property is set at the rule or the ruleset level at design-time,the value overridden at the rule level or the ruleset level will take precedence over thevalues of members in the Page/Point of View and the last saved value. This occursregardless of where the rule is launched (from the form or from the Rules link on theNavigator menu), and regardless of whether the runtime prompt is hidden during design.
Chapter 17Administering Rules
17-99
The Override Value can be set as a user variable, in which case the rule will belaunched with the current value of the variable.
2. When launched from a form, the values of members in the Page/Point of Viewtake precedence over the last saved value if the Use Members on Form option isselected, regardless of whether the runtime prompt is hidden during design. Thebusiness rule is run without displaying the hidden runtime prompt to users, and theruntime prompt values are taken from the Page/Point of View members.
3. If the Use Last Value option is selected for the runtime prompt at design time, andif any of these conditions exist:
• Use Members on Form isn't selected
• A runtime prompt is launched from the Rules link on the Navigator menu
• Values can't be pre-filled from the context
Then the precedence of runtime prompt values is determined by:
a. The last saved value takes precedence.
b. If a ruleset is launched, the value overridden at the ruleset level at design-timeis used.
c. If a business rule is launched, the value overridden at the rule-level at design-time is used. If it's not overridden at the rule-level, the runtime prompt value atdesign-time is used.
Runtime prompts that are hidden at design time never use the last saved value. Inthese cases, the Use Last Value setting is ignored.
4. The Use Members on Form and Hide Prompt options apply only to Member andCross Dimension runtime prompt types (Cross Dimension runtime prompt typesare available only for business rules created with Calculation Manager).
The value set at the rule or the ruleset level at design-time when the Use asOverride Value property is set participates in the Hide Prompt behavior.
5. For Cross Dimension runtime prompts: the runtime prompt isn't hidden unless allthe prompts in the runtime prompt can be pre-filled from the Override Value orPage/Point of View. The runtime prompt is displayed with some values pre-filledfrom the Override Value or Page/Point of View and others filled according toPrinciples 1, 2 and 3.
This table describes the result on runtime prompts of these settings and conditions:
Table 17-25 How Member Availability and Other Settings Affect Runtime Prompts
Availability ofOverride Value andmember on thePage/Point of View
Use Members onForm option isselected
Hide RuntimePrompt property isset during runtimeprompt design
Hide Prompt optionis selected for theform
Result on RuntimePrompt
Use as OverrideValue is set andOverride Value isavailable or themember is availableon the Page/Point ofView to use as theruntime prompt value.
Yes Yes Yes or No
Setting is ignored
The business ruleruns withoutdisplaying the runtimeprompt to users.Instead, the runtimeprompt value is takenfrom the OverrideValue or Page/Pointof View member.
Chapter 17Administering Rules
17-100
Table 17-25 (Cont.) How Member Availability and Other Settings Affect Runtime Prompts
Availability ofOverride Value andmember on thePage/Point of View
Use Members onForm option isselected
Hide RuntimePrompt property isset during runtimeprompt design
Hide Prompt optionis selected for theform
Result on RuntimePrompt
Use as OverrideValue is set andOverride Value isavailable or themember is availableon the Page/Point ofView to use as theruntime prompt value.
Yes No Yes If all runtime promptscan be pre-filled fromthe Override Valueor Page/Point of Viewcontext and are validand within limits, theruntime prompts arenot displayed.However, if even oneruntime prompt valuecan't be pre-filledfrom the OverrideValue or Page/Pointof View context, thenall runtime promptsdisplay, with valuespre-filled whereverpossible. All othersfollow Principles 1and 3.
Use as OverrideValue is set andOverride Value isavailable or themember is availableon the Page/Point ofView to use as theruntime prompt value.
Yes No No The runtime promptis displayed to users,with values pre-filledfrom the OverrideValue or Page/Pointof View.
Use as OverrideValue isn't set andthe member isn'tavailable on thePage/Point of View touse as the runtimeprompt value.
Yes Yes Yes or No
Setting is ignored
The business ruledisplays the runtimeprompt to users, withvalues pre-filledaccording to Principle3.
For example, the formcontext can't bepassed because thedimension of theruntime prompt is onrows or columns, sothe Hide Promptsetting is ignored andthe runtime promptdisplayed.
Use as OverrideValue isn't set andthe member isn'tavailable on thePage/Point of View touse as the runtimeprompt value.
Yes No Yes The runtime promptis displayed to users,with values pre-filledaccording to Principle3.
Chapter 17Administering Rules
17-101
Table 17-25 (Cont.) How Member Availability and Other Settings Affect Runtime Prompts
Availability ofOverride Value andmember on thePage/Point of View
Use Members onForm option isselected
Hide RuntimePrompt property isset during runtimeprompt design
Hide Prompt optionis selected for theform
Result on RuntimePrompt
Use as OverrideValue is set andOverride Value isavailable, and themember isn'tavailable on thePage/Point of View touse as the runtimeprompt value.
Yes No No If all runtime promptscan be pre-filled fromthe Overide Valueand are valid andwithin limits, theruntime prompts arenot displayed.However, if even oneruntime prompt valuecan't be pre-filledfrom the OverideValue, then allruntime promptsdisplay, with valuespre-filled whereverpossible. All othersfollow Principles 1and 3.
Use as OverrideValue isn't set andthe member isn'tavailable on thePage/Point of View touse as the runtimeprompt value.
Yes No No The runtime promptis displayed to users,with values pre-filledaccording to Principle3.
Use as OverrideValue is set andOverride Value isavailable, and themember isn'tavailable on thePage/Point of View touse as the runtimeprompt value.
Yes No No The runtime promptis displayed to users,with values pre-filledaccording toPrinciples 1 and 3.
Use as OverrideValue is set andOverride Value isavailable or themember is availableon the Page/Point ofView to use as theruntime prompt value.
No Yes Not available The business ruleruns withoutdisplaying the runtimeprompt to users.Instead, the design-time values are used.
Use as OverrideValue is set andOverride Value isavailable or themember is availableon the Page/Point ofView to use as theruntime prompt value.
No No Not available The runtime promptis displayed to users,with values pre-filledaccording to Principle3.
Chapter 17Administering Rules
17-102
Table 17-25 (Cont.) How Member Availability and Other Settings Affect Runtime Prompts
Availability ofOverride Value andmember on thePage/Point of View
Use Members onForm option isselected
Hide RuntimePrompt property isset during runtimeprompt design
Hide Prompt optionis selected for theform
Result on RuntimePrompt
Use as OverrideValue isn't set andthe member isn'tavailable on thePage/Point of View touse as the runtimeprompt value.
No Yes Not available The business ruleruns withoutdisplaying the runtimeprompt to users.Instead, the design-time values are used.
Use as OverrideValue isn't set andthe member isn'tavailable on thePage/Point of View touse as the runtimeprompt value.
No No Not available The runtime promptis displayed to users,with values pre-filledaccording to Principle3.
When hidden runtime prompt values are ambiguous, note:
• If the form context can't be passed in (because the dimension is on the row or column, forexample), hidden runtime prompts are displayed.
• With hidden Cross Dimension runtime prompt types, if all prompts can't be passed infrom the Override Value or context, the runtime prompt displays with values pre-filledfrom Override Value or context values and design time values. For example, if the CrossDimension has runtime prompts for Period, Entity, and Scenario, and Entity is defined onthe row and Scenario has an Override Value set, then the runtime prompt displays withthe Override Scenario, then design time value for Entity, then Page Period.
• If the Override Value is present, or context can be passed in for the runtime promptvalue but it's out of limits, then the runtime prompt is displayed with the context value pre-filled.
• If there is more than one runtime prompt of type Member or type Cross Dimensioncombined, then the runtime prompts are displayed with the Override Value or contextvalues pre-filled. For example, if there is a member type runtime prompt for the Entitydimension and a Cross Dimension type runtime prompt with one prompt for the Entitydimension, then both runtime prompts are displayed. This rule doesn't apply toCalculation Manager rulesets.
• When launched from the Rules link on the Navigator menu, runtime prompts are hiddenand the design-time value (overridden at the rule or ruleset level) is used to launch thebusiness rule. If the provided design-time value is out of limits, then the runtime prompt isdisplayed with the design-time value pre-filled.
• Runtime variables that are hidden during design never use the last saved value. The UseLast Value property is ignored, and the values are not saved to the database.
Designing Secure Runtime PromptsThe application supports runtime security on Scenario, Version, Entity, and secondarydimension intersections by relying on the order in which runtime prompts are designed. Forthe business rule to apply Approvals security, the Calculation Manager designer must place
Chapter 17Administering Rules
17-103
runtime prompts for Scenario and Version with Write or Approvals security before theEntity runtime prompt.
Runtime prompts for Version and Scenario members are filtered by write access whenSecurity in Calculation Manager is set to either Approvals or Write. Runtime promptsfor Entities with the Security set to Approvals are filtered according to the lastScenario/Version that is displayed before the Entity runtime prompt. If either theScenario or Version runtime prompt doesn't exist, Entities are filtered by write access.
Runtime prompts for other dimensions with Security set to Approvals are consideredto be secondary dimensions and are filtered according to the last Scenario/Version/Entity that displays before that runtime prompt.
So, for runtime prompts using Approvals security defined in this order:
Scenario1: Version2: To_Entity1, Scenario2: Version1, To_Entity2, To_Product
Runtime prompts are filtered as follows:
• To_Entity1 is filtered by the combination—Scenario1: Version2
• To_Entity2 is filtered by the combination—Scenario2: Version1
• To_Product is filtered by the combination—Scenario2, Version1, To_Entity2,To_Product
For example:
Fix (FY11, Jan,{EntitySalesByCountry},{MyScenario2},{MyVersion2}) Fix ({MyProduct},{MyCountry}) {ToAccount} = {FromAccount} * 2; ENDFIXEndfix
Note:
If the business rule designer omits an approval unit dimension from the list ofruntime prompts (for example, the runtime prompt doesn't include a Scenarioor Entity), then Approvals security isn't applied and the hierarchy is filtered bywrite access.
Using Groovy RulesCreate rules written in the Groovy scripting language that solve use cases that normalbusiness rules can't solve.
Table 17-26 Where Can I Learn More About Groovy Rules?
Your Goal Learn More
Learn the benefits of Groovy rules. About Creating a Groovy Business Rule
View examples of business scenarioswhere Groovy business rules might beused.
Groovy Rule Business Scenarios
Chapter 17Administering Rules
17-104

Table 17-26 (Cont.) Where Can I Learn More About Groovy Rules?
Your Goal Learn More
Watch videos and complete hands-ontutorials that teach best practices whenimplementing and using Groovy rules.
• Groovy Business Rule Tutorial Videos• Learning Groovy in Oracle EPM Cloud
Create Groovy business rules and a Groovytemplate using Calculation Manager.
• Creating a Groovy Business Rule• Creating a Groovy Template for a
Planning BSO CubeConnect to the Java APIs used for creatingGroovy rules and view example Groovyscripts.
• Java API Reference for Groovy Rules• Groovy Business Rule Examples
Edit the script for a Groovy business rule ortemplate using Calculation Manager.
Editing the Script For a Groovy BusinessRule or Template
Secure Groovy templates for authorizedusers.
Assigning Access to Groovy Templates
About Creating a Groovy Business Rule
Note:
You can use Groovy rules only for applications of type "Enterprise" (available withEnterprise PBCS or PBCS Plus One licenses), Oracle Strategic Workforce PlanningCloud, or Oracle Sales Planning Cloud.
Groovy business rules allow you to design sophisticated rules that solve use cases thatnormal business rules can't solve; for example, rules to prevent users from saving data onforms if the data value is above a predefined threshold.
You create Groovy rules in Calculation Manager and execute them from any place that youcan execute a calc script rule in a Planning application; for example, on the Rules page,within the context of a form, in the job scheduler, in dashboards, in task lists, and so on.Groovy rules are also supported in rulesets. You can have a combination of calc script rulesand Groovy rules within a ruleset.
Oracle supports two types of Groovy rules:
• Rules that can dynamically generate calc scripts at runtime based on context other thanthe runtime prompts and return the calc script which is then executed against Essbase.
For example, you could create a rule to calculate expenses for projects only for theduration (start and end dates) of the project.
Another example is a trend-based calculation that restricts the calculation to the accountsavailable on the form. You could use this calculation for various forms in Revenue,Expense, Balance Sheet, and Cash Flow. This allows for optimization and reuse.
• Pure Groovy rules that can, for example, perform data validations and cancel theoperation if the data entered violates company policies.
Watch this tutorial video to learn best practices in moving modified data using Groovy Rulesand Smart Push.
Chapter 17Administering Rules
17-105
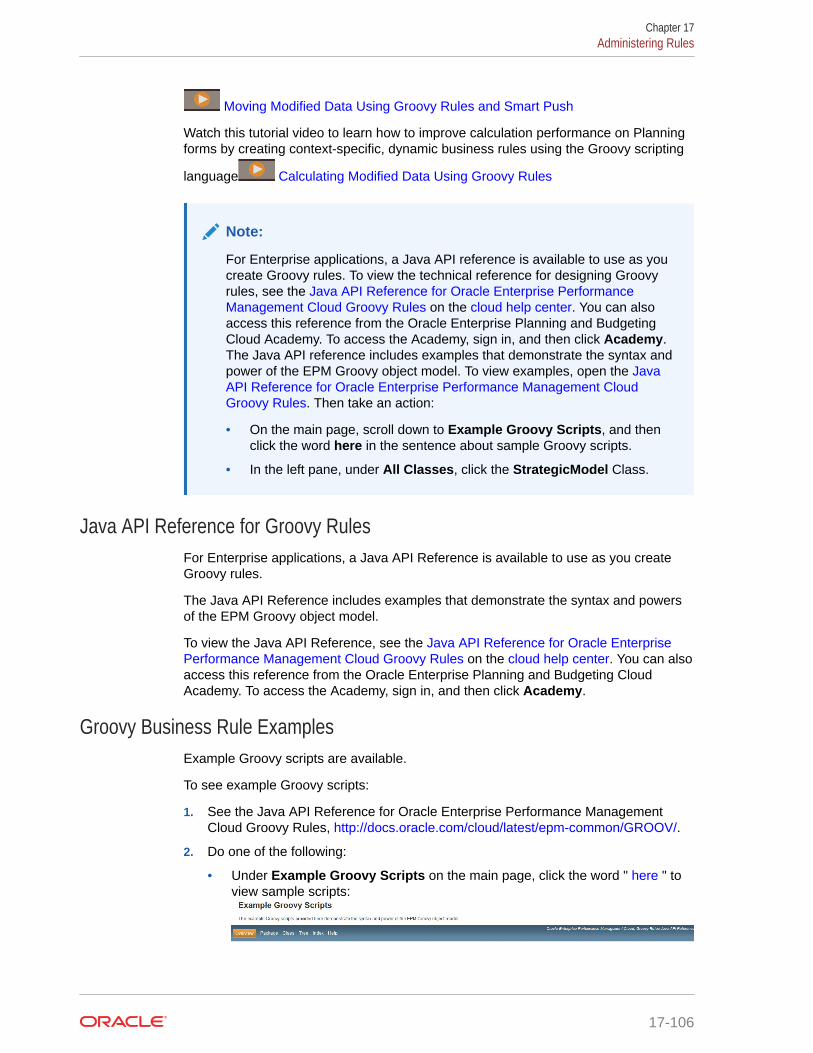
Moving Modified Data Using Groovy Rules and Smart Push
Watch this tutorial video to learn how to improve calculation performance on Planningforms by creating context-specific, dynamic business rules using the Groovy scripting
language Calculating Modified Data Using Groovy Rules
Note:
For Enterprise applications, a Java API reference is available to use as youcreate Groovy rules. To view the technical reference for designing Groovyrules, see the Java API Reference for Oracle Enterprise PerformanceManagement Cloud Groovy Rules on the cloud help center. You can alsoaccess this reference from the Oracle Enterprise Planning and BudgetingCloud Academy. To access the Academy, sign in, and then click Academy.The Java API reference includes examples that demonstrate the syntax andpower of the EPM Groovy object model. To view examples, open the JavaAPI Reference for Oracle Enterprise Performance Management CloudGroovy Rules. Then take an action:
• On the main page, scroll down to Example Groovy Scripts, and thenclick the word here in the sentence about sample Groovy scripts.
• In the left pane, under All Classes, click the StrategicModel Class.
Java API Reference for Groovy RulesFor Enterprise applications, a Java API Reference is available to use as you createGroovy rules.
The Java API Reference includes examples that demonstrate the syntax and powersof the EPM Groovy object model.
To view the Java API Reference, see the Java API Reference for Oracle EnterprisePerformance Management Cloud Groovy Rules on the cloud help center. You can alsoaccess this reference from the Oracle Enterprise Planning and Budgeting CloudAcademy. To access the Academy, sign in, and then click Academy.
Groovy Business Rule ExamplesExample Groovy scripts are available.
To see example Groovy scripts:
1. See the Java API Reference for Oracle Enterprise Performance ManagementCloud Groovy Rules, http://docs.oracle.com/cloud/latest/epm-common/GROOV/.
2. Do one of the following:
• Under Example Groovy Scripts on the main page, click the word " here " toview sample scripts:
Chapter 17Administering Rules
17-106
• Under All Classes in the left pane, click a class to see the examples for that class.
For example, to see Strategic Modeling examples, click the StrategicModel class inthe left pane.
Groovy Business Rule Tutorial VideosWatch these tutorial videos for details and best practices when implementing and usingGroovy Business Rules.
Your Goal Watch this Video
See the training options forcreating Groovy rules inOracle EnterprisePerformance ManagementCloud:
Learning Groovy in Oracle EPM Cloud
Push data from a sourcelocation to a target locationusing Groovy rules andSmart Push.
Moving Modified Data Using Groovy Rules and Smart Push
Generate focusedcalculation scripts inPlanning to calculate onlydata that has been edited,instead of the entire dataentry form.
Calculating Modified Data Using Groovy Rules
Use Groovy rules tocalculate incrementallyloaded data in DataManagement.
Calculating Incrementally Loaded Data in Data ManagementUsing Groovy Rules
Use Groovy templates toimprove usability andcalculation performance foruser actions.
Customizing Actions to Improve Performance Using GroovyTemplates
Groovy Rule Business ScenariosThis section provides examples of business scenarios where you can use Groovy businessrules.
These topics contain scenarios that show you how to use Groovy rules to perform focuseddata movement and smart calculations on planning data:
• Moving Modified Data Using Groovy Rules and Smart Push
• Calculating Modified Data Using Groovy Rules
Moving Modified Data Using Groovy Rules and Smart PushIn this topic, we’ll show you best practices on how you can use Groovy rules and Smart Pushto move modified data into a reporting cube.
Chapter 17Administering Rules
17-107
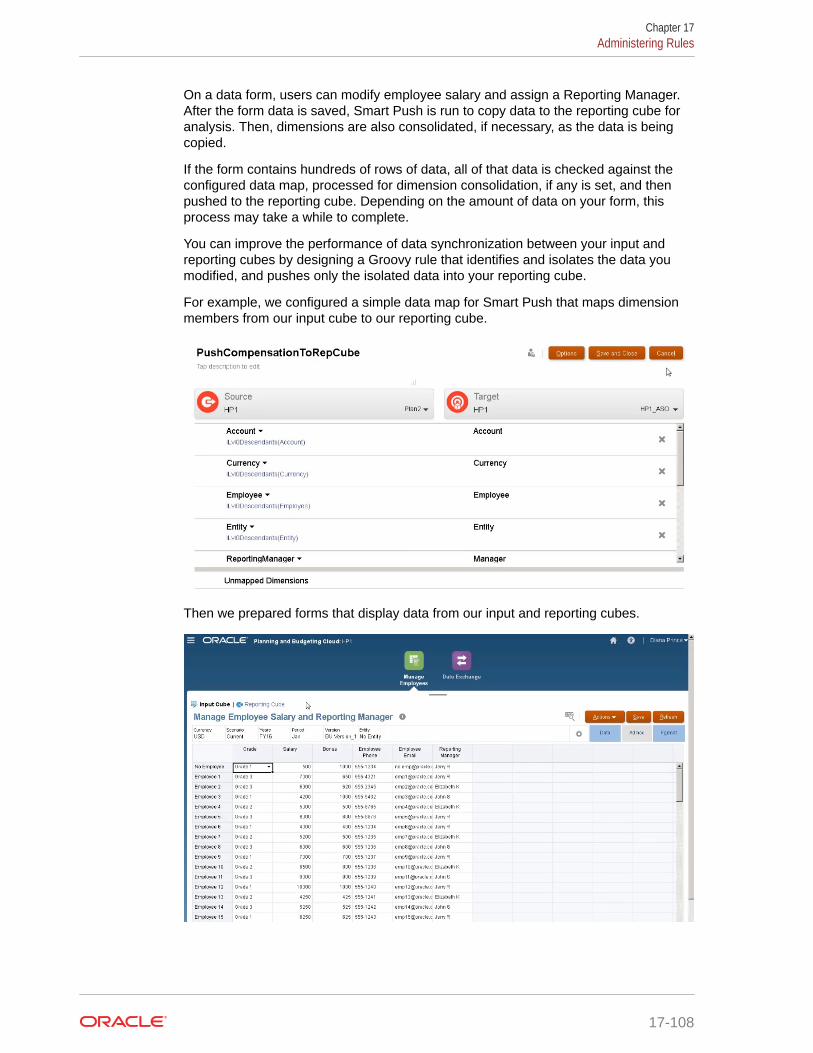
On a data form, users can modify employee salary and assign a Reporting Manager.After the form data is saved, Smart Push is run to copy data to the reporting cube foranalysis. Then, dimensions are also consolidated, if necessary, as the data is beingcopied.
If the form contains hundreds of rows of data, all of that data is checked against theconfigured data map, processed for dimension consolidation, if any is set, and thenpushed to the reporting cube. Depending on the amount of data on your form, thisprocess may take a while to complete.
You can improve the performance of data synchronization between your input andreporting cubes by designing a Groovy rule that identifies and isolates the data youmodified, and pushes only the isolated data into your reporting cube.
For example, we configured a simple data map for Smart Push that maps dimensionmembers from our input cube to our reporting cube.
Then we prepared forms that display data from our input and reporting cubes.
Chapter 17Administering Rules
17-108
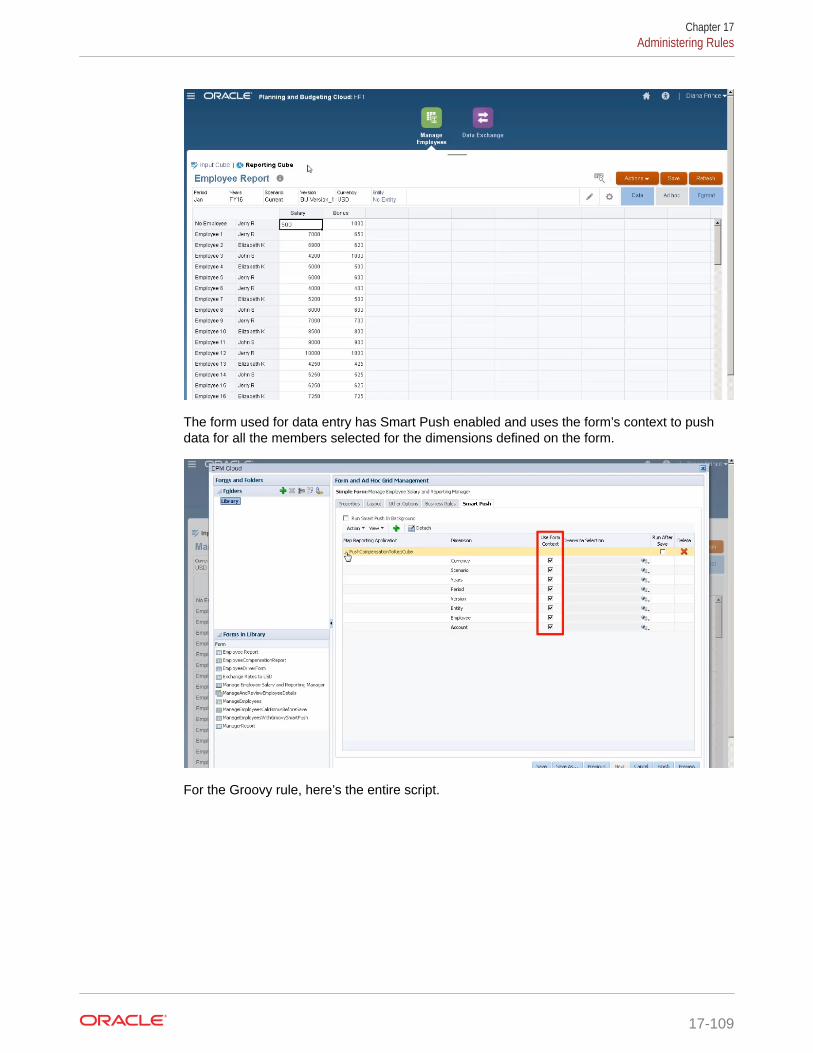
The form used for data entry has Smart Push enabled and uses the form’s context to pushdata for all the members selected for the dimensions defined on the form.
For the Groovy rule, here’s the entire script.
Chapter 17Administering Rules
17-109
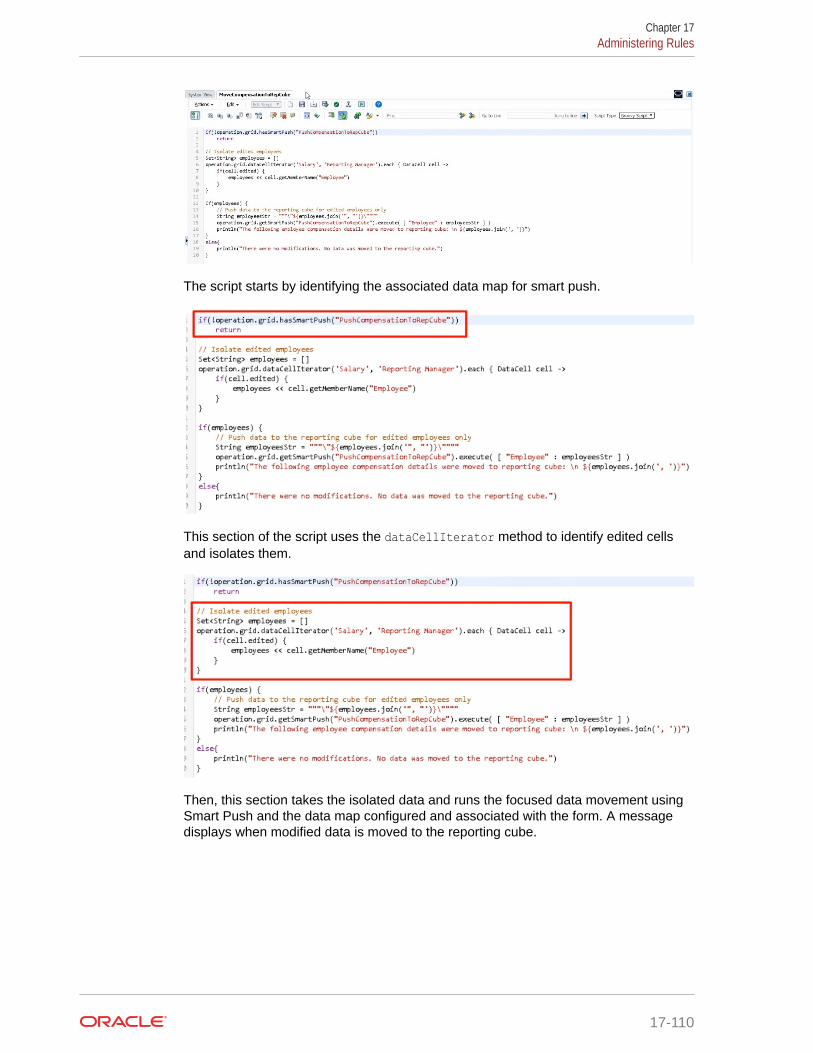
The script starts by identifying the associated data map for smart push.
This section of the script uses the dataCellIterator method to identify edited cellsand isolates them.
Then, this section takes the isolated data and runs the focused data movement usingSmart Push and the data map configured and associated with the form. A messagedisplays when modified data is moved to the reporting cube.
Chapter 17Administering Rules
17-110
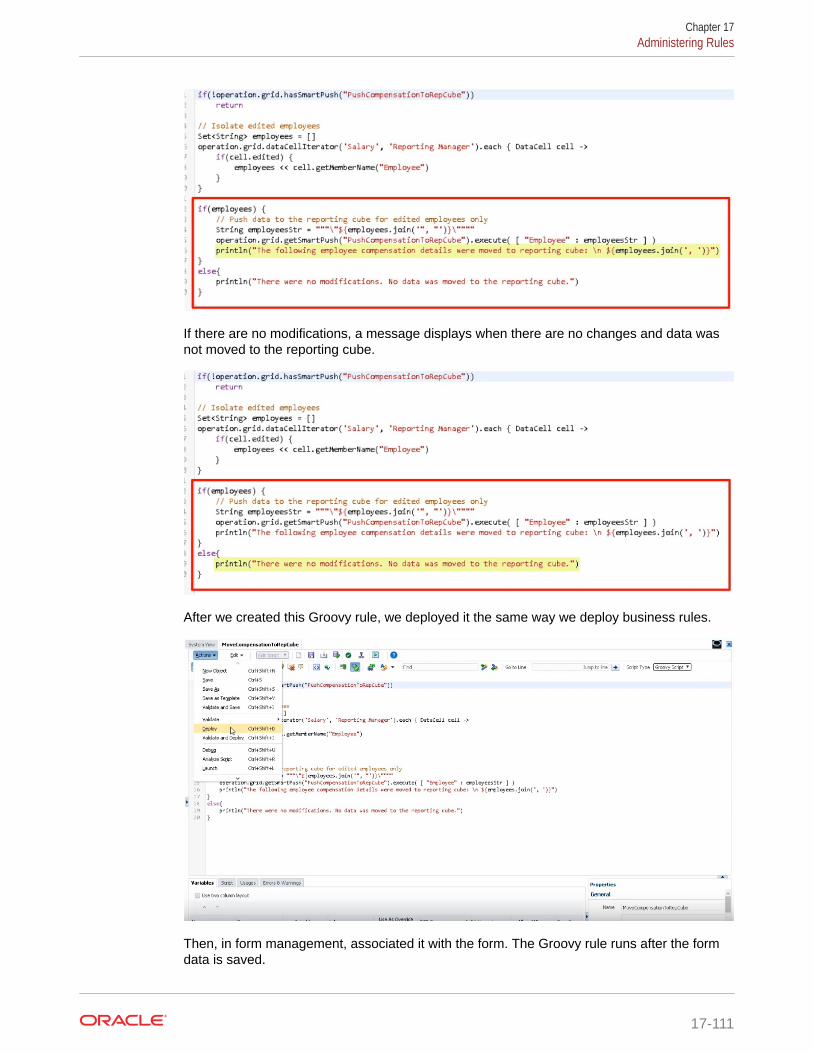
If there are no modifications, a message displays when there are no changes and data wasnot moved to the reporting cube.
After we created this Groovy rule, we deployed it the same way we deploy business rules.
Then, in form management, associated it with the form. The Groovy rule runs after the formdata is saved.
Chapter 17Administering Rules
17-111
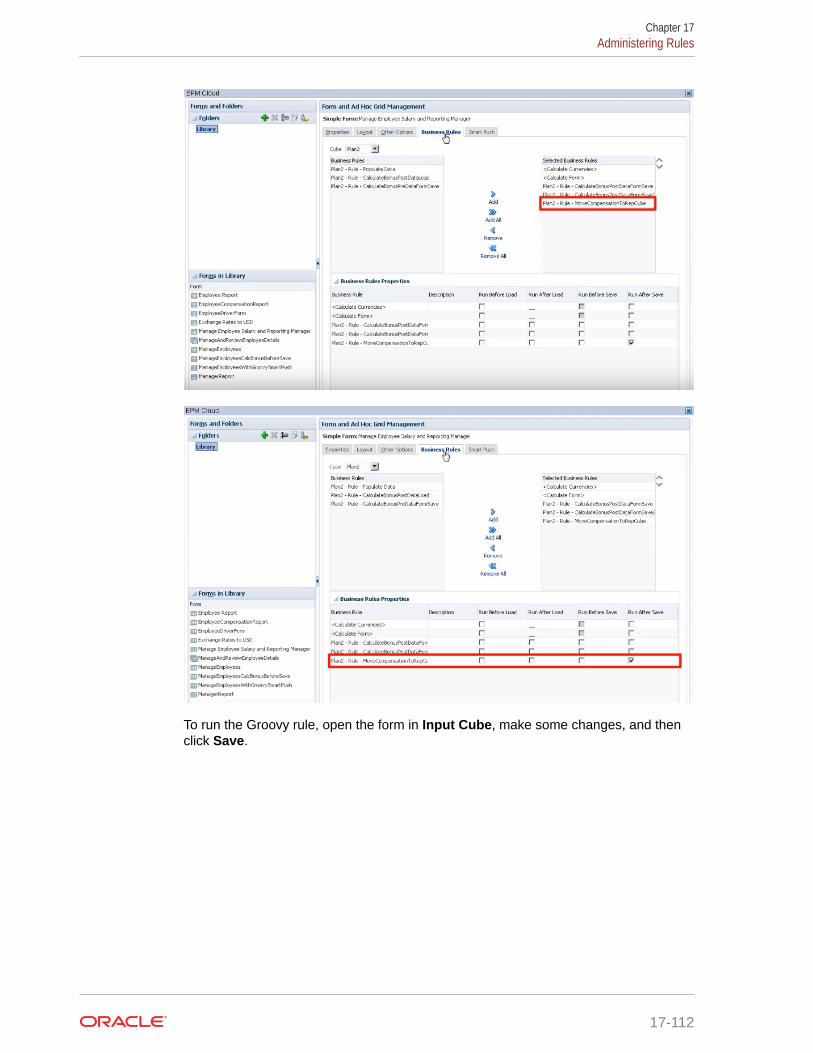
To run the Groovy rule, open the form in Input Cube, make some changes, and thenclick Save.
Chapter 17Administering Rules
17-112
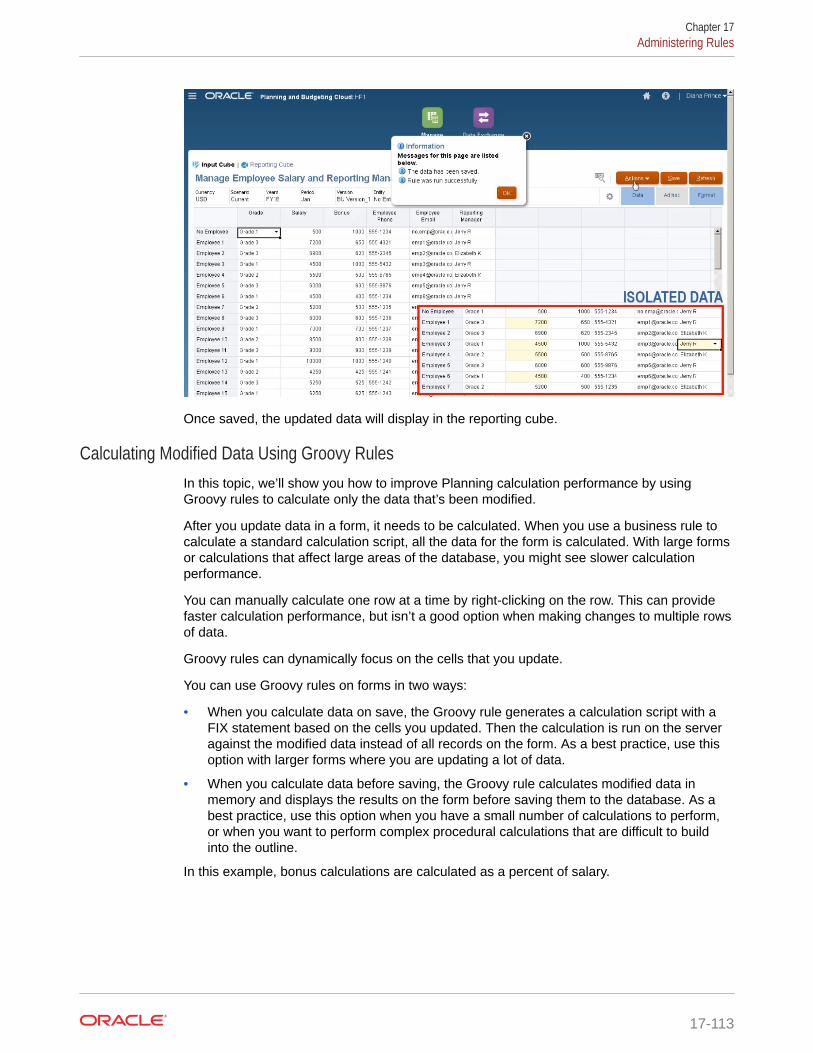
Once saved, the updated data will display in the reporting cube.
Calculating Modified Data Using Groovy RulesIn this topic, we’ll show you how to improve Planning calculation performance by usingGroovy rules to calculate only the data that’s been modified.
After you update data in a form, it needs to be calculated. When you use a business rule tocalculate a standard calculation script, all the data for the form is calculated. With large formsor calculations that affect large areas of the database, you might see slower calculationperformance.
You can manually calculate one row at a time by right-clicking on the row. This can providefaster calculation performance, but isn’t a good option when making changes to multiple rowsof data.
Groovy rules can dynamically focus on the cells that you update.
You can use Groovy rules on forms in two ways:
• When you calculate data on save, the Groovy rule generates a calculation script with aFIX statement based on the cells you updated. Then the calculation is run on the serveragainst the modified data instead of all records on the form. As a best practice, use thisoption with larger forms where you are updating a lot of data.
• When you calculate data before saving, the Groovy rule calculates modified data inmemory and displays the results on the form before saving them to the database. As abest practice, use this option when you have a small number of calculations to perform,or when you want to perform complex procedural calculations that are difficult to buildinto the outline.
In this example, bonus calculations are calculated as a percent of salary.
Chapter 17Administering Rules
17-113

Let’s look at calculating on save. Notice that this form is defined with a Groovy rule tocalculate on save.
After updating some of the salary data and some of the phone numbers on the form,the phone numbers are saved but don’t affect the calculation.
Chapter 17Administering Rules
17-114
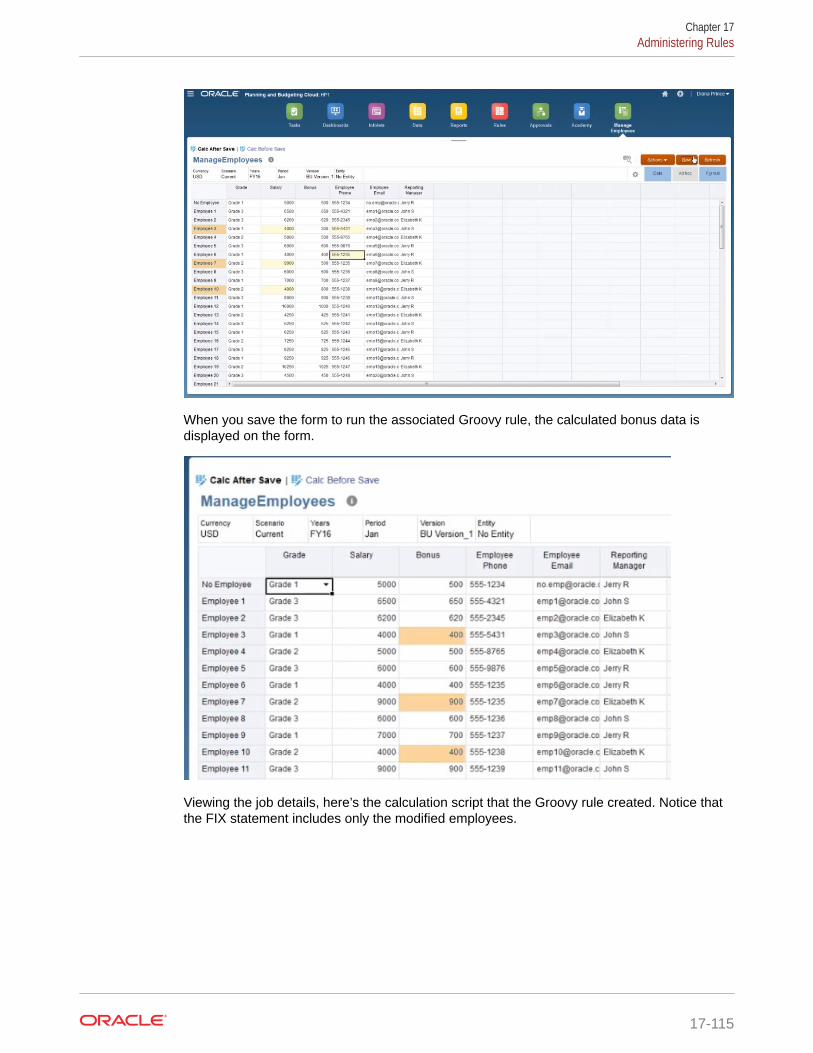
When you save the form to run the associated Groovy rule, the calculated bonus data isdisplayed on the form.
Viewing the job details, here’s the calculation script that the Groovy rule created. Notice thatthe FIX statement includes only the modified employees.
Chapter 17Administering Rules
17-115

Let’s open Calculation Manager to see the Groovy rule. This first section iterates overthe grid in the form to find Salary cells that have been edited and collects the relatedemployee names.
This section generates the calculation script; it finds the POV members from the form,then creates a FIX statement on the POV members and the edited employees.
Chapter 17Administering Rules
17-116
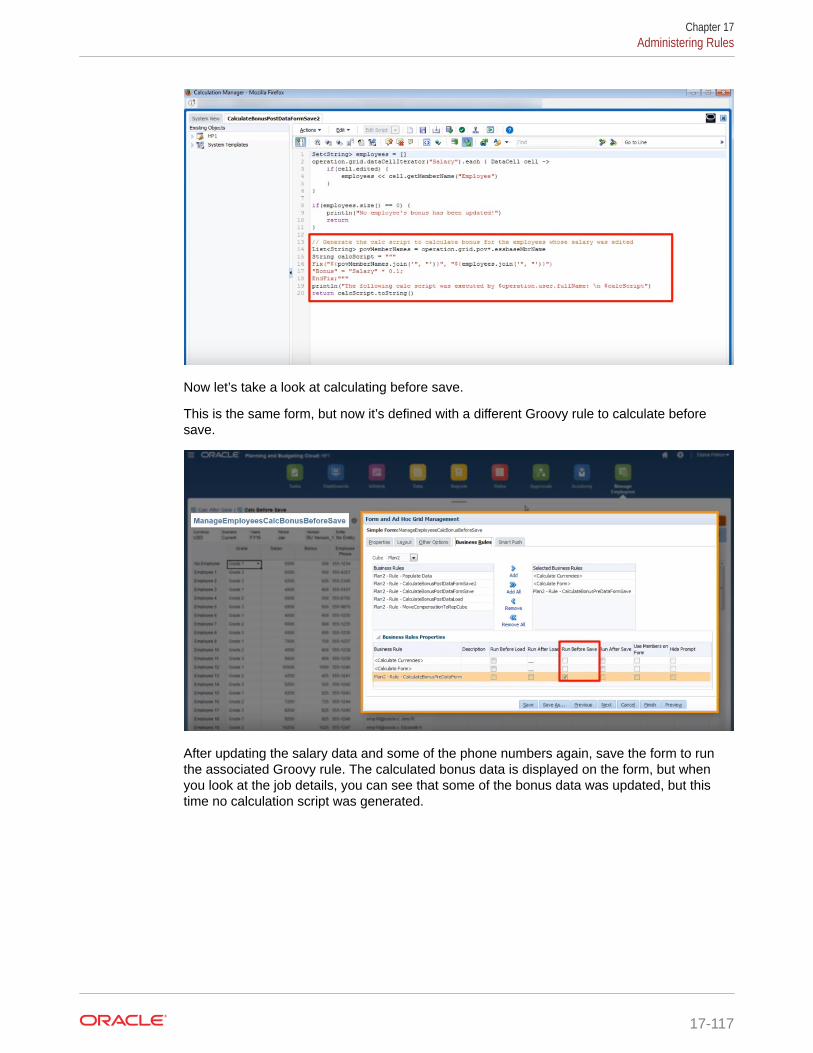
Now let’s take a look at calculating before save.
This is the same form, but now it’s defined with a different Groovy rule to calculate beforesave.
After updating the salary data and some of the phone numbers again, save the form to runthe associated Groovy rule. The calculated bonus data is displayed on the form, but whenyou look at the job details, you can see that some of the bonus data was updated, but thistime no calculation script was generated.
Chapter 17Administering Rules
17-117
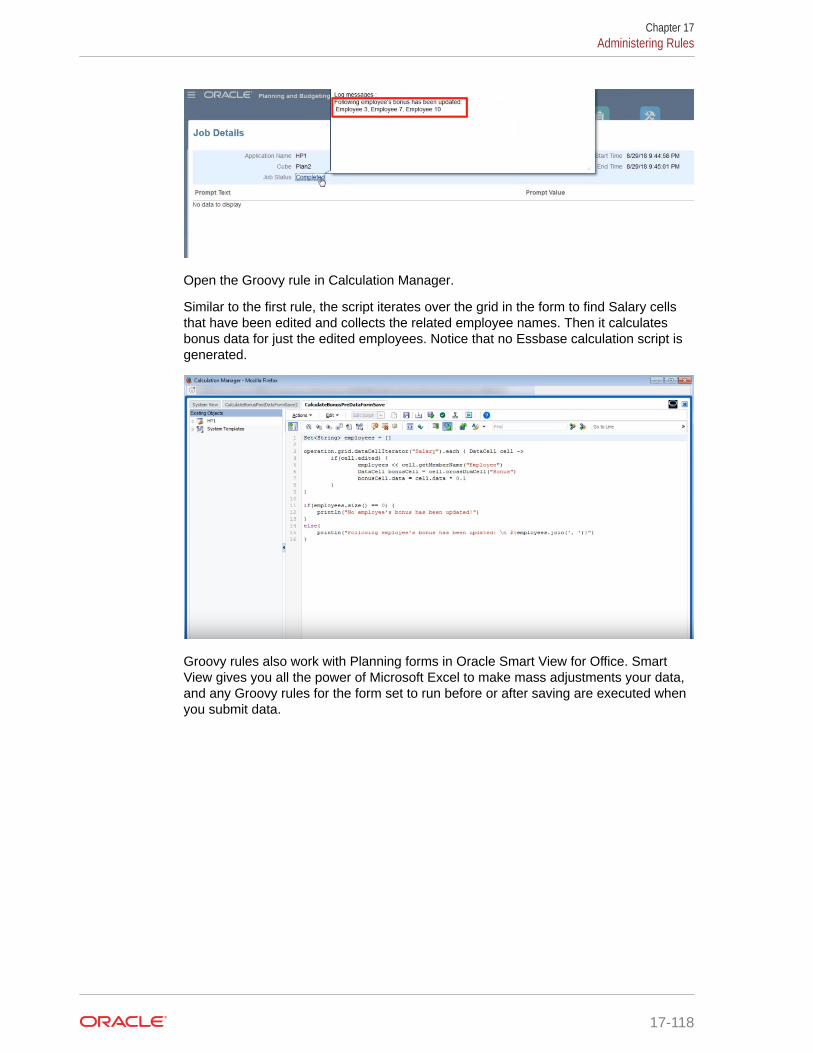
Open the Groovy rule in Calculation Manager.
Similar to the first rule, the script iterates over the grid in the form to find Salary cellsthat have been edited and collects the related employee names. Then it calculatesbonus data for just the edited employees. Notice that no Essbase calculation script isgenerated.
Groovy rules also work with Planning forms in Oracle Smart View for Office. SmartView gives you all the power of Microsoft Excel to make mass adjustments your data,and any Groovy rules for the form set to run before or after saving are executed whenyou submit data.
Chapter 17Administering Rules
17-118
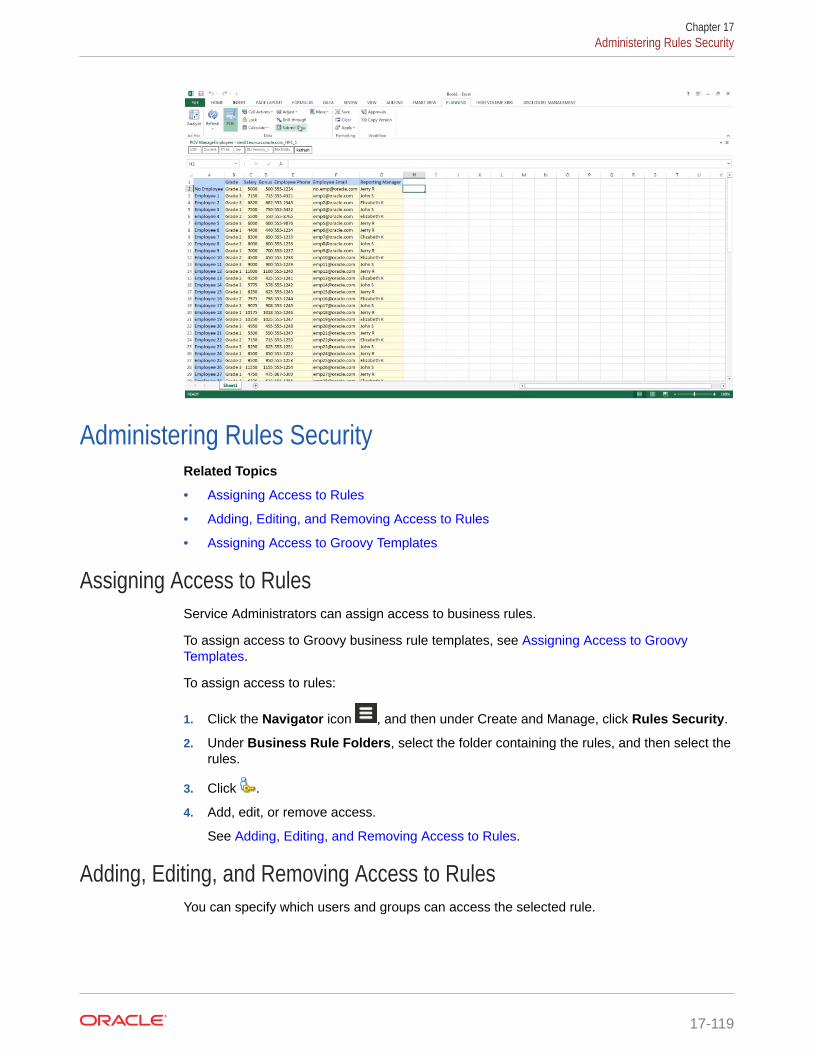
Administering Rules SecurityRelated Topics
• Assigning Access to Rules
• Adding, Editing, and Removing Access to Rules
• Assigning Access to Groovy Templates
Assigning Access to RulesService Administrators can assign access to business rules.
To assign access to Groovy business rule templates, see Assigning Access to GroovyTemplates.
To assign access to rules:
1. Click the Navigator icon , and then under Create and Manage, click Rules Security.
2. Under Business Rule Folders, select the folder containing the rules, and then select therules.
3. Click .
4. Add, edit, or remove access.
See Adding, Editing, and Removing Access to Rules.
Adding, Editing, and Removing Access to RulesYou can specify which users and groups can access the selected rule.
Chapter 17Administering Rules Security
17-119
Note:
Rulesets inherit launch permissions from the rules included in the ruleset.
To assign, edit, and remove access permissions to rules:
1. Click the Navigator icon , and then under Create and Manage, click RulesSecurity.
2. Under Business Rule Folders, select the folder containing the rules, and thenselect the rules.
3. Click .
4. Perform a task:
• To add access, click , and then select from the list of available users andgroups.
For Type of Access:
– Select Launch to allow the selected users and groups to launch theselected rules.
– Select No Launch to prevent the selected users and groups fromlaunching the selected rules.
• To edit access, click , and then select the applicable Type of Access.
• To remove access, select the users or groups for which to remove access, and
then click .
Assigning Access to Groovy TemplatesTo assign access to Groovy templates:
1. From the Home page, click Rules, then Filter, and then select a cube and artifacttype.
2. Next to the rule or template, click Permission, and then click Assign Permission.
3. In Assign Permission, click Permission, and then assign permissions. See Setting Up Access Permissions for more information.
Administering Smart ListsSmart Lists are custom drop-down lists that users access from form cells.
Related Topics
• Working with Smart Lists
• Synchronizing Smart Lists in Reporting Applications
• Setting Smart List Properties
• Defining Smart List Entries
Chapter 17Administering Smart Lists
17-120
• Previewing Smart Lists
• Displaying #MISSING with Smart Lists
Working with Smart ListsService Administrators use Smart Lists to create custom drop-down lists that users accessfrom form cells. When clicking in cells whose members are associated with a Smart List (as amember property), users select items from drop-down lists instead of entering data. Userscan't type in cells that contain Smart Lists. Smart Lists display in cells as down arrows thatexpand when users click into the cells.
Perform these tasks to create and administer Smart Lists:
• Define Smart Lists.
• Associate Smart Lists with members.
• Select dimensions for which Smart Lists are displayed.
• Optionally:
– Use Smart List values in member formulas.
– Set how #MISSING cells associated with Smart Lists display in forms.
– Synchronize Smart Lists in reporting applications
Note:
For a Smart List to be viewable in forms, the dimension to which the Smart List typemember belongs must be first in the evaluation order. See Managing Dimensions.
To create or work with Smart Lists:
1. Click the Navigator icon , and then under Create and Manage, click Smart Lists.
2. Perform one action:
• To create a Smart List, click , and then set Smart List properties. See SettingSmart List Properties.
• To edit a Smart List, select it, click , and then set Smart List properties. See Setting Smart List Properties.
• To delete Smart Lists, select them, click , and then click OK. Deleting Smart Listsalso deletes any associated mappings with dimension members and reportingapplications.
Data cells can display only one Smart List. If multiple Smart Lists intersect at cells,set which one takes precedence.
• Optional: Click to synchronize Smart Lists in a reporting application. See Synchronizing Smart Lists in Reporting Applications.
Chapter 17Administering Smart Lists
17-121
Note:
When a member in a Smart List is deleted and then added back in again, thenew member assumes a new unique ID. Any data that was associated withthe deleted member will display as the deleted member's numeric ID.
Synchronizing Smart Lists in Reporting ApplicationsSynchronizing Smart Lists in reporting applications identifies dimensions in reportingapplications to which Smart Lists are mapped, and adds level 0 members of theselected dimensions as new Smart List entries to the selected Smart Lists. To definedata maps, see Defining Data Maps in Administering Data Integration for OracleEnterprise Performance Management Cloud.
To synchronize Smart Lists in reporting applications:
1. View the Smart Lists listing page.
See Working with Smart Lists.
2. Click the Smart List you want to synchronize, and then select
.
During synchronization, values from reporting applications in all existing mappingsare appended after the last Smart List item in the appropriate Smart list. If a SmartList is mapped to two dimensions, all members from the first mapping are insertedfirst, and then members from the second mapping are inserted. If a memberalready exists in a Smart List, it's not added again. Smart List members in thePlanning Smart Lists are not deleted, even if the corresponding dimensionmembers on the reporting application are deleted.
Note:
If Account is mapped as Smart List to Dimension, all of the level 0members in the Account dimension are brought in as Smart List entrieswhen the Smart List is synchronized. For example, Smart Lists mayinclude entries such as HSP_Average and HSP_Ending. If this occurs,delete the extra entries from the Smart List.
3. Click OK in the dialog box that says "Smart List Synchronized Successfully."
Note:
Smart List names can’t have spaces in them. If you're synchronizing SmartLists in a reporting application, ensure that any new members don't havespaces in the name.
Chapter 17Administering Smart Lists
17-122
Setting Smart List PropertiesDefine Smart List properties on the Properties tab.
Note:
For a Smart List to be viewable in forms, the dimension to which the Smart List typemember belongs must be first in the evaluation order. See Managing Dimensions.
Table 17-27 Smart List Properties
Property Description
Smart List Enter a unique name containing onlyalphanumeric and underscore characters (forexample: Position) and no special characters orspaces. Smart List names can be referenced informula expressions.
Label Enter the text to display when the Smart List isselected. Spaces and special characters areallowed.
Display Order How Smart Lists are sorted in the drop-down list:by ID, Name, or Label
#MISSING Drop-Down Label Enter a label (for example, "No Justification") to bedisplayed as an entry in the Smart List whosevalue is #MISSING.
Note the following:
• It displays as the first selection in the SmartList drop-down, allowing #MISSING as aselection in the form.
• When the cell isn't in focus, this label displaysonly if Drop-Down Setting is selected in thenext option. Otherwise, #MISSING or a blankcell is displayed, depending on the DisplayMissing Values As Blank selection for theform.
• #MISSING labels determine only the displayof cells with #MISSING data; #MISSINGremains the stored value.
#MISSING Form Label Determines how #MISSING values arerepresented in cells associated with Smart Lists.Options:
• Drop-Down Setting—Displays the label setin #MISSING Drop-Down Label.
• Form Setting—Displays #MISSING or leavescells blank, depending on the DisplayMissing Values As Blank selection for theform. This selection determines what isdisplayed in the cell when it's not the focus.When the cell is in focus, the Smart List itemthat is selected from the drop-down isdisplayed.
Chapter 17Administering Smart Lists
17-123
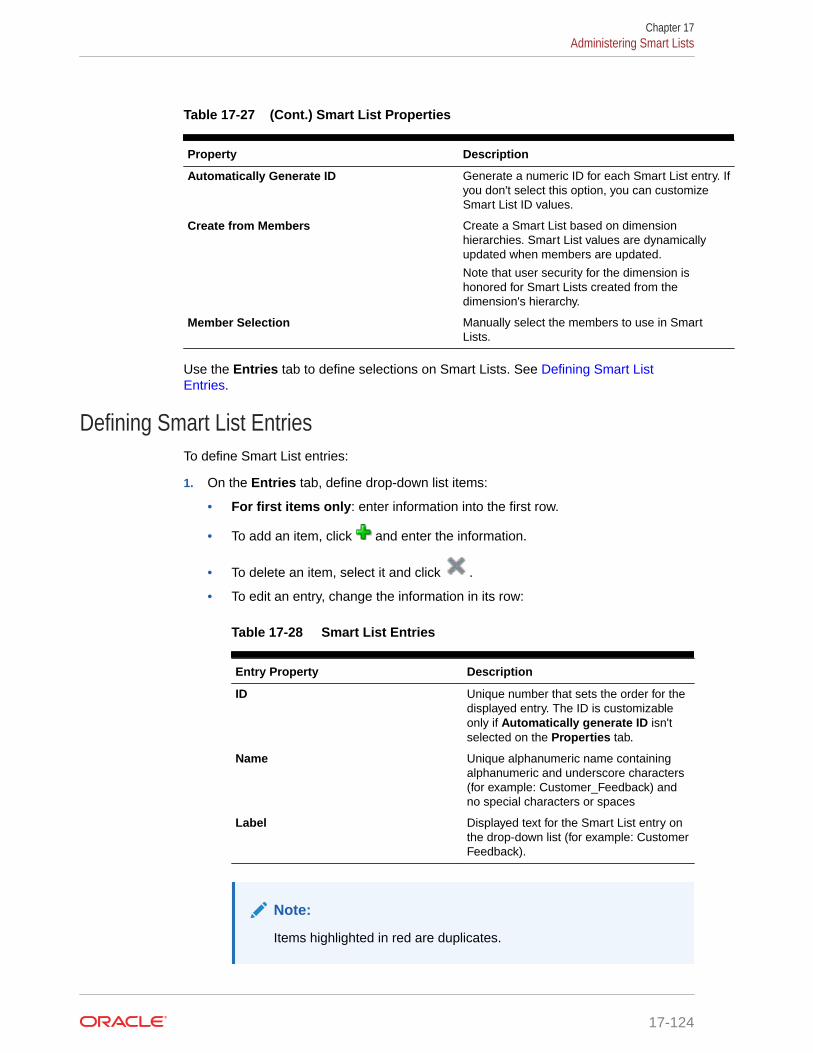
Table 17-27 (Cont.) Smart List Properties
Property Description
Automatically Generate ID Generate a numeric ID for each Smart List entry. Ifyou don't select this option, you can customizeSmart List ID values.
Create from Members Create a Smart List based on dimensionhierarchies. Smart List values are dynamicallyupdated when members are updated.
Note that user security for the dimension ishonored for Smart Lists created from thedimension's hierarchy.
Member Selection Manually select the members to use in SmartLists.
Use the Entries tab to define selections on Smart Lists. See Defining Smart ListEntries.
Defining Smart List EntriesTo define Smart List entries:
1. On the Entries tab, define drop-down list items:
• For first items only: enter information into the first row.
• To add an item, click and enter the information.
• To delete an item, select it and click .
• To edit an entry, change the information in its row:
Table 17-28 Smart List Entries
Entry Property Description
ID Unique number that sets the order for thedisplayed entry. The ID is customizableonly if Automatically generate ID isn'tselected on the Properties tab.
Name Unique alphanumeric name containingalphanumeric and underscore characters(for example: Customer_Feedback) andno special characters or spaces
Label Displayed text for the Smart List entry onthe drop-down list (for example: CustomerFeedback).
Note:
Items highlighted in red are duplicates.
Chapter 17Administering Smart Lists
17-124
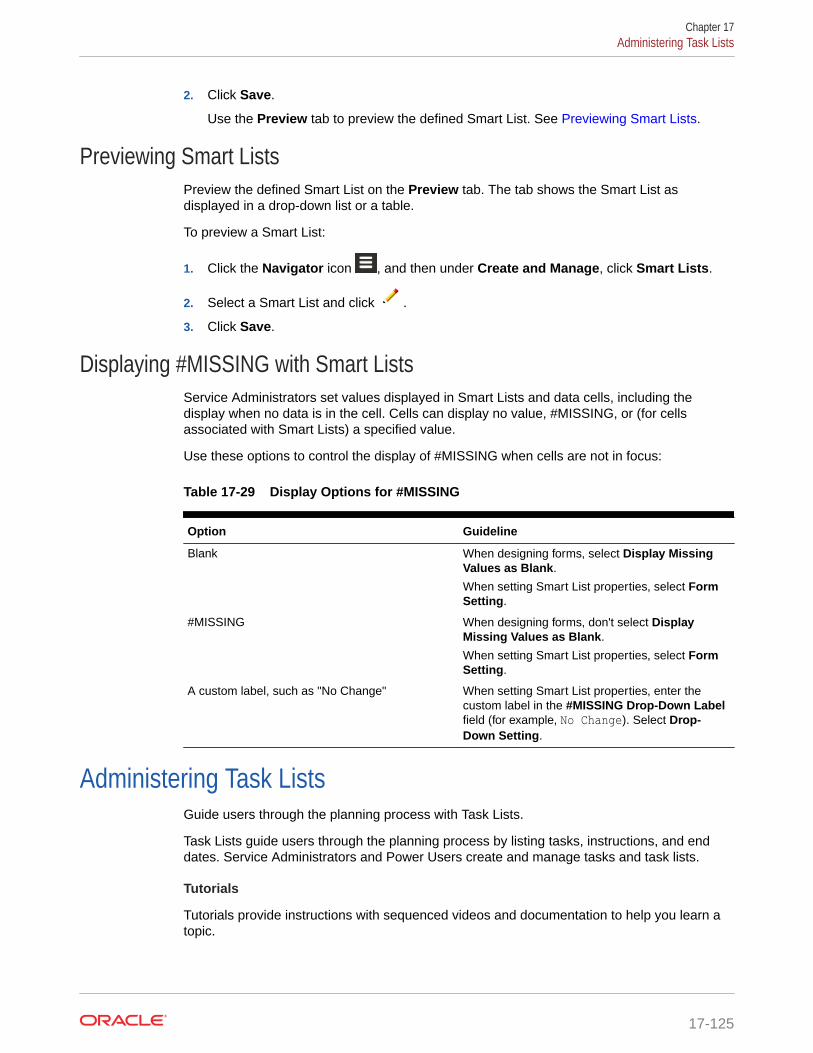
2. Click Save.
Use the Preview tab to preview the defined Smart List. See Previewing Smart Lists.
Previewing Smart ListsPreview the defined Smart List on the Preview tab. The tab shows the Smart List asdisplayed in a drop-down list or a table.
To preview a Smart List:
1. Click the Navigator icon , and then under Create and Manage, click Smart Lists.
2. Select a Smart List and click .
3. Click Save.
Displaying #MISSING with Smart ListsService Administrators set values displayed in Smart Lists and data cells, including thedisplay when no data is in the cell. Cells can display no value, #MISSING, or (for cellsassociated with Smart Lists) a specified value.
Use these options to control the display of #MISSING when cells are not in focus:
Table 17-29 Display Options for #MISSING
Option Guideline
Blank When designing forms, select Display MissingValues as Blank.
When setting Smart List properties, select FormSetting.
#MISSING When designing forms, don't select DisplayMissing Values as Blank.
When setting Smart List properties, select FormSetting.
A custom label, such as "No Change" When setting Smart List properties, enter thecustom label in the #MISSING Drop-Down Labelfield (for example, No Change). Select Drop-Down Setting.
Administering Task ListsGuide users through the planning process with Task Lists.
Task Lists guide users through the planning process by listing tasks, instructions, and enddates. Service Administrators and Power Users create and manage tasks and task lists.
Tutorials
Tutorials provide instructions with sequenced videos and documentation to help you learn atopic.
Chapter 17Administering Task Lists
17-125
Your Goal Learn How
Learn how to how to design forms andmanage task lists in Planning. Designing Forms and Managing
Task Lists in Planning
Related Topics
• Working with Task Lists
• Adding Instructions to Task Lists
• Adding Tasks to Task Lists
• Editing Task Lists
• Assigning Access to Task Lists
Working with Task ListsTask lists organize groups of tasks for users. You must create task lists before creatingtasks.
To create and rename task lists:
1. Click the Navigator icon , and then under Create and Manage, click TaskLists.
2. Perform a task:
• To create a task list, click .
• To rename a task list, select the task list, then click .
• To move a task list, select the task list, then click .
• To remove a task list, select the task list, then click .
3. Click OK.
To define the task list, see:
• Adding Instructions to Task Lists.
• Adding Tasks to Task Lists.
Adding Instructions to Task ListsTo add instructions to task lists:
1. Click the Navigator icon , and then under Create and Manage, click TaskLists.
2. For Task List, select the task list to modify, and then click .
3. Click the Instructions tab.
4. Enter instructions for the task list.
Chapter 17Administering Task Lists
17-126
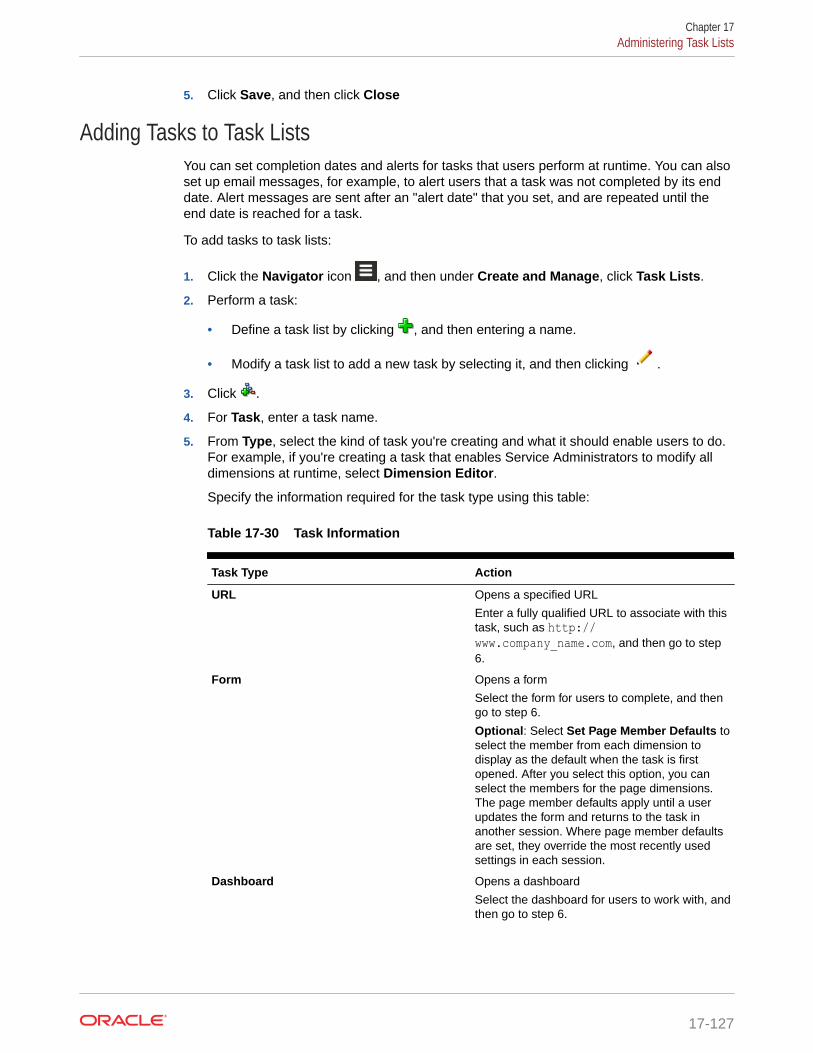
5. Click Save, and then click Close
Adding Tasks to Task ListsYou can set completion dates and alerts for tasks that users perform at runtime. You can alsoset up email messages, for example, to alert users that a task was not completed by its enddate. Alert messages are sent after an "alert date" that you set, and are repeated until theend date is reached for a task.
To add tasks to task lists:
1. Click the Navigator icon , and then under Create and Manage, click Task Lists.
2. Perform a task:
• Define a task list by clicking , and then entering a name.
• Modify a task list to add a new task by selecting it, and then clicking .
3. Click .
4. For Task, enter a task name.
5. From Type, select the kind of task you're creating and what it should enable users to do.For example, if you're creating a task that enables Service Administrators to modify alldimensions at runtime, select Dimension Editor.
Specify the information required for the task type using this table:
Table 17-30 Task Information
Task Type Action
URL Opens a specified URL
Enter a fully qualified URL to associate with thistask, such as http://www.company_name.com, and then go to step6.
Form Opens a form
Select the form for users to complete, and thengo to step 6.
Optional: Select Set Page Member Defaults toselect the member from each dimension todisplay as the default when the task is firstopened. After you select this option, you canselect the members for the page dimensions.The page member defaults apply until a userupdates the form and returns to the task inanother session. Where page member defaultsare set, they override the most recently usedsettings in each session.
Dashboard Opens a dashboard
Select the dashboard for users to work with, andthen go to step 6.
Chapter 17Administering Task Lists
17-127
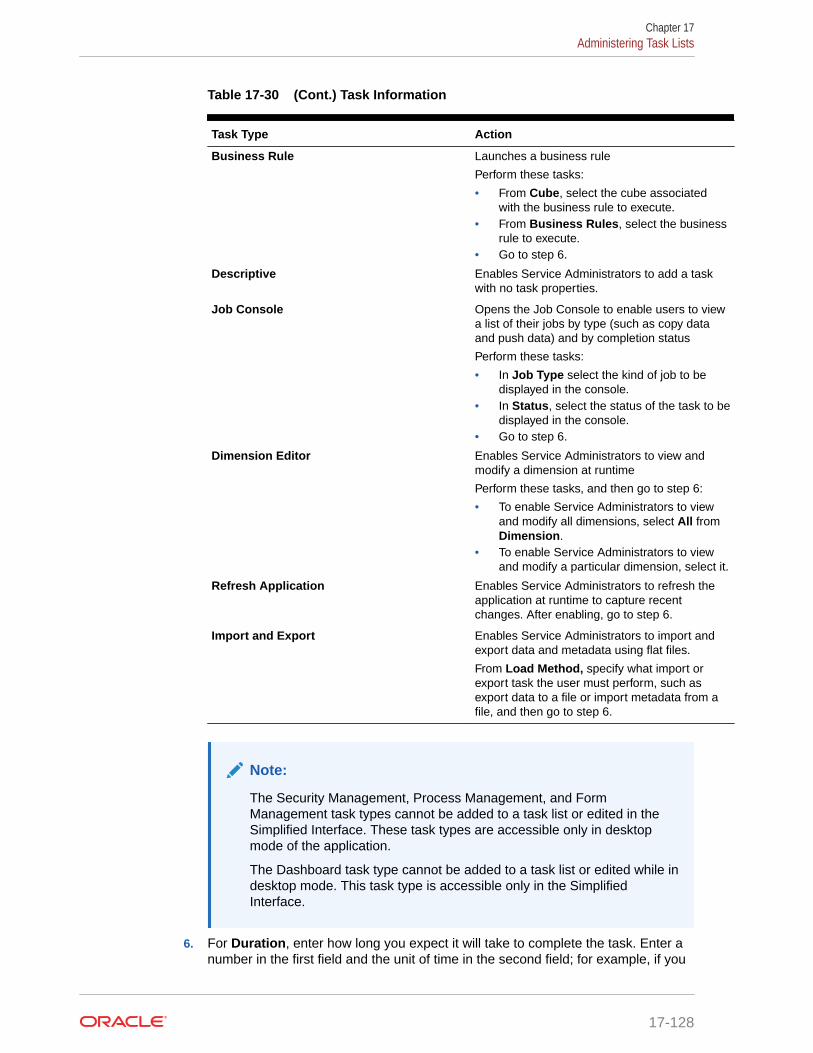
Table 17-30 (Cont.) Task Information
Task Type Action
Business Rule Launches a business rule
Perform these tasks:
• From Cube, select the cube associatedwith the business rule to execute.
• From Business Rules, select the businessrule to execute.
• Go to step 6.
Descriptive Enables Service Administrators to add a taskwith no task properties.
Job Console Opens the Job Console to enable users to viewa list of their jobs by type (such as copy dataand push data) and by completion status
Perform these tasks:
• In Job Type select the kind of job to bedisplayed in the console.
• In Status, select the status of the task to bedisplayed in the console.
• Go to step 6.
Dimension Editor Enables Service Administrators to view andmodify a dimension at runtime
Perform these tasks, and then go to step 6:
• To enable Service Administrators to viewand modify all dimensions, select All fromDimension.
• To enable Service Administrators to viewand modify a particular dimension, select it.
Refresh Application Enables Service Administrators to refresh theapplication at runtime to capture recentchanges. After enabling, go to step 6.
Import and Export Enables Service Administrators to import andexport data and metadata using flat files.
From Load Method, specify what import orexport task the user must perform, such asexport data to a file or import metadata from afile, and then go to step 6.
Note:
The Security Management, Process Management, and FormManagement task types cannot be added to a task list or edited in theSimplified Interface. These task types are accessible only in desktopmode of the application.
The Dashboard task type cannot be added to a task list or edited while indesktop mode. This task type is accessible only in the SimplifiedInterface.
6. For Duration, enter how long you expect it will take to complete the task. Enter anumber in the first field and the unit of time in the second field; for example, if you
Chapter 17Administering Task Lists
17-128
think the task will take two weeks, type 2 in the first field and then in the second field,type a w or W to select Week(s). Time unit options for the second field are as follows:
• Hour(s)—Type h or H to select this option.
• Day(s)—Type d or D to select this option.
• Week(s)—Type w or W to select this option.
• Month(s)—Type m or M to select this option.
• Year(s)—Type y or Y to select this option.
Note:
Unit of time options are not case-sensitive. If the language you are using is notEnglish, these entries are localized. Type the first letter of the localized wordand then select the whole word that is displayed.
7. To ensure that the task is started on a certain date and then completed by a certain date,perform these tasks:
a. For Start Date, click , and then use the calendar to specify the year, month, day,and time by which the task must begin.
b. For End Date, click , and then use the calendar to specify the year, month, day,and time by which the task should be completed.
To send email messages that prompt users to finish uncompleted tasks, selectRepeat Every, and then specify how often to send these emails, such as once a day.
8. To send email messages that prompt users that the date by which they must completethe task is approaching, select Alert, and then:
a. Click to use the calendar to specify the date and time on which to start sendingalert reminders.
b. Click Repeat Every and specify the frequency for email reminders.
For example, if a task's end date is June 9 2014 at 5 PM, and you want to remind usersonce a day starting the week before the task is due, select June 2 2014 at 5 PM, enter 1,and then select Weeks.
9. To make task completion dependent on completing another primary (or parent) task, click
next to Dependency, select the primary task, and then click OK.
Chapter 17Administering Task Lists
17-129
Note:
You cannot make task completion dependent on completing a child taskof another primary task. Dependencies across task list hierarchies arenot supported when a task has children. For example, consider a casewhere Task 3 is dependent on Task 2 and Task 4 is, in turn, dependenton Task 3. When Task 3 is incomplete, Task 4 becomes incompleteautomatically. However, when Task 2.1 is incomplete, its parent task(Task 2) changes to incomplete, but this is not recursive (Task 3 andTask 4 are not affected).
• Task1
• Task2
– Task2.1
– Task2.2
• Task3
• Task4
10. In the Instructions pane to the right, enter information that explains how tocomplete the task. Use the formatting buttons to customize the information. Forexample, you can modify the font, font size, and layout (as bullet points ornumbered steps, for example).
11. Click Save and then click OK.
Editing Task ListsRelated Topics
• Editing Tasks
• Copying and Moving Tasks
• Moving and Reordering Task Lists
• Clearing Task Lists
• Deleting Tasks and Task Lists
Editing TasksUse the Edit Task dialog box to modify the type of task, its instructions, the end dateand alert date, and email reminder messages.
To edit tasks:
1. Click the Navigator icon , and then under Create and Manage, click TaskLists.
2. Select a task list, and then select .
3. Select a task, and then select .
4. In Edit Task:
Chapter 17Administering Task Lists
17-130

• Modify the task name.
• Select another task type.
• Optional: Modify the values for Duration, Start Date, End Date, Alert, andDependency options.
For descriptions of the various options, see Adding Tasks to Task Lists.
5. For Task - Instructions, modify instructions for completing the task.
6. Click Save.
Copying and Moving TasksTo copy or move tasks:
1. Click the Navigator icon , and then under Create and Manage, click Task Lists.
2. Perform an action:
To copy tasks:
a. Select a task list, and then select .
b. Select the task to copy, and then click Save As.
c. Enter the name for the new task list, and then click OK.
To move tasks:
a. Select a task list, then select .
b. Select a task, and then click .
c. Select the task that will be a child of another task, and then select .
d. Select the task that will be the parent task, and then select .
e. Click Save.
To cut and paste tasks:
a. Select a task list, and then click .
b. Select a task, and then click .
c. To move the task to a new position, select the task to appear above it.
d. Click .
e. Click OK.
Moving and Reordering Task ListsTo move or reorder task lists:
1. Click the Navigator icon , and then under Create and Manage, click Task Lists.
2. Perform a task:
To move a task list:
Chapter 17Administering Task Lists
17-131
a. Select a task list, and then click .
b. Select the destination folder.
c. Click OK.
To reorder task lists:
a. Select a task list.
b. Click or .
Clearing Task ListsAfter a task list is completed, you can clear the completion status, end dates, andalerts for all tasks within a selected task list. This allows tasks to be reused for a futureplanning period.
Alerts are enabled only when task lists contains end dates. Clearing task lists disablesalerts by clearing the check boxes for end dates. It doesn't delete the dates.
To clear task lists:
1. Click the Navigator icon , and then under Create and Manage, click TaskLists.
2. Select the task list you want to clear, and then click .
3. In the Clear drop-down list, select an option:
• Completion Status—Clears completion status only
• Due Dates and Alerts—Clears any alerts that are enabled, based on the enddate set for the task
• Both—Clears completion status, end dates, and alerts
4. Click .
5. Click OK.
Deleting Tasks and Task ListsTo delete tasks and task lists:
1. Click the Navigator icon , and then under Create and Manage, click TaskLists.
2. Perform a task:
• To delete a task, select the task list with the task to delete, and then click .
Select the tasks to delete, and then click .
• To delete a task list, select the task list to delete, and then select .
3. Click OK.
Chapter 17Administering Task Lists
17-132
Assigning Access to Task ListsYou can determine who can view and modify task lists. By default, Service Administrators canmanage and assign access permissions for task lists.
Note:
Being assigned to a task list means being able to access and complete tasks in thetask list. It doesn't mean being able to assign tasks to someone else.
• Adding Access to Task Lists
• Changing and Removing Access to Task Lists
Adding Access to Task ListsTo assign access to task lists:
1. Click the Navigator icon , and then under Create and Manage, click Task Lists.
2. Select the task list to modify.
3. Click .
4. Click .
5. Select the users or groups to access the task list.
• Click Users to display all user names; click Groups to display all groups.
• If there are multiple pages of users and groups, a pagination bar displays at thebottom of the page to help you navigate between the pages and to jump to a specificpage.
6. For Type of Access, select how users or groups can use the task list:
• Assigned—View and use
• Manage—Modify
• Manage and Assign—View, use, and modify
• None—No access
7. Click Add.
8. Click Close.
Changing and Removing Access to Task ListsTo change or remove access to task lists:
1. Click the Navigator icon , and then under Create and Manage, click Task Lists.
2. Select the task list to modify, then click .
3. Perform a task:
Chapter 17Administering Task Lists
17-133
To change access to task lists:
a. Select users or groups, and click .
b. For Type of Access, select:
• Assigned—View and use
• Manage—Modify
• Manage and Assign—View, use, and modify
• None—No access
c. Click Set.
To remove access to task lists:
a. Select the user or group, and click .
b. Click OK.
4. Click Close.
Clearing Cell DetailsYou can clear these cell details for a cube: account annotations, supporting detail, celltext, and cell-level documents. For information on creating and viewing accountannotations, supporting detail, cell text, and cell-level documents, see Working withPlanning .
Note:
• You can't delete approval unit annotations.
• Because this function is for Service Administrators and Power Users, theapplication assumes that you have full access to details you delete.
To clear cell details:
1. Click the Navigator icon , and then under Actions, click Clear Cell Details.
2. For Cube, select a cube.
3. To select all dimensions in the cube, click Add All Dimensions.
Select members for the displayed dimensions.
4. Specify the type of information to delete by selecting at least one option fromClear Options.
5. Select members for the data intersections:
a. In Dimension, select at least one dimension with details to delete.
b. For displayed dimensions, click . On the Member Selection page, makea selection that includes the details to delete.
Chapter 17Clearing Cell Details
17-134

Note:
For every dimension selected, you must select at least one member. If adimension isn't selected, the application includes all its members when clearingcell details.
Caution:
To clear exactly the data you want, select at least one Account member andmembers from all other dimensions. If you don't select at least one Accountmember, no data is cleared, even if you select the Yes, set value to #Missingoption. If you don't select members from the other dimensions, all data for theselected Account member is cleared across all other dimensions.
6. Optional: To select another dimension so you can select its members, click .
7. Click Clear.
A Confirmation page displays your selections.
8. Click Finish to proceed, or Back to change your selections.
If Clear Cell Details is successful, data is deleted from the cube. If data isn't deletedsuccessfully, a message is displayed. You can also check the log file.
9. Optional: To view the execution status of Clear Cell Details and review the informationthat was deleted, view the Job . See Managing Jobs.
10. To clear cell details for another cube, select another cube in step 2, and repeat theprocedure.
Copying DataYou can copy plans from one dimensional intersection to another, including relational dataand supporting detail. For example, you can copy Budget, FY10, Final to Forecast, FY11,First Draft.
Chapter 17Copying Data
17-135
Note:
• Selected Copy Data settings are preserved for the current session only.
• Copied dimension members must be present in the selected cubes.
• Data must be copied into cells that can accept data. For example, youcan't copy data into read-only or dynamic cells.
• You can copy account annotations, supporting detail, and cell text. Youcan't copy approval unit annotations.
• You can't use this feature with attributes, so don't select attributes to becopied.
• Because this is an administrative function, the application assumes youhave full access to data you copy. You're not prevented from copying toapproval units that are approved.
• This feature doesn't calculate data. To perform calculations, such asincreasing the forecast by 5%, apply the business rule after copyingdata.
• For Copy Data to be successful, you must select at least one member forScenario, Account, Entity, Period, and Version dimensions.
To copy data:
1. Click the Navigator icon , and then under Actions, click Copy Data.
2. In Cube, select a cube.
Dimensions are displayed for this cube. You can only copy from one cube at atime.
3. In Copy Data Options, select the type of information to copy.
4. Under Static Dimensions, select the members for the data intersections:
a. For Dimension, select a dimension from which to copy.
b. For Members, click to make a selection from which to copy. You canselect multiple members. You must select at least one member for Scenario,Account, Entity, Period, and Version dimensions.
5. Optional: To add another static dimension to the list, click and selectdimension members.
Note:
To remove a dimension, select Select Dimension. The dimensionmoves to the Dimensions with Source and Destination area.
6. In Dimensions with Source and Destination, enter dimensions into which tocopy data.
Chapter 17Copying Data
17-136
In Source and Destination click .
7. Click Copy Data.
Data is copied from one intersection to the other. If data isn't copied successfully, amessage is displayed. You can also check the log file.
8. To copy data for another cube, select another cube in step 2, and repeat the procedure.
Administering Application DiagnosticsRelated Topics
• About Application Diagnostics
• Assumptions
• How Application Diagnostics Works
• Using Application Diagnostics Graphs
• Launching Application Diagnostics
• Modifying Artifacts for Optimal Performance
About Application DiagnosticsApplication diagnostics enables Service Administrators, at design-time, to identify and resolvedesign flaws before an application is placed in production (and on an ongoing basis, as theapplication evolves with new members and data is added to the application) and used by endusers. Service Administrators can use application diagnostics to evaluate the following:
• An entire application
• Types of artifacts such as forms and approval units
• Individual "cherry picked" artifacts
Application diagnostics identifies changes that Service Administrators can make at design-time to resolve artifacts with design flaws, and provides easy access to the editors required tomodify them. At runtime, internal processes perform checks that may deny system request ifartifacts need to be modified. Application diagnostics evaluates your application and artifactsbased on the user a Service Administrator selects. This enables you to determine thepotential problems that may occur at runtime given the individual user's variables and securityaccess as part of the analysis.
AssumptionsOracle can only provide general guidelines about how to design your application and artifactsto ensure reasonable performance. Oracle can't specify precise value ranges for artifacts andoperations.
How Application Diagnostics WorksApplication diagnostics evaluates applications as follows:
• At design-time—Analyzes the application or specific artifacts in terms of all possibleproblems that could occur. To determine this worst possible situation, suppression
Chapter 17Administering Application Diagnostics
17-137
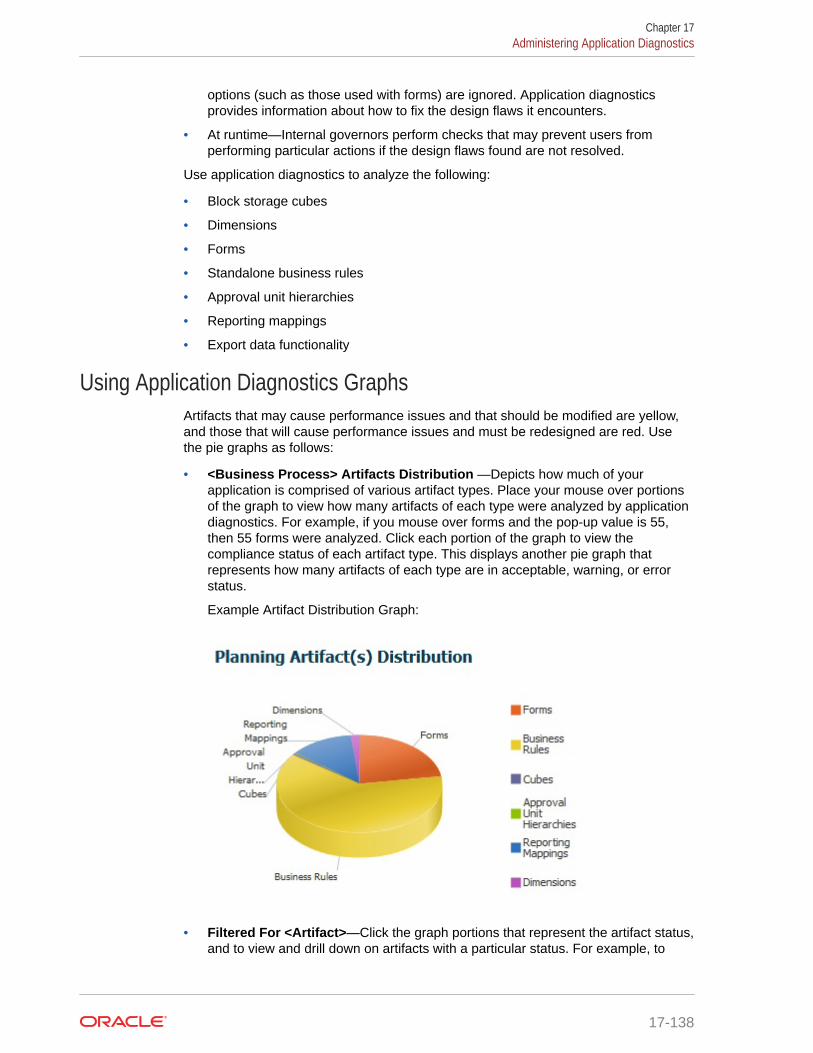
options (such as those used with forms) are ignored. Application diagnosticsprovides information about how to fix the design flaws it encounters.
• At runtime—Internal governors perform checks that may prevent users fromperforming particular actions if the design flaws found are not resolved.
Use application diagnostics to analyze the following:
• Block storage cubes
• Dimensions
• Forms
• Standalone business rules
• Approval unit hierarchies
• Reporting mappings
• Export data functionality
Using Application Diagnostics GraphsArtifacts that may cause performance issues and that should be modified are yellow,and those that will cause performance issues and must be redesigned are red. Usethe pie graphs as follows:
• <Business Process> Artifacts Distribution —Depicts how much of yourapplication is comprised of various artifact types. Place your mouse over portionsof the graph to view how many artifacts of each type were analyzed by applicationdiagnostics. For example, if you mouse over forms and the pop-up value is 55,then 55 forms were analyzed. Click each portion of the graph to view thecompliance status of each artifact type. This displays another pie graph thatrepresents how many artifacts of each type are in acceptable, warning, or errorstatus.
Example Artifact Distribution Graph:
• Filtered For <Artifact>—Click the graph portions that represent the artifact status,and to view and drill down on artifacts with a particular status. For example, to
Chapter 17Administering Application Diagnostics
17-138
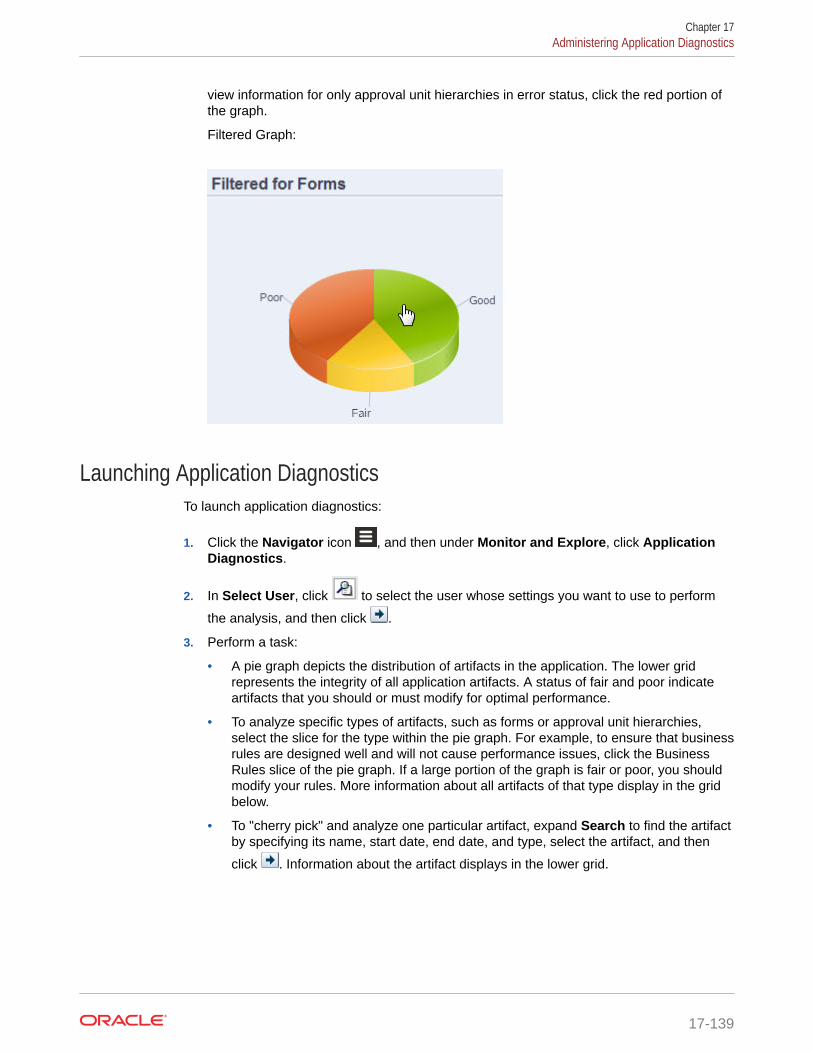
view information for only approval unit hierarchies in error status, click the red portion ofthe graph.
Filtered Graph:
Launching Application DiagnosticsTo launch application diagnostics:
1. Click the Navigator icon , and then under Monitor and Explore, click ApplicationDiagnostics.
2. In Select User, click to select the user whose settings you want to use to perform
the analysis, and then click .
3. Perform a task:
• A pie graph depicts the distribution of artifacts in the application. The lower gridrepresents the integrity of all application artifacts. A status of fair and poor indicateartifacts that you should or must modify for optimal performance.
• To analyze specific types of artifacts, such as forms or approval unit hierarchies,select the slice for the type within the pie graph. For example, to ensure that businessrules are designed well and will not cause performance issues, click the BusinessRules slice of the pie graph. If a large portion of the graph is fair or poor, you shouldmodify your rules. More information about all artifacts of that type display in the gridbelow.
• To "cherry pick" and analyze one particular artifact, expand Search to find the artifactby specifying its name, start date, end date, and type, select the artifact, and then
click . Information about the artifact displays in the lower grid.
Chapter 17Administering Application Diagnostics
17-139
Tip:
For information about what the pie graphs display and how to drill downto access more information, see Using Application Diagnostics Graphs.
4. Click or select Actions, and then Run Application Monitor.
5. If the View Details column doesn't display in the grid, select View, then Columns,and then View Details. This also enables you to display or conceal different typesof artifact data.
6. To display information about how to fix artifacts, click in View Details. Thenclick artifacts to launch editors that enable you to modify them.
Modifying Artifacts for Optimal PerformanceAfter reviewing the details provided by the application diagnostics that tell you how tomodify your artifacts, edit them as follows:
• Forms—Clicking on the form artifact name launches the Form Designer in a newtab. Edit forms as described in Administering Forms.
• Business Rules—Clicking a business rule name launches the System View whichdisplays all application artifacts that you can access. You can perform tasks suchas:
– Use the upper Rule Designer to view the individual components of the rule,such as conditions, commands, and scripts. Click each component to modifythem in the lower portion of the page. You can also insert and removecomponents like formulas, system templates, and scripts by dragging anddropping them from the Rule Pallet and Existing Object panes to the left.
– From Designer, select Edit Script to modify and format the script byperforming tasks such as inserting functions, editing templates, insertingvariables, inserting member ranges, use comments, and validate syntax.
– Create, open, delete, and refresh artifacts, pages, and other documents.
– Import and export business rules and other objects.
– Determine how and where artifacts are used.
See Designing with Calculation Manager for Oracle Enterprise PerformanceManagement Cloud and Understanding Runtime Prompts.
• Cubes—Clicking the cube artifact name launches the Performance Settings tabof the dimension editor in a new tab. Edit the dimensional outline or dimensionalsparsity as described in Editing Dimensions in the Simplified Dimension Editor.
• Reporting Mappings—Clicking the reporting mapping artifact name launches theReport Mapping Designer in a new tab. Edit reporting mappings as described in Defining Data Maps in Administering Data Integration for Oracle EnterprisePerformance Management Cloud.
Chapter 17Administering Application Diagnostics
17-140
ANaming Restrictions
Related Topics
• Naming Restrictions for Applications and Databases
• Naming Restrictions for Dimensions, Members, and Aliases
• Dimension and Member Names in Calculation Scripts, Report Scripts, Formulas, Filters,and Substitution Variables
• Restrictions for User and Group Names
Naming Restrictions for Applications and DatabasesWhen naming an application, follow these rules:
• Use no more than eight characters for an application's name.
• Don't use spaces or tabs.
• Don't use these special characters:
Table A-1 Restricted Characters in Application Names
Character Meaning
* asterisk
\ backslash
[ ] brackets
: colon
, comma
" double quotation mark
= equal sign
> greater than sign
< less than sign
. period
+ plus sign
? question mark
; semicolon
' single quotation mark
/ slash
| vertical bar
• For application names in relational database environments, don't use extendedcharacters (except for underscores).
A-1

• For aggregate storage databases, don't use DEFAULT, LOG, METADATA, orTEMP as application names.
Enter names in the preferred case. Application names are created exactly as entered.
Naming Restrictions for Dimensions, Members, and AliasesWhen naming dimensions, members, and aliases, follow these rules:
• Use no more than 80 characters for dimension, member, or alias names.
• Dimension names that are the same name as a member property or a columnheader in the metadata load file (for example, Data Type) cannot be used.
• HTML tags cannot be used in member names, dimension names, aliases, anddescriptions.
• The TAB key is restricted and cannot be used in dimension, member, and aliasnames.
• The following is a list of characters that are restricted and cannot be used indimension, member, and alias names:
Table A-2 Restricted Characters in Dimension, Member, and Alias Names
Character Meaning
" quotation mark
[ ] bracket
\ backslash
/ slash
Note:
Brackets [ ] are permitted but not recommended in block storageoutlines. They cause errors when converting to aggregate storageoutlines.
• The following is a list of characters that cannot be used at the beginning ofdimension, member, and alias names:
Table A-3 Restricted Characters at the Beginning of Dimension, Member,and Alias Names
Character Meaning
@ at sign
& ampersand
\ backslash
[ ] brackets
, comma
- dash, hyphen, or minus sign
Appendix ANaming Restrictions for Dimensions, Members, and Aliases
A-2
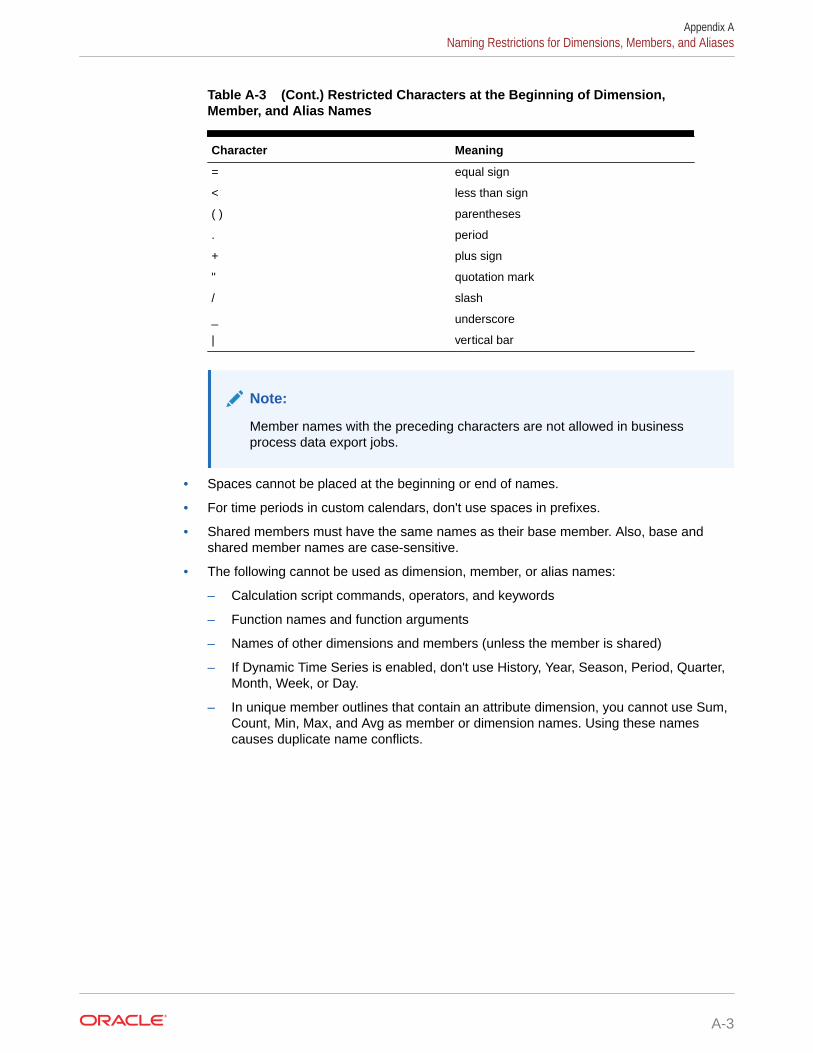
Table A-3 (Cont.) Restricted Characters at the Beginning of Dimension,Member, and Alias Names
Character Meaning
= equal sign
< less than sign
( ) parentheses
. period
+ plus sign
" quotation mark
/ slash
_ underscore
| vertical bar
Note:
Member names with the preceding characters are not allowed in businessprocess data export jobs.
• Spaces cannot be placed at the beginning or end of names.
• For time periods in custom calendars, don't use spaces in prefixes.
• Shared members must have the same names as their base member. Also, base andshared member names are case-sensitive.
• The following cannot be used as dimension, member, or alias names:
– Calculation script commands, operators, and keywords
– Function names and function arguments
– Names of other dimensions and members (unless the member is shared)
– If Dynamic Time Series is enabled, don't use History, Year, Season, Period, Quarter,Month, Week, or Day.
– In unique member outlines that contain an attribute dimension, you cannot use Sum,Count, Min, Max, and Avg as member or dimension names. Using these namescauses duplicate name conflicts.
Appendix ANaming Restrictions for Dimensions, Members, and Aliases
A-3
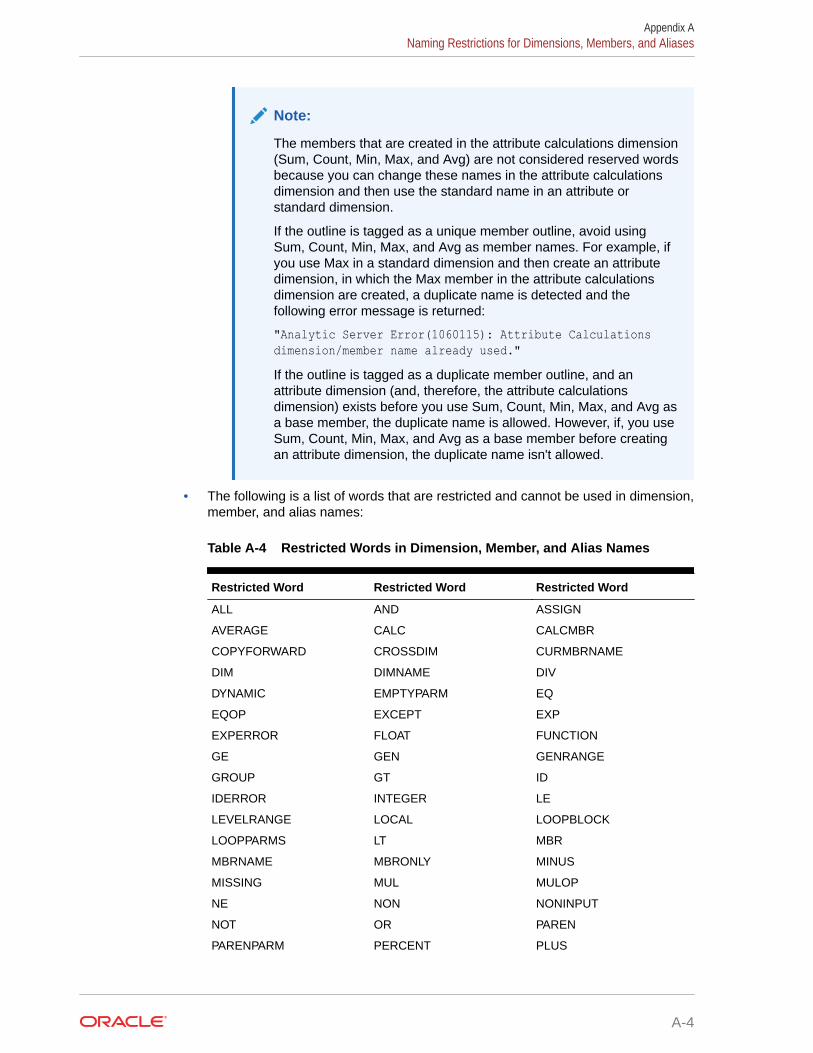
Note:
The members that are created in the attribute calculations dimension(Sum, Count, Min, Max, and Avg) are not considered reserved wordsbecause you can change these names in the attribute calculationsdimension and then use the standard name in an attribute orstandard dimension.
If the outline is tagged as a unique member outline, avoid usingSum, Count, Min, Max, and Avg as member names. For example, ifyou use Max in a standard dimension and then create an attributedimension, in which the Max member in the attribute calculationsdimension are created, a duplicate name is detected and thefollowing error message is returned:
"Analytic Server Error(1060115): Attribute Calculationsdimension/member name already used."If the outline is tagged as a duplicate member outline, and anattribute dimension (and, therefore, the attribute calculationsdimension) exists before you use Sum, Count, Min, Max, and Avg asa base member, the duplicate name is allowed. However, if, you useSum, Count, Min, Max, and Avg as a base member before creatingan attribute dimension, the duplicate name isn't allowed.
• The following is a list of words that are restricted and cannot be used in dimension,member, and alias names:
Table A-4 Restricted Words in Dimension, Member, and Alias Names
Restricted Word Restricted Word Restricted Word
ALL AND ASSIGN
AVERAGE CALC CALCMBR
COPYFORWARD CROSSDIM CURMBRNAME
DIM DIMNAME DIV
DYNAMIC EMPTYPARM EQ
EQOP EXCEPT EXP
EXPERROR FLOAT FUNCTION
GE GEN GENRANGE
GROUP GT ID
IDERROR INTEGER LE
LEVELRANGE LOCAL LOOPBLOCK
LOOPPARMS LT MBR
MBRNAME MBRONLY MINUS
MISSING MUL MULOP
NE NON NONINPUT
NOT OR PAREN
PARENPARM PERCENT PLUS
Appendix ANaming Restrictions for Dimensions, Members, and Aliases
A-4
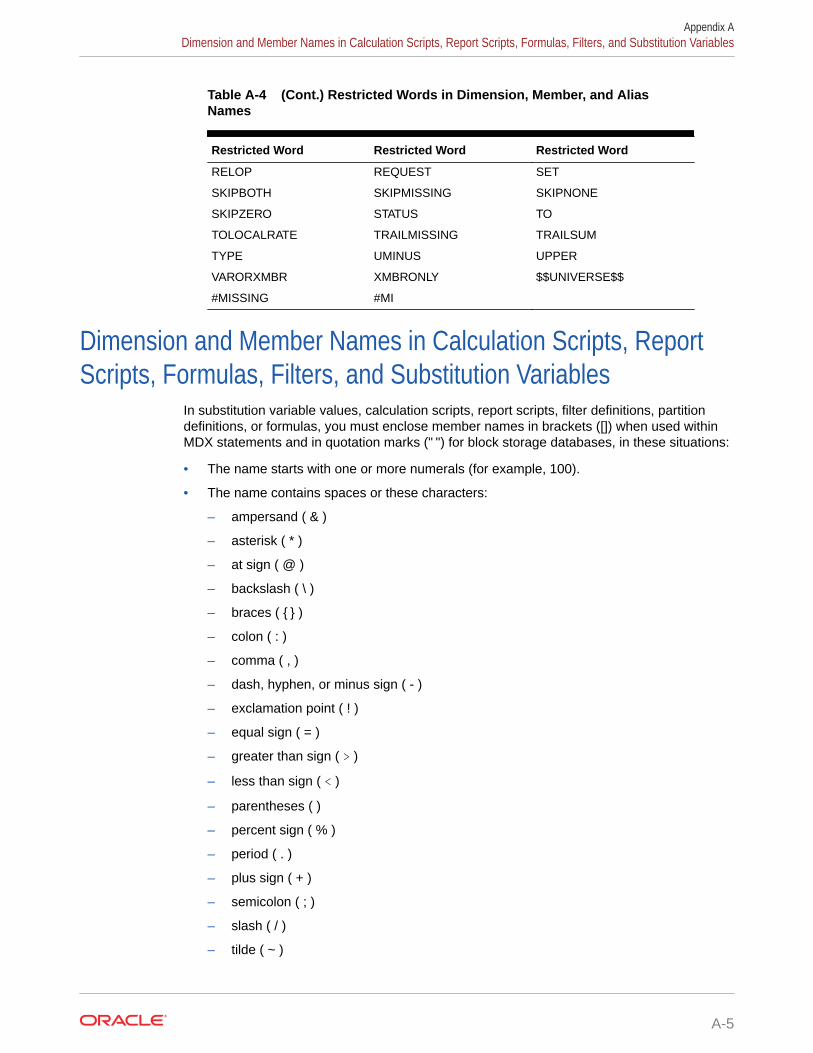
Table A-4 (Cont.) Restricted Words in Dimension, Member, and AliasNames
Restricted Word Restricted Word Restricted Word
RELOP REQUEST SET
SKIPBOTH SKIPMISSING SKIPNONE
SKIPZERO STATUS TO
TOLOCALRATE TRAILMISSING TRAILSUM
TYPE UMINUS UPPER
VARORXMBR XMBRONLY $$UNIVERSE$$
#MISSING #MI
Dimension and Member Names in Calculation Scripts, ReportScripts, Formulas, Filters, and Substitution Variables
In substitution variable values, calculation scripts, report scripts, filter definitions, partitiondefinitions, or formulas, you must enclose member names in brackets ([]) when used withinMDX statements and in quotation marks (" ") for block storage databases, in these situations:
• The name starts with one or more numerals (for example, 100).
• The name contains spaces or these characters:
– ampersand ( & )
– asterisk ( * )
– at sign ( @ )
– backslash ( \ )
– braces ( { } )
– colon ( : )
– comma ( , )
– dash, hyphen, or minus sign ( - )
– exclamation point ( ! )
– equal sign ( = )
– greater than sign ( > )
– less than sign ( < )
– parentheses ( )
– percent sign ( % )
– period ( . )
– plus sign ( + )
– semicolon ( ; )
– slash ( / )
– tilde ( ~ )
Appendix ADimension and Member Names in Calculation Scripts, Report Scripts, Formulas, Filters, and Substitution Variables
A-5

In calculation scripts and formulas, enclose member names that are also Essbasekeywords in quotation marks (" ") for block storage databases, and in brackets ([ ]) foraggregate storage databases including these member names:
BEGIN DOUBLE ELSE END FUNCTION GLOBAL IF MACRO MEMBER RANGE RETURN STRINGTHENEnclose in quotation marks names, in calculation scripts, report scripts, or formulas,that contain or start with spaces or these characters: + - * / ( ) : , @ ; ) { } [ ] <
Also enclose in quotation marks names that start with numbers. For example:
@SUM(ac1, "12345");
Restrictions for User and Group NamesUser and group names can have up to 80 characters.
Appendix ARestrictions for User and Group Names
A-6
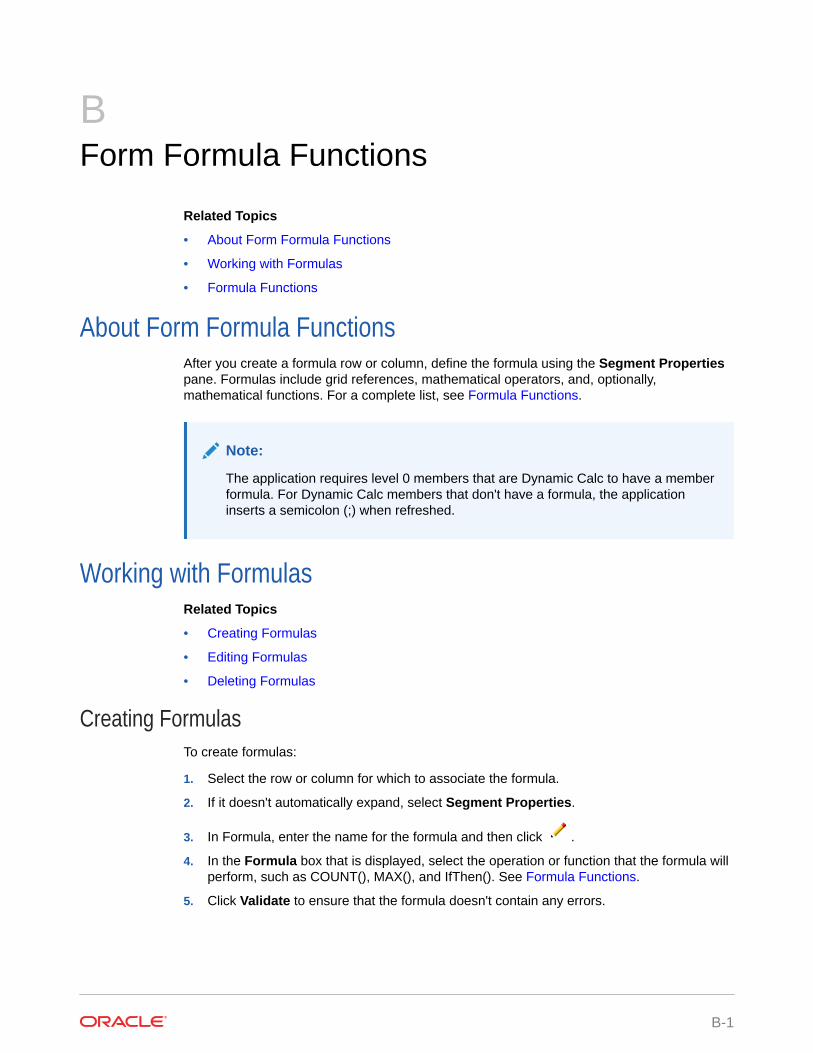
BForm Formula Functions
Related Topics
• About Form Formula Functions
• Working with Formulas
• Formula Functions
About Form Formula FunctionsAfter you create a formula row or column, define the formula using the Segment Propertiespane. Formulas include grid references, mathematical operators, and, optionally,mathematical functions. For a complete list, see Formula Functions.
Note:
The application requires level 0 members that are Dynamic Calc to have a memberformula. For Dynamic Calc members that don't have a formula, the applicationinserts a semicolon (;) when refreshed.
Working with FormulasRelated Topics
• Creating Formulas
• Editing Formulas
• Deleting Formulas
Creating FormulasTo create formulas:
1. Select the row or column for which to associate the formula.
2. If it doesn't automatically expand, select Segment Properties.
3. In Formula, enter the name for the formula and then click .
4. In the Formula box that is displayed, select the operation or function that the formula willperform, such as COUNT(), MAX(), and IfThen(). See Formula Functions.
5. Click Validate to ensure that the formula doesn't contain any errors.
B-1
Editing FormulasTo edit formulas:
1. Open a form with a formula row or column.
2. In Layout, select a numbered formula row or column.
3. Use Segment Properties to modify the formula properties.
4. Click to change the operation or function performed.
5. Save the form.
Deleting FormulasTo delete a formula:
1. Select the formula row or column.
2. Click Delete.
3. To verify formula deletion:
a. Click the checkmark in the formula bar.
b. Click another cell within the grid to reset the formula bar.
c. Click the cell from which you deleted the formula to verify deletion.
Formula FunctionsThis section defines the mathematical functions available for creating formulas for formformula rows and columns. To insert formula rows and columns in forms, see AddingFormula Rows and Columns.
The syntax for mathematical functions:
FunctionName(arguments)
For more information about arguments, see Arguments.
Table B-1 Mathematical Function Syntax
Variable Description
FunctionName The name of a mathematical function
arguments A numeric value, a row, column, or cellreference, or an embedded function
Appendix BFormula Functions
B-2
Mathematical Functions
Table B-2 Mathematical Functions
Function Description
Abs Returns the absolute value of numeric values orreferences. See Abs.
Average Returns the average of a group of numeric valuesor references. See Average.
AverageA Returns the average of a group of numeric valuesor references. The calculation includes #MISSINGcells only for rows or columns that are notsuppressed. See AverageA.
Count Returns the number of values in a group ofnumeric values or references. See Count.
CountA Returns the number of values in a group ofnumeric values or references. The calculationincludes #MISSING cells only for rows or columnsthat are not suppressed. See CountA.
Difference Returns the absolute value of a numeric value orreference subtracted from another numeric valueor reference. See Difference.
Eval Evaluates an expression. Eval is useful forembedding expressions as function arguments.See Eval.
IfThen, If Returns one value if a condition equals true, andanother value if a specified condition equals false.See IfThen, If.
Max Returns the maximum value from a group ofnumeric values or references. See Max.
Min Returns the minimum value from a group ofnumeric values or references. See Min.
Mod Returns the remainder, modulus, from a divisionformula. See Mod.
PercentOfTotal Returns the result of a numeric value or referencedivided by another numeric value or reference,multiplied by 100. See PercentOfTotal.
Pi Returns the number 3.14159265358979, to 15digits. See Pi.
Product Multiplies all numbers or references and returnsthe product. See Product.
Random Returns a random number between 0.0 and 1.0.See Random.
Round Rounds a number up or down by specified digits.See Round.
Sqrt Returns the square root of a numeric value, row,column, or cell. See Sqrt.
Sum Returns the sum of a group of numeric values orreferences. See Sum.
Appendix BFormula Functions
B-3
Table B-2 (Cont.) Mathematical Functions
Function Description
Truncate / Trunc Removes the specified number of digits fromnumeric values. See Truncate/Trunc.
Variance / Var Evaluates the difference between the specifiedvalues based on the account type for the currentaccount. See Variance/Var.
VariancePercent / VarPer Evaluates the percentage difference between thespecified values based on account type for thecurrent account. See VariancePercent/VarPer.
ArgumentsMathematical functions accept numeric values, row, column, or cell references, orembedded functions as arguments. There are four argument types:
• Numeric—See Numeric Arguments.
• Property—See Property Arguments.
• Row, column, or cell reference—See Row, Column, or Cell Reference Arguments.
• Embedded functions—See Embedded Functions as Arguments.
Numeric ArgumentsThe syntax for a numeric argument is
(numeral1, numeral2,...numeraln)
where numerals 1 through n are any numbers including decimals and negative values.For example, the expression Average(10,20,30) returns the value 20.
Row, Column, or Cell Reference ArgumentsThe row, column, or cell argument identifies a row, column, or cell in a grid. Thesyntax:
FunctionName(GridName.GridElement[segment(range)].Property)
Table B-3 Argument Components
Argument Description
GridName The form name. For example:
Difference (grid1.row[5], grid1.row[6]) returnsthe difference of two rows on form grid1.
Optional. If GridName isn't specified, thedefault is the name of the current form.
Appendix BFormula Functions
B-4
Table B-3 (Cont.) Argument Components
Argument Description
GridElement One of the following keywords: row, col,column, or cell.
For example, Max(row[1], row[2], row[3])returns the maximum value of three rows.GridElement is optional. However, a cellreference requires row and column segmentidentifiers. For example, cell[2, A] and [2, A]both refer to the cell that is the intersectionbetween row 2 and column A. The keywordcell is optional. Cell references can use the[row, col] syntax or [col, row] syntax.
Optional. If GridElement isn't specified, lettersrepresent columns and numbers representrows; for example: Max ([1, A], [2, A], [3, A])refers to rows 1, 2 and 3 of column A.
segment A row, column, or cell reference number. Foran expanded row or column, you must specifythe segment. For example, row[2] addressesrow segment 2. Segments are enclosed insquare brackets [ ].
Required.
range The rows, columns, or cell that are expandedfrom the specified segment. If range isspecified, the system calculates the formulausing only the specified range. For example,row[2(3:5)] uses only the third through fifthrows of expanded segment 2.
Optional. When range isn't provided, allexpanded cells are used.
Note:
If a segmentexpands to onlyone row orcolumn, don'tuse the rangeargument.
Appendix BFormula Functions
B-5
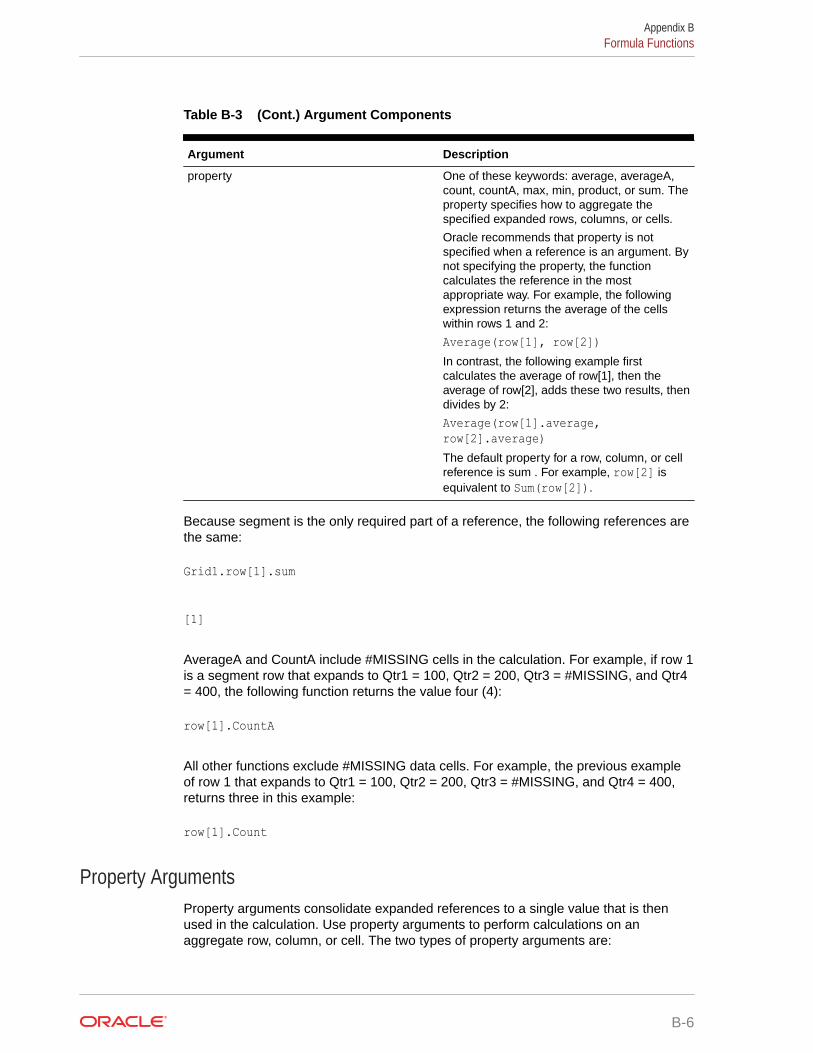
Table B-3 (Cont.) Argument Components
Argument Description
property One of these keywords: average, averageA,count, countA, max, min, product, or sum. Theproperty specifies how to aggregate thespecified expanded rows, columns, or cells.
Oracle recommends that property is notspecified when a reference is an argument. Bynot specifying the property, the functioncalculates the reference in the mostappropriate way. For example, the followingexpression returns the average of the cellswithin rows 1 and 2:
Average(row[1], row[2])In contrast, the following example firstcalculates the average of row[1], then theaverage of row[2], adds these two results, thendivides by 2:
Average(row[1].average,row[2].average)The default property for a row, column, or cellreference is sum . For example, row[2] isequivalent to Sum(row[2]).
Because segment is the only required part of a reference, the following references arethe same:
Grid1.row[1].sum
[1]
AverageA and CountA include #MISSING cells in the calculation. For example, if row 1is a segment row that expands to Qtr1 = 100, Qtr2 = 200, Qtr3 = #MISSING, and Qtr4= 400, the following function returns the value four (4):
row[1].CountA
All other functions exclude #MISSING data cells. For example, the previous exampleof row 1 that expands to Qtr1 = 100, Qtr2 = 200, Qtr3 = #MISSING, and Qtr4 = 400,returns three in this example:
row[1].Count
Property ArgumentsProperty arguments consolidate expanded references to a single value that is thenused in the calculation. Use property arguments to perform calculations on anaggregate row, column, or cell. The two types of property arguments are:
Appendix BFormula Functions
B-6
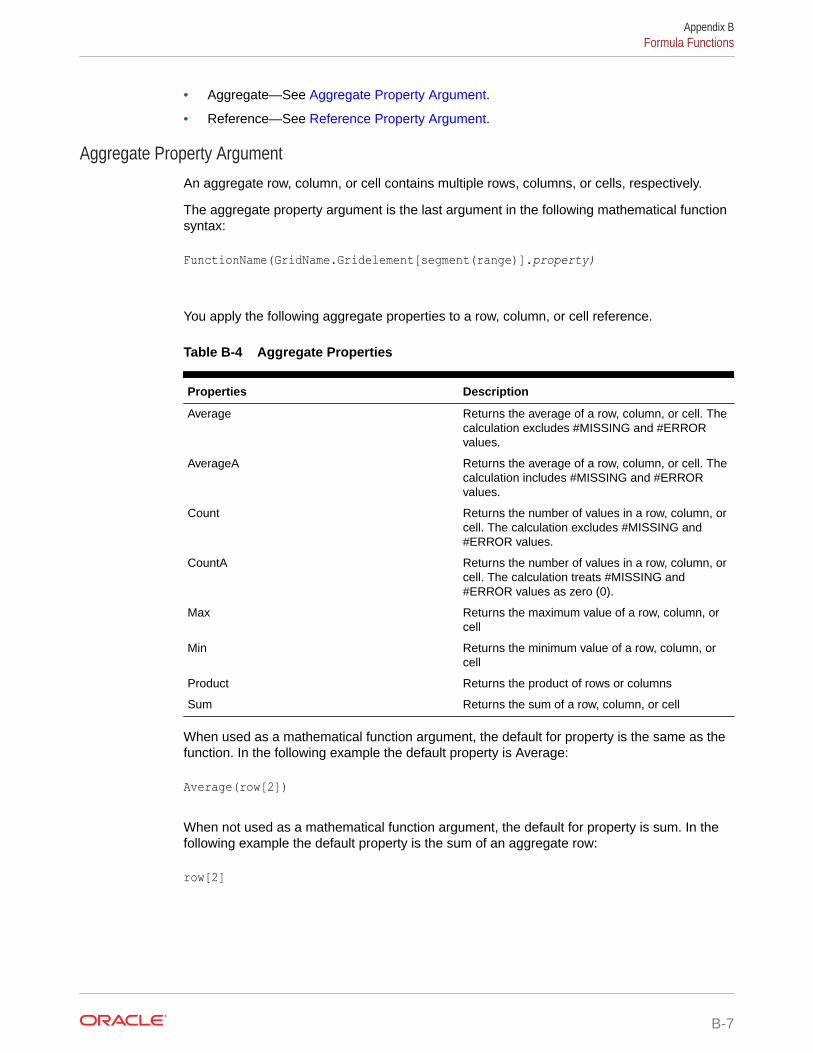
• Aggregate—See Aggregate Property Argument.
• Reference—See Reference Property Argument.
Aggregate Property ArgumentAn aggregate row, column, or cell contains multiple rows, columns, or cells, respectively.
The aggregate property argument is the last argument in the following mathematical functionsyntax:
FunctionName(GridName.Gridelement[segment(range)].property)
You apply the following aggregate properties to a row, column, or cell reference.
Table B-4 Aggregate Properties
Properties Description
Average Returns the average of a row, column, or cell. Thecalculation excludes #MISSING and #ERRORvalues.
AverageA Returns the average of a row, column, or cell. Thecalculation includes #MISSING and #ERRORvalues.
Count Returns the number of values in a row, column, orcell. The calculation excludes #MISSING and#ERROR values.
CountA Returns the number of values in a row, column, orcell. The calculation treats #MISSING and#ERROR values as zero (0).
Max Returns the maximum value of a row, column, orcell
Min Returns the minimum value of a row, column, orcell
Product Returns the product of rows or columns
Sum Returns the sum of a row, column, or cell
When used as a mathematical function argument, the default for property is the same as thefunction. In the following example the default property is Average:
Average(row[2])
When not used as a mathematical function argument, the default for property is sum. In thefollowing example the default property is the sum of an aggregate row:
row[2]
Appendix BFormula Functions
B-7
Reference Property ArgumentA reference property argument specifies how to treat formula reference results and isused in conjunction with the other properties.
There is one reference property argument:
IfNonNumber/IFFN
IfNonNumber specifies a replacement of #MISSING and #ERROR values with aspecific numeric value. The syntax:
AXIS[segment(range)].IfNonNumber(arg).AggregateProperty
Table B-5 Reference Property Arguments
Argument Description
AXIS One of these keywords: row, column, or cell
Optional
Segment(range) Indicates any valid axis reference, such as arow number, column letter
IfNonNumber Indicates how to treat missing or error datawithin the Axis Ref
(arg) Indicates what number to use if missing orerror data is encountered within the AxisRef
AggregateProperty The aggregate function is used for aggregatesegments
Optional
Example:
If cell[1,A] = 3 and
cell[1,B] = #MISSING,
The expression:
cell[1,A] / cell[1,B]
returns #ERROR.
The expression:
cell[1,A] / cell[1,B].ifNonnumber(1)
replaces cell[1,B] with 1 and returns a 3.
Appendix BFormula Functions
B-8
Note:
If you use suppression for #MISSING in a grid, and the grid contains a formula rowor column that uses the IfNonNumber property, #MISSING remains suppressed.
Embedded Functions as ArgumentsYou can embed functions as arguments within a function.
Example:
In this example, the function Average is embedded in the function Sum:
sum(row[3:5], avg(row[4:6], 40, 50), row[7; 9], 70, 80)
• Row segments 3, 4 and 5
• The average of row segments 4, 5 and 6, with the numbers 40 and 50
• Row segments 7 and 9
• The numbers 70 and 80
AbsAbs is a mathematical function that returns the absolute value of a numeric value, row,column, or cell. The absolute value of a number is that number without regard to sign. Anegative number becomes positive, while a positive number doesn't change. The functionsyntax:
Abs (argument)
where argument is one of the following:
Table B-6 Arguments for the Abs Function
Argument Description
numeric A numeric value. For example, Abs (- 20) returnsthe value 20. Numeric values can include decimalsand negative values.
row, column, or cell reference A pointer to a row, column, or cell within a grid.References can be specified in several ways. Thereference syntax:GridName.GridElement[segment(range)].Property.
function An embedded function
Examples:
• The following expression includes a numeric argument and returns the value 30:
Abs ( -30 )
Appendix BFormula Functions
B-9
• The following example returns the absolute value of the value in row 1:
Abs(row[1])
• The following example calculates the absolute value of the sum of column E:
Abs( column[E].sum )
• The following example points to expanded rows 1 through 3 within design segment3 of the form Grid1:
Abs( Grid1.row[3(1:3)])
AverageAverage is a mathematical function that returns the average of a group of numericvalues, rows, columns, or cells. Average excludes #MISSING and #ERROR cellswhen obtaining the average.
Note:
The calculation doesn't include missing values regardless of whether theyare suppressed or not.
The function syntax:
Average(arguments) or Avg(arguments)
where arguments is one or more of the following:
Table B-7 Arguments for the Average Function
Argument Description
numeric A numeric value. For example, Average (10,20, 30) returns the value 20. Numeric valuescan include decimals and negative values.
row, column, or cell reference A pointer to a row, column, or cell within a grid.References can be specified in several ways.The reference syntax:GridName.GridElement[segment(range)].PropertyFor example Avg(Grid1.row[4(3:5)]) returns theaverage of form grid1, row 4, range 3 through5.
function An embedded function
Examples:
Appendix BFormula Functions
B-10
• The following expression returns the value 20:
Avg( 10, 30, 20)
• The following example returns the average of all numbers that are part of three aggregaterows:
Average( row[1], row[6], row[8] )
• The following example calculates the average of three aggregate columns; E, G, and I.The calculation produces three numbers and calculates the average of the threenumbers:
Avg(column[E].avg, column[G].avg,column[I].avg)
• The following example calculates the average of aggregate row 3 and divides theaverage by 100:
Avg(row[3])/100
AverageAAverageA is a mathematical function that returns the average of a group of numeric values,rows, columns, or cells. AverageA includes #MISSING and #ERROR cells, which are treatedas zero values when obtaining the average.
Note:
#MISSING and #ERROR are included only for rows or columns that are notsuppressed.
The function syntax:
AverageA(arguments) or AvgA(arguments)
where arguments is one or more of these arguments:
Table B-8 Arguments for the AverageA Function
Argument Description
numeric A numeric value. For example, AverageA (10, 20,30) returns the value 20. Numeric values caninclude decimals and negative values.
Appendix BFormula Functions
B-11
Table B-8 (Cont.) Arguments for the AverageA Function
Argument Description
row, column, or cell reference A pointer to a row, column, or cell. References canbe specified in several ways. The referencesyntax:GridName.GridElement[segment(range)].Property.For example, AvgA(Grid1.row[4(3:5)] returns theaverage of form grid1, row segment 4, range 3through 5.
function An embedded function
Example
In the following example, a grid has 4 rows with the values 10, 20, 30, and, #ERROR.The following formula in the fifth row returns the value 15:
AverageA([1:4])
CountCount is a mathematical function that returns the number of values in a group ofnumeric values, rows, columns, or cells. Count excludes #MISSING and #ERRORwhen obtaining the count. The function syntax:
Count (arguments)
where arguments is one or more of these arguments:
Table B-9 Arguments for the Count Function
Argument Description
numeric A numeric value. For example, Count (10, 20,30) returns the value 3. Numeric values caninclude decimals and negative values.
row, column, or cell reference A pointer to a row, column, or cell within a grid.References can be specified in several ways.The reference syntax:GridName.GridElement[segment(range)].Property
function An embedded function
Examples:
• The following example returns the count of three rows, 1, 6, and 8:
Count(row[1], row[6], row[8])
Appendix BFormula Functions
B-12
• The following example returns the count of 3 columns:
Count( column[E], column[G], column[I] )
• The following example calculates the count of the cell located at row 4, column D:
Count(cell[D,4])
• The following example calculates the count of aggregate row 3 in grid 5:
Count(grid1.row[3])
CountACountA is a mathematical function that returns the number of values in a group of numericvalues, rows, columns, or cells. CountA includes #MISSING and #ERROR cells whenobtaining the count only for rows or columns that are not suppressed. The function syntax:
CountA(arguments)
where arguments is one or more of these arguments:
Table B-10 Arguments for the CountA Function
Argument Description
numeric A numeric value. For example,CountA(10,20,30,50) returns the value 4.Numeric values can include decimals and negativevalues.
row, column, or cell reference A pointer to a row, column, or cell within a grid.References can be specified in several ways. Thereference syntax:CountA(GridName.GridElement[segment(range)]).property
function An embedded function
Examples:
• In the following example, if a grid has 4 rows with the values 10, 20, 30, and, #ERROR.The following formula in the fifth row returns the count of four rows:
CountA([1:4])
• The following example returns the count of four rows:
CountA(row[1], row[6], row[8] row[where data yields #ERROR])
Appendix BFormula Functions
B-13

DifferenceDifference is a mathematical function that returns the absolute value of the differenceof a numeric value, row, or column subtracted from another numeric value, row, orcolumn. This is also known as the variance. The function syntax:
Difference(arg1, arg2)
where arg2 is subtracted from arg1 and are one or more of the following arguments:
Table B-11 Arguments for the Difference Function
Argument Description
numeric A numeric value. For example, Difference (3,5) returns the absolute value 2. Numericvalues can include decimals and negativevalues.
row, column, or reference A pointer to a row, column, or cell within a grid.References can be specified in several ways.The reference syntax:GridName.GridElement[segment(range)].PropertyThe following example returns the difference oftwo rows in form grid1:
Difference( grid1.row[1], grid1.row[6] )
function An embedded function
Note:
The Difference function returns the absolute value of arg2 subtracted fromarg1, whereas the minus sign in subtraction negates a number.
Examples:
• The following example returns the absolute value of 8:
Difference(3, -5)
• The following example calculates the difference of two aggregate columns:
Difference( column[E], column[G] )
Note:
You can type the text label "Difference" or "Variance."
Appendix BFormula Functions
B-14
EvalEval is a mathematical function that evaluates an expression. You use Eval as an embeddedfunction argument to consolidate multiple expressions into one expression. The functionsyntax:
Eval(expression)
where expression is one or more of these arguments:
Table B-12 Arguments for the Eval Function
Argument Description
numeric A numeric value. Numeric values can includedecimals and negative values.
row, column, or reference A pointer to a row, column, or cell within a grid.References can be specified in several ways. Thereference syntax:GridName.GridElement[segment(range)].Property
function An embedded function
operators Use any of the supported arithmetic operators (+,-, *, /, ^, %, and so on).
Example:
The following example divides row 1 by row 2 and then rounds the data to four places:
Round(Eval([1]/[2]),4)
IfThen, IfIfThen is a conditional function that returns a value when the condition equals True, andanother value when the condition equals False.
The function syntax:
IfThen(Condition, TrueParameter, FalseParameter)
• Condition is a logical expression that evaluates to true or false. Full conditional logic canbe used as well as complex Boolean operators (And, Not, and Or). A condition can alsotest for #MISSING and #ERROR values. See the following table for a list of validconditional operators.
• TrueParameter and FalseParameter are any valid expression that are evaluated basedon the outcome of the condition.
The following table describes the conditional operators that are fully supported. Alternatesyntax is listed wherever it's supported by a conditional operator.
Appendix BFormula Functions
B-15
Table B-13 Conditional Operators
Conditional Operator Syntax Logic
Equal To expression = expression Tests whether the left expression isequal to the right expression.
The routine that evaluates thecondition doesn't consider anyrounding. If rounding is required, usethe Round function.
Example:
1= 4Returns false
Greater Than expression > expression Tests whether the left expression isgreater than the right expression.
Example:
1 > 4Returns false
Greater Than or Equal To expression >= expression Tests whether the left expression isgreater than or equal to the rightexpression.
The correct syntax is ">=". Thesyntax "=>" isn't supported.
Example:
1 >= 4Returns false
Less Than expression < expression Tests whether the left expression isless than the right expression.
Example:
1 < 4Returns true
Less Than or
Equal To
expression <= expression Tests whether the left expression isless than or equal to the rightexpression.
The correct syntax is "<=". Thesyntax "=<" isn't supported.
Example:
1 <= 4Returns true
Not Equal To expression <> expression
expression != expression
Tests whether the left expression isn'tequal to the right expression.
The routine that evaluates thecondition doesn't consider anyrounding. If rounding is required, usethe Round function.
Examples:
1 <> 4Returns true
1 != 4Returns true
Appendix BFormula Functions
B-16
Table B-13 (Cont.) Conditional Operators
Conditional Operator Syntax Logic
IsMissing IsMissing ( reference )IsMiss ( reference )
Tests whether the reference containsa #MISSING result.
If the reference is an expanded rowor column, then all resulting cellsmust be #MISSING in order for thecondition to be true.
Example:
IsMissing([1])Returns true if row 1 has a#MISSING value.
IsError IsError ( reference )IsErr ( reference )
Tests whether the reference containsan #ERROR result.
If the reference is an expanded rowor column, all resulting cells must be#ERROR in order for the condition tobe true. Only formula rows andcolumns can result in #ERROR.
Example:
IsError([2])Returns true if row 2 has a #ERRORvalue.
IsNonNumeric IsNN ( reference )IsNonNumerid ( reference )IfNN ( reference )IfNonNumber ( reference )
Tests whether the reference containsa #MISSING or #ERROR results.
If the reference is an expanded rowor column, all resulting cells must be#MISSING and/or #ERROR in orderfor the condition to be true.
Example:
IsNN([3])Returns true if row 3 has a#MISSING or #ERROR value.
Parenthesis ( condition ) Used to group a condition. Usedmostly for visual clarity.
Example:
(1 > 4)Returns false
Table B-14 Conditional Operators
Complex Conditions Syntax Logic
And ( condition AND condition )( condition & condition)
Complex condition used to comparetwo conditions. Returns true if allconditions result in true.
Example:
(1 > 4 AND 5 > 2)Returns false
Appendix BFormula Functions
B-17
Table B-14 (Cont.) Conditional Operators
Complex Conditions Syntax Logic
Not NOT ( condition )! ( condition )
Used to negate the result byreversing the result of the condition.
Example:
Not (1 > 4)Returns true
Or ( condition OR condition )( condition | condition )
Complex condition used to comparetwo conditions. Returns true if any ofthe conditions result in true.
Example:
(1 > 4 OR 5 > 2)Returns true
Notes on Conditions• Expression—Any valid formula expression. The expression can be any
combination of a constant (integer or real number), a reference, or anotherfunction.
• Reference—Any valid reference; thus the IFNN reference property can be used aspart of the reference.
• Condition—Any valid condition applied to the complex conditions And, Not, andOr. Those operators can have embedded conditions.
Note:
And, Not, and Or operators require surrounding parentheses.
• When any expression within the condition returns an #ERROR or #MISSINGvalue, the If function returns #MISSING or #ERROR. This doesn't apply when youuse the IsMissing, IsError, or IsNonNumeric conditions.
Complex ConditionsComplex conditions And, Or, and Not are fully supported. However, they must besurrounded by parentheses.
Valid example:
If ( ([A] > [B] and [A] > 1000), [A], [B])
Invalid example:
If ( [A] > [B] and [A] > 1000, [A], [B])
Appendix BFormula Functions
B-18
MaxMax is a mathematical function that returns the maximum value in a group of numeric values,rows, columns, or cells. The function syntax:
Max (arguments)
where arguments is one or more of these arguments:
Table B-15 Arguments for the Max Function
Argument Description
numeric A numeric value. For example, Max (10, 20, 30)returns the value 30. Numeric values can includedecimals and negative values.
row, column, or cell reference A pointer to a row, column, or cell within a grid.References can be specified in several ways. Thereference syntax:GridName.GridElement[segment(range)].Property.
function An embedded function
Examples:
• The following example returns the maximum value in rows 1, 6, and 8:
Max(row[1], row[6], row[8])
• The following example calculates the maximum of the sums of aggregate rows:
Max(row[1].sum, row[2].sum, row[3].sum)
MinMin is a mathematical function that returns the minimum value in a group of numeric values,rows, columns, or cells. The function syntax:
Min (arguments)
where arguments is one or more of these arguments:
Table B-16 Arguments for the Min Function
Argument Description
numeric A numeric value. For example, Min (10, 20, 30)returns the value 10. Numeric values can includedecimals and negative values.
Appendix BFormula Functions
B-19
Table B-16 (Cont.) Arguments for the Min Function
Argument Description
row, column, or cell reference A pointer to a row, column, or cell within a grid.References can be specified in several ways. Thereference syntax:GridName.GridElement[segment(range)].Property
function An embedded function
Examples:
• The following example returns the minimum value in rows 1, 6, and 8:
Min (row[1], row[6], row[8])
• The following example calculates the minimum of the sums of aggregate rows:
Min(row[1].sum, row[2].sum, row[3].sum)
ModMod is a mathematical function that returns the remainder, or modulus, from a division.The function syntax:
Mod (arg1, arg2)
where arg2 is the divisor and arg1 and arg2 are one of these arguments:
Table B-17 Arguments for the Mod Function
Argument Description
numeric A numeric value. For example, Mod (6, 4)returns the value 2. Numeric values caninclude decimals and negative values.
row, column, or cell reference A pointer to a row, column, or cell within a grid.References can be specified in several ways.The reference syntax:GridName.GridElement[segment(range)].Property
function An embedded function
Example:
The following example divides 10 by 5 and returns the remainder of 0:
Mod (10,5) = 0
Appendix BFormula Functions
B-20
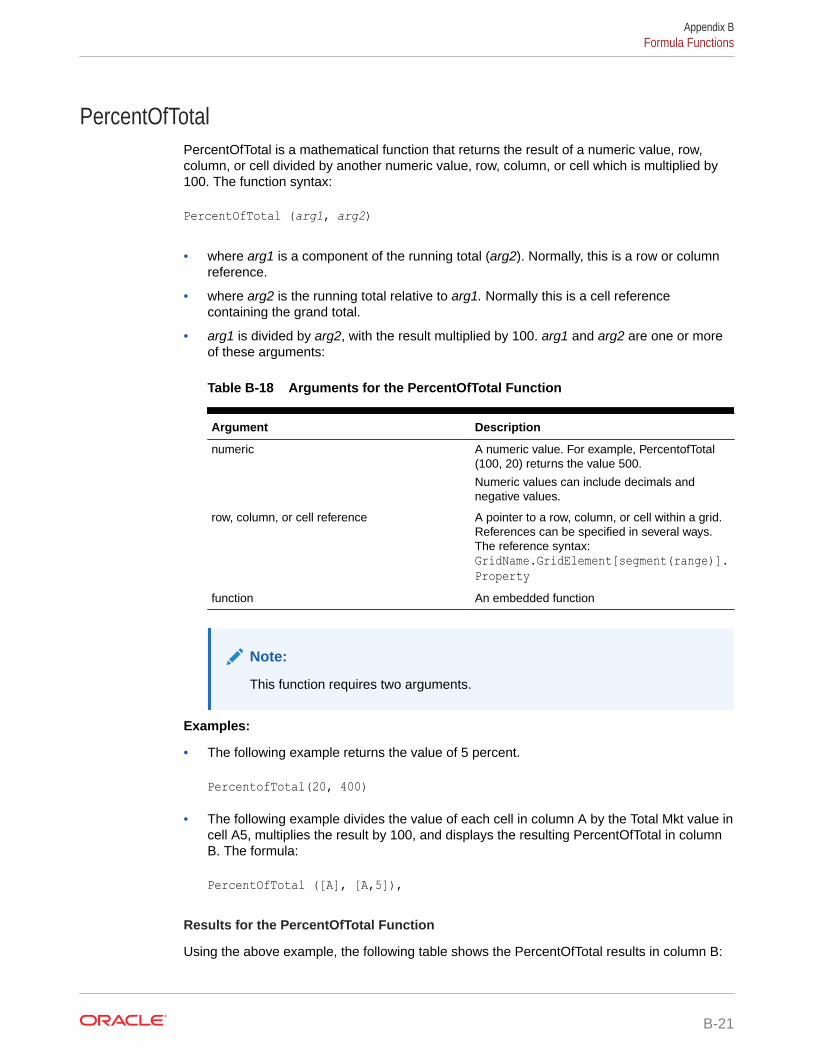
PercentOfTotalPercentOfTotal is a mathematical function that returns the result of a numeric value, row,column, or cell divided by another numeric value, row, column, or cell which is multiplied by100. The function syntax:
PercentOfTotal (arg1, arg2)
• where arg1 is a component of the running total (arg2). Normally, this is a row or columnreference.
• where arg2 is the running total relative to arg1. Normally this is a cell referencecontaining the grand total.
• arg1 is divided by arg2, with the result multiplied by 100. arg1 and arg2 are one or moreof these arguments:
Table B-18 Arguments for the PercentOfTotal Function
Argument Description
numeric A numeric value. For example, PercentofTotal(100, 20) returns the value 500.
Numeric values can include decimals andnegative values.
row, column, or cell reference A pointer to a row, column, or cell within a grid.References can be specified in several ways.The reference syntax:GridName.GridElement[segment(range)].Property
function An embedded function
Note:
This function requires two arguments.
Examples:
• The following example returns the value of 5 percent.
PercentofTotal(20, 400)
• The following example divides the value of each cell in column A by the Total Mkt value incell A5, multiplies the result by 100, and displays the resulting PercentOfTotal in columnB. The formula:
PercentOfTotal ([A], [A,5]),
Results for the PercentOfTotal Function
Using the above example, the following table shows the PercentOfTotal results in column B:
Appendix BFormula Functions
B-21
Tip:
You enter the formula by clicking on the header for Column B and using theformula bar.
PiPi is a mathematical function that returns the number 3.14159265358979, themathematical constant, accurate to 15 digits. Pi is the ratio of the circumference of acircle to its diameter. The function syntax:
PI()
Example:
The following example returns row 3 divided by the product of Pi and 2:
row[3] / (PI() * 2)
ProductProduct is a mathematical function that multiplies all numbers or references andreturns the product. The function syntax:
Product(arguments)
where arguments is one or more of these arguments:
Table B-19 Arguments for the Product Function
Argument Description
numeric A numeric value. For example, Product(2, 20)returns the value 40. Numeric values caninclude decimals and negative values.
row, column, or cell reference A pointer to a row, column, or cell within a grid.References can be specified in several ways.The reference syntax:GridName.GridElement[segment(range)].property
function An embedded function
Appendix BFormula Functions
B-22
Example:
The following example returns 40:
Product(2,20)
RandomRandom is a mathematical function that returns a random number between 0.0 and 1.0. Thefunction syntax:
Random()
Example:
The following example returns a random number between 0.0 and 1.0 and multiplies it by1000:
Random() * 1000
RoundRound is a mathematical function that rounds a number up or down by the specified digits.The function syntax:
Round (arg1, integer)
where arg1 is one or more of these arguments:
Table B-20 Arguments for the Round Function
Argument Description
numeric A numeric value. For example, Round(81.3987,3)returns the value 81.399. Numeric values caninclude decimals and negative values.
row, column, or cell reference A pointer to a row, column, or cell within a grid.References can be specified in several ways. Thereference syntax:GridName.GridElement[segment(range)].property
function An embedded function
Integer specifies the number of digits to which you want to round the number:
• If integer is greater than zero, the number rounds to the specified number of decimalplaces.
• If integer is zero, the number rounds to the nearest integer.
• If integer is less than zero, the number is rounded to the left of the decimal point.
Examples:
Appendix BFormula Functions
B-23
The following example rounds to three decimals:
Round(3594.5567,3) = 3594.557
The following example rounds to the nearest integer:
Round(3594.5567,0) = 3595
The following example rounds to the thousands. This is also known as scaling:
Round(3594.5567,-3) = 4000
SqrtSqrt is a mathematical function that returns the square root of a numeric value, row,column, or cell. The syntax for the Sqrt function:
Sqrt(argument)
where argument is one of these arguments:
Table B-21 Arguments for the Sqrt Function
Argument Description
numeric A numeric value. For example, Sqrt(100)returns the value 10. Numeric values caninclude decimals and negative values.
row, column, or cell reference A pointer to a row, column, or cell within a grid.References can be specified in several ways.The reference syntax:GridName.GridElement[segment(range)].property
function An embedded function
Example
The following example returns the value of 4:
Sqrt(16)
SumSum is a mathematical function that returns the summation of a group of numericvalues, rows, columns, or cells.
The syntax for the Sum function:
Sum (arguments)
Appendix BFormula Functions
B-24
where arguments is one or more of these arguments:
Table B-22 Arguments for the Sum Function
Argument Description
numeric A numeric value. For example, Sum(10, 20, 30)returns the value 60. Numeric values can includedecimals and negative values.
row, column, or cell reference A pointer to a row, column, or cell within a grid.References can be specified in several ways. Thereference syntax:GridName.GridElement[segment(range)].property
function An embedded function
Examples:
• The following example returns the value 30:
sum(10,20)
• The following example returns the sum of three rows:
sum(row[1],row[6],row[8])
• The following example calculates the sum of three aggregate columns:
sum(column[E], column[G], column[I])
When a formula row includes IDESC, the sum includes all of the parents and theirdescendants.
For example, a form is created with the following rows (and each member has children):
IDESC("Mem1"), IDESC("Mem2"), IDESC("Mem3"), IDESC("Mem4")
If a formula row is added with the following formula:
SUM(ROW[1],ROW[2],ROW[3],ROW[4])
When the form is opened for data entry, the formula row will return the sum of all the parentsand their children.
Truncate/TruncTruncate is a mathematical function that removes the specified number of digits from numericvalues.
Syntax:
Trunc (arg1, integer)
Appendix BFormula Functions
B-25
• where arg1 is one of these arguments:
Table B-23 Arguments for the Truncate/Trunc Function
Argument Description
numeric A numeric value; for example, 234.567.
row, column, or cell reference A pointer to a row, column, or cell within agrid. References can be specified in severalways. The reference syntax:GridName.GridElement[segment(range)].property
function An embedded function
• where integer specifies the number of digits you want to remove:
– A positive integer determines the number of significant digits that remain to theright of the decimal point.
– A zero (0) integer returns the integer located to the left of the decimal point.
– A negative integer indicates the number of significant digits that are truncatedto the left of the decimal point.
Examples:
The following statement uses a positive integer of 2. The first two digits to the right ofthe decimal point remain, and the following digit is removed:
Trunc(234.567, 2) = 234.56
The following statement uses a zero (0) integer. All digits to the right of the decimalpoint are removed:
Trunc(234.567, 0) = 234
The following statement uses a negative integer of -2. All digits to the right of thedecimal point are removed and the last two digits of the integer are truncated.
Trunc(234.567, -2) = 200
Note:
Formatting previously applied to a cell, column, or row is maintained whenyou use the Trunc function. The following example shows the results of aTrunc function where the cell value was previously formatted to display threedecimal places: Trunc(234.567, 0) = 234.000
Variance/VarVariance is a financial function that evaluates the difference between the specifiedvalues based on account type for the current account. For example, for Expense or
Appendix BFormula Functions
B-26
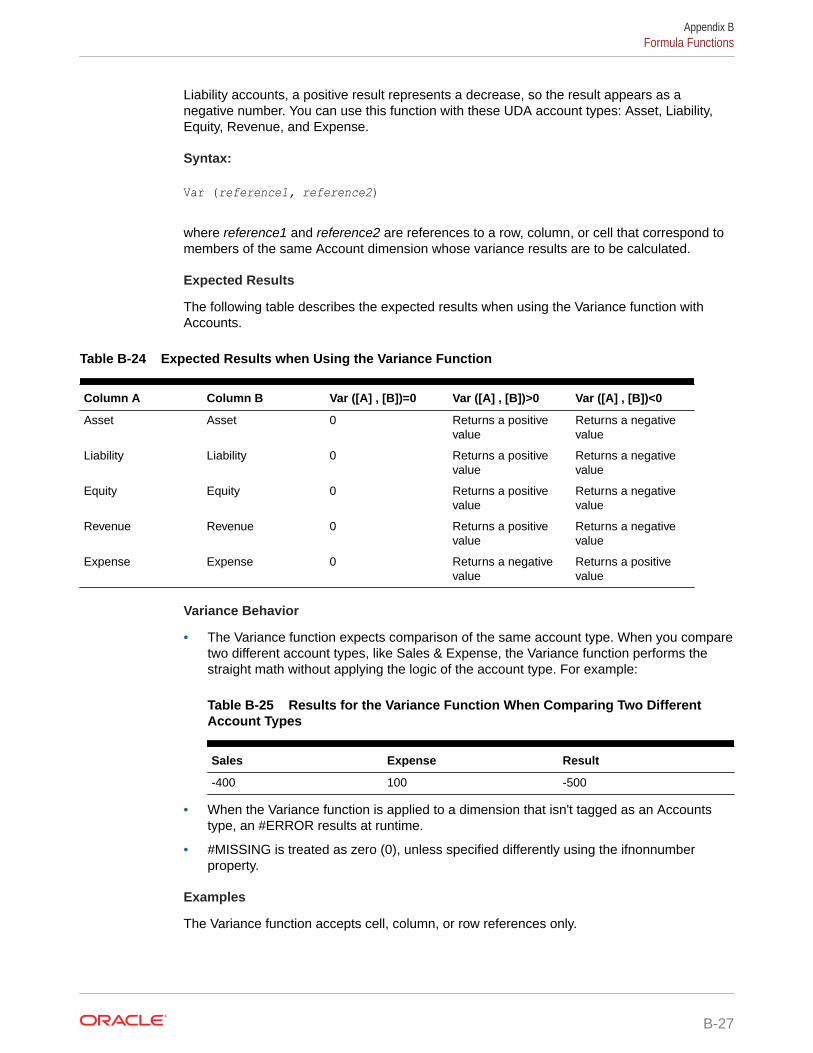
Liability accounts, a positive result represents a decrease, so the result appears as anegative number. You can use this function with these UDA account types: Asset, Liability,Equity, Revenue, and Expense.
Syntax:
Var (reference1, reference2)
where reference1 and reference2 are references to a row, column, or cell that correspond tomembers of the same Account dimension whose variance results are to be calculated.
Expected Results
The following table describes the expected results when using the Variance function withAccounts.
Table B-24 Expected Results when Using the Variance Function
Column A Column B Var ([A] , [B])=0 Var ([A] , [B])>0 Var ([A] , [B])<0
Asset Asset 0 Returns a positivevalue
Returns a negativevalue
Liability Liability 0 Returns a positivevalue
Returns a negativevalue
Equity Equity 0 Returns a positivevalue
Returns a negativevalue
Revenue Revenue 0 Returns a positivevalue
Returns a negativevalue
Expense Expense 0 Returns a negativevalue
Returns a positivevalue
Variance Behavior
• The Variance function expects comparison of the same account type. When you comparetwo different account types, like Sales & Expense, the Variance function performs thestraight math without applying the logic of the account type. For example:
Table B-25 Results for the Variance Function When Comparing Two DifferentAccount Types
Sales Expense Result
-400 100 -500
• When the Variance function is applied to a dimension that isn't tagged as an Accountstype, an #ERROR results at runtime.
• #MISSING is treated as zero (0), unless specified differently using the ifnonnumberproperty.
Examples
The Variance function accepts cell, column, or row references only.
Appendix BFormula Functions
B-27
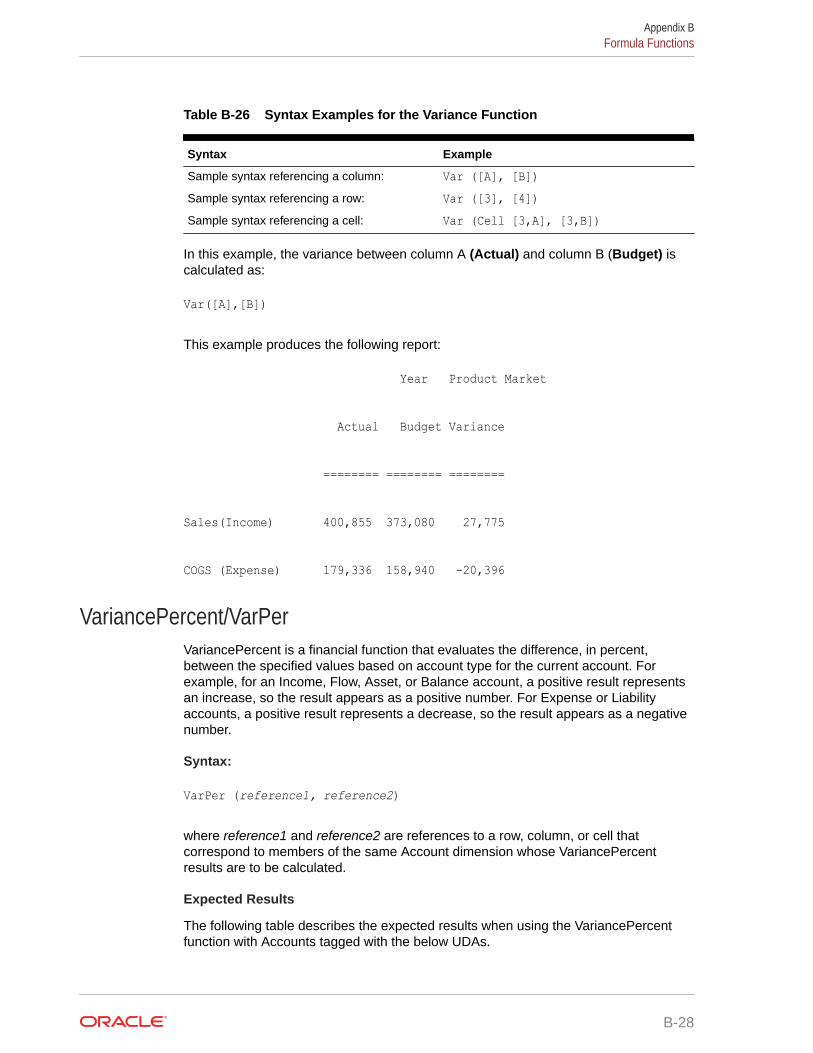
Table B-26 Syntax Examples for the Variance Function
Syntax Example
Sample syntax referencing a column: Var ([A], [B])Sample syntax referencing a row: Var ([3], [4])Sample syntax referencing a cell: Var (Cell [3,A], [3,B])
In this example, the variance between column A (Actual) and column B (Budget) iscalculated as:
Var([A],[B])
This example produces the following report:
Year Product Market
Actual Budget Variance
======== ======== ========
Sales(Income) 400,855 373,080 27,775
COGS (Expense) 179,336 158,940 -20,396
VariancePercent/VarPerVariancePercent is a financial function that evaluates the difference, in percent,between the specified values based on account type for the current account. Forexample, for an Income, Flow, Asset, or Balance account, a positive result representsan increase, so the result appears as a positive number. For Expense or Liabilityaccounts, a positive result represents a decrease, so the result appears as a negativenumber.
Syntax:
VarPer (reference1, reference2)
where reference1 and reference2 are references to a row, column, or cell thatcorrespond to members of the same Account dimension whose VariancePercentresults are to be calculated.
Expected Results
The following table describes the expected results when using the VariancePercentfunction with Accounts tagged with the below UDAs.
Appendix BFormula Functions
B-28
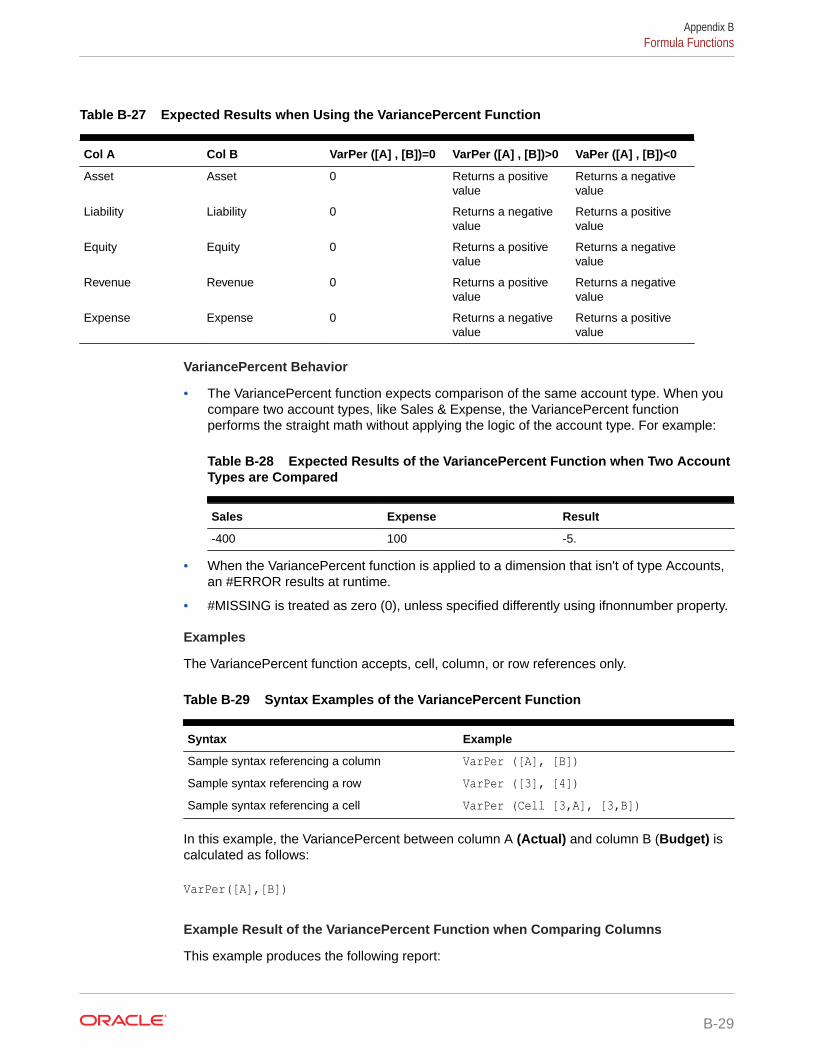
Table B-27 Expected Results when Using the VariancePercent Function
Col A Col B VarPer ([A] , [B])=0 VarPer ([A] , [B])>0 VaPer ([A] , [B])<0
Asset Asset 0 Returns a positivevalue
Returns a negativevalue
Liability Liability 0 Returns a negativevalue
Returns a positivevalue
Equity Equity 0 Returns a positivevalue
Returns a negativevalue
Revenue Revenue 0 Returns a positivevalue
Returns a negativevalue
Expense Expense 0 Returns a negativevalue
Returns a positivevalue
VariancePercent Behavior
• The VariancePercent function expects comparison of the same account type. When youcompare two account types, like Sales & Expense, the VariancePercent functionperforms the straight math without applying the logic of the account type. For example:
Table B-28 Expected Results of the VariancePercent Function when Two AccountTypes are Compared
Sales Expense Result
-400 100 -5.
• When the VariancePercent function is applied to a dimension that isn't of type Accounts,an #ERROR results at runtime.
• #MISSING is treated as zero (0), unless specified differently using ifnonnumber property.
Examples
The VariancePercent function accepts, cell, column, or row references only.
Table B-29 Syntax Examples of the VariancePercent Function
Syntax Example
Sample syntax referencing a column VarPer ([A], [B])Sample syntax referencing a row VarPer ([3], [4])Sample syntax referencing a cell VarPer (Cell [3,A], [3,B])
In this example, the VariancePercent between column A (Actual) and column B (Budget) iscalculated as follows:
VarPer([A],[B])
Example Result of the VariancePercent Function when Comparing Columns
This example produces the following report:
Appendix BFormula Functions
B-29
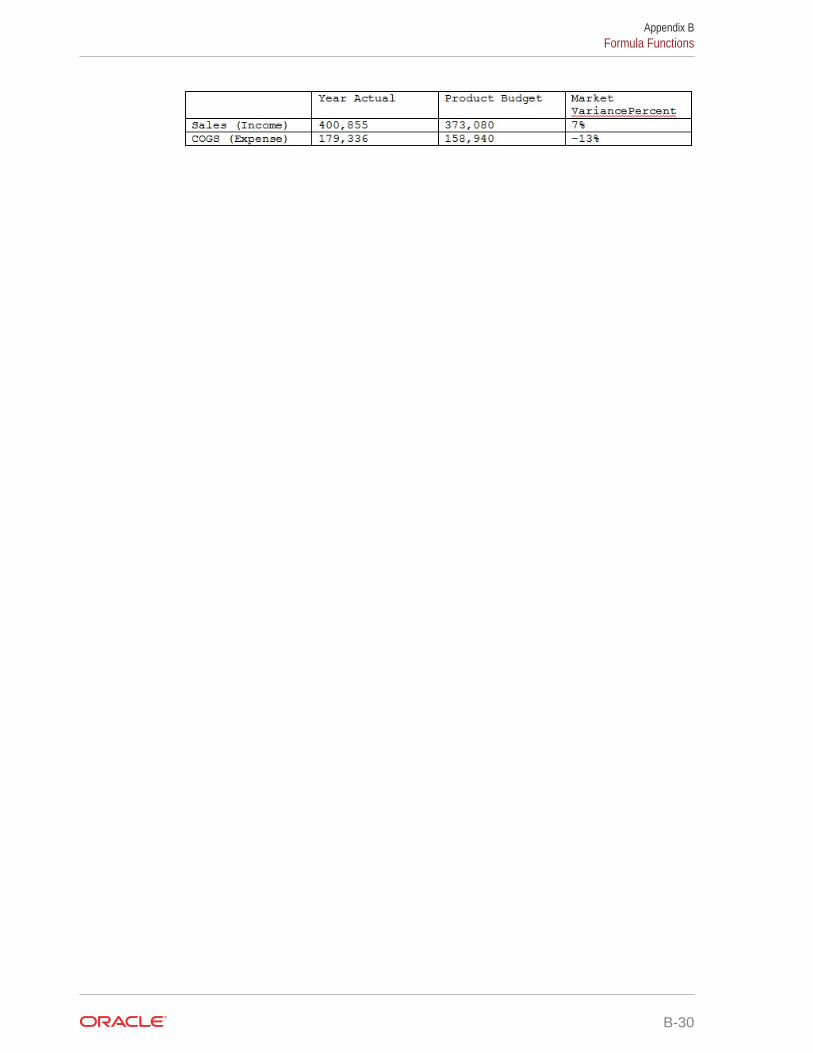
Appendix BFormula Functions
B-30
CUsing Smart View to Manage Applications
Related Topics
• About Managing Applications in Smart View
• Installing Smart View and the Admin Extension
• Controlling the Display of Application Management Options in Smart View
• Downloading the Application Templates
• Creating an Application
• Working with Artifacts in the Application Template
• Updating an Application in Smart View
• Deleting an Application
• Planning Admin Extension and Office AutoCorrect
About Managing Applications in Smart ViewService Administrators can use Excel to create and manage Planning, Planning Modules,and FreeForm applications in Oracle Smart View for Office and Oracle Smart View for Office(Mac and Browser).
Using a downloadable Excel template workbook, you can quickly create, model, and manageapplications in Smart View. By modifying the worksheets within the application templateworkbook, you can define application properties, dimension and member properties, security(access permissions), and substitution variables to fit your needs. You can also load datafrom the template workbook.
Once the application is created, it's available to users from Oracle Smart View for Office,Oracle Smart View for Office (Mac and Browser), and the web application. ServiceAdministrators can further update and refresh the application in Smart View as needed. Youcan also delete the application from Smart View.
Application management in Smart View is a quick and easy way to get an application up andrunning in your business process environment.
To begin, see the topics in Installing Smart View and the Admin Extension
After installation, get started by downloading and then editing the application templateworkbook available in Smart View. Or, download the application template zip file fromDownloads menu in your business process. The template zip file contains starter workbooksfor Planning, Planning Modules, and FreeForm applications, and a sample Planningapplication workbook. See Downloading the Application Templates.
C-1
Note:
Starting in 22.03, a single Excel template workbook,PlanningApplicationTemplate_FreeForm.xlsx, allows you to create a multi-cube application (any combination of up to 12 ASO and BSO cubes) for yourFreeForm business process.
The multi-cube FreeForm template replaces the two previously availabletemplates that allowed you to create a single-cube FreeForm ASO or BSOapplication.
Then continue with Creating an Application, using the information in Working withArtifacts in the Application Template to modify the template according to yourrequirements.
Note:
For information on creating applications in the web, see:
• Creating a Planning Application in Administering Planning
• Setting Up Your Application in Administering Planning Modules
• Creating a FreeForm App in Administering and Working with FreeForm
Videos
Your Goal Watch This Video
Learn about creating an application inSmart View.The video shows the process using OracleSmart View for Office, but the concepts alsoapply to Oracle Smart View for Office (Macand Browser).
Overview: Creating and ManagingPlanning Cloud Applications Using Smart View
Installing Smart View and the Admin ExtensionWith the exception of Controlling the Display of Application Management Options inSmart View and Downloading the Application Template Zip File from the WebInterface, all procedures described in this appendix are performed within Smart View.Before you begin, ensure the following:
• Install Oracle Smart View for Office. In Windows-based Smart View, the AdminExtension is not required to use the application management features.
See Installing Oracle Smart View for Office
• Deploy Oracle Smart View for Office (Mac and Browser) with the Dimension Editoroptions enabled.
See Deploying Oracle Smart View for Office (Mac and Browser) with the AdminExtension
Appendix CInstalling Smart View and the Admin Extension
C-2
Installing Oracle Smart View for Office
To use the Windows client-based version of Smart View, see Getting Started with OracleEnterprise Performance Management Cloud for Administrators , Downloading and InstallingClients for instructions on installing Smart View.
Note:
The Admin Extension is not required with the Windows Smart View client whenworking with application management.
After installation, get started by downloading and then editing the application templateworkbook available in Smart View and the web. By default, from Smart View, you will bedownloading the Planning application workbook template. Or, download the applicationtemplate zip file from the Planning, Planning Modules, or FreeForm business process. Thetemplate zip file contains starter application template workbooks for these businessprocesses, and a sample Planning application workbook.
See the following topics for information on Smart View installation and deployment:
Deploying Oracle Smart View for Office (Mac and Browser) with the Admin Extension
To use the Mac- or browser-based version of Smart View, you must deploy a Smart Viewmanifest file with the Admin Extension options enabled.
See the following topics in the Deploying and Administering Oracle Smart View for Office(Mac and Browser) for instructions on deploying Smart View with the Admin Extensionfeatures.
• Creating and Saving the Manifest File
• Customizing the Manifest File
• Sideloading and Logging In or Deploying the Manifest File to Office 365 Users
Controlling the Display of Application Management Options inSmart View
When a new application is created in the web, in Oracle Smart View for Office, or in OracleSmart View for Office (Mac and Browser), all application management options are displayedby default to Service Administrators in either version of Smart View.
You can choose to hide or display two of the options—Update Application and DeleteApplication—using the Suppress Application Management Options in Smart View optionin Planning, Planning Modules, or FreeForm.
This setting, and the display of the application management options, applies to ServiceAdministrators only.
To control the display of the Update Application and Delete Application options in SmartView:
1. From the Home page, click Application, and then click Settings.
Appendix CControlling the Display of Application Management Options in Smart View
C-3
2. Choose a setting for Suppress Application Management Options in SmartView:
• Yes—Application options are not displayed in Smart View.
• No—Default. Application options are displayed in Smart View.
3. Click Save.
Note:
Any time a new application is created, whether in the web, in Oracle SmartView for Office, or in Oracle Smart View for Office (Mac and Browser), theSuppress Application Management Options in Smart View settingdefaults to No and the Update Application and Delete Application optionswill automatically be displayed. To hide the options, perform the aboveprocedure.
Downloading the Application TemplatesRelated Topics
• Downloading the Template in Smart View
• Downloading the Application Template Zip File from the Web Interface
Downloading the Template in Smart ViewWhen you're logged into Smart View as a Service Administrator, the DownloadTemplate command is available in the Smart View Panel on Windows and in the SmartView Home panel on the Mac and in the browser.
The default template that you download can be used immediately to begin creating aPlanning application. Or, you can modify the template to create your own customapplication.
To download the default application template from Smart View:
1. Log in to the applicable data source in Smart View.
2. Perform an action:
• In the Smart View Panel (Windows), at the bottom of the panel, click theDownload Template command.
• In the Smart View Home panel (Mac and Browser), click , and selectDownload Template from the drop-down menu.
If prompted, allow the file to be created in your cloud repository.
The default application template, PlanningApplicationTemplate.xlsx, is opened.The default template contains the basic elements required to begin creating astandard Planning application.
You can edit the default template to create a custom application, as described in Working with Artifacts in the Application Template.
Appendix CDownloading the Application Templates
C-4
To download the Planning Modules, FreeForm, or sample Planning templates, downloadthe application template zip file from the web, described in Downloading the ApplicationTemplate Zip File from the Web Interface.
Downloading the Application Template Zip File from the Web InterfaceWhen you're logged into Planning, Planning Modules, or FreeForm as Service Administrator,you can download a zip file containing these application template workbook files:
• PlanningApplicationTemplate.xlsx—Creates a Planning application.
• PlanningApplicationTemplate_epbcs.xlsx—Creates a Planning Modules application.
• PlanningApplicationTemplate_FreeForm.xlsx—Creates a FreeForm application.
• PlanningApplicationTemplate_sample.xlsx—Creates the Planning sample application,Sample.
Note:
Starting in 22.03, a single Excel template workbook,PlanningApplicationTemplate_FreeForm.xlsx, allows you to create a multi-cubeapplication (any combination of up to 12 ASO and BSO cubes) for your FreeFormbusiness process.
The multi-cube FreeForm template replaces the two previously-available templatesthat allowed you to create a single-cube FreeForm ASO or BSO application.
To download the application template zip file:
1. From the computer where you want to install or deploy the client software, access abusiness process instance.
2. On the Planning, Planning Modules, or FreeForm Home page, access Settings andActions by clicking your user name at the top right corner of the screen.
3. Select Downloads.
4. In the Downloads page, Planning Extensions section, click Download for ApplicationTemplates.
5. Save the zip file locally or to a server location that you can access, and unzip thecontents.
You should now have these files saved:
• PlanningApplicationTemplate.xlsx• PlanningApplicationTemplate_epbcs.xlsx• PlanningApplicationTemplate_FreeForm.xlsx• PlanningApplicationTemplate_sample.xlsx
6. Open the template file to work with in Excel and proceed with Creating an Application,using the information in Working with Artifacts in the Application Template to modify thetemplate according to your requirements.
Appendix CDownloading the Application Templates
C-5

Creating an ApplicationFrom Oracle Smart View for Office and Oracle Smart View for Office (Mac andBrowser), Service Administrators can create a new application based on either thedownloaded template with no modifications or a modified template. In either case, thetemplate must adhere to template rules and guidelines.
When you create an application, you can:
• Define cubes
• Define dimensions
• Add a limited amount of data
• Define security and access permissions
• Define substitution variables
Only Service Administrators can create an application and only when no applicationexists in the cloud business process. Once an application is created, the option is nolonger available in the Smart View Panel or Smart View Home panel.
Before you begin, you should launch Excel and, from Smart View, log in to theapplicable data source.
To create a new application in Smart View:
1. If you have not already done so, perform one of the following actions:
• Download the application template for Planning as described in Downloadingthe Template in Smart View.
Downloading the application template simply opens the template in SmartView.
• Download and unzip the application template zip file as described in Downloading the Application Template Zip File from the Web Interface, thenopen one of the template files.
• Open a saved template file.
An Excel application template workbook must be open when creating anapplication.
2. Optional: Edit and then save the application template as needed.
See Working with Artifacts in the Application Template for information on modifyingthe worksheets in the application template workbook.
3. With the application template workbook open in Smart View, select Create NewApplication:
• Oracle Smart View for Office (Windows):
In the tree in the Smart View Panel, select the server name to access theCreate New Application command at the bottom of the panel. You can alsoright-click the server name to access the Create New Application command.
• Oracle Smart View for Office (Mac and Browser):In the Smart View Home panel, click the Actions button, , and then selectCreate New Application from the drop-down menu.
Appendix CCreating an Application
C-6
The application creation status appears in the lower left corner of Excel.
4. When the application creation process is complete, verify that the application appears inthe Smart View Panel (Windows) or Smart View Home panel (Mac and Browser).
• Oracle Smart View for Office (Windows):
The application name is displayed in the tree in the Smart View Panel. Expand theapplication name to view folders and cubes.
• Oracle Smart View for Office (Mac and Browser):
In the Smart View Home panel, the application folders and cubes are displayed. Theapplication name is not displayed.
Note that only one application per cloud business process is allowed. Once anapplication is created, the Create New Application command no longer appears in theApplication Management popup window.
The application is now available to the applicable users.
Next steps include updating the application template workbook. You can also delete theapplication and create a new one. See:
• Working with Artifacts in the Application Template
• Updating an Application in Smart View
• Deleting an Application
Working with Artifacts in the Application TemplateRelated Topics
• About Working with Artifacts in the Application Template
• Application Definition
• Dimension Definition
• Attribute Dimension Definition
• Data Definition
• Substitution Variable Definition
• Security Definition
• Advanced Settings Definition
About Working with Artifacts in the Application TemplateEditing the application template involves editing Excel worksheets in the applicationworkbook.
The application template workbook contains sheets for defining application properties, cubes,dimension and member properties, substitution variables, and security. You can also loaddata using the template.
Application DefinitionIn the application template workbook, the Definition worksheet defines your application andcubes. Using the application definition worksheet provided in the template zip file as your
Appendix CWorking with Artifacts in the Application Template
C-7
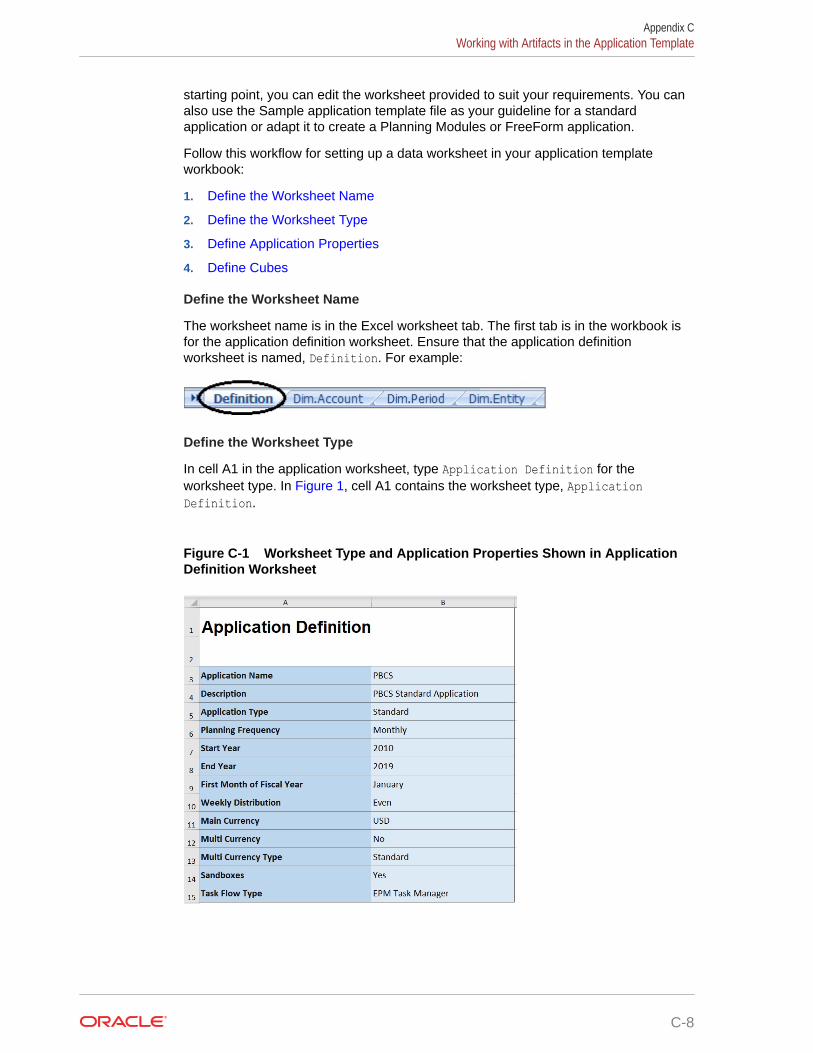
starting point, you can edit the worksheet provided to suit your requirements. You canalso use the Sample application template file as your guideline for a standardapplication or adapt it to create a Planning Modules or FreeForm application.
Follow this workflow for setting up a data worksheet in your application templateworkbook:
1. Define the Worksheet Name
2. Define the Worksheet Type
3. Define Application Properties
4. Define Cubes
Define the Worksheet Name
The worksheet name is in the Excel worksheet tab. The first tab is in the workbook isfor the application definition worksheet. Ensure that the application definitionworksheet is named, Definition. For example:
Define the Worksheet Type
In cell A1 in the application worksheet, type Application Definition for theworksheet type. In Figure 1, cell A1 contains the worksheet type, ApplicationDefinition.
Figure C-1 Worksheet Type and Application Properties Shown in ApplicationDefinition Worksheet
Appendix CWorking with Artifacts in the Application Template
C-8
Define Application Properties
Application properties are the basic information needed to create an application. In general,only the Application Name, Application Description, and Application Type are requiredproperties. For all other properties, if not specified, the default values will be provided duringapplication creation.
Note:
You can create the FreeForm app with only the application properties and nodimensions, attribute dimensions, security (access permissions), or substitutionvariables in the workbook.
Table 1 shows the supported properties, their default values, and valid values.
Table C-1 Application Properties
Property Required Value Type Default Value Valid Values Comments
ApplicationName
Yes Text Name ofPlanningapplication
Description Yes Text Applicationdescription
ApplicationType
Yes Text Standard Standard—Anadvancedapplicationwith twocubes and theoption to addmore laterEnterprise—Also referredto as EPBCSAdvancedFreeForm—AFreeFormapplication
Similar tochoices onweb interface
PlanningFrequency
No Text Monthly MonthlyWeeklyQuarterlyCustom
WeeklyDistribution
No Text 445 Even445454544
Applicable forMonthlyPlanningfrequency
Periods PerYear
No Numeric 13 Only forCustomPlanningFrequency
Appendix CWorking with Artifacts in the Application Template
C-9
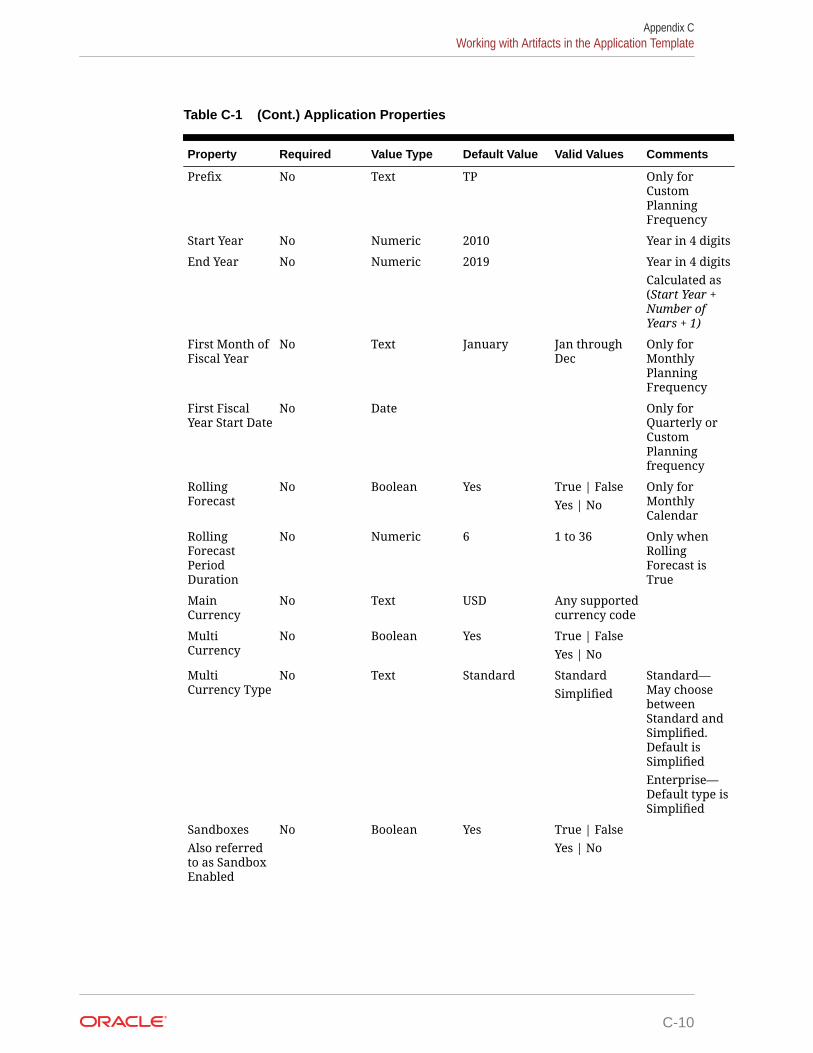
Table C-1 (Cont.) Application Properties
Property Required Value Type Default Value Valid Values Comments
Prefix No Text TP Only forCustomPlanningFrequency
Start Year No Numeric 2010 Year in 4 digits
End Year No Numeric 2019 Year in 4 digitsCalculated as(Start Year +Number ofYears + 1)
First Month ofFiscal Year
No Text January Jan throughDec
Only forMonthlyPlanningFrequency
First FiscalYear Start Date
No Date Only forQuarterly orCustomPlanningfrequency
RollingForecast
No Boolean Yes True | FalseYes | No
Only forMonthlyCalendar
RollingForecastPeriodDuration
No Numeric 6 1 to 36 Only whenRollingForecast isTrue
MainCurrency
No Text USD Any supportedcurrency code
MultiCurrency
No Boolean Yes True | FalseYes | No
MultiCurrency Type
No Text Standard StandardSimplified
Standard—May choosebetweenStandard andSimplified.Default isSimplifiedEnterprise—Default type isSimplified
SandboxesAlso referredto as SandboxEnabled
No Boolean Yes True | FalseYes | No
Appendix CWorking with Artifacts in the Application Template
C-10
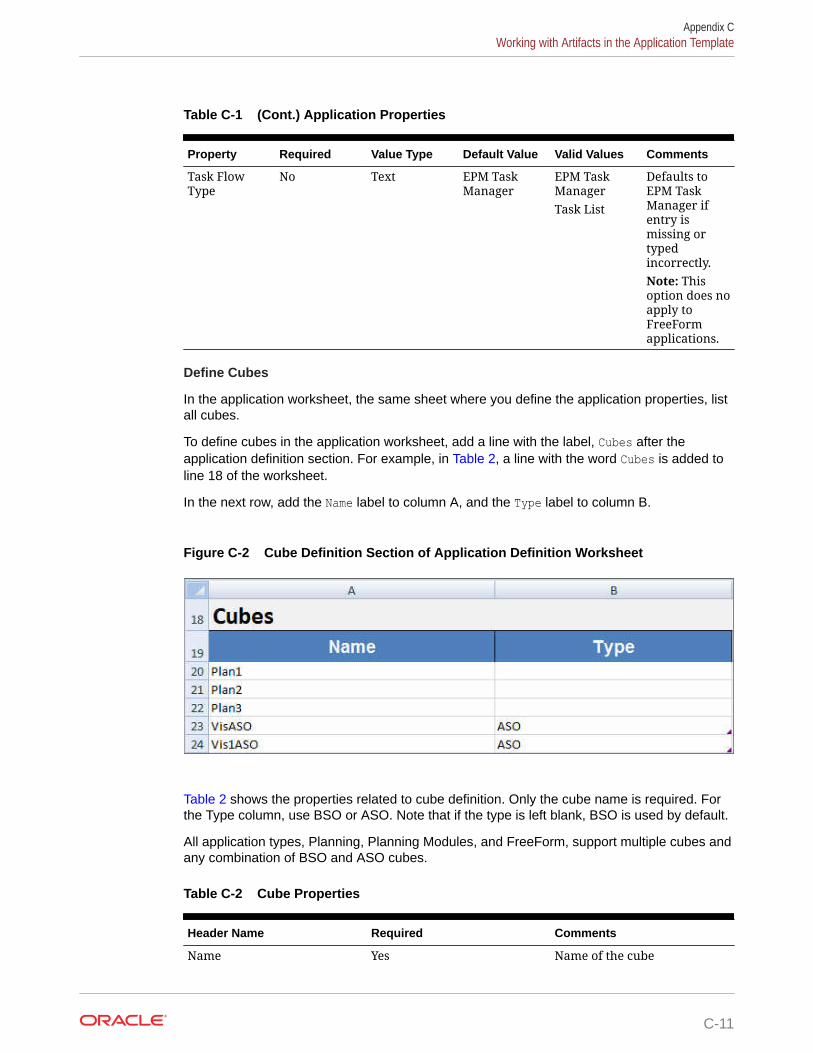
Table C-1 (Cont.) Application Properties
Property Required Value Type Default Value Valid Values Comments
Task FlowType
No Text EPM TaskManager
EPM TaskManagerTask List
Defaults toEPM TaskManager ifentry ismissing ortypedincorrectly.Note: Thisoption does noapply toFreeFormapplications.
Define Cubes
In the application worksheet, the same sheet where you define the application properties, listall cubes.
To define cubes in the application worksheet, add a line with the label, Cubes after theapplication definition section. For example, in Table 2, a line with the word Cubes is added toline 18 of the worksheet.
In the next row, add the Name label to column A, and the Type label to column B.
Figure C-2 Cube Definition Section of Application Definition Worksheet
Table 2 shows the properties related to cube definition. Only the cube name is required. Forthe Type column, use BSO or ASO. Note that if the type is left blank, BSO is used by default.
All application types, Planning, Planning Modules, and FreeForm, support multiple cubes andany combination of BSO and ASO cubes.
Table C-2 Cube Properties
Header Name Required Comments
Name Yes Name of the cube
Appendix CWorking with Artifacts in the Application Template
C-11
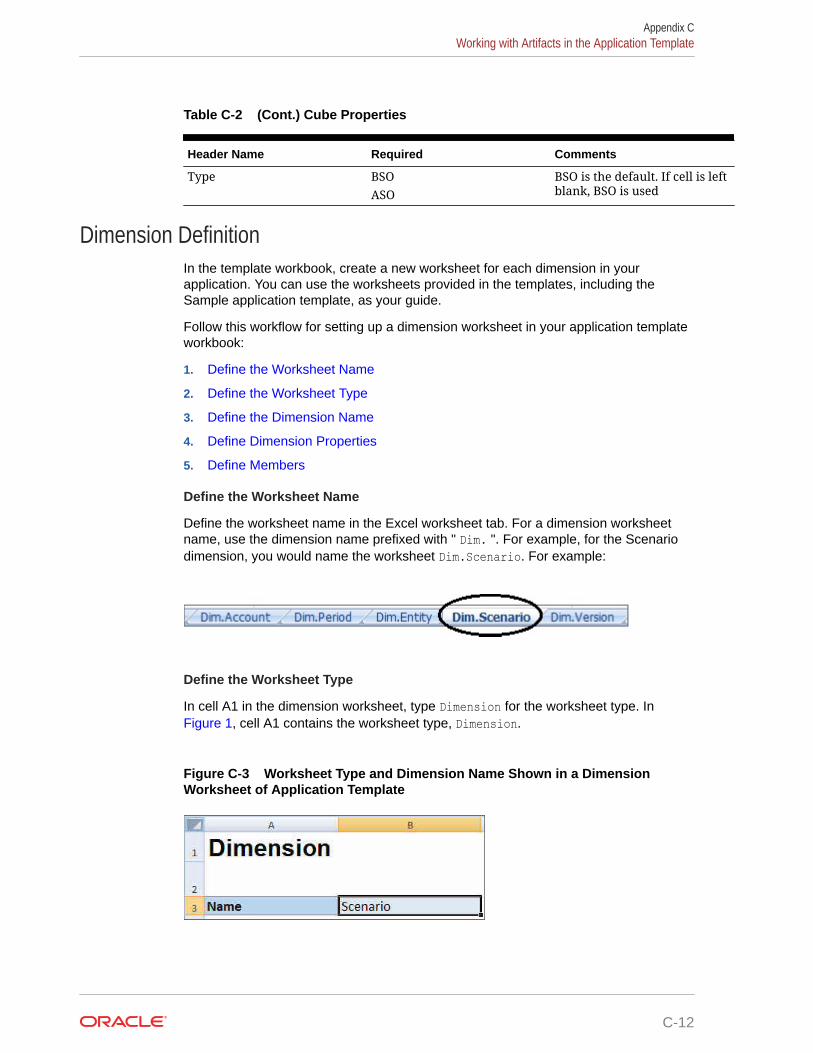
Table C-2 (Cont.) Cube Properties
Header Name Required Comments
Type BSOASO
BSO is the default. If cell is leftblank, BSO is used
Dimension DefinitionIn the template workbook, create a new worksheet for each dimension in yourapplication. You can use the worksheets provided in the templates, including theSample application template, as your guide.
Follow this workflow for setting up a dimension worksheet in your application templateworkbook:
1. Define the Worksheet Name
2. Define the Worksheet Type
3. Define the Dimension Name
4. Define Dimension Properties
5. Define Members
Define the Worksheet Name
Define the worksheet name in the Excel worksheet tab. For a dimension worksheetname, use the dimension name prefixed with " Dim. ". For example, for the Scenariodimension, you would name the worksheet Dim.Scenario. For example:
Define the Worksheet Type
In cell A1 in the dimension worksheet, type Dimension for the worksheet type. In Figure 1, cell A1 contains the worksheet type, Dimension.
Figure C-3 Worksheet Type and Dimension Name Shown in a DimensionWorksheet of Application Template
Appendix CWorking with Artifacts in the Application Template
C-12
Define the Dimension Name
In the dimension worksheet, type the dimension name. In Figure 1, cell B3 contains thedimension name, Scenario.
If the dimension name that you provide doesn't exist, then a new custom type dimension isautomatically created when you create the application.
Define Dimension Properties
You can define dimension properties directly on the dimension worksheet. Using the Typeproperty, you can specify user-defined names for the Account, Year, and Entity dimensionsand then map them to the Accounts, Year, or Entity dimension types. You can also define anyother custom dimensions as you require. The templates in the template zip file includesexample Accounts, Year, and custom dimensions and their properties to guide you.
Note:
You can create the FreeForm app with no dimensions or any other applicationproperties (such as attribute dimensions, security (access permissions), andsubstitution variables) in the workbook.
Table C-3 Dimension Properties
Property Required Value Type Default Value Valid Values Comments
Name Yes Text Name of thedimension
Type No Text AccountPeriodEntity
If thisproperty isomitted, or novalue issupplied, thenthis dimensionis interpretedas a customdimension.
Description No Text An optionaldimensiondescription.
Alias No Text None The alias forthe dimension
Aliases arealternatename fordimensionmembers.
Alias Table No Text No The alias table The defaultalias table fortheapplication.
Appendix CWorking with Artifacts in the Application Template
C-13
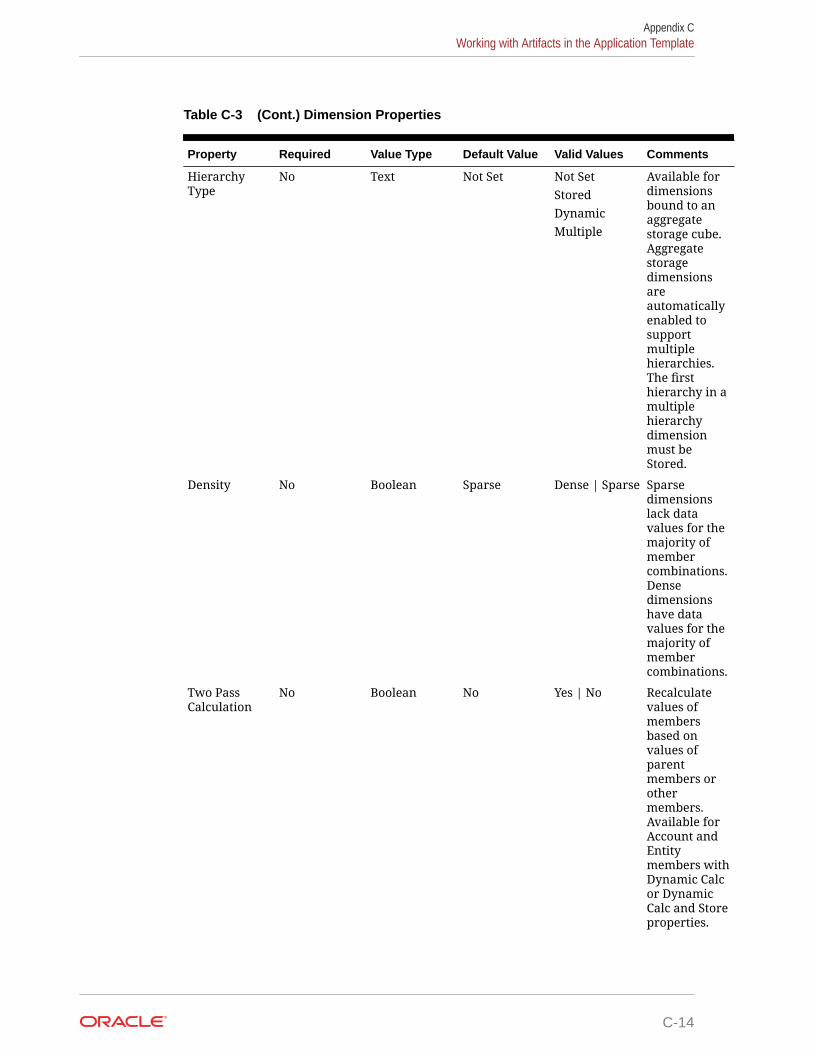
Table C-3 (Cont.) Dimension Properties
Property Required Value Type Default Value Valid Values Comments
HierarchyType
No Text Not Set Not SetStoredDynamicMultiple
Available fordimensionsbound to anaggregatestorage cube.Aggregatestoragedimensionsareautomaticallyenabled tosupportmultiplehierarchies.The firsthierarchy in amultiplehierarchydimensionmust beStored.
Density No Boolean Sparse Dense | Sparse Sparsedimensionslack datavalues for themajority ofmembercombinations.Densedimensionshave datavalues for themajority ofmembercombinations.
Two PassCalculation
No Boolean No Yes | No Recalculatevalues ofmembersbased onvalues ofparentmembers orothermembers.Available forAccount andEntitymembers withDynamic Calcor DynamicCalc and Storeproperties.
Appendix CWorking with Artifacts in the Application Template
C-14
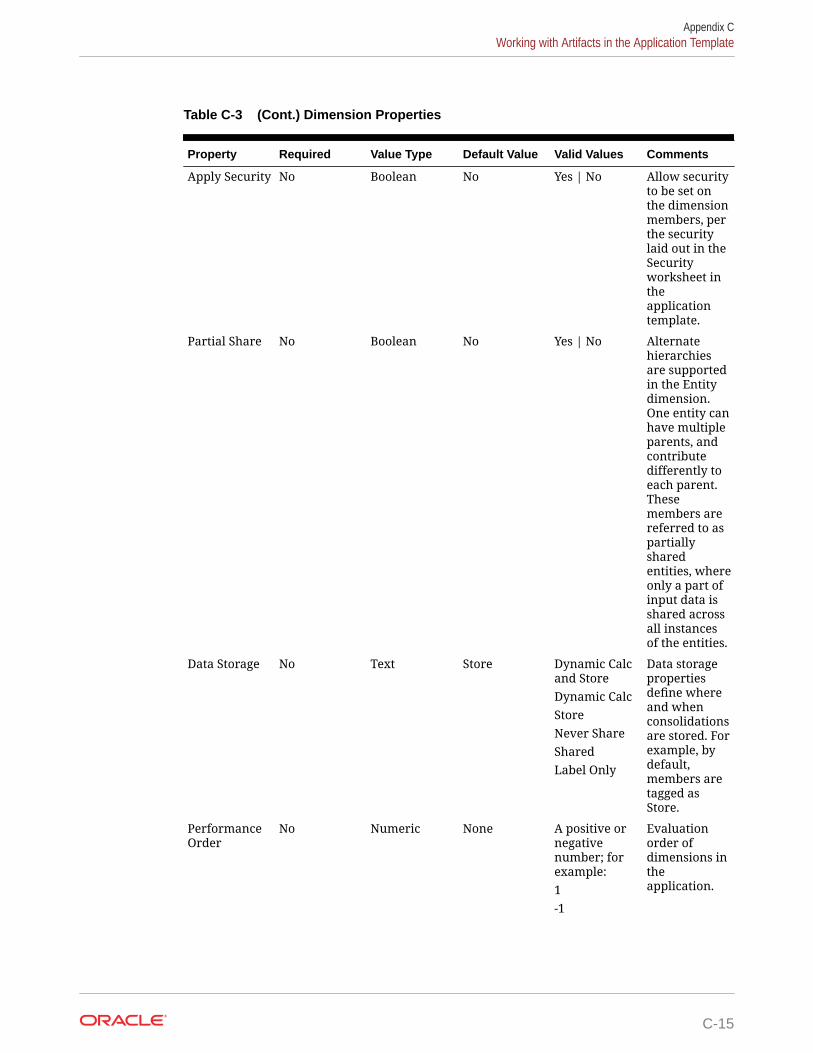
Table C-3 (Cont.) Dimension Properties
Property Required Value Type Default Value Valid Values Comments
Apply Security No Boolean No Yes | No Allow securityto be set onthe dimensionmembers, perthe securitylaid out in theSecurityworksheet intheapplicationtemplate.
Partial Share No Boolean No Yes | No Alternatehierarchiesare supportedin the Entitydimension.One entity canhave multipleparents, andcontributedifferently toeach parent.Thesemembers arereferred to aspartiallysharedentities, whereonly a part ofinput data isshared acrossall instancesof the entities.
Data Storage No Text Store Dynamic Calcand StoreDynamic CalcStoreNever ShareSharedLabel Only
Data storagepropertiesdefine whereand whenconsolidationsare stored. Forexample, bydefault,members aretagged asStore.
PerformanceOrder
No Numeric None A positive ornegativenumber; forexample:1-1
Evaluationorder ofdimensions intheapplication.
Appendix CWorking with Artifacts in the Application Template
C-15

Table C-3 (Cont.) Dimension Properties
Property Required Value Type Default Value Valid Values Comments
EvaluationOrder
No Numeric None A positive ornegativenumber; forexample:1-1
The order ofyourdimensionsdetermineshow your datacalculationswill perform.EvaluationOrder enablesyou to specifywhich datatype prevailswhen a dataintersectionhas conflictingdata types.
Display Option No Text MemberName or Alias
MemberName or Aliasto displaymembers oraliases.MemberName:Aliasdisplaysmembers onthe left andaliases on theright.Alias:MemberName displaysaliases on theleft andmembers onthe right.
Set applicationdefault displayoption.
Define Members
In the dimension worksheet, under the Members heading in (cell A5 in the Planningapplication template), add members and their properties. Your list of members shouldconform to the format described in Importing and Exporting Data and Metadata. Youmay add columns only for required properties. Any missing properties will be addedbased on application, cube, and dimension defaults.
Appendix CWorking with Artifacts in the Application Template
C-16
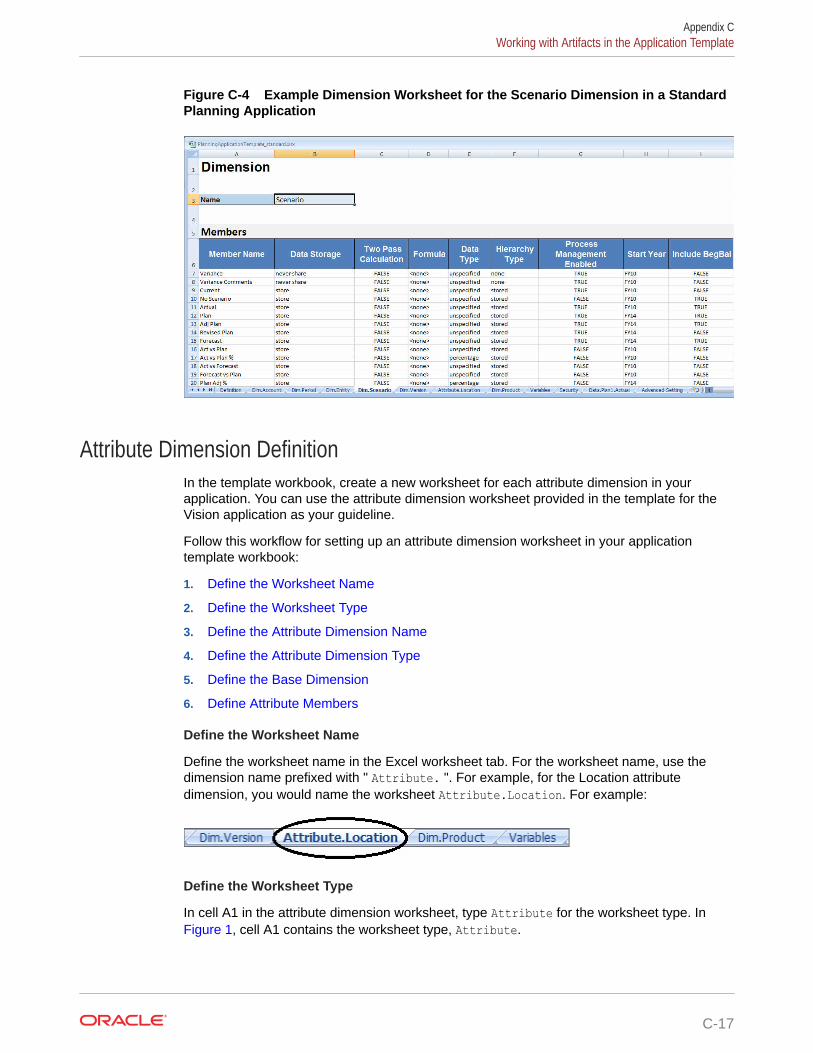
Figure C-4 Example Dimension Worksheet for the Scenario Dimension in a StandardPlanning Application
Attribute Dimension DefinitionIn the template workbook, create a new worksheet for each attribute dimension in yourapplication. You can use the attribute dimension worksheet provided in the template for theVision application as your guideline.
Follow this workflow for setting up an attribute dimension worksheet in your applicationtemplate workbook:
1. Define the Worksheet Name
2. Define the Worksheet Type
3. Define the Attribute Dimension Name
4. Define the Attribute Dimension Type
5. Define the Base Dimension
6. Define Attribute Members
Define the Worksheet Name
Define the worksheet name in the Excel worksheet tab. For the worksheet name, use thedimension name prefixed with " Attribute. ". For example, for the Location attributedimension, you would name the worksheet Attribute.Location. For example:
Define the Worksheet Type
In cell A1 in the attribute dimension worksheet, type Attribute for the worksheet type. In Figure 1, cell A1 contains the worksheet type, Attribute.
Appendix CWorking with Artifacts in the Application Template
C-17
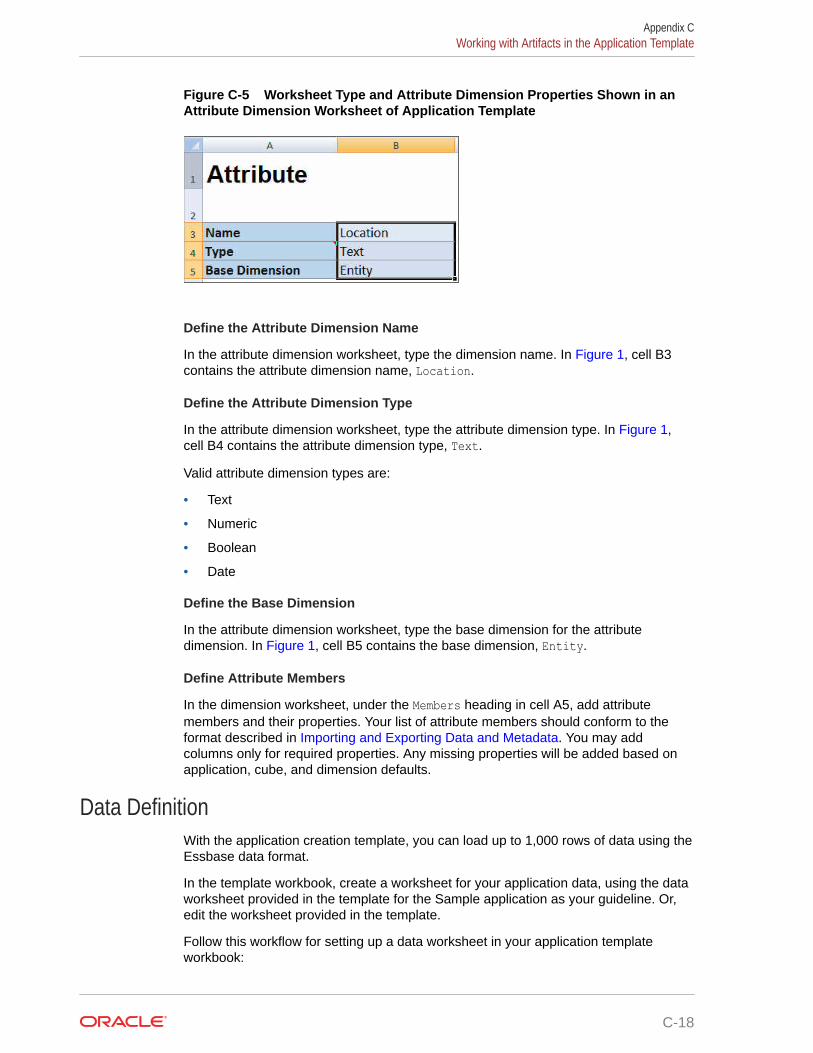
Figure C-5 Worksheet Type and Attribute Dimension Properties Shown in anAttribute Dimension Worksheet of Application Template
Define the Attribute Dimension Name
In the attribute dimension worksheet, type the dimension name. In Figure 1, cell B3contains the attribute dimension name, Location.
Define the Attribute Dimension Type
In the attribute dimension worksheet, type the attribute dimension type. In Figure 1,cell B4 contains the attribute dimension type, Text.
Valid attribute dimension types are:
• Text
• Numeric
• Boolean
• Date
Define the Base Dimension
In the attribute dimension worksheet, type the base dimension for the attributedimension. In Figure 1, cell B5 contains the base dimension, Entity.
Define Attribute Members
In the dimension worksheet, under the Members heading in cell A5, add attributemembers and their properties. Your list of attribute members should conform to theformat described in Importing and Exporting Data and Metadata. You may addcolumns only for required properties. Any missing properties will be added based onapplication, cube, and dimension defaults.
Data DefinitionWith the application creation template, you can load up to 1,000 rows of data using theEssbase data format.
In the template workbook, create a worksheet for your application data, using the dataworksheet provided in the template for the Sample application as your guideline. Or,edit the worksheet provided in the template.
Follow this workflow for setting up a data worksheet in your application templateworkbook:
Appendix CWorking with Artifacts in the Application Template
C-18
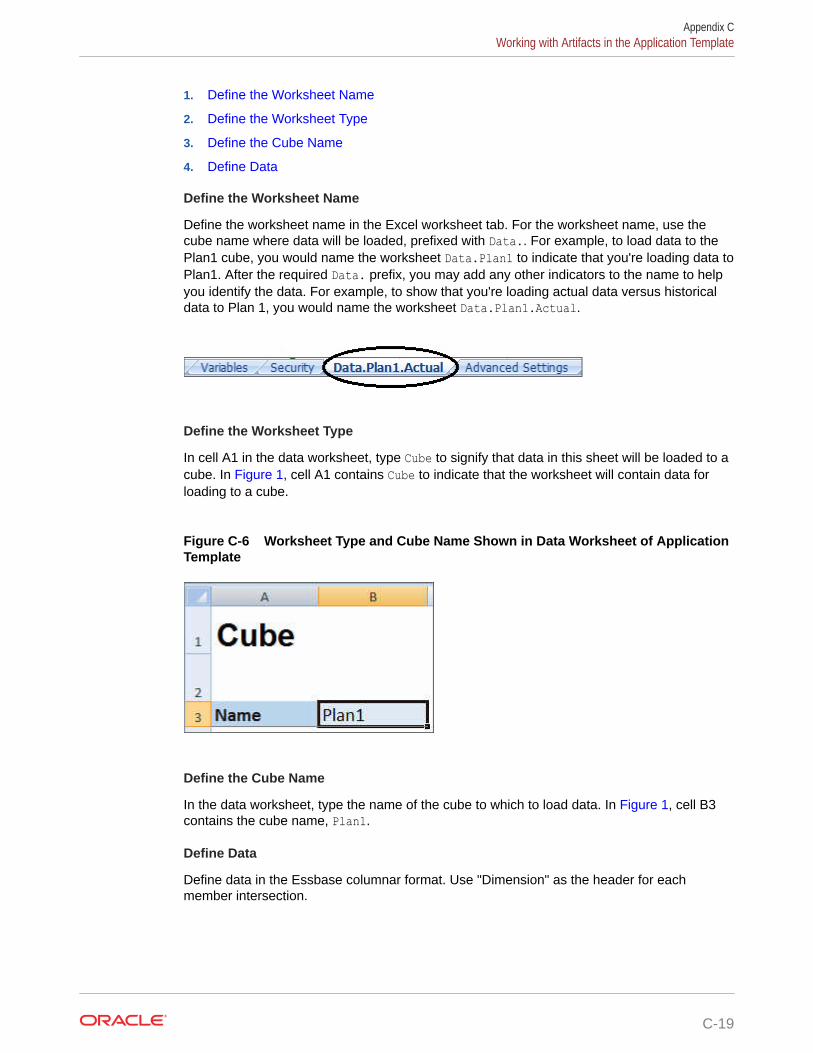
1. Define the Worksheet Name
2. Define the Worksheet Type
3. Define the Cube Name
4. Define Data
Define the Worksheet Name
Define the worksheet name in the Excel worksheet tab. For the worksheet name, use thecube name where data will be loaded, prefixed with Data.. For example, to load data to thePlan1 cube, you would name the worksheet Data.Plan1 to indicate that you're loading data toPlan1. After the required Data. prefix, you may add any other indicators to the name to helpyou identify the data. For example, to show that you're loading actual data versus historicaldata to Plan 1, you would name the worksheet Data.Plan1.Actual.
Define the Worksheet Type
In cell A1 in the data worksheet, type Cube to signify that data in this sheet will be loaded to acube. In Figure 1, cell A1 contains Cube to indicate that the worksheet will contain data forloading to a cube.
Figure C-6 Worksheet Type and Cube Name Shown in Data Worksheet of ApplicationTemplate
Define the Cube Name
In the data worksheet, type the name of the cube to which to load data. In Figure 1, cell B3contains the cube name, Plan1.
Define Data
Define data in the Essbase columnar format. Use "Dimension" as the header for eachmember intersection.
Appendix CWorking with Artifacts in the Application Template
C-19
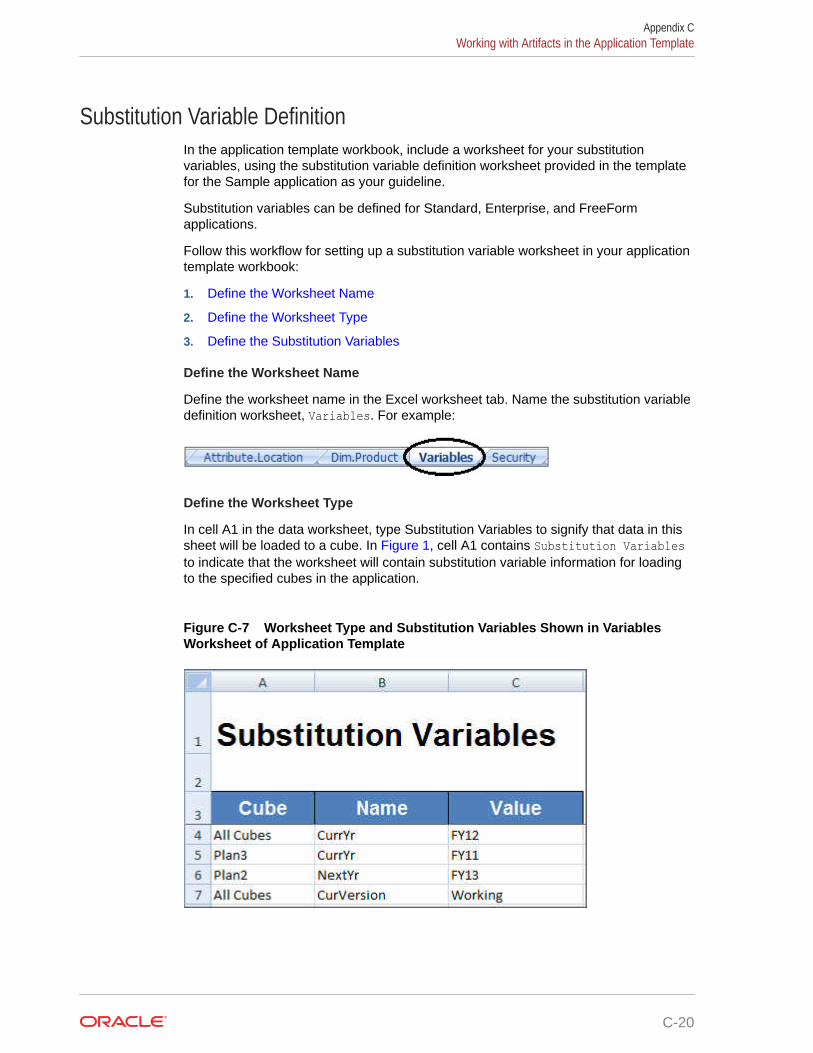
Substitution Variable DefinitionIn the application template workbook, include a worksheet for your substitutionvariables, using the substitution variable definition worksheet provided in the templatefor the Sample application as your guideline.
Substitution variables can be defined for Standard, Enterprise, and FreeFormapplications.
Follow this workflow for setting up a substitution variable worksheet in your applicationtemplate workbook:
1. Define the Worksheet Name
2. Define the Worksheet Type
3. Define the Substitution Variables
Define the Worksheet Name
Define the worksheet name in the Excel worksheet tab. Name the substitution variabledefinition worksheet, Variables. For example:
Define the Worksheet Type
In cell A1 in the data worksheet, type Substitution Variables to signify that data in thissheet will be loaded to a cube. In Figure 1, cell A1 contains Substitution Variablesto indicate that the worksheet will contain substitution variable information for loadingto the specified cubes in the application.
Figure C-7 Worksheet Type and Substitution Variables Shown in VariablesWorksheet of Application Template
Appendix CWorking with Artifacts in the Application Template
C-20
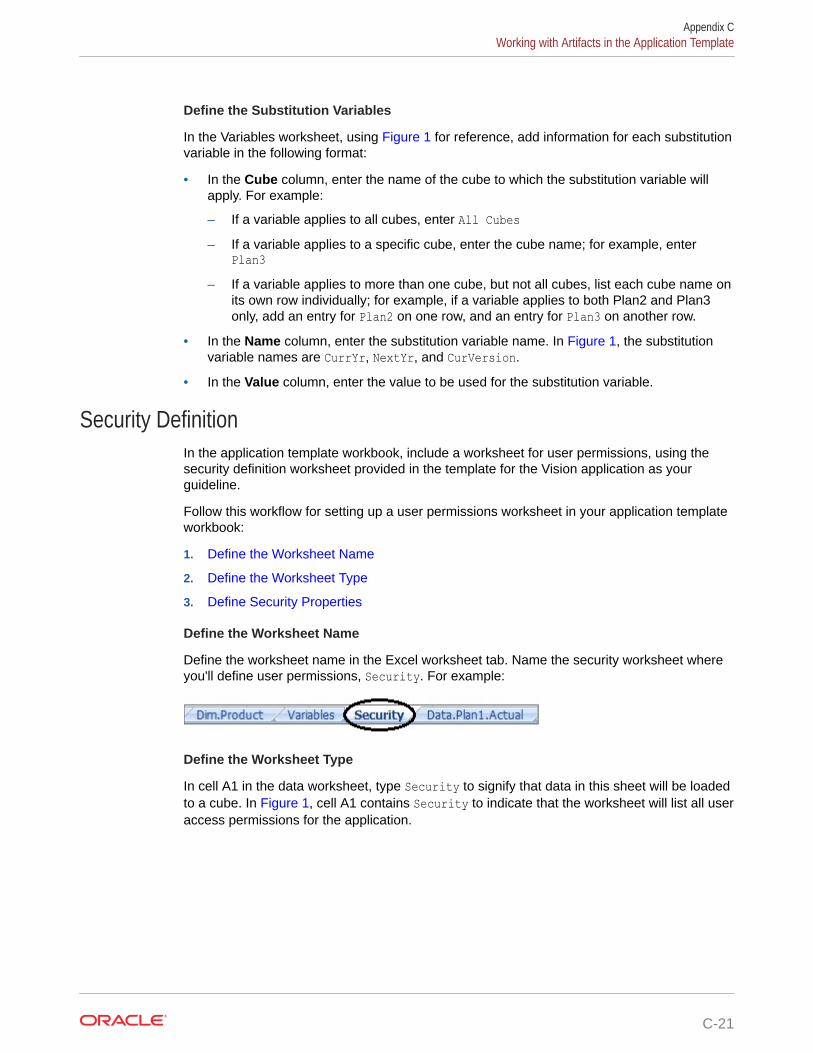
Define the Substitution Variables
In the Variables worksheet, using Figure 1 for reference, add information for each substitutionvariable in the following format:
• In the Cube column, enter the name of the cube to which the substitution variable willapply. For example:
– If a variable applies to all cubes, enter All Cubes– If a variable applies to a specific cube, enter the cube name; for example, enter
Plan3– If a variable applies to more than one cube, but not all cubes, list each cube name on
its own row individually; for example, if a variable applies to both Plan2 and Plan3only, add an entry for Plan2 on one row, and an entry for Plan3 on another row.
• In the Name column, enter the substitution variable name. In Figure 1, the substitutionvariable names are CurrYr, NextYr, and CurVersion.
• In the Value column, enter the value to be used for the substitution variable.
Security DefinitionIn the application template workbook, include a worksheet for user permissions, using thesecurity definition worksheet provided in the template for the Vision application as yourguideline.
Follow this workflow for setting up a user permissions worksheet in your application templateworkbook:
1. Define the Worksheet Name
2. Define the Worksheet Type
3. Define Security Properties
Define the Worksheet Name
Define the worksheet name in the Excel worksheet tab. Name the security worksheet whereyou'll define user permissions, Security. For example:
Define the Worksheet Type
In cell A1 in the data worksheet, type Security to signify that data in this sheet will be loadedto a cube. In Figure 1, cell A1 contains Security to indicate that the worksheet will list all useraccess permissions for the application.
Appendix CWorking with Artifacts in the Application Template
C-21
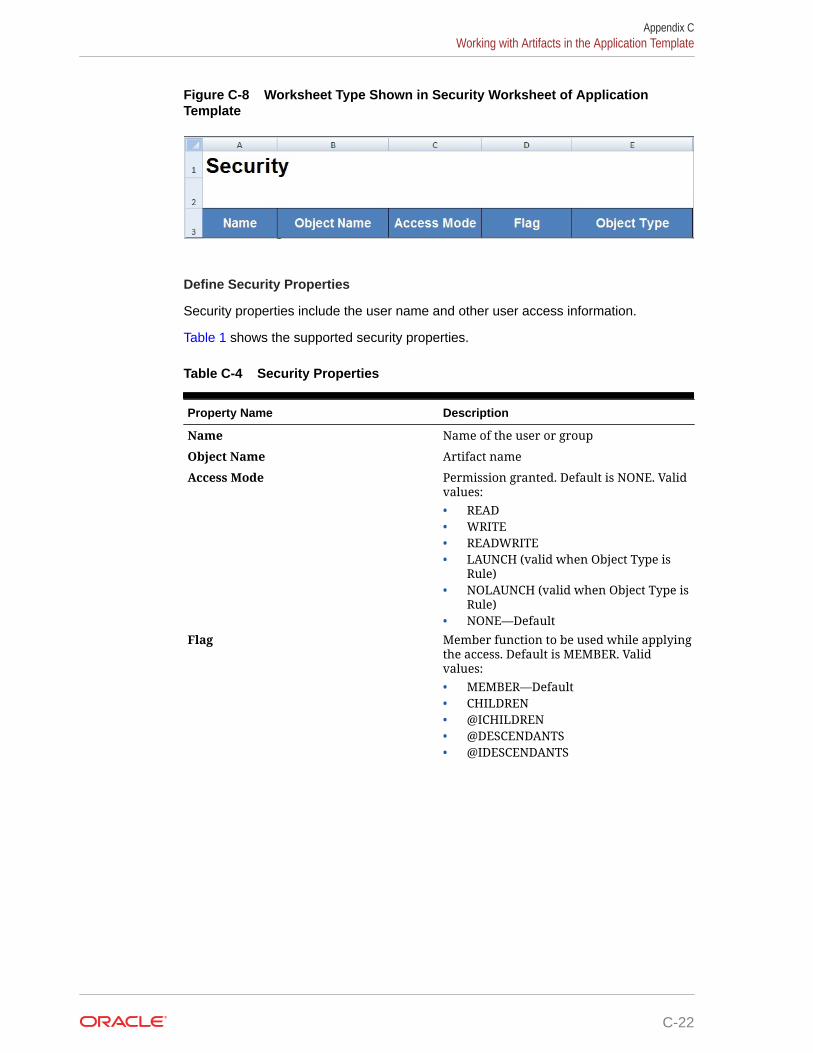
Figure C-8 Worksheet Type Shown in Security Worksheet of ApplicationTemplate
Define Security Properties
Security properties include the user name and other user access information.
Table 1 shows the supported security properties.
Table C-4 Security Properties
Property Name Description
Name Name of the user or group
Object Name Artifact name
Access Mode Permission granted. Default is NONE. Validvalues:• READ• WRITE• READWRITE• LAUNCH (valid when Object Type is
Rule)• NOLAUNCH (valid when Object Type is
Rule)• NONE—Default
Flag Member function to be used while applyingthe access. Default is MEMBER. Validvalues:• MEMBER—Default• CHILDREN• @ICHILDREN• @DESCENDANTS• @IDESCENDANTS
Appendix CWorking with Artifacts in the Application Template
C-22
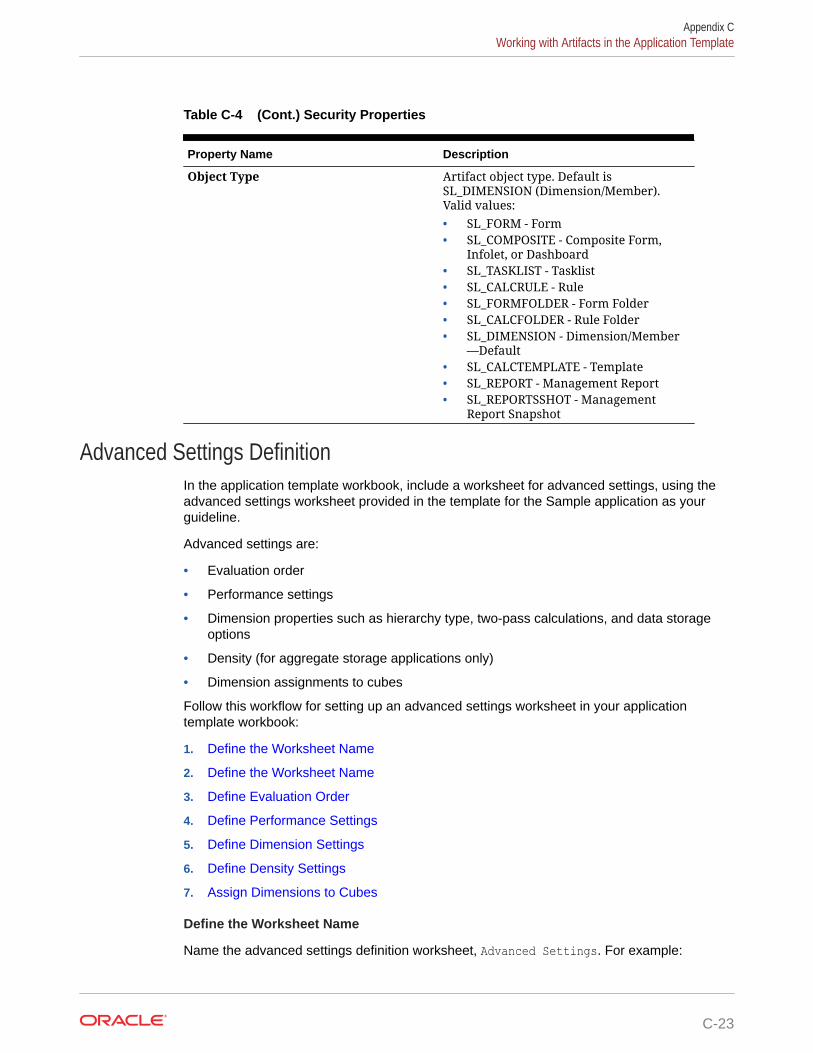
Table C-4 (Cont.) Security Properties
Property Name Description
Object Type Artifact object type. Default isSL_DIMENSION (Dimension/Member).Valid values:• SL_FORM - Form• SL_COMPOSITE - Composite Form,
Infolet, or Dashboard• SL_TASKLIST - Tasklist• SL_CALCRULE - Rule• SL_FORMFOLDER - Form Folder• SL_CALCFOLDER - Rule Folder• SL_DIMENSION - Dimension/Member
—Default• SL_CALCTEMPLATE - Template• SL_REPORT - Management Report• SL_REPORTSSHOT - Management
Report Snapshot
Advanced Settings DefinitionIn the application template workbook, include a worksheet for advanced settings, using theadvanced settings worksheet provided in the template for the Sample application as yourguideline.
Advanced settings are:
• Evaluation order
• Performance settings
• Dimension properties such as hierarchy type, two-pass calculations, and data storageoptions
• Density (for aggregate storage applications only)
• Dimension assignments to cubes
Follow this workflow for setting up an advanced settings worksheet in your applicationtemplate workbook:
1. Define the Worksheet Name
2. Define the Worksheet Name
3. Define Evaluation Order
4. Define Performance Settings
5. Define Dimension Settings
6. Define Density Settings
7. Assign Dimensions to Cubes
Define the Worksheet Name
Name the advanced settings definition worksheet, Advanced Settings. For example:
Appendix CWorking with Artifacts in the Application Template
C-23
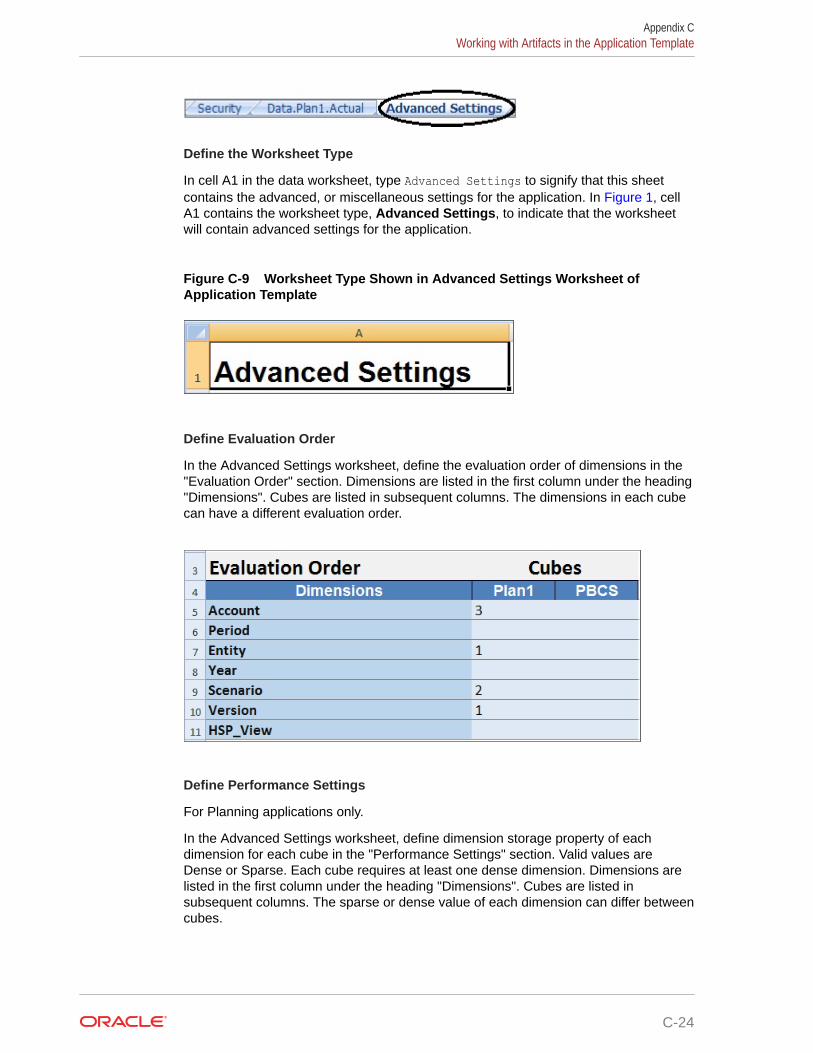
Define the Worksheet Type
In cell A1 in the data worksheet, type Advanced Settings to signify that this sheetcontains the advanced, or miscellaneous settings for the application. In Figure 1, cellA1 contains the worksheet type, Advanced Settings, to indicate that the worksheetwill contain advanced settings for the application.
Figure C-9 Worksheet Type Shown in Advanced Settings Worksheet ofApplication Template
Define Evaluation Order
In the Advanced Settings worksheet, define the evaluation order of dimensions in the"Evaluation Order" section. Dimensions are listed in the first column under the heading"Dimensions". Cubes are listed in subsequent columns. The dimensions in each cubecan have a different evaluation order.
Define Performance Settings
For Planning applications only.
In the Advanced Settings worksheet, define dimension storage property of eachdimension for each cube in the "Performance Settings" section. Valid values areDense or Sparse. Each cube requires at least one dense dimension. Dimensions arelisted in the first column under the heading "Dimensions". Cubes are listed insubsequent columns. The sparse or dense value of each dimension can differ betweencubes.
Appendix CWorking with Artifacts in the Application Template
C-24
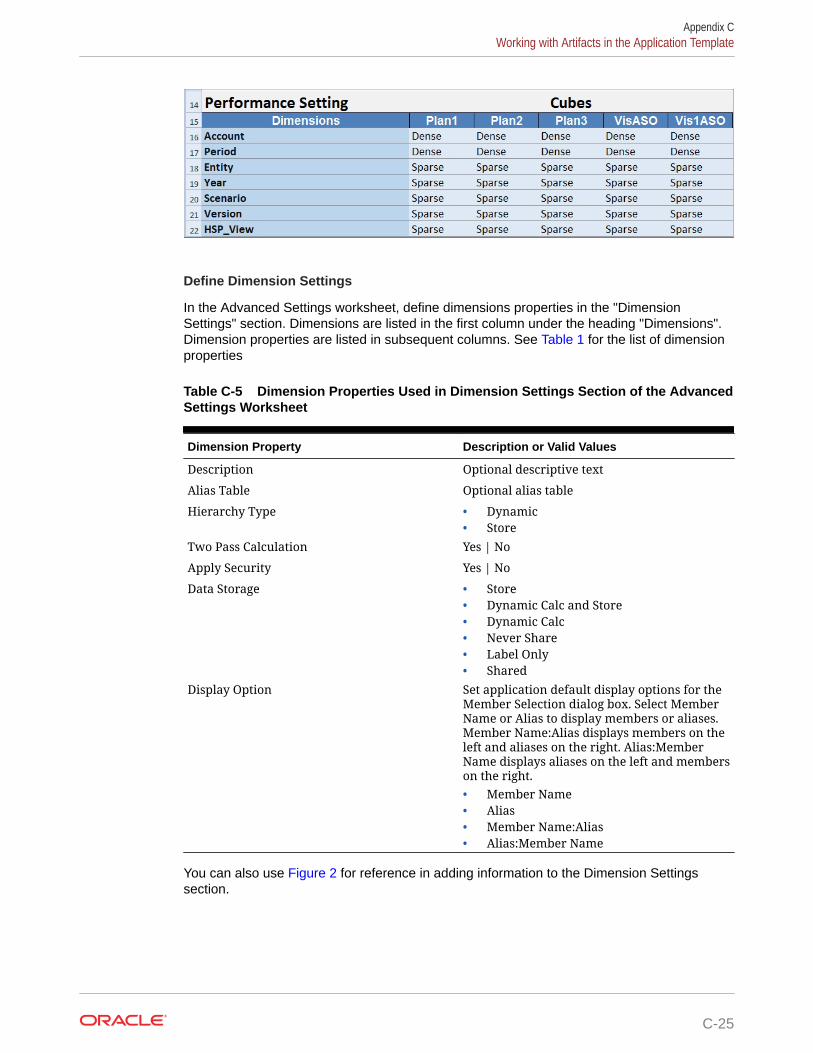
Define Dimension Settings
In the Advanced Settings worksheet, define dimensions properties in the "DimensionSettings" section. Dimensions are listed in the first column under the heading "Dimensions".Dimension properties are listed in subsequent columns. See Table 1 for the list of dimensionproperties
Table C-5 Dimension Properties Used in Dimension Settings Section of the AdvancedSettings Worksheet
Dimension Property Description or Valid Values
Description Optional descriptive text
Alias Table Optional alias table
Hierarchy Type • Dynamic• Store
Two Pass Calculation Yes | No
Apply Security Yes | No
Data Storage • Store• Dynamic Calc and Store• Dynamic Calc• Never Share• Label Only• Shared
Display Option Set application default display options for theMember Selection dialog box. Select MemberName or Alias to display members or aliases.Member Name:Alias displays members on theleft and aliases on the right. Alias:MemberName displays aliases on the left and memberson the right.• Member Name• Alias• Member Name:Alias• Alias:Member Name
You can also use Figure 2 for reference in adding information to the Dimension Settingssection.
Appendix CWorking with Artifacts in the Application Template
C-25
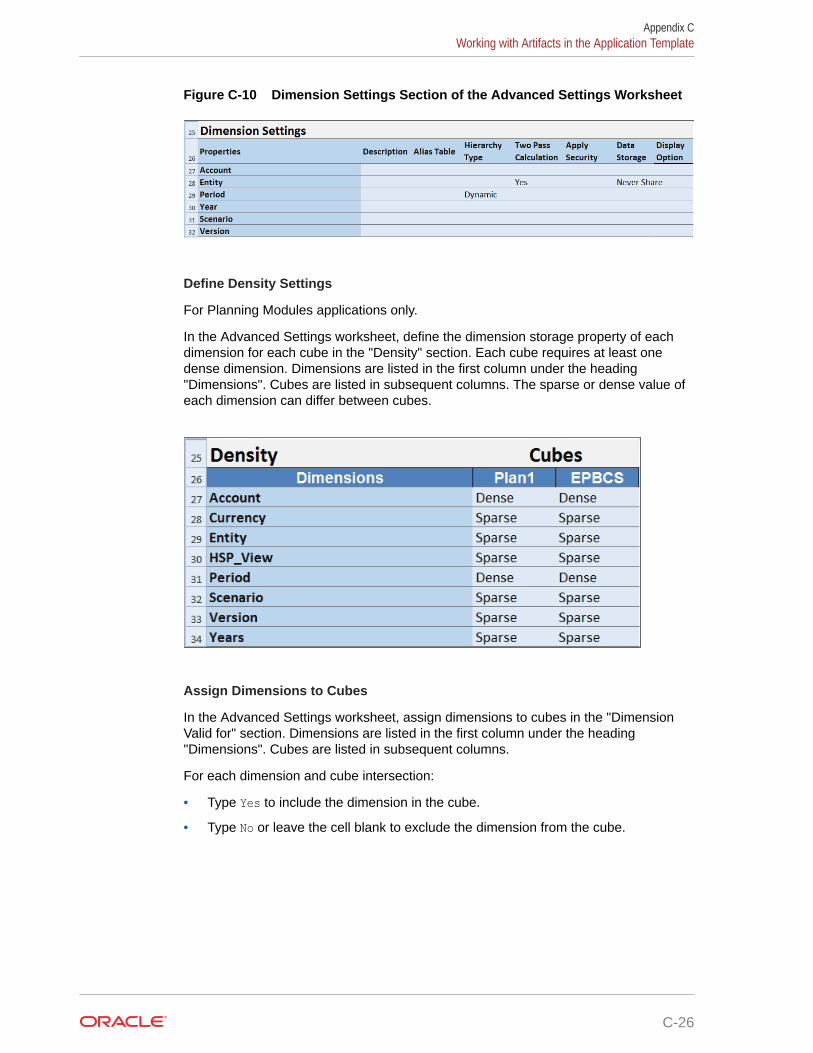
Figure C-10 Dimension Settings Section of the Advanced Settings Worksheet
Define Density Settings
For Planning Modules applications only.
In the Advanced Settings worksheet, define the dimension storage property of eachdimension for each cube in the "Density" section. Each cube requires at least onedense dimension. Dimensions are listed in the first column under the heading"Dimensions". Cubes are listed in subsequent columns. The sparse or dense value ofeach dimension can differ between cubes.
Assign Dimensions to Cubes
In the Advanced Settings worksheet, assign dimensions to cubes in the "DimensionValid for" section. Dimensions are listed in the first column under the heading"Dimensions". Cubes are listed in subsequent columns.
For each dimension and cube intersection:
• Type Yes to include the dimension in the cube.
• Type No or leave the cell blank to exclude the dimension from the cube.
Appendix CWorking with Artifacts in the Application Template
C-26
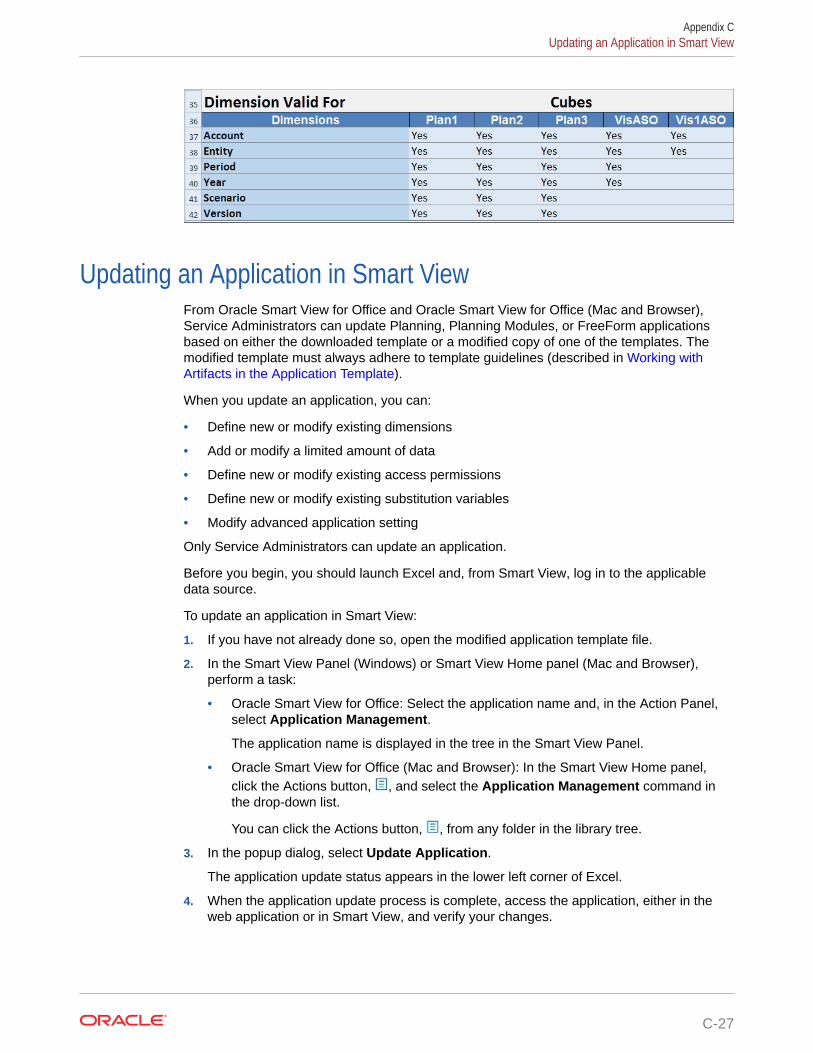
Updating an Application in Smart ViewFrom Oracle Smart View for Office and Oracle Smart View for Office (Mac and Browser),Service Administrators can update Planning, Planning Modules, or FreeForm applicationsbased on either the downloaded template or a modified copy of one of the templates. Themodified template must always adhere to template guidelines (described in Working withArtifacts in the Application Template).
When you update an application, you can:
• Define new or modify existing dimensions
• Add or modify a limited amount of data
• Define new or modify existing access permissions
• Define new or modify existing substitution variables
• Modify advanced application setting
Only Service Administrators can update an application.
Before you begin, you should launch Excel and, from Smart View, log in to the applicabledata source.
To update an application in Smart View:
1. If you have not already done so, open the modified application template file.
2. In the Smart View Panel (Windows) or Smart View Home panel (Mac and Browser),perform a task:
• Oracle Smart View for Office: Select the application name and, in the Action Panel,select Application Management.
The application name is displayed in the tree in the Smart View Panel.
• Oracle Smart View for Office (Mac and Browser): In the Smart View Home panel,click the Actions button, , and select the Application Management command inthe drop-down list.
You can click the Actions button, , from any folder in the library tree.
3. In the popup dialog, select Update Application.
The application update status appears in the lower left corner of Excel.
4. When the application update process is complete, access the application, either in theweb application or in Smart View, and verify your changes.
Appendix CUpdating an Application in Smart View
C-27
Deleting an ApplicationService Administrators may delete applications from Oracle Smart View for Office andOracle Smart View for Office (Mac and Browser).
Before you begin, you should launch Excel and, from Smart View, log in to theapplicable data source.
To delete an application from Smart View:
1. In the Smart View Panel (Windows) or Smart View Home panel (Mac andBrowser), perform a task:
• Oracle Smart View for Office: Select the application name and, in the ActionPanel, select Application Management.
The application name is displayed in the tree in the Smart View Panel.
• Oracle Smart View for Office (Mac and Browser): In the Smart View Homepanel, click the Actions button, , and select the Application Managementcommand in the drop-down list.
You can click the Actions button, , from any folder in the library tree.
2. In the popup dialog, select Delete Application, and confirm in the subsequentdialog.
3. In the Smart View Panel (Windows) or Smart View Home panel (Mac andBrowser), verify that the application is removed.
Planning Admin Extension and Office AutoCorrect
Note:
The information in this topic applies to the Planning Admin Extension on theWindows-based version of Oracle Smart View for Office; this informationdoes not apply to the Planning Admin Extension in Oracle Smart View forOffice (Mac and Browser).
In the Planning Admin Extension on Windows-based versions of Excel, OfficeAutoCorrect can affect member editing in Smart View.
When editing member properties, such as member names, member descriptions,aliases, or member formulas of the data type Text, you may have names that beginwith two initial capital letters; for example
DGreenExcel will autocorrect this name to one initial capital; for example:
DgreenIn Excel, you can set an AutoCorrect option to retain two initial capital letters in aname.
Appendix CDeleting an Application
C-28
To retain two initial capital letters in a name:
1. In Excel, access the Excel Options dialog.
2. Select Proofing, and then click the AutoCorrect Options button.
3. In the AutoCorrect dialog, clear the Correct TWo INitial CApitals check box.
4. Click OK to close the AutoCorrect dialog, and then click OK to close the Excel Optionsdialog.
The change takes effect immediately. There is no need to restart Excel.
Appendix CPlanning Admin Extension and Office AutoCorrect
C-29
Related Documents


![Oracle Fusion Middleware Administering Oracle Data Integrator · [1]Oracle® Fusion Middleware Administering Oracle Data Integrator 12c (12.1.3.0.1) E51086-02 March 2015 This guide](https://static.cupdf.com/doc/110x72/5eccb9c2a0af283cb576ffbb/oracle-fusion-middleware-administering-oracle-data-integrator-1oracle-fusion.jpg)