Community Experience Distilled Develop interactive real-time communication applications with WebRTC Learning WebRTC Dan Ristic Free Sample

Welcome message from author
This document is posted to help you gain knowledge. Please leave a comment to let me know what you think about it! Share it to your friends and learn new things together.
Transcript
C o m m u n i t y E x p e r i e n c e D i s t i l l e d
Develop interactive real-time communication applications with WebRTC
Learning WebRTC
Dan R
istic
Learning WebRTC
The book begins by teaching you how to capture audio and video streams from the browser using the Media Capture and Streams API.
You will then create your fi rst WebRTC application capable of audio and video calling. The book will also give you in-depth knowledge about signaling and building a signaling server in Node.js. While being introduced to the RTCDataChannel object, you will learn how it relates to WebRTC and how to add text-based chat to your application. You will also learn to take your application further by supporting multiple users through different technologies and scale its performance and security. This book will also cover several theories using full mesh networks, partial mesh networks, and multipoint control units. By the end of this book, you will have an extensive understanding of real-time communication and the WebRTC protocol and APIs.
Who this book is written forIf you are a web developer who wants to create well designed WebRTC applications for your users, this is the book for you. Even if you are early in your web development career, this book aims to provide a complete understanding of the WebRTC API. It is assumed that you have previous exposure to web development using HTML5 and JavaScript technologies.
$ 29.99 US£ 19.99 UK
Prices do not include local sales tax or VAT where applicable
Dan Ristic
What you will learn from this book
Understand the underlying platform that WebRTC is built upon
Create applications that utilize your web camera and microphone
Build your very own signaling server from scratch
Enable your applications to communicate with multiple users
Share data and fi les across peer-to-peer connections using WebRTC
Implement best practices to secure and make a WebRTC application perform
Get to know more about multi-peer mesh networks for more than two users
Learn the best practices behind traversing networks, signaling, security, and data transport in WebRTC applications
Use full mesh networks, partial mesh networks, and multipoint control units to manage your applications
Learning WebR
TC
P U B L I S H I N GP U B L I S H I N G
community experience dist i l led
Visit www.PacktPub.com for books, eBooks, code, downloads, and PacktLib.
Free Sample

In this package, you will find: The author biography
A preview chapter from the book, Chapter 3 'Creating a Basic
WebRTC Application'
A synopsis of the book’s content
More information on Learning WebRTC
About the Author
Dan Ristic is a frontend engineer and evangelist for Open Web. He strives to push the Web forward with new and creative ideas using the latest technologies. He attended the University of Advancing Technology, Arizona, where he furthered his engineering knowledge and fueled his passion for the Web. He has been writing applications on the Web ever since.
He currently lives and works in San Francisco as a senior software engineer at Sony Network Entertainment International. At Sony, he is responsible for managing the frontend application architecture and delivering the PlayStation Store to millions of users. In his free time, he can be found hiking, exploring, working on projects, and attending events.
PrefaceWhen I fi rst started writing HTML code, I was excited. Here I was typing letters into the keyboard, each one giving the computer some instructions that it knew what to do with. I was excited that I was creating something and that these instructions allowed me to express my creativity. When I fi nally saved my work, fi red up my browser, and loaded my page, I was in awe. I saw my name in big bold letters with a moving picture, called a GIF, of an animated fi re.
The Web has certainly come a long way since then. This is largely due to the fact that it is not just a place to create something new, but also a platform to share and show this creativity to others. This powerful platform for creative expression is what powers the Web and keeps it growing faster than ever. It has become so popular that we are moving our entire lives onto it. Websites power your e-mail, entertainment, bank accounts, legal documents, taxes, and even parts of this book were written using web tools. It is the want to move our lives to the Web that drives the development of powerful, easy-to-use APIs, such as WebRTC.
WebRTC is one of the most substantial additions to the Web platform. It brings about an entire suite of new technologies, such as cameras, streaming data, and even an entirely new network protocol stack. It is amazing to not only see the amount of work going into the WebRTC API, but also to know that this is all free for use by any application developer out there.
The aim of WebRTC is to democratize real-time communication. Earlier, building even a smaller video communication application used to take months and involved custom engineering to make even the smallest of applications. However, now we can do it in half the time or even less. This also brings the open source community into real-time communication. You can fi nd other examples of WebRTC in the world and look at how these applications are built by searching through the source code.
Preface
It is this creative expression and freedom provided by the Web that drives the motivations for this book. I am glad to have the chance to bring it to more people through my writing, and I hope to inspire others just as I was inspired the fi rst time I built a web page. Writing this book is one of the largest and toughest things I have done in my career, but I am grateful for all the help I have had along the way.
If you are looking for the easiest way to create a new real-time experience and share this with others, then read this book. This book, along with all technical books, is just a way of continuing to drive people to create something even better on the Web. You will learn not just about how to use WebRTC, but also what powers it under the hood. This book serves as not just a learning tool, but also as an inspiration for creating something truly amazing.
What this book coversChapter 1, Getting Started with WebRTC, covers how WebRTC enables audio and video communication for web-based applications. You will also begin by running an example of a WebRTC application inside your browser.
Chapter 2, Getting the User's Media, covers the fi rst step when creating a communication application to get webcam and microphone input. This chapter also covers how to use the Media Capture and Streams API to capture this information from you. We also begin development by building the foundation of our communication example.
Chapter 3, Creating a Basic WebRTC Application, covers an introduction to the fi rst WebRTC API—the RTCPeerConnection. This chapter also lays the groundwork for creating a WebRTC application by peeking inside the complex structure of WebRTC and what we can expect when we begin working with the API.
Chapter 4, Creating a Signaling Server, covers the steps in creating our very own signaling server to help our clients fi nd each other on the Internet. This includes in-depth information on how signaling works in WebRTC and how we will utilize it in our example application.
Chapter 5, Connecting Clients Together, covers the actual usage of our signaling server. It also covers connecting two users successfully using the WebRTC API, Media Capture, and the signaling server that we created in the previous chapter to build our working example.
Chapter 6, Sending Data with WebRTC, covers an introduction to the RTCDataChannel and how it is used to send raw data between two peers. This chapter elaborates on our example by adding a text-based chat for our clients.
Preface
Chapter 7, File Sharing, elaborates on the concept of sending raw data by looking at how we can share fi les between two peers. This will demonstrate the many uses of WebRTC outside of audio and video sharing.
Chapter 8, Advanced Security and Large-scale Optimization, covers advanced topics when delivering a large-scale WebRTC application. We look at theoretical security and performance optimizations used by other companies in the industry.
Appendix, Answers to Self-test Questions, covers the answers to all the self-test questions that appear at the end of every chapter.
[ 31 ]
Creating a Basic WebRTC Application
The fi rst step of any WebRTC application is to create an RTCPeerConnection. Creating a successful RTCPeerConnection will require an understanding of the inner workings of how a browser creates peer connections. Firstly, in this chapter, we will lay the groundwork to understand the internals of WebRTC. Then we will utilize this knowledge to create a basic WebRTC video chat application.
In this chapter, we will cover the following topics:
• Understanding UDP transport and real-time transfer• Signaling and negotiating with other users locally• Finding other users on the Web and NAT traversal• Creating an RTCPeerConnection
Understanding UDP transport and real-time transferReal-time transfer of data requires a fast connection speed between both the users. A typical connection needs to take a frame of both—audio and video—and send it to another user between 40 and 60 times per second in order to be considered good quality. Given this constraint, audio and video applications are allowed to miss certain frames of data in order to keep up the speed of the connection. This means that sending the most recent frame of data is more important than making sure that every frame gets to the other side.
Creating a Basic WebRTC Application
[ 32 ]
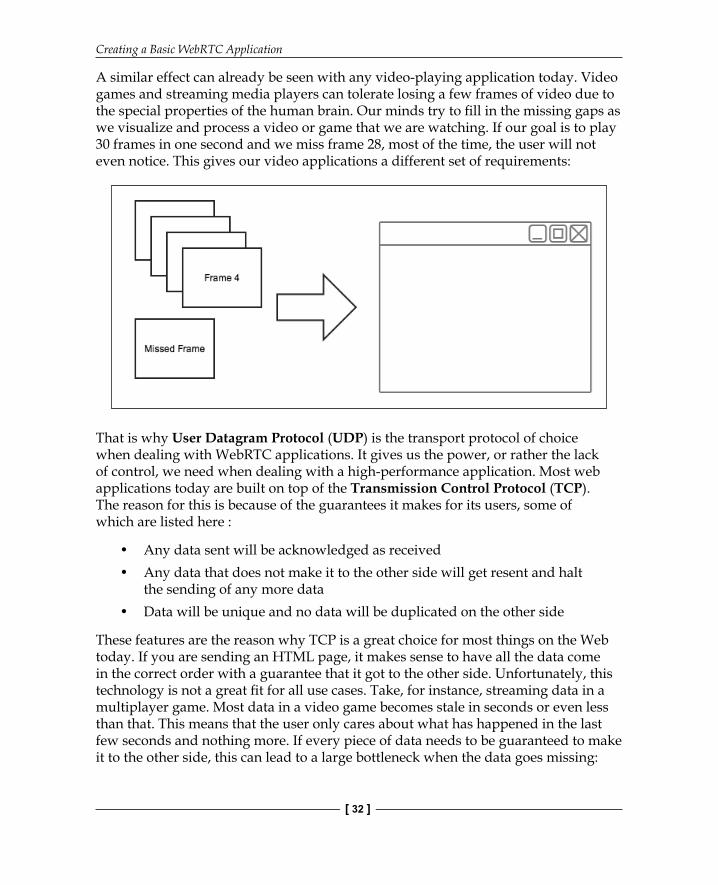
A similar effect can already be seen with any video-playing application today. Video games and streaming media players can tolerate losing a few frames of video due to the special properties of the human brain. Our minds try to fi ll in the missing gaps as we visualize and process a video or game that we are watching. If our goal is to play 30 frames in one second and we miss frame 28, most of the time, the user will not even notice. This gives our video applications a different set of requirements:
That is why User Datagram Protocol (UDP) is the transport protocol of choice when dealing with WebRTC applications. It gives us the power, or rather the lack of control, we need when dealing with a high-performance application. Most web applications today are built on top of the Transmission Control Protocol (TCP). The reason for this is because of the guarantees it makes for its users, some of which are listed here :
• Any data sent will be acknowledged as received• Any data that does not make it to the other side will get resent and halt
the sending of any more data• Data will be unique and no data will be duplicated on the other side
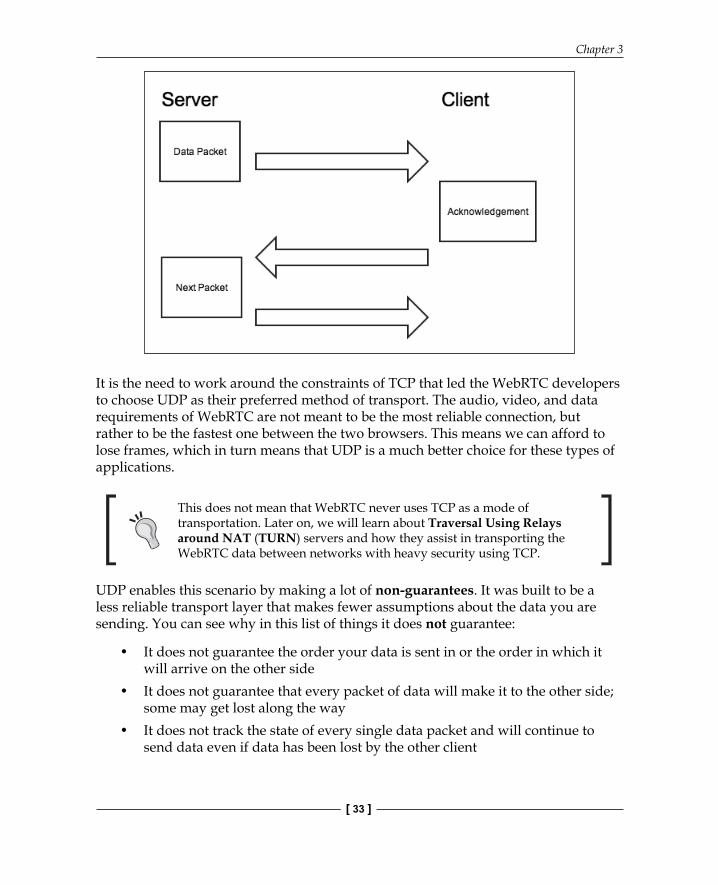
These features are the reason why TCP is a great choice for most things on the Web today. If you are sending an HTML page, it makes sense to have all the data come in the correct order with a guarantee that it got to the other side. Unfortunately, this technology is not a great fi t for all use cases. Take, for instance, streaming data in a multiplayer game. Most data in a video game becomes stale in seconds or even less than that. This means that the user only cares about what has happened in the last few seconds and nothing more. If every piece of data needs to be guaranteed to make it to the other side, this can lead to a large bottleneck when the data goes missing:
Chapter 3
[ 33 ]
It is the need to work around the constraints of TCP that led the WebRTC developers to choose UDP as their preferred method of transport. The audio, video, and data requirements of WebRTC are not meant to be the most reliable connection, but rather to be the fastest one between the two browsers. This means we can afford to lose frames, which in turn means that UDP is a much better choice for these types of applications.
This does not mean that WebRTC never uses TCP as a mode of transportation. Later on, we will learn about Traversal Using Relays around NAT (TURN) servers and how they assist in transporting the WebRTC data between networks with heavy security using TCP.
UDP enables this scenario by making a lot of non-guarantees. It was built to be a less reliable transport layer that makes fewer assumptions about the data you are sending. You can see why in this list of things it does not guarantee:
• It does not guarantee the order your data is sent in or the order in which it will arrive on the other side
• It does not guarantee that every packet of data will make it to the other side; some may get lost along the way
• It does not track the state of every single data packet and will continue to send data even if data has been lost by the other client
Creating a Basic WebRTC Application
[ 34 ]
Now, WebRTC can send audio and video in the fastest way possible. This should also reveal why WebRTC can be such a complex topic. Not every network allows UDP traffi c across it. Large networks with corporate fi rewalls can block UDP traffi c outright to try and protect against malicious connections. These connections have to travel along a different path than most of the web page downloads do today. Many workarounds and processes have to be built around UDP to get it to work properly for a wide audience. This is just the tip of the iceberg when it comes to WebRTC technology. In the next few sections, we will cover the other supporting technologies that enable WebRTC in the browser.
UDP and TCP are not just used for web pages, but most Internet-based traffi c you see today. You will fi nd them being used in mobile devices, TVs, cars, and more. This is why it is important to understand these technologies, and how they work.
The WebRTC APIThe next few sections will cover the WebRTC API currently implemented in the browser. These functions and objects allow developers to communicate with the WebRTC layer and make peer connections to other users. It consists of a few main pieces of technology:
• The RTCPeerConnection object• Signaling and negotiation• Session Description Protocol (SDP)• Interactive Connectivity Establishment (ICE)
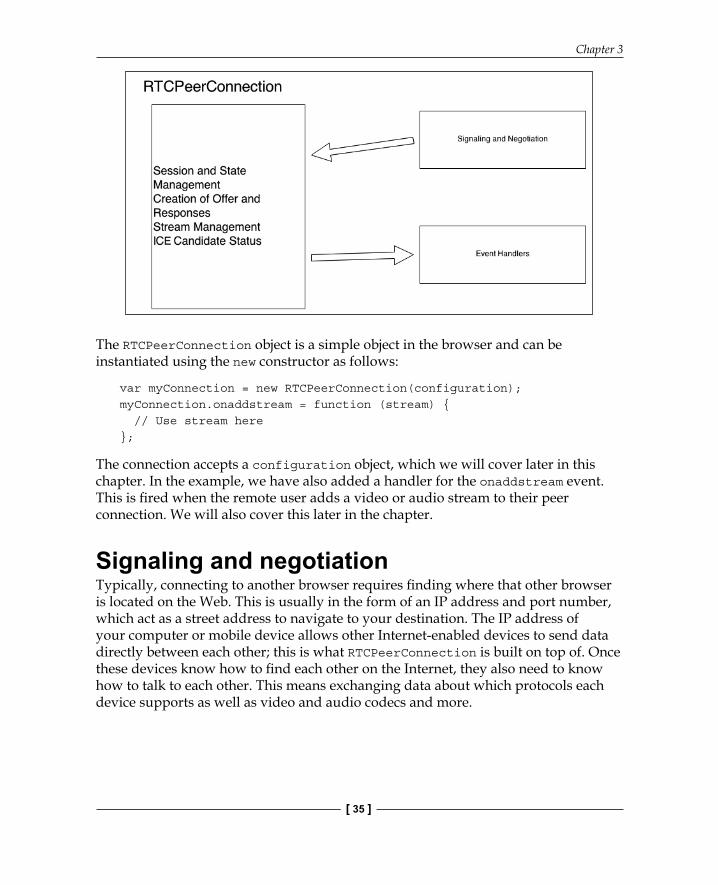
The RTCPeerConnection objectThe RTCPeerConnection object is the main entry point to the WebRTC API. It is what allows us to initialize a connection, connect to peers, and attach media stream information. It handles the creation of a UDP connection with another user. It is time to get familiar with this name because you will be seeing it a lot throughout the rest of the book.
The job of the RTCPeerConnection object is to maintain the session and state of a peer connection in the browser. It also handles the setup and creation of a peer connection. It encapsulates all of these things and exposes a set of events that get fi red at key points in the connection process. These events give you access to the confi guration and internals of what happens during a peer connection:
Chapter 3
[ 35 ]
The RTCPeerConnection object is a simple object in the browser and can be instantiated using the new constructor as follows:
var myConnection = new RTCPeerConnection(configuration);myConnection.onaddstream = function (stream) { // Use stream here};
The connection accepts a configuration object, which we will cover later in this chapter. In the example, we have also added a handler for the onaddstream event. This is fi red when the remote user adds a video or audio stream to their peer connection. We will also cover this later in the chapter.
Signaling and negotiationTypically, connecting to another browser requires fi nding where that other browser is located on the Web. This is usually in the form of an IP address and port number, which act as a street address to navigate to your destination. The IP address of your computer or mobile device allows other Internet-enabled devices to send data directly between each other; this is what RTCPeerConnection is built on top of. Once these devices know how to fi nd each other on the Internet, they also need to know how to talk to each other. This means exchanging data about which protocols each device supports as well as video and audio codecs and more.

Creating a Basic WebRTC Application
[ 36 ]
This means that, in order to connect to another user, you need to know quite a bit about them. One possible solution would be to store a list on your computer of the users that you can connect to. To enable communication with another user, you would simply have to exchange contact information and let WebRTC handle the rest. This has the drawback, however, of your having to manually share information with each user that you want to connect to. You would have to maintain a big list of any users you wanted to connect with and exchange information through some other channel of communication. With WebRTC, we can make this process much more automated.
Luckily, the Web today has solved this problem in most communication applications we use today. To connect with anyone on popular services such as Facebook or LinkedIn, you just need to know their name and search for them. You can then add them to your list of known contacts and access their information at any time. This process is known as signaling and negotiation in WebRTC.
The process of signaling consists of a few steps:
1. Generate a list of potential candidates for a peer connection.2. Either the user or a computer algorithm will select a user to make a
connection with.3. The signaling layer will notify that user that someone would like to connect
with him/her, and he/she can accept or decline.4. The fi rst user is notifi ed of the acceptance of the offer to connect.5. If accepted, the fi rst user will initiate RTCPeerConnection with the other
user.6. Both the users will exchange hardware and software information about their
computers over the signaling channel.7. Both the users will also exchange location information about their computers
over the signaling channel.8. The connection will either succeed or fail between the users.
This, however, is just an example of how WebRTC signaling may happen. In reality, the WebRTC specifi cation does not contain any standards on how two users are supposed to exchange information. This is due to the ever-growing list of standards on connecting users. Many standards exist today, and even more are being created on the process of signaling and negotiating. The WebRTC standard writers decided that to try and agree on one standard would prevent it from moving forward.
Chapter 3
[ 37 ]
In this book, we are going to create our own implementation of signaling and negotiation. This means writing a simple server that can transfer information between two browsers. Although it will be simple and prone to security fl aws, it should give you a good understanding of how this process should work in WebRTC. At the same time, feel free to explore the numerous signaling options presented by many companies today. There are hundreds of signaling and negotiation solutions out there and more popping up every day. Some integrate with the current phone- or chat-based implementations, such as XMPP or SIP, and some come up with an entirely new way of signaling.
Session Description ProtocolTo get connected with another user, you need to know a bit about them fi rst. Some of the most important things to know about the other client is what audio and video codecs they support, how their network looks, and how much data their computer can handle. It also needs to be easily transportable between clients. Since we do not specify how this data should be transferred, it should also be capable of being sent over numerous types of transport protocols. This means we need a string-based business card with all the information about a user that we can send to other users. Luckily, this is exactly what SDP provides us with.
The great thing about SDP is that it has been around a long time, dating back to the late 90s for the fi rst initial draft. This means that SDP is a tried-and-true method of establishing media-based connections between clients. It has been used in numerous other types of applications before WebRTC, such as phones and text-based chatting. This also means there are a lot of great resources out there on using and implementing it.
The SDP is a string-based data blob provided by the browser. The format of this string is a set of key-value pairs, all separated by line breaks:
<key>=<value>\n
The key is a single character that establishes the type of value this is. The value is a structured set of text that comprises a machine-readable confi guration value. The different key-value pairs are then split by line breaks.
Creating a Basic WebRTC Application
[ 38 ]
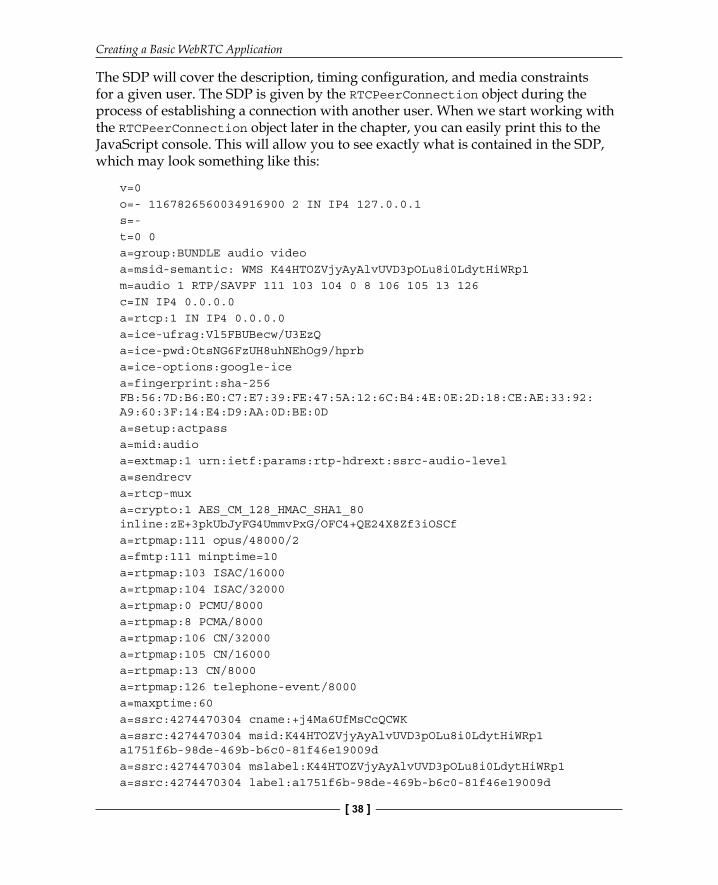
The SDP will cover the description, timing confi guration, and media constraints for a given user. The SDP is given by the RTCPeerConnection object during the process of establishing a connection with another user. When we start working with the RTCPeerConnection object later in the chapter, you can easily print this to the JavaScript console. This will allow you to see exactly what is contained in the SDP, which may look something like this:
v=0o=- 1167826560034916900 2 IN IP4 127.0.0.1s=-t=0 0a=group:BUNDLE audio videoa=msid-semantic: WMS K44HTOZVjyAyAlvUVD3pOLu8i0LdytHiWRp1m=audio 1 RTP/SAVPF 111 103 104 0 8 106 105 13 126c=IN IP4 0.0.0.0a=rtcp:1 IN IP4 0.0.0.0a=ice-ufrag:Vl5FBUBecw/U3EzQa=ice-pwd:OtsNG6FzUH8uhNEhOg9/hprba=ice-options:google-icea=fingerprint:sha-256 FB:56:7D:B6:E0:C7:E7:39:FE:47:5A:12:6C:B4:4E:0E:2D:18:CE:AE:33:92: A9:60:3F:14:E4:D9:AA:0D:BE:0Da=setup:actpassa=mid:audioa=extmap:1 urn:ietf:params:rtp-hdrext:ssrc-audio-levela=sendrecva=rtcp-muxa=crypto:1 AES_CM_128_HMAC_SHA1_80 inline:zE+3pkUbJyFG4UmmvPxG/OFC4+QE24X8Zf3iOSCfa=rtpmap:111 opus/48000/2a=fmtp:111 minptime=10a=rtpmap:103 ISAC/16000a=rtpmap:104 ISAC/32000a=rtpmap:0 PCMU/8000a=rtpmap:8 PCMA/8000a=rtpmap:106 CN/32000a=rtpmap:105 CN/16000a=rtpmap:13 CN/8000a=rtpmap:126 telephone-event/8000a=maxptime:60a=ssrc:4274470304 cname:+j4Ma6UfMsCcQCWKa=ssrc:4274470304 msid:K44HTOZVjyAyAlvUVD3pOLu8i0LdytHiWRp1 a1751f6b-98de-469b-b6c0-81f46e19009da=ssrc:4274470304 mslabel:K44HTOZVjyAyAlvUVD3pOLu8i0LdytHiWRp1a=ssrc:4274470304 label:a1751f6b-98de-469b-b6c0-81f46e19009d
Chapter 3
[ 39 ]
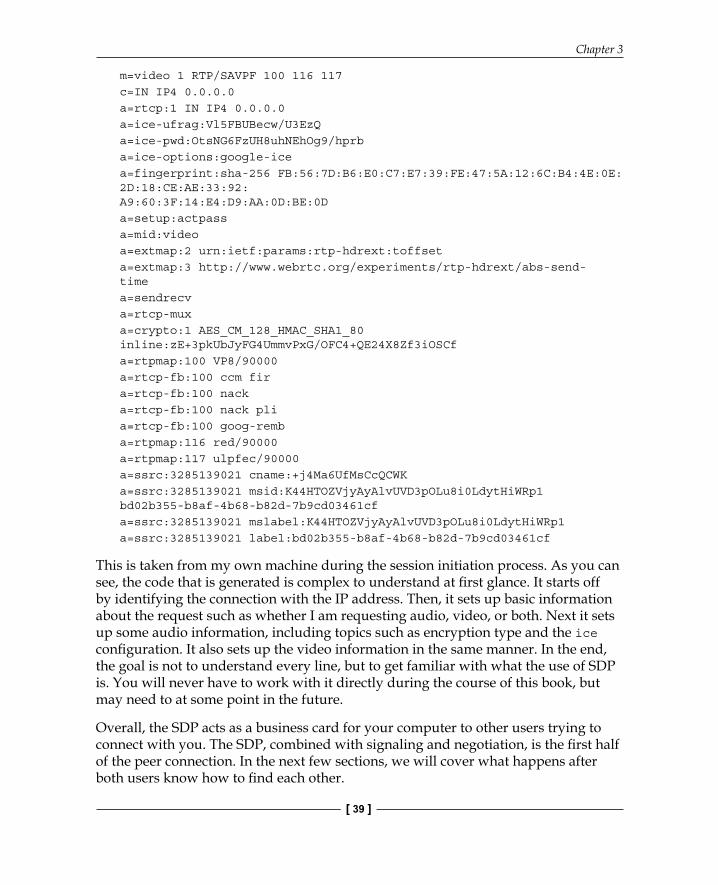
m=video 1 RTP/SAVPF 100 116 117c=IN IP4 0.0.0.0a=rtcp:1 IN IP4 0.0.0.0a=ice-ufrag:Vl5FBUBecw/U3EzQa=ice-pwd:OtsNG6FzUH8uhNEhOg9/hprba=ice-options:google-icea=fingerprint:sha-256 FB:56:7D:B6:E0:C7:E7:39:FE:47:5A:12:6C:B4:4E:0E:2D:18:CE:AE:33:92: A9:60:3F:14:E4:D9:AA:0D:BE:0Da=setup:actpassa=mid:videoa=extmap:2 urn:ietf:params:rtp-hdrext:toffseta=extmap:3 http://www.webrtc.org/experiments/rtp-hdrext/abs-send- timea=sendrecva=rtcp-muxa=crypto:1 AES_CM_128_HMAC_SHA1_80 inline:zE+3pkUbJyFG4UmmvPxG/OFC4+QE24X8Zf3iOSCfa=rtpmap:100 VP8/90000a=rtcp-fb:100 ccm fira=rtcp-fb:100 nacka=rtcp-fb:100 nack plia=rtcp-fb:100 goog-remba=rtpmap:116 red/90000a=rtpmap:117 ulpfec/90000a=ssrc:3285139021 cname:+j4Ma6UfMsCcQCWKa=ssrc:3285139021 msid:K44HTOZVjyAyAlvUVD3pOLu8i0LdytHiWRp1 bd02b355-b8af-4b68-b82d-7b9cd03461cfa=ssrc:3285139021 mslabel:K44HTOZVjyAyAlvUVD3pOLu8i0LdytHiWRp1a=ssrc:3285139021 label:bd02b355-b8af-4b68-b82d-7b9cd03461cf
This is taken from my own machine during the session initiation process. As you can see, the code that is generated is complex to understand at fi rst glance. It starts off by identifying the connection with the IP address. Then, it sets up basic information about the request such as whether I am requesting audio, video, or both. Next it sets up some audio information, including topics such as encryption type and the ice confi guration. It also sets up the video information in the same manner. In the end, the goal is not to understand every line, but to get familiar with what the use of SDP is. You will never have to work with it directly during the course of this book, but may need to at some point in the future.
Overall, the SDP acts as a business card for your computer to other users trying to connect with you. The SDP, combined with signaling and negotiation, is the fi rst half of the peer connection. In the next few sections, we will cover what happens after both users know how to fi nd each other.
Creating a Basic WebRTC Application
[ 40 ]
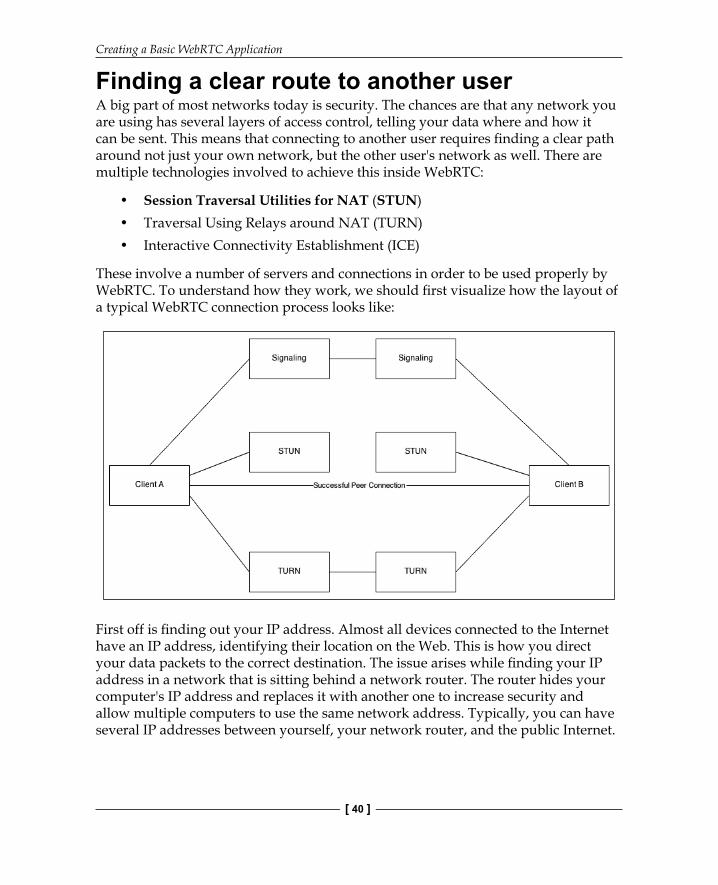
Finding a clear route to another userA big part of most networks today is security. The chances are that any network you are using has several layers of access control, telling your data where and how it can be sent. This means that connecting to another user requires fi nding a clear path around not just your own network, but the other user's network as well. There are multiple technologies involved to achieve this inside WebRTC:
• Session Traversal Utilities for NAT (STUN)• Traversal Using Relays around NAT (TURN)• Interactive Connectivity Establishment (ICE)
These involve a number of servers and connections in order to be used properly by WebRTC. To understand how they work, we should fi rst visualize how the layout of a typical WebRTC connection process looks like:
First off is fi nding out your IP address. Almost all devices connected to the Internet have an IP address, identifying their location on the Web. This is how you direct your data packets to the correct destination. The issue arises while fi nding your IP address in a network that is sitting behind a network router. The router hides your computer's IP address and replaces it with another one to increase security and allow multiple computers to use the same network address. Typically, you can have several IP addresses between yourself, your network router, and the public Internet.
Chapter 3
[ 41 ]
Session Traversal Utilities for NATSTUN is the fi rst step in fi nding a good connection between two peers. It helps identify each user on the Internet, and is intended to be used by other protocols in making a peer connection. It starts by making a request to a server, enabled with the STUN protocol. The server then identifi es the IP address of the client making the request, and returns that to the client. The client can then identify itself with the given IP address.
Using the STUN protocol requires having a STUN-enabled server to connect to. Currently, in Firefox and Chrome, default servers are provided directly from the browser vendors. This is great for getting up-and-running quickly and testing things out.
Although you may be praising the joys of serverless communication, setting up a good quality WebRTC application actually requires several servers to be enabled. You will need to provide your own set of STUN and TURN servers for your clients to use. There are plenty of great services already providing this today, so be sure to search around to fi nd more information.
Traversal Using Relays around NATIn some cases, a fi rewall might be too restrictive and not allow any STUN-based traffi c to the other user. This may be the case in an enterprise NAT that utilizes port randomization to allow thousands of more devices than you would typically fi nd. In this case, we need a different method of connecting with another user. The standard for this is called TURN.
The way this works is by adding a relay in between the clients that acts as a peer to peer connection on behalf of the client. The client then gets its information from the TURN server, much like streaming a video from a popular video service by making a request out to the server. This requires the TURN server to download, process, and redirect every packet that gets sent to it for each client. This is why, using TURN is often considered a last resort when making a WebRTC connection as the cost is high for setting up a quality TURN service.
There are many different statistics published on the use of STUN versus TURN, but they all seem to point to the same conclusion—most of the time, your users will be fi ne without TURN. The use of WebRTC with STUN will work with most network confi gurations. When setting up your own WebRTC service, it is a good idea to track this information and decide for yourself if the cost of using a TURN service is worth it.
Creating a Basic WebRTC Application
[ 42 ]
You may notice that none of the examples have confi guration values for TURN servers. The book assumes that the network you are on will be compatible with STUN. If you are having trouble connecting, it may be necessary to fi nd a public low-use TURN server and use it while following the examples.
Interactive Connectivity EstablishmentNow that we have covered STUN and TURN, we can learn how it is all brought together through another standard called ICE. It is the process that utilizes STUN and TURN to provide a successful route for peer to peer connections. It works by fi nding a range of addresses available to each user and testing each address in sorted order, until it fi nds a combination that will work for both the clients.
The process of ICE starts off by making no assumptions about each user's network confi guration. It will incrementally go through a set of steps to discover how each client's network is set up. This process will use different sets of technologies to do this. The goal is to discover enough information about each network to make a successful connection.
Each ICE candidate is found through the use of STUN and TURN. It will query the STUN server to fi nd the external IP address and append the location of a TURN server as a backup if the connection fails. Whenever the browser fi nds a new candidate, it notifi es the client application that it needs to send the ICE candidate through the signaling channel. After enough addresses have been found and tested, and a connection is made, the process fi nally comes to an end.
Building a basic WebRTC applicationNow that we have a good understanding of how the pieces of WebRTC are used, we are going to build our fi rst WebRTC-enabled application. By the end of this chapter, you will have a working WebRTC web page where you can see the technology in action. We are going to pull all the information we just covered in to an easy-to-develop example. We will cover:
• Creating a RTCPeerConnection• Creating the SDP offer and response• Finding ICE candidates for peers• Creating a successful WebRTC connection
Chapter 3
[ 43 ]
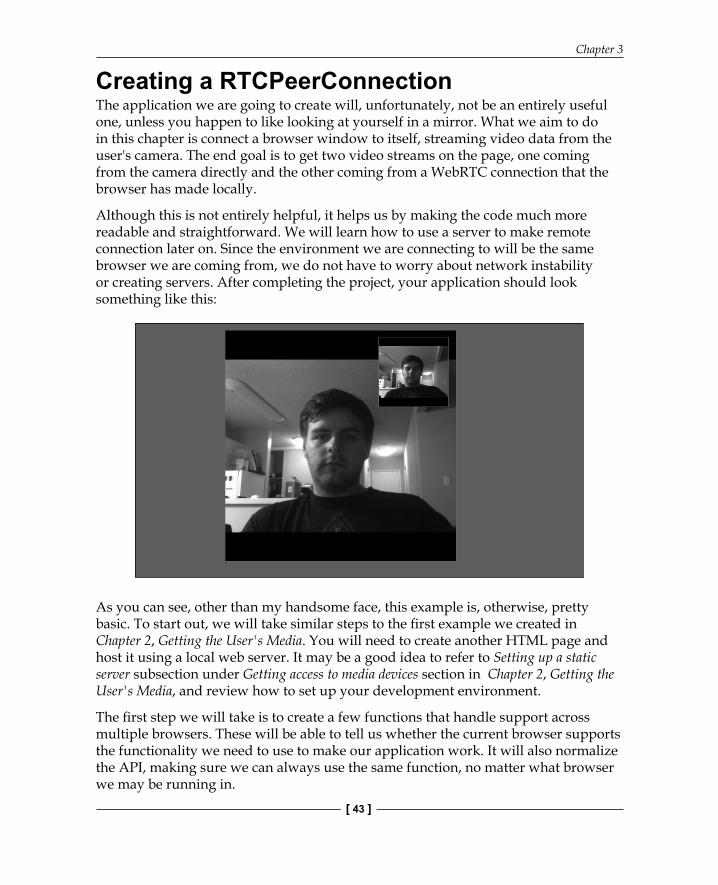
Creating a RTCPeerConnectionThe application we are going to create will, unfortunately, not be an entirely useful one, unless you happen to like looking at yourself in a mirror. What we aim to do in this chapter is connect a browser window to itself, streaming video data from the user's camera. The end goal is to get two video streams on the page, one coming from the camera directly and the other coming from a WebRTC connection that the browser has made locally.
Although this is not entirely helpful, it helps us by making the code much more readable and straightforward. We will learn how to use a server to make remote connection later on. Since the environment we are connecting to will be the same browser we are coming from, we do not have to worry about network instability or creating servers. After completing the project, your application should look something like this:
As you can see, other than my handsome face, this example is, otherwise, pretty basic. To start out, we will take similar steps to the fi rst example we created in Chapter 2, Getting the User's Media. You will need to create another HTML page and host it using a local web server. It may be a good idea to refer to Setting up a static server subsection under Getting access to media devices section in Chapter 2, Getting the User's Media, and review how to set up your development environment.
The fi rst step we will take is to create a few functions that handle support across multiple browsers. These will be able to tell us whether the current browser supports the functionality we need to use to make our application work. It will also normalize the API, making sure we can always use the same function, no matter what browser we may be running in.
Creating a Basic WebRTC Application
[ 44 ]
Most browsers use prefi xes on functions that are still in development. Be sure you are updated on the latest browser implementations to see what prefi xes you should be using in your code. There are also the JavaScript libraries that help with dealing with prefi xes.
To get started, set up a new web page with a JavaScript source fi le. Our HTML page will contain two video elements on it, one for the fi rst client and another for the second:
<!DOCTYPE html><html lang="en"> <head> <meta charset="utf-8" /> <title>Learning WebRTC - Chapter 4: Creating a RTCPeerConnection</title> </head> <body> <div id=""container""> <video id=""yours"" autoplay></video> <video id=""theirs"" autoplay></video> </div> <script src=""main.js""></script> </body></html>
The html and head tags of this page should be familiar if you are used to creating HTML5 web pages. This is the standard format for any HTML5-compliant page. There are a lot of different boilerplate templates for creating a page, and this one is the one I feel is the simplest while still getting the job done. There is nothing that will drastically change the way our application works as long as the video elements are there, so if you need to make changes to this fi le, feel free to do so.
You will notice two video elements labeled—yours and theirs. These will be our two video feeds that will simulate connecting to another peer. Throughout the rest of this chapter—yours will be considered the local user that is initiating the connection. The other user—theirs—will be considered the remote user we are making the WebRTC connection to, even though they are not physically located somewhere else.
Chapter 3
[ 45 ]
Lastly, we include our script function. Always keep in mind to add this at the end of the HTML page. This guarantees that the elements in the body are ready for use and the page is fully loaded for JavaScript to interact with it.
Next, we will create our JavaScript source code. Create a new fi le named main.js and start fi lling it out with the following code:
function hasUserMedia() { navigator.getUserMedia = navigator.getUserMedia || navigator.webkitGetUserMedia || navigator.mozGetUserMedia || navigator.msGetUserMedia; return !!navigator.getUserMedia;}
function hasRTCPeerConnection() { window.RTCPeerConnection = window.RTCPeerConnection || window.webkitRTCPeerConnection || window.mozRTCPeerConnection; return !!window.RTCPeerConnection;}
The fi rst function deals with the getUserMedia API and should look familiar. The second function does a similar thing with the RTCPeerConnection object, ensuring we can use it in the browser. It fi rst tries to assign any implemented WebRTC functions in the browser to a common function we can use in every use case. It then returns the assignment of that variable to see whether it actually exists in this browser.
Now that we can tell which APIs the user supports, let's go ahead and start using them. The next few steps should be pretty familiar as well. We are going to repeat some of the functionality we encountered in Constraining the media stream section in Chapter 2, Getting the User's Media, to get the user's camera stream. Before we do anything with WebRTC, we should get the local camera stream from the user. This ensures that the user is ready to create a peer connection and we do not have to wait for the user to accept camera sharing before we make a peer connection.

Creating a Basic WebRTC Application
[ 46 ]
Most of the applications we build in WebRTC will go through a series of states. The hardest part about getting WebRTC to work is to do things in the proper order. If one step happens before another, it can break down the application quickly. These states are blocking, which means we cannot go onto the next state without completing the previous one. Here is an overview of how our application is going to work:
First we need to get the media stream from the user. This ensures that the stream is ready and the user has agreed to share their camera and microphone.
Next, we create the peer connection. This starts off the process in the disconnected state. This is where we can confi gure the WebRTC connection with the ICE servers that we would like to use. At this moment, the browser is sitting idly and waiting for the connection process to start.

Chapter 3
[ 47 ]
The magic starts when an offer is created by one of the users. This kicks the browser into action and it starts to get ready to make a peer connection with another user. The offer and response are part of the signaling process, discussed in this chapter.
At the same time, the browser is also going to look for the candidate port and IP combinations that the other peer can connect to. It will continue to do this over a period of time, until a connection can be made or the connection fails to succeed. Once this is completed, the WebRTC connection process is over and the two users can start sharing information.
The next piece of code will capture the user's camera and make it available in our stream variable. You can now add this code after our two function defi nitions in your JavaScript:
var yourVideo = document.querySelector(''#yours''), theirVideo = document.querySelector(''#theirs''), yourConnection, theirConnection;
if (hasUserMedia()) { navigator.getUserMedia({ video: true, audio: false }, function (stream) { yourVideo.src = window.URL.createObjectURL(stream);
if (hasRTCPeerConnection()) { startPeerConnection(stream); } else { alert(""Sorry, your browser does not support WebRTC.""); } }, function (error) { alert(""Sorry, we failed to capture your camera, please try again.""); });} else { alert("Sorry, your browser does not support WebRTC.");}
The fi rst part selects our video elements from the document and sets up a few variables we will use down the road. We are assuming that the browser supports the querySelector API at this point. We then check whether the user has access to the getUserMedia API. If they do not, our program stops here and we alert the user that they do not support WebRTC.
Creating a Basic WebRTC Application
[ 48 ]
If this succeeds, we attempt to get the camera from the user. This is an asynchronous operation since the user has to agree to share their camera. If this succeeds, we set our local video's stream to the user's stream so that they can see this happened successfully. If this fails, we notify the user of the error and stop the process.
Finally, we check whether the user has access to the RTCPeerConnection API. If so, we call the function that will start our connection process (this will be defi ned in the next section). If not, we stop here and notify the user once more.
The next step is to implement the startPeerConnection function called in the previous section. This function will create our RTCPeerConnection objects, set up the SDP offer and response, and fi nd the ICE candidates for both peers.
Now we create the RTCPeerConnection object for both the peers. Add the following to your JavaScript fi le:
function startPeerConnection(stream) { var configuration = { // Uncomment this code to add custom iceServers //"iceServers": [{ "url": "stun:stun.1.google.com:19302" }]" }] }; yourConnection = new webkitRTCPeerConnection(configuration); theirConnection = new webkitRTCPeerConnection(configuration);};
Here, we defi ne our function to create the connection objects. In the configuration object, you can pass parameters for which ICE servers you would like to use in your application. To use custom ICE servers, simply uncomment the code and change the value. The browser will automatically pick up the confi guration and use it while making a peer connection. At this point, this is, however, not required, since the browser should have a default set of ICE servers to use. After this, we create two peer connection objects to represent each of the users in our application. Still keep in mind that both of our users will be in the same browser window for this application.
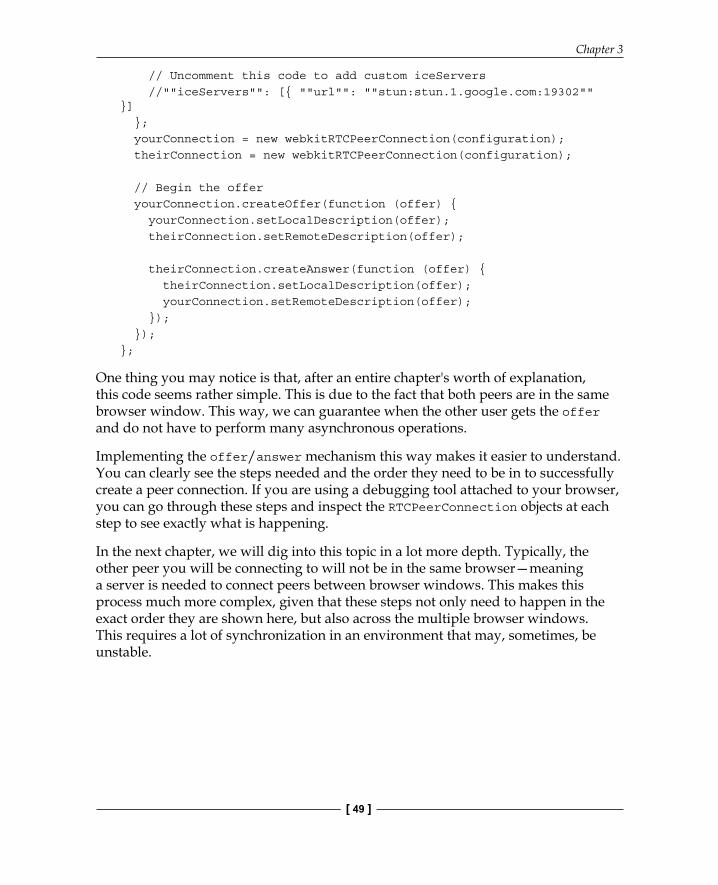
Creating the SDP offer and response answerIn this section, we will perform the offer and response answer process for making a peer connection. Our next block of code will set up the offer and response answer fl ows between the two peers:
function startPeerConnection(stream) { var configuration = {
Chapter 3
[ 49 ]
// Uncomment this code to add custom iceServers //""iceServers"": [{ ""url"": ""stun:stun.1.google.com:19302"" }] }; yourConnection = new webkitRTCPeerConnection(configuration); theirConnection = new webkitRTCPeerConnection(configuration);
// Begin the offer yourConnection.createOffer(function (offer) { yourConnection.setLocalDescription(offer); theirConnection.setRemoteDescription(offer);
theirConnection.createAnswer(function (offer) { theirConnection.setLocalDescription(offer); yourConnection.setRemoteDescription(offer); }); });};
One thing you may notice is that, after an entire chapter's worth of explanation, this code seems rather simple. This is due to the fact that both peers are in the same browser window. This way, we can guarantee when the other user gets the offer and do not have to perform many asynchronous operations.
Implementing the offer/answer mechanism this way makes it easier to understand. You can clearly see the steps needed and the order they need to be in to successfully create a peer connection. If you are using a debugging tool attached to your browser, you can go through these steps and inspect the RTCPeerConnection objects at each step to see exactly what is happening.
In the next chapter, we will dig into this topic in a lot more depth. Typically, the other peer you will be connecting to will not be in the same browser—meaning a server is needed to connect peers between browser windows. This makes this process much more complex, given that these steps not only need to happen in the exact order they are shown here, but also across the multiple browser windows. This requires a lot of synchronization in an environment that may, sometimes, be unstable.
Creating a Basic WebRTC Application
[ 50 ]
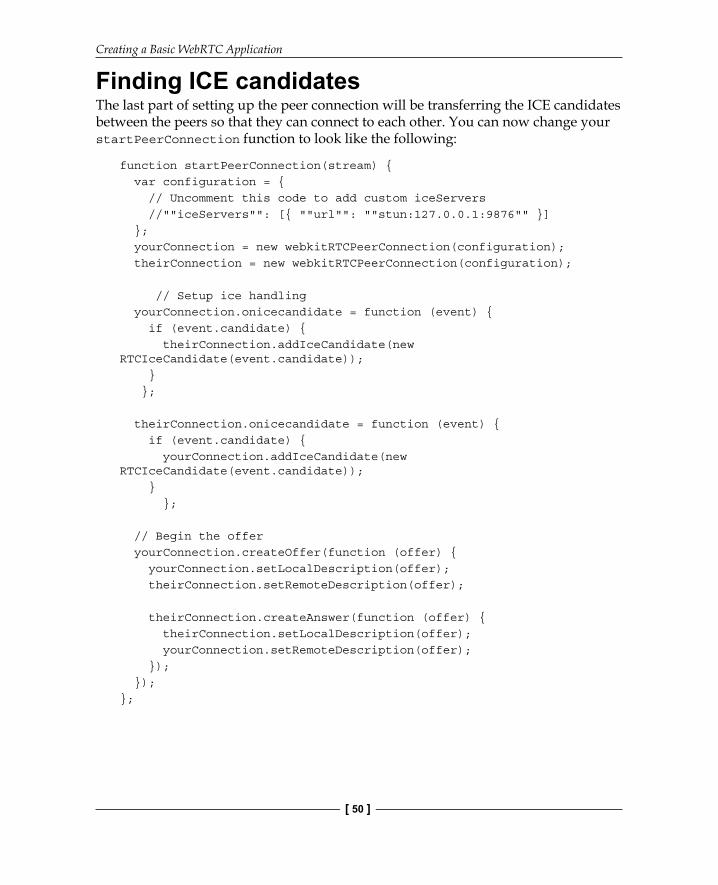
Finding ICE candidatesThe last part of setting up the peer connection will be transferring the ICE candidates between the peers so that they can connect to each other. You can now change your startPeerConnection function to look like the following:
function startPeerConnection(stream) { var configuration = { // Uncomment this code to add custom iceServers //""iceServers"": [{ ""url"": ""stun:127.0.0.1:9876"" }] }; yourConnection = new webkitRTCPeerConnection(configuration); theirConnection = new webkitRTCPeerConnection(configuration);
// Setup ice handling yourConnection.onicecandidate = function (event) { if (event.candidate) { theirConnection.addIceCandidate(new RTCIceCandidate(event.candidate)); } };
theirConnection.onicecandidate = function (event) { if (event.candidate) { yourConnection.addIceCandidate(new RTCIceCandidate(event.candidate)); } };
// Begin the offer yourConnection.createOffer(function (offer) { yourConnection.setLocalDescription(offer); theirConnection.setRemoteDescription(offer);
theirConnection.createAnswer(function (offer) { theirConnection.setLocalDescription(offer); yourConnection.setRemoteDescription(offer); }); });};
Chapter 3
[ 51 ]
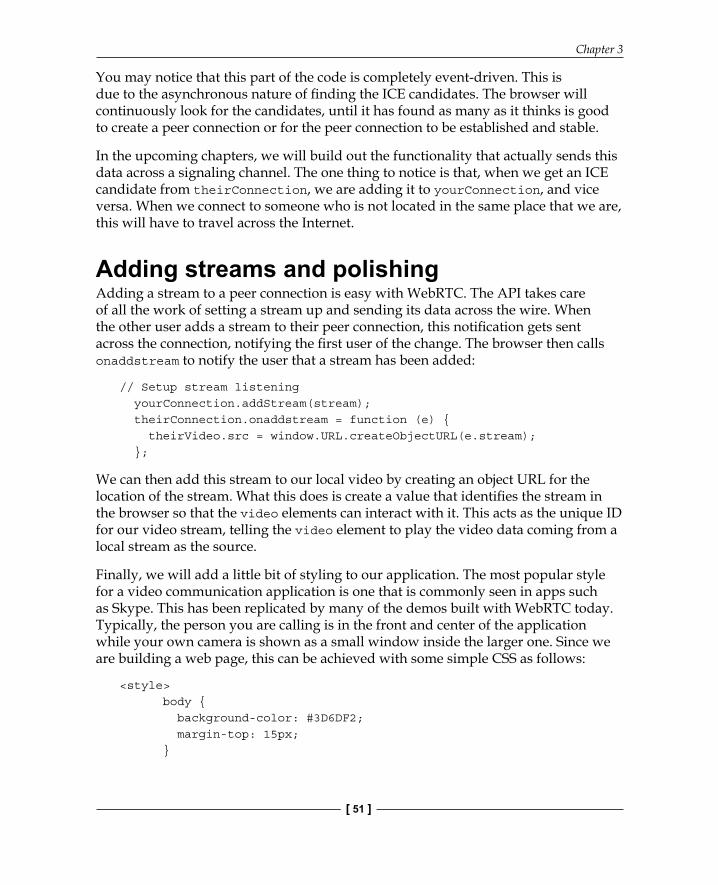
You may notice that this part of the code is completely event-driven. This is due to the asynchronous nature of fi nding the ICE candidates. The browser will continuously look for the candidates, until it has found as many as it thinks is good to create a peer connection or for the peer connection to be established and stable.
In the upcoming chapters, we will build out the functionality that actually sends this data across a signaling channel. The one thing to notice is that, when we get an ICE candidate from theirConnection, we are adding it to yourConnection, and vice versa. When we connect to someone who is not located in the same place that we are, this will have to travel across the Internet.
Adding streams and polishingAdding a stream to a peer connection is easy with WebRTC. The API takes care of all the work of setting a stream up and sending its data across the wire. When the other user adds a stream to their peer connection, this notifi cation gets sent across the connection, notifying the fi rst user of the change. The browser then calls onaddstream to notify the user that a stream has been added:
// Setup stream listening yourConnection.addStream(stream); theirConnection.onaddstream = function (e) { theirVideo.src = window.URL.createObjectURL(e.stream); };
We can then add this stream to our local video by creating an object URL for the location of the stream. What this does is create a value that identifi es the stream in the browser so that the video elements can interact with it. This acts as the unique ID for our video stream, telling the video element to play the video data coming from a local stream as the source.
Finally, we will add a little bit of styling to our application. The most popular style for a video communication application is one that is commonly seen in apps such as Skype. This has been replicated by many of the demos built with WebRTC today. Typically, the person you are calling is in the front and center of the application while your own camera is shown as a small window inside the larger one. Since we are building a web page, this can be achieved with some simple CSS as follows:
<style> body { background-color: #3D6DF2; margin-top: 15px; }
Creating a Basic WebRTC Application
[ 52 ]
video { background: black; border: 1px solid gray; }
#container { position: relative; display: block; margin: 0 auto; width: 500px; height: 500px; }
#yours { width: 150px; height: 150px; position: absolute; top: 15px; right: 15px; }
#theirs { width: 500px; height: 500px; } </style>
Simply add this to your HTML page, and you should have a good start to a well-styled WebRTC application. At this point, if you still think our applications looks dull, feel free to continue to add styling to the application. We will build on this in the upcoming chapters, and it is always more exciting to have a nice looking demo with some CSS.
Running your fi rst WebRTC applicationNow, run your web page to test it out. When you run the page it should ask you to share your camera with the browser. Once you accept, it will start the WebRTC connection process. The browser should almost instantly go through the steps that we have discussed so far, and create a connection. You should then see two videos of yourself, one from your camera and the other being streamed over a WebRTC connection.
Chapter 3
[ 53 ]
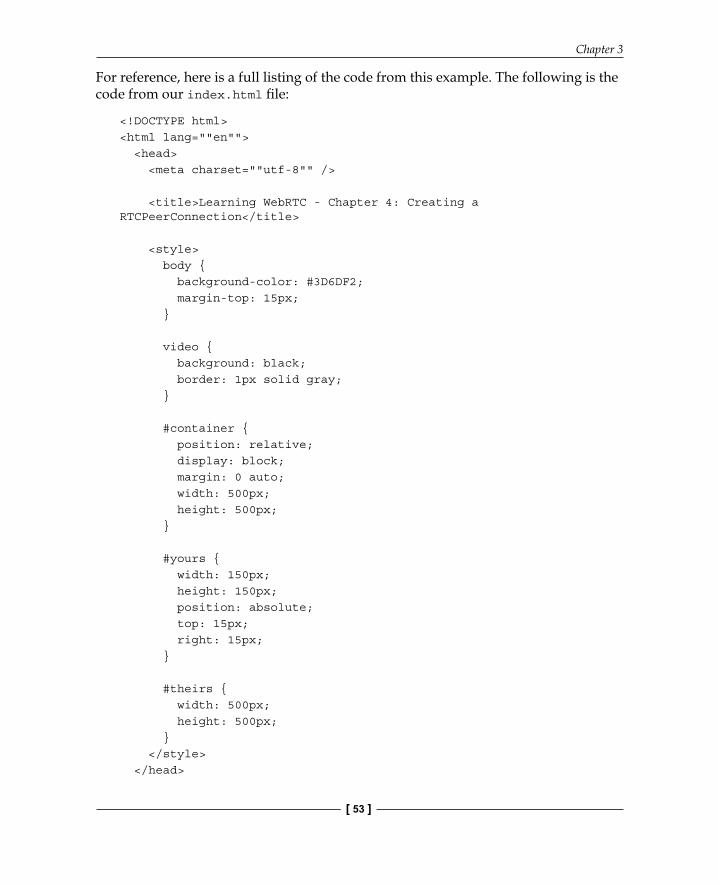
For reference, here is a full listing of the code from this example. The following is the code from our index.html fi le:
<!DOCTYPE html><html lang=""en""> <head> <meta charset=""utf-8"" />
<title>Learning WebRTC - Chapter 4: Creating a RTCPeerConnection</title>
<style> body { background-color: #3D6DF2; margin-top: 15px; }
video { background: black; border: 1px solid gray; }
#container { position: relative; display: block; margin: 0 auto; width: 500px; height: 500px; }
#yours { width: 150px; height: 150px; position: absolute; top: 15px; right: 15px; }
#theirs { width: 500px; height: 500px; } </style> </head>
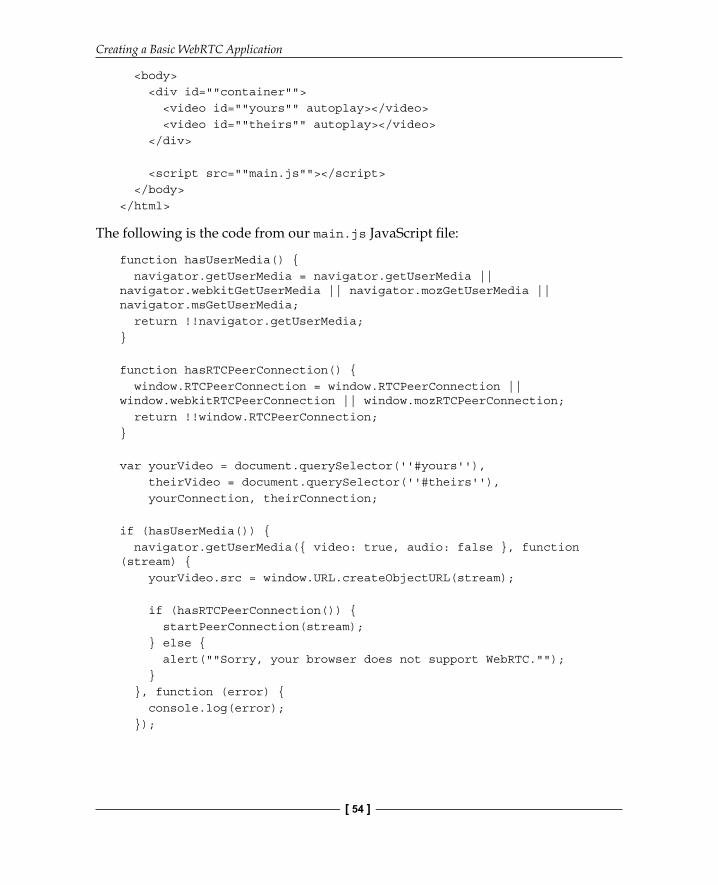
Creating a Basic WebRTC Application
[ 54 ]
<body> <div id=""container""> <video id=""yours"" autoplay></video> <video id=""theirs"" autoplay></video> </div>
<script src=""main.js""></script> </body></html>
The following is the code from our main.js JavaScript fi le:
function hasUserMedia() { navigator.getUserMedia = navigator.getUserMedia || navigator.webkitGetUserMedia || navigator.mozGetUserMedia || navigator.msGetUserMedia; return !!navigator.getUserMedia;}
function hasRTCPeerConnection() { window.RTCPeerConnection = window.RTCPeerConnection || window.webkitRTCPeerConnection || window.mozRTCPeerConnection; return !!window.RTCPeerConnection;}
var yourVideo = document.querySelector(''#yours''), theirVideo = document.querySelector(''#theirs''), yourConnection, theirConnection;
if (hasUserMedia()) { navigator.getUserMedia({ video: true, audio: false }, function (stream) { yourVideo.src = window.URL.createObjectURL(stream);
if (hasRTCPeerConnection()) { startPeerConnection(stream); } else { alert(""Sorry, your browser does not support WebRTC.""); } }, function (error) { console.log(error); });
Chapter 3
[ 55 ]
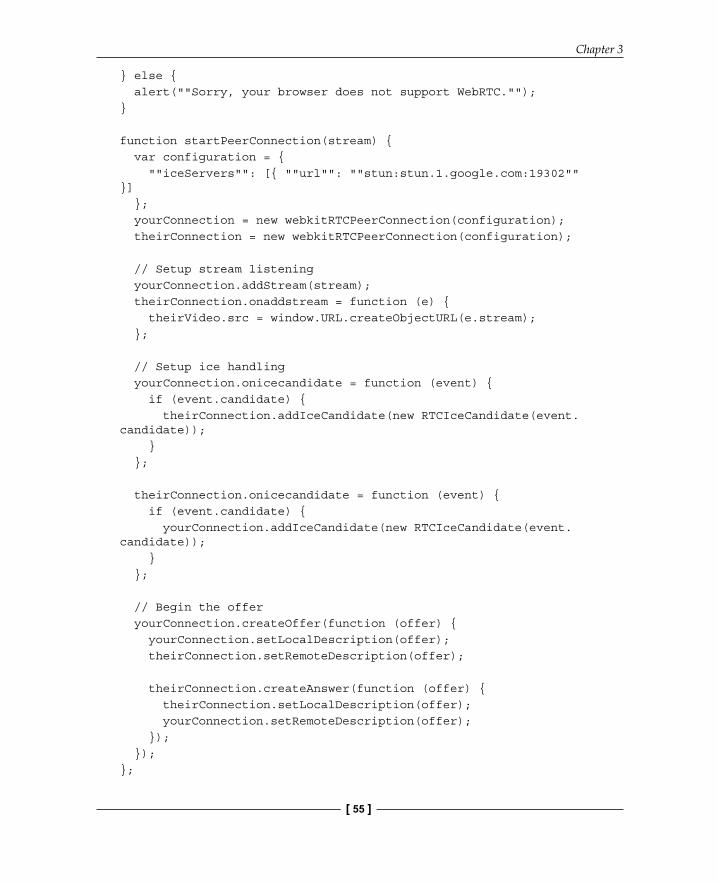
} else { alert(""Sorry, your browser does not support WebRTC."");}
function startPeerConnection(stream) { var configuration = { ""iceServers"": [{ ""url"": ""stun:stun.1.google.com:19302"" }] }; yourConnection = new webkitRTCPeerConnection(configuration); theirConnection = new webkitRTCPeerConnection(configuration);
// Setup stream listening yourConnection.addStream(stream); theirConnection.onaddstream = function (e) { theirVideo.src = window.URL.createObjectURL(e.stream); };
// Setup ice handling yourConnection.onicecandidate = function (event) { if (event.candidate) { theirConnection.addIceCandidate(new RTCIceCandidate(event.candidate)); } };
theirConnection.onicecandidate = function (event) { if (event.candidate) { yourConnection.addIceCandidate(new RTCIceCandidate(event.candidate)); } };
// Begin the offer yourConnection.createOffer(function (offer) { yourConnection.setLocalDescription(offer); theirConnection.setRemoteDescription(offer);
theirConnection.createAnswer(function (offer) { theirConnection.setLocalDescription(offer); yourConnection.setRemoteDescription(offer); }); });};
Creating a Basic WebRTC Application
[ 56 ]
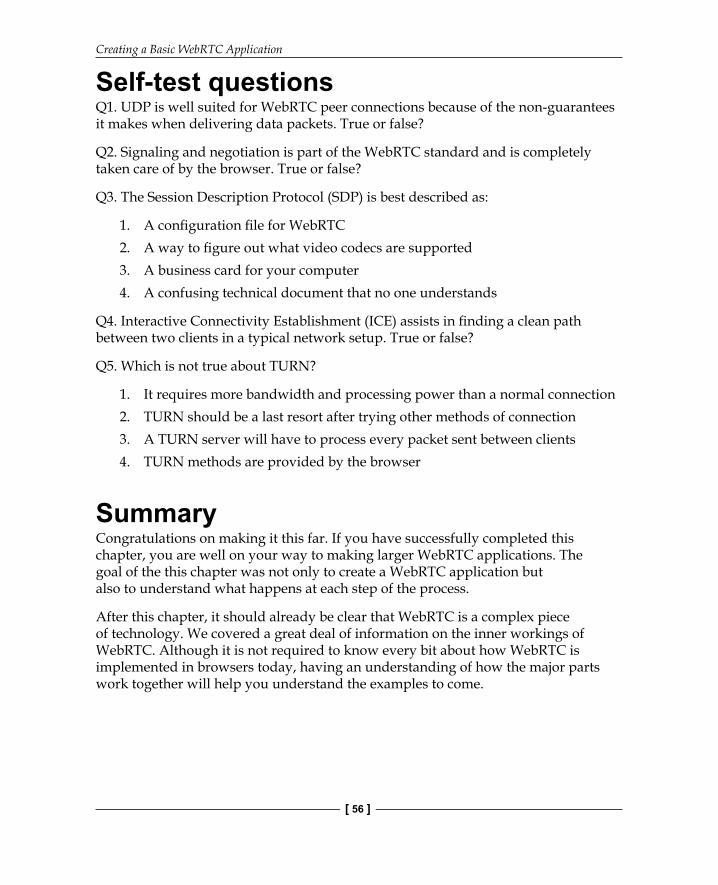
Self-test questionsQ1. UDP is well suited for WebRTC peer connections because of the non-guarantees it makes when delivering data packets. True or false?
Q2. Signaling and negotiation is part of the WebRTC standard and is completely taken care of by the browser. True or false?
Q3. The Session Description Protocol (SDP) is best described as:
1. A confi guration fi le for WebRTC2. A way to fi gure out what video codecs are supported3. A business card for your computer4. A confusing technical document that no one understands
Q4. Interactive Connectivity Establishment (ICE) assists in fi nding a clean path between two clients in a typical network setup. True or false?
Q5. Which is not true about TURN?
1. It requires more bandwidth and processing power than a normal connection2. TURN should be a last resort after trying other methods of connection3. A TURN server will have to process every packet sent between clients4. TURN methods are provided by the browser
SummaryCongratulations on making it this far. If you have successfully completed this chapter, you are well on your way to making larger WebRTC applications. The goal of the this chapter was not only to create a WebRTC application but also to understand what happens at each step of the process.
After this chapter, it should already be clear that WebRTC is a complex piece of technology. We covered a great deal of information on the inner workings of WebRTC. Although it is not required to know every bit about how WebRTC is implemented in browsers today, having an understanding of how the major parts work together will help you understand the examples to come.
Chapter 3
[ 57 ]
In this chapter, we covered the inner workings of how peer connections are created in the browser. We covered several of the technologies that enable this, including UDP, SDP, and ICE. You should now have a surface-level understanding of how two browsers can fi nd each other and communicate over the Internet.
It would be a good idea to review the material we have covered so far to fully understand how WebRTC works in our example. It is important to note that each step is important as well as the sequence. This will help debug issues in your WebRTC application as we introduce more complexity in future chapters.
The rest of the book will build upon this example, making it much more complex than it is currently. We will add features to connect multiple users across several browsers in many different environments. Each chapter will take a part of the WebRTC process and look at it in depth, covering the common pitfalls, and take care of edge cases such as network stability and security.
In the next chapter, we will begin building the signaling server to support connecting remote users. This is the basis for the signaling server that we will use through the rest of the book. It will also allow us to create our fi rst real calling application, much like Google Hangouts.
Where to buy this book You can buy Learning WebRTC from the Packt Publishing website.
Alternatively, you can buy the book from Amazon, BN.com, Computer Manuals and most internet
book retailers.
Click here for ordering and shipping details.
www.PacktPub.com
Stay Connected:
Get more information Learning WebRTC
Related Documents