6V 2A-10A • 12V 2A-20A BATTERY CHARGER OWNER’S MANUAL • Suitable for AGM, GEL, STD Batteries • ETL Certified • CEC/DOE Compliant • Electrical Rating 120VAC / 60Hz • 200A Engine start • Short Circuit Protected • Reverse Polarity Protected • Overheat Protected • Spark Proof • 1 Year Warranty BR – CGES1240

Welcome message from author
This document is posted to help you gain knowledge. Please leave a comment to let me know what you think about it! Share it to your friends and learn new things together.
Transcript

6V 2A-10A • 12V 2A-20A BATTERY CHARGER
OWNER’S MANUAL
• Suitable for AGM, GEL, STD Batteries • ETL Certified • CEC/DOE Compliant • Electrical Rating 120VAC / 60Hz • 200A Engine start
• Short Circuit Protected • Reverse Polarity Protected • Overheat Protected • Spark Proof • 1 Year Warranty
BR – CGES1240

WARNING
This manual contains important safety instruction, read and understand before operation! 1. SAVE THESE INSTRUCTIONS. This manual contains
important safety and operating instructions. You may need to
refer to these instructions at a later date.
2. CAUTION. To reduce risk of injury, charge only wet cell,
lead-acid, automotive type rechargeable batteries. Other types
of batteries may burst causing personal injury and property
damage.
3. Do not expose charger to rain or snow.
4. Use of an attachment not recommended or sold by the
battery charger manufacturer may result in a risk of fire, electric
shock, or injury to persons.
5. To reduce risk of damage to electric plug and cord, pull by
plug rather than cord when disconnecting charger.
6. Make sure cord is located so that it will not be stepped on,
tripped over, or otherwise subjected to damage or stress.
7. An extension cord should not be used unless absolutely
necessary. Use of improper extension cord could result in a
risk of fire and electric shock. If an extension cord must be
used, make sure:
a. That pins on plug of extension cord are the same number,
size, and shape as those of plug on charger;
b. That extension cord is properly wired and in good electrical
condition; and
c. If the length of the extension cord is less than 25 feet, use
an 18AWG cord, If 50 feet – 16AWG, 100 feet -16AWG, 150
feet - 14AWG.
8. Do not operate charger with damaged cord or plug, replace
the cord or plug immediately.
9. Do not operate charger if it has received a sharp blow, been
dropped, or otherwise damaged in any way; take it to a
qualified serviceman.
10. Do not disassemble charger; take it to a qualified
serviceman when service or repair is required. Incorrect
reassembly may result in a risk of electric shock or fire.
11. To reduce risk of electric shock, unplug charger form outlet
before attempting any maintenance or cleaning. Turning off
controls will not reduce this risk.
12. WARNING - RISK OF EXPLOSIVE GASES WORKING IN VICINITY OF A LEAD-ACID BATTERY IS
DANGEROUS. BATTERIES GENERATE EXPLOSIVE GASES
DURING NORMAL BATTERY OPERATION. FOR THIS
REASON IT IS OF UTMOST IMPORTANCE THAT EACH
TIME BEFORE USING YOUR CHARGER.
13. PERSONAL PRECAUTIONS a. Someone should be within range of your voice or close
enough to come to your aid when you work near a lead-
acid battery.
b. Have plenty of fresh water and soap nearby in case
battery acid contacts skin, clothing, or eyes.
c. Wear complete eye protection, and clothing protection.
Avoid touching eyes while working near battery.
d. If battery acid contacts skin or clothing, wash
immediately with soap and water. If acid enter eye,
immediately flood eye with running cold water for at least
10 minutes and get
b. To reduce risk of battery explosion, follow these
instructions and those published by battery manufacturer
and manufacturer of any equipment you intend to use in
vicinity of battery. Review cautionary marking on these
products and on engine.
c. Wear complete eye protection, and clothing protection.
Avoid touching eyes while working near battery.
d. If battery acid contacts skin or clothing, wash
immediately with soap and water. If acid enter eye,
immediately flood eye with running cold water for at least
10 minutes and get medical attention immediately.
e. NEVER smoke or allow a spark or flame in vicinity of
battery or engine.
f. Be extra cautious to reduce risk of dropping a metal tool
onto battery. It might spark or short circuit battery or other
electrical part that may cause explosion.
g. Remove personal metal items such as rings, bracelets,
necklaces, and watches when working with a lead-acid
battery. A lead-acid battery can produce a short circuit
current high enough to weld a ring or the like to metal,
causing a severe burn.
h. Use charger for charging a LEAD-ACID battery only. It
is not intended to supply power to a low-voltage electrical
system other than in a starter motor application. Do not
use battery charger for charging dry-cell batteries that are
commonly used with home appliances. These batteries
may burst and cause injury to persons and damage to
property.
i. NEVER charge a frozen battery!
1

Item Code BR – CGES1240
zH06 CA V011 egatloV tupnI
V21 V6 egatloV tuptuO
Output Current 2 A, 40 A Boost 2 A, 10A, 40 A Boost
Starting settings 12V, 200A
5 second maximum with 180 second minimum rest
Battery Cables 6' Red = Positive Black = Negative
SPECIFICATION
Assembly
Attach Wheels to Axle 1. Slide Wheel Bearing (37) onto Axle (35).
2. Slide Wheel (17) onto Axle.
3. Attach Hubcap (17) to Axle by tapping gently with rubber mallet (not included).
4. Repeat on other side
5. Attach Hubcap (17) to Axle by tapping gently with rubber mallet (not included).
6. Repeat on other side.
Attach Wheel Assembly 1. Lay Charger down.
2. Attach Wheel Assembly with two Brackets (33) and four Tapping Screws (29).
Attach Foot Attach Foot (30) with four Tapping Screws (29).
Attach Handle 1. Remove two top screws on each side of Charger.
2. Align Handle (1) with mounting holes.
3. Attach Handle with screws.
2
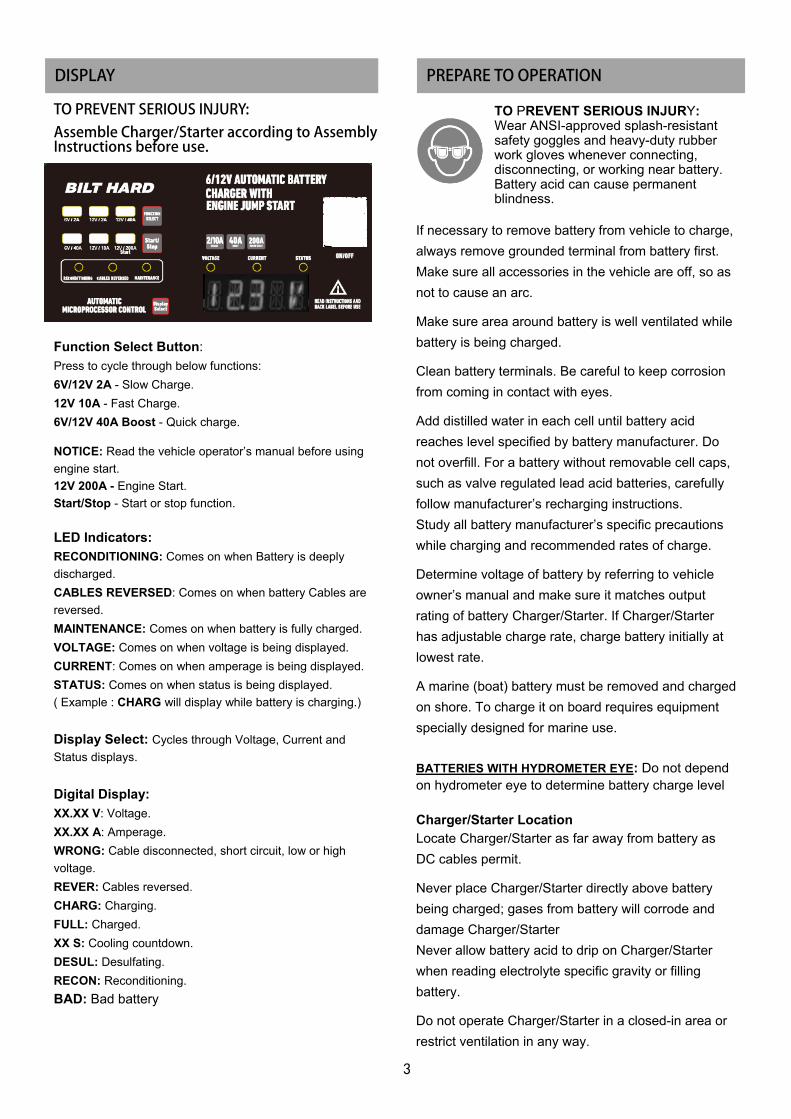
DISPLAY
TO PREVENT SERIOUS INJURY:
Assemble Charger/Starter according to Assembly Instructions before use.
Function Select Button:Press to cycle through below functions: 6V/12V 2A - Slow Charge. 12V 10A - Fast Charge. 6V/12V 40A Boost - Quick charge.
NOTICE: Read the vehicle operator’s manual before using engine start. 12V 200A - Engine Start. Start/Stop - Start or stop function.
LED Indicators: RECONDITIONING: Comes on when Battery is deeply discharged. CABLES REVERSED: Comes on when battery Cables are reversed.MAINTENANCE: Comes on when battery is fully charged. VOLTAGE: Comes on when voltage is being displayed. CURRENT: Comes on when amperage is being displayed. STATUS: Comes on when status is being displayed. ( Example : CHARG will display while battery is charging.)
Display Select: Cycles through Voltage, Current and Status displays.
Digital Display:XX.XX V: Voltage. XX.XX A: Amperage. WRONG: Cable disconnected, short circuit, low or high voltage. REVER: Cables reversed. CHARG: Charging. FULL: Charged. XX S: Cooling countdown. DESUL: Desulfating. RECON: Reconditioning. BAD: Bad battery
If necessary to remove battery from vehicle to charge, always remove grounded terminal from battery first. Make sure all accessories in the vehicle are off, so as not to cause an arc.
Make sure area around battery is well ventilated while battery is being charged.
Clean battery terminals. Be careful to keep corrosion from coming in contact with eyes.
Add distilled water in each cell until battery acid reaches level specified by battery manufacturer. Do not overfill. For a battery without removable cell caps, such as valve regulated lead acid batteries, carefully follow manufacturer’s recharging instructions. Study all battery manufacturer’s specific precautions while charging and recommended rates of charge.
Determine voltage of battery by referring to vehicle owner’s manual and make sure it matches output rating of battery Charger/Starter. If Charger/Starter has adjustable charge rate, charge battery initially at lowest rate.
A marine (boat) battery must be removed and charged on shore. To charge it on board requires equipment specially designed for marine use.
BATTERIES WITH HYDROMETER EYE: Do not depend on hydrometer eye to determine battery charge level
Charger/Starter Location Locate Charger/Starter as far away from battery as DC cables permit.
Never place Charger/Starter directly above battery being charged; gases from battery will corrode and damage Charger/Starter Never allow battery acid to drip on Charger/Starter when reading electrolyte specific gravity or filling battery.
Do not operate Charger/Starter in a closed-in area or restrict ventilation in any way.
PREPARE TO OPERATION
TO PREVENT SERIOUS INJURY:Wear ANSI-approved splash-resistant safety goggles and heavy-duty rubber work gloves whenever connecting, disconnecting, or working near battery. Battery acid can cause permanent blindness.
3

OPERATION
Charging Battery Installed in Vehicle
WARNING! Do not use Start setting to charge batteries. Use to jump start only. DO NOT CHARGE A FROZEN BATTERY. COLD BATTERIES: Begin charging at lowest rate, increase rate as battery reaches normal temperature.
1. Unplug Charger/Starter. 2. Position AC and DC cables to reduce risk of damage by
hood, door, or moving engine part. 3. Stay clear of fan blades, belts, pulleys, and other parts
that can cause injury to persons. 4. Check polarity of battery posts. POSITIVE (POS, P, +)
battery post usually has larger diameter than NEGATIVE (NEG, N,–) post.
5. Determine which battery post is grounded (connected) to the chassis. If negative post is grounded to chassis, see a. If positive post is grounded to the chassis, see b. a. For negative-grounded vehicle (as in most vehicles): *Connect POSITIVE (RED) clip from battery Charger/Starter to POSITIVE (POS, P, +) ungrounded post of battery. *Connect NEGATIVE (BLACK) clip to vehicle chassis or engine block away from battery. Do not connect clip to carburetor, fuel lines, or sheet-metal body parts. Connect to a heavy gauge metal part of the frame or engine block.
b. For positive-grounded vehicle:*Connect NEGATIVE (BLACK) clip from battery Charger/Starter to NEGATIVE (NEG, N, –) ungrounded post of battery. Connect POSITIVE (RED) clip to vehicle chassis or engine block away from battery. Do not connect clip to carburetor, fuel lines, or sheet-metal body parts. Connect to a heavy gauge metal part of the frame or engine block.
6. Plug Charger/Starter into grounded 120V receptacle. 7. Turn Power Switch on. 8. Press Function Select Button until desired function lights
up.
WARNING! Do not use 12V 200A Start function for charging.
9. Press Start/Stop button to start function. 10. When finished, turn Power Switch off, unplug power cord, remove clip from vehicle chassis, and then remove clip from battery terminal. 11. After use clean, then store the charger indoors out of children’s reach.
Charging Battery Installed in Vehicle
WARNING! Do not use Start setting to charge batteries. Use to jump start only. DO NOT CHARGE A FROZEN BATTERY. COLD BATTERIES: Begin charging at lowest rate, increase rate as battery reaches normal temperature.
1. Unplug Charger/Starter.
2. Attach at least a 24-inch-long 6-gauge (AWG) insulated battery cable to NEGATIVE (NEG, N, –) battery post.
3. Connect POSITIVE (RED) charger clip to POSITIVE (POS, P, +) post of battery.
CAUTION! Do not face battery when making final connection. 4. Position yourself and free end of battery cable as
far away from battery as possible – then connect NEGATIVE (BLACK) charger clip to free end of battery cable.
5. Plug Charger/Starter into grounded 120V receptacle.
6. Turn Power Switch on.
7. Press Function Select Button until desired function lights up. Refer to Table Bon page 9.
WARNING! Do not use 12V 200A Start function for charging.
8. Press Start/Stop button to start function.
9. When finished, turn Power Switch off and unplug power cord.
10. When disconnecting Charger/Starter, always do so in reverse sequence of connecting procedure and break first connection while as far away from battery as practical.
11. After use clean, then store the Charger/Starter indoors out of children’s reach.
4

ENGINE STARTING
NOTICE: Some vehicles with onboard computers may be damaged from the high-current starting output. Thoroughly read the vehicle service manual before using this procedure.
WARNING! Do not use Start setting to charge batteries. Use to jump start only.
Note: During extremely cold weather or when battery is severely exhausted, charge the battery at 10A for about five minutes before attempting to start engine. 1. Unplug Charger/Starter.
2. Make sure setting of Engine Start charge rate matches the vehicle battery. The emergency starter function should optimally supply at least 50% of required battery CCA rating.
3. Position AC and DC cables to reduce risk of damage by hood, door, or moving engine part.
4. Stay clear of fan blades, belts, pulleys, and other parts that can cause injury to persons.
5. Determine which battery post is grounded (connected) to the chassis. If negative post is grounded to chassis, see a. If positive post is grounded to the chassis, see b.
a. For negative-grounded vehicle (as in most vehicles):
Connect POSITIVE (RED) clip from battery Charger/Starter to POSITIVE (POS, P, +) ungrounded post of battery.
Connect NEGATIVE (BLACK) clip to vehicle chassis or engine block away from battery. Do not connect clip to carburetor, fuel lines, or sheet-metal body parts. Connect to a heavy gauge metal part of the frame or engine block. b. For positive-grounded vehicle: Connect NEGATIVE (BLACK) clip from battery Charger/Starter to NEGATIVE (NEG, N, –) ungrounded post of battery. Connect POSITIVE (RED) clip to vehicle chassis or engine block away from battery. Do not connect clip to carburetor, fuel lines, or sheet-metal body parts. Connect to a heavy gauge metal part of the frame or engine block.
6. Plug Charger/Starter into grounded 120V receptacle.
7. Turn Power Switch on. 8. Press Function Select Button until 12V 200A Start lights up. 9. Press Start/Stop button to start function. 10. Turn ignition key. If engine fails to start, charge battery at 10A for an additional five minutes before attempting to start again. 11. After the engine starts, press Start/Stop button to stop function, then turn Power Switch off. 12. Unplug power cord, remove clip from vehicle chassis, and then remove clip from battery terminal. 13. After use clean, then store the charger out of children’s reach.
MAINTANENCE & WARRANTY
MAINTANENCE INSTRUCTIONS This charger requires minimal maintenance. As with any
appliance or tool, a few common sense rules will prolong the
life of the battery charger.
ALWAYS BE SURE THE CHARGER IS UNPLUGGED
BEFORE PERFORMING ANY MAINTENANCE OR
CLEANING.
1. Store in a clean, dry place
2. Coil up the cords when not in use.
3. Clean the case and cords with a slightly damp cloth.
4. Clean any corrosion from the clamps with a solution of
water and baking soda.
5. Examine the cords periodically for cracking or other
damage and have them replaced if necessary.
WARRANTY The main unit of charger enjoys 1 Year warranty to be free
from defects in use due to materials or quality problem.
This warranty covers the cost of the defective product only
and does not cover the cost of installation. we reserves the
right to refuse credit in the event that any damage to the
product resulted from collision, improper installation, or
other customer abuses.
This policy extends only to the original purchaser of the
product and is nontransferable.
If any query or want more information, feel free to contact
our Customer Support: (888) 680 2849 or send mail to:
5
Related Documents