Fracture with Blender Model vehicles for animation Master free software Learn to realistically smash and shatter objects using free 3D tools Create a retro car in Maya in just 15 steps. Discover expert techniques for better results Get creative in Sculptris with a 6-step tutorial plus video tuition Improve your character designs See how modo can add life to stylised concepts 52 Practical inspiration for the 3D community www.3DArtistonline.com PAGES OF EXPERT ADVICE 55 ARCH VIS THE ART OF Industry secrets inside... Plus! Follow our step-by-step tutorial for post-production in After Eff ects Top advice to help you sell your talents CREATE YOUR BEST SHOWREEL Pro artists share their tried-and-tested modelling skills HOT TOPOLOGY TIPS 3DS MAX MAYA BLENDER MODO UNITY SCULPTRIS RAYFIRE AFTER EFFECTS ISSUE 052

Welcome message from author
This document is posted to help you gain knowledge. Please leave a comment to let me know what you think about it! Share it to your friends and learn new things together.
Transcript

Fracture with Blender Model vehicles for animationMaster free softwareLearn to realistically smash and shatter objects using free 3D tools
Create a retro car in Maya in just 15 steps. Discover expert techniques for better results
Get creative in Sculptris with a 6-step tutorial plus video tuition
Improve your character designsSee how modo can add life to stylised concepts
52
Practical inspiration for the 3D community
www.3DArtistonline.com
PAGES OF EXPERT ADVICE
55ARCH VIS
THE ART OF
Industry secrets inside... Plus! Follow our step-by-step tutorial for post-production in After E� ects
Top advice to help you sell your talents
CREATE YOUR BEST SHOWREEL
Pro artists share their tried-and-tested modelling skills HOT TOPOLOGY TIPS
3DS MAX MAYA BLENDER MODO UNITY SCULPTRIS RAYFIRE AFTER EFFECTS
ISSU
E 05
2
001_3DA_52_Cover_NoSpine.indd 1 13/02/2013 12:08
Full Page.indd 1 31/01/2013 15:40
3DArtist ● 3
Arch-vis secrets
Page 26
Discover Sérgio’s
post-production tips Page 88
Free models • Nine olive trees supplied by this
issue’s cover artist
Sérgio Merêces shares his arch-vis pearls of wisdom. Page 26
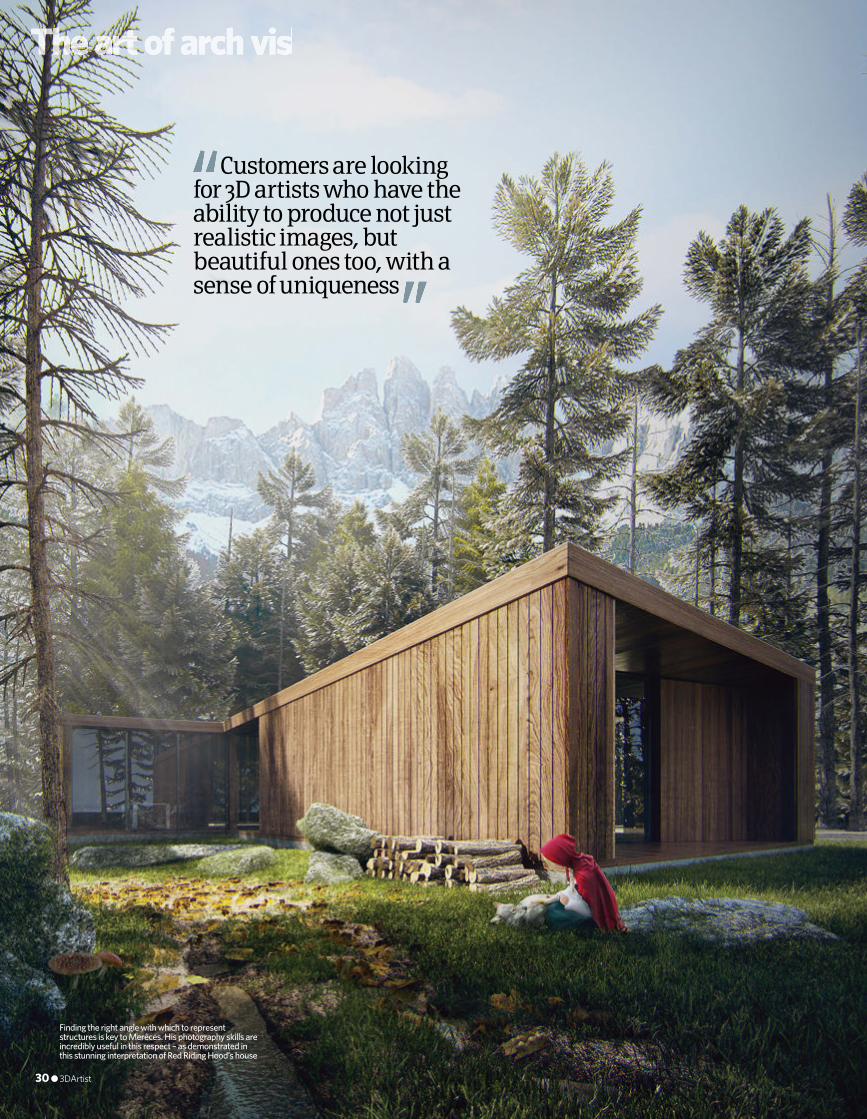
Customers are looking for 3D artists who have the ability to produce not just realistic images, but beautiful ones too, with a sense of uniqueness
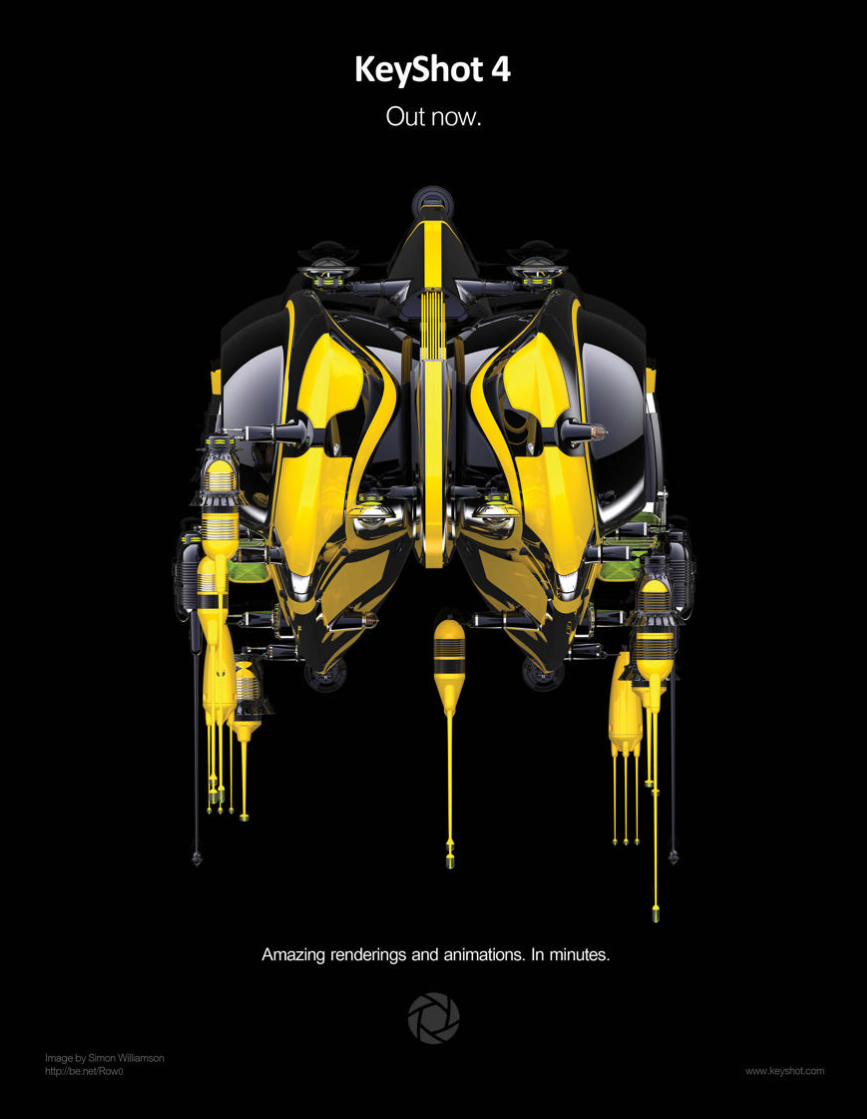
Personal portfolio site www.sergiomereces.comLocation Lisbon, PortugalSoftware used 3ds Max, ZBrush, SpeedTree, V-Ray, MultiScatter, Photoshop, After Eff ects
Art
ist i
nfo
3DArtistOnline.com is packed to the brim with all manner of arch-vis renders – from the clean and simple to the bold and brave. The sheer quantity of these images shows that competition in the fi eld is fi erce.
For Sérgio Merêces, it’s about thinking and acting like a photographer. So if you’re looking to get your portfolio noticed, head to our feature interview with this talented artist on page 26 and check out his six-step tutorial on page 88. Let some serious inspiration and note-taking commence!
Sérgio Merêces
Username: smereces
003_3DA_52_CoverArtist.indd 3 11/02/2013 17:40

This issue’s team of expert artists…
Sérgio Merêces Chris HillWe asked Chris to shed light on the overwhelming subject of creating a showreel. Check out his top advice on page 34
Michael BurnsPutting together the pieces of the topology puzzle, Michael chats to the pros to fi nd out their tried-and-tested modelling methods
Richard YotIt’s always fun to see the incredible results achievable in modo. Richard takes us on a character-creation journey this issue…
Danail Vasilev NikovWe stumbled across Danail’s remarkably di� erent creatures on CGHUB, and we wanted one too! See it evolve on page 50
Jahirul AminProving that he’s no one-trick pony, Jahirul enters this issue in style with his expert guide to modelling vehicles for animation
Our sleepy Viking has been working around the clock to master an arch-vis presentation in Unity, to help us create our own
Ross BoardBy working regularly with artists, you start to learn a thing or two about them. Ross? Well, he likes to smash. Ross, smash!
Filippo VenieroCarrying on the theme of breaking stu� , Filippo returns to his Blender antics to fracture a pretty mug with a… bullet?
Timur ‘Taron’ BaysalWe love Taron. Not content with writing a tutorial, he goes the extra mile, recording video tuition for maximum learnage!
Orestis BastounisOur technical wizard has been busy lately, checking out Workstation Specialist’s RS-D and SCAN’s new system
Christian HeckerHere to reveal the ins and outs of Vue 11, Chris steps in to tell us what’s what. Head to page 95 to fi nd out his thoughts and advice
www.3dartistonline.comSign up, share your art and chat to other artists at
Every issue you can count on…1 Exclusively commissioned art2 Behind-the-scenes guides to images packed with tips3 A disc rammed full with helpful assets4 Interviews with inspirational artists5 Tips for studying 3D or getting work in the industry6 The chance to see your art in the mag!
You wanted to learn how to model cars for animation? You got it – skip to page 68 to get started in Maya. You asked for advice on the best ways to retopologise your models? Done – check out our feature on page 42 where we find out top tips and methods from the pros.
In fact, we’re convinced that a quick flick through this issue’s pages will leave you tingling with inspiration. Try it! From our striking character portrait crafted in modo 601, to the cross-breeding antics of Danail Nikov’s ZBrush and 3ds Max guide to fantasy creatures, there’s something to inspire and treat everyone. The Workshop is also packed with tricks for Unity, 3ds Max, Blender, Sculptris and After Effects, while our features section includes fantastic advice for showreel creation. Phew, with so much to see and do, you’d better get started!
Enjoy the issue,
Roald Høyer-Hansen
We had so much fun interviewing Sérgio that we wanted more! Head to the Q&A section to learn his post-production tricks
Lynette
© Imagine Publishing Ltd 2013
ISSN 1759-9636
Imagine Publishing LtdRichmond House, 33 Richmond HillBournemouth, Dorset BH2 6EZ☎ +44 (0) 1202 586200Web: www.imagine-publishing.co.uk
www.3dartistonline.comwww.greatdigitalmags.com
Magazine teamDeputy Editor Lynette [email protected]☎ 01202 586239
Editor in Chief Dan HutchinsonNews Editor Chris McMahonSub Editor Tim WilliamsonSenior Designer Chris ChristoforidisPhotographer James SheppardHead of Publishing Aaron Asadi Head of Design Ross Andrews
ContributorsJahirul Amin, Orestis Bastounis, Timur ‘Taron’ Baysal, Ross Board, Michael Burns, Roald Høyer-Hansen, Christian Hecker, Chris Hill, Sérgio Merêces, Danail Vasilev Nikov, Filippo Veniero, Richard Yot
AdvertisingDigital or printed media packs are available on request.
Head of Sales Hang Deretz ☎ 01202 [email protected]
Advertising Manager Jennifer Farrell ☎ 01202 [email protected]
Advertising Sales Executive Ryan Ward ☎ 01202 [email protected]
Cover discHead of Digital Mat Toor
Multimedia Editor Steven [email protected]
International3D Artist is available for licensing. Contact the International department to discuss partnership opportunities.
Head of International Licensing Cathy Blackman☎ +44 (0) 1202 [email protected]
SubscriptionsHead of Subscriptions Lucy Nash☎ 01202 [email protected]
To order a subscription to 3D Artist:☎ UK 0844 249 0472☎ Overseas +44 (0) 1795 592951Email: [email protected] subscription (UK) – £21.6013-issue subscription (UK) – £62.4013-issue subscription (Europe) – £7013-issue subscription (ROW) – £80
CirculationHead of Circulation Darren Pearce ☎ 01202 586200
ProductionProduction Director Jane Hawkins ☎ 01202 586200
FoundersGroup Managing Director Damian ButtGroup Finance & Commercial Director Steven BoydGroup Creative Director Mark Kendrick
Printing & DistributionPrinted by William Gibbons & Sons Ltd, 26 Planetary Road, Willenhall, West Midlands, WV13 3XT
Distributed in the UK & Eire by Seymour Distribution,2 East Poultry Avenue, London EC1A 9PT ☎ 020 7429 4000
Distributed in Australia by Gordon & Gotch, Equinox Centre,18 Rodborough Road, Frenchs Forest NSW 2086☎ +61 2 9972 8800
Distributed to the rest of the world by Marketforce, Blue Fin Building, 110 Southwark Street, London SE1 0SU☎ 020 3148 8105
DisclaimerThe publisher cannot accept responsibility for any unsolicited material lost or damaged in the post. All text and layout is the copyright of Imagine Publishing Ltd. Nothing in this magazine may be reproduced in whole or part without the written permission of the publisher. All copyrights are recognised and used specifically for the purpose of criticism and review. Although the magazine has endeavoured to ensure all information is correct at time of print, prices and availability may change. This magazine is fully independent and not affiliated in anyway with the companies mentioned herein.
@3DArtist
3dartistmagazine
to the magazine and 116 pages of awesome 3D
4 ● 3DArtist
004_3DA_52_Welcome.indd 4 11/02/2013 21:45

What is good topology?
Improve your modelling with our 50 hot topology tips feature
Why do you need your topology to be clean? How does the topology of an organic model differ to that of a hard-surface one?
8 The GalleryHand-picked inspiration for artists
16 Community newsStay up-to-date with the latest news and happenings in the world of 3D
20 3D printing newsWe scope out exciting new tech and community projects just for you
22 Readers’ galleryTop work from our online community
24 Have your sayThe readers share their thoughts
26 The art of arch vis Sérgio Merêces reveals the key to his success in our feature interview
34 Create your best showreelGet your work noticed with our expert advice for fantastic reels
42 50 hot topology tipsIndustry pros share their top tricks for getting perfect models every time
74 Subscribe today!Save money and never miss an issue
92 Review: Scan 3XS GW-HT15 An a� ordable workstation featuring the K5000? We’re all over it!
93 Review: RS-D rendering system Workstation Specialists’ powerful solution to the render farm
94 Review: Bitmap2Material 2.0Discover why our reviewer has dropped CrazyBump for this…
95 Review: Vue 11 Infinite Our expert checks out new features galore in this fantastic new version
News reviews & features
110
42
58 68
Learn how to e� ciently model cars in Maya
Create hybrid creatures with our step-by-step guide
52
I N S I D E I S S U E F I F T Y-T W O
6 ● 3DArtist
What’s in the magazine and where
52
I N S I D E I S S U E F I F T Y-T W O
What’s in the magazine and where
006-007_3DA_52_Contents.indd 6 11/02/2013 21:56

Sérgio Merêces shares his portfolio in our feature interview
SAVE 40%SUBSCRIBE TODAY
3DArtist is now available on
iPhone & iPad
Turn to page 74
for details
3DArtist
98 Industry news Catch up right here!
101 Course focus: Study animation and VFXCheck out DAVE School’s Florida-based campus
102 Studio access: Photoreal tricksLondon boutique studio, Neon, reveals its workfl ow
104 Project focus: Halo 4: Spartan OpsWe go behind the scenes
106 Industry insider: Lighting up PixarLighting TD Edu Martin looks to the future of CG
76 Masterclass: Create interactive arch vis in Unity
Step inside your arch-vis interiors with the free game engine
80 Back to basics: Get cracking in 3ds Max
Learn some core destruction techniques with RayFire in Max
84 Questions & Answers Your technical quandaries for
various programs get answered by our experts right here
Blender: Fracture objects Sculptris: Develop organic
models with multiple objects After Effects: Post-production techniques for arch vis
The studioProfessional 3D advice, techniques and tutorials
The workshop
• 19 high-quality 3D models• 2 ultra high-res HDRIs• 2+ hours of video training• Free GameTextures pack• Free software worth $199• Plus tutorial files and more!
84
26
50Master a little
destruction with free software
Richard Yot takes us on a character-
creation journey
Turn to page 112 for the complete list of the disc’s contents
40 I made this: Heavenly Angel by Gerardo Ramón Justel Discover how this fantasy character was created in ZBrush
50 Step by step: Improve your characters in modo Richard Yot takes us on an epic journey for striking results
58 Step by step: Develop fantastical animalsDanail Nikov uncovers his cross-breeding techniques
66 I made this: Abandoned Bel Air by Jochem Aarts Nature fi ghts back in this stunning car-graveyard scene
68 Step by step: Model vehicles for animationJahirul Amin teaches the key to successful cars in Maya
Expert tuition to improve your skills Industry news, career advice & more
Giving your work a story turns it from a simple image into something with a
stronger sense of visual impact
With the Disc
WIN! Over $1,000 worth of 3D software to be won!Reallusion partners with 3D Artist to offer two iClone Animation Pipeline bundles worth £599 each. Turn to page 41 to find out how you can win.
3DArtist ● 7
006-007_3DA_52_Contents.indd 7 11/02/2013 21:56
Seven pages of great artwork from the 3D communityT H E G A L L E R YG A L L E R YG A L L E R YW E L C O M E T O
8 ● 3DArtist
Art
ist i
nfo
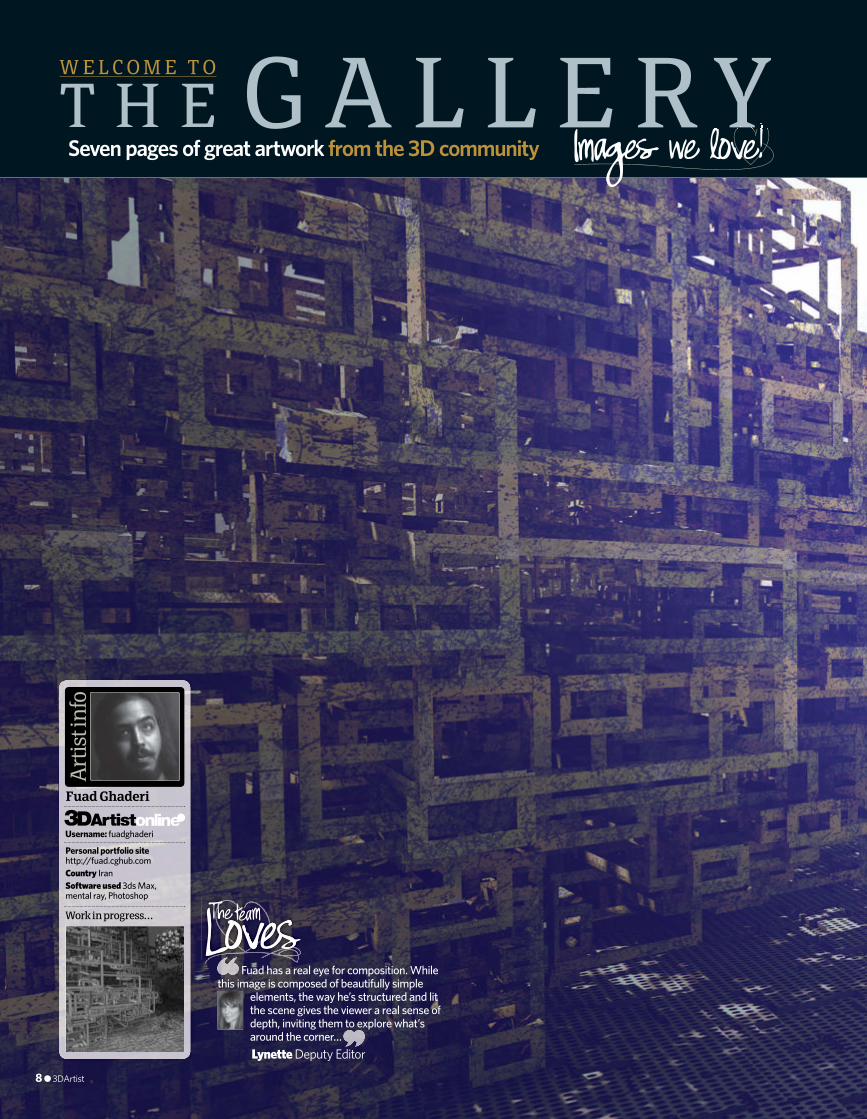
Fuad Ghaderi
Personal portfolio sitehttp://fuad.cghub.comCountry IranSoftware used 3ds Max, mental ray, Photoshop
Work in progress…
Username: fuadghaderi
Fuad has a real eye for composition. While this image is composed of beautifully simple
elements, the way he’s structured and lit the scene gives the viewer a real sense of depth, inviting them to explore what’s around the corner…Lynette Deputy Editor
008-009_3DA_51_Gallery_welcome_FuadGhaderi.indd 8 11/02/2013 19:17
3DArtist ● 9
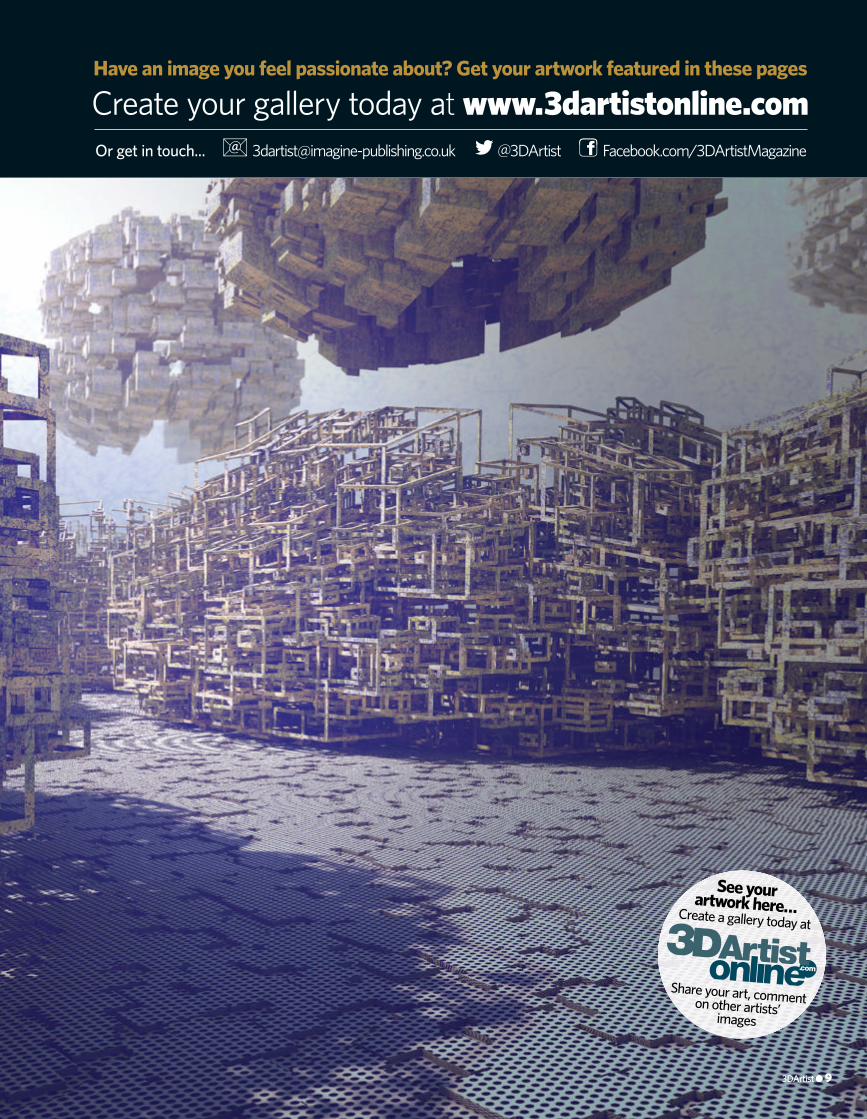
Create your gallery today at www.3dartistonline.comHave an image you feel passionate about? Get your artwork featured in these pages
[email protected] get in touch... Facebook.com/3DArtistMagazine@3DArtist
3DArtist ● 9
See yourartwork here…Create a gallery today at
Share your art, comment on other artists’ images
008-009_3DA_51_Gallery_welcome_FuadGhaderi.indd 9 11/02/2013 19:17
T H E G A L L E R Y
10 ● 3DArtist
Art
ist i
nfo
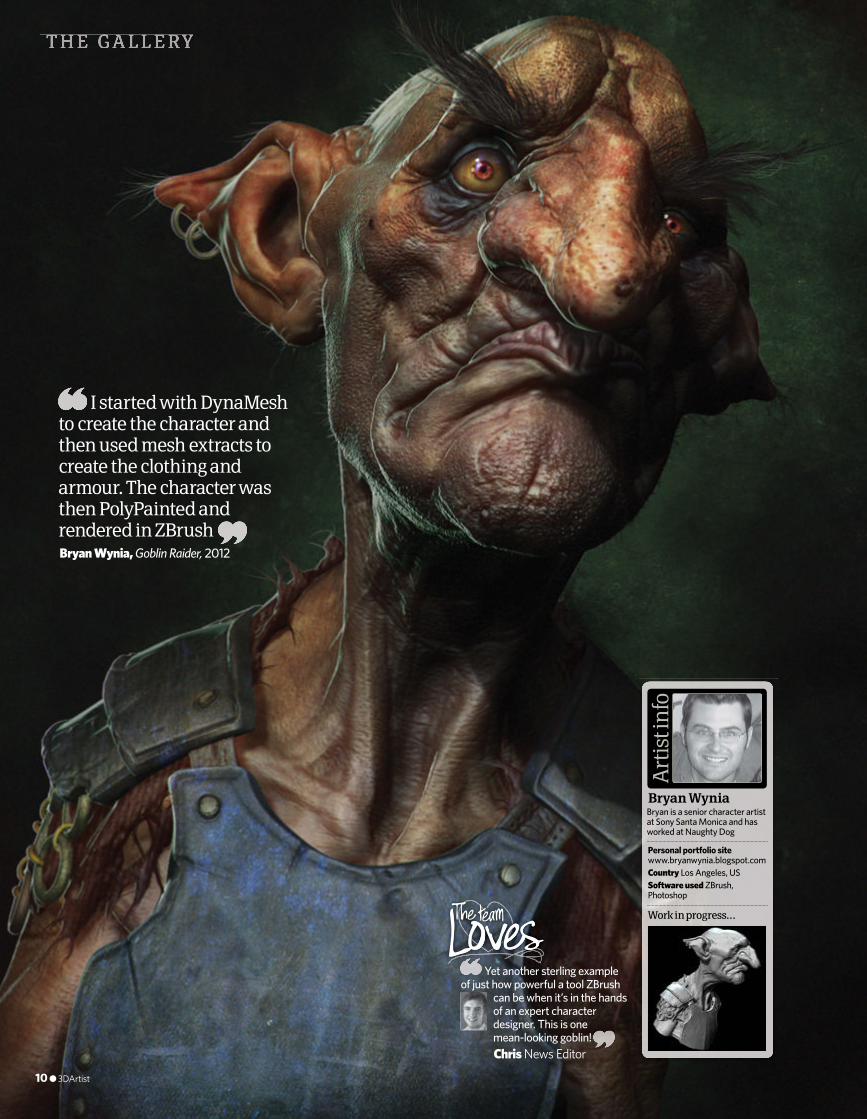
Bryan Wynia
Personal portfolio sitewww.bryanwynia.blogspot.comCountry Los Angeles, USSoftware used ZBrush, Photoshop
Bryan is a senior character artist at Sony Santa Monica and has worked at Naughty Dog
Work in progress…
Yet another sterling example of just how powerful a tool ZBrush
can be when it’s in the hands of an expert character designer. This is one mean-looking goblin!Chris News Editor
I started with DynaMesh to create the character and then used mesh extracts to create the clothing and armour. The character was then PolyPainted and rendered in ZBrush Bryan Wynia, Goblin Raider, 2012
010-014_3DA_52_Gallery_SPs.indd 10 11/02/2013 17:41
T H E G A L L E R Y
3DArtist ● 11
Art
ist i
nfo
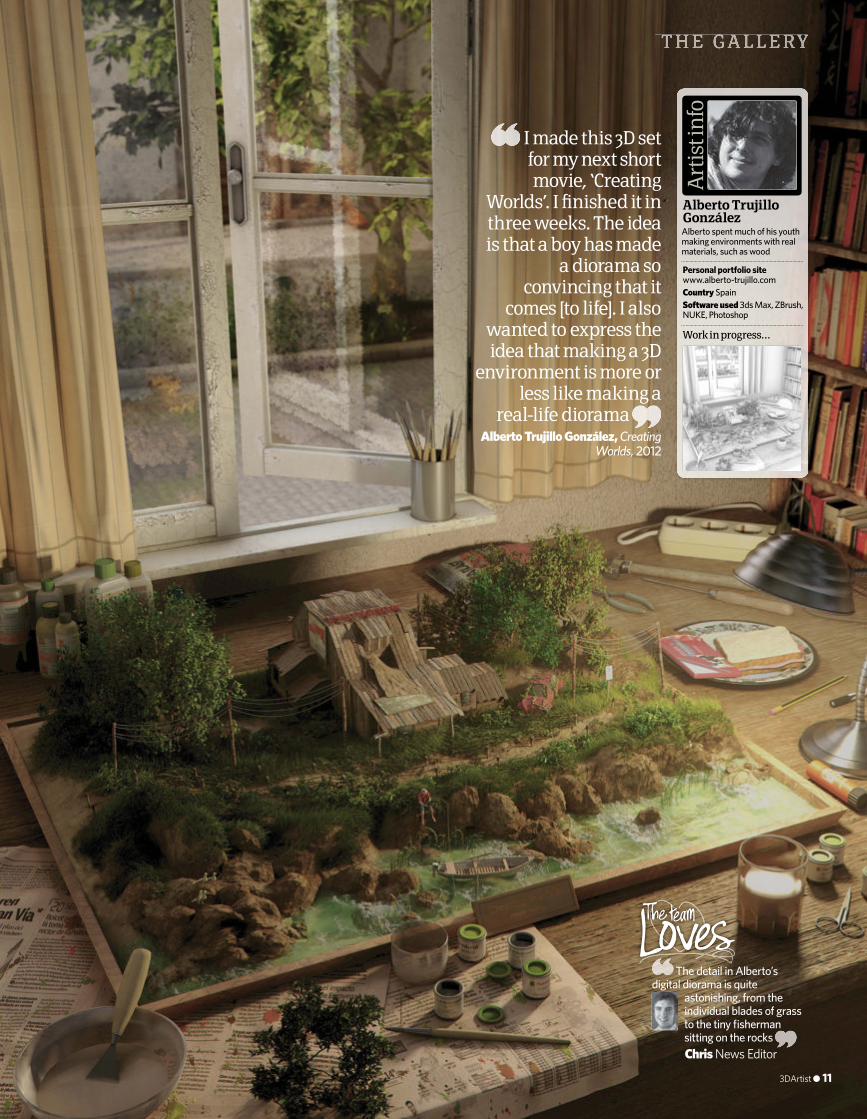
Alberto Trujillo González
Personal portfolio sitewww.alberto-trujillo.comCountry SpainSoftware used 3ds Max, ZBrush, NUKE, Photoshop
Alberto spent much of his youth making environments with real materials, such as wood
Work in progress…
I made this 3D set for my next short movie, ‘Creating
Worlds’. I fi nished it in three weeks. The idea is that a boy has made
a diorama so convincing that it
comes [to life]. I also wanted to express the idea that making a 3D
environment is more or less like making a
real-life diorama Alberto Trujillo González, Creating
Worlds, 2012
The detail in Alberto’s digital diorama is quite
astonishing, from the individual blades of grass to the tiny fi sherman sitting on the rocksChris News Editor
010-014_3DA_52_Gallery_SPs.indd 11 11/02/2013 17:41

T H E G A L L E R Y
12 ● 3DArtist
010-014_3DA_52_Gallery_SPs.indd 12 11/02/2013 17:42
T H E G A L L E R Y
3DArtist ● 13
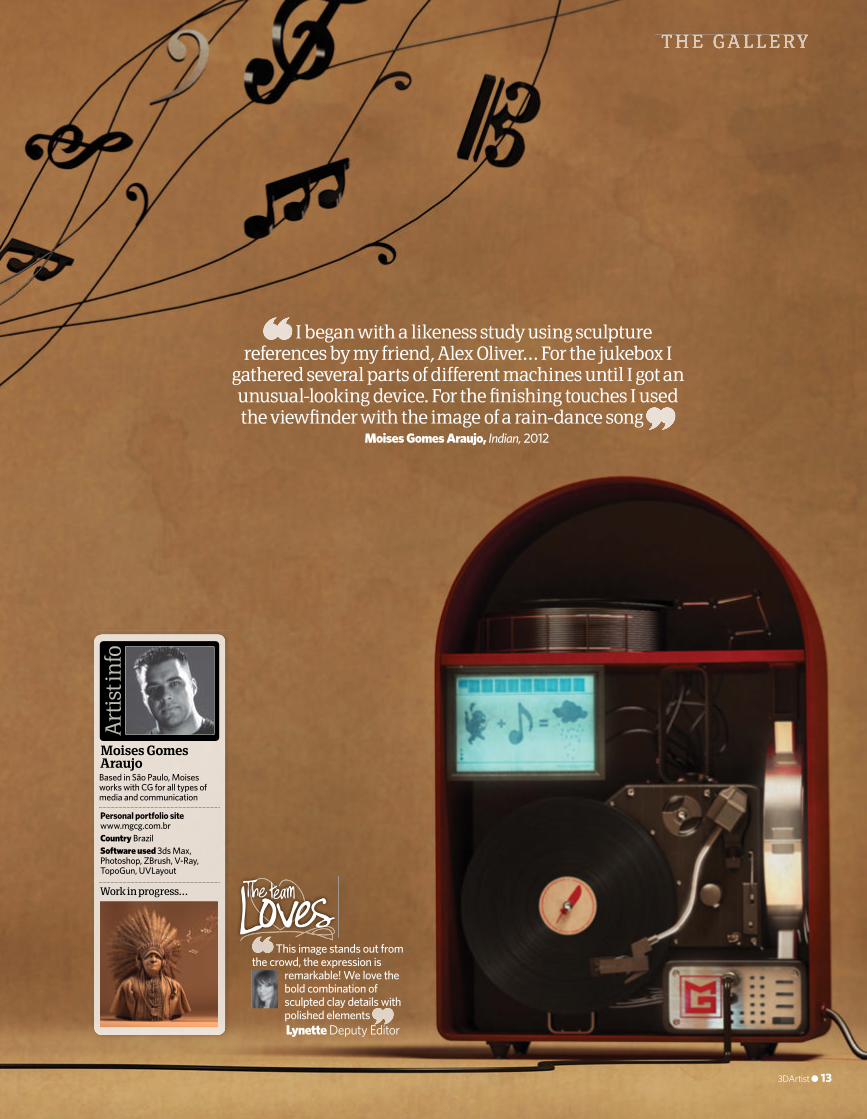
I began with a likeness study using sculpture references by my friend, Alex Oliver… For the jukebox I
gathered several parts of different machines until I got an unusual-looking device. For the fi nishing touches I used the viewfi nder with the image of a rain-dance song
Moises Gomes Araujo, Indian, 2012
This image stands out from the crowd, the expression is
remarkable! We love the bold combination of sculpted clay details with polished elementsLynette Deputy Editor
Art
ist i
nfo
Moises Gomes Araujo
Personal portfolio sitewww.mgcg.com.brCountry BrazilSoftware used 3ds Max, Photoshop, ZBrush, V-Ray, TopoGun, UVLayout
Based in São Paulo, Moises works with CG for all types of media and communication
Work in progress…
010-014_3DA_52_Gallery_SPs.indd 13 11/02/2013 17:43
T H E G A L L E R Y
14 ● 3DArtist
Art
ist i
nfo
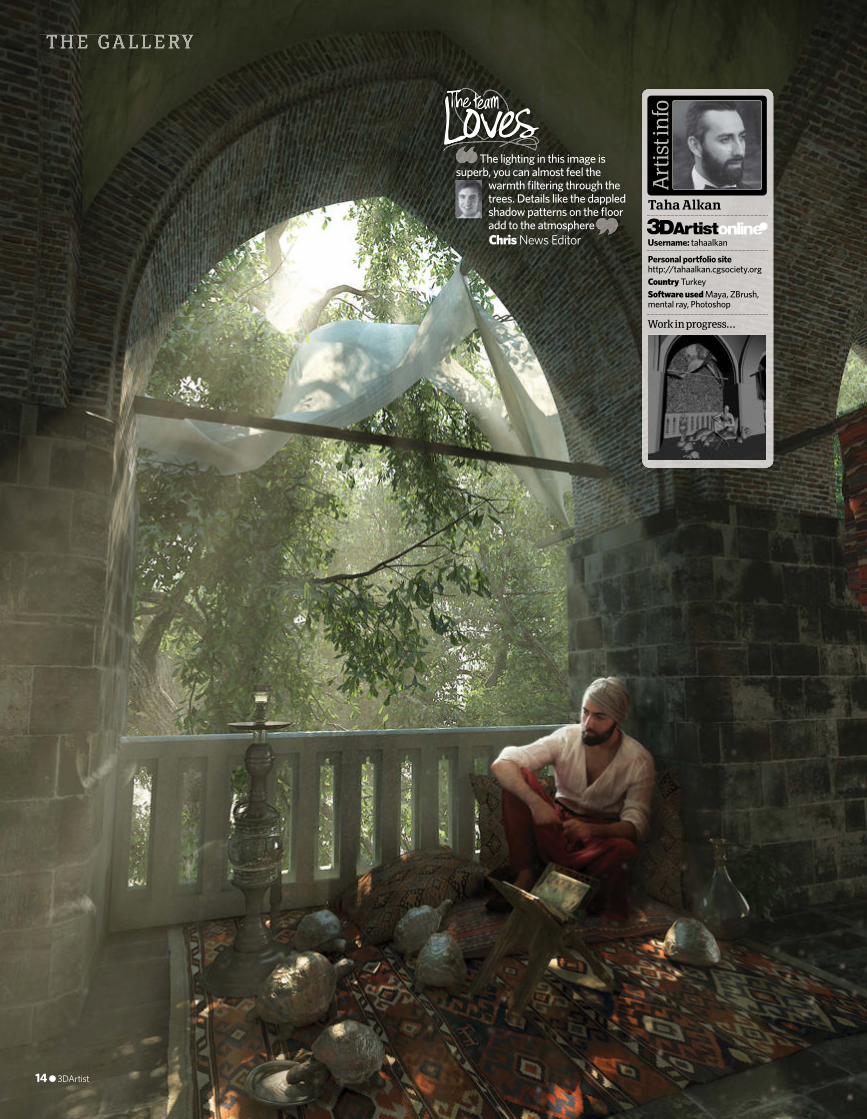
Taha Alkan
Personal portfolio sitehttp://tahaalkan.cgsociety.orgCountry TurkeySoftware used Maya, ZBrush, mental ray, Photoshop
Work in progress…
Username: tahaalkan
The lighting in this image is superb, you can almost feel the
warmth fi ltering through the trees. Details like the dappled shadow patterns on the fl oor add to the atmosphereChris News Editor
010-014_3DA_52_Gallery_SPs.indd 14 11/02/2013 17:43

Special offer
for US readers
Don’t risk missing an issue
Subscribe today and save $$$
To order online, visitwww.imaginesubs.
co.uk/tdaand enter the code USA2
To order by telephone, call+44 (0) 1795 592951
and quote the code USA2
Art
ist i
nfo
Personal portfolio sitewww.oldrhyme.cgsociety.org
Country ChinaSoftware used 3ds Max, Maya, ZBrush, Mudbox, Photoshop, V-Ray
I saw an image
on a website that was
like a kind of transparent man
blending with his
background, which
brought me this great
idea… [I] decided to
show the feeling of
part drying paint, part
real, part plaster
RenPeng Dong
Special
readers
Special Subscribe today &
Non-US readersturn topage 74
• Subscribe and pay just $124 for 13 issues
• Receive the mag before it appears in the shops
• Get each issue for as little as $9.53 (usually $14.99)
• Never miss an issue
This is a US subscription off er. You will actually be charged £80 sterling for an annual subscription. Your subscription will start from the next available issue.
This off er expires 30 June 2013. *5 free issues refers to the USA
newsstand price of $14.99 for 13 issues which comes to $194.87, compared
with $124 for a subscription.
get 5 free issues*
015_3DA_52 New SubsUSA.indd 15 11/02/2013 17:46

The CG Student Awards 2013
52
Launched in 2009 by Andrew McDonald and Alwyn Hunt, owners of CGCoach.com, the CG Student Awards has grown over the years to become one of
the most prestigious of its kind. The event – which showcases and rewards excellence in computer graphics from students to recent graduates – has now kick-started the careers of countless digital artists and has awarded in excess of $200,000 US worth of fantastic prizes.
The site was originally launched to see which CG schools were really creating the best student work, enabling some friendly competition between students and schools alike. However, healthy rivalry aside, the real goal was to showcase the next generation of talented CG artists.
“We wanted to highlight for young artists where all the best students were being educated,” says McDonald of the awards. “We were amazed at the poor quality of some graduating students’ work and thought their eyes needed to be opened to the talent and experiences other students were receiving from around the world. We thought by launching a dedicated event we could not only showcase talent but also enable students to see the artists they were competing with for jobs.”
The latest news, tools and resources for the 3D artist
We thought by launching a dedicated event, we could enable students to see the artists they were competing with for jobsAndrew McDonald, CG Student Awards co-founder
Over the years the event has rapidly grown from a small a� air to a much larger concept. “Our fi rst year received about 80 entries. We received 357 last year,” says McDonald. “Our goal this year is to expand into next-generation games and we’re in talks with videogame studios to o� er internships. We hope this will help expand the event, as there are so many more amazing schools and students in this growing fi eld.”
The event continues to grow, benefi ting the 3D community through the priceless internships it provides – 40 have been awarded so far. The awards are also sponsored by some of the biggest names in the CG world, including Autodesk, Digital-Tutors and Next Limit Technologies. So if you’re a student looking to make it big in the fi eld of CG, head over to www.cgstudentawards.com and get your work submitted.
We talk to Andrew McDonald about how the awards event has provided essential exposure and industry opportunities for young artists
The latest news, tools and resources for the 3D artist
We check out some of the fantastic winnings o� ered by the CGSA Although the prizes for this year’s event are still being fi nalised, they’ll be very similar to those of 2012. The prizes are split into categories: Studio Internship, Student of the Year, School of the Year and People’s Choice.
Ten studio internships are o� ered at Double Negative, MPC, The Mill and more, providing expert experience, a standard intern salary and a foot in the door.
Winners of Student of the Year gain access to a hoard of software and hardware too – 2012’s list can be seen at www.cgstudentawards.com/prizes.
The School of the Year prize is new for 2013, with the prize of a Professional copy of ConceptShare; a great tool for sharing, communicating and collaborating on projects.
Big prizes
a The rules for entry can be read at www.cgstudentawards.com/about/rules. The aim of these is to simulate the content you would submit when applying for a job
b Though in the process of transforming into Tyroe.com, CGCoach.com once gave feedback to a community of over 3,500 artists, reviewing work and suggesting changes
a
b
16 ● 3DArtist
016-018_3DA_52_CommunityNews2.indd 16 11/02/2013 19:21
News, tools and resources ● Community
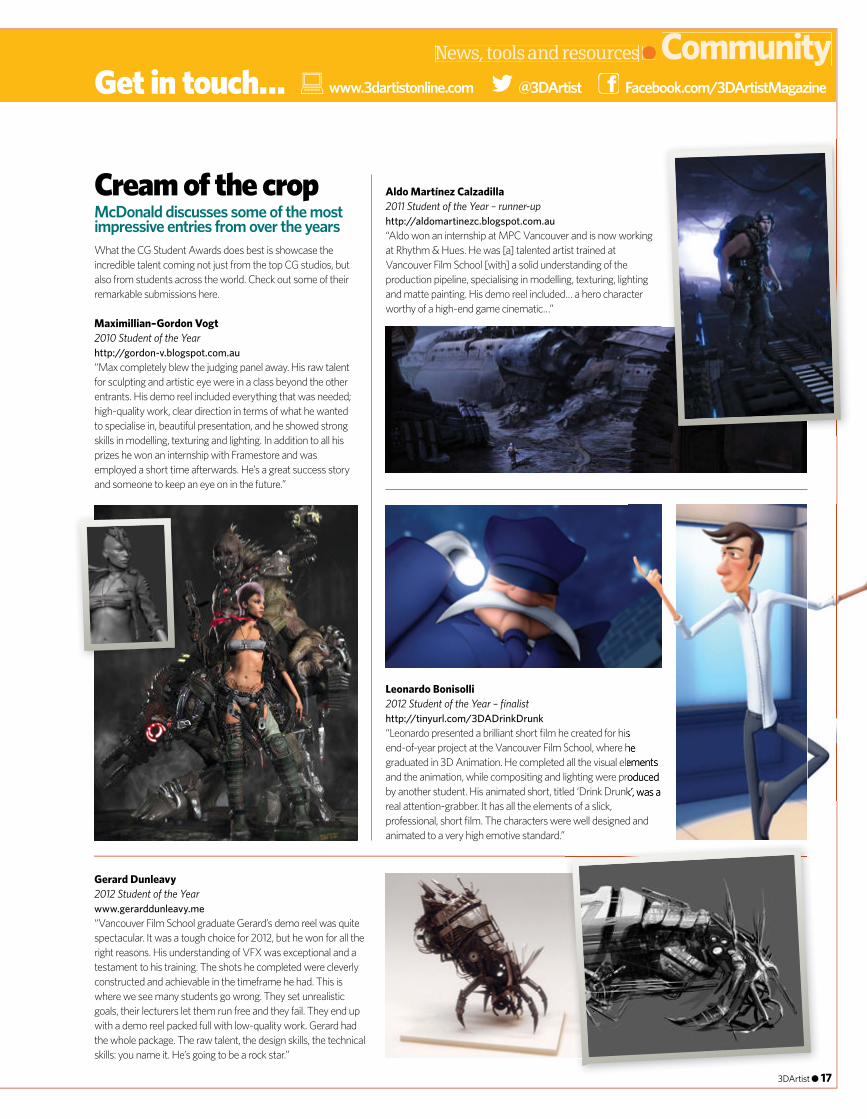
Maximillian–Gordon Vogt2010 Student of the Yearhttp://gordon-v.blogspot.com.au“Max completely blew the judging panel away. His raw talent for sculpting and artistic eye were in a class beyond the other entrants. His demo reel included everything that was needed; high-quality work, clear direction in terms of what he wanted to specialise in, beautiful presentation, and he showed strong skills in modelling, texturing and lighting. In addition to all his prizes he won an internship with Framestore and was employed a short time afterwards. He’s a great success story and someone to keep an eye on in the future.”
What the CG Student Awards does best is showcase the incredible talent coming not just from the top CG studios, but also from students across the world. Check out some of their remarkable submissions here.
Aldo Martínez Calzadilla2011 Student of the Year – runner-uphttp://aldomartinezc.blogspot.com.au“Aldo won an internship at MPC Vancouver and is now working at Rhythm & Hues. He was [a] talented artist trained at Vancouver Film School [with] a solid understanding of the production pipeline, specialising in modelling, texturing, lighting and matte painting. His demo reel included… a hero character worthy of a high-end game cinematic…”
Gerard Dunleavy2012 Student of the Yearwww.gerarddunleavy.me“Vancouver Film School graduate Gerard’s demo reel was quite spectacular. It was a tough choice for 2012, but he won for all the right reasons. His understanding of VFX was exceptional and a testament to his training. The shots he completed were cleverly constructed and achievable in the timeframe he had. This is where we see many students go wrong. They set unrealistic goals, their lecturers let them run free and they fail. They end up with a demo reel packed full with low-quality work. Gerard had the whole package. The raw talent, the design skills, the technical skills: you name it. He’s going to be a rock star.”
Leonardo Bonisolli2012 Student of the Year – fi nalisthttp://tinyurl.com/3DADrinkDrunk“Leonardo presented a brilliant short fi lm he created for his end-of-year project at the Vancouver Film School, where he graduated in 3D Animation. He completed all the visual elements and the animation, while compositing and lighting were produced by another student. His animated short, titled ‘Drink Drunk’, was a real attention-grabber. It has all the elements of a slick, professional, short fi lm. The characters were well designed and animated to a very high emotive standard.”
www.3dartistonline.com Facebook.com/3DArtistMagazine@3DArtistGet in touch…
Cream of the cropMcDonald discusses some of the most impressive entries from over the years
“Leonardo presented a brilliant short fi lm he created for his end-of-year project at the Vancouver Film School, where he graduated in 3D Animation. He completed all the visual elements and the animation, while compositing and lighting were produced by another student. His animated short, titled ‘Drink Drunk’, was a
3DArtist ● 17
016-018_3DA_52_CommunityNews2.indd 17 11/02/2013 19:22
52
The latest news, tools and resources for the 3D artist
As a concept designer, experimenting with modo’s Replicators is something that comes naturally to Maciej Kuciara. “I found modo Replicators very useful in one of the big projects I’ve recently been working on,” he tells us. “Thanks to the use of particle masking, together with Replicators, I could come up with several interesting pattern designs in a very short timeframe…”
Kuciara used Replicators to create the suit design seen here. “It was basically a mix of a few tools available in modo: Surface Particle Generators, Replicators and black-and-white photo textures that would be used as Alphas for surface particles,” he explains. “I used a generic character model, attached a Surface Particle Generator to populate particles across the character’s 3D mesh and then created groups with
image layers on Particle Density modifi ers. This enabled me to use textures to control the way particles populated across the 3D mesh. The next step was to create simple meshes, such as boxes and hexagons, and use them as prototypes in Replicator modifi ers. These modifi ers would then use Surface Particle Generators as a particle source.”
Premier CG-art portal 3DTotal.com has launched LayerPaint.com, a new sister site created to focus on the community’s ever-growing 2D following. LayerPaint enables users to browse an extensive gallery along with plenty of interviews, news, tutorials and products, all dedicated to 2D digital art. Upon visiting the site you’ll also gain access to a free Custom Brushes library, available to the entire LayerPaint audience. Dive in helpings of inspiration today: www.layerpaint.com.
Inspiration cornermodo Replicators
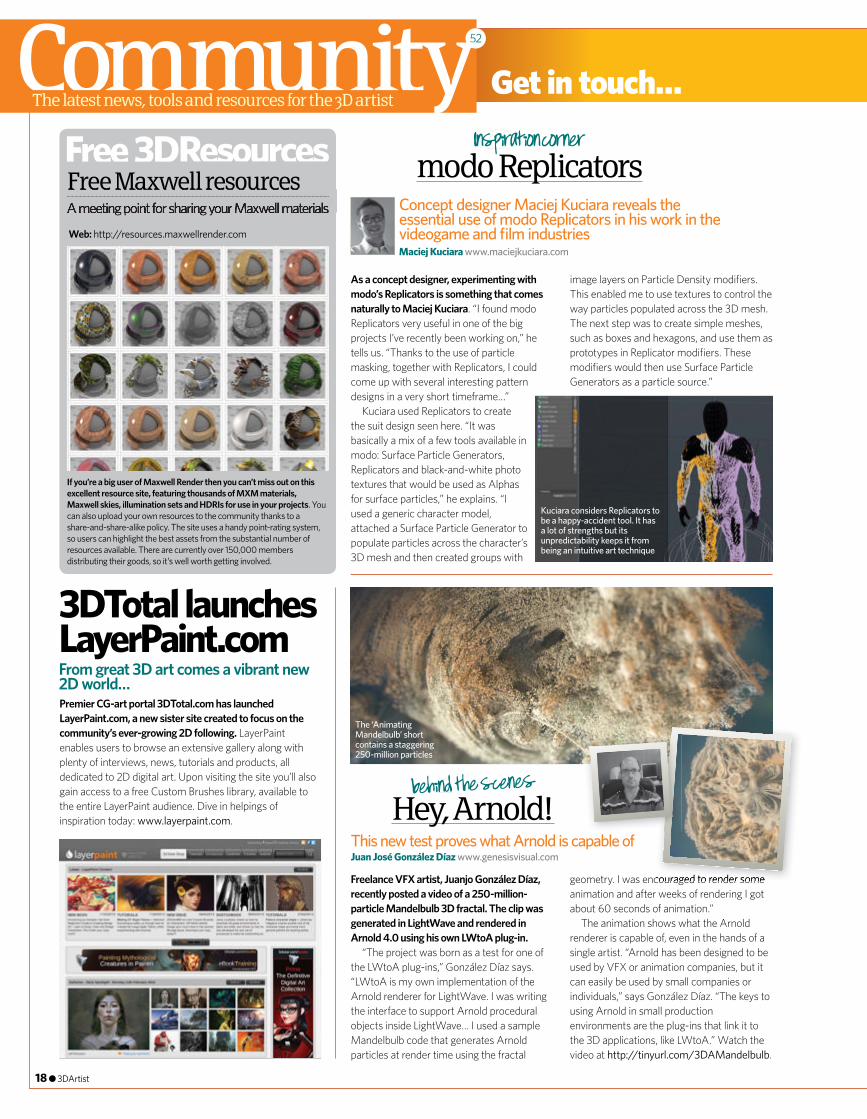
Hey, Arnold!
Freelance VFX artist, Juanjo González Díaz, recently posted a video of a 250-million-particle Mandelbulb 3D fractal. The clip was generated in LightWave and rendered in Arnold 4.0 using his own LWtoA plug-in.
“The project was born as a test for one of the LWtoA plug-ins,” González Díaz says. “LWtoA is my own implementation of the Arnold renderer for LightWave. I was writing the interface to support Arnold procedural objects inside LightWave… I used a sample Mandelbulb code that generates Arnold particles at render time using the fractal
geometry. I was encouraged to render some animation and after weeks of rendering I got about 60 seconds of animation.”
The animation shows what the Arnold renderer is capable of, even in the hands of a single artist. “Arnold has been designed to be used by VFX or animation companies, but it can easily be used by small companies or individuals,” says González Díaz. “The keys to using Arnold in small production environments are the plug-ins that link it to the 3D applications, like LWtoA.” Watch the video at http://tinyurl.com/3DAMandelbulb.
This new test proves what Arnold is capable ofJuan José González Díaz www.genesisvisual.com
Concept designer Maciej Kuciara reveals the essential use of modo Replicators in his work in the videogame and fi lm industriesMaciej Kuciara www.maciejkuciara.com
3DTotal launches LayerPaint.comFrom great 3D art comes a vibrant new 2D world…
Free Maxwell resourcesA meeting point for sharing your Maxwell materialsFree Maxwell resourcesA meeting point for sharing your Maxwell materials
Web: http://resources.maxwellrender.com
If you’re a big user of Maxwell Render then you can’t miss out on this excellent resource site, featuring thousands of MXM materials, Maxwell skies, illumination sets and HDRIs for use in your projects. You can also upload your own resources to the community thanks to a share-and-share-alike policy. The site uses a handy point-rating system, so users can highlight the best assets from the substantial number of resources available. There are currently over 150,000 members distributing their goods, so it’s well worth getting involved.
Get in touch…
Kuciara considers Replicators to be a happy-accident tool. It has a lot of strengths but its unpredictability keeps it from being an intuitive art technique
The ‘Animating Mandelbulb’ short contains a staggering 250-million particles
geometry. I was encouraged to render some
18 ● 3DArtist
016-018_3DA_52_CommunityNews2.indd 18 11/02/2013 19:22

TIPS & TRICKS HARDWARE REVIEWS IOS & OSX APPSBEST ACCESSORIES
Be inspired.
ON SALE NOWSpeed Up Your Mac • 10 Top Photo Fixes • Create With iCloud
w w w . i c r e a t e m a g a z i n e . c o m
Available from all good
newsagents and supermarkets
CREATIVE PROJECTS
BUY YOUR ISSUE TODAYPrint edition available at www.imagineshop.co.uk
Digital edition available at www.greatdigitalmags.com
facebook.com/icreatemagazine twitter.com/icreatemagazine
Available on the following platforms
iC_SA4ha NEW.indd 1 18/01/2013 09:54

Forget vinyl, print your songs!
Get intouch!
facebook.com/3dartistor @3DArtist
on Twitter
Tell us about your 3D-printing adventures and fi nds
3D printing52
The latest news, tools and resources for the 3D artist
20 ● 3DArtist
Print basketball-sized models in multicolourWith prices starting at $2,662 US, the new CubeX printer boasts a print volume of 1,070 cubic inches and triple-colour printing. It o� ers a choice of accuracy: High Defi nition (125 Micron), Crisp Defi nition (250 Micron) or Standard Defi nition (500 Micron), as well as a choice of print fi ll densities.
Also available (at www.cubify.com) is the second generation of the Cube printer ($1, 532 US), with 1.5-times faster print speed and twice as much accuracy for printed parts up to 5.5 inches cubed. There are also more colours, including glow-in-the-dark blue and green.
Both printers o� er smart moisture-lock cartridges, additional print modes and a greater selection of materials, including compostable PLA and recyclable ABS plastics.
Cubify Capture is the intriguing new portal service that enables users to upload photos and videos to Cubify.com to have their images transformed into 3D models. 3D Systems has said it will eventually encompass a full suite of thematic scan-to-print web and mobile apps. Stay tuned!
Lighting up designNecessity drove Samuel Bernier to print a line of 3D lampshadesA lack of decent lighting in his new apartment inspired Samuel Bernier (www.coroflot.com/samuelbernier) to create a series of 3D-printed lampshades. The designer made these with low-cost Fused Deposition Modeling (FDM) technology. Bernier used SolidWorks in the initial design for this collection, named Dentelle.
“I was lucky enough to own two small UP! PP3DP printers, so I wanted to push the limits of this great tool,” says Bernier. “I used mostly ABS plastics, but I also experimented with clear and glow-in-the-dark PLA. The stripes created by the rough layer-by-layer deposition gives character to the objects.”
3D Systems launches new 3D printers, plus an exciting portal service
Staples goes for eco-friendly printsThe forthcoming Staples Easy 3D service will use the Mcor IRISThe newly launched IRIS can print physical objects from STL, OBJ and VRML files in more than a million hues simultaneously. It uses water-based adhesive and standard A4/Letter sheets of paper as the build material and can be ordered from Mcor resellers for £10,200.
Mcor Technologies’ deal with Staples will see a 3D-printing service o� ered online via the Staples O� ce Centre. Customers can pick up the models in their nearby Staples stores, or have them shipped to their address.
Amanda Ghassaei creates 3D-printable, 33-rpm records from digital audio files
Amanda Ghassaei creates
This project is an innovative synthesis of 3D printing and the Processing programming language. So far Amanda Ghassaei (www.amandaghassaei.com) has printed a few prototypes that play on ordinary turntables. The audio quality is unsurprisingly low, but the music is recognisable.
Ghassaei’s Processing program works by importing raw audio data, performing some calculations to generate the geometry of a 12-inch record and eventually exporting this geometry straight to the (3D-printable) STL format. Full instructions and code are posted on Instructables.com.
“To get Processing to export straight to STL, I used the ModelBuilder library written by Marius Watz,” reveals Ghassaei. “The records were printed using Objet’s Vero White material on an Objet Connex 500 resin printer to a precision of 600dpi with 16 micron Z-axis resolution.”
CubeX can print basketball-sized parts in three colours,
using compostable PLA and recyclable ABS plastics
The IRIS from Mcor Technologies (www.
mcortechnologies.com) uses sheets of paper, whether fresh or used
Amanda Ghassaei’s workfl ow can convert any audio fi le into a 3D model of a record
Bernier likes to keep his 3D lampshades raw, without any sanding or painting after printing
© 3D Systems
© A
man
da G
hass
aei
© V
eron
ique
Hyg
ues
CubeX can print basketball-
020_3DA_52_Community_3Dprinting_MichaelBurns.indd 20 11/02/2013 17:47

© Copyright Workstation Specialists – Acecad Software Ltd. E & OE - Prices exc. VAT & are subject to change without notice. All rights reserved. Logo & company/product names are trademarks of their respective owners. All rights reserved. Intel®, the Intel® Logo, Core & Core i7 Inside are trademarks or registered trademarks of Intel® Corporation in the US and other countries. *Based on a corporate finance lease/purchase. Prices based on a 36month contract term and all figures are quoted subject to status. Written details available on request
Pure Performance...3D Design, Visualisation, Analysis/Simulation, Rendering, and more…3D Design, Visualisation, Analysis/Simulation, Rendering, and more…3D Design, Visualisation, Analysis/Simulation, Rendering, and more…3D Design, Visualisation, Analysis/Simulation, Rendering, and more…3D Design, Visualisation, Analysis/Simulation, Rendering, and more…3D Design, Visualisation, Analysis/Simulation, Rendering, and more…3D Design, Visualisation, Analysis/Simulation, Rendering, and more…3D Design, Visualisation, Analysis/Simulation, Rendering, and more…3D Design, Visualisation, Analysis/Simulation, Rendering, and more…3D Design, Visualisation, Analysis/Simulation, Rendering, and more…3D Design, Visualisation, Analysis/Simulation, Rendering, and more…3D Design, Visualisation, Analysis/Simulation, Rendering, and more…3D Design, Visualisation, Analysis/Simulation, Rendering, and more…
Performance... Performance...3D Design, Visualisation, Analysis/Simulation, Rendering, and more…3D Design, Visualisation, Analysis/Simulation, Rendering, and more…
Performance... Performance...3D Design, Visualisation, Analysis/Simulation, Rendering, and more…3D Design, Visualisation, Analysis/Simulation, Rendering, and more…
PurePure Performance...3D Design, Visualisation, Analysis/Simulation, Rendering, and more…
PurePurePurePure Performance... Performance... Performance...3D Design, Visualisation, Analysis/Simulation, Rendering, and more…3D Design, Visualisation, Analysis/Simulation, Rendering, and more…3D Design, Visualisation, Analysis/Simulation, Rendering, and more…3D Design, Visualisation, Analysis/Simulation, Rendering, and more…
Performance... Performance... Performance...3D Design, Visualisation, Analysis/Simulation, Rendering, and more…3D Design, Visualisation, Analysis/Simulation, Rendering, and more…3D Design, Visualisation, Analysis/Simulation, Rendering, and more…3D Design, Visualisation, Analysis/Simulation, Rendering, and more…
Performance... Performance...3D Design, Visualisation, Analysis/Simulation, Rendering, and more…3D Design, Visualisation, Analysis/Simulation, Rendering, and more…3D Design, Visualisation, Analysis/Simulation, Rendering, and more…3D Design, Visualisation, Analysis/Simulation, Rendering, and more…
Performance... Performance... Performance...3D Design, Visualisation, Analysis/Simulation, Rendering, and more…3D Design, Visualisation, Analysis/Simulation, Rendering, and more…3D Design, Visualisation, Analysis/Simulation, Rendering, and more…3D Design, Visualisation, Analysis/Simulation, Rendering, and more…
Performance... Performance... Performance... Performance... Performance...3D Design, Visualisation, Analysis/Simulation, Rendering, and more…3D Design, Visualisation, Analysis/Simulation, Rendering, and more…3D Design, Visualisation, Analysis/Simulation, Rendering, and more…3D Design, Visualisation, Analysis/Simulation, Rendering, and more…
Pure Performance...PurePure Performance...Pure Performance... Performance...3D Design, Visualisation, Analysis/Simulation, Rendering, and more…3D Design, Visualisation, Analysis/Simulation, Rendering, and more…
PurePurePurePurePurePurePurePure3D Design, Visualisation, Analysis/Simulation, Rendering, and more…3D Design, Visualisation, Analysis/Simulation, Rendering, and more…3D Design, Visualisation, Analysis/Simulation, Rendering, and more…
Performance...3D Design, Visualisation, Analysis/Simulation, Rendering, and more…3D Design, Visualisation, Analysis/Simulation, Rendering, and more…3D Design, Visualisation, Analysis/Simulation, Rendering, and more…3D Design, Visualisation, Analysis/Simulation, Rendering, and more…
Performance... Performance...3D Design, Visualisation, Analysis/Simulation, Rendering, and more…3D Design, Visualisation, Analysis/Simulation, Rendering, and more…
Performance... Performance... Performance...3D Design, Visualisation, Analysis/Simulation, Rendering, and more…3D Design, Visualisation, Analysis/Simulation, Rendering, and more…
Performance...
• Powered by Intel® Xeon E5 16/26xx Series CPUs
• Up to 16x Cores (32x Threads) for Superb Performance
• Intel® Turbo Boost Technology 2.0 (Speeds up to 3.80GHz)
• Up to 512GB of ECC Reg. 1600MHz DDR3 Memory
• Quad Channel Memory Architecture (16x DIMMs)
• Pro 3D Graphics (AMD FirePro™ or NVIDIA Quadro®)
• Ultra-Fast Intel® Solid State Hard Drives with 50K IOPS
• Latest Generation PCI-Express Generation 3.0
• Up to 16TB of Hard Disk Storage (with RAID)
• Quiet,LowPower&EnergyEfficientDesign
• Desktop/Rackmount Aluminium Design
• 36Months Full Parts & Labour Warranty
• and much more…
Powered by Intel® Xeon E5 CPUs, the latest WS1850 + WS2850 workstations from WS deliver huge amounts of computing power to the desktop. Professional 3D Artists can now work like never before with dramatically reducedrendertimes,moreinteractivefluidsimulations,faster video/media encoding and more.
Add even more performance when you need it thanks to Intel® Turbo Boost Technology 2.0. Reduce I/O Latency and Increase Bandwidth with Intel® Integrated I/O and trulyrevolutioniseyourworkflow.
Prices from just £1495
Powered by
+44 (0) 800 180 4801 [email protected] www.workstationspecialists.com
@WSpecialists
Rendering time
Full pg.indd 1 05/02/2013 14:51
The latest news, tools and resources for the 3D artistReaders’ Gal leryReaders’ Gal lery52
22 ● 3DArtist
Images of the monthThese are the illustrations that have been awarded Image of the Week on 3DArtistOnline.com in the last month
Share your artRegister with us today at
www.3dartistonline.comto view the art and chat
to the artists
C
BA
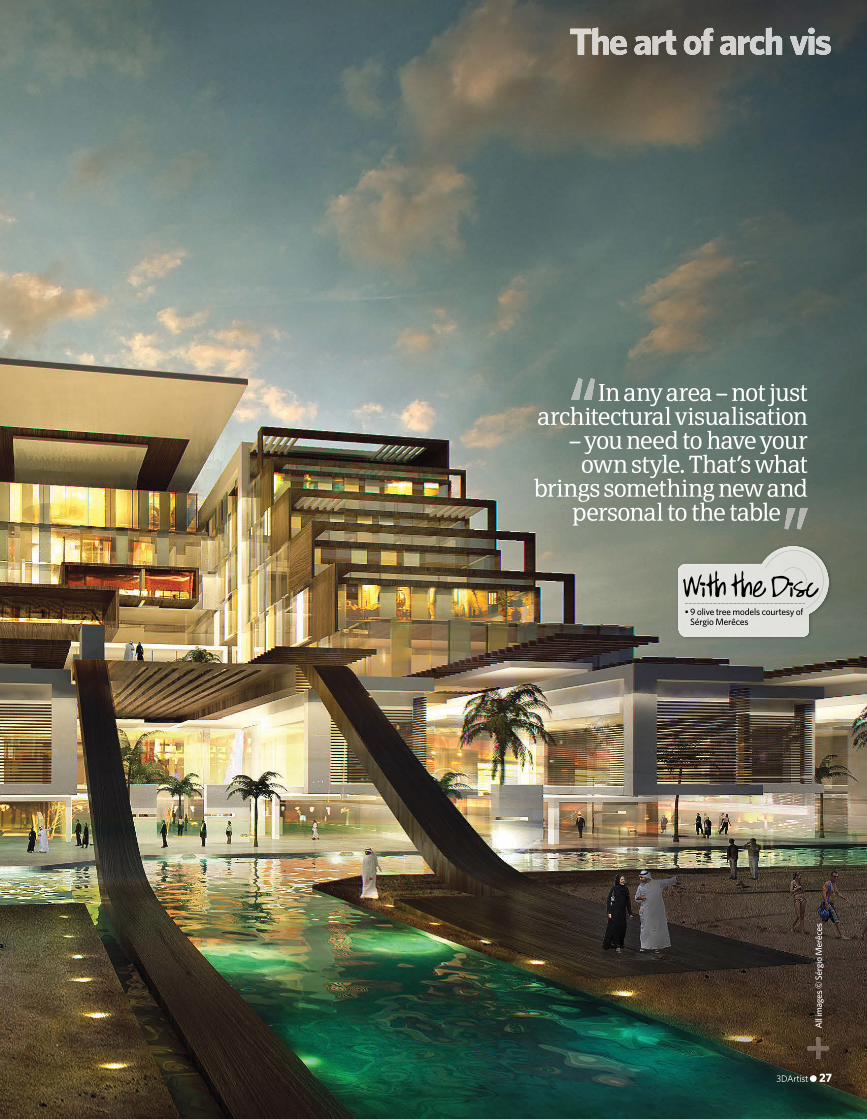
c Hammer Head» Nacho Riesco3DA username nachoriescoNacho says: “Created in ZBrush 4R4 and Photoshop.”We say: There’s something we fi nd really captivating about this bizarre character, from his forlorn eyes to his dignifi ed pout. Nacho’s fantastic texturing work perfectly brings the bust to life.
d 2110 Brasilia» Pedro Fernandes3DA username Arqui9Pedro says: “A futuristic, techno-inspired bar with some touches of Zaha Hadid architecture. It’s really a style I enjoy replicating, trying di� erent approaches to architectural visualisation and experimenting … I used 3ds Max and Photoshop, where I really played around with the post-production.”We say: This sci-fi interior is so majestic. The sharp architecture is softened beautifully by the sleek curves of the furniture and the matte painting of the city outside is an artwork in its own right.
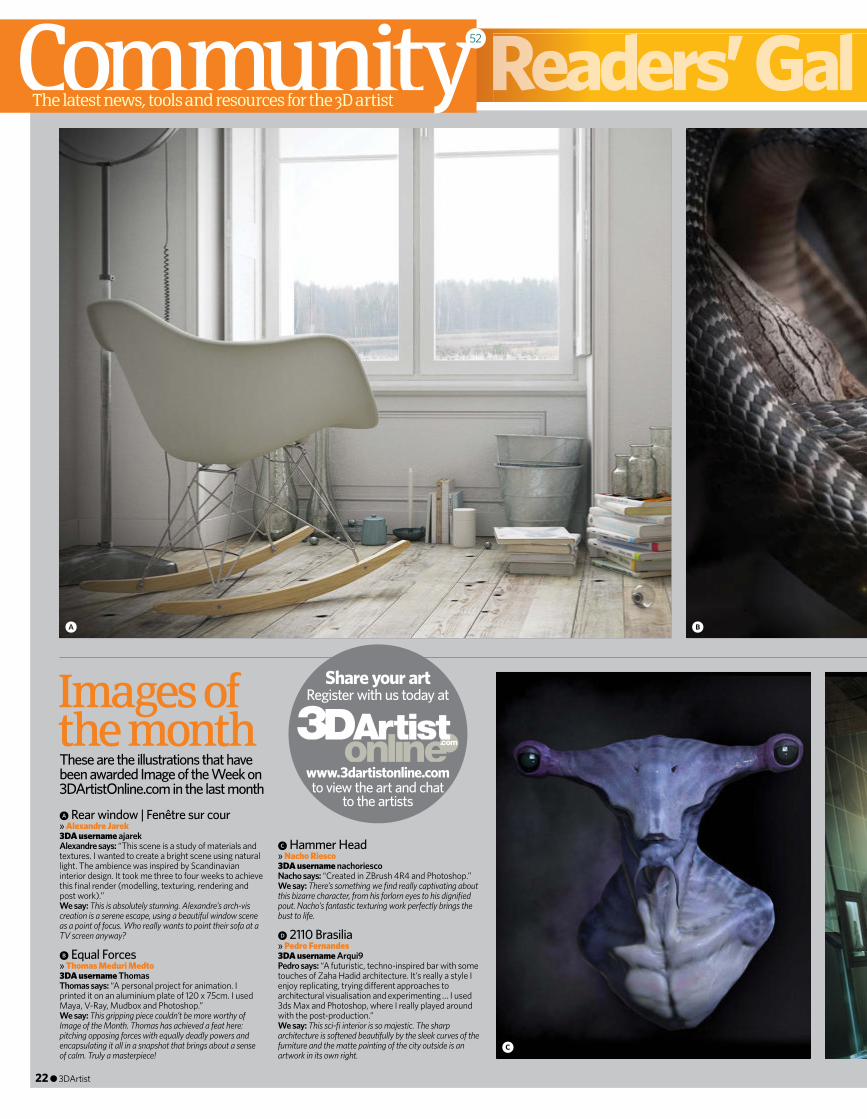
b Equal Forces» Thomas Meduri Medto3DA username ThomasThomas says: “A personal project for animation. I printed it on an aluminium plate of 120 x 75cm. I used Maya, V-Ray, Mudbox and Photoshop.”We say: This gripping piece couldn’t be more worthy of Image of the Month. Thomas has achieved a feat here: pitching opposing forces with equally deadly powers and encapsulating it all in a snapshot that brings about a sense of calm. Truly a masterpiece!
a Rear window | Fenêtre sur cour» Alexandre Jarek3DA username ajarekAlexandre says: “This scene is a study of materials and textures. I wanted to create a bright scene using natural light. The ambience was inspired by Scandinavian interior design. It took me three to four weeks to achieve this fi nal render (modelling, texturing, rendering and post work).”We say: This is absolutely stunning. Alexandre’s arch-vis creation is a serene escape, using a beautiful window scene as a point of focus. Who really wants to point their sofa at a TV screen anyway?
022-023_3DA_52_ReadersGallery.indd 22 11/02/2013 18:12

News, tools and resources ● CommunityReaders’ Gal leryReaders’ Gal lery
3DArtist ● 23
D
Imageof the
month
Old Man» Gene Teh3DA username tenerhGene says: “This is a personal artwork I did during my spare time. I started in ZBrush, retopologised in TopoGun, used Photoshop and 3D-Coat for texturing, mental ray for rendering, and back to Photoshop for colour correction.”We say: Gene has done a great job here to give his character personality and story with those expressive eyes. We also love his beard.
Imola Carbon Sofa» Nikolay Kucherko3DA username vodafone2Nikolay says: “A Carbon Imola Sofa 3 seat at 225 x 100 x 85cm. It has racing red leather, carbon arms and feet and even a printed bull logo on the headrest to fi nish.”We say: This is awesomely retro! This simple sofa is made to feel like the star of the show with its vibrant colour, luxurious materials and professional studio lighting.
Pr» Christian Siecora3DA username B2002Christian: “Design sculpt.”We say: We couldn’t resist the quirky charisma of this fellow. The material gives a beautiful marble fi nish to the bust.
The XXII Century Magnifi er» Damian Machnik3DA username admian3dDamian says: “My friend asked me to design and render a modern magnifi er. To achieve a very realistic e� ect I added blur, chromatic aberration and a slight tint.” We say: We love to see our readers imagining their creations in their homes. This is a lovely example.
022-023_3DA_52_ReadersGallery.indd 23 11/02/2013 18:12

www.3dartistonline.com Facebook.com/3DArtistMagazine@3DArtist
52
The latest news, tools and resources for the 3D artist
Have your say Email, Tweet or get in touch with us on Facebook to share your thoughts, opinions and proudest projects
24 ● 3DArtist
Have your say proudest projects
@Darkworldlegend Definitely Mass Effect!
@scribldogmega Rage! Arkham City. Colossus. Soul Reaver!
@AimForSabir The last chapter of @Naughty_Dog Uncharted 3 when the city breaks apart and sinks. Still can’t believe my eyes at how awesome it is.
THE AUTHOR OF THIS ISSUE’S STAR LETTER WINS A MONTH’S FREE SUBSCRIPTION TO DIGITAL-TUTORS WORTH $45
Thanks for sharing!Hello, I would now say I am regular reader of the magazine edition of 3D Artist and that somehow it’s very inspiring to see great works of outstanding artists, including my colleague and good friend Sérgio Merêces.
I’m sending this email to thank you from my heart for publishing my work in [issue 50], in the category of images published on your o� cial Facebook page. I’m really happy to see my last image [in] such an awesome magazine as yours.
Unfortunately, I’ve had so much work to do, so have only just seen the comment on your Facebook page today, but I would like to thank you so much and show my gratifi cation!
Thank you so much again,Tiago Alexandrino, by email
Hi Tiago, if you love Sérgio’s work then you’ll adore our feature interview with him in this issue (page 26). Sérgio’s story is a fantastic one for us, as we fi rst discovered him through 3DArtistOnline.com. So it just goes to show that we really do fi nd and publish the fantastic talents who upload their work to our galleries.
For your wonderful letter, you get the Star Letter prize this issue, which gives you a whole month’s worth of access to the fantastic Digital-Tutors.com training website. Enjoy!
Star letter
Get in touch…[email protected]
www.digital-tutors.com is a learning resource site boasting a library of over 17,000 video-based CG lessons
Print or digital?Hi Lynette, I will most likely now subscribe... However, I’m not sure whether to subscribe to the physical product (I can do that through a local store, mag nation, where I usually buy 3D Artist) or whether to go digital on the iPad. Any suggestions for that? I think I’d prefer the digital option...All the best,Dario, by email
There are a few things that will help you decide what’s best for you: • The print version comes with a free disc every issue, which gives you access to goodies such as free software, exclusive product trials and discount codes, 3D models, textures and video tuition!• Digital versions don’t come with the full disc content; however you can download all of our magazine tutorial fi les from our website: www.3dartistonline.com/news/tutorial-fi les. • If you live in the UK you’ll often get your new issue ahead of the o� cial on-sale date, so if you’re overseas and want the latest issue immediately, then a digital version may suit you better. Subscribing to print from overseas does mean you get the issue quicker, as it gets posted to you straight away.All the info you need is here: http://tinyurl.com/3DASubs1.
Digital-Tutors loveHey Lynette, sorry to bother you once more, but I just wanted to say thanks once more for the Star Letter. I didn’t know that full access really meant full access; I thought it would mean two or three tutorials maximum that would cover the $45 subscription. But when [Digital-Tutors] told me I could see every tutorial I wanted, I was astonished. Angelo, by email
You’re very welcome, Angelo. We hope you’ve had fun with your free learning! Be sure to check out our 50 hot topology tips feature on page 34, which we put together especially for you this issue following your fantastic letter. Stay tuned to 3D Artist for more tutorials to help you on your way in the coming months!
✘ Correction!In issue 51’s Know your VFX tools feature, we said that RealFlow’s Hybrido solver is a hybrid grid/particle solver used for smaller simulations. In fact, we meant to say that Hybrido is ideal for large-scale simulations, such as fl oods or oceans. In RealFlow 2013: Hybrido 2 will enable even more particles and even greater detail. Visit www.realfl ow.com for more info.
You tell usWhat videogames feature your favourite 3D art direction?
Are you Pinteresting?
Styl Srfer Shadow of the Colossus. Hands down.
Nick Rollo The God of War franchise is cinematically beautiful.
Mike Fong Final Fantasy XII for PS2. The costumes in particular. Always a massive inspiration. Love the design of the judge’s armour.
Alec Chalmers Dear Esther is up there with Shadow of the Colossus for me. It has some of the richest environments I’ve ever experienced.
Marjorie Parham Metroid Prime because that’s what started me in my direction towards becoming a concept artist.
The 3D Artist team is pinning away to keep you inspired…Because Facebook and Twitter just isn’t enough, the 3D Artist team is now getting busy on Pinterest, to pin all kinds of weird and wonderful finds. Join us! Follow our pins and share them with your friends.
Facebook.com/3DArtistMagazine
Pinterest.com/3DArtistmag
Get involved...@3DArtist
Tiago got in touch with the team through
Facebook in November. You can also email the
team at [email protected]
Angelo’s letter was featured in issue 51. The Star Letter winner
gets one-month’s free access to the Digital-Tutors.com
awesome training catalogue!
simulations. In fact, we meant to say that Hybrido simulations, such as fl oods or oceans. In
There are a few things that will help you decide what’s best for you:
024_3DA_52_Reader_Letters.indd 24 11/02/2013 19:27

Start your free trial now, visit www.livedrive.com/prosuite
Cloud Storage for EveryoneEquivalent monthly price of a 2-year account*
14 DAY
FREE TRIAL
NO CREDIT CARD REQUIRED
Completely safe. Protected by miltary grade encryption.
Safe & secure
Access your � les from any web browser or any mobile device.
Access anywhere
Loads of features for Pro users - includingFTP and WebDAV.
Advanced features
5TB cloud storage sync’d between all your computers and devices.
Sync everything
Stream your music & movies to PC, Mac, iOS, Android and Kindle.
Media playback
Upload all of your � les, from up to5 computers, into the cloud.
Unlimited Backup
Keep ALL your filesKeep
ONLINELivedrive Pro Suitefrom just £7/month*
Full Page.indd 1 31/01/2013 15:42

THE ART OF ARCH VIS
The art of arch vis
26 ● 3DArtist
026-032_3DA_52_feat_ArtistInterview.indd 26 11/02/2013 18:22
All i
mag
es ©
Sér
gio
Mer
êces
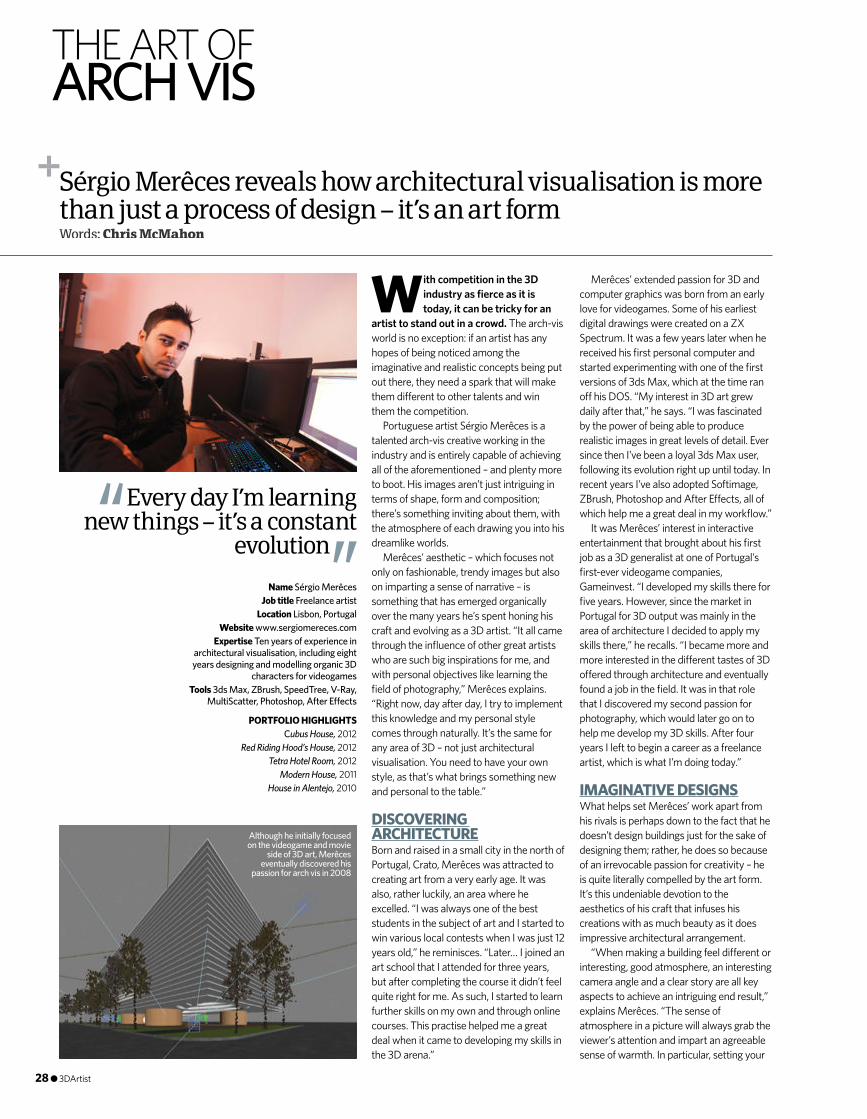
In any area – not just architectural visualisation
– you need to have your own style. That’s what
brings something new and personal to the table
• 9 olive tree models courtesy of Sérgio Merêces
The art of arch vis
3DArtist ● 27
026-032_3DA_52_feat_ArtistInterview.indd 27 11/02/2013 18:22
With competition in the 3D industry as fi erce as it is today, it can be tricky for an
artist to stand out in a crowd. The arch-vis world is no exception: if an artist has any hopes of being noticed among the imaginative and realistic concepts being put out there, they need a spark that will make them di� erent to other talents and win them the competition.
Portuguese artist Sérgio Merêces is a talented arch-vis creative working in the industry and is entirely capable of achieving all of the aforementioned – and plenty more to boot. His images aren’t just intriguing in terms of shape, form and composition; there’s something inviting about them, with the atmosphere of each drawing you into his dreamlike worlds.
Merêces’ aesthetic – which focuses not only on fashionable, trendy images but also on imparting a sense of narrative – is something that has emerged organically over the many years he’s spent honing his craft and evolving as a 3D artist. “It all came through the infl uence of other great artists who are such big inspirations for me, and with personal objectives like learning the fi eld of photography,” Merêces explains. “Right now, day after day, I try to implement this knowledge and my personal style comes through naturally. It’s the same for any area of 3D – not just architectural visualisation. You need to have your own style, as that’s what brings something new and personal to the table.”
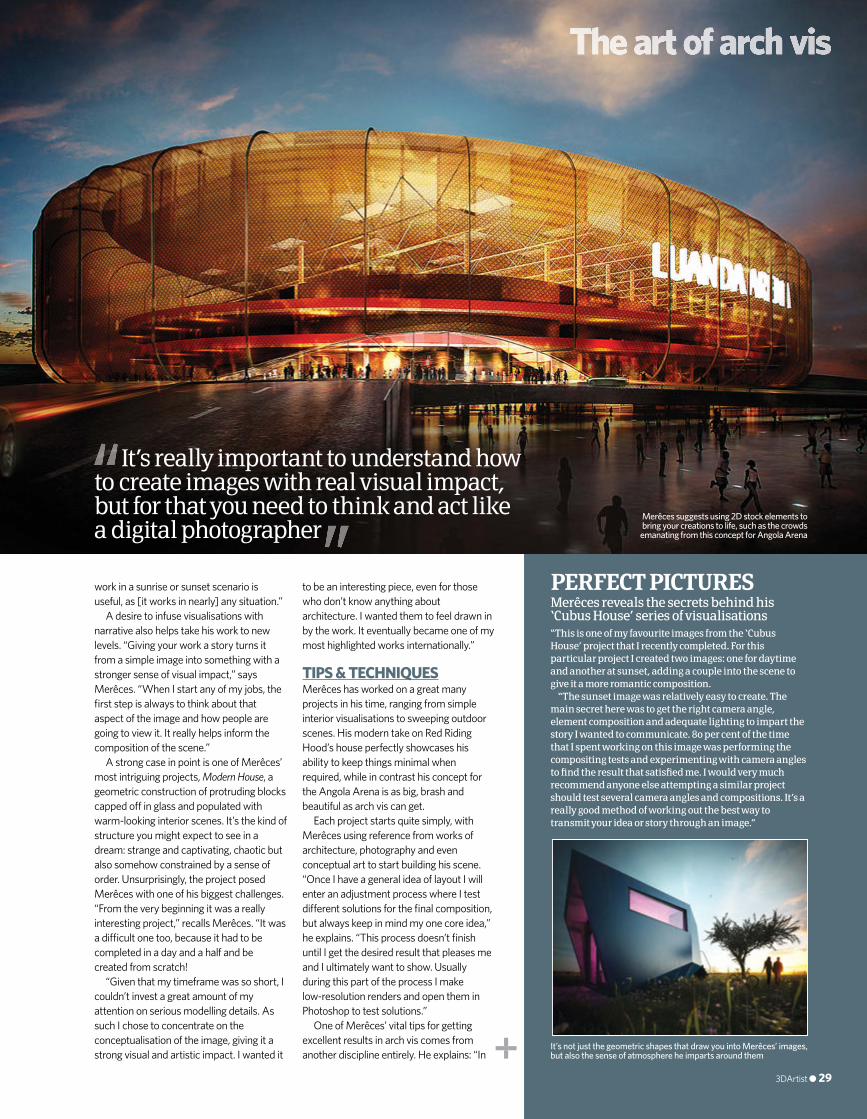
DISCOVERING ARCHITECTUREBorn and raised in a small city in the north of Portugal, Crato, Merêces was attracted to creating art from a very early age. It was also, rather luckily, an area where he excelled. “I was always one of the best students in the subject of art and I started to win various local contests when I was just 12 years old,” he reminisces. “Later… I joined an art school that I attended for three years, but after completing the course it didn’t feel quite right for me. As such, I started to learn further skills on my own and through online courses. This practise helped me a great deal when it came to developing my skills in the 3D arena.”
Merêces’ extended passion for 3D and computer graphics was born from an early love for videogames. Some of his earliest digital drawings were created on a ZX Spectrum. It was a few years later when he received his fi rst personal computer and started experimenting with one of the fi rst versions of 3ds Max, which at the time ran o� his DOS. “My interest in 3D art grew daily after that,” he says. “I was fascinated by the power of being able to produce realistic images in great levels of detail. Ever since then I’ve been a loyal 3ds Max user, following its evolution right up until today. In recent years I’ve also adopted Softimage, ZBrush, Photoshop and After E� ects, all of which help me a great deal in my workfl ow.”
It was Merêces’ interest in interactive entertainment that brought about his fi rst job as a 3D generalist at one of Portugal’s fi rst-ever videogame companies, Gameinvest. “I developed my skills there for fi ve years. However, since the market in Portugal for 3D output was mainly in the area of architecture I decided to apply my skills there,” he recalls. “I became more and more interested in the di� erent tastes of 3D o� ered through architecture and eventually found a job in the fi eld. It was in that role that I discovered my second passion for photography, which would later go on to help me develop my 3D skills. After four years I left to begin a career as a freelance artist, which is what I’m doing today.”
IMAGINATIVE DESIGNSWhat helps set Merêces’ work apart from his rivals is perhaps down to the fact that he doesn’t design buildings just for the sake of designing them; rather, he does so because of an irrevocable passion for creativity – he is quite literally compelled by the art form. It’s this undeniable devotion to the aesthetics of his craft that infuses his creations with as much beauty as it does impressive architectural arrangement.
“When making a building feel di� erent or interesting, good atmosphere, an interesting camera angle and a clear story are all key aspects to achieve an intriguing end result,” explains Merêces. “The sense of atmosphere in a picture will always grab the viewer’s attention and impart an agreeable sense of warmth. In particular, setting your
Sérgio Merêces reveals how architectural visualisation is more than just a process of design – it’s an art formWords: Chris McMahon
THE ART OF ARCH VIS
Name Sérgio MerêcesJob title Freelance artist
Location Lisbon, PortugalWebsite www.sergiomereces.com
Expertise Ten years of experience in architectural visualisation, including eight years designing and modelling organic 3D
characters for videogamesTools 3ds Max, ZBrush, SpeedTree, V-Ray,
MultiScatter, Photoshop, After E� ects
PORTFOLIO HIGHLIGHTSCubus House, 2012
Red Riding Hood’s House, 2012Tetra Hotel Room, 2012
Modern House, 2011House in Alentejo, 2010
Every day I’m learning new things – it’s a constant
evolution
Although he initially focused on the videogame and movie
side of 3D art, Merêces eventually discovered his
passion for arch vis in 2008
28 ● 3DArtist
026-032_3DA_52_feat_ArtistInterview.indd 28 11/02/2013 18:22
Merêces suggests using 2D stock elements to bring your creations to life, such as the crowds
emanating from this concept for Angola Arena
work in a sunrise or sunset scenario is useful, as [it works in nearly] any situation.”
A desire to infuse visualisations with narrative also helps take his work to new levels. “Giving your work a story turns it from a simple image into something with a stronger sense of visual impact,” says Merêces. “When I start any of my jobs, the fi rst step is always to think about that aspect of the image and how people are going to view it. It really helps inform the composition of the scene.”
A strong case in point is one of Merêces’ most intriguing projects, Modern House, a geometric construction of protruding blocks capped o� in glass and populated with warm-looking interior scenes. It’s the kind of structure you might expect to see in a dream: strange and captivating, chaotic but also somehow constrained by a sense of order. Unsurprisingly, the project posed Merêces with one of his biggest challenges. “From the very beginning it was a really interesting project,” recalls Merêces. “It was a di� cult one too, because it had to be completed in a day and a half and be created from scratch!
“Given that my timeframe was so short, I couldn’t invest a great amount of my attention on serious modelling details. As such I chose to concentrate on the conceptualisation of the image, giving it a strong visual and artistic impact. I wanted it
It’s really important to understand how to create images with real visual impact, but for that you need to think and act like a digital photographer
PERFECT PICTURESMerêces reveals the secrets behind his ‘Cubus House’ series of visualisations“This is one of my favourite images from the ‘Cubus House’ project that I recently completed. For this particular project I created two images: one for daytime and another at sunset, adding a couple into the scene to give it a more romantic composition.
“The sunset image was relatively easy to create. The main secret here was to get the right camera angle, element composition and adequate lighting to impart the story I wanted to communicate. 80 per cent of the time that I spent working on this image was performing the compositing tests and experimenting with camera angles to fi nd the result that satisfi ed me. I would very much recommend anyone else attempting a similar project should test several camera angles and compositions. It’s a really good method of working out the best way to transmit your idea or story through an image.”
It’s not just the geometric shapes that draw you into Merêces’ images, but also the sense of atmosphere he imparts around them
to be an interesting piece, even for those who don’t know anything about architecture. I wanted them to feel drawn in by the work. It eventually became one of my most highlighted works internationally.”
TIPS & TECHNIQUESMerêces has worked on a great many projects in his time, ranging from simple interior visualisations to sweeping outdoor scenes. His modern take on Red Riding Hood’s house perfectly showcases his ability to keep things minimal when required, while in contrast his concept for the Angola Arena is as big, brash and beautiful as arch vis can get.
Each project starts quite simply, with Merêces using reference from works of architecture, photography and even conceptual art to start building his scene. “Once I have a general idea of layout I will enter an adjustment process where I test di� erent solutions for the fi nal composition, but always keep in mind my one core idea,” he explains. “This process doesn’t fi nish until I get the desired result that pleases me and I ultimately want to show. Usually during this part of the process I make low-resolution renders and open them in Photoshop to test solutions.”
One of Merêces’ vital tips for getting excellent results in arch vis comes from another discipline entirely. He explains: “In
The art of arch vis
3DArtist ● 29
026-032_3DA_52_feat_ArtistInterview.indd 29 11/02/2013 18:22
Customers are looking for 3D artists who have the ability to produce not just realistic images, but beautiful ones too, with a sense of uniqueness
Finding the right angle with which to represent structures is key to Merêces. His photography skills are incredibly useful in this respect – as demonstrated in this stunning interpretation of Red Riding Hood’s house
The art of arch vis
30 ● 3DArtist
026-032_3DA_52_feat_ArtistInterview.indd 30 11/02/2013 18:23
my personal opinion, it’s really important to understand how to create images with real visual impact, but for that you need to think and act like a digital photographer,” he tells us. “You need a highly visual and creative approach to your scene and a solid grasp about how things like lighting can a� ect the fi nal look. That’s why I highly recommend that any arch-vis artist take up traditional photography as a hobby, because it will really help develop your aesthetic sense in this regard. You will have a better understanding of how to fi nd an interesting camera angle, which will have a big impact on how your work is perceived.”
Grasping photography also helps Merêces’ lighting. He explains: “When it comes to lighting I don’t resort to anything special. For outdoor scenes I always use VRaySun and V-Ray Dome lights with an HDRI map applied, [but] that depends largely on the type of lighting I want for a specifi c scenario. I control the lighting of the whole scene using the parameters of the V-Ray camera…
“However, good knowledge of photography aspects such as camera aperture, shutter speed and ISO really helps with this process. It can also help you to gather light reference from di� erent ambiences in the real world. These can really come in handy when you’re working on the lighting process, whether on an interior or exterior arch-vis scene.”
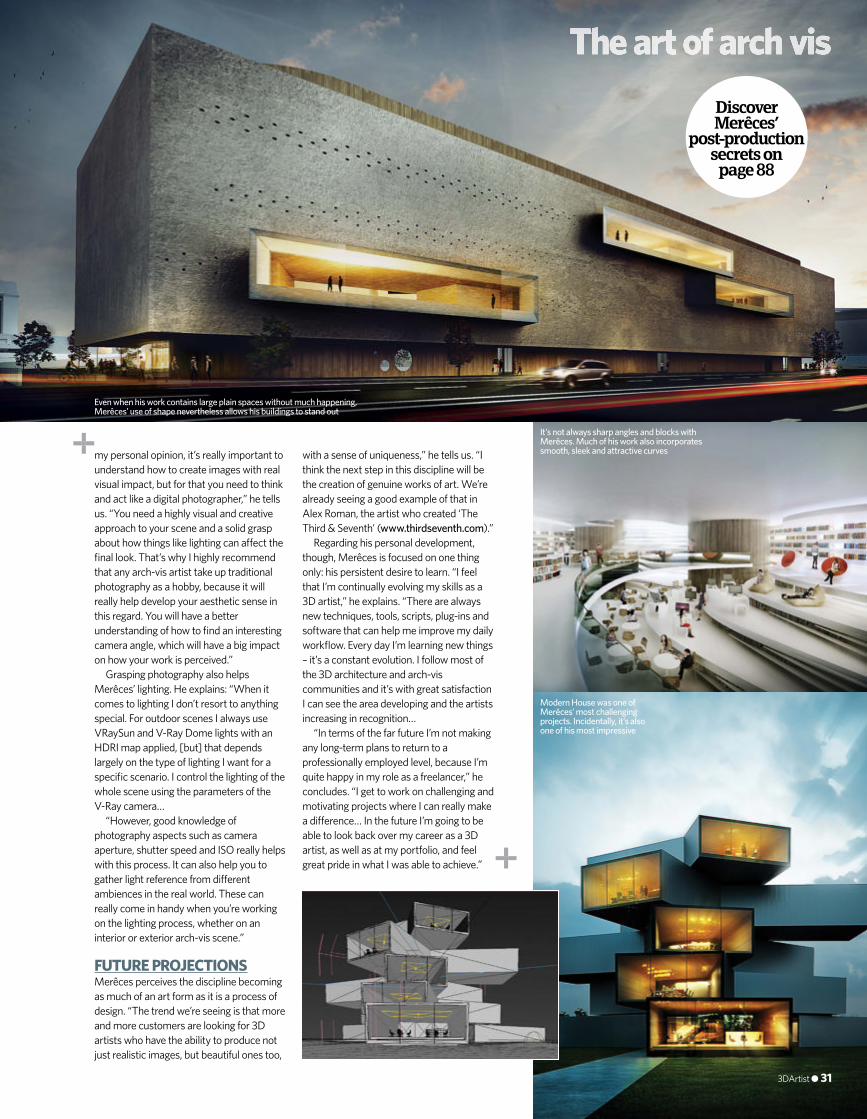
FUTURE PROJECTIONSMerêces perceives the discipline becoming as much of an art form as it is a process of design. “The trend we’re seeing is that more and more customers are looking for 3D artists who have the ability to produce not just realistic images, but beautiful ones too,
with a sense of uniqueness,” he tells us. “I think the next step in this discipline will be the creation of genuine works of art. We’re already seeing a good example of that in Alex Roman, the artist who created ‘The Third & Seventh’ (www.thirdseventh.com).”
Regarding his personal development, though, Merêces is focused on one thing only: his persistent desire to learn. “I feel that I’m continually evolving my skills as a 3D artist,” he explains. “There are always new techniques, tools, scripts, plug-ins and software that can help me improve my daily workfl ow. Every day I’m learning new things – it’s a constant evolution. I follow most of the 3D architecture and arch-vis communities and it’s with great satisfaction I can see the area developing and the artists increasing in recognition…
“In terms of the far future I’m not making any long-term plans to return to a professionally employed level, because I’m quite happy in my role as a freelancer,” he concludes. “I get to work on challenging and motivating projects where I can really make a di� erence… In the future I’m going to be able to look back over my career as a 3D artist, as well as at my portfolio, and feel great pride in what I was able to achieve.”
Modern House was one of Merêces’ most challenging projects. Incidentally, it’s also one of his most impressive
It’s not always sharp angles and blocks with Merêces. Much of his work also incorporates smooth, sleek and attractive curves
Even when his work contains large plain spaces without much happening, Merêces’ use of shape nevertheless allows his buildings to stand out
Discover Merêces’
post-production secrets on
page 88
The art of arch vis
3DArtist ● 31
026-032_3DA_52_feat_ArtistInterview.indd 31 11/02/2013 18:23
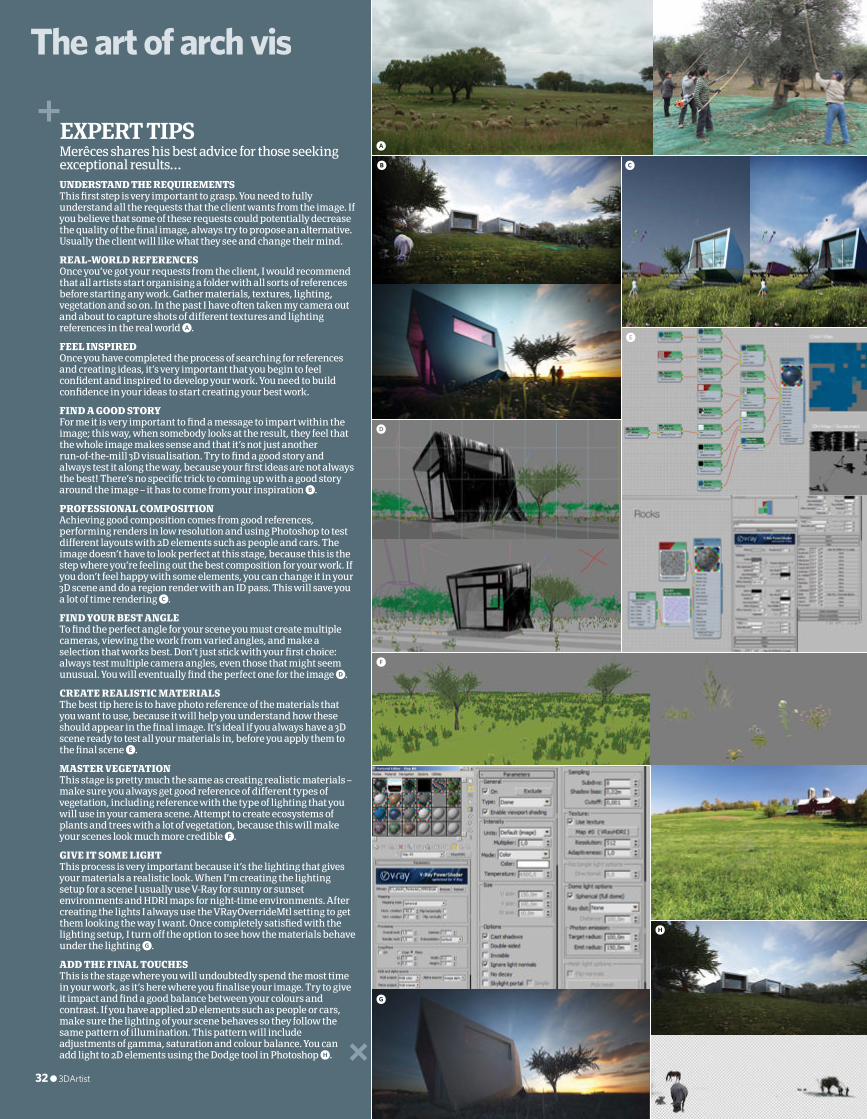
EXPERT TIPSMerêces shares his best advice for those seeking exceptional results…UNDERSTAND THE REQUIREMENTSThis fi rst step is very important to grasp. You need to fully understand all the requests that the client wants from the image. If you believe that some of these requests could potentially decrease the quality of the fi nal image, always try to propose an alternative. Usually the client will like what they see and change their mind.
REAL-WORLD REFERENCESOnce you’ve got your requests from the client, I would recommend that all artists start organising a folder with all sorts of references before starting any work. Gather materials, textures, lighting, vegetation and so on. In the past I have often taken my camera out and about to capture shots of different textures and lighting references in the real world a.
FEEL INSPIREDOnce you have completed the process of searching for references and creating ideas, it’s very important that you begin to feel confi dent and inspired to develop your work. You need to build confi dence in your ideas to start creating your best work.
FIND A GOOD STORYFor me it is very important to fi nd a message to impart within the image; this way, when somebody looks at the result, they feel that the whole image makes sense and that it’s not just another run-of-the-mill 3D visualisation. Try to fi nd a good story and always test it along the way, because your fi rst ideas are not always the best! There’s no specifi c trick to coming up with a good story around the image – it has to come from your inspiration b.
PROFESSIONAL COMPOSITIONAchieving good composition comes from good references, performing renders in low resolution and using Photoshop to test different layouts with 2D elements such as people and cars. The image doesn’t have to look perfect at this stage, because this is the step where you’re feeling out the best composition for your work. If you don’t feel happy with some elements, you can change it in your 3D scene and do a region render with an ID pass. This will save you a lot of time rendering c.
FIND YOUR BEST ANGLETo fi nd the perfect angle for your scene you must create multiple cameras, viewing the work from varied angles, and make a selection that works best. Don’t just stick with your fi rst choice: always test multiple camera angles, even those that might seem unusual. You will eventually fi nd the perfect one for the image d.
CREATE REALISTIC MATERIALSThe best tip here is to have photo reference of the materials that you want to use, because it will help you understand how these should appear in the fi nal image. It’s ideal if you always have a 3D scene ready to test all your materials in, before you apply them to the fi nal scene e.
MASTER VEGETATIONThis stage is pretty much the same as creating realistic materials – make sure you always get good reference of different types of vegetation, including reference with the type of lighting that you will use in your camera scene. Attempt to create ecosystems of plants and trees with a lot of vegetation, because this will make your scenes look much more credible f.
GIVE IT SOME LIGHTThis process is very important because it’s the lighting that gives your materials a realistic look. When I’m creating the lighting setup for a scene I usually use V-Ray for sunny or sunset environments and HDRI maps for night-time environments. After creating the lights I always use the VRayOverrideMtl setting to get them looking the way I want. Once completely satisfi ed with the lighting setup, I turn off the option to see how the materials behave under the lighting g.
ADD THE FINAL TOUCHESThis is the stage where you will undoubtedly spend the most time in your work, as it’s here where you fi nalise your image. Try to give it impact and fi nd a good balance between your colours and contrast. If you have applied 2D elements such as people or cars, make sure the lighting of your scene behaves so they follow the same pattern of illumination. This pattern will include adjustments of gamma, saturation and colour balance. You can add light to 2D elements using the Dodge tool in Photoshop h.
a
c
d
f
g
h
e
b
The art of arch vis
32 ● 3DArtist
026-032_3DA_52_feat_ArtistInterview.indd 32 11/02/2013 18:25

SELL ONLINEBACKUP TO YOURCUSTOMERSJust £39.95 per month for unlimited customers
BACKUP TO YOURBACKUP TO YOUR
30 DAY
MONEY BACK
GUARANTEE
Get started now, visit www.livedrive.com/resellers
Questions? Call our team on 020 3137 6446
It’s so easy and it’s live instantly. Start selling today.
Get set up in minutes
Build your own products. Even brand the desktop software.
White label everything
Our online control panel is so simple to use. Add users in minutes.
Stay in control
You sell the simplest, most powerful online backup. Works on Windows and Mac.
State of the art online backup
Unlimited storage and bandwidth forall accounts.
No charge for storage or bandwidth
For customers that want more. Sell cloud sync and business cloud storage!
Plus more
You pay a � xed £39.95/month. Sell accounts at any price.
No charge per customer
per month for
Full Page.indd 1 31/01/2013 15:43
A great showreel will get you noticed. Compel your audience and demonstrate the skills you have mastered to make them want to employ youWords: Chris Hill
Chris HillBio: Chris has directed and worked on many commercials, with clients including McDonald’s, Nokia, Nike, Toyota, Hasbro and many moreVisit his showreel: http://vimeo.com/39052420
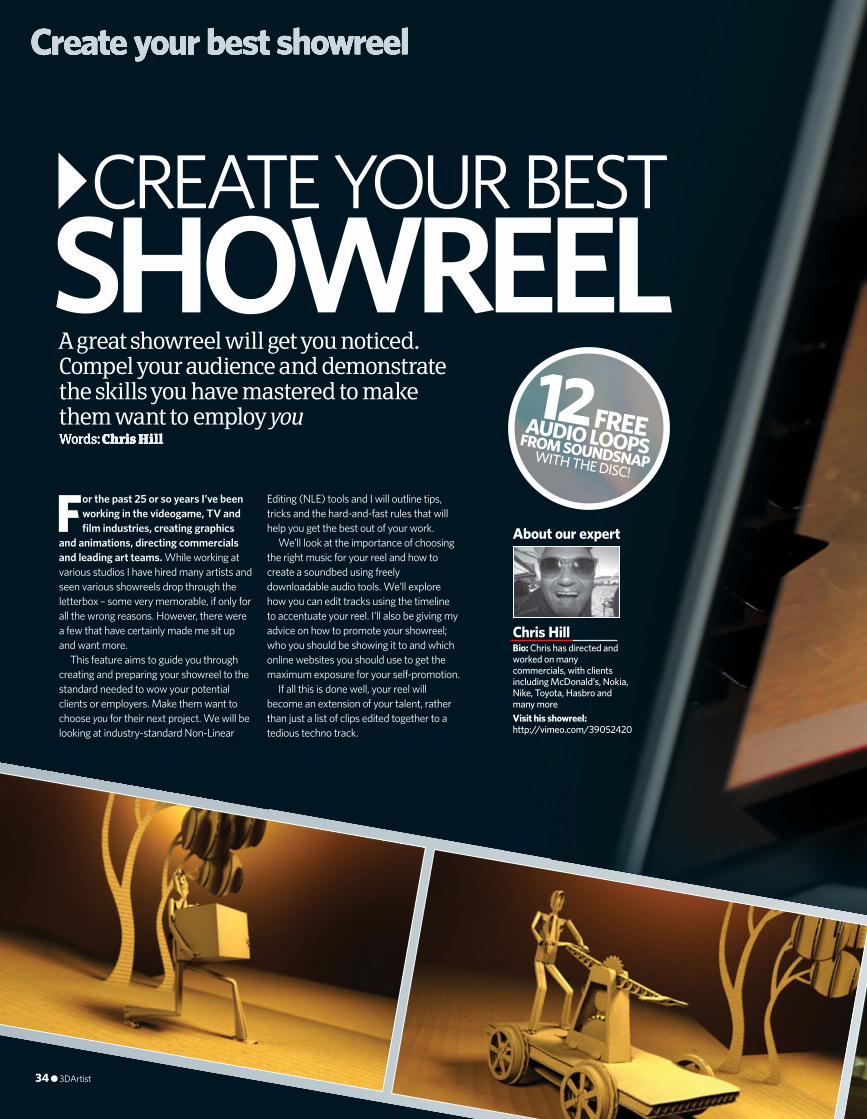
For the past 25 or so years I’ve been working in the videogame, TV and fi lm industries, creating graphics
and animations, directing commercials and leading art teams. While working at various studios I have hired many artists and seen various showreels drop through the letterbox – some very memorable, if only for all the wrong reasons. However, there were a few that have certainly made me sit up and want more.
This feature aims to guide you through creating and preparing your showreel to the standard needed to wow your potential clients or employers. Make them want to choose you for their next project. We will be looking at industry-standard Non-Linear
Editing (NLE) tools and I will outline tips, tricks and the hard-and-fast rules that will help you get the best out of your work.
We’ll look at the importance of choosing the right music for your reel and how to create a soundbed using freely downloadable audio tools. We’ll explore how you can edit tracks using the timeline to accentuate your reel. I’ll also be giving my advice on how to promote your showreel; who you should be showing it to and which online websites you should use to get the maximum exposure for your self-promotion.
If all this is done well, your reel will become an extension of your talent, rather than just a list of clips edited together to a tedious techno track.
SHOWREELCREATE YOUR BEST
12 FREE AUDIO LOOPS FROM SOUNDSNAP WITH THE DISC!
About our expert
Create your best showreel
34 ● 3DArtist
034-039_3DA_52_Feature_Create_your_best-ever_showreel_ChrisHill.indd 34 11/02/2013 21:04

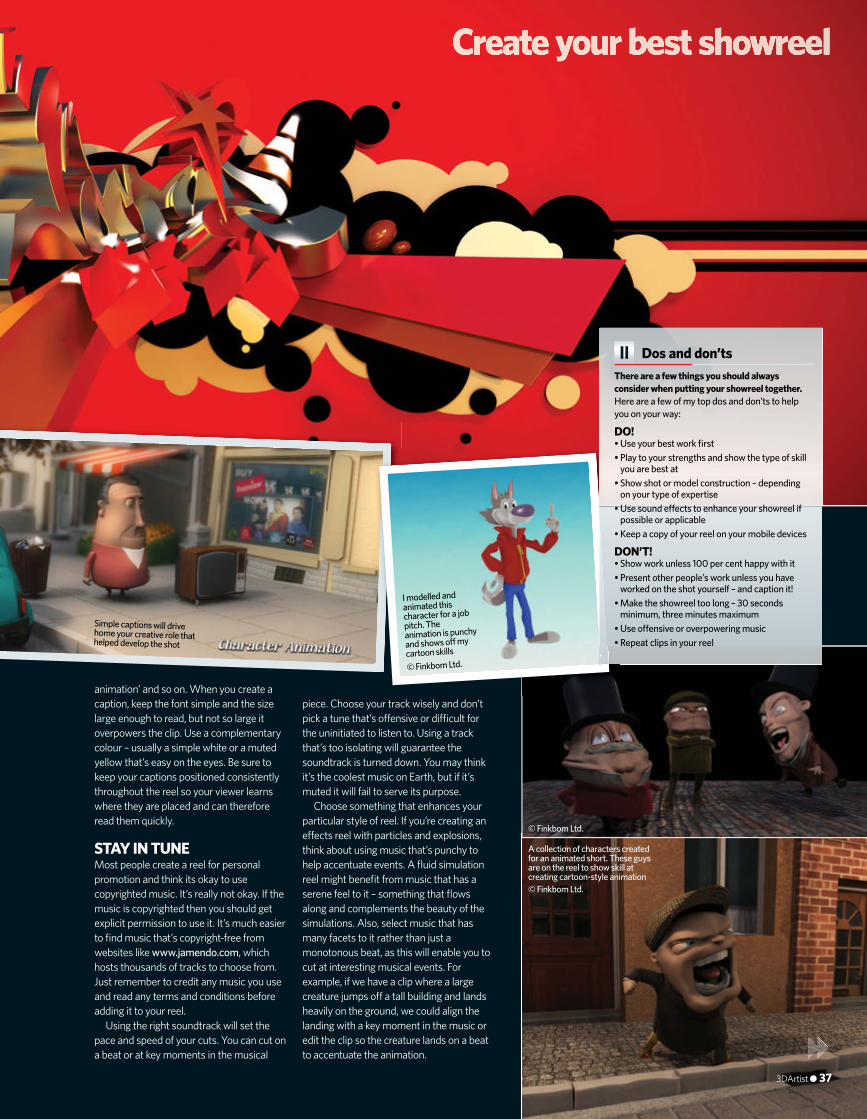
© Finkbom Ltd.
• 12 royalty-free audio loops courtesy of Soundsnap.com
Create your best showreel
3DArtist ● 35
034-039_3DA_52_Feature_Create_your_best-ever_showreel_ChrisHill.indd 35 11/02/2013 21:04
START STRONGThe opening of your showreel has the biggest impact on the client, so it should be the most impressive part. Show the work you are most proud of and that represents your talents. Starting o� strong will captivate your audience, draw them in and set the tone for the rest of what’s to come.
As an employer, when I press Play I expect to see a title, the name of the artist and what the showreel represents. Mine, for example, opens with ‘Chris Hill, Character Animation Showreel 2013’. Keep it short and use a simple, clear font with a backplate that won’t detract from the information you’re giving. Using a short, punchy title sequence can also give your showreel the edge, as it’s this sort of attention to detail that will get you noticed.
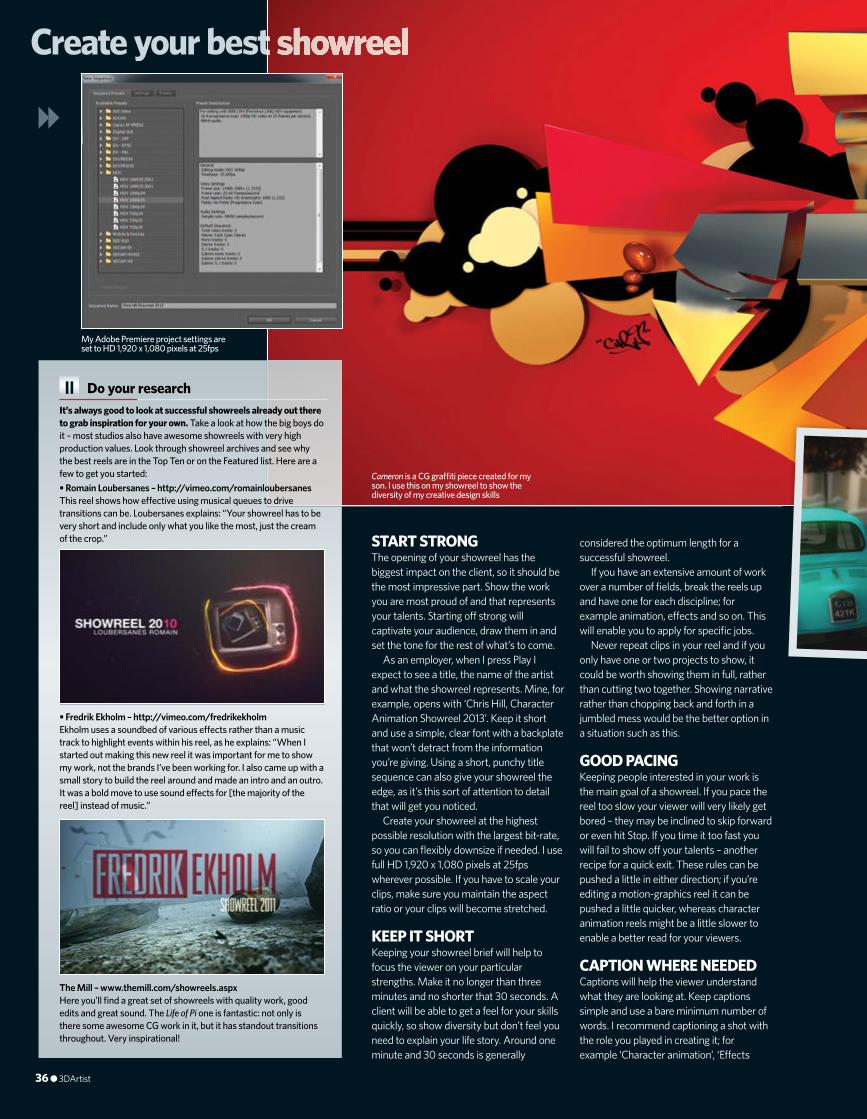
Create your showreel at the highest possible resolution with the largest bit-rate, so you can fl exibly downsize if needed. I use full HD 1,920 x 1,080 pixels at 25fps wherever possible. If you have to scale your clips, make sure you maintain the aspect ratio or your clips will become stretched.
KEEP IT SHORTKeeping your showreel brief will help to focus the viewer on your particular strengths. Make it no longer than three minutes and no shorter that 30 seconds. A client will be able to get a feel for your skills quickly, so show diversity but don’t feel you need to explain your life story. Around one minute and 30 seconds is generally
considered the optimum length for a successful showreel.
If you have an extensive amount of work over a number of fi elds, break the reels up and have one for each discipline; for example animation, e� ects and so on. This will enable you to apply for specifi c jobs.
Never repeat clips in your reel and if you only have one or two projects to show, it could be worth showing them in full, rather than cutting two together. Showing narrative rather than chopping back and forth in a jumbled mess would be the better option in a situation such as this.
GOOD PACINGKeeping people interested in your work is the main goal of a showreel. If you pace the reel too slow your viewer will very likely get bored – they may be inclined to skip forward or even hit Stop. If you time it too fast you will fail to show o� your talents – another recipe for a quick exit. These rules can be pushed a little in either direction; if you’re editing a motion-graphics reel it can be pushed a little quicker, whereas character animation reels might be a little slower to enable a better read for your viewers.
CAPTION WHERE NEEDEDCaptions will help the viewer understand what they are looking at. Keep captions simple and use a bare minimum number of words. I recommend captioning a shot with the role you played in creating it; for example ‘Character animation’, ‘E� ects
It’s always good to look at successful showreels already out there to grab inspiration for your own. Take a look at how the big boys do it – most studios also have awesome showreels with very high production values. Look through showreel archives and see why the best reels are in the Top Ten or on the Featured list. Here are a few to get you started:• Romain Loubersanes – http://vimeo.com/romainloubersanesThis reel shows how e� ective using musical queues to drive transitions can be. Loubersanes explains: “Your showreel has to be very short and include only what you like the most, just the cream of the crop.”
• Fredrik Ekholm – http://vimeo.com/fredrikekholmEkholm uses a soundbed of various e� ects rather than a music track to highlight events within his reel, as he explains: “When I started out making this new reel it was important for me to show my work, not the brands I’ve been working for. I also came up with a small story to build the reel around and made an intro and an outro. It was a bold move to use sound e� ects for [the majority of the reel] instead of music.”
The Mill – www.themill.com/showreels.aspxHere you’ll fi nd a great set of showreels with quality work, good edits and great sound. The Life of Pi one is fantastic: not only is there some awesome CG work in it, but it has standout transitions throughout. Very inspirational!
Do your research
My Adobe Premiere project settings are set to HD 1,920 x 1,080 pixels at 25fps
Cameron is a CG gra� ti piece created for my son. I use this on my showreel to show the diversity of my creative design skills
Create your best showreelCreate your best showreelCreate your best showreel
36 ● 3DArtist
034-039_3DA_52_Feature_Create_your_best-ever_showreel_ChrisHill.indd 36 11/02/2013 21:04
animation’ and so on. When you create a caption, keep the font simple and the size large enough to read, but not so large it overpowers the clip. Use a complementary colour – usually a simple white or a muted yellow that’s easy on the eyes. Be sure to keep your captions positioned consistently throughout the reel so your viewer learns where they are placed and can therefore read them quickly.
STAY IN TUNEMost people create a reel for personal promotion and think its okay to use copyrighted music. It’s really not okay. If the music is copyrighted then you should get explicit permission to use it. It’s much easier to fi nd music that’s copyright-free from websites like www.jamendo.com, which hosts thousands of tracks to choose from. Just remember to credit any music you use and read any terms and conditions before adding it to your reel.
Using the right soundtrack will set the pace and speed of your cuts. You can cut on a beat or at key moments in the musical
piece. Choose your track wisely and don’t pick a tune that’s o� ensive or di� cult for the uninitiated to listen to. Using a track that’s too isolating will guarantee the soundtrack is turned down. You may think it’s the coolest music on Earth, but if it’s muted it will fail to serve its purpose.
Choose something that enhances your particular style of reel. If you’re creating an e� ects reel with particles and explosions, think about using music that’s punchy to help accentuate events. A fl uid simulation reel might benefi t from music that has a serene feel to it – something that fl ows along and complements the beauty of the simulations. Also, select music that has many facets to it rather than just a monotonous beat, as this will enable you to cut at interesting musical events. For example, if we have a clip where a large creature jumps o� a tall building and lands heavily on the ground, we could align the landing with a key moment in the music or edit the clip so the creature lands on a beat to accentuate the animation.
There are a few things you should always consider when putting your showreel together. Here are a few of my top dos and don’ts to help you on your way:
DO!• Use your best work fi rst• Play to your strengths and show the type of skill
you are best at• Show shot or model construction – depending
on your type of expertise• Use sound e� ects to enhance your showreel if
possible or applicable• Keep a copy of your reel on your mobile devices
DON’T!• Show work unless 100 per cent happy with it• Present other people’s work unless you have
worked on the shot yourself – and caption it!• Make the showreel too long – 30 seconds
minimum, three minutes maximum• Use o� ensive or overpowering music• Repeat clips in your reel
Dos and don’ts
© Finkbom Ltd.
© Finkbom Ltd.
© Finkbom Ltd.
Simple captions will drive home your creative role that helped develop the shot
I modelled and animated this character for a job pitch. The animation is punchy and shows o� my cartoon skills
A collection of characters created for an animated short. These guys are on the reel to show skill at creating cartoon-style animation
Create your best showreel
3DArtist ● 37
034-039_3DA_52_Feature_Create_your_best-ever_showreel_ChrisHill.indd 37 11/02/2013 21:05

USE SOUND EFFECTSIf adding sound e� ects seems like your kind of thing, check out www.soungle.com, www.freesound.org, or even www.soundjay.com for tons of free e� ects that can help add atmosphere to your reel. If you’re feeling really creative, why not write your own track that can be tailored specifi cally to your needs? You can fi nd a collection of royalty-free tracks supplied with this issue’s disc (unfortunately unavailable for digital readers).
If applicable, lip-syncing should be demonstrated, but this is something you will have to consider when choosing your audio track. Put the speech into the edit, if at all possible, then add a new audio layer for the dialogue to the audio track and lower the music levels so the client can check your lip-syncing skills. It’s at this point you may fi nd you haven’t used a soundtrack with
vocals running throughout, so also consider this when choosing your music and placing your lip-sync clips.
There are lots of tools out there for editing audio, but one excellent piece of software that will help you edit sound e� ects or tracks is Audacity, which can be downloaded for free at http://audacity.sourceforge.net. Try to work with WAV fi les rather than MP3 if possible. MP3 fi les are compressed and su� er a loss of quality. Also use fi les that are stereo 16-bit 44.1kHz (CD quality). When you fi nally come to encode your reel, the audio and video will get compressed.
Once you’ve edited your audio clips, bring them into your editing software and layer them up in the timeline. You can then sync them to key events in the showreel. This process may take some time, but the impact it will have on your reel is huge.
© Romain Loubersanes
Romain Loubersanes’ showreel is short and sweet, as it includes only his very best work. “The cream of the crop”, as he puts it!
Noah is a character I modelled for an iPad book presentation. I use this on my showreel to make sure the audience can see my modelling and hair-creation skills
Audacity is a great and free audio-editing tool. Download it from http://audacity.sourceforge.net
Add audio layers to your soundtrack in your editing tool and sync to key events in the video
Create your best showreel
38 ● 3DArtist
034-039_3DA_52_Feature_Create_your_best-ever_showreel_ChrisHill.indd 38 11/02/2013 21:05
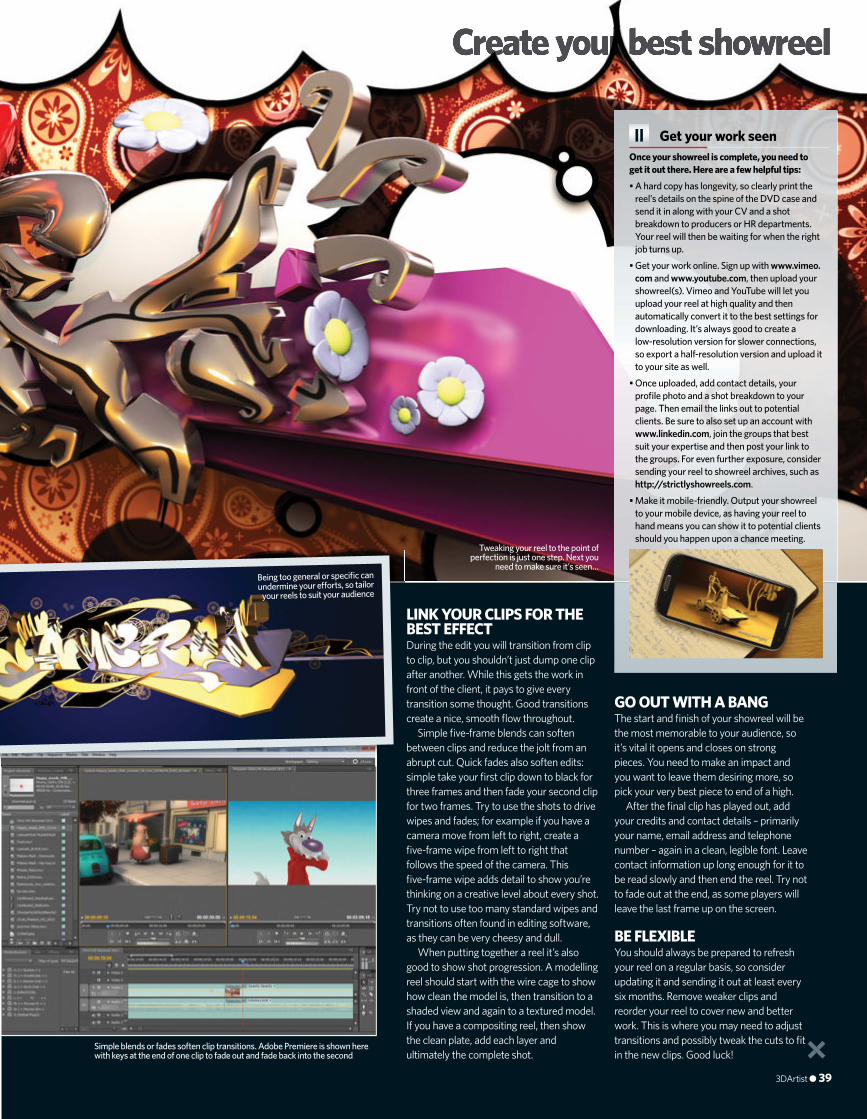
LINK YOUR CLIPS FOR THE BEST EFFECTDuring the edit you will transition from clip to clip, but you shouldn’t just dump one clip after another. While this gets the work in front of the client, it pays to give every transition some thought. Good transitions create a nice, smooth fl ow throughout.
Simple fi ve-frame blends can soften between clips and reduce the jolt from an abrupt cut. Quick fades also soften edits: simple take your fi rst clip down to black for three frames and then fade your second clip for two frames. Try to use the shots to drive wipes and fades; for example if you have a camera move from left to right, create a fi ve-frame wipe from left to right that follows the speed of the camera. This fi ve-frame wipe adds detail to show you’re thinking on a creative level about every shot. Try not to use too many standard wipes and transitions often found in editing software, as they can be very cheesy and dull.
When putting together a reel it’s also good to show shot progression. A modelling reel should start with the wire cage to show how clean the model is, then transition to a shaded view and again to a textured model. If you have a compositing reel, then show the clean plate, add each layer and ultimately the complete shot.
GO OUT WITH A BANGThe start and fi nish of your showreel will be the most memorable to your audience, so it’s vital it opens and closes on strong pieces. You need to make an impact and you want to leave them desiring more, so pick your very best piece to end of a high.
After the fi nal clip has played out, add your credits and contact details – primarily your name, email address and telephone number – again in a clean, legible font. Leave contact information up long enough for it to be read slowly and then end the reel. Try not to fade out at the end, as some players will leave the last frame up on the screen.
BE FLEXIBLEYou should always be prepared to refresh your reel on a regular basis, so consider updating it and sending it out at least every six months. Remove weaker clips and reorder your reel to cover new and better work. This is where you may need to adjust transitions and possibly tweak the cuts to fi t in the new clips. Good luck!
Once your showreel is complete, you need to get it out there. Here are a few helpful tips:
• A hard copy has longevity, so clearly print the reel’s details on the spine of the DVD case and send it in along with your CV and a shot breakdown to producers or HR departments. Your reel will then be waiting for when the right job turns up.
• Get your work online. Sign up with www.vimeo.com and www.youtube.com, then upload your showreel(s). Vimeo and YouTube will let you upload your reel at high quality and then automatically convert it to the best settings for downloading. It’s always good to create a low-resolution version for slower connections, so export a half-resolution version and upload it to your site as well.
• Once uploaded, add contact details, your profi le photo and a shot breakdown to your page. Then email the links out to potential clients. Be sure to also set up an account with www.linkedin.com, join the groups that best suit your expertise and then post your link to the groups. For even further exposure, consider sending your reel to showreel archives, such as http://strictlyshowreels.com.
• Make it mobile-friendly. Output your showreel to your mobile device, as having your reel to hand means you can show it to potential clients should you happen upon a chance meeting.
Get your work seen
Being too general or specifi c can undermine your eff orts, so tailor
your reels to suit your audience
Tweaking your reel to the point of perfection is just one step. Next you
need to make sure it’s seen…
Simple blends or fades soften clip transitions. Adobe Premiere is shown here with keys at the end of one clip to fade out and fade back into the second
Create your best showreel
3DArtist ● 39
034-039_3DA_52_Feature_Create_your_best-ever_showreel_ChrisHill.indd 39 11/02/2013 21:05
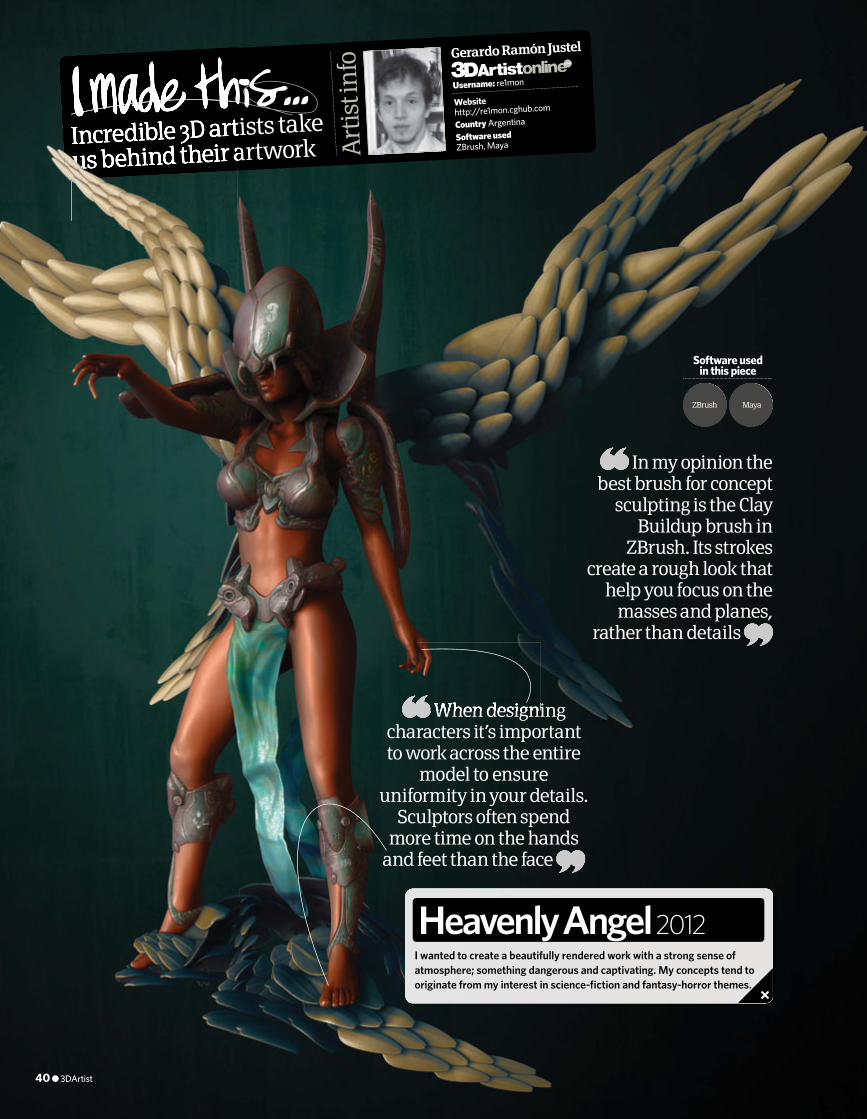
I wanted to create a beautifully rendered work with a strong sense of atmosphere; something dangerous and captivating. My concepts tend to originate from my interest in science-fi ction and fantasy-horror themes.
Heavenly Angel 2012
Software used in this piece
ZBrush Maya
When designing characters it’s important to work across the entire
model to ensure uniformity in your details.
Sculptors often spend more time on the hands
and feet than the face
In my opinion the best brush for concept
sculpting is the Clay Buildup brush in
ZBrush. Its strokes create a rough look that
help you focus on the masses and planes,
rather than details
Incredible 3D artists take
us behind their artwork Art
ist i
nfo Gerardo Ramón Justel
Websitehttp://re1mon.cghub.com
Country Argentina
Software used ZBrush, Maya
When designing
Username: re1mon
Incredible 3D artists take
us behind their artwork
40 ● 3DArtist
040_3DA_52_ImadeThis_Gerardo.indd 40 11/02/2013 18:15

TERMS & CONDITIONS Imagine Publishing and its partners have the right to substitute the prize for a similar item of equal or higher value. Employees of Imagine Publishing, Reallusion, their relatives or any agents are not eligible to enter. The editor’s decision is fi nal and no correspondence will be entered into. Prizes cannot be exchanged for cash. From time to time, Imagine Publishing or its agents may send you related material or special o� ers. If you do not want to receive this, please state so clearly in your competition entry. All entrants agree to participate in any promotion related to this competition. The competition closes on 1 June 2013.
What’s in the bundle? • iClone5 PRO – the most fully featured package
in the bundle. This o� ers advanced puppeteering, BVH conversion and voiceover/lip-sync tracks.
• iClone Mocap Device Plug-in – this enables real-time motion capture from within iClone, using a Microsoft Kinect camera.
• 3DXchange5 – a conversion and editing tool that connects iClone to professional applications such as 3ds Max, Maya and more.
3D Artist magazine has partnered with Reallusion, the maker of iClone5 PRO, to o� er two readers the chance
to win the full iClone Animation Pipeline. Read on to fi nd out how…
What is the iClone Animation Pipeline?If you like working in a what-you-see-is-what-you-get production environment then the iClone Animation Pipeline was made for you. It’s essentially a trio of character creation, facial and body motion animation production, and motion capture with exportable results for use in the likes of Unity or UDK – or any other 3D software that supports FBX.
Comprehensive 3D content conversion
Don’t miss your chance to enter this exciting competition to get your hands on the iClone Animation Pipeline bundle. Simply answer our competition
question to be entered into the prize draw:
To enter, head to www.3dartistonline.com/iclone_pipeline
Would you like to win an entire animation pipeline worth £599? HOW TO ENTER
What is the current version of iClone PRO software? A: 8 B: 5 C: 4
OVER £1,000 WORTH OF SOFTWARE TO BE WON!
Two lucky readers will win the entire iClone Animation Pipeline bundle
by answering one simple question
Two lucky readers will win the entire iClone Animation Pipeline bundle
by answering one simple question
Two iClone Animation Pipeline
bundles up for grabs!
WIN!
041_3DA_52_Competition_iClone_Animation_Pipeline.indd 41 11/02/2013 18:18

50 HOT TOPOLOGY TIPSExpert modellers share their tips, advice and tricks that will help you master this most fundamental of procedures. Read on to fi nd out how you can fi nally perfect your organic and hard-surface projects
© Richard Yot
Since this mesh is not going to be deformed, the topology does not need to be too clean. There are poles in the face but these will not be seen in the fi nal render
It’s common in many tutorials for authors to assume the reader already knows how to do certain tasks. One of
the often-skipped-by tasks in 3D tutorials is the challenge of creating clean, e� cient topology – a daunting task for someone relatively new to 3D. While instructing someone to ‘retopologise your model’ may be seemingly obvious to many, for others it’s a frightening concept.
So what is topology? Why do you need your topology to be clean? How does the topology of an organic model di� er to that of a hard-surface one? How can you e� ciently create clean topology in your models to become a better artist? We’ve brought together a hand-picked selection of successful artists that have been perfecting their topology for many years for a variety of organic and hard-surface projects. Here they reveal the whats, whys and hows of achieving great topology.
OUR EXPERTS
Richard YotWebsite: www.itchy-animation.co.ukArea of expertise: Designing characters with a quirky twistPreferred topology tools: modo and TopoGun
Craig A ClarkWebsite: www.scorpiocgi.co.ukArea of expertise: Photorealistic modellingPreferred topology tools: LightWave, Bandsaw, Band Glue, Add Edges and New Dimensions 2
Filippo VenieroWebsite: www.ifi lgood.itArea of expertise: Modelling and texturingPreferred topology tools: Blender and Bsurfaces GPL (Blender add-on)
José Alves da SilvaWebsite: www.artofjose.comArea of expertise: Designing and illustrating stylised 3D charactersPreferred topology tools: TopoGun and ZBrush
Jahirul AminWebsite: www.warpeaceandpixels.comArea of expertise: Maya generalist with a main focus on character setupPreferred topology tools: Maya
Matt BrealeyWebsite: www.badgrenola.comArea of expertise: Hard-surface modelling, particularly product designPreferred topology tools: modo
Toni BratincevicWebsite: www.interstation3d.comArea of expertise: Environment modelling and texturing for illustrations and cinematicsPreferred topology tools: ZBrush and 3ds Max
© R
icha
rd Y
ot
50 hot topology tips
42 ● 3DArtist
042-048_3DA_52_Feature_50_Hot_topology_tips_MichaelBurns.indd 42 11/02/2013 21:09
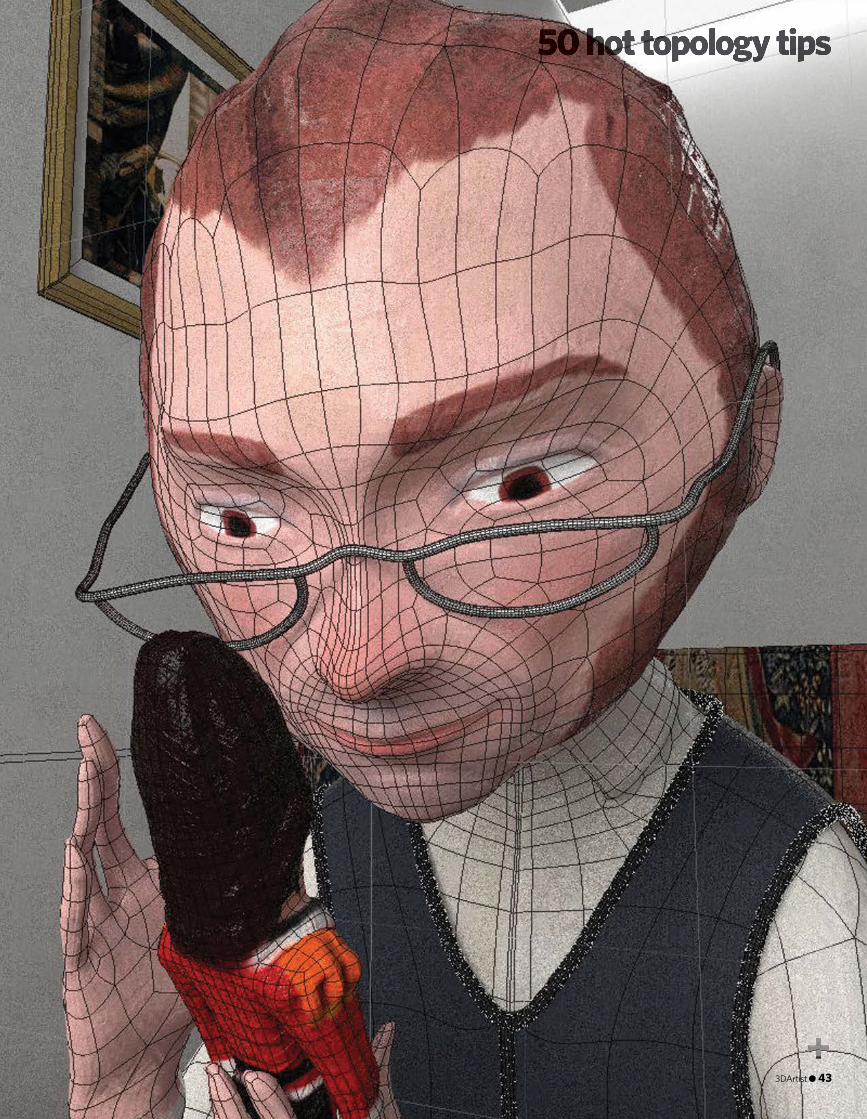
50 hot topology tips
3DArtist ● 43
042-048_3DA_52_Feature_50_Hot_topology_tips_MichaelBurns.indd 43 11/02/2013 21:09
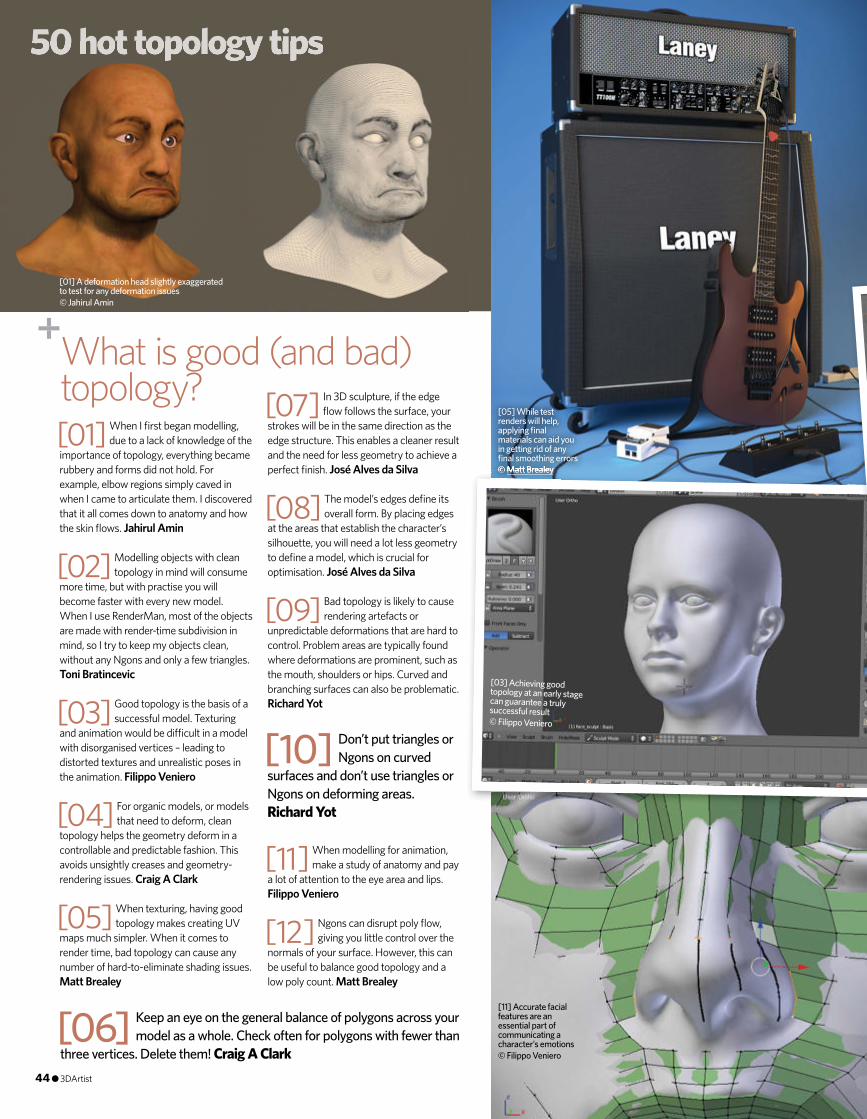
[01] When I fi rst began modelling, due to a lack of knowledge of the
importance of topology, everything became rubbery and forms did not hold. For example, elbow regions simply caved in when I came to articulate them. I discovered that it all comes down to anatomy and how the skin fl ows. Jahirul Amin
[02] Modelling objects with clean topology in mind will consume
more time, but with practise you will become faster with every new model. When I use RenderMan, most of the objects are made with render-time subdivision in mind, so I try to keep my objects clean, without any Ngons and only a few triangles. Toni Bratincevic
[03] Good topology is the basis of a successful model. Texturing
and animation would be di� cult in a model with disorganised vertices – leading to distorted textures and unrealistic poses in the animation. Filippo Veniero
[04] For organic models, or models that need to deform, clean
topology helps the geometry deform in a controllable and predictable fashion. This avoids unsightly creases and geometry-rendering issues. Craig A Clark
[05] When texturing, having good topology makes creating UV
maps much simpler. When it comes to render time, bad topology can cause any number of hard-to-eliminate shading issues. Matt Brealey
[07] In 3D sculpture, if the edge fl ow follows the surface, your
strokes will be in the same direction as the edge structure. This enables a cleaner result and the need for less geometry to achieve a perfect fi nish. José Alves da Silva
[08] The model’s edges defi ne its overall form. By placing edges
at the areas that establish the character’s silhouette, you will need a lot less geometry to defi ne a model, which is crucial for optimisation. José Alves da Silva
[09] Bad topology is likely to cause rendering artefacts or
unpredictable deformations that are hard to control. Problem areas are typically found where deformations are prominent, such as the mouth, shoulders or hips. Curved and branching surfaces can also be problematic. Richard Yot
[11] When modelling for animation, make a study of anatomy and pay
a lot of attention to the eye area and lips. Filippo Veniero
[12] Ngons can disrupt poly fl ow, giving you little control over the
normals of your surface. However, this can be useful to balance good topology and a low poly count. Matt Brealey
[10] Don’t put triangles or Ngons on curved
surfaces and don’t use triangles or Ngons on deforming areas. Richard Yot
[06] Keep an eye on the general balance of polygons across your model as a whole. Check often for polygons with fewer than
three vertices. Delete them! Craig A Clark
What is good (and bad) topology?
© Jahirul Amin
© Matt Brealey
© Filippo Veniero
© Filippo Veniero
[01] A deformation head slightly exaggerated to test for any deformation issues
© Matt Brealey
[05] While test renders will help, applying fi nal materials can aid you in getting rid of any fi nal smoothing errors
[11] Accurate facial features are an essential part of communicating a character’s emotions
[03] Achieving good topology at an early stage can guarantee a truly successful result
50 hot topology tips50 hot topology tips
44 ● 3DArtist
042-048_3DA_52_Feature_50_Hot_topology_tips_MichaelBurns.indd 44 11/02/2013 21:10
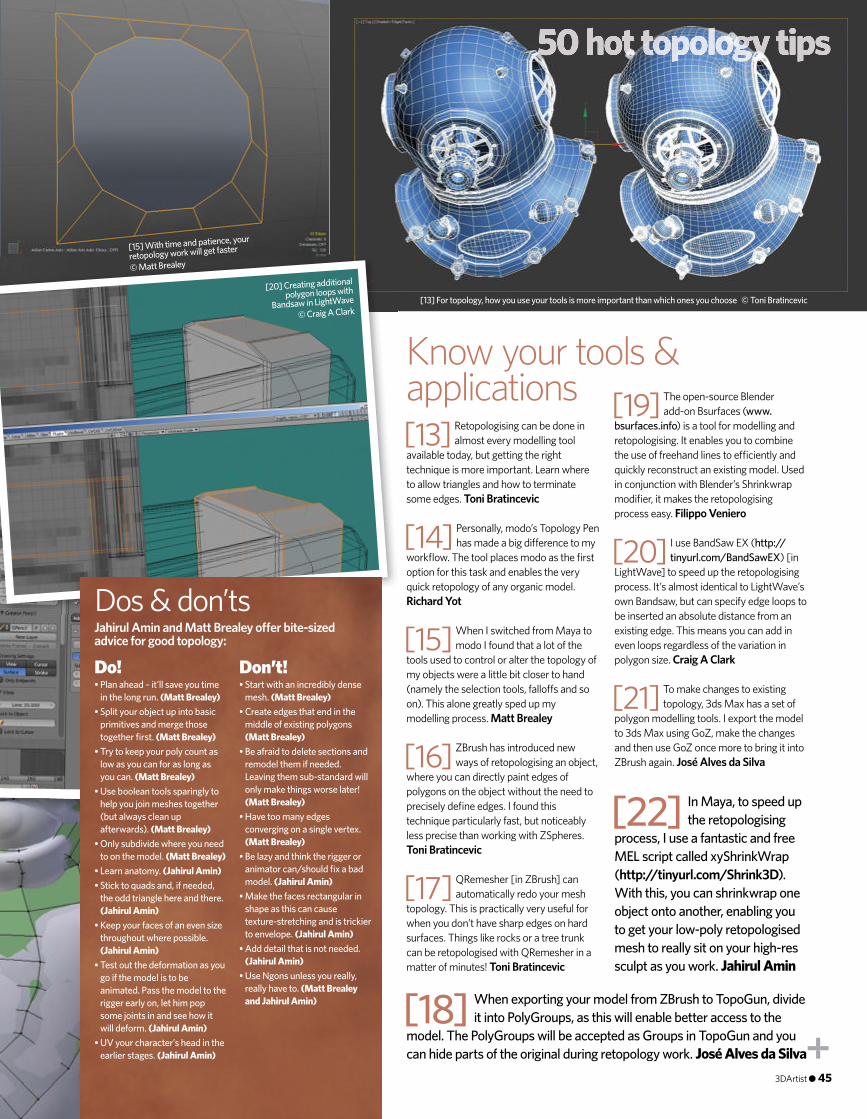
[13] Retopologising can be done in almost every modelling tool
available today, but getting the right technique is more important. Learn where to allow triangles and how to terminate some edges. Toni Bratincevic
[14] Personally, modo’s Topology Pen has made a big di� erence to my
workfl ow. The tool places modo as the fi rst option for this task and enables the very quick retopology of any organic model. Richard Yot
[15] When I switched from Maya to modo I found that a lot of the
tools used to control or alter the topology of my objects were a little bit closer to hand (namely the selection tools, fallo� s and so on). This alone greatly sped up my modelling process. Matt Brealey
[16] ZBrush has introduced new ways of retopologising an object,
where you can directly paint edges of polygons on the object without the need to precisely defi ne edges. I found this technique particularly fast, but noticeably less precise than working with ZSpheres. Toni Bratincevic
[17] QRemesher [in ZBrush] can automatically redo your mesh
topology. This is practically very useful for when you don’t have sharp edges on hard surfaces. Things like rocks or a tree trunk can be retopologised with QRemesher in a matter of minutes! Toni Bratincevic
[19] The open-source Blender add-on Bsurfaces (www.
bsurfaces.info) is a tool for modelling and retopologising. It enables you to combine the use of freehand lines to e� ciently and quickly reconstruct an existing model. Used in conjunction with Blender’s Shrinkwrap modifi er, it makes the retopologising process easy. Filippo Veniero
[20] I use BandSaw EX (http://tinyurl.com/BandSawEX) [in
LightWave] to speed up the retopologising process. It’s almost identical to LightWave’s own Bandsaw, but can specify edge loops to be inserted an absolute distance from an existing edge. This means you can add in even loops regardless of the variation in polygon size. Craig A Clark
[21] To make changes to existing topology, 3ds Max has a set of
polygon modelling tools. I export the model to 3ds Max using GoZ, make the changes and then use GoZ once more to bring it into ZBrush again. José Alves da Silva
[18] When exporting your model from ZBrush to TopoGun, divide it into PolyGroups, as this will enable better access to the
model. The PolyGroups will be accepted as Groups in TopoGun and you can hide parts of the original during retopology work. José Alves da Silva
[22] In Maya, to speed up the retopologising
process, I use a fantastic and free MEL script called xyShrinkWrap (http://tinyurl.com/Shrink3D). With this, you can shrinkwrap one object onto another, enabling you to get your low-poly retopologised mesh to really sit on your high-res sculpt as you work. Jahirul Amin
Know your tools & applications
Dos & don’tsJahirul Amin and Matt Brealey o� er bite-sized advice for good topology:
Do! • Plan ahead – it’ll save you time
in the long run. (Matt Brealey)• Split your object up into basic
primitives and merge those together fi rst. (Matt Brealey)
• Try to keep your poly count as low as you can for as long as you can. (Matt Brealey)
• Use boolean tools sparingly to help you join meshes together (but always clean up afterwards). (Matt Brealey)
• Only subdivide where you need to on the model. (Matt Brealey)
• Learn anatomy. (Jahirul Amin)• Stick to quads and, if needed,
the odd triangle here and there. (Jahirul Amin)
• Keep your faces of an even size throughout where possible. (Jahirul Amin)
• Test out the deformation as you go if the model is to be animated. Pass the model to the rigger early on, let him pop some joints in and see how it will deform. (Jahirul Amin)
• UV your character’s head in the earlier stages. (Jahirul Amin)
Don’t! • Start with an incredibly dense
mesh. (Matt Brealey)• Create edges that end in the
middle of existing polygons (Matt Brealey)
• Be afraid to delete sections and remodel them if needed. Leaving them sub-standard will only make things worse later! (Matt Brealey)
• Have too many edges converging on a single vertex. (Matt Brealey)
• Be lazy and think the rigger or animator can/should fi x a bad model. (Jahirul Amin)
• Make the faces rectangular in shape as this can cause texture-stretching and is trickier to envelope. (Jahirul Amin)
• Add detail that is not needed. (Jahirul Amin)
• Use Ngons unless you really, really have to. (Matt Brealey and Jahirul Amin)
© Craig A Clark
© Matt Brealey
© Toni Bratincevic[20] Creating additional
polygon loops with Bandsaw in LightWave
[15] With time and patience, your
retopology work will get faster
[13] For topology, how you use your tools is more important than which ones you choose
50 hot topology tips
3DArtist ● 45
042-048_3DA_52_Feature_50_Hot_topology_tips_MichaelBurns.indd 45 11/02/2013 21:10
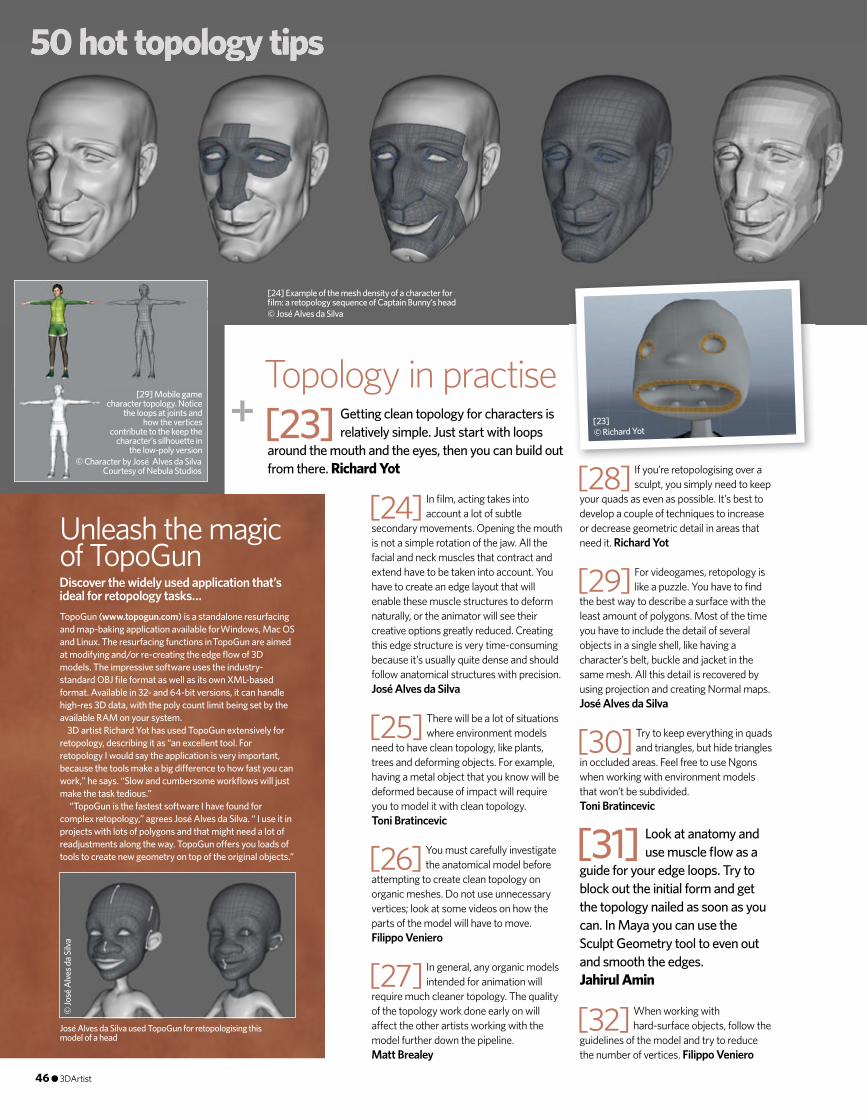
© Richard Yot[23]
[24] In fi lm, acting takes into account a lot of subtle
secondary movements. Opening the mouth is not a simple rotation of the jaw. All the facial and neck muscles that contract and extend have to be taken into account. You have to create an edge layout that will enable these muscle structures to deform naturally, or the animator will see their creative options greatly reduced. Creating this edge structure is very time-consuming because it’s usually quite dense and should follow anatomical structures with precision. José Alves da Silva
[25] There will be a lot of situations where environment models
need to have clean topology, like plants, trees and deforming objects. For example, having a metal object that you know will be deformed because of impact will require you to model it with clean topology. Toni Bratincevic
[26] You must carefully investigate the anatomical model before
attempting to create clean topology on organic meshes. Do not use unnecessary vertices; look at some videos on how the parts of the model will have to move. Filippo Veniero
[27] In general, any organic models intended for animation will
require much cleaner topology. The quality of the topology work done early on will a� ect the other artists working with the model further down the pipeline. Matt Brealey
[28] If you’re retopologising over a sculpt, you simply need to keep
your quads as even as possible. It’s best to develop a couple of techniques to increase or decrease geometric detail in areas that need it. Richard Yot
[29] For videogames, retopology is like a puzzle. You have to fi nd
the best way to describe a surface with the least amount of polygons. Most of the time you have to include the detail of several objects in a single shell, like having a character’s belt, buckle and jacket in the same mesh. All this detail is recovered by using projection and creating Normal maps. José Alves da Silva
[30] Try to keep everything in quads and triangles, but hide triangles
in occluded areas. Feel free to use Ngons when working with environment models that won’t be subdivided. Toni Bratincevic
[32] When working with hard-surface objects, follow the
guidelines of the model and try to reduce the number of vertices. Filippo Veniero
[23] Getting clean topology for characters is relatively simple. Just start with loops
around the mouth and the eyes, then you can build out from there. Richard Yot
[31] Look at anatomy and use muscle fl ow as a
guide for your edge loops. Try to block out the initial form and get the topology nailed as soon as you can. In Maya you can use the Sculpt Geometry tool to even out and smooth the edges. Jahirul Amin
Topology in practise
TopoGun (www.topogun.com) is a standalone resurfacing and map-baking application available for Windows, Mac OS and Linux. The resurfacing functions in TopoGun are aimed at modifying and/or re-creating the edge fl ow of 3D models. The impressive software uses the industry-standard OBJ fi le format as well as its own XML-based format. Available in 32- and 64-bit versions, it can handle high-res 3D data, with the poly count limit being set by the available RAM on your system.
3D artist Richard Yot has used TopoGun extensively for retopology, describing it as “an excellent tool. For retopology I would say the application is very important, because the tools make a big di� erence to how fast you can work,” he says. “Slow and cumbersome workfl ows will just make the task tedious.”
“TopoGun is the fastest software I have found for complex retopology,” agrees José Alves da Silva. “ I use it in projects with lots of polygons and that might need a lot of readjustments along the way. TopoGun o� ers you loads of tools to create new geometry on top of the original objects.”
Unleash the magic of TopoGunDiscover the widely used application that’s ideal for retopology tasks…
© Jo
sé A
lves d
a Silv
a
José Alves da Silva used TopoGun for retopologising this model of a head
© José Alves da Silva
© Character by José Alves da SilvaCourtesy of Nebula Studios
[24] Example of the mesh density of a character for fi lm: a retopology sequence of Captain Bunny’s head
[29] Mobile game character topology. Notice
the loops at joints and how the vertices
contribute to the keep the character’s silhouette in
the low-poly version
50 hot topology tips50 hot topology tips
46 ● 3DArtist
042-048_3DA_52_Feature_50_Hot_topology_tips_MichaelBurns.indd 46 11/02/2013 21:10
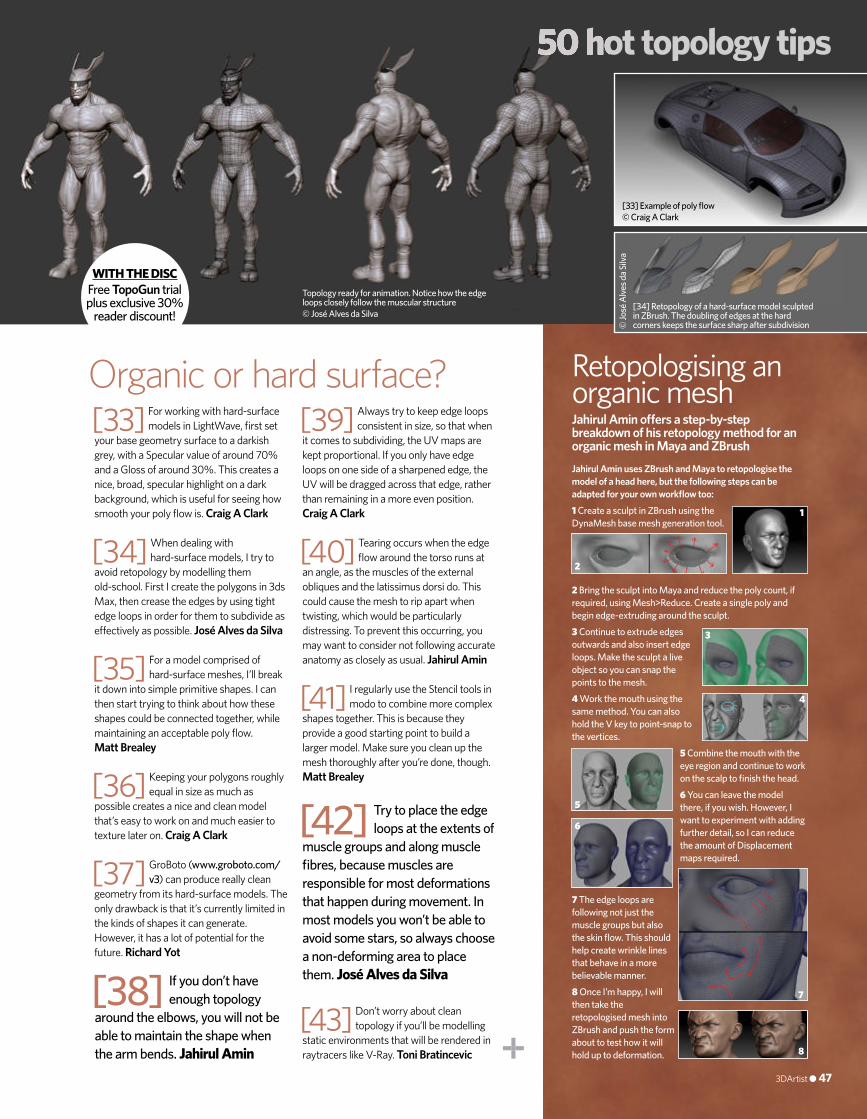
[33] For working with hard-surface models in LightWave, fi rst set
your base geometry surface to a darkish grey, with a Specular value of around 70% and a Gloss of around 30%. This creates a nice, broad, specular highlight on a dark background, which is useful for seeing how smooth your poly fl ow is. Craig A Clark
[34] When dealing with hard-surface models, I try to
avoid retopology by modelling them old-school. First I create the polygons in 3ds Max, then crease the edges by using tight edge loops in order for them to subdivide as e� ectively as possible. José Alves da Silva
[35] For a model comprised of hard-surface meshes, I’ll break
it down into simple primitive shapes. I can then start trying to think about how these shapes could be connected together, while maintaining an acceptable poly fl ow. Matt Brealey
[36] Keeping your polygons roughly equal in size as much as
possible creates a nice and clean model that’s easy to work on and much easier to texture later on. Craig A Clark
[37] GroBoto (www.groboto.com/v3) can produce really clean
geometry from its hard-surface models. The only drawback is that it’s currently limited in the kinds of shapes it can generate. However, it has a lot of potential for the future. Richard Yot
[39] Always try to keep edge loops consistent in size, so that when
it comes to subdividing, the UV maps are kept proportional. If you only have edge loops on one side of a sharpened edge, the UV will be dragged across that edge, rather than remaining in a more even position. Craig A Clark
[40] Tearing occurs when the edge fl ow around the torso runs at
an angle, as the muscles of the external obliques and the latissimus dorsi do. This could cause the mesh to rip apart when twisting, which would be particularly distressing. To prevent this occurring, you may want to consider not following accurate anatomy as closely as usual. Jahirul Amin
[41] I regularly use the Stencil tools in modo to combine more complex
shapes together. This is because they provide a good starting point to build a larger model. Make sure you clean up the mesh thoroughly after you’re done, though. Matt Brealey
[43] Don’t worry about clean topology if you’ll be modelling
static environments that will be rendered in raytracers like V-Ray. Toni Bratincevic
[38] If you don’t have enough topology
around the elbows, you will not be able to maintain the shape when the arm bends. Jahirul Amin
[42] Try to place the edge loops at the extents of
muscle groups and along muscle fi bres, because muscles are responsible for most deformations that happen during movement. In most models you won’t be able to avoid some stars, so always choose a non-deforming area to place them. José Alves da Silva
Organic or hard surface?
Jahirul Amin uses ZBrush and Maya to retopologise the model of a head here, but the following steps can be adapted for your own workfl ow too:
1 Create a sculpt in ZBrush using the DynaMesh base mesh generation tool.
2 Bring the sculpt into Maya and reduce the poly count, if required, using Mesh>Reduce. Create a single poly and begin edge-extruding around the sculpt.
3 Continue to extrude edges outwards and also insert edge loops. Make the sculpt a live object so you can snap the points to the mesh.
4 Work the mouth using the same method. You can also hold the V key to point-snap to the vertices.
5 Combine the mouth with the eye region and continue to work on the scalp to fi nish the head.
6 You can leave the model there, if you wish. However, I want to experiment with adding further detail, so I can reduce the amount of Displacement maps required.
7 The edge loops are following not just the muscle groups but also the skin fl ow. This should help create wrinkle lines that behave in a more believable manner.
8 Once I’m happy, I will then take the retopologised mesh into ZBrush and push the form about to test how it will hold up to deformation.
Retopologising an organic meshJahirul Amin o� ers a step-by-step breakdown of his retopology method for an organic mesh in Maya and ZBrush
1
2
3
4
5
6
7
8
WITH THE DISCFree TopoGun trial plus exclusive 30%
reader discount! © José Alves da Silva
© Craig A Clark
© Jo
sé A
lves d
a Silv
a
Topology ready for animation. Notice how the edge loops closely follow the muscular structure
[33] Example of poly fl ow
[34] Retopology of a hard-surface model sculpted in ZBrush. The doubling of edges at the hard corners keeps the surface sharp after subdivision
50 hot topology tips50 hot topology tips
3DArtist ● 47
042-048_3DA_52_Feature_50_Hot_topology_tips_MichaelBurns.indd 47 11/02/2013 21:10
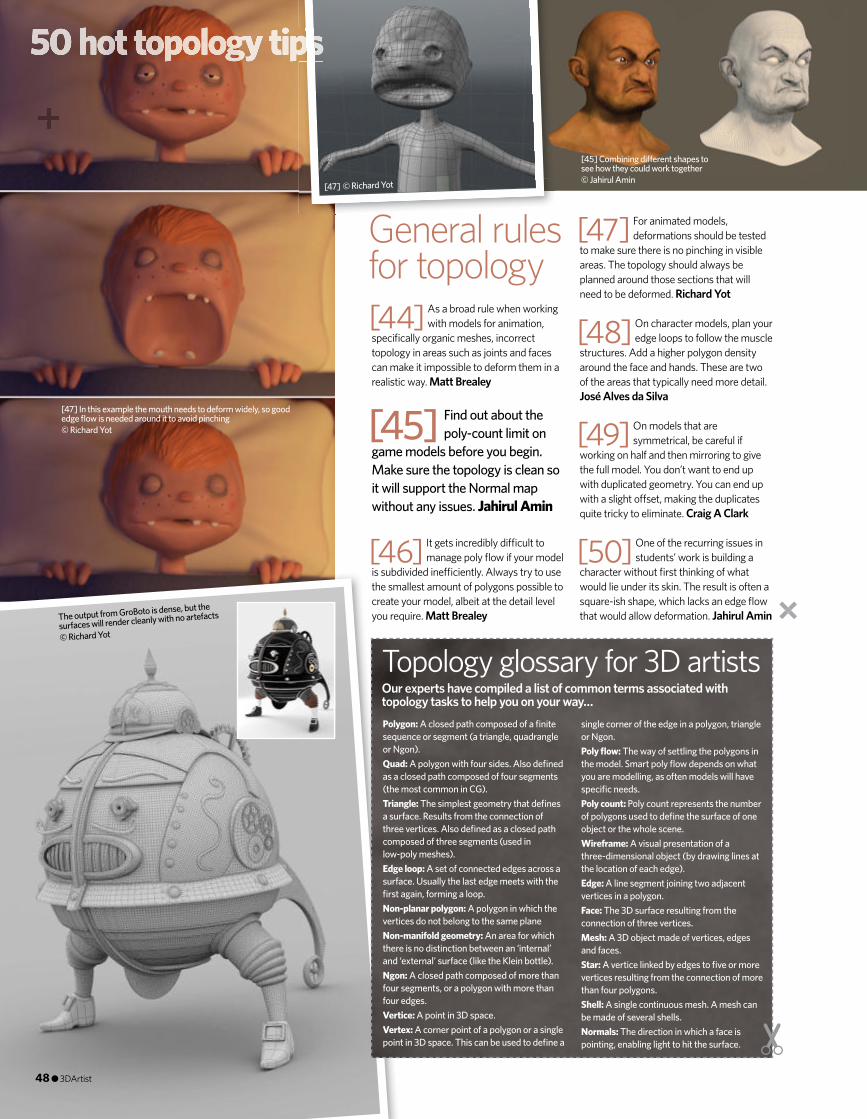
[44] As a broad rule when working with models for animation,
specifi cally organic meshes, incorrect topology in areas such as joints and faces can make it impossible to deform them in a realistic way. Matt Brealey
[46] It gets incredibly di� cult to manage poly fl ow if your model
is subdivided ine� ciently. Always try to use the smallest amount of polygons possible to create your model, albeit at the detail level you require. Matt Brealey
[47] For animated models, deformations should be tested
to make sure there is no pinching in visible areas. The topology should always be planned around those sections that will need to be deformed. Richard Yot
[48] On character models, plan your edge loops to follow the muscle
structures. Add a higher polygon density around the face and hands. These are two of the areas that typically need more detail. José Alves da Silva
[49] On models that are symmetrical, be careful if
working on half and then mirroring to give the full model. You don’t want to end up with duplicated geometry. You can end up with a slight o� set, making the duplicates quite tricky to eliminate. Craig A Clark
[50] One of the recurring issues in students’ work is building a
character without fi rst thinking of what would lie under its skin. The result is often a square-ish shape, which lacks an edge fl ow that would allow deformation. Jahirul Amin
[45] Find out about the poly-count limit on
game models before you begin. Make sure the topology is clean so it will support the Normal map without any issues. Jahirul Amin
General rules for topology
Topology glossary for 3D artistsOur experts have compiled a list of common terms associated with topology tasks to help you on your way…Polygon: A closed path composed of a fi nite sequence or segment (a triangle, quadrangle or Ngon).Quad: A polygon with four sides. Also defi ned as a closed path composed of four segments (the most common in CG).Triangle: The simplest geometry that defi nes a surface. Results from the connection of three vertices. Also defi ned as a closed path composed of three segments (used in low-poly meshes).Edge loop: A set of connected edges across a surface. Usually the last edge meets with the fi rst again, forming a loop.Non-planar polygon: A polygon in which the vertices do not belong to the same planeNon-manifold geometry: An area for which there is no distinction between an ‘internal’ and ‘external’ surface (like the Klein bottle).Ngon: A closed path composed of more than four segments, or a polygon with more than four edges.Vertice: A point in 3D space.Vertex: A corner point of a polygon or a single point in 3D space. This can be used to defi ne a
single corner of the edge in a polygon, triangle or Ngon. Poly fl ow: The way of settling the polygons in the model. Smart poly fl ow depends on what you are modelling, as often models will have specifi c needs.Poly count: Poly count represents the number of polygons used to defi ne the surface of one object or the whole scene.Wireframe: A visual presentation of a three-dimensional object (by drawing lines at the location of each edge).Edge: A line segment joining two adjacent vertices in a polygon.Face: The 3D surface resulting from the connection of three vertices.Mesh: A 3D object made of vertices, edges and faces.Star: A vertice linked by edges to fi ve or more vertices resulting from the connection of more than four polygons.Shell: A single continuous mesh. A mesh can be made of several shells.Normals: The direction in which a face is pointing, enabling light to hit the surface.
© Richard Yot
© Jahirul Amin© Richard Yot
© Richard Yot
[47] In this example the mouth needs to deform widely, so good edge fl ow is needed around it to avoid pinching
[45] Combining di� erent shapes to see how they could work together
[47]
The output from GroBoto is dense, but the
surfaces will render cleanly with no artefacts
50 hot topology tips50 hot topology tips50 hot topology tips50 hot topology tips
48 ● 3DArtist
042-048_3DA_52_Feature_50_Hot_topology_tips_MichaelBurns.indd 48 11/02/2013 21:11
Have you seen the light?www.maxwellrender.com
Full Page.indd 1 31/01/2013 15:42
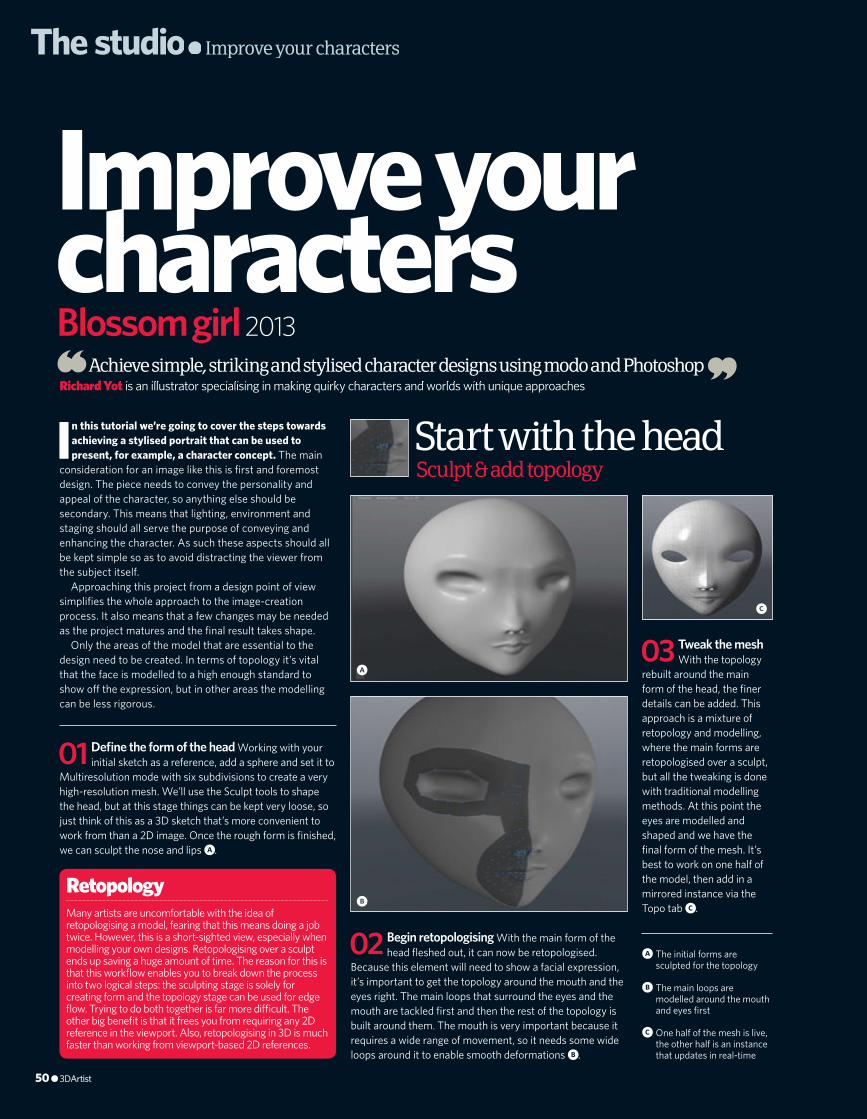
50 ● 3DArtist
Improve your charactersBlossom girl 2013
Richard Yot is an illustrator specialising in making quirky characters and worlds with unique approachesRichard Yot is an illustrator specialising in making quirky characters and worlds with unique approachesAchieve simple, striking and stylised character designs using modo and Photoshop
In this tutorial we’re going to cover the steps towards achieving a stylised portrait that can be used to present, for example, a character concept. The main
consideration for an image like this is fi rst and foremost design. The piece needs to convey the personality and appeal of the character, so anything else should be secondary. This means that lighting, environment and staging should all serve the purpose of conveying and enhancing the character. As such these aspects should all be kept simple so as to avoid distracting the viewer from the subject itself.
Approaching this project from a design point of view simplifi es the whole approach to the image-creation process. It also means that a few changes may be needed as the project matures and the fi nal result takes shape.
Only the areas of the model that are essential to the design need to be created. In terms of topology it’s vital that the face is modelled to a high enough standard to show o� the expression, but in other areas the modelling can be less rigorous.
The studio● Improve your characters
50 ● 3DArtist
Start with the headSculpt & add topology
03 Tweak the mesh With the topology
rebuilt around the main form of the head, the fi ner details can be added. This approach is a mixture of retopology and modelling, where the main forms are retopologised over a sculpt, but all the tweaking is done with traditional modelling methods. At this point the eyes are modelled and shaped and we have the fi nal form of the mesh. It’s best to work on one half of the model, then add in a mirrored instance via the Topo tab c.
02 Begin retopologising With the main form of the head fl eshed out, it can now be retopologised.
Because this element will need to show a facial expression, it’s important to get the topology around the mouth and the eyes right. The main loops that surround the eyes and the mouth are tackled fi rst and then the rest of the topology is built around them. The mouth is very important because it requires a wide range of movement, so it needs some wide loops around it to enable smooth deformations b.
01 Defi ne the form of the head Working with your initial sketch as a reference, add a sphere and set it to
Multiresolution mode with six subdivisions to create a very high-resolution mesh. We’ll use the Sculpt tools to shape the head, but at this stage things can be kept very loose, so just think of this as a 3D sketch that’s more convenient to work from than a 2D image. Once the rough form is fi nished, we can sculpt the nose and lips a.
a The initial forms are sculpted for the topology
b The main loops are modelled around the mouth and eyes fi rst
c One half of the mesh is live, the other half is an instance that updates in real-time
Many artists are uncomfortable with the idea of retopologising a model, fearing that this means doing a job twice. However, this is a short-sighted view, especially when modelling your own designs. Retopologising over a sculpt ends up saving a huge amount of time. The reason for this is that this workfl ow enables you to break down the process into two logical steps: the sculpting stage is solely for creating form and the topology stage can be used for edge fl ow. Trying to do both together is far more di� cult. The other big benefi t is that it frees you from requiring any 2D reference in the viewport. Also, retopologising in 3D is much faster than working from viewport-based 2D references.
Retopology
a
b
c
50 ● 3DArtist
050-056_3DA_52_modo_RichardYot.indd 50 11/02/2013 21:26

3DArtist ● 51
Step by step: Richard Yot ●The studio●The studio●
Design a character Sculpt a base mesh Retopologise Model with modo Handle UVs Sculpt facial details Paint textures Retouch in Photoshop
Learn how to
Tutorial fi les:• Tutorial screenshots
Art
ist i
nfo
Richard Yot
3D artists explain the techniques behind
their amazing artwork
Personal portfolio sitewww.itchy-animation.co.ukCountry London, UKSoftware usedmodo, PhotoshopExpertise Character design and illustration
Software used in this piece
modo Photoshop
050-056_3DA_52_modo_RichardYot.indd 51 11/02/2013 21:26
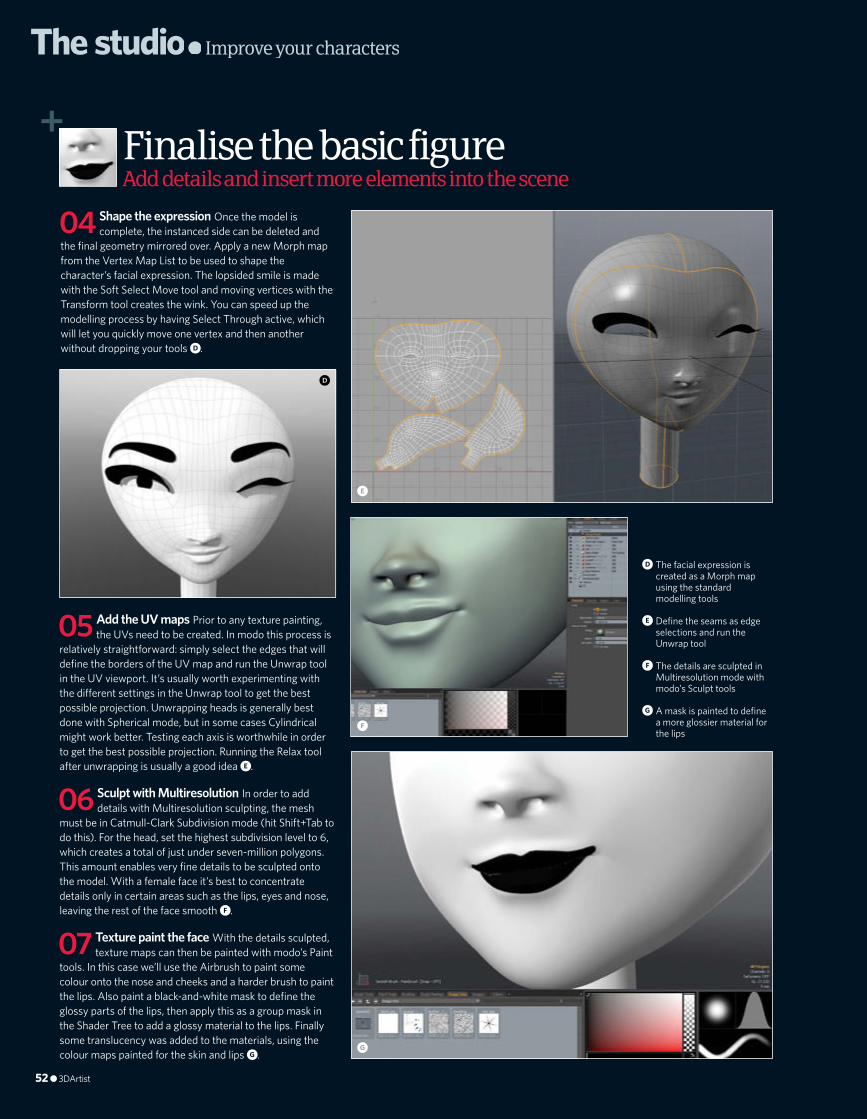
The studio● Improve your characters
Finalise the basic figureAdd details and insert more elements into the scene
04 Shape the expression Once the model is complete, the instanced side can be deleted and
the fi nal geometry mirrored over. Apply a new Morph map from the Vertex Map List to be used to shape the character’s facial expression. The lopsided smile is made with the Soft Select Move tool and moving vertices with the Transform tool creates the wink. You can speed up the modelling process by having Select Through active, which will let you quickly move one vertex and then another without dropping your tools d.
05 Add the UV maps Prior to any texture painting, the UVs need to be created. In modo this process is
relatively straightforward: simply select the edges that will defi ne the borders of the UV map and run the Unwrap tool in the UV viewport. It’s usually worth experimenting with the di� erent settings in the Unwrap tool to get the best possible projection. Unwrapping heads is generally best done with Spherical mode, but in some cases Cylindrical might work better. Testing each axis is worthwhile in order to get the best possible projection. Running the Relax tool after unwrapping is usually a good idea e.
06 Sculpt with Multiresolution In order to add details with Multiresolution sculpting, the mesh
must be in Catmull-Clark Subdivision mode (hit Shift+Tab to do this). For the head, set the highest subdivision level to 6, which creates a total of just under seven-million polygons. This amount enables very fi ne details to be sculpted onto the model. With a female face it’s best to concentrate details only in certain areas such as the lips, eyes and nose, leaving the rest of the face smooth f.
07 Texture paint the face With the details sculpted, texture maps can then be painted with modo’s Paint
tools. In this case we’ll use the Airbrush to paint some colour onto the nose and cheeks and a harder brush to paint the lips. Also paint a black-and-white mask to defi ne the glossy parts of the lips, then apply this as a group mask in the Shader Tree to add a glossy material to the lips. Finally some translucency was added to the materials, using the colour maps painted for the skin and lips g.
d The facial expression is created as a Morph map using the standard modelling tools
e Defi ne the seams as edge selections and run the Unwrap tool
f The details are sculpted in Multiresolution mode with modo’s Sculpt tools
g A mask is painted to defi ne a more glossier material for the lips
d
e
f
g
52 ● 3DArtist
050-056_3DA_52_modo_RichardYot.indd 52 11/02/2013 21:26
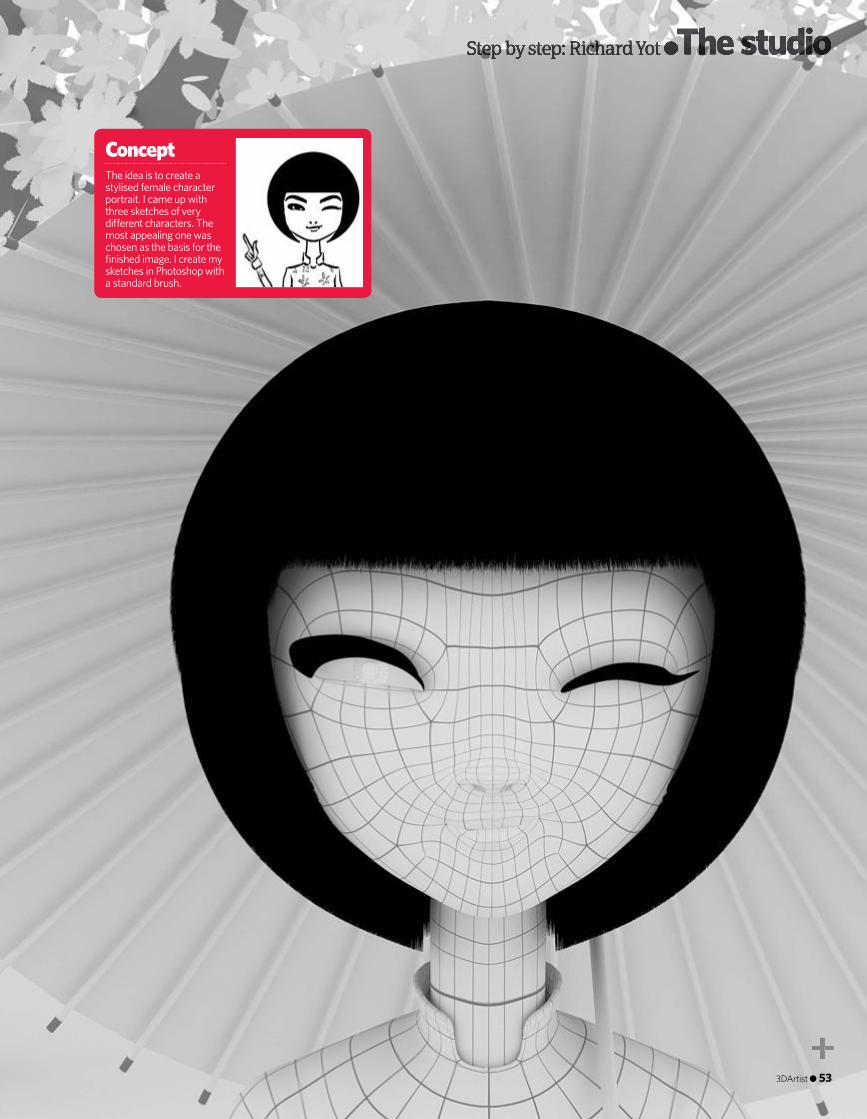
Step by step: Richard Yot ●The studio●The studio●
3DArtist ● 533DArtist ● 53
The idea is to create a stylised female character portrait. I came up with three sketches of very di� erent characters. The most appealing one was chosen as the basis for the fi nished image. I create my sketches in Photoshop with a standard brush.
Concept
050-056_3DA_52_modo_RichardYot.indd 53 11/02/2013 21:27
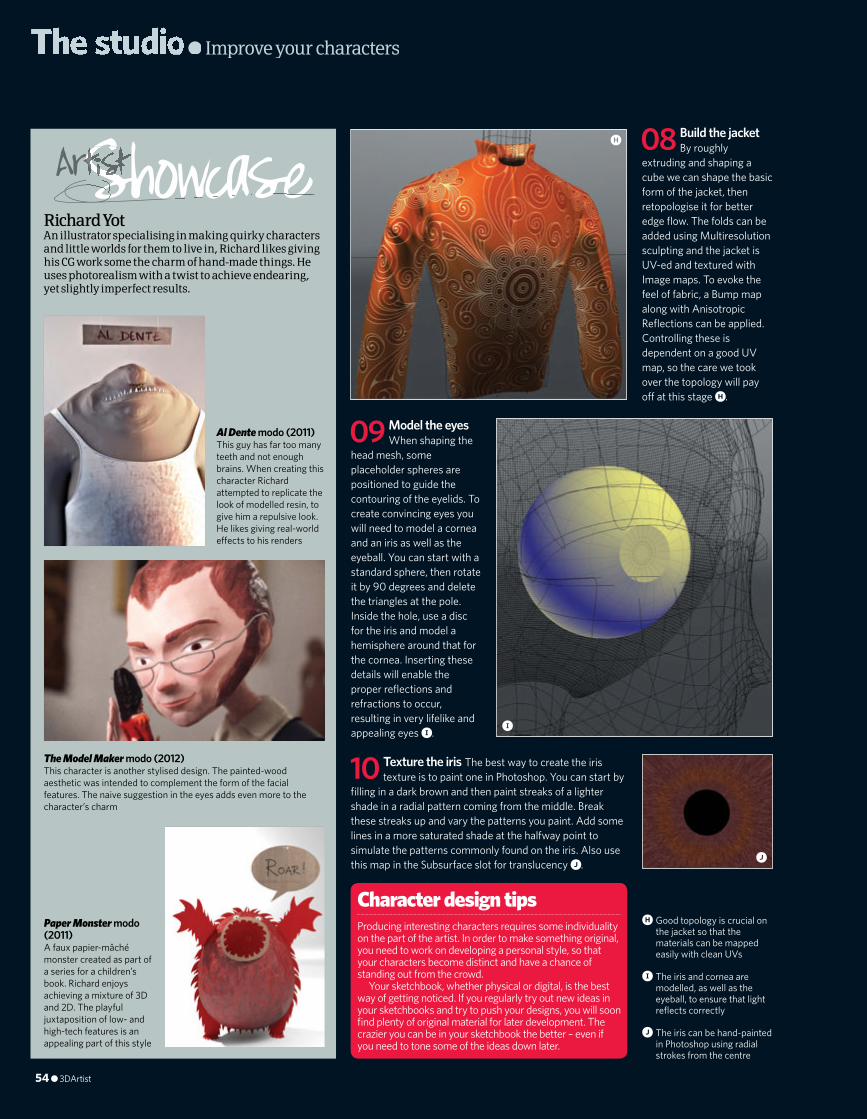
The studio● Improve your characters
54 ● 3DArtist
08 Build the jacket By roughly
extruding and shaping a cube we can shape the basic form of the jacket, then retopologise it for better edge fl ow. The folds can be added using Multiresolution sculpting and the jacket is UV-ed and textured with Image maps. To evoke the feel of fabric, a Bump map along with Anisotropic Refl ections can be applied. Controlling these is dependent on a good UV map, so the care we took over the topology will pay o� at this stage h.
10 Texture the iris The best way to create the iris texture is to paint one in Photoshop. You can start by
fi lling in a dark brown and then paint streaks of a lighter shade in a radial pattern coming from the middle. Break these streaks up and vary the patterns you paint. Add some lines in a more saturated shade at the halfway point to simulate the patterns commonly found on the iris. Also use this map in the Subsurface slot for translucency j.
Richard YotAn illustrator specialising in making quirky characters and little worlds for them to live in, Richard likes giving his CG work some the charm of hand-made things. He uses photorealism with a twist to achieve endearing, yet slightly imperfect results.
ShowcaseArtistShowcaseArtistShowcaseShowcase
Al Dente modo (2011) This guy has far too many teeth and not enough brains. When creating this character Richard attempted to replicate the look of modelled resin, to give him a repulsive look. He likes giving real-world e� ects to his renders
Paper Monster modo (2011) A faux papier-mâché monster created as part of a series for a children’s book. Richard enjoys achieving a mixture of 3D and 2D. The playful juxtaposition of low- and high-tech features is an appealing part of this style
The Model Maker modo (2012) This character is another stylised design. The painted-wood aesthetic was intended to complement the form of the facial features. The naive suggestion in the eyes adds even more to the character’s charm
09 Model the eyesWhen shaping the
head mesh, some placeholder spheres are positioned to guide the contouring of the eyelids. To create convincing eyes you will need to model a cornea and an iris as well as the eyeball. You can start with a standard sphere, then rotate it by 90 degrees and delete the triangles at the pole. Inside the hole, use a disc for the iris and model a hemisphere around that for the cornea. Inserting these details will enable the proper refl ections and refractions to occur, resulting in very lifelike and appealing eyes i.
Producing interesting characters requires some individuality on the part of the artist. In order to make something original, you need to work on developing a personal style, so that your characters become distinct and have a chance of standing out from the crowd.
Your sketchbook, whether physical or digital, is the best way of getting noticed. If you regularly try out new ideas in your sketchbooks and try to push your designs, you will soon fi nd plenty of original material for later development. The crazier you can be in your sketchbook the better – even if you need to tone some of the ideas down later.
Character design tipsh Good topology is crucial on
the jacket so that the materials can be mapped easily with clean UVs
i The iris and cornea are modelled, as well as the eyeball, to ensure that light refl ects correctly
j The iris can be hand-painted in Photoshop using radial strokes from the centre
h
i
j
050-056_3DA_52_modo_RichardYot.indd 54 11/02/2013 21:27
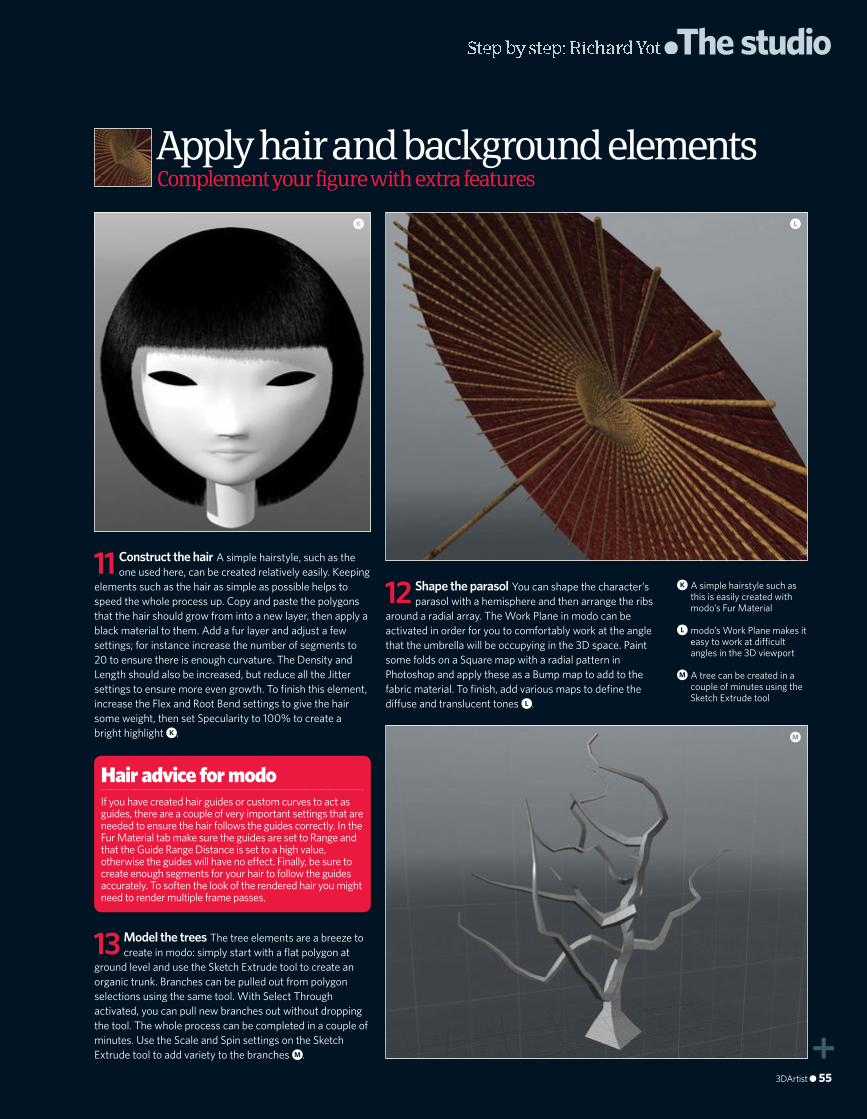
Step by step: Richard Yot ●The studio●The studio●
Apply hair and background elementsComplement your figure with extra features
3DArtist ● 55
11 Construct the hair A simple hairstyle, such as the one used here, can be created relatively easily. Keeping
elements such as the hair as simple as possible helps to speed the whole process up. Copy and paste the polygons that the hair should grow from into a new layer, then apply a black material to them. Add a fur layer and adjust a few settings; for instance increase the number of segments to 20 to ensure there is enough curvature. The Density and Length should also be increased, but reduce all the Jitter settings to ensure more even growth. To fi nish this element, increase the Flex and Root Bend settings to give the hair some weight, then set Specularity to 100% to create a bright highlight k.
12 Shape the parasol You can shape the character’s parasol with a hemisphere and then arrange the ribs
around a radial array. The Work Plane in modo can be activated in order for you to comfortably work at the angle that the umbrella will be occupying in the 3D space. Paint some folds on a Square map with a radial pattern in Photoshop and apply these as a Bump map to add to the fabric material. To fi nish, add various maps to defi ne the di� use and translucent tones l.
13 Model the trees The tree elements are a breeze to create in modo: simply start with a fl at polygon at
ground level and use the Sketch Extrude tool to create an organic trunk. Branches can be pulled out from polygon selections using the same tool. With Select Through activated, you can pull new branches out without dropping the tool. The whole process can be completed in a couple of minutes. Use the Scale and Spin settings on the Sketch Extrude tool to add variety to the branches m.
If you have created hair guides or custom curves to act as guides, there are a couple of very important settings that are needed to ensure the hair follows the guides correctly. In the Fur Material tab make sure the guides are set to Range and that the Guide Range Distance is set to a high value, otherwise the guides will have no e� ect. Finally, be sure to create enough segments for your hair to follow the guides accurately. To soften the look of the rendered hair you might need to render multiple frame passes.
Hair advice for modo
k A simple hairstyle such as this is easily created with modo’s Fur Material
l modo’s Work Plane makes it easy to work at di� cult angles in the 3D viewport
m A tree can be created in a couple of minutes using the Sketch Extrude tool
k l
m
050-056_3DA_52_modo_RichardYot.indd 55 11/02/2013 21:29
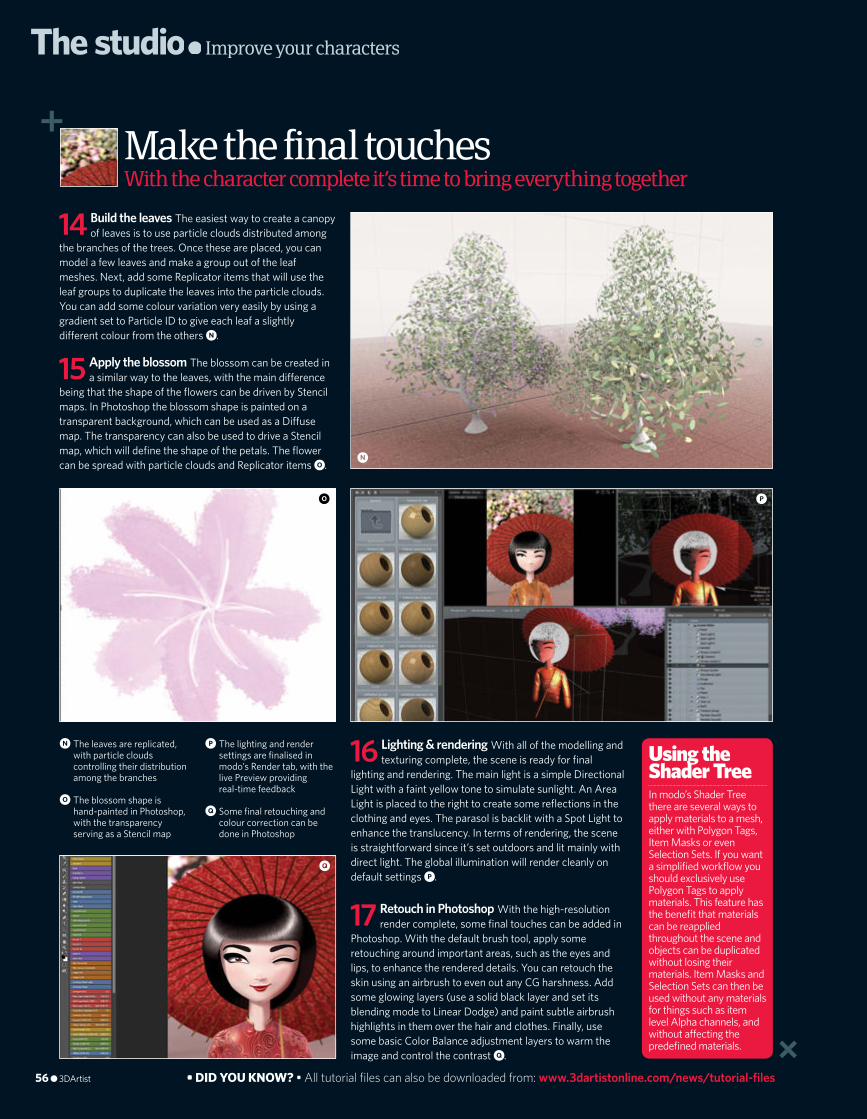
The studio● Improve your characters
Make the final touchesWith the character complete it’s time to bring everything together
56 ● 3DArtist
16 Lighting & rendering With all of the modelling and texturing complete, the scene is ready for fi nal
lighting and rendering. The main light is a simple Directional Light with a faint yellow tone to simulate sunlight. An Area Light is placed to the right to create some refl ections in the clothing and eyes. The parasol is backlit with a Spot Light to enhance the translucency. In terms of rendering, the scene is straightforward since it’s set outdoors and lit mainly with direct light. The global illumination will render cleanly on default settings p.
14 Build the leaves The easiest way to create a canopy of leaves is to use particle clouds distributed among
the branches of the trees. Once these are placed, you can model a few leaves and make a group out of the leaf meshes. Next, add some Replicator items that will use the leaf groups to duplicate the leaves into the particle clouds. You can add some colour variation very easily by using a gradient set to Particle ID to give each leaf a slightly di� erent colour from the others n.
15 Apply the blossom The blossom can be created in a similar way to the leaves, with the main di� erence
being that the shape of the fl owers can be driven by Stencil maps. In Photoshop the blossom shape is painted on a transparent background, which can be used as a Di� use map. The transparency can also be used to drive a Stencil map, which will defi ne the shape of the petals. The fl ower can be spread with particle clouds and Replicator items o.
17 Retouch in Photoshop With the high-resolution render complete, some fi nal touches can be added in
Photoshop. With the default brush tool, apply some retouching around important areas, such as the eyes and lips, to enhance the rendered details. You can retouch the skin using an airbrush to even out any CG harshness. Add some glowing layers (use a solid black layer and set its blending mode to Linear Dodge) and paint subtle airbrush highlights in them over the hair and clothes. Finally, use some basic Color Balance adjustment layers to warm the image and control the contrast q.
n The leaves are replicated, with particle clouds controlling their distribution among the branches
o The blossom shape is hand-painted in Photoshop, with the transparency serving as a Stencil map
p The lighting and render settings are fi nalised in modo’s Render tab, with the live Preview providing real-time feedback
q Some fi nal retouching and colour correction can be done in Photoshop
In modo’s Shader Tree there are several ways to apply materials to a mesh, either with Polygon Tags, Item Masks or even Selection Sets. If you want a simplifi ed workfl ow you should exclusively use Polygon Tags to apply materials. This feature has the benefi t that materials can be reapplied throughout the scene and objects can be duplicated without losing their materials. Item Masks and Selection Sets can then be used without any materials for things such as item level Alpha channels, and without a� ecting the predefi ned materials.
Using the Shader Tree
• DID YOU KNOW? • All tutorial fi les can also be downloaded from: www.3dartistonline.com/news/tutorial-fi les
n
po
q
050-056_3DA_52_modo_RichardYot.indd 56 11/02/2013 21:27

Full Page.indd 1 31/01/2013 15:41
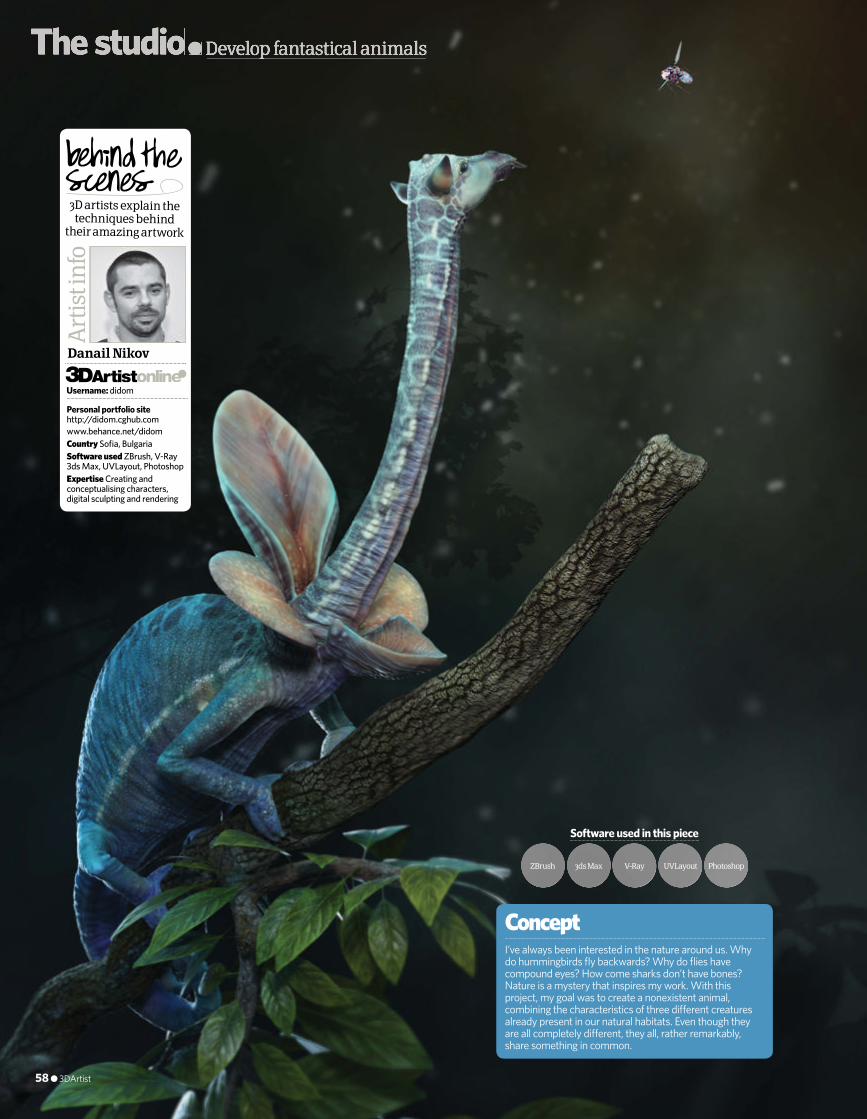
58 ● 3DArtist
The studio●Develop fantastical animals
Software used in this piece
3ds MaxZBrush PhotoshopV-Ray UVLayout
I’ve always been interested in the nature around us. Why do hummingbirds fl y backwards? Why do fl ies have compound eyes? How come sharks don’t have bones? Nature is a mystery that inspires my work. With this project, my goal was to create a nonexistent animal, combining the characteristics of three di� erent creatures already present in our natural habitats. Even though they are all completely di� erent, they all, rather remarkably, share something in common.
Concept
Art
ist i
nfo
Personal portfolio sitehttp://didom.cghub.comwww.behance.net/didomCountry Sofi a, BulgariaSoftware used ZBrush, V-Ray 3ds Max, UVLayout, PhotoshopExpertise Creating and conceptualising characters, digital sculpting and rendering
Danail Nikov
3D artists explain the techniques behind
their amazing artwork
Username: didom
58 ● 3DArtist
058-064_3DA_52_StepByStep_3dsMax_ZBrush_Danail_Nikov.indd 58 11/02/2013 21:31
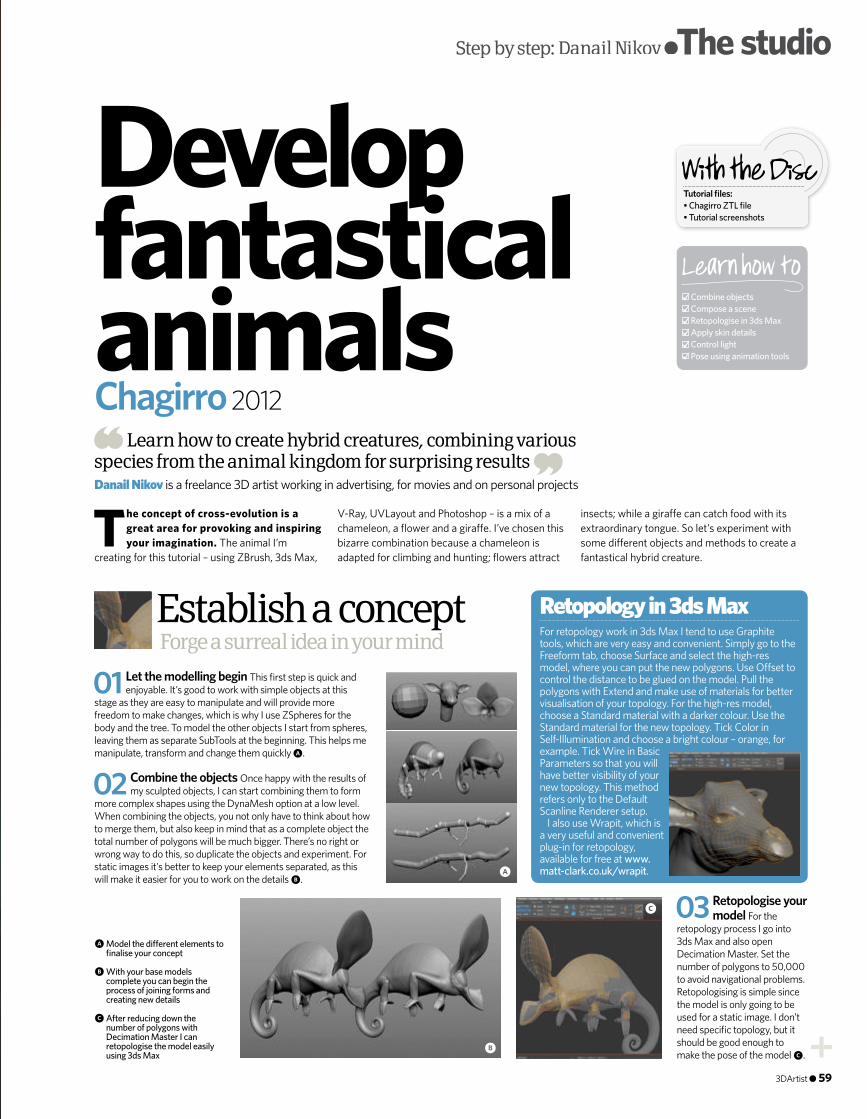
T he concept of cross-evolution is a great area for provoking and inspiring your imagination. The animal I’m
creating for this tutorial – using ZBrush, 3ds Max,
V-Ray, UVLayout and Photoshop – is a mix of a chameleon, a fl ower and a gira� e. I’ve chosen this bizarre combination because a chameleon is adapted for climbing and hunting; fl owers attract
insects; while a gira� e can catch food with its extraordinary tongue. So let’s experiment with some di� erent objects and methods to create a fantastical hybrid creature.
Establish a conceptForge a surreal idea in your mind
01 Let the modelling begin This fi rst step is quick and enjoyable. It’s good to work with simple objects at this
stage as they are easy to manipulate and will provide more freedom to make changes, which is why I use ZSpheres for the body and the tree. To model the other objects I start from spheres, leaving them as separate SubTools at the beginning. This helps me manipulate, transform and change them quickly a.
02 Combine the objects Once happy with the results of my sculpted objects, I can start combining them to form
more complex shapes using the DynaMesh option at a low level. When combining the objects, you not only have to think about how to merge them, but also keep in mind that as a complete object the total number of polygons will be much bigger. There’s no right or wrong way to do this, so duplicate the objects and experiment. For static images it’s better to keep your elements separated, as this will make it easier for you to work on the details b.
3DArtist ● 59
Step by step: Danail Nikov ●The studio●The studio●
Chagirro 2012Learn how to create hybrid creatures, combining various
species from the animal kingdom for surprising resultsDanail Nikov is a freelance 3D artist working in advertising, for movies and on personal projects
Develop fantastical animals
03 Retopologise your model For the
retopology process I go into 3ds Max and also open Decimation Master. Set the number of polygons to 50,000 to avoid navigational problems. Retopologising is simple since the model is only going to be used for a static image. I don’t need specifi c topology, but it should be good enough to make the pose of the model c.
Combine objects Compose a scene Retopologise in 3ds Max Apply skin details Control light Pose using animation tools
Learn how to
Tutorial fi les: • Chagirro ZTL fi le • Tutorial screenshots
a Model the di� erent elements to fi nalise your concept
b With your base models complete you can begin the process of joining forms and creating new details
c After reducing down the number of polygons with Decimation Master I can retopologise the model easily using 3ds Max
For retopology work in 3ds Max I tend to use Graphite tools, which are very easy and convenient. Simply go to the Freeform tab, choose Surface and select the high-res model, where you can put the new polygons. Use O� set to control the distance to be glued on the model. Pull the polygons with Extend and make use of materials for better visualisation of your topology. For the high-res model, choose a Standard material with a darker colour. Use the Standard material for the new topology. Tick Color in Self-Illumination and choose a bright colour – orange, for example. Tick Wire in Basic Parameters so that you will have better visibility of your new topology. This method refers only to the Default Scanline Renderer setup.
I also use Wrapit, which is a very useful and convenient plug-in for retopology, available for free at www.matt-clark.co.uk/wrapit.
Retopology in 3ds Max
a
b
c
058-064_3DA_52_StepByStep_3dsMax_ZBrush_Danail_Nikov.indd 59 11/02/2013 21:31

The studio●Develop fantastical animals
Here’s a quick breakdown of how to use Stencils using Projection Master:• Import your Alpha.• From the Alpha menu
choose Make St and your Stencil will appear (A quick shortcut is to hit Opt/Alt+H to turn the Stencil on and o� , then hold the spacebar to navigate the Stencil).
• Before projecting the detail it’s good to make the morph target so that it will be easier to clean unnecessary parts.
• Pose the model as it’s convenient for you and press Projection Master. Choose Deformation Drop Now.
• When you are ready with the details, clear the unnecessary parts with the Morph brush.
• It’s good to vary the eff ect by applying the Infl at, DamStandard or whatever brush you’ve chosen to use.
• The most diffi cult part is merging diff erent elements. This is likely to cause some extra elements, but despite this the method is quick and convenient.
Tips for Stencils
Add detail & establish a poseOnce your topology is clean you start to add more details
04 Give the model some shape
Since I’m not too familiar with the anatomy of chameleons and giraff es, I have to use references to make sure I get accurate results. Using the Project feature in ZBrush, I can add the details that I want to save onto my new retopologised object. For modelling, I mainly use the Clay Buildup, Move, Standard and DamStandard brushes. I would certainly advise taking your time over the details and gradually increasing the resolution as you progress. Following this process ensures the model stays concise, organic and consequently much more believable d.
05 Pose your creature I already have in mind what the fi nal pose of the model should be. When considering this,
try to imagine your creature in its natural environment, how it would interact with its surroundings and so on. I’ll use Transpose Master to work the creature into a position and choose the Move and Smooth brushes to repair any broken areas, where necessary. At this stage you don’t have to be afraid of destroying what you’ve already done; the model is saved, so be brave and experiment. Once I like the pose, I can import it into 3ds Max to see how it will look in front of the camera e.
06 Finish the details For the fi nal details I need lots of polygons, so I’ll use HD Geometry. I can choose between
two methods: the fi rst is using Stencils with standard sculpting; the second is using Stencils with Projection Master. Both are identical, but personally I feel the latter is better – I’ve found it very useful while making this creature f.
d You can project details onto your retopologised model in ZBrush before sculpting in even more details
e It’s time to pose your model using the Transpose Master tool in ZBrush
f Use Stencils to bring defi nition to your model. My favourite method is to use Stencils with Projection Master
d
e
f
60 ● 3DArtist
058-064_3DA_52_StepByStep_3dsMax_ZBrush_Danail_Nikov.indd 60 11/02/2013 21:31
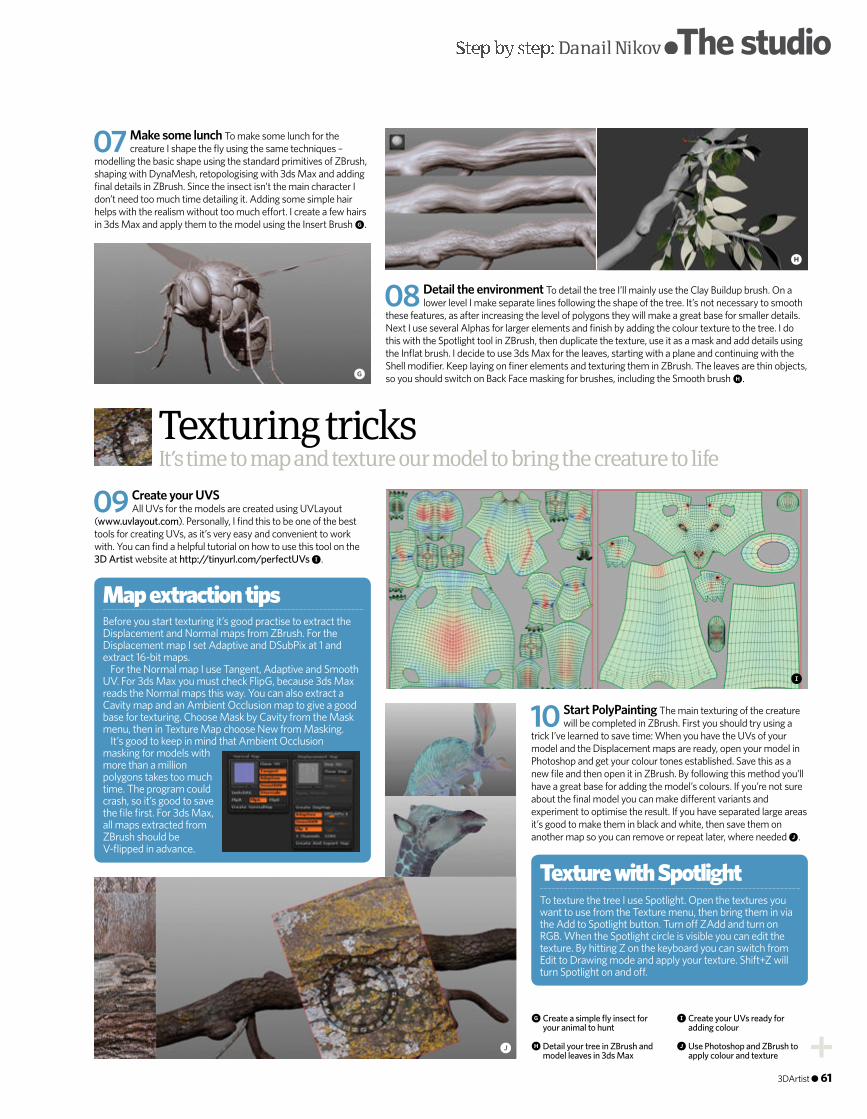
To texture the tree I use Spotlight. Open the textures you want to use from the Texture menu, then bring them in via the Add to Spotlight button. Turn o� ZAdd and turn on RGB. When the Spotlight circle is visible you can edit the texture. By hitting Z on the keyboard you can switch from Edit to Drawing mode and apply your texture. Shift+Z will turn Spotlight on and o� .
Texture with Spotlight
Step by step: Danail Nikov ●The studio●The studio●
Texturing tricksIt’s time to map and texture our model to bring the creature to life
07 Make some lunch To make some lunch for the creature I shape the fl y using the same techniques –
modelling the basic shape using the standard primitives of ZBrush, shaping with DynaMesh, retopologising with 3ds Max and adding fi nal details in ZBrush. Since the insect isn’t the main character I don’t need too much time detailing it. Adding some simple hair helps with the realism without too much e� ort. I create a few hairs in 3ds Max and apply them to the model using the Insert Brush g.
08 Detail the environment To detail the tree I’ll mainly use the Clay Buildup brush. On a lower level I make separate lines following the shape of the tree. It’s not necessary to smooth
these features, as after increasing the level of polygons they will make a great base for smaller details. Next I use several Alphas for larger elements and fi nish by adding the colour texture to the tree. I do this with the Spotlight tool in ZBrush, then duplicate the texture, use it as a mask and add details using the Infl at brush. I decide to use 3ds Max for the leaves, starting with a plane and continuing with the Shell modifi er. Keep laying on fi ner elements and texturing them in ZBrush. The leaves are thin objects, so you should switch on Back Face masking for brushes, including the Smooth brush h.
10 Start PolyPainting The main texturing of the creature will be completed in ZBrush. First you should try using a
trick I’ve learned to save time: When you have the UVs of your model and the Displacement maps are ready, open your model in Photoshop and get your colour tones established. Save this as a new fi le and then open it in ZBrush. By following this method you’ll have a great base for adding the model’s colours. If you’re not sure about the fi nal model you can make di� erent variants and experiment to optimise the result. If you have separated large areas it’s good to make them in black and white, then save them on another map so you can remove or repeat later, where needed j.
09 Create your UVS All UVs for the models are created using UVLayout
(www.uvlayout.com). Personally, I fi nd this to be one of the best tools for creating UVs, as it’s very easy and convenient to work with. You can fi nd a helpful tutorial on how to use this tool on the 3D Artist website at http://tinyurl.com/perfectUVs i.
g Create a simple fl y insect for your animal to hunt
h Detail your tree in ZBrush and model leaves in 3ds Max
i Create your UVs ready for adding colour
j Use Photoshop and ZBrush to apply colour and texture
g
i
Before you start texturing it’s good practise to extract the Displacement and Normal maps from ZBrush. For the Displacement map I set Adaptive and DSubPix at 1 and extract 16-bit maps.
For the Normal map I use Tangent, Adaptive and Smooth UV. For 3ds Max you must check FlipG, because 3ds Max reads the Normal maps this way. You can also extract a Cavity map and an Ambient Occlusion map to give a good base for texturing. Choose Mask by Cavity from the Mask menu, then in Texture Map choose New from Masking.
It’s good to keep in mind that Ambient Occlusion masking for models with more than a million polygons takes too much time. The program could crash, so it’s good to save the fi le fi rst. For 3ds Max, all maps extracted from ZBrush should be V-fl ipped in advance.
Map extraction tips
h
j
3DArtist ● 61
058-064_3DA_52_StepByStep_3dsMax_ZBrush_Danail_Nikov.indd 61 11/02/2013 21:32
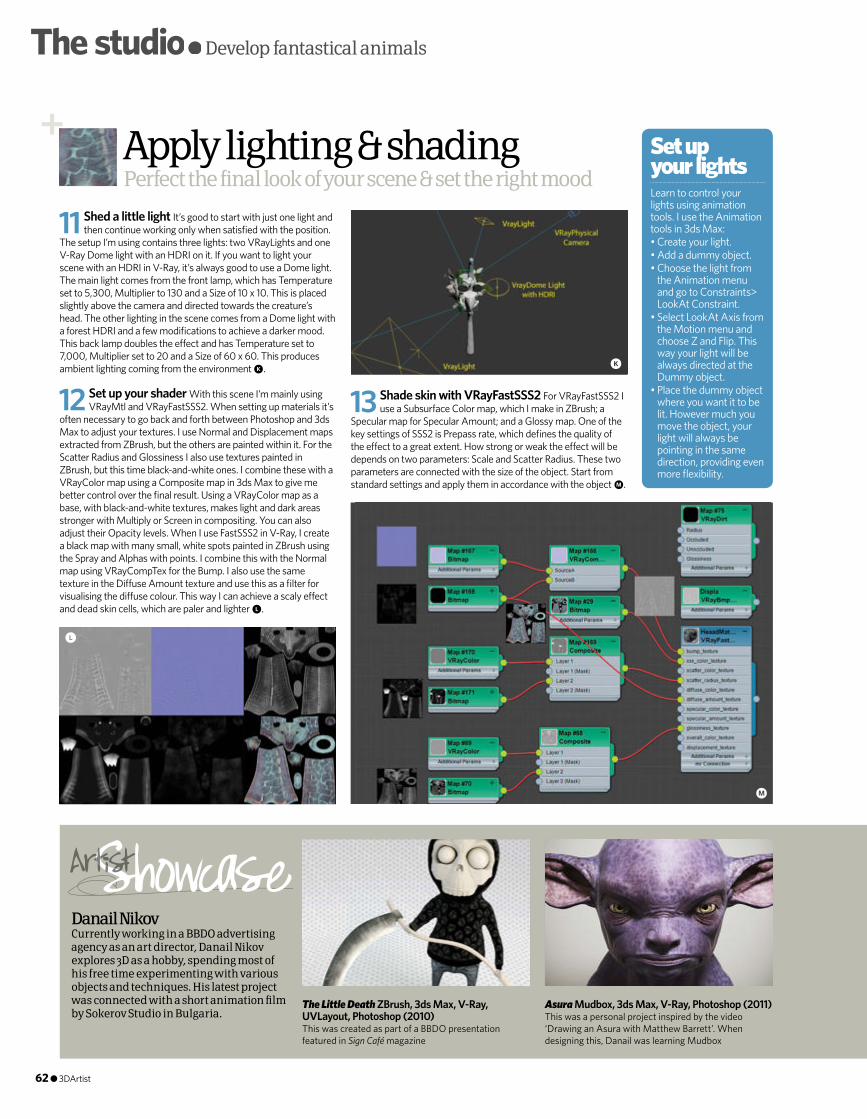
The studio●Develop fantastical animals
Learn to control your lights using animation tools. I use the Animation tools in 3ds Max:• Create your light.• Add a dummy object.• Choose the light from
the Animation menu and go to Constraints> LookAt Constraint.
• Select LookAt Axis from the Motion menu and choose Z and Flip. This way your light will be always directed at the Dummy object.
• Place the dummy object where you want it to be lit. However much you move the object, your light will always be pointing in the same direction, providing even more fl exibility.
Set up your lightsApply lighting & shading
Perfect the final look of your scene & set the right mood
11 Shed a little light It’s good to start with just one light and then continue working only when satisfi ed with the position.
The setup I’m using contains three lights: two VRayLights and one V-Ray Dome light with an HDRI on it. If you want to light your scene with an HDRI in V-Ray, it’s always good to use a Dome light. The main light comes from the front lamp, which has Temperature set to 5,300, Multiplier to 130 and a Size of 10 x 10. This is placed slightly above the camera and directed towards the creature’s head. The other lighting in the scene comes from a Dome light with a forest HDRI and a few modifi cations to achieve a darker mood. This back lamp doubles the eff ect and has Temperature set to 7,000, Multiplier set to 20 and a Size of 60 x 60. This produces ambient lighting coming from the environment k.
12 Set up your shader With this scene I’m mainly using VRayMtl and VRayFastSSS2. When setting up materials it’s
often necessary to go back and forth between Photoshop and 3ds Max to adjust your textures. I use Normal and Displacement maps extracted from ZBrush, but the others are painted within it. For the Scatter Radius and Glossiness I also use textures painted in ZBrush, but this time black-and-white ones. I combine these with a VRayColor map using a Composite map in 3ds Max to give me better control over the fi nal result. Using a VRayColor map as a base, with black-and-white textures, makes light and dark areas stronger with Multiply or Screen in compositing. You can also adjust their Opacity levels. When I use FastSSS2 in V-Ray, I create a black map with many small, white spots painted in ZBrush using the Spray and Alphas with points. I combine this with the Normal map using VRayCompTex for the Bump. I also use the same texture in the Diff use Amount texture and use this as a fi lter for visualising the diff use colour. This way I can achieve a scaly eff ect and dead skin cells, which are paler and lighter l.
13 Shade skin with VRayFastSSS2 For VRayFastSSS2 I use a Subsurface Color map, which I make in ZBrush; a
Specular map for Specular Amount; and a Glossy map. One of the key settings of SSS2 is Prepass rate, which defi nes the quality of the eff ect to a great extent. How strong or weak the eff ect will be depends on two parameters: Scale and Scatter Radius. These two parameters are connected with the size of the object. Start from standard settings and apply them in accordance with the object m.
k
l
m
Danail NikovCurrently working in a BBDO advertising agency as an art director, Danail Nikov explores 3D as a hobby, spending most of his free time experimenting with various objects and techniques. His latest project was connected with a short animation fi lm by Sokerov Studio in Bulgaria.
The Little Death ZBrush, 3ds Max, V-Ray, UVLayout, Photoshop (2010) This was created as part of a BBDO presentation featured in Sign Café magazine
Asura Mudbox, 3ds Max, V-Ray, Photoshop (2011) This was a personal project inspired by the video ‘Drawing an Asura with Matthew Barrett’. When designing this, Danail was learning Mudbox
62 ● 3DArtist
058-064_3DA_52_StepByStep_3dsMax_ZBrush_Danail_Nikov.indd 62 11/02/2013 21:32
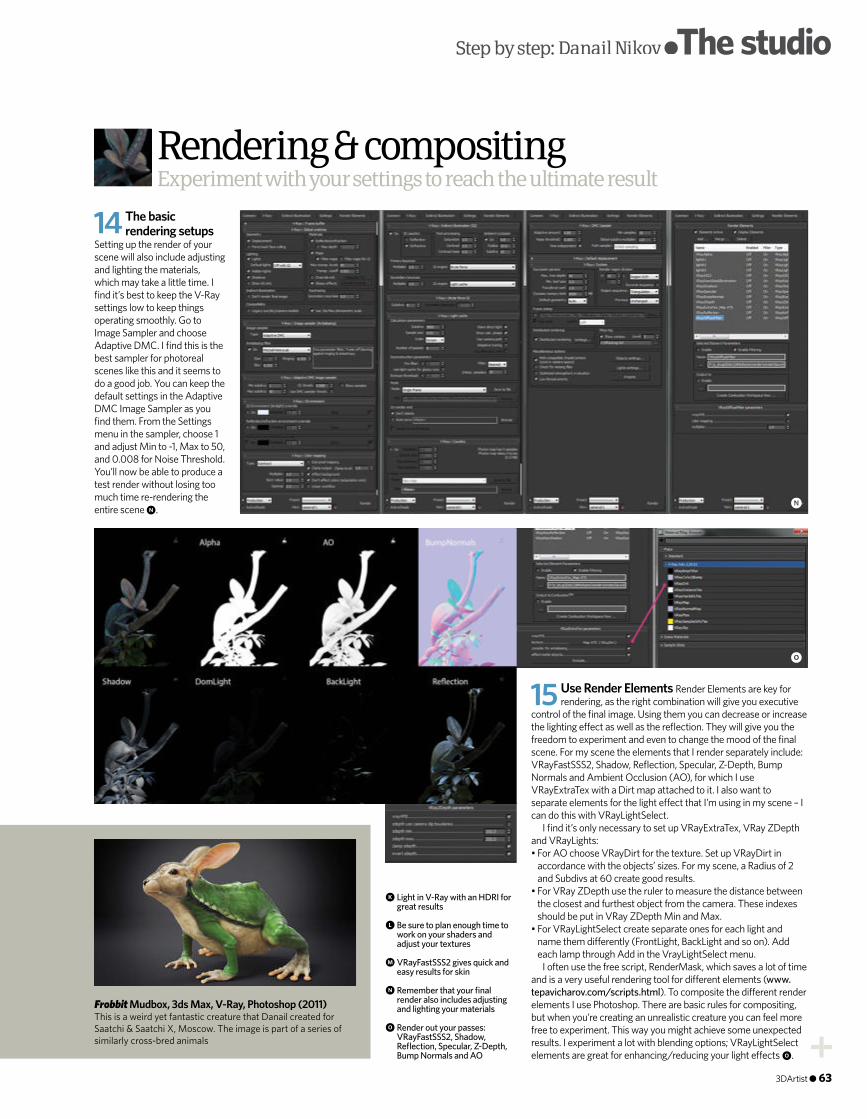
Experiment with your settings to reach the ultimate resultRendering & compositing
Step by step: Danail Nikov ●The studio●The studio●
15 Use Render Elements Render Elements are key for rendering, as the right combination will give you executive
control of the fi nal image. Using them you can decrease or increase the lighting e� ect as well as the refl ection. They will give you the freedom to experiment and even to change the mood of the fi nal scene. For my scene the elements that I render separately include: VRayFastSSS2, Shadow, Refl ection, Specular, Z-Depth, Bump Normals and Ambient Occlusion (AO), for which I use VRayExtraTex with a Dirt map attached to it. I also want to separate elements for the light e� ect that I’m using in my scene – I can do this with VRayLightSelect.
I fi nd it’s only necessary to set up VRayExtraTex, VRay ZDepth and VRayLights: • For AO choose VRayDirt for the texture. Set up VRayDirt in
accordance with the objects’ sizes. For my scene, a Radius of 2 and Subdivs at 60 create good results.
• For VRay ZDepth use the ruler to measure the distance between the closest and furthest object from the camera. These indexes should be put in VRay ZDepth Min and Max.
• For VRayLightSelect create separate ones for each light and name them di� erently (FrontLight, BackLight and so on). Add each lamp through Add in the VrayLightSelect menu.
I often use the free script, RenderMask, which saves a lot of time and is a very useful rendering tool for di� erent elements (www.tepavicharov.com/scripts.html). To composite the di� erent render elements I use Photoshop. There are basic rules for compositing, but when you’re creating an unrealistic creature you can feel more free to experiment. This way you might achieve some unexpected results. I experiment a lot with blending options; VRayLightSelect elements are great for enhancing/reducing your light e� ects o.
14 The basic rendering setups
Setting up the render of your scene will also include adjusting and lighting the materials, which may take a little time. I fi nd it’s best to keep the V-Ray settings low to keep things operating smoothly. Go to Image Sampler and choose Adaptive DMC. I fi nd this is the best sampler for photoreal scenes like this and it seems to do a good job. You can keep the default settings in the Adaptive DMC Image Sampler as you fi nd them. From the Settings menu in the sampler, choose 1 and adjust Min to -1, Max to 50, and 0.008 for Noise Threshold. You’ll now be able to produce a test render without losing too much time re-rendering the entire scene n.
k Light in V-Ray with an HDRI for great results
l Be sure to plan enough time to work on your shaders and adjust your textures
m VRayFastSSS2 gives quick and easy results for skin
n Remember that your fi nal render also includes adjusting and lighting your materials
o Render out your passes: VRayFastSSS2, Shadow, Refl ection, Specular, Z-Depth, Bump Normals and AO
Frobbit Mudbox, 3ds Max, V-Ray, Photoshop (2011) This is a weird yet fantastic creature that Danail created for Saatchi & Saatchi X, Moscow. The image is part of a series of similarly cross-bred animals
n
o
3DArtist ● 63
058-064_3DA_52_StepByStep_3dsMax_ZBrush_Danail_Nikov.indd 63 11/02/2013 21:32
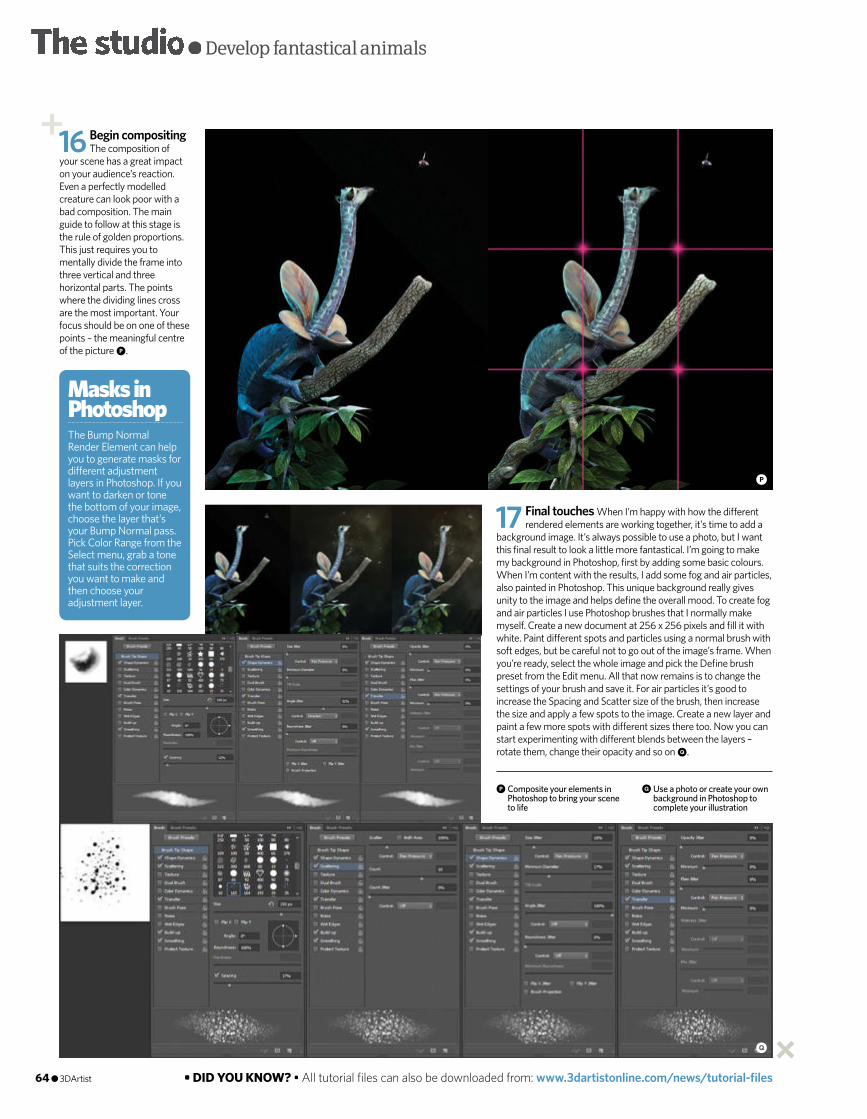
The studio●Develop fantastical animals
The Bump Normal Render Element can help you to generate masks for di� erent adjustment layers in Photoshop. If you want to darken or tone the bottom of your image, choose the layer that’s your Bump Normal pass. Pick Color Range from the Select menu, grab a tone that suits the correction you want to make and then choose your adjustment layer.
Masks in Photoshop
16 Begin compositing The composition of
your scene has a great impact on your audience’s reaction. Even a perfectly modelled creature can look poor with a bad composition. The main guide to follow at this stage is the rule of golden proportions. This just requires you to mentally divide the frame into three vertical and three horizontal parts. The points where the dividing lines cross are the most important. Your focus should be on one of these points – the meaningful centre of the picture p.
17 Final touches When I’m happy with how the di� erent rendered elements are working together, it’s time to add a
background image. It’s always possible to use a photo, but I want this fi nal result to look a little more fantastical. I’m going to make my background in Photoshop, fi rst by adding some basic colours. When I’m content with the results, I add some fog and air particles, also painted in Photoshop. This unique background really gives unity to the image and helps defi ne the overall mood. To create fog and air particles I use Photoshop brushes that I normally make myself. Create a new document at 256 x 256 pixels and fi ll it with white. Paint di� erent spots and particles using a normal brush with soft edges, but be careful not to go out of the image’s frame. When you’re ready, select the whole image and pick the Defi ne brush preset from the Edit menu. All that now remains is to change the settings of your brush and save it. For air particles it’s good to increase the Spacing and Scatter size of the brush, then increase the size and apply a few spots to the image. Create a new layer and paint a few more spots with di� erent sizes there too. Now you can start experimenting with di� erent blends between the layers – rotate them, change their opacity and so on q.
p Composite your elements in Photoshop to bring your scene to life
• DID YOU KNOW? • All tutorial fi les can also be downloaded from: www.3dartistonline.com/news/tutorial-fi les
p
q
q Use a photo or create your own background in Photoshop to complete your illustration
64 ● 3DArtist
058-064_3DA_52_StepByStep_3dsMax_ZBrush_Danail_Nikov.indd 64 11/02/2013 21:32

Full Page.indd 1 31/01/2013 15:43
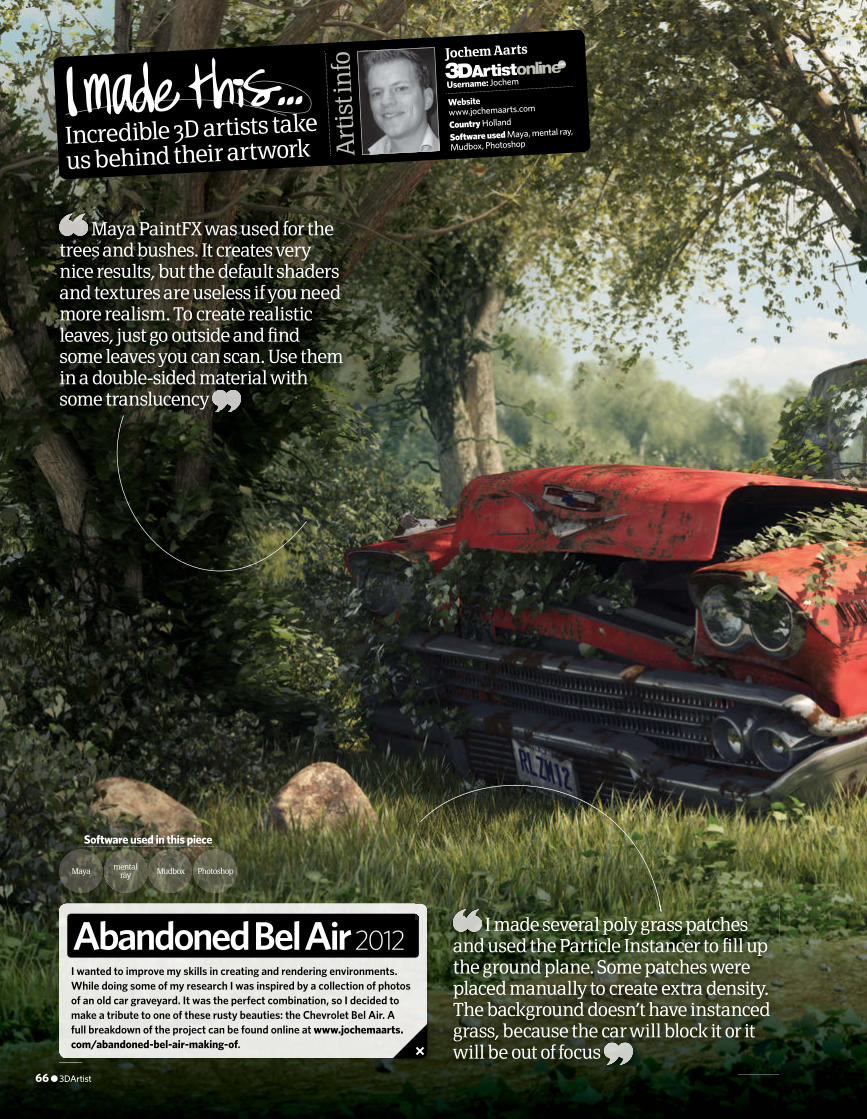
Maya PaintFX was used for the trees and bushes. It creates very nice results, but the default shaders and textures are useless if you need more realism. To create realistic leaves, just go outside and fi nd some leaves you can scan. Use them in a double-sided material with some translucency
I wanted to improve my skills in creating and rendering environments. While doing some of my research I was inspired by a collection of photos of an old car graveyard. It was the perfect combination, so I decided to make a tribute to one of these rusty beauties: the Chevrolet Bel Air. A full breakdown of the project can be found online at www.jochemaarts.com/abandoned-bel-air-making-of.
Abandoned Bel Air 2012
Software used in this piece
mental rayMaya Mudbox Photoshop
I made several poly grass patches and used the Particle Instancer to fi ll up the ground plane. Some patches were placed manually to create extra density. The background doesn’t have instanced grass, because the car will block it or it will be out of focus
Incredible 3D artists take
us behind their artwork Art
ist i
nfo Jochem Aarts
Websitewww.jochemaarts.com
Country Holland
Software used Maya, mental ray,
Mudbox, Photoshop
Username: Jochem
66 ● 3DArtist
066-067_3DA_52_ImadeThis_Abandoned_BelAir.indd 66 11/02/2013 21:39
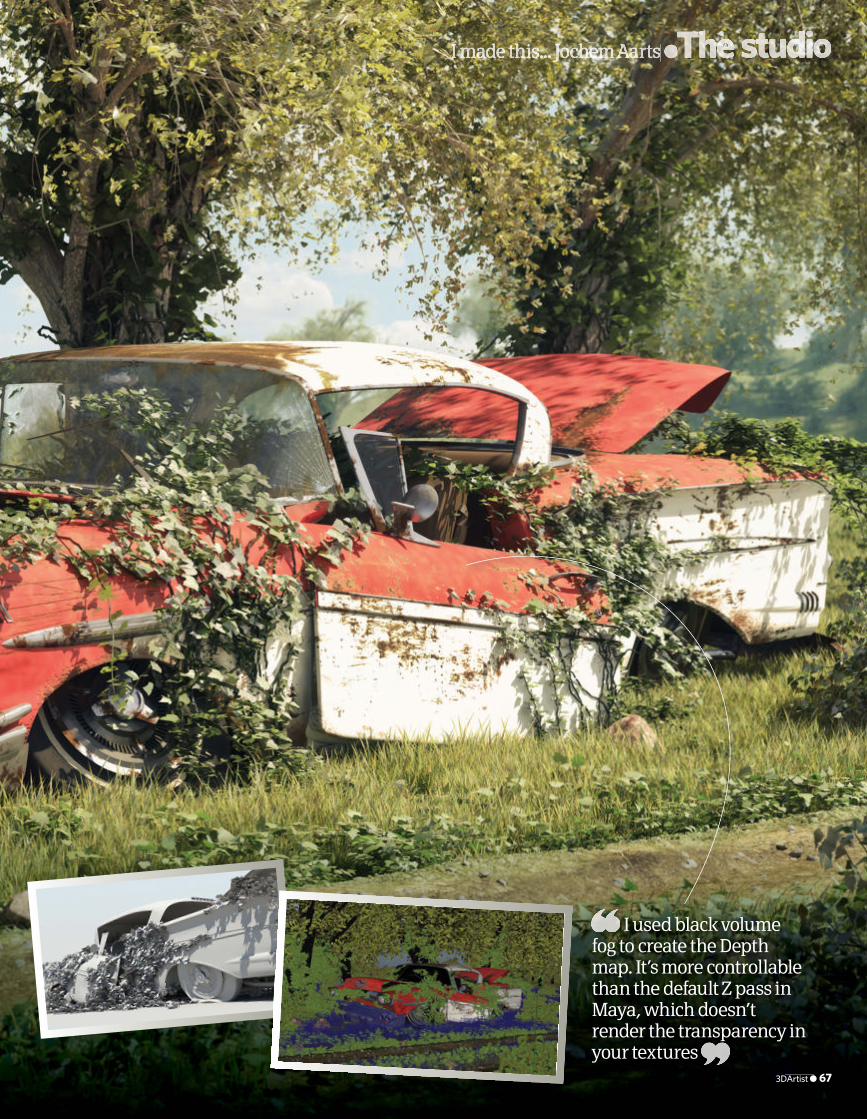
I used black volume fog to create the Depth map. It’s more controllable than the default Z pass in Maya, which doesn’t render the transparency in your textures
3DArtist ● 67
I made this... Jochem Aarts ●The studio●The studio●
066-067_3DA_52_ImadeThis_Abandoned_BelAir.indd 67 11/02/2013 21:39

68 ● 3DArtist
The studio●Model vehicles for animation
Model vehicles for animationSunbeam Rapier Mark IV 2013
68 ● 3DArtist
068-073_3DA_52_StepByStep_JahirulAmin.indd 68 11/02/2013 21:58
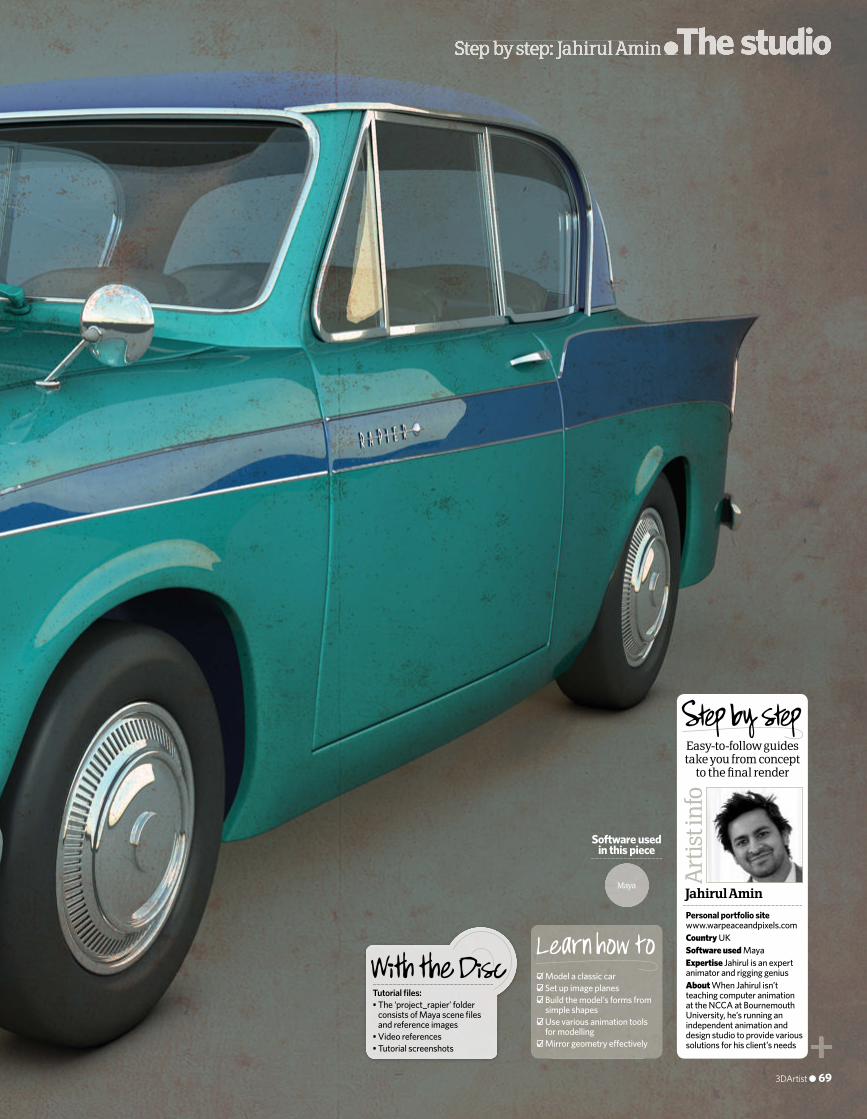
3DArtist ● 69
Step by step: Jahirul Amin ●The studio●The studio●
Software used in this piece
Maya Art
ist i
nfo
Jahirul Amin
Easy-to-follow guides take you from concept
to the fi nal render
Personal portfolio sitewww.warpeaceandpixels.comCountry UKSoftware used MayaExpertise Jahirul is an expert animator and rigging geniusAbout When Jahirul isn’t teaching computer animation at the NCCA at Bournemouth University, he’s running an independent animation and design studio to provide various solutions for his client’s needs
Model a classic car Set up image planes Build the model’s forms from simple shapes Use various animation tools for modelling Mirror geometry e� ectively
Learn how toTutorial fi les:• The ‘project_rapier’ folder
consists of Maya scene fi les and reference images
• Video references• Tutorial screenshots
068-073_3DA_52_StepByStep_JahirulAmin.indd 69 11/02/2013 21:59
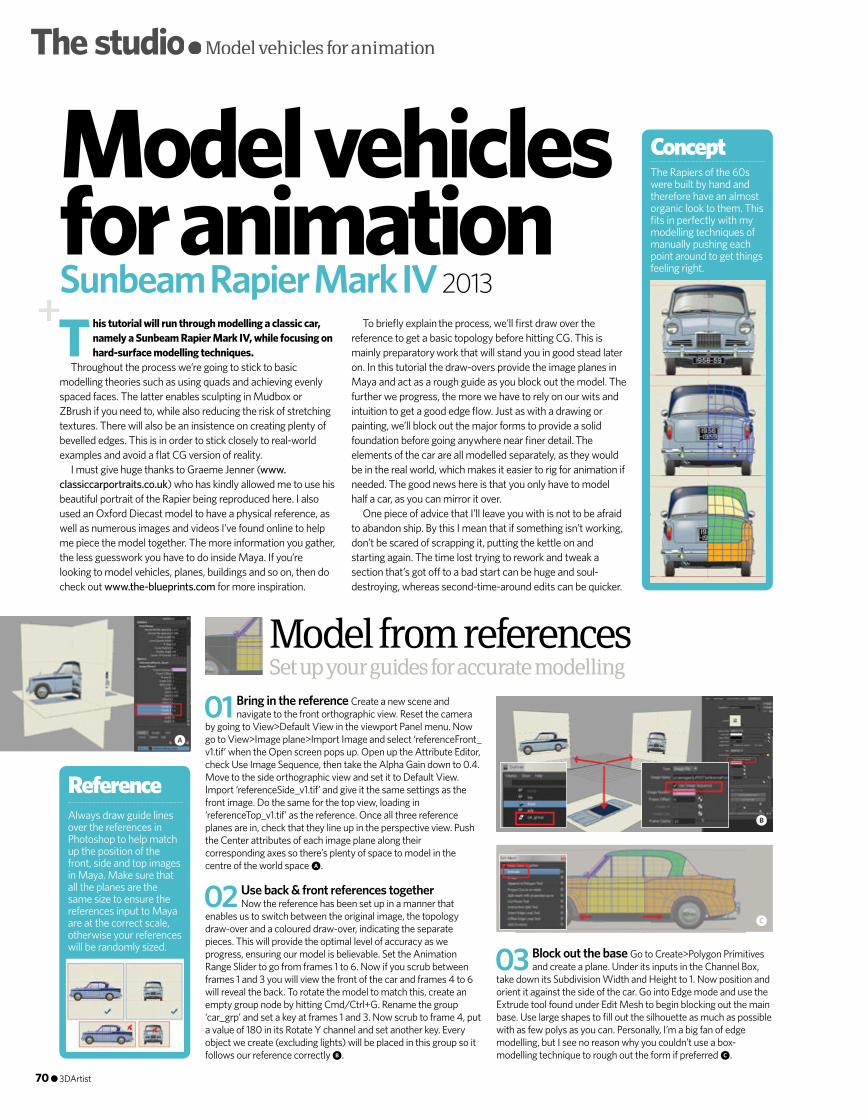
The studio●Model vehicles for animation
The Rapiers of the 60s were built by hand and therefore have an almost organic look to them. This fi ts in perfectly with my modelling techniques of manually pushing each point around to get things feeling right.
Concept
Model from referencesSet up your guides for accurate modelling
01 Bring in the reference Create a new scene and navigate to the front orthographic view. Reset the camera
by going to View>Default View in the viewport Panel menu. Now go to View>Image plane>Import Image and select ‘referenceFront_v1.tif’ when the Open screen pops up. Open up the Attribute Editor, check Use Image Sequence, then take the Alpha Gain down to 0.4. Move to the side orthographic view and set it to Default View. Import ‘referenceSide_v1.tif’ and give it the same settings as the front image. Do the same for the top view, loading in ‘referenceTop_v1.tif’ as the reference. Once all three reference planes are in, check that they line up in the perspective view. Push the Center attributes of each image plane along their corresponding axes so there’s plenty of space to model in the centre of the world space a.
02 Use back & front references together Now the reference has been set up in a manner that
enables us to switch between the original image, the topology draw-over and a coloured draw-over, indicating the separate pieces. This will provide the optimal level of accuracy as we progress, ensuring our model is believable. Set the Animation Range Slider to go from frames 1 to 6. Now if you scrub between frames 1 and 3 you will view the front of the car and frames 4 to 6 will reveal the back. To rotate the model to match this, create an empty group node by hitting Cmd/Ctrl+G. Rename the group ‘car_grp’ and set a key at frames 1 and 3. Now scrub to frame 4, put a value of 180 in its Rotate Y channel and set another key. Every object we create (excluding lights) will be placed in this group so it follows our reference correctly b.
03 Block out the base Go to Create>Polygon Primitives and create a plane. Under its inputs in the Channel Box,
take down its Subdivision Width and Height to 1. Now position and orient it against the side of the car. Go into Edge mode and use the Extrude tool found under Edit Mesh to begin blocking out the main base. Use large shapes to fi ll out the silhouette as much as possible with as few polys as you can. Personally, I’m a big fan of edge modelling, but I see no reason why you couldn’t use a box-modelling technique to rough out the form if preferred c.
This tutorial will run through modelling a classic car, namely a Sunbeam Rapier Mark IV, while focusing on hard-surface modelling techniques.
Throughout the process we’re going to stick to basic modelling theories such as using quads and achieving evenly spaced faces. The latter enables sculpting in Mudbox or ZBrush if you need to, while also reducing the risk of stretching textures. There will also be an insistence on creating plenty of bevelled edges. This is in order to stick closely to real-world examples and avoid a fl at CG version of reality.
I must give huge thanks to Graeme Jenner (www.classiccarportraits.co.uk) who has kindly allowed me to use his beautiful portrait of the Rapier being reproduced here. I also used an Oxford Diecast model to have a physical reference, as well as numerous images and videos I’ve found online to help me piece the model together. The more information you gather, the less guesswork you have to do inside Maya. If you’re looking to model vehicles, planes, buildings and so on, then do check out www.the-blueprints.com for more inspiration.
To briefl y explain the process, we’ll fi rst draw over the reference to get a basic topology before hitting CG. This is mainly preparatory work that will stand you in good stead later on. In this tutorial the draw-overs provide the image planes in Maya and act as a rough guide as you block out the model. The further we progress, the more we have to rely on our wits and intuition to get a good edge fl ow. Just as with a drawing or painting, we’ll block out the major forms to provide a solid foundation before going anywhere near fi ner detail. The elements of the car are all modelled separately, as they would be in the real world, which makes it easier to rig for animation if needed. The good news here is that you only have to model half a car, as you can mirror it over.
One piece of advice that I’ll leave you with is not to be afraid to abandon ship. By this I mean that if something isn’t working, don’t be scared of scrapping it, putting the kettle on and starting again. The time lost trying to rework and tweak a section that’s got o� to a bad start can be huge and soul-destroying, whereas second-time-around edits can be quicker.
Model vehicles for animationSunbeam Rapier Mark IV 2013
Always draw guide lines over the references in Photoshop to help match up the position of the front, side and top images in Maya. Make sure that all the planes are the same size to ensure the references input to Maya are at the correct scale, otherwise your references will be randomly sized.
Reference
a
b
c
70 ● 3DArtist
068-073_3DA_52_StepByStep_JahirulAmin.indd 70 11/02/2013 21:59
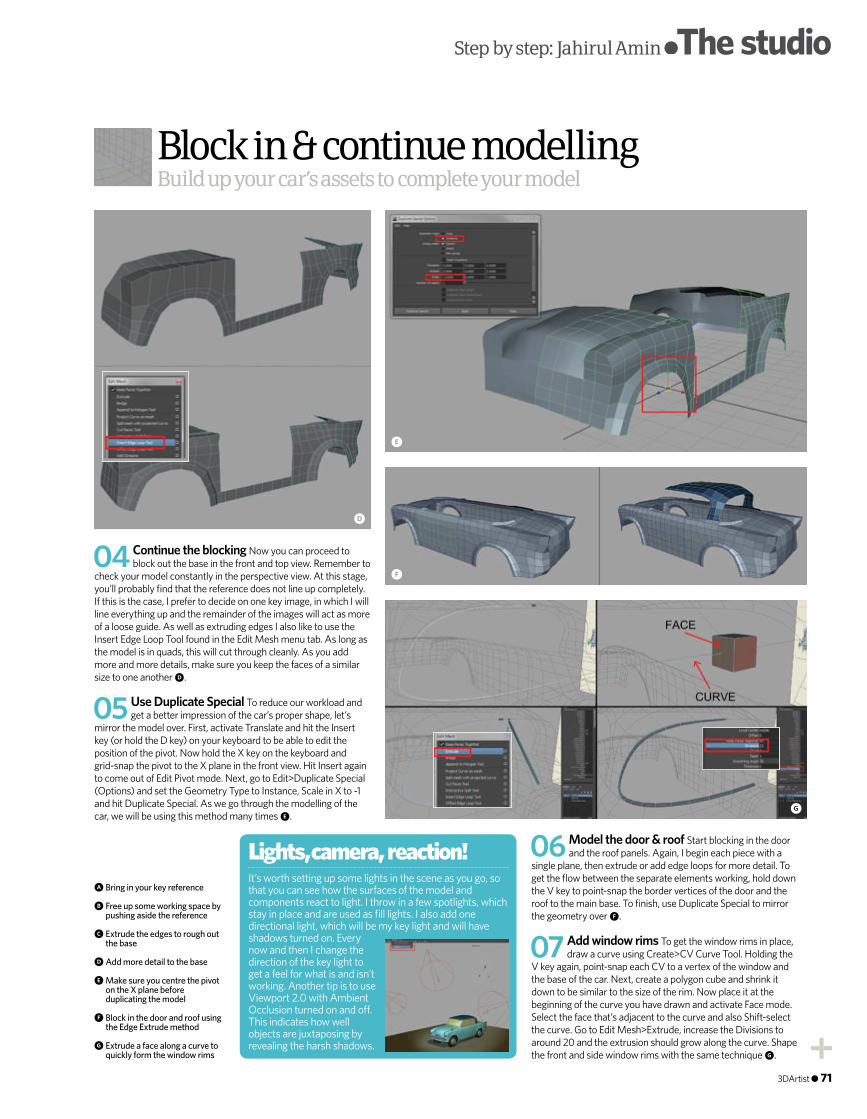
d
e
f
g
Build up your car’s assets to complete your modelBlock in & continue modelling
Step by step: Jahirul Amin ●The studio●The studio●
04 Continue the blocking Now you can proceed to block out the base in the front and top view. Remember to
check your model constantly in the perspective view. At this stage, you’ll probably fi nd that the reference does not line up completely. If this is the case, I prefer to decide on one key image, in which I will line everything up and the remainder of the images will act as more of a loose guide. As well as extruding edges I also like to use the Insert Edge Loop Tool found in the Edit Mesh menu tab. As long as the model is in quads, this will cut through cleanly. As you add more and more details, make sure you keep the faces of a similar size to one another d.
05 Use Duplicate Special To reduce our workload and get a better impression of the car’s proper shape, let’s
mirror the model over. First, activate Translate and hit the Insert key (or hold the D key) on your keyboard to be able to edit the position of the pivot. Now hold the X key on the keyboard and grid-snap the pivot to the X plane in the front view. Hit Insert again to come out of Edit Pivot mode. Next, go to Edit>Duplicate Special (Options) and set the Geometry Type to Instance, Scale in X to -1 and hit Duplicate Special. As we go through the modelling of the car, we will be using this method many times e.
06 Model the door & roof Start blocking in the door and the roof panels. Again, I begin each piece with a
single plane, then extrude or add edge loops for more detail. To get the fl ow between the separate elements working, hold down the V key to point-snap the border vertices of the door and the roof to the main base. To fi nish, use Duplicate Special to mirror the geometry over f.
07 Add window rims To get the window rims in place, draw a curve using Create>CV Curve Tool. Holding the
V key again, point-snap each CV to a vertex of the window and the base of the car. Next, create a polygon cube and shrink it down to be similar to the size of the rim. Now place it at the beginning of the curve you have drawn and activate Face mode. Select the face that’s adjacent to the curve and also Shift-select the curve. Go to Edit Mesh>Extrude, increase the Divisions to around 20 and the extrusion should grow along the curve. Shape the front and side window rims with the same technique g.
It’s worth setting up some lights in the scene as you go, so that you can see how the surfaces of the model and components react to light. I throw in a few spotlights, which stay in place and are used as fi ll lights. I also add one directional light, which will be my key light and will have shadows turned on. Every now and then I change the direction of the key light to get a feel for what is and isn’t working. Another tip is to use Viewport 2.0 with Ambient Occlusion turned on and o� . This indicates how well objects are juxtaposing by revealing the harsh shadows.
Lights, camera, reaction!a Bring in your key reference
b Free up some working space by pushing aside the reference
c Extrude the edges to rough out the base
d Add more detail to the base
e Make sure you centre the pivot on the X plane before duplicating the model
f Block in the door and roof using the Edge Extrude method
g Extrude a face along a curve to quickly form the window rims
3DArtist ● 71
068-073_3DA_52_StepByStep_JahirulAmin.indd 71 11/02/2013 21:59
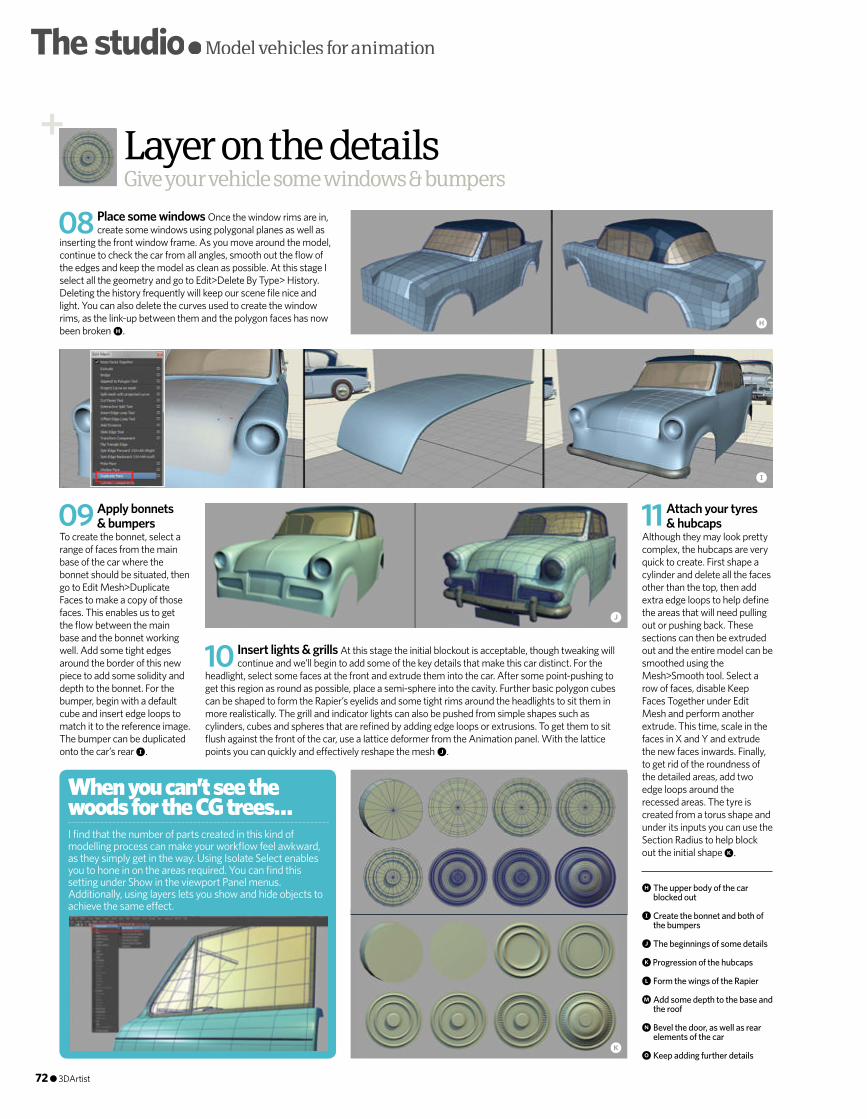
h
i
j
k
The studio●Model vehicles for animation
Layer on the detailsGive your vehicle some windows & bumpers
08 Place some windows Once the window rims are in, create some windows using polygonal planes as well as
inserting the front window frame. As you move around the model, continue to check the car from all angles, smooth out the fl ow of the edges and keep the model as clean as possible. At this stage I select all the geometry and go to Edit>Delete By Type> History. Deleting the history frequently will keep our scene fi le nice and light. You can also delete the curves used to create the window rims, as the link-up between them and the polygon faces has now been broken h.
10 Insert lights & grills At this stage the initial blockout is acceptable, though tweaking will continue and we’ll begin to add some of the key details that make this car distinct. For the
headlight, select some faces at the front and extrude them into the car. After some point-pushing to get this region as round as possible, place a semi-sphere into the cavity. Further basic polygon cubes can be shaped to form the Rapier’s eyelids and some tight rims around the headlights to sit them in more realistically. The grill and indicator lights can also be pushed from simple shapes such as cylinders, cubes and spheres that are refi ned by adding edge loops or extrusions. To get them to sit fl ush against the front of the car, use a lattice deformer from the Animation panel. With the lattice points you can quickly and e� ectively reshape the mesh j.
11 Attach your tyres & hubcaps
Although they may look pretty complex, the hubcaps are very quick to create. First shape a cylinder and delete all the faces other than the top, then add extra edge loops to help defi ne the areas that will need pulling out or pushing back. These sections can then be extruded out and the entire model can be smoothed using the Mesh>Smooth tool. Select a row of faces, disable Keep Faces Together under Edit Mesh and perform another extrude. This time, scale in the faces in X and Y and extrude the new faces inwards. Finally, to get rid of the roundness of the detailed areas, add two edge loops around the recessed areas. The tyre is created from a torus shape and under its inputs you can use the Section Radius to help block out the initial shape k.
09 Apply bonnets & bumpers
To create the bonnet, select a range of faces from the main base of the car where the bonnet should be situated, then go to Edit Mesh>Duplicate Faces to make a copy of those faces. This enables us to get the fl ow between the main base and the bonnet working well. Add some tight edges around the border of this new piece to add some solidity and depth to the bonnet. For the bumper, begin with a default cube and insert edge loops to match it to the reference image. The bumper can be duplicated onto the car’s rear i.
h The upper body of the car blocked out
i Create the bonnet and both of the bumpers
j The beginnings of some details
k Progression of the hubcaps
l Form the wings of the Rapier
m Add some depth to the base and the roof
n Bevel the door, as well as rear elements of the car
o Keep adding further details
I fi nd that the number of parts created in this kind of modelling process can make your workfl ow feel awkward, as they simply get in the way. Using Isolate Select enables you to hone in on the areas required. You can fi nd this setting under Show in the viewport Panel menus. Additionally, using layers lets you show and hide objects to achieve the same e� ect.
When you can’t see the woods for the CG trees…
72 ● 3DArtist
068-073_3DA_52_StepByStep_JahirulAmin.indd 72 11/02/2013 21:59
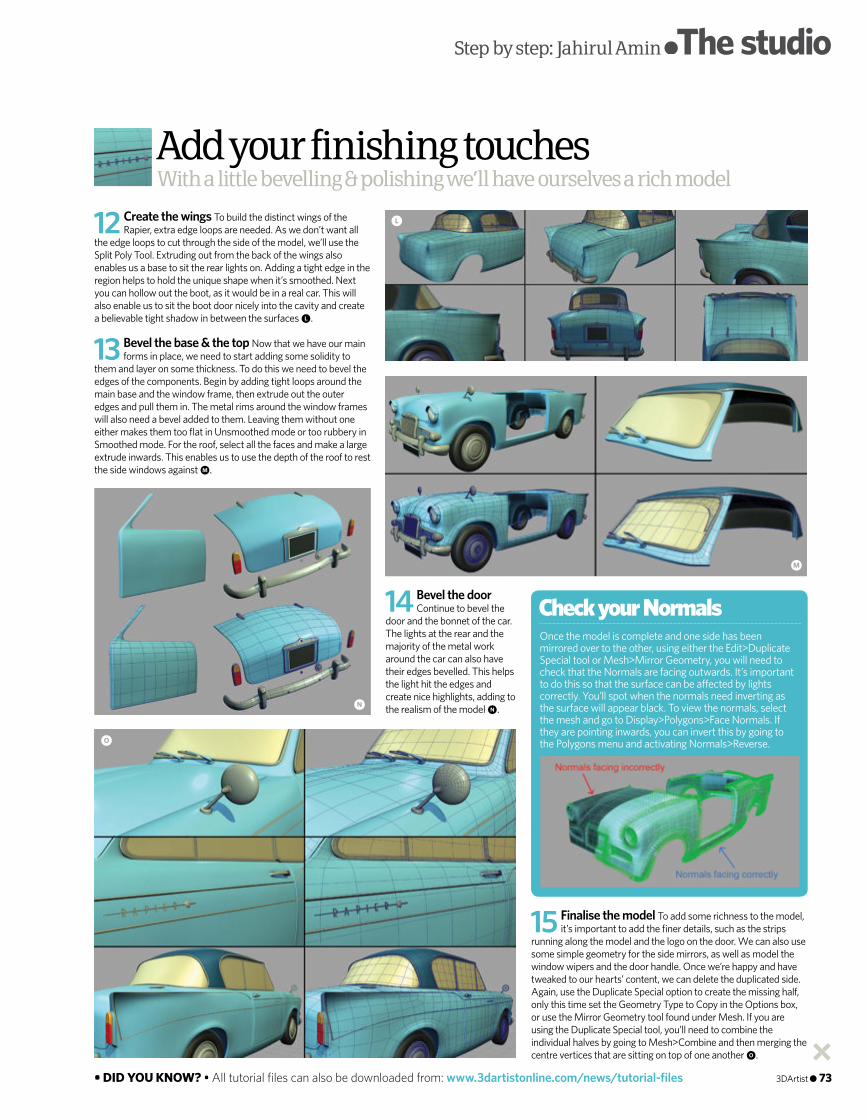
l
m
n
o
• DID YOU KNOW? • All tutorial fi les can also be downloaded from: www.3dartistonline.com/news/tutorial-fi les
With a little bevelling & polishing we’ll have ourselves a rich modelAdd your finishing touches
Step by step: Jahirul Amin ●The studio●The studio●
14 Bevel the door Continue to bevel the
door and the bonnet of the car. The lights at the rear and the majority of the metal work around the car can also have their edges bevelled. This helps the light hit the edges and create nice highlights, adding to the realism of the model n.
15 Finalise the model To add some richness to the model, it’s important to add the fi ner details, such as the strips
running along the model and the logo on the door. We can also use some simple geometry for the side mirrors, as well as model the window wipers and the door handle. Once we’re happy and have tweaked to our hearts’ content, we can delete the duplicated side. Again, use the Duplicate Special option to create the missing half, only this time set the Geometry Type to Copy in the Options box, or use the Mirror Geometry tool found under Mesh. If you are using the Duplicate Special tool, you’ll need to combine the individual halves by going to Mesh>Combine and then merging the centre vertices that are sitting on top of one another o.
12 Create the wings To build the distinct wings of the Rapier, extra edge loops are needed. As we don’t want all
the edge loops to cut through the side of the model, we’ll use the Split Poly Tool. Extruding out from the back of the wings also enables us a base to sit the rear lights on. Adding a tight edge in the region helps to hold the unique shape when it’s smoothed. Next you can hollow out the boot, as it would be in a real car. This will also enable us to sit the boot door nicely into the cavity and create a believable tight shadow in between the surfaces l.
13 Bevel the base & the top Now that we have our main forms in place, we need to start adding some solidity to
them and layer on some thickness. To do this we need to bevel the edges of the components. Begin by adding tight loops around the main base and the window frame, then extrude out the outer edges and pull them in. The metal rims around the window frames will also need a bevel added to them. Leaving them without one either makes them too fl at in Unsmoothed mode or too rubbery in Smoothed mode. For the roof, select all the faces and make a large extrude inwards. This enables us to use the depth of the roof to rest the side windows against m.
Once the model is complete and one side has been mirrored over to the other, using either the Edit>Duplicate Special tool or Mesh>Mirror Geometry, you will need to check that the Normals are facing outwards. It’s important to do this so that the surface can be a� ected by lights correctly. You’ll spot when the normals need inverting as the surface will appear black. To view the normals, select the mesh and go to Display>Polygons>Face Normals. If they are pointing inwards, you can invert this by going to the Polygons menu and activating Normals>Reverse.
Check your Normals
3DArtist ● 73
068-073_3DA_52_StepByStep_JahirulAmin.indd 73 11/02/2013 21:59

THREE EASY WAYS TO SUBSCRIBE1. OnlineOrder via credit or debit card:www.imaginesubs.co.uk/tdaand enter the code PCJ052
2. TelephoneOrder by phone, quoting code PCJ052:
0844 249 0472Overseas: +44 (0) 1795 592 951
3. Post or emailPlease complete and post the form to:3D Artist Subs Department800 Guillat AvenueKent Science ParkSittingbourneME9 8GUAlternatively, scan and email the form to: [email protected]
EXCLUSIVE SUBSCRIBERBENEFITSSubscribe today & get yourfi rst three issues for £1!• Massive savings on the cover price• Pay only £3.60 for every future
issue, saving 40% on store price• Free postage & packing in the UK• Free disc every issue• Delivered to your door
3D Artist Subs Department
US readersturn to
page 15
Subscriptions Voucher
■ YES! I would like to subscribe to 3D ArtistYour DetailsTitle First name Surname Address
Postcode Country Telephone number Mobile number
Email address
Direct Debit Payment■ UK Direct Debit Payment: I will receive my � rst 3 issues for £1, I will
then pay £21.60 every 6 issues thereafter. I can cancel at any time
Payment detailsYour EXCLUSIVE READER PRICE 1 year (13 issues)
■ UK £62.40 (save 20%) ■ Europe £70 ■ World £80Cheque
■ I enclose a cheque for £ (made payable to Imagine Publishing Ltd)
Credit/Debit Card
■ Visa ■ MasterCard ■ Amex ■ MaestroCard number Expiry date
Security number ■■■ (last three digits on the strip at the back of the card)
Issue number ■■ (if Maestro)
Signed
Date
Code: PCJ052■ Tick this box if you do not wish to receive any promotional material from Imagine Publishing Ltd ■ Tick this box if you do not wish to receive promotional material from other companies. Terms & Conditions apply. We publish 13 issues a year, your subscription will start from the next available issue unless otherwise indicated. Direct Debit guarantee details available on request. This offer expires 30-Jun-13.I would like my subscription to start from issue:
Return this order form to:3D Artist Subs Department, 800 Guillat Avenue, Kent Science Park, Sittingbourne ME9 8GUor email it directly to [email protected] To manage your subscription account visit www.imaginesubs.co.uk
✔
Please complete your email address to receive news and special offers from us
Instruction to your Bank orBuilding Society to pay by Direct Debit
Signature(s)
Date
Bank/Building Society account number
Banks and Building Societies may not accept Direct Debit instructions for some types of account
Instructions to your Bank or Building SocietyPlease pay Imagine Publishing Limited Direct Debits from the account detailed in this instruction subject to the safeguards assured by the Direct Debit guarantee. I understand that this instruction may remain with Imagine Publishing Limited and, if so, details will be passed on electronically to my Bank/Building Society
Branch sort code
Originator’s Identification Number
Name(s) of account holder(s)
To: The Manager Bank/Building Society
Address
Postcode
Reference Number
5 0 1 8 8 4
Name and full postal address of your Bank or Building Society
Please fill in the form and send it to: Dovetail, 800 Guillat Avenue, Kent Science Park, Sittingbourne, ME9 8GU
074-075_3DA_52 New Subs Spread.indd 74 11/02/2013 19:50

SUBSCRIBE TODAY www.imaginesubs.co.uk/tdaTutoria
ls
Features
Interviews
Industry
and enter the code PCJ052
The UK’s best 3D magazine has never been so a� ordable, thanks to this introductory o� er
3and getissuesfor £1 GREATDIGITALMAGS.COM
GO DIGITAL!
FOR ANDROID, MAC, PC iPHONE & iPAD
GREAT DIGITAL SUBSCRIPTIONOFFERS AVAILABLE AT:
Subscribe
074-075_3DA_52 New Subs Spread.indd 75 11/02/2013 19:54
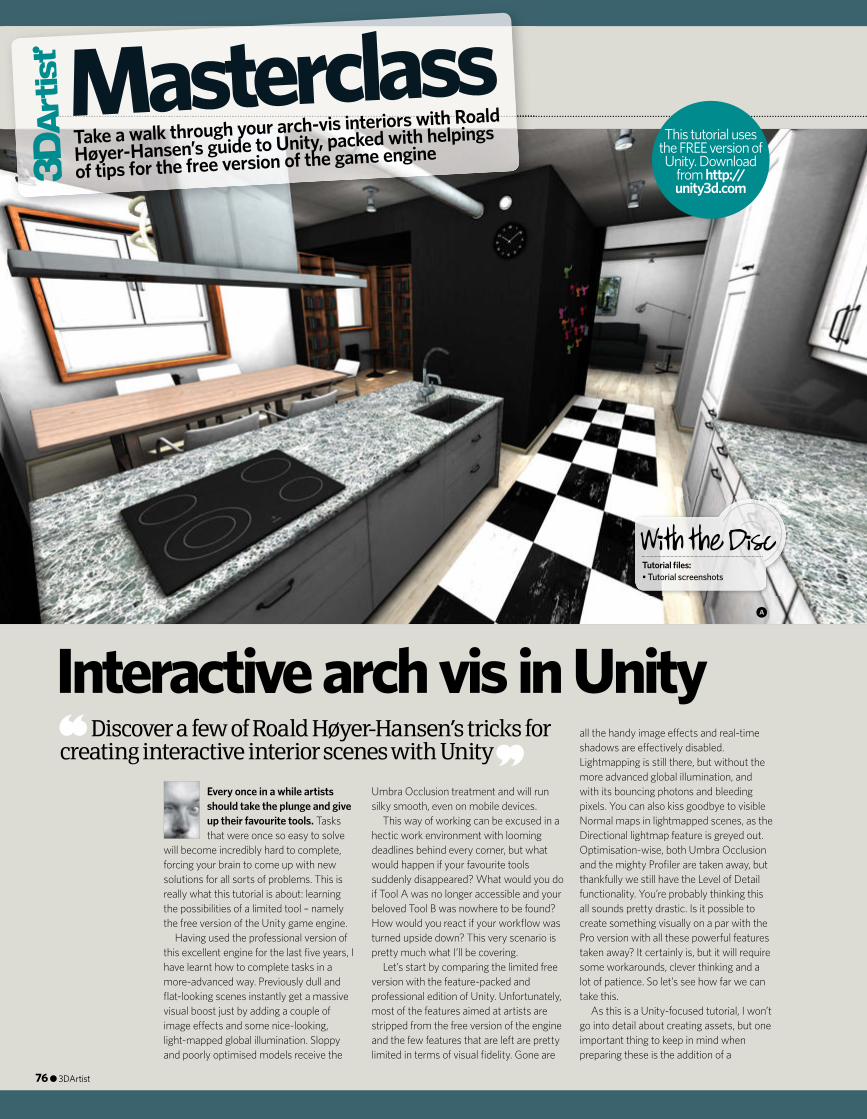
MasterclassTake a walk through your arch-vis interiors with Roald
Høyer-Hansen’s guide to Unity, packed with helpings
of tips for the free version of the game engine
Join the community at www.3dartistonline.com
Interactive arch vis in UnityDiscover a few of Roald Høyer-Hansen’s tricks for
creating interactive interior scenes with Unity
Every once in a while artists should take the plunge and give up their favourite tools. Tasks that were once so easy to solve
will become incredibly hard to complete, forcing your brain to come up with new solutions for all sorts of problems. This is really what this tutorial is about: learning the possibilities of a limited tool – namely the free version of the Unity game engine.
Having used the professional version of this excellent engine for the last fi ve years, I have learnt how to complete tasks in a more-advanced way. Previously dull and fl at-looking scenes instantly get a massive visual boost just by adding a couple of image e� ects and some nice-looking, light-mapped global illumination. Sloppy and poorly optimised models receive the
Umbra Occlusion treatment and will run silky smooth, even on mobile devices.
This way of working can be excused in a hectic work environment with looming deadlines behind every corner, but what would happen if your favourite tools suddenly disappeared? What would you do if Tool A was no longer accessible and your beloved Tool B was nowhere to be found? How would you react if your workfl ow was turned upside down? This very scenario is pretty much what I’ll be covering.
Let’s start by comparing the limited free version with the feature-packed and professional edition of Unity. Unfortunately, most of the features aimed at artists are stripped from the free version of the engine and the few features that are left are pretty limited in terms of visual fi delity. Gone are
all the handy image e� ects and real-time shadows are e� ectively disabled. Lightmapping is still there, but without the more advanced global illumination, and with its bouncing photons and bleeding pixels. You can also kiss goodbye to visible Normal maps in lightmapped scenes, as the Directional lightmap feature is greyed out. Optimisation-wise, both Umbra Occlusion and the mighty Profi ler are taken away, but thankfully we still have the Level of Detail functionality. You’re probably thinking this all sounds pretty drastic. Is it possible to create something visually on a par with the Pro version with all these powerful features taken away? It certainly is, but it will require some workarounds, clever thinking and a lot of patience. So let’s see how far we can take this.
As this is a Unity-focused tutorial, I won’t go into detail about creating assets, but one important thing to keep in mind when preparing these is the addition of a
a
Tutorial fi les:• Tutorial screenshots
This tutorial uses the FREE version of Unity. Download
from http://unity3d.com
76 ● 3DArtist
076-079_3DA_52_Masterclass_Unity_Roald_Hoyer-Hansen.indd 76 11/02/2013 22:03
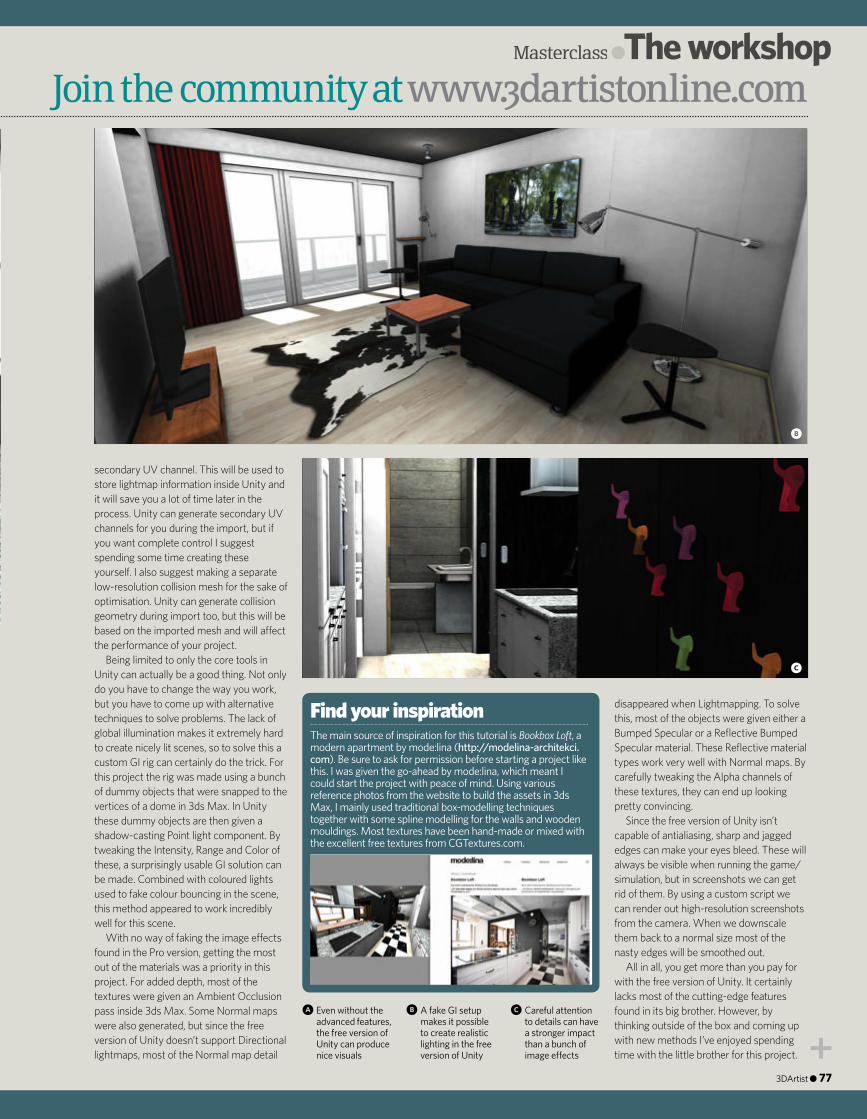
Masterclass ●The workshop●The workshop●
Join the community at www.3dartistonline.com
a Even without the advanced features, the free version of Unity can produce nice visuals
secondary UV channel. This will be used to store lightmap information inside Unity and it will save you a lot of time later in the process. Unity can generate secondary UV channels for you during the import, but if you want complete control I suggest spending some time creating these yourself. I also suggest making a separate low-resolution collision mesh for the sake of optimisation. Unity can generate collision geometry during import too, but this will be based on the imported mesh and will a� ect the performance of your project.
Being limited to only the core tools in Unity can actually be a good thing. Not only do you have to change the way you work, but you have to come up with alternative techniques to solve problems. The lack of global illumination makes it extremely hard to create nicely lit scenes, so to solve this a custom GI rig can certainly do the trick. For this project the rig was made using a bunch of dummy objects that were snapped to the vertices of a dome in 3ds Max. In Unity these dummy objects are then given a shadow-casting Point light component. By tweaking the Intensity, Range and Color of these, a surprisingly usable GI solution can be made. Combined with coloured lights used to fake colour bouncing in the scene, this method appeared to work incredibly well for this scene.
With no way of faking the image e� ects found in the Pro version, getting the most out of the materials was a priority in this project. For added depth, most of the textures were given an Ambient Occlusion pass inside 3ds Max. Some Normal maps were also generated, but since the free version of Unity doesn’t support Directional lightmaps, most of the Normal map detail
disappeared when Lightmapping. To solve this, most of the objects were given either a Bumped Specular or a Refl ective Bumped Specular material. These Refl ective material types work very well with Normal maps. By carefully tweaking the Alpha channels of these textures, they can end up looking pretty convincing.
Since the free version of Unity isn’t capable of antialiasing, sharp and jagged edges can make your eyes bleed. These will always be visible when running the game/simulation, but in screenshots we can get rid of them. By using a custom script we can render out high-resolution screenshots from the camera. When we downscale them back to a normal size most of the nasty edges will be smoothed out.
All in all, you get more than you pay for with the free version of Unity. It certainly lacks most of the cutting-edge features found in its big brother. However, by thinking outside of the box and coming up with new methods I’ve enjoyed spending time with the little brother for this project.
b A fake GI setup makes it possible to create realistic lighting in the free version of Unity
c Careful attention to details can have a stronger impact than a bunch of image e� ects
b
c
The main source of inspiration for this tutorial is Bookbox Loft, a modern apartment by mode:lina (http://modelina-architekci.com). Be sure to ask for permission before starting a project like this. I was given the go-ahead by mode:lina, which meant I could start the project with peace of mind. Using various reference photos from the website to build the assets in 3ds Max, I mainly used traditional box-modelling techniques together with some spline modelling for the walls and wooden mouldings. Most textures have been hand-made or mixed with the excellent free textures from CGTextures.com.
Find your inspiration
3DArtist ● 77
076-079_3DA_52_Masterclass_Unity_Roald_Hoyer-Hansen.indd 77 11/02/2013 22:03
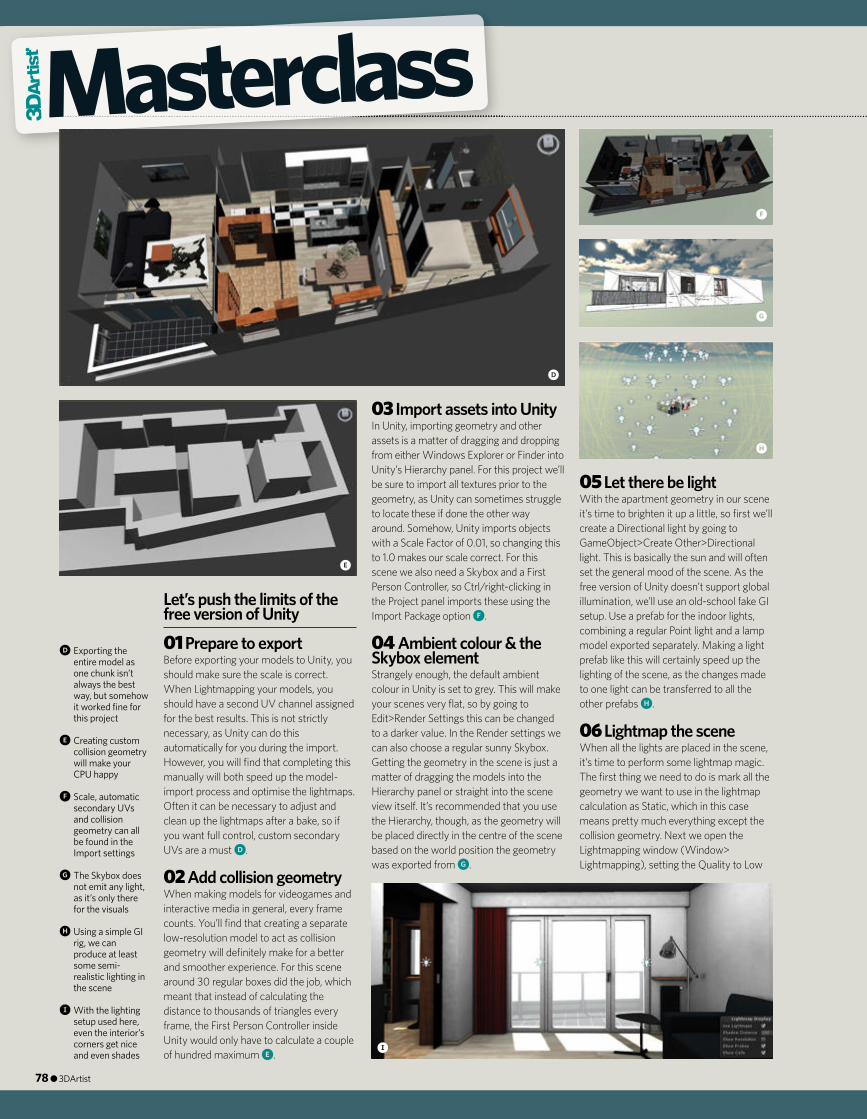
Join the community at www.3dartistonline.comMasterclass
d Exporting the entire model as one chunk isn’t always the best way, but somehow it worked fi ne for this project
e Creating custom collision geometry will make your CPU happy
f Scale, automatic secondary UVs and collision geometry can all be found in the Import settings
g The Skybox does not emit any light, as it’s only there for the visuals
h Using a simple GI rig, we can produce at least some semi-realistic lighting in the scene
i With the lighting setup used here, even the interior’s corners get nice and even shades
05 Let there be lightWith the apartment geometry in our scene it’s time to brighten it up a little, so fi rst we’ll create a Directional light by going to GameObject>Create Other>Directional light. This is basically the sun and will often set the general mood of the scene. As the free version of Unity doesn’t support global illumination, we’ll use an old-school fake GI setup. Use a prefab for the indoor lights, combining a regular Point light and a lamp model exported separately. Making a light prefab like this will certainly speed up the lighting of the scene, as the changes made to one light can be transferred to all the other prefabs h.
06 Lightmap the sceneWhen all the lights are placed in the scene, it’s time to perform some lightmap magic. The fi rst thing we need to do is mark all the geometry we want to use in the lightmap calculation as Static, which in this case means pretty much everything except the collision geometry. Next we open the Lightmapping window (Window> Lightmapping), setting the Quality to Low
Let’s push the limits of the free version of Unity
01 Prepare to exportBefore exporting your models to Unity, you should make sure the scale is correct. When Lightmapping your models, you should have a second UV channel assigned for the best results. This is not strictly necessary, as Unity can do this automatically for you during the import. However, you will fi nd that completing this manually will both speed up the model-import process and optimise the lightmaps. Often it can be necessary to adjust and clean up the lightmaps after a bake, so if you want full control, custom secondary UVs are a must d.
02 Add collision geometryWhen making models for videogames and interactive media in general, every frame counts. You’ll fi nd that creating a separate low-resolution model to act as collision geometry will defi nitely make for a better and smoother experience. For this scene around 30 regular boxes did the job, which meant that instead of calculating the distance to thousands of triangles every frame, the First Person Controller inside Unity would only have to calculate a couple of hundred maximum e.
03 Import assets into UnityIn Unity, importing geometry and other assets is a matter of dragging and dropping from either Windows Explorer or Finder into Unity’s Hierarchy panel. For this project we’ll be sure to import all textures prior to the geometry, as Unity can sometimes struggle to locate these if done the other way around. Somehow, Unity imports objects with a Scale Factor of 0.01, so changing this to 1.0 makes our scale correct. For this scene we also need a Skybox and a First Person Controller, so Ctrl/right-clicking in the Project panel imports these using the Import Package option f.
04 Ambient colour & the Skybox elementStrangely enough, the default ambient colour in Unity is set to grey. This will make your scenes very fl at, so by going to Edit>Render Settings this can be changed to a darker value. In the Render settings we can also choose a regular sunny Skybox. Getting the geometry in the scene is just a matter of dragging the models into the Hierarchy panel or straight into the scene view itself. It’s recommended that you use the Hierarchy, though, as the geometry will be placed directly in the centre of the scene based on the world position the geometry was exported from g.
d
e
f
g
h
i
78 ● 3DArtist
076-079_3DA_52_Masterclass_Unity_Roald_Hoyer-Hansen.indd 78 11/02/2013 22:03
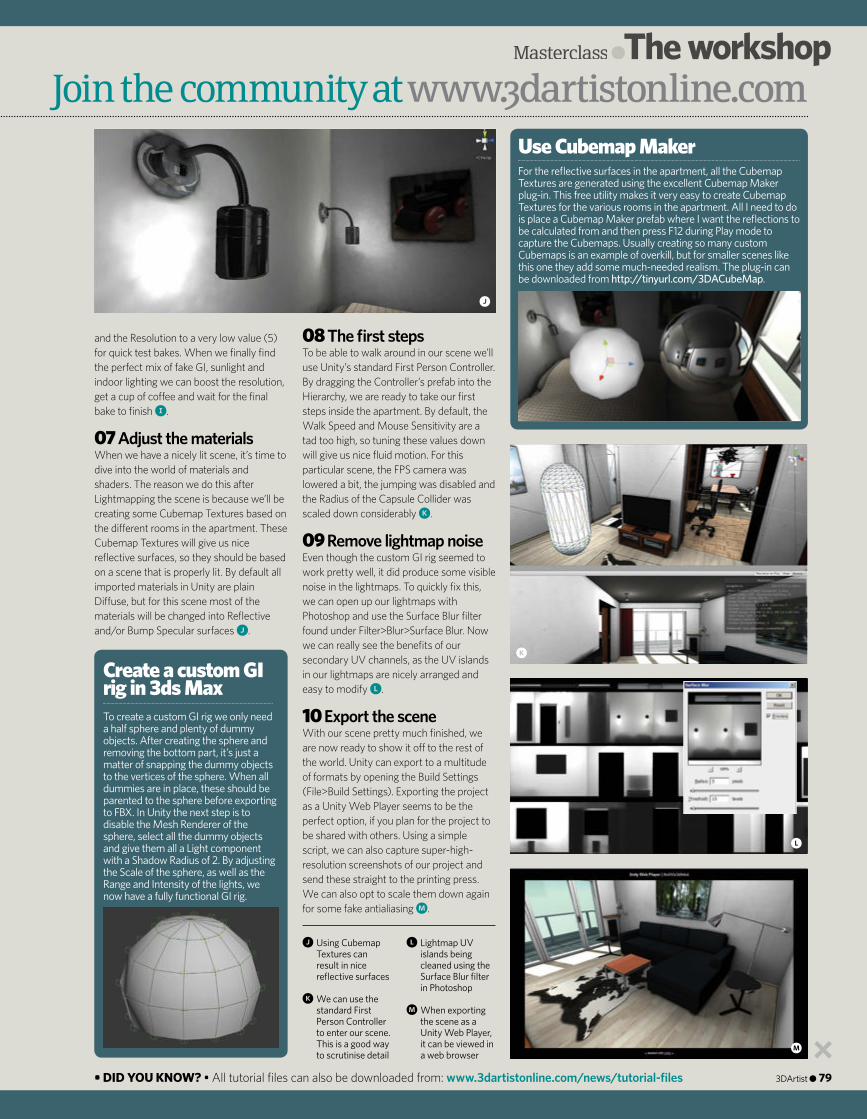
Masterclass ●The workshop●The workshop●
Join the community at www.3dartistonline.com
and the Resolution to a very low value (5) for quick test bakes. When we fi nally fi nd the perfect mix of fake GI, sunlight and indoor lighting we can boost the resolution, get a cup of co� ee and wait for the fi nal bake to fi nish i.
07 Adjust the materialsWhen we have a nicely lit scene, it’s time to dive into the world of materials and shaders. The reason we do this after Lightmapping the scene is because we’ll be creating some Cubemap Textures based on the di� erent rooms in the apartment. These Cubemap Textures will give us nice refl ective surfaces, so they should be based on a scene that is properly lit. By default all imported materials in Unity are plain Di� use, but for this scene most of the materials will be changed into Refl ective and/or Bump Specular surfaces j.
08 The fi rst stepsTo be able to walk around in our scene we’ll use Unity’s standard First Person Controller. By dragging the Controller’s prefab into the Hierarchy, we are ready to take our fi rst steps inside the apartment. By default, the Walk Speed and Mouse Sensitivity are a tad too high, so tuning these values down will give us nice fl uid motion. For this particular scene, the FPS camera was lowered a bit, the jumping was disabled and the Radius of the Capsule Collider was scaled down considerably k.
09 Remove lightmap noiseEven though the custom GI rig seemed to work pretty well, it did produce some visible noise in the lightmaps. To quickly fi x this, we can open up our lightmaps with Photoshop and use the Surface Blur fi lter found under Filter>Blur>Surface Blur. Now we can really see the benefi ts of our secondary UV channels, as the UV islands in our lightmaps are nicely arranged and easy to modify l.
10 Export the sceneWith our scene pretty much fi nished, we are now ready to show it o� to the rest of the world. Unity can export to a multitude of formats by opening the Build Settings (File>Build Settings). Exporting the project as a Unity Web Player seems to be the perfect option, if you plan for the project to be shared with others. Using a simple script, we can also capture super-high-resolution screenshots of our project and send these straight to the printing press. We can also opt to scale them down again for some fake antialiasing m.
j Using Cubemap Textures can result in nice refl ective surfaces
k We can use the standard First Person Controller to enter our scene. This is a good way to scrutinise detail
l Lightmap UV islands being cleaned using the Surface Blur fi lter in Photoshop
m When exporting the scene as a Unity Web Player, it can be viewed in a web browser
To create a custom GI rig we only need a half sphere and plenty of dummy objects. After creating the sphere and removing the bottom part, it’s just a matter of snapping the dummy objects to the vertices of the sphere. When all dummies are in place, these should be parented to the sphere before exporting to FBX. In Unity the next step is to disable the Mesh Renderer of the sphere, select all the dummy objects and give them all a Light component with a Shadow Radius of 2. By adjusting the Scale of the sphere, as well as the Range and Intensity of the lights, we now have a fully functional GI rig.
Create a custom GI rig in 3ds Max
For the refl ective surfaces in the apartment, all the Cubemap Textures are generated using the excellent Cubemap Maker plug-in. This free utility makes it very easy to create Cubemap Textures for the various rooms in the apartment. All I need to do is place a Cubemap Maker prefab where I want the refl ections to be calculated from and then press F12 during Play mode to capture the Cubemaps. Usually creating so many custom Cubemaps is an example of overkill, but for smaller scenes like this one they add some much-needed realism. The plug-in can be downloaded from http://tinyurl.com/3DACubeMap.
Use Cubemap Maker
j
k
l
m
• DID YOU KNOW? • All tutorial fi les can also be downloaded from: www.3dartistonline.com/news/tutorial-fi les 3DArtist ● 79
076-079_3DA_52_Masterclass_Unity_Roald_Hoyer-Hansen.indd 79 11/02/2013 22:03
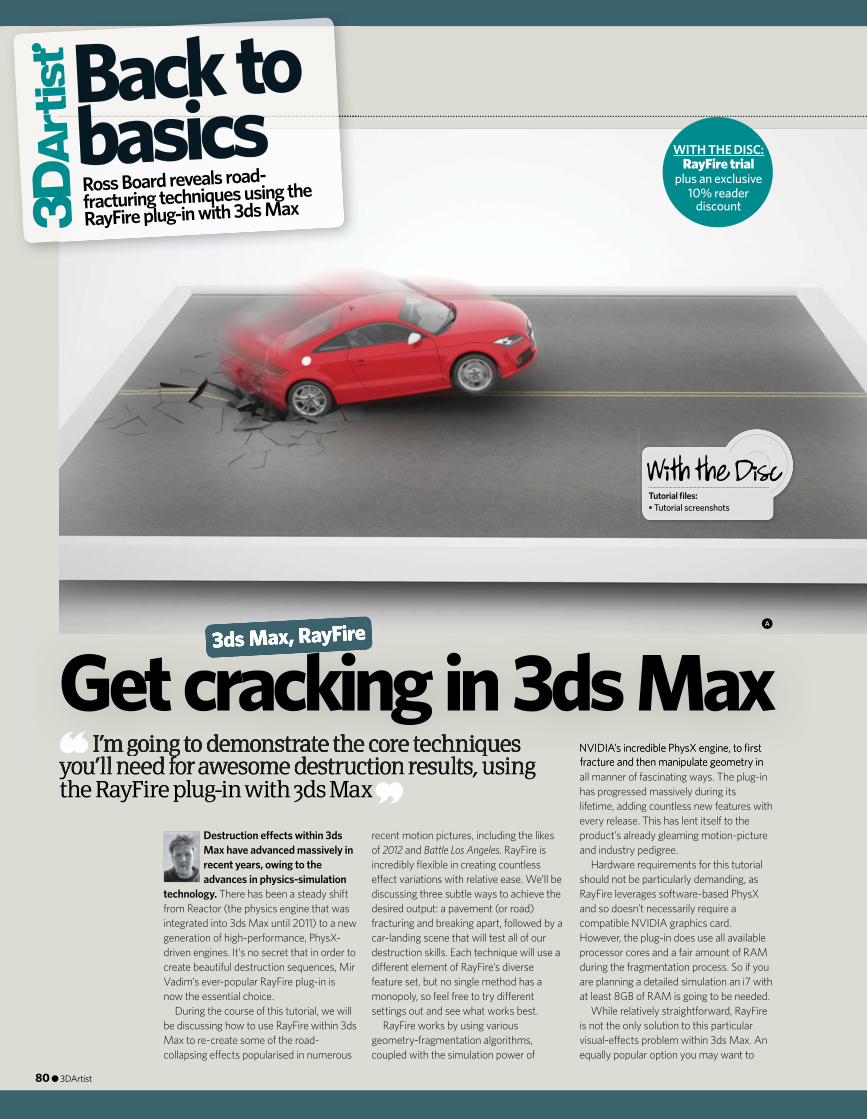
Destruction e� ects within 3ds Max have advanced massively in recent years, owing to the advances in physics-simulation
technology. There has been a steady shift from Reactor (the physics engine that was integrated into 3ds Max until 2011) to a new generation of high-performance, PhysX-driven engines. It’s no secret that in order to create beautiful destruction sequences, Mir Vadim’s ever-popular RayFire plug-in is now the essential choice.
During the course of this tutorial, we will be discussing how to use RayFire within 3ds Max to re-create some of the road-collapsing e� ects popularised in numerous
recent motion pictures, including the likes of 2012 and Battle Los Angeles. RayFire is incredibly fl exible in creating countless e� ect variations with relative ease. We’ll be discussing three subtle ways to achieve the desired output: a pavement (or road) fracturing and breaking apart, followed by a car-landing scene that will test all of our destruction skills. Each technique will use a di� erent element of RayFire’s diverse feature set, but no single method has a monopoly, so feel free to try di� erent settings out and see what works best.
RayFire works by using various geometry-fragmentation algorithms, coupled with the simulation power of
NVIDIA’s incredible PhysX engine, to fi rst fracture and then manipulate geometry in all manner of fascinating ways. The plug-in has progressed massively during its lifetime, adding countless new features with every release. This has lent itself to the product’s already gleaming motion-picture and industry pedigree.
Hardware requirements for this tutorial should not be particularly demanding, as RayFire leverages software-based PhysX and so doesn’t necessarily require a compatible NVIDIA graphics card. However, the plug-in does use all available processor cores and a fair amount of RAM during the fragmentation process. So if you are planning a detailed simulation an i7 with at least 8GB of RAM is going to be needed.
While relatively straightforward, RayFire is not the only solution to this particular visual-e� ects problem within 3ds Max. An equally popular option you may want to
Back tobasicsRoss Board reveals road-fracturing techniques using the RayFire plug-in with 3ds Max
Join the community at www.3dartistonline.com
I’m going to demonstrate the core techniques you’ll need for awesome destruction results, using the RayFire plug-in with 3ds Max
3ds Max, RayFire
NVIDIA’s incredible PhysX engine, to fi rst fracture and then manipulate geometry in
I’m going to demonstrate the core techniques you’ll need for awesome destruction results, using
3ds Max, RayFire
Get cracking in 3ds Maxa
Tutorial fi les:• Tutorial screenshots
WITH THE DISC:RayFire trial
plus an exclusive 10% reader
discount
80 ● 3DArtist
080-083_3DA_52_BackToBasics_3dsMax_RayFire_RossBoard.indd 80 11/02/2013 22:05
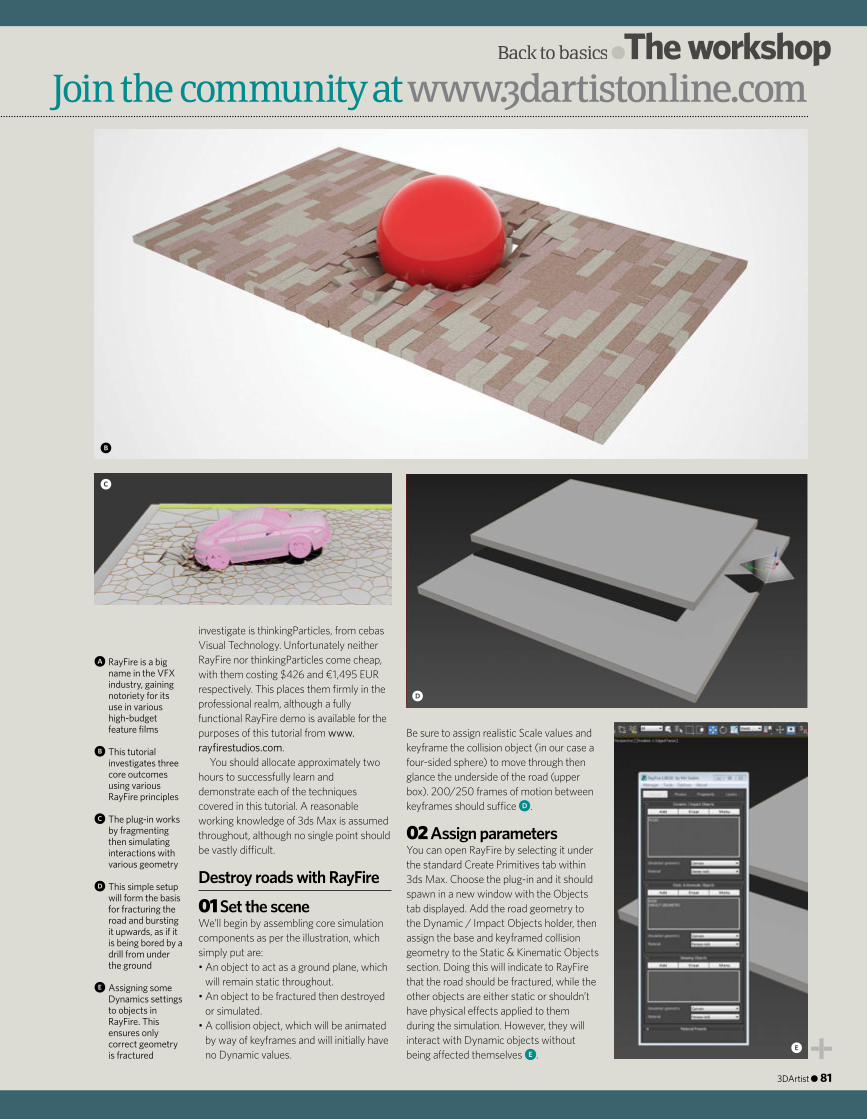
Back to basics ●The workshop●The workshop●
Join the community at www.3dartistonline.com
A RayFire is a big name in the VFX industry, gaining notoriety for its use in various high-budget feature fi lms
B This tutorial investigates three core outcomes using various RayFire principles
C The plug-in works by fragmenting then simulating interactions with various geometry
D This simple setup will form the basis for fracturing the road and bursting it upwards, as if it is being bored by a drill from under the ground
E Assigning some Dynamics settings to objects in RayFire. This ensures only correct geometry is fractured
investigate is thinkingParticles, from cebas Visual Technology. Unfortunately neither RayFire nor thinkingParticles come cheap, with them costing $426 and €1,495 EUR respectively. This places them fi rmly in the professional realm, although a fully functional RayFire demo is available for the purposes of this tutorial from www.rayfi restudios.com.
You should allocate approximately two hours to successfully learn and demonstrate each of the techniques covered in this tutorial. A reasonable working knowledge of 3ds Max is assumed throughout, although no single point should be vastly di� cult.
Destroy roads with RayFire
01 Set the sceneWe’ll begin by assembling core simulation components as per the illustration, which simply put are: • An object to act as a ground plane, which
will remain static throughout.• An object to be fractured then destroyed
or simulated.• A collision object, which will be animated
by way of keyframes and will initially have no Dynamic values.
Be sure to assign realistic Scale values and keyframe the collision object (in our case a four-sided sphere) to move through then glance the underside of the road (upper box). 200/250 frames of motion between keyframes should su� ce D.
02 Assign parametersYou can open RayFire by selecting it under the standard Create Primitives tab within 3ds Max. Choose the plug-in and it should spawn in a new window with the Objects tab displayed. Add the road geometry to the Dynamic / Impact Objects holder, then assign the base and keyframed collision geometry to the Static & Kinematic Objects section. Doing this will indicate to RayFire that the road should be fractured, while the other objects are either static or shouldn’t have physical e� ects applied to them during the simulation. However, they will interact with Dynamic objects without being a� ected themselves E.
c
d
e
b
3DArtist ● 81
080-083_3DA_52_BackToBasics_3dsMax_RayFire_RossBoard.indd 81 11/02/2013 22:06
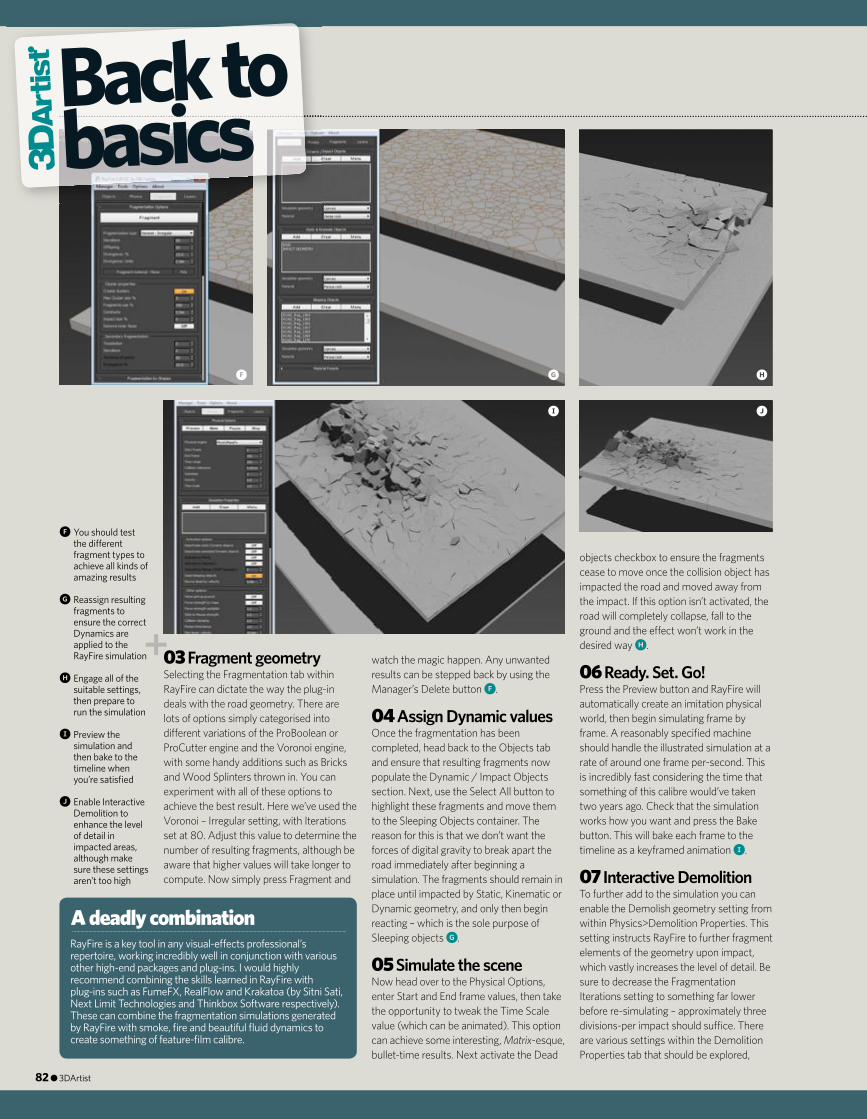
Join the community at www.3dartistonline.com
82 ● 3DArtist
Back tobasics
watch the magic happen. Any unwanted results can be stepped back by using the Manager’s Delete button f.
04 Assign Dynamic valuesOnce the fragmentation has been completed, head back to the Objects tab and ensure that resulting fragments now populate the Dynamic / Impact Objects section. Next, use the Select All button to highlight these fragments and move them to the Sleeping Objects container. The reason for this is that we don’t want the forces of digital gravity to break apart the road immediately after beginning a simulation. The fragments should remain in place until impacted by Static, Kinematic or Dynamic geometry, and only then begin reacting – which is the sole purpose of Sleeping objects g.
05 Simulate the sceneNow head over to the Physical Options, enter Start and End frame values, then take the opportunity to tweak the Time Scale value (which can be animated). This option can achieve some interesting, Matrix-esque, bullet-time results. Next activate the Dead
objects checkbox to ensure the fragments cease to move once the collision object has impacted the road and moved away from the impact. If this option isn’t activated, the road will completely collapse, fall to the ground and the e� ect won’t work in the desired way h.
06 Ready. Set. Go!Press the Preview button and RayFire will automatically create an imitation physical world, then begin simulating frame by frame. A reasonably specifi ed machine should handle the illustrated simulation at a rate of around one frame per-second. This is incredibly fast considering the time that something of this calibre would’ve taken two years ago. Check that the simulation works how you want and press the Bake button. This will bake each frame to the timeline as a keyframed animation i.
07 Interactive DemolitionTo further add to the simulation you can enable the Demolish geometry setting from within Physics>Demolition Properties. This setting instructs RayFire to further fragment elements of the geometry upon impact, which vastly increases the level of detail. Be sure to decrease the Fragmentation Iterations setting to something far lower before re-simulating – approximately three divisions-per impact should su� ce. There are various settings within the Demolition Properties tab that should be explored,
f You should test the di� erent fragment types to achieve all kinds of amazing results
g Reassign resulting fragments to ensure the correct Dynamics are applied to the RayFire simulation
h Engage all of the suitable settings, then prepare to run the simulation
i Preview the simulation and then bake to the timeline when you’re satisfi ed
j Enable Interactive Demolition to enhance the level of detail in impacted areas, although make sure these settings aren’t too high
RayFire is a key tool in any visual-e� ects professional’s repertoire, working incredibly well in conjunction with various other high-end packages and plug-ins. I would highly recommend combining the skills learned in RayFire with plug-ins such as FumeFX, RealFlow and Krakatoa (by Sitni Sati, Next Limit Technologies and Thinkbox Software respectively). These can combine the fragmentation simulations generated by RayFire with smoke, fi re and beautiful fl uid dynamics to create something of feature-fi lm calibre.
A deadly combination
03 Fragment geometrySelecting the Fragmentation tab within RayFire can dictate the way the plug-in deals with the road geometry. There are lots of options simply categorised into di� erent variations of the ProBoolean or ProCutter engine and the Voronoi engine, with some handy additions such as Bricks and Wood Splinters thrown in. You can experiment with all of these options to achieve the best result. Here we’ve used the Voronoi – Irregular setting, with Iterations set at 80. Adjust this value to determine the number of resulting fragments, although be aware that higher values will take longer to compute. Now simply press Fragment and
f g
i
h
j
080-083_3DA_52_BackToBasics_3dsMax_RayFire_RossBoard.indd 82 11/02/2013 22:06
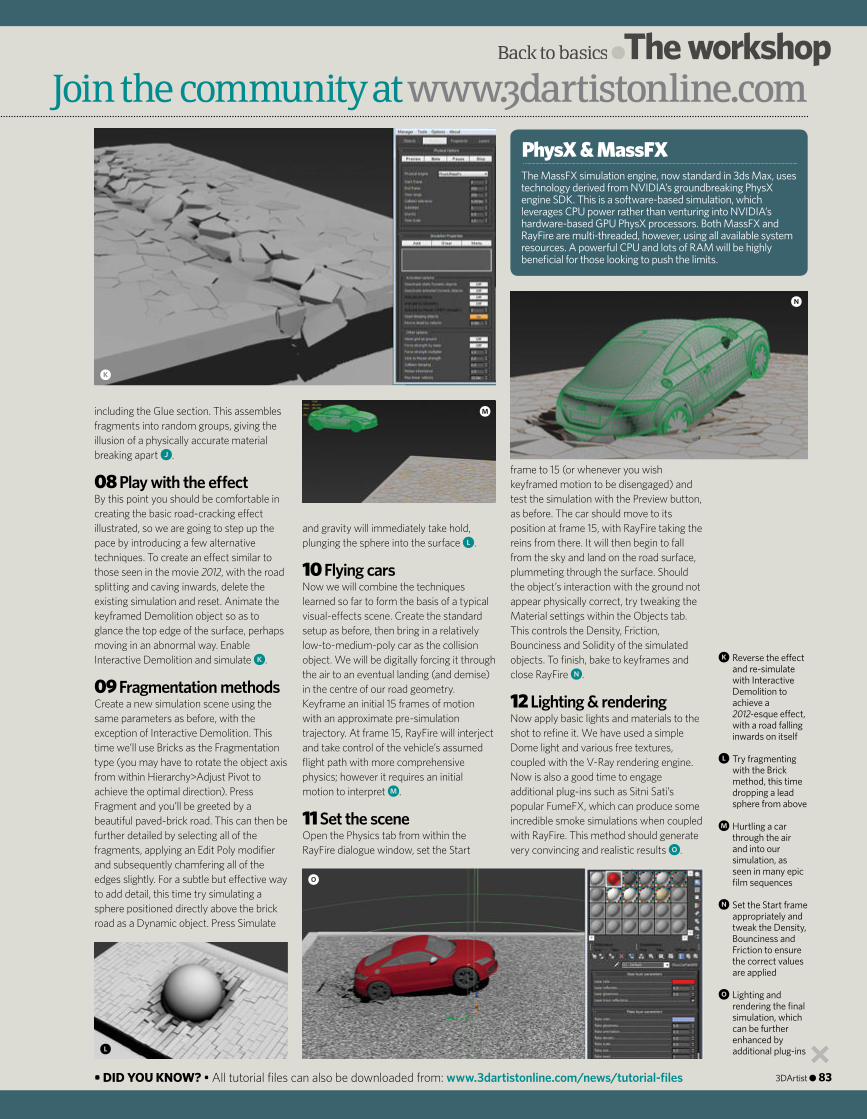
Back to basics ●The workshop●The workshop●
Join the community at www.3dartistonline.com
3DArtist ● 83
k Reverse the e� ect and re-simulate with Interactive Demolition to achieve a 2012-esque e� ect, with a road falling inwards on itself
l Try fragmenting with the Brick method, this time dropping a lead sphere from above
m Hurtling a car through the air and into our simulation, as seen in many epic fi lm sequences
n Set the Start frame appropriately and tweak the Density, Bounciness and Friction to ensure the correct values are applied
o Lighting and rendering the fi nal simulation, which can be further enhanced by additional plug-ins
including the Glue section. This assembles fragments into random groups, giving the illusion of a physically accurate material breaking apart j.
08 Play with the e� ectBy this point you should be comfortable in creating the basic road-cracking e� ect illustrated, so we are going to step up the pace by introducing a few alternative techniques. To create an e� ect similar to those seen in the movie 2012, with the road splitting and caving inwards, delete the existing simulation and reset. Animate the keyframed Demolition object so as to glance the top edge of the surface, perhaps moving in an abnormal way. Enable Interactive Demolition and simulate k.
09 Fragmentation methodsCreate a new simulation scene using the same parameters as before, with the exception of Interactive Demolition. This time we’ll use Bricks as the Fragmentation type (you may have to rotate the object axis from within Hierarchy>Adjust Pivot to achieve the optimal direction). Press Fragment and you’ll be greeted by a beautiful paved-brick road. This can then be further detailed by selecting all of the fragments, applying an Edit Poly modifi er and subsequently chamfering all of the edges slightly. For a subtle but e� ective way to add detail, this time try simulating a sphere positioned directly above the brick road as a Dynamic object. Press Simulate
The MassFX simulation engine, now standard in 3ds Max, uses technology derived from NVIDIA’s groundbreaking PhysX engine SDK. This is a software-based simulation, which leverages CPU power rather than venturing into NVIDIA’s hardware-based GPU PhysX processors. Both MassFX and RayFire are multi-threaded, however, using all available system resources. A powerful CPU and lots of RAM will be highly benefi cial for those looking to push the limits.
PhysX & MassFX
and gravity will immediately take hold, plunging the sphere into the surface l.
10 Flying carsNow we will combine the techniques learned so far to form the basis of a typical visual-e� ects scene. Create the standard setup as before, then bring in a relatively low-to-medium-poly car as the collision object. We will be digitally forcing it through the air to an eventual landing (and demise) in the centre of our road geometry. Keyframe an initial 15 frames of motion with an approximate pre-simulation trajectory. At frame 15, RayFire will interject and take control of the vehicle’s assumed fl ight path with more comprehensive physics; however it requires an initial motion to interpret m.
11 Set the sceneOpen the Physics tab from within the RayFire dialogue window, set the Start
frame to 15 (or whenever you wish keyframed motion to be disengaged) and test the simulation with the Preview button, as before. The car should move to its position at frame 15, with RayFire taking the reins from there. It will then begin to fall from the sky and land on the road surface, plummeting through the surface. Should the object’s interaction with the ground not appear physically correct, try tweaking the Material settings within the Objects tab. This controls the Density, Friction, Bounciness and Solidity of the simulated objects. To fi nish, bake to keyframes and close RayFire n.
12 Lighting & renderingNow apply basic lights and materials to the shot to refi ne it. We have used a simple Dome light and various free textures, coupled with the V-Ray rendering engine. Now is also a good time to engage additional plug-ins such as Sitni Sati’s popular FumeFX, which can produce some incredible smoke simulations when coupled with RayFire. This method should generate very convincing and realistic results o.
• DID YOU KNOW? • All tutorial fi les can also be downloaded from: www.3dartistonline.com/news/tutorial-fi les
k
m
n
o
l
080-083_3DA_52_BackToBasics_3dsMax_RayFire_RossBoard.indd 83 11/02/2013 22:06
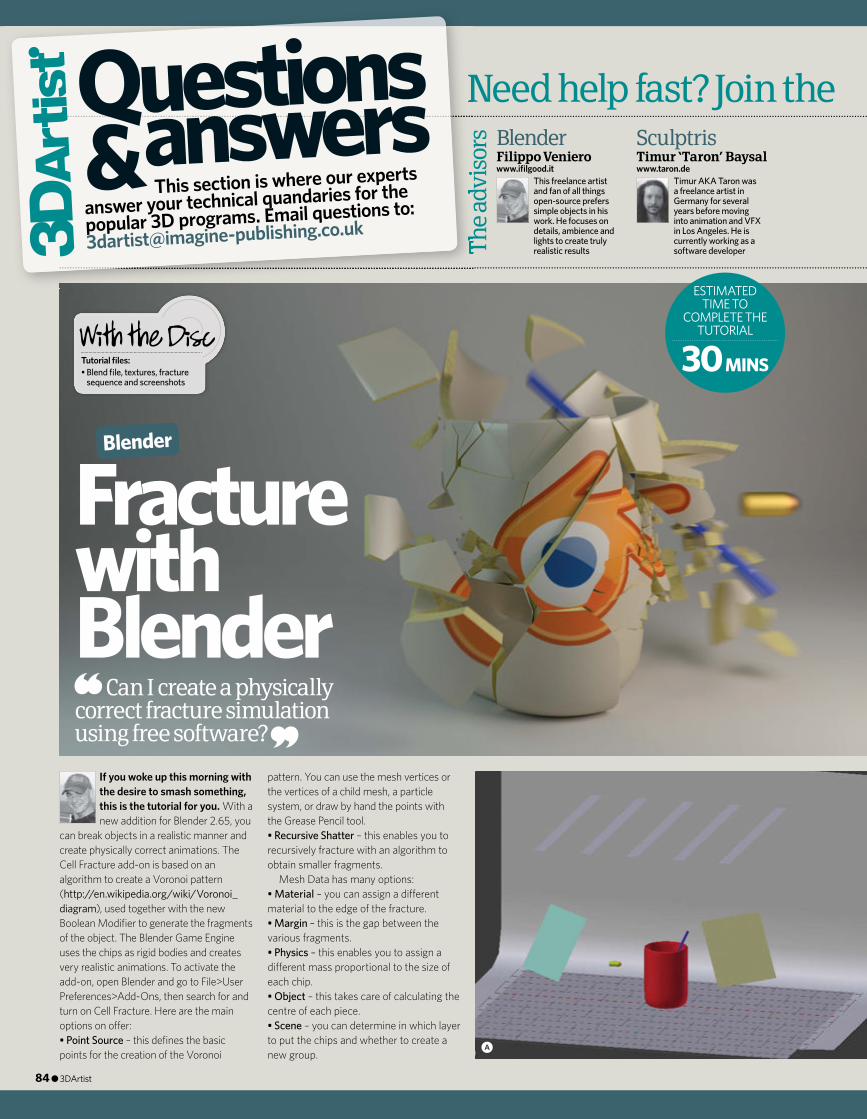
The
advi
sors
If you woke up this morning with the desire to smash something, this is the tutorial for you. With a new addition for Blender 2.65, you
can break objects in a realistic manner and create physically correct animations. The Cell Fracture add-on is based on an algorithm to create a Voronoi pattern (http://en.wikipedia.org/wiki/Voronoi_diagram), used together with the new Boolean Modifi er to generate the fragments of the object. The Blender Game Engine uses the chips as rigid bodies and creates very realistic animations. To activate the add-on, open Blender and go to File>User Preferences>Add-Ons, then search for and turn on Cell Fracture. Here are the main options on o� er: • Point Source – this defi nes the basic points for the creation of the Voronoi
Need help fast? Join the growing community at www.3dartistonline.com
pattern. You can use the mesh vertices or the vertices of a child mesh, a particle system, or draw by hand the points with the Grease Pencil tool.• Recursive Shatter – this enables you to recursively fracture with an algorithm to obtain smaller fragments.
Mesh Data has many options: • Material – you can assign a di� erent material to the edge of the fracture.• Margin – this is the gap between the various fragments.• Physics – this enables you to assign a di� erent mass proportional to the size of each chip.• Object – this takes care of calculating the centre of each piece.• Scene – you can determine in which layer to put the chips and whether to create a new group.
Can I create a physically correct fracture simulation using free software?
Fracture with Blender
Blender
a
This freelance artist and fan of all things open-source prefers simple objects in his work. He focuses on details, ambience and lights to create truly realistic results
Filippo Venierowww.ifi lgood.it
Blender
The
advi
sors
Need help fast? Join the growing community at
This section is where our experts
answer your technical quandaries for the
popular 3D programs. Email questions to:
Questionsanswers&
Tutorial fi les:• Blend fi le, textures, fracture
sequence and screenshots30 MINS
ESTIMATEDTIME TO
COMPLETE THE TUTORIAL
Timur AKA Taron was a freelance artist in Germany for several years before moving into animation and VFX in Los Angeles. He is currently working as a software developer
Timur ‘Taron’ Baysalwww.taron.de
Sculptris
84 ● 3DArtist
084-085_3DA_52_QA_Blender_FilippoVeniero.indd 84 11/02/2013 22:09
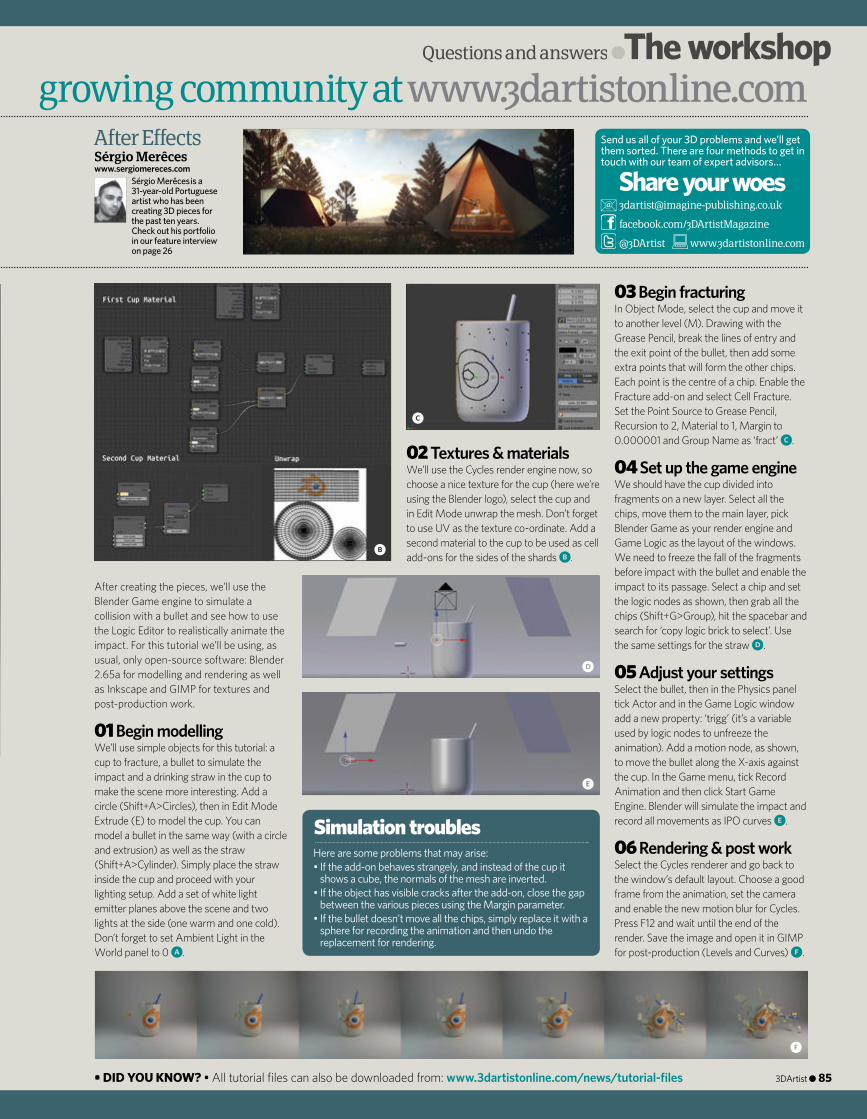
Questions and answers ●The workshop●The workshop●
Need help fast? Join the growing community at www.3dartistonline.com
After creating the pieces, we’ll use the Blender Game engine to simulate a collision with a bullet and see how to use the Logic Editor to realistically animate the impact. For this tutorial we’ll be using, as usual, only open-source software: Blender 2.65a for modelling and rendering as well as Inkscape and GIMP for textures and post-production work.
02 Textures & materialsWe’ll use the Cycles render engine now, so choose a nice texture for the cup (here we’re using the Blender logo), select the cup and in Edit Mode unwrap the mesh. Don’t forget to use UV as the texture co-ordinate. Add a second material to the cup to be used as cell add-ons for the sides of the shards b.
03 Begin fracturingIn Object Mode, select the cup and move it to another level (M). Drawing with the Grease Pencil, break the lines of entry and the exit point of the bullet, then add some extra points that will form the other chips. Each point is the centre of a chip. Enable the Fracture add-on and select Cell Fracture. Set the Point Source to Grease Pencil, Recursion to 2, Material to 1, Margin to 0.000001 and Group Name as ‘fract’ c.
04 Set up the game engineWe should have the cup divided into fragments on a new layer. Select all the chips, move them to the main layer, pick Blender Game as your render engine and Game Logic as the layout of the windows. We need to freeze the fall of the fragments before impact with the bullet and enable the impact to its passage. Select a chip and set the logic nodes as shown, then grab all the chips (Shift+G>Group), hit the spacebar and search for ‘copy logic brick to select’. Use the same settings for the straw d.
05 Adjust your settingsSelect the bullet, then in the Physics panel tick Actor and in the Game Logic window add a new property: ‘trigg’ (it’s a variable used by logic nodes to unfreeze the animation). Add a motion node, as shown, to move the bullet along the X-axis against the cup. In the Game menu, tick Record Animation and then click Start Game Engine. Blender will simulate the impact and record all movements as IPO curves e.
06 Rendering & post workSelect the Cycles renderer and go back to the window’s default layout. Choose a good frame from the animation, set the camera and enable the new motion blur for Cycles. Press F12 and wait until the end of the render. Save the image and open it in GIMP for post-production (Levels and Curves) f.
Sérgio Merêces is a 31-year-old Portuguese artist who has been creating 3D pieces for the past ten years. Check out his portfolio in our feature interview on page 26
Sérgio Merêceswww.sergiomereces.com
After Effects
Here are some problems that may arise: • If the add-on behaves strangely, and instead of the cup it
shows a cube, the normals of the mesh are inverted. • If the object has visible cracks after the add-on, close the gap
between the various pieces using the Margin parameter. • If the bullet doesn’t move all the chips, simply replace it with a
sphere for recording the animation and then undo the replacement for rendering.
Simulation troubles
Send us all of your 3D problems and we’ll get them sorted. There are four methods to get in touch with our team of expert advisors…
facebook.com/3DArtistMagazine
@3DArtist www.3dartistonline.com
01 Begin modellingWe’ll use simple objects for this tutorial: a cup to fracture, a bullet to simulate the impact and a drinking straw in the cup to make the scene more interesting. Add a circle (Shift+A>Circles), then in Edit Mode Extrude (E) to model the cup. You can model a bullet in the same way (with a circle and extrusion) as well as the straw (Shift+A>Cylinder). Simply place the straw inside the cup and proceed with your lighting setup. Add a set of white light emitter planes above the scene and two lights at the side (one warm and one cold). Don’t forget to set Ambient Light in the World panel to 0 a.
b
c
d
e
f
• DID YOU KNOW? • All tutorial fi les can also be downloaded from: www.3dartistonline.com/news/tutorial-fi les 3DArtist ● 85
084-085_3DA_52_QA_Blender_FilippoVeniero.indd 85 11/02/2013 22:09
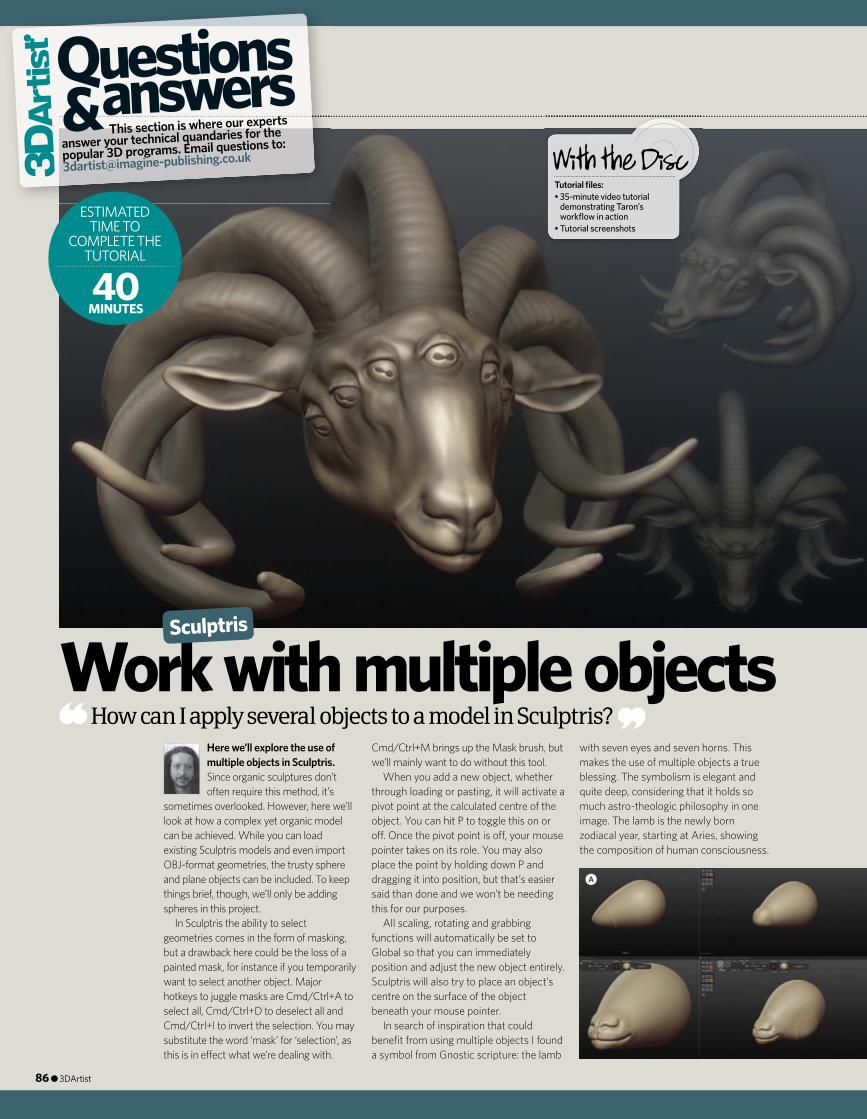
Work with multiple objectsSculptris
Here we’ll explore the use of multiple objects in Sculptris. Since organic sculptures don’t often require this method, it’s
sometimes overlooked. However, here we’ll look at how a complex yet organic model can be achieved. While you can load existing Sculptris models and even import OBJ-format geometries, the trusty sphere and plane objects can be included. To keep things brief, though, we’ll only be adding spheres in this project.
In Sculptris the ability to select geometries comes in the form of masking, but a drawback here could be the loss of a painted mask, for instance if you temporarily want to select another object. Major hotkeys to juggle masks are Cmd/Ctrl+A to select all, Cmd/Ctrl+D to deselect all and Cmd/Ctrl+I to invert the selection. You may substitute the word ‘mask’ for ‘selection’, as this is in e� ect what we’re dealing with.
Cmd/Ctrl+M brings up the Mask brush, but we’ll mainly want to do without this tool.
When you add a new object, whether through loading or pasting, it will activate a pivot point at the calculated centre of the object. You can hit P to toggle this on or o� . Once the pivot point is o� , your mouse pointer takes on its role. You may also place the point by holding down P and dragging it into position, but that’s easier said than done and we won’t be needing this for our purposes.
All scaling, rotating and grabbing functions will automatically be set to Global so that you can immediately position and adjust the new object entirely. Sculptris will also try to place an object’s centre on the surface of the object beneath your mouse pointer.
In search of inspiration that could benefi t from using multiple objects I found a symbol from Gnostic scripture: the lamb
with seven eyes and seven horns. This makes the use of multiple objects a true blessing. The symbolism is elegant and quite deep, considering that it holds so much astro-theologic philosophy in one image. The lamb is the newly born zodiacal year, starting at Aries, showing the composition of human consciousness.
a
How can I apply several objects to a model in Sculptris?
This section is where our experts
answer your technical quandaries for the
popular 3D programs. Email questions to:
Questionsanswers&
Tutorial fi les:• 35-minute video tutorial
demonstrating Taron’s workfl ow in action
• Tutorial screenshots
40MINUTES
ESTIMATEDTIME TO
COMPLETE THE TUTORIAL
86 ● 3DArtist
086-087_3DA_52_QA_Sculptris_Taron.indd 86 11/02/2013 22:10
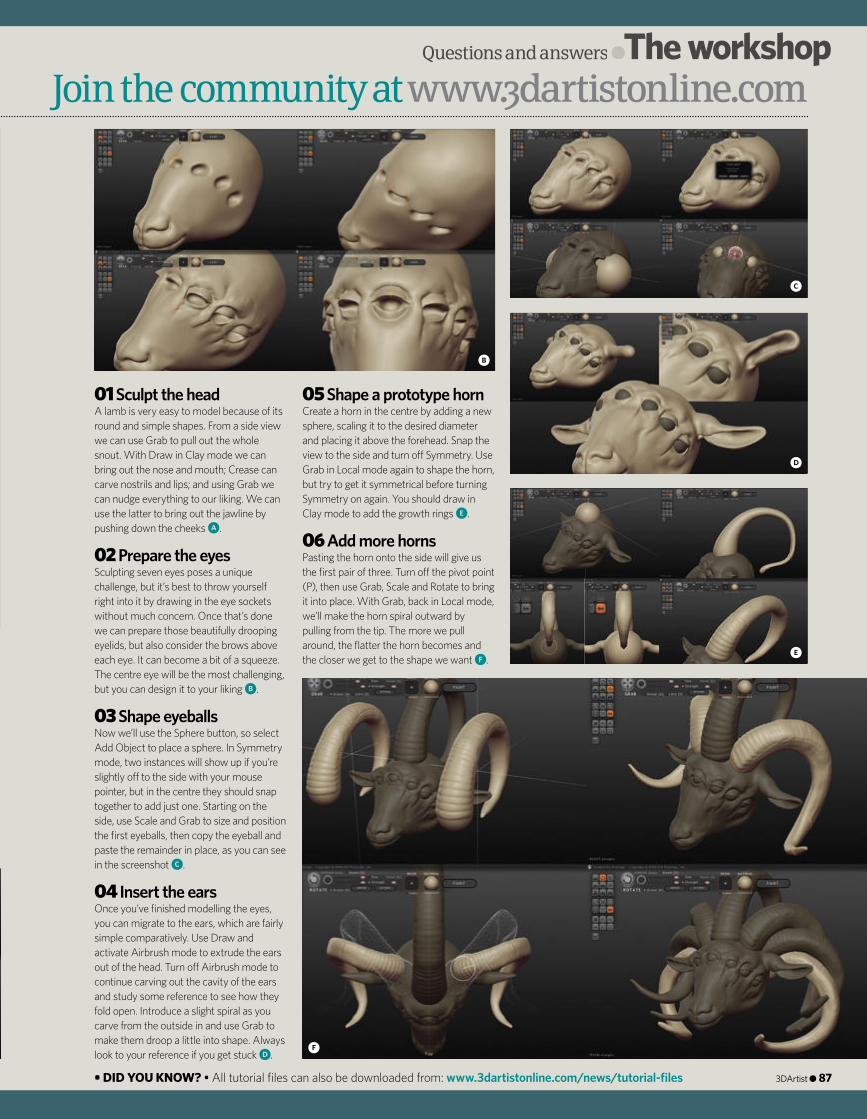
Questions and answers ●The workshop●The workshop●
01 Sculpt the headA lamb is very easy to model because of its round and simple shapes. From a side view we can use Grab to pull out the whole snout. With Draw in Clay mode we can bring out the nose and mouth; Crease can carve nostrils and lips; and using Grab we can nudge everything to our liking. We can use the latter to bring out the jawline by pushing down the cheeks a.
02 Prepare the eyesSculpting seven eyes poses a unique challenge, but it’s best to throw yourself right into it by drawing in the eye sockets without much concern. Once that’s done we can prepare those beautifully drooping eyelids, but also consider the brows above each eye. It can become a bit of a squeeze. The centre eye will be the most challenging, but you can design it to your liking b.
03 Shape eyeballsNow we’ll use the Sphere button, so select Add Object to place a sphere. In Symmetry mode, two instances will show up if you’re slightly o� to the side with your mouse pointer, but in the centre they should snap together to add just one. Starting on the side, use Scale and Grab to size and position the fi rst eyeballs, then copy the eyeball and paste the remainder in place, as you can see in the screenshot c.
04 Insert the earsOnce you’ve fi nished modelling the eyes, you can migrate to the ears, which are fairly simple comparatively. Use Draw and activate Airbrush mode to extrude the ears out of the head. Turn o� Airbrush mode to continue carving out the cavity of the ears and study some reference to see how they fold open. Introduce a slight spiral as you carve from the outside in and use Grab to make them droop a little into shape. Always look to your reference if you get stuck d.
05 Shape a prototype hornCreate a horn in the centre by adding a new sphere, scaling it to the desired diameter and placing it above the forehead. Snap the view to the side and turn o� Symmetry. Use Grab in Local mode again to shape the horn, but try to get it symmetrical before turning Symmetry on again. You should draw in Clay mode to add the growth rings e.
06 Add more hornsPasting the horn onto the side will give us the fi rst pair of three. Turn o� the pivot point (P), then use Grab, Scale and Rotate to bring it into place. With Grab, back in Local mode, we’ll make the horn spiral outward by pulling from the tip. The more we pull around, the fl atter the horn becomes and the closer we get to the shape we want f.
Join the community at www.3dartistonline.com
b
c
d
e
f
• DID YOU KNOW? • All tutorial fi les can also be downloaded from: www.3dartistonline.com/news/tutorial-fi les 3DArtist ● 87
086-087_3DA_52_QA_Sculptris_Taron.indd 87 11/02/2013 22:11
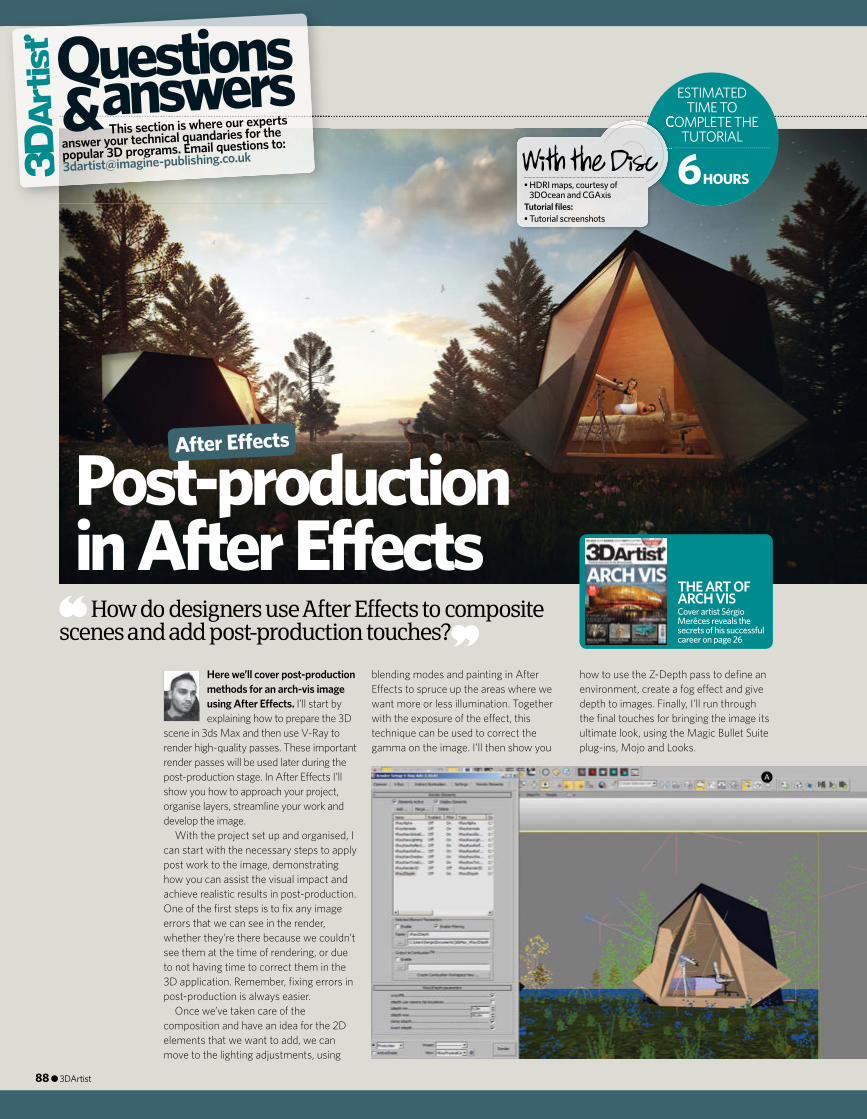
6 HOURS
ESTIMATEDTIME TO
COMPLETE THE TUTORIAL
Post-production in After Effects
After E� ects
Here we’ll cover post-production methods for an arch-vis image using After E� ects. I’ll start by explaining how to prepare the 3D
scene in 3ds Max and then use V-Ray to render high-quality passes. These important render passes will be used later during the post-production stage. In After E� ects I’ll show you how to approach your project, organise layers, streamline your work and develop the image.
With the project set up and organised, I can start with the necessary steps to apply post work to the image, demonstrating how you can assist the visual impact and achieve realistic results in post-production. One of the fi rst steps is to fi x any image errors that we can see in the render, whether they’re there because we couldn’t see them at the time of rendering, or due to not having time to correct them in the 3D application. Remember, fi xing errors in post-production is always easier.
Once we’ve taken care of the composition and have an idea for the 2D elements that we want to add, we can move to the lighting adjustments, using
blending modes and painting in After E� ects to spruce up the areas where we want more or less illumination. Together with the exposure of the e� ect, this technique can be used to correct the gamma on the image. I’ll then show you
how to use the Z-Depth pass to defi ne an environment, create a fog e� ect and give depth to images. Finally, I’ll run through the fi nal touches for bringing the image its ultimate look, using the Magic Bullet Suite plug-ins, Mojo and Looks.
How do designers use After Effects to composite scenes and add post-production touches?
This section is where our experts
answer your technical quandaries for the
popular 3D programs. Email questions to:
Questionsanswers& COMPLETE THE
• HDRI maps, courtesy of 3DOcean and CGAxis
Tutorial fi les:• Tutorial screenshots
a
THE ART OF ARCH VISCover artist Sérgio Merêces reveals the secrets of his successful career on page 26
88 ● 3DArtist
088-090_3DA_52_QA_AfterEffects_SergioMereces.indd 88 11/02/2013 22:12

Questions and answers ●The workshop●The workshop●
01 Render in 3ds MaxFor more control over your post-production process, it’s important that you render out the passes required to assist you. At this stage I always select the render passes shown in the screenshot. The render pass Render ID is the most important because we can make selections or masks quickly and accurately with it. It’s important to always save your images in 32-bit format. In my projects I always save my render passes in TGA 32-bits or 32-bit EXR, because then I can fully control the exposure and lighting adjustments in post a.
02 Set up in After E� ectsWhen you have your render and all your render passes done, go to After E� ects and create a new project with the resolution you want for your image – in this case we’re using 3,000 x 1,688 pixels. Because this project will be a static image, we’ll set the Animation Time in Duration to 0. Change the Project Depth in Project Color Depth
from 8 to 32bpc, then import the render passes into the project and apply the Color pass. We’ll duplicate it and use the Alpha pass in the new layer to remove the background. This means we can add a new sky or make some changes to it. We now have the basis on which we can develop the rest of the post-production work b.
03 Apply 2D elementsThe integration of 2D elements is key in order to create a credible atmosphere. Having formed the idea of the composition in my head, we’ll start to make a quick composite in Photoshop to test if it works. I always recommend making three or more tests of di� erent compositions to see what works the best for your idea. Once you have the desired layout, save the 2D elements in PNG format to take them into After E� ects, where you can then create a new composition to place them all (this works like Photoshop’s folders). We’ll apply this composition as a layer in the project. If in the future you need to make modifi cations, the elements will always be much easier and more organised. Apply a small correction in the sky, creating a mask in the desired zone, as you can see in the screenshot c.
Join the community at www.3dartistonline.com
04 Use contrast & gammaThis step is very important because it’s here that we’ll fi x the lighting and contrast of the image. Start by creating a new solid layer and paint on it with the Blend Mode set to Overlay. Apply white over the areas you want to be brighter and use black in those areas you want darker. We’ll then add the Exposure e� ect and set the parameters shown in the screenshot. These settings will sightly reduce the saturation of the image and subtly lighten the overall feel d.
b
c
d
3DArtist ● 89
088-090_3DA_52_QA_AfterEffects_SergioMereces.indd 89 11/02/2013 22:12
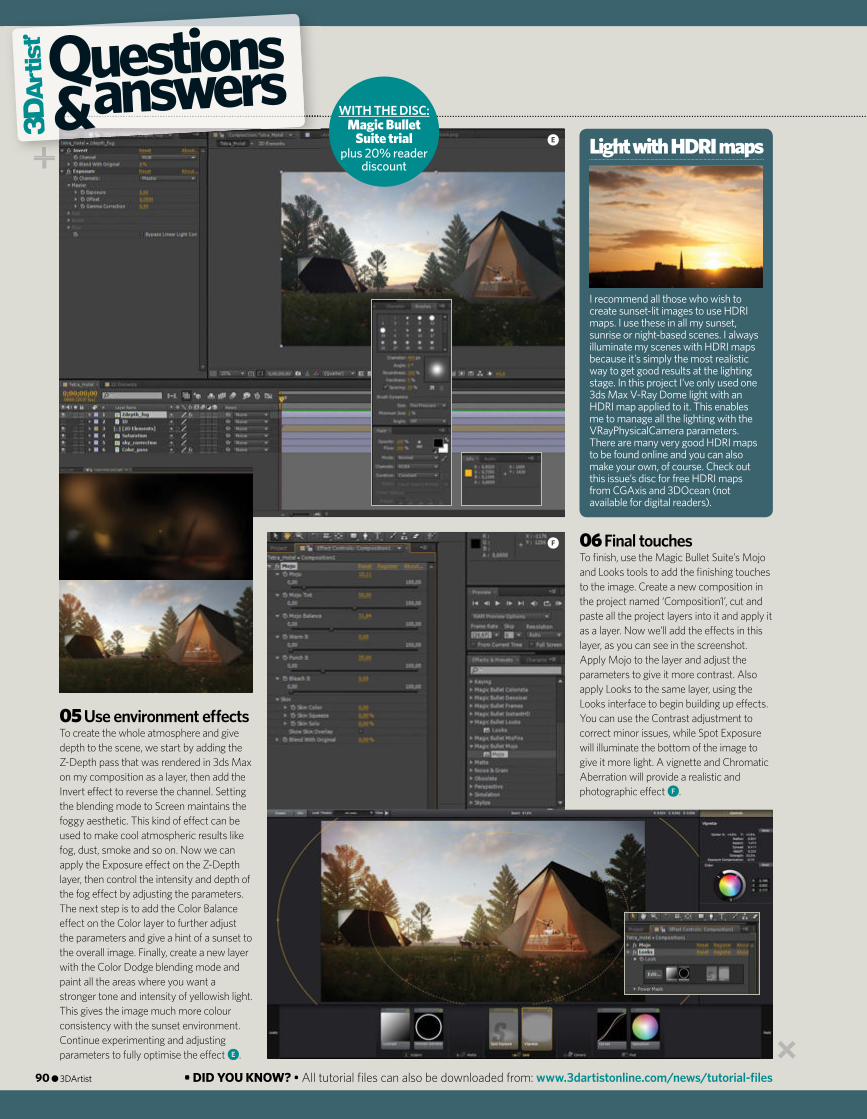
05 Use environment e� ectsTo create the whole atmosphere and give depth to the scene, we start by adding the Z-Depth pass that was rendered in 3ds Max on my composition as a layer, then add the Invert e� ect to reverse the channel. Setting the blending mode to Screen maintains the foggy aesthetic. This kind of e� ect can be used to make cool atmospheric results like fog, dust, smoke and so on. Now we can apply the Exposure e� ect on the Z-Depth layer, then control the intensity and depth of the fog e� ect by adjusting the parameters. The next step is to add the Color Balance e� ect on the Color layer to further adjust the parameters and give a hint of a sunset to the overall image. Finally, create a new layer with the Color Dodge blending mode and paint all the areas where you want a stronger tone and intensity of yellowish light. This gives the image much more colour consistency with the sunset environment. Continue experimenting and adjusting parameters to fully optimise the e� ect e.
06 Final touchesTo fi nish, use the Magic Bullet Suite’s Mojo and Looks tools to add the fi nishing touches to the image. Create a new composition in the project named ‘Composition1’, cut and paste all the project layers into it and apply it as a layer. Now we’ll add the e� ects in this layer, as you can see in the screenshot. Apply Mojo to the layer and adjust the parameters to give it more contrast. Also apply Looks to the same layer, using the Looks interface to begin building up e� ects. You can use the Contrast adjustment to correct minor issues, while Spot Exposure will illuminate the bottom of the image to give it more light. A vignette and Chromatic Aberration will provide a realistic and photographic e� ect f.
Questionsanswers&
Light with HDRI maps
I recommend all those who wish to create sunset-lit images to use HDRI maps. I use these in all my sunset, sunrise or night-based scenes. I always illuminate my scenes with HDRI maps because it’s simply the most realistic way to get good results at the lighting stage. In this project I’ve only used one 3ds Max V-Ray Dome light with an HDRI map applied to it. This enables me to manage all the lighting with the VRayPhysicalCamera parameters. There are many very good HDRI maps to be found online and you can also make your own, of course. Check out this issue’s disc for free HDRI maps from CGAxis and 3DOcean (not available for digital readers).
e
f
• DID YOU KNOW? • All tutorial fi les can also be downloaded from: www.3dartistonline.com/news/tutorial-fi les
WITH THE DISC:Magic Bullet
Suite trial plus 20% reader
discount
90 ● 3DArtist
088-090_3DA_52_QA_AfterEffects_SergioMereces.indd 90 11/02/2013 22:13

CGWorkshops offers short, world class, fully mentored,
online training courses.
IN THE WORLD
FROM THE
LEARNBEST
Interested in FX, 2D, 3D or even writing code? CGWorkshops has short, fully mentored, online training courses to help you improve your reel and become better at what you love doing. Our instructors work at places like Blizzard, WETA Digital, Image Engine and Sony Santa Monica. Get personal feedback in a supportive online classroom environment.
Lots more great CGWorkshops online. New courses starting each month.
Imag
e co
urte
sy: N
ele
Klum
peCG
Wor
ksho
p: B
ecom
ing
a Be
tter
Art
ist w
ith R
ob C
hang
Zom
bie
Play
grou
nd, M
assi
ve B
lack
BALLISTIC PUBLISHING’S
MASSIVE BLACK VOLUME TWO
For close to a decade, concept art studio Massive Black has created artwork, illustration, and animation for some of the biggest games, movies, and TV shows known today. This book is the second volume of their work available in print.
Full Page.indd 1 05/02/2013 09:35
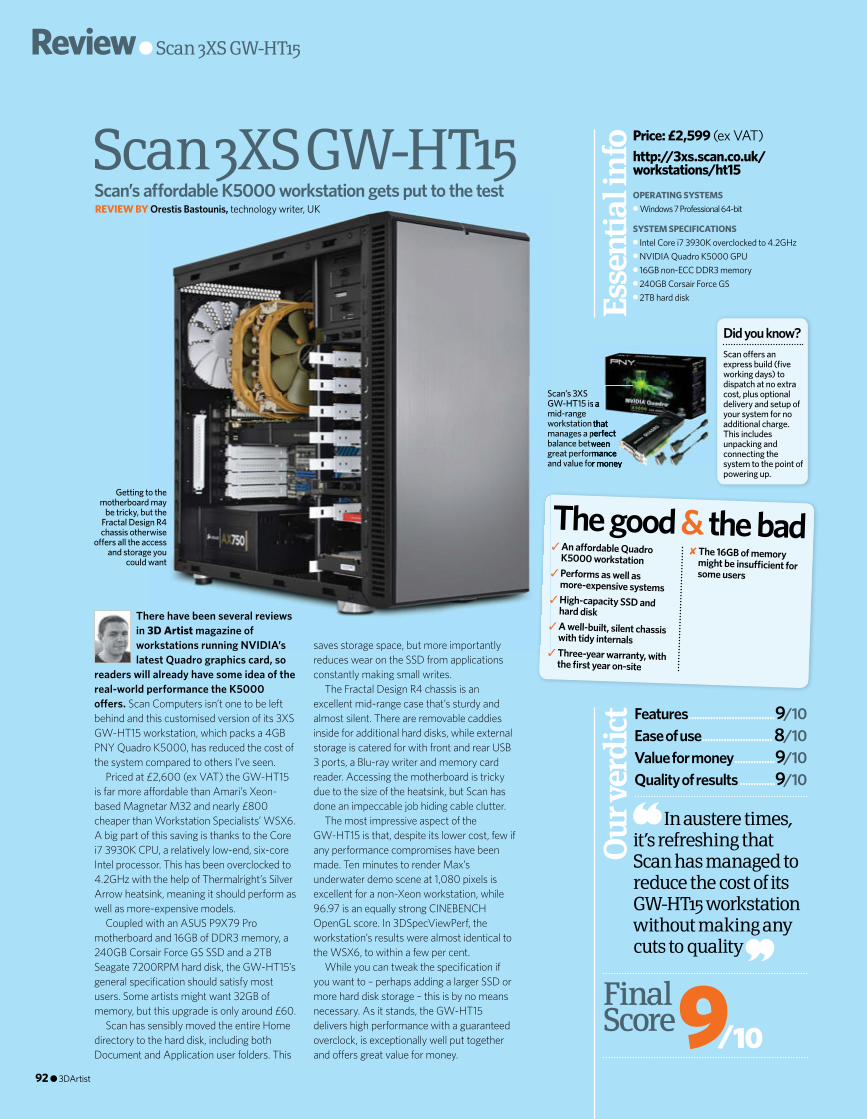
92 ● 3DArtist
Scan 3XS GW-HT15Scan’s a� ordable K5000 workstation gets put to the test
9/10
Features ................................9/10Ease of use ..........................8/10Value for money ...............9/10Quality of results .............9/10
Ou
r ver
dic
t
In austere times, it’s refreshing that Scan has managed to reduce the cost of its GW-HT15 workstation without making any cuts to quality
FinalScore
Getting to the motherboard may
be tricky, but the Fractal Design R4 chassis otherwise
o� ers all the access and storage you
could want
Scan’s 3XS GW-HT15 is a mid-range workstation that manages a perfect balance between great performance and value for money
Review ● Scan 3XS GW-HT15
The good & the bad✘ The 16GB of memory
might be insu� cient for some users
✓ An a� ordable Quadro K5000 workstation
✓ Performs as well as more-expensive systems
✓ High-capacity SSD and hard disk
✓ A well-built, silent chassis with tidy internals
✓ Three-year warranty, with the fi rst year on-site
Price: £2,599 (ex VAT)http://3xs.scan.co.uk/workstations/ht15
OPERATING SYSTEMS● Windows 7 Professional 64-bit
SYSTEM SPECIFICATIONS● Intel Core i7 3930K overclocked to 4.2GHz● NVIDIA Quadro K5000 GPU● 16GB non-ECC DDR3 memory● 240GB Corsair Force GS● 2TB hard diskEs
sent
ial i
nfo
REVIEW BY Orestis Bastounis, technology writer, UK
There have been several reviews in 3D Artist magazine of workstations running NVIDIA’s latest Quadro graphics card, so
readers will already have some idea of the real-world performance the K5000 o� ers. Scan Computers isn’t one to be left behind and this customised version of its 3XS GW-HT15 workstation, which packs a 4GB PNY Quadro K5000, has reduced the cost of the system compared to others I’ve seen.
Priced at £2,600 (ex VAT) the GW-HT15 is far more a� ordable than Amari’s Xeon-based Magnetar M32 and nearly £800 cheaper than Workstation Specialists’ WSX6. A big part of this saving is thanks to the Core i7 3930K CPU, a relatively low-end, six-core Intel processor. This has been overclocked to 4.2GHz with the help of Thermalright’s Silver Arrow heatsink, meaning it should perform as well as more-expensive models.
Coupled with an ASUS P9X79 Pro motherboard and 16GB of DDR3 memory, a 240GB Corsair Force GS SSD and a 2TB Seagate 7200RPM hard disk, the GW-HT15’s general specifi cation should satisfy most users. Some artists might want 32GB of memory, but this upgrade is only around £60.
Scan has sensibly moved the entire Home directory to the hard disk, including both Document and Application user folders. This
saves storage space, but more importantly reduces wear on the SSD from applications constantly making small writes.
The Fractal Design R4 chassis is an excellent mid-range case that’s sturdy and almost silent. There are removable caddies inside for additional hard disks, while external storage is catered for with front and rear USB 3 ports, a Blu-ray writer and memory card reader. Accessing the motherboard is tricky due to the size of the heatsink, but Scan has done an impeccable job hiding cable clutter.
The most impressive aspect of the GW-HT15 is that, despite its lower cost, few if any performance compromises have been made. Ten minutes to render Max’s underwater demo scene at 1,080 pixels is excellent for a non-Xeon workstation, while 96.97 is an equally strong CINEBENCH OpenGL score. In 3DSpecViewPerf, the workstation’s results were almost identical to the WSX6, to within a few per cent.
While you can tweak the specifi cation if you want to – perhaps adding a larger SSD or more hard disk storage – this is by no means necessary. As it stands, the GW-HT15 delivers high performance with a guaranteed overclock, is exceptionally well put together and o� ers great value for money.
GW-HT15 is a
workstation that manages a perfect balance between great performance and value for money
Did you know?Scan o� ers an express build (fi ve working days) to dispatch at no extra cost, plus optional delivery and setup of your system for no additional charge. This includes unpacking and connecting the system to the point of powering up.
092_3DA_52_Review_SCANworkstation_OrestisBastounis.indd 92 11/02/2013 19:31
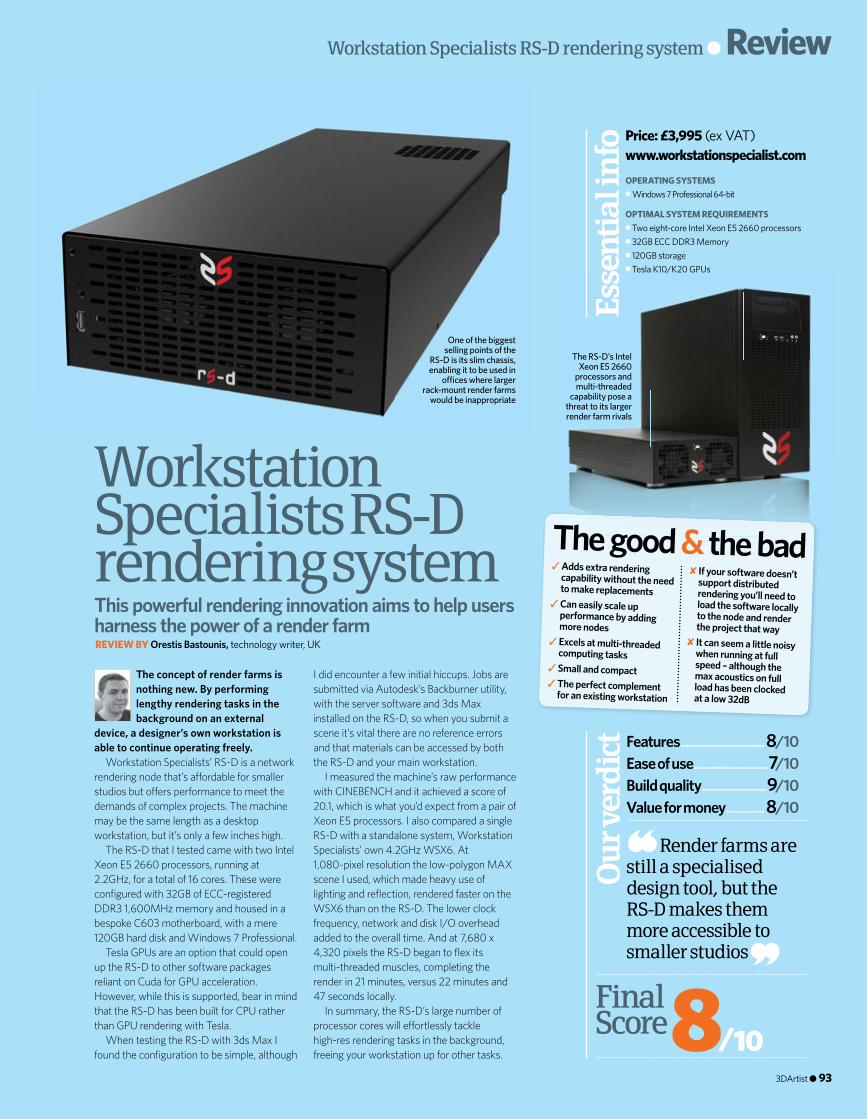
3DArtist ● 93
The concept of render farms is nothing new. By performing lengthy rendering tasks in the background on an external
device, a designer’s own workstation is able to continue operating freely.
Workstation Specialists’ RS-D is a network rendering node that’s a� ordable for smaller studios but o� ers performance to meet the demands of complex projects. The machine may be the same length as a desktop workstation, but it’s only a few inches high.
The RS-D that I tested came with two Intel Xeon E5 2660 processors, running at 2.2GHz, for a total of 16 cores. These were confi gured with 32GB of ECC-registered DDR3 1,600MHz memory and housed in a bespoke C603 motherboard, with a mere 120GB hard disk and Windows 7 Professional.
Tesla GPUs are an option that could open up the RS-D to other software packages reliant on Cuda for GPU acceleration. However, while this is supported, bear in mind that the RS-D has been built for CPU rather than GPU rendering with Tesla.
When testing the RS-D with 3ds Max I found the confi guration to be simple, although
I did encounter a few initial hiccups. Jobs are submitted via Autodesk’s Backburner utility, with the server software and 3ds Max installed on the RS-D, so when you submit a scene it’s vital there are no reference errors and that materials can be accessed by both the RS-D and your main workstation.
I measured the machine’s raw performance with CINEBENCH and it achieved a score of 20.1, which is what you’d expect from a pair of Xeon E5 processors. I also compared a single RS-D with a standalone system, Workstation Specialists’ own 4.2GHz WSX6. At 1,080-pixel resolution the low-polygon MAX scene I used, which made heavy use of lighting and refl ection, rendered faster on the WSX6 than on the RS-D. The lower clock frequency, network and disk I/O overhead added to the overall time. And at 7,680 x 4,320 pixels the RS-D began to fl ex its multi-threaded muscles, completing the render in 21 minutes, versus 22 minutes and 47 seconds locally.
In summary, the RS-D’s large number of processor cores will e� ortlessly tackle high-res rendering tasks in the background, freeing your workstation up for other tasks.
Workstation Specialists RS-D rendering systemThis powerful rendering innovation aims to help users harness the power of a render farm
Ou
r ver
dic
t Features ...............................8/10Ease of use ...........................7/10Build quality ........................9/10Value for money ..............8/10
8/10FinalScore
Price: £3,995 (ex VAT)www.workstationspecialist.com
OPERATING SYSTEMS● Windows 7 Professional 64-bit
OPTIMAL SYSTEM REQUIREMENTS● Two eight-core Intel Xeon E5 2660 processors● 32GB ECC DDR3 Memory● 120GB storage● Tesla K10/K20 GPUs
Esse
ntia
l in
fo
The good & the bad✘ If your software doesn’t
support distributed rendering you’ll need to load the software locally to the node and render the project that way
✘ It can seem a little noisy when running at full speed – although the max acoustics on full load has been clocked at a low 32dB
✓ Adds extra rendering capability without the need to make replacements
✓ Can easily scale up performance by adding more nodes
✓ Excels at multi-threaded computing tasks
✓ Small and compact✓ The perfect complement
for an existing workstation
Render farms are still a specialised design tool, but the RS-D makes them more accessible to smaller studios
One of the biggest selling points of the
RS-D is its slim chassis, enabling it to be used in
o� ces where larger rack-mount render farms
would be inappropriate
The RS-D’s Intel Xeon E5 2660
processors and multi-threaded
capability pose a threat to its larger render farm rivals
Workstation Specialists RS-D rendering system ● Review
REVIEW BY Orestis Bastounis, technology writer, UK
093_3DA_52_Review_RS-D_OrestisBastounis.indd 93 11/02/2013 19:33
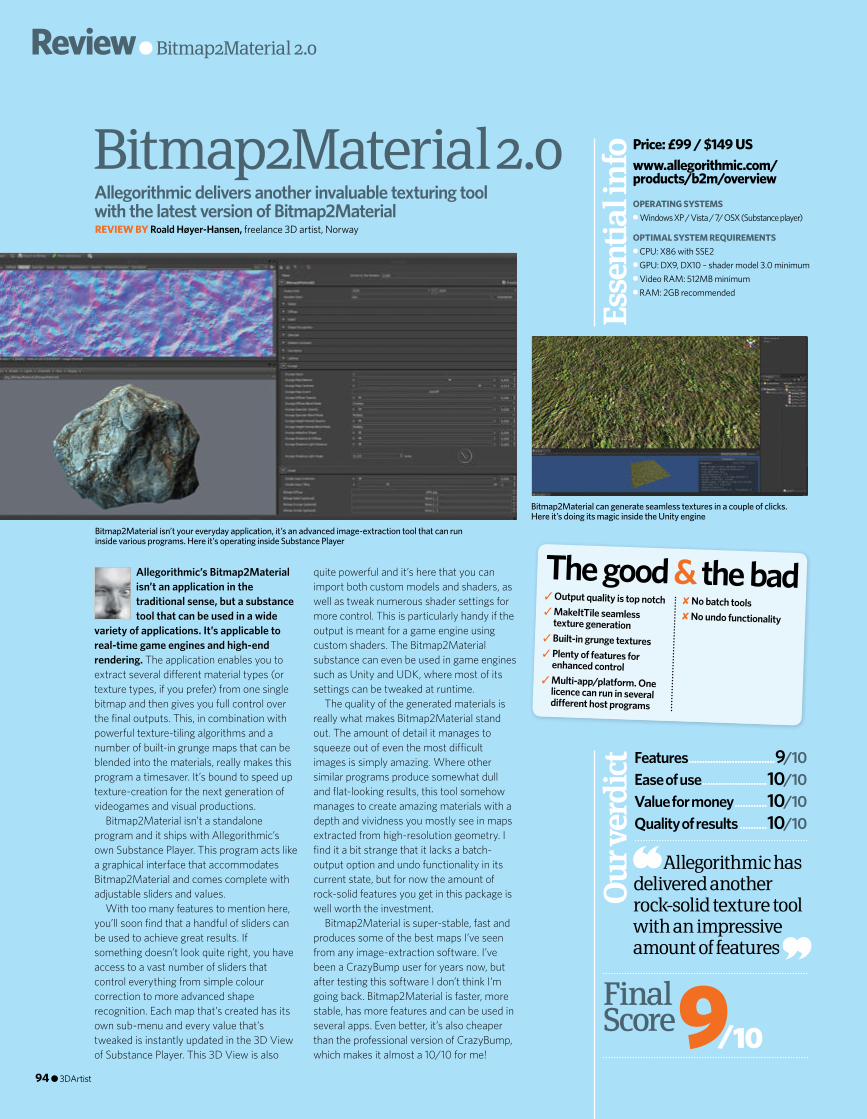
94 ● 3DArtist
Bitmap2Material 2.0Allegorithmic delivers another invaluable texturing tool with the latest version of Bitmap2Material
9/10
Features ................................9/10Ease of use ........................10/10Value for money ............10/10Quality of results ..........10/10
Ou
r ver
dic
t
Allegorithmic has delivered another rock-solid texture tool with an impressive amount of features
FinalScore
Allegorithmic’s Bitmap2Material isn’t an application in the traditional sense, but a substance tool that can be used in a wide
variety of applications. It’s applicable to real-time game engines and high-end rendering. The application enables you to extract several di� erent material types (or texture types, if you prefer) from one single bitmap and then gives you full control over the fi nal outputs. This, in combination with powerful texture-tiling algorithms and a number of built-in grunge maps that can be blended into the materials, really makes this program a timesaver. It’s bound to speed up texture-creation for the next generation of videogames and visual productions.
Bitmap2Material isn’t a standalone program and it ships with Allegorithmic’s own Substance Player. This program acts like a graphical interface that accommodates Bitmap2Material and comes complete with adjustable sliders and values.
With too many features to mention here, you’ll soon fi nd that a handful of sliders can be used to achieve great results. If something doesn’t look quite right, you have access to a vast number of sliders that control everything from simple colour correction to more advanced shape recognition. Each map that’s created has its own sub-menu and every value that’s tweaked is instantly updated in the 3D View of Substance Player. This 3D View is also
quite powerful and it’s here that you can import both custom models and shaders, as well as tweak numerous shader settings for more control. This is particularly handy if the output is meant for a game engine using custom shaders. The Bitmap2Material substance can even be used in game engines such as Unity and UDK, where most of its settings can be tweaked at runtime.
The quality of the generated materials is really what makes Bitmap2Material stand out. The amount of detail it manages to squeeze out of even the most di� cult images is simply amazing. Where other similar programs produce somewhat dull and fl at-looking results, this tool somehow manages to create amazing materials with a depth and vividness you mostly see in maps extracted from high-resolution geometry. I fi nd it a bit strange that it lacks a batch-output option and undo functionality in its current state, but for now the amount of rock-solid features you get in this package is well worth the investment.
Bitmap2Material is super-stable, fast and produces some of the best maps I’ve seen from any image-extraction software. I’ve been a CrazyBump user for years now, but after testing this software I don’t think I’m going back. Bitmap2Material is faster, more stable, has more features and can be used in several apps. Even better, it’s also cheaper than the professional version of CrazyBump, which makes it almost a 10/10 for me!
Bitmap2Material can generate seamless textures in a couple of clicks. Here it’s doing its magic inside the Unity engine
Bitmap2Material isn’t your everyday application, it’s an advanced image-extraction tool that can run inside various programs. Here it’s operating inside Substance Player
Review ● Bitmap2Material 2.0
The good & the bad✘ No batch tools✘ No undo functionality
✓ Output quality is top notch✓ MakeItTile seamless
texture generation✓ Built-in grunge textures✓ Plenty of features for
enhanced control✓ Multi-app/platform. One
licence can run in several di� erent host programs
Price: £99 / $149 US www.allegorithmic.com/products/b2m/overview
OPERATING SYSTEMS● Windows XP / Vista / 7/ OSX (Substance player)
OPTIMAL SYSTEM REQUIREMENTS● CPU: X86 with SSE2● GPU: DX9, DX10 – shader model 3.0 minimum● Video RAM: 512MB minimum● RAM: 2GB recommended
Esse
ntia
l in
fo
REVIEW BY Roald Høyer-Hansen, freelance 3D artist, Norway
094_3DA_52_Review_Roald_Hoyer-Hansen.indd 94 11/02/2013 19:35
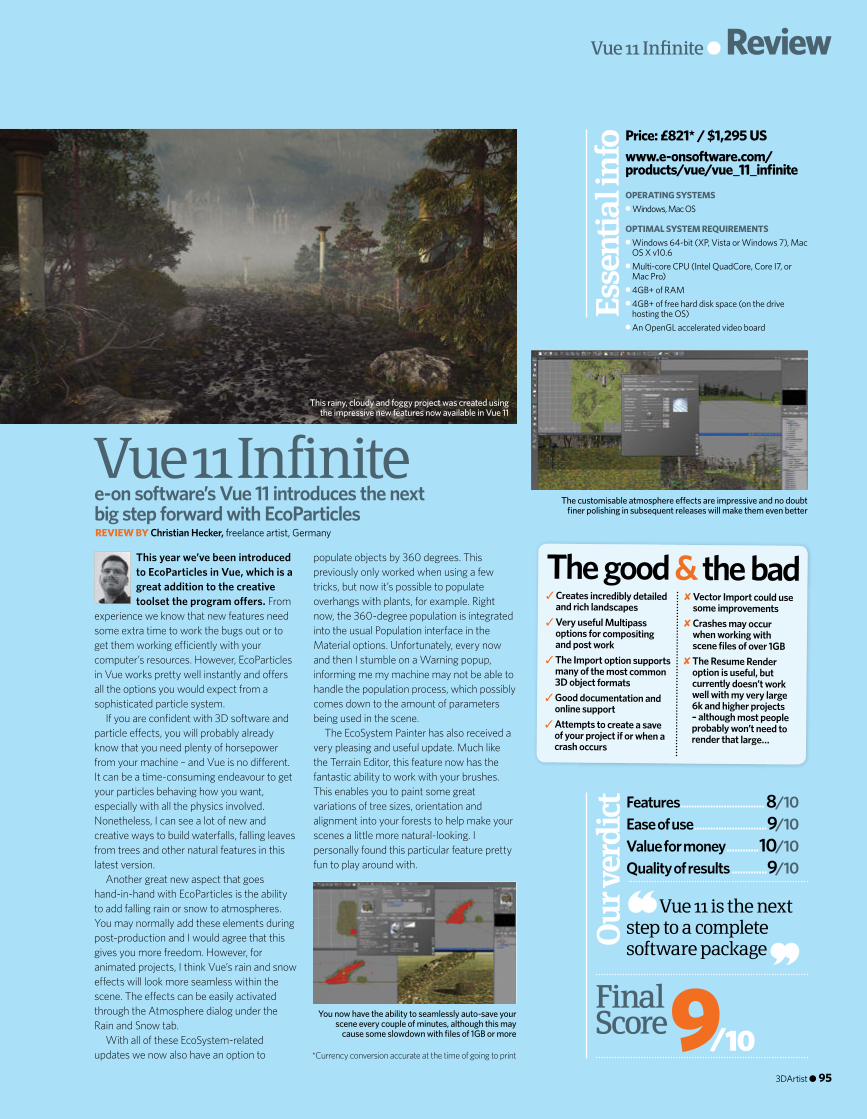
3DArtist ● 95
This year we’ve been introduced to EcoParticles in Vue, which is a great addition to the creative toolset the program o� ers. From
experience we know that new features need some extra time to work the bugs out or to get them working e� ciently with your computer’s resources. However, EcoParticles in Vue works pretty well instantly and o� ers all the options you would expect from a sophisticated particle system.
If you are confi dent with 3D software and particle e� ects, you will probably already know that you need plenty of horsepower from your machine – and Vue is no di� erent. It can be a time-consuming endeavour to get your particles behaving how you want, especially with all the physics involved. Nonetheless, I can see a lot of new and creative ways to build waterfalls, falling leaves from trees and other natural features in this latest version.
Another great new aspect that goes hand-in-hand with EcoParticles is the ability to add falling rain or snow to atmospheres. You may normally add these elements during post-production and I would agree that this gives you more freedom. However, for animated projects, I think Vue’s rain and snow e� ects will look more seamless within the scene. The e� ects can be easily activated through the Atmosphere dialog under the Rain and Snow tab.
With all of these EcoSystem-related updates we now also have an option to
populate objects by 360 degrees. This previously only worked when using a few tricks, but now it’s possible to populate overhangs with plants, for example. Right now, the 360-degree population is integrated into the usual Population interface in the Material options. Unfortunately, every now and then I stumble on a Warning popup, informing me my machine may not be able to handle the population process, which possibly comes down to the amount of parameters being used in the scene.
The EcoSystem Painter has also received a very pleasing and useful update. Much like the Terrain Editor, this feature now has the fantastic ability to work with your brushes. This enables you to paint some great variations of tree sizes, orientation and alignment into your forests to help make your scenes a little more natural-looking. I personally found this particular feature pretty fun to play around with.
Vue 11 Infinitee-on software’s Vue 11 introduces the next big step forward with EcoParticles
Ou
r ver
dic
t Features ...............................8/10Ease of use ...........................9/10Value for money ............10/10Quality of results .............9/10
9/10FinalScore
Price: £821* / $1,295 USwww.e-onsoftware.com/products/vue/vue_11_infi nite
OPERATING SYSTEMS● Windows, Mac OS
OPTIMAL SYSTEM REQUIREMENTS● Windows 64-bit (XP, Vista or Windows 7), Mac
OS X v10.6● Multi-core CPU (Intel QuadCore, Core I7, or
Mac Pro)● 4GB+ of RAM● 4GB+ of free hard disk space (on the drive
hosting the OS)● An OpenGL accelerated video board
Esse
ntia
l in
foThe good & the bad
✘ Vector Import could use some improvements
✘ Crashes may occur when working with scene fi les of over 1GB
✘ The Resume Render option is useful, but currently doesn’t work well with my very large 6k and higher projects – although most people probably won’t need to render that large…
✓ Creates incredibly detailed and rich landscapes
✓ Very useful Multipass options for compositing and post work
✓ The Import option supports many of the most common 3D object formats
✓ Good documentation and online support
✓ Attempts to create a save of your project if or when a crash occurs
Vue 11 is the next step to a complete software package
This rainy, cloudy and foggy project was created using the impressive new features now available in Vue 11
The customisable atmosphere e� ects are impressive and no doubt fi ner polishing in subsequent releases will make them even better
You now have the ability to seamlessly auto-save your scene every couple of minutes, although this may
cause some slowdown with fi les of 1GB or more
Vue 11 Infi nite ● Review
REVIEW BY Christian Hecker, freelance artist, Germany
*Currency conversion accurate at the time of going to print
095_3DA_52_Review_Vue11_ChristianHecker.indd 95 11/02/2013 19:37

Learn in style
Discover more with the Book series’ expert, accessible tutorials for iPad, iPhone, Mac, Android, Photoshop, Windows and more
The
Series
TM
BUY YOUR COPY TODAYPrint edition available at www.imagineshop.co.uk
Digital edition available at www.greatdigitalmags.com
facebook.com/ImagineBookazines twitter.com/Books_Imagine
Available on the following platforms
Book_230x297 Nov2012.indd 1 11/02/2013 18:06
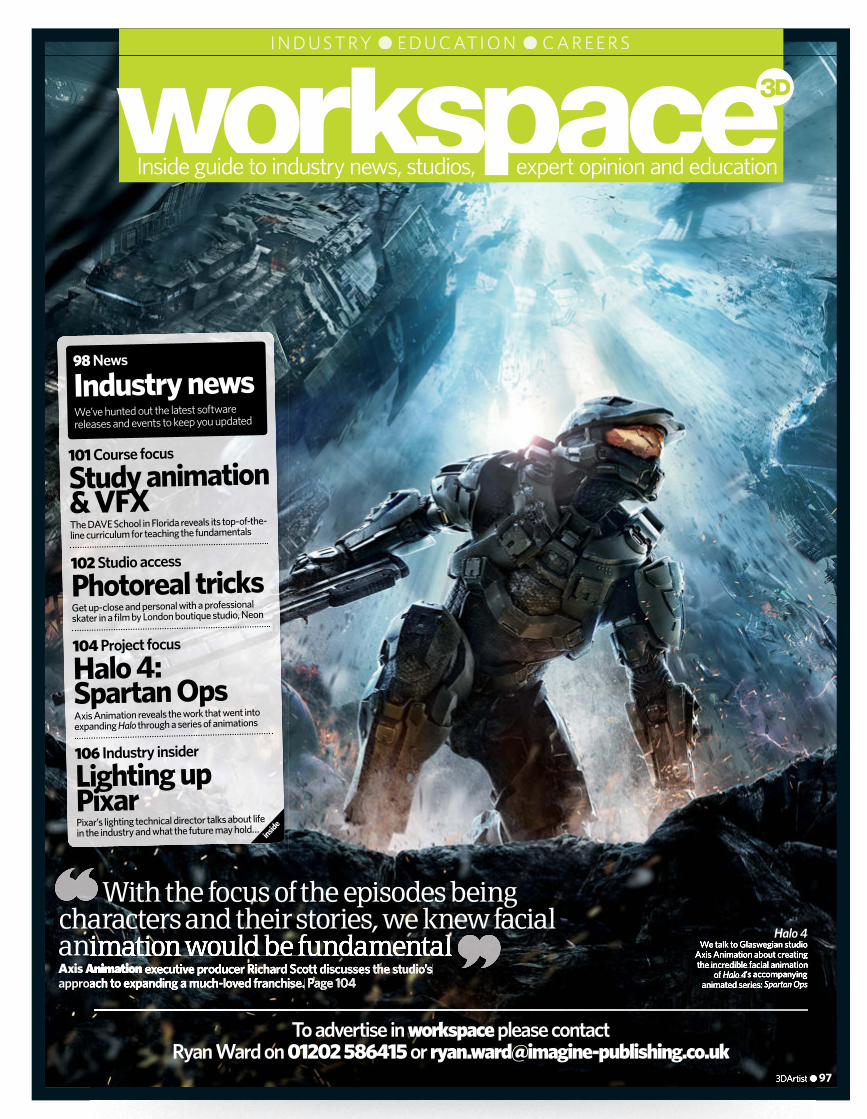
Inside guide to industry news, studios, expert opinion and education
3DArtist ● 97
● ED U C AT I O N ● C A R EER S
Halo 4We talk to Glaswegian studio
Axis Animation about creating the incredible facial animation
of Halo 4’s accompanying animated series: Spartan Ops
With the focus of the episodes being characters and their stories, we knew facial animation would be fundamentalAxis Animation executive producer Richard Scott discusses the studio’s approach to expanding a much-loved franchise. Page 104
3DArtist ●
We talk to Glaswegian studio Axis Animation about creating the incredible facial animation
of Halo 4’s accompanying animated series: Spartan Ops
animation would be fundamentalAxis Animation executive producer Richard Scott discusses the studio’s approach to expanding a much-loved franchise. Page 104
To advertise in workspace please contactRyan Ward on 01202 586415 or [email protected]
The DAVE School in Florida reveals its top-of-the-line curriculum for teaching the fundamentals
Study animation & VFX
101 Course focus
Get up-close and personal with a professional skater in a fi lm by London boutique studio, Neon
Photoreal tricks102 Studio access
Pixar’s lighting technical director talks about life in the industry and what the future may hold…
Lighting up Pixar
106 Industry insider
Industry news98 News
We’ve hunted out the latest software releases and events to keep you updated
inside
Axis Animation reveals the work that went into expanding Halo through a series of animations
Halo 4: Spartan Ops104 Project focus
097_3DA_52_WorkspaceCover.indd 97 11/02/2013 18:31
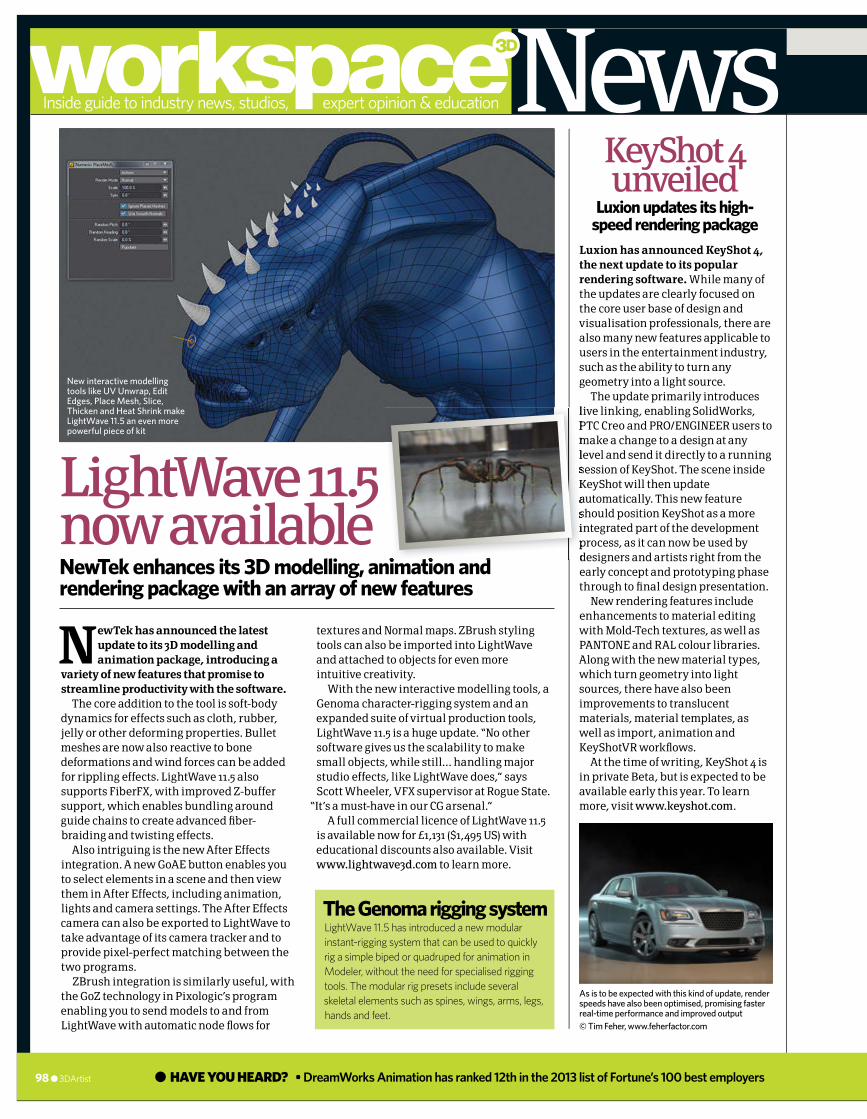
Inside guide to industry news, studios, expert opinion & education News
HAVE YOU HEARD?98 ● 3DArtist
NewTek has announced the latest update to its 3D modelling and animation package, introducing a
variety of new features that promise to streamline productivity with the software.
The core addition to the tool is soft-body dynamics for effects such as cloth, rubber, jelly or other deforming properties. Bullet meshes are now also reactive to bone deformations and wind forces can be added for rippling effects. LightWave 11.5 also supports FiberFX, with improved Z-buffer support, which enables bundling around guide chains to create advanced fi ber-braiding and twisting effects.
Also intriguing is the new After Effects integration. A new GoAE button enables you to select elements in a scene and then view them in After Effects, including animation, lights and camera settings. The After Effects camera can also be exported to LightWave to take advantage of its camera tracker and to provide pixel-perfect matching between the two programs.
ZBrush integration is similarly useful, with the GoZ technology in Pixologic’s program enabling you to send models to and from LightWave with automatic node fl ows for
textures and Normal maps. ZBrush styling tools can also be imported into LightWave and attached to objects for even more intuitive creativity.
With the new interactive modelling tools, a Genoma character-rigging system and an expanded suite of virtual production tools, LightWave 11.5 is a huge update. “No other software gives us the scalability to make small objects, while still… handling major studio effects, like LightWave does,” says Scott Wheeler, VFX supervisor at Rogue State.
“It’s a must-have in our CG arsenal.”A full commercial licence of LightWave 11.5
is available now for £1,131 ($1,495 US) with educational discounts also available. Visit www.lightwave3d.com to learn more.
• DreamWorks Animation has ranked 12th in the 2013 list of Fortune’s 100 best employers
LightWave 11.5 now availableNewTek enhances its 3D modelling, animation and rendering package with an array of new features
Luxion updates its high-speed rendering package
KeyShot 4 unveiled
As is to be expected with this kind of update, render speeds have also been optimised, promising faster real-time performance and improved output
Luxion has announced KeyShot 4, the next update to its popular rendering software. While many of the updates are clearly focused on the core user base of design and visualisation professionals, there are also many new features applicable to users in the entertainment industry, such as the ability to turn any geometry into a light source.
The update primarily introduces live linking, enabling SolidWorks, PTC Creo and PRO/ENGINEER users to make a change to a design at any level and send it directly to a running session of KeyShot. The scene inside KeyShot will then update automatically. This new feature should position KeyShot as a more integrated part of the development process, as it can now be used by designers and artists right from the early concept and prototyping phase through to fi nal design presentation.
New rendering features include enhancements to material editing with Mold-Tech textures, as well as PANTONE and RAL colour libraries. Along with the new material types, which turn geometry into light sources, there have also been improvements to translucent materials, material templates, as well as import, animation and KeyShotVR workfl ows.
At the time of writing, KeyShot 4 is in private Beta, but is expected to be available early this year. To learn more, visit www.keyshot.com.
The Genoma rigging systemLightWave 11.5 has introduced a new modular instant-rigging system that can be used to quickly rig a simple biped or quadruped for animation in Modeler, without the need for specialised rigging tools. The modular rig presets include several skeletal elements such as spines, wings, arms, legs, hands and feet.
New interactive modelling tools like UV Unwrap, Edit Edges, Place Mesh, Slice, Thicken and Heat Shrink make LightWave 11.5 an even more powerful piece of kit
NewTek enhances its 3D modelling, animation and
live linking, enabling SolidWorks, PTC Creo and PRO/ENGINEER users to make a change to a design at any level and send it directly to a running session of KeyShot. The scene inside KeyShot will then update automatically. This new feature should position KeyShot as a more integrated part of the development process, as it can now be used by designers and artists right from the
© Tim Feher, www.feherfactor.com
098-099_3DA_52_WorkspaceNews.indd 98 11/02/2013 18:43
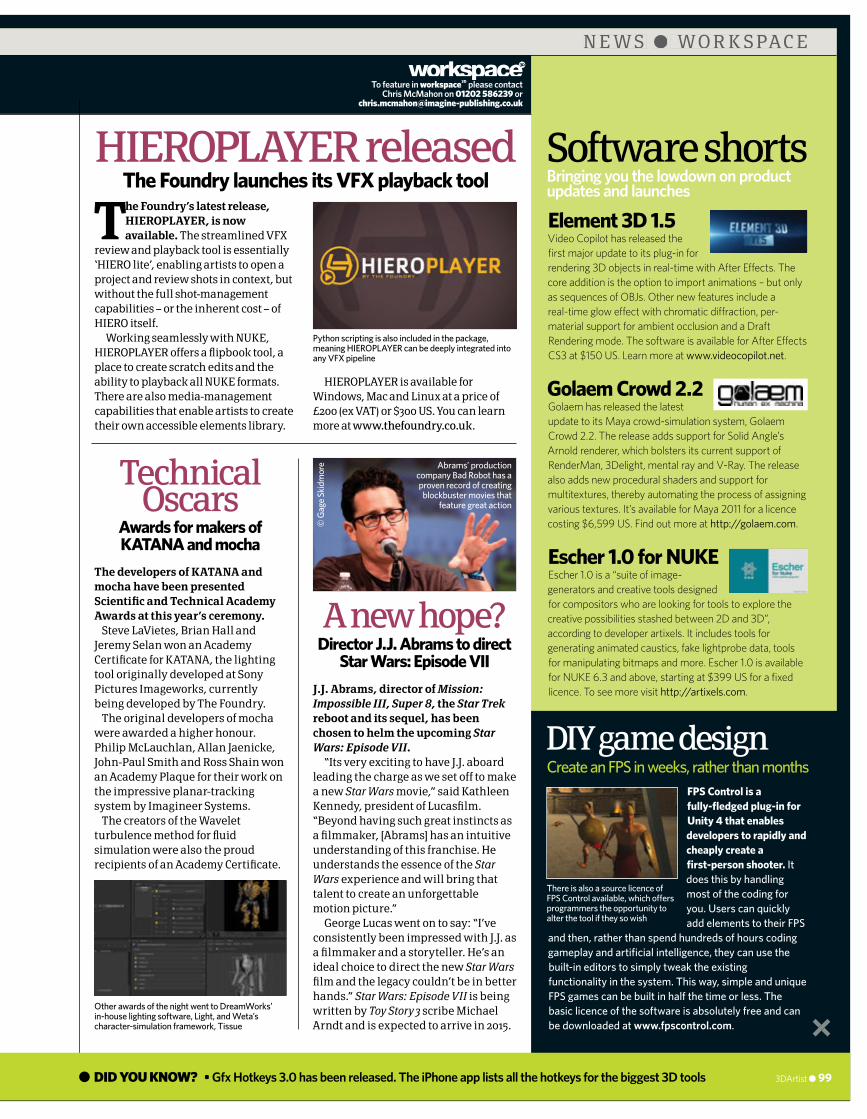
N E W S ● W O R K S PA C E
To feature in workspace3D please contact Chris McMahon on 01202 586239 or
DID YOU KNOW?
J.J. Abrams, director of Mission: Impossible III, Super 8, the Star Trek reboot and its sequel, has been chosen to helm the upcoming Star Wars: Episode VII.
“Its very exciting to have J.J. aboard leading the charge as we set off to make a new Star Wars movie,” said Kathleen Kennedy, president of Lucasfi lm. “Beyond having such great instincts as a fi lmmaker, [Abrams] has an intuitive understanding of this franchise. He understands the essence of the Star Wars experience and will bring that talent to create an unforgettable motion picture.”
George Lucas went on to say: “I’ve consistently been impressed with J.J. as a fi lmmaker and a storyteller. He’s an ideal choice to direct the new Star Wars fi lm and the legacy couldn’t be in better hands.” Star Wars: Episode VII is being written by Toy Story 3 scribe Michael Arndt and is expected to arrive in 2015.
3DArtist ● 99
The Foundry’s latest release, HIEROPLAYER, is now available. The streamlined VFX
review and playback tool is essentially ‘HIERO lite’, enabling artists to open a project and review shots in context, but without the full shot-management capabilities – or the inherent cost – of HIERO itself.
Working seamlessly with NUKE, HIEROPLAYER offers a fl ipbook tool, a place to create scratch edits and the ability to playback all NUKE formats. There are also media-management capabilities that enable artists to create their own accessible elements library.
Bringing you the lowdown on product updates and launches
HIEROPLAYER released
Technical Oscars
A new hope?
The Foundry launches its VFX playback toolSoftware shorts
Awards for makers of KATANA and mocha
Director J.J. Abrams to direct Star Wars: Episode VII
The developers of KATANA and mocha have been presented Scientifi c and Technical Academy Awards at this year’s ceremony.
Steve LaVietes, Brian Hall and Jeremy Selan won an Academy Certifi cate for KATANA, the lighting tool originally developed at Sony Pictures Imageworks, currently being developed by The Foundry.
The original developers of mocha were awarded a higher honour. Philip McLauchlan, Allan Jaenicke, John-Paul Smith and Ross Shain won an Academy Plaque for their work on the impressive planar-tracking system by Imagineer Systems.
The creators of the Wavelet turbulence method for fl uid simulation were also the proud recipients of an Academy Certifi cate.
DIY game designCreate an FPS in weeks, rather than months
Element 3D 1.5Video Copilot has released the fi rst major update to its plug-in for rendering 3D objects in real-time with After E� ects. The core addition is the option to import animations – but only as sequences of OBJs. Other new features include a real-time glow e� ect with chromatic di� raction, per-material support for ambient occlusion and a Draft Rendering mode. The software is available for After E� ects CS3 at $150 US. Learn more at www.videocopilot.net.
Golaem Crowd 2.2Golaem has released the latest update to its Maya crowd-simulation system, Golaem Crowd 2.2. The release adds support for Solid Angle’s Arnold renderer, which bolsters its current support of RenderMan, 3Delight, mental ray and V-Ray. The release also adds new procedural shaders and support for multitextures, thereby automating the process of assigning various textures. It’s available for Maya 2011 for a licence costing $6,599 US. Find out more at http://golaem.com.
Escher 1.0 for NUKEEscher 1.0 is a “suite of image-generators and creative tools designed for compositors who are looking for tools to explore the creative possibilities stashed between 2D and 3D”, according to developer artixels. It includes tools for generating animated caustics, fake lightprobe data, tools for manipulating bitmaps and more. Escher 1.0 is available for NUKE 6.3 and above, starting at $399 US for a fi xed licence. To see more visit http://artixels.com.
Other awards of the night went to DreamWorks’ in-house lighting software, Light, and Weta’s character-simulation framework, Tissue
FPS Control is a fully-fl edged plug-in for Unity 4 that enables developers to rapidly and cheaply create a fi rst-person shooter. It does this by handling most of the coding for you. Users can quickly add elements to their FPS
and then, rather than spend hundreds of hours coding gameplay and artifi cial intelligence, they can use the built-in editors to simply tweak the existing functionality in the system. This way, simple and unique FPS games can be built in half the time or less. The basic licence of the software is absolutely free and can be downloaded at www.fpscontrol.com.
There is also a source licence of FPS Control available, which o� ers programmers the opportunity to alter the tool if they so wish
• Gfx Hotkeys 3.0 has been released. The iPhone app lists all the hotkeys for the biggest 3D tools
HIEROPLAYER is available for Windows, Mac and Linux at a price of £200 (ex VAT) or $300 US. You can learn more at www.thefoundry.co.uk.
Python scripting is also included in the package, meaning HIEROPLAYER can be deeply integrated into any VFX pipeline
Abrams’ production company Bad Robot has a proven record of creating blockbuster movies that
feature great action
© G
age S
kidm
ore
098-099_3DA_52_WorkspaceNews.indd 99 11/02/2013 21:02

HUGE EXCLUSIVES DEVELOPER ACCESS RETRO CLASSICSTHE BIGGEST NAMES
QUALITY. INNOVATION. RESPECT
ON SALE NOW■ The Next-Gen Countdown ■ Lightning Returns: FF XIII ■ Metal Gear Rising
w w w . g a m e s t m . c o . u k
INDUSTRY SECRETS
BUY YOUR ISSUE TODAYPrint edition available at www.imagineshop.co.uk
Digital edition available at www.greatdigitalmags.com
Available from all good
newsagents and supermarkets
facebook.com/gamesTM twitter.com/gamesTMmag
Available on the following platforms
GTM131 house ad .indd 1 28/01/2013 18:36
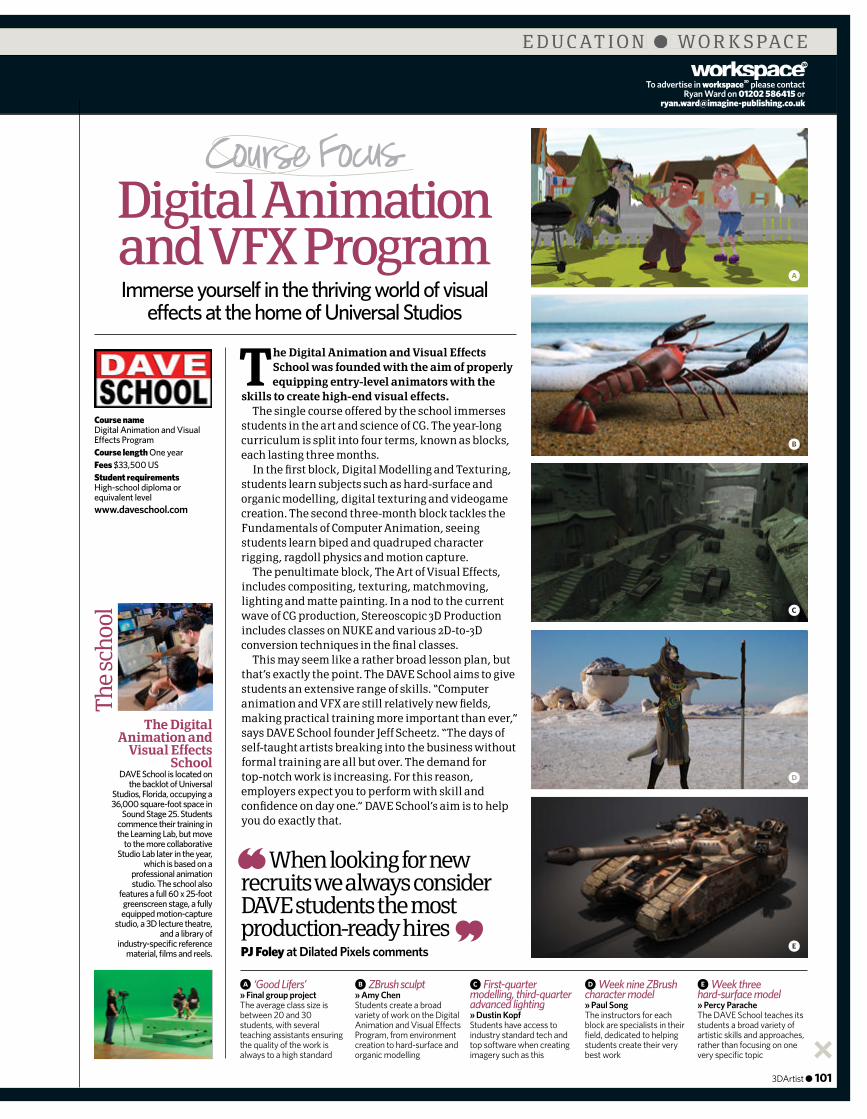
E D U C A T I O N ● W O R K S PA C E
3DArtist ● 101
E Week three hard-surface model» Percy ParacheThe DAVE School teaches its students a broad variety of artistic skills and approaches, rather than focusing on one very specifi c topic
D Week nine ZBrush character model» Paul SongThe instructors for each block are specialists in their fi eld, dedicated to helping students create their very best work
C First-quarter modelling, third-quarter advanced lighting» Dustin KopfStudents have access to industry standard tech and top software when creating imagery such as this
B ZBrush sculpt» Amy ChenStudents create a broad variety of work on the Digital Animation and Visual E� ects Program, from environment creation to hard-surface and organic modelling
To advertise in workspace3D please contact Ryan Ward on 01202 586415 or
A
B
C
D
E
The Digital Animation and Visual Effects School was founded with the aim of properly equipping entry-level animators with the
skills to create high-end visual effects.The single course offered by the school immerses
students in the art and science of CG. The year-long curriculum is split into four terms, known as blocks, each lasting three months.
In the fi rst block, Digital Modelling and Texturing, students learn subjects such as hard-surface and organic modelling, digital texturing and videogame creation. The second three-month block tackles the Fundamentals of Computer Animation, seeing students learn biped and quadruped character rigging, ragdoll physics and motion capture.
The penultimate block, The Art of Visual Effects, includes compositing, texturing, matchmoving, lighting and matte painting. In a nod to the current wave of CG production, Stereoscopic 3D Production includes classes on NUKE and various 2D-to-3D conversion techniques in the fi nal classes.
This may seem like a rather broad lesson plan, but that’s exactly the point. The DAVE School aims to give students an extensive range of skills. “Computer animation and VFX are still relatively new fi elds, making practical training more important than ever,” says DAVE School founder Jeff Scheetz. “The days of self-taught artists breaking into the business without formal training are all but over. The demand for top-notch work is increasing. For this reason, employers expect you to perform with skill and confi dence on day one.” DAVE School’s aim is to help you do exactly that.
Immerse yourself in the thriving world of visual effects at the home of Universal Studios
Digital Animation and VFX Program
Course name Digital Animation and Visual E� ects ProgramCourse length One yearFees $33,500 USStudent requirements High-school diploma or equivalent levelwww.daveschool.com
The Digital Animation and
Visual Effects School
DAVE School is located on the backlot of Universal
Studios, Florida, occupying a 36,000 square-foot space in
Sound Stage 25. Students commence their training in the Learning Lab, but move
to the more collaborative Studio Lab later in the year,
which is based on a professional animation studio. The school also
features a full 60 x 25-foot greenscreen stage, a fully equipped motion-capture
studio, a 3D lecture theatre, and a library of
industry-specifi c reference material, fi lms and reels.
When looking for new recruits we always consider DAVE students the most production-ready hiresPJ Foley at Dilated Pixels comments
The
scho
ol
a ‘Good Lifers’» Final group projectThe average class size is between 20 and 30 students, with several teaching assistants ensuring the quality of the work is always to a high standard
101_3DA_52_CourseFocus.indd 101 11/02/2013 19:25
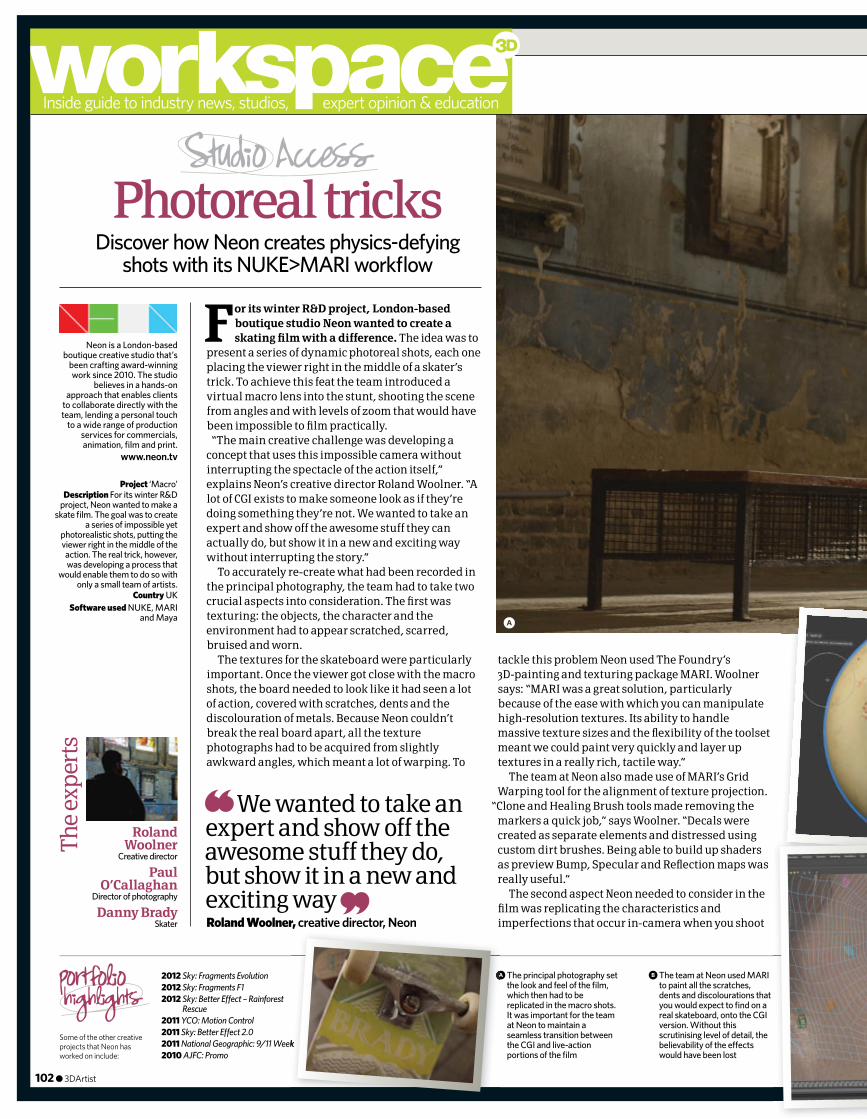
Inside guide to industry news, studios, expert opinion & education
We wanted to take an expert and show off the awesome stuff they do, but show it in a new and exciting way
For its winter R&D project, London-based boutique studio Neon wanted to create a skating fi lm with a difference. The idea was to
present a series of dynamic photoreal shots, each one placing the viewer right in the middle of a skater’s trick. To achieve this feat the team introduced a virtual macro lens into the stunt, shooting the scene from angles and with levels of zoom that would have been impossible to fi lm practically.
“The main creative challenge was developing a concept that uses this impossible camera without interrupting the spectacle of the action itself,” explains Neon’s creative director Roland Woolner. “A lot of CGI exists to make someone look as if they’re doing something they’re not. We wanted to take an expert and show off the awesome stuff they can actually do, but show it in a new and exciting way without interrupting the story.”
To accurately re-create what had been recorded in the principal photography, the team had to take two crucial aspects into consideration. The fi rst was texturing: the objects, the character and the environment had to appear scratched, scarred, bruised and worn.
The textures for the skateboard were particularly important. Once the viewer got close with the macro shots, the board needed to look like it had seen a lot of action, covered with scratches, dents and the discolouration of metals. Because Neon couldn’t break the real board apart, all the texture photographs had to be acquired from slightly awkward angles, which meant a lot of warping. To
tackle this problem Neon used The Foundry’s 3D-painting and texturing package MARI. Woolner says: “MARI was a great solution, particularly because of the ease with which you can manipulate high-resolution textures. Its ability to handle massive texture sizes and the fl exibility of the toolset meant we could paint very quickly and layer up textures in a really rich, tactile way.”
The team at Neon also made use of MARI’s Grid Warping tool for the alignment of texture projection.
“Clone and Healing Brush tools made removing the markers a quick job,” says Woolner. “Decals were created as separate elements and distressed using custom dirt brushes. Being able to build up shaders as preview Bump, Specular and Refl ection maps was really useful.”
The second aspect Neon needed to consider in the fi lm was replicating the characteristics and imperfections that occur in-camera when you shoot Roland Woolner, creative director, Neon
Some of the other creative projects that Neon has worked on include:
102 ● 3DArtist
Discover how Neon creates physics-defying shots with its NUKE>MARI workfl ow
Photoreal tricks
Neon is a London-based boutique creative studio that’s
been crafting award-winning work since 2010. The studio
believes in a hands-on approach that enables clients
to collaborate directly with the team, lending a personal touch
to a wide range of production services for commercials, animation, fi lm and print.
Project ‘Macro’Description For its winter R&D
project, Neon wanted to make a skate fi lm. The goal was to create
a series of impossible yet photorealistic shots, putting the viewer right in the middle of the action. The real trick, however, was developing a process that
would enable them to do so with only a small team of artists.
Country UKSoftware used NUKE, MARI
and Maya
www.neon.tv
b The team at Neon used MARI to paint all the scratches, dents and discolourations that you would expect to fi nd on a real skateboard, onto the CGI version. Without this scrutinising level of detail, the believability of the e� ects would have been lost
a The principal photography set the look and feel of the fi lm, which then had to be replicated in the macro shots. It was important for the team at Neon to maintain a seamless transition between the CGI and live-action portions of the fi lm
Roland Woolner
Creative director
Paul O’Callaghan
Director of photography
Danny BradySkater
A
2012 Sky: Fragments Evolution2012 Sky: Fragments F12012 Sky: Better E� ect – Rainforest
Rescue2011 YCO: Motion Control2011 Sky: Better E� ect 2.02011 National Geographic: 9/11 Week2010 AJFC: Promo
The
expe
rts
a
National Geographic: 9/11 Week
102-103_3DA_52_StudioAccess.indd 102 11/02/2013 19:40
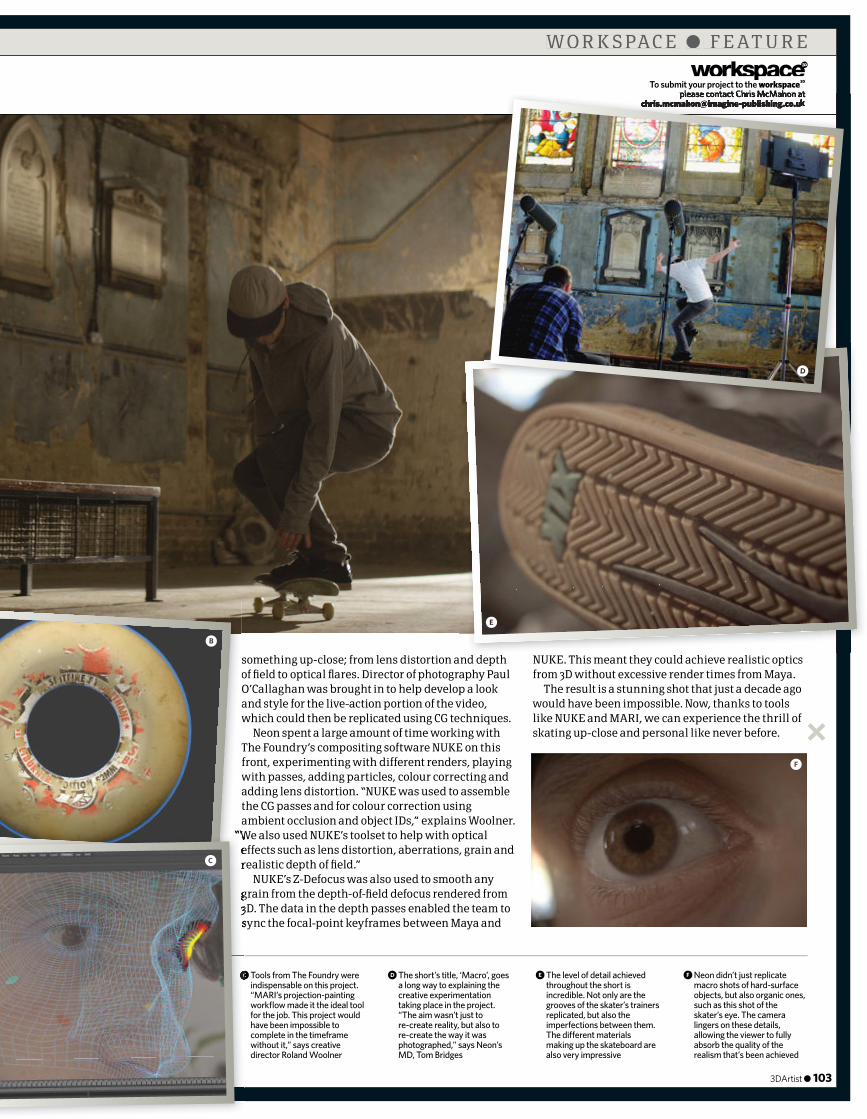
something up-close; from lens distortion and depth of fi eld to optical fl ares. Director of photography Paul O’Callaghan was brought in to help develop a look and style for the live-action portion of the video, which could then be replicated using CG techniques.
Neon spent a large amount of time working with The Foundry’s compositing software NUKE on this front, experimenting with different renders, playing with passes, adding particles, colour correcting and adding lens distortion. “NUKE was used to assemble the CG passes and for colour correction using ambient occlusion and object IDs,” explains Woolner.
“We also used NUKE’s toolset to help with optical effects such as lens distortion, aberrations, grain and realistic depth of fi eld.”
NUKE’s Z-Defocus was also used to smooth any grain from the depth-of-fi eld defocus rendered from 3D. The data in the depth passes enabled the team to sync the focal-point keyframes between Maya and
NUKE. This meant they could achieve realistic optics from 3D without excessive render times from Maya.
The result is a stunning shot that just a decade ago would have been impossible. Now, thanks to tools like NUKE and MARI, we can experience the thrill of skating up-close and personal like never before.
3DArtist ● 103
c Tools from The Foundry were indispensable on this project. “MARI’s projection-painting workfl ow made it the ideal tool for the job. This project would have been impossible to complete in the timeframe without it,” says creative director Roland Woolner
d The short’s title, ‘Macro’, goes a long way to explaining the creative experimentation taking place in the project. “The aim wasn’t just to re-create reality, but also to re-create the way it was photographed,” says Neon’s MD, Tom Bridges
e The level of detail achieved throughout the short is incredible. Not only are the grooves of the skater’s trainers replicated, but also the imperfections between them. The di� erent materials making up the skateboard are also very impressive
f Neon didn’t just replicate macro shots of hard-surface objects, but also organic ones, such as this shot of the skater’s eye. The camera lingers on these details, allowing the viewer to fully absorb the quality of the realism that’s been achieved
“We also used NUKE’s toolset to help with optical “We also used NUKE’s toolset to help with optical effects such as lens distortion, aberrations, grain and realistic depth of fi eld.”
grain from the depth-of-fi eld defocus rendered from 3D. The data in the depth passes enabled the team to sync the focal-point keyframes between Maya and
c
“We also used NUKE’s toolset to help with optical
b
C
To submit your project to the workspace3D please contact Chris McMahon at
[email protected] contact Chris McMahon at
d
e
f
W O R K S PA C E ● F E A T U R E
102-103_3DA_52_StudioAccess.indd 103 11/02/2013 19:40
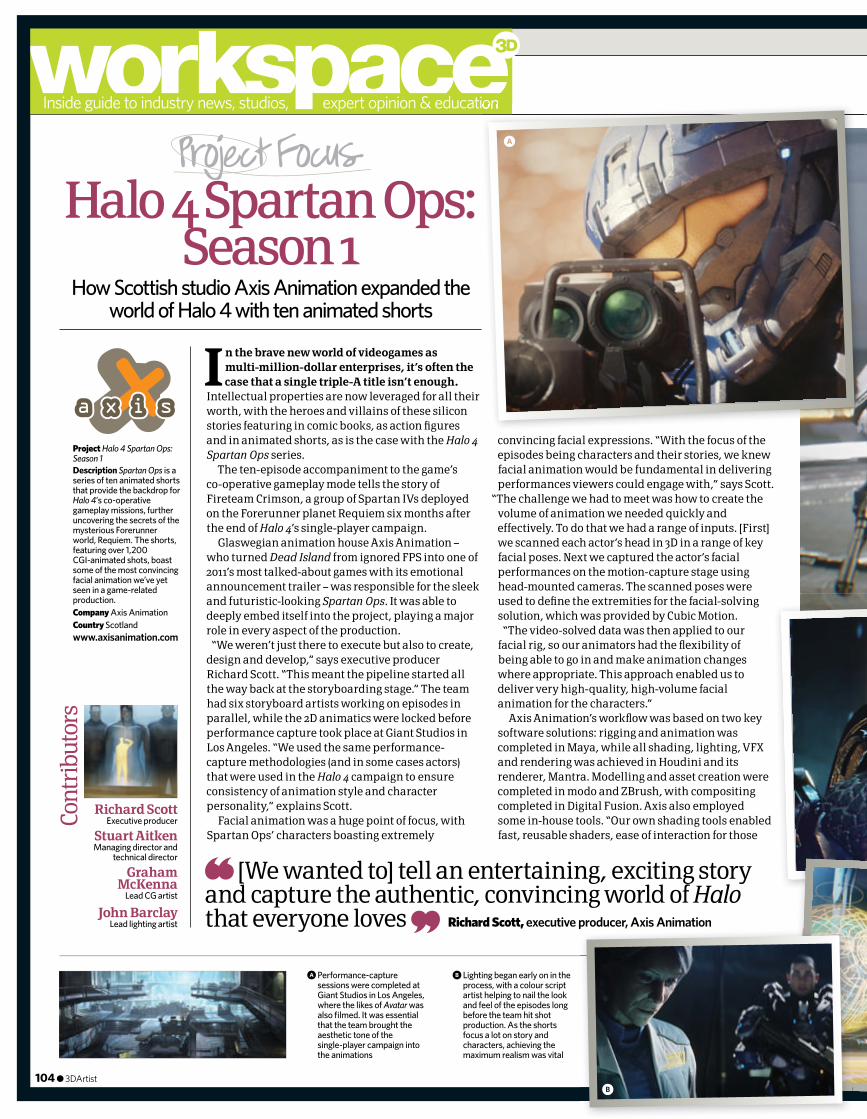
Inside guide to industry news, studios, expert opinion & education
In the brave new world of videogames as multi-million-dollar enterprises, it’s often the case that a single triple-A title isn’t enough.
Intellectual properties are now leveraged for all their worth, with the heroes and villains of these silicon stories featuring in comic books, as action fi gures and in animated shorts, as is the case with the Halo 4 Spartan Ops series.
The ten-episode accompaniment to the game’s co-operative gameplay mode tells the story of Fireteam Crimson, a group of Spartan IVs deployed on the Forerunner planet Requiem six months after the end of Halo 4’s single-player campaign.
Glaswegian animation house Axis Animation – who turned Dead Island from ignored FPS into one of 2011’s most talked-about games with its emotional announcement trailer – was responsible for the sleek and futuristic-looking Spartan Ops. It was able to deeply embed itself into the project, playing a major role in every aspect of the production.
“We weren’t just there to execute but also to create, design and develop,” says executive producer Richard Scott. “This meant the pipeline started all the way back at the storyboarding stage.” The team had six storyboard artists working on episodes in parallel, while the 2D animatics were locked before performance capture took place at Giant Studios in Los Angeles. “We used the same performance-capture methodologies (and in some cases actors) that were used in the Halo 4 campaign to ensure consistency of animation style and character personality,” explains Scott.
Facial animation was a huge point of focus, with Spartan Ops’ characters boasting extremely
convincing facial expressions. “With the focus of the episodes being characters and their stories, we knew facial animation would be fundamental in delivering performances viewers could engage with,” says Scott.
“The challenge we had to meet was how to create the volume of animation we needed quickly and effectively. To do that we had a range of inputs. [First] we scanned each actor’s head in 3D in a range of key facial poses. Next we captured the actor’s facial performances on the motion-capture stage using head-mounted cameras. The scanned poses were used to defi ne the extremities for the facial-solving solution, which was provided by Cubic Motion.
“The video-solved data was then applied to our facial rig, so our animators had the fl exibility of being able to go in and make animation changes where appropriate. This approach enabled us to deliver very high-quality, high-volume facial animation for the characters.”
Axis Animation’s workfl ow was based on two key software solutions: rigging and animation was completed in Maya, while all shading, lighting, VFX and rendering was achieved in Houdini and its renderer, Mantra. Modelling and asset creation were completed in modo and ZBrush, with compositing completed in Digital Fusion. Axis also employed some in-house tools. “Our own shading tools enabled fast, reusable shaders, ease of interaction for those
[We wanted to] tell an entertaining, exciting story and capture the authentic, convincing world of Halo that everyone loves Richard Scott, executive producer, Axis Animation
104 ● 3DArtist
b Lighting began early on in the process, with a colour script artist helping to nail the look and feel of the episodes long before the team hit shot production. As the shorts focus a lot on story and characters, achieving the maximum realism was vital
a Performance-capture sessions were completed at Giant Studios in Los Angeles, where the likes of Avatar was also fi lmed. It was essential that the team brought the aesthetic tone of the single-player campaign into the animations
Project Halo 4 Spartan Ops: Season 1Description Spartan Ops is a series of ten animated shorts that provide the backdrop for Halo 4’s co-operative gameplay missions, further uncovering the secrets of the mysterious Forerunner world, Requiem. The shorts, featuring over 1,200 CGI-animated shots, boast some of the most convincing facial animation we’ve yet seen in a game-related production.Company Axis AnimationCountry Scotlandwww.axisanimation.com
Richard ScottExecutive producer
Stuart AitkenManaging director and
technical director
Graham McKenna
Lead CG artist
John Barclay Lead lighting artist
Cont
ribu
tors
How Scottish studio Axis Animation expanded the world of Halo 4 with ten animated shorts
Halo 4 Spartan Ops: Season 1
Halo 4 Spartan Ops:
Inside guide to industry news, studios, expert opinion & education
executive producer, Axis Animation
a
b
104-105_3DA_52_ProjectFocus.indd 104 11/02/2013 19:44
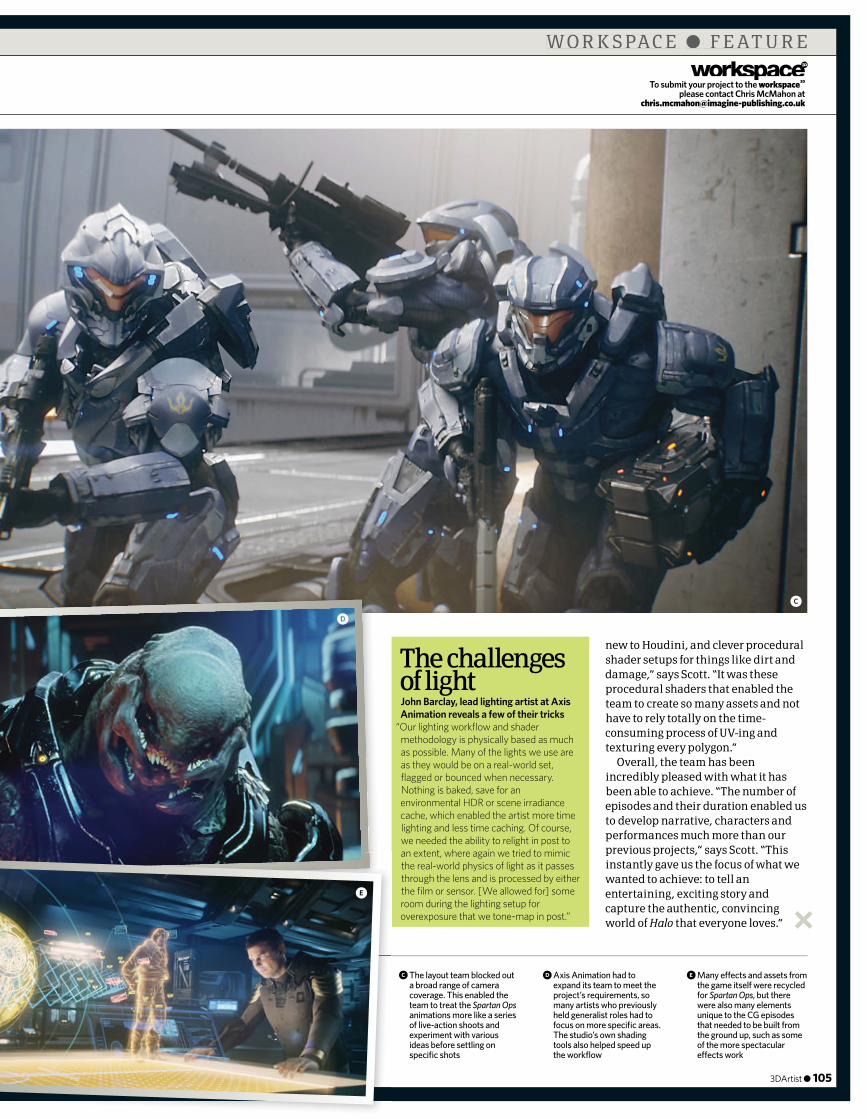
new to Houdini, and clever procedural shader setups for things like dirt and damage,” says Scott. “It was these procedural shaders that enabled the team to create so many assets and not have to rely totally on the time-consuming process of UV-ing and texturing every polygon.”
Overall, the team has been incredibly pleased with what it has been able to achieve. “The number of episodes and their duration enabled us to develop narrative, characters and performances much more than our previous projects,” says Scott. “This instantly gave us the focus of what we wanted to achieve: to tell an entertaining, exciting story and capture the authentic, convincing world of Halo that everyone loves.”
John Barclay, lead lighting artist at Axis Animation reveals a few of their tricks
“Our lighting workfl ow and shader methodology is physically based as much as possible. Many of the lights we use are as they would be on a real-world set, fl agged or bounced when necessary. Nothing is baked, save for an environmental HDR or scene irradiance cache, which enabled the artist more time lighting and less time caching. Of course, we needed the ability to relight in post to an extent, where again we tried to mimic the real-world physics of light as it passes through the lens and is processed by either the fi lm or sensor. [We allowed for] some room during the lighting setup for overexposure that we tone-map in post.”
The challenges of light
3DArtist ● 105
c The layout team blocked out a broad range of camera coverage. This enabled the team to treat the Spartan Ops animations more like a series of live-action shoots and experiment with various ideas before settling on specifi c shots
To submit your project to the workspace3D please contact Chris McMahon at
d Axis Animation had to expand its team to meet the project’s requirements, so many artists who previously held generalist roles had to focus on more specifi c areas. The studio’s own shading tools also helped speed up the workfl ow
e Many e� ects and assets from the game itself were recycled for Spartan Ops, but there were also many elements unique to the CG episodes that needed to be built from the ground up, such as some of the more spectacular e� ects work
c
d
e
W O R K S PA C E ● F E A T U R E
104-105_3DA_52_ProjectFocus.indd 105 11/02/2013 19:44

Inside guide to industry news, studios, expert opinion & education
106 ● 3DArtist
has helped with the craft of compiling images. Nowadays we can render the same shot quite a few times, iterating and refi ning it. A few years ago the render times were so slow that… you couldn’t afford to re-render your images more than a couple of times, [so] they were less polished.
You’ve held various roles in the past. What have your experiences taught you about the fi eld of CGI?One of the most important lessons I have learned over the years is the impact of planning. One of the motifs at Pixar is ‘fail early, fail often, learn fast’. The closer you are to your project deadline the more expensive your changes or mistakes become, therefore it’s very important to make sure you make as many mistakes as possible at the beginning of your production, where you can try things out at a relatively low cost. In that regard, I think producers are key when it comes to making sure the director of the project understands the cost of changing his mind at the very last minute.
2012 Brave2011 Cars 22010 Legend of the Guardians2009 Planet 512006 Lazy Town
Some recent features that Edu Martin has worked on include:
Pixar lighting technical director, Edu Martin, discusses the past, present and future of the
CG landscape
Lighting up PixarLighting up Pixar
Job Lighting technical directorEducation Self-taught
Biography Edu Martin was born in Barcelona, Spain in the mid 70s. He became interested in
fi lms, comics and animation at an early age, then during the
90s he crossed paths with CG. Over the past 15 years he has
worked on a wide variety of projects, from commercials to
animated fi lms. He currently works at Pixar as a lighting
technical director.www.theposmaker.com
Aboutthe insider For Edu Martin, starting out in CG in 90s’ Spain
was no easy task, with the industry there being relatively undeveloped at the time. “It
was diffi cult to specialise in any of the 3D disciplines because jobs were completed by small teams, where everyone did a bit of everything,” remembers Martin. After years of working as a generalist he fi nally managed to specialise in lighting in 2007, when he worked on one of the most relevant animated features in Spain to date – Planet 51. From there he worked at Animal Logic and was eventually lucky enough to get hired by Pixar.
“The role of a lighting technical director at Pixar is not that different from the same position in other companies,” he tells us. “It mixes the creative process of lighting and compositing the shots with the technical part of dealing with the rendering. Sometimes you have the chance to work on the key areas or master lighting, where you create a lighting setup that will later be used for the shot-lighters who will fi ne-tune it… You’re also in charge of the technical part of that shot, paying attention to the render times, splitting extra layers if necessary, taking care of possible problems or demands that a shot needs and compositing all the different passes together.”
How has the discipline of lighting evolved over the time you’ve been involved with it?The major evolution that I’ve seen over the years is the speed of the CPUs, the massive increase of RAM in the computers and the cost of hardware. Having cheaper and more powerful computers has enabled us to develop complex rendering techniques that can now be used in production. Over the last 15 years I have seen how raytracing has evolved and how global-illumination solutions, image-based lighting and HDR formats or subsurface scattering of light have all become industry standards. Now we have better tools to simulate the way real light behaves and that has enabled the industry to create seamless visual effects where we can’t distinguish between what’s real and what’s CG. On the other hand… having more-effi cient tools, more control over the lights and faster computers
“I’ve had the chance to work with full raytracing render engines, as well as renderers based on caching workfl ows, and I personally prefer the former. Raytracers are still having a hard time dealing with elements like hair or volumetric e� ects as well as handling memory, but they are getting better and the benefi ts outweigh the fl aws.
“Another indispensable tool for a lighter is a frame player, so you can loop your shots and see how lighting plays throughout. It also enables you to watch your shots in context and see if they play well in continuity. Software like RV or FrameCycler is great and easily customisable.”
The lighter’s toolkitMartin reveals some of the best tools and software used in the lighting trade
time dealing with elements like hair or volumetric e� ects as well as handling memory, but they are getting better and the
“Another indispensable tool for a lighter is a frame player, so
throughout. It also enables you to watch your shots in context
b
a
106-109_3DA_52_IndustryInsider.indd 106 11/02/2013 19:47
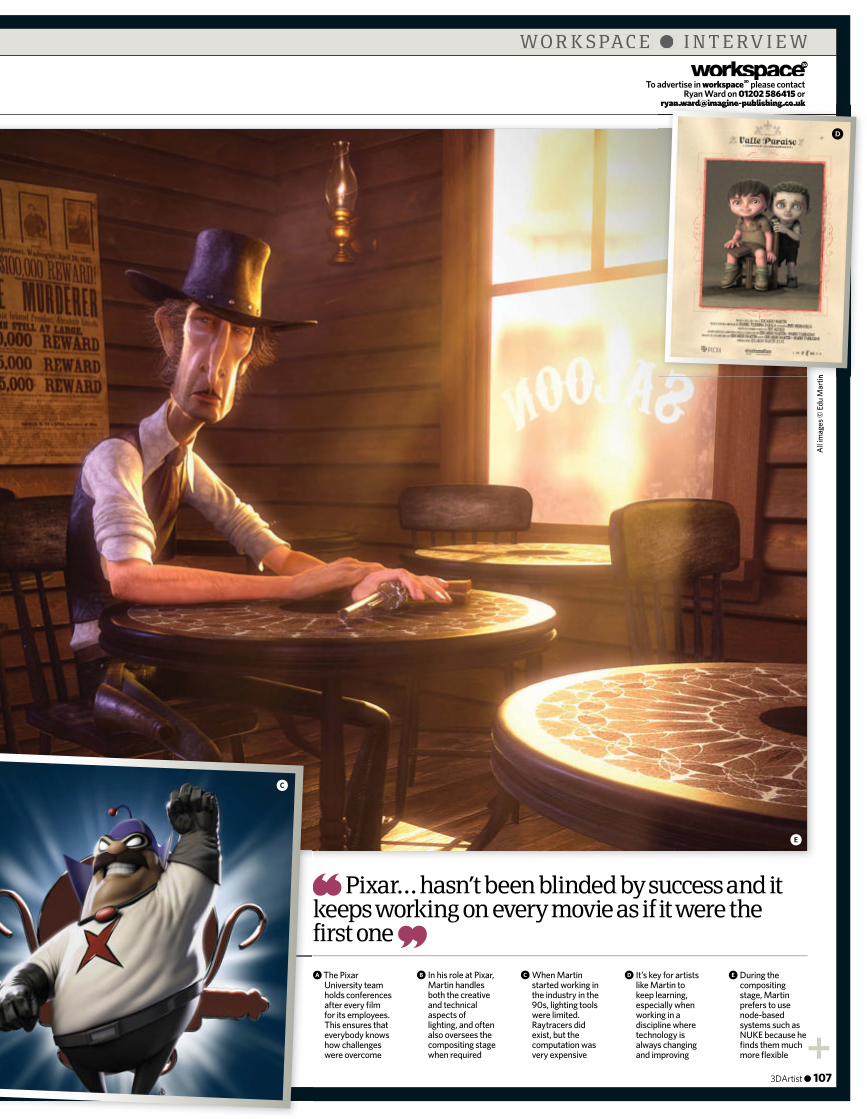
3DArtist ● 107
W O R K S PA C E ● I N T E R V I E W
To advertise in workspace3D please contact Ryan Ward on 01202 586415 or
Pixar… hasn’t been blinded by success and it keeps working on every movie as if it were the first one
e
All i
mag
es ©
Edu
Mar
tin
a The Pixar University team holds conferences after every fi lm for its employees. This ensures that everybody knows how challenges were overcome
e During the compositing stage, Martin prefers to use node-based systems such as NUKE because he fi nds them much more fl exible
d It’s key for artists like Martin to keep learning, especially when working in a discipline where technology is always changing and improving
c When Martin started working in the industry in the 90s, lighting tools were limited. Raytracers did exist, but the computation was very expensive
b In his role at Pixar, Martin handles both the creative and technical aspects of lighting, and often also oversees the compositing stage when required
c
Edu
Mar
tin
d
106-109_3DA_52_IndustryInsider.indd 107 11/02/2013 19:48
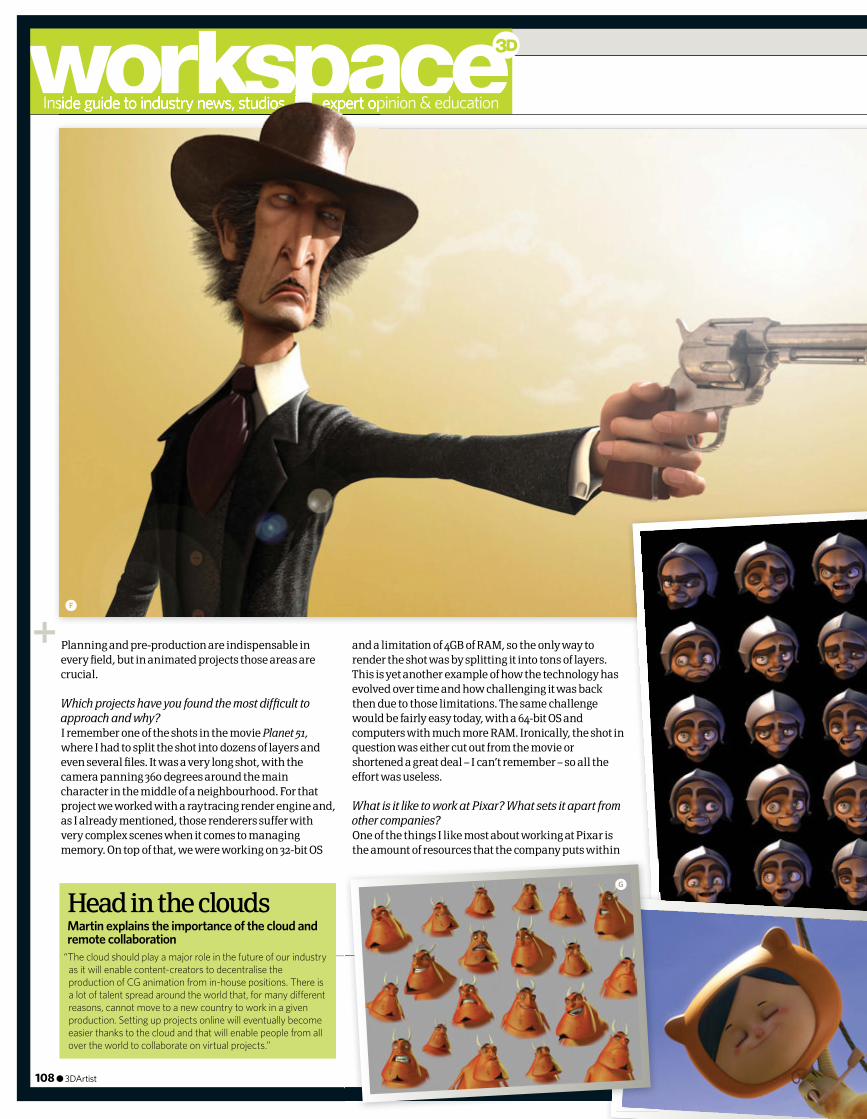
Inside guide to industry news, studios, expert opinion & education
108 ● 3DArtist
and a limitation of 4GB of RAM, so the only way to render the shot was by splitting it into tons of layers. This is yet another example of how the technology has evolved over time and how challenging it was back then due to those limitations. The same challenge would be fairly easy today, with a 64-bit OS and computers with much more RAM. Ironically, the shot in question was either cut out from the movie or shortened a great deal – I can’t remember – so all the effort was useless.
What is it like to work at Pixar? What sets it apart from other companies?One of the things I like most about working at Pixar is the amount of resources that the company puts within
Planning and pre-production are indispensable in every fi eld, but in animated projects those areas are crucial.
Which projects have you found the most diffi cult to approach and why?I remember one of the shots in the movie Planet 51, where I had to split the shot into dozens of layers and even several fi les. It was a very long shot, with the camera panning 360 degrees around the main character in the middle of a neighbourhood. For that project we worked with a raytracing render engine and, as I already mentioned, those renderers suffer with very complex scenes when it comes to managing memory. On top of that, we were working on 32-bit OS
Inside guide to industry news, studios, expert opinion & educationInside guide to industry news, studios, expert opinion & education
“The cloud should play a major role in the future of our industry as it will enable content-creators to decentralise the production of CG animation from in-house positions. There is a lot of talent spread around the world that, for many di� erent reasons, cannot move to a new country to work in a given production. Setting up projects online will eventually become easier thanks to the cloud and that will enable people from all over the world to collaborate on virtual projects.”
Head in the cloudsMartin explains the importance of the cloud and remote collaboration
f
g
106-109_3DA_52_IndustryInsider.indd 108 11/02/2013 19:48
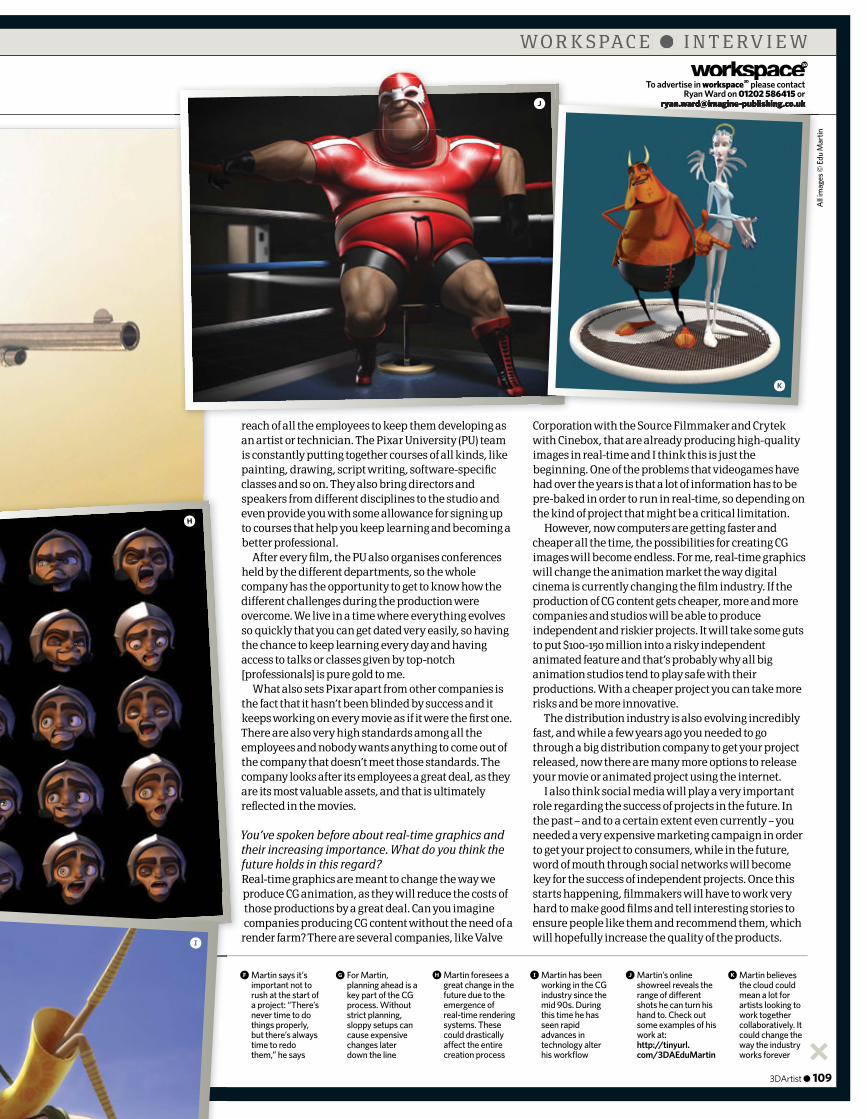
3DArtist ● 109
W O R K S PA C E ● I N T E R V I E W
To advertise in workspace3D please contact Ryan Ward on 01202 586415 or
reach of all the employees to keep them developing as an artist or technician. The Pixar University (PU) team is constantly putting together courses of all kinds, like painting, drawing, script writing, software-specifi c classes and so on. They also bring directors and speakers from different disciplines to the studio and even provide you with some allowance for signing up to courses that help you keep learning and becoming a better professional.
After every fi lm, the PU also organises conferences held by the different departments, so the whole company has the opportunity to get to know how the different challenges during the production were overcome. We live in a time where everything evolves so quickly that you can get dated very easily, so having the chance to keep learning every day and having access to talks or classes given by top-notch [professionals] is pure gold to me.
What also sets Pixar apart from other companies is the fact that it hasn’t been blinded by success and it keeps working on every movie as if it were the fi rst one. There are also very high standards among all the employees and nobody wants anything to come out of the company that doesn’t meet those standards. The company looks after its employees a great deal, as they are its most valuable assets, and that is ultimately refl ected in the movies.
You’ve spoken before about real-time graphics and their increasing importance. What do you think the future holds in this regard?Real-time graphics are meant to change the way we produce CG animation, as they will reduce the costs of those productions by a great deal. Can you imagine companies producing CG content without the need of a
render farm? There are several companies, like Valve
Corporation with the Source Filmmaker and Crytek with Cinebox, that are already producing high-quality images in real-time and I think this is just the beginning. One of the problems that videogames have had over the years is that a lot of information has to be pre-baked in order to run in real-time, so depending on the kind of project that might be a critical limitation.
However, now computers are getting faster and cheaper all the time, the possibilities for creating CG images will become endless. For me, real-time graphics will change the animation market the way digital cinema is currently changing the fi lm industry. If the production of CG content gets cheaper, more and more companies and studios will be able to produce independent and riskier projects. It will take some guts to put $100-150 million into a risky independent animated feature and that’s probably why all big animation studios tend to play safe with their productions. With a cheaper project you can take more risks and be more innovative.
The distribution industry is also evolving incredibly fast, and while a few years ago you needed to go through a big distribution company to get your project released, now there are many more options to release your movie or animated project using the internet.
I also think social media will play a very important role regarding the success of projects in the future. In the past – and to a certain extent even currently – you needed a very expensive marketing campaign in order to get your project to consumers, while in the future, word of mouth through social networks will become key for the success of independent projects. Once this starts happening, fi lmmakers will have to work very hard to make good fi lms and tell interesting stories to ensure people like them and recommend them, which will hopefully increase the quality of the products.
g For Martin, planning ahead is a key part of the CG process. Without strict planning, sloppy setups can cause expensive changes later down the line
f Martin says it’s important not to rush at the start of a project: “There’s never time to do things properly, but there’s always time to redo them,” he says
k Martin believes the cloud could mean a lot for artists looking to work together collaboratively. It could change the way the industry works forever
j Martin’s online showreel reveals the range of di� erent shots he can turn his hand to. Check out some examples of his work at: http://tinyurl.com/3DAEduMartin
i Martin has been working in the CG industry since the mid 90s. During this time he has seen rapid advances in technology alter his workfl ow
h Martin foresees a great change in the future due to the emergence of real-time rendering systems. These could drastically a� ect the entire creation process
All i
mag
es ©
Edu
Mar
tin
h
i
j
k
106-109_3DA_52_IndustryInsider.indd 109 11/02/2013 19:48

GreatDigitalMags_SA4_Woman.indd 110 11/02/2013 21:22

2 Filter titles by your favourite store
3 Choose a digital magazine or book
1 Visit the websiteGreatDigitalMags.com
4 Purchase in-store, download & enjoy!
GreatDigitalMags_SA4_Woman.indd 111 11/02/2013 21:23

✓iPad ✓iPhone ✓Android phone ✓Android tablet ✓Apple Mac ✓Windows PC

To get the most out of your digital editions, be sure to enjoy all of our fantastic features, including:
• Zoomable text and pictures• In-app browsing• Searchable text• Take your collection with you• Read offl ine
Imagine digital editions are a new and exciting way to experience our
world-leading magazines and bookazines.
No Disc. No ProblemMany of the � les you’re looking for can be
found on the magazine’s website
To buy more Imagine digital editions and for the latest issues and best offers, please go to www.GreatDigitalMags.com

Issue 53 of is on sale 27 March 2013
www.3dartistonline.com
If the menu doesn’t run or your disc is faulty, we will replace it free of charge. Simply email your disc problem to [email protected] and it will be investigated.
Please avoid emailing disc problems to the editorial team as this is the wrong department for dealing with your query. If you have problems getting the best out of individual programs or assets provided, please contact the relevant manufacturer for professional advice.
Disc problems?It’s not over yet…The fun doesn’t stop here! There’s also the 3D Artist magazine website with its readers’ gallery where you can upload your images and comment on those by your peers. You can also follow the 3D Artist’s team posts on Facebook (www.facebook.com/3DArtistMagazine) and Twitter (http://twitter.com/3DArtist) to stay up to date on all the latest news, tips, advice and general 3D action!
12 royalty-free audio loops
2 ultra high-res HDRI sunsets
9 hand-crafted textures with maps
10 superb-quality furniture models
Software worth $199 US
2+ hours of Digital-Tutors’ tuition
9 olive trees for arch-vis scenes9arch-vis scenesarch-vis scenes9arch-vis scenes9
Pop the disc into your CD drive and the menu will start running. Click Accept on the terms and conditions to progress. This issue you’ll fi nd a generous collection of arch-vis goodies, software, video training, textures, audio fi les and more!
WORTH OVER$550FREE RESOURCES
As the disc is so packed with content, some of it is stored safely online for you to download from the links provided. You can also access magazine tutorial files at www.3dartistonline.com/news/tutorial-fi les.DOWNLOAD
Whenever you see this icon in the mag……it means you can fi nd fantastic supporting fi les with your free disc. This issue you’ll discover models, HDRIs, video guides, magazine tutorial fi les and more!
AWESOME ARCH-VIS ASSETS, HOURS OF VIDEO TUITION, FREE SOFTWARE & MORE!
Software worth $199
112-114_3DA_52_With_The_Disc.indd 114 11/02/2013 21:42

Full Page.indd 1 05/02/2013 09:33

Full Page.indd 1 31/01/2013 15:41
Related Documents