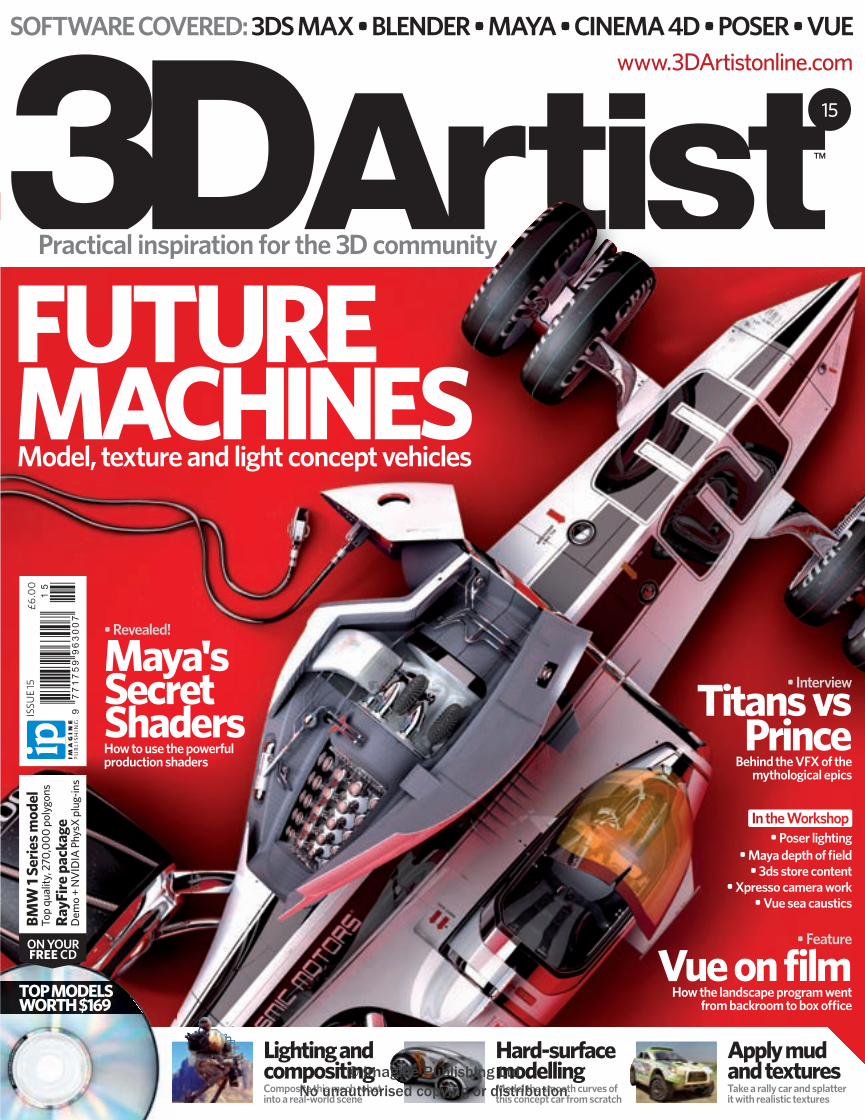
Practical inspiration for the 3D community www.3DArtistonline.com SOFTWARE COVERED: 3DS MAX • BLENDER • MAYA • CINEMA 4D • POSER • VUE 15 Future machines www.3DArtistonline.com TOP MODELS WORTH $169 ISSUE 15 £6.00 9 7 7 1 7 5 9 9 6 3 0 0 7 1 5 ON YOUR FREE CD BMW 1 Series model Top quality, 270,000 polygons RayFire package Demo + NVIDIA PhysX plug-ins Lighting and compositing Composite this mech robot into a real-world scene Hard-surface modelling Model the smooth curves of this concept car from scratch Apply mud and textures Take a rally car and splatter it with realistic textures Maya's Secret Shaders How to use the powerful production shaders • Revealed! • Poser lighting • Maya depth of field • 3ds store content • Xpresso camera work • Vue sea caustics Vue on film How the landscape program went from backroom to box office • Feature Titans vs Prince Behind the VFX of the mythological epics • Interview MACHINES Model, texture and light concept vehicles FUTURE © Imagine Publishing Ltd No unauthorised copying or distribution

Welcome message from author
This document is posted to help you gain knowledge. Please leave a comment to let me know what you think about it! Share it to your friends and learn new things together.
Transcript
Practical inspiration for the 3D community
www.3DArtistonline.comSOFTWARE COVERED: 3DS MAX • BLENDER • MAYA • CINEMA 4D • POSER • VUE
15
Future machines
15
ww
w.3D
Artistonline.com
TOP MODELS WORTH $169
ISSU
E 15
£6.0
0IS
SN
175
9-96
36
97
71
75
99
63
00
7
15
ON YOUR FREE CD
BMW
1 Se
ries m
odel
Top
qual
ity, 2
70,0
00 p
olyg
ons
RayF
ire p
acka
ge
Dem
o +
NV
IDIA
Phy
sX p
lug-
ins
Lighting and compositingComposite this mech robot into a real-world scene
Hard-surface modellingModel the smooth curves of this concept car from scratch
Apply mud and texturesTake a rally car and splatter it with realistic textures
Maya's SecretShadersHow to use the powerful production shaders
• Revealed!
• Poser lighting• Maya depth of fi eld
• 3ds store content• Xpresso camera work
• Vue sea caustics
Vue on filmHow the landscape program went
from backroom to box o� ce
• Feature
Titans vs Prince
Behind the VFX of the mythological epics
• Interview
MACHINESModel, texture and light concept vehicles
FUTURE
001_3DA_15-Cover final.indd 1 6/4/10 18:59:06
© Imagine Publishing Ltd No unauthorised copying or distribution

It’s a jungle out there. Swing through it
Directory TM
Also in this series
The definitive review listings for iPad, iPhone and Android apps
www.imaginebookshop.co.uk
BookazineseBooks • Apps
iPad
Printed full colour large format book
Kindle
App StoreKindle Store ImagineShop.co.ukHigh street
HIGH ST.BUY IN STORE
HIGH ST.
Directory range single Ad 230 x 297.indd 1 01/08/2011 15:55

Personal portfolio site http://danielsimon.comCountry Born in Germany, lives in CaliforniaSoftware used Autodesk Alias, Maya, mental ray, Bunkspeed Move, Photoshop
Art
ist i
nfo
Daniel Simon
Cover artist
Who better to represent this issue of 3D Artist than vehicle concept designer for Hollywood, Daniel Simon? The CM Gravion 4S 46 SWB is just one of a series of ‘Cosmic Motors’ designed and visualised in hyper-real 3D for the Galaxion-System of a parallel universe.
The CM Gravion 4S 46 SWB can be found in print along with a whole host of other tailor-made vehicles from Daniel’s extraordinary imagination in the Cosmic Motors book, published by Design Studio Press. Order at www.designstudiopress.com.
003_3DA_15 Wireframe.indd 3 8/4/10 13:50:27
© Imagine Publishing Ltd No unauthorised copying or distribution
© Imagine Publishing Ltd 2010
ISSN 1759-9636
Magazine team Editor Duncan [email protected]☎ 01202 586282
Editor in Chief Jo ColeNews Editor Lynette CleeSenior Sub Editor Colleen JohnsonSenior Designer Luke McDonaldHead of Design Ross AndrewsContributorsBilly Cheng, David Crookes, Christian Darkin, Dominic Davison, Obaid Farooq, Paul Francis, Lance Hitchings, Phil King, Ryan Knope, Robert Lechl, Daniel Lovas, April Madden, Tyree Ross, Rob Redman, Michal Suchanek
AdvertisingDigital or printed media packs are available on request.
Head of Sales James Hanslip☎ 01202 [email protected]
Advertising Manager Hang Deretz☎ 01202 [email protected]
Cover discMultimedia Editor Tom [email protected]
International3D Artist is available for licensing. Contact the International department to discuss partnership opportunities.
International Manager Cathy Blackman☎ +44 (0) 1202 [email protected]
SubscriptionsSubscriptions Manager Lucy Nash☎ 01202 [email protected]
To order a subscription to 3D Artist:☎ UK 0844 249 0472☎ Overseas +44 (0) 1795 592951Email: [email protected] subscription (UK) – £21.6013-issue subscription (UK) – £62.4013-issue subscription (Europe) – £7013-issue subscription (ROW) – £80
CirculationCirculation & Export Manager Darren Pearce☎ 01202 586200
ProductionProduction Director Jane Hawkins☎ 01202 586200
FoundersManaging Director Damian ButtFinance Director Steven BoydCreative Director Mark Kendrick
Printing & DistributionPrinted by St Ives Plymouth Ltd, Eastern Wood Road, Langage Industrial Estate, Plympton, Plymouth PL7 5ET
Distributed in the UK & Eire by Seymour Distribution, 2 East Poultry Avenue, London EC1A 9PT ☎ 020 7429 4000
Distributed in Australia by Gordon & Gotch, Equinox Centre, 18 Rodborough Road, Frenchs Forest NSW 2086 ☎ +61 2 9972 8800
Distributed to the rest of the world by Marketforce, Blue Fin Building, 110 Southwark Street, London SE1 0SU ☎ 020 3148 8105
DisclaimerThe publisher cannot accept responsibility for any unsolicited material lost or damaged in the post. All text and layout is the copyright of Imagine Publishing Ltd. Nothing in this magazine may be reproduced in whole or part without the written permission of the publisher. All copyrights are recognised and used specifically for the purpose of criticism and review. Although the magazine has endeavoured to ensure all information is correct at time of print, prices and availability may change. This magazine is fully independent and not affiliated in any way with the companies mentioned herein.
Imagine Publishing LtdRichmond House, 33 Richmond HillBournemouth, Dorset BH2 6EZ☎ +44 (0) 1202 586200Web: www.imagine-publishing.co.uk www.3dartistonline.com
Lynette Clee
This issue’s team of expert artists…
Billy Cheng Christian DarkinWorking the 3D reviews section, Christian had plenty of rendering to do with all the 3D apps we gave him
Paul FrancisPaul is our Poser expert and comes up with all manner of tips and ideas to make your Posing life as easy as possible
Lance HitchingsLance runs a design studio in the States, and also comes up with solutions for all your general Maya-related problems
Dominic DavisonOur resident Vue expert creates images that mortals can only dream of. Dom is here to reveal all about Vue
Daniel LovasThe guy with CINEMA 4D in his DNA is a sci-fi enthusiast but can solve any problem you may encounter
From a student project to the go-to tool for Hollywood studios, David traces the life and times of Vue and e-on
Obaid FarooqObaid explains how to take a pristine model of a rally car and fi lth it up with dust and mud splatters. This tutorial is all about the textures
Robert LechlLarge robot with machine gun, stomping across the landscape looking for humans to mow down. It’s all good
Ryan KnopeWhen he isn’t busy in his architectural design studio, Ryan is available to answer questions on 3ds Max and Arch Vis
Tyree RossLet’s get hard surface modelling with Tyree and his one-seater concept car. Here’s how to create those smooth curves
Michal SuchanekIn the future, we’ll all be fl ying these things around. Michal gives an overview of how he put the futuristic fl ier image together
www.3dartistonline.comSign up, share your art and chat to other artists at
Every issue you can count on…1 116 pages of creative inspiration2 Behind-the-scenes guides to images and fantastic artwork3 A CD packed full of creative goodness4 Interviews with inspirational artists5 Tips for studying 3D or getting work in the industry6 The chance to see your art in the mag!
When is 3D really 3D? That’s the question we’re asking this month as Clash of the Titans hits the cinema screens. Titans was fi lmed in 2D but just after Christmas the studio made
the decision to turn it into 3D using the Prime Focus conversion process. We went to see Cinesite – fresh from fi nishing work on both Titans and Prince of Persia – and the head of VFX for the project was frankly worried about the result. Having seen the fi lm I can understand why. Some things look fi ne and work, others simply don’t, especially the high speed cuts and the fl ying sequences. Be sure to let us know what you think and enjoy the issue. Duncan Evans,
Editor
David Crookes
It’s all about vehicles this month and Billy’s white sports, concept car is an example of what we have in store for you
to the magazine and 116 pages of amazing 3D
Follow us now on twitter Search for 3DARTIST
4 ● 3DArtist
004_008_3DA_15 Front.indd 4 8/4/10 15:16:19
© Imagine Publishing Ltd No unauthorised copying or distribution

Pass our knowledge off as your own
Also in this series
Know more with world-leading features and tutorials on everything from Mac OS X to War Of The Worlds
www.imaginebookshop.co.uk
BookazineseBooks • Apps
iPad
Printed full colour large format book
Kindle
TM
App StoreKindle Store ImagineShop.co.ukHigh street
HIGH ST.BUY IN STORE
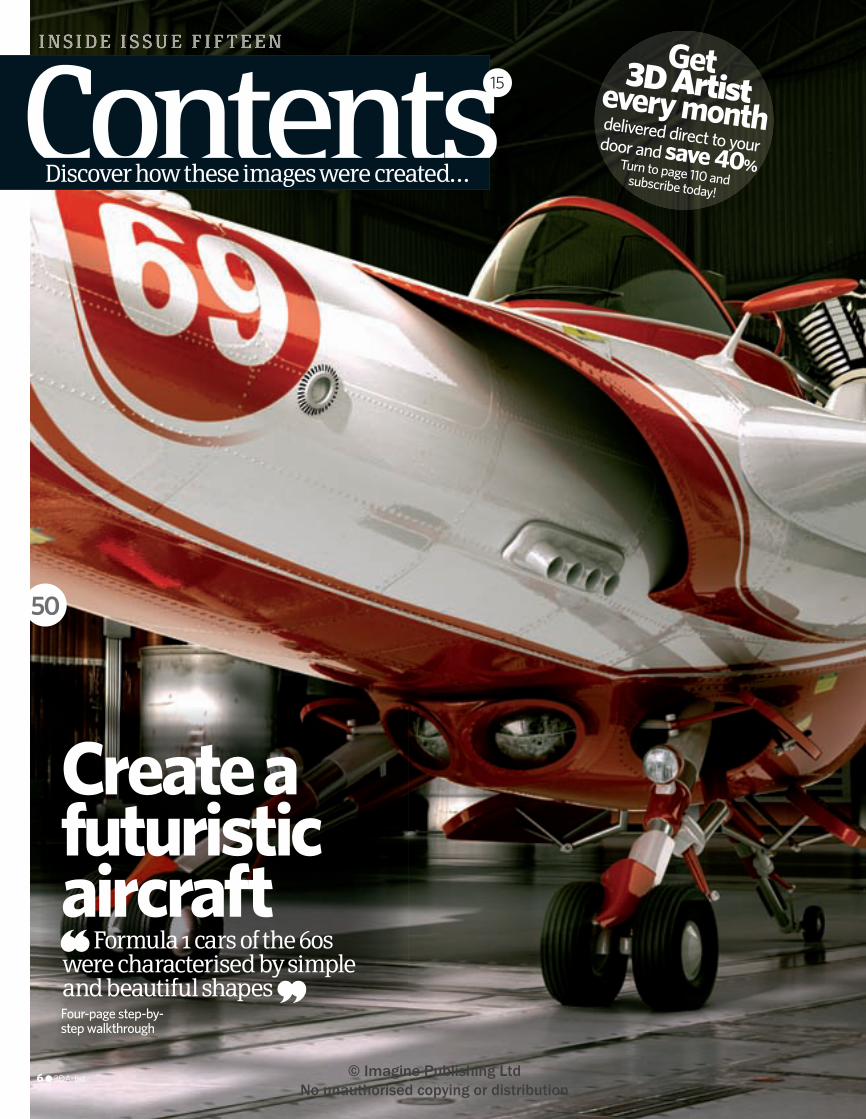
Create a futuristic aircraft
I N S I D E I S S U E F I F T E E N Get 3D Artist every monthTurn to page 110 and subscribe today!
delivered direct to your door and save 40%
15
Discover how these images were created…
50
Four-page step-by-step walkthrough
Formula 1 cars of the 60s were characterised by simple and beautiful shapes
6 ● 3DArtist
004_008_3DA_15 Front.indd 6 8/4/10 15:16:42
© Imagine Publishing Ltd No unauthorised copying or distribution
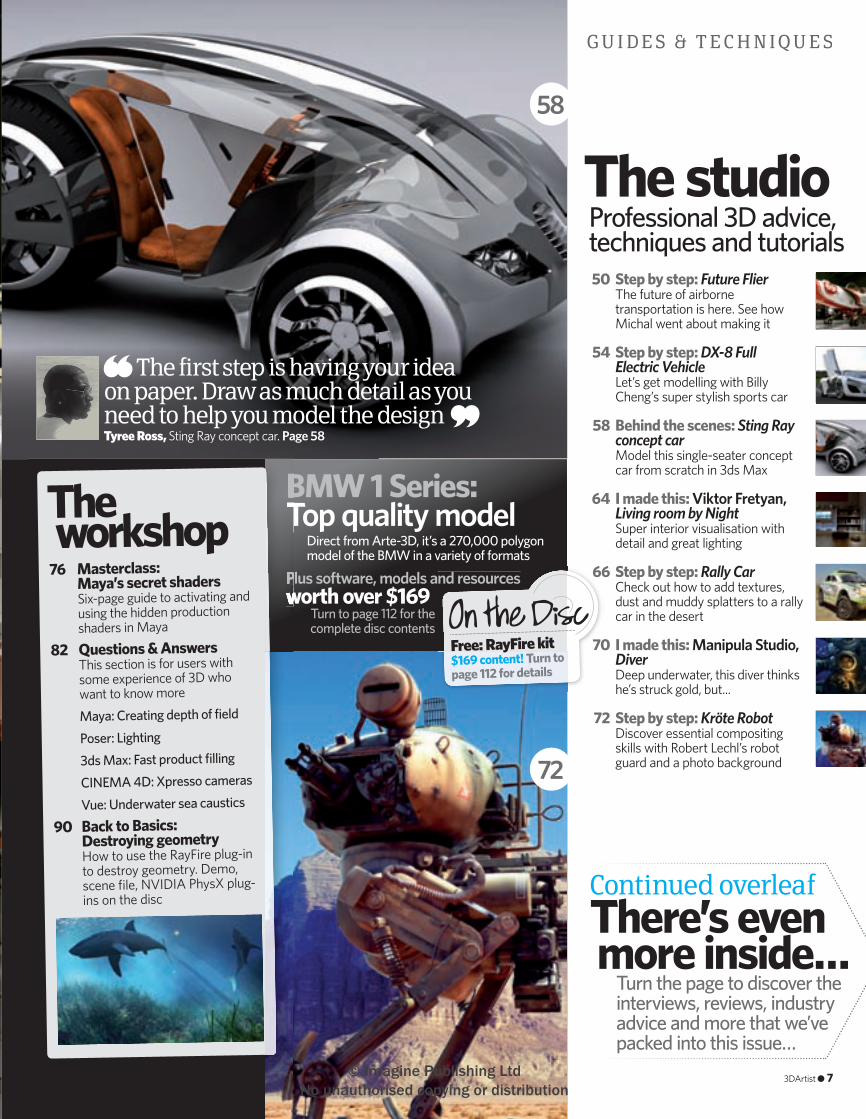
The first step is having your idea on paper. Draw as much detail as you need to help you model the designTyree Ross, Sting Ray concept car. Page 58
BMW 1 Series: Top quality model
Direct from Arte-3D, it’s a 270,000 polygon model of the BMW in a variety of formats
Free: RayFire kit $169 content! Turn to page 112 for details
Plus software, models and resources worth over $169
Turn to page 112 for the complete disc contents
G U I D E S & T E C H N I Q U E S
Continued overleafThere’s even more inside…
Turn the page to discover the interviews, reviews, industry advice and more that we’ve packed into this issue…
50 Step by step: Future Flier The future of airborne
transportation is here. See how Michal went about making it
54 Step by step: DX-8 Full Electric Vehicle
Let’s get modelling with Billy Cheng’s super stylish sports car
58 Behind the scenes: Sting Ray
concept car Model this single-seater concept
car from scratch in 3ds Max
64 I made this: Viktor Fretyan, Living room by Night Super interior visualisation with
detail and great lighting
66 Step by step: Rally Car Check out how to add textures,
dust and muddy splatters to a rally car in the desert
70 I made this: Manipula Studio, Diver
Deep underwater, this diver thinks he’s struck gold, but...
72 Step by step: Kröte Robot Discover essential compositing
skills with Robert Lechl’s robot guard and a photo background
The studioProfessional 3D advice, techniques and tutorials
58
72
BMW 1 Series: Top quality model
Plus software, models and resources worth over $169
The workshop76 Masterclass: Maya’s secret shaders Six-page guide to activating and
using the hidden production shaders in Maya
82 Questions & Answers This section is for users with
some experience of 3D who want to know more
Maya: Creating depth of field
Poser: Lighting
3ds Max: Fast product filling
CINEMA 4D: Xpresso cameras
Vue: Underwater sea caustics
90 Back to Basics: Destroying geometry How to use the RayFire plug-in
to destroy geometry. Demo, scene fi le, NVIDIA PhysX plug-ins on the disc
3DArtist ● 7
004_008_3DA_15 Front.indd 7 8/4/10 15:17:37
© Imagine Publishing Ltd No unauthorised copying or distribution
I N S I D E I S S U E F I F T E E N
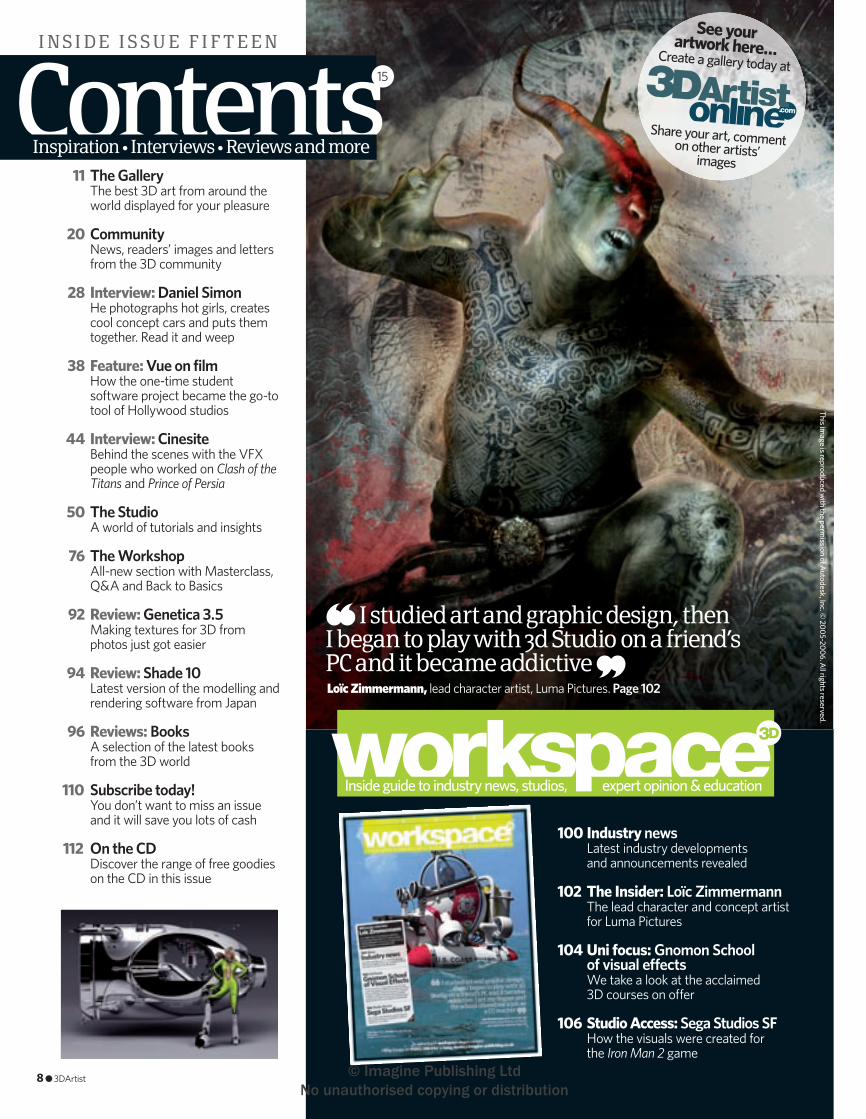
I studied art and graphic design, then I began to play with 3d Studio on a friend’s PC and it became addictiveLoïc Zimmermann, lead character artist, Luma Pictures. Page 102
11 The Gallery The best 3D art from around the
world displayed for your pleasure
20 Community News, readers’ images and letters
from the 3D community
28 Interview: Daniel Simon He photographs hot girls, creates
cool concept cars and puts them together. Read it and weep
38 Feature: Vue on film How the one-time student
software project became the go-to tool of Hollywood studios
44 Interview: Cinesite Behind the scenes with the VFX
people who worked on Clash of the Titans and Prince of Persia
50 The Studio A world of tutorials and insights
76 The Workshop All-new section with Masterclass,
Q&A and Back to Basics
92 Review: Genetica 3.5 Making textures for 3D from
photos just got easier
94 Review: Shade 10 Latest version of the modelling and
rendering software from Japan
96 Reviews: Books A selection of the latest books
from the 3D world
110 Subscribe today! You don’t want to miss an issue
and it will save you lots of cash
112 On the CD Discover the range of free goodies
on the CD in this issue
Inside guide to industry news, studios, expert opinion & education
100 Industry news Latest industry developments
and announcements revealed
102 The Insider: Loïc Zimmermann The lead character and concept artist
for Luma Pictures
104 Uni focus: Gnomon School of visual effects
We take a look at the acclaimed 3D courses on o� er
106 Studio Access: Sega Studios SF How the visuals were created for
the Iron Man 2 game
15
Inspiration • Interviews • Reviews and more
See yourartwork here…Create a gallery today at
Share your art, comment on other artists’ images
This image is reproduced w
ith the permission of A
utodesk, Inc. © 2005-2006. A
ll rights reserved.
8 ● 3DArtist
004_008_3DA_15 Front.indd 8 8/4/10 15:18:15
© Imagine Publishing Ltd No unauthorised copying or distribution

Not just fordummies
A clear, comprehensive series for people who want to start learningabout iPhone, iPad, Mac, Android and Photoshop
Also in this series
www.imaginebookshop.co.uk
BookazineseBooks • Apps
TM
App StoreKindle Store ImagineShop.co.ukHigh street
HIGH ST.BUY IN STORE
HIGH ST.
For Beginners range single Ad 230 x 297.indd 1 01/08/2011 15:57

Learn in style
Now available onAlso in this series
www.imaginebookshop.co.uk App StoreKindle Store ImagineShop.co.uk
BookazineseBooks • Apps
Discover more with the Book series’ expert, accessible tutorials for iPad, iPhone, Mac, Android, Photoshop, Windows and more
The
Series
High street
HIGH ST.BUY IN STORE
iPad
Printed full colour large format book
Kindle
TM
Feat
ured
art
ists
T H E G A L L E R YNine pages of great artwork from the 3D community
W E L C O M E T O T H E G A L L E R Y
Get your artwork featured in these pagesSimply send it to the 3D Artist Gallery. Here’s how…
You’ll be missing out on a thriving 3D community, but if you’d rather submit your work by email or post, here’s how. Make sure your image is at least 3,000 pixels on the longest side, save it as a maximum quality JPEG or zip it up as a TIFF and email it to the address below. Please include your contact details! If you’ve created a Pixar-beating animation and want to see that featured on the cover CD, then save it onto a CD and post it to us. You can also send your images on CD. The addresses are:
The Gallery, 3D Artist, Imagine Publishing, Richmond House, 33 Richmond Hill, Bournemouth, Dorset BH2 6EZ
Emai
l or p
ost
1. Register with usCheck out the website below and click on Register. Choose a username and password and you’re ready to go.www.3dartistonline.com2. Upload your imagesOnce registered, you can upload images to your gallery – there’s no limits on numbers but check the size criteria.
3. Tell us about them!Have an image you feel passionate about? Drop editorial an email at [email protected].
Hang your art in our online gallery and get selected for the magazine
Ente
r on
line
Comment on more great
3D art…Head straight over to
www.3dartistonline.com, register and you can leave
comments for other artists. Some of the people featured
here already have their galleries, so get online and
join our club! Create your gallery today: www.3dartistonline.com
Superb toy loco with a plastic fi nish, nestling on the settee
There’s a killer on the loose - a robot killer in a grimy urban setting
Faraz Sayyadi
Feodor Ivaneev
A painterly fi nish on this historical rendering
What a great combination of characters and colourful design
Red is the name, red is the colour in this sexy portrait shot
I have a lounge like this. Well, when I win the lottery I will
Maher Ragheb
Adam Potter
Hossein Afzali
Ruben D. Karamañites Arango
Delightful portrait with oh so subtle tones and soft, dewy lips
Wang Shiyong
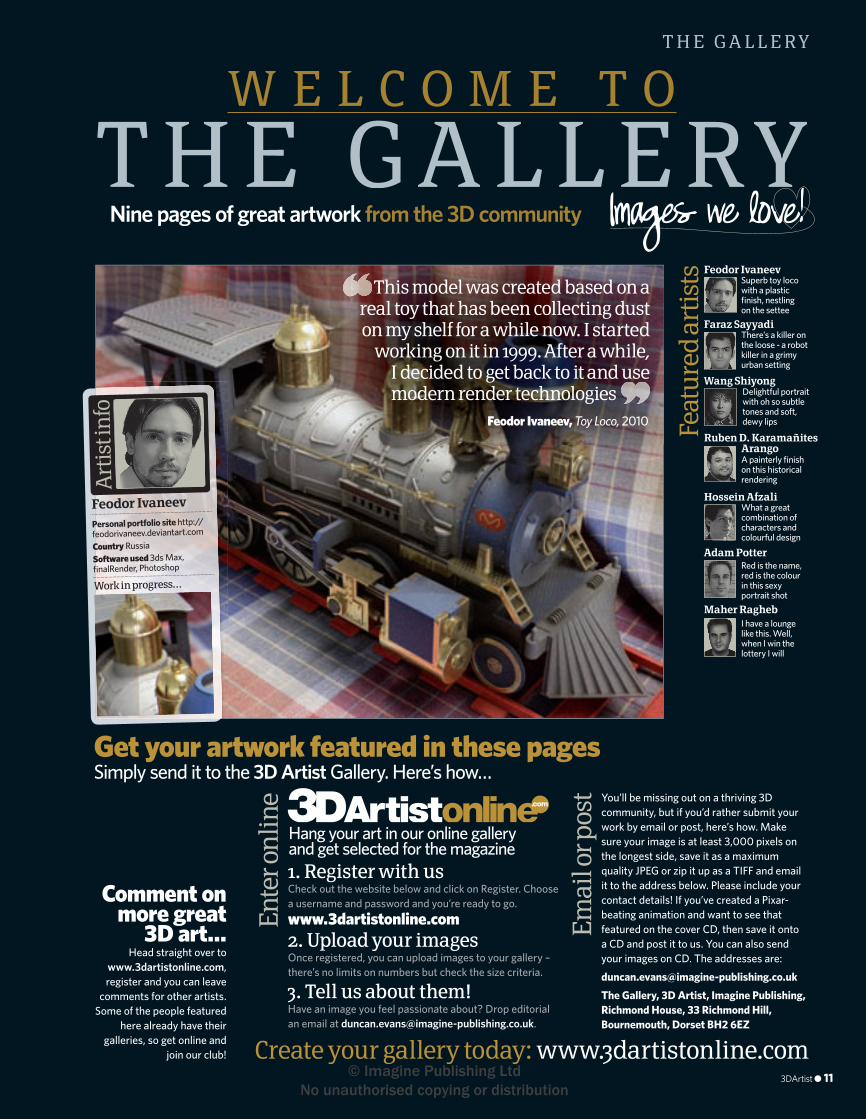
This model was created based on a real toy that has been collecting dust on my shelf for a while now. I started
working on it in 1999. After a while, I decided to get back to it and use modern render technologies
Feodor Ivaneev, Toy Loco, 2010
I decided to get back to it and use
Personal portfolio site http://feodorivaneev.deviantart.com
Country RussiaSoftware used 3ds Max, fi nalRender, Photoshop
Art
ist i
nfo
Feodor Ivaneev
Work in progress…
3DArtist ● 11
011-19_3DA_15 Gallery.indd 11 8/4/10 15:38:49
© Imagine Publishing Ltd No unauthorised copying or distribution
T H E G A L L E R Y
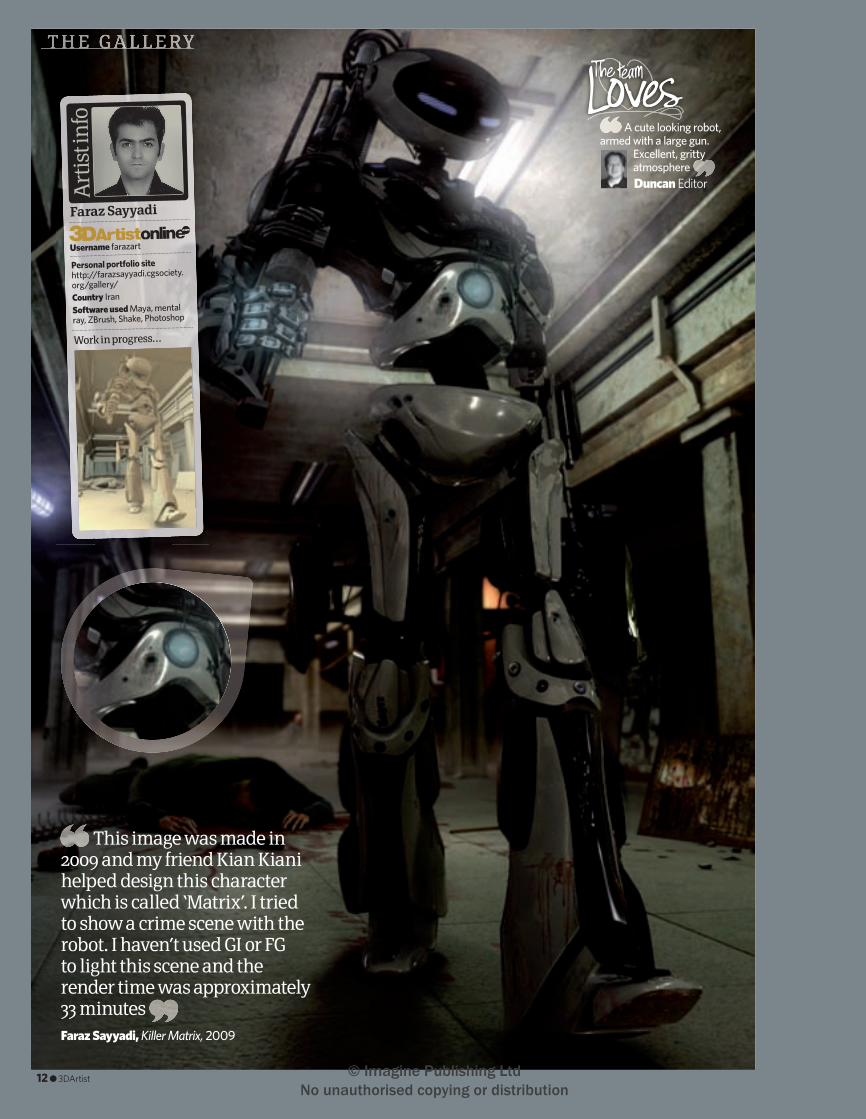
A cute looking robot, armed with a large gun.
Excellent, gritty atmosphereDuncan EditorA
rtis
t in
fo
Personal portfolio sitehttp://farazsayyadi.cgsociety.org/gallery/Country IranSoftware used Maya, mental ray, ZBrush, Shake, Photoshop
Faraz Sayyadi
Username farazart
Work in progress…
This image was made in 2009 and my friend Kian Kiani helped design this character which is called ‘Matrix’. I tried to show a crime scene with the robot. I haven’t used GI or FG to light this scene and the render time was approximately 33 minutesFaraz Sayyadi, Killer Matrix, 2009
12 ● 3DArtist
011-19_3DA_15 Gallery.indd 12 8/4/10 13:52:59
© Imagine Publishing Ltd No unauthorised copying or distribution
T H E G A L L E R Y
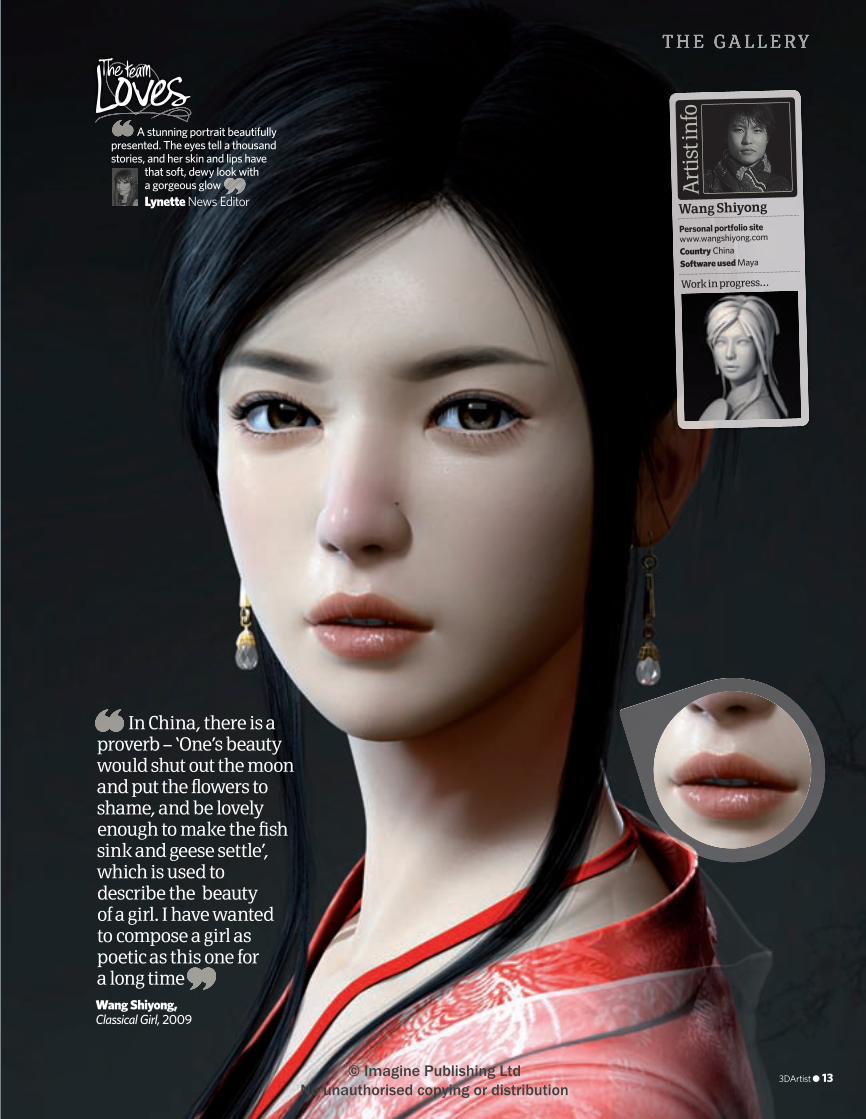
Lynette News Editor
A stunning portrait beautifully presented. The eyes tell a thousand stories, and her skin and lips have
that soft, dewy look with a gorgeous glow
In China, there is a proverb – ‘One’s beauty would shut out the moon and put the fl owers to shame, and be lovely enough to make the fi sh sink and geese settle’, which is used to describe the beauty of a girl. I have wanted to compose a girl as poetic as this one for a long timeWang Shiyong, Classical Girl, 2009
Personal portfolio site www.wangshiyong.comCountry ChinaSoftware used Maya
Art
ist i
nfo
Wang Shiyong
Work in progress…
3DArtist ● 13
011-19_3DA_15 Gallery.indd 13 8/4/10 13:53:19
© Imagine Publishing Ltd No unauthorised copying or distribution
T H E G A L L E R Y
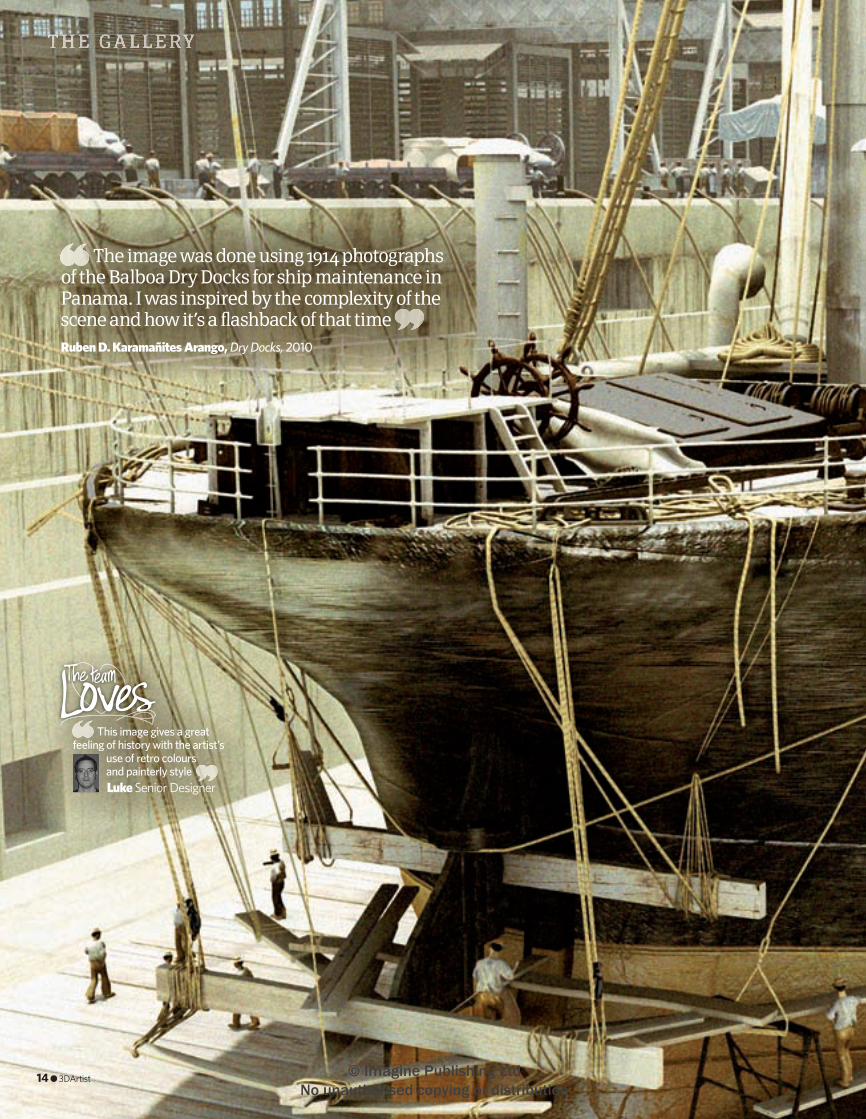
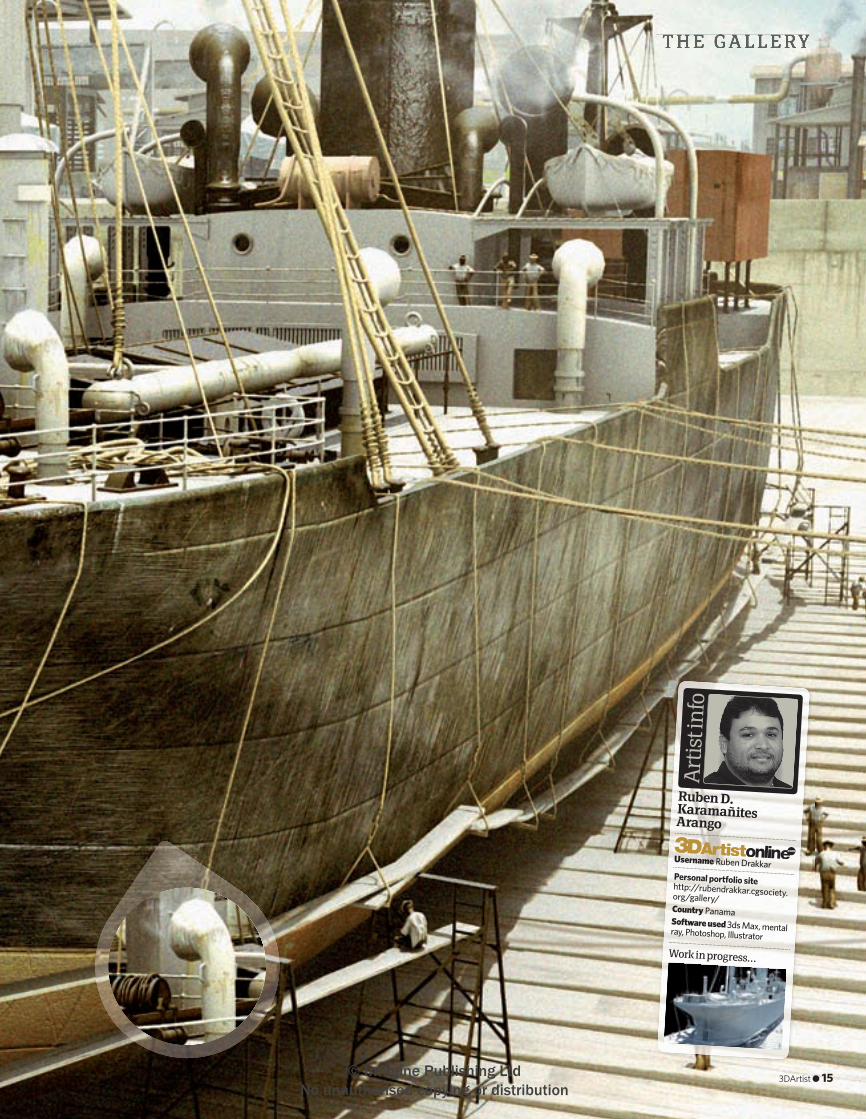
Ruben D. Karamañites Arango, Dry Docks, 2010
The image was done using 1914 photographs of the Balboa Dry Docks for ship maintenance in Panama. I was inspired by the complexity of the scene and how it’s a fl ashback of that time
This image gives a great feeling of history with the artist’s
use of retro colours and painterly style Luke Senior Designer
14 ● 3DArtist
011-19_3DA_15 Gallery.indd 14 8/4/10 13:53:36
© Imagine Publishing Ltd No unauthorised copying or distribution
T H E G A L L E R Y
Art
ist i
nfo
Personal portfolio site http://rubendrakkar.cgsociety.org/gallery/Country PanamaSoftware used 3ds Max, mental ray, Photoshop, Illustrator
Ruben D. Karamañites Arango
Username Ruben Drakkar
Work in progress…
3DArtist ● 15
011-19_3DA_15 Gallery.indd 15 8/4/10 13:53:55
© Imagine Publishing Ltd No unauthorised copying or distribution
Art
ist i
nfo
Personal portfolio sitehttp://rysh.netCountry IranSoftware used 3ds Max, Mudbox, V-Ray, Photoshop
Hossein Afzali
Username Rysh
Work in progress…
T H E G A L L E R Y
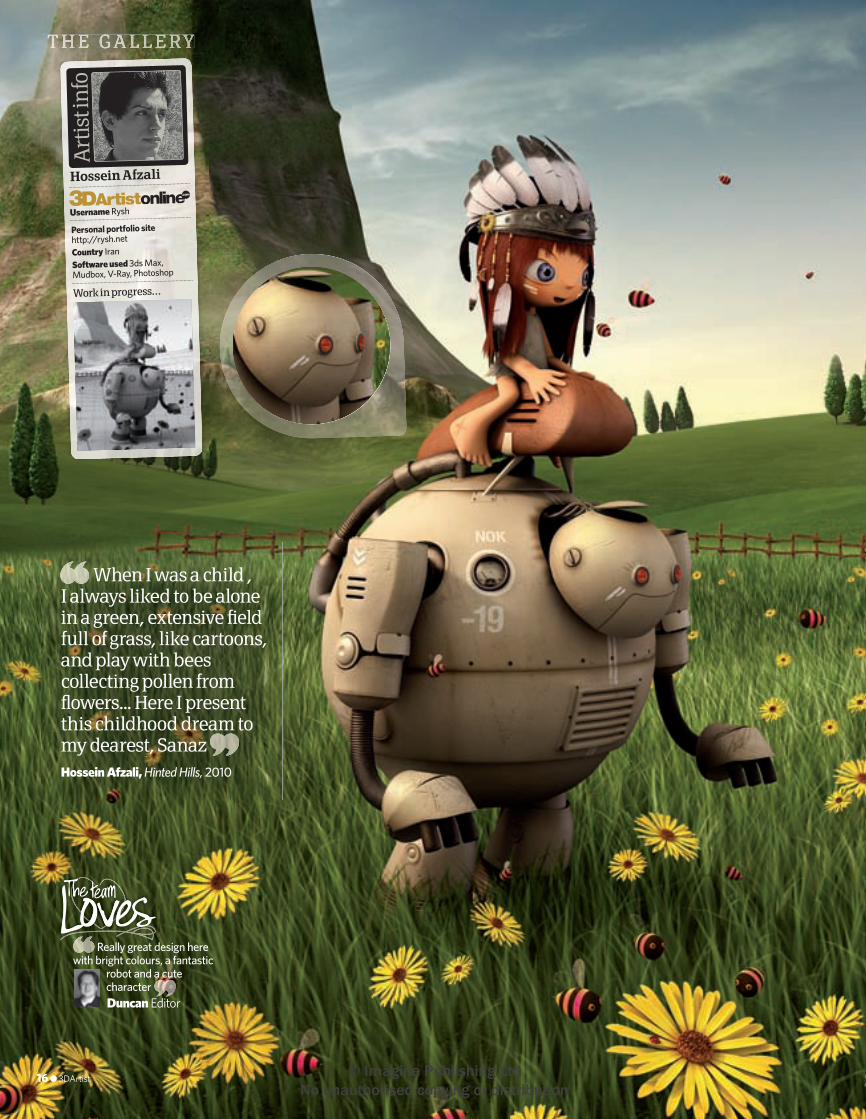
When I was a child , I always liked to be alone in a green, extensive fi eld full of grass, like cartoons, and play with bees collecting pollen from fl owers... Here I present this childhood dream to my dearest, SanazHossein Afzali, Hinted Hills, 2010
Really great design here with bright colours, a fantastic
robot and a cute characterDuncan Editor
16 ● 3DArtist
011-19_3DA_15 Gallery.indd 16 8/4/10 14:33:56
© Imagine Publishing Ltd No unauthorised copying or distribution
Art
ist i
nfo
Personal portfolio sitehttp://phoenix4.cgsociety.org/gallery/Country AustraliaSoftware used 3ds Max, Poser, V-Ray
Adam Potter
Username phoenix4
Work in progress…
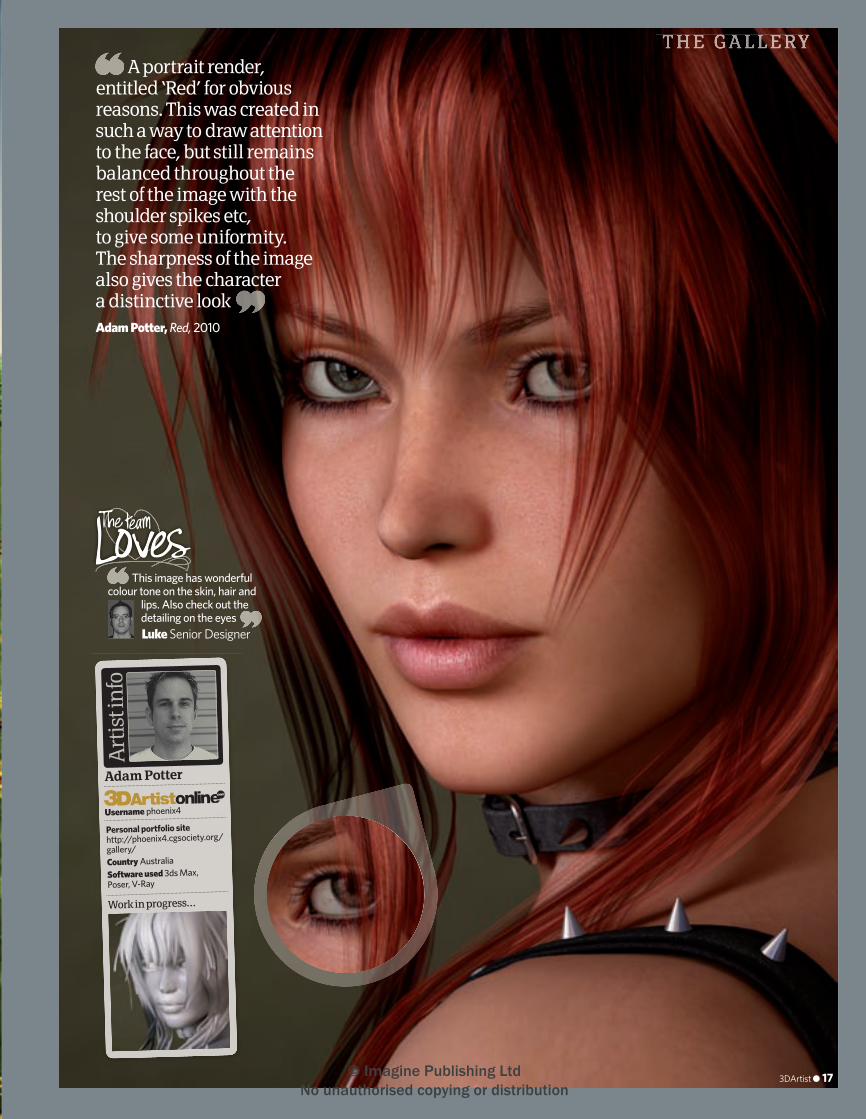
T H E G A L L E R YA portrait render,
entitled ‘Red’ for obvious reasons. This was created in such a way to draw attention to the face, but still remains balanced throughout the rest of the image with the shoulder spikes etc, to give some uniformity. The sharpness of the image also gives the character a distinctive lookAdam Potter, Red, 2010
This image has wonderful colour tone on the skin, hair and
lips. Also check out the detailing on the eyesLuke Senior Designer
3DArtist ● 17
011-19_3DA_15 Gallery.indd 17 8/4/10 13:56:01
© Imagine Publishing Ltd No unauthorised copying or distribution
Art
ist i
nfo
Personal portfolio sitewww.4grey.comCountry SyriaSoftware used Autocad, 3ds Max, Photoshop
Maher Ragheb
Username Artist-Lounge
Work in progress…
18 ● 3DArtist
011-19_3DA_15 Gallery.indd 18 8/4/10 13:56:18
© Imagine Publishing Ltd No unauthorised copying or distribution

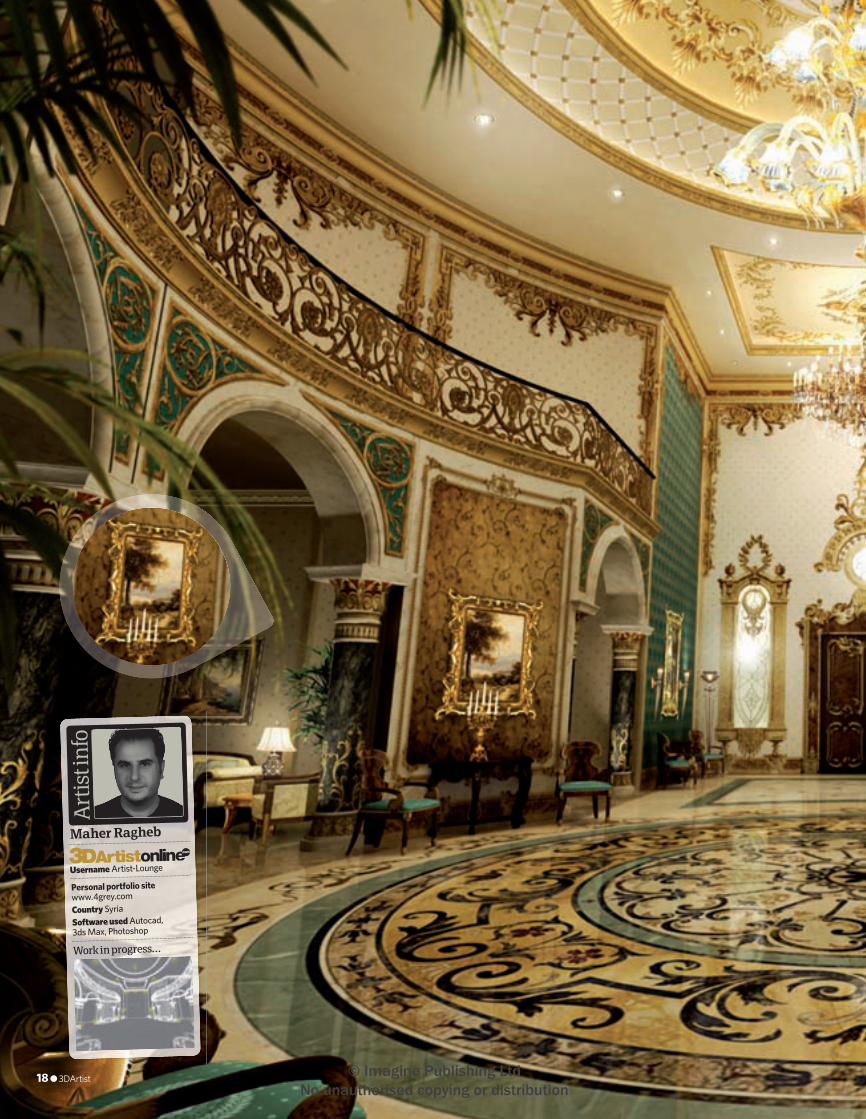
The image is part of a presentation for the interior
design of a big palace that has an area of approximately 2,500 sq/m. I wanted to show the
regality of the imperial palace and the details implemented. I
used Autocad and 3ds Max to build it up and did some fi nal
editing in Photoshop
Maher Ragheb, Entrance to a Palace, 2010
The image is part of a
The symmetry is broken nicely on either side with subtle di� erences that keep you roaming
this entrance hall, studying all the wonderful detailsLynette News Editor
3DArtist ● 19
011-19_3DA_15 Gallery.indd 19 8/4/10 13:56:33
© Imagine Publishing Ltd No unauthorised copying or distribution

15
A luxury gallery to host exhibitions, events and cosy art workshops
GameArtisans.org, which already brings the CG community international game art competitions like the Dominance War, has launched a fl agship
studio in Canada: Game Artisans Montreal.Fred Hultqvist, founder and studio manager of Game
Artisans Montreal, brings us a gallery lounge that aims to exhibit and celebrate art while o� ering a place for artists to grow and learn.
With the space covering two fl oor elevations, Fred told 3D Artist, “It will be a sanctuary for artists wanting a home away from home or a place to hang out after a stressful day at work or school.” There will be various forms of training, such as sketch groups with live models, and Game Art Master Ed Sessions (GAMES), which are intensive programmes based on the popular online game art challenges.
With the Dominance War competition having become a staple event in the CG community calendar over the last four years, it was disappointing for many that the main Dominance War V event would be postponed until 2011. However, the launch exhibition at Game Artisans Montreal, aptly titled The Art of Dominance War, o� ers visitors the chance to celebrate the past successes of the extraordinarily popular competition, giving an insight into the creative geniuses behind the art produced as a response to the annual challenge briefs. Fred commented: “It o� ers an unprecedented look at the artistic production, style and thoughts of artists from various cultures, and symbolises the creative achievement of artists pushing the envelope for next-generation games.”
Dominance War IV 3D winner, Vadim Bakhlychev (http://slipgatecentral.cghub.com) experienced life-changing events at the tail end of his big win: a job o� er from Blizzard, marriage and relocation to the USA. “To sum things up, the whole thing with the mad DWIV rush and lots of energy drinks was totally worth it,” Vadim said. “It’s a great opportunity to show your artwork and skills to the worldwide game-CG community and possibly get a job o� er you can’t refuse.”
The fi rst Dominance War V mini-challenge will start in November 2010. Visit www.gameartisans.org to keep up to date on competition and gallery developments.
The latest news, tools and resources for the 3D artist
It should also be a place where artists of all levels can come in to relax, hang out and get help finding a career in what artists love creating – Game Art
Have you entered the Dominance War contests? Want to show o� your entry or discuss other people’s work? Head along to the forum at www.3dartistonline.com/forum
With support from the CGTalk.ru community, Vadim Bakhlychev created this low-poly game character for Dominance War IV. And won!
Game art gallery meets lounge
Fred Hultqvist – founder and studio manager
20 ● 3DArtist
020-23_3DA_15 Community News.ind20 20 8/4/10 15:49:39
© Imagine Publishing Ltd No unauthorised copying or distribution

The SHC (Super Hatchback Concept) is Jamie Martin’s vision of the future for eco-friendly cars. Intended as a potential future rival for cars such as the Honda Civic and Ford Focus, the SHC has been visualised to demonstrate that a ‘green’ hatchback needn’t be dull and uninspiring. With the performance and handling of a sports car, coupled with the economic considerations and e� ciency of a town car, the SHC is a glimpse into the future of the eco-friendly hatchback.
A complete gallery of high-resolution imagery, teaser video and more information on Jamie’s concept can be found on the dedicated microsite at www.jamiemartindesign.co.uk/SHC.html.
News, tools and resources ● Community
Festival diaryA guide to forthcoming events in the 3D art industry calendar
Festival diary
Sven has been working freelance for games, movies and toys since 2008, while creating a wealth of stunning characters for his personal online gallery.
With a fantastic collection of extraordinary characters to Sven’s credit, from soldiers and marines to yetis and superheroes, Goblin is the latest in his line-up: a devilish creature portrait made with the most superb attention to detail and texturing touches. Having started out life as just a quick ZBrush doodle, this impressive fi nal render, done in Maya, is captivating and full of personality.
You’ll fi nd plenty of inspiration from Sven’s other character masterpieces on his website at www.daybreakcg.com.
Hybrid vehicleMating a supercar with a hatchback
Time travel for dummiesIT’S ART is running an art contest for 2D, 3D, comic and video artists
‘A time-traveller’s guide for dummies’ is the theme of the latest contest hosted by IT’S ART, open until 30 June 2010. The challenge? To illustrate a fake time-traveller’s guide in response to the concept: “For more than a decade,
time travelling has been allowed for everyone. Although it’s secure nowadays, the government wants to produce a little guide for travellers to warn them about annoyances and how to avoid little problems.” Artists are asked to choose 2D, 3D, comic or video as their category, and to use their sense of humour!
With over $30,000 in prizes, sponsors include eyeon, e-on software, Luxology, Pixologic, Corel, Smith Micro, Eat 3D, TopoGun, and many more. Competition rules and further details can be found at www.itsartmag.com/features/timetravellers.
Freelance artist Sven Juhlin adds to his portfolio of awesome characters with this latest mischievous creature
Sven Juhlin www.daybreakcg.com
Beautifully grotesque
A legendary evil goblin is the latest addition to Sven’s character gallery
Freelance senior visual e� ects artist Jelmer Boskma currently resides in Vancouver, BC, Canada, where he works full-time as a digital modeller, texture and concept artist, with a number of feature fi lms to his credit. Exploring facial expressions in ZBrush, Jelmer has created a series of 15 portraits of a friendly troll – all made using the same model. First of all, a fairly dense model was made in Maya to ensure it could support a decent amount of deformation and changes in expression. Jelmer told 3D Artist, “ZBrush was used to sculpt surface detail which was then later applied back onto the model through Displacement and Bump maps.”
Jelmer Boskma uses ZBrush to capture a range of expressions from one modelJelmer Boskma www.jelmerboskma.com
Exploring expressions
events
Comic-Con 2010Date 22–25 JulyLocation San Diego, USAComic-Con has become the show to attend for comic fans worldwide. The exhibition hall covers over 460,000 square feet, and the convention has the largest attendee fi gures of any in the country. Special guests this year include legendary comics creator Neal Adams, while the Artists’ Alley gives visitors the opportunity to meet many of their favourite creators who will be selling original and exclusive work. www.comic-con.org
SIGGRAPH 2010Date 25–29 JulyLocation Los Angeles, USAArguably the event of the year for CG artists far and wide, SIGGRAPH 2010 is to be held in Los Angeles this year and, as always, will be exploding with the latest in computer graphics and interactive techniques. It’s the best place to be if you want to get an insight into what’s happening in research, animation, art, software, visualisation, games, visual e� ects and education, and perfect for building up your contacts.You can also volunteer to work at SIGGRAPH, which is a great opportunity for your own professional development. www.siggraph.org/s2010
Gamescom 2010Date 19–22 AugustLocation Cologne, GermanyIndoor and outdoor performances, live acts and highlights from the gaming world are what Gamescom promises visitors to this year’s convention. Last year’s event boasted 245,000 visitors and 458 exhibitors from 31 countries, making Gamescom the largest games trade fair in the world. www.gamescom-cologne.com/en
exhibitors from 31 countries, making Gamescom the largest games trade
3DArtist ● 21
020-23_3DA_15 Community News.ind21 21 8/4/10 14:00:06
© Imagine Publishing Ltd No unauthorised copying or distribution
15
The latest news, tools and resources for the 3D artist
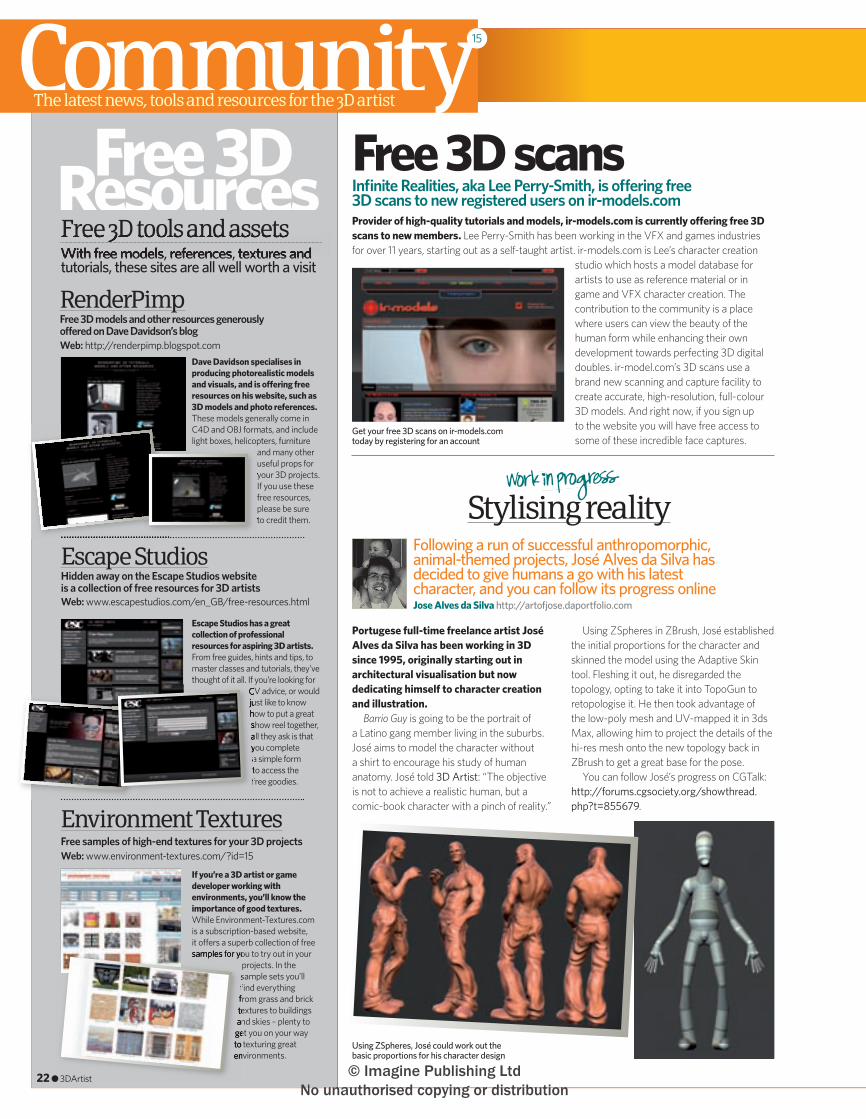
Stylising reality
Portugese full-time freelance artist José Alves da Silva has been working in 3D since 1995, originally starting out in architectural visualisation but now dedicating himself to character creation and illustration.
Barrio Guy is going to be the portrait of a Latino gang member living in the suburbs. José aims to model the character without a shirt to encourage his study of human anatomy. José told 3D Artist: “The objective is not to achieve a realistic human, but a comic-book character with a pinch of reality.”
Using ZSpheres in ZBrush, José established the initial proportions for the character and skinned the model using the Adaptive Skin tool. Fleshing it out, he disregarded the topology, opting to take it into TopoGun to retopologise it. He then took advantage of the low-poly mesh and UV-mapped it in 3ds Max, allowing him to project the details of the hi-res mesh onto the new topology back in ZBrush to get a great base for the pose.
You can follow José’s progress on CGTalk: http://forums.cgsociety.org/showthread.php?t=855679.
Following a run of successful anthropomorphic, animal-themed projects, José Alves da Silva has decided to give humans a go with his latest character, and you can follow its progress onlineJose Alves da Silva http://artofjose.daportfolio.com
Free 3D tools and assetsWith free models, references, textures and tutorials, these sites are all well worth a visit
Free 3D tools and assetsWith free models, references, textures and
RenderPimpFree 3D models and other resources generously offered on Dave Davidson’s blogWeb: http://renderpimp.blogspot.com
Escape StudiosHidden away on the Escape Studios website is a collection of free resources for 3D artistsWeb: www.escapestudios.com/en_GB/free-resources.html
Environment TexturesFree samples of high-end textures for your 3D projectsWeb: www.environment-textures.com/?id=15
If you’re a 3D artist or game developer working with environments, you’ll know the importance of good textures. While Environment-Textures.com is a subscription-based website, it o� ers a superb collection of free samples for you to try out in your
projects. In the sample sets you’ll fi nd everything from grass and brick textures to buildings and skies – plenty to get you on your way to texturing great environments.
samples for you to try out in your
sample sets you’ll fi nd everything from grass and brick textures to buildings and skies – plenty to get you on your way to texturing great environments.
Escape Studios has a great collection of professional resources for aspiring 3D artists. From free guides, hints and tips, to master classes and tutorials, they’ve thought of it all. If you’re looking for
CV advice, or would just like to know how to put a great show reel together, all they ask is that you complete a simple form to access the free goodies.
CV advice, or would just like to know how to put a great show reel together, all they ask is that you complete a simple form to access the free goodies.
Dave Davidson specialises in producing photorealistic models and visuals, and is o� ering free resources on his website, such as 3D models and photo references. These models generally come in C4D and OBJ formats, and include light boxes, helicopters, furniture
and many other useful props for your 3D projects. If you use these free resources, please be sure to credit them.
your 3D projects.
free resources,
to credit them.
Using ZSpheres, José could work out the basic proportions for his character design
Provider of high-quality tutorials and models, ir-models.com is currently o� ering free 3D scans to new members. Lee Perry-Smith has been working in the VFX and games industries for over 11 years, starting out as a self-taught artist. ir-models.com is Lee’s character creation
studio which hosts a model database for artists to use as reference material or in game and VFX character creation. The contribution to the community is a place where users can view the beauty of the human form while enhancing their own development towards perfecting 3D digital doubles. ir-model.com’s 3D scans use a brand new scanning and capture facility to create accurate, high-resolution, full-colour 3D models. And right now, if you sign up to the website you will have free access to some of these incredible face captures.
Free 3D scansInfi nite Realities, aka Lee Perry-Smith, is o� ering free 3D scans to new registered users on ir-models.com
Get your free 3D scans on ir-models.com today by registering for an account
22 ● 3DArtist
020-23_3DA_15 Community News.ind22 22 8/4/10 14:00:37
© Imagine Publishing Ltd No unauthorised copying or distribution
News, tools and resources ● Community
UV Master is a new plug-in for ZBrush 3.2 Mac and 3.5R3 WIN that allows artists to quickly create high-quality UV maps. It’s very easy to master: simply select your model’s lowest level of subdivision, click UV Master’s Unwrap button – and that’s it! The result is your model’s UV maps, which are easy to understand and free from any texture distortion.
Master your UVs in ZBrush
Poser Pro 2010 is the latest in professional 3D fi gure design and animation from Smith Micro. Made specifi cally for professional artists and production teams, this 2010 version is even easier to use than ever before with its improved interface, and saves both time and resources in the production pipeline with its pre-rigged characters and library of assets.
Poser for professionals
Software shortsGet the lowdown on updates and launches
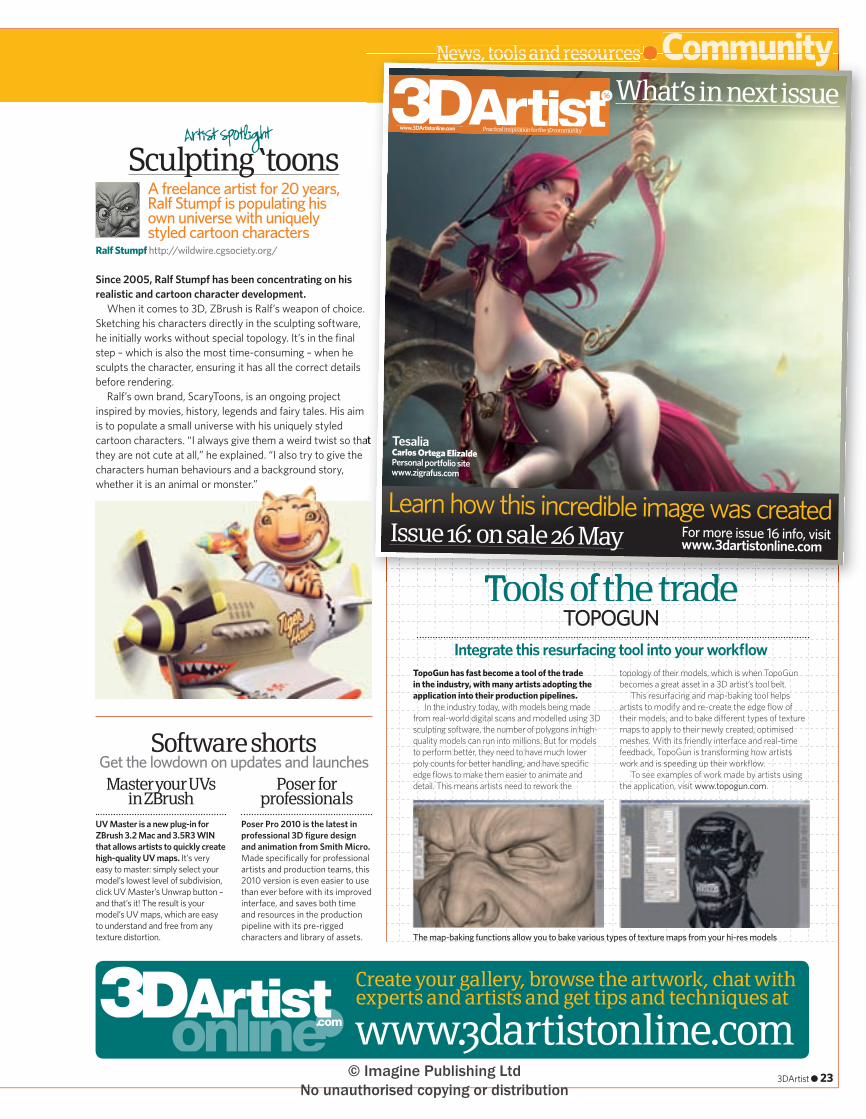
Sculpting ‘toons
Since 2005, Ralf Stumpf has been concentrating on his realistic and cartoon character development.
When it comes to 3D, ZBrush is Ralf’s weapon of choice. Sketching his characters directly in the sculpting software, he initially works without special topology. It’s in the fi nal step – which is also the most time-consuming – when he sculpts the character, ensuring it has all the correct details before rendering.
Ralf’s own brand, ScaryToons, is an ongoing project inspired by movies, history, legends and fairy tales. His aim is to populate a small universe with his uniquely styled cartoon characters. “I always give them a weird twist so that they are not cute at all,” he explained. “I also try to give the characters human behaviours and a background story, whether it is an animal or monster.”
A freelance artist for 20 years, Ralf Stumpf is populating his own universe with uniquely styled cartoon characters
Ralf Stumpf http://wildwire.cgsociety.org/
Integrate this resurfacing tool into your workfl ow
TOPOGUN
Create your gallery, browse the artwork, chat with experts and artists and get tips and techniques at
www.3dartistonline.com
News, tools and resources ● Community
cartoon characters. “I always give them a weird twist so that
www.3DArtistonline.com Practical inspiration for the 3D community
16 What’s in next issue
Issue 16: on sale 26 MayLearn how this incredible image was created
For more issue 16 info, visit www.3dartistonline.com
TesaliaCarlos Ortega ElizaldePersonal portfolio sitewww.zigrafus.com
The map-baking functions allow you to bake various types of texture maps from your hi-res models
TopoGun has fast become a tool of the trade in the industry, with many artists adopting the application into their production pipelines.
In the industry today, with models being made from real-world digital scans and modelled using 3D sculpting software, the number of polygons in high-quality models can run into millions. But for models to perform better, they need to have much lower poly counts for better handling, and have specifi c edge fl ows to make them easier to animate and detail. This means artists need to rework the
topology of their models, which is when TopoGun becomes a great asset in a 3D artist’s tool belt.
This resurfacing and map-baking tool helps artists to modify and re-create the edge fl ow of their models, and to bake di� erent types of texture maps to apply to their newly created, optimised meshes. With its friendly interface and real-time feedback, TopoGun is transforming how artists work and is speeding up their workfl ow.
To see examples of work made by artists using the application, visit www.topogun.com.
3DArtist ● 23
020-23_3DA_15 Community News.ind23 23 8/4/10 14:01:05
© Imagine Publishing Ltd No unauthorised copying or distribution
15
The latest news, tools and resources for the 3D artistReaders’ Gal leryReaders’ Gal lery
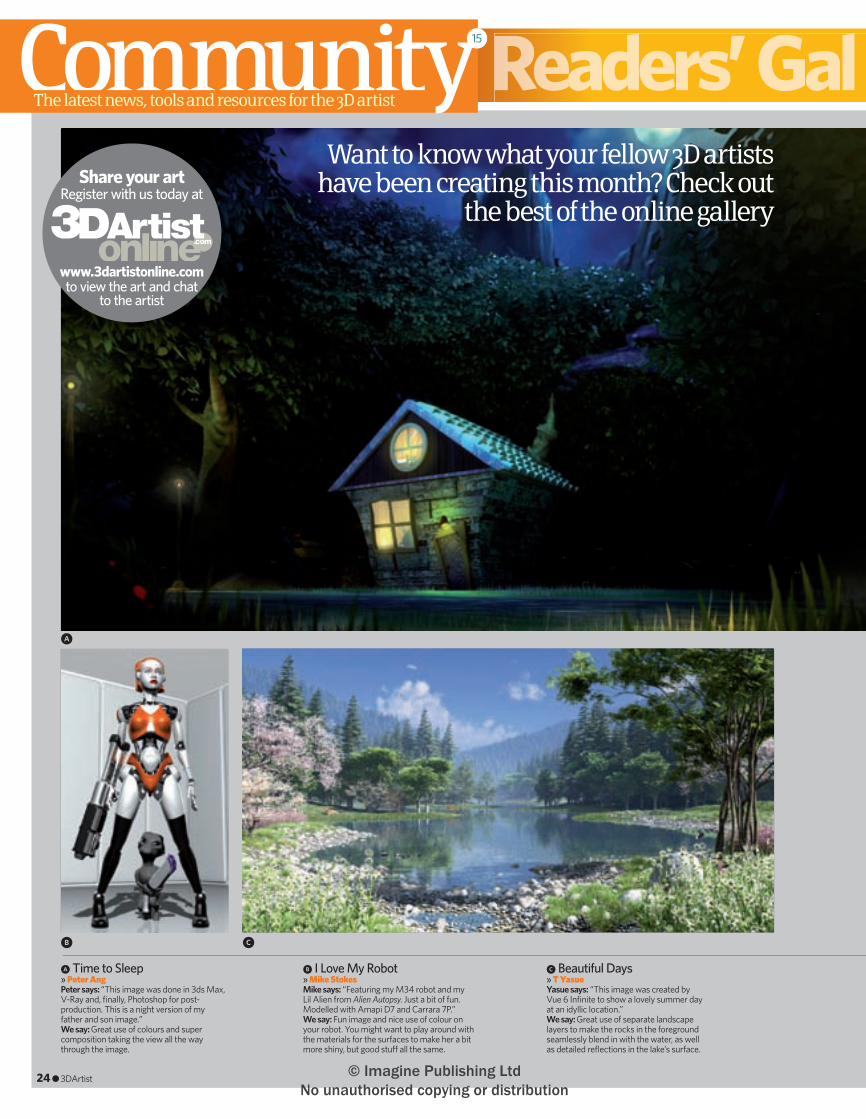
c Beautiful Days» T YasueYasue says: “This image was created by Vue 6 Infi nite to show a lovely summer day at an idyllic location.”We say: Great use of separate landscape layers to make the rocks in the foreground seamlessly blend in with the water, as well as detailed refl ections in the lake’s surface.
a Time to Sleep» Peter AngPeter says: “This image was done in 3ds Max, V-Ray and, fi nally, Photoshop for post-production. This is a night version of my father and son image.”We say: Great use of colours and super composition taking the view all the way through the image.
b I Love My Robot» Mike StokesMike says: “Featuring my M34 robot and my Lil Alien from Alien Autopsy. Just a bit of fun. Modelled with Amapi D7 and Carrara 7P.”We say: Fun image and nice use of colour on your robot. You might want to play around with the materials for the surfaces to make her a bit more shiny, but good stu� all the same.
Share your artRegister with us today at
www.3dartistonline.comto view the art and chat
to the artist
Want to know what your fellow 3D artists have been creating this month? Check out
the best of the online gallery
24 ● 3DArtist
A
B C
024-25_3DA_15 Community Gallery.24 24 8/4/10 14:04:24
© Imagine Publishing Ltd No unauthorised copying or distribution
News, tools and resources ● CommunityReaders’ Gal leryReaders’ Gal leryPictures of the weekTHESE ARE THE IMAGES THAT
WERE AWARDED PICTURE OF THE WEEK IN THE LAST MONTH
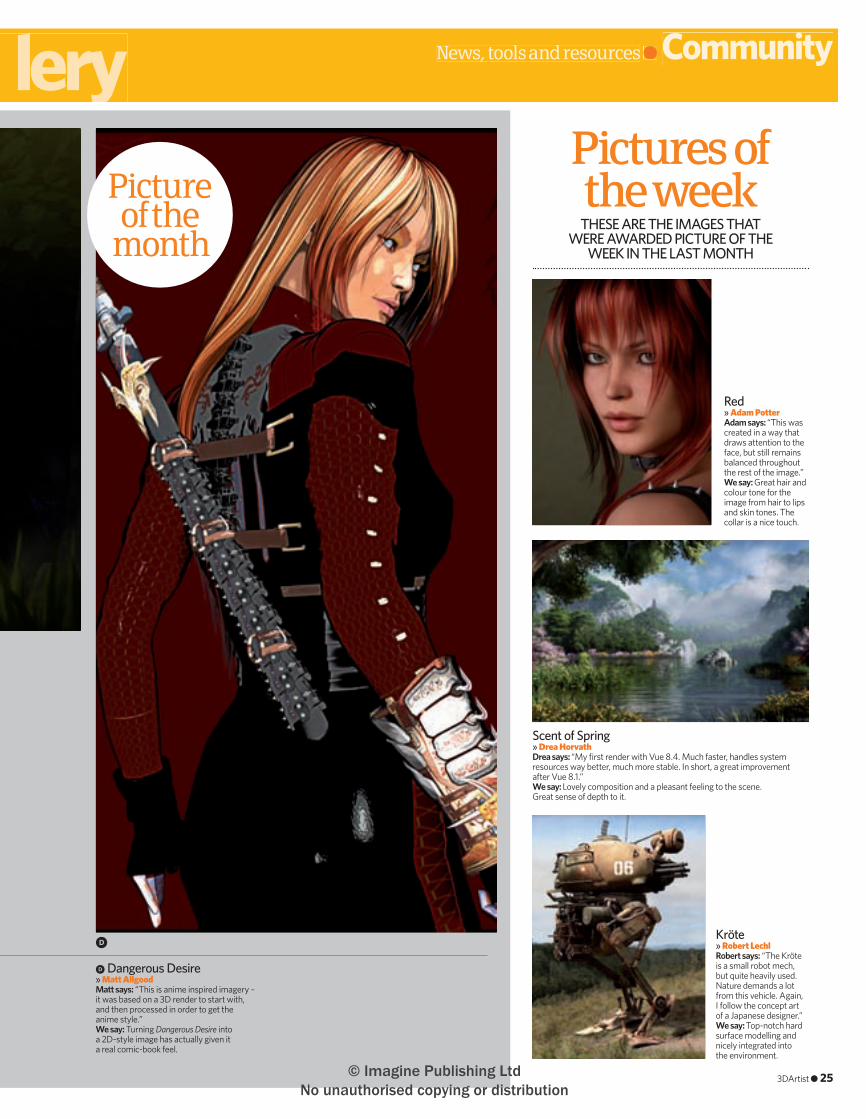
d Dangerous Desire» Matt Allgood Matt says: “This is anime inspired imagery – it was based on a 3D render to start with, and then processed in order to get the anime style.”We say: Turning Dangerous Desire into a 2D-style image has actually given it a real comic-book feel.
Red» Adam Potter Adam says: “This was created in a way that draws attention to the face, but still remains balanced throughout the rest of the image.”We say: Great hair and colour tone for the image from hair to lips and skin tones. The collar is a nice touch.
Scent of Spring» Drea HorvathDrea says: “My fi rst render with Vue 8.4. Much faster, handles system resources way better, much more stable. In short, a great improvement after Vue 8.1.”We say: Lovely composition and a pleasant feeling to the scene. Great sense of depth to it.
Kröte» Robert LechlRobert says: “The Kröte is a small robot mech, but quite heavily used. Nature demands a lot from this vehicle. Again, I follow the concept art of a Japanese designer.”We say: Top-notch hard surface modelling and nicely integrated into the environment.
3DArtist ● 25
Picture of the
month
D
024-25_3DA_15 Community Gallery.25 25 8/4/10 14:04:57
© Imagine Publishing Ltd No unauthorised copying or distribution

15
The latest news, tools and resources for the 3D artist
Have your sayWrite, email or use the website forums to get in touch about the magazine, your problems or triumphs
Childhood memoriesI am sending you my artwork, Childhood Memories – if it has a chance to get selected for the magazine, that would be great! Here’s a short description about the image: I was walking through a dense forest when I suddenly came upon a glade where there was a really old, falling apart house. This was my inspiration for this picture. I tried to imagine what this house was like when people still lived there. I tried to give the picture a warm, romantic mood. I used 3ds Max, Vue and Photoshop to make it.
Simon Wendler, by email
Great image, with a really quaint country feel. The modelling of the house is great, though perhaps the textures at the front porch could do with just a bit more attention.
Cooking up 3DI’m a Brazilian graphic designer, currently living in London and working as a chef. I’m thinking of attending a VFX course at Escape Studios. It’s a three-month full-time course, which includes about 360 hours of learning Maya, Photoshop, PF Track, Boujou, Shake, ZBrush and HDR Shop. Do you think it could help me become a VFX professional? In other words, would I get a job in a good VFX company in London, Rio de
Email the team directly with your letter [email protected] in and leave your comments on the forumwww.3dartistonline. com/forumPOST TO: The Editor, 3D Artist, Imagine Publishing, Richmond House, 33 Richmond Hill, Bournemouth, Dorset BH2 6EZ, UK
Send your letters to…
Childhood MemoriesGreat building design from Simon with a real sense of times gone by
26 l 3DArtist
Janeiro or wherever? It is really important for me to know as I will have to pay out a big amount of money. I really would appreciate your help.
Alessandro Thomazini, by email
It’s a tough call to make blind, because a lot will depend on your ability and your showreel. Really, it’s what you can produce and show companies that will get you the job. If you have enough educational background already and can use the Escape Studios’ course to really bring it up to a level where you can create a killer showreel, then you’ve got every chance of getting a job. If, however, your work after the course is no better than that of a Year 1 or Year 2 university student, you’re going to struggle. On the whole, with a good showreel, you should be able to get an entry-level job in the industry.
There’s an app for thatI have downloaded the 3D Artist app from iTunes and used it to get ‘out-of-stock’ copies of 3DA. This is a nice little application that, when I purchase an iPad, will enable me to get rid of the piles of old copies that seem to accumulate, because I have the ‘can’t get rid of that, one of the articles may come in useful some day’ attitude!
026-27_3DA_15 Letters page.indd 26 8/4/10 14:02:09
© Imagine Publishing Ltd No unauthorised copying or distribution
News, tools and resources ● Community
My only concern is that if I take out a subscription for the magazine (must have the CD), do I have to buy the magazine for the app as well? It would be so useful to have a combined one or the ability to download (for a limited time?) the whole disc content for a more expensive eMag subscription – though I know there may be copyright issues with that.
Liam Collins, by email
The app-based version comes out a month after the printed one, so it doesn’t a� ect sales and they aren’t synchronised anyway. At the current time, there are no plans to o� er a combined mag/digital version because of that. There are both copyright and delivery problems with o� ering an electronic download of the disc – the server bandwidth needed would dramatically push our costs up, so it’s not an option at the moment.
Across the pondRecently I have noticed that issues of your magazine have not been showing up on the shelves of the local Borders and Barnes and Noble bookstores here in Tampa, FL. Someone even suggested that your publication has gone out of business, which would not be surprising considering the current economic environment. A search for your magazine online turns up a number of links to a (now defunct?) site with a similar name. Can someone tell me if issues have been published after November 2009? If so, when can we expect them to turn up over here in the United States? I would subscribe, but I suspect that there would be shipping issues and a subscription might not be the proper workaround.
Bob Bennett, by email
Nope, we’re still very much here and now up to issue 15. Our website is www.3dartistonline.com where you can order the latest issues directly, though getting a subscription is the cheapest way for US readers to get the mag. Distribution in the US is done at a local level, so it’s down to your local distributor to order the mags and get them on the shelves. We’re selling quite well in other areas of the USA.
Appearing in 3D ArtistI’m writing to you from Italy and I have a question. If I write a tutorial for you, a work in progress of my last creation, Fairies and Cherries, which I have uploaded on your website www.3dartistonline.com/show_image. php? imageID=3350&page=1, is it possible, in the future, to see it published in the magazine? I buy every issue of the fantastic and colourful 3D Artist, and to see my work published within it one day would be a dream for me.
Michele Saporito, by email
Well, we can make that dream come true here by publishing it on the Letters page. As far as tutorials go, these are commissioned by the Editor from the best artwork being made by 3D artists. This is pretty good, so keep practising.
Blender or Maya?I am emailing from Sydney, Australia. I bought my fi rst copy of 3D Artist and love it – great bedtime reading, but not the best habit to get into as it often leaves me daydreaming about ambitions rather than sleeping.
Here’s my story: I’m 33, looking for a hobby that may possibly lead to a change of career, and that hobby is 3D animation. I spent my teenage years drawing cartoons and did work experience at Walt Disney Animation Australia, and some 15 years later I fi nd myself wanting to fulfi l that dream, as I opted for a career in audio production. My wife is supportive of me in every way, which makes my new aspiration as an animator all the more exciting, even though a step outside of my comfort zone.
My question to you is, should I use Blender or Maya? I have done plenty of internet research, and while everything points to Maya, I have seen Pixar-style animation results from Blender.
I am totally new to all this. It would be awesome if your mag ever had time to do a story on software and hardware, the introductory package to buy, basically a fail-proof shopping list. I am not surrounded by like-minded people, or young and free enough to take on an internship. 3D Artist is my current ‘go to’ for everything, as Google has provided too many debates and congestion regarding options.
I am coming to you simply, and hoping to be told what to do.Kacey Baker, by email
In issue 10, we covered all the main software apps, what they are used for and how easy they are to learn. In issue 13, we covered the main job fi elds in 3D from fi lm to architecture. A combination of the two should be ideal for judging what you need. If you want to look to use the software for a career change, then my suggestion would have to be Maya for fi lm, 3ds Max for architecture and design, and also CINEMA 4D for both fi lm/TV and design. For Hollywood projects Maya is the king, but is correspondingly very complex and expensive. I would recommend Blender for hobbyists because it isn’t used anything like as much commercially as the other packages.
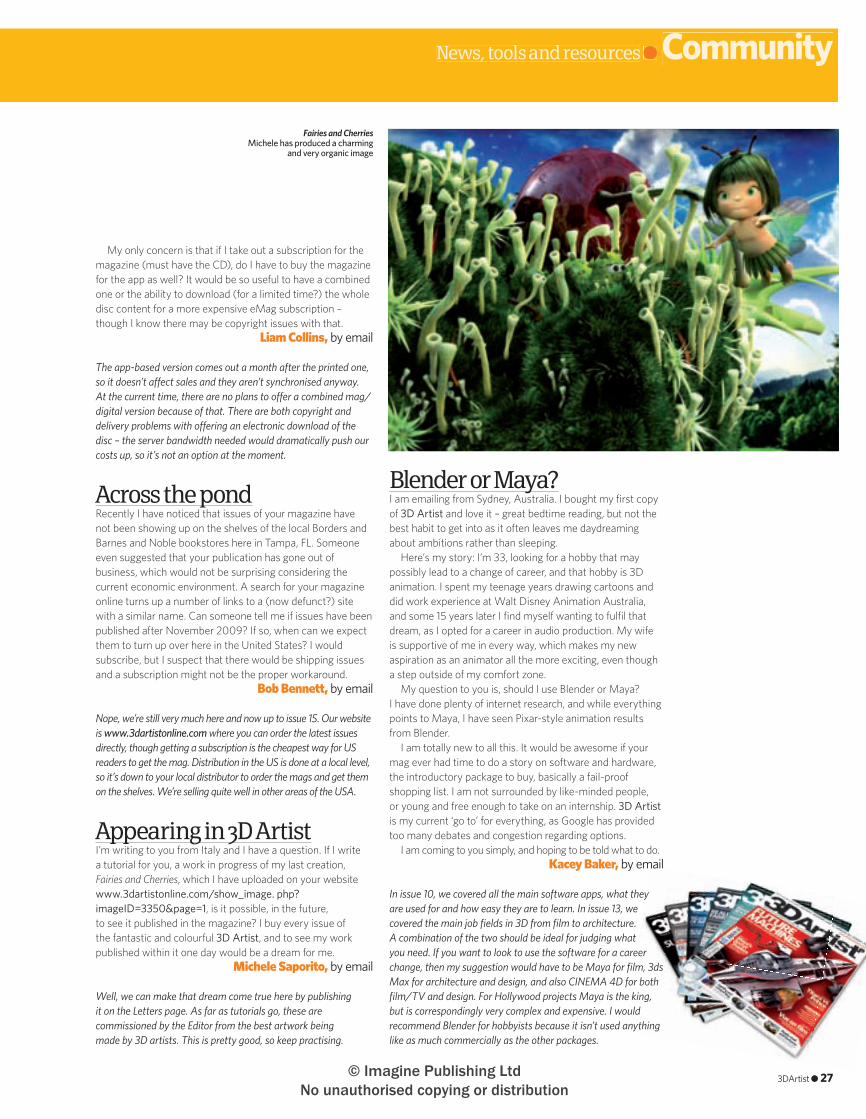
Fairies and CherriesMichele has produced a charming
and very organic image
3DArtist ● 27
026-27_3DA_15 Letters page.indd 27 8/4/10 14:02:28
© Imagine Publishing Ltd No unauthorised copying or distribution
Interview● Daniel Simon● Daniel Simon●
Company Cosmic MotorsFounded 2005
Company websitehttp://danielsimon.com
Country Born in Germany, lives in California
Software used Autodesk Alias, Autodesk Maya, mental ray,
Bunkspeed Move, PhotoshopExpertise Vehicle
concept designClient list Disney, Marvel,
Bugatti, Puma, Rocket Racing League, Honda
All Cosmic Motors images featured are from the book Cosmic Motors by Design Studio Press (ISBN 978-1-933492-27-8). Copyright Daniel Simon (www.danielsimon.com)
Cosmic M
otors © D
aniel Simon Studio
28 ● 3DArtist
028-37_3DA 15 Interview with Dan28 28 8/4/10 14:06:51
© Imagine Publishing Ltd No unauthorised copying or distribution

Seductive mechanics ●Interview
Lynette Clee talks to Daniel Simon, a vehicle concept designer using 3D to stunning e� ect in his hyper-real visions of a parallel universe
mechanicsA concept designer creates products
that do not exist, yet makes people believe that they could. It’s about sparking dreams and fantasies in others – and what would the world be without that?Daniel Simon – vehicle concept designer
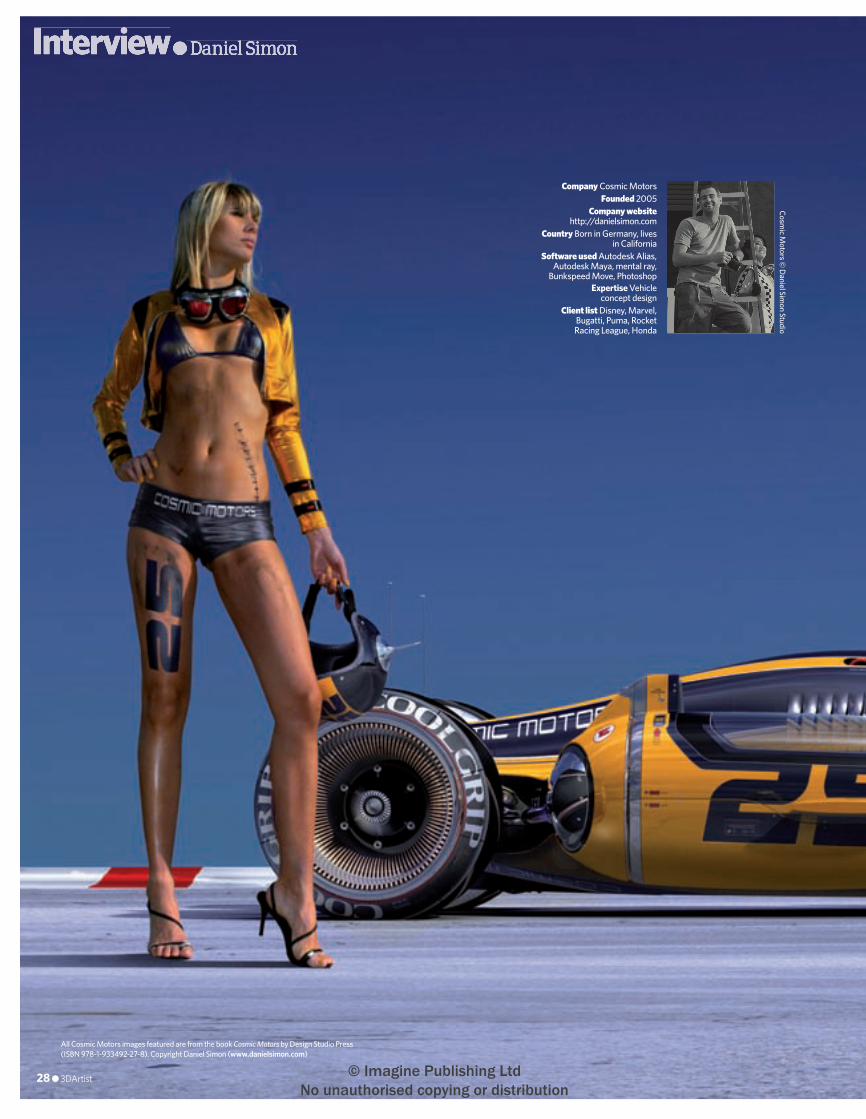
a Cosmic Motors Gravion Racer 25 “Pilot LaGata Donner posing with her winning turbine-powered circle racer”
3DArtist ● 29
028-37_3DA 15 Interview with Dan29 29 8/4/10 14:07:15
© Imagine Publishing Ltd No unauthorised copying or distribution
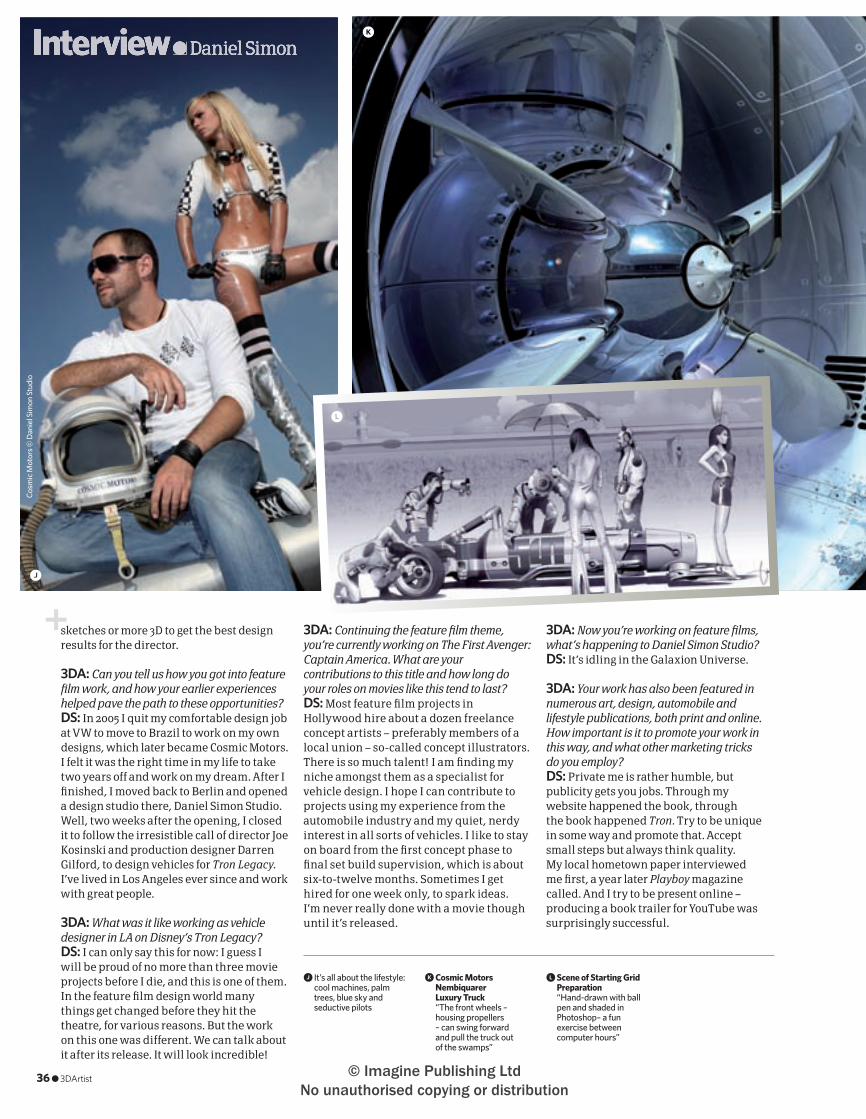
Daniel Simon visualises vehicles of all kinds for feature fi lms in Hollywood. Prior to his move to
California to work as a vehicle designer on such blockbusters as Tron Legacy for Walt Disney Studios, and The First Avenger: Captain America for Marvel Studios, Daniel worked for a number of years for Volkswagen Design and its related sports car brands, Bugatti and Lamborghini, as an exterior designer. Other clients have included Puma, for which he designed a global print ad for
futuristic soccer boots. He also successfully launched his own fantasy label in 2005, Cosmic Motors, which is a ‘virtual studio’, so to speak. It’s all about the lifestyle: palm trees, blue sky and seductive pilots. But it’s not all glamorous: to bring his visualisations to hyper-reality he relies heavily on 3D software and spends a fair portion of his time indoors behind a monitor, where he envisions a fantastical parallel world.
3D Artist: You design stunning vehicles and work with beautiful women. What aspects of your job do you enjoy the most, and why?Daniel Simon: We all look for balance in our lives. Mechanical beauty and female attraction is haunting me all day, so I try to combine it in my work. Nothing extraordinarily new, I guess, but it’s challenging. It’s not easy to stay away from cheesiness and remain classy. But after months behind a computer it’s a relief to get outside in the sun and do a production shoot with a real model.
3DA: What does working in concept design mean to you? DS: It’s being out of your comfort zone almost every day. A concept designer creates products that do not exist, yet makes
people believe that they could. It’s about sparking dreams and fantasies in others – and what would the world be without that? So, it’s not about creating production data (although if it comes to manufacturing a vehicle for a movie then very much so), but more about a spiritual impact. Your art will be seen by a widespread audience from all cultures. There is no package to start from, no pedigree, nothing. You can get lost with so much freedom!
A concept designer questions everything in the beginning of a project and does extensive research. It’s fun to know a little about everything – aircraft, ships, cars, space, manufacturing, architecture, animals, anatomy, history, fashion, photography, colour… I love this variety and could never go back to a job that handles only one of these things.
3DA: What are your general feelings about 3D modelling and rendering for concepts? DS: CGI is just a tool for me. Like a pencil. But no one talks about their tool as much as 3D artists about their software. Sure, it is an interesting subject, but don’t over-hype it. It’s a tool and they change every year. Let software engineers (and God bless them) talk about it. For artists, all that matters
c
Interview● Daniel Simon● Daniel Simon●
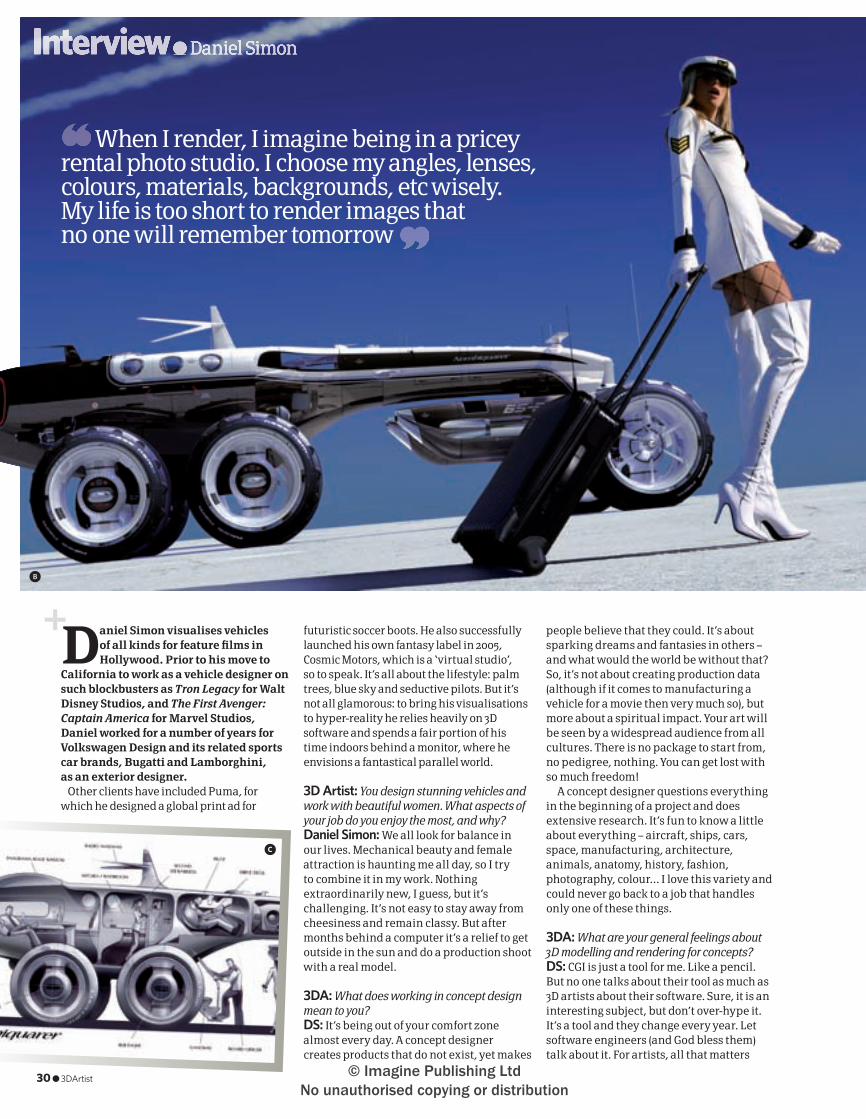
When I render, I imagine being in a pricey rental photo studio. I choose my angles, lenses, colours, materials, backgrounds, etc wisely. My life is too short to render images that no one will remember tomorrow
b
30 ● 3DArtist
028-37_3DA 15 Interview with Dan30 30 8/4/10 14:07:39
© Imagine Publishing Ltd No unauthorised copying or distribution
Seductive mechanics ●Interview
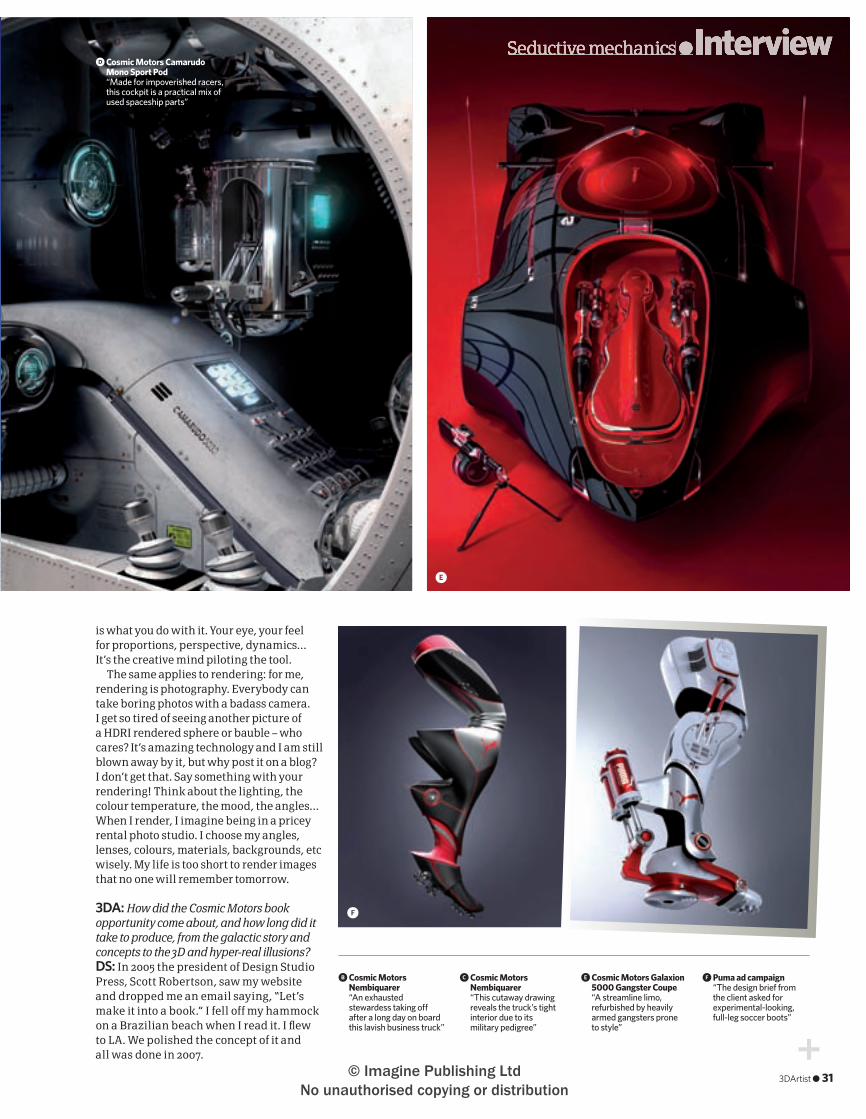
f Puma ad campaign “The design brief from the client asked for experimental-looking, full-leg soccer boots”
b Cosmic Motors Nembiquarer “An exhausted stewardess taking o� after a long day on board this lavish business truck”
e Cosmic Motors Galaxion 5000 Gangster Coupe “A streamline limo, refurbished by heavily armed gangsters prone to style”
f
e
is what you do with it. Your eye, your feel for proportions, perspective, dynamics… It’s the creative mind piloting the tool.
The same applies to rendering: for me, rendering is photography. Everybody can take boring photos with a badass camera. I get so tired of seeing another picture of a HDRI rendered sphere or bauble – who cares? It’s amazing technology and I am still blown away by it, but why post it on a blog? I don’t get that. Say something with your rendering! Think about the lighting, the colour temperature, the mood, the angles… When I render, I imagine being in a pricey rental photo studio. I choose my angles, lenses, colours, materials, backgrounds, etc wisely. My life is too short to render images that no one will remember tomorrow.
3DA: How did the Cosmic Motors book opportunity come about, and how long did it take to produce, from the galactic story and concepts to the 3D and hyper-real illusions? DS: In 2005 the president of Design Studio Press, Scott Robertson, saw my website and dropped me an email saying, “Let’s make it into a book.” I fell off my hammock on a Brazilian beach when I read it. I fl ew to LA. We polished the concept of it and all was done in 2007.
c Cosmic Motors Nembiquarer “This cutaway drawing reveals the truck’s tight interior due to its military pedigree”
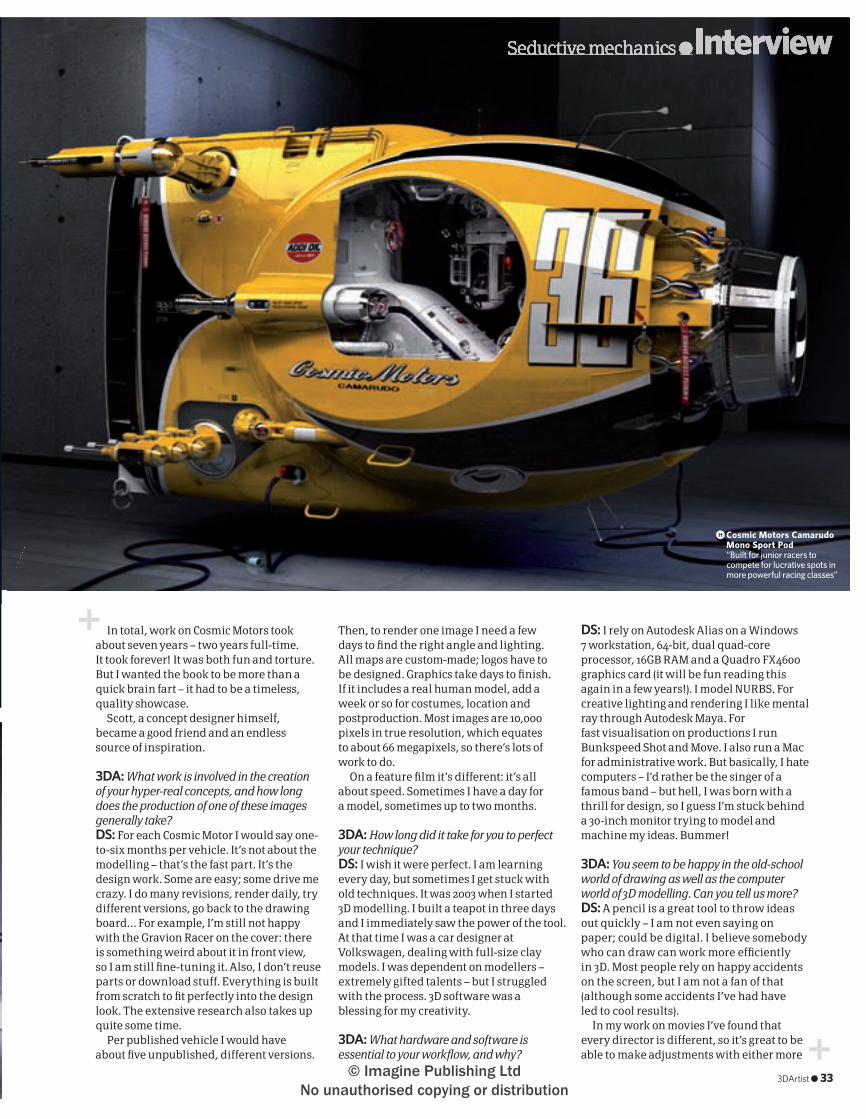
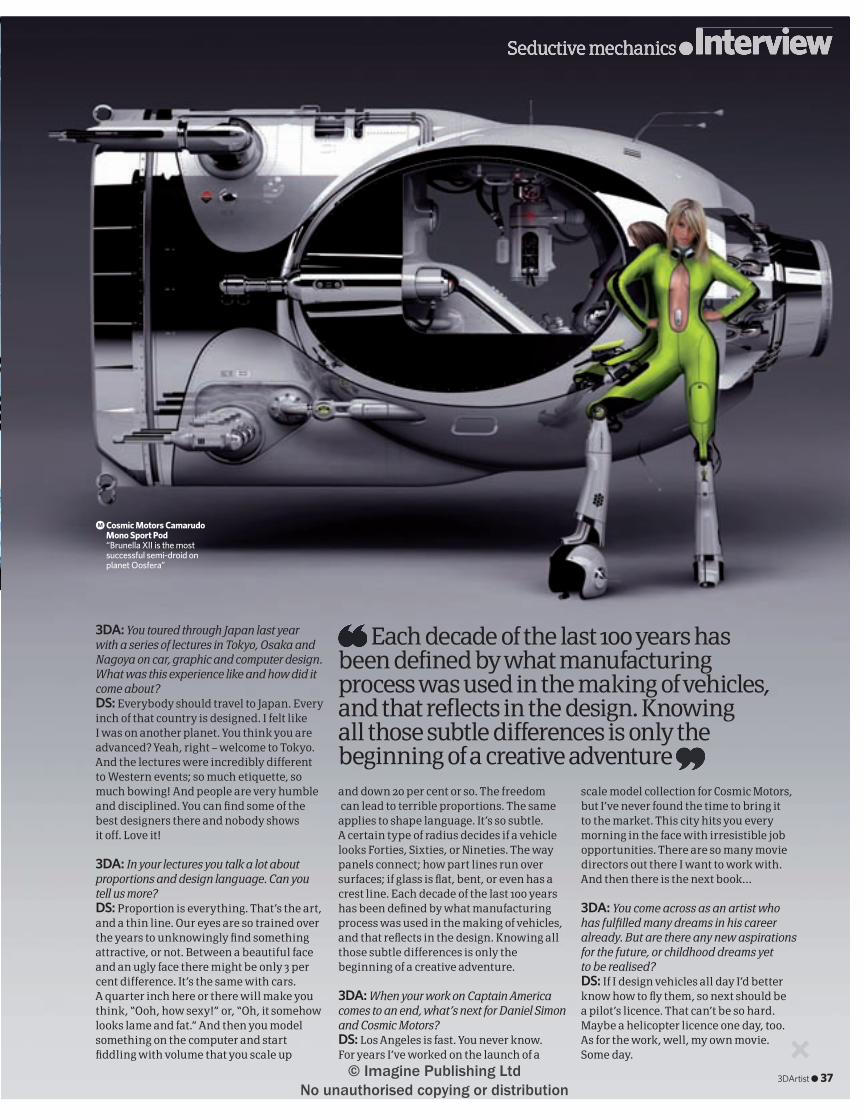
d Cosmic Motors Camarudo Mono Sport Pod “Made for impoverished racers, this cockpit is a practical mix of used spaceship parts”
3DArtist ● 31
028-37_3DA 15 Interview with Dan31 31 8/4/10 14:08:47
© Imagine Publishing Ltd No unauthorised copying or distribution
Interview● Daniel Simon● Daniel Simon●
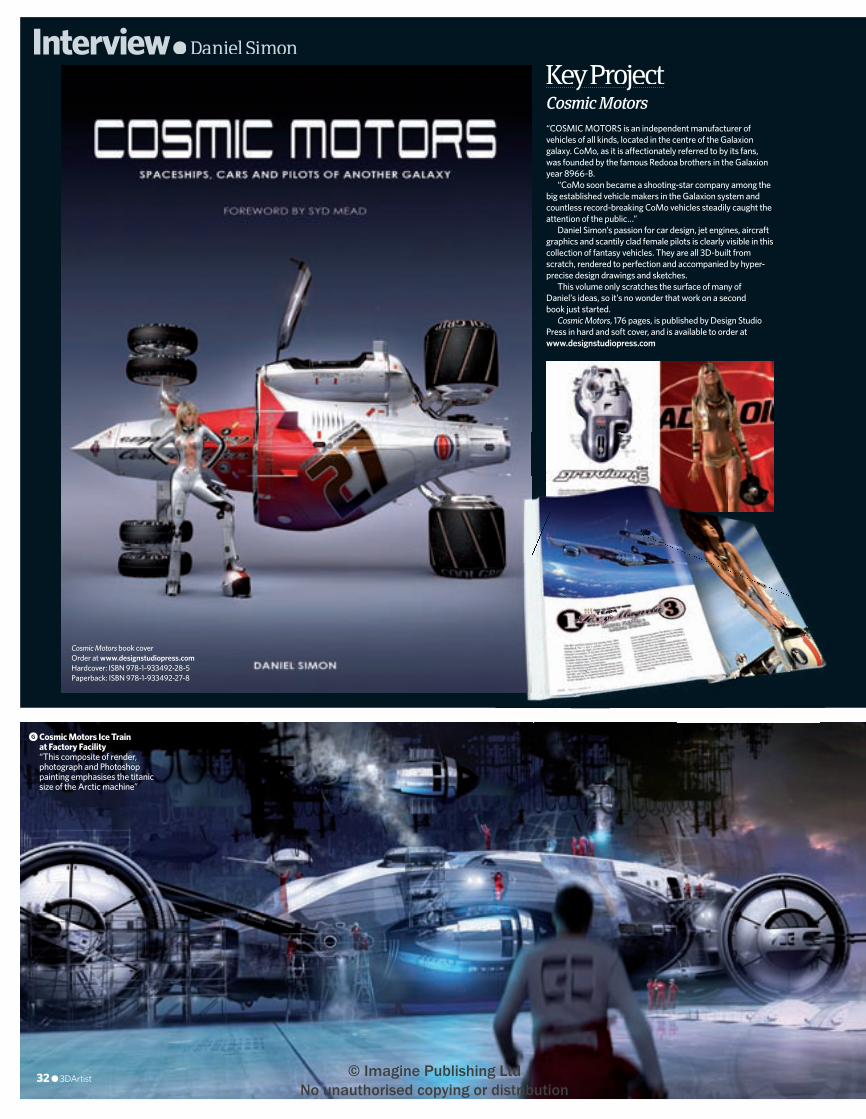
“COSMIC MOTORS is an independent manufacturer of vehicles of all kinds, located in the centre of the Galaxion galaxy. CoMo, as it is a� ectionately referred to by its fans, was founded by the famous Redooa brothers in the Galaxion year 8966-B.
“CoMo soon became a shooting-star company among the big established vehicle makers in the Galaxion system and countless record-breaking CoMo vehicles steadily caught the attention of the public…”
Daniel Simon’s passion for car design, jet engines, aircraft graphics and scantily clad female pilots is clearly visible in this collection of fantasy vehicles. They are all 3D-built from scratch, rendered to perfection and accompanied by hyper-precise design drawings and sketches.
This volume only scratches the surface of many of Daniel’s ideas, so it’s no wonder that work on a second book just started.
Cosmic Motors, 176 pages, is published by Design Studio Press in hard and soft cover, and is available to order at www.designstudiopress.com
Cosmic Motors
Cosmic Motors book coverOrder at www.designstudiopress.com Hardcover: ISBN 978-1-933492-28-5 Paperback: ISBN 978-1-933492-27-8
g Cosmic Motors Ice Train at Factory Facility “This composite of render, photograph and Photoshop painting emphasises the titanic size of the Arctic machine”
32 ● 3DArtist
028-37_3DA 15 Interview with Dan32 32 8/4/10 14:09:25
© Imagine Publishing Ltd No unauthorised copying or distribution
Seductive mechanics ●Interview
In total, work on Cosmic Motors took about seven years – two years full-time. It took forever! It was both fun and torture. But I wanted the book to be more than a quick brain fart – it had to be a timeless, quality showcase.
Scott, a concept designer himself, became a good friend and an endless source of inspiration.
3DA: What work is involved in the creation of your hyper-real concepts, and how long does the production of one of these images generally take? DS: For each Cosmic Motor I would say one-to-six months per vehicle. It’s not about the modelling – that’s the fast part. It’s the design work. Some are easy; some drive me crazy. I do many revisions, render daily, try different versions, go back to the drawing board… For example, I’m still not happy with the Gravion Racer on the cover: there is something weird about it in front view, so I am still fi ne-tuning it. Also, I don’t reuse parts or download stuff. Everything is built from scratch to fi t perfectly into the design look. The extensive research also takes up quite some time.
Per published vehicle I would have about fi ve unpublished, different versions.
Then, to render one image I need a few days to fi nd the right angle and lighting. All maps are custom-made; logos have to be designed. Graphics take days to fi nish. If it includes a real human model, add a week or so for costumes, location and postproduction. Most images are 10,000 pixels in true resolution, which equates to about 66 megapixels, so there’s lots of work to do.
On a feature fi lm it’s different: it’s all about speed. Sometimes I have a day for a model, sometimes up to two months.
3DA: How long did it take for you to perfect your technique? DS: I wish it were perfect. I am learning every day, but sometimes I get stuck with old techniques. It was 2003 when I started 3D modelling. I built a teapot in three days and I immediately saw the power of the tool. At that time I was a car designer at Volkswagen, dealing with full-size clay models. I was dependent on modellers – extremely gifted talents – but I struggled with the process. 3D software was a blessing for my creativity.
3DA: What hardware and software is essential to your workfl ow, and why?
DS: I rely on Autodesk Alias on a Windows 7 workstation, 64-bit, dual quad-core processor, 16GB RAM and a Quadro FX4600 graphics card (it will be fun reading this again in a few years!). I model NURBS. For creative lighting and rendering I like mental ray through Autodesk Maya. For fast visualisation on productions I run Bunkspeed Shot and Move. I also run a Mac for administrative work. But basically, I hate computers – I’d rather be the singer of a famous band – but hell, I was born with a thrill for design, so I guess I’m stuck behind a 30-inch monitor trying to model and machine my ideas. Bummer!
3DA: You seem to be happy in the old-school world of drawing as well as the computer world of 3D modelling. Can you tell us more? DS: A pencil is a great tool to throw ideas out quickly – I am not even saying on paper; could be digital. I believe somebody who can draw can work more effi ciently in 3D. Most people rely on happy accidents on the screen, but I am not a fan of that (although some accidents I’ve had have led to cool results).
In my work on movies I’ve found that every director is different, so it’s great to be able to make adjustments with either more
h Cosmic Motors Camarudo Mono Sport Pod “Built for junior racers to compete for lucrative spots in more powerful racing classes”
3DArtist ● 33
028-37_3DA 15 Interview with Dan33 33 8/4/10 14:09:58
© Imagine Publishing Ltd No unauthorised copying or distribution
Interview● Daniel Simon● Daniel Simon●
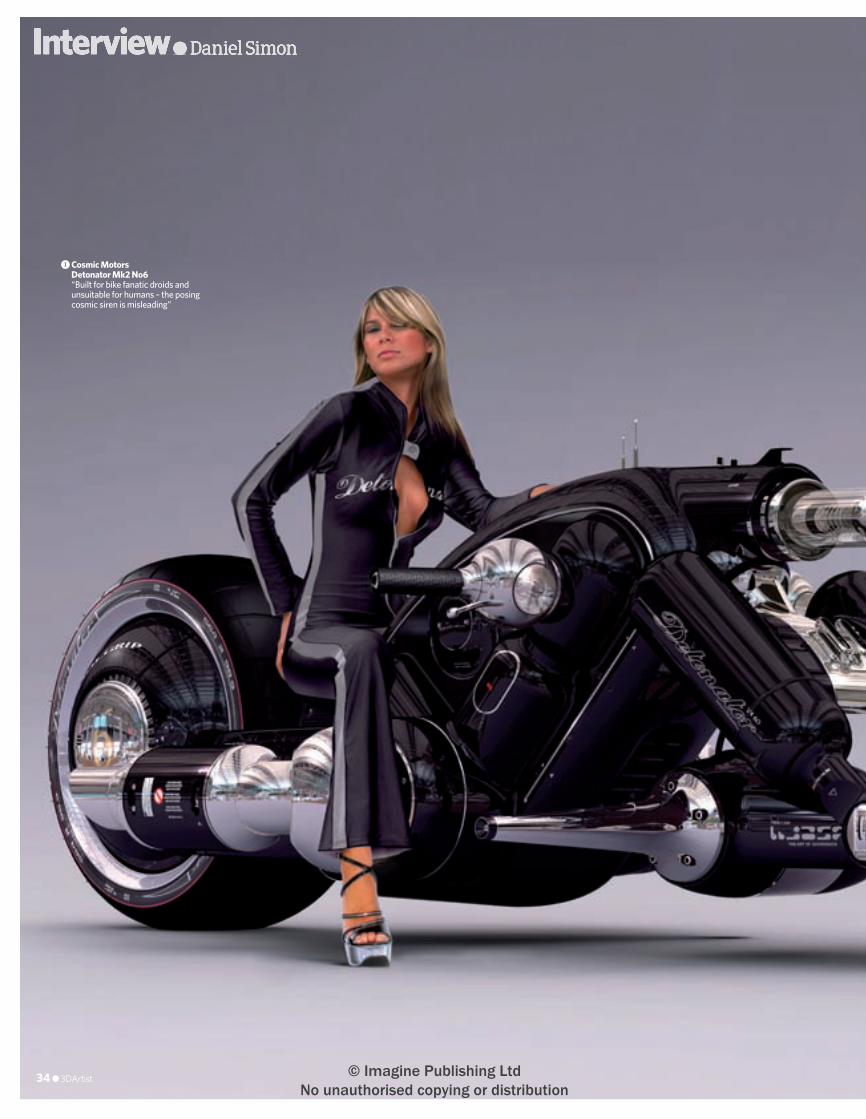
i Cosmic Motors Detonator Mk2 No6 “Built for bike fanatic droids and unsuitable for humans – the posing cosmic siren is misleading”
34 ● 3DArtist
028-37_3DA 15 Interview with Dan34 34 8/4/10 14:10:14
© Imagine Publishing Ltd No unauthorised copying or distribution
Seductive mechanics ●Interview
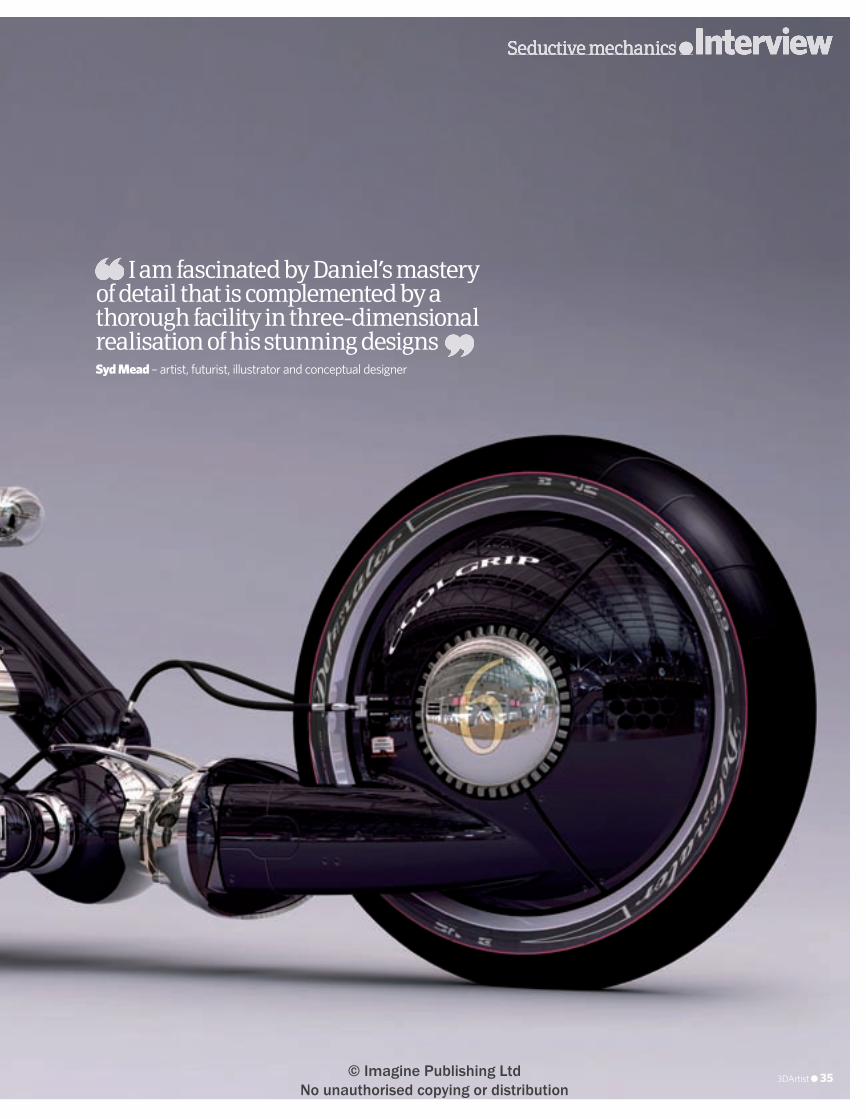
I am fascinated by Daniel’s mastery of detail that is complemented by a thorough facility in three-dimensional realisation of his stunning designsSyd Mead – artist, futurist, illustrator and conceptual designer
3DArtist ● 35
028-37_3DA 15 Interview with Dan35 35 8/4/10 14:10:33
© Imagine Publishing Ltd No unauthorised copying or distribution
Interview● Daniel Simon● Daniel Simon●
sketches or more 3D to get the best design results for the director.
3DA: Can you tell us how you got into feature fi lm work, and how your earlier experiences helped pave the path to these opportunities? DS: In 2005 I quit my comfortable design job at VW to move to Brazil to work on my own designs, which later became Cosmic Motors. I felt it was the right time in my life to take two years off and work on my dream. After I fi nished, I moved back to Berlin and opened a design studio there, Daniel Simon Studio. Well, two weeks after the opening, I closed it to follow the irresistible call of director Joe Kosinski and production designer Darren Gilford, to design vehicles for Tron Legacy. I’ve lived in Los Angeles ever since and work with great people.
3DA: What was it like working as vehicle designer in LA on Disney’s Tron Legacy? DS: I can only say this for now: I guess I will be proud of no more than three movie projects before I die, and this is one of them. In the feature fi lm design world many things get changed before they hit the theatre, for various reasons. But the work on this one was different. We can talk about it after its release. It will look incredible!
3DA: Continuing the feature fi lm theme, you’re currently working on The First Avenger: Captain America. What are your contributions to this title and how long do your roles on movies like this tend to last? DS: Most feature fi lm projects in Hollywood hire about a dozen freelance concept artists – preferably members of a local union – so-called concept illustrators. There is so much talent! I am fi nding my niche amongst them as a specialist for vehicle design. I hope I can contribute to projects using my experience from the automobile industry and my quiet, nerdy interest in all sorts of vehicles. I like to stay on board from the fi rst concept phase to fi nal set build supervision, which is about six-to-twelve months. Sometimes I get hired for one week only, to spark ideas. I’m never really done with a movie though until it’s released.
3DA: Now you’re working on feature fi lms, what’s happening to Daniel Simon Studio? DS: It’s idling in the Galaxion Universe.
3DA: Your work has also been featured in numerous art, design, automobile and lifestyle publications, both print and online. How important is it to promote your work in this way, and what other marketing tricks do you employ? DS: Private me is rather humble, but publicity gets you jobs. Through my website happened the book, through the book happened Tron. Try to be unique in some way and promote that. Accept small steps but always think quality. My local hometown paper interviewed me fi rst, a year later Playboy magazine called. And I try to be present online – producing a book trailer for YouTube was surprisingly successful.
j It’s all about the lifestyle: cool machines, palm trees, blue sky and seductive pilots
l Scene of Starting Grid Preparation “Hand-drawn with ball pen and shaded in Photoshop– a fun exercise between computer hours”
k Cosmic Motors Nembiquarer Luxury Truck “The front wheels – housing propellers – can swing forward and pull the truck out of the swamps”
j
l
kCo
smic
Mot
ors ©
Dan
iel S
imon
Stu
dio
36 ● 3DArtist
028-37_3DA 15 Interview with Dan36 36 8/4/10 14:11:05
© Imagine Publishing Ltd No unauthorised copying or distribution
Seductive mechanics ●Interview
3DA: You toured through Japan last year with a series of lectures in Tokyo, Osaka and Nagoya on car, graphic and computer design. What was this experience like and how did it come about? DS: Everybody should travel to Japan. Every inch of that country is designed. I felt like I was on another planet. You think you are advanced? Yeah, right – welcome to Tokyo. And the lectures were incredibly different to Western events; so much etiquette, so much bowing! And people are very humble and disciplined. You can fi nd some of the best designers there and nobody shows it off. Love it!
3DA: In your lectures you talk a lot about proportions and design language. Can you tell us more? DS: Proportion is everything. That’s the art, and a thin line. Our eyes are so trained over the years to unknowingly fi nd something attractive, or not. Between a beautiful face and an ugly face there might be only 3 per cent difference. It’s the same with cars. A quarter inch here or there will make you think, “Ooh, how sexy!” or, “Oh, it somehow looks lame and fat.” And then you model something on the computer and start fi ddling with volume that you scale up
and down 20 per cent or so. The freedom can lead to terrible proportions. The same applies to shape language. It’s so subtle. A certain type of radius decides if a vehicle looks Forties, Sixties, or Nineties. The way panels connect; how part lines run over surfaces; if glass is fl at, bent, or even has a crest line. Each decade of the last 100 years has been defi ned by what manufacturing process was used in the making of vehicles, and that refl ects in the design. Knowing all those subtle differences is only the beginning of a creative adventure.
3DA: When your work on Captain America comes to an end, what’s next for Daniel Simon and Cosmic Motors? DS: Los Angeles is fast. You never know. For years I’ve worked on the launch of a
scale model collection for Cosmic Motors, but I’ve never found the time to bring it to the market. This city hits you every morning in the face with irresistible job opportunities. There are so many movie directors out there I want to work with. And then there is the next book…
3DA: You come across as an artist who has fulfi lled many dreams in his career already. But are there any new aspirations for the future, or childhood dreams yet to be realised? DS: If I design vehicles all day I’d better know how to fl y them, so next should be a pilot’s licence. That can’t be so hard. Maybe a helicopter licence one day, too. As for the work, well, my own movie. Some day.
Each decade of the last 100 years has been defined by what manufacturing process was used in the making of vehicles, and that reflects in the design. Knowing all those subtle differences is only the beginning of a creative adventure
m Cosmic Motors Camarudo Mono Sport Pod “Brunella XII is the most successful semi-droid on planet Oosfera”
3DArtist ● 37
028-37_3DA 15 Interview with Dan37 37 8/4/10 14:11:50
© Imagine Publishing Ltd No unauthorised copying or distribution

Feature● Inside e-on Software● Inside e-on Software●
There’s nothing more beautiful than nature – except when you create it yourself with scenery generator, Vue. David Crookes reports
With a Vue to the past
xStream – which shares the same top-end features as Infi nite – is designed to be used from within other packages including CINEMA 4D, LightWave 3D, Softimage, 3ds Max and Maya.
So where have you seen the results? You only have to check out The Curious Case Of Benjamin Button, Monsters Vs Aliens, Terminator Salvation, GI Joe – The Rise Of The Cobra, The Imaginarium Of Doctor Parnassus, 2012 and Avatar to see how impressive Vue is. But the program is not just suited for top Hollywood types. There is a bustling community of 3D artists, both professional and amateur, churning out some beautiful renders.
Software
Inside
1992The wife of Nicholas Phelps needs to write a computer program as part of a college project. They produce ‘fractal mountain’. He enjoys the result so much, development continues.
1995The fi rst public version of Vue is released: Vue d’Esprit 1.2. And it has an interface.
1997Vue d’Esprit 2 hits the streets. It’s the fi rst, full retail Vue product. Two years later, Vue 3 adds animation.
2001Vue d’Esprit 4 rolls out, and welcomes Mac users. In 2002, Steve Jobs himself presents Vue 4 during his Apple Expo keynote speech.
2003Vue drops the ‘d’ ’ and enters the professional market, with Vue 4 Professional. A year laterVue is now in its fi fth generation, and Professional becomes Infi nite.
For most people in Britain, Vue equates to a cinema chain and e-on to a natural energy supplier. How apt, then, that in
the 3D world, e-on software’s Vue is a powerful scenery generator that has been used to create, animate and render natural environments for a host of movies.
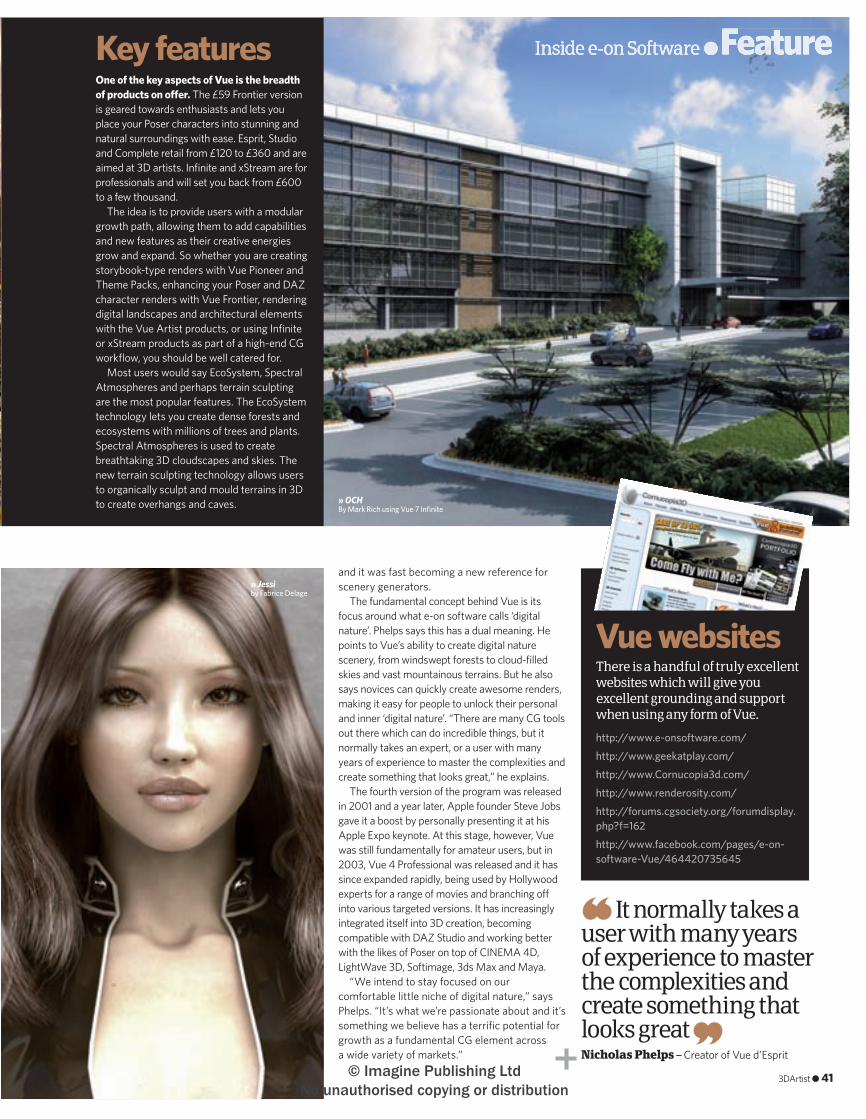
And yet there will be a fair few 3D artists who will never have come across this package, despite it being commercially available since 1997. Over the years, it has grown to become available in a number of versions. Complete, Pro Studio, Esprit, Pioneer and Infi nite are standalone programs while
38 ● 3DArtist
038-43_3DA_15 Inside e-on.indd 38 8/4/10 14:16:36
© Imagine Publishing Ltd No unauthorised copying or distribution
2005Three more versions of Vue 5 are released: Easel (entry-level version), Pro Studio (for advanced artists) and the Vue 5 xStream plug-ins for 3DS Max and Maya.
2006Vue 5 Infi nite helps ILM generate environments for its blockbuster fi lm Pirates Of The Caribbean 2. Vue 6 Infi nite and xStream are pre-released.
2007The complete Vue 6 line is released, adding support for numerous 3D packages. The use of Vue grows in studios, for movies such as Alien Vs Predator: Requiem and Fantastic Four 2: Rise Of The Silver Surfer.
2008Vue 7 is released, introducing Pioneer – free, together with three thematic packs. Vue 7 Complete bridges the gap between Pro Studio and Infi nite, and completes the product line for 3D artists.
2009e-on introduces maintenance plans and switches to a twice-yearly release schedule. Vue 7.5 ships in March and Vue 8 in November. Vue is used in Hollywood movies including Avatar.
2010A free, feature-rich Vue 8.4 upgrade ships in March, and Vue 8.4 Frontier is improved to receive DAZ Studio compatibility. e-on ships Vue 8.5 in April, and Vue 9 is expected to be released by the end of the year.
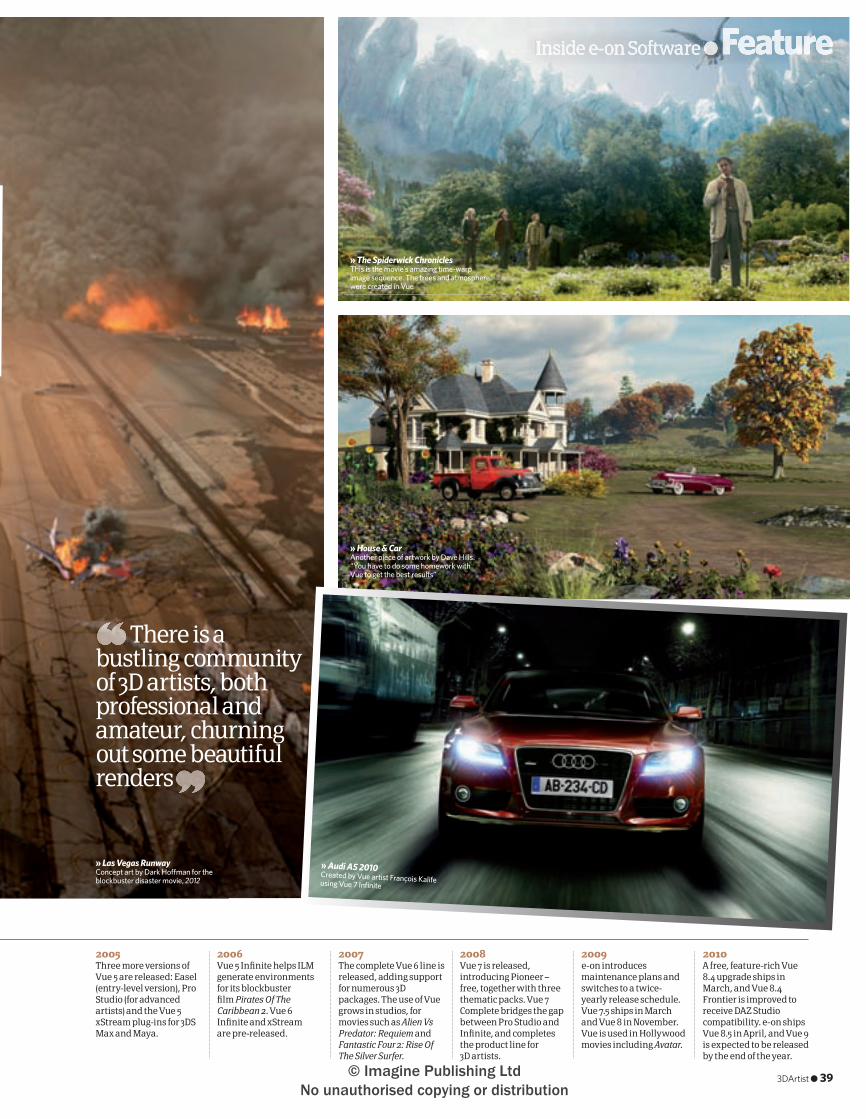
» Las Vegas Runway Concept art by Dark Ho� man for the blockbuster disaster movie, 2012
» House & Car Another piece of artwork by Dave Hills. “You have to do some homework with Vue to get the best results”
» Audi A5 2010 Created by Vue artist François Kalife using Vue 7 Infi nite
» The Spiderwick Chronicles This is the movie’s amazing time-warp image sequence. The trees and atmosphere were created in Vue
Inside e-on Software ●Feature
There is a bustling community of 3D artists, both professional and amateur, churning out some beautiful renders
3DArtist ● 39
038-43_3DA_15 Inside e-on.indd 39 8/4/10 14:16:56
© Imagine Publishing Ltd No unauthorised copying or distribution
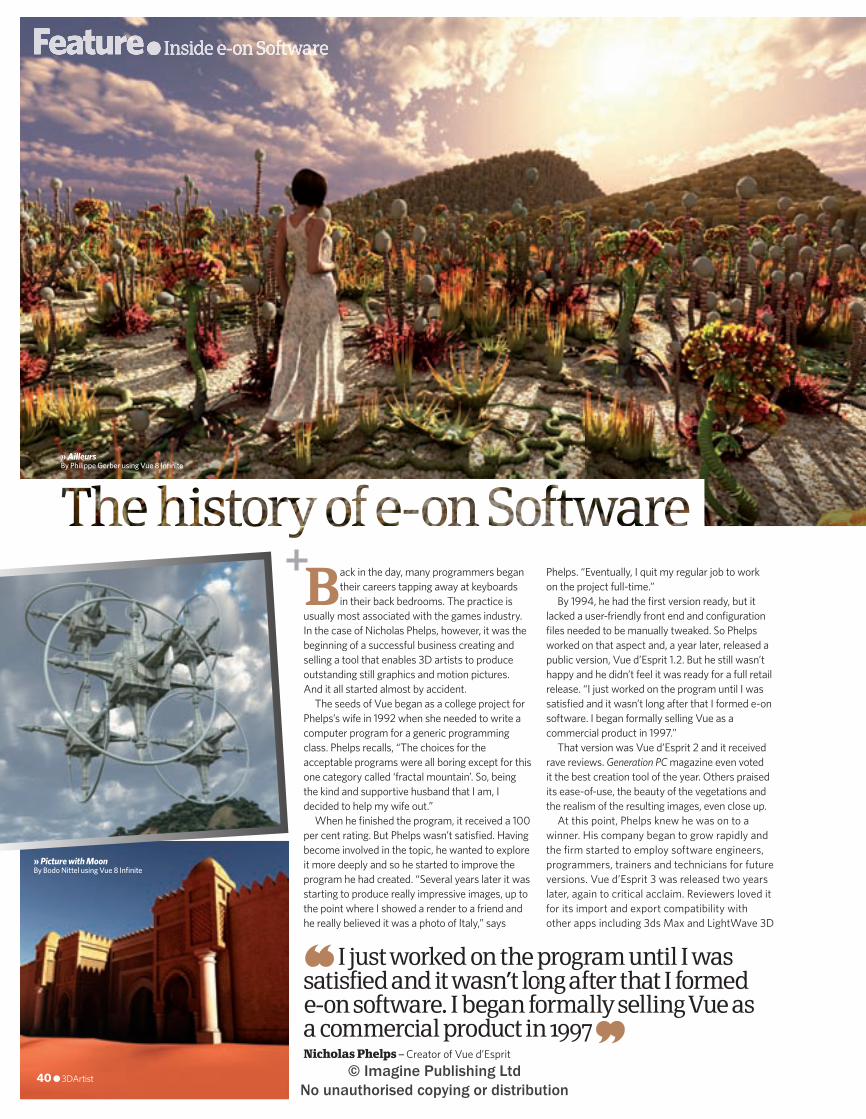
I just worked on the program until I was satisfied and it wasn’t long after that I formed e-on software. I began formally selling Vue as a commercial product in 1997Nicholas Phelps – Creator of Vue d’Esprit
Feature● Inside e-on Software● Inside e-on Software●
Back in the day, many programmers began their careers tapping away at keyboards in their back bedrooms. The practice is
usually most associated with the games industry. In the case of Nicholas Phelps, however, it was the beginning of a successful business creating and selling a tool that enables 3D artists to produce outstanding still graphics and motion pictures. And it all started almost by accident.
The seeds of Vue began as a college project for Phelps’s wife in 1992 when she needed to write a computer program for a generic programming class. Phelps recalls, “The choices for the acceptable programs were all boring except for this one category called ‘fractal mountain’. So, being the kind and supportive husband that I am, I decided to help my wife out.”
When he fi nished the program, it received a 100 per cent rating. But Phelps wasn’t satisfi ed. Having become involved in the topic, he wanted to explore it more deeply and so he started to improve the program he had created. “Several years later it was starting to produce really impressive images, up to the point where I showed a render to a friend and he really believed it was a photo of Italy,” says
Phelps. “Eventually, I quit my regular job to work on the project full-time.”
By 1994, he had the fi rst version ready, but it lacked a user-friendly front end and confi guration fi les needed to be manually tweaked. So Phelps worked on that aspect and, a year later, released a public version, Vue d’Esprit 1.2. But he still wasn’t happy and he didn’t feel it was ready for a full retail release. “I just worked on the program until I was satisfi ed and it wasn’t long after that I formed e-on software. I began formally selling Vue as a commercial product in 1997.”
That version was Vue d’Esprit 2 and it received rave reviews. Generation PC magazine even voted it the best creation tool of the year. Others praised its ease-of-use, the beauty of the vegetations and the realism of the resulting images, even close up.
At this point, Phelps knew he was on to a winner. His company began to grow rapidly and the fi rm started to employ software engineers, programmers, trainers and technicians for future versions. Vue d’Esprit 3 was released two years later, again to critical acclaim. Reviewers loved it for its import and export compatibility with other apps including 3ds Max and LightWave 3D
40 ● 3DArtist
» Ailleurs By Philippe Gerber using Vue 8 Infi nite
» Picture with Moon By Bodo Nittel using Vue 8 Infi nite
038-43_3DA_15 Inside e-on.indd 40 8/4/10 14:17:37
© Imagine Publishing Ltd No unauthorised copying or distribution
Inside e-on Software ●Feature
and it was fast becoming a new reference for scenery generators.
The fundamental concept behind Vue is its focus around what e-on software calls ‘digital nature’. Phelps says this has a dual meaning. He points to Vue’s ability to create digital nature scenery, from windswept forests to cloud-fi lled skies and vast mountainous terrains. But he also says novices can quickly create awesome renders, making it easy for people to unlock their personal and inner ‘digital nature’. “There are many CG tools out there which can do incredible things, but it normally takes an expert, or a user with many years of experience to master the complexities and create something that looks great,” he explains.
The fourth version of the program was released in 2001 and a year later, Apple founder Steve Jobs gave it a boost by personally presenting it at his Apple Expo keynote. At this stage, however, Vue was still fundamentally for amateur users, but in 2003, Vue 4 Professional was released and it has since expanded rapidly, being used by Hollywood experts for a range of movies and branching o� into various targeted versions. It has increasingly integrated itself into 3D creation, becoming compatible with DAZ Studio and working better with the likes of Poser on top of CINEMA 4D, LightWave 3D, Softimage, 3ds Max and Maya.
“We intend to stay focused on our comfortable little niche of digital nature,” says Phelps. “It’s what we’re passionate about and it’s something we believe has a terrifi c potential for growth as a fundamental CG element across a wide variety of markets.”
Vue websites
http://www.e-onsoftware.com/
http://www.geekatplay.com/
http://www.Cornucopia3d.com/
http://www.renderosity.com/
http://forums.cgsociety.org/forumdisplay.php?f=162
http://www.facebook.com/pages/e-on-software-Vue/464420735645
There is a handful of truly excellent websites which will give you excellent grounding and support when using any form of Vue.
Key featuresOne of the key aspects of Vue is the breadth of products on o� er. The £59 Frontier version is geared towards enthusiasts and lets you place your Poser characters into stunning and natural surroundings with ease. Esprit, Studio and Complete retail from £120 to £360 and are aimed at 3D artists. Infi nite and xStream are for professionals and will set you back from £600 to a few thousand.
The idea is to provide users with a modular growth path, allowing them to add capabilities and new features as their creative energies grow and expand. So whether you are creating storybook-type renders with Vue Pioneer and Theme Packs, enhancing your Poser and DAZ character renders with Vue Frontier, rendering digital landscapes and architectural elements with the Vue Artist products, or using Infi nite or xStream products as part of a high-end CG workfl ow, you should be well catered for.
Most users would say EcoSystem, Spectral Atmospheres and perhaps terrain sculpting are the most popular features. The EcoSystem technology lets you create dense forests and ecosystems with millions of trees and plants. Spectral Atmospheres is used to create breathtaking 3D cloudscapes and skies. The new terrain sculpting technology allows users to organically sculpt and mould terrains in 3D to create overhangs and caves.
It normally takes a user with many years of experience to master the complexities and create something that looks greatNicholas Phelps – Creator of Vue d’Esprit
» Jessi by Fabrice Delage
» OCHBy Mark Rich using Vue 7 Infi nite
3DArtist ● 41
038-43_3DA_15 Inside e-on.indd 41 8/4/10 14:18:44
© Imagine Publishing Ltd No unauthorised copying or distribution
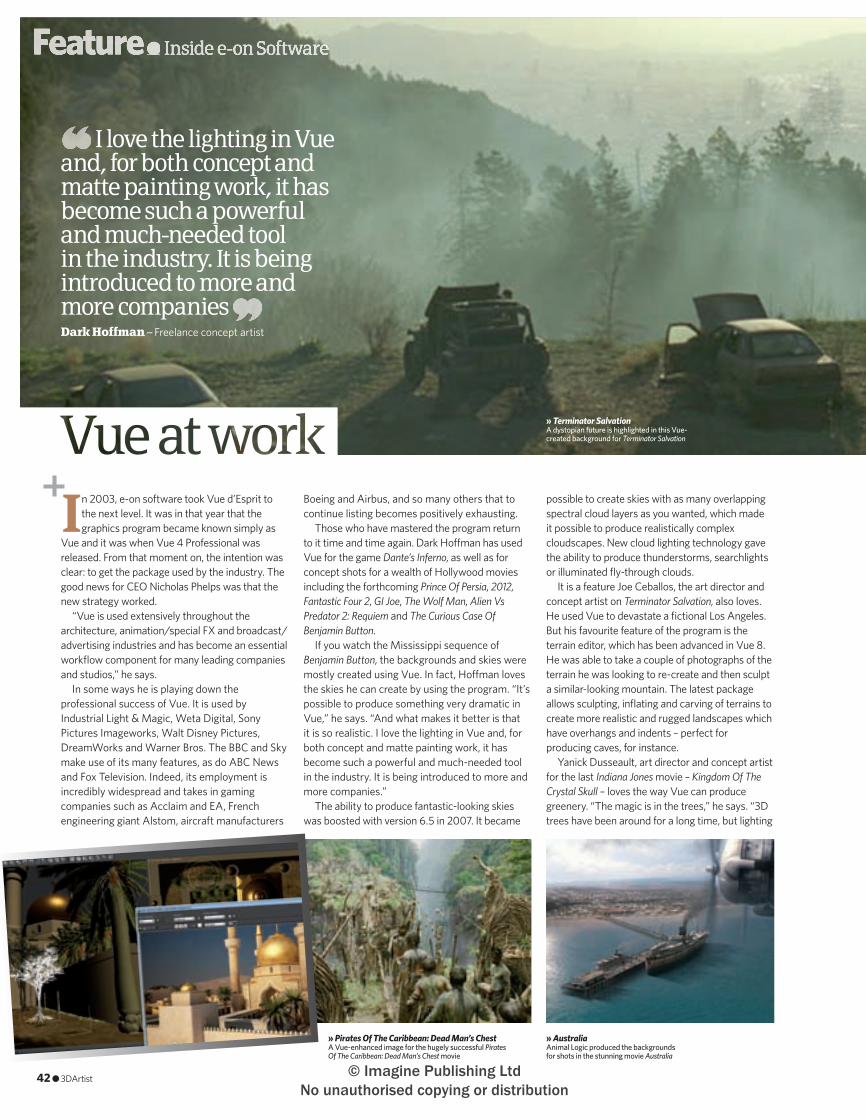
42 ● 3DArtist
Feature● Inside e-on Software● Inside e-on Software●
In 2003, e-on software took Vue d’Esprit to the next level. It was in that year that the graphics program became known simply as
Vue and it was when Vue 4 Professional was released. From that moment on, the intention was clear: to get the package used by the industry. The good news for CEO Nicholas Phelps was that the new strategy worked.
“Vue is used extensively throughout the architecture, animation/special FX and broadcast/advertising industries and has become an essential workfl ow component for many leading companies and studios,” he says.
In some ways he is playing down the professional success of Vue. It is used by Industrial Light & Magic, Weta Digital, Sony Pictures Imageworks, Walt Disney Pictures, DreamWorks and Warner Bros. The BBC and Sky make use of its many features, as do ABC News and Fox Television. Indeed, its employment is incredibly widespread and takes in gaming companies such as Acclaim and EA, French engineering giant Alstom, aircraft manufacturers
I love the lighting in Vue and, for both concept and matte painting work, it has become such a powerful and much-needed tool in the industry. It is being introduced to more and more companiesDark Hoffman – Freelance concept artist
Boeing and Airbus, and so many others that to continue listing becomes positively exhausting.
Those who have mastered the program return to it time and time again. Dark Ho� man has used Vue for the game Dante’s Inferno, as well as for concept shots for a wealth of Hollywood movies including the forthcoming Prince Of Persia, 2012, Fantastic Four 2, GI Joe, The Wolf Man, Alien Vs Predator 2: Requiem and The Curious Case Of Benjamin Button.
If you watch the Mississippi sequence of Benjamin Button, the backgrounds and skies were mostly created using Vue. In fact, Ho� man loves the skies he can create by using the program. “It’s possible to produce something very dramatic in Vue,” he says. “And what makes it better is that it is so realistic. I love the lighting in Vue and, for both concept and matte painting work, it has become such a powerful and much-needed tool in the industry. It is being introduced to more and more companies.”
The ability to produce fantastic-looking skies was boosted with version 6.5 in 2007. It became
possible to create skies with as many overlapping spectral cloud layers as you wanted, which made it possible to produce realistically complex cloudscapes. New cloud lighting technology gave the ability to produce thunderstorms, searchlights or illuminated fl y-through clouds.
It is a feature Joe Ceballos, the art director and concept artist on Terminator Salvation, also loves. He used Vue to devastate a fi ctional Los Angeles. But his favourite feature of the program is the terrain editor, which has been advanced in Vue 8. He was able to take a couple of photographs of the terrain he was looking to re-create and then sculpt a similar-looking mountain. The latest package allows sculpting, infl ating and carving of terrains to create more realistic and rugged landscapes which have overhangs and indents – perfect for producing caves, for instance.
Yanick Dusseault, art director and concept artist for the last Indiana Jones movie – Kingdom Of The Crystal Skull – loves the way Vue can produce greenery. “The magic is in the trees,” he says. “3D trees have been around for a long time, but lighting
» Terminator Salvation A dystopian future is highlighted in this Vue-created background for Terminator Salvation
» AustraliaAnimal Logic produced the backgrounds for shots in the stunning movie Australia
» Pirates Of The Caribbean: Dead Man’s Chest A Vue-enhanced image for the hugely successful Pirates Of The Caribbean: Dead Man’s Chest movie
038-43_3DA_15 Inside e-on.indd 42 8/4/10 14:19:11
© Imagine Publishing Ltd No unauthorised copying or distribution
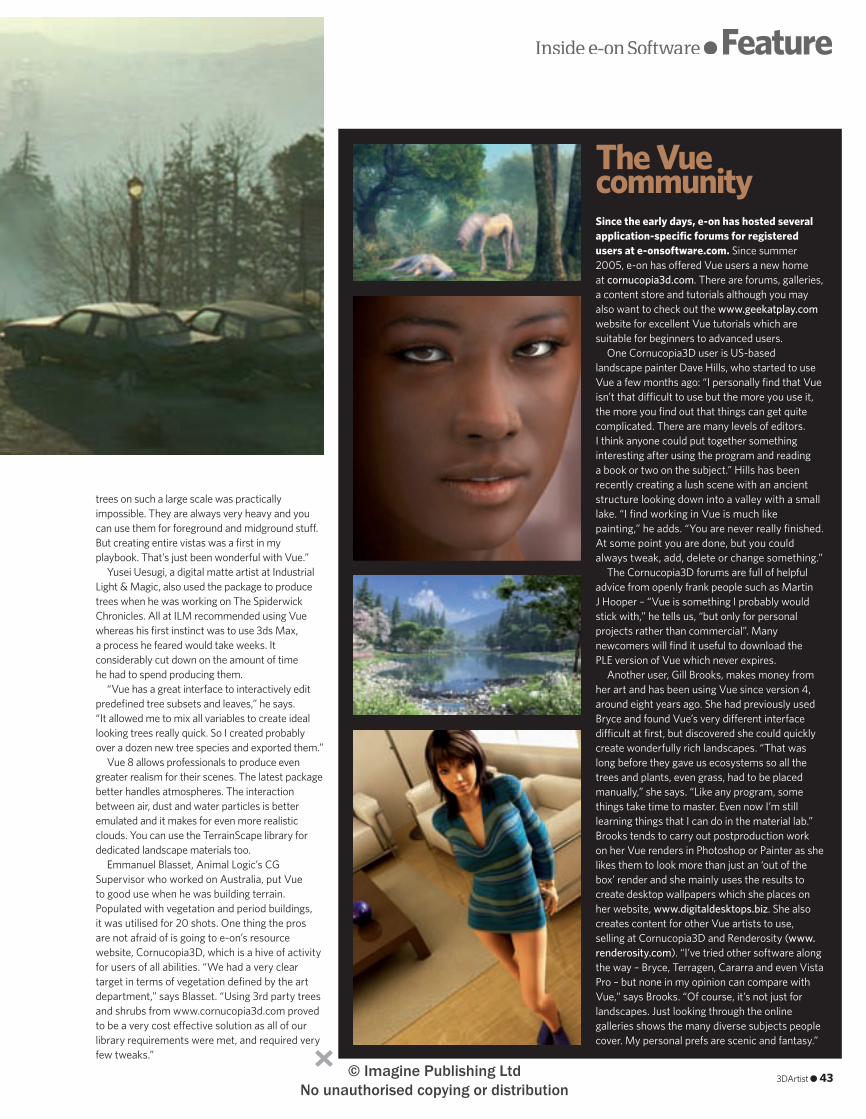
Inside e-on Software ●Feature
The Vue communitySince the early days, e-on has hosted several application-specifi c forums for registered users at e-onsoftware.com. Since summer 2005, e-on has o� ered Vue users a new home at cornucopia3d.com. There are forums, galleries, a content store and tutorials although you may also want to check out the www.geekatplay.com website for excellent Vue tutorials which are suitable for beginners to advanced users.
One Cornucopia3D user is US-based landscape painter Dave Hills, who started to use Vue a few months ago: “I personally fi nd that Vue isn’t that di� cult to use but the more you use it, the more you fi nd out that things can get quite complicated. There are many levels of editors. I think anyone could put together something interesting after using the program and reading a book or two on the subject.” Hills has been recently creating a lush scene with an ancient structure looking down into a valley with a small lake. “I fi nd working in Vue is much like painting,” he adds. “You are never really fi nished. At some point you are done, but you could always tweak, add, delete or change something.”
The Cornucopia3D forums are full of helpful advice from openly frank people such as Martin J Hooper – “Vue is something I probably would stick with,” he tells us, “but only for personal projects rather than commercial”. Many newcomers will fi nd it useful to download the PLE version of Vue which never expires.
Another user, Gill Brooks, makes money from her art and has been using Vue since version 4, around eight years ago. She had previously used Bryce and found Vue’s very di� erent interface di� cult at fi rst, but discovered she could quickly create wonderfully rich landscapes. “That was long before they gave us ecosystems so all the trees and plants, even grass, had to be placed manually,” she says. “Like any program, some things take time to master. Even now I’m still learning things that I can do in the material lab.” Brooks tends to carry out postproduction work on her Vue renders in Photoshop or Painter as she likes them to look more than just an ‘out of the box’ render and she mainly uses the results to create desktop wallpapers which she places on her website, www.digitaldesktops.biz. She also creates content for other Vue artists to use, selling at Cornucopia3D and Renderosity (www.renderosity.com). “I’ve tried other software along the way – Bryce, Terragen, Cararra and even Vista Pro – but none in my opinion can compare with Vue,” says Brooks. “Of course, it’s not just for landscapes. Just looking through the online galleries shows the many diverse subjects people cover. My personal prefs are scenic and fantasy.”
trees on such a large scale was practically impossible. They are always very heavy and you can use them for foreground and midground stu� . But creating entire vistas was a fi rst in my playbook. That’s just been wonderful with Vue.”
Yusei Uesugi, a digital matte artist at Industrial Light & Magic, also used the package to produce trees when he was working on The Spiderwick Chronicles. All at ILM recommended using Vue whereas his fi rst instinct was to use 3ds Max, a process he feared would take weeks. It considerably cut down on the amount of time he had to spend producing them.
“Vue has a great interface to interactively edit predefi ned tree subsets and leaves,” he says. “It allowed me to mix all variables to create ideal looking trees really quick. So I created probably over a dozen new tree species and exported them.”
Vue 8 allows professionals to produce even greater realism for their scenes. The latest package better handles atmospheres. The interaction between air, dust and water particles is better emulated and it makes for even more realistic clouds. You can use the TerrainScape library for dedicated landscape materials too.
Emmanuel Blasset, Animal Logic’s CG Supervisor who worked on Australia, put Vue to good use when he was building terrain. Populated with vegetation and period buildings, it was utilised for 20 shots. One thing the pros are not afraid of is going to e-on’s resource website, Cornucopia3D, which is a hive of activity for users of all abilities. “We had a very clear target in terms of vegetation defi ned by the art department,” says Blasset. “Using 3rd party trees and shrubs from www.cornucopia3d.com proved to be a very cost e� ective solution as all of our library requirements were met, and required very few tweaks.”
3DArtist ● 43
038-43_3DA_15 Inside e-on.indd 43 8/4/10 14:19:27
© Imagine Publishing Ltd No unauthorised copying or distribution
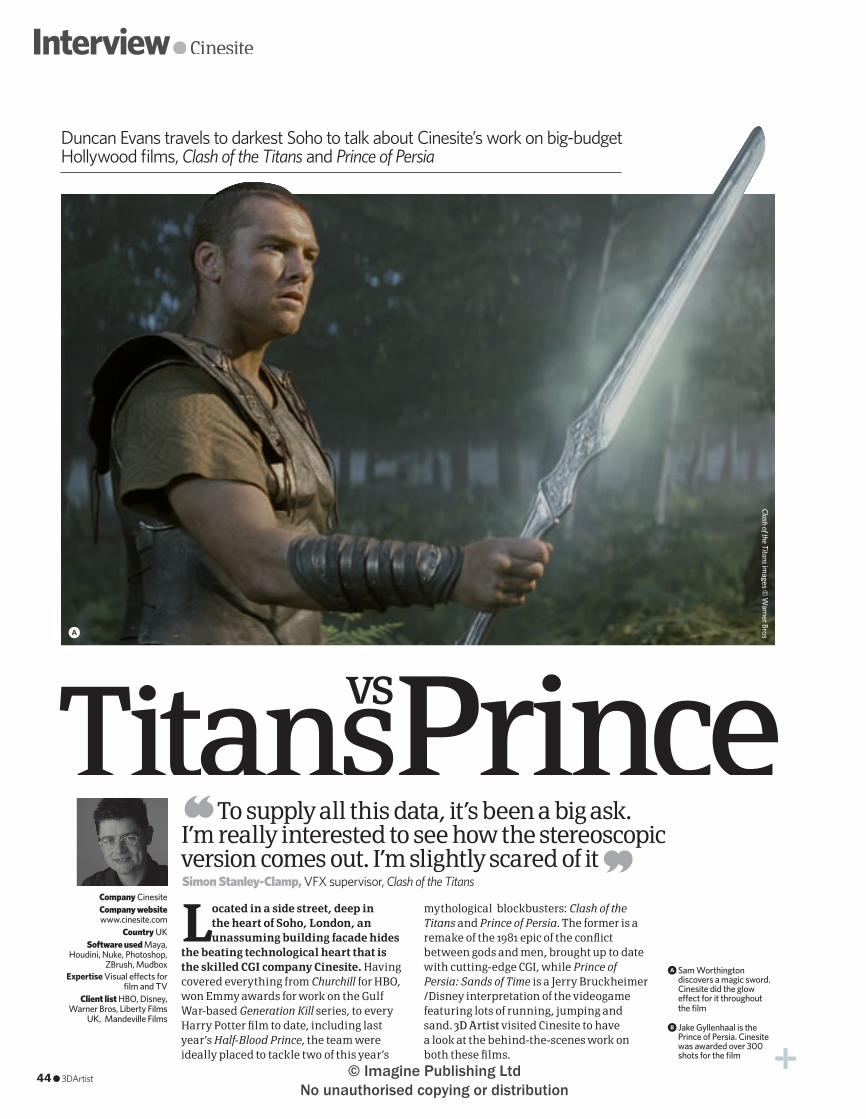
Interview● Cinesite● Cinesite●
Located in a side street, deep in the heart of Soho, London, an unassuming building facade hides
the beating technological heart that is the skilled CGI company Cinesite. Having covered everything from Churchill for HBO, won Emmy awards for work on the Gulf War-based Generation Kill series, to every Harry Potter fi lm to date, including last year’s Half-Blood Prince, the team were ideally placed to tackle two of this year’s
mythological blockbusters: Clash of the Titans and Prince of Persia. The former is a remake of the 1981 epic of the confl ict between gods and men, brought up to date with cutting-edge CGI, while Prince of Persia: Sands of Time is a Jerry Bruckheimer /Disney interpretation of the videogame featuring lots of running, jumping and sand. 3D Artist visited Cinesite to have a look at the behind-the-scenes work on both these fi lms.
Company CinesiteCompany websitewww.cinesite.com
Country UKSoftware used Maya,
Houdini, Nuke, Photoshop, ZBrush, Mudbox
Expertise Visual e� ects for fi lm and TV
Client list HBO, Disney, Warner Bros, Liberty Films
UK, Mandeville Films
A Sam Worthington discovers a magic sword. Cinesite did the glow e� ect for it throughout the fi lm
b Jake Gyllenhaal is the Prince of Persia. Cinesite was awarded over 300 shots for the fi lm
To supply all this data, it’s been a big ask. I’m really interested to see how the stereoscopic version comes out. I’m slightly scared of itSimon Stanley-Clamp, VFX supervisor, Clash of the Titans
Duncan Evans travels to darkest Soho to talk about Cinesite’s work on big-budget Hollywood fi lms, Clash of the Titans and Prince of Persia
a
vsTitansPrince
Clash of the Titans images ©
Warner Bros
44 ● 3DArtist
044-49_3DA_15 Cinesite.indd 44 8/4/10 14:23:04
© Imagine Publishing Ltd No unauthorised copying or distribution
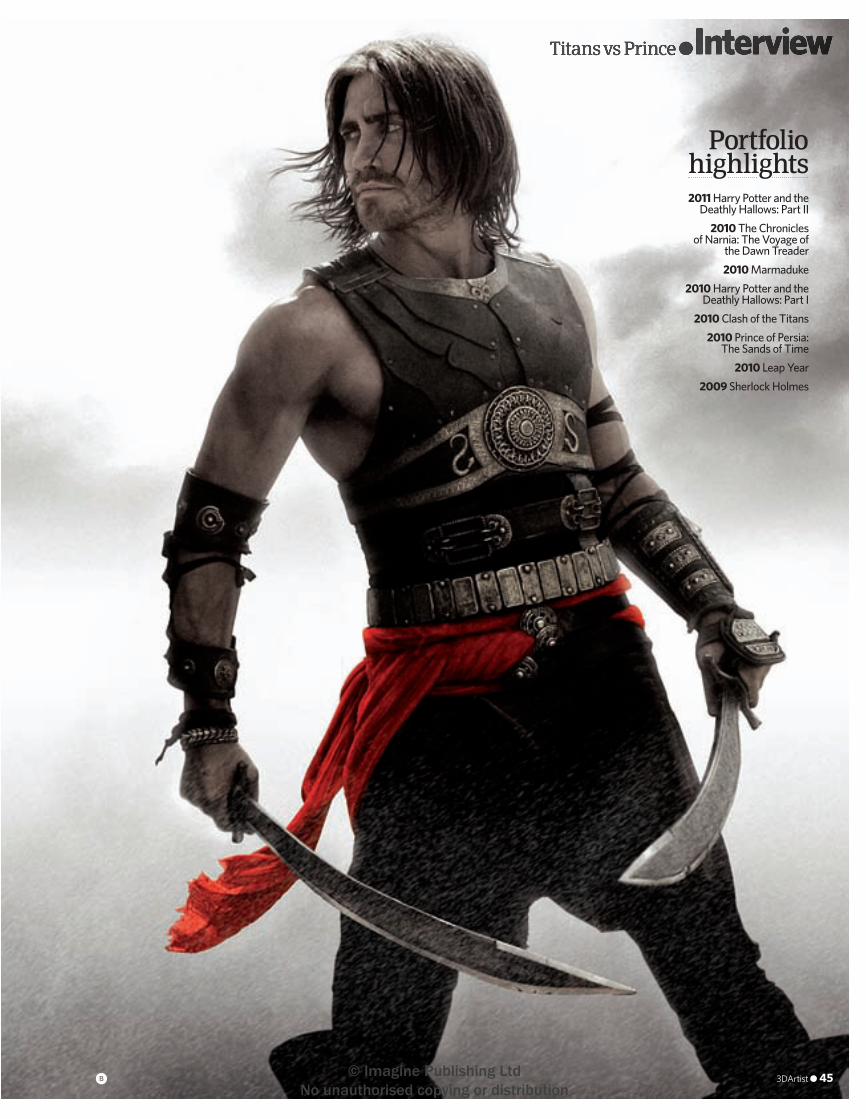
Titans vs Prince ●Interview
b
Portfolio highlights2011 Harry Potter and the
Deathly Hallows: Part II2010 The Chronicles
of Narnia: The Voyage of the Dawn Treader 2010 Marmaduke
2010 Harry Potter and the Deathly Hallows: Part I
2010 Clash of the Titans2010 Prince of Persia:
The Sands of Time2010 Leap Year
2009 Sherlock Holmes
3DArtist ● 45
044-49_3DA_15 Cinesite.indd 45 8/4/10 14:23:44
© Imagine Publishing Ltd No unauthorised copying or distribution
The mortal son of the god Zeus embarks on a perilous journey to stop the underworld and its minions from spreading their evil to Earth as well as the heavens. That’s the plot anyway. Cinesite was awarded around 200 shots for the fi lm, 120 of which were centred around the Scorpioch battle sequence. The Scorpiochs are scorpions on steroids, ranging in size from large and scary to huge and downright pant-messing. Simon Stanley-Clamp, VFX supervisor for Clash explained that Cinesite had been working on the title for around 13 months, just wrapping it up at the end of January.
3D Artist: So what elements did you cover?Simon Stanley-Clamp: Mainly the Scorps, CG sword, baton transformation into his magic sword, background effects.
3DA: What’s the magic sword all about? SSC: He has this baton, which turns into a magic sword. It’s a background effect, but it’s seen throughout the fi lm. He doesn’t want to use it because he thinks it will make him a god.
3DA: Why was the fi lm shot on Tenerife? SSC: The primary location for the scorpion battle is in the desert and we were given
access to the national park. It’s a fantastic location because it’s a volcanic island and you’ve got the volcanoes, but it’s also really varied. This is just 20 minutes from the forest location. We were working very high, up above the cloudline, so we wanted to get some shots of the clouds to give you the feeling of being up in the gods.
3DA: In one sequence, Calibos gets his hand chopped off. What did you do there? SSC: That hand’s been cut off and it’s transforming into something, but you don’t know what yet. This takes you to the location for the scorpions’ battle. There’s one big location in Tenerife, divided up into three areas. Here you’ve got a big vista with some matte paintings.
3DA: What software did you use to do the matte paintings? SSC: Matte painting was done with Photoshop. We also built some CG columns and walls. When we get to the battle sequence, we’ve done a CG stump and CG blood. His blood generates the scorpions coming out of the ground.
3DA: The scorpions were modelled with Mudbox; was there any reason for using that
rather than, say, ZBrush? SSC: We actually used ZBrush a bit as well. We used Mudbox because it’s a tool my 3D supervisor likes, knows a lot; his background is sculpting. It’s quick, very organic, and gets results you want.
3DA: So were you on set while they were fi lming this? SSC: Yes, I was there for a month. It was a three-week shoot for this sequence. I went out a week before for surveying, stills references, HDRI reference, setting out for the gimbal shoot.
3DA: How long did it take you to come up with the models for all the different scorpions in the scene? SSC: We started this pretty quickly and there were some production designs, but they were quite scanty. I did essentially 12 designs and took elements of those designs and moulded them into one. There are four different types of scorpions. The palanquin is the mother scorpion and that was the important one to get right. Get that right and all the others are variations of that. There’s a 65-foot one, a 40-foot, a 30-foot one and several 15-foot ones, the little angry ones. That took about, oh, three months.
Interview●Cinesite
Clash of the Titans
c
d
46 ● 3DArtist
044-49_3DA_15 Cinesite.indd 46 8/4/10 14:24:11
© Imagine Publishing Ltd No unauthorised copying or distribution
Titans vs Prince ●Interview
e The team studied real scorpions to get an idea of how they would move, then made them bigger and heavier, more slow moving, for the fi lm
c Where is this land they ask in the fi lm. Actually it’s a slate quarry in Wales. This lead to a problem matching scoprion movements with the camera moves
d Now you spike him, now you don’t. The spike was removed from the chest and a digital double was created for the scorpion to toss backwards
3DA: Did you have to study actual, live scorpions to get the designs right? SSC: We did. They had a scorpion farm out there. The smaller they are, the angrier they are, running around. We got that right. The big ones we made move slowly and carry things on their backs. The real ones are just too quick; we had to slow them down, gave them more mass and weight. It came through from the director: he wanted them to be powerful but athletic.
3DA: What about the colour changes? SSC: As you move through different scenes, they are not chameleon or camoufl aged, but take on the colours of the environment. So, when in the desert, they are orange and here [in the slate landscape] they are a little blue.
3DA: The texture of the scorpions looks very rocky, craggy. SSC: We went very deep on the textures. Almost more detailed than was needed. That said, during reshoots we got a lot closer than was planned.
3DA: What about the fi ght sequence where the guy gets spiked? What’s going on there? SSC: Originally it was going to be a spike. We removed the spike from his costume; here this is an entirely digital shot. It was made up from 25 still plates using Maya and Nuke – we rebuilt that with CGI elements, CG dust, the sword falling away. That had to hook up to the real guy. He wasn’t shot moving out of the plate, so the bottom half of him is digital as well, with digital legs.
3DA: Were there any specifi c problems with matching up the movement of the camera on set with the CGI scorpions? SSC: There were. I went in March to do an initial recce; we did a Lido scan, our own photography, we covered everything we needed. The shot that caused the most problems was one where I wasn’t on location when they did it. I got a call when they shot it on location in Wales, but I’d been waiting a week with them saying, ‘We’re shooting it today, we’re shooting it today’, then they said, ‘We’re shooting it now’, but it would have taken seven hours to get there. So, on this shot, because it’s long and slow, you can’t see the ground. We replaced everything in CGI, so there’s the scorpion, tower, fabrics, leaving only the
actors. The problem was we hadn’t done the preparation and an accurate survey. It’s a tricky one because the vehicle has its own motion, and the camera and the crane, all opposing each other.
3DA: There’s a sequence near the end where your scorpions battle with some winged creatures that another VFX studio created. How did that work out? SSC: This was a shared shot with MPC [Moving Picture Company]. We animated this scorpion with a choreographed battle so the scorpion grabs it out the sky, bashes it around the ground, hooks another one up with the tail. We set the animation up using just a single, digital double, six-foot fi gure and gave that animation and model to MPC so that they could make the harpies do the same thing. So they then did the same thing and gave the harpies, lit and rendered, back to us to drop back into the shot.
3DA: How many people did you have just working on things like the dust? SSC: A team of about eight strong, a good tidy team. There’s in the region of 300 shots. Each department had about the same compositors and lighters and we buddied them up so a compositor and lighter were working on the same shot.
3DA: While you were working on these shots did you have any idea that it was going to be turned into 3D at any point? SSC: No. That cropped up fully before Christmas. Obviously Sam Worthington is in Avatar. I think there was perhaps an inkling before Christmas. We talked about it then; they were doing tests in the States and then it went quiet. And then, after Christmas, it was ‘it’s defi nitely not happening’, and we were ‘phew’, and then a week later it was happening and it’s full-on stereoscopic postproduction. We supplied them with the scorpion depth maps, foregrounds and backgrounds. This sequence really lends itself to 3D, the scorpions jumping at angles. So, conceptually, it’s a good idea, but you wouldn’t have shot it like this and, technically, you defi nitely wouldn’t shoot it like this.
3DA: So did this mean a lot of extra work? SSC: Yeah, I had to tell the team to extract all the maps, the 3D passes, the roto, running back through the scripts. We got additional camera movements and camera shakes and we had to ensure that the mattes would do the same thing. I haven’t seen any of the results. What I have heard is that it’s a bit Viewmasterish – it’s a bit layered – which doesn’t surprise me. I think it could work. It’ll give it another look, though it may destroy some of it. Prime Focus is doing the stereography. Some of the feedback is people don’t like the camera shake. And it’s a six-week turnaround. To supply all this data, it’s been a big ask. I’m really interested to see how the stereoscopic version comes out. I’m slightly scared of it.
Fact fi leTitle Clash of the Titans
UK/USA Released 2 AprilDirector Louis Leterrier
Stars Sam Worthington, Liam Neeson, Ralph Fiennes,
Gemma Arterton, Jason Flemyng
Synopsis The mortal son of the god Zeus embarks on a perilous journey to stop the underworld and its minions from spreading their evil to
Earth as well as the heavens
We went very deep on the textures. Almost more detailed than was needed. That said, during reshoots we got a lot closer than was planned
e
3DArtist ● 47
044-49_3DA_15 Cinesite.indd 47 8/4/10 14:24:34
© Imagine Publishing Ltd No unauthorised copying or distribution
With a big name cast, Jerry Bruckheimer overseeing and Disney paying the wages, the production on Prince of Persia was always going to be a big deal. Cinesite assigned around 60 artists to the project and completed over 300 shots for the fi lm. The team even went on location for six weeks to Morocco for the fi lming. Showcasing the work on Prince of Persia were 3D Supervisor, Artemis Oikonomopoulou, 2D Supervisor, Matt Kasmir, and Visual Effects Producer, Clare Norman.
3D Artist: What involvement did Cinesite have in the movie?Matt Kasmir: A combination of 3D bolts, wire removal, face replacements; Jake wasn’t doing half the stunts. A lot of these shots had minimal sets which were on location in Morocco. There’s also a combination of studio shots. Because it was shot over a period of three weeks, the weather conditions altered dramatically. It’s in the mountains, and you get these low lying clouds coming in, so you’ve got a combination of overcast days, bright lit sunny days, different times of day and all interspersed with studio shots. So balancing these before we started was quite a task. There was also this yellow
fi lter that almost entirely removed any defi nition and colour.
3DA: Was it an easy fi x to remove the yellow colouring? MK: It was a bit more complicated than you’d think. Because it was such a severe yellow fi lter it meant that just by pumping in blue, there wasn’t too much information there. We had a few in-house grading tools to cheat contrast into the right areas and to give everything a nice depth. Because depth is inherently blue we were losing things.
3DA: What did you do the mattes with? MK: That was projected wherever possible in Nuke. We had done basic geometry builds and we also had extensive Lidar information, so the 3D guys could carve up sections of the Lidar that was taken on set and give it to us. So, we knew where the mountains were in relation to our 3D objects.Artemis Oikonomopoulou: We had a really good tool for the city, to vary all the buildings and swap different roofs and different parts of the city with different textures to give variation.MK: The practical sets, particularly on location, weren’t holding up because they were so new, so we had to map in and add
dirt and distress and add practical walls and environments. We had to sculpt additional shadows and stark lighting onto the sets because they were all very fl at-lit and the overall effect was a hard, starkly lit-environment.
3DA: What about personal alterations to the characters, especially Ben Kingsley? MK: There’s make-up augmentation on his hands at key points throughout the fi lm. This is where Jake realises his uncle has been a little bit naughty and, as a consequence, they wanted it not to be obvious at the beginning that he had those hands and we had to dial it up throughout. It was a combination of 2D and 3D, a matte painting projected.
3DA: Did they not consider just doing this with prosthetics or make-up? MK: They just wanted to control it in minute detail. Here, they aren’t just burnt hands, they are quite charred.Clare Norman: Was it these that he refused to use their make-up?MK: He had his own make-up woman. He had these 3D boils and pustules on his face because he’s been poisoned and they wanted these to be increased. As it
Interview●Cinesite
Prince of Persia: Sands of time
48 ● 3DArtist
044-49_3DA_15 Cinesite.indd 48 8/4/10 14:24:51
© Imagine Publishing Ltd No unauthorised copying or distribution
Titans vs Prince tans vs Prince Titans vs Prince Ti ●Interview
transpired, we had to back off, it being a Disney fi lm; our original brief was quite gruesome.
3DA: Tell us about the memorable sequence where assassins drop through the clouds. AO: The bad guys appear through the 3D clouds. You see fi ery arrows, bolts fl ying, so all the clouds were done in 3D.MK: Again, we had a lot more. We had heads being removed. Again, Disney decided that the heads had to go back on and whatever came off their necks or stab wounds had to be indeterminate, so it could be blood, dust.
3DA: Were there any environment issues? MK: When they went on location, they went in winter so saw all these lovely, snowy peaks and obviously went back in May and all the snowy peaks had gone. Luckily we replaced about 50 shots and the snowy peaks end up back in another two sequences. The art department made a token gesture and put in a smattering of white. Again we had to take a lot of that into Nuke and extend the snow.
3DA: Now there’s some whipping action in the fi lm but, apparently, they are all CGI?
AO: The bad guys were on set holding these stumps and we had to cut the stumps and add CG whips to them. The diffi cult part was getting the dynamic movement of the whips to work with the retimes of the sequence.
3DA: How did you work out the animation of the whips? AO: We had a choreograph from the clients of what they wanted to happen so we had to kind of adjust what he was doing on the set. We had guidelines – eg we need Jake at that point, the whip has to come around left to right. The trick was to get the dynamic feel of the whip, with what he was doing on set and what our clients wanted. Make it look cool.
MK: We had a whip going from real-time to third speed and, to actually animate something that still looks heavy which has momentum, was a lot more tricky than it sounds.AO: We decided not to go down the dynamic route for the whips because it had to be so choreographed, so we hand animated it.
3DA: What about other, gory effects? MK: There’s one that was too gruesome when we did the sequence. Originally this guy had his hand removed so he’s wearing
a blue sock. We ended up having to replace his hand because Disney felt it was too gruesome for him to have lost it.CN: We did a lot of reverse effects. I don’t think they were very happy with the way it was shot. If it was thought through a bit more, it would have saved them a lot of money.MK: We painted blood off Jake’s face because it was deemed too much.
3DA: I understand there were problems with Ben Kingsley’s beard. MK: He had this very dodgy prosthetic beard that he’d fallen asleep in, and so not only did we have to make him look younger, but no-one liked his beard. We have proprietary in-house software. What it does is 2D motion analysis of the plate and, with a bit of digital paintwork, it warps on a frame I painted on as a hero frame.
3DA: It sounds like there were a lot of fi xes needed. Was this unusual?MK: It was unusual. We found in some set shots and location shots we were painting out water coolers and things that it wouldn’t take two seconds to fi x on set; they just hadn’t been addressed.AO: Costume department. In one sequence there are two small kids and the costume department gave them the exact same outfi t and they had the exact same hair colour too. They did a preview screening and it was impossible to tell the two kids apart. So Matt and the 2D team had to change the colour of their outfi ts.
3DA: Finally, tell us about the opening shot of the fi lm with the sweeping camera view that reveals the city on the hill.AO: This was one of our biggest shots in the show. It was a helicopter shoot they did. The fi rst thing we did was retime this because they wanted it speedramped.MK: We found there were limitations on just retiming it in a conventional sense by removing frames. AO: So we took the retime and created geometry everything in the scene, apart from the CG buildings and the top: the mountains, the hills, the lighting, projecting everything from the plate back.
3DA: Surely it would have been better to have done it from scratch? AO: This was pretty much what we did, but we had to use some of what they did so we could use textures from the mountains and hills. It used a huge extension. We had to do it in so many parts because there was so much geometry. We had the level of detail going to the back, but there were thousands of buildings, and a CG crowd coming through, walking around.
Fact fi leTitle Prince of Persia:
Sands of TimeUK/USA Released 28th May
Director Mike NewellExecutive Producer Jordan
Mechner (creator of the Prince of Persia game)Stars Jake Gyllenhaal,
Gemma Arterton, Ben Kingsley
Synopsis Set in medieval Persia, the story follows an
adventurous prince who teams up with a rival
princess to stop an angry ruler from unleashing a
sandstorm that could destroy the world
Prince of Persia images ©
Disney
Enterprises and Jerry Bruckheimer Ltd
3DArtist ● 49
044-49_3DA_15 Cinesite.indd 49 8/4/10 14:28:21
© Imagine Publishing Ltd No unauthorised copying or distribution
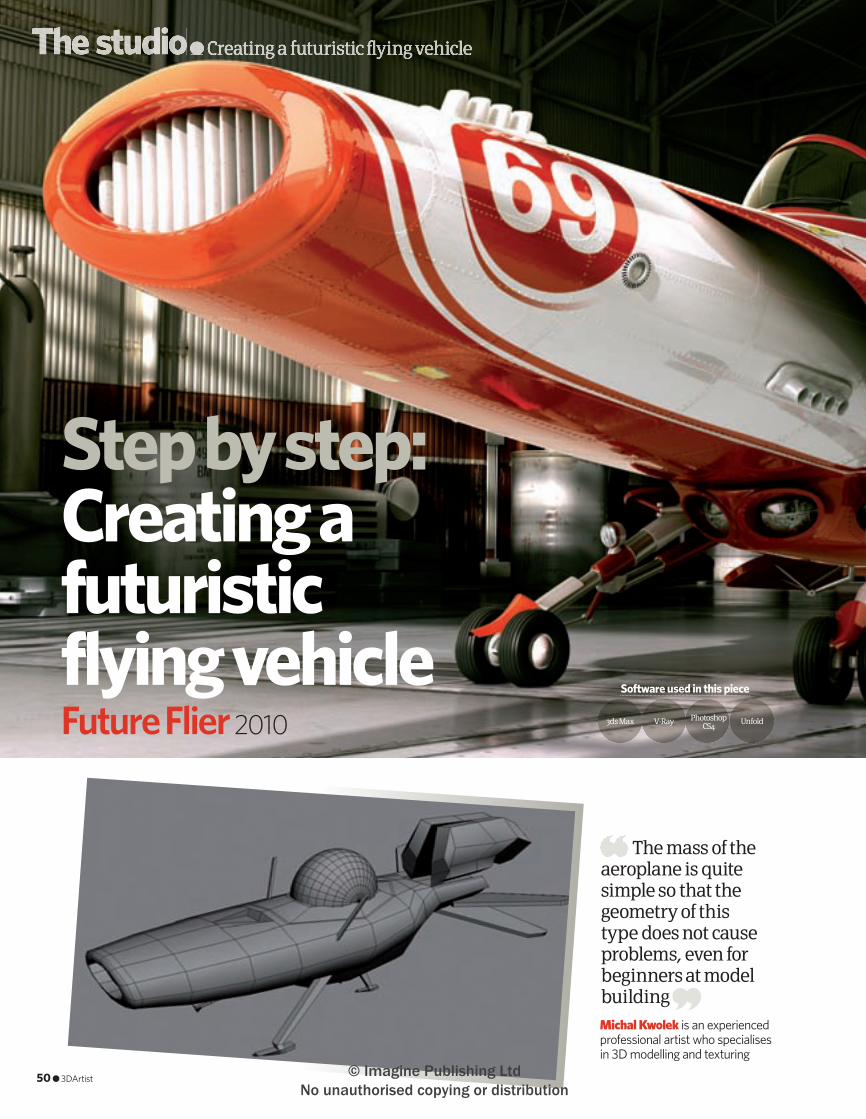
50 ● 3DArtist
The studio● Creating a futuristic fl ying vehicle● Creating a futuristic fl ying vehicle●
Step by step: Creating a futuristic flying vehicleFuture Flier 2010
Michal Kwolek is an experienced professional artist who specialises in 3D modelling and texturing
The mass of the aeroplane is quite simple so that the geometry of this type does not cause problems, even for beginners at model building
Software used in this piece
Photoshop CS4
V-Ray3ds Max Unfold
50 ● 3DArtist
050-53_3DA_15 Future Flier tutor50 50 8/4/10 14:35:07
© Imagine Publishing Ltd No unauthorised copying or distribution

ConceptsThe inspiration behind the scene
Concepts,Modelling
Step by step: Michal Kwolek ●The studio●The studio●
01 Formula 1 cars of the Sixties were
characterised by simple and beautiful shapes. The typical car shape looked like a long tube with a hole in the front. When working on the Future Flier craft, I wanted to re-create this basic shape. The fi rst step of the work was therefore to collect reference material for vehicles from those years. When I had the necessary pictures, I could start the modelling process.
03 After an initial vehicle concept I decided to draw a more accurate version. The base for the simple model was constructed mainly from primitive shapes
in 3D, then this model was rendered and composited in Photoshop. Here I have also modifi ed the vehicle to fi t the proportions of the interior elements. The modelled ship now has the look of the original concept drawing.
Easy-to-follow guides take you from concept
to the fi nal render
Art
ist i
nfo
Personal portfolio sitewww.kwolek.orgCountry PolandHardware used Intel Core 2 Quad 2.40GHz, 8GB RAMExpertise Michal specialises in 3D modelling and texturing
Michal Kwolek
Username: kreska90
T his tutorial shows the process of creating the
Future Flier image from conception to a shiny fi nal render. The concept was based on the form of old F1 cars. The image has been completely modelled, lit and rendered in 3ds Max 2008 using V-Ray. The postproduction work was done in Photoshop. The modelling work was established quite quickly, in less than two weeks. The mass of the aeroplane is quite simple so that the geometry of this type does not cause problems, even for beginners at model building. Similarly, the hangar and equipment were very straightforward. After creating primitive models, the poly modelling for the detail parts was simple. The plane materials are standard materials in 3ds Max. The most di� cult part of the project was the lighting and rendering, mainly because a few test renders were needed to get the exact glow and desired e� ect.
02 The fi rst stage was to work on the shape
of a simple sketch, made in Photoshop, viewed from the side. The dimensions weren’t exact – it was more important to get the lines of the vehicle sketched out. At this stage I did not care about details – it was all about creating the right shape of the car so that when it came to modelling, it would be much easier to keep the form in the right shape.
3DArtist ● 513DArtist ● 51
050-53_3DA_15 Future Flier tutor51 51 8/4/10 14:35:26
© Imagine Publishing Ltd No unauthorised copying or distribution
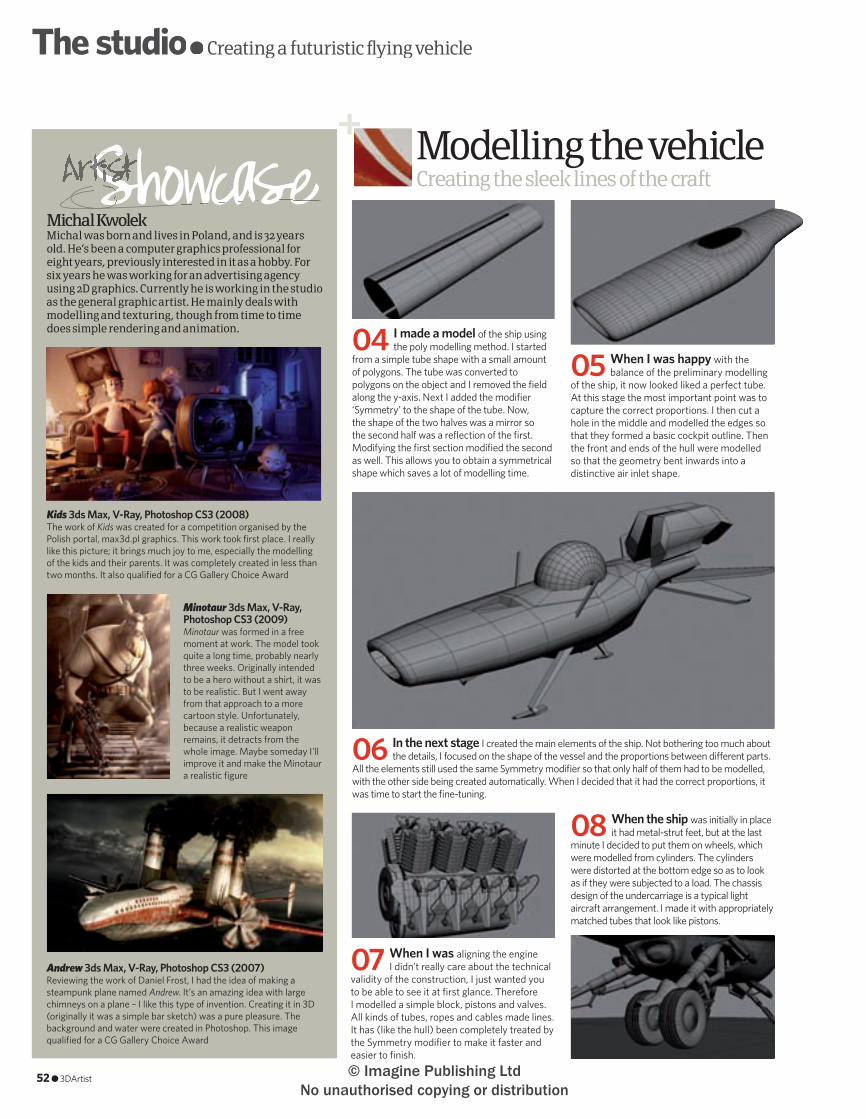
The studio● Creating a futuristic fl ying vehicle● Creating a futuristic fl ying vehicle●
Modelling the vehicleCreating the sleek lines of the craft
05 When I was happy with the balance of the preliminary modelling
of the ship, it now looked liked a perfect tube. At this stage the most important point was to capture the correct proportions. I then cut a hole in the middle and modelled the edges so that they formed a basic cockpit outline. Then the front and ends of the hull were modelled so that the geometry bent inwards into a distinctive air inlet shape.
06 In the next stage I created the main elements of the ship. Not bothering too much about the details, I focused on the shape of the vessel and the proportions between di� erent parts.
All the elements still used the same Symmetry modifi er so that only half of them had to be modelled, with the other side being created automatically. When I decided that it had the correct proportions, it was time to start the fi ne-tuning.
07 When I was aligning the engine I didn’t really care about the technical
validity of the construction, I just wanted you to be able to see it at fi rst glance. Therefore I modelled a simple block, pistons and valves. All kinds of tubes, ropes and cables made lines. It has (like the hull) been completely treated by the Symmetry modifi er to make it faster and easier to fi nish.
08 When the ship was initially in place it had metal-strut feet, but at the last
minute I decided to put them on wheels, which were modelled from cylinders. The cylinders were distorted at the bottom edge so as to look as if they were subjected to a load. The chassis design of the undercarriage is a typical light aircraft arrangement. I made it with appropriately matched tubes that look like pistons.
04 I made a model of the ship using the poly modelling method. I started
from a simple tube shape with a small amount of polygons. The tube was converted to polygons on the object and I removed the fi eld along the y-axis. Next I added the modifi er ‘Symmetry’ to the shape of the tube. Now, the shape of the two halves was a mirror so the second half was a refl ection of the fi rst. Modifying the fi rst section modifi ed the second as well. This allows you to obtain a symmetrical shape which saves a lot of modelling time.
52 ● 3DArtist
Michal KwolekMichal was born and lives in Poland, and is 32 years old. He’s been a computer graphics professional for eight years, previously interested in it as a hobby. For six years he was working for an advertising agency using 2D graphics. Currently he is working in the studio as the general graphic artist. He mainly deals with modelling and texturing, though from time to time does simple rendering and animation.
Minotaur 3ds Max, V-Ray, Photoshop CS3 (2009) Minotaur was formed in a free moment at work. The model took quite a long time, probably nearly three weeks. Originally intended to be a hero without a shirt, it was to be realistic. But I went away from that approach to a more cartoon style. Unfortunately, because a realistic weapon remains, it detracts from the whole image. Maybe someday I’ll improve it and make the Minotaur a realistic fi gure
Andrew 3ds Max, V-Ray, Photoshop CS3 (2007)Reviewing the work of Daniel Frost, I had the idea of making a steampunk plane named Andrew. It’s an amazing idea with large chimneys on a plane – I like this type of invention. Creating it in 3D (originally it was a simple bar sketch) was a pure pleasure. The background and water were created in Photoshop. This image qualifi ed for a CG Gallery Choice Award
Kids 3ds Max, V-Ray, Photoshop CS3 (2008)The work of Kids was created for a competition organised by the Polish portal, max3d.pl graphics. This work took fi rst place. I really like this picture; it brings much joy to me, especially the modelling of the kids and their parents. It was completely created in less than two months. It also qualifi ed for a CG Gallery Choice Award
ShowcaseArtistShowcaseArtistShowcaseShowcase
050-53_3DA_15 Future Flier tutor52 52 8/4/10 14:35:52
© Imagine Publishing Ltd No unauthorised copying or distribution
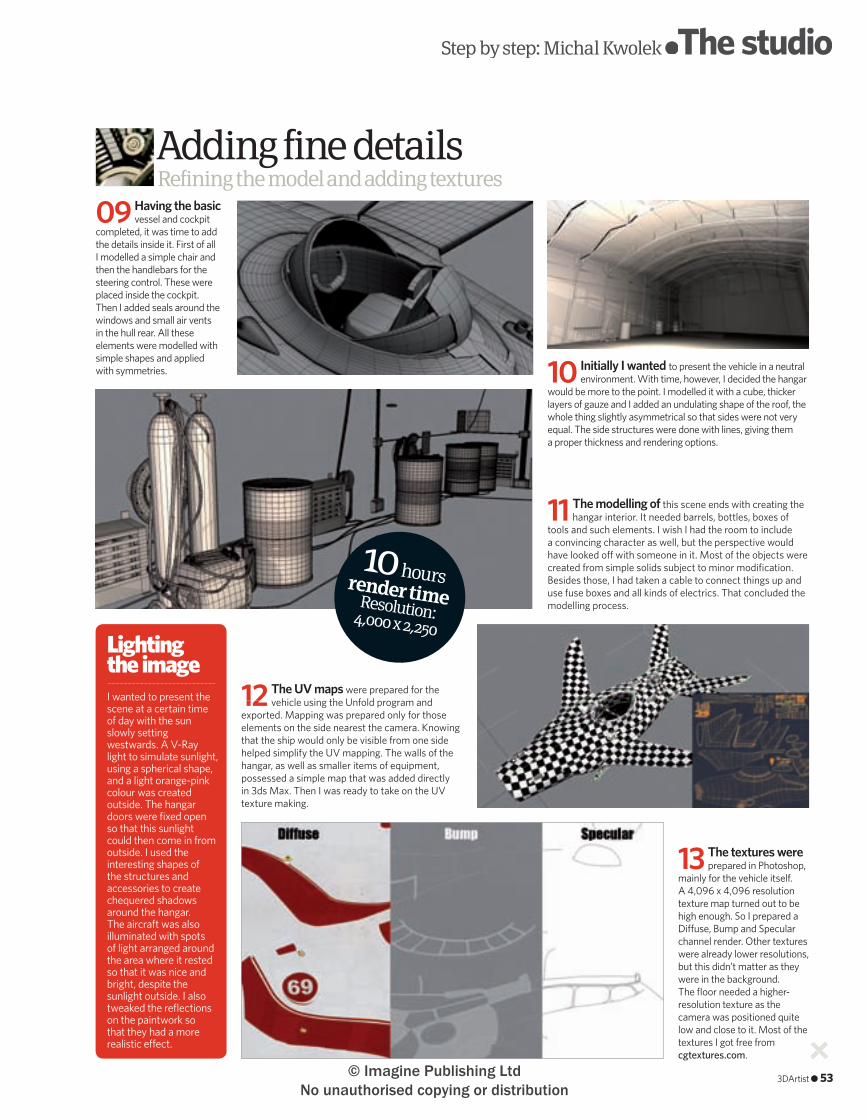
Step by step: Michal Kwolek ●The studio●The studio●
Refining the model and adding textures
10 Initially I wanted to present the vehicle in a neutral environment. With time, however, I decided the hangar
would be more to the point. I modelled it with a cube, thicker layers of gauze and I added an undulating shape of the roof, the whole thing slightly asymmetrical so that sides were not very equal. The side structures were done with lines, giving them a proper thickness and rendering options.
Adding fine details
09 Having the basic vessel and cockpit
completed, it was time to add the details inside it. First of all I modelled a simple chair and then the handlebars for the steering control. These were placed inside the cockpit. Then I added seals around the windows and small air vents in the hull rear. All these elements were modelled with simple shapes and applied with symmetries.
11 The modelling of this scene ends with creating the hangar interior. It needed barrels, bottles, boxes of
tools and such elements. I wish I had the room to include a convincing character as well, but the perspective would have looked o� with someone in it. Most of the objects were created from simple solids subject to minor modifi cation. Besides those, I had taken a cable to connect things up and use fuse boxes and all kinds of electrics. That concluded the modelling process.
12 The UV maps were prepared for the vehicle using the Unfold program and
exported. Mapping was prepared only for those elements on the side nearest the camera. Knowing that the ship would only be visible from one side helped simplify the UV mapping. The walls of the hangar, as well as smaller items of equipment, possessed a simple map that was added directly in 3ds Max. Then I was ready to take on the UV texture making.
13 The textures were prepared in Photoshop,
mainly for the vehicle itself. A 4,096 x 4,096 resolution texture map turned out to be high enough. So I prepared a Di� use, Bump and Specular channel render. Other textures were already lower resolutions, but this didn’t matter as they were in the background. The fl oor needed a higher-resolution texture as the camera was positioned quite low and close to it. Most of the textures I got free from cgtextures.com.
I wanted to present the scene at a certain time of day with the sun slowly setting westwards. A V-Ray light to simulate sunlight, using a spherical shape, and a light orange-pink colour was created outside. The hangar doors were fi xed open so that this sunlight could then come in from outside. I used the interesting shapes of the structures and accessories to create chequered shadows around the hangar. The aircraft was also illuminated with spots of light arranged around the area where it rested so that it was nice and bright, despite the sunlight outside. I also tweaked the refl ections on the paintwork so that they had a more realistic e� ect.
Lighting the image
render timeResolution:4,000 x 2,250
10 hours
3DArtist ● 53
050-53_3DA_15 Future Flier tutor53 53 8/4/10 14:36:12
© Imagine Publishing Ltd No unauthorised copying or distribution
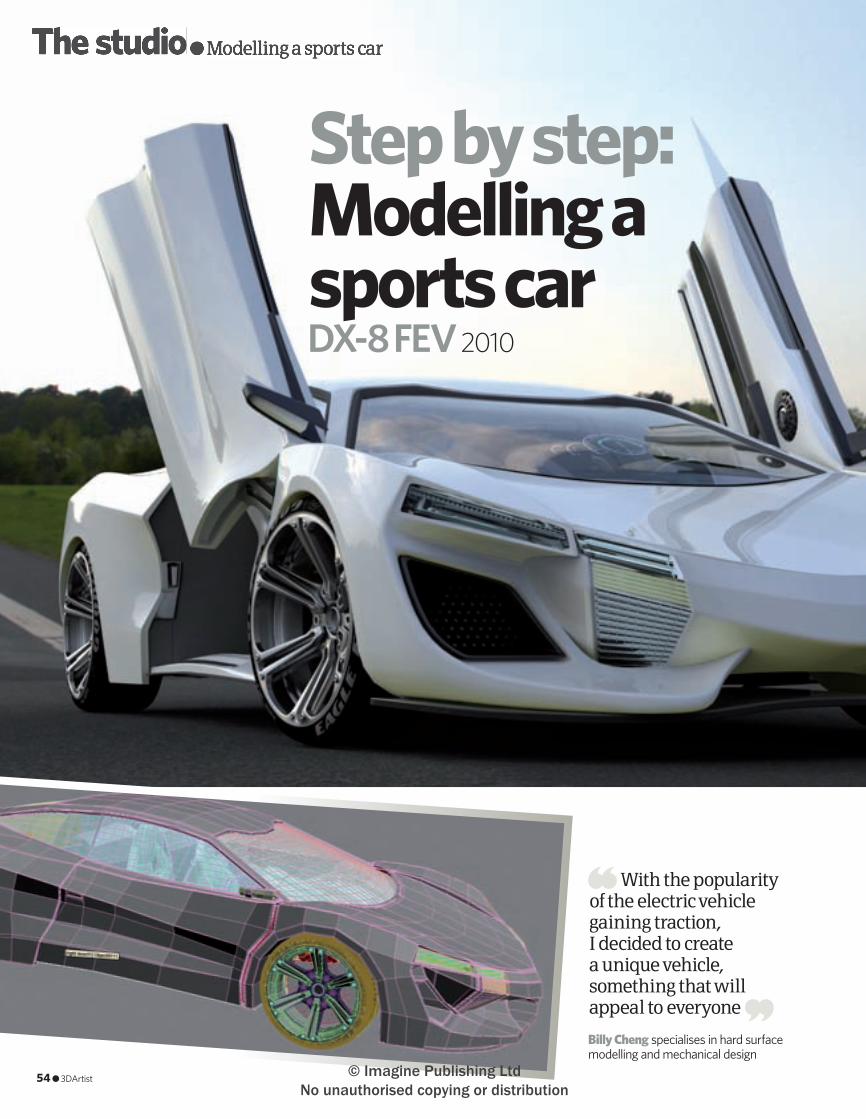
54 ● 3DArtist
The studio● Modelling a sports car● Modelling a sports car●
Step by step: Modelling a sports carDX-8 FEV 2010
Billy Cheng specialises in hard surface modelling and mechanical design
With the popularity of the electric vehicle gaining traction, I decided to create a unique vehicle, something that will appeal to everyone
54 ● 3DArtist
054-57_3DA_15 Sports car.indd 54 8/4/10 14:37:05
© Imagine Publishing Ltd No unauthorised copying or distribution
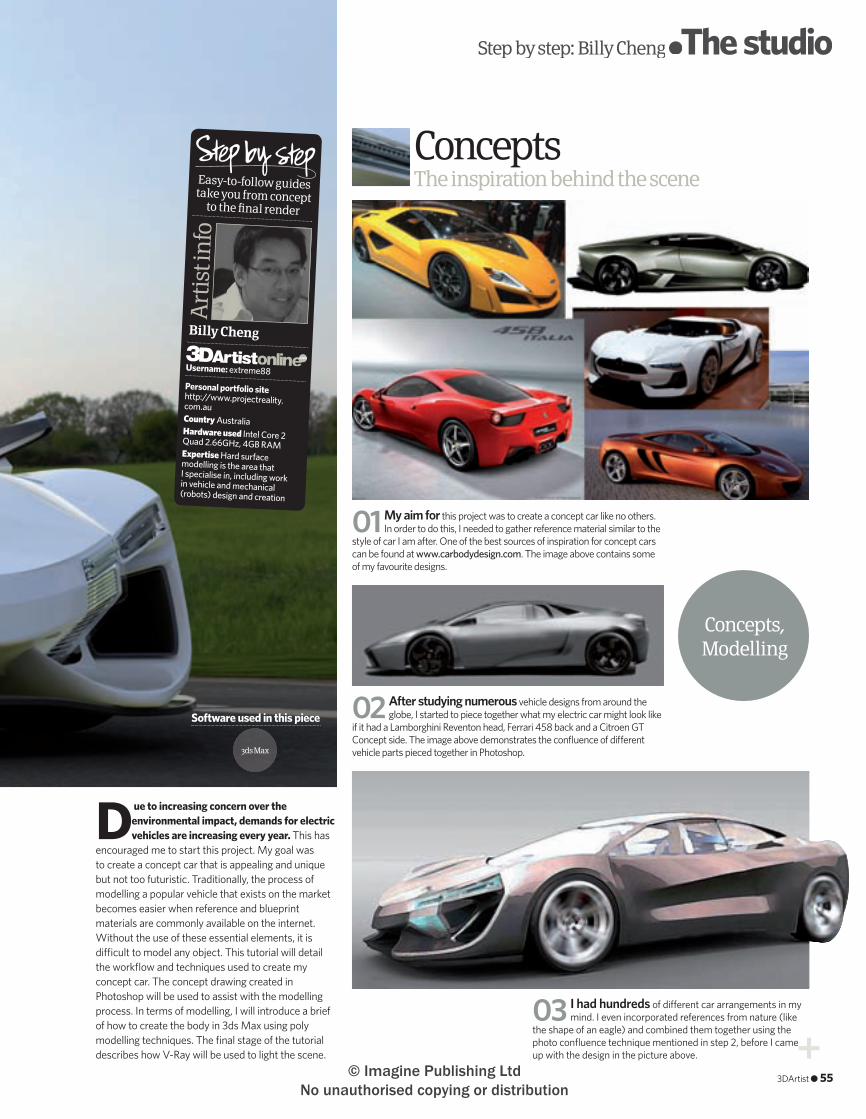
D ue to increasing concern over the environmental impact, demands for electric vehicles are increasing every year. This has
encouraged me to start this project. My goal was to create a concept car that is appealing and unique but not too futuristic. Traditionally, the process of modelling a popular vehicle that exists on the market becomes easier when reference and blueprint materials are commonly available on the internet. Without the use of these essential elements, it is di� cult to model any object. This tutorial will detail the workfl ow and techniques used to create my concept car. The concept drawing created in Photoshop will be used to assist with the modelling process. In terms of modelling, I will introduce a brief of how to create the body in 3ds Max using poly modelling techniques. The fi nal stage of the tutorial describes how V-Ray will be used to light the scene.
ConceptsThe inspiration behind the scene
Concepts,Modelling
Step by step: Billy Cheng ●The studio●The studio●
Software used in this piece
3ds Max
01 My aim for this project was to create a concept car like no others. In order to do this, I needed to gather reference material similar to the
style of car I am after. One of the best sources of inspiration for concept cars can be found at www.carbodydesign.com. The image above contains some of my favourite designs.
02 After studying numerous vehicle designs from around the globe, I started to piece together what my electric car might look like
if it had a Lamborghini Reventon head, Ferrari 458 back and a Citroen GT Concept side. The image above demonstrates the confl uence of di� erent vehicle parts pieced together in Photoshop.
03 I had hundreds of di� erent car arrangements in my mind. I even incorporated references from nature (like
the shape of an eagle) and combined them together using the photo confl uence technique mentioned in step 2, before I came up with the design in the picture above.
Easy-to-follow guides take you from concept
to the fi nal renderA
rtis
t in
fo
Personal portfolio sitehttp://www.projectreality.com.auCountry AustraliaHardware used Intel Core 2 Quad 2.66GHz, 4GB RAMExpertise Hard surface modelling is the area that I specialise in, including work in vehicle and mechanical (robots) design and creation
Billy Cheng
Username: extreme88
3DArtist ● 553DArtist ● 55
054-57_3DA_15 Sports car.indd 55 8/4/10 14:37:22
© Imagine Publishing Ltd No unauthorised copying or distribution
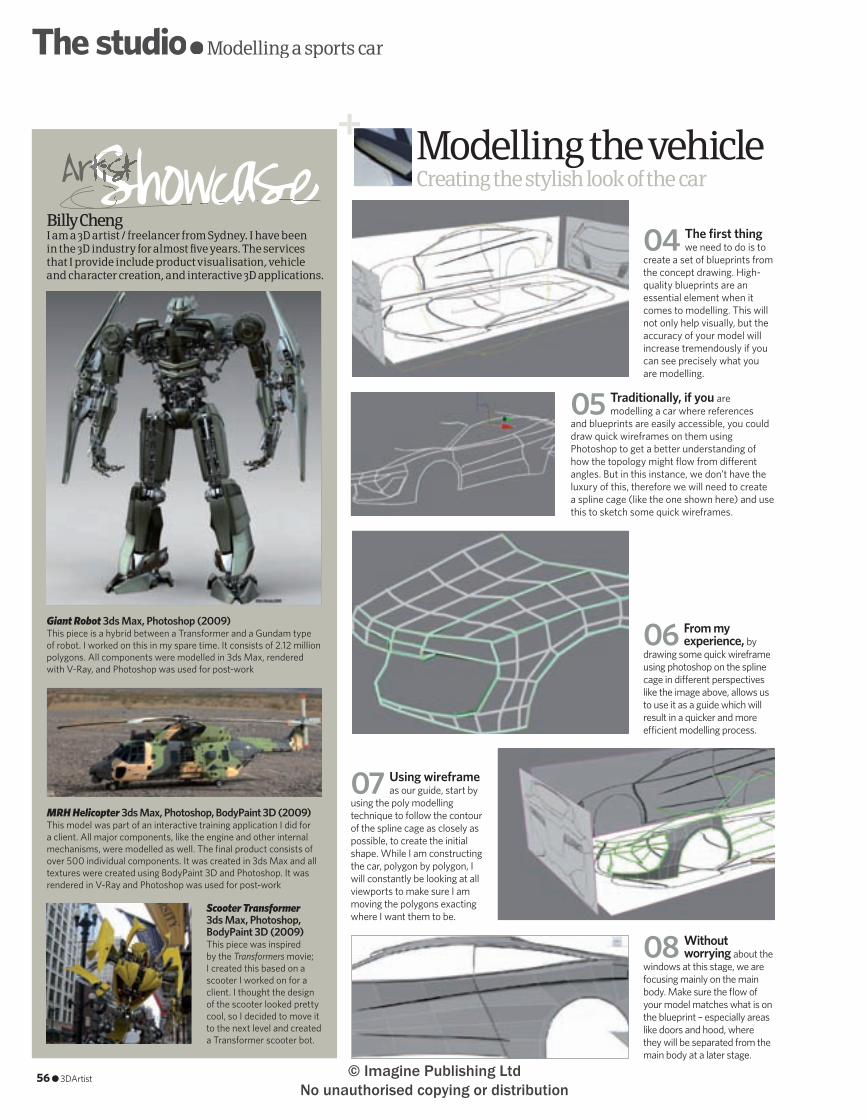
The studio● Modelling a sports car● Modelling a sports car●
Modelling the vehicleCreating the stylish look of the car
05 Traditionally, if you are modelling a car where references
and blueprints are easily accessible, you could draw quick wireframes on them using Photoshop to get a better understanding of how the topology might fl ow from di� erent angles. But in this instance, we don’t have the luxury of this, therefore we will need to create a spline cage (like the one shown here) and use this to sketch some quick wireframes.
06 From my experience, by
drawing some quick wireframe using photoshop on the spline cage in di� erent perspectives like the image above, allows us to use it as a guide which will result in a quicker and more e� cient modelling process.
07 Using wireframe as our guide, start by
using the poly modelling technique to follow the contour of the spline cage as closely as possible, to create the initial shape. While I am constructing the car, polygon by polygon, I will constantly be looking at all viewports to make sure I am moving the polygons exacting where I want them to be.
08 Without worrying about the
windows at this stage, we are focusing mainly on the main body. Make sure the fl ow of your model matches what is on the blueprint – especially areas like doors and hood, where they will be separated from the main body at a later stage.
04 The fi rst thing we need to do is to
create a set of blueprints from the concept drawing. High-quality blueprints are an essential element when it comes to modelling. This will not only help visually, but the accuracy of your model will increase tremendously if you can see precisely what you are modelling.
56 ● 3DArtist
Billy ChengI am a 3D artist / freelancer from Sydney. I have been in the 3D industry for almost fi ve years. The services that I provide include product visualisation, vehicle and character creation, and interactive 3D applications.
MRH Helicopter 3ds Max, Photoshop, BodyPaint 3D (2009)This model was part of an interactive training application I did for a client. All major components, like the engine and other internal mechanisms, were modelled as well. The fi nal product consists of over 500 individual components. It was created in 3ds Max and all textures were created using BodyPaint 3D and Photoshop. It was rendered in V-Ray and Photoshop was used for post-work
Scooter Transformer 3ds Max, Photoshop, BodyPaint 3D (2009)This piece was inspired by the Transformers movie; I created this based on a scooter I worked on for a client. I thought the design of the scooter looked pretty cool, so I decided to move it to the next level and created a Transformer scooter bot.
Giant Robot 3ds Max, Photoshop (2009)This piece is a hybrid between a Transformer and a Gundam type of robot. I worked on this in my spare time. It consists of 2.12 million polygons. All components were modelled in 3ds Max, rendered with V-Ray, and Photoshop was used for post-work
ShowcaseArtistShowcaseArtistShowcaseShowcase
054-57_3DA_15 Sports car.indd 56 8/4/10 14:37:41
© Imagine Publishing Ltd No unauthorised copying or distribution

Step by step: Billy Cheng ●The studio●The studio●
Refining the model
10 It is vital to get the general proportions correct before we add edge loops to detail the model, because it could get
arduous trying to change the overall shape once you have all the details cut into the high poly object.
Getting the overall look and feel
09 In the initial stage of the modelling
process, it is essential to keep the doors and the main body as one single object to ensure the topology is consistent throughout the entire model. Once the overall shape is blocked out, the next step will involve the detailing of the current shape.
11 Now it comes to the part where areas like
the doors and hood will be separated from the main body. We do this by selecting the door area with the poly selection tool. Then, under Edit Geometry, click Detach to create a new object, as shown to the left.
12 After separating all required body parts, it
is time to add elements like windows, grill, wheels, headlights, back lights and interior. The fi nal result is shown in the image here.
13 Lastly and also most importantly, I want to
emphasise the signifi cance of the headlights, which are like the eyes of a vehicle – in my opinion, they will be the fi rst thing that attracts people’s attention. To achieve realism in any image, the key ingredient is detail. The image here shows a cluster of elements such as the refl ector, glass cover and light bulb, which were all modelled as separate elements.
render timeResolution:1,200 x 648
38 mins
The lighting setup for this scene consists of a target direct light for the simulation of the sun. It is set to a relatively low value and a V-Ray dome light is used for ambient to add a bit of mood to the scene. For example, I usually set the ambient dome light at a quarter of the value of the target direct light. Finally, open up the material editor and put VRayHDRI into your di� use slot, then locate your HDRI and select spherical environment as your map type. Once this is done, put it inside ‘GI environment (skylight) override’ under V-Ray Environment. With the help of the right HDRI image, you should be able to get a realistic-looking render using this setup.
The lighting plan
3DArtist ● 57
054-57_3DA_15 Sports car.indd 57 8/4/10 14:37:57
© Imagine Publishing Ltd No unauthorised copying or distribution
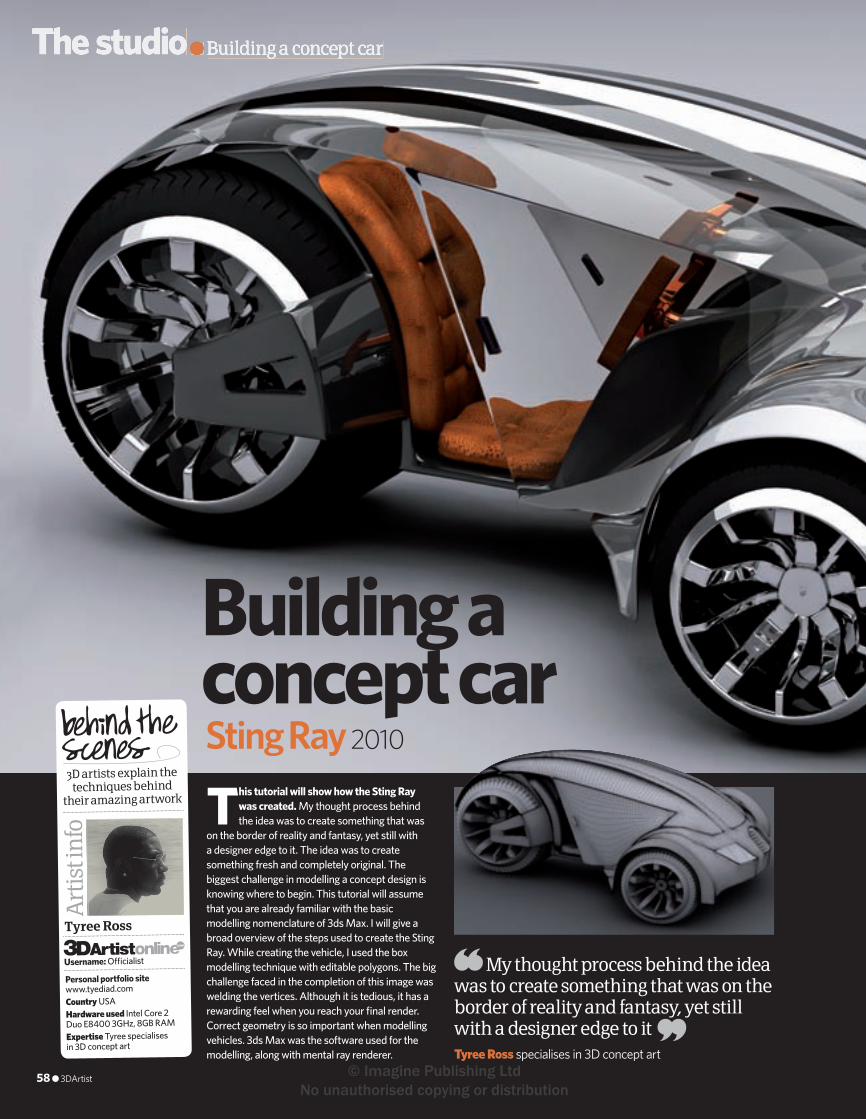
The studio●Building a concept car
Building a concept carSting Ray 2010
This tutorial will show how the Sting Ray was created. My thought process behind the idea was to create something that was
on the border of reality and fantasy, yet still with a designer edge to it. The idea was to create something fresh and completely original. The biggest challenge in modelling a concept design is knowing where to begin. This tutorial will assume that you are already familiar with the basic modelling nomenclature of 3ds Max. I will give a broad overview of the steps used to create the Sting Ray. While creating the vehicle, I used the box modelling technique with editable polygons. The big challenge faced in the completion of this image was welding the vertices. Although it is tedious, it has a rewarding feel when you reach your fi nal render. Correct geometry is so important when modelling vehicles. 3ds Max was the software used for the modelling, along with mental ray renderer. Tyree Ross specialises in 3D concept art
My thought process behind the idea was to create something that was on the border of reality and fantasy, yet still with a designer edge to it
58 ● 3DArtist
Art
ist i
nfo
3D artists explain the techniques behind
their amazing artwork
Personal portfolio site www.tyediad.comCountry USAHardware used Intel Core 2 Duo E8400 3GHz, 8GB RAMExpertise Tyree specialises in 3D concept art
Tyree Ross
Username: O� cialist
058-63_3DA_15 Concept vehicle.in58 58 8/4/10 14:40:29
© Imagine Publishing Ltd No unauthorised copying or distribution
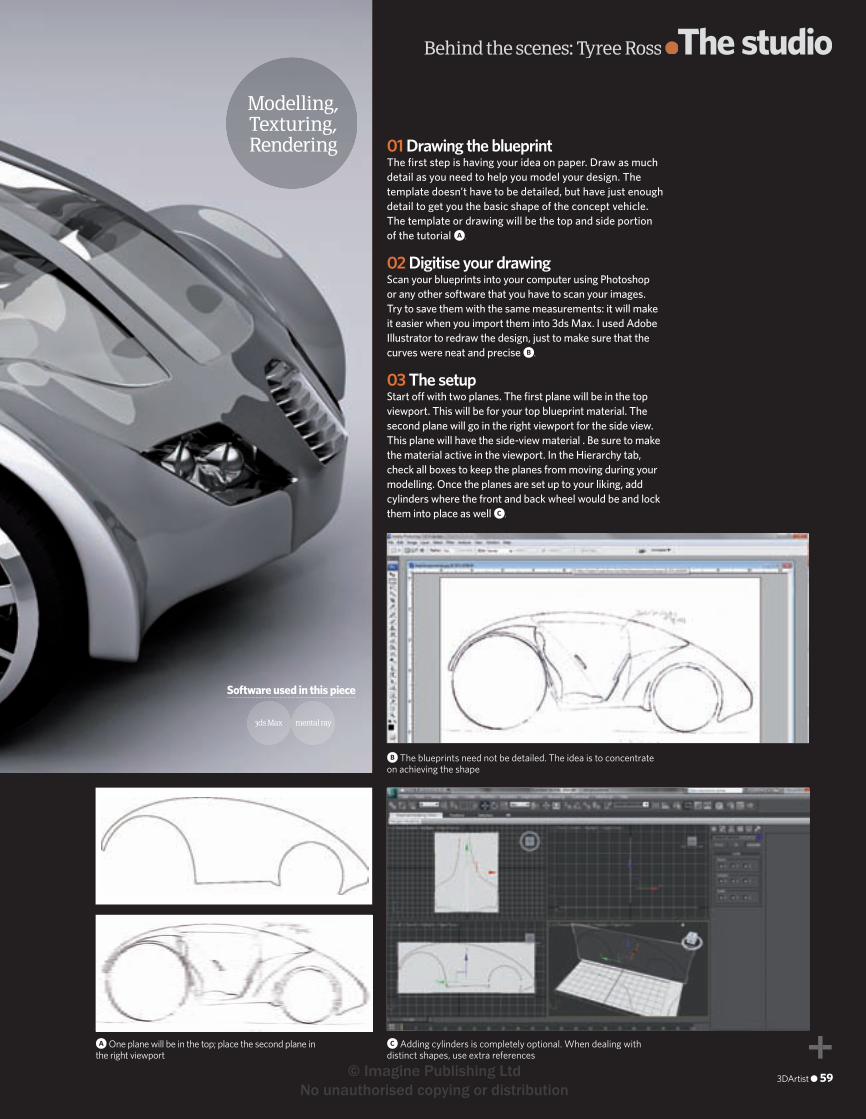
Behind the scenes: Tyree Ross ●The studio●The studio●
a One plane will be in the top; place the second plane in the right viewport
B The blueprints need not be detailed. The idea is to concentrate on achieving the shape
01 Drawing the blueprintThe fi rst step is having your idea on paper. Draw as much detail as you need to help you model your design. The template doesn’t have to be detailed, but have just enough detail to get you the basic shape of the concept vehicle. The template or drawing will be the top and side portion of the tutorial a.
02 Digitise your drawingScan your blueprints into your computer using Photoshop or any other software that you have to scan your images. Try to save them with the same measurements: it will make it easier when you import them into 3ds Max. I used Adobe Illustrator to redraw the design, just to make sure that the curves were neat and precise b.
03 The setupStart o� with two planes. The fi rst plane will be in the top viewport. This will be for your top blueprint material. The second plane will go in the right viewport for the side view. This plane will have the side-view material . Be sure to make the material active in the viewport. In the Hierarchy tab, check all boxes to keep the planes from moving during your modelling. Once the planes are set up to your liking, add cylinders where the front and back wheel would be and lock them into place as well c.
C Adding cylinders is completely optional. When dealing with distinct shapes, use extra references
Software used in this piece
3ds Max mental ray
Modelling, Texturing, Rendering
3DArtist ● 59
058-63_3DA_15 Concept vehicle.in59 59 8/4/10 14:41:00
© Imagine Publishing Ltd No unauthorised copying or distribution
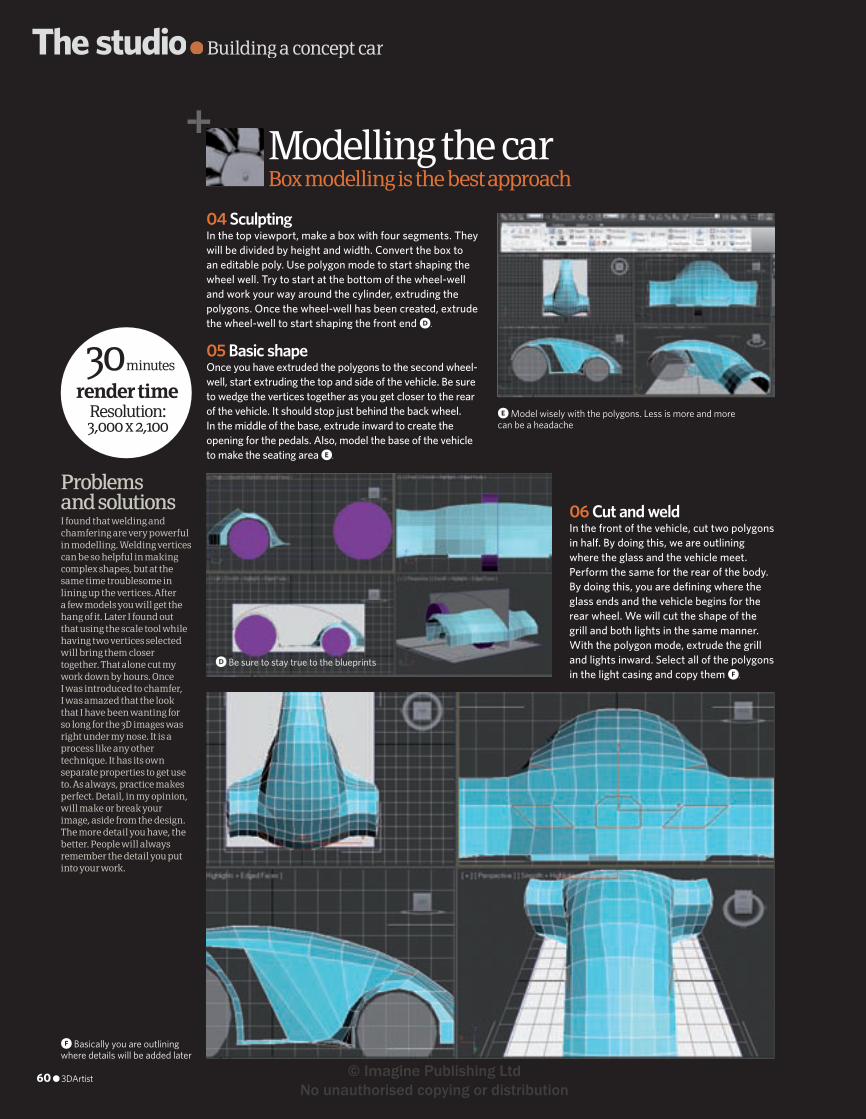
The studio● Building a concept car● Building a concept car●
I found that welding and chamfering are very powerful in modelling. Welding vertices can be so helpful in making complex shapes, but at the same time troublesome in lining up the vertices. After a few models you will get the hang of it. Later I found out that using the scale tool while having two vertices selected will bring them closer together. That alone cut my work down by hours. Once I was introduced to chamfer, I was amazed that the look that I have been wanting for so long for the 3D images was right under my nose. It is a process like any other technique. It has its own separate properties to get use to. As always, practice makes perfect. Detail, in my opinion, will make or break your image, aside from the design. The more detail you have, the better. People will always remember the detail you put into your work.
Problems and solutions
d Be sure to stay true to the blueprints
Modelling the carBox modelling is the best approach
render timeResolution: 3,000 x 2,100
30 minutes
04 SculptingIn the top viewport, make a box with four segments. They will be divided by height and width. Convert the box to an editable poly. Use polygon mode to start shaping the wheel well. Try to start at the bottom of the wheel-well and work your way around the cylinder, extruding the polygons. Once the wheel-well has been created, extrude the wheel-well to start shaping the front end d.
05 Basic shapeOnce you have extruded the polygons to the second wheel-well, start extruding the top and side of the vehicle. Be sure to wedge the vertices together as you get closer to the rear of the vehicle. It should stop just behind the back wheel. In the middle of the base, extrude inward to create the opening for the pedals. Also, model the base of the vehicle to make the seating area e.
06 Cut and weldIn the front of the vehicle, cut two polygons in half. By doing this, we are outlining where the glass and the vehicle meet. Perform the same for the rear of the body. By doing this, you are defi ning where the glass ends and the vehicle begins for the rear wheel. We will cut the shape of the grill and both lights in the same manner. With the polygon mode, extrude the grill and lights inward. Select all of the polygons in the light casing and copy them f.
e Model wisely with the polygons. Less is more and more can be a headache
f Basically you are outlining where details will be added later
60 ● 3DArtist
058-63_3DA_15 Concept vehicle.in60 60 8/4/10 14:41:15
© Imagine Publishing Ltd No unauthorised copying or distribution
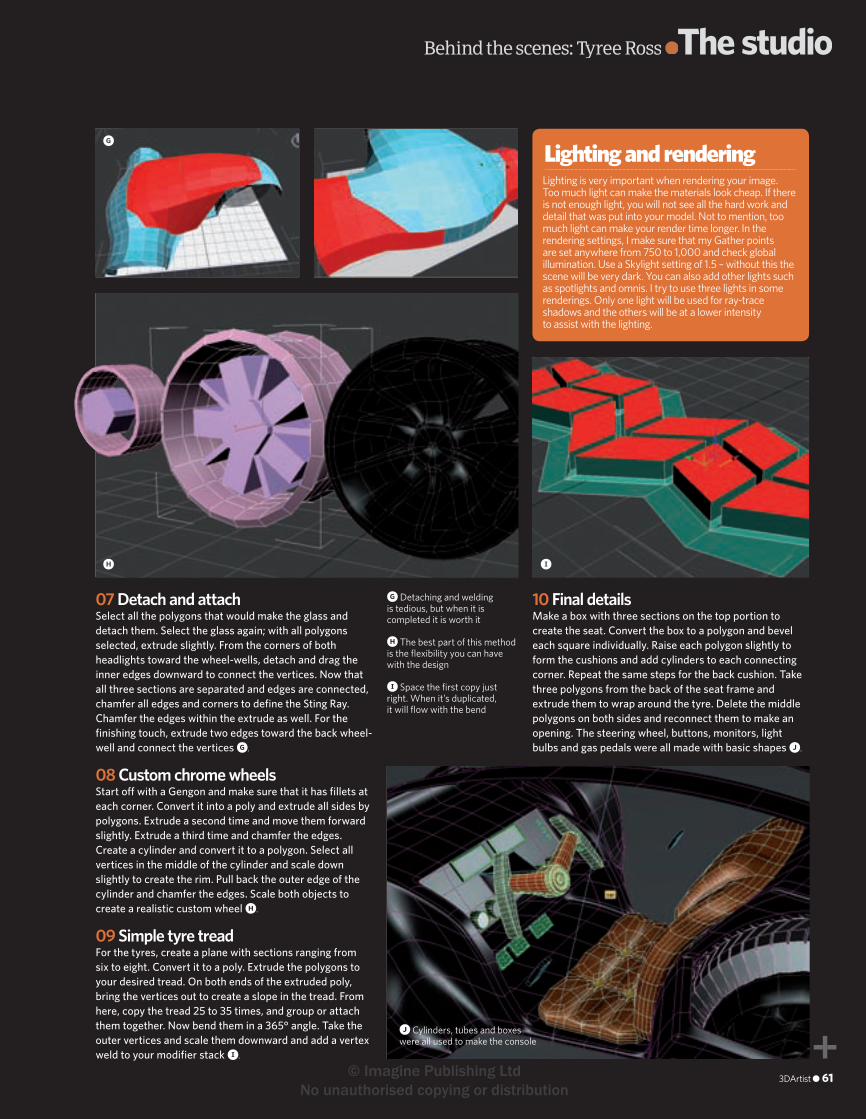
10 Final detailsMake a box with three sections on the top portion to create the seat. Convert the box to a polygon and bevel each square individually. Raise each polygon slightly to form the cushions and add cylinders to each connecting corner. Repeat the same steps for the back cushion. Take three polygons from the back of the seat frame and extrude them to wrap around the tyre. Delete the middle polygons on both sides and reconnect them to make an opening. The steering wheel, buttons, monitors, light bulbs and gas pedals were all made with basic shapes j.
Behind the scenes: Tyree Ross ●The studio●The studio●
Lighting is very important when rendering your image. Too much light can make the materials look cheap. If there is not enough light, you will not see all the hard work and detail that was put into your model. Not to mention, too much light can make your render time longer. In the rendering settings, I make sure that my Gather points are set anywhere from 750 to 1,000 and check global illumination. Use a Skylight setting of 1.5 – without this the scene will be very dark. You can also add other lights such as spotlights and omnis. I try to use three lights in some renderings. Only one light will be used for ray-trace shadows and the others will be at a lower intensity to assist with the lighting.
Lighting and rendering
g Detaching and welding is tedious, but when it is completed it is worth it
h The best part of this method is the fl exibility you can have with the design
i Space the fi rst copy just right. When it’s duplicated, it will fl ow with the bend
07 Detach and attachSelect all the polygons that would make the glass and detach them. Select the glass again; with all polygons selected, extrude slightly. From the corners of both headlights toward the wheel-wells, detach and drag the inner edges downward to connect the vertices. Now that all three sections are separated and edges are connected, chamfer all edges and corners to defi ne the Sting Ray. Chamfer the edges within the extrude as well. For the fi nishing touch, extrude two edges toward the back wheel-well and connect the vertices g.
08 Custom chrome wheelsStart o� with a Gengon and make sure that it has fi llets at each corner. Convert it into a poly and extrude all sides by polygons. Extrude a second time and move them forward slightly. Extrude a third time and chamfer the edges. Create a cylinder and convert it to a polygon. Select all vertices in the middle of the cylinder and scale down slightly to create the rim. Pull back the outer edge of the cylinder and chamfer the edges. Scale both objects to create a realistic custom wheel h.
09 Simple tyre treadFor the tyres, create a plane with sections ranging from six to eight. Convert it to a poly. Extrude the polygons to your desired tread. On both ends of the extruded poly, bring the vertices out to create a slope in the tread. From here, copy the tread 25 to 35 times, and group or attach them together. Now bend them in a 365° angle. Take the outer vertices and scale them downward and add a vertex weld to your modifi er stack i.
j Cylinders, tubes and boxes were all used to make the console
g
h i
3DArtist ● 61
058-63_3DA_15 Concept vehicle.in61 61 8/4/10 14:41:29
© Imagine Publishing Ltd No unauthorised copying or distribution
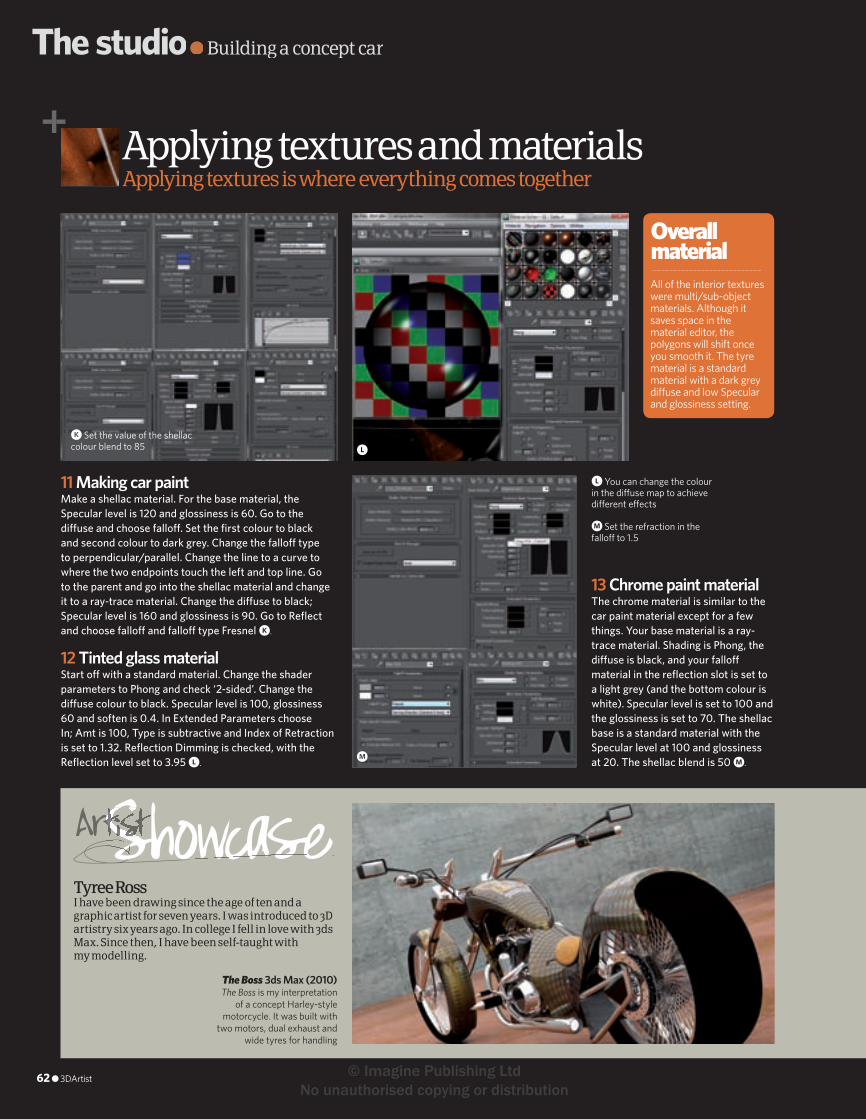
The studio● Building a concept car● Building a concept car●
All of the interior textures were multi/sub-object materials. Although it saves space in the material editor, the polygons will shift once you smooth it. The tyre material is a standard material with a dark grey di� use and low Specular and glossiness setting.
Overall material
Applying textures and materialsApplying textures is where everything comes together
ShowcaseArtistShowcaseArtistShowcaseShowcaseThe Boss 3ds Max (2010)The Boss is my interpretation
of a concept Harley-style motorcycle. It was built with
two motors, dual exhaust and wide tyres for handling
Tyree RossI have been drawing since the age of ten and a graphic artist for seven years. I was introduced to 3D artistry six years ago. In college I fell in love with 3ds Max. Since then, I have been self-taught with my modelling.
11 Making car paintMake a shellac material. For the base material, the Specular level is 120 and glossiness is 60. Go to the di� use and choose fallo� . Set the fi rst colour to black and second colour to dark grey. Change the fallo� type to perpendicular/parallel. Change the line to a curve to where the two endpoints touch the left and top line. Go to the parent and go into the shellac material and change it to a ray-trace material. Change the di� use to black; Specular level is 160 and glossiness is 90. Go to Refl ect and choose fallo� and fallo� type Fresnel k.
12 Tinted glass materialStart o� with a standard material. Change the shader parameters to Phong and check ‘2-sided’. Change the di� use colour to black. Specular level is 100, glossiness 60 and soften is 0.4. In Extended Parameters choose In; Amt is 100, Type is subtractive and Index of Retraction is set to 1.32. Refl ection Dimming is checked, with the Refl ection level set to 3.95 l.
13 Chrome paint materialThe chrome material is similar to the car paint material except for a few things. Your base material is a ray-trace material. Shading is Phong, the di� use is black, and your fallo� material in the refl ection slot is set to a light grey (and the bottom colour is white). Specular level is set to 100 and the glossiness is set to 70. The shellac base is a standard material with the Specular level at 100 and glossiness at 20. The shellac blend is 50 m.
k Set the value of the shellac colour blend to 85
l You can change the colour in the di� use map to achieve di� erent e� ects
m Set the refraction in the fallo� to 1.5
l
m
62 ● 3DArtist
058-63_3DA_15 Concept vehicle.in62 62 8/4/10 14:41:49
© Imagine Publishing Ltd No unauthorised copying or distribution
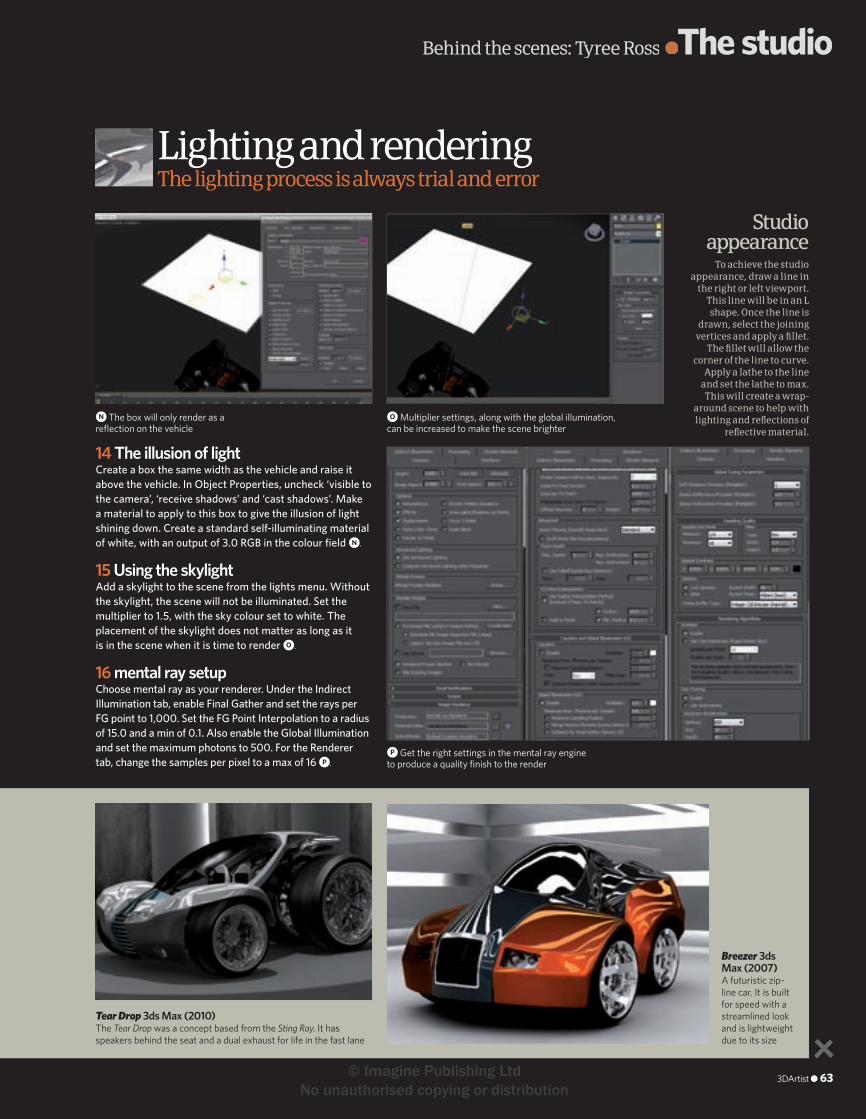
Behind the scenes: Tyree Ross ●The studio●The studio●
Lighting and renderingThe lighting process is always trial and error
Breezer 3ds Max (2007)A futuristic zip-line car. It is built for speed with a streamlined look and is lightweight due to its size
Tear Drop 3ds Max (2010)The Tear Drop was a concept based from the Sting Ray. It has speakers behind the seat and a dual exhaust for life in the fast lane
14 The illusion of lightCreate a box the same width as the vehicle and raise it above the vehicle. In Object Properties, uncheck ‘visible to the camera’, ‘receive shadows’ and ‘cast shadows’. Make a material to apply to this box to give the illusion of light shining down. Create a standard self-illuminating material of white, with an output of 3.0 RGB in the colour fi eld n.
15 Using the skylightAdd a skylight to the scene from the lights menu. Without the skylight, the scene will not be illuminated. Set the multiplier to 1.5, with the sky colour set to white. The placement of the skylight does not matter as long as it is in the scene when it is time to render o.
16 mental ray setupChoose mental ray as your renderer. Under the Indirect Illumination tab, enable Final Gather and set the rays per FG point to 1,000. Set the FG Point Interpolation to a radius of 15.0 and a min of 0.1. Also enable the Global Illumination and set the maximum photons to 500. For the Renderer tab, change the samples per pixel to a max of 16 p.
To achieve the studio appearance, draw a line in
the right or left viewport. This line will be in an L shape. Once the line is
drawn, select the joining vertices and apply a fi llet.
The fi llet will allow the corner of the line to curve.
Apply a lathe to the line and set the lathe to max. This will create a wrap-
around scene to help with lighting and refl ections of
refl ective material.
Studio appearance
p Get the right settings in the mental ray engine to produce a quality fi nish to the render
n The box will only render as a refl ection on the vehicle
o Multiplier settings, along with the global illumination, can be increased to make the scene brighter
3DArtist ● 63
058-63_3DA_15 Concept vehicle.in63 63 8/4/10 14:42:40
© Imagine Publishing Ltd No unauthorised copying or distribution
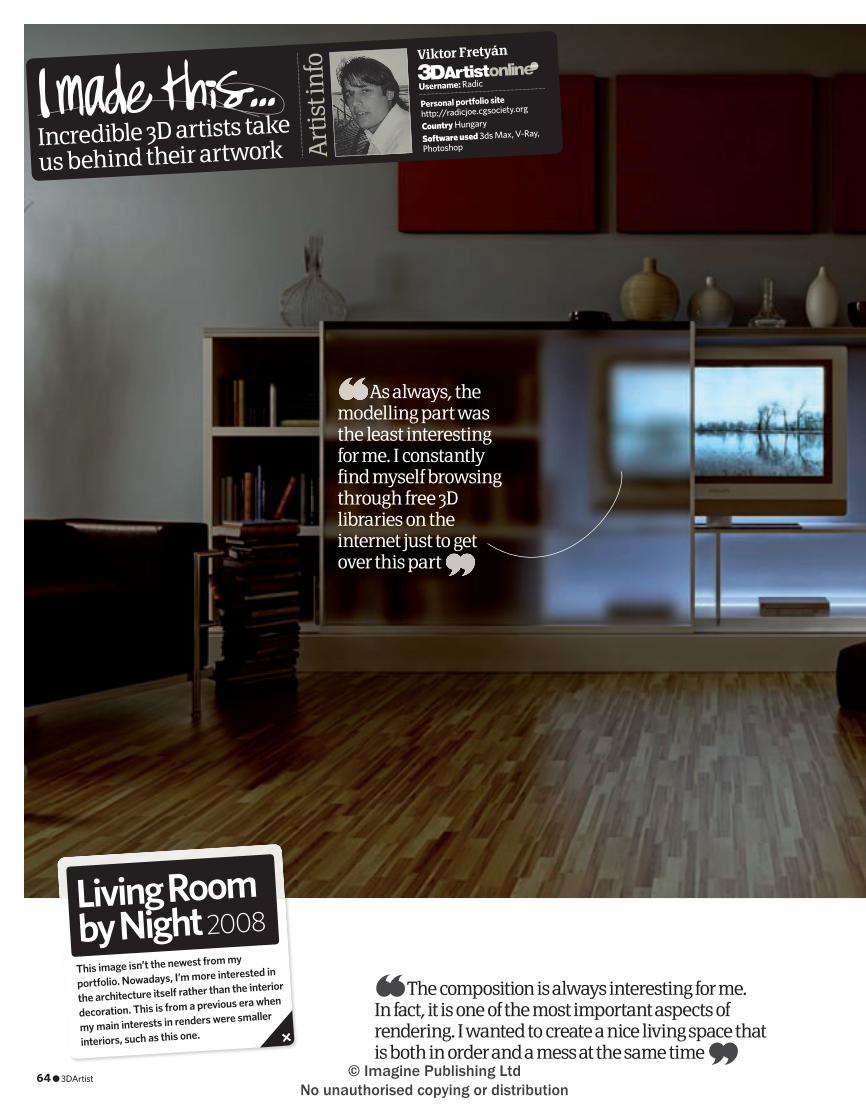
Incredible 3D artists take
us behind their artwork Art
ist i
nfo Viktor Fretyán
Personal portfolio site http://radicjoe.cgsociety.org
Country Hungary
Software used 3ds Max, V-Ray,
Photoshop
Username: Radic
This image isn’t the newest from my
portfolio. Nowadays, I’m more interested in
the architecture itself rather than the interior
decoration. This is from a previous era when
my main interests in renders were smaller
interiors, such as this one.
Living Room by Night 2008
The composition is always interesting for me. In fact, it is one of the most important aspects of rendering. I wanted to create a nice living space that is both in order and a mess at the same time
As always, the modelling part was the least interesting for me. I constantly find myself browsing through free 3D libraries on the internet just to get over this part
64 ● 3DArtist
064-65_3DA_15 IMT2 - Living room64 64 8/4/10 14:44:14
© Imagine Publishing Ltd No unauthorised copying or distribution
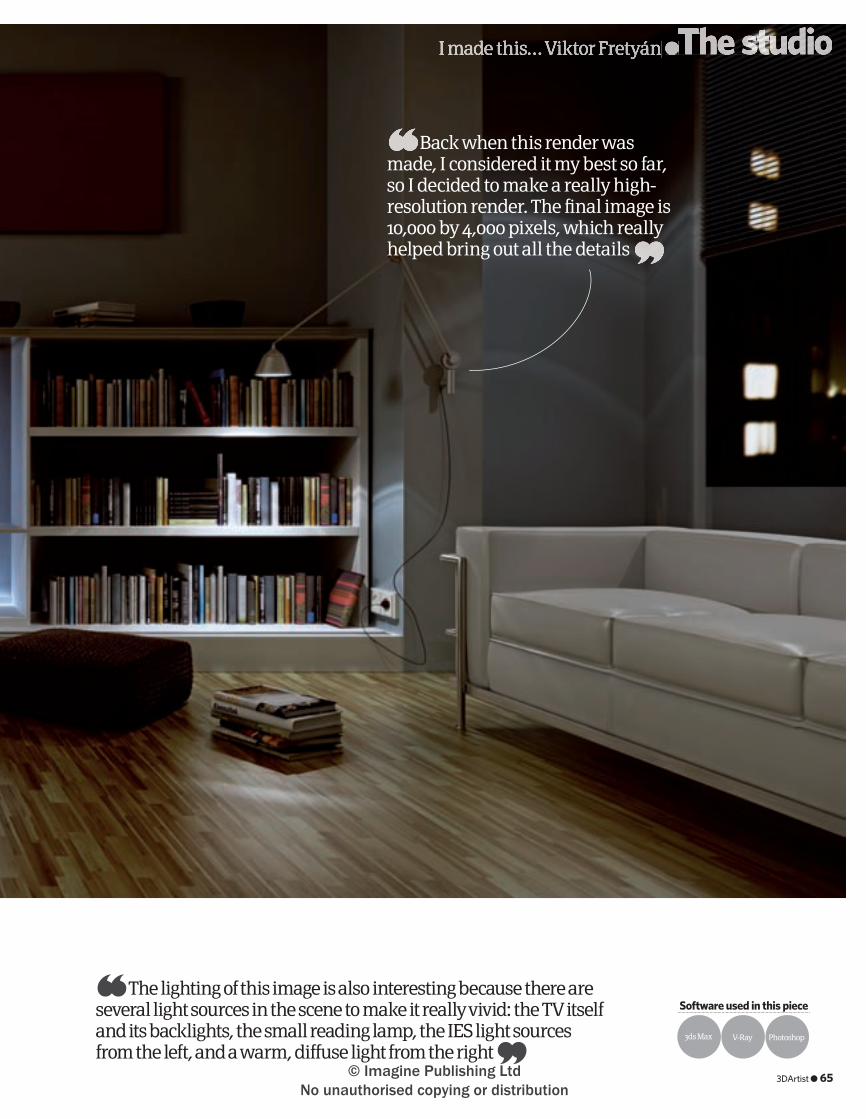
I made this… Viktor Fretyán ●The studio●The studio●
Software used in this piece
Back when this render was made, I considered it my best so far, so I decided to make a really high-resolution render. The fi nal image is 10,000 by 4,000 pixels, which really helped bring out all the details
The lighting of this image is also interesting because there are several light sources in the scene to make it really vivid: the TV itself and its backlights, the small reading lamp, the IES light sources from the left, and a warm, diffuse light from the right
V-Ray3ds Max Photoshop
3DArtist ● 65
064-65_3DA_15 IMT2 - Living room65 65 8/4/10 14:44:34
© Imagine Publishing Ltd No unauthorised copying or distribution
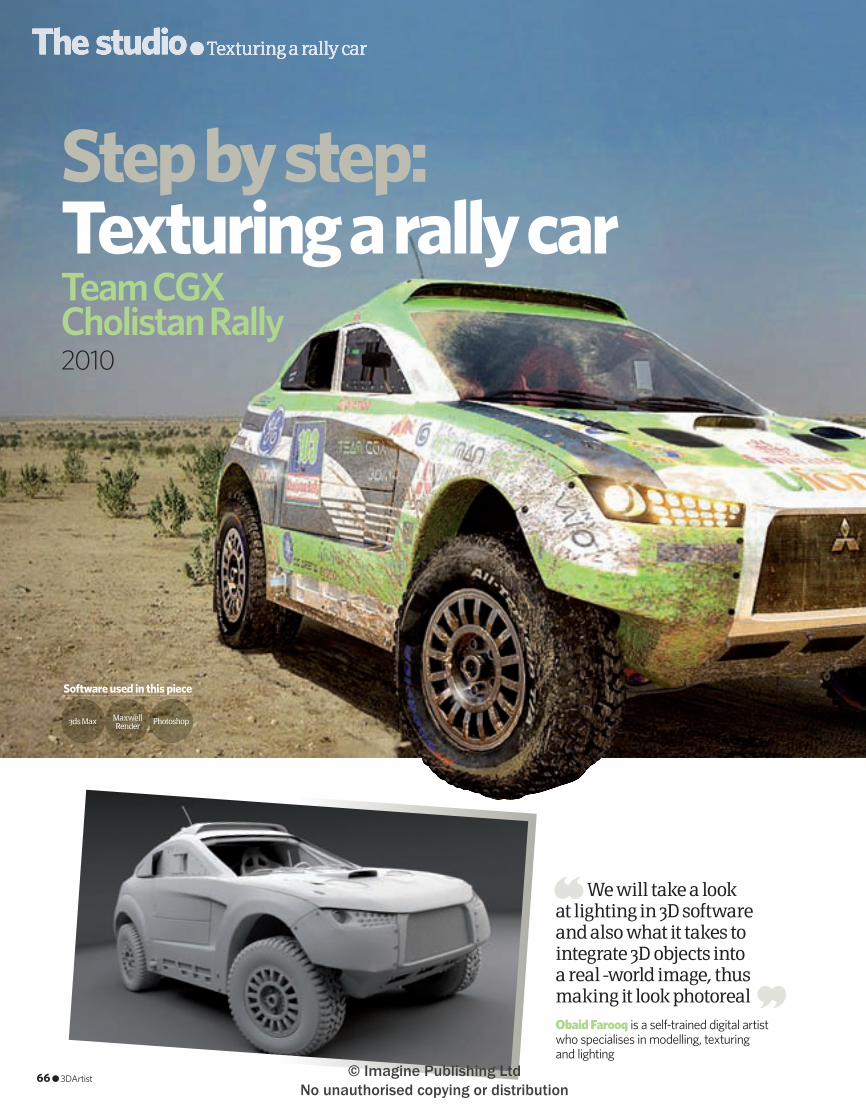
66 ● 3DArtist
The studio● Texturing a rally car● Texturing a rally car●
Step by step: Texturing a rally carTeam CGX Cholistan Rally 2010
Obaid Farooq is a self-trained digital artist who specialises in modelling, texturing and lighting
We will take a look at lighting in 3D software and also what it takes to integrate 3D objects into a real -world image, thus making it look photoreal
Software used in this piece
Maxwell Render
3ds Max Photoshop
66 ● 3DArtist
066-69_3DA_15 Rally car tutorial66 66 8/4/10 14:45:35
© Imagine Publishing Ltd No unauthorised copying or distribution
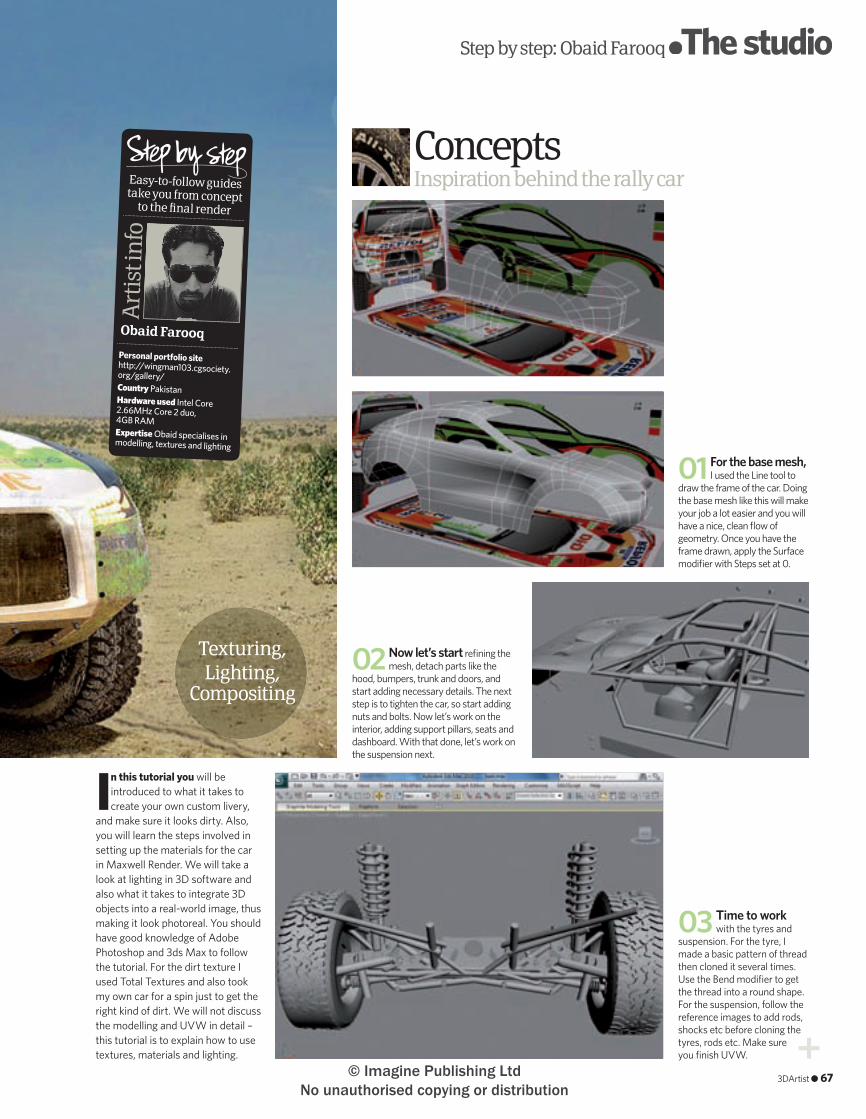
I n this tutorial you will be introduced to what it takes to create your own custom livery,
and make sure it looks dirty. Also, you will learn the steps involved in setting up the materials for the car in Maxwell Render. We will take a look at lighting in 3D software and also what it takes to integrate 3D objects into a real-world image, thus making it look photoreal. You should have good knowledge of Adobe Photoshop and 3ds Max to follow the tutorial. For the dirt texture I used Total Textures and also took my own car for a spin just to get the right kind of dirt. We will not discuss the modelling and UVW in detail – this tutorial is to explain how to use textures, materials and lighting.
Easy-to-follow guides take you from concept
to the fi nal render
Art
ist i
nfo
Personal portfolio sitehttp://wingman103.cgsociety.org/gallery/Country Pakistan Hardware used Intel Core 2.66MHz Core 2 duo, 4GB RAMExpertise Obaid specialises in modelling, textures and lighting
Obaid Farooq
ConceptsInspiration behind the rally car
Texturing,Lighting,
Compositing
Step by step: Obaid Farooq ●The studio●The studio●
01 For the base mesh, I used the Line tool to
draw the frame of the car. Doing the base mesh like this will make your job a lot easier and you will have a nice, clean fl ow of geometry. Once you have the frame drawn, apply the Surface modifi er with Steps set at 0.
02 Now let’s start refi ning the mesh, detach parts like the
hood, bumpers, trunk and doors, and start adding necessary details. The next step is to tighten the car, so start adding nuts and bolts. Now let’s work on the interior, adding support pillars, seats and dashboard. With that done, let’s work on the suspension next.
03 Time to work with the tyres and
suspension. For the tyre, I made a basic pattern of thread then cloned it several times. Use the Bend modifi er to get the thread into a round shape. For the suspension, follow the reference images to add rods, shocks etc before cloning the tyres, rods etc. Make sure you fi nish UVW.
3DArtist ● 673DArtist ● 67
066-69_3DA_15 Rally car tutorial67 67 8/4/10 14:45:52
© Imagine Publishing Ltd No unauthorised copying or distribution
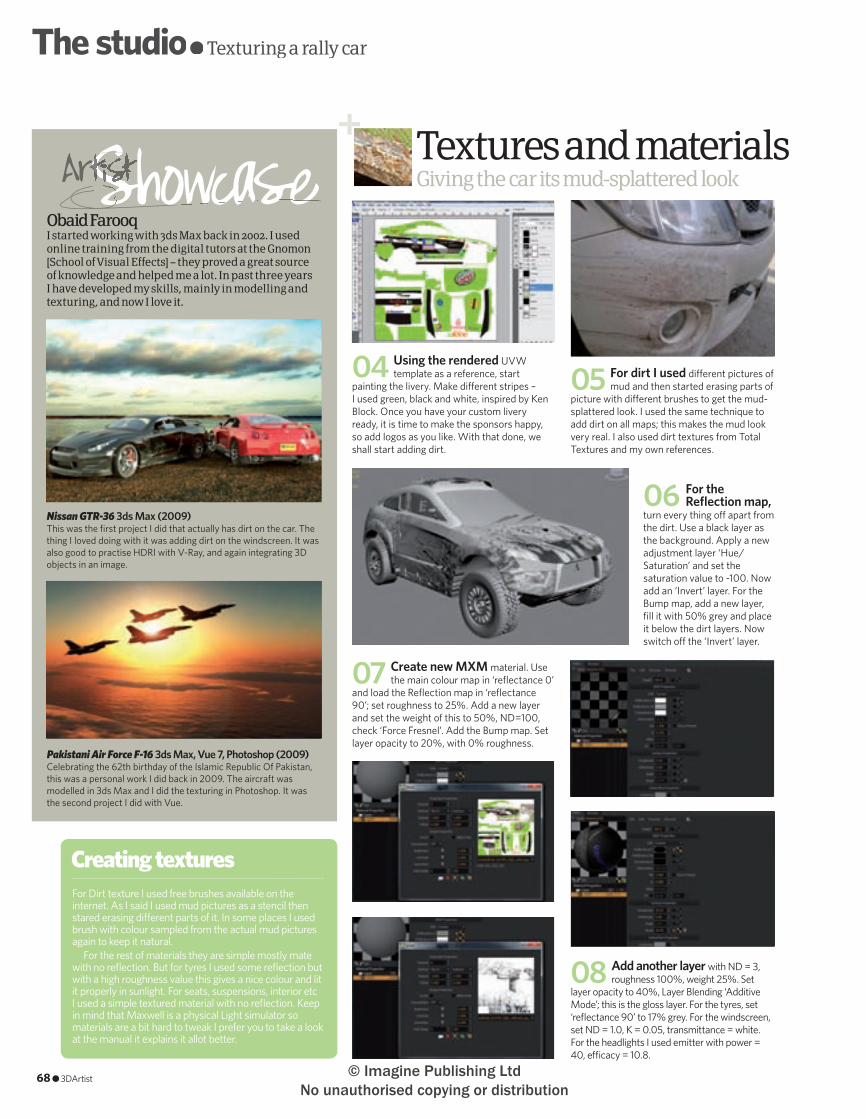
The studio● Texturing a rally car● Texturing a rally car●
Textures and materialsGiving the car its mud-splattered look
05 For dirt I used di� erent pictures of mud and then started erasing parts of
picture with di� erent brushes to get the mud-splattered look. I used the same technique to add dirt on all maps; this makes the mud look very real. I also used dirt textures from Total Textures and my own references.
06 For the Refl ection map,
turn every thing o� apart from the dirt. Use a black layer as the background. Apply a new adjustment layer ‘Hue/Saturation’ and set the saturation value to -100. Now add an ‘Invert’ layer. For the Bump map, add a new layer, fi ll it with 50% grey and place it below the dirt layers. Now switch o� the ‘Invert’ layer.
07 Create new MXM material. Use the main colour map in ‘refl ectance 0’
and load the Refl ection map in ‘refl ectance 90’; set roughness to 25%. Add a new layer and set the weight of this to 50%, ND=100, check ‘Force Fresnel’. Add the Bump map. Set layer opacity to 20%, with 0% roughness.
08 Add another layer with ND = 3, roughness 100%, weight 25%. Set
layer opacity to 40%, Layer Blending ‘Additive Mode’; this is the gloss layer. For the tyres, set ‘refl ectance 90’ to 17% grey. For the windscreen, set ND = 1.0, K = 0.05, transmittance = white. For the headlights I used emitter with power = 40, e� cacy = 10.8.
04 Using the rendered UVW template as a reference, start
painting the livery. Make di� erent stripes – I used green, black and white, inspired by Ken Block. Once you have your custom livery ready, it is time to make the sponsors happy, so add logos as you like. With that done, we shall start adding dirt.
For Dirt texture I used free brushes available on the internet. As I said I used mud pictures as a stencil then stared erasing di� erent parts of it. In some places I used brush with colour sampled from the actual mud pictures again to keep it natural.
For the rest of materials they are simple mostly mate with no refl ection. But for tyres I used some refl ection but with a high roughness value this gives a nice colour and lit it properly in sunlight. For seats, suspensions, interior etc I used a simple textured material with no refl ection. Keep in mind that Maxwell is a physical Light simulator so materials are a bit hard to tweak I prefer you to take a look at the manual it explains it allot better.
Creating textures
68 ● 3DArtist
Obaid FarooqI started working with 3ds Max back in 2002. I used online training from the digital tutors at the Gnomon [School of Visual Effects] – they proved a great source of knowledge and helped me a lot. In past three years I have developed my skills, mainly in modelling and texturing, and now I love it.
Pakistani Air Force F-16 3ds Max, Vue 7, Photoshop (2009)Celebrating the 62th birthday of the Islamic Republic Of Pakistan, this was a personal work I did back in 2009. The aircraft was modelled in 3ds Max and I did the texturing in Photoshop. It was the second project I did with Vue.
Nissan GTR-36 3ds Max (2009)This was the fi rst project I did that actually has dirt on the car. The thing I loved doing with it was adding dirt on the windscreen. It was also good to practise HDRI with V-Ray, and again integrating 3D objects in an image.
ShowcaseArtistShowcaseArtistShowcaseShowcase
066-69_3DA_15 Rally car tutorial68 68 8/4/10 14:46:08
© Imagine Publishing Ltd No unauthorised copying or distribution

Step by step: Obaid Farooq ●The studio●The studio●
Matching the model with the scene
10 I extracted the following channels: Roughness, Shadow, Fresnel and MATID. I used the Multilight feature
in Maxwell – it allows you to manipulate lighting in real-time. I rendered the image at 1,600 x 857; it took about six hours to render at 32 samples. I saved two versions – one without and one with the headlight glare.
Lighting and compositing
09 For light I used Daylight System to get the time matched with the background; it was roughly 1:30pm. Set
Maxwell for rendering. Under the Environment setting tab, check ‘Use from Daylight System’. Under the Image Based Environment tab, select the background image and set intensity to 25; check refl ection. Click on Use Background. That’s all there is to the lighting – no fancy stu� .
11 Place the rendered image in the background. Use the Material ID channel
as a selection Mask to quickly isolate the car. I used Fresnel only for colour-correcting the rims. For the refl ection layer I used ‘Colour burn’ and the Shadows layer with ‘multiply’ as a layer blend mode. You will have to tweak these layers’ opacity to get the right colour.
12 With the car integrated in the background, I started adding some more dirt. For dirt I used a free dirt brush
available on the internet. Once I decided the right colours for dirt, I would fi ll the place where I wanted to add dirt with sampled colours, then start removing it with di� erent brushes to get the right amount of dirt.
13 For tyre tracks, I used a layer with
bevel and emboss e� ects, using a brush to dig and eraser to fi ll the ground. I also added some textures to make it look real. I added Selective Colour and a Colour Balance layer. I also played a bit with hue saturation, and brightness and contrast, to get the daytime feel.
render timeResolution:1,600 x 857
4 hours
When using the Line tool to make a base mesh, it’s important to set Step level to 0, as all you need is a single set of polys that you can refi ne later. I detached parts like bumpers and hood. I detached all those parts where I didn’t wanted to have symmetrical textures. Before detaching or making any changes to the mesh, it’s a good idea to bake the UVW Unwrapped map on the mesh. To bake the UVW, all you need to do is use collapse tools.
Modelling
Post-productionIn the post-processing I added extra dirt that just gave it an overall muddy feel. Most of the scene’s feel was developed in post-processing. I added di� erent adjustment layers to colour-correct and match the lighting and exposure of the image. The background was taken at Focal Length: 28mm; Aperture: f/5.6.
3DArtist ● 69
066-69_3DA_15 Rally car tutorial69 69 8/4/10 14:46:39
© Imagine Publishing Ltd No unauthorised copying or distribution
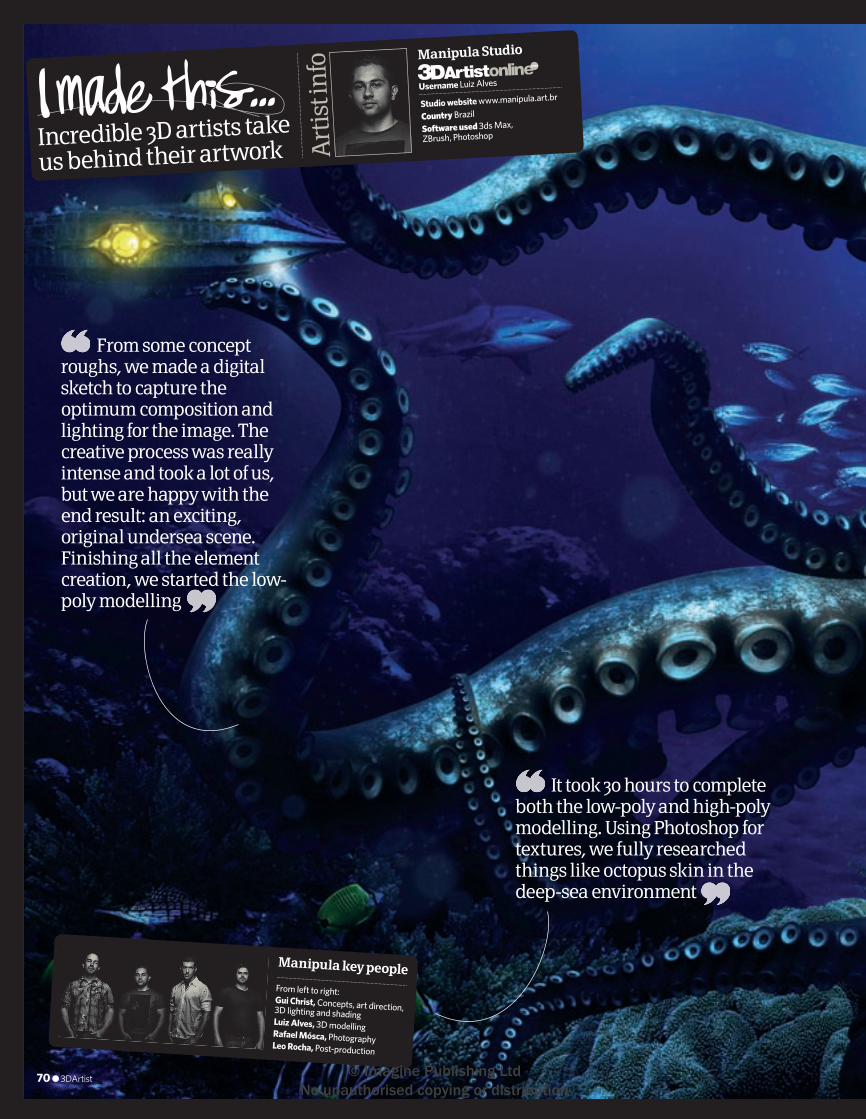
From left to right: Gui Christ, Concepts, art direction, 3D lighting and shadingLuiz Alves, 3D modellingRafael Mósca, PhotographyLeo Rocha, Post-production
Incredible 3D artists take
us behind their artwork Art
ist i
nfo Manipula Studio
Studio website www.manipula.art.br
Country Brazil
Software used 3ds Max, ZBrush, Photoshop
Username Luiz Alves
From some concept roughs, we made a digital sketch to capture the optimum composition and lighting for the image. The creative process was really intense and took a lot of us, but we are happy with the end result: an exciting, original undersea scene. Finishing all the element creation, we started the low-poly modelling
Manipula key people
It took 30 hours to complete both the low-poly and high-poly modelling. Using Photoshop for textures, we fully researched things like octopus skin in the deep-sea environment
70 ● 3DArtist
070-71_3DA_15 IMT 3 Underwater.i70 70 8/4/10 14:48:52
© Imagine Publishing Ltd No unauthorised copying or distribution
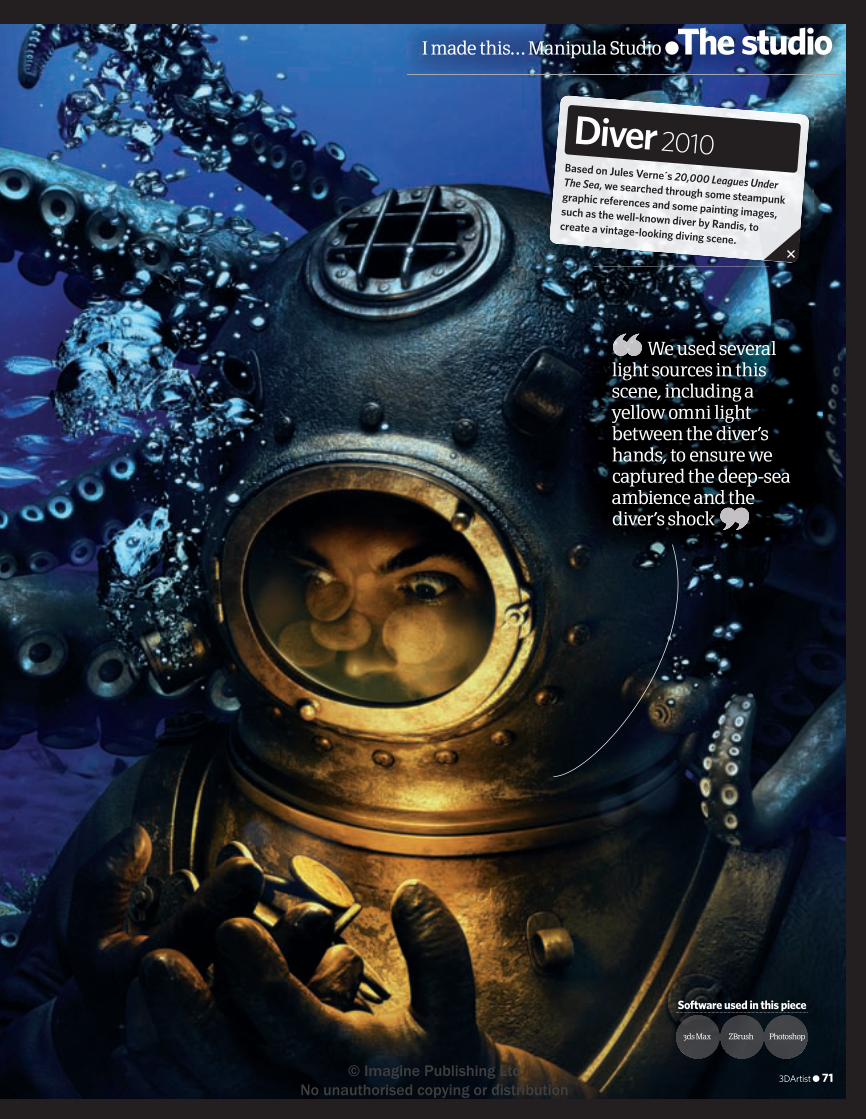
Software used in this piece
PhotoshopZBrush3ds Max
Based on Jules Verne s 20,000 Leagues Under The Sea, we searched through some steampunk graphic references and some painting images, such as the well-known diver by Randis, to create a vintage-looking diving scene.
Diver 2010
I made this… Manipula Studio ● The studio
We used several light sources in this scene, including a yellow omni light between the diver’s hands, to ensure we captured the deep-sea ambience and the diver’s shock
3DArtist ● 71
070-71_3DA_15 IMT 3 Underwater.i71 71 8/4/10 14:49:20
© Imagine Publishing Ltd No unauthorised copying or distribution
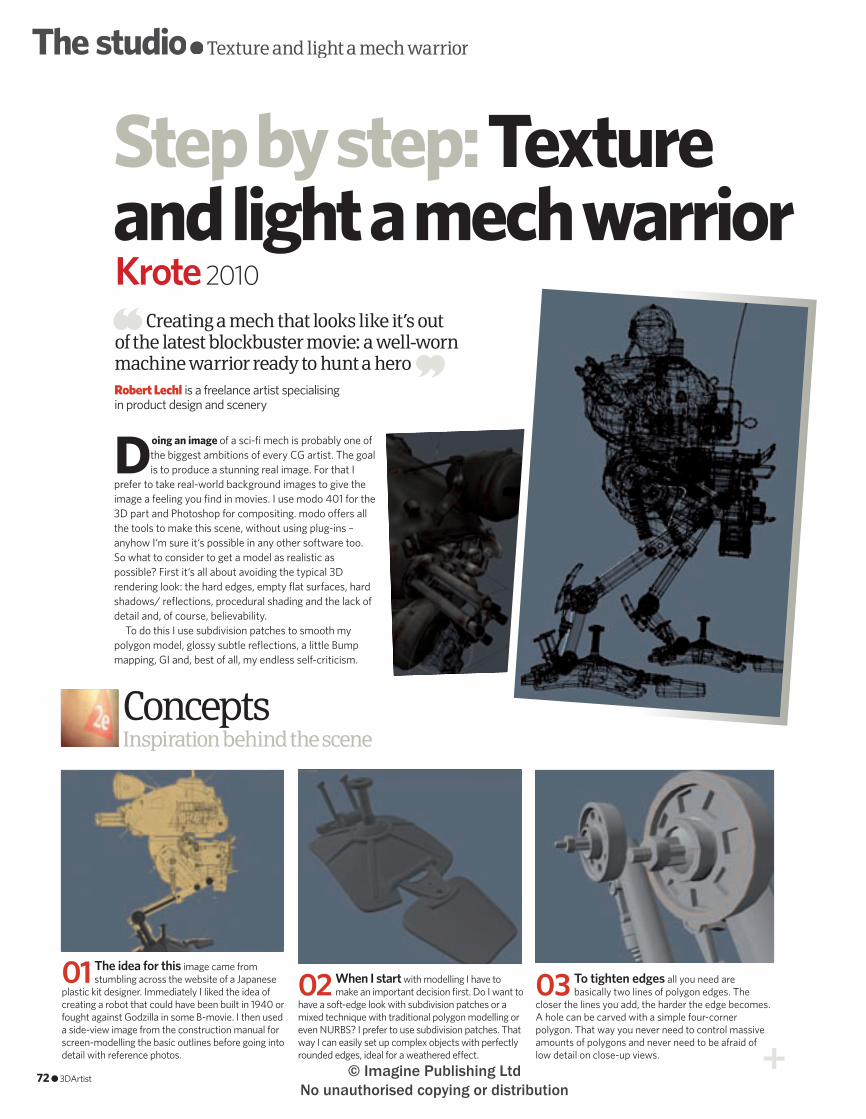
72 ● 3DArtist
D oing an image of a sci-fi mech is probably one of the biggest ambitions of every CG artist. The goal is to produce a stunning real image. For that I
prefer to take real-world background images to give the image a feeling you fi nd in movies. I use modo 401 for the 3D part and Photoshop for compositing. modo o� ers all the tools to make this scene, without using plug-ins – anyhow I‘m sure it‘s possible in any other software too. So what to consider to get a model as realistic as possible? First it‘s all about avoiding the typical 3D rendering look: the hard edges, empty fl at surfaces, hard shadows/ refl ections, procedural shading and the lack of detail and, of course, believability.
To do this I use subdivision patches to smooth my polygon model, glossy subtle refl ections, a little Bump mapping, GI and, best of all, my endless self-criticism.
The studio● Texture and light a mech warrior● Texture and light a mech warrior●
Step by step: Texture and light a mech warriorKrote 2010
Robert Lechl is a freelance artist specialising in product design and scenery
Creating a mech that looks like it’s out of the latest blockbuster movie: a well-worn machine warrior ready to hunt a hero
ConceptsInspiration behind the scene
01 The idea for this image came from stumbling across the website of a Japanese
plastic kit designer. Immediately I liked the idea of creating a robot that could have been built in 1940 or fought against Godzilla in some B-movie. I then used a side-view image from the construction manual for screen-modelling the basic outlines before going into detail with reference photos.
02 When I start with modelling I have to make an important decision fi rst. Do I want to
have a soft-edge look with subdivision patches or a mixed technique with traditional polygon modelling or even NURBS? I prefer to use subdivision patches. That way I can easily set up complex objects with perfectly rounded edges, ideal for a weathered e� ect.
03 To tighten edges all you need are basically two lines of polygon edges. The
closer the lines you add, the harder the edge becomes. A hole can be carved with a simple four-corner polygon. That way you never need to control massive amounts of polygons and never need to be afraid of low detail on close-up views.
72 ● 3DArtist
072-75_3DA_15 mech robot.indd 72 8/4/10 14:51:38
© Imagine Publishing Ltd No unauthorised copying or distribution
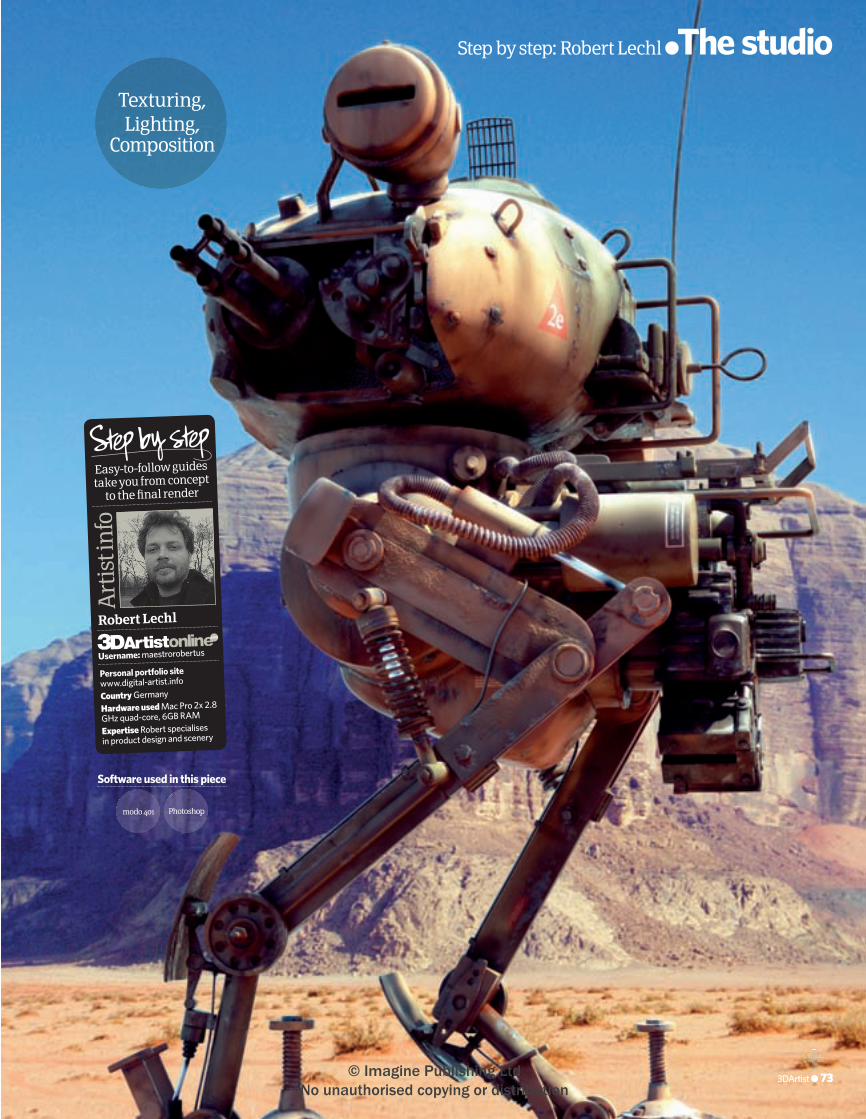
Easy-to-follow guides take you from concept
to the fi nal render
Art
ist i
nfo
Personal portfolio sitewww.digital-artist.info
Country GermanyHardware used Mac Pro 2x 2.8 GHz quad-core, 6GB RAM
Expertise Robert specialises in product design and scenery
Robert Lechl
Username: maestrorobertus
Texturing,Lighting,
Composition
modo 401
Software used in this piece
Step by step: Robert Lechl ● The studio
Photoshop
3DArtist ● 733DArtist ● 73
072-75_3DA_15 mech robot.indd 73 8/4/10 14:51:55
© Imagine Publishing Ltd No unauthorised copying or distribution
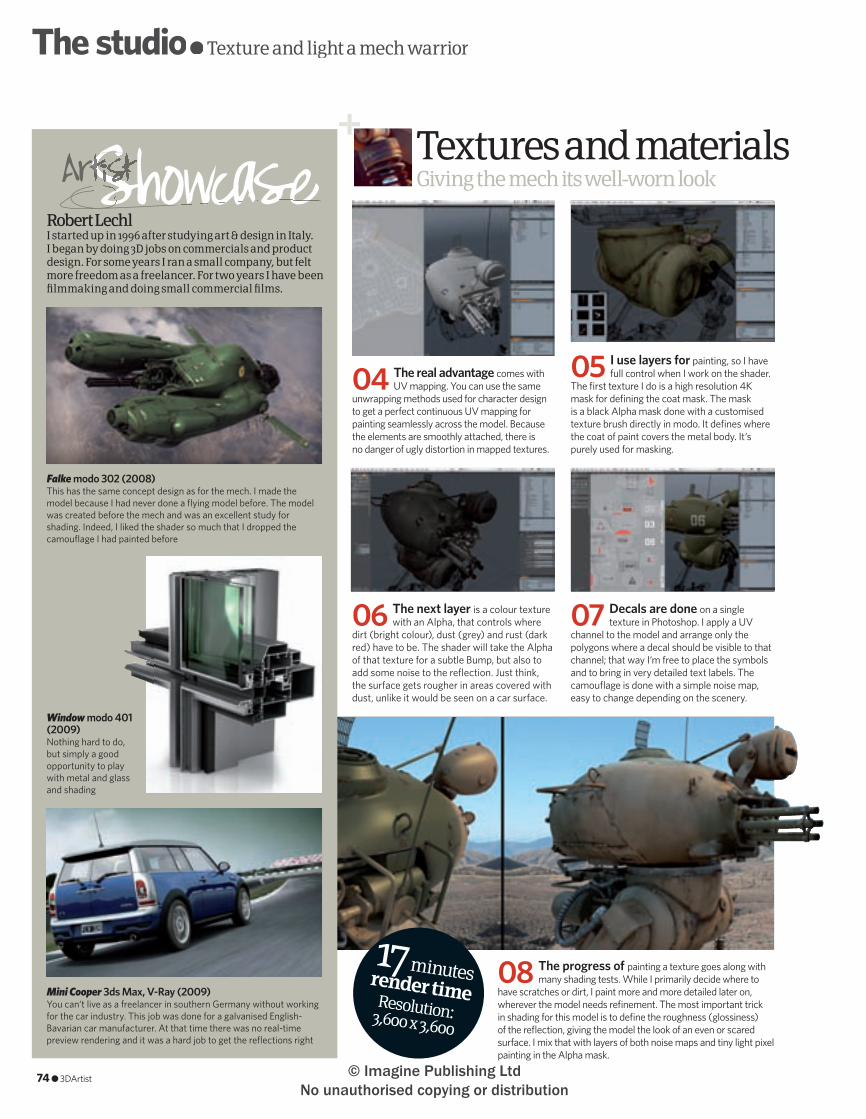
The studio● Texture and light a mech warrior● Texture and light a mech warrior●
Textures and materialsGiving the mech its well-worn look
06 The next layer is a colour texture with an Alpha, that controls where
dirt (bright colour), dust (grey) and rust (dark red) have to be. The shader will take the Alpha of that texture for a subtle Bump, but also to add some noise to the refl ection. Just think, the surface gets rougher in areas covered with dust, unlike it would be seen on a car surface.
04 The real advantage comes with UV mapping. You can use the same
unwrapping methods used for character design to get a perfect continuous UV mapping for painting seamlessly across the model. Because the elements are smoothly attached, there is no danger of ugly distortion in mapped textures.
08 The progress of painting a texture goes along with many shading tests. While I primarily decide where to
have scratches or dirt, I paint more and more detailed later on, wherever the model needs refi nement. The most important trick in shading for this model is to defi ne the roughness (glossiness) of the refl ection, giving the model the look of an even or scared surface. I mix that with layers of both noise maps and tiny light pixel painting in the Alpha mask.
05 I use layers for painting, so I have full control when I work on the shader.
The fi rst texture I do is a high resolution 4K mask for defi ning the coat mask. The mask is a black Alpha mask done with a customised texture brush directly in modo. It defi nes where the coat of paint covers the metal body. It‘s purely used for masking.
07 Decals are done on a single texture in Photoshop. I apply a UV
channel to the model and arrange only the polygons where a decal should be visible to that channel; that way I‘m free to place the symbols and to bring in very detailed text labels. The camoufl age is done with a simple noise map, easy to change depending on the scenery.
render timeResolution:3,600 x 3,600
17 minutes
74 ● 3DArtist
Robert LechlI started up in 1996 after studying art & design in Italy. I began by doing 3D jobs on commercials and product design. For some years I ran a small company, but felt more freedom as a freelancer. For two years I have been fi lmmaking and doing small commercial fi lms.
Mini Cooper 3ds Max, V-Ray (2009)You can‘t live as a freelancer in southern Germany without working for the car industry. This job was done for a galvanised English-Bavarian car manufacturer. At that time there was no real-time preview rendering and it was a hard job to get the refl ections right
Falke modo 302 (2008)This has the same concept design as for the mech. I made the model because I had never done a fl ying model before. The model was created before the mech and was an excellent study for shading. Indeed, I liked the shader so much that I dropped the camoufl age I had painted before
ShowcaseArtistShowcaseArtistShowcaseShowcase
Window modo 401 (2009)Nothing hard to do, but simply a good opportunity to play with metal and glass and shading
072-75_3DA_15 mech robot.indd 74 8/4/10 14:52:17
© Imagine Publishing Ltd No unauthorised copying or distribution
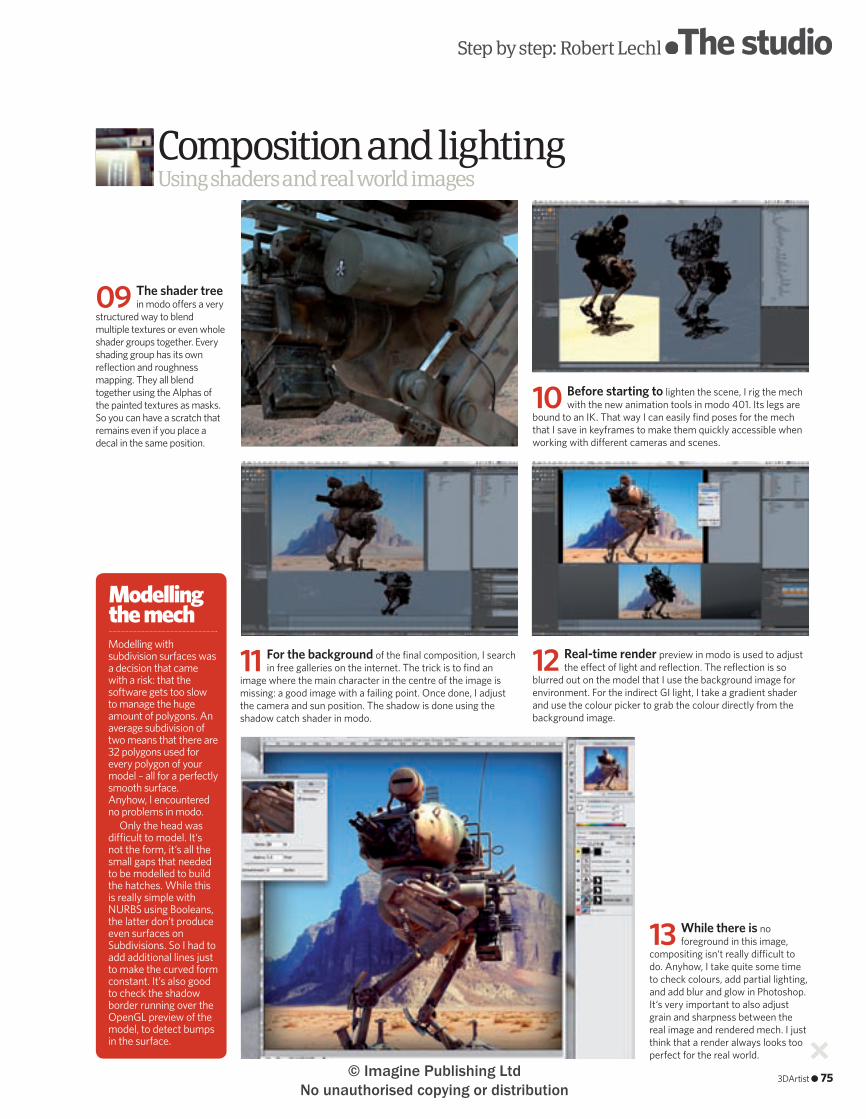
Step by step: Robert Lechl ●The studio●The studio●
Using shaders and real world imagesComposition and lighting
Modelling with subdivision surfaces was a decision that came with a risk: that the software gets too slow to manage the huge amount of polygons. An average subdivision of two means that there are 32 polygons used for every polygon of your model – all for a perfectly smooth surface. Anyhow, I encountered no problems in modo.
Only the head was di� cult to model. It‘s not the form, it‘s all the small gaps that needed to be modelled to build the hatches. While this is really simple with NURBS using Booleans, the latter don‘t produce even surfaces on Subdivisions. So I had to add additional lines just to make the curved form constant. It’s also good to check the shadow border running over the OpenGL preview of the model, to detect bumps in the surface.
Modelling the mech
09 The shader tree in modo o� ers a very
structured way to blend multiple textures or even whole shader groups together. Every shading group has its own refl ection and roughness mapping. They all blend together using the Alphas of the painted textures as masks. So you can have a scratch that remains even if you place a decal in the same position.
10 Before starting to lighten the scene, I rig the mech with the new animation tools in modo 401. Its legs are
bound to an IK. That way I can easily fi nd poses for the mech that I save in keyframes to make them quickly accessible when working with di� erent cameras and scenes.
11 For the background of the fi nal composition, I search in free galleries on the internet. The trick is to fi nd an
image where the main character in the centre of the image is missing: a good image with a failing point. Once done, I adjust the camera and sun position. The shadow is done using the shadow catch shader in modo.
12 Real-time render preview in modo is used to adjust the e� ect of light and refl ection. The refl ection is so
blurred out on the model that I use the background image for environment. For the indirect GI light, I take a gradient shader and use the colour picker to grab the colour directly from the background image.
13 While there is no foreground in this image,
compositing isn‘t really di� cult to do. Anyhow, I take quite some time to check colours, add partial lighting, and add blur and glow in Photoshop. It‘s very important to also adjust grain and sharpness between the real image and rendered mech. I just think that a render always looks too perfect for the real world.
3DArtist ● 75
072-75_3DA_15 mech robot.indd 75 8/4/10 14:52:39
© Imagine Publishing Ltd No unauthorised copying or distribution
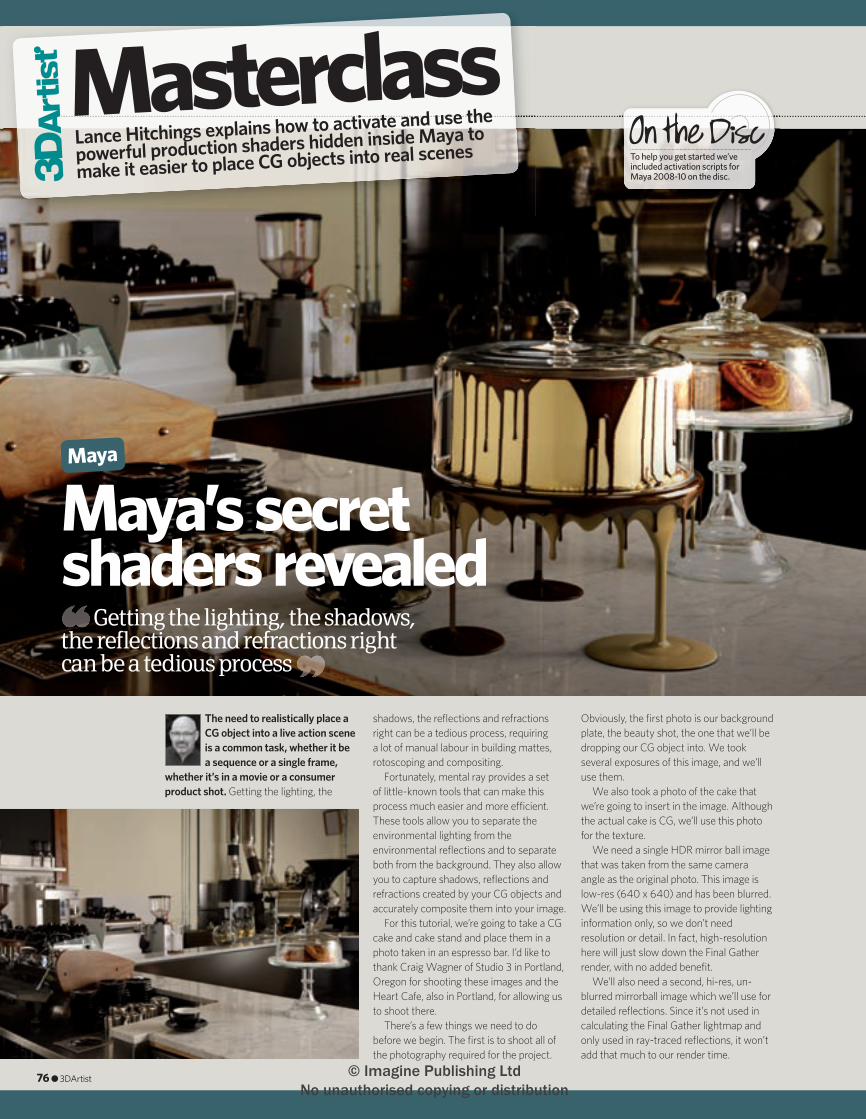
The need to realistically place a CG object into a live action scene is a common task, whether it be a sequence or a single frame,
whether it’s in a movie or a consumer product shot. Getting the lighting, the
shadows, the refl ections and refractions right can be a tedious process, requiring a lot of manual labour in building mattes, rotoscoping and compositing.
Fortunately, mental ray provides a set of little-known tools that can make this process much easier and more e� cient. These tools allow you to separate the environmental lighting from the environmental refl ections and to separate both from the background. They also allow you to capture shadows, refl ections and refractions created by your CG objects and accurately composite them into your image.
For this tutorial, we’re going to take a CG cake and cake stand and place them in a photo taken in an espresso bar. I’d like to thank Craig Wagner of Studio 3 in Portland, Oregon for shooting these images and the Heart Cafe, also in Portland, for allowing us to shoot there.
There’s a few things we need to do before we begin. The fi rst is to shoot all of the photography required for the project.
Obviously, the fi rst photo is our background plate, the beauty shot, the one that we’ll be dropping our CG object into. We took several exposures of this image, and we’ll use them.
We also took a photo of the cake that we’re going to insert in the image. Although the actual cake is CG, we’ll use this photo for the texture.
We need a single HDR mirror ball image that was taken from the same camera angle as the original photo. This image is low-res (640 x 640) and has been blurred. We’ll be using this image to provide lighting information only, so we don’t need resolution or detail. In fact, high-resolution here will just slow down the Final Gather render, with no added benefi t.
We’ll also need a second, hi-res, un-blurred mirrorball image which we’ll use for detailed refl ections. Since it’s not used in calculating the Final Gather lightmap and only used in ray-traced refl ections, it won’t add that much to our render time.
MasterclassLance Hitchings explains how to activate and use the
powerful production shaders hidden inside Maya to
make it easier to place CG objects into real scenes
Join the community at www.3dartistonline.com
Getting the lighting, the shadows, the reflections and refractions right can be a tedious process
Maya’s secret shaders revealed
Maya
To help you get started we’ve included activation scripts for Maya 2008-10 on the disc.
76 ● 3DArtist
076-81_3DA_15 Production Shaders76 76 8/4/10 15:56:12
© Imagine Publishing Ltd No unauthorised copying or distribution

Masterclass ●The workshop●The workshop●
Getting Started How to enable the production shaders
01 Finding the mental ray Custom Node ScriptUnfortunately, although Autodesk implements the mr production shaders extremely well, it doesn’t actually support them. As a result, the production shaders are both hidden and disabled. So, the fi rst step is to manually enable them, which will also reveal them in the Hypershade.
To do this, you’ll need to make a change to the MEL script that Maya reads when it loads mental ray. This script is titled ‘mentalrayCustomNodeClass.mel’ and is found in the ‘scripts/others’ directory inside the application. For Windows users, that path is: /Program Files/Autodesk/Maya2010/scripts/others.
For Mac users, go to the Application folder and open the Autodesk directory, then open the Maya2010 directory. Conrtol-click on the Maya application icon and select ‘Show Package Contents’. From there, go to the /Contents/scripts/others directory a.
02 Enabling the production shaders in Maya 2010Open ‘mentalrayCustomNodeClass.mel’ in any text or script editor. Scroll to the bottom of the script and fi nd the section that begins with the comment ‘// Internal MentalRay Nodes. Not meant to be used with Maya’. Four lines up from the bottom of this section, you’ll fi nd a line that reads ‘$enableMIPShaders == 0 ) ||’ b. The ‘0’ in this line indicates that the production shaders are disabled. To enable them, you should simply change the ‘0’ to a ‘1’ and save the script. You’ll now need to relaunch Maya, and you’ll fi nd the production shaders in the mental ray materials section of the Hypershade.
03 Or in Maya 2008 and Maya 2009The process for enabling the production shaders is the same for Maya 2009, but it’s a bit di� erent for Maya 2008. When you open ‘mentalRayCustomNodeClass.mel’, you’ll see that the fi nal section is a bit di� erent c. You’ll need to replace the entire highlighted section with the highlighted text d .
Join the community at www.3dartistonline.coma
The mip shaders (‘mip’ stands for ‘mental images production’) are widely used by working professionals. They were developed by Håkan ‘Zap’ Andersson, who works at Mental Images, the creators of mental ray. He also created the Architectural, Paint and Sub Surface Scatter shaders.
The shaders used in this project easily and e� ciently recalculate the rays cast by the renderer, and replace the source images that many of those rays reference by default. This allows our CG objects to accurately refl ect and refract objects and receive shadows cast by those objects in the background plate, while also allowing those same objects to refl ect the CG objects and receive shadows cast by them.
Master Zap and his amazing shaders
The process for enabling the production shaders is the same for Maya 2009, but it’s a bit different for Maya 2008
b
c d
3DArtist ● 77
076-81_3DA_15 Production Shaders77 77 8/4/10 14:54:36
© Imagine Publishing Ltd No unauthorised copying or distribution
Shooting the scene Laying the groundwork
04 The primary CG objectsThe fi rst step is to build the CG objects that will be going into the scene. For this project I built a cake stand that looks as though it’s a frosting-covered plate that is hovering in mid-air, with frosting running and dripping o� the edges onto the counter below. There is the cake itself, with the cake photo projection mapped and applied as a surface shader. And fi nally, the cake stand has a glass cover. I’ve raised the cover in this image to reveal the cake e. These are our primary CG beauty objects, and each has a shading network assigned to it.
05 Matte objectsNext, we need to build the objects that we’ll use to capture all of the shadows, refl ections and refractions for this scene. These objects stand in for the real-world geometry of the objects in the photo, and are called matte objects. Although these objects never appear in the fi nal composite, they are the objects upon which the beauty CG objects project shadows, refl ections and refractions f.
06 Setting up the sceneFinally, we need to set up our scene. When taking the beauty photo in the espresso bar, I did a set survey – meaning I measured everything. In particular, I measured the height of the camera from the fl oor, and the distance of the camera from the centre-of-interest, the spot the cake stand would occupy. I measured from the nodal point of the camera, and I measured both a straight-line distance, and the distance in each of the x, y and z axes. This info, combined with the meta data from the photos (ISO, shutter speed, f-stop, etc) allowed me to replicate the scene inside of Maya. Using the beauty photo as an image plane, and with the viewport shading set to ‘X-Ray’, I made fi nal adjustments until everything lined up perfectly g.
Setting up the environment Preparing the scene
07 mip_cameramapThe fi rst thing we’ll do is map out the basic environment for our scene. This will use a series of shaders that will all map to the camera. And the fi rst of these is the mip_
cameramap shader, found in the mental ray Materials section of the Hypershade. The mip_cameramap performs a function very similar to the mib_lookup_background. Technically, the di� erence between the two is that the mib_lookup_background calculates the x and y co-ordinate of the pixel being rendered (which means that the ray continues straight through on that co-ordinate, regardless of refl ections or refractions); whereas the mip_cameramap calculates the image space position of the shaded point (which means that it will calculate a new set of position co-ordinates based on the refl ections and refractions).
When you create a new mip_cameramap node, you will need to select an image to map. In the Attribute Editor, click on the chequered button to the right of the ‘Map’ slot, which creates a new mentalrayTexture node. Click on the folder button to the right of the ‘Image Name’ slot and select your beauty shot. Leave everything thing else at default.
Since we’re also going to map an environment, you’ll want to select the ‘O� screen Is Environment’ checkbox in the mip_camermap attributes. This will allow the node to return colours from the
Join the community at www.3dartistonline.comMasterclass
fe
g
h i
78 ● 3DArtist
076-81_3DA_15 Production Shaders78 78 8/4/10 14:59:01
© Imagine Publishing Ltd No unauthorised copying or distribution
Masterclass ●The workshop●The workshop●
Join the community at www.3dartistonline.com
environment for refl ections and refractions that are o� screen (o� screen being anything that’s outside the borders of your beauty shot) h i.
08 Map the environmentNext, we’ll need to map the environment. This is the HDR image that we’ll use for lighting, and we’ll map it to the mip_mirrorball node, found in the mental ray Environments section of the Hypershade. Since this shader uses the mental ray camera co-ordinate space, the mirrorball image needs to be shot from the exact camera angle that the fi nal image will be rendered from.
We’ll start by selecting an image to map. Click on the chequered button to the right of the ‘Texture’ slot to create another new mr Texture node j. As with the cameramap node, use the ‘Image Name’ slot to select your image.
Here, we’re going to select our low-res, blurred mirrorball image of the scene. This image was shot from the same camera angle as the beauty shot, which is identical to the camera angle we’ll be rendering from, thanks to our set survey.
The Multiplier attribute allows you to adjust the light value, the Degamma
applies an inverse gamma adjustment, and the Blur blurs the image if it is a literal mental ray texture. Since our image is already blurred, we won’t be using this.
09 Rayswitch nodesIn order to plug both the mip_cameramap node and the mip_mirrorball node into our camera, we’ll use the mip_rayswitch_environment node, found in the mental ray Environment section of the Hypershade.
All of the rayswitch nodes allow you to specify di� erent sources (colours or textures) for each of the rays that mental ray uses to calculate your render. The primary rays are the eye rays, which is what the camera sees. The secondary rays are the environment, background, refl ection, refraction, transparency, Final Gather and photon rays.
The mip_rayswitch_environment node allows you to assign di� erent maps or networks to the background and to the environment k.
10 Plugging into the slotsSo, we’ll plug the mip_cameramap node into the ‘Background’ slot, and the mip_mirrorball node into the ‘Environment’ slot. Then we need to plug the mip_rayswitch_
environment node into the mental ray ‘Environment Shader’ slot of our camera. Here’s what this network looks like in the Hypershade l m.
11 Progress renderHere’s what a render looks like at this point n. The cake and cake stand are textured and the matte objects just have the default lambert shader. The camera is using the mip_camermap node to reference our beauty photo as the background. It’s also using our low-res, blurred HDR image to calculate the Final Gather lightmap through the mip_mirrorball node.
However, we don’t want to actually see any of the matte objects and we don’t want them casting shadows. We only want them to receive shadows and refl ections. Let’s fi x that next.
All of the rayswitch nodes allow you to specify different sources (colours or textures) for each of the rays that mental ray uses to calculate your render
m n
l
j k
3DArtist ● 79
076-81_3DA_15 Production Shaders79 79 8/4/10 14:59:12
© Imagine Publishing Ltd No unauthorised copying or distribution
Join the community at www.3dartistonline.comMasterclass
Capturing shadows and refl ections Using the mip_matteshadow node, a very powerful tool
12 Setting up the shading networkTo use the matte objects we created to capture shadows, refl ections and refractions, we need to use the mip_matteshadow node, found in the mr Materials section of the Hypershade. This may be the most powerful tool among the production shaders.
To build the shading network, we need to start by plugging the mip_cameramap node into the ‘Background’ slot of the mip_matteshadow node o. This is the same cameramap node that we’re using in the environment shader network of our rendering camera, which was plugged into the ‘Background’ slot of the rayswitcher_environment node. This allows the same background image (our beauty photo) to pass through, essentially making all our matte objects disappear.
13 Workaround problemsTechnically, you’re supposed to be able to apply the mip_matteshadow node to
geometry as a shader, but it didn’t work on my system. If you experience the same problem, here’s a workaround. Run the matteshadow node through a mip_rayswitch_advanced node.
The mip_rayswitch and the mip_rayswitch_advanced nodes do basically the same thing, except that the rayswitch node is built to pass basic colours or textures while the rayswitch_advanced node will pass entire shading networks. These nodes break out the rays into the primary (eye rays) and all of the secondary rays (transparency, refl ection, refraction, Final Gather, etc). This allows the di� erent rays cast by the mr renderer to pull separate data for each individual ray from di� erent colours, textures or shading networks than that applied to the geometry by default.
Our CG object pulls all of its refl ection and refraction data from either this shader, or from the environment, which isn’t nearly as accurate. If you only plug the matteshadow node into the ‘Eye’ slot, the cake stand doesn’t refl ect or refract the background properly. Be sure to plug the matteshadow node into the ‘Refl ections’ and the ‘Refractions’ slots as well, to get accurate results p.
14 Adjusting the ambient occlusionNow we need to start fi ne-tuning the mip_matteshadow attributes. First, we need to get rid of the really dark shadows under the cake stand. We’ll start by sampling a colour from a part of the counter top that is lit up for the ‘Ambient’ colour. The big, soft, dark shadow is caused by the Ambient Occlusion parameter. The ‘Ao On’ is checked, which we want. We’ll sample a dark, shaded part of the counter for the ‘Ao Dark’ colour, bring up the ‘Ao Samples’ to 32 to get rid of the noise and change the ‘Ao Distance’ to 10, so that the AO rays don’t reach out to infi nity when sampling q.
t
s
q
r
o p
80 ● 3DArtist
076-81_3DA_15 Production Shaders80 80 8/4/10 14:59:27
© Imagine Publishing Ltd No unauthorised copying or distribution
Masterclass ●The workshop●The workshop●
Join the community at www.3dartistonline.com
15 Capturing refl ectionsNext we’ll turn on the ‘Catch Refl ections’ parameter r. This will allow the matte objects to capture refl ections of the cake stand. Now the counter top, the co� ee cup and the other pastry stand all refl ect our CG cake stand. The other refl ection parameters work much the way they do in the architectural shaders to produce blurred ‘glossy’ refl ections s.
16 Fixing the refractionsThe glass cover of our cake stand is still not refracting the background correctly, and that’s because there is no geometry behind it which uses the mip_matteshadow node, except for the counter. As a result, it is pulling its data from the environment, and we’re seeing the ‘pinch’ common to all mirrorball images right in the centre of the knob on top of the cover. We’ll solve this by placing
a card with the matteshadow material behind the entire glass cover. I also placed a spot light in the scene to create some Specular highlights similar to the other glass cover in the photo. The CG glass cover now refracts correctly t.
17 Casting shadowsWe want our CG cake stand to cast some soft shadows like the shadows being cast by the pastry stand and the co� ee cup in the photo. Therefore I added an area light to the right side of the scene to cast these shadows. Switching on the ‘No Self Shadow’ attribute will prevent any object with the matteshadow material from casting a shadow onto any other object with the matteshadow material U. So our CG cake stand casts a nice shadow, but none of our matte objects do. Since their real-life counterparts in the photo are already casting shadows, we don’t
want the matte objects to cast any additional shadows v.
18 Creating detailed refl ectionsThere’s one small issue left to resolve. The cake stand is now using the low-res, blurred mirrorball image mapped to the camera’s ‘Environment Shader’ for any refl ections of the environment. But we want detailed, hi-res refl ections. We’ll use the mip_rayswitch_advanced node for this. We’ll create a separate node for each of the materials mapped to the cake stand geometry. We’ll plug the regular material into the ‘Eye’, ‘Refl ection’ and ‘Refraction’ slots. But we’ll create a new mirrorball node and plug our hi-res HDR mirrorball image into the ‘Texture’ slot. We’ll now plug this new mirrorball node into the ‘Environment’ slot of the rayswitch_advanced node for each material in our cake stand geometry w.
19 Di� erent texturesThanks to the rayswitch shader, we’ve now assigned a di� erent texture to the environment rays for each piece of geometry, and the cake stand now has detailed, hi-res refl ections x.
Turning on the ‘No Self Shadow’ attribute will prevent any object with the matteshadow material from casting a shadow onto any other object with the matteshadow material
w
u
x
v
3DArtist ● 81
076-81_3DA_15 Production Shaders81 81 8/4/10 14:59:43
© Imagine Publishing Ltd No unauthorised copying or distribution

Lance is our Maya master and in this issue he looks at the various ways of creating depth-of-fi eld e� ects, including what he believes to be the best
Lance Hitchingswww.hitchingsdesign.com
The
Advi
sors Maya
achieve it, then you will defi nitely want to take a look at the mr mia_lens_bokeh lens shader.
With the exception of the Z-Depth map, regardless of the method you choose, you’re going to take a serious hit on render times. To demonstrate the various DOF e� ects, I built a scene with numbers indicating their distance from the lens in world units. I also added some chrome balls, one at every fi ve world units from the camera; a chequered ground plane; and a chequered cylinder stretching away from the camera.
This scene took 26 seconds to render with no DOF e� ects. The DOF e� ects built into the camera took 3:49 minutes to render, the mr physical_lens_dof took 3:19
to render and the mia_lens_bokeh took 7:59 minutes to render. By contrast, the Z-Depth map took 4 seconds to render.
01 Camera mr DOF attributeWith the exception of using a render pass to create a depth map, all of your DOF options are going to come from mental ray. In the mental ray tab in the Attribute Editor of every camera, you’ll fi nd a ‘Depth of Field’ tab. Enable ‘Depth of Field’; the ‘Focus Distance’ is the distance the focal plane is from the camera; the ‘F Stop’ controls the depth of focal plane, just like a real camera; and the ‘Focus Region Scale’ will scale the the result of the ‘F Stop’ value.
Need help fast? Join the growing community at www.3dartistonline.com3ds Max
Ryan is our architecture and 3ds Max expert. This time he looks at how to quickly fi ll the shelves of store visualisations with merchandise
Ryan [email protected]
What is the best way to create depth-of-field effects in renders?
Getting the focus right
Which method is best for creating DOF (depth-of-fi eld) e� ects in renders depends on the circumstances of the render.
There are several ways to create DOF e� ects; you can use the mental ray DOF parameter found in any camera or you can use the mr physical_lens_dof lens shader – neither of which works very well in my opinion, but I’ll go over them briefl y here nonetheless. If you’re doing animations that will be composited in some type of compositing software, then your best choice is probably to go with a Z-Depth map. For a standalone, single image where you really want a lot of control, beautiful results and are willing to dedicate some serious render time to
Maya
The
Advi
sors
Need help fast? Join the growing community atQuestions Welcome to the Q&A section where
we answer all manner of techical questions
on the most popular 3D programs such as
Maya, Max, CINEMA 4D, Poser and Vue
?answers&
82 ● 3DArtist
082-88_3DA_15 Q&A.indd 82 8/4/10 15:00:32
© Imagine Publishing Ltd No unauthorised copying or distribution
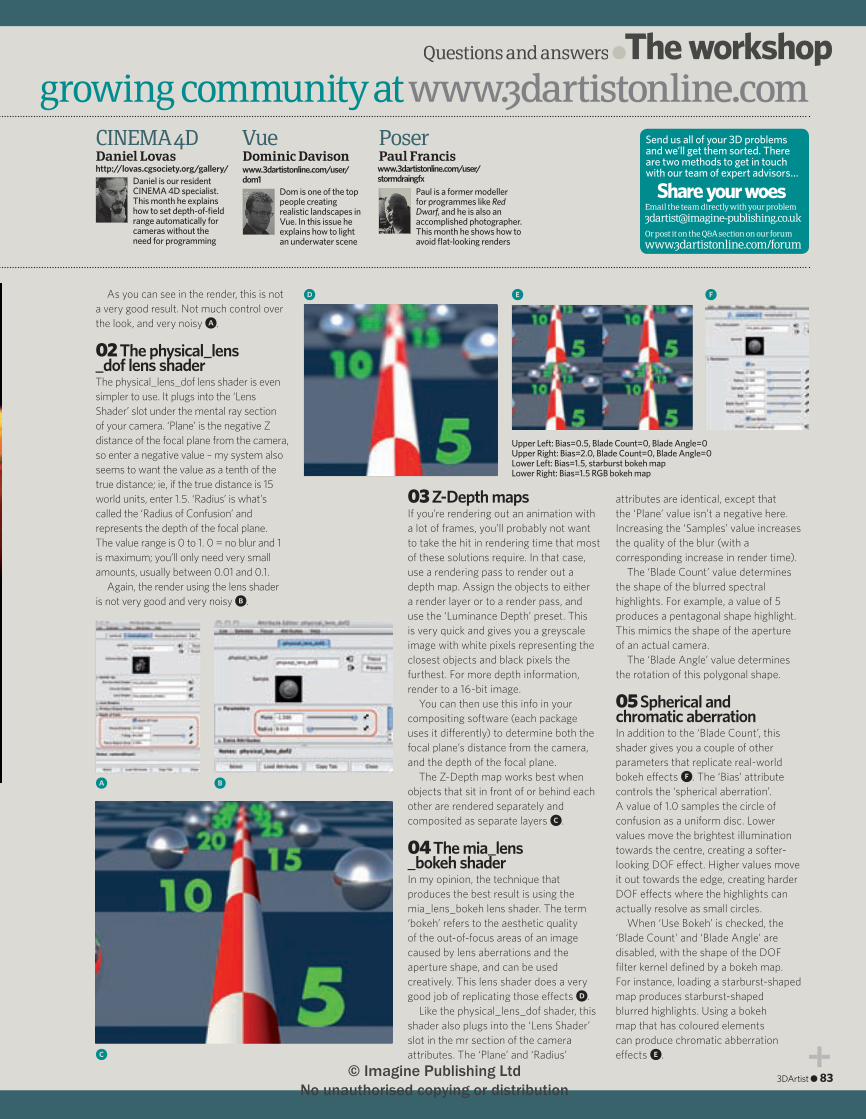
Questions and answers ●The workshop●The workshop●
As you can see in the render, this is not a very good result. Not much control over the look, and very noisy a.
02 The physical_lens_dof lens shaderThe physical_lens_dof lens shader is even simpler to use. It plugs into the ‘Lens Shader’ slot under the mental ray section of your camera. ‘Plane’ is the negative Z distance of the focal plane from the camera, so enter a negative value – my system also seems to want the value as a tenth of the true distance; ie, if the true distance is 15 world units, enter 1.5. ‘Radius’ is what’s called the ‘Radius of Confusion’ and represents the depth of the focal plane. The value range is 0 to 1. 0 = no blur and 1 is maximum; you’ll only need very small amounts, usually between 0.01 and 0.1.
Again, the render using the lens shader is not very good and very noisy b.
03 Z-Depth mapsIf you’re rendering out an animation with a lot of frames, you’ll probably not want to take the hit in rendering time that most of these solutions require. In that case, use a rendering pass to render out a depth map. Assign the objects to either a render layer or to a render pass, and use the ‘Luminance Depth’ preset. This is very quick and gives you a greyscale image with white pixels representing the closest objects and black pixels the furthest. For more depth information, render to a 16-bit image.
You can then use this info in your compositing software (each package uses it di� erently) to determine both the focal plane’s distance from the camera, and the depth of the focal plane.
The Z-Depth map works best when objects that sit in front of or behind each other are rendered separately and composited as separate layers c.
04 The mia_lens_bokeh shaderIn my opinion, the technique that produces the best result is using the mia_lens_bokeh lens shader. The term ‘bokeh’ refers to the aesthetic quality of the out-of-focus areas of an image caused by lens aberrations and the aperture shape, and can be used creatively. This lens shader does a very good job of replicating those e� ects d.
Like the physical_lens_dof shader, this shader also plugs into the ‘Lens Shader’ slot in the mr section of the camera attributes. The ‘Plane’ and ‘Radius’
attributes are identical, except that the ‘Plane’ value isn’t a negative here. Increasing the ‘Samples’ value increases the quality of the blur (with a corresponding increase in render time).
The ‘Blade Count’ value determines the shape of the blurred spectral highlights. For example, a value of 5 produces a pentagonal shape highlight. This mimics the shape of the aperture of an actual camera.
The ‘Blade Angle’ value determines the rotation of this polygonal shape.
05 Spherical and chromatic aberrationIn addition to the ‘Blade Count’, this shader gives you a couple of other parameters that replicate real-world bokeh e� ects f. The ‘Bias’ attribute controls the ‘spherical aberration’. A value of 1.0 samples the circle of confusion as a uniform disc. Lower values move the brightest illumination towards the centre, creating a softer-looking DOF e� ect. Higher values move it out towards the edge, creating harder DOF e� ects where the highlights can actually resolve as small circles.
When ‘Use Bokeh’ is checked, the ‘Blade Count’ and ‘Blade Angle’ are disabled, with the shape of the DOF fi lter kernel defi ned by a bokeh map. For instance, loading a starburst-shaped map produces starburst-shaped blurred highlights. Using a bokeh map that has coloured elements can produce chromatic abberration e� ects e.
Need help fast? Join the growing community at www.3dartistonline.comCINEMA 4D
Daniel is our resident CINEMA 4D specialist. This month he explains how to set depth-of-fi eld range automatically for cameras without the need for programming
Daniel Lovas http://lovas.cgsociety.org/gallery/
Vue
Dom is one of the top people creating realistic landscapes in Vue. In this issue he explains how to light an underwater scene
Dominic Davison www.3dartistonline.com/user/dom1
Send us all of your 3D problems and we’ll get them sorted. There are two methods to get in touch with our team of expert advisors…
Email the team directly with your [email protected] post it on the Q&A section on our forum www.3dartistonline.com/forum
Poser
Paul is a former modeller for programmes like Red Dwarf, and he is also an accomplished photographer. This month he shows how to avoid fl at-looking renders
Paul Francis www.3dartistonline.com/user/stormdraingfx
Upper Left: Bias=0.5, Blade Count=0, Blade Angle=0Upper Right: Bias=2.0, Blade Count=0, Blade Angle=0Lower Left: Bias=1.5, starburst bokeh mapLower Right: Bias=1.5 RGB bokeh map
d e f
a b
c
3DArtist ● 83
082-88_3DA_15 Q&A.indd 83 8/4/10 15:00:47
© Imagine Publishing Ltd No unauthorised copying or distribution

Join the community at www.3dartistonline.com
84 ● 3DArtist
I’ve been using Poser for ten years, but never really use it to create atmospheric, or aerial, perspective; I’ve always
previously added it in postproduction. In order to research this Q&A, I decided it was time to get to grips with one of the lesser-used features of Poser - if you look at the online galleries of Poser artworks, you’ll see I’m not the only person shy of using it. Atmospheric perspective and volumetric e� ects are amongst those tiny illusions which, when added to a scene, really add the extra oomph to make a fl at, unrealistic render come alive. It can be seen in real life, where increasing distance to an object results in less detail and contrast; it is caused by water vapour or dust in the atmosphere. It’s one of the little clues your brain fi xes on to tell you one object is further away than another, and is faked for example in fi lms with the use of smoke or steam in scenes which would otherwise look fl at to the viewer – see the amazing
Troll Market scene in Hellboy II for a dramatic illustration. It’s this e� ect you want to mimic in your renders, to add that extra, almost indefi nable third dimension.
Nice place, but no atmosphereHere’s a basic setup in Poser, featuring a large-scale set and a single point-source light, which has been rendered. As you can see (above), the back of the set has the same contrast level as the foreground, and the result is a fl at-looking render with no clues as to depth or perspective; if you look at the ceiling, you can see it’s just a mess, visually. Poser has a slightly idiosyncratic method of solving this, which, once you get the hang of it, actually produces very good results, and can also be used to add further volumetric e� ects which you would otherwise have to fake afterwards.
Pump up the volumeIt might surprise you that the fi rst step to adding volume and atmosphere lies in the Material Room, where, under your drop-down list of all the items in your scene you’ll see, right at the bottom, ‘Atmosphere’; switch to the Advanced view and you’ll see a small dialog box with various values. Check the box marked ‘Volume_on’ and for the moment leave all the other values at the default settings. Select your light, and in the properties box for it, set ‘Atmosphere Strength’ to 0.05. Render away and see the di� erence – the scene suddenly has depth, looks far more realistic, and as you can see in the ceiling area, suddenly makes sense visually.
Seeing the lightBeing Poser, this is a pretty non-standard way of adding such depth, but it also leaves open the possibility of really taking your renders away from those fl at, 2D creations that everyone else pushes out! The ‘Atmospheric Strength’ value we tinkered with earlier is key to this – if you leave it at 0, you won’t get any atmosphere, as it is this which determines how much a light illuminates the atmosphere which you switched on earlier. In the main image, the general atmosphere was set up as above, but I then added a second light, in this case a Spot light, to make the visible red volumetric light beam.
Atmospheric and volumetric effects
My renders look flat – how do I create atmosphere in Poser?
The simple volumetric e� ect has allowed even this single-light setup to come to life; it now has depth and atmosphere
The basic render, with no atmosphere – the scene looks fl at and confusing to the eye and no depth
Poser
Questions Welcome to the Q&A section where
we answer all manner of techical questions
on the most popular 3D programs such as
Maya, Max, CINEMA 4D, Poser and Vue
?answers& Courtesy of Aery Soul we have the outfi ts and morphs. Yaara Poser characterEclipse outfi t
082-88_3DA_15 Q&A.indd 84 8/4/10 15:01:10
© Imagine Publishing Ltd No unauthorised copying or distribution
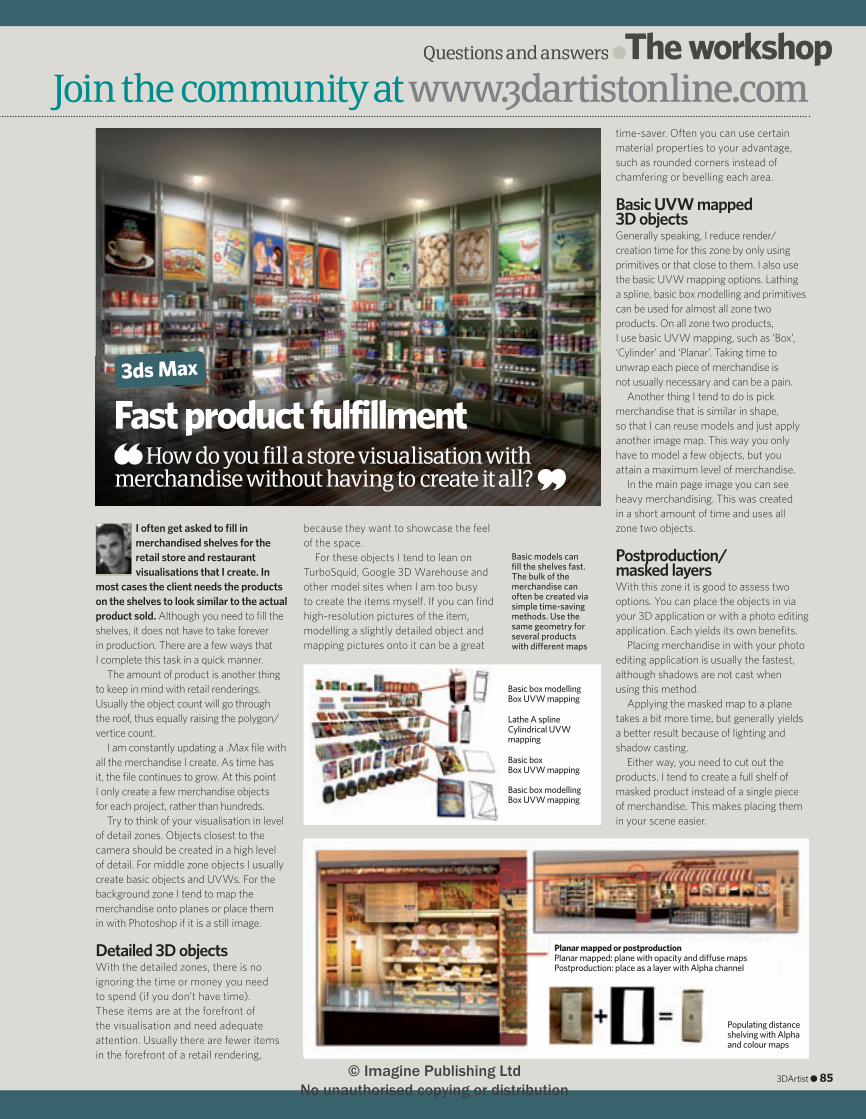
Questions and answers ●The workshop●The workshop●
Join the community at www.3dartistonline.com
I often get asked to fi ll in merchandised shelves for the retail store and restaurant visualisations that I create. In
most cases the client needs the products on the shelves to look similar to the actual product sold. Although you need to fi ll the shelves, it does not have to take forever in production. There are a few ways that I complete this task in a quick manner.
The amount of product is another thing to keep in mind with retail renderings. Usually the object count will go through the roof, thus equally raising the polygon/ vertice count.
I am constantly updating a .Max fi le with all the merchandise I create. As time has it, the fi le continues to grow. At this point I only create a few merchandise objects for each project, rather than hundreds.
Try to think of your visualisation in level of detail zones. Objects closest to the camera should be created in a high level of detail. For middle zone objects I usually create basic objects and UVWs. For the background zone I tend to map the merchandise onto planes or place them in with Photoshop if it is a still image.
Detailed 3D objectsWith the detailed zones, there is no ignoring the time or money you need to spend (if you don’t have time). These items are at the forefront of the visualisation and need adequate attention. Usually there are fewer items in the forefront of a retail rendering,
3DArtist ● 85
because they want to showcase the feel of the space.
For these objects I tend to lean on TurboSquid, Google 3D Warehouse and other model sites when I am too busy to create the items myself. If you can fi nd high-resolution pictures of the item, modelling a slightly detailed object and mapping pictures onto it can be a great
time-saver. Often you can use certain material properties to your advantage, such as rounded corners instead of chamfering or bevelling each area.
Basic UVW mapped 3D objectsGenerally speaking, I reduce render/ creation time for this zone by only using primitives or that close to them. I also use the basic UVW mapping options. Lathing a spline, basic box modelling and primitives can be used for almost all zone two products. On all zone two products, I use basic UVW mapping, such as ‘Box’, ‘Cylinder’ and ‘Planar’. Taking time to unwrap each piece of merchandise is not usually necessary and can be a pain.
Another thing I tend to do is pick merchandise that is similar in shape, so that I can reuse models and just apply another image map. This way you only have to model a few objects, but you attain a maximum level of merchandise.
In the main page image you can see heavy merchandising. This was created in a short amount of time and uses all zone two objects.
Postproduction/ masked layersWith this zone it is good to assess two options. You can place the objects in via your 3D application or with a photo editing application. Each yields its own benefi ts.
Placing merchandise in with your photo editing application is usually the fastest, although shadows are not cast when using this method.
Applying the masked map to a plane takes a bit more time, but generally yields a better result because of lighting and shadow casting.
Either way, you need to cut out the products. I tend to create a full shelf of masked product instead of a single piece of merchandise. This makes placing them in your scene easier.
Basic models can fi ll the shelves fast. The bulk of the merchandise can often be created via simple time-saving methods. Use the same geometry for several products with di� erent maps
How do you fill a store visualisation with merchandise without having to create it all?
Fast product fulfillment
Populating distance shelving with Alpha and colour maps
3ds Max
Basic box modellingBox UVW mapping
Lathe A splineCylindrical UVW mapping
Basic boxBox UVW mapping
Basic box modellingBox UVW mapping
Planar mapped or postproductionPlanar mapped: plane with opacity and di� use mapsPostproduction: place as a layer with Alpha channel
082-88_3DA_15 Q&A.indd 85 8/4/10 15:01:29
© Imagine Publishing Ltd No unauthorised copying or distribution
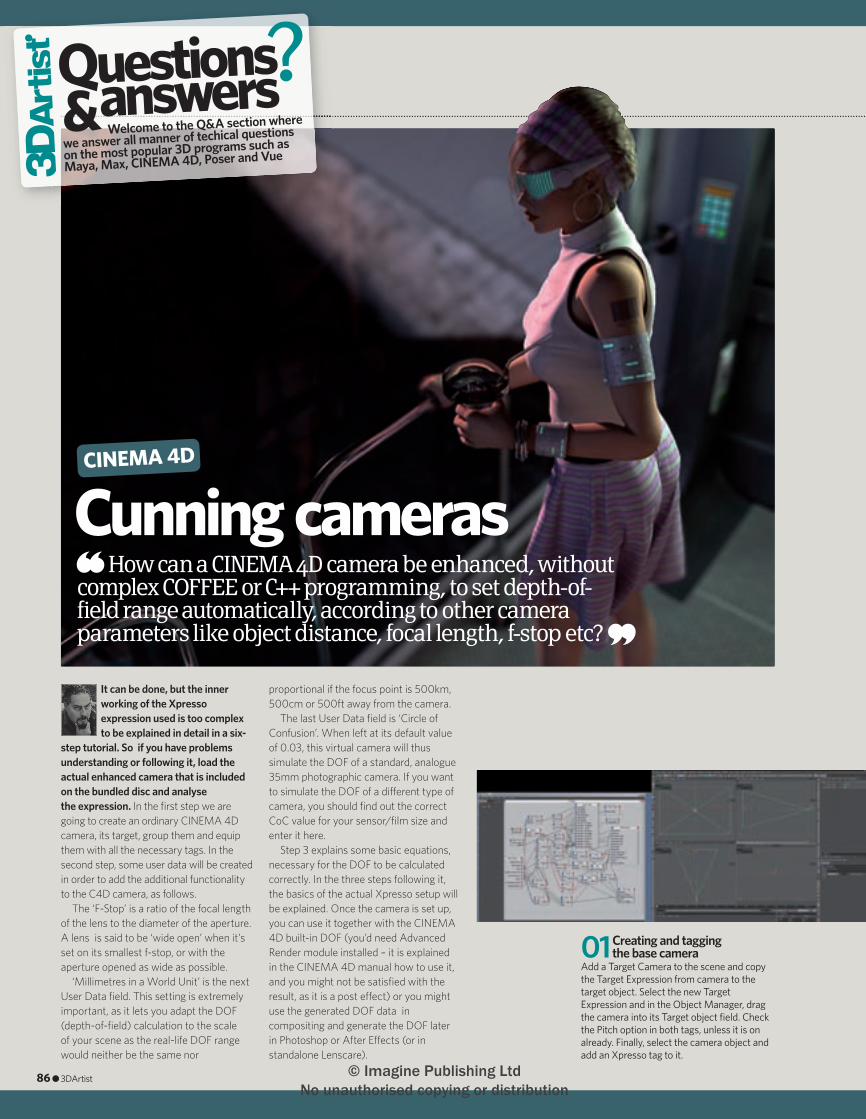
Join the community at www.3dartistonline.com
It can be done, but the inner working of the Xpresso expression used is too complex to be explained in detail in a six-
step tutorial. So if you have problems understanding or following it, load the actual enhanced camera that is included on the bundled disc and analyse the expression. In the fi rst step we are going to create an ordinary CINEMA 4D camera, its target, group them and equip them with all the necessary tags. In the second step, some user data will be created in order to add the additional functionality to the C4D camera, as follows.
The ‘F-Stop’ is a ratio of the focal length of the lens to the diameter of the aperture. A lens is said to be ‘wide open’ when it’s set on its smallest f-stop, or with the aperture opened as wide as possible.
‘Millimetres in a World Unit’ is the next User Data fi eld. This setting is extremely important, as it lets you adapt the DOF (depth-of-fi eld) calculation to the scale of your scene as the real-life DOF range would neither be the same nor
01 Creating and tagging the base camera
Add a Target Camera to the scene and copy the Target Expression from camera to the target object. Select the new Target Expression and in the Object Manager, drag the camera into its Target object fi eld. Check the Pitch option in both tags, unless it is on already. Finally, select the camera object and add an Xpresso tag to it.
86 ● 3DArtist
How can a CINEMA 4D camera be enhanced, without complex COFFEE or C++ programming, to set depth-of-field range automatically, according to other camera parameters like object distance, focal length, f-stop etc?
Cunning cameras
proportional if the focus point is 500km, 500cm or 500ft away from the camera.
The last User Data fi eld is ‘Circle of Confusion’. When left at its default value of 0.03, this virtual camera will thus simulate the DOF of a standard, analogue 35mm photographic camera. If you want to simulate the DOF of a di� erent type of camera, you should fi nd out the correct CoC value for your sensor/fi lm size and enter it here.
Step 3 explains some basic equations, necessary for the DOF to be calculated correctly. In the three steps following it, the basics of the actual Xpresso setup will be explained. Once the camera is set up, you can use it together with the CINEMA 4D built-in DOF (you’d need Advanced Render module installed – it is explained in the CINEMA 4D manual how to use it, and you might not be satisfi ed with the result, as it is a post e� ect) or you might use the generated DOF data in compositing and generate the DOF later in Photoshop or After E� ects (or in standalone Lenscare).
CINEMA 4D
Questions Welcome to the Q&A section where
we answer all manner of techical questions
on the most popular 3D programs such as
Maya, Max, CINEMA 4D, Poser and Vue
?answers&
082-88_3DA_15 Q&A.indd 86 8/4/10 16:38:36
© Imagine Publishing Ltd No unauthorised copying or distribution
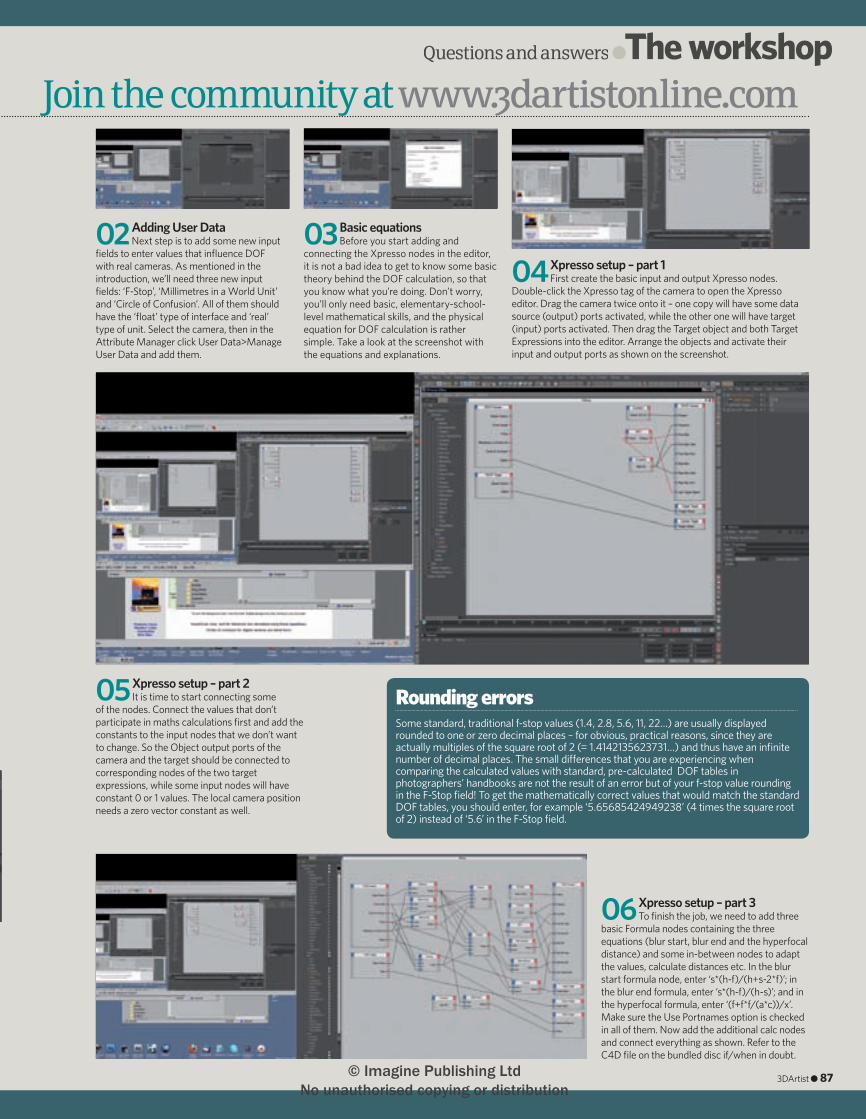
Questions and answers ●The workshop●The workshop●
Join the community at www.3dartistonline.com
3DArtist ● 87
03 Basic equationsBefore you start adding and
connecting the Xpresso nodes in the editor, it is not a bad idea to get to know some basic theory behind the DOF calculation, so that you know what you’re doing. Don’t worry, you’ll only need basic, elementary-school-level mathematical skills, and the physical equation for DOF calculation is rather simple. Take a look at the screenshot with the equations and explanations.
02 Adding User DataNext step is to add some new input
fi elds to enter values that infl uence DOF with real cameras. As mentioned in the introduction, we’ll need three new input fi elds: ‘F-Stop’, ‘Millimetres in a World Unit’ and ‘Circle of Confusion’. All of them should have the ‘fl oat’ type of interface and ‘real’ type of unit. Select the camera, then in the Attribute Manager click User Data>Manage User Data and add them.
04 Xpresso setup – part 1First create the basic input and output Xpresso nodes.
Double-click the Xpresso tag of the camera to open the Xpresso editor. Drag the camera twice onto it – one copy will have some data source (output) ports activated, while the other one will have target (input) ports activated. Then drag the Target object and both Target Expressions into the editor. Arrange the objects and activate their input and output ports as shown on the screenshot.
06 Xpresso setup – part 3To fi nish the job, we need to add three
basic Formula nodes containing the three equations (blur start, blur end and the hyperfocal distance) and some in-between nodes to adapt the values, calculate distances etc. In the blur start formula node, enter ‘s*(h-f)/(h+s-2*f)’; in the blur end formula, enter ‘s*(h-f)/(h-s)’; and in the hyperfocal formula, enter ‘(f+f*f/(a*c))/x’. Make sure the Use Portnames option is checked in all of them. Now add the additional calc nodes and connect everything as shown. Refer to the C4D fi le on the bundled disc if/when in doubt.
05 Xpresso setup – part 2It is time to start connecting some
of the nodes. Connect the values that don’t participate in maths calculations fi rst and add the constants to the input nodes that we don’t want to change. So the Object output ports of the camera and the target should be connected to corresponding nodes of the two target expressions, while some input nodes will have constant 0 or 1 values. The local camera position needs a zero vector constant as well.
Some standard, traditional f-stop values (1.4, 2.8, 5.6, 11, 22…) are usually displayed rounded to one or zero decimal places – for obvious, practical reasons, since they are actually multiples of the square root of 2 (= 1.4142135623731…) and thus have an infi nite number of decimal places. The small di� erences that you are experiencing when comparing the calculated values with standard, pre-calculated DOF tables in photographers’ handbooks are not the result of an error but of your f-stop value rounding in the F-Stop fi eld! To get the mathematically correct values that would match the standard DOF tables, you should enter, for example ‘5.65685424949238’ (4 times the square root of 2) instead of ‘5.6’ in the F-Stop fi eld.
Rounding errors
082-88_3DA_15 Q&A.indd 87 8/4/10 15:02:17
© Imagine Publishing Ltd No unauthorised copying or distribution
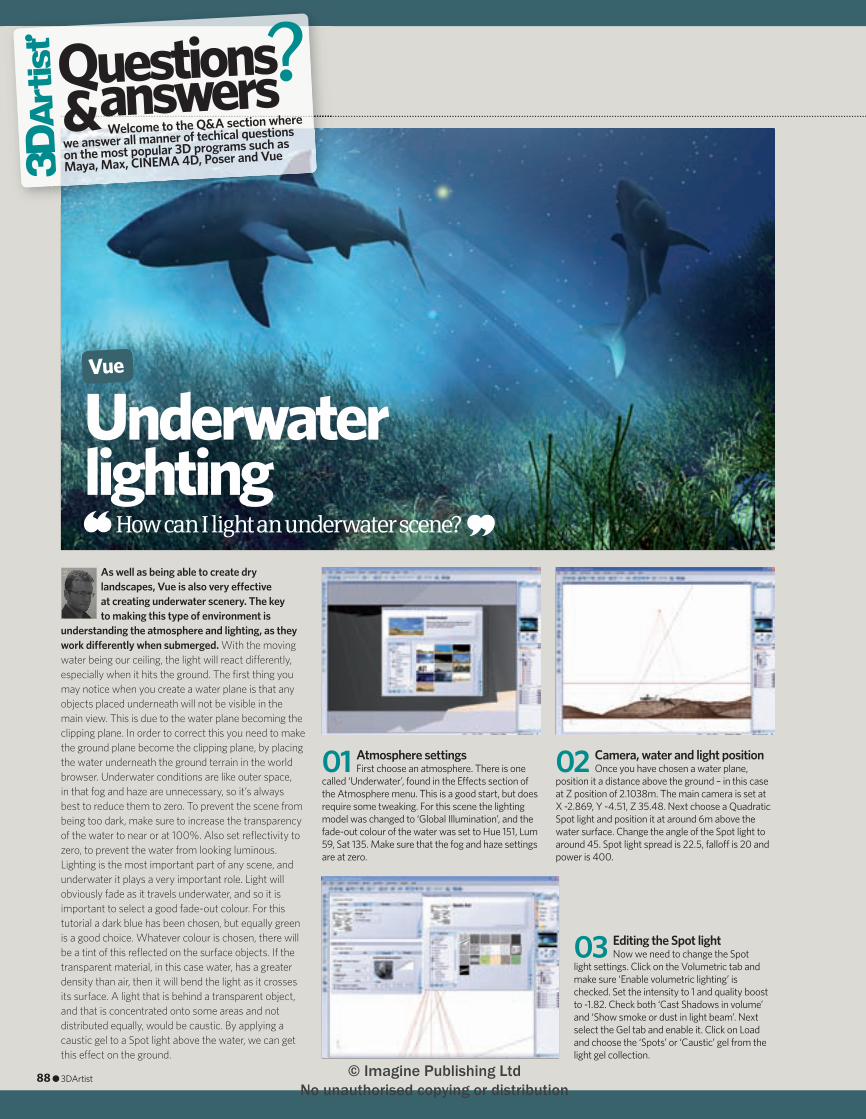
As well as being able to create dry landscapes, Vue is also very e� ective at creating underwater scenery. The key to making this type of environment is
understanding the atmosphere and lighting, as they work di� erently when submerged. With the moving water being our ceiling, the light will react di� erently, especially when it hits the ground. The fi rst thing you may notice when you create a water plane is that any objects placed underneath will not be visible in the main view. This is due to the water plane becoming the clipping plane. In order to correct this you need to make the ground plane become the clipping plane, by placing the water underneath the ground terrain in the world browser. Underwater conditions are like outer space, in that fog and haze are unnecessary, so it’s always best to reduce them to zero. To prevent the scene from being too dark, make sure to increase the transparency of the water to near or at 100%. Also set refl ectivity to zero, to prevent the water from looking luminous. Lighting is the most important part of any scene, and underwater it plays a very important role. Light will obviously fade as it travels underwater, and so it is important to select a good fade-out colour. For this tutorial a dark blue has been chosen, but equally green is a good choice. Whatever colour is chosen, there will be a tint of this refl ected on the surface objects. If the transparent material, in this case water, has a greater density than air, then it will bend the light as it crosses its surface. A light that is behind a transparent object, and that is concentrated onto some areas and not distributed equally, would be caustic. By applying a caustic gel to a Spot light above the water, we can get this e� ect on the ground.
How can I light an underwater scene?
Underwater lighting
01 Atmosphere settingsFirst choose an atmosphere. There is one
called ‘Underwater’, found in the E� ects section of the Atmosphere menu. This is a good start, but does require some tweaking. For this scene the lighting model was changed to ‘Global Illumination’, and the fade-out colour of the water was set to Hue 151, Lum 59, Sat 135. Make sure that the fog and haze settings are at zero.
02 Camera, water and light positionOnce you have chosen a water plane,
position it a distance above the ground – in this case at Z position of 2.1038m. The main camera is set at X -2.869, Y -4.51, Z 35.48. Next choose a Quadratic Spot light and position it at around 6m above the water surface. Change the angle of the Spot light to around 45. Spot light spread is 22.5, fallo� is 20 and power is 400.
88 ● 3DArtist
03 Editing the Spot lightNow we need to change the Spot
light settings. Click on the Volumetric tab and make sure ‘Enable volumetric lighting’ is checked. Set the intensity to 1 and quality boost to -1.82. Check both ‘Cast Shadows in volume’ and ‘Show smoke or dust in light beam’. Next select the Gel tab and enable it. Click on Load and choose the ‘Spots’ or ‘Caustic’ gel from the light gel collection.
Vue
Questions Welcome to the Q&A section where
we answer all manner of techical questions
on the most popular 3D programs such as
Maya, Max, CINEMA 4D, Poser and Vue
?answers&
082-88_3DA_15 Q&A.indd 88 8/4/10 15:02:39
© Imagine Publishing Ltd No unauthorised copying or distribution

Learn in style
Now available onAlso in this series
www.imaginebookshop.co.uk App StoreKindle Store ImagineShop.co.uk
BookazineseBooks • Apps
Discover more with the Book series’ expert, accessible tutorials for iPad, iPhone, Mac, Android, Photoshop, Windows and more
The
Series
High street
HIGH ST.BUY IN STORE
iPad
Printed full colour large format book
Kindle
TM
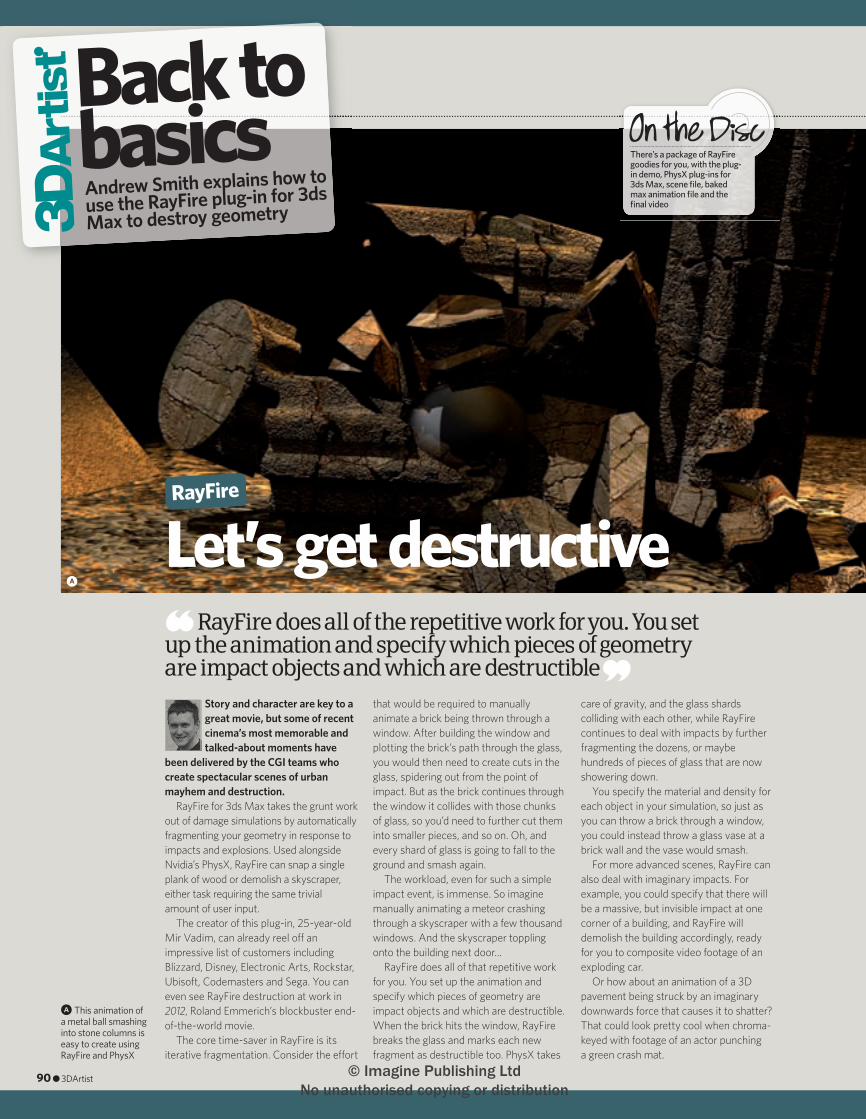
Story and character are key to a great movie, but some of recent cinema’s most memorable and talked-about moments have
been delivered by the CGI teams who create spectacular scenes of urban mayhem and destruction.
RayFire for 3ds Max takes the grunt work out of damage simulations by automatically fragmenting your geometry in response to impacts and explosions. Used alongside Nvidia’s PhysX, RayFire can snap a single plank of wood or demolish a skyscraper, either task requiring the same trivial amount of user input.
The creator of this plug-in, 25-year-old Mir Vadim, can already reel o� an impressive list of customers including Blizzard, Disney, Electronic Arts, Rockstar, Ubisoft, Codemasters and Sega. You can even see RayFire destruction at work in 2012, Roland Emmerich’s blockbuster end-of-the-world movie.
The core time-saver in RayFire is its iterative fragmentation. Consider the e� ort
that would be required to manually animate a brick being thrown through a window. After building the window and plotting the brick’s path through the glass, you would then need to create cuts in the glass, spidering out from the point of impact. But as the brick continues through the window it collides with those chunks of glass, so you’d need to further cut them into smaller pieces, and so on. Oh, and every shard of glass is going to fall to the ground and smash again.
The workload, even for such a simple impact event, is immense. So imagine manually animating a meteor crashing through a skyscraper with a few thousand windows. And the skyscraper toppling onto the building next door…
RayFire does all of that repetitive work for you. You set up the animation and specify which pieces of geometry are impact objects and which are destructible. When the brick hits the window, RayFire breaks the glass and marks each new fragment as destructible too. PhysX takes
care of gravity, and the glass shards colliding with each other, while RayFire continues to deal with impacts by further fragmenting the dozens, or maybe hundreds of pieces of glass that are now showering down.
You specify the material and density for each object in your simulation, so just as you can throw a brick through a window, you could instead throw a glass vase at a brick wall and the vase would smash.
For more advanced scenes, RayFire can also deal with imaginary impacts. For example, you could specify that there will be a massive, but invisible impact at one corner of a building, and RayFire will demolish the building accordingly, ready for you to composite video footage of an exploding car.
Or how about an animation of a 3D pavement being struck by an imaginary downwards force that causes it to shatter? That could look pretty cool when chroma-keyed with footage of an actor punching a green crash mat.
Back to basicsAndrew Smith explains how to use the RayFire plug-in for 3ds Max to destroy geometry
Join the community at www.3dartistonline.com
RayFire does all of the repetitive work for you. You set up the animation and specify which pieces of geometry are impact objects and which are destructible
Let’s get destructive
a This animation of a metal ball smashing into stone columns is easy to create using RayFire and PhysX
a
RayFire
There’s a package of RayFire goodies for you, with the plug-in demo, PhysX plug-ins for 3ds Max, scene fi le, baked max animation fi le and the fi nal video
90 ● 3DArtist
090-91_3DA_15 B2B - RayFire.indd90 90 8/4/10 16:19:49
© Imagine Publishing Ltd No unauthorised copying or distribution
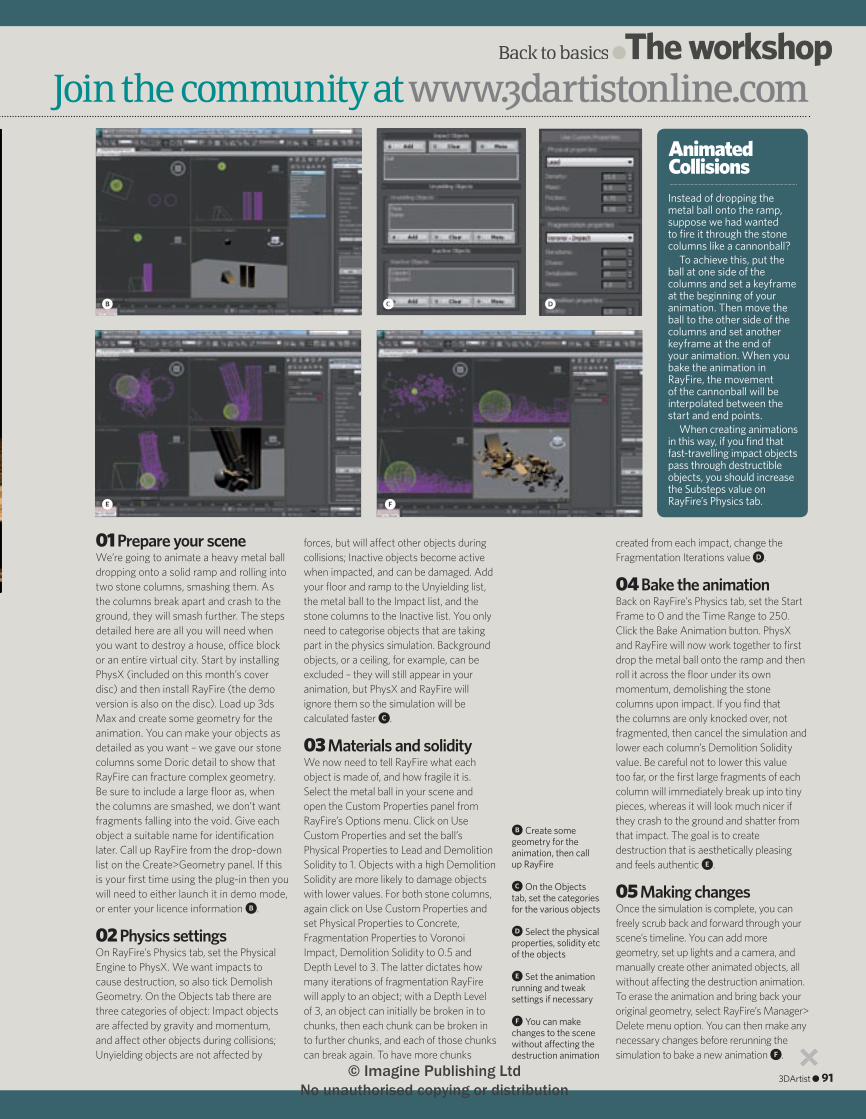
Back to basics ●The workshop●The workshop●
01 Prepare your sceneWe’re going to animate a heavy metal ball dropping onto a solid ramp and rolling into two stone columns, smashing them. As the columns break apart and crash to the ground, they will smash further. The steps detailed here are all you will need when you want to destroy a house, o� ce block or an entire virtual city. Start by installing PhysX (included on this month’s cover disc) and then install RayFire (the demo version is also on the disc). Load up 3ds Max and create some geometry for the animation. You can make your objects as detailed as you want – we gave our stone columns some Doric detail to show that RayFire can fracture complex geometry. Be sure to include a large fl oor as, when the columns are smashed, we don’t want fragments falling into the void. Give each object a suitable name for identifi cation later. Call up RayFire from the drop-down list on the Create>Geometry panel. If this is your fi rst time using the plug-in then you will need to either launch it in demo mode, or enter your licence information b.
02 Physics settingsOn RayFire’s Physics tab, set the Physical Engine to PhysX. We want impacts to cause destruction, so also tick Demolish Geometry. On the Objects tab there are three categories of object: Impact objects are a� ected by gravity and momentum, and a� ect other objects during collisions; Unyielding objects are not a� ected by
forces, but will a� ect other objects during collisions; Inactive objects become active when impacted, and can be damaged. Add your fl oor and ramp to the Unyielding list, the metal ball to the Impact list, and the stone columns to the Inactive list. You only need to categorise objects that are taking part in the physics simulation. Background objects, or a ceiling, for example, can be excluded – they will still appear in your animation, but PhysX and RayFire will ignore them so the simulation will be calculated faster c.
03 Materials and solidityWe now need to tell RayFire what each object is made of, and how fragile it is. Select the metal ball in your scene and open the Custom Properties panel from RayFire’s Options menu. Click on Use Custom Properties and set the ball’s Physical Properties to Lead and Demolition Solidity to 1. Objects with a high Demolition Solidity are more likely to damage objects with lower values. For both stone columns, again click on Use Custom Properties and set Physical Properties to Concrete, Fragmentation Properties to Voronoi Impact, Demolition Solidity to 0.5 and Depth Level to 3. The latter dictates how many iterations of fragmentation RayFire will apply to an object; with a Depth Level of 3, an object can initially be broken in to chunks, then each chunk can be broken in to further chunks, and each of those chunks can break again. To have more chunks
created from each impact, change the Fragmentation Iterations value d.
04 Bake the animationBack on RayFire’s Physics tab, set the Start Frame to 0 and the Time Range to 250. Click the Bake Animation button. PhysX and RayFire will now work together to fi rst drop the metal ball onto the ramp and then roll it across the fl oor under its own momentum, demolishing the stone columns upon impact. If you fi nd that the columns are only knocked over, not fragmented, then cancel the simulation and lower each column’s Demolition Solidity value. Be careful not to lower this value too far, or the fi rst large fragments of each column will immediately break up into tiny pieces, whereas it will look much nicer if they crash to the ground and shatter from that impact. The goal is to create destruction that is aesthetically pleasing and feels authentic e.
05 Making changesOnce the simulation is complete, you can freely scrub back and forward through your scene’s timeline. You can add more geometry, set up lights and a camera, and manually create other animated objects, all without a� ecting the destruction animation. To erase the animation and bring back your original geometry, select RayFire’s Manager>Delete menu option. You can then make any necessary changes before rerunning the simulation to bake a new animation f.
Join the community at www.3dartistonline.com
Instead of dropping the metal ball onto the ramp, suppose we had wanted to fi re it through the stone columns like a cannonball?
To achieve this, put the ball at one side of the columns and set a keyframe at the beginning of your animation. Then move the ball to the other side of the columns and set another keyframe at the end of your animation. When you bake the animation in RayFire, the movement of the cannonball will be interpolated between the start and end points.
When creating animations in this way, if you fi nd that fast-travelling impact objects pass through destructible objects, you should increase the Substeps value on RayFire’s Physics tab.
Animated Collisions
b Create some geometry for the animation, then call up RayFire
c On the Objects tab, set the categories for the various objects
d Select the physical properties, solidity etc of the objects
e Set the animation running and tweak settings if necessary
f You can make changes to the scene without a� ecting the destruction animation
b c d
e f
3DArtist ● 91
090-91_3DA_15 B2B - RayFire.indd91 91 8/4/10 15:04:53
© Imagine Publishing Ltd No unauthorised copying or distribution
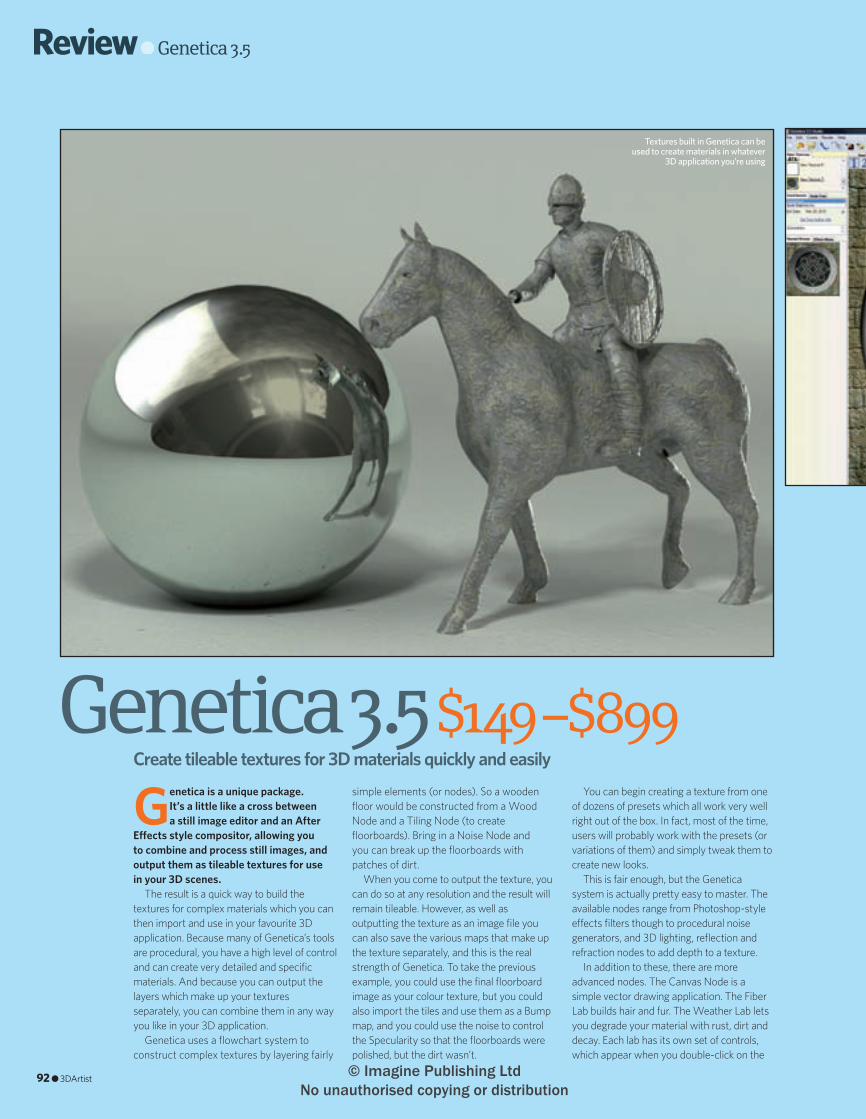
Review● Genetica 3.5● Genetica 3.5●
Genetica is a unique package. It’s a little like a cross between a still image editor and an After
E� ects style compositor, allowing you to combine and process still images, and output them as tileable textures for use in your 3D scenes.
The result is a quick way to build the textures for complex materials which you can then import and use in your favourite 3D application. Because many of Genetica’s tools are procedural, you have a high level of control and can create very detailed and specifi c materials. And because you can output the layers which make up your textures separately, you can combine them in any way you like in your 3D application.
Genetica uses a fl owchart system to construct complex textures by layering fairly
Genetica 3.5 $149 –$899Create tileable textures for 3D materials quickly and easily
Textures built in Genetica can be used to create materials in whatever
3D application you’re using
simple elements (or nodes). So a wooden fl oor would be constructed from a Wood Node and a Tiling Node (to create fl oorboards). Bring in a Noise Node and you can break up the fl oorboards with patches of dirt.
When you come to output the texture, you can do so at any resolution and the result will remain tileable. However, as well as outputting the texture as an image fi le you can also save the various maps that make up the texture separately, and this is the real strength of Genetica. To take the previous example, you could use the fi nal fl oorboard image as your colour texture, but you could also import the tiles and use them as a Bump map, and you could use the noise to control the Specularity so that the fl oorboards were polished, but the dirt wasn’t.
You can begin creating a texture from one of dozens of presets which all work very well right out of the box. In fact, most of the time, users will probably work with the presets (or variations of them) and simply tweak them to create new looks.
This is fair enough, but the Genetica system is actually pretty easy to master. The available nodes range from Photoshop-style e� ects fi lters though to procedural noise generators, and 3D lighting, refl ection and refraction nodes to add depth to a texture.
In addition to these, there are more advanced nodes. The Canvas Node is a simple vector drawing application. The Fiber Lab builds hair and fur. The Weather Lab lets you degrade your material with rust, dirt and decay. Each lab has its own set of controls, which appear when you double-click on the
92 ● 3DArtist
092-93_3DA_15 Genetica review.in92 92 8/4/10 15:05:45
© Imagine Publishing Ltd No unauthorised copying or distribution
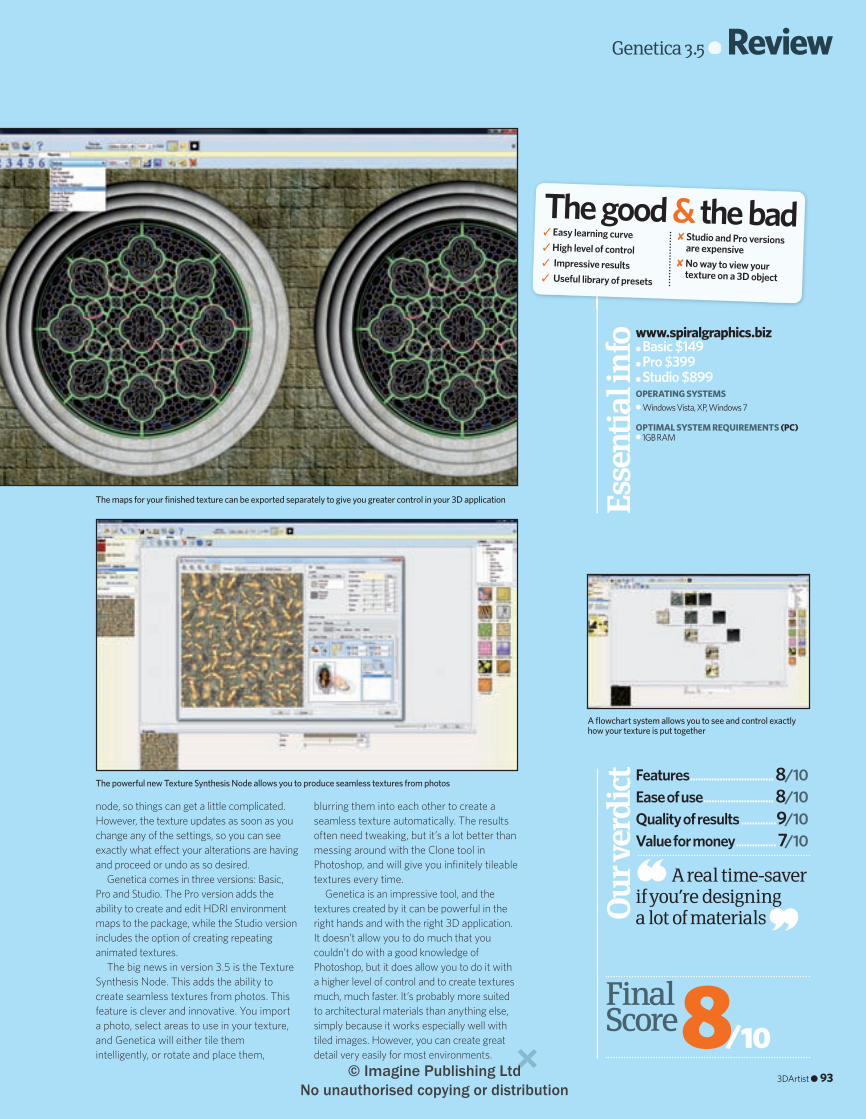
Genetica 3.5 ● Review
node, so things can get a little complicated. However, the texture updates as soon as you change any of the settings, so you can see exactly what e� ect your alterations are having and proceed or undo as so desired.
Genetica comes in three versions: Basic, Pro and Studio. The Pro version adds the ability to create and edit HDRI environment maps to the package, while the Studio version includes the option of creating repeating animated textures.
The big news in version 3.5 is the Texture Synthesis Node. This adds the ability to create seamless textures from photos. This feature is clever and innovative. You import a photo, select areas to use in your texture, and Genetica will either tile them intelligently, or rotate and place them,
8/10
Features ...............................8/10Ease of use ..........................8/10Quality of results .............9/10Value for money ...............7/10
Ou
r ver
dic
t
A real time-saver if you’re designing a lot of materials
blurring them into each other to create a seamless texture automatically. The results often need tweaking, but it’s a lot better than messing around with the Clone tool in Photoshop, and will give you infi nitely tileable textures every time.
Genetica is an impressive tool, and the textures created by it can be powerful in the right hands and with the right 3D application. It doesn’t allow you to do much that you couldn’t do with a good knowledge of Photoshop, but it does allow you to do it with a higher level of control and to create textures much, much faster. It’s probably more suited to architectural materials than anything else, simply because it works especially well with tiled images. However, you can create great detail very easily for most environments.
FinalScore
www.spiralgraphics.biz● Basic $149● Pro $399● Studio $899OPERATING SYSTEMS● Windows Vista, XP, Windows 7
OPTIMAL SYSTEM REQUIREMENTS (PC)● 1GB RAM
Esse
ntia
l in
fo
A fl owchart system allows you to see and control exactly how your texture is put together
The powerful new Texture Synthesis Node allows you to produce seamless textures from photos
The good & the bad✘ Studio and Pro versions
are expensive✘ No way to view your
texture on a 3D object
✓ Easy learning curve✓ High level of control ✓ Impressive results✓ Useful library of presets
The maps for your fi nished texture can be exported separately to give you greater control in your 3D application
3DArtist ● 93
092-93_3DA_15 Genetica review.in93 93 8/4/10 15:06:00
© Imagine Publishing Ltd No unauthorised copying or distribution
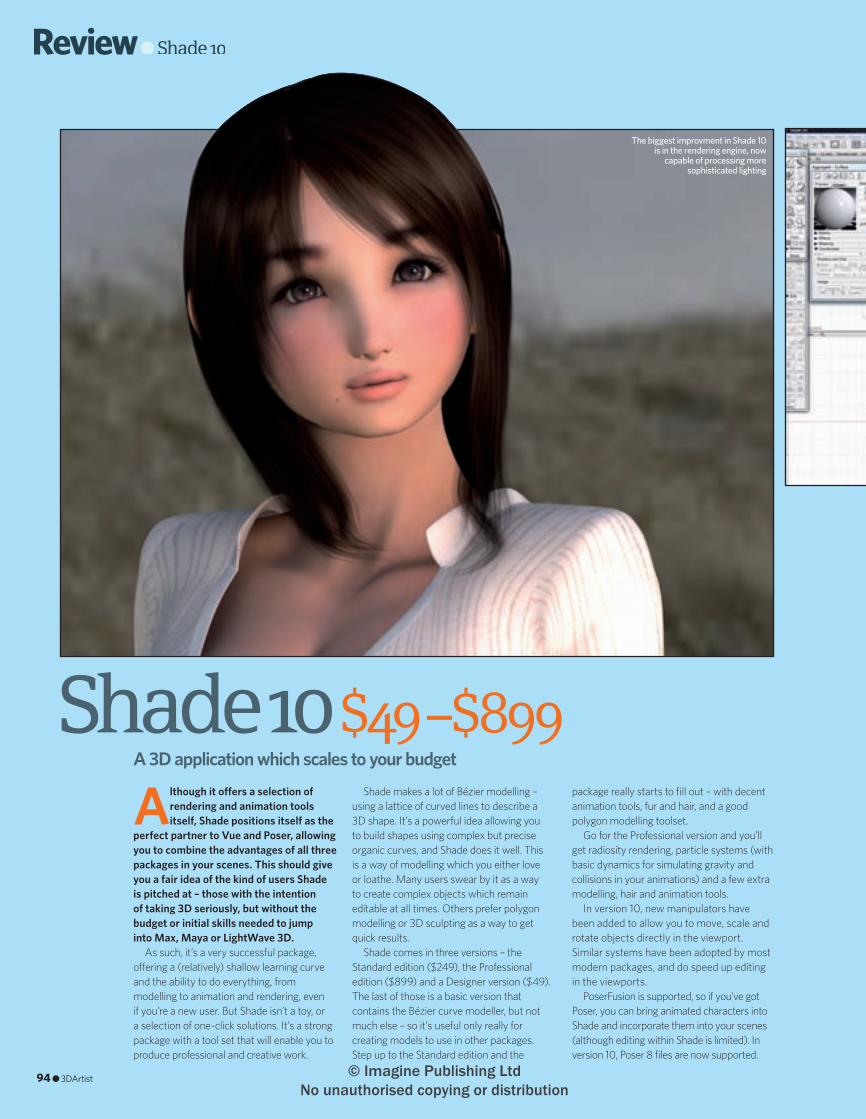
Review● Shade 10● Shade 10●
Although it o� ers a selection of rendering and animation tools itself, Shade positions itself as the
perfect partner to Vue and Poser, allowing you to combine the advantages of all three packages in your scenes. This should give you a fair idea of the kind of users Shade is pitched at – those with the intention of taking 3D seriously, but without the budget or initial skills needed to jump into Max, Maya or LightWave 3D.
As such, it’s a very successful package, o� ering a (relatively) shallow learning curve and the ability to do everything, from modelling to animation and rendering, even if you’re a new user. But Shade isn’t a toy, or a selection of one-click solutions. It’s a strong package with a tool set that will enable you to produce professional and creative work.
Shade 10 $49 –$899A 3D application which scales to your budget
The biggest improvment in Shade 10 is in the rendering engine, now
capable of processing more sophisticated lighting
Shade makes a lot of Bézier modelling – using a lattice of curved lines to describe a 3D shape. It’s a powerful idea allowing you to build shapes using complex but precise organic curves, and Shade does it well. This is a way of modelling which you either love or loathe. Many users swear by it as a way to create complex objects which remain editable at all times. Others prefer polygon modelling or 3D sculpting as a way to get quick results.
Shade comes in three versions – the Standard edition ($249), the Professional edition ($899) and a Designer version ($49). The last of those is a basic version that contains the Bézier curve modeller, but not much else – so it’s useful only really for creating models to use in other packages. Step up to the Standard edition and the
package really starts to fi ll out – with decent animation tools, fur and hair, and a good polygon modelling toolset.
Go for the Professional version and you’ll get radiosity rendering, particle systems (with basic dynamics for simulating gravity and collisions in your animations) and a few extra modelling, hair and animation tools.
In version 10, new manipulators have been added to allow you to move, scale and rotate objects directly in the viewport. Similar systems have been adopted by most modern packages, and do speed up editing in the viewports.
PoserFusion is supported, so if you’ve got Poser, you can bring animated characters into Shade and incorporate them into your scenes (although editing within Shade is limited). In version 10, Poser 8 fi les are now supported.
94 ● 3DArtist
094-95_3DA_15 Shade 10.indd 94 8/4/10 15:06:42
© Imagine Publishing Ltd No unauthorised copying or distribution
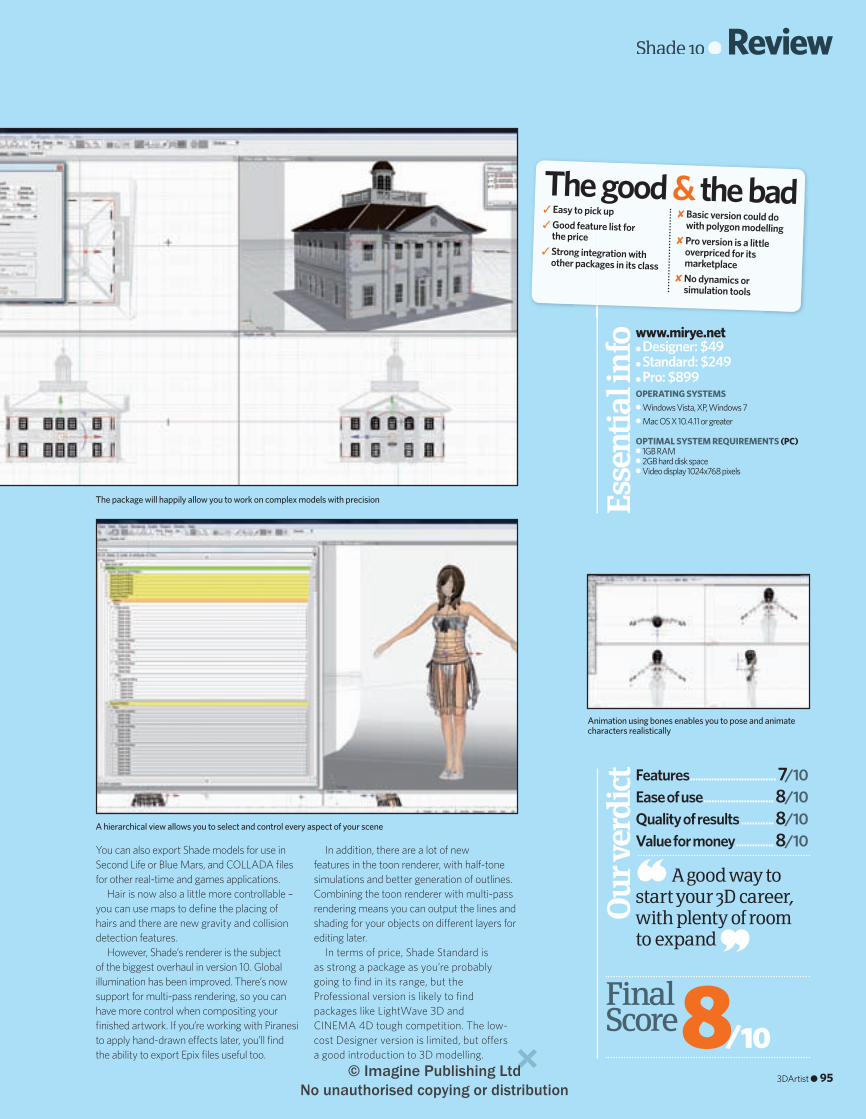
Shade 10 ● Review
You can also export Shade models for use in Second Life or Blue Mars, and COLLADA fi les for other real-time and games applications.
Hair is now also a little more controllable – you can use maps to defi ne the placing of hairs and there are new gravity and collision detection features.
However, Shade’s renderer is the subject of the biggest overhaul in version 10. Global illumination has been improved. There’s now support for multi-pass rendering, so you can have more control when compositing your fi nished artwork. If you’re working with Piranesi to apply hand-drawn e� ects later, you’ll fi nd the ability to export Epix fi les useful too.
8/10
Features ................................7/10Ease of use ..........................8/10Quality of results ............8/10Value for money ..............8/10
Ou
r ver
dic
t
A good way to start your 3D career, with plenty of room to expand
In addition, there are a lot of new features in the toon renderer, with half-tone simulations and better generation of outlines. Combining the toon renderer with multi-pass rendering means you can output the lines and shading for your objects on di� erent layers for editing later.
In terms of price, Shade Standard is as strong a package as you’re probably going to fi nd in its range, but the Professional version is likely to fi nd packages like LightWave 3D and CINEMA 4D tough competition. The low-cost Designer version is limited, but o� ers a good introduction to 3D modelling.
FinalScore
www.mirye.net● Designer: $49● Standard: $249● Pro: $899OPERATING SYSTEMS● Windows Vista, XP, Windows 7● Mac OS X 10.4.11 or greater
OPTIMAL SYSTEM REQUIREMENTS (PC)● 1GB RAM● 2GB hard disk space● Video display 1024x768 pixels
Esse
ntia
l in
fo
The good & the bad
Animation using bones enables you to pose and animate characters realistically
A hierarchical view allows you to select and control every aspect of your scene
✘ Basic version could do with polygon modelling
✘ Pro version is a little overpriced for its marketplace
✘ No dynamics or simulation tools
✓ Easy to pick up✓ Good feature list for
the price ✓ Strong integration with
other packages in its class
The package will happily allow you to work on complex models with precision
3DArtist ● 95
094-95_3DA_15 Shade 10.indd 95 8/4/10 15:06:57
© Imagine Publishing Ltd No unauthorised copying or distribution
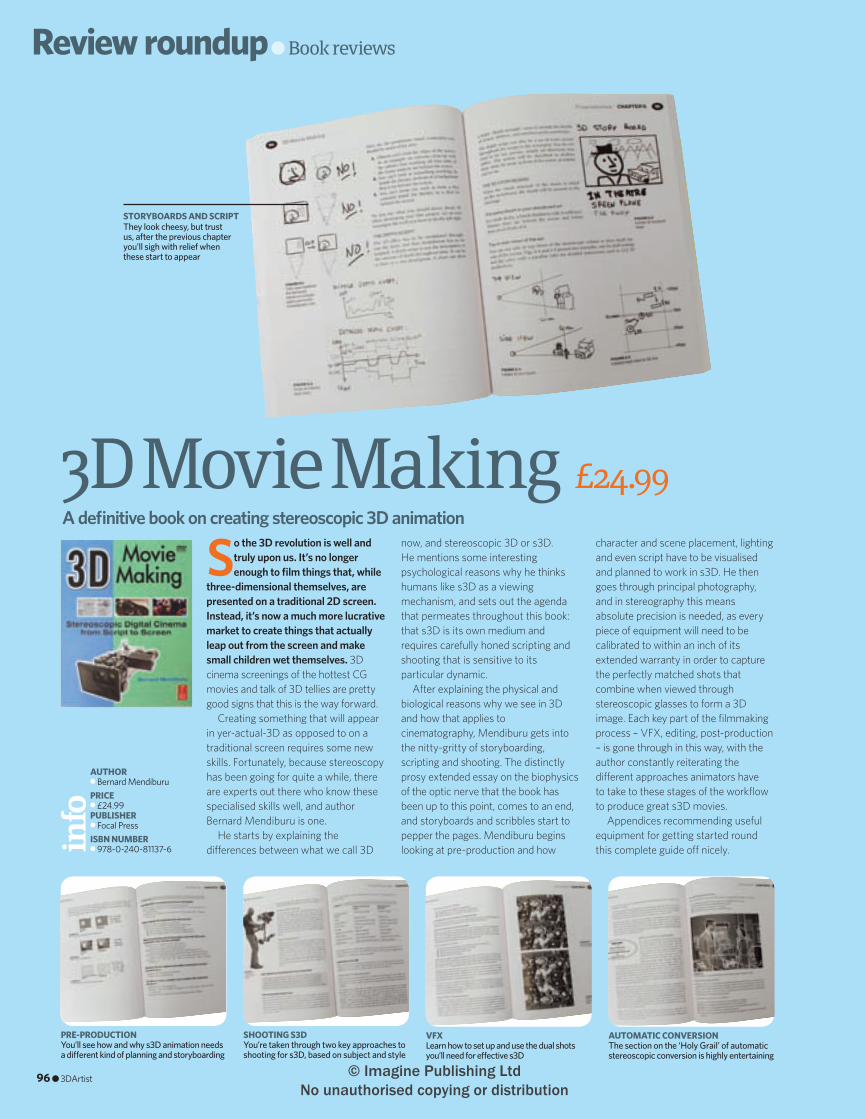
So the 3D revolution is well and truly upon us. It’s no longer enough to film things that, while
three-dimensional themselves, are presented on a traditional 2D screen. Instead, it’s now a much more lucrative market to create things that actually leap out from the screen and make small children wet themselves. 3D cinema screenings of the hottest CG movies and talk of 3D tellies are pretty good signs that this is the way forward.
Creating something that will appear in yer-actual-3D as opposed to on a traditional screen requires some new skills. Fortunately, because stereoscopy has been going for quite a while, there are experts out there who know these specialised skills well, and author Bernard Mendiburu is one.
He starts by explaining the differences between what we call 3D
now, and stereoscopic 3D or s3D. He mentions some interesting psychological reasons why he thinks humans like s3D as a viewing mechanism, and sets out the agenda that permeates throughout this book: that s3D is its own medium and requires carefully honed scripting and shooting that is sensitive to its particular dynamic.
After explaining the physical and biological reasons why we see in 3D and how that applies to cinematography, Mendiburu gets into the nitty-gritty of storyboarding, scripting and shooting. The distinctly prosy extended essay on the biophysics of the optic nerve that the book has been up to this point, comes to an end, and storyboards and scribbles start to pepper the pages. Mendiburu begins looking at pre-production and how
character and scene placement, lighting and even script have to be visualised and planned to work in s3D. He then goes through principal photography, and in stereography this means absolute precision is needed, as every piece of equipment will need to be calibrated to within an inch of its extended warranty in order to capture the perfectly matched shots that combine when viewed through stereoscopic glasses to form a 3D image. Each key part of the filmmaking process – VFX, editing, post-production – is gone through in this way, with the author constantly reiterating the different approaches animators have to take to these stages of the workflow to produce great s3D movies.
Appendices recommending useful equipment for getting started round this complete guide off nicely.
Review roundup l Book reviews
3D Movie Making £24.99A definitive book on creating stereoscopic 3D animation
PRe-PRoductionYou’ll see how and why s3D animation needs a different kind of planning and storyboarding
Shooting S3dYou’re taken through two key approaches to shooting for s3D, based on subject and style
AutomAtic conveRSionThe section on the ‘Holy Grail’ of automatic stereoscopic conversion is highly entertaining
vFXLearn how to set up and use the dual shots you’ll need for effective s3D
AuthoRl Bernard MendiburuPRicel £24.99PuBLiSheRl Focal PressiSBn numBeRl 978-0-240-81137-6in
fo
StoRyBoARdS And ScRiPtThey look cheesy, but trust us, after the previous chapter you’ll sigh with relief when these start to appear
96 l 3DArtist
096-97_3DA_15 Book reviews.indd 96 8/4/10 15:08:18
© Imagine Publishing Ltd No unauthorised copying or distribution

Book reviews ● Review roundup
Compositing Visual Effects £20.99
This book by Steve Wright is one of two on this theme that we’re covering this issue. This one’s
for the less experienced end of the market, so it looks at the nuts and bolts of compositing from the perspective of the aspiring artist.
First it goes through the key processes you’ll need to learn about if you’re new to compositing. This includes green and blue screening, motion tracking and a few of the more interesting e� ects such as Bullet Time. This is a nice way to introduce you to what you want to achieve, but on the downside it could be accused of rushing newcomers straight into what they want to do without the benefi t of the enlightening long, hard slog to get there.
The basics of digital imaging are only covered in the second chapter, which makes the book seem a bit topsy-turvy. Nonetheless, it’s an intriguing intro to this must-know subject.
Professional Digital Compositing $59.99
If Steve Wright’s book had fooled you into the idea that compositing is an easy business once you’ve
mastered green screens, selection tools and speed, this tome will soon relieve you of that notion. Twice the size of the beginners’ guide, this is a serious book for serious 3D artists. This one starts with how to set up a composite – no ninnying about with aspirational trickery you might one day be able to achieve; get in there and do it! It follows up with an exhaustive discussion of colour spaces and profi les as well as the artistic colour theory that informs them, then goes on to alphas, mattes, channel control and much more. Each highly focused chapter includes an interview with a professional who regularly uses these techniques, so you can get a feel for their real-world application. There’s even a chapter on stereoscopic 3D. An excellent resource for intermediate and advanced animators.
FIXING ERRORSAdvice on something you’re likely to end up doing a lot as a newbie – fi xing mistakes!
WORKING WITH FILMThere’s a good amount of info on the unique imaging challenges that fi lm presents
COLOUR SPACEGet in-depth info about the CMYK and RGB colour spaces and how to use them e� ectively
FILTERSFind out how you can make use of fi lters to create VFX
AUTHOR● Steve WrightPRICE● £20.99PUBLISHER● ElsevierISBN NUMBER● 978-0-240-80963-2in
fo
AUTHOR● Lee LanierPRICE● $59.99 USPUBLISHER● SybexISBN NUMBER● 978-0-470-45261-5in
fo
THE BASICSLearn about colour profi les and fi lm grain structures for e� ective composites
Professional compositing for advanced animators
The basics of compositing for enthusiasts and newcomers
SETTING UP A COMPOSITEStart with the basics by learning how a composite is set up properly
3DArtist ● 97
096-97_3DA_15 Book reviews.indd 97 8/4/10 15:09:05
© Imagine Publishing Ltd No unauthorised copying or distribution

We don’t keep secrets
Now available onAlso in this series
Learn the truth about iPhone, iPad, Android, Photoshop and more with the Tips & Tricks series’ expert advice and tutorials
www.imaginebookshop.co.uk
BookazineseBooks • Apps
iPad
Printed full colour large format book
Kindle
TM
App StoreKindle Store ImagineShop.co.ukHigh street
HIGH ST.BUY IN STORE
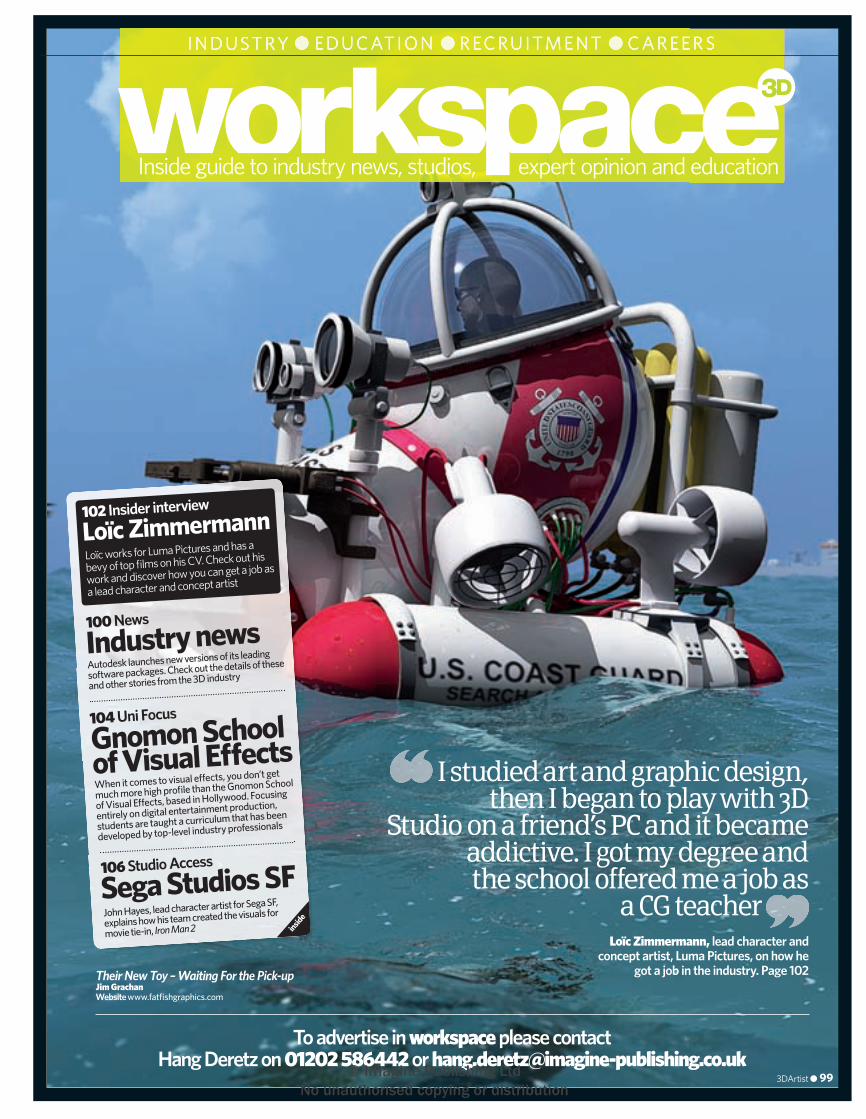
Inside guide to industry news, studios, expert opinion and education
3DArtist ● 99
To advertise in workspace please contact Hang Deretz on 01202 586442 or [email protected]
● ED U C AT I O N ● R ECRU ITM EN T ● C A R EER S
Their New Toy – Waiting For the Pick-upJim GrachanWebsite www.fatfi shgraphics.com
I studied art and graphic design, then I began to play with 3D
Studio on a friend’s PC and it became addictive. I got my degree and the school offered me a job as
a CG teacherLoïc Zimmermann, lead character and
concept artist, Luma Pictures, on how he got a job in the industry. Page 102
inside
Autodesk launches new versions of its leading
software packages. Check out the details of these
and other stories from the 3D industry
Industry news100 News
Loïc Zimmermann102 Insider interview
Loïc works for Luma Pictures and has a
bevy of top fi lms on his CV. Check out his
work and discover how you can get a job as
a lead character and concept artist
When it comes to visual e� ects, you don’t get
much more high profi le than the Gnomon School
of Visual E� ects, based in Hollywood. Focusing
entirely on digital entertainment production,
students are taught a curriculum that has been
developed by top-level industry professionals
Gnomon School of Visual E� ects104 Uni Focus
John Hayes, lead character artist for Sega SF,
explains how his team created the visuals for
movie tie-in, Iron Man 2
Sega Studios SF106 Studio Access
099_3DA_15 Industry Opener.indd 99 8/4/10 15:11:00
© Imagine Publishing Ltd No unauthorised copying or distribution
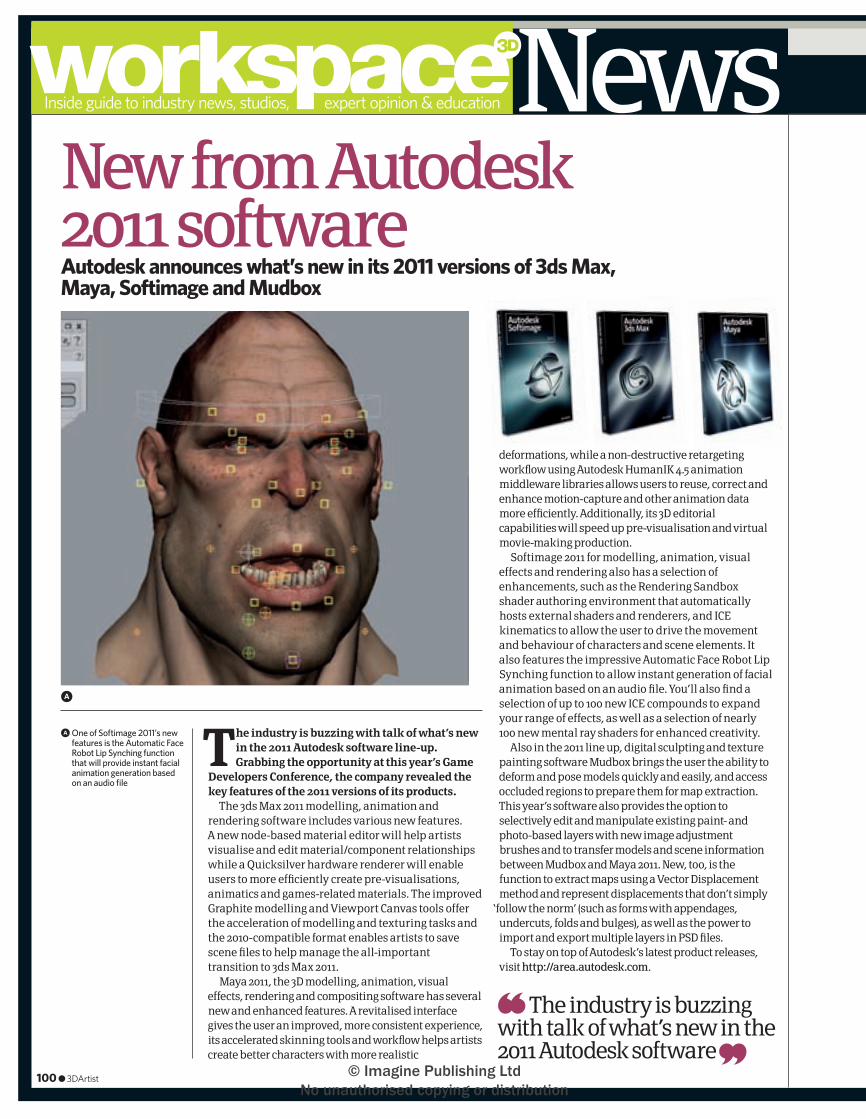
Inside guide to industry news, studios, expert opinion & education News
100 ● 3DArtist
a One of Softimage 2011’s new features is the Automatic Face Robot Lip Synching function that will provide instant facial animation generation based on an audio fi le
a
The industry is buzzing with talk of what’s new in the 2011 Autodesk software line-up. Grabbing the opportunity at this year’s Game
Developers Conference, the company revealed the key features of the 2011 versions of its products.
The 3ds Max 2011 modelling, animation and rendering software includes various new features. A new node-based material editor will help artists visualise and edit material/component relationships while a Quicksilver hardware renderer will enable users to more effi ciently create pre-visualisations, animatics and games-related materials. The improved Graphite modelling and Viewport Canvas tools offer the acceleration of modelling and texturing tasks and the 2010-compatible format enables artists to save scene fi les to help manage the all-important transition to 3ds Max 2011.
Maya 2011, the 3D modelling, animation, visual effects, rendering and compositing software has several new and enhanced features. A revitalised interface gives the user an improved, more consistent experience, its accelerated skinning tools and workfl ow helps artists create better characters with more realistic
Autodesk announces what’s new in its 2011 versions of 3ds Max, Maya, Softimage and Mudbox
deformations, while a non-destructive retargeting workfl ow using Autodesk HumanIK 4.5 animation middleware libraries allows users to reuse, correct and enhance motion-capture and other animation data more effi ciently. Additionally, its 3D editorial capabilities will speed up pre-visualisation and virtual movie-making production.
Softimage 2011 for modelling, animation, visual effects and rendering also has a selection of enhancements, such as the Rendering Sandbox shader authoring environment that automatically hosts external shaders and renderers, and ICE kinematics to allow the user to drive the movement and behaviour of characters and scene elements. It also features the impressive Automatic Face Robot Lip Synching function to allow instant generation of facial animation based on an audio fi le. You’ll also fi nd a selection of up to 100 new ICE compounds to expand your range of effects, as well as a selection of nearly 100 new mental ray shaders for enhanced creativity.
Also in the 2011 line up, digital sculpting and texture painting software Mudbox brings the user the ability to deform and pose models quickly and easily, and access occluded regions to prepare them for map extraction. This year’s software also provides the option to selectively edit and manipulate existing paint- and photo-based layers with new image adjustment brushes and to transfer models and scene information between Mudbox and Maya 2011. New, too, is the function to extract maps using a Vector Displacement method and represent displacements that don’t simply
‘follow the norm’ (such as forms with appendages, undercuts, folds and bulges), as well as the power to import and export multiple layers in PSD fi les.
To stay on top of Autodesk’s latest product releases, visit http://area.autodesk.com.
New from Autodesk 2011 software
The industry is buzzing with talk of what’s new in the 2011 Autodesk software
deformations, while a non-destructive retargeting
100-101_3DA_15 Industry News.ind100 100 8/4/10 15:19:33
© Imagine Publishing Ltd No unauthorised copying or distribution
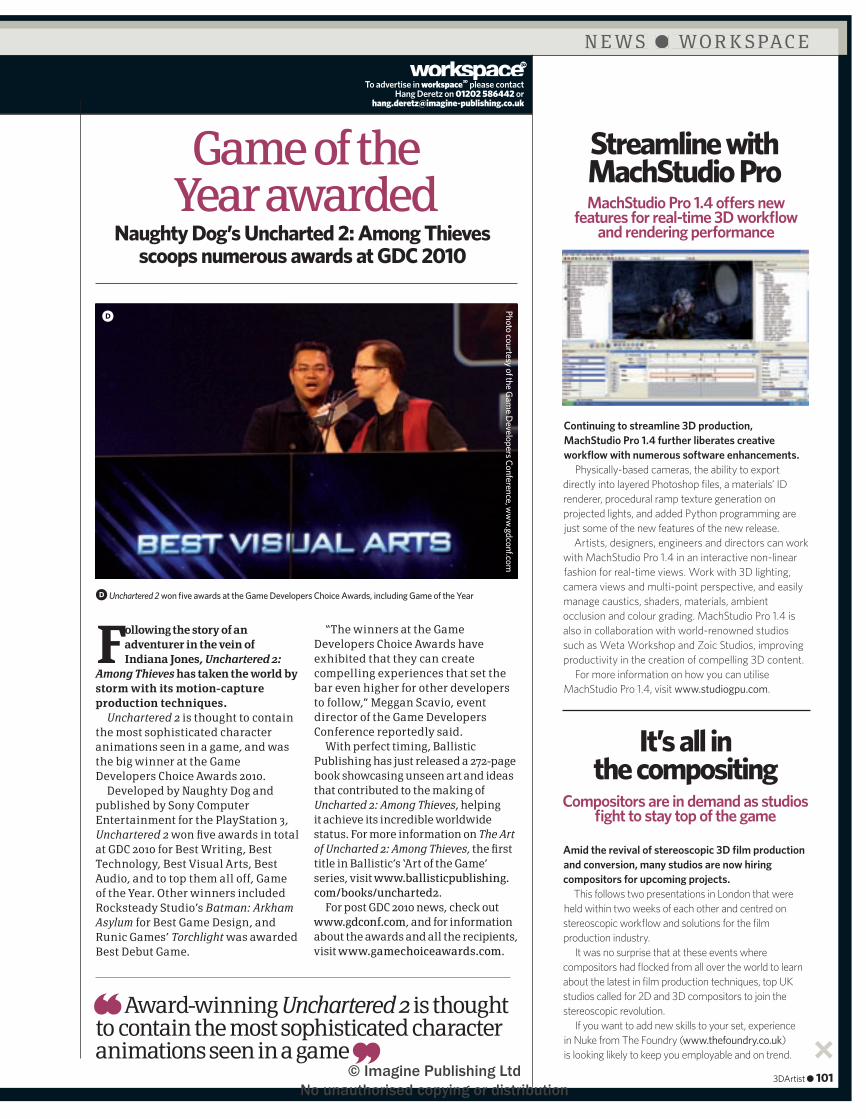
3DArtist ● 101
To advertise in workspace3D please contact Hang Deretz on 01202 586442 or
Streamline with MachStudio ProMachStudio Pro 1.4 o� ers new
features for real-time 3D workfl ow and rendering performance
It’s all in the compositing
Compositors are in demand as studios fi ght to stay top of the game
Amid the revival of stereoscopic 3D fi lm production and conversion, many studios are now hiring compositors for upcoming projects.
This follows two presentations in London that were held within two weeks of each other and centred on stereoscopic workfl ow and solutions for the fi lm production industry.
It was no surprise that at these events where compositors had fl ocked from all over the world to learn about the latest in fi lm production techniques, top UK studios called for 2D and 3D compositors to join the stereoscopic revolution.
If you want to add new skills to your set, experience in Nuke from The Foundry (www.thefoundry.co.uk) is looking likely to keep you employable and on trend.
Continuing to streamline 3D production, MachStudio Pro 1.4 further liberates creative workfl ow with numerous software enhancements.
Physically-based cameras, the ability to export directly into layered Photoshop fi les, a materials’ ID renderer, procedural ramp texture generation on projected lights, and added Python programming are just some of the new features of the new release.
Artists, designers, engineers and directors can work with MachStudio Pro 1.4 in an interactive non-linear fashion for real-time views. Work with 3D lighting, camera views and multi-point perspective, and easily manage caustics, shaders, materials, ambient occlusion and colour grading. MachStudio Pro 1.4 is also in collaboration with world-renowned studios such as Weta Workshop and Zoic Studios, improving productivity in the creation of compelling 3D content.
For more information on how you can utilise MachStudio Pro 1.4, visit www.studiogpu.com.
d Unchartered 2 won fi ve awards at the Game Developers Choice Awards, including Game of the Year
Following the story of an adventurer in the vein of Indiana Jones, Unchartered 2:
Among Thieves has taken the world by storm with its motion-capture production techniques.
Unchartered 2 is thought to contain the most sophisticated character animations seen in a game, and was the big winner at the Game Developers Choice Awards 2010.
Developed by Naughty Dog and published by Sony Computer Entertainment for the PlayStation 3, Unchartered 2 won fi ve awards in total at GDC 2010 for Best Writing, Best Technology, Best Visual Arts, Best Audio, and to top them all off, Game of the Year. Other winners included Rocksteady Studio’s Batman: Arkham Asylum for Best Game Design, and Runic Games’ Torchlight was awarded Best Debut Game.
Game of the Year awarded
Naughty Dog’s Uncharted 2: Among Thieves scoops numerous awards at GDC 2010
“The winners at the Game Developers Choice Awards have exhibited that they can create compelling experiences that set the bar even higher for other developers to follow,” Meggan Scavio, event director of the Game Developers Conference reportedly said.
With perfect timing, Ballistic Publishing has just released a 272-page book showcasing unseen art and ideas that contributed to the making of Uncharted 2: Among Thieves, helping it achieve its incredible worldwide status. For more information on The Art of Uncharted 2: Among Thieves, the fi rst title in Ballistic’s ‘Art of the Game’ series, visit www.ballisticpublishing.com/books/uncharted2.
For post GDC 2010 news, check out www.gdconf.com, and for information about the awards and all the recipients, visit www.gamechoiceawards.com.
Award-winning Unchartered 2 is thought to contain the most sophisticated character animations seen in a game
Photo courtesy of the Gam
e Developers Conference, w
ww
.gdconf.com
d
N E W S ● W O R K S PA C E
100-101_3DA_15 Industry News.ind101 101 8/4/10 15:19:53
© Imagine Publishing Ltd No unauthorised copying or distribution
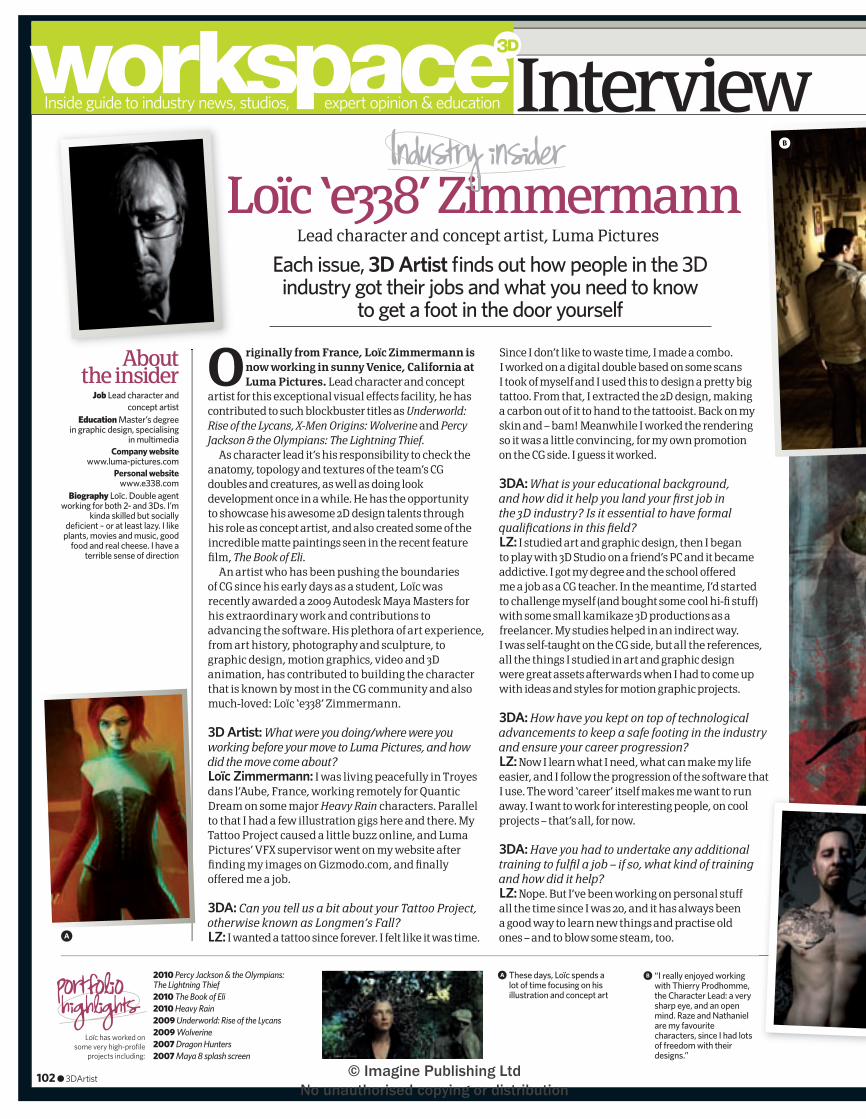
Inside guide to industry news, studios, expert opinion & education
Since I don’t like to waste time, I made a combo. I worked on a digital double based on some scans I took of myself and I used this to design a pretty big tattoo. From that, I extracted the 2D design, making a carbon out of it to hand to the tattooist. Back on my skin and – bam! Meanwhile I worked the rendering so it was a little convincing, for my own promotion on the CG side. I guess it worked.
3DA: What is your educational background, and how did it help you land your fi rst job in the 3D industry? Is it essential to have formal qualifi cations in this fi eld?LZ: I studied art and graphic design, then I began to play with 3D Studio on a friend’s PC and it became addictive. I got my degree and the school offered me a job as a CG teacher. In the meantime, I’d started to challenge myself (and bought some cool hi-fi stuff) with some small kamikaze 3D productions as a freelancer. My studies helped in an indirect way. I was self-taught on the CG side, but all the references, all the things I studied in art and graphic design were great assets afterwards when I had to come up with ideas and styles for motion graphic projects.
3DA: How have you kept on top of technological advancements to keep a safe footing in the industry and ensure your career progression? LZ: Now I learn what I need, what can make my life easier, and I follow the progression of the software that I use. The word ‘career’ itself makes me want to run away. I want to work for interesting people, on cool projects – that’s all, for now.
3DA: Have you had to undertake any additional training to fulfi l a job – if so, what kind of training and how did it help? LZ: Nope. But I’ve been working on personal stuff all the time since I was 20, and it has always been a good way to learn new things and practise old ones – and to blow some steam, too.
2010 Percy Jackson & the Olympians: The Lightning Thief2010 The Book of Eli2010 Heavy Rain2009 Underworld: Rise of the Lycans2009 Wolverine2007 Dragon Hunters2007 Maya 8 splash screen
Loïc has worked on some very high-profi le
projects including:
102 ● 3DArtist
Each issue, 3D Artist fi nds out how people in the 3D industry got their jobs and what you need to know
to get a foot in the door yourself
Loïc ‘e338’ ZimmermannLoïc ‘e338’ ZimmermannLead character and concept artist, Luma Pictures
Job Lead character and concept artist
Education Master’s degree in graphic design, specialising
in multimediaCompany website
www.luma-pictures.comPersonal website
www.e338.comBiography Loïc. Double agent
working for both 2- and 3Ds. I’m kinda skilled but socially
defi cient – or at least lazy. I like plants, movies and music, good
food and real cheese. I have a terrible sense of direction
About the insider
Loïc ‘e338’ Zimmermann
About
a
a These days, Loïc spends a lot of time focusing on his illustration and concept art
Originally from France, Loïc Zimmermann is now working in sunny Venice, California at Luma Pictures. Lead character and concept
artist for this exceptional visual effects facility, he has contributed to such blockbuster titles as Underworld: Rise of the Lycans, X-Men Origins: Wolverine and Percy Jackson & the Olympians: The Lightning Thief.
As character lead it’s his responsibility to check the anatomy, topology and textures of the team’s CG doubles and creatures, as well as doing look development once in a while. He has the opportunity to showcase his awesome 2D design talents through his role as concept artist, and also created some of the incredible matte paintings seen in the recent feature fi lm, The Book of Eli.
An artist who has been pushing the boundaries of CG since his early days as a student, Loïc was recently awarded a 2009 Autodesk Maya Masters for his extraordinary work and contributions to advancing the software. His plethora of art experience, from art history, photography and sculpture, to graphic design, motion graphics, video and 3D animation, has contributed to building the character that is known by most in the CG community and also much-loved: Loïc ‘e338’ Zimmermann.
3D Artist: What were you doing/where were you working before your move to Luma Pictures, and how did the move come about?Loïc Zimmermann: I was living peacefully in Troyes dans l’Aube, France, working remotely for Quantic Dream on some major Heavy Rain characters. Parallel to that I had a few illustration gigs here and there. My Tattoo Project caused a little buzz online, and Luma Pictures’ VFX supervisor went on my website after fi nding my images on Gizmodo.com, and fi nally offered me a job.
3DA: Can you tell us a bit about your Tattoo Project, otherwise known as Longmen’s Fall? LZ: I wanted a tattoo since forever. I felt like it was time.
Interview
B “I really enjoyed working with Thierry Prodhomme, the Character Lead: a very sharp eye, and an open mind. Raze and Nathaniel are my favourite characters, since I had lots of freedom with their designs.”
b
102-103_3DA_15 Industry Insider.102 102 8/4/10 15:20:53
© Imagine Publishing Ltd No unauthorised copying or distribution
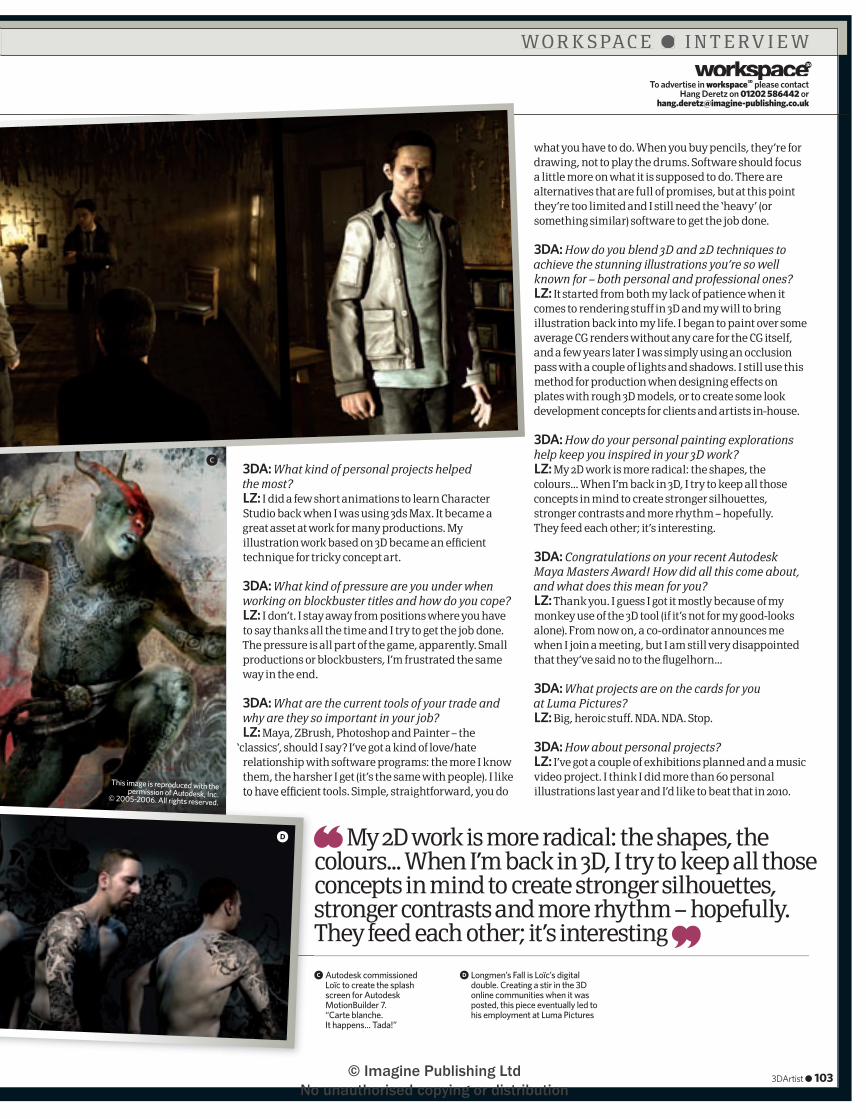
To advertise in workspace3D please contact Hang Deretz on 01202 586442 or
W O R K S PA C E ● I N T E R V I E W
3DArtist ● 103
c Autodesk commissioned Loïc to create the splash screen for Autodesk MotionBuilder 7. “Carte blanche. It happens... Tada!”
d Longmen’s Fall is Loïc’s digital double. Creating a stir in the 3D online communities when it was posted, this piece eventually led to his employment at Luma Pictures
3DA: What kind of personal projects helped the most? LZ: I did a few short animations to learn Character Studio back when I was using 3ds Max. It became a great asset at work for many productions. My illustration work based on 3D became an effi cient technique for tricky concept art.
3DA: What kind of pressure are you under when working on blockbuster titles and how do you cope? LZ: I don’t. I stay away from positions where you have to say thanks all the time and I try to get the job done. The pressure is all part of the game, apparently. Small productions or blockbusters, I’m frustrated the same way in the end.
3DA: What are the current tools of your trade and why are they so important in your job? LZ: Maya, ZBrush, Photoshop and Painter – the
‘classics’, should I say? I’ve got a kind of love/hate relationship with software programs: the more I know them, the harsher I get (it’s the same with people). I like to have effi cient tools. Simple, straightforward, you do
what you have to do. When you buy pencils, they’re for drawing, not to play the drums. Software should focus a little more on what it is supposed to do. There are alternatives that are full of promises, but at this point they’re too limited and I still need the ‘heavy’ (or something similar) software to get the job done.
3DA: How do you blend 3D and 2D techniques to achieve the stunning illustrations you’re so well known for – both personal and professional ones? LZ: It started from both my lack of patience when it comes to rendering stuff in 3D and my will to bring illustration back into my life. I began to paint over some average CG renders without any care for the CG itself, and a few years later I was simply using an occlusion pass with a couple of lights and shadows. I still use this method for production when designing effects on plates with rough 3D models, or to create some look development concepts for clients and artists in-house.
3DA: How do your personal painting explorations help keep you inspired in your 3D work? LZ: My 2D work is more radical: the shapes, the colours... When I’m back in 3D, I try to keep all those concepts in mind to create stronger silhouettes, stronger contrasts and more rhythm – hopefully. They feed each other; it’s interesting.
3DA: Congratulations on your recent Autodesk Maya Masters Award! How did all this come about, and what does this mean for you? LZ: Thank you. I guess I got it mostly because of my monkey use of the 3D tool (if it’s not for my good-looks alone). From now on, a co-ordinator announces me when I join a meeting, but I am still very disappointed that they’ve said no to the fl ugelhorn...
3DA: What projects are on the cards for you at Luma Pictures? LZ: Big, heroic stuff. NDA. NDA. Stop.
3DA: How about personal projects? LZ: I’ve got a couple of exhibitions planned and a music video project. I think I did more than 60 personal illustrations last year and I’d like to beat that in 2010.to have effi cient tools. Simple, straightforward, you do
Interview
My 2D work is more radical: the shapes, the colours... When I’m back in 3D, I try to keep all those concepts in mind to create stronger silhouettes, stronger contrasts and more rhythm – hopefully. They feed each other; it’s interesting
This image is reproduced with the permission of Autodesk, Inc. © 2005-2006. All rights reserved.
c
d
102-103_3DA_15 Industry Insider.103 103 8/4/10 15:21:13
© Imagine Publishing Ltd No unauthorised copying or distribution
Inside guide to industry news, studios, expert opinion & education Uni focus
104 ● 3DArtist
Gnomon School of Visual Effects
The best courses and freshest talent from universities around the globe…
Course detailsName Entertainment DesignLength One yearFees $14,000 US
Name Digital Production for EntertainmentLength Two yearsFees $66,075 US
Name Combined Entertainment Design and Digital Production for EntertainmentLength Three yearsFees $81,075 US
ENTRY REQUIREMENTSA portfolio is a course prerequisite. It isn’t necessary that the student has learned CG before, or necessarily comes from an art education background, but the student must be able to show artistic skills/talent and demonstrate dedication to the fi eld of study
A leading digital entertainment production school, Gnomon has trained many of the world’s best artists
Hollywood-based Gnomon School of Visual Effects has been training artists in
digital production for over a decade. Focusing entirely on digital entertainment production, students are taught a curriculum that has been developed by top-level industry professionals, giving them a specialised education laser-focused on their chosen fi eld of study.
Courses are all taught by working professionals in the industry who bring their invaluable experiences to the classroom. Instructors include such impressive names as Dylan Cole, David Levy, Iain McCaig, Ben Procter, Aaron Sims and Feng Zhu – all who have world-renowned credits.
Teaching industry-proven curriculum right at the heart of the entertainment industry itself, students receive hands-on training at Gnomon’s innovative facilities from professionals working on the latest blockbusters. But it is the artists who drive the results, many of whom have gone on to work on world-famous movies and games themselves.
The result of the school’s dedication to giving the next generation of production artists the best career start is, in fact,
a 90 per cent job placement rate within three months of graduation.
Gnomon offers various course options at the visual effects school, including full-time programmes in Entertainment Design, Digital Production for Entertainment, and a Combined Entertainment Design and Digital Production for Entertainment course. Since full-time study is not suitable for everyone, there are also options for students to take part-time courses, individual classes on campus, or study online – all taught by current industry professionals.
Entertainment Design is a one-year full-time programme. Laying the foundations for students looking to learn the fundamentals of entertainment-specifi c art, this course teaches students how to draw and storyboard to a high level of profi ciency.
Gnomon’s fl agship programme is the two-year, full-time Digital Production for Entertainment course. Offering two years of intensive CG training, students on this programme have the option to specialise in modelling and texturing, character animation, visual effects animation or 3D generalist studies. With this being such an intensive course, upon graduation students are prepared to work in real-world production.
A recent addition to Gnomon’s course offerings, the Combined Entertainment Design and Digital Production for
Teaching industry-proven curriculum right at the heart of the entertainment industry itself, students receive hands-on training at Gnomon’s innovative facilities from professionals working on the latest blockbusters
Entertainment programme was created for artists who lack a strong fi ne art background but still want a successful career in the CG industry. Spanning three years in total, the fi rst year is dedicated to foundational studies and the following two years move on to teaching the more comprehensive high-rend CG skills for digital production.
Though to the onlooker, the course prices may seem steep, comparing the tuition fees to other US institutions offering computer animation programmes should reveal the value of Gnomon’s training. For more information about Gnomon’s courses, instructors and to read about alumni success stories, visit www.gnomonschool.com.
104-105_3DA_15 Student.indd 104 8/4/10 15:22:05
© Imagine Publishing Ltd No unauthorised copying or distribution
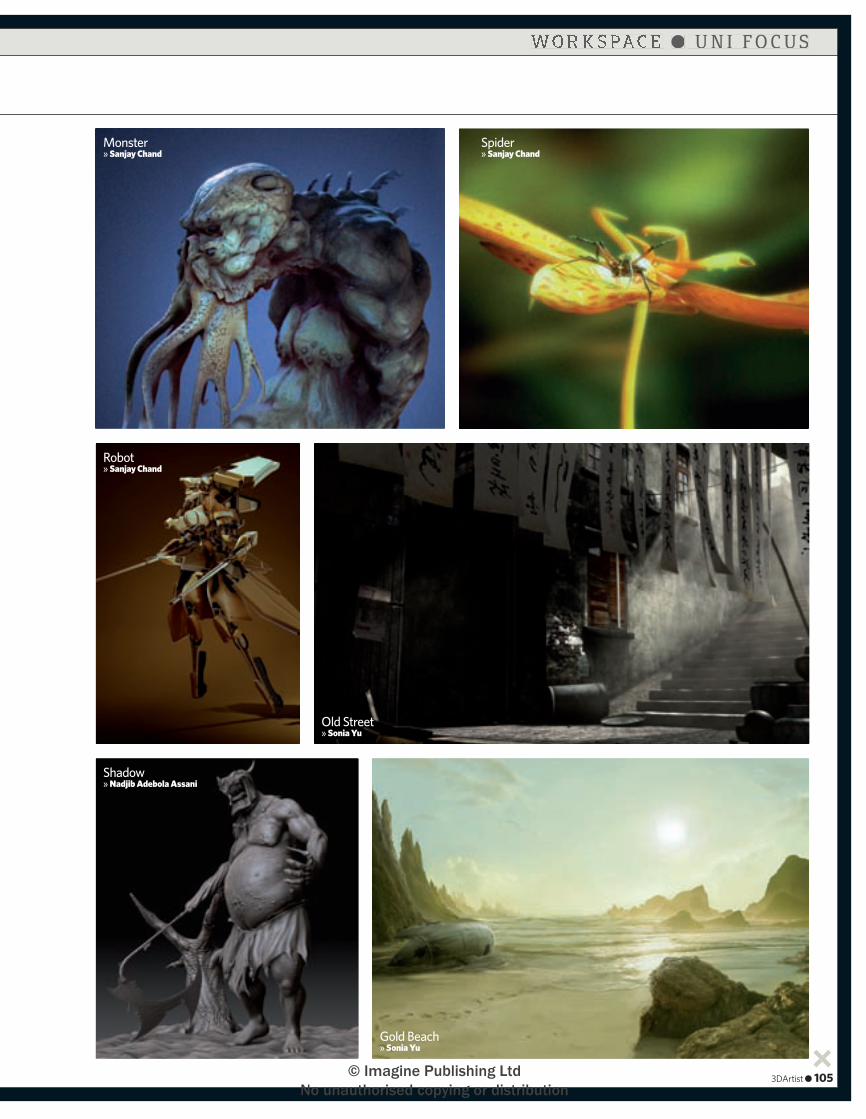
Uni focus
3DArtist ● 105
Monster » Sanjay Chand
Robot » Sanjay Chand
Old Street » Sonia Yu
Shadow » Nadjib Adebola Assani
Gold Beach » Sonia Yu
Spider » Sanjay Chand
W O R K S PA C E ● U N I F O C U S
104-105_3DA_15 Student.indd 105 8/4/10 15:22:22
© Imagine Publishing Ltd No unauthorised copying or distribution
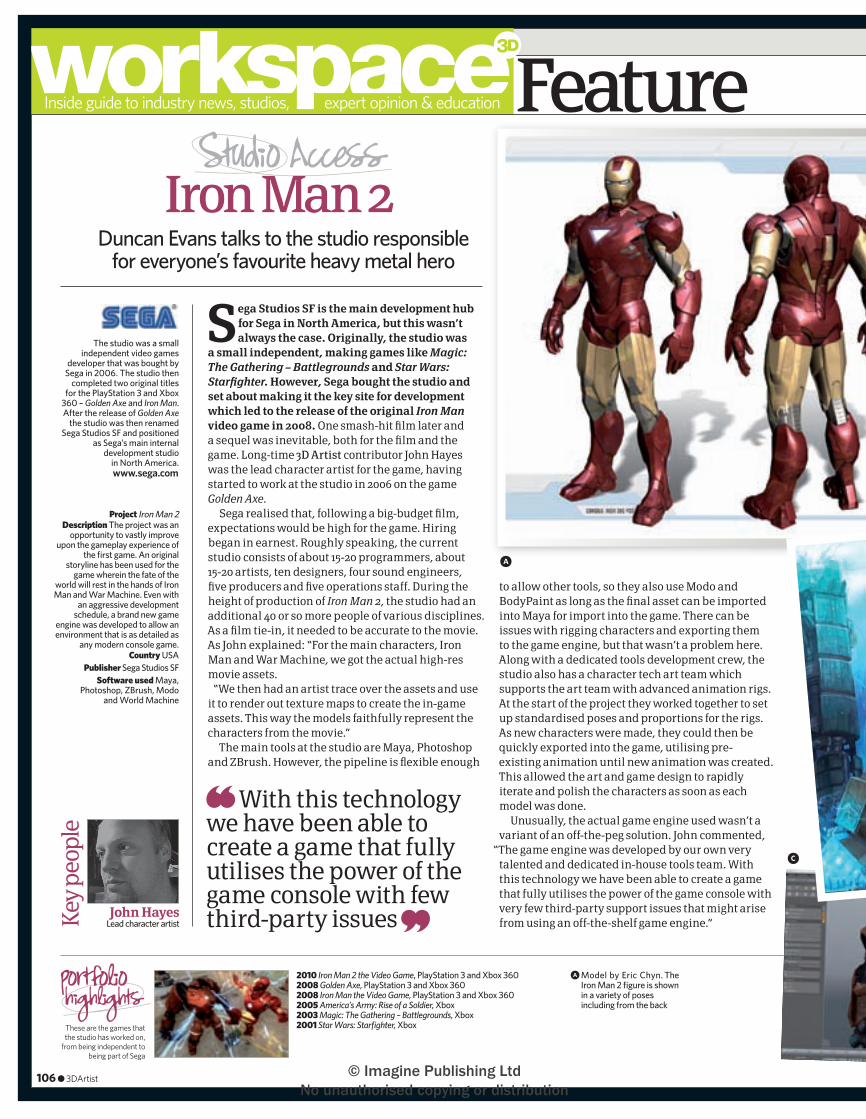
Inside guide to industry news, studios, expert opinion & education
With this technology we have been able to create a game that fully utilises the power of the game console with few third-party issues
Sega Studios SF is the main development hub for Sega in North America, but this wasn’t always the case. Originally, the studio was
a small independent, making games like Magic: The Gathering – Battlegrounds and Star Wars: Starfi ghter. However, Sega bought the studio and set about making it the key site for development which led to the release of the original Iron Man video game in 2008. One smash-hit fi lm later and a sequel was inevitable, both for the fi lm and the game. Long-time 3D Artist contributor John Hayes was the lead character artist for the game, having started to work at the studio in 2006 on the game Golden Axe.
Sega realised that, following a big-budget fi lm, expectations would be high for the game. Hiring began in earnest. Roughly speaking, the current studio consists of about 15-20 programmers, about 15-20 artists, ten designers, four sound engineers, fi ve producers and fi ve operations staff. During the height of production of Iron Man 2, the studio had an additional 40 or so more people of various disciplines. As a fi lm tie-in, it needed to be accurate to the movie. As John explained: “For the main characters, Iron Man and War Machine, we got the actual high-res movie assets.
“We then had an artist trace over the assets and use it to render out texture maps to create the in-game assets. This way the models faithfully represent the characters from the movie.”
The main tools at the studio are Maya, Photoshop and ZBrush. However, the pipeline is fl exible enough
to allow other tools, so they also use Modo and BodyPaint as long as the fi nal asset can be imported into Maya for import into the game. There can be issues with rigging characters and exporting them to the game engine, but that wasn’t a problem here. Along with a dedicated tools development crew, the studio also has a character tech art team which supports the art team with advanced animation rigs. At the start of the project they worked together to set up standardised poses and proportions for the rigs. As new characters were made, they could then be quickly exported into the game, utilising pre-existing animation until new animation was created. This allowed the art and game design to rapidly iterate and polish the characters as soon as each model was done.
Unusually, the actual game engine used wasn’t a variant of an off-the-peg solution. John commented,
“The game engine was developed by our own very talented and dedicated in-house tools team. With this technology we have been able to create a game that fully utilises the power of the game console with very few third-party support issues that might arise from using an off-the-shelf game engine.”
Feature
These are the games that the studio has worked on,
from being independent to being part of Sega
106 ● 3DArtist
Duncan Evans talks to the studio responsible for everyone’s favourite heavy metal hero
Iron Man 2
The studio was a small independent video games
developer that was bought by Sega in 2006. The studio then
completed two original titles for the PlayStation 3 and Xbox
360 – Golden Axe and Iron Man. After the release of Golden Axe
the studio was then renamed Sega Studios SF and positioned
as Sega’s main internal development studio
in North America.
Project Iron Man 2Description The project was an
opportunity to vastly improve upon the gameplay experience of
the fi rst game. An original storyline has been used for the
game wherein the fate of the world will rest in the hands of Iron Man and War Machine. Even with
an aggressive development schedule, a brand new game
engine was developed to allow an environment that is as detailed as
any modern console game. Country USA
Publisher Sega Studios SFSoftware used Maya,
Photoshop, ZBrush, Modo and World Machine
Key
peop
le
www.sega.com
2010 Iron Man 2 the Video Game, PlayStation 3 and Xbox 3602008 Golden Axe, PlayStation 3 and Xbox 3602008 Iron Man the Video Game, PlayStation 3 and Xbox 3602005 America’s Army: Rise of a Soldier, Xbox2003 Magic: The Gathering – Battlegrounds, Xbox2001 Star Wars: Starfi ghter, Xbox
A
John HayesLead character artist
a Model by Eric Chyn. The Iron Man 2 fi gure is shown in a variety of poses including from the back
c
106-107_3DA_15 Studio Access.ind106 106 8/4/10 15:23:12
© Imagine Publishing Ltd No unauthorised copying or distribution
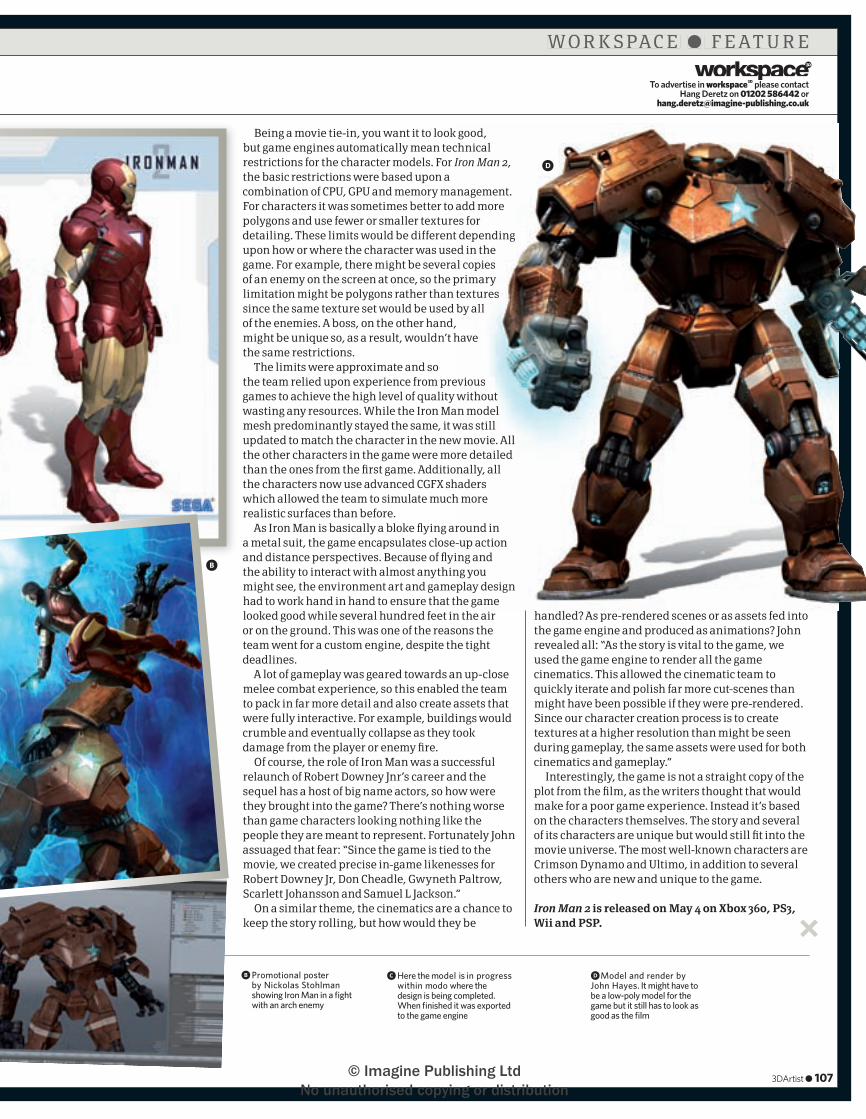
Being a movie tie-in, you want it to look good, but game engines automatically mean technical restrictions for the character models. For Iron Man 2, the basic restrictions were based upon a combination of CPU, GPU and memory management. For characters it was sometimes better to add more polygons and use fewer or smaller textures for detailing. These limits would be different depending upon how or where the character was used in the game. For example, there might be several copies of an enemy on the screen at once, so the primary limitation might be polygons rather than textures since the same texture set would be used by all of the enemies. A boss, on the other hand, might be unique so, as a result, wouldn’t have the same restrictions.
The limits were approximate and so the team relied upon experience from previous games to achieve the high level of quality without wasting any resources. While the Iron Man model mesh predominantly stayed the same, it was still updated to match the character in the new movie. All the other characters in the game were more detailed than the ones from the fi rst game. Additionally, all the characters now use advanced CGFX shaders which allowed the team to simulate much more realistic surfaces than before.
As Iron Man is basically a bloke fl ying around in a metal suit, the game encapsulates close-up action and distance perspectives. Because of fl ying and the ability to interact with almost anything you might see, the environment art and gameplay design had to work hand in hand to ensure that the game looked good while several hundred feet in the air or on the ground. This was one of the reasons the team went for a custom engine, despite the tight deadlines.
A lot of gameplay was geared towards an up-close melee combat experience, so this enabled the team to pack in far more detail and also create assets that were fully interactive. For example, buildings would crumble and eventually collapse as they took damage from the player or enemy fi re.
Of course, the role of Iron Man was a successful relaunch of Robert Downey Jnr’s career and the sequel has a host of big name actors, so how were they brought into the game? There’s nothing worse than game characters looking nothing like the people they are meant to represent. Fortunately John assuaged that fear: “Since the game is tied to the movie, we created precise in-game likenesses for Robert Downey Jr, Don Cheadle, Gwyneth Paltrow, Scarlett Johansson and Samuel L Jackson.”
On a similar theme, the cinematics are a chance to keep the story rolling, but how would they be
handled? As pre-rendered scenes or as assets fed into the game engine and produced as animations? John revealed all: “As the story is vital to the game, we used the game engine to render all the game cinematics. This allowed the cinematic team to quickly iterate and polish far more cut-scenes than might have been possible if they were pre-rendered. Since our character creation process is to create textures at a higher resolution than might be seen during gameplay, the same assets were used for both cinematics and gameplay.”
Interestingly, the game is not a straight copy of the plot from the fi lm, as the writers thought that would make for a poor game experience. Instead it’s based on the characters themselves. The story and several of its characters are unique but would still fi t into the movie universe. The most well-known characters are Crimson Dynamo and Ultimo, in addition to several others who are new and unique to the game.
Iron Man 2 is released on May 4 on Xbox 360, PS3, Wii and PSP.
3DArtist ● 107
b Promotional poster by Nickolas Stohlman showing Iron Man in a fi ght with an arch enemy
c Here the model is in progress within modo where the design is being completed. When fi nished it was exported to the game engine
d Model and render by John Hayes. It might have to be a low-poly model for the game but it still has to look as good as the fi lm
To advertise in workspace3D please contact Hang Deretz on 01202 586442 or
b
d
W O R K S PA C E ● F E A T U R E
106-107_3DA_15 Studio Access.ind107 107 8/4/10 16:28:51
© Imagine Publishing Ltd No unauthorised copying or distribution

Requ
irem
ents
: App
le iP
hone
3G
, 3Gs
, iPod
Touc
h or
iPad
>>
iPho
ne 3
.1.2
or h
ighe
r >>
an In
tern
et co
nnec
tion
iTUNES SEARCH: 3D ARTIST iTUNES SEARCH: RETRO GAMER iTUNES SEARCH: DIGITAL ARTIST MAGAZINE iTUNES SEARCH: GAMES TM
ITUNES SEARCH: PHOTO FOR BEGINNERS
iTUNES SEARCH: 360 MAGAZINE
Everythingyou love about mags but nowin digital form
& yoursforever!
iTUNES SEARCH: ICREATE
iTUNES SEARCH: X360
iTUNES SEARCH: PHOTOSHOP CREATIVE iTUNES SEARCH: SCIFINOW

iTUNES SEARCH: ADVANCED PHOTOSHOP iTUNES SEARCH: WEB DESIGNER iTUNES SEARCH: HOW IT WORKS iTUNES SEARCH: LINUXUSER
iTUNES SEARCH: TOTAL 911 iTUNES SEARCH: PHOTOGRAPHER iTUNES SEARCH: PLAY MAGAZINE iTUNES SEARCH: SMARTPHONE ESSENTIALS
Your favourite magazines now on iPad & iPhone
Download now from the iTunes App Store
Download direct to your iPhone or iPad
Once downloaded, you do not need an Internet connection to enjoy
Subscribe for 6 or 12 months
Pages are flickable, zoomable and viewed in either widescreen or portrait format
Purchase individual issues Share it with your friends
iTUNES SEARCH: GO RUN
New: The latest video game cheats and tips
iTUNES SEARCH: CHEATS & TIPS
For Xbox 360 guides:XBOX 360 Cheats & Tips
For Playstation 3 guides:PS3 Cheats & Tips
Guides for all consoles: PowerStation
iTUNES SEARCH: CHEATS & TIPS
iTUNES SEARCH: POWERSTATION
New: Digital-only magazine for runners of all abilities
Whether you want to run to lose weight, get fit or meet personal goals, this app has everything you need to know
Related Documents