30.625" CLOSET CORNER KIT 77,78 CM ENSEMBLE DE COIN POUR GARDE-ROBE KIT DE ARMARIO DE ESQUINA DE 77,78 CM Model Number(s): Numéro(s) de modèle : Número de modelo: ASSEMBLY & INSTALLATION INSTRUCTIONS • INSTRUCTIONS POUR L’ASSEMBLAGE ET L’INSTALLATION • INSTRUCCIONES DE ENSAMBLAJE E INSTALACIÓN TOOLS NEEDED FOR ASSEMBLY OUTILS NÉCESSAIRES POUR L’ASSEMBLAGE HERRAMIENTAS NECESARIAS PARA EL ENSAMBLAJE TOOLS NOT INCLUDED OUTILS NON INCLUS NO INCLUYE HERRAMIENTAS STUD FINDER DÉTECTEUR DE MONTANTS DETECTOR DE VIGAS BEFORE BEGINNING ASSEMBLY – Read directions thoroughly – Assemble near desired location – Familiarize yourself with all parts (see hardware list) and check quantities – Select the hardware appropriate for wall installation (not provided) AVANT DE COMMENCER L’ASSEMBLAGE – Lisez attentivement les instructions. – Assemblez l’article près de l’endroit voulu. – Familiarisez-vous avec toutes les pièces (voir la liste de la quincaillerie) et vérifiez les quantités. – Choisissez la quincaillerie appropriée pour l’installation au mur (non incluse) ANTES DE EMPEZAR A ENSAMBLAR EL PRODUCTO – Lea todas las instrucciones completamente. – Ensamble el producto cerca de la ubicación deseada. – Familiarícese con todas las piezas (consulte la lista de aditamentos) y verifique las cantidades. – Seleccione los aditamentos adecuados para la instalación en la pared (no se incluyen) U180238 / 0615 CLCRK27SW

Welcome message from author
This document is posted to help you gain knowledge. Please leave a comment to let me know what you think about it! Share it to your friends and learn new things together.
Transcript
30.625" CLOSET CORNER KIT77,78 CM ENSEMBLE DE COIN POUR GARDE-ROBE
KIT DE ARMARIO DE ESQUINA DE 77,78 CM
ROTATION1) 25° LEFT2) 8° DOWN3) SET TO PERPECTIVE VIEW
CLCRK27SW
COVER SHEET
Model Number(s):Numéro(s) de modèle :Número de modelo:
ASSEMBLY & INSTALLATION INSTRUCTIONS • INSTRUCTIONS POUR L’ASSEMBLAGE ET L’INSTALLATION • INSTRUCCIONES DE ENSAMBLAJE E INSTALACIÓN
TOOLS NEEDED FOR ASSEMBLYOUTILS NÉCESSAIRES POUR L’ASSEMBLAGE
HERRAMIENTAS NECESARIAS PARA EL ENSAMBLAJE
TOOLS NOT INCLUDEDOUTILS NON INCLUSNO INCLUYE HERRAMIENTAS
STUD FINDERDÉTECTEUR DE MONTANTSDETECTOR DE VIGAS
BEFORE BEGINNING ASSEMBLY– Read directions thoroughly– Assemble near desired location– Familiarize yourself with all
parts (see hardware list) and check quantities
– Select the hardware appropriate for wall installation (not provided)
AVANT DE COMMENCER L’ASSEMBLAGE– Lisez attentivement les instructions.– Assemblez l’article près
de l’endroit voulu.– Familiarisez-vous avec toutes
les pièces (voir la liste de la quincaillerie) et vérifiez les quantités.
– Choisissez la quincaillerie appropriée pour l’installation au mur (non incluse)
ANTES DE EMPEZAR A ENSAMBLAR EL PRODUCTO– Lea todas las instrucciones
completamente.– Ensamble el producto cerca de
la ubicación deseada.– Familiarícese con todas las piezas
(consulte la lista de aditamentos) y verifique las cantidades.
– Seleccione los aditamentos adecuados para la instalación en la pared (no se incluyen)
U180238 / 0615
CLCRK27SW
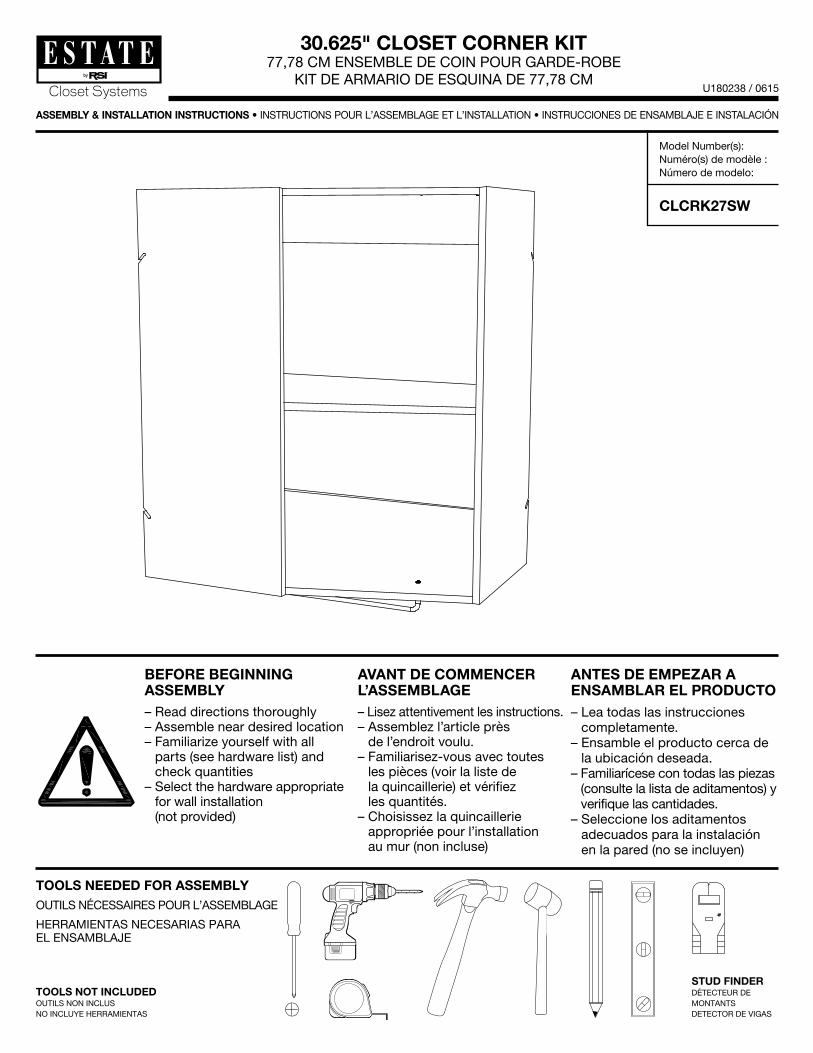
HELPFUL TIPS • CONSEILS PRATIQUES • CONSEJOS PRÁCTICOS
DO NOT RETURN PRODUCT TO THE STORE! If you have any problems or missing parts, please contact our parts department at the number provided.
NE RETOURNEZ PAS LE PRODUIT AU DÉTAILLANT! En cas de problèmes ou de pièces manquantes, communiquez avec notre service des pièces au numéro indiqué.
NO DEVUELVA ESTE PRODUCTO A LA TIENDA. Si tiene algún problema o si falta alguna pieza, póngase en contacto con el departamento de partes al número indicado.
INSTALLING CAM LOCKS (t)Align the arrow toward the outside edge of the panel and insert; the lock sits flush with the surface of the panel. Join the panels, then turn the cam lock clockwise. Cam is considered “locked” when tight (usually between the 2 and 4 o’clock positions).
INSTALLATION DES ATTACHES CAMLOC (t) Orientez la flèche en direction du rebord extérieur du panneau et insérez l’attache de manière à ce qu’elle soit de niveau avec la surface du panneau. Assemblez les panneaux, puis tournez l’attache Camloc dans le sens des aiguilles d’une montre. L’attache est considérée comme « verrouillée » lorsqu’elle est bien serrée (habituellement entre l’endroit où se trouve le 2 et celui où se trouve le 4 sur une horloge).
CÓMO INSTALAR LOS CERROJOS DE LEVA (t) Alinee la flecha hacia el borde exterior del panel e insértelo, el cerrojo se asienta y se alinea con la superficie del panel. Una los paneles. A continuación, gire el cerrojo en sentido horario. Se considera que el cerrojo queda “fijo” cuando queda apretado (generalmente entre las posiciones de las horas 2 y 4 en punto).
MIN LOCKED VERROUILLÉE FIJOMAX
t
Turn inner barrel of cam lock clockwise.
Tournez la tige intérieure de l’attache Camloc dans le sens des aiguilles d’une montre.
Gire el barril interior del cerrojo de leva e n sentido horario.
Position cam lock as shown above. Ensure straight edge of cam lock is flush with edge of panel (top).
Placez les attaches Camloc dans la position illustrée ci-dessus. Assurez-vous que le bord droit de l’attache Camloc est de niveau avec le bord du panneau (en haut).
Posicione el cerrojo de leva como se muestra más arriba. Asegúrese de que el borde recto del cerrojo de leva esté alineado con el borde del panel (superior).
Once cam lock is in correct position, use mallet to install cam lock.
Une fois que l’attache Camloc est dans la bonne position, utilisez un maillet pour l’insérer.
Una vez que el cerrojo de leva está en la posición correcta utilice un mazo para instalar el cerrojo de leva.
f
INSTALLING CAM LOCKS (f)Align the arrow toward the outside edge of the panel and insert; the lock sits flush with the surface of the panel. Join the panels, then turn the cam lock clockwise. Cam is considered “locked” when tight (usually between the 2 and 4 o’clock positions).
INSTALLATION DES ATTACHES CAMLOC (f)Orientez la flèche en direction du rebord extérieur du panneau et insérez l’attache de manière à ce qu’elle soit de niveau avec la surface du panneau. Assemblez les panneaux, puis tournez l’attache Camloc dans le sens des aiguilles d’une montre. L’attache est considérée comme « verrouillée » lorsqu’elle est bien serrée (habituellement entre l’endroit où se trouve le 2 et celui où se trouve le 4 sur une horloge).
CÓMO INSTALAR LOS CERROJOS DE LEVA (f) Alinee la flecha hacia el borde exterior del panel e insértelo, el cerrojo se asienta y se alinea con la superficie del panel. Una los paneles. A continuación, gire el cerrojo en sentido horario. Se considera que el cerrojo queda “fijo” cuando queda apretado (generalmente entre las posiciones de las horas 2 y 4 en punto).
TO CALL FROM THE UNITED STATES:
888-774-80626AM-4PM PST MONDAY-FRIDAY
PARA LLAMAR DE MEXICO: 001-714-578-2525
6AM-4PM PST LUNES-VIERNES
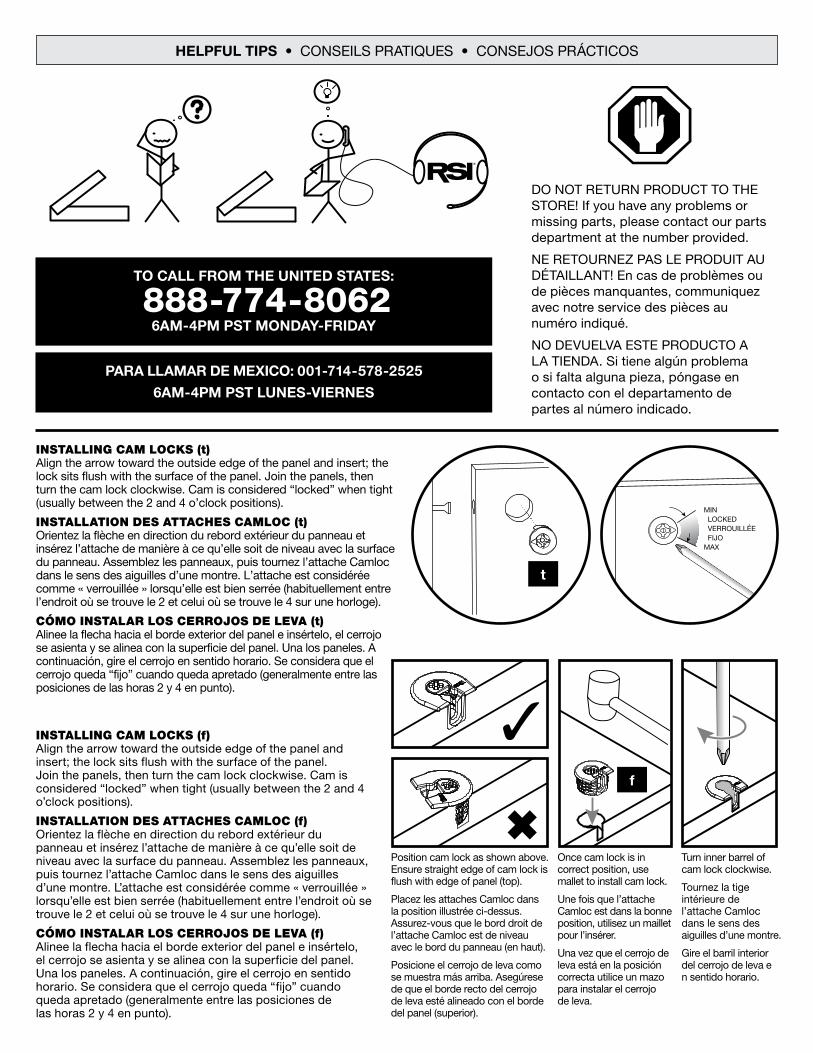
WALL MOUNT HANG RAIL(QTY. 2)
TRAVERSE DE FIXATION MURALE (QTÉ 2) RIEL PARA COLGAR PARA MONTAJE
EN LA PARED (CANT. 2)
UNDERMOUNT HANG ROD(QTY. 1)
TRAVERSE À MONTAGE (QTÉ 1) RIEL DE MONTAJE INFERIOR (CANT. 1)
SHELF PIN(QTY. 6)
TAQUET POUR ÉTAGÈRE (QTÉ 6) GANCHO PARA ESTANTE (CANT. 6)
WOOD DOWEL(QTY. 3)
GOUJON EN BOIS (QTÉ 3) ESPIGA DE MADERA (CANT. 3)
PLASTIC DOWEL(QTY. 16)
GOUJON EN PLASTIQUE (QTÉ 16) ESPIGAS DE PLÁSTICO (CANT. 16)
CAM BOLT(QTY. 16)
VIS CAMLOC (QTÉ 16) PERNO DE LEVA (CANT. 16)
CAM LOCK(QTY. 16)
ATTACHE CAMLOC (QTÉ 16) CERROJO DE LEVA (CANT. 16)
#8-32 x 1" SCREW(QTY. 2)
VIS N° 8 DE 1 PO (QTÉ 2) TORNILLO #20,32 CM X 2,54 CM (CANT. 2)
PARTS • PIÈCES • PIEZAS
SIDE PANEL(QTY. 3)
PANNEAU LATÉRAL (QTÉ 3) PANEL LATERAL (CANT. 3)
SHELF(QTY. 1)
TABLETTE (QTÉ 1) REPISA (CANT. 1)
HANG RAIL(QTY. 2)
TRAVERSE (QTÉ 2) RIEL PARA COLGAR (CANT. 2)
TOP/BOTTOM PANEL(QTY. 2)
PANNEAUX SUPÉRIEUR (QTÉ 2) PANELESS SUPERIOR E INFERIOR (CANT. 2)
HARDWARE • QUINCAILLERIE • ADITAMENTOS
UNDERMOUNT CLOTHING RODSCALE 1:2
R23421SHELF PINSCALE 1:1
a
g
b
h
A
c
B
d
C
e f
D
CORN
ER C
ABIN
ETTO
P/BO
TTO
M P
ANEL
CORNER SHELFCORNER RAIL U360315
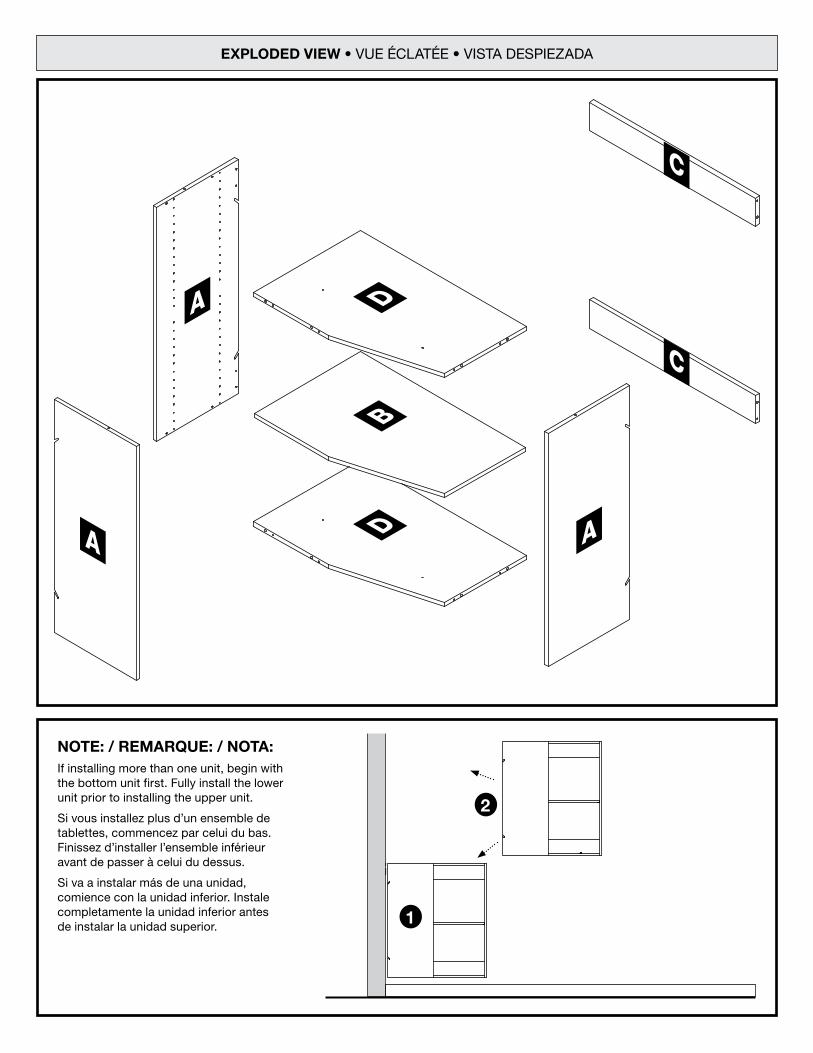
NOTE: / REMARQUE: / NOTA:If installing more than one unit, begin with the bottom unit first. Fully install the lower unit prior to installing the upper unit.
Si vous installez plus d’un ensemble de tablettes, commencez par celui du bas. Finissez d’installer l’ensemble inférieur avant de passer à celui du dessus.
Si va a instalar más de una unidad, comience con la unidad inferior. Instale completamente la unidad inferior antes de instalar la unidad superior.
1
2
EXPLODED VIEW
EXPLODED VIEW • VUE ÉCLATÉE • VISTA DESPIEZADA
A
A
D
B
DA
C
C
SIDE PNL & CAM BOLTS
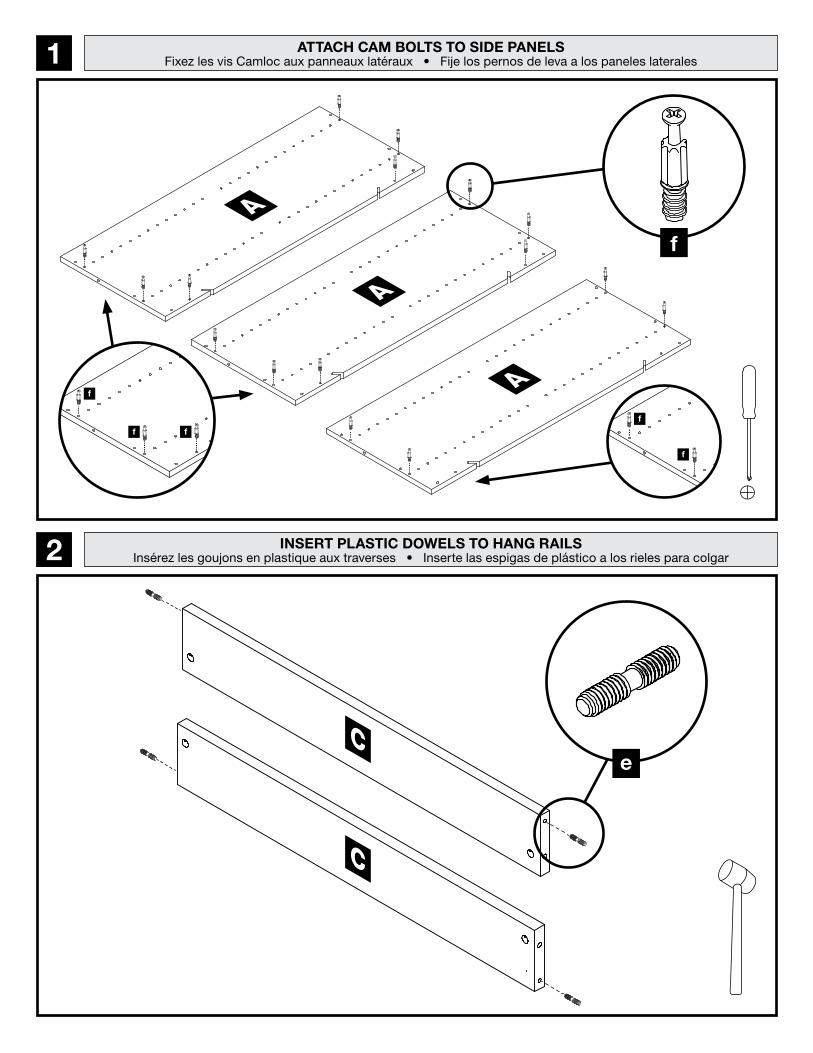
ATTACH CAM BOLTS TO SIDE PANELSFixez les vis Camloc aux panneaux latéraux • Fije los pernos de leva a los paneles laterales1
A
A
A
f
INSERT PLASTIC DOWELS TO HANG RAILSInsérez les goujons en plastique aux traverses • Inserte las espigas de plástico a los rieles para colgar2
HANG RAIL & DOWELS
HANG RAIL & DOWELS
eC
C
SIDE PNL & CAM BOLTS
SIDE PNL & CAM BOLTS
f
f ff
f
HANG RAIL & SIDE PNL
C
CA
TOP & BOT PNL & DOWELS
D
TOP & BOT PNL & DOWELS
D
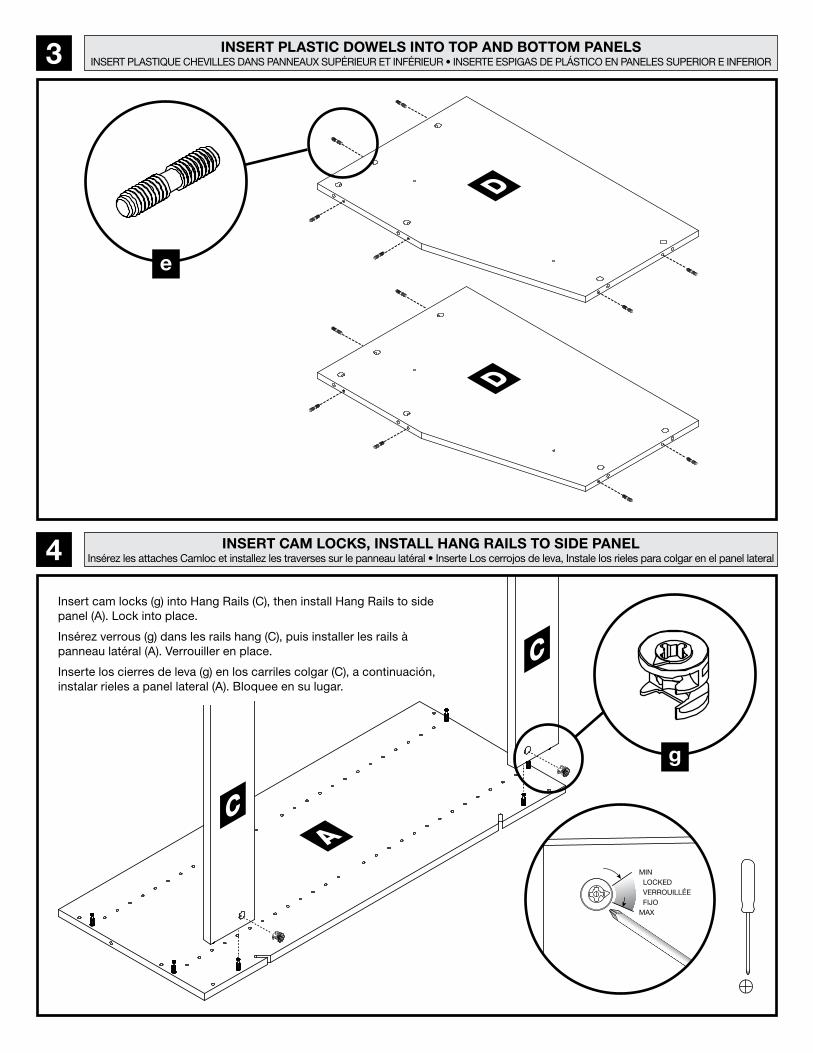
3 INSERT PLASTIC DOWELS INTO TOP AND BOTTOM PANELSINSERT PLASTIQUE CHEVILLES DANS PANNEAUX SUPÉRIEUR ET INFÉRIEUR • INSERTE ESPIGAS DE PLÁSTICO EN PANELES SUPERIOR E INFERIOR
INSERT CAM LOCKS, INSTALL HANG RAILS TO SIDE PANELInsérez les attaches Camloc et installez les traverses sur le panneau latéral • Inserte Los cerrojos de leva, Instale los rieles para colgar en el panel lateral4
Insert cam locks (g) into Hang Rails (C), then install Hang Rails to side panel (A). Lock into place.
Insérez verrous (g) dans les rails hang (C), puis installer les rails à panneau latéral (A). Verrouiller en place.
Inserte los cierres de leva (g) en los carriles colgar (C), a continuación, instalar rieles a panel lateral (A). Bloquee en su lugar.
g
e
MIN LOCKED VERROUILLÉE FIJOMAX
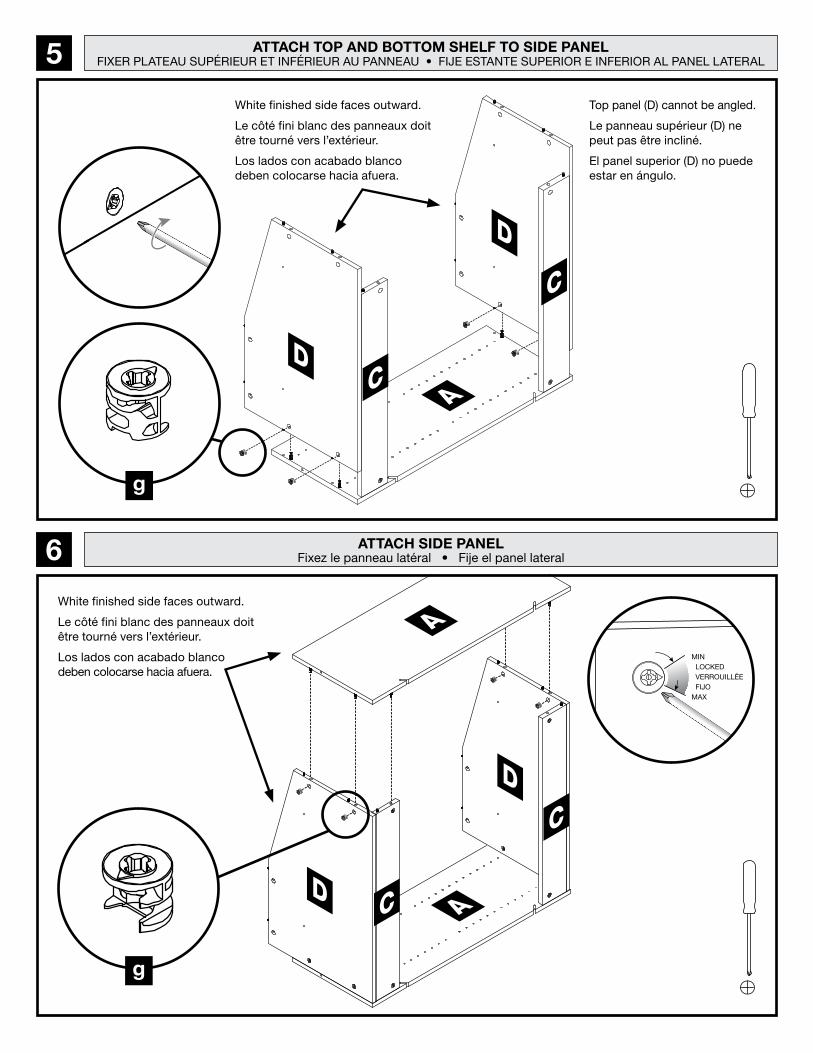
ATTACH TOP AND BOTTOM SHELF TO SIDE PANELFIXER PLATEAU SUPÉRIEUR ET INFÉRIEUR AU PANNEAU • FIJE ESTANTE SUPERIOR E INFERIOR AL PANEL LATERAL5
TOP & BOT PNL TO HANG RAILS
AC
C
D
D
Top panel (D) cannot be angled.
Le panneau supérieur (D) ne peut pas être incliné.
El panel superior (D) no puede estar en ángulo.
g
SIDE PNL TO TOP & BOT PNL_HRS
A
AC
C
D
D
g
ATTACH SIDE PANELFixez le panneau latéral • Fije el panel lateral6
White finished side faces outward.
Le côté fini blanc des panneaux doit être tourné vers l’extérieur.
Los lados con acabado blanco deben colocarse hacia afuera.
White finished side faces outward.
Le côté fini blanc des panneaux doit être tourné vers l’extérieur.
Los lados con acabado blanco deben colocarse hacia afuera.
MIN LOCKED VERROUILLÉE FIJOMAX
FRONT SIDE PNL
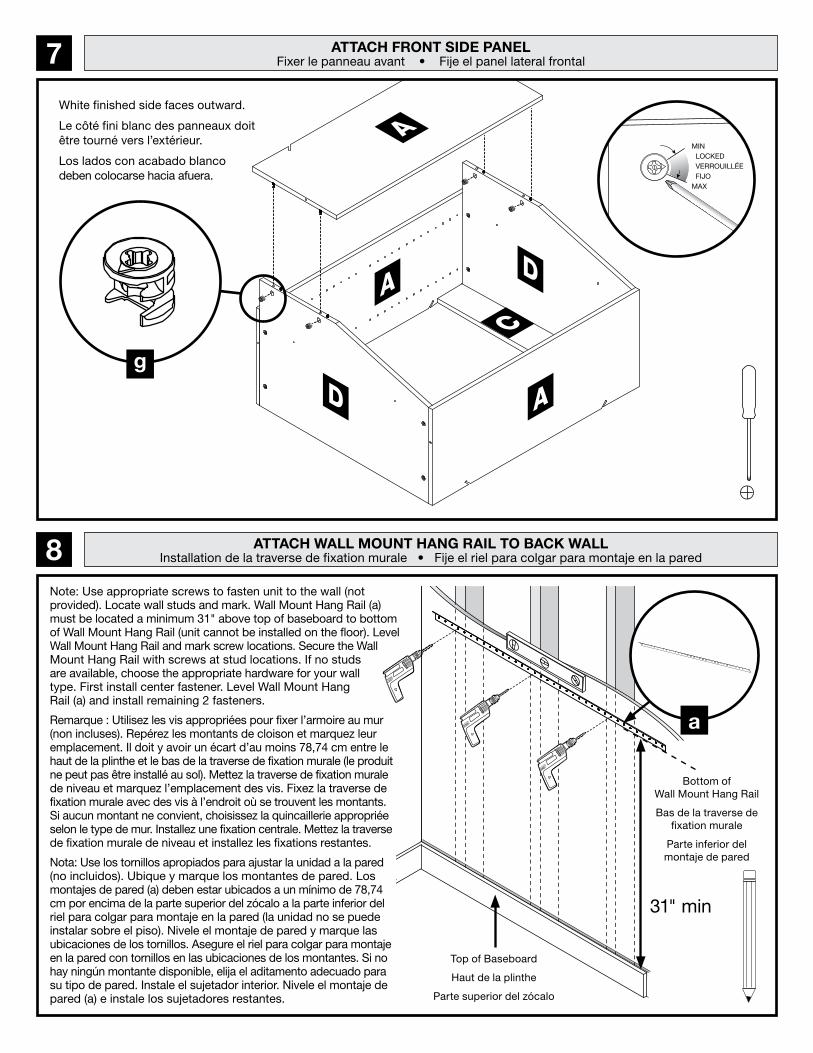
ATTACH FRONT SIDE PANELFixer le panneau avant • Fije el panel lateral frontal7
g
White finished side faces outward.
Le côté fini blanc des panneaux doit être tourné vers l’extérieur.
Los lados con acabado blanco deben colocarse hacia afuera.
A
A
D
D
C
A
31" min
Bottom of Wall Mount Hang Rail
Bas de la traverse de fixation murale
Parte inferior del montaje de pared
Top of Baseboard
Haut de la plinthe
Parte superior del zócalo
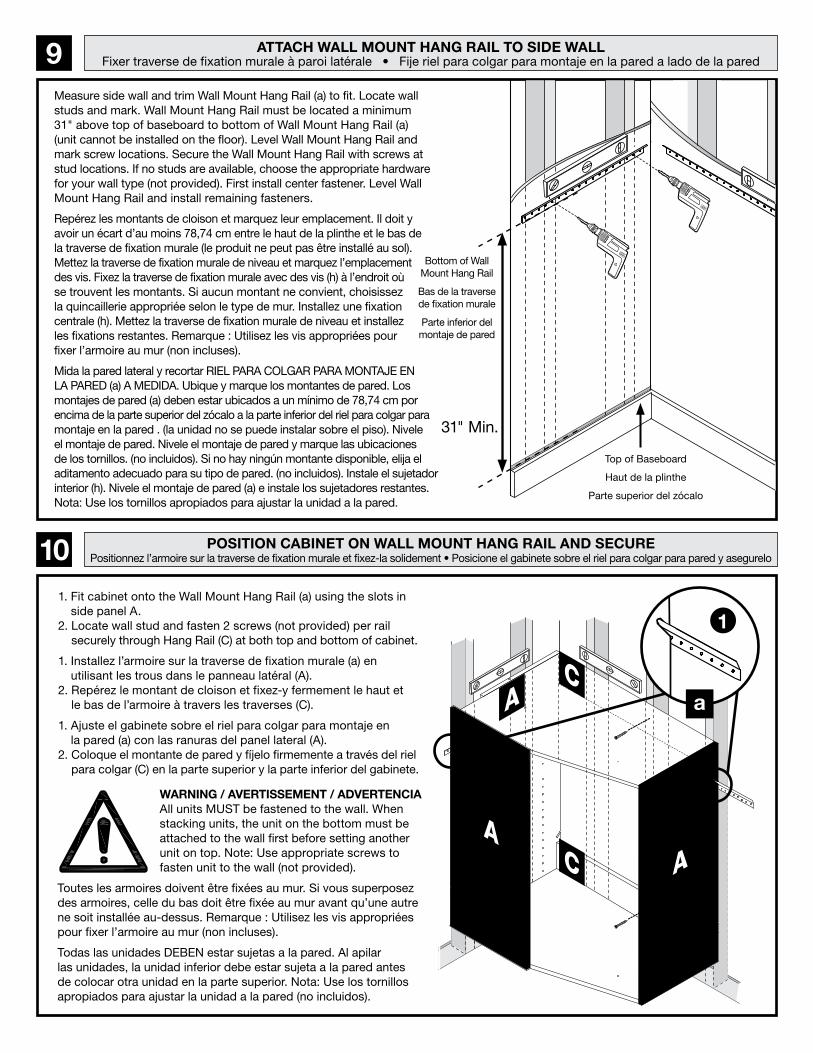
ATTACH WALL MOUNT HANG RAIL TO BACK WALLInstallation de la traverse de fixation murale • Fije el riel para colgar para montaje en la pared8
Note: Use appropriate screws to fasten unit to the wall (not provided). Locate wall studs and mark. Wall Mount Hang Rail (a) must be located a minimum 31" above top of baseboard to bottom of Wall Mount Hang Rail (unit cannot be installed on the floor). Level Wall Mount Hang Rail and mark screw locations. Secure the Wall Mount Hang Rail with screws at stud locations. If no studs are available, choose the appropriate hardware for your wall type. First install center fastener. Level Wall Mount Hang Rail (a) and install remaining 2 fasteners.
Remarque : Utilisez les vis appropriées pour fixer l’armoire au mur (non incluses). Repérez les montants de cloison et marquez leur emplacement. Il doit y avoir un écart d’au moins 78,74 cm entre le haut de la plinthe et le bas de la traverse de fixation murale (le produit ne peut pas être installé au sol). Mettez la traverse de fixation murale de niveau et marquez l’emplacement des vis. Fixez la traverse de fixation murale avec des vis à l’endroit où se trouvent les montants. Si aucun montant ne convient, choisissez la quincaillerie appropriée selon le type de mur. Installez une fixation centrale. Mettez la traverse de fixation murale de niveau et installez les fixations restantes.
Nota: Use los tornillos apropiados para ajustar la unidad a la pared (no incluidos). Ubique y marque los montantes de pared. Los montajes de pared (a) deben estar ubicados a un mínimo de 78,74 cm por encima de la parte superior del zócalo a la parte inferior del riel para colgar para montaje en la pared (la unidad no se puede instalar sobre el piso). Nivele el montaje de pared y marque las ubicaciones de los tornillos. Asegure el riel para colgar para montaje en la pared con tornillos en las ubicaciones de los montantes. Si no hay ningún montante disponible, elija el aditamento adecuado para su tipo de pared. Instale el sujetador interior. Nivele el montaje de pared (a) e instale los sujetadores restantes.
a
MIN LOCKED VERROUILLÉE FIJOMAX
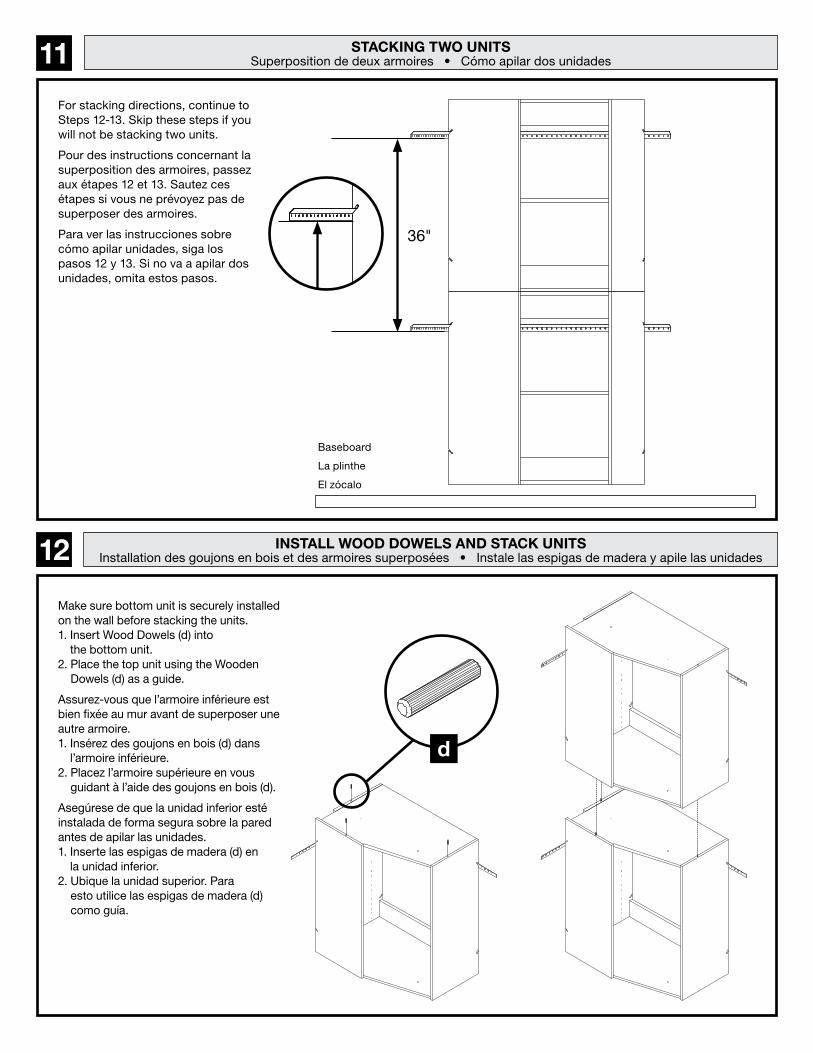
ATTACH WALL MOUNT HANG RAIL TO SIDE WALLFixer traverse de fixation murale à paroi latérale • Fije riel para colgar para montaje en la pared a lado de la pared9
Measure side wall and trim Wall Mount Hang Rail (a) to fit. Locate wall studs and mark. Wall Mount Hang Rail must be located a minimum 31" above top of baseboard to bottom of Wall Mount Hang Rail (a) (unit cannot be installed on the floor). Level Wall Mount Hang Rail and mark screw locations. Secure the Wall Mount Hang Rail with screws at stud locations. If no studs are available, choose the appropriate hardware for your wall type (not provided). First install center fastener. Level Wall Mount Hang Rail and install remaining fasteners.
Repérez les montants de cloison et marquez leur emplacement. Il doit y avoir un écart d’au moins 78,74 cm entre le haut de la plinthe et le bas de la traverse de fixation murale (le produit ne peut pas être installé au sol). Mettez la traverse de fixation murale de niveau et marquez l’emplacement des vis. Fixez la traverse de fixation murale avec des vis (h) à l’endroit où se trouvent les montants. Si aucun montant ne convient, choisissez la quincaillerie appropriée selon le type de mur. Installez une fixation centrale (h). Mettez la traverse de fixation murale de niveau et installez les fixations restantes. Remarque : Utilisez les vis appropriées pour fixer l’armoire au mur (non incluses).
Mida la pared lateral y recortar RIEL PARA COLGAR PARA MONTAJE EN LA PARED (a) A MEDIDA. Ubique y marque los montantes de pared. Los montajes de pared (a) deben estar ubicados a un mínimo de 78,74 cm por encima de la parte superior del zócalo a la parte inferior del riel para colgar para montaje en la pared . (la unidad no se puede instalar sobre el piso). Nivele el montaje de pared. Nivele el montaje de pared y marque las ubicaciones de los tornillos. (no incluidos). Si no hay ningún montante disponible, elija el aditamento adecuado para su tipo de pared. (no incluidos). Instale el sujetador interior (h). Nivele el montaje de pared (a) e instale los sujetadores restantes. Nota: Use los tornillos apropiados para ajustar la unidad a la pared.
31" Min.
Top of Baseboard
Haut de la plinthe
Parte superior del zócalo
POSITION CABINET ON WALL MOUNT HANG RAIL AND SECUREPositionnez l’armoire sur la traverse de fixation murale et fixez-la solidement • Posicione el gabinete sobre el riel para colgar para pared y asegurelo10
a
11. Fit cabinet onto the Wall Mount Hang Rail (a) using the slots in
side panel A.2. Locate wall stud and fasten 2 screws (not provided) per rail
securely through Hang Rail (C) at both top and bottom of cabinet.
1. Installez l’armoire sur la traverse de fixation murale (a) en utilisant les trous dans le panneau latéral (A).
2. Repérez le montant de cloison et fixez-y fermement le haut et le bas de l’armoire à travers les traverses (C).
1. Ajuste el gabinete sobre el riel para colgar para montaje en la pared (a) con las ranuras del panel lateral (A).
2. Coloque el montante de pared y fíjelo firmemente a través del riel para colgar (C) en la parte superior y la parte inferior del gabinete.
A
C
C A
A
WARNING / AVERTISSEMENT / ADVERTENCIAAll units MUST be fastened to the wall. When stacking units, the unit on the bottom must be attached to the wall first before setting another unit on top. Note: Use appropriate screws to fasten unit to the wall (not provided).
Toutes les armoires doivent être fixées au mur. Si vous superposez des armoires, celle du bas doit être fixée au mur avant qu’une autre ne soit installée au-dessus. Remarque : Utilisez les vis appropriées pour fixer l’armoire au mur (non incluses).
Todas las unidades DEBEN estar sujetas a la pared. Al apilar las unidades, la unidad inferior debe estar sujeta a la pared antes de colocar otra unidad en la parte superior. Nota: Use los tornillos apropiados para ajustar la unidad a la pared (no incluidos).
Bottom of Wall Mount Hang Rail
Bas de la traverse de fixation murale
Parte inferior del montaje de pared
ROTATED AT 10° AS THE OTHERSROTATED AT 25°
STACKING TWO UNITSSuperposition de deux armoires • Cómo apilar dos unidades11
ROTATED AT 10° AS THE OTHERSROTATED AT 25°
For stacking directions, continue to Steps 12-13. Skip these steps if you will not be stacking two units.
Pour des instructions concernant la superposition des armoires, passez aux étapes 12 et 13. Sautez ces étapes si vous ne prévoyez pas de superposer des armoires.
Para ver las instrucciones sobre cómo apilar unidades, siga los pasos 12 y 13. Si no va a apilar dos unidades, omita estos pasos.
Baseboard
La plinthe
El zócalo
INSTALL WOOD DOWELS AND STACK UNITSInstallation des goujons en bois et des armoires superposées • Instale las espigas de madera y apile las unidades12
Make sure bottom unit is securely installed on the wall before stacking the units.1. Insert Wood Dowels (d) into
the bottom unit.2. Place the top unit using the Wooden
Dowels (d) as a guide.
Assurez-vous que l’armoire inférieure est bien fixée au mur avant de superposer une autre armoire.1. Insérez des goujons en bois (d) dans
l’armoire inférieure.2. Placez l’armoire supérieure en vous
guidant à l’aide des goujons en bois (d).
Asegúrese de que la unidad inferior esté instalada de forma segura sobre la pared antes de apilar las unidades.1. Inserte las espigas de madera (d) en
la unidad inferior.2. Ubique la unidad superior. Para
esto utilice las espigas de madera (d) como guía.
d
36"
SHELF PINS
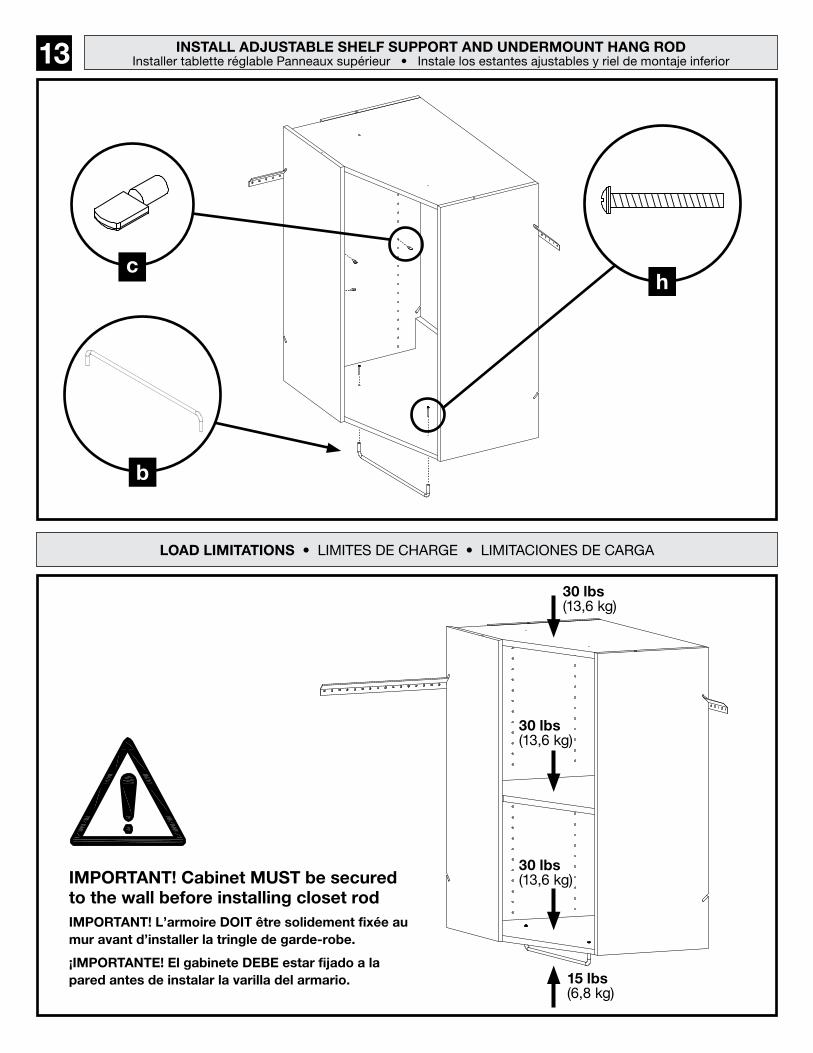
INSTALL ADJUSTABLE SHELF SUPPORT AND UNDERMOUNT HANG RODInstaller tablette réglable Panneaux supérieur • Instale los estantes ajustables y riel de montaje inferior13
R23421SHELF PINSCALE 1:1
ch
UNDERMOUNT CLOTHING RODSCALE 1:2
b
LOAD LIMITATIONS • LIMITES DE CHARGE • LIMITACIONES DE CARGA
30 lbs(13,6 kg)
30 lbs(13,6 kg)
30 lbs(13,6 kg)
15 lbs(6,8 kg)
IMPORTANT! Cabinet MUST be secured to the wall before installing closet rod IMPORTANT! L’armoire DOIT être solidement fixée au mur avant d’installer la tringle de garde-robe.
¡IMPORTANTE! El gabinete DEBE estar fijado a la pared antes de instalar la varilla del armario.
Related Documents


![1.1 Definición de PNL - ...elmayorportaldegerencia.com/Documentos/PNL/[PD] Documentos - PN… · Modulo I: Principios de la PNL U1-1 Diplomado PNL 1.1 Definición de PNL La PNL es](https://static.cupdf.com/doc/110x72/5a71fded7f8b9a9d538d4988/11-definicin-de-pnl-wwwelmayorportaldegerenciacom-elmayorportaldegerenciacomdocumentospnlpd.jpg)