UTO Training | Case Management 1 © Arizona State University. All rights reserved. V6 Welcome to ASU Connections Case Management Training Technical Assistance email: [email protected] Salesforce: https://asu.my.salesforce.com Salesforce Sandbox (practice): http://links.asu.edu/uatsandbox Online Training: http://links.asu.edu/sftraining Contents Welcome to ASU Connections Case Management Training ....................................................................... 1 Introduction .................................................................................................................................................. 3 What is Case Management? ......................................................................................................................... 3 Key Terms...................................................................................................................................................... 4 Service Console ............................................................................................................................................. 5 Search for a Contact Record ......................................................................................................................... 5 Creating New Cases ...................................................................................................................................... 7 My ASU Service Center (Student View) .................................................................................................... 7 Manually Create a New Case .................................................................................................................... 8 Collaborate (@Mention) ..................................................................................................................... 10 Send an Email ...................................................................................................................................... 11 Transferring Cases....................................................................................................................................... 12 Transfer the Case to a User in your Functional Group ........................................................................... 12 Transfer to A Different Category within Your Functional Group ............................................................ 13 Transfer a Case to a Different Functional Group .................................................................................... 15 Forward to Another Department Not Using ASU Connections .............................................................. 17 Working the Case List View......................................................................................................................... 18 Taking Ownership of a Case .................................................................................................................... 18 To Open and View a Case ....................................................................................................................... 18 Contact Details vs. Case Details .............................................................................................................. 18 Case Details ......................................................................................................................................... 19 Contact Details .................................................................................................................................... 20 Case Feed ............................................................................................................................................ 20 Reassign the Case to a Contact ............................................................................................................... 21 Reply to an Email .................................................................................................................................... 22 Resolve a Case......................................................................................................................................... 24

Contents · Welcome to ASU Connections Case Management Training. Technical Assistance email: [email protected]. Salesforce: .
Jul 14, 2018
Welcome message from author
This document is posted to help you gain knowledge. Please leave a comment to let me know what you think about it! Share it to your friends and learn new things together.
Transcript
UTO Training | Case Management
1 © Arizona State University. All rights reserved. V6
Welcome to ASU Connections Case Management Training Technical Assistance email: [email protected] Salesforce: https://asu.my.salesforce.com Salesforce Sandbox (practice): http://links.asu.edu/uatsandbox Online Training: http://links.asu.edu/sftraining Contents
Welcome to ASU Connections Case Management Training ....................................................................... 1
Introduction .................................................................................................................................................. 3
What is Case Management? ......................................................................................................................... 3
Key Terms ...................................................................................................................................................... 4
Service Console ............................................................................................................................................. 5
Search for a Contact Record ......................................................................................................................... 5
Creating New Cases ...................................................................................................................................... 7
My ASU Service Center (Student View) .................................................................................................... 7
Manually Create a New Case .................................................................................................................... 8
Collaborate (@Mention) ..................................................................................................................... 10
Send an Email ...................................................................................................................................... 11
Transferring Cases ....................................................................................................................................... 12
Transfer the Case to a User in your Functional Group ........................................................................... 12
Transfer to A Different Category within Your Functional Group ............................................................ 13
Transfer a Case to a Different Functional Group .................................................................................... 15
Forward to Another Department Not Using ASU Connections .............................................................. 17
Working the Case List View ......................................................................................................................... 18
Taking Ownership of a Case .................................................................................................................... 18
To Open and View a Case ....................................................................................................................... 18
Contact Details vs. Case Details .............................................................................................................. 18
Case Details ......................................................................................................................................... 19
Contact Details .................................................................................................................................... 20
Case Feed ............................................................................................................................................ 20
Reassign the Case to a Contact ............................................................................................................... 21
Reply to an Email .................................................................................................................................... 22
Resolve a Case ......................................................................................................................................... 24
UTO Training | Case Management
2 © Arizona State University. All rights reserved. V6
Manage Contact Records ............................................................................................................................ 25
Creating a New Contact Record .............................................................................................................. 26
About Chatter ............................................................................................................................................. 27
Following People ..................................................................................................................................... 28
Mentioning People .................................................................................................................................. 29
Groups ..................................................................................................................................................... 29
My Profile & Settings .................................................................................................................................. 30
Updating My Profile ................................................................................................................................ 30
Adding a Photo .................................................................................................................................... 30
Updating My Settings .............................................................................................................................. 31
Update Sender Email address ............................................................................................................. 31
Manage your Chatter notifications ..................................................................................................... 33
Additional Resources .................................................................................................................................. 34
Reopen a Case ......................................................................................................................................... 34
Create your own list of cases .................................................................................................................. 35
How to Run a Report .............................................................................................................................. 37
How to View a Dashboard ...................................................................................................................... 39
How to Modify & Customize an Existing Report ................................................................................. 40
How to log into Salesforce Production with ASU Single Sign-On (SSO) .................................................. 43
UTO Training | Case Management
3 © Arizona State University. All rights reserved. V6
Introduction Salesforce is a cloud-based system which users can integrate their business processes allowing automated functionality. This functionality can assist in reducing workloads and enabling an increased focus on customer service. It provides a central location to manage student prospects and all communication to and from the student.
The goal of the ASU Connections implementation as a part of a service initiative to provide students with enhanced support from the time they become a prospective student through their years as alumni. Everyone that helps students will have access to a student’s contact record and be able to see a list of cases they have opened, as well as a history associated with the student’s record.
What is Case Management? Salesforce Case Management offers us:
• Centralized information on current and past requests for service within or external to our unit.
• It allows us to create workflow rules for automated routing, so that the sharing of information is done behind the scenes as opposed to having students walk or call from office to office, person to person.
• Allows us to create cases and track how our resources are being used. We can now easily quantify the amount of service being provided via email or phone or web or walk-ins.
• There is accountability for us to provide timely and accurate resolution to issues and allow the students to give us feedback on the experience.
• Collaboration - this is a big one. Being able to interact with others across your department or ASU on that student’s case, consolidating the back and forth email trail, escalating issues, assigning to the right person, and outcome
UTO Training | Case Management
4 © Arizona State University. All rights reserved. V6
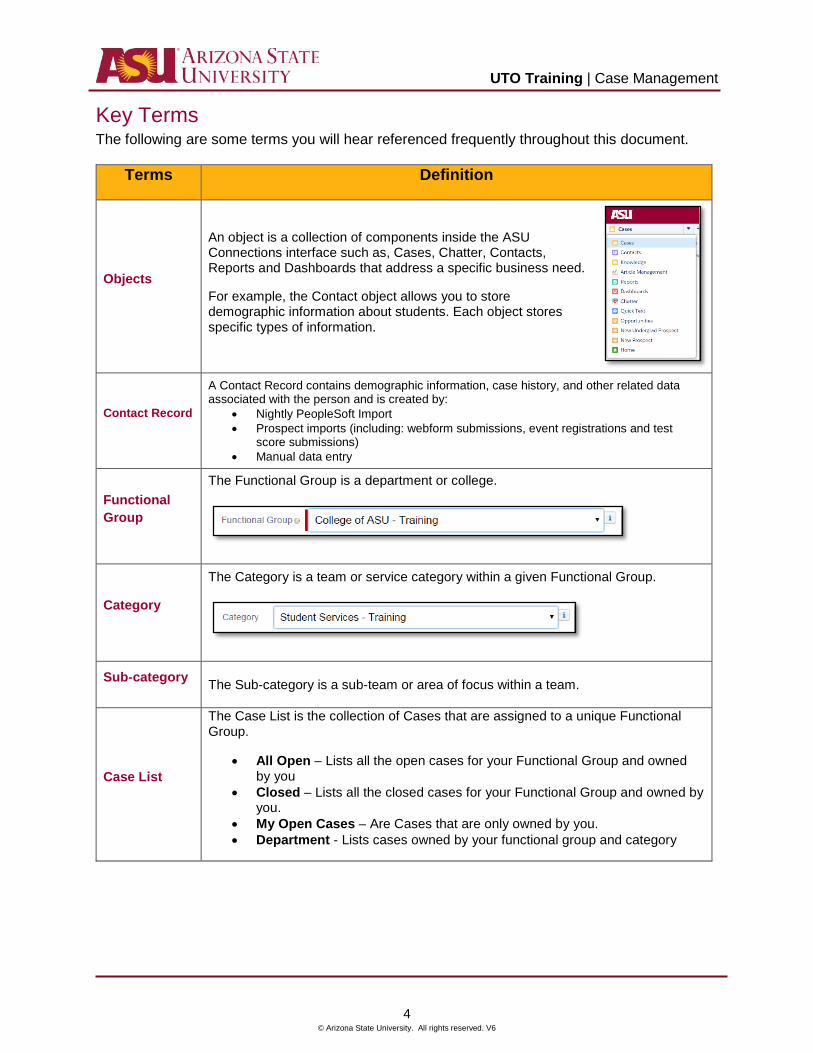
Key Terms The following are some terms you will hear referenced frequently throughout this document.
Terms Definition
Objects
An object is a collection of components inside the ASU Connections interface such as, Cases, Chatter, Contacts, Reports and Dashboards that address a specific business need.
For example, the Contact object allows you to store demographic information about students. Each object stores specific types of information.
Contact Record
A Contact Record contains demographic information, case history, and other related data associated with the person and is created by:
• Nightly PeopleSoft Import • Prospect imports (including: webform submissions, event registrations and test
score submissions) • Manual data entry
Functional Group
The Functional Group is a department or college.
Category
The Category is a team or service category within a given Functional Group.
Sub-category The Sub-category is a sub-team or area of focus within a team.
Case List
The Case List is the collection of Cases that are assigned to a unique Functional Group.
• All Open – Lists all the open cases for your Functional Group and owned by you
• Closed – Lists all the closed cases for your Functional Group and owned by you.
• My Open Cases – Are Cases that are only owned by you. • Department - Lists cases owned by your functional group and category
UTO Training | Case Management
5 © Arizona State University. All rights reserved. V6
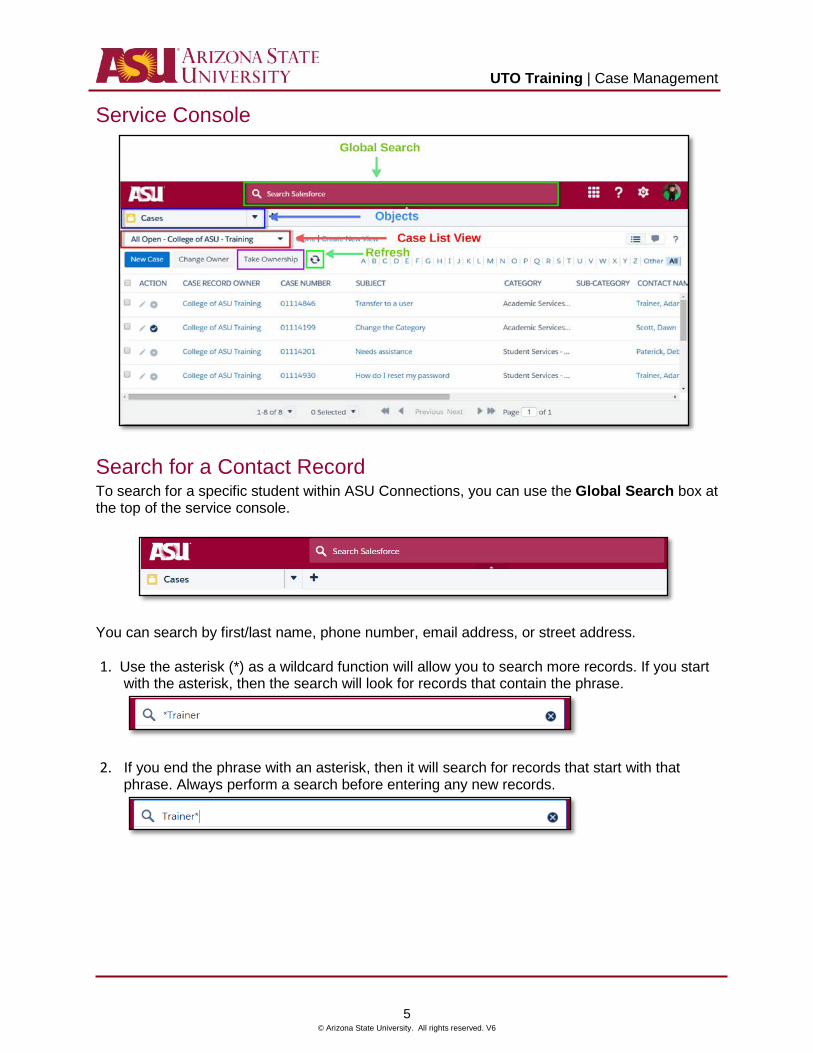
Service Console
Search for a Contact Record To search for a specific student within ASU Connections, you can use the Global Search box at the top of the service console.
You can search by first/last name, phone number, email address, or street address.
1. Use the asterisk (*) as a wildcard function will allow you to search more records. If you start with the asterisk, then the search will look for records that contain the phrase.
2. If you end the phrase with an asterisk, then it will search for records that start with that phrase. Always perform a search before entering any new records.
UTO Training | Case Management
6 © Arizona State University. All rights reserved. V6
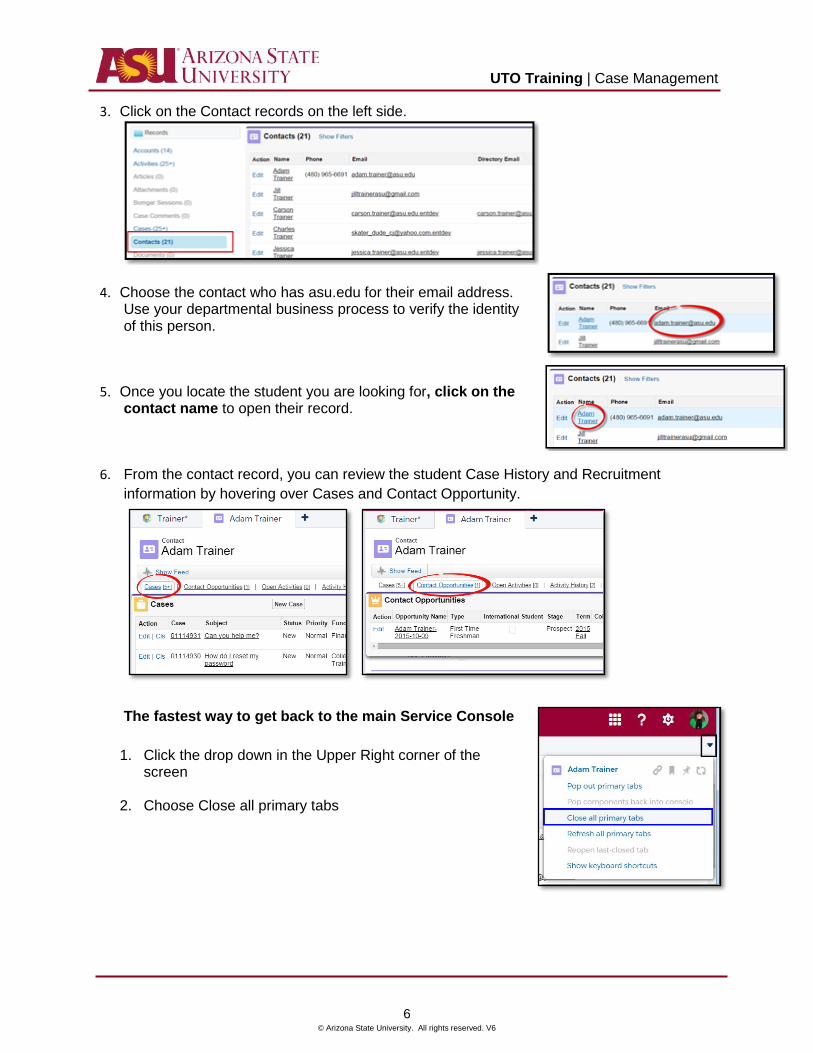
3. Click on the Contact records on the left side.
4. Choose the contact who has asu.edu for their email address. Use your departmental business process to verify the identity of this person.
5. Once you locate the student you are looking for, click on the contact name to open their record.
6. From the contact record, you can review the student Case History and Recruitment information by hovering over Cases and Contact Opportunity.
The fastest way to get back to the main Service Console 1. Click the drop down in the Upper Right corner of the
screen
2. Choose Close all primary tabs
UTO Training | Case Management
7 © Arizona State University. All rights reserved. V6
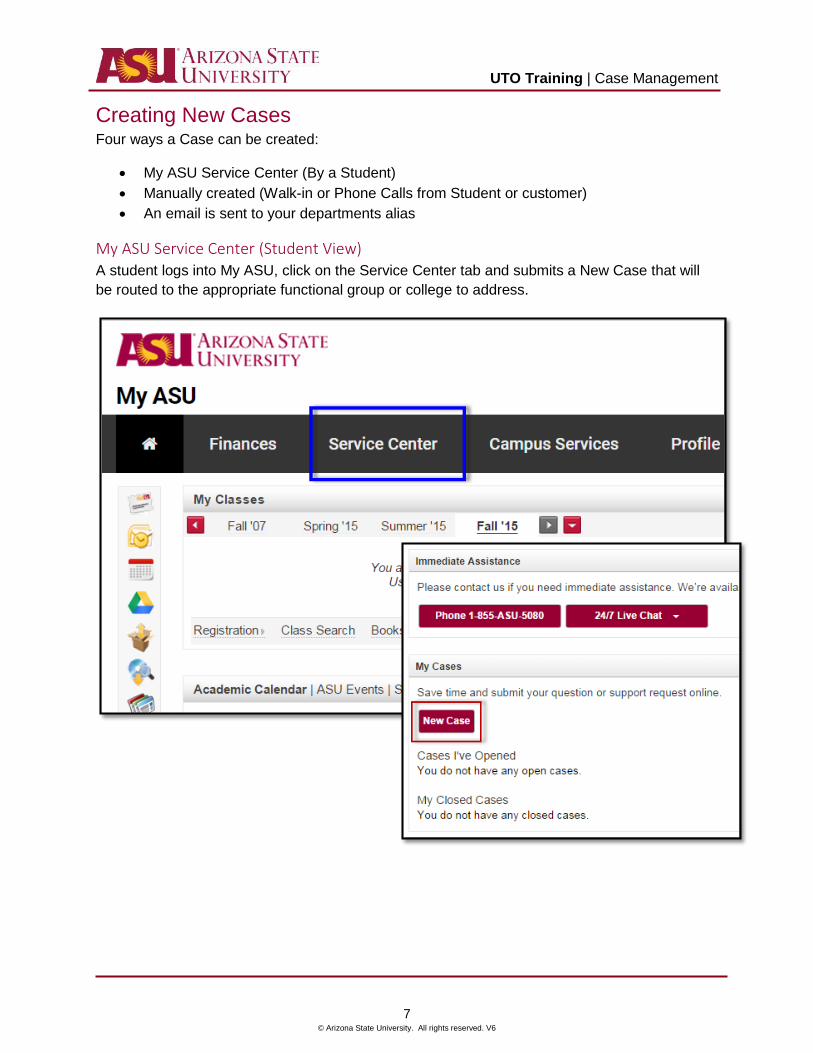
Creating New Cases Four ways a Case can be created:
• My ASU Service Center (By a Student) • Manually created (Walk-in or Phone Calls from Student or customer) • An email is sent to your departments alias
My ASU Service Center (Student View) A student logs into My ASU, click on the Service Center tab and submits a New Case that will be routed to the appropriate functional group or college to address.
UTO Training | Case Management
8 © Arizona State University. All rights reserved. V6
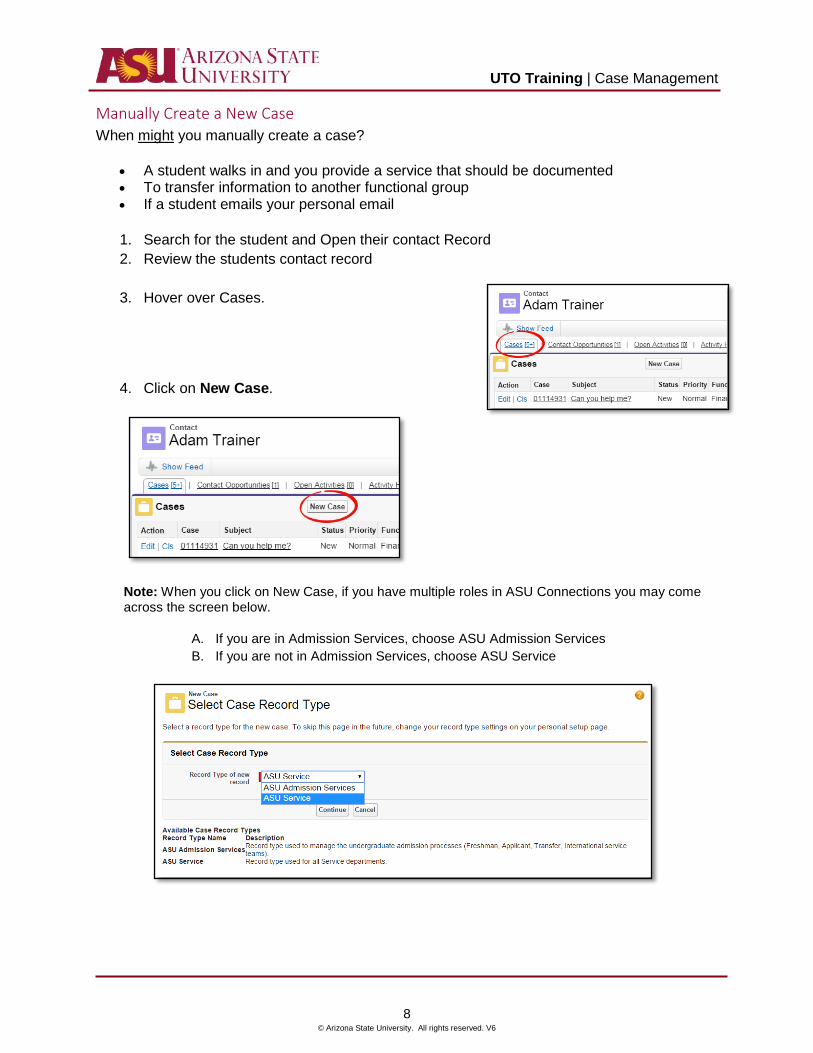
Manually Create a New Case When might you manually create a case?
• A student walks in and you provide a service that should be documented • To transfer information to another functional group • If a student emails your personal email
1. Search for the student and Open their contact Record 2. Review the students contact record
3. Hover over Cases.
4. Click on New Case.
Note: When you click on New Case, if you have multiple roles in ASU Connections you may come across the screen below.
A. If you are in Admission Services, choose ASU Admission Services B. If you are not in Admission Services, choose ASU Service
UTO Training | Case Management
9 © Arizona State University. All rights reserved. V6
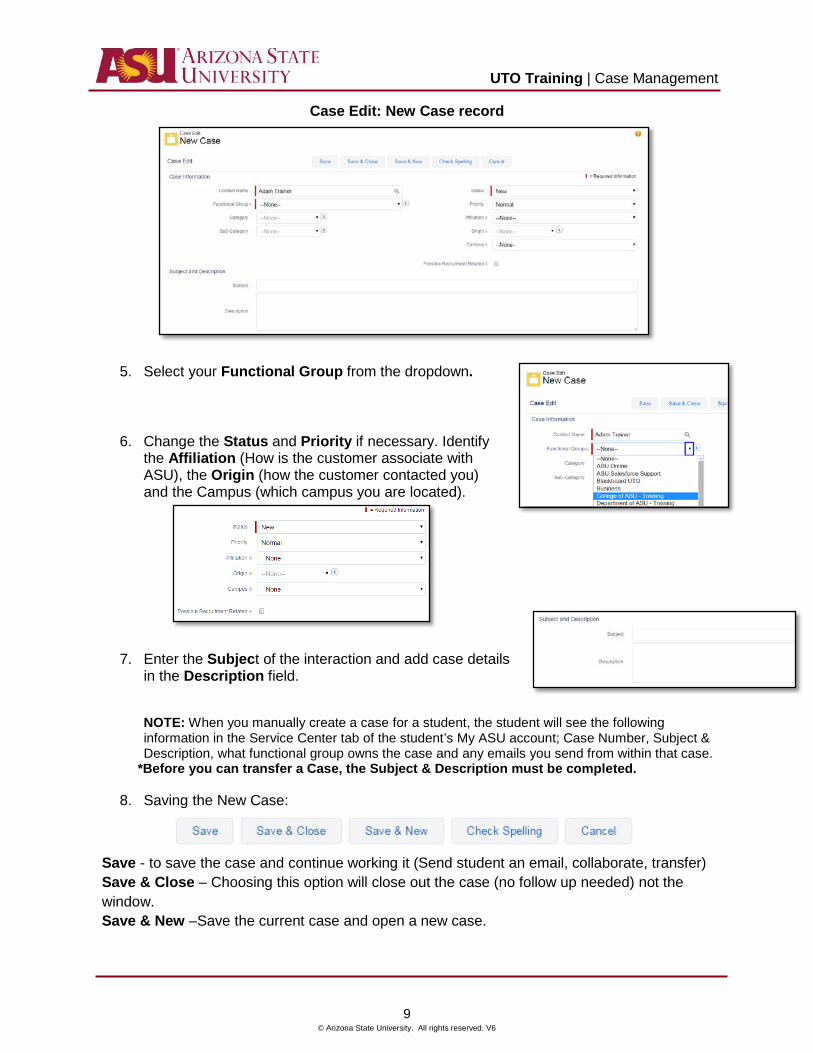
Case Edit: New Case record
5. Select your Functional Group from the dropdown.
6. Change the Status and Priority if necessary. Identify the Affiliation (How is the customer associate with ASU), the Origin (how the customer contacted you) and the Campus (which campus you are located).
7. Enter the Subject of the interaction and add case details in the Description field. NOTE: When you manually create a case for a student, the student will see the following information in the Service Center tab of the student’s My ASU account; Case Number, Subject & Description, what functional group owns the case and any emails you send from within that case.
*Before you can transfer a Case, the Subject & Description must be completed.
8. Saving the New Case:
Save - to save the case and continue working it (Send student an email, collaborate, transfer) Save & Close – Choosing this option will close out the case (no follow up needed) not the window. Save & New –Save the current case and open a new case.

UTO Training | Case Management
10 © Arizona State University. All rights reserved. V6
After you save your new case you can perform all of the following functions:
• Collaborate with colleges by @mentioning them • Email the student • Transfer the case
Collaborate (@Mention) To mention a person:
1. Type @FirstName LastName to highlight a user. This will ensure that the comment is sent to the person.
2. Then type message and Share your Post
3. Your post will show under All Updates for this case, your post also appears in the
person's To Me Feed and Chatter sends an email notification to the people you mentioned.
Sample email notification:
UTO Training | Case Management
11 © Arizona State University. All rights reserved. V6
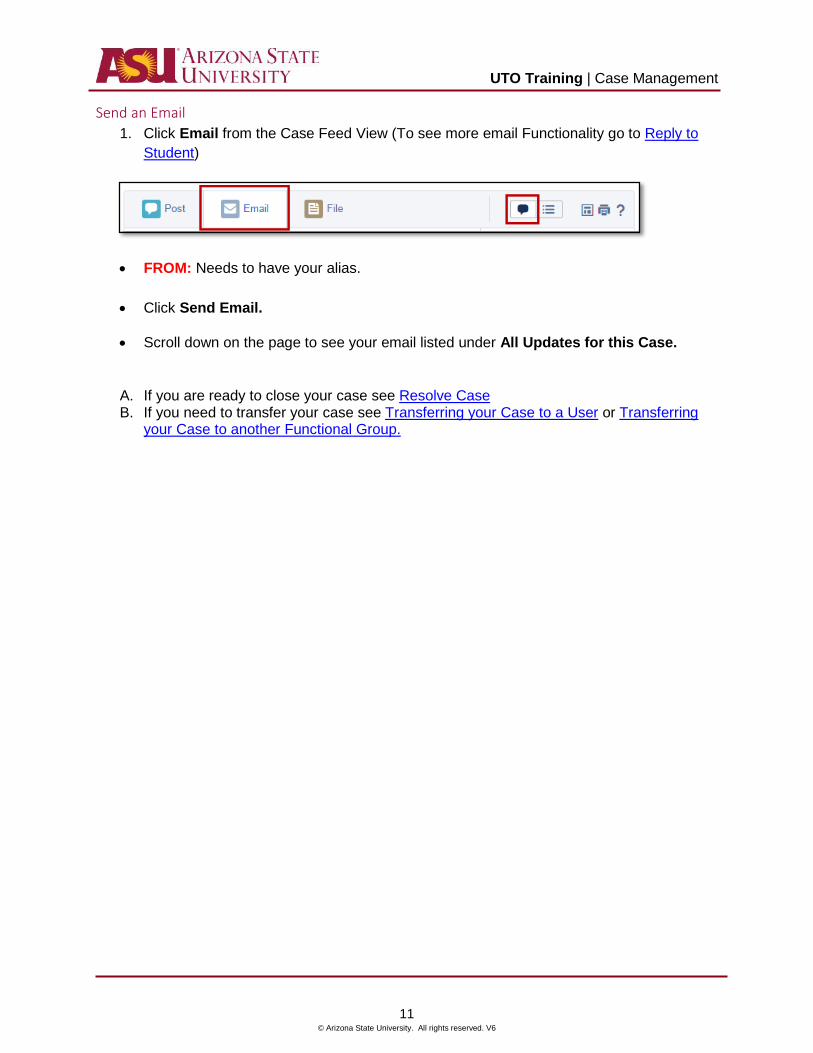
Send an Email 1. Click Email from the Case Feed View (To see more email Functionality go to Reply to
Student)
• FROM: Needs to have your alias.
• Click Send Email.
• Scroll down on the page to see your email listed under All Updates for this Case.
A. If you are ready to close your case see Resolve Case B. If you need to transfer your case see Transferring your Case to a User or Transferring
your Case to another Functional Group.
UTO Training | Case Management
12 © Arizona State University. All rights reserved. V6
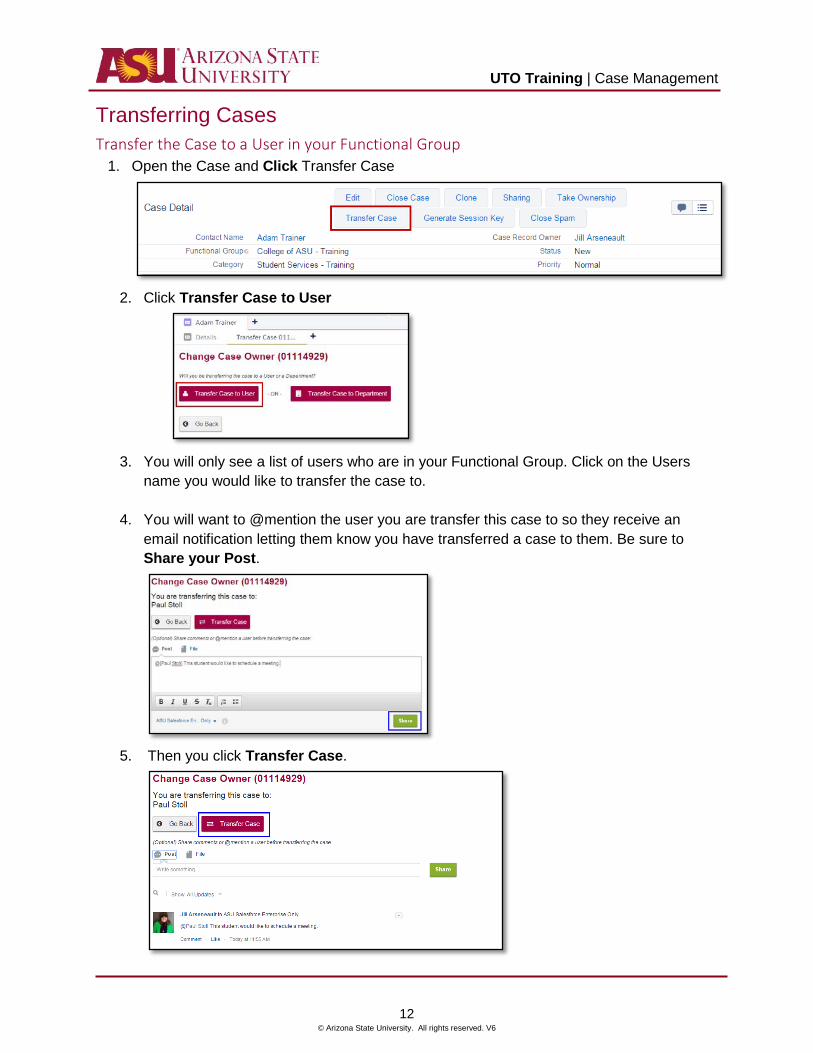
Transferring Cases Transfer the Case to a User in your Functional Group
1. Open the Case and Click Transfer Case
2. Click Transfer Case to User
3. You will only see a list of users who are in your Functional Group. Click on the Users
name you would like to transfer the case to.
4. You will want to @mention the user you are transfer this case to so they receive an email notification letting them know you have transferred a case to them. Be sure to Share your Post.
5. Then you click Transfer Case.
UTO Training | Case Management
13 © Arizona State University. All rights reserved. V6
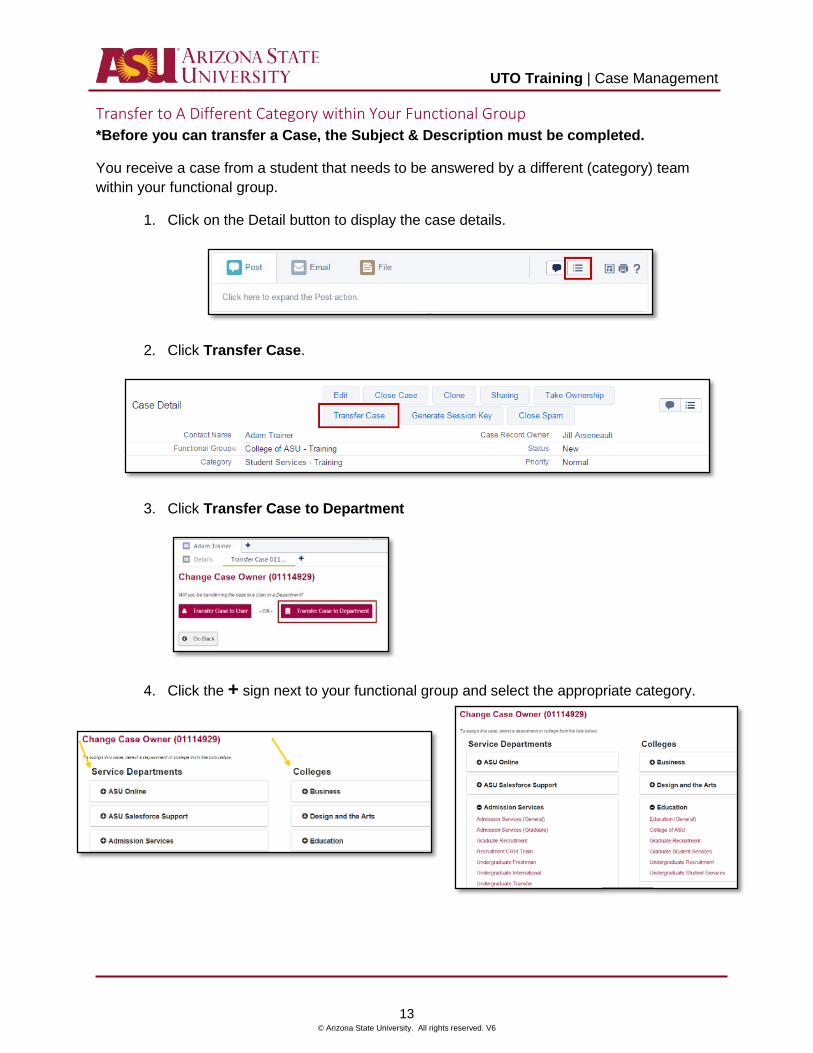
Transfer to A Different Category within Your Functional Group *Before you can transfer a Case, the Subject & Description must be completed.
You receive a case from a student that needs to be answered by a different (category) team within your functional group.
1. Click on the Detail button to display the case details.
2. Click Transfer Case.
3. Click Transfer Case to Department
4. Click the + sign next to your functional group and select the appropriate category.

UTO Training | Case Management
14 © Arizona State University. All rights reserved. V6
Alternate Method – Check that the Case Record Owner says your functional group.
1. Hover over the category field and Double Click the Pencil icon to open the Dependent Fields window.
2. Select the Category for the team who should handle the case.
Note: Never change the Functional Group from the Dependent Fields screen.
3. Click Save. The case will automatically be listed in the appropriate Case List View.
4. You can follow the case should you wish to know the
outcome or any updates on it.
UTO Training | Case Management
15 © Arizona State University. All rights reserved. V6
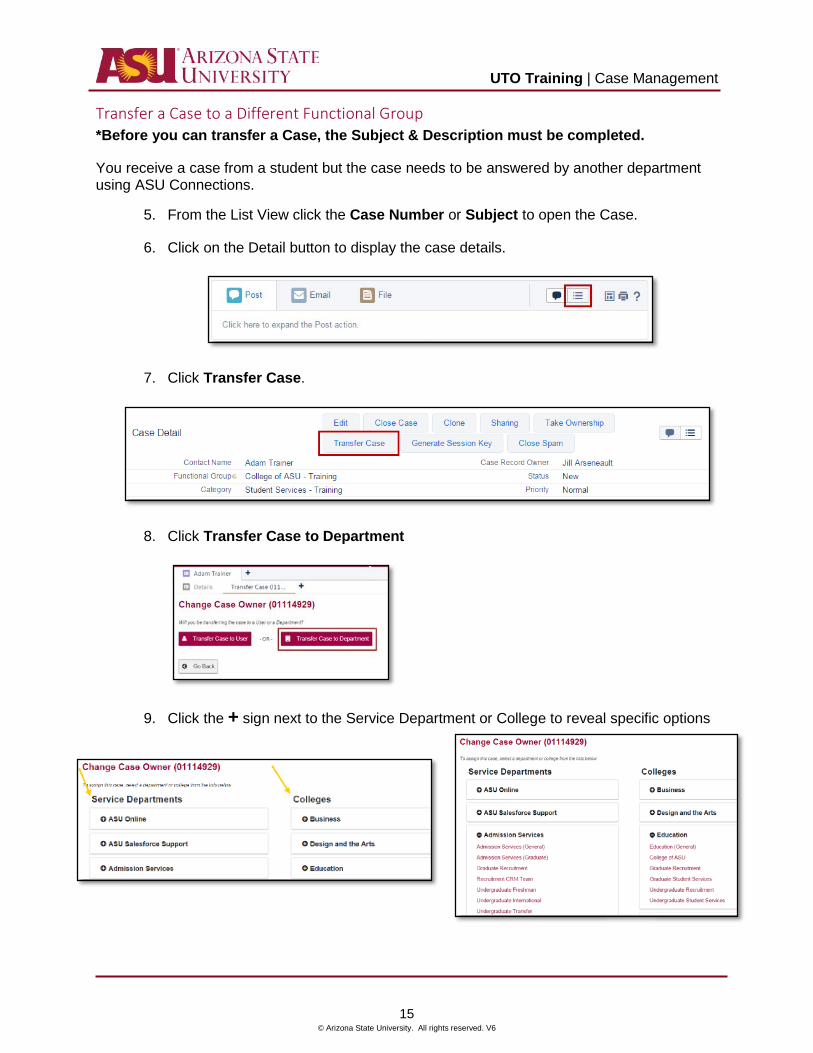
Transfer a Case to a Different Functional Group *Before you can transfer a Case, the Subject & Description must be completed.
You receive a case from a student but the case needs to be answered by another department using ASU Connections.
5. From the List View click the Case Number or Subject to open the Case.
6. Click on the Detail button to display the case details.
7. Click Transfer Case.
8. Click Transfer Case to Department
9. Click the + sign next to the Service Department or College to reveal specific options
UTO Training | Case Management
16 © Arizona State University. All rights reserved. V6
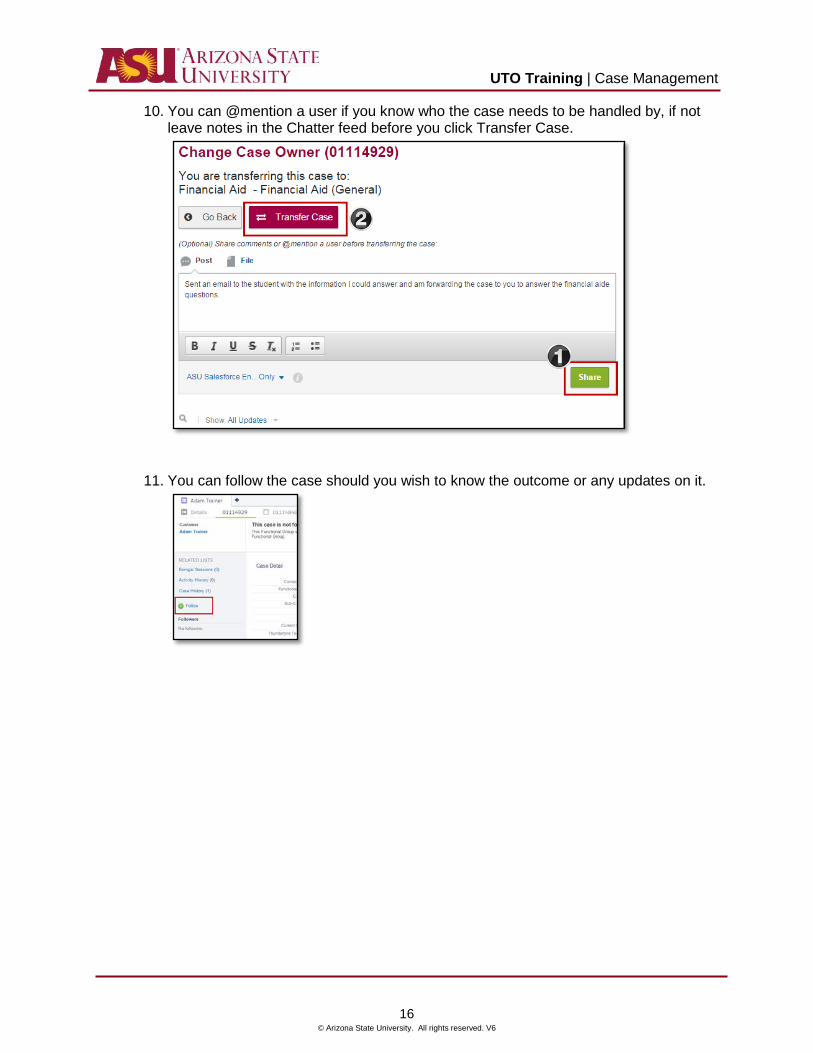
10. You can @mention a user if you know who the case needs to be handled by, if not leave notes in the Chatter feed before you click Transfer Case.
11. You can follow the case should you wish to know the outcome or any updates on it.
UTO Training | Case Management
17 © Arizona State University. All rights reserved. V6
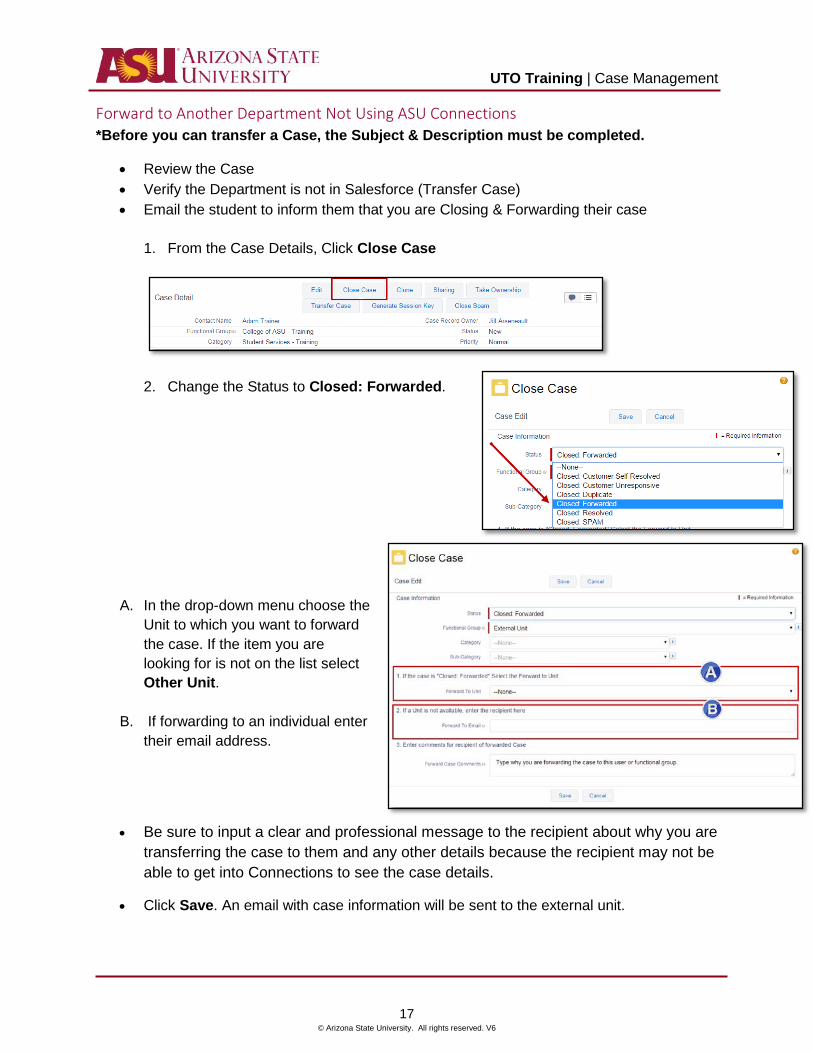
Forward to Another Department Not Using ASU Connections *Before you can transfer a Case, the Subject & Description must be completed.
• Review the Case • Verify the Department is not in Salesforce (Transfer Case) • Email the student to inform them that you are Closing & Forwarding their case
1. From the Case Details, Click Close Case
2. Change the Status to Closed: Forwarded.
A. In the drop-down menu choose the Unit to which you want to forward the case. If the item you are looking for is not on the list select Other Unit.
B. If forwarding to an individual enter their email address.
• Be sure to input a clear and professional message to the recipient about why you are transferring the case to them and any other details because the recipient may not be able to get into Connections to see the case details.
• Click Save. An email with case information will be sent to the external unit.
UTO Training | Case Management
18 © Arizona State University. All rights reserved. V6
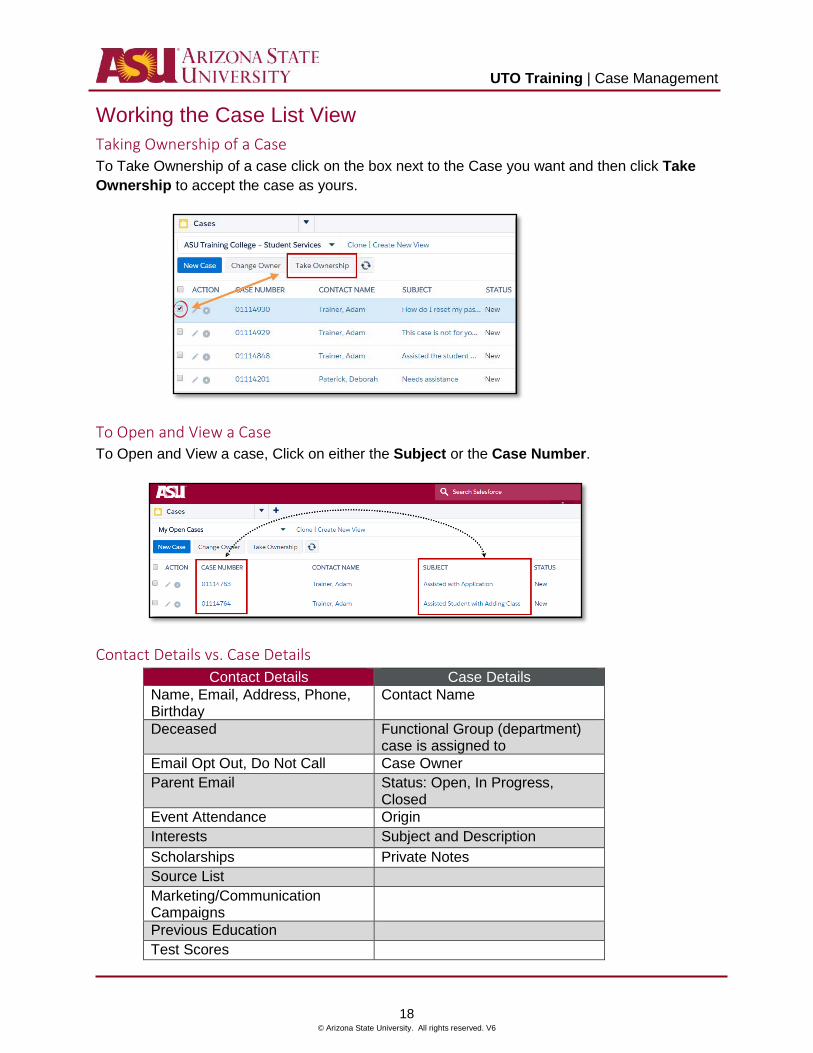
Working the Case List View Taking Ownership of a Case To Take Ownership of a case click on the box next to the Case you want and then click Take Ownership to accept the case as yours.
To Open and View a Case To Open and View a case, Click on either the Subject or the Case Number.
Contact Details vs. Case Details Contact Details Case Details
Name, Email, Address, Phone, Birthday
Contact Name
Deceased Functional Group (department) case is assigned to
Email Opt Out, Do Not Call Case Owner Parent Email Status: Open, In Progress,
Closed Event Attendance Origin Interests Subject and Description Scholarships Private Notes Source List Marketing/Communication Campaigns
Previous Education Test Scores
UTO Training | Case Management
19 © Arizona State University. All rights reserved. V6
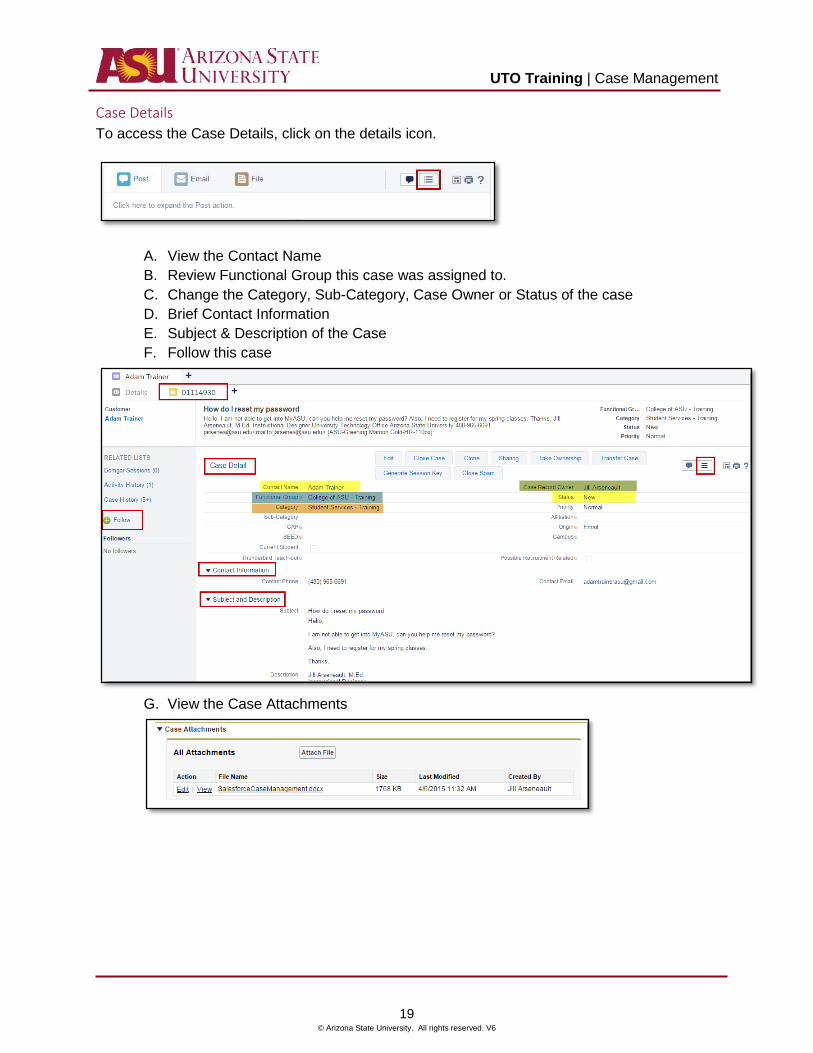
Case Details To access the Case Details, click on the details icon.
A. View the Contact Name B. Review Functional Group this case was assigned to. C. Change the Category, Sub-Category, Case Owner or Status of the case D. Brief Contact Information E. Subject & Description of the Case F. Follow this case
G. View the Case Attachments
UTO Training | Case Management
20 © Arizona State University. All rights reserved. V6
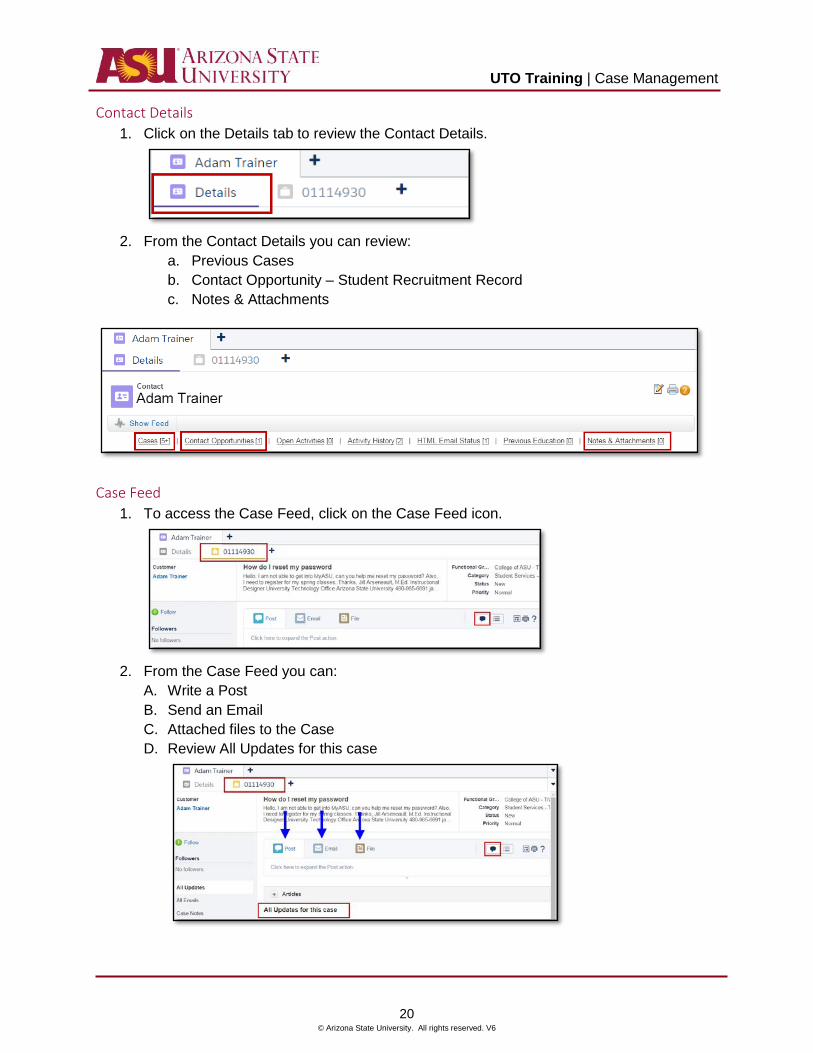
Contact Details 1. Click on the Details tab to review the Contact Details.
2. From the Contact Details you can review:
a. Previous Cases b. Contact Opportunity – Student Recruitment Record c. Notes & Attachments
Case Feed
1. To access the Case Feed, click on the Case Feed icon.
2. From the Case Feed you can:
A. Write a Post B. Send an Email C. Attached files to the Case D. Review All Updates for this case

UTO Training | Case Management
21 © Arizona State University. All rights reserved. V6
Reassign the Case to a Contact 1. Click the Details icon.
2. Hover over the Contact Name and Double Click on the Pencil icon
3. Search for your Student by email, First & Last name, ASURITE, or EMPLID (remember the *), then
click Go!
4. Click on the Name
5. Click Save
UTO Training | Case Management
22 © Arizona State University. All rights reserved. V6
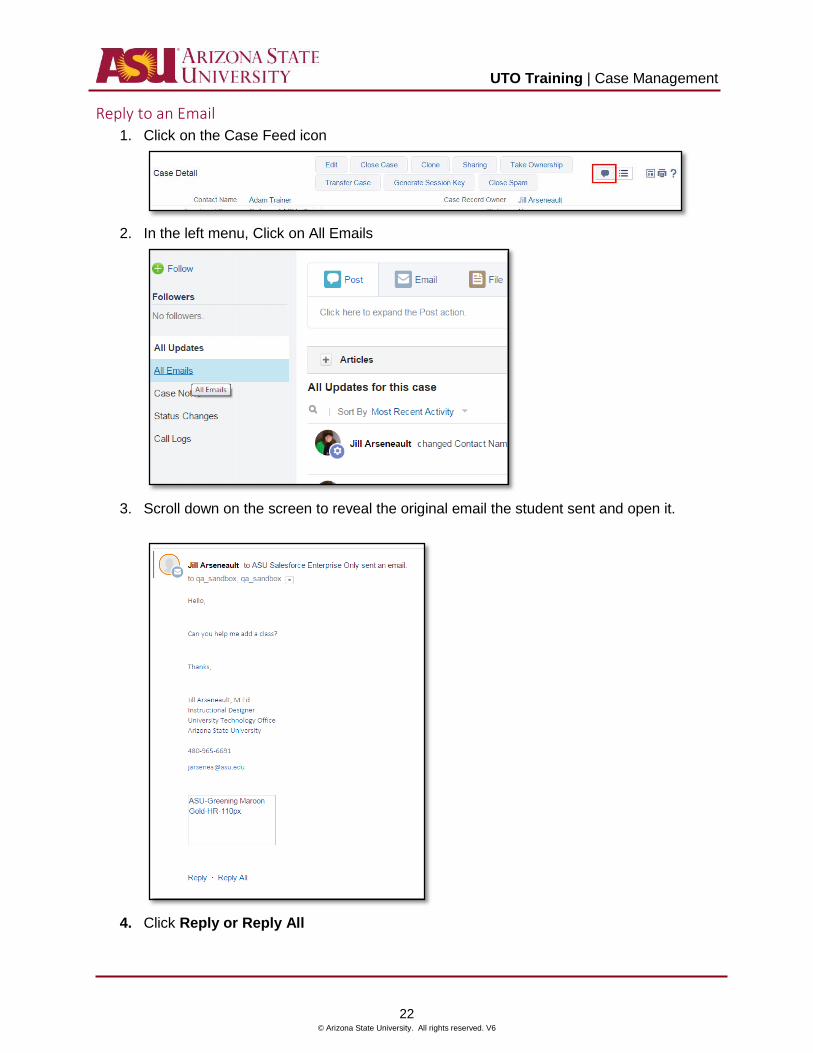
Reply to an Email 1. Click on the Case Feed icon
2. In the left menu, Click on All Emails
3. Scroll down on the screen to reveal the original email the student sent and open it.
4. Click Reply or Reply All

UTO Training | Case Management
23 © Arizona State University. All rights reserved. V6
About the email:
• FROM: Needs to have your alias.
• Quick Text – Is activated by two semi colons (;;) then your department’s key word or phrase. (i.e. library, financial)
• Templates – Click the templates icon to display a list of templates. Select the template for your department.
• Documents – Click on the paper clip icon to attached documents from your local drives.
• Articles – Click on the + sign next to Articles to see a list of Knowledge Base Articles that are relevant to the subject line of your response to the customer.
• Click Send Email.
UTO Training | Case Management
24 © Arizona State University. All rights reserved. V6
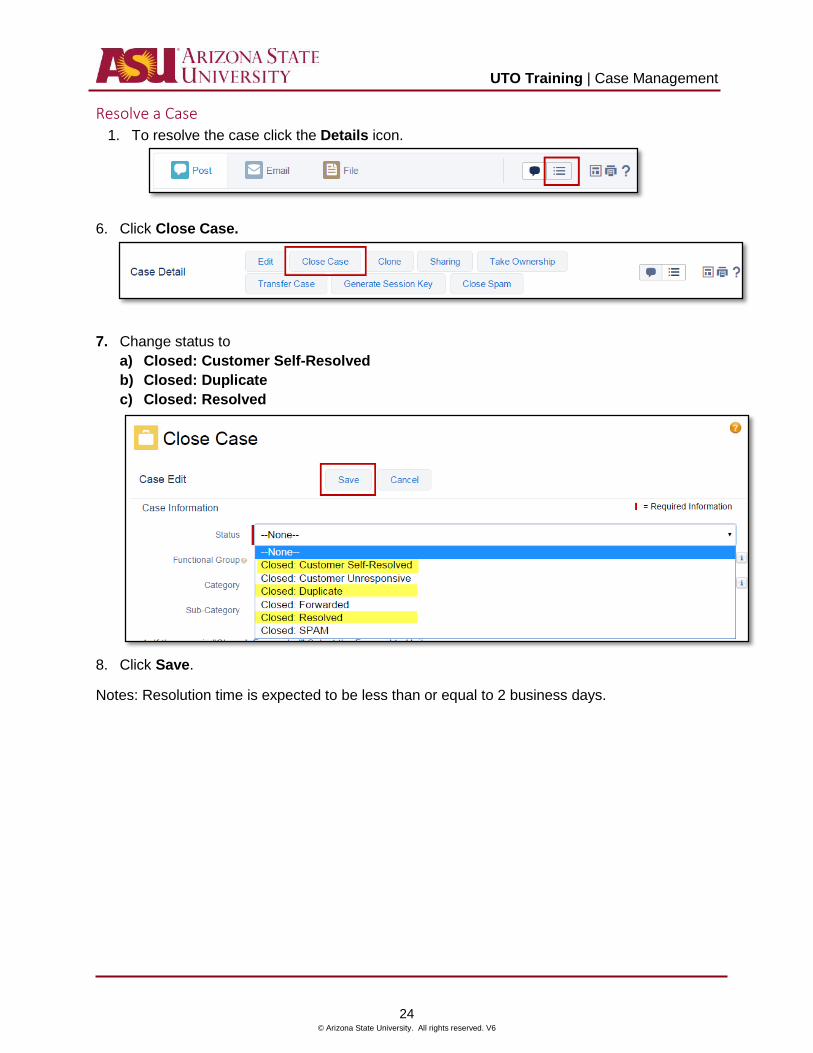
Resolve a Case 1. To resolve the case click the Details icon.
6. Click Close Case.
7. Change status to a) Closed: Customer Self-Resolved b) Closed: Duplicate c) Closed: Resolved
8. Click Save.
Notes: Resolution time is expected to be less than or equal to 2 business days.
UTO Training | Case Management
25 © Arizona State University. All rights reserved. V6
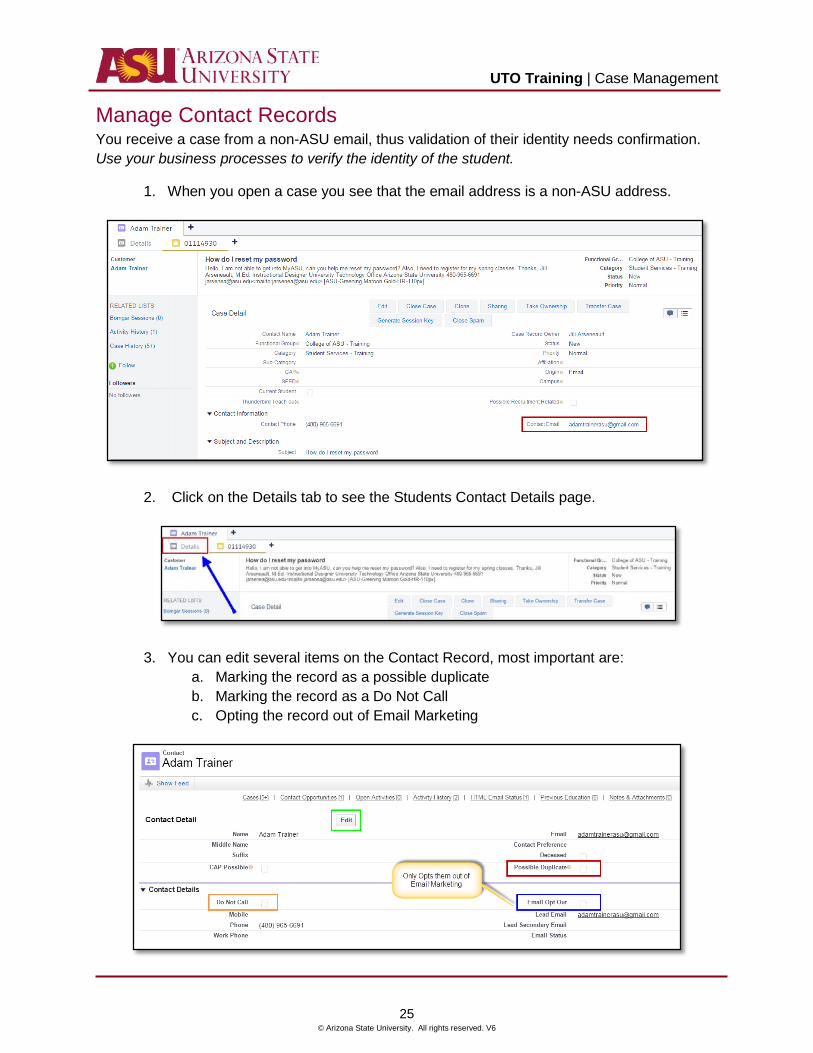
Manage Contact Records You receive a case from a non-ASU email, thus validation of their identity needs confirmation. Use your business processes to verify the identity of the student.
1. When you open a case you see that the email address is a non-ASU address.
2. Click on the Details tab to see the Students Contact Details page.
3. You can edit several items on the Contact Record, most important are: a. Marking the record as a possible duplicate b. Marking the record as a Do Not Call c. Opting the record out of Email Marketing
UTO Training | Case Management
26 © Arizona State University. All rights reserved. V6
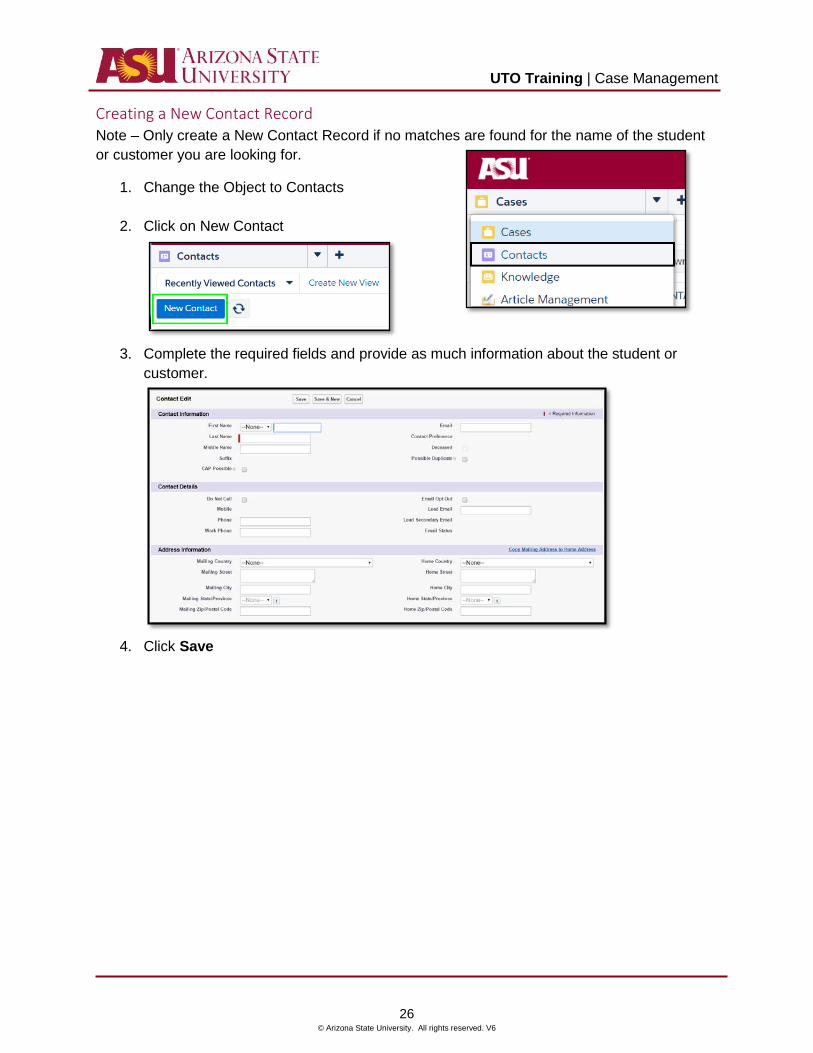
Creating a New Contact Record Note – Only create a New Contact Record if no matches are found for the name of the student or customer you are looking for.
1. Change the Object to Contacts
2. Click on New Contact
3. Complete the required fields and provide as much information about the student or
customer.
4. Click Save
UTO Training | Case Management
27 © Arizona State University. All rights reserved. V6
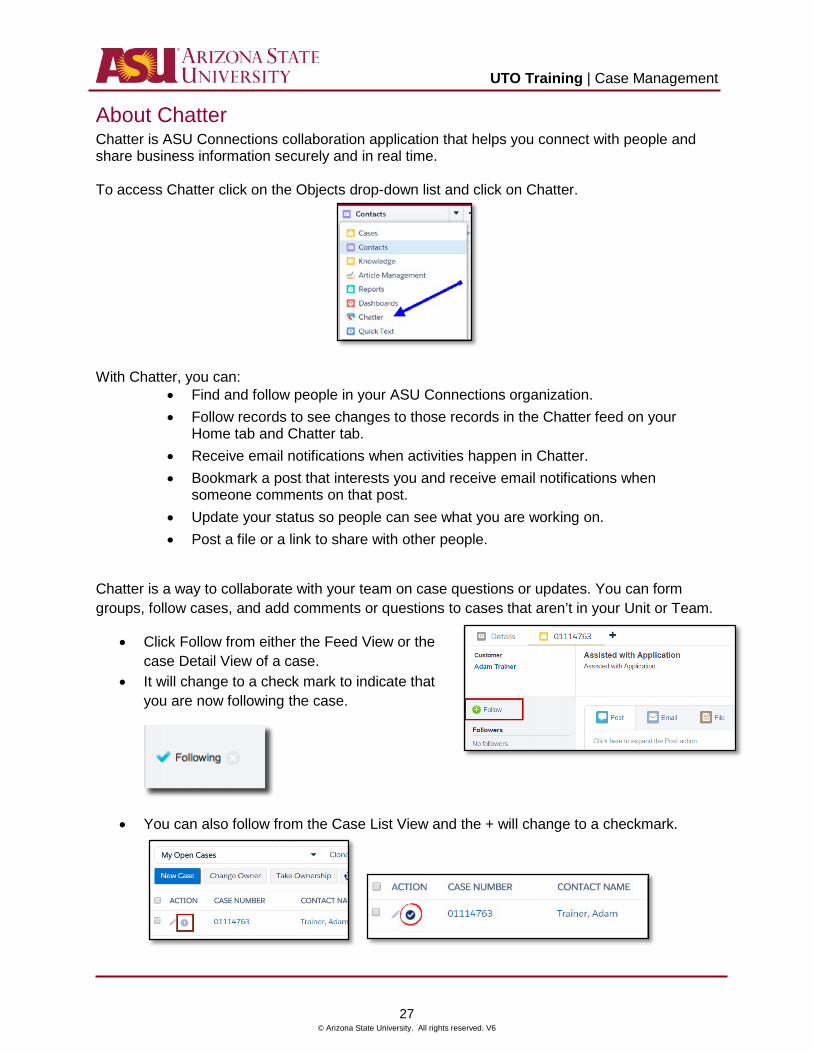
About Chatter Chatter is ASU Connections collaboration application that helps you connect with people and share business information securely and in real time. To access Chatter click on the Objects drop-down list and click on Chatter.
With Chatter, you can:
• Find and follow people in your ASU Connections organization. • Follow records to see changes to those records in the Chatter feed on your
Home tab and Chatter tab. • Receive email notifications when activities happen in Chatter. • Bookmark a post that interests you and receive email notifications when
someone comments on that post. • Update your status so people can see what you are working on. • Post a file or a link to share with other people.
Chatter is a way to collaborate with your team on case questions or updates. You can form groups, follow cases, and add comments or questions to cases that aren’t in your Unit or Team.
• Click Follow from either the Feed View or the case Detail View of a case.
• It will change to a check mark to indicate that you are now following the case.
• You can also follow from the Case List View and the + will change to a checkmark.
UTO Training | Case Management
28 © Arizona State University. All rights reserved. V6
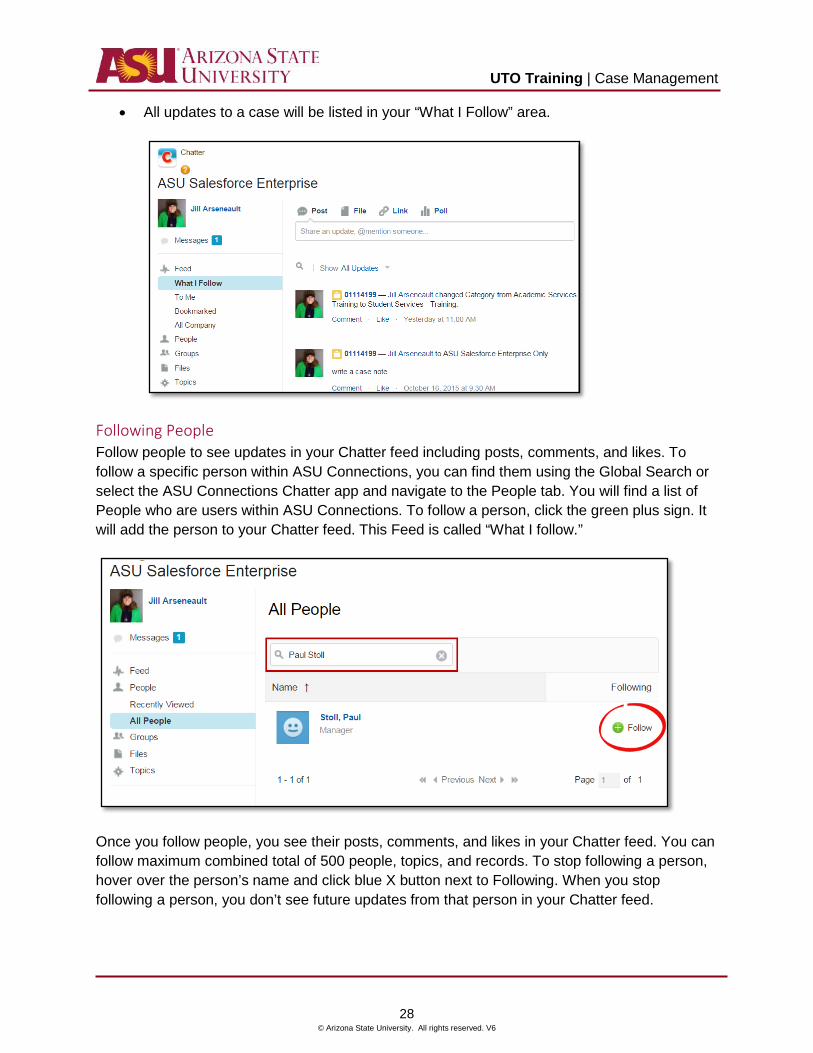
• All updates to a case will be listed in your “What I Follow” area.
Following People Follow people to see updates in your Chatter feed including posts, comments, and likes. To follow a specific person within ASU Connections, you can find them using the Global Search or select the ASU Connections Chatter app and navigate to the People tab. You will find a list of People who are users within ASU Connections. To follow a person, click the green plus sign. It will add the person to your Chatter feed. This Feed is called “What I follow.”
Once you follow people, you see their posts, comments, and likes in your Chatter feed. You can follow maximum combined total of 500 people, topics, and records. To stop following a person, hover over the person’s name and click blue X button next to Following. When you stop following a person, you don’t see future updates from that person in your Chatter feed.
UTO Training | Case Management
29 © Arizona State University. All rights reserved. V6
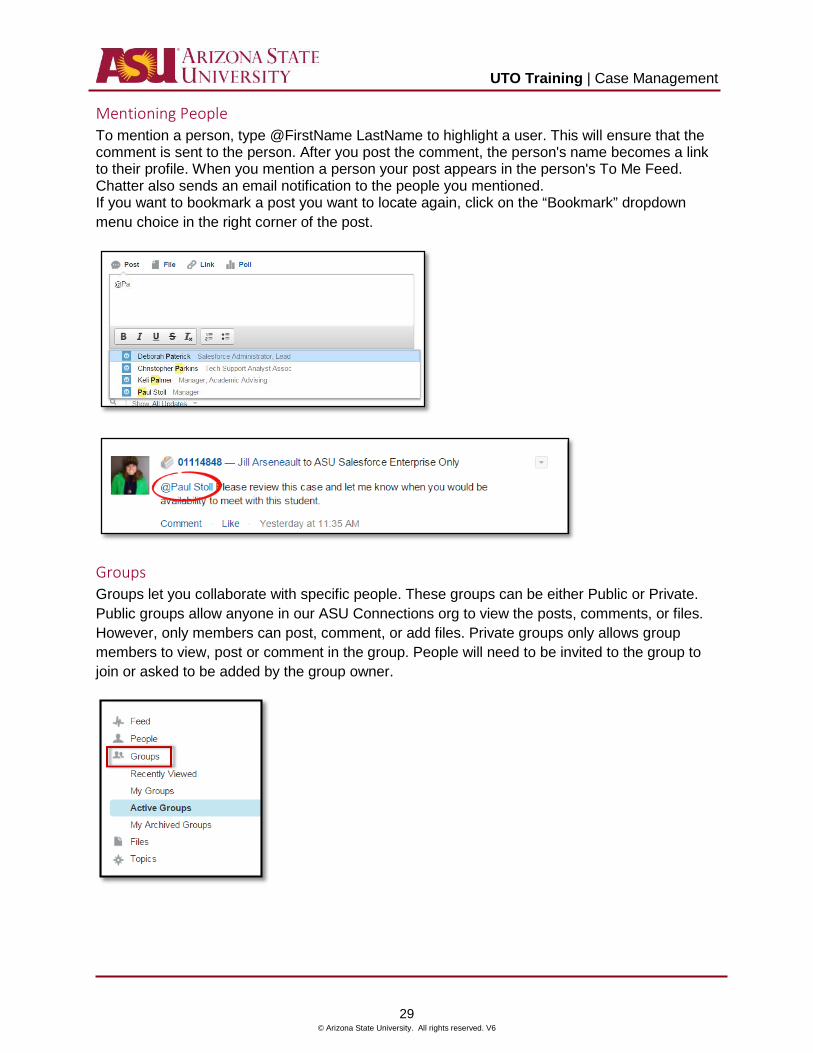
Mentioning People To mention a person, type @FirstName LastName to highlight a user. This will ensure that the comment is sent to the person. After you post the comment, the person's name becomes a link to their profile. When you mention a person your post appears in the person's To Me Feed. Chatter also sends an email notification to the people you mentioned. If you want to bookmark a post you want to locate again, click on the “Bookmark” dropdown menu choice in the right corner of the post.
Groups Groups let you collaborate with specific people. These groups can be either Public or Private. Public groups allow anyone in our ASU Connections org to view the posts, comments, or files. However, only members can post, comment, or add files. Private groups only allows group members to view, post or comment in the group. People will need to be invited to the group to join or asked to be added by the group owner.
UTO Training | Case Management
30 © Arizona State University. All rights reserved. V6
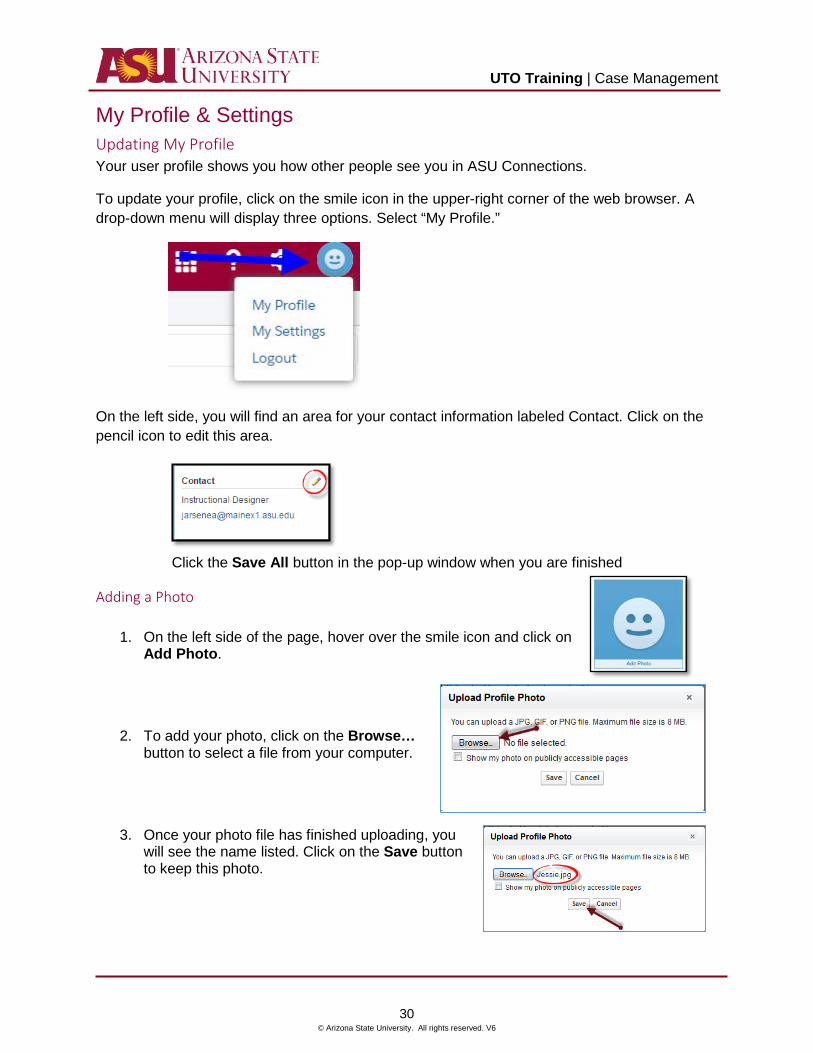
My Profile & Settings Updating My Profile Your user profile shows you how other people see you in ASU Connections.
To update your profile, click on the smile icon in the upper-right corner of the web browser. A drop-down menu will display three options. Select “My Profile.”
On the left side, you will find an area for your contact information labeled Contact. Click on the pencil icon to edit this area.
Click the Save All button in the pop-up window when you are finished
Adding a Photo
1. On the left side of the page, hover over the smile icon and click on Add Photo.
2. To add your photo, click on the Browse… button to select a file from your computer.
3. Once your photo file has finished uploading, you will see the name listed. Click on the Save button to keep this photo.
UTO Training | Case Management
31 © Arizona State University. All rights reserved. V6
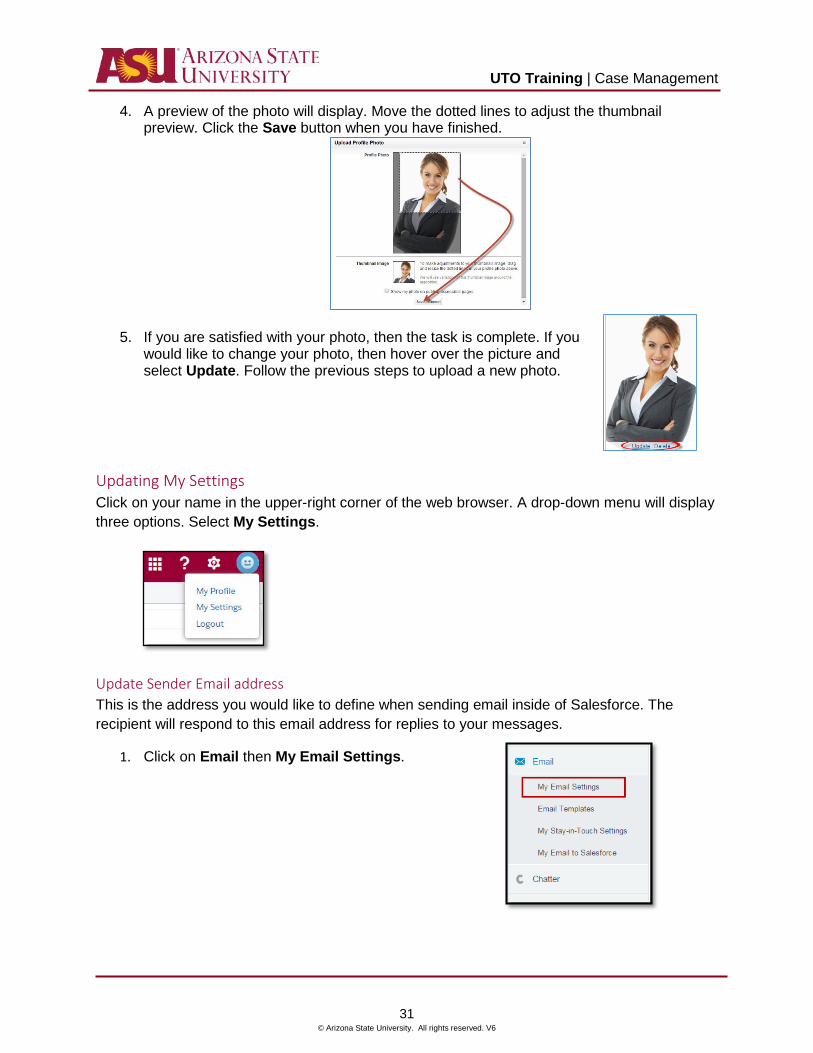
4. A preview of the photo will display. Move the dotted lines to adjust the thumbnail preview. Click the Save button when you have finished.
5. If you are satisfied with your photo, then the task is complete. If you would like to change your photo, then hover over the picture and select Update. Follow the previous steps to upload a new photo.
Updating My Settings Click on your name in the upper-right corner of the web browser. A drop-down menu will display three options. Select My Settings.
Update Sender Email address This is the address you would like to define when sending email inside of Salesforce. The recipient will respond to this email address for replies to your messages.
1. Click on Email then My Email Settings.
UTO Training | Case Management
32 © Arizona State University. All rights reserved. V6
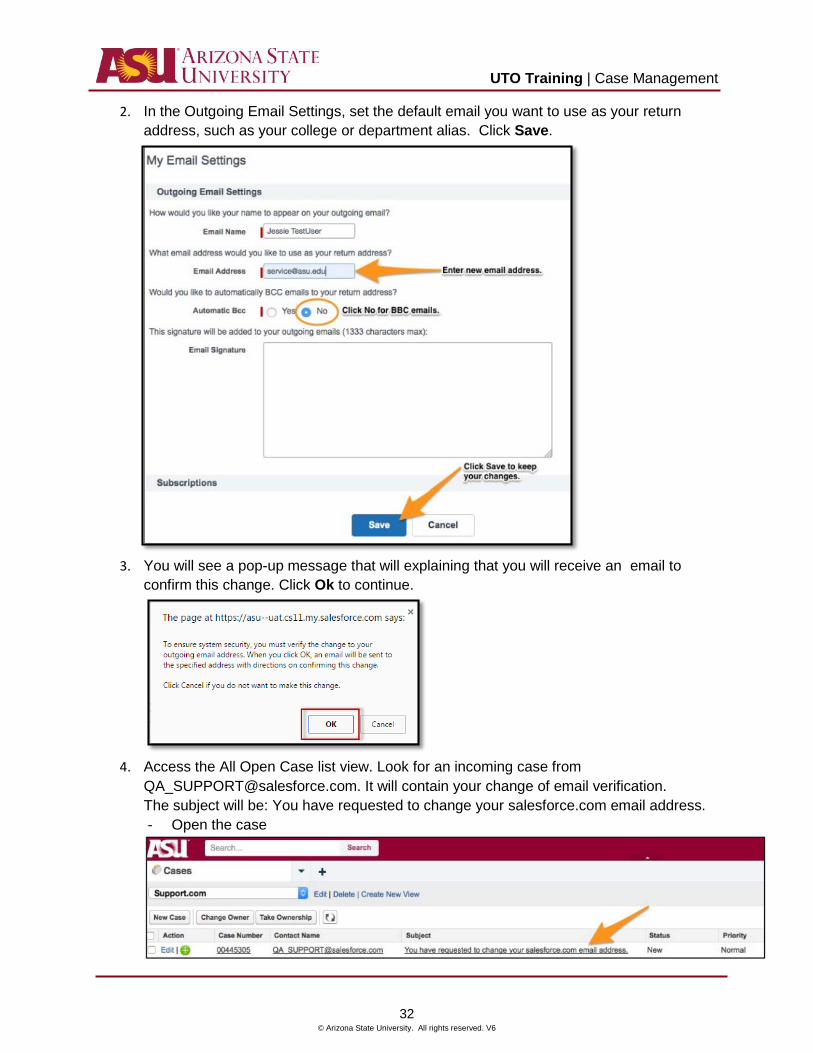
2. In the Outgoing Email Settings, set the default email you want to use as your return address, such as your college or department alias. Click Save.
3. You will see a pop-up message that will explaining that you will receive an email to
confirm this change. Click Ok to continue.
4. Access the All Open Case list view. Look for an incoming case from
[email protected]. It will contain your change of email verification. The subject will be: You have requested to change your salesforce.com email address. - Open the case
UTO Training | Case Management
33 © Arizona State University. All rights reserved. V6
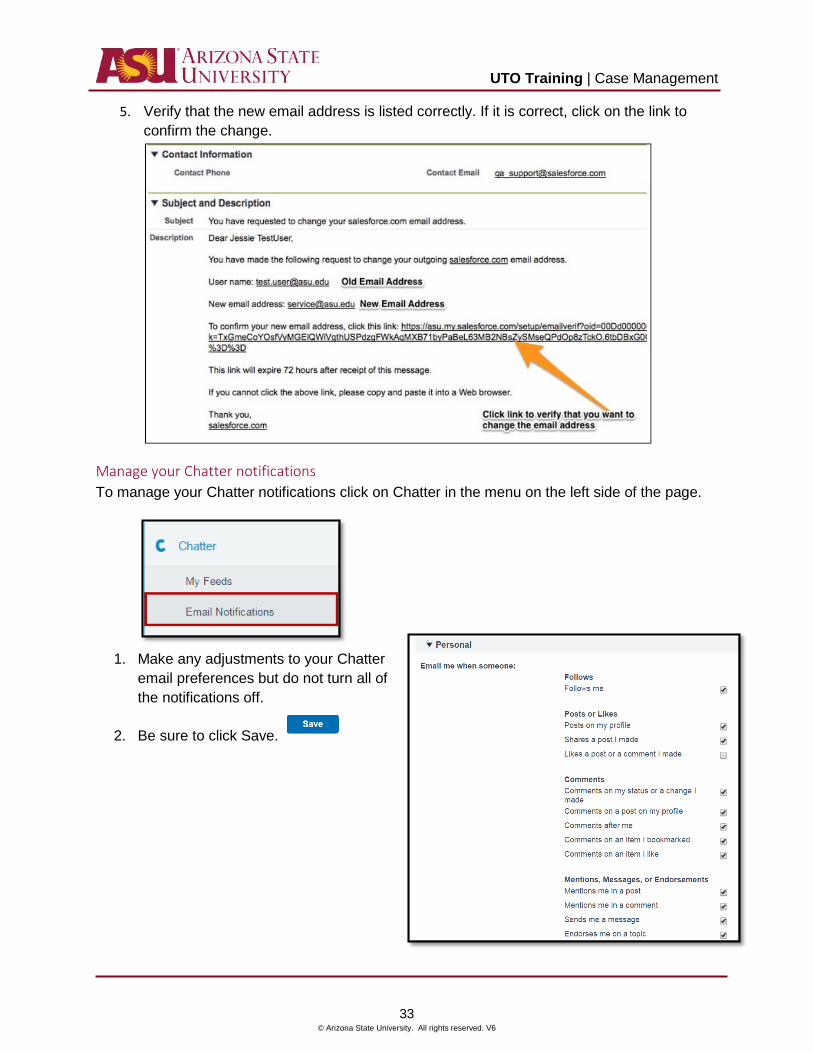
5. Verify that the new email address is listed correctly. If it is correct, click on the link to confirm the change.
Manage your Chatter notifications To manage your Chatter notifications click on Chatter in the menu on the left side of the page.
1. Make any adjustments to your Chatter
email preferences but do not turn all of the notifications off.
2. Be sure to click Save.
UTO Training | Case Management
34 © Arizona State University. All rights reserved. V6
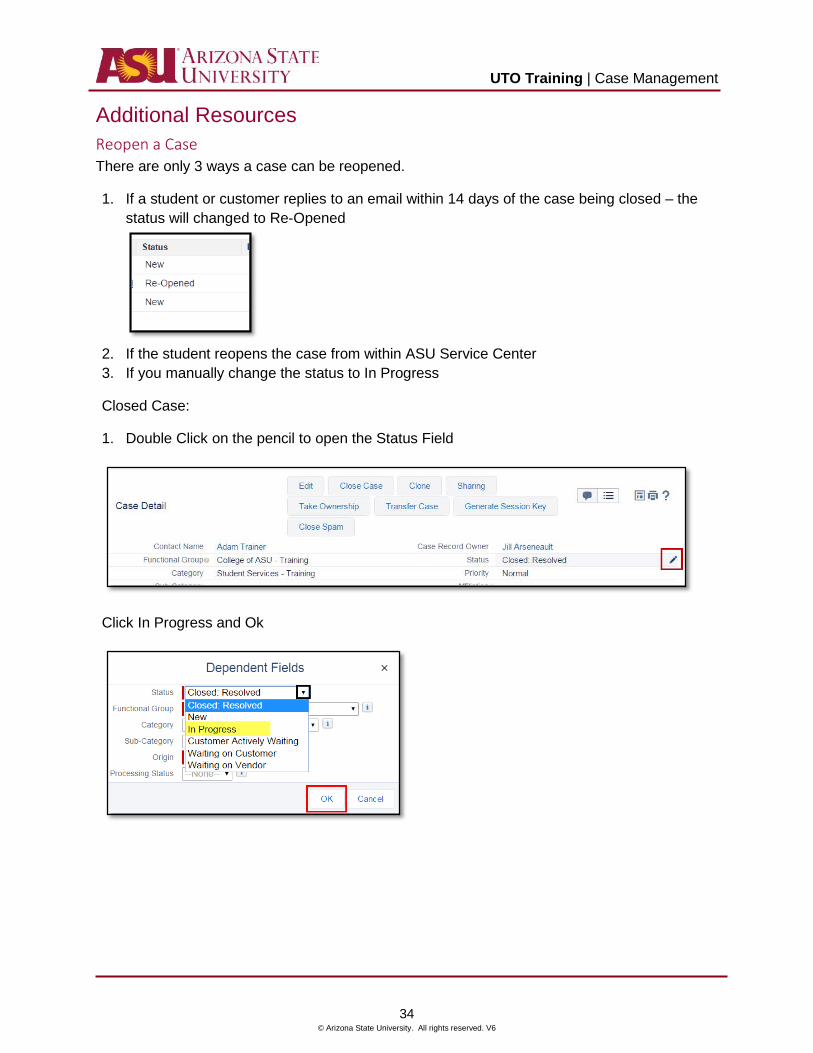
Additional Resources Reopen a Case There are only 3 ways a case can be reopened.
1. If a student or customer replies to an email within 14 days of the case being closed – the status will changed to Re-Opened
2. If the student reopens the case from within ASU Service Center 3. If you manually change the status to In Progress
Closed Case:
1. Double Click on the pencil to open the Status Field
Click In Progress and Ok
UTO Training | Case Management
35 © Arizona State University. All rights reserved. V6
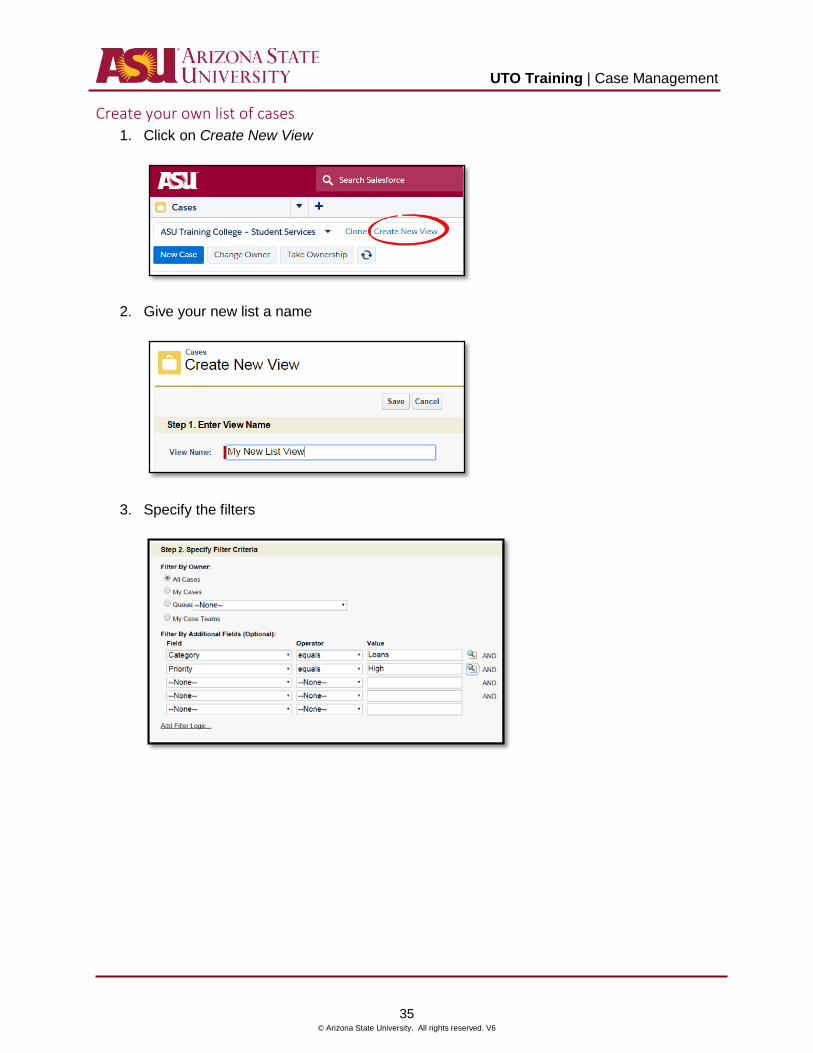
Create your own list of cases 1. Click on Create New View
2. Give your new list a name
3. Specify the filters
UTO Training | Case Management
36 © Arizona State University. All rights reserved. V6
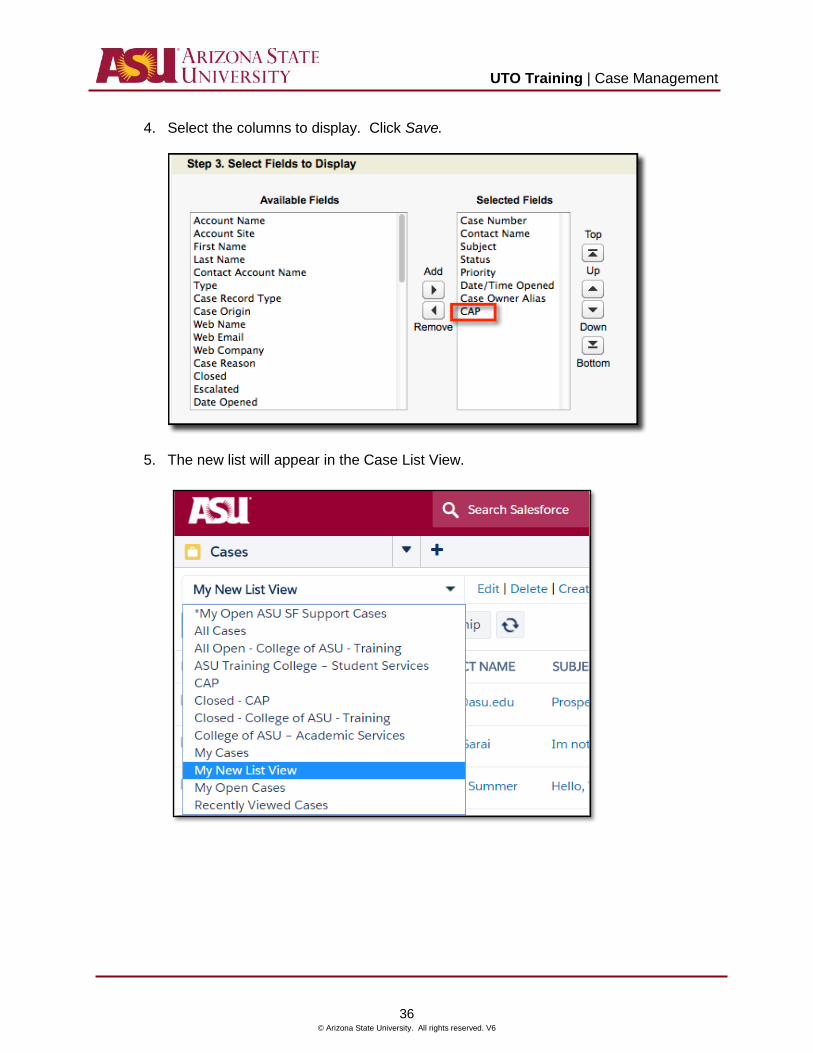
4. Select the columns to display. Click Save.
5. The new list will appear in the Case List View.
UTO Training | Case Management
37 © Arizona State University. All rights reserved. V6
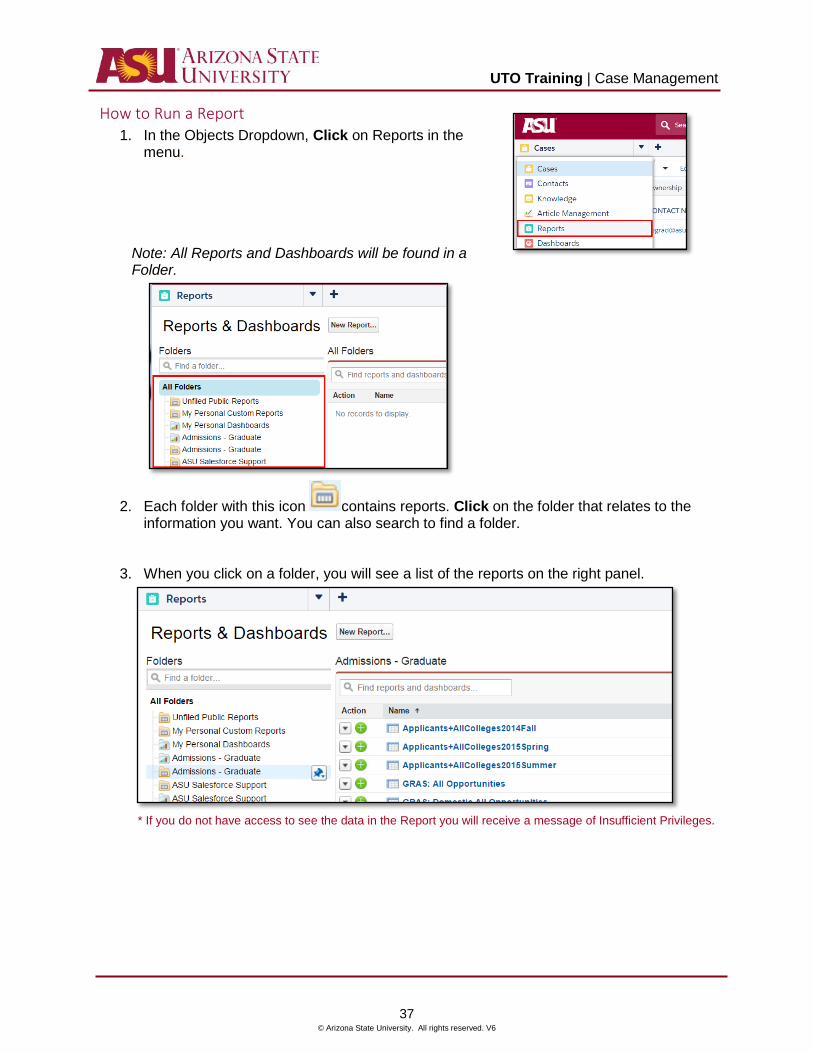
How to Run a Report 1. In the Objects Dropdown, Click on Reports in the
menu.
Note: All Reports and Dashboards will be found in a Folder.
2. Each folder with this icon contains reports. Click on the folder that relates to the information you want. You can also search to find a folder.
3. When you click on a folder, you will see a list of the reports on the right panel.
* If you do not have access to see the data in the Report you will receive a message of Insufficient Privileges.
UTO Training | Case Management
38 © Arizona State University. All rights reserved. V6
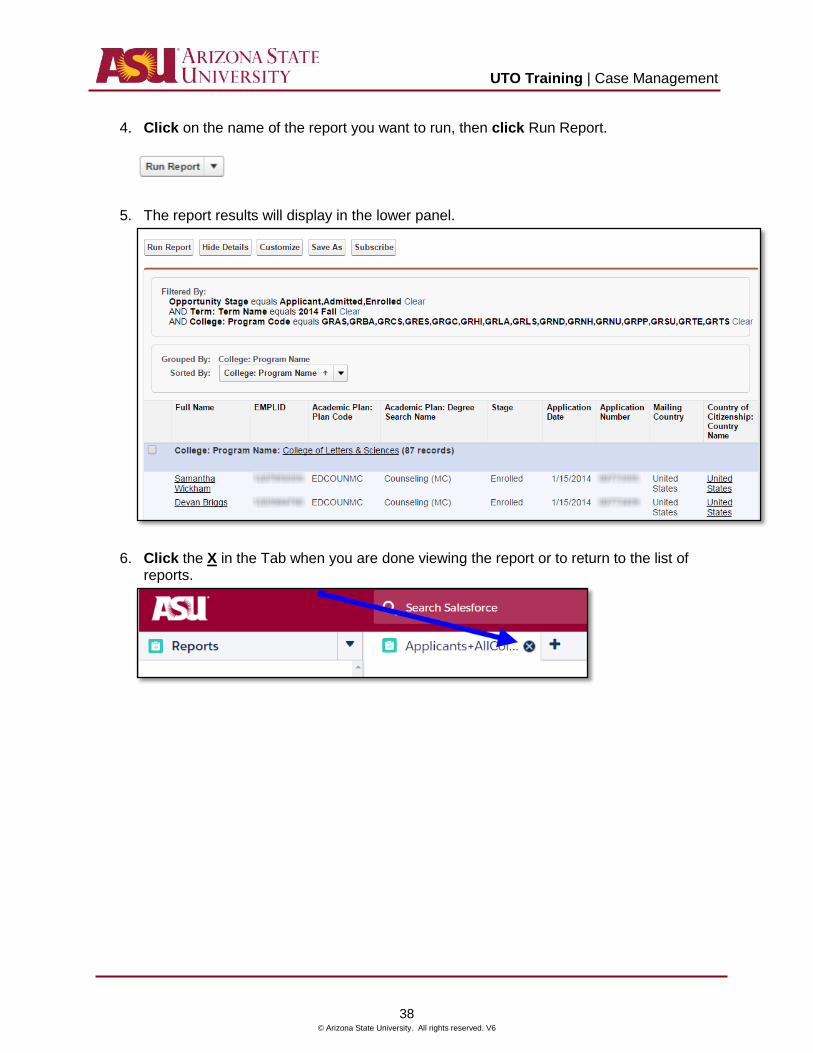
4. Click on the name of the report you want to run, then click Run Report.
5. The report results will display in the lower panel.
6. Click the X in the Tab when you are done viewing the report or to return to the list of reports.
UTO Training | Case Management
39 © Arizona State University. All rights reserved. V6
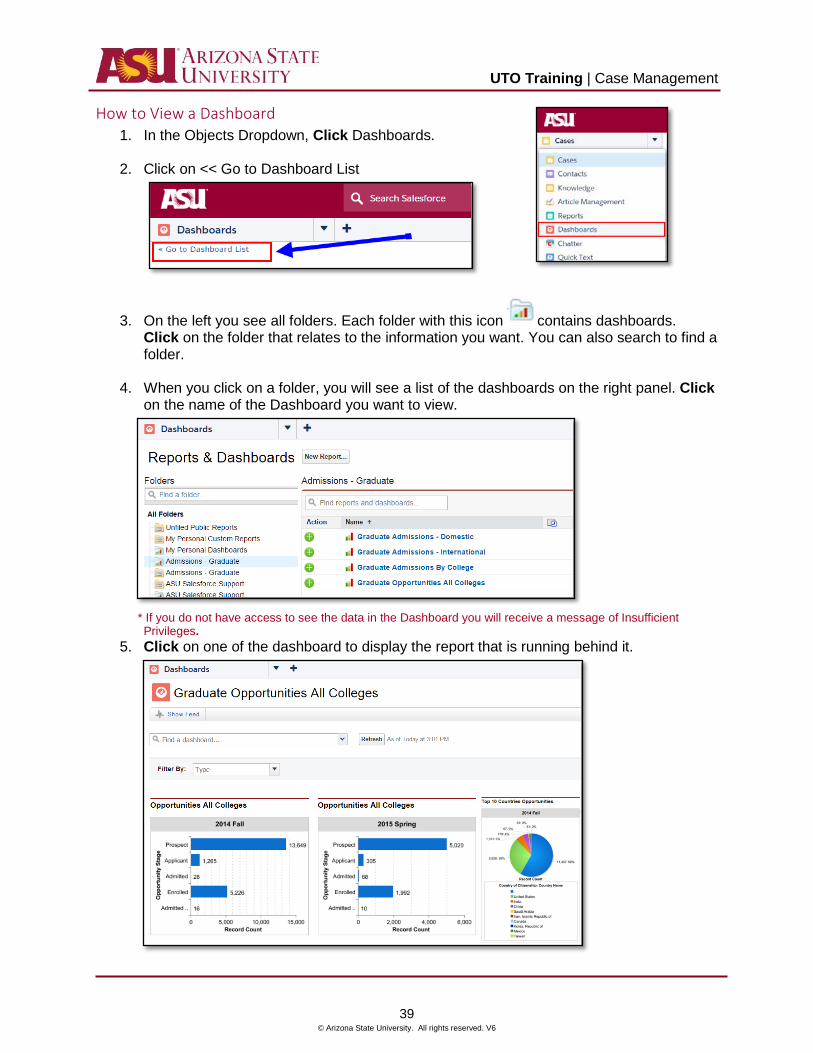
How to View a Dashboard 1. In the Objects Dropdown, Click Dashboards.
2. Click on << Go to Dashboard List
3. On the left you see all folders. Each folder with this icon contains dashboards. Click on the folder that relates to the information you want. You can also search to find a folder.
4. When you click on a folder, you will see a list of the dashboards on the right panel. Click on the name of the Dashboard you want to view.
* If you do not have access to see the data in the Dashboard you will receive a message of Insufficient Privileges.
5. Click on one of the dashboard to display the report that is running behind it.
UTO Training | Case Management
40 © Arizona State University. All rights reserved. V6
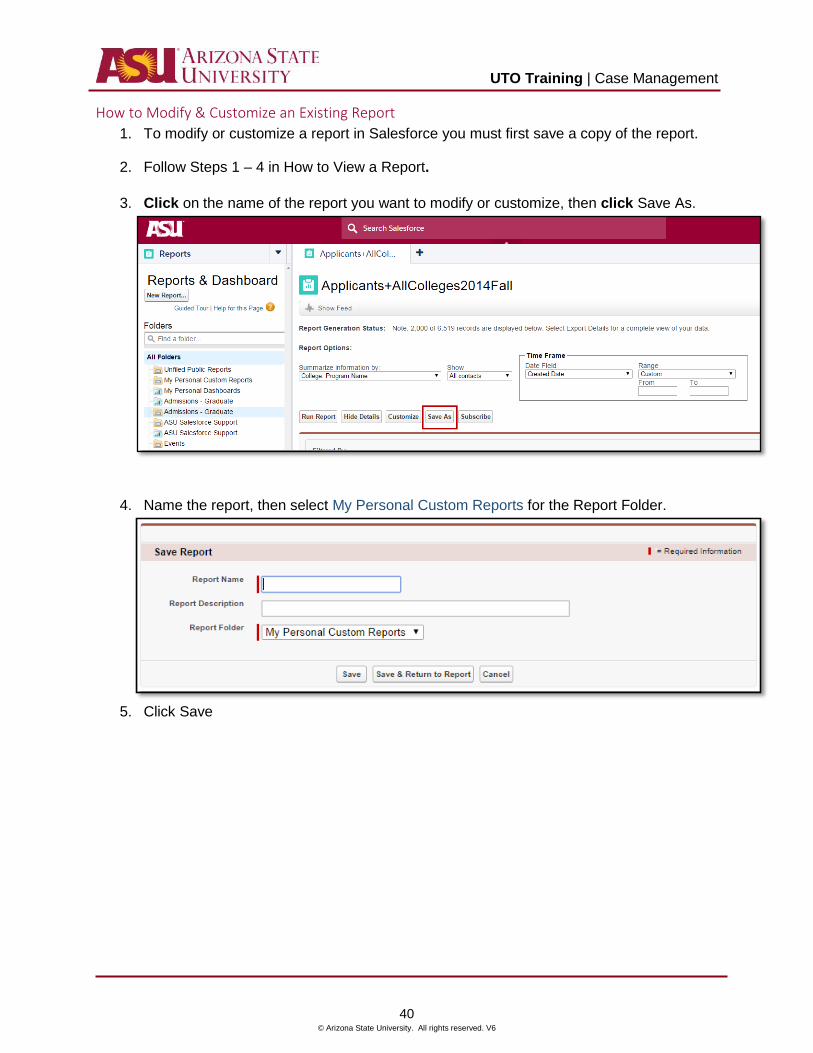
How to Modify & Customize an Existing Report 1. To modify or customize a report in Salesforce you must first save a copy of the report.
2. Follow Steps 1 – 4 in How to View a Report.
3. Click on the name of the report you want to modify or customize, then click Save As.
4. Name the report, then select My Personal Custom Reports for the Report Folder.
5. Click Save
UTO Training | Case Management
41 © Arizona State University. All rights reserved. V6
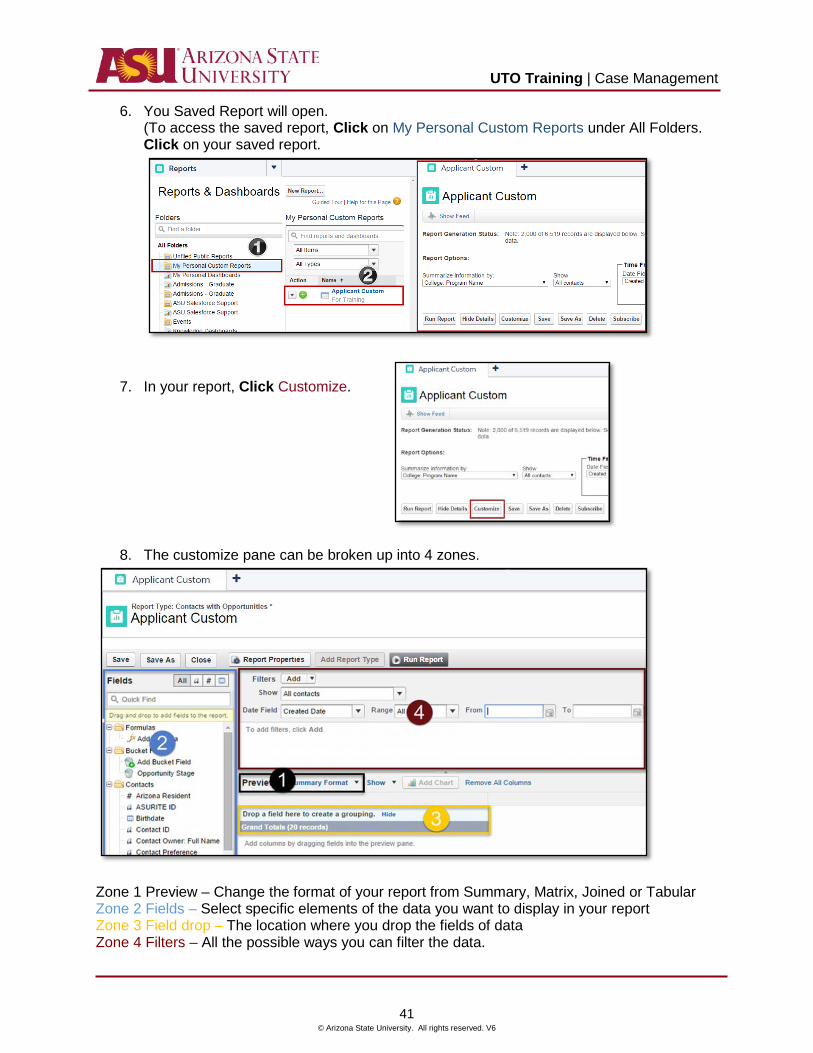
6. You Saved Report will open. (To access the saved report, Click on My Personal Custom Reports under All Folders. Click on your saved report.
7. In your report, Click Customize.
8. The customize pane can be broken up into 4 zones.
Zone 1 Preview – Change the format of your report from Summary, Matrix, Joined or Tabular Zone 2 Fields – Select specific elements of the data you want to display in your report Zone 3 Field drop – The location where you drop the fields of data Zone 4 Filters – All the possible ways you can filter the data.
UTO Training | Case Management
42 © Arizona State University. All rights reserved. V6
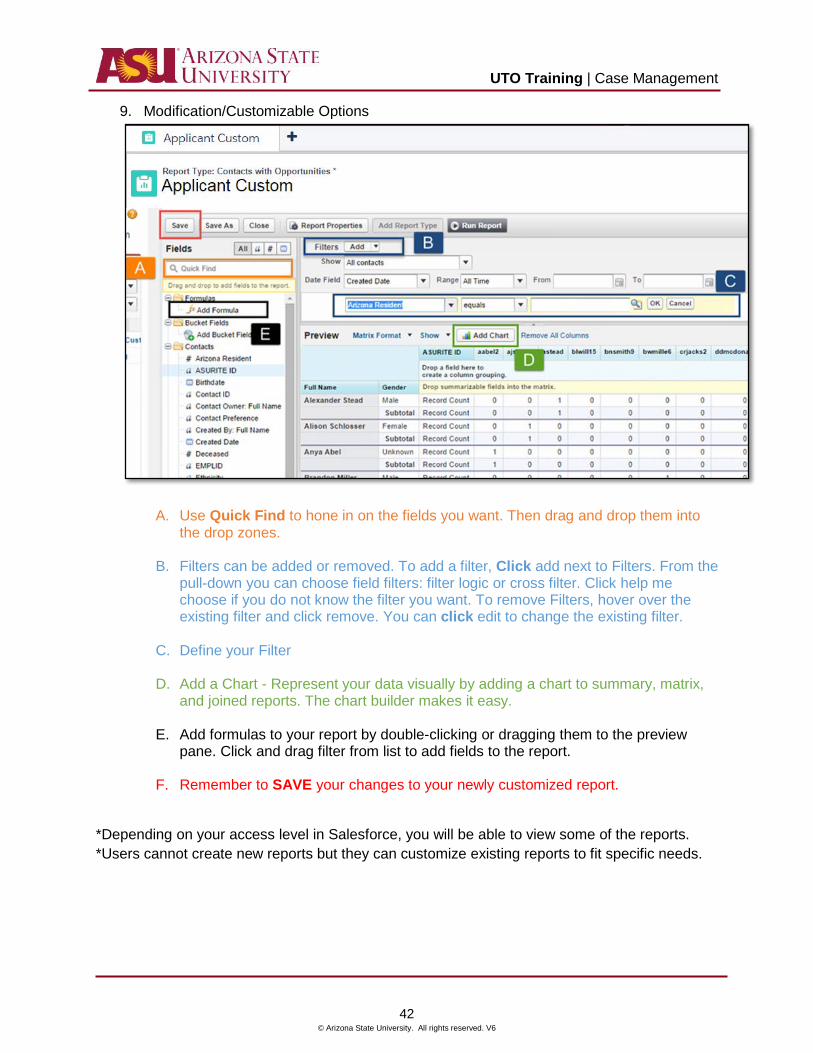
9. Modification/Customizable Options
A. Use Quick Find to hone in on the fields you want. Then drag and drop them into the drop zones.
B. Filters can be added or removed. To add a filter, Click add next to Filters. From the pull-down you can choose field filters: filter logic or cross filter. Click help me choose if you do not know the filter you want. To remove Filters, hover over the existing filter and click remove. You can click edit to change the existing filter.
C. Define your Filter
D. Add a Chart - Represent your data visually by adding a chart to summary, matrix,
and joined reports. The chart builder makes it easy.
E. Add formulas to your report by double-clicking or dragging them to the preview pane. Click and drag filter from list to add fields to the report.
F. Remember to SAVE your changes to your newly customized report.
*Depending on your access level in Salesforce, you will be able to view some of the reports. *Users cannot create new reports but they can customize existing reports to fit specific needs.
UTO Training | Case Management
43 © Arizona State University. All rights reserved. V6
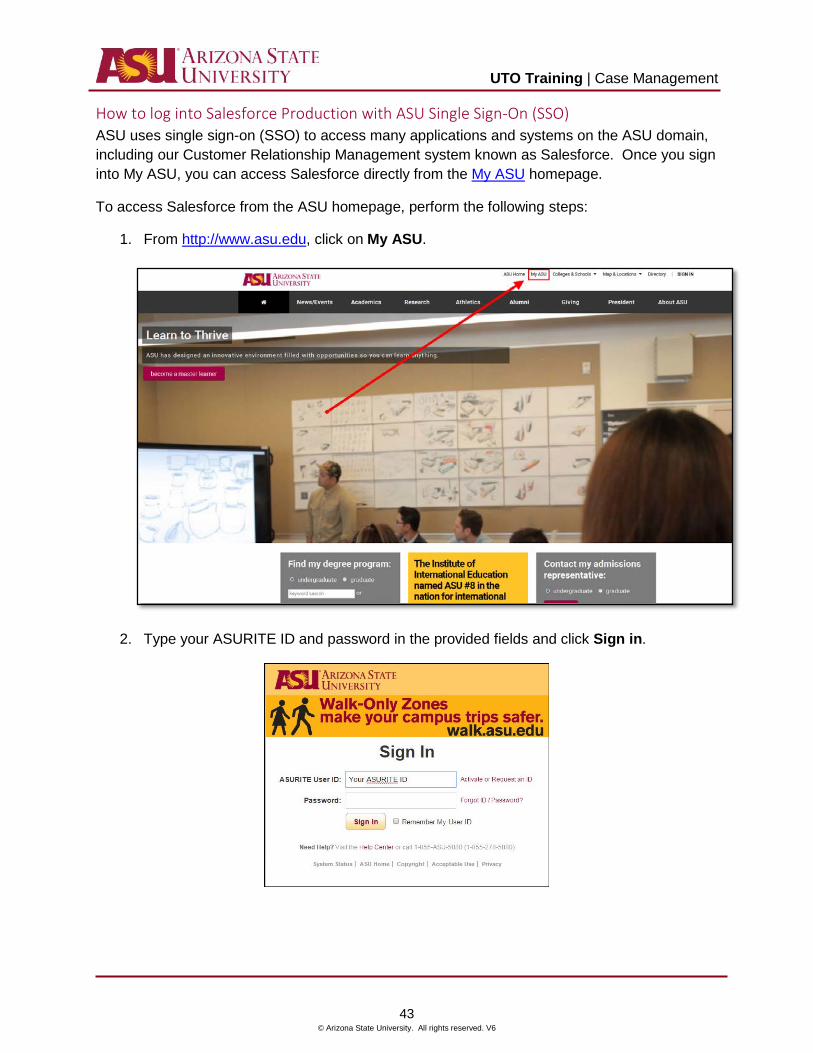
How to log into Salesforce Production with ASU Single Sign-On (SSO) ASU uses single sign-on (SSO) to access many applications and systems on the ASU domain, including our Customer Relationship Management system known as Salesforce. Once you sign into My ASU, you can access Salesforce directly from the My ASU homepage.
To access Salesforce from the ASU homepage, perform the following steps:
1. From http://www.asu.edu, click on My ASU.
2. Type your ASURITE ID and password in the provided fields and click Sign in.
UTO Training | Case Management
44 © Arizona State University. All rights reserved. V6
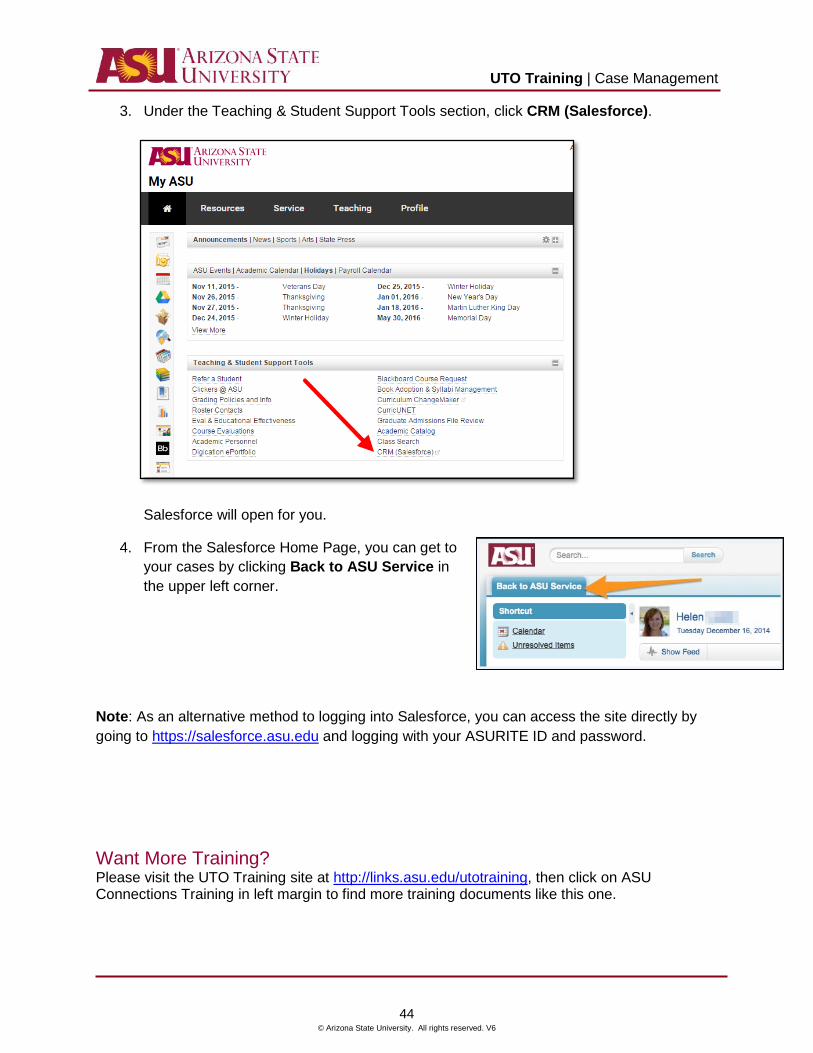
3. Under the Teaching & Student Support Tools section, click CRM (Salesforce).
Salesforce will open for you.
4. From the Salesforce Home Page, you can get to your cases by clicking Back to ASU Service in the upper left corner.
Note: As an alternative method to logging into Salesforce, you can access the site directly by going to https://salesforce.asu.edu and logging with your ASURITE ID and password.
Want More Training? Please visit the UTO Training site at http://links.asu.edu/utotraining, then click on ASU Connections Training in left margin to find more training documents like this one.
Related Documents