Zola Makes Things Clucky Chicken Pattern 1 Pattern © Sarah Ellender 2019 zolamakesthings.com Zola Makes Things Clucky Chicken What you will need for this pattern: • Approx. 50g of yarn for main body (light brown on my chicken). You can use any yarn you like, depending on how big you want your chicken. • Very small amounts of yarn in black and a contrast colour for embroidering the eyes. (I’m using black and gold). Or buttons or beads if you prefer and you’re not giving the chicken to a very young person who might gnaw on it. I don’t recommend safety eyes for this pattern, as the chicken’s head is quite narrow, especially if you’re using DK. • Small amounts of yarn in other colours for legs, beak, and embroidering feathers. (I’m using red for legs and beak, and brown and gold for feather detail.) • Crochet hook. Use one a little smaller than recommended for the yarn to keep the fabric tight so the stuffing doesn’t show. I use 3.5mm for DK yarn, 4mm for aran, and 5mm for the super chunky. • Ball point tapestry or wool needles. • Scissors. • Stuffing.

Welcome message from author
This document is posted to help you gain knowledge. Please leave a comment to let me know what you think about it! Share it to your friends and learn new things together.
Transcript

Zola Makes Things Clucky Chicken Pattern 1
Pattern © Sarah Ellender 2019 zolamakesthings.com
Zola Makes Things Clucky Chicken
What you will need for this pattern:
• Approx. 50g of yarn for main body (light brown on my chicken). You can use any yarn you
like, depending on how big you want your chicken.
• Very small amounts of yarn in black and a contrast colour for embroidering the eyes. (I’m
using black and gold). Or buttons or beads if you prefer and you’re not giving the chicken to
a very young person who might gnaw on it. I don’t recommend safety eyes for this pattern,
as the chicken’s head is quite narrow, especially if you’re using DK.
• Small amounts of yarn in other colours for legs, beak, and embroidering feathers. (I’m using
red for legs and beak, and brown and gold for feather detail.)
• Crochet hook. Use one a little smaller than recommended for the yarn to keep the fabric
tight so the stuffing doesn’t show. I use 3.5mm for DK yarn, 4mm for aran, and 5mm for the
super chunky.
• Ball point tapestry or wool needles.
• Scissors.
• Stuffing.

Zola Makes Things Clucky Chicken Pattern 2
Pattern © Sarah Ellender 2019 zolamakesthings.com
• Stitch marker.
Techniques you will need to know:
• slip knot
• chain
• slip stitch
• double crochet
• how to work in spiral, amigurumi style. It’s easy, you just keep going.
• increase
• half treble crochet
• treble crochet
• optional – make a “magic ring”
Abbreviations:
DC = double crochet
2DC = make two double crochet stitches into one stitch in the previous round. This is the same as an
increase.
TR = treble crochet
HTR = half treble crochet
I have shown how I do the embroidery, but this is just a suggestion. Obviously, you can decorate
your chicken however you want, and even add sequins and beads for extra bling!
Have fun! I’d love to see the finished results. #zolascluckychicken
A few notes for beginners
The majority of the pattern is worked amigurumi style, in a continuous spiral. You do not need to
join rounds or turn the crochet. It’s easy peasy!
The trickiest bit is starting the body with a magic ring. If you’ve never made one before, I
recommend you practice a few times until you’ve got it.
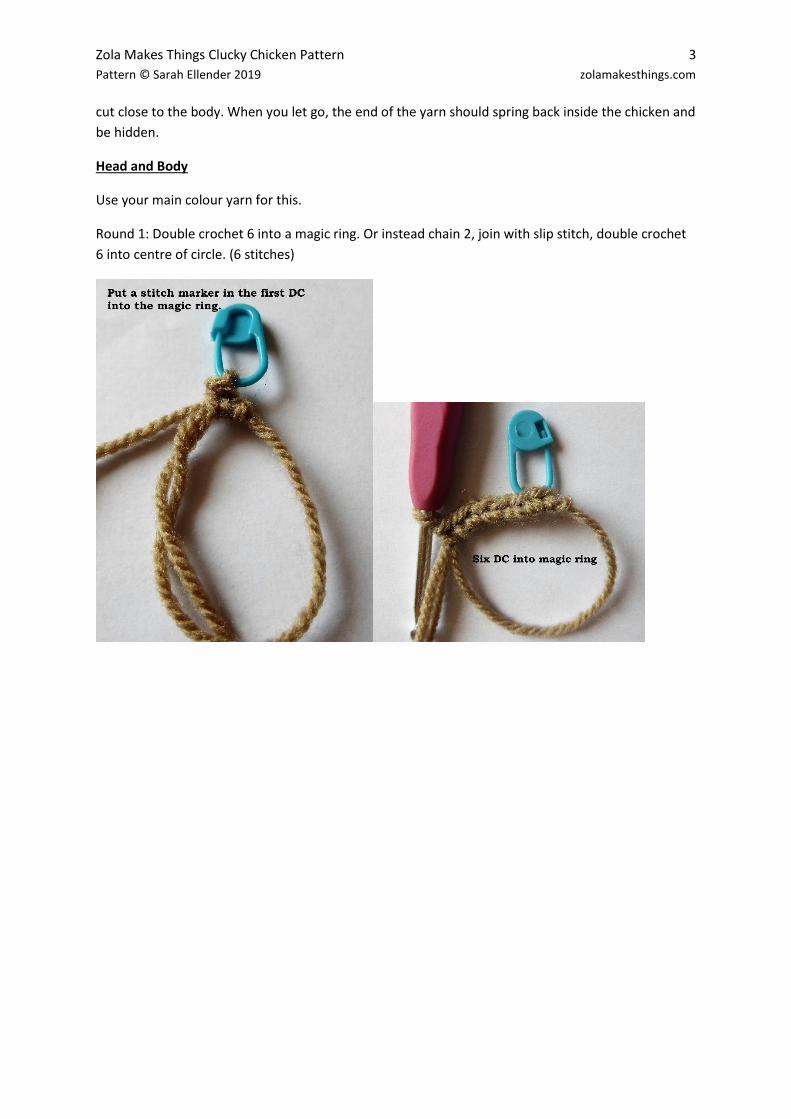
Mark the start of each round with a stitch marker, or a scrap of a different colour yarn, pulled
through the first stitch. You will move this marker each time you start a new round. You need it to
help you keep count of your stitches. As you are crocheting in a spiral, the first stitch of each round
will move around too!
If you find your count is a stitch or two out on the head/body, don’t worry. As long as you like the
look of your chicken, he/she is just fine.
When securing or weaving in yarn ends, I finish by sewing the thread over the same stitch 3 times,
then pulling the tail end of the yarn through the stuffed part of the chicken’s body. Pull it tight, and
Zola Makes Things Clucky Chicken Pattern 3
Pattern © Sarah Ellender 2019 zolamakesthings.com
cut close to the body. When you let go, the end of the yarn should spring back inside the chicken and
be hidden.
Head and Body
Use your main colour yarn for this.
Round 1: Double crochet 6 into a magic ring. Or instead chain 2, join with slip stitch, double crochet
6 into centre of circle. (6 stitches)

Zola Makes Things Clucky Chicken Pattern 4
Pattern © Sarah Ellender 2019 zolamakesthings.com
Round 2: Increase every stitch. 2DC into every stitch in round. (12 stitches)

Zola Makes Things Clucky Chicken Pattern 5
Pattern © Sarah Ellender 2019 zolamakesthings.com
Round 3: Increase every other stitch. (DC into next stitch, 2DC into next stitch) repeat until end of
round. (18 stitches)
Round 4: Increase every other stitch. (DC into next stitch, 2DC into next stitch) repeat until end of
round. (27 stitches)
Round 5: Increase every 2 stitches. (DC into next 2 stitches, 2DC into next stitch) repeat until end of
round. (36 stitches)
Round 6: Increase every 2 stitches. (DC into next 2 stitches, 2DC into next stitch) repeat until end of
round. (48 stitches)
Zola Makes Things Clucky Chicken Pattern 6
Pattern © Sarah Ellender 2019 zolamakesthings.com
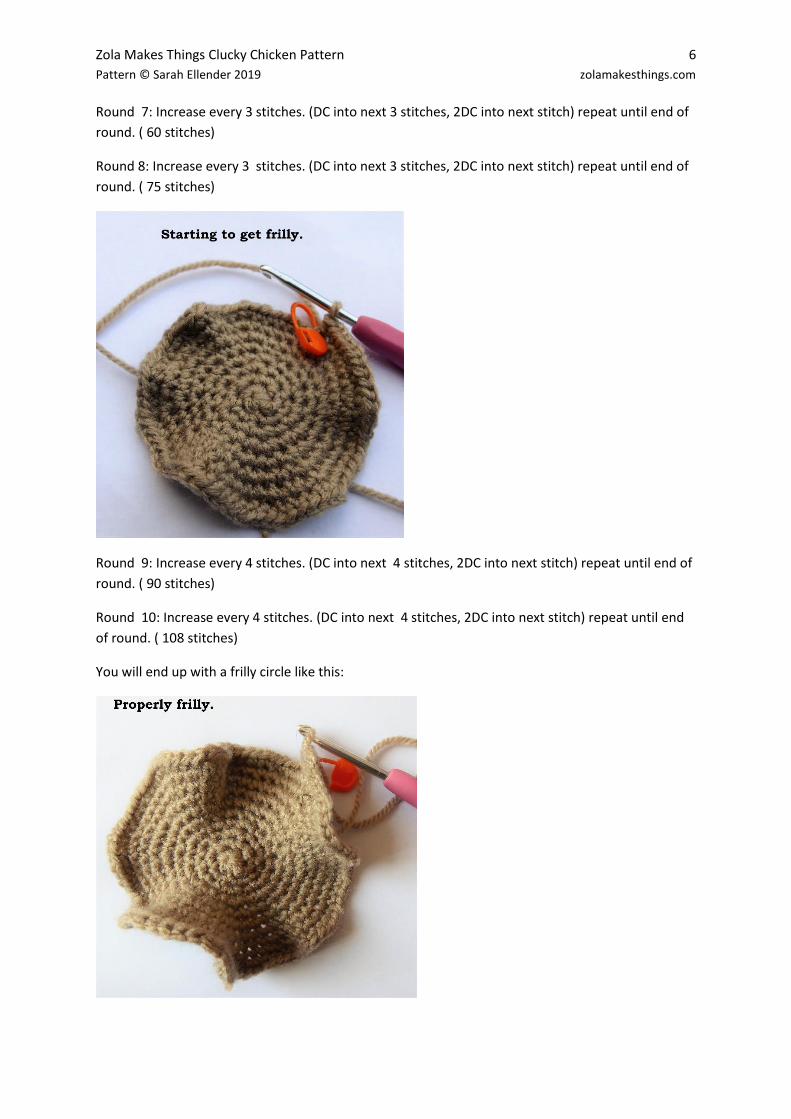
Round 7: Increase every 3 stitches. (DC into next 3 stitches, 2DC into next stitch) repeat until end of
round. ( 60 stitches)
Round 8: Increase every 3 stitches. (DC into next 3 stitches, 2DC into next stitch) repeat until end of
round. ( 75 stitches)
Round 9: Increase every 4 stitches. (DC into next 4 stitches, 2DC into next stitch) repeat until end of
round. ( 90 stitches)
Round 10: Increase every 4 stitches. (DC into next 4 stitches, 2DC into next stitch) repeat until end
of round. ( 108 stitches)
You will end up with a frilly circle like this:

Zola Makes Things Clucky Chicken Pattern 7
Pattern © Sarah Ellender 2019 zolamakesthings.com
Fold the circle in half to make a crescent, right side out, with your working thread at the tip of one
corner, like this:
Now continue working through both layers as follows...
3TR into the first stitch. Slip stitch into next stitch.
Repeat (3TR, slip stitch) 4 more times to complete the tail feathers.
Continue with DC around the rest of the crescent, stopping about an inch before the end to stuff the
chicken (with toy stuffing, not sage and lemon). This is a good time to put on safety eyes, if you are
using them.

Zola Makes Things Clucky Chicken Pattern 8
Pattern © Sarah Ellender 2019 zolamakesthings.com
Continue with DC to the end of the crescent.
After the last stitch, cut the yarn leaving a tail of a few inches. Pull the end through the final loop to
secure, and weave in the end.
Comb
With your comb colour (I’m using red), pull a loop through at the tip of the head like this.
Make 3HTR into this stitch.

Zola Makes Things Clucky Chicken Pattern 9
Pattern © Sarah Ellender 2019 zolamakesthings.com
Slip stitch into the next stitch.
3HTR into the next stitch.
Slip stitch into the next stitch.
3HTR into the next stitch.
Slip stitch into the next stitch.
Cut yarn, pull end through loop of final stitch, fasten off and weave in ends.
Beak
Make a slip knot on your hook, and chain 6 stitches. (This picture was taken using super chunky yarn
because it’s easier to see the stitches.)

Zola Makes Things Clucky Chicken Pattern 10
Pattern © Sarah Ellender 2019 zolamakesthings.com
DC into 2nd chain from hook.
DC 4 to the end of the row.

Zola Makes Things Clucky Chicken Pattern 11
Pattern © Sarah Ellender 2019 zolamakesthings.com
Turn your work over. Do not add a turning chain.
DC into 2nd stitch. DC 3 to the end of the row.
Turn. Do not add a turning chain.
DC into 2nd stitch. DC 2 to the end of the row.
Turn. Do not add a turning chain.

Zola Makes Things Clucky Chicken Pattern 12
Pattern © Sarah Ellender 2019 zolamakesthings.com
DC into 2nd stitch. DC into final stitch in the row.
Cut yarn leaving a long tail and pull through final stitch loop to secure.
Fold beak in half lengthwise and stitch together using the long tail and a needle.

Zola Makes Things Clucky Chicken Pattern 13
Pattern © Sarah Ellender 2019 zolamakesthings.com
Stitch beak to head over central body seam.
Weave in loose ends. I do this by going over the final stitch two or three times, then putting the
needle through the main body of the chicken, pulling the yarn taught, and cutting close to the body.
The end of the yarn should spring back inside the body when you let go.
Wings
Make 2 of these.
Slip knot onto hook. Chain 11 stitches in wing colour.

Zola Makes Things Clucky Chicken Pattern 14
Pattern © Sarah Ellender 2019 zolamakesthings.com
2TR into 2nd stitch from hook.
Slip stitch into next stitch.
(3TR into next stitch. Slip stitch into next stitch.) Repeat 4 times to finish wing.

Zola Makes Things Clucky Chicken Pattern 15
Pattern © Sarah Ellender 2019 zolamakesthings.com
Cut thread leaving a long tail to sew the wing onto the body with. Pull tail through to secure.
Use long tail to sew wing to body. Only stitch the inner edge of the wing, leaving the frills/feathers
free. Attach in a curve with one end of the wing at the centre of the chicken’s back, and the other at
the centre of its tummy.
Weave ends in.
Now do it all over again for the other side of your chicken!
(Note for more experienced crochet folk – you can do this with surface crochet instead of creating
an extra wing piece, but I found the results weren’t as neat.)
Legs

Zola Makes Things Clucky Chicken Pattern 16
Pattern © Sarah Ellender 2019 zolamakesthings.com
Find the position you want to put the legs on the bottom seam of the chicken. Pull a loop through
that stitch with the crochet hook, leaving a tail.
Into that loop, chain 12.
Slip stitch into the chain next to the hook. Slip stitch into the next two chain stitches to make the
first toe on the foot.

Zola Makes Things Clucky Chicken Pattern 17
Pattern © Sarah Ellender 2019 zolamakesthings.com
Chain 4 to start the second toe. Slip stitch back down the chain to the join with the first toe.
Chain 3 to start the third toe. Slip stitch back down the chain to the join with the first toe.
Continue with slip stitch back down the leg to the start.
Slip stitch into the next stitch along the bottom seam and repeat the above from “chain 12” for the
second leg.

Zola Makes Things Clucky Chicken Pattern 18
Pattern © Sarah Ellender 2019 zolamakesthings.com
Slip stitch into the next stitch along the bottom seam to finish. Cut yarn and pull through final loop.
Fasten off and weave in both ends.
That’s it for the crochet! Everything else is decoration with embroidery.
Eyes
Safety eyes obviously need to be put in before the chicken is crocheted closed (see instructions for
head and body above).
Small buttons or beads or felt pieces work well for eyes if you’re not a big fan of embroidery. Stitch
them on securely. (Again – caution if you are giving the chicken to a very young person. I would
recommend embroidery or felt in that case.)
To embroider, I start with a black French knot for the pupil, stitching around and over it until I get
the size I want, and then stitch around that with gold. I do both pupils at the same time so I only
have two ends of black thread to hide, not 4. Then the same for the gold surround.

Zola Makes Things Clucky Chicken Pattern 19
Pattern © Sarah Ellender 2019 zolamakesthings.com

Zola Makes Things Clucky Chicken Pattern 20
Pattern © Sarah Ellender 2019 zolamakesthings.com
Feathers
To suggest feathers, I stitch Vs in rows, using the holes between the crochet stitches as my guide.

Zola Makes Things Clucky Chicken Pattern 21
Pattern © Sarah Ellender 2019 zolamakesthings.com
Tail Detail
To finish the tail, I make long stitches from behind the wings to the gaps between the tail feathers.

Zola Makes Things Clucky Chicken Pattern 22
Pattern © Sarah Ellender 2019 zolamakesthings.com
All done!
Nest
If you want to make a little nest for your chicken to sit in (perhaps with some chocolate eggs), here’s
how.
Round 1: Double crochet 6 into a magic ring. Or instead chain 2, join with slip stitch, double crochet
6 into centre of circle. (6 stitches)
Round 2: Increase every stitch. 2DC into every stitch in round. (12 stitches)
Round 3: Increase every other stitch. (DC into next stitch, 2DC into next stitch) repeat until end of
round. (18 stitches)

Zola Makes Things Clucky Chicken Pattern 23
Pattern © Sarah Ellender 2019 zolamakesthings.com
Round 4: Increase every 2 stitches. (DC into next 2 stitches, 2DC into next stitch) repeat until end of
round. (24 stitches)
Round 5: Increase every 3 stitches. (DC into next 3 stitches, 2DC into next stitch) repeat until end of
round. (30 stitches)
Round 6: Increase every 4 stitches. (DC into next 4 stitches, 2DC into next stitch) repeat until end of
round. (36 stitches)
Round 7: Increase every 5 stitches. (DC into next 5 stitches, 2DC into next stitch) repeat until end of
round. (36 stitches)
Round 8: Increase every 6 stitches. (DC into next 6 stitches, 2DC into next stitch) repeat until end of
round. (42 stitches)
Round 7: Increase every 7 stitches. (DC into next 7 stitches, 2DC into next stitch) repeat until end of
round. (48 stitches)
This fits my chicken, working in DK yarn. You can make it bigger if needed by following the pattern of
increases. (Or smaller by stopping earlier.)
Round 8 – 13: Crochet all around in DC (48 stitches). Or continue until the nest is as tall as you want
it to be.
If you want a defined edge to the nest, crochet one extra round. Fold it over on the outside of the
nest, and do one final round, crocheting (DC) over the top of the folded over edge.
Related Documents