Logistics and Setup This section will cover basic logistics and setup for implementation of a YCCC Program. USB Drives We strongly suggest that each participant have their own USB memory stick that they use throughout the workshop. This is the best way to ensure that no hard work is lost, since participants will most likely be switching between computers that may have their contents cleared. Also, the MicroObservatory software can be stored and run from the memory stick itself, so there’s no need to install anything on the computers beforehand. When you first insert your USB drive, choose “Open Folder to View Files.” The key to making this work is to very clearly explain that all work should be explicitly saved to the USB drive. The easiest way to find the drive is to have participants change the name of the drive to their own name, so they may easily find it under “Computer.” To do this, right click on the flash drive and choose “Rename.” When you save an image, MicroObservatory image will not automatically choose the USB drive as the location, so you must navigate there yourself to make that happen. Choose Computer, then your USB drive name. 1

Welcome message from author
This document is posted to help you gain knowledge. Please leave a comment to let me know what you think about it! Share it to your friends and learn new things together.
Transcript
Logistics and Setup
This section will cover basic logistics and setup for implementation of a YCCC Program.
USB Drives
We strongly suggest that each participant have their own USB memory stick that they use throughout the workshop. This is the best way to ensure that no hard work is lost, since participants will most likely be switching between computers that may have their contents cleared. Also, the MicroObservatory software can be stored and run from the memory stick itself, so there’s no need to install anything on the computers beforehand.
When you first insert your USB drive, choose “Open Folder to View Files.”
The key to making this work is to very clearly explain that all work should be explicitly saved to the USB drive. The easiest way to find the drive is to have participants change the name of the drive to their own name, so they may easily find it under “Computer.” To do this, right click on the flash drive and choose “Rename.”
When you save an image, MicroObservatory image will not automatically choose the USB drive as the location, so you must navigate there yourself to make that happen. Choose Computer, then your USB drive name.
1
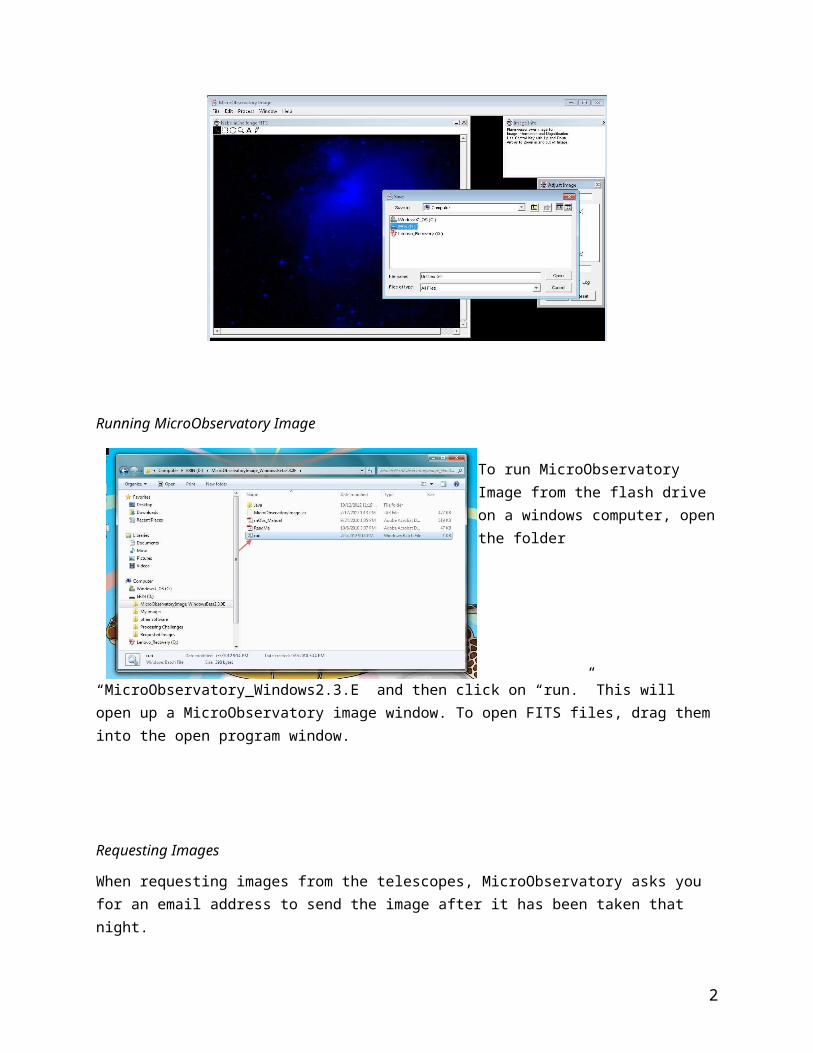
Running MicroObservatory Image
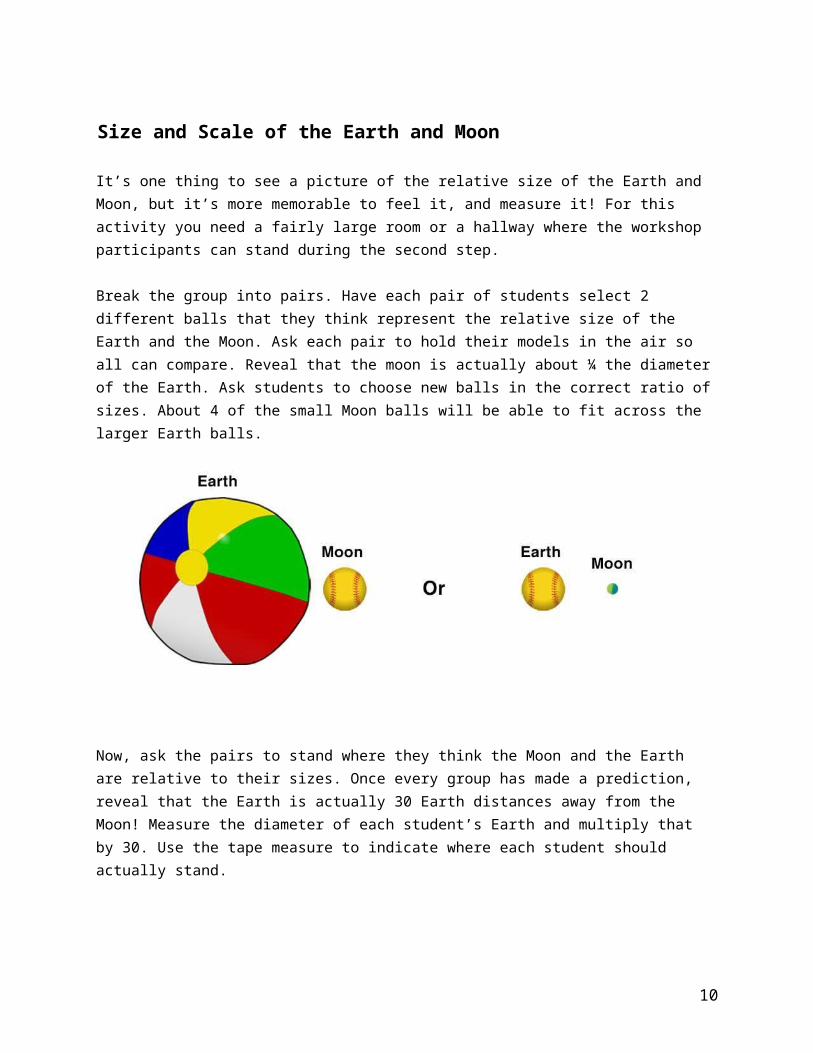
To run MicroObservatory Image from the flash drive on a windows computer, open the folder “MicroObservatory_Windows2.3.E” and then click on “run.” This will open up a MicroObservatory image window. To open FITS files, drag them into the open program window.
Requesting Images
When requesting images from the telescopes, MicroObservatory asks you for an email address to send the image after it has been taken that night.
We suggest that you use a group email address for requesting class images. This prevents students from being distracted by their personal email during workshop time, and is also a good solution for students who don’t have email addresses of their own. After requesting images, students should make sure to write down the names of the images they requested since there is no way to know who requested which image once they are sent to the group email address. They can use the Observing Log on the YCCC website, or you can create your own observing log.
Images are sent from the telescopes to requesters at 1pm the next day. Since workshop time is precious, as a facilitator you may want to log into the email account and download the groups’ images before the workshop begins. We would then suggest that you check the observing log and distribute the images to participants’ USB drives before the workshop begins. That way, when the workshop day begins, everyone already has the images they requested on their USB drives, and you can spend more time processing and less time searching for downloaded images.
You will notice that some of your images are not as clear as others, and may contain clouds or may even appear blank. These images are taken the night of each request, regardless of the weather conditions. If there are clouds in the sky, there will be clouds in your images! If you have bad luck on a particular night of imaging, but desperately need images so that your workshop participants can process images in their program period, you can easily visit the MicroObservatory image directory linked at the bottom of MicroObservatory.org. Here you can see all the images taken by the MicroObservatory telescopes, and choose a recent image of the same object taken on a less cloudy evening. You can then transfer these images on your participants’ flash drives for processing.
Folders
2

At the beginning of the workshop, all participants should be given a folder where they can keep the different activities they will complete. This folder is also a perfect place for participants to store their printed out processed images that they can use in their final exhibit. It is very important to print out as many images each day for each student, so that they have a wide variety of images to choose from when it comes down to choosing topics and images for their final project. As you print out each image, it is very helpful to label each one with the students name and the file name they chose for the image. Later on, when the students use the images, they will know whose is whose and can more easily credit their fellow workshop participants work.
Star System of Rewards
If you like, you can create a star chart for your class to act as a rewards system throughout the workshop. When a student answers a question correctly, when they are the first to raise their hand or follow an instruction, or when they do a particularly good job with an activity, you can choose to reward them with a star sticker next to their name. At the end of the program, the student or students who collected the most stars throughout earn an extra prize!
Introduction to Telescopes
3

During the YCCC program, you will control several robotic telescopes over the internet. In order to better understand these telescopes, it is helpful to look through a telescope with your own eyes! Your kit will include 2 different kinds of telescopes, a refracting telescope and a reflecting telescope.
Refracting Telescope - the Galileoscope
A refracting telescope is what most people think of when they hear “telescope.” It has a long skinny body, a lens at one end, and an eyepiece made of lenses at the other end.
Reflecting Telescope - the Celestron FirstScope
The Celestron FirstScope (like the MicroObservatory telescopes) uses mirrors instead of lenses to collect and focus light. This telescope has a large mirror at the very end of the main body, and a smaller mirror held in the center of the tube that reflects the light upwards towards the eyepiece.
4

Lenses and Mirrors
Make sure you have a bright object to project; this can be a projected image of a large R. You can easily make this slide in PowerPoint. You can also use a window in a darkened room as your target.
Part 1: Making an image with a lens and index card
Hold the magnifying glass between the image source and the index card. You’ll have to experiment with different distances between the lens and the card to get the right focus.
Part 2: Making an image with a mirror and an index card
Hold the mirror behind the index card, and reflect the light from the image source onto the index card. It can be tricky to find the right angle where the index card doesn’t block the light coming from the light source.
5

Kinesthetic Telescope
Part 1: Construct Your TelescopeRecruit 2 students to be the telescope’s aperture, the opening of the telescope that lets light in. Next, recruit a student to be the telescope’s mirror that will reflect and focus the light. Then, ask a student to be the shutter, the piece of the telescope that opens and closes to let light through to the detector. Next, recruit a student to play the detector, the piece of the telescope that collects the focused light, and records it as an image. One student can be the shining star that the telescope is observing. The remaining students are light that is shining from the star, and will be observed by the telescope and recorded by the detector.
1. Light travels from an object in space to the telescope
2. The aperture lets the light into the telescope
3. The mirror focuses the light toward the detector
4. The shutter lets the light through to the detector
5. The detector records the light to create an image
6

Kinesthetic telescope vocabulary cards
Light Light
Light Light
Aperture Aperture
Mirror Shutter
Detector Star
7

Size and Scale of the Earth and Moon
It’s one thing to see a picture of the relative size of the Earth and Moon, but it’s more memorable to feel it, and measure it! For this activity you need a fairly large room or a hallway where the workshop participants can stand during the second step.
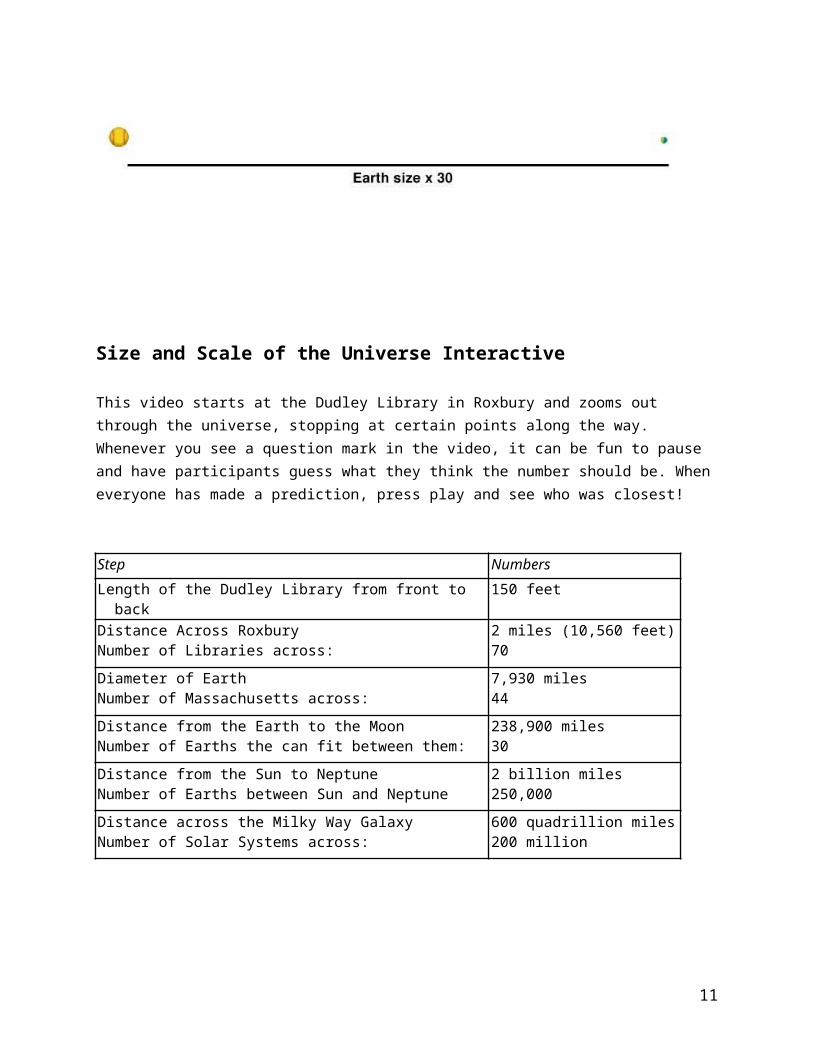
Break the group into pairs. Have each pair of students select 2 different balls that they think represent the relative size of the Earth and the Moon. Ask each pair to hold their models in the air so all can compare. Reveal that the moon is actually about ¼ the diameter of the Earth. Ask students to choose new balls in the correct ratio of sizes. About 4 of the small Moon balls will be able to fit across the larger Earth balls.
Now, ask the pairs to stand where they think the Moon and the Earth are relative to their sizes. Once every group has made a prediction, reveal that the Earth is actually 30 Earth distances away from the Moon! Measure the diameter of each student’s Earth and multiply that by 30. Use the tape measure to indicate where each student should actually stand.
Size and Scale of the Universe Interactive
8

This video starts at the Dudley Library in Roxbury and zooms out through the universe, stopping at certain points along the way. Whenever you see a question mark in the video, it can be fun to pause and have participants guess what they think the number should be. When everyone has made a prediction, press play and see who was closest!
Step Numbers
Length of the Dudley Library from front to back 150 feet
Distance Across RoxburyNumber of Libraries across:
2 miles (10,560 feet)70
Diameter of EarthNumber of Massachusetts across:
7,930 miles44
Distance from the Earth to the MoonNumber of Earths the can fit between them:
238,900 miles30
Distance from the Sun to NeptuneNumber of Earths between Sun and Neptune
2 billion miles250,000
Distance across the Milky Way GalaxyNumber of Solar Systems across:
600 quadrillion miles200 million
Vocabulary Game: Jump Up!
9
Give the same vocabulary cards to students on 2 teams. The first student with the correct card to jump up and say the vocabulary word gets a point. Here is a vocabulary card template.
Telescope Reflector
Refractor Aperture
Mirror Shutter
Exposure Time Detector
Pixel Brightness
Moon Planet
10
Our Solar System Gravity
Galaxy Milky Way
Universe Nebula
Star Crop
False Color Table Sharpen
Contrast Noise
11

{ This page intentionally left blank }
12

Image Show and Tell plus Astronomy InformationUse this information to talk to participants about images they’ve requested and processed!
What's Out There? Notes, Description Where in the Universe?
Size RangeNote: 1 light year = 10 trillion (10^12) kilometers
Notes about telescope observing
The "Bit Players"PlanetsMoonsCometsAsteroids
These objects (including our own Earth) are the left-overs from star formation… they orbit their parent star. They don't glow with their own visible light, but reflect the light of their star.
There are eight planets, some dwarf planets and oodles of comets and asteroids in our own solar system, here on the outskirts of the Milky Way Galaxy.
Using special telescopes and instruments, astronomers have discovered nearly 200 other stars with "Bit Players" -- planets -- circling them as well. The big question: are any of them a host for living organisms?
Bit Players can range from fist and house-size (asteroids) to Jupiter-size (around 10 times Earth's diameter, or 70,000 km). Much bigger and they no longer qualify as "bits" -- If Jupiter were much larger, it's gravity might cause it to start glowing on it's own to become a star!
As they orbit our Sun, solar system objects move around with respect to the far-away background stars, so you'll need to use the pull-down pointing menu, or, for comets and asteroids, look up the coordinates for the exact time you want to observe.
Because they are relatively close and reflect the Sun’s bright light, exposure times for the moon and planets will be short.
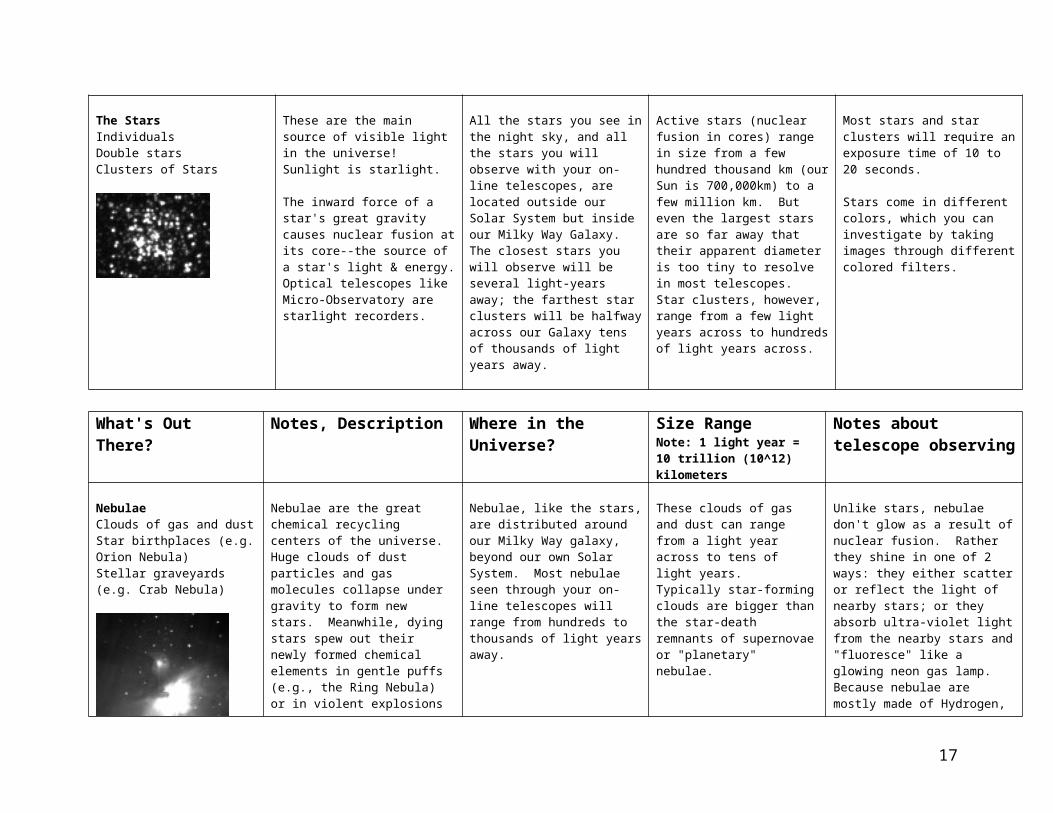
The StarsIndividualsDouble starsClusters of Stars
These are the main source of visible light in the universe! Sunlight is starlight.
The inward force of a star's great gravity causes nuclear fusion at its core--the source of a star's light & energy. Optical telescopes like Micro-Observatory are starlight recorders.
All the stars you see in the night sky, and all the stars you will observe with your on-line telescopes, are located outside our Solar System but inside our Milky Way Galaxy. The closest stars you will observe will be several light-years away; the farthest star clusters will be halfway across our Galaxy tens of thousands of light years away.
Active stars (nuclear fusion in cores) range in size from a few hundred thousand km (our Sun is 700,000km) to a few million km. But even the largest stars are so far away that their apparent diameter is too tiny to resolve in most telescopes. Star clusters, however, range from a few light years across to hundreds of light years across.
Most stars and star clusters will require an exposure time of 10 to 20 seconds.
Stars come in different colors, which you can investigate by taking images through different colored filters.
13

What's Out There? Notes, Description Where in the Universe?
Size RangeNote: 1 light year = 10 trillion (10^12) kilometers
Notes about telescope observing
NebulaeClouds of gas and dustStar birthplaces (e.g. Orion Nebula)Stellar graveyards (e.g. Crab Nebula)
Nebulae are the great chemical recycling centers of the universe. Huge clouds of dust particles and gas molecules collapse under gravity to form new stars. Meanwhile, dying stars spew out their newly formed chemical elements in gentle puffs (e.g., the Ring Nebula) or in violent explosions (supernovae). The atoms of carbon and calcium that make up your skin and bones were once in a great interstellar cloud at the beginning of the Solar System.
Nebulae, like the stars, are distributed around our Milky Way galaxy, beyond our own Solar System. Most nebulae seen through your on-line telescopes will range from hundreds to thousands of light years away.
These clouds of gas and dust can range from a light year across to tens of light years. Typically star-forming clouds are bigger than the star-death remnants of supernovae or "planetary" nebulae.
Unlike stars, nebulae don't glow as a result of nuclear fusion. Rather they shine in one of 2 ways: they either scatter or reflect the light of nearby stars; or they absorb ultra-violet light from the nearby stars and "fluoresce" like a glowing neon gas lamp. Because nebulae are mostly made of Hydrogen, and hydrogen glows with a red color, you'll find that nebulae are often brighter through the red filter than through the blue. Use long exposure times to gather the faint light from these diffuse cloudy objects.
GalaxiesSpiralEllipticalIrregularGalaxy clusters
These cosmic cast members could also be called the "Hollywoods of the Heavens" — they are huge cities of hundreds of billions of stars.
Everywhere! Our own Milky Way Galaxy (which we cannot see from the outside since we are inside) is but one of billions of galaxies that appear to populate the cosmos all the way out to the very limits of the observable universe! While galaxies had been observed since the invention of the telescope, it was only in the 1920s that we realized they were huge islands of stars outside our own galaxy.
Galaxies are VERY big, averaging about 100,000 light years across (that's 10^17 kilometers).
Because galaxies are very far away (millions to billions of light years) -- they are dim, so you'll need long exposure times.When you see an image of a galaxy, you're seeing the combined light of billions of stars, but our telescopes can not resolve individual stars. In fact, at the scale of a typical galaxy image (say 2 inches across or 100 pixels), a single star would be much smaller than an atom!
Exotic stuffBlack holes, Quasars, Pulsars
These weird members of the cosmic stage are often special cases of stars or galaxies….
Found in our own galaxy as well as others
Stellar sizes to galactic sizes Hard to observe with online telescopes.
14

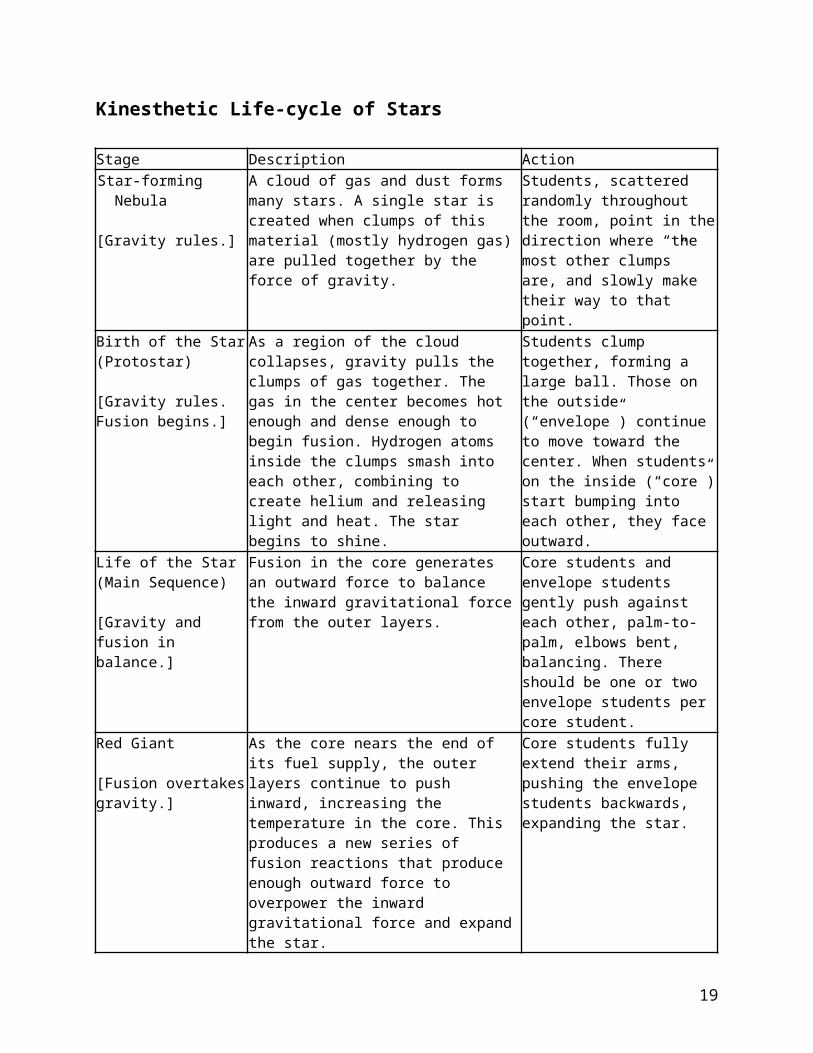
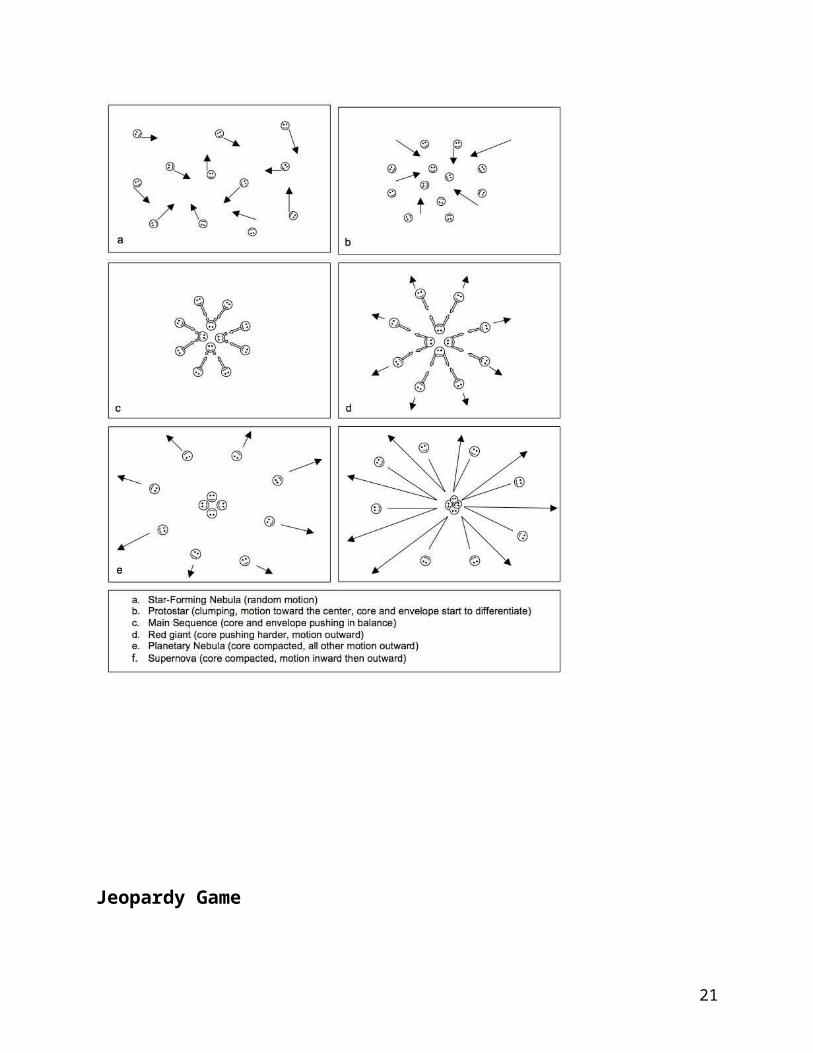
Kinesthetic Life-cycle of Stars
Stage Description ActionStar-forming Nebula
[Gravity rules.]
A cloud of gas and dust forms many stars. A single star is created when clumps of this material (mostly hydrogen gas) are pulled together by the force of gravity.
Students, scattered randomly throughout the room, point in the direction where “the most other clumps” are, and slowly make their way to that point.
Birth of the Star (Protostar)
[Gravity rules. Fusion begins.]
As a region of the cloud collapses, gravity pulls the clumps of gas together. The gas in the center becomes hot enough and dense enough to begin fusion. Hydrogen atoms inside the clumps smash into each other, combining to create helium and releasing light and heat. The star begins to shine.
Students clump together, forming a large ball. Those on the outside (“envelope”) continue to move toward the center. When students on the inside (“core”) start bumping into each other, they face outward.
Life of the Star (Main Sequence)
[Gravity and fusion in balance.]
Fusion in the core generates an outward force to balance the inward gravitational force from the outer layers.
Core students and envelope students gently push against each other, palm-to-palm, elbows bent, balancing. There should be one or two envelope students per core student.
Red Giant
[Fusion overtakes gravity.]
As the core nears the end of its fuel supply, the outer layers continue to push inward, increasing the temperature in the core. This produces a new series of fusion reactions that produce enough outward force to overpower the inward gravitational force and expand the star.
Core students fully extend their arms, pushing the envelope students backwards, expanding the star.
Death of a Low-Mass Star (Planetary Nebula with White Dwarf)
[Fusion ends; gravity wins.]
As the core runs out of fuel for fusion, it emits one last push outward, ejecting the star’s outer layers, which drift away into space. The core then contracts under its own gravity, forming a white dwarf.
Core students push the envelope outward then move together into a tight blob at the center. The envelope students, in a ring-like shape, drift away from the core.
Death of a High-Mass Star (Supernova, with Neutron Star or Black Hole)
[Fusion ends; gravity wins.]
The massive core continues to fuse elements and expands the star so it is even larger. Once the core runs out of fuel, it collapses to form a neutron star. The outer layers then collapse as well. As material falls toward the star’s center, it bounces off the core and explodes outward through the star. This explosion is called a supernova. In the most massive stars, the collapsed core will become a black hole.
Core students extend their arms, expanding the star. Then, they stop pushing and scrunch together at the star’s center. Envelope students rush inward, and bounce off the packed- together students in the core, exploding outward dramatically, revealing the collapsed core.
15

To transition between the deaths of low- and high-mass stars, facilitators must rewind the clock, to the original star-forming nebula or to the main sequence stage. Recreating all stages of the activity up to the red giant phase, from students’ memory, is most effective because it highlights the parallel paths of the two stars and allows students to review and teach back what they have learned.
16
Jeopardy Game
Category Points Definition QuestionTelescopes 100 An instrument that makes a far away object
look nearer by collecting and focusing light. Allows us to see more details that we can see with our eyes only.
What is a Telescope?
200 A type of telescope that uses lenses to collect and focus light.
What is a refractor or refracting telescope?
300 A type of telescope that uses mirrors to collect and focus light.
What is a reflector or reflecting telescope?
400 The part of a reflecting telescope that reflects and focuses light.
What is a mirror?
500 The part of a telescope that opens and closes to let light shine through.
What is the shutter?
Our Solar System
100 Made of our one star the Sun, and all the planets and their moons which orbit the Sun.
What is our Solar System?
200 A chunk of material (usually rock) that travels in a circle around a planet.
What is a moon?
300 A chunk of material (can be rock or gas) that travels in a circle around a star.
What is a planet?
400 A massive ball of gas that shines brightly because of the huge amount of energy that is produced inside it.
What is a star?
500 A force that pulls all things together. What is gravity? The Universe
100 A huge explosion that releases gas and dust. One of the ways a massive star can end its life.
What is a supernova?
200 A giant cloud of gas and dust. What is a nebula?300 A collection of many billions of stars, gas and
dust (including nebulae), all held together by the force of gravity.
What is a galaxy?
400 Earth and our solar system are part of this galaxy. All the stars visible in the night sky are part of our ‘home’ galaxy.
What is the Milky Way?
500 Made of billions of galaxies. All the galaxies you could see are part of it.
What is the Universe?
Light 100 The opening in a telescope through which light enters.
What is the aperture?
200 The amount of light that was collected by the telescope from part of an object. Measured as “pixel value” from an image using MicroObservatory Image software.
What is brightness?
300 The range of brightness (pixel value) that we choose to display in an image. We don’t HAVE to display the WHOLE range of brightness in an image.
What is contrast?
17

400 The part of a telescope that collects the focused light and records it as an electronic image.
What is the detector?
500 The amount of time that the shutter stays open.
What is exposure time?
Image Processing
100 Short for “picture element.” The smallest square portion of an electronic image where light was collected by each part of the detector.
What is a pixel?
200 A tool that uses colors to represent the brightness of pixels in an image.
What is a false color table?
300 Extra brightness in an image that did not come from light from an object, usually from the detector electronics.
What is noise?
400 A tool that makes clearer the edges between nearby regions of high and low brightness.
What is sharpen?
500 A tool that takes away the parts of an image around a chosen area.
What is crop?
18
Astro-Poetry
Materials: index cards cut into 1/3, pencils
Goal: Students will need to create captions for their exhibits, and it can sometimes be difficult to come up with descriptions for an image. Astro-Poetry is a good way to come up with a compelling caption, and practice observation and description.
Part 1: Project an image of a galaxy or nebula on a projector in PowerPoint. Ask the students to each provide a single word they’d use to describe the image. Try to get a variety of nouns, verbs, and adjectives. As participants come up with ideas, type them as individual words on the PowerPoint slide. Now, ask volunteers to verbally arrange the words on the screen into different lines of a poem, while you move the words into place on the PowerPoint slide.
Part 2: On your ownNow, students can create their own Astro Poems based on their own images. Ask students to select an RGB image that they requested and processed. They should brainstorm words they would use to describe the image, and write one word per index card. Then, have them arrange the index cards into a poem! Finally ask students to type up or write down their resulting poem.
Here’s an example of a completed Astro Poem
19

Image Processing Challenges
Prudential Challenge – practice adjusting an image to display pixel values in different ranges
- Open the Adjust Image window by going to Process > Adjust Image. - Move the cursor around the parts of the image you know you want to be displayed as white. Set the maximum brightness to be around that value. You can move the sliders, or just type a number into the box and hit enter. All pixel values at that number or above will be displayed as white. - Move the cursor around the areas of the image that you would like to be displayed as black, and set the minimum value to a number in that range. Again, you may use the sliders, or type in a number and press enter. All values below that number will be displayed on the screen as black.- All values between the numbers you set will be displayed as shades of grey.
- Hover your cursor over the lightest part of the image you’d like to appear black (the stripes on the right side of the building.) Set the minimum to around that value. Around 330. - Set the maximum value to around the value of pixels you’d like to be displayed as white of the image (the letters in Prudential and the stripes around them.) This should be around 530. Moon Challenge – practice using the zoom, crop and sharpen tools
20
- Open MoonChallenge.FITS- Go to Process > Sharpen to bring out more detail in the Moon’s craters- Click on the magnifying glass and click on the round crater near the center of the Moon 3 times to zoom in. - Go to Process > Adjust Image and adjust the sliders to create more contrast- Use the dashed square selection tool to drag and select the part of the image with the crater. Go to Process > Crop to take away the other parts of the image.
- Open MoonChallenge.FITS- Go to Process > Sharpen to bring out more detail in the Moon’s craters- Click on the magnifying glass and click on the craters near the bottom of the Moon 2 times-- Go to Process > Adjust Image and adjust the sliders to create more contrast- Use the dashed square selection tool to drag and select the part of the image you want. - Go to Process > Crop to take away the other parts of the image.
Nebula Challenge – practice using the Auto adjust image feature
21

- Open NebulaChallenge.FITS- Go to Process > Adjust Image- Click “Auto.” This auto-adjusts the settings to get the best range of brightness. - Notice that this is not always the best option. If you move your cursor around the bright center of the nebula, you’ll notice there is a range of pixel values that is all displayed as the same color.
- Open NebulaChallenge.FITS- Go to Process > Adjust Image- Click the radio button “Log,” then click “Auto.” This auto-adjusts the settings to get the best range of brightness with a different scale for lower pixel values than higher ones. You’ll notice that the center of the nebula, which before was all one saturated brightness, is now displayed with a better range of detail.
Hercules Star Custer Challenge – practice using the Log Auto adjust image feature
22

- Open StarClusterChallenge.FITS- Go to Process > Adjust Image- Click on “Log,” and then “Auto” to get the best range of pixel value displays!
Whirlpool Galaxy Challenge – practice using the Remove Noise and Crop tools
- Open GalaxyChallenge.FITS- Open the adjust image window by going to Process > Adjust Image- Click on “log,” and then click “auto.”- Remove the excess brightness in the image by going to Process > Reduce Noise- Select the area of the image you’d like to keep with the square selection tool- Go to Process > Crop to remove areas of the image outside your selection.
RGB Challenge and Making an RGB Image
23

Link to Video Tutorial: http://www.youtube.com/watch?v=ejeKGZwcgzY
Step 1: Open a red, a green, and a blue FITS image of an object in MicroObservatory Image. Open the MicroObservatory Image program, then drag the FITS files into the window.
Step 2: Open the Adjust Image dialog box by going to File > Adjust Image. Click on each image, and select log, then click Auto in the Adjust image dialog box.
Step 3: For each image, go to Process > Color Tables, and select the color that is appropriate for each image. To see which image was taken with which filter, go to Window > FITS header.
24

Step 4: Go to Process > Shift. For the easiest shifting, select the green image as the background. Then, select one of the 2 other images for the first foreground. Use the mouse to drag the foreground image until it matches up with the background image. Then, select the last color and match it to the background image. When you’re done lining up all 3 images, click OK.
Step 5: Go to Process > Stack > Convert Stack to RGB. There’s your final image! Save all of your work by saving your image as a GIF by going to File > Save As > GIF.
Vocabulary List
25

Telescope: An instrument that makes a far away object look nearer by collecting and focusing light. Allows us to see more details than we can with our eyes only.Reflector: A type of telescope that uses mirrors to collect and focus light.Refractor: A type of telescope that uses lenses to collect and focus light.Aperture: The opening in a telescope through which light enters.Mirror: The part of a telescope that reflects and focuses light.Shutter: The part of a telescope that opens and closes to let light through to the detector.Exposure time: The amount of time the shutter stays open.Detector: The part of a telescope that collects the focused light, and records it as an electronic image.Pixel: Short for “picture element”. The smallest square portion of an electronic image, where light was collected by each part of the detector.Brightness: The amount of light that was collected by the telescope from part of an object. Measured as “pixel value” from an image using MicroObservatory Image software.
Moon: A chunk of material (usually rock), that travels in a circle around a planet.Planet: A chunk of material (can be rock or gas) that travels in a circle around a star.Our Solar System: Made of our one star the Sun, and all the planets and their moons, which orbit the Sun.Gravity: A force that pulls all things together.Galaxy: A collection of many billions of stars, gas and dust (including nebulae), all held together by the force of gravity.Milky Way: Earth and our solar system are part of this galaxy. All the stars visible in the night sky are part of this galaxy.Universe: This is made of billions of galaxies. All the galaxies you could see with any telescope are part of this.Nebula: A giant cloud of gas and dust.Star: A massive ball of gas that shines brightly because of the huge amount of energy that is produced inside it.
Crop: A tool that takes away the parts of an image around a chosen area.False color table: A tool that uses colors to represent the brightness of pixels in an image.Sharpen: A tool that makes clearer the edges between nearby regions of high and low brightness.Contrast: The range of brightness (pixel value) that we choose to display in an image.Noise: Extra brightness in an image that did not come from light from an object, usually from the detector electronics.
Notes
26

Notes
27

Notes
28

Notes
29
Related Documents
![[moves] - Neo-Arcadianeo-arcadia.com/neoencyclopedia/garou_mark_of_the_wolves_moves.pdf · close Tai-otoshi jump close Tai-hineri Command Moves then quickly jump Super Jump jump on](https://static.cupdf.com/doc/110x72/5c11acf309d3f2b60f8c601d/moves-neo-arcadianeo-close-tai-otoshi-jump-close-tai-hineri-command-moves.jpg)