Summary Here is my remixed case for using an Bigtreetech SKR 1.4 with the Bear frame. Tested with 1.4 Turbo and Bear 2.1. 3D Printers > 3D Printers - Upgrades skr bigtreetechskr bear Important Notes: Looks like I got the labelling wrong (as did Jerlo :) who I copied w/o checking). Until I can fix it, please use the wiring guide here: https:// www.biqu.equipment/products/btt-skr-v1-4-skr-v1-4-pro? variant=31220354187362 Dont copy the orientation of the 5v DCDC board per my photos - its the wrong way round and unsurprisingly will blow the 10A fuse if you power up like that ;) luckily no magic smoke... (Wiring picture shows correct orientation) Here is my remixed case for using an Bigtreetech SKR 1.4 with the Bear frame. Tested with 1.4 Turbo and Bear 2.1. H Hijinx BTT SKR v1.3/1.4/1.4Turbo Mainboard Case for Bear Frame VIEW IN BROWSER updated 9. 3. 2021 | published 17. 2. 2021 1. 2. 3D MODEL ONLY

Welcome message from author
This document is posted to help you gain knowledge. Please leave a comment to let me know what you think about it! Share it to your friends and learn new things together.
Transcript

Summary
Here is my remixed case for using an Bigtreetech SKR 1.4 with the Bearframe. Tested with 1.4 Turbo and Bear 2.1.
3D Printers > 3D Printers - Upgrades
skr bigtreetechskr bear
Important Notes:
Looks like I got the labelling wrong (as did Jerlo :) who Icopied w/o checking).Until I can fix it, please use the wiring guide here: https://www.biqu.equipment/products/btt-skr-v1-4-skr-v1-4-pro?variant=31220354187362Dont copy the orientation of the 5v DCDC board per myphotos - its the wrong way round and unsurprisingly will blowthe 10A fuse if you power up like that ;) luckily no magicsmoke...(Wiring picture shows correct orientation)
Here is my remixed case for using an Bigtreetech SKR 1.4 with the Bearframe. Tested with 1.4 Turbo and Bear 2.1.
H Hijinx
BTT SKRv1.3/1.4/1.4TurboMainboard Case forBear Frame
VIEW IN BROWSER
updated 9. 3. 2021 | published 17. 2. 2021
1.
2.
3D M
ODEL
ONLY

It is based on the excellent Bear SKR case from RC-CnC, and I have alsomixed in elements from another super bear SKR case from Jerlo.
Here is a list of the changes:
Use of heat-set M3 threaded inserts instead of captive nuts for PCB mountand securing the case lid.See image for the type of inserts to use.
Remixed lid to include a 80mm fan, which is the optimal balance betweennoise vs airflow vs size (it fits with the X motor).Note that RC-CnCs original lids will work fine too if you dont want a 80mmfan
Adopted the cable management solution from Jerlo's design - this worksgreat! Plus I added a couple of slots for cable ties if needed
Adopted the idea for port labelling from Jerlo's design (re-implemented notdirect remix). It saves a bit of thinking when hooking up the cables - seenote above
Adopted the extruder aperture from MK3s rambo case to include capturehole for 3mm nylon filament for extruder loom support
Bevelled apertures for SD card and USB port to increase access andaddress I hope a comment on the original
Added mount slots for (optional) common 22mm x 17mm DC-DC buckconverters - this is to allow flexible use of fans with different voltage thanthe PSU/mainboard (e.g. 12v fans with 24v PSU). Example product fromAmazon UK: https://smile.amazon.co.uk/DollaTek-MP1584EN-Step-Down-Adjustable-Converter/dp/B07DJ5HZ7GAlso see image for the correct buck converter
Removed some of the bottom (print bed facing) vents to prevent airflowfrom the cooling fan to print area. This is a precaution to to preventwarping of prints. Additional vents added to lid. Airflow from the coolingfan will exit the case primarily from the lid or from the hole at base
Filleted corners for aesthetics
Included mouse ear brims for easier printing - align these with the case/lidon the slicer build plate
Cable tie tag added to lid for cooling fan cable management
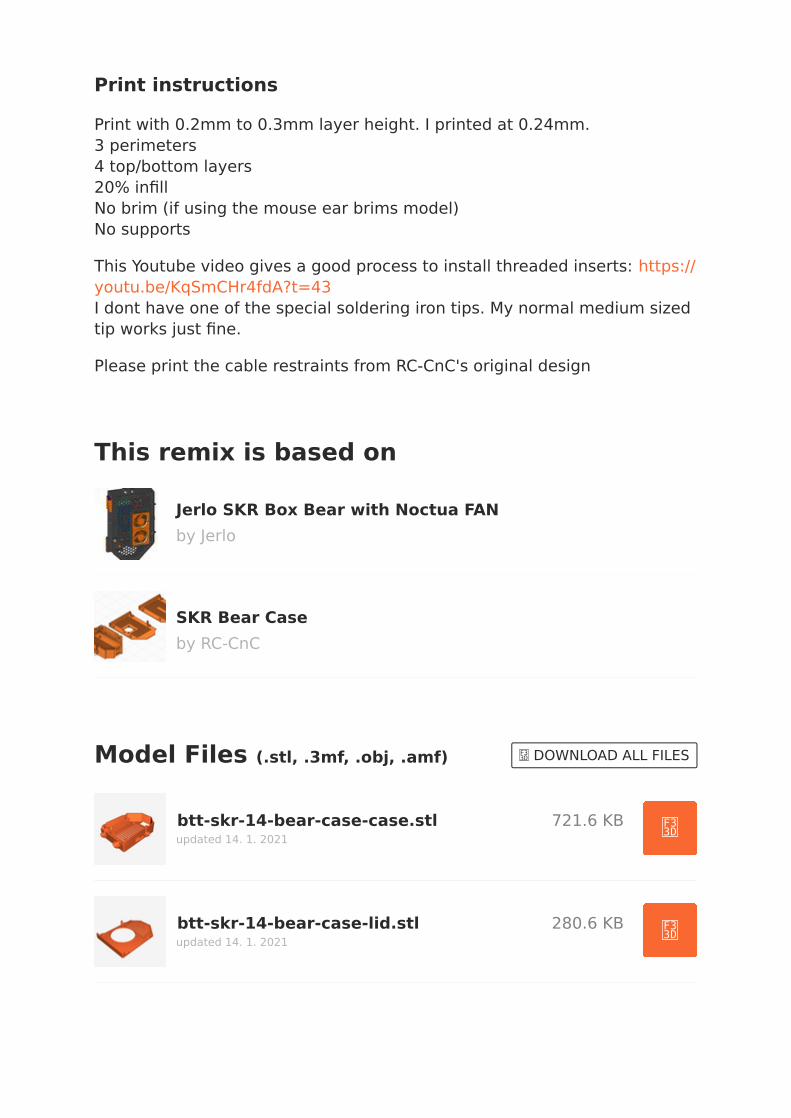
Model Files (.stl, .3mf, .obj, .amf) F33D DOWNLOAD ALL FILES
721.6 KBupdated 14. 1. 2021
F33D
280.6 KBupdated 14. 1. 2021
F33D
Print instructions
Print with 0.2mm to 0.3mm layer height. I printed at 0.24mm.3 perimeters4 top/bottom layers20% infillNo brim (if using the mouse ear brims model)No supports
This Youtube video gives a good process to install threaded inserts: https://youtu.be/KqSmCHr4fdA?t=43I dont have one of the special soldering iron tips. My normal medium sizedtip works just fine.
Please print the cable restraints from RC-CnC's original design
This remix is based on
Jerlo SKR Box Bear with Noctua FAN
by Jerlo
SKR Bear Case
by RC-CnC
btt-skr-14-bear-case-case.stl
btt-skr-14-bear-case-lid.stl

28.6 KBupdated 14. 1. 2021
F33D
21.4 KBupdated 14. 1. 2021
F33D
F30F
The Author has not uploaded any print files.Try to search in User print files section or generate and upload yourown.
License
This work is licensed under a Creative Commons (4.0 International License)
Attribution
✖ | Sharing without ATTRIBUTION ✔ | Remix Culture allowed ✔ | Commercial Use ✔ | Free Cultural Works ✔ | Meets Open Definition
btt-skr-14-bear-case-case-brims.stl
btt-skr-14-bear-case-lid-brims.stl
Related Documents