XSEDE New User Training @University of Central Florida Linda Akli, SURA Director, IT Programs Deputy Area Director, XSEDE Community Engagement & Enrichment Jay Alameda, NCSA Senior Technical Program Manager Manager, XSEDE Extended Support for Training Education & Outreach April 15, 2021

Welcome message from author
This document is posted to help you gain knowledge. Please leave a comment to let me know what you think about it! Share it to your friends and learn new things together.
Transcript

XSEDE New User Training@University of Central Florida
Linda Akli, SURADirector, IT ProgramsDeputy Area Director, XSEDE Community Engagement & Enrichment
Jay Alameda, NCSASenior Technical Program ManagerManager, XSEDE Extended Support for Training Education & Outreach
April 15, 2021
Housekeeping
2
Introductions
Code of Conduct
Terminology Acknowledgement
Materials Repository - http://hpcuniversity.org/trainingMaterials/253/
Post session survey
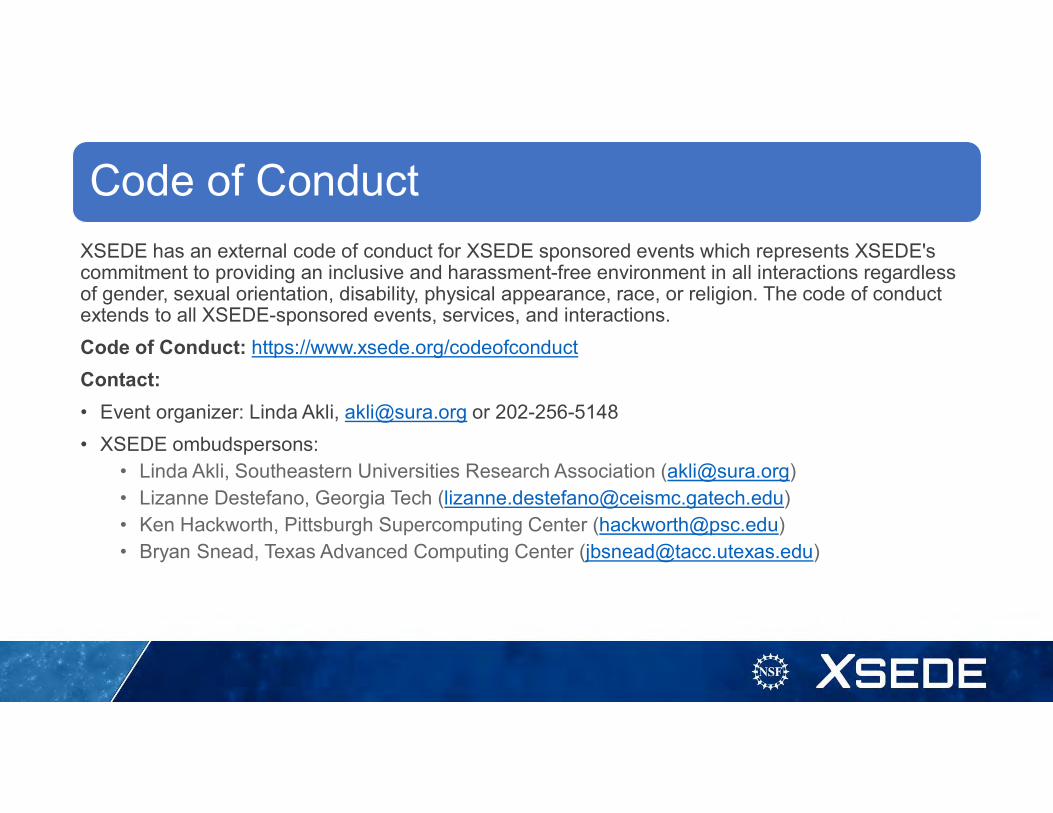
Code of Conduct
XSEDE has an external code of conduct for XSEDE sponsored events which represents XSEDE's commitment to providing an inclusive and harassment-free environment in all interactions regardless of gender, sexual orientation, disability, physical appearance, race, or religion. The code of conduct extends to all XSEDE-sponsored events, services, and interactions.
Code of Conduct: https://www.xsede.org/codeofconduct
Contact:
• Event organizer: Linda Akli, [email protected] or 202-256-5148
• XSEDE ombudspersons:• Linda Akli, Southeastern Universities Research Association ([email protected])• Lizanne Destefano, Georgia Tech ([email protected])• Ken Hackworth, Pittsburgh Supercomputing Center ([email protected])• Bryan Snead, Texas Advanced Computing Center ([email protected])
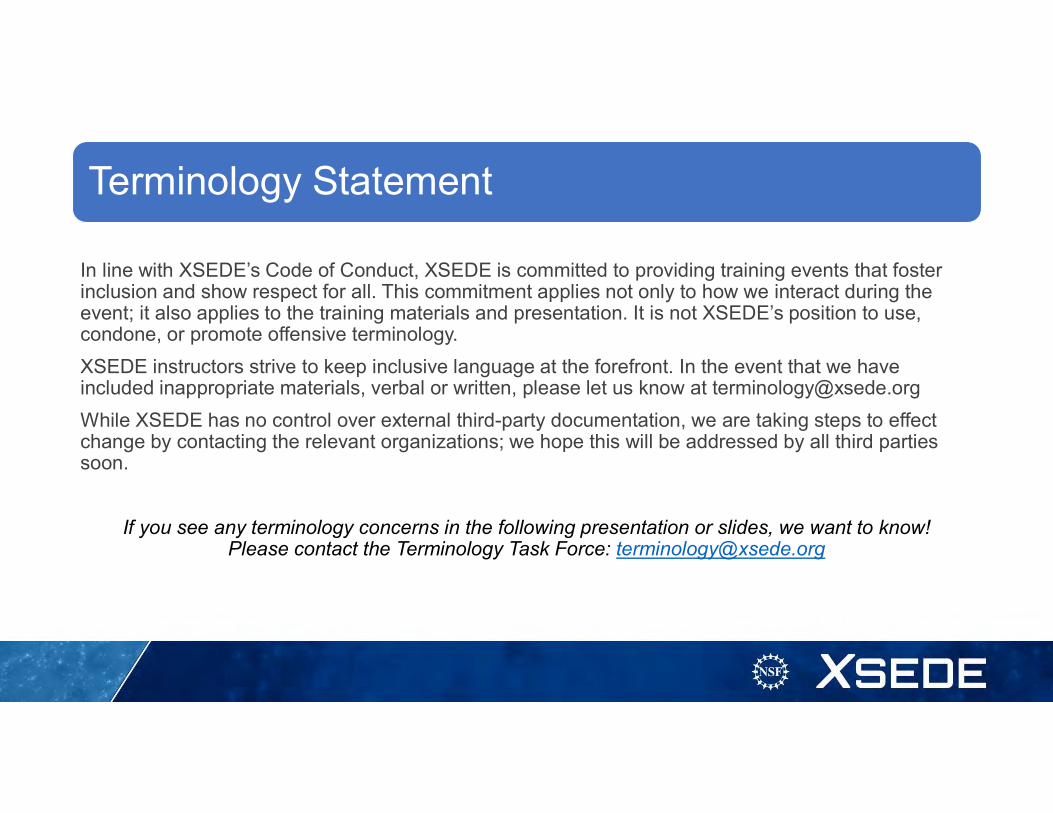
Terminology Statement
In line with XSEDE’s Code of Conduct, XSEDE is committed to providing training events that foster inclusion and show respect for all. This commitment applies not only to how we interact during the event; it also applies to the training materials and presentation. It is not XSEDE’s position to use, condone, or promote offensive terminology.
XSEDE instructors strive to keep inclusive language at the forefront. In the event that we have included inappropriate materials, verbal or written, please let us know at [email protected]
While XSEDE has no control over external third-party documentation, we are taking steps to effect change by contacting the relevant organizations; we hope this will be addressed by all third parties soon.
If you see any terminology concerns in the following presentation or slides, we want to know! Please contact the Terminology Task Force: [email protected]
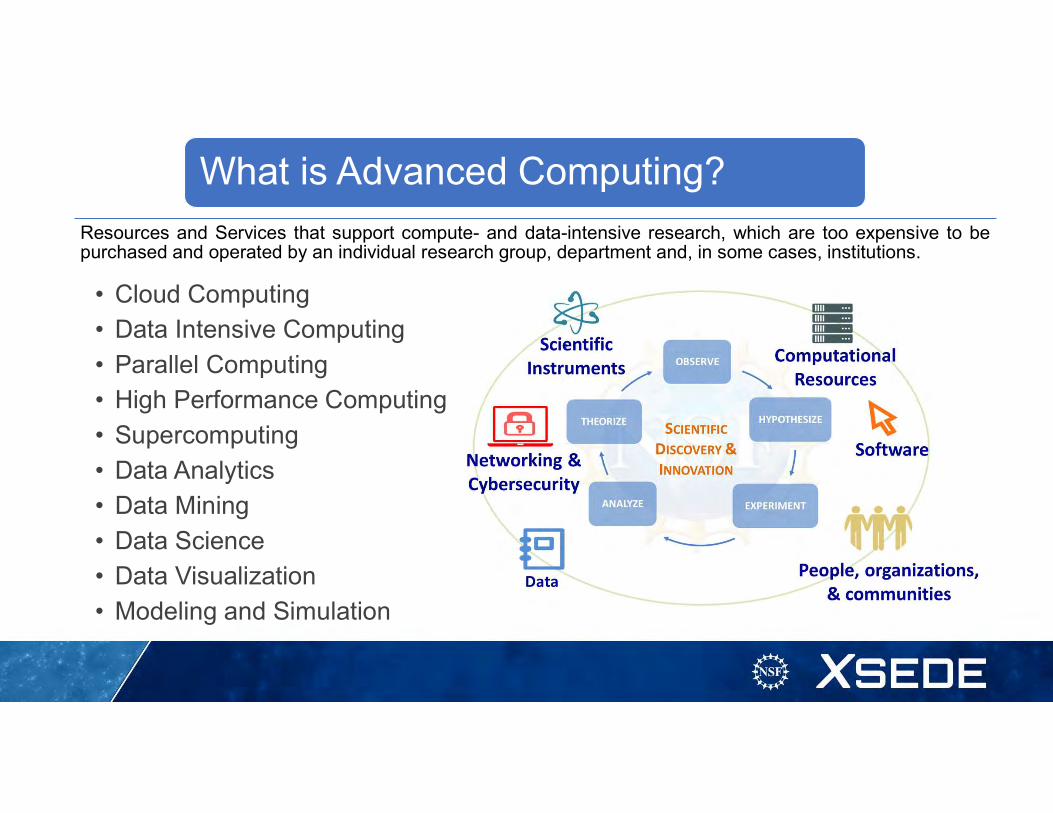
What is Advanced Computing?
• Cloud Computing• Data Intensive Computing
• Parallel Computing• High Performance Computing
• Supercomputing
• Data Analytics• Data Mining
• Data Science• Data Visualization
• Modeling and Simulation
Resources and Services that support compute- and data-intensive research, which are too expensive to bepurchased and operated by an individual research group, department and, in some cases, institutions.
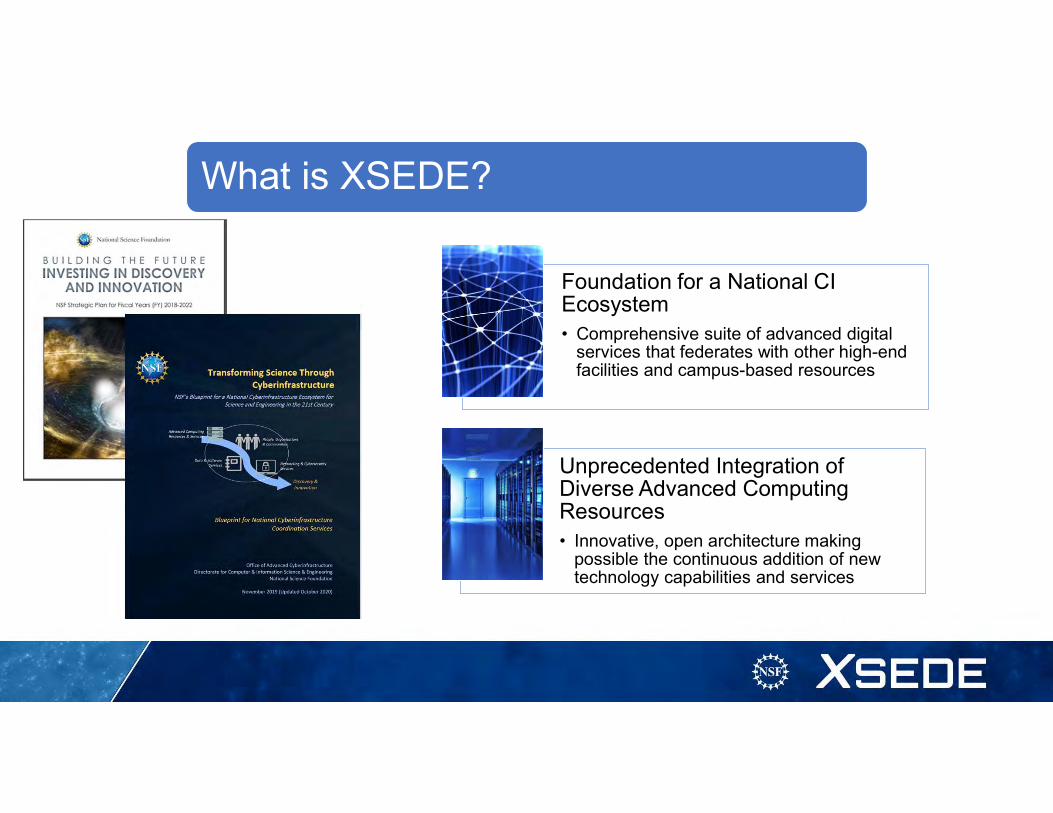
What is XSEDE?
Foundation for a National CI Ecosystem• Comprehensive suite of advanced digital
services that federates with other high-end facilities and campus-based resources
Unprecedented Integration of Diverse Advanced Computing Resources • Innovative, open architecture making
possible the continuous addition of new technology capabilities and services
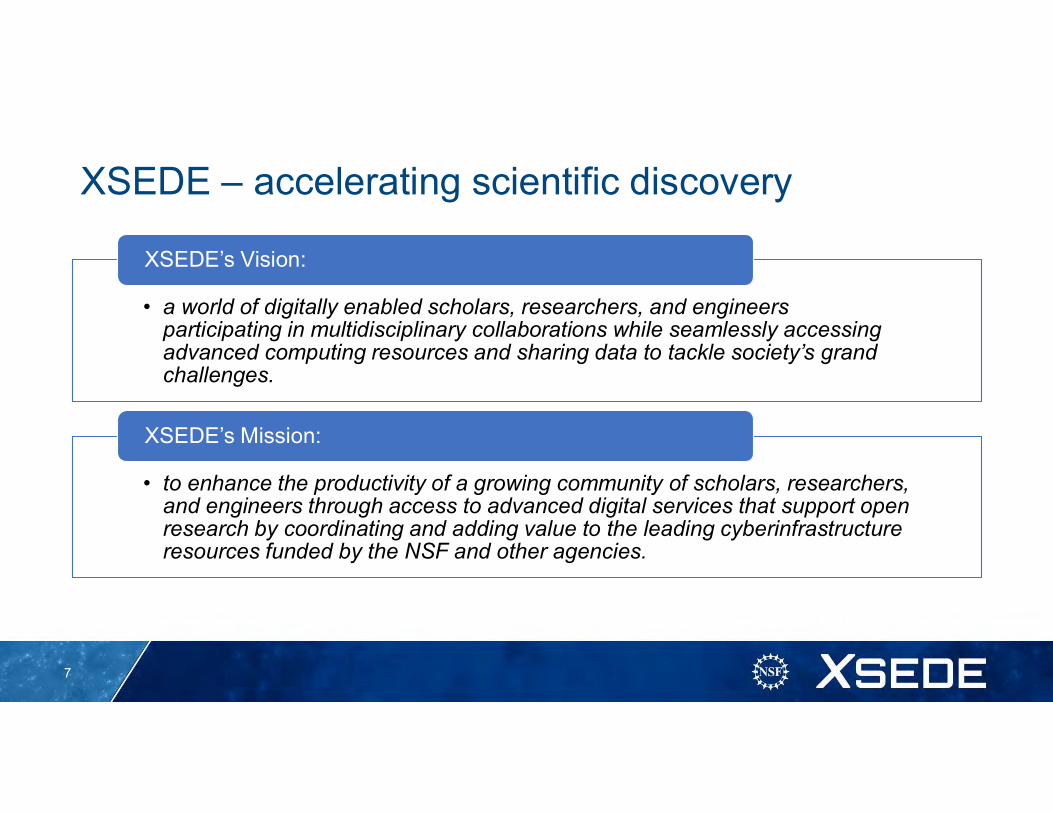
XSEDE – accelerating scientific discovery
• a world of digitally enabled scholars, researchers, and engineers participating in multidisciplinary collaborations while seamlessly accessing advanced computing resources and sharing data to tackle society’s grand challenges.
XSEDE’s Vision:
• to enhance the productivity of a growing community of scholars, researchers, and engineers through access to advanced digital services that support open research by coordinating and adding value to the leading cyberinfrastructure resources funded by the NSF and other agencies.
XSEDE’s Mission:
7
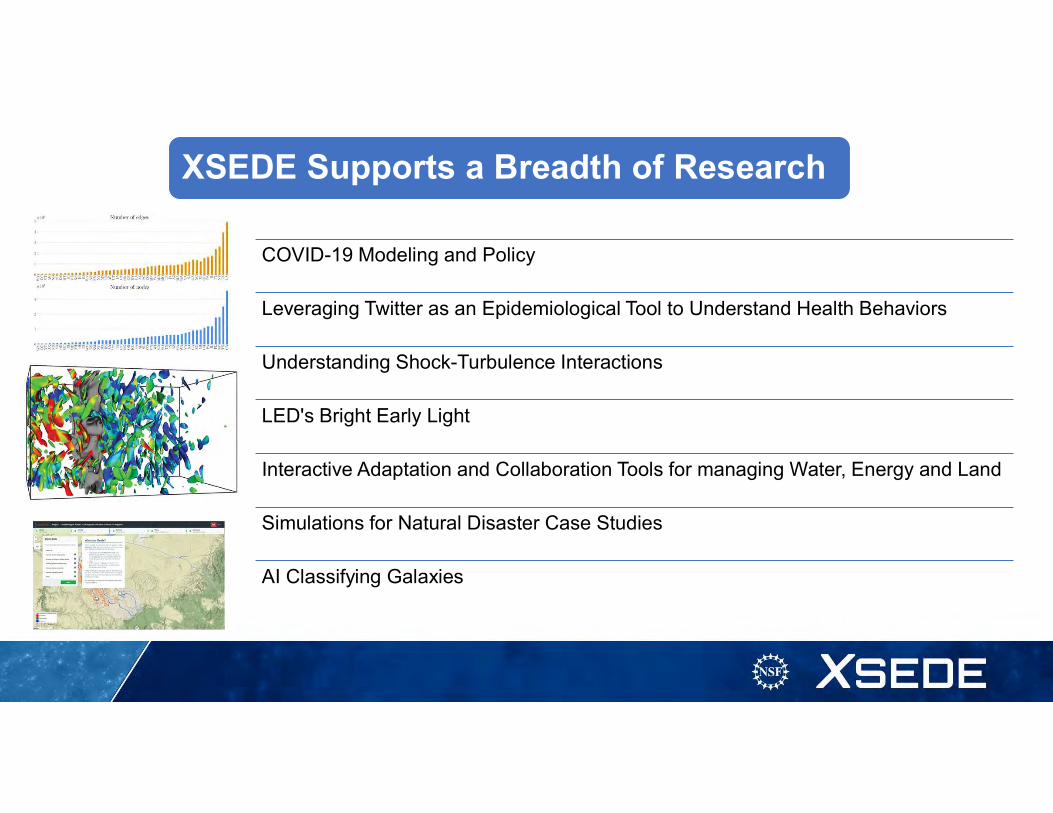
XSEDE Supports a Breadth of Research
COVID-19 Modeling and Policy
Leveraging Twitter as an Epidemiological Tool to Understand Health Behaviors
Understanding Shock-Turbulence Interactions
LED's Bright Early Light
Interactive Adaptation and Collaboration Tools for managing Water, Energy and Land
Simulations for Natural Disaster Case Studies
AI Classifying Galaxies

Upcoming Opportunities
Monday, June 7 – Tuesday, June 15, 2021, Computational Chemistry for Chemistry Educators (CCCE) workshop https://portal.xsede.org/course-calendar/-/training-user/class/2038/session/3995
June 17 – 18, 2021 Advanced Computing for Social Change Curriculum Workshop – contact [email protected]
Summer 2022, International HPC Summer School – contact [email protected]
EMPOWER ( Expert Mentoring Producing Opportunities for Work, Education, and Research ) –undergraduate student participants and faculty/research staff with projects – contact
Spring 2022 Advanced Computing for Social Change Regional Student Workshops
9
XSEDE New User Training@University of Central Florida
Jay Alameda, NCSASenior Technical Program ManagerManager, XSEDE Extended Support for Training Education & Outreach
April 15, 2021
Housekeeping
11
Materials Repository -http://hpcuniversity.org/trainingMaterials/253/
Post session and post workshop survey

Nowwhat?
Yeah! I got an XSEDE
allocation!
Learning Outcomes
After completing this tutorial, you will be able to:
• Use the XSEDE User Portal
• Access your XSEDE resources
• Manage files
• Run jobs
• Get help
XSEDE User Portal (XUP)
• URL: portal.xsede.org
• Single point-of-entry to information about XSEDE services and utilities for using them
• Anyone can create an XUP user account and access non-project features
• Only XSEDE allocation project members can access project features
Using the XUP
• Create and login to your XUP Account
• Use XSEDE resources responsibly
• Get added to your XSEDE project
• Navigate your personal My XSEDE webpage
• Navigate the information in the XUP

Create and login to your XUP account
1. From the XUP homepage, click CREATE ACCOUNT
2. Complete the User Account Form
3. Verify your account request
4. Select your username and password
5. Login to the XUP
portal.xsede.org
Click the CREATE ACCOUNT link to access the XUP User Account Form
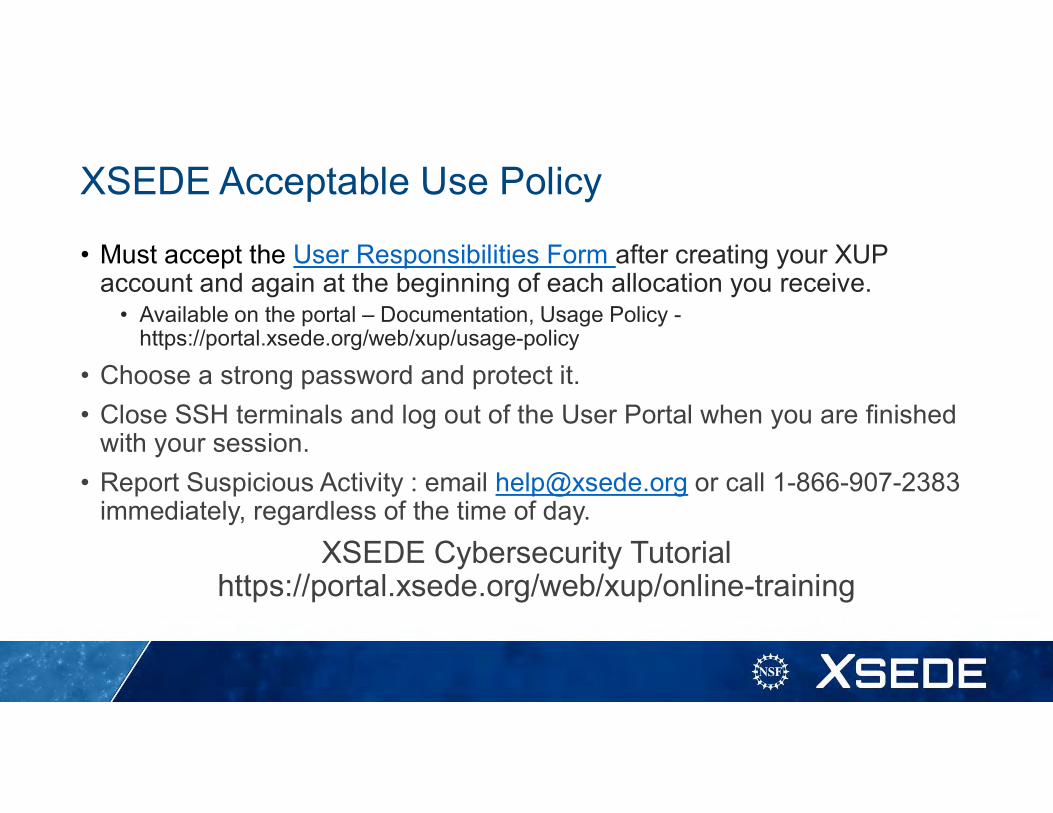
XSEDE Acceptable Use Policy
• Must accept the User Responsibilities Form after creating your XUP account and again at the beginning of each allocation you receive.
• Available on the portal – Documentation, Usage Policy -https://portal.xsede.org/web/xup/usage-policy
• Choose a strong password and protect it.
• Close SSH terminals and log out of the User Portal when you are finished with your session.
• Report Suspicious Activity : email [email protected] or call 1-866-907-2383 immediately, regardless of the time of day.
XSEDE Cybersecurity Tutorialhttps://portal.xsede.org/web/xup/online-training
Get Added to Your XSEDE project
• PIs automatically have full access to their project’s account.
• The PI is responsible for managing users on their account.
• Ask the PI, or their allocation manager, to add your XUP username to the project.
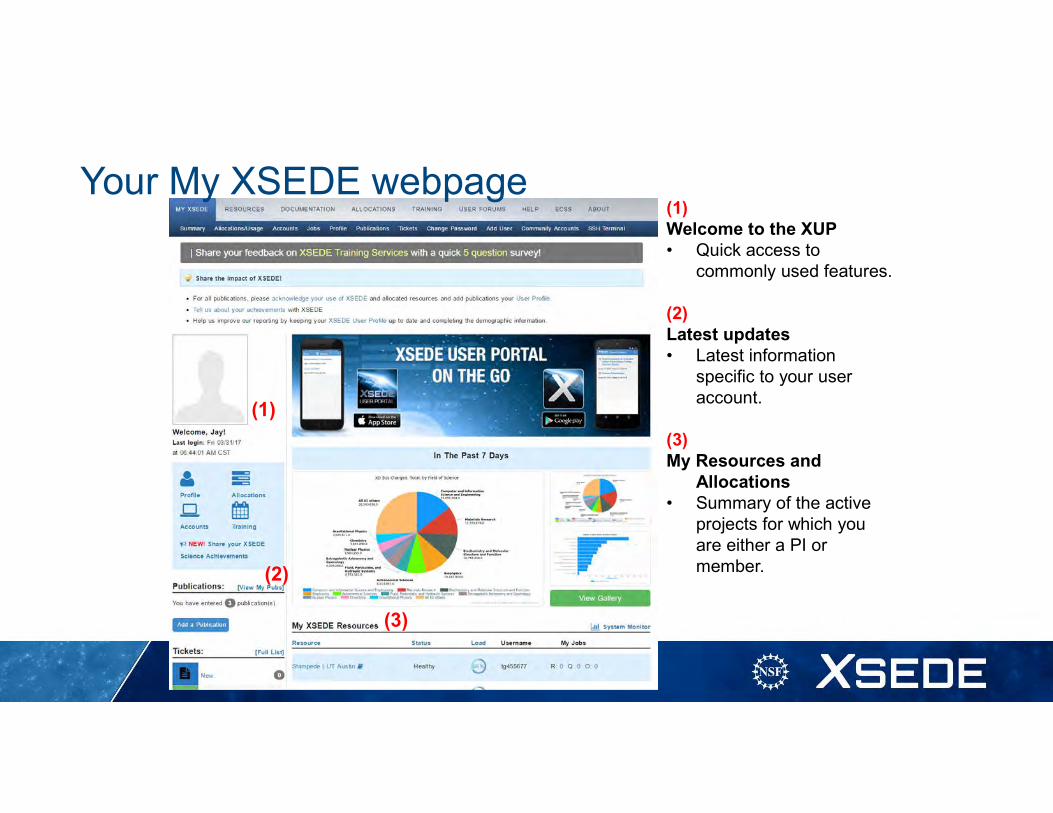
Your My XSEDE webpage(1)Welcome to the XUP• Quick access to
commonly used features.
(2)Latest updates• Latest information
specific to your user account.
(3)My Resources and
Allocations• Summary of the active
projects for which you are either a PI or member.
(1)
(2)
(3)
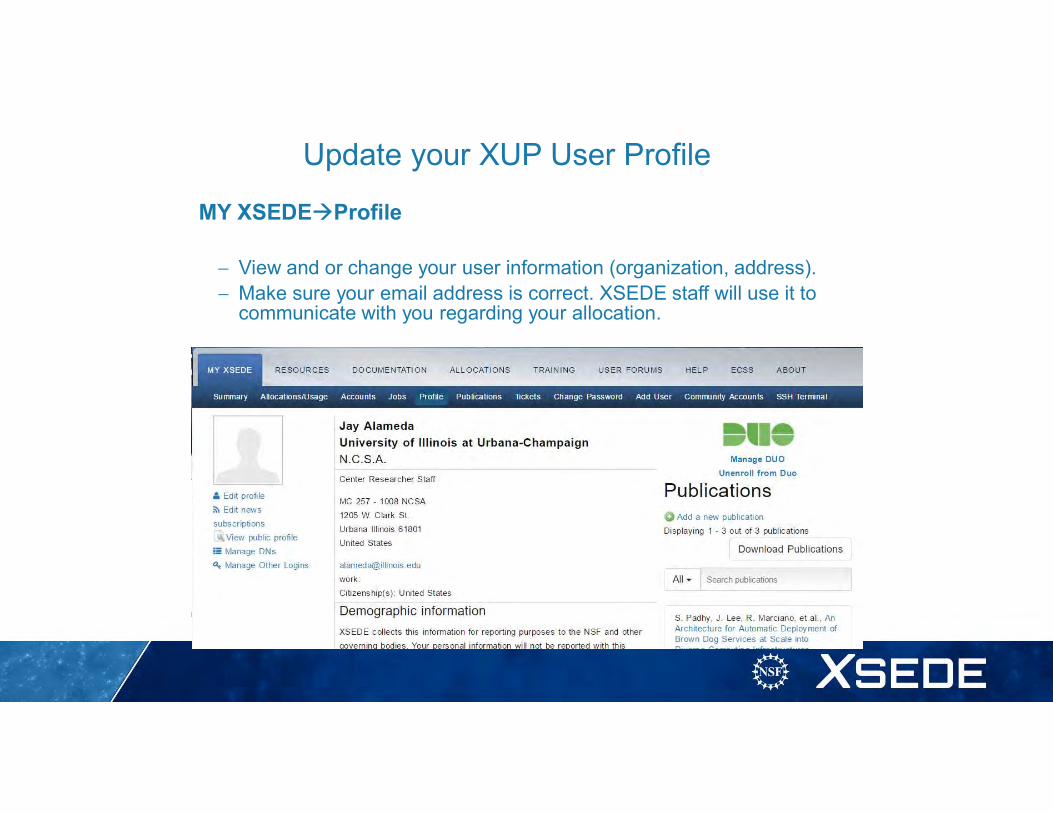
Update your XUP User Profile
MY XSEDEProfile
View and or change your user information (organization, address). Make sure your email address is correct. XSEDE staff will use it to
communicate with you regarding your allocation.

Navigating the XUP
• My XSEDE
• Resources
• Documentation
• Allocations
• Training
• Help
• About
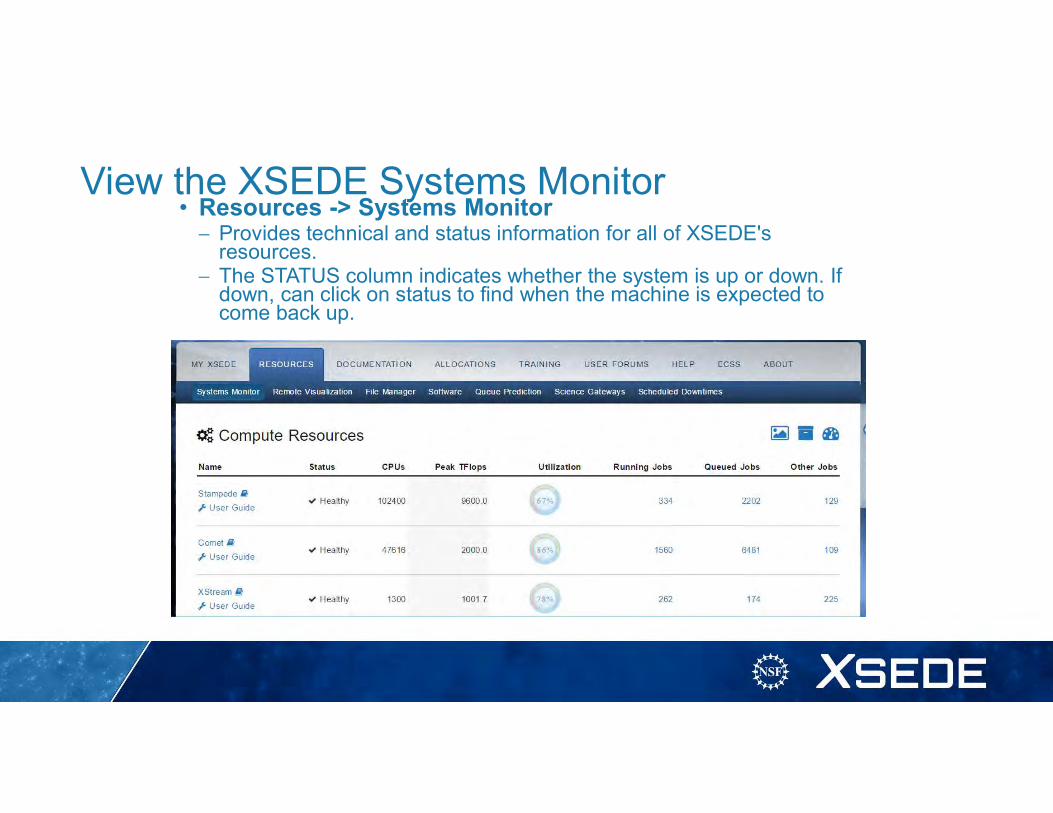
View the XSEDE Systems Monitor• Resources -> Systems Monitor Provides technical and status information for all of XSEDE's
resources. The STATUS column indicates whether the system is up or down. If
down, can click on status to find when the machine is expected to come back up.

Accessing XSEDE ResourcesAuthentication Methods1. Password
• XUP credentials• Site-password• One-time password
2. Key-based
Single Sign-On• Enables logging in once to
access all of your allocated resources
Connection Methods1. GSI-OpenSSH2. OpenSSH
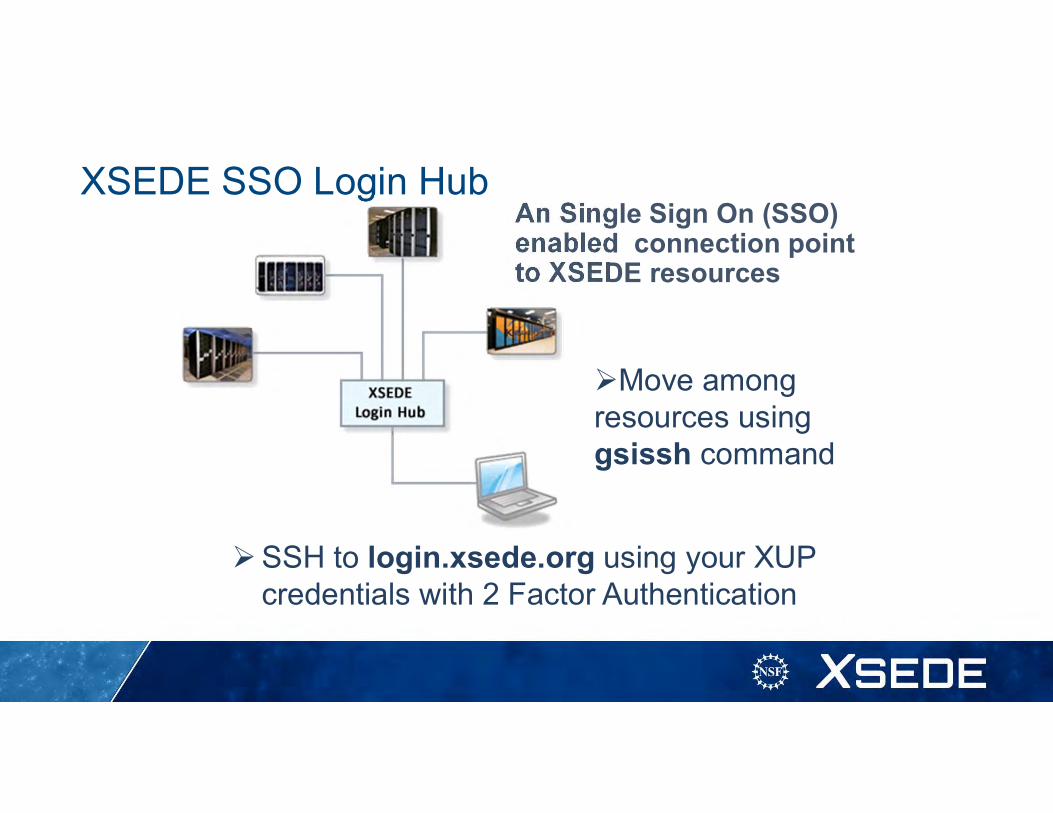
XSEDE SSO Login HubAn Single Sign On (SSO) enabled connection point to XSEDE resources
SSH to login.xsede.org using your XUP credentials with 2 Factor Authentication
Move among resources using gsissh command
Set up 2 Factor Authentication
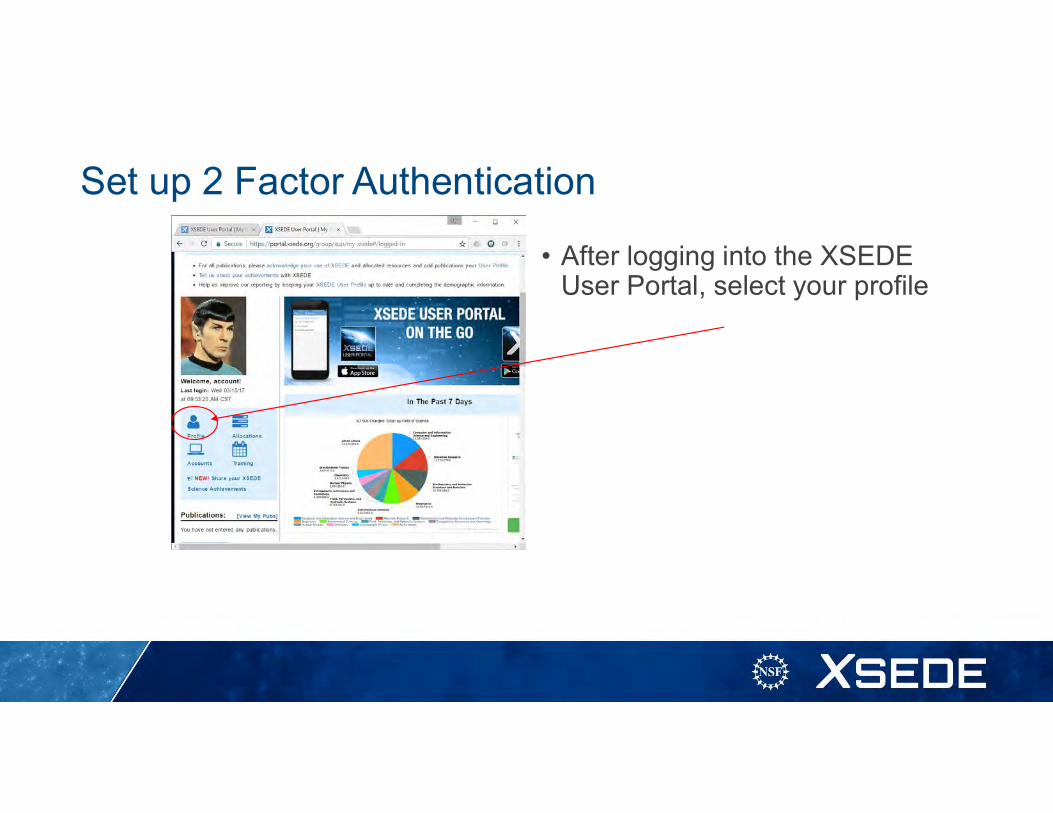
• After logging into the XSEDE User Portal, select your profile
Adding 2 Factor Authentication
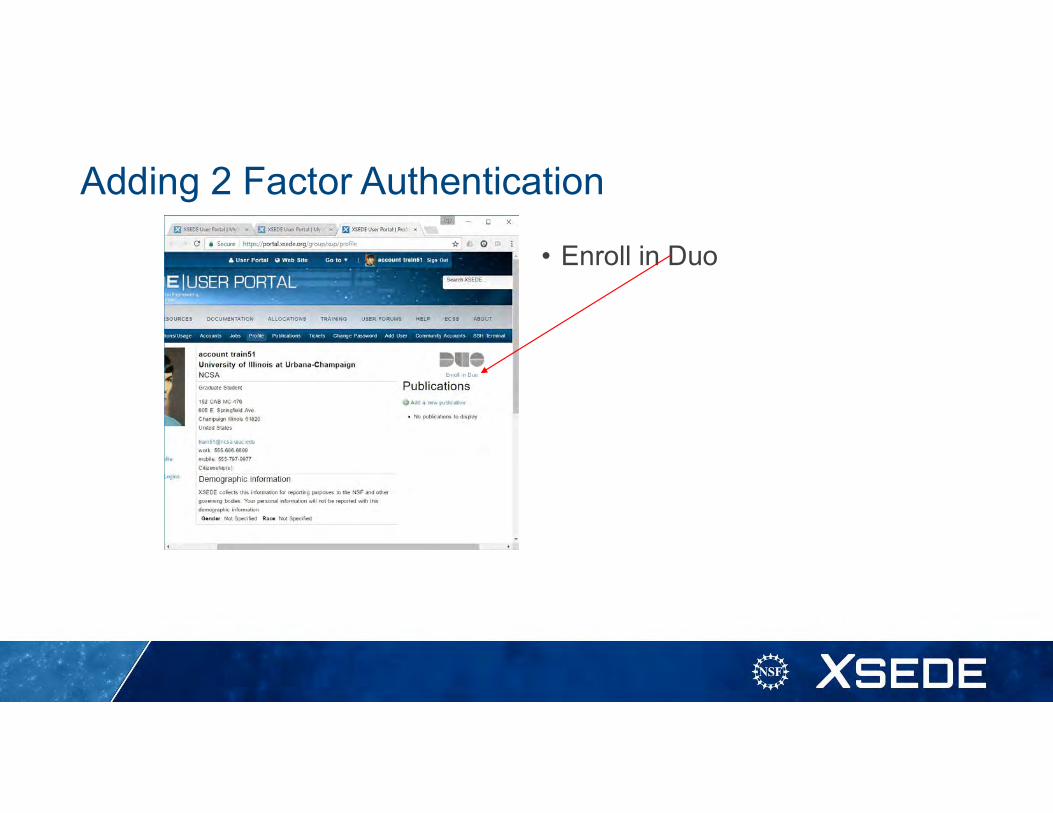
• Enroll in Duo
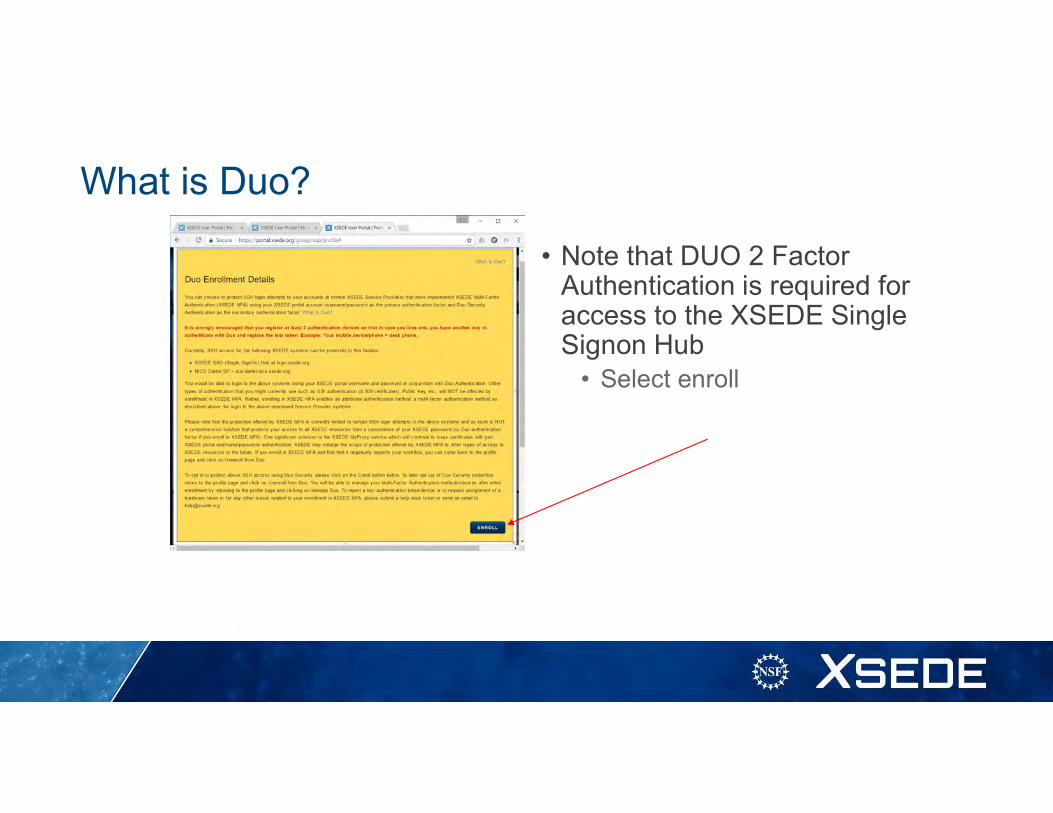
What is Duo?
• Note that DUO 2 Factor Authentication is required for access to the XSEDE Single Signon Hub
• Select enroll
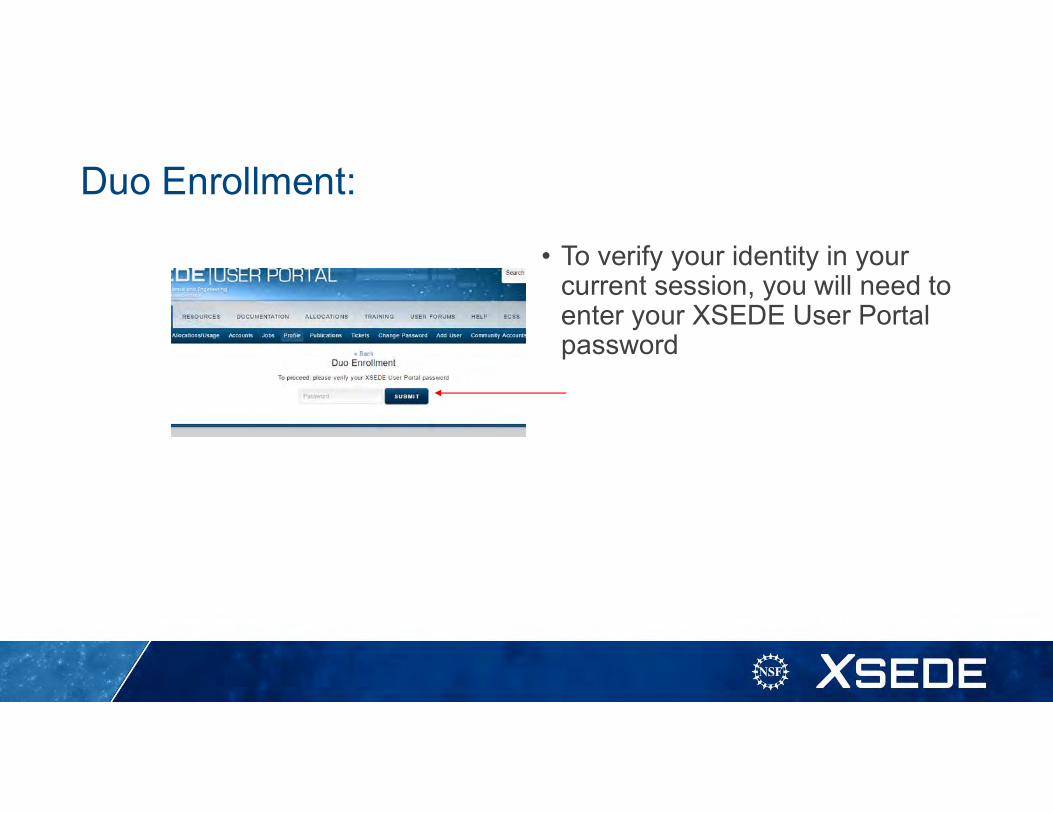
Duo Enrollment:
• To verify your identity in your current session, you will need to enter your XSEDE User Portal password

Setup Duo
• Start the process of setting up 2 factor authentication
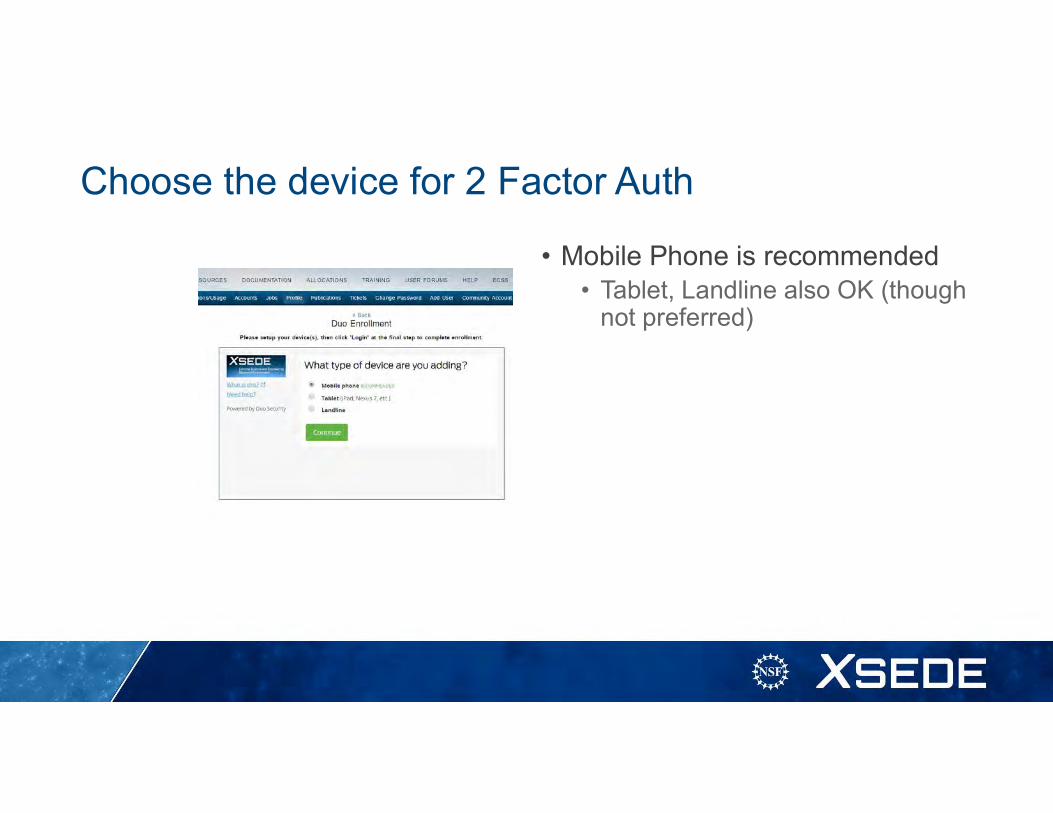
Choose the device for 2 Factor Auth
• Mobile Phone is recommended• Tablet, Landline also OK (though
not preferred)
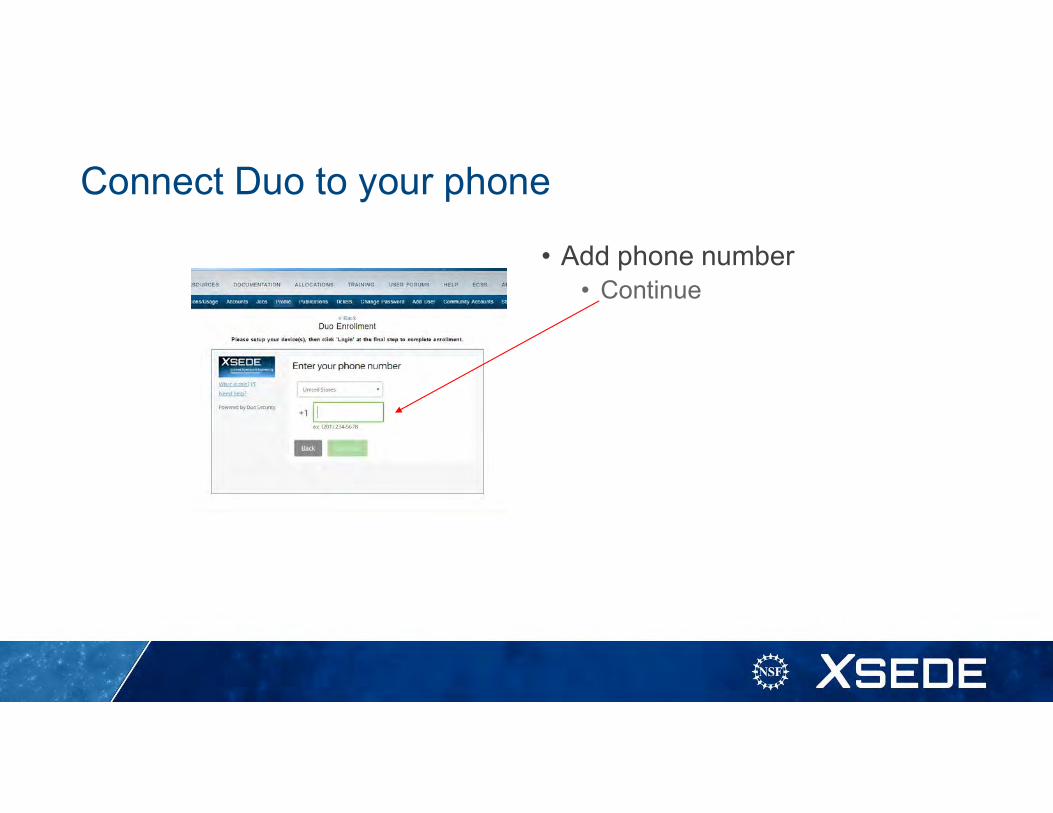
Connect Duo to your phone
• Add phone number• Continue
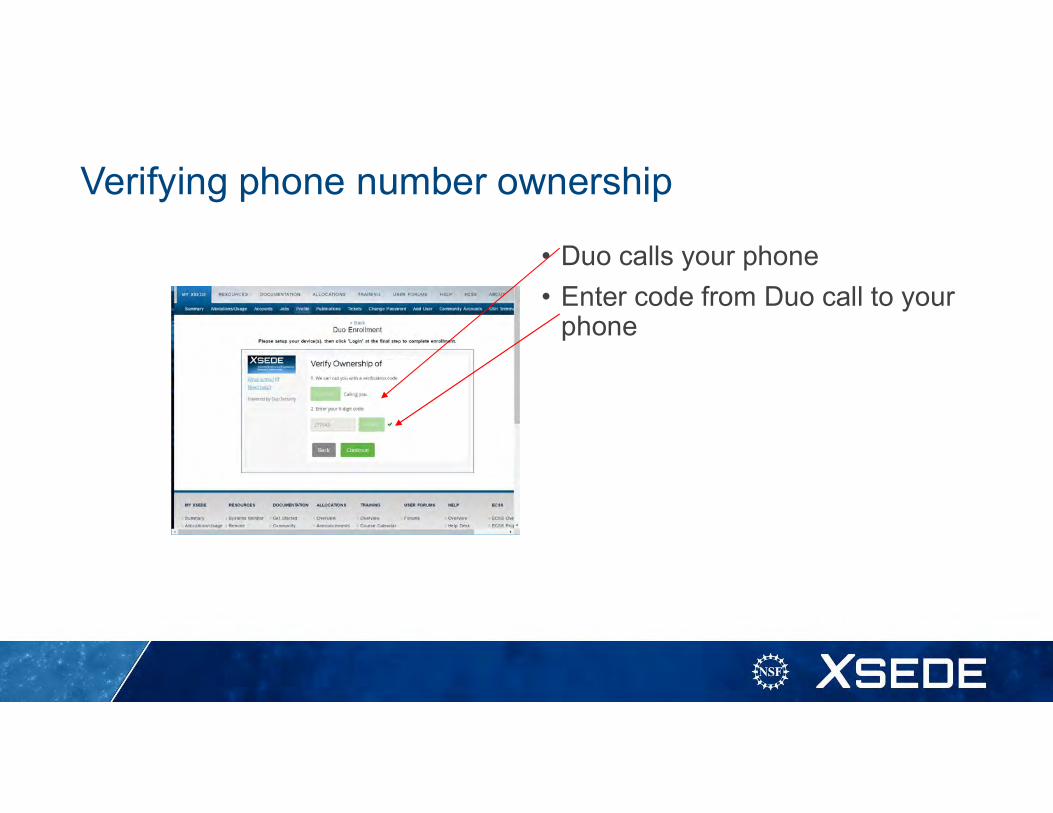
Verifying phone number ownership
• Duo calls your phone
• Enter code from Duo call to your phone
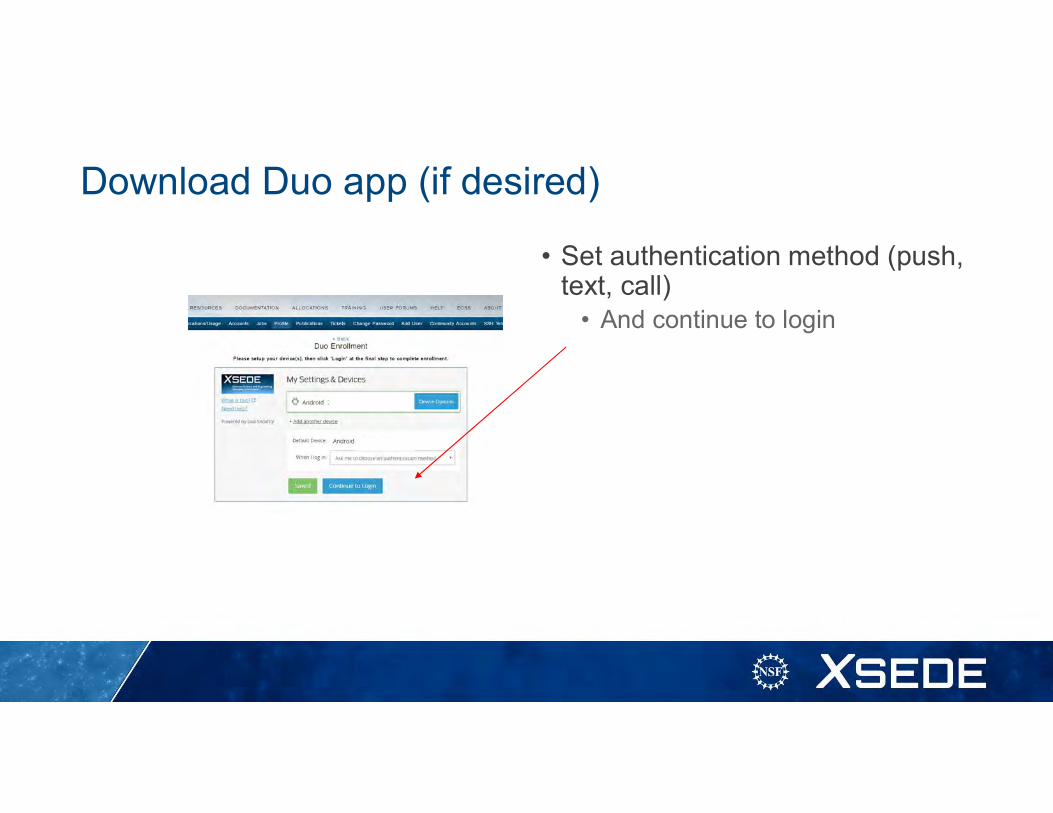
Download Duo app (if desired)
• Set authentication method (push, text, call)
• And continue to login
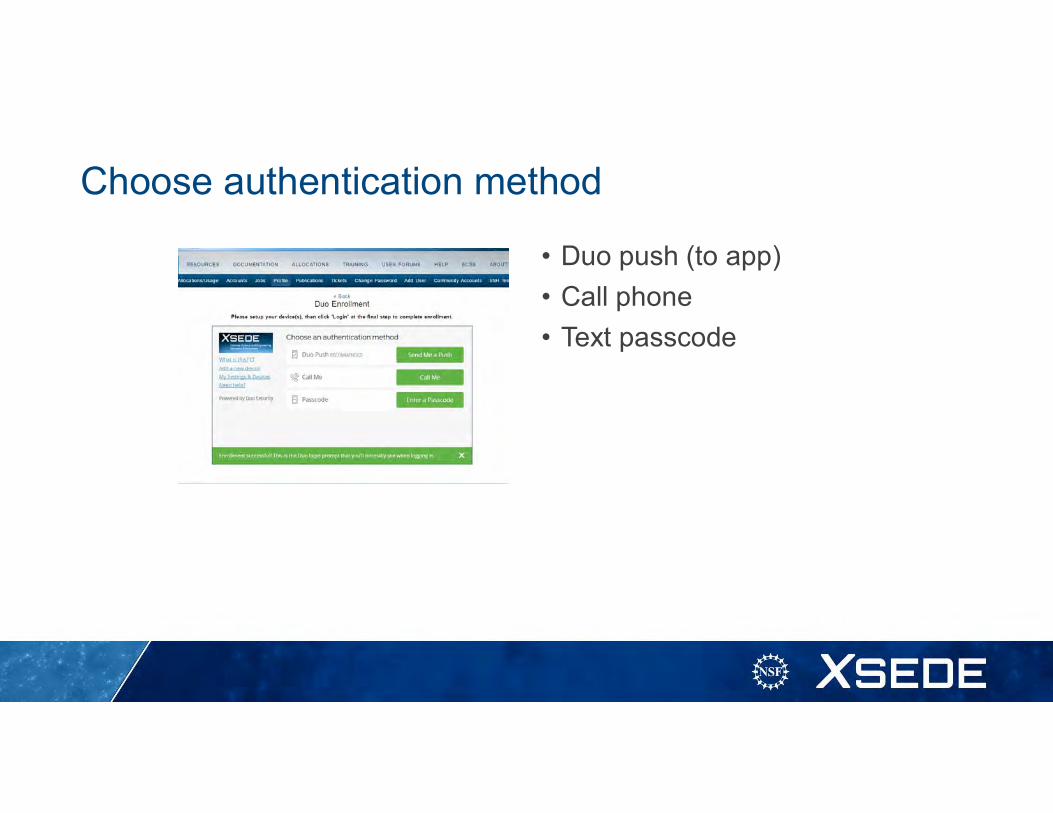
Choose authentication method
• Duo push (to app)
• Call phone
• Text passcode
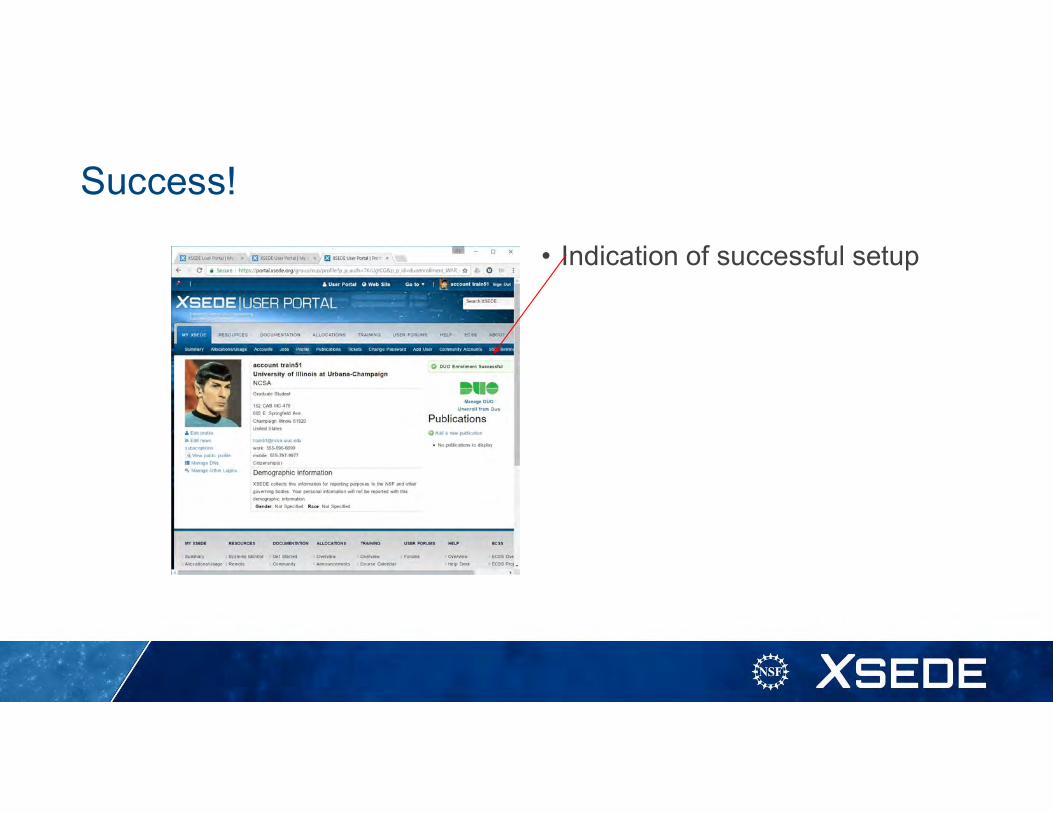
Success!
• Indication of successful setup
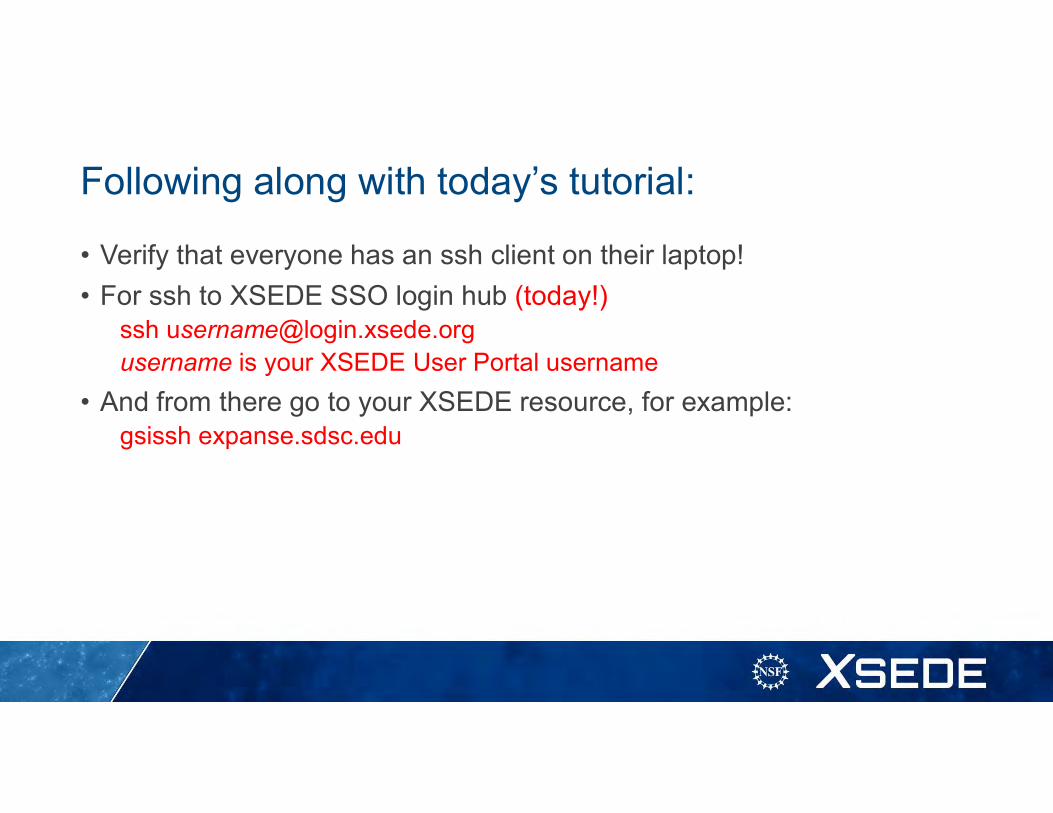
Following along with today’s tutorial:
• Verify that everyone has an ssh client on their laptop!
• For ssh to XSEDE SSO login hub (today!)ssh [email protected] is your XSEDE User Portal username
• And from there go to your XSEDE resource, for example: gsissh expanse.sdsc.edu
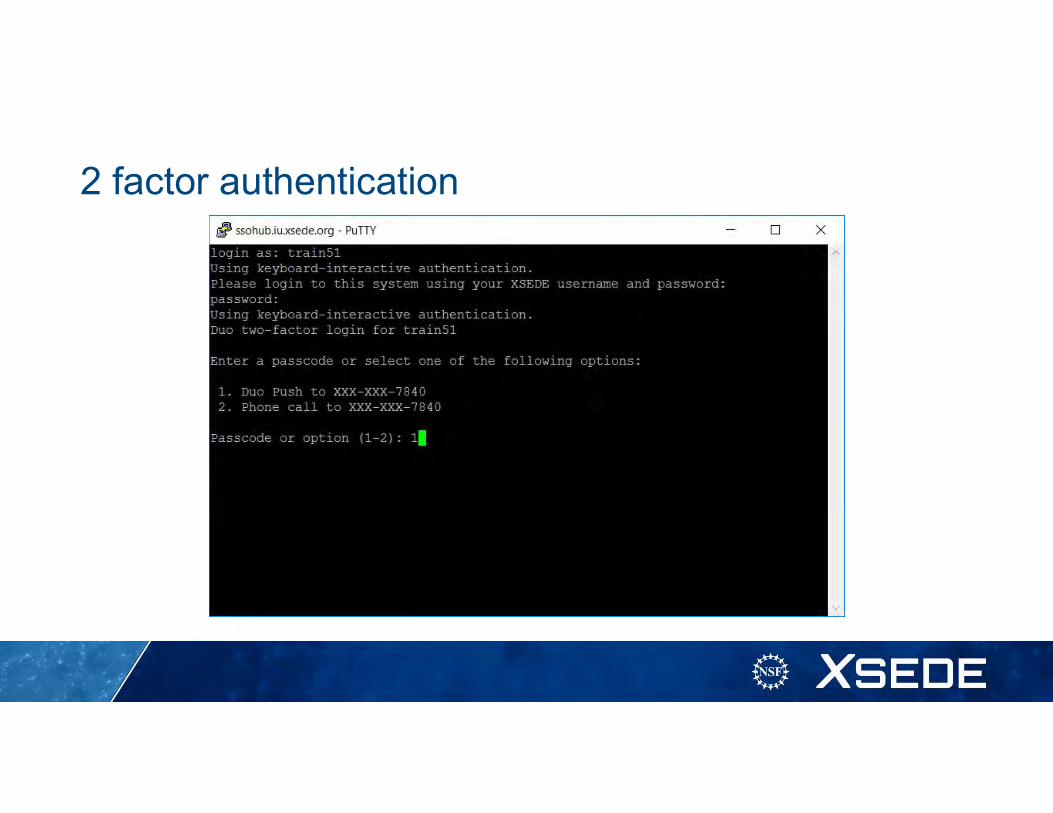
2 factor authentication
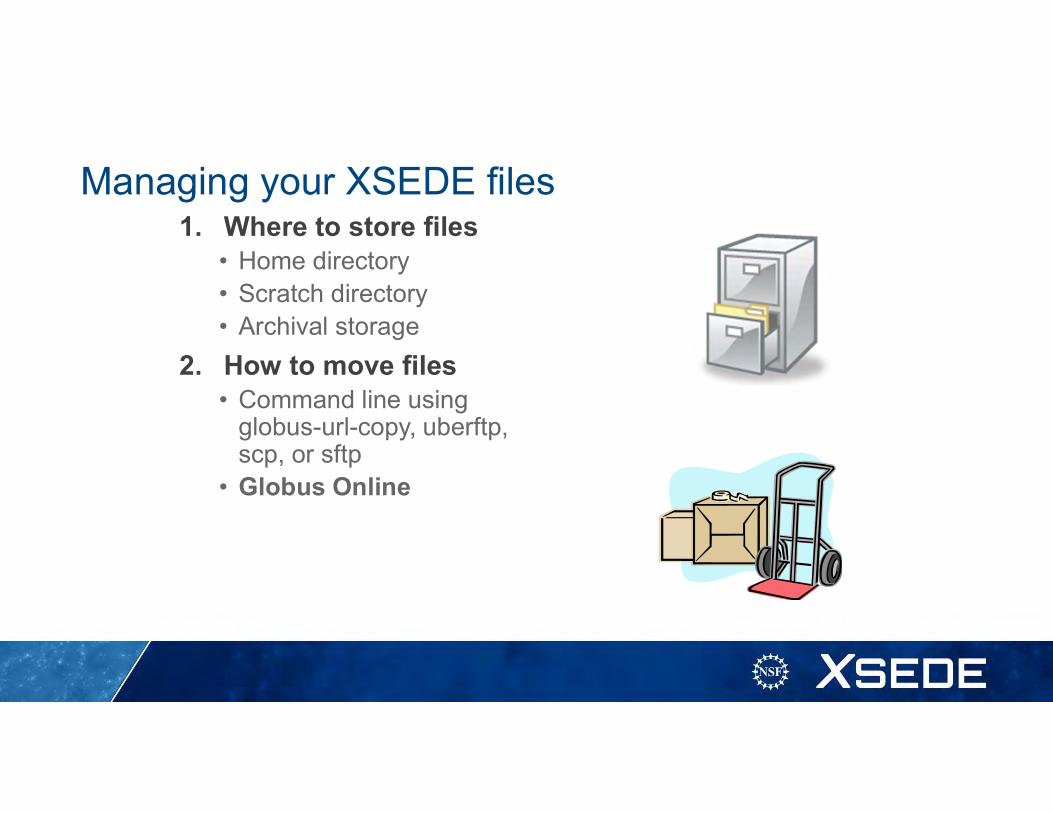
Managing your XSEDE files1. Where to store files
• Home directory• Scratch directory• Archival storage
2. How to move files• Command line using
globus-url-copy, uberftp, scp, or sftp
• Globus Online
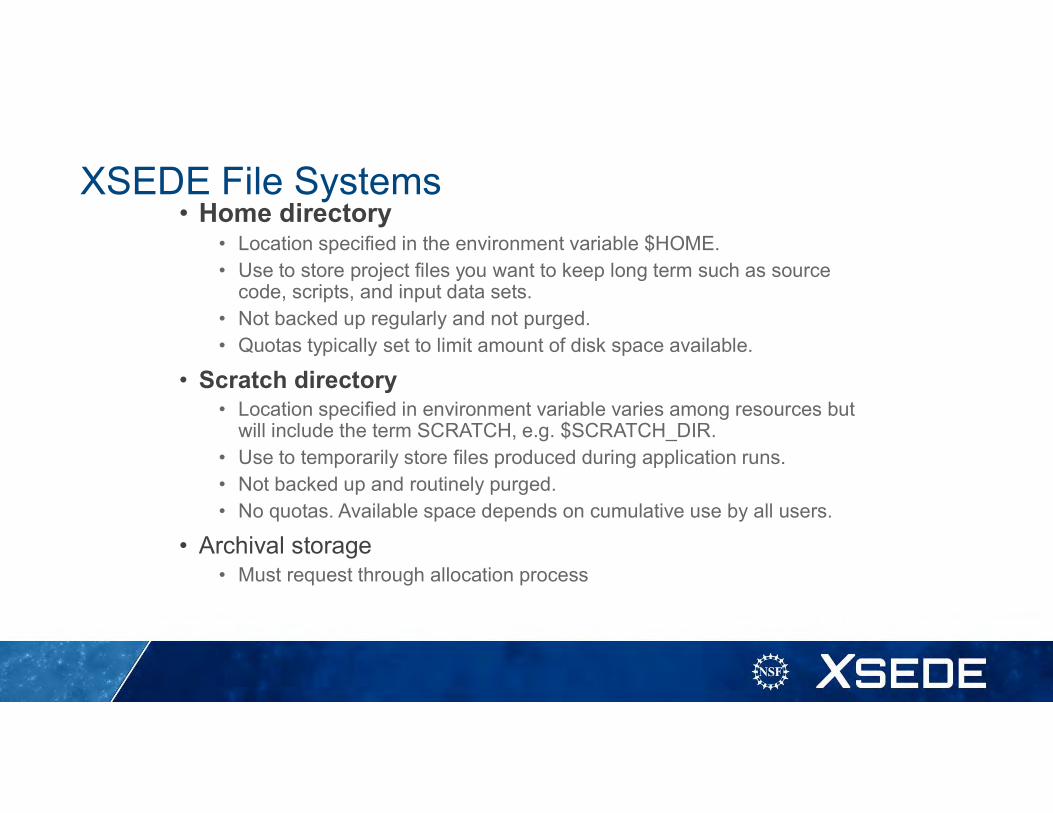
XSEDE File Systems• Home directory
• Location specified in the environment variable $HOME.• Use to store project files you want to keep long term such as source
code, scripts, and input data sets. • Not backed up regularly and not purged. • Quotas typically set to limit amount of disk space available.
• Scratch directory• Location specified in environment variable varies among resources but
will include the term SCRATCH, e.g. $SCRATCH_DIR.• Use to temporarily store files produced during application runs.• Not backed up and routinely purged.• No quotas. Available space depends on cumulative use by all users.
• Archival storage• Must request through allocation process
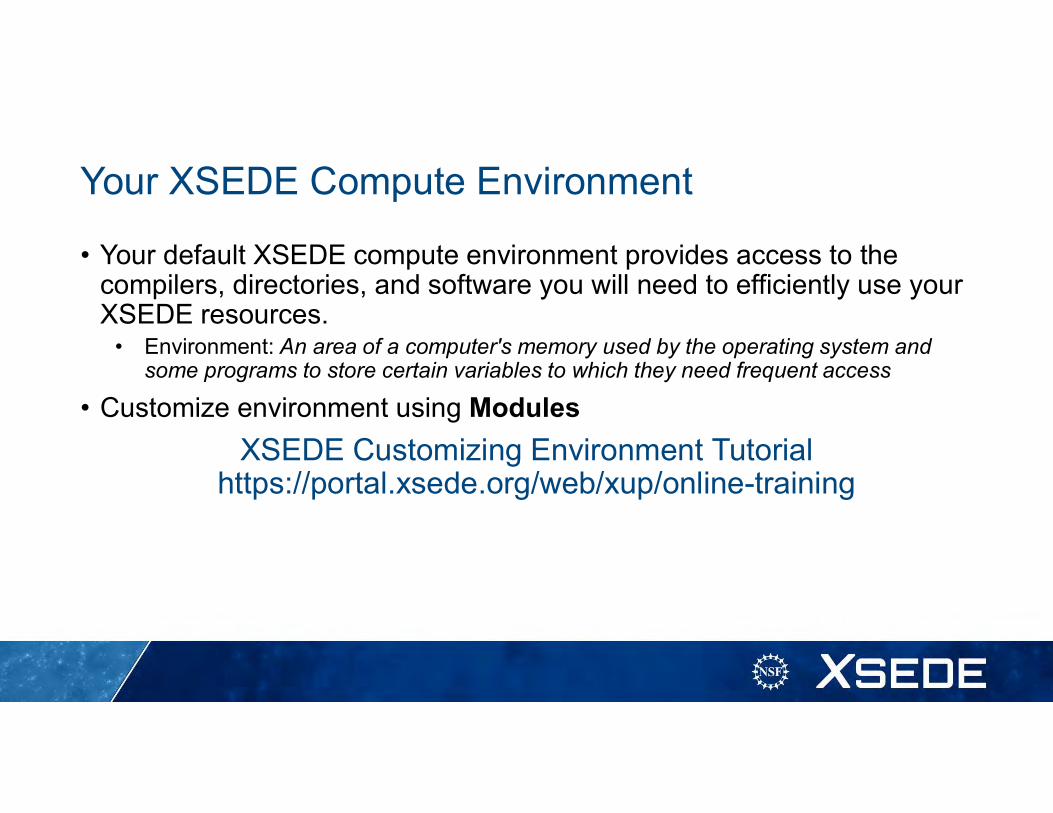
Your XSEDE Compute Environment
• Your default XSEDE compute environment provides access to the compilers, directories, and software you will need to efficiently use your XSEDE resources.
• Environment: An area of a computer's memory used by the operating system and some programs to store certain variables to which they need frequent access
• Customize environment using Modules
XSEDE Customizing Environment Tutorialhttps://portal.xsede.org/web/xup/online-training
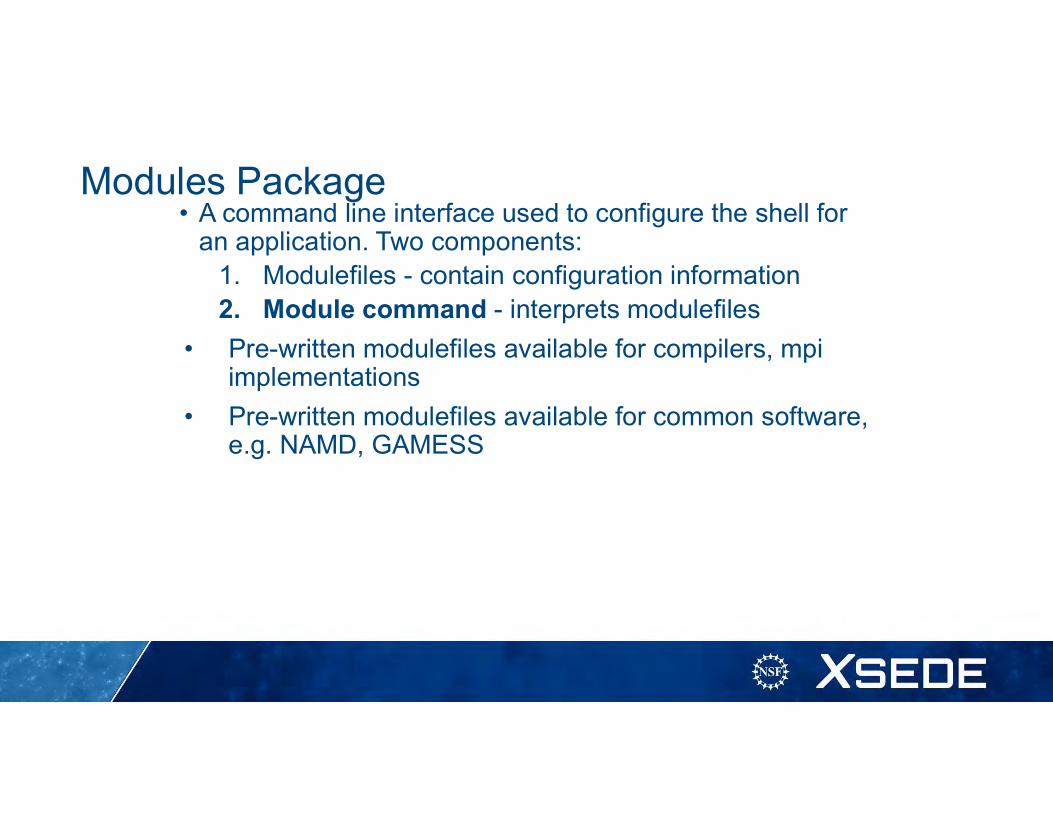
Modules Package• A command line interface used to configure the shell for
an application. Two components:1. Modulefiles - contain configuration information2. Module command - interprets modulefiles
• Pre-written modulefiles available for compilers, mpiimplementations
• Pre-written modulefiles available for common software, e.g. NAMD, GAMESS
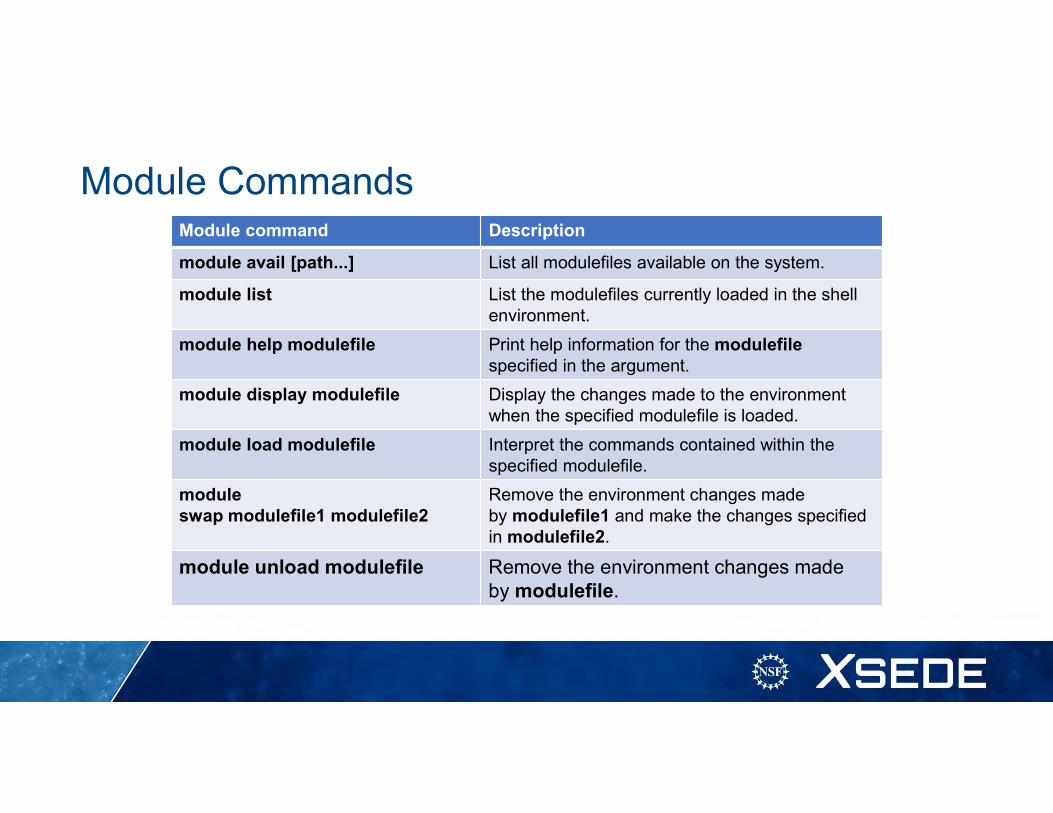
Module CommandsModule command Description
module avail [path...] List all modulefiles available on the system.
module list List the modulefiles currently loaded in the shell environment.
module help modulefile Print help information for the modulefilespecified in the argument.
module display modulefile Display the changes made to the environment when the specified modulefile is loaded.
module load modulefile Interpret the commands contained within the specified modulefile.
module swap modulefile1 modulefile2
Remove the environment changes made by modulefile1 and make the changes specified in modulefile2.
module unload modulefile Remove the environment changes made by modulefile.
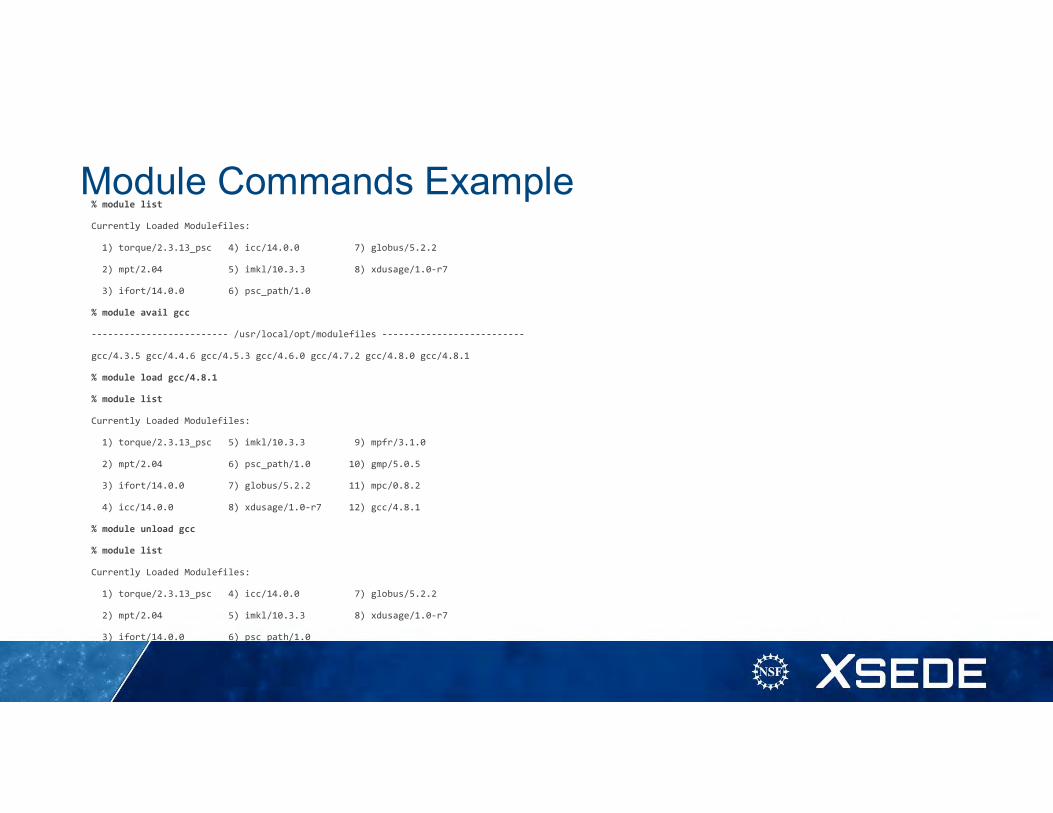
Module Commands Example% module list
Currently Loaded Modulefiles:
1) torque/2.3.13_psc 4) icc/14.0.0 7) globus/5.2.2
2) mpt/2.04 5) imkl/10.3.3 8) xdusage/1.0-r7
3) ifort/14.0.0 6) psc_path/1.0
% module avail gcc
------------------------- /usr/local/opt/modulefiles --------------------------
gcc/4.3.5 gcc/4.4.6 gcc/4.5.3 gcc/4.6.0 gcc/4.7.2 gcc/4.8.0 gcc/4.8.1
% module load gcc/4.8.1
% module list
Currently Loaded Modulefiles:
1) torque/2.3.13_psc 5) imkl/10.3.3 9) mpfr/3.1.0
2) mpt/2.04 6) psc_path/1.0 10) gmp/5.0.5
3) ifort/14.0.0 7) globus/5.2.2 11) mpc/0.8.2
4) icc/14.0.0 8) xdusage/1.0-r7 12) gcc/4.8.1
% module unload gcc
% module list
Currently Loaded Modulefiles:
1) torque/2.3.13_psc 4) icc/14.0.0 7) globus/5.2.2
2) mpt/2.04 5) imkl/10.3.3 8) xdusage/1.0-r7
3) ifort/14.0.0 6) psc_path/1.0
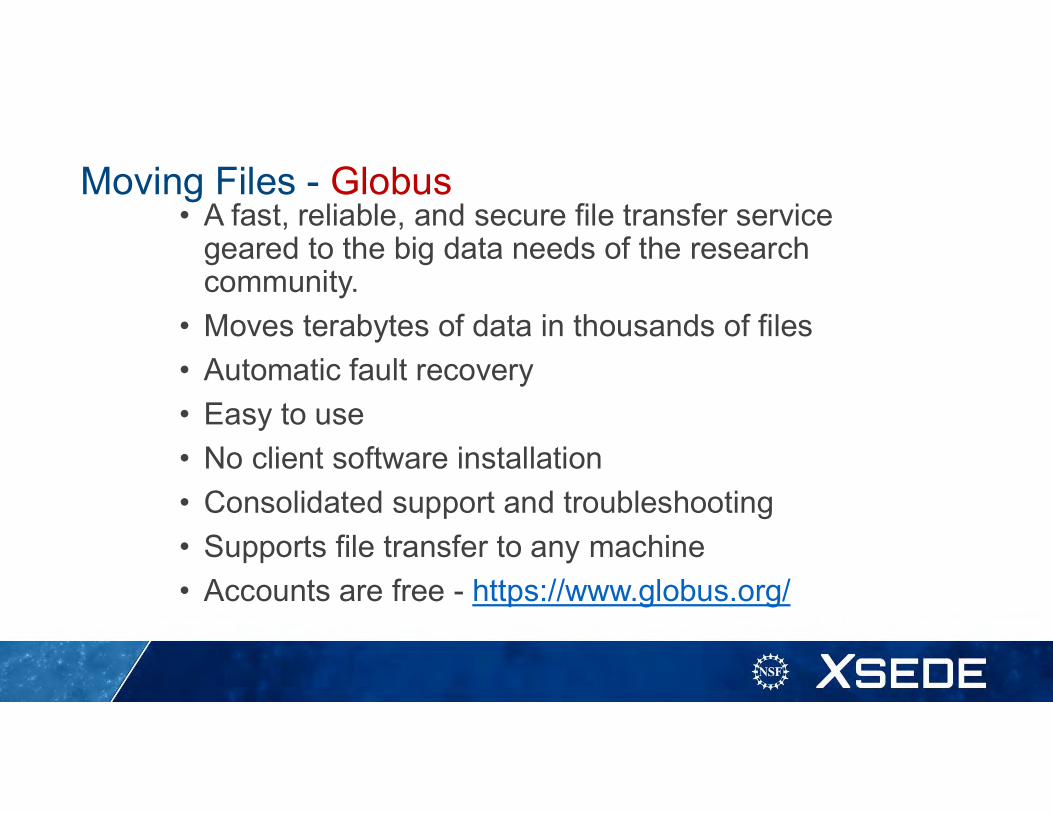
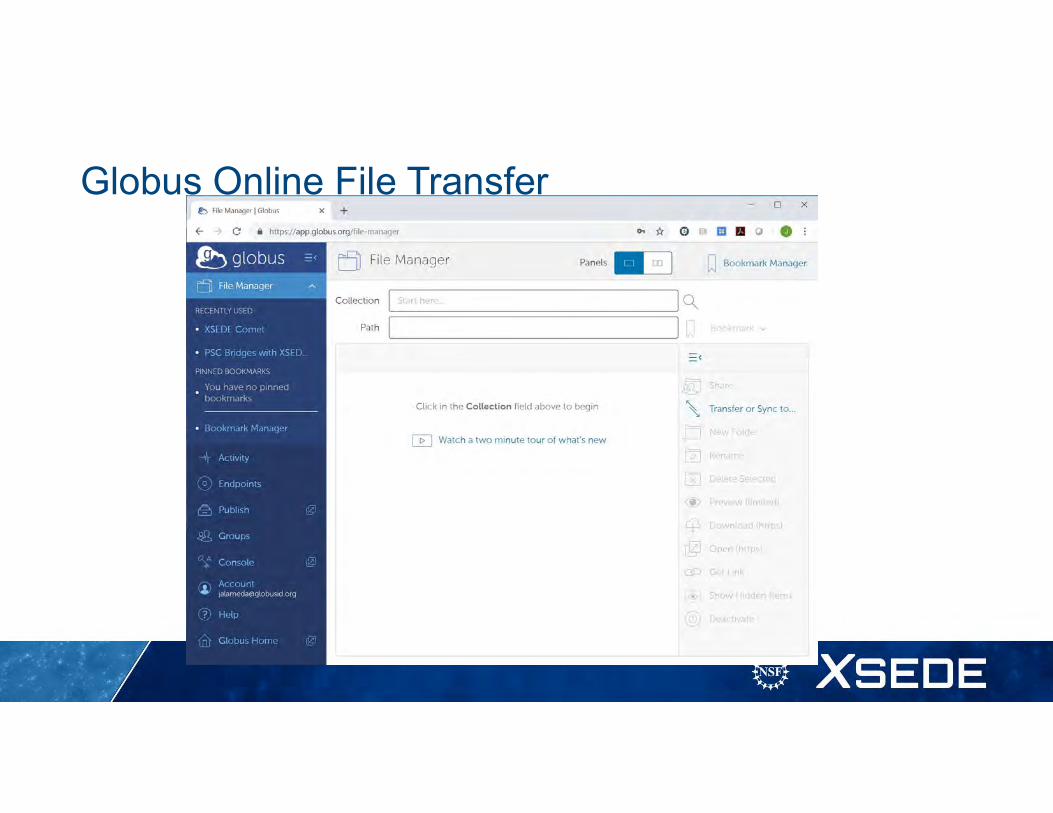
Moving Files - Globus• A fast, reliable, and secure file transfer service
geared to the big data needs of the research community.
• Moves terabytes of data in thousands of files
• Automatic fault recovery
• Easy to use
• No client software installation
• Consolidated support and troubleshooting
• Supports file transfer to any machine
• Accounts are free - https://www.globus.org/

Globus Dashboard
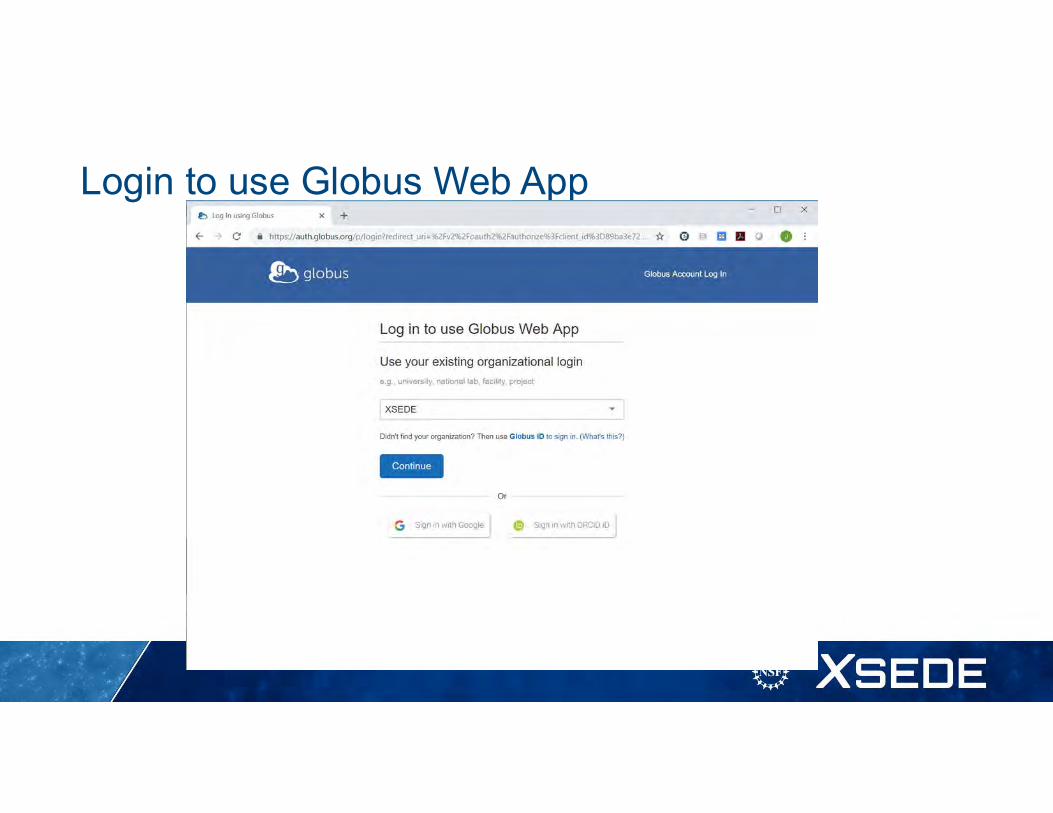
Login to use Globus Web App

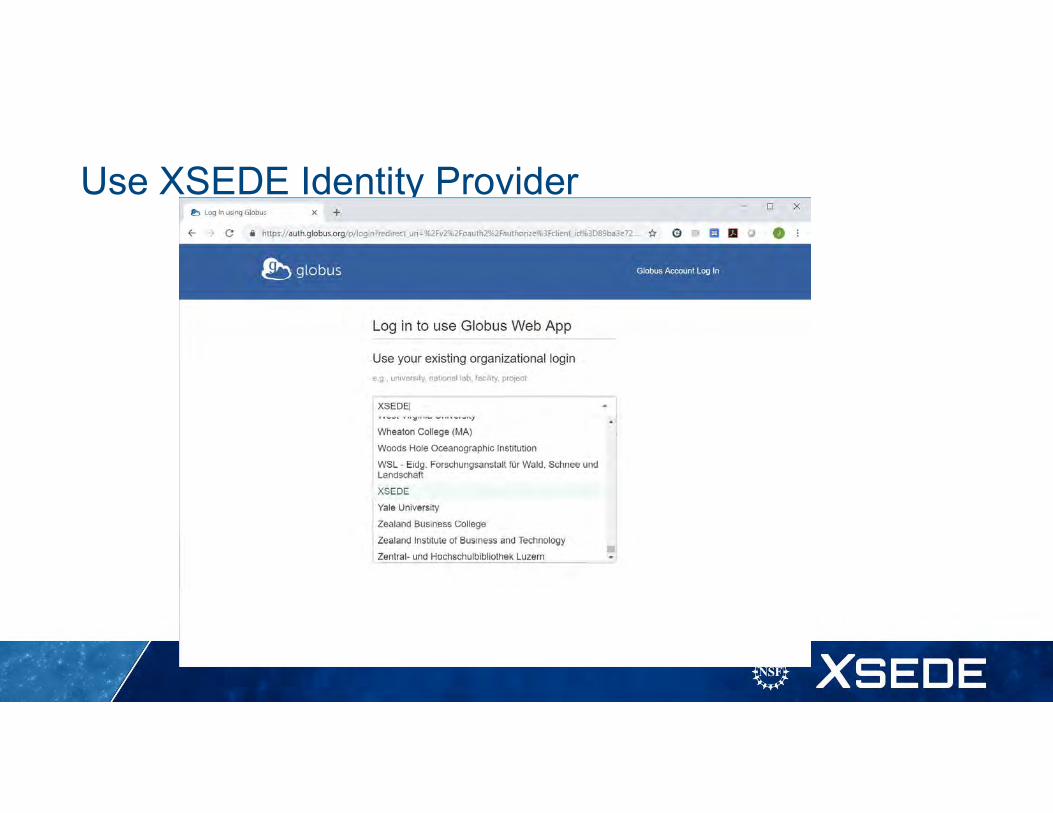
Use XSEDE Identity Provider

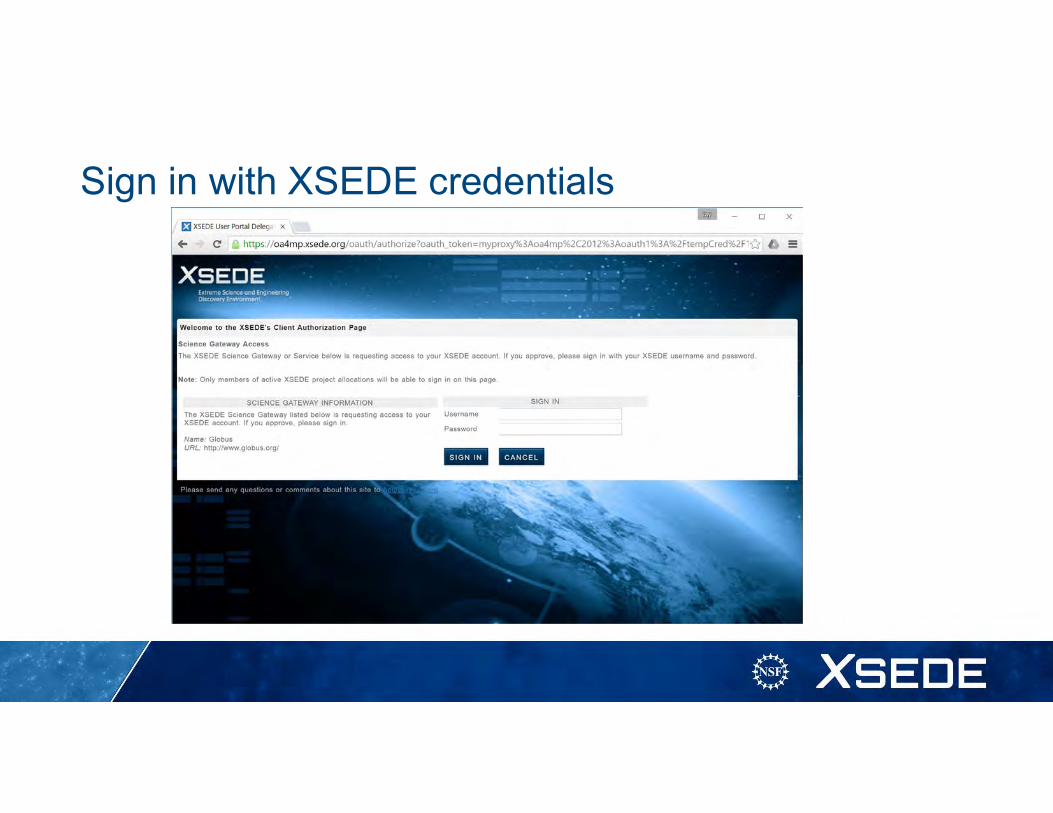
Sign in with XSEDE credentials
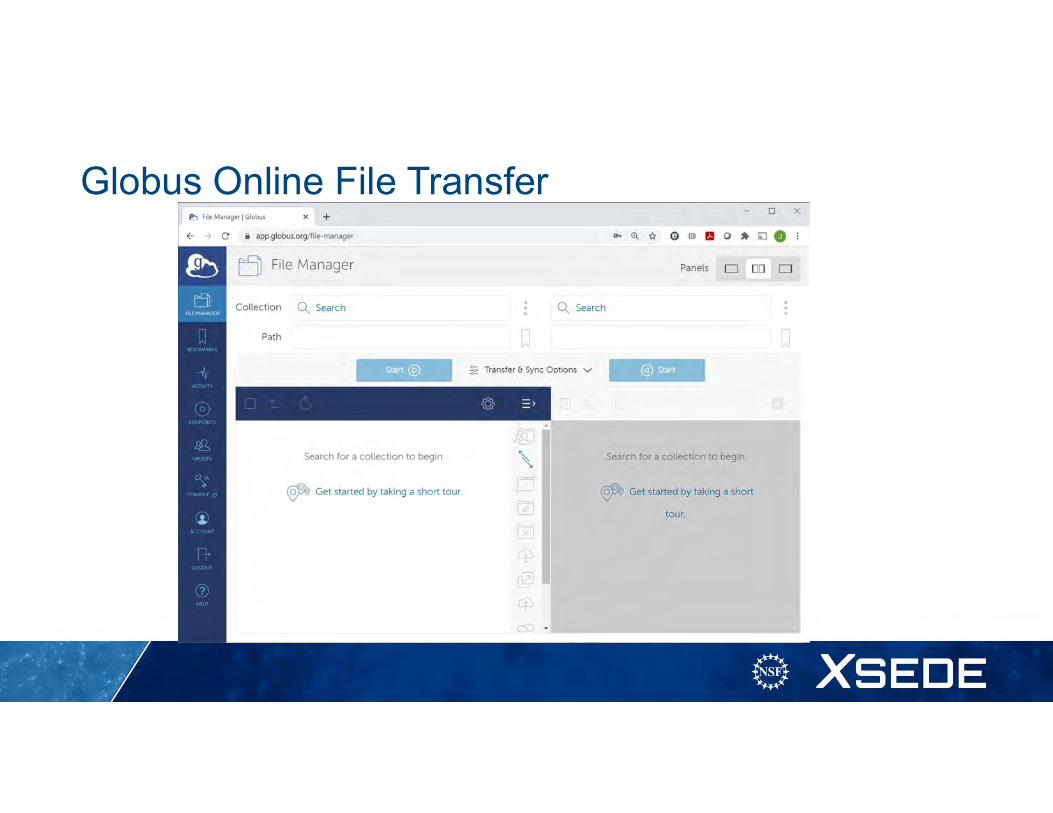
Globus Online File Transfer
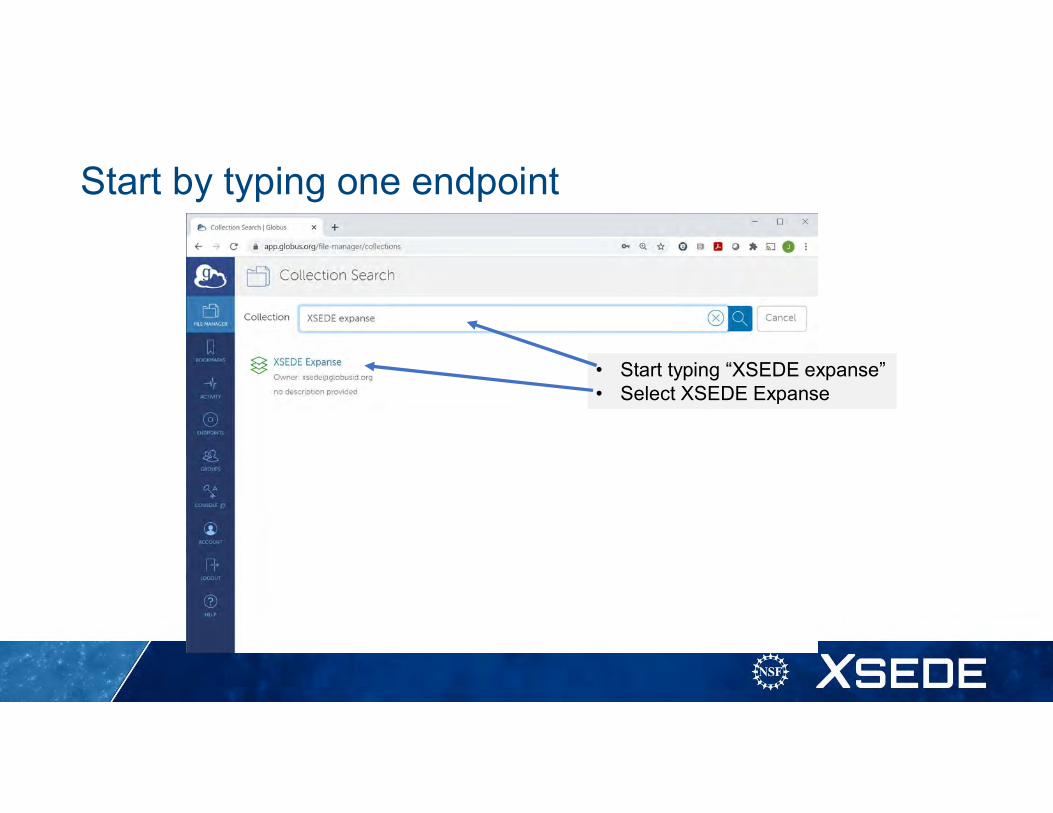
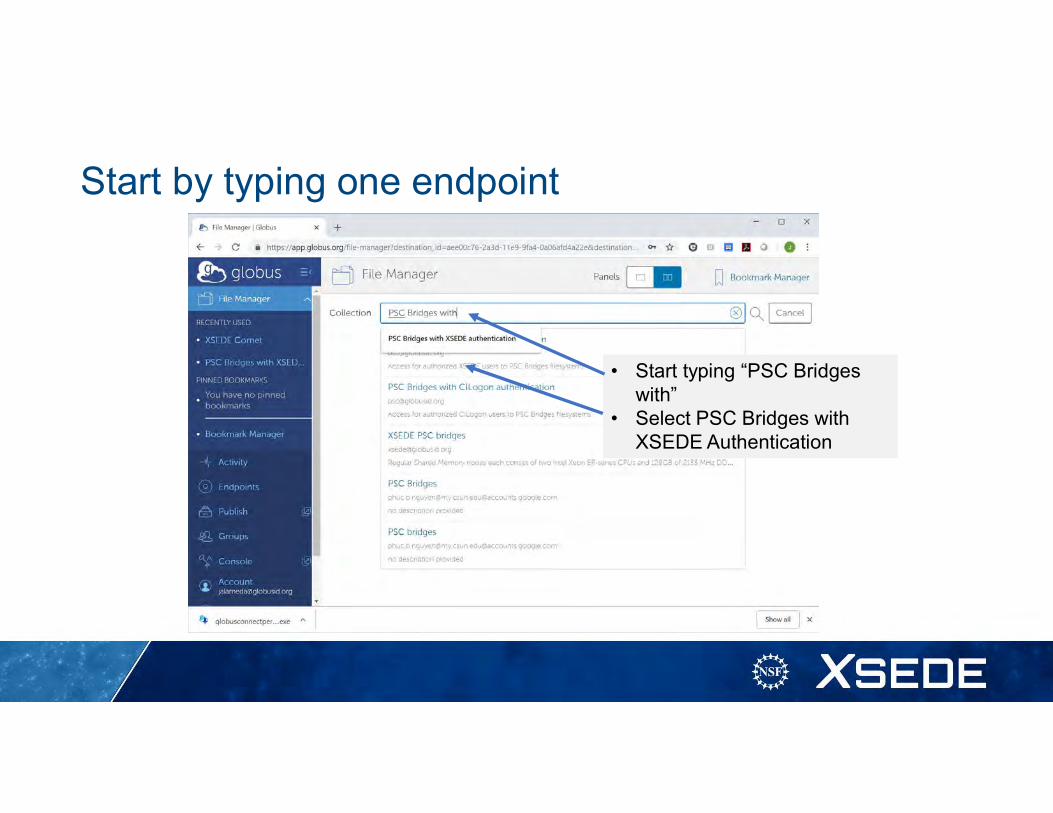
Start by typing one endpoint
• Start typing “XSEDE expanse”• Select XSEDE Expanse
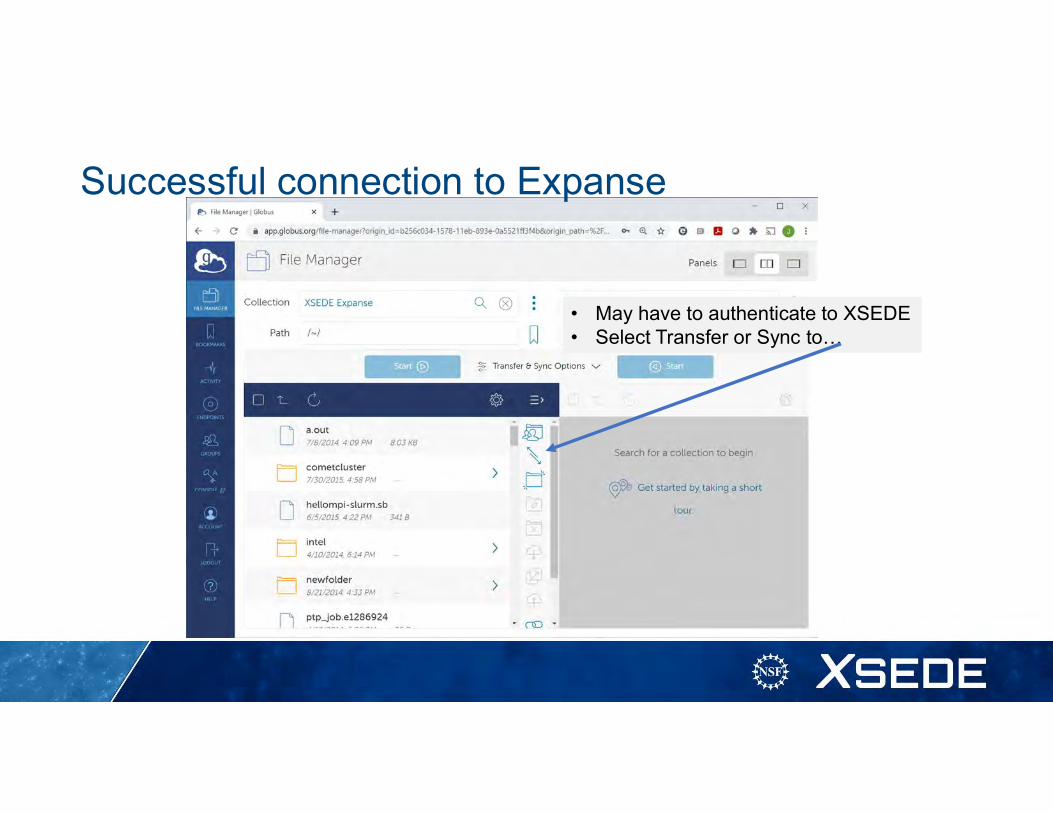
Successful connection to Expanse
• May have to authenticate to XSEDE• Select Transfer or Sync to…

Add second endpoint
Type PSC Bridges2 here
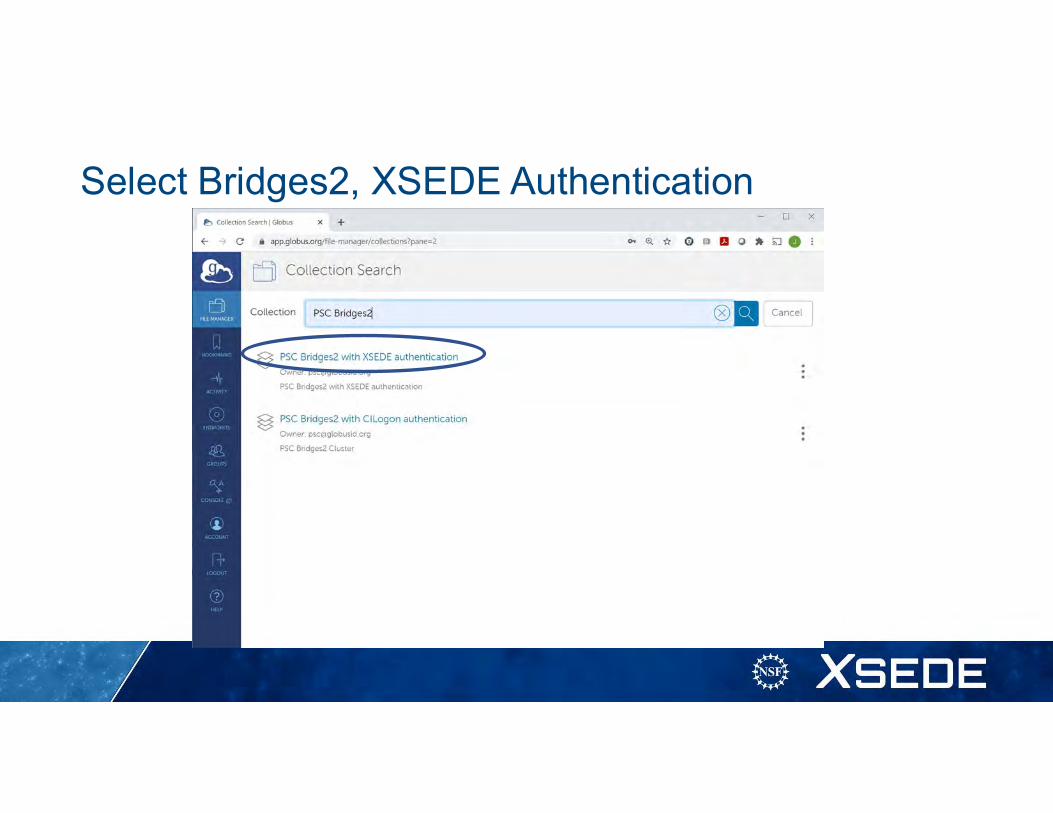
Select Bridges2, XSEDE Authentication
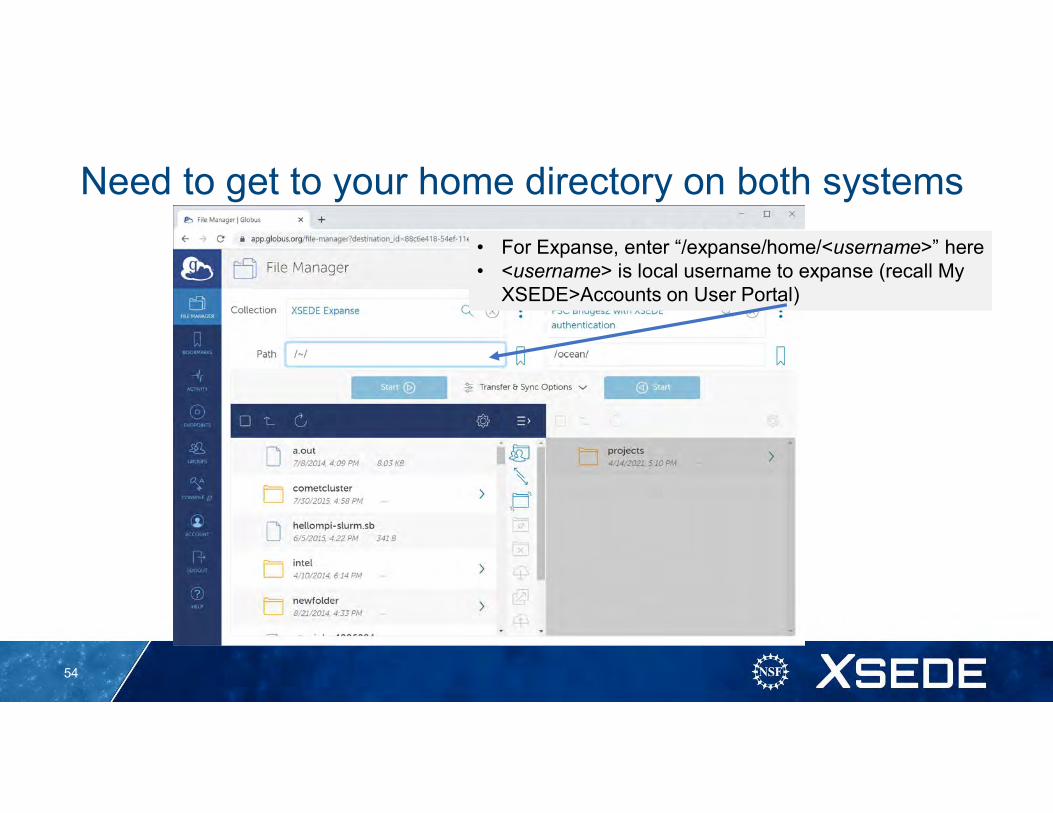
Need to get to your home directory on both systems
54
• For Expanse, enter “/expanse/home/<username>” here• <username> is local username to expanse (recall My
XSEDE>Accounts on User Portal)
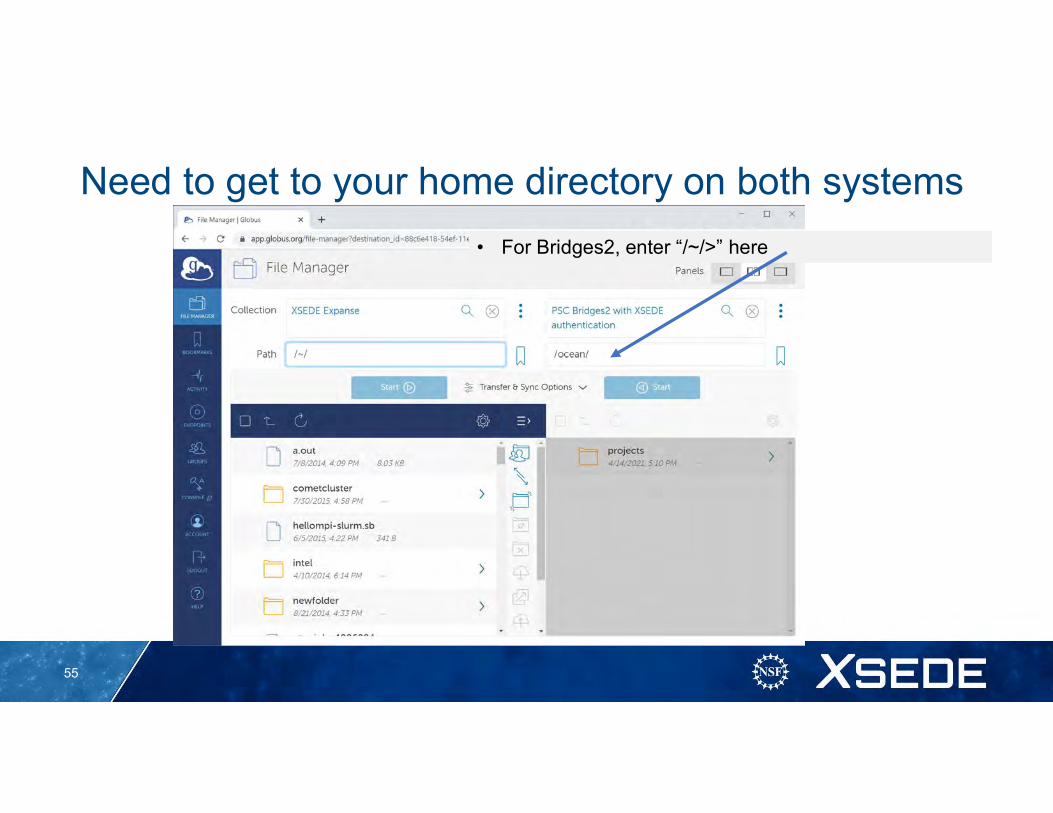
Need to get to your home directory on both systems
55
• For Bridges2, enter “/~/>” here
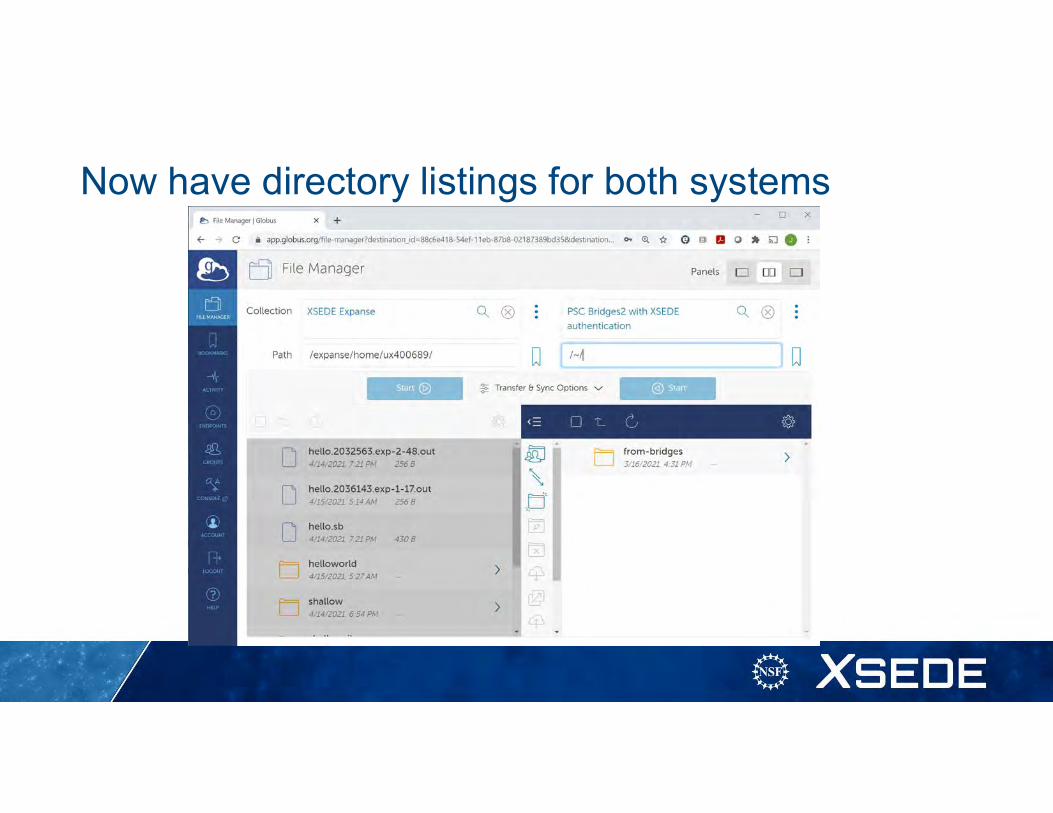
Now have directory listings for both systems
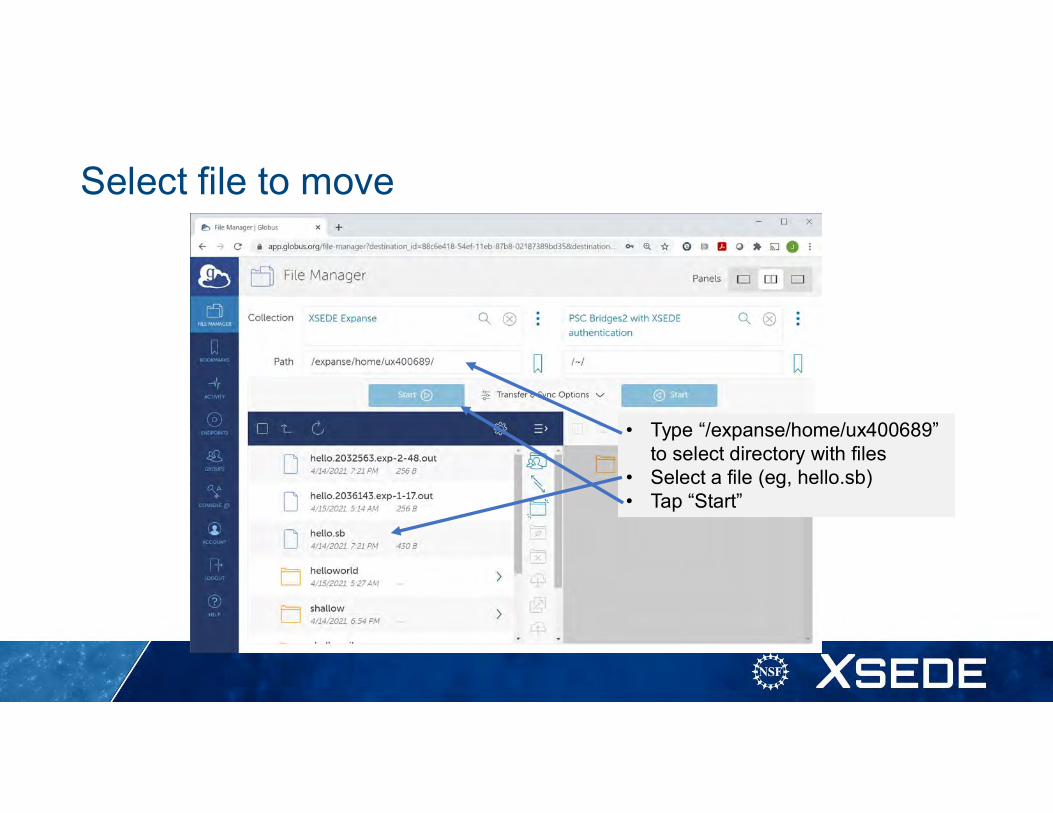
Select file to move
• Type “/expanse/home/ux400689” to select directory with files
• Select a file (eg, hello.sb)• Tap “Start”
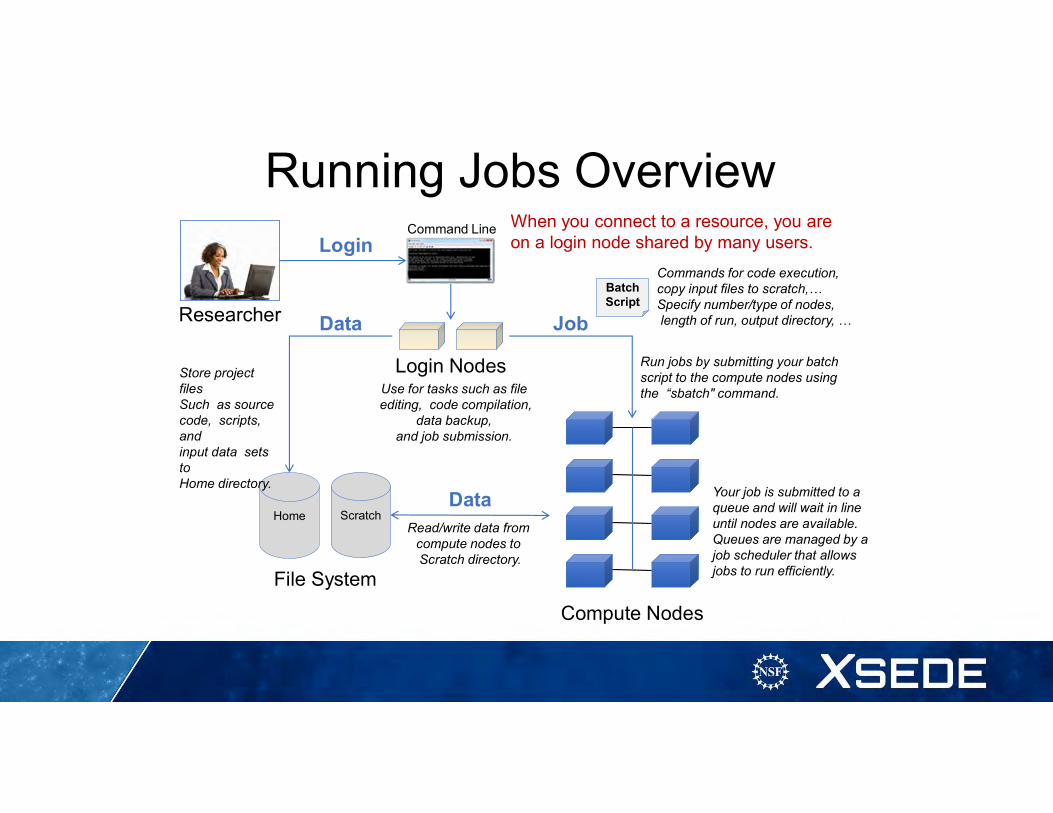
Running Jobs Overview
Compute Nodes
Home Scratch
File System
JobData
Data
Researcher
Login
Login Nodes
Command Line
Use for tasks such as fileediting, code compilation,
data backup, and job submission.
Read/write data from compute nodes to Scratch directory.
Store project filesSuch as sourcecode, scripts, andinput data sets toHome directory.
Run jobs by submitting your batch script to the compute nodes using the “sbatch" command.
When you connect to a resource, you are on a login node shared by many users.
Your job is submitted to a queue and will wait in line until nodes are available. Queues are managed by a job scheduler that allows jobs to run efficiently.
BatchScript
Commands for code execution, copy input files to scratch,…Specify number/type of nodes,length of run, output directory, …
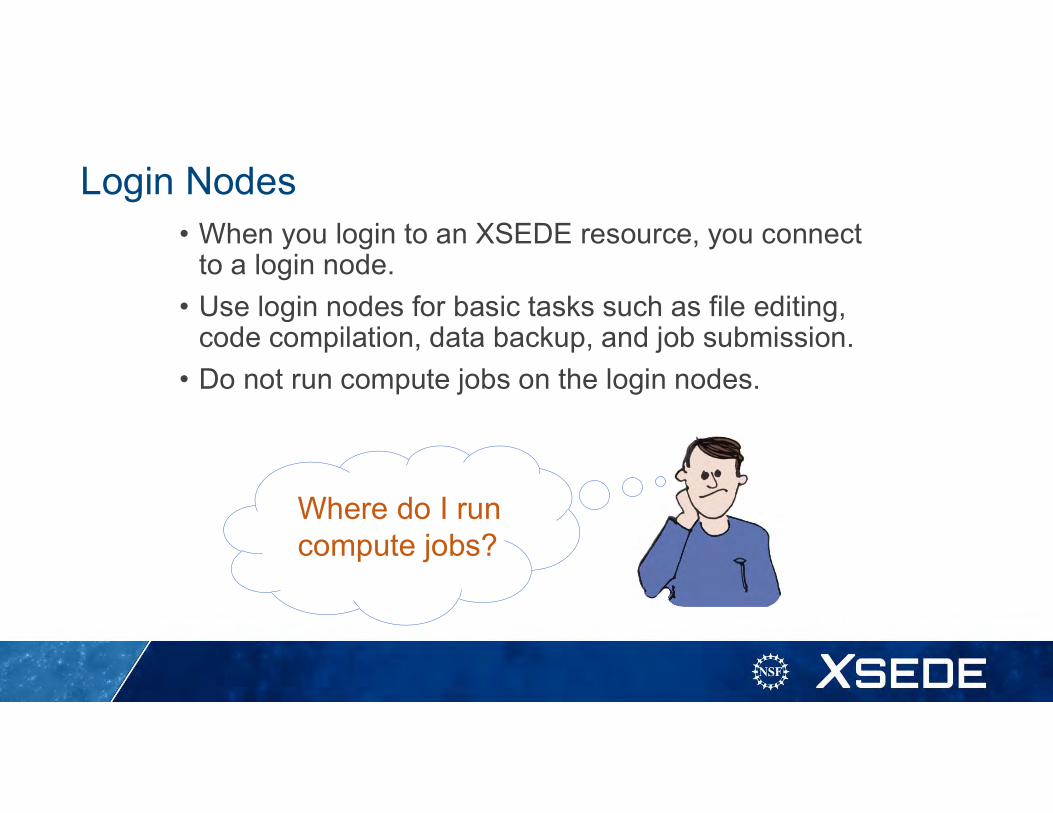
Login Nodes• When you login to an XSEDE resource, you connect
to a login node.
• Use login nodes for basic tasks such as file editing, code compilation, data backup, and job submission.
• Do not run compute jobs on the login nodes.
Where do I run compute jobs?
Running Compute Jobs
• Jobs are run on the compute nodes by submitting a batch script on a login node
• All jobs are placed in a batch queue after they are submitted.
• All XSEDE compute resources use a batch schedulerfor running jobs.
• Resource User Guides on the XUP have details on your system’s scheduler.
Batch Schedulers• Attempt to balance queue wait
times of competing jobs with efficient system utilization.
• Job prioritization influenced by number of cores and wall clock time requested
• FIFO queues with fair use mechanisms to keep a single user from dominating the queue
• Backfilling unused nodes with smaller jobs
• Will not start jobs if they will not finish before scheduled system maintenance.
Batch Scripts
• Batch scripts include scheduler specific directives, comments, and executable commands, e.g.:
• Number and type of nodes needed• Time needed to run the job• Where to write output files
• Script commands are system specific – see the resource’s User Guide on the XUP for details
Running batch jobs on XSEDE resources
• XSEDE compute resources use a batch scheduler to submit, monitor and cancel jobs
• Although there are several widely used schedulers (LSF, Torque, Slurm) all XSEDE compute resources now use Slurm
• Configuration details vary from site to site (see User Portal Resource Guides), but basic functionality is consistent
• sbatch to submit jobs• squeue to view information about jobs• scancel to cancel jobs• sinfo to view information about nodes and partitions
• See slurm.schedmd.com/ for more details
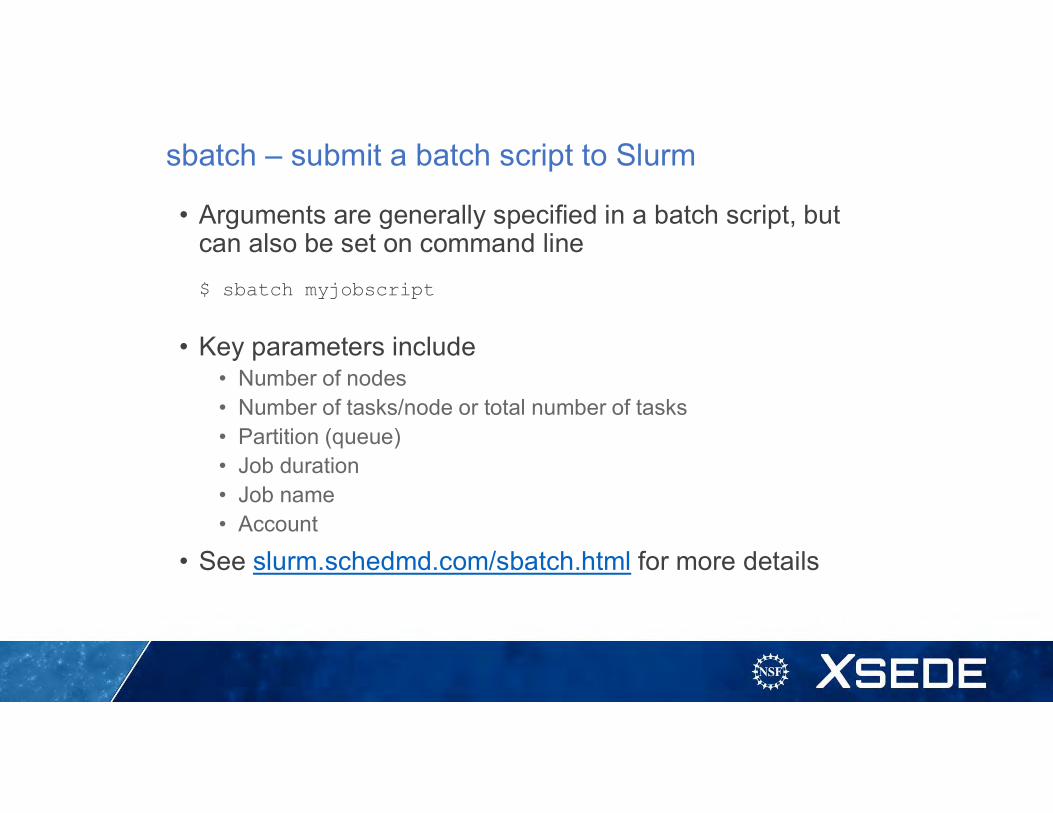
sbatch – submit a batch script to Slurm
• Arguments are generally specified in a batch script, but can also be set on command line
$ sbatch myjobscript
• Key parameters include• Number of nodes• Number of tasks/node or total number of tasks• Partition (queue)• Job duration• Job name• Account
• See slurm.schedmd.com/sbatch.html for more details
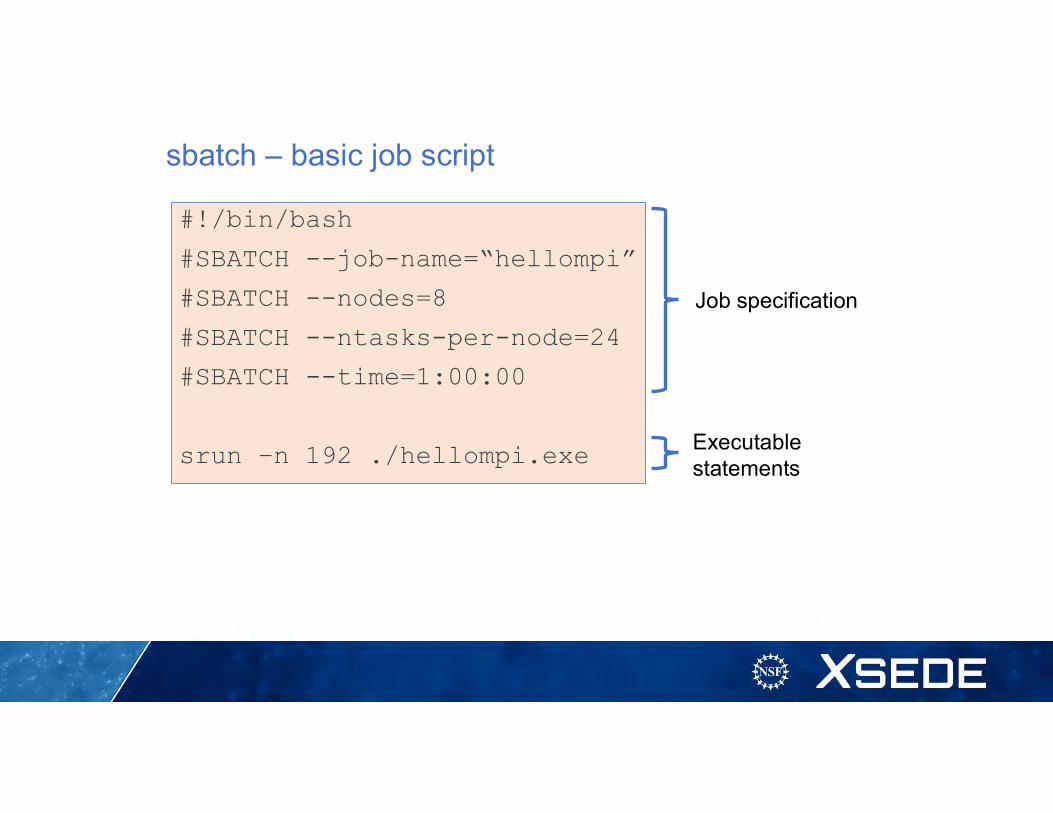
sbatch – basic job script
#!/bin/bash
#SBATCH --job-name=“hellompi”
#SBATCH --nodes=8
#SBATCH --ntasks-per-node=24
#SBATCH --time=1:00:00
srun –n 192 ./hellompi.exe
Job specification
Executablestatements
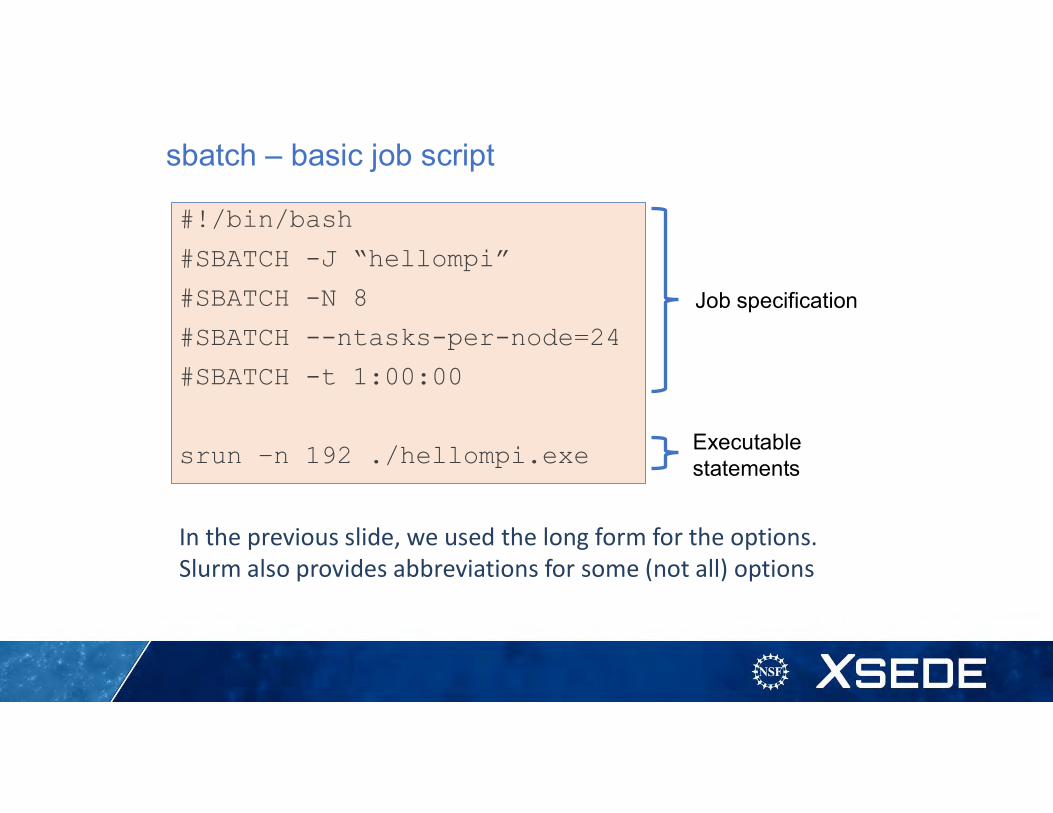
sbatch – basic job script
#!/bin/bash
#SBATCH -J “hellompi”
#SBATCH -N 8
#SBATCH --ntasks-per-node=24
#SBATCH -t 1:00:00
srun –n 192 ./hellompi.exe
Job specification
Executablestatements
In the previous slide, we used the long form for the options. Slurm also provides abbreviations for some (not all) options
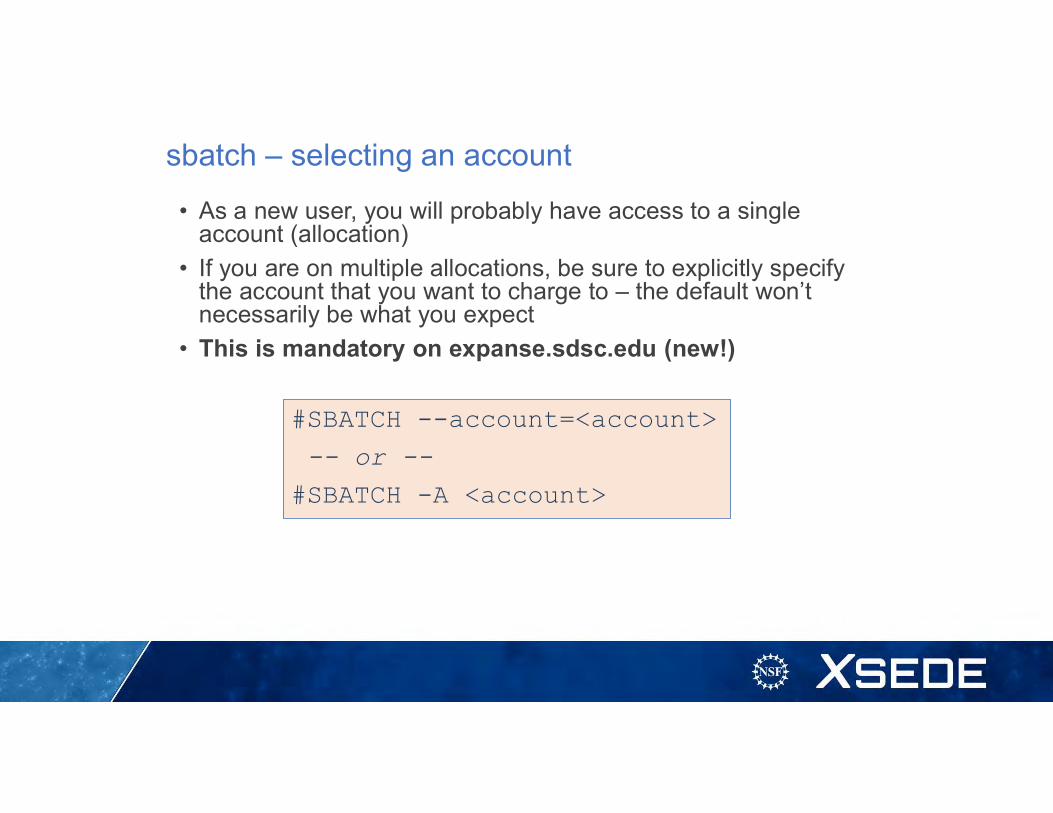
sbatch – selecting an account
• As a new user, you will probably have access to a single account (allocation)
• If you are on multiple allocations, be sure to explicitly specify the account that you want to charge to – the default won’t necessarily be what you expect
• This is mandatory on expanse.sdsc.edu (new!)
#SBATCH --account=<account>
-- or --
#SBATCH -A <account>
sbatch – improving your turnaround time
• Try to be as accurate as possible in estimating the wall time for your jobs
• But don’t underestimate the time since your job will be killed if you exceed the time limit and any results that have not been checkpointed will be lost
• Note that the default wall time is normally set to the maximum wall time
• Slurm uses a strategy call backfill to improve throughput
• The scheduler can “loan out” nodes that are being held for a pending parallel job as long as the duration of the loan is less than time remaining until all nodes are available
squeue – monitor jobs
• With squeue, you can monitor the state of jobs that had been submitted to the queues.
• Without any arguments, squeue returns information on the job status for all users. In most cases you will probably want to restrict to yourself using the -u option
• Many options for formatting output and restricting to particular job states, partitions or job ids
• See slurm.schedmd.com/squeue.html/ for more details
squeue – monitor jobs
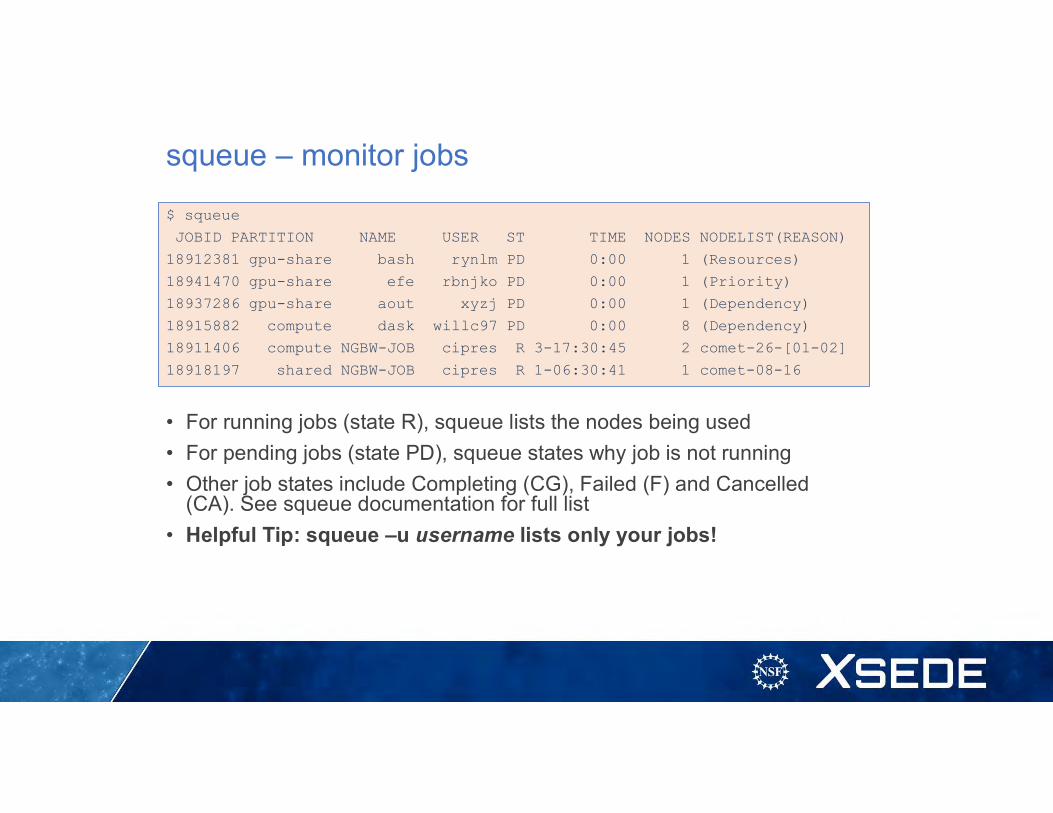
$ squeue
JOBID PARTITION NAME USER ST TIME NODES NODELIST(REASON)
18912381 gpu-share bash rynlm PD 0:00 1 (Resources)
18941470 gpu-share efe rbnjko PD 0:00 1 (Priority)
18937286 gpu-share aout xyzj PD 0:00 1 (Dependency)
18915882 compute dask willc97 PD 0:00 8 (Dependency)
18911406 compute NGBW-JOB cipres R 3-17:30:45 2 comet-26-[01-02]
18918197 shared NGBW-JOB cipres R 1-06:30:41 1 comet-08-16
• For running jobs (state R), squeue lists the nodes being used
• For pending jobs (state PD), squeue states why job is not running
• Other job states include Completing (CG), Failed (F) and Cancelled (CA). See squeue documentation for full list
• Helpful Tip: squeue –u username lists only your jobs!
scancel – cancel jobs
• Slurm allows you to cancel jobs that are running or queued
• Use squeue to find jobid
• Comes in handy if you realize job is not progressing as expected, wrong input files were used, etc.
$ scancel jobid [jobid] [jobid]
$ scancel -u username # cancel all my jobs
• See slurm.schedmd.com/scancel.html/ for more details
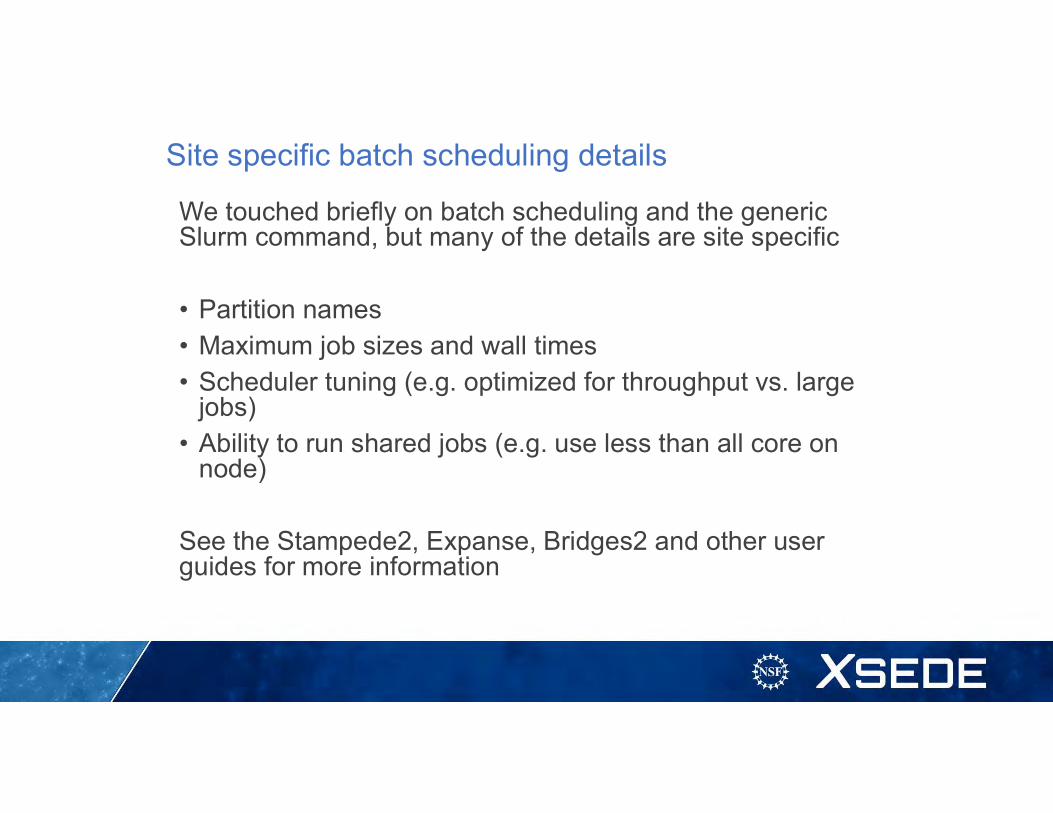
Site specific batch scheduling details
We touched briefly on batch scheduling and the generic Slurm command, but many of the details are site specific
• Partition names• Maximum job sizes and wall times• Scheduler tuning (e.g. optimized for throughput vs. large
jobs)• Ability to run shared jobs (e.g. use less than all core on
node)
See the Stampede2, Expanse, Bridges2 and other user guides for more information
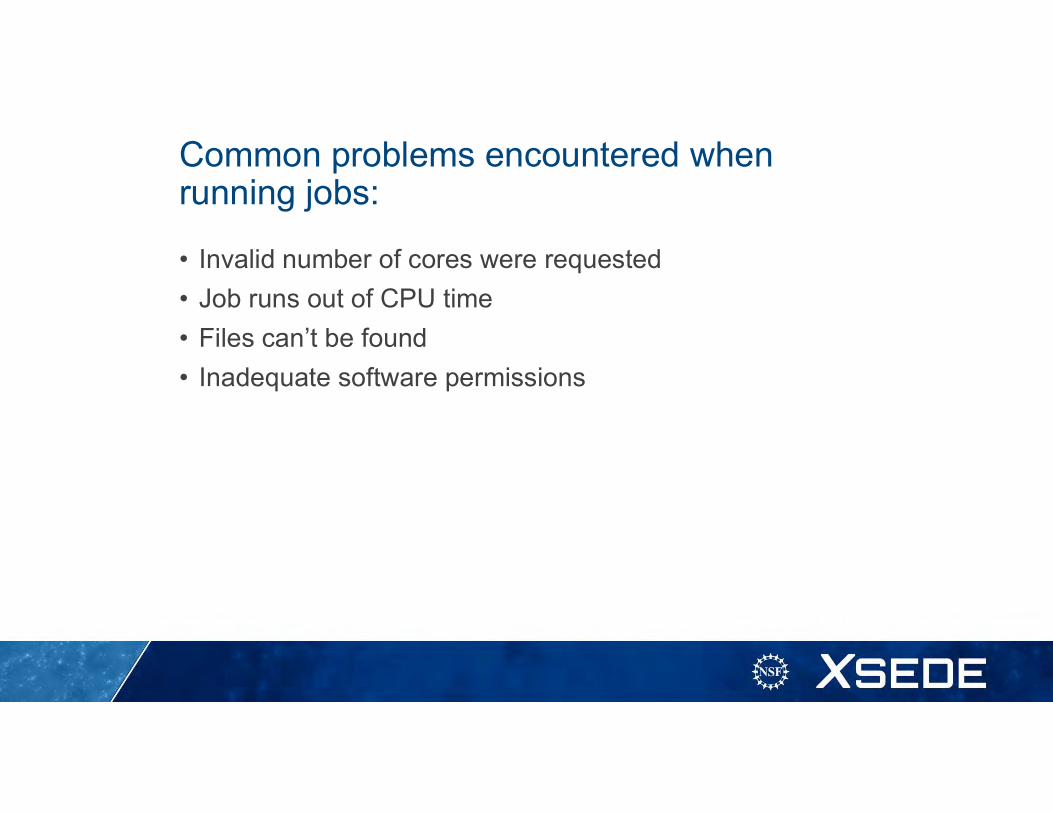
Common problems encountered when running jobs:
• Invalid number of cores were requested
• Job runs out of CPU time
• Files can’t be found
• Inadequate software permissions
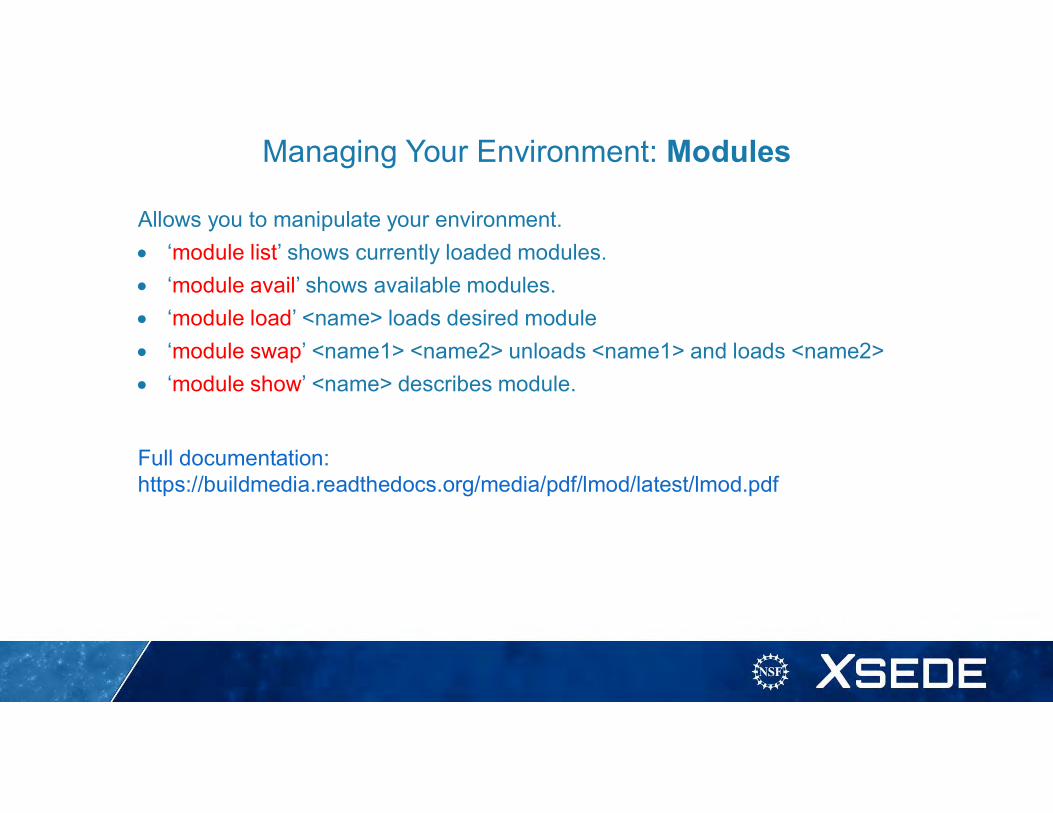
Managing Your Environment: Modules
Allows you to manipulate your environment.
‘module list’ shows currently loaded modules.
‘module avail’ shows available modules.
‘module load’ <name> loads desired module
‘module swap’ <name1> <name2> unloads <name1> and loads <name2>
‘module show’ <name> describes module.
Full documentation: https://buildmedia.readthedocs.org/media/pdf/lmod/latest/lmod.pdf
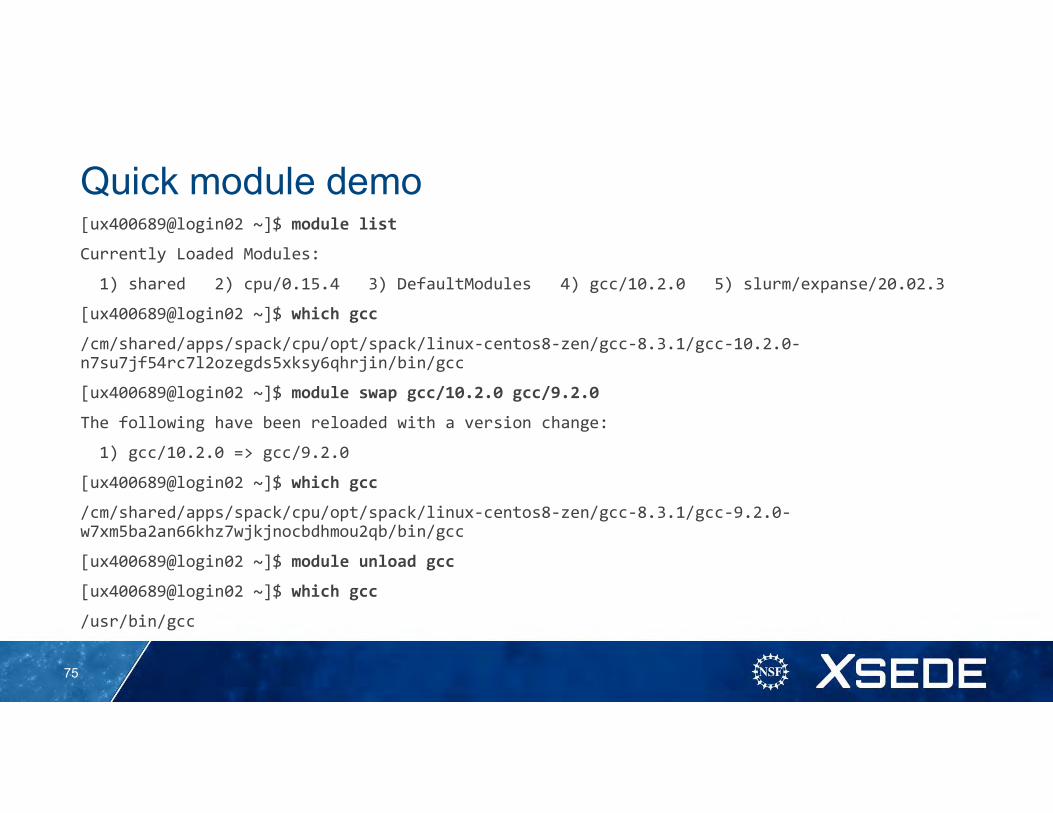
Quick module demo[ux400689@login02 ~]$ module list
Currently Loaded Modules:
1) shared 2) cpu/0.15.4 3) DefaultModules 4) gcc/10.2.0 5) slurm/expanse/20.02.3
[ux400689@login02 ~]$ which gcc
/cm/shared/apps/spack/cpu/opt/spack/linux-centos8-zen/gcc-8.3.1/gcc-10.2.0-n7su7jf54rc7l2ozegds5xksy6qhrjin/bin/gcc
[ux400689@login02 ~]$ module swap gcc/10.2.0 gcc/9.2.0
The following have been reloaded with a version change:
1) gcc/10.2.0 => gcc/9.2.0
[ux400689@login02 ~]$ which gcc
/cm/shared/apps/spack/cpu/opt/spack/linux-centos8-zen/gcc-8.3.1/gcc-9.2.0-w7xm5ba2an66khz7wjkjnocbdhmou2qb/bin/gcc
[ux400689@login02 ~]$ module unload gcc
[ux400689@login02 ~]$ which gcc
/usr/bin/gcc
75
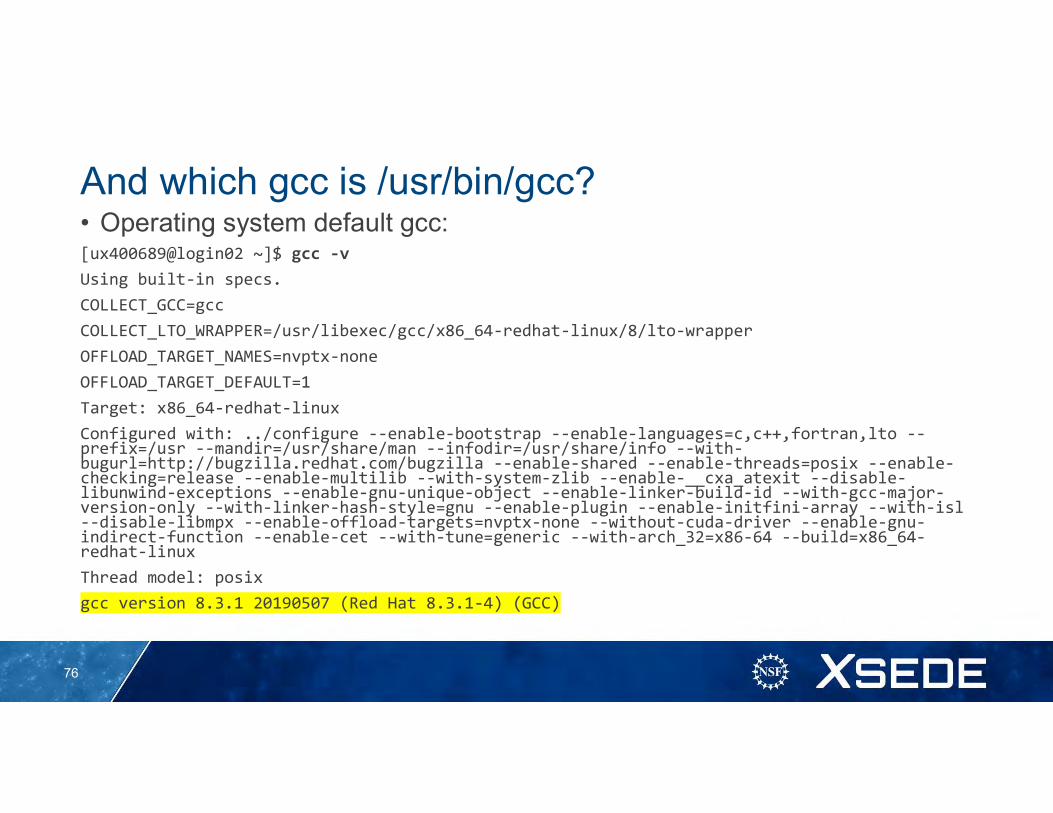
And which gcc is /usr/bin/gcc?• Operating system default gcc:[ux400689@login02 ~]$ gcc -v
Using built-in specs.
COLLECT_GCC=gcc
COLLECT_LTO_WRAPPER=/usr/libexec/gcc/x86_64-redhat-linux/8/lto-wrapper
OFFLOAD_TARGET_NAMES=nvptx-none
OFFLOAD_TARGET_DEFAULT=1
Target: x86_64-redhat-linux
Configured with: ../configure --enable-bootstrap --enable-languages=c,c++,fortran,lto --prefix=/usr --mandir=/usr/share/man --infodir=/usr/share/info --with-bugurl=http://bugzilla.redhat.com/bugzilla --enable-shared --enable-threads=posix --enable-checking=release --enable-multilib --with-system-zlib --enable-__cxa_atexit --disable-libunwind-exceptions --enable-gnu-unique-object --enable-linker-build-id --with-gcc-major-version-only --with-linker-hash-style=gnu --enable-plugin --enable-initfini-array --with-isl--disable-libmpx --enable-offload-targets=nvptx-none --without-cuda-driver --enable-gnu-indirect-function --enable-cet --with-tune=generic --with-arch_32=x86-64 --build=x86_64-redhat-linux
Thread model: posix
gcc version 8.3.1 20190507 (Red Hat 8.3.1-4) (GCC)
76
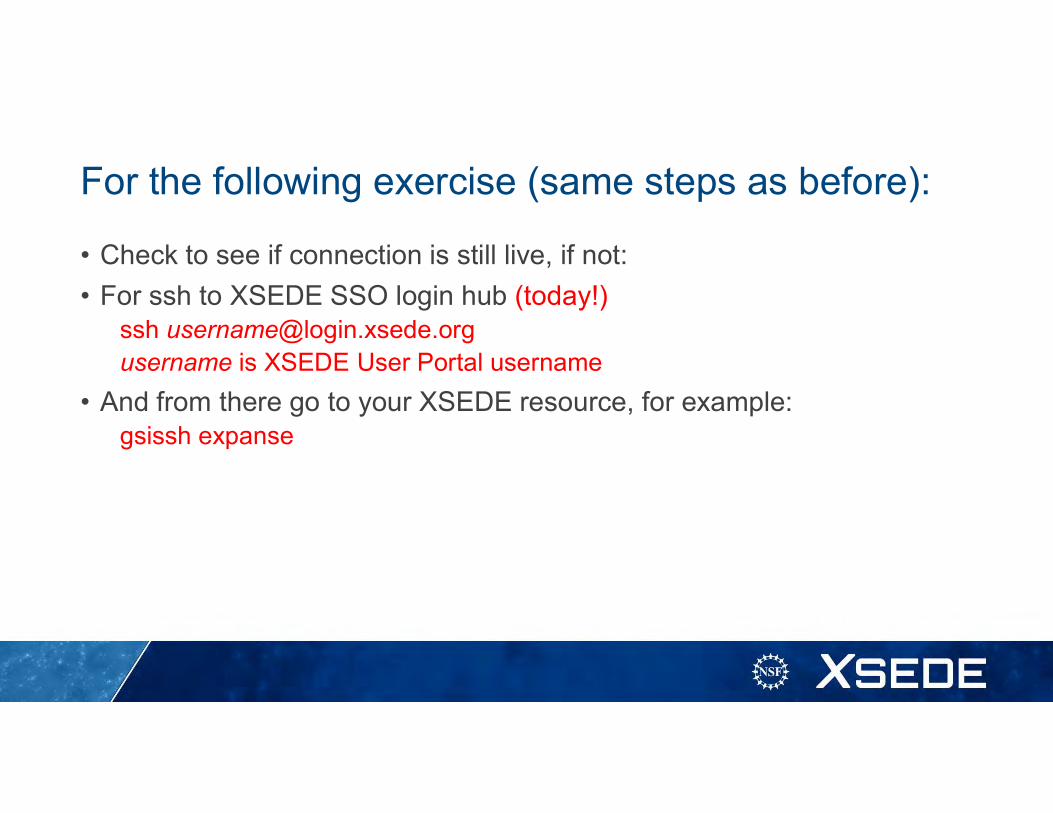
For the following exercise (same steps as before):
• Check to see if connection is still live, if not:
• For ssh to XSEDE SSO login hub (today!)ssh [email protected] is XSEDE User Portal username
• And from there go to your XSEDE resource, for example: gsissh expanse
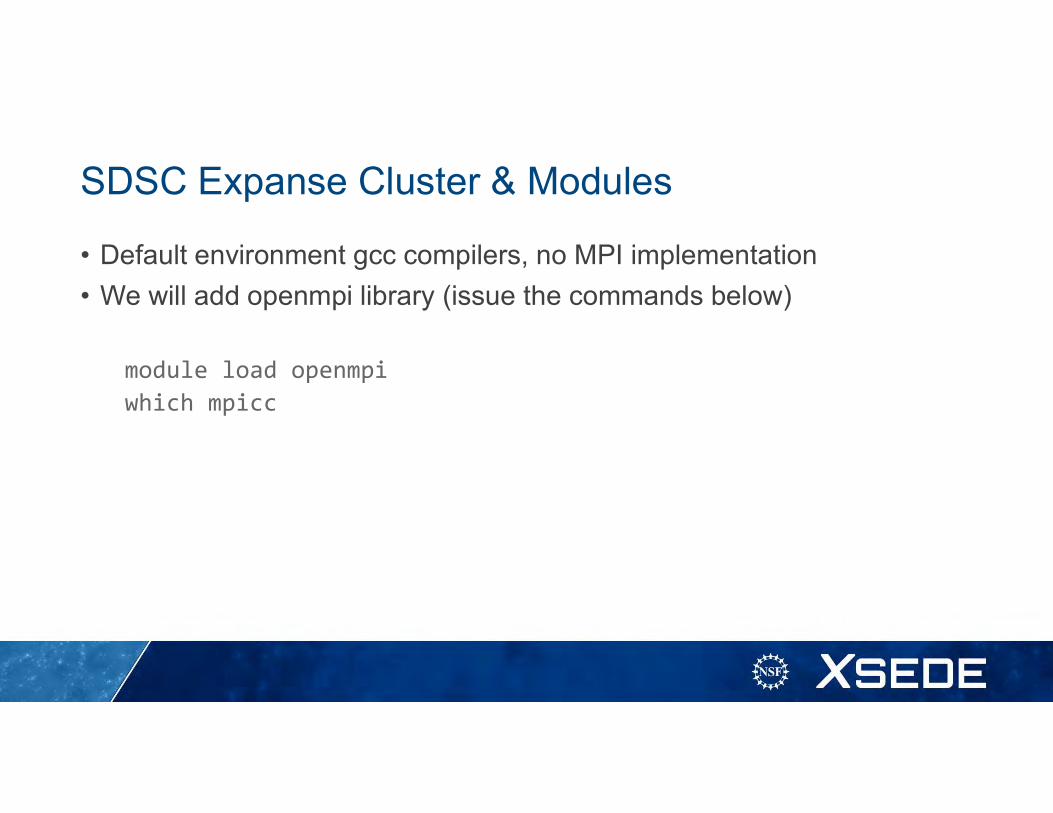
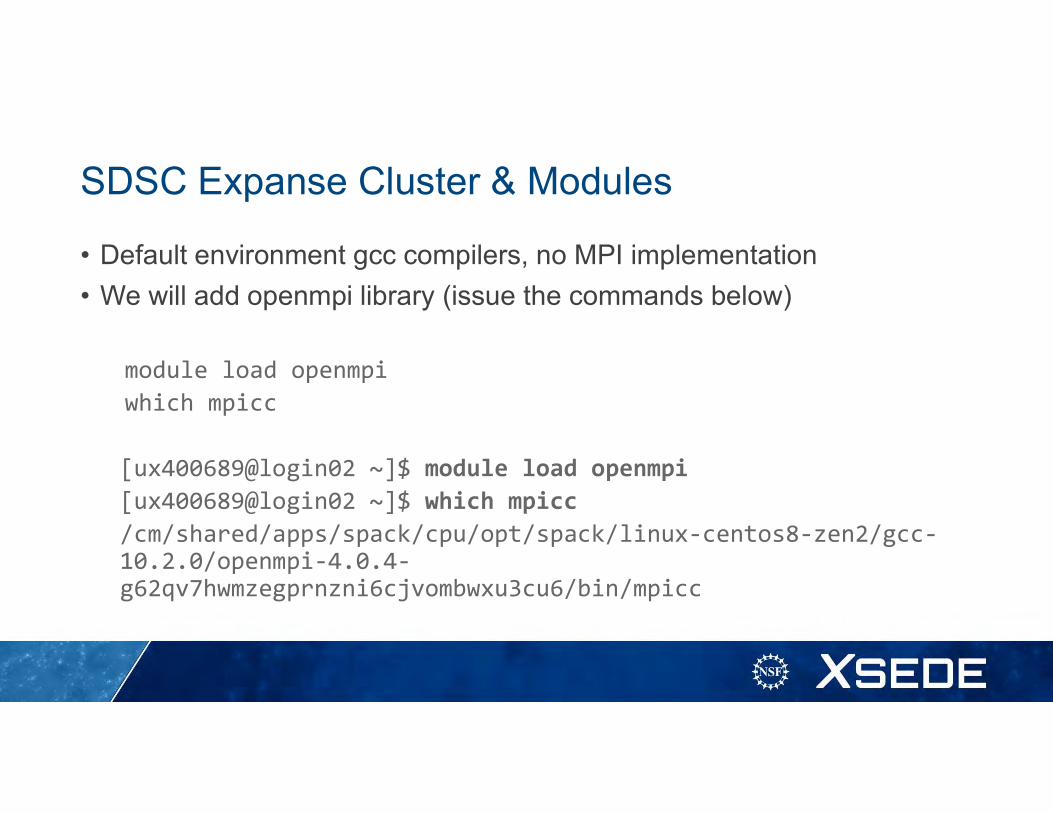
SDSC Expanse Cluster & Modules
• Default environment gcc compilers, no MPI implementation
• We will add openmpi library (issue the commands below)
module load openmpiwhich mpicc
SDSC Expanse Cluster & Modules
• Default environment gcc compilers, no MPI implementation
• We will add openmpi library (issue the commands below)
module load openmpiwhich mpicc
[ux400689@login02 ~]$ module load openmpi[ux400689@login02 ~]$ which mpicc/cm/shared/apps/spack/cpu/opt/spack/linux-centos8-zen2/gcc-10.2.0/openmpi-4.0.4-g62qv7hwmzegprnzni6cjvombwxu3cu6/bin/mpicc
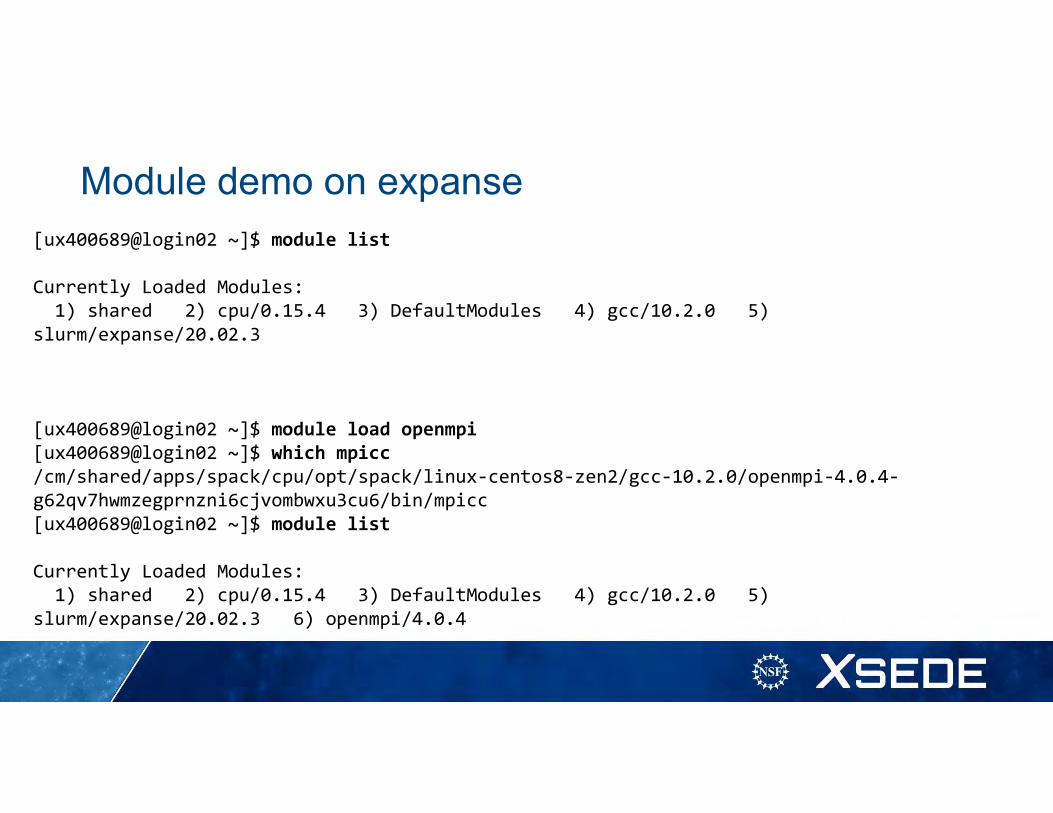
Module demo on expanse[ux400689@login02 ~]$ module list
Currently Loaded Modules:1) shared 2) cpu/0.15.4 3) DefaultModules 4) gcc/10.2.0 5)
slurm/expanse/20.02.3
[ux400689@login02 ~]$ module load openmpi[ux400689@login02 ~]$ which mpicc/cm/shared/apps/spack/cpu/opt/spack/linux-centos8-zen2/gcc-10.2.0/openmpi-4.0.4-g62qv7hwmzegprnzni6cjvombwxu3cu6/bin/mpicc[ux400689@login02 ~]$ module list
Currently Loaded Modules:1) shared 2) cpu/0.15.4 3) DefaultModules 4) gcc/10.2.0 5)
slurm/expanse/20.02.3 6) openmpi/4.0.4
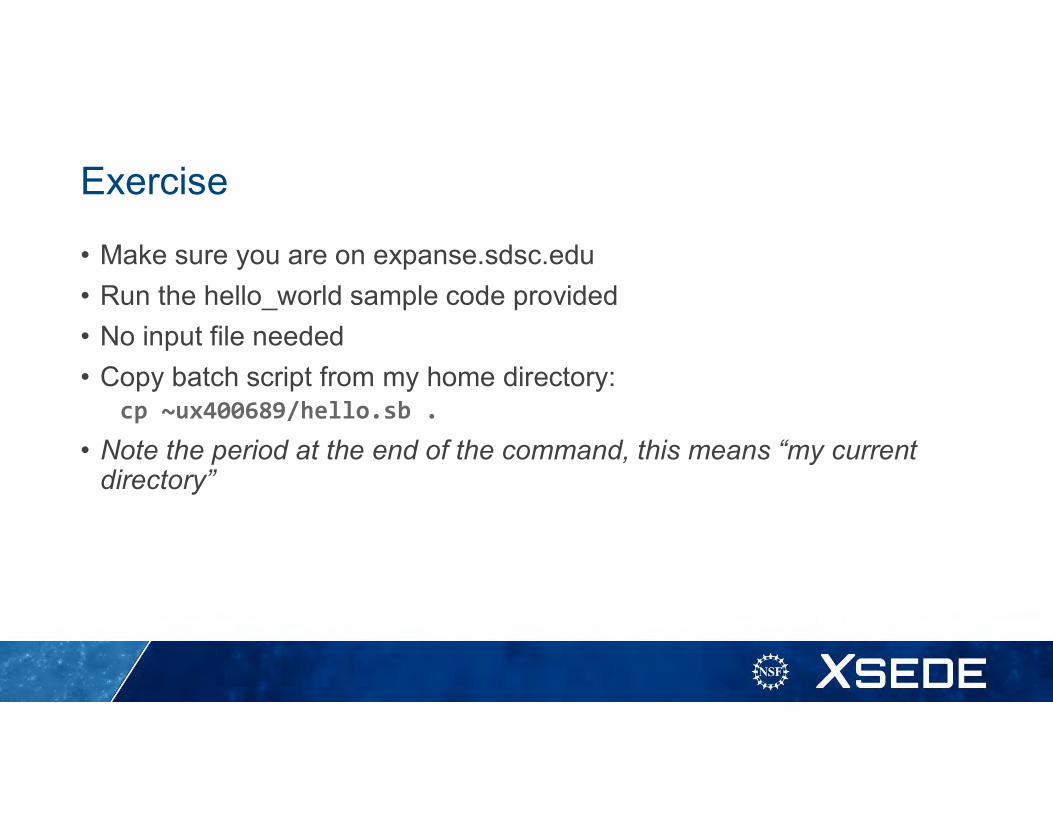
Exercise
• Make sure you are on expanse.sdsc.edu
• Run the hello_world sample code provided
• No input file needed
• Copy batch script from my home directory:cp ~ux400689/hello.sb .
• Note the period at the end of the command, this means “my current directory”
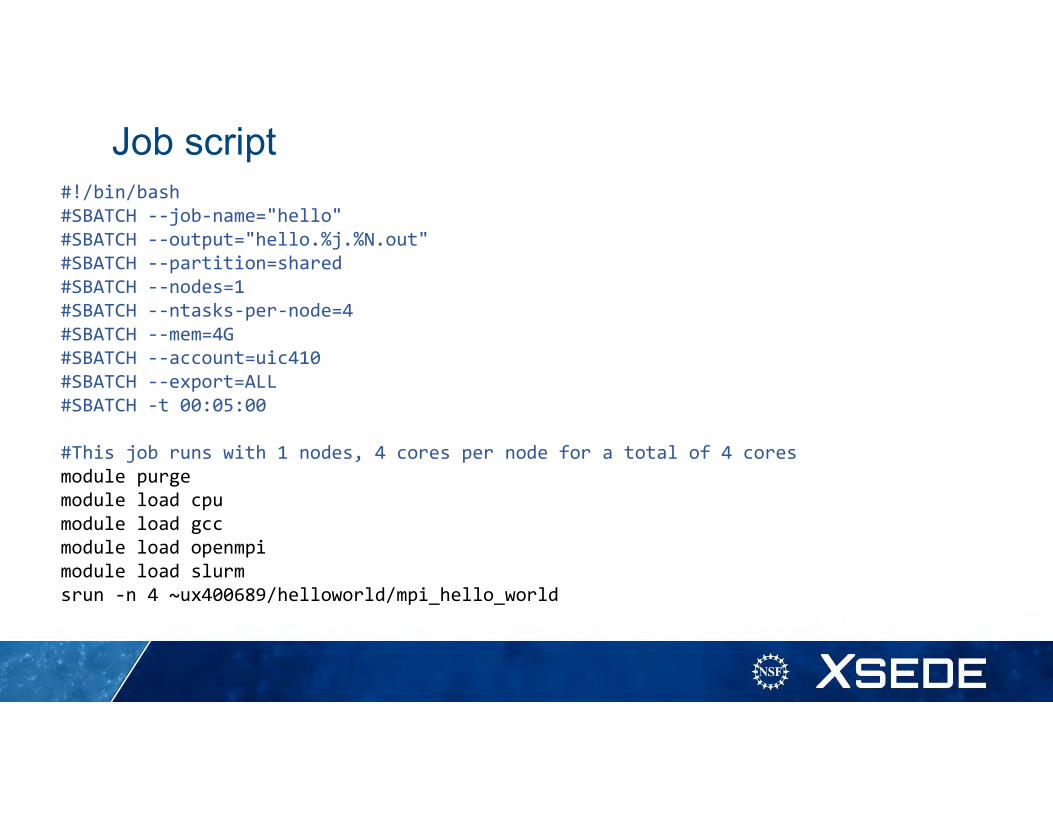
Job script#!/bin/bash#SBATCH --job-name="hello"#SBATCH --output="hello.%j.%N.out"#SBATCH --partition=shared#SBATCH --nodes=1#SBATCH --ntasks-per-node=4#SBATCH --mem=4G#SBATCH --account=uic410#SBATCH --export=ALL#SBATCH -t 00:05:00
#This job runs with 1 nodes, 4 cores per node for a total of 4 coresmodule purgemodule load cpumodule load gccmodule load openmpimodule load slurmsrun -n 4 ~ux400689/helloworld/mpi_hello_world
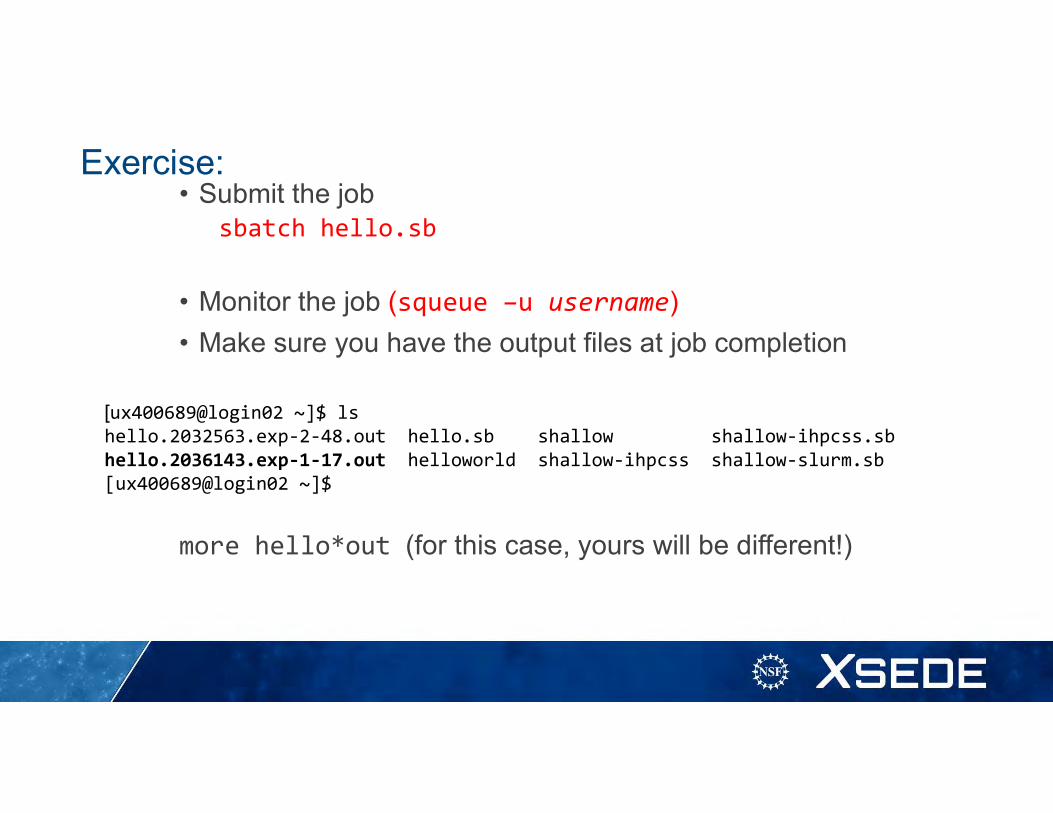
Exercise:• Submit the job
sbatch hello.sb
• Monitor the job (squeue –u username)
• Make sure you have the output files at job completion
more hello*out (for this case, yours will be different!)
[ux400689@login02 ~]$ lshello.2032563.exp-2-48.out hello.sb shallow shallow-ihpcss.sbhello.2036143.exp-1-17.out helloworld shallow-ihpcss shallow-slurm.sb[ux400689@login02 ~]$

Output files: need to show successful completion
[ux400689@login02 ~]$ more hello.2036143.exp-1-17.outHello world from processor exp-1-17, rank 2 out of 4 processorsHello world from processor exp-1-17, rank 0 out of 4 processorsHello world from processor exp-1-17, rank 1 out of 4 processorsHello world from processor exp-1-17, rank 3 out of 4 processors
This example shows that we ran on node exp-1-17, using 4 processor (cores) on that node
More “helpful” resourcesxsede.orgUser Services
• Resources available at each Service Provider• User Guides describing memory, number of CPUs,
file systems, etc.• Storage facilities• Software (Comprehensive Search)
• Training: portal.xsede.org Training• Course Calendar• On-line training
• Get face-to-face help from XSEDE experts at your institution; contact your local Campus Champions.
• Extended Collaborative Support
• portal.xsede.org Help Submit ticket
• portal.xsede.org My XSEDE Tickets– Submit ticket– View past tickets (both open and closed)
• Can also email [email protected] or call 1-866-907-2383, at any hour (24/7)
Need help? Reporting and Tracking Issues

XSEDE Training Survey
• Afte the end of this training, you will receive a link to a survey by email. Please complete this survey, we value your feedback, and will use your input to help improve our training offerings.
• Slides from this workshop will be available athttp://hpcuniversity.org/trainingMaterials/253/

Thanks for listening and welcome to XSEDE!
Additional slides to set up Globus Connect for transfers to your laptop
89
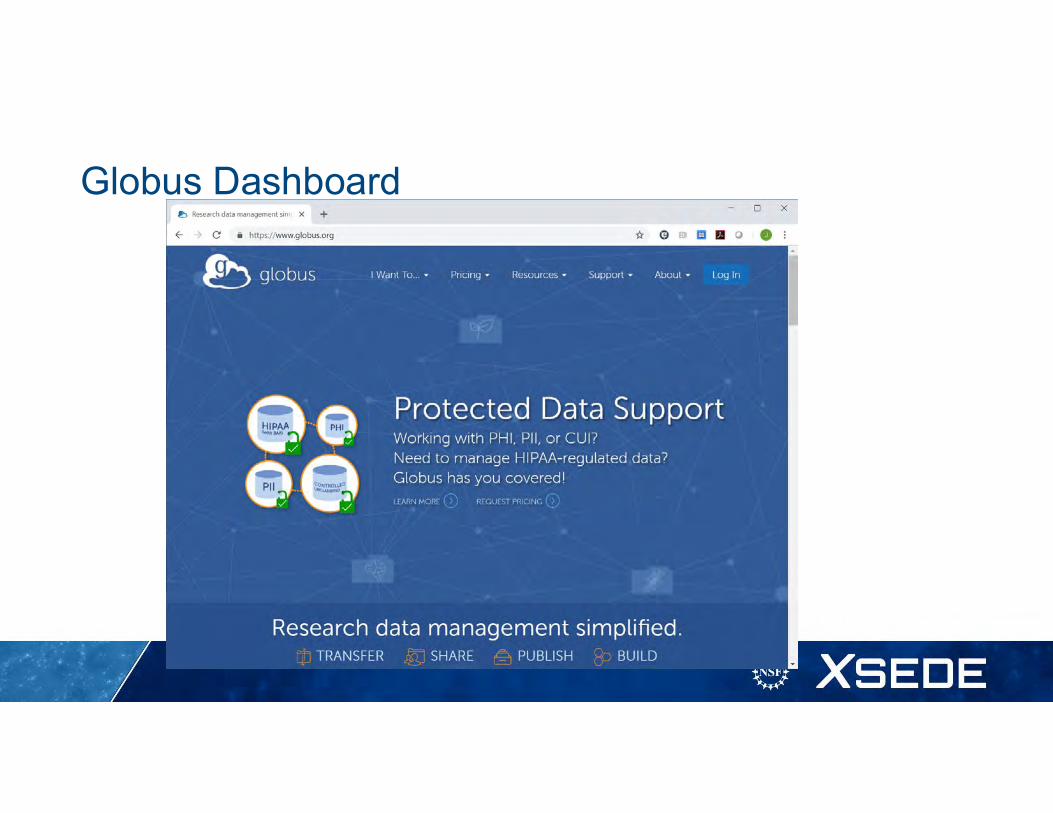
Globus Dashboard

Login to use Globus Web App
Use XSEDE Identity Provider
Sign in with XSEDE credentials
Globus Online File Transfer
Start by typing one endpoint
• Start typing “PSC Bridges with”
• Select PSC Bridges with XSEDE Authentication
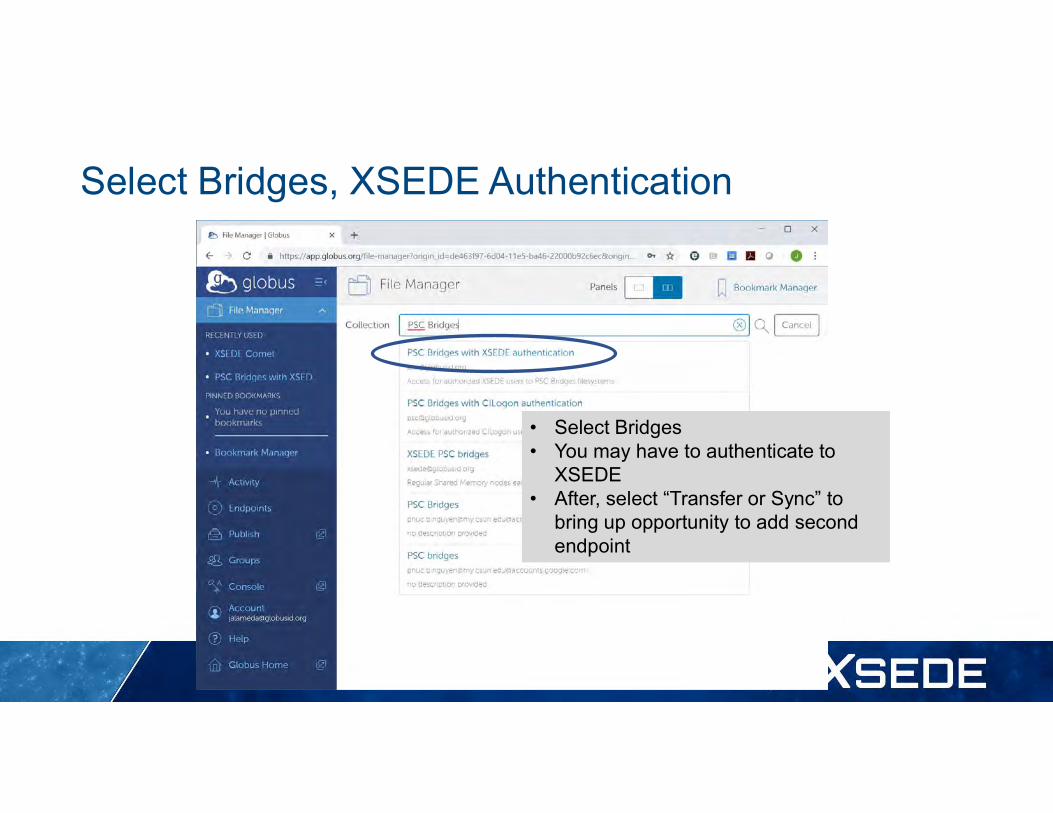
Select Bridges, XSEDE Authentication
• Select Bridges• You may have to authenticate to
XSEDE• After, select “Transfer or Sync” to
bring up opportunity to add second endpoint
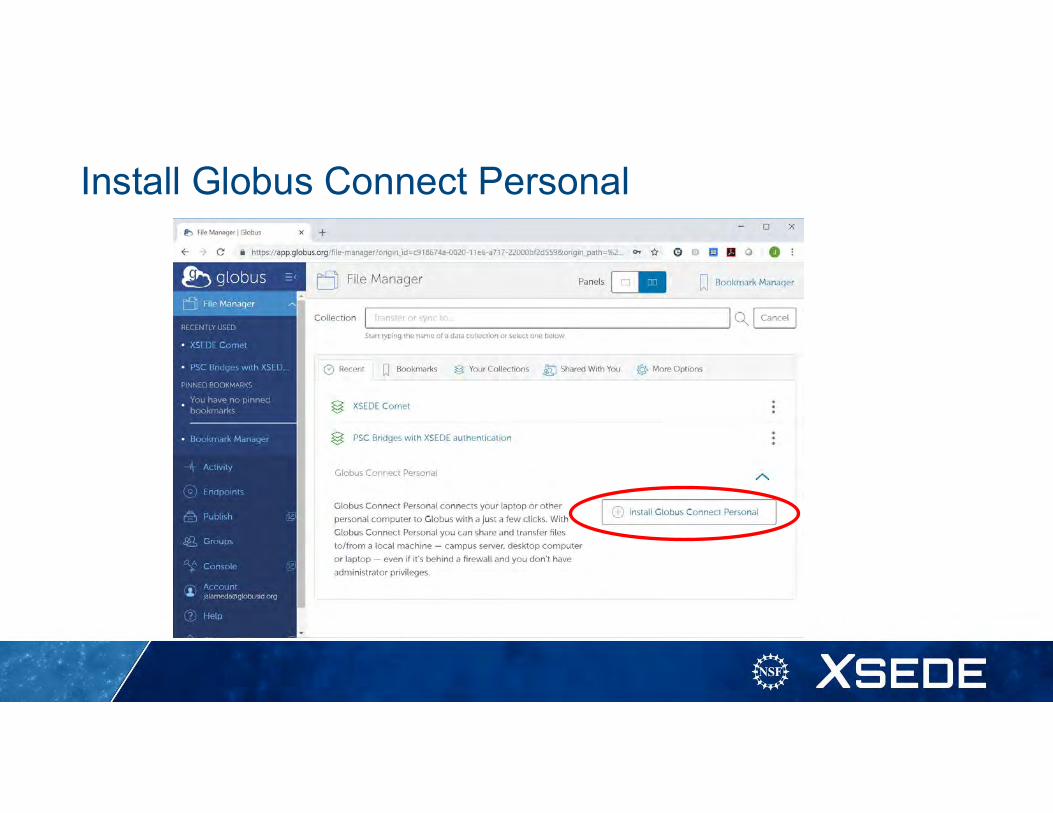
Install Globus Connect Personal
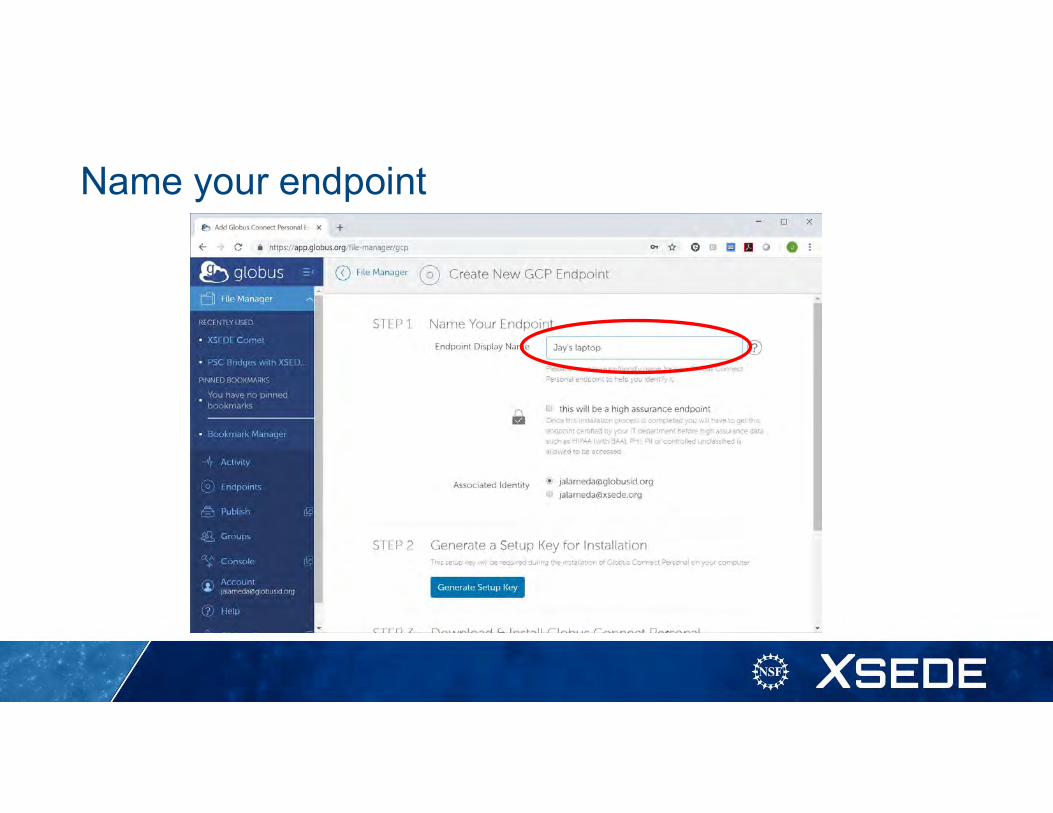
Name your endpoint
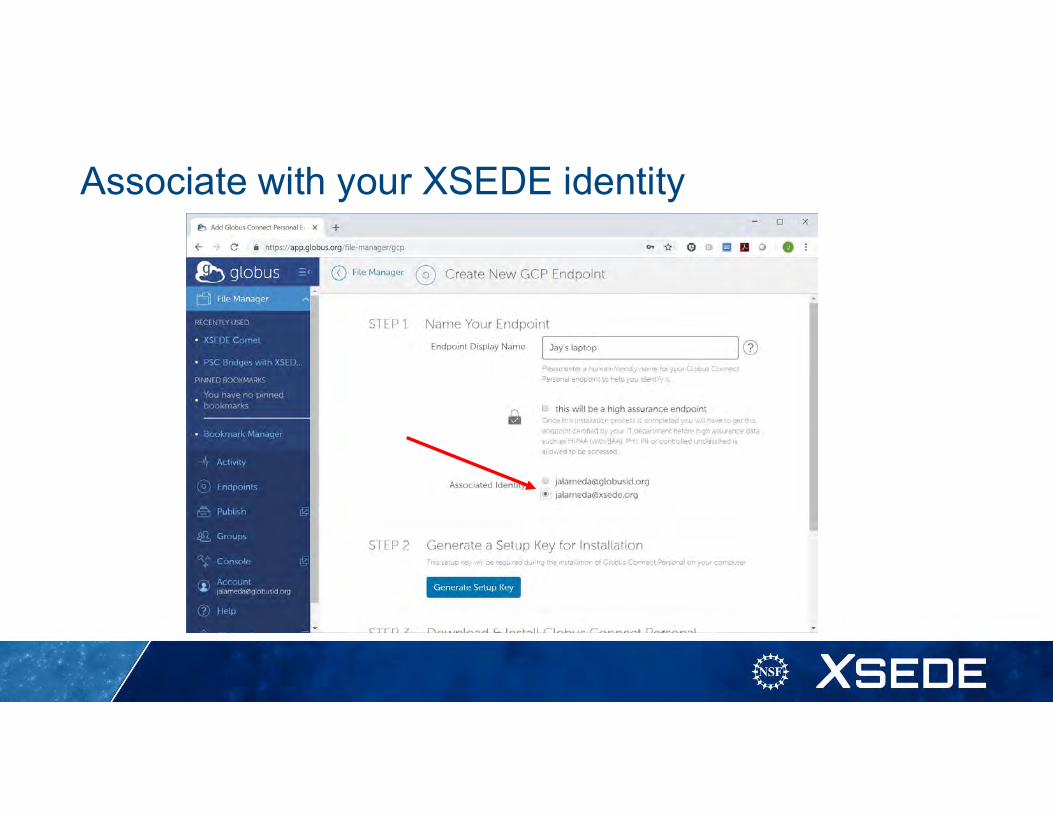
Associate with your XSEDE identity
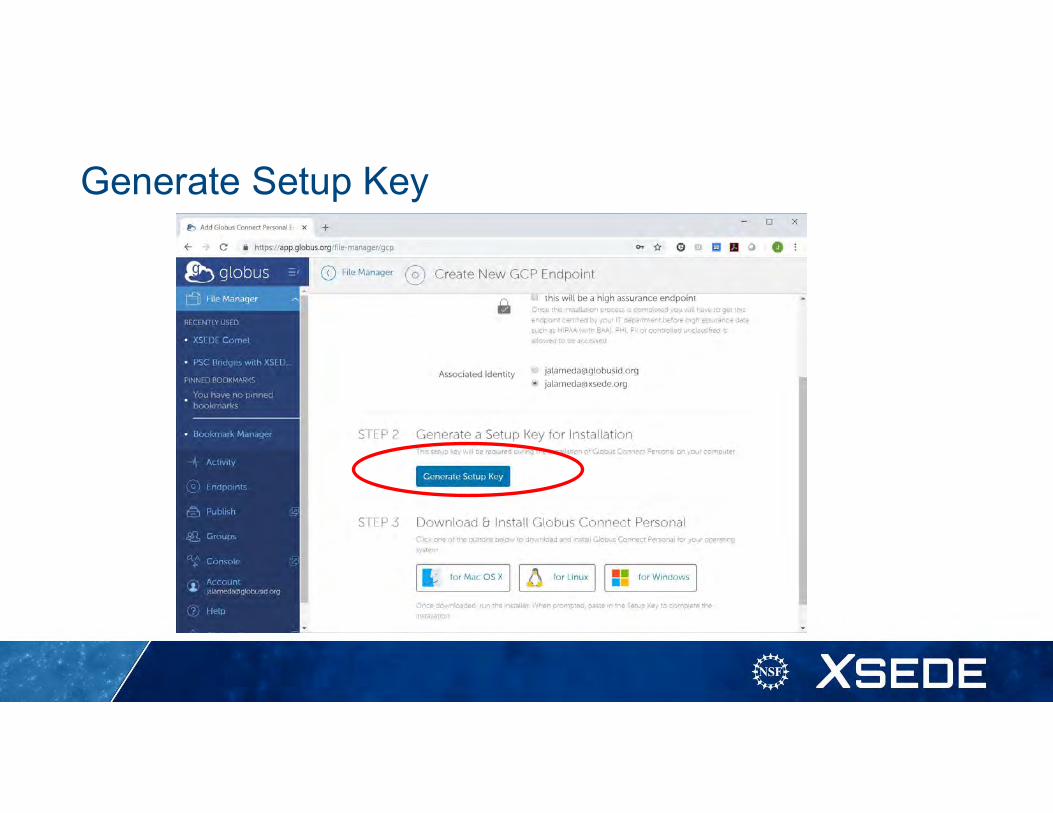
Generate Setup Key
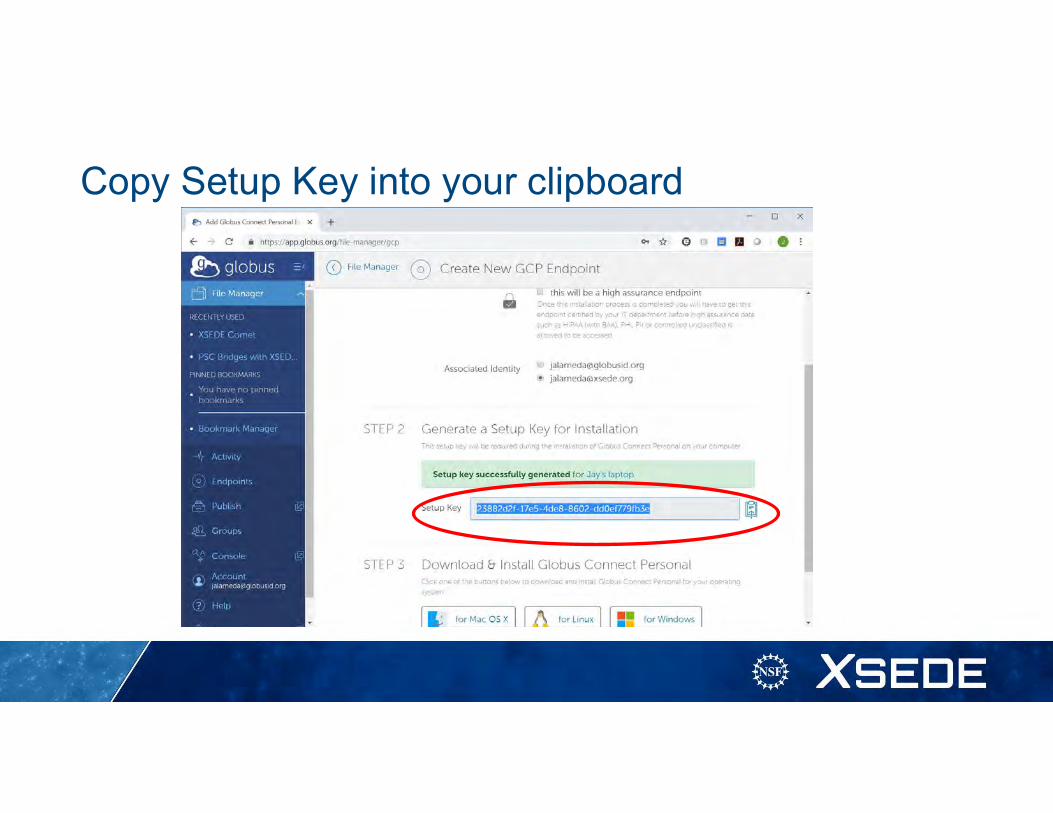
Copy Setup Key into your clipboard
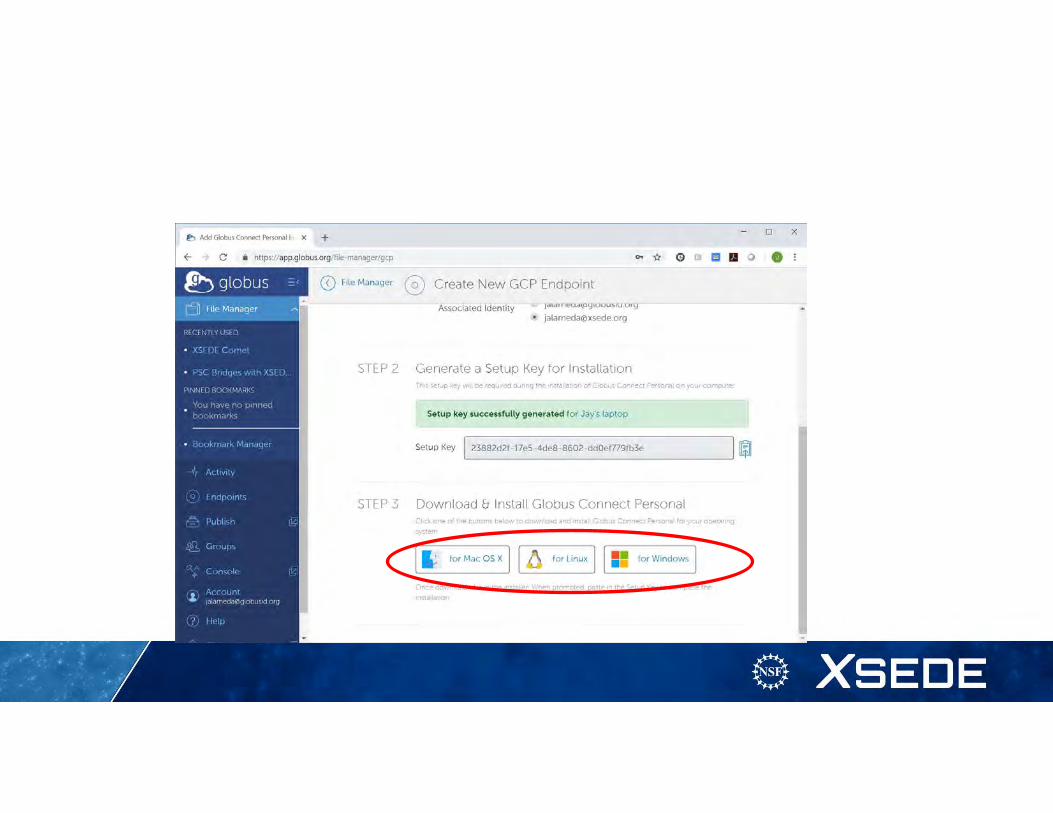
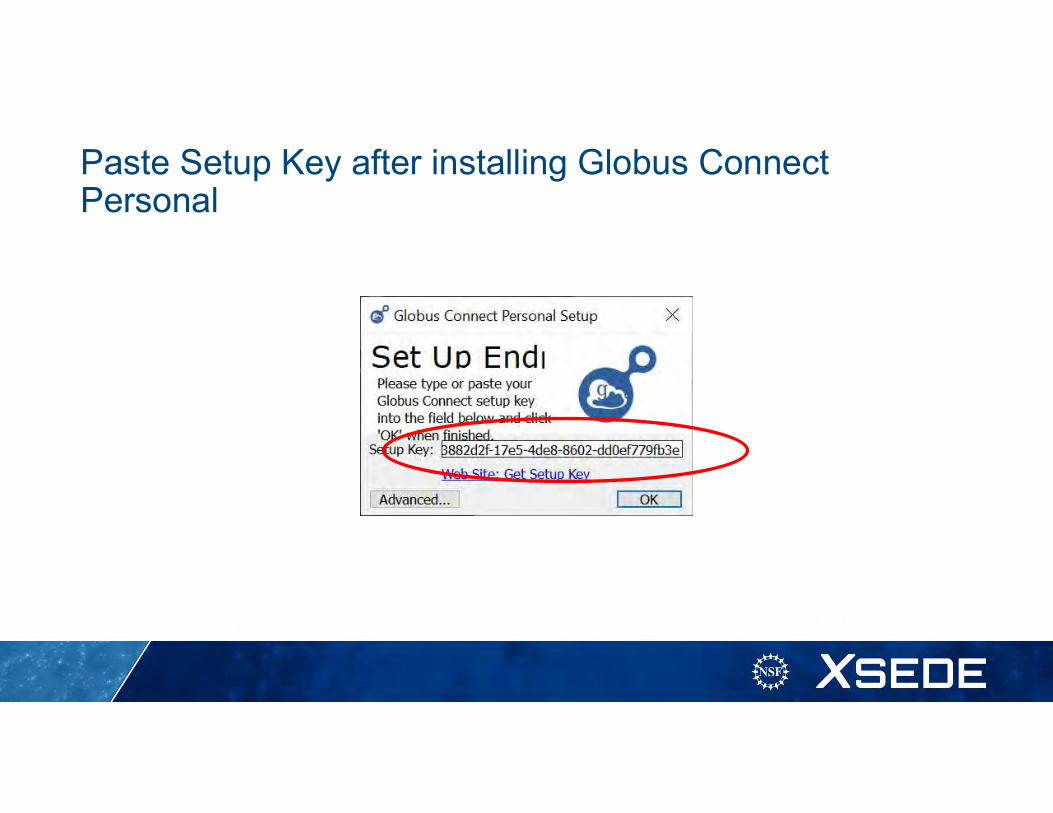
Paste Setup Key after installing Globus Connect Personal
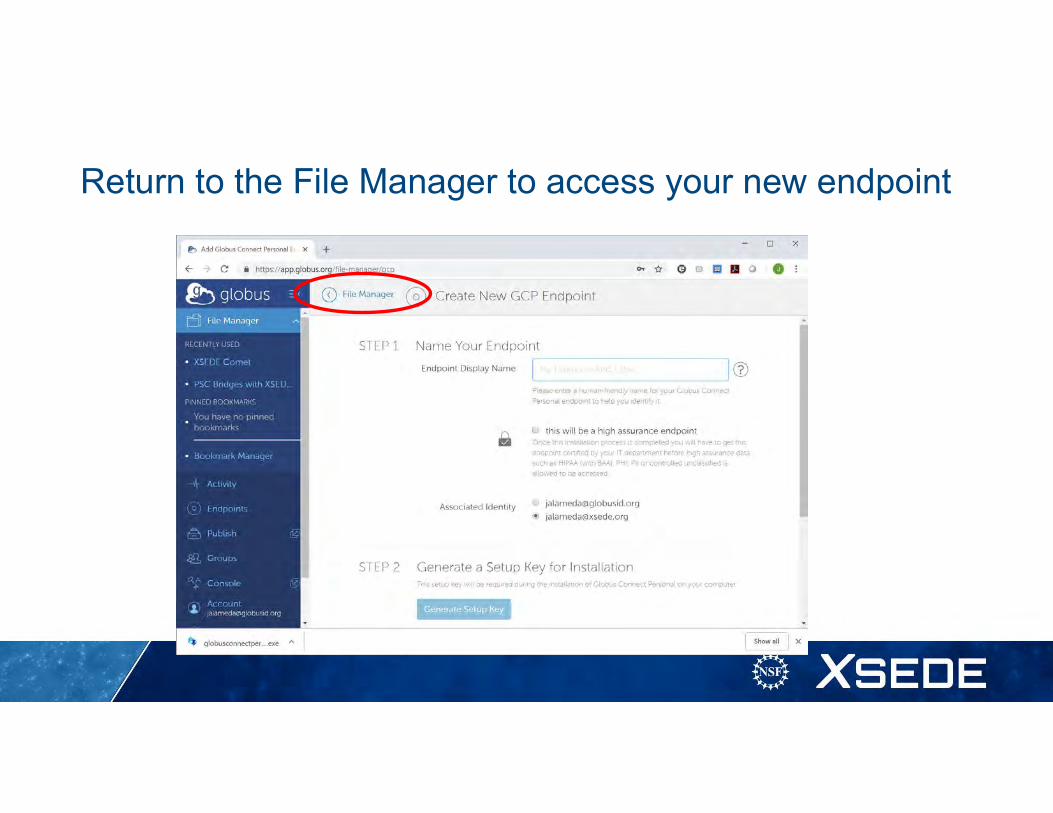
Return to the File Manager to access your new endpoint
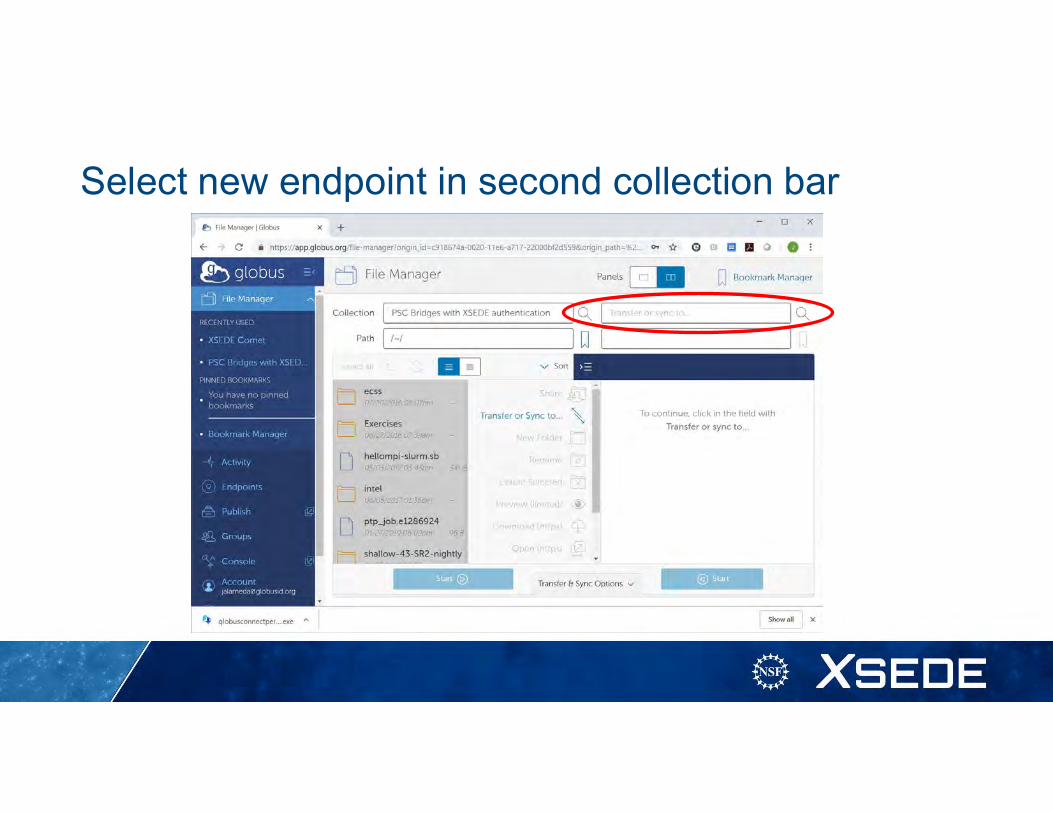
Select new endpoint in second collection bar
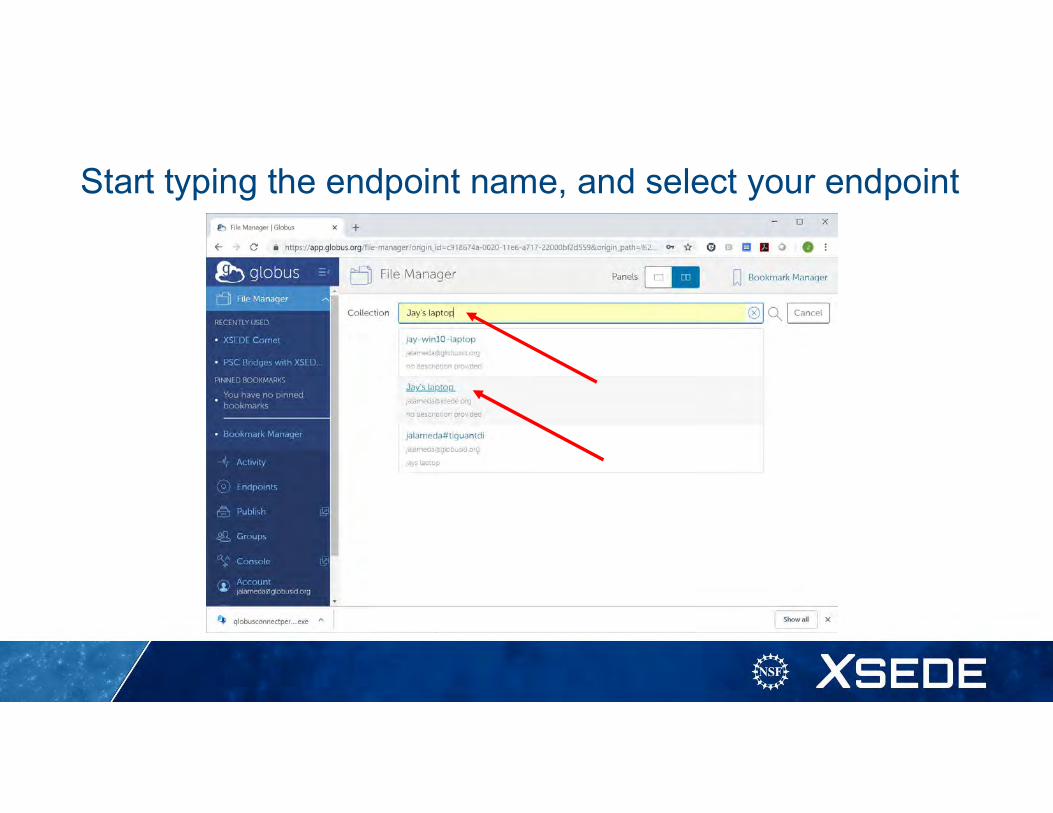
Start typing the endpoint name, and select your endpoint
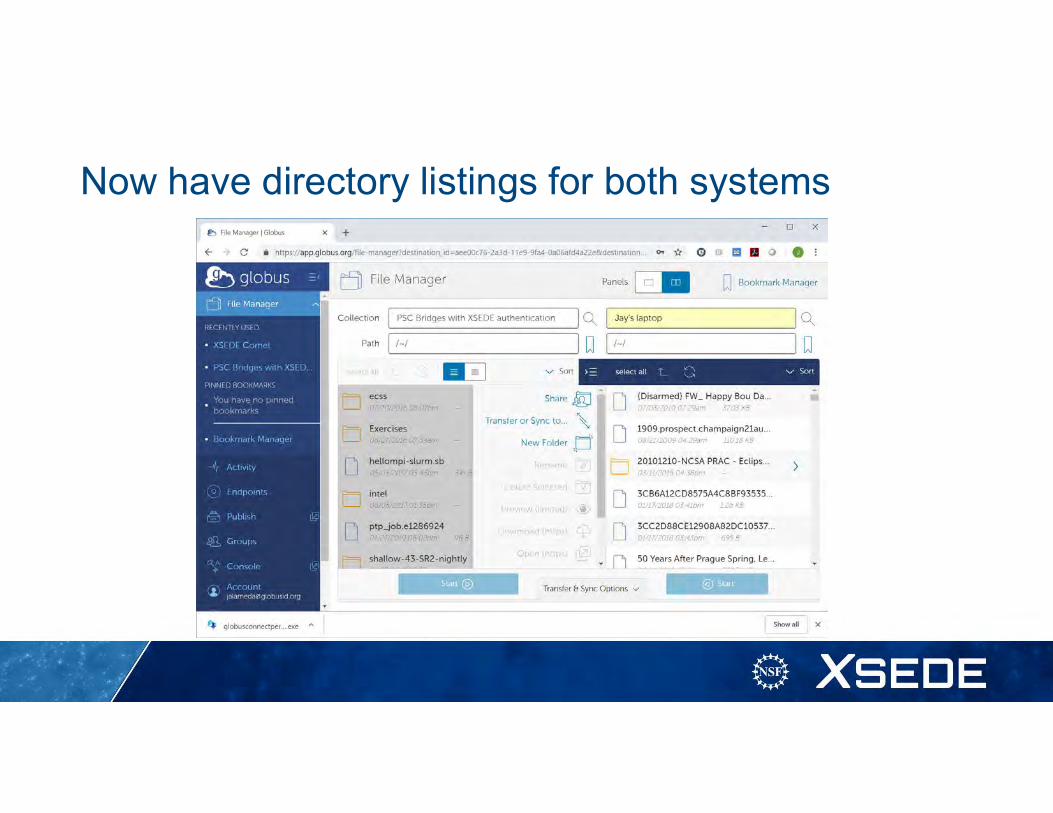
Now have directory listings for both systems
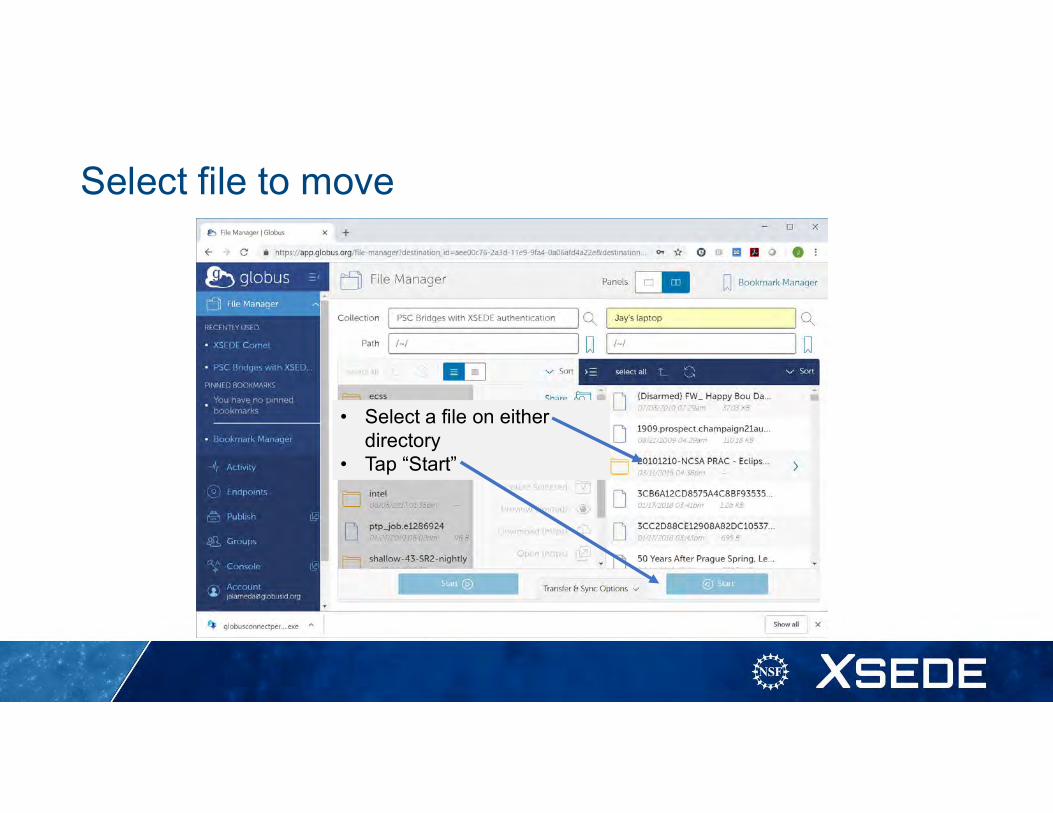
Select file to move
• Select a file on either directory
• Tap “Start”
Related Documents


