Xero for Beginners ISBN Number: 978-1-925782-67-7 Part Number: 774 Version: Xero 19.1 AUTHOR – Kerryn Maguire Kerryn has been working with accounting software products for over twenty years. Originally working from 1994 as an accountant with small business when accounting software became mainstream. Kerryn then focused on providing consulting and training services to small business in particular. Expanding from this into to providing curriculum based resources to TAFE and private RTOs. From this she established Microstar Publishing and more recently incorporated OfficeLink Learning to provide a wide range of resources for the Accounting and Business Services Certificate courses. Kerryn has a long association with many TAFEs and RTOs across Australia. Kerryn’s fundamental aim is to provide resources that are easy to understand while providing a practical application of skills acquired. Kerryn also co-authors two titles for Cambridge University Press which are in their 4 th Edition – first published in 2000. Kerryn has considerable experience and knowledge: Bachelor of Applied Science Mathematics Diploma of Education Graduate Diploma of Accounting CRI: Criterion Referenced Instruction Member of Institute of Certified Bookkeepers Member of VELG Reproduction and Communication for educational purposes The Australian Copyright Act 1968 (the Act) allows a maximum of one chapter or 10% of the pages of this publication, whichever is greater, to be reproduced and/or communicated by any educational institution for its educational purposes provided that the educational institution (or the body that administers it) has given remuneration notice to the Copyright Agency Limited (CAL) under the Act. For details of the CAL license for educational institutions contact: Copyright Agency Limited Level 15 233 Castlereagh Street Sydney NSW 2000 Telephone: (02) 9394 7600 Facsimile: (02) 9394 7601 Email: [email protected] Sample

Welcome message from author
This document is posted to help you gain knowledge. Please leave a comment to let me know what you think about it! Share it to your friends and learn new things together.
Transcript
Xero for Beginners ISBN Number: 978-1-925782-67-7
Part Number: 774
Version: Xero 19.1
AUTHOR – Kerryn Maguire
Kerryn has been working with accounting software products for over twenty years. Originally working from 1994 as an accountant with small business when accounting software became mainstream. Kerryn then focused on providing consulting and training services to small business in particular. Expanding from this into to providing curriculum based resources to TAFE and private RTOs. From this she established Microstar Publishing and more recently incorporated OfficeLink Learning to provide a wide range of resources for the Accounting and Business Services Certificate courses. Kerryn has a long association with many TAFEs and RTOs across Australia. Kerryn’s fundamental aim is to provide resources that are easy to understand while providing a practical application of skills acquired. Kerryn also co-authors two titles for Cambridge University Press which are in their 4th Edition – first published in 2000. Kerryn has considerable experience and knowledge:
Bachelor of Applied Science Mathematics Diploma of Education Graduate Diploma of Accounting CRI: Criterion Referenced Instruction Member of Institute of Certified Bookkeepers Member of VELG
Reproduction and Communication for educational purposes
The Australian Copyright Act 1968 (the Act) allows a maximum of one chapter or 10% of the pages of this publication, whichever is greater, to be reproduced and/or communicated by any educational institution for its educational purposes provided that the educational institution (or the body that administers it) has given remuneration notice to the Copyright Agency Limited (CAL) under the Act. For details of the CAL license for educational institutions contact:
Copyright Agency Limited Level 15 233 Castlereagh Street Sydney NSW 2000 Telephone: (02) 9394 7600 Facsimile: (02) 9394 7601 Email: [email protected]
Sample
All Rights Reserved
© Copyright 2019 OfficeLink Learning Version Xero 19.1
No part of the contents of this book may be reproduced or transmitted in any form or by any
means without the written permission of OfficeLink Learning. All registered trademarks or service
marks are the property of their respective owners.
While care has been taken in the preparation of this Training Tool, OfficeLink Learning, the
developers do not accept any liability for any damage or loss (including indirect and
consequential loss) incurred by any person as a result of relying on the information contained in
this material. This tool should not be regarded as professional advice and it should not be relied
upon in any important matter without obtaining appropriate advice relevant to your situation.
It is the Registered Training Organisation’s responsibility to validate the mapping of this tool to
the performance criteria.
Trademarks and Acknowledgements
All terms or products mentioned in this manual that are known to be trademarks have been
acknowledged. OfficeLink Learning cannot attest to the accuracy of this information. Use of a
term in this manual should not be regarded as affecting the validity of any trademark.
Software Description
This course has been designed for users of the Xero software. All attempts have been made to
provide current information. Instructions are correct at the time of writing.
The case study in this material uses fictional information.
Sample

Contents
© Copyright 2019 OfficeLink Learning iii
Contents Unit 1 Introduction .................................................................. 1 Purpose of this User Guide ....................................................................... 1
Accounting software used ........................................................................ 2
Prerequisites ........................................................................................ 2
Delivery .............................................................................................. 2
Duration ............................................................................................. 2
What you will need ................................................................................ 3
Conventions used in this User Guide ........................................................... 3
Download Student files ........................................................................... 4
Symbols used in this User Guide ................................................................ 5
Create an Account in Xero ....................................................................... 6
The Xero Business Site ............................................................................ 9
The Getting Started Panel and Help Centre ................................................ 10
The Tab Menus ................................................................................... 11
Sales ................................................................................................ 11
Contacts ........................................................................................... 13
Reports ............................................................................................. 15
Navigation tools .................................................................................. 17
Logout of Xero .................................................................................... 18
Unit 2 Introducing Bookkeeping ................................................ 21 What is bookkeeping? ........................................................................... 22
Functions of bookkeeping ...................................................................... 23
Bookkeeper’s responsibility .................................................................... 23
Accountant’s responsibility .................................................................... 25
Bookkeeping terminology ....................................................................... 26
Key features of a Computerised Accounting System....................................... 26
Double Entry Accounting (Debits and Credits) .............................................. 27
A Double-sided Entry ............................................................................ 28
Chart of Accounts ................................................................................ 28
Goods & Services Tax ........................................................................... 31
Cash versus Accrual Accounting ............................................................... 32
Methods of reporting GST ...................................................................... 32
Reference websites .............................................................................. 33
Source documents ............................................................................... 33
Sample
Contents
iv © Copyright 2019 OfficeLink Learning
Unit 3 Accessing an Organisation in Xero ..................................... 37 Case Study ......................................................................................... 38
Login to Xero ...................................................................................... 42
Access the Xero organisation file .............................................................. 43
Organisation Settings ............................................................................. 45
Financial Settings ................................................................................. 48
Tax Rates ........................................................................................... 49
Display Advanced Tax Rates .................................................................... 51
Change User Role to Adviser .................................................................... 52
Invite New User ................................................................................... 53
Unit 4 Working with the Chart of Accounts .................................. 57 The Chart of Accounts ........................................................................... 58
Account Types ..................................................................................... 58
The Chart of Accounts ........................................................................... 59
Changing account details ........................................................................ 61
Change an Account Code and Type ............................................................ 63
Change Tax Rate for an Account ............................................................... 64
Create a New Account ........................................................................... 65
Deleting an account .............................................................................. 68
Create a Trial Balance Report .................................................................. 70
Unit 5 Using Contact Records ................................................... 73 Types of Contacts ................................................................................. 74
Add a New Contact ............................................................................... 77
Set up Default Terms for Contacts ............................................................ 81
Edit an Existing Contact ......................................................................... 84
Search and Find ................................................................................... 85
Sort Contacts ...................................................................................... 86
Delete/Archive a Contact ....................................................................... 87
Restore an Archived Contact ................................................................... 88
Privacy .............................................................................................. 89
Unit 6 Using Items ................................................................. 91 Overview ........................................................................................... 92
Create a Simple Inventory Item for Sale ...................................................... 95
Create a Tracked Inventory Item .............................................................. 96
Search and find items ............................................................................ 98
Sample
Contents
© Copyright 2019 OfficeLink Learning v
Unit 7 Spend Money: Purchases .............................................. 101 Overview ......................................................................................... 102
Enter payments through Spend Money ...................................................... 102
GST Free Purchase .............................................................................. 106
Purchases Dashboard ........................................................................... 111
Add a New Bill ................................................................................... 112
Repeating Bills ................................................................................... 116
Paying Bills ....................................................................................... 119
Part Payment of Bill ............................................................................ 120
Pay Several Bills Together for One Supplier................................................ 121
Email Remittance Advice ...................................................................... 122
Check Transactions ............................................................................. 123
Edit a Transaction .............................................................................. 124
Enter Asset Purchase by Credit Card in Spend Money .................................... 127
Unit 8 Create Invoices & Receive Money.................................... 131 Overview ......................................................................................... 131
Create a New Invoice ........................................................................... 132
Email an Invoice ................................................................................. 134
Sales Dashboard ................................................................................. 136
Edit a Draft Invoice and Approve ............................................................. 137
Repeating Invoices .............................................................................. 138
Receive a Payment ............................................................................. 139
Payment of more than one invoice – Batch deposit ...................................... 142
Enter Invoice and Receive Payment in One Step .......................................... 143
Cash Sales Receipts using Receive Money .................................................. 144
Credit Notes and Refunds ..................................................................... 147
Create and Pay a Refund ...................................................................... 149
Create a Credit Note and Apply to Another Outstanding Invoice ...................... 151
Apply Existing Credit Note to a new Invoice ............................................... 153
Unit 9 Bank Reconciliation .................................................... 157 Overview ......................................................................................... 157
Account transactions tab ...................................................................... 158
Bank Statements ................................................................................ 159
Things to do prior to a Bank Reconciliation ................................................ 160
Importing a Bank Statement .................................................................. 161
The Reconcile tab ............................................................................... 163
Find and Match .................................................................................. 165
Unreconciling a Transaction .................................................................. 170
Sample
Contents
vi © Copyright 2019 OfficeLink Learning
Create Suggested Transactions and Match ................................................. 171
Create New Transaction ....................................................................... 172
Bank Rules........................................................................................ 173
Edit a Bank Rule ................................................................................. 178
Cash Coding ...................................................................................... 179
Recording Payments while Reconciling ..................................................... 180
Entering Bank Fees ............................................................................. 184
Split Line Transaction with partly Private Spend ......................................... 185
Transferring between Accounts .............................................................. 187
Discuss tab – when further clarification is required ...................................... 188
Bank Reconciliation Report ................................................................... 189
Unit 10 Petty Cash ................................................................ 195 Overview ......................................................................................... 196
Petty Cash documents ......................................................................... 197
The Petty Cash account ....................................................................... 201
Enter a Transfer to Petty Cash ............................................................... 202
Enter Petty Cash Entries Using Spend Money .............................................. 204
Using the Petty Cash Journal to Reconcile ................................................. 208
Enable Mark as Reconciled .................................................................... 209
Disable Mark as Reconciled ................................................................... 211
Unit 11 Reports .................................................................... 213 The Balance Sheet Report ..................................................................... 214
Create a Trial Balance Report ................................................................ 217
Create a Profit and Loss Report and Customise ........................................... 219
Aged Receivables Report ...................................................................... 223
Aged Payables Report .......................................................................... 224
GST reporting .................................................................................... 225
Check Activity Statement Settings ........................................................... 226
Run the Simpler BAS on a Cash basis ........................................................ 227
Run the Simpler BAS on an Accrual Basis ................................................... 229
Difference between Cash and Accrual GST Reports ...................................... 230
The GST Audit Report .......................................................................... 231
Reports for 31 Aug 2018 ....................................................................... 234
Appendix A Solutions to Exercises ........................................... 243
Sample

Introduction
© Copyright 2019 OfficeLink Learning 1
Unit 1
Introduction
The following pages are designed to help you become familiar with the material in the book. Please read carefully before progressing.
Purpose of this User Guide
This course is designed to introduce you to Xero. You will learn how to:
• navigate within Xero
• work with the Chart of Accounts
• create and work with Contacts
• create and work with Items
• enter sales and receive payments
• spend money, enter and pay bills
• perform bank reconciliations
• work with Petty Cash
• create Reports
• use Simpler BAS reporting Sample

Introduction
2 © Copyright 2019 OfficeLink Learning
Accounting software used
This book is suitable for Xero software. December 2018.
Prerequisites
• Microsoft Windows™ experience and basic bookkeeping knowledge are an advantage.
Delivery
This manual is designed for self-paced study. You will work through a series of examples using a case study.
Duration
1 day
Sample
Introduction
© Copyright 2019 OfficeLink Learning 3
What you will need
You will need access to the following text/resources:
this workbook
access to the Internet and an email account
access to the Xero organisation Hot Bod Yoga
student files available from www.officelinklearning.com.au
Conventions used in this User Guide
Keys to press appear in upper case, for example:
TAB Press the TAB key on the keyboard.
ENTER Press the ENTER key on the keyboard.
Bold print indicates text you should type, or a menu or command to
select. For example:
Type in 145700 Type in the number 145700
Click Sales Click the Sales button
Procedures explain how to perform a specific task. Procedures in this
workbook are numbered as shown below:
1. Step 1 of the procedure
a. sub step of step 1
b. sub step of step 1
2. Step 2 of the procedure
Sample
Introduction
4 © Copyright 2019 OfficeLink Learning
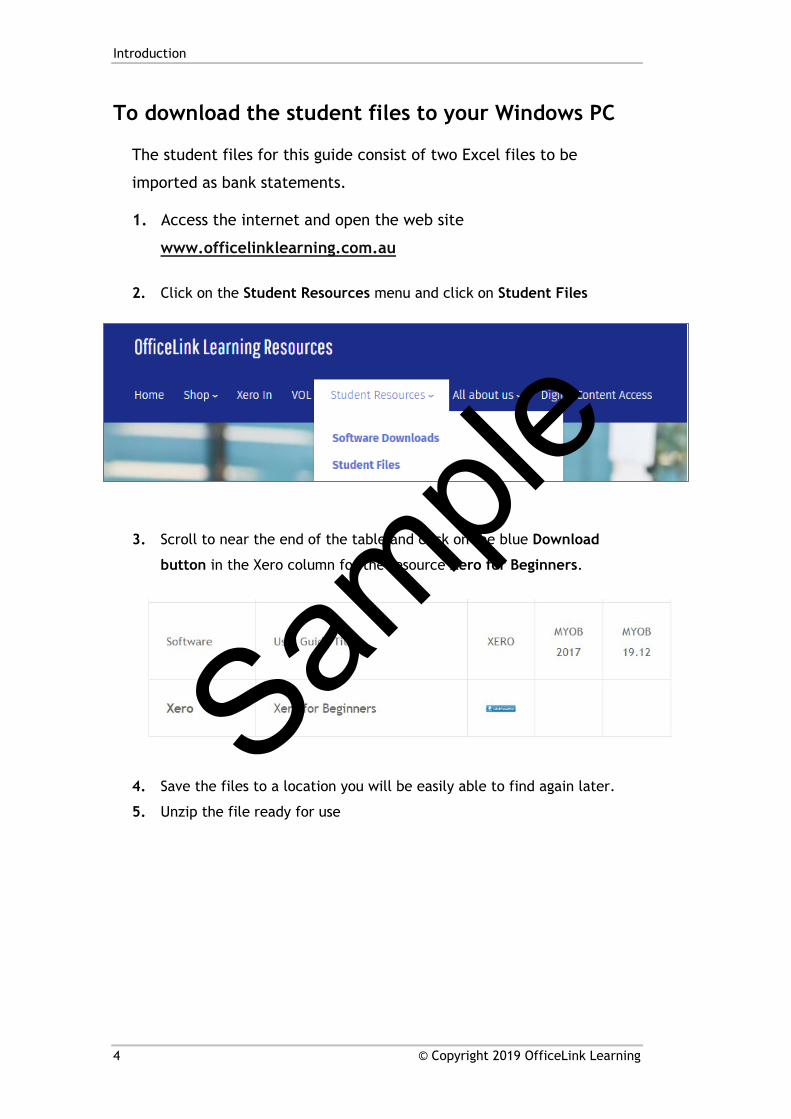
To download the student files to your Windows PC
The student files for this guide consist of two Excel files to be
imported as bank statements.
1. Access the internet and open the web site
www.officelinklearning.com.au
2. Click on the Student Resources menu and click on Student Files
3. Scroll to near the end of the table and click on the blue Download
button in the Xero column for the resource Xero for Beginners.
4. Save the files to a location you will be easily able to find again later.
5. Unzip the file ready for use
Sample
Introduction
© Copyright 2019 OfficeLink Learning 5
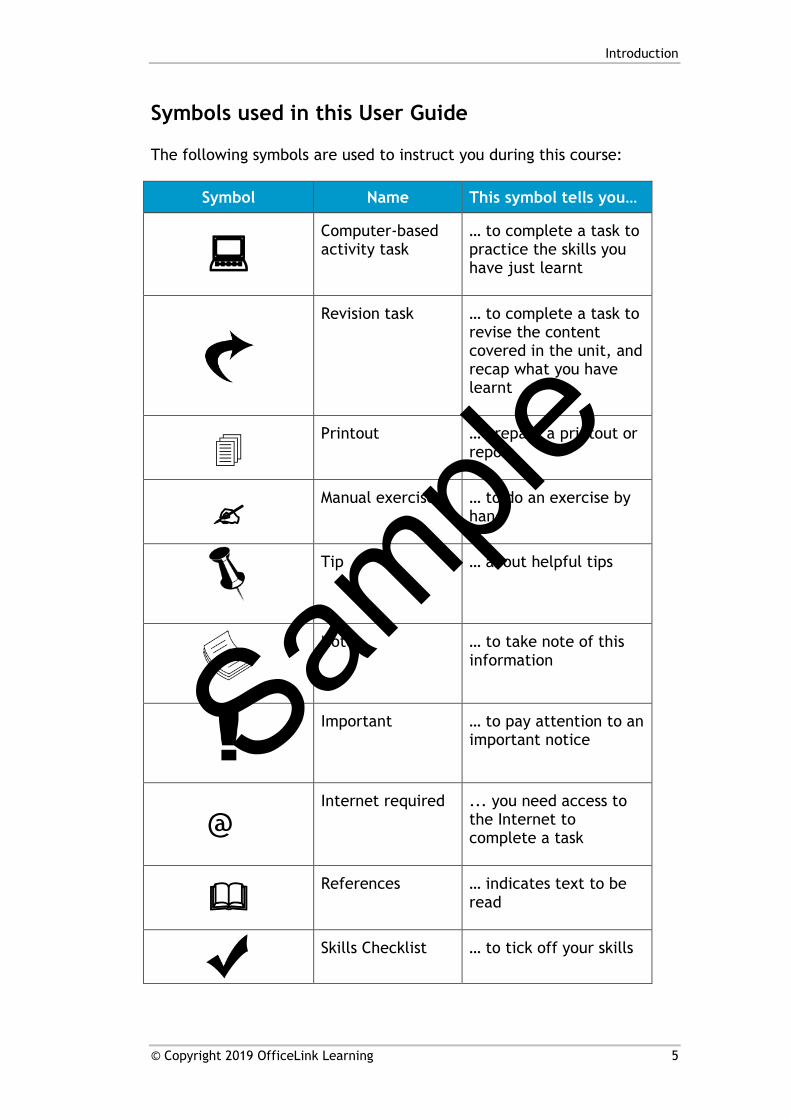
Symbols used in this User Guide
The following symbols are used to instruct you during this course:
Symbol Name This symbol tells you…
Computer-based activity task
… to complete a task to practice the skills you have just learnt
Revision task … to complete a task to revise the content covered in the unit, and recap what you have learnt
Printout … prepare a printout or report
Manual exercise … to do an exercise by hand
Tip … about helpful tips
Note … to take note of this information
Important … to pay attention to an important notice
Internet required ... you need access to the Internet to complete a task
References … indicates text to be read
Skills Checklist … to tick off your skills
@
Sample
Introduction
6 © Copyright 2019 OfficeLink Learning
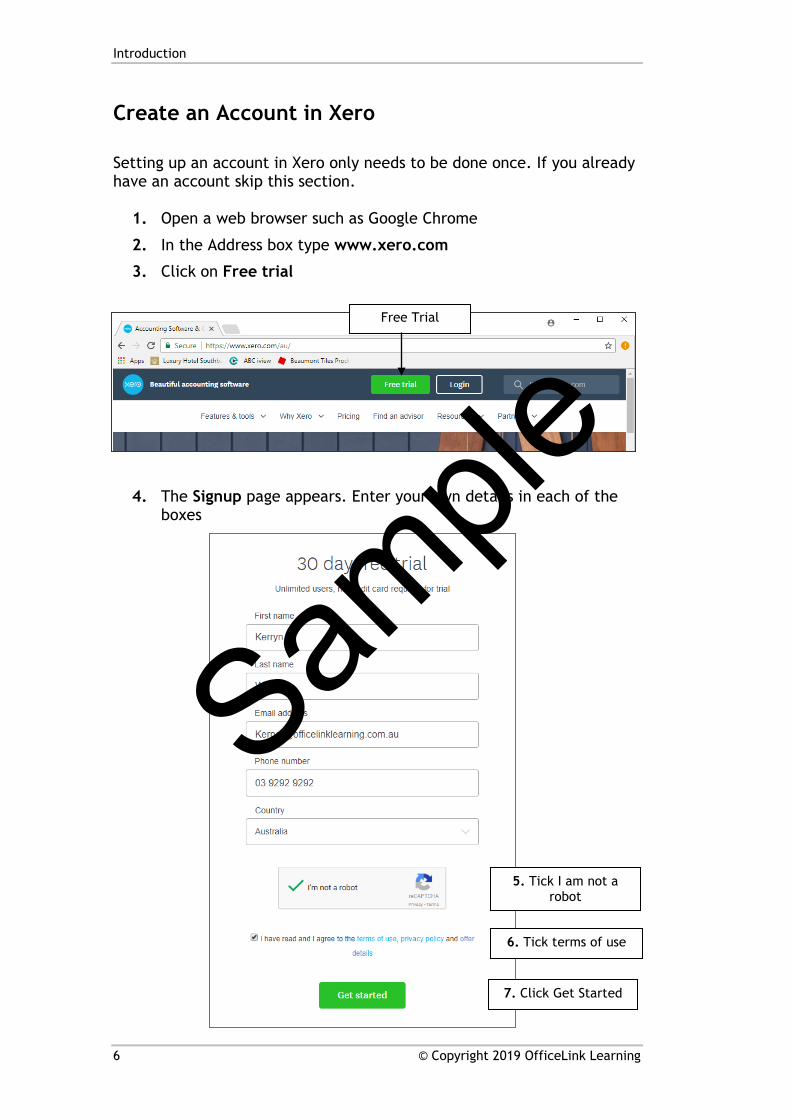
Create an Account in Xero
Setting up an account in Xero only needs to be done once. If you already have an account skip this section.
1. Open a web browser such as Google Chrome
2. In the Address box type www.xero.com
3. Click on Free trial
4. The Signup page appears. Enter your own details in each of the boxes
Free Trial
5. Tick I am not a robot
6. Tick terms of use
7. Click Get Started
Sample
Introducing Bookkeeping
© Copyright 2019 OfficeLink Learning 21
Unit 2
Introducing Bookkeeping
Lesson outcomes
By the end of this unit you understand:
the functions of bookkeeping, bookkeeping terminology and the responsibilities of a bookkeeper versus those of an accountant
the concept of double entry accounting and the structure of a chart of accounts
what GST is and the methods of reporting GST
the concepts of cash and accrual accounting
Sample

Introducing Bookkeeping
22 © Copyright 2019 OfficeLink Learning
What is Bookkeeping?
A simple definition of bookkeeping is: Bookkeeping means to record transactions
in books.
What are transactions? Transactions are the business events that occur in the day-
to-day operations of a business, for example:
• buying and selling goods or services
• paying for goods
• receiving payments.
Therefore, a better definition is: Bookkeeping is the process used to keep an
accurate record of a business's transactions.
We have already established that a business must keep records. The daily
transactions of the business are written into books of record.
These books may be either active or inactive.
Active books are those that relate to the transactions occurring in the current
accounting period. An accounting period is the length of time — a week, month,
or financial year — used by a business to assess its financial position.
Inactive books are those that relate to the transactions occurring in a previous
accounting period.
The accounting period is the length of time reflected in financial statements and
distinguishes between active and inactive books. Sample
Introducing Bookkeeping
© Copyright 2019 OfficeLink Learning 23
Functions of bookkeeping
A business must keep records by law. This enables the ATO to assess the amount
of tax the business must pay. There are other interested parties who also need to
be provided with information.
Some of the interested parties are owners, management, shareholders/investors,
the bank, suppliers, the public, and of course the taxation department.
Owners and management use the information provided by the records to assist in
managing the business and controlling the income and expenditure of the
business.
Therefore, the functions of bookkeeping can be summarised as:
• to provide information to interested parties
• to use the information provided to simplify business decision making, and as
a guide to planning for the future.
Bookkeeper’s responsibility
It is important for the bookkeeper to be aware of the responsibilities involved in
keeping the records of a business. A bookkeeper must:
a. Keep the books neat and legible or in an organised electronic format. Why?
Because other people will need to read them (managers, auditors and
accountants).
b. Use proper correction techniques (if handwritten). Always neatly cross out,
correct and initial correction. Why? Because it may be necessary for other
people interpreting or auditing the books to track or inspect the original
entry. Correction tape can be used when correcting totals.
Sample
Introducing Bookkeeping
24 © Copyright 2019 OfficeLink Learning
c. Be consistent in the presentation of the records. Why? There are variances
in style of presentation. Develop your own style and abbreviations but be
consistent. It is also easier for other people to read your books or
interpret your electronic data.
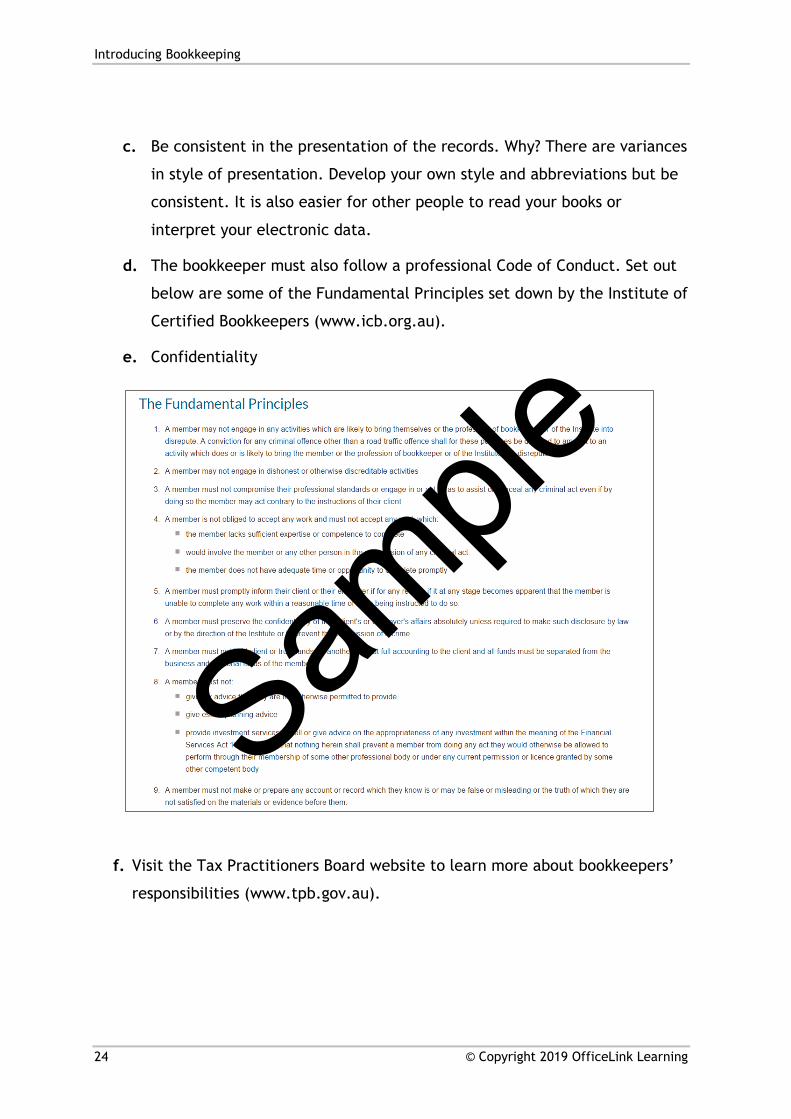
d. The bookkeeper must also follow a professional Code of Conduct. Set out
below are some of the Fundamental Principles set down by the Institute of
Certified Bookkeepers (www.icb.org.au).
e. Confidentiality
f. Visit the Tax Practitioners Board website to learn more about bookkeepers’
responsibilities (www.tpb.gov.au).
Sample
Introducing Bookkeeping
© Copyright 2019 OfficeLink Learning 25
Accountant’s responsibility
It is important for the bookkeeper to know that accountants have different
responsibilities.
An accountant’s ethical responsibility is to those who rely on his/her work. An
accountant has the responsibility for validity of the financial statements they
work on, and must perform their duties in accordance with principles, standard
and laws set out by their state and country. These could include (but are not
limited to):
• Australian Taxation laws and legislation
• Australian Competition and Consumer Commission (ACCC)
• The Australian Accounting Standards
• The Australian Auditing Standards.
Common duties and responsibilities performed by accountants include:
• Preparation of profit and loss statements and monthly closing and cost
accounting reports.
• Compilation of financial entries for ledger accounts using business
transactions, e.g. accounts, payroll, invoices
• Establish, maintain and coordinate the implementation of accounting and
accounting control procedures.
• Monitor and reviewing accounting and relation system reports for accuracy
and completeness.
• Resolve any discrepancies.
• Recommend, develop and maintain financial data bases, computer
software systems and manual filing systems.
• Interact with internal and external auditors in completing audits.
Sample
Introducing Bookkeeping
26 © Copyright 2019 OfficeLink Learning
Bookkeeping terminology
Term Description
Accounts Payable
Creditors
Vendors
Suppliers
Individuals or businesses who your business buys goods and services from.
Accounts Receivable
Debtors
Customers
Individuals or businesses who buy your goods and services.
Disbursement An entry where money has been spent.
Receipt An entry where money has been received.
Remittance When money has been paid a note is sent to explain what bill is being paid.
ABN Australian Business Number
BAS Business Activity Statement
Key Features of a Computerised Accounting System
An electronic bookkeeping system will allow you to computerise:
• Information about your business finances in the form of income and
expenses
• Invoicing
• Reporting
• The inventory of your business
• Your GST obligations and
• If available, the payroll system and time billing for your business.
Sample
Introducing Bookkeeping
© Copyright 2019 OfficeLink Learning 27
In the process of doing this, it translates all the transactions into journal and
ledger entries so that you can easily produce those balance sheets and profit and
loss statements that make accountants happy. When you create and manage your
accounting records electronically, you will have instant access to all sorts of
important information for your business.
Let’s look at some basic accounting theory in the following topics:
• Double-entry accounting
• Six basic accounting types: assets, liabilities, equity, income, costs of sales, expenses (also known as a Chart of Accounts)
Double Entry Accounting (Debits and Credits)
The purpose of double entry accounting is to reflect where money comes from
and where it goes. A transaction is any event that requires an entry in the books –
for example, buying equipment or goods or services, selling goods or services,
paying rent, paying wages etc. When you record $200 deposited in your business
account you are completing only one half of the transaction. In accounting terms,
you will need to indicate also where this money originated. It may have come
from the sale of a product, the supply of a service, a loan, a deposit or from a
variety of other sources.
Each transaction must be analysed to determine what type of accounts are
affected, and whether each account is increased or decreased to determine
whether the accounts are to be debited or credited. Each accounting transaction
therefore should have two complimentary entries. The following diagram
illustrates the accounting equation and the accounting rules that dictate which
accounts are debited or credited. Note that the rules for liability and owner’s
equity accounts are the opposite of the rules for asset accounts.
Sample

Introducing Bookkeeping
28 © Copyright 2019 OfficeLink Learning
A Double-sided Entry
If you spent $110.00 at a Stationery Supplier, this is the double side entry in a computerised accounting system. The To side is split as one part is an expense: Stationery, the other part is the GST in the payment. GST is generally 1/11th of the total payment. More about GST later.
FROM TO
$110
Cheque Account
Asset Type Account
$100
Stationery
Expense Account
$10
GST Paid to Supplier
Liability Account
Chart of Accounts
To help you understand the financial operation of your business it is customary to
group your transactions into accounts or categories. In general accounting there
are six basic account types.
Type Function
Assets Record what the business owns.
Liabilities Records what the business owes.
Owner’s Equity
Records the remainder after subtracting Liabilities from Assets reflecting the owner’s net worth or capital.
Income Records the money received from sales and supply of services.
Cost of Goods Sold
Records the original cost of products and services (or raw materials).
Expenses Records other money required to run the business.
Each of the account types above can be broken up into subcategories that reflect
the nature and operation of your business. The full list of account types and their
subcategories is referred to as your Chart of Accounts. An electronic bookkeeping
system relies on the Chart of Accounts to record all the transactions accurately.
Sample
Introducing Bookkeeping
© Copyright 2019 OfficeLink Learning 29
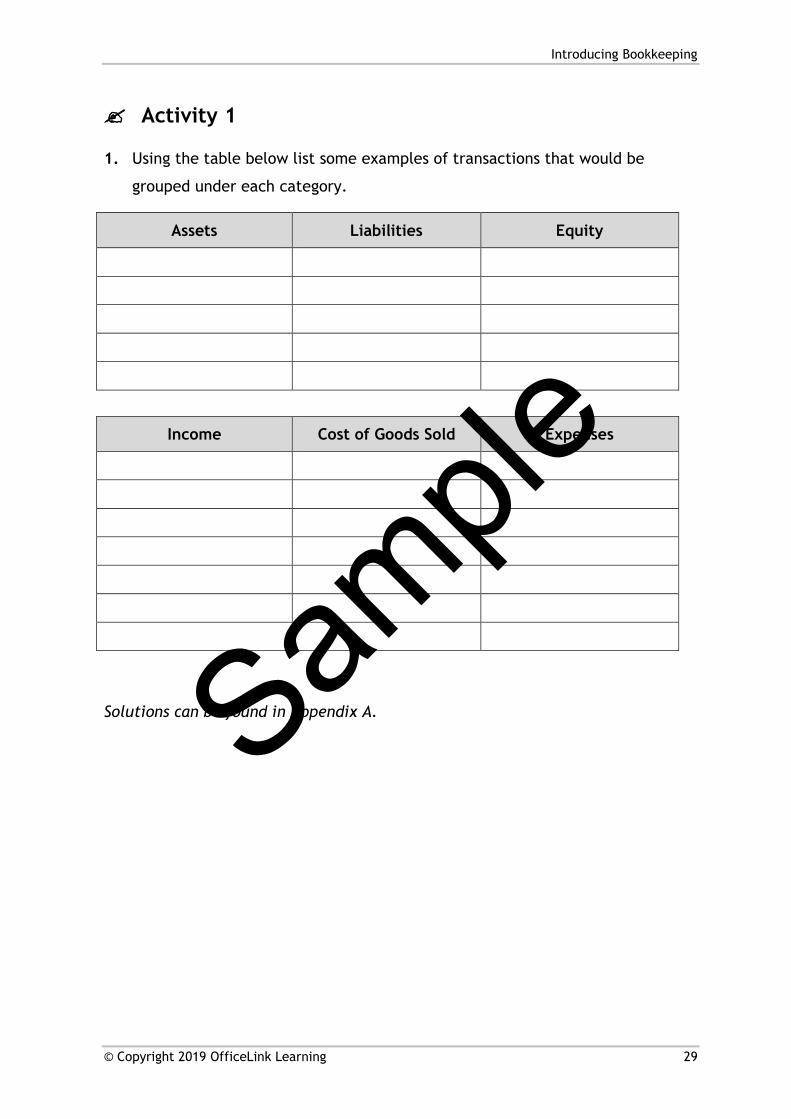
Activity 1
1. Using the table below list some examples of transactions that would be
grouped under each category.
Assets Liabilities Equity
Income Cost of Goods Sold Expenses
Solutions can be found in Appendix A.
Sample
Accessing an Organisation in Xero
© Copyright 2019 OfficeLink Learning 37
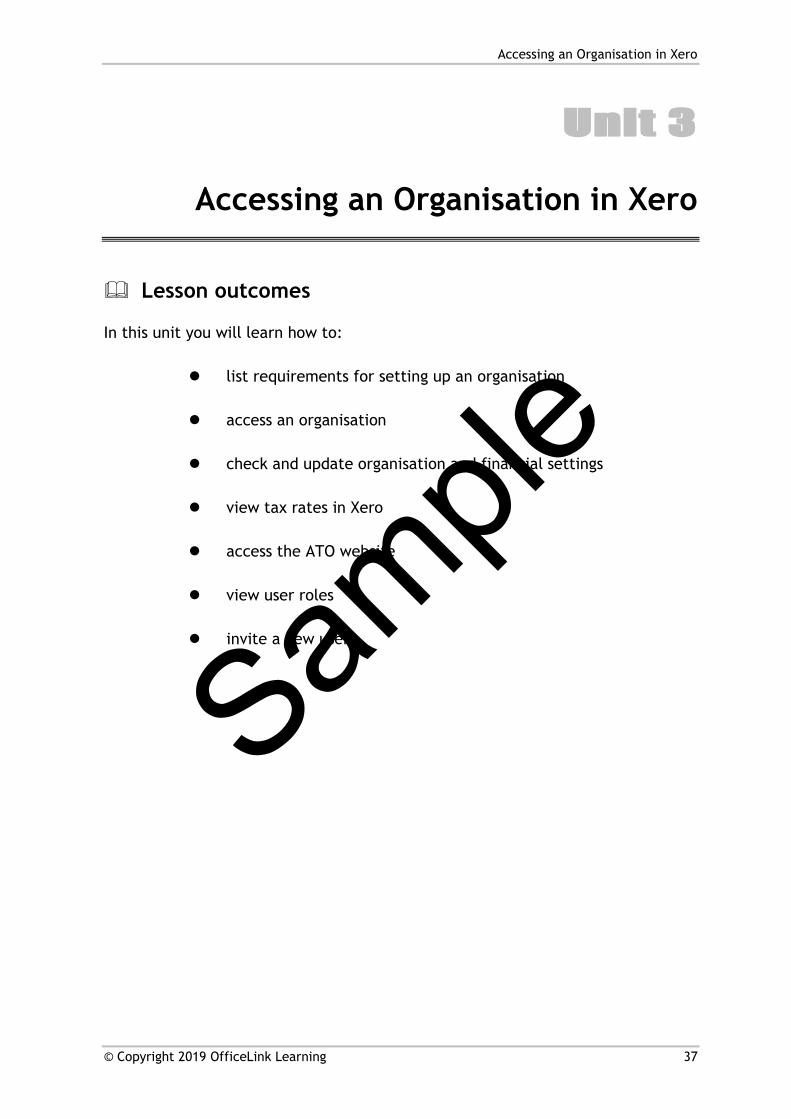
Unit 3
Accessing an Organisation in Xero
Lesson outcomes
In this unit you will learn how to:
list requirements for setting up an organisation
access an organisation
check and update organisation and financial settings
view tax rates in Xero
access the ATO website
view user roles
invite a new user
Sample

Accessing an Organisation in Xero
38 © Copyright 2019 OfficeLink Learning
Requirements for organisation file settings
An organisation file is the term used in Xero software to name a company’s data file. Before you create an organisation or company file you need to have the following information:
• Company details such as name, address, ABN and phone number
• Your current financial year and the last month of the financial year
• The conversion date – this is the month when you plan to start using Xero. This month is important for the opening balances that will be entered during the organisation file setup. Examples include bank account balance, debtors and creditor aged balances.
• A list of all the accounts can be generated by Xero based on templates or you can build your own, for example, Assets and Liabilities.
Case study overview (policy and procedures)
Hot Bod Yoga is a small business that focuses on providing Yoga services. Amelia’s business is divided into 3 main areas: yoga sessions at the studio, special workshops and then events for longer weekend and week-long yoga retreats. She rents a studio space.
Amelia started this business in January 2017. She has setup the business on Xero but needs your help to enter transactions and create reports. Sam
ple
Accessing an Organisation in Xero
© Copyright 2019 OfficeLink Learning 39
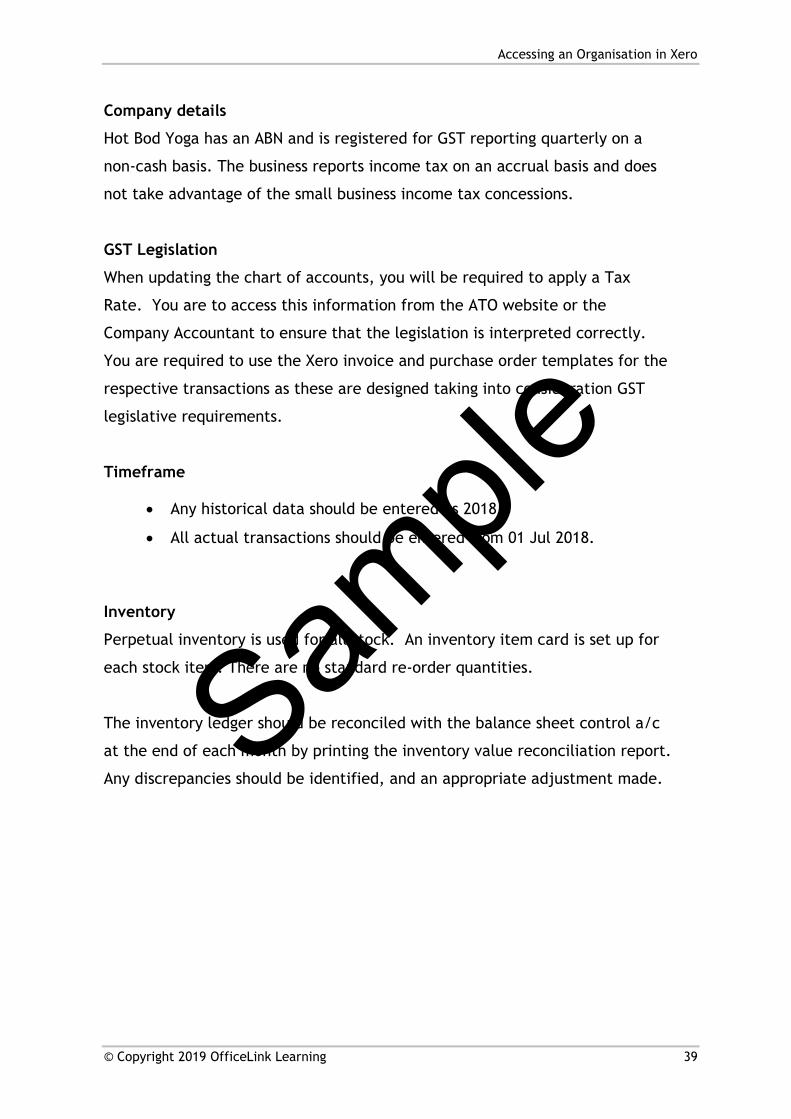
Company details
Hot Bod Yoga has an ABN and is registered for GST reporting quarterly on a
non-cash basis. The business reports income tax on an accrual basis and does
not take advantage of the small business income tax concessions.
GST Legislation
When updating the chart of accounts, you will be required to apply a Tax
Rate. You are to access this information from the ATO website or the
Company Accountant to ensure that the legislation is interpreted correctly.
You are required to use the Xero invoice and purchase order templates for the
respective transactions as these are designed taking into consideration GST
legislative requirements.
Timeframe
• Any historical data should be entered as 2018.
• All actual transactions should be entered from 01 Jul 2018.
Inventory
Perpetual inventory is used for all stock. An inventory item card is set up for
each stock item. There are no standard re-order quantities.
The inventory ledger should be reconciled with the balance sheet control a/c
at the end of each month by printing the inventory value reconciliation report.
Any discrepancies should be identified, and an appropriate adjustment made.
Sample
Accessing an Organisation in Xero
40 © Copyright 2019 OfficeLink Learning
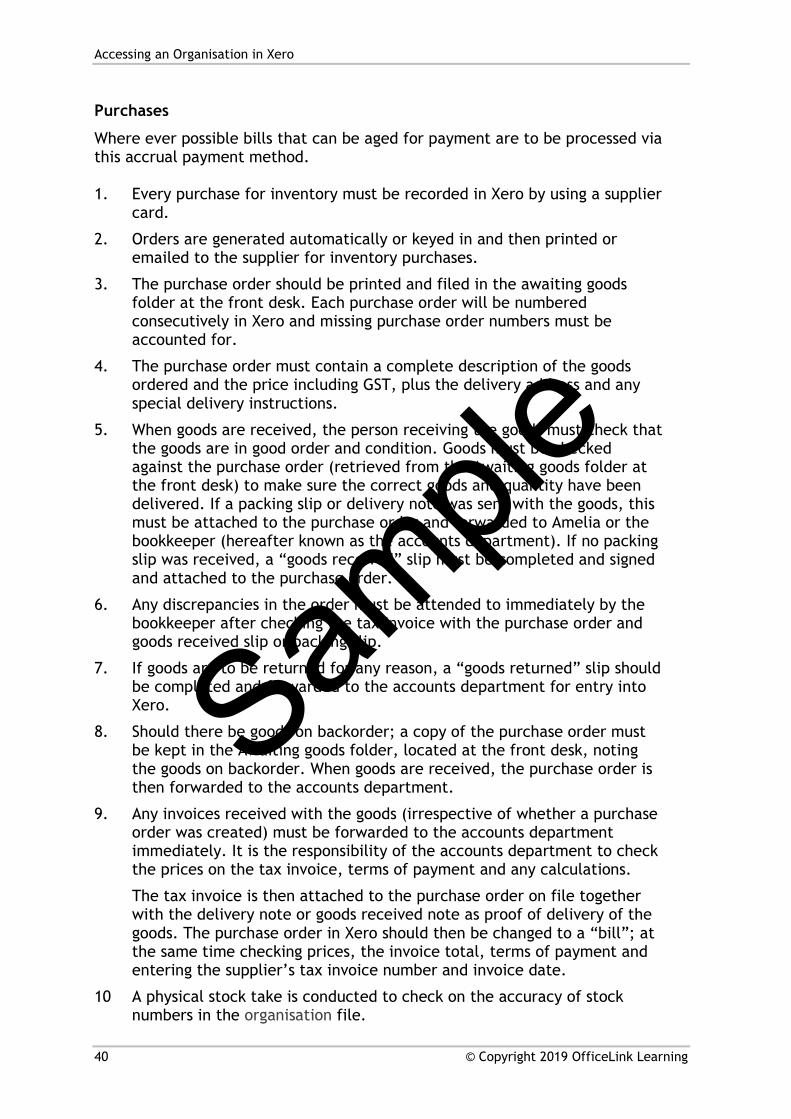
Purchases
Where ever possible bills that can be aged for payment are to be processed via this accrual payment method. 1. Every purchase for inventory must be recorded in Xero by using a supplier
card.
2. Orders are generated automatically or keyed in and then printed or emailed to the supplier for inventory purchases.
3. The purchase order should be printed and filed in the awaiting goods folder at the front desk. Each purchase order will be numbered consecutively in Xero and missing purchase order numbers must be accounted for.
4. The purchase order must contain a complete description of the goods ordered and the price including GST, plus the delivery address and any special delivery instructions.
5. When goods are received, the person receiving the goods must check that the goods are in good order and condition. Goods must be checked against the purchase order (retrieved from the Awaiting goods folder at the front desk) to make sure the correct goods and quantity have been delivered. If a packing slip or delivery note was sent with the goods, this must be attached to the purchase order and forwarded to Amelia or the bookkeeper (hereafter known as the accounts department). If no packing slip was received, a “goods received” slip must be completed and signed and attached to the purchase order.
6. Any discrepancies in the order must be attended to immediately by the bookkeeper after checking the tax invoice with the purchase order and goods received slip or packing slip.
7. If goods are to be returned for any reason, a “goods returned” slip should be completed and forwarded to the accounts department for entry into Xero.
8. Should there be goods on backorder; a copy of the purchase order must be kept in the Awaiting goods folder, located at the front desk, noting the goods on backorder. When goods are received, the purchase order is then forwarded to the accounts department.
9. Any invoices received with the goods (irrespective of whether a purchase order was created) must be forwarded to the accounts department immediately. It is the responsibility of the accounts department to check the prices on the tax invoice, terms of payment and any calculations.
The tax invoice is then attached to the purchase order on file together with the delivery note or goods received note as proof of delivery of the goods. The purchase order in Xero should then be changed to a “bill”; at the same time checking prices, the invoice total, terms of payment and entering the supplier’s tax invoice number and invoice date.
10 A physical stock take is conducted to check on the accuracy of stock numbers in the organisation file.
Sample
Accessing an Organisation in Xero
© Copyright 2019 OfficeLink Learning 41
Reconciliations
1. At the end of each month the following accounts are to be reconciled and any discrepancies are to be reported to the Accountant for further instructions:
• Bank Account • Accounts Receivable • Accounts Payable • Inventory • GST accounts
2. As a minimum, the Balance Sheet and Trial Balance reports must be sent to
the Accountant at the end of each month.
3. When instructions are received from the Accountant to enter adjusting journal entries, they must be recorded promptly. A Trial Balance should then be printed and sent to the Accountant for approval.
Source Documents All source documents are to be filed in arch lever folders in alphabetical order for future reference. When hardcopy source documents are processed into Xero a stamp ‘entered’ should be used to identify it has been processed.
Sample
Accessing an Organisation in Xero
42 © Copyright 2019 OfficeLink Learning
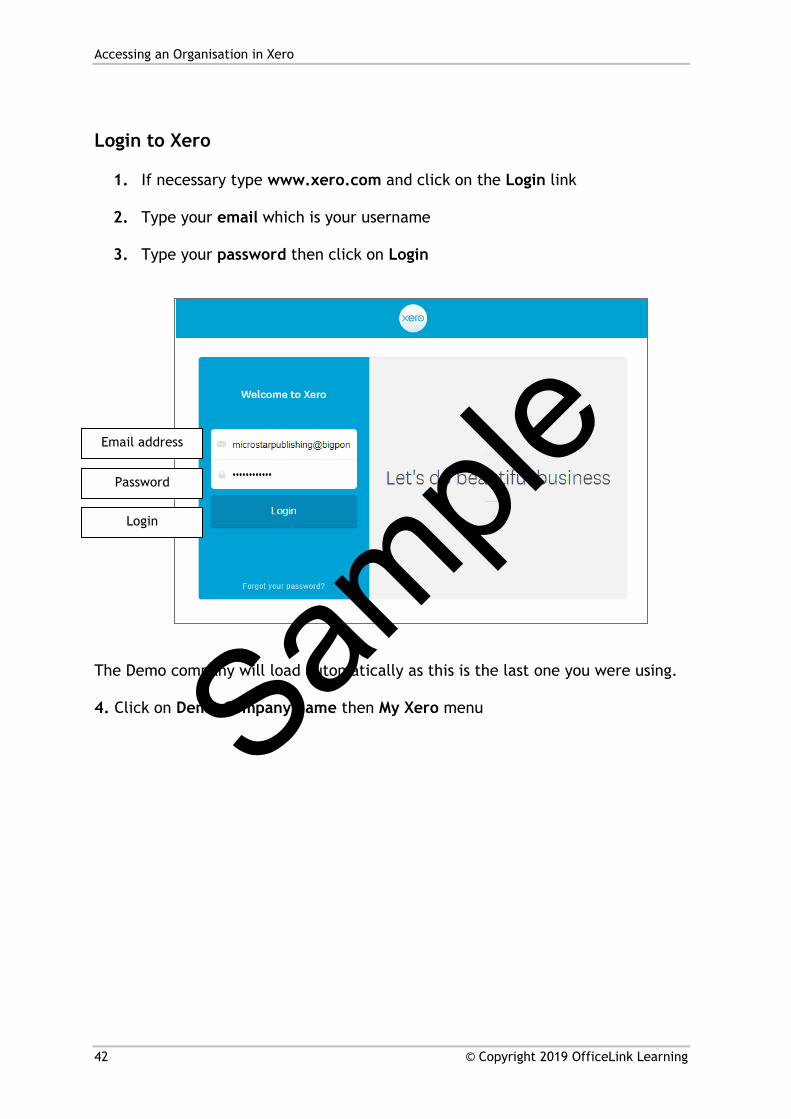
Login to Xero
1. If necessary type www.xero.com and click on the Login link
2. Type your email which is your username
3. Type your password then click on Login
The Demo company will load automatically as this is the last one you were using.
4. Click on Demo Company name then My Xero menu
Email address
Password
Login
Sample

Accessing an Organisation in Xero
© Copyright 2019 OfficeLink Learning 43
Access the Xero organisation file
Access your organisation.
Your trainer/instructor will organize for you to have access to the Xero organisation used as the case study in this book. You will then receive an email similar to the one shown below.
1. Login to your account in Xero (you created an account on page 6 if you didn’t already have one)
2. Simply click on the link in the email and you will be redirected to Xero and the practice organisation for this User Guide
Sample
Accessing an Organisation in Xero
44 © Copyright 2019 OfficeLink Learning
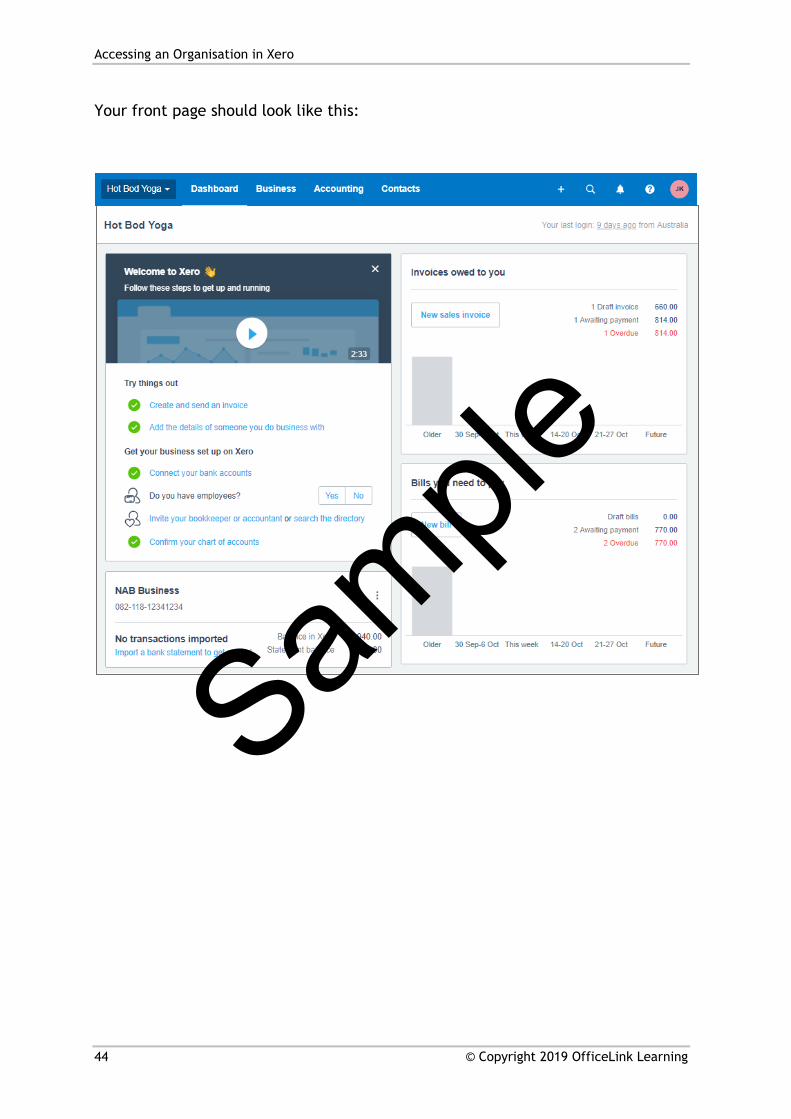
Your front page should look like this:
Sample
Accessing an Organisation in Xero
© Copyright 2019 OfficeLink Learning 45
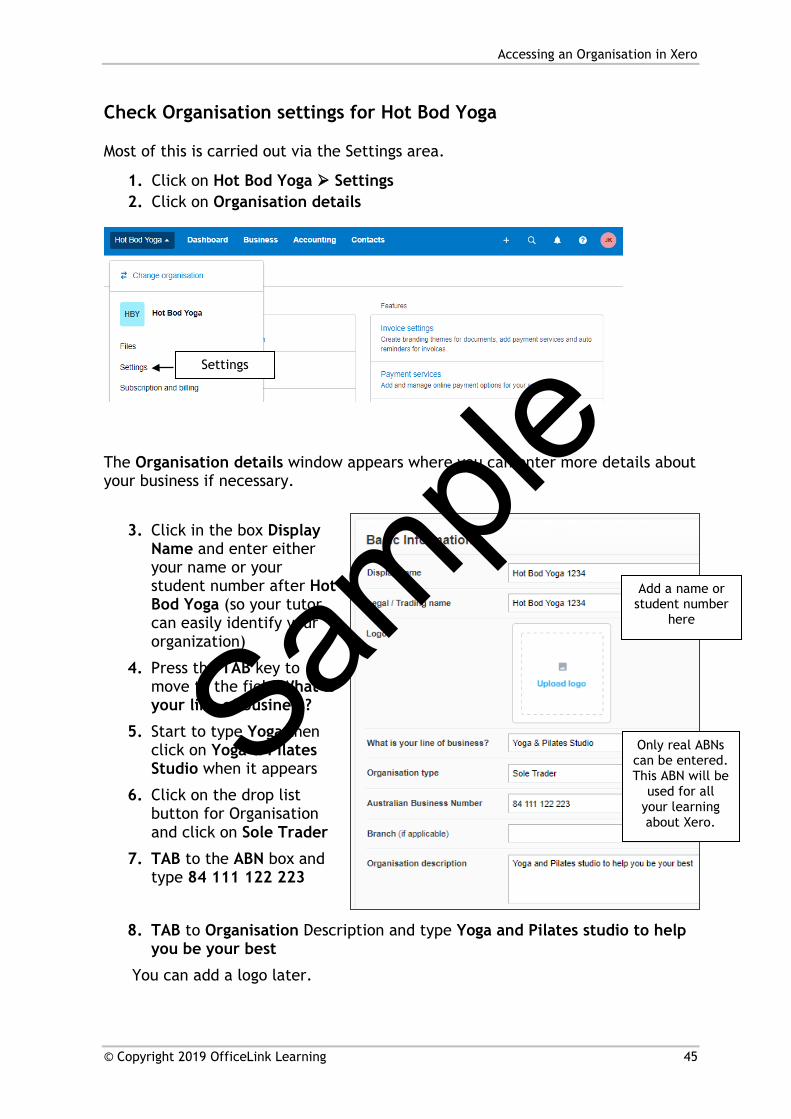
Check Organisation settings for Hot Bod Yoga
Most of this is carried out via the Settings area.
1. Click on Hot Bod Yoga Settings 2. Click on Organisation details
The Organisation details window appears where you can enter more details about your business if necessary.
3. Click in the box Display Name and enter either your name or your student number after Hot Bod Yoga (so your tutor can easily identify your organization)
4. Press the TAB key to move to the field What is your line of business?
5. Start to type Yoga then click on Yoga & Pilates Studio when it appears
6. Click on the drop list button for Organisation and click on Sole Trader
7. TAB to the ABN box and type 84 111 122 223
8. TAB to Organisation Description and type Yoga and Pilates studio to help you be your best
You can add a logo later.
Only real ABNs can be entered. This ABN will be
used for all your learning about Xero.
Add a name or student number
here
Settings
Sample
Accessing an Organisation in Xero
46 © Copyright 2019 OfficeLink Learning
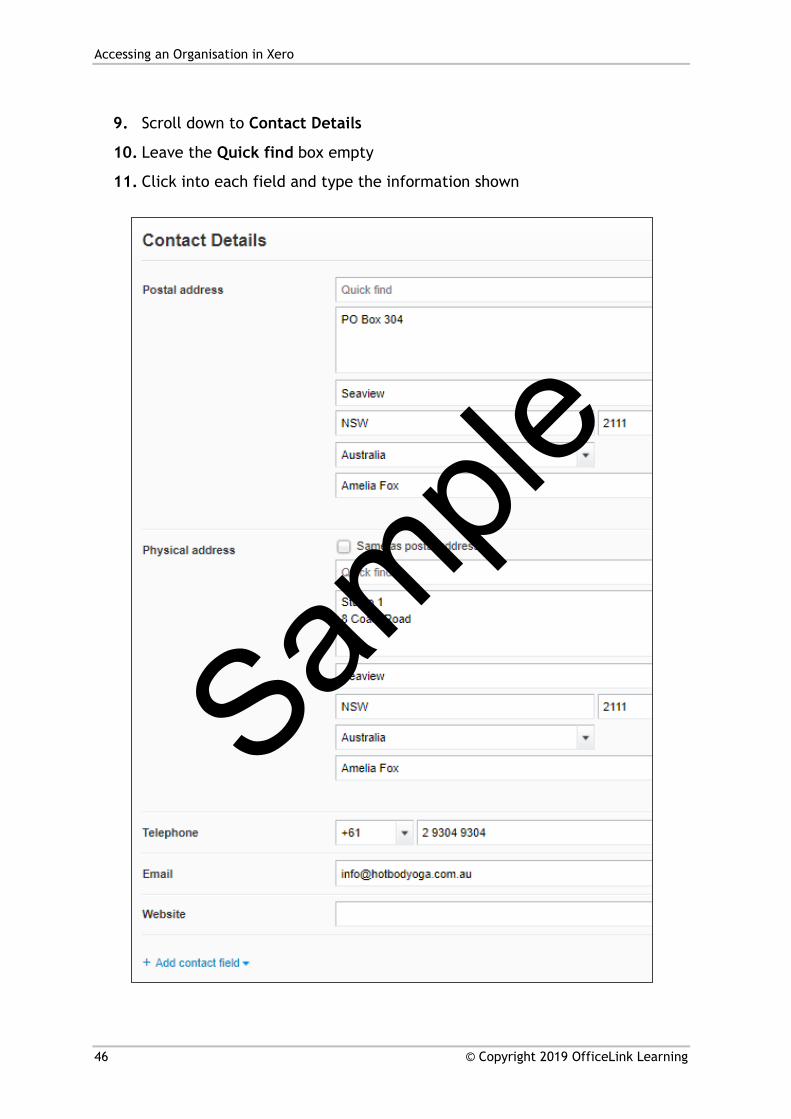
9. Scroll down to Contact Details
10. Leave the Quick find box empty
11. Click into each field and type the information shown
Sample
Accessing an Organisation in Xero
© Copyright 2019 OfficeLink Learning 47
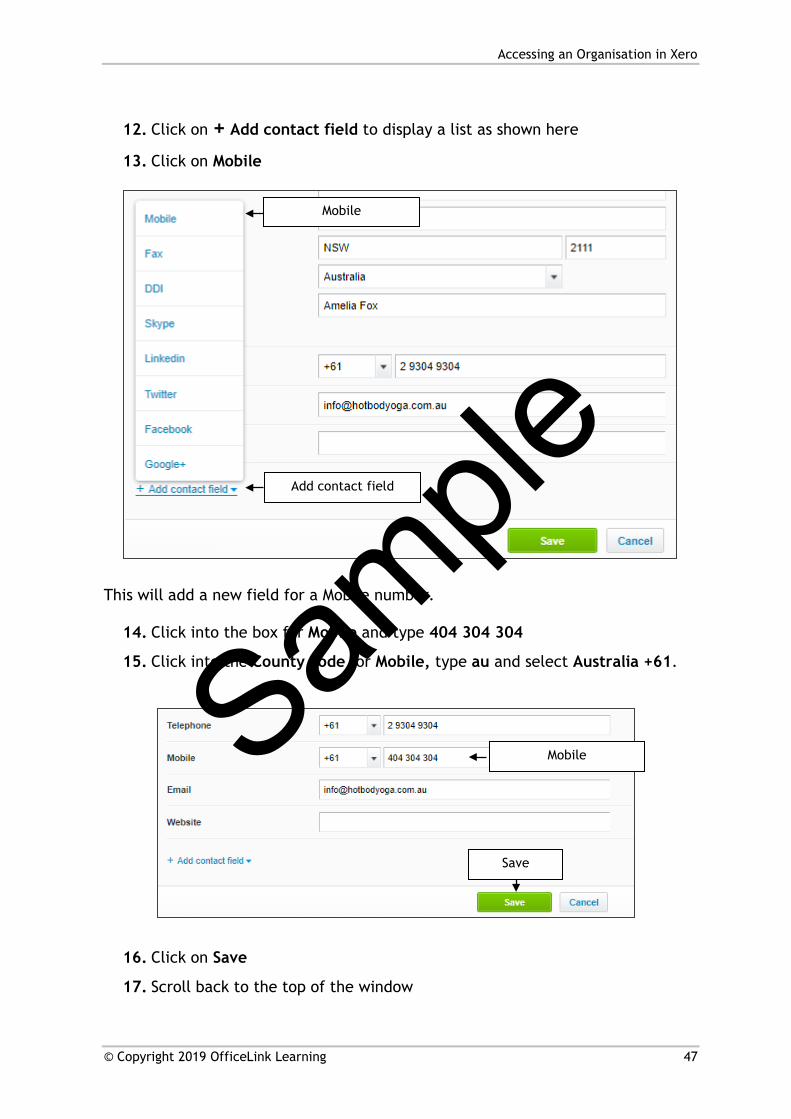
12. Click on + Add contact field to display a list as shown here
13. Click on Mobile
This will add a new field for a Mobile number.
14. Click into the box for Mobile and type 404 304 304
15. Click into the County code for Mobile, type au and select Australia +61.
16. Click on Save
17. Scroll back to the top of the window
Add contact field
Mobile
Mobile
Save
Sample

Accessing an Organisation in Xero
48 © Copyright 2019 OfficeLink Learning
Financial Settings
This area is where you make settings relevant to GST and other tax details.
1. Click on Accounting Advanced Financial settings
2. Enter the details shown
3. Click on Save
Tax File Number 123 456 789
GST Method Cash Basis
For Sales Tax Inclusive
For Purchases Tax Inclusive
Accounting
Advanced
Financial settings
Sample
Accessing an Organisation in Xero
© Copyright 2019 OfficeLink Learning 49
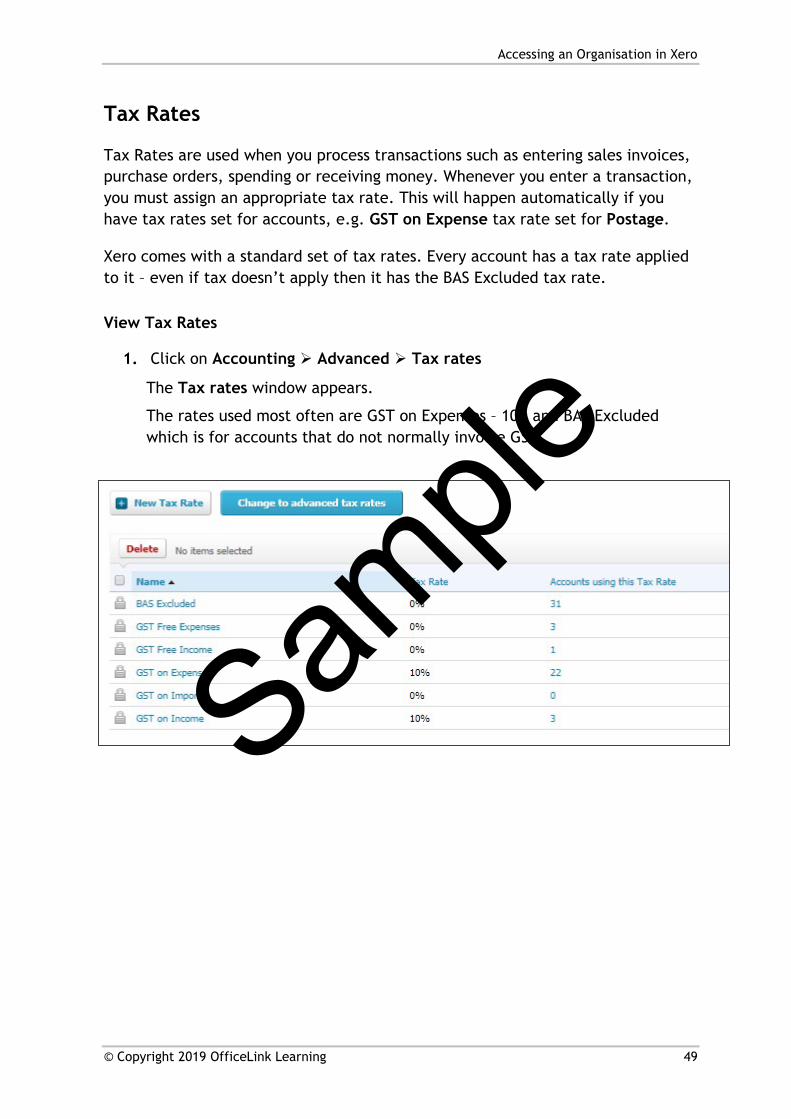
Tax Rates
Tax Rates are used when you process transactions such as entering sales invoices, purchase orders, spending or receiving money. Whenever you enter a transaction, you must assign an appropriate tax rate. This will happen automatically if you have tax rates set for accounts, e.g. GST on Expense tax rate set for Postage.
Xero comes with a standard set of tax rates. Every account has a tax rate applied to it – even if tax doesn’t apply then it has the BAS Excluded tax rate.
View Tax Rates
1. Click on Accounting Advanced Tax rates
The Tax rates window appears.
The rates used most often are GST on Expenses – 10% and BAS Excluded which is for accounts that do not normally involve GST.
Sample
Accessing an Organisation in Xero
50 © Copyright 2019 OfficeLink Learning
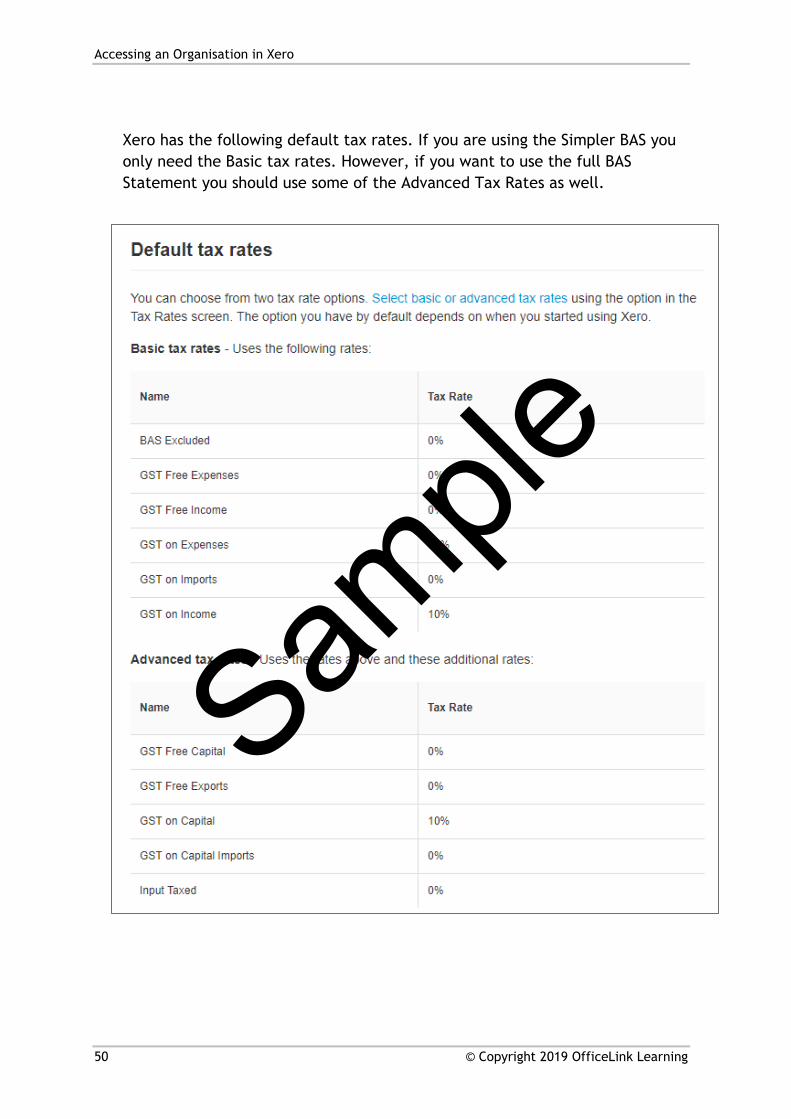
Xero has the following default tax rates. If you are using the Simpler BAS you only need the Basic tax rates. However, if you want to use the full BAS Statement you should use some of the Advanced Tax Rates as well.
Sample
Accessing an Organisation in Xero
© Copyright 2019 OfficeLink Learning 51
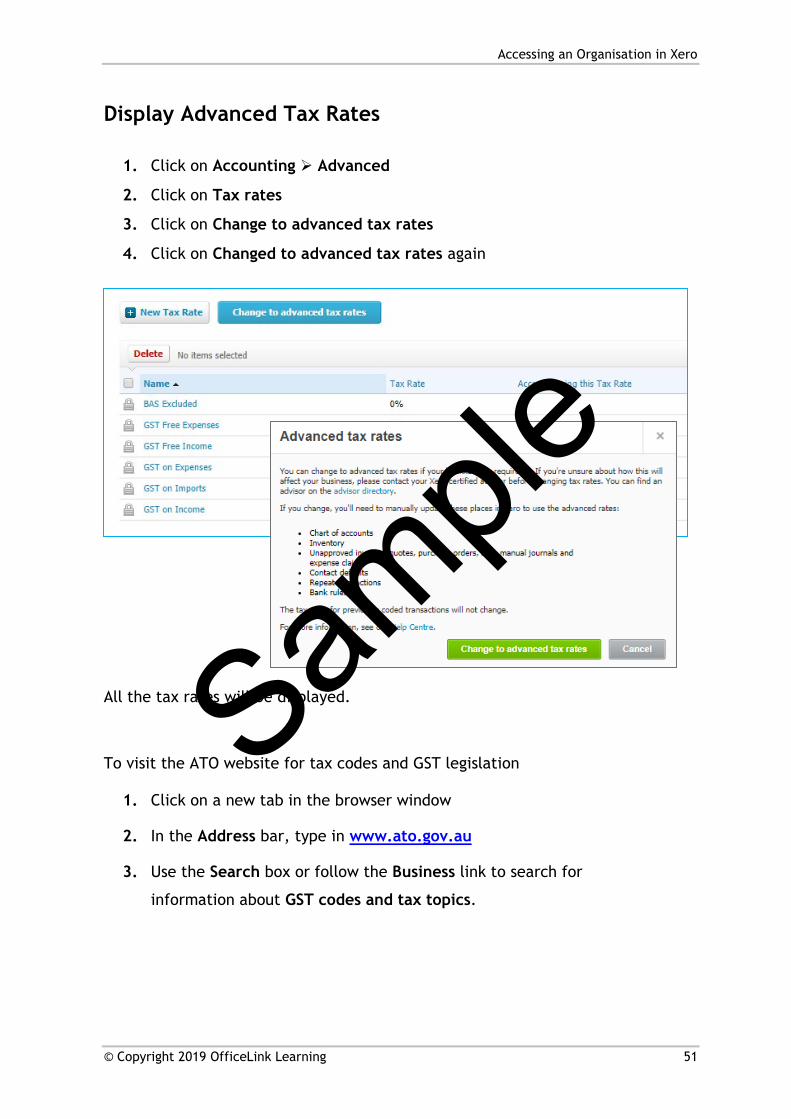
Display Advanced Tax Rates
1. Click on Accounting Advanced
2. Click on Tax rates
3. Click on Change to advanced tax rates
4. Click on Changed to advanced tax rates again
All the tax rates will be displayed.
To visit the ATO website for tax codes and GST legislation
1. Click on a new tab in the browser window
2. In the Address bar, type in www.ato.gov.au
3. Use the Search box or follow the Business link to search for
information about GST codes and tax topics.
Sample
Working with the Chart of Accounts
© Copyright 2019 OfficeLink Learning 57
Unit 4
Working with the Chart of Accounts
Lesson outcomes
By the end of this unit you will be able to:
view the Chart of Accounts
list account classes and types
change account information
move accounts
delete accounts
create a Trial Balance report
Sample
Working with the Chart of Accounts
58 © Copyright 2019 OfficeLink Learning
The Chart of Accounts
A Chart of Accounts contains a list of all the accounts required to record, track, organise and report on your company’s financial activity.
In Xero all accounts are in one of these five Classes: Assets, Liabilities, Equity, Expenses and Revenue.
In Xero these five classes are further divided into 17 specific account types. Numbers are associated with the accounts, but they do not determine grouping – the account type determines this.
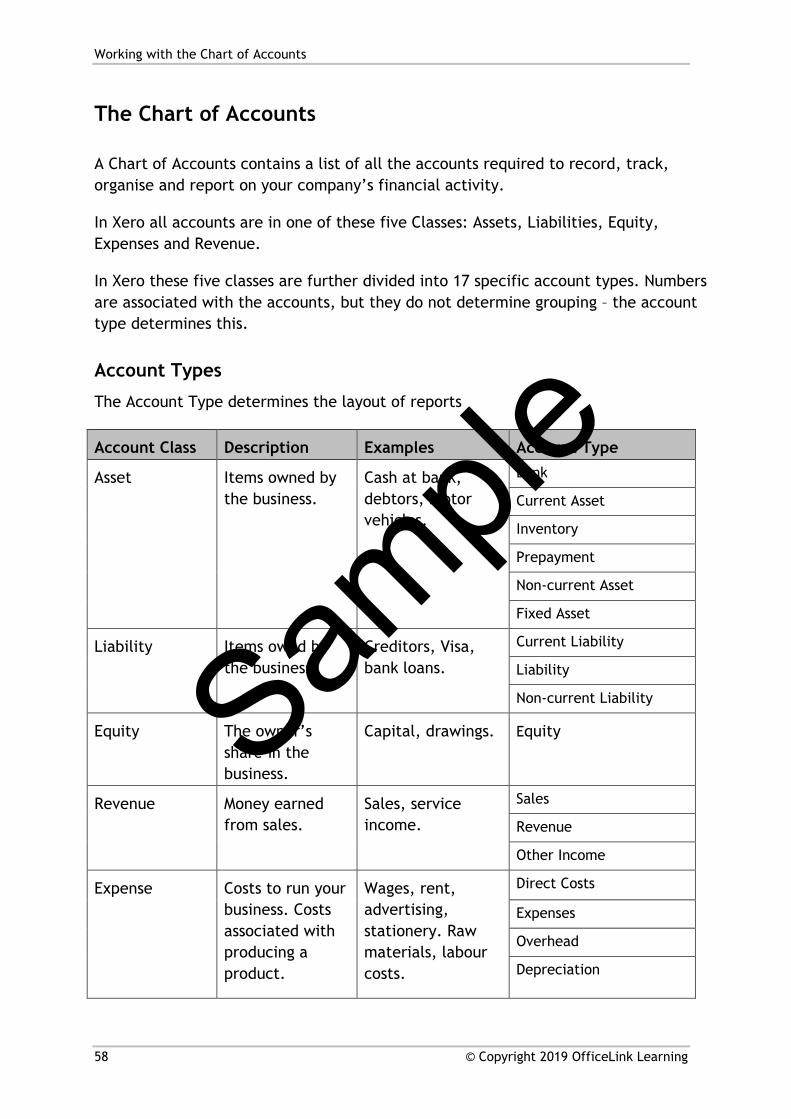
Account Types
The Account Type determines the layout of reports
Account Class Description Examples Account Type
Asset Items owned by the business.
Cash at bank, debtors, motor vehicles.
Bank
Current Asset
Inventory
Prepayment
Non-current Asset
Fixed Asset
Liability Items owed by the business.
Creditors, Visa, bank loans.
Current Liability
Liability
Non-current Liability
Equity The owner’s share in the business.
Capital, drawings. Equity
Revenue Money earned from sales.
Sales, service income.
Sales
Revenue
Other Income
Expense Costs to run your business. Costs associated with producing a product.
Wages, rent, advertising, stationery. Raw materials, labour costs.
Direct Costs
Expenses
Overhead
Depreciation
Sample
Working with the Chart of Accounts
© Copyright 2019 OfficeLink Learning 59
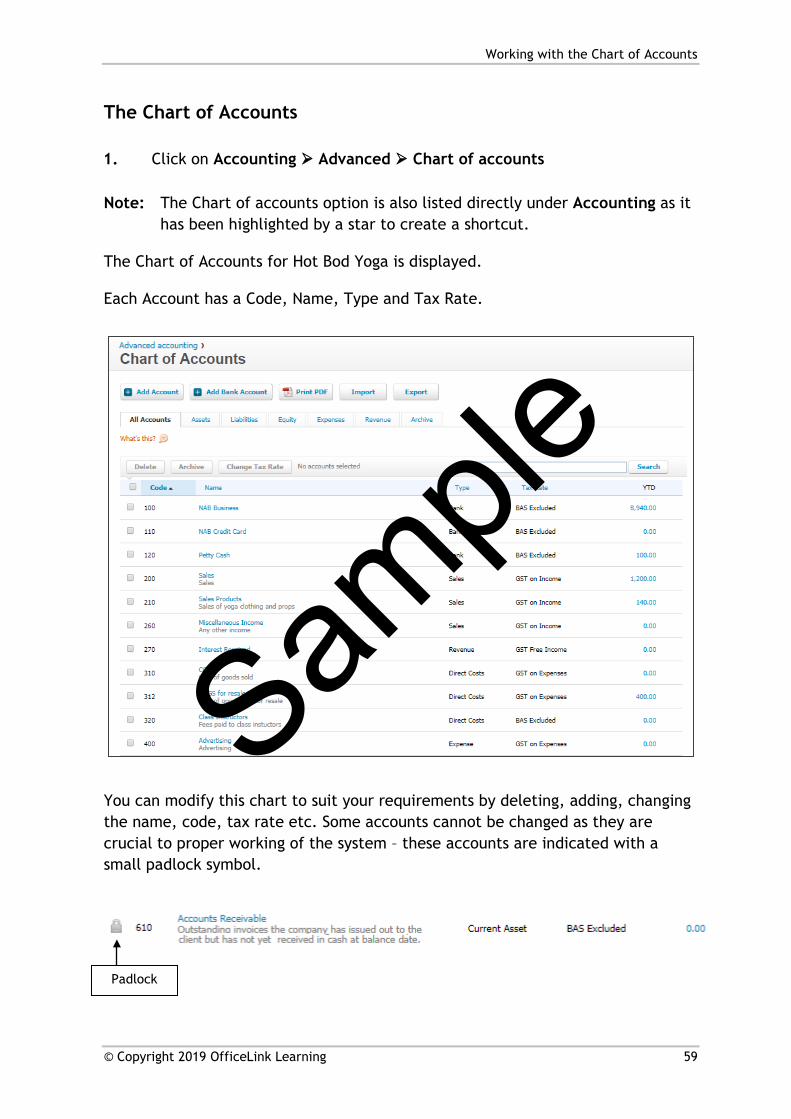
The Chart of Accounts
1. Click on Accounting Advanced Chart of accounts
Note: The Chart of accounts option is also listed directly under Accounting as it has been highlighted by a star to create a shortcut.
The Chart of Accounts for Hot Bod Yoga is displayed.
Each Account has a Code, Name, Type and Tax Rate.
You can modify this chart to suit your requirements by deleting, adding, changing the name, code, tax rate etc. Some accounts cannot be changed as they are crucial to proper working of the system – these accounts are indicated with a small padlock symbol.
Padlock
Sample
Working with the Chart of Accounts
60 © Copyright 2019 OfficeLink Learning
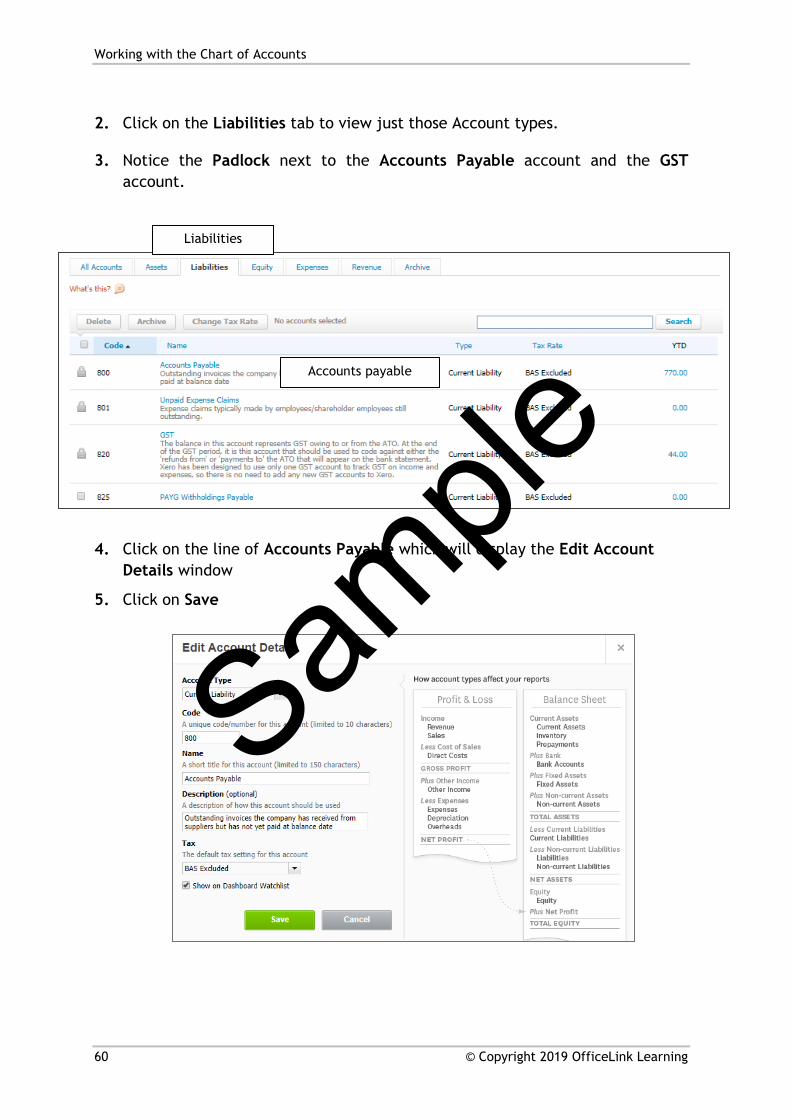
2. Click on the Liabilities tab to view just those Account types.
3. Notice the Padlock next to the Accounts Payable account and the GST account.
4. Click on the line of Accounts Payable which will display the Edit Account Details window
5. Click on Save
Liabilities
Accounts payable
Sample
Working with the Chart of Accounts
© Copyright 2019 OfficeLink Learning 61
Changing Account Details
When Amelia’s file was set up a set of accounts was selected to automatically create the many accounts required in general. From time to time you may need to modify the accounts.
Information such as account name, account type, code, description and tax rate can be changed.
Change an Account Name
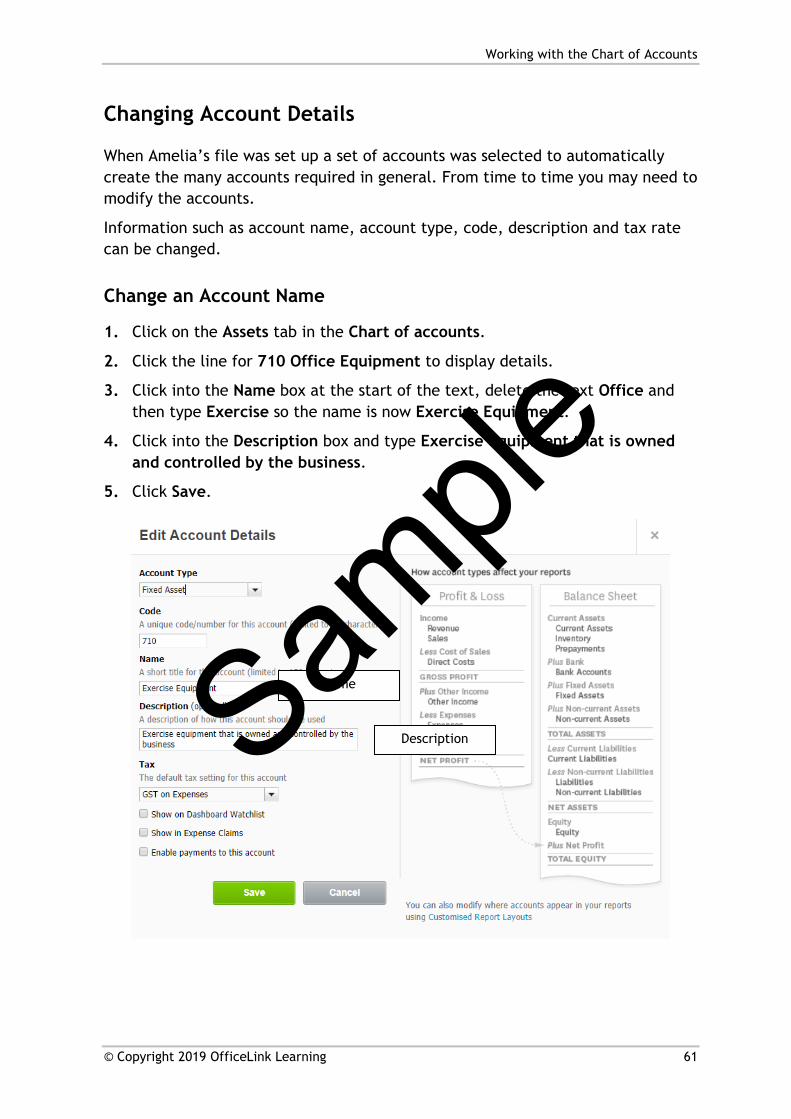
1. Click on the Assets tab in the Chart of accounts.
2. Click the line for 710 Office Equipment to display details.
3. Click into the Name box at the start of the text, delete the text Office and then type Exercise so the name is now Exercise Equipment.
4. Click into the Description box and type Exercise equipment that is owned and controlled by the business.
5. Click Save.
Name
Description Sample
Working with the Chart of Accounts
62 © Copyright 2019 OfficeLink Learning
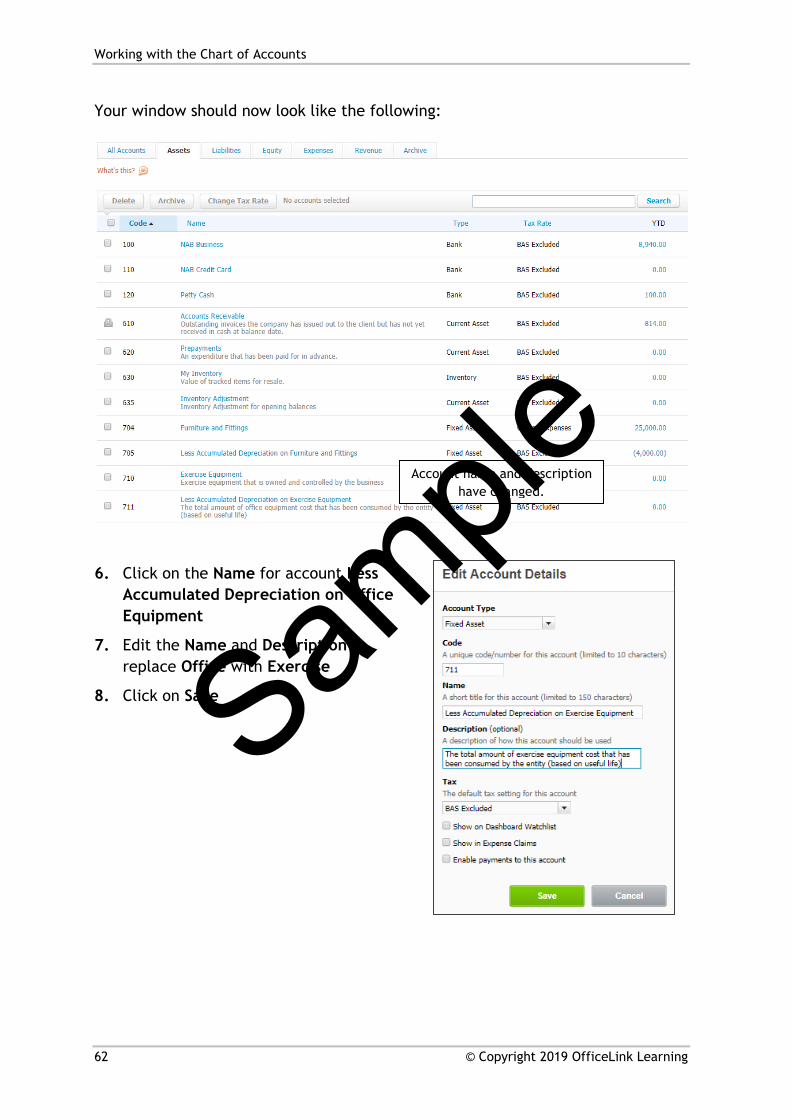
Your window should now look like the following:
6. Click on the Name for account Less
Accumulated Depreciation on Office Equipment
7. Edit the Name and Description to replace Office with Exercise
8. Click on Save
Account name and description have changed.
Sample
Working with the Chart of Accounts
© Copyright 2019 OfficeLink Learning 63
Change an Account Code and Type
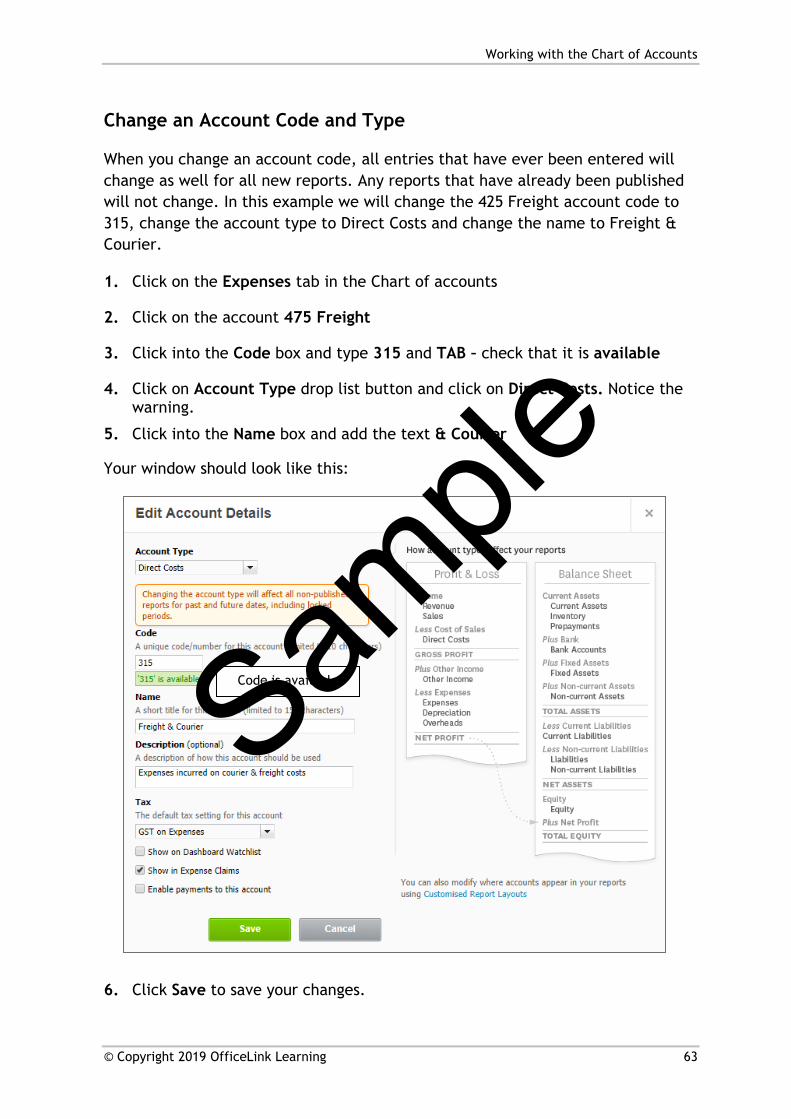
When you change an account code, all entries that have ever been entered will change as well for all new reports. Any reports that have already been published will not change. In this example we will change the 425 Freight account code to 315, change the account type to Direct Costs and change the name to Freight & Courier.
1. Click on the Expenses tab in the Chart of accounts
2. Click on the account 475 Freight
3. Click into the Code box and type 315 and TAB – check that it is available
4. Click on Account Type drop list button and click on Direct Costs. Notice the warning.
5. Click into the Name box and add the text & Courier
Your window should look like this:
6. Click Save to save your changes.
Code is available Sample
Working with the Chart of Accounts
64 © Copyright 2019 OfficeLink Learning
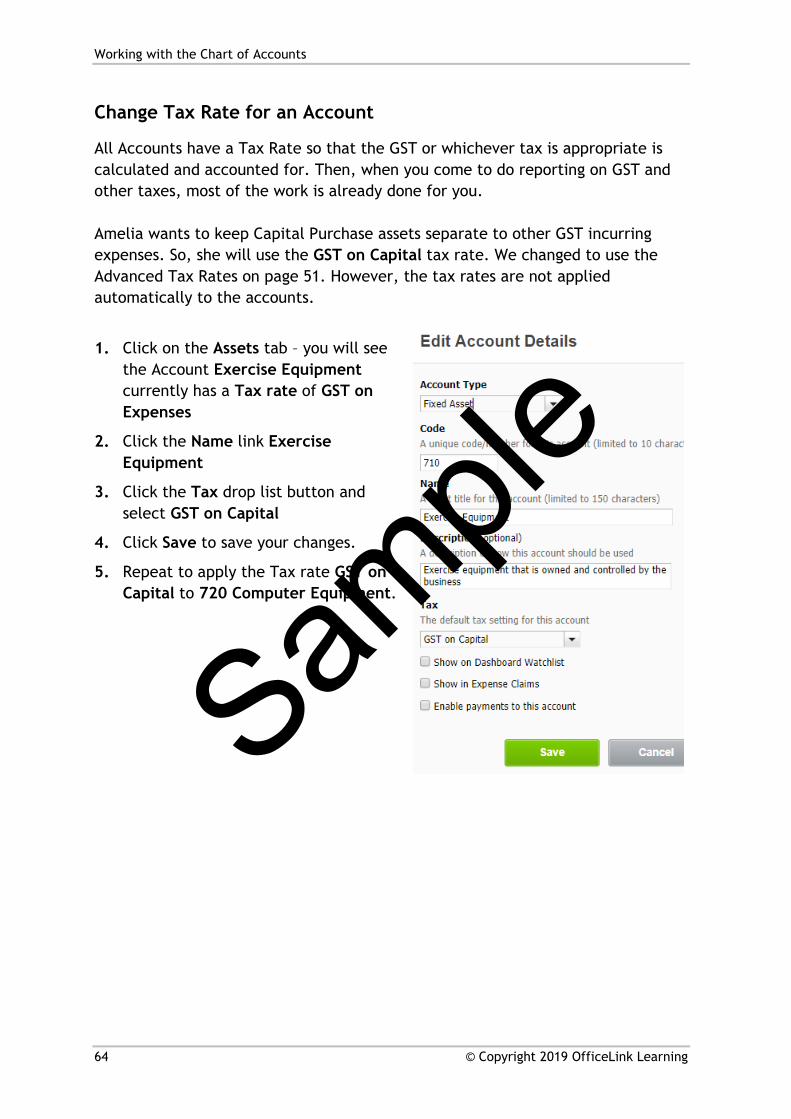
Change Tax Rate for an Account
All Accounts have a Tax Rate so that the GST or whichever tax is appropriate is calculated and accounted for. Then, when you come to do reporting on GST and other taxes, most of the work is already done for you. Amelia wants to keep Capital Purchase assets separate to other GST incurring expenses. So, she will use the GST on Capital tax rate. We changed to use the Advanced Tax Rates on page 51. However, the tax rates are not applied automatically to the accounts.
1. Click on the Assets tab – you will see the Account Exercise Equipment currently has a Tax rate of GST on Expenses
2. Click the Name link Exercise Equipment
3. Click the Tax drop list button and select GST on Capital
4. Click Save to save your changes.
5. Repeat to apply the Tax rate GST on Capital to 720 Computer Equipment.
Sample

Working with the Chart of Accounts
© Copyright 2019 OfficeLink Learning 65
Create a New Account
The set of accounts provided for Amelia includes two main Sales accounts. We will add another account so the sales for classes in the studio are separated from sales to do with workshops and retreats. While Xero does not have sub accounts this is one way we can group accounts in reports which you will learn how to do later.
1. Click on Accounting Advanced Chart of accounts if necessary to display it
2. Click on the Revenue tab to view the current accounts in this Class
3. Click on the Add Account button
4. Click on the drop list button for Account Type
5. Scroll down and click on Sales
6. Click into the Code box and type 220
7. Click in the Name box and type Sales Workshops and Retreats
8. Click in the Description box and type Sales for Workshops and Retreats
9. Check that GST on Income Tax Rate appears in the Tax box
10. Click on Save
Add Account
Sample

Using Contacts Records
© Copyright 2019 OfficeLink Learning 73
Unit 5
Using Contacts Records
Lesson outcomes
By the end of this unit you will be able to:
create a contact
enter profile information
enter tax and credit terms
set default terms for Contacts
edit Contact details
archive and restore a Contact
review privacy requirements
Sample

Using Contacts Records
74 © Copyright 2019 OfficeLink Learning
Overview
The Contacts feature is a database that stores information about your customers, suppliers and employees.
When you create a contact, you can enter information such as contact details, credit terms and tax terms. When you choose a Contact in a transaction, the information stored within it is automatically retrieved, helping speed up your data entry.
Types of contacts
• use Customer contacts to complete sales quotes, orders and invoices.
• use Supplier contacts to complete supplier quotes, purchase orders and bills.
1. Click on the Contacts All contacts
Some basic contacts have already been entered. We can edit these contacts to include more details.
Sample

Using Contacts Records
© Copyright 2019 OfficeLink Learning 75
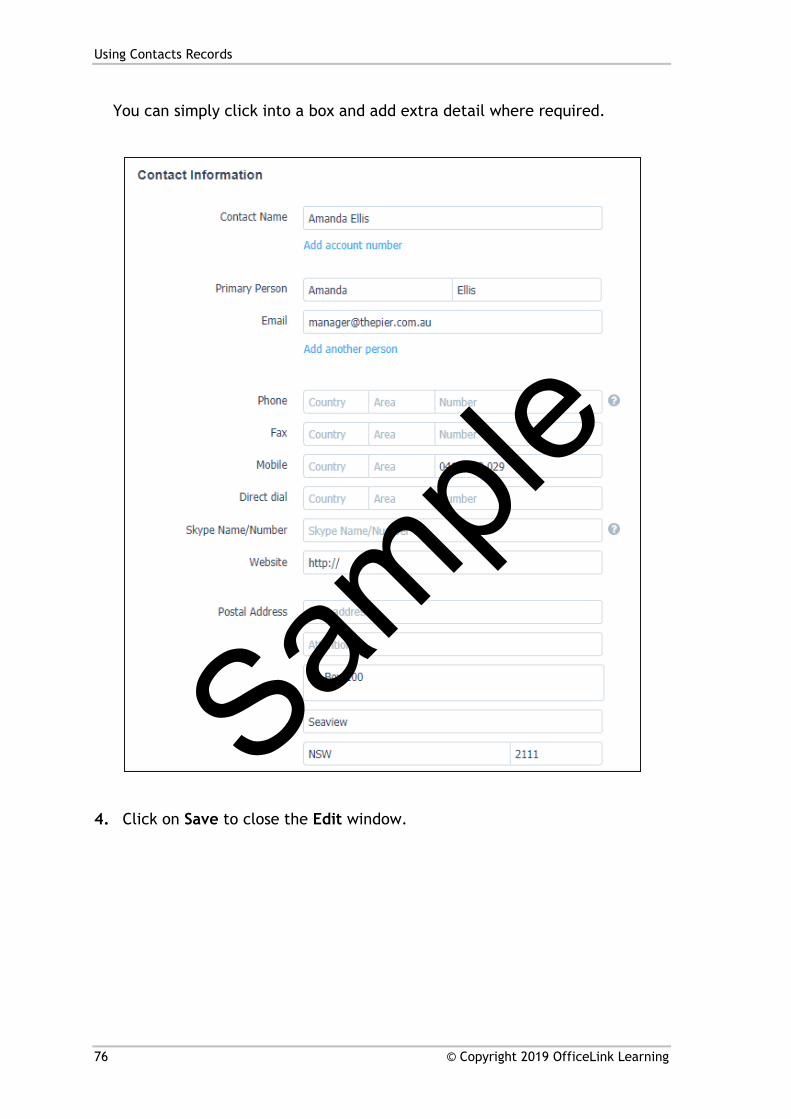
You can put as much or as little detail as you need in a Contacts record. As an example, we will look at a Contact with quite a few details.
2. Click on Amanda Ellis at the top of the list
3. Click on the Edit button to view the contact with some details filled out as shown on the following page.
Edit
Sample
Using Contacts Records
76 © Copyright 2019 OfficeLink Learning
You can simply click into a box and add extra detail where required.
4. Click on Save to close the Edit window.
Sample
Using Contacts Records
© Copyright 2019 OfficeLink Learning 77
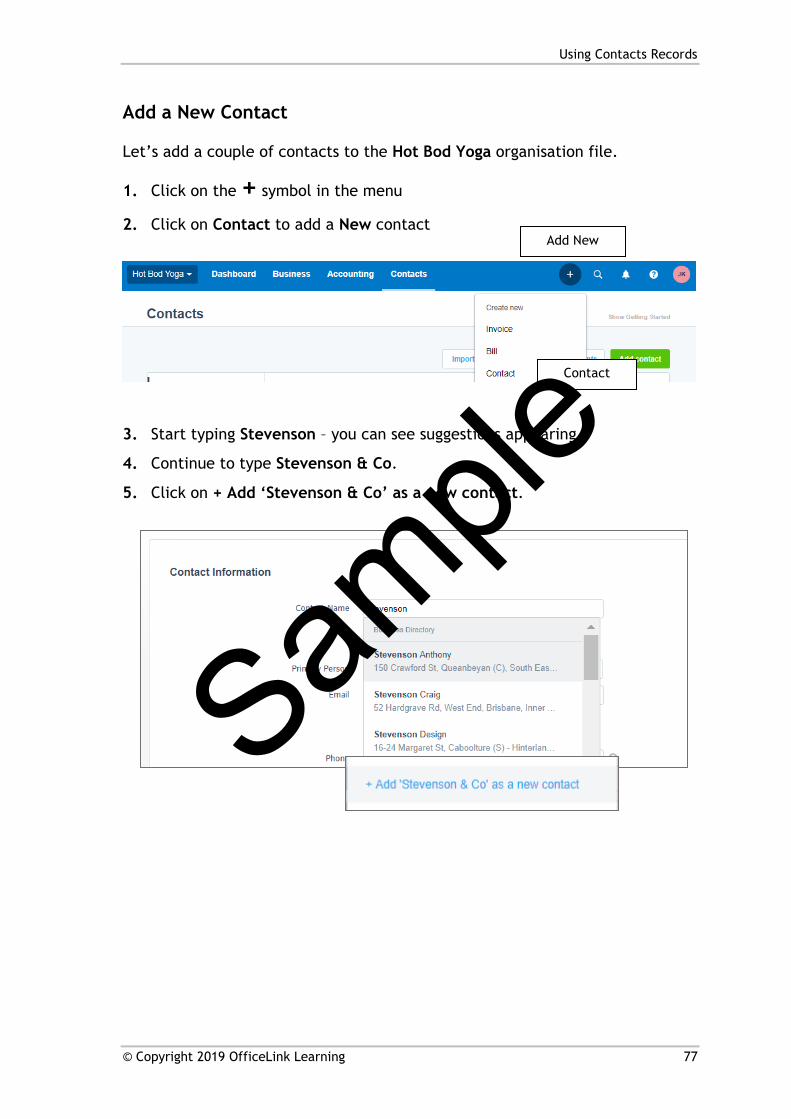
Add a New Contact
Let’s add a couple of contacts to the Hot Bod Yoga organisation file.
1. Click on the + symbol in the menu
2. Click on Contact to add a New contact
3. Start typing Stevenson – you can see suggestions appearing.
4. Continue to type Stevenson & Co.
5. Click on + Add ‘Stevenson & Co’ as a new contact.
Add New
Contact
Sample
Using Contacts Records
78 © Copyright 2019 OfficeLink Learning
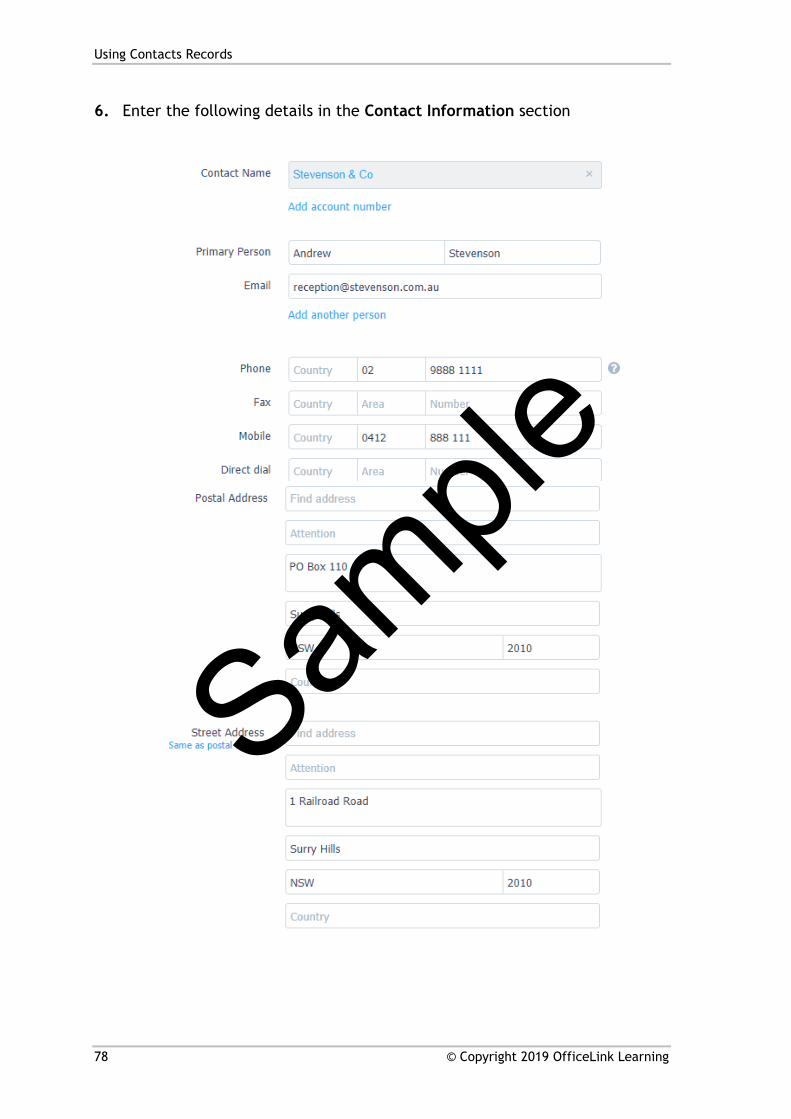
6. Enter the following details in the Contact Information section
Sample
Using Contacts Records
© Copyright 2019 OfficeLink Learning 79
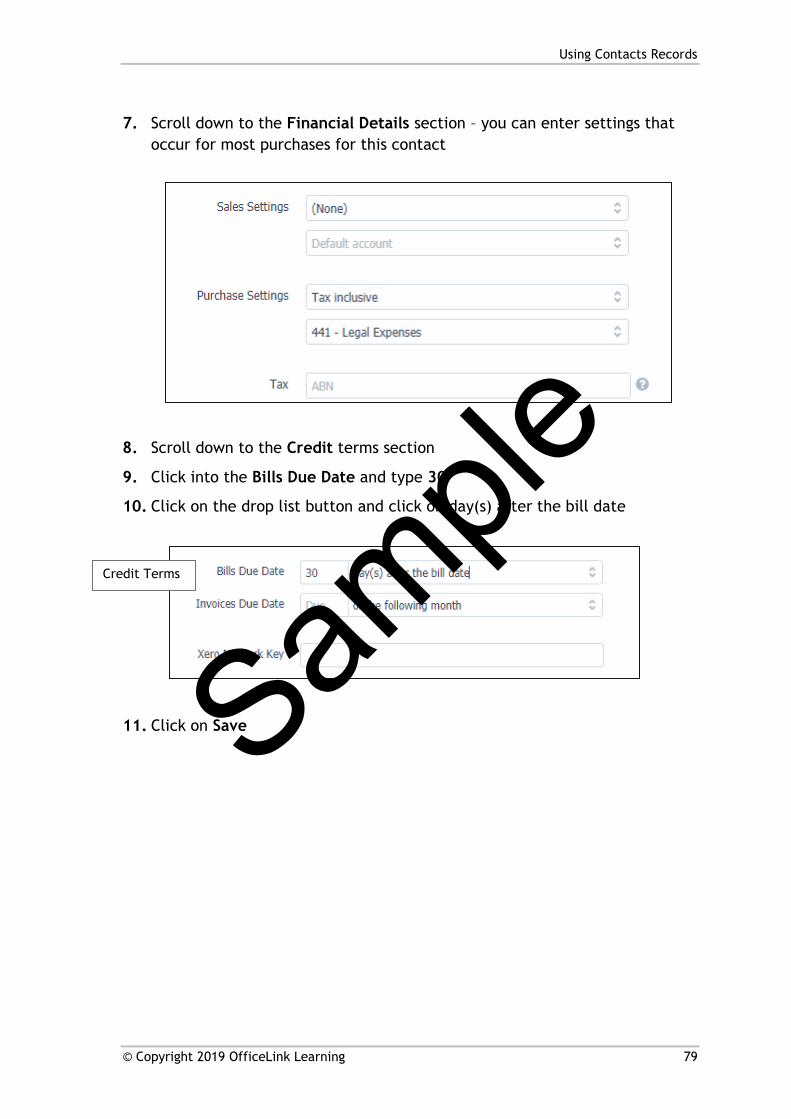
7. Scroll down to the Financial Details section – you can enter settings that occur for most purchases for this contact
8. Scroll down to the Credit terms section
9. Click into the Bills Due Date and type 30
10. Click on the drop list button and click on day(s) after the bill date
11. Click on Save
Credit Terms
Sample
Using Contacts Records
80 © Copyright 2019 OfficeLink Learning
To go back to the main Contacts page:
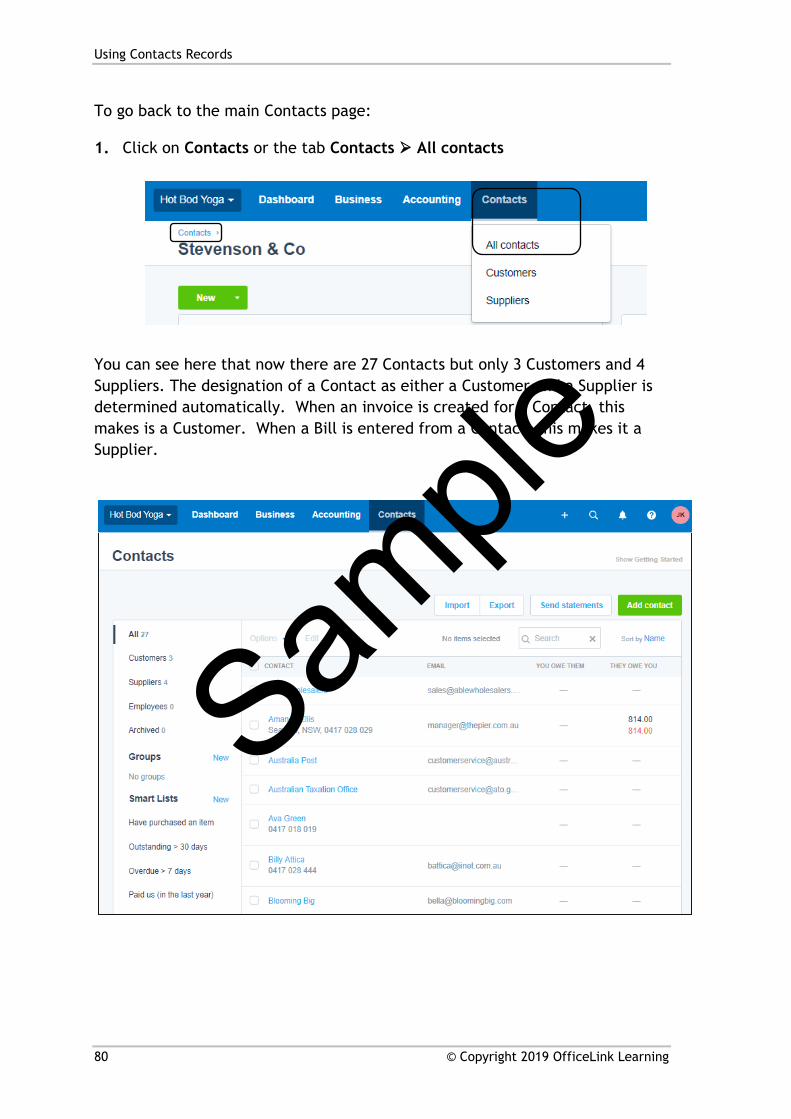
1. Click on Contacts or the tab Contacts All contacts
You can see here that now there are 27 Contacts but only 3 Customers and 4 Suppliers. The designation of a Contact as either a Customer and a Supplier is determined automatically. When an invoice is created for a Contact, this makes is a Customer. When a Bill is entered from a Contact, this makes it a Supplier.
Sample
Using Contacts Records
© Copyright 2019 OfficeLink Learning 81
Setting up Default Terms for Contacts
Before you enter a lot of contacts you can save yourself some time by setting your default terms for sales. You could also enter the general terms you usually have for Bills you receive.
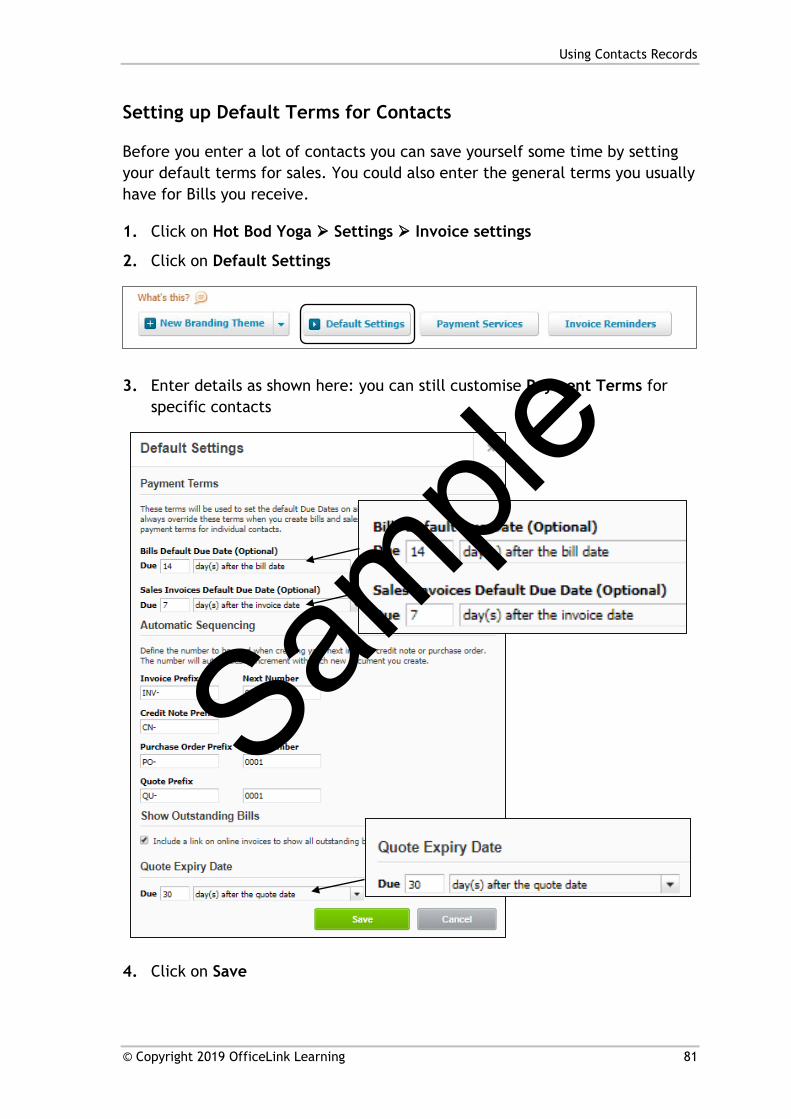
1. Click on Hot Bod Yoga Settings Invoice settings
2. Click on Default Settings
3. Enter details as shown here: you can still customise Payment Terms for specific contacts
4. Click on Save
Sample
Using Contacts Records
82 © Copyright 2019 OfficeLink Learning
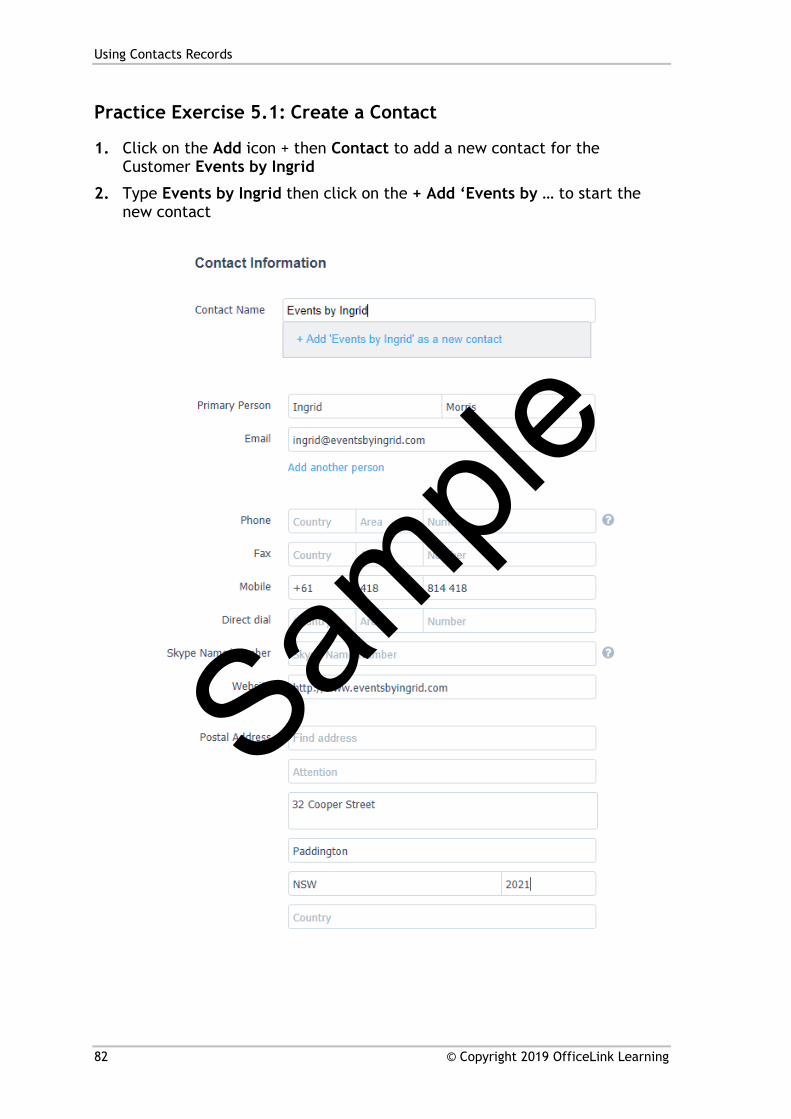
Practice Exercise 5.1: Create a Contact
1. Click on the Add icon + then Contact to add a new contact for the Customer Events by Ingrid
2. Type Events by Ingrid then click on the + Add ‘Events by … to start the new contact
Sample

Spend Money: Purchases
© Copyright 2019 OfficeLink Learning 101
Unit 7
Spend Money: Purchases
Lesson outcomes
By the end of this unit you will be able to:
• enter payments to Suppliers through Spend Money
• create a Bill received from a Supplier
• pay Bills
• create a batch payment
• send a remittance advice
• enter and use Repeating Bills
• edit a payment
• view transactions in the bank account
Sample
Spend Money: Purchases
102 © Copyright 2019 OfficeLink Learning
Overview
Xero is all about accurate records and saving time. You don’t want to go through the process of entering every little purchase as a purchase order or bill and then paying it.
There are three methods of entering money that has been spent:
• Paying Bills
• Spend Money
• Cash Coding
Bills are useful for purchases from Suppliers that you have an account with. Entering Bills helps you keep track of what you owe when and to whom.
Spend Money can be used to enter immediate payments, writing a cheque or using EFTPOS to pay expenses such as your electricity bill, telephone account, insurance payments etc.
Cash Coding is very useful for recording transactions that happen regularly such as bank charges from a bank statement or paying for fuel, or other payments that happen multiple times in a month. We will look at cash coding in the Unit on bank reconciliation.
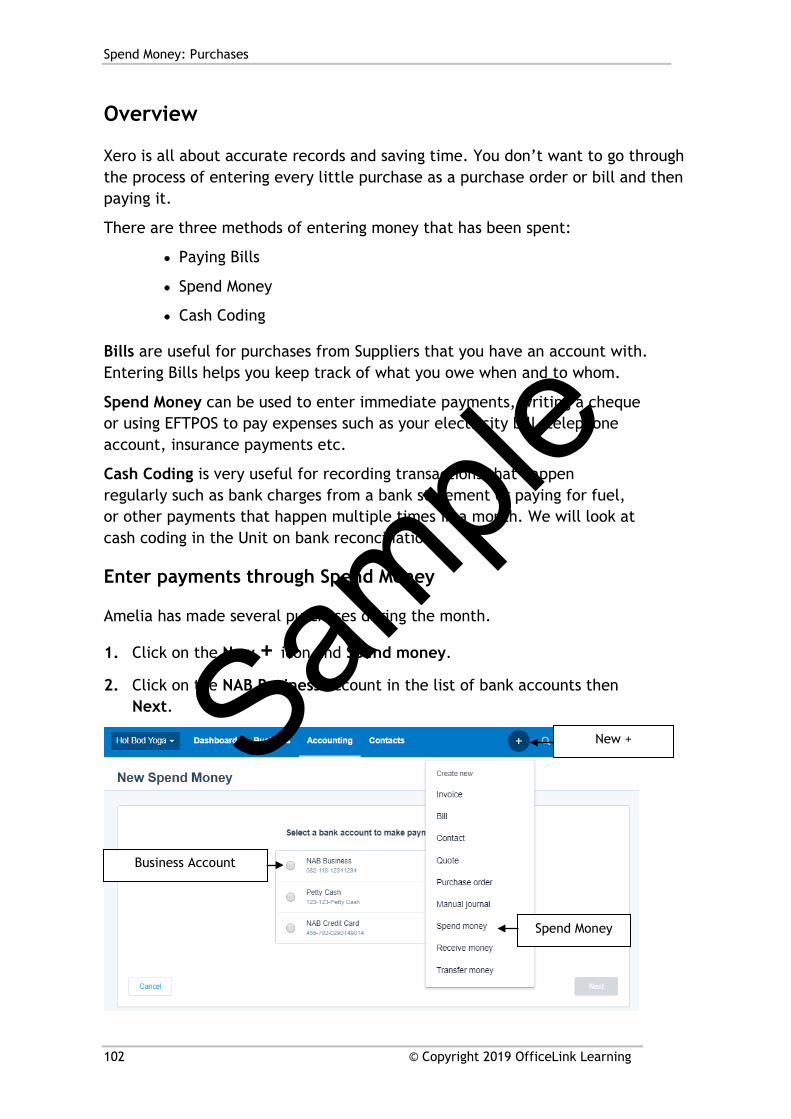
Enter payments through Spend Money
Amelia has made several purchases during the month.
1. Click on the New + icon and Spend money.
2. Click on the NAB Business account in the list of bank accounts then Next.
New +
Spend Money
Business Account
Sample
Spend Money: Purchases
© Copyright 2019 OfficeLink Learning 103
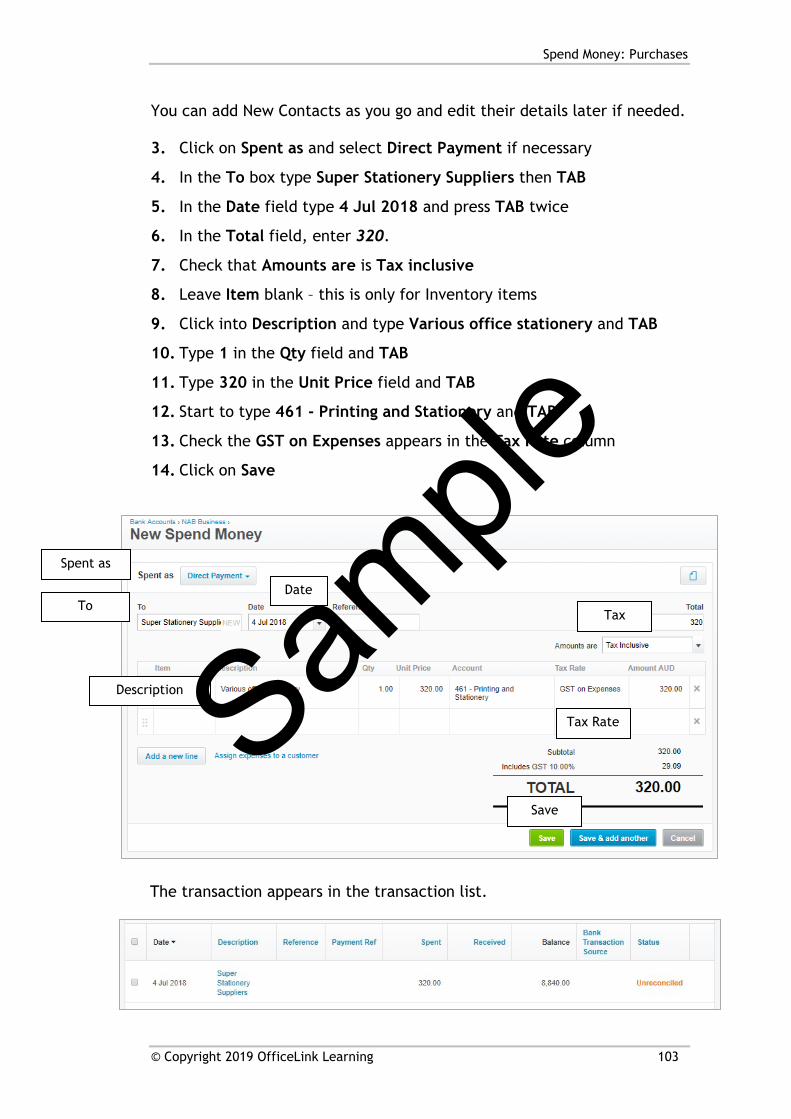
You can add New Contacts as you go and edit their details later if needed.
3. Click on Spent as and select Direct Payment if necessary
4. In the To box type Super Stationery Suppliers then TAB
5. In the Date field type 4 Jul 2018 and press TAB twice
6. In the Total field, enter 320.
7. Check that Amounts are is Tax inclusive
8. Leave Item blank – this is only for Inventory items
9. Click into Description and type Various office stationery and TAB
10. Type 1 in the Qty field and TAB
11. Type 320 in the Unit Price field and TAB
12. Start to type 461 - Printing and Stationery and TAB
13. Check the GST on Expenses appears in the Tax Rate column
14. Click on Save
The transaction appears in the transaction list.
Spent as
To Date
Tax
Description
Save
Tax Rate Sample
Spend Money: Purchases
104 © Copyright 2019 OfficeLink Learning
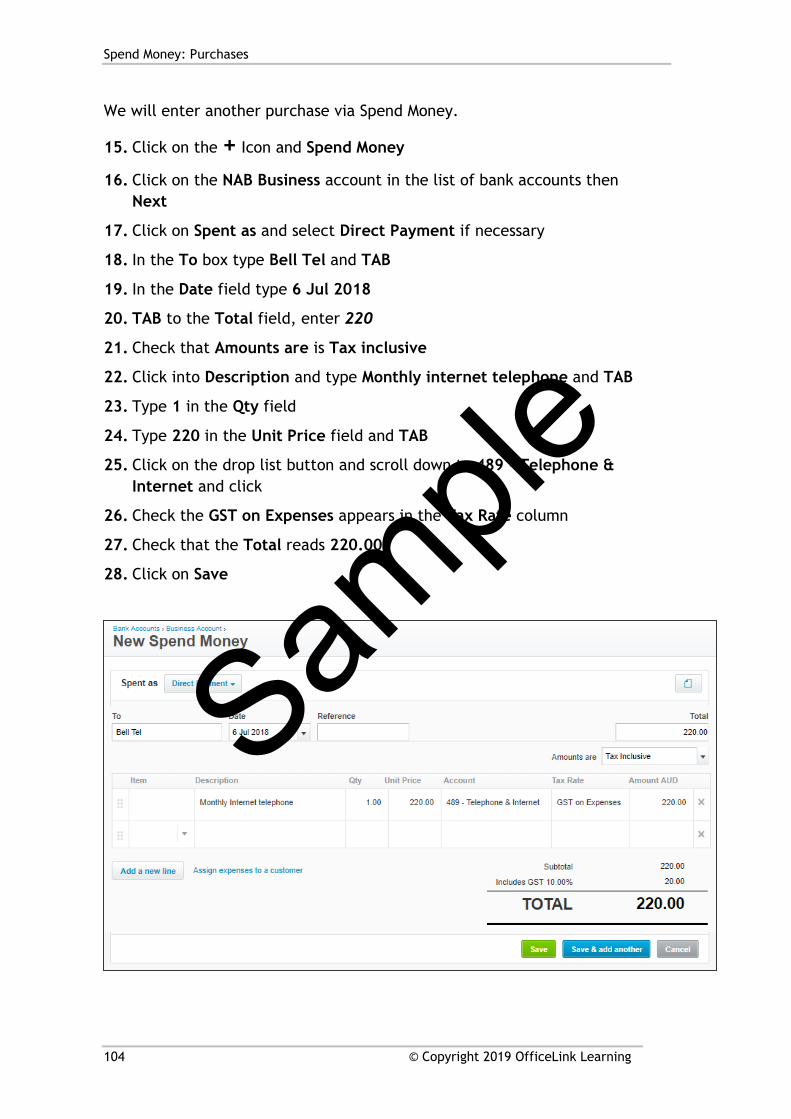
We will enter another purchase via Spend Money.
15. Click on the + Icon and Spend Money
16. Click on the NAB Business account in the list of bank accounts then Next
17. Click on Spent as and select Direct Payment if necessary
18. In the To box type Bell Tel and TAB
19. In the Date field type 6 Jul 2018
20. TAB to the Total field, enter 220
21. Check that Amounts are is Tax inclusive
22. Click into Description and type Monthly internet telephone and TAB
23. Type 1 in the Qty field
24. Type 220 in the Unit Price field and TAB
25. Click on the drop list button and scroll down to 489 - Telephone & Internet and click
26. Check the GST on Expenses appears in the Tax Rate column
27. Check that the Total reads 220.00
28. Click on Save
Sample
Spend Money: Purchases
© Copyright 2019 OfficeLink Learning 105
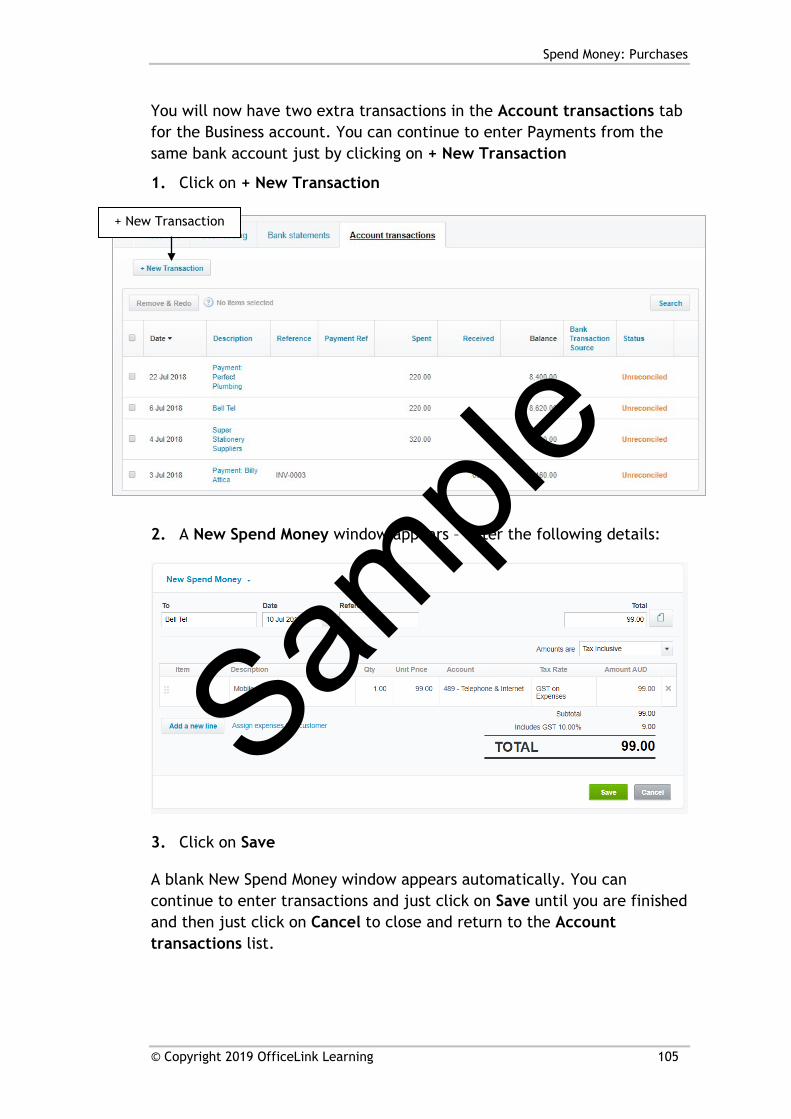
You will now have two extra transactions in the Account transactions tab for the Business account. You can continue to enter Payments from the same bank account just by clicking on + New Transaction
1. Click on + New Transaction
2. A New Spend Money window appears – enter the following details:
3. Click on Save
A blank New Spend Money window appears automatically. You can continue to enter transactions and just click on Save until you are finished and then just click on Cancel to close and return to the Account transactions list.
+ New Transaction
Sample
Spend Money: Purchases
106 © Copyright 2019 OfficeLink Learning
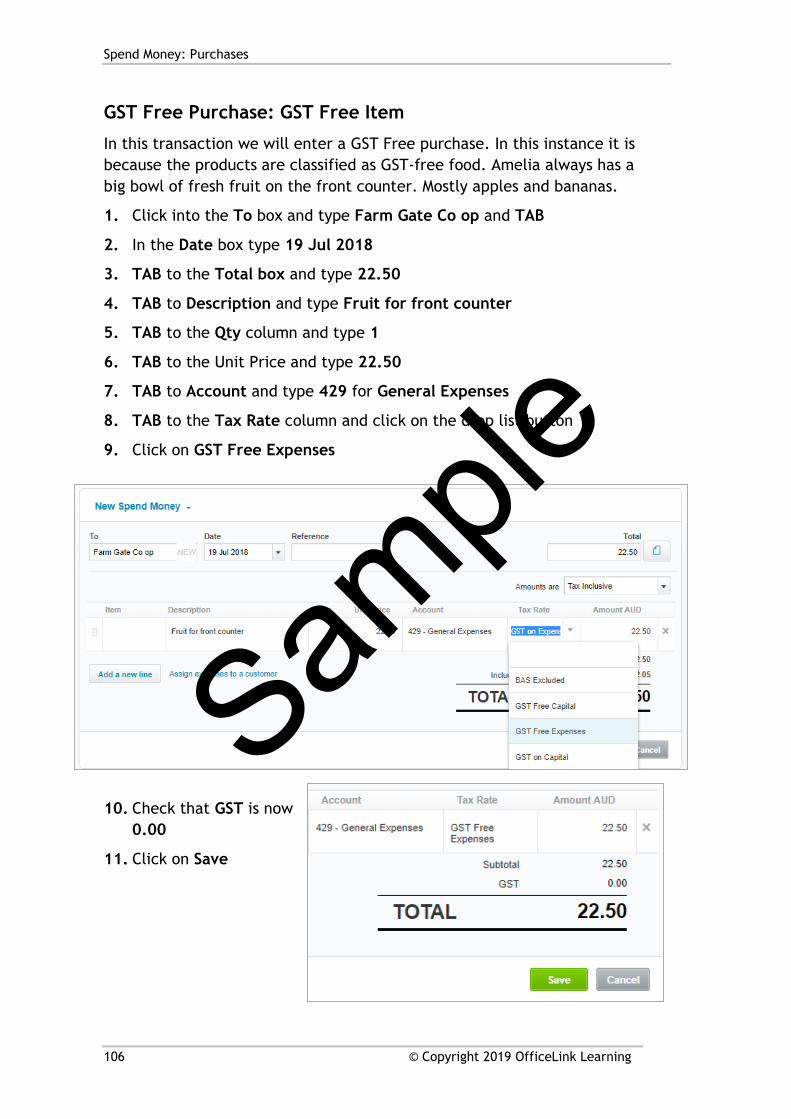
GST Free Purchase: GST Free Item
In this transaction we will enter a GST Free purchase. In this instance it is because the products are classified as GST-free food. Amelia always has a big bowl of fresh fruit on the front counter. Mostly apples and bananas.
1. Click into the To box and type Farm Gate Co op and TAB
2. In the Date box type 19 Jul 2018
3. TAB to the Total box and type 22.50
4. TAB to Description and type Fruit for front counter
5. TAB to the Qty column and type 1
6. TAB to the Unit Price and type 22.50
7. TAB to Account and type 429 for General Expenses
8. TAB to the Tax Rate column and click on the drop list button
9. Click on GST Free Expenses
10. Check that GST is now 0.00
11. Click on Save
Sample
Spend Money: Purchases
© Copyright 2019 OfficeLink Learning 107
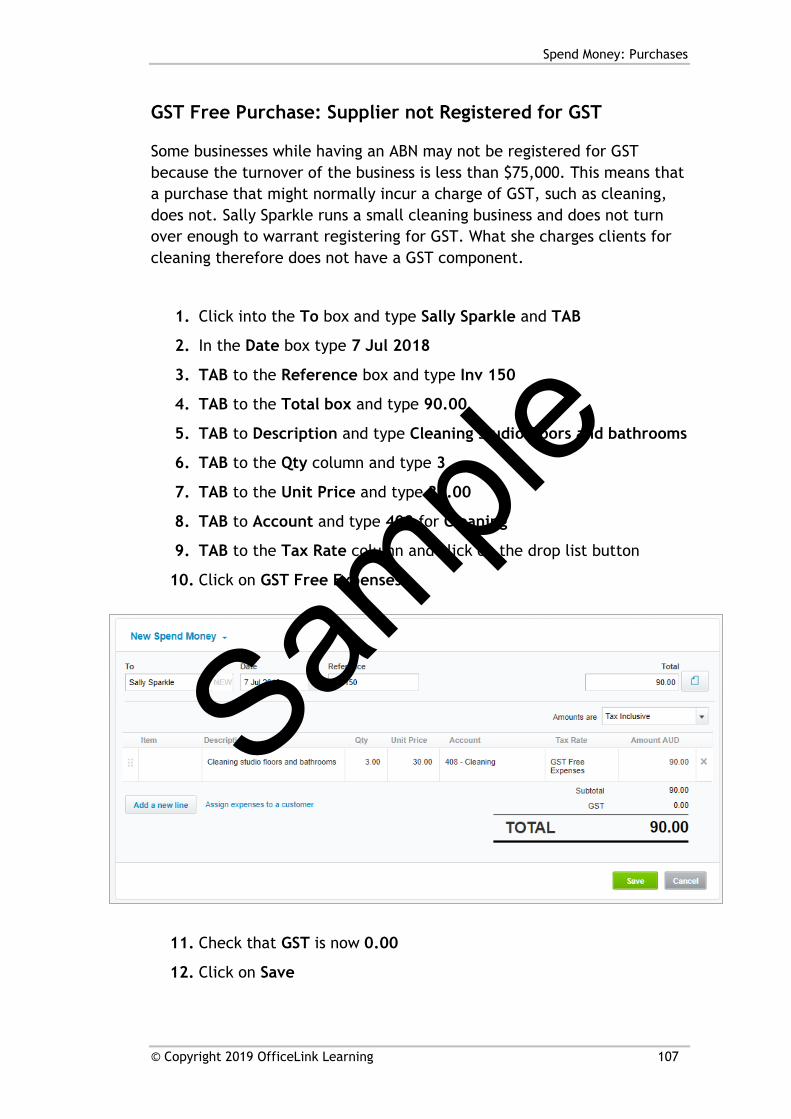
GST Free Purchase: Supplier not Registered for GST
Some businesses while having an ABN may not be registered for GST because the turnover of the business is less than $75,000. This means that a purchase that might normally incur a charge of GST, such as cleaning, does not. Sally Sparkle runs a small cleaning business and does not turn over enough to warrant registering for GST. What she charges clients for cleaning therefore does not have a GST component.
1. Click into the To box and type Sally Sparkle and TAB
2. In the Date box type 7 Jul 2018
3. TAB to the Reference box and type Inv 150
4. TAB to the Total box and type 90.00
5. TAB to Description and type Cleaning studio floors and bathrooms
6. TAB to the Qty column and type 3
7. TAB to the Unit Price and type 30.00
8. TAB to Account and type 408 for Cleaning
9. TAB to the Tax Rate column and click on the drop list button
10. Click on GST Free Expenses
11. Check that GST is now 0.00
12. Click on Save
Sample

Spend Money: Purchases
108 © Copyright 2019 OfficeLink Learning
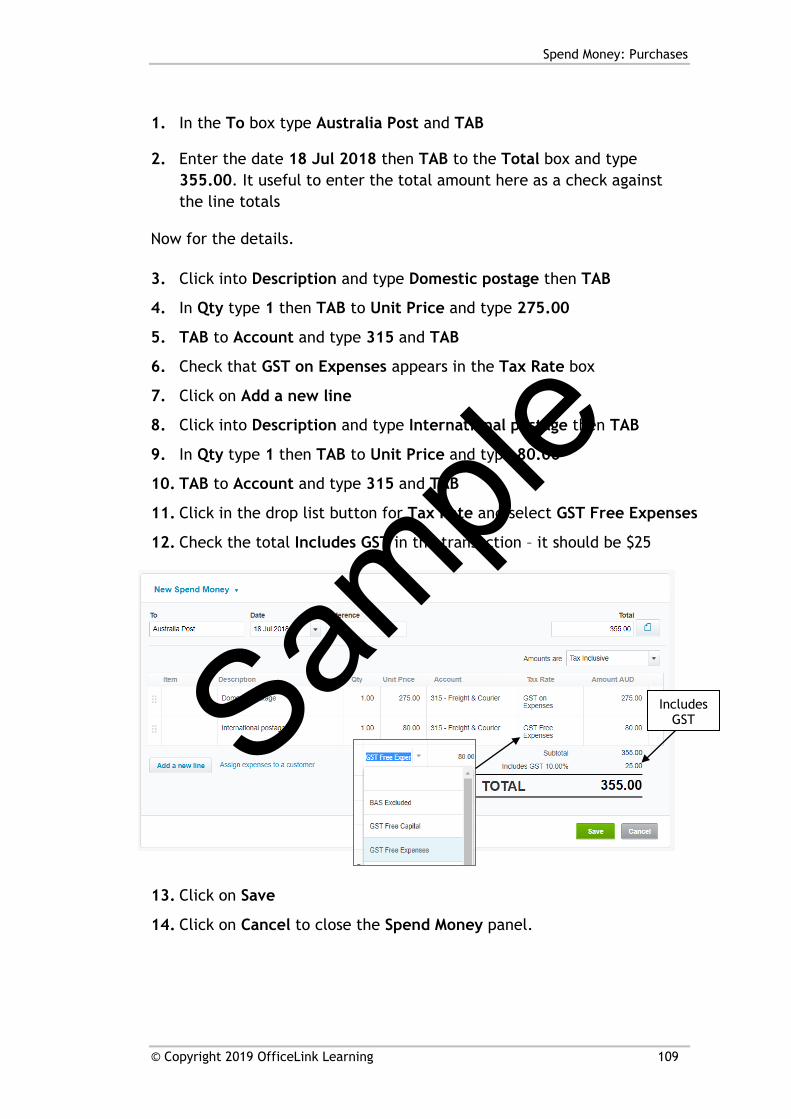
Purchase Part GST and Part GST Free
The situation where the amount of GST is not just 1/11th of the total charge can happen easily where some items have GST applied and some do not.
This payment is for a postage bill and includes $25 GST. The Total including GST is $355 – however $25 is not 1/11th of $355.
EFT: Business Account Date: 18/07/2018
Pay: Australia Post
Postage (within Australia + International)
Total Amount inc GST: $355.00 Amount of GST included: $25.00
We use this amount to work out the portion that is GST Free.
GST is 1/11th of the charge that includes GST. So, GST amount multiplied by 11 will give the charge including GST amount.
Postage bill (including GST) = $25 x 11 = $275.00
Therefore, the total amount of the bill less the charge including GST should give us the GST free amount.
International postage bill (GST-Free) = $355 - $275 = $80.00
Go to the following page to look at how this is entered in Xero.
Sample
Spend Money: Purchases
© Copyright 2019 OfficeLink Learning 109
1. In the To box type Australia Post and TAB
2. Enter the date 18 Jul 2018 then TAB to the Total box and type 355.00. It useful to enter the total amount here as a check against the line totals
Now for the details. 3. Click into Description and type Domestic postage then TAB
4. In Qty type 1 then TAB to Unit Price and type 275.00
5. TAB to Account and type 315 and TAB
6. Check that GST on Expenses appears in the Tax Rate box
7. Click on Add a new line
8. Click into Description and type International postage then TAB
9. In Qty type 1 then TAB to Unit Price and type 80.00
10. TAB to Account and type 315 and TAB
11. Click in the drop list button for Tax Rate and select GST Free Expenses
12. Check the total Includes GST in the transaction – it should be $25
13. Click on Save
14. Click on Cancel to close the Spend Money panel.
Includes GST Sam
ple
Spend Money: Purchases
110 © Copyright 2019 OfficeLink Learning
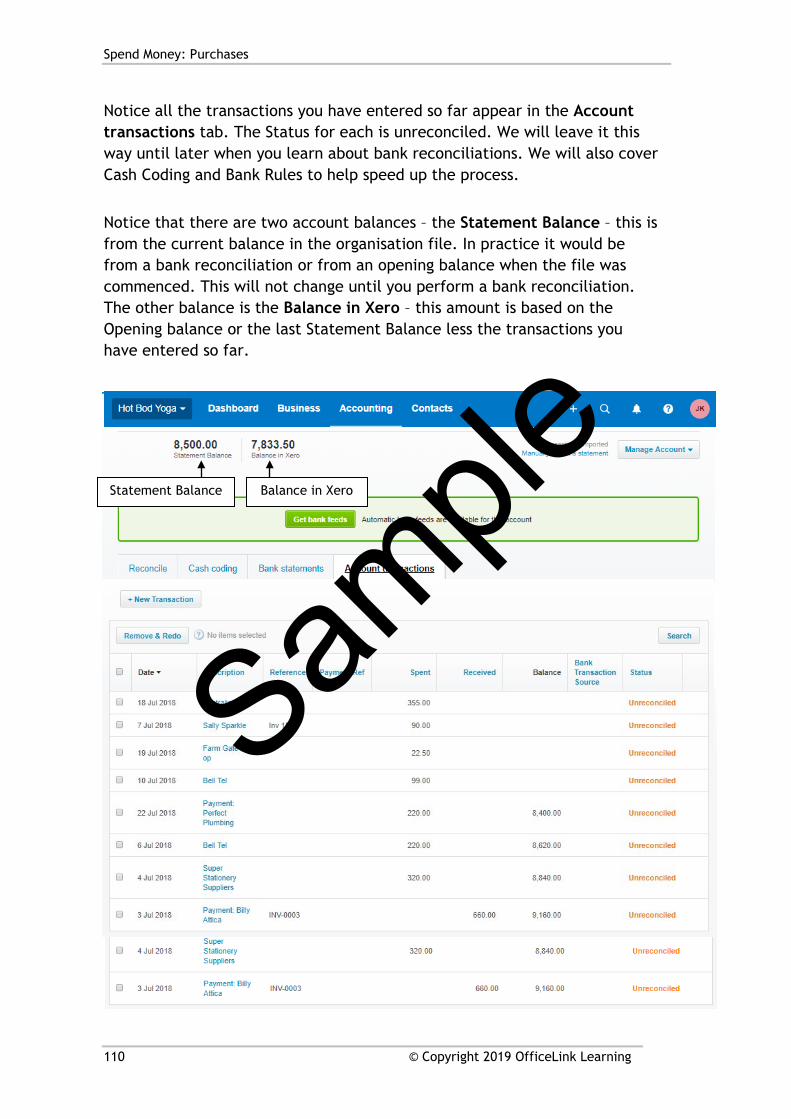
Notice all the transactions you have entered so far appear in the Account transactions tab. The Status for each is unreconciled. We will leave it this way until later when you learn about bank reconciliations. We will also cover Cash Coding and Bank Rules to help speed up the process.
Notice that there are two account balances – the Statement Balance – this is from the current balance in the organisation file. In practice it would be from a bank reconciliation or from an opening balance when the file was commenced. This will not change until you perform a bank reconciliation. The other balance is the Balance in Xero – this amount is based on the Opening balance or the last Statement Balance less the transactions you have entered so far.
Account transactions
Statement Balance Balance in Xero
Sample
Related Documents