Professional Disc Drive Unit XDCAM Drive Utility Software HELP [English] 2nd Edition Software Version 3.0 and Later

Welcome message from author
This document is posted to help you gain knowledge. Please leave a comment to let me know what you think about it! Share it to your friends and learn new things together.
Transcript
Professional Disc Drive Unit
XDCAM Drive Utility Software
HELP [English]2nd EditionSoftware Version 3.0 and Later
2
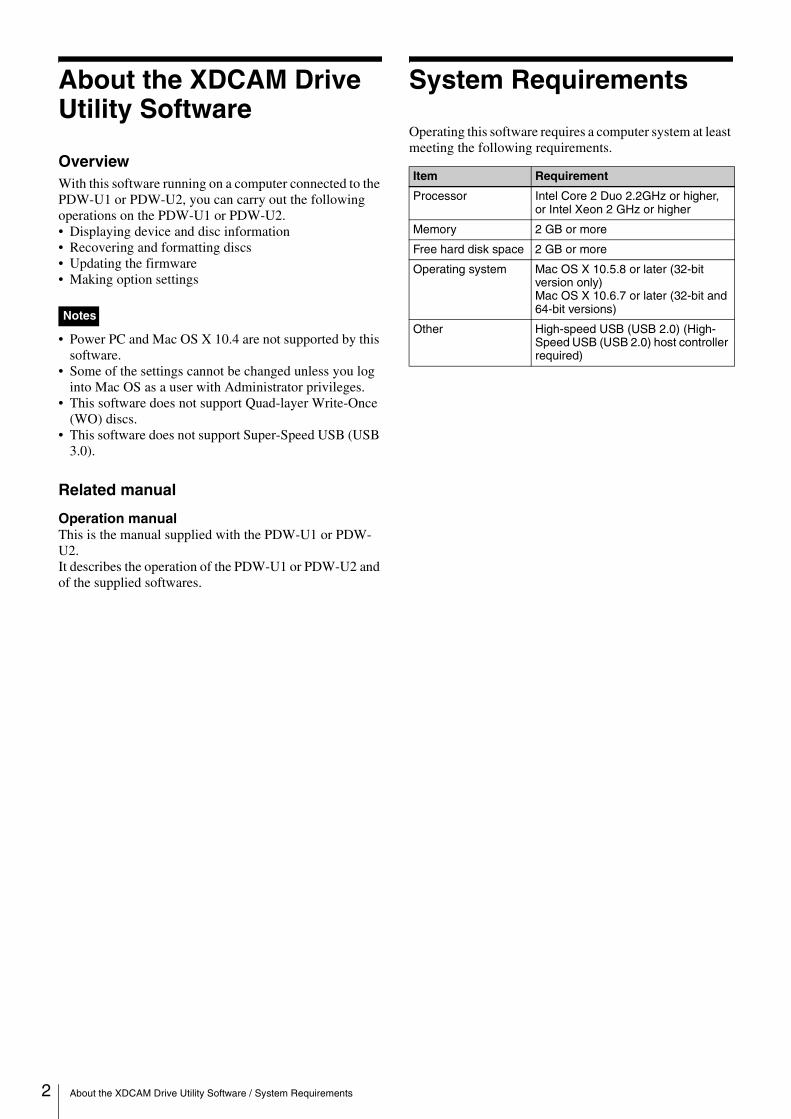
About the XDCAM Drive Utility Software
OverviewWith this software running on a computer connected to the PDW-U1 or PDW-U2, you can carry out the following operations on the PDW-U1 or PDW-U2. • Displaying device and disc information• Recovering and formatting discs• Updating the firmware• Making option settings
• Power PC and Mac OS X 10.4 are not supported by this software.
• Some of the settings cannot be changed unless you log into Mac OS as a user with Administrator privileges.
• This software does not support Quad-layer Write-Once (WO) discs.
• This software does not support Super-Speed USB (USB 3.0).
Related manual
Operation manualThis is the manual supplied with the PDW-U1 or PDW-U2.It describes the operation of the PDW-U1 or PDW-U2 and of the supplied softwares.
System Requirements
Operating this software requires a computer system at least meeting the following requirements.
Notes
Item Requirement
Processor Intel Core 2 Duo 2.2GHz or higher, or Intel Xeon 2 GHz or higher
Memory 2 GB or more
Free hard disk space 2 GB or more
Operating system Mac OS X 10.5.8 or later (32-bit version only)Mac OS X 10.6.7 or later (32-bit and 64-bit versions)
Other High-speed USB (USB 2.0) (High-Speed USB (USB 2.0) host controller required)
About the XDCAM Drive Utility Software / System Requirements
Starting and Exiting
StartingFirst make sure that the PDW-U1 or PDW-U2 is connected to the computer.
For connection details, refer to the operation manual.
To start this software, open the installed folder of the software, and double click the XDCAM Drive Utility.Behavior after starting depends on the type of user account.
If you are a computer administratorYou can use all of the functions of this software.
If you are a normal user (without administrator privileges)You cannot change the settings in the User Settings screen (see page 7).
ExitingCarry out either of the following.• Click the x (close) button in the upper left of the window.• Select the “Quit XDCAM Drive Utility” from the
XDCAM Drive Utility menu.• Click the XDCAM Drive Utility icon on the Dock, and
then select “Exit”.
To Start the HelpA PDF help file appears when you select “XDCAM Drive Utility Help” from the Help menu.
3Starting and Exiting
4
Names and Functions of Parts
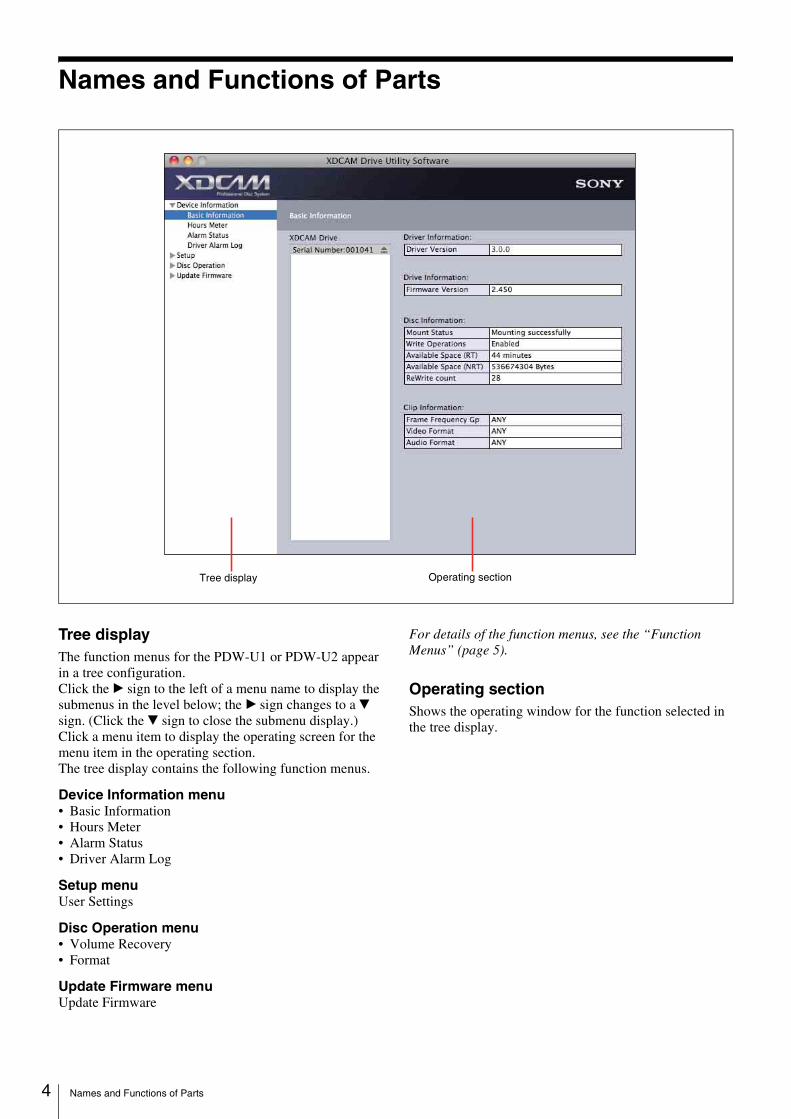
Tree displayThe function menus for the PDW-U1 or PDW-U2 appear in a tree configuration.Click the B sign to the left of a menu name to display the submenus in the level below; the B sign changes to a V sign. (Click the V sign to close the submenu display.)Click a menu item to display the operating screen for the menu item in the operating section.The tree display contains the following function menus.
Device Information menu • Basic Information• Hours Meter• Alarm Status• Driver Alarm Log
Setup menuUser Settings
Disc Operation menu• Volume Recovery• Format
Update Firmware menu Update Firmware
For details of the function menus, see the “Function Menus” (page 5).
Operating sectionShows the operating window for the function selected in the tree display.
Tree display Operating section
Names and Functions of Parts
Function Menus
Device Information Menu
Basic Information screenThis displays the following information about the PDW-U1 or PDW-U2.
XDCAM DriveThis displays the serial number of the connected PDW-U1 or PDW-U2. The firmware version and the disc information of the selected PDW-U1 or PDW-U2 are displayed on the right side.
Driver Information
Drive Information
Disc Information
Clip Information
• When the loaded disc does not contain any clips, “ANY” appears in the Frame Frequency Gp, Video Format, and Audio Format fields.
• In the following cases, “---” appears in the Frame Frequency Gp, Video Format, and Audio Format fields.- no disc is loaded, or the disc is not loaded properly - an unsupported disc is loaded - a disc cannot be recognized because of an error or for
any other reason • Regardless of the setting of “Prohibit mixed recording”
in the User Settings screen (see page 7), “MIXED” appears in the Video Format field when a mixedly recorded disc is inserted.
• Even when their video formats are the same, clips are handled as clips with different formats if their audio formats are not the same.
• Video types that differ only in their bit rates are handled as the same video format.
To refresh the displaySelect “Update” from the View menu.
Hours Meter screenInformation about the operational history of the PDW-U1 or PDW-U2 can be displayed. Use the information as a guide in scheduling periodic maintenance. For periodic maintenance, consult a Sony service representative.
Item name Display contents
Driver Version Version of the currently installed driver
Item name Display contents
Firmware Version Firmware version of the selected PDW-U1 or PDW-U2
Item name Display contents
Mount Status Mount status (including disc status) of the selected PDW-U1 or PDW-U2
Write Operations Whether it is possible to write to the selected PDW-U1 or PDW-U2, and the reason why if it is not possible
Available Space (RT)
Amount of space available for real-time data (MXF files) (unit: minutes)
Available Space (NRT)
Amount of space available for non-real-time data (files other than MXF files) (unit: bytes)
ReWrite Count Number of times that data has been written to the disc
Item name Display contents
Frame Frequency Gp
Frame frequency group of clips recorded on the disc. One of the following three groups is displayed. 50Hz [50i, 25p, 50p] , 59.94Hz [59.94i, 29.97p, 59.94p], 23.98Hz [23.98p]
Video Format The video format of the disc loaded into the selected PDW-U1 or PDW-U2. A combination of the following video types and system frequencies is displayed (for example: IMX50-625/50i). Video type: IMX30, IMX40, IMX50, DVCAM, HD422, HD420 (“--” appears if none of these is applicable) System frequency: 625/50i, 525/59.94i, 1080/23.98p, 1080/25p, 1080/50i, 1080/59.94i, 1080/29.97p, 1080/23.98p, 540/23.98p, 720/59.94p, 720/50p (“---/---” appears if none of these is applicable)“MIXED” appears if the disc contains clips recorded in different video formats.
Audio Format The audio format of the disc loaded into the selected PDW-U1 or PDW-U2. A combination of the following channel configurations and audio types is displayed (for example: 8ch 16bits LPCM). Channel configuration: 2ch, 4ch, 8ch Audio type: 16bits LPCM, 24bits LPCM, 16bits NonLPCM, 24bits NonLPCM (“---” appears if none of these is applicable). “MIXED” appears if the disc contains clips recorded in different audio formats.
Notes
Item name Display contents
5Function Menus
6
XDCAM DriveThis displays the serial number of the connected PDW-U1 or PDW-U2. The cumulative operation hours or the number of operation of the selected PDW-U1 or PDW-U2 is displayed on the right side.
Hours Meter
To refresh the displaySelect “Update” from the View menu.
Alarm Status screenThis shows the current alarm of the selected PDW-U1 or PDW-U2 when an alarm occurs. This information is preserved until the next alarm is generated or the PDW-U1 or PDW-U2 is powered off.
XDCAM DriveThis displays the serial number of the connected PDW-U1 or PDW-U2. The alarm information of the selected PDW-U1 or PDW-U2 is displayed on the right side.
DetailsThe alarm code of the selected PDW-U1 or PDW-U2 is displayed.
For details of alarms, see “Alarm Lists” (page 15).
To refresh the displaySelect “Update” from the View menu.
Driver Alarm Log screenThis displays the driver alarm log.
DateSelect a date to display a list of the alarms that occurred on that date.You can click the v and V buttons to specify a year, month, and day.If you do not specify a date, the log for the current day appears.
Alarm LogThis displays the alarm list for the selected date.By default, the alarms for the most recent data are displayed. The columns can be clicked to sort the alarm list.
To refresh the displaySelect “Update” from the View menu.
Item name Display contents
Operation Hours The total number of hours the PDW-U1 or PDW-U2 has been powered on (unit: hours)
Laser Parameter The cumulative light output time for the optical head
Seek Running Hours (PDW-U1)
The cumulative seek operation time for the optical head (unit: hours)
Seek Counter(PDW-U2)
The cumulative number of seek operations of the optical head
Spindle Running Hours
The cumulative spindle rotation time (unit: hours)
Loading Counter The total number of times disc has been loaded
Function Menus
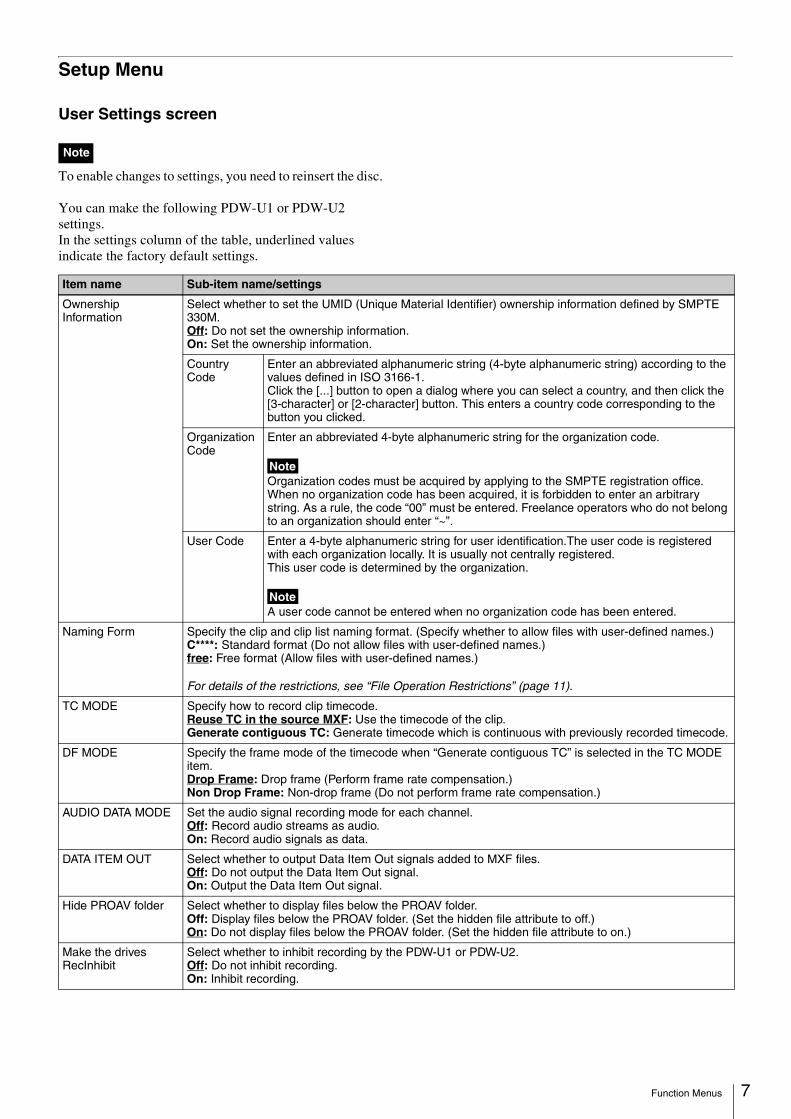
Setup Menu
User Settings screen
To enable changes to settings, you need to reinsert the disc.
You can make the following PDW-U1 or PDW-U2 settings.In the settings column of the table, underlined values indicate the factory default settings.
Note
Item name Sub-item name/settings
Ownership Information
Select whether to set the UMID (Unique Material Identifier) ownership information defined by SMPTE 330M.Off: Do not set the ownership information.On: Set the ownership information.
Country Code
Enter an abbreviated alphanumeric string (4-byte alphanumeric string) according to the values defined in ISO 3166-1.Click the [...] button to open a dialog where you can select a country, and then click the [3-character] or [2-character] button. This enters a country code corresponding to the button you clicked.
Organization Code
Enter an abbreviated 4-byte alphanumeric string for the organization code.
NoteOrganization codes must be acquired by applying to the SMPTE registration office. When no organization code has been acquired, it is forbidden to enter an arbitrary string. As a rule, the code “00” must be entered. Freelance operators who do not belong to an organization should enter “~”.
User Code Enter a 4-byte alphanumeric string for user identification.The user code is registered with each organization locally. It is usually not centrally registered.This user code is determined by the organization.
NoteA user code cannot be entered when no organization code has been entered.
Naming Form Specify the clip and clip list naming format. (Specify whether to allow files with user-defined names.)C****: Standard format (Do not allow files with user-defined names.)free: Free format (Allow files with user-defined names.)
For details of the restrictions, see “File Operation Restrictions” (page 11).
TC MODE Specify how to record clip timecode.Reuse TC in the source MXF: Use the timecode of the clip.Generate contiguous TC: Generate timecode which is continuous with previously recorded timecode.
DF MODE Specify the frame mode of the timecode when “Generate contiguous TC” is selected in the TC MODE item.Drop Frame: Drop frame (Perform frame rate compensation.)Non Drop Frame: Non-drop frame (Do not perform frame rate compensation.)
AUDIO DATA MODE Set the audio signal recording mode for each channel.Off: Record audio streams as audio.On: Record audio signals as data.
DATA ITEM OUT Select whether to output Data Item Out signals added to MXF files.Off: Do not output the Data Item Out signal.On: Output the Data Item Out signal.
Hide PROAV folder Select whether to display files below the PROAV folder.Off: Display files below the PROAV folder. (Set the hidden file attribute to off.)On: Do not display files below the PROAV folder. (Set the hidden file attribute to on.)
Make the drives RecInhibit
Select whether to inhibit recording by the PDW-U1 or PDW-U2.Off: Do not inhibit recording.On: Inhibit recording.
7Function Menus
8
Tip for mixed format recording modeAs long as the frame frequency group is the same, clips in different recording formats can be recorded or written to the same disc. 1)
The system frequencies supported by this unit are divided into frame frequency groups, as shown in the following table.
1) The recording format is regarded as different whenever the system frequency, video resolution, video codec/bit rate, or number of audio channels or number of bits does not match.
You can record clips with different recording formats, for example HD422 and HD420SP clips, by putting this unit into mixed format recording mode.
Continuous playback may not be possible at the transition point between two clips with different recording formats.
To enable changes to the settings
1 Click the [Apply] button.
The message “The setting has been changed. Please reinsert the disc.” is displayed.
If you select another screen before clicking the [Apply] button, changes to the settings are discarded.
2 Click the Z (eject) icon on the right side of XDCAM Disc displayed in Finder to eject the disc, then reinsert the disc.
3 Click the [OK] button.
To reset settings to the default settings
1 Click the [Reset] button.
The message “The display content has been reset to the factory setting.” is displayed.
2 Click the [OK] button.
The message “Reset to factory default settings. To reflect the changes in the display, press the Apply button.” appears.
3 Click the [OK] button to erase the message, and then click the [Apply] button.
The settings are reset to the factory default settings.
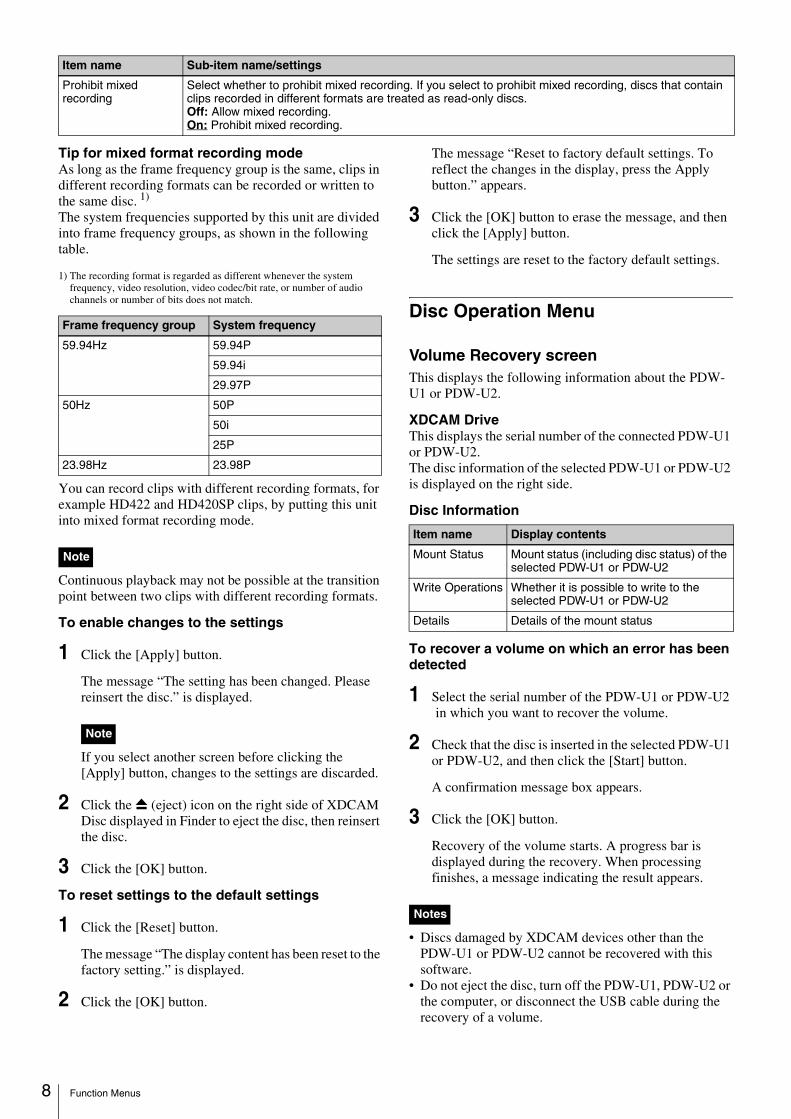
Disc Operation Menu
Volume Recovery screenThis displays the following information about the PDW-U1 or PDW-U2.
XDCAM DriveThis displays the serial number of the connected PDW-U1 or PDW-U2.The disc information of the selected PDW-U1 or PDW-U2 is displayed on the right side.
Disc Information
To recover a volume on which an error has been detected
1 Select the serial number of the PDW-U1 or PDW-U2 in which you want to recover the volume.
2 Check that the disc is inserted in the selected PDW-U1 or PDW-U2, and then click the [Start] button.
A confirmation message box appears.
3 Click the [OK] button.
Recovery of the volume starts. A progress bar is displayed during the recovery. When processing finishes, a message indicating the result appears.
• Discs damaged by XDCAM devices other than the PDW-U1 or PDW-U2 cannot be recovered with this software.
• Do not eject the disc, turn off the PDW-U1, PDW-U2 or the computer, or disconnect the USB cable during the recovery of a volume.
Prohibit mixed recording
Select whether to prohibit mixed recording. If you select to prohibit mixed recording, discs that contain clips recorded in different formats are treated as read-only discs.Off: Allow mixed recording.On: Prohibit mixed recording.
Item name Sub-item name/settings
Frame frequency group System frequency
59.94Hz 59.94P
59.94i
29.97P
50Hz 50P
50i
25P
23.98Hz 23.98P
Note
Note
Item name Display contents
Mount Status Mount status (including disc status) of the selected PDW-U1 or PDW-U2
Write Operations Whether it is possible to write to the selected PDW-U1 or PDW-U2
Details Details of the mount status
Notes
Function Menus
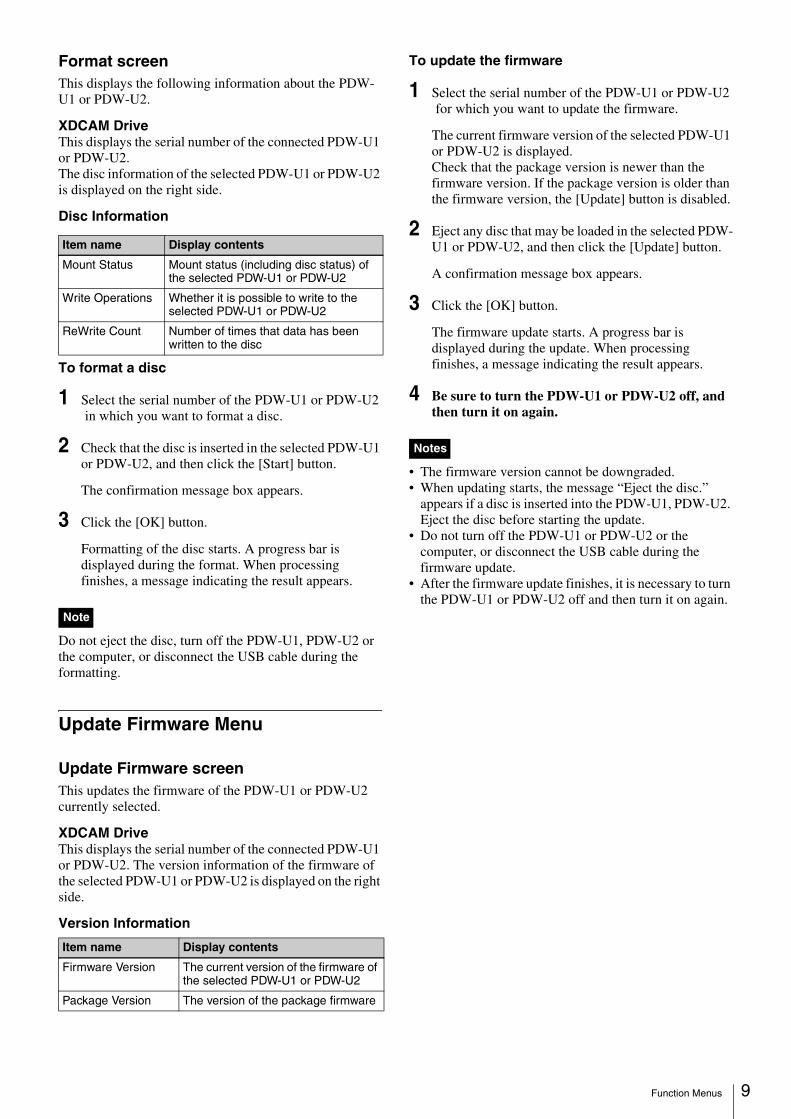
Format screenThis displays the following information about the PDW-U1 or PDW-U2.
XDCAM DriveThis displays the serial number of the connected PDW-U1 or PDW-U2.The disc information of the selected PDW-U1 or PDW-U2 is displayed on the right side.
Disc Information
To format a disc
1 Select the serial number of the PDW-U1 or PDW-U2 in which you want to format a disc.
2 Check that the disc is inserted in the selected PDW-U1 or PDW-U2, and then click the [Start] button.
The confirmation message box appears.
3 Click the [OK] button.
Formatting of the disc starts. A progress bar is displayed during the format. When processing finishes, a message indicating the result appears.
Do not eject the disc, turn off the PDW-U1, PDW-U2 or the computer, or disconnect the USB cable during the formatting.
Update Firmware Menu
Update Firmware screenThis updates the firmware of the PDW-U1 or PDW-U2 currently selected.
XDCAM DriveThis displays the serial number of the connected PDW-U1 or PDW-U2. The version information of the firmware of the selected PDW-U1 or PDW-U2 is displayed on the right side.
Version Information
To update the firmware
1 Select the serial number of the PDW-U1 or PDW-U2 for which you want to update the firmware.
The current firmware version of the selected PDW-U1 or PDW-U2 is displayed.Check that the package version is newer than the firmware version. If the package version is older than the firmware version, the [Update] button is disabled.
2 Eject any disc that may be loaded in the selected PDW-U1 or PDW-U2, and then click the [Update] button.
A confirmation message box appears.
3 Click the [OK] button.
The firmware update starts. A progress bar is displayed during the update. When processing finishes, a message indicating the result appears.
4 Be sure to turn the PDW-U1 or PDW-U2 off, and then turn it on again.
• The firmware version cannot be downgraded.• When updating starts, the message “Eject the disc.”
appears if a disc is inserted into the PDW-U1, PDW-U2. Eject the disc before starting the update.
• Do not turn off the PDW-U1 or PDW-U2 or the computer, or disconnect the USB cable during the firmware update.
• After the firmware update finishes, it is necessary to turn the PDW-U1 or PDW-U2 off and then turn it on again.
Item name Display contents
Mount Status Mount status (including disc status) of the selected PDW-U1 or PDW-U2
Write Operations Whether it is possible to write to the selected PDW-U1 or PDW-U2
ReWrite Count Number of times that data has been written to the disc
Note
Item name Display contents
Firmware Version The current version of the firmware of the selected PDW-U1 or PDW-U2
Package Version The version of the package firmware
Notes
9Function Menus
10
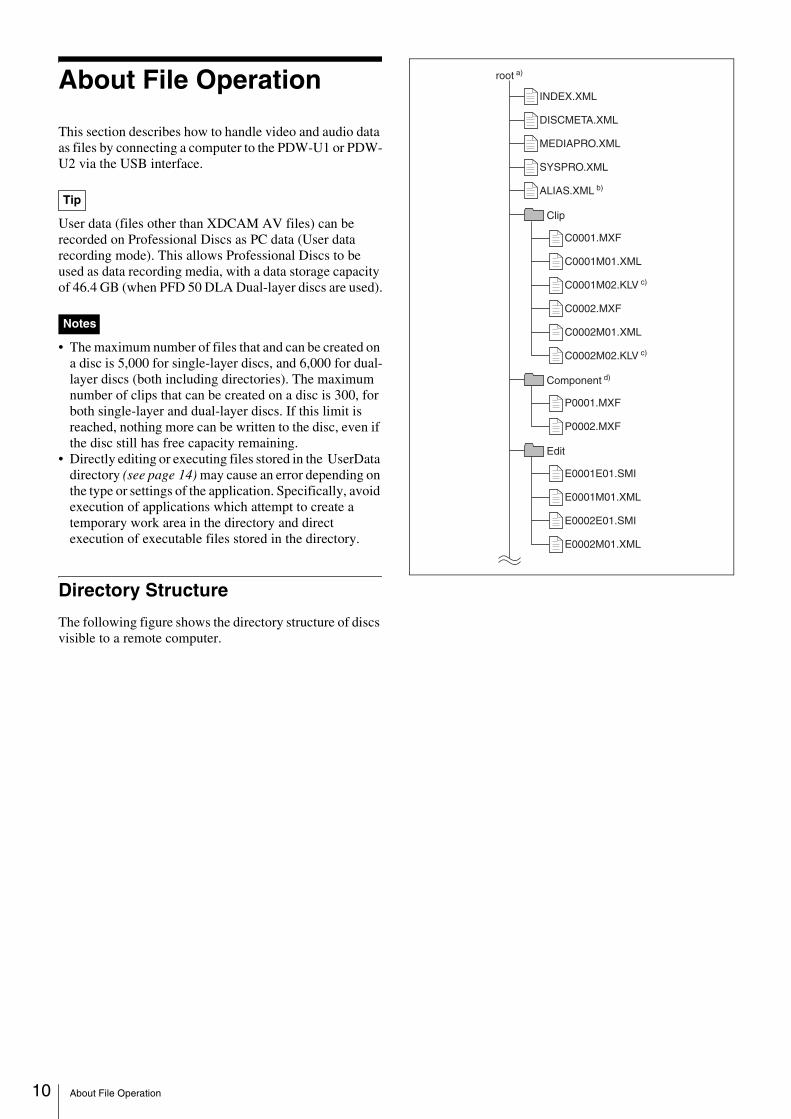
About File Operation
This section describes how to handle video and audio data as files by connecting a computer to the PDW-U1 or PDW-U2 via the USB interface.
User data (files other than XDCAM AV files) can be recorded on Professional Discs as PC data (User data recording mode). This allows Professional Discs to be used as data recording media, with a data storage capacity of 46.4 GB (when PFD 50 DLA Dual-layer discs are used).
• The maximum number of files that and can be created on a disc is 5,000 for single-layer discs, and 6,000 for dual-layer discs (both including directories). The maximum number of clips that can be created on a disc is 300, for both single-layer and dual-layer discs. If this limit is reached, nothing more can be written to the disc, even if the disc still has free capacity remaining.
• Directly editing or executing files stored in the UserData directory (see page 14) may cause an error depending on the type or settings of the application. Specifically, avoid execution of applications which attempt to create a temporary work area in the directory and direct execution of executable files stored in the directory.
Directory Structure
The following figure shows the directory structure of discs visible to a remote computer.
Tip
Notes
About File Operation
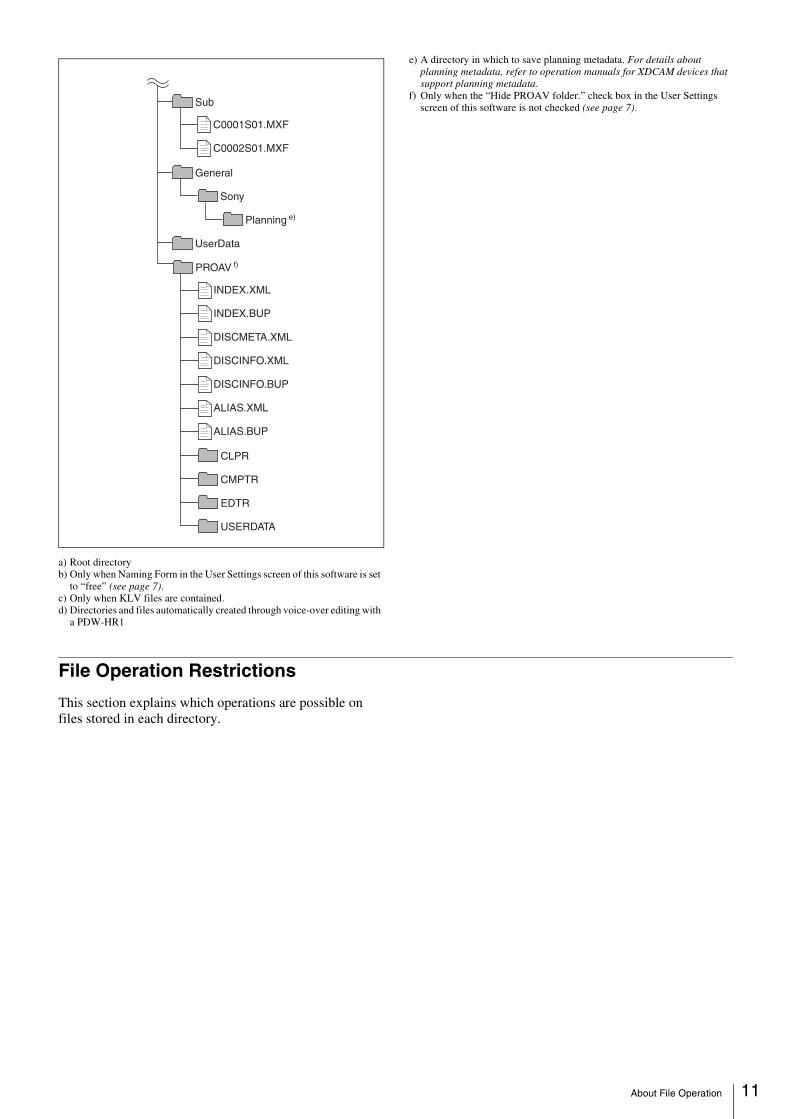
a) Root directoryb) Only when Naming Form in the User Settings screen of this software is set
to “free” (see page 7).c) Only when KLV files are contained.d) Directories and files automatically created through voice-over editing with
a PDW-HR1
e) A directory in which to save planning metadata. For details about planning metadata, refer to operation manuals for XDCAM devices that support planning metadata.
f) Only when the “Hide PROAV folder.” check box in the User Settings screen of this software is not checked (see page 7).
File Operation Restrictions
This section explains which operations are possible on files stored in each directory.
11About File Operation
12
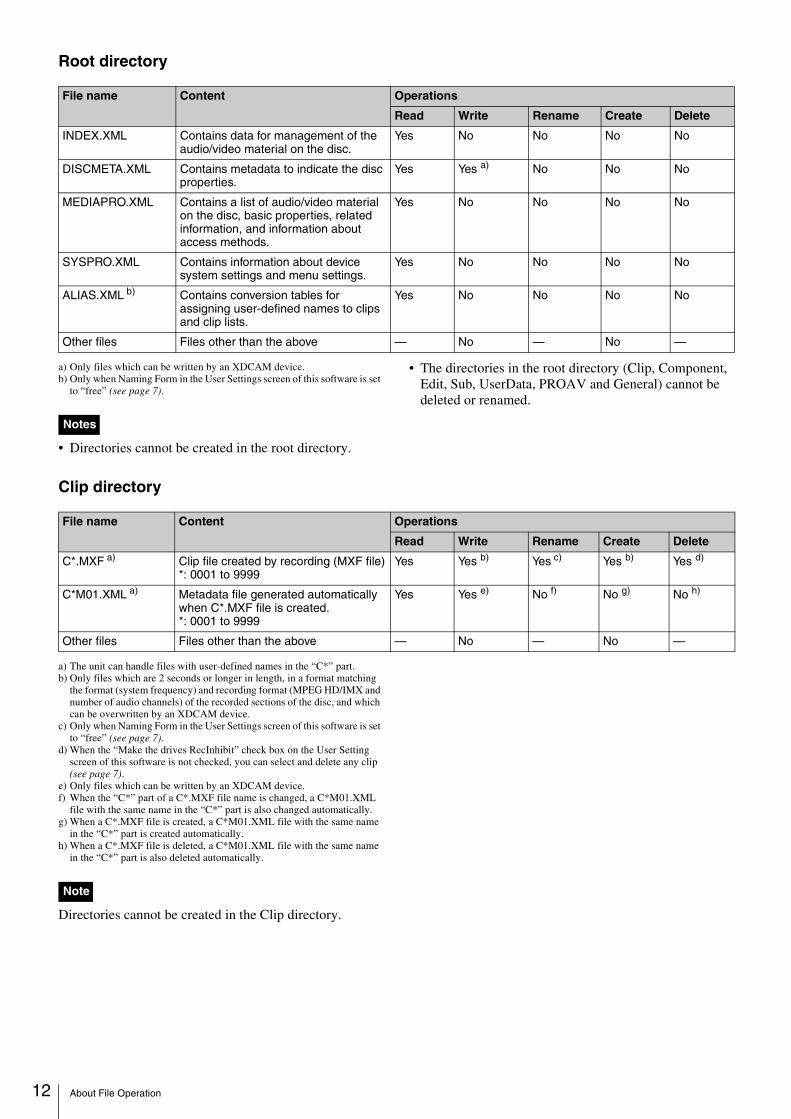
Root directory
a) Only files which can be written by an XDCAM device.b) Only when Naming Form in the User Settings screen of this software is set
to “free” (see page 7).
• Directories cannot be created in the root directory.
• The directories in the root directory (Clip, Component, Edit, Sub, UserData, PROAV and General) cannot be deleted or renamed.
Clip directory
a) The unit can handle files with user-defined names in the “C*” part.b) Only files which are 2 seconds or longer in length, in a format matching
the format (system frequency) and recording format (MPEG HD/IMX and number of audio channels) of the recorded sections of the disc, and which can be overwritten by an XDCAM device.
c) Only when Naming Form in the User Settings screen of this software is set to “free” (see page 7).
d) When the “Make the drives RecInhibit” check box on the User Setting screen of this software is not checked, you can select and delete any clip (see page 7).
e) Only files which can be written by an XDCAM device.f) When the “C*” part of a C*.MXF file name is changed, a C*M01.XML
file with the same name in the “C*” part is also changed automatically.g) When a C*.MXF file is created, a C*M01.XML file with the same name
in the “C*” part is created automatically.h) When a C*.MXF file is deleted, a C*M01.XML file with the same name
in the “C*” part is also deleted automatically.
Directories cannot be created in the Clip directory.
File name Content Operations
Read Write Rename Create Delete
INDEX.XML Contains data for management of the audio/video material on the disc.
Yes No No No No
DISCMETA.XML Contains metadata to indicate the disc properties.
Yes Yes a) No No No
MEDIAPRO.XML Contains a list of audio/video material on the disc, basic properties, related information, and information about access methods.
Yes No No No No
SYSPRO.XML Contains information about device system settings and menu settings.
Yes No No No No
ALIAS.XML b) Contains conversion tables for assigning user-defined names to clips and clip lists.
Yes No No No No
Other files Files other than the above — No — No —
Notes
File name Content Operations
Read Write Rename Create Delete
C*.MXF a) Clip file created by recording (MXF file)*: 0001 to 9999
Yes Yes b) Yes c) Yes b) Yes d)
C*M01.XML a) Metadata file generated automatically when C*.MXF file is created.*: 0001 to 9999
Yes Yes e) No f) No g) No h)
Other files Files other than the above — No — No —
Note
About File Operation
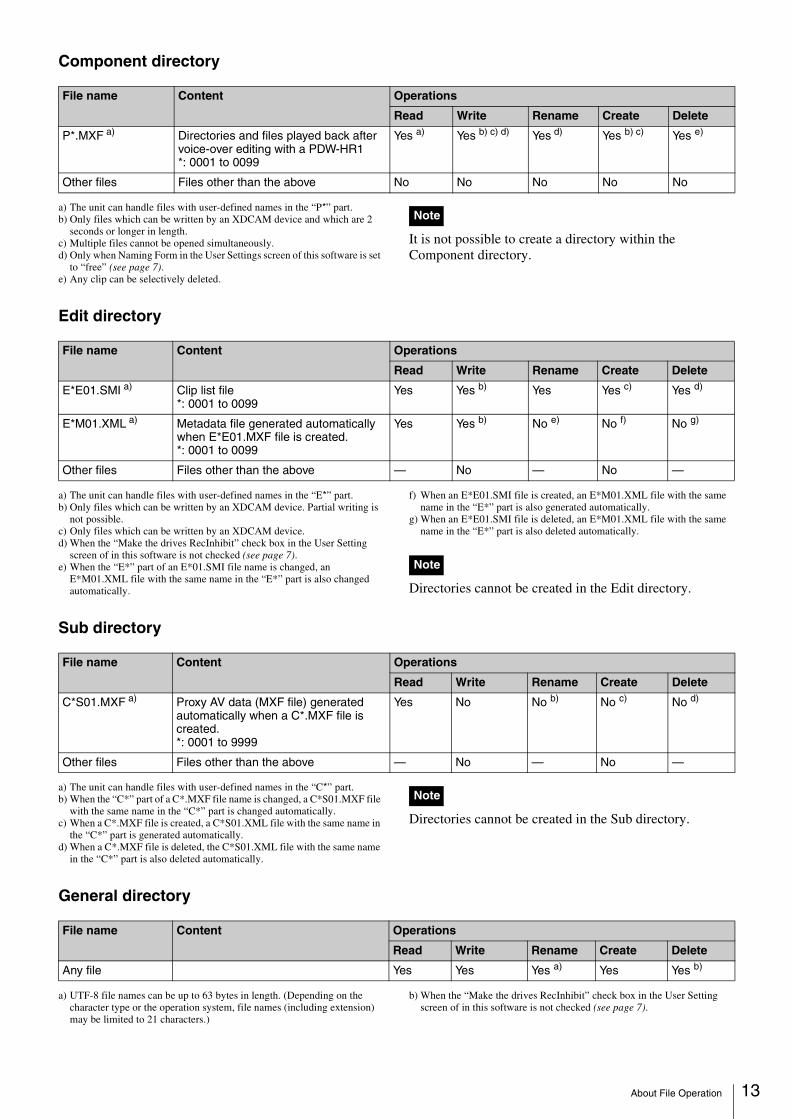
Component directory
a) The unit can handle files with user-defined names in the “P*” part.b) Only files which can be written by an XDCAM device and which are 2
seconds or longer in length.c) Multiple files cannot be opened simultaneously.d) Only when Naming Form in the User Settings screen of this software is set
to “free” (see page 7).e) Any clip can be selectively deleted.
It is not possible to create a directory within the Component directory.
Edit directory
a) The unit can handle files with user-defined names in the “E*” part.b) Only files which can be written by an XDCAM device. Partial writing is
not possible.c) Only files which can be written by an XDCAM device.d) When the “Make the drives RecInhibit” check box in the User Setting
screen of in this software is not checked (see page 7). e) When the “E*” part of an E*01.SMI file name is changed, an
E*M01.XML file with the same name in the “E*” part is also changed automatically.
f) When an E*E01.SMI file is created, an E*M01.XML file with the same name in the “E*” part is also generated automatically.
g) When an E*E01.SMI file is deleted, an E*M01.XML file with the same name in the “E*” part is also deleted automatically.
Directories cannot be created in the Edit directory.
Sub directory
a) The unit can handle files with user-defined names in the “C*” part.b) When the “C*” part of a C*.MXF file name is changed, a C*S01.MXF file
with the same name in the “C*” part is changed automatically.c) When a C*.MXF file is created, a C*S01.XML file with the same name in
the “C*” part is generated automatically.d) When a C*.MXF file is deleted, the C*S01.XML file with the same name
in the “C*” part is also deleted automatically.
Directories cannot be created in the Sub directory.
General directory
a) UTF-8 file names can be up to 63 bytes in length. (Depending on the character type or the operation system, file names (including extension) may be limited to 21 characters.)
b) When the “Make the drives RecInhibit” check box in the User Setting screen of in this software is not checked (see page 7).
File name Content Operations
Read Write Rename Create Delete
P*.MXF a) Directories and files played back after voice-over editing with a PDW-HR1*: 0001 to 0099
Yes a) Yes b) c) d) Yes d) Yes b) c) Yes e)
Other files Files other than the above No No No No No
Note
File name Content Operations
Read Write Rename Create Delete
E*E01.SMI a) Clip list file*: 0001 to 0099
Yes Yes b) Yes Yes c) Yes d)
E*M01.XML a) Metadata file generated automatically when E*E01.MXF file is created.*: 0001 to 0099
Yes Yes b) No e) No f) No g)
Other files Files other than the above — No — No —
Note
File name Content Operations
Read Write Rename Create Delete
C*S01.MXF a) Proxy AV data (MXF file) generated automatically when a C*.MXF file is created.*: 0001 to 9999
Yes No No b) No c) No d)
Other files Files other than the above — No — No —
Note
File name Content Operations
Read Write Rename Create Delete
Any file Yes Yes Yes a) Yes Yes b)
13About File Operation
14
The following directory operations are possible in the General directory.
• Directory creation (up to 63 levels, including the General directory)
• Deletion and renaming of directories
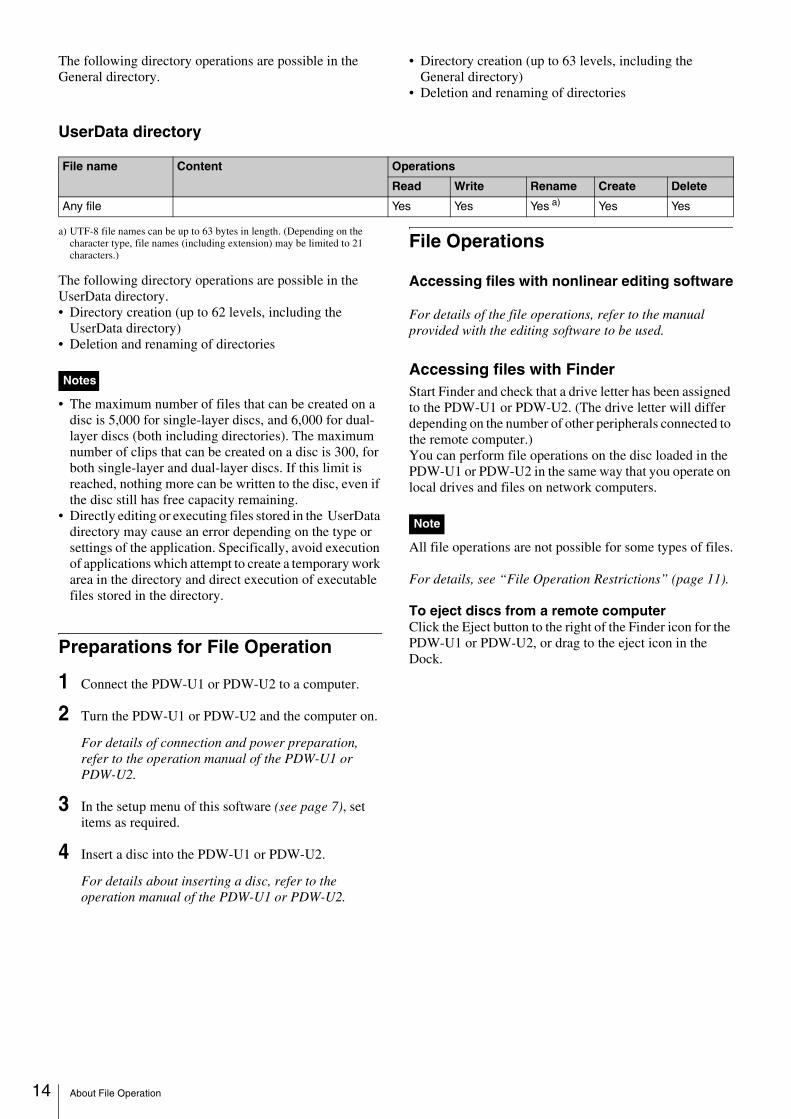
UserData directory
a) UTF-8 file names can be up to 63 bytes in length. (Depending on the character type, file names (including extension) may be limited to 21 characters.)
The following directory operations are possible in the UserData directory.• Directory creation (up to 62 levels, including the
UserData directory)• Deletion and renaming of directories
• The maximum number of files that can be created on a disc is 5,000 for single-layer discs, and 6,000 for dual-layer discs (both including directories). The maximum number of clips that can be created on a disc is 300, for both single-layer and dual-layer discs. If this limit is reached, nothing more can be written to the disc, even if the disc still has free capacity remaining.
• Directly editing or executing files stored in the UserData directory may cause an error depending on the type or settings of the application. Specifically, avoid execution of applications which attempt to create a temporary work area in the directory and direct execution of executable files stored in the directory.
Preparations for File Operation
1 Connect the PDW-U1 or PDW-U2 to a computer.
2 Turn the PDW-U1 or PDW-U2 and the computer on.
For details of connection and power preparation, refer to the operation manual of the PDW-U1 or PDW-U2.
3 In the setup menu of this software (see page 7), set items as required.
4 Insert a disc into the PDW-U1 or PDW-U2.
For details about inserting a disc, refer to the operation manual of the PDW-U1 or PDW-U2.
File Operations
Accessing files with nonlinear editing software
For details of the file operations, refer to the manual provided with the editing software to be used.
Accessing files with FinderStart Finder and check that a drive letter has been assigned to the PDW-U1 or PDW-U2. (The drive letter will differ depending on the number of other peripherals connected to the remote computer.)You can perform file operations on the disc loaded in the PDW-U1 or PDW-U2 in the same way that you operate on local drives and files on network computers.
All file operations are not possible for some types of files.
For details, see “File Operation Restrictions” (page 11).
To eject discs from a remote computerClick the Eject button to the right of the Finder icon for the PDW-U1 or PDW-U2, or drag to the eject icon in the Dock.
File name Content Operations
Read Write Rename Create Delete
Any file Yes Yes Yes a) Yes Yes
Notes
Note
About File Operation
Alarm Lists
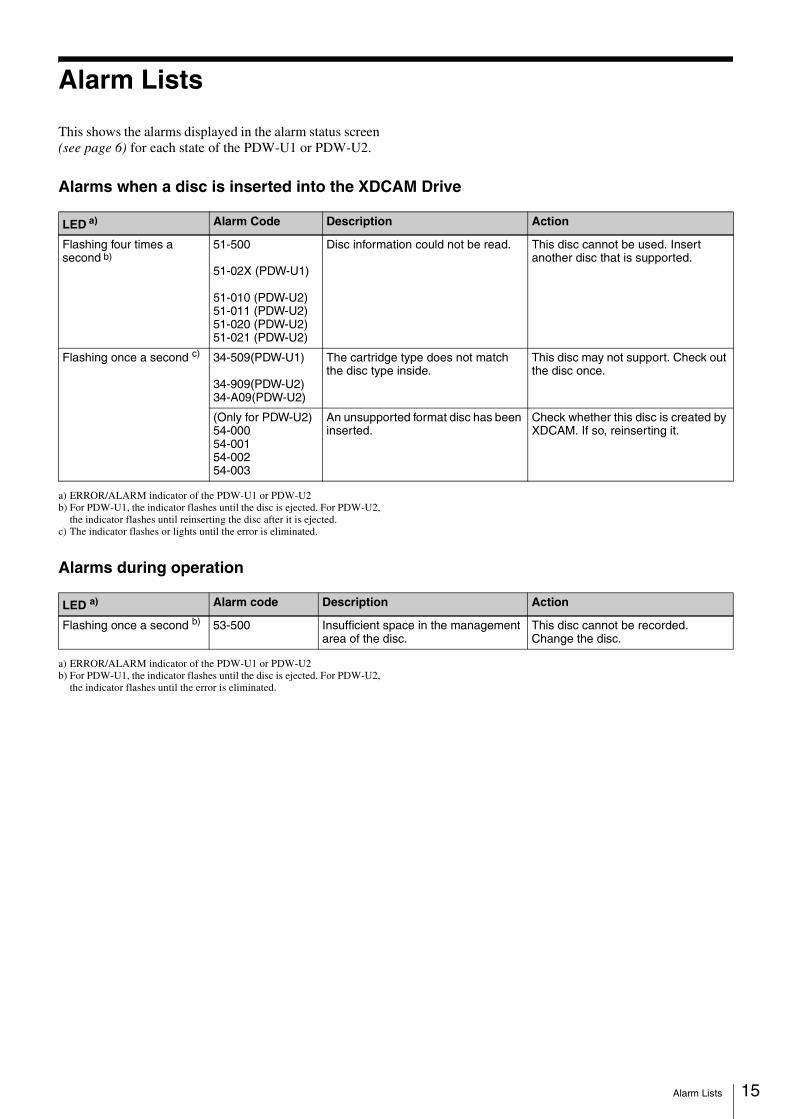
This shows the alarms displayed in the alarm status screen (see page 6) for each state of the PDW-U1 or PDW-U2.
Alarms when a disc is inserted into the XDCAM Drive
a) ERROR/ALARM indicator of the PDW-U1 or PDW-U2b) For PDW-U1, the indicator flashes until the disc is ejected. For PDW-U2,
the indicator flashes until reinserting the disc after it is ejected.c) The indicator flashes or lights until the error is eliminated.
Alarms during operation
a) ERROR/ALARM indicator of the PDW-U1 or PDW-U2b) For PDW-U1, the indicator flashes until the disc is ejected. For PDW-U2,
the indicator flashes until the error is eliminated.
LED a) Alarm Code Description Action
Flashing four times a second b)
51-500
51-02X (PDW-U1)
51-010 (PDW-U2)51-011 (PDW-U2)51-020 (PDW-U2)51-021 (PDW-U2)
Disc information could not be read. This disc cannot be used. Insert another disc that is supported.
Flashing once a second c) 34-509(PDW-U1)
34-909(PDW-U2)34-A09(PDW-U2)
The cartridge type does not match the disc type inside.
This disc may not support. Check out the disc once.
(Only for PDW-U2)54-00054-00154-00254-003
An unsupported format disc has been inserted.
Check whether this disc is created by XDCAM. If so, reinserting it.
LED a) Alarm code Description Action
Flashing once a second b) 53-500 Insufficient space in the management area of the disc.
This disc cannot be recorded. Change the disc.
15Alarm Lists
16
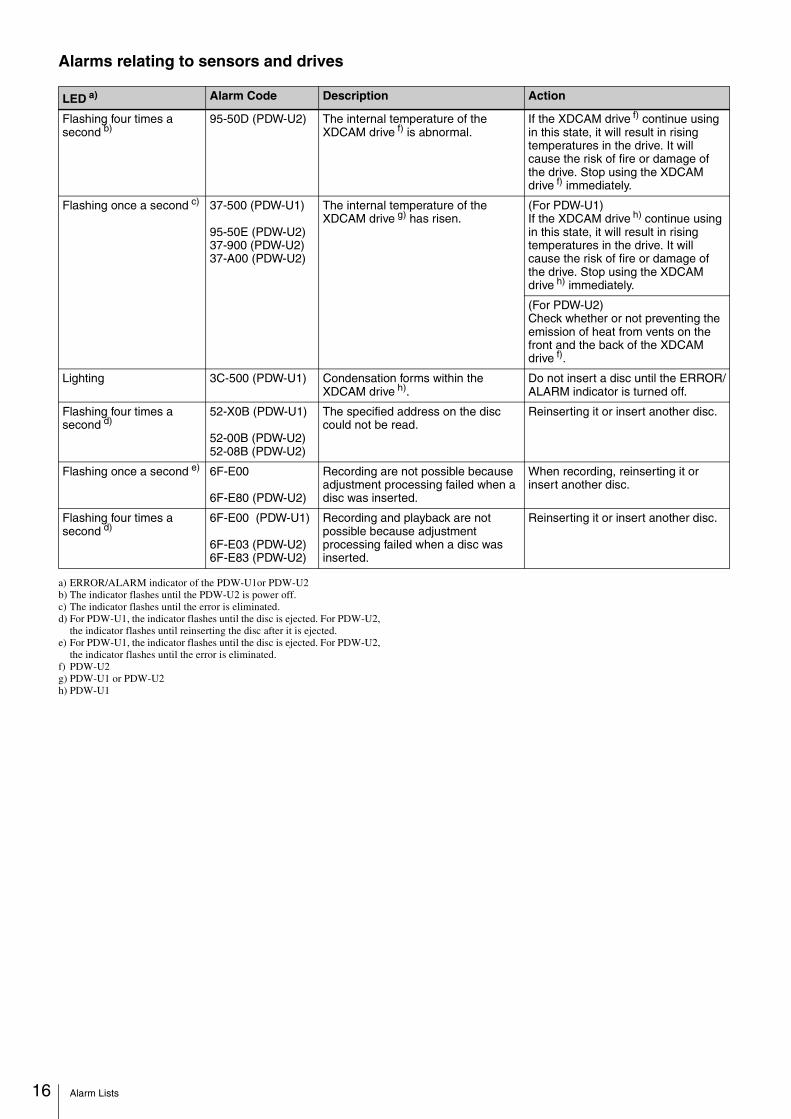
Alarms relating to sensors and drives
a) ERROR/ALARM indicator of the PDW-U1or PDW-U2b) The indicator flashes until the PDW-U2 is power off.c) The indicator flashes until the error is eliminated.d) For PDW-U1, the indicator flashes until the disc is ejected. For PDW-U2,
the indicator flashes until reinserting the disc after it is ejected.e) For PDW-U1, the indicator flashes until the disc is ejected. For PDW-U2,
the indicator flashes until the error is eliminated.f) PDW-U2g) PDW-U1 or PDW-U2h) PDW-U1
LED a) Alarm Code Description Action
Flashing four times a second b)
95-50D (PDW-U2) The internal temperature of the XDCAM drive f) is abnormal.
If the XDCAM drive f) continue using in this state, it will result in rising temperatures in the drive. It will cause the risk of fire or damage of the drive. Stop using the XDCAM drive f) immediately.
Flashing once a second c) 37-500 (PDW-U1)
95-50E (PDW-U2)37-900 (PDW-U2)37-A00 (PDW-U2)
The internal temperature of the XDCAM drive g) has risen.
(For PDW-U1)If the XDCAM drive h) continue using in this state, it will result in rising temperatures in the drive. It will cause the risk of fire or damage of the drive. Stop using the XDCAM drive h) immediately.
(For PDW-U2)Check whether or not preventing the emission of heat from vents on the front and the back of the XDCAM drive f).
Lighting 3C-500 (PDW-U1) Condensation forms within the XDCAM drive h).
Do not insert a disc until the ERROR/ALARM indicator is turned off.
Flashing four times a second d)
52-X0B (PDW-U1)
52-00B (PDW-U2)52-08B (PDW-U2)
The specified address on the disc could not be read.
Reinserting it or insert another disc.
Flashing once a second e) 6F-E00
6F-E80 (PDW-U2)
Recording are not possible because adjustment processing failed when a disc was inserted.
When recording, reinserting it or insert another disc.
Flashing four times a second d)
6F-E00 (PDW-U1)
6F-E03 (PDW-U2)6F-E83 (PDW-U2)
Recording and playback are not possible because adjustment processing failed when a disc was inserted.
Reinserting it or insert another disc.
Alarm Lists
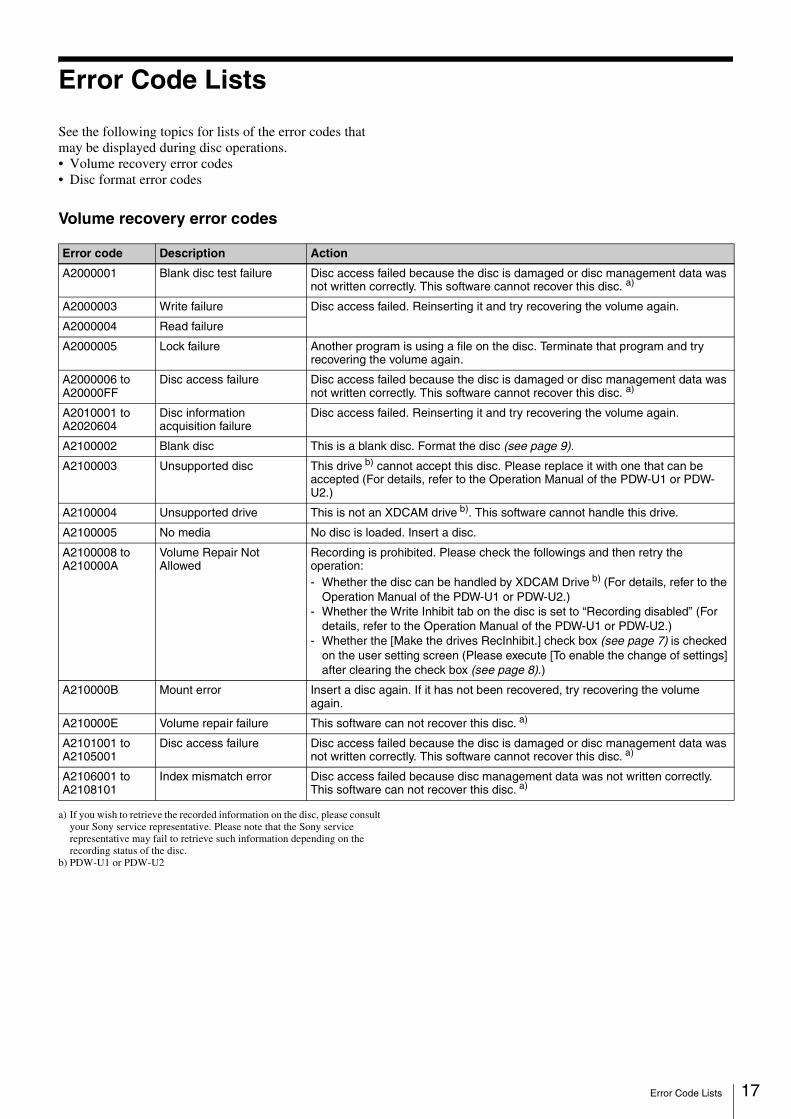
Error Code Lists
See the following topics for lists of the error codes that may be displayed during disc operations.• Volume recovery error codes• Disc format error codes
Volume recovery error codes
a) If you wish to retrieve the recorded information on the disc, please consult your Sony service representative. Please note that the Sony service representative may fail to retrieve such information depending on the recording status of the disc.
b) PDW-U1 or PDW-U2
Error code Description Action
A2000001 Blank disc test failure Disc access failed because the disc is damaged or disc management data was not written correctly. This software cannot recover this disc. a)
A2000003 Write failure Disc access failed. Reinserting it and try recovering the volume again.
A2000004 Read failure
A2000005 Lock failure Another program is using a file on the disc. Terminate that program and try recovering the volume again.
A2000006 to A20000FF
Disc access failure Disc access failed because the disc is damaged or disc management data was not written correctly. This software cannot recover this disc. a)
A2010001 to A2020604
Disc information acquisition failure
Disc access failed. Reinserting it and try recovering the volume again.
A2100002 Blank disc This is a blank disc. Format the disc (see page 9).
A2100003 Unsupported disc This drive b) cannot accept this disc. Please replace it with one that can be accepted (For details, refer to the Operation Manual of the PDW-U1 or PDW-U2.)
A2100004 Unsupported drive This is not an XDCAM drive b). This software cannot handle this drive.
A2100005 No media No disc is loaded. Insert a disc.
A2100008 to A210000A
Volume Repair Not Allowed
Recording is prohibited. Please check the followings and then retry the operation:- Whether the disc can be handled by XDCAM Drive b) (For details, refer to the
Operation Manual of the PDW-U1 or PDW-U2.)- Whether the Write Inhibit tab on the disc is set to “Recording disabled” (For
details, refer to the Operation Manual of the PDW-U1 or PDW-U2.)- Whether the [Make the drives RecInhibit.] check box (see page 7) is checked
on the user setting screen (Please execute [To enable the change of settings] after clearing the check box (see page 8).)
A210000B Mount error Insert a disc again. If it has not been recovered, try recovering the volume again.
A210000E Volume repair failure This software can not recover this disc. a)
A2101001 to A2105001
Disc access failure Disc access failed because the disc is damaged or disc management data was not written correctly. This software cannot recover this disc. a)
A2106001 to A2108101
Index mismatch error Disc access failed because disc management data was not written correctly. This software can not recover this disc. a)
17Error Code Lists
18
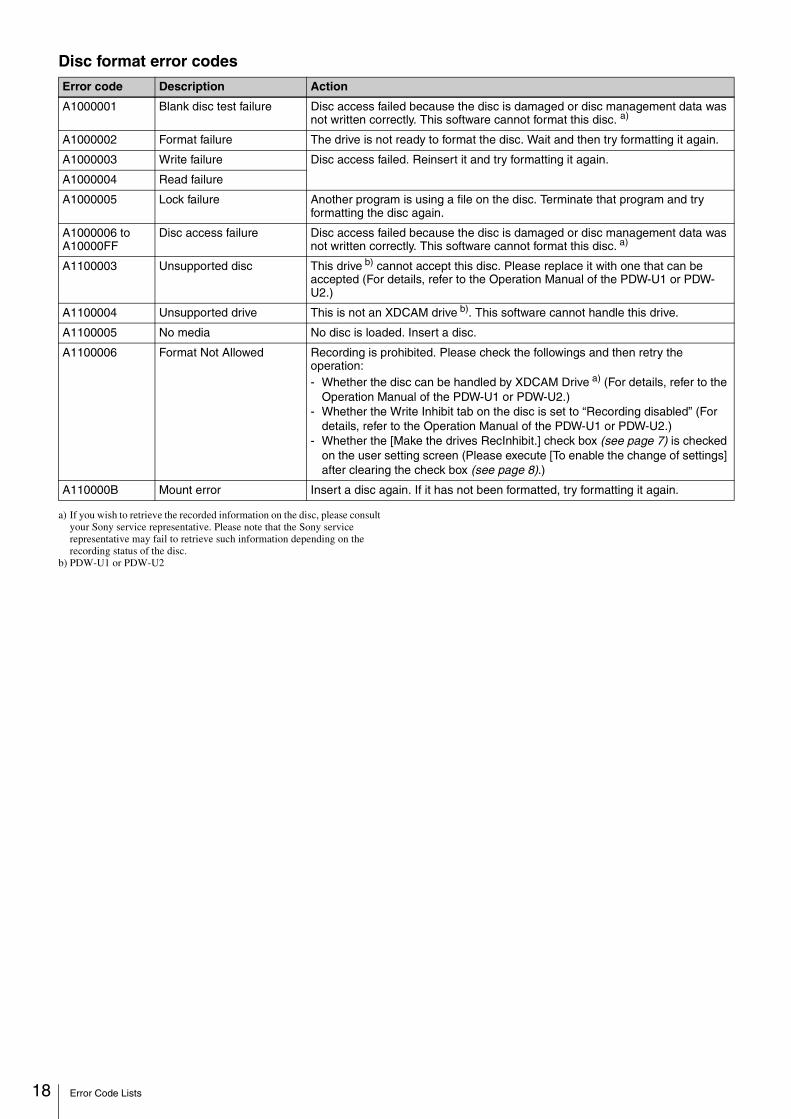
Disc format error codes
a) If you wish to retrieve the recorded information on the disc, please consult your Sony service representative. Please note that the Sony service representative may fail to retrieve such information depending on the recording status of the disc.
b) PDW-U1 or PDW-U2
Error code Description Action
A1000001 Blank disc test failure Disc access failed because the disc is damaged or disc management data was not written correctly. This software cannot format this disc. a)
A1000002 Format failure The drive is not ready to format the disc. Wait and then try formatting it again.
A1000003 Write failure Disc access failed. Reinsert it and try formatting it again.
A1000004 Read failure
A1000005 Lock failure Another program is using a file on the disc. Terminate that program and try formatting the disc again.
A1000006 to A10000FF
Disc access failure Disc access failed because the disc is damaged or disc management data was not written correctly. This software cannot format this disc. a)
A1100003 Unsupported disc This drive b) cannot accept this disc. Please replace it with one that can be accepted (For details, refer to the Operation Manual of the PDW-U1 or PDW-U2.)
A1100004 Unsupported drive This is not an XDCAM drive b). This software cannot handle this drive.
A1100005 No media No disc is loaded. Insert a disc.
A1100006 Format Not Allowed Recording is prohibited. Please check the followings and then retry the operation:- Whether the disc can be handled by XDCAM Drive a) (For details, refer to the
Operation Manual of the PDW-U1 or PDW-U2.)- Whether the Write Inhibit tab on the disc is set to “Recording disabled” (For
details, refer to the Operation Manual of the PDW-U1 or PDW-U2.)- Whether the [Make the drives RecInhibit.] check box (see page 7) is checked
on the user setting screen (Please execute [To enable the change of settings] after clearing the check box (see page 8).)
A110000B Mount error Insert a disc again. If it has not been formatted, try formatting it again.
Error Code Lists

About Trademarks
• XDCAM, MPEG HD, MPEG IMX, DVCAM, and Professional Disc logo are trademarks of Sony Corporation.
• Intel and Intel Core are registered trademarks of Intel Corporation or its subsidiaries in the United States and other countries.
• Microsoft and Windows are registered trademarks of Microsoft Corporation in the United States and/or other countries.
• Mac OS is a trademark of Apple, Inc., registered in the United States and other countries.
• PowerPC is a trademark of International Business Machines Corporation, used under license therefrom.
19About Trademarks

Sony CorporationXDCAM Drive Utility Software (SYL)3-281-457-11 (1) © 2007
Related Documents