Written Directions for EV3 Line Follow (Heaviside Algorithm) Description: Given a black line and the light sensor on the EV3 robot, we want to have the light sensor read values from the reflected light. When the values read dark, we will direct the robot to turn right. When the light values read light, we direct the robot to turn left. A graph representing this action would look like: These directions are written for a two motor robot with Left wheel assigned to C and Right wheel assigned to B. The light sensor should be mounted in front, pointing down and centered between the wheels. The robotsquare.com website has plans for the Educator Robot at http://robotsquare.com/wp- content/uploads/2013/10/45544_educator.pdf . This design would work with these directions. Light > threshold: Turn Left Light < threshold: Turn Right

Welcome message from author
This document is posted to help you gain knowledge. Please leave a comment to let me know what you think about it! Share it to your friends and learn new things together.
Transcript
Written Directions for EV3 Line Follow (Heaviside Algorithm) Description: Given a black line and the light sensor on the EV3 robot, we want to have the light sensor read values from the reflected light. When the values read dark, we will direct the robot to turn right. When the light values read light, we direct the robot to turn left. A graph representing this action would look like:
These directions are written for a two motor robot with Left wheel assigned to C and Right wheel assigned to B. The light sensor should be mounted in front, pointing down and centered between the wheels. The robotsquare.com website has plans for the Educator Robot at http://robotsquare.com/wp-content/uploads/2013/10/45544_educator.pdf. This design would work with these directions.
Light > threshold: Turn Left
Light < threshold: Turn Right

Procedure: The Pseudo Code for the program is as follows: threshold = 40; while (true) { if (SensorValue[light] < threshold) { motor[left] = 30; motor[right] = 0; } else { motor[left] = 0; motor[right] = 30; } }
1. Start the EV3 software. (Double click the EV3 icon) 2. Select “File-New Project”
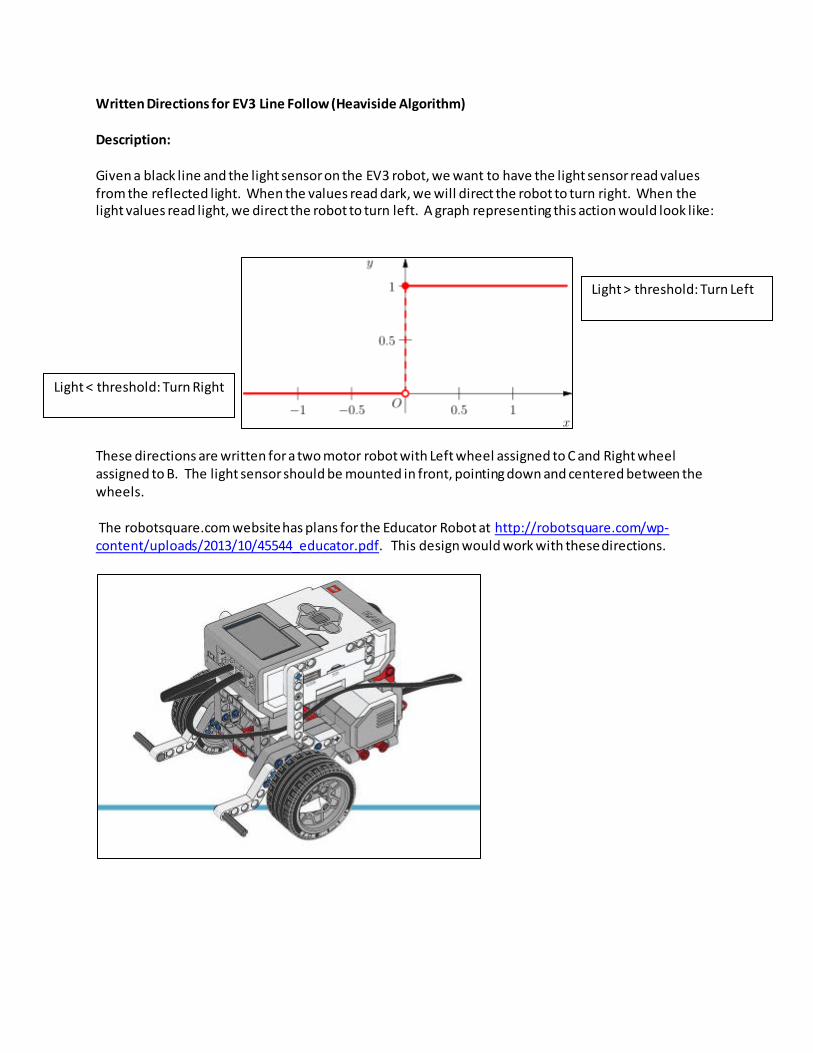
3. Save the Project as “Line Follow Tutorial”
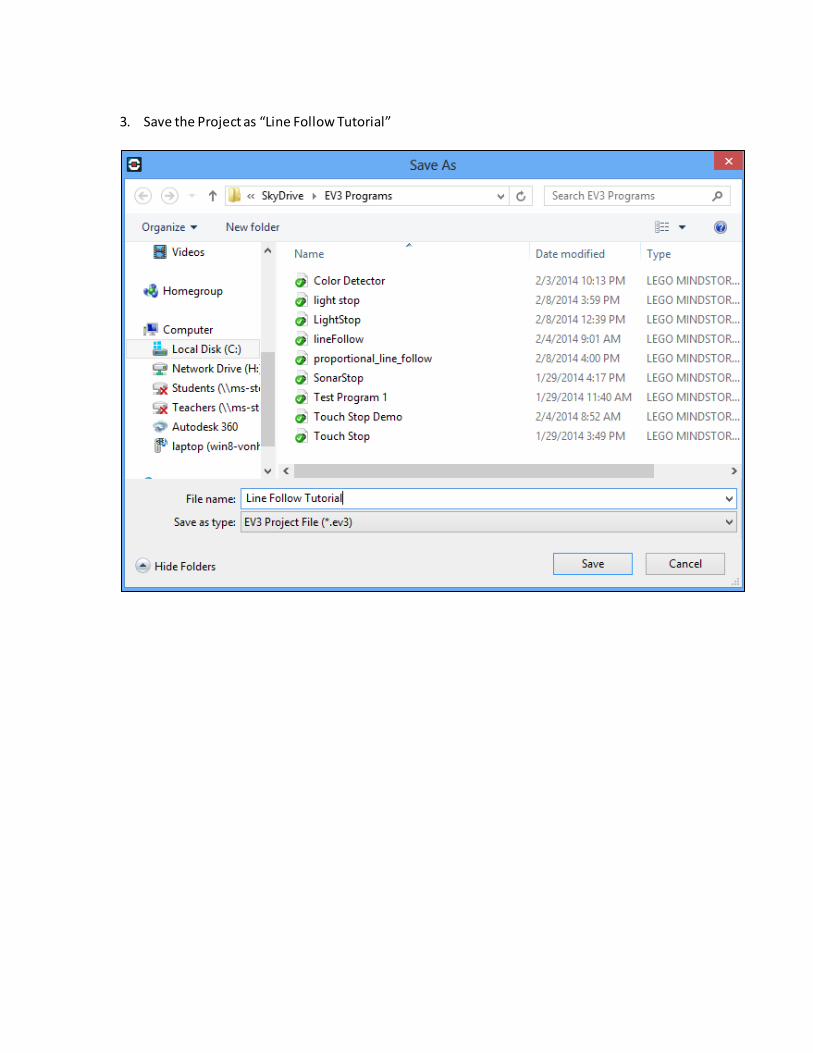
4. Note the “Program” Tab – this is where we will write the “main method” of our program. (EV3
Projects can have multiple ‘tabs’ or program files.)

5. We need a ‘while (true)’ statement. This is a loop that will continue forever (at least while the
program and robot is on). Click on the Orange block tab and drag a loop block into the program area. Note the infinity icon in the block. This is the loop condition (infinity being forever). Any icon in a block can be clicked and changed to set the properties of the block. (Like count, sensor, logic . . . for loop condition).
Orange Block Tab (Flow)
Drag and connect loop block to Play bock.
Play Block
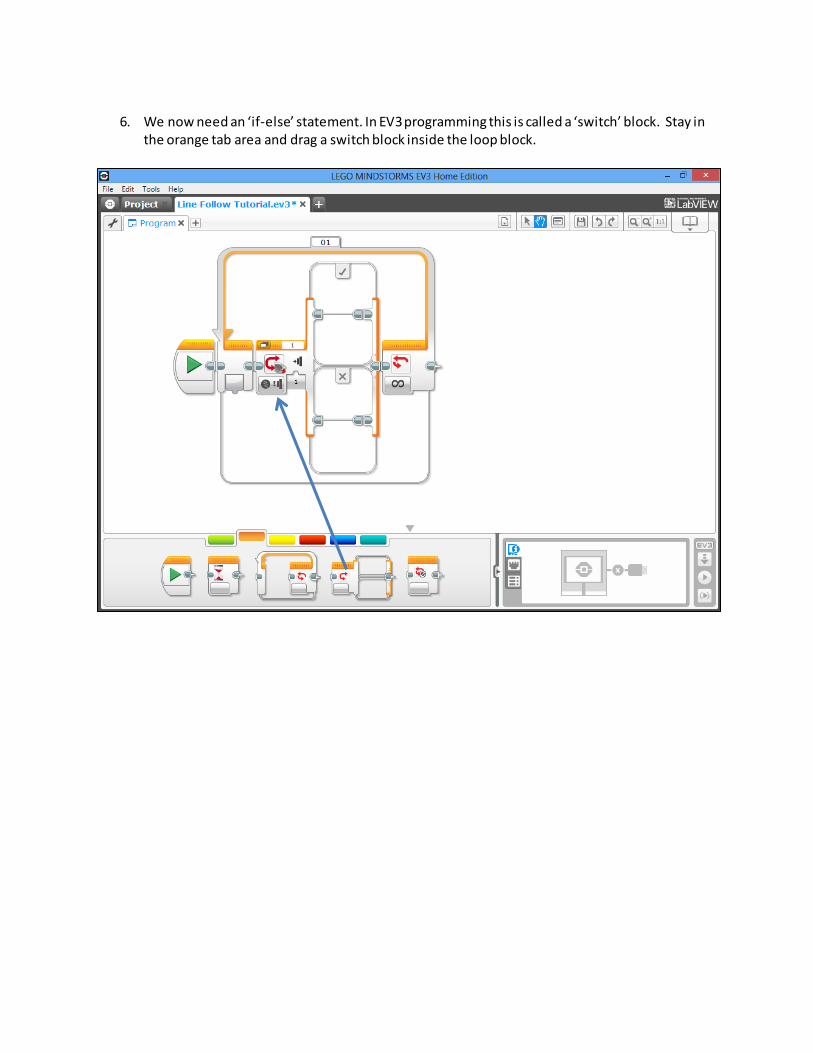
6. We now need an ‘if-else’ statement. In EV3 programming this is called a ‘switch’ block. Stay in
the orange tab area and drag a switch block inside the loop block.
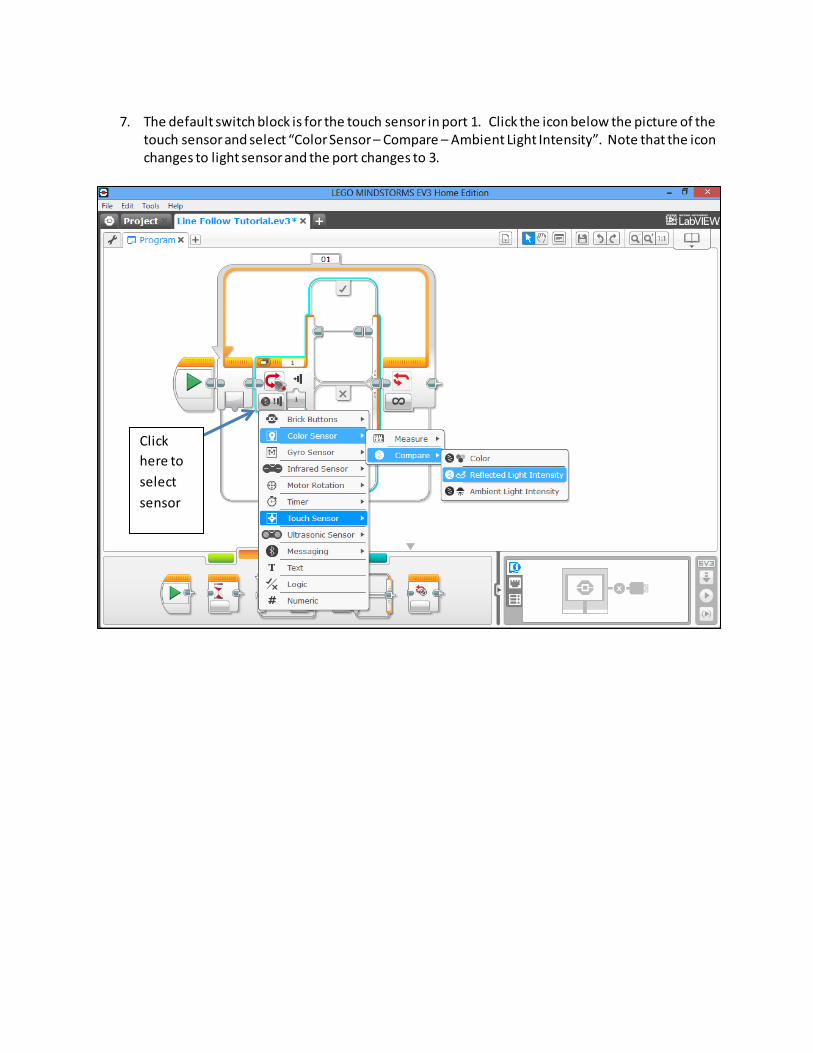
7. The default switch block is for the touch sensor in port 1. Click the icon below the picture of the
touch sensor and select “Color Sensor – Compare – Ambient Light Intensity”. Note that the icon changes to light sensor and the port changes to 3.
Click here to select sensor

8. We need to set the threshold value for the light sensor switch block. Note the icons for the less
than sign and the sensor value on the block: We can change the ‘<’ sign or the threshold value by changing these parameters. For now, leave the block at ‘<’ and change the sensor value to ‘40’.
Change to:

9. Recall the code we outlined in the beginning. We need to turn the left motor on and the right
motor off when the light is less than 40. Click on the green Action block tab and drag two regular motor blocks to the top of the switch block. Note the checkmark – this indicates the actions the block will take when the condition is met (light is less than 40).
10. Note that both these blocks are set to “D” port and the stopping condition is “Rotations” (Indicated by the icons). Go to the first block and set the parameters to:
a. Port C (Left Motor)
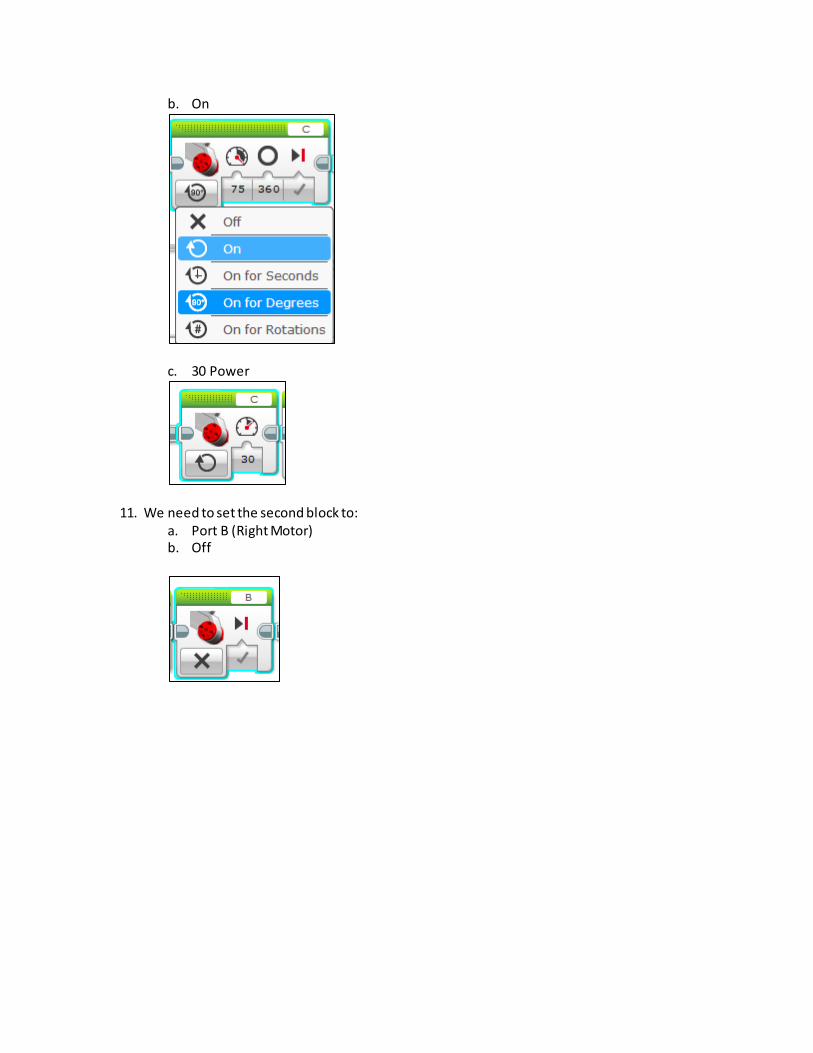
b. On
c. 30 Power
11. We need to set the second block to: a. Port B (Right Motor) b. Off
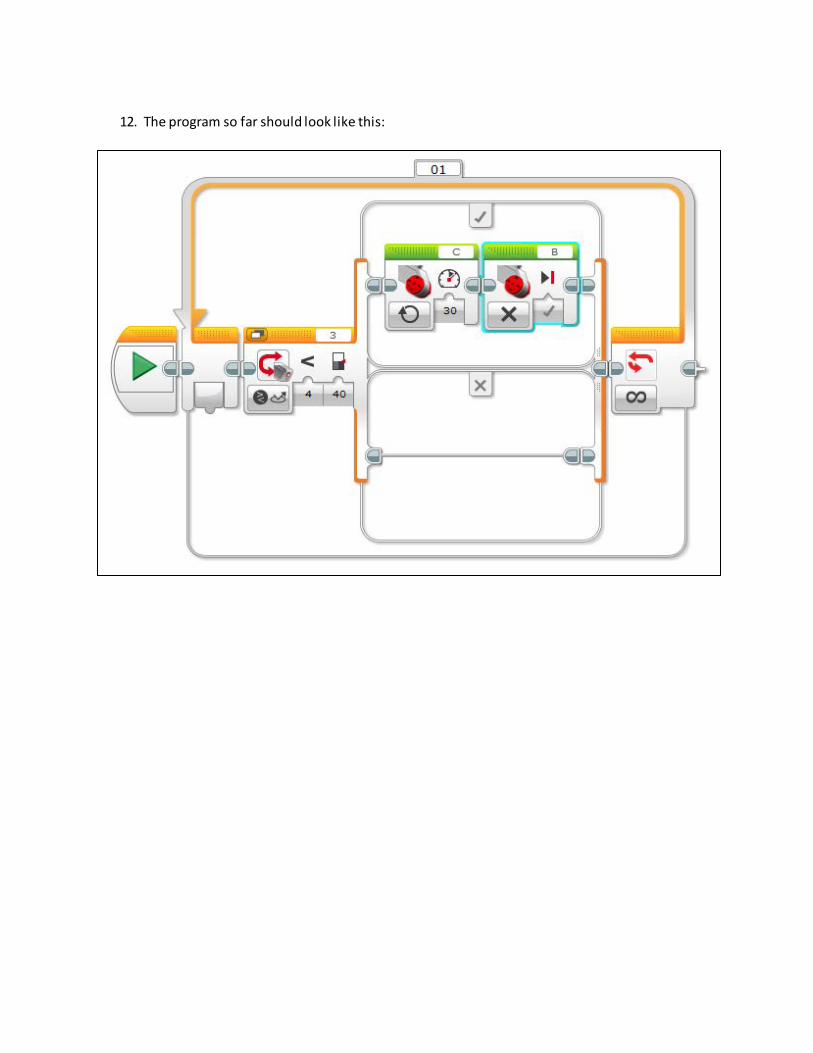
12. The program so far should look like this:

13. We will now do the blocks for the ‘else’ part of the block (indicated by the ‘x’). Drag two motor
blocks into the ‘else’ section.
14. Change the parameters on the blocks to: a. Port C (Left Motor)
i. Off b. Port B(Right Motor)
i. On ii. 30 Power
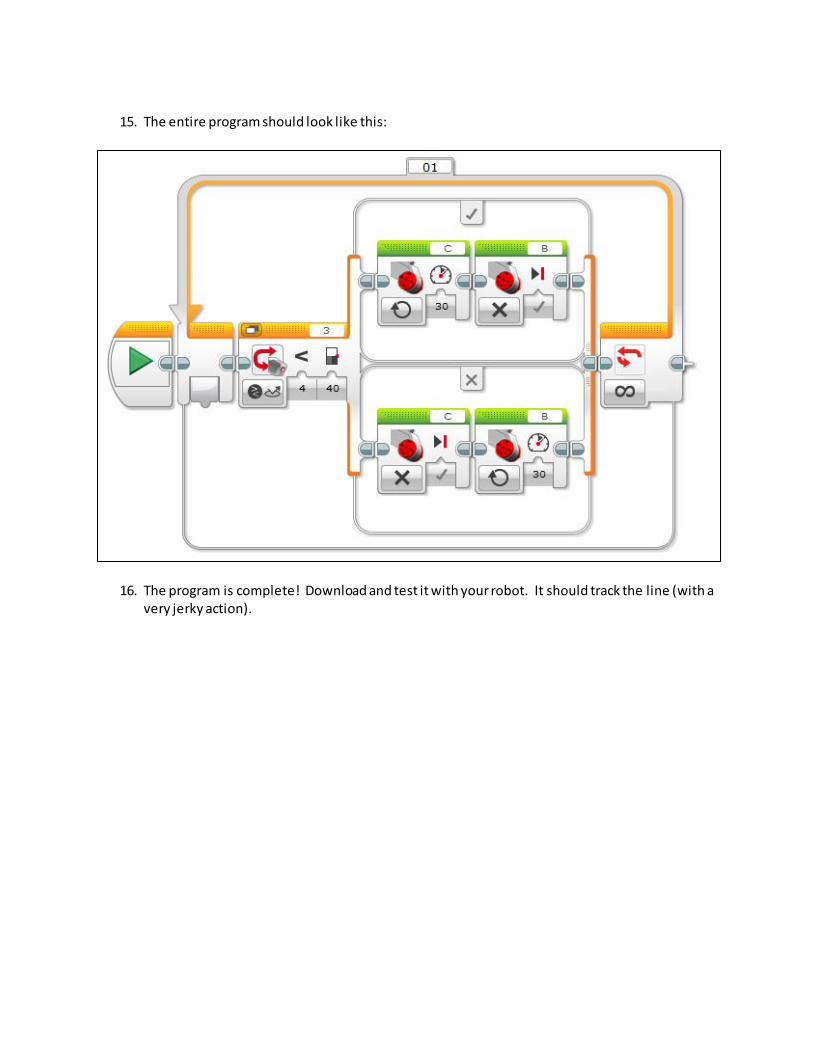
15. The entire program should look like this:
16. The program is complete! Download and test it with your robot. It should track the line (with a very jerky action).
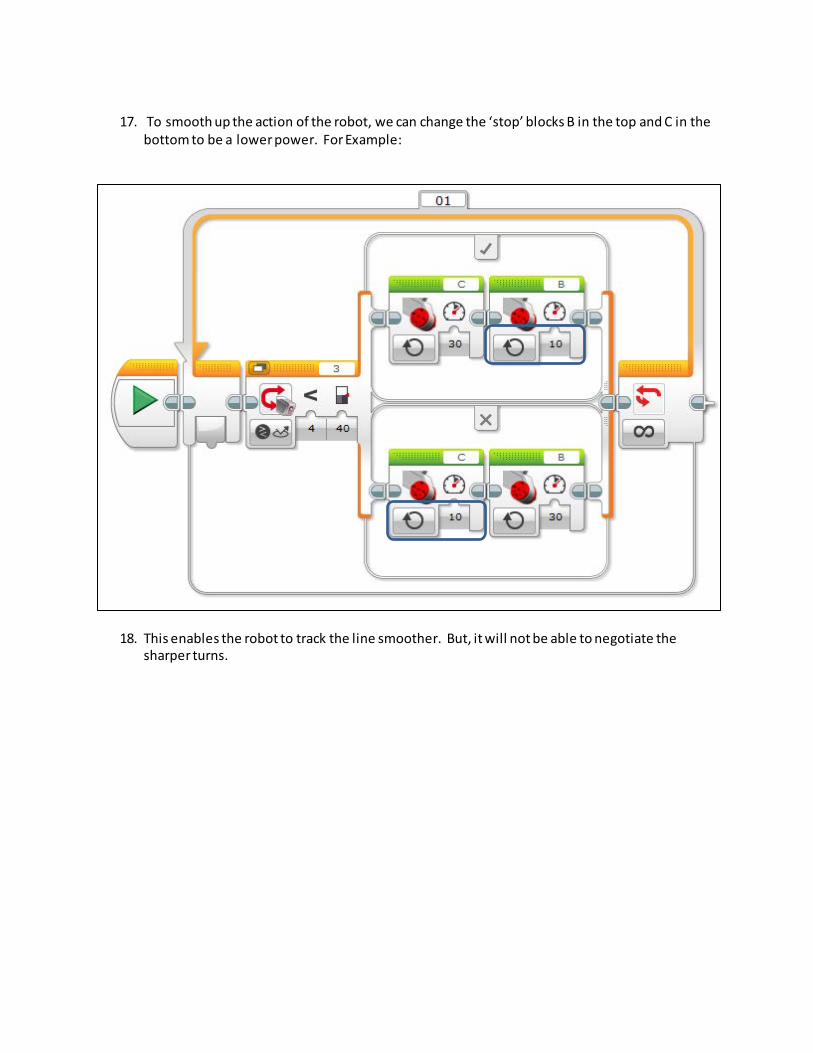
17. To smooth up the action of the robot, we can change the ‘stop’ blocks B in the top and C in the
bottom to be a lower power. For Example:
18. This enables the robot to track the line smoother. But, it will not be able to negotiate the sharper turns.
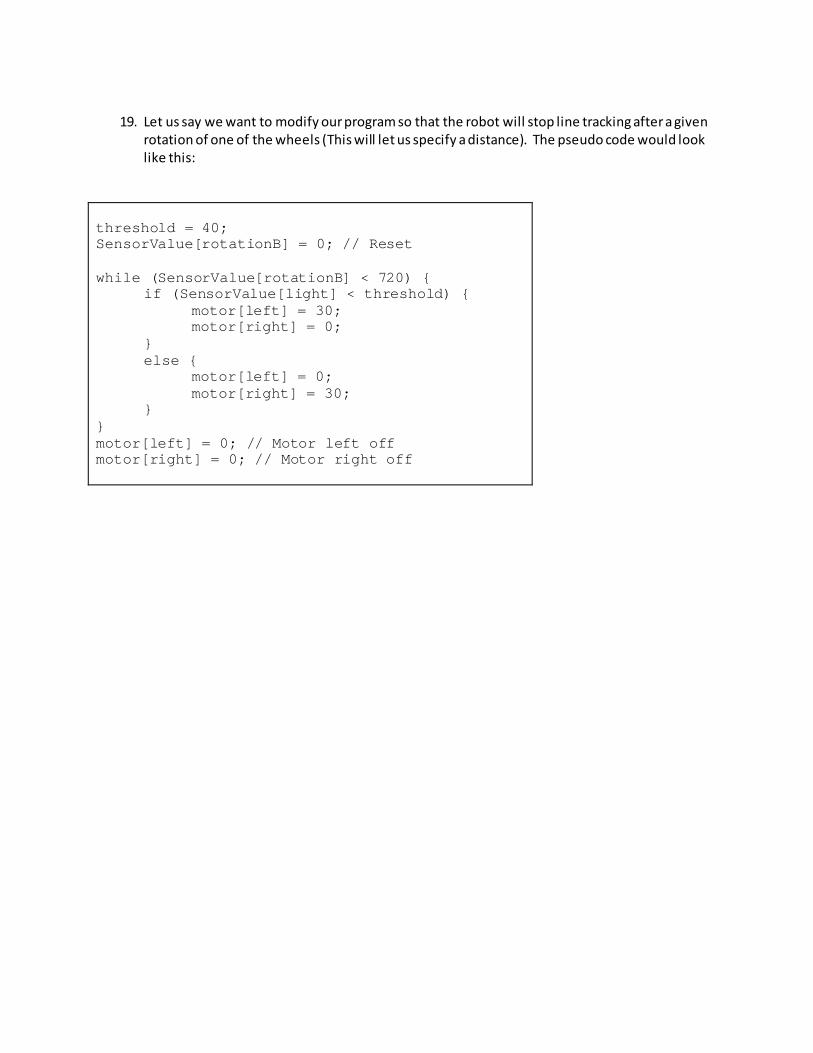
19. Let us say we want to modify our program so that the robot will stop line tracking after a given
rotation of one of the wheels (This will let us specify a distance). The pseudo code would look like this:
threshold = 40; SensorValue[rotationB] = 0; // Reset while (SensorValue[rotationB] < 720) { if (SensorValue[light] < threshold) { motor[left] = 30; motor[right] = 0; } else { motor[left] = 0; motor[right] = 30; } } motor[left] = 0; // Motor left off motor[right] = 0; // Motor right off

20. First, click on the Yellow Tab for Sensor Value blocks and drag a motor rotation sensor in front of
the loop:
21. Set the Port to C.
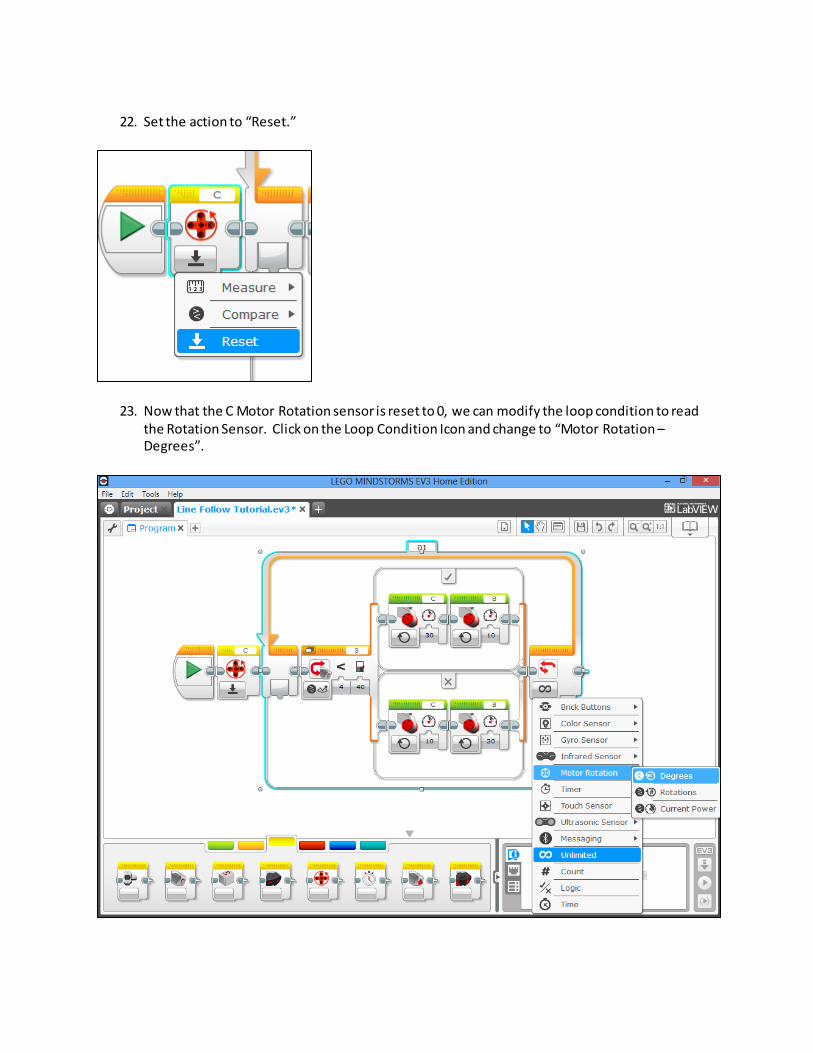
22. Set the action to “Reset.”
23. Now that the C Motor Rotation sensor is reset to 0, we can modify the loop condition to read the Rotation Sensor. Click on the Loop Condition Icon and change to “Motor Rotation – Degrees”.

24. Loops in EV3 are “Loop Until” in structure. So to set the loop to continue while the rotation sensor is less than 720 degrees, we need to say “rotate until Rotation C is > 720 degrees.”
a. Change the Port to C
b. Keep the ‘>’ and change the degrees to 720.
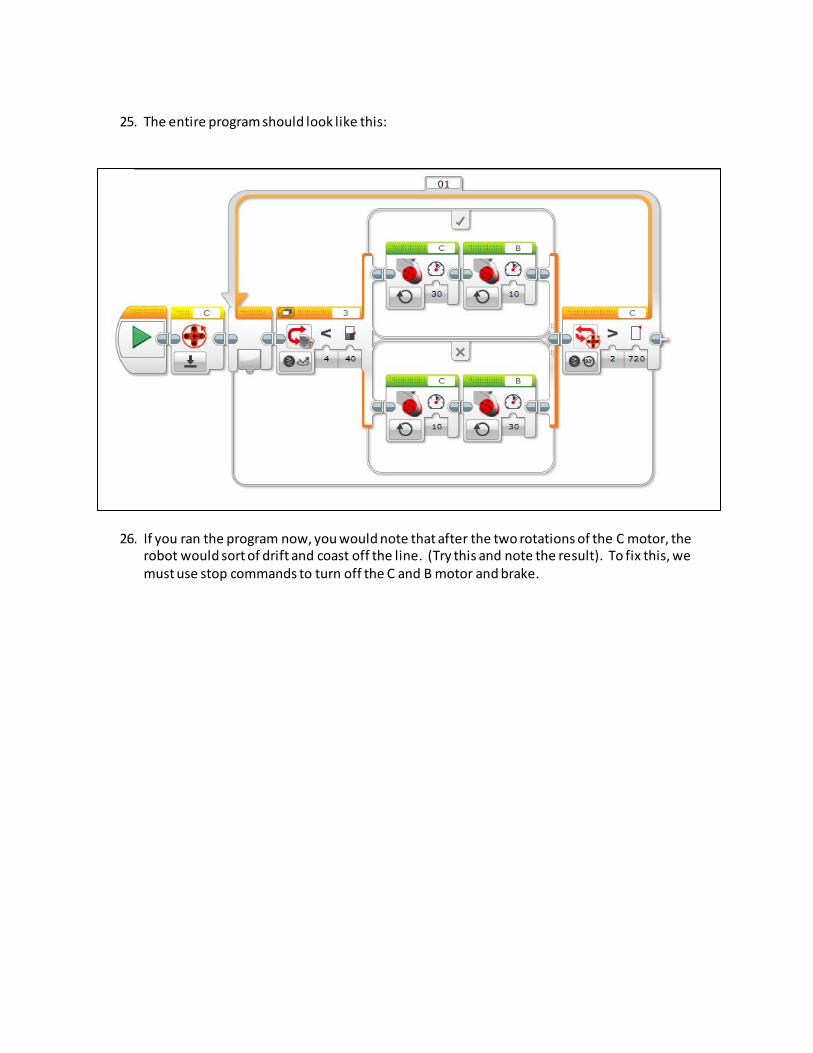
25. The entire program should look like this:
26. If you ran the program now, you would note that after the two rotations of the C motor, the robot would sort of drift and coast off the line. (Try this and note the result). To fix this, we must use stop commands to turn off the C and B motor and brake.

27. Go back to the Green Action Tab and Drag a Move Tank Motor Block (allows for controlling two
motors in one block) after the loop. Set the Motors to B+C and the action to “Off”
28. Save and run the program. You will note that the robot should stop quickly after the two rotations. You can set a Loop exit condition for any sensor or logic.
29. Let us say that we want to re-use the light sensor if-else statement for line following. We can create a function or ‘My Block’ that we can re-use in other programs or later in this program. To make a My-Block:
a. Click on the Switch Block to select. b. Click on Tools -> My Block Builder
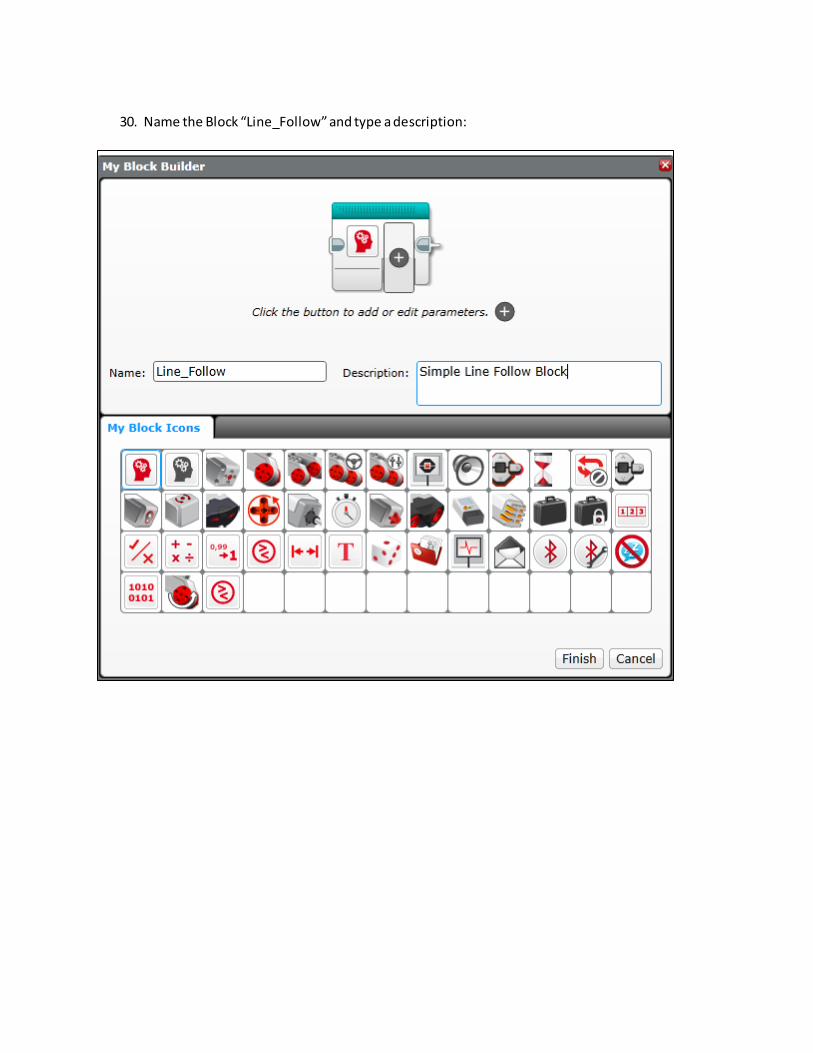
30. Name the Block “Line_Follow” and type a description:

31. You can select an Icon for you MyBlock. Then click Finish. Note that the MyBlock now replaces
the Switch Block:
32. You can access your Line Follow block in the MyBlock Tab:
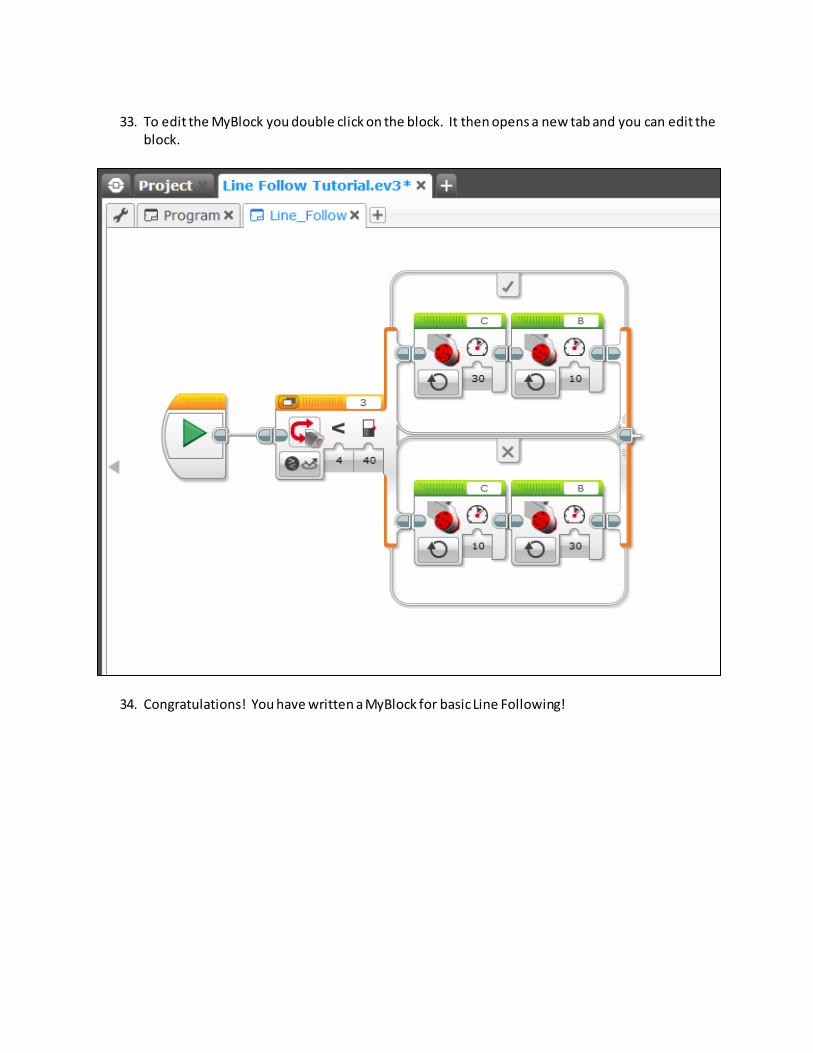
33. To edit the MyBlock you double click on the block. It then opens a new tab and you can edit the
block.
34. Congratulations! You have written a MyBlock for basic Line Following!
Related Documents