Working on tasks in Project Web App: A guide for team members My Project Web App administrator is: My Project Web App address is:

Welcome message from author
This document is posted to help you gain knowledge. Please leave a comment to let me know what you think about it! Share it to your friends and learn new things together.
Transcript

Working on tasks in
Project Web App:
A guide for team members
My Project Web App administrator is:
My Project Web App address is:
2 Working on tasks in Project Web App
Copyright
This document is provided “as-is”. Information and views expressed in this document,
including URL and other Internet Web site references, may change without notice.
This document does not provide you with any legal rights to any intellectual property
in any Microsoft product. You may copy and use this document for your internal,
reference purposes.
© 2014 Microsoft Corporation. All rights reserved.
Microsoft, Active Directory, Excel, Internet Explorer, Outlook, SharePoint, SQL Server,
and Windows are trademarks of the Microsoft group of companies. All other
trademarks are property of their respective owners.

Table of Contents 3
Table of Contents
Table of Contents 3
Introduction 7
Hold on, what’s Project Web App?................................................... 7
Is this guide for Project Online or Project Server?.......................8
I need help! ..............................................................................................8
1 10
Get your bearings 10
Quick Launch..........................................................................................11
Ribbon ......................................................................................................11
Main display area ................................................................................. 12
Just want to see a list of projects?................................................... 12
2 14
Turning in timesheets 14
Why are timesheets important? ...................................................... 14
Okay, I’m convinced. Now how does it work? ............................ 15
Let’s fill out your timesheet!.............................................................. 16 Ready to enter your hours?..................................................................................................17 Don’t see the task you worked on? ....................................................................................17 What about hours that aren’t part of a project? ............................................................ 18 How do I get a task off of my timesheet?........................................................................ 19 Need to enter hours for a different timesheet period? ................................................ 19

4 Working on tasks in Project Web App
And…SUBMIT! ...................................................................................... 20
Peek at what’s going on behind the scenes ............................... 22
3 24
More than just hours: Updating task progress 24
Time vs. task progress: What’s the difference? .......................... 24 Let’s look at an example… ................................................................................................... 25 Okay, but remind me, why are we doing this?............................................................... 26
Where do I enter my task progress? ............................................. 27 How do I know which way my organization is set up?................................................. 28
My organization is using separate views ..................................... 28 Report the percent of work you’ve completed .............................................................. 28 Update how much work you have left to do .................................................................. 32
My organization is using one view ................................................ 34 Report the percent of work you’ve completed .............................................................. 34 Update how much work you have left to do .................................................................. 37
Add comments about your work ................................................... 40 In the Tasks view…................................................................................................................. 40 In the Timesheet view….........................................................................................................41
Capture issues and risks .................................................................... 43 Add an issue ........................................................................................................................... 43 Add a risk ................................................................................................................................ 45
I need to look at a project document…where is it? .................. 48
Hand off work to someone else ..................................................... 50
4 53
Vacation, sick leave, and other non-project hours 53
Ahead of time....................................................................................... 53 Let your project manager know ........................................................................................ 54 Assign someone to enter your time and task progress ............................................... 54

Table of Contents 5
While you’re out .................................................................................. 55
After you’re back ................................................................................. 56
5 57
Uh oh, I didn’t mean to submit that! 57
Take back a timesheet that you sent for approval .................... 57
Delete a timesheet and start over ................................................. 59
6 60
Rejected! Now what? 60
How do I know if my updates were rejected?............................ 60
Why were my updates rejected? ..................................................... 61
What do I do now? .............................................................................. 61 Okay, but how? ......................................................................................................................62 When in doubt, add comments… ......................................................................................62
Appendix 63
In Project Web App, how do I…...................................................... 64


Introduction 7
Introduction
If you have been assigned a task in a project, this guide can help you learn how to
stay plugged into the project and keep your project manager up to date on how
your task is progressing, using Project Web App.
Send us your feedback ([email protected]). Please let us know what you
think about the quality of this content. If this guide does not meet your needs, let us
know how we can improve it. If this guide was helpful to you, let us know how it
helped. We love feedback!
Hold on, what’s Project Web App?
Project Web App is a project management application that you access in a web
browser. It is connected to a database, behind the scenes, that stores information
about the projects going on in your organization, including:
The tasks that are part of each project.
All of the people who are available to work on those tasks.
The materials needed to complete tasks for each project.
The costs associated with the people, materials, projects, and tasks in
your organization.

8 Working on tasks in Project Web App
Is this guide for Project Online or Project Server?
Project Web App is a part of Project Server 2013 (on premises), or Project Online (in
the cloud). From a team member perspective, it really doesn’t matter whether you’re
using Project Web App as part of Project Server 2013 or Project Online. The
functionality is mostly identical, and the steps in this guide apply regardless of which
option your organization has chosen.
For more information about Project Online and Project Server 2013, go to:
http://office.com/project
I need help!
If this guide doesn’t answer your questions, you can try a few different things:
Ask your peers! The people you work with are often the best source of
information about working in Project Web App. They’re familiar with how
your organization has customized things, and what processes are in place. If
you need help, don’t be shy! Your coworkers may be just as confused as you
are, and working together may make things easier.
Search on Office.com. Articles on Office.com are designed to help you learn
how to use Project Web App, but may not cover specific details about how
your organization has set things up. Try searching for “Find information about
Project Server 2013” or “Find information about Project Online.”
Ask on the Project forums! The Project discussion forums on TechNet tend
to be very active, with subject matter experts and Microsoft MVPs responding
to posts, as well as some folks from Microsoft Support and Engineering. This
makes them a great resource for finding others who may have worked
through similar issues, or who have encountered the same situation. Take a
look at: http://social.technet.microsoft.com/Forums/projectserver

Introduction 9
And if none of that works, ask your
administrator! When you simply can’t
find the answer you’re looking for, try
asking your Project Web App
administrator.
My Project Web App administrator is:

Get your bearings 10
1 Get your bearings
Ready to dive in and start using Project Web App? This chapter will help you figure
out what you’re looking at when you log in, so you know which pieces do what.
The Project Web App window is made up of three main areas: the Quick Launch,
the ribbon, and the main display area.
Quick Launch Main display area
Ribbon
Get your bearings 11
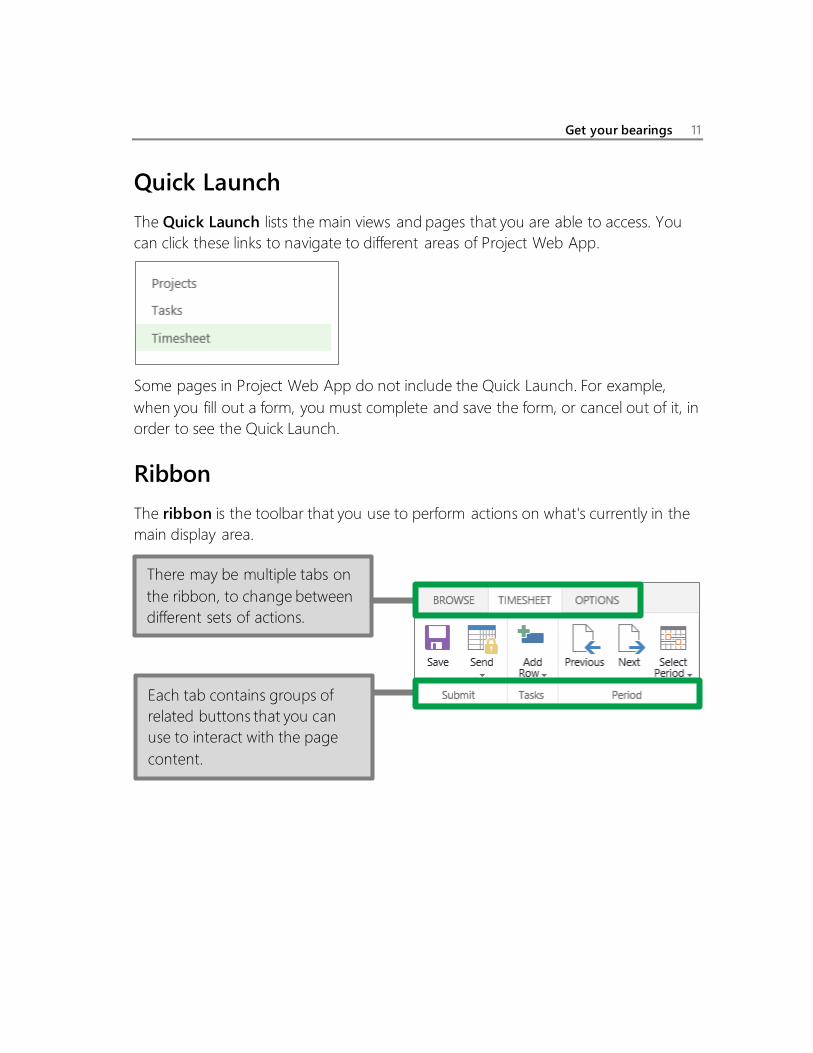
Quick Launch
The Quick Launch lists the main views and pages that you are able to access. You
can click these links to navigate to different areas of Project Web App.
Some pages in Project Web App do not include the Quick Launch. For example,
when you fill out a form, you must complete and save the form, or cancel out of it, in
order to see the Quick Launch.
Ribbon
The ribbon is the toolbar that you use to perform actions on what's currently in the
main display area.
There may be multiple tabs on
the ribbon, to change between
different sets of actions.
Each tab contains groups of
related buttons that you can
use to interact with the page
content.

12 Working on tasks in Project Web App
Main display area
The main display area contains information about your projects and tasks. This is
the main focus of each page, and is where you will enter and review data.
That’s it! You’ve got the basics of how to get around within Project Web App.
Just want to see a list of projects?
Most of the time, you’ll probably be entering time and task progress for tasks that
you’re assigned to. Occasionally, though, you might want to look at a list of all the
projects you’re working on. The Project Center shows a list of of your projects.
1. Click Projects on
the Quick Launch.
This shows a timesheet in the
main display area. Other pages
will also display here.

Get your bearings 13
2. Click the name of a
project in the list to
view that project’s
tasks and schedule.
3. Click through the
links below the
project name on the
Quick Launch to
view information
about the project.
4. Scroll through the
list of tasks, and
view them on the
Gantt chart on the
right, to see the
work planned for
this project.
💡 TIP Slide the splitter in the middle over to see more of
either side of the view.
Also, what’s a Gantt chart? A Gantt chart is a fancy timeline. It shows time
going across the top, with bars for each row. Progress is shown within each bar,
and arrows show how one task or project relates to another.
List of tasks Gantt chart

14 Working on tasks in Project Web App
2 Turning in timesheets
Timesheets are the core of what you, as a team member, will do in Project Web App.
This chapter covers why timesheets are important, how timesheets work overall in
Project Web App, and how you can get yours filled out and turned in.
Why are timesheets important?
Nobody loves filling out timesheets. If you’re working on a lot of different tasks at the
same time, it can be hard to figure out how much of your day was spent on each
task. It’s also sometimes tough to commit to having worked a set number of hours.
Maybe you feel like you should be working more hours, or maybe you feel like
you’re working too much. In either case, you might not feel inclined to draw
attention to your work hours.
When it comes to managing projects, the focus really
isn’t on your work ethic, although of course that’s still
important. The focus is about making sure the right
things get done on time and within budget. It’s about
making sure there are enough people to get the work
done without burning anyone out, or costing the
organization more money than planned.
The focus is about
making sure the right
things get done on
time and within
budget.

Turning in timesheets 15
Project managers use timesheet data to help them figure out how many people
need to be assigned to similar tasks in future projects. Your HR department might
use this data to make sure they have appropriate headcount allocated to certain
roles. And yes, timesheets can translate to dollars in your pocket if you’re paid
hourly. But it’s important to remember that’s not all your timesheet data is…there are
bigger-picture benefits for your organization, that result in better planning and
efficiency going forward.
And you’ll see the benefit of that better planning and efficiency too, because you
won’t end up having to put in a ton of overtime trying to get your work done on
time. Your project manager will have a realistic expectation of how long things take
to get done, or how many people are actually needed on a given task, and you
might end up getting your weekend back.
Okay, I’m convinced. Now how does it work?
Behind the scenes, an administrator sets up the
timesheet periods for your organization (for
example, each week might be a separate
timesheet).
123
Task A
Task B
Task C
When your project manager
assigns you to a task, that task
shows up on your timesheet during
the period when it is scheduled in
the project plan.
8 8 4Task A
4 4Task B
4 8Task C
You fill out the actual hours you
spend on each task during the
timesheet period, and then you
submit it.

16 Working on tasks in Project Web App
Every person in Project Web App is assigned a timesheet manager (sometimes more
than one). Your timesheet manager might be the project manager, or it might be
someone else, like a resource manager that is responsible for people across your
entire organization.
Your timesheet manager receives the
timesheet that you turned in, and reviews it. If
everything looks good, your timesheet is
approved. If things look different than
expected, your timesheet manager might reject
it and add some comments about why it’s
being rejected.
8 8 4Task A
4 4Task B
4 8Task C
8 8 4Task A
4 4Task B
4 8Task C
If your timesheet is approved, the time you submitted counts toward the total
amount of work done on the task, and the amount of work remaining on the task is
reduced. This is recorded in the overall project plan, so that the project manager can
accurately account for whether the project is progressing as planned.
Let’s fill out your timesheet!
First, we need to get to the Timesheet view.
On the Quick Launch, click Timesheet.
The Timesheet view is made up of a table with two sides, and a splitter in the middle.
The left side lists your tasks,
as well as things like sick
time and vacation.
The right side is where you enter
the actual hours that you spent per
day on each task.
Turning in timesheets 17
💡 TIP Slide the splitter in the middle over to see
more of either side of the view.
Ready to enter your hours?
Find the task that you worked on in the list on the left side, and then follow the row
across to the right side of the view.
Don’t see the task you worked on?
Tasks assigned to you that are scheduled for the dates in the current timesheet
period will be automatically included on your timesheet. Sometimes, however, you
might start work on a task early, for example, and need to add a task to your
timesheet that isn’t automatically included. You can add a task to your timesheet,
and your time will be accounted for in the project.
1. Click the
Timesheet tab on
the ribbon.
Fill in your hours across the top row of the grid, next to Actual.
The bottom row of the grid shows the Planned hours, from
the when the task was initially scheduled in the project.
Do this ▶

18 Working on tasks in Project Web App
2. Click Add Row, and then
choose the kind of task you
want to add.
What about hours that aren’t part of a project?
Your timesheet may also include non-project lines, to represent things like training,
travel, or even sick time and vacation. These are referred to as administrative tasks,
and you fill out hours in those rows the same as any other task. The difference with
administrative tasks is that the hours don’t roll up to any particular project.
▶ NOTE There’s more to read about sick leave and vacation time in
Chapter 4: Vacation, sick leave, and other non-project hours.
When the Project Name column lists
Administrative, hours in that row
won’t roll up to a project.

Turning in timesheets 19
How do I get a task off of my timesheet?
If your timesheet includes a task that you aren’t currently working on, it’s really best
to just leave it there. It may look a bit cluttered, but removing it can cause issues for
other time periods. However, if a task on your timesheet isn’t really yours, you can
remove it from your timesheet. This submits a request to be removed from the task
altogether, and your project manager can decide whether this is the right call.
1. Select the check box
for the row.
2. Click the Options
tab on the ribbon.
3. Click Remove Task.
Need to enter hours for a different timesheet period?
There may be times when you need to enter time for a different period than the
current one. Maybe you forgot to fill out your time for a previous week, or you might

20 Working on tasks in Project Web App
want to put in hours ahead of time because you know you’ll be in training or on
vacation when timesheets are due.
1. Click the
Timesheet tab on
the ribbon.
2. Click Select
Period, and then
choose which
period you want
to show.
If you don’t see
the period you
want listed, click
Select Period to
set specific dates.
Older periods
may be closed
for editing.
And…SUBMIT!
After you’ve entered your hours on a timesheet, the next step is to submit it to your
manager for approval.

Turning in timesheets 21
1. Click the
Timesheet tab on
the ribbon.
2. Click Send > Turn
in Final
Timesheet.
💡 TIP When you choose Turn in Final Timesheet, your timesheet is
locked for editing. If you’re not ready to commit to that, click Send
Progress for All Tasks or Send Progress for Selected Tasks.

22 Working on tasks in Project Web App
Peek at what’s going on behind the scenes
After submitting your timesheet, it should theoretically go to your manager for
approval. Sometimes, however, things go a little sideways and something might get
stuck in the system. It’s a complicated system…these things happen.
You can check on the things you’ve submitted using the My Queued Jobs page.
1. Click Settings > PWA Settings.
2. Click My Queued Jobs.

Turning in timesheets 23
3. Use the Jobs > View list to
narrow down what’s displayed in
the grid.
In the grid, you can see all of your actions in Project Web App, including the state of
each action, and whether it is complete.
If something doesn’t seem to be acting the way you expect, take a look in your
queued jobs to see if something is stuck. If you see anything that looks problematic,
it might be worth chatting with your project manager or administrator.

24 Working on tasks in Project Web App
3 More than just hours: Updating task progress
While it’s important to turn in the hours you work on your tasks, it’s equally important to
communicate with your project manager about how things are going in a more general way.
This chapter covers what the differences are between reporting time and updating task
progress, why it’s important to keep your project manager up to date, and how to submit
your task progress in Project Web App. We’ll also cover how you can capture issues and
risks, and where you can store documents.
Time vs. task progress: What’s the difference?
Before we talk about how to report on task progress in Project Web App, it’s
important to make sure we’re clear on the differences between time and task
progress.

More than just hours: Updating task progress 25
Time is the actual number of hours you spend working on a specific task.
This is what you fill out on your timesheet (covered in Chapter 2:
Turning in timesheets), to capture the number of hours you spent on
different things during your work week.
◔ Task progress is an umbrella term for things like the percent of work that
is complete for a task (percent complete), and how much work is left to
do before the task is finished (remaining work).
Submitting task progress is a way to capture a broader description of how you think
things are going with your tasks.
Let’s look at an example…
Task A: 40 hours In this example, you are assigned to a
task that is scheduled to take 40 hours.
You spent 8 hours on the
task on Monday, 4 hours
on Tuesday, and 8 hours
on Wednesday, for a total
of 20 hours.
Mon Tues Weds Thurs Fri Total
Actual 8 4 8 0 0 20
Planned 8 8 8 8 8 40
This is the time that you would enter on a timesheet.

26 Working on tasks in Project Web App
Now, let’s look at the work you did from a task progress perspective.
Even though 20 of 40
hours have been spent on
the task, you may not feel
that you are 50%
complete.
You may think you are
farther along, say 75%
complete, or a bit behind,
maybe 25% complete.
20 of 40 hours looks like this ▶ ◑
But really, you may be
ahead of schedule, like this ▶ ◕ Or behind schedule, like this ▶ ◔
When you communicate your estimated percent complete, this is your task
progress. Communicating your estimated number of hours left on the task
(remaining work) is also considered your task progress.
Continuing with our example, after completing 20 of the 40 scheduled hours, you
may feel like you have more than 20 hours of work left to do before the task is
finished. By submitting your estimated remaining work to your project manager, you
are communicating task progress.
Okay, but remind me, why are we doing this?
Remember, just like with timesheets, reporting on task progress, frankly, isn’t
about you. It’s about the project itself, and making sure things get done on time
and within budget.
If the task you’re working on is taking longer than expected, for
whatever reason, your project manager may be able to rearrange
things down the road so that the overall project isn’t derailed.

More than just hours: Updating task progress 27
Even when you do your job to the best of your abilities, things don’t always work as
planned. Every good project manager knows this, so don’t stress it if your task
progress doesn’t line up with the schedule. Just be honest, share how things are
going, and you’ll be doing your part to keep the project on track.
Where do I enter my task progress?
This is kind of a tricky question. There are two ways to set up Project Web App for
entering task progress.
Separate views for time and task progress.
If your organization has set up Project Web
App this way, team members enter and submit
time in the Timesheet view, and task progress
in the Tasks view.
Time Hours in the
Timesheet view
Task
progress
Percent complete
in the Tasks view
+
Remaining work in
the Tasks view
One combined view for time and task
progress. If your organization has set up
Project Web App this way, team members can
capture both time and task progress in the
Timesheet view. Task progress is represented
by your hours, in this case, rather than percent
complete, in addition to remaining work.
Time Hours in the
Timesheet view
Task
progress
Hours in the
Timesheet view
+
Remaining work in
the Timesheet view
The “combined view” method (which your administrator might know as “single entry
mode”) eliminates having to record things in two places, but you lose the ability to
report percent complete in a more general sense (“I’m about 25% done with this
task”). So, there are pros and cons. Ultimately, as a team member, you’re just going
with whatever your organization has chosen, but sometimes it’s helpful to know the
behind-the-scenes details.

28 Working on tasks in Project Web App
How do I know which way my organization is set up?
You could ask your Project Web App
administrator about whether your organization is
using single entry mode, but an easier way to
figure it out on your own is to look at the Quick
Launch.
If your organization is tracking time and task
progress separately, you’ll most likely see both
the Tasks and Timesheet views listed on the
Quick Launch.
If you’re still not sure, ask your coworkers!
They’ve probably already been submitting time
and task progress, so they should know where
you should be entering your hours.
My organization is using separate views
Report the percent of work you’ve completed
1. Click Tasks on the
Quick Launch.
Got both? You’re
probably tracking things
separately.
More than just hours: Updating task progress 29
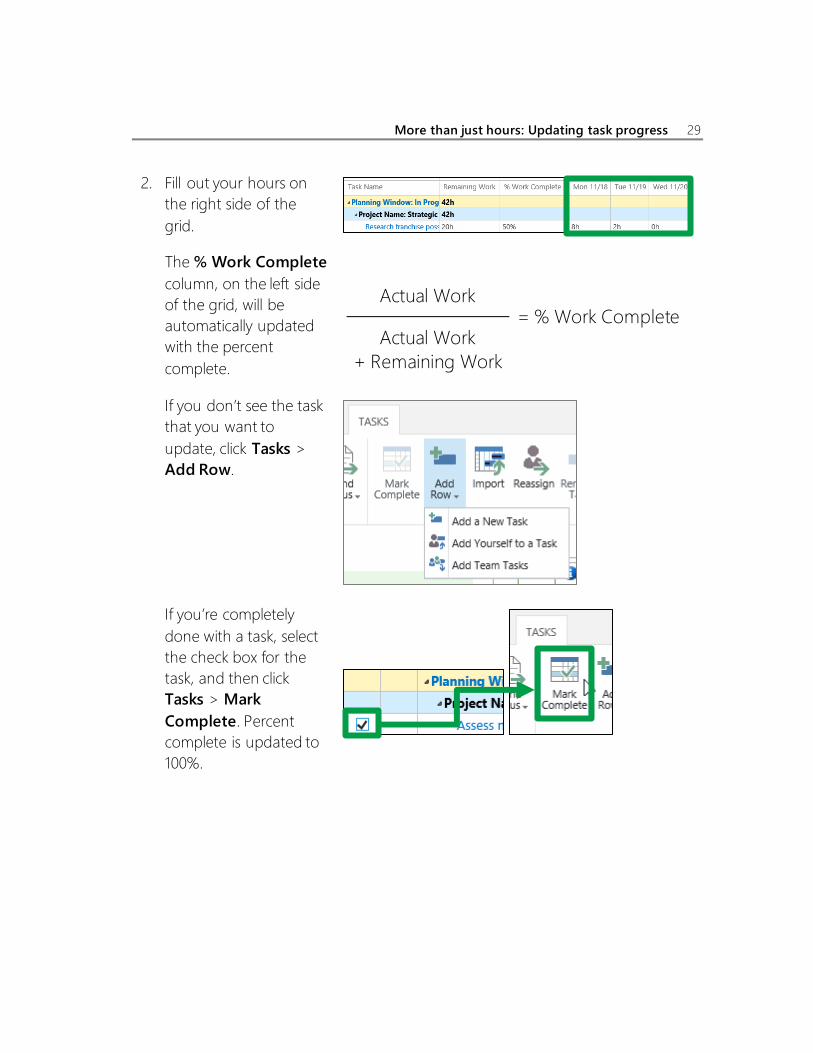
2. Fill out your hours on
the right side of the
grid.
The % Work Complete
column, on the left side
of the grid, will be
automatically updated
with the percent
complete.
Actual Work = % Work Complete
Actual Work
+ Remaining Work
If you don’t see the task
that you want to
update, click Tasks >
Add Row.
If you’re completely
done with a task, select
the check box for the
task, and then click
Tasks > Mark
Complete. Percent
complete is updated to
100%.

30 Working on tasks in Project Web App
3. Send your updates to
the project managers
for your tasks.
If you’re ready to send
all of your updates, click
Tasks > Send Status >
All Tasks.
If you only want to
submit some of your
updates, select the
check box for each task,
and then click Tasks >
Send Status >
Selected Tasks.
But the percentage doesn’t look accurate…what do I do?
Remember how percent complete is calculated?
20 hours completed
= 50% complete 40 hours scheduled

More than just hours: Updating task progress 31
You know how much you worked, and you have an idea about what percentage
of the total work that represents, so what you’ll need to adjust is the number of
hours that are scheduled for the task.
For example, let’s say you’ve worked 20 hours, but you really only feel about 25%
complete on the task. That means that you really think the task will take 80 hours,
not 40, because 20 hours is 25% of 80 hours. Here’s what the math looks like:
20 hours completed
= 25% complete 80 hours scheduled
To adjust the hours scheduled, you can either change the hours in the Work
column, to reflect the 80 total hours, or you can change the hours in the
Remaining Work column, to reflect the additional work left to do.
In this example, you’re saying that you think the whole thing will take 80 hours,
and you’ve already completed 20 of those hours. That means you have 60 hours
of remaining work. When you enter 60 in the Remaining Work column, the %
Work Complete column is updated to reflect the percentage that you feel is
more accurate.
Keep reading. The next section talks about how to submit your remaining work to
the project manager.

32 Working on tasks in Project Web App
Update how much work you have left to do
1. Click Tasks on the
Quick Launch.
2. Update your tasks.
In the grid, fill out the
Remaining Work
column.
If you don’t see the task
that you want to
update, click Tasks >
Add Row.

More than just hours: Updating task progress 33
If you’re completely
done with a task, select
the check box for the
task, and then click
Tasks > Mark
Complete. Remaining
work is set to 0 hours.
3. Send your updates to
the project managers
for your tasks.
If you’re ready to send
all of your updates, click
Tasks > Send Status >
All Tasks.
If you only want to
submit some of your
updates, select the
check box for each task,
and then click Tasks >
Send Status >
Selected Tasks.

34 Working on tasks in Project Web App
💡 Not ready to submit? If you aren’t ready to send
your remaining work to the project manager, click
Tasks > Save to save your updates and submit
them later.
My organization is using one view
Report the percent of work you’ve completed
When your organization uses one view to track time and task progress, the hours
that you fill out on your timesheet are used to calculate percent complete.
1. Click Timesheet on the
Quick Launch.
2. Use the right side of the
view to enter the hours
you worked on the task.
More than just hours: Updating task progress 35
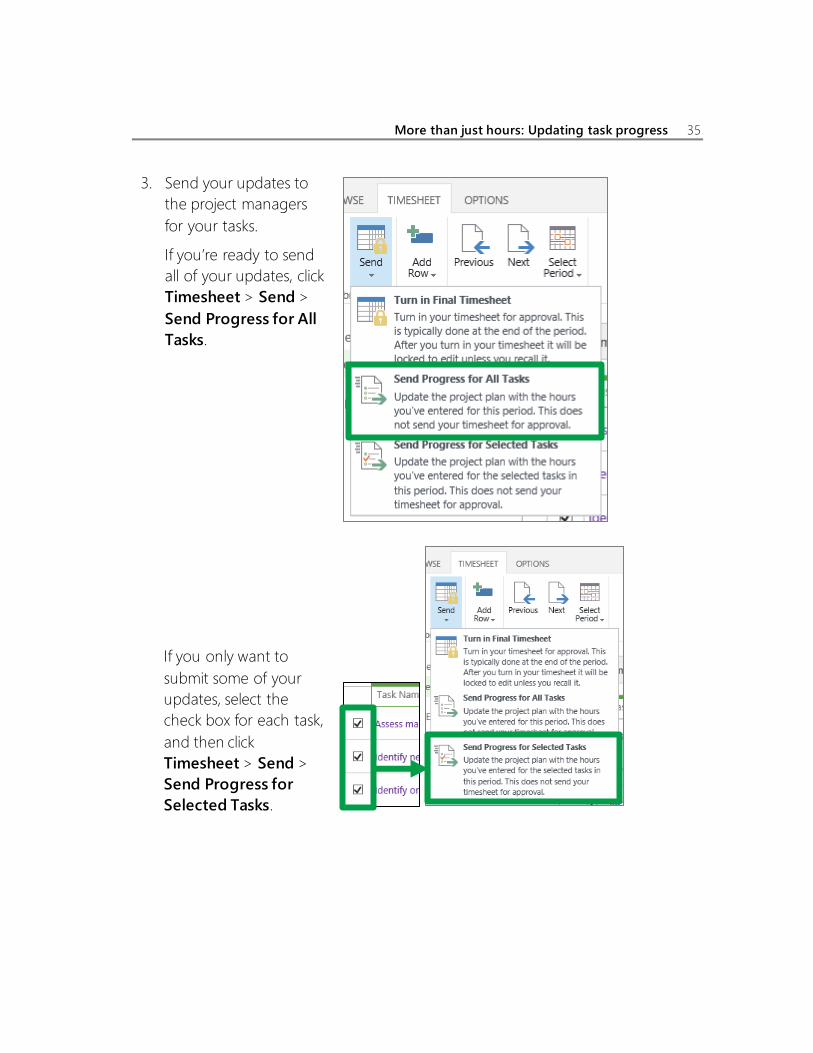
3. Send your updates to
the project managers
for your tasks.
If you’re ready to send
all of your updates, click
Timesheet > Send >
Send Progress for All
Tasks.
If you only want to
submit some of your
updates, select the
check box for each task,
and then click
Timesheet > Send >
Send Progress for
Selected Tasks.

36 Working on tasks in Project Web App
4. After you’ve sent your
updates, the task will be
updated on your
timesheet, with the new
percent complete in the
% Work Complete
column.
But the percentage doesn’t look accurate…what do I do?
Remember how percent complete is calculated?
20 hours completed
= 50% complete 40 hours scheduled
You know how much you worked, and you have an idea about what percentage
of the total work that represents, so what you’ll need to adjust is the number of
hours that are scheduled for the task.
For example, let’s say you’ve worked 20 hours, but you really only feel about 25%
complete on the task. That means that you really think the task will take 80 hours,
not 40, because 20 hours is 25% of 80 hours. Here’s what the math looks like:
20 hours completed
= 25% complete 80 hours scheduled

More than just hours: Updating task progress 37
However, you’re a team member, not the project manager, so you can’t just go in
and change the project plan to get your numbers to work out. You need to
communicate this part of your task progress to your project manager. You do this
by submitting the remaining work on the task.
In this example, you’re saying that you think the whole thing will take 80 hours,
and you’ve already completed 20 of those hours. That means you have 60 hours
of remaining work.
Keep reading. The next section talks about how to submit your remaining work to
the project manager. Once you do that, the percent complete should look
accurate.
Update how much work you have left to do
1. Click Timesheet on the
Quick Launch.

38 Working on tasks in Project Web App
2. Find the task that you
want to update on the
left side of the view.
3. Use the scroll bar at the
bottom of the grid to
scroll right, to the
Remaining Work
column. Add the hours
you think are still
required to get the task
done.
If you don’t see the task
that you want to
update, click
Timesheet > Add
Row.

More than just hours: Updating task progress 39
4. Send your updates to
the project managers
for your tasks.
If you’re ready to send
all of your updates, click
Timesheet > Send >
Send Progress for All
Tasks.
If you only want to
submit some of your
updates, select the
check box for each task,
and then click
Timesheet > Send >
Send Progress for
Selected Tasks.

40 Working on tasks in Project Web App
Add comments about your work
Another way to communicate task progress is by simply adding
some comments when you send updates to your project
manager. Sometimes you may need to explain why things are
taking longer than planned (“I added 20 hours of remaining work
because…”), or you might want to give a few more details about
the work you did that week (“I spent 6 hours on that task on
Tuesday doing…”).
“I added 20
hours of
remaining
work
because…”
You can add comments to your timesheet and task progress when you send them to
your project manager.
In the Tasks view…
1. Click the Tasks tab, and
then select the
Comment on Submit
check box in the
Show/Hide group.
2. Fill out your task
progress and then click
Tasks > Send Status
to choose what you
want to send.
If you’re not sure which
option to choose, take
a look at the sections
earlier in this chapter.

More than just hours: Updating task progress 41
3. Fill out the comment
box, and then click OK
to send your updates to
your project manager.
In the Timesheet view…
1. Click the Options tab,
and then select the
Comment on Submit
check box in the
Show/Hide group.

42 Working on tasks in Project Web App
2. Fill out your timesheet
and then click
Timesheet > Send to
choose what you want
to send.
If you’re not sure which
option to choose, take
a look at the sections
earlier in this chapter.
3. Fill out the Comment
box, and then click OK
to send your timesheet
to your manager.

More than just hours: Updating task progress 43
Capture issues and risks
Projects very rarely go exactly as planned. (Talk about stating the obvious!)
Issues may come up along the way that have an impact on the
project schedule. Maybe someone you need to talk to goes out on
leave unexpectedly, or a tool you need to get the work done breaks.
Risks are things that can impact the schedule, and that you’re
aware of when the project is planned. These may be things like an
upcoming personnel change, or a tight turnaround time on a
particular deliverable.
As a person who is assigned to do the work on a project, you may have the best
perspective on exactly what risks there are, and you certainly know what issues you
run into.
By planning for a project’s risks ahead of time, and recording the issues that come
up as the project progresses, your project manager is better able to manage the
project schedule. Sometimes, the project manager will do this work without asking
team members to add anything. In other cases, project managers will ask team
members to help fill out issues and risks on the project site.
Add an issue
1. Click Projects on
the Quick Launch.
2. Click the name of a
project in the list.
!

44 Working on tasks in Project Web App
3. Click Project Site
on the Quick
Launch.
4. Click Issues on the
Quick Launch.
5. Click New Item.

More than just hours: Updating task progress 45
6. Fill out the form,
including as many
details as you can
about the issue.
7. When you’re done,
click Edit > Save.
Add a risk
1. Click Projects on
the Quick Launch.
2. Click the name of a
project in the list.
46 Working on tasks in Project Web App
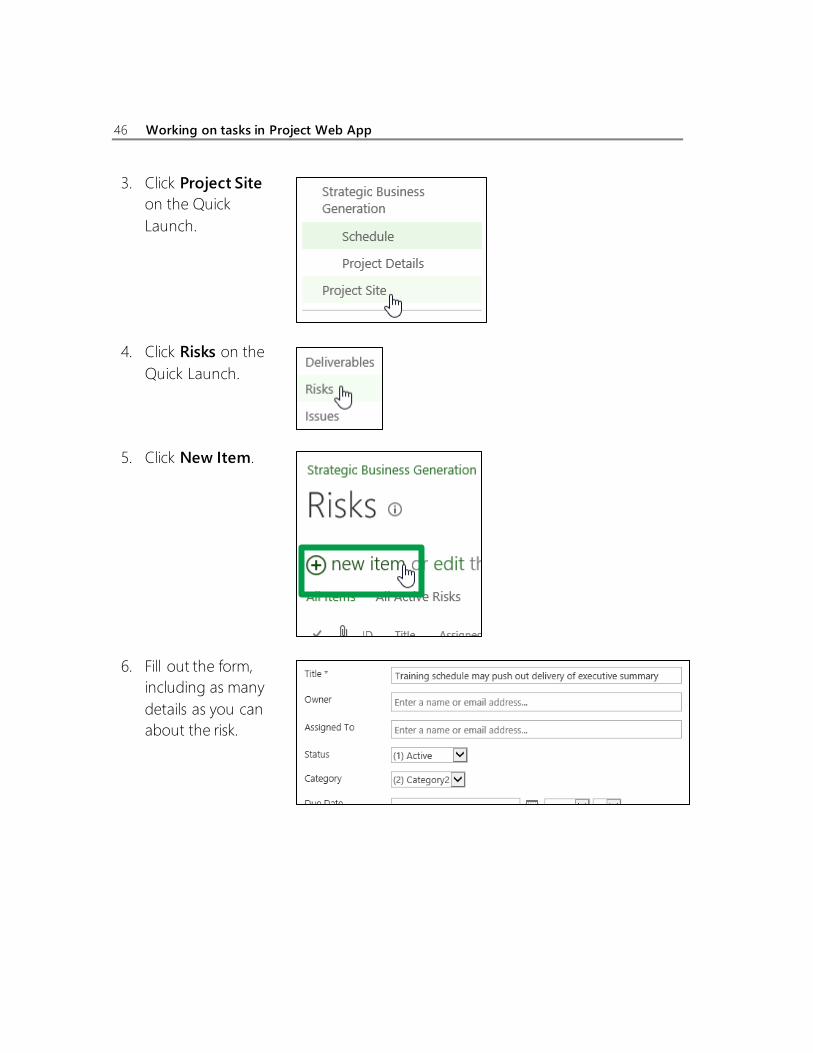
3. Click Project Site
on the Quick
Launch.
4. Click Risks on the
Quick Launch.
5. Click New Item.
6. Fill out the form,
including as many
details as you can
about the risk.

More than just hours: Updating task progress 47
The Probability,
Impact (which is a
general score, in
comparison with
other risks), and
Cost of the risk help
your project
manager
understand the risk,
at a glance.
The Description
should cover why
the risk is a
possibility, and what
will happen if it
occurs.
The Mitigation
Plan is what you
need to do to try to
avoid the risk
occurring.

48 Working on tasks in Project Web App
The Contingency
Plan is what you’re
going to do if the
risk actually does
occur.
The Trigger
Description and
Trigger are the
things that happen
that will indicate
when the risk is
occurring, and when
you need to put the
contingency plan
into action.
7. When you’re done,
click Edit > Save.
I need to look at a project document…where is it?
Projects sometimes come equipped with a lot of documents, from proposals and
planning documents, to research and presentations. Each project in Project Web

More than just hours: Updating task progress 49
App has an associated project site, with a spot for storing and working with
documents.
1. Click Projects on
the Quick Launch.
2. Click the name of a
project in the list.
3. Click Project Site
on the Quick
Launch.
4. Click Documents
on the Quick
Launch.

50 Working on tasks in Project Web App
5. Click the name of
the document in the
list, to open it.
Hand off work to someone else
There are a lot of reasons why you’d need to reassign one of your tasks to someone
else. Here are some examples:
Maybe you’re being pulled onto another, higher-priority project, and you
need someone else to take on part of your existing workload.
Maybe another person on the team has more experience than you do with a
certain aspect of the project, and your project manager has asked you to
transition your work to that person.
Or…maybe you’re just really good at delegating.
Regardless, reassigning a task is easy.

More than just hours: Updating task progress 51
1. Click Tasks on the
Quick Launch.
2. Click Tasks >
Reassign.
3. Find the task that
you want to
reassign in the
Select New
Resources grid,
and choose a new
team member in
the Reassign To
column.

52 Working on tasks in Project Web App
4. Set a Start Date
for when the
transition should
happen, and add
Comments if
you’d like.
5. Click Submit to
send the
reassignment to
the project
manager.

Vacation, sick leave, and other non-project hours 53
4 Vacation, sick leave, and other
non-project hours
Hard work frequently results in one of two things: a well-
deserved vacation, or a miserable, knock-you-off-your-
feet headcold.
Okay, maybe there isn’t a direct correlation, but in the
course of working on a project, you will surely have some
time that you’ve spent doing things other than working on
your tasks. Sometimes it’s vacation, sometimes it’s sick
leave, and sometimes it’s work-related (but not project-
related) things like training or business travel.
This chapter covers what you need to do ahead of time, while you’re out, and after
you’re back from time spent outside of your assigned tasks.
Ahead of time
There are a couple of things that you can do ahead of time, when you know you’re
not going to be working on your tasks for a certain day or set of days. You can let
your project manager know, for planning purposes, and you may be able to
assign someone to enter time and task progress for you while you’re out.

54 Working on tasks in Project Web App
Let your project manager know
If you know ahead of time that you’re going to be out of the office, or not able to
work on your tasks for some other reason, you can do your project manager a huge
favor by sharing that information as soon as you know you’re going to be out.
Your project manager can enter your planned time away into a
calendar that reflects your working hours. Project Web App uses that
calendar to determine the project schedule, and your task work will
be automatically pushed out until you get back.
Assign someone to enter your time and task progress
Depending on how your organization uses Project Web App, you may be able to
identify someone who can enter and submit time and task progress on your behalf
while you’re out. This person is know as a “delegate.”
Before you leave for vacation (or whatever else has you away from your project for a
short period), set up a new delegation in Project Web App, so that someone else can
log in for you while you’re out.
1. Click Settings >
PWA Settings.
2. Under Personal
Settings, click Manage
Delegates.

Vacation, sick leave, and other non-project hours 55
3. Click Delegations >
New.
4. Use the From and To
dates to set the time
period when you’ll be
away.
5. Enter the name of the
person that you want to
enter things for you
while you’re out.
6. Click Save.
After you get the delegation saved, don’t forget to chat with the person you just
assigned to let them know that they’re set up.
While you’re out
Time spent away from your project tasks can make for a refreshing
change of pace…especially if that time is spent poolside with a
tasty beverage. But even if your time away is spent in a training
session, or under a blanket on the couch with a box of tissues,
you’ll probably find that when you return to your task work, you
have a new perspective. 🍹

56 Working on tasks in Project Web App
Really, the only thing you need to worry about while you’re out is making sure that
your time and task progress gets submitted on time. In some cases, you can submit
your information ahead of time, but not always. Some organizations require that you
submit things only on specific days or dates. That’s where your delegate comes in.
If you assigned a delegate to enter time and task progress for you, that person can
log in by clicking Settings > PWA Settings, and then clicking Act as a Delegate
under Personal Settings.
After you’re back
Welcome back to your tasks! Now that you’re back, you need to account for your
time away on your timesheet. Time spent on non-project work, including vacation
and sick time, is called administrative time in Project Web App.
1. Click Timesheet on the
Quick Launch.
2. Fill out the Actual row, on
the right side of the grid, for
vacation, sick time, or
another category of
administrative time.
If the administrative task you
need isn’t listed on your
timesheet, click Timesheet >
Add Row > Add Non-
Project Line.
3. Continue filling out the rest of your timesheet, and submit it whenever you’re
ready. For more information on this, see Chapter 2: Turning in timesheets.

Uh oh, I didn’t mean to submit that! 57
5 Uh oh, I didn’t mean to submit that!
Maybe you were working from home and your four-year-old accidentally submitted
your timesheet, or your cat walked across your keyboard and entered some extra
hours for you. Or, more likely, you forgot to add some task work to your timesheet
before sending it to your project manager. Whatever the reason, sometimes, you just
didn’t mean to submit things yet.
This chapter covers how to recall a timesheet you’ve already submitted, and how to
delete a timesheet altogether.
▶ NOTE You can only recall or delete timesheets that are not yet
approved. If they’re approved, you’ll need to chat with your project
manager about your changes.
Take back a timesheet that you sent for approval
If you realize, after you’ve sent your timesheet for approval, that you need to make
changes, you can recall your timesheet if it hasn’t been approved yet.
58 Working on tasks in Project Web App
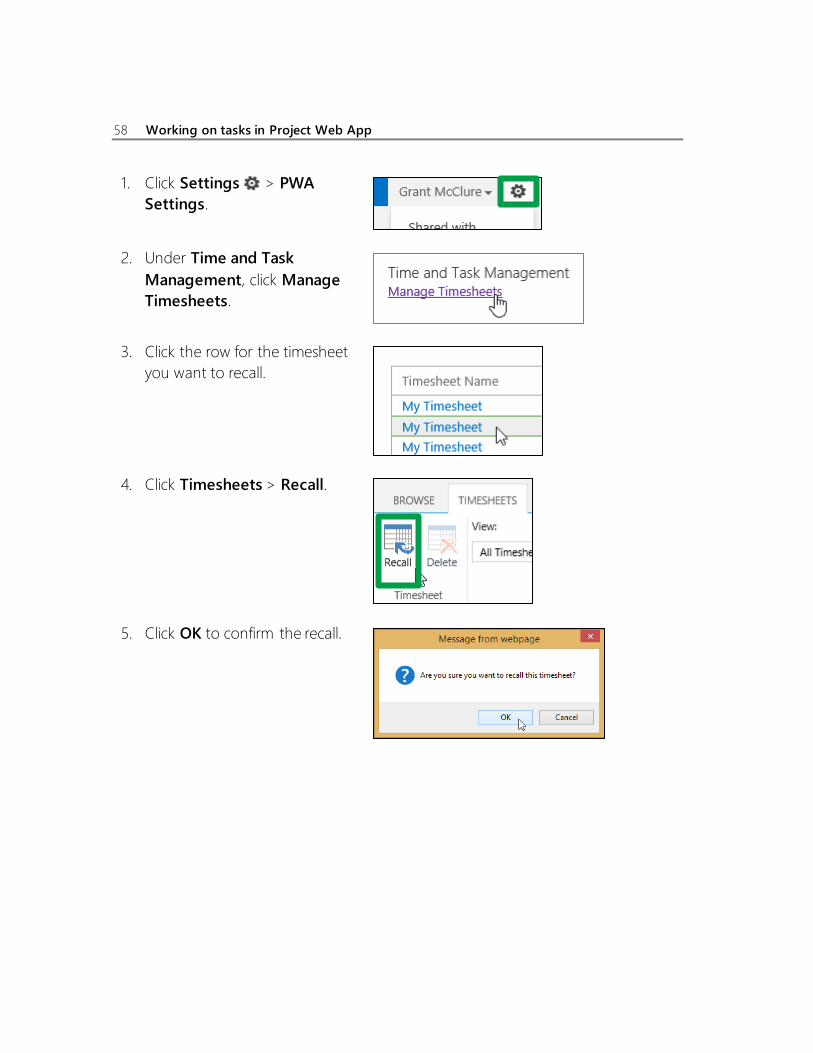
1. Click Settings > PWA
Settings.
2. Under Time and Task
Management, click Manage
Timesheets.
3. Click the row for the timesheet
you want to recall.
4. Click Timesheets > Recall.
5. Click OK to confirm the recall.

Uh oh, I didn’t mean to submit that! 59
Delete a timesheet and start over
Sometimes it’s easier just to start a timesheet over from scratch. You can delete the existing
timesheet, as long as you haven’t sent it for approval yet.
1. Click Settings > PWA
Settings.
2. Under Time and Task
Management, click Manage
Timesheets.
3. Click the row for the timesheet
you want to delete.
4. Click Timesheets > Delete.
5. Click OK to confirm the
deletion.

60 Working on tasks in Project Web App
6 Rejected! Now what?
If your timesheet or task progress doesn’t match what your manager
was expecting, you may find out it’s been rejected. This never feels
great, but it’s probably not personal, and hopefully your project
manager has included some comments outlining why your updates
were rejected.
This chapter covers how to figure out if your updates are rejected, how to find out
why they were rejected, and what you should do to get your time and task progress
resubmitted.
How do I know if my updates were rejected?
When your time or task progress is rejected, this status shows up in the Process
Status column on the Timesheet or Tasks view.

Rejected! Now what? 61
In the Timesheet view… In the Tasks view…
Why were my updates rejected?
Hopefully, your project manager will chat with you about why they’re rejecting your
updates. If not, he or she may have added a comment before sending it back to you.
If you see an update that has been rejected, it’s best to look closely at the task and
see if a comment has been added, before hunting down your project manager to
ask questions.
1. Click the name of the
rejected task in the
list on the Timesheet
or Tasks view.
2. Comments are listed
under Recent Task
Changes.
What do I do now?
Once you’ve reviewed comments, and chatted with your project manager if needed,
the next step is to make appropriate changes to your timesheet and task progress,
and then resubmit it.

62 Working on tasks in Project Web App
When you see that your
updates have been
rejected…
8 8 4Task A
4 4Task B
4 8Task C
…you figure out what
you need to do to fix
them…
8 8 2Task A
6 6Task B
2 8Task C
…then you resubmit
your updates…
8 8 2Task A
6 6Task B
2 8Task C
…and your project
manager can approve
them if they make sense.
8 8 2Task A
6 6Task B
2 8Task C
Okay, but how?
This process doesn’t require anything different or fancy…you just do things the same
way you submitted things initially:
If you need help resubmitting your timesheet, see Chapter 2: Turning in
timesheets.
If you need help resubmitting your task progress, see Chapter 3: More
than just hours: Updating task progress.
When in doubt, add comments…
Adding comments when you resubmit your updates can help your manager
understand what changes you made, and how they address the issues that came up
initially. Chapter 3: More than just hours: Updating task progress covers how to
add comments in the Timesheet and Tasks views.

63
Appendix
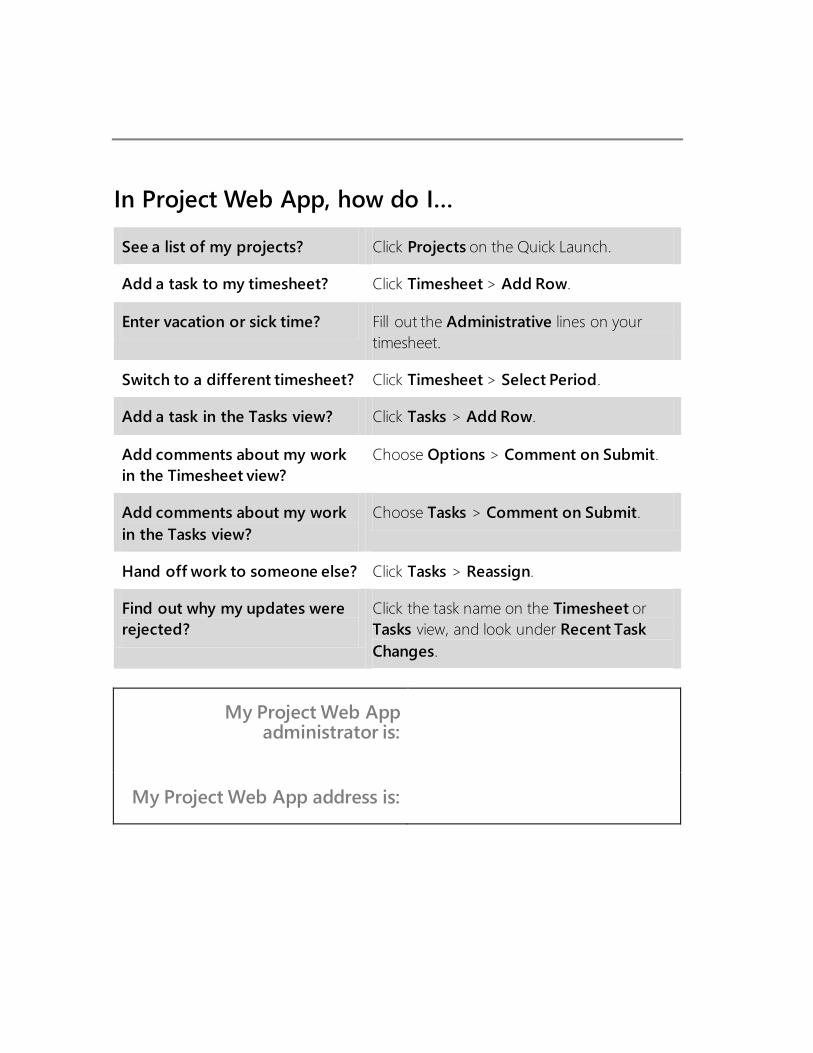
In Project Web App, how do I…
See a list of my projects? Click Projects on the Quick Launch.
Add a task to my timesheet? Click Timesheet > Add Row.
Enter vacation or sick time? Fill out the Administrative lines on your
timesheet.
Switch to a different timesheet? Click Timesheet > Select Period.
Add a task in the Tasks view? Click Tasks > Add Row.
Add comments about my work
in the Timesheet view?
Choose Options > Comment on Submit.
Add comments about my work
in the Tasks view?
Choose Tasks > Comment on Submit.
Hand off work to someone else? Click Tasks > Reassign.
Find out why my updates were
rejected?
Click the task name on the Timesheet or
Tasks view, and look under Recent Task
Changes.
My Project Web App administrator is:
My Project Web App address is:
Related Documents