Kunststoffschweißtechnik WIDOS Einsteinstr. 5 Phone +49 (0) 71 52 99 39 - 0 W. Dommer Söhne GmbH D-71254 Ditzingen-Heimerdingen Fax +49 (0) 71 52 99 39 - 40 Website: www.widos.de Email: [email protected] Headquarters: D-71254 Ditzingen-Heimerdingen Country Court Stuttgart HRB 200973 Managing director: Dieter Dommer Working Instructions Sheet Welding Machine WIDOS PSM 15 with pneumatic clamping Keep for further use!

Welcome message from author
This document is posted to help you gain knowledge. Please leave a comment to let me know what you think about it! Share it to your friends and learn new things together.
Transcript

Kunststo ffschweißtechni k
WIDOS Einsteinstr. 5 Phone +49 (0) 71 52 99 39 - 0
W. Dommer Söhne GmbH D-71254 Ditzingen-Heimerdingen Fax +49 (0) 71 52 99 39 - 40
Website: www.widos.de Email: [email protected]
Headquarters: D-71254 Ditzingen-Heimerdingen Country Court Stuttgart HRB 200973 Managing director: Dieter Dommer
Working Instructions
Sheet Welding Machine
WIDOS PSM 15 with pneumatic clamping
Keep for further use!

Kunststo ffschweißtechni k
Product Identification
03.03.2009 Working Instructions WIDOS PSM 15 with pneumatic clamping Page 2 of 33
Type: WIDOS PSM 15
with pneumatic clamping
Serial number: / Year of construction: see type label
Customers’ entries
Inventory no.:
Location:
Address of manufacturer WIDOS
W. Dommer Söhne GmbH Einsteinstr. 5
D -71254 Ditzingen-Heimerdingen
Phone: ++49 7152 / 99 39 - 0
Fax: ++49 7152 / 99 39 - 40
E-Mail: [email protected]
Address of the Subsidiary Companies:
WIDOS
WIDOS GmbH W. Dommer Söhne AG An der Wiesenmühle 15 St. Gallerstr. 93
D-09224 Grüna / Sachsen CH-9201 Gossau
Phone: ++49 371 / 8 15 73 - 0 Phone: ++41 71 / 3 88 89 79
Fax: ++49 371 / 8 15 73 - 20 Fax: ++41 71 / 3 88 89 73

Kunststo ffschweißtechni k
Introduction
03.03.2009 Working Instructions WIDOS PSM 15 with pneumatic clamping Page 3 of 33
Purpose of the Document
These working instructions give you information about all important questions which refer to the construction and the safe working of your machine.
Just as we are, you are obliged to engage in these working instructions, as well.
Not only to run your machine economically but also to avoid damages and injuries.
Should questions arise, contact our advisers in the factory or in our subsidiary companies.
We will help you with pleasure.
According to our interest to continuously improve our products and working instructions, we kindly ask you to inform us about problems and defects which might appear in practical experience.
Thank you.
Structure of the Working Instructions
This manual is arranged in chapters which belong to the different using phases of the
machine. Therefore the searched information can be easily found.
03.03.2009 WIDOS
W. Dommer Söhne GmbH
Einsteinstraße 5
D-71254 Ditzingen-Heimerdingen
All rights reserved
Reprinting only allowed with permission of the corporation.
Any changes subject to technical innovations.

Kunststo ffschweißtechni k
Contents
03.03.2009 Working Instructions WIDOS PSM 15 with pneumatic clamping Page 4 of 33
1. DESCRIPTION OF PRODUCT ............................................................................................. 6
1.1. Usage and non-intended use ..........................................................................................6
1.2. Safety measures ..............................................................................................................6
1.3. Conformity........................................................................................................................6
1.4. Designation of the product..............................................................................................7
1.4.1. Technical data ...........................................................................................................7
1.4.1.1. WIDOS PSM 15 general data ...............................................................................7
1.4.1.2. Heating element.....................................................................................................7
1.4.2. Accessories...............................................................................................................7
2. SAFETY RULES..................................................................................................................... 8
2.1. Explication of the different symbols ...............................................................................8
2.2. Obligations of the operator .............................................................................................9
2.3. Obligations of the worker ................................................................................................9
2.4. Measures of organization................................................................................................9
2.5. Information on safety precautions..................................................................................9
2.6. Instructions for the staff..................................................................................................9
2.7. Dangers while handling the machine............................................................................10
2.8. Special dangers .............................................................................................................10
2.8.1. Danger of stumbling over pneumatic and electric wires ............................................10
2.8.2. Danger of combustion at heating element resp. welding area ...................................10
2.8.3. Danger of crushing near and between the clamping beams ......................................11
2.9. Structural modifications on the machine .....................................................................11
2.10. Cleaning the machine ....................................................................................................11
2.11. Warranty and liability .....................................................................................................11
3. FUNCTIONAL DESCRIPTION............................................................................................ 12
4. OPERATING AND INDICATING ELEMENTS .................................................................. 13
4.1. Components at the heating element ............................................................................14
4.2. How to clamp the sheet .................................................................................................15
4.3. Service unit ....................................................................................................................16
4.4. How to clamp sheets for angle welding ........................................................................17
5. STARTING AND OPERATING........................................................................................... 18
5.1. Starting ...........................................................................................................................18
5.2. Welding process ............................................................................................................19
6. WELDING TABLES ............................................................................................................. 21
7. MAINTENANCE / STORAGE / TRANSPORT.................................................................. 24

Kunststo ffschweißtechni k
Contents
03.03.2009 Working Instructions WIDOS PSM 15 with pneumatic clamping Page 5 of 33
7.1. In general........................................................................................................................24
7.2. Clamping elements ........................................................................................................24
7.3. Cleaning the machine ....................................................................................................24
7.4. Service unit ....................................................................................................................24
7.5. Transport........................................................................................................................25
7.6. Disposal..........................................................................................................................25
8. ELECTRIC AND PNEUMATIC DIAGRAMS ..................................................................... 26
9. SPARE PARTS LIST ........................................................................................................... 28
9.1. Basic machine with motion ...........................................................................................28
9.2. Heating element .............................................................................................................31
10. DECLARATION OF CONFORMITY .............................................................................. 33

Kunststo ffschweißtechni k
WIDOS Einsteinstr. 5 Phone +49 (0) 71 52 99 39 - 0
W. Dommer Söhne GmbH D-71254 Ditzingen-Heimerdingen Fax +49 (0) 71 52 99 39 - 40
Website: http://www.widos.de Email: [email protected]
03.03.2009 Working Instructions WIDOS PSM 15 with pneumatic clamping Page 6 of 33
1. Description of Product
This chapter gives important basic information about the product and its prescribed use.
All technical details of the machine are put together as a general arrangement.
1.1. Usage and non-intended use
The WIDOS PSM 15 with pneumatic clamping is a workshop machine for the heating element butt welding of sheets made out of PE, PP, PVDF for the thickness range up to 20 mm and width of sheet up to 1500 mm.
Any other use of this machine is non-intended.
The machine is only to be used in a technically perfect condition as well as intended, safety- and danger-conscious in compliance with the working instructions and the relevant safety regulations (especially the regulations for the prevention of accidents).
The described plastic welding machine may only be operated, maintained and repaired by persons who are trained and informed about the dangers.
The manufacturer is not responsible for any damages caused by inappropriate handling or
operation.
For personal injuries, material and property damages resulting herefrom, only the user is responsible!
Prescribed use also means:
• following all indications of these working instructions and
• performing the inspection and maintenance works.
1.2. Safety measures
In case of wrong use, wrong operation or wrong maintenance, the machine itself or products standing nearby can be damaged or destroyed.
Persons in the endangered area may be injured.
Therefore these working instructions have to be thoroughly read and the corresponding safety regulations must necessarily be observed.
1.3. Conformity
The machine corresponds in its construction to the valid recommendations of the European Community as well as to the European standard specifications.
The development, manufacturing and mounting of the machine were executed very carefully.

Kunststo ffschweißtechni k
Description of product Chapter 1
03.03.2009 Working Instructions WIDOS PSM 15 with pneumatic clamping Page 7 of 33
1.4. Designation of the product
The product is designated by a type label. It contains the type of the machine, the serial number and the year of construction.
1.4.1. Technical data
1.4.1.1. WIDOS PSM 15 general data
Sheet size max. (L x W): 1500 x 20 mm
Welding material: PP, PE 80, PVDF, PE 100
Fuse protection: 16 A
Line cross-section: 1,5 mm²
Dimensions (W x L x H) appr. 810 x 2000 x 1150 mm
Weight: 305 kg
Max. pneumatic working
pressure 6 bar
Emissions By using the stated plastic materials during operation within a
temperature range of up to 260° C, no poisonous vapors are
generated.
Ambient conditions in the
welding area
- Keep the workshop clean (no dust at the welding spot) - Do not weld below 5°C - Avoid humidity, if necessary use tent - Avoid strong sunlight - Avoid strong wind
1.4.1.2. Heating element
Power: 2,5 kW
Current: 10,9 A (± 10 %)
Voltage: 230 V (± 10 %)
Frequency: 50 Hz
Surface: Anti-stick coated
Included components: - electronic temperature adjustment
- control lamp (green)
- on / off switch with control lamp (red)
1.4.2. Accessories
The following tool is included in initial delivery.
1 each Ring / flat spanner SW 13 / 17
Order numbers and individual parts, please see „spare parts lists“, when ordering please indicate serial
no. of the machine!

Kunststo ffschweißtechni k
WIDOS Einsteinstr. 5 Phone +49 (0) 71 52 99 39 - 0
W. Dommer Söhne GmbH D-71254 Ditzingen-Heimerdingen Fax +49 (0) 71 52 99 39 - 40
Website: www.widos.de Email: [email protected]
03.03.2009 Working Instructions WIDOS PSM 15 with pneumatic clamping Page 8 of 33
2. Safety rules
A basic premise for working safely and without disturbances is the knowledge of the basic safety signs and rules.
• These working instructions provide you with the most important information to safely run the machine.
• The safety information has to be respected by all persons working with the machine.
2.1. Explication of the different symbols
The working instructions contain the following signs for certain situations:
This symbol means a possible danger to a person’s life and health.
• The disrespect of this indication may have severe consequences for the health.
This symbol means a possibly dangerous situation.
• The disrespect of this indication may cause light injuries or damages of machine parts.
This symbol means a possibly dangerous situation due to hot surfaces.
• The disrespect of these indications may lead to severe burns, respectively to ignition or even fire.
This symbol means a possibly dangerous situation by moving parts of the machine
• The disrespect of these indications may cause severe crushings of parts of the body resp. damages of machine parts.
This symbol gives important indications for the proper use of the machine.
• The disrespect of this indication may lead to malfunctions and damages on the machine or on parts in the surrounding.
Under this symbol you get user hints and particularly useful information.
• It is a help for using all the functions on your machine in an optimal way and helps you to make the job easier.
T h e regu l a t i on s for t h e preven t i on o f acc i den ts a re va l i d (UVV) .

Kunststo ffschweißtechni k
Safety rules Chapter 2
03.03.2009 Working Instructions WIDOS PSM 15 with pneumatic clamping Page 9 of 33
2.2. Obligations of the operator
The owner is obliged to only let persons work at the machine who
• know about basic safety and accident prevention rules and who are instructed in the handling of the machine
• the worker also must have read and understood the safety chapter of this manual and certify this by his signature.
The safety-conscious working of the staff has to be checked in regular intervals.
2.3. Obligations of the worker
Before working at the machine, all persons in charge of it oblige themselves:
• to follow the basic safety and accident protection rules.
• to have read and understood the safety chapter and the warnings in this manual and to confirm by their signature that they have understood well.
• to inform themselves about the functions of the machine before using it.
2.4. Measures of organization
• The necessary personal protection equipment is to be provided by the operator.
• All available safety equipment is to be inspected regularly.
2.5. Information on safety precautions
• The working instructions are to be permanently kept at the place of use of the machine. They are to be at the operator‘s disposal at any time and without effort.
• In addition to the manual, the common valid and the local accident protection rules and regulations for the environmental protection must be available and followed.
• All safety and danger indications on the machine have to be in a clear, readable condition.
• Every time the machine changes hands or is being hired to a third person, the working instructions are to be sent along with the machine and their importance is to be emphasized.
2.6. Instructions for the staff
• It must be clearly defined who is responsible for transport, mounting and dismounting, starting the operation, setting and tooling, operation, maintenance and inspection, repair and disassembly.
• Only skilled and trained persons are allowed to work at the machine.
• A person who is being trained may only work at the machine under supervision of an experienced person.
Kunststo ffschweißtechni k
Safety rules Chapter 2
03.03.2009 Working Instructions WIDOS PSM 15 with pneumatic clamping Page 10 of 33
2.7. Dangers while handling the machine
The WIDOS PSM 15 with pneumatic clamping is constructed according to the latest technical standard and the acknowledged technical safety rules.
However, dangers for the operator or other persons standing nearby may occur. Also damages of the machine itself or of other parts are possible.
The machine has to be only used
• according to the prescriptions
• in technically safe condition
Disturbances which may affect the safety of the machine must be immediately
eliminated.
Only skilled persons are allowed to work at electric appliances.
• The electric equipment of the machine has to be regularly checked. Loose connections and damaged cables have to be immediately replaced.
• The heating element has to be protected against rain and dripping water.
• According to VDE 0100, the machine may only be applied on building sites via power distributors with FI security switch.
2.8. Special dangers
2.8.1. Danger of stumbling over pneumatic and electric wires
Make sure that nobody has to step over the cables to the heating element. Lay lines favorably in order that the danger is minimized. Do not bruise and fold lines or similar.
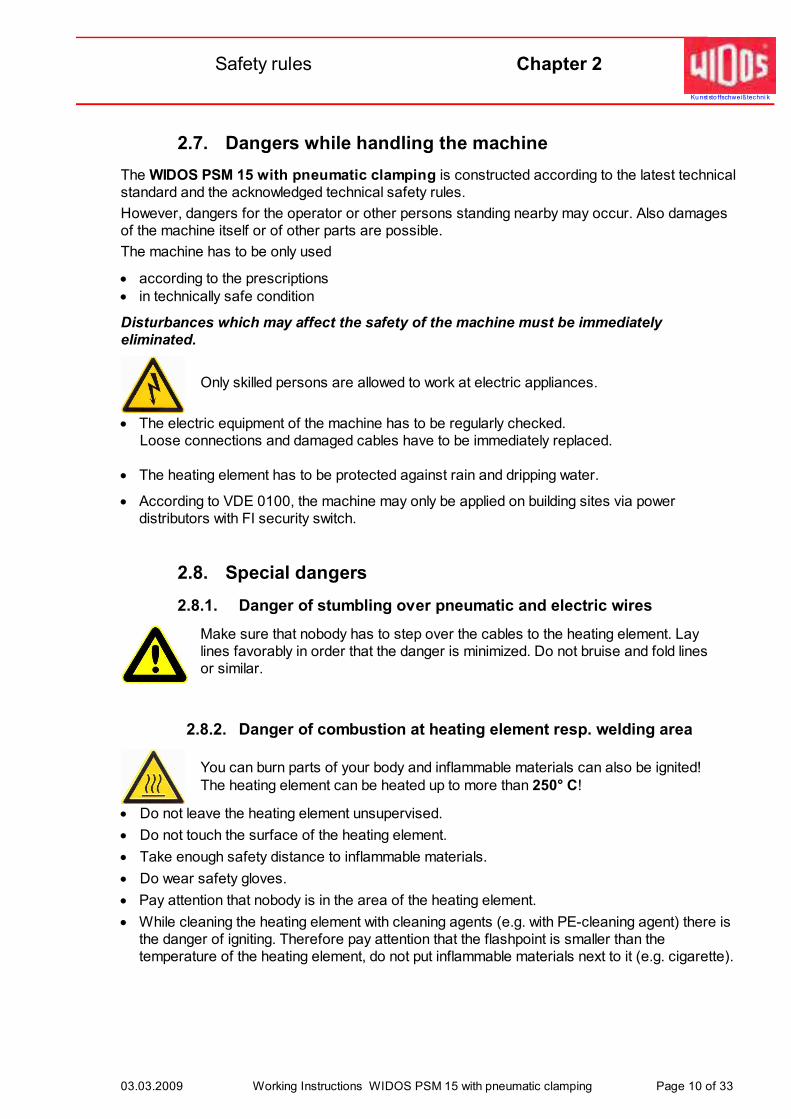
2.8.2. Danger of combustion at heating element resp. welding area
You can burn parts of your body and inflammable materials can also be ignited!
The heating element can be heated up to more than 250° C!
• Do not leave the heating element unsupervised.
• Do not touch the surface of the heating element.
• Take enough safety distance to inflammable materials.
• Do wear safety gloves.
• Pay attention that nobody is in the area of the heating element.
• While cleaning the heating element with cleaning agents (e.g. with PE-cleaning agent) there is the danger of igniting. Therefore pay attention that the flashpoint is smaller than the temperature of the heating element, do not put inflammable materials next to it (e.g. cigarette).

Kunststo ffschweißtechni k
Safety rules Chapter 2
03.03.2009 Working Instructions WIDOS PSM 15 with pneumatic clamping Page 11 of 33
2.8.3. Danger of crushing near and between the clamping beams
You may jam or crush your fingers.
- While closing the clamping beams do not reach between beams and sheet.
- Only activate the pneumatic clamping if no body part or foreign object is within the clamping area.
- While closing the tables do not reach between beams and sheet.
2.9. Structural modifications on the machine
• No modifications, extensions or reconstructions may be made on the machine without permission of the manufacturer. In case of disrespect the warranty or liability will expire.
• Machine parts which are not in a perfect condition are to be immediately replaced.
• Only use original WIDOS spare and wear parts.
• In case of purchase orders please always indicate the machine number!
2.10. Cleaning the machine
The materials you use for cleaning the machine have to be properly treated and have to be appropriately disposed, especially:
• when cleaning with solvents
• when lubricating with oil and grease.
2.11. Warranty and liability
Our „General Sales and Delivery Conditions“ are principally valid.
They are at the owner's disposal at the latest when signing the contract.
Warranty and liability demands referring to damages of persons or objects are suspended if they are caused by one or several of the following reasons:
• not using the machine according to the prescriptions
• improper transport, building-up, starting and operating the machine and maintenance
• ignoring the information given in this manual
• structural changes at the machine without permission
• unsatisfactory checking of machine parts which are worn out
• repairs performed in an inexpert way
• catastrophes by external influence and Acts of God.

Kunststo ffschweißtechni k
WIDOS Einsteinstr. 5 Phone +49 (0) 71 52 99 39 - 0
W. Dommer Söhne GmbH D-71254 Ditzingen-Heimerdingen Fax +49 (0) 71 52 99 39 - 40
Website: www.widos.de Email: [email protected]
03.03.2009 Working Instructions WIDOS PSM 15 with pneumatic clamping Page 12 of 33
3. Functional description
Al l i n t e rn a t i on a l an d n a t i on a l process gu i de l i n es a re to be bas i ca l l y
f o l l ow ed!
By using the clamping beams the plastic sheets are clamped. Afterwards the position of the sheets are checked and if necessary changed.
Now the heating element is swivelled in and the sheets are pressed on the heating element at a
defined pressure. This process is called "adjusting".
The applied power can be seen on the range display you find on the machine.
Having reached the mandatory bead height the pressure is reduced, the heating time begins. This time is used to reach the welding temperature at the sheet ends. After the ending of the heating-up, the tables drive apart, the heating element quickly slews out
of the machine and the tables drive together again, we call this change-over time. The sheets are joined at the needed welding pressure and cool down under pressure
(cooling time).
The welding joint can be clamped out and the welding process is completed. Image of a heating element butt welding:
Heating element heats the sheets up to welding temperature
Completed weld joint with bead on top and below

Kunststo ffschweißtechni k
WIDOS Einsteinstr. 5 Phone +49 (0) 71 52 99 39 - 0
W. Dommer Söhne GmbH D-71254 Ditzingen-Heimerdingen Fax +49 (0) 71 52 99 39 - 40
Website: www.widos.de Email: [email protected]
03.03.2009 Working Instructions WIDOS PSM 15 with pneumatic clamping Page 13 of 33
4. Operating and indicating elements
(machine with foot valves)
( machine with hand lever valves)
No. Denomination Function
1 Clamping beam, left side - to clamp sheet
2 Basis plate, left side - to support sheet
3 Hand lever for left clamping beam - to swivel left clamping beam up and down
4 Scale - indication of applied welding force - max. indication: 325 kp.
5 Service unit - to switch compressed air supply on/off - to regulate compressed air onto working pressure
6 Heating element lever - Heating element is swivelled up and downwards
7 Foot valve on the left (optional) - to clamp / release clamping beam left side
8 Heating element - to heat up the sheets
9 Clamping beam, right side - to clamp sheet
10 Basis plate, right side - to support sheet
11 Hand lever for right clamping beam - to swivel left clamping beam up and down
12 Hand wheel - to open / shut mobile slide - to apply adjusting and joining force
13 Foot valve on the right (optional) - to clamp / release clamping beam right side
1
2
3
4
5
6
7
8
9
10
11
12
13
14 15

Kunststo ffschweißtechni k
Operating and indicating elements Chapter 4
03.03.2009 Working Instructions WIDOS PSM 15 with pneumatic clamping Page 14 of 33
No. Denomination Function
14 Hand lever valve on the right (optional) - to clamp / release clamping beam right side
15 Hand lever valve on the left (optional) - to clamp / release clamping beam left side
4.1. Components at the heating element
(View of heating element from the rear, only with basic frame)
No. Denomination Function
12 On/off-switch with red lamp
- as soon as the heating element is activated, it is heated up. - lamp is red if connected to the mains
13 Display + rotary regulator
- temperature adjustment for the heating element
14 Control lamp, green We distinguish between 3 conditions:
• ON: signal for the state that the heating element does not heat up or cool down at the moment.
• Blinking: The temperature of the heating element is maintained. This is realized by the pulse-interval relation.
• Off: signal for the state that the heating element is heated up at the moment. The nominal temperature is not yet reached.
15 Connection cable - cable for the connection with local power supply 230 V / 50 Hz, covering 16 A
The heating element shown in welding position is descended below by slewing the lever (5) in direction of the arrow.
(5)
16
17
18
19
Kunststo ffschweißtechni k
Operating and indicating elements Chapter 4
03.03.2009 Working Instructions WIDOS PSM 15 with pneumatic clamping Page 15 of 33
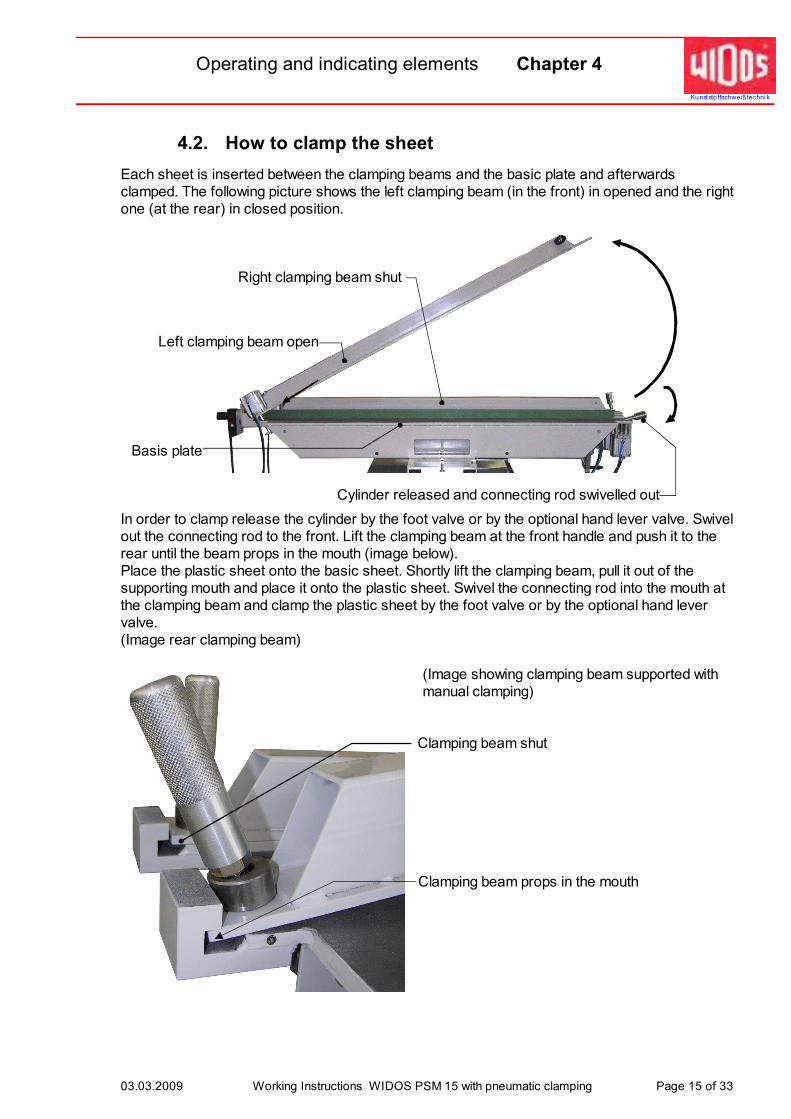
4.2. How to clamp the sheet
Each sheet is inserted between the clamping beams and the basic plate and afterwards clamped. The following picture shows the left clamping beam (in the front) in opened and the right one (at the rear) in closed position.
In order to clamp release the cylinder by the foot valve or by the optional hand lever valve. Swivel out the connecting rod to the front. Lift the clamping beam at the front handle and push it to the rear until the beam props in the mouth (image below). Place the plastic sheet onto the basic sheet. Shortly lift the clamping beam, pull it out of the supporting mouth and place it onto the plastic sheet. Swivel the connecting rod into the mouth at the clamping beam and clamp the plastic sheet by the foot valve or by the optional hand lever valve. (Image rear clamping beam)
(Image showing clamping beam supported with manual clamping)
Cylinder released and connecting rod swivelled out
Left clamping beam open
Basis plate
Right clamping beam shut
Clamping beam shut
Clamping beam props in the mouth
Kunststo ffschweißtechni k
Operating and indicating elements Chapter 4
03.03.2009 Working Instructions WIDOS PSM 15 with pneumatic clamping Page 16 of 33
There is acute danger of jamming and crushing!
• Only activate the foot valve (optional hand lever valves) to clamp if no body part or strange object is within the clamping area.
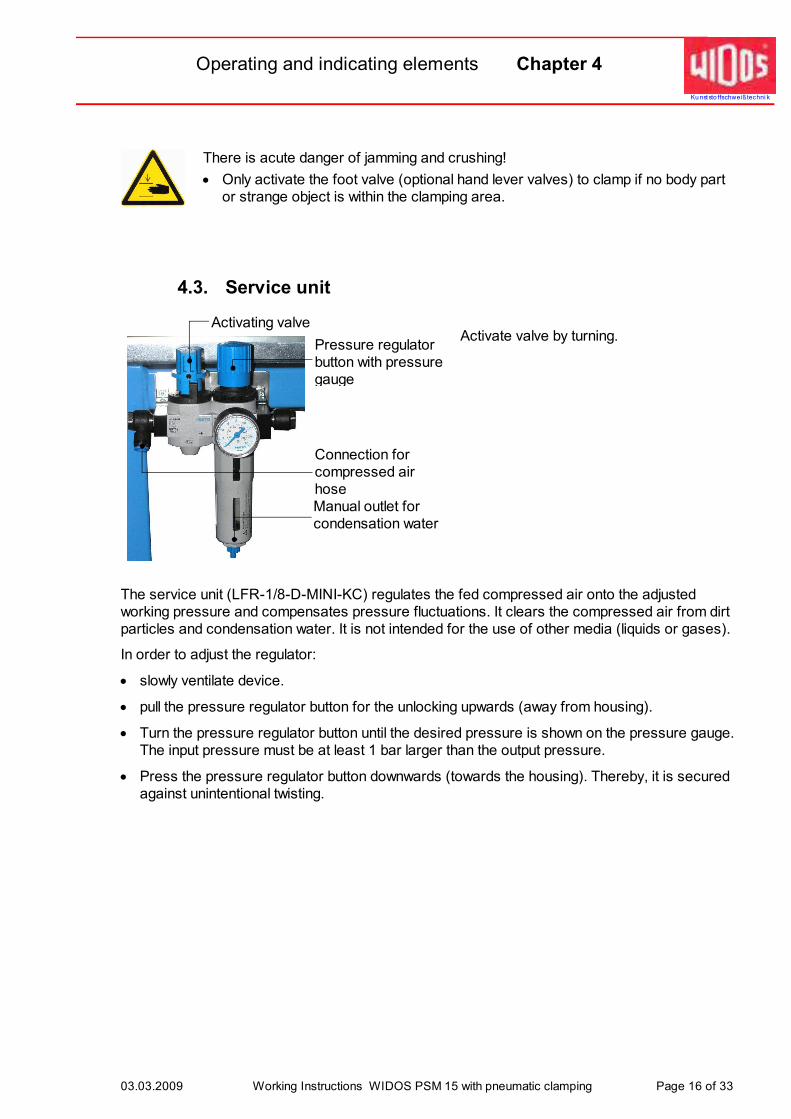
4.3. Service unit
Activate valve by turning.
The service unit (LFR-1/8-D-MINI-KC) regulates the fed compressed air onto the adjusted working pressure and compensates pressure fluctuations. It clears the compressed air from dirt particles and condensation water. It is not intended for the use of other media (liquids or gases).
In order to adjust the regulator:
• slowly ventilate device.
• pull the pressure regulator button for the unlocking upwards (away from housing).
• Turn the pressure regulator button until the desired pressure is shown on the pressure gauge. The input pressure must be at least 1 bar larger than the output pressure.
• Press the pressure regulator button downwards (towards the housing). Thereby, it is secured against unintentional twisting.
Activating valve
Pressure regulator button with pressure gauge
Connection for compressed air hose Manual outlet for condensation water

Kunststo ffschweißtechni k
Operating and indicating elements Chapter 4
03.03.2009 Working Instructions WIDOS PSM 15 with pneumatic clamping Page 17 of 33
4.4. How to clamp sheets for angle welding
You may weld an angle out of two plastic sheets on the WIDOS PSM 15.
The horizontal sheet of 10 up to 20 mm is clamped onto the left side (chapter: 4.2).
The vertical sheet, from 5 mm thickness, is clamped onto the right side.
First clamp the right beam (without sheet) tightly onto the right attachment.
Put the vertical sheet onto the interior of the right clamping beam onto the ledge and fix sheet e.g. with screw clamps.
Additionally fix the heating element in height by a spacer.
The machine disposes of (optional) spacers for a sheet thickness for the horizontal sheet of 10 / 15 / 20 mm.
Please always align spacer and sheet thickness in order that the vertical sheet is only heated in the welding area.
Remove spacer after heating otherwise you will not be able to turn the heating element downwards.
ledge for horizontal sheet
horizontal sheet
vertical sheet
spacer
screw clamp
Put spacer here into the lifted heating element.

Kunststo ffschweißtechni k
WIDOS Einsteinstr. 5 Phone +49 (0) 71 52 99 39 - 0
W. Dommer Söhne GmbH D-71254 Ditzingen-Heimerdingen Fax +49 (0) 71 52 99 39 - 40
Website: www.widos.de Email: [email protected]
03.03.2009 Working Instructions WIDOS PSM 15 with pneumatic clamping Page 18 of 33
5. Starting and operating
The instructions of this chapter are supposed to guide you in the operation of the machine and lead you during the appropriate starting of the machine. This includes:
- the safe operation of the machine;
- using all the possible options of the machine;
- economic operation of the machine.
5.1. Starting
• Remove the packaging.
• Connect the heating element to the local mains supply (230 V / 50 Hz / 16 A).
• Connect one pneumatic hose to the local compressed air supply (6 – 8 bar) and to the connector of the service unit (chapter: 4.3)
The machine only has to be introduced and used by skilled persons. For their qualification they can pass an exam of plastic welding according to DVS and DVGW.
• In dangerous situations for man and machine you have to immediately disconnect the machine from the mains plug.
• Having finished the welding work and during intervals you have to turn off the machine. Furthermore you have to control that no unauthorized person can use the machine
• Protect machine against humidity!
• The use on building sites is only permitted when respecting VDE 0100 and using current distribution with FI-safety-switch.
Carefully install electric cables (danger of stumbling)!
• Pay attention to environmental conditions: − The welding process may not take place in case of direct insulation.
• If local temperature is under 5° C the following measures have to be taken: − if necessary heat up sheet ends.
• Take measures against rain, wind and dust.

Kunststo ffschweißtechni k
Starting and operating Chapter 5
03.03.2009 Working Instructions WIDOS PSM 15 with pneumatic clamping Page 19 of 33
5.2. Welding process
Bas i ca l l y, t h e respec t i ve l y va l i d w e l d i n g gu i de l i n es h ave to be
respec ted ( ISO / CEN / DVS . . . ) .
• For the protection of being burnt wear safety gloves!
• You have to use a stop watch for taking the actual time of heating up and cooling down.
• You have to use a table where you can find the mandatory parameters to be used (time and force) for the dimensions of the sheets to be welded.
• The surface of the heating element has to be clean, especially free of oil, and has to be cleaned before every welding process resp. if it is dirty with non-fibering paper or cleaning agent (e.g. PE - cleaner).
The ant-stick coating of the heating element has to be intact.
Upon cleaning the hot heating element with cleaning agents there is the danger of inflammation, therefore make sure that the flash point is above the current heating element temperature, do not bring any sources of fire (e.g. cigarettes) nearby.
• Swivel the heating element to the lower position, turn it on (chapter 0 No. 16) and adjust the needed welding temperature at the adjusting screw (17) at the handle.
- When the green control lamp is blinking (18), the desired temperature is reached and stays stable with the help of a pulse-interval relation.
• The sheets have to be clean and free of oil in the welding area.
• Put the sheets under the clamping beams, adjust the sheets to each other and clamp the sheets with the optional foot valve or the hand lever valve (chapter 4.2).
• Close machine by the hand wheel (chapter: 4, No. 12).
• Check sheet displacement and crack at the ends of the nudging sheets. According to DVS 2207 the displacement of the tolerated crack may not be larger than 0,5 mm. - The displacement compensation is realized by opening the clamping nuts and displacing of the sheets. Afterwards refasten the clamping nuts.
- Take the adjusting force for the sheet dimensions to be welded out of the table.
• Heating up time, max. change-over time, cooling-down time and height of bead for the sheet dimensions to be welded have to be taken out of the table.
• Drive the machine a little bit open.
• Slew in the cleaned heating element when it has reached the desired temperature. If necessary wait until the green control lamp smoothly blinks.
• Drive the machine with identified adjusting force and hitchless together. The reached force can be seen on the force range (4) of the slide of the left side.
Having reached the mandatory surrounding bead height reduce the force (heating up force = appr. 10 % of adjusting force).
• Now the heating up time begins. Press the stopwatch and compare the actual time with the desired time of the table.
• Having finished the heating up time drive the slide a little bit open, slew out the heating element as fast as possible and drive the slides hitchless together. The maximum time for this process is given by the value for the change-over time indicated in the table.

Kunststo ffschweißtechni k
Starting and operating Chapter 5
03.03.2009 Working Instructions WIDOS PSM 15 with pneumatic clamping Page 20 of 33
• After the erection of the welding force press the stopwatch.
During the cooling down adjust the force if necessary once again (the cooling down force is the same as the adjusting force).
• After the cooling down time has elapsed, remove the force.
• release the clamping beams with the optional foot valves or hand lever valves and swivel it open.
• Take out the welded piece.
• Then open the machine.

Kunststo ffschweißtechni k
WIDOS Einsteinstr. 5 Phone +49 (0) 71 52 99 39 - 0
W. Dommer Söhne GmbH D-71254 Ditzingen-Heimerdingen Fax +49 (0) 71 52 99 39 - 40
Website: www.widos.de Email: [email protected]
03.03.2009 Working Instructions WIDOS PSM 15 with pneumatic clamping Page 21 of 33
6. Welding tables
Kunststo
ffschweißtechnik
Welding Table C
hapte
r 6
20
2
31
37
43
49
55
61
67
73
79
85
91
97
103
109
115
121
19
2
29
35
40
46
52
58
63
69
75
80
86
92
97
103
109
115
18
2
28
33
38
44
49
55
60
65
71
76
82
87
92
98
103
109
17
2
26
31
36
41
46
52
57
62
67
72
77
82
87
92
97
103
16
2
25
29
34
39
44
49
53
58
63
68
73
77
82
87
92
97
15
2
23
28
32
37
41
46
50
55
59
64
68
73
77
82
86
91
14
2
22
26
30
34
38
43
47
51
55
59
64
68
72
76
80
85
13
2
20
24
28
32
36
40
43
47
51
55
59
63
67
71
75
79
12
1,5
19
22
26
29
33
37
40
44
47
51
55
58
62
65
69
73
11
1,5
17
20
24
27
30
34
37
40
43
47
50
53
57
60
63
67
10
1,5
16
19
22
25
28
31
34
37
40
43
46
49
52
55
58
61
9
1,5
14
17
19
22
25
28
30
33
36
38
41
44
46
49
52
55
8
1,5
13
15
17
20
22
25
27
29
32
34
37
39
41
44
46
49
7
1,5
11
13
15
17
19
22
24
26
28
30
32
34
36
38
40
43
6
1
10
11
13
15
17
19
20
22
24
26
28
29
31
33
35
37
5
1
8
10
11
13
14
16
17
19
20
22
23
25
26
28
29
31
4
1
7
8
9
10
11
13
14
15
16
17
19
20
21
22
23
25
3
0,5
5
6
7
8
9
10
10
11
12
13
14
15
16
17
18
19
2
0,5
4
4
5
5
6
7
7
8
8
9
10
10
11
11
12
13
1
0,5
2
2
3
3
3
4
4
4
4
5
5
5
6
6
6
7
PE 80
PE 100
Tickness
Bead height
Lenght
100
120
140
160
180
200
220
240
260
280
300
320
340
360
380
400
J o i n i n g f o r c e [kp]
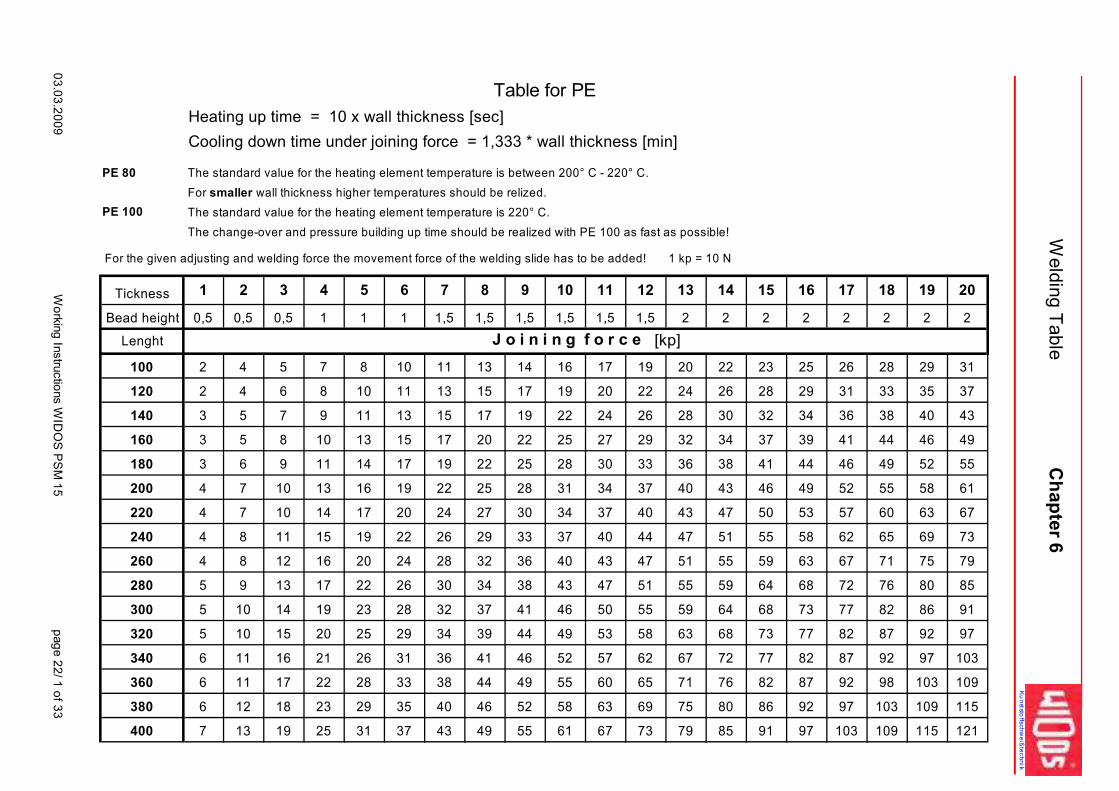
For smaller wall thickness higher temperatures should be relized.
The standard value for the heating element temperature is 220° C.
The change-over and pressure building up time should be realized with PE 100 as fast as possible!
For the given adjusting and welding force the movement force of the welding slide has to be added! 1 kp = 10 N
Table for PE
Heating up time = 10 x wall thickness [sec]
Cooling down time under joining force = 1,333 * wall thickness [min]
The standard value for the heating element temperature is between 200° C - 220° C.
03.03.2009
Working Instructions WIDOS PSM 15
page 22/ 1 of 33
Kunststo
ffschweißtechnik
Welding Table C
hapte
r 6
20
2
19
2
18
2
17
2
16
2
15
2
14
2
13
2
12
1,5
11
1,5
10
1,5
9
1,5
8
1,5
7
1,5
6
1
5
1
4
1
3
0,5
2
0,5
1
0,5
PE 80
PE 100
Tickness
Bead height
Lenght J o i n i n g f o r c e [kp]
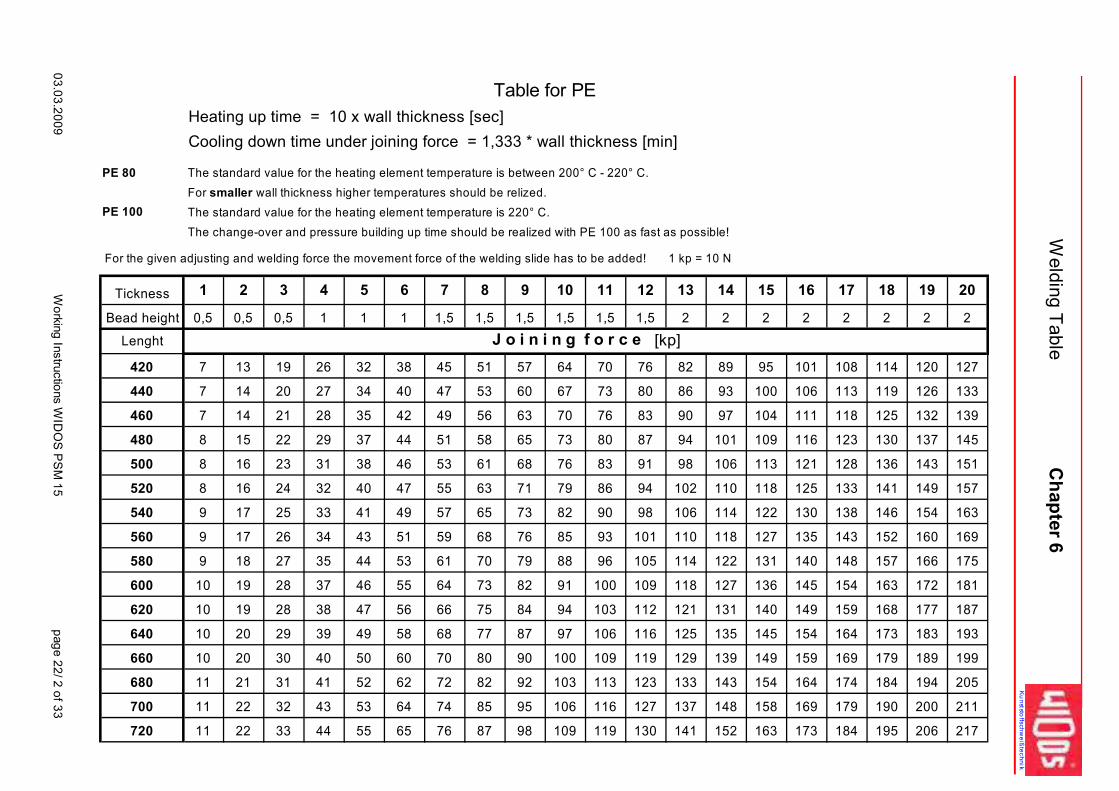
For smaller wall thickness higher temperatures should be relized.
The standard value for the heating element temperature is 220° C.
The change-over and pressure building up time should be realized with PE 100 as fast as possible!
For the given adjusting and welding force the movement force of the welding slide has to be added! 1 kp = 10 N
Table for PE
Heating up time = 10 x wall thickness [sec]
Cooling down time under joining force = 1,333 * wall thickness [min]
The standard value for the heating element temperature is between 200° C - 220° C.
127
133
139
145
151
157
163
169
175
181
187
193
199
205
211
217
120
126
132
137
143
149
154
160
166
172
177
183
189
194
200
206
114
119
125
130
136
141
146
152
157
163
168
173
179
184
190
195
108
113
118
123
128
133
138
143
148
154
159
164
169
174
179
184
101
106
111
116
121
125
130
135
140
145
149
154
159
164
169
173
95
100
104
109
113
118
122
127
131
136
140
145
149
154
158
163
89
93
97
101
106
110
114
118
122
127
131
135
139
143
148
152
82
86
90
94
98
102
106
110
114
118
121
125
129
133
137
141
76
80
83
87
91
94
98
101
105
109
112
116
119
123
127
130
70
73
76
80
83
86
90
93
96
100
103
106
109
113
116
119
64
67
70
73
76
79
82
85
88
91
94
97
100
103
106
109
57
60
63
65
68
71
73
76
79
82
84
87
90
92
95
98
51
53
56
58
61
63
65
68
70
73
75
77
80
82
85
87
45
47
49
51
53
55
57
59
61
64
66
68
70
72
74
76
38
40
42
44
46
47
49
51
53
55
56
58
60
62
64
65
32
34
35
37
38
40
41
43
44
46
47
49
50
52
53
55
26
27
28
29
31
32
33
34
35
37
38
39
40
41
43
44
19
20
21
22
23
24
25
26
27
28
28
29
30
31
32
33
13
14
14
15
16
16
17
17
18
19
19
20
20
21
22
22
7
7
7
8
8
8
9
9
9
10
10
10
10
11
11
11
420
440
460
480
500
520
540
560
580
600
620
640
660
680
700
720
03.03.2009
Working Instructions WIDOS PSM 15
page 22/ 2 of 33

Kunststo
ffschweißtechnik
Welding Table C
hapte
r 6
20
2
19
2
18
2
17
2
16
2
15
2
14
2
13
2
12
1,5
11
1,5
10
1,5
9
1,5
8
1,5
7
1,5
6
1
5
1
4
1
3
0,5
2
0,5
1
0,5
PE 80
PE 100
Tickness
Bead height
Lenght J o i n i n g f o r c e [kp]
For smaller wall thickness higher temperatures should be relized.
The standard value for the heating element temperature is 220° C.
The change-over and pressure building up time should be realized with PE 100 as fast as possible!
For the given adjusting and welding force the movement force of the welding slide has to be added! 1 kp = 10 N
Table for PE
Heating up time = 10 x wall thickness [sec]
Cooling down time under joining force = 1,333 * wall thickness [min]
The standard value for the heating element temperature is between 200° C - 220° C.
223
229
235
241
247
253
259
265
271
277
283
289
295
301
307
313
211
217
223
229
234
240
246
251
257
263
268
274
280
286
291
297
200
206
211
217
222
227
233
238
244
249
254
260
265
271
276
281
189
194
199
205
210
215
220
225
230
235
240
245
250
256
261
266
178
183
188
193
197
202
207
212
217
221
226
231
236
241
245
250
167
172
176
181
185
190
194
199
203
208
212
217
221
226
230
235
156
160
164
169
173
177
181
185
190
194
198
202
206
211
215
219
145
149
153
157
160
164
168
172
176
180
184
188
192
196
199
203
134
137
141
145
148
152
155
159
163
166
170
173
177
181
184
188
123
126
129
133
136
139
142
146
149
152
156
159
162
166
169
172
112
115
118
121
124
127
130
133
136
139
142
145
148
151
154
157
100
103
106
109
111
114
117
119
122
125
127
130
133
136
138
141
89
92
94
97
99
101
104
106
109
111
113
116
118
121
123
125
78
80
82
85
87
89
91
93
95
97
99
101
103
106
108
110
67
69
71
73
74
76
78
80
82
83
85
87
89
91
92
94
56
58
59
61
62
64
65
67
68
70
71
73
74
76
77
79
45
46
47
49
50
51
52
53
55
56
57
58
59
61
62
63
34
35
36
37
37
38
39
40
41
42
43
44
45
46
46
47
23
23
24
25
25
26
26
27
28
28
29
29
30
31
31
32
12
12
12
13
13
13
13
14
14
14
15
15
15
16
16
16
740
760
780
800
820
840
860
880
900
920
940
960
980
1000
1020
1040
03.03.2009
Working Instructions WIDOS PSM 15
page 22/ 3 of 33

Kunststo
ffschweißtechnik
Welding Table C
hapte
r 6
20
2
19
2
18
2
17
2
16
2
15
2
14
2
13
2
12
1,5
11
1,5
10
1,5
9
1,5
8
1,5
7
1,5
6
1
5
1
4
1
3
0,5
2
0,5
1
0,5
PE 80
PE 100
Tickness
Bead height
Lenght J o i n i n g f o r c e [kp]
For smaller wall thickness higher temperatures should be relized.
The standard value for the heating element temperature is 220° C.
The change-over and pressure building up time should be realized with PE 100 as fast as possible!
For the given adjusting and welding force the movement force of the welding slide has to be added! 1 kp = 10 N
Table for PE
Heating up time = 10 x wall thickness [sec]
Cooling down time under joining force = 1,333 * wall thickness [min]
The standard value for the heating element temperature is between 200° C - 220° C.
319
325
331
337
343
349
355
361
367
373
379
385
391
397
403
409
303
308
314
320
325
331
337
343
348
354
360
365
371
377
382
388
287
292
298
303
308
314
319
325
330
335
341
346
352
357
362
368
271
276
281
286
291
296
301
307
312
317
322
327
332
337
342
347
255
260
265
269
274
279
284
289
293
298
303
308
313
317
322
327
239
244
248
253
257
262
266
271
275
280
284
289
293
298
302
307
223
227
232
236
240
244
248
253
257
261
265
269
274
278
282
286
207
211
215
219
223
227
231
235
238
242
246
250
254
258
262
266
191
195
199
202
206
209
213
217
220
224
227
231
235
238
242
245
175
179
182
185
189
192
195
199
202
205
208
212
215
218
222
225
160
163
166
169
172
175
178
181
184
187
190
193
196
199
202
205
144
146
149
152
154
157
160
163
165
168
171
173
176
179
181
184
128
130
133
135
137
140
142
145
147
149
152
154
157
159
161
164
112
114
116
118
120
122
124
127
129
131
133
135
137
139
141
143
96
98
100
101
103
105
107
109
110
112
114
116
118
119
121
123
80
82
83
85
86
88
89
91
92
94
95
97
98
100
101
103
64
65
67
68
69
70
71
73
74
75
76
77
79
80
81
82
48
49
50
51
52
53
54
55
55
56
57
58
59
60
61
62
32
33
34
34
35
35
36
37
37
38
38
39
40
40
41
41
16
17
17
17
18
18
18
19
19
19
19
20
20
20
21
21
1060
1080
1100
1120
1140
1160
1180
1200
1220
1240
1260
1280
1300
1320
1340
1360
03.03.2009
Working Instructions WIDOS PSM 15
page 22/ 4 of 33

Kunststo
ffschweißtechnik
Welding Table C
hapte
r 6
20
2
19
2
18
2
17
2
16
2
15
2
14
2
13
2
12
1,5
11
1,5
10
1,5
9
1,5
8
1,5
7
1,5
6
1
5
1
4
1
3
0,5
2
0,5
1
0,5
PE 80
PE 100
Tickness
Bead height
Lenght J o i n i n g f o r c e [kp]
For smaller wall thickness higher temperatures should be relized.
The standard value for the heating element temperature is 220° C.
The change-over and pressure building up time should be realized with PE 100 as fast as possible!
For the given adjusting and welding force the movement force of the welding slide has to be added! 1 kp = 10 N
Table for PE
Heating up time = 10 x wall thickness [sec]
Cooling down time under joining force = 1,333 * wall thickness [min]
The standard value for the heating element temperature is between 200° C - 220° C.
415
421
427
433
439
445
451
394
400
405
411
417
422
428
373
379
384
389
395
400
406
352
358
363
368
373
378
383
332
337
341
346
351
356
361
311
316
320
325
329
334
338
290
295
299
303
307
311
316
270
274
277
281
285
289
293
249
253
256
260
263
267
271
228
232
235
238
241
245
248
208
211
214
217
220
223
226
187
190
192
195
198
200
203
166
169
171
173
176
178
181
145
148
150
152
154
156
158
125
127
128
130
132
134
136
104
106
107
109
110
112
113
83
85
86
87
88
89
91
63
64
64
65
66
67
68
42
43
43
44
44
45
46
21
22
22
22
22
23
23
1380
1400
1420
1440
1460
1480
1500
03.03.2009
Working Instructions WIDOS PSM 15
page 22/ 5 of 33

Kunststo
ffschweißtechnik
Welding Tables C
hapte
r 6
20
1,5
21
25
29
33
37
41
45
49
53
57
61
65
69
73
77
81
85
89
19
1
20
23
27
31
35
39
42
46
50
54
58
61
65
69
73
77
80
84
18
1
19
22
26
29
33
37
40
44
47
51
55
58
62
65
69
73
76
80
17
1
18
21
24
28
31
35
38
41
45
48
52
55
58
62
65
69
72
75
16
1
17
20
23
26
29
33
36
39
42
45
49
52
55
58
61
65
68
71
15
1
16
19
22
25
28
31
34
37
40
43
46
49
52
55
58
61
64
67
14
1
15
17
20
23
26
29
31
34
37
40
43
45
48
51
54
57
59
62
13
1
14
16
19
21
24
27
29
32
34
37
40
42
45
47
50
53
55
58
12
1
13
15
17
20
22
25
27
29
32
34
37
39
41
44
46
49
51
53
11
1
12
14
16
18
20
23
25
27
29
31
34
36
38
40
42
45
47
49
10
1
11
13
15
17
19
21
23
25
27
29
31
33
35
37
39
41
43
45
9
1
10
11
13
15
17
19
20
22
24
26
28
29
31
33
35
37
38
40
9
1
10
11
13
15
17
19
20
22
24
26
28
29
31
33
35
37
38
40
8
1
9
10
12
13
15
17
18
20
21
23
25
26
28
29
31
33
34
36
7
0,5
8
9
10
12
13
15
16
17
19
20
22
23
24
26
27
29
30
31
6
0,5
7
8
9
10
11
13
14
15
16
17
19
20
21
22
23
25
26
27
5
0,5
6
7
8
9
10
11
12
13
14
15
16
17
18
19
20
21
22
23
4
0,5
5
5
6
7
8
9
9
10
11
12
13
13
14
15
16
17
17
18
3
0,5
4
4
5
5
6
7
7
8
8
9
10
10
11
11
12
13
13
14
2
0,5
3
3
3
4
4
5
5
5
6
6
7
7
7
8
8
9
9
9
Thickness
Bead hight
Lenght
100
120
140
160
180
200
220
240
260
280
300
320
340
360
380
400
420
440
J o i n i n g f o r c e [kp]
For the given adjusting and welding force the movement force of the welding slide has to be added! 1 kp = 10 N
Table for PP
Heating up time = 15 x wall thickness [sec], for 2 - 4 mm wall thickness; and 16 x wall thickness [sec], for 5 - 10 mm wall thickness
Cooling down time under joining force = 2,0 x wall thickness [min], for 2 - 4 mm; and 1,75 x wall thickness [min] for >4 - 10 mm wall thi
The standard value for heating element temperature is 210° C ± 10 °C, for smaller wall thickness higher temperatures have to be realized.
03.03.2009
Working Instructions WIDOS PSM 15
Page 23 / 1 of 33

Kunststo
ffschweißtechnik
Welding Tables C
hapte
r 6
20
1,5
19
1
18
1
17
1
16
1
15
1
14
1
13
1
12
1
11
1
10
1
9
1
9
1
8
1
7
0,5
6
0,5
5
0,5
4
0,5
3
0,5
2
0,5
Thickness
Bead hight
Lenght J o i n i n g f o r c e [kp]
For the given adjusting and welding force the movement force of the welding slide has to be added! 1 kp = 10 N
Table for PP
Heating up time = 15 x wall thickness [sec], for 2 - 4 mm wall thickness; and 16 x wall thickness [sec], for 5 - 10 mm wall thickness
Cooling down time under joining force = 2,0 x wall thickness [min], for 2 - 4 mm; and 1,75 x wall thickness [min] for >4 - 10 mm wall thi
The standard value for heating element temperature is 210° C ± 10 °C, for smaller wall thickness higher temperatures have to be realized.
93
97
101
105
109
113
117
121
125
129
133
137
141
145
149
153
157
161
88
92
96
99
103
107
111
115
118
122
126
130
134
137
141
145
149
153
83
87
91
94
98
101
105
109
112
116
119
123
127
130
134
137
141
145
79
82
86
89
92
96
99
103
106
109
113
116
120
123
126
130
133
137
74
77
81
84
87
90
93
97
100
103
106
109
113
116
119
122
125
129
70
73
76
79
82
85
88
91
94
97
100
103
106
109
112
115
118
121
65
68
71
73
76
79
82
85
87
90
93
96
99
101
104
107
110
113
60
63
66
68
71
73
76
79
81
84
86
89
92
94
97
99
102
105
56
58
61
63
65
68
70
73
75
77
80
82
85
87
89
92
94
97
51
53
56
58
60
62
64
67
69
71
73
75
78
80
82
84
86
89
47
49
51
53
55
57
59
61
63
65
67
69
71
73
75
77
79
81
42
44
46
47
49
51
53
55
56
58
60
62
64
65
67
69
71
73
42
44
46
47
49
51
53
55
56
58
60
62
64
65
67
69
71
73
37
39
41
42
44
45
47
49
50
52
53
55
57
58
60
61
63
65
33
34
36
37
38
40
41
43
44
45
47
48
50
51
52
54
55
57
28
29
31
32
33
34
35
37
38
39
40
41
43
44
45
46
47
49
24
25
26
27
28
29
30
31
32
33
34
35
36
37
38
39
40
41
19
20
21
21
22
23
24
25
25
26
27
28
29
29
30
31
32
33
14
15
16
16
17
17
18
19
19
20
20
21
22
22
23
23
24
25
10
10
11
11
11
12
12
13
13
13
14
14
15
15
15
16
16
17
460
480
500
520
540
560
580
600
620
640
660
680
700
720
740
760
780
800
03.03.2009
Working Instructions WIDOS PSM 15
Page 23 / 2 of 33

Kunststo
ffschweißtechnik
Welding Tables C
hapte
r 6
20
1,5
19
1
18
1
17
1
16
1
15
1
14
1
13
1
12
1
11
1
10
1
9
1
9
1
8
1
7
0,5
6
0,5
5
0,5
4
0,5
3
0,5
2
0,5
Thickness
Bead hight
Lenght J o i n i n g f o r c e [kp]
For the given adjusting and welding force the movement force of the welding slide has to be added! 1 kp = 10 N
Table for PP
Heating up time = 15 x wall thickness [sec], for 2 - 4 mm wall thickness; and 16 x wall thickness [sec], for 5 - 10 mm wall thickness
Cooling down time under joining force = 2,0 x wall thickness [min], for 2 - 4 mm; and 1,75 x wall thickness [min] for >4 - 10 mm wall thi
The standard value for heating element temperature is 210° C ± 10 °C, for smaller wall thickness higher temperatures have to be realized.
165
169
173
177
181
185
189
193
197
201
205
209
213
217
221
225
229
233
156
160
164
168
172
175
179
183
187
191
194
198
202
206
210
213
217
221
148
152
155
159
163
166
170
173
177
181
184
188
191
195
199
202
206
209
140
143
147
150
154
157
160
164
167
171
174
177
181
184
188
191
194
198
132
135
138
141
145
148
151
154
157
161
164
167
170
173
177
180
183
186
124
127
130
133
136
139
142
145
148
151
154
157
160
163
166
169
172
175
115
118
121
124
127
129
132
135
138
141
143
146
149
152
155
157
160
163
107
110
112
115
118
120
123
125
128
131
133
136
138
141
144
146
149
151
99
101
104
106
109
111
113
116
118
121
123
125
128
130
133
135
137
140
91
93
95
97
100
102
104
106
108
111
113
115
117
119
122
124
126
128
83
85
87
89
91
93
95
97
99
101
103
105
107
109
111
113
115
117
74
76
78
80
82
83
85
87
89
91
92
94
96
98
100
101
103
105
74
76
78
80
82
83
85
87
89
91
92
94
96
98
100
101
103
105
66
68
69
71
73
74
76
77
79
81
82
84
85
87
89
90
92
93
58
59
61
62
64
65
66
68
69
71
72
73
75
76
78
79
80
82
50
51
52
53
55
56
57
58
59
61
62
63
64
65
67
68
69
70
42
43
44
45
46
47
48
49
50
51
52
53
54
55
56
57
58
59
33
34
35
36
37
37
38
39
40
41
41
42
43
44
45
45
46
47
25
26
26
27
28
28
29
29
30
31
31
32
32
33
34
34
35
35
17
17
18
18
19
19
19
20
20
21
21
21
22
22
23
23
23
24
820
840
860
880
900
920
940
960
980
1000
1020
1040
1060
1080
1100
1120
1140
1160
03.03.2009
Working Instructions WIDOS PSM 15
Page 23 / 3 of 33

Kunststo
ffschweißtechnik
Welding Tables C
hapte
r 6
20
1,5
19
1
18
1
17
1
16
1
15
1
14
1
13
1
12
1
11
1
10
1
9
1
9
1
8
1
7
0,5
6
0,5
5
0,5
4
0,5
3
0,5
2
0,5
Thickness
Bead hight
Lenght J o i n i n g f o r c e [kp]
For the given adjusting and welding force the movement force of the welding slide has to be added! 1 kp = 10 N
Table for PP
Heating up time = 15 x wall thickness [sec], for 2 - 4 mm wall thickness; and 16 x wall thickness [sec], for 5 - 10 mm wall thickness
Cooling down time under joining force = 2,0 x wall thickness [min], for 2 - 4 mm; and 1,75 x wall thickness [min] for >4 - 10 mm wall thi
The standard value for heating element temperature is 210° C ± 10 °C, for smaller wall thickness higher temperatures have to be realized.
237
241
245
249
253
257
261
265
269
273
277
281
285
289
293
297
301
225
229
232
236
240
244
248
251
255
259
263
267
270
274
278
282
286
213
217
220
224
227
231
235
238
242
245
249
253
256
260
263
267
271
201
205
208
211
215
218
222
225
228
232
235
239
242
245
249
252
256
189
193
196
199
202
205
209
212
215
218
221
225
228
231
234
237
241
178
181
184
187
190
193
196
199
202
205
208
211
214
217
220
223
226
166
169
171
174
177
180
183
185
188
191
194
197
199
202
205
208
211
154
157
159
162
164
167
170
172
175
177
180
183
185
188
190
193
196
142
145
147
149
152
154
157
159
161
164
166
169
171
173
176
178
181
130
133
135
137
139
141
144
146
148
150
152
155
157
159
161
163
166
119
121
123
125
127
129
131
133
135
137
139
141
143
145
147
149
151
107
109
110
112
114
116
118
119
121
123
125
127
128
130
132
134
136
107
109
110
112
114
116
118
119
121
123
125
127
128
130
132
134
136
95
97
98
100
101
103
105
106
108
109
111
113
114
116
117
119
121
83
85
86
87
89
90
92
93
94
96
97
99
100
101
103
104
106
71
73
74
75
76
77
79
80
81
82
83
85
86
87
88
89
91
60
61
62
63
64
65
66
67
68
69
70
71
72
73
74
75
76
48
49
49
50
51
52
53
53
54
55
56
57
57
58
59
60
61
36
37
37
38
38
39
40
40
41
41
42
43
43
44
44
45
46
24
25
25
25
26
26
27
27
27
28
28
29
29
29
30
30
31
1180
1200
1220
1240
1260
1280
1300
1320
1340
1360
1380
1400
1420
1440
1460
1480
1500
03.03.2009
Working Instructions WIDOS PSM 15
Page 23 / 4 of 33

Kunststo ffschweißtechni k
WIDOS Einsteinstr. 5 Phone +49 (0) 71 52 99 39 - 0
W. Dommer Söhne GmbH D-71254 Ditzingen-Heimerdingen Fax +49 (0) 71 52 99 39 - 40
Website: www.widos.de Email: [email protected]
03.03.2009 Working Instructions WIDOS PSM 15 with pneumatic clamping Page 24 of 33
7. Maintenance / Storage / Transport
7.1. In general
• Damaged parts have to be immediately replaced, in particular be careful with electric parts, dirt and humidity are very good conductors.
• In case of repair do only use original WIDOS – spare parts.
• Control resp. refasten all screwed connections if loose every 3 months.
All maintenance and repair work must be carried out with the machine being switched off. Thereby, the machine has to be protected against unintentional activation.
Prescribed maintenance and repair works are to be carried out in due time. DVS recommends repair works after one year.
Machines which are loaded above the average, the checking cycle should be shortened. The works have to be executed by company WIDOS GmbH or by one of its authorized representatives.
7.2. Clamping elements
In order to warrant a long lifetime, threaded spindles and joint pieces for clamping the sheets should be regularly cleaned and greased.
7.3. Cleaning the machine
The materials you use for cleaning the machine have to be properly treated and have to be appropriately disposed, especially:
• when cleaning with solvents
• when lubricating with oil and grease.
7.4. Service unit
Upon reaching a condensation level of appr. 10 mm below the filter element: Open the outlet screw counterclockwise (seen from below). Thereby, the condensate is released.
In case of minor flow despite unchanged pressure settings: Exchange the filter cartridge:
• Ventilate equipment and device.
• Turn filter jacket counterclockwise.
• Only seize the new filter cartridge by its lower end.
• Mount individual parts in reverse order.
• Restarting see „adjusting“ (chapter: 4.3)
Kunststo ffschweißtechni k
Maintenance / Storage / Transport Chapter 7
03.03.2009 Working Instructions WIDOS PSM 15 with pneumatic clamping Page 25 of 33
7.5. Transport
• The machine has to be carefully handled.
• Protect against shocks and hits.
• Close the clamping beams during the transport.
7.6. Disposal
The machine and wear parts have to be disposed of at the end of their service life according to the common Waste Management Laws in a proper and environmentally sound manner.

Kunststo ffschweißtechni k
WIDOS Einsteinstr. 5 Phone +49 (0) 71 52 99 39 - 0
W. Dommer Söhne GmbH D-71254 Ditzingen-Heimerdingen Fax +49 (0) 71 52 99 39 - 40
Website: www.widos.de Email: [email protected]
03.03.2009 Working Instructions WIDOS PSM 15 with pneumatic clamping Page 26 of 33
8. Electric and pneumatic diagrams

Kunststo ffschweißtechni k
Electric and pneumatic diagrams Chapter 8
03.03.2009 Working Instructions WIDOS PSM 15 with pneumatic clamping Page 27 of 33

Kunststo ffschweißtechni k
WIDOS Einsteinstr. 5 Phone +49 (0) 71 52 99 39 - 0
W. Dommer Söhne GmbH D-71254 Ditzingen-Heimerdingen Fax +49 (0) 71 52 99 39 - 40
Website: www.widos.de Email: [email protected]
03.03.2009 Working Instructions WIDOS PSM 15 with pneumatic clamping Page 28 of 33
9. Spare parts list
9.1. Basic machine with motion
1
2 - 8
9
10 - 12
14 - 16
17
18 - 23
24 - 26
33
30 - 32
27 – 29
45 - 47
48 - 50
41
56 - 59
36 - 40
34
35
42 - 44
60
13
51 - 55

Kunststo ffschweißtechni k
Spare parts list Chapter 9
03.03.2009 Working Instructions WIDOS PSM 15 with pneumatic clamping Page 29 of 33
(Image: basic machine from below, without base frame)
(Machine with hand lever valves, optional)
61 - 64 65 - 67
76 - 77
78
79 - 81
74 - 75
73
92 - 95 96 97
69 - 72 66 - 68
99 - 99
82 - 83
84 - 85
100 - 101
86 - 87
88 - 91
102
103
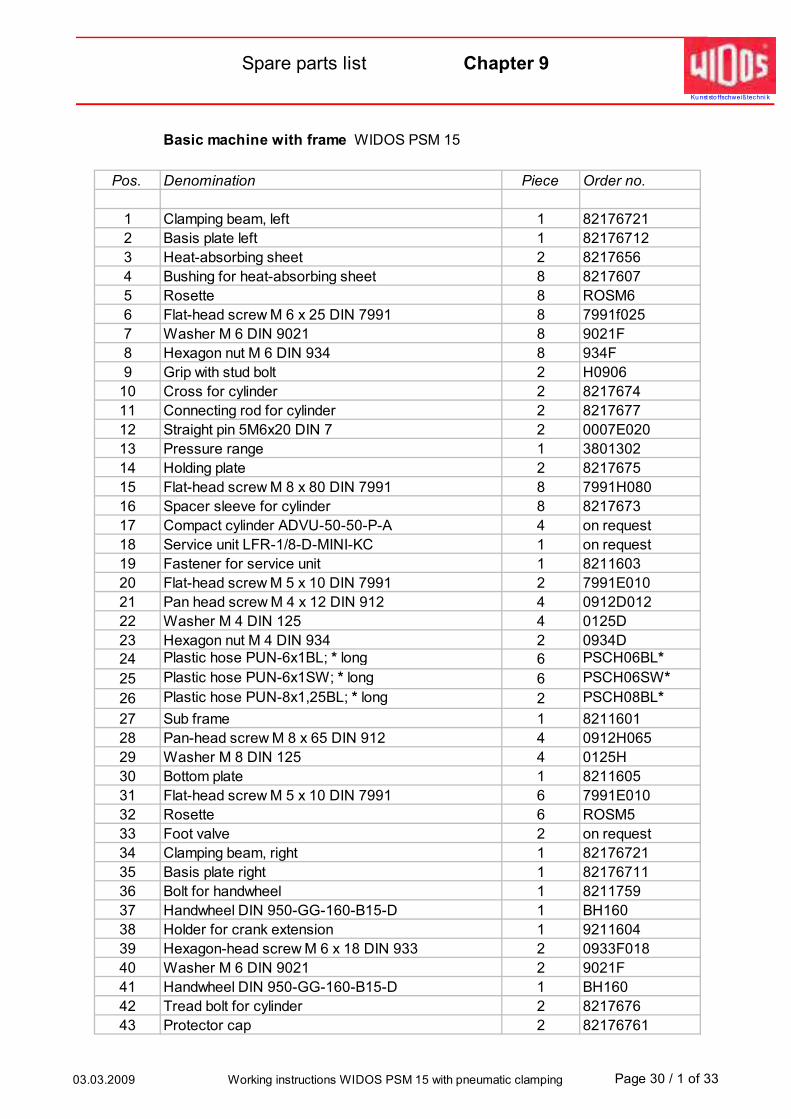
Kunststo ffschweißtechni k
Spare parts list Chapter 9
Basic machine with frame WIDOS PSM 15
Pos. Denomination Piece Order no.
1 Clamping beam, left 1 82176721
2 Basis plate left 1 82176712
3 Heat-absorbing sheet 2 8217656
4 Bushing for heat-absorbing sheet 8 8217607
5 Rosette 8 ROSM6
6 Flat-head screw M 6 x 25 DIN 7991 8 7991f025
7 Washer M 6 DIN 9021 8 9021F
8 Hexagon nut M 6 DIN 934 8 934F
9 Grip with stud bolt 2 H0906
10 Cross for cylinder 2 8217674
11 Connecting rod for cylinder 2 8217677
12 Straight pin 5M6x20 DIN 7 2 0007E020
13 Pressure range 1 3801302
14 Holding plate 2 8217675
15 Flat-head screw M 8 x 80 DIN 7991 8 7991H080
16 Spacer sleeve for cylinder 8 8217673
17 Compact cylinder ADVU-50-50-P-A 4 on request
18 Service unit LFR-1/8-D-MINI-KC 1 on request
19 Fastener for service unit 1 8211603
20 Flat-head screw M 5 x 10 DIN 7991 2 7991E010
21 Pan head screw M 4 x 12 DIN 912 4 0912D012
22 Washer M 4 DIN 125 4 0125D
23 Hexagon nut M 4 DIN 934 2 0934D
24 Plastic hose PUN-6x1BL; * long 6 PSCH06BL*
25 Plastic hose PUN-6x1SW; * long 6 PSCH06SW*
26 Plastic hose PUN-8x1,25BL; * long 2 PSCH08BL*
27 Sub frame 1 8211601
28 Pan-head screw M 8 x 65 DIN 912 4 0912H065
29 Washer M 8 DIN 125 4 0125H
30 Bottom plate 1 8211605
31 Flat-head screw M 5 x 10 DIN 7991 6 7991E010
32 Rosette 6 ROSM5
33 Foot valve 2 on request
34 Clamping beam, right 1 82176721
35 Basis plate right 1 82176711
36 Bolt for handwheel 1 8211759
37 Handwheel DIN 950-GG-160-B15-D 1 BH160
38 Holder for crank extension 1 9211604
39 Hexagon-head screw M 6 x 18 DIN 933 2 0933F018
40 Washer M 6 DIN 9021 2 9021F
41 Handwheel DIN 950-GG-160-B15-D 1 BH160
42 Tread bolt for cylinder 2 8217676
43 Protector cap 2 82176761
03.03.2009 Working instructions WIDOS PSM 15 with pneumatic clamping Page 30 / 1 of 33

Kunststo ffschweißtechni k
Spare parts list Chapter 9
Basic machine with frame WIDOS PSM 15
Pos. Denomination Piece Order no.
44 Flat-head screw 2 7991E012
45 Covering behind 1 8211607
46 Flat-head screw M 5 x 10 DIN 7991 10 7991E010
47 Rosette 10 ROSM5
48 Covering lateral 2 8211606
49 Flat-head screw M 5 x 10 DIN 7991 14 7991E010
50 Rosette 14 ROSM5
51 Hexagon-head screw M 8 x 16 DIN 933 4 0933F016
52 Washer M 8 DIN 9021 4 0921F
53 Hexagon-head screw M 10 x 16 DIN 933 2 0933J025
54 Washer M 10 DIN 9021 2 9021J
55 Nut for T-slots M 10 DIN 508 2 0508J
56 Sheet for sub frame 1 8211602
57 Flat-head screw M 5 x 10 DIN 7991 2 7991E010
58 Rosette 2 ROSM5
59 Edge protection, 800 mm long 1 on request
60 Screw cap 80x40x5 4 J0204
61 Beam, at the back 1 3861912
62 NSK-guide rail 500 mm 1 L20500
63 Pan-head screw M 5x16 DIN 912 15 0912E016
64 Cap 15 L20501
65 Support, movable 1 380103
66 NSK-guide carriage 4 L20CLZ
67 Pan-head screw M 5x12 DIN 912 8 0912E012
68 Support, fix 1 380104
69 Threaded spindle 1 380113
70 Hexagon nut M 12 DIN 934 1 0934L
71 Washer M 12 DIN 125 4 0125L
72 Stop nut 2 380114
73 Bevel gear with threaded bolt 1 3801612
74 Washer for threaded rod 1 3801681
75 Pan-head screw M 8 x 15 DIN 912 1 0912H015
76 Bevel gear, big 1 3801692
77 Grub screw M 8 x 12 DIN 916 1 0916H012
78 Nut for gearwheel shafting collar 1 380109
79 Shafting for crank 1 3801682
80 Parallel pin 6 m6 x 30 DIN 7 1 0007F030
81 Collar for gearwheel shafting 1 380117
82 Guiding for shafting 1 380165
83 Pan-head screw M 8 x 50 DIN 912 2 0912H050
84 Shafting for spring 2 380166
85 Pressure spring 2 FE033
86 Plate for spring support 1 3801641
03.03.2009 Working instructions WIDOS PSM 15 with pneumatic clamping Page 30 / 2 of 33

Kunststo ffschweißtechni k
Spare parts list Chapter 9
Basic machine with frame WIDOS PSM 15
Pos. Denomination Piece Order no.
87 Flat-head screw M 8 x 25 DIN 7991 2 7991H025
88 Beam, at the front 1 380101
89 NSK-guide rail 500 mm 1 L20500
90 Pan-head screw M 5x16 DIN 912 15 0912E016
91 Cap 15 L20501
92 Bearing for threaded bolt 1 380163
93 Ball-bearing 6005 ZZ 2 L6005Z
94 Sleeve intermediate bearing 1 380162
95 Pan-head screw M 8 x 70 DIN 912 2 0912H070
96 Nut for bevel gear bolt 1 3801611
97 Threaded rod TR 16x4 1 380168
98 Coupler plate 1 3801642
99 Pan-head screw M 8 x 25 DIN 912 1 0912H025
100 Pointer angle 1 380167
101 Pan-head screw M 4 x 10 DIN 912 2 0912D010
102 Holding plate for hand lever valve 2 82176751
103 Hand lever valve H-5-1/4-B 2 on request
-- Data plate 1 on request
03.03.2009 Working instructions WIDOS PSM 15 with pneumatic clamping Page 30 / 3 of 33

Kunststo ffschweißtechni k
Spare parts list Chapter 9
03.03.2009 Working Instructions WIDOS PSM 15 with pneumatic clamping Page 31 of 33
9.2. Heating element
1
2 - 4 14
5 - 7
10 18
11 - 13
15 - 17
21 / 22
20
19
24 - 26
27
28 / 29
30
33
31 / 32
39 / 40
36 - 38 23
8 / 9
34 / 35
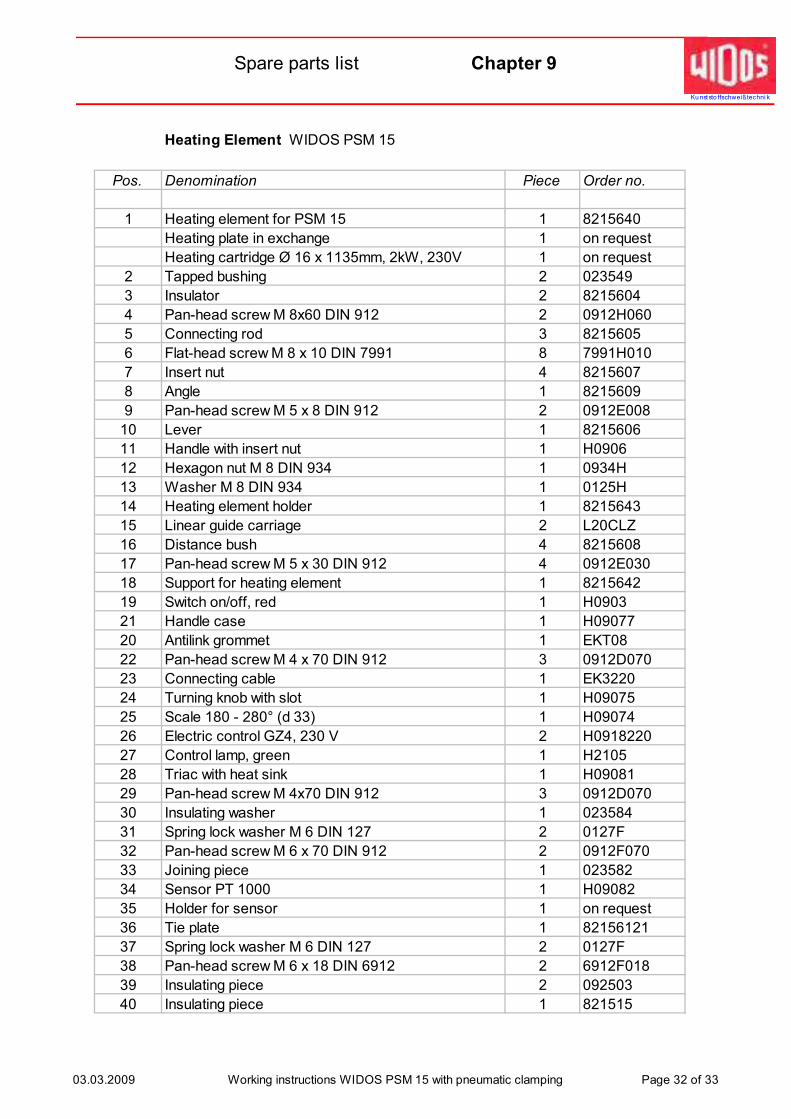
Kunststo ffschweißtechni k
Spare parts list Chapter 9
Heating Element WIDOS PSM 15
Pos. Denomination Piece Order no.
1 Heating element for PSM 15 1 8215640
Heating plate in exchange 1 on request
Heating cartridge Ø 16 x 1135mm, 2kW, 230V 1 on request
2 Tapped bushing 2 023549
3 Insulator 2 8215604
4 Pan-head screw M 8x60 DIN 912 2 0912H060
5 Connecting rod 3 8215605
6 Flat-head screw M 8 x 10 DIN 7991 8 7991H010
7 Insert nut 4 8215607
8 Angle 1 8215609
9 Pan-head screw M 5 x 8 DIN 912 2 0912E008
10 Lever 1 8215606
11 Handle with insert nut 1 H0906
12 Hexagon nut M 8 DIN 934 1 0934H
13 Washer M 8 DIN 934 1 0125H
14 Heating element holder 1 8215643
15 Linear guide carriage 2 L20CLZ
16 Distance bush 4 8215608
17 Pan-head screw M 5 x 30 DIN 912 4 0912E030
18 Support for heating element 1 8215642
19 Switch on/off, red 1 H0903
21 Handle case 1 H09077
20 Antilink grommet 1 EKT08
22 Pan-head screw M 4 x 70 DIN 912 3 0912D070
23 Connecting cable 1 EK3220
24 Turning knob with slot 1 H09075
25 Scale 180 - 280° (d 33) 1 H09074
26 Electric control GZ4, 230 V 2 H0918220
27 Control lamp, green 1 H2105
28 Triac with heat sink 1 H09081
29 Pan-head screw M 4x70 DIN 912 3 0912D070
30 Insulating washer 1 023584
31 Spring lock washer M 6 DIN 127 2 0127F
32 Pan-head screw M 6 x 70 DIN 912 2 0912F070
33 Joining piece 1 023582
34 Sensor PT 1000 1 H09082
35 Holder for sensor 1 on request
36 Tie plate 1 82156121
37 Spring lock washer M 6 DIN 127 2 0127F
38 Pan-head screw M 6 x 18 DIN 6912 2 6912F018
39 Insulating piece 2 092503
40 Insulating piece 1 821515
03.03.2009 Working instructions WIDOS PSM 15 with pneumatic clamping Page 32 of 33
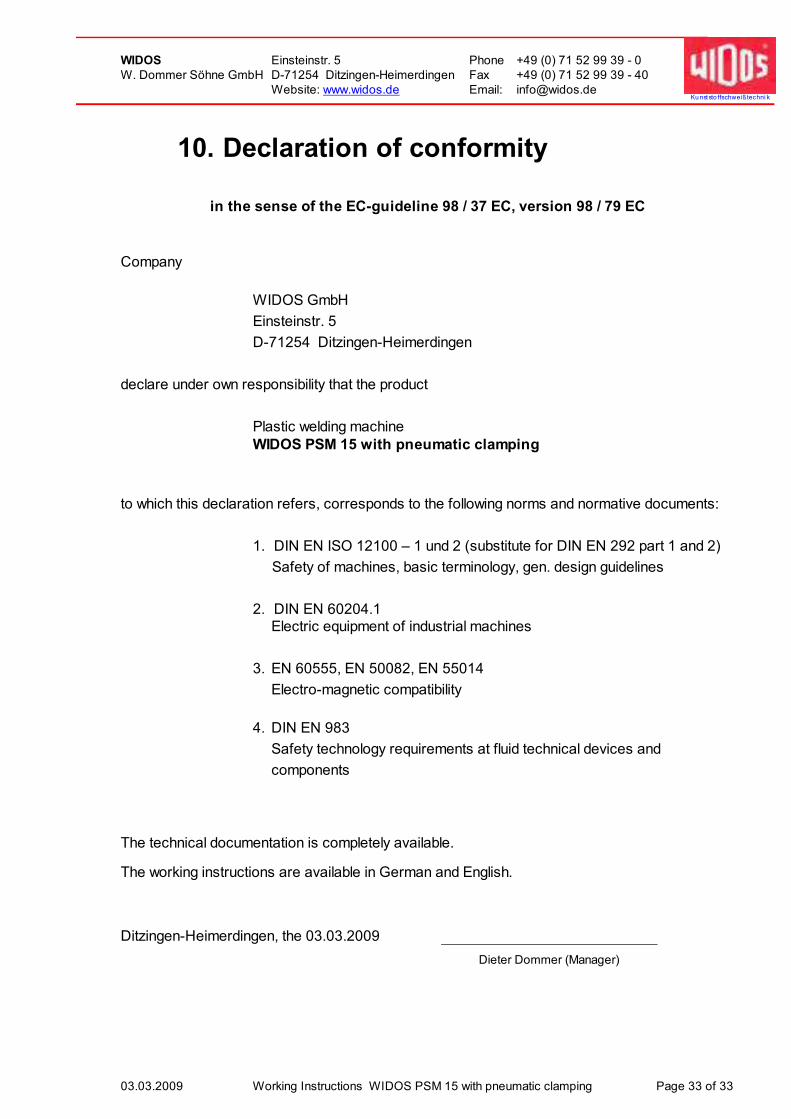
Kunststo ffschweißtechni k
WIDOS Einsteinstr. 5 Phone +49 (0) 71 52 99 39 - 0
W. Dommer Söhne GmbH D-71254 Ditzingen-Heimerdingen Fax +49 (0) 71 52 99 39 - 40
Website: www.widos.de Email: [email protected]
03.03.2009 Working Instructions WIDOS PSM 15 with pneumatic clamping Page 33 of 33
10. Declaration of conformity
in the sense of the EC-guideline 98 / 37 EC, version 98 / 79 EC
Company
WIDOS GmbH
Einsteinstr. 5
D-71254 Ditzingen-Heimerdingen
declare under own responsibility that the product
Plastic welding machine
WIDOS PSM 15 with pneumatic clamping
to which this declaration refers, corresponds to the following norms and normative documents:
1. DIN EN ISO 12100 – 1 und 2 (substitute for DIN EN 292 part 1 and 2)
Safety of machines, basic terminology, gen. design guidelines
2. DIN EN 60204.1 Electric equipment of industrial machines
3. EN 60555, EN 50082, EN 55014
Electro-magnetic compatibility
4. DIN EN 983
Safety technology requirements at fluid technical devices and
components
The technical documentation is completely available.
The working instructions are available in German and English.
Ditzingen-Heimerdingen, the 03.03.2009
Dieter Dommer (Manager)
Related Documents