Workbook 2010

Welcome message from author
This document is posted to help you gain knowledge. Please leave a comment to let me know what you think about it! Share it to your friends and learn new things together.
Transcript

Workbook 2010

CONTENTS
Contents 2
Preface to the FOURTH edition 6
Introduction 7
Chapter I: E-Prime at a glance 9
E-Studio, E-Data-Aid, E-Recovery and E-Merge 10
Object Oriented Programming 12
Conceptualizing an experiment 13
E-Prime’s Structure 15
E-Objects 17
Procedures, Lists and TextDisplays 18
the TextDisplay 19
General tab: 20
Frame tab 21
Font tab 22
Duration tab 22
Sync tab 24
Logging tab 24
Tutorial I: A simple RT experiment 26
Step 1: Building the basic hierarchy 26
Step 2: Programming the trial 27
Step 3: Analyse the data 28
Exercises Chapter 1 29
Chapter II: Attributes, Slides and more on Lists 30
Experimental design in E-Prime 30
More on lists 31
Selection tab 32
Reset / Exit tab 32
Attributes 33
Showing an Image 35
Showing multiple images and layers of texts 36
Feedback 37
Tutorial II: The Simon Task 38
Step 1: Building the basic design 38

Step 2: Drawing your stimuli 38
Step 3: Programming the trial 39
Exercises 40
Chapter III: Sound, hardware and inlines 41
SoundOut Objects and Digital Audio 42
SoundOut Objects 42
Digital Audio 43
Wait Object 45
Labels 45
Experiment Properties 46
Startup Info 46
Devices 47
Display Hardware 47
Beginning Programming in E-Prime 48
Variables and Scope 49
Changing and checking variables 51
Ad-hoc Randomization 53
Tutorial III: Distracting sound 54
Building the basic design 54
Programming the trial 55
Adding sound 56
Exercises 59
Chapter IV: More Inlines and Context-Control 61
Inlines, everywhere 61
Sleeping and beeping 61
Logging Timing 61
Getting attributes 62
Setting attributes 64
Balance responses 65
Tutorial IV: Making moving displays 67
The basic Design 67
The Trial 68
Programming moving objects 69
Exercises 70
Chapter V: Various Devices 72
The Serial-Response box 72

Adding the SRBOX 73
Using the SRBOX 74
Voice-Key experiments 74
Tutorial V: Making A Voicekey (VK) test program 77
The basic Design 77
The TRIAL 77
too loud or too soft? 77
to conclude 78
Chapter VI: Advanced E-Basic Programming 79
Arrays 79
Looping beyond Goto: For-Next; While-Wend 80
Learn more 82
Additional Exercises Chapter 1 82
Additional Exercises Chapter 2 82
Additional Exercises Chapter 3 83
Additional Exercises Chapter 4 83

6
PREFACE TO THE FOURTH EDITION
This workbook is part of the “Experimentation I: E-Prime” seminars, taught at the psychology
department of Leiden University by Saskia van Dantzig and Jesse van Muijden. The first edition of this
workbook was written in 2006 by Michiel Spapé and Jan-Rouke Kuipers, merely as a bundle of tutorial exercises. The second edition was largely rewritten by Michiel Spapé, resulting in a book which should
help those who are not quite getting started after doing PST’s own ‘getting started’ guide. The third edition was updated with the help of Rinus Verdonschot. In that edition two ‘advanced’ chapters were
added dealing with various devices that one may want to include in experiments and some of the more
interesting parts of the inline-programming experience. In april 2009 Michiel Spapé moved for a post-
doc to Nottingham where he will continue to shock people with his wit and remarkable E-prime
knowledge. The current, fourth, edition, was updated by Saskia van Dantzig and Rinus Verdonschot.

INTRODUCTION
What is E-Prime, and what will I learn?
E-Prime is a software package which is used to create and run psychological experiments and to
collect, format and analyse data. E-Prime consists of a number of programs with different functions.
The E-Prime programs that you will get to know during this course are E-Studio, E-Basic, E-Merge, E-
Recovery and E-DataAid.
E-Studio is the program that is used to create experiments. E-Studio is an object-oriented programming
environment with a graphical user interface. This phrase may sound intimidating, but it actually means
that programming in E-Studio is relatively easy. Being an object-oriented programming environment
means that E-Studio contains a lot of pre-programmed objects, ready-made building blocks of an
experiment. You can simply paste an object into your own experiment and change its properties according to your own preferences. E-Studio also has a graphical user interface, which means that it
has the familiar looks of a windows program, with different windows displaying different components
of the program.
In order to create a basic experiment in E-Studio, you won’t need any programming knowledge. In the
first session you will learn to work with E-Studio, and at the end of this session you will already be able to create a simple experiment, without having to write a single line of programming code (also
called script). Nevertheless, you’ll notice that the standard building blocks provided by E-Studio may not always be sufficient to make your experiment exactly as you want it to be. Therefore, E-Prime
allows you to write small pieces of code in E-Basic, a simple programming language. In the third and fourth session you’ll learn to program in E-Basic, and you’ll learn how to add the code to your
experiment.
E-Prime also enables you to collect, format and analyse data. A single run of an experiment by a
participant is called a session. During each session, a unique datafile is created, storing data such as the
time and date of the session, details of the participant (such as participant number, gender, age,
handedness), and details of each trial (e.g., its condition and duration, as well as response data such as
the reaction time and accuracy). The program E-Merge is used to merge multiple datafiles, generated
by different participants, into one large datafile containing the data of all participants. Sometimes, a
session does not result in a complete datafile (for example, because E-Prime crashes while running the experiment). In this case, the program E-Recovery can be used to recover the remaining data of the
session.
Why should I learn E-Prime?
There are a number of reasons to learn E-Prime. First, a large part of this Research Master is devoted
to doing a research project. That also involves setting up and programming your own experiment,
which requires good E-Prime programming skills.
Second, learning to program is more than just learning a specific programming language.
Programming is mostly logic thinking. Once you have learned to program in E-Prime, you can easily
transfer your knowledge and skills to new programming languages. Moreover, you’ll have learned to
think about experiments in a structured and logical way. This skill is not only useful when you have to
set up an experiment yourself (for example, during your research project), but it also helps you to read
and understand empirical papers.
What is the set up of the course?

Introduction
8
The four-week course consists of lectures and practicals. The 2-hour lectures will give you insight in
the background of experimental programming and the specifics of the E-Prime software. During the mandatory practical sessions, you will practice to use E-Prime yourself, guided by the tutorials in this
book and by the supervisors present during the session. In the fifth week, the course will be finished by an exam.
Time Table
Week Date Time Location Activity
1 Monday 6 september 11:00 – 13:00 5B04 Lecture E-Prime I Thursday 9 september
13:00 – 15:00 2B04 Practical I
2 Monday 13 september 11:00 – 15:00 5B04 Lecture E-Prime II
Thursday 16 september
13:00 – 15:00 2B04 Practical II
3 Monday 20 september 11:00 – 15:00 5B04 Lecture E-Prime III Thursday 23 september
13:00 – 15:00 2B04 Practical III
4 Monday 27 september 11:00 – 15:00 5B04 Lecture E-Prime IV
Thursday 30 september 13:00 – 15:00 2B04 Practical IV
5 Friday 8 october 13:00 – 16:00 TBA Examination
What does the exam look like?
During the examination (October 8; 13:00-16:00), you will be asked to program a replication of an
experiment. That is, you will be provided with three different texts describing the procedure and
design of a typical experiment. You can pick your favourite experiment and replicate it.
What if I have more questions?
You can send an email to one of the coordinators ([email protected] or [email protected]).
E-Prime also has a good support website: http://www.pstnet.com/products/e-prime/. On this website, you’ll find examples of experiments and answers to frequently asked questions and problems. If you
encounter a problem and can’t find the answer on their FAQ page, you can send them your question,
using a special form on the website. You’ll then receive a personal answer, usually within a day or two.
In order to get this personal support, you have to register on the website (free).
More information can also be found in the E-Prime tutorials (on blackboard). There is a short Getting
Started Guide, and a more extensive Users Manual.
Lastly, it might be useful to mention the E-prime google group where you can ask a large (>500)
community questions about E-Prime:
http://groups.google.com/group/e-prime

Chapter 1
9
CHAPTER I: E-PRIME AT A GLANCE
In this chapter, you will learn
About:
E-Studio, E-DataAid, E-Recovery and E-Merge
Object Oriented Programming
E-Prime’s structure
Procedures
Lists
TextDisplays
How to:
Create your first experiment
Pimp your experiment
Save and analyse your data

Chapter 1
10
E-STUDIO, E-DATA-AID, E-RECOVERY AND E-MERGE
E-Studio is a software package, composed of several programs. Two of the programs will be covered
throughout this book; the others are too straightforward to merit extensive coverage beyond a quick
summary.
E-Studio. is an object-oriented programming environment with a graphical user interface. This phrase
may sound intimidating, but it actually means that creating an experiment in E-Prime is relatively easy. Object-oriented means that each experiment is built up of basic building blocks called E-Objects.
Graphical user interface means that E-Studio uses a familiar-looking windows environment, in which you can simply drag and drop objects onto the timeline of your experiment, and can select objects by
clicking on them. As a result of the predefined objects, you’ll hardly have to write programming code
(also called script) yourself. Once you’ve worked your way through the first chapter of this book,
you’ll be able to create your own experiment, and that without having to write a single line of code!
However, sometimes the options provided by E-Studio are not flexible enough to allow for your
specific designing ideas. In that case, you’ll need to write a few lines of code. Chapters III and IV will
teach you how to do this.
E-DataAid is a program that can read E-Prime output. Whenever an E-Prime experiment is run, a
unique datafile is created (an .edat file). These .edat files cannot be opened directly by Microsoft Excel or SPSS, but you can use E-DataAid to convert them to such formats. Additionally, E-DataAid comes
with many more features that can make it much easier to get your data in a proper shape for analysis. For example, you can filter out missing data before exporting, explore outliers and filter them out,
generate crosstabs to base your graphs on, etc.
E-Merge does nothing more than merging data. Typically, when you have run N subjects, you’ll
end up with N .edat datafiles. Of course, you can analyse each one of them after another, or even
import each one into SPSS, but each action can go wrong, adding a chance of data-corruption due to
human- or machine error, and each action costs time. With E-Merge you can merge the N datafiles into
one large file. To merge a set of datafiles, you take the following steps.
1. find the .edat files your experiment has generated,
2. select them all using your mouse and control- or shift-clicking,
3. click on the Merge button
This generates a .emrg file, which can also be opened and analysed within E-DataAid. As E-Merge is rather self-explanatory, it will not be covered anywhere else in this book.
E-Recovery is the smallest and simplest program in the package. If E-Prime crashes during an
experiment, no .edat file is generated. However, during experimental runtime, a .txt file is created to
which data from each trial are appended. This .txt file contains the same data as the .edat file, but it is
rather inconvenient to analyse. So, should E-Prime crash after having gone through several trials, you can open E-Recovery, take the following steps to recover the (partial) data:
1. press Browse, 2. look up the specific .txt file that you wish to recover,
3. press Recover Now you have an .edat file that is fully equivalent to the others, except that it lacks a few trials. Since
this is all E-Recovery does, the program will not be mentioned anywhere else in this book.
E-Run is E-Prime’s basic compiler. When you have created an experiment in E-Studio and press
(control+) F7, an .ebs (e-basic script) file is created. The .ebs file can be opened and run in E-Run.

Chapter 1
11
ConceptualizeExperiment
From idea to resultDesigning, running and analysing an experiment with E-Prime software
Flow chart
Createexperiment
E-Basic Script
(.ebs)E-Studio file
(.es)
Runexperiment
Convert Text file to E-Prime datafile
Subject 1
Text fileE-Prime Datafile(.edat)
Subject 2
E-Prime Datafile(.edat)
Text file
Subject N
E-Prime Datafile(.edat)
Text file
Merge E-Prime datafiles
Analyse and export
data
Merged file(.emrg)
E-Studio
E-Basic
E-Run
E-Recovery
E-Merge
E-DataAid
Step Subprogram

Chapter 1
12
OBJECT ORIENTED PROGRAMMING
E-Prime, like many popular modern programming languages such as C++ and Visual Basic, is based on
the concept of Object Oriented Programming (OOP).
A good example of an object in daily life is “a car”. One can do certain things with objects, such as
driving, steering and pursuing horizons. In programming, we call such abilities methods. In
programming script, an object’s method is indicated in the following way: Object.method(parameters). For example, the code Car.drive(forward) would let the car object drive forward, the Car being the
object, drive being the method, forward being a parameter of the drive-method. The other important feature of objects is that they almost always have properties: a car can be red, have a top speed of 200
km/h, have four seats and so on. If I wanted to tell an object oriented programming language that my
car is dark-blue, I would say that my Car.colour = dark-blue, car being the object, colour being the
property and dark-blue being the parameter of the colour property.
Two other concepts of OOP are instances and inheritance. My car, for example, is not just any car, it is
MY car! That is to say, myCar is an instance, in other words, a particular or token from the object or
type Car. This matters for programming, because if I would add something to myCar, such as a boom-box, this does not alter cars in general, but the same is not true if Cars in general came with such
devices. Inheritance is also about the types and tokens: since my car is a Suzuki, it inherits certain properties and methods that are generally true for most cars, such as that it comes with a steering
wheel and four wheels. Specifically, my car is a Suzuki Swift, which inherits certain features from the Suzuki object, such as its cheap price and uncomfortable seats.
Don’t worry if these concepts strike you as difficult and abstract. Understanding them is not crucial to programming basic experiments, but since they are of such importance to modern-day programming, I
hope that their functions will be revealed to you during your work with E-Prime.

Chapter 1
13
CONCEPTUALIZING AN EXPERIMENT
When you’re designing an experiment you might be tempted to run to your computer and start
programming straight away. However, before you start programming, you should know exactly what
your experiment should look like. This may sound self-explanatory, but you should realize that this is
the most important step of the whole process. Therefore, you should always start by conceptualizing
the experiment. Also, drawing a simple flow chart will be of significant help during later programming steps.
Conceptualizing the experiment helps you to specify the setup of the experiment. You could start by asking yourself the following questions:
- What kind of design do you need? A between-subjects design or a within-subjects design?
- Which are the variables that you will manipulate? What are the independent variables? How many
levels do these variables have? How many conditions does the experiment have?
- What are the dependent variables that you will measure? Reaction time, error rate, other
variables?
- Does your experiment contain multiple lists or blocks of trials? If yes, what is the order of presentations of these blocks?
- Does your experiment have a practice block? - How do you instruct the participant?
- What happens during a trial? What kind of stimulus is presented? For how long is the stimulus presented? How should the participant respond? What happens if the participant responds too
slowly? - What happens between trials? Does the participant get feedback? How long is the interval between
trials (ITI: intertrial interval)?
- In which order are trials presented? In random order? In a fixed order? Or in a semi-random order?
To facilitate programming, it is useful to draw a flow chart that displays the structure of the
experiment. An experiment typically contains a hierarchy of procedures. The main procedure (called SessionProc in E-Prime) determines the global order of events in the experiment. This one is depicted
on the left. Subprocedures are depicted to the right of the main procedure.
A flow chart contains different elements:
Event: Refers to a specific event during the experiment, for example the
presentation of a picture, text or sound. Indicate what happens, the duration of
the event, and how the event is terminated (e.g., by clicking the space bar).
Subprocedure: Refers to a procedure at a lower level of the hierarchy. Indicate
the name of the procedure, the number of repetitions of the procedure and the
order of the repetitions (e.g., random)
Decision: The procedure branches in two options. The diamond indicates a criterion (e.g., response = correct, or reaction time < 1000). If the criterion is
met, the Yes-branch is followed, if the condition is not met, the No-branch is
followed.
Arrow: Indicates the flow of the events

Chapter 1
14
Here’s a flow chart of a simple reaction time experiment with one practice block and one experimental block.
TrialProc
Instruction screenRun until spacebar is
pressed
Practice blockTrialProc
16x random order
BreakRun until spacebar is
pressed
Thank you screenEnd of experiment
Experimental trialsTrialProc
100x random order
SessionProc
ITI1200 ms
Prime40 ms
Target2000 ms
Response?
Correct?
FeedbackTOO SLOW
FeedbackError
Ja
Nee
Nee
Ja
Next trial

Chapter 1
15
E-PRIME’S STRUCTURE
1 2 3 4 5 6 7 8
In the Menu you can do a number of typical Windows things, such as opening and saving your
experiment. In addition, by clicking on “View”, you can open the other areas (2 – 7 and a few other
ones). By clicking the Run icon - -, you can compile and test the experiment.
The Toolbox area shows all components (E-Objects) available in E-Prime. To use one of them, drag it
onto either the Structure area (4) or a Procedure object (7).
The Properties window displays the properties of the currently selected instance. If I would select a
TextDisplay, for example (see below), I can quickly change certain properties (such as the background
colour) from within the properties area. Typically, you can also use the working area (5) for that,
which is easier.
The Structure window shows the hierarchy of the experiment. Most experiments are organised into
blocks and trials. For example, you may want an experiment to have two blocks: one for training your
participants followed by one for testing them.

Chapter 1
16
This area – which covers almost half the screen – is called the Working Area. This is where you can
edit elements of the experiment in a visual, easy way. When you double click on an object in the Structure window, it appears in the Working Area.
The Output Window appears when you click the Generate button in order to compile the experiment. If there is an error in your experiment, the output window will show a message describing that error.
The Procedure Object called “SessionProc”. Displays a timeline with the main procedure of the
experiment.
The Browser Window shows all objects (instances) that you have created for the experiment. In the
Browser window you can copy objects. E-Prime then creates a new instance with the same properties
as the original object. If you copy an object in a different way (e.g., in the Structure window), no new
object is created, but the same object is simply reused at a different location of the experiment.

Chapter 1
17
E-OBJECTS
E-Prime contains different objects, each with its own characteristic features. Each of them is used for
specific purposes. Here is an overview of the objects that are used most often.
A Procedure is used to determine the order of events in an experiment.
A List contains rows of items with specific properties (attributes).
An ImageDisplay displays a picture.
A TextDisplay displays one or more lines of text.
A MovieDisplay displays a short movie clip.
A Slide can simultaneously present text, images and sound.
A FeedbackDisplay gives specific feedback on the participant’s response to a stimulus.
A SoundIn is used to record sounds.
A SoundOut presents a sound file (.wav).
An InLine is used to add E-Basic script.
A Label indicates a particular location on the timeline. The program can ‘jump’ backward or
forward to a label, in order to repeat or skip a part of the procedure.

Chapter 1
18
PROCEDURES, LISTS AND TEXTDISPLAYS
A procedure is the highest unit in the hierarchy of E-Prime. It is used to specify the sequence of events
in the experiment.
A procedure is depicted as a timeline. The green
ball on the left indicates the start of the procedure
and the green ball on the right depicts the end of the procedure. In this example, the procedure called
“TestProc” presents two TextDisplays. First, it shows the Wait1000ms TextDisplay, followed by
the PressSpace TextDisplay.
When you open a new experiment, it already
contains a procedure, specifying the order of events
in an experimental session. This procedure is called “SessionProc” by default.
Lists are extremely useful objects. Their function is basically this: they repeat procedures. Also, they
determine the way in which procedures are repeated, for instance, randomising certain variables that are contained in the list.
When you create a new List, you’ll see this window:
The rows contain different items, the columns
indicate the properties (called attributes) of these items.
By clicking on the Add Level icon or the Add
Multiple Levels icon , you can add one or more
rows respectively.
By clicking on the Add Attribute icon or the Add Multiple Attributes icon , you can add one or more columns, respectively.
Each list has a column named Procedure. By filling in the
name of a procedure in a particular row, you specify
which procedure is used by that row. If the procedure name does not yet exist in the experiment, the following
pop-up window appears, telling you that the procedure does not yet exist and asking you whether the procedure
should be created. Click Yes.
Subsequently, E-Prime asks if this procedure should be the default procedure for newly created levels.
Click Yes if you want all rows to use the same procedure.
When you specify a procedure, it will appear in the Structure window under the List
containing the procedure, such as in the example below, where PracticeList uses a
procedure called TrialProc .

Chapter 1
19
Lists are explained in more detail in Chapter II. For now, it will be enough that Weight indicates the
number of repetitions of a particular item.
THE TEXTDISPLAY
TextDisplays present text. This one shows the instruction to press the space bar. TextDisplays also offer a feature
that may be even more important than showing text on the screen: they can collect responses. This, amongst others, is
discussed in detail below.
The TextDisplay is the simplest way of showing stimuli and collecting responses and almost the only
object required to make a simple Stroop experiment (see Chapter II). Later on, we will see that other
objects, such as the Slide and the FeedbackDisplay, can contain TextDisplays.
When you drag a TextBox from the Toolbox area onto a procedure and double click on it, you should
see something like the screenshot above, with the exception that it is usually named differently and does not say “PRESS SPACE”.
The TextDisplay’s name is shown at the top left corner. When you add a new TextDisplay to the experiment, it will be named ‘TextDisplay1’ (or ‘TextDisplay2’, if there already exists a ‘TextDisplay1’,
etcetera). It is good practice to rename the objects and give each of them a unique and descriptive name without funky characters such as commas, semicolons, spaces, etc. Admitted, the above example shows
how not to name an object: sensory presentations in experiments are stimuli by default, which makes this name not at all descriptive or unique at all.
Once you have created a TextDisplay, you can click on the properties symbol to open the Properties
window. This window has different tabs, in which you can specify various properties of the object. The
Common tab is left out here, as it does not do anything aside from enabling you to describe the object,
anyway.
Do NOT select a procedure like the SessionProc from the drop-down menu
I’ve tried explaining this as creating an infinite loop or as ‘similar to Ouroboros – the great snake
that bites its own tail’, but no matter whether that makes sense to you: please just don’t.

Chapter 1
20
GENERAL TAB:
- Text: Here you should enter the text that the TextDisplay will show. Usually, you may find it easier
to adjust the Text property by using the more graphical interface shown earlier (the figure showing the “PRESS SPACE” TextDisplay), but it is important to remember that .Text is a property of a
TextDisplay, which can be used when you start writing your own script in the later chapters.
- AlignHorizontal, AlignVertical: Adjusting these properties adjust the position of the text relative
to the horizontal and vertical dimensions respectively.
- ForeColor: The color of the text. You can choose a fixed color name, e.g. “red”, “green”, or “black”
from the dropdown menu. Alternatively, you can enter an RGB (Red, Green, Blue) value; three
numbers ranging from 0 to 255, representing the relative amount of red, green and blue. Thus,
(255,0,0) means red, (0,255,0) means green, (0,0,255) means blue, (255,255,255) means white, and
(0,0,0) means black. In this way, you can easily ‘mix’ your own shades: (12,188,180) is turquoise, for
example.
- BackColor: The color of the background. Specified in the same way as ForeColor.
- BackStyle: The background color may also be transparent; i.e., see through. This is generally not
very useful for TextDisplays, but for other objects, such as Slides, it might be practical.
- ClearAfter: Specifies whether or not the TextDisplay is cleared after it its presentation. Usually, it
does not matter what you specify here, because the Display is overridden by the presentation of the
next object anyway.
- WordWrap: Specifies whether E-Prime should automatically insert enters when the text doesn’t fit
any more. Without WordWrap on, E-Prime will simply cut off the text where the screen ends.

Chapter 1
21
FRAME TAB
In the Frame tab, you can specify a rectangular area of the screen in which the object is presented. This area is called the Frame.
- Under Size you can specify the Width and Height of the frame. You can either specify the relative size (in percentage of the total screen size) or absolutely (in pixels).
- If the Frame is smaller than the screen, you can specify its position on the screen under Position. You can set four different parameters. XAlign and YAlign specify which point of the frame is used as
a referencepoint for placing the frame on the screen. X and Y specify the horizontal and vertical
position of the frame’s referencepoint on the screen. You can compare it to putting a piece of paper
on a pin board. The parameters XAlign and YAlign specify the position of the pin (punaise) relative
to the paper, the parameters X and Y specify the position of the pin on the pin board (see examples below).
Screen
Frame
Screen
Frame
Screen
Frame
XAlign: Center XAlign: Center XAlign: Right Align: Bottom YAlign: Center YAlign: Top
X : Center X : Left X : Right Y : Center Y : Center Y : Top
- BorderColor: Shows the color of the border, if BorderWidth is greater than 0.
- BorderWidth: With this property, you can set the width of the border around the TextDisplay in
number of pixels.

Chapter 1
22
FONT TAB
-
- Name: the type of font to use in this TextDisplay.
- Point Size: the size of the font in points. This is the standard unit of font that is used in all Windows
applications, but be careful: most experiments run in a lower resolution than normal, so fonts tend
to look bigger when running the experiment.
- Bold: This feature is very self-explanatory, but please note that E-Prime’s default for Bold is on.
DURATION TAB
This is perhaps the single-most important tab. This is where you adjust the timing part of the stimulus, stimulus duration adjustments being crucial (some might say: tantamount) to classic cognitive
experiments. Besides this, it is where you select which input devices (such as keyboard, mouse, serial
response box) are used to record responses. The tab also deals with most other aspects of responding:
“what should happen after a response?”, “what was the correct answer?”, etc.

Chapter 1
23
- Duration: With this property, you can manipulate how long the TextDisplay is presented on the
screen. When you set this to -1, it acts the same as when you select the infinite duration.
- TimingMode: E-Prime is praised for its timing accuracy and its developers even claim that E-Prime
can be sub-millisecond accurate (i.e., have random timing errors with a standard deviation of less than one millisecond). However, this all depends very much on which other processes are running
in the background, which hardware is installed, and whether annoying software like Norton
Antivirus is allowed to be run alongside E-Prime. More on timing issues later, but for now, here’s the
basic story. It takes time (mere milliseconds, or even less) between the moment when E-Prime’s
clock notices that an event should be triggered and when that object is actually presented. Because
of this, events may not synchronise with time, which E-Prime calls “cumulative drift”. To prevent
this, you can change the TimingMode to Cumulative, which changes the duration of this TextDisplay to adjust for this drift.
- The other way to cope with a certain type of timing error is the PreRelease. Suppose you wish to present high-resolution images, perhaps even in a rapid serial visual presentation task. In this case,
E-Prime will have a hard time loading all those large image files. In order to alleviate the stress E-Prime puts on your processor, you can use TextDisplays prior to the pictures you want to use and
add a bit of PreRelease. The PreRelease time is added to the duration of the preceding TextDisplay,
but is used to load the oncoming picture, sound or other “heavy” object into memory. Then, when
it’s show-time, E-Prime already has loaded the object, thereby decreasing onset errors of the next
stimulus.
- The Data Logging property has a few options by which you may log various timing and response
parts of the TextDisplay. I would personally suggest leaving this untouched and selecting the logging
properties in the Logging tab, as E-Prime generally logs far too much if you allow it to.
- If you want the participant to respond to the TextDisplay, you will have to add an InputDevice. To
do so, click on “Add” and select the Keyboard or Mouse. More devices (such as the serial response
box) are available, you have to go to Edit > Experiment > Devices > Add in order to add these.
- After an InputDevice is selected, you can edit which keys are Allowable. Normally, you enter a range
of characters here, for example: Allowable: abcd. Then, all four keys (a, b, c, d) are seen as valid
responses. Pressing “e”, for example, will not do anything. If you want to use the space bar or other
special keys, you will have to use the round brackets and capitalized letters: “Allowable: {SPACE}”
for example. The default ({ANY}) is not recommended for a serious experiment, since accidental
key-presses should not be counted as “real” responses.
- Whereas the Allowable part generally has several options, usually only one of them is correct. It is
important to understand the fundamental difference between the allowable and the correct
response. As a rule of thumb, then: the allowable set of responses covers the range of possible
responses and generally is the same for each trial, the correct response is typically only the one
response that the subject should have made and is generally different for each trial.
The correct response does not have to be specified. For example, a welcoming screen does not have a correct response. It can simply be closed after pressing a specific key.
On the other hand, the allowable response should always be specified. If you have failed to do so, and the duration is set to infinite, your experiment will get stuck, since the participant cannot press
any key to close the TextDisplay.
- By adjusting the Time Limit property, you can increase or decrease the time a response is logged.
Often, this will be the same as the Duration of the stimulus, which is the selected option by default.
That way, if the duration of a stimulus is 2000 ms, a response will still be logged when it follows
1999 ms after the onset of the stimulus. However, you might want to avoid outliers, which you can
do by setting the Time Limit to 1000 ms. A response that follows 1100 ms after the onset will then not be logged. Also, it is possible to log responses even longer than the duration of the stimulus. If,

Chapter 1
24
for example, you use a subliminal priming paradigm, you could set the Duration of the stimulus at 20
ms, but the Time Limit at 1000 ms. Then, responses are logged even if the stimulus is no longer being shown.
- End Action specifies which action to undertake when the subject responds. By setting this to Terminate (default), for example, the TextDisplay is immediately wiped off the screen when an
allowable response is given.
SYNC TAB
The Sync tab enables you to switch on on- and offset
synchronisation. To understand what synchronisation is
about, you have to grasp a basic fact about both cathode
ray tube (CRT – or, the “old” type) and liquid crystal
display (LCD – or, the “flat” type) computer monitors:
each dot (pixel) you see on the screen is updated
sequentially: that is, from up to down. Although it may
look as if the pixels you see on the screen are static (especially with LCD monitors), in fact they are
updated at a rate of at least 60 times each second: 60 Hz (generally about 100 Hz in our own labs).
Crucially for cognitive psychologists, especially those working with perception and (subliminal)
priming is that presentation of visual stimuli is constrained by the timing characteristics of the
monitor.
Consider, for example, a psychologist who wants to show a subliminal prime, say, a smiling face, 10
milliseconds before the onset of a word to which the participant is required to react. When onset- and
offset- sync are turned off, and the experiment is running on a 60 Hz monitor, the screen is updated
every (1000 / 60 = ) 17 ms. When E-Prime is programmed to show the smiley, it sends “commands to
the screen”, but there is no way to know exactly how and what it shows: it may show everything 17 ms
later because it just finished updating the screen, but it may also show only half a smiley because the
updating cycle just got round to half the screen on its up to down route. The same may then happen
with the word to be responded to. However, if we enable onset sync for both the prime and the word,
E-Prime will wait until the screen is able to fully show the word. The only problem is then that it must
show the prime for at least so long as the refresh cycle (17 ms) lasts, thus creating a timing error of 17
ms and making it impossible to show anything for less than 17 ms.
For exactly this reason, we typically use monitors that have shorter refresh cycles (100 Hz – 10 ms;
which gives nice, round numbers), so we can safely use onset sync by default.
LOGGING TAB
If you, like many psychologists, love
reaction times and other temporal measures, E-Prime is the thing for you. Not
only does it let you collect standard outcome measures, such as response,
accuracy and reaction time, but it also
provides an arsenal of auditing weaponry
to bedazzle even die-hard statisticians. For
example, if you wish to check whether E-Prime really presents your stimuli for t
milliseconds, you can log the duration error.
You can select as many values to log as you like, but try to be somewhat pragmatic: you may want to log the time it took for a participant to read the introduction-screen – so you can log RT for this display

Chapter 1
25
– but I have yet to hear from the psychologist who’s interested in the timing accuracy of this
introduction-screen – so you don’t generally log OnsetDelay, for instance.
Typically, a psychological experiment requires only one response for each single trial. For example, in
a Stroop task, each word requires one reaction. This means that one text-display collects responses. For this object, my favourite logging properties would then be:
ACC: The accuracy, defined as 1 if the RESP and CRESP are equal and otherwise 0.
CRESP: correct response. As stated above, typically depends on the condition and trial.
RESP: The actual response.
RT: Reaction time (ms)
OnsetDelay: Difference between programmed time the stimulus was to be presented on the screen
and the actual time its presentation started.
DurationError: Difference between programmed duration the stimulus was to be shown on screen
and the actual time.

TUTORIAL I: A SIMPLE RT EXPERIMENT
Do you have ‘lightning reflexes’? Believe it or not, many participants who are unfamiliar with
psychological experiments want to know “how well they did” and considering that you may not be exactly interested in pinning individuals on some kind of normal (vs abnormal!) distribution, it is
always good to tell them they were quite fast… “How fast?” Let’s find out.
It can be hard to start programming an experiment from scratch and so, you may find it easier to
follow a certain process schema. First, and crucially, what is it that you want your participants to see
during an experiment – what do you know from your own experiences with psychological research in
the lab? Imagine examples, rather than defining everything beforehand: instead of trying to show
Stroop-like stimuli, think of “the word red written in blue”. Then, define the procedure of a trial as the
sequential presentation of such stimuli. Common ingredients of an experiment include:
A trial
Generally, this includes:
- A fixation: this stimulus that is often shaped like a crosshair or addition sign “warns” the participant that the interesting stimulus is approaching
- The target: the interesting stimulus itself, to which the participant is to respond. - Some form of feedback.
A block
Blocks are defined by the number and variant of trials they contain. For instance, - A training block may contain some 20 trials and is used to get the participant accustomed to the
experiment.
- A testing block contains more trials, depending on the variability of the outcome measures, the number of conditions, etc.
STEP 1: BUILDING THE BASIC HIERARCHY
- Open E-Studio, select “Blank experiment”
- Save your experiment on a location where you can find it back easily (e.g. a USB stick, your P-drive,
etc). Give the experiment a unique name that does not have strange characters (slashes, dots, etc).
- In the structure view, double-click on SessionProc so you will see a timeline popping up:
-
- Drag a list from the toolbox to the SessionProc to the timeline and call it “BlockList” (this is a
conventional name; you can also use any other name as long as it does not contain strange
characters or spaces).
- Double-click on the BlockList and add one row by clicking on the icon of the arrow pointing down.
- Change the name of the procedure column of the first row to “TrainingProc” by editing the text. It is
also possible to click on the triangle down next to the name and changing the procedure to an
existing one: SessionProc – as said, do NOT do this! For some reason, this seems the most natural
action and I have seen many students being amazed at how fatally E-Prime crashes with this
seemingly minor mistake.
- E-Prime will ask you whether you really want to create this new procedure – TrainingProc – and
here you select yes. If E-Prime asks you whether you want this procedure to be the default one,
select no.

Tutorial I
27
- Change the name of the procedure column of the second row to “TestingProc”. The same comments
apply here also.
- Double-click on the TrainingProc and add a list there. Rename (select and press f2) the list to
TrainingList. Double-click on the TestingProc and add a list there, renaming it to TestingList.
- Edit TrainingList and make the weight of the first and only row 10. In the procedure column, write
down the name TrialProc.
- Edit TestingList and make the weight of the first and only row 20, then write down the name
TrialProc as its procedure.
- Now you have the basic hierarchy of an experiment: one experiment with two blocks, one for
training and one for testing, and the two blocks run the same procedure, the training 10 times, the
testing 20. You can check whether you successfully completed this step by matching your screen with the below screenshot.
-
STEP 2: PROGRAMMING THE TRIAL
- The trial is perhaps the most important unit in programming experiment. Here, you will be showing
your participant a fixation for 500 ms, and a target for an infinite – or until key-press – amount of
time.
- Double-click on the TrialProc and drag two text-displays to the timeline. Name the first “Fixation”
and the second “TargetStimulus”.
- Edit the Fixation to show a single ‘+’ sign and to have a duration of 500 ms.
- Edit the TargetStimulus to show the command “Press space!” and to have an infinite duration. Then,
add an input-device by clicking on Add in the duration/input tab, and choose keyboard. Set, as the
only allowable key, {SPACE}. Mind the capitals, they are important here. Also, set as the only correct
key the spacebar as well (this is generally not the case!) and accept the basic type of logging.

Tutorial I
28
- Your experiment should run now, so try this. It is good practice to run your experiment very often,
because this makes it easier for you to diagnose, or debug, problems. Run your experiment with any subject number but 0, or else nothing is logged.
STEP 3: ANALYSE THE DATA
- When you finished testing the experiment, start up E-DataAid and open the data you generated. These can be found in the same folder where your experiment was last saved.
- Scroll through your data and note the various columns. For example, notice how the trial number starts at 1 and goes on to 10, because block 1 (the TrainingList) is finished after 10 trials, then starts
at 1 again but now goes to 20, because block 2 (the TestingList) is finished after 20 trials.
- Since we wanted to know what your participant’s average ‘basic’ reaction time was, the
TargetStimulus.RT is most important to us. Notice how several values will be well below
(approaching an unlikely 0) and above (in case you were distracted) the average are. Apparently, a
bit of filtering needs to happen to get a clear picture of your RT as compared to your neighbour’s.
- Click on tools, select analyze and click on filter. In the dropdown box, select TargetStimulus.RT (in
alphabetical order here) and click on checklist. Now, click once on the first value that is higher or
equal to 100, then scroll down, and shift+click on the last value that is lower than 300. Only then,
with all the values you want to include selected, press spacebar and click on OK.
- So now that we have deleted the outliers from further analysis, close the filter and drag
TargetStimulus.RT from the list of variables to “Data”. Click on run and be ready to be astounded by your reaction time! Mine was 191 ms…
- One of the reasons why many people use E-DataAid in conjunction with E-Prime is the ease with
which you can make crosstabs. Here’s how we do it:
- Close the analysis results and without changing anything else, drag the Procedure[Block] variable
from the list to either the row or the columns (try both). Again, click on run.
- This is what it should look like:
-
- So, I was about 23 ms faster after training a bit.

EXERCISES CHAPTER 1
- Add an introduction screen to the start of your experiment, with infinite duration, or until the
participant presses a certain unique key (“press C to continue”)
- Add a goodbye and thanks screen to your experiment.
- Use the mouse instead of the keyboard as InputDevice for the TargetStimulus. To do this, you
basically do the same as with the keyboard as an input device, except that the response keys are defined as 1 (left mouse-button) and 2 (right mouse-button). Therefore, entering 12 as allowable
would make either key an allowable response.
- Pimp your experiment: adjust it to your taste or to what you think would be wise; just experiment
with all the options.
- Design an experiment to test the following hypothesis: it is easier to make a “go” response to green
than to red. The idea is clear: typically, we need to stop doing something when a red light appears,
so a psychologist could hypothesise that because we internalised this rule and thus suppress all
action when a red light appears. It’s time to find out whether this is true.
You can base this experiment on the one you made in the tutorial. First, the trial needs to be changed: the fixation should now have a gray background; the target should have no word anymore, but just be
a red, white or green background. The TrainingList should now have white targets. The TestingList should get at least one extra row, with two different procedures. Instead of having the TestingList call
“TrialProc”, let it refer to “RedProc” and “GreenProc”:
Also, randomise the selection between these two procedures (see the list properties) so that the
participant cannot know in advance what colour the target will be. Edit both the RedProc and GreenProc equally such that they are exactly the same in terms of look, duration and response, except
that the background of the target differs.
Test your experiment: is it easier to respond to green than to red?

CHAPTER II: ATTRIBUTES, SLIDES AND MORE ON LISTS
In this chapter, you will learn
About:
Experimental design in E-Prime
Latent and manifest variables
More on lists
Attributes everywhere
Images
Slides and feedback
How to:
Program basic conflict experiments (Stroop, Simon)
Manipulate your data
Save and analyse your data
EXPERIMENTAL DESIGN IN E-PRIME
When it comes to programming experiments in E-Prime, it is crucial to define every part of your
design to the fullest extent.
One of the first ways to approach programming software is to start with a good plan. For example,
John Ridley Stroop may have said to himself, back in 1935: “Reading may be an automatic process that
can interfere, or inhibit, other skills, such as naming colours”. To test it, he had to go one step further:
“if reading and naming interfere with one another, then… naming the colour in which a word was
printed should go slower if the colour of the ink is incongruent to the word that was printed.” If he
would have had access to, but not quite the experience in, E-Prime, he would ask E-Prime to “print
words and colours in congruent colours”, but E-Prime would not know what words, which colours and
what congruence means. My favourite way to approach definitions is to just name all possible
combinations. It takes a bit of time, but it is foolproof.
So, with Stroop, let’s say we have 2 colours, red and green, and 2 words, “red” and “green”. This would
give us the following 4 combinations:
Colour Word
Red Red
Red Green Green Red
Green Green

Chapter II
31
This is the online bit E-Prime cares about; they are what I call manifest, or explicit variables if you
prefer, as these are the ones that literally explicate the design as it manifests itself. They are quite unlike latent, or implicit variables, in that these are generally the ones psychologists are most
interested in: except to filter out the incidental colour-blind subject, Stroop was not concerned about colours and words as such, but their interference. So, to analyse the data, he might have added another
variable to these two: congruence. That way, he could average data from the congruent and
incongruent conditions and measure the more general difference between the two.
Colour Word Congruence
Red Red Congruent
Red Green Incongruent
Green Red Incongruent
Green Green Congruent
In other words: start with writing out all combinations (‘cells’) of manifest variables – the number of
cells should always equal the product of the number of categories within each variable – then add
latent variables for your own convenience. But: having different variables – even if they are manifest –
does not automatically entail E-Prime does anything with them; for that, we need lists.
MORE ON LISTS
With lists, we can control the sequence and selection of experimental (manifest) variables. A variable,
as entered in a list in E-Prime, is called an attribute, and is generally anchored to the current context
of the list. Consider the previous list of four different types of Stroop stimuli (based on the colour – red or green – and the word – red or green). Especially when you have made a little, digital sketch of your
design by writing down all different combinations of categories, you can easily copy-paste the values
from Excel or Word to an E-Prime list:
Notice the ID tag of each row here. When going through a list, and it is randomised, all E-Prime really
does is randomise the ID tags, such that their order becomes 2413 instead of 1234, for instance. In this
particular scenario, the first trial will call the context of ID 2 (with a red colour and green word),
followed by ID 4 (with a green colour and red word), and so on. If, instead of using weights, you edit
the number of cycles (see below), this order is repeated after each time a list is finished running (in
this case, after four trials). Later chapters of this workbook will clarify what this means when you are
dealing with ‘scripting’. For now it is enough that you understand how lists easily randomise your experimental conditions.
To change the order of a list from sequential to randomised, you will have to edit the properties of the
list: . Some of the properties are best looked up in the E-Prime user guide, as there are only a few rare cases where these come in handy, but please note the following more interesting properties:

Chapter II
32
SELECTION TAB
Most important of all is the Order property. This is ‘sequential’ (from the first to the last ID) by default. However, when presenting a trial list, you would probably choose a ‘random’ order, which randomises
the order of the IDs every time a cycle (defined by the number of samples and weights) has finished. If you choose ‘random with replacement’, the IDs are randomised at every sample: thus, a random
(weighted by the number in the weight column) ID is picked every new trial. This will upset the
balance of your trial list, since repetitions of combinations are very likely to occur (in this case the
sequence of IDs 2222 is as likely to occur as 2413!), so it is generally not a good idea to carelessly pick
random with replacement if you are not sure.
Other, less typical forms of randomisation are offset, counterbalance and permutation. These have in
common that the order is not exactly randomised, but balanced such that participants get, for example, a random selection of IDs each, yet in such a way that the orders themselves occur an equal number of
times amongst participants (for example, participant 1 gets order 1234, participant 2 gets 2341, etc). This is useful if you do not want to control something directly, but do want groups of equal size.
In many cognitive psychology experiments, it is useful to balance between stimulus-response mappings. This is called counterbalancing. For example: half of the participants are required to
respond left whenever they see a circle, the other half are required to respond right when they see a circle. By doing this, the combination of left-circle occurs equally often as the combination right-circle.
Therefore, if there existed some benefit for one of those combinations (very unlikely in this case),
counterbalancing the stimulus-response mappings would correct for it. If you need to balance instead of randomise sequences between or within subjects, use one of the following three methods:
Offset: makes the order for each subject (or group or session) one step after the previous order. Or, better, if you compare balancing to shuffling decks of cards: with each subject (or group or session),
the topmost card is placed on the bottom. This essentially makes the order 1234 for the first participant and 2341 for the second.
Counterbalance: picks one (yet untaken) ID from the list. This is similar to the dealer giving each subject (or group or session), including him or herself a new card until the deck is finished.
Permutation: calculates all possible combinations of the conditions using a mathematical algorithm.
Then, ordering occurs like Offset, where one of the list of possible combinations is chosen based on a
predetermined offset, and all conditions within that combination are run in sequential order. That is,
according to the E-Prime user guide.
RESET / EXIT TAB
This tab defines the sampling. As said, a list is randomised again if it has more than one cycle and one
of the cycles has ended. A cycle then, is composed of a number of samples, either ‘All samples’ (the sum
of the weighted rows in the list) or ‘X samples’, in which X denotes the number of samples that are
picked from the (weighted) list.
In most cognitive psychology designs, all aspects of the stimuli are orthogonal: the proportions of
every experimental or non-experimental condition are kept equal. This ensures that every participant
encounters every combination of conditions the same number of times as other participants, which
(partly) rules out strategy-based hypotheses. For example, if a psychologist interested in doing a
Stroop experiment wants to find out whether the effect changes if the colour is shown 1000, 500 or 0 ms before the onset of the word, and he uses a list of two words and two colours, his design should
contain 3 x 2 x 2 = 12 rows.

Chapter II
33
By default, a cycle in E-Prime has all of these 12 samples, so this researcher would choose Random
order in the selection tab, leave the reset sampling to All (12) samples and make sure the list is “recycled” for a number of times.
How many cycles? The answer to this question is based on your continuing experience with behavioural experimental paradigms, but a few considerations are general:
- If you don’t know, pilot-test it yourself. Or better: annoy your friends by asking them, so they can
also tell you whether your introduction is clear while they’re at it.
- Basically, you want to end up with enough data for each participant that the variability in the
outcome measures (e.g. reaction time) is smaller than the size of the effect. And, you may delete the
inaccurate and outlying responses, so you will probably end up with fewer usable data than you
might expect. So, more repetitions is useful. However, you do not want to torture your participant any longer than necessary, so enough is enough.
- If you still have not got a clue as to how many cycles you should use, try the rule of the magical
number 12: the number of trials should equal at least 12 multiplied by the number of latent
variable cells. For example, with a simple Stroop effect with one latent variable (congruence) which has two cells (congruent and incongruent), the number of trials should be 2 x 12 = 24. Since there
are 4 (2 colours x 2 words) samples in each cycle, the number of cycles should be 24 / 4 = 6. There is
no clear reason why this works, but so far, my colleagues and I have found no evidence that it does
not, which is why we call it magical!
ATTRIBUTES
So, you have a list, your design is flawless, but still nothing changes when you run your experiment. This is where attributes come in: each and every property in your trial (or any other object that is of a
lower level than the list) can make use of them. To do this, to manipulate a (manifest) variable by the
list, so to speak, you merely have to fill in the name of that attribute, but with square brackets around it. For example, with our Stroop example, we can fill in the word attribute instead of explicitly naming
the word:
Now, instead of writing down the word every new trial, E-Prime does it for you. In trial one and two,
the participant will see (considering this list is not randomised) the word “red”. In trial three and four,
the participant will see the word “green”. Still, this is not quite a Stroop stimulus: every word is printed
in black. However, as you may remember from chapter I, the colour of the text can simply be edited by

Chapter II
34
editing the ForeColor property of the text-display. Now, to manipulate it by referring to the list, you
can just enter [Colour] in the ForeColor property. So, now we are finished with the perception aspect of the Stroop task: the first trial will show the word red in a red colour, the second the word red in a
green colour.
However, in my experiment, which is based on the previous chapter’s exercise, the participant does
not really have to watch, he or she may just click on the right mouse-button every time any word is
shown. To make a pure Stroop experiment, you should record the participant’s voice as he or she
mentions the name of the colour in which the word is printed. Alternatively, you could ask participants
to respond by pressing a key on the keyboard; for example, “r” to the word red or green printed in
red, “g” to the word red or green printed in green. To do this:
Add an attribute to the list called “CorrectResponse” or something like that.
Fill in the correct response for each row: in my list, I’d add r in the first row, g in the second, and so on.
Now check the properties of the Stroop stimulus and change the correct property (Duration / input tab) to refer to [CorrectResponse].
Always remember that the allowable list refers to the set of allowed responses, not to any one particular response. Thus, in our case (with only r and g responses possible), it should say rg.
This is what it should look like:
Another example of using attributes in E-Prime will be covered in the Tutorial, but first: you may have
wondered if editing text is the only thing you can do with E-Prime. It is quite easy to add images, sound
(Chapter III) and even video (with E-Prime 2), and it does not require much extra explanation, so let’s
see how images work.

Chapter II
35
SHOWING AN IMAGE
You can show pictures by moving an ImageDisplay onto a procedure, in the same way as you inserted
a TextDisplay. The properties of ImageDisplays are almost exactly the same as those of TextDisplays:
The Filename property should mention the name of the picture you want to present. This file has to be a BMP, which is an uncompressed windows image format. Most students are more familiar with
JPEG and GIF formats, since these are more commonly found on the internet. However, it is bad programming practice to use these compressed images, since they lose part of the details in colour or
pixels. Instead, I always ask my own students to try to use MSPAINT, because 1) it ships with Windows (in accessories > paint), 2) allows you to see the minute details by zooming in to 800%, after which
editing single pixels becomes much easier and 3) allows converting to bitmap (by saving as .bmp). Editing single pixels and paying an extraordinary amount of attention to your visual presentation are
important skills if you want to work with images. For example: if you use multiple cards like the above
one, make sure all are of equal width and height, say 100 x 200 pixels, because if you have one card
that is 101 x 199 pixels, it will be distorted and thus immediately capture the participant’s attention.
The Mirror properties flip the image horizontally (left / right) or vertically (up / down). This
adjustment does not alter the quality of the images, unlike the following property.
By stretching you can adjust the image to the size of the frame (in % or pixels, see TextDisplay properties in
chapter I). Although this does not immediately show on screen, you can see the effect of this when you run the
experiment. To the right is an example of what to expect under different frame widths and heights and
with stretching on and off.
Please note that stretching may lead to a loss in quality:
if a picture of 100 x 100 pixels is stretched to
accommodate a 150 x 150 frame, the computer cannot
modify the pixel-size directly, since this depends on the
screen itself. Instead, half of the pixels will become 2
times as large, the other half will remain the same,
causing your image to look messy. So, I discourage
using stretching altogether, but if you must: use whole
(integer) ratios of frame-size/picture-size.

Chapter II
36
Transparency can be realised by
fiddling around with the Source Color
Key, BackColor and BackStyle. In the
example to the left, the same image is used as in the figure before, but the
Source Color Key was set to white, and
BackColor was set to blue. As a result,
all pixels that were white are now
blue. If BackStyle was set to
transparent instead of opaque, all the
blue that is shown now would show the previously presented image.
Although none of this is shown whilst working in E-Studio, it works well
when running experiments.
SHOWING MULTIPLE IMAGES AND LAYERS OF TEXTS
If E-Prime would only allow text or images to be displayed on the screen, the programme’s use would be seriously limited. Luckily, it is also possible to combine text, images and sound (see chapter III) in
one object, called the slide. The slide is actually nothing more than an object that consists of multiple frames – and frames can be text, images or sound – that are located on one or more states. State one,
named “won” may contain, for example, both an image of a smiling face and the text “you won”, whereas state two, named “lost”, may contain both an image of a weeping face and the text “you lost”.
To the left, the upper part of a slide is shown.
By clicking on icon a, you can insert a frame where text can be entered. Icon b enables
you to insert images, c to insert sound (chapter III). With d, a new state can be inserted, which may be deleted by clicking on e. All this should
be quite intuitive, unlike the way to edit a property. To edit properties of the slide in general (such as the response), you first click on f and select the name from the dropdown menu to reflect the exact
name of the slide itself (not default!), and only then click on the properties icon g. If, on the other hand, you want to edit a property of a particular text or image within the slide, you can either look up the
name of this specific text or image in f and click on g, or just right-mouse click on the frame you want
to edit and select “properties”.
You can show different pictures and text using different states. This requires working with the
ActiveState property, which sets one of the states you made to be visible. When working with various
states, the idea is that the ActiveState should either refer to an attribute (see one of the exercises) or
be scripted to be changed just before it is shown. For example, if you would have a slide with a “right”
and “wrong” state that comes in just after some kind of response had to be made (say, the Stroop
stimulus), you could insert a script just in between these two, which reads the accuracy of the Stroop stimulus and then set the ActiveState accordingly. I will discuss scripts for reading and writing
properties in the next two chapters.

Chapter II
37
FEEDBACK
Much easier than the previous example, however, would be to just use a FeedbackDisplay.
FeedbackDisplays are largely the same as Slides, that is, they inherit most if not all of the
characteristics of slides, but have some pre-programmed content. That is: they have four states, and
depending on the reaction to some other object, the ActiveState is set to one of four states “correct”,
“incorrect”, “pending” or “no response”. A common mistake is to forget that FeedbackDisplays needs an input object: without that, it will not work.
To the right, you can see how this works: the FeedbackDisplay1 follows directly after the
TargetStimulus and also has this Target-Stimulus
as its Input Object Name. Please note that, much
like slides, you will have to edit the properties of
the FeedbackDisplay itself, not one of its four
states, so you have to change what was f in the
previous picture to reflect the exact name of the FeedbackDisplay.
The FeedbackDisplay shows quite a bit of feedback – too much if you ask me. So, you can and should
always accommodate these slides to better match your specific paradigm and aesthetics. You may decide, for instance, to only show positive and negative
feedback during the training, but following these trials, only show negative feedback and blank screens instead of positive feedback.
Lastly, you may be wondering what state is activated by specifically what kind of response to the
TargetStimulus (or other input object):
Correct: when the reaction was both fast enough (RT < TimeLimit) and correct (ACC = 1).
Incorrect: when the reaction was fast enough (RT < TimeLimit) but incorrect (ACC = 1).
Pending: when there has been no reaction yet (RT > Duration), but when there is still time to react
(RT < TimeLimit). This can only be the case when the TimeLimit is greater than the Duration (see Chapter I, Duration tab).
NoResponse: when there was no reaction, or it was too late (RT > TimeLimit).
Note: if you don’t specify the object that the FeedbackDisplay needs to give feedback on, you’ll
receive the following error message:

TUTORIAL II: THE SIMON TASK
J. Richard Simon was interested in hemispheric dominance for speech (left hemisphere for language,
and so forth), but stumbled, quite by accident (Simon & Rudell, 1967; Simon, 1990) into a stimulus-response compatibility effect that later became one of the most popular psychological effects after
Stroop (1935). He (and Rudell) found that when participants were asked to respond with a left key-press to a command in the left ear, they were much faster than when they were asked to respond with
a right key-press to a command in the left ear. This effect, which was then referred to as “reaction
towards the source” was replicated in the visual domain as well, and generally became known as the
Simon Effect.
In this replica of the visual Simon task, you will learn about working with images, slides and feedback,
as well as using attributes to manipulate a balanced design.
STEP 1: BUILDING THE BASIC DESIGN
- Begin by building a design similar to last week’s tutorial. This
means the highest level in the hierarchy, the session procedure, should have a BlockList, where the two rows each
refer to a different procedure: TrainingProc and TestingProc, for instance. These two procedures should both get a list:
TrainingTrialList and TestingTrialList, where each level refers to the same procedure: TrainingTrialProc and
TestingTrialProc. So, the really stereotypical hierarchy of your
experiment should look like this:
- Now, which latent and manifest variables do we have in this experiment? As the introduction
implied, there is a compatibility effect when the location of the stimulus differs from the location of
the response. We can call the only latent variable something like compatibility then: compatible if the location of stimulus is equal to the location of the response, and incompatible if not. So, we have
two manifest variables: StimulusLocation and ResponseLocation and if both have two categories (left and right), the list should contain (2 x 2) 4 rows. Edit both lists to accomplish this:
-
- Don’t forget to save your experiment!
STEP 2: DRAWING YOUR STIMULI
- Since our experiment is only about the visual domain, we can’t just use audio files like Simon did
(although audio and psychoacoustics generally do not make things easier), but we still need to cue
participants to respond with a left- or right keypress. Usually (and based on later work by Simon), this is done with colours: first, you tell participants to respond with a left key-press whenever they
see a blue square, and right if the square is red; and to ignore the location of the square. However, it takes less training to ask participants to respond in the direction as indicated by a little arrow. So,
we are going to draw arrows.
- Open MSPaint (with start>run>mspaint being my favourite method). Go to image>attributes and
make your image 100 x 100 pixels. Zoom in on this rather small image (with the zoom icon left).

Tutorial II
39
- With the square tool (left), draw a filled square, starting at {0,
25} and being exactly 50x50 in size. You can check this in the lower-right corner (see figure left). Then, with the polygon tool
(right next to the square tool), draw lines from
{50, 0} to {99, 50}, from
{99, 50} to {50, 99} and from {50,99} to {50, 0},
such that you end up with a black pyramid that is rotated 90 degrees (see figure right).
- Save this file to disk, in exactly the same folder where you
saved the Simon experiment, as “ArrowRight.bmp”. Flip your
image by choosing Image>Flip/Rotate>Flip horizontal and save your picture as ArrowLeft.bmp.
-
STEP 3: PROGRAMMING THE TRIAL
- First, a black fixation cross was presented in the centre of the gray screen for 1000 ms, followed by
the presentation of the arrow left (halfway between the left edge and the centre of screen) or right
(halfway between the centre and the right edge of the screen). The stimulus remained for 1000 ms
on screen, or until the participant responded. A blank screen of 1000 ms was shown after that,
unless the response was late or incorrect, in which case the blank screen showed the word
“WRONG!” instead.
- The above is written in more or less the same style you may know from papers on experimental
psychological papers. Both now and during the examination, you will try to replicate this procedure.
- Create a fixation mark like last week’s, but on a gray background and with a duration of 1000 ms.
- Insert a slide and insert an image frame within the slide. Change the following properties:
- The image’s FileName: ArrowRight.bmp.
- The image’s Width 100; Height 100. Position: X: 25%; Y: 50%.
- SourceColor Use: yes, key: white; BackColor: grey.
- The state’s background colour: gray.
- Now, if you try to run your experiment, you should see an arrow pointing right on the left side of the screen. This stands to reason, since we requested the ArrowRight.bmp to be presented at 25% of the
screen, but we want the list to sometimes pick, for example, ArrowLeft.bmp to be presented at 75% of the screen. The moral here should be clear: when you try to at least get one of the conditions to
work (an arrow pointing right presented left), it should be far easier to figure out where exactly
those attributes go.
- So, edit your lists and add one attribute, CorrectResponse. Then, rename your attribute ResponseLocation to ArrowFileName. For every StimulusLocation that is left, insert 25%, right 75%.
For every ArrowFileName, make it say either ArrowLeft.bmp or ArrowRight.bmp. For ArrowFileName that say ArrowLeft.bmp or ArrowRight.bmp, make the CorrectResponse q or p
respectively:

Tutorial II
40
- Change the image’s filename to [ArrowFileName] and its location to [StimulusLocation]. Change the properties of the slide itself: the duration should be 1000, the input device should be a keyboard, the
allowable responses are qp and the correct response is [CorrectResponse].
- Add a feedback display after the Simon stimulus, and set its input object name to be that Simon
stimulus. Clear all text from all four states, add the text Wrong in the incorrect and no response states, and set background of all four states to gray.
- Finished! Check the experiment, see if it compiles and runs okay.
EXERCISES
- Also, check whether data is saved and if you would actually be able to analyse it. The Simon effect should be about 30 ms longer reaction times with incompatible trials.
- Extend the current design with a training list.
- Using single-state slides, make an introduction-, an instruction- and a goodbye-screen.
- Instead of manipulating the target’s filename with an attribute, you can also make clever use of the
target slide’s ActiveState property. Let ActiveState refer to an attribute in the list and try to get the
experiment to work.
- So, what does the Simon effect mean? Simon himself figured that the location of the stimulus, even though it is completely irrelevant to the task, automatically triggers a response towards that
stimulus; much like you will look over your right shoulder if someone taps on it. If that is true, it may also be true that the more peripheral a visual stimulus is presented, the stronger a reaction towards
that location will be triggered. Design an experiment to test the following hypothesis: more peripheral stimuli elicit greater Simon effects than more central stimuli. Use at least 3 distances, for
example 25%, 35% and 45% for left vs. 55%, 65% and 75% for right responses.

CHAPTER III: SOUND, HARDWARE AND INLINES
In this chapter, you will learn
About:
The SoundOut object;
Digital Audio;
The Wait object;
The Label object;
Experiment Properties and
Inline and E-Basic
How to:
Replicate a visual search experiment;
Programme counters and breaks and
Ad-hoc randomisation.

Chapter III
42
SOUNDOUT OBJECTS AND DIGITAL AUDIO
Since the 19th century, psychoacoustic research has gone into a
bit of a decline. For that reason, one may argue that much less is
known about the auditory system compared to the visual one,
which should, in itself, be enough reason to go ahead and study
the perception of sound. Still, if you have less ambitious plans,
sound can be pretty useful as a channel, for example to present feedback (e.g., a sharp, loud beep if the participant reacts
incorrectly).
Whenever people start working with sound in E-Prime and other packages, they seem to end up
making all sorts of mistakes. After you’ve read this chapter’s section on sound, you should be able to
avoid the most common errors, and know the basics about digital audio. As a starter, let’s talk about
how to insert sound in E-Prime.
SOUNDOUT OBJECTS
As you may have come to expect, a SoundOut object can be inserted on a procedure as well as on a
slide in much the same way as TextDisplays and ImageDisplays. However, E-Prime will not run until
you activate the SoundDevice: by following these steps: Edit > Experiment > Devices and select
Sound.
Once you enabled the SoundDevice, E-Prime usually still crashes if you were not very careful in choosing your acoustic stimuli. The reason is that E-Prime expects your .wav (windows default
uncompressed sound-files) files to be of a specific format. Again, go to SoundDevice: Edit > Experiment > Devices > Sound > Edit and see the screen to the left. The wave files in your experiment should all
conform to the values entered in the SoundDeviceObject Properties. Exactly what these properties refer to will be discussed in the section on digital audio, whereas how to adjust your audio-files so that
they can actually be played in E-Prime will be shown in this chapter’s tutorial.
Let us assume, for the moment that this chimes.wav file was actually a 2 channel, 22050 samples, 16
bit file (it was not). In order to make E-Prime play this file, the following properties of the SoundOut
object are relevant:
a: The Filename should refer to a valid .wav
file that is, preferably, located within the
directory where the experiment is last
saved. Much like images, also, is that when
you want to copy or move the experiment,
you will also have to copy the sounds that
are used in your experiment to this new
folder.
b: The maximum length is the same as the
buffer. In order to present audio without
timing errors (latency), E-Prime reserves a
part of the computer’s memory to preload
the audio, such that when the moment
comes to start this audio file, E-Prime can
immediately play it. If this seems difficult, it
is somewhat comparable to asking a DJ to
play this or that track: if the record is
already on hold, he or she can immediately press play and mix the new song through

Chapter III
43
the old; otherwise, the DJ will look up (or: will pretend to) the album first, which obviously takes some time. It takes some time to load a buffer, so if you make the buffer very long, the song (or audio file),
timing errors may still occur. Generally, my advise is to make the buffer’s max length just a little bit longer (in milliseconds) than the longest audio file you will present. Note: if the audio file is longer
than the buffer, E-Prime will crash.
c: Start Offset is the moment within the buffer from which to play the audio. So: if your buffer is
(partly) filled with audio file “chimes.wav” (a default windows file) and you have the Start Offset set at
300, the first 300 ms of the sound are skipped.
d: Stop Offset is the moment within the buffer where the audio stops playing. So: if your buffer is
(partly) filled with audio file “chimes.wav”, and the Stop Offset is set at 350, the audio stops playing
after 350 ms.
e: Setting the Loop property of a SoundOut object to “Yes” makes the audio file repeat (through the buffer) for as long as the duration of the stimulus.
f: By setting Stop after to “No”, the buffer keeps playing even though the SoundOut object is no longer present. That is: if you have the SoundOut object’s duration set at 200 ms and the buffer is 800 ms, it
will still continue playing even though the object itself is no longer there. This is particularly useful if you want to use SoundOut objects but you want to present them more or less independently from
other stimuli or reactions.
g: If Stop after is not set to “No”, you can either let the experiment continue to the next object (by
selecting terminate) or let the experiment jump to a label.
h: With Volume Control, you can edit the volume of the sample “ad hoc”: by entering a value of -
10000, the sound becomes attenuated for about 100 dB (which usually makes it silent). By entering a
value of -5000, the sound becomes 50 dB softer, and so forth. The sound cannot be made louder using
this volume control, only softer.
i: Pan Control works similar to Volume Control. By entering a value of -10000, the right channel is
attenuated by 100 dB, so that only the left channel is audible; a value of 10000 makes the left audio-
channel 100 dB softer, so that only the right side is playing. Since this pan control only attenuates one
channel, it is necessarily so that audio in the centre (with both left and right playing) sound louder to
the human ear than sounds that are panned, confounding panning with volume. If you do not want
this, please look up “panning laws” on the internet.
DIGITAL AUDIO
So, what is this Hz thing people keep referring to? Why can’t E-Prime play chimes.wav without
changing the properties of the SoundDevice? Why all the talk about attenuating sounds? How do I present a 70 dB sound?
All these questions are related to the specialist realm of digital audio. The waveform of air that is sound can be approximated by digital computers using bits. That is, for each moment in time, the
position of the waveform can be described by using a number of bits, such that…
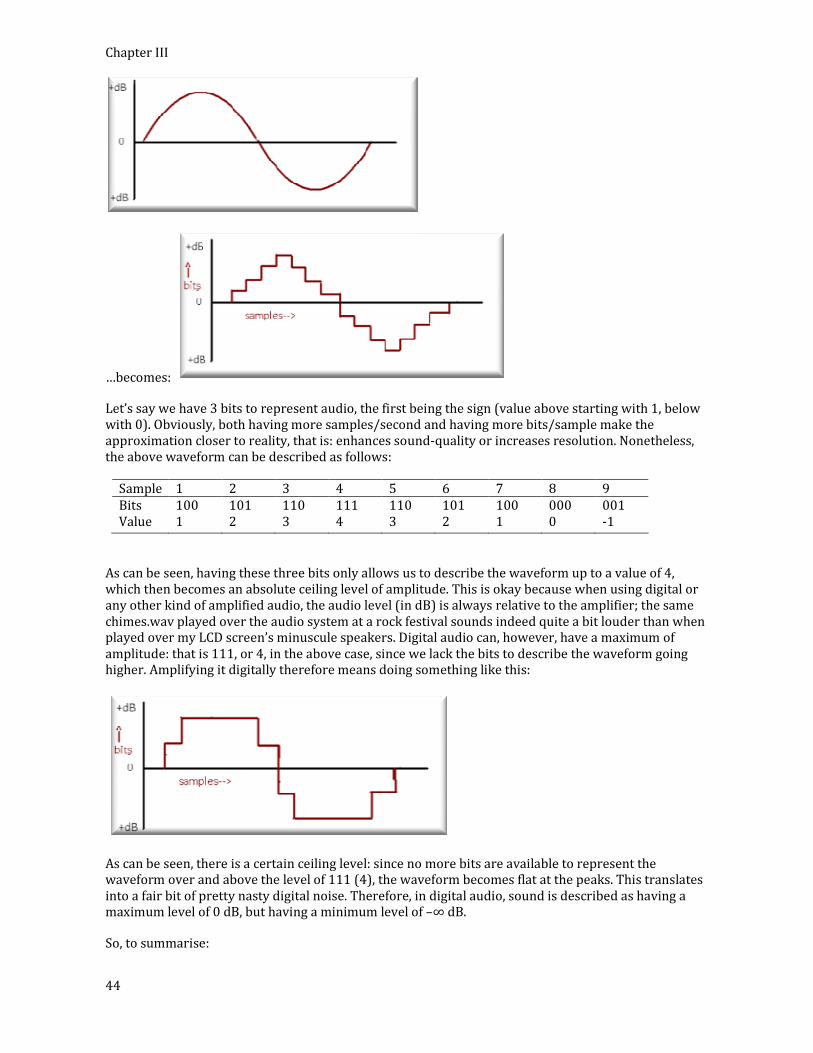
Chapter III
44
…becomes:
Let’s say we have 3 bits to represent audio, the first being the sign (value above starting with 1, below
with 0). Obviously, both having more samples/second and having more bits/sample make the
approximation closer to reality, that is: enhances sound-quality or increases resolution. Nonetheless,
the above waveform can be described as follows:
Sample 1 2 3 4 5 6 7 8 9
Bits 100 101 110 111 110 101 100 000 001
Value 1 2 3 4 3 2 1 0 -1
As can be seen, having these three bits only allows us to describe the waveform up to a value of 4,
which then becomes an absolute ceiling level of amplitude. This is okay because when using digital or
any other kind of amplified audio, the audio level (in dB) is always relative to the amplifier; the same
chimes.wav played over the audio system at a rock festival sounds indeed quite a bit louder than when played over my LCD screen’s minuscule speakers. Digital audio can, however, have a maximum of
amplitude: that is 111, or 4, in the above case, since we lack the bits to describe the waveform going higher. Amplifying it digitally therefore means doing something like this:
As can be seen, there is a certain ceiling level: since no more bits are available to represent the waveform over and above the level of 111 (4), the waveform becomes flat at the peaks. This translates
into a fair bit of pretty nasty digital noise. Therefore, in digital audio, sound is described as having a maximum level of 0 dB, but having a minimum level of –∞ dB.
So, to summarise:

Chapter III
45
Resolution in digital audio is defined both by its sample-rate and its bit-depth. - The sample-rate refers to the number of moments in time in which the value of the waveform is
described; CDs typically have a sample-rate of 44,100, DVDs 48,000.
- The bit-depth refers to the number of bits used to measure the value of the waveform; CDs typically
have bit-depths of 16, DVDs 24.
- You cannot ask E-Prime to present a 70 dB sound; but you can amplify a digital sound that has a
peak value of 0dB to 70 dB. To measure audio levels in your experiment, look for a digital ear or
similar device.
WAIT OBJECT
The Wait object is very similar to the Text- and ImageDisplays except that it does not show
anything. For this reason, I prefer to either use TextDisplays or a miniscule inline command known as
sleep. However, if you want to make a transparent experiment – one that your colleagues would quickly understand – it may help to use wait objects as they will instantly see there is some kind of
pause in the experiment. You can also use Wait objects to do most of the other stuff that is available in TextDisplays, such as logging responses (random actions when nothing is shown on the screen?).
LABELS
The Label is more than a pretty banner to brighten up your E-Studio, but not a lot more. In programming, it is actually merely a defined moment in the script. One typical curiosity of the Basic
programming language – which has close links with E-Prime – is that one can skip lines of programming using the Goto statement. On the Commodore 64, for example, the following would
produce the text “Hello” on the screen:
10 Print “Hello”
20 End
… whereas this mini-programme would produce absolutely nothing:
10 Goto 30
20 Print “Hello”
30 End
In later versions of Basic, the line numbers were not required in code anymore (because it is pretty annoying to recode all the numbers when you want to insert a piece of code!), but the Goto statement
remained in vogue:
Goto AfterHello
Print “Hello”
AfterHello:
End

Chapter III
46
…would still produce nothing. So, in E-Prime, these Labels can be inserted onto timelines, much like objects, but they are represented in the E-Prime script as nothing more than the name of the label with
a colon added to it.
You can use such labels for two reasons. First, as said and as will be explained later on, it can be used
in programming (inline scripts). Second, all objects in E-Prime that can capture responses (such as the TextDisplay, etc) provide a way to jump to the label. When you enter the name of a label in a “jump
label” property of an object and set the end action to jump, the participant is moved forward in time, so
to speak. That is, all objects between the current one and the label to which to jump are then skipped.
One word of caution though: due to the mostly object-oriented nature of E-Prime, it is only possible to
jump to a label within the same procedure. It is possible to skip lists and then jump to a label on a
higher level, for example, but it takes a bit of programming (described in the E-Basic help under
FactorSpace.Terminate).
EXPERIMENT PROPERTIES
Since I already mentioned activating the SoundDevice by going to edit > experiment > devices, I might
as well name a few more useful things in the experiment properties. Basically, this is the place where
you set and edit properties that are constant throughout the experiment, such as which Startup info to ask the experimenter (or the participant) and which hardware devices to use. The other tabs of the
experiment properties are not mentioned since they are either too self-explanatory or too advanced. As a result, I seldomly use those tabs.
STARTUP INFO
When you run an experiment, E-Prime by default asks you which participant
number and session number it should use. Since these values are immediately
logged, it is pretty useful to add more
prompts like this to the start-up info:
age, sex, and handedness, for example.
To do this, you can either click on “Add”
and make a new one, or use one of the
current prompts by clicking on the
checkbox next to one and then selecting
this Startup parameter, clicking on Edit,
and enabling “Prompt the user for this
startup info parameter”. It seems
rather redundant that E-Prime allows
you to add these parameters without
actually using them in the experiment,
but it is certainly flexible.

Chapter III
47
DEVICES
Like editing the SoundDevice to adjust the sample-rate
and bit-rate, other hardware devices can also be
inspected, added, removed and edited here.
We’ve already seen the properties of the SoundDevice.
About the others:
- The keyboard is on and activated by default. You can
also edit several properties such as whether the capslock is enabled and whether to also collect key-
releases (instead of only key-presses).
- The mouse is on by default but the cursor is hidden.
This can also be changed, although I do not recommend it. Deactivating the mouse entails that is still
ever present in your experimental screen, for instance – E-prime then merely does not “mind it”.
- The Serial port is an older way of communicating between computers or other hardware, which we
sporadically use in the lab since it is relatively easy to connect specialized input devices and because it’s timing is very accurate.
- The SRBOX is PST’s own way to collect key-presses and voice-onsets. This is basically an ugly, small grey box by the name of “serial response box”. With it, timing issues
are completely absent, apparently. We use it in our lab for two reasons,
however: for EEG (electroencephalogram) experiments; we have two of these
fastened to the dentist chair. And, for experiments that use the microphone to
collect reaction times, which we call voice-key (typically employed in language
production studies and Stroop tasks).
DISPLAY HARDWARE
Since this is a subject that is of crucial importance to most psychonomic experiments, the display
properties here are treated apart from the rest.
The Display is the screen used to present stuff during experiments. Importantly, you can set the width and height (in pixels) here, as well as the bits used for colours. You will notice the screen looks pretty
pixelated when you run an experiment without changing the Display settings, this can be avoided by increasing the width and height, but it will simultaneously make everything appear smaller. In this
university, nearly all computers now have a screen with a resolution of 1280 x 1024 pixels; E-Prime’s display is set to 640 x 480 on default. This makes everything you see on screen whilst programming
your experiment look about two times as large when you run it. Using the display properties within E-Prime you can adjust this, but I would personally recommend not going much further than 800 x 600 if
you are concerned about timing.
Why? Generally, every pixel on the screen is updated a number of times every second. This is usually 60 times a second (60 Hz) on LCD monitors (liquid crystal displays, also known as “flat-screens), but
higher refresh rates can be obtained by using CRT monitors (cathode ray tubes, also known as “those old, big tellies”), which is why we still use these in our labs. Basically, the refresh rate is the final
boundary of timing accuracy: if a screen is updated sixty times a second, this means every pixel is at least shown for 1000 / 60 = 16.67 milliseconds. Ergo: on LCD screens it is impossible to show a prime
for, say, 15 ms. More importantly: it is impossible to show a pixel 95 ms, for instance, and a timing error would result from trying this. However, our dear old CRT monitors can have refresh-rates of 160
Hz, one update very 6.25 ms, so we could theoretically both show primes lasting a mere 6.25 ms, and

Chapter III
48
show a pixel for about 94 ms, but: the higher the resolution, the longer it takes to update all pixels, and the lower the refresh-rate. This is the reason why E-Prime runs at such a low resolution by default.
Timing errors due to refresh-rates can be unavoidable. The basic problem is that although stimuli can be shown independent from the update time, there is then no reason to know whether all pixels were
updated. For example, the lower part of a stimulus is updated first because the updating “cycle” was there when the command to show the stimulus on the screen was presented; so for a brief moment,
only half the stimulus is shown. This makes matters rather confusing to say the least, so it is generally
considered good practice to at least time the stimuli so that they are presented just before their turn to
show up comes around: this we call Onset-sync.
Some points:
- Higher resolutions (width x height): smaller, but better quality images;
- The higher the resolutions, the lower the refresh-rate;
- Sync display onsets and be prepared for timing inaccuracy;
- Always have your experiment’s display settings adjusted to your Windows display settings.
BEGINNING PROGRAMMING IN E-PRIME
All this dragging about of objects is all well and dandy, but it does not quite feel like programming, does it? According to the developers of the E-Prime package (PST), E-Prime does not require
programming, or “using code”. But in reality, that is only true for tutorial experiments and is rarely the case for real experiments. Therefore, the remainder of this chapter is dedicated to giving you a
“primer” in E-Prime script, or code, called E-Basic (which is mostly outdated Visual Basic) programming, so you can use E-Prime without running into problems when you want your experiment
even only slightly different from the standard paradigms.
Whenever you create an experiment in E-Studio and press the Generate button, the experiment is
compiled. This means that the underlying E-Basic code (or script) is generated. This code is displayed
in the Script window. The Script window has two tabs, a Full tab and a User tab. The code in the Full tab
is regenerated each time you press the Generate button. You cannot change or add anything within
this tab, because all the changes are overwritten as soon as the experiment is compiled. If you want to add code, you can do so in two ways; in the User tab of the Script window, or in an Inline object. The
User tab is used to declare global variables (see the next paragraph on Variables and Scope), and to declare functions and subroutines. However, these options will not be discussed any further in this
course, so you don’t need to bother about the User script.
The code in the Script window consists of text in various font colours. The colour of the text indicates
what kind of code it is:
So-called Fixed code is displayed in blue. These are standard routines in E-Basic.
Strings (text-variables) are displayed in red. A string is always surrounded by double quotation
marks (e.g., “this is a string”).
Standard functions are displayed in grey.
Comment is displayed in green. Comment does not form a part of the code. It is used by the
programmer to give information about the program. A comment should always be preceded by a
single quotation mark (e.g., ‘this is a comment). E-Prime interpretes everything after the single quote as a comment.

Chapter III
49
VARIABLES AND SCOPE
In programming, a variable is a user-defined unit that can have different values. Variables are used to
hold some information temporarily (e.g. within a procedure). You could compare it to variables in
mathematical formulas, such as y = 3x + 5. In this formula, x and y are variables. You can fill in different
values for x, resulting in different values for y. In mathematics, variables are typically numbers. In
most programming languages, variables can be of different types. For example, an integer can only hold whole numbers. A single or double, on the other hand, can hold real numbers (with 7 and 15
decimals, respectively). A boolean can be true or false. A string contains a number of characters.
Type Value Example
Boolean true or false TrainingFinished = true
Integer Whole numbers, between -32,768 – 32,767 TrialNum = 19
Single Real numbers (7 digits of precision) EEGVolt = 0.00000001
String Text myName = “Michiel”
So, there are many different types of variables and they can contain some values, but not others. More
of these are available in E-Prime, such as the Double (which is like a single, but with more precision),
the Long (which is like a Integer, but allowing higher and lower values) and the Variant (which
adjusts automatically to whatever it contains), but being able to use the four types above is usually
enough to understand the rest as well.
Fixed code
Comment
String
Standard function

Chapter III
50
To use variables, two steps are involved. First, they have to be declared using the dim statement: dim [new variable name] as [type], for example:
dim myName as string
Once this is done, E-Basic reserves some memory to contain the value. Also, the Basic language assigns
a default value to your new variable, but since you seldomly want this value, the second step is to
assign a value to your variable, for example:
myName = “Michiel”
To illustrate, let’s go back to E-Prime. In E-Prime, code may be placed in between objects by dragging
an Inline icon from the toolbox to a procedure. Double click on it and write down the
following:
dim myName as string
myName = “[insert name here]”
Debug.Print myName
This piece of code declares the variable myName as a string, then assigns the value “[insert name
here]” to it, and finally shows it in the output window of your experiment. When you run this, E-Prime should show [insert name here] in the debug tab of the bottom part of your screen (press alt+3 if you
do not see this output window).
Wow. I use the debug.print method quite a lot myself and think it presents a nifty track that has many
uses for debugging your experiment, as it enables you to understand where things went wrong. And during programming, a lot of errors can and will be made. Try this in an inline object:
Dim myNumber as single ‘this declares myNumber to be a single
Dim myNumberInt as integer ‘this declares myNumberInt to be an integer
myNumber = 26.5 ‘the value 26.5 is assigned to the single
myNumberInt = myNumber ‘myNumberInt is assigned the value from myNumber
debug.print myNumber ‘myNumber is shown in the debug output.
debug.print myNumberInt ‘myNumberInt is shown in the debug output.
What happens here? Notice the comments above to see what each line does. All text that is preceded
by an apostrophe is ignored by the compiler, so you can actually copy all text above to an inline and it
will work. I believe typing all this helps to learn it, though. So, two variables, one gets a value of 26.5,
and this value is then copied into myNumberInt. However, since integers can only be whole numbers, the value is rounded, but poorly so. In some programming languages, the part following 26 would have
been cut off, or truncated, but Visual Basic rounds it off in similar fashion to the education department: a 5.5 is a 5, but a 5.6 is a 6.
Finally, let’s focus on the issue of scope. When you place an inline on a procedure, its contents are
“known” across the whole procedure. That is, if you would declare a variable in one inline object and
change it in a different inline object, you would be fine. However, if you have two procedures, for
example, one TrainingProc and a TestingProc (as in Chapter I), and would declare a variable in the
TrainingProc, but change it in the TestingProc, you would run into the problem of scope. This may
happen in real situations, for example: you train the participant on reacting to a prime and want to adjust the duration of the prime to the result of the training. However, due to the object-oriented

Chapter III
51
nature of E-Prime, the TrainingProc and TestingProc here are independent, so they do not “know” about the “existence” of parts relative to the other.
What to do? There are two ways to solve this. First, you can declare your variable on a higher level in the experimental hierarchy. If both Training- and TestingProc are part of a higher-order “SessionProc”,
then both could reference this parent object; kind of like two branches of a tree not communicating to one another at all, but still sharing the same trunk, such that whatever happens to the trunk is also of
importance to the branches. Second, you can declare your variable on the global level in the User
Script: press alt+5 (sometimes twice) and click on the “user” tab. Everything you declare in the user
script is available throughout your experiment. However, you can only declare variables there, not
assign values to them.
CHANGING AND CHECKING VARIABLES
If you would not do something with a variable, why bother having one? Of course, we call variables
“variables” because they can be changed. In this chapter’s tutorial, you will both be changing a variable
so that it keeps track of the trial number and check whether it is already time for a break.
To change a variable, you simply assign a new value to it. This new value may also be the old value, so
logical absurdities like A = A is perfectly okay for most programming languages, E-Basic including.
However, usually we want the value of A to be different, and the one thing that you will likely most
often do is adding 1 to the previous value of 1. So, instead of telling E-Prime it should add 1 to A, the
logical format is this: A = A + 1. If we do this every trial, we have a nice trial-counter, which is
incredibly useful.
For instance, you might want to know whether 8 trials have passed, because, for instance, you only
want to present feedback every now and then. To do this, you need the IF-THEN-ELSE statement.
This holy trinity checks for a set of conditions (if) and does something (then) when the conditions are
true. Optionally, it does something (else) when the conditions are false.
Try this:
Dim Counter as integer ‘this declares Counter to be a single
Counter = 16 ‘Counter is assigned the value of 16.
IF Counter = 16 THEN
debug.print “It is 16”
ELSE
debug.print “It is actually “ & Counter
Counter = Counter - 1 ‘1 is subtracted from Counter’s value
IF Counter = 16 THEN
debug.print “It is 16”
ELSE
debug.print “It is actually “ & Counter

Chapter III
52
The capitals in IF-THEN-ELSE are not strictly necessary, but they do give it a bit of an epic feel. So, basically, this programme creates a variable, called Counter and assigns 16 to it. Then, the IF statement
checks whether it really is 16, and since it – surprise! – is indeed 16, it writes “It is 16” to the debug output. Then, 1 is subtracted from Counter and no longer does E-Prime write “It is 16” in the debug
output; it “prints” the actual value of Counter.
Note that this “&” character concatenates (i.e. combines) two strings; since Counter is not a string, it is
pretty amazing that E-Basic can actually handle this. This does not always hold, however: “It is
actually” is a piece of text, Counter is a number, so asking E-Prime to combine the two is more or less
similar to increasing the value of your name by 1, or solving riddles like “Pete / 3 = ?”. Should you run
into problems like this, E-Prime will crash with the error-report that there was a Type Mismatch. To
solve this, you could use the following command to convert an integer to a string:
[string variable name] = cstr([integer variable nam e])
Inversely, you could use
[integer variable name] = cint([string variable nam e])
to convert a string to an integer.
For example, try out the following code:
dim myInt as int
dim myString as string
myInt = 16
myString = cstr(myInt) ‘converts int to string
debug.print myString
myString = “4”
debug.print myString
myInt = myString + 8 ‘results in an error, because you cannot add a string and an int
myInt = cint(myString) ‘converts the string into an integer
myInt = myInt + 8 ‘now you can add the values
debug.print myInt
Due to the Basic’s language structure, it is actually important how to write down an IF statement, and
most importantly: when to press enter. For instance:
IF Counter = 16 THEN
debug.print “It is 16”
ELSE
debug.print “It
is actually “ & Counter
…won’t work. If you still want to use enters, you can use an underscore (_) before pressing enter:

Chapter III
53
IF Counter = 16 THEN
debug.print “It is 16”
ELSE
debug.print “It _
is actually “ & Counter
…and that should work. However, it is usually easier and clearer to keep within that line. There is one reason to use multiple lines, however: sometimes, you want E-Prime to do more than one thing in the
THEN part of the IF statement, but…
IF Counter = 16 THEN
debug.print “It is 16”
debug.print “It isnt 15”
…won’t work. To make it work, there can be only one format:
IF Counter = 16 THEN
debug.print “It is 16”
debug.print “It isnt 15”
END IF
This is particularly annoying when you go on to use IFs within IFs within IFs with multiple THENs and
ELSEs!
AD-HOC RANDOMIZATION
To conclude this rather long block of theory, I will teach you the quick and dirty road to randomization.
As will be further explained in Chapter IV, it is possible to use Inline for altering properties of all
objects in E-Prime on the fly. One common property is .Duration. Slides, TextDisplays, ImageDisplays
and Waits all have a .Duration property. To randomise the duration, for example, for fMRI jittering, you can use the following trick:
Insert a textDisplay, name it something like Fixation (with a + crosshair for example) on a procedure. Drag an inline on the procedure before the textDisplay.
Edit the inline to something:
Fixation.Duration = random (10, 2000)
Finished! Now, the Fixation’s duration is randomised to a length between 10 and 2000 ms. Possibly, you might want to make the fixation “somewhat random”, i.e.: it is defined by an attribute as lasting for
either 500 or 1000 ms, but you want to randomise it around these values. This can easily be done by
doing something like:
Fixation.Duration = Fixation.Duration + random (0, 50) – random (0, 50)
Now the fixation’s duration is either between 450 and 550 ms or between 950 and 1050 ms,
depending on the value of the .Duration property of Fixation.

TUTORIAL III: DISTRACTING SOUND
Sound can be a joy as well as a nuisance.
Today, we will design an experiment that measures the effect of the rather annoying
“windows critical stop” sound on tasks with high and low cognitive load. Intuitively, one
would think it is more distracting to hear this
nasty sound if you are mentally very active, so
we predict a higher effect of distracting sound
during tasks with a high cognitive load.
Our experiment will be a classic one, yet again: the visual search task. Basically, we ask participants to
search at a screen containing distracters (here: all letters except the T), and to look for a target (the T).
Cognitive load is then manipulated by increasing the number of distracters (or, if you prefer, by using
letters that are more similar to the target). We require our participants to respond, as fast as possible, by pressing T if they find a target, or N if there is no target. The prediction is that on average,
participants will take longer to press T when there is a distracting sound, but this effect should be more pronounced when the number of distracters is increased.
BUILDING THE BASIC DESIGN
- Let’s first think about the design. Basically, we have a couple of latent variables:
- Cognitive Load
- Auditory Distraction
- But more importantly, we have these manifest variables:
- Target or non-target trial: the trial may either actually contain a target, but half the times
(randomized), this is not the case.
- Number of distracters: either 10 or 20.
- Sound: either silence or the Windows Critical Stop.
- And obviously, the response variable: CorrectResponse, which is t for target-trials and n for non-
target trials. Here’s what I made from this 2 x 2 x 2 design:
-
- So, we have a SoundOrSilence attribute, an IsThereATargetThere attribute, the CognitiveLoad is an
attribute and lastly, the CorrectResponse is already defined. What may not be immediately clear is the use of these Nested Lists and the LetterString attribute. As you can see, I have added four
different lists for each combination of IsThereATargetThere and CognitiveLoad: TargetLow for
IsThereATargetThere = Yes and CognitiveLoad = Low, etc. The Letterstring, in turn, refers to an
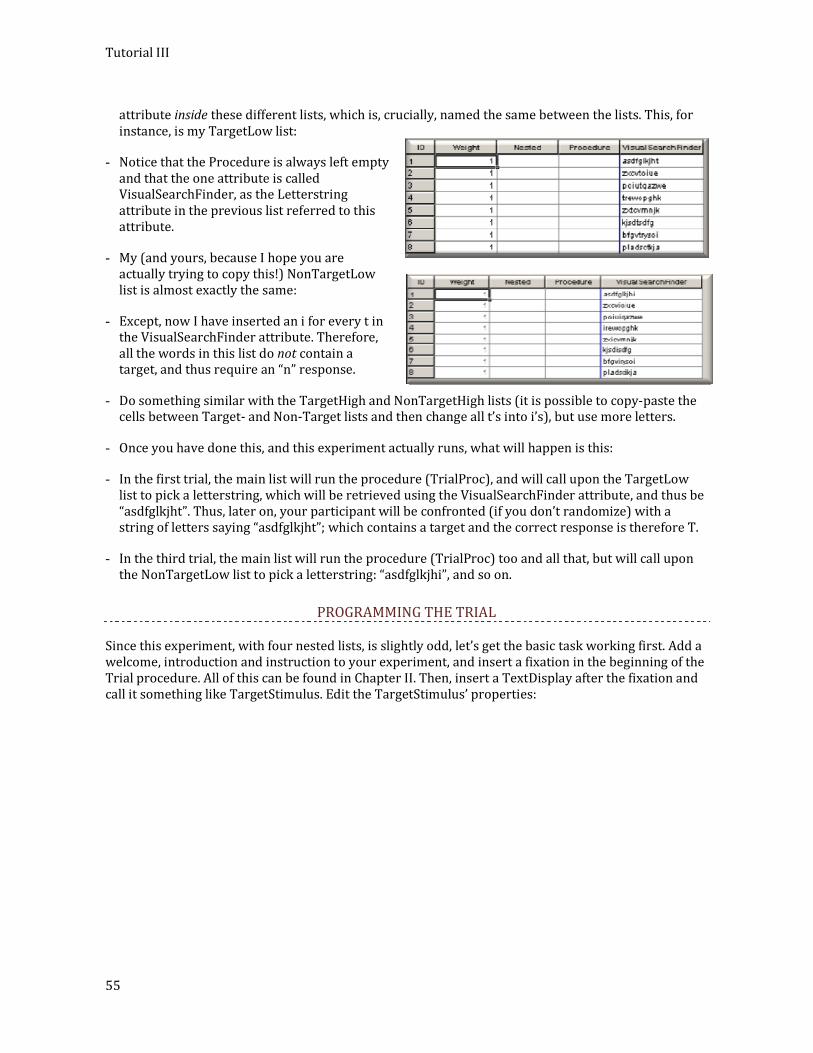
Tutorial III
55
attribute inside these different lists, which is, crucially, named the same between the lists. This, for
instance, is my TargetLow list:
- Notice that the Procedure is always left empty
and that the one attribute is called VisualSearchFinder, as the Letterstring
attribute in the previous list referred to this
attribute.
- My (and yours, because I hope you are
actually trying to copy this!) NonTargetLow
list is almost exactly the same:
- Except, now I have inserted an i for every t in the VisualSearchFinder attribute. Therefore,
all the words in this list do not contain a target, and thus require an “n” response.
- Do something similar with the TargetHigh and NonTargetHigh lists (it is possible to copy-paste the cells between Target- and Non-Target lists and then change all t’s into i’s), but use more letters.
- Once you have done this, and this experiment actually runs, what will happen is this:
- In the first trial, the main list will run the procedure (TrialProc), and will call upon the TargetLow
list to pick a letterstring, which will be retrieved using the VisualSearchFinder attribute, and thus be
“asdfglkjht”. Thus, later on, your participant will be confronted (if you don’t randomize) with a
string of letters saying “asdfglkjht”; which contains a target and the correct response is therefore T.
- In the third trial, the main list will run the procedure (TrialProc) too and all that, but will call upon
the NonTargetLow list to pick a letterstring: “asdfglkjhi”, and so on.
PROGRAMMING THE TRIAL
Since this experiment, with four nested lists, is slightly odd, let’s get the basic task working first. Add a
welcome, introduction and instruction to your experiment, and insert a fixation in the beginning of the
Trial procedure. All of this can be found in Chapter II. Then, insert a TextDisplay after the fixation and
call it something like TargetStimulus. Edit the TargetStimulus’ properties:

Tutorial III
56
If you did the lists exactly like me, and inserted these attributes similarly, the experiment should run.
Now we only need a bit of sound.
ADDING SOUND
Insert a SoundOut object before the TargetStimulus and after the fixation, then edit its properties to
the following.
The filename refers to the Windows
Critical Stop in the windows\media
directory. You might want to copy it
to the directory where your
experiment resides though.
Also notice that Loop is set to Yes and
Stop After is set to No. Finally, and though this screenshot does not show
it, the Duration is set to 0 ms.
Try to run this, does it work?
In my case, it did not. Indeed, it
showed the following error:

Tutorial III
57
I know most people feel a certain need to press OK to random errors and pop-ups to get rid of them as
soon as possible, but they may actually help sometimes. This one states that Windows Critical Stop.wav has an invalid sample-rate, pointing to the line number (in the script, press alt+5, twice if
necessary, and see the Full tab to see this) where the error occurred. It is the last line you see here: DistractingStimulusSoundBuffer.Load fails. So, what’s wrong with your file? Go to Windows Explorer
(Start > Run > explorer) and find the directory: C:\Windows\Media and the file Windows Critical Stop.
Right click on it, select properties, and see the Summary tab. Ah, the file is a 16 bit, 44 kHz, stereo wave
file.
Now go back to E-Prime, select edit >
experiment > devices > sound > edit and
adjust the sound properties to conform to
the Windows Critical Stop properties. Run
again, it should work now.
Now, you should hear the sound-file playing
whenever a stimulus is present. However,
in half of the trials, no sound should be
presented at all. Go back to the TrialList,
add an attribute called VolumeChange (or
any name you prefer), and enter a value of -
10000 for every silent trial
(SoundOrSilence = TheSilence) or 0 for every noisy trial (SoundOrSilence = TheSound). In the
DistractingStimulus’s properties, let the Volume Control’s Volume level reference the VolumeChange
attribute:

Tutorial III
58
Finished!

EXERCISES
- Check your design: is everything randomized correctly?
- Extend the current design with a training list.
- Make an introduction-, an instruction- and a goodbye-screen.
- Randomize the duration of the fixation using inline.
Participants can get tired, although they rarely admit it (because introducing a short break makes the experiment take more of their time). As psychologists, we can hardly deny that attention is limited,
and it would be foolish for any experimenter to test these limits unless they form an essential part of the research question. In E-Prime, there are many ways to programme a quick break, but the way this
will be achieved in this final exercise is easy, controllable and will teach you about using variables in E-
Basic.
Start by adding a text-display just prior to the fixation screen. Ask your participant whether he/she
wants to continue to the next trial, and press an (allowable!) key to continue.
If the participant does not want to continue to the next trial, they are taking a break – which you can of
course keep track of by looking at the reaction time of this object (if you would log it), so you’d know if they are having too many breaks. The problem, however, is not that participants take too much time
breaking or are ‘lazy’ or something: in my experience with reaction time experiments, I found that they are usually very eager to ‘get it done with’. Such insights have prompted me to specify when they are
pausing and how long exactly. Should you have 200 trials with 4 blocks of 50 trials each, it makes sense to let the participant have a break after 100 trials.
Thus, our goal is to hide the pause-screen during the other 199 trials.
First, you need to keep track of the trial number, so make a global variable and call it something like
trialcounter, tellertje, etc. As said, global (accessible throughout your experiment) variables are
defined in the ‘user’ part of the script (view>script>user tab – sometimes you need to do this twice). Enter the following code:
Dim Tellertje as Integer
As explained earlier in this chapter, in E-Basic, declaring a variable automatically means a value is
assigned to it. In other words, with the previous statement “dim Tellertje as Integer” the integer
variable “Tellertje” was assigned a default value of 0. Thus, although other programming languages
like C++ would get very upset when you would try this, Visual Basic (and therefore, E-Basic) finds the
code of the next exercise (c) perfectly reasonable.
During each trial, we want ‘tellertje’ to go up with 1, so in trial 1, ‘tellertje’ is also equal to 1 (this may
sound like common knowledge, but in programming, ‘the first’ is often the 0-value). Thus, insert an
inline object at the very beginning of the trial, and write the following statement:
tellertje = tellertje + 1
Another important difference between Visual Basic and most other programming languages, is that
Visual Basic cares little about casing.
tellertje = Tellertje + 1
…is thus seen as the exact same thing as…

Tutorial III
60
TeLLeRTje + tELLERtje + 1
Still, if you ever want to continue studying programming, it makes sense to always keep your casing
consistent.
“Our goal is to hide the pause-screen during the other 199 trials”, translates into programming language
like IF “NOT-pause” THEN “hide pause-screen”. Hiding is not very easy, but just ‘skipping past’ the
pause-screen is quickly done. Insert a Label object just after the pause-screen and give it a name you
will remember.
Now, edit your last inline-object (the tellertje = tellertje + 1 one) so it basically says: IF tellertje Is_Not
<trial-when-you-want-a-break> then goto <whatever you named that label>. Note that Is_Not is not a
proper operator, so use <> instead (‘is smaller then or greater then’).
Run your experiment and check whether you see the pause-display.

CHAPTER IV: MORE INLINES AND CONTEXT-CONTROL
In this chapter, you will learn
About:
Inlines sleeping and beeping
Inline timing
Getting and setting attributes
How to:
Balance responses.
Make moving displays and
INLINES, EVERYWHERE
Inlines are incredibly useful in E-Prime. Indeed, when I program an experiment in E-Prime, I seldomly
use anything but lists, a few textDisplays and a lot of inline. I’ll talk some more about how to efficiently
integrate lists and inline later on in this chapter, but for now, some easy and interesting examples of
inline code.
SLEEPING AND BEEPING
Well, you could use a wait object, but the following code is really easier:
Sleep 2000
Sleep makes your experiment wait for 2000 ms. Value is a long: must be smaller than 2,147,483,647
(almost 25 days). By the end of the 25 days, you may need an alarm so you know the time has elapsed. To do this, try:
Beep
Wow. However, note that Beep only works when the SoundDevice object is unchecked or removed
entirely from the experiment property (devices tab). It didn’t actually work on my pc at home, but it’s
a nice example of what should, in principle, be a very short and simple statement.
LOGGING TIMING
Of course, especially if you are using that Sleep statement mentioned earlier, you might want to do some time auditing without running your entire experiment and seeing whether the .onsetdelays and
.durationerrors are high. Here’s the other way, and let’s say you want to log the precision of this sleep
statement, for instance:
Debug.print Clock.read
Sleep 2000
Debug.print Clock.read

Tutorial III
62
Debug.print, like before, shows you anything you would like to see in the Output (debug tab) window
inside E-Prime. Now, it shows you whatever the output is of Clock.Read. Clock.Read, in turn, returns the current time of E-Prime’s clock, in milliseconds, from the beginning of the experiment. So this is
“cumulative timing”, if you will. In my case, the Output window showed:
10541
12541
That is, the time before the Sleep statement was 10541 ms, and after 12541, so in between 2000 ms
had elapsed. Pretty accurate timing, if you consider I’m running this under Windows Vista with loads
of other programmes also running. What happens when E-Prime does something more interesting
than sleeping for 2000 ms? To find out, I inserted a textDisplay after this inline, and another small
inline with just Debug.print Clock.read in it. The textDisplay is supposed to be shown for 1000 ms. Now, the output shows this:
11211
13211
14223
Notice that:
The textDisplay lasted 1012 ms instead of the 1000 ms that it should have lasted, but this is mostly due
to Onset Sync (see chapter I and III). Indeed, I tried it again, with Onset Sync turned off, and it took
1003 ms, so that’s much better. Obviously, it is not actually shown for 1003 ms, though (see chapter III,
on refresh cycles).
The experiment did not quite start at the same time: about 11211 – 10541 = 670 ms later actually. This
is mainly due to timing errors that occur when you just run your experiment: E-Prime is still loading
some stuff, whilst other, “Windows-governed” processes are still running to some extent. Therefore,
always introduce an introduction screen that takes some time to read and that ends by a (unlogged, no
“correct response”) key-press.
GETTING ATTRIBUTES
As said, inlines are very useful for getting the most out of your experiment, but without the ability to
interact with your experimental design, they are of limited consequence. You can read attributes by using the following code:
c.GetAttrib (“[attribute to read]”)
So, for instance, let’s say we have a list, and this list is sequentially presented, and we are in the third
trial:
Then here are some example codes

Tutorial III
63
Debug.print c.GetAttrib (“Word”)
Debug.print c.GetAttrib (“Colour”)
Debug.print c.GetAttrib (“Subject”)
The output would then show:
Red
Green
[whatever your subject number would be]
Notice that Subject is not actually in this list, but because it is a default start-up value of the experiment
(see Chapter III), it is automatically made into an attribute. This will be useful in the example on
response-balancing.
The same inline should show, one trial later:
Green
Green
[whatever your subject number would be]
So, c.GetAttrib reads the value of the attribute relative to the position in the list. Or, if you prefer, it reads the attribute relative to the current context, c. for short.

Tutorial III
64
SETTING ATTRIBUTES
Let’s say, in our previous example, we added one extra start-up info parameter: ColourSight:
As you see, the experiment will not ask the subject whether he or she “sees between red and green”, and whilst this may sound a bit ambiguous, I will trust the lab-assistant or experimenter to make this
somewhat more clear to the participant, since the prompt may only be 30 characters for some odd
reason.
So, we have a Stroop task, and usually you will want to get rid of those who fail to see the difference
between red and green, as they will be unable to finish the task (if there are only two colours). However, you may decide (although I don’t recommend it) to show purple instead of red for colour-
blind people. I admit to not knowing much about colour-blindness, so don’t try this at home, or at least, not in a real experiment.
Anyway, we need to do three things in the beginning of each trial:
Read the ColourSight attribute to see whether the participant selected “No”
Read the Colour attribute and if it is “green”, Change the colour attribute.
I’m still working with the Stroop list shown in the previous page.
IF c.getAttrib ("ColourSight") = "No" THEN
IF c.GetAttrib ("Colour") = "Red" THEN
c.SetAttrib "Colour", "Purple"
END IF
END IF
Notice:

Tutorial III
65
c.GetAttrib (“ColourSight”) reads the coloursight attribute, so either “Yes” or “No” is returned. Basically
then, the first line of code asks whether the ColourSight attribute returns “No”.
The second line of code first, in the IF clause, asks what the current colour “to be presented” should be.
If it is Red, then the third line comes into play:
C.SetAttrib “[Name of the attribute to be saved in]”, [value to save]. Notice that there are no brackets
of any kind in this syntax, even though this is necessary with GetAttrib. So, this line of code saves the
word “Purple” into the current list, updating the list so every time the current value “Red” is
encountered, it becomes “Purple”.
The fourth and fifth lines are, strictly speaking, not necessary. This would also have worked:
IF c.getAttrib ("ColourSight") = "No" AND c.GetAttr ib (“Colour”) = “Red” THEN
c.SetAttrib "Colour", "Purple"
END IF
BALANCE RESPONSES
Should you still have your Simon experiment, you might want to try this trick, as many cognitive
psychologists find this to be important. Basically, the problem is “handedness”, that is, people are
usually faster to make right-handed than left-handed responses, and whilst it is impossible for this to
corrupt your data (since the Simon effect lies in the interaction between stimulus- and response-location), it won’t hurt to control for it.
Basically, say we have an experiment where not arrows, but colours would indicate the correct response. We’d end up with a list like this:
Location Colour CResponse
25% Red q
25% Green p
75% Red q
75% Green p
Basically, the difference here is that the participant is asked in advance to react to a red stimulus with
a left key-press and with a green stimulus with a right key-press, instead of showing arrows. So, the
first stimulus is presented left, the colour is red, so the correct key is Q (left) and this is stimulus-
response compatible.
Now, in order to balance responses, we should ask half the participant to do the reverse mapping: press P for every red stimulus and Q for every left stimulus. One way to do it (my favourite way) is to
use the following inline and put it in the beginning of every trial (or earlier, to adjust the instruction accordingly).

Tutorial III
66
Dim Subjectnum as integer
Subjectnum = c.GetAttrib (“Subject”)
IF Subjectnum mod 2 = 0 THEN
IF c.GetAttrib (“CResponse”) = “Q” THEN
c.SetAttrib “CResponse”, “P”
ELSE
c.SetAttrib “CResponse”, “Q”
END IF
END IF
So, this little piece of inline reads the subject number to the integer Subjectnum and then asks whether
Subjectnum mod two equals zero. Mod is short for “modular”, and is a bit of a strange, but useful function for programming and mathematics. It returns the part that could not be divided anymore; the
rest, so to speak. Some examples might clear this up:
10 mod 2 = 0 10 mod 3 = 1 10 mod 4 = 2
11 mod 2 = 1 11 mod 3 = 2 11 mod 4 = 3
12 mod 2 = 0 12 mod 3 = 0 12 mod 4 = 0
Or, with big numbers: 1183 mod 500 = 183; because 1183 can be divided two times by 500, after
which 183 is left. Thus, all that If Subjectnum mod 2 = 0 does is asking whether the subject is odd or
even; if it is even, then the responses are reversed.
The reversal itself is simpler: it reads the CResponse attribute, and asks whether it is Q; if so, it writes into the same attribute the value “P”. If not, the CResponse must be P, so it writes in the same attribute
the value “Q”.

TUTORIAL IV: MAKING MOVING DISPLAYS
According to some psychologists, people can actively “track” – mentally follow – four randomly moving
objects. Others, or really, I, doubt that this information is irrelevant so long people don’t do anything with the four randomly moving objects. Although this experiment is far from being a classic
experiment on object-based attention, and not even really part of “the stuff I’m into”, it does illustrate how to enable moving objects without using tons of images.
The experiment will be the following: an object, either >> in a gray square or << will move upwards
after the participant pressed >> or <<. It will move at a certain speed: slow or fast. Then, after having
moved for a certain amount of time, it will be masked by a black block, covering the full track for a
short or long while. Immediately thereafter, it will re-appear again, at a high or low position, and with
again a << or >> at which point the participant is again required to respond with a Q (for <<) or P (key-
press).
So this is the basic procedure, from left to right:
THE BASIC DESIGN
Make everything you are used to, training, testing, etc. Fill in the trial-list with the following details
that should make sense from reading the introduction in the last paragraph:
StartText StartKey SpeedOfMoving Mask EndPosition EndText EndKey
<< q 10 100 600 << q
<< q 10 100 600 >> p
<< q 20 100 600 << q << q 20 100 600 >> p
>> p 10 100 600 << q
>> p 10 100 600 >> p
>> p 20 100 600 << q
>> p 20 100 600 >> p
I will use a design that is somewhat easier than the main design above, but you can extend upon it by
finishing the exercises later on. So, here is my list:
>>
<<
<<
<<
Until key-
press (Q)
Fast or slow Until key-
press (P)
Mask (long or
short)

Tutorial IV
68
It is nearly the same as the table directly above it. However, notice that it calls a procedure: MovingTrial and also has a mysterious extra attribute: CurrentYPos that keeps saying 460.
Now it is time to edit the MovingTrial itself.
THE TRIAL
First, let’s create the trial without moving stuff, and without inlines, see how far we can get. As the
procedure suggests, there are basically four stages in every trial: 1. A cue, 2. A moving shape, 3. A mask and 4. A target.
The Cue:
It is basically a single-state slide, with one text display in it. The textDisplay says [StartText] as text, thus referring to the attribute with the arrow in it. It is 40 x 40 in size, horizontally centred (set at
50%) has a gray background and a black border of width 2. Furthermore, the slide itself (edit properties of the Slide itself), has a correct response attribute that is [StartKey], allowable response:
qp and infinite duration. Since CurrentYPos is stated in the list to be 460, the arrow <<, in the first trial, will be shown in a gray object near the bottom of the screen when you run this. If you don’t see this,
something has gone wrong.
Moving Shape
The moving display is nearly the same as the cue, but there are some important differences: there is no
allowable key anymore, and the duration is 50.
Mask
The mask is a slide that looks like this:

Tutorial IV
69
It has a height of 100% and a width of 40 (not %). Also, it should have a duration of [MaskDuration].
Target Target is, again, almost exactly like the cue, except it refers to EndText for its text to display (so
[EndText]) and [EndKey] as the Correct Response.
Okay, run it, see if it works like this: it shows the cue for an infinite amount of time, or until you press the key that is associated to the cue (<< or >>), then nothing happens for about 50 ms, after which the
great black pillar emerges for about 100 ms, and yet again, a cube is presented near the bottom of the screen.
PROGRAMMING MOVING OBJECTS
The idea is this: to make something look as if it moves, basically you show it again and again with a different position. If this is done fast (e.g. at 15-25 Hz), it looks as if it moves. So, first edit your trial to
make it look like mine:
I’ve added an inline in the beginning of the trial and one after the Mover slide (the one lasting for 50 ms). Also, I’ve made one label “PreMove” and one “PostMove”. The first inline will initialise and declare
a few variables. Edit this InlineStart to say the following:
Dim NumberToMove, NumberMoved, Speed, PosY as integ er
Speed = c.GetAttrib ("SpeedOfMoving")
PosY = c.GetAttrib ("CurrentYPos")
NumberMoved = 1
NumberToMove = 20

Tutorial IV
70
This declares four variables: NumberToMove – which will be the number of times that the position of
the object will be relocated – NumberMoved – which will be the number of times that the position of the object has been moved, Speed – which will be the number of pixels that the position of the object
will be moved and finally PosY – which will temporarily contain the current Y position. Speed is read from the list, so it is 10 pixels in some trials and 20 pixels in others. Current Y position is also read
from the list, although it would have been just as easy to assign it the value 460, since it starts off as
460 in every trial anyway.
Now, edit the other inline to say the following:
IF NumberMoved < NumberToMove THEN
PosY = PosY - Speed
c.SetAttrib "CurrentYPos", PosY
NumberMoved = NumberMoved + 1
goto PreMove
END if
This inline checks whether a number of updates (“iterations”) have occurred, so up till 20 times, this
code is run (since NumberToMove is set to 20). Then the position of Y, starting at 460, is subtracted 20
from. This new value of PosY is then written to the CurrentYPos attribute. One is added to the NumberMoved (otherwise the update will always happen!) and finally, a leap, back in time is made to
before the Mover slide happened. The mover slide, in turn will refer to the newly updated CurrentYPos, which will be 440, the first time, then 420, etc.
Actually, I could have added an ELSE clause to this inline, saying something like
IF NumberMoved >= NumberToMove THEN goto PostMove, but actually, this label is totally
unnecessary, much like this THEN clause.
Time to run the experiment!
EXERCISES
- Correct your design: is everything randomized?
- Extend the current design with a training list, and an introduction-, an instruction- and a goodbye-screen. Also, add a feedback display for both responses, both in the very end of the trial.
- Adjust the speed of the moving object so that it ends either halfway in the screen (at Ypos = 240) or
at the top (at Ypos = 20). Also, adjust the duration of the moving slide so that it appears to move somewhat smoothly.
- Measure the duration of the move itself using inlines. Are both speeds similarly timed?
- Answer the following research question by extending the design: does the predicted location of the
target object interact with the previously cued action?
- If the cued action (for example Q) is the same as the action after moving (again Q), it is useful when
it seems as if the position of the object shifted towards the new position (slow move, ends midway, target is at Y = 240; fast move, ends at top of screen, target is at Y = 20).

Tutorial IV
71
- If the cued action (for example Q) is different from the action after moving (now P), it is useful when it seems as if the position of the object shifted towards the new position (slow move, ends midway,
target is at Y = 20; fast move, ends at top of screen, target appears at Y = 240).
- So, ideally, an interaction should be found between the “real” and “predicted” location, and in order
to study this, you should, at a minimum, have the target appear at one out of two locations.

CHAPTER V: VARIOUS DEVICES
In this chapter, you will learn
About:
The PST SRBOX
Voice-Key
EEG
Tobii Eye-Tracking
How to:
Use the stuff sold by PST
Get the EEG to log E-Prime data
Running unreferenced objects
THE SERIAL-RESPONSE BOX
The Serial-Response Box (SRBOX) comes heavily recommended with an E-Prime license. This is, of
course, only to be expected since the same people who made E-Prime also sell this nifty, but rather
ugly, little device. Apart from that, however, they insist it comes with timing properties that are far
superior to those of other reaction-recording devices – typically keyboards, mice and (with E-Prime 2)
joysticks. On the subject of keyboards and mice, in particular, it makes a great deal of difference
exactly what kind of response-device you use and how it is connected. Please see
http://www.pstnet.com/products/E-Prime/timing/ for more information on that, and find out that
PST claims that their SRBOX does quite well in all cases. Whether or not that would be the case, it is
certainly true that it is rather easy to use it, considering it comes pre-programmed in E-Prime, saving
us a lot of work and cognitive strain.
Our typical SRBOX has five buttons that are horizontally placed on the top of the device,
a parallel port connection (the one with the many pins) and a microphone
connection. The latter will be discussed in more detail below on the subject of
voice-key experiments, so let’s first get the thing to work in the simplest way
possible.

Chapter V
73
ADDING THE SRBOX
We go to Edit>Experiment>Devices tab and press the “Add” button. After double-clicking on the
SRBOX and pressing okay, the following screen shows it is now added to the experiment:
That is, this is what you would get if you had also selected SRBOX and clicked on “Edit”. The properties are confusing enough, so I will only mention two here:
Collection Mode: can also be set to collect “releases” and both “presses and releases”. This also applies to most of the other response-capturing devices (such as keyboards and mice) and can be
useful if you would, for example, have a subject pressing a button before the trial starts, and only to start it after releasing it.
Port: refers to the COM port of the computer to which the SRBOX is serially connected. In the good old days, when communication between computers went through serial connection by default, PCs
typically had a number of serial ports. Now, it is getting more and more rare to find PCs that even have
a single one. We will assume the reader has such a port, or has bought PSTs serial to USB SRBOX, and in the mean time, it is usually easier to connect the cable to whatever plug in the computer works and
then see if this is the correct port.
If you connect the SRBOX to the power supply, you will notice the lights just above the buttons will
light up. Upon running your experiment at this stage, they should turn off automatically. If this is not the case, the SRBOX’s connection is usually faulty.

Chapter V
74
USING THE SRBOX
Now, clicking on OK finalises the first step. On
with the question as to how to gather data
using the SRBOX, we take a typical stimulus
showing object, such as the TextDisplay, go to
its properties, select the Duration / Input tab
and “Add” the SRBOX as a new response-
collecting device. By entering “12345” as
allowable responses, you allow the SRBOX’s
buttons to be used for this TextDisplay. Response 1, here, refers to the leftmost
button of the SRBox (to your left, if you have
placed it with the buttons towards you), 3 to
the middle button, etcetera.
VOICE-KEY EXPERIMENTS
Using the voice-key is in many ways not very different from using the SRBOX, except that you attach
the microphone to the SRBOX and set the allowable response to “6”. However, many psychological
experiments depend to a great extent on the accuracy of the voice-key, so we will make an effort here to get you started using it in a sensible way.
In many psycholinguistic experiments, a voicekey (VK) is a valuable tool to measure
onset latencies of utterances. If, for instance, you want to measure how much
time it takes from seeing a picture of a chair and actually pronouncing the word “chair”
the voicekey is the device you will most
likely use. It captures how long it takes
between presentation of a stimulus and the
beginning of an utterance, hopefully
precisely the planning process you are
interested in.
So, what is a VK anyway? Well, a VK is a device which is situated between a microphone and a
(Eprime) computer which measures a participant’s vocal reaction time (note: it does not record the participant voice). It monitors the volume level of auditory input coming from an attached
microphone. When that volume crosses a certain threshold and stays over that threshold for a certain
amount of time it will register this as a participant’s reaction time. In the SRBOX a VK is already built
in, so there is no need to attach a separate VK. We already learned that the SRBOX is connected to the
PC with a serial (COM) cable. So the next part is: how do we connect a microphone to the SRBOX/VK?

Chapter V
75
You’d guess it would be a straightforward answer, just plug in the microphone in the microphone
input, but that need not necessarily be the case. It depends whether the microphone needs power or
not. The SRBOX ships with a separate microphone which can be attached with no problems as it does not require power. However, if one wants to attach a headset microphone, a problem will arise. The
headset microphone requires some electrical power to operate, which is normally provided by the computer it is attached to, but the SRBOX does not supply that power to the microphone. The solution
is to put a small power supply – called an electret condenser (normally used for tie clip microphones) – in between.
Ok, suppose now that everything is working fine technically: the microphone is correctly plugged in
and the VK is purring with excitement in awaiting its input. What then? First of all, we need to calibrate
and check the VK settings for each participant separately (not everybody’s voice is the same). This can
be done by presenting a participant with words which he/she is required to read aloud.
Obviously, not all words sound the same. What is especially important for experiments using a VK is to
keep in mind that not all onsets of words are equally loud. Words like “house” and “prince”, for
example, have very different onsets. The “h” in “House” starts much softer than the ‘plosive’ “p” in
“prince”, so if you would calibrate the VK using only strong onset words but using other words in your
real experiment, this would likely lead to non-registered responses.
Also of crucial importance in a VK experiment is the instruction/explanation that is given to the
participant. A VK is a “dumb” machine, meaning that it does not know whether auditory input is a voice, or smacking, sighing, rocking the chair about, etcetera. Many people, without knowing it, exhibit
a little “smack” (caused by opening their mouth) before they speak and/or sometimes breathe loudly
before they utter a word or sentence. This can lead to accidental triggering of the VK before the word
is actually spoken, which results in an unusable RT. The instruction should therefore clearly indicate
that unwanted sounds - meaning sounds other than spoken words - should be avoided.
In most VK experiments the experiment leader plays a greater role than in a “normal” experiment. This
is because in most cases the experimental leader has to judge whether a trial was valid or invalid. This

Chapter V
76
judgment procedure is mainly done by inserting a blank TextDisplay with the duration set to infinitive to which the experimenter can react with a code (putting allowed to , for instance: 123, 1=correct trial,
2=VK error like a “smack”, 3=wrong utterance like saying “fruit” to “ banana” or something).

TUTORIAL V: MAKING A VOICEKEY (VK) TEST PROGRAM
To be able to conduct a good VK experiment, it needs to be established how the VK and instructions
are to be modified for a given participant. We are going to create a simple word naming experiment to test this.
THE BASIC DESIGN
Create a test list (16-20 items) with words that have a multitude of onsets (like the well-
known “aap-noot-mies” table).
THE TRIAL
The basic trial setup is quite simple: 1) Fixation Cross + (1000ms), 2) TestWord (infinite; allowed
SRBOX:6), 3) a feedback screen to see the RT and 4) a TextDisplay containing an asterisk (infinite;
allowed keyboard: 123). Set the TestList to present the words
randomly (perhaps even twice), also make sure to ADD the SRBOX
to the experiment (using experiment object) otherwise it won’t
show up as a possible response device (also see: ADDING THE
SRBOX). Check whether the “input object name” of the feedback screen is properly set and make sure it only displays an RT and not
whether the stimulus was correct or not. For the reading and
pronunciation of a written word an average RT spans between 350
and 550ms.
TOO LOUD OR TOO SOFT?
Now run the experiment. The tricky part is if a subject’s voice is too soft (to be registered as a response) or to loud (e.g. if non-utterances trigger the voice-key). There are three ways of coping with
problems like these. First, you can move the microphone closer to or further away from the mouth of the participant or ask the participant to speak softer or louder. Secondly, by using a screwdriver in the
VK sensitivity knob, it is possible to adjust its hardware sensitivity (see picture on page 75).
Counterclockwise turning renders the VK threshold more sensitive and clockwise turning makes it less
sensitive. Lastly, you can use an InLine to adjust the sensitivity. This can be done by using the
following code (where x = a value between 0 and 31; 0 being most and 31 least sensitive).
SRBOX.VoicekeyTripLevel = x
Note that option two and three work independently, meaning that they can affect one another.

Tutorial V
78
If you notice that a subject, who is asked to speak louder/softer, does not follow experimental instructions, and you do not want to cope with the burdensome hardware sensitivity adjustment, you
might want to build in a statement at the checking part that allows for manipulation of the abovementioned variable.
TO CONCLUDE
The abovementioned VK test experiment might not be the most challenging with respect to programming and design but to perform any valid VK experiment it is essential to control for sound
anomalies and to explain to the subject where “things” can go wrong. Also the checking part for the experimental leader is of utmost importance. Think of the following example: you presented subjects
the word “weide” [meadow] but the word disappeared not on the onset W but rather on the consonant
D from the –DE part, this is an invalid trial. As significant psycholinguistic effects tend to range from
10-50ms it is essential that the RT of the word (or picture) reflects the onset of the utterance.

CHAPTER VI: ADVANCED E-BASIC PROGRAMMING
In this chapter, you will learn
About:
Arrays
Loops
Canvas Programming
How to:
Collect multiple responses with the same object
Write custom functions and subs
Display simple vector-graphics
ARRAYS
If you want to create ten variables which all have a random number between 1 and 50, how would you
do that? Well, you could declare ten separate variables and assign them all a random number but you
could also do that somewhat easier using an array. What is an array anyway? An array is a data
structure consisting of elements which you can access by means of an index number. You could think
of it as being a sort of excel file. A very simple example would be the following array. You would be
able to reach an element of this array by typing the name and between () the number of the element.
elementNr contents
1 hello 2 we
3 are
4 elements
5 of
6 an
7 array
Suppose this array is called CoolArray then you can retrieve the word “we” by typing CoolArray(2). For instance debug.print CoolArray(2) will print “we” in the output screen. As a variable you will also
have to declare an array, meaning to specify what kind of an array it is (integer, string, [etc]) and the number of elements. This type of array is called a static array as you provide a predetermined number
of elements, however also dynamic arrays can be made for which the length is variable. Ok, how do we
declare this array:
dim CoolArray[7] as string
So, we’ve declared an array named CoolArray consisting of 7 elements of the type string.
How can we fill these elements with valuable data? Well, simply the same as a normal variable only now you refer to the array name with an element number.

Learn More
80
CoolArray(1) = “ hello”
Ok, try now to declare the abovementioned array in Eprime, fill it with the elements described in the
table and print each element to the output screen. If you succeeded in doing that create another
arraycalled RandNumArr consisting of 10 elements of the type integer and fill each element of the
array with a random number and print this number on the output screen (using debug.print).
LOOPING BEYOND GOTO: FOR-NEXT; WHILE-WEND
Wow, our mission succeeded already (if everything went fine). We got a nice array with 10 random
numbers, the trouble is that we would’ve also picked up a massive outburst of Repetitive Strain Injury for writing all this code out.
Is there no way of simplifying this process? Well, of course there is, it is called the FOR-NEXT loop.
Basically, a FOR-NEXT loop repeats all the code between two markers, the beginning (FOR) marker and the end (NEXT) marker. Thus, a FOR-
NEXT loop allows code to be repeatedly executed.
FOR [variable name] = [LowerRange] to [UpperRange]
[... some repeated code...]
NEXT [variable name]
Basically, a FOR-NEXT loop repeats all the code between two markers, the beginning (FOR) marker
and the end (NEXT) marker. The two numbers for LowerRange and UpperRange will then be used to establish a consecutive loop for all whole integers between and including these numbers (so,
1,2,3,4,5,6,7,8,9,10), the code in between will be executed for each number individually. So, how can we use that for our RandNumArr?
dim i as Integer
dim RandNumArr(10) as Integer
FOR i = 1 to 10
RandNumArr(i) = Random(1,50)
Debug.Print RandNumArr(i)
NEXT i
Ok, that is all pretty amazing. But what is actually happening now? Well, if you think it through, the
following happens: An integer and an Array of 10 elements are created. The FOR statement specifies
the beginning and the end of the loop and gives at the first iterarion the integer i the value 1. Then, the
code between FOR – NEXT is executed. So, the RandNumArr(i) meaning in this case RandNumArr(1)

Learn More
81
(because the i = 1) will be assigned a random value between 1 and 50. Subsequently this value which is put in the array will be printed on the output screen Debug.Print RandNumArr(i), then the NEXT i
will be encountered, that means that i is going to its next value in the cycle (in this case 2) and the same code is executed. Note: you can also use Ubound(RandNumArr) as an UpperRange for the for
loop, Ubound() gives the length of a given Array.
It is also possible to use FOR-NEXT loops which do not have an ascending number from 1 to 10 but
rather jump in steps, for instance: in the example underneath i will take the following values
(1,3,5,7,9).
Dim i as Integer
FOR i = 1 to 10 Step 2
Debug.Print i
NEXT i
There is also another way without using FOR-NEXT to achieve our goal. It is called a WHILE-WEND
loop. What does it do? Well, it executes a series of statements until a certain condition has become
false (or is no longer true). If you take the below mentioned example, a variable i and an array of 10
elements are created. The variable i is given the value 1. Then a WHILE statement appears which says:
“as long as i is smaller or equal (<=) to the length of the RandNumArr execute the code which is
written until the WEND statement appears. So, in this case in the beginning the i is given the value 1
right? So, the WHILE statement is true, ok then it executes the assignment of a random number to the
current element of the array and subsequently printing that element on the output screen. The i is then
raised with 1. The WEND will put Eprime back to the WHILE statement. Well, our i is now 2 right?
(i=i+1, so i=1+1) so the statement is again true and the process repeats itself. At the last iteration the i
is added 1 again (10+1) and then the i is 11, this is greater than the Ubound(RandNumArr) and the statement becomes false and the subsequent code is no longer executed.
dim i as Integer
dim RandNumArr(10) as Integer
i = 1
WHILE i <= Ubound(RandNumArr)
RandNumArr(i) = Random(1,50)
debug.print RandNumArr(i)
i = i + 1
WEND

Learn More
82
LEARN MORE
So, you are finished doing the tutorial and all exercises, but not ready to go home just yet? Why don’t
you take the rest of the two hours to expand your E-Prime skills and get some crucial training in
programming psychological experiments quickly and efficiently? These experiments should be programmed from scratch, are based on actual psychological experiments and take the skills taught in
the specific week to the max.
ADDITIONAL EXERCISES CHAPTER 1
Design an experiment that is right in between the lecture’s priming paradigm and exercise 5’s task: the
go-/no-go task. Your participants’ task will be to press the space-bar whenever, like before, a signal of
your own choice (such as this week’s PRESS SPACE NOW!) is shown on the screen. However, in either
25 or 50% of the trials, a coloured screen follows the signal after 50, 200 or 350 ms. (randomized),
indicating that the participant should not do anything. For the proportion of no-go signals, employ a
blocked design, i.e. first 25% of the trials contains these signals, then 50%, or vice versa. Find out what
the influence of the delay of the stop-signal is on the proportion of errors (i.e. when the space is
pressed despite being instructed not to). Is there a “point of no return” in reaction? Does the
percentage of no-go trials modulate this effect?
ADDITIONAL EXERCISES CHAPTER 2
As said in this week’s lecture, affect is often said to modulate cognitive control; the Simon task being one of many ways to measure cognitive control. The idea is this: if a stimulus is shown and it
automatically triggers a response due to its irrelevant position, then executive control is needed to “inhibit” the response that is triggered by the location. So, if people are positively primed, they may
find it either easier (as Isen and colleagues found) or more difficult (as a Freudian might predict) to cope with subsequent conflict. A larger Simon effect after a positive prime would indicate less cognitive
control.
Find pictures on the internet, or look for the IOPS pictures, use smileys or whatever you prefer (and
would be able to defend). Try using nested lists for these pictures. Present them “unconsciously” short
(20 ms) or “consciously” long (500 ms) whilst keeping the stimulus onset asynchrony (SOA, here: the
time between the onset of prime and the onset of the target) constant. Try to get rid of the timing error
that you probably will find in your logs.
Finally, complete the experiment by adding a last block (the first being the “training” and “testing”
blocks) in which you ask the participant to rate each stimulus both on one (such as valence) or two
(such as valence and arousal, or both positive and negative) affective scales. Basically, you do this by
showing an X number of slides, based on the X number of pictures you used, and asking the participant something like “How much does this picture look [questionnaire-item] to you on a scale of 1 to 9?
\nPress 1 for not at all and 9 for extremely so.” (The \n forces a new-line in the code).

Learn More
83
ADDITIONAL EXERCISES CHAPTER 3
Adjust your experiment so that it gives feedback: pleasant tones for correct trials and more nasty
sounds for incorrect trials. Randomize the location of the word by setting the .X and .Y properties of
the textDisplay to a random value by using two lines of code. Finally, fill your entire screen with the
visual search by:
Use letter strings with spaces in them.
Adjust the font of the TextDisplay that presents the letterstring so that the letters are somewhat larger. Make the letter strings repeat by deleting the reference to [letterstring] in the TextDisplay and using a
piece of inline code:
[NameOfTheTextDisplay].Text = c.GetAttrib (“letters tring”) & _ c.GetAttrib (“letterstring”) & c.GetAttrib (“letterstring”) & [etc]
Note: by using c.GetAttrib, the current value of “letterstring” is read from the list; this will be more
thoroughly explained in chapter 4.
ADDITIONAL EXERCISES CHAPTER 4
As a final set of exercises, try the following:
Besides making the target move only up, see if you can get it to move down; whilst keeping in mind the
design.
Randomise the horizontal location of the target.
During every 8th trial, show the participant a running “score” in terms of accuracy and mean RT. Make
this textdisplay’s duration longer during that 8th trial.
Related Documents