DIY Magic Mirror Sensor Wiring & Software Operations Manual Version 7.8 Last Updated June 2016 Copyright © Open Gadgets LLC

Welcome message from author
This document is posted to help you gain knowledge. Please leave a comment to let me know what you think about it! Share it to your friends and learn new things together.
Transcript
DIY Magic Mirror Sensor Wiring & Software Operations Manual
Version 7.8 Last Updated June 2016
Copyright © Open Gadgets LLC

2
Contents 3 Chapter 1 – Required Hardware 5 Chapter 2 – Wiring and Testing the Sensors 10 Chapter 3 – Software Features 10 Switches 13 Touch Sensors 15 Changing the Character 17 Proximity Sensor 19 X-10 Control 21 Adjusting the Size and Position of the Characters and Text 23 Weather, Stock, Breathalyzer Read-Outs & Stealth Mode 24 LED Control 25 Breathalyzer 30 Custom Audio Mode (Text to Speech and User Supplied MP3s) 33 Using the Twitter Feature
38 Webcam Facial Recognition 40 Stand Alone Mode 42 Quiz Mode 47 Photobooth Feature 53 Setting the Magic Mirror for Permanent Operation
55 Chapter 4 – Configuration Settings 61 Customizing the Magic Mirror with your own Videos 65 Chapter 5 – Hardware Installation Tips 77 Chapter 6 – Troubleshooting 80 Appendix A – Magic Mirror Sensor Hub Schematic 81 Appendix B – Sensor Wiring Physical View 82 Appendix C – Magic Mirror Sensor Hub Internal Schematic
3
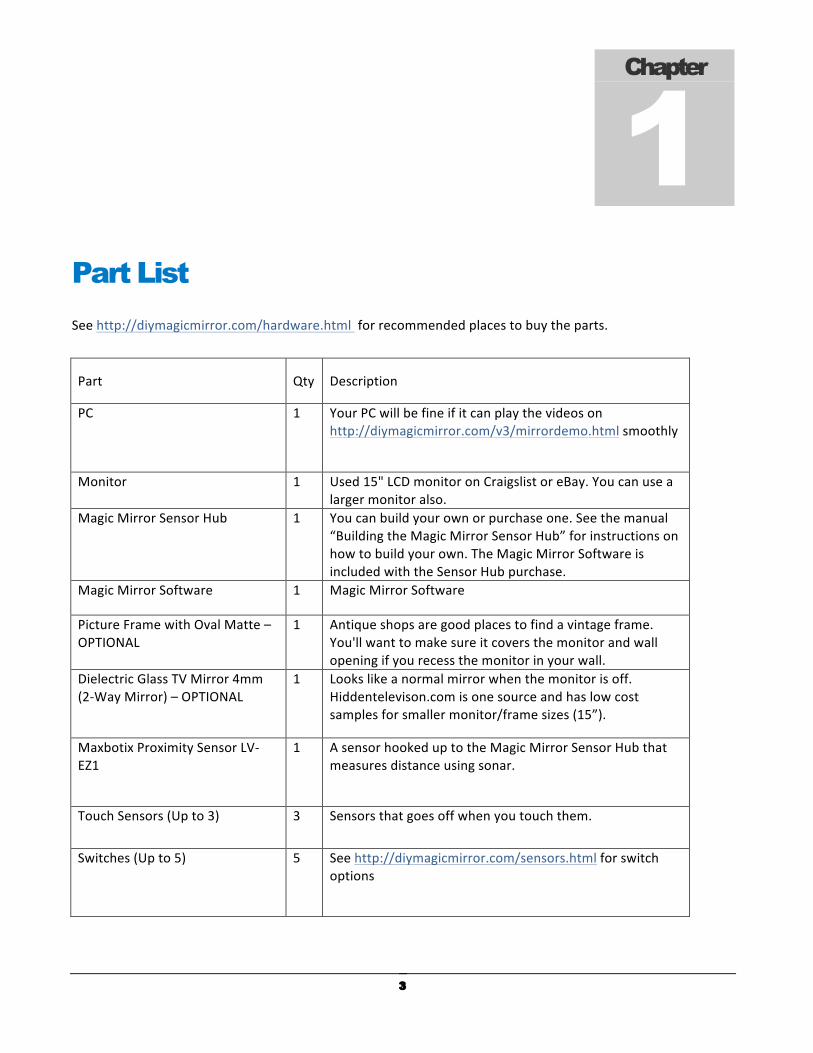
Part List Seehttp://diymagicmirror.com/hardware.htmlforrecommendedplacestobuytheparts.
Part Qty Description
PC 1 YourPCwillbefineifitcanplaythevideosonhttp://diymagicmirror.com/v3/mirrordemo.htmlsmoothly
Monitor 1 Used15"LCDmonitoronCraigslistoreBay.Youcanusealargermonitoralso.
MagicMirrorSensorHub 1 Youcanbuildyourownorpurchaseone.Seethemanual“BuildingtheMagicMirrorSensorHub”forinstructionsonhowtobuildyourown.TheMagicMirrorSoftwareisincludedwiththeSensorHubpurchase.
MagicMirrorSoftware 1 MagicMirrorSoftware
PictureFramewithOvalMatte–OPTIONAL
1 Antiqueshopsaregoodplacestofindavintageframe.You'llwanttomakesureitcoversthemonitorandwallopeningifyourecessthemonitorinyourwall.
DielectricGlassTVMirror4mm(2-WayMirror)–OPTIONAL
1 Lookslikeanormalmirrorwhenthemonitorisoff.Hiddentelevison.comisonesourceandhaslowcostsamplesforsmallermonitor/framesizes(15”).
MaxbotixProximitySensorLV-EZ1
1 AsensorhookeduptotheMagicMirrorSensorHubthatmeasuresdistanceusingsonar.
TouchSensors(Upto3) 3 Sensorsthatgoesoffwhenyoutouchthem.
Switches(Upto5) 5 Seehttp://diymagicmirror.com/sensors.htmlforswitchoptions
Chapter
1

4
Part Qty Description
AlcoholSensor 1 AlcoholSensorfortheBreathalyzerFeature
X-10Plug-inRFBase–OPTIONAL 1 ReceivestheX-10commandsoverRFfromtheSensorHub.
X-10FirecrackerCM17A–OPTIONAL
1 PlugsintotheMagicMirrorSensorHub,sendsX-10RFcommandstotheX-10Plug-inRFBase
X-10LM465LampModuleorX-10WS467WallSwitch–OPTIONAL
1 FortheX-10lightingcontrolfeature.PlugalampintotheLM465replaceanexistinglightswitchwiththeWS467foranin-wallinstallation.Note:
X-10ApplianceModuleAM466–OPTIONAL
1 ForX-10On/Offcontrolfeature.Pluganydeviceintotheappliancemodule.
LEDs–OPTIONAL 5 Use4HighBrightnessRedLEDsifusingfortheflickeringfireeffect.Otherwise,useindicatorLEDsofcolorblue,green,yellow,andred.The5thLEDistheproximitysensorindicatorLEDandshouldbethecolorofyourchoice.
10KLinearPotentiometerandknob–OPTIONAL
1 10KLinearPotentiometer,mountthisexternallyandwiretotheSensorHubtochangetheMagicMirrorcharacteronthefly
ThermostatorDoorbellwire–OPTIONAL
1 Usethiswireforanin-wallinstallationtoconnectthesensorstotheSensorHub.Youcanget1000ftspoolsatyourlocalHomeImprovementStore

5
Wiring and Testing the Sensors ThischapterassumesyouhaveeitherbuiltyourownorpurchasedaMagicMirrorSensorHub.Refer to the“BuildingtheMagicMirrorSensorHub”forinstructionsonhowtobuildyourown.
RunningaprogramcalledFirmata,theArduinosendssensordatatoaserialserverrunningonthePC.TheserialserverthenpassesthedatatoalocalnetworkportthattheMagicMirrorsoftwarereads.TheMagicMirrorsoftwaresendscommandsbacktotheArduinoforX-10andLEDcontrol.
Arduino or Arduino Clone(Running Firmata)
Alcohol, Proximity, Touch Sensors and Switches LEDs
Magic Mirror SoftwareAdobe AIR Application
USB Connection
Inputs Outputs
PC
, Mac
, or
Linu
x
X-10 Firecracker
CM17A
X-10 RF Receiver
(Plugged into AC Outlet)
Existing Light Fixture
Existing AC Wiring
RF Signal
X-10 Light Dimmer Switch
Existing AC Wiring
Serial Server
Figure1–HowtheMagicMirrorWorks
Chapter
2

6
TheMagicMirrorsupports1proximity(distance)sensor,upto3PhidgetsTouchSensors,1AlcoholSensor(Breathalyzerfeature),1Potentiometer(forchangingthecharacter),andupto5on/offswitches(toggleormomentary).
NotethecurrentMagicMirrorhardwareusestheSeeedStudioGrovesensors(4-pin)andnotthe3-pinsensorsshowninthesepictures.
Sensor MagicMirrorFunction(s)
SensorPicture
Alochol Sensor (1) – From left toright: Seeedstudio alcohol sensorMQ-5 (recommended), SparkfunMQ-3
Breathalyzer
Proximity Sensor (1) –Maxbotix LV-EV1, a sonar based sensor thatmeasures thedistanceofobjectsupto22feet
Playsvariousanimationsbasedonthedistancethesubjectisfromthesensor
Touch Sensors (Up to 3) – From leftto right: Seeedstudio Touch Sensor,Phidgets1110,andPhidgets1129
Weather Forecast,Stock Performance,andX-10On/Off
Potentiometer (1) – From left toright:SeeedstduioPot,GenericPot
Changes the MagicMirrorcharacter
Switches(Upto5)–Anymomentaryor toggle switch is supported. Fromleft to right: Seeedstudio button,door roller switch, standard lightswitch, momentary switch, arcadebutton,reed(magnetic)switch
Doorbell,WeatherForecast,StockPerformance,PicasaPictureFrame,BreathalyzerTrigger

7
AfterassemblingtheMagicMirrorKit,connectthesensorsandLEDs(optional),refertoAppendixA(LogicalView)andAppendixB(PhysicalView).Therearetwowaystogoonthewiring,usingtheplugandplayconnectorsandscrewterminalsorusingCAT5cabling.Usingtheplugandplayconnectorsandscrewterminalswillbeeasieranddoesnotrequireanysolderingasinfigure3.UseCAT5forlongrunsorin-wallinstallations.Alsonotethattheswitchpull-downandLEDresistorsareontheboardsojustconnectdirectlytotheswitchesandLEDs,noadditionalresistorsareneeded.
Figure2–MagicMirrorSensorHub(ArduinoShield)
[A]SensorPinoutCheatSheet[B]PlugandPlayAlcoholSensor[C]PlugandPlayBreathalyzerSwitch[D]ScrewTerminalSensorConnections[E]CAT5ECableSensorConnections[F]OnboardPot–ChangestheCharacter[G]ProximitySensor[H]PlugandPlaySwitchorTouchSensor–WeatherForecast[I]PlugandPlaySwitchorTouchSensor–StockPerformance[J]PlugandPlaySwitchorTouchSensor–X10On/OffControl[K]+5VandGNDOut–PowerforSensorswiredtoScrewTerminalsand/orCAT5ECables[L]ConnectOptionalX-10CM17AHere[M]ExternalPot–ChangestheCharacter[N]SlideswitchtotogglefromInternalPotorExternalPot
8
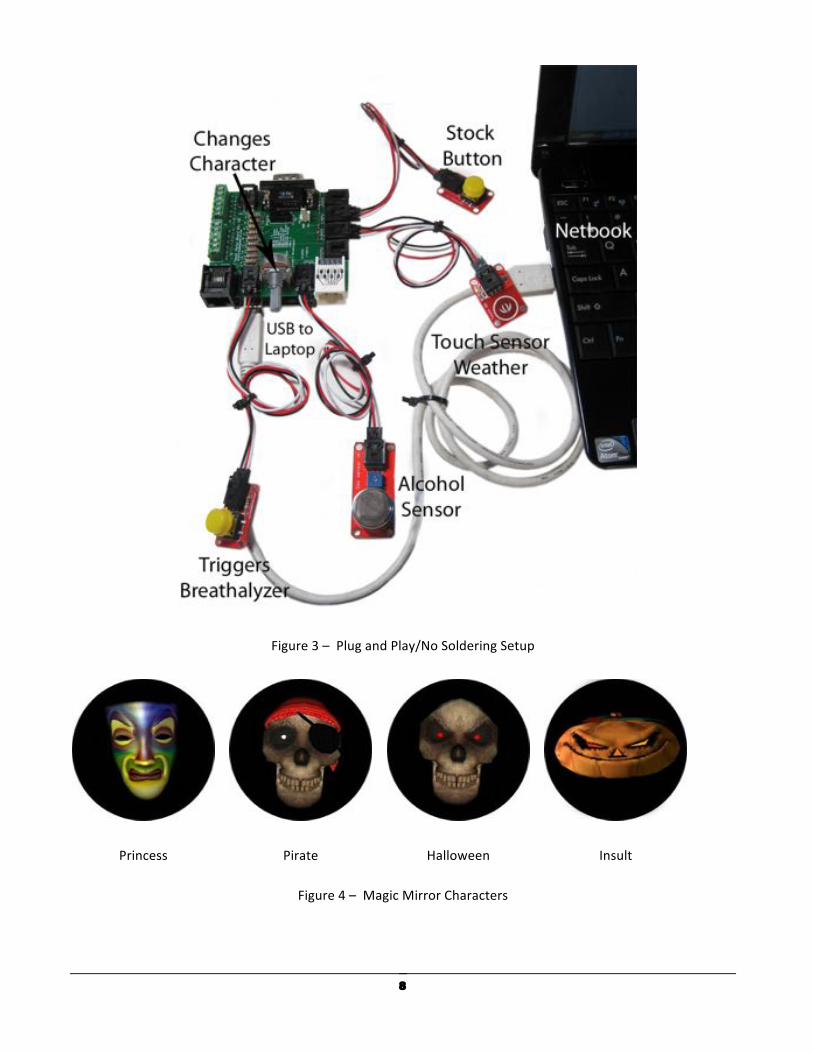
Figure3–PlugandPlay/NoSolderingSetup
Princess Pirate Halloween Insult
Figure4–MagicMirrorCharacters

9
IfyoudogotheCAT5route,besurethatyourCAT5cablesusetheT-568BwiringconventionasopposedtoT-568A.Followthewiringschematic, refertoAppendixA(LogicalView)andAppendixB (PhysicalView),connecttherespectiveCat5ecablewire to the respectivesensorper tablebelow. It’s recommendedtowireupandtestonesetofsensorsatatimetoeasetroubleshooting.
Magic Mirror Board Pin Number
Wire Color (Cat5 T568B convention) Function
Arduino Pin
Reference 1 Cable 1 – White w/ Orange Proximity Sensor Analog 0 2 Cable 1 – Orange Touch 1 – Weather Forecast Analog 5 3 Cable 1 – White w/ Green Touch 2 – Stock Performance Analog 2 4 Cable 1 – Blue Touch 3 – X10 On/Off Control Analog 3 5 Cable 1 – White w/ Blue Switch 1 - Door Switch Digital 2 6 Cable 1 – Green Switch 2 – Weather Forecast Digital 3 7 Cable 1 – White w/ Brown Switch 3 – Stock Performance Digital 4 8 Cable 1 – Brown LED 1 – Indicator (Blue) or Fake Fire (Red) Digital 6 9
Cable 2 – White w/ Orange Switch 4 – Picasa Slide Show – Slide show will play when this switch is OFF and will stop when this switch is ON Digital 7
10 Cable 2 – Orange LED 2 – Indicator (Green) or Fake Fire (Red) Digital 9 11 Cable 2 – White w/ Green LED 3 – Indicator (Yellow) or Fake Fire (Red) Digital 10 12 Cable 2 – Blue LED 4 – Indicator (Red) or Fake Fire (Red) Digital 11 13 Cable 2 – White w/ Blue Proximity LED (Color or your Choice) Digital 13 14 Cable 2 – Green External Character Select Pot Analog 4 15 Cable 2 – White w/ Brown Switch 5 – Triggers Breathalyzer Digital 5 16 Cable 2 – Brown Alcohol Sensor (For Breathalyzer) Analog 1
Table 1 – Magic Mirror Sensor Hub Pinouts
Table 2 – T568B Wiring Convention

10
Software Features
Switches StartbywiringupthedigitalON/OFFswitches(switches1-5).Thesecanbetoggleswitchessuchasastandardlightswitchormomentaryswitches.
Per Appendix A (logical view) and B (physical view),wire the 5 digital switches (switches 1-5) to theMagicMirrorSensorHub.
Launch“MagicMirrorAdvancedSetup”
a.EntertheMagicMirorSensorHubPort ifyouhaven’tdonesoyet. IfyouneedtoentertheMagicMirrorSensorHubPort,itwillbe5335forCOM5,5334forCOM4…onthePC.ForMacandLinuxusers,thevaluewillalwaysbe5333.
b. Turn on just the digital switches (Switches 1-5) that you have wired up and click < Save >.IMPORTANT:Onlyturnonthesensorsintheconfigurationscreenthatarehookedup.Ifnot,theMagicMirrorSensorHubwilloverloadthePCwithfalsedatacausingtheprogramtolockupandpotentiallycrash.
Chapter
3

11
Ifyougetthismessage,itmeansyourconfigurationfilewasanolderversionandhasbeenupgraded.Yourcurrentconfigurationsettingswillbemaintainedsoyouwon’tneedtore-enterthem.
Launch“RunMagicMirror” onthePCand“mirror” onMacandLinux.
VerifythattheMagicMirrorSensorHubwasfound&thetoprightboxreads“MagicMirrorSensorHubFoundonPortx”.IftheMagicMirrorSensorHubwasnotfound,ensurethatyou’veenteredthecorrectSensorHubportfromthe“ConfigureMagicMirror”program.

12
TriggerSwitch1andyouwillseea“1”flashonthetext“Switch1–ArduinoDigitalPin2=1”andthedoorvideoplay.
Testtheremainingswitchesthatyouhavewiredupandthenclose.
Note:Youdon’thavetousealltheswitches,simplydonotturnontheswitchesthatarenotwiredintheconfigurationprogram.

13
Touch Sensors PerAppendixAandB,connectthePhidgetsTouchSensors.Asreference,thePhidgetsTouchSensorsP/N1110willread+5Vnormallyand0Vwhentouched.
You’llneedtocutofftheendconnectorsofthePhidgetsTouchSensors.Theredwireshouldgotoawirenutwiththe+5vconnections,theblackwiretoawirenutwiththeGNDconnections,andthewhitewiretotherespectiveSensorHubinputpin.IfyouneedtolengthenthePhidgetsTouchSensorcable,thecablecanbeextendedupto100feet.
Launch“MagicMirrorAdvancedSetup” andturnonthetouchsensorinputsthatarewiredupandclick<Save>.IMPORTANT:OnlyturnontheTouchSensorinputsfortheonesyouhaveconnected.

14
Launch“RunMagicMirror” onthePCand“mirror” onMacandLinux.
Touch“TouchSensor1”andyouwillsee“Touched”andaweathervideoplay.AlsotestTouchSensor2andTouchSensor3.
Exitoutofthesoftware

15
Changing the Character IfusinganexternallymountedpotentiometertochangetheMagicMirrorcharacterasopposedtotheonboardpotentiometer,movetheslideswitchontheMagicMirrorboardtowardsthe“ExternalPot”positionasshowninthepicturebelow.
Launch“MagicMirrorAdvancedSetup” andensureCharacterSelectPotentiometerisONandclick<Save>.IfyouwouldliketheMagicMirrorcharactertobeonlysetfromtheConfigurationProgram/Software,thenchangetoOFF.TheDefaultisON.
Note:Youdonothavetospecifywhetherornotyouareusingtheonboardorexternalpotentiometerintheconfigurationprogram.

16
Launch“RunMagicMirror” onthePCand“mirror” onMacandLinux.
Nowturnthepotentiometerknobandyoushouldseethe“CharacterSelectPotentiometer”boxchangealongwiththecharacter(princess,pirate,Halloween,insult,orTTS/customaudio).
TheMagicMirrorCharacters:
Princess Pirate Halloween Insult

17
Proximity Sensor
Connecttheproximitysensor,perAppendixA.TheLV-MaxSonarEZ-1detectsobjectsfrom0to21feet(6.45meters).
Launch“MagicMirrorAdvancedSetup” andturnontheproximitysensor.TheProximity1videowillplaywhenthesubjectiswithinadistancebetweenthe Proximity1LowerRangeandProximity1UpperRangesettings.TheProximity2videowillplaywhenthesubjectiswithinadistancebetweentheProximity2LowerRange andProximity 2UpperRange settings. The units are roughly inches but not exact so some trial anderrorwillberequiredhere.TheTimesettingsdeterminehowlongthesubjectmuststandwithinthedistancebeforetheproximityvideosplays.Asettingof100equatestoroughly2secondsbutsometrialanderrorwillberequiredhere.IfProx2CanPlayBeforeProx1issettoOFF,thenthefirstproximityvideomustbetriggeredbeforethesecondproximityvideocanplay.

18
Launch“RunMagicMirror” onthePCand“mirror” onMacandLinuxandstandinfrontoftheproximitysensoratvariousdistances.WhenyouarewithintherangespecifiedbyProximityLowerRangeandProximityUpperRange,youwillseethisnumberincreaseandaproximityvideowilltriggerwhenitreachestheTimesetting(100inthisexample).Continuetotweakthesettingsandre-launch“RunMagicMirror”untilcalibratedtoyourliking.IMPORTANT:Besuretocheckthereadingswhennosubjectisinfrontoftheproximitysensor(i.e.whennooneisintheroom)andensurethatyourdistancesettingsdonotfallwithinthisrangeotherwisetheproximityvideoswillgooffatrandom.
Onceyouhavethedesiredsettings,itmaybehelpfultoplaceastickerorsomekindofindicatoronthefloorsoyoursubjectsknowwheretostandtotriggertheproximityvideos.
If the proximity LED is hooked up, this LED will blink when the subject is within range providing a visualindicator that the subject is standing in the right place. The proximity LED will then turn solid when theproximityvideosareplayingandturnoffwhentheproximityvideoshavefinishedplaying.
19
X-10 Control
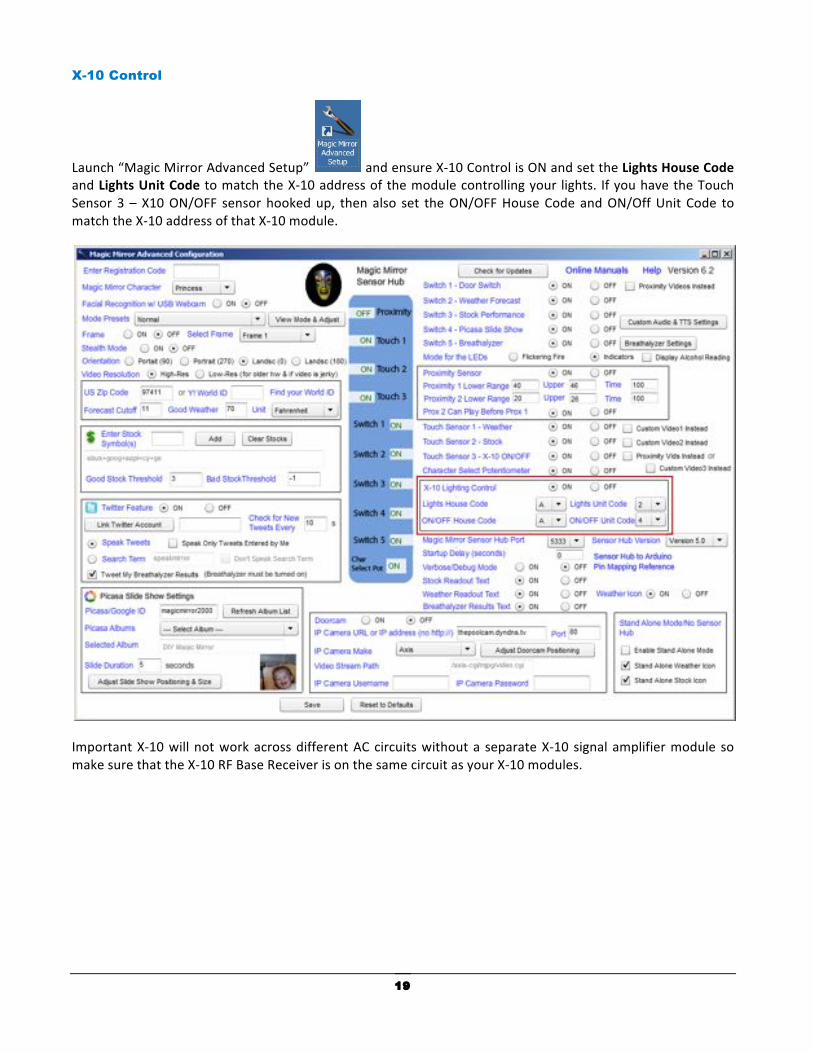
Launch“MagicMirrorAdvancedSetup” andensureX-10ControlisONandsettheLightsHouseCodeandLightsUnitCode tomatchtheX-10addressofthemodulecontrollingyour lights. IfyouhavetheTouchSensor3–X10ON/OFF sensorhookedup, thenalso set theON/OFFHouseCodeandON/OffUnitCode tomatchtheX-10addressofthatX-10module.
ImportantX-10willnotworkacrossdifferentACcircuitswithouta separateX-10signalamplifiermodule somakesurethattheX-10RFBaseReceiverisonthesamecircuitasyourX-10modules.
20
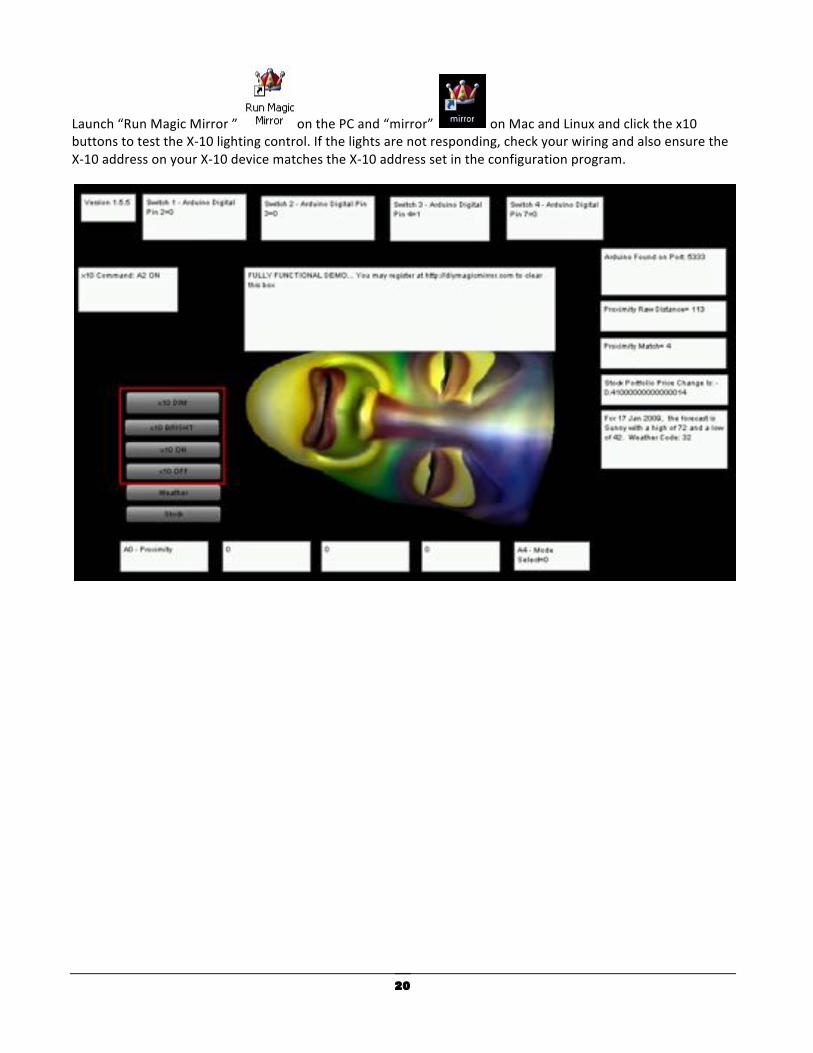
Launch“RunMagicMirror” onthePCand“mirror” onMacandLinuxandclickthex10buttonstotesttheX-10lightingcontrol.Ifthelightsarenotresponding,checkyourwiringandalsoensuretheX-10addressonyourX-10devicematchestheX-10addresssetintheconfigurationprogram.

21
Adjusting the Size and Position of the Characters and Text Ifyouneedtoadjustthesizeorpositionofthecharacter,thenclicktheAdjustCharactersbutton.Note:IfyouchangetheOrientation(PortraitorLandscape),thenyou’llneedtore-starttheconfigurationprogramtocontinue.
Usethebuttonsonthelefttomoveandre-sizethecharacter.Youmayalsomove(draganddrop)andre-sizethestockreadouttext,weatherreadouttext,Breathalyzertext,andweathericonfromhere.
YoumayalsoadjustthesizeandpositioningofthePicasaSlideShowandDoorcaminthesamemanner.

22

23
Weather, Stock, Breathalyzer Read-Outs & Stealth Mode
IfStockReadoutTextissettoON,anumericdisplayofstockperformancewilldisplayalongwiththestockvideo.WeatherReadoutTextwilldisplayabrieftextforecastwhiletheweathervideoplays.WeatherIconwilldisplayaweathericoncorrespondingtotheweatherforecastwhiletheweathervideoplays.YoumayturntheseONandOFFhere.
SetStealthModetoONtoruntheMagicMirrorinstealthmodemeaningthatvideoswillplayonlywhenasensorhasbeentriggered.Usethisifyouneedtheelementofsurpriseinyourinstallation.

24
LED Control
Choose“Indicators”or“FlickeringFire”modefortheLEDs.“Indicators”isthedefaultmode.
“Indicators”Mode
LED1(Blue)-LitwhenBreathalyzerisReadyLED2(Green)-LitwhenfewdrinksonBreathalyzerandalsoforGoodWeatherandGoodStocksLED3(Yellow)–LitwhenbuzzedonBreathalyzerandalsoforOKWeatherandOKStockPerformanceLED4(Red)-LitwhenflatoutdrunkonBreathalyzerandalsoforBadWeatherandBadStockPerformance“FlickeringFire”ModeLED1–LED4willflickerforafakefireeffect.UsehighbrightnessredLEDsifusingthismode.
25
Breathalyzer
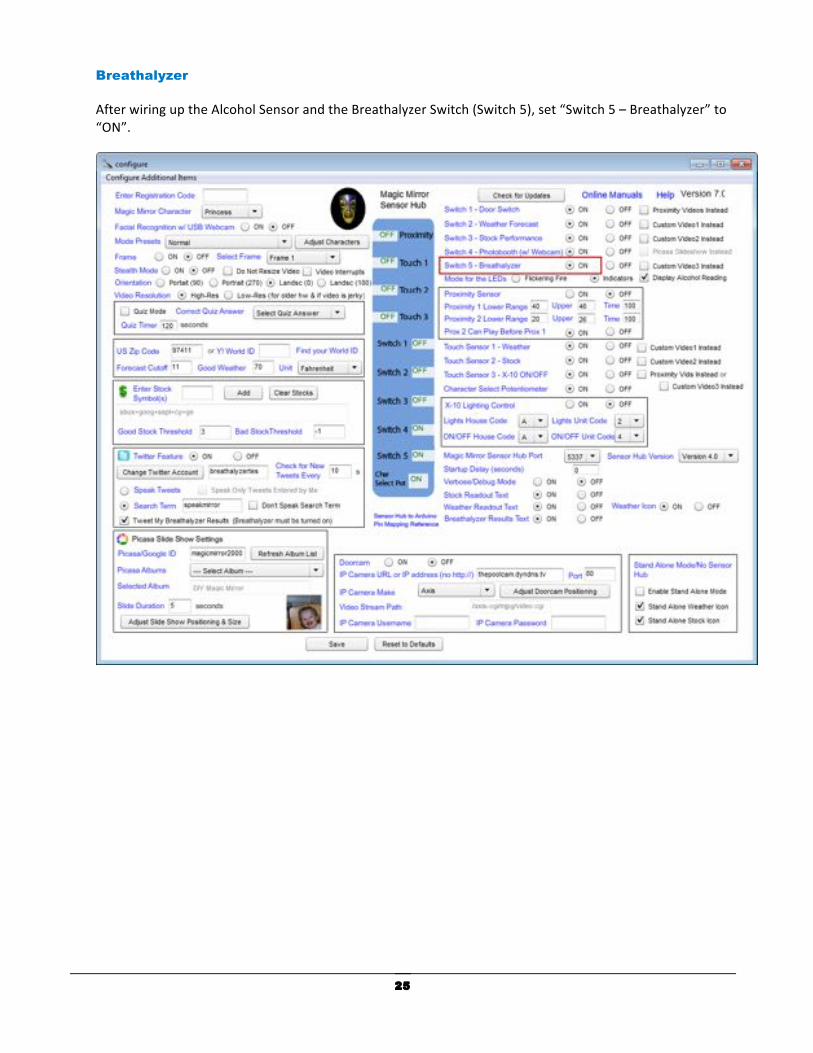
AfterwiringuptheAlcoholSensorandtheBreathalyzerSwitch(Switch5),set“Switch5–Breathalyzer”to“ON”.

26
PushtheSwitch5buttontostarttheBreathalyzer.You’llbepromptedtoblowintothealcoholsensor.Thealcoholsensorishotsojustblowonthealcoholsensorwithouttouchingitwithyourmouth.Attheendofthecountdown,theMagicMirrorwillspeakoneoftheresponsesinfigure5.Theresponsesinfigure5willbeproportionaltoyouralcoholintakebutpleasenotethattheMagicMirrorBreathalyzerisnotaprofessionalBreathalyzer(itdoesnotprovideabloodalcoholcontentnumber)andshouldbeusedfornoveltypurposesonly.
Figure5–BreathalyzerResponses

27
TotriggertheBreathalyzerautomaticallybyjustblowingonthealcoholsensorandnothavingtopushabutton,check“BreathalyzercangooffalsowithoutSwtich5trigger”.Inthismode,theBreathalyzerwilltriggerifachangeinalcohollevelisdetected.
Withthisselection,thebeericonwillappearwhenachangeinalcohollevelhasbeendetected.Thebeericonwillfadeforthenumberofsecondsasspecifiedinthe“Countdown(Seconds)”abovesettingsduringwhichtimetheusershouldcontinueblowinguntilthebeericonhasfadedawayandthentheMagicMirrorwillgivethealcohollevelreadinginfigure5.

28
BreathalyzerCalibrationSettings
You may also calibrate the thresholds of the responses. To change the default settings, click “ConfigureAdditionalItems”andthen“BreathalyzerCalibrationandSettings”.
Baseline Idle Value: After hooking up the Breathalyzer, set the configuration program and run the MagicMirror in verbose mode. While in verbose mode, look for the Alcohol Sensor box and then enter theidle/steady state valuewhen no alcohol is near the Breathalyzer. The value you enter does not need to beexact.WhentheBreathalyzerruneachtime, itwillobtainanewbaselinevalue(whennoalcohol ispresent)dynamically.Default:100
Reset Difference Allowance: When the Breathalyzer has detected alcohol, it can take some time for thealcoholsensortoresetbacktotheoriginalBaselineIdleValue.TosavetimeandbecausetheBreathalyzerwillobtainanewbaselinevaluedynamicallyeachtime,itisnotnecessarythatthealcoholsensorresetallthewayback to the Baseline Idle Value. This setting determines how close the alcohol sensor readings needs to bebeforethenextBreathalyzerreadingcantakeplace.Forexample,withthedefaultBaselineIdleValuesetto100andiftheResetDifferenceAllowanceissetto100,thentheBreathalyzerwillbereadyforthenextreadingwhenthevalueis200orbelow.Default:100

29
ThistextwillappearwhiletheBreathalyzerisresetting(hasnotreachedtheResetDifferenceAllowanceyet).
This textwill appearwhen theBreathalyzer iswithin theResetDifferenceAllowanceand ready for thenextreading.
FewDrinksOffset:Default:100
BuzzedOffset:Default:200
FlatOutDrunkOffset:Default:300
Countdown(Seconds):DurationinsecondsforthesubjecttoblowintotheBreathalyzer.Default:5s
Example:
TheIdleBaselineValueis100,theResetDifferenceAllownaceis100,andthedynamicbaselinereadingbeforetheuserblowsintotheBreathalyzeris200.
FewDrinks:DynamicAlcoholBasline(200)+100=300
Buzzed:FewDrinksValue(200)+300=500
FlatOutDrunk:BuzzedValue(200)+600=800
Iftheactualreadingisbetween300and500,theFewDrinksvideowillplay
Iftheactualreadingisbetween500and800,theBuzzedvideowillplay
Iftheactualreadingisover800,theFlatOutDrunkvideowillplay
Oncetheactualreadinghasreturnedto200orless,theBreathalyzerwillbereadingforthenextreading.

30
Custom Audio Mode (Text to Speech and User Supplied MP3s) TheMagicMirrorfeaturesaTexttoSpeechmodethatallowsyoutodefineyourownresponsestothesensorevents.Click“ConfigureAdditionalItems”andthen“CustomAudio&TexttoSpeechMode”.
Select“UseTexttoSpeech”.Enteryourdesiredresponsesforeachsensoreventandclick“Save”.

31
YoucanalsosupplyyourownMP3file.Select“UseCustomMP3s”.
Click“BrowseCustomAudioFiles”tolistentothecurrentsoundfiles.

32
Over-writethedesiredMP3fileswithyourown.
Check“LipsyncEnabled”toenablethelipsyncfeature.Ifthisisnotchecked,avideowillplaybutthelipsyncmovementswillnotbesyncedtotheaudio.

33
Using the Twitter Feature UsingtheTwitterfeature,youcanautomaticallyTweetyourBreathalyzerresultsand/orhavetheMagicMirrorspeakyourTweets.Thisfeatureisbydefaultturnedoff.Select“ON”nexttoTwitterFeatureandthenlinkyourTwitteraccountbyclicking“LinkTwitterAccount”.FollowthepromptsenteringyourTwitterusernameandpassword.

34
IfTwitteristurnedon,yourTwitteraccounthasbeenlinked,and“TweetMyBreathalyzerResults”ischecked,theMagicMirrorwillsendaTweetofyourresultseachtimetheBreathalyzerbuttonispressed.TheTwitterbirdwillappearmomentarilyalongwithanotificationsoundlettingyouknowtheTweethasbeensent.

35
TweetspostedtoyourTwitterhomepage.YoucancustomizetheTweettextandalsodecidewhetherornottoincludethealcoholsensorvalueintheTweet.
You may also customize the verbage of the Breathalyzer Tweets. Click “Configure Additional Items” and“BreathalyzerCalibrationandSettings”.
36
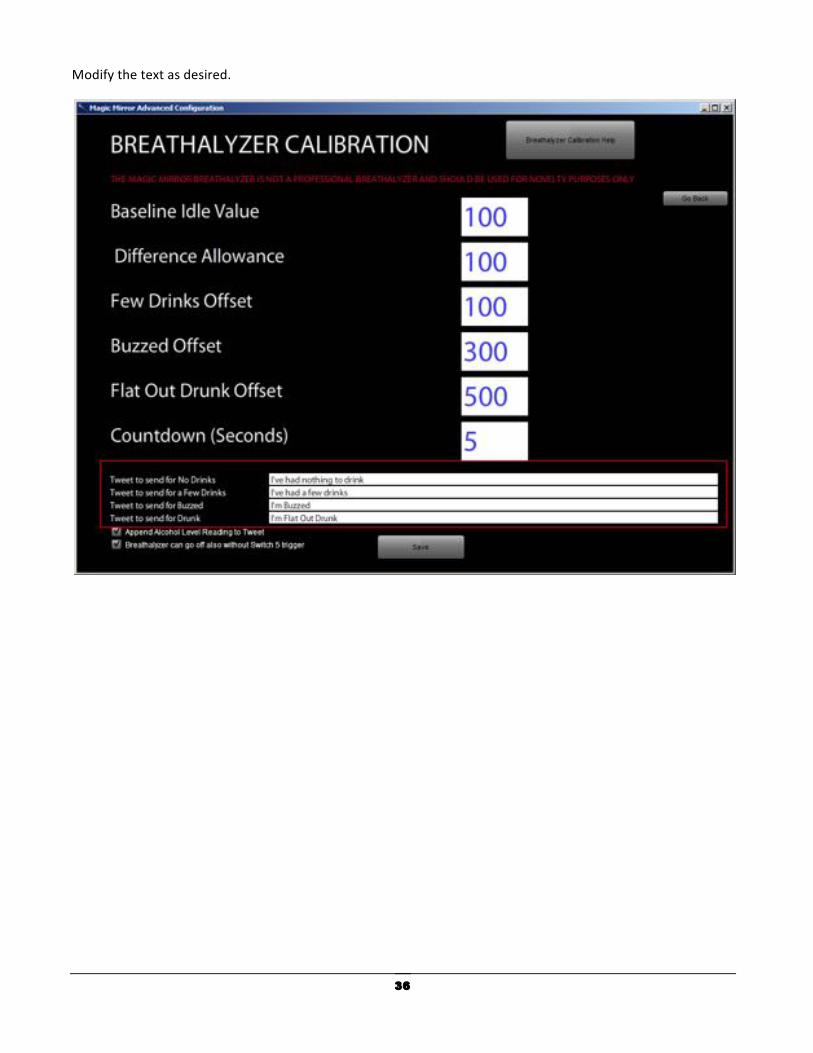
Modifythetextasdesired.

37
Using the default settings, the Magic Mirror will speak (using Text to Speech) any Tweet containing“speakmirror”whilecheckingTwitterevery10seconds.Forexample,theTweet“speakmirrorhellofromtheMagicMirror”willresultintheMagicMirrorspeaking“hellofromtheMagicMirror”.Youmayalsochangethesearchtermtoanykeywordyoulike.TheMagicMirrorautomaticallyfiltersoutanywordcontaininghttp://soURLs are not spoken. Uncheck “Don’t Speak Search Term” to have theMagicMirror also speak the searchterm.
Alternatively,youmayalsoenteryourusernameandpasswordtohavetheMagicMirrorspeakTweetsfromyourTwitteraccount.Uponstartingup,theMagicMirrorwillspeakyourmostrecentTweetandthenperthe“CheckforNewTweetsEvery”setting(defaultis10seconds),speakanynewTweet.Checking“AnnounceOnlyMyTweets”willlimitsresponsestojustTweetsauthoredbyyou.

38
Webcam Facial Recognition
Usingthefeature,theMagicMirrorwillplaythesamevideosasitwouldfromtheproximitysensorwhenafaceisdetectedfromaUSBconnectedwebcam.FromtheModePresetsdropdown,select“Normal+WebcamFacew/Frame”toturnonthisfeature.
Thenclickthe“ViewMode&Adjust”button”.You’llbepromptedtore-starttheconfigurationprogram.

39
Exitoutandre-launchandclick“ViewMode&Adjust”again.
Youshouldnowseethewebcamfeed.Youmayalsochangethegraphicforthepictureframeorturnitoffbyunchecking“DisplayWebcamFrame”.
Adjustthesizeandpositionofthewebcamfeed&frametoyourlikingandthensave.WhenyouruntheMagicMirrorprogram,theproximityvideoswillnowplaywhenafacehasbeendetectedbythewebcam.
40
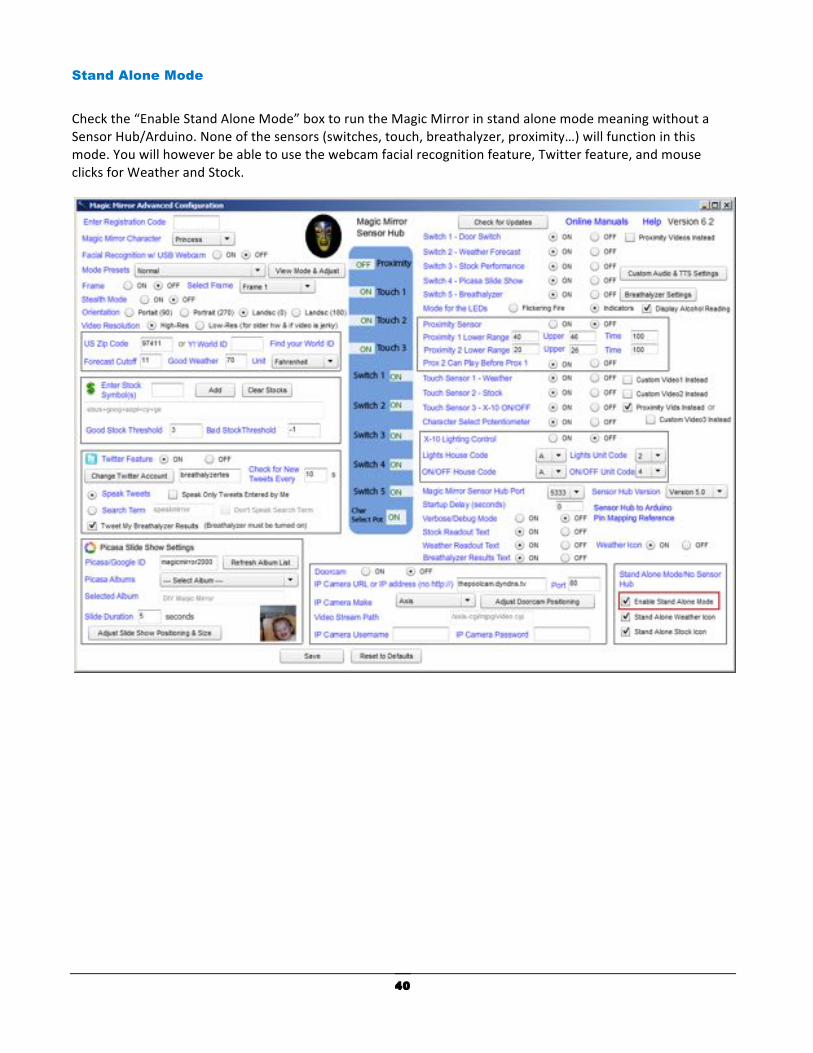
Stand Alone Mode Checkthe“EnableStandAloneMode”boxtoruntheMagicMirrorinstandalonemodemeaningwithoutaSensorHub/Arduino.Noneofthesensors(switches,touch,breathalyzer,proximity…)willfunctioninthismode.Youwillhoweverbeabletousethewebcamfacialrecognitionfeature,Twitterfeature,andmouseclicksforWeatherandStock.

41
TheMagicMirrorrunninginstandalonemode.
Youmayalsoturnoffthestockandweathericonsfromtheconfigurationprogram.

42
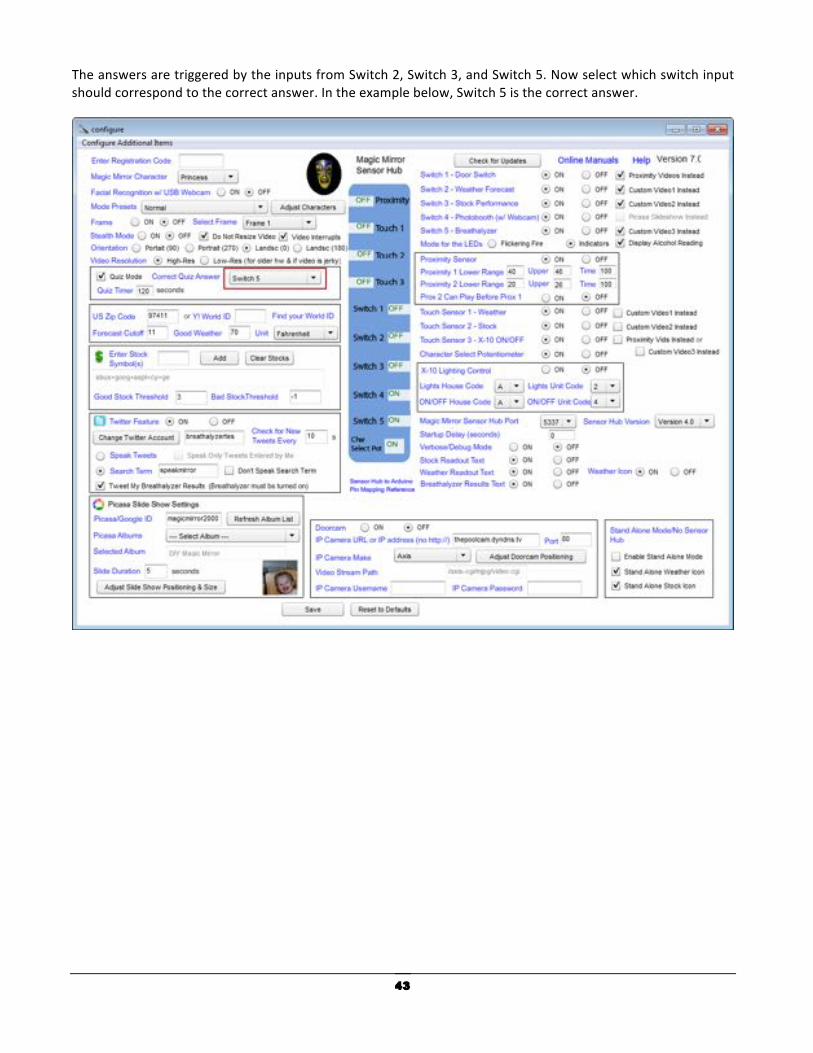
Quiz Mode Quizmodecanbeusedforaquestionandanswerscenario.Quizmodesupportonequestionandthreepossibleanswers.TurnonquizmodefromtheAdvancedConfigurationprogram.
Oncequizmodehasbeenselected,thefollowingconfigurationsaremadeautomatically,donotchangetheseconfigurationswhileinquizmode.
43
TheanswersaretriggeredbytheinputsfromSwitch2,Switch3,andSwitch5.Nowselectwhichswitchinputshouldcorrespondtothecorrectanswer.Intheexamplebelow,Switch5isthecorrectanswer.
44
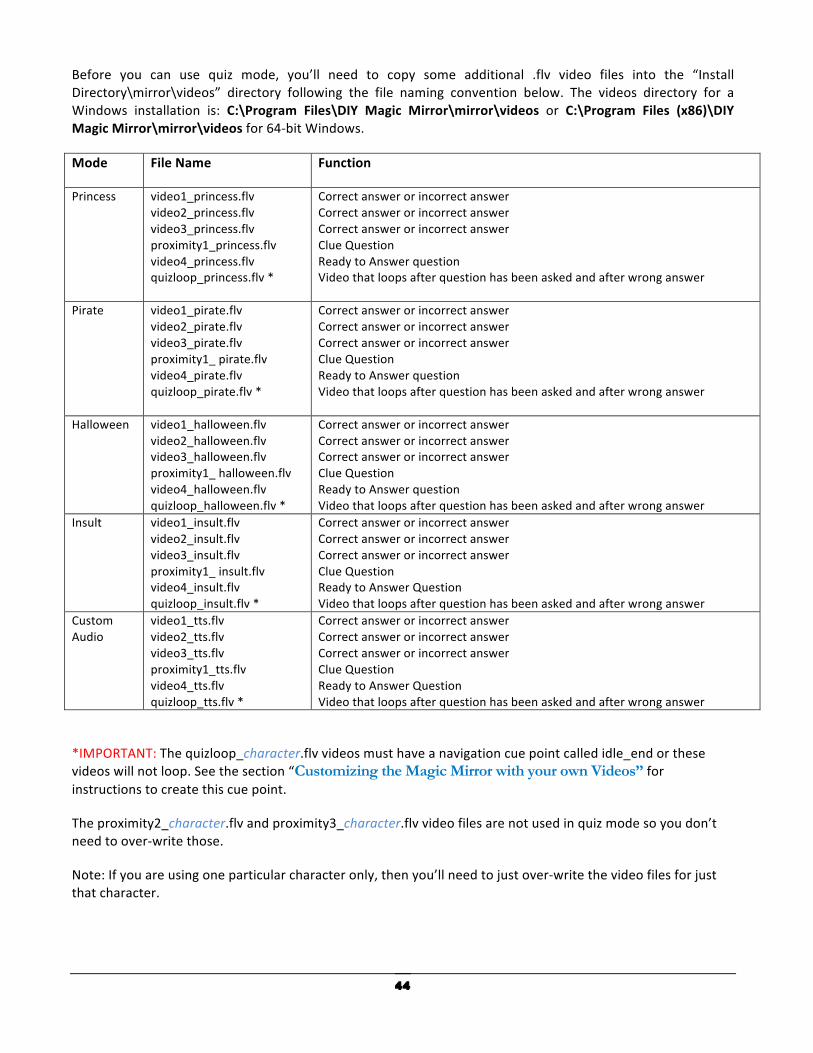
Before you can use quiz mode, you’ll need to copy some additional .flv video files into the “InstallDirectory\mirror\videos” directory following the file naming convention below. The videos directory for aWindows installation is: C:\Program Files\DIY Magic Mirror\mirror\videos or C:\Program Files (x86)\DIYMagicMirror\mirror\videosfor64-bitWindows.
Mode FileName Function
Princess video1_princess.flvvideo2_princess.flvvideo3_princess.flvproximity1_princess.flvvideo4_princess.flvquizloop_princess.flv*
CorrectanswerorincorrectanswerCorrectanswerorincorrectanswerCorrectanswerorincorrectanswerClueQuestionReadytoAnswerquestionVideothatloopsafterquestionhasbeenaskedandafterwronganswer
Pirate video1_pirate.flvvideo2_pirate.flvvideo3_pirate.flvproximity1_pirate.flvvideo4_pirate.flvquizloop_pirate.flv*
CorrectanswerorincorrectanswerCorrectanswerorincorrectanswerCorrectanswerorincorrectanswerClueQuestionReadytoAnswerquestionVideothatloopsafterquestionhasbeenaskedandafterwronganswer
Halloween video1_halloween.flvvideo2_halloween.flvvideo3_halloween.flvproximity1_halloween.flvvideo4_halloween.flvquizloop_halloween.flv*
CorrectanswerorincorrectanswerCorrectanswerorincorrectanswerCorrectanswerorincorrectanswerClueQuestionReadytoAnswerquestionVideothatloopsafterquestionhasbeenaskedandafterwronganswer
Insult video1_insult.flvvideo2_insult.flvvideo3_insult.flvproximity1_insult.flvvideo4_insult.flvquizloop_insult.flv*
CorrectanswerorincorrectanswerCorrectanswerorincorrectanswerCorrectanswerorincorrectanswerClueQuestionReadytoAnswerQuestionVideothatloopsafterquestionhasbeenaskedandafterwronganswer
CustomAudio
video1_tts.flvvideo2_tts.flvvideo3_tts.flvproximity1_tts.flvvideo4_tts.flvquizloop_tts.flv*
CorrectanswerorincorrectanswerCorrectanswerorincorrectanswerCorrectanswerorincorrectanswerClueQuestionReadytoAnswerQuestionVideothatloopsafterquestionhasbeenaskedandafterwronganswer
*IMPORTANT:Thequizloop_character.flvvideosmusthaveanavigationcuepointcalledidle_endorthesevideoswillnotloop.Seethesection“Customizing the Magic Mirror with your own Videos” forinstructionstocreatethiscuepoint.
Theproximity2_character.flvandproximity3_character.flvvideofilesarenotusedinquizmodesoyoudon’tneedtoover-writethose.
Note:Ifyouareusingoneparticularcharacteronly,thenyou’llneedtojustover-writethevideofilesforjustthatcharacter.

45
Theflowchartbelowillustratestheflowofquizmodeandwhichvideofilesplaycorrespondingtowhichsensorinputs.Inthisexampleflow,Switch5wasselectedintheAdvancedConfigurationprogramasthecorrectanswer.
Triggered By Proximity Sensor Range 1
Question/Clue Video Plays
proximity1_character.flv
Quiz Loop Video Plays
quizloop_character.flv
User Makes Wrong Choice
Switch 2
User Makes Wrong Choice
Switch 3
User Selected Repeat Ready to Answer Question
Switch 1
Try Again Video Plays
video1_character.flv
Try Again Video Plays
video2_character.flv
Question is Repeated
video4_character.flv
Idle Video Playing
idle_character.flv
User Makes Right Choice
Siwtch 5
Correct Choice Video Plays
video3_character.flv
Start Over
Quiz LoopVideo Plays
quizloop_character.flv
Triggered By Switch 1
Ready to Answer Video Plays
video4_character.flv
Start Timer
Timer Up
Figure6–QuizModeFlow
ProximitySensorRange2isnotusedforquizmode,onlyproximitysensorrange1triggersthequizquestionvideo.

46
IntheexampleshowninFigure6withthecorrectanswersettoSwitch5,thefollowingfilenamesshouldbeused:
VideoFunction VideoFileName
InitialQuiz/ClueQuestionVideo(FromProximitySensor) proximity1_character.flv
ReadytoAnswerQuestionVideo(FromSwitch1) video4_character.flv
CorrectAnswerVideo video3_character.flv
WrongAnswerVideo video1_character.flvandvideo2_character.flv
Videoloopthatplayswhilewaitingfortheusertoselectthecorrectanswer quizloop_character.flv
character= princess, pirate, halloween, insult, and tts
Whileinquizmode,theanswervideoswillnotplayuntilthequestionhasplayedthe“ReadytoAnswerQuestionVideo”fromSwitch1.
Onlyproximityrange1isusedinquizmode,proximityrange2isnotused.
Whileinquizmode,theanswervideoswillnotplayuntilthe“ReadytoAnswerQuestionVideo”hasfinishedplaying.
ThereisnotexttospeechorcustomerMP3capabilityforquizmode,onlycustomvideoscanbeused.
Whilethe“ReadytoAnswerQuestionVideo”canberepeatedlytriggeredviaSwitch1,thequizquestionvideotriggeredbytheproximitysensorplaysonlyonce.Thisissothequestionvideodoesnotkeepplayingoverandoverwhiletheuserisstandinginfrontoftheproximitysensorthinkingabouttheanswer.
Thetouchsensorswillfunctionalasnormalduringquizmode.

47
Photobooth Feature
TousethePhotoboothfeature,atoggleswitch(notamomentaryswitch)mustbewireduptotheMagicMirrorSensorHub.TheeasiestwaytodothisistousethescrewterminalsconnectionsandwireoneendofthetoggleswitchtoPin9onthescrewterminalblock(Dinthediagrambelow)andtheotherendofthetoggleswtichto+5Vonthescrewterminal.
Inthisexample,thetoggleswitchisattachedtotheMagicMirrorSensorHubcasebutitcanalsobemountedsomewhereelseexternallyinyourinstallation.

48
ToturnonthePhotoboothfeature,launchtheAdvancedConfigurationprogramandselect“ON”for“Switch4–Photobooth(w/Webcam)”.ThePhotoboothrequiresawebcamtotakethepictures,you’llgetthebestresultswithanHDWebcam.
TocustomizethePhotobooth,select“ConfigureAdditionalItems”,andthenclick“Photobooth”.

49
Check“EnableX-10LightingControl”toturnonthelightingcontrolfeature.Forthisfeature,you’llneedtheX-10componentsbelow(purchasedseparately).BesureandalsomatchtheX10houseandunitcodeaddressontheX-10moduleswiththe“X-10HouseCode”and“X-10UnitCode”intheconfigurationprogram.ThedefaultaddressisA4.Withthelightingcontrolfeatureenabled,thelamppluggedintotheLM465LampModulewillturnonwhenthePhotoboothstartbuttonhasbeenpressed(duringthecountdown)andthenwhenthelastpicturehasbeentaken,thelampwillautomaticallyturnoff.
X-10Plug-inRFBase
ReceivestheX-10commandsoverRFfromtheSensorHub.
X-10FirecrackerCM17A
PlugsintotheMagicMirrorSensorHub,sendsX-10RFcommandstotheX-10
Plug-inRFBase
X-10LM465LampModule
PlugalampintotheLM465

50
Check“EnableLEDcontrol”toturnontheLEDcontrolfeature.TwoLEDscanbewiredtoindicatewhenthePhotoboothisidleandwhenitisinuse.TheidleLEDisLED3(pin11onthescrewterminalblock)andtheinuseLEDisLED4(pin12onthescrewterminalblock).
ExampleLEDindicatorboxforthePhotobooth.ThegreenLEDmeansthePhotoboothisinidlemodeandtheredLEDmeansthePhotoboothisinuse.
WirethelongleadoftheidleLEDtoPin11andthelongleadoftheInUseLEDtoPin12onthescrewterminalblock.ThenwirethetwoshortleadsoftheLEDstogetherandthenconnecttotheGNDconnectiononthescrewterminalblock.
If“EnablePrinting”ischecked,thePhotoboothwillprinttoyourdefaultprinter.Papersizesof4x6inchesand8.5x11inchesaresupported.If“SavedIndividualPhotos”ischecked,thePhotoboothwillsavepicturestotheindicatedfilepath.If“IncludeCustomLogo”ischecked,thePhotoboothwilldisplaythelogointheupperlefthandcorner.Toaddyourownlogo,simplyover-writethisfilewithyourownlogo.Ensurethereplacementfileisexactlythesameimagedimensions.SelecttheWebcamResolutioncorrespondingtoyourwebcam.Thehighertheresolutionwillproducebetterpicturesandprints.WebcamFPSistheframespersecond.Leavethedefaultof20unlessyouareexperiencingsluggishwebcamvideoinwhichcaseyoucanreduce.“CountDownFrom”isthecountdowntimeinsecondsafterthekeyboardorbuttonhasbeenpressedtostartthePhotobooth.Increase“ShotDelay”ifyouwantanadditionaldelayinbetweenphototakes.“PhotosPreviewDuration”isthelengthoftimethePhotoboothwilldisplaytheallphotostogetherafterthey’vebeentaken.

51
“EnablePhotoboothStartonWebcamFacialRecognition”willsetthePhotoboothtostartwhentheWebcamrecognizesaface.Notethisfeatureisstillabitexperimental,someonesitwilltriggerwhenthereisnoface.“ProofPreviewDuration”ishowlongthephotostripproofisdisplayed.Ifyou’dliketoaddacustomimagetothephtostripprint,thencheck“OverlayBackgroundImage”.Replacethebackgroundoverlayimagewithyourownfileandensuretokeepexactlythesameimagesizedimensions.If“OverlayBackgroundImage”ischecked,theprintoutwilllooklikethis:
If“OverlayBackgroundImage”isnotchecked,theprintoutwilllooklikethis:
YoumaycustomizethestartuptextthatisdisplayedinthePhotoboothbyeditingthe“StartUpText”field.
52
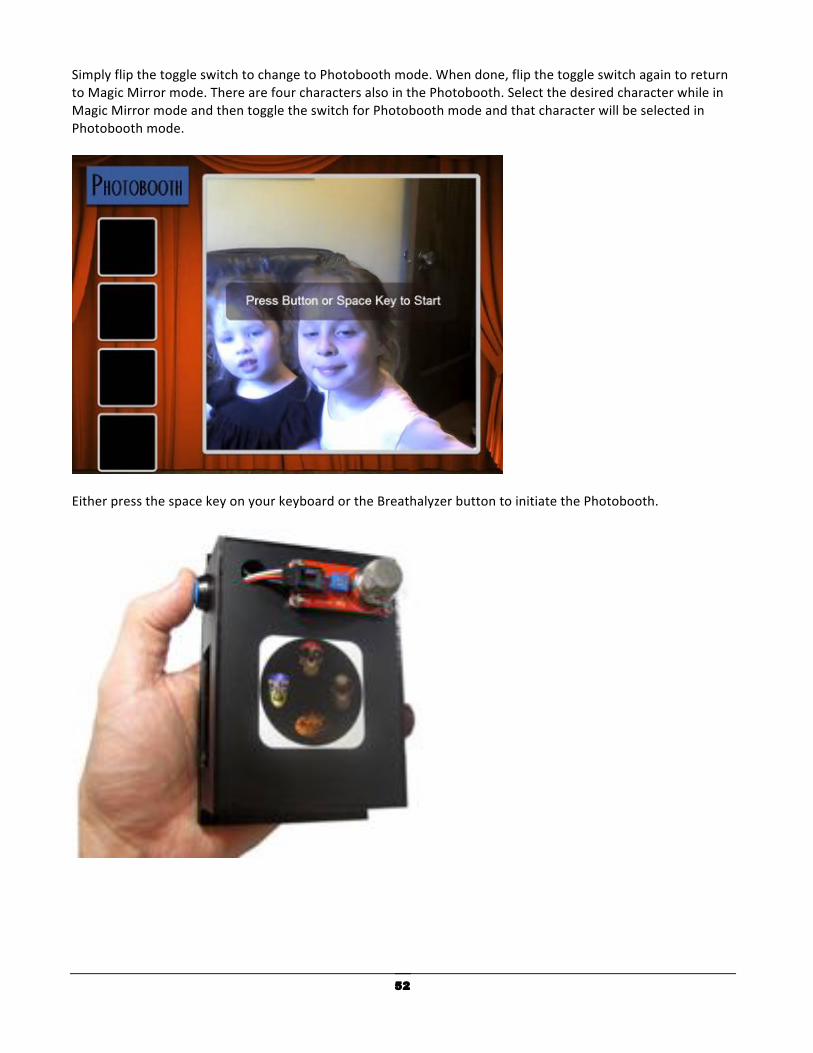
SimplyflipthetoggleswitchtochangetoPhotoboothmode.Whendone,flipthetoggleswitchagaintoreturntoMagicMirrormode.TherearefourcharactersalsointhePhotobooth.SelectthedesiredcharacterwhileinMagicMirrormodeandthentoggletheswitchforPhotoboothmodeandthatcharacterwillbeselectedinPhotoboothmode.
EitherpressthespacekeyonyourkeyboardortheBreathalyzerbuttontoinitiatethePhotobooth.

53
Setting the Magic Mirror for Permanent Operation YouarenowreadytosettheMagicMirrorforpermanentoperation.
Launch“MagicMirrorAdvancedSetup” andsetVerboseModetoOFF.
54
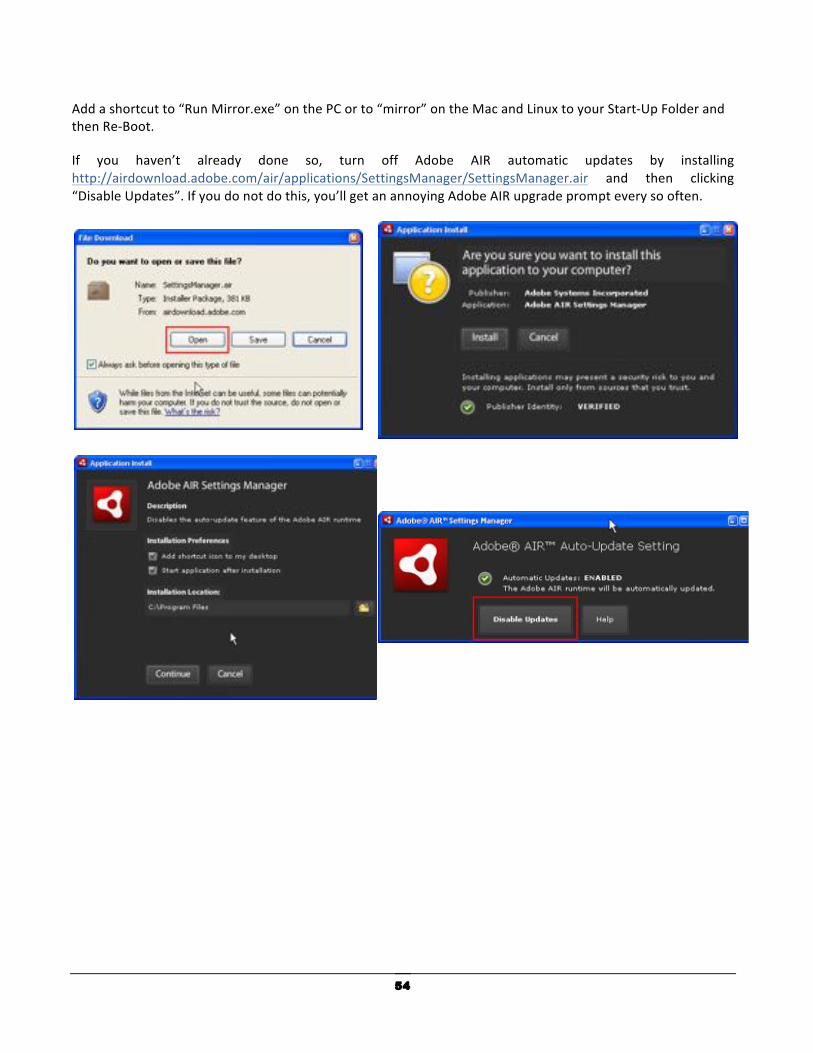
Addashortcutto“RunMirror.exe”onthePCorto“mirror”ontheMacandLinuxtoyourStart-UpFolderandthenRe-Boot.
If you haven’t already done so, turn off Adobe AIR automatic updates by installinghttp://airdownload.adobe.com/air/applications/SettingsManager/SettingsManager.air and then clicking“DisableUpdates”.Ifyoudonotdothis,you’llgetanannoyingAdobeAIRupgradeprompteverysooften.
55
Configuration Settings ConfigurationSettings
EnterRegistrationCode:Enteryourregistrationcodeheretoclearthedemobox.
SensorHubVersion:IfyoubuilttheSensorHubyourself,thenleavethedefault.Default:Version3.0
ArduinoVersion:SettoATMega168ifyourArduinousestheATMega168chiporATMega328ifyourArduinousestheATMega328chip.PurchasedMagicMirrorSensorHubsusetheATMega328.
MagicMirrorMode:SetstheMagicMirrortoPrincess,Pirate,Halloween,orInsultMode.Ifwiredup,theCharacterSelectPotentiometerwillover-ridethissetting.
IdleVideos:SetIdleVideostoOFFtoruntheMagicMirrorinstealthmodemeaningthatvideoswillplayonlywhenasensorhasbeentriggered.Usethisifyouneedtheelementofsurpriseinyourinstallation.Default:ON
WeatherZipCode:Enteryourzipcodetobeusedfortheweatherforecast.
UnitofMeasure:Weatherunitofmeasure,pickFahrenheitorCelsius.Default:Fahrenheit
ForecastCutoff:Ifthecurrenttimeisbeforethistime(military24hr),thecurrentdayforecastisusedandifthecurrenttimeisafter,tomorrow'sforecastisused.Forthedefaultof11,ifthecurrenttimeisbefore11:00AM,thecurrentdayforecastwillbeused.Ifthecurrenttimeisafter11:00AM,thentomorrow’sforecastwillbeused.Default:11
GoodWeatherThreshold:Thetemperaturethatdefinesasunnydaywhichtriggersthegoodweathervideo.Withthedefaultsettingsof70,thegoodweathervideowillplayifthetemperatureforecastis70orabove.Default:70
VideoResolution:Settolow-resifyouarerunningonolderPChardwareandthevideoissluggish.Default:High-Res
Orientation:SetstheMagicMirrortoPortraitorLandscapemode.Default:Portrait90
EnterStockSymbol:Enterasmanystocksymbolsasyoulike,youcanalsoenterjustonestocktoo.
Chapter
4

56
GoodStockThreshold:Thresholdforgoodstockperformance.Ifsetto3,thenthegoodstockvideowillplayifthesumgainofyourportfoliois3orgreater.
BadStockThreshold:Thresholdforbadstockperformance.Ifsetto-1,thebadstockvideowillplayifthesumdecreaseofyourportfoliois-1orless.Ifit'sinbetweenthisandthegoodstockthreshold,thentheokstockvideowillplay.
Picasa/GoogleID:IfusingtheSlideShowFeature(DigitalSwitch4),enteryourPicasa/Googleusername
PicasaAlbums:DisplaysyourPicasaAlbums,pickonetousefortheSlideShowMode
SlideDuration:AmountoftimeinsecondsbeforethenextPicasapictureisdisplayed.Default:10
Switch1-DoorVideo:Hookuptoanyon/offswitch.Playsavideolettingyouknowsomeoneisatthedoor.
Switch2-WeatherForecast:Hookuptoanyon/offswitch(toggleormomentary),playstheweatherforecast
Switch3-Stocks:Hookuptoanyon/offswitch(toggleormomentary),reportsstockperformance
Switch4-PicasaSlideShow:TurnOnifusingthePicasaSlideShowfeature.Thisswitchmustbeatoggleon/offswitch(standardlightswitch,reedswitch)andcannotbeamomentaryon/offswitch.TheslideshowwillplaywhentheswitchisoffandwillreturntonormalMagicMirrormodewhentheswitchison.
Switch5-Breathalyzer:TurnOnifusingtheBreathalyzerfunction,boththealcoholsensorandthisswitchmustbeconnected
X-10LightingControl:OnTurnsontheX-10lightingcontrol,Offturnsoff
LightsHouseCode:SelectaletterbetweenAandPthatmatchestheX-10housecodeonyourX-10device.
LightsUnitCode:Selectanumberbetween1and16thatmatchestheX-10unitcodeonyourX-10device.ThecombinationofhousecodeandunitcodeisthedeviceX-10address(Ex.A2).
ON/OFFHouseCode:TouchSensor3triggersthis.Selectanumberbetween1and16thatmatchestheX-10unitcodeonyourX-10device.ThecombinationofhousecodeandunitcodeisthedeviceX-10address(Ex.A4).
ON/OFFUnitCode:TouchSensor3triggersthis.Selectanumberbetween1and16thatmatchestheX-10unitcodeonyourX-10device.ThecombinationofhousecodeandunitcodeisthedeviceX-10address(Ex.A4).
ProximitySensor:OnturnsontheProximitySensor.SettoOffiftheproximitysensorisnothookedup.
Proximity1LowerRange:Thelowerdistancerangeinroughlyinchesfortheproximitysensortotriggerthefirstproximityvideo.
Proximity1UpperRange:Theupperdistancerangeinroughlyinchesfortheproximitysensortotriggerthefirstproximityvideo.
Proximity1Time:Howlongthesubjectstandswithinthelowerandupperdistancelimitbeforetriggeringtheproximity1video,100isapprox.3seconds.If6secondsisdesired,thenuse200.Default:100

57
Proximity2LowerRange:Thelowerdistancerangeinroughlyinchesfortheproximitysensortotriggerthesecondproximityvideo.
Proximity2UpperRange:Theupperdistancerangeinroughlyinchesfortheproximitysensortotriggerthesecondproximityvideo.
Proximity2Time:Howlongthesubjectstandswithinthelowerandupperdistancelimitbeforetriggeringtheproximity2video,100isapprox.3seconds.If6secondsisdesired,thenuse200.Default:100
Prox2CanPlayBeforeProx1:IfsettoON,eitherproximityvideowillplaydependingonwhichdistancerangewastriggered.IfsettoOFF,thefirstproximityvideomustplaybeforethesecondproximityvideo.Default:ON
TouchSensor1–WeatherForecast:OnturnsonTouchSensor1.SettoOffifthisinputisnothookeduptoaTouchSensor.
TouchSensor2-Stocks:OnturnsonTouchSensor2.SettoOffifthisinputisnothookeduptoaTouchSensor.
TouchSensor3–X10ON/OFF:OnturnsonTouchSensor3.SettoOffifthisinputisnothookeduptoaTouchSensor.ThiswillsendanX-10commandtotheX-10ON/OFFaddress.
CharacterSelectPotentiometer:Yesenablesthemirrormode(Princess,Pirate,Halloween,orInsult)tobeselectedontheflyviathepotentiometerwhichwilloverridetheabovemirrormodesoftwaresetting.Ifsettono,thenthemirrormodeisselectedviatheabovemirrormodesoftwaresettingandcannotbechangedonthefly.
MagicMirrorSensorHubPort:TheSensorHubnetwork/comport.PCusersuse5332forcom2,5333forcom3,5334forcom4andsoon.MacandLinuxuserswillalwayssetto5333.IMPORTANT:YOUMUSTENTERTHISCORRECTLY
StartupDelay(seconds):Delaysprogramexecution.Onlychangeincaseofsensortimingissues.Default:0
Verbose:Yesturnsonverbosemodewhichshowsthesensorreadings,you'llusethisduringinstallationandsensorcalibration.Oncedone,settonofornormaloperation.
StockReadoutText:Displaysanumericstockperformancereadoutwiththestockvideo.Forexample,ifyourstockportfoliowasup+3.2fortheday,then3.2willdisplaywhenthestockvideoplays.Thetextwillbeingreenifthegain/losswasintheGoodStockThresholdrange,whiteforlittleornochange,andredifwithintheBadStockThresholdrange.Default:On
WeatherReadoutText:Displaysabrieftextforecastwhiletheweathervideoplays.Default:On
WeatherIcon:Displaysaweathericoncorrespondingtotheweatherforecastwhiletheweathervideoplays.Default:On
58
Doorcam:IfsettoOnandSwitch1–DoorSwitchisalsosettoOn,anIPcameravideofeedwillappearalongwiththedoorswitchvideo.
IPCameraURLorIPaddress:EnterthewebaddressofthedesiredIPcamerafeed.IMPORTANT:Donotenter“http://”infrontoftheaddress.
Port:ThenetworkportoftheIPcamerafeed.
IPCameraMake:ThemanufactureroftheIPcamera.Thewebcamfeedvariesbymanufacturersoyoumustsetthiscorrectly.
VideoStreamPath:YouwillonlyneedtoenterthisiftheIPCameraMakeissetto“Other”
IPCameraUsername:OnlyiftheIPCamerarequiresausernameandpasswordtoview.
IPCameraPassword:OnlyiftheIPCamerarequiresausernameandpasswordtoview.
BaselineIdleValue:AfterhookinguptheBreathalyzer,settheconfigurationprogramandruntheMagicMirrorinverbosemode.Whileinverbosemode,lookfortheAlcoholSensorboxandthenentertheidle/steadystatevaluewhennoalcoholisneartheBreathalyzer.Thevalueyouenterdoesnotneedtobeexact.WhentheBreathalyzerruneachtime,itwillobtainanewbaselinevalue(whennoalcoholispresent)dynamically.Default:100
ResetDifferenceAllowance:WhentheBreathalyzerhasdetectedalcohol,itcantakeawhile(morethan5minutesinsomecases)forthealcoholsensortoresetbacktotheoriginalBaselineIdleValue.TosavetimeandbecausetheBreathalyzerwillobtainanewbaselinevaluedynamicallyeachtime,itisnotnecessarythatthealcoholsensorresetallthewaybacktotheBaselineIdleValue.ThissettingdetermineshowclosethealcoholsensorreadingsneedstobebeforethenextBreathalyzerreadingcantakeplace.Forexample,withthedefaultBaselineIdleValuesetto100andiftheResetDifferenceAllowanceissetto100,thentheBreathalyzerwillbereadyforthenextreadingwhenthevalueis200orbelow.Default:100
FewDrinksOffset:Default:100
BuzzedOffset:Default:300
FlatOutDrunkOffset:Default:600
Countdown(Seconds):AmountoftimeinsecondsforthesubjecttoblowintotheBreathalyzer.Default:8

59
Output LEDs (Optional)
LED Sensor Hub Pin Indicator Mode Flickering Fire Mode
LED 1 8 Lit when Breathalyzer is Ready Flickering Fire
LED 2 10
Lit when few drinks on Breathalyzer and also for Good Weather and Good Stocks
Flickering Fire
LED 3 11
Lit when buzzed on Breathalyzer and also for OK Weather and OK Stock Performance
Flickering Fire
LED 2 12
Lit when flat out drunk on Breathalyzer and also for Bad Weather and Bad Stock Performance
Flickering Fire
Proximity LED 13
This LED will blink providing a visual indicator that the subject is within the proximity range defined by the configuration program. It will then turn solid when the Proximity Videos are playing and turn off when the Proximity Videos have stopped playing.
This LED will blink providing a visual indicator that the subject is within the proximity range defined by the configuration program. It will then turn solid when the Proximity Videos are playing and turn off when the Proximity Videos have stopped playing.

60
Customizing the Magic Mirror with your own Videos
The DIY Magic Mirror was designed to allow the animations/videos to be personalized. To add your ownvideos: 1 You can use any video you like for the animations. If you'd like to add your own audio to the existingcharacters, purchase the character (each character is $15) you would like to personalize fromhttp://www.imagineerieing.com/ 2 Record the audio separately. Then manually move the mouth movements of the digital puppet fromimagineerieing using your keyboard to sync the audio. Use a video capture program (FRAPSworkswell forWindowsusers)torecordtheperformance.Thenassembletheaudioandvideotogetherinyourfavoritevideoeditingprogram.Rotatethecharacter90degreesasperPiratescreenshotonthenextpage. 3 EncodethevideoinAdobe.FLVformatusingthesettingsbelow.Donotusethe.F4Vformat.
61
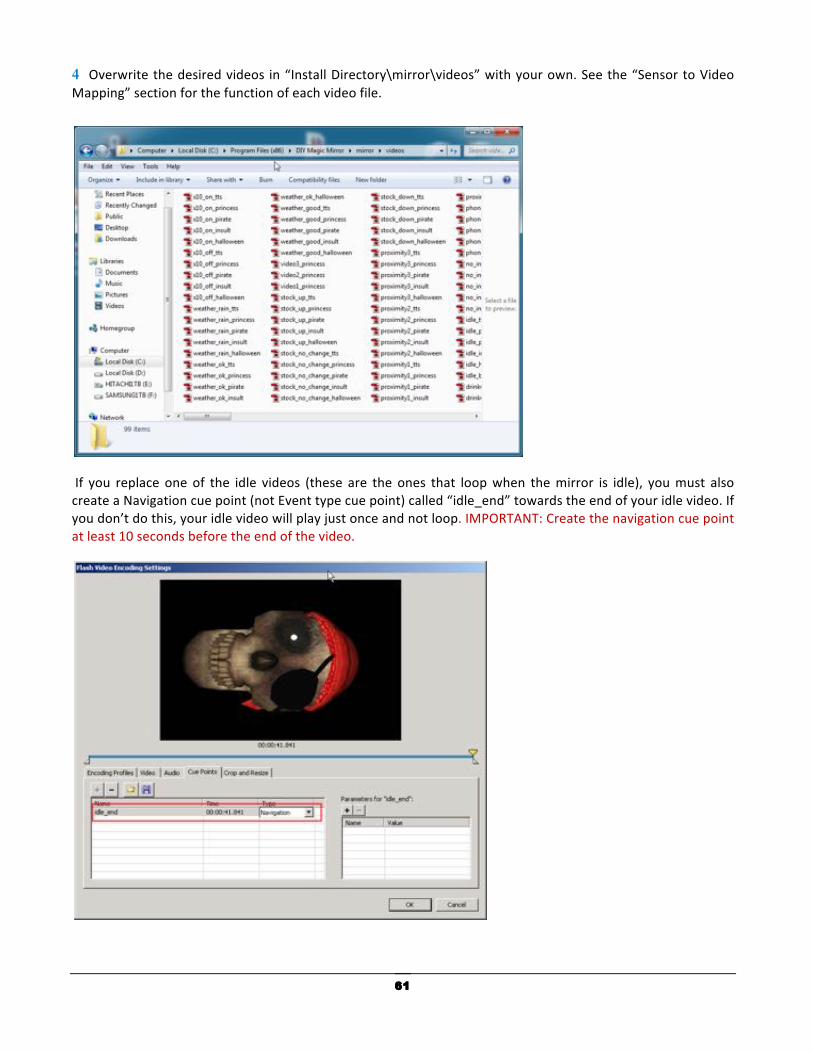
4 Overwritethedesiredvideos in“InstallDirectory\mirror\videos”withyourown.Seethe“SensortoVideoMapping”sectionforthefunctionofeachvideofile.
If you replace one of the idle videos (these are the ones that loopwhen themirror is idle), youmust alsocreateaNavigationcuepoint(notEventtypecuepoint)called“idle_end”towardstheendofyouridlevideo.Ifyoudon’tdothis,youridlevideowillplayjustonceandnotloop.IMPORTANT:Createthenavigationcuepointatleast10secondsbeforetheendofthevideo.

62
In addition, youmay also change the touch sensor inputs to play custom videos you supply instead of theweather, stock,andx10 functions.Checktherespective“CustomVideoX Instead”boxes in theMagicMirrorAdvancedConfigurationprogramtousethisfeature.
Andthencopyyourcustom.flvvideosinto“InstallDirectory\mirror\videos”followingthenamingconventionbelow.
Mode FileName
Princess video1_princess.flvvideo2_princess.flvvideo3_princess.flv
Pirate video1_pirate.flvvideo2_pirate.flvvideo3_pirate.flv
Halloween video1_halloween.flvvideo2_halloween.flvvideo3_halloween.flv
Insult video1_insult.flvvideo2_insult.flvvideo3_insult.flv
CustomAudio video1_tts.flvvideo2_tts.flvvideo3_tts.flv
As an example, while in PrincessMode (selected by turning the character select knob/potentiometer) andTouch1ispressed,the“video1_princess.flv”videowillplay.WhileinInsultmodeandTouch3ispressed,the“video3_insult.flv”videowillplay.

63
SensorstoVideoMapping(VideosmustbeinAdobe.FLVformat)ForallvideosexceptTouchSensor3–X10/ON/OFF,switch4–Picasaslideshow,andtheBreathalyzervideos,thelightswillturnoffwhenthevideofirstbeginstoplayandthenturnbackonwhenthevideohascompletedifX-10lightingcontrolhasbeenturnedon.
Sensor Triggered Video Filename Proximity Proximity 1, Proximity 2, and Proximity 3
Videos
proximity1_princess.flv proximity2_princess.flv proximity3_princess.flv proximity1_halloween.flv proximity2_halloween.flv proximity3_halloween.flv proximity1_pirate.flv proximity2_pirate.flv proximity3_pirate.flv proximity1_insult.flv proximity2_insult.flv proximity3_insult.flv
Touch 1 - Weather
Plays one of three videos depending on the weather forecast
weather_good_princess.flv weather_ok_princess.flv weather_rain_princess.flv weather_good_halloween.flv weather_ok_halloween.flv weather_rain_halloween.flv weather_good_pirate.flv weather_ok_pirate.flv weather_rain_pirate.flv weather_good_insult.flv weather_ok_insult.flv weather_rain_insult.flv
Touch 2 - Stock Plays one of three stock videos depending on your stock portfolio performance for the day
stock_up_princess.flv stock_no_change_princess.flv stock_down_princess.flv stock_up_halloween.flv stock_no_change_halloween.flv stock_down_halloween.flv stock_up_pirate.flv stock_no_change_pirate.flv stock_down_pirate.flv stock_up_insult.flv stock_no_change_insult.flv stock_down_insult.flv
Touch 3 X-10 Generic ON/OFF
x10_off_princess.flv x10_on_princess.flv x10_off_halloween.flv x10_on_halloween.flv x10_off_pirate.flv x10_on_pirate.flv x10_off_insult.flv x10_on_insult.flv
Switch 1 Door Video
doorbell_princess.flv doorbell_halloween.flv doorbell_pirate.flv doorbell_insult.flv
Switch 2 Weather
weather_good_princess.flv weather_ok_princess.flv weather_rain_princess.flv weather_good_halloween.flv weather_ok_halloween.flv weather_rain_halloween.flv weather_good_pirate.flv weather_ok_pirate.flv

64
weather_rain_pirate.flv weather_good_insult.flv weather_ok_insult.flv weather_rain_insult.flv
Switch 3 Stock
stock_up_princess.flv stock_no_change_princess.flv stock_down_princess.flv stock_up_halloween.flv stock_no_change_halloween.flv stock_down_halloween.flv stock_up_pirate.flv stock_no_change_pirate.flv stock_down_pirate.flv stock_up_insult.flv stock_no_change_insult.flv stock_down_insult.flv
Switch 4 Picasa Slide Show
Picasa Slide Show
Switch 5 Breathalyzer
drink1_princess.flv drink2_princess.flv drink3_princess.flv drink4_princess.flv drink1_halloween.flv drink2_halloween.flv drink3_halloween.flv drink4_halloween.flv drink1_pirate.flv drink2_pirate.flv drink3_pirate.flv drink4_pirate.flv drink1_insult.flv drink2_insult.flv drink3_insult.flv drink4_insult.flv

65
Hardware Installation Tips MagicMirrorInstallationExamples
PlayhouseInstallation
Chapter
5

66
HalloweenPartyRunninginstealthmode,theMagicMirrorappearsasanormalbathroommirror.Guestsgetasurprisewhenapproachingthesinktowashtheirhands.
HauntedHousePropTheMagicMirroratthebottomofawell.

67
HotelInstallationTheMagicMirrorspeakstheweatherforecasttohotelguests.
MakerFaireExhibit
68
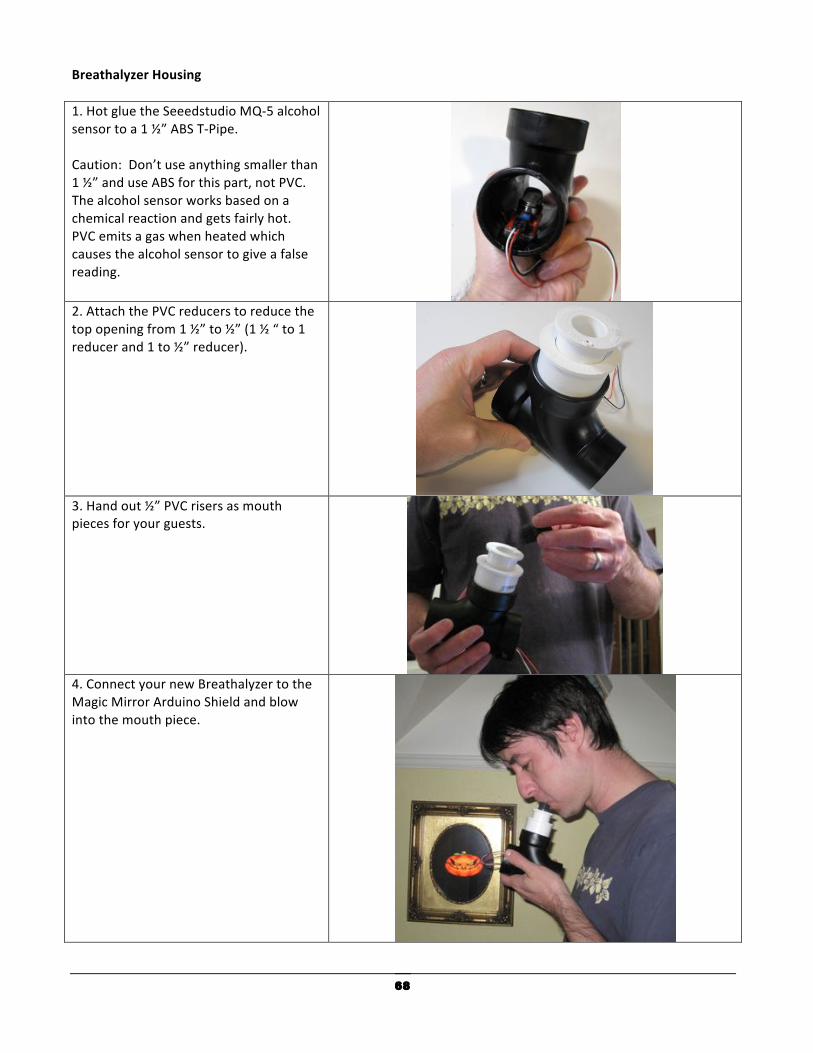
BreathalyzerHousing1.HotgluetheSeeedstudioMQ-5alcoholsensortoa1½”ABST-Pipe.Caution:Don’tuseanythingsmallerthan1½”anduseABSforthispart,notPVC.Thealcoholsensorworksbasedonachemicalreactionandgetsfairlyhot.PVCemitsagaswhenheatedwhichcausesthealcoholsensortogiveafalsereading.
2.AttachthePVCreducerstoreducethetopopeningfrom1½”to½”(1½“to1reducerand1to½”reducer).
3.Handout½”PVCrisersasmouthpiecesforyourguests.
4.ConnectyournewBreathalyzertotheMagicMirrorArduinoShieldandblowintothemouthpiece.
69
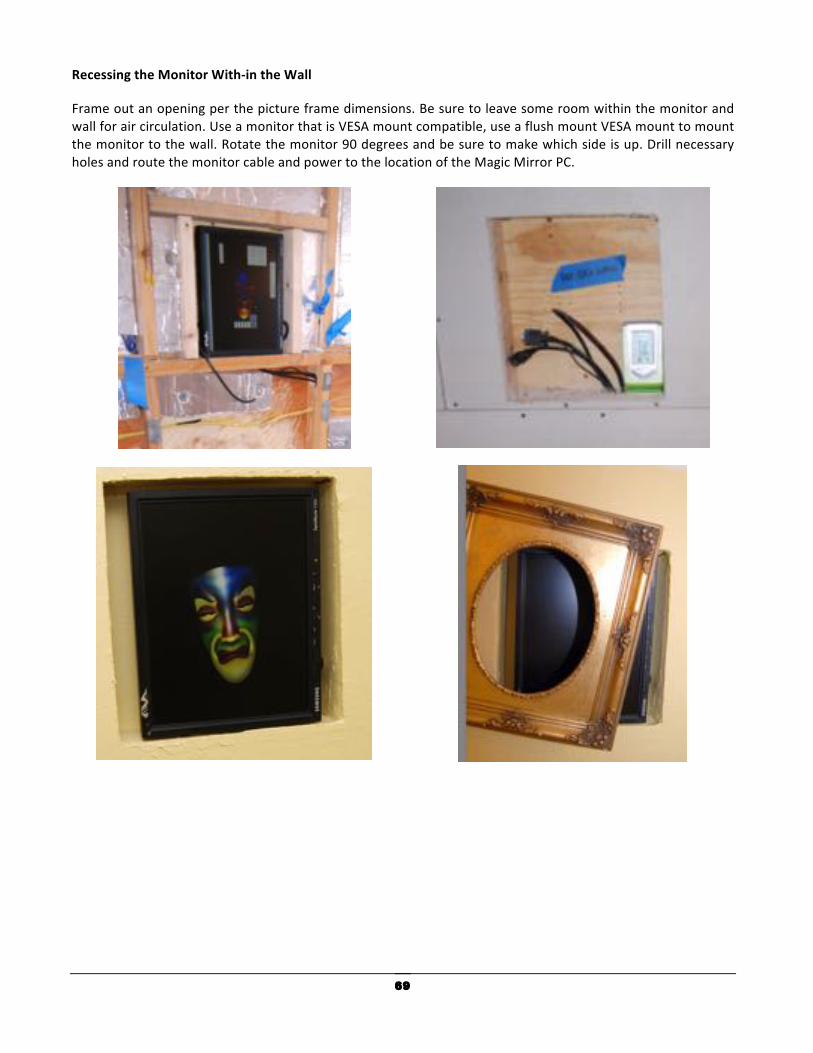
RecessingtheMonitorWith-intheWall
Frameoutanopeningperthepictureframedimensions.Besuretoleavesomeroomwithinthemonitorandwallforaircirculation.UseamonitorthatisVESAmountcompatible,useaflushmountVESAmounttomountthemonitortothewall.Rotatethemonitor90degreesandbesuretomakewhichsideisup.DrillnecessaryholesandroutethemonitorcableandpowertothelocationoftheMagicMirrorPC.

70
BuildaCustomBoxifIn-WallisnotanOption

71
MountthePCinanOldCase
MounttheX-10FirecrackerandArduinoinsidethePCcasetosavespace

72
RecesstheProximitySensorintheDrywall
UseRTVSiliconeAdhesiveorEpoxytosecuretheproximitysensortothebackofthedrywall.
73
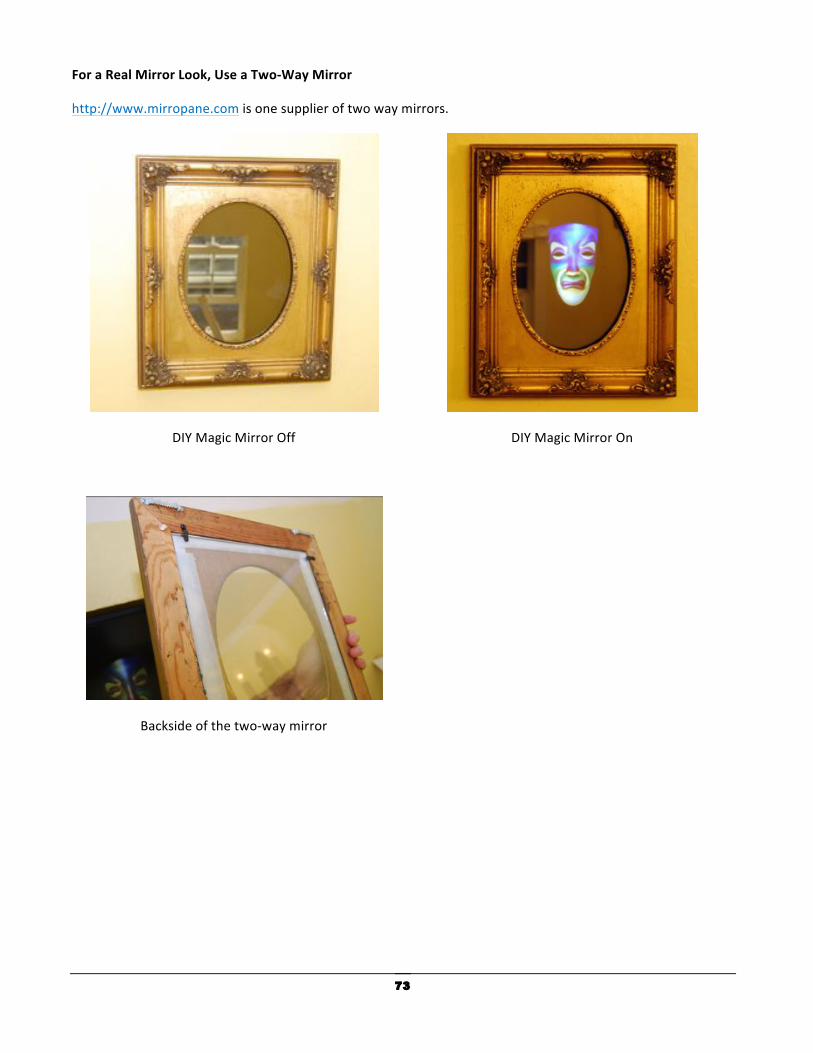
ForaRealMirrorLook,UseaTwo-WayMirror
http://www.mirropane.comisonesupplieroftwowaymirrors.
DIYMagicMirrorOff
DIYMagicMirrorOn
Backsideofthetwo-waymirror

74
FakeFireplace
BuildafakefireplacebelowtheDIYMagicMirror.PerAppendix1,theLEDsshouldbewiredtoFireLED1,2,3,and4.Theywillallflickeratdifferentintervalstosimulateafakefire.
Usedrywalljointcompoundorwoodpuddyforthefireboxtextureandthenblackspraypaint

75
MountingtheTouchSensorsinDrywall
Don’tforgettomeasureexactlythelocationofthesensorsoyouknowwhereitiswhenthedrywallisup.TheTouchSensorcablelengthcanbeextendedupto100feet.
Cutholeindrywall,1.5inchesx1.5inches
Coverholewithathinpieceofplastic/acrylic(lessthan1/8”thick),gluetouchsensortoplastic/acrylic
piece(donotuseametaldrywallpatchkit)
Coverwithdrywallfiberglassmesh
Coverwithdrywalljointcompound
Sandwith150gritsandpaper.Re-applyjoint
compound,sandagain,andpaint.
Addasticker

76
RemotePCMaintenanceForremotemaintenancetothemagicmirrorPC,VNCisfreeandworksgreat.Tightvnc.comisoneversion.Note:VNCrunsonWindowsXPbutnotonWindowsVista.You’llneedtoinstallVNCserveronthemagicmirrorPCandthentheVNCclientontheremotecontrollingPC.IfusingLINUXUbuntuforthemagicmirrorPC,theVNCserverisalreadyinstalledbydefault.

77
Troubleshooting IfyouseethismessagewhenstartingtheMagicMirror,thismeanstheSensorHub/Arduinowasnotfound.
Pleasecheckthefollowing:1.TheSensorHub/ArduinoispluggedintoyourUSBport.2.TheOSdriverhasbeeninstalledfortheMagicMirrorSensorHub/Arduino3.Ifyoubuilt/assembledyourownSensorHub,youdidtheonetimeuploadoftheFirmatafirmwaretotheArduino4.You’veenteredthecorrectMagicMirrorSensorHubportintheconfigurationprogram5.ForWindowsandMac,serproxyisrunning(Onwindows,youhavetoinstructyourfirewallnottoblock).ForLinux,ser2netisrunning.6.OnWindows,theCOMportmustbelessthanCOM9.Itwillnotworkifit’ssettoCOM10orhigher.Ifthisisthecase,rightclickon<USBSerialPort>andclickthe<Advanced>buttontochangetheCOMport.
7.Restartandchoose“RunMagicMirrorwithBoardReset”
Chapter
6

78
OnWindows,ifyourinstallationdirectoryisnotondriveC,thenyou’llneedtoeditthesefourfilestoyourinstallationdrive.ThefourfilesarelocatedinProgramFiles\DIYMagicMirror.
Forexample,ifyourinstallationdriveisE:\ProgramFiles\DIYMagicMirror,thenchangeC:\toE:\ineachofthe4files.
Problem SolutionWhileinverbosemode,theproximitysensorisspittingoutrandomdistances
Yourproximitysensorisnothookedupcorrectly.Checkyourwiringandalsoensuretheproximitysensorisgettingpower.
Weather,stock,doorvideosplayrandomlyduringnormaloperationwhennosensorwastriggered
You’vegotasensorturnedonintheconfigurationprogramthatdoesnothaveaphysicalsensorhookeduptoit.Runtheconfigurationprogramandenableonlyinputswithphysicalsensorshookedup.Checkyourwiringifyouhavetheconfigurationsetcorrectlybutstillhavetheproblem.
TheMagicMirrorsoftwareiscrashing IfyouarenotusingtheTouchSensor/Analoginputs,ensurethoseareturnedofffromtheConfigurationprogram.Ifananaloginputisleftonwithnosensor,theinputwillspitoutrandomdataoverloadingtheMagicMirrorsoftwarecausingittocrash.
Theproximityvideosaregoingoffwhennooneisstandinginfrontoftheproximitysensor.
Eithertheproximitysensorisnotgetting+5V/notwiredcorrectlyorthedistancereturnedfromtheproximitysensorwhennooneisintheroomfallsbetweentheProximityLowerLimitandProximityUpperLimitsettings.StarttheMagicMirrorsoftwareinverbosemodeandseewhatdistancesettingsarereturnedwithnooneinfrontoftheproximitysensor.ThenruntheconfigurationprogramandmodifytheProximityLowerLimitandProximityUpperLimitsettingsensuringtheyareoutofthisrange.
Everythingelseworksbutthethestockvideodoesnotplay.
Mostlikelyyouhaveenteredaninvalidstocksymbol.Starttheconfigurationprogramandensureallyourstocksymbolsarevalid.

79
Problem SolutionTheMagicMirrorisnotturningoffandonmyX-10lights.
FirstensureyouhaveX-10turnedonintheconfigurationprogram.ThenensureyourX-10Plug-inRFBaseispluggedinandonthesameACcircuitasyourX-10lampmoduleorswitch.EnsuretheX-10addresssetonyourX-10modulematchestheX-10addressintheconfigurationprogram.YoucanhookuptheTouchSensorstothedigitalinputs(Switches1-4)whichwillturnoffandontheX-10lights.
TheMagicMirrorsoftwareisrunningfine,howdoIstopandexitout?
ThemousecursorishiddenwhiletheMagicMirrorsoftwareisrunning.OnWindows,doanALT-F4toexitoutoftheMagicMirrorsoftware.
Turningthemodeselectknobdoesnotchangethemode(Princess,Pirate,orHalloween).
EnsurethattheCharacterSelectPotentiometeristurnedonintheconfigurationprogram.AlsonotetheCharacterSelectPotentiometersettingover-ridesthesoftwaremodeselectsettingfromtheconfigurationprogram.SosimplyturntheknobtothedesiredmodeandtheMagicMirrorwillstartinthismodeeverytime.

80
Appendix A – Magic Mirror Sensor Hub Wiring Schematic

81
Appendix B – Sensor Wiring Diagram Visual View
82
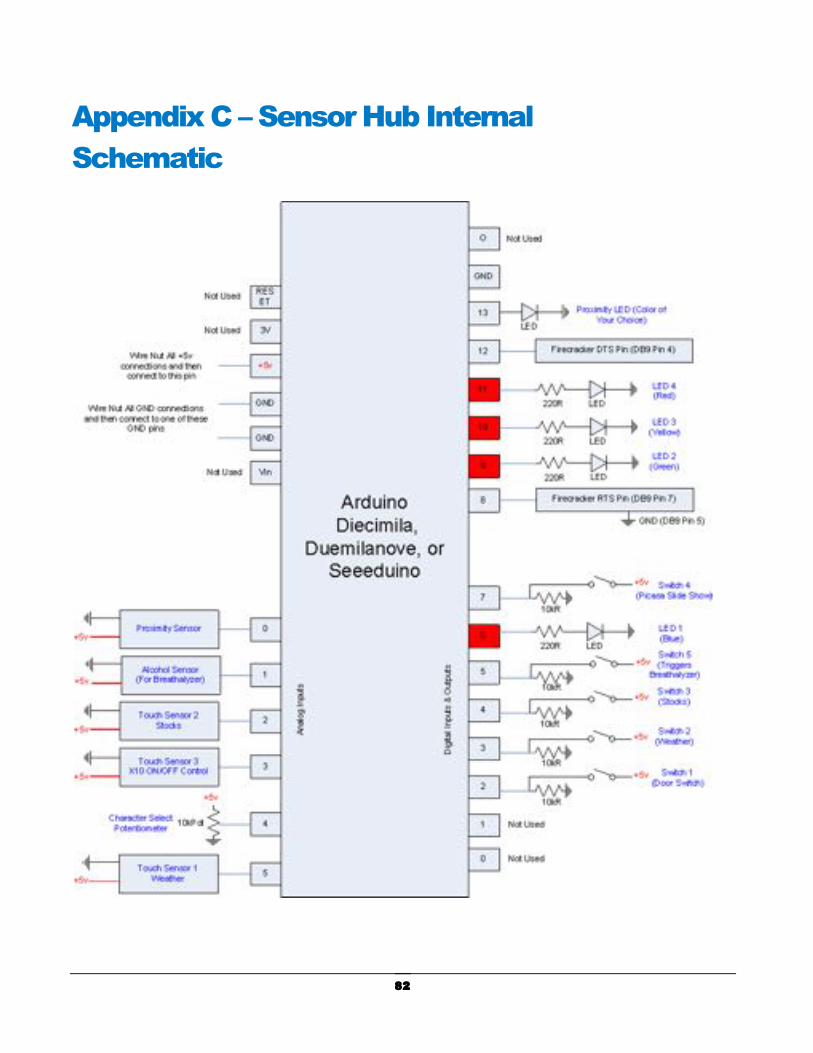
Appendix C – Sensor Hub Internal Schematic
Related Documents