Bachelor Thesis in Electrical Engineering Department of Electrical Engineering, Linköping University, 2016 Wireless Communication using Energy Harvesting Push Button By Erik Amgård and Kevin Bergman LiTH-ISY-EX-ET--16/0454--SE Linköping, 2016

Welcome message from author
This document is posted to help you gain knowledge. Please leave a comment to let me know what you think about it! Share it to your friends and learn new things together.
Transcript

Bachelor Thesis in Electrical Engineering
Department of Electrical Engineering, Linköping University, 2016
Wireless Communication using
Energy Harvesting Push Button
By Erik Amgård and Kevin Bergman
LiTH-ISY-EX-ET--16/0454--SE
Linköping, 2016


Bachelor Thesis in Electrical Engineering
Erik Amgård and Kevin Bergman
LiTH-ISY-EX-ET--16/0454--SE
Supervisor:
Martin Nielsen Lönn
ISY, Linköping University
Examiner:
J Jacob Wikner
ISY, Linköping University
Division of Integrated Circuits and Systems
Department of Electrical Engineering
Linköping University
SE-581 38 Linköping, Sweden
Copyright 2016 Erik Amgård and Kevin Bergman


jenlöejkfnlöekjfenflöjnefökejfnöekjndöslkmölsdkmcödlkfsmföldskmfösdlkfmsdölfkmsdölfksd
möflskdmfö


Abstract
A disadvantage with battery powered circuits is the fact that the battery sometimes can
run out of power. If a button that can generate energy by applying mechanical work to
it was applied instead of batteries, is it possible to enable a transmitter to stay active
long enough to transmit data which can later by received and decoded?
This thesis contains a study, in which how to effectively send data wirelessly between
a transmitter and receiver module, without the use of any batteries or external power
sources, only an energy harvesting push button is constructed and evaluated. There
will also be a theoretical comparison between different transmission formats and
which is more suitable for a task such as this.
Sammanfattning
En nackdel som kan förekomma vid användning av batteridrivna kretsar är att batteriet
någon gång kan ta slut. Om man istället skulle använda sig av en knapp som kunde
generera energi till en sändarkrets med hjälp utav en persons tillförda mekaniska
arbete, är det möjligt att generera tillräckligt med energi för att hålla en sändare aktiv
tillräckligt länge för att kunna skicka data som sedan kan mottagas och avkodas?
Denna rapport innehåller en studie som innefattar hur man effektivt kan skicka
information trådlöst mellan en sändare och en mottagarmodul, utan användningen av
batterier eller utomstående energikällor, utan enbart genom användandet av en
energiskördande knapp. Det finns också en teoretisk jämförelse mellan olika
överföringsprotokoll och vilken av dem som är bäst anpassad för att kunna utföra en
sådan uppgift.


Acknowledgments
We would like to thank our examiner Dr. J Jacob Wikner for actively answering
questions concerning the project and thesis and for helping with all the things that
surrounds it.
We also want to thank our supervisor Martin Nielsen Lönn for his continuous help
whenever the project got stuck and also for helping with general questions surrounding
construction of different parts of the project.


Table of Contents
1 Introduction ................................................................................................................................. 1
1.1 Motivation ................................................................................................................................. 1
1.2 Purpose...................................................................................................................................... 1
1.3 Problem statements .................................................................................................................. 1
1.4 Limitations ................................................................................................................................ 2
1.5 Outline of thesis ........................................................................................................................ 2
2 Background ................................................................................................................................. 5
2.1 Introduction .............................................................................................................................. 5
2.2 Related work............................................................................................................................. 6
3 Theory .......................................................................................................................................... 7
3.1 Introduction .............................................................................................................................. 7
3.2 Block-level schematic of transmitter circuit .......................................................................... 8
3.3 Energy harvesting methods ..................................................................................................... 9
3.3.1 Piezoelectric element ................................................................................................... 10
3.3.2 Electromagnetic induction .......................................................................................... 11
3.4 Different energy harvesting push buttons ........................................................................... 12
3.5 Voltage regulation .................................................................................................................. 15
3.6 Encoder ................................................................................................................................... 17
3.7 Transmission formats ............................................................................................................ 18
3.8 Advantages and disadvantages of the transmission formats ............................................. 19
3.8.1 Wi-Fi ............................................................................................................................. 19
3.8.2 Radio frequency identification ................................................................................... 19
3.8.3 Bluetooth Low Energy ................................................................................................ 20
3.8.4 ZigBee ........................................................................................................................... 20
3.8.5 WirelessHART ............................................................................................................ 20
3.8.6 ANT ............................................................................................................................... 20
3.9 The receiver circuit ................................................................................................................ 21
3.10 Decoder ................................................................................................................................. 22
3.11 Raspberry Pi ......................................................................................................................... 22
4 Methodology .............................................................................................................................. 23

4.1 Introduction ............................................................................................................................ 23
4.2 Pre studies ............................................................................................................................... 23
4.3 Implementing components .................................................................................................... 23
4.4 Rectifying ................................................................................................................................ 24
4.5 Energy from the various push buttons................................................................................. 25
4.6 Encoder (HT12E) and Decoder (HT12D) ............................................................................ 25
4.7 Different voltage regulators .................................................................................................. 25
4.8 Transmitter schematic ........................................................................................................... 27
4.9 Prototypes of the receiver and transmitter .......................................................................... 28
4.10 Receiver schematic ............................................................................................................... 30
4.11 Evaluation of methodology.................................................................................................. 32
4.12 Conclusions of methodology................................................................................................ 32
5 Results ....................................................................................................................................... 33
5.1 The finished product .............................................................................................................. 35
5.2 Implementation ...................................................................................................................... 35
5.2.1 Rectifier ........................................................................................................................ 36
5.2.2 Energy from the various push buttons ...................................................................... 39
5.2.3 Energy needed to push the button.............................................................................. 39
5.2.4 Transmitting and receiving certain IDs through RF ............................................... 40
5.2.5 Voltage regulation........................................................................................................ 41
5.2.6 Receiver ........................................................................................................................ 42
5.2.7 Range analysis in various areas .................................................................................. 43
5.3 Evaluation of results .............................................................................................................. 44
6 Discussion................................................................................................................................... 45
6.1 Outcome .................................................................................................................................. 45
6.2 Method .................................................................................................................................... 46
6.3 Problems during implementations ....................................................................................... 46
6.4 The work in a wider perspective........................................................................................... 47
6.5 Source criticism ...................................................................................................................... 47
7 Conclusions ................................................................................................................................ 49
7.1 The questions of issue ............................................................................................................ 49
7.2 Impact on target audience ..................................................................................................... 50
7.3 Future work ............................................................................................................................ 50
8 Bibliography .............................................................................................................................. 51

9 Appendix .................................................................................................................................... 55
Appendix A ................................................................................................................................... 55


Table of figures
Figure 3.1: Basic overview of the transmitter circuit ................................................................. 8
Figure 3.2: Principle of generating electricity through a piezo element ................................. 10
Figure 3.3: Electromagnetic induction ....................................................................................... 11
Figure 3.4: Piezoelectric stove igniter ........................................................................................ 12
Figure 3.5: Piezoelectric cigarette lighter .................................................................................. 13
Figure 3.6: Piezoelectric generator ............................................................................................. 13
Figure 3.7: Electromagnetic induction button .......................................................................... 13
Figure 3.8: The signal before and after the rectifier................................................................. 15
Figure 3.9: Basic overview of the receiver circuit ..................................................................... 21
Figure 3.10: Raspberry Pi 3 ........................................................................................................ 22
Figure 4.1: Unrectified signal using electromagnetic induction push button ........................ 24
Figure 4.2: “Nano power energy harvesting power supply” ................................................... 26
Figure 4.3: Schematic of the transmitter circuit ....................................................................... 27
Figure 4.4: First prototype of the transmitter circuit ............................................................... 28
Figure 4.5: The receiver prototype ..................................................................................... ……29
Figure 4.6: Schematic over the receiver ..................................................................................... 30
Figure 5.1: The transmitter circuit............................................................................................. 34
Figure 5.2: The finished product ................................................................................................ 35
Figure 5.3: The rectified signal using electromagnetic push button ....................................... 36
Figure 5.4: Non-rectified signal using piezoelectric cigarette lighter ...................................... 37
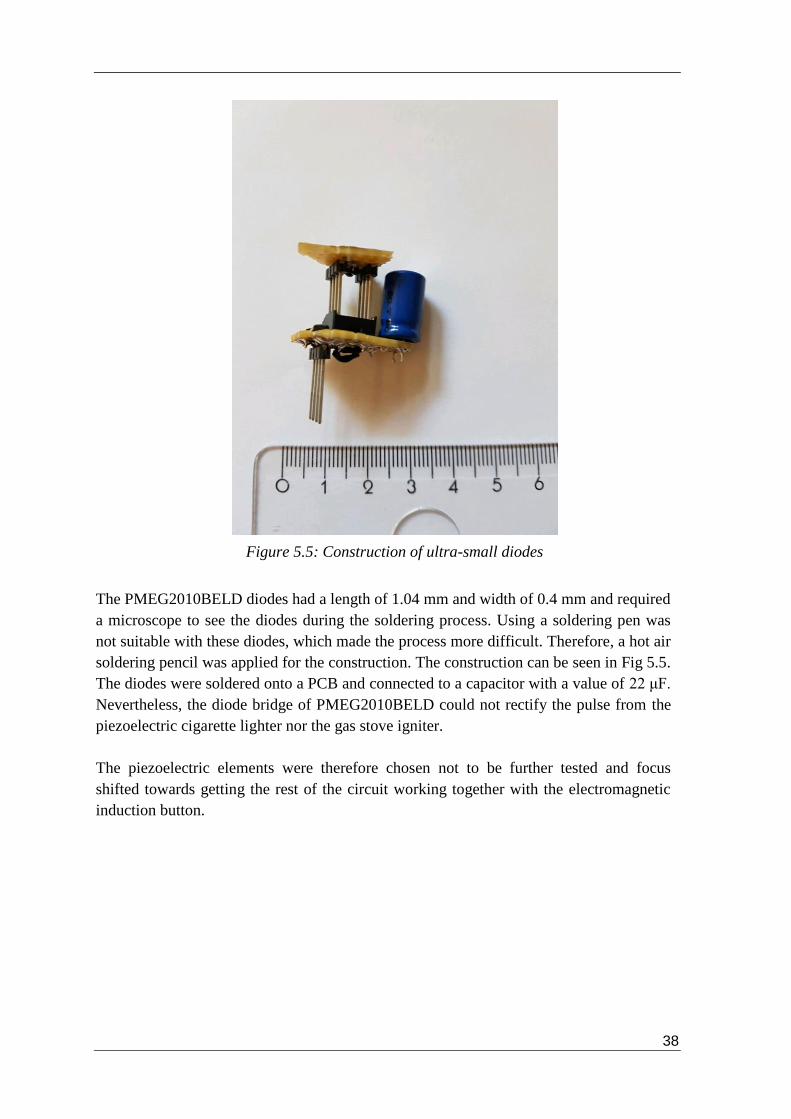
Figure 5.5: Construction of ultra-small diodes ......................................................................... 38
Figure 5.6: The first pulse when pressing the button ............................................................... 40
Figure 5.7: The second pulse when releasing the button .......................................................... 40
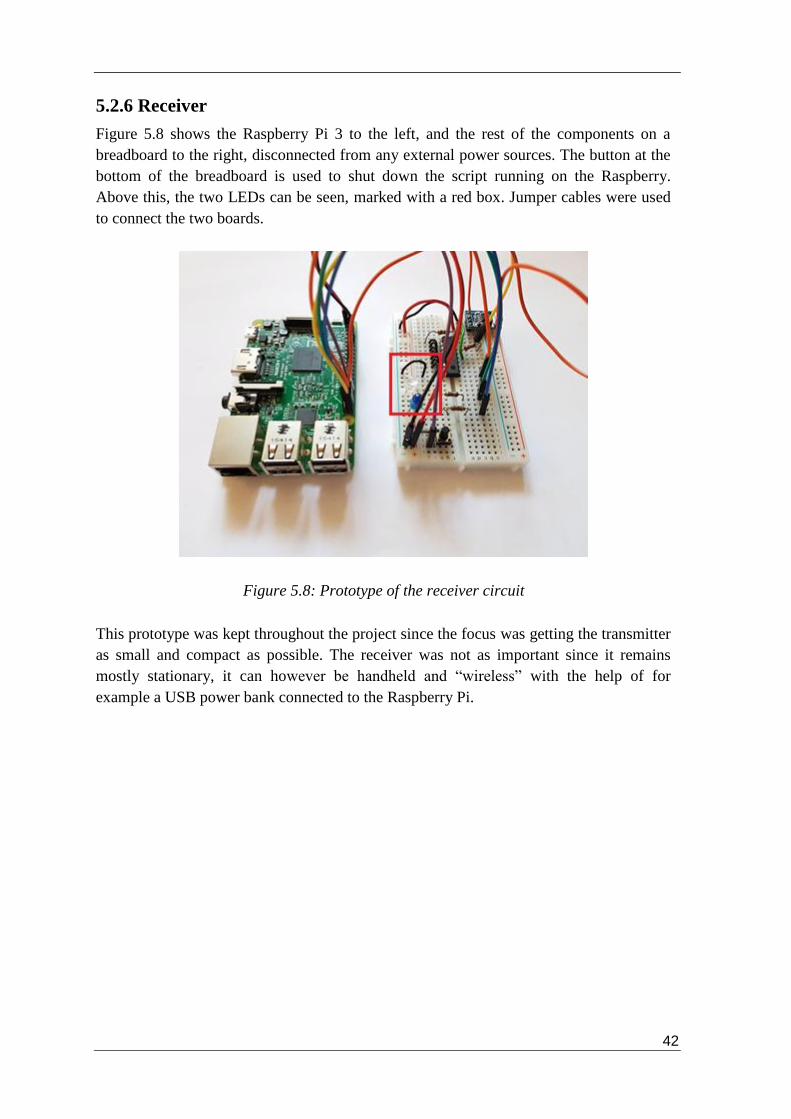
Figure 5.8: Prototype of the receiver circuit ............................................................................. 42
Figure 5.9: Number of successful transmission in various environments .............................. 43


List of tables
Table 3.1: The four different power sources. ............................................................. 14
Table 3.2: Different transmission formats and their specifications. ........................ 18
Table 3.3: Measured voltages from the various buttons ........................................... 39


Notations
Abbreviation Meaning Explanation Context
RF Radio
Frequency
A frequency in which
radio waves are
transmitted
… energy which then powers a
wireless radio frequency
transmitter.
ID Identification Different devices have
different
identifications
…received data can then be
decoded to determine which
identification that was sent.
LED Light Emitting
Diode
A small diode which
glows when a current
is applied
If the energy transmitted is
enough to order a receiver to turn
on a light emitting diode …
PCB Printed Circuit
Board
A thin board on which
components are
applied
…where the components will be
soldered on a printed circuit
board prototype board.
GPIO General
Purpose Input
Output
Pins which can be
used for sensing input
and outputs
…does not match the general
purpose input output pin
numbers on the actual Raspberry.
BLE Bluetooth low
energy
A wireless technology
used to transfer data
Bluetooth low energy is a good
contender with high efficiency
and yet low power
consumption…
IEEE Institute of
electrical and
electronics
engineers
The world’s largest
technical organization
which is advancing
technology.
The institute of electrical and
electronics engineers standard
802 is a family of networking
standards.
RFID Radio
frequency
identification
A wireless sensor
technology
Radio frequency identifications
is based on the detection of
electromagnetic signals and is a
wireless sensor technology.
WHART
WirelessHART A wireless technology
used to transfer data
WirelessHART is constructed to
support several applications
applications…


1
1
Introduction
1.1 Motivation
One of the issues with smaller handheld electronic devices is their lack of battery time.
What if there is a way to harvest energy and send information while using the device,
without charging it with a cable or having an internal battery? This is not only good for
the environment but it also makes it simpler by removing the need for changing batteries.
1.2 Purpose
The purpose with this project is to extend the knowledge of how to harvest energy from a
push button and what can be done with that energy. To do research on how to harvest the
highest amount of energy from energy harvesting push buttons that harvest enough
energy to drive a circuit long enough to send information. Furthermore, to find the most
suitable transmission formats for low energy circuits.
1.3 Problem statements
The main question which will be answered is how to harvest enough energy from an
energy harvesting button to power a battery less circuit to be able to send data wirelessly.
Which transmission format is most suitable for a circuit that has a relatively low energy
input will also be answered. This thesis will attempt to answer these questions:
● How can a circuit be constructed so that it fulfills the task of sending data
wirelessly by using only an energy harvesting button as its power source?
● Which transmission formats are most suitable for a low energy circuit?
● What are the advantages/disadvantages of these transmission formats?
When looking at which transmission formats that are most suitable for low energy driven
circuits, range and current consumptions will be in focus. Transmission formats which
requires high energy consumption will be more difficult to send data from, due to the fact
that a single push button might not deliver as much energy as required for the transmitter
to be active long enough to successfully send data.

2
1.4 Limitations
Some limitations were applied to prevent the project from getting too broad or general.
These limitations include:
● Only theoretical analyses between different transmission formats will be taken
into account, not empirical.
● From the analysis, only the most suitable transmission format will be chosen for
implementation.
● The data only has to be able to send from a distance of about 10 m.
● The security of different transmission formats will not be taken into account.
● The current consumption from the receiver circuit will not be taken into account.
The thesis has a limited amount of resources which makes implementing all the
components difficult, which is why they will only be discussed theoretically.
1.5 Outline of thesis
The content of the chapters will occur in chronological order, meaning the same order
that the project was executed. To understand the contents of this thesis a basic knowledge
in physics and in electronics is sufficient for the reader.
In chapter 3, Theory, some basic information about the parts of the project is explained.
After this, the signal flow in the system will be followed and the boxes in the block-level
schematic will be explained along the way. Basically, the thesis starts in the leftmost side
of the circuit which is the power source and then follows the components which has been
added to benefit from all the energy that was harvested from it.
In chapter 4, Method, the focus will be on how the components were chosen and how the
testing on the circuit was performed. This chapter will follow the order of which the
components were applied and tested upon. The different components will then further be
explained and schematic over the circuits will be shown. The method will then be
evaluated and summarized.
In chapter 5, Results, the finished product will be shown and various component values
will be further explained and why certain values or components have been chosen. The
range analysis will be shown in a diagram, comparing the common error rate in different
environments.
In chapter 6, Discussion, the different parts of the project will be explained. Why various
parts of the project were carried out the way they were. The work in a wider perspective
will also be discussed along with source criticism.

3
In chapter 7, Conclusion, the thesis will further discuss how the project went and if the
results were satisfactory. Propositions on how future work should be carried out and the
impact on target audience will be shortly mentioned.
Bibliography and Appendixes contains references and the code used in the project.

4

5
2
Background
2.1 Introduction
One should always strive to be as efficient as possible when consuming energy and
turning it into new energy, since generating energy to a device while using it is generally
very efficient. The more ways there are to harvest energy from the environment, the
better. Energy harvesting is not a new technology, way back in time windmills and
waterwheels were created to make the most out of the resources that were close to them.
An energy harvesting button is just a further development of the same theory.
It has been shown that wireless sensor communication and smart energy harvesting
methods are becoming a bigger interest nowadays. As wireless sensor communication
increases in number, device sizes decreases. The problem is to get an efficient power
supply in smaller devices and the biggest disadvantage is also that batteries run out of
power. Researchers are trying to find different ways to harvest energy wherever possible.
There are methods to harvest energy from daily activities or directly from the
environment, for example while walking [1] or using solar energy as a power source or
thermoelectric modules which can be found in the Seiko Thermic wristwatch [2].
Batteries always seem to run out of energy when you need it the most. This can even
become a risk in safety environments when the battery dies without warning. If the
technology of energy harvesting buttons were to be implemented at a bigger scale, the
problem with batteries dying without warning might become a thing of the past.

6
2.2 Related work
One of the studies most familiar to this project is Mark Feldmeier’s et al. study. In this
study a circuit is powered by a piezoelectric element, which is used to send information
to turn on a diode. The piezoelectric element was taken from the core of a Scripto “Aim
‘N Flame” lighter. The voltage regulation and the process to the energy storage were not
very effective and much energy was lost. Nonetheless, it was an adequate amount of
energy to perform the task of sending data from the transmitter to a receiver using a radio
frequency of 418 MHz. This work could be improved by finding a better linear regulator
to gain improved efficiency. This could generate more energy to power the circuit, which
means it could drive more advanced transmitting modules that require higher power
consumption [3].
Another study familiar to this project is shown in Y.K. Tan’s et al. paper. In this paper the
work investigates various renewable energy sources, for example solar energy, vibrations,
kinetic force and thermoelectricity etc. The kinetic force energy is provided by human
force and is then converted into electrical energy which then powers a wireless radio
frequency (RF) transmitter. A piezoelectric element is applied for the conversion of
mechanical energy into electrical energy to power a transmitter. The piezoelectric
element is a piezoelectric push button igniter which can be found in different
applications, for example in stove lighting. In this study, less energy was harvested
compared to Mark Feldmeier’s study. Although it produced an adequate amount of
energy to successfully transmit data wirelessly [2].

7
3
Theory
3.1 Introduction
To be able to power up a battery less circuit one must find ways to harvest energy. One of
the best ways to do this is by harvesting the energy around oneself. This can be achieved
with wind turbines, watermills, solar panels or others. The issues with these are that they
are not very portable. There are simpler ways to harvest energy through more compact
electrical generators; one of the ways is to harvest energy from piezoelectric elements or
other electrical buttons which acts as generators. Logically, these will exert less energy,
at least at this point in time. The question that will be attempted to answer is, do these
buttons create enough energy to transmit packets of data which can then be received and
do further operations? If the energy transmitted is enough to order a receiver to turn on a
light emitting diode (LED), this can be used for more complex functions in the future.
Since many transmitters consume relatively high power, certain transmitters with low
current consumptions will most likely be implemented, granting a mediocre range with
lower bit rate compared to high power ones.
For example, the Voyager 1, which is a space probe launched in 1977, uses two different
channels to communicate with the earth. One is the X-band which operates at around 8.4
GHz, and the other one which is the S-band sends data in a frequency of about 2.3 GHz,
with a measly bit rate of 40 bits per second. Even though this band of frequency is only
used for monitoring the Voyager 1’s health. This simply goes to show that a high bit rate
along with high frequency is not necessarily crucial for being able to send information as
far as into deep space [4].
Also in order to keep up with the constant growth within ubiquitous computing, being
wireless is crucial and less of a hassle. New wireless transmission technologies are
constantly getting discovered and shipped out to the consumers, but which format is the
most suitable for a circuit which is powered by an energy harvesting push button?
In order to explain how these questions were answered, some theoretical grounds must be
explained. First the basics of the project will be explained, and then the thesis will dive
deeper into which problems were discovered and how they were solved.

8
3.2 Block-level schematic of transmitter circuit
The transmitter circuit which is to be constructed, is the circuit that contains all the
components required to send information wirelessly. Figure 3.1 shows a basic overview
of the block diagram of the transmitter circuit and how it was intended to be constructed
without actual component descriptions or values. This was the basic idea of how the
circuit was to be constructed.
All the parts of the block-level schematic will be explained further along the way.
By pressing the energy harvesting button, energy is generated. The energy is transferred
through a rectifier so as much energy as possible can be stored in the energy storage.
After the energy storage the energy is transferred through a voltage converter where the
voltage is regulated for the transmitter and delivers a constant low output voltage of
approximately 3.3 V. This is necessary since the transmitter cannot take high voltages
and at the same time needs a certain amount of current to operate [3].
A switch is applied to enable different data to be sent to the output signal. An encoder is
then applied before the transmitter. This means that the received data can then be decoded
to determine which identification (ID) that was sent. The transmitter in combination with
the receiver enables the two to communicate wirelessly.
Figure 3.1: Basic overview of the transmitter circuit

9
Before the circuit was constructed, some questions had to be discussed:
● Which transmission format the transmitter will use will be implemented according
to the amount of energy which can be harvested from the energy harvesting
button.
● Various pushbuttons will be measured and evaluated to find the most suitable for
a circuit such as this.
● Different ways to regulate the voltage will be tested.
All of these were taken into consideration before starting the implementation.
3.3 Energy harvesting methods
There are different ways to harvest energy from the push of a button. The two discussed
here are the piezoelectric element and the other is the electromagnetic induction button,
which are discussed further in section 3.3.1 and section 3.3.2. The different push buttons
will be explained more further in the thesis. The idea was to only have a button to press to
generate electricity, not have something that requires to be for example wounded up. The
energy applied to a single keystroke can be calculated by
𝐸 = 𝐹𝑑 , (3.1)
where E is energy applied in joule [J], F is the force of which the button is pressed in
Newton [N], and d is the depth of the keystroke in meter [m].

10
3.3.1 Piezoelectric element
A piezoelectric generator creates electrical energy from a mechanical press from for
example a press of a button. Piezoelectric elements are usually made of quartz, a certain
kind of crystal, that when submitted to stress generates an electric charge [p396-396, 5].
Around this crystal are two plates which are then connected to outer wires. The crystal is
then hit by a smaller “hammer” inside the button when pressed, which deforms the
material and changes the electrical charge, illustrated in Fig 3.2. This also creates an
oscillation which in its turn results in an electrical current [2].
There are many different forms of piezoelectric elements and they generate different
amounts of energy. Piezoelectric elements are commonly known for producing high
voltages at low currents. To get out the most energy from a piezoelectric element it needs
to be operated at its resonance frequency, which can be achieved by giving the element
an impact, which is the press of the button, under a short duration of time and then
releasing it [3].
Figure 3.2: Principle of generating electricity through a piezo element

11
3.3.2 Electromagnetic induction
Michael Faraday proved that a magnetic field could cause an electrical current. The
discovery Faraday made is what is called electromagnetic induction. By letting a magnet
move through a coil a voltage is induced. If the coil is then connected to an electrical
load, current will flow through it. Through this principle electricity can be generated [6].
The induced voltage in a coil is equal to the negative of the rate of change of magnetic
flux times the coil’s number of turns.
Figure 3.3 shows the electromagnetic induction principle. The button in Fig 3.7 works by
this principle. By pressing the button, a magnet is moved through the coil which changes
the magnetic flow and creates an electric pulse. The same principle is applicable when
releasing the button. A spring will then push the magnet back into its original position.
Figure 3.3: Electromagnetic induction

12
3.4 Different energy harvesting push buttons
To be able to get the most current out to the rest of the circuit the most important
component is the energy harvesting button, the energy source. As seen in Table 3.1, the
piezoelectric elements have high alternating current (AC) voltage. By using a power
source that has a low output voltage with high output current a transformer may be
skipped and replaced with a better step down circuit with a higher efficiency and thereby
save more energy which can be used to power better transmission modules with longer
range and higher bit rate.
These are the various buttons that were evaluated in this project:
A piezoelectric stove igniter, number 1 in Table 3.1, which can be seen in Fig 3.4.
This is usually used to create a spark which starts a flame inside a stove, grill and
others.
A piezoelectric cigarette lighter, number 2 in Table 3.1, which was taken from the
yellow lighter in Fig 3.5. This lighter is used to create a spark in combination with
the gas inside the lighter. These can also be found inside regular smaller lighters.
Several different kinds of these were tested.
A piezoelectric generator, number 3 in Table 3.1, which can be seen in Fig 3.6.
This is used to create voltages by bending it back and forth or simply pressing it.
An electromagnetic induction button, number 4 in Table 3.1, which can be seen in
Fig 3.7. The button is used to power a transmitter which is used for portable door
bells, it also has a receiver which makes a sound when the button is pressed.
Figure 3.4: Piezoelectric stove igniter

13
Figure 3.5: Piezoelectric cigarette lighter
Figure 3.6: Piezoelectric generator

14
Table 3.1: The four different power sources.
Number Button Voltage [per push] Price
1 Gas Stove Igniter1 >=20 kV (AC) ~97 SEK
2 Cigarette Lighter Igniter2 ~14 kV (AC) ~10 SEK
3 Piezo Generator3 ~6-20 V (AC) ~25 SEK
4 Electromagnetic
induction button4
N/A ~280 SEK
The prices in Table 3.1 vary depending on manufacturer and where the item is purchased.
Prices were taken 2016-04-18. N/A means not available, meaning it could not be found
when researching online.
1 http://www.aliexpress.com/store/product/High-quality-piezo-igniter-kitchen-push-button-ignitor-piezo-sparking-for-gas-heater-burner-stove-grill/404961_32373660038.html 2 http://www.alibaba.com/product-detail/Piezoelectric-igniter_216858492.html 3 http://www.ebay.com/itm/Piezo-Generator-KIT-/190969042206 4 http://www.aliexpress.com/store/product/No-need-batteries-and-cables-Batteryless-RF-wireless-door-bell-with-25-ringtones-IP44-waterproof-200m/1039013_1926216784.html
Figure 3.7: Piezoelectric generator

15
The gas stove igniter in Fig 3.4, might be considered to be the best, because of the high
voltages it can generate. This however requires more components to step down the
voltage a considerable amount. The same goes for the cigarette lighter in Fig 3.5; they
both exert large amounts of voltage and energy. Using buttons which exert high amounts
of voltage might create problems in itself, such as having to use transformers or other
components to step down the voltage so that the rest of the components do not take any
harm.
The electromagnetic induction push buttons in Fig 3.7 has a high price since it cannot be
ordered separately. The button itself is probably cheaper, although it could not be found
to be bought without the receiver. The voltage rating was also not available since no
datasheet could be found and the specifications could not be found on any website. The
output voltage is believed to be in about the range as the piezo generator in Fig 3.6,
although no actual sources could be found, this was however tested later. The buttons will
be measured upon and evaluated, to be able to determine which is the most suitable and
renders best results. The buttons voltage and price can be seen in Table 3.1
3.5 Voltage regulation
The voltage regulation is important for the circuit to work. Since high voltages are
exerted from the energy harvesting button and not all components can operate at high
voltages, a procedure to regulate the voltage must be applied. The voltage regulation is
categorized into three steps; a rectifier, energy storage and a regulator. These three steps
are required to successfully power the transmitter and deliver the data to a receiver
circuit.
Rectifying the voltage
The first component after the energy harvesting button is a rectifier which converts all
AC voltage to direct current (DC) voltage.
Figure 3.8: Voltage wave before and after a bridge rectifier

16
The rectifier reverses the polarity of one half of the period of the AC voltage wave. This
is a crucial component because if the voltage is not rectified, the lower part of the wave,
which is negative, will cancel out the upper part of the wave which is positive. This will
first charge the capacitor and then discharge it which is a disadvantage when one wants to
save as much energy as possible. Figure 3.7 demonstrates how a wave looks before and
after a full bridge rectifier. If a single diode was to be used, that would make it a half
bridge rectifier which is not as effective as a full bridge, which only removes the negative
part of the wave, instead of adding it to the positive part.
Storing the energy from the energy harvesting button
The energy storage consists of a capacitor which is used to store as high amount of
energy as possible. The energy in the capacitor is what is holding the power for the
circuit. With substantial energy in the capacitor a greater amount of power could be
provided to drive the circuit. By adapting the capacitor’s value to the voltage over the
capacitor, more energy can be stored. This also enables the circuit to first charge the
capacitor and then discharge it which enables a big pulse of energy. The equation to
calculate the energy stored in a capacitor is
𝐸 = 𝑈2 ×𝑐
2 , (3.2)
where E is energy [J] stored in capacitor, C is the value of the capacitor in farad [F], and
U is the voltage [V] over the capacitor.
3.5.1 Regulators
There are different ways to regulate the voltage. In this study, only two different
regulators will be evaluated, because of budget and time limitations. The voltage across
the capacitor needs to be regulated down to a suitable voltage to drive the transmitter
circuit. Standard circuits operate with a constant flow of a low voltage and high current.
This is not the case here since only a high pulse of energy will come from the push
button, which usually contains high voltage with lower current, depending on which
button is used [3].
Several different regulators can be applied, however all regulators do not offer high
efficiency and will maintain different output voltages compared to others.
Buck converter (switching regulator)
The buck converter, also known as switching regulator or step-down converter is used to
step down a higher DC voltage to a lower one. A buck converter can also be called a
switching converter since it switches on and off to maintain a constant DC level and
thereby output a steady voltage. A switching regulator is more often than not considered
more efficient than a linear regulator except at very low load currents. Switching
regulators have an efficiency grade of up to 96% [7].

17
Linear regulator
A linear regulator works similarly to a potentiometer, where the resistance of the
regulator changes depending on the input voltage applied to the regulator. If the input
voltage is high, the resistance is increased and vice versa, which results in a steady output
voltage. The linear regulator can however only be used to step down current, whereas the
buck converter can be used to step up and down the voltage. Efficiency in a linear
regulator is high if the input voltage is similar to the output [8].
3.6 Encoder
To determine the information sent from the transmitter a digital encoder is applied. This
sends an ID from the transmitter circuit which is then picked up by the receiver. The
amount of bits being used depends on the encoder. The focus here is using an encoder
which is, again, energy- and current efficient.
The encoder enables certain IDs to be sent. This will be used to power different LEDs
depending on which address ports are activated or deactivated.

18
3.7 Transmission formats
One of the questions of issues was which transmission formats that were suitable for low
energy driven circuits. The table below shows which formats that were taken into
consideration and evaluated. The values from the different modules have been taken from
various manufacturers’ datasheets and websites. Results may vary depending on which
company has manufactured the modules. These are the specifications for the transmitter
modules, the receiver is not as important for this project since the cutbacks in power and
current consumptions only is important in the transmitter.
Table 3.2: Different transmission formats and their specifications.
Formats Power/Bit
[µW/bit]
Range
[m]
Current
consumption
[mA]
Bit rate
bits/sec
Power
consumption
[mW]
Wi-Fi
@ 1.8 V7
0.035 ~150 ~116 >6 Mbps ~210.0
RF 433 MHz
@ 3.3 V 5
2.406 ~ 40 ~3.50 ~4.8
kbps
~11.55
RF 2.4 GHz
@ 3.3 V 6
1.716 <1200 ~130 250 kbps ~429.0
Bluetooth LE
@ 3V 7
0.123 ~280 ~12.5 305 kbps
~37.5
ZigBee
@ 3.3 V7
0.36 ~100 ~10.82 100 kbps ~35.70
WirelessHART
@ 3.3 V 8
0.12 ~200 ~9.70 250 kbps ~32.01
ANT @ 3 V7 2.55 ~30 ~17.0 20 kbps ~51
5 http://www.ebay.com/itm/Mini-RF-Transmitter-Receiver-Module-433MHz-Wireless-Link-Kit-w-Spring-Antennas-/272085051966?hash=item3f59886a3e%3Ag%3AOH4AAOSwZ1lWekkh 6 http://cdn.sparkfun.com/datasheets/Wireless/General/Synapse-RF266PC1-Engine-Data-Sheet.pdf 7 http://www.digikey.com/en/articles/techzone/2011/aug/comparing-low-power-wireless-technologies 8 http://cds.linear.com/docs/en/datasheet/5900whmfa.pdf

19
Information such as the current consumption, bit rates and ranges has been taken from
datasheets or other sources. The range and bit rates vary depending on how much voltage
is being sent to the transmitter and more. The range is taken from how long one device
can send to another, instead of how devices can transmit information to one another
through a network of devices. The current consumption of certain modules in the table are
their peak value.
3.8 Advantages and disadvantages of the transmission formats
There are advantages and disadvantages with every different technique to send
information wirelessly. The main focus in this study is their advantages primarily within
power consumption and range.
The Institute of Electrical and Electronics Engineers (IEEE) standard 802 contains a
family of networking standards. These different standards contain different substandard
which includes for example Ethernet and Wi-Fi and more, these will be shortly
mentioned in the following sections [9].
3.8.1 Wi-Fi
Wi-fi is wireless technology which is an IEEE standard 802.11 [10]. As seen in the Table
3.2, Wi-Fi offers the lowest power/bit ratio. This however, comes with a price which is
the power consumption. Wi-Fi might draw too much power for an application such as this
particular circuit which is powered by an energy harvesting button. One can however see
why this is a very suitable transmission format for transferring large data files. Wi-Fi can
however send data at a much higher data rate than 6 Mbps as mentioned in the Table 3.2.
3.8.2 Radio frequency identification
Radio frequency identifications (RFID) is based on the detection of electromagnetic
signals and is a wireless sensor technology. It commonly includes three components; a
transponder (radio frequency tag) programmed with information, an antenna or coil and a
transceiver with a decoder [11].
In this project, two radio frequency (RF) modules were analysed. One that sends
information over a 433 Mhz frequency and another that sends over a 2.4 GHz frequency,
which can be seen in Table 3.2. Since low current- and power consumption is a key
element, the RF module that sends data with a frequency of 433 MHz, from Table 3.2,
seems like a good choice. The requirement of being able to send and receive data from
approximately 10 m is also fulfilled. The current consumption is low compared to the
other modules, although the data rate is inferior, it should be enough for sending smaller
samples of data.

20
3.8.3 Bluetooth low energy
Bluetooth low energy (BLE) is a good contender with high efficiency and yet low power
consumption, it consumes only 10% of the power compared to regular Bluetooth. It can
be found in applications like home devices, remote controls and in fitness products. It has
superior range and high data rate. A disadvantage is not many devices support it yet.
Comparing the Bluetooth LE with the RF 433 MHz transmitter in Table 3.2 shows that
the BLE consumes about four times more current. BLE might be the best choice if the
power source exerts enough energy for it to be activated [12].
3.8.4 ZigBee
ZigBee can be found in applications like home control, home security and in medical
monitoring. ZigBee is supported by many devices and has a decent range [12]. Zigbee is
a wireless low-powered technology which is based on IEEE standard 802.15.4 [10]. A
disadvantage is the slower data rate compared to BLE, as seen in Table 3.2, although it
has smaller current consumption.
3.8.5 WirelessHART
WirelessHART (WHART) is constructed to support several applications and is made to
be easy to use and be applied in applications. WHART is designed to fit both large and
small devices and is based on the physical layer specified in the IEEE 802.15.4-2006
standard [13]. WHART is a relatively new transmission format which only became an
international electrotechnical commission standard in 2010, which is new compared to
for example the RF modules compared in this study [14]. Some advantages with
WHART compared to the other transmission formats in Table 3.2 are the range and rather
low current consumption. Yet, the current consumption might be too high for a low
powered circuit.
3.8.6 ANT
ANT is a propriety wireless technology which can be found in sport and fitness products
and was establish by the sensor company Dynastream. It operates in the 2.4 GHz
spectrum and allows sport and fitness sensors to communicate with a display unit [15]
and is easy to use for consumers, manufactures and developers [16]. When looking at
Table 3.2, the current consumption of ANT is similar to Bluetooth LE but not as low.
Comparing the range of the ANT module to the others, in Table 3.2 such as ZigBee and
BLE, makes ANT look inferior and not as desirable to implement in this case.

21
3.9 The receiver circuit
The receiver will be connected to a portable power bank or the power grid, therefore,
power- and current consumptions in the receiver circuit is not as relevant and therefore
these will not be taken into account.
Figure 3.9: Basic overview of the receiver circuit
Figure 3.9 shows the basic idea to receive data sent from the transmitter and will show
that data has been successfully sent by turning on different LEDs. Depending on which
way the switch is set on the transmitter it will send different IDs which the decoder will
send to the Raspberry Pi. The Raspberry Pi will then, depending on the data sent from the
decoder, power on one of the two LEDs, or no one at all, if the ID is not recognized by
the receiver. This will also prevent the LEDs from activating by accident by sorting out
the noise from the actual transmitted data.
The idea was, if an adequate amount of energy was produced by the energy harvesting
button to send data wirelessly from one circuit to another, more complex functions could
be implemented later. One of the easiest ways to see if data has successfully been sent
was to turn on an LED.

22
3.10 Decoder
The receiver end stands ready to receive the information consistently. The information is
sent with a specific frequency which the receiver end is gathering. The receiver is not
able to distinguish the noise from the environment and the real information, which is a
disadvantage. Therefore, a decoder is applied after the receiver to sort out the noise from
information sent from the transmitter.
3.11 Raspberry Pi
A Raspberry Pi is applied at the receiver circuit after the decoder to be able to precede the
command the transmitter circuit has sent. To save time this was considered to be the
easier choice over a microcontroller because of the easy setup of the I/O on the Raspberry
Pi.
Depending on how the switch on the transmitter circuit is set, different IDs can be sent.
The Raspberry Pi is programmed in such a way that if a certain ID has been recognized
on an input port, a certain LED will be turned on. Only two LEDs will be used to
demonstrate this.
Figure 3.10: Raspberry Pi 3

23
4
Methodology
4.1 Introduction
As previously mentioned, attempts to send information wirelessly by using an energy
harvesting button has been done before. But which steps are taken in order to fully
construct and test a circuit with this functionality?
4.2 Pre studies
The project started with reading large amounts of research. The research was used to find
key components for the project to fulfill the task to transmit code from a battery less
circuit.
In Mark Feldmeier’s et al. and Y.K. Tan’s et al. studies, where the task was to send data
from a battery less circuit, one could find valid information on what kind of problems that
needed to be taken into account of before starting the project. For example, how energy is
harvested and how much energy one could expect to get out from a piezoelectric element
to drive the circuit. The studies gave a hint on the power one could expect to use to power
a battery less circuit and how to transmit data. The studies showed the main components
to harvest energy and store it and what components that were needed to regulate the
voltage after the energy storage [2][3].
4.3 Implementing components
The project started with finding and gathering all the materials which will be used in the
project. Ideas on what kind of components that were needed were taken from the earlier
studies. The same components and later and improved versions of the components that
were used in the pre studies were gathered. Then ideas on how to improve earlier circuits
were discussed and later implemented. The two most crucial factors for the project to
work is getting enough amount of energy that can be used to power the circuit and also
the transmitting and receiving process.

24
4.4 Rectifying
Once gathering all the components, a lot of testing of the different push buttons was done
to get an overview of the energy that could be harvested. The different piezoelectric push
buttons along with the electromagnetic induction button were connected to a capacitor to
see how much energy that was able to be stored from the four different push buttons. An
oscilloscope was connected to be able to see the waveforms before and after the rectifier.
Figure 4.1: Unrectified voltage using electromagnetic induction push button
Figure 4.1 shows how the wave looked before the rectifier. Two pulses can be seen, the
first one is the positive one which occurs when the button is pressed. The second pulse
occurs when the button is released which creates a negative charge. If a capacitor were to
be connected to the push button without the rectifier, it would simply get charged with
~16 V and after approximately 250 ms it would be discharged with the same voltage.
Different rectifying components were tested to handle the quick pulses from the
piezoelectric cigarette igniter and the gas stove igniter. Two full wave bridge rectifiers
called NTE5334 [17], and B80C800G [18] were tested along with the ultra-small surface
mounted diode PMEG2010BELD [19].

25
4.5 Energy from the various push buttons
Equation 3.2 was used to calculate the energy stored in the capacitor from a single push
of the various buttons. The value of the capacitor and the voltage over it determines the
amount of energy that can be used to drive the other components which is required for the
transmitter circuit. The higher the value is on both the capacitor and the voltage over it,
the more energy can be used. This is explained further down in the thesis.
4.6 Encoder (HT12E) and decoder (HT12D)
To be able to send information the encoder HT12E [20] was applied. It consists of eight
address ports and four data ports. A switch was connected to the data ports to be able to
activate different pins on the encoder, so that different LEDs could be turned on. On the
HT12E the oscillation frequency can be regulated by applying a resistor on its OSC port,
according to the datasheet. A resistor of 470 kΩ was applied to get maximum oscillation
frequency at 3.3 V.
To distinguish the information from the noise in the environment a HT12D [21] was
applied at the receiver-end. The decoder requires four successful receipts before it can
confirm that legit information was received, instead of noise. The HT12D remembers the
confirmed information that has been sent from the transmitter and saves it on the output
ports, which is a disadvantage. It does not have a reset port so it can forget the
information and is keeping the value on the data ports until it has received new
information or is turned off. The oscillation frequency on the decoder requires adapting to
the HT12E oscillation frequency. It can be applied by putting a resistor on the oscillation
ports. A resistor of 27 kΩ fit the requirement to receive data sent from the transmitter.
To first ensure that the transmitter and receiver worked together, the transmitter got
connected to a constant power source. The transmission module used was using RF 433
MHz, since it seemed like the most appropriate choice from the current consumption
point of view from Table 3.2. The transmitter was connected to an encoder to transmit a
certain ID and the receiver was connected to the decoder so one could be sure that the
right ID was received and that they worked together. When the receiver had received the
information it was waiting for, it turned on an LED to show that the correct information
had been received.
4.7 Different voltage regulators
Different ways to regulate the voltage after the capacitor were applied and evaluated. An
integrated circuit containing a buck converter, a rectifier and the possibility to solder on a
capacitor in an integrated circuit the first component to be tested, which is the LTC3588
[22] shown in Fig 4.2. A linear regulator called MAX666 [23] was also tested and
evaluated.

26
Voltage regulation using buck converter (LTC3588)
The LTC3588 is constructed to keep the required output voltage with a higher efficiency
grade compared to MAX666 and not lose as much energy on the voltage regulation. The
circuit’s area of use is said to be within piezoelectric elements, although in testing and
evaluating this chip, it did not function properly and could not rectify the pulse sent from
the piezoelectric stove lighter nor the cigarette lighter. With the LTC3588’s relatively
high price of about 300 SEK and inability to function for this particular task, this chip
was not used in the final product for regulating the voltage. This was the only buck
converter that was tested in this project.
Figure 4.2: Nano power energy harvesting power supply (LTC3588)
Voltage regulation using linear converter (MAX666)
The linear regulator used in the project was the MAX666. It has an input voltage range
from 2.0 V to 16.5 V. According to the datasheet [23], it has an output voltage from 4.75
V to 5.25 when 𝑉𝑠𝑒𝑡 is connected to ground, which is pin number six on the MAX666.
This can however be adjusted by a simple voltage divider using two resistors, of which
the values are shown in Fig 4.1. This sends a steady output voltage from the MAX666 of
~3.3 V which it outputs until the capacitor is discharged.

27
4.8 Transmitter schematic
The schematic in Fig 4.3 shows how the transmitter circuit was built. These are the key
components necessary for a circuit such as this to function.
Figure 4.3: Schematic of the transmitter circuit
The switch in this case is a three mode lever switch which is off in the middle position.
This sends an ID to tell the receiver to turn on a green LED in the upper position, and a
blue LED in the lowermost position.
The module using a radio frequency of 433 MHz was chosen because of its low power
consumption and decent range. RF is also easier to implement compared to other modules
such as BLE. The range of which the two modules can send information to and from will
also be tested and measured.

28
4.9 Prototypes of the receiver and transmitter
After both the transmitter and receiver circuit had been theoretically drawn, it was time to
implement them. For testing purposes, project boards along with jumpers were used since
this makes it easier to replace and test different components this way.
Transmitter prototype
Figure 4.4 shows the first prototype of the receiver. The project board made it easy to
replace and test components. This was later made into a more compact and easily held
device.
The picture shows the electromagnetic induction button to the left, directly after this is
the full wave bridge rectifier B80C800G, followed by a capacitor with a value of 48 μF.
The capacitor is connected to a MAX666 which in its turn is both connected to the
HT12E and the RF 433 MHz. This was later constructed into a more portable product,
where the components will be soldered on a printed circuit board (PCB) prototype board.
It can be made very compact, except for the button which will of course stay the same
size.
Figure 4.4: First prototype of the transmitter circuit

29
Receiver prototype
Figure 4.5 shows how the receiver circuit was implemented to ensure it had received
information before applying the raspberry. The green diode is connected to the HT12D’s
VT-port, which indicates when the HT12D has successfully received a 12-bit ID four
separate times and distinguished it from the noise from the environment. The blue diode
is connected to one of the HT12E’s data port. When the blue diode is lit, it means that the
HT12D has successfully received four transmissions of a 12-bit ID from the transmitter.
Between the diodes and the HT12D is a darlington transistor circuit ULN2003A [24]
which got applied to step up the current. The whole circuit is powered by an external
power source.
Figure 4.5: The receiver prototype

30
4.10 Receiver schematic
Figure 4.6 shows how the receiver has been constructed. The Raspberry Pi 3 gets power
from an USB power bank, from which it then powers the rest of the circuit.
Figure 4.6: Schematic over the receiver
The pin numbers on the circuit called “Raspberry Pi 3 GPIO” in Fig 4.7 does not match
the general purpose input output (GPIO) pin numbers on the actual Raspberry. The three
called GPIO19, GPIO26 and GPIO21 has been set to output pins in the programming
script. GPIO20, GPIO16 and GPIO12 have been selected as inputs [25].

31
Functionality of the receiver circuit
The circuit works by the Raspberry Pi 3 recognizing an input from the HT12D ports on
pin number ten and eleven. The information on pin number ten and eleven on the HT12D
ports explains whether its high or low (1/0, on/off), depending on how the switch on the
transmitter side is set. If the Raspberry Pi 3 recognizes that the input on GPIO20 is a ‘1’,
that means that the switch is in the downward position on the transmitter circuit. This
then sends out a ‘1’ on GPIO19 which lights up the blue LED. After this has been done,
GPIO21 sends out a ‘0’ which resets the HT12D which then makes it ready to receive
another ID from the RF 433 MHz receiver. The same procedure is applicable for the
green light. If the GPIO16 is ‘1’ that means that the switch is upwards. This then sends
out a ‘1’ on the GPIO26 which lights up the green LED.
Pin number 25 “CLOSE_PROGRAM” on the Raspberry Pi 3 in Fig 4.6, simply acts as an
input which waits for the press of a physical button on the receiver which tells the script
on the Raspberry Pi to terminate itself.
On the HT12D, pin number 14 is the one which receives data sent from the radio
frequency receiver, which in its turn has gotten information from the transmitter. Pin
number four on the RF receiver is the antenna, not included in the Fig 4.6.
The programming language used on the Raspberry Pi 3 is Python. The code can be found
in appendix A.

32
4.11 Evaluation of methodology
Several different components were tested, although several problems were encountered.
Of course, no project is perfect and there are areas in which the method could be
improved.
The main issue was the inability to harvest the energy sent from the piezoelectric igniters
in a proper way. When the circuit was connected to an oscilloscope one could see how
quick the pulses were in Fig 5.4, from the peak of about 9 V to about -9 V were 4 ns
behind one another. This was an extremely high frequency, hence the diodes with the
quickest recovery time that was available, got connected, however with no success. Even
with help from supervisors, no solution was found for this problem. This was the main
reason for continuing the testing with the electromagnetic induction button.
The other bigger problem was the voltage regulator. Theoretically, the buck converter in
section 4.7 should be more efficient. This was however not the case when testing the
different regulators, but that will be further discussed later on. Ideally, several different
regulators, both linear and switching regulators should have been tested. One of each was
tested, which is not ideal. The MAX666 is not the newest in the industry which means a
high probability that more efficient chips have been produced since. The same goes for
the buck converter, although resources were shifted towards other parts of the project.
4.12 Conclusions of methodology
The methods for finding the solution to the task have been good. Other familiar studies
have given inspiration and ideas on how one should tackle the problem and transmit data
from a self-powered transmitting circuit. There are several key components which are
necessary for a circuit such as this to function properly. It might not be possible at this
time to skip one or several of the components which has been used, except the Raspberry
Pi 3 which was added mostly for educational purposes and simple usage. There are
however ways to improve circuits such as this by using different energy sources or
different, less power consuming components.

33
5 Results
5.1 The finished product
In the end, the transmitter was able to send information and also receive it at the other
end, wirelessly. Depending on how fast the button was struck, it could power the
transmitter circuit. A normal struck is 200ms long. A struck is the time it takes for the
button to be pressed down to its lowest position and go back to its original position. If the
button was pushed down very slowly, about five seconds, there was sometimes not
enough energy generated to be able to send data, however if the button was struck fast,
faster than 200ms, the transmitter could send information by simply pressing the button
down, and not release it.
So if the force applied to the button was high enough, it could send data twice, which is 8
successful receipts of data on the receiver, which makes the LED turn on twice. This is
explained by Faraday’s law, which is mentioned in section 3.3.2, that the change of rate
affects the induced voltage. This also implies that the speed with which the button is
pressed down is similar to the speed the button is pressed back to its original position by
the spring. It can be shown by the voltage peaks in Fig 4.1.
A medium fast hit, at 200ms, with a force of 10 N works as good as every time. Sending
different IDs depending on how the switch is set also works as intended. If the switch is
in the uppermost position, the green LED is turned on, on the receiver side, and the other
way around with the blue LED. If the Raspberry Pi is connected to a monitor, it also
prints which LED was turned on.
A single push of a button on the electromagnetic induction push button gives ~4.67 V
over the capacitor, which translates to 1.09 mJ. The button was chosen because of its
higher energy output compared to the piezoelectric elements. As previously mentioned,
the MAX666, which is a linear regulator, has higher efficiency the closer the input is to
the output voltage. Since the output voltage is about 70 % of the input voltage in this
case, the regulator is seemingly efficient and outputs a steady ~3.3 V to the transmitter
and HT12E encoder.

34
Figure 5.1 shows the transmitter circuit after it was made more compact, although
without the electromagnetic induction button, which is about as big as the transmitter
circuit. A hole as big as the switch was cut into the button and attached to it. This circuit
was later made into a complete unit together with the push button.
Figure 5.1: The transmitter circuit

35
Figure 5.2 shows the finished product. The PCB was made as big as the electromagnetic
induction button. A hole was cut into the button and the switch was place in the hole’s
place. Spacers were then added to protect the circuit and its components. It also fits good
in the hand when holding it which is a good feature.
5.2 Implementation
Before implementing the various components and modules, some testing had to be done.
After testing that the circuit worked as intended with the chosen components, the project
continued. The MAX666 and the RF module using 433 MHz were chosen since both
components worked well together and performed the wanted tasks.
Figure 5.2: The finished product

36
5.2.1 Rectifier
In Fig 5.3, one can see the wave after a bridge rectifier NTE5334 and how the second
pulse simply has changed polarity. How quickly the second pulse occurs depends on how
quick the button is pressed. A faster click shortens the distance between the two pulses.
The pulse from the cigarette lighter and the gas stove igniter were very fast and the full
bridge rectifier NTE5334 was unable to rectify the pulse. The NTE5334 was however
able to rectify the pulse from the piezoelectric generator in Fig 3.6.
Figure 5.3: The rectified voltage using electromagnetic push button

37
Figure 5.4 shows how quick the pulses are from a piezoelectric cigarette lighter. The
time/div is set to 10 ns and the voltage peak to peak is about 20 V. The pulses were too
fast for the NTE5334 to be able to rectify. This is using the piezoelectric cigarette lighter
in Fig 3.5.
The gas stove igniter in Fig 3.4 gave similar results when connected to the diode bridge
alone. The pulses were too quick for the rectifier to rectify which ended with a capacitor
charged with about 1 V which is too low to be able power up the rest of the components.
The full wave bridge B80C800G could not rectify the fast pulses from the cigarette
lighter nor the gas stove igniter. Yet, it could rectify the electromagnetic induction button
and the piezoelectric generator successfully.
The ultra-small surface mounted diode PMEG2010BELD which has a recovery time of
1.6 ns was tested to handle the quick pulse from the piezoelectric cigarette lighter and the
gas stove igniter. One diode could not by itself rectify the pulse, therefore a construction
of a full wave bridge with diodes of the PMEG2010BELD was made.
Figure 5.4: Non-rectified voltage using piezoelectric cigarette lighter
38
The PMEG2010BELD diodes had a length of 1.04 mm and width of 0.4 mm and required
a microscope to see the diodes during the soldering process. Using a soldering pen was
not suitable with these diodes, which made the process more difficult. Therefore, a hot air
soldering pencil was applied for the construction. The construction can be seen in Fig 5.5.
The diodes were soldered onto a PCB and connected to a capacitor with a value of 22 μF.
Nevertheless, the diode bridge of PMEG2010BELD could not rectify the pulse from the
piezoelectric cigarette lighter nor the gas stove igniter.
The piezoelectric elements were therefore chosen not to be further tested and focus
shifted towards getting the rest of the circuit working together with the electromagnetic
induction button.
Figure 5.5: Construction of ultra-small diodes

39
5.2.2 Energy from the various push buttons
From Table 5.1 one can see the measured energy that was harvested from the different
push buttons. The electromagnetic induction button produced the highest amount of
energy from a single push. Therefore, the electromagnetic induction button seemed to be
a good choice as an energy harvesting source comparing to the other elements.
Table 3.3: Measured voltages from the various buttons
Button Capacitor Voltage (per push) Energy
Gas stove igniter 2.2 µF 1.5 V 2.475 µJ
Cigarette lighter
igniter
2.2 µF 1.3 V 1.859 µJ
Piezo generator 2.2 µF 5.88 V 38.03 µJ
Electromagnetic induction
button
100 µF 4.7 V 1.09 mJ
Different capacitor sizes were used since when using the piezoelectric elements with
bigger capacitors such as 100 µF, very low voltages were measured. The voltages that
were exerted were unreasonably low, part of this problem was that the rectifier was
unable to rectify the pulses exerted from the piezoelectric elements which causes the
capacitors to get discharged almost as quickly as they get charged.
Different values of the capacitor for the electromagnetic induction button were tested.
The size of the capacitor varied between 2.2 µF up to 1 F. In the end, the 100 µF gave the
best results when transmitting data from a single push.
5.2.3 Energy needed to push the button
Equation 3.1 was used to calculate how much energy that was needed to be applied for
the person pressing the button. The electromagnetic induction button requires 10 N to be
pressed down and the depth of the keystroke is approximately 1 cm, which means that the
energy applied is 0.1 J. This translates to 1.09 % mechanical-to-electrical efficiency. This
is considered low and a reason for this is the large capacitor which leads to a lower
voltage across it.

40
5.2.4 Transmitting and receiving certain IDs through RF
To be able to confirm both the ID being sent and received the software called Saleae
Logic was used. A probe was connected to the USB port of a computer. The HT12D
confirms a successful transmission when a repetition of a 12-bit serial ID has been
completed four times. This then tells the Raspberry Pi to turn on LEDs, depending on
which bit pattern has been sent.
Figure 5.6 shows three different channels. “Channel 0” is the transmitter, “Channel 1” is
the receiver and “Channel 2” is high, or ‘1’, when the transmission has been completed.
Here, depending on how fast button has been pressed, different amounts of data can be
sent because the more energy produced by the button means that the transmitter can stay
activated for longer. In Fig 5.6 one can see when the first button was pressed for the first
time, three repetitions were sent, which means the LED was not activated. “Channel 2” is
still low which indicates that four repetitive IDs has not been received. There was simply
not enough energy for the transmitter to be active long enough to be able to transmit
enough data. Releasing the button also adds energy for the circuit which is also harvested
and saved.
Figure 5.6: The first pulse when pressing the button. The different channels show the sent ID
(channel 0) and the received ID (channel 1) and that the diode is not lit (channel 2).
Figure 5.7: The second pulse when releasing the button. The different channels show the sent ID
(channel 0) and the received ID (channel 1) and that the diode is lit (channel 2).

41
Figure 5.7 shows that when the button was released, more energy was added into the
capacitor which enable a successful transmission. Channel 2 shows that the receiver has
accepted four repetitive IDs by turning the required data port to high. This means that the
rectifier is doing its part which is adding the negative charge of the button, when released,
to further add energy into the capacitor which means it successfully receives the ID
which has been sent. So, with the press and release of the button, there was enough
energy for the transmitter to send four repetitive IDs.
5.2.5 Voltage regulation
When trying the two different voltage regulation methods the result showed that the
linear regulator MAX666 could power the circuit long enough to successfully transmit
data from one push of the electromagnetic button with the RF 433 MHz module
connected. The LTC3588, which was the buck converter, required two pushes on the
button for a complete transmission. Another capacitor with the value of 48 μF was used
for the LTC3588 to enable a successful transmission, but it still required more than one
push. Using a 100 μF capacitor with the LTC3588 meant it could not provide the circuit
with enough energy for a complete transmission, which is why the MAX666 was used in
the end.
A transmission module named SYN115 [26] got tested as well with the two different
regulators, to see if the circuit could transmit data with a module that has higher current
consumption. The result showed that the MAX666 could not power the circuit long
enough to successfully transmit data together with the SYN115. Although, the LTC3588
could successfully transmit data if the right amount of energy was filled in the capacitor,
it still required more than one push for the transmission to be completed; therefore, the
focus was shifted towards getting the circuit working together with the MAX666 and the
RF module using 433 MHz.
42
5.2.6 Receiver
Figure 5.8 shows the Raspberry Pi 3 to the left, and the rest of the components on a
breadboard to the right, disconnected from any external power sources. The button at the
bottom of the breadboard is used to shut down the script running on the Raspberry.
Above this, the two LEDs can be seen, marked with a red box. Jumper cables were used
to connect the two boards.
This prototype was kept throughout the project since the focus was getting the transmitter
as small and compact as possible. The receiver was not as important since it remains
mostly stationary, it can however be handheld and “wireless” with the help of for
example a USB power bank connected to the Raspberry Pi.
Figure 5.8: Prototype of the receiver circuit

43
5.2.7 Range analysis in various areas
Earlier similar studies like the one Mark Feldmeier et al. conducted, had rendered a
transmitter and receiver circuit with a range of about 15 m, with similar components [3].
It was therefore interesting to compare that circuits range with the one created in the
project. The results are shown in Fig 5.9 from tests in different environments.
In the analysis the receiver was held stationary while the transmitter was moved with five
meter steps. Ten clicks were performed at five meters a step. As one can see in the graph,
the transmitter successfully worked almost every time up to 20 m, except one small
mishap. As previously mentioned in section 5.2.4, the button does not always exert
enough energy for a complete transmission unless the button is pressed fast enough.
One can clearly see that the circuits worked best in an indoor corridor inside Linköping
University. The corridor was completely straight, although had smaller rooms all along it,
which might cause a decrease in range. Up to 40 m it successfully completed nine out of
ten button pushes. After 45 m it worked about two out of ten times and after that, no
communication between the receiver and the transmitter could be completed. The reason
it worked so well in the corridor is most likely since the signal can bounce in a way it
cannot do outdoors.
In the underground area the transmitter worked surprisingly bad. It might have been
because of big electrical cables running visibly all along the ceiling which may have
caused electrical interference.
Figure 5.9: Number of successful transmission in various environments

44
The obstacle was in this case a glass and metallic door, also inside a corridor. This was
the simplest way to both hear the click of the button and also see when the LED was
activated. It was also tested through regular walls but the results were not written down
and evaluated. The circuit worked similarly outdoor as it did with an obstacle.
5.3 Evaluation of results
In the end, the project was deemed successful and the results were satisfactory. The
finished product was made fairly compact and the range was better than expected. The
hypothetical range was right above ten meters in an environment without obstacles and
obvious interferences. The results were that in a corridor without obstacles nine out of ten
button pushes granted a successful transmission of data up to about 40 m, which is a long
range when considering how it was powered.

45
6
Discussion
6.1 Outcome
The results for the project were enough to fulfill the task. The distance the information
could be sent from was further than required, although it could render better results if
more energy could have been harvested from the push button. This leads to the problem
that longer distances can be more difficult to send information over with the energy
available from the electromagnetic induction button.
The piezoelectric elements seemed like a good choice in the beginning of the project due
to the fact that they could generate a high AC voltage. The problem was to harvest energy
from the piezoelectric elements since they oscillated too fast for the rectifier. If the pulses
coming from for example the piezoelectric stove igniter could be properly applied,
perhaps better ways to transmit data such as Bluetooth Low Energy could have been
used. This could result in even better ranges compared to the RF transmitter used in this
project. Even though the bit rate of the RF module is inferior compared to the BLE, it still
fulfills the task of sending an ID wirelessly to tell the Raspberry Pi to turn on different
LEDs.
If bigger tasks were to be achieved, such as sending files or pictures wirelessly, a better
energy source would have had to been used, at least if only one push of a button was
desired.

46
6.2 Method
The method applied led to the biggest problem being solved, which was simply
transmitting data from a batteryless cicruit, and then recieving it at the receiver. There are
some attempts that could have been made during the project that could have made the
results better. One example is matching the impedances with the piezoelectric elements
which could have enabled a higher amount of energy compared to the electromagnetic
induction button.
Another problem was since the different transmission formats were only compared
theoretically, modules using for example BLE were not tested and therefore there was not
any way to know if it would have worked or not.
6.3 Problems during implementations
When trying the different push buttons it turned out that the electromagnetic induction
button generated an adequate amount of energy to drive the transmission circuit. From
this information, a decision was made that not much focus would be laid on trying to
harvest more energy from the piezoelectric buttons, due to the fact that the
electromagnetic button could produce enough energy for the task to be fulfilled. The
piezoelectric elements might have had more energy to deliver if the right match of
impedances were applied.
There were also difficulties in finding different energy harvesting buttons to test. One
would think that these switches were made in a broader scale than they currently are. The
buttons used in this project, almost all came from the inside of another device and cannot
be bought separately.
Furthermore, struggles with the components came along the way, which caused delays.
During the implementation, components got broken and communication problems
between the transmitter and receiver occurred and much of the time was spent
troubleshooting. Waiting on components also took time.
More focus could have been laid on trying to match the impedances with the piezoelectric
igniters, although focus and resources were shifted towards other parts of the project.
When trying the different voltage regulators, the results were that the LTC3588 could not
power the transmitter circuit with one push. In theory it seemed like the better choice
rather than the MAX666 due to the fact that the LTC3588 has a higher efficiency rate,
being a buck converter rather than a linear regulator. If more energy could have been
harvested, the LTC3588 might have been able to power the circuit long enough to
transmit data through transmission formats that has a higher current consumption with
one push.

47
It also seems as if the transmitter had gotten more efficient when transferring the
components from the project board to the PCB board. It now registers as good as every
button push, both when pressing and releasing, which turns the LED on twice. It could
also have been made smaller than in Fig 5.1, even though that was not the main focus
here.
6.4 The work in a wider perspective
Battery less circuits can hardly be seen as something that can be considered a negative
addition to society, the other way around, if every electronic device in one's vicinity in
the future could be run with energy that was harvested around it, many problems could be
solved. Devices would never run out of battery and would therefore not need them, which
might lead to smaller and more compact devices. Batteries would not be made as widely
and thereby possibly decrease pollution.
The biggest cutback of implementing a technology such as this might be that the
companies and workers within the field of creating batteries might lose their jobs if this
was used all over the world.
6.5 Source criticism
One of the bigger problems when searching for information about the various
transmission formats was that different sources say different things. There was a
difficulty in trusting which sources that should be followed and which should be
discouraged. For instance, some sources mention that BLE has a certain range, and
another mentions that BLE has in fact much shorter range, etc. This made it harder to
make conclusions on the various transmission formats and their advantages and
disadvantages.
Datasheets were considered a trusted source, although datasheets could not be found on
every component. Web links were therefore added containing partial information about
certain objects. These links should not be trusted blindly, as they come from the sellers’
point of view and might not be completely truthful.

48

49
7
Conclusions
7.1 The questions of issue
The problem with simply figuring out if there is even possible to send data wirelessly,
powered by nothing more than an energy harvesting button was answered and the answer
is simply; yes. The question can however be asked in a different way which is: Which
way is the most effective when sending data wirelessly using a low energy source? That
question has more complex answers which include which component should be used and
how they should be applied. The hope for this study is to help in some way to further dig
deeper into that area and help bring more and better answers in the future.
In the question about which transmission format that should be used, the answer was the
radio frequency module using 433 MHz to communicate. This was considered the best
for this particular project since the most crucial thing was keeping down the current
consumption of the components. Trying to keep the budget down made it difficult to test
different modules that use various transmission formats empirically, which is why they
were only compared theoretically.
When comparing advantages and disadvantages, only the most basic specifications such
as bit rate, range and so on was compared, since this is what is in focus in this particular
project. One could dig much deeper into parts of the various formats, but that was not
considered as important as other parts of the project.

50
7.2 Impact on target audience
If the product created in this project were to be mass produced and sold, this could
simplify big parts of the electronic device market. Both the transmitter and receiver can
be made smaller and more compact. This could for example mean that cables would not
be needed to be drawn from the light switch to a lamp in the ceiling. Or more
importantly, devices that would require electricity in an emergency situation when the
power is out, could have a backup energy harvesting button which means it could still
function without the internal battery, which might have run out of power. These devices
should theoretically have a longer life span since the need to replace batteries is gone,
which means they might be cheaper once they have become more commonplace. The
buttons will of course also need replacing depending on how much they have been used.
One might also see a decrease in output voltage from the buttons depending on how old
and used they are.
7.3 Future work
The hope for this thesis was to further help in some small way in the future within the
area. If more resources were available, many different power sources, components and
transmitters with various transmission formats could be empirically tested upon.
Hopefully, in the future, there will be a broader market of these energy harvesting buttons
which will have better performance which in some time might render batteries not
useless, but not used as much as before.

51
8
Bibliography
1. J. Paradiso and T. Starner, "Energy Scavenging for Mobile and Wireless
Electronics", IEEE Pervasive Comput., vol. 4, no. 1, pp. 18-27, 2005. Available
at:
http://ieeexplore.ieee.org/stamp/stamp.jsp?tp=&arnumber=1401839
Accessed 8/4-2016
2. Tan, Y.K., K.Y. Hoe, and S.K. Panda. "Energy Harvesting Using Piezoelectric
Igniter For Self-Powered Radio Frequency (RF) Wireless Sensors". 2006 IEEE
International Conference on Industrial Technology (2006): n. pag. Web. 14 Apr.
2016. Available at:
http://ieeexplore.ieee.org/stamp/stamp.jsp?tp=&arnumber=4237839
3. Paradiso, Joseph A. and Mark Feldmeier. "A Compact, Wireless, Self-Powered
Pushbutton Controller". Ubicomp 2001: Ubiquitous Computing (2001): 299-304.
Web. 8 Apr. 2016. Available at:
http://resenv.media.mit.edu/pubs/papers/UbiComp-Switch-submitted.pdf
4. Medina, Enrique and Daniel Sedlacko. "Voyager - The Interstellar Mission".
Voyager.jpl.nasa.gov. Web. 11 May 2016. Available at:
http://voyager.jpl.nasa.gov/spacecraft/instruments_hga.html
5. Molin, Bengt. Analog Elektronik. Lund: Studentlitteratur, 2009. Print.
Accessed: 2/5-2016
6. Williams, C.B. and R.B. Yates. "Analysis Of A Micro-Electric Generator For
Microsystems". Sciencedirect.com. N.p., 1996. Web. 22 Apr. 2016. Available at:
http://ac.els-cdn.com/092442479680118X/1-s2.0-092442479680118X-
main.pdf?_tid=5f520728-0866-11e6-bcdb-
00000aacb360&acdnat=1461314826_20c3367df379176ff74daa08beaa04b4
7. "Switching Regulator - Linear Technology". Linear.com. N.p., 2016. Web. 11
May 2016.
http://www.linear.com/products/switching_regulator

52
8. Zhang, Henry J. "Basic Concepts Of Linear Regulator And Switching Mode
Power Supplies". Linear.com . N.p., 2013. Web. 11 May 2016. Available at:
http://cds.linear.com/docs/en/application-note/AN140fa.pdf
9. R. Marks, I. Gifford and B. O'Hara, "Standards from IEEE 802 Unleash the
Wireless Internet March 5, 2001 1 Standards from IEEE 802 Unleash the Wireless
Internet", ieee802.org, 2001. 2016. Web. 11 June. 2016. Available at:
http://www.ieee802.org/15/pub/2001/Mar01/00126r3P802-15_TG1-Wireless-
802-MW-Mag-Article.pdf
10. E. Callaway, P. Gorday and L. Hester, "Home Networking with IEEE 802.15.4: A
Developing Standard for Low-Rate Wireless Personal Area Networks",
http://cs.tju.edu.cn/, 2002. Web. 11 June. 2016. Available at:
http://cs.tju.edu.cn/faculty/ytshu/old%20courses/Net_II_08/Ch4/4-
2%20Networking/CGH02_802.15.4.pdf.
11. Domdouzis, Konstantinos, Bimal Kumar, and Chimay Anumba. "Radio-
Frequency Identification (RFID) Applications: A Brief Introduction".
Sciencedirect.com. N.p., 2007. Web. 28 Apr. 2016. Available at:
http://www.sciencedirect.com/science/article/pii/S1474034606000498
12. Georgakakis, Emmanouil et al. "An Analysis Of Bluetooth, Zigbee And Bluetooth
Low Energy And Their Use In Wbans". Lecture Notes of the Institute for
Computer Sciences, Social Informatics and Telecommunications Engineering
(2011): 168-175. Web. 28 Apr. 2016. Available at:
http://download.springer.com/static/pdf/408/chp%253A10.1007%252F978-3-642-
20865-
2_22.pdf?originUrl=http%3A%2F%2Flink.springer.com%2Fchapter%2F10.1007
%2F978-3-642-20865-
2_22&token2=exp=1461845182~acl=%2Fstatic%2Fpdf%2F408%2Fchp%25253
A10.1007%25252F978-3-642-20865-
2_22.pdf%3ForiginUrl%3Dhttp%253A%252F%252Flink.springer.com%252Fcha
pter%252F10.1007%252F978-3-642-20865-
2_22*~hmac=f8989f36fa391b2c55e0e65fc237ef18387737dfc80f1e5ad6c7a7a5f3
f2b7e2
13. Lennvall, Tomas and Stefan Svensson. "A Comparison Of Wirelesshart And
Zigbee For Industrial Applications". www.amazonaws.com. N.p., 2008. Web. 2
May 2016. Available at:
https://abblibrary.s3.amazonaws.com/public/8043193f45e3cc6a85257bc6006366c
8/A%20Comparison%20of%20WirelessHART%20and%20ZigBee%20for%20In
dustrial%20Applications.pdf

53
14. Khader, Osama and Andreas Willig. "An Energy Consumption Analysis Of The
Wireless HART TDMA Protocol". Ac.els-cdn.com. N.p., 2013. Web. 2 May 2016.
Available at:
http://ac.els-cdn.com/S0140366413000029/1-s2.0-S0140366413000029-
main.pdf?_tid=34f87a00-1060-11e6-8933-
00000aab0f6c&acdnat=1462191787_d769f7be01aade108560aaaa006197b7
15. P. Smith, "Comparing Low-Power Wireless Technologies | DigiKey",
Digikey.com, 2008. Web. 11 June. 2016. Available at:
http://www.digikey.com/en/articles/techzone/2011/aug/comparing-low-power-
wireless-technologies
16. "ANT Protocol | Dynastream Innovations", Dynastream.com. Web. 11 June.
2016. Available at:
https://www.dynastream.com/solutions/ant-wireless
17. "NTE5332 & NTE5334 Silicon Bridge Rectifier, 1A". Elfa Distrelec Sweden.
Web. 5 Apr. 2016. Available at:
https://www.elfa.se/Web/Downloads/_t/ds/nte5332_34_eng_tds.pdf?mime=applic
ation%2Fpdf
18. "Glass Passivated Single-P Hase Bridge Rectifier". Elfa Distrelec Sweden. N.p.,
2013. Web. 5 Apr. 2016. Available at:
https://www.elfa.se/Web/Downloads/_t/ds/BxxC800G_eng_tds.pdf?mime=applic
ation%2Fpdf
19. "20 V, 1 A Low VF MEGA Schottky Barrier Rectifier". Se.farnell.com. N.p.,
2015. Web. 5 Apr. 2016. Available at:
http://www.farnell.com/datasheets/1996746.pdf
20. "HT12A/HT12E Series Of Encoders". Se.farnell.com. N.p., 2009. Web. 5 Apr.
2016. Available at:
http://www.farnell.com/datasheets/1899539.pdf
21. "HT12D/HT12F Series Of Decoders". Se.farnell.com. N.p., 2009. Web. 5 Apr.
2016. Available at:
http://www.farnell.com/datasheets/1525377.pdf
22. "Nanopower Energy Harvesting Power Supply". Linear.com. N.p., 2010. Web. 5
Apr. 2016. Available at:
http://cds.linear.com/docs/en/datasheet/35881fc.pdf

54
23. "MAXIM Programable Micropower Voltage Regulators". Maximintegrated.com.
N.p., 1996. Web. 5 Apr. 2016. Available at:
http://pdfserv.maximintegrated.com/en/ds/MAX663-MAX666.pdf
24. "Uln200x, Ulq200x High-Voltage, High-Current Darlington Transistor Arrays".
Ti.com. N.p., 1967. Web. 5 Apr. 2016. Available at:
http://www.ti.com/lit/ds/symlink/uln2003a.pdf
25. "GPIO: Raspberry Pi Models A And B - Raspberry Pi Documentation".
Raspberrypi.org. Web. 10 May 2016. Available at:
https://www.raspberrypi.org/documentation/usage/gpio/README.md
26. "SYN 113 /SYN115 Datasheet". https://www.openimpulse.com. N.p., 2010. Web.
14 May 2016. Available at:
https://www.openimpulse.com/blog/wp-
content/uploads/wpsc/downloadables/SYN115-ASK-Transmitter-Datasheet.pdf

55
9
Appendix
Beneath is the code used on the Raspberry Pi which was used to detect and turn on
different LEDs. The code is written is the programming language python. The prints can
only be seen on the monitor, if such is connected to the Raspberry Pi. The “#” in the code
are comments that explains process.
Appendix A
# The first line in the code will tell how to work with the Raspberry Pi’s GPIO pins. The
second line imports the time library so we can pause the script.
import RPi.GPIO as GPIO
import time
# Each pin has different names. Here it tells the program which naming assembly is to be
used and it tells Python not to print GPIO warnings.
GPIO.setmode(GPIO.BCM)
GPIO.setwarnings(False)
# Variables are named and given a number. The number which is given is a pin number
on the Raspberry Pi’s 3 GIPO pins. This will make it easier to follow the code.
GREENLED = 19
BLUELED = 26
SWITCH1 = 16
SWITCH2 = 20
RESET = 21
SHUTDOWN = 12

56
# Information which pins that will be used are set. Here the pins get a setup weather they
are going to be an input or output.
GPIO.setup(GREENLED,GPIO.OUT)
GPIO.setup(BLUELED,GPIO.OUT)
GPIO.setup(RESET, GPIO.OUT)
GPIO.setup(SHUTDOWN, GPIO.IN,GPIO.PUD_UP)
GPIO.setup(SWITCH2,GPIO.IN,GPIO.PUD_DOWN)
GPIO.setup(SWITCH1,GPIO.IN,GPIO.PUD_DOWN)
# This will print text on the monitor.
print("/////////////////////////////////")
print("///POWERBUTTON SCRIPT STARTED///")
print("////////////////////////////////")
print("\n")
print(">> WAITING TO RECEIVE ID")
# The program will be in a loop and run all the time until the button on the receiver is
pressed. When the button is pressed the loop will end.
while True:
GPIO.output(RESET,1)
# The code for the green diode. When the switch is downwards the code looks if the pin
on SWITCH1 is low and if the pin on SWITCH2 is high. If this is correct it will turn on
the green diode and after it has turned it of it will reset the decoder by turning off the
power to it and turn it on again.
#SWITCH ON TRANSMITTER DOWNWARDS.
if GPIO.input(SWITCH1) == True and GPIO.input(SWITCH2) == False :
print(">> GREEN LIGHT ACTIVATED")
GPIO.output(GREENLED,1)
time.sleep(1)
GPIO.output(GREENLED,0)
GPIO.output(RESET,0)
print(">> HT12-D RESET")
print("\n")
print(">> WAITING TO RECEIVE ID")

57
# The code for the blue diode. This is when the switch is upwards. It works similar to the
green diode, but instead it is looking if the pin on SWITCH2 is low and the pin on
SWITCH1 is high.
#SWITCH ON TRANSMITTER UPWARDS
if GPIO.input(SWITCH1) == False and GPIO.input(SWITCH2) == True :
print(">> BLUE LIGHT ACTIVATED")
GPIO.output(BLUELED,1)
time.sleep(1)
GPIO.output(BLUELED,0)
GPIO.output(RESET,0)
print(">> HT12-D RESET")
print("\n")
print(">> WAITING TO RECEIVE ID")
# To end the while loop, this code was added. When the button on receiver circuit is
pressed. The while loop will break and close the program.
#IF BUTTON ON RECEIVER IS PRESSED
if GPIO.input(SHUTDOWN) == False:
print(">> PROGRAM ENDED")
break
# This cleans up all the ports that has been used.
GPIO.cleanup()

58
Related Documents