WIRED REMOTE CONTROLLED CAR PROJECT

Welcome message from author
This document is posted to help you gain knowledge. Please leave a comment to let me know what you think about it! Share it to your friends and learn new things together.
Transcript

WIRED REMOTE CONTROLLED CAR
PROJECT

ASSEMBLED RC CAR

PROCEDURE TO
ASSEMBLE
RC CAR
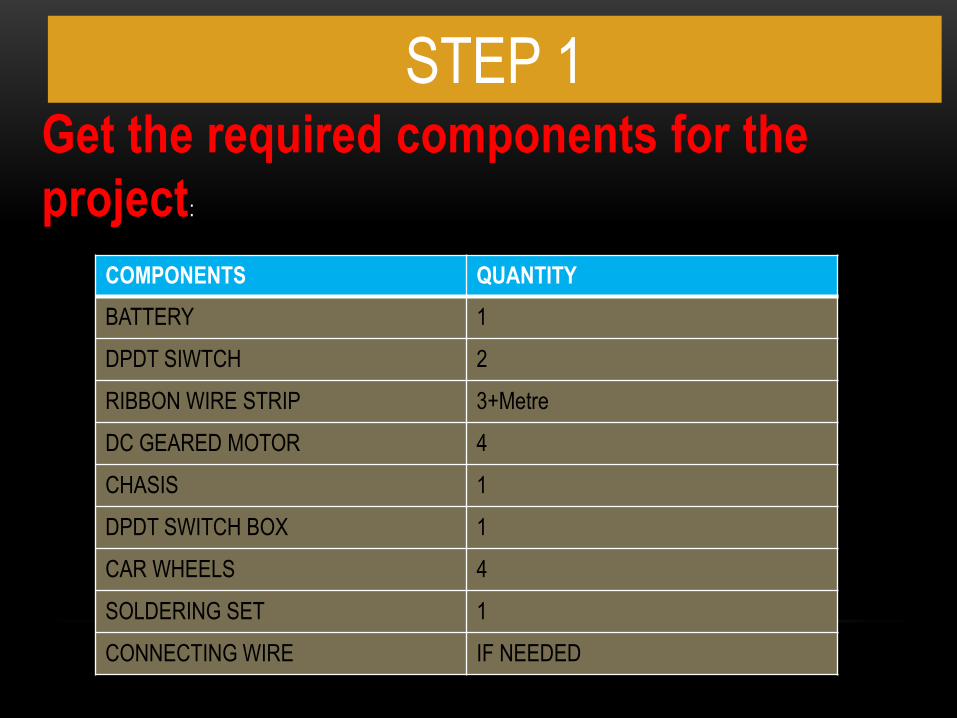
Get the required components for the
project:
COMPONENTS QUANTITY
BATTERY 1
DPDT SIWTCH 2
RIBBON WIRE STRIP 3+Metre
DC GEARED MOTOR 4
CHASIS 1
DPDT SWITCH BOX 1
CAR WHEELS 4
SOLDERING SET 1
CONNECTING WIRE IF NEEDED
STEP 1

COMPONENTS OF PROJECT


Solder the ribbon wire strip with the each motors.
Do it for all the four motors.
Place the motors in the chasis.
Tighten the motors with the required spanner.
STEP 2

MOTOR IS PLACED IN THE CHASIS

Now, attach each wheels with the motors.
Tighten the wheels with the motor using the
screw given with the wheels.
Place the wire as given in the diagram.
STEP 3

MOTORS TIGHTEN WITH THE CHASIS

NOW CHECK WHETHER THE ALL THE
SOLDERED WIRES WITH THE MOTORS ARE
WORKING.
ALL THE FOUR MOTORS SHOULD WORK
PROPERLY.
IF NOT CHECK FOR THE CONNECTIONS.
STEP 4

WIRES SOLDERED WITH THE
MOTORS
DECIDE WHICH TWO MOTORS SHOULD GO
FRONT DIRECTION.
AND DECIDE WHICH TWO MOTORS SHOULD
GO IN BACKWARD DIRECTION.
STEP 5

NOW GIVE THE CONNECTIONS FOR THE DPDT SWITCH.
TWO DPDT SWITCHES ARE ENOUGH FOR THE WIRED RC CAR PROJECT.
IN CASE IF YOU WANT THE CAR TO BE SO GRIPPER YOU CAN USE THE FOUR DPDT SWITCHES.
HERE I USED TWO DPDT SWICHES.
STEP 6

CONNECTIONS FOR DPDT
SWITCHES


CONNECTIONS FOR THE TWO DPDT SWITCHES ARE
SHOWN IN THE DIAGRAM
GIVE THE CONNECTIONS AS PER THE CONNECTIONS IN
THE DIAGRAM.
THE CONNECTION IS THAT THE LEFT SIDE TWO MOTORS
ARE FOR ONE SWITCH.
AND THE RIGHT SIDE TWO MOTORS IN THE CAR ARE FOR
ANOTHER SWITCHES.
THIS IS HOW THE CONNECTIONS ARE THERE IN THE
DIAGRAM.
STEP 7

CONNECTIONS FOR EACH
SWITCHES

AND CONNECT THE TWO POSITIVE ENDS OF
THE DPDT SWITCHES.
AND ALSO CONNECT TWO NEGATIVE ENDS
OF THE DPDT SWITCHES.
AND GIVE THESE ENDS TO THE BATTERY.
THE MIDDLE TWO PINS IN BOTH THE DPDT
SWITCH ARE FOR THE BATTERY
CONNECTIONS.
STEP 8

GIVE THE WIRE CONNECTIONS AS SHOWN IN THE
DIAGRAM FOR THE BOX.
PLACE THE WIRES IN THE BOX THROUGH THE
SPECIFIED HOLE.
NOW CONNECT THE WIRES WITH BATTERY.
NOW CHECK THE WIRED REMOTE CONTROLLED
CAR IS WORKING ACCORDING TO THE
FOLLOWING INSTRUCTIONS.
STEP 9

WIRES FROM BOX

CONNECTION OF WIRES WITH THE
BATTERY

ASSEMBLED RC CAR

WORKING OF THE DPDT SWITCHES :
STEP 10
LEFT BUTTON RIGHT BUTTON
UP UP
DOWN DOWN
UP -----------
----------- UP
UP DOWN
DOWN UP
NIL NIL

INSTRUCTIONS OF WORKING OF DPDT SWITCHES:
1.THE RC CAR WILL GO IN THE FRONT DIRECTION.
2.THE RC CAR WILL GO IN THE BACKWARD DIRECTION.
3.THE RC CAR WILL TURN TOWRADS RIGHT.
4.THE RC CAR WILL TURN TOWARDS LEFT.
5.THE RC CAR WILL ROTATE 360 DEGREE TOWARDS RIGHT.
6.THE RC CAR WILL ROTATE 360 DEGREE TOWARDS LEFT.
7.THE RC CAR WILL STOP RUNNING.
STEP 11

IF YOUR WIRED REMOTE CONTROLLED CAR
FOLLOWS THIS INSTRUCTIONS THEN YOU
GOT YOU PERFECT WIRED RC CAR.
STEP 12

CHECK THE CONNECTIONS AND THE
PLACEMENT OF THE MOTORS IN THE
CHASIS AS SHOWN IN THE DIAGRAM.
STEP 13

Related Documents