Agilent Technologies Windows 7 Professional (64-bit) for MassHunter Workstation Setup Guide Step 1. Set up Windows 7 2 Step 2. Rename the network adapters 7 Step 3. Set the network adapter IP addresses 10 Step 4. Change firewall settings for the LC-MS instrument network adapter 12 Step 5. Confirm that Telnet Client and TFTP Client are enabled 16 Step 6. Disable the HP Support Assistant 18 Step 7. Set up Microsoft Update 22 Step 8. Install MassHunter programs 23 Before you can install MassHunter software on Windows 7 Professional, you need to set up the operating system. Note that installations on computers not supplied by Agilent are supported on a best-effort basis only. Additional support can be purchased from the Agilent field support team. Minimum Requirements The minimum computer specifications to run MassHunter programs on Windows 7 Professional (64-bit) are: • HP Z400 Xeon W3520 Quad Core Processor • 8 GB of 1333 MHz ECC RAM • 4 × 500 GB SATA HDD in a RAID 1+0 configuration (mirrored and striped) • 80 GB C partition and a 851 GB D partition • For MassHunter Acquisition, additional network adapter

Welcome message from author
This document is posted to help you gain knowledge. Please leave a comment to let me know what you think about it! Share it to your friends and learn new things together.
Transcript

Windows 7 Professional (64-bit) for MassHunter Workstation
Setup Guide
Step 1. Set up Windows 7 2
Step 2. Rename the network adapters 7
Step 3. Set the network adapter IP addresses 10
Step 4. Change firewall settings for the LC-MS instrument network adapter 12
Step 5. Confirm that Telnet Client and TFTP Client are enabled 16
Step 6. Disable the HP Support Assistant 18
Step 7. Set up Microsoft Update 22
Step 8. Install MassHunter programs 23
Before you can install MassHunter software on Windows 7 Professional, you need to set up the operating system.
Note that installations on computers not supplied by Agilent are supported on a best-effort basis only. Additional support can be purchased from the Agilent field support team.
Minimum Requirements
The minimum computer specifications to run MassHunter programs on Windows 7 Professional (64-bit) are:
• HP Z400 Xeon W3520 Quad Core Processor
• 8 GB of 1333 MHz ECC RAM
• 4 × 500 GB SATA HDD in a RAID 1+0 configuration (mirrored and striped)
• 80 GB C partition and a 851 GB D partition
• For MassHunter Acquisition, additional network adapter
Agilent Technologies

Step 1. Set up Windows 7
Step 1. Set up Windows 7
The first time that Windows 7 Professional starts up after installation, you are prompted for setup information.
1 When prompted, select your Country or region, Time and currency, and Keyboard layout, then click Next.
Only these operating systems are supported:
• English (United States)
• Japanese (for MassHunter Qualitative Analysis and Quantitative Analysis programs)
• Simplified Chinese (for MassHunter Qualitative Analysis and Quantitative Analysis programs)
2 Windows 7 Professional (64-bit) for MassHunter Workstation Setup Guide

Step 1. Set up Windows 7
2 Create a user name and password for a user that will be a member of the Administrators group.
For Agilent bundle computers, create a new user other than “admin.” The user name “admin” with password “3000hanover” is already created when the Emergency Recovery Disk is used.
Windows 7 Professional (64-bit) for MassHunter Workstation Setup Guide 3

Step 1. Set up Windows 7
3 Read Microsoft’s license terms for Windows 7 Professional. Select I accept the license terms and click Next.
4 Click Ask me later when prompted to turn on Microsoft Updates, then click Next.
If you choose to turn on Microsoft Updates, be aware that an update can automatically restart your computer, which could cause MassHunter programs to fail.
4 Windows 7 Professional (64-bit) for MassHunter Workstation Setup Guide

Step 1. Set up Windows 7
5 Set up the time and time zone for the computer.
6 If you are prompted to accept the End User License Agreement, click I Agree.
7 If you prompted to reboot the computer, ignore this message. Do not restart the computer.
Windows 7 Professional (64-bit) for MassHunter Workstation Setup Guide 5

Step 1. Set up Windows 7
8 Right-click the Computer icon on the Desktop and select Properties.
9 Confirm that your computer meets minimum requirements:
• Windows 7 Professional
• 8 GB of RAM
• 64-bit system type
If the incorrect operating system is installed, get media and a license for Windows 7 Professional (64-bit) and reinstall the operating system.
10 Restart the computer.
11 After you restart the computer, if the screen resolution is not properly reset, then:
a Right-click the Desktop and click Screen resolution.
b Change the resolution to the correct resolution for the monitor.
The MassHunter Data Acquisition, Qualitative Analysis, and Quantitative programs require a minimum screen resolution of 1280 × 1024.
For efficient data processing, set the resolution to 1680 × 1050 or higher. Agilent LC/MS instruments ship with a minimum monitor resolution of 1680 × 1050.
For maximum picture clarity, operate LCD monitors at their native resolution. Lower than native resolution causes blurred images.
6 Windows 7 Professional (64-bit) for MassHunter Workstation Setup Guide

Step 2. Rename the network adapters
Step 2. Rename the network adapters
1 Select Start > Control Panel.
2 From the Control Panel, select Network and Internet > Network and Sharing Center > View network status and tasks.
3 From the left menu, select Change adapter settings.
You will see two network connections, Local Area Connection and Local Area Connection 2. Neither are connected at this time.
Windows 7 Professional (64-bit) for MassHunter Workstation Setup Guide 7

Step 2. Rename the network adapters
4 Identify the onboard network adapter:
a Connect a network cable to the onboard network adapter on the back of the computer.
b Note which Local Area Connection is enabled.
Typically, the onboard network adapter is Local Area Connection.
5 Right-click the Local Area Connection for the onboard network adapter and select Rename. Change the name to HOUSE connection.
6 Right-click the other Local Area Connection icon and select Rename. Change the name to LC-MS Instrument.
8 Windows 7 Professional (64-bit) for MassHunter Workstation Setup Guide

Step 2. Rename the network adapters
Windows 7 Professional (64-bit) for MassHunter Workstation Setup Guide 9

Step 3. Set the network adapter IP addresses
Step 3. Set the network adapter IP addresses
1 Right-click HOUSE connection and select Properties.
2 Double-click Internet Protocol Version 4 (TCP/IPv4).
3 In the General tab:
a Make sure Obtain an IP address automatically is selected.
b Click OK twice to return to the Network Connections dialog box.
10 Windows 7 Professional (64-bit) for MassHunter Workstation Setup Guide

Step 3. Set the network adapter IP addresses
4 Right-click LC-MS Instrument and select Properties.
5 Double-click Internet Protocol Version 4 (TCP/IPv4).
6 In the General tab:
a Select Use the following IP address.
b For IP address, type 192.168.254.1.
The Subnet mask automatically populates as 255.255.255.0. Leave the Default Gateway and DNS Server lines empty.
c Click OK twice to return to the Network Connections panel.
Windows 7 Professional (64-bit) for MassHunter Workstation Setup Guide 11

Step 4. Change firewall settings for the LC-MS instrument network adapter
Step 4. Change firewall settings for the LC-MS instrument network adapter
1 Return to the Control Panel view.
2 Click System and Security > Windows Firewall.
3 From the left menu, click Advanced settings
12 Windows 7 Professional (64-bit) for MassHunter Workstation Setup Guide
Step 4. Change firewall settings for the LC-MS instrument network adapter
4 Under Overview, click Windows Firewall Properties.
Windows 7 Professional (64-bit) for MassHunter Workstation Setup Guide 13

Step 4. Change firewall settings for the LC-MS instrument network adapter
5 In the Domain Profile tab, next to Protected network connections, click Customize.
6 Clear the LC-MS Instrument check box, and then click OK.
14 Windows 7 Professional (64-bit) for MassHunter Workstation Setup Guide

Step 4. Change firewall settings for the LC-MS instrument network adapter
7 Repeat the step 5 and step 6 for the Private Profile and Public Profile tabs.
8 Click OK to close the Windows Firewall with Advanced Security on Local Computer Properties dialog box.
9 Close the Windows Firewall with Advanced Security window.
Windows 7 Professional (64-bit) for MassHunter Workstation Setup Guide 15
Step 5. Confirm that Telnet Client and TFTP Client are enabled
Step 5. Confirm that Telnet Client and TFTP Client are enabled
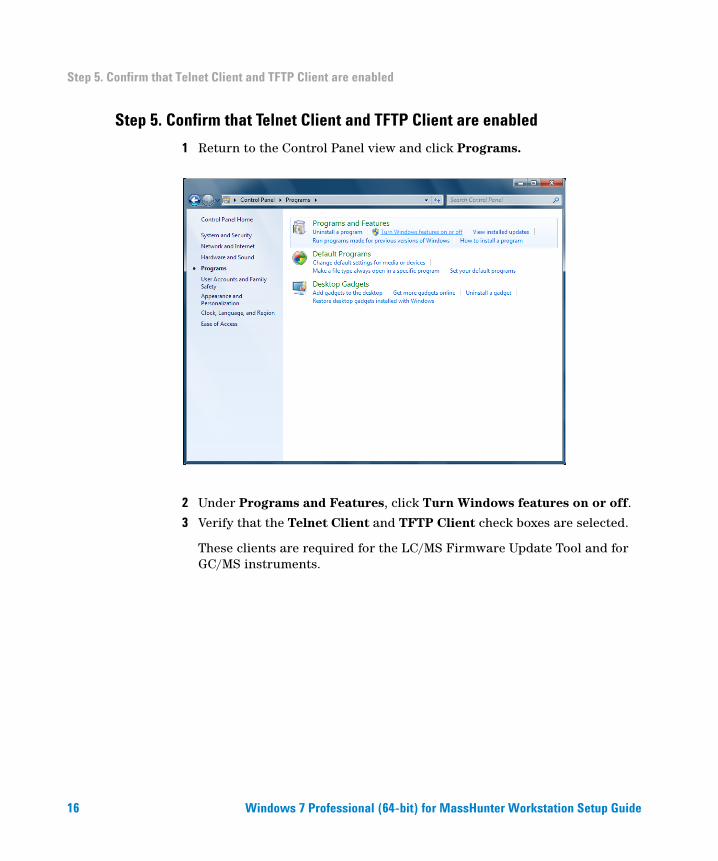
1 Return to the Control Panel view and click Programs.
2 Under Programs and Features, click Turn Windows features on or off.
3 Verify that the Telnet Client and TFTP Client check boxes are selected.
These clients are required for the LC/MS Firmware Update Tool and for GC/MS instruments.
16 Windows 7 Professional (64-bit) for MassHunter Workstation Setup Guide

Step 5. Confirm that Telnet Client and TFTP Client are enabled
4 Press OK and close the Control Panel.
Windows 7 Professional (64-bit) for MassHunter Workstation Setup Guide 17

Step 6. Disable the HP Support Assistant
Step 6. Disable the HP Support Assistant
If your computer is a Hewlett-Packard computer, you must disable the HP Support Assistant so that it does not run scans while MassHunter programs are running.
1 Click Start > All Programs > HP > HP Support Assistant.
2 Click Cancel.
18 Windows 7 Professional (64-bit) for MassHunter Workstation Setup Guide

Step 6. Disable the HP Support Assistant
3 Click the Settings icon in the lower left corner. Make sure you click the icon and not the Settings label.
Windows 7 Professional (64-bit) for MassHunter Workstation Setup Guide 19

Step 6. Disable the HP Support Assistant
4 In the Health Analysis tab, change Frequency to Never.
20 Windows 7 Professional (64-bit) for MassHunter Workstation Setup Guide

Step 6. Disable the HP Support Assistant
5 In the Tune up tab, change Frequency to Never.
6 Click Save and then close the program.
Windows 7 Professional (64-bit) for MassHunter Workstation Setup Guide 21

Step 7. Set up Microsoft Update
Step 7. Set up Microsoft Update
Agilent recommends that Microsoft Update is turned on if possible. However, an update can cause your computer to restart unexpectedly during data acquisition and cause you to lose data.
Do this step to set up Windows 7 so that it updates your computer only with user permission.
1 In the Control Panel, click Systems and Security > Windows Update > Change settings.
2 Under Important updates, select Download updates but let me choose whether to install them.
3 Click OK and close the Control Panel.
When the Control Panel is closed, if the computer is connected to the Internet, Windows immediately checks for updates. The list of suggested updates can be large.
22 Windows 7 Professional (64-bit) for MassHunter Workstation Setup Guide

Step 8. Install MassHunter programs
Step 8. Install MassHunter programs
• Install MassHunter programs.
Follow the appropriate installation or upgrade guide. Note that on Windows 7, some MassHunter programs require that you run the installation program as administrator. The installation guide tells you which steps require that you right-click the installation command and select Run as administrator.
Windows 7 Professional (64-bit) for MassHunter Workstation Setup Guide 23

Agilent Technologies
© Agilent Technologies, Inc. 2011
Revision A, April 2011
*G3336-90016*
G3336-90016
www.agilent.com
In This Book
This guide describes how to set up Windows 7 Professional (64-bit) for MassHunter Workstation, to prepare for MassHunter software installation.
Windows® is a registered trademark of Microsoft Corporation in the United States and other countries.
Related Documents