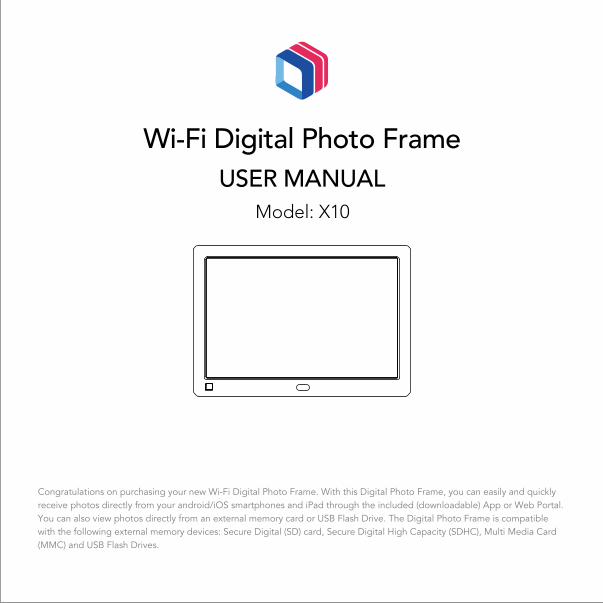
Wi-Fi Digital Photo Frame USER MANUAL Model: X10 Congratulations on purchasing your new Wi-Fi Digital Photo Frame. With this Digital Photo Frame, you can easily and quickly receive photos directly from your android/iOS smartphones and iPad through the included (downloadable) App or Web Portal. You can also view photos directly from an external memory card or USB Flash Drive. The Digital Photo Frame is compatible with the following external memory devices: Secure Digital (SD) card, Secure Digital High Capacity (SDHC), Multi Media Card (MMC) and USB Flash Drives.

Welcome message from author
This document is posted to help you gain knowledge. Please leave a comment to let me know what you think about it! Share it to your friends and learn new things together.
Transcript
Wi-Fi Digital Photo FrameUSER MANUAL
Model: X10
Congratulations on purchasing your new Wi-Fi Digital Photo Frame. With this Digital Photo Frame, you can easily and quickly receive photos directly from your android/iOS smartphones and iPad through the included (downloadable) App or Web Portal. You can also view photos directly from an external memory card or USB Flash Drive. The Digital Photo Frame is compatible with the following external memory devices: Secure Digital (SD) card, Secure Digital High Capacity (SDHC), Multi Media Card (MMC) and USB Flash Drives.

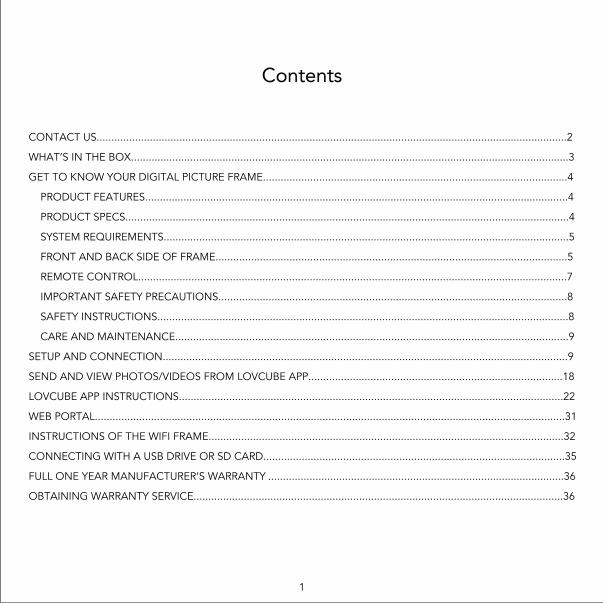
Contents
CONTACT US...............................................................................................................................................................2
WHAT’S IN THE BOX....................................................................................................................................................3
GET TO KNOW YOUR DIGITAL PICTURE FRAME.......................................................................................................4
PRODUCT FEATURES...............................................................................................................................................4
PRODUCT SPECS......................................................................................................................................................4
SYSTEM REQUIREMENTS.........................................................................................................................................5
FRONT AND BACK SIDE OF FRAME.......................................................................................................................5
REMOTE CONTROL.................................................................................................................................................7
IMPORTANT SAFETY PRECAUTIONS......................................................................................................................8
SAFETY INSTRUCTIONS...........................................................................................................................................8
CARE AND MAINTENANCE.....................................................................................................................................9
SETUP AND CONNECTION.........................................................................................................................................9
SEND AND VIEW PHOTOS/VIDEOS FROM LOVCUBE APP......................................................................................18
LOVCUBE APP INSTRUCTIONS..................................................................................................................................22
WEB PORTAL...............................................................................................................................................................31
INSTRUCTIONS OF THE WIFI FRAME..................................................................................................... ...................32
CONNECTING WITH A USB DRIVE OR SD CARD......................................................................................................35
FULL ONE YEAR MANUFACTURER’S WARRANTY ....................................................................................................36
OBTAINING WARRANTY SERVICE.............................................................................................................................36
1

CONTACT USIn case you face any issues with the product you have received, please contact our support team. We will respond
to your queries within 24 hours.
You can also submit your questions/feedbacks through the Lovcube App.
1) Go to your account by selecting “Me”.
2) Click on “Feedback questions”.
2
Support Team Email: [email protected]

WHAT’S IN THE BOXPlease check the accessories as soon as you receive the frame to make sure you have all of them.
3
LOVCUBE Digital Picture Frame *1 pcs
User Manual * 1pcsPower Adaptor * 1pcs Remote Control * 1pcs
OK

• 1280 x 800 high resolution IPS screen for better visual effect of photos
• Free 10GB cloud storage for storing your favorite photos
• Wi-Fi enabled internet photo frame with Lovcube App or Web Portal
• Wi-Fi connected frame allows you to send photos/videos from Android/iOS smart phones and iPad to the frame
• Pair multiple phones/devices (Android/iOS) to one frame or one phone/device to multiple frames
• Personalized playlist group your treasured photos and enable sharing to be easy
• Customizable slideshow transition effects
• Programmable sleep timer turns display on/off automatically
• Motion sensor available; the frame turns on when someone is near the picture frame and turns off when no one
is around
• View photos, musics, videos from your USB drive or SD card.
4
GET TO KNOW YOUR DIGITAL PICTURE FRAME1 PRODUCT FEATURES
2 PRODUCT SPECS
• Wi-Fi: WLAN built-in Wi-Fi module; supports IEEE 802.11 b/g/n
• File format: supports JPG, BMP, PNG pictures files; supports MP4 video files with resolution of 1920x1080;
supports MP3, WMA audio files
• I/O interface: USB 2.0 port*1, SD/MMC port*1, 3.5mm earphone jack*1
• Power: adaptor input (100-240V, 50/60Hz), adaptor output (DC output, 5V/1.5A)
• Screen: Non-touch screen with high-resolution 1280x800, Aspect Ratio 16:10
• Storage: 10GB cloud storage
• Supported external memory devices: SD, SDHC, MMC, and USB flash drive, Maximum support 64GB,
not included in the standard package
• Operating temp: 0°C to 40°C, storage temp: -10°C to 60°C
• Operating humidity: 10-90% (non-condensing)

5
• Wi-Fi router with a 2.4GHz internet connection
• Android mobile device with OS 6.0 or higher, or Apple mobile device with iOS 10.0 or higher
NOTE: These products are NOT compatible with Linux or Windows phones
3 SYSTEM REQUIREMENTS
A: Motion Sensor
Senses movement and turns the Digital Frame on and off.
B: Infra-red Sensor
Receives signals from the remote control.
C: Power Button
Turns the Digital Frame on or puts it into standby.
D: Volume Up
Volume up when playing videos, musics.
4 FRONT AND BACK SIDE OF FRAME
Front of Frame Back of Frame
D
J I G H
F
H
C
A B
6
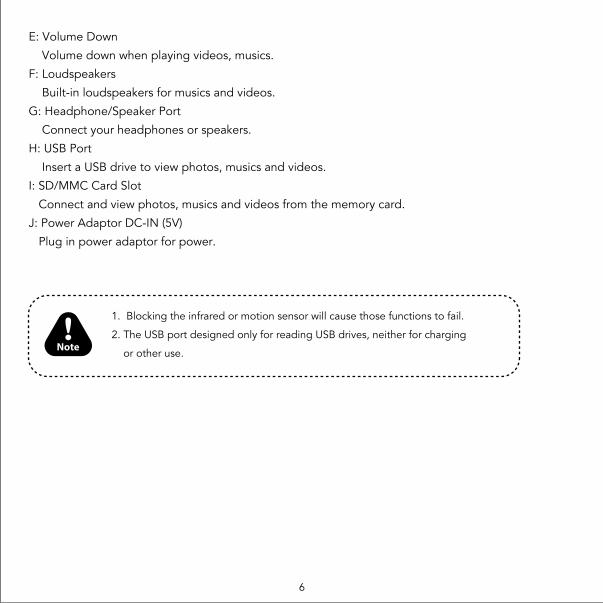
E: Volume Down
Volume down when playing videos, musics.
F: Loudspeakers
Built-in loudspeakers for musics and videos.
G: Headphone/Speaker Port
Connect your headphones or speakers.
H: USB Port
Insert a USB drive to view photos, musics and videos.
I: SD/MMC Card Slot
Connect and view photos, musics and videos from the memory card.
J: Power Adaptor DC-IN (5V)
Plug in power adaptor for power.
1. Blocking the infrared or motion sensor will cause those functions to fail.
2. The USB port designed only for reading USB drives, neither for charging
or other use.

7
5 REMOTE CONTROL
K: ON/OFF Button - Turns the frame on or puts it into standby
L: Home - Go back to home menu
M: or Move cursor left/right
N: or Move cursor up/down. Up/Down volume when playing videos, musics
O: Slideshow -Starts slideshow
P: Mute
Q: Sub-menu - Enter sub-menu
R: Back - Return to the previous menu
S: Play - Select/Play/Pause
1.Push catch toward slot.
2.With the catch pushed, pull the battery compartment at the same time.
3.Use the Lithium cell, CR-2025 type.
4.Remove battery stopper for first time use. Maximum working distance is six meters.
K
OK
L
M
P
N
Q
M
O
R
S
N
8
6 IMPORTANT SAFETY PRECAUTIONS
• High voltage product. Please do not open the casing of the digital photo frame. Servicing of the frame should
be done by qualified personnel only.
• To reduce the risk of fire or electric shock, do not expose this product to rain or moisture.
• To avoid permanent loss of data, do not insert or remove memory cards or USB devices when the frame is
powered on.
7 SAFETY INSTRUCTIONS
• Do not expose the product to liquids or objects filled with liquids, such as vases. Use in a dry location only.
• Keep product away from open flames, such as candles.
• Keep the digital photo frame clean and never store it near a heat source or in dirty, humid, or wet places. Keep
it out of direct sunlight.
• Do not drop the product. It may result in damage to the product and loss of data.
• Do not attempt to repair or disassemble the unit by yourself. Only qualified service personnel should perform
repairs.
• The digital photo frame is for indoor use only.
• Use only the DC 5V/1.5A power adaptor supplied with this product. Do not unplug the adaptor while viewing
the pictures.
• Do not block the ventilation holes on the back of the digital photo frame.
• Children should be supervised to ensure safety.
• To prevent overheating and damage to the screen, unplug the product when you do not intend to use it for a
long period of time.
• Please insert the plug into the DC IN jack on the unit completely before connecting the AC adapter to an
electrical outlet.
• This product can only display files with compatible formats.
• Do not use the product in extreme temperatures over 105° F (40° C).
• Do not allow metallic objects to touch the DC plug when the player is on.
9
8 CARE AND MAINTENANCE
• Always turn off the unit and remove the power adaptor from the electrical outlet before cleaning the unit.
• Use a soft dry cloth to clean this product.
• Never spray or pour liquids directly onto the screen or casing.
• Do not use abrasive materials or chemical cleaners such as alcohol, benzene, etc. Do not allow any water or
other liquid to enter the device.
• Do not drop the device as the devices cannot withstand shock from falls.
• Do not hit or scratch the screen. Handle it with care. The LCD panel of the photo frame may be damaged due
to excessive force or if it comes in contact with sharp objects.
SETUP AND CONNECTION
• Peel back and remove plastic screen protector from the LCD panel using the tab in the upper right corner.
• Keep the frame as close to the Wi-Fi router as possible, preferably within 10 feet.
• If you are going to place your frame more than 20 feet from your router or on another floor you may require
a Wi-Fi extender.
Connect the frame using the included power adaptor, and the frame will automatically turn on. Follow the below
on-screen instructions to set up your frame.
NOTE: When the frame powers on the LOVCUBE logo be drawn three times will on the screen while the system
initializes(around 45 seconds).
IMPORTANT: Before you install your Wi-Fi frame
10
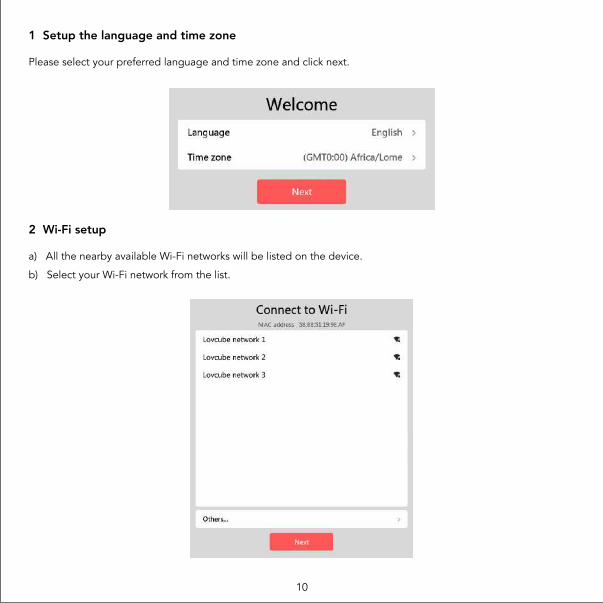
1 Setup the language and time zone
Please select your preferred language and time zone and click next.
2 Wi-Fi setup
a) All the nearby available Wi-Fi networks will be listed on the device.
b) Select your Wi-Fi network from the list.
11
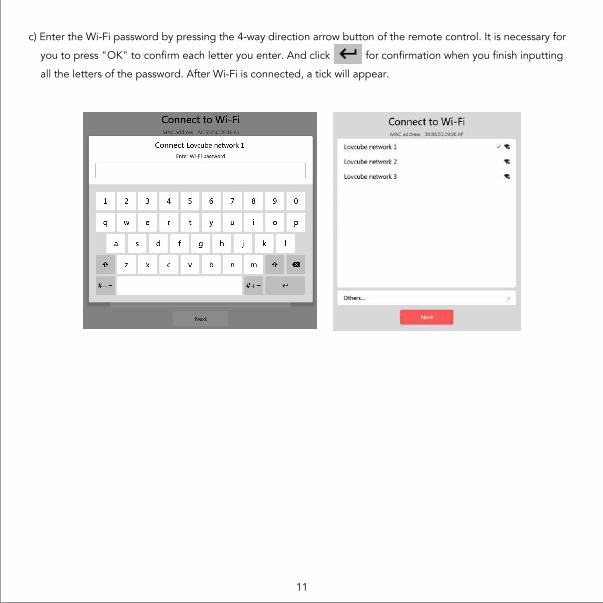
c) Enter the Wi-Fi password by pressing the 4-way direction arrow button of the remote control. It is necessary for
you to press "OK" to confirm each letter you enter. And click for confirmation when you finish inputting
all the letters of the password. After Wi-Fi is connected, a tick will appear.

12
3 Download the Lovcube App on your Android/iOS devices
There are two options for you to download the Lovcube App.
Option 1: Scan the related QR code on the frame to download it.
Option 2: Available on the App Store or Google Play for your Android/ iOS smartphones and iPad.
Search “Lovcube” in App Store or Google Play to download it
13
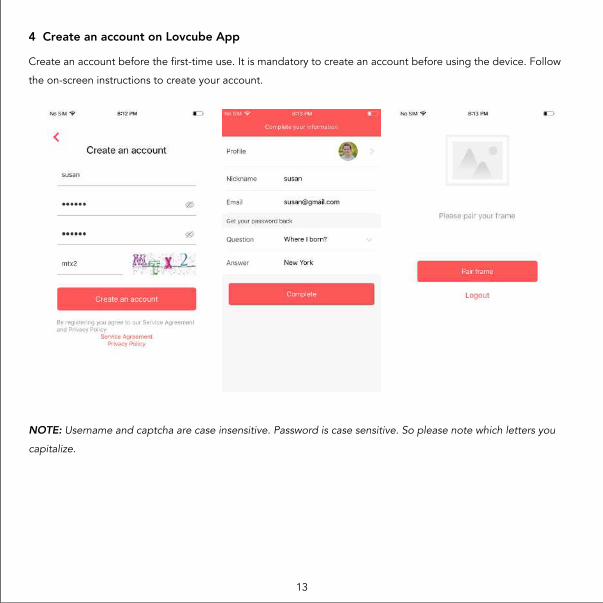
4 Create an account on Lovcube App
Create an account before the first-time use. It is mandatory to create an account before using the device. Follow
the on-screen instructions to create your account.
NOTE: Username and captcha are case insensitive. Password is case sensitive. So please note which letters you
capitalize.
5 Pair the frame
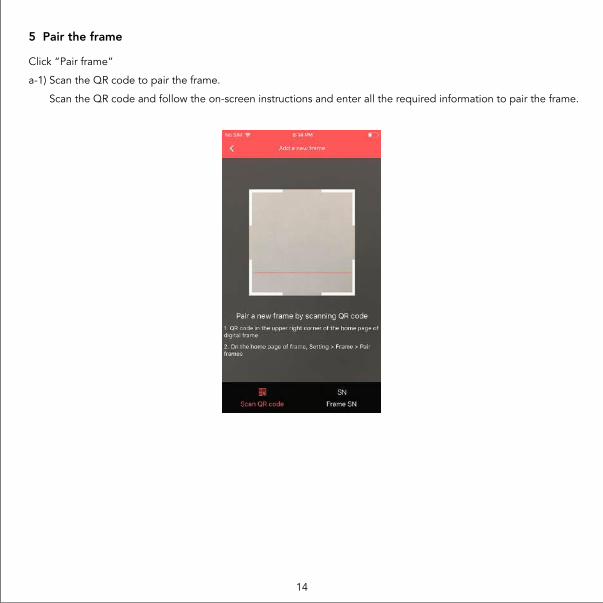
Click “Pair frame”
a-1) Scan the QR code to pair the frame.
Scan the QR code and follow the on-screen instructions and enter all the required information to pair the frame.
14

a-2) Input the SN number to pair the frame.
Input the SN number, Click “Sure” on Lovcube App. Then you can see the below window appearing on the
home screen of your digital picture frame. Choose “Agree”.
15
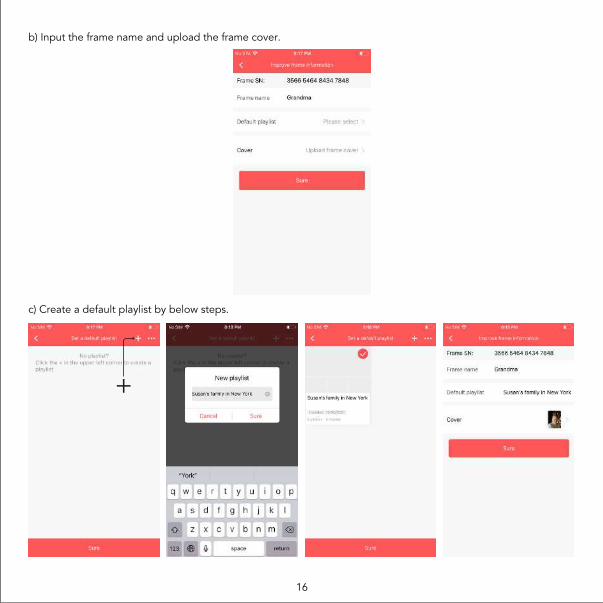
b) Input the frame name and upload the frame cover.
c) Create a default playlist by below steps.
16
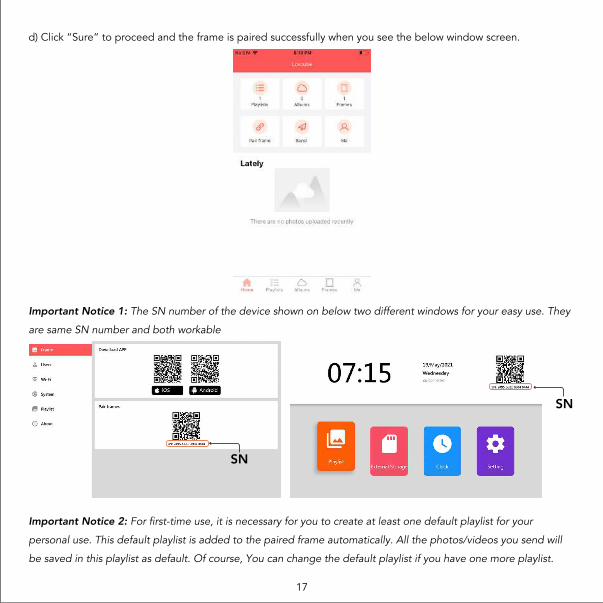
d) Click “Sure” to proceed and the frame is paired successfully when you see the below window screen.
Important Notice 1: The SN number of the device shown on below two different windows for your easy use. They
are same SN number and both workable
Important Notice 2: For first-time use, it is necessary for you to create at least one default playlist for your
personal use. This default playlist is added to the paired frame automatically. All the photos/videos you send will
be saved in this playlist as default. Of course, You can change the default playlist if you have one more playlist.
SN
SN
17
SEND AND VIEW PHOTOS/VIDEOS FROM LOVCUBE APP
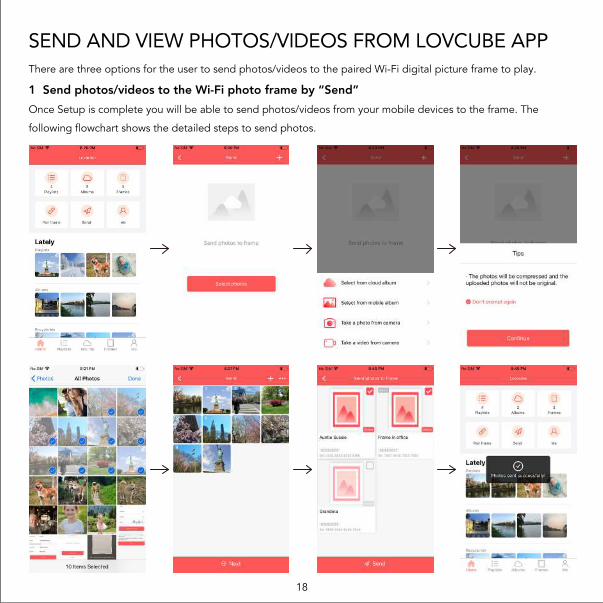
1 Send photos/videos to the Wi-Fi photo frame by “Send”
There are three options for the user to send photos/videos to the paired Wi-Fi digital picture frame to play.
Once Setup is complete you will be able to send photos/videos from your mobile devices to the frame. The
following flowchart shows the detailed steps to send photos.
18

2 Send photos/videos to the Wi-Fi photo frame using “playlist” on Lovcube App
NOTE: We strongly recommend that you only play in those “Online” frames. Those “Offline” frames will not
receive the photos/videos you send.
a) The red triangle quick share button is available on the playlist section. We call this triangle button as
“Play Button”. You can click it to share the full photos/videos from the selected playlist to all paired frames.
NOTE: The Digital Photo Frame will display all the photos/videos added under the playlist. There are no options to
display only some from the playlist.
Please make sure that the playlists are added to the correct Digital Photo Frame in case you have multiple frames.
Play Button
19
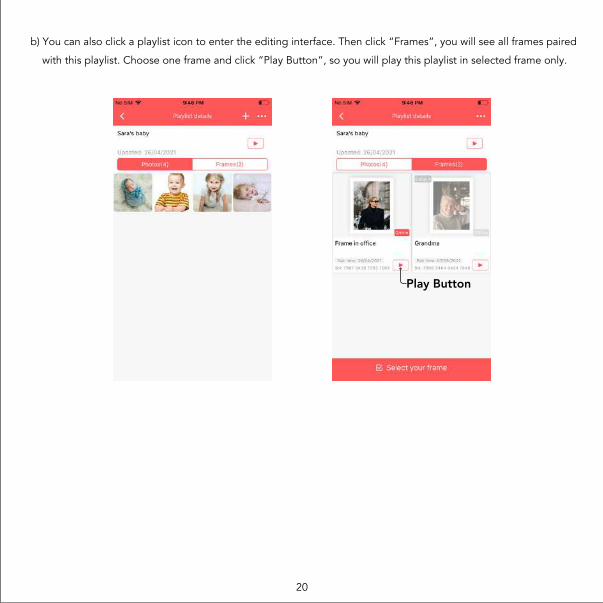
b) You can also click a playlist icon to enter the editing interface. Then click “Frames”, you will see all frames paired
with this playlist. Choose one frame and click “Play Button”, so you will play this playlist in selected frame only.
20
Play Button
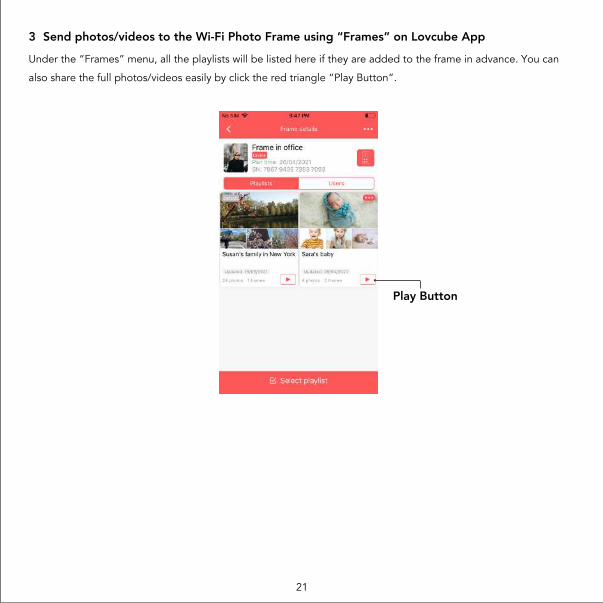
Under the “Frames” menu, all the playlists will be listed here if they are added to the frame in advance. You can
also share the full photos/videos easily by click the red triangle “Play Button”.
3 Send photos/videos to the Wi-Fi Photo Frame using “Frames” on Lovcube App
Play Button
21
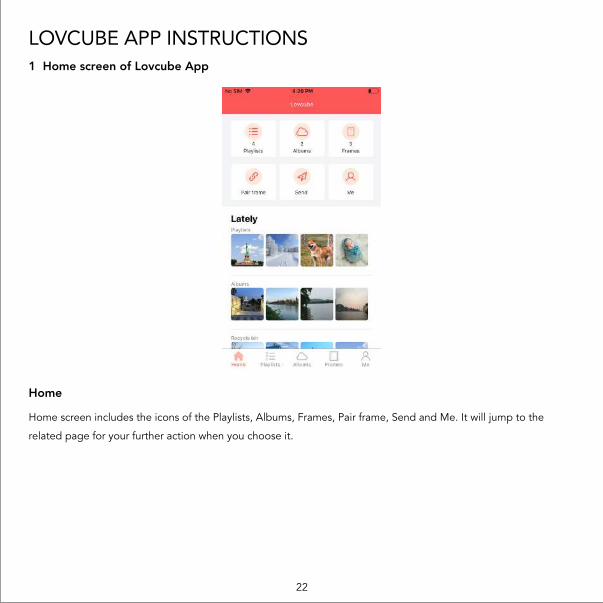
Home screen includes the icons of the Playlists, Albums, Frames, Pair frame, Send and Me. It will jump to the
related page for your further action when you choose it.
LOVCUBE APP INSTRUCTIONS1 Home screen of Lovcube App
Home
22

Playlists
A playlist is simply a collection of photos and videos you upload. You can create different playlists to manage your
photos and videos, which makes you to find the intended photos or videos easily from the millions of photos and
videos. With the playlist, you can
a) Share your photos/videos quickly by the quick “Play Button”.
b) Sort your playlists by pressing at the right corner of the screen to make sure you can find the photos/
videos easily.
23
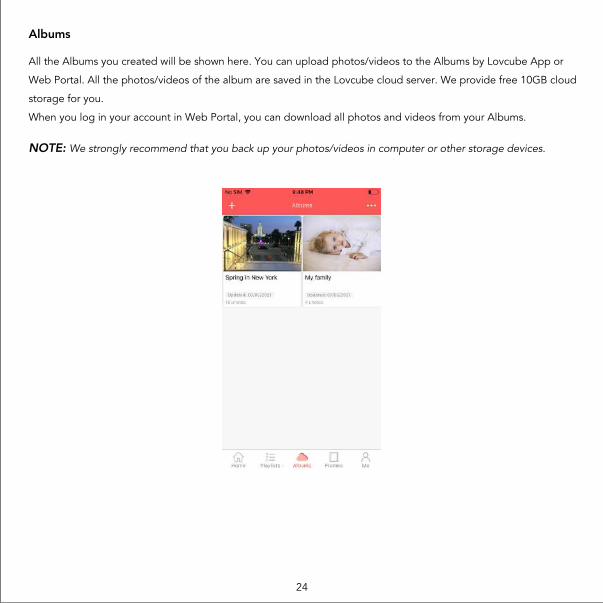
Albums
All the Albums you created will be shown here. You can upload photos/videos to the Albums by Lovcube App or
Web Portal. All the photos/videos of the album are saved in the Lovcube cloud server. We provide free 10GB cloud
storage for you.
When you log in your account in Web Portal, you can download all photos and videos from your Albums.
NOTE: We strongly recommend that you back up your photos/videos in computer or other storage devices.
24
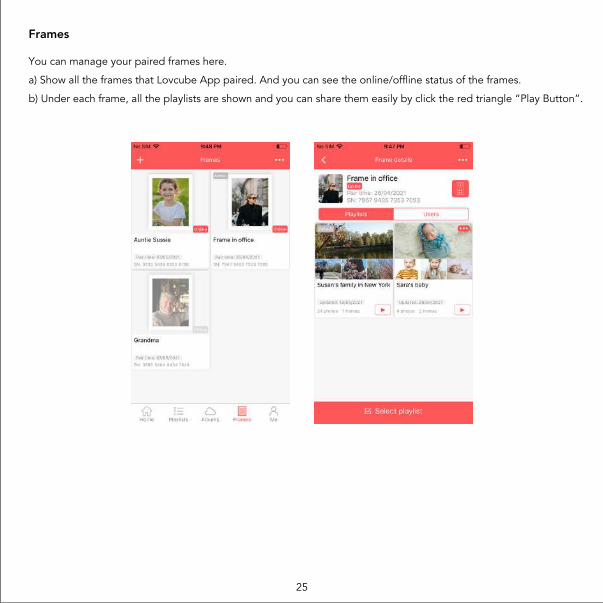
Frames
You can manage your paired frames here.
a) Show all the frames that Lovcube App paired. And you can see the online/offline status of the frames.
b) Under each frame, all the playlists are shown and you can share them easily by click the red triangle “Play Button”.
25

c) If you are set as an administrator of a frame, you can also have below rights,
1) You can see all users paired with a frame. In the meanwhile, you can set or cancel a user as an administrator.
2) You can control the frame by using below online remote control.
26

Show some information about your paired frame.
Cloud storage - The maximum memory capacitive is 10GB. All the photos/videos under Playlists or Albums are
saved here. It shows the memory size for used and unused.
Change mail - Change your registered email address.
Change password - Change your password if needed.
Feedback questions - It is a window for the user to connect to our customer service team. All the messages will be
responded within 24 hours.
Recycle bin - All the deleted photos/videos are saved here temporarily.
Clean up cache - Clean up useless cache files. Cleaning up does not affect normal use.
About Frame - Show “Service Agreement” and “Privacy Policy” of the frame.
Me
27
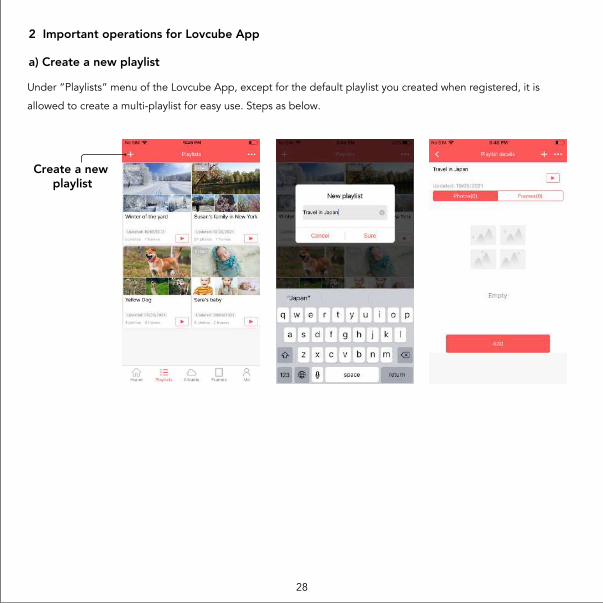
Create a new playlist
Under “Playlists” menu of the Lovcube App, except for the default playlist you created when registered, it is
allowed to create a multi-playlist for easy use. Steps as below.
2 Important operations for Lovcube App
a) Create a new playlist
28
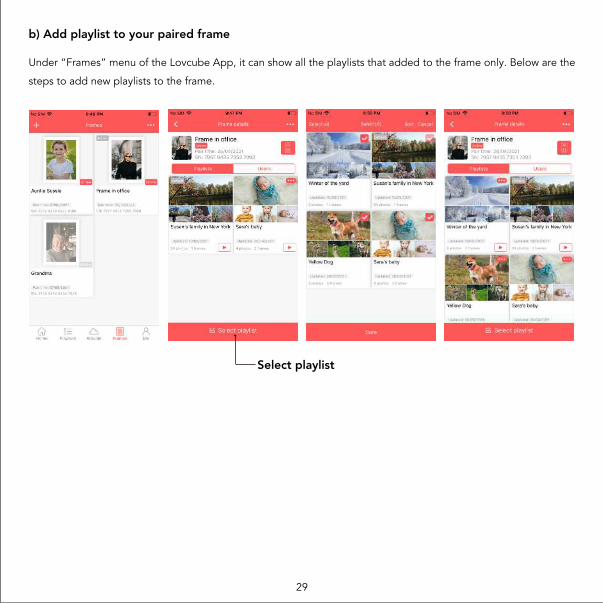
Select playlist
Under “Frames” menu of the Lovcube App, it can show all the playlists that added to the frame only. Below are the
steps to add new playlists to the frame.
b) Add playlist to your paired frame
29
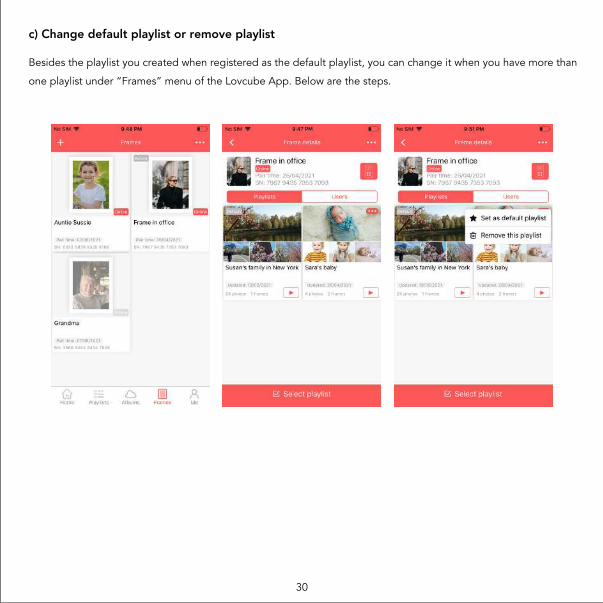
Besides the playlist you created when registered as the default playlist, you can change it when you have more than
one playlist under “Frames” menu of the Lovcube App. Below are the steps.
c) Change default playlist or remove playlist
30

Forgot your password? Follow the on-screen instructions, you can find it back.
Besides the Lovcube App, you can also visit www.lovcube.com to upload your photos and videos to the Lovcube
cloud and manage your playlists, albums, frames. The login name and password of the Lovcube App can be used
in common with www.lovcube.com.
You can download all photos and videos from your Albums here.
d) Find password back
WEB PORTAL
31

The frame will show the time and date on the top. There’s also symbol showing the connecting status between the
frame and Lovcube cloud server. When it shows “connecting…”, it indicates connecting is on process; when it
shows “connected”, it indicates connecting is fulfilled.
NOTE: When you set up the frame for the first time, you need connect to Wi-Fi to regulate the time. Each time
when you power on the frame after you cut off the power, you need ensure Wi-Fi is successfully connected so
that the time can be regulated.
Home screen of Digital Photo Frame
INSTRUCTIONS OF THE WIFI FRAME
32
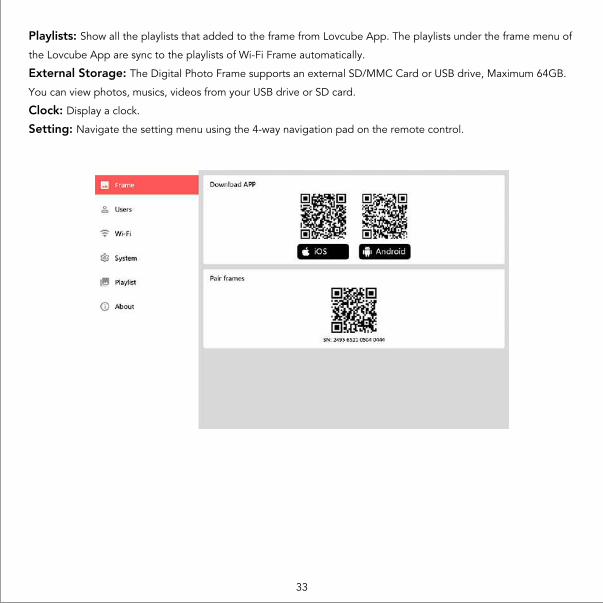
Playlists: Show all the playlists that added to the frame from Lovcube App. The playlists under the frame menu of
the Lovcube App are sync to the playlists of Wi-Fi Frame automatically.
External Storage: The Digital Photo Frame supports an external SD/MMC Card or USB drive, Maximum 64GB.
You can view photos, musics, videos from your USB drive or SD card.
Clock: Display a clock.
Setting: Navigate the setting menu using the 4-way navigation pad on the remote control.
33

Item
Frame
Users
Wi-Fi
System
Playlist
Content for setting
Show APP Download QR Code
Show SN number of the frame
Delete App user
Wi-Fi Setup
All the paired APP users are listed here,
you can set up admin here
Download App
Pair frames
Set or cancel Admin
Delete user of App
Connect to Wi-Fi
Language Set your language
Time Zone Set your time zone
Brightness Adjust the brightness
Volume Adjust the volume
Sleep schedule Set sleep mode start & end time
Motion sensor Set sleep time of motion sensor
Auto slideshow
12-Hour time
Set waiting time of auto slideshow if not any
operation
Set 12-Hour time or 24-Hour time
Transition type Set transition effect of slideshow
Transition time Set transition time of slideshow
Show playlist owner's profile Set whether or not to show the sender of playlist
Show serial numberSet whether or not to show the sequence no of
photo or video
Show captionSet whether or not to display the captions that
your friends have sent with the photo
Show clockSet whether or not to show clock and date when
slideshow
Functions
34
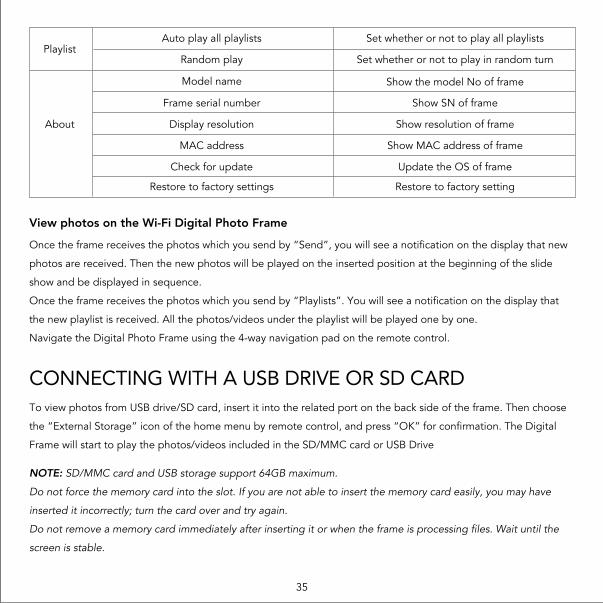
Playlist
About
View photos on the Wi-Fi Digital Photo Frame
CONNECTING WITH A USB DRIVE OR SD CARD
Auto play all playlists
Random play
Display resolution
MAC address
Model name
Set whether or not to play in random turn
Show the model No of frame
Frame serial number Show SN of frame
Show resolution of frame
Show MAC address of frame
Check for update Update the OS of frame
Restore to factory settings
Once the frame receives the photos which you send by “Send”, you will see a notification on the display that new
photos are received. Then the new photos will be played on the inserted position at the beginning of the slide
show and be displayed in sequence.
Once the frame receives the photos which you send by “Playlists”. You will see a notification on the display that
the new playlist is received. All the photos/videos under the playlist will be played one by one.
Navigate the Digital Photo Frame using the 4-way navigation pad on the remote control.
To view photos from USB drive/SD card, insert it into the related port on the back side of the frame. Then choose
the “External Storage” icon of the home menu by remote control, and press “OK” for confirmation. The Digital
Frame will start to play the photos/videos included in the SD/MMC card or USB Drive
NOTE: SD/MMC card and USB storage support 64GB maximum.
Do not force the memory card into the slot. If you are not able to insert the memory card easily, you may have
inserted it incorrectly; turn the card over and try again.
Do not remove a memory card immediately after inserting it or when the frame is processing files. Wait until the
screen is stable.
Restore to factory setting
Set whether or not to play all playlists
35

FULL ONE YEAR MANUFACTURER’S WARRANTYLOVCUBE warrants the product hardware components against defects in materials and workmanship when used in
accordance with the company’s documentation for a period of one (1) YEAR after the date of original purchase
from the company. If a hardware defective arises and a valid claim is received within the Warranty Period, at its
option and to the extent permitted by law, Company will either (1) repair the hardware defect at no charge, using
new or refurbished replacement parts, (2) exchange the product with a new or manufactured from new or
serviceable used parts and is at least functionally equivalent to the original product or (3) refund the purchase price
of the product.
We only cover warranty for purchase made within the USA, Canada, UK.
OBTAINING WARRANTY SERVICEPlease access and review the online help resources referred to in the documentation accompanying this hardware
product before requesting warranty service. If the product is still not functioning properly after making use of these
resources, please contact our representatives at [email protected]. No replacements will be sent out by the
manufacturer until the returned item is received.
36

Related Documents