GARMENTS QUILTING • English Breakfast Pillow • Black and White and Red All Over Quilt • Fringed Top • Serger Easy, Serger Speedy Sleepwear • Vintage Hankies • Freemotion Floral • Overnight Slouch Bag • Quilting in the Hoop • High Falutin’ Fairy 2 • Monogrammed Bed Jacket • Big Beautiful Borders • Sewing Accessory Bag • Sleepy Eyes Sleep Mask • Sew Easy Home Dec • Sew Easy Nursery What’s Inside? Page 15 Page 54 Page 58

Welcome message from author
This document is posted to help you gain knowledge. Please leave a comment to let me know what you think about it! Share it to your friends and learn new things together.
Transcript
GA
RM
EN
TS
QU
IL
TI
NG
• English BreakfastPillow
• Black and White andRed All Over Quilt
• Fringed Top
• Serger Easy, SergerSpeedy Sleepwear
• Vintage Hankies
• Freemotion Floral
• Overnight Slouch Bag
• Quilting in the Hoop
• High Falutin’ Fairy 2
• Monogrammed BedJacket
• Big Beautiful Borders
• Sewing Accessory Bag
• Sleepy Eyes Sleep Mask
• Sew Easy Home Dec
• Sew Easy Nursery
What’sInside?
Page 15
Page 54
Page 58
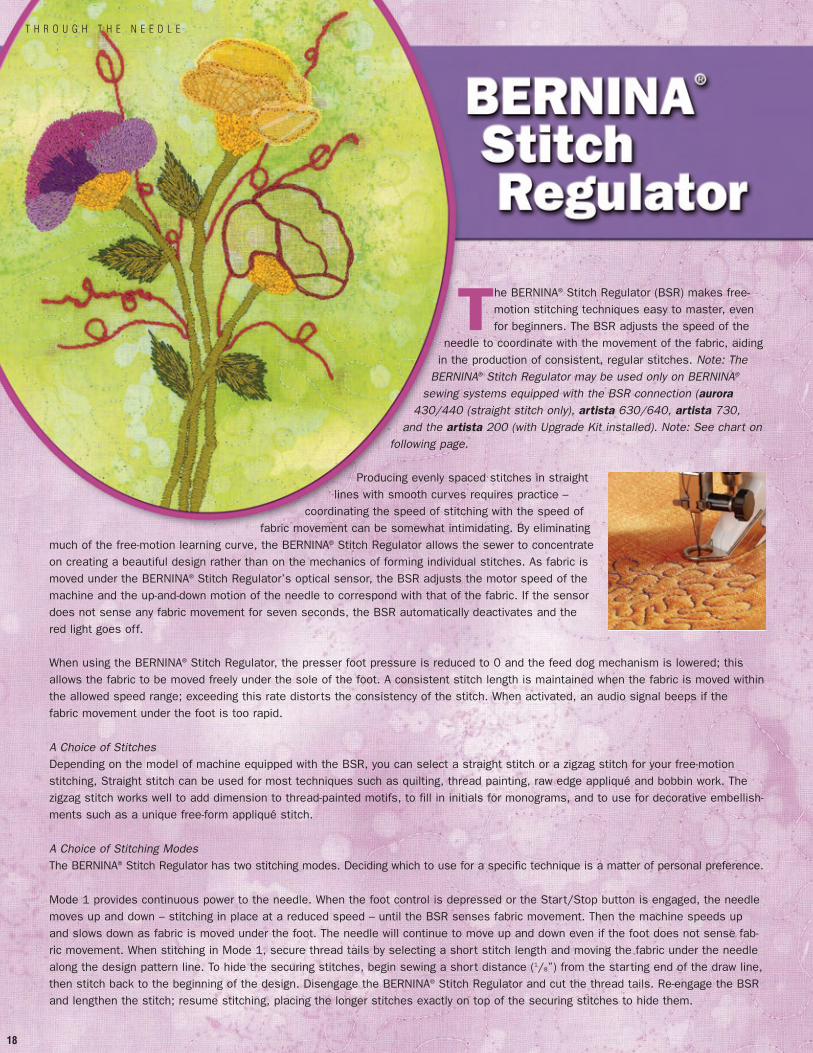
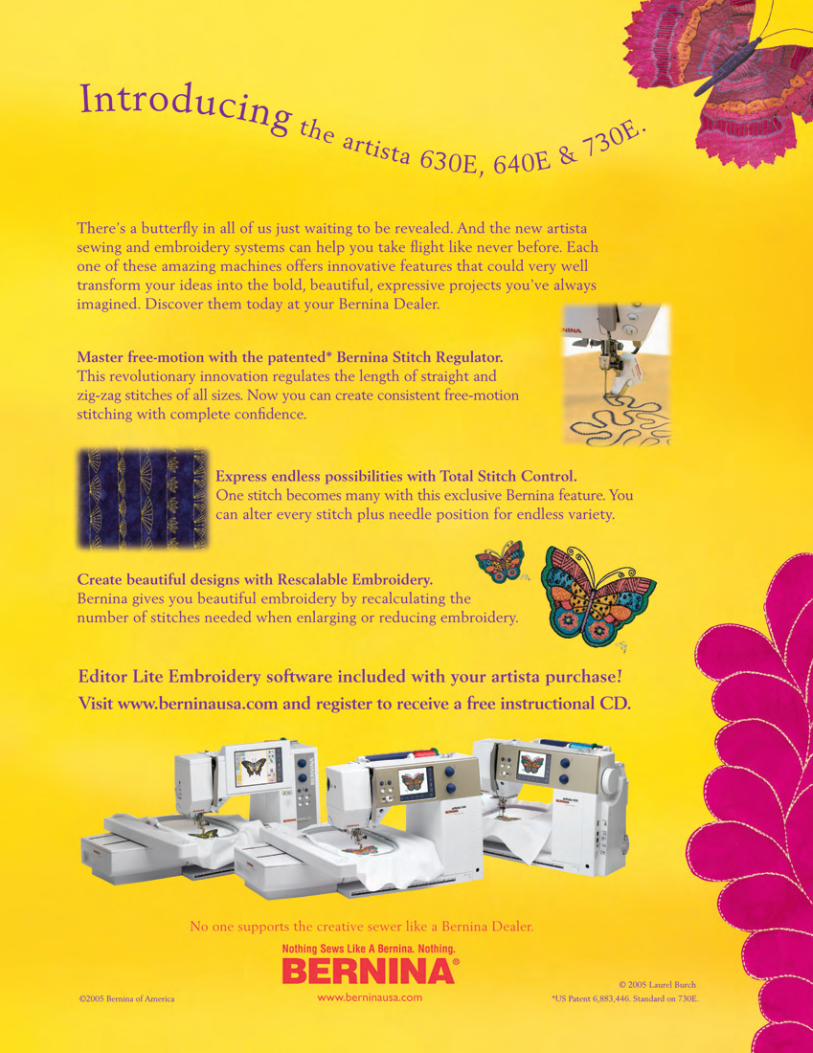
Only the Bernina Stitch Regulator frees you to focus on your free-motion design.
I ’m free!
Available in straight stitch and zigzag.
Experience the freedom for yourself! With the patented* Bernina Stitch Regulator (BSR), you’ll learn free-motion in minutes. And you don’t have to fuss with frames or platforms or foot pedals. With BSR, you simply move the fabric. The revolutionary BSR sensor takes care of everything else, giving you stitches that are gorgeously even and consistent. You’re freed up to simply design, create and play. Try it today!
*US
Pate
nt 6
,883
,446
©
2005
Ber
nina
of A
mer
ica
No one supports the creative sewer like a Bernina Dealer.
www.berninausa.com
Created by Kayla Kennington
For information about BSR or to fi nd out about the “I’m Free with BSR” contest, visit your Bernina Dealer or go to www.BerninaBSR.com
1
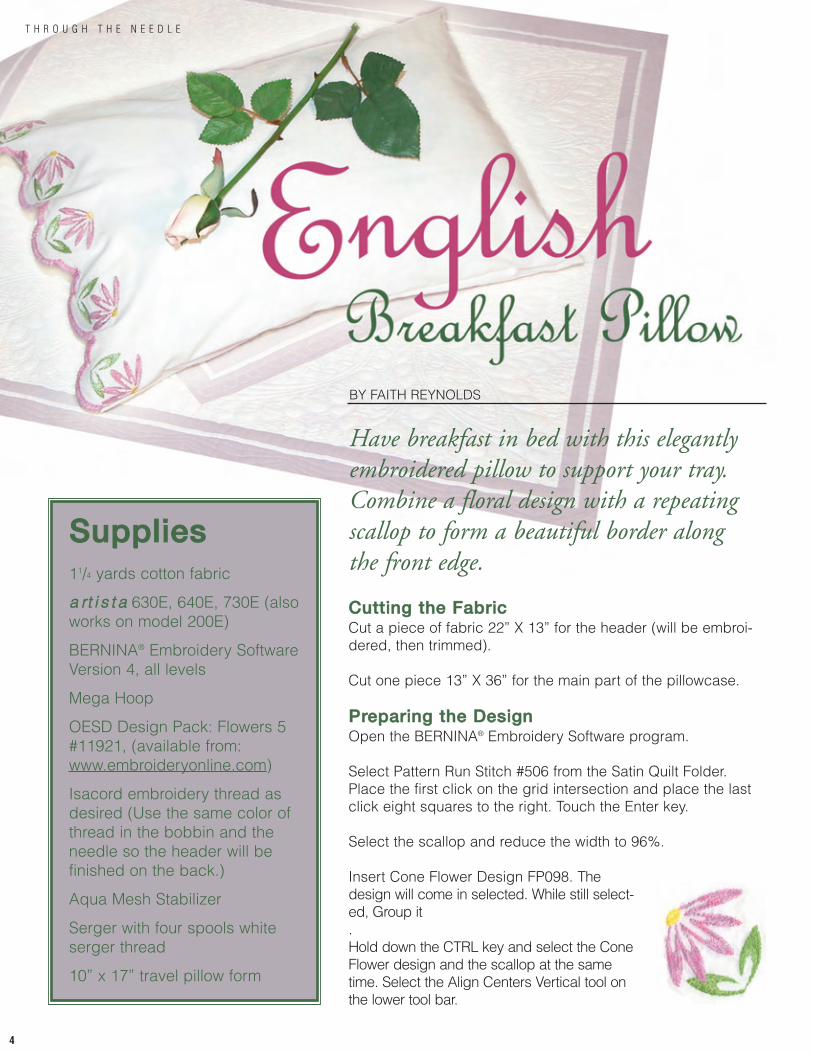
ENGLISH BREAKFAST PILLOW
4 Have breakfast in bed with this elegantly embroidered pillow to support your tray. A floral
design with a repeating scallop forms the beautiful border.
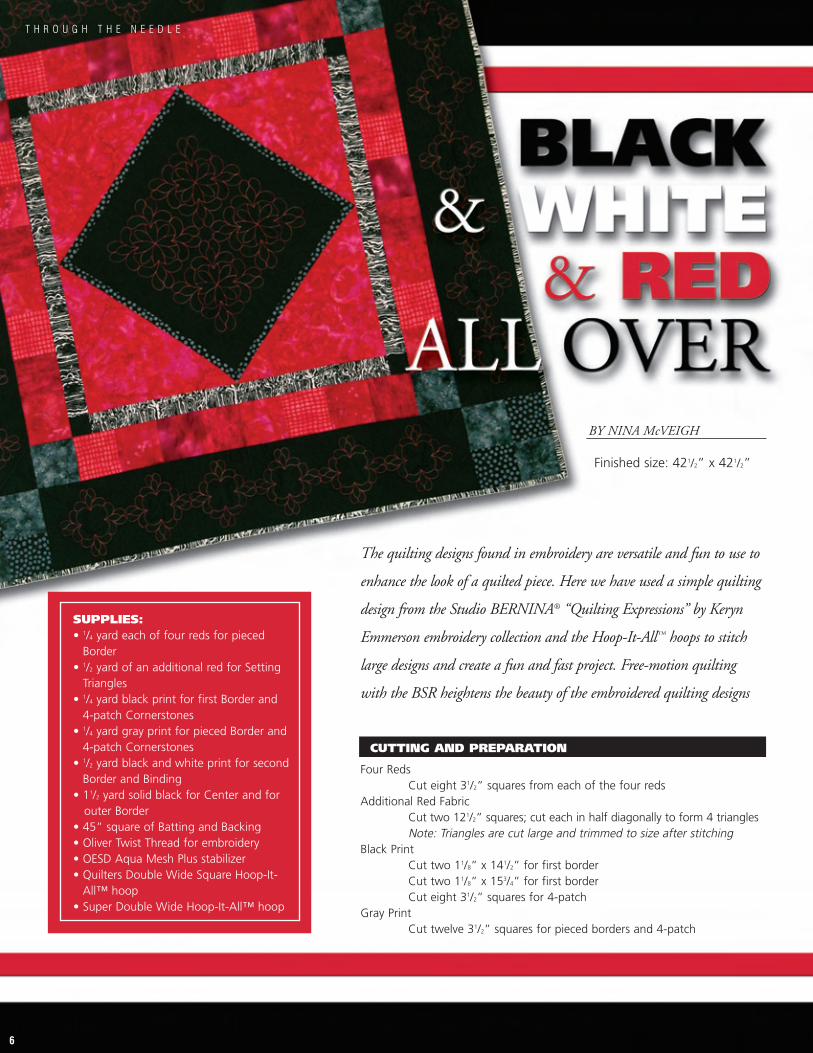
BLACK AND WHITE AND RED ALL OVER
6 This striking lap quilt uses a simple outline quilting design from the Studio BERNINA®
“Quilting Inspirations” by Keryn Emmerson embroidery collection and Hoop-It-All™
Double Wide hoop frames to stitch large designs, creating a fun and fast project. Free-
motion quilting with the BSR enhances the embroidered quilting designs.
FRINGED TOP
9 Add color, style, and movement to a plain knit top with some funky fibers and a few well-
placed free-motion stitches.
SERGER EASY, SERGER SPEEDY SLEEPWEAR
10 Take advantage of the secure and tidy seams created by BERNINA® sergers to stitch these
colorful batik pajama pants in less than 90 minutes!
VINTAGE HANKIES
12 If you love to reminiscence about the “good ol’ days”, you’ll love these natural fiber,
embroidered handkerchiefs. With some basic editing techniques and the BERNINA®
Embroidery Software, you can create vintage look-alike hankies that are as practical as
they are beautiful.
FREE-MOTION FLORAL
15 Learn the basics of freemotion stitching and open up a world of technique possibilities!
Learn Thread Painting, Freehand Quilting, Trapunto, Raw Edge Appliqué, and Bobbin Play
while creating a beautiful bouquet of colorful flowers.
OVERNIGHT SLOUCH BAG
28 Sophisticated on the outside; practical on the inside, the Overnight Slouch Bag has a
removable inner pocket that stores necessities for an overnight trip.
QUILTING IN THE HOOP
36 From continuous line designs to elaborate crazy patchwork to decorative bobbin play, a
BERNINA® embroidery system can add a unique artistic flair to your quilting projects.
HIGH FALUTIN’ FAIRY 2
40 More fairy fun with original artwork by elinor peace bailey, available as FREE Downloads
from www.berninausa.com. Get creative and dress up your fairy with embellishments
before hanging her in your sewing space.
MONOGRAMMED BED JACKET
44 Luxurious fabrics teamed with stitched monograms and silk ribbon embroidery combine to
create a stunning bed jacket that will keep you warm during cold winter months.
BIG BEAUTIFUL BORDERS
46 Make beautiful edgings using the 16-directional stitching capabilities of the artista730. Program decorative scallops with directional straight stitches to create lovely
scalloped borders for doilies, table linens, pillowcase, blouses, and more.
SEWING ACCESSORY BAG
50 This tri-fold bag has deep pockets to hold presser feet and small sewing tools. A felt over-
lap prevents articles from spilling and provides a place for storing pins and needles.
SLEEPY EYES SLEEP MASK
52 Digitizing and embroidering sleepy eyes for your next slumber party or good night’s sleep
is quick and easy. Completely stitched in the hoop, this is a fast, easy, and fun project!
SEW EASY HOME DEC
54 Sewing for your home is an enjoyable way to express yourself. Start with a commercial
pattern, add your own touches, and you can freshen the look of a room in a matter of
hours, giving it your own signature style.
SEW EASY NURSERY
58 It’s “sew easy” to plan a nursery when you start with commercial patterns, learn a few
tricks to simplify the sewing process, and add your own decorative touches!
table of
contents
50
54Managing Editor/Creative Director
Susan Beck
Senior Editor/Art Director
Jo Leichte
Through The Needle is published quarterly
by BERNINA® of America, Inc. for machine
stitchers and embroiderers of all types
and all skill levels. No portion of this
publication may be reproduced in any form
without prior written permission of the
publisher.
BERNINA® of America, Inc.
3702 Prairie Lake Court
Aurora, IL 60504
Phone: 630-978-2500
Website: www.berninausa.com
E-mail: [email protected]
For subscription information, contact:
Quilters’ Resource, Inc., P.O. Box 148850,
Chicago, IL 60614-8850
Printed in the U.S.A.
2
NINA McVEIGH
During 14 years of owning her own store, Nina developed and taught
her original patterns and designs in BERNINA® Clubs and Classes. An
avid quilter, heirloom sewer and lover of all kinds of embellishment,
she is also a collector of scissors, buttons and thread.
FAITH REYNOLDS
As a BERNINA® Educator, Faith teaches national classes for both
dealers and consumers. One of her favorite topics is the use of the
BERNINA® Embroidery Software.
NANCY BEDNAR
Nancy is a BERNINA® Educator and is co-author of The Encyclopediaof Sewing Machine Techniques. Her newest book is CreativeSerging: A Comprehensive Guide.
DEBBI LASHBROOK
A former teacher at the University level, Debbi also managed the
BERNINA® Sewing Center in Plano, TX for five years before joining the
Education staff at BERNINA® of America. Her specialties include gar-
ment construction, pattern drafting and fitting, and embroidery software.
PAT JENNINGS
A BERNINA® Educator, Pat was part of the original artista sewing/
embroidery development team, and now directs the artista 200 Portal
and the myartista section of www.berninausa.com.
MARLIS BENNETT
As an Education Consultant for BERNINA® of America, Inc., Marlis
creates unique interpretations of classic and heirloom garments,
putting her own stamp of creativity on machine-sewn projects.
LYNDA MH FAIRIES
Lynda MH Fairies is a quilt teacher living in Louisville, Colorado, who specializes in
teaching contemporary improvisational patchwork and design.
JENNIFER GIGAS
Jennifer, an Education Consultant for BERNINA® of America, Inc.,
combines serging, sewing, and embroidery in her updated versions
of favorite patterns.
BARBARA ALENCI
Barbara has been involved with sewing since she was 11 years old and
started making her own clothes. She opened a quilt shop in Florida 12
years ago, and a year later became a BERNINA® dealer. Since closing
her shop, she has been working for BERNINA®. Her favorite parts of the
job are teaching, and seeing the enthusiasm on the faces of her students.
JILL DANKLEFSEN
Jill’s exquisite work with manipulating decorative stitches – playing
with them, changing them, creating texture with them – is one of
her specialties as a BERNINA® Educator.
contributors
28
4
REGULAR CONTRIBUTORS:
Gayle Hillert
Vice President of Education,
BERNINA® of America, Inc.
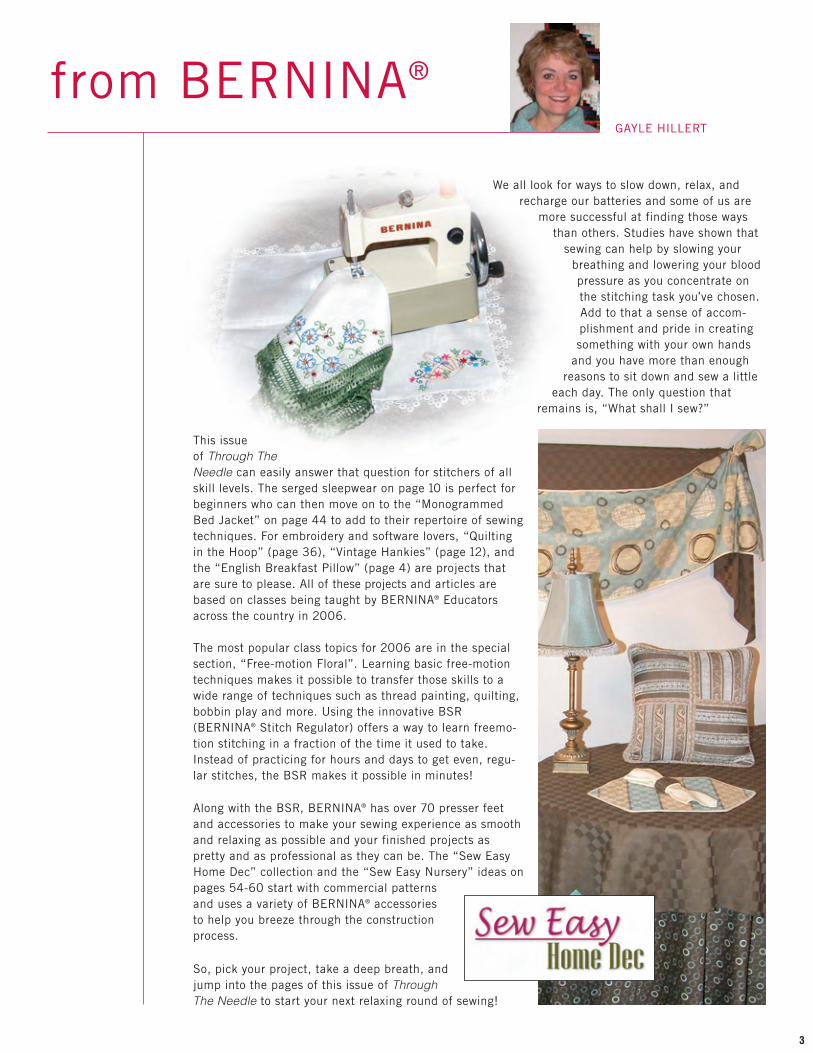
We all look for ways to slow down, relax, and
recharge our batteries and some of us are
more successful at finding those ways
than others. Studies have shown that
sewing can help by slowing your
breathing and lowering your blood
pressure as you concentrate on
the stitching task you’ve chosen.
Add to that a sense of accom-
plishment and pride in creating
something with your own hands
and you have more than enough
reasons to sit down and sew a little
each day. The only question that
remains is, “What shall I sew?”
This issue
of Through TheNeedle can easily answer that question for stitchers of all
skill levels. The serged sleepwear on page 10 is perfect for
beginners who can then move on to the “Monogrammed
Bed Jacket” on page 44 to add to their repertoire of sewing
techniques. For embroidery and software lovers, “Quilting
in the Hoop” (page 36), “Vintage Hankies” (page 12), and
the “English Breakfast Pillow” (page 4) are projects that
are sure to please. All of these projects and articles are
based on classes being taught by BERNINA® Educators
across the country in 2006.
The most popular class topics for 2006 are in the special
section, “Free-motion Floral”. Learning basic free-motion
techniques makes it possible to transfer those skills to a
wide range of techniques such as thread painting, quilting,
bobbin play and more. Using the innovative BSR
(BERNINA® Stitch Regulator) offers a way to learn freemo-
tion stitching in a fraction of the time it used to take.
Instead of practicing for hours and days to get even, regu-
lar stitches, the BSR makes it possible in minutes!
Along with the BSR, BERNINA® has over 70 presser feet
and accessories to make your sewing experience as smooth
and relaxing as possible and your finished projects as
pretty and as professional as they can be. The “Sew Easy
Home Dec” collection and the “Sew Easy Nursery” ideas on
pages 54-60 start with commercial patterns
and uses a variety of BERNINA® accessories
to help you breeze through the construction
process.
So, pick your project, take a deep breath, and
jump into the pages of this issue of ThroughThe Needle to start your next relaxing round of sewing!
from BERNINA®
GAYLE HILLERT
3
4
T H R O U G H T H E N E E D L E
CCuuttttiinngg tthhee FFaabbrriiccCut a piece of fabric 22” X 13” for the header (will be embroi-dered, then trimmed).
Cut one piece 13” X 36” for the main part of the pillowcase.
PPrreeppaarriinngg tthhee DDeessiiggnnOpen the BERNINA® Embroidery Software program.
Select Pattern Run Stitch #506 from the Satin Quilt Folder.Place the first click on the grid intersection and place the lastclick eight squares to the right. Touch the Enter key.
Select the scallop and reduce the width to 96%.
Insert Cone Flower Design FP098. Thedesign will come in selected. While still select-ed, Group it.Hold down the CTRL key and select the ConeFlower design and the scallop at the sametime. Select the Align Centers Vertical tool onthe lower tool bar.
Have breakfast in bed with this elegantlyembroidered pillow to support your tray.Combine a floral design with a repeatingscallop to form a beautiful border alongthe front edge.
SSuupppplliieess11/4 yards cotton fabric
aa rrtt ii ss tt aa 630E, 640E, 730E (alsoworks on model 200E)
BERNINA® Embroidery SoftwareVersion 4, all levels
Mega Hoop
OESD Design Pack: Flowers 5#11921, (available from:www.embroideryonline.com)
Isacord embroidery thread asdesired (Use the same color ofthread in the bobbin and theneedle so the header will befinished on the back.)
Aqua Mesh Stabilizer
Serger with four spools whiteserger thread
10” x 17” travel pillow form
BY FAITH REYNOLDS
S P E C I A L C L A S S R O O M E D I T I O N
5
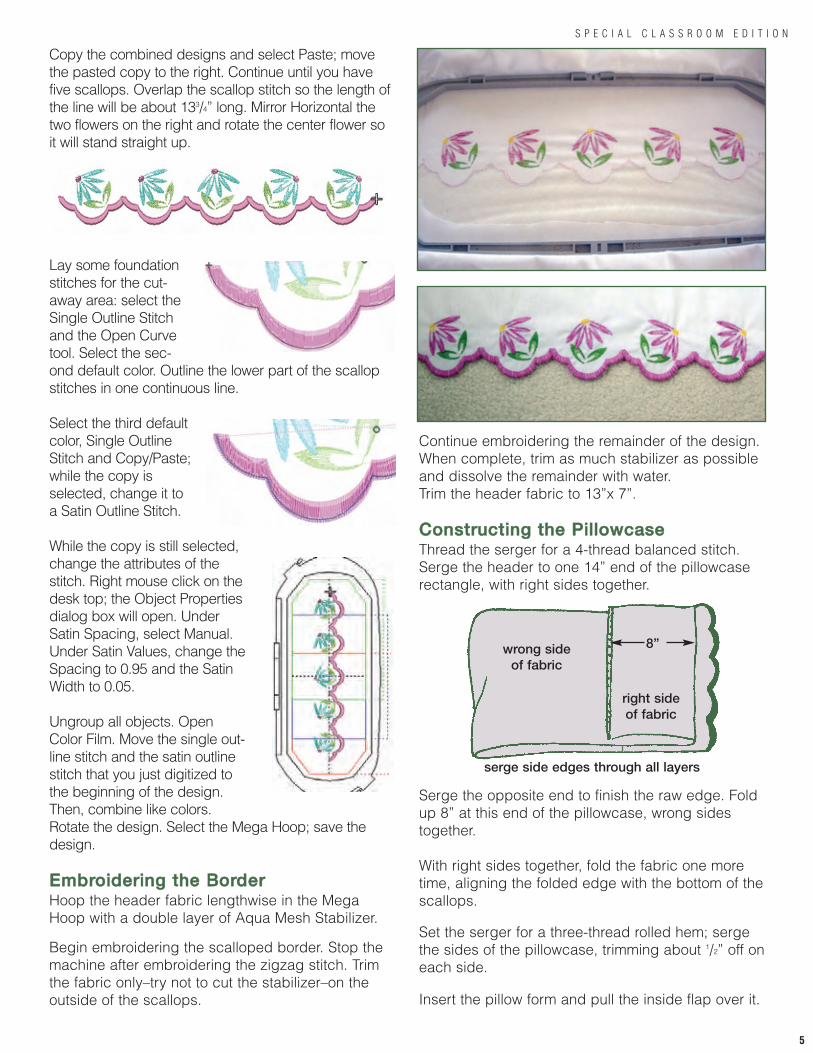
Copy the combined designs and select Paste; movethe pasted copy to the right. Continue until you havefive scallops. Overlap the scallop stitch so the length ofthe line will be about 133/4” long. Mirror Horizontal thetwo flowers on the right and rotate the center flower soit will stand straight up.
Lay some foundationstitches for the cut-away area: select theSingle Outline Stitchand the Open Curvetool. Select the sec-ond default color. Outline the lower part of the scallopstitches in one continuous line.
Select the third defaultcolor, Single OutlineStitch and Copy/Paste;while the copy isselected, change it toa Satin Outline Stitch.
While the copy is still selected,change the attributes of thestitch. Right mouse click on thedesk top; the Object Propertiesdialog box will open. UnderSatin Spacing, select Manual.Under Satin Values, change theSpacing to 0.95 and the SatinWidth to 0.05.
Ungroup all objects. OpenColor Film. Move the single out-line stitch and the satin outlinestitch that you just digitized tothe beginning of the design.Then, combine like colors.Rotate the design. Select the Mega Hoop; save thedesign.
EEmmbbrrooiiddeerriinngg tthhee BBoorrddeerrHoop the header fabric lengthwise in the MegaHoop with a double layer of Aqua Mesh Stabilizer.
Begin embroidering the scalloped border. Stop themachine after embroidering the zigzag stitch. Trimthe fabric only–try not to cut the stabilizer–on theoutside of the scallops.
Continue embroidering the remainder of the design.When complete, trim as much stabilizer as possibleand dissolve the remainder with water. Trim the header fabric to 13”x 7”.
CCoonnssttrruuccttiinngg tthhee PPiilllloowwccaasseeThread the serger for a 4-thread balanced stitch.Serge the header to one 14” end of the pillowcaserectangle, with right sides together.
Serge the opposite end to finish the raw edge. Foldup 8” at this end of the pillowcase, wrong sidestogether.
With right sides together, fold the fabric one moretime, aligning the folded edge with the bottom of thescallops.
Set the serger for a three-thread rolled hem; sergethe sides of the pillowcase, trimming about 1/2” off oneach side.
Insert the pillow form and pull the inside flap over it.
wrong side of fabric
serge side edges through all layers
right side of fabric
8”
6
T H R O U G H T H E N E E D L E
BY NINA McVEIGH
Finished size: 421/2” x 421/2”
The quilting designs found in embroidery are versatile and fun to use to
enhance the look of a quilted piece. Here we have used a simple quilting
design from the Studio BERNINA® “Quilting Expressions” by Keryn
Emmerson embroidery collection and the Hoop-It-All™ hoops to stitch
large designs and create a fun and fast project. Free-motion quilting
with the BSR heightens the beauty of the embroidered quilting designs
CUTTING AND PREPARATION
Four RedsCut eight 31/2” squares from each of the four reds
Additional Red Fabric Cut two 121/2” squares; cut each in half diagonally to form 4 trianglesNote: Triangles are cut large and trimmed to size after stitching
Black PrintCut two 11/8” x 141/2” for first borderCut two 11/8” x 153/4” for first border Cut eight 31/2” squares for 4-patch
Gray PrintCut twelve 31/2” squares for pieced borders and 4-patch
SUPPLIES:• 1/4 yard each of four reds for pieced
Border• 1/2 yard of an additional red for Setting
Triangles• 1/4 yard black print for first Border and
4-patch Cornerstones• 1/4 yard gray print for pieced Border and
4-patch Cornerstones• 1/2 yard black and white print for second
Border and Binding• 11/2 yard solid black for Center and for
outer Border• 45” square of Batting and Backing• Oliver Twist Thread for embroidery • OESD Aqua Mesh Plus stabilizer• Quilters Double Wide Square Hoop-It-
All™ hoop• Super Double Wide Hoop-It-All™ hoop
S P E C I A L C L A S S R O O M E D I T I O N
7
Black & White PrintCut four 17/8” x 213/4” for second borderCut five 21/2” x 45” strips for binding
Solid BlackCut four 17/8” squares for corners squares in second borderCut four 61/2” x 45” strips for borders (to be trimmed after embroidery)Cut one 16” square for the center (to be trimmed after embroidery)
Note: This project requires the use of both the Quilter’s Square Double Wideand the Super Double Wide Hoop-It-All™ frames to avoid multiple re-hoopingand repositioning of the fabric. To aid with design placement when usingthese frames, download the HIA Template-Quilters Square and the HIA-SuperDouble Wide Template found as free downloads at www.berninausa.com.After logging on, go to What’s New > Free Downloads > Hoop-It-All™
Templates, then select the Super Double Wide Hoop Template and QuiltersSquare Template files, available in version 3 and 4 .art formats.
EMBROIDERY
Open the BERNINA® V4 Embroidery Software to prepare the design.
Center SquareOpen HIA Template-Quilters Square-V4 .ART. Insert design #23 from the“Quilting Inspirations” embroidery collection.
Resize the design to 135% (should measure approximately 5.06mm x5.04mm). Move design so that it is positioned in the upper right corner of thehoop, as close to the center as possible without overlapping the placementlines of the hoop.
Because a small square will be added to thedesign to aid in aligning the sections, add asecond color to the color bar by selectingSettings>Thread colors. Change threads in thedesign to 2; click OK. With this second color ofthread, draw a small square in the lower cornerwhere the lines intersect.
From the drop-down menu select Arrange>Startand End. Select “digitize start point”; click on the bottom left corner of thealignment square. Delete the template. Note: You may need to reorder thecolors so that the alignment box is the first thread color.
Send the design to the machine. Once thedesign is open in the machine make sure thatthe needle is at the start point rather thancenter.
Prepare the Quilters Double Wide Square withAqua Mesh Plus. Fold the black center squarefabric into quarters and lightly crease to markthe horizontal and vertical centers.
Position the folded square in one quadrant of thehoop so that the folded corner is in the center. Openfabric and smooth onto the stabilizer. Lightly markhorizontal and vertical centers with chalk; theseshould intersect at the exact center of the hoop.
Attach hoop to the slide bracket. Slide hoop untilthe needle is on the horizontal line. Use the MoveMotif and/or Move Hoop functions to position theneedle on the vertical line.
Embroider the first motif, skipping the first threadcolor (alignment box).
When complete, take the hoop off the machineand rotate it counterclockwise. Remove the hoopattachment and put it on the left side of thehoop; repeat the steps taken to position the firstdesign.
Embroider the design again. Continue until designis complete.
Trim the embroidered square to 141/2”, centeringthe design.
BordersUsing the BERNINA® Embroidery Software, openHIAtemplate-Superdouble Wide-rotated-V4.ART.Insert design #23 as before.
Rotate thedesign 45°.Decrease thesize of thedesign to 4.5”x 4.5”. Selectthe center por-tion of thedesign and
delete. Copy and paste so there are two designs.Place one next to the other as shown.
Draw another alignment box as shown. Digitizethe start point of square. Delete the template.Reorder colors so alignment box is the first color.Send the design to the machine.
Prepare the hoop with Aqua Mesh Plus stabilizer.Mark the centering lines on the stabilizer. Mark asecond line 21/2” from the long centerline. Mark
8
T H R O U G H T H E N E E D L E
the vertical and horizontal centers of theborder strip. Mark a line 41/2” down fromthe short center; mark a chalk line 21/2”from the long center.
Place the fabric in the hoop so that thelong centerline is on the line marked 21/2”from center and the line on the fabric thatis 41/2” from the center of the strip is onthe center line of the hoop.
After embroidering two motifs, repositionthe fabric in the hoop and embroider athird motif. Repeat for the other threeborders. Trim borders to 301/2”.
Putting It All TogetherFirst Border: Sew the 141/2” borders to opposite sides of center square; sew the153/4” borders to the other two sides. The square should now measure 153/4” x153/4”.
Setting Triangles: Sew the large red triangles to each side of the bordered centersquare. Square up to measure 213/4” x 213/4”.
Sew two black and white border strips to oppositesides of the square; sew two 17/8” squares to eachend of the remaining black and white border stripsand sew to bordered center square. Quilt top shouldnow measure 241/2” x 241/2”.
Using the red 31/2” squares, piece four borders withvarious reds. Sew gray squares to the ends of two ofthe border strips. Attach the borders to the quilt top.
With the gray and the black prints construct four4-patch blocks. Attach to the ends of two blackborders; sew the black borders to the quilt. Quilt topshould now measure 421/2” x 421/2”.
Quilt and bind as desired.
9
SUPPLIES
• Sewing machine with free-motion foot (sample was made with artista 640 and theBERNINA® Stitch Regulator)
• Simple knit top in a strong color such as black, red, teal, etc.
• 8-12 lengths of assorted ribbons and fibers – about 2 yards of each: select a colorfamily with a strong contrast to the color of the top and look for a variety of textures
• Polyester or cotton thread to match the color of the top (for bobbin)
• Polyester or cotton thread in the same color family as the fibers (for needle)
• OESD tear-away or cut-away stabilizer, about 3” x 12”
• HRFive temporary spray adhesive
• Assorted beads
y
INSTRUCTIONS
Determine the desired placement of the fibers. The sample shown has the fibers stitched over the left shoulder with the free ends extending down the back and also in the front.
Spray one side of the stabilizer with temporary spray adhesive. Place the sticky side of the stabilizer on the wrong side of the fabric under the areas where the fibers will be stitched.
Place the fibers side by side and find the approximate center, positioning it on the shoulder seam of the top. Pin in place.
Thread the machine with the threads indicated in the supply list. Attach the BSR (BERNINA® Stitch Regulator #42). Select the BSR zigzag stitch. Lower the feed dog of the machine.
Stitch over the fibers, sewing about 6” down the back of the top and 6” down the front. Sew several rows of zigzag stitching, covering the width of the fibers.
On the front of the shirt, separate the fibers into two groups and tie them into a bow. Add assorted beads to the free parts of the fibers as desired.
BY ERIN HILLERT
The BSR (BERNINA® Stitch Regulator) for zigzag stitching is available on the following BERNINA® models: artista 730 (standard), artista 630 and 640 (optional) and the artista200 (if upgraded).
Add color, style, and movement to a plain
knit top with some funky fibers and a few simple
free-motion stitches.
S P E C I A L C L A S S R O O M E D I T I O N
SUPPLIES
• Any pajama pant with an elastic waist. Pajama Partyby Cindy Taylor Oates was used for the sample shown
• Batik yardage according to pattern for pant style selected
• Coordinating yardage according to pattern for contrast cuff
• 4 cones all-purpose serger thread to color-match the batik
• 1 cone heavier decorative thread for flatlock, such as Jeans Stitch by YLI
• 1” wide soft elastic – your comfortable waistline measurement plus 1”
• 3” length of 1” wide satin ribbon
• Bodkin or safety pin
Take advantage of the secure and tidy seams created
by BERNINA® sergers to stitch these colorful batik
pajama pants. Serged in less than 90 minutes, you’ll
want several pairs in your nighttime wardrobe.
WHY CONSTRUCT USING A SERGER?Flat construction methods for the serger, bor-rowed from garment factory assembly line tech-niques, make quick work of putting a garmenttogether. Keeping the overall garment unit as flatas possible for as long as possible during the con-struction process allows for quick seaming, easywaistband addition, and simple elastic insertion.The fact that a serger cuts, seams and clean finish-es in one pass eliminates several sewing steps andproduces a professional-looking garment. Homestitchers can easily adapt any commercial patternto these methods. The pajama project describedhere is a simple and ideal beginner’s introductionto the serger flat assembly method.
10
T H R O U G H T H E N E E D L E

CUTTING AND MARKINGCut two fronts and two backs from main batik fabric. Note: If an elastic casingallowance is included on the pant pattern you selected, fold it down and do notinclude it when you cut. Review the instructions to see if this allowance hasbeen drafted into the pattern. A separate serged-on elastic casing will be addedlater in the construction process. For easy identification, chalk mark CF and CB(center front and center back) on the wrong side of each pant piece, close to thewaistline edge.
STEP ONE: Seaming Fronts and BacksSet the serger for a 4-thread basic overlock stitch.
Serge-seam the pants units to each other in thefollowing order – think of it as a “laundry line”of pants pieces:• Pants Back side seam to Pants Front side seam• Pants Front to Pants Front at center crotch
seam• Pants Front side seam to Pants Back side seam
Press all seams to one side. Note: Illustration atleft includes casing from Step Three.
STEP TWO: Adding Flatlocked Contrast BandsHold up the pants to your body and determine if the pant legs need to be short-ened in order to accommodate the 31/4” contrast cuff. Measure and shorten eachpant leg unit as needed.
Measure the width of the seamed front/back pantleg unit. Cut 2 cuff pieces this width by 71/2” tall.Fold these cuff pieces in half across the width,wrong sides together, and press.
Reset the serger for a wide 2-thread flatlockstitch.
Match all raw edges and pin the cuff to thewrong side of the lower pant leg. Note:Remove pins as you serge, being careful notto serge over them. Flatlock the two unitstogether, having the pant leg fabric facing upwhile serging. (This will allow the flatlock bandto fold downwards, simulating a tuck.) Pull thetwo pieces away from each other allowing the
stitches to lie flat. The flatlocking creates a smooth, color accent on the pant leg.
STEP THREE: Adding a Waistline CasingReset the serger for basic 4-thread overlock seaming.
Measure the width of the seamed waistline at the pants upper edge. Cut a strip offabric this measurement x 3” tall. Fold the casing piece in half across the width,wrong sides together, and press.
With right sides together, pin the raw edges of thecasing to the top of the pants unit. Serge-seamtogether. Press the seam allowance down, away fromthe waistband.
Cut a piece of 1” elastic a comfortable waistlinemeasurement plus 1”. Using a bodkin or a safety pin,thread the elastic through the casing, extending theelastic out each edge by 1/4”. Pin in place. Using asewing machine, stitch the elastic in place throughthe casing to secure.
STEP FOUR: Final SeamingWith right sides together, match and seam the centerback crotch seam. Begin serging at the lower crotchedge, ending at the elastic waistline. Tip: Slide thegathers of the elastic away from the center backseamline to allow for the flattest possible seamingover the thickest part of this seam.
Refold the pants legs to match the inner leg seams.You will be seaming one pant front to one pant backon each side.
Begin seaming at one cuff, up the inner leg, throughthe center seams and down the second pant leg.Leave long thread tails at the beginning and end ofthe seam.
Press the leg seams to one side. Using a large-eyedhand-sewing needle, draw the serger thread tailsinside the seam allowance.
A FINAL TOUCH….Using a sewing machine, stitch a piece of ribbon overthe top of the center back seam to cover the end ofthe serger seam. Not only does this attractively markthe center back of your new PJ’s, but eliminates theneed for weaving in one set of thread tails!
4-Thread Overlock Stitch
• Left and right needles:All-purpose sergerthread: tension 4-5
• Upper and Lower loop-ers: All-purpose sergerthread: tension 4-5
• Stitch length: 21/2
• Cutting Width: 21/2
2-Thread Flatlock Stitch
• Left Needle: All-purposeserger thread – 0 – 1/2
• Right Needle: Removed• Upper Looper:
Converter cap installed• Lower Looper:
Decorative thread –tension 4-5
• Stitch Length: 11/2
• Cutting Width: 21/2
S P E C I A L C L A S S R O O M E D I T I O N
11
Back BackFront Front
SSuupppplliieess• BERNINA® Embroidery Software, Designer Plus
• Straight Stitch Hemmer Foot #62
• Edgestitch Foot #10/10C
• 16” square of white cotton batiste or linen
• 60” of lace edgingNote: Pre-finished handkerchief blanks can be used instead of fabric and lace edging
• OESD AquaMesh stabilizer
• HRFive Temporary Spray Adhesive
• Fabric marker
• Desired embroidery design(s): Designs shown are from OESD’s Grandmother’s Linens 1 embroidery collection, design pack #12021, available at www.embroideryonline.com.
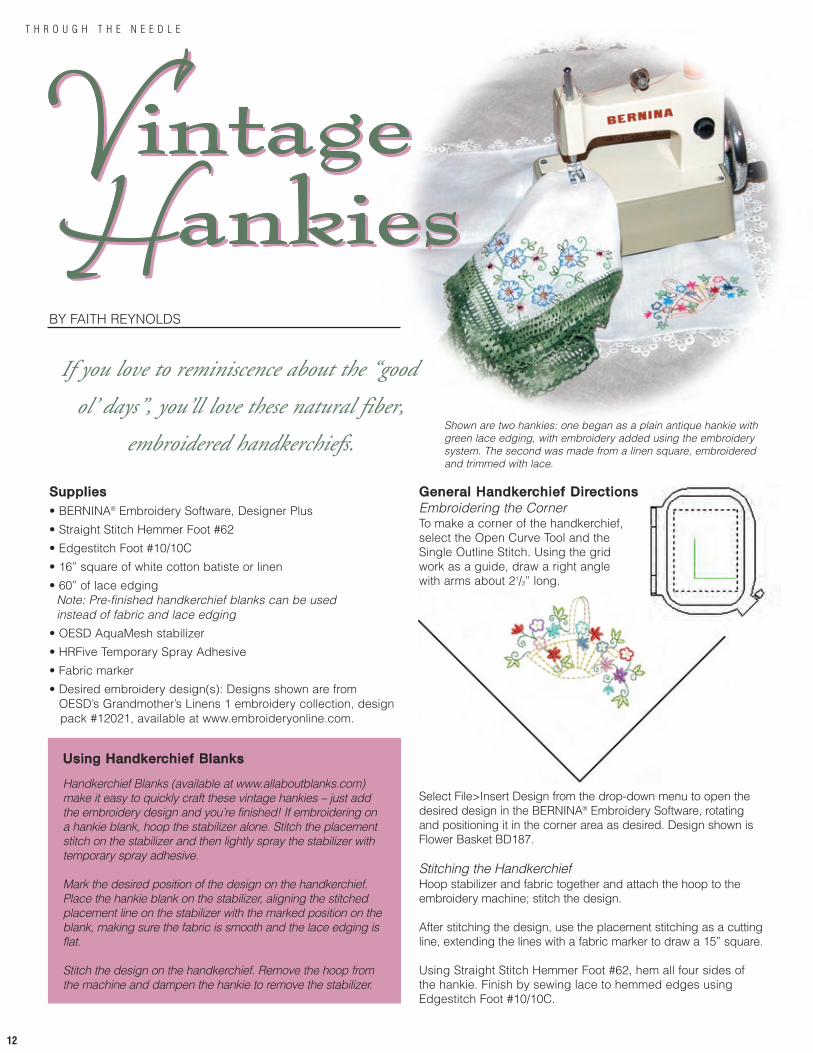
GGeenneerraall HHaannddkkeerrcchhiieeff DDiirreeccttiioonnssEmbroidering the Corner To make a corner of the handkerchief,select the Open Curve Tool and theSingle Outline Stitch. Using the gridwork as a guide, draw a right anglewith arms about 21/2” long.
Select File>Insert Design from the drop-down menu to open thedesired design in the BERNINA® Embroidery Software, rotatingand positioning it in the corner area as desired. Design shown isFlower Basket BD187.
Stitching the HandkerchiefHoop stabilizer and fabric together and attach the hoop to theembroidery machine; stitch the design.
After stitching the design, use the placement stitching as a cuttingline, extending the lines with a fabric marker to draw a 15” square.
Using Straight Stitch Hemmer Foot #62, hem all four sides ofthe hankie. Finish by sewing lace to hemmed edges usingEdgestitch Foot #10/10C.
If you love to reminiscence about the “good
ol’ days”, you’ll love these natural fiber,
embroidered handkerchiefs.Shown are two hankies: one began as a plain antique hankie withgreen lace edging, with embroidery added using the embroiderysystem. The second was made from a linen square, embroideredand trimmed with lace.
BY FAITH REYNOLDS
UUssiinngg HHaannddkkeerrcchhiieeff BBllaannkkss
Handkerchief Blanks (available at www.allaboutblanks.com)make it easy to quickly craft these vintage hankies – just addthe embroidery design and you’re finished! If embroidering ona hankie blank, hoop the stabilizer alone. Stitch the placementstitch on the stabilizer and then lightly spray the stabilizer withtemporary spray adhesive.
Mark the desired position of the design on the handkerchief.Place the hankie blank on the stabilizer, aligning the stitchedplacement line on the stabilizer with the marked position on theblank, making sure the fabric is smooth and the lace edging isflat.
Stitch the design on the handkerchief. Remove the hoop fromthe machine and dampen the hankie to remove the stabilizer.
12
T H R O U G H T H E N E E D L E
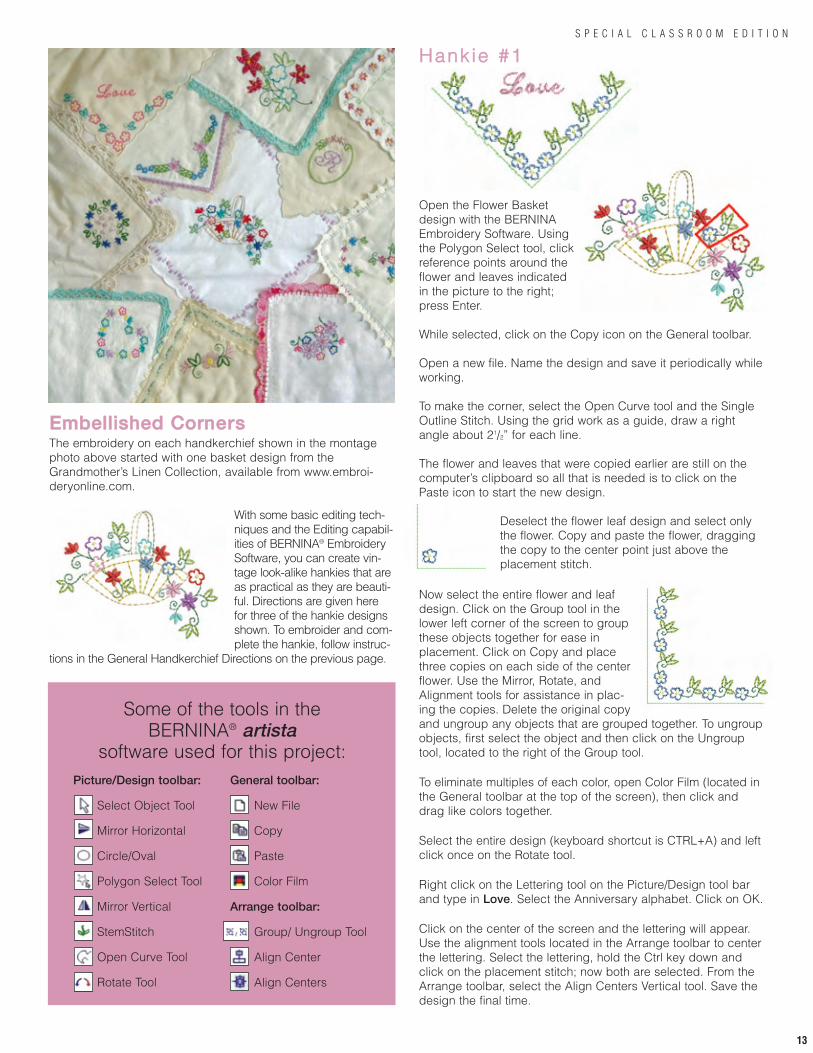
EEmmbbeelllliisshheedd CCoorrnneerrssThe embroidery on each handkerchief shown in the montagephoto above started with one basket design from theGrandmother’s Linen Collection, available from www.embroi-deryonline.com.
With some basic editing tech-niques and the Editing capabil-ities of BERNINA® EmbroiderySoftware, you can create vin-tage look-alike hankies that areas practical as they are beauti-ful. Directions are given herefor three of the hankie designsshown. To embroider and com-plete the hankie, follow instruc-
tions in the General Handkerchief Directions on the previous page.
HHaannkk iiee ##11
Open the Flower Basketdesign with the BERNINAEmbroidery Software. Usingthe Polygon Select tool, clickreference points around theflower and leaves indicatedin the picture to the right;press Enter.
While selected, click on the Copy icon on the General toolbar.
Open a new file. Name the design and save it periodically whileworking.
To make the corner, select the Open Curve tool and the SingleOutline Stitch. Using the grid work as a guide, draw a rightangle about 21/2” for each line.
The flower and leaves that were copied earlier are still on thecomputer’s clipboard so all that is needed is to click on thePaste icon to start the new design.
Deselect the flower leaf design and select onlythe flower. Copy and paste the flower, draggingthe copy to the center point just above theplacement stitch.
Now select the entire flower and leafdesign. Click on the Group tool in thelower left corner of the screen to groupthese objects together for ease inplacement. Click on Copy and placethree copies on each side of the centerflower. Use the Mirror, Rotate, andAlignment tools for assistance in plac-ing the copies. Delete the original copyand ungroup any objects that are grouped together. To ungroupobjects, first select the object and then click on the Ungrouptool, located to the right of the Group tool.
To eliminate multiples of each color, open Color Film (located inthe General toolbar at the top of the screen), then click anddrag like colors together.
Select the entire design (keyboard shortcut is CTRL+A) and leftclick once on the Rotate tool.
Right click on the Lettering tool on the Picture/Design tool barand type in Love. Select the Anniversary alphabet. Click on OK.
Click on the center of the screen and the lettering will appear.Use the alignment tools located in the Arrange toolbar to centerthe lettering. Select the lettering, hold the Ctrl key down andclick on the placement stitch; now both are selected. From theArrange toolbar, select the Align Centers Vertical tool. Save thedesign the final time.
Picture/Design toolbar:
Select Object Tool
Mirror Horizontal
Circle/Oval
Polygon Select Tool
Mirror Vertical
StemStitch
Open Curve Tool
Rotate Tool
General toolbar:
New File
Copy
Paste
Color Film
Arrange toolbar:
Group/ Ungroup Tool
Align Center
Align Centers
Some of the tools in the BERNINA® artista
software used for this project:
S P E C I A L C L A S S R O O M E D I T I O N
13

HHaannkk iiee ##22
Open the Floral Basketdesign. Select the objectsmarked by the red outline.Copy these objects andPaste them to a new file.
Select the first default colorand draw a placement linejust as you did in the previ-ous design.
Open Color Film and dragthis placement line to thebeginning of the color bar.
Sometimes it is necessary toclean up the design. Zoomin on the design and noticethat there are three frag-ments of stems under thelarge flower. Select each ofthe fragments and deletethem.
Select the stem and flowerbud at the end. Group theseobjects together; then Copy,Paste, Mirror-Image Vertical,and Mirror-Image Horizontal.Move the new flower to theopposite side of the centerflower. Place this part of thedesign in a position that ispleasing to you.
Ungroup all objects andopen Color Film. Drag likecolors together.
As a finishing touch, add adecorative stitch: Select theOpen Curve tool and selectthe Pattern Run OutlineStitch. Open ObjectProperties on the Generaltoolbar and select stitch#KOO15a from the newfolder (NP004a) of patternrun stitches.
Use the placement stitch asa guide. Start on the upperleft side and click to start,click the second time on the center point and the third timeon the end of the right line. Touch Enter and the design iscomplete.
HHaannkk iiee ##33
Open the Flower Basketdesign. Select the twoobjects marked by the redoutlines. Drag to the side ofthe screen. Select both andCopy.
Open a new file. Draw cornerplacement lines as in the pre-vious designs.
Select the first default color. Make a template using theCircle/Oval tool. In Object Properties, change the Oval size toapproximately 2” x 2.5”.
Right-click on the Lettering tool and type in one initial. Selectthe Anniversary font and increase letter height to one inch.
Hold down the Ctrl key and select the oval and the letter. Selectthe Align Centers tool.
Click on Paste to paste the copy of the flower and leaf. Placethree flowers on the top left of the ovaland three leaves below them on theoval.
Click on an object the second time toget empty boxes around an object. Clickand drag those boxes to get desiredangle.
Select the Open Curve tool and the stemstitch. Using right mouse clicks, placethe stem stitch around the oval, forming acurl at the center of the upper edge asshown. Press the Enter key.
The original oval is no longer needed. Select it and touch theDelete key on the keyboard.
Select the Open Curve tool and Pattern Run a701 from theHeirloom folder. Follow the right angle as a guide. Select thePattern Run stitch. Using the arrow keys on the keyboard, movethe outline stitch, above the placement stitch.
14
T H R O U G H T H E N E E D L E
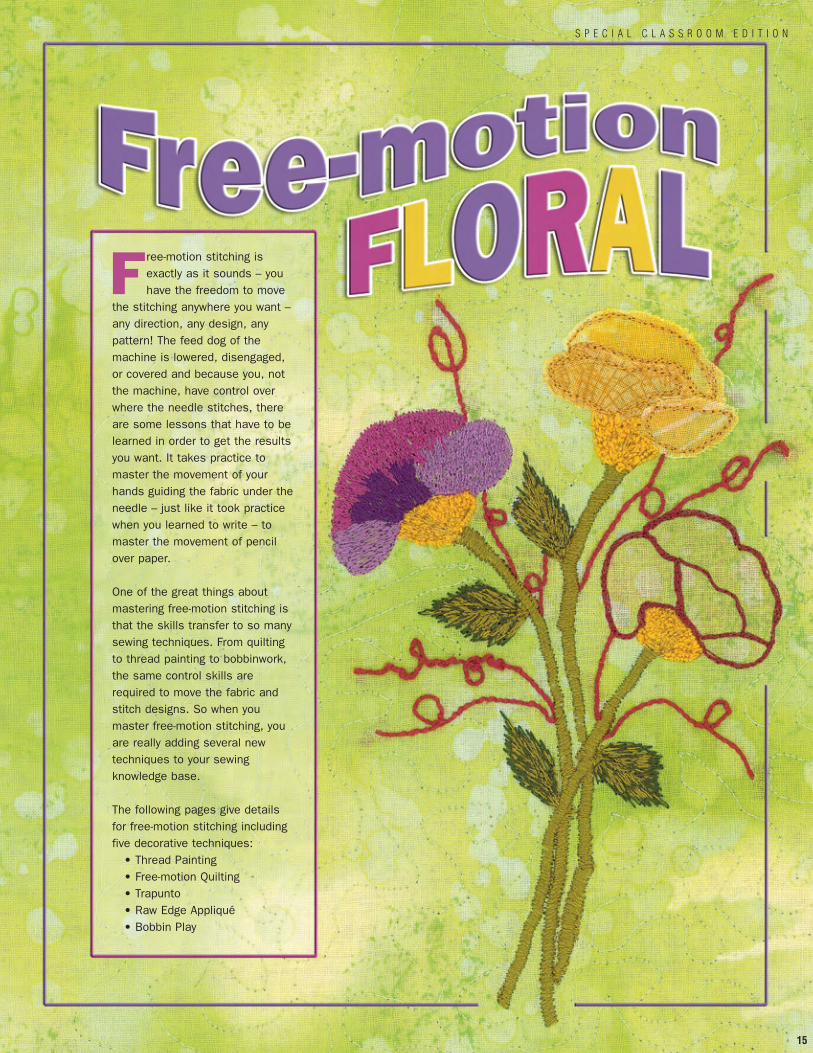
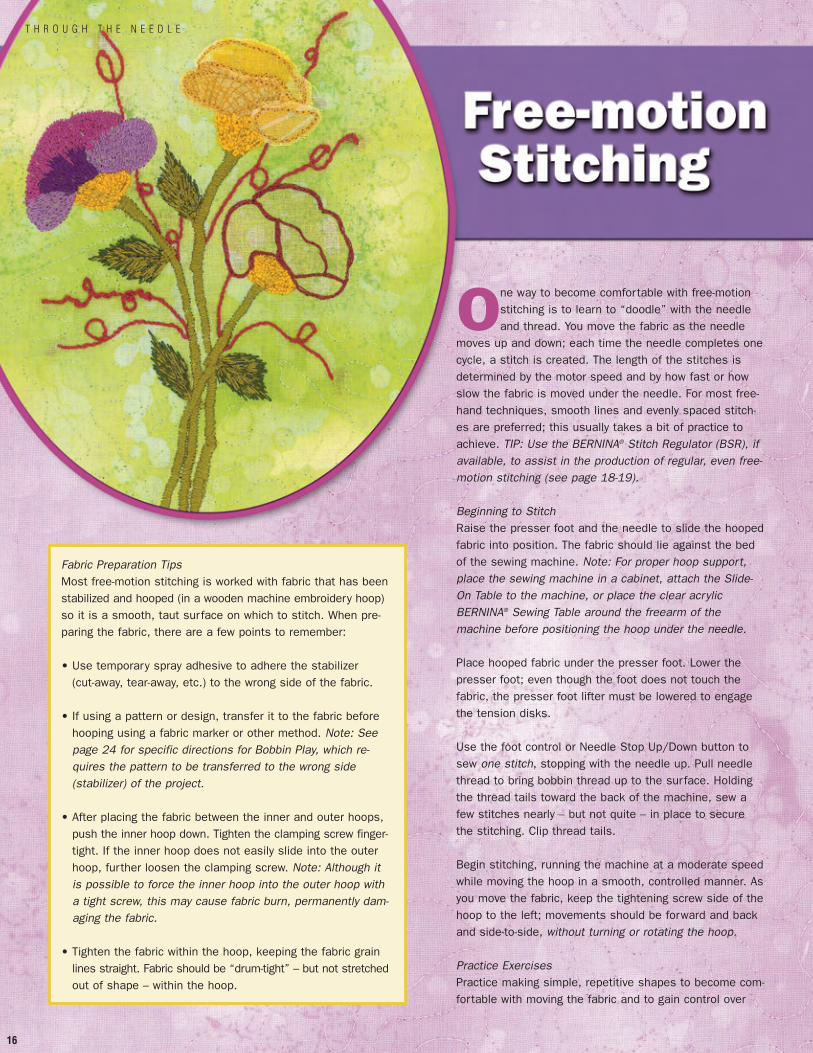
Free-motion stitching isexactly as it sounds – youhave the freedom to move
the stitching anywhere you want –any direction, any design, anypattern! The feed dog of themachine is lowered, disengaged,or covered and because you, notthe machine, have control overwhere the needle stitches, thereare some lessons that have to belearned in order to get the resultsyou want. It takes practice tomaster the movement of yourhands guiding the fabric under theneedle – just like it took practicewhen you learned to write – tomaster the movement of pencilover paper.
One of the great things aboutmastering free-motion stitching isthat the skills transfer to so manysewing techniques. From quiltingto thread painting to bobbinwork,the same control skills arerequired to move the fabric andstitch designs. So when youmaster free-motion stitching, youare really adding several newtechniques to your sewingknowledge base.
The following pages give detailsfor free-motion stitching includingfive decorative techniques:
• Thread Painting• Free-motion Quilting• Trapunto• Raw Edge Appliqué • Bobbin Play
S P E C I A L C L A S S R O O M E D I T I O N
15
One way to become comfortable with free-motionstitching is to learn to “doodle” with the needleand thread. You move the fabric as the needle
moves up and down; each time the needle completes onecycle, a stitch is created. The length of the stitches isdetermined by the motor speed and by how fast or howslow the fabric is moved under the needle. For most free-hand techniques, smooth lines and evenly spaced stitch-es are preferred; this usually takes a bit of practice toachieve. TIP: Use the BERNINA® Stitch Regulator (BSR), ifavailable, to assist in the production of regular, even free-motion stitching (see page 18-19).
Beginning to StitchRaise the presser foot and the needle to slide the hoopedfabric into position. The fabric should lie against the bedof the sewing machine. Note: For proper hoop support,place the sewing machine in a cabinet, attach the Slide-On Table to the machine, or place the clear acrylicBERNINA® Sewing Table around the freearm of themachine before positioning the hoop under the needle.
Place hooped fabric under the presser foot. Lower thepresser foot; even though the foot does not touch thefabric, the presser foot lifter must be lowered to engagethe tension disks.
Use the foot control or Needle Stop Up/Down button tosew one stitch, stopping with the needle up. Pull needlethread to bring bobbin thread up to the surface. Holdingthe thread tails toward the back of the machine, sew afew stitches nearly – but not quite – in place to securethe stitching. Clip thread tails.
Begin stitching, running the machine at a moderate speedwhile moving the hoop in a smooth, controlled manner. Asyou move the fabric, keep the tightening screw side of thehoop to the left; movements should be forward and backand side-to-side, without turning or rotating the hoop.
Practice ExercisesPractice making simple, repetitive shapes to become com-fortable with moving the fabric and to gain control over
16
T H R O U G H T H E N E E D L E
Fabric Preparation TipsMost free-motion stitching is worked with fabric that has beenstabilized and hooped (in a wooden machine embroidery hoop)so it is a smooth, taut surface on which to stitch. When pre-paring the fabric, there are a few points to remember:
• Use temporary spray adhesive to adhere the stabilizer(cut-away, tear-away, etc.) to the wrong side of the fabric.
• If using a pattern or design, transfer it to the fabric beforehooping using a fabric marker or other method. Note: Seepage 24 for specific directions for Bobbin Play, which re-quires the pattern to be transferred to the wrong side(stabilizer) of the project.
• After placing the fabric between the inner and outer hoops,push the inner hoop down. Tighten the clamping screw finger-tight. If the inner hoop does not easily slide into the outerhoop, further loosen the clamping screw. Note: Although itis possible to force the inner hoop into the outer hoop witha tight screw, this may cause fabric burn, permanently dam-aging the fabric.
• Tighten the fabric within the hoop, keeping the fabric grainlines straight. Fabric should be “drum-tight” – but not stretchedout of shape – within the hoop.
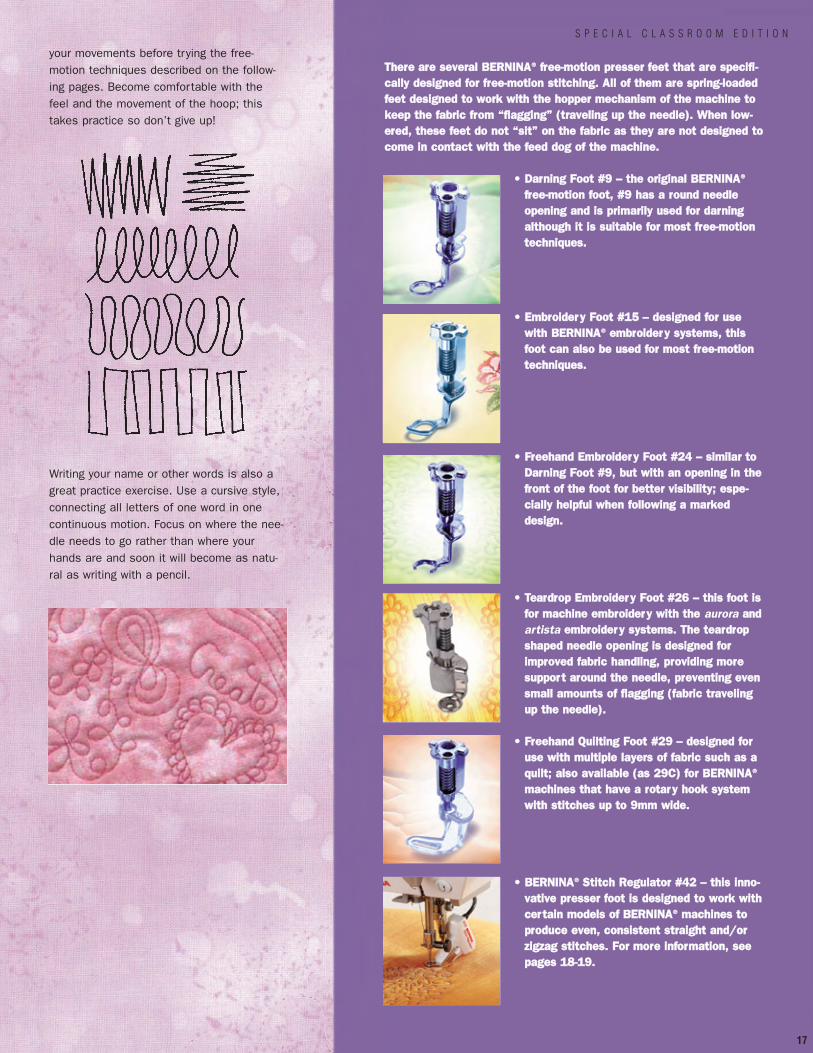
TThheerree aarree sseevveerraall BBEERRNNIINNAA®® ffrreeee--mmoottiioonn pprreesssseerr ffeeeett tthhaatt aarree ssppeecciiffii--ccaallllyy ddeessiiggnneedd ffoorr ffrreeee--mmoottiioonn ssttiittcchhiinngg.. AAllll ooff tthheemm aarree sspprriinngg--llooaaddeeddffeeeett ddeessiiggnneedd ttoo wwoorrkk wwiitthh tthhee hhooppppeerr mmeecchhaanniissmm ooff tthhee mmaacchhiinnee ttookkeeeepp tthhee ffaabbrriicc ffrroomm ““ffllaaggggiinngg”” ((ttrraavveelliinngg uupp tthhee nneeeeddllee)).. WWhheenn llooww--eerreedd,, tthheessee ffeeeett ddoo nnoott ““ssiitt”” oonn tthhee ffaabbrriicc aass tthheeyy aarree nnoott ddeessiiggnneedd ttooccoommee iinn ccoonnttaacctt wwiitthh tthhee ffeeeedd ddoogg ooff tthhee mmaacchhiinnee..
•• DDaarrnniinngg FFoooott ##99 –– tthhee oorriiggiinnaall BBEERRNNIINNAA®®
ffrreeee--mmoottiioonn ffoooott,, ##99 hhaass aa rroouunndd nneeeeddlleeooppeenniinngg aanndd iiss pprriimmaarriillyy uusseedd ffoorr ddaarrnniinnggaalltthhoouugghh iitt iiss ssuuiittaabbllee ffoorr mmoosstt ffrreeee--mmoottiioonntteecchhnniiqquueess..
•• EEmmbbrrooiiddeerryy FFoooott ##1155 –– ddeessiiggnneedd ffoorr uusseewwiitthh BBEERRNNIINNAA®® eemmbbrrooiiddeerryy ssyysstteemmss,, tthhiissffoooott ccaann aallssoo bbee uusseedd ffoorr mmoosstt ffrreeee--mmoottiioonntteecchhnniiqquueess..
•• FFrreeeehhaanndd EEmmbbrrooiiddeerryy FFoooott ##2244 –– ssiimmiillaarr ttooDDaarrnniinngg FFoooott ##99,, bbuutt wwiitthh aann ooppeenniinngg iinn tthheeffrroonntt ooff tthhee ffoooott ffoorr bbeetttteerr vviissiibbiilliittyy;; eessppee--cciiaallllyy hheellppffuull wwhheenn ffoolllloowwiinngg aa mmaarrkkeeddddeessiiggnn..
•• TTeeaarrddrroopp EEmmbbrrooiiddeerryy FFoooott ##2266 –– tthhiiss ffoooott iissffoorr mmaacchhiinnee eemmbbrrooiiddeerryy wwiitthh tthhee aurora aannddartista eemmbbrrooiiddeerryy ssyysstteemmss.. TThhee tteeaarrddrrooppsshhaappeedd nneeeeddllee ooppeenniinngg iiss ddeessiiggnneedd ffoorriimmpprroovveedd ffaabbrriicc hhaannddlliinngg,, pprroovviiddiinngg mmoorreessuuppppoorr tt aarroouunndd tthhee nneeeeddllee,, pprreevveennttiinngg eevveennssmmaallll aammoouunnttss ooff ffllaaggggiinngg ((ffaabbrriicc ttrraavveelliinngguupp tthhee nneeeeddllee))..
•• FFrreeeehhaanndd QQuuiillttiinngg FFoooott ##2299 –– ddeessiiggnneedd ffoorruussee wwiitthh mmuullttiippllee llaayyeerrss ooff ffaabbrriicc ssuucchh aass aaqquuiilltt;; aallssoo aavvaaiillaabbllee ((aass 2299CC)) ffoorr BBEERRNNIINNAA®®
mmaacchhiinneess tthhaatt hhaavvee aa rroottaarryy hhooookk ssyysstteemmwwiitthh ssttiittcchheess uupp ttoo 99mmmm wwiiddee..
•• BBEERRNNIINNAA®® SSttiittcchh RReegguullaattoorr ##4422 –– tthhiiss iinnnnoo--vvaattiivvee pprreesssseerr ffoooott iiss ddeessiiggnneedd ttoo wwoorrkk wwiitthhcceerr ttaaiinn mmooddeellss ooff BBEERRNNIINNAA®® mmaacchhiinneess ttoopprroodduuccee eevveenn,, ccoonnssiisstteenntt ssttrraaiigghhtt aanndd//oorrzziiggzzaagg ssttiittcchheess.. FFoorr mmoorree iinnffoorrmmaattiioonn,, sseeeeppaaggeess 1188--1199..
your movements before trying the free-motion techniques described on the follow-ing pages. Become comfortable with thefeel and the movement of the hoop; thistakes practice so don’t give up!
Writing your name or other words is also agreat practice exercise. Use a cursive style,connecting all letters of one word in onecontinuous motion. Focus on where the nee-dle needs to go rather than where yourhands are and soon it will become as natu-ral as writing with a pencil.
S P E C I A L C L A S S R O O M E D I T I O N
17
The BERNINA® Stitch Regulator (BSR) makes free-motion stitching techniques easy to master, evenfor beginners. The BSR adjusts the speed of the
needle to coordinate with the movement of the fabric, aidingin the production of consistent, regular stitches. Note: The
BERNINA® Stitch Regulator may be used only on BERNINA®
sewing systems equipped with the BSR connection (aurora430/440 (straight stitch only), artista 630/640, artista 730,
and the artista 200 (with Upgrade Kit installed). Note: See chart onfollowing page.
Producing evenly spaced stitches in straightlines with smooth curves requires practice –
coordinating the speed of stitching with the speed offabric movement can be somewhat intimidating. By eliminating
much of the free-motion learning curve, the BERNINA® Stitch Regulator allows the sewer to concentrateon creating a beautiful design rather than on the mechanics of forming individual stitches. As fabric ismoved under the BERNINA® Stitch Regulator’s optical sensor, the BSR adjusts the motor speed of themachine and the up-and-down motion of the needle to correspond with that of the fabric. If the sensordoes not sense any fabric movement for seven seconds, the BSR automatically deactivates and thered light goes off.
When using the BERNINA® Stitch Regulator, the presser foot pressure is reduced to 0 and the feed dog mechanism is lowered; thisallows the fabric to be moved freely under the sole of the foot. A consistent stitch length is maintained when the fabric is moved withinthe allowed speed range; exceeding this rate distorts the consistency of the stitch. When activated, an audio signal beeps if thefabric movement under the foot is too rapid.
A Choice of StitchesDepending on the model of machine equipped with the BSR, you can select a straight stitch or a zigzag stitch for your free-motionstitching, Straight stitch can be used for most techniques such as quilting, thread painting, raw edge appliqué and bobbin work. Thezigzag stitch works well to add dimension to thread-painted motifs, to fill in initials for monograms, and to use for decorative embellish-ments such as a unique free-form appliqué stitch.
A Choice of Stitching ModesThe BERNINA® Stitch Regulator has two stitching modes. Deciding which to use for a specific technique is a matter of personal preference.
Mode 1 provides continuous power to the needle. When the foot control is depressed or the Start/Stop button is engaged, the needlemoves up and down – stitching in place at a reduced speed – until the BSR senses fabric movement. Then the machine speeds upand slows down as fabric is moved under the foot. The needle will continue to move up and down even if the foot does not sense fab-ric movement. When stitching in Mode 1, secure thread tails by selecting a short stitch length and moving the fabric under the needlealong the design pattern line. To hide the securing stitches, begin sewing a short distance (1/8”) from the starting end of the draw line,then stitch back to the beginning of the design. Disengage the BERNINA® Stitch Regulator and cut the thread tails. Re-engage the BSRand lengthen the stitch; resume stitching, placing the longer stitches exactly on top of the securing stitches to hide them.
18
T H R O U G H T H E N E E D L E
The most consistent stitch length is main-tained when the fabric is moved smoothly –without abrupt changes in direction orspeed. When the fabric movement exceedsthe limits of the BSR, an audio signal“beeps” as a reminder to reduce speed.
Mode 2 does not engage the needle untileither the foot control or Start/Stop buttonis engaged and the fabric is moved. If thefoot does not sense fabric movement, theneedle stops moving up and down even ifthe foot control is depressed or theStart/Stop unit is still active. SelectingMode 2 enables the use of the SecurityFunction for locking stitches. Position theneedle over the beginning of the design,then activate the BERNINA® Stitch Regulatorby depressing the foot control or engagingthe Start/Stop button. Set the desired stitch length, then touch the Securing function. The needle will move up and down, taking fourstitches and securing the thread tails to the fabric. When the needle stops moving, move the fabric under the needle and stitch thedesign. Touch the Securing function again at the completion of the stitched design to secure the stitching; clip thread ends.
A Choice of SolesThe BERNINA® Stitch Regulator is packaged with three interchangeable soles. Followingare guidelines for using these soles, but ultimately the choice of which sole to use is apersonal preference. Try them all to determine which sole you prefer for specific tech-niques. • Closed Metal Sole - similar to the Darning Foot #9. It is used for free-motion darning,
free-motion stipple quilting, free-motion echo quilting, and free-motion embroidery. • Open Metal Sole - similar to the Freehand Embroidery Foot #24, the front of the foot is
cut away, providing better visibility to the needle area. Use this foot for free-motionembroidery and free-motion quilting techniques on thick, smooth fabrics. The curveddesign of the foot’s toes moveeasily over multiple layers of fab-ric. Note: The Open Metal Sole isnot suitable for loopy fabricssuch as terry toweling or bouclé;the toes of the sole can becomeentangled in the material’s loops.
•Transparent Sole - rounded withcross hairs and concentric circleguides etched into the foot. Usethe cross hairs as a guide whenstitching straight lines in theditch. The concentric circles arehelpful guides for echo quilting.
The stitched design to the rightwas created by Kayla Kenningtonusing free-motion straight andzigzag stitching with theBERNINA® Stitch Regulator.
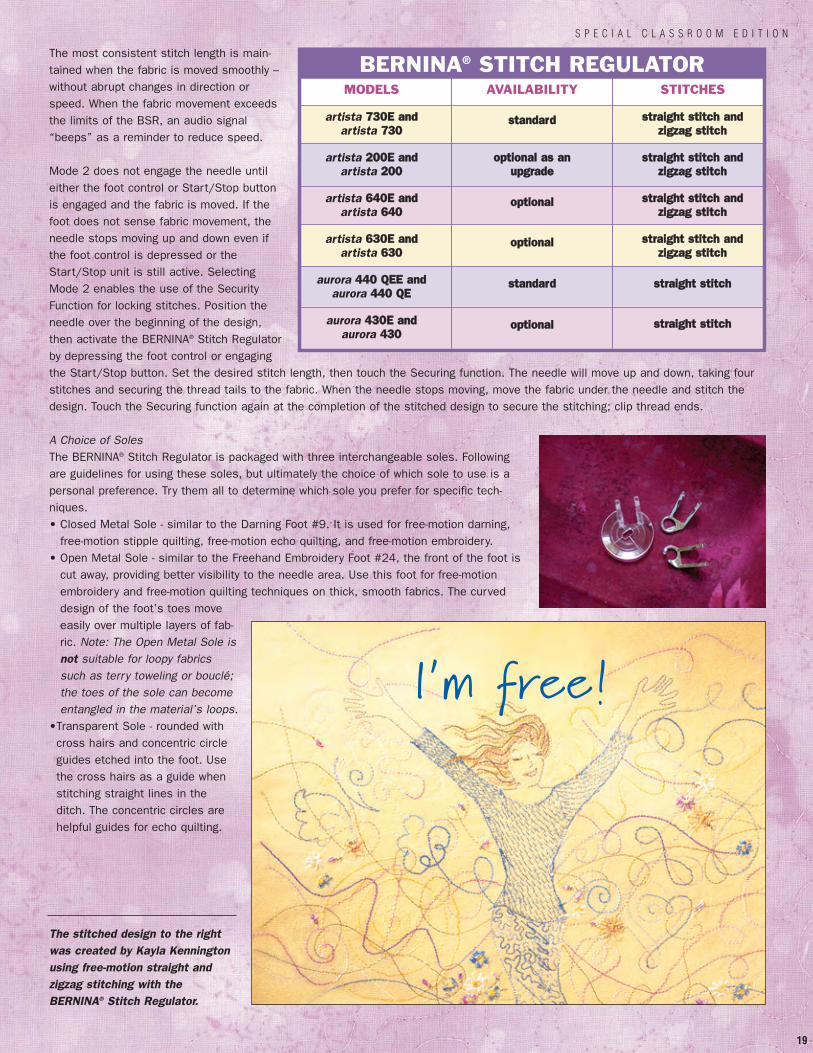
BERNINA® STITCH REGULATORMODELS
artista 773300EE aanndd artista 773300
artista 220000EE aanndd artista 220000
artista 664400EE aanndd artista 664400
artista 663300EE aanndd artista 663300
aurora 444400 QQEEEE aanndd aurora 444400 QQEE
aurora 443300EE aanndd aurora 443300
AVAILABILITY
ssttaannddaarrdd
ooppttiioonnaall aass aannuuppggrraaddee
ooppttiioonnaall
ooppttiioonnaall
ssttaannddaarrdd
ooppttiioonnaall
STITCHES
ssttrraaiigghhtt ssttiittcchh aannddzziiggzzaagg ssttiittcchh
ssttrraaiigghhtt ssttiittcchh aannddzziiggzzaagg ssttiittcchh
ssttrraaiigghhtt ssttiittcchh aannddzziiggzzaagg ssttiittcchh
ssttrraaiigghhtt ssttiittcchh aannddzziiggzzaagg ssttiittcchh
ssttrraaiigghhtt ssttiittcchh
ssttrraaiigghhtt ssttiittcchh
S P E C I A L C L A S S R O O M E D I T I O N
19
I ’m free!
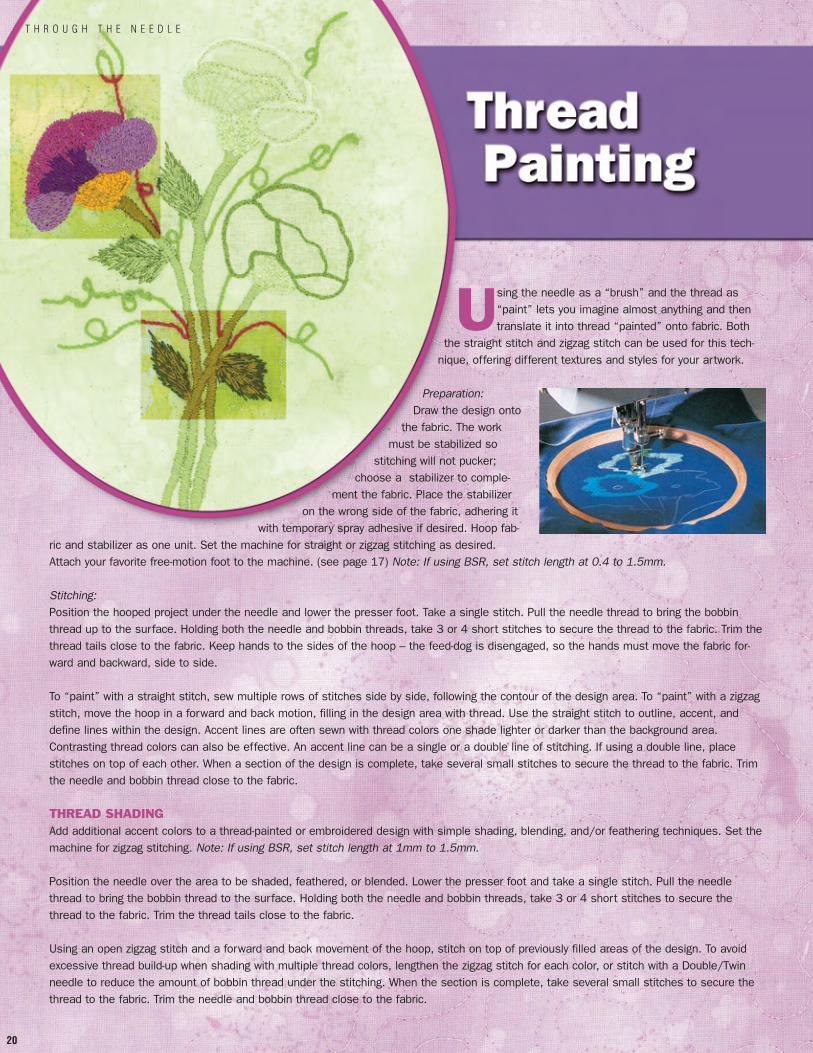
Using the needle as a “brush” and the thread as“paint” lets you imagine almost anything and thentranslate it into thread “painted” onto fabric. Both
the straight stitch and zigzag stitch can be used for this tech-nique, offering different textures and styles for your artwork.
Preparation:Draw the design onto
the fabric. The workmust be stabilized so
stitching will not pucker;choose a stabilizer to comple-
ment the fabric. Place the stabilizeron the wrong side of the fabric, adhering it
with temporary spray adhesive if desired. Hoop fab-ric and stabilizer as one unit. Set the machine for straight or zigzag stitching as desired. Attach your favorite free-motion foot to the machine. (see page 17) Note: If using BSR, set stitch length at 0.4 to 1.5mm.
Stitching:Position the hooped project under the needle and lower the presser foot. Take a single stitch. Pull the needle thread to bring the bobbinthread up to the surface. Holding both the needle and bobbin threads, take 3 or 4 short stitches to secure the thread to the fabric. Trim thethread tails close to the fabric. Keep hands to the sides of the hoop – the feed-dog is disengaged, so the hands must move the fabric for-ward and backward, side to side.
To “paint” with a straight stitch, sew multiple rows of stitches side by side, following the contour of the design area. To “paint” with a zigzagstitch, move the hoop in a forward and back motion, filling in the design area with thread. Use the straight stitch to outline, accent, anddefine lines within the design. Accent lines are often sewn with thread colors one shade lighter or darker than the background area.Contrasting thread colors can also be effective. An accent line can be a single or a double line of stitching. If using a double line, placestitches on top of each other. When a section of the design is complete, take several small stitches to secure the thread to the fabric. Trimthe needle and bobbin thread close to the fabric.
THREAD SHADINGAdd additional accent colors to a thread-painted or embroidered design with simple shading, blending, and/or feathering techniques. Set themachine for zigzag stitching. Note: If using BSR, set stitch length at 1mm to 1.5mm.
Position the needle over the area to be shaded, feathered, or blended. Lower the presser foot and take a single stitch. Pull the needlethread to bring the bobbin thread to the surface. Holding both the needle and bobbin threads, take 3 or 4 short stitches to secure thethread to the fabric. Trim the thread tails close to the fabric.
Using an open zigzag stitch and a forward and back movement of the hoop, stitch on top of previously filled areas of the design. To avoidexcessive thread build-up when shading with multiple thread colors, lengthen the zigzag stitch for each color, or stitch with a Double/Twinneedle to reduce the amount of bobbin thread under the stitching. When the section is complete, take several small stitches to secure thethread to the fabric. Trim the needle and bobbin thread close to the fabric.
20
T H R O U G H T H E N E E D L E
Trapunto is a three-dimensional technique thatgives a raised look to selected areas of stitching.While the look is related to quilting, only the
design is stuffed, not the background.
Hoop two layers of fabrictogether, marking the design
shape on the top layer of fabricwith a fabric marker. Set the
machine for straight stitching. Attachyour favorite free-motion foot to the
machine. (see page 17) Note: If using BSR,set stitch length at 2mm to 3mm.
Position the project under the needle and lower the presser foot.Take a single stitch. Pull the needle thread to bring the bobbin thread to the surface. Holding both the needle and bobbin threads, take 3 or4 short stitches to secure the thread to the fabric. Trim the thread tails close to the fabric.
Stitch completely around the drawn design several times, moving the fabric under the foot without turning the hoop. When a design/color iscomplete, take several small stitches to secure the thread to the fabric. Trim the needle and bobbin thread close to the fabric.
Make a small cut in the backing fabric within the stitched shape. Fill the motif with small bits of batting or fiberfill. Fuse a small pieceof interfacing over the opening on the back of the work.
RAW EDGE APPLIQUÉRaw Edge Appliqué is an easy way to apply fabric shapes to a background fabric. This technique oftenuses motifs cut from printed fabric and results in a simple or primitive look.
Prepare background fabric by bonding tear-away or cut-away stabilizer to the wrong side with temporaryspray adhesive. Cut fabric shapes as desired; if cutting printed motifs, trim about 1/4” outside the edgeof the motif. Using fusible web or spray adhesive, position and bond the shapes to the background fab-ric as desired. Hoop the prepared fabric in a wooden embroidery hoop.
Thread the machine with a polyester, cotton, or rayon embroidery thread. Attach the free-motion presserfoot of your choice (see page 17) to the machine and select a straight stitch.
Position the hooped project under the needle and lower the presser foot. Take a single stitch. Pull the needle thread to bring the bob-bin thread to the surface. Holding both the needle and bobbin threads, take 3 or 4 short stitches to secure the thread to the fabric.Trim the thread tails close to the fabric.
Stitch around the edge of the motif about 1/4” from the cut edge of the fabric. Follow the same path 3-4 times to secure the appliquéshapes and form a decorative edge of thread around the edges of the motifs. When finished, take 3-4 small stitches to secure; clip threadtails.
S P E C I A L C L A S S R O O M E D I T I O N
21
Quilting refers to stitching two layers of fabric withbatting between them. A variety of styles andtechniques are used to do this.
STIPPLE QUILTINGAlso called serpentine quilting, stippling is used to secure and
fill areas of a quilt or quilted garment. Generally the designs arecurved, and stitching lines do not cross or intersect. The lines of
stitching should be evenly spaced, about 1/4” apart.
Set the machine for straight stitching. Attach your favorite free-motionfoot to the machine. (see page 17) Note: If using BSR, set stitch length at
2mm to 3mm; for very small, tight stippling, adjust stitch length to 1.25mm to1.5mm.
Prepare a “quilt sandwich” (top, batting, backing), bonding the layers together with temporary sprayadhesive. If desired, mark a stippling design on the quilt.
Loosen the clamping screw on a wooden embroidery hoop and hoop the area to be quilted with themarked stitching pattern facing upward.
Tip: When working with a large and/or bulky quilt or other project, be sure to support the weight ofthe fabric to prevent it from pulling the hoop or distorting the fabric. For proper hoop support, placethe sewing machinein a cabinet, attachthe Slide-On Tableto the machine, or
place the clear acrylic BERNINA® Sewing/Quilting Tablearound the free-arm of the machine before positioningthe hoop under the needle.
Position the project under the needle and lower thepresser foot; take a single stitch. Pull the needlethread to bring the bobbin thread to the surface.Holding both the needle and bobbin threads, take 3or 4 short stitches to secure the thread to the fabric.Trim the thread tails close to the fabric.
Re-hoop as needed to continue quilting until thedesign is complete.
Stipple Quilting
22
T H R O U G H T H E N E E D L E
OUTLINE QUILTINGAccentuate printed, appliquéd, or pieced motifs by outliningthem with a single line of stitching. Thread the machine withcoordinating or contrasting thread. Adjust the stitch length to1-3mm; shorter for smaller designs, longer for larger motifs.
Position the needle over the fabric and lower the presser foot.Pull the bobbin thread up to the top of the work; take a fewshort stitches to secure and clip threads. Outline the design,stitching on or outside the edge of the motif as desired.
ECHO QUILTINGOften used to set off or emphasize an appliquéd or pieceddesign, this technique can be compared to the rings formedwith a stone is thrown into a pond. Position the needle over thefabric and lower the presser foot. Outline the design with rowsof stitching. Use the presser foot to gauge the distancebetween the rows of echo stitching.
CONTINUOUS LINE QUILTINGStitch continuous, connected quilting designs, eliminating theneed for frequent stops and starts and securing of thread tails.
Trace, transfer, or draw continuous line stitching paths ontoquilt. Designs are available in many forms and from a variety ofsources, including books and magazines, templates, and print-ed on “stitch-through” paper. Patterns may also be stitchedfreeform without following a marked path, moving from oneshape to the next, as the leaves in the sample were stitched tofill the space between flowers.
Thread the machine with coordinating or contrasting thread.Adjust the stitch length to 1-3mm; shorter for smaller designs,longer for larger motifs. Position the needle over the fabric andlower the presser foot.
Stitch along the drawn thread path.
Outline Quilting
Echo Quilting
Continuous Line Quilting
S P E C I A L C L A S S R O O M E D I T I O N
23
Add textured dimension to projects by stitchingwith heavy threads, cords, and yarns on the bob-bin and sewing with the project upside down. Use
decorative thread, cord, or yarn – such as YLI Silk Ribbon orPearl Crown Rayon, DMC Perle Cotton, or Superior Threads
Razzle Dazzle – and the Black Latch Bobbin Case or a second-ary bobbin case to create textured free-motion stitchery.
Interface or otherwise stabilize the fabric to be embellished. Tracethe reversed design onto the stabilizer. Hoop the project fabric with
the right side of the fabric against the outer hoop. Note: The right sideof the fabric will lie on the bed of the machine and the drawn design on the
interfacing will be facing up in the hoop.
Wind several bobbins with decorative thread using the bobbin winder of the machine and aslow speed. If you are using a machine that doesn’t have multiple-speed bobbin winder, let the deco-
rative thread pass through your fingers to control the speed and wind it evenly onto the bobbin.
Insert the bobbin into the Black Latch Bobbin Case (or a secondary bobbin case) and loosen the tension by turning the screw in acounter clockwise direction. The looser the tension on the bobbin case, the loopier the stitches will be, creating more texture. Tip:When loosening the screw, hold your hands over a container so that if it drops, you will find it. The screw is very short and small,making it easy to fall out when loosened and difficult to find if it does.
The thickness of the thread/yarn being used will greatly reduce the yardage wound onto the bobbin. Expect to stop and change thebobbin often. At the beginning and end of each bobbin, pull the bobbin thread to the wrong side of the fabric. When the work is com-plete, use a hand-sewing needle to secure needle and bobbin threadsto the wrong side of the project. Note: If your machine has a lowerbobbin monitor, the machine will stop sewing with sufficient bobbinthread to enable you to pull the bobbin through to the wrong side ofthe fabric.
Thread the needle with a coordinating polyester thread and increaseupper tension to 8-9.5. Set the machine for straight stitching. Attachyour favorite free-motion foot to the machine (see page 17). Note: Ifusing BSR, set stitch length at 2mm to 3mm. Take a single stitch andpull the needle thread to bring the heavy bobbin thread to the wrongside of the fabric. Hold the thread tails while stitching to prevent themfrom entangling in the design. Following the drawn design, sew slowlywith long straight stitches.
Run the machine at a smooth, even speed, filling in the shapes. Covereach area completely, moving the fabric constantly to avoid building uptoo much bobbin thread in any one place. Moving the hoop in a circu-lar motion will produce softer, curlier patterns; straight, parallel rowswill yield a more linear texture.
24
T H R O U G H T H E N E E D L E
A SEPARATE BOBBIN CASE
When stitching bobbin-work, using a BlackLatch bobbin case(available for CB bobbinsystems) or a secondarybobbin case (for rotarybobbin systems) is rec-ommended. Changesmade to the tension willnot affect normalsewing tension if theprimary bobbin case is
not adjusted. If a secondary bobbin case is used forthe rotary systems, mark it with a dab of paint ornail polish to distinguish it from your regular sewingbobbin case.
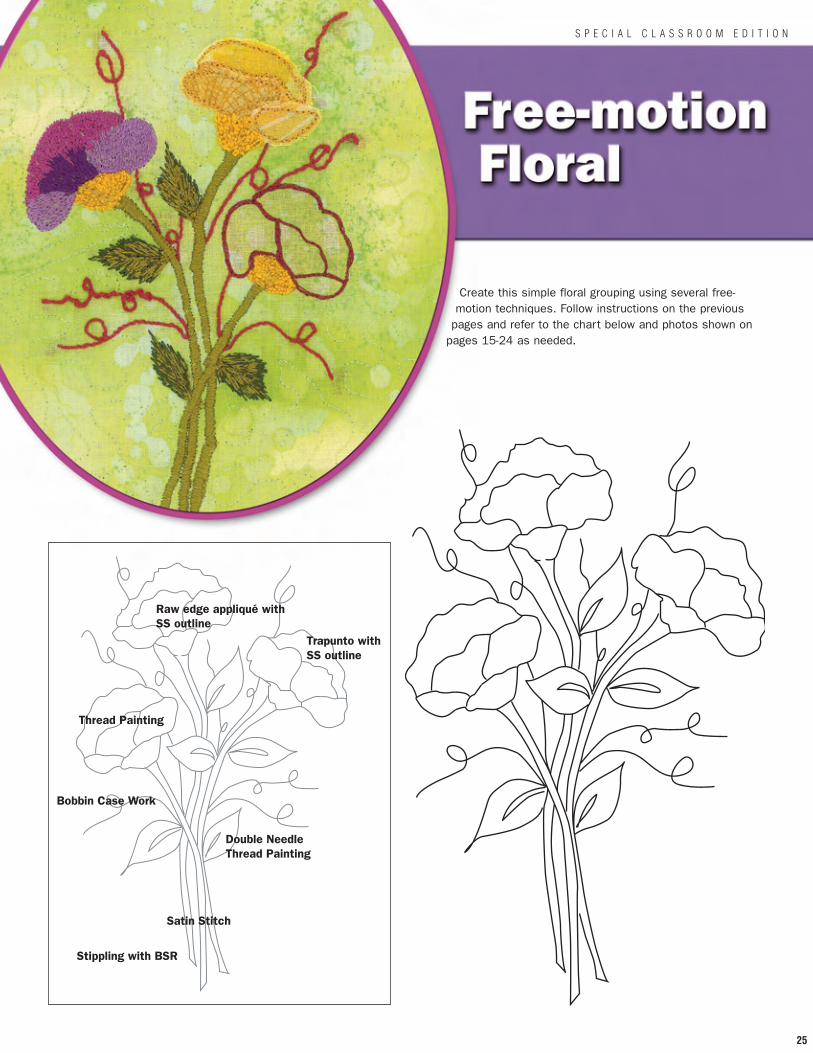
Create this simple floral grouping using several free-motion techniques. Follow instructions on the previous
pages and refer to the chart below and photos shown onpages 15-24 as needed.
Thread Painting
Bobbin Case Work
Satin Stitch
Stippling with BSR
Raw edge appliqué withSS outline
Trapunto withSS outline
Double NeedleThread Painting
S P E C I A L C L A S S R O O M E D I T I O N
25

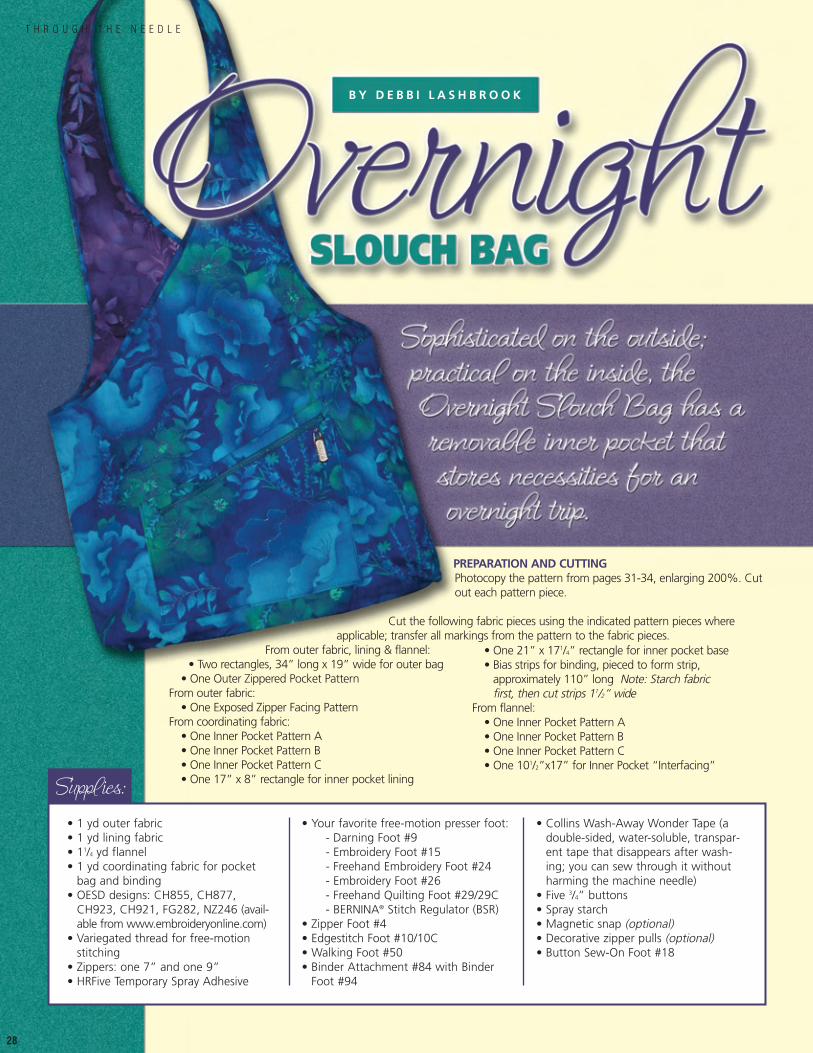
B Y D E B B I L A S H B R O O K
• 1 yd outer fabric• 1 yd lining fabric• 11/4 yd flannel• 1 yd coordinating fabric for pocket
bag and binding• OESD designs: CH855, CH877,
CH923, CH921, FG282, NZ246 (avail-able from www.embroideryonline.com)
• Variegated thread for free-motionstitching
• Zippers: one 7” and one 9”• HRFive Temporary Spray Adhesive
• Your favorite free-motion presser foot: - Darning Foot #9- Embroidery Foot #15- Freehand Embroidery Foot #24- Embroidery Foot #26- Freehand Quilting Foot #29/29C- BERNINA® Stitch Regulator (BSR)
• Zipper Foot #4• Edgestitch Foot #10/10C• Walking Foot #50• Binder Attachment #84 with Binder
Foot #94
• Collins Wash-Away Wonder Tape (adouble-sided, water-soluble, transpar-ent tape that disappears after wash-ing; you can sew through it withoutharming the machine needle)
• Five 3/4” buttons• Spray starch • Magnetic snap (optional)• Decorative zipper pulls (optional)• Button Sew-On Foot #18
Suppl ies:
PREPARATION AND CUTTINGPhotocopy the pattern from pages 31-34, enlarging 200%. Cutout each pattern piece.
Cut the following fabric pieces using the indicated pattern pieces whereapplicable; transfer all markings from the pattern to the fabric pieces.
From outer fabric, lining & flannel:• Two rectangles, 34” long x 19” wide for outer bag
• One Outer Zippered Pocket Pattern From outer fabric:
• One Exposed Zipper Facing Pattern From coordinating fabric:
• One Inner Pocket Pattern A• One Inner Pocket Pattern B• One Inner Pocket Pattern C• One 17” x 8” rectangle for inner pocket lining
• One 21” x 171/4” rectangle for inner pocket base• Bias strips for binding, pieced to form strip,
approximately 110” long Note: Starch fabricfirst, then cut strips 11/2” wide
From flannel:• One Inner Pocket Pattern A• One Inner Pocket Pattern B• One Inner Pocket Pattern C• One 101/2”x17” for Inner Pocket “Interfacing”
28
T H R O U G H T H E N E E D L E
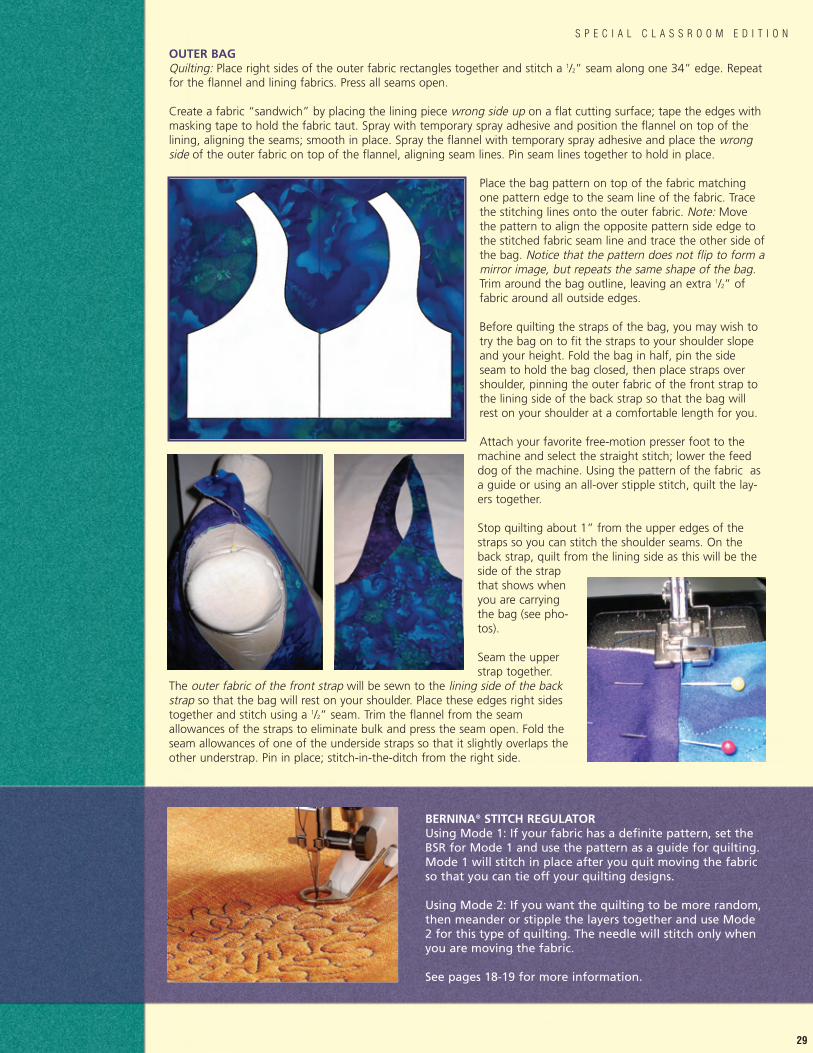
OUTER BAGQuilting: Place right sides of the outer fabric rectangles together and stitch a 1/2” seam along one 34” edge. Repeatfor the flannel and lining fabrics. Press all seams open.
Create a fabric “sandwich” by placing the lining piece wrong side up on a flat cutting surface; tape the edges withmasking tape to hold the fabric taut. Spray with temporary spray adhesive and position the flannel on top of thelining, aligning the seams; smooth in place. Spray the flannel with temporary spray adhesive and place the wrongside of the outer fabric on top of the flannel, aligning seam lines. Pin seam lines together to hold in place.
Place the bag pattern on top of the fabric matchingone pattern edge to the seam line of the fabric. Tracethe stitching lines onto the outer fabric. Note: Movethe pattern to align the opposite pattern side edge tothe stitched fabric seam line and trace the other side ofthe bag. Notice that the pattern does not flip to form amirror image, but repeats the same shape of the bag.Trim around the bag outline, leaving an extra 1/2” offabric around all outside edges.
Before quilting the straps of the bag, you may wish totry the bag on to fit the straps to your shoulder slopeand your height. Fold the bag in half, pin the sideseam to hold the bag closed, then place straps overshoulder, pinning the outer fabric of the front strap tothe lining side of the back strap so that the bag willrest on your shoulder at a comfortable length for you.
Attach your favorite free-motion presser foot to themachine and select the straight stitch; lower the feeddog of the machine. Using the pattern of the fabric asa guide or using an all-over stipple stitch, quilt the lay-ers together.
Stop quilting about 1” from the upper edges of thestraps so you can stitch the shoulder seams. On theback strap, quilt from the lining side as this will be theside of the strapthat shows whenyou are carryingthe bag (see pho-tos).
Seam the upperstrap together.
The outer fabric of the front strap will be sewn to the lining side of the backstrap so that the bag will rest on your shoulder. Place these edges right sidestogether and stitch using a 1/2” seam. Trim the flannel from the seamallowances of the straps to eliminate bulk and press the seam open. Fold theseam allowances of one of the underside straps so that it slightly overlaps theother understrap. Pin in place; stitch-in-the-ditch from the right side.
BERNINA® STITCH REGULATORUsing Mode 1: If your fabric has a definite pattern, set theBSR for Mode 1 and use the pattern as a guide for quilting.Mode 1 will stitch in place after you quit moving the fabricso that you can tie off your quilting designs.
Using Mode 2: If you want the quilting to be more random,then meander or stipple the layers together and use Mode2 for this type of quilting. The needle will stitch only whenyou are moving the fabric.
See pages 18-19 for more information.
S P E C I A L C L A S S R O O M E D I T I O N
29
30
T H R O U G H T H E N E E D L E
BERNINA®
Slouch Bag
Main Bag Pattern
Cut 1 of outer fabricCut 1 of flannel
Cut 1 of lining fabric
Photocopy pattern, enlarging to 200%
Match this edge to the corresponding edge and tape them together with no overlap to form the pattern piece for the body of the bag.
S P E C I A L C L A S S R O O M E D I T I O N
31
Plac
emen
t fo
rO
ute
r Zi
pp
ed P
ock
et
Mat
ch t
his
ed
ge
to t
he
corr
esp
on
din
g e
dg
e an
d t
ape
them
to
get
her
wit
h
no
ove
rlap
to
fo
rm t
he
pat
tern
pie
ce f
or
the
bo
dy
of
the
bag
.
32
T H R O U G H T H E N E E D L E
BER
NIN
A®
Slo
uch
Bag
Pho
toco
py
pat
tern
,en
larg
ing
to
200
%
All
seam
al
low
ance
s 1/
2”
un
less
oth
erw
ise
ind
icat
edo
n p
atte
rn
BER
NIN
A®
Slo
uch
Bag
Ou
ter
Zip
per
ed P
ock
et P
atte
rn
Cut
1 o
f ou
ter
fabr
icC
ut 1
of
flann
elC
ut 1
of
linin
g fa
bric
Pho
toco
py
pat
tern
, en
larg
ing
to
200
%
BER
NIN
A®
Slo
uch
Bag
Ou
ter
Zip
per
ed P
ock
et F
acin
g P
atte
rn
Pho
toco
py
pat
tern
, en
larg
ing
to
200
% -
Cu
t 1
of
ou
ter
fab
ric
Stitc
hing
line
s
Cut
ting
lines
S P E C I A L C L A S S R O O M E D I T I O N
33
BER
NIN
A®
Slo
uch
Bag
Inn
er P
ock
et A
Patt
ern
Cut
1 o
f in
ner
pock
et f
abric
Pho
toco
py
pat
tern
,en
larg
ing
to
200
%
Incl
udes
1/4
” se
am a
llow
ance
s
BER
NIN
A®
Sl
ouch
Bag
Inne
r Po
cket
C P
atte
rnC
ut 1
of i
nner
poc
ket f
abric
Phot
ocop
y pa
tter
n, e
nlar
ging
to
200%
Incl
udes
1/4
” se
am a
llow
ance
s
Cut
1 o
f in
ner
pock
et f
abric
Pho
toco
py
pat
tern
,en
larg
ing
to
200
%
BER
NIN
A®
Slo
uch
Bag
Inn
er P
ock
et B
Pa
tter
n
Incl
udes
1/4
” se
am a
llow
ance
s
34
T H R O U G H T H E N E E D L E
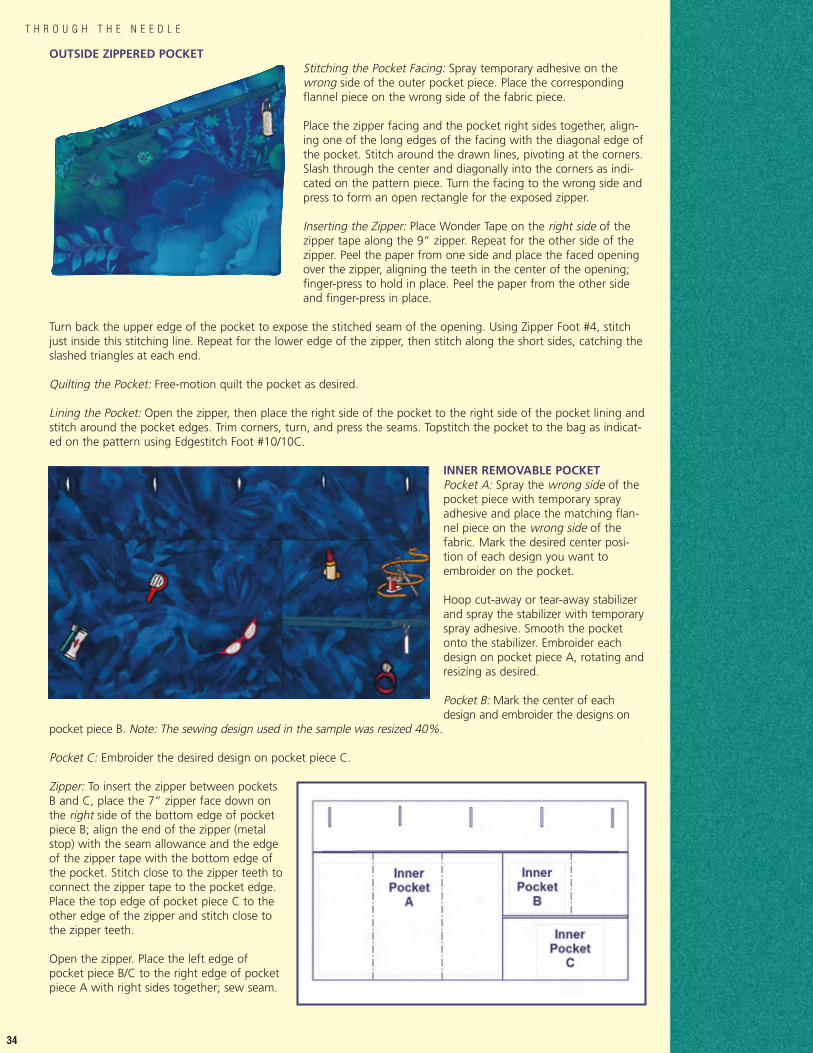
OUTSIDE ZIPPERED POCKETStitching the Pocket Facing: Spray temporary adhesive on thewrong side of the outer pocket piece. Place the correspondingflannel piece on the wrong side of the fabric piece.
Place the zipper facing and the pocket right sides together, align-ing one of the long edges of the facing with the diagonal edge ofthe pocket. Stitch around the drawn lines, pivoting at the corners.Slash through the center and diagonally into the corners as indi-cated on the pattern piece. Turn the facing to the wrong side andpress to form an open rectangle for the exposed zipper.
Inserting the Zipper: Place Wonder Tape on the right side of thezipper tape along the 9” zipper. Repeat for the other side of thezipper. Peel the paper from one side and place the faced openingover the zipper, aligning the teeth in the center of the opening;finger-press to hold in place. Peel the paper from the other sideand finger-press in place.
Turn back the upper edge of the pocket to expose the stitched seam of the opening. Using Zipper Foot #4, stitchjust inside this stitching line. Repeat for the lower edge of the zipper, then stitch along the short sides, catching theslashed triangles at each end.
Quilting the Pocket: Free-motion quilt the pocket as desired.
Lining the Pocket: Open the zipper, then place the right side of the pocket to the right side of the pocket lining andstitch around the pocket edges. Trim corners, turn, and press the seams. Topstitch the pocket to the bag as indicat-ed on the pattern using Edgestitch Foot #10/10C.
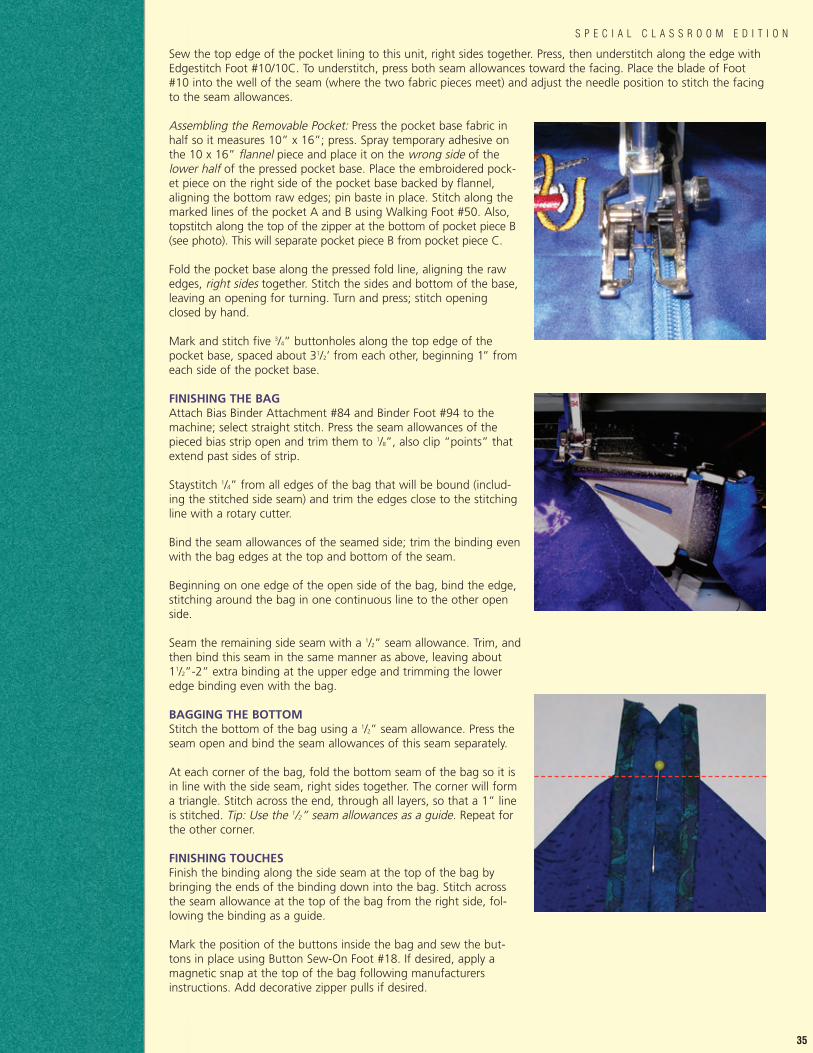
INNER REMOVABLE POCKET Pocket A: Spray the wrong side of thepocket piece with temporary sprayadhesive and place the matching flan-nel piece on the wrong side of thefabric. Mark the desired center posi-tion of each design you want toembroider on the pocket.
Hoop cut-away or tear-away stabilizerand spray the stabilizer with temporaryspray adhesive. Smooth the pocketonto the stabilizer. Embroider eachdesign on pocket piece A, rotating andresizing as desired.
Pocket B: Mark the center of eachdesign and embroider the designs on
pocket piece B. Note: The sewing design used in the sample was resized 40%.
Pocket C: Embroider the desired design on pocket piece C.
Zipper: To insert the zipper between pocketsB and C, place the 7” zipper face down onthe right side of the bottom edge of pocketpiece B; align the end of the zipper (metalstop) with the seam allowance and the edgeof the zipper tape with the bottom edge ofthe pocket. Stitch close to the zipper teeth toconnect the zipper tape to the pocket edge.Place the top edge of pocket piece C to theother edge of the zipper and stitch close tothe zipper teeth.
Open the zipper. Place the left edge ofpocket piece B/C to the right edge of pocketpiece A with right sides together; sew seam.
Sew the top edge of the pocket lining to this unit, right sides together. Press, then understitch along the edge withEdgestitch Foot #10/10C. To understitch, press both seam allowances toward the facing. Place the blade of Foot#10 into the well of the seam (where the two fabric pieces meet) and adjust the needle position to stitch the facingto the seam allowances.
Assembling the Removable Pocket: Press the pocket base fabric inhalf so it measures 10” x 16”; press. Spray temporary adhesive onthe 10 x 16” flannel piece and place it on the wrong side of thelower half of the pressed pocket base. Place the embroidered pock-et piece on the right side of the pocket base backed by flannel,aligning the bottom raw edges; pin baste in place. Stitch along themarked lines of the pocket A and B using Walking Foot #50. Also,topstitch along the top of the zipper at the bottom of pocket piece B(see photo). This will separate pocket piece B from pocket piece C.
Fold the pocket base along the pressed fold line, aligning the rawedges, right sides together. Stitch the sides and bottom of the base,leaving an opening for turning. Turn and press; stitch openingclosed by hand.
Mark and stitch five 3/4” buttonholes along the top edge of thepocket base, spaced about 31/2’ from each other, beginning 1” fromeach side of the pocket base.
FINISHING THE BAGAttach Bias Binder Attachment #84 and Binder Foot #94 to themachine; select straight stitch. Press the seam allowances of thepieced bias strip open and trim them to 1/8”, also clip “points” thatextend past sides of strip.
Staystitch 1/4” from all edges of the bag that will be bound (includ-ing the stitched side seam) and trim the edges close to the stitchingline with a rotary cutter.
Bind the seam allowances of the seamed side; trim the binding evenwith the bag edges at the top and bottom of the seam.
Beginning on one edge of the open side of the bag, bind the edge,stitching around the bag in one continuous line to the other openside.
Seam the remaining side seam with a 1/2” seam allowance. Trim, andthen bind this seam in the same manner as above, leaving about11/2”-2” extra binding at the upper edge and trimming the loweredge binding even with the bag.
BAGGING THE BOTTOMStitch the bottom of the bag using a 1/2” seam allowance. Press theseam open and bind the seam allowances of this seam separately.
At each corner of the bag, fold the bottom seam of the bag so it isin line with the side seam, right sides together. The corner will forma triangle. Stitch across the end, through all layers, so that a 1” lineis stitched. Tip: Use the 1/2” seam allowances as a guide. Repeat forthe other corner.
FINISHING TOUCHESFinish the binding along the side seam at the top of the bag bybringing the ends of the binding down into the bag. Stitch acrossthe seam allowance at the top of the bag from the right side, fol-lowing the binding as a guide.
Mark the position of the buttons inside the bag and sew the but-tons in place using Button Sew-On Foot #18. If desired, apply amagnetic snap at the top of the bag following manufacturersinstructions. Add decorative zipper pulls if desired.
S P E C I A L C L A S S R O O M E D I T I O N
35
Using the embroidery system for quilting
techniques opens up creative possibilities for
today’s quilter. From continuous line designs
to elaborate crazy patchwork to decorative
bobbinwork, the embroidery system can add a
unique artistic flair to your quilting projects.
Quilting and embroidery are two different sewing venues –each with its own set of “rules”. Prior to beginning an “in-the-hoop” project, let’s review the rules to determine which onesto bend in order to bridge the gap between the quilting andembroidery worlds. Experiment with the different options andmake decisions for your project based upon the desired fin-ished results.
Taming Tension: Embroidery thread tension is loose, with atight bobbin tension. For general embroidery, this is desired inorder to keep bobbin thread from showing on the front of theproject. When quilting, thread tension must be balanced.Embroidery design files do not contain any tension informa-tion; adjustments must be made at the machine. Increase yourupper thread tension until the stitching is balanced. The
amount of the adjustment will depend upon the thread beingused; increase by 2 and test. Continue to increase as needed,testing after each adjustment. If your machine has a specificbobbin case for embroidery, substitute your regular sewingbobbin case and increase upper thread tension. Note: For asimplified quilting method that does not require a tensionadjustment, read on to the Outline and Continuous LineQuilting section of this article.
Thread Selection: Embroidery designs are generally digitizedfor 40 weight embroidery thread. The nature of outline quiltingdesigns often requires use of a heavier thread to prevent thedesigns from being lost in the fabric design. Heavier cottonquilting threads are absolutely beautiful for outline quiltingmotifs, however they do create another challenge. Embroiderydesigns must have tie-offs at the end to prevent the embroi-dery from raveling away. Heavy threads will leave a visible knotthat may not be acceptable on the backside of the quilt. Usinga coordinating lighter weight thread in the bobbin helps mini-mize the visibility of the tie-off.
Stabilizing: For the best results when embroidering, the projectshould be hooped and stabilized appropriately. Outline quiltdesigns are very light, making water- soluble stabilizer the per-fect choice. The water-soluble stabilizer will rinse completelyaway, leaving your quilt soft and stabilizer free.
BY JENNIFER GIGAS AND MARLIS BENNETT
36
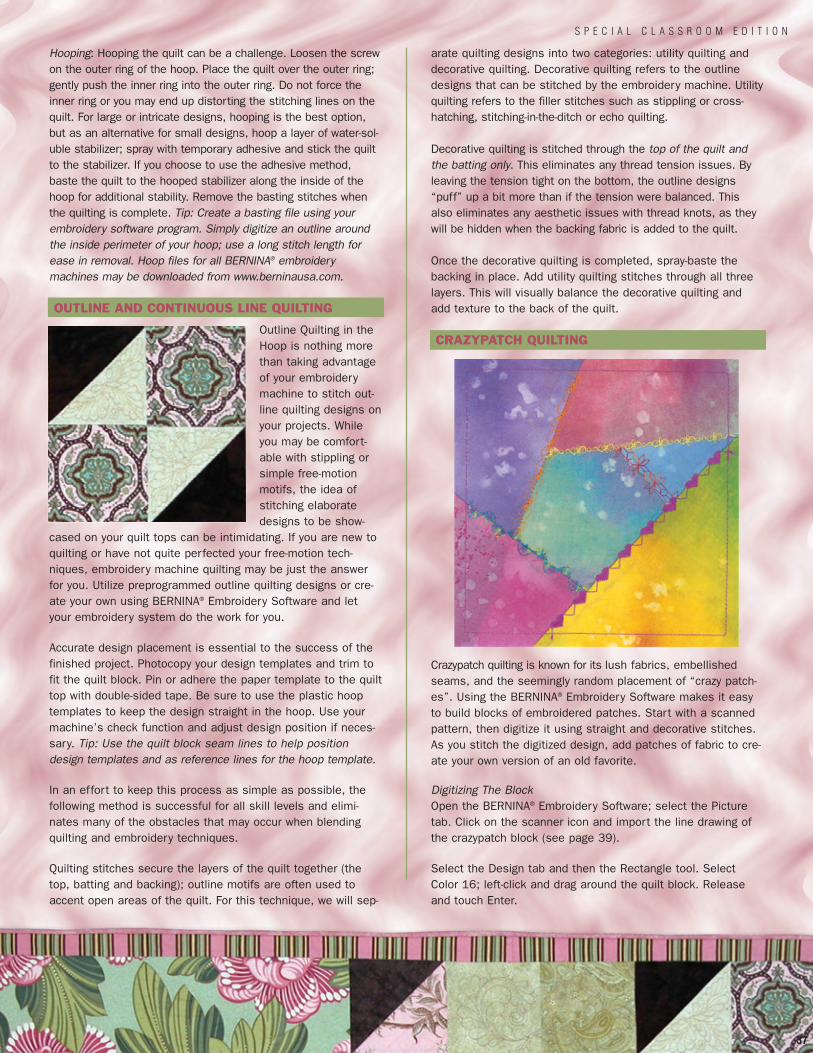
Hooping: Hooping the quilt can be a challenge. Loosen the screwon the outer ring of the hoop. Place the quilt over the outer ring;gently push the inner ring into the outer ring. Do not force theinner ring or you may end up distorting the stitching lines on thequilt. For large or intricate designs, hooping is the best option,but as an alternative for small designs, hoop a layer of water-sol-uble stabilizer; spray with temporary adhesive and stick the quiltto the stabilizer. If you choose to use the adhesive method,baste the quilt to the hooped stabilizer along the inside of thehoop for additional stability. Remove the basting stitches whenthe quilting is complete. Tip: Create a basting file using yourembroidery software program. Simply digitize an outline aroundthe inside perimeter of your hoop; use a long stitch length forease in removal. Hoop files for all BERNINA® embroiderymachines may be downloaded from www.berninausa.com.
OUTLINE AND CONTINUOUS LINE QUILTING
Outline Quilting in theHoop is nothing morethan taking advantageof your embroiderymachine to stitch out-line quilting designs onyour projects. Whileyou may be comfort-able with stippling orsimple free-motionmotifs, the idea ofstitching elaboratedesigns to be show-
cased on your quilt tops can be intimidating. If you are new toquilting or have not quite perfected your free-motion tech-niques, embroidery machine quilting may be just the answerfor you. Utilize preprogrammed outline quilting designs or cre-ate your own using BERNINA® Embroidery Software and letyour embroidery system do the work for you.
Accurate design placement is essential to the success of thefinished project. Photocopy your design templates and trim tofit the quilt block. Pin or adhere the paper template to the quilttop with double-sided tape. Be sure to use the plastic hooptemplates to keep the design straight in the hoop. Use yourmachine’s check function and adjust design position if neces-sary. Tip: Use the quilt block seam lines to help positiondesign templates and as reference lines for the hoop template.
In an effort to keep this process as simple as possible, thefollowing method is successful for all skill levels and elimi-nates many of the obstacles that may occur when blendingquilting and embroidery techniques.
Quilting stitches secure the layers of the quilt together (thetop, batting and backing); outline motifs are often used toaccent open areas of the quilt. For this technique, we will sep-
arate quilting designs into two categories: utility quilting anddecorative quilting. Decorative quilting refers to the outlinedesigns that can be stitched by the embroidery machine. Utilityquilting refers to the filler stitches such as stippling or cross-hatching, stitching-in-the-ditch or echo quilting.
Decorative quilting is stitched through the top of the quilt andthe batting only. This eliminates any thread tension issues. Byleaving the tension tight on the bottom, the outline designs“puff” up a bit more than if the tension were balanced. Thisalso eliminates any aesthetic issues with thread knots, as theywill be hidden when the backing fabric is added to the quilt.
Once the decorative quilting is completed, spray-baste thebacking in place. Add utility quilting stitches through all threelayers. This will visually balance the decorative quilting andadd texture to the back of the quilt.
CRAZYPATCH QUILTING
Crazypatch quilting is known for its lush fabrics, embellishedseams, and the seemingly random placement of “crazy patch-es”. Using the BERNINA® Embroidery Software makes it easyto build blocks of embroidered patches. Start with a scannedpattern, then digitize it using straight and decorative stitches.As you stitch the digitized design, add patches of fabric to cre-ate your own version of an old favorite.
Digitizing The BlockOpen the BERNINA® Embroidery Software; select the Picturetab. Click on the scanner icon and import the line drawing ofthe crazypatch block (see page 39).
Select the Design tab and then the Rectangle tool. SelectColor 16; left-click and drag around the quilt block. Releaseand touch Enter.
37
S P E C I A L C L A S S R O O M E D I T I O N
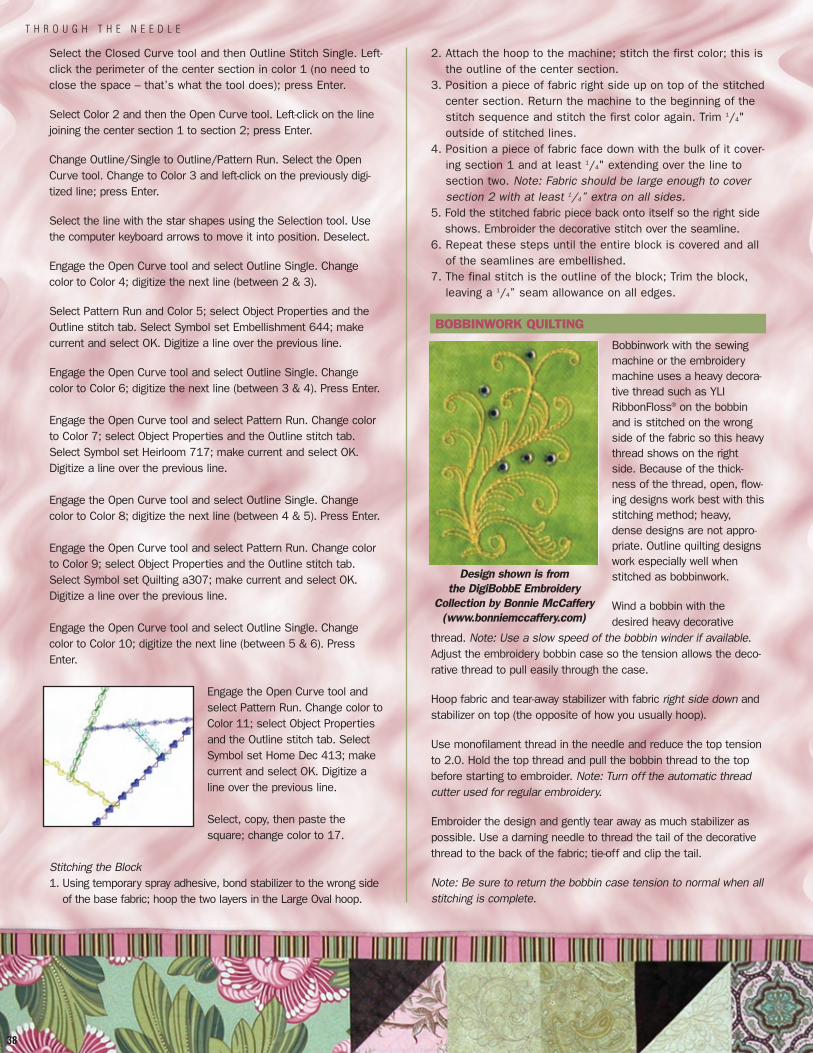
Select the Closed Curve tool and then Outline Stitch Single. Left-click the perimeter of the center section in color 1 (no need toclose the space – that’s what the tool does); press Enter.
Select Color 2 and then the Open Curve tool. Left-click on the linejoining the center section 1 to section 2; press Enter.
Change Outline/Single to Outline/Pattern Run. Select the OpenCurve tool. Change to Color 3 and left-click on the previously digi-tized line; press Enter.
Select the line with the star shapes using the Selection tool. Usethe computer keyboard arrows to move it into position. Deselect.
Engage the Open Curve tool and select Outline Single. Changecolor to Color 4; digitize the next line (between 2 & 3).
Select Pattern Run and Color 5; select Object Properties and theOutline stitch tab. Select Symbol set Embellishment 644; makecurrent and select OK. Digitize a line over the previous line.
Engage the Open Curve tool and select Outline Single. Changecolor to Color 6; digitize the next line (between 3 & 4). Press Enter.
Engage the Open Curve tool and select Pattern Run. Change colorto Color 7; select Object Properties and the Outline stitch tab.Select Symbol set Heirloom 717; make current and select OK.Digitize a line over the previous line.
Engage the Open Curve tool and select Outline Single. Changecolor to Color 8; digitize the next line (between 4 & 5). Press Enter.
Engage the Open Curve tool and select Pattern Run. Change colorto Color 9; select Object Properties and the Outline stitch tab.Select Symbol set Quilting a307; make current and select OK.Digitize a line over the previous line.
Engage the Open Curve tool and select Outline Single. Changecolor to Color 10; digitize the next line (between 5 & 6). PressEnter.
Engage the Open Curve tool andselect Pattern Run. Change color toColor 11; select Object Propertiesand the Outline stitch tab. SelectSymbol set Home Dec 413; makecurrent and select OK. Digitize aline over the previous line.
Select, copy, then paste thesquare; change color to 17.
Stitching the Block1. Using temporary spray adhesive, bond stabilizer to the wrong side
of the base fabric; hoop the two layers in the Large Oval hoop.
2. Attach the hoop to the machine; stitch the first color; this isthe outline of the center section.
3. Position a piece of fabric right side up on top of the stitchedcenter section. Return the machine to the beginning of thestitch sequence and stitch the first color again. Trim 1/4"outside of stitched lines.
4. Position a piece of fabric face down with the bulk of it cover-ing section 1 and at least 1/4" extending over the line tosection two. Note: Fabric should be large enough to coversection 2 with at least 1/4” extra on all sides.
5. Fold the stitched fabric piece back onto itself so the right sideshows. Embroider the decorative stitch over the seamline.
6. Repeat these steps until the entire block is covered and allof the seamlines are embellished.
7. The final stitch is the outline of the block; Trim the block,leaving a 1/4” seam allowance on all edges.
BOBBINWORK QUILTING
Bobbinwork with the sewingmachine or the embroiderymachine uses a heavy decora-tive thread such as YLIRibbonFloss® on the bobbinand is stitched on the wrongside of the fabric so this heavythread shows on the rightside. Because of the thick-ness of the thread, open, flow-ing designs work best with thisstitching method; heavy,dense designs are not appro-priate. Outline quilting designswork especially well whenstitched as bobbinwork.
Wind a bobbin with thedesired heavy decorative
thread. Note: Use a slow speed of the bobbin winder if available.Adjust the embroidery bobbin case so the tension allows the deco-rative thread to pull easily through the case.
Hoop fabric and tear-away stabilizer with fabric right side down andstabilizer on top (the opposite of how you usually hoop).
Use monofilament thread in the needle and reduce the top tensionto 2.0. Hold the top thread and pull the bobbin thread to the topbefore starting to embroider. Note: Turn off the automatic threadcutter used for regular embroidery.
Embroider the design and gently tear away as much stabilizer aspossible. Use a darning needle to thread the tail of the decorativethread to the back of the fabric; tie-off and clip the tail.
Note: Be sure to return the bobbin case tension to normal when allstitching is complete.
38
T H R O U G H T H E N E E D L E
Design shown is from the DigiBobbE Embroidery
Collection by Bonnie McCaffery(www.bonniemccaffery.com)
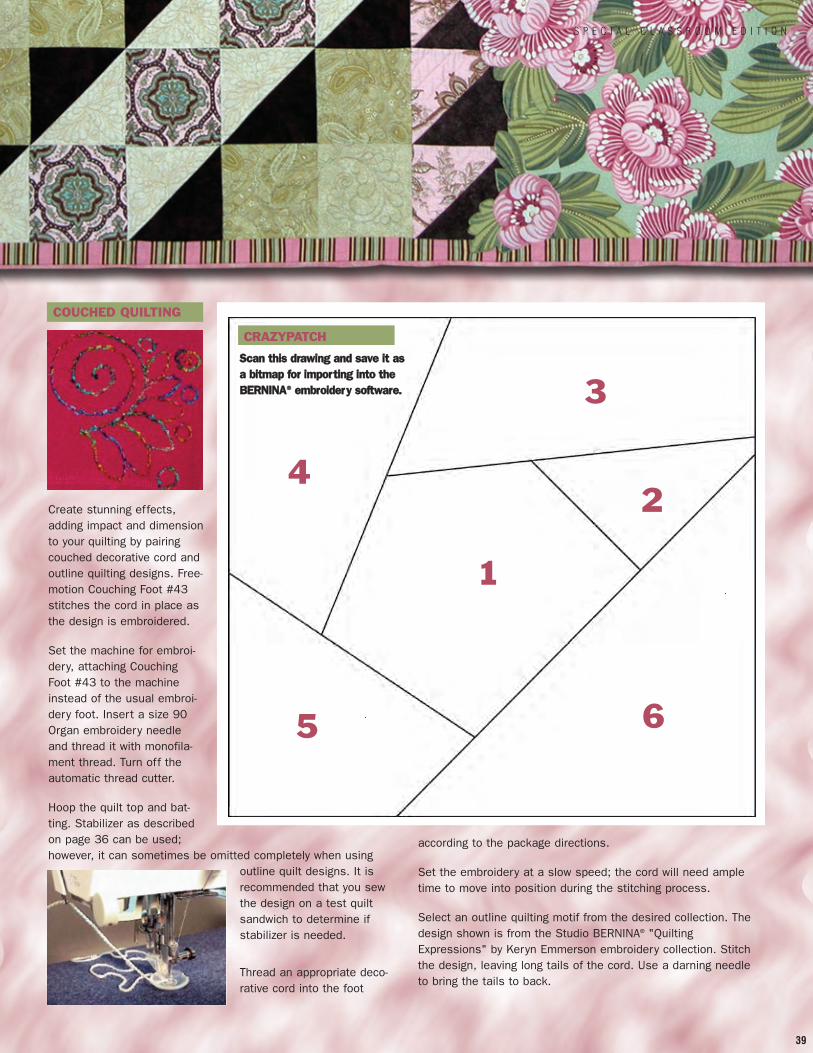
39
S P E C I A L C L A S S R O O M E D I T I O N
COUCHED QUILTING
Create stunning effects,adding impact and dimensionto your quilting by pairingcouched decorative cord andoutline quilting designs. Free-motion Couching Foot #43stitches the cord in place asthe design is embroidered.
Set the machine for embroi-dery, attaching CouchingFoot #43 to the machineinstead of the usual embroi-dery foot. Insert a size 90Organ embroidery needleand thread it with monofila-ment thread. Turn off theautomatic thread cutter.
Hoop the quilt top and bat-ting. Stabilizer as describedon page 36 can be used;however, it can sometimes be omitted completely when using
outline quilt designs. It isrecommended that you sewthe design on a test quiltsandwich to determine ifstabilizer is needed.
Thread an appropriate deco-rative cord into the foot
according to the package directions.
Set the embroidery at a slow speed; the cord will need ampletime to move into position during the stitching process.
Select an outline quilting motif from the desired collection. Thedesign shown is from the Studio BERNINA® "QuiltingExpressions" by Keryn Emmerson embroidery collection. Stitchthe design, leaving long tails of the cord. Use a darning needleto bring the tails to back.
3
2
5
4
6
1
CRAZYPATCH
SSccaann tthhiiss ddrraawwiinngg aanndd ssaavvee iitt aass aa bbiittmmaapp ffoorr iimmppoorrttiinngg iinnttoo tthhee BBEERRNNIINNAA®® eemmbbrrooiiddeerryy ssooffttwwaarree..
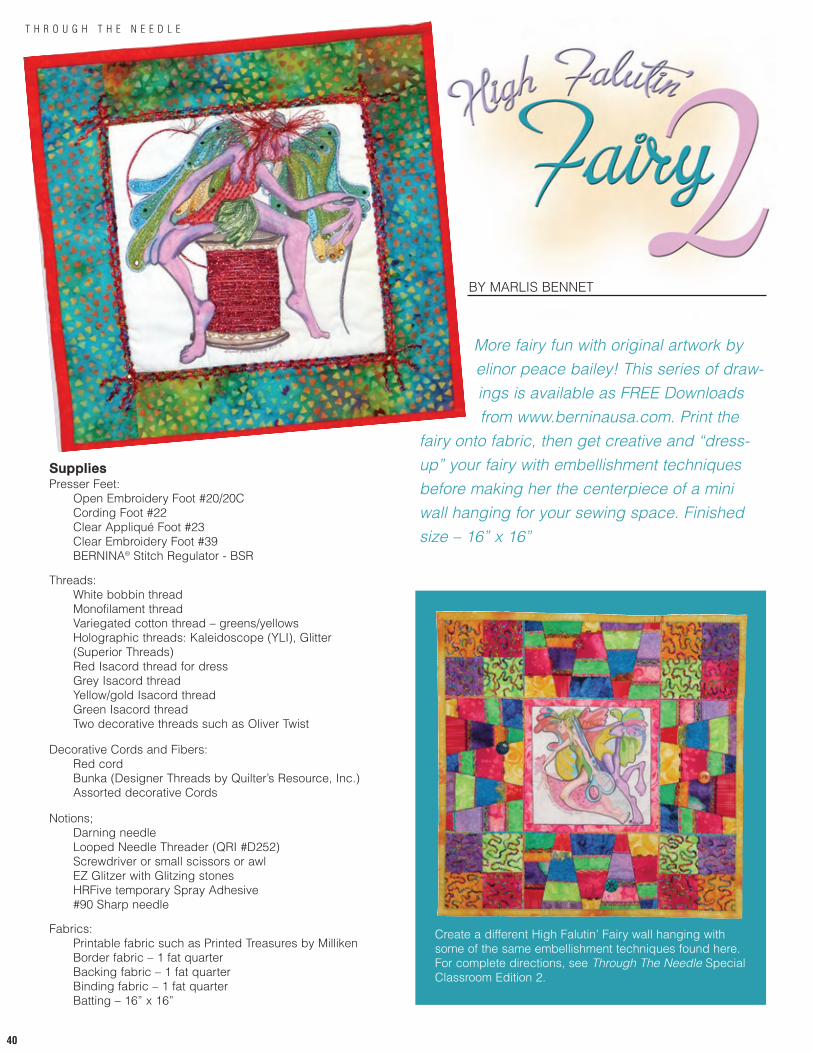
BY MARLIS BENNET
More fairy fun with original artwork byelinor peace bailey! This series of draw-ings is available as FREE Downloadsfrom www.berninausa.com. Print the
fairy onto fabric, then get creative and “dress-up” your fairy with embellishment techniquesbefore making her the centerpiece of a miniwall hanging for your sewing space. Finishedsize – 16” x 16”
SSuupppplliieessPresser Feet:
Open Embroidery Foot #20/20CCording Foot #22Clear Appliqué Foot #23Clear Embroidery Foot #39BERNINA® Stitch Regulator - BSR
Threads:White bobbin thread Monofilament threadVariegated cotton thread – greens/yellows Holographic threads: Kaleidoscope (YLI), Glitter(Superior Threads) Red Isacord thread for dress Grey Isacord thread Yellow/gold Isacord thread Green Isacord thread Two decorative threads such as Oliver Twist
Decorative Cords and Fibers:Red cordBunka (Designer Threads by Quilter’s Resource, Inc.) Assorted decorative Cords
Notions;Darning needleLooped Needle Threader (QRI #D252)Screwdriver or small scissors or awl EZ Glitzer with Glitzing stonesHRFive temporary Spray Adhesive#90 Sharp needle
Fabrics:Printable fabric such as Printed Treasures by MillikenBorder fabric – 1 fat quarterBacking fabric – 1 fat quarterBinding fabric – 1 fat quarterBatting – 16” x 16”
Create a different High Falutin’ Fairy wall hanging withsome of the same embellishment techniques found here.For complete directions, see Through The Needle SpecialClassroom Edition 2.
40
T H R O U G H T H E N E E D L E
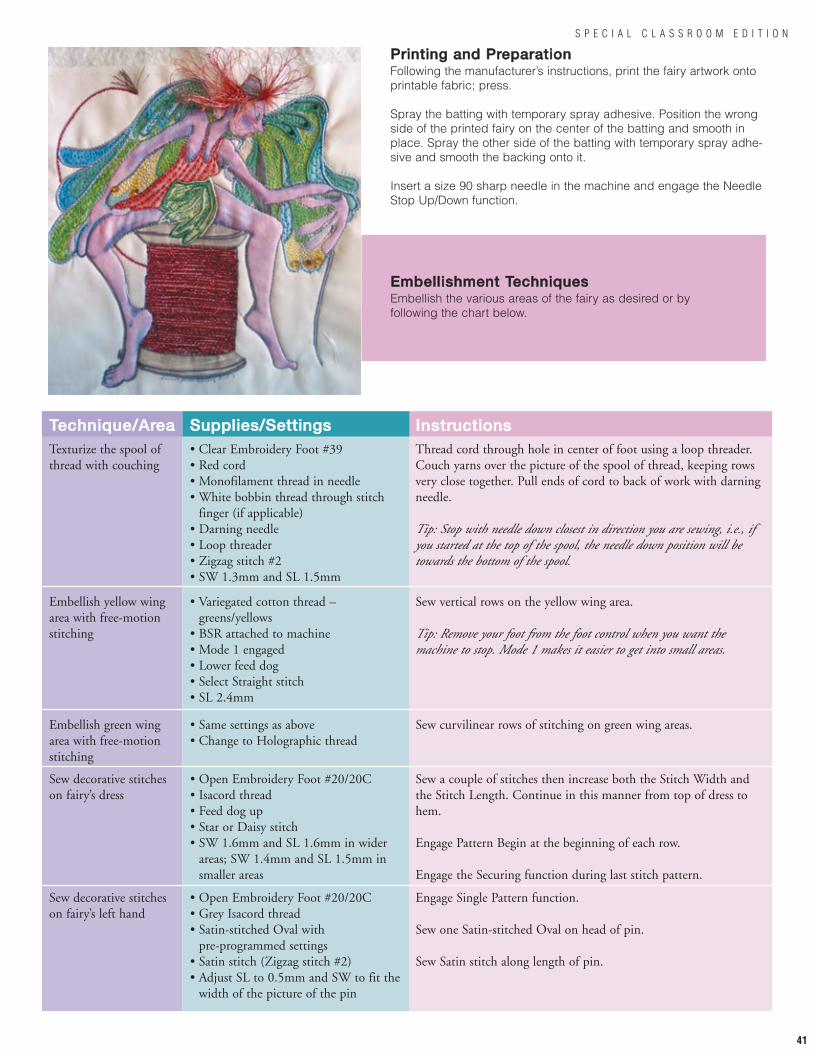
Texturize the spool ofthread with couching
• Clear Embroidery Foot #39 • Red cord• Monofilament thread in needle• White bobbin thread through stitch
finger (if applicable)• Darning needle • Loop threader • Zigzag stitch #2• SW 1.3mm and SL 1.5mm
Thread cord through hole in center of foot using a loop threader.Couch yarns over the picture of the spool of thread, keeping rowsvery close together. Pull ends of cord to back of work with darningneedle.
Tip: Stop with needle down closest in direction you are sewing, i.e., ifyou started at the top of the spool, the needle down position will betowards the bottom of the spool.
Embellish yellow wingarea with free-motionstitching
• Variegated cotton thread – greens/yellows
• BSR attached to machine • Mode 1 engaged• Lower feed dog• Select Straight stitch • SL 2.4mm
Sew vertical rows on the yellow wing area.
Tip: Remove your foot from the foot control when you want themachine to stop. Mode 1 makes it easier to get into small areas.
TTeecchhnniiqquuee//AArreeaa SSuupppplliieess//SSeettttiinnggss IInnssttrruuccttiioonnss
Embellish green wingarea with free-motionstitching
• Same settings as above • Change to Holographic thread
Sew curvilinear rows of stitching on green wing areas.
Sew decorative stitcheson fairy’s dress
• Open Embroidery Foot #20/20C• Isacord thread• Feed dog up• Star or Daisy stitch• SW 1.6mm and SL 1.6mm in wider
areas; SW 1.4mm and SL 1.5mm insmaller areas
Sew a couple of stitches then increase both the Stitch Width andthe Stitch Length. Continue in this manner from top of dress tohem.
Engage Pattern Begin at the beginning of each row.
Engage the Securing function during last stitch pattern.
Sew decorative stitcheson fairy’s left hand
• Open Embroidery Foot #20/20C • Grey Isacord thread• Satin-stitched Oval with
pre-programmed settings• Satin stitch (Zigzag stitch #2)• Adjust SL to 0.5mm and SW to fit the
width of the picture of the pin
Engage Single Pattern function.
Sew one Satin-stitched Oval on head of pin.
Sew Satin stitch along length of pin.
EEmmbbeelllliisshhmmeenntt TTeecchhnniiqquueessEmbellish the various areas of the fairy as desired or byfollowing the chart below.
PPrriinnttiinngg aanndd PPrreeppaarraattiioonnFollowing the manufacturer’s instructions, print the fairy artwork ontoprintable fabric; press.
Spray the batting with temporary spray adhesive. Position the wrongside of the printed fairy on the center of the batting and smooth inplace. Spray the other side of the batting with temporary spray adhe-sive and smooth the backing onto it.
Insert a size 90 sharp needle in the machine and engage the NeedleStop Up/Down function.
S P E C I A L C L A S S R O O M E D I T I O N
41
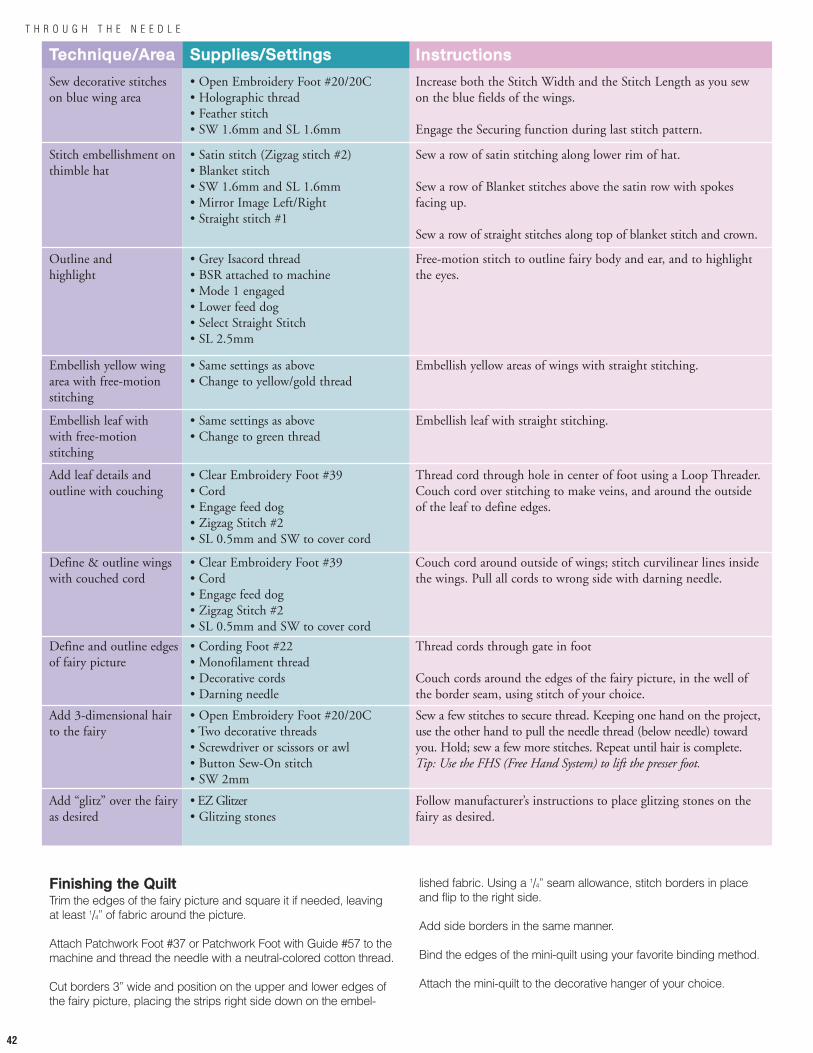
Add leaf details andoutline with couching
• Clear Embroidery Foot #39 • Cord• Engage feed dog • Zigzag Stitch #2• SL 0.5mm and SW to cover cord
Thread cord through hole in center of foot using a Loop Threader.Couch cord over stitching to make veins, and around the outsideof the leaf to define edges.
Define & outline wingswith couched cord
• Clear Embroidery Foot #39 • Cord• Engage feed dog • Zigzag Stitch #2• SL 0.5mm and SW to cover cord
Couch cord around outside of wings; stitch curvilinear lines insidethe wings. Pull all cords to wrong side with darning needle.
Define and outline edgesof fairy picture
• Cording Foot #22• Monofilament thread• Decorative cords• Darning needle
Thread cords through gate in foot
Couch cords around the edges of the fairy picture, in the well ofthe border seam, using stitch of your choice.
Add 3-dimensional hairto the fairy
• Open Embroidery Foot #20/20C• Two decorative threads• Screwdriver or scissors or awl • Button Sew-On stitch• SW 2mm
Sew a few stitches to secure thread. Keeping one hand on the project,use the other hand to pull the needle thread (below needle) towardyou. Hold; sew a few more stitches. Repeat until hair is complete.Tip: Use the FHS (Free Hand System) to lift the presser foot.
Add “glitz” over the fairyas desired
• EZ Glitzer• Glitzing stones
Follow manufacturer’s instructions to place glitzing stones on thefairy as desired.
FFiinniisshhiinngg tthhee QQuuiillttTrim the edges of the fairy picture and square it if needed, leavingat least 1/4” of fabric around the picture.
Attach Patchwork Foot #37 or Patchwork Foot with Guide #57 to themachine and thread the needle with a neutral-colored cotton thread.
Cut borders 3” wide and position on the upper and lower edges ofthe fairy picture, placing the strips right side down on the embel-
lished fabric. Using a 1/4” seam allowance, stitch borders in placeand flip to the right side.
Add side borders in the same manner.
Bind the edges of the mini-quilt using your favorite binding method.
Attach the mini-quilt to the decorative hanger of your choice.
Sew decorative stitcheson blue wing area
• Open Embroidery Foot #20/20C• Holographic thread • Feather stitch• SW 1.6mm and SL 1.6mm
Increase both the Stitch Width and the Stitch Length as you sewon the blue fields of the wings.
Engage the Securing function during last stitch pattern.
Stitch embellishment onthimble hat
• Satin stitch (Zigzag stitch #2)• Blanket stitch• SW 1.6mm and SL 1.6mm• Mirror Image Left/Right• Straight stitch #1
Sew a row of satin stitching along lower rim of hat.
Sew a row of Blanket stitches above the satin row with spokesfacing up.
Sew a row of straight stitches along top of blanket stitch and crown.
TTeecchhnniiqquuee//AArreeaa SSuupppplliieess//SSeettttiinnggss IInnssttrruuccttiioonnss
Embellish yellow wingarea with free-motionstitching
• Same settings as above • Change to yellow/gold thread
Embellish yellow areas of wings with straight stitching.
Outline and highlight
• Grey Isacord thread• BSR attached to machine • Mode 1 engaged• Lower feed dog• Select Straight Stitch • SL 2.5mm
Free-motion stitch to outline fairy body and ear, and to highlightthe eyes.
Embellish leaf withwith free-motionstitching
• Same settings as above • Change to green thread
Embellish leaf with straight stitching.
42
T H R O U G H T H E N E E D L E
S P E C I A L C L A S S R O O M E D I T I O N
43
GENERAL CONSTRUCTION NOTES
Follow the pattern instructions for garment construction using WalkingFoot #50 or a serger for seaming. The Walking Foot is particularly helpfulwhen attaching the collar to the garment body and for topstitching thegarment fronts.
Use Blindstitch Foot #5 to hem the body of the jacket and both sleeves,following the general directions in your owner’s manual. Also use this footto attach the pocket to the garment front.
Attaching the Pocket: Note: Complete this step after embellishingthe pocket. Fold under 1/2” on all sides of pocket; secure with WonderTape. Topstitch the pocket top using Walking Foot #50 and monofilamentthread. Pin the pocket onto the garment right front, 21/2” from hem and31/2” from the finished center front. Select the blindstitch, decreasing thedepth of the bite (stitch width) to 3mm. Decrease the stitch length to2mm. Sew around 3 sides, securing both beginning and ending stitches.
POCKET EMBELLISHMENT
Silk ribbon embroidery is a simple way to add dimension and embellish-ment detail to a project. The two techniques shown here both use silk rib-bon. One requires that the ribbon be placed in the bobbin and thatmachine stitches be sewn from the wrong side of the fabric. The other issewn with lowered feed dog and silk ribbon positioned on top of the fab-ric, where it is secured with well-placed stitches using monofilament thread.
BY MARLIS BENNETT
Luxurious fabrics teamed with your monogram and silk ribbon embroidery create a stunning bed jacket that will keep you warm during cold winter months.
SUP
PLI
ES
• Pattern for simple, unlined jacket with stand-upcollar (Simplicity 5778 was used for the sample)
• Minkee™ Skins fabric by Benartex, yardage as requiredfor pattern
• 1/4 yd Minkee™ Blankee fabric by Benartex in acontrasting color for collar and pocket
• 1 yard of satin ribbon for closure• One 10” x 10” sheet black PolyMesh stabilizer• One 10” x 10” sheet Aqua Film stabilizer• One 5” square OESD Tear-Away stabilizer• HR5 temporary spray adhesive• Sewing thread for garment construction• Monofilament thread• Size 80 Embroidery needle• 4mm silk ribbon: green, and desired colors for
flower petals, centers and French knot buds• Isacord embroidery thread in desired color for
monogram embroidery
• 60 wt. cotton embroidery thread for bobbin
• Wash-A-Way Wonder Tape by Collins
• 1 bamboo stiletto
• Blindstitch Foot #5
• Open Embroidery Foot #20/20C
• Freehand Embroidery Foot #24
• Teardrop Embroidery Foot #26
• Walking Foot #50
• Optional: A serger set for a balanced 4-threadoverlock stitch for garment construction
• Chenille hand-sewing needle
• Medium machine embroidery hoop
• Embroidery module/machine
44
T H R O U G H T H E N E E D L E
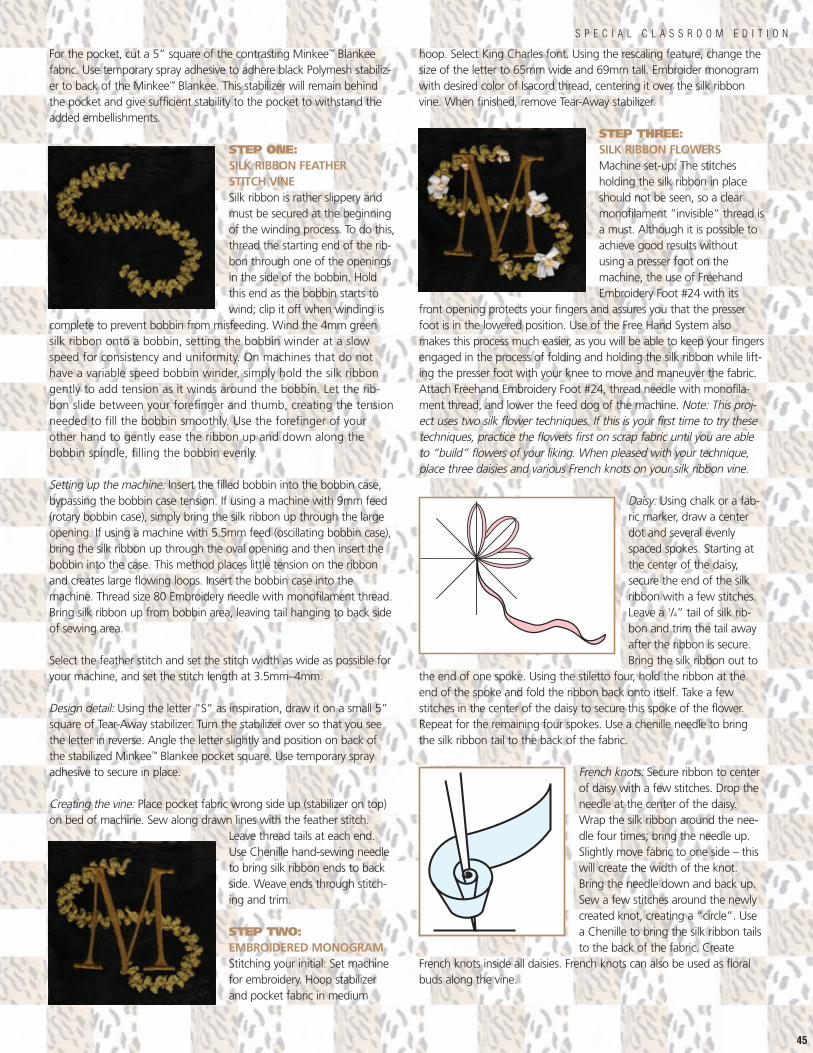
For the pocket, cut a 5” square of the contrasting Minkee™ Blankeefabric. Use temporary spray adhesive to adhere black Polymesh stabiliz-er to back of the Minkee™ Blankee. This stabilizer will remain behindthe pocket and give sufficient stability to the pocket to withstand theadded embellishments.
STEP ONE: SILK RIBBON FEATHER STITCH VINESilk ribbon is rather slippery andmust be secured at the beginningof the winding process. To do this,thread the starting end of the rib-bon through one of the openingsin the side of the bobbin. Holdthis end as the bobbin starts towind; clip it off when winding is
complete to prevent bobbin from misfeeding. Wind the 4mm greensilk ribbon onto a bobbin, setting the bobbin winder at a slowspeed for consistency and uniformity. On machines that do nothave a variable speed bobbin winder, simply hold the silk ribbongently to add tension as it winds around the bobbin. Let the rib-bon slide between your forefinger and thumb, creating the tensionneeded to fill the bobbin smoothly. Use the forefinger of yourother hand to gently ease the ribbon up and down along thebobbin spindle, filling the bobbin evenly.
Setting up the machine: Insert the filled bobbin into the bobbin case,bypassing the bobbin case tension. If using a machine with 9mm feed(rotary bobbin case), simply bring the silk ribbon up through the largeopening. If using a machine with 5.5mm feed (oscillating bobbin case),bring the silk ribbon up through the oval opening and then insert thebobbin into the case. This method places little tension on the ribbonand creates large flowing loops. Insert the bobbin case into themachine. Thread size 80 Embroidery needle with monofilament thread.Bring silk ribbon up from bobbin area, leaving tail hanging to back sideof sewing area.
Select the feather stitch and set the stitch width as wide as possible foryour machine, and set the stitch length at 3.5mm–4mm.
Design detail: Using the letter “S” as inspiration, draw it on a small 5”square of Tear-Away stabilizer. Turn the stabilizer over so that you seethe letter in reverse. Angle the letter slightly and position on back ofthe stabilized Minkee™ Blankee pocket square. Use temporary sprayadhesive to secure in place.
Creating the vine: Place pocket fabric wrong side up (stabilizer on top)on bed of machine. Sew along drawn lines with the feather stitch.
Leave thread tails at each end.Use Chenille hand-sewing needleto bring silk ribbon ends to backside. Weave ends through stitch-ing and trim.
STEP TWO: EMBROIDERED MONOGRAMStitching your initial: Set machinefor embroidery. Hoop stabilizerand pocket fabric in medium
hoop. Select King Charles font. Using the rescaling feature, change thesize of the letter to 65mm wide and 69mm tall. Embroider monogramwith desired color of Isacord thread, centering it over the silk ribbonvine. When finished, remove Tear-Away stabilizer.
STEP THREE:SILK RIBBON FLOWERSMachine set-up: The stitchesholding the silk ribbon in placeshould not be seen, so a clearmonofilament “invisible” thread isa must. Although it is possible toachieve good results withoutusing a presser foot on themachine, the use of FreehandEmbroidery Foot #24 with its
front opening protects your fingers and assures you that the presserfoot is in the lowered position. Use of the Free Hand System alsomakes this process much easier, as you will be able to keep your fingersengaged in the process of folding and holding the silk ribbon while lift-ing the presser foot with your knee to move and maneuver the fabric.Attach Freehand Embroidery Foot #24, thread needle with monofila-ment thread, and lower the feed dog of the machine. Note: This proj-ect uses two silk flower techniques. If this is your first time to try thesetechniques, practice the flowers first on scrap fabric until you are ableto “build” flowers of your liking. When pleased with your technique,place three daisies and various French knots on your silk ribbon vine.
Daisy: Using chalk or a fab-ric marker, draw a centerdot and several evenlyspaced spokes. Starting atthe center of the daisy,secure the end of the silkribbon with a few stitches.Leave a 1/4” tail of silk rib-bon and trim the tail awayafter the ribbon is secure.Bring the silk ribbon out to
the end of one spoke. Using the stiletto four, hold the ribbon at theend of the spoke and fold the ribbon back onto itself. Take a fewstitches in the center of the daisy to secure this spoke of the flower.Repeat for the remaining four spokes. Use a chenille needle to bringthe silk ribbon tail to the back of the fabric.
French knots: Secure ribbon to centerof daisy with a few stitches. Drop theneedle at the center of the daisy.Wrap the silk ribbon around the nee-dle four times; bring the needle up.Slightly move fabric to one side – thiswill create the width of the knot.Bring the needle down and back up.Sew a few stitches around the newlycreated knot, creating a “circle”. Usea Chenille to bring the silk ribbon tailsto the back of the fabric. Create
French knots inside all daisies. French knots can also be used as floralbuds along the vine.
S P E C I A L C L A S S R O O M E D I T I O N
45
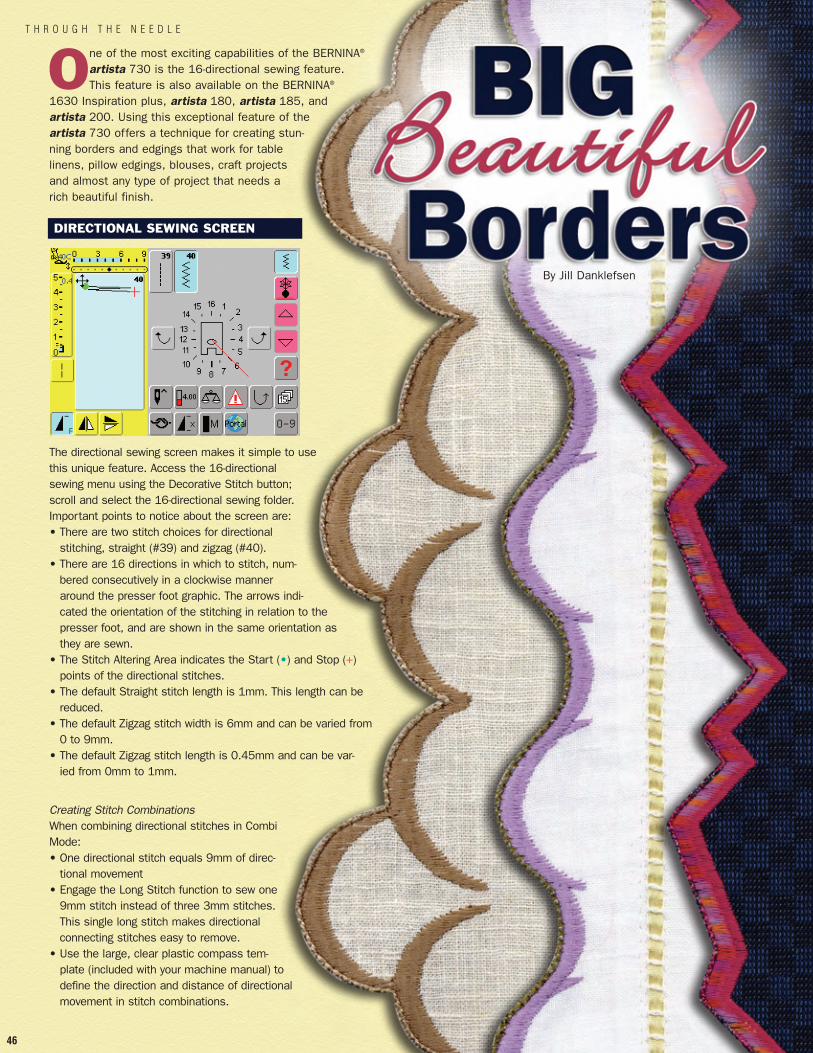
46
T H R O U G H T H E N E E D L E
One of the most exciting capabilities of the BERNINA®
artista 730 is the 16-directional sewing feature.This feature is also available on the BERNINA®
1630 Inspiration plus, artista 180, artista 185, andartista 200. Using this exceptional feature of theartista 730 offers a technique for creating stun-ning borders and edgings that work for tablelinens, pillow edgings, blouses, craft projectsand almost any type of project that needs arich beautiful finish.
DIRECTIONAL SEWING SCREEN
The directional sewing screen makes it simple to usethis unique feature. Access the 16-directionalsewing menu using the Decorative Stitch button;scroll and select the 16-directional sewing folder.Important points to notice about the screen are:• There are two stitch choices for directional
stitching, straight (#39) and zigzag (#40).• There are 16 directions in which to stitch, num-
bered consecutively in a clockwise manneraround the presser foot graphic. The arrows indi-cated the orientation of the stitching in relation to thepresser foot, and are shown in the same orientation asthey are sewn.
• The Stitch Altering Area indicates the Start (•) and Stop (+)points of the directional stitches.
• The default Straight stitch length is 1mm. This length can bereduced.
• The default Zigzag stitch width is 6mm and can be varied from0 to 9mm.
• The default Zigzag stitch length is 0.45mm and can be var-ied from 0mm to 1mm.
Creating Stitch CombinationsWhen combining directional stitches in CombiMode: • One directional stitch equals 9mm of direc-
tional movement• Engage the Long Stitch function to sew one
9mm stitch instead of three 3mm stitches.This single long stitch makes directionalconnecting stitches easy to remove.
• Use the large, clear plastic compass tem-plate (included with your machine manual) todefine the direction and distance of directionalmovement in stitch combinations.
By Jill Danklefsen
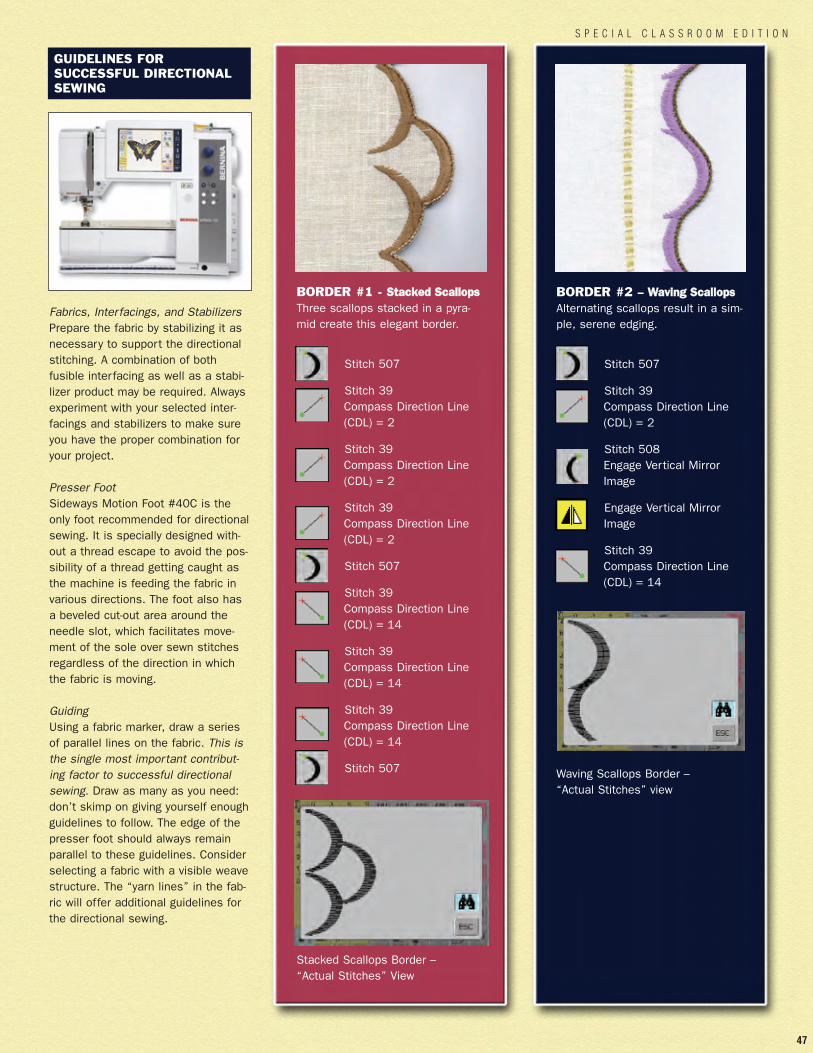
47
S P E C I A L C L A S S R O O M E D I T I O N
BORDER #2 – WWaavviinngg SSccaallllooppssAlternating scallops result in a sim-ple, serene edging.
Stitch 507
Stitch 39Compass Direction Line(CDL) = 2
Stitch 508Engage Vertical MirrorImage
Engage Vertical Mirror Image
Stitch 39Compass Direction Line(CDL) = 14
Waving Scallops Border –“Actual Stitches” view
BORDER #1 - SSttaacckkeedd SSccaallllooppssThree scallops stacked in a pyra-mid create this elegant border.
Stitch 507
Stitch 39Compass Direction Line(CDL) = 2
Stitch 39Compass Direction Line(CDL) = 2
Stitch 39Compass Direction Line(CDL) = 2
Stitch 507
Stitch 39Compass Direction Line(CDL) = 14
Stitch 39Compass Direction Line(CDL) = 14
Stitch 39Compass Direction Line(CDL) = 14
Stitch 507
Stacked Scallops Border –“Actual Stitches” View
GUIDELINES FOR SUCCESSFUL DIRECTIONAL SEWING
Fabrics, Interfacings, and Stabilizers Prepare the fabric by stabilizing it asnecessary to support the directionalstitching. A combination of bothfusible interfacing as well as a stabi-lizer product may be required. Alwaysexperiment with your selected inter-facings and stabilizers to make sureyou have the proper combination foryour project.
Presser FootSideways Motion Foot #40C is theonly foot recommended for directionalsewing. It is specially designed with-out a thread escape to avoid the pos-sibility of a thread getting caught asthe machine is feeding the fabric invarious directions. The foot also hasa beveled cut-out area around theneedle slot, which facilitates move-ment of the sole over sewn stitchesregardless of the direction in whichthe fabric is moving.
Guiding Using a fabric marker, draw a seriesof parallel lines on the fabric. This isthe single most important contribut-ing factor to successful directionalsewing. Draw as many as you need:don’t skimp on giving yourself enoughguidelines to follow. The edge of thepresser foot should always remainparallel to these guidelines. Considerselecting a fabric with a visible weavestructure. The “yarn lines” in the fab-ric will offer additional guidelines forthe directional sewing.
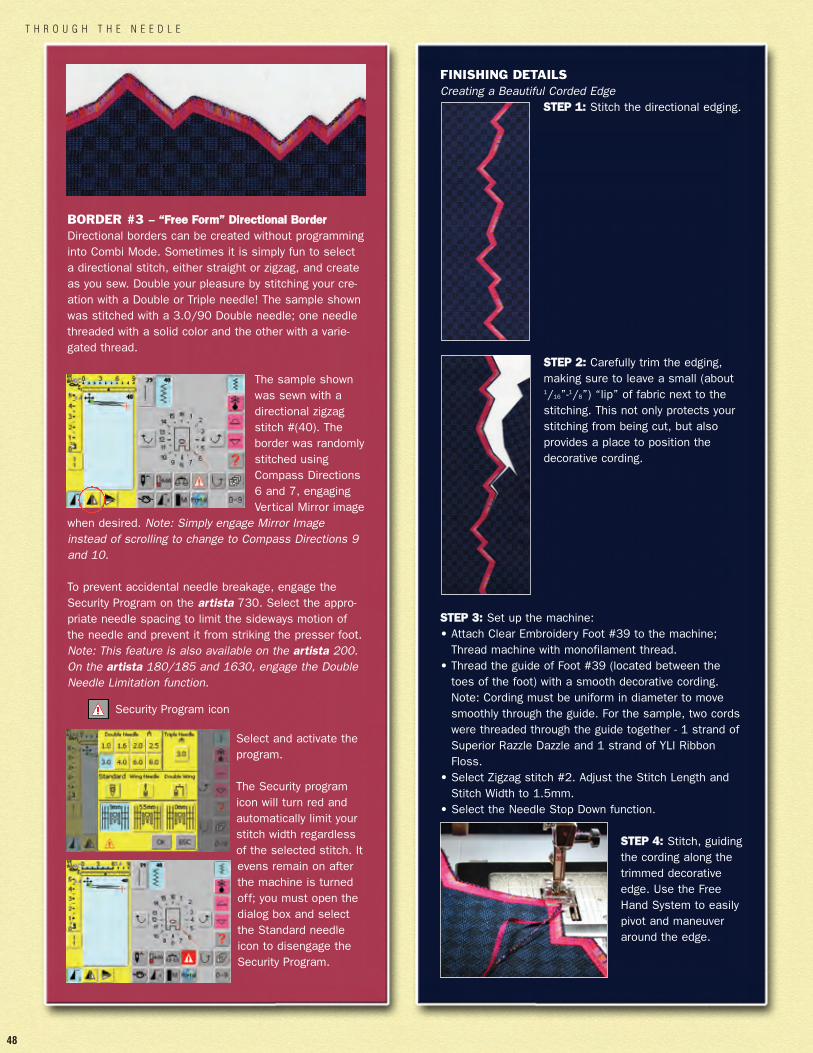
FINISHING DETAILSCreating a Beautiful Corded Edge
SSTTEEPP 11:: Stitch the directional edging.
SSTTEEPP 22:: Carefully trim the edging,making sure to leave a small (about1/16”-1/8”) “lip” of fabric next to thestitching. This not only protects yourstitching from being cut, but alsoprovides a place to position thedecorative cording.
SSTTEEPP 33:: Set up the machine:• Attach Clear Embroidery Foot #39 to the machine;
Thread machine with monofilament thread.• Thread the guide of Foot #39 (located between the
toes of the foot) with a smooth decorative cording.Note: Cording must be uniform in diameter to movesmoothly through the guide. For the sample, two cordswere threaded through the guide together - 1 strand ofSuperior Razzle Dazzle and 1 strand of YLI RibbonFloss.
• Select Zigzag stitch #2. Adjust the Stitch Length andStitch Width to 1.5mm.
• Select the Needle Stop Down function.
SSTTEEPP 44:: Stitch, guidingthe cording along thetrimmed decorativeedge. Use the FreeHand System to easilypivot and maneuveraround the edge.
BORDER #3 – ““FFrreeee FFoorrmm”” DDiirreeccttiioonnaall BBoorrddeerrDirectional borders can be created without programminginto Combi Mode. Sometimes it is simply fun to selecta directional stitch, either straight or zigzag, and createas you sew. Double your pleasure by stitching your cre-ation with a Double or Triple needle! The sample shownwas stitched with a 3.0/90 Double needle; one needlethreaded with a solid color and the other with a varie-gated thread.
The sample shownwas sewn with adirectional zigzagstitch #(40). Theborder was randomlystitched usingCompass Directions6 and 7, engagingVertical Mirror image
when desired. Note: Simply engage Mirror Imageinstead of scrolling to change to Compass Directions 9and 10.
To prevent accidental needle breakage, engage theSecurity Program on the artista 730. Select the appro-priate needle spacing to limit the sideways motion ofthe needle and prevent it from striking the presser foot.Note: This feature is also available on the artista 200.On the artista 180/185 and 1630, engage the DoubleNeedle Limitation function.
Security Program icon
Select and activate theprogram.
The Security programicon will turn red andautomatically limit yourstitch width regardlessof the selected stitch. Itevens remain on afterthe machine is turnedoff; you must open thedialog box and selectthe Standard needleicon to disengage theSecurity Program.
48
T H R O U G H T H E N E E D L E
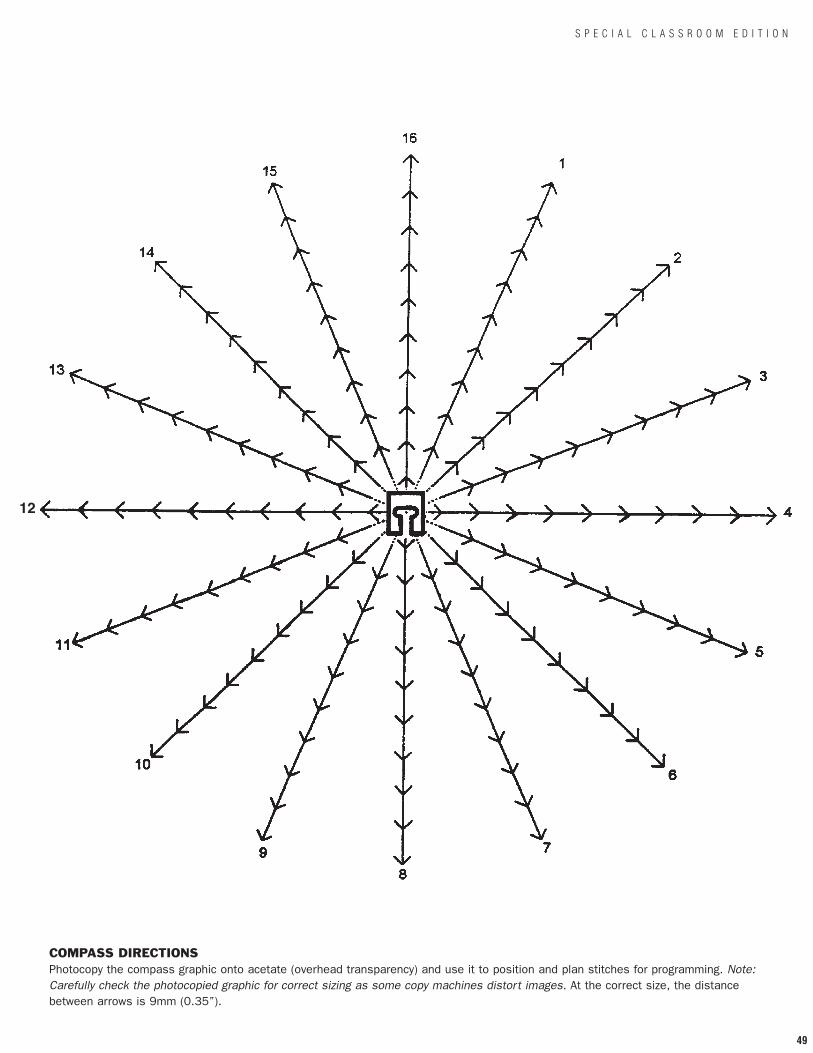
COMPASS DIRECTIONS Photocopy the compass graphic onto acetate (overhead transparency) and use it to position and plan stitches for programming. Note:Carefully check the photocopied graphic for correct sizing as some copy machines distort images. At the correct size, the distancebetween arrows is 9mm (0.35”).
49
S P E C I A L C L A S S R O O M E D I T I O N
12
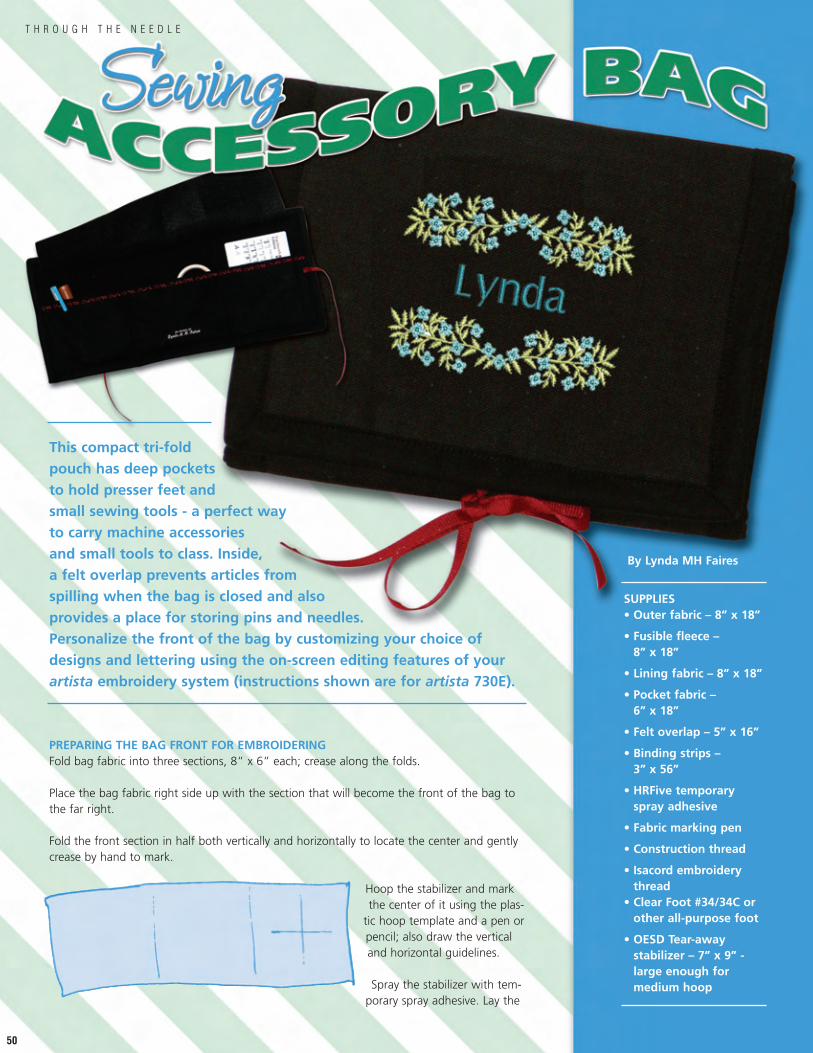
PREPARING THE BAG FRONT FOR EMBROIDERINGFold bag fabric into three sections, 8” x 6” each; crease along the folds.
Place the bag fabric right side up with the section that will become the front of the bag tothe far right.
Fold the front section in half both vertically and horizontally to locate the center and gentlycrease by hand to mark.
Hoop the stabilizer and markthe center of it using the plas-
tic hoop template and a pen orpencil; also draw the verticaland horizontal guidelines.
Spray the stabilizer with tem-porary spray adhesive. Lay the
By Lynda MH Faires
SUPPLIES• Outer fabric – 8” x 18”
• Fusible fleece –8” x 18”
• Lining fabric – 8” x 18”
• Pocket fabric –6” x 18”
• Felt overlap – 5” x 16”
• Binding strips –3” x 56”
• HRFive temporaryspray adhesive
• Fabric marking pen
• Construction thread
• Isacord embroiderythread
• Clear Foot #34/34C orother all-purpose foot
• OESD Tear-awaystabilizer – 7” x 9” -large enough formedium hoop
This compact tri-fold pouch has deep pockets to hold presser feet and small sewing tools - a perfect way to carry machine accessories and small tools to class. Inside, a felt overlap prevents articles from spilling when the bag is closed and also provides a place for storing pins and needles. Personalize the front of the bag by customizing your choice ofdesigns and lettering using the on-screen editing features of yourartista embroidery system (instructions shown are for artista 730E).
50
T H R O U G H T H E N E E D L E
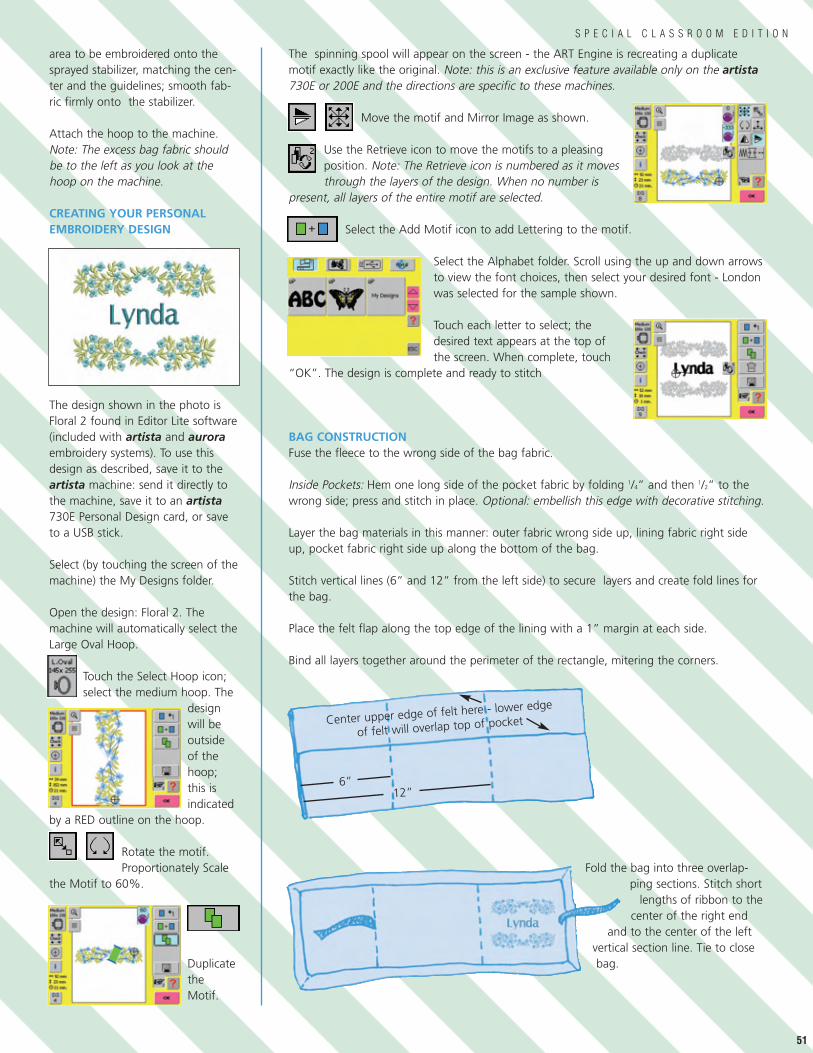
area to be embroidered onto thesprayed stabilizer, matching the cen-ter and the guidelines; smooth fab-ric firmly onto the stabilizer.
Attach the hoop to the machine.Note: The excess bag fabric shouldbe to the left as you look at thehoop on the machine.
CREATING YOUR PERSONAL EMBROIDERY DESIGN
The design shown in the photo isFloral 2 found in Editor Lite software(included with artista and auroraembroidery systems). To use thisdesign as described, save it to theartista machine: send it directly tothe machine, save it to an artista730E Personal Design card, or saveto a USB stick.
Select (by touching the screen of themachine) the My Designs folder.
Open the design: Floral 2. Themachine will automatically select theLarge Oval Hoop.
Touch the Select Hoop icon;select the medium hoop. The
designwill beoutsideof thehoop;this isindicated
by a RED outline on the hoop.
Rotate the motif.Proportionately Scale
the Motif to 60%.
DuplicatetheMotif.
The spinning spool will appear on the screen - the ART Engine is recreating a duplicatemotif exactly like the original. Note: this is an exclusive feature available only on the artista730E or 200E and the directions are specific to these machines.
Move the motif and Mirror Image as shown.
Use the Retrieve icon to move the motifs to a pleasingposition. Note: The Retrieve icon is numbered as it movesthrough the layers of the design. When no number is
present, all layers of the entire motif are selected.
Select the Add Motif icon to add Lettering to the motif.
Select the Alphabet folder. Scroll using the up and down arrowsto view the font choices, then select your desired font - Londonwas selected for the sample shown.
Touch each letter to select; thedesired text appears at the top ofthe screen. When complete, touch
“OK”. The design is complete and ready to stitch
BAG CONSTRUCTIONFuse the fleece to the wrong side of the bag fabric.
Inside Pockets: Hem one long side of the pocket fabric by folding 1/4” and then 1/2” to thewrong side; press and stitch in place. Optional: embellish this edge with decorative stitching.
Layer the bag materials in this manner: outer fabric wrong side up, lining fabric right sideup, pocket fabric right side up along the bottom of the bag.
Stitch vertical lines (6” and 12” from the left side) to secure layers and create fold lines forthe bag.
Place the felt flap along the top edge of the lining with a 1” margin at each side.
Bind all layers together around the perimeter of the rectangle, mitering the corners.
Fold the bag into three overlap-ping sections. Stitch short
lengths of ribbon to thecenter of the right end
and to the center of the leftvertical section line. Tie to closebag.
S P E C I A L C L A S S R O O M E D I T I O N
51
6”12”
Center upper edge of felt here - lower edge
of felt will overlap top of pocket
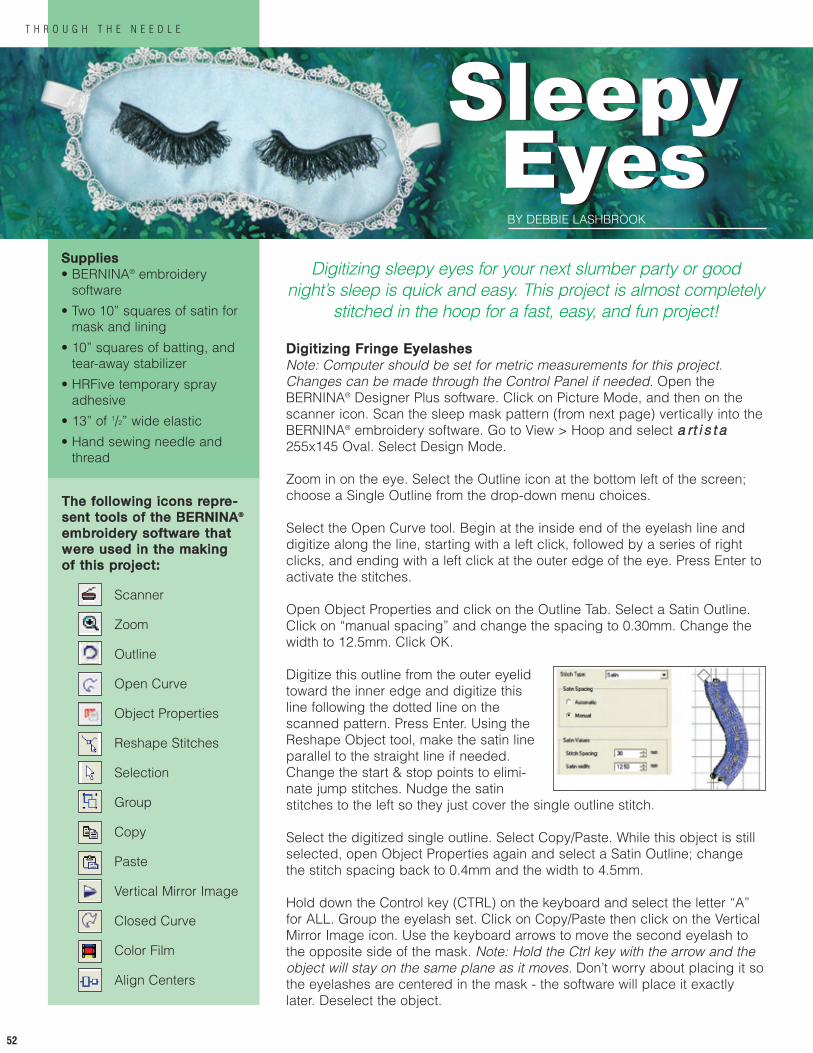
52
T H R O U G H T H E N E E D L E
SleepyEyes
SleepyEyes
BY DEBBIE LASHBROOK
Digitizing sleepy eyes for your next slumber party or goodnight’s sleep is quick and easy. This project is almost completely
stitched in the hoop for a fast, easy, and fun project!
DDiiggiittiizziinngg FFrriinnggee EEyyeellaasshheessNote: Computer should be set for metric measurements for this project.Changes can be made through the Control Panel if needed. Open theBERNINA® Designer Plus software. Click on Picture Mode, and then on thescanner icon. Scan the sleep mask pattern (from next page) vertically into theBERNINA® embroidery software. Go to View > Hoop and select aa rrtt ii ss tt aa255x145 Oval. Select Design Mode.
Zoom in on the eye. Select the Outline icon at the bottom left of the screen;choose a Single Outline from the drop-down menu choices.
Select the Open Curve tool. Begin at the inside end of the eyelash line anddigitize along the line, starting with a left click, followed by a series of rightclicks, and ending with a left click at the outer edge of the eye. Press Enter toactivate the stitches.
Open Object Properties and click on the Outline Tab. Select a Satin Outline.Click on “manual spacing” and change the spacing to 0.30mm. Change thewidth to 12.5mm. Click OK.
Digitize this outline from the outer eyelidtoward the inner edge and digitize thisline following the dotted line on thescanned pattern. Press Enter. Using theReshape Object tool, make the satin lineparallel to the straight line if needed.Change the start & stop points to elimi-nate jump stitches. Nudge the satinstitches to the left so they just cover the single outline stitch.
Select the digitized single outline. Select Copy/Paste. While this object is stillselected, open Object Properties again and select a Satin Outline; changethe stitch spacing back to 0.4mm and the width to 4.5mm.
Hold down the Control key (CTRL) on the keyboard and select the letter “A”for ALL. Group the eyelash set. Click on Copy/Paste then click on the VerticalMirror Image icon. Use the keyboard arrows to move the second eyelash tothe opposite side of the mask. Note: Hold the Ctrl key with the arrow and theobject will stay on the same plane as it moves. Don’t worry about placing it sothe eyelashes are centered in the mask - the software will place it exactlylater. Deselect the object.
TThhee ffoolllloowwiinngg iiccoonnss rreepprree--sseenntt ttoooollss ooff tthhee BBEERRNNIINNAA®®
eemmbbrrooiiddeerryy ssooffttwwaarree tthhaattwweerree uusseedd iinn tthhee mmaakkiinnggooff tthhiiss pprroojjeecctt::
Scanner
Zoom
Outline
Open Curve
Object Properties
Reshape Stitches
Selection
Group
Copy
Paste
Vertical Mirror Image
Closed Curve
Color Film
Align Centers
SSuupppplliieess• BERNINA® embroidery
software
• Two 10” squares of satin formask and lining
• 10” squares of batting, andtear-away stabilizer
• HRFive temporary sprayadhesive
• 13” of 1/2” wide elastic
• Hand sewing needle andthread
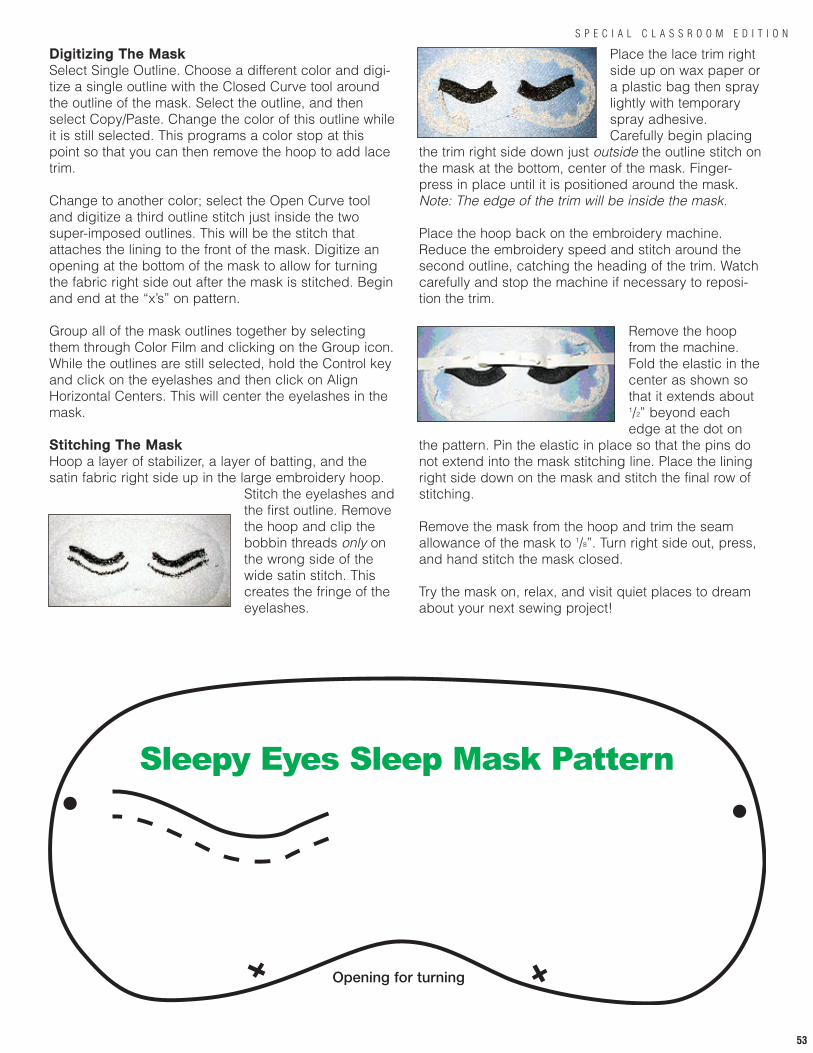
53
DDiiggiittiizziinngg TThhee MMaasskkSelect Single Outline. Choose a different color and digi-tize a single outline with the Closed Curve tool aroundthe outline of the mask. Select the outline, and thenselect Copy/Paste. Change the color of this outline whileit is still selected. This programs a color stop at thispoint so that you can then remove the hoop to add lacetrim.
Change to another color; select the Open Curve tooland digitize a third outline stitch just inside the twosuper-imposed outlines. This will be the stitch thatattaches the lining to the front of the mask. Digitize anopening at the bottom of the mask to allow for turningthe fabric right side out after the mask is stitched. Beginand end at the “x’s” on pattern.
Group all of the mask outlines together by selectingthem through Color Film and clicking on the Group icon.While the outlines are still selected, hold the Control keyand click on the eyelashes and then click on AlignHorizontal Centers. This will center the eyelashes in themask.
SSttiittcchhiinngg TThhee MMaasskk Hoop a layer of stabilizer, a layer of batting, and thesatin fabric right side up in the large embroidery hoop.
Stitch the eyelashes andthe first outline. Removethe hoop and clip thebobbin threads only onthe wrong side of thewide satin stitch. Thiscreates the fringe of theeyelashes.
Place the lace trim rightside up on wax paper ora plastic bag then spraylightly with temporaryspray adhesive.Carefully begin placing
the trim right side down just outside the outline stitch onthe mask at the bottom, center of the mask. Finger-press in place until it is positioned around the mask.Note: The edge of the trim will be inside the mask.
Place the hoop back on the embroidery machine.Reduce the embroidery speed and stitch around thesecond outline, catching the heading of the trim. Watchcarefully and stop the machine if necessary to reposi-tion the trim.
Remove the hoopfrom the machine.Fold the elastic in thecenter as shown sothat it extends about1/2” beyond eachedge at the dot on
the pattern. Pin the elastic in place so that the pins donot extend into the mask stitching line. Place the liningright side down on the mask and stitch the final row ofstitching.
Remove the mask from the hoop and trim the seamallowance of the mask to 1/8”. Turn right side out, press,and hand stitch the mask closed.
Try the mask on, relax, and visit quiet places to dreamabout your next sewing project!
S P E C I A L C L A S S R O O M E D I T I O N
Sleepy Eyes Sleep Mask Pattern
Opening for turning
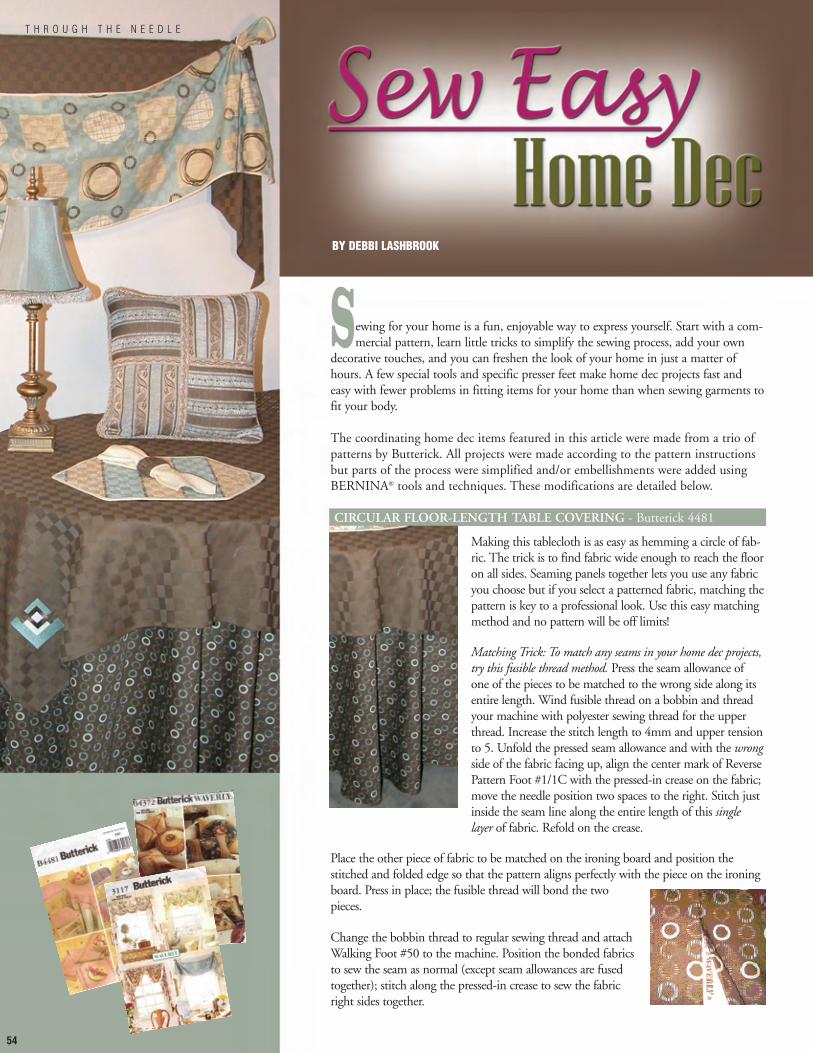
BY DEBBI LASHBROOK
Sewing for your home is a fun, enjoyable way to express yourself. Start with a com-mercial pattern, learn little tricks to simplify the sewing process, add your own
decorative touches, and you can freshen the look of your home in just a matter ofhours. A few special tools and specific presser feet make home dec projects fast andeasy with fewer problems in fitting items for your home than when sewing garments tofit your body.
The coordinating home dec items featured in this article were made from a trio ofpatterns by Butterick. All projects were made according to the pattern instructionsbut parts of the process were simplified and/or embellishments were added usingBERNINA® tools and techniques. These modifications are detailed below.
CIRCULAR FLOOR-LENGTH TABLE COVERING - Butterick 4481
Making this tablecloth is as easy as hemming a circle of fab-ric. The trick is to find fabric wide enough to reach the flooron all sides. Seaming panels together lets you use any fabricyou choose but if you select a patterned fabric, matching thepattern is key to a professional look. Use this easy matchingmethod and no pattern will be off limits!
Matching Trick: To match any seams in your home dec projects,try this fusible thread method. Press the seam allowance ofone of the pieces to be matched to the wrong side along itsentire length. Wind fusible thread on a bobbin and threadyour machine with polyester sewing thread for the upperthread. Increase the stitch length to 4mm and upper tensionto 5. Unfold the pressed seam allowance and with the wrongside of the fabric facing up, align the center mark of ReversePattern Foot #1/1C with the pressed-in crease on the fabric;move the needle position two spaces to the right. Stitch justinside the seam line along the entire length of this singlelayer of fabric. Refold on the crease.
Place the other piece of fabric to be matched on the ironing board and position thestitched and folded edge so that the pattern aligns perfectly with the piece on the ironingboard. Press in place; the fusible thread will bond the twopieces.
Change the bobbin thread to regular sewing thread and attachWalking Foot #50 to the machine. Position the bonded fabricsto sew the seam as normal (except seam allowances are fusedtogether); stitch along the pressed-in crease to sew the fabricright sides together.
54
T H R O U G H T H E N E E D L E
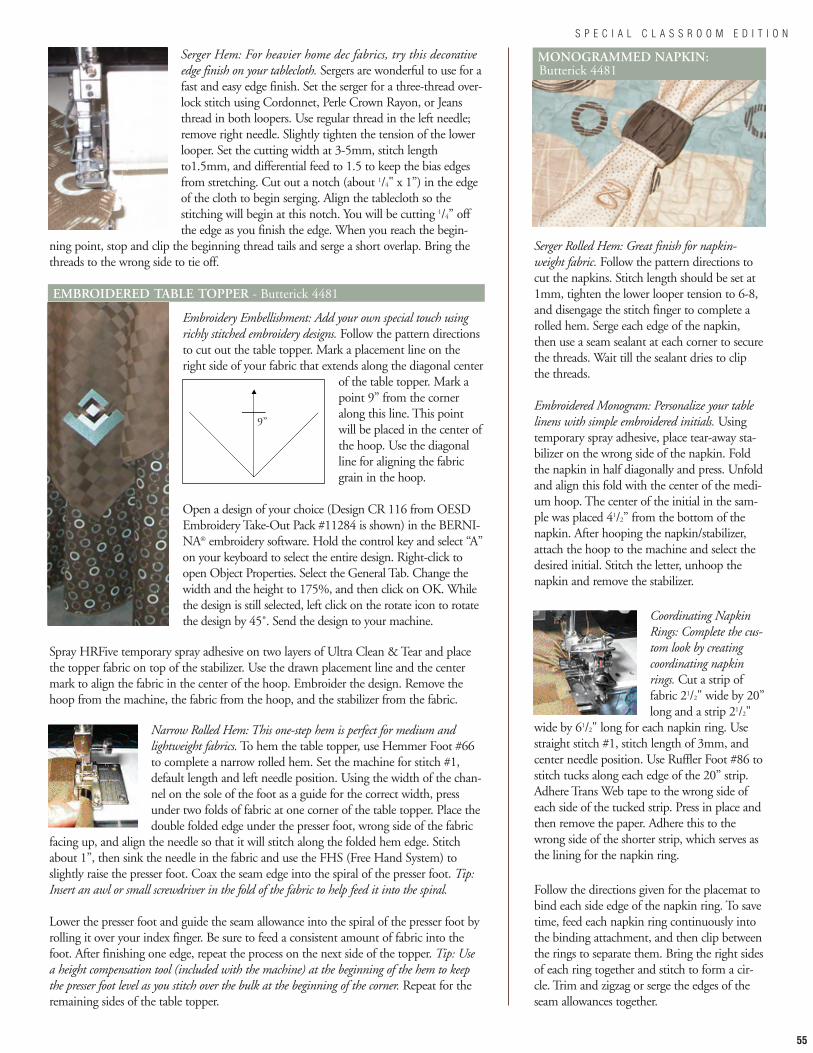
Serger Hem: For heavier home dec fabrics, try this decorativeedge finish on your tablecloth. Sergers are wonderful to use for afast and easy edge finish. Set the serger for a three-thread over-lock stitch using Cordonnet, Perle Crown Rayon, or Jeansthread in both loopers. Use regular thread in the left needle;remove right needle. Slightly tighten the tension of the lowerlooper. Set the cutting width at 3-5mm, stitch lengthto1.5mm, and differential feed to 1.5 to keep the bias edgesfrom stretching. Cut out a notch (about 1/4" x 1”) in the edgeof the cloth to begin serging. Align the tablecloth so thestitching will begin at this notch. You will be cutting 1/4” offthe edge as you finish the edge. When you reach the begin-
ning point, stop and clip the beginning thread tails and serge a short overlap. Bring thethreads to the wrong side to tie off.
EMBROIDERED TABLE TOPPER - Butterick 4481
Embroidery Embellishment: Add your own special touch usingrichly stitched embroidery designs. Follow the pattern directionsto cut out the table topper. Mark a placement line on theright side of your fabric that extends along the diagonal center
of the table topper. Mark apoint 9” from the corneralong this line. This pointwill be placed in the center ofthe hoop. Use the diagonalline for aligning the fabricgrain in the hoop.
Open a design of your choice (Design CR 116 from OESDEmbroidery Take-Out Pack #11284 is shown) in the BERNI-NA® embroidery software. Hold the control key and select “A”on your keyboard to select the entire design. Right-click toopen Object Properties. Select the General Tab. Change thewidth and the height to 175%, and then click on OK. Whilethe design is still selected, left click on the rotate icon to rotatethe design by 45˚. Send the design to your machine.
Spray HRFive temporary spray adhesive on two layers of Ultra Clean & Tear and placethe topper fabric on top of the stabilizer. Use the drawn placement line and the centermark to align the fabric in the center of the hoop. Embroider the design. Remove thehoop from the machine, the fabric from the hoop, and the stabilizer from the fabric.
Narrow Rolled Hem: This one-step hem is perfect for medium andlightweight fabrics. To hem the table topper, use Hemmer Foot #66to complete a narrow rolled hem. Set the machine for stitch #1,default length and left needle position. Using the width of the chan-nel on the sole of the foot as a guide for the correct width, pressunder two folds of fabric at one corner of the table topper. Place thedouble folded edge under the presser foot, wrong side of the fabric
facing up, and align the needle so that it will stitch along the folded hem edge. Stitchabout 1”, then sink the needle in the fabric and use the FHS (Free Hand System) toslightly raise the presser foot. Coax the seam edge into the spiral of the presser foot. Tip:Insert an awl or small screwdriver in the fold of the fabric to help feed it into the spiral.
Lower the presser foot and guide the seam allowance into the spiral of the presser foot byrolling it over your index finger. Be sure to feed a consistent amount of fabric into thefoot. After finishing one edge, repeat the process on the next side of the topper. Tip: Usea height compensation tool (included with the machine) at the beginning of the hem to keepthe presser foot level as you stitch over the bulk at the beginning of the corner. Repeat for theremaining sides of the table topper.
9”
MONOGRAMMED NAPKIN:Butterick 4481
Serger Rolled Hem: Great finish for napkin-weight fabric. Follow the pattern directions tocut the napkins. Stitch length should be set at1mm, tighten the lower looper tension to 6-8,and disengage the stitch finger to complete arolled hem. Serge each edge of the napkin,then use a seam sealant at each corner to securethe threads. Wait till the sealant dries to clipthe threads.
Embroidered Monogram: Personalize your tablelinens with simple embroidered initials. Usingtemporary spray adhesive, place tear-away sta-bilizer on the wrong side of the napkin. Foldthe napkin in half diagonally and press. Unfoldand align this fold with the center of the medi-um hoop. The center of the initial in the sam-ple was placed 41/2” from the bottom of thenapkin. After hooping the napkin/stabilizer,attach the hoop to the machine and select thedesired initial. Stitch the letter, unhoop thenapkin and remove the stabilizer.
Coordinating NapkinRings: Complete the cus-tom look by creatingcoordinating napkinrings. Cut a strip offabric 21/2" wide by 20”long and a strip 21/2"
wide by 61/2" long for each napkin ring. Usestraight stitch #1, stitch length of 3mm, andcenter needle position. Use Ruffler Foot #86 tostitch tucks along each edge of the 20” strip.Adhere Trans Web tape to the wrong side ofeach side of the tucked strip. Press in place andthen remove the paper. Adhere this to thewrong side of the shorter strip, which serves asthe lining for the napkin ring.
Follow the directions given for the placemat tobind each side edge of the napkin ring. To savetime, feed each napkin ring continuously intothe binding attachment, and then clip betweenthe rings to separate them. Bring the right sidesof each ring together and stitch to form a cir-cle. Trim and zigzag or serge the edges of theseam allowances together.
S P E C I A L C L A S S R O O M E D I T I O N
55
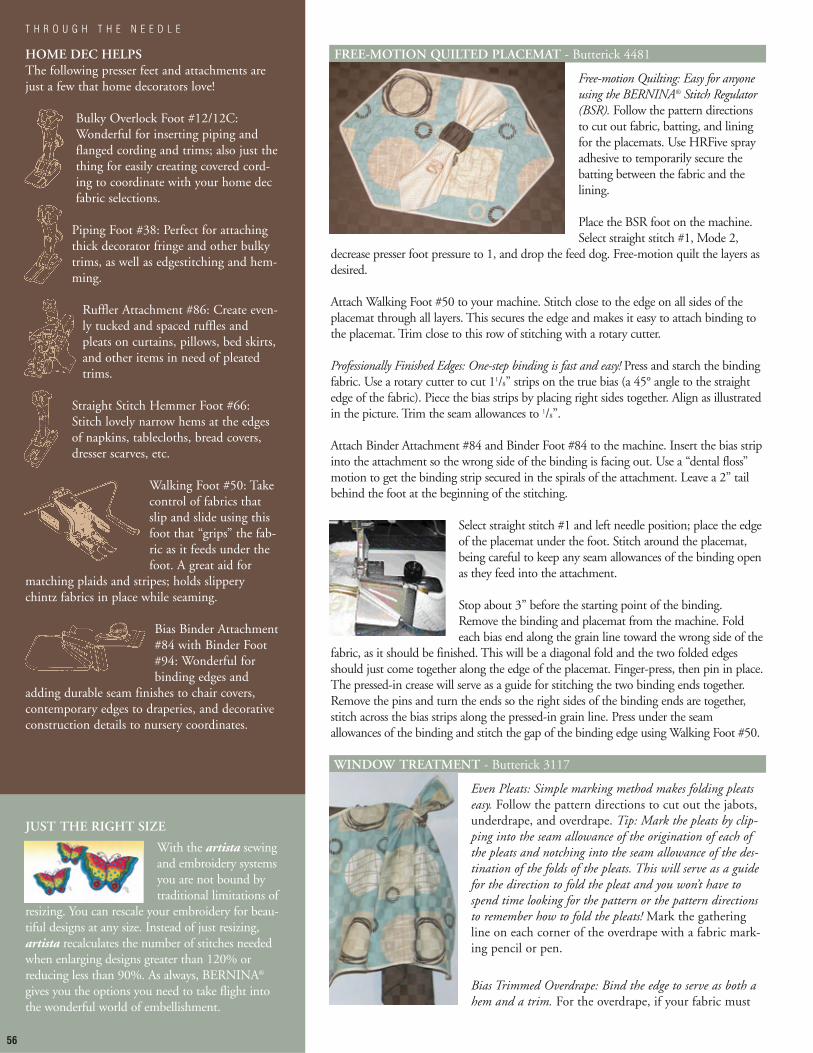
With the artista sewingand embroidery systemsyou are not bound bytraditional limitations of
resizing. You can rescale your embroidery for beau-tiful designs at any size. Instead of just resizing,artista recalculates the number of stitches neededwhen enlarging designs greater than 120% orreducing less than 90%. As always, BERNINA®
gives you the options you need to take flight intothe wonderful world of embellishment.
JUST THE RIGHT SIZE
FREE-MOTION QUILTED PLACEMAT - Butterick 4481
Free-motion Quilting: Easy for anyoneusing the BERNINA® Stitch Regulator(BSR). Follow the pattern directionsto cut out fabric, batting, and liningfor the placemats. Use HRFive sprayadhesive to temporarily secure thebatting between the fabric and thelining.
Place the BSR foot on the machine.Select straight stitch #1, Mode 2,
decrease presser foot pressure to 1, and drop the feed dog. Free-motion quilt the layers asdesired.
Attach Walking Foot #50 to your machine. Stitch close to the edge on all sides of theplacemat through all layers. This secures the edge and makes it easy to attach binding tothe placemat. Trim close to this row of stitching with a rotary cutter.
Professionally Finished Edges: One-step binding is fast and easy! Press and starch the bindingfabric. Use a rotary cutter to cut 11/8” strips on the true bias (a 45° angle to the straightedge of the fabric). Piece the bias strips by placing right sides together. Align as illustratedin the picture. Trim the seam allowances to 1/8”.
Attach Binder Attachment #84 and Binder Foot #84 to the machine. Insert the bias stripinto the attachment so the wrong side of the binding is facing out. Use a “dental floss”motion to get the binding strip secured in the spirals of the attachment. Leave a 2” tailbehind the foot at the beginning of the stitching.
Select straight stitch #1 and left needle position; place the edgeof the placemat under the foot. Stitch around the placemat,being careful to keep any seam allowances of the binding openas they feed into the attachment.
Stop about 3” before the starting point of the binding.Remove the binding and placemat from the machine. Foldeach bias end along the grain line toward the wrong side of the
fabric, as it should be finished. This will be a diagonal fold and the two folded edgesshould just come together along the edge of the placemat. Finger-press, then pin in place.The pressed-in crease will serve as a guide for stitching the two binding ends together.Remove the pins and turn the ends so the right sides of the binding ends are together,stitch across the bias strips along the pressed-in grain line. Press under the seamallowances of the binding and stitch the gap of the binding edge using Walking Foot #50.
WINDOW TREATMENT - Butterick 3117
Even Pleats: Simple marking method makes folding pleatseasy. Follow the pattern directions to cut out the jabots,underdrape, and overdrape. Tip: Mark the pleats by clip-ping into the seam allowance of the origination of each ofthe pleats and notching into the seam allowance of the des-tination of the folds of the pleats. This will serve as a guidefor the direction to fold the pleat and you won’t have tospend time looking for the pattern or the pattern directionsto remember how to fold the pleats! Mark the gatheringline on each corner of the overdrape with a fabric mark-ing pencil or pen.
Bias Trimmed Overdrape: Bind the edge to serve as both ahem and a trim. For the overdrape, if your fabric must
HOME DEC HELPSThe following presser feet and attachments arejust a few that home decorators love!
Bulky Overlock Foot #12/12C:Wonderful for inserting piping andflanged cording and trims; also just thething for easily creating covered cord-ing to coordinate with your home decfabric selections.
Piping Foot #38: Perfect for attachingthick decorator fringe and other bulkytrims, as well as edgestitching and hem-ming.
Ruffler Attachment #86: Create even-ly tucked and spaced ruffles andpleats on curtains, pillows, bed skirts,and other items in need of pleatedtrims.
Straight Stitch Hemmer Foot #66:Stitch lovely narrow hems at the edgesof napkins, tablecloths, bread covers,dresser scarves, etc.
Walking Foot #50: Takecontrol of fabrics thatslip and slide using thisfoot that “grips” the fab-ric as it feeds under thefoot. A great aid for
matching plaids and stripes; holds slipperychintz fabrics in place while seaming.
Bias Binder Attachment#84 with Binder Foot#94: Wonderful forbinding edges and
adding durable seam finishes to chair covers,contemporary edges to draperies, and decorativeconstruction details to nursery coordinates.
56
T H R O U G H T H E N E E D L E
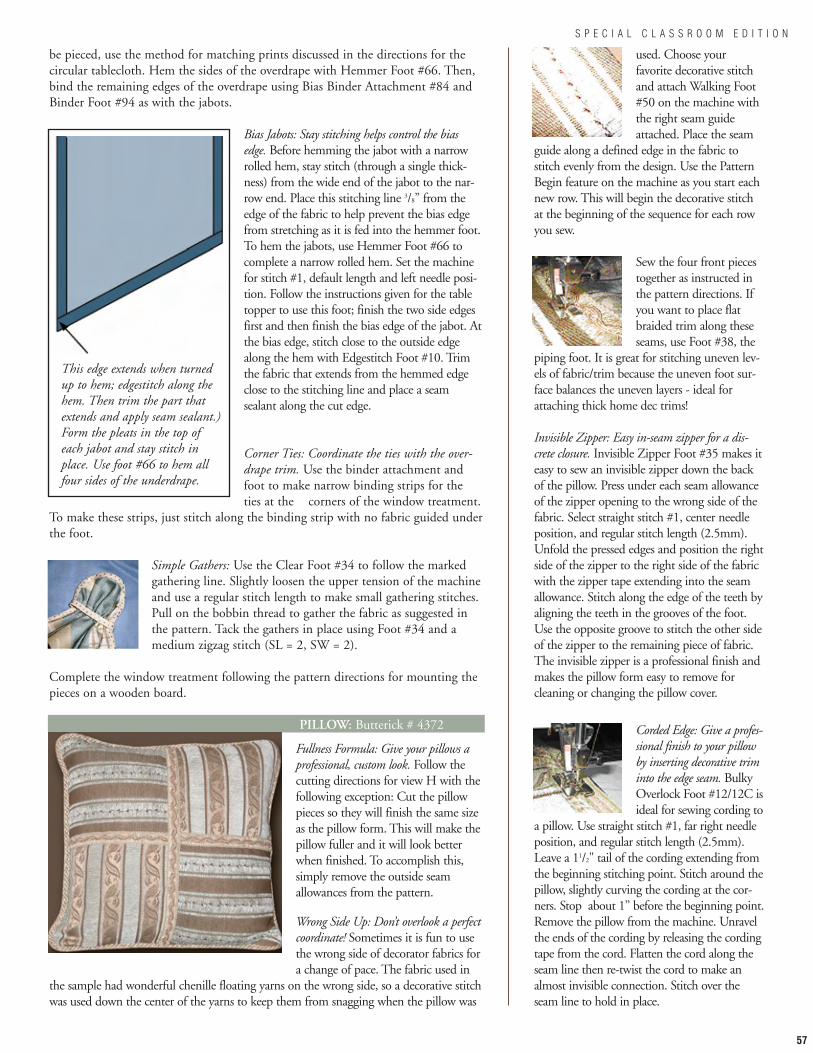
be pieced, use the method for matching prints discussed in the directions for thecircular tablecloth. Hem the sides of the overdrape with Hemmer Foot #66. Then,bind the remaining edges of the overdrape using Bias Binder Attachment #84 andBinder Foot #94 as with the jabots.
Bias Jabots: Stay stitching helps control the biasedge. Before hemming the jabot with a narrowrolled hem, stay stitch (through a single thick-ness) from the wide end of the jabot to the nar-row end. Place this stitching line 3/8” from theedge of the fabric to help prevent the bias edgefrom stretching as it is fed into the hemmer foot.To hem the jabots, use Hemmer Foot #66 tocomplete a narrow rolled hem. Set the machinefor stitch #1, default length and left needle posi-tion. Follow the instructions given for the tabletopper to use this foot; finish the two side edgesfirst and then finish the bias edge of the jabot. Atthe bias edge, stitch close to the outside edgealong the hem with Edgestitch Foot #10. Trimthe fabric that extends from the hemmed edgeclose to the stitching line and place a seamsealant along the cut edge.
Corner Ties: Coordinate the ties with the over-drape trim. Use the binder attachment andfoot to make narrow binding strips for theties at the corners of the window treatment.
To make these strips, just stitch along the binding strip with no fabric guided underthe foot.
Simple Gathers: Use the Clear Foot #34 to follow the markedgathering line. Slightly loosen the upper tension of the machineand use a regular stitch length to make small gathering stitches.Pull on the bobbin thread to gather the fabric as suggested inthe pattern. Tack the gathers in place using Foot #34 and amedium zigzag stitch (SL = 2, SW = 2).
Complete the window treatment following the pattern directions for mounting thepieces on a wooden board.
PILLOW: Butterick # 4372
Fullness Formula: Give your pillows aprofessional, custom look. Follow thecutting directions for view H with thefollowing exception: Cut the pillowpieces so they will finish the same sizeas the pillow form. This will make thepillow fuller and it will look betterwhen finished. To accomplish this,simply remove the outside seamallowances from the pattern.
Wrong Side Up: Don’t overlook a perfectcoordinate! Sometimes it is fun to usethe wrong side of decorator fabrics fora change of pace. The fabric used in
the sample had wonderful chenille floating yarns on the wrong side, so a decorative stitchwas used down the center of the yarns to keep them from snagging when the pillow was
used. Choose yourfavorite decorative stitchand attach Walking Foot#50 on the machine withthe right seam guideattached. Place the seam
guide along a defined edge in the fabric tostitch evenly from the design. Use the PatternBegin feature on the machine as you start eachnew row. This will begin the decorative stitchat the beginning of the sequence for each rowyou sew.
Sew the four front piecestogether as instructed inthe pattern directions. Ifyou want to place flatbraided trim along theseseams, use Foot #38, the
piping foot. It is great for stitching uneven lev-els of fabric/trim because the uneven foot sur-face balances the uneven layers - ideal forattaching thick home dec trims!
Invisible Zipper: Easy in-seam zipper for a dis-crete closure. Invisible Zipper Foot #35 makes iteasy to sew an invisible zipper down the backof the pillow. Press under each seam allowanceof the zipper opening to the wrong side of thefabric. Select straight stitch #1, center needleposition, and regular stitch length (2.5mm).Unfold the pressed edges and position the rightside of the zipper to the right side of the fabricwith the zipper tape extending into the seamallowance. Stitch along the edge of the teeth byaligning the teeth in the grooves of the foot.Use the opposite groove to stitch the other sideof the zipper to the remaining piece of fabric.The invisible zipper is a professional finish andmakes the pillow form easy to remove forcleaning or changing the pillow cover.
Corded Edge: Give a profes-sional finish to your pillowby inserting decorative triminto the edge seam. BulkyOverlock Foot #12/12C isideal for sewing cording to
a pillow. Use straight stitch #1, far right needleposition, and regular stitch length (2.5mm).Leave a 11/2" tail of the cording extending fromthe beginning stitching point. Stitch around thepillow, slightly curving the cording at the cor-ners. Stop about 1” before the beginning point.Remove the pillow from the machine. Unravelthe ends of the cording by releasing the cordingtape from the cord. Flatten the cord along theseam line then re-twist the cord to make analmost invisible connection. Stitch over theseam line to hold in place.
This edge extends when turned up to hem; edgestitch along the hem. Then trim the part thatextends and apply seam sealant.)Form the pleats in the top of each jabot and stay stitch in place. Use foot #66 to hem all four sides of the underdrape.
S P E C I A L C L A S S R O O M E D I T I O N
57
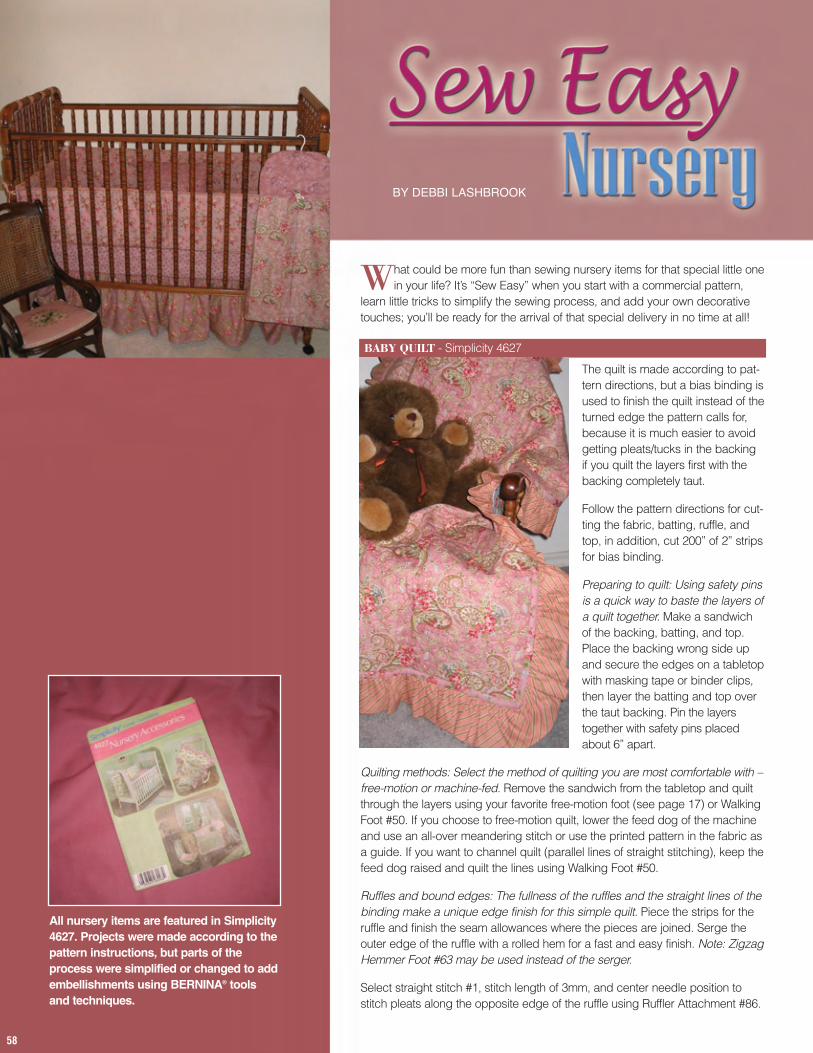
What could be more fun than sewing nursery items for that special little onein your life? It’s “Sew Easy” when you start with a commercial pattern,
learn little tricks to simplify the sewing process, and add your own decorativetouches; you’ll be ready for the arrival of that special delivery in no time at all!
BABY QUILT - Simplicity 4627
The quilt is made according to pat-tern directions, but a bias binding isused to finish the quilt instead of theturned edge the pattern calls for,because it is much easier to avoidgetting pleats/tucks in the backingif you quilt the layers first with thebacking completely taut.
Follow the pattern directions for cut-ting the fabric, batting, ruffle, andtop, in addition, cut 200” of 2” stripsfor bias binding.
Preparing to quilt: Using safety pinsis a quick way to baste the layers ofa quilt together. Make a sandwichof the backing, batting, and top.Place the backing wrong side upand secure the edges on a tabletopwith masking tape or binder clips,then layer the batting and top overthe taut backing. Pin the layerstogether with safety pins placedabout 6” apart.
Quilting methods: Select the method of quilting you are most comfortable with –free-motion or machine-fed. Remove the sandwich from the tabletop and quiltthrough the layers using your favorite free-motion foot (see page 17) or WalkingFoot #50. If you choose to free-motion quilt, lower the feed dog of the machineand use an all-over meandering stitch or use the printed pattern in the fabric asa guide. If you want to channel quilt (parallel lines of straight stitching), keep thefeed dog raised and quilt the lines using Walking Foot #50.
Ruffles and bound edges: The fullness of the ruffles and the straight lines of thebinding make a unique edge finish for this simple quilt. Piece the strips for theruffle and finish the seam allowances where the pieces are joined. Serge theouter edge of the ruffle with a rolled hem for a fast and easy finish. Note: ZigzagHemmer Foot #63 may be used instead of the serger.
Select straight stitch #1, stitch length of 3mm, and center needle position tostitch pleats along the opposite edge of the ruffle using Ruffler Attachment #86.
BY DEBBI LASHBROOK
All nursery items are featured in Simplicity4627. Projects were made according to thepattern instructions, but parts of theprocess were simplified or changed to addembellishments using BERNINA® toolsand techniques.
58
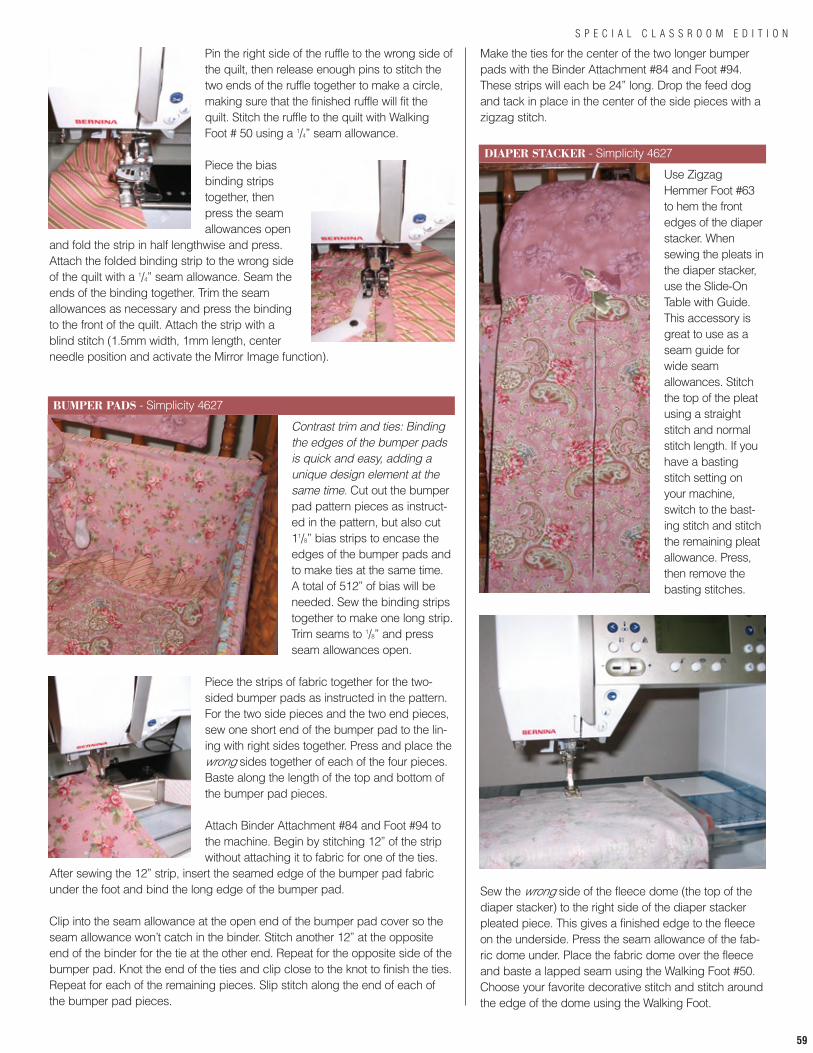
S P E C I A L C L A S S R O O M E D I T I O N
59
Pin the right side of the ruffle to the wrong side ofthe quilt, then release enough pins to stitch thetwo ends of the ruffle together to make a circle,making sure that the finished ruffle will fit thequilt. Stitch the ruffle to the quilt with WalkingFoot # 50 using a 1/4” seam allowance.
Piece the biasbinding stripstogether, thenpress the seamallowances open
and fold the strip in half lengthwise and press.Attach the folded binding strip to the wrong sideof the quilt with a 1/4” seam allowance. Seam theends of the binding together. Trim the seamallowances as necessary and press the bindingto the front of the quilt. Attach the strip with ablind stitch (1.5mm width, 1mm length, centerneedle position and activate the Mirror Image function).
BUMPER PADS - Simplicity 4627
Contrast trim and ties: Bindingthe edges of the bumper padsis quick and easy, adding aunique design element at thesame time. Cut out the bumperpad pattern pieces as instruct-ed in the pattern, but also cut11/8” bias strips to encase theedges of the bumper pads andto make ties at the same time.A total of 512” of bias will beneeded. Sew the binding stripstogether to make one long strip.Trim seams to 1/8” and pressseam allowances open.
Piece the strips of fabric together for the two-sided bumper pads as instructed in the pattern.For the two side pieces and the two end pieces,sew one short end of the bumper pad to the lin-ing with right sides together. Press and place thewrong sides together of each of the four pieces.Baste along the length of the top and bottom ofthe bumper pad pieces.
Attach Binder Attachment #84 and Foot #94 tothe machine. Begin by stitching 12” of the stripwithout attaching it to fabric for one of the ties.
After sewing the 12” strip, insert the seamed edge of the bumper pad fabricunder the foot and bind the long edge of the bumper pad.
Clip into the seam allowance at the open end of the bumper pad cover so theseam allowance won’t catch in the binder. Stitch another 12” at the oppositeend of the binder for the tie at the other end. Repeat for the opposite side of thebumper pad. Knot the end of the ties and clip close to the knot to finish the ties.Repeat for each of the remaining pieces. Slip stitch along the end of each ofthe bumper pad pieces.
Make the ties for the center of the two longer bumperpads with the Binder Attachment #84 and Foot #94.These strips will each be 24” long. Drop the feed dogand tack in place in the center of the side pieces with azigzag stitch.
DIAPER STACKER - Simplicity 4627
Use ZigzagHemmer Foot #63to hem the frontedges of the diaperstacker. Whensewing the pleats inthe diaper stacker,use the Slide-OnTable with Guide.This accessory isgreat to use as aseam guide forwide seamallowances. Stitchthe top of the pleatusing a straightstitch and normalstitch length. If youhave a bastingstitch setting onyour machine,switch to the bast-ing stitch and stitchthe remaining pleatallowance. Press,then remove thebasting stitches.
Sew the wrong side of the fleece dome (the top of thediaper stacker) to the right side of the diaper stackerpleated piece. This gives a finished edge to the fleeceon the underside. Press the seam allowance of the fab-ric dome under. Place the fabric dome over the fleeceand baste a lapped seam using the Walking Foot #50.Choose your favorite decorative stitch and stitch aroundthe edge of the dome using the Walking Foot.
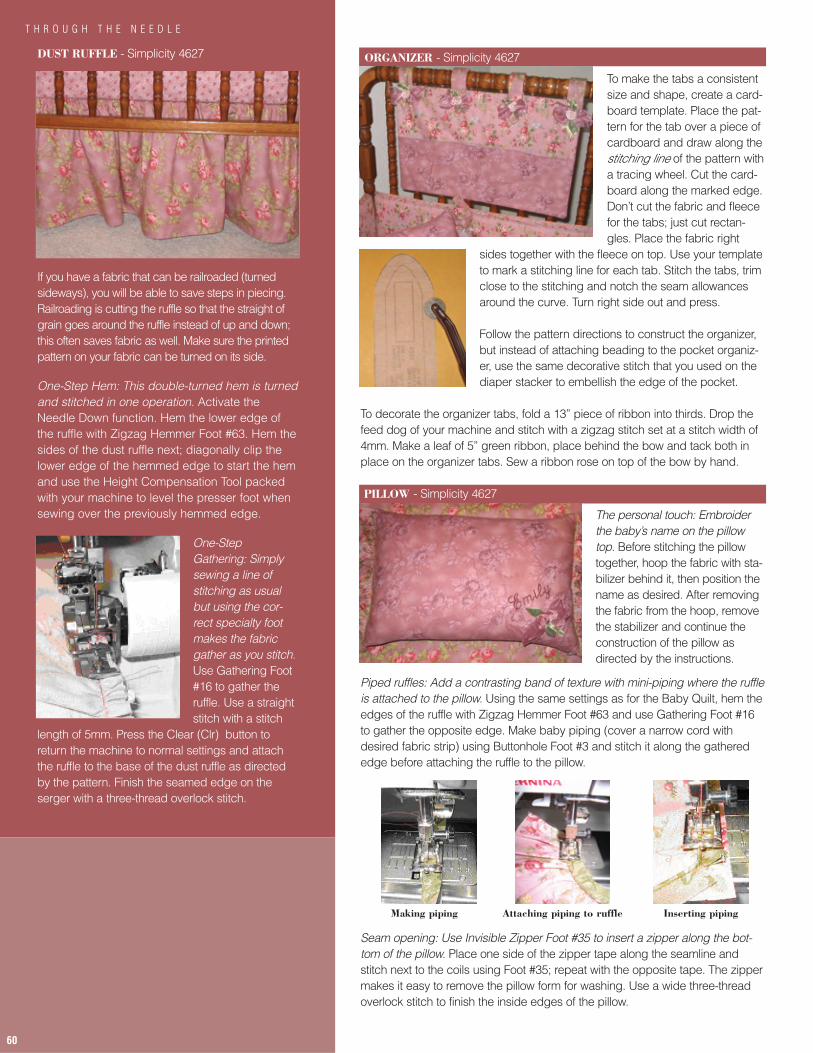
60
T H R O U G H T H E N E E D L E
ORGANIZER - Simplicity 4627
To make the tabs a consistentsize and shape, create a card-board template. Place the pat-tern for the tab over a piece ofcardboard and draw along thestitching line of the pattern witha tracing wheel. Cut the card-board along the marked edge.Don’t cut the fabric and fleecefor the tabs; just cut rectan-gles. Place the fabric right
sides together with the fleece on top. Use your templateto mark a stitching line for each tab. Stitch the tabs, trimclose to the stitching and notch the seam allowancesaround the curve. Turn right side out and press.
Follow the pattern directions to construct the organizer,but instead of attaching beading to the pocket organiz-er, use the same decorative stitch that you used on thediaper stacker to embellish the edge of the pocket.
To decorate the organizer tabs, fold a 13” piece of ribbon into thirds. Drop thefeed dog of your machine and stitch with a zigzag stitch set at a stitch width of4mm. Make a leaf of 5” green ribbon, place behind the bow and tack both inplace on the organizer tabs. Sew a ribbon rose on top of the bow by hand.
PILLOW - Simplicity 4627
The personal touch: Embroiderthe baby’s name on the pillowtop. Before stitching the pillowtogether, hoop the fabric with sta-bilizer behind it, then position thename as desired. After removingthe fabric from the hoop, removethe stabilizer and continue theconstruction of the pillow asdirected by the instructions.
Piped ruffles: Add a contrasting band of texture with mini-piping where the ruffleis attached to the pillow. Using the same settings as for the Baby Quilt, hem theedges of the ruffle with Zigzag Hemmer Foot #63 and use Gathering Foot #16to gather the opposite edge. Make baby piping (cover a narrow cord withdesired fabric strip) using Buttonhole Foot #3 and stitch it along the gatherededge before attaching the ruffle to the pillow.
Seam opening: Use Invisible Zipper Foot #35 to insert a zipper along the bot-tom of the pillow. Place one side of the zipper tape along the seamline andstitch next to the coils using Foot #35; repeat with the opposite tape. The zippermakes it easy to remove the pillow form for washing. Use a wide three-threadoverlock stitch to finish the inside edges of the pillow.
Making piping Attaching piping to ruffle Inserting piping
DUST RUFFLE - Simplicity 4627
If you have a fabric that can be railroaded (turnedsideways), you will be able to save steps in piecing.Railroading is cutting the ruffle so that the straight ofgrain goes around the ruffle instead of up and down;this often saves fabric as well. Make sure the printedpattern on your fabric can be turned on its side.
One-Step Hem: This double-turned hem is turnedand stitched in one operation. Activate theNeedle Down function. Hem the lower edge ofthe ruffle with Zigzag Hemmer Foot #63. Hem thesides of the dust ruffle next; diagonally clip thelower edge of the hemmed edge to start the hemand use the Height Compensation Tool packedwith your machine to level the presser foot whensewing over the previously hemmed edge.
One-StepGathering: Simplysewing a line ofstitching as usualbut using the cor-rect specialty footmakes the fabricgather as you stitch.Use Gathering Foot#16 to gather theruffle. Use a straightstitch with a stitch
length of 5mm. Press the Clear (Clr) button toreturn the machine to normal settings and attachthe ruffle to the base of the dust ruffle as directedby the pattern. Finish the seamed edge on theserger with a three-thread overlock stitch.

Related Documents