Welch Allyn ® MDI HL7 Information Source Service Manual Manufactured by Welch Allyn, Inc., Skaneateles Falls, NY U.S.A. CAUTION: Federal law restricts this device to sale by or on the order of a physician.

Welcome message from author
This document is posted to help you gain knowledge. Please leave a comment to let me know what you think about it! Share it to your friends and learn new things together.
Transcript
Welch Allyn® MDI
HL7 Information Source Service Manual
Manufactured by Welch Allyn, Inc., Skaneateles Falls, NY U.S.A.
CAUTION: Federal law restricts this device to sale by or on the order of a physician.

© 2021 Welch Allyn This document contains confidential information that belongs to Welch Allyn, Inc. No part of this document may be transmitted, reproduced, used, or disclosed outside of the receiving organization without the express written consent of Welch Allyn, Inc. Welch Allyn is a registered trademark of Welch Allyn, Inc. ELI is a trademark of Welch Allyn, Inc. Microsoft and Windows are registered trademarks of Microsoft Corporation.
Information in this document is subject to change without notice.
PATENT/PATENTS hillrom.com/patents May be covered by one or more patents. See above Internet address. The Hill-Rom companies are the proprietors of European, US, and other patents and pending patent applications.
Hillrom Technical Support For information about any Hillrom product, contact Hillrom Technical Support at 1.888.667.8272, [email protected].
9516-166-51-ENG Rev F
Revision Date: 2021-06
Welch Allyn, Inc. 4341 State Street Road Skaneateles Falls, NY 13153 USA hillrom.com Welch Allyn, Inc. is a subsidiary of Hill-Rom Holdings, Inc.
1
TABLE OF CONTENTSNOTICES ............................................................................................................................................................................ 2
MANUFACTURER’S RESPONSIBILITY................................................................................................................................................ 2 RESPONSIBILITY OF THE CUSTOMER................................................................................................................................................ 2 COPYRIGHT AND TRADEMARK NOTICES .......................................................................................................................................... 2 LICENSING ................................................................................................................................................................................ 2 OTHER IMPORTANT INFORMATION ................................................................................................................................................ 2 NOTICE TO EU USERS AND/OR PATIENTS ........................................................................................................................................ 2 DISPOSAL ................................................................................................................................................................................. 2
WARRANTY INFORMATION ............................................................................................................................................... 3
YOUR WELCH ALLYN WARRANTY .................................................................................................................................................. 3
USER SAFETY INFORMATION ............................................................................................................................................. 4
WARNING(S) .......................................................................................................................................................................... 4 CAUTIONS ................................................................................................................................................................................. 4 NOTES ..................................................................................................................................................................................... 4
EQUIPMENT SYMBOLS AND MARKINGS ............................................................................................................................. 5
SYMBOL DELINEATION ................................................................................................................................................................ 5
INTRODUCTION ................................................................................................................................................................. 6
MDI INFORMATION WORKFLOW .................................................................................................................................................. 6
PRODUCT INSTALLATION ................................................................................................................................................... 7
MDI INSTALLATION .................................................................................................................................................................... 7 SYSTEM REQUIREMENTS .............................................................................................................................................................. 7 INSTALLATION COMPONENTS ........................................................................................................................................................ 8 MDI INSTALLATION PROCEDURE ................................................................................................................................................... 8 MDI DEPENDENT SOFTWARE INSTALLATION DESCRIPTION ............................................................................................................... 12
MDI PRODUCT CONFIGURATION ..................................................................................................................................... 18
CONFIGURING JAVA .................................................................................................................................................................. 18 CONFIGURING SQL SERVER NETWORKING .................................................................................................................................... 19 INSTALLING THE MDI SERVICES ................................................................................................................................................... 23 RECONFIGURING MDI............................................................................................................................................................... 24 CONFIGURING INTERFACE ENGINE ............................................................................................................................................... 24 DISABLING MESSAGE LOGGING ................................................................................................................................................... 28 DEPLOYING INTERFACE ENGINE CHANNELS .................................................................................................................................... 29 CONFIGURING THE MDI APPLICATION SECURITY ............................................................................................................................ 33 CONFIGURING ADT PROGRAM PARAMETERS ................................................................................................................................ 34
TROUBLESHOOTING ........................................................................................................................................................ 36
GLOSSARY ............................................................................................................................................................................... 37

2
NOTICES
Manufacturer’s Responsibility
Welch Allyn, Inc. is responsible for the effects on safety and performance only if:
• Assembly operations, extensions, readjustments, modifications, or repairs are carried out only by persons authorized by Welch Allyn, Inc.
• The application is used in accordance with the instructions for use.
Responsibility of the Customer
The user of this application is responsible for ensuring the implementation of a satisfactory maintenance schedule. Failure to do so may cause undue failure and possible health hazards.
Copyright and Trademark Notices
This document contains information that is protected by copyright. All rights are reserved. No part of this document may be photocopied, reproduced, or translated to another language without prior written consent of Welch Allyn, Inc.
Licensing
The MDI-HL7 interface application is offered to customers of Welch Allyn under the terms of the Welch Allyn software licensing agreement.
The MDI-HL7 interface application uses the Mirth Connect Interface Engine under the terms of the Mozilla Public License (MPL).
Other Important Information
The information in this document is subject to change without notice.
Welch Allyn, Inc. makes no warranty of any kind with regard to this material including, but not limited to, implied warranties of merchantability and fitness for a particular purpose. Welch Allyn, Inc. assumes no responsibility for any errors or omissions that may appear in this document. Welch Allyn, Inc. makes no commitment to update or to keep current the information contained in this document.
Notice to EU Users and/or Patients
Any serious incident that has occurred in relation to the device, should be reported to the manufacturer and the competent authority of the Member State in which the user and/or patient is established.
Disposal
This product and its accessories must be disposed of according to local laws and regulations. Do not dispose of this product as unsorted municipal waste. For more specific disposal information see www.welchallyn.com/weee.

3
WARRANTY INFORMATION
Your Welch Allyn Warranty
WELCH ALLYN, INC. (hereafter referred to as “Welch Allyn”) warrants that components within Welch Allyn products (hereafter referred to as “Product/s”) will be free from defects in workmanship and materials for the number of years specified on documentation accompanying the product, or previously agreed to by the purchaser and Welch Allyn, or if not otherwise noted, for a period of twelve (12) months from the date of shipment.
Consumable, disposable or single use products such as, but not limited to, PAPER or ELECTRODES are warranted to be free from defects in workmanship and materials for a period of 90 days from the date of shipment or the date of first use, whichever is sooner.
Reusable product such as, but not limited to, BATTERIES, BLOOD PRESSURE CUFFS, BLOOD PRESSURE HOSES, TRANSDUCER CABLES, Y-CABLES, PATIENT CABLES, LEAD WIRES, MAGNETIC STORAGE MEDIUMS, CARRY CASES or MOUNTS, are warranted to be free from defects in workmanship and materials for a period of 90 days. This warranty does not apply to damage to the Product/s caused by any or all of the following circumstances or conditions:
a) Freight damage; b) Supplies, accessories and internal parts NOT approved by Welch Allyn; c) Misapplication, misuse, abuse, and/or failure to follow the Product/s instruction sheets and/or
information guides; d) Accident; e) A disaster affecting the Product/s; f) Alterations and/or modifications to the Product/s not authorized by Welch Allyn; g) Other events outside of Welch Allyn’s reasonable control or not arising under normal operating conditions.
THE REMEDY UNDER THIS WARRANTY IS LIMITED TO THE REPAIR OR REPLACEMENT WITHOUT CHARGE FOR LABOR OR MATERIALS, OR ANY PRODUCT/S FOUND UPON EXAMINATION BY WELCH ALLYN TO HAVE BEEN DEFECTIVE. This remedy shall be conditioned upon receipt of notice by Welch Allyn of any alleged defects promptly after discovery thereof within the warranty period. Welch Allyn’s obligations under the foregoing warranty will further be conditioned upon the assumption by the purchaser of the Product/s (i) of all carrier charges with respect to any Product/s returned to Welch Allyn’s principal place or any other place as specifically designated by Welch Allyn or an authorized distributor or representative of Welch Allyn, and (ii) all risk of loss in transit. It is expressly agreed that the liability of Welch Allyn is limited and that Welch Allyn does not function as an insurer. A purchaser of a Product/s, by its acceptance and purchase thereof, acknowledges and agrees that Welch Allyn is not liable for loss, harm, or damage due directly or indirectly to an occurrence or consequence there from relating to the Product/s. If Welch Allyn should be found liable to anyone under any theory (except the expressed warranty set forth herein) for loss, harm, or damage, the liability of Welch Allyn shall be limited to the lesser of the actual loss, harm, or damage, or the original purchase price of the Product/s when sold.
EXCEPT AS SET FORTH HEREIN WITH RESPECT TO REIMBURSEMENT OF LABOR CHARGES, A PURCHASER’S SOLE EXCLUSIVE REMEDY AGAINST WELCH ALLYN FOR CLAIMS RELATING TO THE PRODUCT/S FOR ANY AND ALL LOSSES AND DAMAGES RESULTING FROM ANY CAUSE SHALL BE THE REPAIR OR REPLACEMENT OF DEFECTIVE PRODUCT/S TO THE EXTENT THAT THE DEFECT IS NOTICED AND WELCH ALLYN IS NOTIFIED WITHIN THE WARRANTY PERIOD. IN NO EVENT, INCLUDING THE CLAIM FOR NEGLIGENCE, SHALL WELCH ALLYN BE LIABLE FOR INCIDENTAL, SPECIAL, OR CONSEQUENTIAL DAMAGES, OR FOR ANY OTHER LOSS, DAMAGE, OR EXPENSE OF ANY KIND, INCLUDING LOSS OF PROFITS, WHETHER UNDER TORT, NEGLIGENCE OR STRICT LIABILITY THEORIES OF LAW, OR OTHERWISE. THIS WARRANTY IS EXPRESSLY IN LIEU OF ANY OTHER WARRANTIES, EXPRESS OR IMPLIED, INCLUDING, BUT NOT LIMITED TO THE IMPLIED WARRANTY OF MERCHANTABILITY AND THE WARRANTY OF FITNESS FOR A PARTICULAR PURPOSE.
4
USER SAFETY INFORMATION
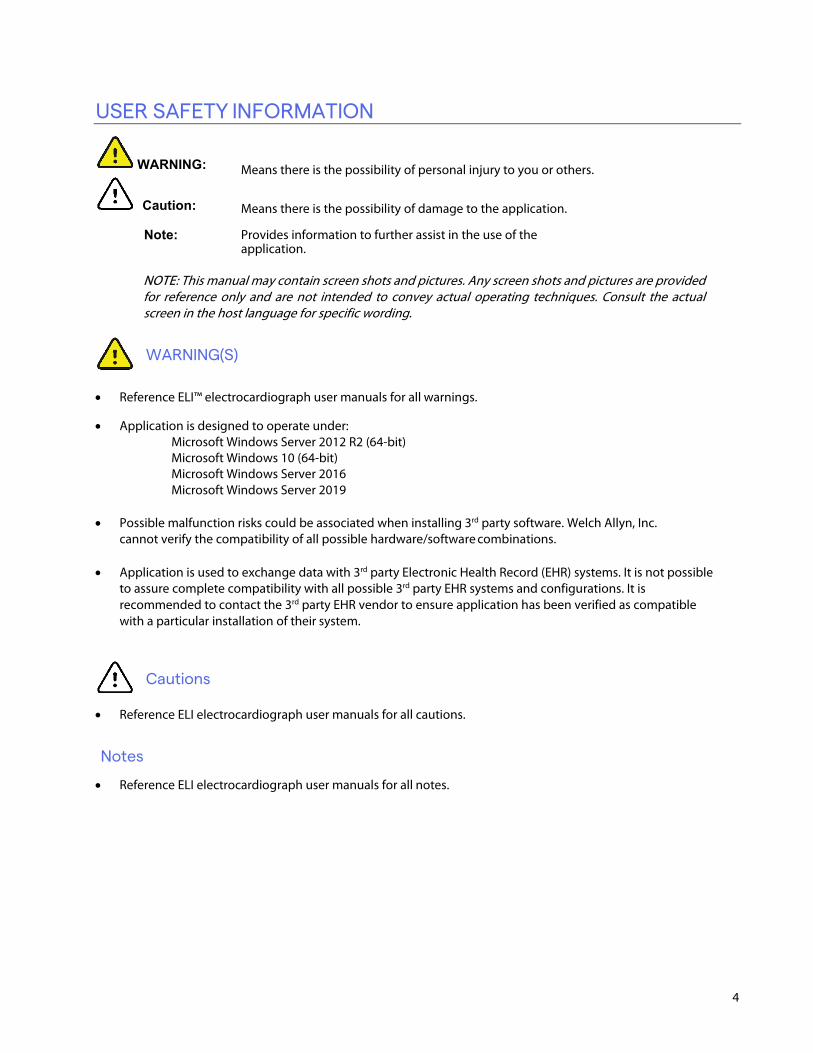
WARNING:
Means there is the possibility of personal injury to you or others.
Caution:
Means there is the possibility of damage to the application.
Note: Provides information to further assist in the use of the application.
NOTE: This manual may contain screen shots and pictures. Any screen shots and pictures are provided for reference only and are not intended to convey actual operating techniques. Consult the actual screen in the host language for specific wording.
WARNING(S)
• Reference ELI™ electrocardiograph user manuals for all warnings.
• Application is designed to operate under: Microsoft Windows Server 2012 R2 (64-bit) Microsoft Windows 10 (64-bit) Microsoft Windows Server 2016 Microsoft Windows Server 2019
• Possible malfunction risks could be associated when installing 3rd party software. Welch Allyn, Inc.
cannot verify the compatibility of all possible hardware/software combinations.
• Application is used to exchange data with 3rd party Electronic Health Record (EHR) systems. It is not possible to assure complete compatibility with all possible 3rd party EHR systems and configurations. It is recommended to contact the 3rd party EHR vendor to ensure application has been verified as compatible with a particular installation of their system.
Cautions
• Reference ELI electrocardiograph user manuals for all cautions.
Notes
• Reference ELI electrocardiograph user manuals for all notes.
5
EQUIPMENT SYMBOLS AND MARKINGS
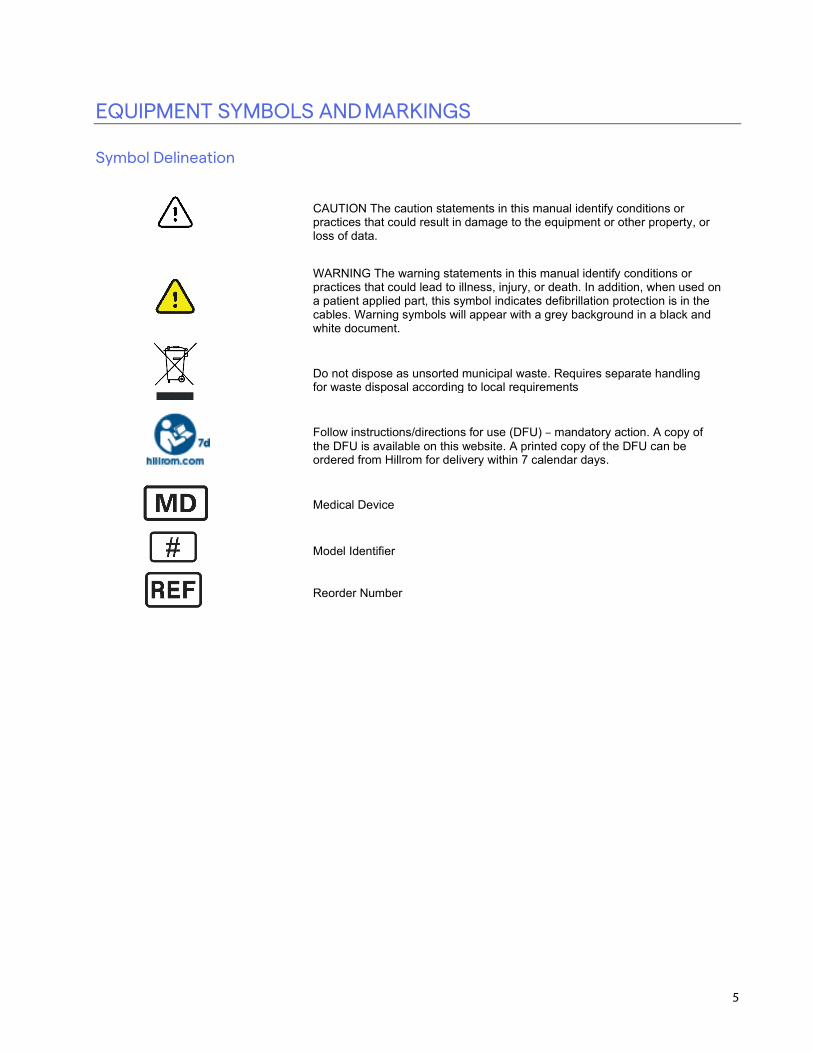
Symbol Delineation
CAUTION The caution statements in this manual identify conditions or practices that could result in damage to the equipment or other property, or loss of data.
WARNING The warning statements in this manual identify conditions or practices that could lead to illness, injury, or death. In addition, when used on a patient applied part, this symbol indicates defibrillation protection is in the cables. Warning symbols will appear with a grey background in a black and white document.
Do not dispose as unsorted municipal waste. Requires separate handling for waste disposal according to local requirements
Follow instructions/directions for use (DFU) – mandatory action. A copy of the DFU is available on this website. A printed copy of the DFU can be ordered from Hillrom for delivery within 7 calendar days.
Medical Device
Model Identifier
Reorder Number
6
INTRODUCTION
This service manual contains information about the installation, configuration and maintenance of the MDI (Mortara Device Interface) HL7 interface.
The MDI is a suite of applications that provide interoperability with Electronic Health Record (EHR) systems that exchange medical information using HL7 technology. Supported feature include:
• ADT interface-capture patient demographic information for use on Welch Allyn devices. • Orders interface-capture ordered procedure information for use on Welch Allyn devices. • Results reporting interface-provide results of resting ECG, stress, Holter and Cardiac Rehabilitation
exams collected by the Welch Allyn devices.
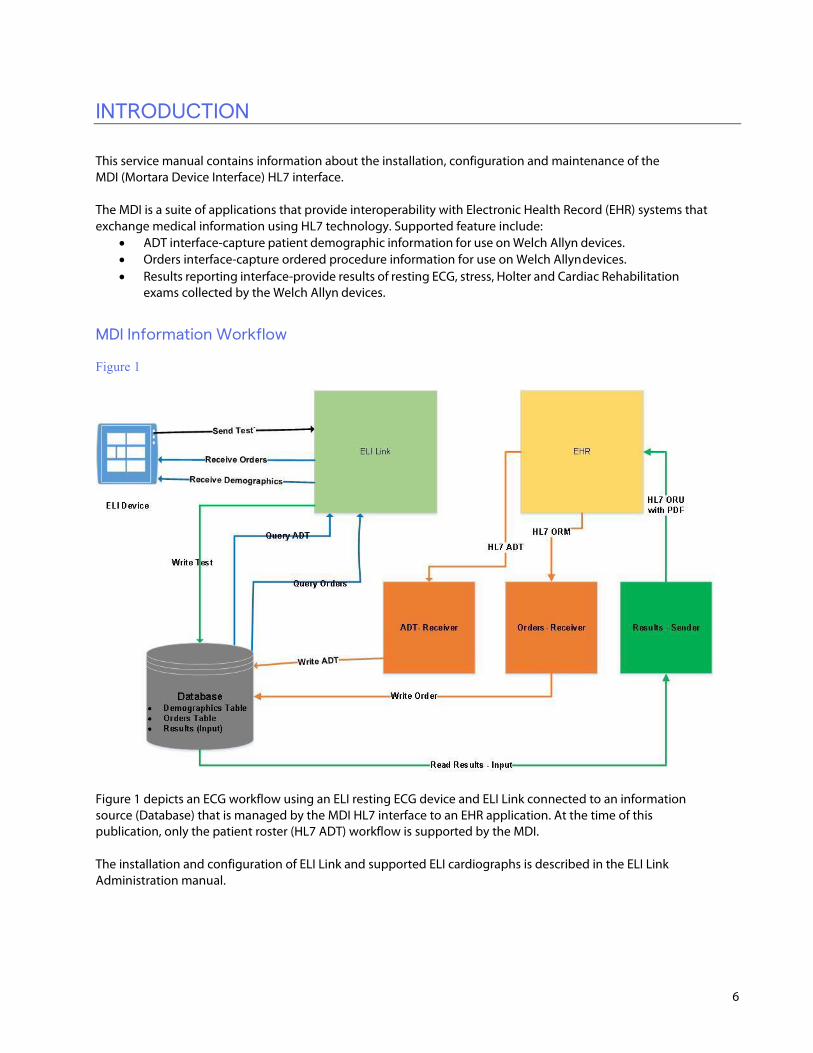
MDI Information Workflow
Figure 1
Figure 1 depicts an ECG workflow using an ELI resting ECG device and ELI Link connected to an information source (Database) that is managed by the MDI HL7 interface to an EHR application. At the time of this publication, only the patient roster (HL7 ADT) workflow is supported by the MDI.
The installation and configuration of ELI Link and supported ELI cardiographs is described in the ELI Link Administration manual.
7
PRODUCT INSTALLATION
MDI Installation The MDI software is provided to a customer as part of the ELI Link Software Installation DVD (P/N 107347)
The customer environment and the nature of the EHR application (local install, hosted, cloud based) will dictate which type of installation topography is prescribed:
• LAN Scenario • LAN (MDI – HL7 Interface) – EHR Server Application Hosted Scenario • MDI – HL7 Interface and EHR Server Application – Both Hosted Scenario
Refer to the MDI – HL7 Implementation Guide for more detail and considerations on these deployment scenarios.
System Requirements
Operating System Support
• Windows 2012 Server R2 (64-bit) • Microsoft Windows 10 (64-bit) • Microsoft Windows Server 2016 • Microsoft Windows Server 2019
Hardware Support
Hardware support for the system should meet the recommended specifications as outlined for the corresponding Windows operating systems. This would include; RAM, CPU and hard drive requirements.
PRODUCT INSTALLATION
8
Installation Components
The installation of the MDI software consists of the following software packages: • Java Runtime Environment (JRE); Java SE Runtime Environment 8u131 • Mirth Interface Engine; mirthconnect-3.4.2.8129.b167 • MDI software; version 5.0.0 (or later)
A user with Administrative privileges is required to install the MDI application software. The user does not need to be the Administrator for the computer where the MDI application is being installed.
This section will describe the installation of the MDI software upon running the Setup.exe from the MDI installation CD.
MDI Installation Procedure
Starting the MDI Software Installation
This section describes the installation of the MDI software application. Using the installation DVD, navigate to the “MDI” folder. Click on Setup.exe. This will launch the installation of the MDI application as defined in the MDIInstall.msi file.
NOTE: If the MDI application is already installed, you will receive a notice that you must uninstall prior to re-installation.
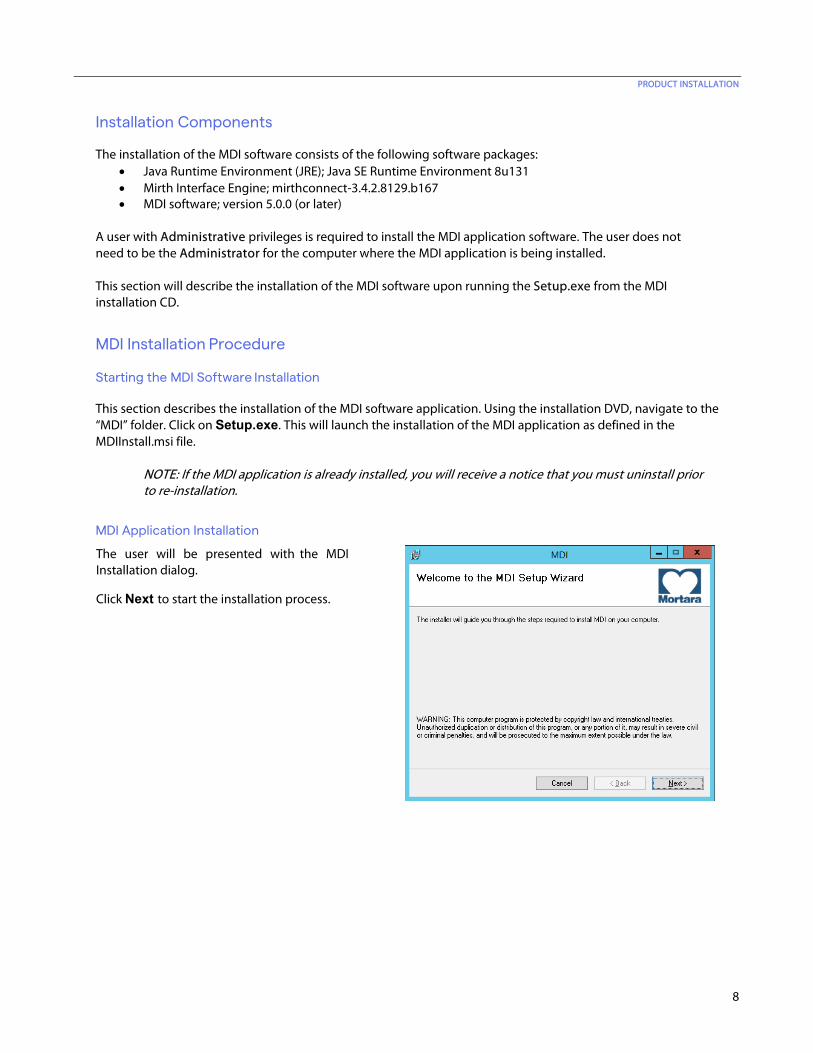
MDI Application Installation
The user will be presented with the MDI Installation dialog.
Click Next to start the installation process.
PRODUCT INSTALLATION
9
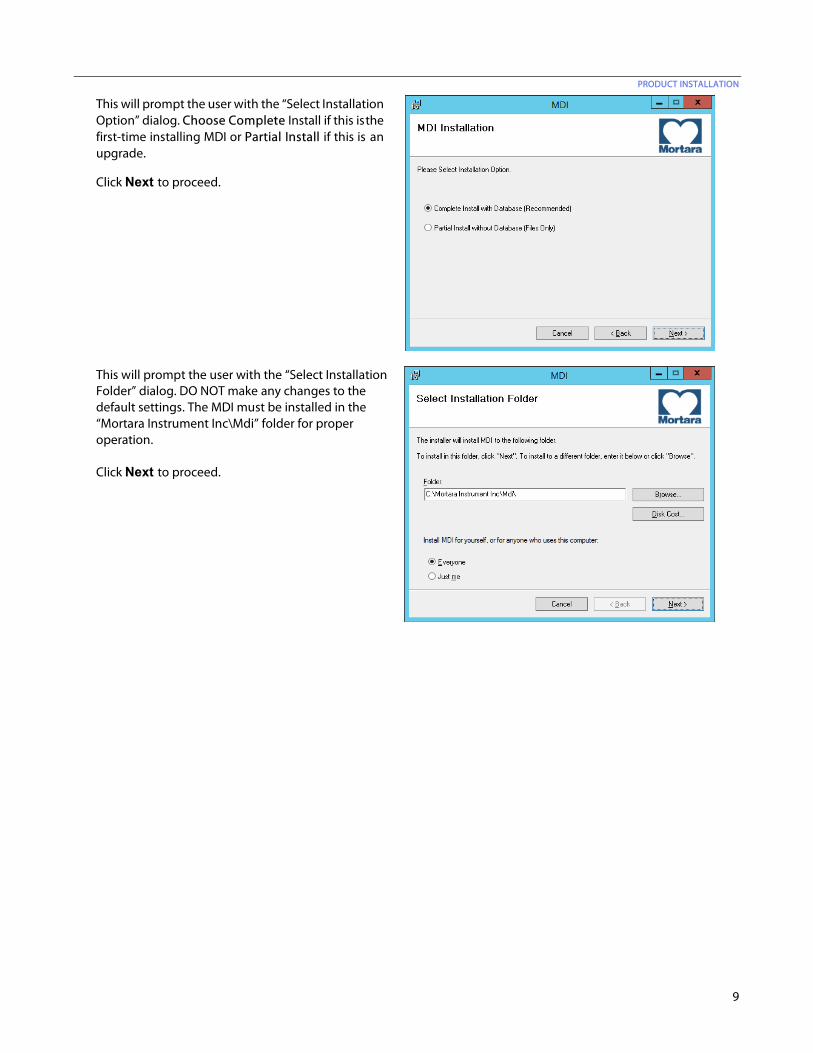
This will prompt the user with the “Select Installation Option” dialog. Choose Complete Install if this is the first-time installing MDI or Partial Install if this is an upgrade.
Click Next to proceed.
This will prompt the user with the “Select Installation Folder” dialog. DO NOT make any changes to the default settings. The MDI must be installed in the “Mortara Instrument Inc\Mdi” folder for proper operation.
Click Next to proceed.
PRODUCT INSTALLATION
10
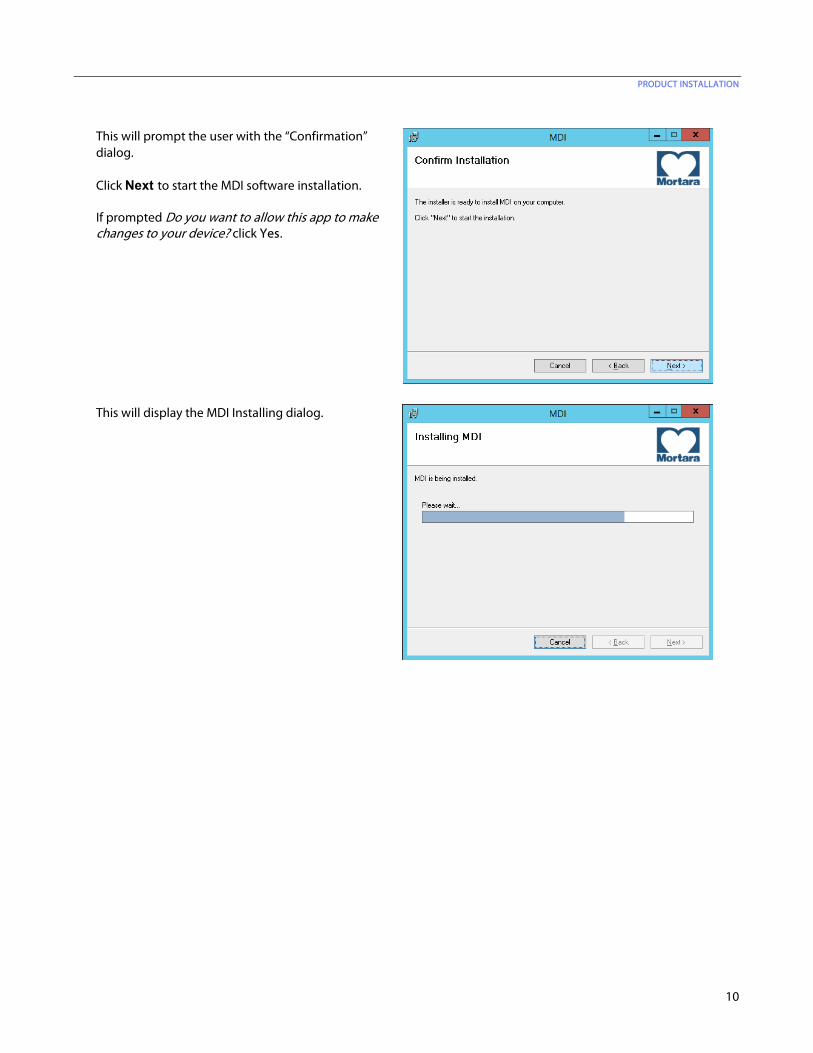
This will prompt the user with the “Confirmation” dialog.
Click Next to start the MDI software installation. If prompted Do you want to allow this app to make changes to your device? click Yes.
This will display the MDI Installing dialog.
PRODUCT INSTALLATION
11
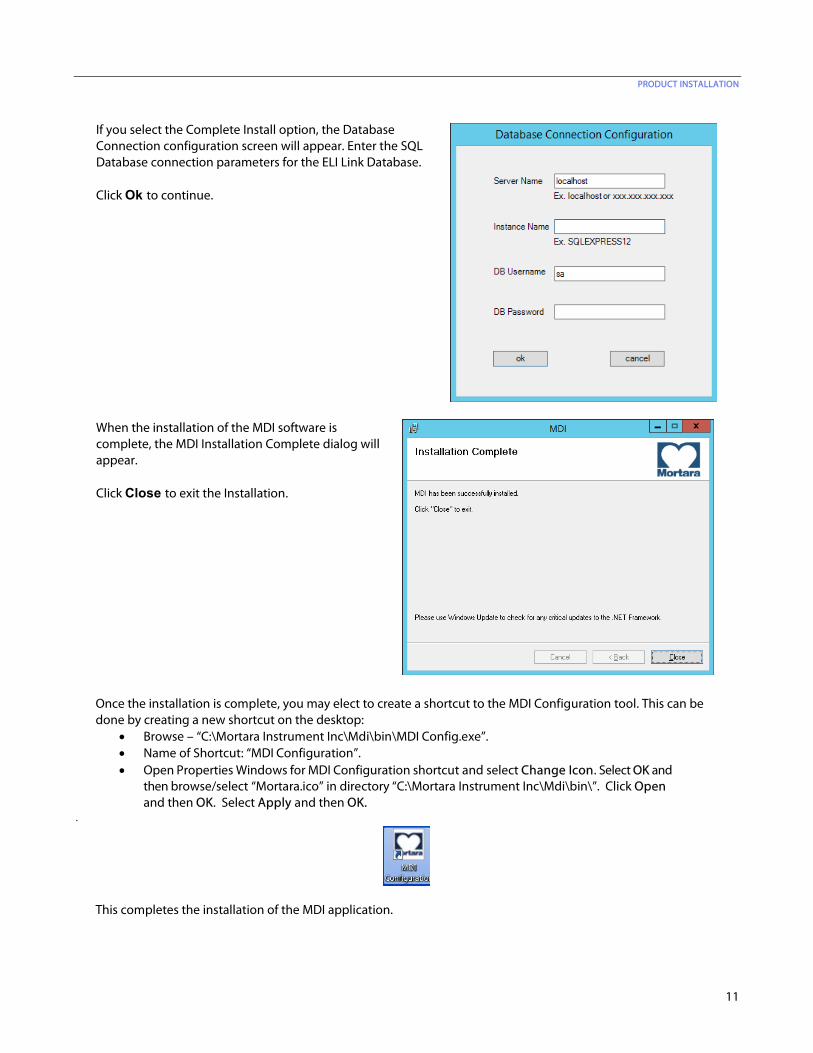
If you select the Complete Install option, the Database Connection configuration screen will appear. Enter the SQL Database connection parameters for the ELI Link Database. Click Ok to continue.
When the installation of the MDI software is complete, the MDI Installation Complete dialog will appear.
Click Close to exit the Installation.
Once the installation is complete, you may elect to create a shortcut to the MDI Configuration tool. This can be done by creating a new shortcut on the desktop:
• Browse – “C:\Mortara Instrument Inc\Mdi\bin\MDI Config.exe”. • Name of Shortcut: “MDI Configuration”. • Open Properties Windows for MDI Configuration shortcut and select Change Icon. Select OK and
then browse/select “Mortara.ico” in directory “C:\Mortara Instrument Inc\Mdi\bin\”. Click Open and then OK. Select Apply and then OK.
.
This completes the installation of the MDI application.
PRODUCT INSTALLATION
12
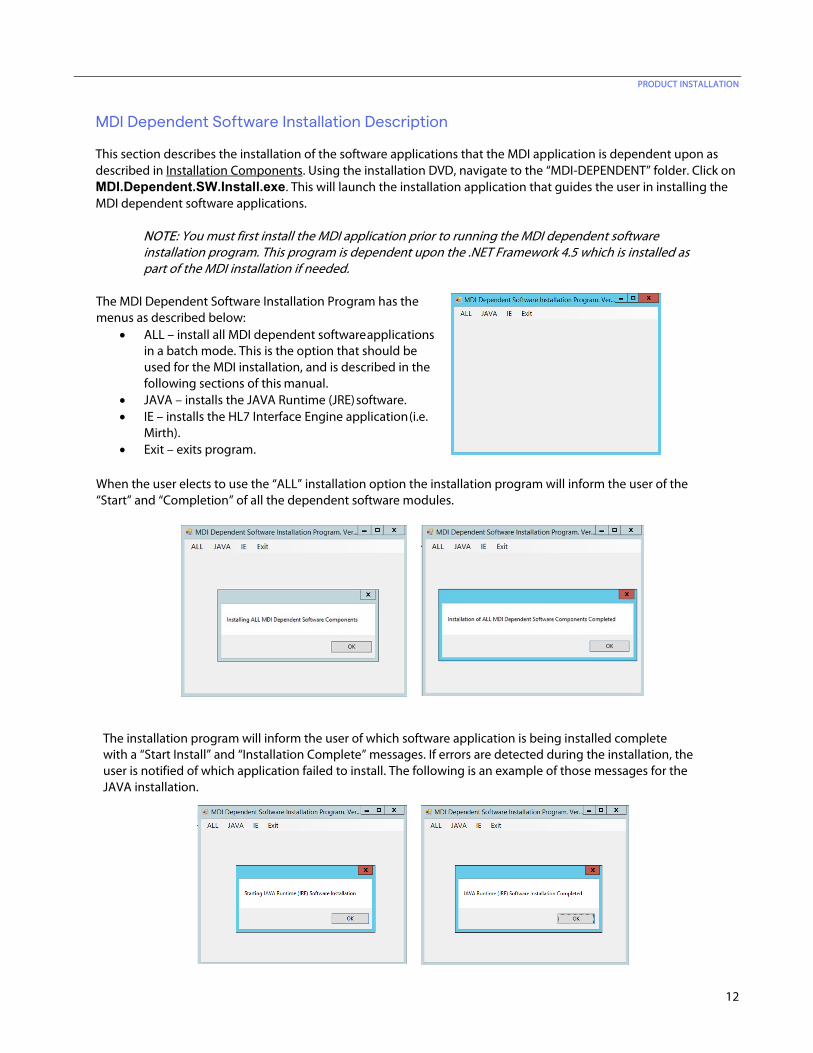
MDI Dependent Software Installation Description
This section describes the installation of the software applications that the MDI application is dependent upon as described in Installation Components. Using the installation DVD, navigate to the “MDI-DEPENDENT” folder. Click on MDI.Dependent.SW.Install.exe. This will launch the installation application that guides the user in installing the MDI dependent software applications.
NOTE: You must first install the MDI application prior to running the MDI dependent software installation program. This program is dependent upon the .NET Framework 4.5 which is installed as part of the MDI installation if needed.
The MDI Dependent Software Installation Program has the menus as described below:
• ALL – install all MDI dependent software applications in a batch mode. This is the option that should be used for the MDI installation, and is described in the following sections of this manual.
• JAVA – installs the JAVA Runtime (JRE) software. • IE – installs the HL7 Interface Engine application (i.e.
Mirth). • Exit – exits program.
When the user elects to use the “ALL” installation option the installation program will inform the user of the “Start” and “Completion” of all the dependent software modules.
The installation program will inform the user of which software application is being installed complete with a “Start Install” and “Installation Complete” messages. If errors are detected during the installation, the user is notified of which application failed to install. The following is an example of those messages for the JAVA installation.
PRODUCT INSTALLATION
13
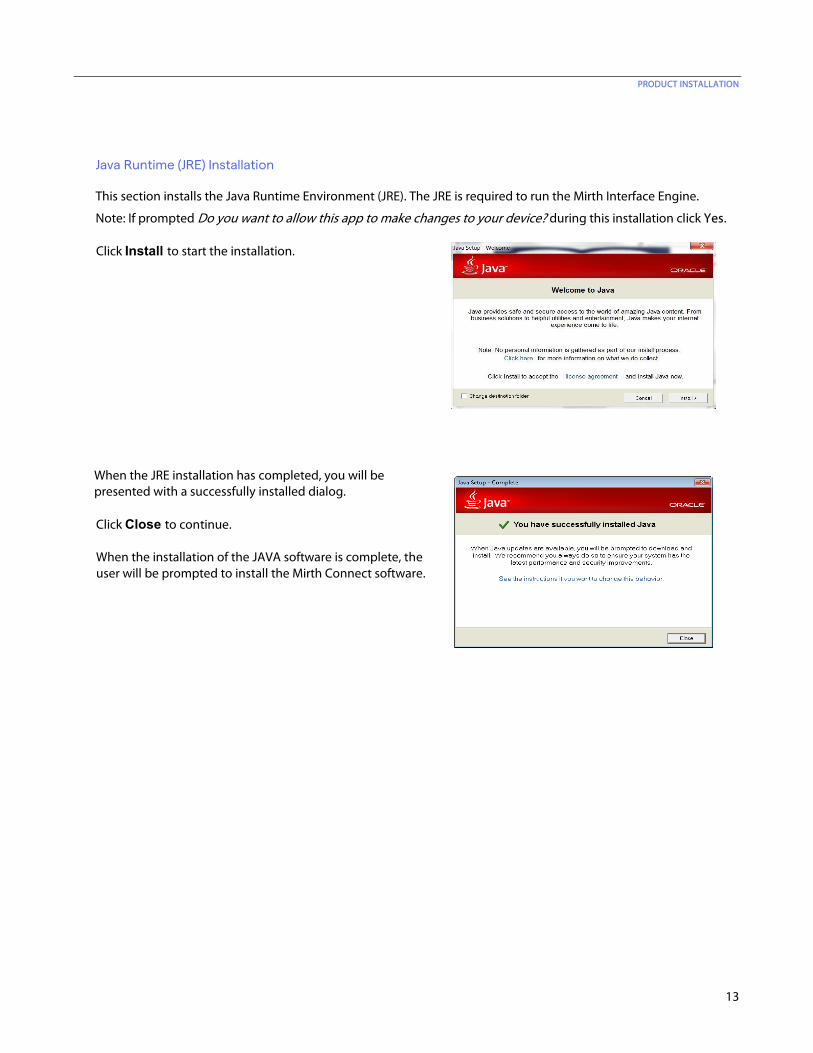
Java Runtime (JRE) Installation
This section installs the Java Runtime Environment (JRE). The JRE is required to run the Mirth Interface Engine.
Note: If prompted Do you want to allow this app to make changes to your device? during this installation click Yes.
Click Install to start the installation.
When the JRE installation has completed, you will be presented with a successfully installed dialog. Click Close to continue. When the installation of the JAVA software is complete, the user will be prompted to install the Mirth Connect software.
PRODUCT INSTALLATION
14
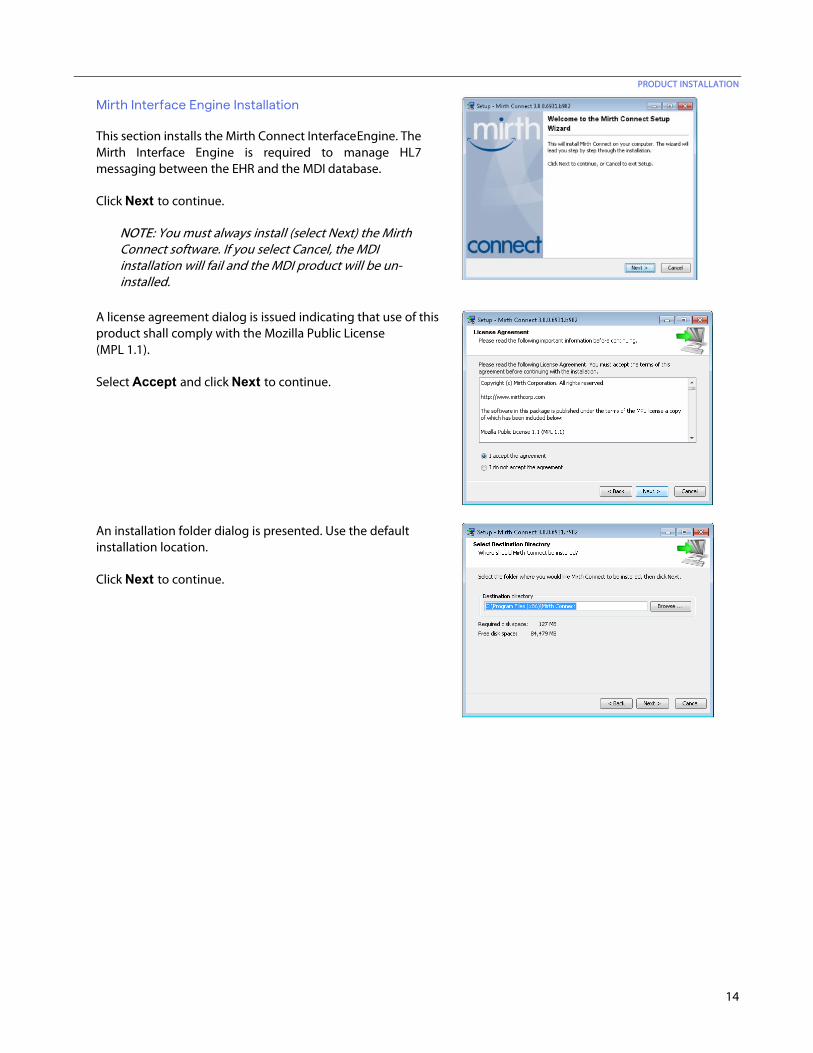
Mirth Interface Engine Installation
This section installs the Mirth Connect Interface Engine. The Mirth Interface Engine is required to manage HL7 messaging between the EHR and the MDI database.
Click Next to continue.
NOTE: You must always install (select Next) the Mirth Connect software. If you select Cancel, the MDI installation will fail and the MDI product will be un- installed.
A license agreement dialog is issued indicating that use of this product shall comply with the Mozilla Public License (MPL 1.1).
Select Accept and click Next to continue.
An installation folder dialog is presented. Use the default installation location.
Click Next to continue.
PRODUCT INSTALLATION
15
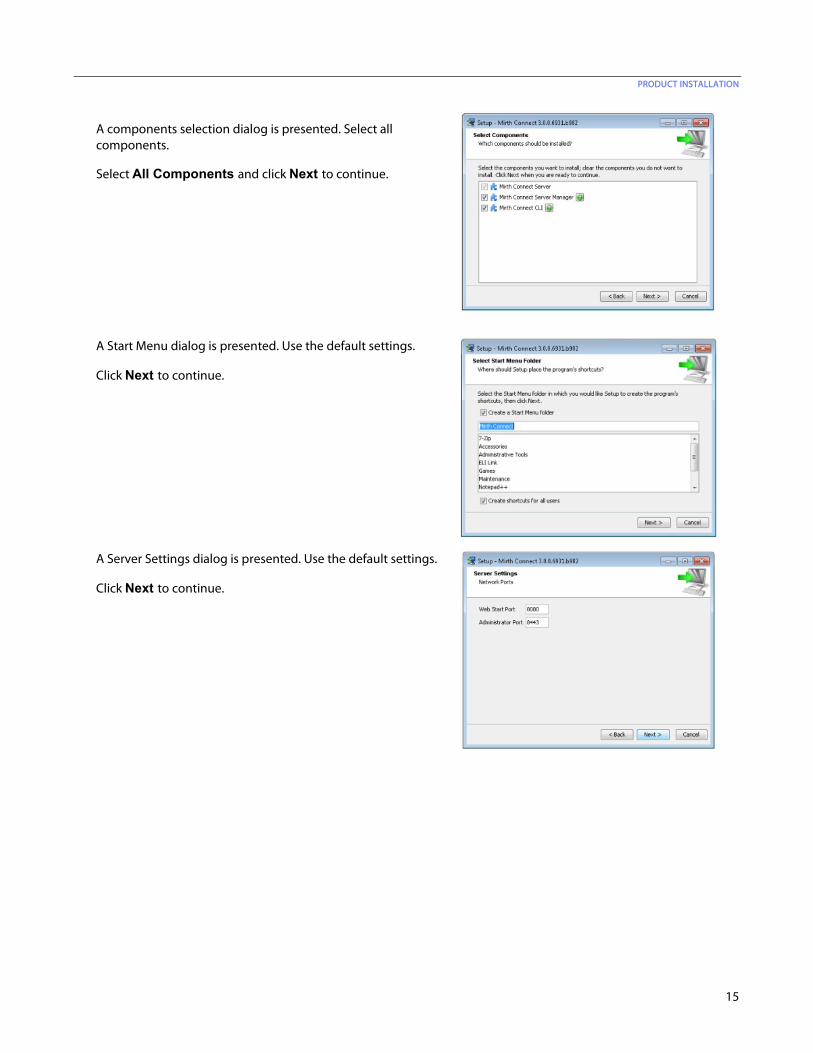
A components selection dialog is presented. Select all components.
Select All Components and click Next to continue.
A Start Menu dialog is presented. Use the default settings.
Click Next to continue.
A Server Settings dialog is presented. Use the default settings.
Click Next to continue.
PRODUCT INSTALLATION
16
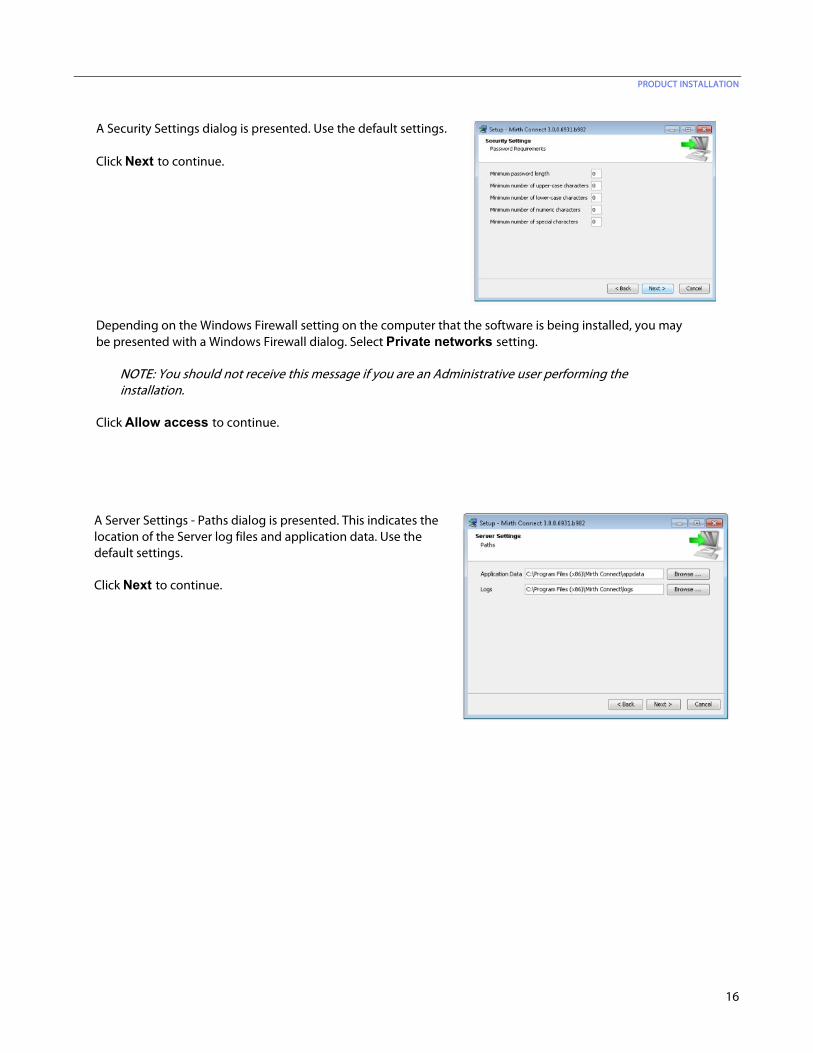
A Security Settings dialog is presented. Use the default settings.
Click Next to continue.
Depending on the Windows Firewall setting on the computer that the software is being installed, you may be presented with a Windows Firewall dialog. Select Private networks setting.
NOTE: You should not receive this message if you are an Administrative user performing the installation.
Click Allow access to continue.
A Server Settings - Paths dialog is presented. This indicates the location of the Server log files and application data. Use the default settings. Click Next to continue.
PRODUCT INSTALLATION
17
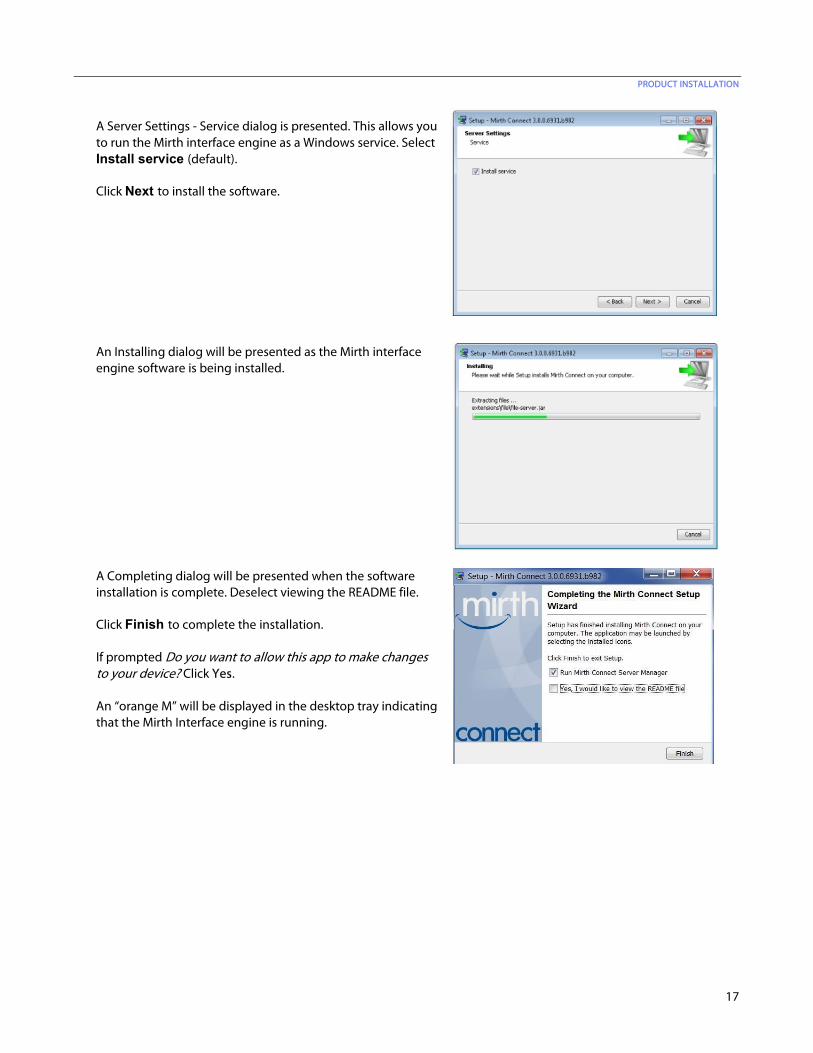
A Server Settings - Service dialog is presented. This allows you to run the Mirth interface engine as a Windows service. Select Install service (default). Click Next to install the software.
An Installing dialog will be presented as the Mirth interface engine software is being installed.
A Completing dialog will be presented when the software installation is complete. Deselect viewing the README file.
Click Finish to complete the installation. If prompted Do you want to allow this app to make changes to your device? Click Yes.
An “orange M” will be displayed in the desktop tray indicating that the Mirth Interface engine is running.
18
MDI PRODUCT CONFIGURATION
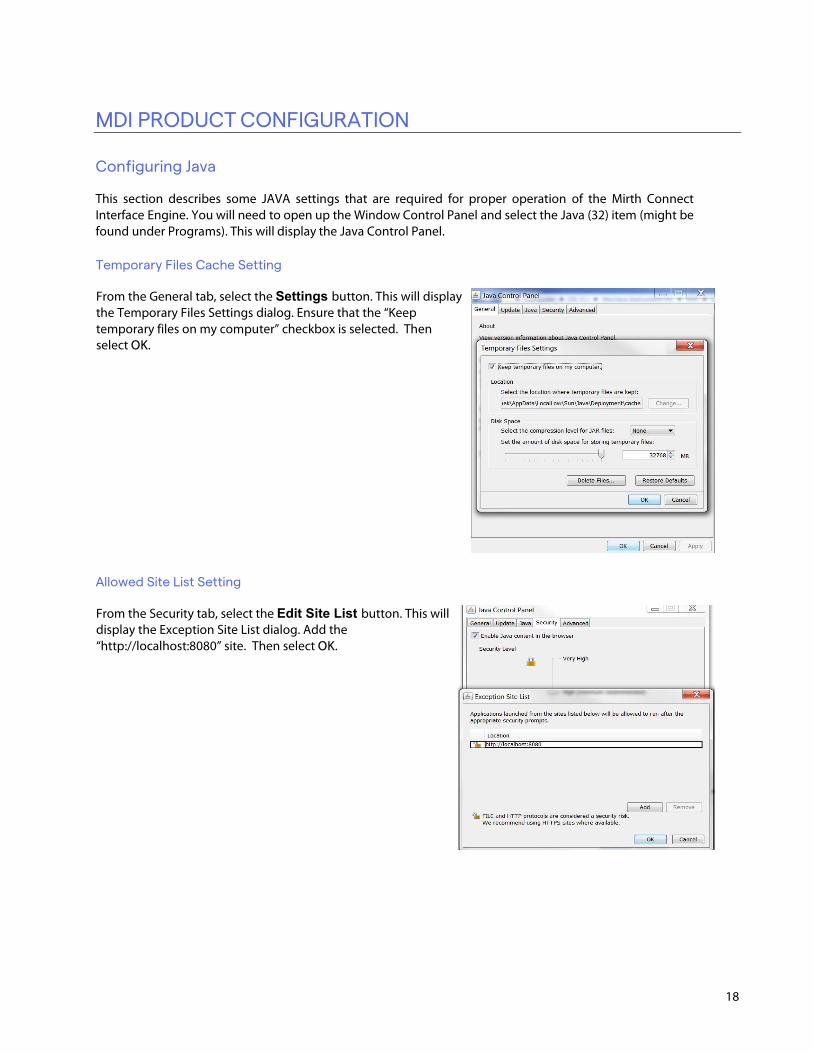
Configuring Java
This section describes some JAVA settings that are required for proper operation of the Mirth Connect Interface Engine. You will need to open up the Window Control Panel and select the Java (32) item (might be found under Programs). This will display the Java Control Panel.
Temporary Files Cache Setting
From the General tab, select the Settings button. This will display the Temporary Files Settings dialog. Ensure that the “Keep temporary files on my computer” checkbox is selected. Then select OK.
Allowed Site List Setting
From the Security tab, select the Edit Site List button. This will display the Exception Site List dialog. Add the “http://localhost:8080” site. Then select OK.
MDI PRODUCT CONFIGURATION
19
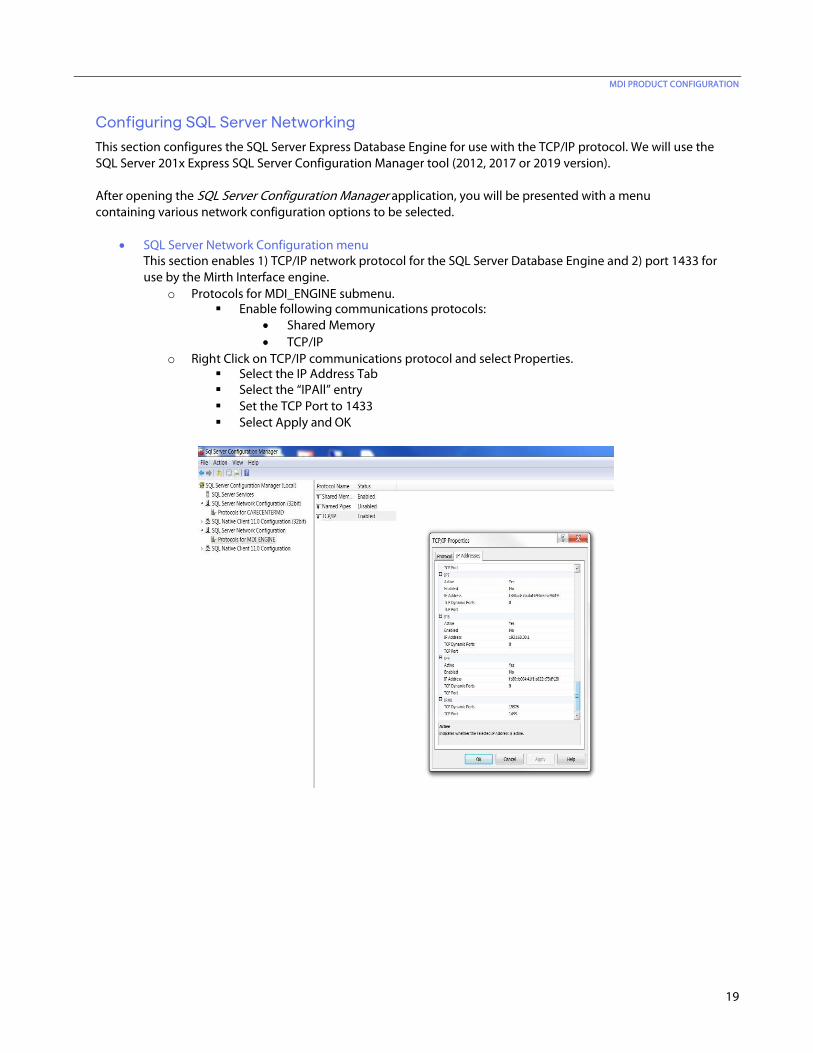
Configuring SQL Server Networking This section configures the SQL Server Express Database Engine for use with the TCP/IP protocol. We will use the SQL Server 201x Express SQL Server Configuration Manager tool (2012, 2017 or 2019 version).
After opening the SQL Server Configuration Manager application, you will be presented with a menu containing various network configuration options to be selected.
• SQL Server Network Configuration menu
This section enables 1) TCP/IP network protocol for the SQL Server Database Engine and 2) port 1433 for use by the Mirth Interface engine.
o Protocols for MDI_ENGINE submenu. Enable following communications protocols:
• Shared Memory • TCP/IP
o Right Click on TCP/IP communications protocol and select Properties. Select the IP Address Tab Select the “IPAll” entry Set the TCP Port to 1433 Select Apply and OK
MDI PRODUCT CONFIGURATION
20
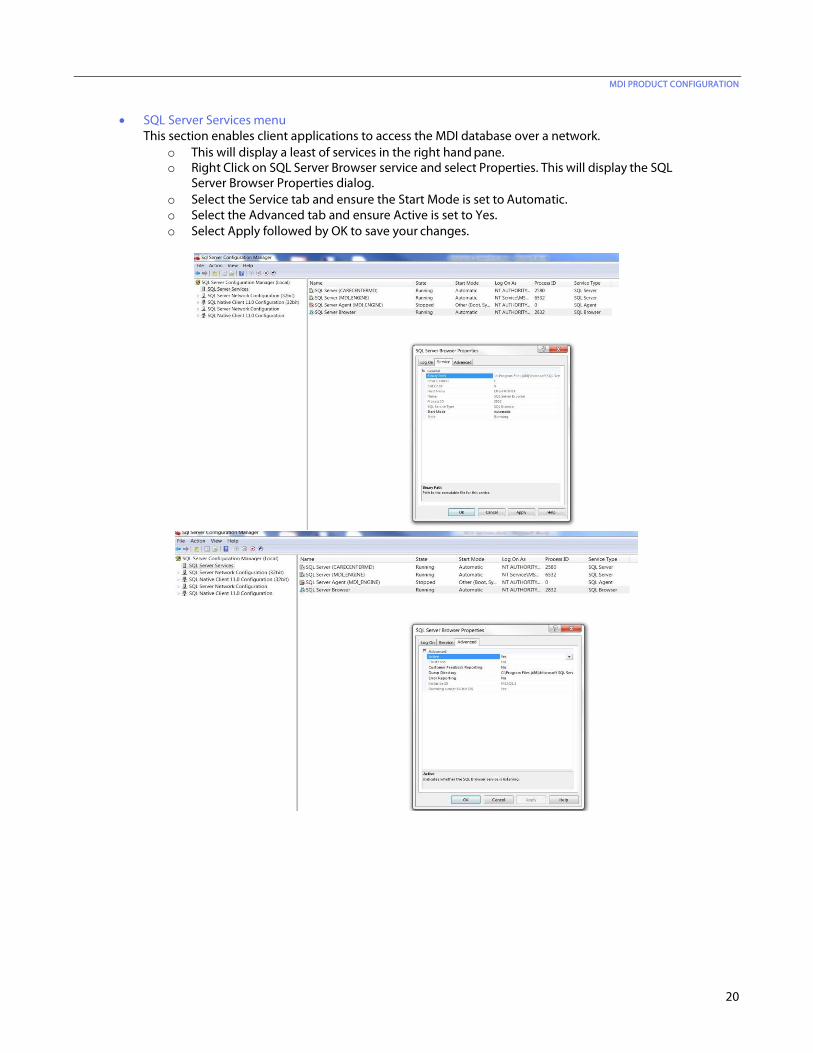
• SQL Server Services menu This section enables client applications to access the MDI database over a network.
o This will display a least of services in the right hand pane. o Right Click on SQL Server Browser service and select Properties. This will display the SQL
Server Browser Properties dialog. o Select the Service tab and ensure the Start Mode is set to Automatic. o Select the Advanced tab and ensure Active is set to Yes. o Select Apply followed by OK to save your changes.
MDI PRODUCT CONFIGURATION
21
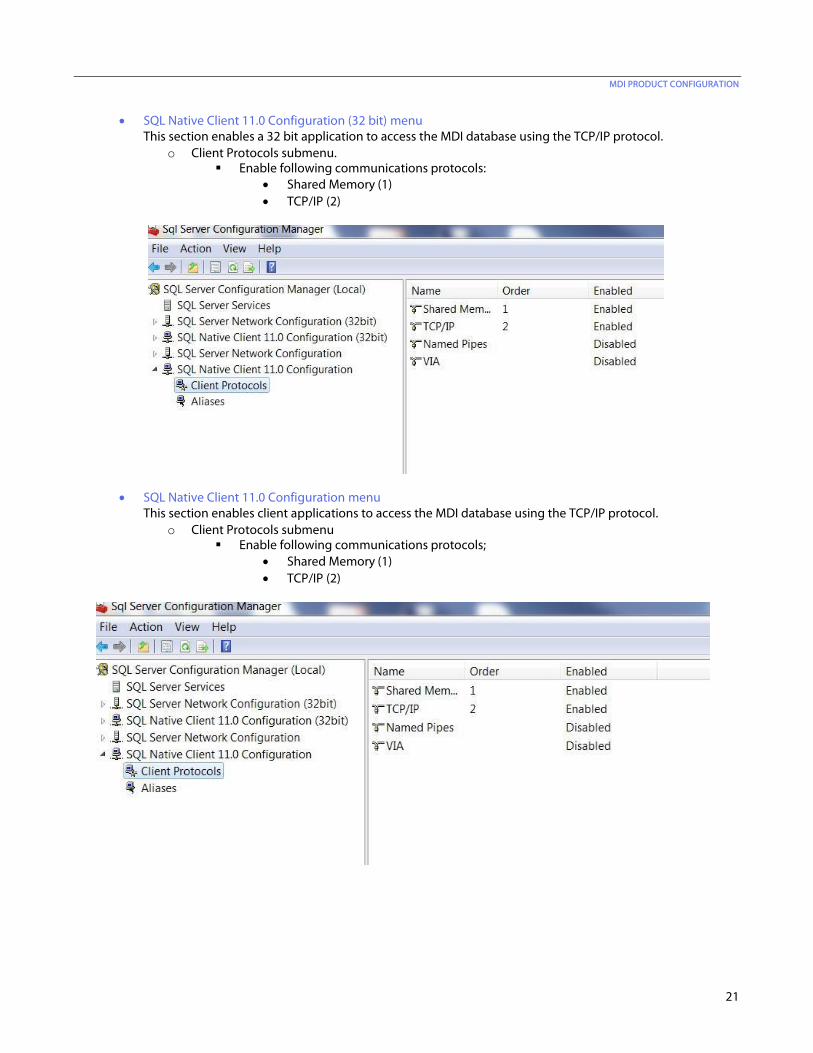
• SQL Native Client 11.0 Configuration (32 bit) menu This section enables a 32 bit application to access the MDI database using the TCP/IP protocol.
o Client Protocols submenu. Enable following communications protocols:
• Shared Memory (1) • TCP/IP (2)
• SQL Native Client 11.0 Configuration menu This section enables client applications to access the MDI database using the TCP/IP protocol.
o Client Protocols submenu Enable following communications protocols;
• Shared Memory (1) • TCP/IP (2)
MDI PRODUCT CONFIGURATION
22
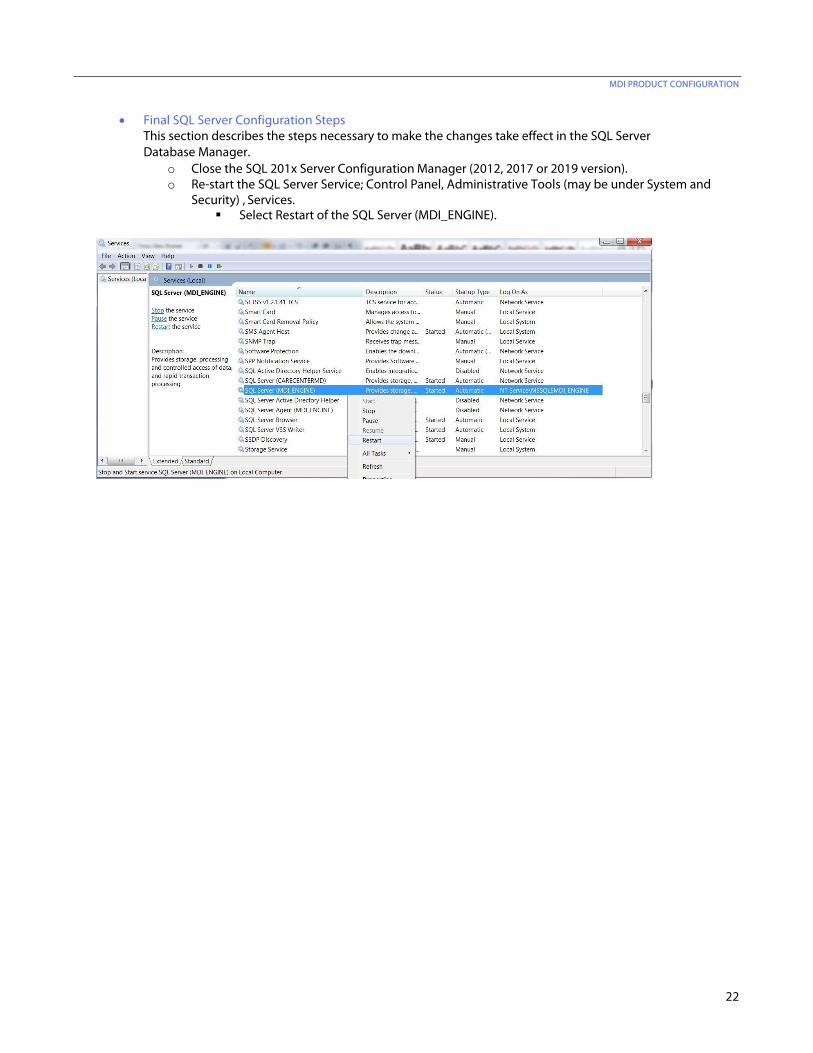
• Final SQL Server Configuration Steps This section describes the steps necessary to make the changes take effect in the SQL Server Database Manager.
o Close the SQL 201x Server Configuration Manager (2012, 2017 or 2019 version). o Re-start the SQL Server Service; Control Panel, Administrative Tools (may be under System and
Security) , Services. Select Restart of the SQL Server (MDI_ENGINE).
MDI PRODUCT CONFIGURATION
23
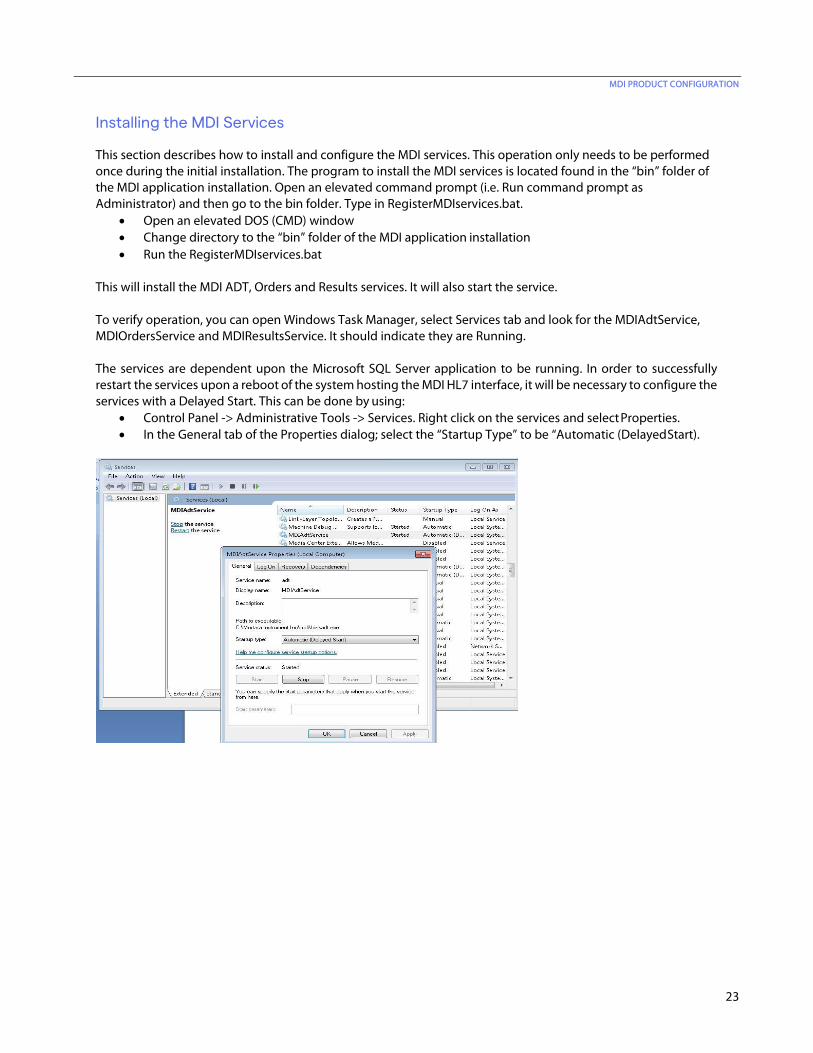
Installing the MDI Services
This section describes how to install and configure the MDI services. This operation only needs to be performed once during the initial installation. The program to install the MDI services is located found in the “bin” folder of the MDI application installation. Open an elevated command prompt (i.e. Run command prompt as Administrator) and then go to the bin folder. Type in RegisterMDIservices.bat.
• Open an elevated DOS (CMD) window • Change directory to the “bin” folder of the MDI application installation • Run the RegisterMDIservices.bat
This will install the MDI ADT, Orders and Results services. It will also start the service.
To verify operation, you can open Windows Task Manager, select Services tab and look for the MDIAdtService, MDIOrdersService and MDIResultsService. It should indicate they are Running.
The services are dependent upon the Microsoft SQL Server application to be running. In order to successfully restart the services upon a reboot of the system hosting the MDI HL7 interface, it will be necessary to configure the services with a Delayed Start. This can be done by using:
• Control Panel -> Administrative Tools -> Services. Right click on the services and select Properties. • In the General tab of the Properties dialog; select the “Startup Type” to be “Automatic (Delayed Start).
MDI PRODUCT CONFIGURATION
24
Reconfiguring MDI The MDI database instance name can be modified after installation by using the MDI Configuration Application.
1. Run C:\Mortara Instrument Inc\Mdi\bin\MDI Config.exe 2. Select the Security tab. 3. The current value in the DATABASE INSTANCE field can be seen. 4. Enter the desired new value into the DATABASE INSTANCE field. 5. Click on the SAVE button. 6. To check that the MDI database is present and named correctly, click the DATABASE button found under
CHECK DATABASE CONNECTION. When entered correctly, a connection status of SUCCESSFUL is displayed. 7. Exit the MDI Configuration Application.
Configuring Interface Engine This section configures the Mirth Connect Manager and the Mirth Administrator Account for use with the MDI application. The Mirth Interface Engine is required to manage HL7 messaging between the EHR and MDI applications.
Configuring Mirth Connect Manager
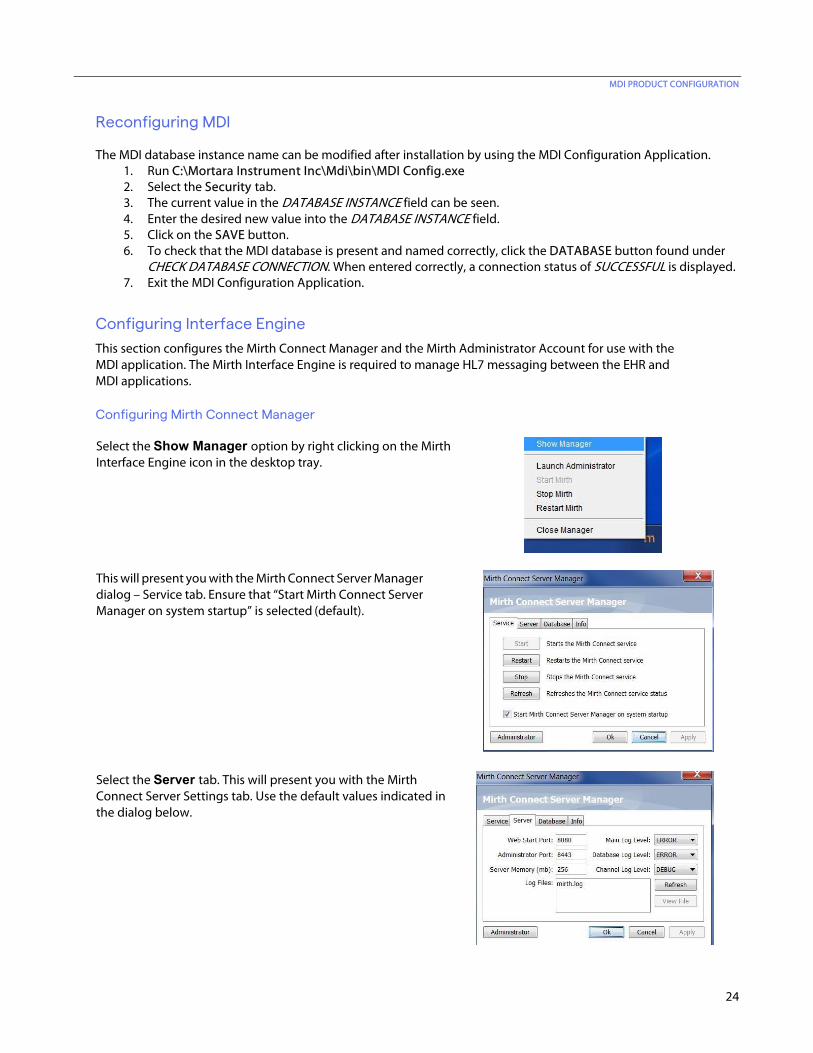
Select the Show Manager option by right clicking on the Mirth Interface Engine icon in the desktop tray.
This will present you with the Mirth Connect Server Manager dialog – Service tab. Ensure that “Start Mirth Connect Server Manager on system startup” is selected (default).
Select the Server tab. This will present you with the Mirth Connect Server Settings tab. Use the default values indicated in the dialog below.
MDI PRODUCT CONFIGURATION
25
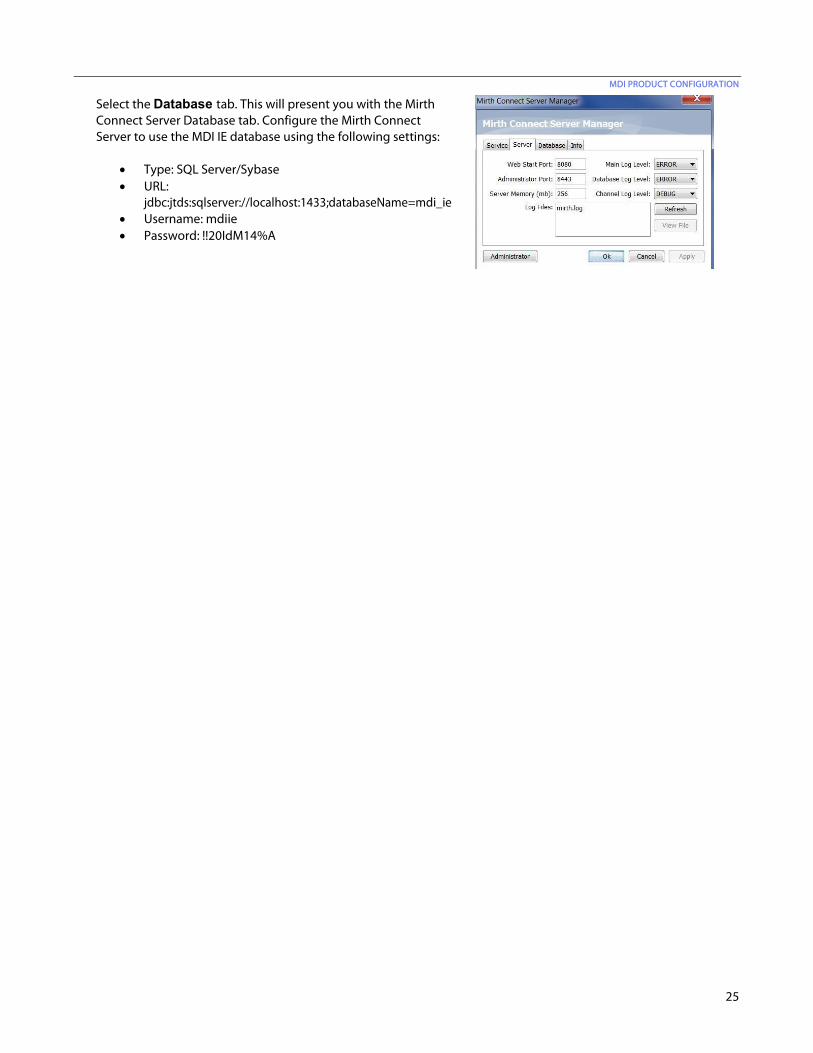
Select the Database tab. This will present you with the Mirth Connect Server Database tab. Configure the Mirth Connect Server to use the MDI IE database using the following settings:
• Type: SQL Server/Sybase • URL:
jdbc:jtds:sqlserver://localhost:1433;databaseName=mdi_ie • Username: mdiie • Password: !!20IdM14%A
MDI PRODUCT CONFIGURATION
26
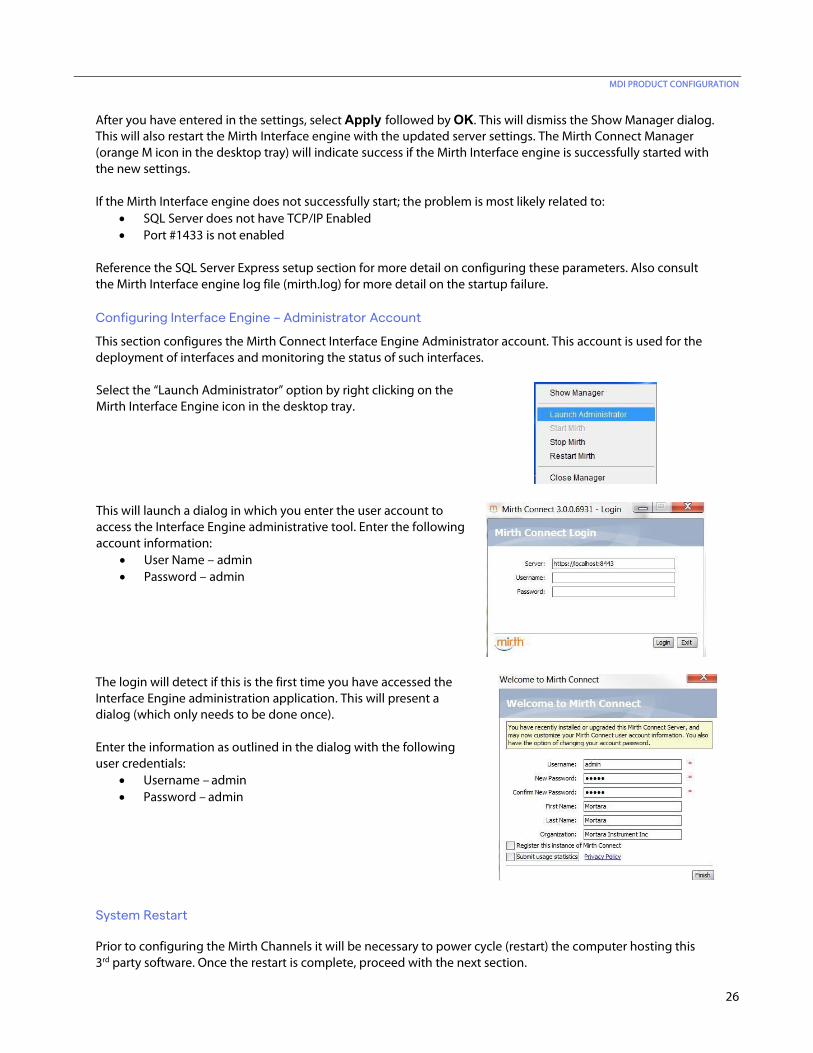
After you have entered in the settings, select Apply followed by OK. This will dismiss the Show Manager dialog. This will also restart the Mirth Interface engine with the updated server settings. The Mirth Connect Manager (orange M icon in the desktop tray) will indicate success if the Mirth Interface engine is successfully started with the new settings.
If the Mirth Interface engine does not successfully start; the problem is most likely related to:
• SQL Server does not have TCP/IP Enabled • Port #1433 is not enabled
Reference the SQL Server Express setup section for more detail on configuring these parameters. Also consult the Mirth Interface engine log file (mirth.log) for more detail on the startup failure.
Configuring Interface Engine – Administrator Account
This section configures the Mirth Connect Interface Engine Administrator account. This account is used for the deployment of interfaces and monitoring the status of such interfaces.
Select the “Launch Administrator” option by right clicking on the Mirth Interface Engine icon in the desktop tray.
This will launch a dialog in which you enter the user account to access the Interface Engine administrative tool. Enter the following account information:
• User Name – admin • Password – admin
The login will detect if this is the first time you have accessed the Interface Engine administration application. This will present a dialog (which only needs to be done once).
Enter the information as outlined in the dialog with the following user credentials:
• Username – admin • Password – admin
System Restart
Prior to configuring the Mirth Channels it will be necessary to power cycle (restart) the computer hosting this 3rd party software. Once the restart is complete, proceed with the next section.
MDI PRODUCT CONFIGURATION
27
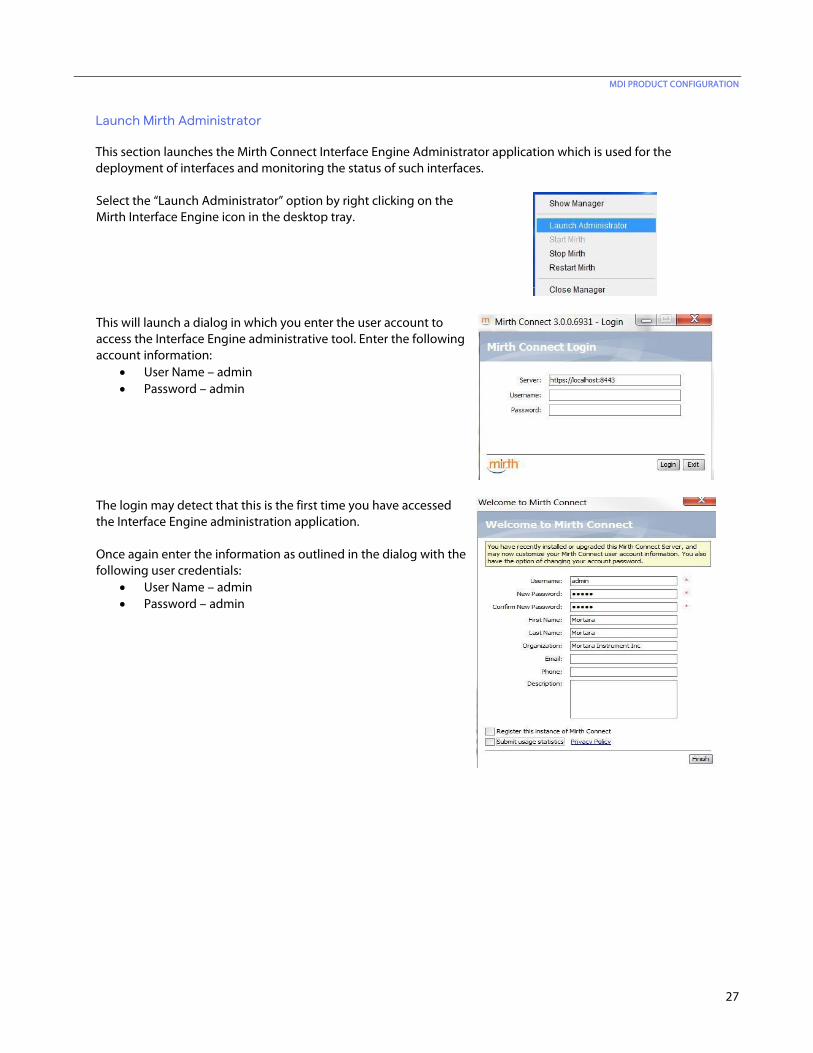
Launch Mirth Administrator
This section launches the Mirth Connect Interface Engine Administrator application which is used for the deployment of interfaces and monitoring the status of such interfaces.
Select the “Launch Administrator” option by right clicking on the Mirth Interface Engine icon in the desktop tray.
This will launch a dialog in which you enter the user account to access the Interface Engine administrative tool. Enter the following account information:
• User Name – admin • Password – admin
The login may detect that this is the first time you have accessed the Interface Engine administration application.
Once again enter the information as outlined in the dialog with the following user credentials:
• User Name – admin • Password – admin
MDI PRODUCT CONFIGURATION
28
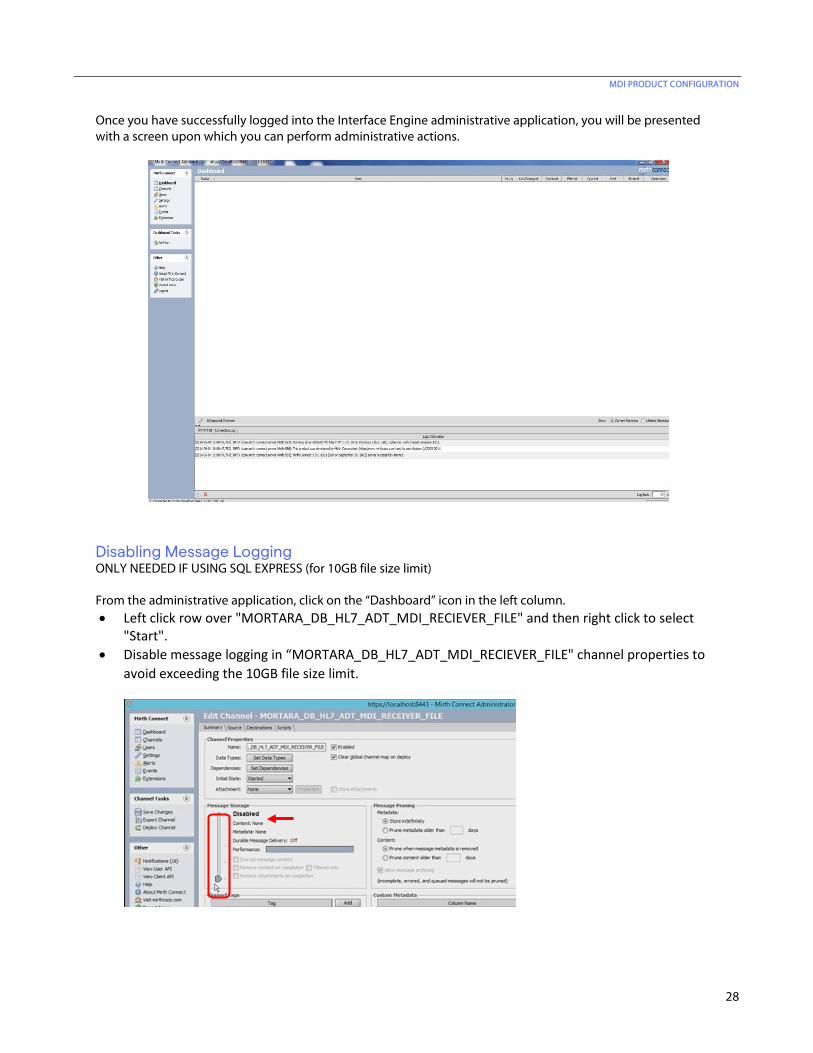
Once you have successfully logged into the Interface Engine administrative application, you will be presented with a screen upon which you can perform administrative actions.
Disabling Message Logging ONLY NEEDED IF USING SQL EXPRESS (for 10GB file size limit) From the administrative application, click on the “Dashboard” icon in the left column. • Left click row over "MORTARA_DB_HL7_ADT_MDI_RECIEVER_FILE" and then right click to select
"Start". • Disable message logging in “MORTARA_DB_HL7_ADT_MDI_RECIEVER_FILE" channel properties to
avoid exceeding the 10GB file size limit.

MDI PRODUCT CONFIGURATION
29
Deploying Interface Engine Channels
This section describes how to deploy an HL7 ADT, ORM and ORU channels using the Mirth Connect Interface Engine. For purposes of example we will import the HL7 ADT File Reader channel.
Login to the Mirth Administrator application using the “admin” account. This will display the main Mirth Administrator page.
To deploy a channel, perform the following steps:
• Mirth Connect menu; Select Channels • Channel Tasks menu; Select Import
MDI PRODUCT CONFIGURATION
30
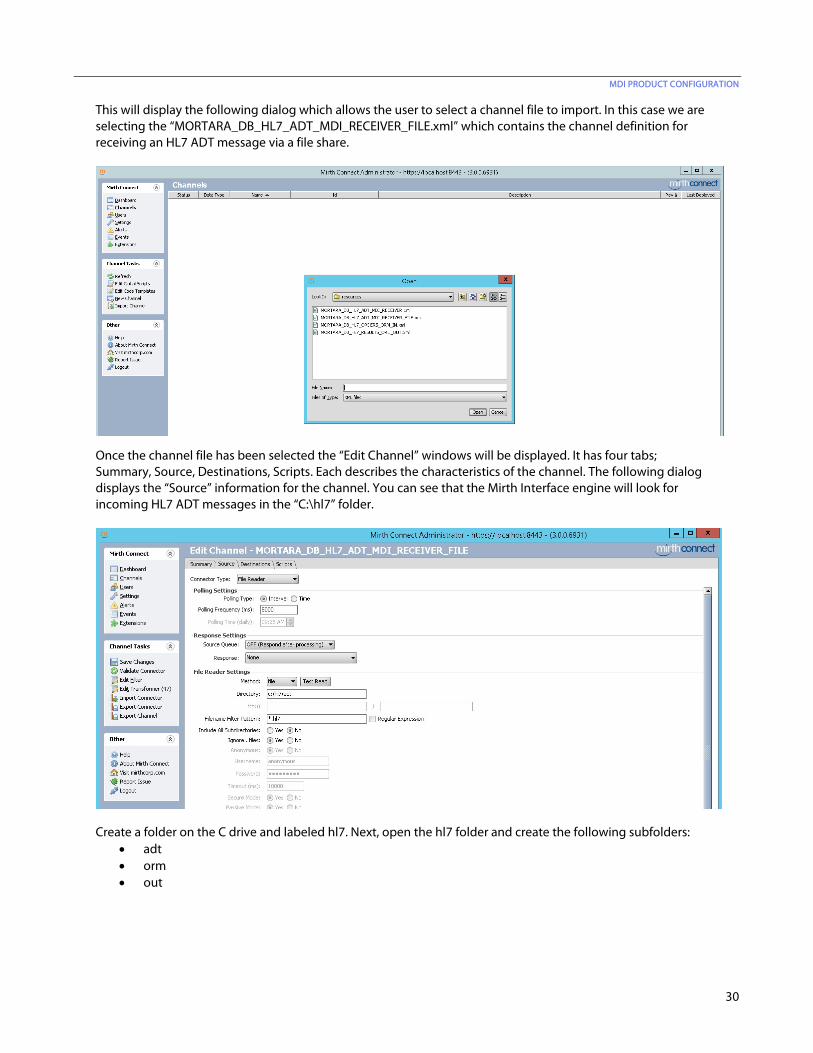
This will display the following dialog which allows the user to select a channel file to import. In this case we are selecting the “MORTARA_DB_HL7_ADT_MDI_RECEIVER_FILE.xml” which contains the channel definition for receiving an HL7 ADT message via a file share.
Once the channel file has been selected the “Edit Channel” windows will be displayed. It has four tabs; Summary, Source, Destinations, Scripts. Each describes the characteristics of the channel. The following dialog displays the “Source” information for the channel. You can see that the Mirth Interface engine will look for incoming HL7 ADT messages in the “C:\hl7” folder.
Create a folder on the C drive and labeled hl7. Next, open the hl7 folder and create the following subfolders:
• adt • orm • out

MDI PRODUCT CONFIGURATION
31
Once the channel has been reviewed, Save the channel. This action will display the Mirth – Channels dialog. This dialog presents all the channels that are known to the Mirth Interface engine. You will see the “MDI Receiver” channel in the list. Right click on the MDI Receiver channel and select Deploy Channel. This will start the channel for use.
Repeat the steps above to import the ORM and ORU channels.

MDI PRODUCT CONFIGURATION
32
Once the channels have been deployed the status of the channels will be set to “Started”. The following dialog demonstrates the status of “Started” for the MDI Receiver channel. The channel has been expanded to depict the “source” and “destination (ADT dest)”of the channel. In the case of this channel; the ADT destination is defined as a patient record in the MDI Queue database.
MDI PRODUCT CONFIGURATION
33
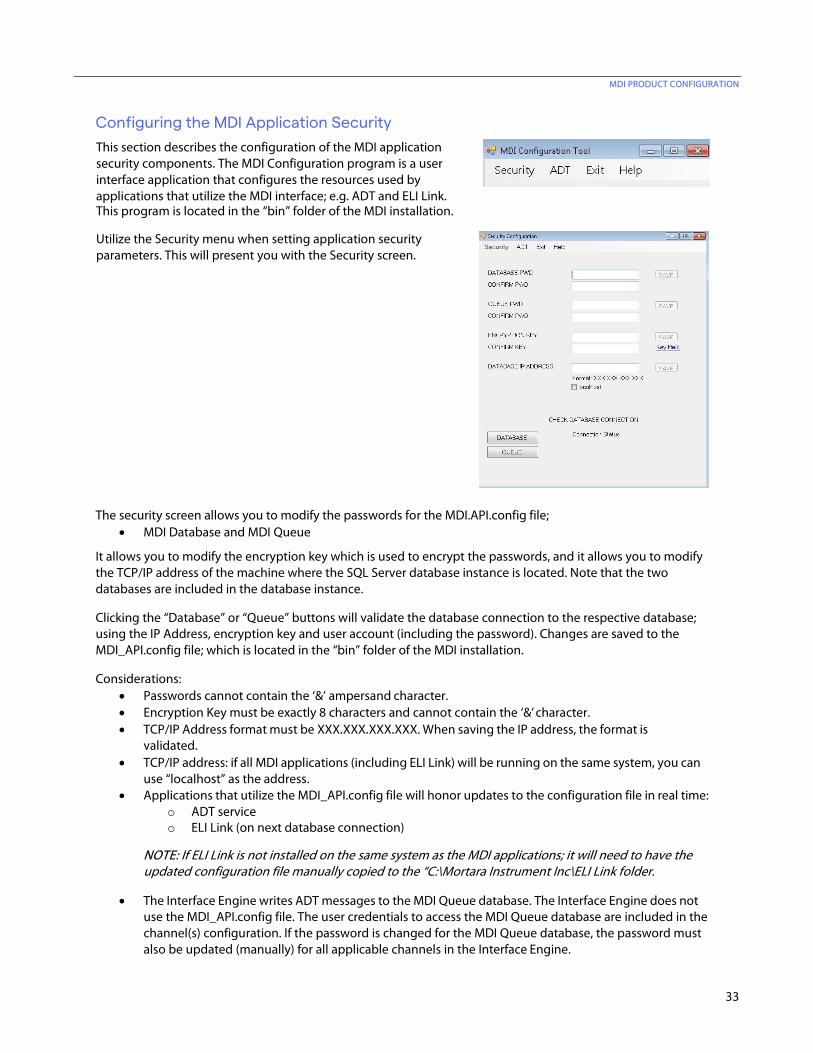
Configuring the MDI Application Security
This section describes the configuration of the MDI application security components. The MDI Configuration program is a user interface application that configures the resources used by applications that utilize the MDI interface; e.g. ADT and ELI Link. This program is located in the “bin” folder of the MDI installation.
Utilize the Security menu when setting application security parameters. This will present you with the Security screen.
The security screen allows you to modify the passwords for the MDI.API.config file; • MDI Database and MDI Queue
It allows you to modify the encryption key which is used to encrypt the passwords, and it allows you to modify the TCP/IP address of the machine where the SQL Server database instance is located. Note that the two databases are included in the database instance.
Clicking the “Database” or “Queue” buttons will validate the database connection to the respective database; using the IP Address, encryption key and user account (including the password). Changes are saved to the MDI_API.config file; which is located in the “bin” folder of the MDI installation.
Considerations: • Passwords cannot contain the ‘&’ ampersand character. • Encryption Key must be exactly 8 characters and cannot contain the ‘&’ character. • TCP/IP Address format must be XXX.XXX.XXX.XXX. When saving the IP address, the format is
validated. • TCP/IP address: if all MDI applications (including ELI Link) will be running on the same system, you can
use “localhost” as the address. • Applications that utilize the MDI_API.config file will honor updates to the configuration file in real time:
o ADT service o ELI Link (on next database connection)
NOTE: If ELI Link is not installed on the same system as the MDI applications; it will need to have the updated configuration file manually copied to the “C:\Mortara Instrument Inc\ELI Link folder.
• The Interface Engine writes ADT messages to the MDI Queue database. The Interface Engine does not use the MDI_API.config file. The user credentials to access the MDI Queue database are included in the channel(s) configuration. If the password is changed for the MDI Queue database, the password must also be updated (manually) for all applicable channels in the Interface Engine.
MDI PRODUCT CONFIGURATION
34
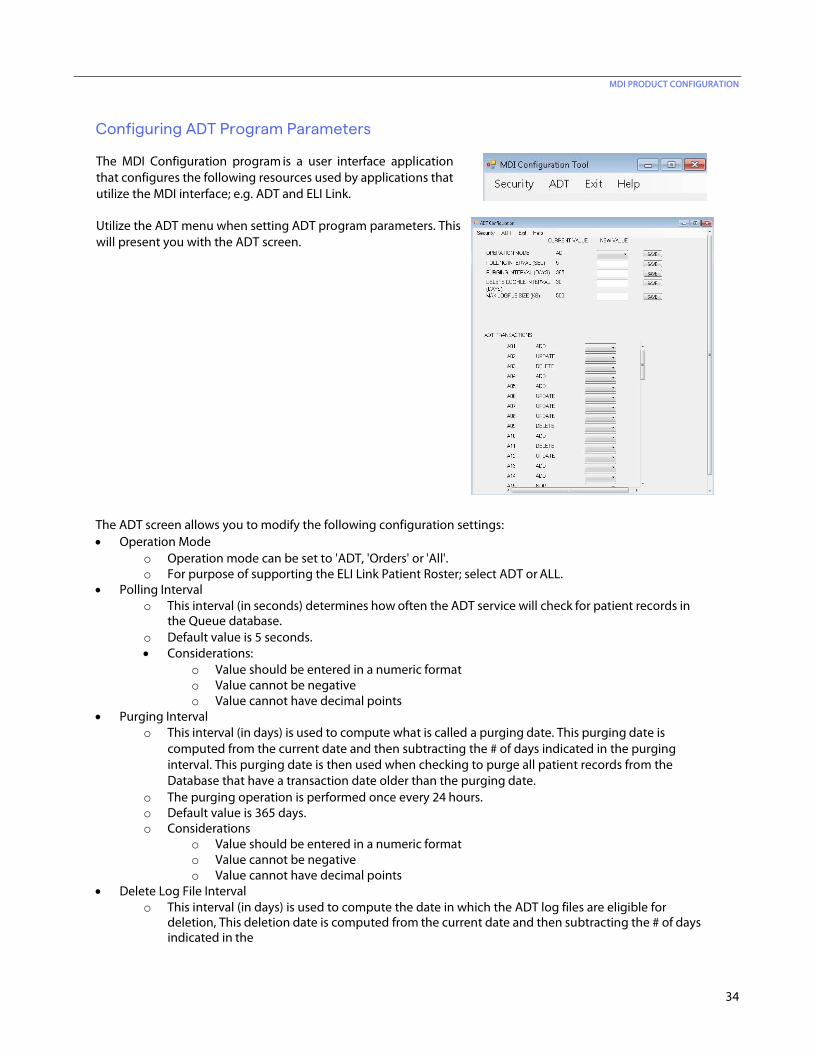
Configuring ADT Program Parameters
The MDI Configuration program is a user interface application that configures the following resources used by applications that utilize the MDI interface; e.g. ADT and ELI Link.
Utilize the ADT menu when setting ADT program parameters. This will present you with the ADT screen.
The ADT screen allows you to modify the following configuration settings: • Operation Mode
o Operation mode can be set to 'ADT, 'Orders' or 'All'. o For purpose of supporting the ELI Link Patient Roster; select ADT or ALL.
• Polling Interval o This interval (in seconds) determines how often the ADT service will check for patient records in
the Queue database. o Default value is 5 seconds. • Considerations:
o Value should be entered in a numeric format o Value cannot be negative o Value cannot have decimal points
• Purging Interval o This interval (in days) is used to compute what is called a purging date. This purging date is
computed from the current date and then subtracting the # of days indicated in the purging interval. This purging date is then used when checking to purge all patient records from the Database that have a transaction date older than the purging date.
o The purging operation is performed once every 24 hours. o Default value is 365 days. o Considerations
o Value should be entered in a numeric format o Value cannot be negative o Value cannot have decimal points
• Delete Log File Interval o This interval (in days) is used to compute the date in which the ADT log files are eligible for
deletion, This deletion date is computed from the current date and then subtracting the # of days indicated in the
MDI PRODUCT CONFIGURATION
35
deletion interval. This deletion date is then used when checking to delete all ADT log files that have a “update” date older than the deletion date.
o The deletion operation is performed once every 24 hours. o Default value is 30 days. o Considerations
o Value should be entered in a numeric format o Value cannot be negative o Value cannot have decimal points
• Maximum Log File Size o The maximum log file size parameter (in kilobytes) is used by the ADT program to determine if a
new log file should be allocated for use. If the size of the current log file exceeds the maximum size indicated, the ADT program will allocate a new log file based on the current date.
o The maximum log file size check is done once every 24 hours. Therefore, it is possible for an actual log file to exceed the maximum indicated.
o Default value is 500 kB. o Considerations
o Value should be entered in a numeric format o Value cannot be negative o Value cannot have decimal points
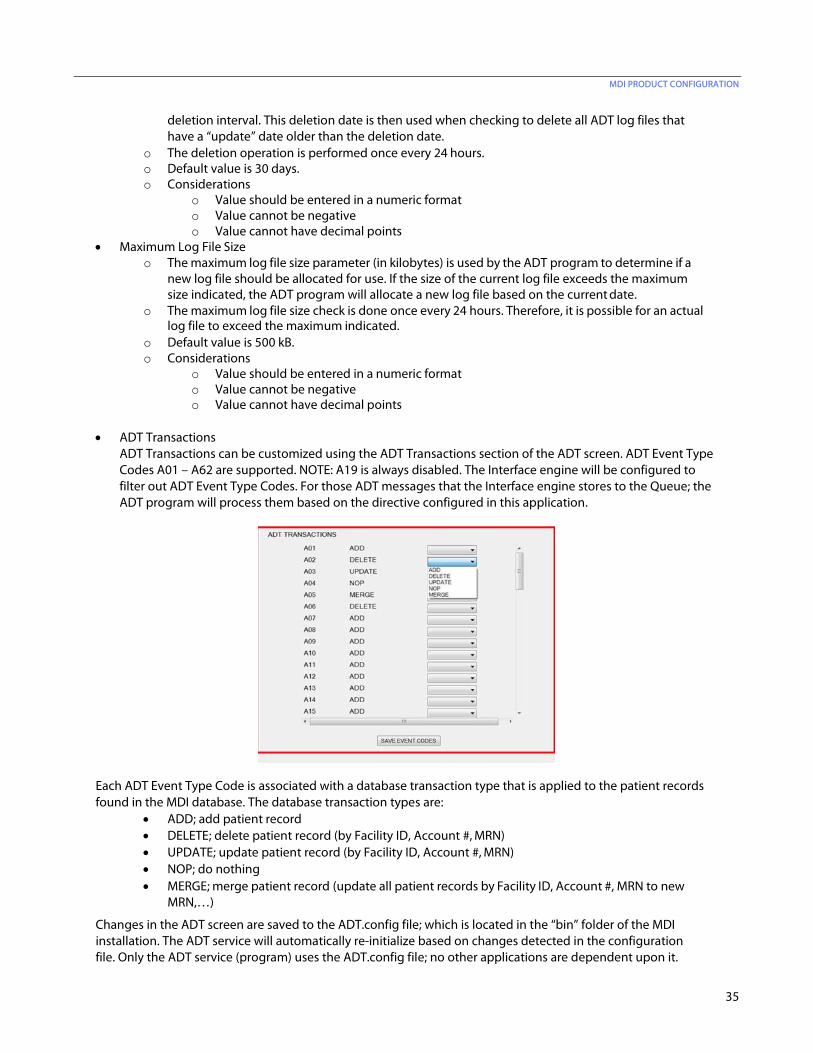
• ADT Transactions
ADT Transactions can be customized using the ADT Transactions section of the ADT screen. ADT Event Type Codes A01 – A62 are supported. NOTE: A19 is always disabled. The Interface engine will be configured to filter out ADT Event Type Codes. For those ADT messages that the Interface engine stores to the Queue; the ADT program will process them based on the directive configured in this application.
Each ADT Event Type Code is associated with a database transaction type that is applied to the patient records found in the MDI database. The database transaction types are:
• ADD; add patient record • DELETE; delete patient record (by Facility ID, Account #, MRN) • UPDATE; update patient record (by Facility ID, Account #, MRN) • NOP; do nothing • MERGE; merge patient record (update all patient records by Facility ID, Account #, MRN to new
MRN,…)
Changes in the ADT screen are saved to the ADT.config file; which is located in the “bin” folder of the MDI installation. The ADT service will automatically re-initialize based on changes detected in the configuration file. Only the ADT service (program) uses the ADT.config file; no other applications are dependent upon it.

36
TROUBLESHOOTING
1. Port Numbers used by the MDI Application • 8080 • 1433
2. Mirth Interface Engine is not running a. Check port #’s 8080 and 1433 are not blocked by a firewall b. Check that the password used by the MDI Interface Engine database is correct c. Validate the connection string to the MDI Interface Engine database
3. ADT messages not being processed into the MDI Queue database a. Check that the password used by the MDI Queue database is correct.
i. The password must be manually changed in the associated interface engine channel if it has been changed by the MDI Configuration tool.
b. Verify that the messages are not filtered out based on HL7 facility ID or service location 4. Order messages not being processed into the MDI Queue database
a. Check that the password used by the MDI Queue database is correct. i. The password must be manually changed in the associated interface engine channel
if it has been changed by the MDI Configuration tool. b. Verify that the messages are not filtered out based on HL7 facility ID, service location or modality
5. ADT Service is not running a. Verify the MDI Queue and Database are installed b. Check that the passwords used by the MDI Queue and Database are correct. c. Ensure the ADT service is enabled for Automatic – Delayed Start
6. ADT messages not being processed by the ADT program a. Verify that the ADT event code type/ADT transaction pair are assigned correctly. View/modify
via the MDI Configuration tool. 7. Order messages not being updated properly by the ADT program
a. Verify that the ADT event code type/order transaction pair are assigned correctly. View/modify via the MDI Configuration tool.
8. Client application (e.g. ELI Link) cannot access MDI Database a. Verify that the MDI_API.config file used by client application is the same as that used by the
MDI applications i. If the client application is not running on the same computer/system as the MDI
application; it will be necessary to copy the MDI_API.config file from the MDI application environment to the appropriate location where the client application is running.
b. If the client application is not running on the same computer/system as the MDI application; ensure that SQL Browsing is enabled on the system running the MDI application.
c. Verify that the IP Address defined for accessing the MDI Database is correct
9. Database password or encryption key are not working a. Obtain the MDI.API.config file from the customer b. Install the configuration file into the MDI “bin” installation folder on the local support computer c. Open the MDI Configuration tool in the “show password” mode. d. Review the password accounts for the Database and Queue databases. You can also
review the encryption key. e. Make modifications as necessary to the password and encryption keys to guarantee that they work. f. NOTE: Modify the shortcut to the MDI Configuration tool with the “-showpwd”
option; "C:\Mortara Instrument Inc\Mdi\bin\MDI Config.exe" -showpwd
TROUBLESHOOTING
37
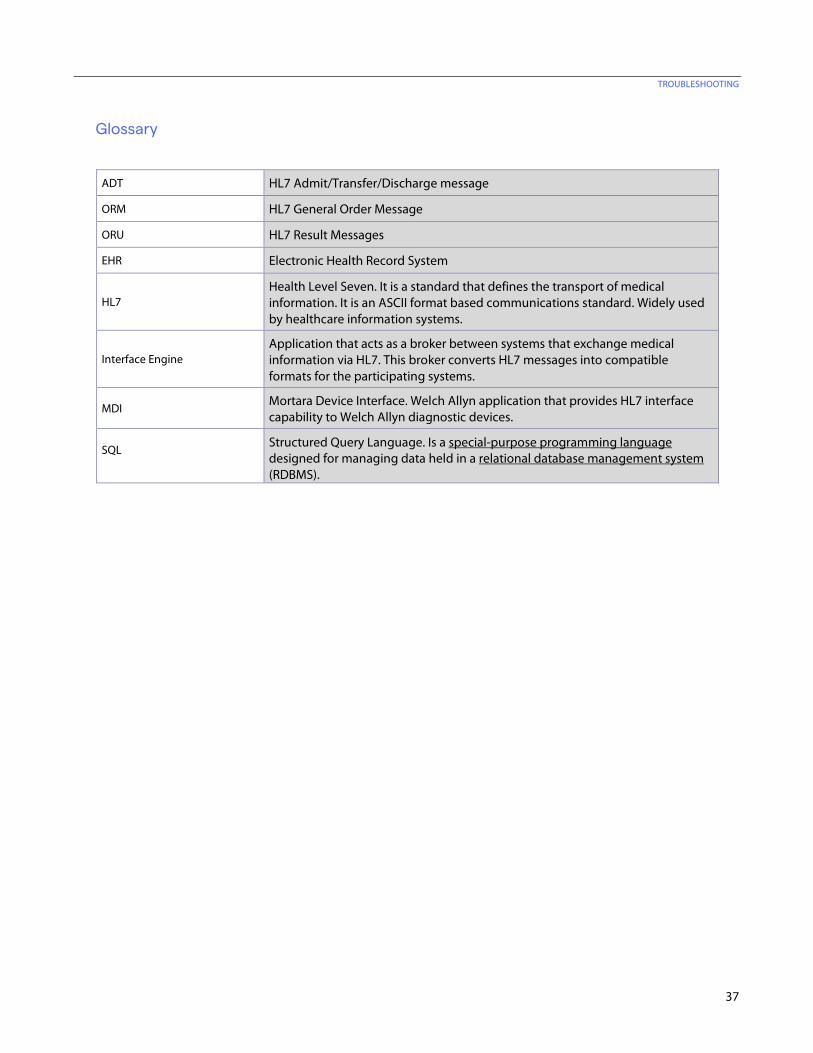
Glossary
ADT HL7 Admit/Transfer/Discharge message
ORM HL7 General Order Message
ORU HL7 Result Messages
EHR Electronic Health Record System
HL7
Health Level Seven. It is a standard that defines the transport of medical information. It is an ASCII format based communications standard. Widely used by healthcare information systems.
Interface Engine
Application that acts as a broker between systems that exchange medical information via HL7. This broker converts HL7 messages into compatible formats for the participating systems.
MDI
Mortara Device Interface. Welch Allyn application that provides HL7 interface capability to Welch Allyn diagnostic devices.
SQL
Structured Query Language. Is a special-purpose programming language designed for managing data held in a relational database management system (RDBMS).
Related Documents