ME 24-688 – Week 4 Project 2 – Assembly Interaction ME 24-688 – Introduction to CAD/CAE Tools Page 1 of 12 1 Interacting with an Assembly Introduction The following section will give an overview of interacting with an assembly model and using various tools to locate parts, visualize specific area of the assembly, and cut sections through the assembly to aid in viewing the model while in the assembly environment. 1.1 Project 2 1. Open an existing assembly file. • On the Quick Access toolbar, click Open. • In the Open dialog box, select the file Complex-Assembly.iam • Click Open. 2. Isolate a component or subassembly

Week 4 - Project 2 - Assembly Interaction
Dec 09, 2015
Week 4 - Project 2 - Assembly Interaction
Welcome message from author
This document is posted to help you gain knowledge. Please leave a comment to let me know what you think about it! Share it to your friends and learn new things together.
Transcript

ME 24-688 – Week 4
Project 2 – Assembly Interaction
ME 24-688 – Introduction to CAD/CAE Tools Page 1 of 12
1 Interacting with an Assembly Introduction The following section will give an overview of interacting with an assembly model and using various tools to locate parts, visualize specific area of the assembly, and cut sections through the assembly to aid in viewing the model while in the assembly environment.
1.1 Project 2
1. Open an existing assembly file. • On the Quick Access toolbar, click Open.
• In the Open dialog box, select the file Complex-Assembly.iam
• Click Open.
2. Isolate a component or subassembly
ME 24-688 – Week 4
Project 2 – Assembly Interaction
ME 24-688 – Introduction to CAD/CAE Tools Page 2 of 12
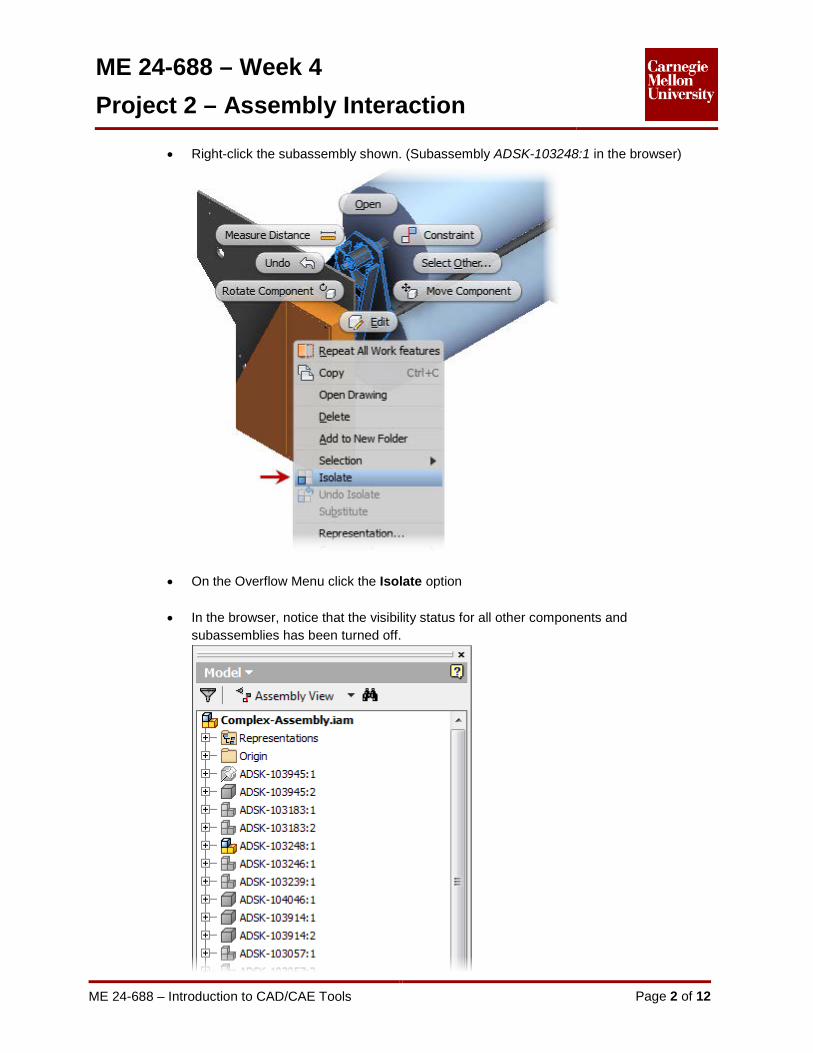
• Right-click the subassembly shown. (Subassembly ADSK-103248:1 in the browser)
• On the Overflow Menu click the Isolate option
• In the browser, notice that the visibility status for all other components and subassemblies has been turned off.

ME 24-688 – Week 4
Project 2 – Assembly Interaction
ME 24-688 – Introduction to CAD/CAE Tools Page 3 of 12
3. Use a browser filter • In the browser, expand the isolated subassembly ADSK-103248:1
• Notice the nested subassemblies and components.
• On the Browser Filters menu, click Show Children Only.

ME 24-688 – Week 4
Project 2 – Assembly Interaction
ME 24-688 – Introduction to CAD/CAE Tools Page 4 of 12
• All nested components and subassemblies are filtered out of the browser list. While they are not displayed in the browser, they are still visible in the graphics window.
• Now, clear the bowser filter by unchecking Show Children Only on the Browser Filters menu to display all components and subassemblies.
4. Change Selection Priority • In the graphics window, try to select any of the individual components in the subassembly
ADSK-103248:1. The entire subassembly is selected / highlighted.
• To set the selection priority click Selection Priority drop down menu from the Quick Access tool bar.

ME 24-688 – Week 4
Project 2 – Assembly Interaction
ME 24-688 – Introduction to CAD/CAE Tools Page 5 of 12
• Click Select Part Priority
• Select the component indicated.
5. To locate the component reference in the browser, right-click the component in the graphics window. On the Overflow Menu click Find in Browser.

ME 24-688 – Week 4
Project 2 – Assembly Interaction
ME 24-688 – Introduction to CAD/CAE Tools Page 6 of 12

ME 24-688 – Week 4
Project 2 – Assembly Interaction
ME 24-688 – Introduction to CAD/CAE Tools Page 7 of 12
• The component ADSK-104023:1 is highlighted in the browser.
6. To select all occurrences of the component ADSK-104023:
• Press SHIFT + right-click the selected component.

ME 24-688 – Week 4
Project 2 – Assembly Interaction
ME 24-688 – Introduction to CAD/CAE Tools Page 8 of 12
• Click Select All Occurrences
• In the browser, expand the subassemblies as shown. All occurrences of the component are selected in the browser and in the graphics window.

ME 24-688 – Week 4
Project 2 – Assembly Interaction
ME 24-688 – Introduction to CAD/CAE Tools Page 9 of 12
7. To undo the effects of the Isolate tool used in the beginning of the exercise, right-click anywhere in the graphics window. Click Undo Isolate.
• The visibility status of all components is returned to their previous state, prior to the Isolate tool being used.
8. Create a half-section view: • Start the Half Section View tool
View tab | Appearance panel | Section View flyout | Half Section View
• In the browser, scroll to the bottom of the list and select Work Plane3.
• Click OK on the Offset dialog box
• Right-click anywhere in the graphics window. Click Done.

ME 24-688 – Week 4
Project 2 – Assembly Interaction
ME 24-688 – Introduction to CAD/CAE Tools Page 10 of 12
9. Create a quarter-section and three-quarter section views: • Start the Quarter Section tool
View tab | Appearance panel | Section View flyout | Quarter Section View
• In the browser, scroll to the bottom of the list. Select Work Plane3.
• Click OK on the Offset dialog box.
• Now select Work Plane4.
• Click OK on the Offset dialog box.
• Right-click anywhere in the graphics window. Click Flip Section. Continue to click Flip Section, notice how the section view changes.
• Now right-click anywhere in the graphics window. Click Three Quarter Section View.
• Notice how the section view changes from a Quarter Section to a Three Quarter Section view.
• Right-click anywhere in the graphics window. Click Flip Section. Continue to click Flip Section, until the section view is displayed as shown.

ME 24-688 – Week 4
Project 2 – Assembly Interaction
ME 24-688 – Introduction to CAD/CAE Tools Page 11 of 12
10. With the Section View command still active, use Virtual Movement to modify the section view. • Right-click anywhere in the graphics window. Click Virtual Movement.
• Select Section Plane 2 from the flyout.
• Click anywhere in the graphics window and Drag the plane
• Drag the section plane until the offset is -550, or directly enter -550 into the Offset dialog
box.
• Click OK on the Offset dialog box.
• Right-click anywhere in the graphics window. Click Done.

ME 24-688 – Week 4
Project 2 – Assembly Interaction
ME 24-688 – Introduction to CAD/CAE Tools Page 12 of 12
11. End Section View View tab | Appearance panel | Section View flyout | End Section View
12. Close all files. Do not save.
Related Documents


