WebSphere MQ Security Version 7.0 SC34-6932-00

WebsphereMQv7 Security
Dec 01, 2015
mq7
Welcome message from author
This document is posted to help you gain knowledge. Please leave a comment to let me know what you think about it! Share it to your friends and learn new things together.
Transcript

WebSphere MQ
Security
Version 7.0
SC34-6932-00
���


WebSphere MQ
Security
Version 7.0
SC34-6932-00
���
Note
Before using this information and the product it supports, be sure to read the general information under notices at the back
of this book.
First edition (April 2008)
This edition of the book applies to the following products:
v IBM WebSphere MQ, Version 7.0
v IBM WebSphere MQ for z/OS, Version 7.0
and to any subsequent releases and modifications until otherwise indicated in new editions.
© Copyright International Business Machines Corporation 2002, 2008. All rights reserved.
US Government Users Restricted Rights – Use, duplication or disclosure restricted by GSA ADP Schedule Contract
with IBM Corp.

Contents
Figures . . . . . . . . . . . . . . . v
Tables . . . . . . . . . . . . . . . vii
Chapter 1. Introduction . . . . . . . . 1
Security services . . . . . . . . . . . . . 1
Identification and authentication . . . . . . . 1
Access control . . . . . . . . . . . . . 2
Confidentiality . . . . . . . . . . . . . 2
Data integrity . . . . . . . . . . . . . 3
Non-repudiation . . . . . . . . . . . . 3
Planning for your security requirements . . . . . 4
Basic considerations . . . . . . . . . . . 4
Additional considerations . . . . . . . . . 5
Link level security and application level security . 7
Cryptographic concepts . . . . . . . . . . 11
Cryptography . . . . . . . . . . . . 11
Message digests . . . . . . . . . . . . 13
Digital signatures . . . . . . . . . . . 13
Digital certificates . . . . . . . . . . . 14
Public Key Infrastructure (PKI) . . . . . . . 18
Cryptographic security protocols: TLS and SSL . . 18
Transport Layer Security (TLS) concepts . . . . 19
Secure Sockets Layer (SSL) concepts . . . . . 19
CipherSuites and CipherSpecs . . . . . . . 22
Security protocols in WebSphere MQ . . . . . 23
Chapter 2. WebSphere MQ security
provisions . . . . . . . . . . . . . 25
Access control . . . . . . . . . . . . . 25
Authority to administer WebSphere MQ . . . . 25
Authority to work with WebSphere MQ objects 29
Channel security . . . . . . . . . . . . 37
WebSphere MQ support for SSL and TLS . . . . 39
Channel attributes . . . . . . . . . . . 40
Channel status attributes . . . . . . . . . 40
Queue manager attributes . . . . . . . . 41
The authentication information object
(AUTHINFO) . . . . . . . . . . . . . 42
The SSL key repository . . . . . . . . . 42
Federal Information Processing Standards (FIPS) 44
WebSphere MQ client considerations . . . . . 46
Working with WebSphere MQ internet pass-thru
(IPT) . . . . . . . . . . . . . . . . 47
Support for cryptographic hardware . . . . . 47
Other link level security services . . . . . . . 47
Channel exit programs . . . . . . . . . 48
The SSPI channel exit program . . . . . . . 50
SNA LU 6.2 security services . . . . . . . 52
Providing your own link level security . . . . . 57
Security exit . . . . . . . . . . . . . 58
Message exit . . . . . . . . . . . . . 61
Send and receive exits . . . . . . . . . . 63
Access Manager for Business Integration . . . . 64
Introduction . . . . . . . . . . . . . 65
Access control . . . . . . . . . . . . 66
Identification and authentication . . . . . . 67
Data integrity . . . . . . . . . . . . . 67
Confidentiality . . . . . . . . . . . . 67
Non-repudiation . . . . . . . . . . . . 68
Obtaining more information . . . . . . . . 69
Providing your own application level security . . . 70
The API exit . . . . . . . . . . . . . 70
The API-crossing exit . . . . . . . . . . 72
The role of the API exit and the API-crossing exit
in security . . . . . . . . . . . . . . 73
Other ways of providing your own application
level security . . . . . . . . . . . . . 76
Chapter 3. Working with WebSphere
MQ TLS and SSL support . . . . . . 77
Setting up communications for SSL or TLS . . . . 77
Task 1: Using self-signed certificates . . . . . 78
Task 2: Using CA-signed certificates . . . . . 81
Task 3: Anonymous queue managers . . . . . 85
Working with SSL or TLS on i5/OS . . . . . . 87
Digital Certificate Manager (DCM) . . . . . 87
Assigning a certificate to a queue manager . . . 89
Setting up a key repository . . . . . . . . 89
Working with a key repository . . . . . . . 91
Obtaining server certificates . . . . . . . . 92
Adding server certificates to a key repository . . 94
Managing digital certificates . . . . . . . . 94
Configuring cryptographic hardware . . . . . 96
Mapping DNs to user IDs . . . . . . . . 96
Working with SSL or TLS on UNIX and Windows
systems . . . . . . . . . . . . . . . . 96
Using iKeyman, iKeyCmd, and GSKCapiCmd . . 97
Setting up a key repository . . . . . . . . 98
Working with a key repository . . . . . . 101
Obtaining personal certificates . . . . . . . 103
Receiving personal certificates into a key
repository . . . . . . . . . . . . . 106
Managing digital certificates . . . . . . . 107
Configuring for cryptographic hardware . . . 116
Mapping DNs to user IDs . . . . . . . . 119
Migrating SSL security certificates in WebSphere
MQ for Windows . . . . . . . . . . . 119
Working with SSL or TLS on z/OS . . . . . . 119
Setting the SSLTASKS parameter . . . . . . 120
Setting up a key repository . . . . . . . . 120
Working with a key repository . . . . . . 121
Obtaining personal certificates . . . . . . . 122
Adding personal certificates to a key repository 124
Managing digital certificates . . . . . . . 124
Working with Certificate Name Filters (CNFs) 126
Working with Certificate Revocation Lists and
Authority Revocation Lists . . . . . . . . . 127
Setting up LDAP servers . . . . . . . . 128
Accessing CRLs and ARLs . . . . . . . . 129
© Copyright IBM Corp. 2002, 2008 iii

Checking CRLs and ARLs . . . . . . . . 133
Manipulating authentication information objects
with PCF commands . . . . . . . . . . 133
Keeping CRLs and ARLs up to date . . . . . 133
Certificate validation and trust policy design on
UNIX and Windows systems . . . . . . . 133
Working with CipherSpecs . . . . . . . . . 142
Specifying CipherSpecs . . . . . . . . . 143
Understanding CipherSpec mismatches . . . . 146
WebSphere MQ rules for SSLPEER values . . . . 146
Understanding authentication failures . . . . . 147
Chapter 4. Cryptographic hardware 149
Notices . . . . . . . . . . . . . . 151
Index . . . . . . . . . . . . . . . 155
Sending your comments to IBM . . . 161
iv WebSphere MQ: Security

Figures
1. Link level security and application level
security . . . . . . . . . . . . . . 8
2. Symmetric key cryptography . . . . . . . 12
3. Asymmetric key cryptography . . . . . . 12
4. The digital signature process . . . . . . . 14
5. Obtaining a digital certificate . . . . . . . 17
6. Chain of trust . . . . . . . . . . . . 17
7. Overview of the SSL handshake . . . . . . 21
8. Security, message, send, and receive exits on a
message channel . . . . . . . . . . . 48
9. Flows for session level authentication . . . . 53
10. WebSphere MQ support for conversation level
authentication . . . . . . . . . . . . 55
11. Configuration resulting from Task 1 . . . . 80
12. Configuration resulting from Task 2 . . . . 83
13. Configuration resulting from Task 3 . . . . 86
14. Sample LDIF for a Certification Authority.
This might vary from implementation to
implementation. . . . . . . . . . . 128
15. Example of an LDAP Directory Information
Tree structure . . . . . . . . . . . 129
© Copyright IBM Corp. 2002, 2008 v

vi WebSphere MQ: Security
Tables
1. PCF commands and their equivalent OAM
commands . . . . . . . . . . . . . 36
2. Total number of certificates in each queue
manager’s key repository, both CA certificates
and personal certificates, when using each
scheme. . . . . . . . . . . . . . . 84
3. CipherSpecs that can be used with
WebSphere MQ SSL and TLS support . . . 143
© Copyright IBM Corp. 2002, 2008 vii

viii WebSphere MQ: Security

Chapter 1. Introduction
Security requirements are different for each application. This part of the
information center covers the factors to consider when determining the scope of
your security requirements, enabling you to make an informed choice from the
options available.
You can use WebSphere® MQ for a wide variety of applications on a range of
platforms. The security requirements are likely to be different for each application.
For some, security will be a critical consideration.
WebSphere MQ provides a range of link-level security services, including support
for the Secure Sockets Layer (SSL) and Transport Layer Security (TLS).
Security services
Security services are the services within a computer system that protect its
resources. This chapter describes the five security services that are identified in the
IBM® Security Architecture:
v “Identification and authentication”
v “Access control” on page 2
v “Confidentiality” on page 2
v “Data integrity” on page 3
v “Non-repudiation” on page 3
Security mechanisms are technical tools and techniques that are used to implement
security services. A mechanism might operate by itself, or in conjunction with
others, to provide a particular service. Examples of common security mechanisms
are:
v Access control lists
v Cryptography
v Digital signatures
When you are planning a WebSphere MQ implementation, you need to consider
which security services and mechanisms you require. For information about what
to consider after you have read this chapter, see “Planning for your security
requirements” on page 4.
For more information about the IBM Security Architecture, see IBM Security
Architecture: Securing the Open Client/Server Distributed Enterprise, SC28-8135, which
is available from the IBM Publications Center at: http://www.elink.ibmlink.ibm.com/publications/servlet/pbi.wss
Identification and authentication
Identification is being able to identify uniquely a user of a system or an application
that is running in the system. Authentication is being able to prove that a user or
application is genuinely who that person or what that application claims to be.
© Copyright IBM Corp. 2002, 2008 1

For example, consider a user who logs on to a system by entering a user ID and
password. The system uses the user ID to identify the user and, at the time of
logon, authenticates the user by checking that the supplied password is correct.
Here are some examples of the identification and authentication service in a
WebSphere MQ environment:
v Every message can contain message context information. This information is held
in the message descriptor and can be generated by the queue manager when a
message is put on a queue by an application. Alternatively, the application can
supply the information if the user ID associated with the application is
authorized to do so.
The context information in a message allows the receiving application to find
out about the originator of the message. It contains, for example, the name of the
application that put the message and the user ID associated with the application.
v When a message channel starts, it is possible for the message channel agent
(MCA) at each end of the channel to authenticate its partner. This is known as
mutual authentication. For the sending MCA, this provides assurance that the
partner it is about to send messages to is genuine. And, for the receiving MCA,
there is a similar assurance that it is about to receive messages from a genuine
partner.
Access control
The access control service protects critical resources in a system by limiting access
only to authorized users and their applications. It prevents the unauthorized use of
a resource or the use of a resource in an unauthorized manner.
Here are some examples of the access control service in a WebSphere MQ
environment:
v Allowing only an authorized administrator to issue commands to manage
WebSphere MQ resources.
v Allowing an application to connect to a queue manager only if the user ID
associated with the application is authorized to do so.
v Allowing a user’s application to open only those queues that are necessary for
its function.
v Allowing a user’s application to subscribe only to those topics that are necessary
for its function.
v Allowing a user’s application to perform only those operations on a queue that
are necessary for its function. For example, an application might need only to
browse messages on a particular queue, and not to put or get messages.
Confidentiality
The confidentiality service protects sensitive information from unauthorized
disclosure.
When sensitive data is stored locally, access control mechanisms might be sufficient
to protect it on the assumption that the data cannot be read if it cannot be
accessed. If a greater level of security is required, the data can be encrypted.
2 WebSphere MQ: Security

Sensitive data should be encrypted when it is transmitted over a communications
network, especially over an insecure network such as the Internet. In a networking
environment, access control mechanisms are not effective against attempts to
intercept the data, such as wiretapping.
Here are some examples of the confidentiality service that can be implemented in a
WebSphere MQ environment:
v After a sending MCA gets a message from a transmission queue, the message is
encrypted before it is sent over the network to the receiving MCA. At the other
end of the channel, the message is decrypted before the receiving MCA puts it
on its destination queue.
v While messages are stored on a local queue, the access control mechanisms
provided by WebSphere MQ might be considered sufficient to protect their
contents against unauthorized disclosure. However, for a greater level of
security, their contents can be encrypted as well.
Data integrity
The data integrity service detects whether there has been unauthorized modification
of data. There are two ways in which data might be altered: accidentally, through
hardware and transmission errors, or because of a deliberate attack. Many
hardware products and transmission protocols now have mechanisms to detect and
correct hardware and transmission errors. The purpose of the data integrity service
is to detect a deliberate attack.
The data integrity service aims only to detect whether data has been modified. It
does not aim to restore data to its original state if it has been modified.
Access control mechanisms can contribute to data integrity insofar as data cannot
be modified if access is denied. But, as with confidentiality, access control
mechanisms are not effective in a networking environment.
Here are some examples of the data integrity service that can be implemented in a
WebSphere MQ environment:
v A data integrity service can be used to detect whether the contents of a message
have been deliberately modified while it was being transmitted over a network.
v While messages are stored on a local queue, the access control mechanisms
provided by WebSphere MQ might be considered sufficient to prevent deliberate
modification of the contents of the messages. However, for a greater level of
security, a data integrity service can be used to detect whether the contents of a
message have been deliberately modified between the time the message was put
on the queue and the time it was retrieved from the queue.
Non-repudiation
The non-repudiation service can be viewed as an extension to the identification and
authentication service. In general, non-repudiation applies when data is
transmitted electronically; for example, an order to a stock broker to buy or sell
stock, or an order to a bank to transfer funds from one account to another. The
overall goal is to be able to prove that a particular message is associated with a
particular individual.
The non-repudiation service can contain more than one component, where each
component provides a different function. If the sender of a message ever denies
Chapter 1. Introduction 3

sending it, the non-repudiation service with proof of origin can provide the receiver
with undeniable evidence that the message was sent by that particular individual.
If the receiver of a message ever denies receiving it, the non-repudiation service
with proof of delivery can provide the sender with undeniable evidence that the
message was received by that particular individual.
In practice, proof with virtually 100% certainty, or undeniable evidence, is a
difficult goal. In the real world, nothing is fully secure. Managing security is more
concerned with managing risk to a level that is acceptable to the business. In such
an environment, a more realistic expectation of the non-repudiation service is to be
able to provide evidence that is admissible, and supports your case, in a court of
law.
Non-repudiation is a relevant security service in a WebSphere MQ environment
because WebSphere MQ is a means of transmitting data electronically. For example,
you might require contemporaneous evidence that a particular message was sent
or received by an application associated with a particular individual.
Be aware that neither IBM WebSphere MQ nor IBM Tivoli® Access Manager for
Business Integration provides a non-repudiation service as part of its base function.
However, this book does contain suggestions on how you might provide your own
non-repudiation service within a WebSphere MQ environment by writing your
own exit programs.
Planning for your security requirements
The purpose of this chapter is to explain what you need to consider when
planning security in a WebSphere MQ environment. The considerations are
discussed under three main headings:
v “Basic considerations”
v “Additional considerations” on page 5
v “Link level security and application level security” on page 7
Basic considerations
The basic considerations are those aspects of security you must consider when
implementing WebSphere MQ. On i5/OS®, UNIX® systems, and Windows®
systems, if you ignore these considerations and do nothing, you cannot implement
WebSphere MQ. On z/OS®, the effect is that your WebSphere MQ resources are
unprotected. That is, all users can access and change all WebSphere MQ resources.
Authority to administer WebSphere MQ
WebSphere MQ administrators need authority to:
v Issue commands to administer WebSphere MQ
v Use the WebSphere MQ Explorer
v Use the operations and control panels on z/OS
v Use the WebSphere MQ utility program, CSQUTIL, on z/OS
v Access the queue manager data sets on z/OS
This is an aspect of access control. For more information, see “Authority to
administer WebSphere MQ” on page 25.
4 WebSphere MQ: Security

Authority to work with WebSphere MQ objects
Applications can access the following WebSphere MQ objects by issuing MQI calls:
v Queue managers
v Queues
v Processes
v Namelists
v Topics
Applications can also use Programmable Command Format (PCF) commands to
access these WebSphere MQ objects, and to access authentication information
objects as well. Applications can also use PCF commands to access channels, in
addition to the objects listed above. These objects are protected by WebSphere MQ
and the user IDs associated with the applications need authority to access them.
This is another aspect of access control. For more information, see “Authority to
work with WebSphere MQ objects” on page 29.
Channel security
The user IDs associated with message channel agents (MCAs) need authority to
access various WebSphere MQ resources. For example, an MCA must be able to
connect to a queue manager. If it is a sending MCA, it must be able to open the
transmission queue for the channel. If it is a receiving MCA, it must be able to
open destination queues. The user IDs associated with applications need authority
to use PCF commands to administer channels, channel initiators, and listeners.
This is another aspect of access control. For more information, see “Channel
security” on page 37.
Additional considerations
The following are aspects of security you need to consider only if you are using
certain WebSphere MQ function or base product extensions:
v “Queue manager clusters”
v “WebSphere MQ Publish/Subscribe” on page 6
v “WebSphere MQ internet pass-thru” on page 7
Queue manager clusters
A queue manager cluster is a network of queue managers that are logically
associated in some way. A queue manager that is a member of a cluster is called a
cluster queue manager.
A queue that belongs to a cluster queue manager can be made known to other
queue managers in the cluster. Such a queue is called a cluster queue. Any queue
manager in a cluster can send messages to cluster queues without needing any of
the following:
v An explicit remote queue definition for each cluster queue
v Explicitly defined channels to and from each remote queue manager
v A separate transmission queue for each outbound channel
Chapter 1. Introduction 5

You can create a cluster in which two or more queue managers are clones. This
means that they have instances of the same local queues, including any local
queues declared as cluster queues, and can support instances of the same server
applications.
When an application connected to a cluster queue manager sends a message to a
cluster queue that has an instance on each of the cloned queue managers,
WebSphere MQ decides which queue manager to send it to. When many
applications send messages to the cluster queue, WebSphere MQ balances the
workload across each of the queue managers that have an instance of the queue. If
one of the systems hosting a cloned queue manager fails, WebSphere MQ
continues to balance the workload across the remaining queue managers until the
system that failed is restarted.
If you are using queue manager clusters, you need to consider the following
security issues:
v Allowing only selected queue managers to send messages to your queue
manager
v Allowing only selected users of a remote queue manager to send messages to a
queue on your queue manager
v Allowing applications connected to your queue manager to send messages only
to selected remote queues
These considerations are relevant even if you are not using clusters, but they
become more important if you are using clusters.
If an application can send messages to one cluster queue, it can send messages to
any other cluster queue without needing additional remote queue definitions,
transmission queues, or channels. It therefore becomes more important to consider
whether you need to restrict access to the cluster queues on your queue manager,
and to restrict the cluster queues to which your applications can send messages.
There are some additional security considerations, which are relevant only if you
are using queue manager clusters:
v Allowing only selected queue managers to join a cluster
v Forcing unwanted queue managers to leave a cluster
For more information about all these considerations, see WebSphere MQ Queue
Manager Clusters. For considerations specific to WebSphere MQ for z/OS, see the
WebSphere MQ for z/OS System Setup Guide.
WebSphere MQ Publish/Subscribe
In a Publish/Subscribe system, there are two types of application: publisher and
subscriber. Publishers supply information in the form of WebSphere MQ messages.
When a publisher publishes a message, it specifies a topic, which identifies the
subject of the information inside the message.
Subscribers are the consumers of the information that is published. A subscriber
specifies the topics it is interested in by subscribing to them.
The Queue Manager is an application supplied with WebSphere MQ
Publish/Subscribe. It receives published messages from publishers and
6 WebSphere MQ: Security
subscription requests from subscribers, and routes the published messages to the
subscribers. A subscriber is sent messages only on those topics to which it has
subscribed.
There are additional security considerations if you are using WebSphere MQ
Publish/Subscribe. For more information, see the WebSphere MQ
Publish/Subscribe User’s Guide.
WebSphere MQ internet pass-thru
WebSphere MQ internet pass-thru is a WebSphere MQ base product extension that
is supplied in SupportPac™ MS81.
WebSphere MQ internet pass-thru enables two queue managers to exchange
messages, or a WebSphere MQ client application to connect to a queue manager,
over the Internet without requiring a direct TCP/IP connection. This is useful if a
firewall prohibits a direct TCP/IP connection between two systems. It makes the
passage of WebSphere MQ channel protocol flows into and out of a firewall
simpler and more manageable by tunnelling the flows inside HTTP or by acting as
a proxy. Using the Secure Sockets Layer (SSL), it can also be used to encrypt and
decrypt messages that are sent over the Internet.
For more information about WebSphere MQ internet pass-thru, see MS81:
WebSphere MQ internet pass-thru, available from the following address:
http://www.ibm.com/software/integration/support/supportpacs/
Link level security and application level security
The remaining security considerations are discussed under two headings: link level
security and application level security.
Link level security
Link level security refers to those security services that are invoked, directly or
indirectly, by an MCA, the communications subsystem, or a combination of the
two working together. This is illustrated in Figure 1 on page 8.
Chapter 1. Introduction 7
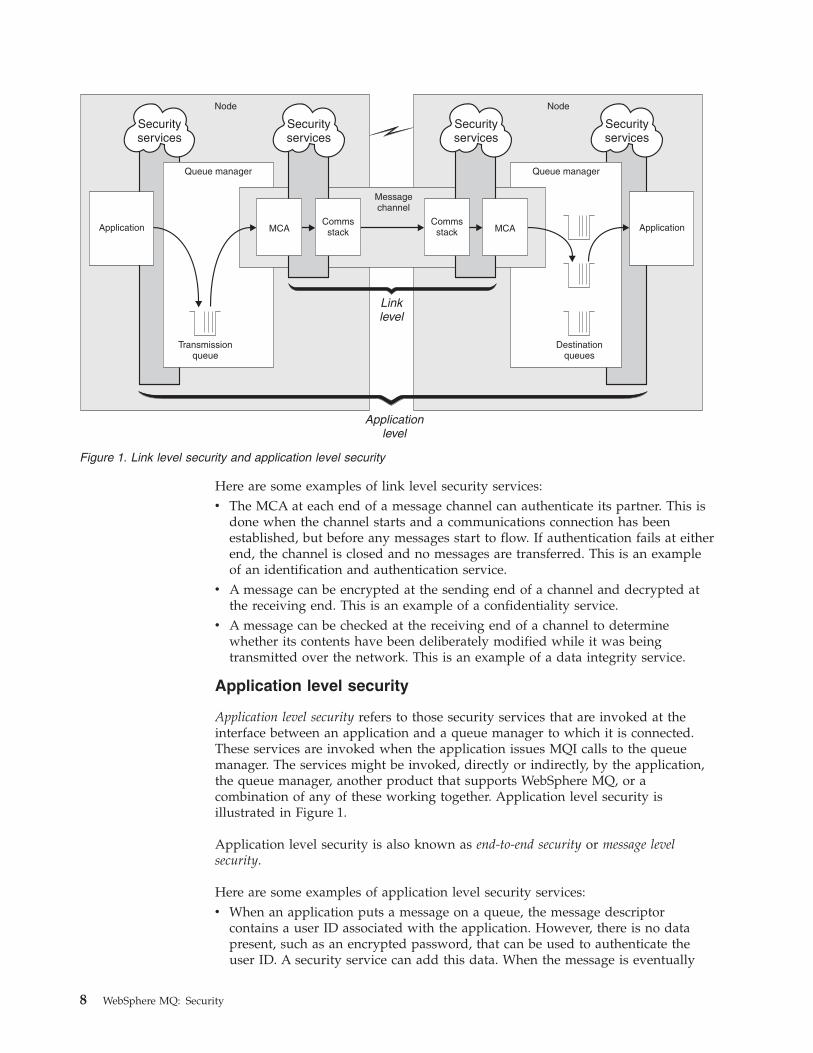
Here are some examples of link level security services:
v The MCA at each end of a message channel can authenticate its partner. This is
done when the channel starts and a communications connection has been
established, but before any messages start to flow. If authentication fails at either
end, the channel is closed and no messages are transferred. This is an example
of an identification and authentication service.
v A message can be encrypted at the sending end of a channel and decrypted at
the receiving end. This is an example of a confidentiality service.
v A message can be checked at the receiving end of a channel to determine
whether its contents have been deliberately modified while it was being
transmitted over the network. This is an example of a data integrity service.
Application level security
Application level security refers to those security services that are invoked at the
interface between an application and a queue manager to which it is connected.
These services are invoked when the application issues MQI calls to the queue
manager. The services might be invoked, directly or indirectly, by the application,
the queue manager, another product that supports WebSphere MQ, or a
combination of any of these working together. Application level security is
illustrated in Figure 1.
Application level security is also known as end-to-end security or message level
security.
Here are some examples of application level security services:
v When an application puts a message on a queue, the message descriptor
contains a user ID associated with the application. However, there is no data
present, such as an encrypted password, that can be used to authenticate the
user ID. A security service can add this data. When the message is eventually
Queue manager Queue manager
Linklevel
Applicationlevel
Application Application
Transmissionqueue
Destinationqueues
Messagechannel
Securityservices
Securityservices
Securityservices
Securityservices
Node Node
CommsstackMCA
Commsstack MCA
Figure 1. Link level security and application level security
8 WebSphere MQ: Security
retrieved by the receiving application, another component of the service can
authenticate the user ID using the data that has travelled with the message. This
is an example of an identification and authentication service.
v A message can be encrypted when it is put on a queue by an application and
decrypted when it is retrieved by the receiving application. This is an example
of a confidentiality service.
v A message can be checked when it is retrieved by the receiving application. This
check determines whether its contents have been deliberately modified since it
was first put on a queue by the sending application. This is an example of a
data integrity service.
Comparing link level security and application level security
The following sections discuss various aspects of link level security and application
level security, and compare the two levels of security.
Protecting messages in queues:
Link level security can protect messages while they are transferred from one queue
manager to another. It is particularly important when messages are transmitted
over an insecure network. It cannot, however, protect messages while they are
stored in queues at either a source queue manager, a destination queue manager,
or an intermediate queue manager.
Application level security, by comparison, can protect messages while they are
stored in queues and applies even when distributed queuing is not used. This is
the major difference between link level security and application level security and
is illustrated in Figure 1 on page 8.
Queue managers not running in controlled and trusted environments:
If a queue manager is running in a controlled and trusted environment, the access
control mechanisms provided by WebSphere MQ might be considered sufficient to
protect the messages stored on its queues. This is particularly true if only local
queuing is involved and messages never leave the queue manager. Application
level security in this case might be considered unnecessary.
Application level security might also be considered unnecessary if messages are
transferred to another queue manager that is also running in a controlled and
trusted environment, or are received from such a queue manager. But the need for
application level security becomes greater when messages are transferred to, or
received from, a queue manager that is not running in a controlled and trusted
environment.
Differences in cost:
Application level security might cost more than link level security in terms of
administration and performance.
The cost of administration is almost certainly greater because there are potentially
more constraints to configure and maintain. For example, you might need to
ensure that a particular user sends only certain types of message and sends
messages only to certain destinations. Conversely, you might need to ensure that a
particular user receives only certain types of message and receives messages only
from certain sources. Instead of managing the link level security services on a
Chapter 1. Introduction 9

single message channel, you might need to be configuring and maintaining rules
for every pair of users who exchange messages across that channel.
There might be an impact on performance if security services are invoked every
time an application puts or gets a message.
Organizations tend to consider link level security first because it might be easier to
implement. They consider application level security if they discover that link level
security does not satisfy all their requirements.
Availability of components:
As a general rule, in a distributed environment, a security service requires a
component on at least two systems. For example, a message might be encrypted on
one system and decrypted on another. This applies to both link level security and
application level security.
In a heterogeneous environment, with different platforms in use, each with
different levels of security function, the required components of a security service
might not be available for every platform on which they are needed and in a form
that is easy to use. This is probably more of an issue for application level security
than for link level security, particularly if you intend to provide your own
application level security by buying in components from various sources.
Messages in a dead letter queue:
If a message is protected by application level security, there might be a problem if,
for any reason, the message does not reach its destination and is put on a dead
letter queue. If you cannot work out how to process the message from the
information in the message descriptor and the dead letter header, you might need
to inspect the contents of the application data. You cannot do this if the application
data is encrypted and only the intended recipient can decrypt it.
What application level security cannot do:
Application level security is not a complete solution. Even if you implement
application level security, you might still require some link level security services.
For example:
v When a channel starts, the mutual authentication of the two MCAs might still be
a requirement. This can be done only by a link level security service.
v Application level security cannot protect the transmission queue header,
MQXQH, which includes the embedded message descriptor. Nor can it protect
the data in WebSphere MQ channel protocol flows other than message data.
Only link level security can provide this protection.
v If application level security services are invoked at the server end of an MQI
channel, the services cannot protect the parameters of MQI calls that are sent
over the channel. In particular, the application data in an MQPUT, MQPUT1, or
MQGET call is unprotected. Only link level security can provide the protection
in this case.
Obtaining more information
Link level and application level security services are available for you to install,
configure, and use. Some services are supplied with WebSphere MQ and
WebSphere MQ base product extensions. The remainder are provided by other IBM
products, vendor products, and the SNA LU 6.2 communications subsystem.
10 WebSphere MQ: Security

For more information about what is available for link level security, see:
v “WebSphere MQ support for SSL and TLS” on page 39
v “Other link level security services” on page 47
For application level security, see:
v “Access Manager for Business Integration” on page 64
You can also provide your own link level and application level security services by
writing exit programs. This might involve significant effort in terms of developing
and maintaining the exit programs. For more information, see:
v “Providing your own link level security” on page 57
v “Providing your own application level security” on page 70
Cryptographic concepts
This chapter describes the following concepts:
v “Cryptography”
v “Message digests” on page 13
v “Digital signatures” on page 13
v “Digital certificates” on page 14
v “Public Key Infrastructure (PKI)” on page 18
This chapter uses the term entity to refer to a queue manager, a WebSphere MQ
client, an individual user, or any other system capable of exchanging messages.
Cryptography
Cryptography is the process of converting between readable text, called plaintext,
and an unreadable form, called ciphertext:
1. The sender converts the plaintext message to ciphertext. This part of the
process is called encryption (sometimes encipherment).
2. The ciphertext is transmitted to the receiver.
3. The receiver converts the ciphertext message back to its plaintext form. This
part of the process is called decryption (sometimes decipherment).
The conversion involves a sequence of mathematical operations that change the
appearance of the message during transmission but do not affect the content.
Cryptographic techniques can ensure confidentiality and protect messages against
unauthorized viewing (eavesdropping), because an encrypted message is not
understandable. Digital signatures, which provide an assurance of message
integrity, use encryption techniques. See “Digital signatures” on page 13 for more
information.
Cryptographic techniques involve a general algorithm, made specific by the use of
keys. There are two classes of algorithm:
v Those that require both parties to use the same secret key. Algorithms that use a
shared key are known as symmetric algorithms. Figure 2 on page 12 illustrates
symmetric key cryptography.
v Those that use one key for encryption and a different key for decryption. One of
these must be kept secret but the other can be public. Algorithms that use public
Chapter 1. Introduction 11

and private key pairs are known as asymmetric algorithms. Figure 3 illustrates
asymmetric key cryptography, which is also known as public key cryptography.
The encryption and decryption algorithms used can be public but the shared secret
key and the private key must be kept secret.
Figure 3 shows plaintext encrypted with the receiver’s public key and decrypted
with the receiver’s private key. Only the intended receiver holds the private key for
decrypting the ciphertext. Note that the sender can also encrypt messages with a
private key, which allows anyone that holds the sender’s public key to decrypt the
message, with the assurance that the message must have come from the sender.
With asymmetric algorithms, messages are encrypted with either the public or the
private key but can be decrypted only with the other key. Only the private key is
secret, the public key can be known by anyone. With symmetric algorithms, the
shared key must be known only to the two parties. This is called the key
distribution problem. Asymmetric algorithms are slower but have the advantage that
there is no key distribution problem.
Other terminology associated with cryptography is:
Strength
The strength of encryption is determined by the key size. Asymmetric
algorithms require large keys, for example:
768 bits Low-strength asymmetric key
1024 bits Medium-strength asymmetric key
2048 bits High-strength asymmetric key
Symmetric keys are smaller: 256 bit keys give you strong encryption.
Symmetric key
plaintextplaintext
ciphertext
encrypt decrypt
Figure 2. Symmetric key cryptography
Asymmetric key pair
plaintextplaintext
ciphertext
encrypt decrypt
Private keyPublic key
Figure 3. Asymmetric key cryptography
12 WebSphere MQ: Security

Block cipher algorithm
These algorithms encrypt data by blocks. For example, the RC2 algorithm
from RCA Data Security Inc. uses blocks 8 bytes long. Block algorithms are
usually slower than stream algorithms.
Stream cipher algorithm
These algorithms operate on each byte of data. Stream algorithms are
usually faster than block algorithms.
Message digests
Message digests are fixed size numeric representations of the contents of messages,
which are inherently variable in size. A message digest is computed by a hash
function, which is a transformation that meets two criteria:
v The hash function must be one-way. It must not be possible to reverse the
function to find the message corresponding to a given message digest, other
than by testing all possible messages.
v It must be computationally infeasible to find two messages that hash to the same
digest.
A message digest is also known as a Message Authentication Code (MAC), because
it can provide assurance that the message has not been modified. The message
digest is sent with the message itself. The receiver can generate a digest for the
message and compare it with the sender’s digest. If the two digests are the same,
this verifies the integrity of the message. Any tampering with the message during
transmission almost certainly results in a different message digest.
Digital signatures
A digital signature is formed by encrypting a representation of a message. The
encryption uses the private key of the signatory and, for efficiency, usually
operates on a message digest rather than the message itself. See “Message digests”
for more information.
Digital signatures vary with the data being signed, unlike handwritten signatures,
which do not depend on the content of the document being signed. If two different
messages are signed digitally by the same entity, the two signatures differ, but both
signatures can be verified with the same public key, that is, the public key of the
entity that signed the messages.
The steps of the digital signature process are as follows:
1. The sender computes a message digest and then encrypts the digest using the
sender’s private key, forming the digital signature.
2. The sender transmits the digital signature with the message.
3. The receiver decrypts the digital signature using the sender’s public key,
regenerating the sender’s message digest.
4. The receiver computes a message digest from the message data received and
verifies that the two digests are the same.
Figure 4 on page 14 illustrates this process.
Chapter 1. Introduction 13

If the digital signature is verified, the receiver knows that:
v The message has not been modified during transmission.
v The message was sent by the entity that claims to have sent it.
Digital signatures are part of integrity and authentication services. Digital
signatures also provide proof of origin. Only the sender knows the private key,
which provides strong evidence that the sender is the originator of the message.
Note: You can also encrypt the message itself, which protects the confidentiality of
the information in the message.
Digital certificates
Digital certificates provide protection against impersonation, because a digital
certificate binds a public key to its owner, whether that owner is an individual, a
queue manager, or some other entity. Digital certificates are also known as public
key certificates, because they give you assurances about the ownership of a public
key when you use an asymmetric key scheme. A digital certificate contains the
public key for an entity and is a statement that the public key belongs to that
entity:
v When the certificate is for an individual entity, the certificate is called a personal
certificate or user certificate.
v When the certificate is for a Certification Authority, the certificate is called a CA
certificate or signer certificate.
If public keys are sent directly by their owner to another entity, there is a risk that
the message could be intercepted and the public key substituted by another. This is
known as a man in the middle attack. The solution to this problem is to exchange
public keys through a trusted third party, giving you a strong assurance that the
public key really belongs to the entity with which you are communicating. Instead
of sending your public key directly, you ask the trusted third party to incorporate
it into a digital certificate. The trusted third party that issues digital certificates is
called a Certification Authority (CA), as described in “Certification Authorities” on
page 15.
This section provides the following information:
v “What is in a digital certificate” on page 15
Sender
hash
hash
encrypt decrypt
Receiver
Messagedigest
Digitalsignature
Messagetransmitted
Messagereceived
Digitalsignature
plaintext
plaintext plaintext
Compare
Messagedigest
Messagedigest
Figure 4. The digital signature process
14 WebSphere MQ: Security

v “Certification Authorities”
v “Distinguished Names” on page 16
v “How digital certificates work” on page 16
What is in a digital certificate
Digital certificates used by WebSphere MQ comply with the X.509 standard, which
specifies the information that is required and the format for sending it. X.509 is the
Authentication framework part of the X.500 series of standards. X.500 is the OSI
Directory Standard.
Digital certificates contain at least the following information about the entity being
certified:
v The owner’s public key
v The owner’s Distinguished Name
v The Distinguished Name of the CA that is issuing the certificate
v The date from which the certificate is valid
v The expiry date of the certificate
v A version number
v A serial number
When you receive a certificate from a CA, the certificate is signed by the issuing
CA with a digital signature. You verify that signature by using a CA certificate,
from which you obtain the public key for the CA. You can use the CA public key
to validate other certificates issued by that authority. Recipients of your certificate
use the CA public key to check the signature.
Digital certificates do not contain your private key. You must keep your private
key secret.
Requirements for personal certificates
WebSphere MQ supports digital certificates that comply with the X.509 standard.
Since MQ is a peer to peer system, in SSL terminology this is viewed as client
authentication, which means that any personal certificate used for SSL
authentication needs to allow a key usage of client authentication. Not all server
certificates have this option enabled, so the certificate provider might need to
enable client authentication on the root CA for the secure certificate.
Certification Authorities
A Certification Authority (CA) is an independent and trusted third party that
issues digital certificates to provide you with an assurance that the public key of
an entity truly belongs to that entity. The roles of a CA are:
v On receiving a request for a digital certificate, to verify the identity of the
requestor before building, signing and returning the personal certificate
v To provide the CA’s own public key in its CA certificate
v To publish lists of certificates that are no longer trusted in a Certificate
Revocation List (CRL). For more information, refer to “Working with Certificate
Revocation Lists and Authority Revocation Lists” on page 127
Chapter 1. Introduction 15
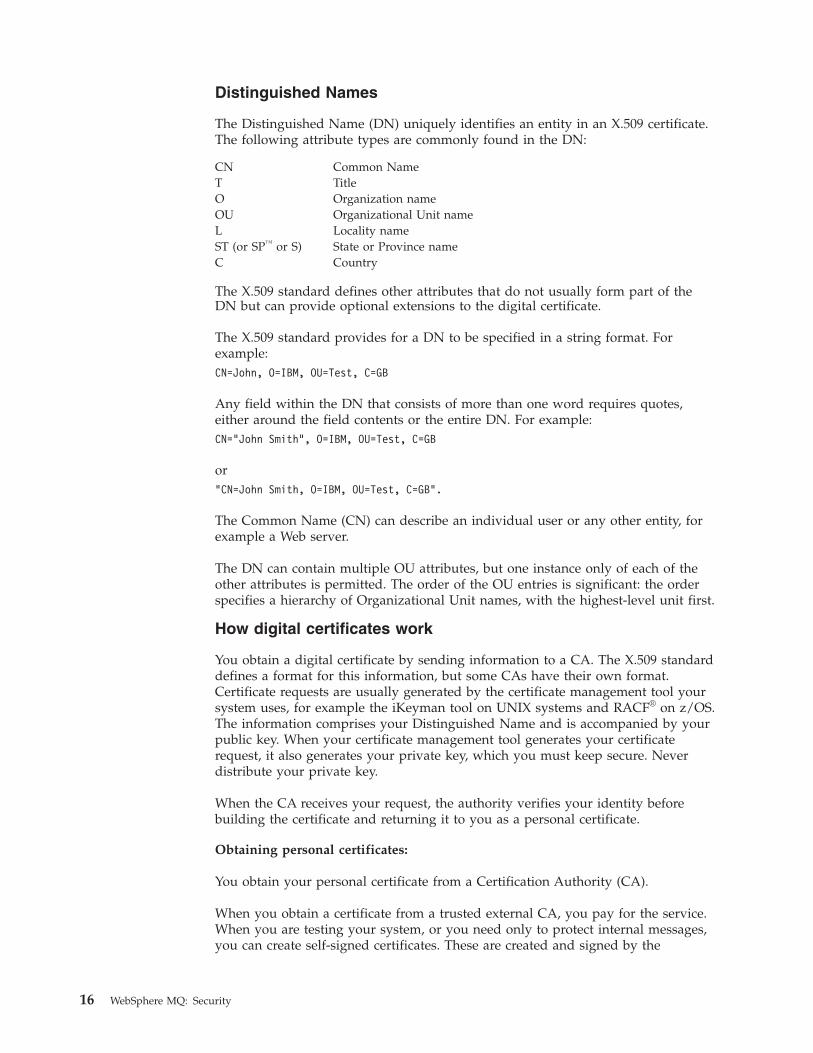
Distinguished Names
The Distinguished Name (DN) uniquely identifies an entity in an X.509 certificate.
The following attribute types are commonly found in the DN:
CN Common Name
T Title
O Organization name
OU Organizational Unit name
L Locality name
ST (or SP™ or S) State or Province name
C Country
The X.509 standard defines other attributes that do not usually form part of the
DN but can provide optional extensions to the digital certificate.
The X.509 standard provides for a DN to be specified in a string format. For
example:
CN=John, O=IBM, OU=Test, C=GB
Any field within the DN that consists of more than one word requires quotes,
either around the field contents or the entire DN. For example:
CN="John Smith", O=IBM, OU=Test, C=GB
or
"CN=John Smith, O=IBM, OU=Test, C=GB".
The Common Name (CN) can describe an individual user or any other entity, for
example a Web server.
The DN can contain multiple OU attributes, but one instance only of each of the
other attributes is permitted. The order of the OU entries is significant: the order
specifies a hierarchy of Organizational Unit names, with the highest-level unit first.
How digital certificates work
You obtain a digital certificate by sending information to a CA. The X.509 standard
defines a format for this information, but some CAs have their own format.
Certificate requests are usually generated by the certificate management tool your
system uses, for example the iKeyman tool on UNIX systems and RACF® on z/OS.
The information comprises your Distinguished Name and is accompanied by your
public key. When your certificate management tool generates your certificate
request, it also generates your private key, which you must keep secure. Never
distribute your private key.
When the CA receives your request, the authority verifies your identity before
building the certificate and returning it to you as a personal certificate.
Obtaining personal certificates:
You obtain your personal certificate from a Certification Authority (CA).
When you obtain a certificate from a trusted external CA, you pay for the service.
When you are testing your system, or you need only to protect internal messages,
you can create self-signed certificates. These are created and signed by the
16 WebSphere MQ: Security
certificate management tool your system uses. Self-signed certificates cannot be
used to authenticate certificates from outside your organization.
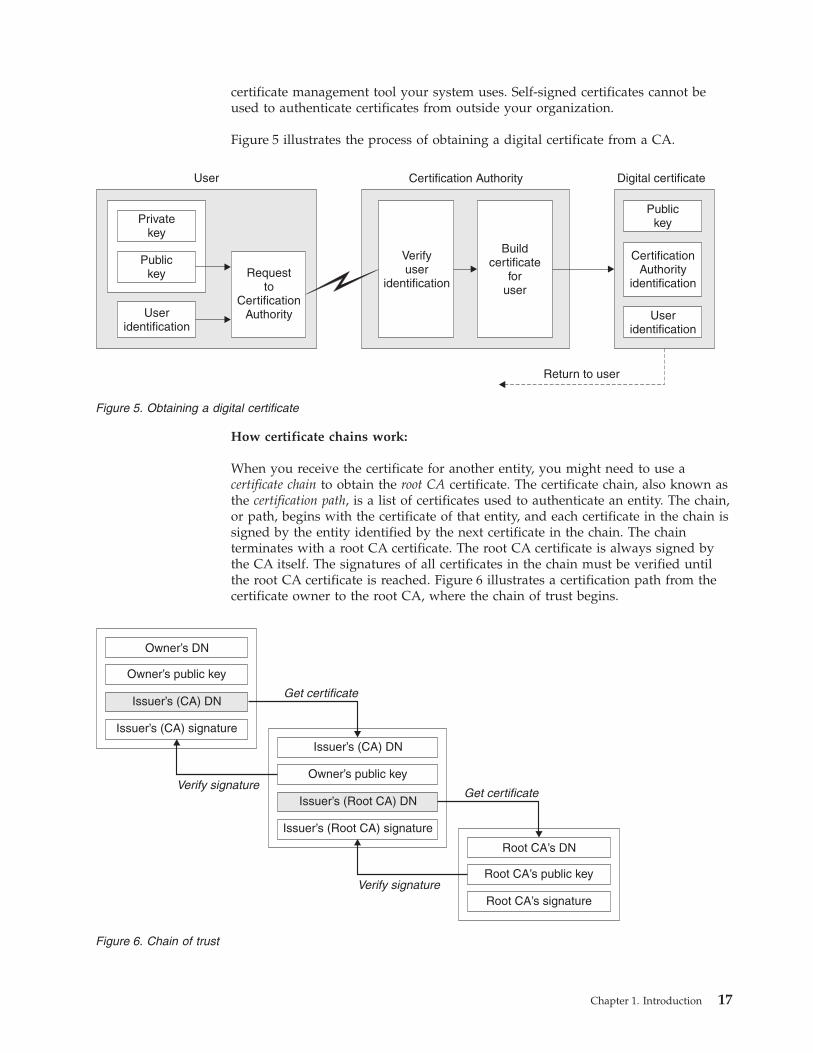
Figure 5 illustrates the process of obtaining a digital certificate from a CA.
How certificate chains work:
When you receive the certificate for another entity, you might need to use a
certificate chain to obtain the root CA certificate. The certificate chain, also known as
the certification path, is a list of certificates used to authenticate an entity. The chain,
or path, begins with the certificate of that entity, and each certificate in the chain is
signed by the entity identified by the next certificate in the chain. The chain
terminates with a root CA certificate. The root CA certificate is always signed by
the CA itself. The signatures of all certificates in the chain must be verified until
the root CA certificate is reached. Figure 6 illustrates a certification path from the
certificate owner to the root CA, where the chain of trust begins.
Return to user
Digital certificate
Publickey
Useridentification
CertificationAuthority
identification
Certification Authority
Verifyuser
identification
Buildcertificate
foruser
Useridentification
Privatekey
Publickey Request
toCertification
Authority
User
Figure 5. Obtaining a digital certificate
Verify signature
Verify signature
Owner’s DN
Owner’s public key
Issuer’s (CA) DN
Issuer’s signature(CA)
Issuer’s signature(Root CA)
Issuer’s (Root CA) DN
Owner’s public key
Issuer’s (CA) DN
Root CA’s DN
Root CA’s public key
Root CA’s signature
Get certificate
Get certificate
Figure 6. Chain of trust
Chapter 1. Introduction 17

When certificates are no longer valid:
Digital certificates are issued for a fixed period and are not valid after their expiry
date. Certificates can also become untrustworthy for various reasons, including:
v The owner has moved to a different organization
v The private key is no longer secret
A Certification Authority can revoke a certificate that is no longer trusted by
publishing it in a Certificate Revocation List (CRL). For more information, refer to
“Working with Certificate Revocation Lists and Authority Revocation Lists” on
page 127.
Public Key Infrastructure (PKI)
A Public Key Infrastructure (PKI) is a system of facilities, policies, and services that
supports the use of public key cryptography for authenticating the parties involved
in a transaction. There is no single standard that defines the components of a
Public Key Infrastructure, but a PKI typically comprises Certification Authorities
and other Registration Authorities (RAs) that provide the following services:
v Issuing digital certificates
v Validating digital certificates
v Revoking digital certificates
v Distributing public keys
The X.509 standard is a Public Key Infrastructure.
Refer to “Digital certificates” on page 14 for more information about digital
certificates and Certification Authorities (CAs). RAs verify the information
provided when digital certificates are requested. If the RA verifies that information,
the CA can issue a digital certificate to the requester.
A PKI might also provide tools for managing digital certificates and public keys. A
PKI is sometimes described as a trust hierarchy for managing digital certificates, but
most definitions include additional services. Some definitions include encryption
and digital signature services, but these are not essential to the operation of a PKI.
Cryptographic security protocols: TLS and SSL
Cryptographic protocols provide secure connections, enabling two parties to
communicate with privacy and data integrity. The Transport Layer Security (TLS)
protocol evolved from that of the Secure Sockets Layer (SSL).
Applications use TLS or SSL to establish secure connections between two
communicating parties. The primary goal of both protocols is to provide privacy
and data integrity. Other goals are as follows:
v Enabling interoperability between applications
v Providing an extensible framework that can readily incorporate new public key
and bulk encryption methods
v Ensuring relative computational efficiency
Both TLS and SSL comprise two layers: a Record Protocol and a Handshake
Protocol.
18 WebSphere MQ: Security

Although the two protocols are similar, the differences are sufficiently significant
that SSL 3.0 and the various versions of TLS do not interoperate.
Transport Layer Security (TLS) concepts
The Transport Layer Security (TLS) protocol enables two parties to communicate
with privacy and data integrity. The TLS protocol evolved from the SSL 3.0
protocol but TLS and SSL do not interoperate.
The TLS protocol provides communications security over the internet, and allows
client/server applications to communicate in a way that is private and reliable. The
protocol has two layers: the TLS Record Protocol and the TLS Handshake Protocol,
and these are layered above a transport protocol such as TCP/IP.
The TLS protocol evolved from the Netscape SSL 3.0 protocol. Although similar,
TLS and SSL are not interoperable.
The TLS protocol applies when any of the following CipherSpecs are specified:
v TLS_RSA_WITH_AES_128_CBC_SHA
v TLS_RSA_WITH_AES_256_CBC_SHA
v TLS_RSA_WITH_DES_CBC_SHA
v TLS_RSA_WITH_3DES_EDE_CBC_SHA
v TLS_RSA_WITH_NULL_MDS
v TLS_RSA_WITH_NULL_SHA
v TLS_RSA_EXPORT_WITH_RC4_40_MDS
v TLS_RSA_WITH_RC4_128_MDS
v TLS_RSA_WITH_RC4_40_MDS
For more information about the TLS protocol, see the information provided by the
TLS Working Group on the web site of the Internet Engineering Task Force at
http://www.ietf.org.
Secure Sockets Layer (SSL) concepts
Secure Sockets Layer (SSL) protocol enables two parties to communicate with
privacy and data integrity. Although SSL and TLS are similar, the two protocols do
not interoperate.
The Secure Sockets Layer (SSL) provides an industry standard protocol for
transmitting data in a secure manner over an insecure network. The SSL protocol is
widely deployed in both Internet and Intranet applications. SSL defines methods
for authentication, data encryption, and message integrity for a reliable transport
protocol, usually TCP/IP. SSL uses both asymmetric and symmetric cryptography
techniques. Refer to the following web site for a complete description of the SSL
protocol: http://wp.netscape.com/eng/ssl3/
An SSL connection is initiated by the caller application, which becomes the SSL
client. The responder application becomes the SSL server. Every new SSL session
begins with an SSL handshake, as defined by the SSL protocol.
Note that SSL does not provide any formal access control service, because SSL
operates at the link level.
An overview of the SSL handshake
The SSL handshake enables the SSL client and SSL server to establish the secret
keys with which they communicate.
Chapter 1. Introduction 19
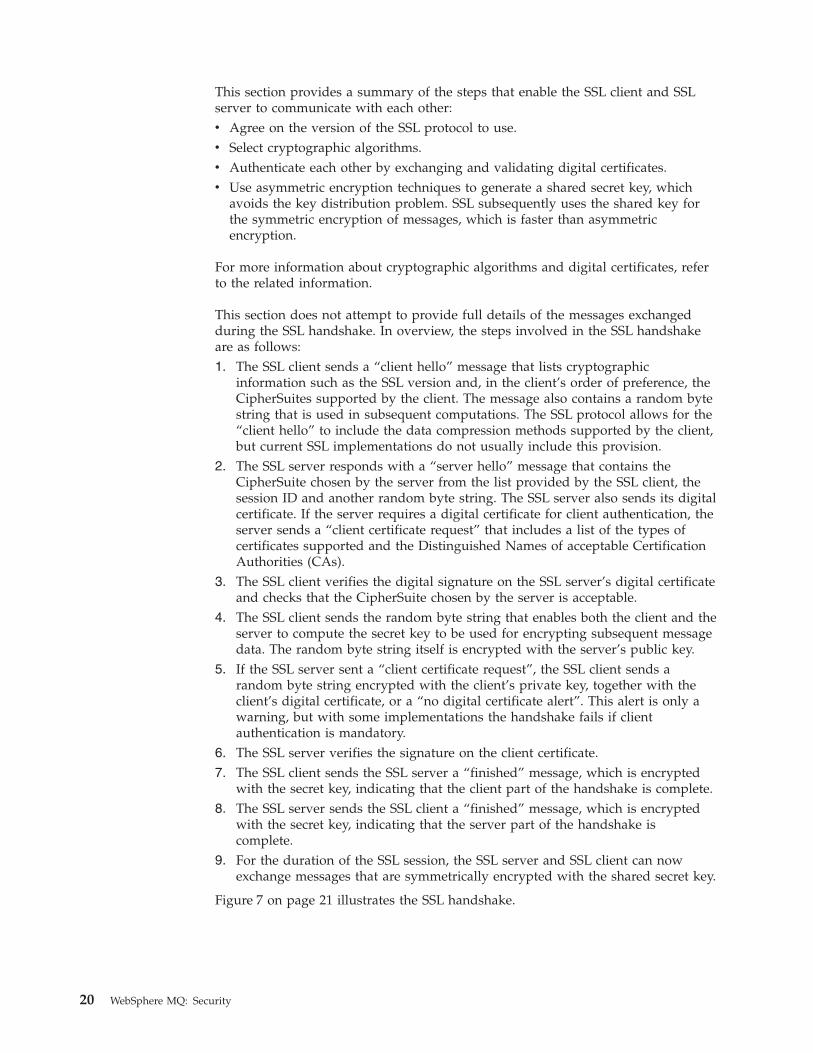
This section provides a summary of the steps that enable the SSL client and SSL
server to communicate with each other:
v Agree on the version of the SSL protocol to use.
v Select cryptographic algorithms.
v Authenticate each other by exchanging and validating digital certificates.
v Use asymmetric encryption techniques to generate a shared secret key, which
avoids the key distribution problem. SSL subsequently uses the shared key for
the symmetric encryption of messages, which is faster than asymmetric
encryption.
For more information about cryptographic algorithms and digital certificates, refer
to the related information.
This section does not attempt to provide full details of the messages exchanged
during the SSL handshake. In overview, the steps involved in the SSL handshake
are as follows:
1. The SSL client sends a “client hello” message that lists cryptographic
information such as the SSL version and, in the client’s order of preference, the
CipherSuites supported by the client. The message also contains a random byte
string that is used in subsequent computations. The SSL protocol allows for the
“client hello” to include the data compression methods supported by the client,
but current SSL implementations do not usually include this provision.
2. The SSL server responds with a “server hello” message that contains the
CipherSuite chosen by the server from the list provided by the SSL client, the
session ID and another random byte string. The SSL server also sends its digital
certificate. If the server requires a digital certificate for client authentication, the
server sends a “client certificate request” that includes a list of the types of
certificates supported and the Distinguished Names of acceptable Certification
Authorities (CAs).
3. The SSL client verifies the digital signature on the SSL server’s digital certificate
and checks that the CipherSuite chosen by the server is acceptable.
4. The SSL client sends the random byte string that enables both the client and the
server to compute the secret key to be used for encrypting subsequent message
data. The random byte string itself is encrypted with the server’s public key.
5. If the SSL server sent a “client certificate request”, the SSL client sends a
random byte string encrypted with the client’s private key, together with the
client’s digital certificate, or a “no digital certificate alert”. This alert is only a
warning, but with some implementations the handshake fails if client
authentication is mandatory.
6. The SSL server verifies the signature on the client certificate.
7. The SSL client sends the SSL server a “finished” message, which is encrypted
with the secret key, indicating that the client part of the handshake is complete.
8. The SSL server sends the SSL client a “finished” message, which is encrypted
with the secret key, indicating that the server part of the handshake is
complete.
9. For the duration of the SSL session, the SSL server and SSL client can now
exchange messages that are symmetrically encrypted with the shared secret key.
Figure 7 on page 21 illustrates the SSL handshake.
20 WebSphere MQ: Security

How SSL provides authentication
During both client and server authentication there is a step that requires data to be
encrypted with one of the keys in an asymmetric key pair and decrypted with the
other key of the pair.
For server authentication, the client uses the server’s public key to encrypt the data
that is used to compute the secret key. The server can generate the secret key only
if it can decrypt that data with the correct private key.
For client authentication, the server uses the public key in the client certificate to
decrypt the data the client sends during step 5 on page 20 of the handshake. The
exchange of finished messages that are encrypted with the secret key (steps 7 on
page 20 and 8 on page 20 in the overview) confirms that authentication is
complete.
If any of the authentication steps fail, the handshake fails and the session
terminates.
The exchange of digital certificates during the SSL handshake is part of the
authentication process. For more information about how certificates provide
protection against impersonation, refer to the related information. The certificates
required are as follows, where CA X issues the certificate to the SSL client, and CA
Y issues the certificate to the SSL server:
For server authentication only, the SSL server needs:
v The personal certificate issued to the server by CA Y
SSL Client SSL Server
(3)Verify servercertificate.
Checkcryptographicparameters
(1) "client hello”
Cryptographic information
(2) "server hello”
CipherSuiteServer certificate
"client certificate request" (optional)
(6)Verify clientcertificate
(if required)
(4) Client key exchange
Send secret key information(encrypted with server public key)
(5) Send client certificate
(9) Exchange messages
(encrypted with shared secret key)
(7) Client “finished”
(8) Server “finished”
Figure 7. Overview of the SSL handshake
Chapter 1. Introduction 21
v The server’s private key
and the SSL client needs:
v The CA certificate for CA Y or the personal certificate issued to the server by CA
Y
If the SSL server requires client authentication, the server verifies the client’s
identity by verifying the client’s digital certificate with the public key for the CA
that issued the personal certificate to the client, in this case CA X. For both server
and client authentication, the SSL server needs:
v The personal certificate issued to the server by CA Y
v The server’s private key
v The CA certificate for CA X or the personal certificate issued to the client by CA
X
and the SSL client needs:
v The personal certificate issued to the client by CA X
v The client’s private key
v The CA certificate for CA Y or the personal certificate issued to the server by CA
Y
Both the SSL server and the SSL client might need other CA certificates to form a
certificate chain to the root CA certificate. For more information about certificate
chains, refer to the related information.
How SSL provides confidentiality
SSL uses a combination of symmetric and asymmetric encryption to ensure
message privacy. During the SSL handshake, the SSL client and SSL server agree an
encryption algorithm and a shared secret key to be used for one session only. All
messages transmitted between the SSL client and SSL server are encrypted using
that algorithm and key, ensuring that the message remains private even if it is
intercepted. SSL supports a wide range of cryptographic algorithms. Because SSL
uses asymmetric encryption when transporting the shared secret key, there is no
key distribution problem with SSL. For more information about encryption
techniques, refer to “Cryptography” on page 11.
How SSL provides integrity
SSL provides data integrity by calculating a message digest. For more information,
refer to “Data integrity” on page 62.
CipherSuites and CipherSpecs
Cryptographic security protocols must agree the algorithms used by a secure
connection. CipherSuites and CipherSpecs define specific combinations of
algorithms.
A CipherSuite is a suite of cryptographic algorithms used by an SSL connection. A
suite comprises three distinct algorithms:
v The key exchange and authentication algorithm, used during the SSL handshake
v The encryption algorithm, used to encipher the data
v The MAC (Message Authentication Code) algorithm, used to generate the
message digest
22 WebSphere MQ: Security

There are several options for each component of the suite, but only certain
combinations are valid when specified for an SSL connection. The name of a valid
CipherSuite defines the combination of algorithms used. For example, the
CipherSuite SSL_RSA_WITH_RC4_128_MD5 specifies:
v The RSA key exchange and authentication algorithm
v The RC4 encryption algorithm, using a 128–bit key
v The MD5 MAC algorithm
Several algorithms are available for key exchange and authentication, but the RSA
algorithm is currently the most widely used. There is more variety in the
encryption algorithms and MAC algorithms that are used.
A CipherSpec identifies the combination of the encryption algorithm and MAC
algorithm. Both ends of an SSL connection must agree the same CipherSpec to be
able to communicate.
For more information about CipherSpecs, see the related information.
Security protocols in WebSphere MQ
WebSphere MQ supports both the Transport Layer Security (TLS) and the Secure
Sockets Layer (SSL) protocols to provide link level security for message channels
and MQI channels.
Message channels and MQI channels can use the SSL protocol to provide link level
security. A caller MCA is an SSL client and a responder MCA is an SSL server.
WebSphere MQ supports Version 3.0 of the SSL protocol. You specify the
cryptographic algorithms that are used by the SSL protocol by supplying a
CipherSpec as part of the channel definition.
WebSphere MQ also supports Version 1.0 of the Transport Layer Security (TLS)
protocol.
At each end of a message channel, and at the server end of an MQI channel, the
MCA acts on behalf of the queue manager to which it is connected. During the SSL
handshake, the MCA sends the digital certificate of the queue manager to its
partner MCA at the other end of the channel. The WebSphere MQ code at the
client end of an MQI channel acts on behalf of the user of the WebSphere MQ
client application. During the SSL handshake, the WebSphere MQ code sends the
user’s digital certificate to the MCA at the server end of the MQI channel.
Note that queue managers and WebSphere MQ client users are not required to
have personal digital certificates associated with them when they are acting as SSL
clients, unless SSLCAUTH(REQUIRED) is specified at the server side of the
channel.
Digital certificates are stored in a key repository. The queue manager attribute
SSLKeyRepository specifies the location of the key repository that holds the queue
manager’s digital certificate. On a WebSphere MQ client system, the MQSSLKEYR
environment variable specifies the location of the key repository that holds the
user’s digital certificate. Alternatively, a WebSphere MQ client application can
specify its location in the KeyRepository field of the SSL configuration options
structure, MQSCO, on an MQCONNX call. Refer to the WebSphere MQ support
for more information about key repositories and how to specify where they are
located.
Chapter 1. Introduction 23

24 WebSphere MQ: Security
Chapter 2. WebSphere MQ security provisions
This part describes the security services provided by WebSphere MQ:
v “Access control”
v “WebSphere MQ support for SSL and TLS” on page 39
v “Other link level security services” on page 47
v “Access Manager for Business Integration” on page 64
v “Providing your own link level security” on page 57
v “Providing your own application level security” on page 70
Access control
This section introduces the access control mechanisms that are provided by
WebSphere MQ. It contains the following sections:
v “Authority to administer WebSphere MQ”
v “Authority to work with WebSphere MQ objects” on page 29
v “Channel security” on page 37
Authority to administer WebSphere MQ
WebSphere MQ administrators need authority to:
v Issue commands to administer WebSphere MQ
v Use the WebSphere MQ Explorer
v Use the operations and control panels on z/OS
v Use the WebSphere MQ utility program, CSQUTIL, on z/OS
v Access the queue manager data sets on z/OS
Authority to administer WebSphere MQ on UNIX and Windows
systems
To be a WebSphere MQ administrator on UNIX and Windows systems, you must
be a member of the mqm group. This group is created automatically when you
install WebSphere MQ. To allow users to perform administration, you must add
them to the mqm group. This includes the root user on UNIX systems.
All members of the mqm group have access to all WebSphere MQ resources on the
system, including being able to administer any queue manager running on the
system. This access can be revoked only by removing a user from the mqm group.
On Windows systems, members of the Administrators group also have access to all
WebSphere MQ resources.
Administrators can use control commands to administer WebSphere MQ. One of
these control commands is setmqaut, which is used to grant authorities to other
users to enable them to access WebSphere MQ resources.
Administrators can use the control command runmqsc to issue WebSphere MQ
Script (MQSC) commands. When runmqsc is used in indirect mode to send MQSC
commands to a remote queue manager, each MQSC command is encapsulated
© Copyright IBM Corp. 2002, 2008 25
within an Escape PCF command. Administrators must have the required
authorities for the MQSC commands to be processed by the remote queue
manager.
The WebSphere MQ Explorer issues PCF commands to perform administration
tasks. Administrators require no additional authorities to use the WebSphere MQ
Explorer to administer a queue manager on the local system. When the WebSphere
MQ Explorer is used to administer a queue manager on another system,
administrators must have the required authorities for the PCF commands to be
processed by the remote queue manager.
For more information about authority checks when PCF and MQSC commands are
processed, see the following:
v For PCF commands that operate on queue managers, queues, processes,
namelists, and authentication information objects, see “Authority to work with
WebSphere MQ objects” on page 29. Refer to this section for the equivalent
MQSC commands encapsulated within Escape PCF commands.
v For PCF commands that operate on channels, channel initiators, listeners, and
clusters, see “Channel security” on page 37. Refer to this section for the
equivalent MQSC commands encapsulated within Escape PCF commands.
v For MQSC commands that are processed by the command server on WebSphere
MQ for z/OS, see “Command security and command resource security” on page
28.
For more information about the authority you need to administer WebSphere MQ
on UNIX and Windows systems, see the WebSphere MQ System Administration
Guide.
Authority to administer WebSphere MQ on i5/OS
To be a WebSphere MQ administrator on i5/OS, you must be a member of the
QMQMADM group. This group has properties similar to those of the mqm group
on UNIX and Windows systems. In particular, the QMQMADM group is created
when you install WebSphere MQ for i5/OS, and members of the QMQMADM
group have access to all WebSphere MQ resources on the system. You also have
access to all WebSphere MQ resources if you have *ALLOBJ authority.
Administrators can use CL commands to administer WebSphere MQ. One of these
commands is GRTMQMAUT, which is used to grant authorities to other users.
Another command, STRMQMMQSC, enables an administrator to issue MQSC
commands to a local queue manager.
There are two groups of CL command provided by WebSphere MQ for i5/OS:
Group 1
To issue a command in this category, a user must be a member of the
QMQMADM group or have *ALLOBJ authority. GRTMQMAUT and
STRMQMMQSC belong to this category, for example.
Group 2
To issue a command in this category, a user does not need to be a member
of the QMQMADM group or have *ALLOBJ authority. Instead, two levels
of authority are required:
v The user requires i5/OS authority to use the command. This authority is
granted by using the GRTOBJAUT command.
26 WebSphere MQ: Security
v The user requires WebSphere MQ authority to access any WebSphere
MQ object associated with the command. This authority is granted by
using the GRTMQMAUT command.
The following are examples of commands in this group:
v CRTMQMQ, Create MQM Queue
v CHGMQMPRC, Change MQM Process
v DLTMQMNL, Delete MQM Namelist
v DSPMQMAUTI, Display MQM Authentication Information
v CRTMQMCHL, Create MQM channel
For more information about this group of commands, see “Authority to
work with WebSphere MQ objects” on page 29.
For more information about the authority you need to administer WebSphere MQ
on i5/OS, see WebSphere MQ for i5/OS System Administration Guide.
Authority to administer WebSphere MQ on z/OS
The following sections describe various aspects of the authority you need to
administer WebSphere MQ for z/OS.
Authority checks on z/OS:
WebSphere MQ uses the System Authorization Facility (SAF) to route requests for
authority checks to an external security manager (ESM) such as the z/OS Security
Server Resource Access Control Facility (RACF). WebSphere MQ does no authority
checks of its own.
This book assumes that you are using RACF as your ESM. If you are using a
different ESM, you might need to interpret the information provided for RACF in a
way that is relevant to your ESM.
You can specify whether you want authority checks turned on or off for each
queue manager individually or for every queue manager in a queue-sharing group.
This level of control is called subsystem security. If you turn subsystem security off
for a particular queue manager, no authority checks are carried out for that queue
manager.
If you turn subsystem security on for a particular queue manager, authority checks
can be performed at two levels:
Queue-sharing group level security
Authority checks use RACF profiles that are shared by all queue managers
in the queue-sharing group. This means that there are fewer profiles to
define and maintain, making security administration easier.
Queue manager level security
Authority checks use RACF profiles specific to the queue manager.
You can use a combination of queue-sharing group and queue manager level
security. For example, you can arrange for profiles specific to a queue manager to
override those of the queue-sharing group to which it belongs.
Subsystem security, queue-sharing group level security, and queue manager level
security are turned on or off by defining switch profiles. A switch profile is a normal
RACF profile that has a special meaning to WebSphere MQ.
Chapter 2. WebSphere MQ security provisions 27

Command security and command resource security:
Authority checks are carried out when a WebSphere MQ administrator issues an
MQSC command. This is called command security.
To implement command security, you must define certain RACF profiles and give
the necessary groups and user IDs access to these profiles at the required levels.
The name of a profile for command security contains the name of an MQSC
command.
Some MQSC commands perform an operation on a WebSphere MQ resource, such
as the DEFINE QLOCAL command to create a local queue. When an administrator
issues an MQSC command, authority checks are carried out to determine whether
the requested operation can be performed on the resource specified in the
command. This is called command resource security.
To implement command resource security, you must define certain RACF profiles
and give the necessary groups and user IDs access to these profiles at the required
levels. The name of a profile for command resource security contains the name of a
WebSphere MQ resource and its type (QUEUE, PROCESS, NAMELIST, TOPIC,
AUTHINFO, or CHANNEL).
Command security and command resource security are independent. For example,
when an administrator issues the command:
DEFINE QLOCAL(MOON.EUROPA)
the following authority checks are performed:
v Command security checks that the administrator is authorized to issue the
DEFINE QLOCAL command.
v Command resource security checks that the administrator is authorized to
perform an operation on the local queue called MOON.EUROPA.
Command security and command resource security can be turned on or off by
defining switch profiles.
MQSC commands and the system command input queue:
Command security and command resource security are also used when the
command server retrieves a message containing an MQSC command from the
system command input queue. The user ID that is used for the authority checks is
the one found in the UserIdentifier field in the message descriptor of the message
containing the MQSC command. This user ID must have the required authorities
on the queue manager where the command is processed. For more information
about the UserIdentifier field and how it is set, see “Message context” on page 32.
Messages containing MQSC commands are sent to the system command input
queue in the following circumstances:
v The operations and control panels send MQSC commands to the system
command input queue of the target queue manager. The MQSC commands
correspond to the actions you choose on the panels. The UserIdentifier field in
each message is set to the TSO user ID of the administrator.
v The COMMAND function of the WebSphere MQ utility program, CSQUTIL,
sends the MQSC commands in the input data set to the system command input
queue of the target queue manager. The COPY and EMPTY functions send
28 WebSphere MQ: Security

DISPLAY QUEUE and DISPLAY STGCLASS commands. The UserIdentifier field
in each message is set to the job user ID.
v The MQSC commands in the CSQINPX data sets are sent to the system
command input queue of the queue manager to which the channel initiator is
connected. The UserIdentifier field in each message is set to the channel initiator
address space user ID.
No authority checks are performed when MQSC commands are issued from the
CSQINP1 and CSQINP2 data sets. You can control who is allowed to update
these data sets using RACF data set protection.
v Within a queue-sharing group, a channel initiator might send START CHANNEL
commands to the system command input queue of the queue manager to which
it is connected. A command is sent when an outbound channel that uses a
shared transmission queue is started by triggering. The UserIdentifier field in
each message is set to the channel initiator address space user ID.
v An application can send MQSC commands to a system command input queue.
By default, the UserIdentifier field in each message is set to the user ID associated
with the application.
v On UNIX and Windows systems, the runmqsc control command can be used in
indirect mode to send MQSC commands to the system command input queue of
a queue manager on z/OS. The UserIdentifier field in each message is set to the
user ID of the administrator who issued the runmqsc command.
Access to the queue manager data sets:
WebSphere MQ administrators need authority to access the queue manager data
sets. These data sets include:
v The data sets referred to by CSQINP1, CSQINP2, and CSQXLIB in the queue
manager’s started task procedure
v The queue manager’s page sets, active log data sets, archive log data sets, and
bootstrap data sets (BSDSs)
v The data sets referred to by CSQXLIB and CSQINPX in the channel initiator’s
started task procedure
You must protect the data sets so that no unauthorized user can start a queue
manager or gain access to any queue manager data. To do this, use RACF data set
protection.
Obtaining more information:
For more information about the authority you need to administer WebSphere MQ
on z/OS, see the WebSphere MQ for z/OS System Setup Guide.
Authority to work with WebSphere MQ objects
Applications can access the following WebSphere MQ objects by issuing MQI calls:
v Queue managers
v Queues
v Processes
v Namelists
v Topics
Applications can also use PCF commands to access these WebSphere MQ objects,
and to access channels and authentication information objects as well. These
Chapter 2. WebSphere MQ security provisions 29
objects are protected by WebSphere MQ and the user IDs associated with the
applications need authority to access them.
Applications, in this context, include those written by users and vendors, and those
supplied with WebSphere MQ for z/OS. The applications supplied with
WebSphere MQ for z/OS include:
v The operations and control panels
v The WebSphere MQ utility program, CSQUTIL
v The dead letter queue handler utility, CSQUDLQH
Applications that use the Application Messaging Interface (AMI), WebSphere MQ
classes for Java™, or WebSphere MQ classes for Java Message Service (JMS) still use
the MQI indirectly.
MCAs also issue MQI calls and the user IDs associated with the MCAs need
authority to access these WebSphere MQ objects. For more information about these
user IDs and the authorities they require, see “Channel security” on page 37.
On z/OS, applications can also use MQSC commands to access these WebSphere
MQ objects but command security and command resource security provide the
authority checks in these circumstances. For more information, see “Command
security and command resource security” on page 28 and “MQSC commands and
the system command input queue” on page 28.
On i5/OS, a user that issues a CL command in Group 2 might require authority to
access a WebSphere MQ object associated with the command. For more
information, see “When authority checks are performed.”
When authority checks are performed
Authority checks are performed when an application attempts to access a
WebSphere MQ object that is a queue manager, queue, process, or namelist. On
i5/OS, authority checks might also be performed when a user issues a CL
command in Group 2 that accesses any of these WebSphere MQ objects. The checks
are performed in the following circumstances:
When an application connects to a queue manager using an MQCONN or
MQCONNX call
The queue manager asks the operating system for the user ID associated
with the application. The queue manager then checks that the user ID is
authorized to connect to it and retains the user ID for future checks.
When an application opens a WebSphere MQ object using an MQOPEN or
MQPUT1 call
All authority checks are performed when an object is opened, not when it
is accessed subsequently. For example, authority checks are performed
when an application opens a queue, but not when the application puts
messages on the queue or gets messages from the queue.
When an application opens an object, it specifies the types of operation it
needs to perform on the object. For example, an application might open a
queue to browse the messages on it, get messages from it, but not to put
messages on it. For each type of operation the application specifies, the
queue manager checks that the user ID associated with the application has
the authority to perform that operation.
30 WebSphere MQ: Security

When an application opens a queue, the authority checks are performed
against the object named in the ObjectName field of the object descriptor
used on the MQOPEN or MQPUT1 call. If the object is an alias queue or a
remote queue definition, the authority checks are performed against the
object itself, not the queue to which the alias queue or the remote queue
definition resolves.
If an application references a remote queue explicitly by setting the
ObjectName and ObjectQMgrName fields in the object descriptor to the
names of the remote queue and the remote queue manager respectively,
the authority checks are performed against the transmission queue with
the same name as the remote queue manager. If an application references a
cluster queue explicitly by setting the ObjectName field in the object
descriptor to the name of the cluster queue, the authority checks are
performed against the cluster transmission queue,
SYSTEM.CLUSTER.TRANSMIT.QUEUE.
The user ID that the queue manager uses for the authority checks is the
user ID obtained from the operating system when the application connects
to the queue manager.
When an application subscribes to a topic using an MQSUB call
When an application subscribes to a topic, it specifies the type of operation
that it needs to perform. It will either be creating a new subscription,
altering an existing subscription, or resuming an existing subscription
without making any changes to it. For each type of operation, the queue
manager checks that the user ID that is associated with the application has
the authority to perform the operation.
When an application subscribes to a topic, the authority checks are
performed against the topic objects that are found in the topic tree at, or
above, the point in the topic tree at which the application subscribed. The
authority checks might involve checks on more than one topic object.
The user ID that the queue manager uses for the authority checks is the
user ID obtained from the operating system when the application connects
to the queue manager.
The queue manager performs authority checks on subscriber queues but
not on managed queues.
When an application deletes a permanent dynamic queue using an MQCLOSE
call If the object handle specified on the MQCLOSE call is not the one returned
by the MQOPEN call that created the permanent dynamic queue, the
queue manager checks that the user ID associated with the application that
issued the MQCLOSE call is authorized to delete the queue.
When an application closes a subscription to remove it but the application
did not create it, the appropriate authority is required to remove it.
When a PCF command that operates on a WebSphere MQ object is processed by
the command server
This includes the case where a PCF command operates on an
authentication information object.
The user ID that is used for the authority checks is the one found in the
UserIdentifier field in the message descriptor of the PCF command. This
user ID must have the required authorities on the queue manager where
the command is processed. The equivalent MQSC command encapsulated
Chapter 2. WebSphere MQ security provisions 31

within an Escape PCF command is treated in the same way. For more
information about the UserIdentifier field and how it is set, see “Message
context.”
On i5/OS, when a user issues a CL command in Group 2 that operates on a
WebSphere MQ object
This includes the case where a CL command in Group 2 operates on an
authentication information object.
Unless the user is a member of the QMQMADM group or has *ALLOBJ
authority, checks are performed to determine whether the user has the
authority to operate on a WebSphere MQ object associated with the
command. The authority required depends on the type of operation that
the command performs on the object. For example, the command
CHGMQMQ, Change MQM Queue, requires the authority to change the
attributes of the queue specified by the command. In contrast, the
command DSPMQMQ, Display MQM Queue, requires the authority to
display the attributes of the queue specified by the command.
Many commands operate on more than one object. For example, to issue
the command DLTMQMQ, Delete MQM Queue, the following authorities
are required:
v The authority to connect to the queue manager specified by the
command
v The authority to delete the queue specified by the command
Some commands operate on no object at all. In this case, the user requires
only i5/OS authority to issue one of these commands. STRMQMLSR, Start
MQM Listener, is an example of such a command.
Alternate user authority
When an application opens an object or subscribes to a topic, the application can
supply a user ID on the MQOPEN, MQPUT1 or MQSUB call and ask the queue
manager to use this user ID for authority checks instead of the one associated with
the application. The application succeeds in opening the object only if both the
following conditions are met:
v The user ID associated with the application has the authority to supply a
different user ID for authority checks. The application is said to have alternate
user authority.
v The user ID supplied by the application has the authority to open the object for
the types of operation requested, or to subscribe to the topic.
Message context
Message context information allows the application that retrieves a message to find
out about the originator of the message. The information is held in fields in the
message descriptor and the fields are divided into:
identity context
These fields contain information about the user of the application that put
the message on the queue.
origin context
These fields contain information about the application itself and when the
message was put on the queue.
32 WebSphere MQ: Security
user context
These fields contain message properties that applications can use to select
messages that the queue manager should deliver.
When an application puts a message on a queue, the application can ask the queue
manager to generate the context information in the message. This is the default
action. Alternatively, it can specify that the context fields are to contain no
information. The user ID associated with an application requires no special
authority to do either of these.
An application can set the identity context fields in a message, allowing the queue
manager to generate the origin context, or it can set all the context fields. An
application can also pass the identity context fields from a message it has retrieved
to a message it is putting on a queue, or it can pass all the context fields. However,
the user ID associated with an application requires authority to set or pass context
information. An application specifies that it intends to set or pass context
information when it opens the queue on which it is about to put messages, and its
authority is checked at this time.
Here is a brief description of each of the context fields:
Identity context
UserIdentifier
The user ID associated with the application that put the message. If
the queue manager sets this field, it is set to the user ID obtained
from the operating system when the application connects to the
queue manager.
AccountingToken
Information that can be used to charge for the work done as a
result of the message.
ApplIdentityData
If the user ID associated with an application has authority to set
the identity context fields, or to set all the context fields, the
application can set this field to any value related to identity. If the
queue manager sets this field, it is set to blank.
Origin context
PutApplType
The type of the application that put the message; a CICS®
transaction, for example.
PutApplName
The name of the application that put the message.
PutDate
The date when the message was put.
PutTime
The time when the message was put.
ApplOriginData
If the user ID associated with an application has authority to set all
the context fields, the application can set this field to any value
related to origin. If the queue manager sets this field, it is set to
blank.
User context
Chapter 2. WebSphere MQ security provisions 33

The following values are supported for MQINQMP or MQSETMP:
MQPD_USER _CONTEXT
The property is associated with the user context.
No special authorization is required to be able to set a
property associated with the user context using the
MQSETMP call.
On a V7.0 or subsequent queue manager, a property
associated with the user context is saved as described for
MQOO_SAVE_ALL_CONTEXT in WebSphere MQ Using
Java. An MQPUT with MQOO_PASS_ALL_CONTEXT
specified causes the property to be copied from the saved
context into the new message.
MQPD_NO_CONTEXT
The property is not associated with a message context.
An unrecognized value is rejected with MQRC_PD_ERROR. The
initial value of this field is MQPD_NO_CONTEXT.
For a detailed description of each of the context fields, see the WebSphere MQ
Application Programming Reference. For more information about how to use
message context, see the WebSphere MQ Application Programming Guide.
Authority to work with WebSphere MQ objects on i5/OS, UNIX
systems, and Windows systems
On i5/OS, UNIX systems, and Windows systems, the authorization service provides
the access control when an application issues an MQI call to access a WebSphere
MQ object that is a queue manager, queue, process, topic or namelist. This includes
checks for alternate user authority and the authority to set or pass context
information.
As with other versions of Windows, the OAM gives members of the
Administrators group the authority to access all MQ objects even when UAC is
enabled on Windows Vista.
The authorization service also provides authority checks when a PCF command
operates on one of these WebSphere MQ objects or an authentication information
object. The equivalent MQSC command encapsulated within an Escape PCF
command is treated in the same way.
On i5/OS, unless the user is a member of the QMQMADM group or has *ALLOBJ
authority, the authorization service also provides authority checks when a user
issues a CL command in Group 2 that operates on any of these WebSphere MQ
objects or an authentication information object.
The authorization service is an installable service, which means that it is
implemented by one or more installable service components. Each component is
invoked using a documented interface. This enables users and vendors to provide
components to augment or replace those provided by the WebSphere MQ
products.
34 WebSphere MQ: Security
The authorization service component provided with WebSphere MQ is called the
Object Authority Manager (OAM). The OAM is automatically enabled for each
queue manager you create.
The OAM maintains an access control list (ACL) for each WebSphere MQ object it
is controlling access to. On UNIX systems, only group IDs can appear in an ACL.
This means that all members of a group have the same authorities. On i5/OS and
on Windows systems, both user IDs and group IDs can appear in an ACL. This
means that authorities can be granted to individual users as well as to groups.
The OAM can authenticate a user and change appropriate identity context fields.
You enable this by specifying a connection security parameters structure (MQCSP)
on an MQCONNX call. The structure is passed to the OAM Authenticate User
function (MQZ_AUTHENTICATE_USER), which sets appropriate identity context
fields. In the case of an MQCONNX connection from a WebSphere MQ client, the
information in the MQCSP is flowed to the queue manager to which the client is
connecting over the client-connection and server-connection channel. If security
exits are defined on that channel, the MQCSP is passed into each security exit and
can be altered by the exit. Security exits can also create the MQCSP. For more
details of the use of security exits in this context, see “Channel-exit programs”, in
the WebSphere MQ Intercommunication manual.
On UNIX and Windows systems, the control command setmqaut grants and
revokes authorities and is used to maintain the ACLs. For example, the command:
setmqaut -m JUPITER -t queue -n MOON.EUROPA -g VOYAGER +browse +get
allows the members of the group VOYAGER to browse messages on the queue
MOON.EUROPA that is owned by the queue manager JUPITER. It allows the
members to get messages from the queue as well. To revoke these authorities
subsequently, enter the following command:
setmqaut -m JUPITER -t queue -n MOON.EUROPA -g VOYAGER -browse -get
The command:
setmqaut -m JUPITER -t queue -n MOON.* -g VOYAGER +put
allows the members of the group VOYAGER to put messages on any queue whose
name commences with the characters MOON. . MOON.* is the name of a generic
profile. A generic profile allows you to grant authorities for a set of objects using a
single setmqaut command. Objects whose names match the profile name do not
have to exist when the setmqaut command is issued. Using generic profiles,
therefore, allows you to grant authorities for objects that you might create in the
future. For more information about the setmqaut command, see the WebSphere
MQ System Administration Guide.
The control command dspmqaut is available to display the current authorities that
a user or group has for a specified object. The control command dmpmqaut is also
available to display the current authorities associated with generic profiles. For
more information about the dspmqaut and dmpmqaut commands, see the
WebSphere MQ System Administration Guide.
On i5/OS, an administrator uses the CL command GRTMQMAUT to grant
authorities and the CL command RVKMQMAUT to revoke authorities. Generic
profiles can be used as well. For example, the CL command:
GRTMQMAUT MQMNAME(JUPITER) OBJTYPE(*Q) OBJ(’MOON.*’) USER(VOYAGER) AUT(*PUT)
Chapter 2. WebSphere MQ security provisions 35
provides the same function as the previous example of a setmqaut command; it
allows the members of the group VOYAGER to put messages on any queue whose
name commences with the characters MOON. .
The CL command DSPMQMAUT displays the current authorities that user or
group has for a specified object. The CL commands WRKMQMAUT and
WRKMQMAUTD are also available to work with the current authorities associated
with objects and generic profiles.
If you do not want any authority checks, for example, in a test environment, you
can disable the OAM.
For more information about the authority to work with WebSphere MQ objects,
see:
v WebSphere MQ for i5/OS System Administration Guide
v WebSphere MQ System Administration Guide, for UNIX and Windows systems
Using PCF to access OAM commands:
On i5/OS, UNIX, and Windows systems, you can use PCF commands to access
OAM administration commands. The PCF commands and their equivalent OAM
commands are as follows:
Table 1. PCF commands and their equivalent OAM commands
PCF command OAM command
Inquire Authority Records dmpmqaut
Inquire Entity Authority dspmqaut
Set Authority Record setmqaut
Delete Authority Record setmqaut with -remove option
For more information on using these commands, see the WebSphere MQ
Programmable Command Formats and Administration Interface book.
Authority to work with WebSphere MQ objects on z/OS
On z/OS, there are seven categories of authority check associated with calls to the
MQI:
Connection security
The authority checks that are performed when an application connects to a
queue manager
Queue security
The authority checks that are performed when an application opens a
queue or deletes a permanent dynamic queue
Process security
The authority checks that are performed when an application opens a
process object
Namelist security
The authority checks that are performed when an application opens a
namelist object
36 WebSphere MQ: Security
Alternate user security
The authority checks that are performed when an application requests
alternate user authority when opening an object
Context security
The authority checks that are performed when an application opens a
queue and specifies that it intends to set or pass the context information in
the messages it puts on the queue
Topic security
The authority checks that are performed when an application opens a topic
Each category of authority check is implemented in the same way that command
security and command resource security are implemented. You must define certain
RACF profiles and give the necessary groups and user IDs access to these profiles
at the required levels. For queue security, the level of access determines the types
of operation the application can perform on a queue. For context security, the level
of access determines whether the application can:
v Pass all the context fields
v Pass all the context fields and set the identity context fields
v Pass and set all the context fields
Each category of authority check can be turned on or off by defining switch
profiles.
All the categories, except connection security, are known collectively as API-resource
security.
By default, when an API-resource security check is performed as a result of an
MQI call from an application using a batch connection, only one user ID is
checked. When a check is performed as a result of an MQI call from a CICS or
IMS™ application, or from the channel initiator, two user IDs are checked.
By defining a RESLEVEL profile, however, you can control whether zero, one, or
two users IDs are checked. The number of user IDs that are checked is determined
by the user ID associated with the type of connection when an application
connects to the queue manager and the access level that user ID has to the
RESLEVEL profile. The user ID associated with each type of connection is:
v The user ID of the connecting task for batch connections
v The CICS address space user ID for CICS connections
v The IMS region address space user ID for IMS connections
v The channel initiator address space user ID for channel initiator connections
For more information about the authority to work with WebSphere MQ objects on
z/OS, see the WebSphere MQ for z/OS System Setup Guide.
Channel security
The user IDs associated with message channel agents (MCAs) need authority to
access various WebSphere MQ resources.
An MCA must be able to connect to a queue manager and open the dead letter
queue. If it is a sending MCA, it must be able to open the transmission queue for
the channel. If it is a receiving MCA, it must be able to open destination queues
and set context information in the messages it puts on those queues.
Chapter 2. WebSphere MQ security provisions 37

If the PUTAUT parameter is set to CTX (or ALTMCA on z/OS) in the channel
definition at the receiving end of a channel, the user ID in the UserIdentifier field in
the message descriptor of each incoming message needs authority to open the
destination queue for the message. In addition, the user ID associated with the
receiving MCA needs alternate user authority to open the destination queue using
the authority of a different user ID.
On an MQI channel, the user ID associated with the server connection MCA needs
authority to issue MQI calls on behalf of the client application.
The user ID that is used for authority checks depends on whether the MCA is
connecting to a queue manager or accessing queue manager resources after it has
connected to a queue manager:
The user ID for connecting to a queue manager
On i5/OS, UNIX systems, and Windows systems, the user ID whose
authority is checked when an MCA connects to a queue manager is the
one under which the MCA is running. This is known as the default user ID
of the MCA. The default user ID might be derived in various ways. Here
are some examples:
v If a caller MCA is started by a channel initiator, the MCA runs under the
same user ID as that of the channel initiator. This user ID might be
derived in various ways. For example, if the channel initiator is started
by using the WebSphere MQ Explorer, it runs under the
MUSER_MQADMIN user ID. This user ID is created when you install
WebSphere MQ for Windows and is a member of the mqm group.
v If a responder MCA is started by a WebSphere MQ listener, the MCA
runs under the same user ID as that of the listener.
v If the communications protocol for the channel is TCP/IP and a
responder MCA is started by the inet daemon, the MCA runs under the
user ID obtained from the entry in the inetd.conf file that was used to
start the MCA.
v If the communications protocol for the channel is SNA LU 6.2, a
responder MCA might run under the user ID contained in the inbound
attach request, or under the user ID specified in the transaction program
(TP) definition for the MCA.
After an MCA has connected to a queue manager, it accesses certain queue
manager resources as part of its initialization processing. The default user
ID of the MCA is also used for the authority checks when it opens these
resources. To enable the MCA to access these resources, you must ensure
that the default user ID is a member of the QMQMADM group on i5/OS,
the mqm group on UNIX and Windows systems, or the Administrators
group on Windows systems.
On z/OS, every task in the channel initiator address space that needs to
connect to the queue manager does so when the channel initiator address
space is started. This includes the dispatcher tasks that run as MCAs. The
channel initiator address space user ID is used to check the authority of a
task to connect to the queue manager.
The user ID for subsequent authority checks
After an MCA has connected to a queue manager, the user ID whose
authority is checked when the MCA accesses queue manager resources
subsequently might be different from the one that was checked when the
MCA connected to the queue manager. In addition, on z/OS, zero, one, or
two user IDs might be checked, depending on the access level of the
38 WebSphere MQ: Security

channel initiator address space user ID to the RESLEVEL profile. Here are
some examples of other user IDs that might be used:
v The value of the MCAUSER parameter in the channel definition
v For a channel to which the PUTAUT parameter applies, if PUTAUT is
set to CTX (or, on z/OS only, ALTMCA), the user ID in the UserIdentifier
field in the message descriptor of each incoming message
v For a server connection MCA, the user ID that is received from a client
system when a WebSphere MQ client application issues an MQCONN
call
The user ID actually used is displayed on the channel status.
On z/OS, the channel initiator address space user ID needs authority to open
certain system queues, such as SYSTEM.CHANNEL.INITQ, independently of the
MCAs that are running in the address space.
For more information about channel security, see:
v WebSphere MQ for i5/OS System Administration Guide
v WebSphere MQ System Administration Guide, for UNIX and Windows systems
v WebSphere MQ for z/OS System Setup Guide
v WebSphere MQ Clients, for MQI channels
WebSphere MQ support for SSL and TLS
WebSphere MQ supports both the Secure Sockets Layer (SSL) protocol and the
Transport Layer Security (TLS) protocol.
For more information about the SSL and TLS protocols, refer to the related
information.
WebSphere MQ provides the following support for SSL Version 3.0 and TLS 1.0:
i5/OS SSL support is integral to the i5/OS operating system.
Java and JMS clients
These clients use the JVM to provide SSL support.
Windows and UNIX systems
For all the UNIX and Windows systems, the SSL support is installed with
WebSphere MQ.
z/OS SSL support is integral to the z/OS operating system. Note that the SSL
support on z/OS is known as System SSL.
For information about any prerequisites for WebSphere MQ SSL support, refer to
the appropriate material for the following platforms:
v “Checking optional software” in WebSphere MQ Quick Beginnings for AIX
v “Checking optional software - PA-RISC” or “Checking optional software -
Itanium platform” in WebSphere MQ Quick Beginnings for HP-UX
v “SSL (Secure Sockets Layer)” in WebSphere MQ Quick Beginnings for i5/OS
v “Using Secure Sockets Layer (SSL) with WebSphere MQ classes for JMS” or
“Using Secure Sockets Layer (SSL) with WebSphere MQ classes for JMS” or, for
the WebSphere MQ classes for Java material, “Secure Sockets Layer (SSL)
support” in WebSphere MQ Using Java
Chapter 2. WebSphere MQ security provisions 39
v “Prerequisite software for using SSL” in WebSphere MQ Quick Beginnings for
Linux
v “Checking prerequisite hardware and software - SPARC platform” or “Checking
hardware and software requirements - x86-64 platform” in WebSphere MQ Quick
Beginnings for Solaris
v “Software requirements” in WebSphere MQ for z/OS Concepts and Planning Guide
This section describes the provisions in WebSphere MQ that enable you to use and
control the SSL support:
v “Channel attributes”
v “Channel status attributes”
v “Queue manager attributes”
v “The authentication information object (AUTHINFO)”
v “The SSL key repository”
v “WebSphere MQ client considerations”
v “Working with WebSphere MQ internet pass-thru (IPT)”
v “Support for cryptographic hardware”
Channel attributes
WebSphere MQ SSL or TLS support includes the following parameters on the
DEFINE CHANNEL MQSC command:
SSLCIPH
The CipherSpec for the channel to use. For more information about the
CipherSpecs that WebSphere MQ supports, refer to the related information.
The SSLCIPH parameter is mandatory if you want your channel to use
SSL.
SSLPEER
The Distinguished Name pattern that WebSphere MQ uses to decide the
entities from which messages are accepted. The SSLPEER pattern filters the
Distinguished Names of the entities. For more information, refer to the
related information.
SSLCAUTH
Whether the SSL or TLS server requires the corresponding client to send its
digital certificate for authentication. For more information about
mandatory client authentication, refer to the related information.
For more information about setting these parameters with the DEFINE CHANNEL
MQSC command, refer to the WebSphere MQ Script (MQSC) Command Reference.
Channel status attributes
WebSphere MQ SSL or TLS support includes the following parameters on the
DISPLAY CHSTATUS MQSC command:
SSLPEER
The Distinguished Name (DN) of the remote certificate.
SSLCERTI
Represents the full Distinguished Name (DN) of the issuer of the remote
certificate. The ″issuer″ is the Certification Authority (CA) that issued the
certificate.
40 WebSphere MQ: Security

SSLCERTU
Represents the Local UserId associated with the remote certificate.
Supported on z/OS only.
SSLRKEYS
Displays the number of SSL or TLS key resets successfully performed for
this channel instance. The count of SSL or TLS key resets is reset when the
channel instance is ended.
SSLKEYDA
Displays the date when the last SSL or TLS secret key reset was
successfully issued for this channel instance. The date of the last SSL or
TLS secret key reset is reset when the channel instance is ended.
SSLKEYTI
Displays the time when the last SSL or TLS secret key reset was
successfully issued for this channel instance. The time of the last SSL or
TLS secret key reset is reset when the channel instance is ended.
For more information about displaying these parameters with the DISPLAY
CHSTATUS MQSC command, refer to the WebSphere MQ Script (MQSC)
Command Reference.
Queue manager attributes
WebSphere MQ SSL or TLS support includes the following parameters on the
ALTER QMGR MQSC command:
SSLKEYR
Sets a queue manager attribute, SSLKeyRepository, which holds the name of
the SSL or TLS key repository.
SSLCRLNL
Sets a queue manager attribute, SSLCRLNamelist, which holds the name of
a namelist of authentication information objects.
SSLCRYP
Sets a queue manager attribute, SSLCryptoHardware, which holds the name
of the parameter string required to configure the cryptographic hardware
present on the system. This parameter applies only to Windows and UNIX
queue managers.
SSLTASKS
Sets a queue manager attribute, SSLTasks, which holds the number of
server subtasks to use for processing SSL or TLS calls. If you use SSL or
TLS channels you must have at least two of these tasks. This parameter
applies only to z/OS queue managers.
SSLRKEYC
Sets a numeric queue manager attribute called SSLKeyResetCount, the total
number of unencrypted bytes that are sent and received within an SSL
conversation before the secret key is renegotiated. The number of bytes
includes control information sent by the message channel agent.
SSLFIPS
Specifies whether only FIPS-certified algorithms are to be used if
cryptography is carried out in WebSphere MQ. If cryptographic hardware
is configured, the cryptographic modules used are those provided by the
hardware product, and these may, or may not, be FIPS-certified to a
Chapter 2. WebSphere MQ security provisions 41

particular level. This depends on the hardware product in use. For more
information about FIPS, see “Federal Information Processing Standards
(FIPS)” on page 44.
For more information about setting these parameters with the ALTER QMGR
MQSC command, refer to the WebSphere MQ Script (MQSC) Command Reference,
which also describes when changes to the SSL queue manager attributes become
effective.
On i5/OS, you can also set the SSLKEYR and SSLCRLNL parameters with the
CHGMQM command.
The authentication information object (AUTHINFO)
WebSphere MQ SSL support includes a queue manager object called an
authentication information object (AUTHINFO).
An authentication information object of type CRLLDAP holds information that
allows WebSphere MQ to obtain Certificate Revocation List (CRL) information
from an LDAP server. For more information about CRLs and working with
authentication information objects, refer to “Working with Certificate Revocation
Lists and Authority Revocation Lists” on page 127.
The SSL key repository
This book uses the general term key repository to describe the store for digital
certificates and their associated private keys. The specific store names used on the
platforms that support SSL are:
i5/OS certificate store
Windows and UNIX key database file
z/OS key ring
For more information, refer to “Digital certificates” on page 14 and “Secure Sockets
Layer (SSL) concepts” on page 19.
A fully authenticated SSL connection requires a key repository at each end of the
connection. The key repository contains:
v A number of CA certificates from various Certification Authorities that allow the
queue manager or client to verify certificates it receives from its partner at the
remote end of the connection. Individual certificates might be in a certificate
chain.
v One or more personal certificates received from a Certification Authority. You
associate a separate personal certificate with each queue manager or WebSphere
MQ client. Personal certificates are essential on an SSL client if mutual
authentication is required. If mutual authentication is not required, personal
certificates are not needed on the SSL client.
The location of the key repository depends on the platform you are using:
i5/OS On i5/OS the key repository is a certificate store. The default system
certificate store is located at /QIBM/UserData/ICSS/Cert/Server/Default in
the integrated file system (IFS). On i5/OS, WebSphere MQ stores the
password for the certificate store in a password stash file. For example, the
stash file for queue manager QM1 is /QIBM/UserData/mqm/qmgrs/QM1/ssl/Stash.sth.
42 WebSphere MQ: Security

Alternatively, you can specify that the i5/OS system certificate store is to
be used instead. To do this you change the value of the queue manager’s
SSLKEYR attribute to *SYSTEM. This value indicates that the queue
manager will use the system certificate store, and the queue manager is
registered for use as an application with Digital Certificate Manager
(DCM).
On i5/OS the certificate store also contains the private key for the queue
manager.
For more information, see “Working with a key repository” on page 91.
Windows and UNIX
On Windows and UNIX systems the key repository is a key database file.
The name of the key database file must have a file extension of .kdb. For
example, on UNIX, the default key database file for queue manager QM1 is
/var/mqm/qmgrs/QM1/ssl/key.kdb. If WebSphere MQ is installed in the
default location, the equivalent path on Windows is C:\Program
Files\IBM\WebSphere MQ\Qmgrs\QM1\ssl\key.kdb.
On Windows and UNIX systems each key database file has an associated
password stash file. This file holds encrypted passwords that allow
programs to access the key database. The password stash file must be in
the same directory and have the same file stem as the key database, and
must end with the suffix .sth, for example /var/mqm/qmgrs/QM1/ssl/key.sth
Note: On Windows and UNIX systems, PKCS #11 cryptographic hardware
cards can contain the certificates and keys that are otherwise held in a key
database file. When certificates and keys are held on PKCS #11 cards,
WebSphere MQ still requires access to both a key database file and a
password stash file.
On Windows and UNIX systems, the key database also contains the private
key for the personal certificate associated with the queue manager or
WebSphere MQ client.
z/OS Certificates are held in a key ring in RACF. Refer to “Setting up a key
repository” on page 120 for more information about creating a key ring in
RACF.
Other external security managers (ESMs) also use key rings for storing
certificates.
On z/OS, private keys are managed by RACF.
Protecting WebSphere MQ client key repositories
The key repository for a WebSphere MQ client is a file on the client machine.
Ensure that only the intended user can access the key repository file. This prevents
an intruder or other unauthorized user copying the key repository file to another
system, and then setting up an identical user ID on that system to impersonate the
intended user.
Refreshing a key repository
You can refresh the copy of the key repository held in memory, without restarting
the channel process, by using the MQSC command REFRESH SECURITY
Chapter 2. WebSphere MQ security provisions 43
TYPE(SSL). This enables you to use an up-to-date version of the SSL key repository
when you have added a new certificate, without having to stop the channel
process.
On platforms other than z/OS, the REFRESH SECURITY TYPE(SSL) command
updates all SSL channels whether a refresh is required or not. On z/OS, if no
refresh is required, REFRESH SECURITY TYPE(SSL) completes successfully and
the channels are unaffected.
For more information on the REFRESH SECURITY TYPE(SSL) command, see the
WebSphere MQ Script (MQSC) Command Reference.
You can also refresh the key repository using the PCF command Refresh Security
(MQCMD_REFRESH_SECURITY). The SecurityType (MQSECTYPE_SSL) parameter
refreshes the copy of the key repository held in memory, allowing updates to
become effective once the command has completed successfully. For more
information about this command, see the WebSphere MQ Programmable
Command Formats and Administration Interface book.
Resetting SSL secret keys
During an SSL handshake a secret key is generated to encrypt data between the SSL
client and SSL server. The secret key is used in a mathematical formula that is
applied to the data to transform plaintext into unreadable ciphertext, and
ciphertext into plaintext.
The secret key is generated from the random text sent as part of the handshake
and is used to encrypt plaintext into ciphertext. The secret key is also used in the
MAC (Message Authentication Code) algorithm, which is used to determine
whether a message has been altered. See “Message digests” on page 13 for more
information.
If the secret key is discovered, the plaintext of a message could be deciphered from
the ciphertext, or the message digest could be calculated, allowing messages to be
altered without detection. Even for a complex algorithm, the plaintext can
eventually be discovered by applying every possible mathematical transformation
to the ciphertext. To minimize the amount of data that can be deciphered or altered
if the secret key is broken, the secret key can be renegotiated periodically.
Once the secret key has been renegotiated, the previous secret key can no longer be
used to decrypt data encrypted with the new secret key. The commands ALTER
QMGR SSLRKEYC and DISPLAY QMGR SSLRKEYC are used to set the values
used during key renegotiation. On i5/OS and Java, you can use the CHGMQM
SSLRSTCNT and DSPMQM commands. For more information on these commands,
see the WebSphere MQ Script (MQSC) Command Reference.
Federal Information Processing Standards (FIPS)
When cryptography is required on an SSL channel on Windows or UNIX,
WebSphere MQ uses a cryptography package called IBM Crypto for C (ICC). On
all the Windows and UNIX platforms supported by WebSphere MQ Version 7.0,
the ICC software has passed the Federal Information Processing Standards (FIPS)
Cryptomodule Validation Program of the US National Institute of Standards and
Technology, at level 140-2.
The FIPS 140-2 compliance of a WebSphere MQ SSL connection on UNIX systems
and Windows is as follows:
44 WebSphere MQ: Security

v For all WebSphere MQ message channels (except SVRCONN and CLNTCONN
channel types), the connection is FIPS-compliant if both the following conditions
are met:
– The installed GSkit ICC version has been certified FIPS 140-2 compliant on
the installed operating system version and hardware architecture.
– The queue manager’s SSLFIPS attribute has been set to YES.v For all WebSphere MQ client applications (except WebSphere MQ classes for
Java and WebSphere MQ classes for JMS applications in client mode), the
connection uses GSkit and is FIPS-compliant if both the following conditions are
met:
– The installed GSkit ICC version has been certified FIPS 140-2 compliant on
the installed operating system version and hardware architecture.
– SSLFIPS mode has been enabled on the client as described in the related
topic.v For WebSphere MQ classes for Java and WebSphere MQ classes for JMS
applications using client mode, the connection uses the JRE’s SSL
implementation and is FIPS-compliant if both the following conditions are met:
– The Java Runtime Environment used to run the application is FIPS-compliant
on the installed operating system version and hardware architecture.
– SSLFIPS mode has been enabled on the client as described in the related
topic.
All supported AIX®, Linux®, HP-UX, Solaris and Windows platforms are FIPS 140-2
certified except as noted in the readme file included with each fix pack or refresh
pack.
For SSL connections using GSkit, the component which is FIPS 140-2 certified is
named ICC. It is the version of this component which determines GSkit FIPS
compliance on any given platform. To determine the ICC version currently
installed, run the gsk7ver command. Here is an example extract of the gsk7ver
output relating to ICC:
ICC
============
@(#)CompanyName: IBM Corporation
@(#)LegalTrademarks: IBM
@(#)FileDescription: IBM Crypto for C-language
@(#)FileVersion: 1.4.5.0
@(#)LegalCopyright: Licensed Materials - Property of IBM
@(#) ICC
@(#) (C) Copyright IBM Corp. 2002-2005
@(#) All Rights Reserved. US Government Users
@(#) Restricted Rights - Use, duplication or
disclosure
@(#) restricted by GSA ADP Schedule Contract
with IBM Corp.
@(#)ProductName: icc_1.4 (GoldCoast Build)
@(#)ProductVersion: 1.4.5.0
@(#)ProductInfo: 07/03/12.23:55:21.07/03/13.15:00:28
@(#)CMVCInfo: icc_1.4/icc1.4.0_051026
The NIST certification statement for GSkit ICC 1.4.5 (included in GSkit 7.0.4.11,
applicable to Websphere MQ Version 6.0.2.2 and later releases) can be found at the
following link: http://csrc.nist.gov/groups/STM/cmvp/documents/140-1/1401val2007.htm#775
Chapter 2. WebSphere MQ security provisions 45
WebSphere MQ client considerations
WebSphere MQ provides SSL support for WebSphere MQ clients in the following:
v WebSphere MQ for AIX
v WebSphere MQ for HP-UX
v WebSphere MQ for Linux
v WebSphere MQ for Solaris
v WebSphere MQ for Windows
If you are using WebSphere MQ classes for Java or WebSphere MQ classes for JMS,
refer to WebSphere MQ Using Java. The rest of this section does not apply to the
Java or JMS environments.
You can specify the key repository for a WebSphere MQ client either with the
MQSSLKEYR value you have defined in your WebSphere MQ client configuration
file, or when your application makes an MQCONNX call. You have three options
for specifying that a channel uses SSL:
v Using a channel definition table
v Using the SSL configuration options structure, MQSCO, on an MQCONNX call
v Using the Active Directory (on Windows systems)
You cannot use the MQSERVER environment variable to specify that a channel
uses SSL.
You can continue to run your existing WebSphere MQ client applications without
SSL, as long as SSL is not specified at the other end of the channel.
If changes are made on a client machine to the contents of the SSL Key Repository,
the location of the SSL Key Repository, the Authentication Information, or the
Cryptographic hardware parameters, you need to end all the SSL connections in
order to reflect these changes in the client-connection channels that the application
is using to connect to the queue manager. Once all of the connections have ended,
restart the SSL channels. All the new SSL settings are used. These settings are
analogous to those refreshed by the REFRESH SECURITY TYPE(SSL) command on
queue manager systems.
When your WebSphere MQ client runs on a Windows or UNIX system with
cryptographic hardware, you configure that hardware with the MQSSLCRYP
environment variable. This variable is equivalent to the SSLCRYP parameter on the
ALTER QMGR MQSC command. Refer to “Queue manager attributes” on page 41
for a description of the SSLCRYP parameter. If you use the GSK_PCS11 version of
the SSLCRYP parameter, the PKCS #11 token label must be specified entirely in
lower-case.
SSL secret key reset and FIPS are supported on WebSphere MQ clients. For more
information, see “Resetting SSL secret keys” on page 44 and “Federal Information
Processing Standards (FIPS)” on page 44.
Refer to the WebSphere MQ Clients book for more information about the SSL
support for WebSphere MQ clients, and to “Protecting WebSphere MQ client key
repositories” on page 43.
46 WebSphere MQ: Security

Working with WebSphere MQ internet pass-thru (IPT)
For detailed information about IPT, refer to the WebSphere MQ internet pass-thru
SupportPac MS81.
When your WebSphere MQ system communicates with IPT, unless you are using
SSLProxyMode in IPT, ensure that the CipherSpec used by WebSphere MQ
matches the CipherSuite used by IPT:
v When IPT is acting as the SSL server and WebSphere MQ is connecting as the
SSL client, the CipherSpec used by WebSphere MQ must correspond to a
CipherSuite that is enabled in the relevant IPT key ring.
v When IPT is acting as the SSL client and is connecting to a WebSphere MQ SSL
server, the IPT CipherSuite must match the CipherSpec defined on the receiving
WebSphere MQ channel.
When you migrate from IPT to the integrated WebSphere MQ SSL support, you
transfer the digital certificates from IPT Using iKeyman.
For more information about importing certificates, refer to the relevant section for
your platform in Chapter 3, “Working with WebSphere MQ TLS and SSL support,”
on page 77.
Support for cryptographic hardware
On Windows and UNIX systems you can use the SSLCRYP parameter on the
ALTER QMGR MQSC command to provide cryptographic hardware configuration
information to the WebSphere MQ SSL support. Refer to “Queue manager
attributes” on page 41 for a description of the SSLCRYP parameter. Note however
that WebSphere MQ can run SSL without cryptographic hardware. On i5/OS and
z/OS, SSLCRYP is not used in cryptographic hardware configuration.
To configure cryptographic hardware for a WebSphere MQ client on Windows or
UNIX, use the MQSSLCRYP value you have defined in your WebSphere MQ client
configuration file, or set the CryptoHardware field of the MQSCO structure on an
MQCONNX call.
The permitted values for MQSSLCRYP and the CryptoHardware field are the same
as for the SSLCRYP parameter. If you use the GSK_PCS11 version of the SSLCRYP
parameter, the PKCS #11 token label must be specified entirely in lower-case.
Refer to Chapter 4, “Cryptographic hardware,” on page 149 for information about
the cryptographic hardware that has been tested with WebSphere MQ SSL support.
Other link level security services
This chapter describes link level security services for WebSphere MQ other than
those available through WebSphere MQ SSL support. It contains the following
sections:
v “Channel exit programs” on page 48
v “The SSPI channel exit program” on page 50
v “SNA LU 6.2 security services” on page 52
Chapter 2. WebSphere MQ security provisions 47
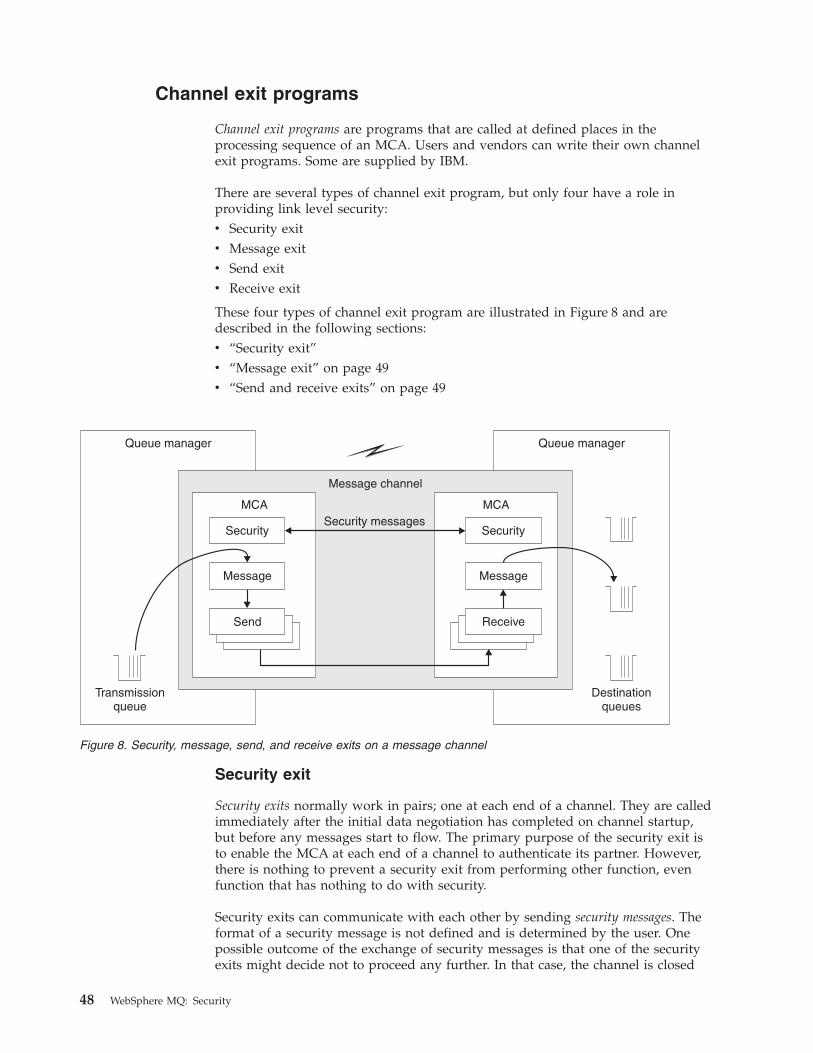
Channel exit programs
Channel exit programs are programs that are called at defined places in the
processing sequence of an MCA. Users and vendors can write their own channel
exit programs. Some are supplied by IBM.
There are several types of channel exit program, but only four have a role in
providing link level security:
v Security exit
v Message exit
v Send exit
v Receive exit
These four types of channel exit program are illustrated in Figure 8 and are
described in the following sections:
v “Security exit”
v “Message exit” on page 49
v “Send and receive exits” on page 49
Security exit
Security exits normally work in pairs; one at each end of a channel. They are called
immediately after the initial data negotiation has completed on channel startup,
but before any messages start to flow. The primary purpose of the security exit is
to enable the MCA at each end of a channel to authenticate its partner. However,
there is nothing to prevent a security exit from performing other function, even
function that has nothing to do with security.
Security exits can communicate with each other by sending security messages. The
format of a security message is not defined and is determined by the user. One
possible outcome of the exchange of security messages is that one of the security
exits might decide not to proceed any further. In that case, the channel is closed
Queue manager Queue manager
Transmissionqueue
Destinationqueues
Message channel
MCA
Message
Security
Receive
MCA
Message
Security
Send
Security messages
Figure 8. Security, message, send, and receive exits on a message channel
48 WebSphere MQ: Security

and messages do not flow. If there is a security exit at only one end of a channel,
the exit is still called and can elect whether to continue or to close the channel.
Security exits can be called on both message and MQI channels. The name of a
security exit is specified as a parameter in the channel definition at each end of a
channel.
For more information about security exits, see “Security exit” on page 58.
Message exit
Message exits at the sending and receiving ends of a channel normally work in
pairs. A message exit at the sending end of a channel is called after the MCA has
got a message from the transmission queue. At the receiving end of a channel, a
message exit is called before the MCA puts a message on its destination queue.
A message exit has access to both the transmission queue header, MQXQH, which
includes the embedded message descriptor, and the application data in a message.
A message exit can modify the contents of the message and change its length. A
change of length might be the result of compressing, decompressing, encrypting, or
decrypting the message. It might also be the result of adding data to the message,
or removing data from it.
Message exits can be used for any purpose that requires access to the whole
message, rather than a portion of it, and not necessarily for security.
A message exit can decide that the message it is currently processing should not to
proceed any further towards its destination. The MCA then puts the message on
the dead letter queue. A message exit can also decide to close the channel.
Message exits can be called only on message channels, not on MQI channels. This
is because the purpose of an MQI channel is to enable the input and output
parameters of MQI calls to flow between the WebSphere MQ client application and
the queue manager.
The name of a message exit is specified as a parameter in the channel definition at
each end of a channel. You can also specify a list of message exits to be run in
succession.
For more information about message exits, see “Message exit” on page 61.
Send and receive exits
A send exit at one end of a channel and a receive exit at the other end normally
work in pairs. A send exit is called just before an MCA issues a communications
send to send data over a communications connection. A receive exit is called just
after an MCA has regained control following a communications receive and has
received data from a communications connection. If sharing conversations is in
use, over an MQI channel, a different instance of a send and receive exit is called
for each conversation.
The WebSphere MQ channel protocol flows between two MCAs on a message
channel contain control information as well as message data. Similarly, on an MQI
channel, the flows contain control information as well as the parameters of MQI
calls. Send and receive exits are called for all types of data.
Chapter 2. WebSphere MQ security provisions 49

Message data flows in only one direction on a message channel but, on an MQI
channel, the input parameters of an MQI call flow in one direction and the output
parameters flow in the other. On both message and MQI channels, control
information flows in both directions. As a result, send and receive exits can be
called at both ends of a channel.
The unit of data that is transmitted in a single flow between two MCAs is called a
transmission segment. Send and receive exits have access to each transmission
segment. They can modify its contents and change its length. A send exit, however,
must not change the first eight bytes of a transmission segment. These eight bytes
form part of the WebSphere MQ channel protocol header. There are also
restrictions on how much a send exit can increase the length of a transmission
segment. In particular, a send exit cannot increase its length beyond the maximum
that was negotiated between the two MCAs at channel startup.
On a message channel, if a message is too large to be sent in a single transmission
segment, the sending MCA splits the message and sends it in more than one
transmission segment. As a consequence, a send exit is called for each transmission
segment containing a portion of the message and, at the receiving end, a receive
exit is called for each transmission segment. The receiving MCA reconstitutes the
message from the transmission segments after they have been processed by the
receive exit.
Similarly, on an MQI channel, the input or output parameters of an MQI call are
sent in more than one transmission segment if they are too large. This might occur,
for example, on an MQPUT, MQPUT1, or MQGET call if the application data is
sufficiently large.
Taking these considerations into account, it is more appropriate to use send and
receive exits for purposes in which they do not need to understand the structure of
the data they are handling and can therefore treat each transmission segment as a
binary object.
A send or a receive exit can decide to close a channel.
The names of a send exit and a receive exit are specified as parameters in the
channel definition at each end of a channel. You can also specify a list of send exits
to be run in succession. Similarly, you can specify a list of receive exits.
For more information about send and receive exits, see “Send and receive exits” on
page 63.
Obtaining more information
For more information about channel exit programs, see WebSphere MQ
Intercommunication.
The SSPI channel exit program
WebSphere MQ for Windows supplies a security exit, which can be used on both
message and MQI channels. The security exit uses the Security Support Provider
Interface (SSPI), which provides the integrated security facilities of Windows
platforms.
The security exit provides the following identification and authentication services:
50 WebSphere MQ: Security

One way authentication
This uses Windows NT® LAN Manager (NTLM) authentication support.
NTLM allows servers to authenticate their clients. It does not allow a client
to authenticate a server, or one server to authenticate another. NTLM was
designed for a network environment in which servers are assumed to be
genuine. NTLM is supported on all Windows platforms that are supported
by WebSphere MQ Version 7.0.
This service is typically used on an MQI channel to enable a server queue
manager to authenticate a WebSphere MQ client application. A client
application is identified by the user ID associated with the process that is
running.
To perform the authentication, the security exit at the client end of a
channel acquires an authentication token from NTLM and sends the token
in a security message to its partner at the other end of the channel. The
partner security exit passes the token to NTLM, which checks that the
token is authentic. If the partner security exit is not satisfied with the
authenticity of the token, it instructs the MCA to close the channel.
Two way, or mutual, authentication
This uses Kerberos authentication services. The Kerberos protocol does not
assume that servers in a network environment are genuine. Servers can
authenticate clients and other servers, and clients can authenticate servers.
Kerberos is supported on all Windows platforms that are supported by
WebSphere MQ Version 7.0.
This service can be used on both message and MQI channels. On a
message channel, it provides mutual authentication of the two queue
managers. On an MQI channel, it enables the server queue manager and
the WebSphere MQ client application to authenticate each other. A queue
manager is identified by its name prefixed by the string ibmMQSeries/. A
client application is identified by the user ID associated with the process
that is running.
To perform the mutual authentication, the initiating security exit acquires
an authentication token from the Kerberos security server and sends the
token in a security message to its partner. The partner security exit passes
the token to the Kerberos server, which checks that it is authentic. The
Kerberos security server generates a second token, which the partner sends
in a security message to the initiating security exit. The initiating security
exit then asks the Kerberos server to check that the second token is
authentic. During this exchange, if either security exit is not satisfied with
the authenticity of the token sent by the other, it instructs the MCA to close
the channel.
The security exit is supplied in both source and object format. You can use the
source code as a starting point for writing your own channel exit programs or you
can use the object module as supplied. The object module has two entry points,
one for one way authentication using NTLM authentication support and the other
for two way authentication using Kerberos authentication services.
For more information about how the SSPI channel exit program works, and for
instructions on how to implement it, see the WebSphere MQ Application
Programming Guide.
Chapter 2. WebSphere MQ security provisions 51
SNA LU 6.2 security services
Note: This section assumes that you have a basic understanding of Systems
Network Architecture (SNA). Each of the books referenced in this section contains
a brief introduction to the relevant concepts and terminology. If you require a more
comprehensive technical introduction to SNA, see Systems Network Architecture
Technical Overview, GC30-3073.
SNA LU 6.2 provides three security services:
v Session level cryptography
v Session level authentication
v Conversation level authentication
For session level cryptography and session level authentication, SNA uses the Data
Encryption Standard (DES) algorithm. The DES algorithm is a block cipher
algorithm, which uses a symmetric key for encrypting and decrypting data. Both
the block and the key are eight bytes in length.
Session level cryptography
Session level cryptography encrypts and decrypts session data using the DES
algorithm. It can therefore be used to provide a link level confidentiality service on
SNA LU 6.2 channels.
Logical units (LUs) can provide mandatory (or required) data cryptography,
selective data cryptography, or no data cryptography.
On a mandatory cryptographic session, an LU encrypts all outbound data request
units and decrypts all inbound data request units.
On a selective cryptographic session, an LU encrypts only the data request units
specified by the sending transaction program (TP). The sending LU signals that the
data is encrypted by setting an indicator in the request header. By checking this
indicator, the receiving LU can tell which request units to decrypt before passing
them on to the receiving TP.
In an SNA network, WebSphere MQ MCAs are transaction programs. MCAs do
not request encryption for any data that they send. Selective data cryptography is
not an option therefore; only mandatory data cryptography or no data
cryptography is possible on a session.
For information about how to implement mandatory data cryptography, see the
books for your SNA subsystem. Refer to the same books for information about
stronger forms of encryption that might be available for use on your platform,
such as Triple DES 24-byte encryption on z/OS.
For more general information about session level cryptography, see Systems
Network Architecture LU 6.2 Reference: Peer Protocols, SC31-6808.
Session level authentication
Session level authentication is a session level security protocol that enables two LUs
to authenticate each other while they are activating a session. It is also known as
LU-LU verification.
52 WebSphere MQ: Security

Because an LU is effectively the “gateway” into a system from the network, you
might consider this level of authentication to be sufficient in certain circumstances.
For example, if your queue manager needs to exchange messages with a remote
queue manager that is running in a controlled and trusted environment, you might
be prepared to trust the identities of the remaining components of the remote
system after the LU has been authenticated.
Session level authentication is achieved by each LU verifying its partner’s
password. The password is called an LU-LU password because one password is
established between each pair of LUs. The way that an LU-LU password is
established is implementation dependent and outside the scope of SNA.
Figure 9 illustrates the flows for session level authentication.
The protocol for session level authentication is as follows. The numbers in the
procedure correspond to the numbers in Figure 9.
1. The primary LU generates a random data value (RD1) and sends it to the
secondary LU in the BIND request.
2. When the secondary LU receives the BIND request with the random data, it
encrypts the data using the DES algorithm with its copy of the LU-LU
password as the key. The secondary LU then generates a second random data
value (RD2) and sends it, with the encrypted data (ERD1), to the primary LU
in the BIND response.
3. When the primary LU receives the BIND response, it computes its own version
of the encrypted data from the random data it generated originally. It does this
by using the DES algorithm with its copy of the LU-LU password as the key. It
then compares its version with the encrypted data that it received in the BIND
response. If the two values are the same, the primary LU knows that the
Legend:
BINDBIND-RSPERDFMH-12RD
= BIND request unit= BIND response unit= Encrypted random data= Function Management Header 12= Random data
Primary LU Secondary LU
BIND(RD1)
BIND-RSP(ERD1, RD2)
FMH-12(ERD2)
1
3
4
2
Figure 9. Flows for session level authentication
Chapter 2. WebSphere MQ security provisions 53
secondary LU has the same password as it does and the secondary LU is
authenticated. If the two values do not match, the primary LU terminates the
session.
The primary LU then encrypts the random data that it received in the BIND
response and sends the encrypted data (ERD2) to the secondary LU in a
Function Management Header 12 (FMH-12).
4. When the secondary LU receives the FMH-12, it computes its own version of
the encrypted data from the random data it generated. It then compares its
version with the encrypted data that it received in the FMH-12. If the two
values are the same, the primary LU is authenticated. If the two values do not
match, the secondary LU terminates the session.
In an enhanced version of the protocol, which provides better protection against
man in the middle attacks, the secondary LU computes a DES Message
Authentication Code (MAC) from RD1, RD2, and the fully qualified name of the
secondary LU, using its copy of the LU-LU password as the key. The secondary
LU sends the MAC to the primary LU in the BIND response instead of ERD1.
The primary LU authenticates the secondary LU by computing its own version of
the MAC, which it compares with the MAC received in the BIND response. The
primary LU then computes a second MAC from RD1 and RD2, and sends the
MAC to the secondary LU in the FMH-12 instead of ERD2.
The secondary LU authenticates the primary LU by computing its own version of
the second MAC, which it compares with the MAC received in the FMH-12.
For information about how to configure session level authentication, see the books
for your SNA subsystem. For more general information about session level
authentication, see Systems Network Architecture LU 6.2 Reference: Peer Protocols,
SC31-6808.
Conversation level authentication
When a local TP attempts to allocate a conversation with a partner TP, the local LU
sends an attach request to the partner LU, asking it to attach the partner TP. Under
certain circumstances, the attach request can contain security information, which
the partner LU can use to authenticate the local TP. This is known as conversation
level authentication, or end user verification.
The following sections describe how WebSphere MQ provides support for
conversation level authentication.
Support for conversation level authentication in WebSphere MQ on i5/OS, UNIX
systems, and Windows systems:
The support for conversation level authentication in WebSphere MQ for i5/OS,
WebSphere MQ on UNIX systems, and WebSphere MQ for Windows is illustrated
in Figure 10 on page 55. The numbers in the diagram correspond to the numbers in
the description that follows.
54 WebSphere MQ: Security

On i5/OS, UNIX systems, and Windows systems, an MCA uses Common
Programming Interface Communications (CPI-C) calls to communicate with a
partner MCA across an SNA network. In the channel definition at the caller end of
a channel, the value of the CONNAME parameter is a symbolic destination name,
which identifies a CPI-C side information entry (1). This entry specifies:
v The name of the partner LU
v The name of the partner TP, which is a responder MCA
v The name of the mode to be used for the conversation
A side information entry can also specify the following security information:
v A security type.
The commonly implemented security types are CM_SECURITY_NONE,
CM_SECURITY_PROGRAM, and CM_SECURITY_SAME, but others are defined
in the CPI-C specification.
v A user ID.
v A password.
A caller MCA prepares to allocate a conversation with a responder MCA by issuing
the CPI-C call CMINIT, using the value of CONNAME as one of the parameters on
the call. The CMINIT call identifies, for the benefit of the local LU, the side
1
PLUTO PLUTOTP #INTER CM_SECURITY_NONESATURN SATURNTP #INTER CM_SECURITY_NONE
VENUS VENUSTP #INTER CM_SECURITY_NONE
CPI-C side information
MARS MARSTP #INTER CM_SECURITY_NONEGALAXY.SOLARLUGALAXY.SOLARLUGALAXY.SOLARLUGALAXY.SOLARLU
User IDPartner LU
namePartner TP
nameModename
Symbolicdestination
name PasswordSecurity type
Caller MCA...CALL CMINIT(..., "MARS", ...)
CALL CMALLC(...)...
CALL CMSCST(..., CM_SECURITY_PROGRAM, ...)CALL CMSCSU(..., "ANDREAS", ...)CALL CMSCSP(..., "THASOS", ...)
Logical unit
Attach request (FMH-5)to partner LU
ANDREAS, THASOS
DEFINE CHANNEL(...) +CHLTYPE(...) +TRPTYPE(LU62) +CONNAME('MARS') +USERID('ANDREAS') +PASSWORD('THASOS')
Set:• Security type• User ID• PasswordInitialize the
characteristics ofthe conversation
2
3
4
5
6Characteristics ofthe conversation
Figure 10. WebSphere MQ support for conversation level authentication
Chapter 2. WebSphere MQ security provisions 55

information entry that the MCA intends to use for the conversation. The local LU
uses the values in this entry to initialize the characteristics of the conversation (2).
The caller MCA then checks the values of the USERID and PASSWORD parameters
in the channel definition (3). If USERID is set, the caller MCA issues the following
CPI-C calls (4):
v CMSCST, to set the security type for the conversation to
CM_SECURITY_PROGRAM.
v CMSCSU, to set the user ID for the conversation to the value of USERID.
v CMSCSP, to set the password for the conversation to the value of PASSWORD.
CMSCSP is not called unless PASSWORD is set.
The security type, user ID, and password set by these calls override any values
acquired previously from the side information entry.
The caller MCA then issues the CPI-C call CMALLC to allocate the conversation
(5). In response to this call, the local LU sends an attach request (Function
Management Header 5, or FMH-5) to the partner LU (6).
If the partner LU will accept a user ID and a password, the values of USERID and
PASSWORD are included in the attach request. If the partner LU will not accept a
user ID and a password, the values are not included in the attach request. The
local LU discovers whether the partner LU will accept a user ID and a password
as part of an exchange of information when the LUs bind to form a session.
In a later version of the attach request, a password substitute can flow between the
LUs instead of a clear password. A password substitute is a DES Message
Authentication Code (MAC), or an SHA-1 message digest, formed from the
password. Password substitutes can be used only if both LUs support them.
When the partner LU receives an incoming attach request containing a user ID and
a password, it might use the user ID and password for the purposes of
identification and authentication. By referring to access control lists, the partner LU
might also determine whether the user ID has the authority to allocate a
conversation and attach the responder MCA.
In addition, the responder MCA might run under the user ID included in the
attach request. In this case, the user ID becomes the default user ID for the
responder MCA and is used for authority checks when the MCA attempts to
connect to the queue manager. It might also be used for authority checks
subsequently when the MCA attempts to access the queue manager’s resources.
The way in which a user ID and a password in an attach request can be used for
identification, authentication, and access control is implementation dependent. For
information specific to your SNA subsystem, refer to the appropriate books.
If USERID is not set, the caller MCA does not call CMSCST, CMSCSU, and
CMSCSP. In this case, the security information that flows in an attach request is
determined solely by what is specified in the side information entry and what the
partner LU will accept.
Conversation level authentication and WebSphere MQ for z/OS:
On WebSphere MQ for z/OS, MCAs do not use CPI-C. Instead, they use
APPC/MVS TP Conversation Callable Services, an implementation of Advanced
Program-to-Program Communication (APPC), which has some CPI-C features.
56 WebSphere MQ: Security
When a caller MCA allocates a conversation, a security type of SAME is specified
on the call. Therefore, because an APPC/MVS LU supports persistent verification
only for inbound conversations, not for outbound conversations, there are two
possibilities:
v If the partner LU trusts the APPC/MVS LU and will accept an already verified
user ID, the APPC/MVS LU sends an attach request containing:
– The channel initiator address space user ID
– A security profile name, which, if RACF is used, is the name of the current
connect group of the channel initiator address space user ID
– An already verified indicatorv If the partner LU does not trust the APPC/MVS LU and will not accept an
already verified user ID, the APPC/MVS LU sends an attach request containing
no security information.
On WebSphere MQ for z/OS, the USERID and PASSWORD parameters on the
DEFINE CHANNEL command cannot be used for a message channel and are valid
only at the client connection end of an MQI channel. Therefore, an attach request
from an APPC/MVS LU never contains values specified by these parameters.
Obtaining more information:
For more information about conversation level authentication, see Systems Network
Architecture LU 6.2 Reference: Peer Protocols, SC31-6808. For information specific to
z/OS, see z/OS MVS™ Planning: APPC/MVS Management, SA22-7599.
For more information about CPI-C, see Common Programming Interface
Communications CPI-C Specification, SC31-6180. For more information about
APPC/MVS TP Conversation Callable Services, see z/OS MVS Programming:
Writing Transaction Programs for APPC/MVS, SA22-7621.
Providing your own link level security
This chapter describes how you can provide your own link level security services.
Writing your own channel exit programs is the main way of doing this.
Channel exit programs are introduced in “Other link level security services” on
page 47. The same chapter also describes the channel exit program that is supplied
with WebSphere MQ for Windows (the SSPI channel exit program). This channel
exit program is supplied in source format so that you can modify the source code
to suit your requirements. If neither this channel exit program, nor channel exit
programs available from other vendors, meets your requirements, you can design
and write your own. This chapter suggests ways in which channel exit programs
can provide security services. For information about how to write a channel exit
program, see WebSphere MQ Intercommunication.
This chapter contains the following sections:
v “Security exit” on page 58
v “Message exit” on page 61
v “Send and receive exits” on page 63
Chapter 2. WebSphere MQ security provisions 57

Security exit
Security exits normally work in pairs; one at each end of a channel. They are called
immediately after the initial data negotiation has completed on channel startup.
Security exits can be used to provide the security services described in the
following sections.
Identification and authentication
The primary purpose of a security exit is to enable the MCA at each end of a
channel to authenticate its partner. At each end of a message channel, and at the
server end of an MQI channel, an MCA typically acts on behalf of the queue
manager to which it is connected. At the client end of an MQI channel, an MCA
typically acts on behalf of the user of the WebSphere MQ client application. In this
situation, mutual authentication actually takes place between two queue managers,
or between a queue manager and the user of a WebSphere MQ client application.
The supplied security exit (the SSPI channel exit) illustrates how mutual
authentication can be implemented by exchanging authentication tokens that are
generated, and subsequently checked, by a trusted authentication server such as
Kerberos. For more details, see “The SSPI channel exit program” on page 50.
Mutual authentication can also be implemented by using Public Key Infrastructure
(PKI) technology. Each security exit generates some random data, signs it using the
private key of the queue manager or user it is representing, and sends the signed
data to its partner in a security message. The partner security exit performs the
authentication by checking the digital signature using the public key of the queue
manager or user. Before exchanging digital signatures, the security exits might
need to agree the algorithm for generating a message digest, if more than one
algorithm is available for use.
When a security exit sends the signed data to its partner, it also needs to send
some means of identifying the queue manager or user it is representing. This
might be a Distinguished Name, or even a digital certificate. If a digital certificate
is sent, the partner security exit can validate the certificate by working through the
certificate chain to the root CA certificate. This provides assurance of the
ownership of the public key that is used to check the digital signature.
The partner security exit can validate a digital certificate only if it has access to a
key repository that contains the remaining certificates in the certificate chain. If a
digital certificate for the queue manager or user is not sent, one must be available
in the key repository to which the partner security exit has access. The partner
security exit cannot check the digital signature unless it can find the signer’s public
key.
The Secure Sockets Layer (SSL) and Transport Layer Security (TLS) use PKI
techniques similar to ones just described. For more information about how the
Secure Sockets Layer performs authentication, see “Secure Sockets Layer (SSL)
concepts” on page 19.
If a trusted authentication server or PKI support is not available, other techniques
can be used. A common technique, which can be implemented in security exits,
uses a symmetric key algorithm.
One of the security exits, exit A, generates a random number and sends it in a
security message to its partner security exit, exit B. Exit B encrypts the number
58 WebSphere MQ: Security

using its copy of a key which is known only to the two security exits. Exit B sends
the encrypted number to exit A in a security message with a second random
number that exit B has generated. Exit A verifies that the first random number has
been encrypted correctly, encrypts the second random number using its copy of the
key, and sends the encrypted number to exit B in a security message. Exit B then
verifies that the second random number has been encrypted correctly. During this
exchange, if either security exit is not satisfied with the authenticity of other, it can
instruct the MCA to close the channel.
An advantage of this technique is that no key or password is sent over the
communications connection during the exchange. A disadvantage is that it does
not provide a solution to the problem of how to distribute the shared key in a
secure way. One solution to this problem is described in “Confidentiality” on page
61. A similar technique is used in SNA for the mutual authentication of two LUs
when they bind to form a session. The technique is described in “Session level
authentication” on page 52.
All the preceding techniques for mutual authentication can be adapted to provide
one way authentication.
Access control
Security exits can play a role in access control.
MCAUserIdentifier:
Every instance of a channel that is current has an associated channel definition
structure, MQCD. The initial values of the fields in MQCD are determined by the
channel definition that is created by a WebSphere MQ administrator. In particular,
the initial value of one of the fields, MCAUserIdentifier, is determined by the value
of the MCAUSER parameter on the DEFINE CHANNEL command, or by the
equivalent to MCAUSER if the channel definition is created in another way.
The MQCD structure is passed to a channel exit program when it is called by an
MCA. When a security exit is called by an MCA, the security exit can change the
value of MCAUserIdentifier, replacing any value that was specified in the channel
definition.
On i5/OS, UNIX systems, and Windows systems, unless the value of
MCAUserIdentifier is blank, the queue manager uses the value of MCAUserIdentifier
as the user ID for authority checks when an MCA attempts to access the queue
manager’s resources after it has connected to the queue manager. If the value of
MCAUserIdentifier is blank, the queue manager uses the default user ID of the
MCA instead. This applies only to receiving MCAs, and assumes that the PUTAUT
parameter is set to DEF in the channel definition. The queue manager always uses
the default user ID of a sending MCA for authority checks, even if the value of
MCAUserIdentifier is not blank.
On z/OS, the queue manager might use the value of MCAUserIdentifier for
authority checks, provided it is not blank. For receiving MCAs and server
connection MCAs, whether the queue manager uses the value of MCAUserIdentifier
for authority checks depends on:
v The value of the PUTAUT parameter in the channel definition
v The RACF profile used for the checks
v The access level of the channel initiator address space user ID to the RESLEVEL
profile
Chapter 2. WebSphere MQ security provisions 59

For sending MCAs, it depends on:
v Whether the sending MCA is a caller or a responder
v The access level of the channel initiator address space user ID to the RESLEVEL
profile
The user ID that a security exit stores in MCAUserIdentifier can be acquired in
various ways. Here are some examples:
v Provided there is no security exit at the client end of an MQI channel, a user ID
associated with the WebSphere MQ client application flows from the client
connection MCA to the server connection MCA when the client application
issues an MQCONN call. The server connection MCA stores this user ID in the
RemoteUserIdentifier field in the channel definition structure, MQCD. If the value
of MCAUserIdentifier is blank at this time, the MCA stores the same user ID in
MCAUserIdentifier. If the MCA does not store the user ID in MCAUserIdentifier, a
security exit can do it subsequently by setting MCAUserIdentifier to the value of
RemoteUserIdentifier.
If the user ID that flows from the client system is entering a new security
domain and is not valid on the server system, the security exit can substitute the
user ID for one that is valid and store the substituted user ID in
MCAUserIdentifier.
v The user ID can be sent by the partner security exit in a security message.
On a message channel, a security exit called by the sending MCA can send the
user ID under which the sending MCA is running. A security exit called by the
receiving MCA can then store the user ID in MCAUserIdentifier. Similarly, on an
MQI channel, a security exit at the client end of the channel can send the user
ID associated with the WebSphere MQ client application. A security exit at the
server end of the channel can then store the user ID in MCAUserIdentifier. As in
the previous example, if the user ID is not valid on the target system, the
security exit can substitute the user ID for one that is valid and store the
substituted user ID in MCAUserIdentifier.
If a digital certificate is received as part of the identification and authentication
service, a security exit can map the Distinguished Name in the certificate to a
user ID that is valid on the target system. It can then store the user ID in
MCAUserIdentifier.
v If SSL is used on the channel, the partner’s Distinguished Name (DN) is passed
to the exit in the SSLPeerNamePtr field of the MQCD, and the DN of the issuer
of that certificate is passed to the exit in the SSLRemCertIssNamePtr field of the
MQCXP.
For more information about the MCAUserIdentifier field, the channel definition
structure, MQCD, and the channel exit parameter structure MQCXP, see
WebSphere MQ Intercommunication. For more information about how the
MCAUserIdentifier field is used for authority checks on z/OS, see the WebSphere
MQ for z/OS System Setup Guide. For more information about the user ID that
flows from a client system on an MQI channel, see WebSphere MQ Clients.
WebSphere MQ Object Authority Manager user authentication:
On WebSphere MQ client connections, security exits can be used to modify or
create the MQCSP structure used in Object Authority Manager (OAM) user
authentication. This is described in “Channel-exit programs”, in the WebSphere
MQ Intercommunication manual.
60 WebSphere MQ: Security

Confidentiality
Security exits can play a role in the confidentiality service by generating and
distributing the symmetric key for encrypting and decrypting the data that flows
on the channel. A common technique for doing this uses PKI technology.
One security exit generates a random data value, encrypts it with the public key of
the queue manager or user that the partner security exit is representing, and sends
the encrypted data to its partner in a security message. The partner security exit
decrypts the random data value with the private key of the queue manager or user
it is representing. Each security exit can now use the random data value to derive
the symmetric key independently of the other by using an algorithm known to
both of them. Alternatively, they can simply use the random data value as the key.
If the first security exit has not authenticated its partner by this time, the next
security message sent by the partner can contain an expected value encrypted with
the symmetric key. The first security exit can now authenticate its partner by
checking that the partner security exit was able to encrypt the expected value
correctly.
The security exits can also use this opportunity to agree the algorithm for
encrypting and decrypting the data that flows on the channel, if more than one
algorithm is available for use.
Message exit
A message exit can be used only on a message channel, not on an MQI channel. It
has access to both the transmission queue header, MQXQH, which includes the
embedded message descriptor, and the application data in a message. It can
modify the contents of the message and change its length. A message exit can be
used for any purpose that requires access to the whole message rather than a
portion of it.
Message exits can be used to provide the security services described in the
following sections.
Identification and authentication
When an application puts a message on a queue, the UserIdentifier field in the
message descriptor contains a user ID associated with the application. However,
there is no data present that can be used to authenticate the user ID. This data can
be added by a message exit at the sending end of a channel and checked by a
message exit at the receiving end of the channel. The authenticating data can be an
encrypted password or a digital signature, for example.
This service might be more effective if it is implemented at the application level.
The basic requirement is for the user of the application that receives the message to
be able to identify and authenticate the user of the application that sent the
message. It is therefore natural to consider implementing this service at the
application level. For more discussion about this, see “Identification and
authentication” on page 73.
Access control
In a client/server environment, consider a client application that sends a message
to a server application. The server application can extract the user ID from the
Chapter 2. WebSphere MQ security provisions 61

UserIdentifier field in the message descriptor and, provided it has alternate user
authority, ask the queue manager to use this user ID for authority checks when it
accesses WebSphere MQ resources on behalf of the client.
If the PUTAUT parameter is set to CTX (or ALTMCA on z/OS) in the channel
definition at the receiving end of a channel, the user ID in the UserIdentifier field of
each incoming message is used for authority checks when the MCA opens the
destination queue.
In certain circumstances, when a report message is generated, it is put using the
authority of the user ID in the UserIdentifier field of the message causing the report.
In particular, confirm-on-delivery (COD) reports and expiration reports are always
put with this authority.
Because of these situations, it might be necessary to substitute one user ID for
another in the UserIdentifier field as a message enters a new security domain. This
can be done by a message exit at the receiving end of the channel. Alternatively,
you can ensure that the user ID in the UserIdentifier field of an incoming message
is defined in the new security domain.
If an incoming message contains a digital certificate for the user of the application
that sent the message, a message exit can validate the certificate and map the
Distinguished Name in the certificate to a user ID that is valid on the receiving
system. It can then set the UserIdentifier field in the message descriptor to this user
ID.
If it is necessary for a message exit to change the value of the UserIdentifier field in
an incoming message, it might be appropriate for the message exit to authenticate
the sender of the message at the same time. For more details, see “Identification
and authentication” on page 61.
Confidentiality
A message exit at the sending end of a channel can encrypt the application data in
a message and another message exit at the receiving end of the channel can
decrypt the data. For performance reasons, a symmetric key algorithm is normally
used for this purpose. For more information about how the symmetric key can be
generated and distributed, see “Confidentiality” on page 61.
Headers in a message, such as the transmission queue header, MQXQH, which
includes the embedded message descriptor, must not be encrypted by a message
exit. This is because data conversion of the message headers takes place either after
a message exit is called at the sending end or before a message exit is called at the
receiving end. If the headers are encrypted, data conversion fails and the channel
stops.
Data integrity
A message can be digitally signed by a message exit at the sending end of a
channel. The digital signature can then be checked by a message exit at the
receiving end of a channel to detect whether the message has been deliberately
modified.
Some protection can be provided by using a message digest instead of a digital
signature. A message digest might be effective against casual or indiscriminate
tampering, but it does not prevent the more informed individual from changing or
62 WebSphere MQ: Security

replacing the message, and generating a completely new digest for it. This is
particularly true if the algorithm that is used to generate the message digest is a
well known one.
Non-repudiation
If incoming messages are digitally signed, a message exit at the receiving end of a
channel can log sufficient evidence to enable the digital signature of a message to
be checked at any time in the future. This can form the basis of a non-repudiation
service with proof of origin.
Like the identification and authentication service, this service might be more
effective if it is implemented at the application level. At the application level, the
service can also be extended to provide proof of delivery. For more information
about how this service can be implemented at the application level, see
“Non-repudiation” on page 75.
Other uses of message exits
Message exits can be used for reasons other than security. For example, a message
exit can be used for application data conversion, although a data conversion exit is
normally more appropriate for this purpose. They can be used for compressing
and decompressing the application data in messages if the communications
subsystem cannot provide this function. Headers in a message must not be
compressed by a message exit because it causes data conversion of the message
headers to fail.
Message exits also play an important role in implementing reference messages.
Reference messages allow a large object, such as a file, to be transferred from one
system to another without needing to store the object in a WebSphere MQ queue at
either the source or destination queue manager. For more information about
reference messages, see the WebSphere MQ Application Programming Guide.
Send and receive exits
Send and receive exits can be used on both message and MQI channels. They are
called for all types of data that flow on a channel, and for flows in both directions.
Send and receive exits have access to each transmission segment. They can modify
its contents and change its length.
On a message channel, if an MCA needs to split a message and send it in more
than one transmission segment, a send exit is called for each transmission segment
containing a portion of the message and, at the receiving end, a receive exit is
called for each transmission segment. The same occurs on an MQI channel if the
input or output parameters of an MQI call are too large to be sent in a single
transmission segment.
On an MQI channel, byte 10 of a transmission segment identifies the MQI call, and
indicates whether the transmission segment contains the input or output
parameters of the call. Send and receive exits can examine this byte to determine
whether the MQI call contains application data that might need to be protected.
When a send exit is called for the first time, to acquire and initialize any resources
it needs, it can ask the MCA to reserve a specified amount of space in the buffer
that holds a transmission segment. When it is called subsequently to process a
transmission segment, it can use this space to add an encrypted key or a digital
Chapter 2. WebSphere MQ security provisions 63

signature, for example. The corresponding receive exit at the other end of the
channel can remove the data added by the send exit, and use it to process the
transmission segment.
It is recommended to use send and receive exits for purposes in which they do not
need to understand the structure of the data they are handling and can therefore
treat each transmission segment as a binary object.
Send and receive exits can be used to provide the security services described in the
following sections.
Confidentiality
Send and receive exits can be used to encrypt and decrypt the data that flows on a
channel. They are more appropriate than message exits for providing this service
for the following reasons:
v On a message channel, message headers can be encrypted as well as the
application data in the messages.
v Send and receive exits can be used on MQI channels as well as message
channels. Parameters on MQI calls might contain sensitive application data that
needs to be protected while it flows on an MQI channel. You can therefore use
the same send and receive exits on both kinds of channel.
Data integrity
On a message channel, message exits are more appropriate for providing this
service because a message exit has access to a whole message. On an MQI channel,
parameters on MQI calls might contain application data that needs to be protected
and only send and receive exits can provide this protection.
Other uses of send and receive exits
Send and receive exits can be used for reasons other than security. For example,
they can be used to compress and decompress the data that flows on a channel.
On message channels, they are more appropriate than message exits for this
purpose because message headers can be compressed as well as the application
data in the messages.
Data compression on channels is supported as an integral part of WebSphere MQ
functionality. This integral support does not involve use of channel exits.
Access Manager for Business Integration
This section contains an introduction to Access Manager for Business Integration,
focusing on the support it provides for the security services introduced in
“Security services” on page 1. The chapter contains the following sections:
v “Introduction” on page 65
v “Access control” on page 66
v “Identification and authentication” on page 67
v “Data integrity” on page 67
v “Confidentiality” on page 67
v “Non-repudiation” on page 68
v “Obtaining more information” on page 69
64 WebSphere MQ: Security

Introduction
Access Manager for Business Integration is part of WebSphere MQ Extended
Security Edition, but is not supplied with the WebSphere MQ base product. Access
Manager for Business Integration provides application level security services for
both MQ applications and MQ client (C and JMS) applications. These security
services protect WebSphere MQ messages while they are stored in queues and
while they are flowing across a network. From a single point of control, an
administrator can configure and maintain security services to protect WebSphere
MQ resources belonging to more than one queue manager and across multiple
systems.
Access Manager for Business Integration uses Public Key Infrastructure (PKI)
technology to provide authentication, authorization, confidentiality, and data
integrity services for messages. Access Manager for Business Integration also
provides client channel authentication and authorization services to secure client
connections at the channel level.
Access Manager for Business Integration has its own access control lists to control
who can gain access to messages that are stored in queues. WebSphere MQ
applications require no modification, recompilation, or relinking in order to
implement Access Manager for Business Integration. For MQ applications, security
services are invoked by Access Manager for Business Integration’s API exit
implementation. For applications using the MQI C and JMS client API’s, security
services are invoked by corresponding interceptors, which intercept calls to those
APIs.
For client channels, Access Manager for Business Integration provides a security
exit at the server side, which allows customers to enforce tight control of what
clients are allowed to attach to production servers. Authentication using this
security exit requires the presentation of a client certificate and requires the use of
an SSL connection between each MQ client and server.
Access Manager for Business Integration is available on the following platforms:
v AIX
v Solaris
v Windows 2000
v Windows XP
v Windows 2003
v z/OS and OS/390®
v Linux x86
v HP/UX
Every queue manager and queue that is protected by Access Manager for Business
Integration is represented in the Access Manager protected object space. Each queue
manager and queue in the protected object space can have an associated access
control list. This list specifies which application or user, represented as an OS ID,
can put messages on the queue and get messages from the queue. For more
information about the access control list, see “Access control” on page 66.
Each queue can also have a protected object policy (POP), which specifies the quality
of protection (QoP) that is required for the messages that are put on the queue. The
quality of protection for a queue can be one of the following:
Chapter 2. WebSphere MQ security provisions 65

none No cryptographic protection is required for the messages in the queue.
When a message is put on the queue, no Access Manager for Business
Integration header is added to the message. When a message is retrieved
from the queue, an Access Manager for Business Integration header is not
expected. This quality of protection is appropriate, for example, when
messages are being sent to, or arrive from, a queue manager whose queues
are not protected by Access Manager for Business Integration.
integrity
The messages in the queue are digitally signed. For more information
about this quality of protection, see “Identification and authentication” on
page 67 and “Data integrity” on page 67.
privacy
The messages in the queue are encrypted and digitally signed. For more
information about this quality of protection, see “Confidentiality” on page
67.
The protected object policy also specifies the audit level for the queue. For more
information about the audit level, see “Non-repudiation” on page 68.
Access control
The access control list for a queue uses the following permissions:
[PDMQ]E
The application or user is allowed to enqueue, or put, messages on the
queue
[PDMQ]D
The application or user is allowed to dequeue, or get, messages from the
queue
[PDMQ]R
The application or user is allowed to connect to the queue manager via
client channel connection
When an application attempts to open a queue, Access Manager for Business
Integration inspects the access control list for the queue to check whether the user
ID associated with the application has the required permissions for the operations
requested. If the user ID does not have the required permissions, the MQOPEN
call fails.
Access Manager for Business Integration performs these authority checks even if
the quality of protection for the queue is specified as none. You can therefore
specify a quality of protection of none for a queue if the only security service you
require is access control.
When an application attempts to get a message from a queue, Access Manager for
Business Integration checks that the sender of the message did have permission to
put the message on the queue. This check is relevant for a message that has
arrived from a remote queue manager and was actually put on the queue by an
MCA. If the sender does not have the required permission, the MQGET call fails
and the message is not delivered to the application. The message is put on the
Access Manager for Business Integration error queue, or on the local dead letter
queue if an error queue has not been created. This authority check is performed
only if the quality of protection for the queue is specified as integrity or privacy.
66 WebSphere MQ: Security
When a queue manager receives a client channel connection request, the Access
Manager for Business Integration security exit checks whether the initiator has
permission to connect to the queue manager. The client identity is then extracted
from the client certificate by WMQ SSL. If the check is successful, the client
channel connection is established and the client identity is saved for use during
authorization of other requests. If the check failed, the client channel connection is
dropped.
Identification and authentication
When an application puts a message on a queue whose quality of protection is
specified as integrity, Access Manager for Business Integration replaces the
application data in the message with an Access Manager for Business Integration
header followed by a data structure. The data structure conforms to the PKCS #7
cryptographic message syntax standard for signed data, and includes:
v The digital certificate of the sender
v The digital signature of the sender
v The original application data
When an application attempts to get the message from the queue, Access Manager
for Business Integration performs the following checks:
v The digital certificate is validated by working through the certificate chain to the
root CA certificate. This check provides assurance that the sender, identified by
the Distinguished Name, is the genuine owner of the public key contained in the
certificate.
v The digital signature is checked using the public key contained in the digital
certificate. This check authenticates the sender.
If either of these checks fail, or if the message is not signed, the MQGET call fails
and the message is not delivered to the application. The message is put on the
Access Manager for Business Integration error queue, or on the local dead letter
queue if an error queue has not been created.
Access Manager for Business Integration supports two algorithms for generating
the message digest that is used to create a digital signature: MD5 and SHA-1. You
can specify the message digest algorithm to be used globally for all queues in the
protected object space, but you can override this global selection by specifying a
different algorithm for an individual queue. If you do not specify a message digest
algorithm, SHA-1 is used by default.
Data integrity
When an application attempts to get a message from a queue whose quality of
protection is specified as integrity, the check of the digital signature (as described
in “Identification and authentication”) also detects whether the message has been
deliberately modified since it was first put on a queue by the sending application.
Confidentiality
When an application puts a message on a queue whose quality of protection is
specified as privacy, Access Manager for Business Integration encrypts the
application data in the message using a randomly generated symmetric key. A
copy of the symmetric key is encrypted with the public key of each of the intended
receivers of the message. This action ensures that only an intended receiver can
Chapter 2. WebSphere MQ security provisions 67
decrypt the application data. The intended receivers are specified as extended
attributes of the queue in the protected object space.
Access Manager for Business Integration replaces the application data in the
message with an Access Manager for Business Integration header followed by a
data structure. The data structure conforms to the PKCS #7 cryptographic message
syntax standard for signed and enveloped data, and includes:
v The digital certificate of the sender
v The digital signature of the sender
v A copy of the encrypted symmetric key for each of the intended receivers
v The encrypted application data
When an application attempts to get the message from the queue, Access Manager
for Business Integration decrypts the symmetric key using the private key of the
actual receiver, and then decrypts the application data using the symmetric key.
Access Manager for Business Integration also performs the checks for
authentication and data integrity that are described in “Identification and
authentication” on page 67. A quality of protection of privacy, therefore, implies
integrity.
If Access Manager for Business Integration is not able to decrypt the application
data for any reason, or if the authentication and data integrity checks fail, the
MQGET call fails and the message is not delivered to the application. The message
is put on the Access Manager for Business Integration error queue, or on the local
dead letter queue if an error queue has not been created.
Access Manager for Business Integration supports five message content encryption
algorithms:
STRONG
Triple DES with a 168-bit encryption key
MEDIUM
DES with a 56-bit encryption key
WEAK
RC2 with a 40-bit encryption key
AES128
AES with 128-bit encryption key
AES256
AES with 256-bit encryption key
You can specify the message content encryption algorithm to be used globally for
all queues in the protected object space, but you can override the global selection
by specifying a different algorithm for an individual queue. If you do not specify a
message content encryption algorithm, STRONG is used by default.
Non-repudiation
In addition to specifying a quality of protection, the protected object policy for a
queue specifies the audit level for the queue. The audit level can be one of the
following:
all Access Manager for Business Integration generates an audit record for each
MQOPEN, MQGET, MQPUT, MQPUT1, and MQCLOSE call on a protected
queue.
68 WebSphere MQ: Security

none Access Manager for Business Integration generates no audit records for
MQI calls.
Although these audit levels are available on all platforms, additional ones are
available for use with Access Manager for Business Integration on AIX, Solaris,
HP/UX, Linux Intel® and Windows 2000/2003/XP:
permit
Records only successful access to Tivoli Access Manager for Business
Integration–protected resources
deny Records only denied requests for access to Tivoli Access Manager for
Business Integration–protected resources
admin Records OPEN, CLOSE, PUT, and GET operations on protected IBM
WebSphere MQ queues
error Records any unsuccessful GET operations which result in messages being
sent to the error handling queue.
When an application gets a message from a queue, the audit record for the
MQGET call includes the following information:
v The date and time of the MQGET call
v The name of the queue from which the message was retrieved
v The name of the queue manager that owns the queue
v Whether the MQGET call completed successfully
v The message digest algorithm that was used to create the digital signature, if the
message was signed
v The Distinguished Name of the sender of the message
v The contents of the MsgId field in the message descriptor of the message
v The contents of the Format field in the message descriptor of the message
Although the audit record contains some information about the message, who sent
it, and where and when it was received, other evidence that might be used to
provide a non-repudiation service with proof of origin is not recorded. In
particular, the audit record does not contain:
v The digital certificate of the sender
v The digital signature of the sender
v The original message
Obtaining more information
For more information about Access Manager for Business Integration, see the
following:
v Tivoli Access Manager for Business Integration V5.1 readme file for the latest
information about installing.
v Tivoli Access Manager for Business Integration Administration Guide Version 5.1,
SC23-4831-01, for Access Manager for Business Integration on AIX, Solaris,
HP-UX, Linux, Windows 2000 and Windows XP.
v Tivoli Access Manager for Business Integration - Host Edition Administration Guide
Version 4.1, SC32-1122-00, for Access Manager for Business Integration on z/OS.
Chapter 2. WebSphere MQ security provisions 69

Providing your own application level security
This chapter describes how you can provide your own application level security
services. To help you do this, WebSphere MQ provides two exits, the API exit and
the API-crossing exit.
This chapter contains the following sections:
v “The API exit”
v “The API-crossing exit” on page 72
v “The role of the API exit and the API-crossing exit in security” on page 73
v “Other ways of providing your own application level security” on page 76
The API exit
Note: The information in this section does not apply to WebSphere MQ for z/OS.
An API exit is a program module that monitors or modifies the function of MQI
calls. An API exit comprises multiple API exit functions, each with its own entry
point in the module.
There are two categories of exit function:
An exit function that is associated with an MQI call
There are two exit functions in this category for each MQI call and an
additional one for an MQGET call with the MQGMO_CONVERT option.
The MQCONN and MQCONNX calls share the same exit functions.
For each MQI call, one of the two exit functions is invoked before the
queue manager starts to process the call and the other is invoked after the
queue manager has completed processing the call. The exit function for an
MQGET call with the MQGMO_CONVERT option is invoked during the
MQGET call, after the message has been retrieved from the queue by the
queue manager but before any data conversion takes place. This allows, for
example, a message to be decrypted before data conversion.
An exit function can inspect and modify any of the parameters on an MQI
call. On an MQPUT call, for example, an exit function that is invoked
before the processing of the call has started can:
v Inspect and modify the contents of the application data in the message
being put
v Change the length of the application data in the message
v Modify the contents of the fields in the message descriptor structure,
MQMD
v Modify the contents of the fields in the put message options structure,
MQPMO
An exit function that is invoked before the processing of an MQI call has
started can suppress the call completely. The exit function for an MQGET
call with the MQGMO_CONVERT option can suppress data conversion of
the message being retrieved.
Initialization and termination exit functions
There are two exit functions in this category, the initialization exit function
and the termination exit function.
70 WebSphere MQ: Security

The initialization exit function is invoked by the queue manager when an
application connects to the queue manager. Its primary purpose is to
register exit functions and their respective entry points with the queue
manager and perform any initialization processing. You do not have to
register all the exit functions, only those that are required for this
connection. When the application disconnects from the queue manager, the
registrations are removed automatically.
The initialization exit function can also be used to acquire any storage
required by the exit and examine the values of any environment variables.
The termination exit function is invoked by the queue manager when an
application disconnects from the queue manager. Its purpose is to release
any storage used by the exit and perform any required cleanup operations.
An API exit can issue calls to the MQI but, if it does, the API exit is not invoked
recursively a second time. The following exit functions, however, are not able to
issue MQI calls because the correct environment is not present at the time the exit
functions are invoked:
v The initialization exit function
v The exit function for an MQCONN and MQCONNX call that is invoked before
the queue manager starts to process the call
v The exit function for the MQDISC call that is invoked after the queue manager
has completed processing the call
v The termination exit function
An API exit can also use other APIs that might be available; for example, it can
issue calls to DB2®.
An API exit can be used with a WebSphere MQ client application, but it is
important to note that the exit is invoked at the server end of an MQI channel. See
the discussion in “What application level security cannot do” on page 10.
An API exit is written using the C programming language.
To enable an API exit, you must configure it. On i5/OS, Windows, and UNIX
systems, you do this by editing the WebSphere MQ configuration file, mqs.ini, and
the queue manager configuration file, qm.ini, for each queue manager.
You configure an API exit by providing the following information:
v The descriptive name of the API exit.
v The name of the module and its location; for example, the full path name.
v The name of the entry point for the initialization exit function.
v The sequence in which the API exit is invoked relative to other API exits. You
can configure more than one API exit for a queue manager.
v Optionally, any data to be passed to the API exit.
For more information about how to configure an API exit, see:
v WebSphere MQ for i5/OS System Administration Guide
v WebSphere MQ System Administration Guide, for UNIX and Windows systems
For information about how to write an API exit, see the WebSphere MQ
Application Programming Guide.
Chapter 2. WebSphere MQ security provisions 71

The API-crossing exit
Note: The information in this section applies only to CICS applications on z/OS.
An API-crossing exit is a program that monitors or modifies the function of MQI
calls issued by CICS applications on z/OS. The exit program is invoked by the
CICS adapter and runs in the CICS address space.
The API-crossing exit is invoked for the following MQI calls only:
MQBUFMH
MQCB
MQCB_FUNCTION
MQCLOSE
MQCRTMH
MQCTL
MQDLTMH
MQGET
MQINQ
MQOPEN
MQPUT
MQPUT1
MQSET
MQSTAT
MQSUB
MQSUBRQ
For each MQI call, it is invoked once before the processing of the call has started
and once after the processing of the call has been completed.
The exit program can determine the name of an MQI call and can inspect and
modify any of the parameters on the call. If it is invoked before an MQI call is
processed, it can suppress the call completely.
The exit program can use any of the APIs that a CICS task-related user exit can
use; for example, the IMS, DB2, and CICS APIs. It can also use any of the MQI
calls except MQCONN, MQCONNX, and MQDISC. However, any MQI calls
issued by the exit program do not invoke the exit program a second time.
You can write an API-crossing exit in any programming language supported by
WebSphere MQ for z/OS.
Before an API-crossing exit can be used, the exit program load module must be
available when the CICS adapter connects to a queue manager. The load module is
a CICS program that must be named CSQCAPX and reside in a library in the
DFHRPL concatenation sequence. CSQCAPX must be defined in the CICS system
definition file (CSD), and the program must be enabled.
An API-crossing exit can be managed using the CICS adapter control panels,
CKQC. When CSQCAPX is loaded, a confirmation message is written to the
adapter control panels or to the system console. The adapter control panels can
also be used to enable or disable the exit program.
72 WebSphere MQ: Security

For more information about how to write and implement an API-crossing exit, see
the WebSphere MQ Application Programming Guide.
The role of the API exit and the API-crossing exit in security
Note: In this section, the term API exit means either an API exit or an API-crossing
exit.
There are many possible uses of API exits. For example, you can use them to log
messages, monitor the use of queues, log failures in MQI calls, maintain audit
trails for accounting purposes, or collect statistics for planning purposes.
API exits can also provide the security services described in the following sections.
Identification and authentication
At the level of an individual message, identification and authentication is a service
that involves two users, the sender and the receiver of the message. The basic
requirement is for the user of the application that receives the message to be able
to identify and authenticate the user of the application that sent the message. Note
that the requirement is for one way, not two way, authentication.
Depending on how it is implemented, the users and their applications might need
to interface, or even interact, with the service. In addition, when and how the
service is used might depend on where the users and their applications are located,
and on the nature of the applications themselves. It is therefore natural to consider
implementing the service at the application level rather than at the link level.
If you consider implementing this service at the link level, you might need to
resolve issues such as the following:
v On a message channel, how do you apply the service only to those messages
that require it?
v How do you enable users and their applications to interface, or interact, with the
service, if this is a requirement?
v In a multi-hop situation, where a message is sent over more than one message
channel on the way to its destination, where do you invoke the components of
the service?
Here are some examples of how the identification and authorization service can be
implemented at the application level:
v When an application puts a message on a queue, an API exit can acquire an
authentication token from a trusted authentication server such as Kerberos. The
API exit can add this token to the application data in the message. When the
message is retrieved by the receiving application, a second API exit can ask the
authentication server to authenticate the sender by checking the token.
v When an application puts a message on a queue, an API exit can append the
following items to the application data in the message:
– The digital certificate of the sender
– The digital signature of the sender
If different algorithms for generating a message digest are available for use, the
API exit can include the name of the algorithm it has used.
When the message is retrieved by the receiving application, a second API exit
can perform the following checks:
Chapter 2. WebSphere MQ security provisions 73

– The API exit can validate the digital certificate by working through the
certificate chain to the root CA certificate. To do this, the API exit must have
access to a key repository that contains the remaining certificates in the
certificate chain. This check provide assurance that the sender, identified by
the Distinguished Name, is the genuine owner of the public key contained in
the certificate.
– The API exit can check the digital signature using the public key contained in
the certificate. This check authenticates the sender.The Distinguished Name of the sender can be sent instead of the whole digital
certificate. In this case, the key repository must contain the sender’s certificate so
that the second API exit can find the public key of the sender. Another
possibility is to send all the certificates in the certificate chain.
Tivoli Access Manager for Business Integration uses Public Key Infrastructure
(PKI) techniques similar to the ones just described. For more information about
how Access Manager for Business Integration implements this and other
application level security services, see “Access Manager for Business Integration”
on page 64.
v When an application puts a message on a queue, the UserIdentifier field in the
message descriptor contains a user ID associated with the application. The user
ID can be used to identify the sender. To enable authentication, an API exit can
append some data, such as an encrypted password, to the application data in
the message. When the message is retrieved by the receiving application, a
second API exit can authenticate the user ID by using the data that has travelled
with the message.
This technique might be considered sufficient for messages that originate in a
controlled and trusted environment, and in circumstances where a trusted
authentication server or PKI support is not available.
Access control
An API exit can provide access controls to supplement those provided by
WebSphere MQ. In particular, an API exit can provide access control at the
message level. An API exit can ensure that an application puts on a queue, or gets
from a queue, only those messages that satisfy certain criteria.
Consider the following examples:
v A message contains information about an order. When an application attempts
to put a message on a queue, an API exit can check that the total value of the
order is less than some prescribed limit.
v Messages arrive on a destination queue from remote queue managers. When an
application attempts to get a message from the queue, an API exit can check that
the sender of the message is authorized to send a message to the queue.
Confidentiality
The application data in a message can be encrypted by an API exit when the
message is put by the sending application and decrypted by a second API exit
when the message is retrieved by the receiving application.
For performance reasons, a symmetric key algorithm is normally used for this
purpose. However, at the application level, where many users might be sending
messages to each other, the problem is how to ensure that only the intended
receiver of a message is able to decrypt the message. One solution is to use a
different symmetric key for each pair of users that send messages to each other.
But this solution might be difficult and time consuming to administer, particularly
74 WebSphere MQ: Security
if the users belong to different organizations. A standard way of solving this
problem is known as digital enveloping and uses PKI technology.
When an application puts a message on a queue, an API exit generates a random
symmetric key and uses the key to encrypt the application data in the message.
The API exit encrypts the symmetric key with the public key of the intended
receiver. It then replaces the application data in the message with the encrypted
application data and the encrypted symmetric key. In this way, only the intended
receiver can decrypt the symmetric key and therefore the application data. If an
encrypted message has more than one possible intended receiver, the API exit can
encrypt a copy of the symmetric key for each intended receiver.
If different algorithms for encrypting and decrypting the application data are
available for use, the API exit can include the name of the algorithm it has used.
Data integrity
A message can be digitally signed by an API exit when the message is put by the
sending application. The digital signature can then be checked by a second API
exit when the message is retrieved by the receiving application. This can detect
whether the message has been deliberately modified.
As discussed in “Data integrity” on page 62, some protection can be provided by
using a message digest instead of a digital signature.
Non-repudiation
Consider an API exit that checks the digital signature of each message that is
retrieved from a queue by the receiving application. If the API exit logs sufficient
evidence to enable the digital signature to be checked at any time in the future,
this can form the basis of a non-repudiation service with proof of origin.
The evidence that is logged might include:
v The digital certificate of the sender
v The digital signature of the sender
v The original message
The API exit can also prepare a delivery report on behalf of the receiver of the
message and send it to the reply-to queue specified in the message descriptor of
the message. The delivery report might include :
v The date and time of delivery of the message
v The digital certificate of the receiver
v The digital signature of the receiver
v The original message, a subset of the original message, or some means of
identifying the original message
When the delivery report is retrieved from the reply-to queue, another API exit can
check the digital signature to authenticate the receiver of the original message. If
the API exit also logs sufficient evidence to enable the digital signature to be
checked at any time in the future, this can form the basis of a non-repudiation
service with proof of delivery.
Chapter 2. WebSphere MQ security provisions 75

Other ways of providing your own application level security
If the API exit or API-crossing exit is not supported in your system environment,
you might want to consider other ways of providing your own application level
security. One way is to develop a higher level API that encapsulates the MQI.
Programmers then use this API, instead of the MQI, to write WebSphere MQ
applications.
The most common reasons for using a higher level API are:
v To hide the more advanced features of the MQI from programmers.
v To enforce standards in the use of the MQI.
v To add function to the MQI. This additional function can be security services.
Some vendor products use this technique to provide application level security for
WebSphere MQ.
If you are planning to provide security services in this way, note the following
regarding data conversion:
v If a security token, such as a digital signature, has been added to the application
data in a message, any code performing data conversion must be aware of the
presence of this token.
v A security token might have been derived from a binary image of the
application data. Therefore, any checking of the token must be done before
converting the data.
v If the application data in a message has been encrypted, it must be decrypted
before data conversion.
76 WebSphere MQ: Security

Chapter 3. Working with WebSphere MQ TLS and SSL support
The tasks that you perform when implementing the WebSphere MQ TLS and SSL
support for your installation can depend upon your platform as well as how you
set up communications for SSL or TLS.
You can select from the following tasks:
Setting up communications for SSL or TLS
Secure communications that use the SSL or TLS cryptographic security protocols
involve setting up the communication channels and managing the digital
certificates that you will use for authentication.
To set up your SSL installation you must define your channels to use SSL. You
must also create and manage your digital certificates. On UNIX systems, Windows
systems, and on z/OS, you can perform the tests with self–signed certificates. On
i5/OS, Windows systems, and on z/OS, you can work with personal certificates
signed by a local CA. For full information about creating and managing
certificates, see:
v “Working with SSL or TLS on i5/OS” on page 87
v “Working with SSL or TLS on UNIX and Windows systems” on page 96
v “Working with SSL or TLS on z/OS” on page 119
This chapter introduces some of the tasks involved in setting up SSL
communications, and provides step-by-step guidance on completing those tasks:
v “Task 1: Using self-signed certificates” on page 78
v “Task 2: Using CA-signed certificates” on page 81
v “Task 3: Anonymous queue managers” on page 85
You might also want to test SSL client authentication, which is an optional part of
the SSL protocol. During the SSL handshake the SSL client always obtains and
validates a digital certificate from the SSL server. With the WebSphere MQ
implementation, the SSL server always requests a certificate from the SSL client.
On UNIX, i5/OS, or Windows, the SSL client sends a certificate only if it has one
labelled in the correct WebSphere MQ format:
v For a queue manager on UNIX, i5/OS, or Windows, ibmwebspheremq followed by
the name of your queue manager changed to lower case. For example, for QM1,
ibmwebspheremqqm1
v For a WebSphere MQ client on UNIX or Windows systems, ibmwebspheremq
followed by your logon user ID changed to lower case, for example
ibmwebspheremqmyuserid.
On z/OS, the SSL client sends a certificate only if it has either of the following:
v For a queue manager on z/OS, ibmWebSphereMQ followed by the name of your
queue manager, for example ibmWebSphereMQQM1
v A default certificate (which might be the ibmWebSphereMQ certificate).
© Copyright IBM Corp. 2002, 2008 77
Note: On UNIX, i5/OS, and Windows systems, WebSphere MQ uses the
ibmwebspheremq prefix, and on z/OS the ibmWebSphereMQ prefix, on a label to avoid
confusion with certificates for other products. On UNIX and Windows systems,
ensure that you specify the entire certificate label in lower case.
The SSL server always validates the client certificate if one is sent. If the SSL client
does not send a certificate, authentication fails only if the end of the channel acting
as the SSL server is defined:
v With the SSLCAUTH parameter set to REQUIRED or
v With an SSLPEER parameter value
For more information, see “Task 3: Anonymous queue managers” on page 85.
Task 1: Using self-signed certificates
Scenario:
v You have two queue managers, QM1 and QM2, which need to communicate
securely. You require mutual authentication to be carried out between QM1 and
QM2.
v You have decided to test your secure communication using self-signed
certificates.
On UNIX, Windows, and z/OS systems, you can create self-signed certificates for
testing.
On i5/OS, you cannot create self-signed certificates. Use personal certificates
signed by a local CA to test SSL on i5/OS. When testing on i5/OS, ensure that the
other end of the test connection has a copy of your local CA’s certificate. See “Task
2: Using CA-signed certificates” on page 81 for more information.
The steps required to complete task 1
To complete this task, follow these steps:
1. Prepare the key repository on each queue manager:
On both QM1 and QM2, ensure the key repository is correctly set up:
v On UNIX and Windows systems as described in “Setting up a key repository”
on page 98
v On z/OS systems as described in “Setting up a key repository” on page 120.
2. Create a self-signed certificate for each queue manager:
On both QM1 and QM2, create a self-signed certificate:
v On UNIX and Windows systems as described in “Creating a self-signed personal
certificate” on page 103
v On z/OS systems as described in “Creating a self-signed personal certificate” on
page 122.
3. Add the self-signed certificate to the key repository:
This step is required only on z/OS systems. On both QM1 and QM2, add the
certificate created in step 2 to the key repository that was set up in step 1, as
described in “Adding personal certificates to a key repository” on page 124.
78 WebSphere MQ: Security

4. Extract a copy of each certificate:
In order to authenticate a partner’s certificate when using self-signed certificates,
you must send a copy to the partner system. In order to send it, you must first
extract it:
v On UNIX or Windows systems as described in “Extracting the CA part of a
self-signed certificate from a key repository” on page 109.
v On z/OS systems as described in “Exporting a personal certificate from a key
repository” on page 125.
5. Exchange certificates:
If QM1 and QM2 are running on different systems, transfer the CA part of the
QM1 certificate to the QM2 system and vice versa, for example, by ftp.
When you transfer certificates by ftp, you must ensure that you do so in the
correct format.
Transfer the following certificate types in binary format:
v DER encoded binary X.509
v PKCS #7 (CA certificates)
v PKCS #12 (personal certificates)
and transfer the following certificate types in ASCII format:
v PEM (privacy-enhanced mail)
v Base64 encoded X.509
6. Add partner’s certificate to the key repository:
Add the partner’s certificate to the key repository:
v On UNIX and Windows systems, add the certificate as a signer certificate as
described in “Adding a CA certificate (or the CA part of a self-signed certificate)
into a key repository” on page 109
v On z/OS systems, connect the certificate to the key ring as described in “Adding
personal certificates to a key repository” on page 124
7. Define sender channel:
On QM1 you need to define a sender channel to use SSL. For example:
DEFINE CHANNEL(QM1.TO.QM2) CHLTYPE(SDR) TRPTYPE(TCP) CONNAME(QM1.MACH.COM) XMIT(QM2)
SSLCIPH(RC4_MD5_US) DESCR(’Sender channel using SSL from QM1 to QM2’)
This example uses CipherSpec RC4_MD5. Note that the CipherSpecs at each end of
the channel must be the same.
Only the SSLCIPH parameter is mandatory if you want your channel to use SSL.
Refer to “Working with CipherSpecs” on page 142 for information about the
permitted values for the SSLCIPH parameter.
Refer to the WebSphere MQ Script (MQSC) Command Reference for a complete
description of the DEFINE CHANNEL command, and to the WebSphere MQ
Intercommunication book for general information about WebSphere MQ channels.
Chapter 3. Working with WebSphere MQ TLS and SSL support 79

For a description of the i5/OS CRTMQMCHL command, which is used to define
channels on i5/OS, refer to the WebSphere MQ for i5/OS System Administration
Guide.
8. Define a transmission queue:
On QM1 you need to define a transmission queue for your sender channel to use:
DEFINE QLOCAL(QM2) USAGE(XMITQ)
9. Define a receiver channel:
On QM2 you need to define a receiver channel with the same name as the sender
channel you defined in step 7, and using the same CipherSpec:
DEFINE CHANNEL(QM1.TO.QM2) CHLTYPE(RCVR) TRPTYPE(TCP) SSLCIPH(RC4_MD5_US)
SSLCAUTH(REQUIRED) DESCR(’Receiver channel using SSL from QM1 to QM2’)
10. Start the channel:
Now that you have completed all the definitions, if you have not already done so,
start the channel initiator on WebSphere MQ for z/OS and, on all platforms, start a
listener program on QM2. The listener program listens for incoming network
requests and starts the receiver channel when it is needed. For information on how
to start a listener, see the WebSphere MQ Intercommunication manual.
If the channel initiator was already running (on z/OS) or if any SSL channels have
run previously, you need to issue a REFRESH SECURITY TYPE(SSL) command.
This ensures that all the changes made to the key repository are available.
Start the channel on QM1:
START CHANNEL(QM1.TO.QM2)
Result of task 1
The resulting configuration looks like this:
In Figure 11, QM1’s key repository contains QM1’s certificate and QM2’s CA
certificate. QM2’s key repository contains QM2’s certificate and QM1’s CA
certificate.
transmissionqueuekey repository
QM1.TO.QM2
key repository
QM1's certificate QM2's certificate
QM2's certificate QM1's certificate
QM1 QM2
QM2
Figure 11. Configuration resulting from Task 1
80 WebSphere MQ: Security

Verifying task 1
You can issue some DISPLAY commands to verify that the task has been
completed successfully. If the task was successful, the resulting output will be
similar to that shown in the following examples.
From the QM1 queue manager, enter the following command:
DISPLAY CHS(QM1.TO.QM2) SSLPEER SSLCERTI
The resulting output will be similar to the following:
dis chs(QM1.TO.QM2) SSLPEER SSLCERTI
4 : dis chs(QM1.TO.QM2) SSLPEER SSLCERTI
AMQ8417: Display Channel Status details.
CHANNEL(QM1.TO.QM2) CHLTYPE(SDR)
CONNAME(9.20.25.40) CURRENT
RQMNAME(QM2)
SSLCERTI(CN=QM2,OU="WebSphere MQ Development",O=IBM,ST=Hampshire,C=UK)
SSLPEER(CN=QM2,OU="WebSphere MQ Development",O=IBM,ST=Hampshire,C=UK)
STATUS(RUNNING) SUBSTATE(MQGET)
XMITQ(QM2)
From the QM2 queue manager, enter the following command:
DISPLAY CHS(QM1.TO.QM2) SSLPEER SSLCERTI
The resulting output will be similar to the following:
dis chs(QM1.TO.QM2) SSLPEER SSLCERTI
5 : dis chs(QM1.TO.QM2) SSLPEER SSLCERTI
AMQ8417: Display Channel Status details.
CHANNEL(QM2.TO.QM1) CHLTYPE(RCVR)
CONNAME(9.20.35.92) CURRENT
RQMNAME(QM1)
SSLCERTI(CN=QM1,OU="WebSphere MQ Development",O=IBM,ST=Hampshire,C=UK
SSLPEER(CN=QM1,OU="WebSphere MQ Development",O=IBM,ST=Hampshire,C=UK)
STATUS(RUNNING) SUBSTATE(RECEIVE)
XMITQ( )
In each case, the value of SSLPEER should match that of the DN in the partner
certificate that was created in Step 2. The issuer’s name matches the peer name
because this is a self-signed certificate.
SSLPEER is optional. If it is specified, its value must be set so that the DN in the
partner certificate (created in step 2) is allowed. For more information on the use of
SSLPEER, see “WebSphere MQ rules for SSLPEER values” on page 146.
Task 2: Using CA-signed certificates
Scenario:
v You have two queue managers called QMA and QMB, which need to
communicate securely. You require mutual authentication to be carried out
between QMA and QMB.
v You are planning to extend this network, and therefore you have decided to use
CA-signed certificates from the beginning.
The steps required to complete task 2
To complete this task, follow these steps:
1. Prepare the key repository on each queue manager:
Chapter 3. Working with WebSphere MQ TLS and SSL support 81

On both QMA and QMB, ensure the key repository is correctly set up:
v On UNIX and Windows systems as described in “Setting up a key repository”
on page 98.
v On z/OS systems as described in “Setting up a key repository” on page 120.
v On i5/OS systems as described in “Setting up a key repository” on page 89.
2. Request a CA-signed certificate for each queue manager:
On both QMA and QMB, create certificate requests:
v On UNIX and Windows systems, as described in “Requesting a personal
certificate” on page 105.
v On i5/OS systems, as described in “Requesting a server certificate” on page 93.
v On z/OS systems, as described in “Requesting a personal certificate” on page
123.
3. Add the Certification Authority’s certificate to the key repository:
On both QMA and QMB, add the CA’s certificate to the queue manager’s key
repository:
v On UNIX and Windows systems, as described in “Adding a CA certificate (or
the CA part of a self-signed certificate) into a key repository” on page 109
v On i5/OS systems, as described in “Working with SSL or TLS on i5/OS” on
page 87
v On z/OS systems, as described in “Ensuring CA certificates are available to a
queue manager” on page 121.
4. Add the CA-signed certificate to the key repository:
When the signed personal certificate is sent to you by the CA, add the relevant
certificate to the queue manager’s key repository (on both QMA and QMB):
v On UNIX and Windows systems, as described in “Receiving personal certificates
into a key repository” on page 106.
v On i5/OS systems, as described in “Adding server certificates to a key
repository” on page 94.
v On z/OS systems, as described in “Adding personal certificates to a key
repository” on page 124.
5. Define sender channel and associated transmission queue:
On QMA you need to define a sender channel and the transmission is uses:
DEFINE CHANNEL(TO.QMB) CHLTYPE(SDR) TRPTYPE(TCP) CONNAME(QMB.MACH.COM) XMITQ(QMB)
SSLCIPH(RC2_MD5_EXPORT) DESCR(’Sender channel using SSL from QMA to QMB’)
DEFINE QLOCAL(QMB) USAGE(XMITQ)
6. Define receiver channel:
On QMB, you need to define a receiver channel:
DEFINE CHANNEL(TO.QMB) CHLTYPE(RCVR) TRPTYPE(TCP) SSLCIPH(RC2_MD5_EXPORT)
SSLCAUTH(REQUIRED) DESCR(’Receiver channel using SSL to QMB’)
7. Start the channel:
82 WebSphere MQ: Security
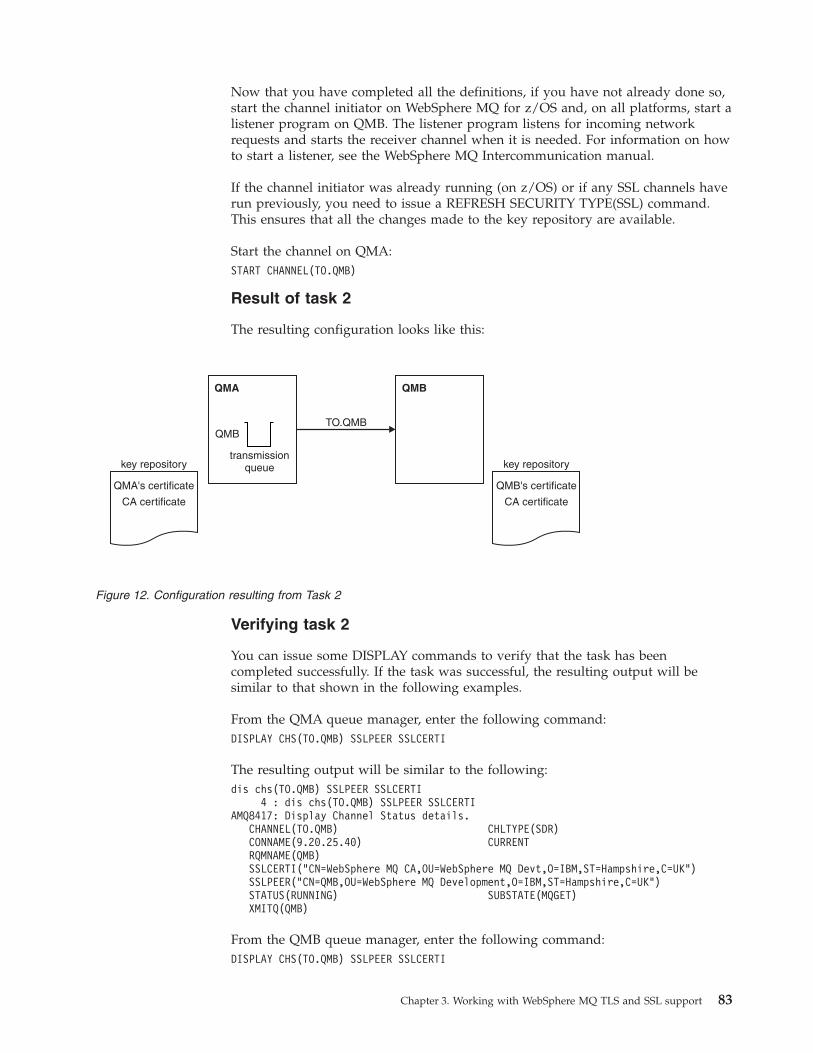
Now that you have completed all the definitions, if you have not already done so,
start the channel initiator on WebSphere MQ for z/OS and, on all platforms, start a
listener program on QMB. The listener program listens for incoming network
requests and starts the receiver channel when it is needed. For information on how
to start a listener, see the WebSphere MQ Intercommunication manual.
If the channel initiator was already running (on z/OS) or if any SSL channels have
run previously, you need to issue a REFRESH SECURITY TYPE(SSL) command.
This ensures that all the changes made to the key repository are available.
Start the channel on QMA:
START CHANNEL(TO.QMB)
Result of task 2
The resulting configuration looks like this:
Verifying task 2
You can issue some DISPLAY commands to verify that the task has been
completed successfully. If the task was successful, the resulting output will be
similar to that shown in the following examples.
From the QMA queue manager, enter the following command:
DISPLAY CHS(TO.QMB) SSLPEER SSLCERTI
The resulting output will be similar to the following:
dis chs(TO.QMB) SSLPEER SSLCERTI
4 : dis chs(TO.QMB) SSLPEER SSLCERTI
AMQ8417: Display Channel Status details.
CHANNEL(TO.QMB) CHLTYPE(SDR)
CONNAME(9.20.25.40) CURRENT
RQMNAME(QMB)
SSLCERTI("CN=WebSphere MQ CA,OU=WebSphere MQ Devt,O=IBM,ST=Hampshire,C=UK")
SSLPEER("CN=QMB,OU=WebSphere MQ Development,O=IBM,ST=Hampshire,C=UK")
STATUS(RUNNING) SUBSTATE(MQGET)
XMITQ(QMB)
From the QMB queue manager, enter the following command:
DISPLAY CHS(TO.QMB) SSLPEER SSLCERTI
transmissionqueuekey repository
TO.QMB
key repository
QMA's certificate QMB's certificate
CA certificate CA certificate
QMA QMB
QMB
Figure 12. Configuration resulting from Task 2
Chapter 3. Working with WebSphere MQ TLS and SSL support 83

The resulting output will be similar to the following:
dis chs(TO.QMB) SSLPEER SSLCERTI
5 : dis chs(TO.QMB) SSLPEER SSLCERTI
AMQ8417: Display Channel Status details.
CHANNEL(TO.QMB) CHLTYPE(RCVR)
CONNAME(9.20.35.92) CURRENT
RQMNAME(QMA)
SSLCERTI("CN=WebSphere MQ CA,OU=WebSphere MQ Devt,O=IBM,ST=Hampshire,C=UK")
SSLPEER("CN=QMA,OU=WebSphere MQ Development,O=IBM,ST=Hampshire,C=UK")
STATUS(RUNNING) SUBSTATE(RECEIVE)
XMITQ( )
In each case, the value of SSLPEER should match that of the Distinguished Name
(DN) in the partner certificate that was created in Step 2. The issuer’s name
matches the subject’s DN of the CA certificate that has signed the personal
certificate added in Step 4.
Extensions to this task
The use of CA-signed certificates makes it easier to add extra queue managers
(which will also use SSL) to your network, because it reduces the administration of
certificates in your network. Table 2 compares the number of certificates that need
to be installed in each queue manager’s key repository to be able to communicate
with all the other queue managers, when using self-signed certificates (as described
in “Task 1: Using self-signed certificates” on page 78) and when using CA-signed
certificates.
The administration of certificates includes the copying of these certificates from
system to system as well as adding them to key repositories. Table 2 shows that, as
your network grows, the number of certificates that must be copied into each
queue manager’s key repository increases when you use self-signed certificates.
When you use CA-signed certificates however, the number of certificates remains
the same, making the administration much simpler.
Table 2. Total number of certificates in each queue manager’s key repository, both CA
certificates and personal certificates, when using each scheme.
Number of queue managers
in network
Using self-signed
certificates Using CA-signed certificates
2 2 2
3 3 2
4 4 2
5 5 2
You can extend this task by adding a third queue manager called QMC. QMC’s
key repository will contain its own certificate. The CA-signed certificate and
appropriate channels can be defined to communicate with QMB, for example on
QMC issue:
DEFINE CHANNEL(TO.QMB) CHLTYPE(SDR) TRPTYPE(TCP) CONNAME(QMB.MACH.COM) XMITQ(QMB)
SSLCIPH(RC2_MD5_EXPORT) DESCR(’Sender channel using SSL from QMC to QMB’)
The same CipherSpec must be used on the sender channels at QMA and QMC, if
generic receiver definitions are used at queue manager QMB, because the
CipherSpec must match on both ends of each channel.
84 WebSphere MQ: Security
Task 3: Anonymous queue managers
Scenario:
v Your two queue managers (QMA and QMB) have been set up as in “Task 2:
Using CA-signed certificates” on page 81.
v You want to change QMA so that it will anonymously connect to QMB.
The steps required to complete task 3
To complete this task, follow these steps:
1. Remove QMA’s personal certificate:
Remove QMA’s personal certificate from its key repository. As a result, QMA will
attempt to connect anonymously to QMB.
Note that on all platforms you remove the certificates from the key repository. If
you do not already have a copy of a certificate and you want to restore it after
testing for failure of SSL client authentication, you must save a copy of the
certificate.
v On UNIX and Windows systems, remove from the SSL client’s key repository
the certificate labelled:
– For a queue manager, ibmwebspheremq followed by the name of your queue
manager folded to lower case. For example, for QM1, ibmwebspheremqqm1, or,
– For a WebSphere MQ client, ibmwebspheremq followed by your logon user ID
folded to lower case, for example ibmwebspheremqmyuserid.
The procedure for removing personal certificates is described in “Deleting a
personal certificate from a key repository” on page 115.
v On i5/OS, remove the certificate labelled ibmwebspheremq followed by the name
of your queue manager folded to lower case. For example, for QM1,
ibmwebspheremqqm1. The procedure for removing personal certificates is described
in “Removing certificates” on page 95.
v On z/OS, remove from the SSL client’s key repository both:
– The certificate labelled ibmWebSphereMQ followed by the name of your queue
manager, for example ibmWebSphereMQQM1
– The default certificate (which might be the ibmWebSphereMQ certificate).
The procedure for removing personal certificates is described in “Removing
certificates” on page 125.
2. Refresh the SSL environment (if necessary):
On QMA, if the channel initiator was already running (on z/OS) or if any SSL
channels have run previously, you need to issue a REFRESH SECURITY TYPE(SSL)
command. This ensures that all the changes made to the key repository are
available. On QMA, enter the following command:
REFRESH SECURITY TYPE(SSL)
3. Allow anonymous connections on the receiver:
You need to change the receiver definition on QMB to allow anonymous
connections. On QMB, enter the following command:
ALTER CHANNEL(TO.QMB) CHLTYPE(RCVR) SSLCAUTH(OPTIONAL)
Chapter 3. Working with WebSphere MQ TLS and SSL support 85

Result of task 3
The resulting configuration looks like this:
Verifying task 3
If the sender channel was running and the REFRESH SECURITY TYPE(SSL)
command was issued (in step 2), the channel will be restarted automatically. If the
sender channel was not running, you will need to start it.
At the server end of the channel, the presence of the peer name parameter value
on the channel status display indicates that a client certificate has flowed.
You can issue some DISPLAY commands to verify that the task has been
completed successfully. If the task was successful, the resulting output will be
similar to that shown in the following examples:
From the QMA queue manager, enter the following command:
DISPLAY CHS(TO.QMB) SSLPEER SSLCERTI
The resulting output will be similar to the following:
dis chs(TO.QMB) SSLPEER SSLCERTI
4 : dis chs(TO.QMB) SSLPEER
AMQ8417: Display Channel Status details.
CHANNEL(TO.QMB) CHLTYPE(SDR)
CONNAME(9.20.25.40) CURRENT
RQMNAME(QMB)
SSLCERTI("CN=WebSphere MQ CA,OU=WebSphere MQ Devt,O=IBM,ST=Hampshire,C=UK")
SSLPEER("CN=QMB,OU=WebSphere MQ Development,O=IBM,ST=Hampshire,C=UK")
STATUS(RUNNING) SUBSTATE(MQGET)
XMITQ(QMB)
From the QMB queue manager, enter the following command:
DISPLAY CHS(TO.QMB) SSLPEER SSLCERTI
The resulting output will be similar to the following:
dis chs(TO.QMB) SSLPEER SSLCERTI
5 : dis chs(TO.QMB) SSLPEER SSLCERTI
AMQ8417: Display Channel Status details.
CHANNEL(TO.QMB) CHLTYPE(RCVR)
CONNAME(9.20.35.92) CURRENT
transmissionqueuekey repository
TO.QMB
SSLCAUTH (optional)
key repository
CA certificate QMB's certificate
CA certificate
QMA QMB
QMB
Figure 13. Configuration resulting from Task 3
86 WebSphere MQ: Security

RQMNAME(QMA) SSLCERTI( )
SSLPEER( ) STATUS(RUNNING)
SUBSTATE(RECEIVE) XMITQ( )
On QMB, the SSLPEER field is empty, showing that QMA did not send a
certificate. On QMA, the value of SSLPEER matches that of the DN in QMB’s
personal certificate.
Extensions to this task
This task shows the setup required to successfully connect anonymous senders.
In order to see the failure messages that are displayed when anonymous senders
try to connect and the system is not set up to accept them, issue the following
command on QMB:
ALTER CHANNEL(TO.QMB) CHLTYPE(RCVR) SSLCAUTH(REQUIRED)
and restart the sender on QMA.
Other failure scenarios could be tested by removing other certificates from the key
repositories, and issuing
REFRESH SECURITY TYPE(SSL)
when the changes have been made. See “Understanding authentication failures” on
page 147 for information on the types of failures that might occur during an SSL
handshake.
Working with SSL or TLS on i5/OS
To use the WebSphere MQ TLS and SSL support for your i5/OS installation you
must set up your communications to use cryptographic protocols.
This chapter describes how you set up and work with the Secure Sockets Layer
(SSL) on i5/OS. The operations you can perform are:
v “Setting up a key repository” on page 89
v “Working with a key repository” on page 91
v “Obtaining server certificates” on page 92
v “Adding server certificates to a key repository” on page 94
v “Managing digital certificates” on page 94
v “Configuring cryptographic hardware” on page 96
v “Mapping DNs to user IDs” on page 96
For i5/OS, the SSL support is integral to the operating system. Ensure that you
have installed the prerequisites listed in WebSphere MQ for i5/OS Quick
Beginnings.
On i5/OS, you manage keys and digital certificates with the Digital Certificate
Manager (DCM) tool.
Digital Certificate Manager (DCM)
The Digital Certificate Manager (DCM) enables you to manage digital certificates
and to use them in secure applications on the i5/OS server. With Digital Certificate
Manager, you can request and process digital certificates from Certification
Chapter 3. Working with WebSphere MQ TLS and SSL support 87

Authorities (CAs) or other third-parties. You can also act as a local Certification
Authority to create and manage digital certificates for your users.
DCM also supports using CRLs to provide a stronger certificate and application
validation process. You can use DCM to define the location where a specific
Certificate Authority CRL resides on an LDAP server so that WebSphere MQ can
verify that a specific certificate has not been revoked.
On i5/OS V5R1, DCM supports and can automatically detect certificates in the
following formats: Base64, PKCS #7, PKCS #12 V1 and V3 (new in V5R1) and the
C3 encoded standard. C3 is an IBM internal format, used when importing from, or
exporting to, i5/OS systems with i5/OS V4R3. When DCM detects a PKCS #12
encoded certificate, or a PKCS #7 certificate that contains encrypted data, it
automatically prompts the user to enter the password that was used to encrypt the
certificate. DCM does not prompt for PKCS #7 certificates that do not contain
encrypted data.
DCM provides a browser-based user interface that you can use to manage digital
certificates for your applications and users. The user interface is divided into two
main frames: a navigation frame and a task frame.
You use the navigation frame to select the tasks to manage certificates or the
applications that use them. Some individual tasks appear directly in the main
navigation frame, but most tasks in the navigation frame are organized into
categories. For example, Manage Certificates is a task category that contains a
variety of individual guided tasks, such as View certificate, Renew certificate,
Import certificate. If an item in the navigation frame is a category that contains
more than one task, an arrow appears to the left of it. The arrow indicates that
when you select the category link, an expanded list of tasks displays, enabling you
to choose which task to perform.
For important information about DCM, see the following IBM Redbooks®:
v IBM i5/OS Wired Network Security: OS/400® V5R1 DCM and Cryptographic
Enhancements, SG24-6168. Specifically, see the appendices for essential
information on setting up your AS/400® or i5/OS system as a local CA.
v AS/400 Internet Security: Developing a Digital Certificate Infrastructure, SG24-5659.
Specifically, see “Chapter 5. Digital Certificate Manager for AS/400”, which
explains the AS/400 DCM.
Accessing DCM
To access the DCM interface, use a web browser that can display frames and
perform the following steps:
1. Go to either http://machine.domain:2001 or https://machine.domain:2010,
where machine is the name of your computer.
2. A dialog box appears, requesting a user name and a password. Type a valid
user profile and password.
Ensure your user profile has *ALLOBJ and *SECADM special authorities to
enable you to create new certificate stores. If you do not have the special
authorities, you can only manage your personal certificates or view the object
signatures for the objects for which you are authorized. If you are authorized to
use an object signing application, you can also sign objects from DCM.
3. On the AS/400 Tasks page, click Digital Certificate Manager. The Digital
Certificate Manager page displays.
88 WebSphere MQ: Security
Assigning a certificate to a queue manager
In WebSphere MQ Version 7.0, you can use the traditional i5/OS digital certificate
management. This means that you can specify that a queue manager uses the
system certificate store, and that the queue manager is registered for use as an
application with Digital Certificate Manager. To do this you change the value of
the queue manager’s SSLKEYR attribute to *SYSTEM.
When the SSLKEYR parameter is changed to *SYSTEM, WebSphere MQ registers
the queue manager as a server application with a unique application label of
QIBM_WEBSPHERE_MQ_QMGRNAME and a label with a description of
Qmgrname (WMQ). The queue manager then appears as a server application in
Digital Certificate Manager, and you can assign to this application any server or
client certificate in the system store.
Because the queue manager is registered as an application, advanced features of
DCM such as defining CA trust lists can be carried out.
If the SSLKEYR parameter is changed to a value other than *SYSTEM, WebSphere
MQ deregisters the queue manager as an application with Digital Certificate
Manager. If a queue manager is deleted, it is also deregistered from DCM. A user
with sufficient *SECADM authority can also manually add or remove applications
from DCM.
Setting up a key repository
An SSL connection requires a key repository at each end of the connection. Each
queue manager must have access to a key repository. If you want to access the key
repository using a file name and password (that is, not using the *SYSTEM option)
ensure:
v the QMQM user profile has execute authority for the directory containing the
key repository
v the QMQM user profile has read authority for the file containing the key
repository
See “The SSL key repository” on page 42 for more information.
On i5/OS, digital certificates are stored in a certificate store that is managed with
DCM. These digital certificates have labels, which associate a certificate with a
queue manager. SSL uses the certificates for authentication purposes.
The queue manager certificate store name comprises a path and stem name. The
default path is /QIBM/UserData/ICSS/Cert/Server/ and the default stem name is
Default. On i5/OS, the default certificate store, /QIBM/UserData/ICSS/Cert/Server/Default.kdb, is also known as *SYSTEM. Optionally, you can choose your own path
and stem name.
“Working with a key repository” on page 91 tells you about checking and
specifying the certificate store name. You can specify the certificate store name
either before or after creating the certificate store.
Note: The operations you can perform with DCM might be limited by the
authority of your user profile. For example, you require *ALLOBJ and *SECADM
authorities to create a CA certificate.
Chapter 3. Working with WebSphere MQ TLS and SSL support 89
Creating a new certificate store
You create a new certificate store only if you do not want to use the i5/OS default
certificate store.
You can specify that the i5/OS system certificate store is to be used by changing
the value of the queue manager’s SSLKEYR attribute to *SYSTEM. This value
indicates that the queue manager will use the system certificate store, and the
queue manager is registered for use as an application with Digital Certificate
Manager (DCM).
Use the following procedure to create a new certificate store for a queue manager:
1. Access the DCM interface, as described in “Accessing DCM” on page 88.
2. In the navigation panel, click Create New Certificate Store. The Create New
Certificate Store page displays in the task frame.
3. In the task frame, select the Other System Certificate Store radio button. Click
Continue. The Create a Certificate in New Certificate Store page displays in the
task frame.
4. Select the No - Do not create a certificate in the certificate store radio button.
Click Continue. The Certificate Store Name and Password page displays in the
task frame.
5. In the Certificate store path and filename field, type an IFS path and filename,
for example /QIBM/UserData/mqm/qmgrs/qm1/key.kdb
6. Type a password in the Password field and type it again in the Confirm
Password field. Click Continue. A window displays, containing a list of the CA
certificates that are pre-installed in the certificate store. This list includes the
certificate for the local CA, if you have created one. Make a note of the
password (which is case sensitive) because you will need it when you stash the
repository key.
7. To exit from DCM, close your browser window.
When you have created the certificate store using DCM, ensure you stash the
password, as described in “Stashing the certificate store password.”
Stashing the certificate store password
Note that if you have specified that the system certificate store is to be used (by
changing the value of the queue manager’s SSLKEYR attribute to *SYSTEM) you
do not need to follow the steps in this section.
When you have created the certificate store using DCM, use the following
commands to stash the password:
STRMQM MQMNAME(’queue manager name’)
CHGMQM MQMNAME(’queue manager name’) SSLKEYRPWD(’password’)
The password must be entered as a literal (in single quotes) exactly as you entered
it in 6 of “Creating a new certificate store” (it is case sensitive).
Note: If you are not using the default system certificate store, and you do not
stash the password, attempts to start SSL channels fail because they cannot obtain
the password required to access the certificate store.
90 WebSphere MQ: Security

Working with a key repository
This section tells you how to perform the following tasks:
v “Locating the key repository for a queue manager”
v “Changing the key repository location for a queue manager”
Note: When you change either the key repository attribute, or the certificates in
the key repository, check “When changes become effective.”
Locating the key repository for a queue manager
Use this procedure to obtain information about the location of your queue
manager’s certificate store:
1. Display your queue manager’s attributes, using the following command:
DSPMQM MQMNAME(’queue manager name’)
2. Examine the command output for the path and stem name of the certificate
store. For example: /QIBM/UserData/ICSS/Cert/Server/Default, where
/QIBM/UserData/ICSS/Cert/Server is the path and Default is the stem name.
Changing the key repository location for a queue manager
You can change the location of your queue manager’s certificate store using any of
the following methods:
v Use either the CHGMQM command or the ALTER QMGR MQSC command to
set your queue manager’s key repository attribute, for example:
CHGMQM MQMNAME(’qm1’) SSLKEYR(’/QIBM/UserData/ICSS/Cert/Server/MyKey’)
ALTER QMGR SSLKEYR(’/QIBM/UserData/ICSS/Cert/Server/MyKey’)
The certificate store has the fully-qualified filename: /QIBM/UserData/ICSS/Cert/Server/MyKey.kdb
When you change the location of a queue manager’s certificate store, certificates
are not transferred from the old location. If the CA certificates pre-installed when
you created the certificate store are insufficient, you must populate the new
certificate store with certificates, as described in “Managing digital certificates” on
page 94. You must also stash the password for the new location, as described in
“Stashing the certificate store password” on page 90.
When changes become effective
Changes to the certificates in the certificate store and to the key repository attribute
become effective:
v When a new outbound single channel process first runs an SSL channel.
v When a new inbound TCP/IP single channel process first receives a request to
start an SSL channel.
v When the REFRESH SECURITY TYPE(SSL) command is issued to refresh the
contents of the SSL key repository.
v For channels that run as threads of a process pooling process (amqrmppa), when
the process pooling process is started or restarted and first runs an SSL channel.
If the process pooling process has already run an SSL channel, and you want the
change to become effective immediately, restart the queue manager.
v For channels that run as threads of the channel initiator, when the channel
initiator is started or restarted and first runs an SSL channel. If the channel
Chapter 3. Working with WebSphere MQ TLS and SSL support 91
initiator process has already run an SSL channel, and you want the change to
become effective immediately, restart the queue manager.
v For channels that run as threads of a TCP/IP listener, when the listener is
started or restarted and first receives a request to start an SSL channel.
Obtaining server certificates
You apply to a Certification Authority for the server certificate that is used to
verify the identity of your queue manager. You can also create CA certificates for
signing certificates for testing SSL on i5/OS.
This section tells you how to use DCM for:
1. “Creating CA certificates for testing”
2. “Requesting a server certificate” on page 93
Creating CA certificates for testing
The CA certificates that are provided when you install SSL are signed by the
issuing CA. On i5/OS, you can generate a local Certification Authority that can
sign server certificates for testing SSL communications on your system.
The instructions in this section assume that a local CA does not already exist. If a
local CA does exist, go straight to “Requesting a server certificate” on page 93.
Use the following procedure in Internet Explorer to create a local CA certificate to
sign certificate requests:
1. Access the DCM interface, as described in “Accessing DCM” on page 88.
2. In the navigation panel, click Create a Certificate Authority. The Create a
Certificate Authority page displays in the task frame.
3. Type a password in the Certificate store password field and type it again in
the Confirm password field.
4. Type a name in the Certificate Authority (CA) name field, for example SSL
Test Certification Authority.
5. Type a Common Name and Organization, and select a Country. For the
remaining optional fields, type the values you require.
6. Type a validity period for the local CA in the Validity period field. The
default value is 1095 days.
7. Click Continue. The CA is created, and DCM creates a certificate store and a
CA certificate for your local CA.
8. Click Install certificate. The download manager dialog box displays.
9. Type the full path name for the temporary file in which you want to store the
CA certificate and click Save.
10. When download is complete, click Open. The Certificate window displays
11. Click Install certificate. The Certificate Import Wizard displays.
12. Click Next.
13. Type the full path name of the temporary file in which you stored the CA
certificate, or click Browse to find the temporary file.
14. Click Next.
15. Select the Automatically select the certificate store based on the type of
certificate check box.
16. Click Next.
92 WebSphere MQ: Security
17. Click Finish. A confirmation window appears.
18. Click OK.
19. Click OK in the Certificate window.
20. Click Continue. The Certificate Authority Policy page displays in the task
frame.
21. In the allow creation of user certificates field, select the Yes radio button.
22. In the Validity period field, type the validity period of certificates that are
issued by your local CA. The default value is 365 days.
23. Click Continue. The Create a Certificate in New Certificate Store page
displays in the task frame.
24. Ensure none of the applications are selected.
25. Click Continue to complete the setup of the local CA.
When you make certificate requests to the local CA, as described in “Requesting a
server certificate,” the signed certificates can be exported and imported in PKCS
#12 format into certificate stores to test SSL.
Requesting a server certificate
To apply for a server certificate, use the DCM tool as follows:
1. Access the DCM interface, as described in “Accessing DCM” on page 88.
2. In the navigation panel, click Select a Certificate Store. The Select a
Certificate Store page displays in the task frame.
3. Select the Other System Certificate Store check box and click Continue. The
Certificate Store and Password page displays.
4. In the Certificate store path and filename field, type the IFS path and
filename you set when “Creating a new certificate store” on page 90.
5. Type a password in the Certificate Store Password field. Click Continue. The
Current Certificate Store page displays in the task frame.
6. In the navigation panel, click Create Certificate.
7. In the task frame, select the Server or client certificate radio button and click
Continue. The Select a Certificate Authority (CA) page displays in the task
frame.
8. If you have a local CA on your machine you choose either the local CA or a
commercial CA to sign the certificate. Select the radio button for the CA you
want and click Continue. The Create a Certificate page displays in the task
frame.
9. In the Certificate label field, type ibmwebspheremq followed by the name of
your queue manager folded to lower case. For example, for QM1,
ibmwebspheremqqm1
10. Type a Common Name and Organization, and select a Country. For the
remaining optional fields, type the values you require.
11. If you selected a commercial CA to sign your certificate, DCM creates a
certificate request in PEM (Privacy-Enhanced Mail) format. Forward the
request to your chosen CA.
If you selected the local CA to sign your certificate, DCM informs you that the
certificate has been created in the certificate store and can be used.
Chapter 3. Working with WebSphere MQ TLS and SSL support 93

Adding server certificates to a key repository
After the CA sends you a new server certificate, you add it to the certificate store
from which you generated the request. If the CA sends the certificate as part of an
e-mail message, copy the certificate into a separate file.
Note:
1. You do not need to perform this procedure if the server certificate is signed by
your local CA.
2. Before you import a server certificate in PKCS #12 format into DCM, you must
first import the corresponding CA certificate.
Use the following procedure to receive a server certificate into the queue manager
certificate store:
1. Access the DCM interface, as described in “Accessing DCM” on page 88.
2. In the Manage Certificates task category in the navigation panel, click Import
Certificate. The Import Certificate page displays in the task frame.
3. Select the radio button for your certificate type and click Continue. Either the
Import Server or Client Certificate page or the Import Certificate Authority
(CA) Certificate page displays in the task frame.
4. In the Import File field, type the filename of the certificate you want to import
and click Continue. DCM automatically determines the format of the file.
5. If the certificate is a Server or client certificate, type the password in the task
frame and click Continue. DCM informs you that the certificate has been
imported.
Managing digital certificates
This section tells you about managing the digital certificates in your certificate
store.
When you make changes to the certificates in a certificate store, refer to “When
changes become effective” on page 91.
Transferring certificates
This section tells you how to extract a certificate from a certificate store to allow it
to be copied to another system, and how to add a certificate from another system
into your certificate store.
Exporting a certificate from a key repository:
Perform the following steps on the machine from which you want to export the
certificate:
1. Access the DCM interface, as described in “Accessing DCM” on page 88.
2. In the navigation panel, click Select a Certificate Store. The Select a
Certificate Store page displays in the task frame.
3. Select the Other System Certificate Store check box and click Continue. The
Certificate Store and Password page displays.
4. In the Certificate store path and filename field, type the IFS path and
filename you set when “Creating a new certificate store” on page 90.
5. Type a password in the Certificate Store Password field. Click Continue. The
Current Certificate Store page displays in the task frame.
94 WebSphere MQ: Security
6. In the Manage Certificates task category in the navigation panel, click Export
Certificate. The Export a Certificate page displays in the task frame.
7. Select the radio button for your certificate type and click Continue. Either the
Export Server or Client Certificate page or the Export Certificate Authority
(CA) Certificate page displays in the task frame.
8. Select the certificate you want to export.
9. Select the radio button to specify whether you want to export the certificate to
a file or directly into another certificate store.
10. If you selected to export a server or client certificate to a file, you provide the
following information:
v The path and file name of the location where you want to store the
exported certificate.
v For a personal certificate, the password that is used to encrypt the exported
certificate and the target release. The target release specifies the minimum
level of i5/OS to which the certificate can be exported. For CA certificates,
you do not need to specify the password.
If you selected to export a certificate directly into another certificate store,
specify the target certificate store and its password. Click Continue.
Importing a certificate into a key repository:
Note: Before you import a personal certificate in PKCS #12 format into DCM, you
must first import the corresponding CA certificate.
Perform the following steps on the machine to which you want to import the
certificate:
1. Access the DCM interface, as described in “Accessing DCM” on page 88.
2. In the navigation panel, click Select a Certificate Store. The Select a Certificate
Store page displays in the task frame.
3. Select the Other System Certificate Store check box and click Continue. The
Certificate Store and Password page displays.
4. In the Certificate store path and filename field, type the IFS path and filename
you set when “Creating a new certificate store” on page 90.
5. Type a password in the Certificate Store Password field. Click Continue. The
Current Certificate Store page displays in the task frame.
6. In the Manage Certificates task category in the navigation panel, click Import
Certificate. The Import Certificate page displays in the task frame.
7. Select the radio button for your certificate type and click Continue. Either the
Import Server or Client Certificate page or the Import Certificate Authority
(CA) Certificate page displays in the task frame.
8. In the Import File field, type the filename of the certificate you want to import
and click Continue. DCM automatically determines the format of the file.
9. If the certificate is a Server or client certificate, type the password in the task
frame and click Continue. DCM informs you that the certificate has been
imported.
Removing certificates
Use the following procedure to remove personal certificates:
1. Access the DCM interface, as described in “Accessing DCM” on page 88.
2. In the navigation panel, click Select a Certificate Store. The Select a Certificate
Store page displays in the task frame.
Chapter 3. Working with WebSphere MQ TLS and SSL support 95

3. Select the Other System Certificate Store check box and click Continue. The
Certificate Store and Password page displays.
4. In the Certificate store path and filename field, type the IFS path and filename
you set when “Creating a new certificate store” on page 90.
5. Type a password in the Certificate Store Password field. Click Continue. The
Current Certificate Store page displays in the task frame.
6. In the Manage Certificates task category in the navigation panel, click Delete
Certificate. The Delete a Certificate page displays in the task frame.
7. Select the radio button for your certificate type and click Continue. The
Confirm Delete a Certificate page displays in the task frame.
8. Select the certificate you want to delete. Click Delete.
9. Click Yes to confirm that you want to delete the certificate. Otherwise, click No.
DCM informs you if it has deleted the certificate.
Configuring cryptographic hardware
Use the following procedure to configure the 4758 PCI Cryptographic Coprocessor
on i5/OS:
1. Go to either http://machine.domain:2001 or https://machine.domain:2010,
where machine is the name of your computer.
2. A dialog box appears, requesting a user name and a password. Type a valid
i5/OS user profile and password.
Ensure your user profile has *ALLOBJ and *SECADM special authorities to
enable you to configure the coprocessor hardware.
3. On the AS/400 Tasks page, click 4758 PCI Cryptographic Coprocessor.
For more information about configuring the 4758 PCI Cryptographic Coprocessor,
refer to the i5/OS Information Center at http://publib.boulder.ibm.com/html/as400/infocenter.html
Mapping DNs to user IDs
WebSphere MQ on i5/OS does not support the i5/OS function that is equivalent to
the z/OS CNFs, which are described in “Working with Certificate Name Filters
(CNFs)” on page 126. If you want to implement a function that maps
Distinguished Names to user IDs, consider using a channel security exit.
Working with SSL or TLS on UNIX and Windows systems
To use the WebSphere MQ TLS and SSL support for your UNIX or Windows
system you must set up your communications to use cryptographic protocols.
This chapter applies to the following:
v WebSphere MQ for AIX
v WebSphere MQ for HP-UX
v WebSphere MQ for Linux
v WebSphere MQ for Solaris
v WebSphere MQ for Windows
For WebSphere MQ on UNIX and Windows, the SSL support is installed with
WebSphere MQ.
96 WebSphere MQ: Security

This chapter describes how you set up and work with the Secure Sockets Layer
(SSL) on UNIX and Windows systems.
Before you run SSL on HP-UX, read the WebSphere MQ for HP-UX Quick
Beginnings book.
Using iKeyman, iKeyCmd, and GSKCapiCmd
On UNIX and Windows systems, manage keys and digital certificates with the
iKeyman GUI or from the command line using iKeyCmd or GSKCapiCmd.
v For UNIX systems:
– Use the gsk7ikm command to start the iKeyman GUI.
– Use the gsk7cmd command to perform tasks with the iKeyCmd command
line interface.
– Use the gsk7capicmd command to perform tasks with the GSKCapiCmd
command line interface. The command syntax for gsk7capicmd is the same as
the syntax for gsk7cmd.
If you need to manage SSL certificates in a way that is FIPS and Common
Criteria compliant, use the gsk7capicmd command instead of the gsk7cmd or
runmqckm commands.
See the WebSphere MQ System Administration Guide for a full description of
the command line interfaces for the gsk7cmd and gsk7capicmd commands.
Before you run the gsk7ikm command to start the iKeyman GUI, ensure you are
working on a machine that is able to run the X Window System and that you do
the following:
– Set the DISPLAY environment variable, for example:
export DISPLAY=mypc:0
– Ensure that your PATH environment variable contains /usr/bin and /bin. This
is also required for the gsk7cmd and gsk7capicmd commands. For example:
export PATH=$PATH:/usr/bin:/bin
– Set the JAVA_HOME environment variable:
AIX export JAVA_HOME=/usr/mqm/ssl/jre
HP-UX export JAVA_HOME=/opt/mqm/ssl/jre
Linux export JAVA_HOME=/opt/mqm/ssl/jre
Solaris export JAVA_HOME=/opt/mqm/ssl
These are also required for the gsk7cmd command.v For Windows systems:
– Use the strmqikm command to start the iKeyman GUI.
– Use the runmqckm command to perform tasks with the iKeyCmd command
line interface.
– Use the gsk7capicmd command to perform tasks with the GSKCapiCmd
command line interface. The command syntax for gsk7capicmd is the same as
the syntax for runmqckm.
Before you run gsk7capicmd on Windows, set your PATH environment variable
to include the GSKit binary and library directories. For example, at the
command line, enter:
set PATH=%PATH%;C:\Program Files\IBM\gsk7\bin;C:\Program Files\IBM\gsk7\lib
See the WebSphere MQ System Administration Guide for more information on the
strmqikm, runmqckm, and gsk7capicmd commands.
Chapter 3. Working with WebSphere MQ TLS and SSL support 97

To request SSL tracing on UNIX or Windows systems, see the WebSphere MQ
System Administration Guide.
Setting up a key repository
An SSL connection requires a key repository at each end of the connection. Each
WebSphere MQ queue manager and WebSphere MQ client must have access to a
key repository. See “The SSL key repository” on page 42 for more information.
On UNIX and Windows systems, digital certificates are stored in a key database
file that is managed with iKeyman, iKeyCmd, or GSKCapiCmd. These digital
certificates have labels. A specific label associates a personal certificate with a
queue manager or WebSphere MQ client. SSL uses that certificate for
authentication purposes. On UNIX and Windows systems, WebSphere MQ uses the
ibmwebspheremq prefix on a label to avoid confusion with certificates for other
products. The prefix is followed by the name of the queue manager or WebSphere
MQ client user logon ID, changed to lower case. Ensure that you specify the entire
certificate label in lower case.
The key database file name comprises a path and stem name:
v On UNIX, the default path for a queue manager (set when you create the queue
manager) is /var/mqm/qmgrs/<queue_manager_name>/ssl.
On Windows, the default path is install_directory\Qmgrs\<queue_manager_name>\ssl, where install_directory is the directory in which
WebSphere MQ is installed. For example, C:\Program Files\IBM\WebSphere
MQ\Qmgrs\<queue_manager_name>\ssl .
The default stem name is key. Optionally, you can choose your own path and
stem name, but the extension must be .kdb.
v For a WebSphere MQ client, there is no default path or stem name. Choose a
key database file to which you can restrict access. The extension must be .kdb.
Note that key repositories should not be created on a file system that does not
support file level locks, for example NFS version 2 on Linux.
“Working with a key repository” on page 101 tells you about checking and
specifying the key database file name. You can specify the key database file name
either before or after creating the key database file.
The user ID from which you run iKeyman or iKeyCmd must have write
permission for the directory in which the key database file is created or updated.
For a queue manager using the default SSL directory, the user ID from which you
run iKeyman or iKeyCmd must be a member of the mqm group. For a WebSphere
MQ client, if you run iKeyman or iKeyCmd from a user ID different from that
under which the client runs, you must alter the file permissions to enable the
WebSphere MQ client to access the key database file at run time. For more
information, refer to “Accessing your key database file” on page 100.
Use the following procedure to create a new key database file for either a queue
manager or a WebSphere MQ client:
1. Start the iKeyman GUI (using the gsk7ikm command on UNIX, or the
strmqikm command on Windows).
2. From the Key Database File menu, click New. The New window is displayed.
3. Click Key database type and select CMS (Certificate Management System).
98 WebSphere MQ: Security

4. In the File Name field, type a file name. This field already contains the text
key.kdb. If your stem name is key, leave this field unchanged. If you have
specified a different stem name, replace key with your stem name but you
must not change the .kdb.
5. In the Location field, type the path, for example:
v For a queue manager: /var/mqm/qmgrs/QM1/ssl (on UNIX) or C:\Program
Files\IBM\WebSphere MQ\qmgrs\QM1\ssl (on Windows)
v For a WebSphere MQ client: /var/mqm/ssl (on UNIX) or C:\mqm\ssl (on
Windows) 6. Click Open. The Password Prompt window displays.
7. Type a password in the Password field, and type it again in the Confirm
Password field.
8. Select the Stash the password to a file check box.
Note: If you do not stash the password, attempts to start SSL channels fail
because they cannot obtain the password required to access the key database
file.
9. Click OK. A window is displayed, confirming that the password is in file
key.sth (unless you specified a different stem name).
10. Click OK. The Signer Certificates window is displayed, containing a list of the
CA certificates that are provided with iKeyman and pre-installed in the key
database.
11. Set the access permissions, as described in “Accessing your key database file”
on page 100.
Use the following commands to create a new CMS key database file using
iKeyCmd or GSKCapiCmd:
v On UNIX:
gsk7cmd -keydb -create -db filename -pw password -type cms -expire days
-stash
v On Windows:
runmqckm -keydb -create -db filename -pw password -type cms -expire days
-stash
v Using GSKCapiCmd:
gsk7capicmd -keydb -create -db filename -pw password -type cms -expire days
-stash -fips -strong
where:
-db filename is the fully qualified file name of a CMS key database, and
must have a file extension of .kdb.
-pw password is the password for the CMS key database.
-type cms is the type of database (for WebSphere MQ, this must be cms).
-expire days is the expiration time in days of the database password. There
is no default time for a database password: use the -expire
option to set a database password expiration time explicitly.
-stash tells iKeyCmd or GSKCapiCmd to stash the key database
password to a file.
-fips disables the use of the BSafe cryptographic library. Only the
ICC component is used and this component must be
successfully initialized in FIPS mode. When in FIPS mode, the
ICC component uses algorithms that have been FIPS 140-2
validated. If the ICC component does not initialize in FIPS
mode, the gsk7capicmd command fails.
Chapter 3. Working with WebSphere MQ TLS and SSL support 99

-strong checks that the password entered satisfies the minimum
requirements for password strength. The minimum
requirements for a password are as follows:
v The password must be a minimum length of 14 characters.
v The password must contain a minimum of one lower case
character, one upper case character, and one digit or special
character. Special characters include the asterisk (*), the
dollar sign ($), the number sign (#) and the percent sign (%).
A space is classified as a special character.
v Each character can only occur a maximum of three times in a
password.
v A maximum of two consecutive characters in the password
can be identical.
v All characters described above are in the standard ASCII
printable character set within the range from 0x20 to 0x7E
inclusive.
For more information about CA certificates, refer to “Digital certificates” on page
14.
Accessing your key database file
Accessing your key database file on Windows:
On Windows, the key database file (.kdb) is created with read permission for all
user IDs, so it is not necessary to change the access permissions. When you
migrate your digital certificates from the certificate store on WebSphere MQ for
Windows V5.3 or V5.3.1 to a GSKit key repository, the .kdb file is created as part of
the certificate transfer (using AMQTCERT), and the required access permissions
must already be set for this to succeed.
Accessing your key database file on UNIX:
On UNIX, the key database file must be created using iKeyman, iKeyCmd, or
GSKCapiCmd. When you create your key database file using iKeyman, iKeyCmd,
or GSKCapiCmd, the access permissions for the key database file are set to give
access only to the user ID from which you used iKeyman, iKeyCmd, or
GSKCapiCmd.
The key database file is accessed by an MCA, so ensure that the user ID under
which the MCA runs has permission to read both the key database file and the
password stash file. MCAs usually run under the mqm user ID, which is in the
mqm group. After you have created your queue manager key database file, work
with the same user ID to add read permission for the mqm group, using the UNIX
chmod command. For example:
chmod g+r /var/mqm/qmgrs/QM1/ssl/key.kdb
chmod g+r /var/mqm/qmgrs/QM1/ssl/key.sth
When you set up the key database file for a WebSphere MQ client, consider
working with the user ID under which you run the WebSphere MQ client. This
allows you to restrict access to that single user ID. If you need to grant access to a
user ID in the same group, use the UNIX chmod command. For example:
chmod g+r /var/mqm/ssl/key.kdb
chmod g+r /var/mqm/ssl/key.sth
100 WebSphere MQ: Security

Avoid giving permission to user IDs that are in different groups. For more
information, refer to “Protecting WebSphere MQ client key repositories” on page
43.
Working with a key repository
This section tells you how to perform the following tasks:
v “Locating the key repository for a queue manager”
v “Changing the key repository location for a queue manager”
v “Locating the key repository for a WebSphere MQ client” on page 102
v “Specifying the key repository location for a WebSphere MQ client” on page 102
Note: When you change either the key repository attribute, or the certificates in
the key database file, check “When changes become effective” on page 102.
Locating the key repository for a queue manager
Use this procedure to obtain information about the location of your queue
manager’s key database file:
1. Display your queue manager’s attributes, using either of the following MQSC
commands:
DISPLAY QMGR ALL
DISPLAY QMGR SSLKEYR
You can also display your queue manager’s attributes using the WebSphere MQ
Explorer or PCF commands.
2. Examine the command output for the path and stem name of the key database
file. For example, on UNIX: /var/mqm/qmgrs/QM1/ssl/key, where
/var/mqm/qmgrs/QM1/ssl is the path and key is the stem name; on Windows:
C:\Program Files\IBM\WebSphere MQ\qmgrs\QM1\ssl\key, where C:\Program
Files\IBM\WebSphere MQ\qmgrs\QM1\ssl is the path and key is the stem name.
Changing the key repository location for a queue manager
You can change the location of your queue manager’s key database file by using
the MQSC command ALTER QMGR to set your queue manager’s key repository
attribute. For example, on UNIX:
ALTER QMGR SSLKEYR(’/var/mqm/qmgrs/QM1/ssl/MyKey’)
The key database file has the fully-qualified filename: /var/mqm/qmgrs/QM1/ssl/MyKey.kdb
On Windows:
ALTER QMGR SSLKEYR(’C:\Program Files\IBM\WebSphere MQ\Qmgrs\QM1\ssl\Mykey’)
The key database file has the fully-qualified filename: C:\Program
Files\IBM\WebSphere MQ\Qmgrs\QM1\ssl\Mykey.kdb
You can also alter your queue manager’s attributes using the WebSphere MQ
Explorer or PCF commands.
When you change the location of a queue manager’s key database file, certificates
are not transferred from the old location. If the CA certificates pre-installed when
Chapter 3. Working with WebSphere MQ TLS and SSL support 101

you create the key database file are insufficient, you must populate the new key
database file with the extra CA certificates you need, as described in “Managing
digital certificates” on page 107.
Locating the key repository for a WebSphere MQ client
Examine the MQSSLKEYR environment variable to obtain the location of your
WebSphere MQ client’s key database file. For example:
echo $MQSSLKEYR
Also check your application, because the key database file name can also be set in
an MQCONNX call, as described in “Specifying the key repository location for a
WebSphere MQ client.” The value set in an MQCONNX call overrides the value of
MQSSLKEYR.
Specifying the key repository location for a WebSphere MQ
client
There is no default key repository for a WebSphere MQ client. Ensure that the key
database file can be accessed only by intended users or administrators to prevent
unauthorized copying to other systems.
You can specify the location of your WebSphere MQ client’s key database file by:
v Setting the MQSSLKEYR environment variable. For example, on UNIX:
export MQSSLKEYR=/var/mqm/ssl/key
The key database file has the fully-qualified filename:
/var/mqm/ssl/key.kdb
On Windows:
set MQSSLKEYR=C:\Program Files\IBM\WebSphere MQ\ssl\key
The key database file has the fully-qualified filename:
C:\Program Files\IBM\WebSphere MQ\ssl\key.kdb
Note: The .kdb extension is a mandatory part of the filename, but is not
included as part of the value of the environment variable.
v Providing the path and stem name of the key database file in the KeyRepository
field of the MQSCO structure when an application makes an MQCONNX call.
For more information about using the MQSCO structure in MQCONNX, refer to
the WebSphere MQ Application Programming Reference.
When changes become effective
Changes to the certificates in the key database file and to the key repository
attribute become effective:
v When a new outbound single channel process first runs an SSL channel.
v When a new inbound TCP/IP single channel process first receives a request to
start an SSL channel.
v When the MQSC command REFRESH SECURITY TYPE(SSL) is issued to refresh
the WMQ SSL environment.
v For channels that run as threads of a process pooling process (amqrmppa), when
the process pooling process is started or restarted and first runs an SSL channel.
102 WebSphere MQ: Security

If the process pooling process has already run an SSL channel, and you want the
change to become effective immediately, run the MQSC command REFRESH
SECURITY TYPE(SSL).
v For channels that run as threads of the channel initiator, when the channel
initiator is started or restarted and first runs an SSL channel. If the channel
initiator process has already run an SSL channel, and you want the change to
become effective immediately, run the MQSC command REFRESH SECURITY
TYPE(SSL).
v For channels that run as threads of a TCP/IP listener, when the listener is
started or restarted and first receives a request to start an SSL channel. If the
listener has already run an SSL channel, and you want the change to become
effective immediately, run the MQSC command REFRESH SECURITY
TYPE(SSL).
You can also refresh the WebSphere MQ SSL environment using the WebSphere
MQ Explorer or PCF commands.
Obtaining personal certificates
Usually, in a production environment, you apply to a Certification Authority for
the personal certificate that is used to verify the identity of your queue manager or
WebSphere MQ client. You can also use self-signed personal certificates for testing
SSL on your UNIX or Windows system.
This section tells you how to use iKeyman for:
1. “Creating a self-signed personal certificate”
2. “Requesting a personal certificate” on page 105
Creating a self-signed personal certificate
When you create a key database, no personal certificates are provided. However,
you need a personal certificate before you can run an SSL channel. A self-signed
personal certificate can be used to run SSL channels for the purposes of testing SSL
communications. These certificates can be created on either a WebSphere MQ
queue manager or WebSphere MQ client system.
Use the following procedure to obtain a self-signed certificate for your queue
manager or WebSphere MQ client:
1. Start the iKeyman GUI using either the gsk7ikm command (on UNIX) or the
strmqikm command (on Windows).
2. From the Key Database File menu, click Open. The Open window displays.
3. Click Key database type and select CMS (Certificate Management System).
4. Click Browse to navigate to the directory that contains the key database files.
5. Select the key database file in which you want to save the certificate, for
example key.kdb.
6. Click Open. The Password Prompt window displays.
7. Type the password you set when you created the key database and click OK.
The name of your key database file displays in the File Name field.
8. From the Create menu, click New Self-Signed Certificate. The Create New
Self-Signed Certificate window displays.
9. In the Key Label field, type:
Chapter 3. Working with WebSphere MQ TLS and SSL support 103

v For a queue manager, ibmwebspheremq followed by the name of your queue
manager folded to lower case. For example, for QM1, ibmwebspheremqqm1, or,
v For a WebSphere MQ client, ibmwebspheremq followed by your logon user
ID folded to lower case, for example ibmwebspheremqmyuserid.10. Type a Common Name and Organization, and select a Country. For the
remaining optional fields, either accept the default values, or type or select
new values. Note that you can supply only one name in the Organizational
Unit field. For more information about these fields, refer to “Distinguished
Names” on page 16.
11. Click OK. The Personal Certificates list shows the label of the self-signed
personal certificate you created.
Use the following commands to create a self-signed personal certificate using
iKeyCmd or GSKCapiCmd:
v On UNIX:
gsk7cmd -cert -create -db filename -pw password -label label
-dn distinguished_name -size key_size -x509version version -expire days
v On Windows:
runmqckm -cert -create -db filename -pw password -label label
-dn distinguished_name -size key_size -x509version version -expire days
v Using GSKCapiCmd:
gsk7capicmd -cert -create -db filename -pw password -label label
-dn distinguished_name -size key_size -x509version version -expire days
-fips -sigalg md5 | sha1 | sha224 | sha256 | sha384 | sha512
where:
-db filename is the fully qualified file name of a CMS key database.
-pw password is the password for the CMS key database.
-label label is the key label attached to the certificate.
-dn distinguished_name is the X.500 distinguished name enclosed in double quotes.
Note that only the CN attribute is required. You can supply
multiple OU attributes.
-size key_size is the key size. For iKeyCmd, the value can be 512 or 1024.
For GSKCapiCmd, the value can be 512, 1024, or 2048.
-x509version version is the version of X.509 certificate to create. The value can be 1,
2, or 3. The default is 3.
-expire days is the expiration time in days of the certificate. The default is
365 days for a certificate.
-fips specifies that the command is run in FIPS mode. This mode
disables the use of the BSafe cryptographic library. Only the
ICC component is used and this component must be
successfully initialized in FIPS mode. When in FIPS mode, the
ICC component uses algorithms that have been FIPS 140-2
validated. If the ICC component does not initialize in FIPS
mode, the gsk7capicmd command fails.
-sigalg The hashing algorithm used during the creation of a certificate
request, a self-signed certificate, or the signing of a certificate.
This hashing algorithm is used to create the signature
associated with the newly created self-signed certificate. The
value can be md5, sha1, sha224, sha256, sha384, or sha512. The
default is sha1.
104 WebSphere MQ: Security

Requesting a personal certificate
To apply for a personal certificate, use the iKeyman tool as follows:
1. Start the iKeyman GUI using either the gsk7ikm command (UNIX) or the
strmqikm command (Windows).
2. From the Key Database File menu, click Open. The Open window displays.
3. Click Key database type and select CMS (Certificate Management System).
4. Click Browse to navigate to the directory that contains the key database files.
5. Select the key database file from which you want to generate the request, for
example key.kdb.
6. Click Open. The Password Prompt window displays.
7. Type the password you set when you created the key database and click OK.
The name of your key database file displays in the File Name field.
8. From the Create menu, click New Certificate Request. The Create New Key
and Certificate Request window displays.
9. In the Key Label field, type:
v For a queue manager, ibmwebspheremq followed by the name of your queue
manager changed to lower case. For example, for QM1, ibmwebspheremqqm1,
or
v For a WebSphere MQ client, ibmwebspheremq followed by your logon user
ID folded to lower case, for example ibmwebspheremqmyuserid.10. Type a Common Name and Organization, and select a Country. For the
remaining optional fields, either accept the default values, or type or select
new values. Note that you can supply only one name in the Organizational
Unit field. For more information about these fields, refer to “Distinguished
Names” on page 16.
11. In the Enter the name of a file in which to store the certificate request field,
either accept the default certreq.arm, or type a new value with a full path.
12. Click OK. A confirmation window displays.
13. Click OK. The Personal Certificate Requests list shows the label of the new
personal certificate request you created. The certificate request is stored in the
file you chose in step 11.
14. Request the new personal certificate either by sending the file to a
Certification Authority (CA), or by copying the file into the request form on
the Web site for the CA.
Use the following commands to request a personal certificate using iKeyCmd or
GSKCapiCmd:
v On UNIX:
gsk7cmd -certreq -create -db filename -pw password -label label
-dn distinguished_name -size key_size -file filename
v On Windows:
runmqckm -certreq -create -db filename -pw password -label label
-dn distinguished_name -size key_size -file filename
v Using GSKCapiCmd:
gsk7capicmd -certreq -create -db filename -pw password -label label
-dn distinguished_name -size key_size -file filename -fips
-sigalg md5 | sha1 | sha224 | sha256 | sha384 | sha512
where:
-db filename is the fully qualified file name of a CMS key database.
Chapter 3. Working with WebSphere MQ TLS and SSL support 105
-pw password is the password for the CMS key database.
-label label is the key label attached to the certificate.
-dn distinguished_name is the X.500 distinguished name enclosed in double quotes.
Note that only the CN attribute is required. You can supply
multiple OU attributes.
-size key_size is the key size. If you are using iKeyCmd, the value can be 512
or 1024.
If you are using GSKCapiCmd, the value can be 512, 1024, or
2048.
-file filename is the filename for the certificate request.
-fips specifies that the command is run in FIPS mode. This mode
disables the use of the BSafe cryptographic library. Only the
ICC component is used and this component must be
successfully initialized in FIPS mode. When in FIPS mode, the
ICC component uses algorithms that have been FIPS 140-2
validated. If the ICC component does not initialize in FIPS
mode, the gsk7capicmd command fails.
-sigalg The hashing algorithm used during the creation of a certificate
request, a self-signed certificate, or the signing of a certificate.
This hashing algorithm is used to create the signature
associated with the newly-created certificate request. The value
can be md5, sha1, sha224, sha256, sha384, or sha512. The
default is sha1.
If you are using cryptographic hardware, refer to “Requesting a personal certificate
for your PKCS #11 hardware” on page 118.
Receiving personal certificates into a key repository
After the CA sends you a new personal certificate, you add it to the key database
file from which you generated the new certificate request . If the CA sends the
certificate as part of an e-mail message, copy the certificate into a separate file.
Ensure that the certificate file to be imported has write permission for the current
user, and then use the following procedure for either a queue manager or a
WebSphere MQ client to receive a personal certificate into the key database file:
1. Start the iKeyman GUI using either the gsk7ikm command (on UNIX) or the
strmqikm command (on Windows).
2. From the Key Database File menu, click Open. The Open window displays.
3. Click Key database type and select CMS (Certificate Management System).
4. Click Browse to navigate to the directory that contains the key database files.
5. Select the key database file to which you want to add the certificate, for
example key.kdb.
6. Click Open, and then click OK. The Password Prompt window displays.
7. Type the password you set when you created the key database and click OK.
The name of your key database file is displayed in the File Name field. Select
the Personal Certificates view.
8. Click Receive. The Receive Certificate from a File window displays.
9. Select the Data type of the new personal certificate, for example
Base64–encoded ASCII data for a file with the .arm extension.
10. Type the certificate file name and location for the new personal certificate, or
click Browse to select the name and location.
106 WebSphere MQ: Security

11. Click OK. If you already have a personal certificate in your key database, a
window appears, asking if you want to set the key you are adding as the
default key in the database.
12. Click Yes or No. The Enter a Label window displays.
13. Click OK. The Personal Certificates field shows the label of the new personal
certificate you added.
Use the following commands to add a personal certificate to a key database file
using iKeyCmd or GSKCapiCmd:
v On UNIX:
gsk7cmd -cert -receive -file filename -db filename -pw password
-format ascii
v On Windows:
runmqckm -cert -receive -file filename -db filename -pw password
-format ascii
v Using GSKCapiCmd:
gsk7capicmd -cert -receive -file filename -db filename -pw password -fips
where:
-file filename is the fully qualified file name of the file containing the
personal certificate.
-db filename is the fully qualified file name of a CMS key database.
-pw password is the password for the CMS key database.
-format ascii is the format of the certificate. The value can be ascii for
Base64-encoded ASCII or binary for Binary DER data. The
default is ascii.
-fips specifies that the command is run in FIPS mode. This mode
disables the use of the BSafe cryptographic library. Only the
ICC component is used and this component must be
successfully initialized in FIPS mode. When in FIPS mode, the
ICC component uses algorithms that have been FIPS 140-2
validated. If the ICC component does not initialize in FIPS
mode, the gsk7capicmd command fails.
If you are using cryptographic hardware, refer to “Importing a personal certificate
to your PKCS #11 hardware” on page 118.
Managing digital certificates
This section tells you about managing the existing digital certificates in your key
database file.
When you make changes to the configuration of the certificates in the key database
file, refer to “When changes become effective” on page 102.
Transferring certificates
This section tells you how to perform the following tasks:
v “Extracting a CA certificate from a key repository” on page 108
v “Extracting the CA part of a self-signed certificate from a key repository” on
page 109
v “Adding a CA certificate (or the CA part of a self-signed certificate) into a key
repository” on page 109
Chapter 3. Working with WebSphere MQ TLS and SSL support 107

v “Exporting a personal certificate from a key repository” on page 110
v “Importing a personal certificate into a key repository” on page 111
Extracting a CA certificate from a key repository:
Perform the following steps on the machine from which you want to extract the
CA certificate:
1. Start the iKeyman GUI using either the gsk7ikm command (on UNIX) or the
strmqikm command (on Windows).
2. From the Key Database File menu, click Open. The Open window displays.
3. Click Key database type and select CMS (Certificate Management System).
4. Click Browse to navigate to the directory that contains the key database files.
5. Select the key database file to which you want to add the certificate, for
example key.kdb.
6. Click Open. The Password Prompt window displays.
7. Type the password you set when you created the key database and click OK.
The name of your key database file displays in the File Name field.
8. In the Key database content field, select Signer Certificates and select the
certificate you want to extract.
9. Click Extract. The Extract a Certificate to a File window displays.
10. Select the Data type of the certificate, for example Base64-encoded ASCII
data for a file with the .arm extension.
11. Type the certificate file name and location where you want to store the
certificate, or click Browse to select the name and location.
12. Click OK. The certificate is written to the file you specified.
Use the following commands to extract a CA certificate using iKeyCmd or
GSKCapiCmd:
v On UNIX:
gsk7cmd -cert -extract -db filename -pw password -label label -target filename
-format ascii
v On Windows:
runmqckm -cert -extract -db filename -pw password -label label -target filename
-format ascii
v Using GSKCapiCmd:
gsk7capicmd -cert -extract -db filename -pw password -label label
-target filename -format ascii -fips
where:
-db filename is the fully qualified path name of a CMS key database.
-pw password is the password for the CMS key database.
-label label is the label attached to the certificate.
-target filename is the name of the destination file.
-format ascii is the format of the certificate. The value can be ascii for
Base64-encoded ASCII or binary for Binary DER data. The
default is ascii.
108 WebSphere MQ: Security

-fips specifies that the command is run in FIPS mode. This mode
disables the use of the BSafe cryptographic library. Only the
ICC component is used and this component must be
successfully initialized in FIPS mode. When in FIPS mode, the
ICC component uses algorithms that have been FIPS 140-2
validated. If the ICC component does not initialize in FIPS
mode, the gsk7capicmd command fails.
Extracting the CA part of a self-signed certificate from a key repository:
Perform the following steps on the machine from which you want to extract the
CA part of a self-signed certificate:
1. Start the iKeyman GUI using either the gsk7ikm command (on UNIX) or the
strmqikm command (on Windows).
2. From the Key Database File menu, click Open. The Open window displays.
3. Click Key database type and select CMS (Certificate Management System).
4. Click Browse to navigate to the directory that contains the key database files.
5. Select the key database file to which you want to add the certificate, for
example key.kdb.
6. Click Open. The Password Prompt window displays.
7. Type the password you set when you created the key database and click OK.
The name of your key database file displays in the File Name field.
8. In the Key database content field, select Personal Certificates and select the
certificate you want to extract.
9. Click Extract certificate. The Extract a Certificate to a File window displays.
10. Select the Data type of the certificate, for example Base64-encoded ASCII
data for a file with the .arm extension.
11. Type the certificate file name and location where you want to store the
certificate, or click Browse to select the name and location.
12. Click OK. The certificate is written to the file you specified. Note that when
you extract (rather than export) a certificate, only the public part of the
certificate is included, so a password is not required.
Adding a CA certificate (or the CA part of a self-signed certificate) into a key
repository:
If the certificate that you want to add is in a certificate chain, you must also add
all the certificates that are above it in the chain. You must add the certificates in
strictly descending order starting from the root, followed by the CA certificate
immediately below it in the chain, and so on.
Perform the following steps on the machine on which you want to add the CA
certificate:
1. Start the iKeyman GUI using either the gsk7ikm command (on UNIX) or the
strmqikm command (on Windows).
2. From the Key Database File menu, click Open. The Open window displays.
3. Click Key database type and select CMS (Certificate Management System).
4. Click Browse to navigate to the directory that contains the key database files.
5. Select the key database file to which you want to add the certificate, for
example key.kdb.
6. Click Open. The Password Prompt window displays.
Chapter 3. Working with WebSphere MQ TLS and SSL support 109

7. Type the password you set when you created the key database and click OK.
The name of your key database file displays in the File Name field.
8. In the Key database content field, select Signer Certificates and select the
certificate you want to add.
9. Click Add. The Add CA’s Certificate from a File window displays.
10. Select the Data type of the certificate you transferred, for example
Base64-encoded ASCII data for a file with the .arm extension.
11. Type the certificate file name and location where the certificate is stored, or
click Browse to select the name and location.
12. Click OK. The Enter a Label window displays.
13. In the Enter a Label window, type the name of the certificate.
14. Click OK. The certificate is added to the key database.
Use the following commands to add a CA certificate using iKeyCmd or
GSKCapiCmd:
v On UNIX:
gsk7cmd -cert -add -db filename -pw password -label label -file filename
-format ascii
v On Windows:
runmqckm -cert -add -db filename -pw password -label label -file filename
-format ascii
v Using GSKCapiCmd:
gsk7capicmd -cert -add -db filename -pw password -label label -file filename
-format ascii -fips
where:
-db filename is the fully qualified path name of the CMS key database.
-pw password is the password for the CMS key database.
-label label is the label attached to the certificate.
-file filename is the name of the file containing the certificate.
-format ascii is the format of the certificate. The value can be ascii for
Base64-encoded ASCII or binary for Binary DER data. The
default is ascii.
-fips specifies that the command is run in FIPS mode. This mode
disables the use of the BSafe cryptographic library. Only the
ICC component is used and this component must be
successfully initialized in FIPS mode. When in FIPS mode, the
ICC component uses algorithms that have been FIPS 140-2
validated. If the ICC component does not initialize in FIPS
mode, the gsk7capicmd command fails.
Exporting a personal certificate from a key repository:
Perform the following steps on the machine from which you want to export the
personal certificate:
1. Start the iKeyman GUI using either the gsk7ikm command (on UNIX) or the
strmqikm command (on Windows).
2. From the Key Database File menu, click Open. The Open window displays.
3. Click Key database type and select CMS (Certificate Management System).
4. Click Browse to navigate to the directory that contains the key database files.
5. Select the key database file to which you want to add the certificate, for
example key.kdb.
110 WebSphere MQ: Security

6. Click Open. The Password Prompt window displays.
7. Type the password you set when you created the key database and click OK.
The name of your key database file displays in the File Name field.
8. In the Key database content field, select Personal Certificates and select the
certificate you want to export.
9. Click Export/Import. The Export/Import key window displays.
10. Select Export Key.
11. Select the Key file type of the certificate you want to export, for example
PKCS12.
12. Type the file name and location to which you want to export the certificate, or
click Browse to select the name and location.
13. Click OK. The Password Prompt window displays. Note that when you
export (rather than extract) a certificate, both the public and private parts of
the certificate are included. This is why the exported file is protected by a
password. When you extract a certificate, only the public part of the certificate
is included, so a password is not required.
14. Type a password in the Password field, and type it again in the Confirm
Password field.
15. Click OK. The certificate is exported to the file you specified.
Use the following commands to export a personal certificate using iKeyCmd:
v On UNIX:
gsk7cmd -cert -export -db filename -pw password -label label -type cms
-target filename -target_pw password -target_type pkcs12
v On Windows:
runmqckm -cert -export -db filename -pw password -label label -type cms
-target filename -target_pw password -target_type pkcs12
To export a personal certificate using GSKCapiCmd, use the following command:
gsk7capicmd -cert -export -db filename -pw password -label label -type cms
-target filename -target_pw password -target_type pkcs12
-encryption strong | weak -fips
where:
-db filename is the fully qualified path name of the CMS key database.
-encryption is the strength of encryption used in certificate export
command. The value can be strong or weak. The default is
strong.
-fips specifies that the command is run in FIPS mode. This mode
disables the use of the BSafe cryptographic library. Only the
ICC component is used and this component must be
successfully initialized in FIPS mode. When in FIPS mode, the
ICC component uses algorithms that have been FIPS 140-2
validated. If the ICC component does not initialize in FIPS
mode, the gsk7capicmd command fails.
-pw password is the password for the CMS key database.
-label label is the label attached to the certificate.
-type cms is the type of the database.
-target filename is the name of the destination file.
-target_pw password is the password for encrypting the certificate.
-target_type pkcs12 is the type of the certificate.
Importing a personal certificate into a key repository:
Chapter 3. Working with WebSphere MQ TLS and SSL support 111

Before importing a personal certificate in PKCS #12 format into the key database
file, you must first add the full valid chain of issuing CA certificates to the key
database file (see “Adding a CA certificate (or the CA part of a self-signed
certificate) into a key repository” on page 109).
PKCS #12 files should be considered temporary and deleted after use.
Perform the following steps on the machine to which you want to import the
personal certificate:
1. Start the iKeyman GUI using either the gsk7ikm command (on UNIX) or the
strmqikm command (on Windows).
2. From the Key Database File menu, click Open. The Open window displays.
3. Click Key database type and select CMS (Certificate Management System).
4. Click Browse to navigate to the directory that contains the key database files.
5. Select the key database file to which you want to add the certificate, for
example key.kdb.
6. Click Open. The Password Prompt window displays.
7. Type the password you set when you created the key database and click OK.
The name of your key database file displays in the File Name field.
8. In the Key database content field, select Personal Certificates.
9. Click Export/Import. The Export/Import key window is displayed.
10. Select Import Key.
11. Select the Key file type of the certificate you want to import, for example
PKCS12.
12. Type the certificate file name and location where the certificate is stored, or
click Browse to select the name and location.
13. Click OK. The Password Prompt window displays.
14. In the Password field, type the password used when the certificate was
exported.
15. Click OK. The Select from Key Label List window is displayed.
16. From the list of certificate labels displayed, select the ones that you want to
import. Ensure that you include any CA (signer) certificates that might be
necessary to form a full chain for any personal certificates you are importing.
You do not need to include any that are already in the target key database.
17. Click OK. The Change Labels window is displayed. This window allows the
labels of certificates being imported to be changed if, for example, a certificate
with the same label already exists in the target key database. Changing
certificate labels has no effect on certificate chain validation. This can be used
to change the personal certificate label to that required by WebSphere MQ in
order to associate the certificate with the particular queue manager or client
(ibmwebspheremqqm1 for example).
18. To change a label, select the required label from the Select a label to change:
list. The label is copied into the Enter a new label: entry field. Replace the
label text with that of the new label and click Apply.
19. The text in the Enter a new label: entry field is copied back into the Select a
label to change: field, replacing the originally selected label and so relabelling
the corresponding certificate.
20. When you have changed all the labels that needed to be changed, click OK.
The Change Labels window closes, and the original IBM Key Management
window reappears with the Personal Certificates and Signer Certificates
fields updated with the correctly labeled certificates.
112 WebSphere MQ: Security

21. The certificate is imported to the target key database.
To import a personal certificate using iKeyCmd, use the following commands:
v On UNIX:
gsk7cmd -cert -import -file filename -pw password -type pkcs12 -target filename
-target_pw password -target_type cms -label label
v On Windows:
runmqckm -cert -import -file filename -pw password -type pkcs12 -target filename
-target_pw password -target_type cms -label label
To import a personal certificate using GSKCapiCmd, use the following command:
gsk7capicmd -cert -import -file filename -pw password -type pkcs12 -target filename
-target_pw password -target_type cms -label label -fips
where:
-file filename is the fully qualified file name of the file containing the PKCS
#12 certificate.
-pw password is the password for the PKCS #12 certificate.
-type pkcs12 is the type of the file.
-target filename is the name of the destination CMS key database.
-target_pw password is the password for the CMS key database.
-target_type cms is the type of the database specified by -target
-label label is the label of the certificate to import from the source key
database.
-new_label label is the label that the certificate will be assigned in the target
database. If you omit -new_label option, the default is to use
the same as the -label option.
-fips specifies that the command is run in FIPS mode. This mode
disables the use of the BSafe cryptographic library. Only the
ICC component is used and this component must be
successfully initialized in FIPS mode. When in FIPS mode, the
ICC component uses algorithms that have been FIPS 140-2
validated. If the ICC component does not initialize in FIPS
mode, the gsk7capicmd command fails.
iKeyCmd does not provide a command to change certificate labels directly. Use the
following steps to change a certificate label:
1. Export the certificate to a PKCS #12 file using the -cert -export command.
Specify the existing certificate label for the -label option.
2. Remove the existing copy of the certificate from the original key database using
the -cert -delete command.
3. Import the certificate from the PKCS #12 file using the -cert -import command.
Specify the old label for the -label option and the required new label for the
-new_label option. The certificate will be imported back into the key database
with the required label.
Importing from a Microsoft .pfx file:
This section describes how to import from a Microsoft® .pfx file using iKeyman.
You cannot use GSKCapiCmd to import a .pfx file.
A .pfx file can contain two certificates relating to the same key. One is a personal
or site certificate (containing both a public and private key). The other is a CA
(signer) certificate (containing only a public key). These certificates cannot coexist
Chapter 3. Working with WebSphere MQ TLS and SSL support 113
in the same CMS key database file, so only one of them can be imported. Also, the
“friendly name” or label is attached to only the signer certificate.
The personal certificate is identified by a system generated Unique User Identifier
(UUID). This section shows the import of a personal certificate from a pfx file
while labeling it with the friendly name previously assigned to the CA (signer)
certificate. The issuing CA (signer) certificates should already be added to the
target key database. Note that PKCS#12 files should be considered temporary and
deleted after use.
Follow these steps to import a personal certificate from a source pfx key database:
1. Start the iKeyman GUI using either the gsk7ikm command (on UNIX) or the
strmqikm command (on Windows). The IBM Key Management window is
displayed.
2. From the Key Database File menu, click Open. The Open window is
displayed.
3. Select a key database type of PKCS12.
4. You are recommended to take a backup of the pfx database before
performing this step. Select the pfx key database that you want to import.
Click Open. The Password Prompt window is displayed.
5. Enter the key database password and click OK. The IBM Key Management
window is displayed. The title bar shows the name of the selected pfx key
database file, indicating that the file is open and ready.
6. Select Signer Certificates from the list. The “friendly name” of the required
certificate is displayed as a label in the Signer Certificates panel.
7. Select the label entry and click Delete to remove the signer certificate. The
Confirm window is displayed.
8. Click Yes. The selected label is no longer displayed in the Signer Certificates
panel.
9. Repeat steps 6, 7, and 8 for all the signer certificates.
10. From the Key Database File menu, click Open. The Open window is
displayed.
11. Select the target key CMS database which the pfx file is being imported into.
Click Open. The Password Prompt window is displayed.
12. Enter the key database password and click OK. The IBM Key Management
window is displayed. The title bar shows the name of the selected key
database file, indicating that the file is open and ready.
13. Select Personal Certificates from the list.
14. Click Import to import keys from the pfx key database. The Import Key
window is displayed.
v Click Export/Import key. The Export/Import key window is displayed.
v Select Import from Choose Action Type15. Select the PKCS12 file.
16. Enter the name of the pfx file as used in Step 4. Click OK. The Password
Prompt window is displayed.
17. Specify the same password that you specified when you deleted the signer
certificate. Click OK.
18. The Change Labels window is displayed (as there should be only a single
certificate available for import). The label of the certificate should be a UUID
which has a format xxxxxxxx-xxxx-xxxx-xxxx-xxxxxxxxxxxx.
114 WebSphere MQ: Security

19. To change the label select the UUID from the Select a label to change: panel.
The label will be replicated into the Enter a new label: field. Replace the label
text with that of the friendly name that was deleted in Step 7 and click Apply.
The friendly name must be in the form ibmwebspheremq, followed by the
queue manager name or the WebSphere MQ client user logon ID in lower
case.
20. The text in the Enter a new label: field is replicated back into the Select a
label to change: panel, replacing the originally selected label and so
relabelling the personal certificate with the required friendly name.
21. Click OK. The Change Labels window is now removed and the original IBM
Key Management window reappears with the Personal Certificates and Signer
Certificates panels updated with the correctly labeled personal certificate.
22. The pfx personal certificate is now imported to the (target) database.
It is not possible to change a certificate label using iKeyCmd or GSKCapiCmd.
Importing from a PKCS #7 file:
The iKeyman and iKeyCmd tools do not support PKCS #7 (.p7b) files. Use the
GSKCapiCmd tool to import certificates from a PKCS #7 file.
Use the following command to add a CA certificate from a PKCS #7 file:
gsk7capicmd -cert -add -db filename -pw password -type cms -file filename
-label label
-db filename is the fully qualified file name of the CMS key database.
-pw password is the password for the key database.
-type cms is the type of the key database.
-file filename is the name of the PKCS #7 file.
-label label is the label that the certificate is assigned in the target database.
The first certificate takes the label given. All other certificates, if
present, are labelled with their subject name.
Use the following command to import a personal certificate from a PKCS #7 file:
gsk7capicmd -cert -import -db filename -pw password -type pkcs7 -target filename
-target_pw password -target_type cms -label label -new_label label
-db filename is the fully qualified file name of the file containing the PKCS
#7 certificate.
-pw password is the password for the PKCS #7 certificate.
-type pkcs7 is the type of the file.
-target filename is the name of the destination key database.
-target_pw password is the password for the destination key database.
-target_type cms is the type of the database specified by -target
-label label is the label of the certificate that is to be imported.
-new_label label is the label that the certificate will be assigned in the target
database. If you omit the -new_label option, the default is to
use the same as the -label option.
Deleting a personal certificate from a key repository
Use the following procedure to remove personal certificates:
Chapter 3. Working with WebSphere MQ TLS and SSL support 115
1. Start the iKeyman GUI using either the gsk7ikm command (on UNIX) or the
strmqikm command (on Windows).
2. From the Key Database File menu, click Open. The Open window displays.
3. Click Key database type and select CMS (Certificate Management System).
4. Click Browse to navigate to the directory that contains the key database files.
5. Select the key database file to which you want to add the certificate, for
example key.kdb.
6. Click Open. The Password Prompt window is displayed.
7. Type the password you set when you created the key database and click OK.
The name of your key database file displays in the File Name field.
8. In the Personal Certificates list, select the certificate you want to delete.
9. If you do not already have a copy of the certificate and you want to save it,
click Export/Import and export it (see “Exporting a personal certificate from a
key repository” on page 110).
10. With the certificate selected, click Delete. The Confirm window displays.
11. Click Yes. The Personal Certificates field no longer shows the label of the
certificate you deleted.
Use the following commands to delete a personal certificate using iKeyCmd or
GSKCapiCmd:
v On UNIX:
gsk7cmd -cert -delete -db filename -pw password -label label
v On Windows:
runmqckm -cert -delete -db filename -pw password -label label
v Using GSKCapiCmd:
gsk7capicmd -cert -delete -db filename -pw password -label label -fips
where:
-db filename is the fully qualified file name of a CMS key database.
-pw password is the password for the CMS key database.
-label label is the label attached to the personal certificate.
-fips specifies that the command is run in FIPS mode. This mode
disables the use of the BSafe cryptographic library. Only the
ICC component is used and this component must be
successfully initialized in FIPS mode. When in FIPS mode, the
ICC component uses algorithms that have been FIPS 140-2
validated. If the ICC component does not initialize in FIPS
mode, the gsk7capicmd command fails.
Configuring for cryptographic hardware
You can configure cryptographic hardware for a queue manager on UNIX or
Windows using either of the following methods:
v Use the ALTER QMGR MQSC command with the SSLCRYP parameter, as
described in the WebSphere MQ Script (MQSC) Command Reference.
v Use WebSphere MQ Explorer to configure the cryptographic hardware on your
UNIX or Windows system. For more information, refer to the online help.
You can configure cryptographic hardware for a WebSphere MQ client on UNIX or
Windows using either of the following methods:
116 WebSphere MQ: Security

v Set the MQSSLCRYP environment variable. The permitted values for
MQSSLCRYP are the same as for the SSLCRYP parameter, as described in the
WebSphere MQ Script (MQSC) Command Reference. If you use the GSK_PCS11
version of the SSLCRYP parameter, the PKCS #11 token label must be specified
entirely in lower-case.
v Set the CryptoHardware field of the SSL configuration options structure, MQSCO,
on an MQCONNX call. For more information, see the WebSphere MQ
Application Programming Guide.
If you have configured cryptographic hardware which uses the PKCS #11 interface
using any of these methods, you must store the personal certificate for use on your
channels in the key database file for the cryptographic token you have configured.
This is described in “Managing certificates on PKCS #11 hardware.”
Managing certificates on PKCS #11 hardware
This section tells you about managing digital certificates on cryptographic
hardware that supports the PKCS #11 interface. Note that you still need a key
database file, even when you store all your certificates on your cryptographic
hardware.
Perform the following steps to work with your cryptographic hardware:
1. On UNIX, login as the root user. On Windows, login as Administrator or a
member of the MQM group.
2. Execute the gsk7ikm command to start the iKeyman GUI.
3. From the Key Database File menu, click Open. The Open window displays.
4. Click Key database type and select Cryptographic token.
5. In the File Name field, type the name of the module for managing your
cryptographic hardware, for example PKCS11_API.so
6. In the Location field, type the path, for example /usr/lib/pksc11 (on UNIX).
On Windows, you can type the library name, for example cryptoki.
7. Click OK. The Open Cryptographic Token window displays.
8. In the Cryptographic Token Password field, type the password that you set
when you configured the cryptographic hardware.
9. If your cryptographic hardware has the capacity to hold the signer certificates
required to receive or import a personal certificate, clear both secondary key
database check boxes and continue from step 17 on page 118.
If you require a secondary CMS key database to hold the signer certificates,
select either the Open existing secondary key database file check box or the
Create new secondary key database file check box.
10. In the File Name field, type a file name. This field already contains the text
key.kdb. If your stem name is key, leave this field unchanged. If you have
specified a different stem name, replace key with your stem name but you
must not change the .kdb
11. In the Location field, type the path, for example:
v For a queue manager: /var/mqm/qmgrs/QM1/ssl
v For a WebSphere MQ client: /var/mqm/ssl
12. Click OK. The Password Prompt window displays.
13. If you selected the Open existing secondary key database file check box in
step 9, type a password in the Password field, and continue from step 17 on
page 118.
Chapter 3. Working with WebSphere MQ TLS and SSL support 117

14. If you selected the Create new secondary key database file check box in step
9 on page 117, type a password in the Password field, and type it again in the
Confirm Password field.
15. Select the Stash the password to a file check box. Note that if you do not
stash the password, attempts to start SSL channels fail because they cannot
obtain the password required to access the key database file.
16. Click OK. A window displays, confirming that the password is in file key.sth
(unless you specified a different stem name).
17. Click OK. The Key database content frame displays.
Requesting a personal certificate for your PKCS #11 hardware:
Use the following procedure for either a queue manager or a WebSphere MQ client
to request a personal certificate for your cryptographic hardware:
1. Perform the steps to work with your cryptographic hardware.
2. From the Create menu, click New Certificate Request. The Create New Key
and Certificate Request window displays.
3. In the Key Label field, type:
v For a queue manager, ibmwebspheremq followed by the name of your queue
manager folded to lower case. For example, for QM1, ibmwebspheremqqm1, or
v For a WebSphere MQ client, ibmwebspheremq followed by your logon user ID
folded to lower case, for example ibmwebspheremqmyuserid.4. Type a Common Name and Organization, and select a Country. For the
remaining optional fields, either accept the default values, or type or select new
values. Note that you can supply only one name in the Organizational Unit
field. For more information about these fields, refer to “Distinguished Names”
on page 16.
5. In the Enter the name of a file in which to store the certificate request field,
either accept the default certreq.arm, or type a new value with a full path.
6. Click OK. A confirmation window displays.
7. Click OK. The Personal Certificate Requests list shows the label of the new
personal certificate request you created. The certificate request is stored in the
file you chose in step 5.
8. Request the new personal certificate either by sending the file to a Certification
Authority (CA), or by copying the file into the request form on the Web site for
the CA.
Importing a personal certificate to your PKCS #11 hardware:
Use the following procedure for either a queue manager or a WebSphere MQ client
to import a personal certificate to your cryptographic hardware:
1. Perform the steps to work with your cryptographic hardware.
2. Click Receive. The Receive Certificate from a File window displays.
3. Select the Data type of the new personal certificate, for example
Base64–encoded ASCII data for a file with the .arm extension.
4. Type the certificate file name and location for the new personal certificate, or
click Browse to select the name and location.
5. Click OK. If you already have a personal certificate in your key database, a
window appears, asking if you want to set the key you are adding as the
default key in the database.
6. Click Yes or No. The Enter a Label window displays.
118 WebSphere MQ: Security

7. Type a label, for example the label you used when you requested the personal
certificate. Note that the label must be in the correct WebSphere MQ format:
v For a queue manager, ibmwebspheremq followed by the name of your queue
manager folded to lower case. For example, for QM1, ibmwebspheremqqm1, or,
v For a WebSphere MQ client, ibmwebspheremq followed by your logon user ID
folded to lower case, for example ibmwebspheremqmyuserid.8. Click OK. The Personal Certificates list shows the label of the new personal
certificate you added. This label is formed by adding the cryptographic token
label before the label you supplied.
Mapping DNs to user IDs
UNIX systems do not have a function equivalent to the z/OS CNFs, which are
described in “Working with Certificate Name Filters (CNFs)” on page 126. If you
want to implement a function that maps Distinguished Names to user IDs,
consider using a channel security exit.
Migrating SSL security certificates in WebSphere MQ for
Windows
In WebSphere MQ for Windows Version 5.3, support for WebSphere MQ SSL is
provided using Microsoft SSL. In WebSphere MQ for Windows Version 7.0,
support for WebSphere MQ SSL is provided using Global Security Kit (GSKit) SSL.
This means that WebSphere MQ for Windows supports only SSL in which
certificates are stored in a GSKit key database. Therefore, if you migrate from
WebSphere MQ for Windows Version 5.3 to Version 7.0, you need to migrate your
certificates from the Microsoft Certificate Store to a GSKit key repository. The
amqtcert (Transfer Certificates) command helps to do this (see WebSphere MQ
System Administration Guide for more information on using this command). The
chain checker application, which is used to verify all the required certificates are
there before migrating certificates from the WebSphere MQ for Windows V5.3 store
to the GSKit store, is available in WebSphere MQ V5.3 Fix Pack 10 (CSD10) or later.
Migration of security certificates from WebSphere MQ Version 5.3 to Version 7.0 is
described fully in WebSphere MQ Migration Information.
Working with SSL or TLS on z/OS
To use the WebSphere MQ TLS and SSL support for your z/OS installation you
must set up your communications to use cryptographic protocols.
The operations you can perform are:
v “Setting up a key repository” on page 120
v “Working with a key repository” on page 121
v “Obtaining personal certificates” on page 122
v “Adding personal certificates to a key repository” on page 124
v “Managing digital certificates” on page 124
v “Working with Certificate Name Filters (CNFs)” on page 126
Each section includes examples of performing each task using RACF. You can
perform similar tasks using the other external security managers.
Chapter 3. Working with WebSphere MQ TLS and SSL support 119

On z/OS, you must also set the number of server subtasks that each queue
manager uses for processing SSL calls, as described in “Setting the SSLTASKS
parameter.”
z/OS SSL support is integral to the operating system, and is known as System SSL.
System SSL is part of the Cryptographic Services Base element of z/OS. The
Cryptographic Services Base members are installed in the pdsname.SIEALNKE
partitioned data set (PDS). When you install System SSL, ensure that you choose
the appropriate options to provide the CipherSpecs that you require.
Setting the SSLTASKS parameter
To use SSL channels, ensure that there are at least two server subtasks by setting
the SSLTASKS parameter, using the ALTER QMGR command. For example:
ALTER QMGR SSLTASKS(5)
To avoid problems with storage allocation, do not set the SSLTASKS parameter to a
value greater than 50.
For more information about the ALTER QMGR MQSC command, refer to the
WebSphere MQ Script (MQSC) Command Reference.
Setting up a key repository
An SSL connection requires a key repository at each end of the connection. Each
queue manager must have access to a key repository. Use the SSLKEYR parameter
on the ALTER QMGR command to associate a key repository with a queue
manager. See “The SSL key repository” on page 42 for more information.
On z/OS, digital certificates are stored in a key ring that is managed by your
External Security Manager (ESM) . These digital certificates have labels, which
associate the certificate with a queue manager. SSL uses these certificates for
authentication purposes. All the examples that follow use RACF commands.
Equivalent commands exist for other ESM programs.
On z/OS, WebSphere MQ uses the ibmWebSphereMQ prefix on a label to avoid
confusion with certificates for other products. The prefix is followed by the name
of the queue manager.
The key repository name for a queue manager is the name of a key ring in your
RACF database. You can specify the key ring name either before or after creating
the key ring.
Use the following procedure to create a new key ring for a queue manager:
1. Ensure that you have the appropriate authority to issue the RACDCERT
command (see the SecureWay Security Server RACF Command Language Reference
for more details).
2. Issue the following command:
RACDCERT ID(userid1) ADDRING(ring-name)
where:
v userid1 is the user ID of the channel initiator address space, or the user ID
that is going to own the key ring (if the key ring is shared).
120 WebSphere MQ: Security
v ring-name is the name you want to give to your key ring. The length of this
name can be up to 237 characters. This name is case-sensitive. Specify
ring-name in upper case to avoid problems.
Ensuring CA certificates are available to a queue manager
After you have created your key ring, you need to connect any relevant CA
certificates to it. For example, to connect a CA certificate for My CA to your key
ring, use the following command:
RACDCERT ID(userid1)
CONNECT(CERTAUTH LABEL(’My CA’) RING(ring-name) USAGE(CERTAUTH))
where userid1 is either the channel initiator user ID or the owner of a shared key
ring.
For more information about CA certificates, refer to “Digital certificates” on page
14.
Working with a key repository
This section tells you how to perform the following tasks:
v “Locating the key repository for a queue manager”
v “Specifying the key repository location for a queue manager”
Note: When you change either the key repository attribute, or the certificates in
the key ring, check “When changes become effective” on page 122.
Locating the key repository for a queue manager
Use the following procedure to obtain information about the location of your
queue manager’s key ring:
1. Display your queue manager’s attributes, using either of the following MQSC
commands:
DISPLAY QMGR ALL
DISPLAY QMGR SSLKEYR
2. Examine the command output for the location of the key ring.
Specifying the key repository location for a queue manager
To specify the location of your queue manager’s key ring, use the ALTER QMGR
MQSC command to set your queue manager’s key repository attribute. For
example:
ALTER QMGR SSLKEYR(CSQ1RING)
if the key ring is owned by the channel initiator address space, or:
ALTER QMGR SSLKEYR(userid1/CSQ1RING)
if it is a shared key ring, where userid1 is the user ID that owns the key ring.
Ensuring the CHINIT has the correct read access:
Ensuring the CHINIT has access to read the key repository
Ensure your CHINIT userid has read access to the IRR.DIGTCERT.LISTRING
profile in the FACILITY class by using the following command:
Chapter 3. Working with WebSphere MQ TLS and SSL support 121

PERMIT IRR.DIGTCERT.LISTRING CLASS(FACILITY) ID(userid) ACCESS(READ)
where userid is the user ID of the channel initiator address space.
Ensuring CHINIT has read access to the appropriate CSF* profiles
Ensure your CHINIT userid has read access to the appropriate CSF* profiles in the
CSFSERV class by using the following command:
PERMIT csf-resource CLASS(CSFSERV) ID(userid) ACCESS(READ)
where csf-resource is the name of the CSF* profile and userid is the user ID of the
channel initiator address space.
Repeat this command for each of the following CSF* profile names:
v CSFPKD
v CSFPKE
v CSFPKI
v CSFDSG
v CSFDSV
v CSFKEYS
When changes become effective
Changes to the certificates in the key ring and to the key repository attribute
become effective:
v When the channel initiator is started or restarted, or
v When the REFRESH SECURITY TYPE(SSL) command is issued to refresh the
contents of the SSL key repository.
Obtaining personal certificates
You apply to a Certification Authority (CA) for the personal certificate that is used
to verify the identity of your queue manager. You can also create self-signed
certificates for testing SSL on your z/OS system.
This section tells you how to use RACF for:
1. “Creating a self-signed personal certificate”
2. “Requesting a personal certificate” on page 123
3. “Creating a RACF signed personal certificate” on page 123
Creating a self-signed personal certificate
Use the following procedure to create a self-signed personal certificate:
1. Generate a certificate and a public and private key pair using the following
command:
RACDCERT ID(userid2) GENCERT
SUBJECTSDN(CN(’common-name’)
T(’title’)
OU(’organizational-unit’)
O(’organization’)
L(’locality’)
SP(’state-or-province’)
C(’country’))
WITHLABEL(’label-name’)
122 WebSphere MQ: Security
2. Connect the certificate to your key ring using the following command:
RACDCERT ID(userid1)
CONNECT(ID(userid2) LABEL(’label-name’) RING(ring-name) USAGE(PERSONAL))
where:
v userid1 is the user ID of the channel initiator address space or owner of the
shared key ring.
v userid2 is the user ID associated with the certificate.
v ring-name is the name you gave the key ring in “Setting up a key repository” on
page 120.
v label-name must be in the correct WebSphere MQ format for a queue manager:
ibmWebSphereMQ followed by the name of your queue manager, for example,
ibmWebSphereMQCSQ1.
Note that userid1 and userid2 can be the same ID.
Requesting a personal certificate
To apply for a personal certificate, use RACF as follows:
1. Create a self-signed personal certificate, as in “Creating a self-signed personal
certificate” on page 122. This certificate provides the request with the attribute
values for the Distinguished Name.
2. Create a PKCS #10 Base64-encoded certificate request written to a data set,
using the following command:
RACDCERT ID(userid2) GENREQ(LABEL(’label-name’)) DSN(output-data-set-name)
where label-name is the label used when creating the self-signed certificate, and
userid2 is the user ID associated with the certificate.
3. Send the data set to a Certification Authority (CA) to request a new personal
certificate.
4. When the signed certificate is returned to you by the Certification Authority,
you need to add the certificate back into the RACF database, using the original
label, as described in “Adding personal certificates to a key repository” on page
124.
Creating a RACF signed personal certificate
RACF can function as a Certification Authority and issue its own CA certificate.
This section uses the term signer certificate to denote a CA certificate issued by
RACF.
The private key for the signer certificate must be in the RACF database before you
carry out the following procedure:
1. Use the following command to generate a personal certificate signed by RACF,
using the signer certificate contained in your RACF database:
RACDCERT ID(userid2) GENCERT
SUBJECTSDN(CN(’common-name’)
T(’title’)
OU(’organizational-unit’)
O(’organization’)
L(’locality’)
SP(’state-or-province’)
C(’country’))
WITHLABEL(’label-name’)
SIGNWITH(CERTAUTH LABEL(’signer-label’))
2. Connect the certificate to your key ring using the following command:
Chapter 3. Working with WebSphere MQ TLS and SSL support 123

RACDCERT ID(userid1)
CONNECT(ID(userid2) LABEL(’label-name’) RING(ring-name) USAGE(PERSONAL))
where:
v userid1 is the user ID of the channel initiator address space or owner of the
shared key ring.
v userid2 is the user ID associated with the certificate.
v ring-name is the name you gave the key ring in “Setting up a key repository” on
page 120.
v label-name must be in the correct WebSphere MQ format for a queue manager:
ibmWebSphereMQ followed by the name of your queue manager, for example,
ibmWebSphereMQCSQ1.
v signer-label is the label of your own signer certificate.
Note that userid1 and userid2 can be the same ID.
Adding personal certificates to a key repository
After the Certification Authority sends you a new personal certificate, add it to the
key ring using the following procedure:
1. Add the certificate to the RACF database using the following command:
RACDCERT ID(userid2) ADD(input-data-set-name) WITHLABEL(’label-name’)
2. Connect the certificate to your key ring using the following command:
RACDCERT ID(userid1)
CONNECT(ID(userid2) LABEL(’label-name’) RING(ring-name) USAGE(PERSONAL))
where:
v userid1 is the user ID of the channel initiator address space or owner of the
shared key ring.
v userid2 is the user ID associated with the certificate.
v ring-name is the name you gave the key ring in “Setting up a key repository” on
page 120.
v input-data-set-name is the name of the data set containing the CA signed
certificate. The data set must be cataloged and must not be a PDS or a member
of a PDS. The record format (RECFM) expected by RACDCERT is VB.
RACDCERT dynamically allocates and opens the data set, and reads the
certificate from it as binary data.
v label-name is the label name that was used when you created the original request.
It must be in the correct WebSphere MQ format for a queue manager:
ibmWebSphereMQ followed by the name of your queue manager, for example,
ibmWebSphereMQCSQ1.
Managing digital certificates
This section tells you about managing the digital certificates in your key ring.
When you make changes to the certificates in a key ring, refer to “When changes
become effective” on page 122.
This section contains the following procedures:
v “Transferring certificates” on page 125
v “Removing certificates” on page 125
124 WebSphere MQ: Security

Transferring certificates
This section describes how to extract a certificate from a key ring to allow it to be
copied to another system, and how to import a certificate from another system into
a key ring.
Exporting a personal certificate from a key repository:
On the system from which you want to extract the certificate, use the following
command:
RACDCERT ID(userid2) EXPORT(LABEL(’label-name’))
DSN(output-data-set-name) FORMAT(CERTB64)
where:
v userid2 is the user ID under which the certificate was added to the key ring.
v label-name is the label of the certificate you want to extract.
v output-data-set-name is the data set into which the certificate is placed.
v CERTB64 is a DER encoded X.509 certificate that is in Base64 format. You can
choose an alternative format, for example:
CERTDER
DER encoded X.509 certificate in binary format
PKCS12B64
PKCS #12 certificate in Base64 format
PKCS12DER
PKCS #12 certificate in binary format
Note that PKCS12DER is supported only on OS/390 V2.10 and z/OS
V1.1 and subsequent releases.
Importing a personal certificate into a key repository:
To import the extracted certificate into a different key ring, follow the procedure
described in “Adding personal certificates to a key repository” on page 124.
Removing certificates
This section describes two methods of removing a certificate:
v “Deleting a personal certificate from a key repository”
v “Renaming a personal certificate in a key repository”
Deleting a personal certificate from a key repository:
Before deleting a personal certificate, you might want to save a copy of it. To copy
your personal certificate to a data set before deleting it, follow the procedure in
“Exporting a personal certificate from a key repository.” Then use the following
command to delete your personal certificate:
RACDCERT ID(userid2) DELETE(LABEL(’label-name’))
where:
v userid2 is the user ID under which the certificate was added to the key ring.
v label-name is the name of the certificate you want to delete.
Renaming a personal certificate in a key repository:
Chapter 3. Working with WebSphere MQ TLS and SSL support 125

If you do not want a certificate with a specific label to be found, but do not want
to delete it, you can rename it temporarily using the following command:
RACDCERT ID(userid2) LABEL(’label-name’) NEWLABEL(’new-label-name’)
where:
v userid2 is the user ID under which the certificate was added to the key ring.
v label-name is the name of the certificate you want to rename.
v new-label-name is the new name of the certificate.
This can be useful when testing SSL client authentication.
Working with Certificate Name Filters (CNFs)
When an entity at one end of an SSL channel receives a certificate from a remote
connection, the entity asks RACF if there is a user ID associated with that
certificate. The entity uses that user ID as the channel user ID. If there is no user
ID associated with the certificate, the entity uses the user ID under which the
channel initiator is running. For more information about which user ID is used,
refer to the WebSphere MQ for z/OS System Setup Guide.
There are two ways to associate a user ID with a certificate:
v Install that certificate into the RACF database under the user ID with which you
wish to associate it, as described in “Adding personal certificates to a key
repository” on page 124.
v Use a Certificate Name Filter (CNF) to map the Distinguished Name of the
subject or issuer of the certificate to the user ID, as described in “Setting up a
CNF.”
Setting up a CNF
Perform the following steps to set up a CNF. Refer to the SecureWay® Security
Server RACF Security Administrator’s Guide for more information about the
commands you use to manipulate CNFs.
1. Enable CNF functions. You require update authority on the class DIGTNMAP
to do this:
SETROPTS CLASSACT(DIGTNMAP) RACLIST(DIGTNMAP)
2. Define the CNF. For example:
RACDCERT ID(USER1) MAP WITHLABEL(’filter1’) TRUST
SDNFILTER(’O=IBM.C=UK’) IDNFILTER(’O=ExampleCA.L=Internet’)
where USER1 is the user ID to be used when:
v The DN of the subject has an Organization of IBM and a Country of UK.
v The DN of the issuer has an Organization of ExampleCA and a Locality of
Internet.3. Refresh the CNF mappings:
SETROPTS RACLIST(DIGTNMAP) REFRESH
Note:
1. If the actual certificate is stored in the RACF database, the user ID under which
it is installed is used in preference to the user ID associated with any CNF. If
the certificate is not stored in the RACF database, the user ID associated with
the most specific matching CNF is used. Matches of the subject DN are
considered more specific than matches of the issuer DN.
126 WebSphere MQ: Security
2. Changes to CNFs do not apply until you refresh the CNF mappings.
3. A DN matches the DN filter in a CNF only if the DN filter is identical to the
least significant portion of the DN. The least significant portion of the DN
comprises the attributes that are usually listed at the right-most end of the DN,
but which appear at the beginning of the certificate.
For example, consider the SDNFILTER ’O=IBM.C=UK’. A subject DN of
’CN=QM1.O=IBM.C=UK’ matches that filter, but a subject DN of
’CN=QM1.O=IBM.L=Hursley.C=UK’ does not match that filter.
Note that the least significant portion of some certificates can contain fields that
do not match the DN filter. Consider excluding these certificates by specifying a
DN pattern in the SSLPEER pattern on the DEFINE CHANNEL command.
4. If the most specific matching CNF is defined to RACF as NOTRUST, the entity
uses the user ID under which the channel initiator is running.
5. RACF uses the ’.’ character as a separator. WebSphere MQ uses either a
comma or a semicolon.
You can define CNFs to ensure that the entity never sets the channel user ID to the
default, which is the user ID under which the channel initiator is running. For each
CA certificate in the key ring associated with the entity, define a CNF with an
IDNFILTER that exactly matches the subject DN of that CA certificate. This ensures
that all certificates that the entity might use match at least one of these CNFs. This
is because all such certificates must either be connected to the key ring associated
with the entity, or must be issued by a CA for which a certificate is connected to
the key ring associated with the entity.
Working with Certificate Revocation Lists and Authority Revocation
Lists
During the SSL handshake, the communicating partners authenticate each other
with digital certificates. Authentication can include a check that the certificate
received can still be trusted. Certification Authorities (CAs) revoke certificates for
various reasons, including:
v The owner has moved to a different organization
v The private key is no longer secret
CAs publish revoked personal certificates in a Certificate Revocation List (CRL).
CA certificates that have been revoked are published in an Authority Revocation
List (ARL).
For more information about Certification Authorities, refer to “Digital certificates”
on page 14.
WebSphere MQ SSL support implements CRL and ARL checking using LDAP
(Lightweight Directory Access Protocol) servers. This chapter tells you about:
v “Setting up LDAP servers” on page 128
v “Accessing CRLs and ARLs” on page 129
v “Manipulating authentication information objects with PCF commands” on page
133
v “Keeping CRLs and ARLs up to date” on page 133
v “Certificate validation and trust policy design on UNIX and Windows systems”
on page 133
Chapter 3. Working with WebSphere MQ TLS and SSL support 127

For more information about LDAP, refer to the WebSphere MQ Application
Programming Guide.
The WebSphere MQ CRL and ARL support on each platform is as follows:
v On i5/OS, the CRL and ARL support complies with PKIX X.509 V2 CRL profile
recommendations.
v On Windows and UNIX systems, the CRL and ARL support complies with PKIX
X.509 V2 CRL profile recommendations.
v On z/OS, System SSL supports CRLs and ARLs stored in LDAP servers by the
Tivoli Public Key Infrastructure product.
Setting up LDAP servers
Configure the LDAP Directory Information Tree (DIT) structure to use the
hierarchy corresponding to the Distinguished Names of the CAs that issue the
certificates and CRLs. You can set up the DIT structure with a file that uses the
LDAP Data Interchange Format (LDIF). You can also use LDIF files to update a
directory.
LDIF files are ASCII text files that contain the information required to define
objects within an LDAP directory. LDIF files contain one or more entries, each of
which comprises a Distinguished Name, at least one object class definition and,
optionally, multiple attribute definitions.
The certificateRevocationList;binary attribute contains a list, in binary form, of
revoked user certificates. The authorityRevocationList;binary attribute contains a
binary list of CA certificates that have been revoked. For use with WebSphere MQ
SSL, the binary data for these attributes must conform to DER (Definite Encoding
Rules) format. For more information about LDIF files, refer to the documentation
provided with your LDAP server.
Figure 14 shows a sample LDIF file that you might create as input to your LDAP
server to load the CRLs and ARLs issued by CA1, which is an imaginary
Certification Authority with the Distinguished Name “CN=CA1, OU=Test, O=IBM,
C=GB”, set up by the Test organization within IBM.
Figure 15 on page 129 shows the DIT structure that your LDAP server creates
when you load the sample LDIF file shown in Figure 14 together with a similar file
dn: o=IBM, c=GB
o: IBM
objectclass: top
objectclass: organization
dn: ou=Test, o=IBM, c=GB
ou: Test
objectclass: organizationalUnit
dn: cn=CA1, ou=Test, o=IBM, c=GB
cn: CA1
objectclass: cRLDistributionPoint
objectclass: certificationAuthority
authorityRevocationList;binary:: (DER format data)
certificateRevocationList;binary:: (DER format data)
caCertificate;binary:: (DER format data)
Figure 14. Sample LDIF for a Certification Authority. This might vary from implementation to implementation.
128 WebSphere MQ: Security

for CA2, an imaginary Certification Authority set up by the PKI organization, also
within IBM.
Note that both CRLs and ARLs are checked by WebSphere MQ.
Note: Ensure that the access control list for your LDAP server allows authorized
users to read, search, and compare the entries that hold the CRLs and ARLs.
WebSphere MQ accesses the LDAP server using the LDAPUSER and LDAPPWD
properties of the AUTHINFO object.
Configuring and updating LDAP servers
Use the following procedure to configure or update your LDAP server:
1. Obtain the CRLs and ARLs in DER format from your Certification Authority, or
Authorities.
2. Using a text editor or the tool provided with your LDAP server, create one or
more LDIF files that contain the Distinguished Name of the CA and the
required object class definitions. Copy the DER format data into the LDIF file
as the values of either the certificateRevocationList;binary attribute for
CRLs, the authorityRevocationList;binary attribute for ARLs , or both.
3. Start your LDAP server.
4. Add the entries from the LDIF file or files you created at step 2.
Accessing CRLs and ARLs
This section describes:
v “Accessing CRLs and ARLs with a queue manager” on page 130
v “Accessing CRLs and ARLs with a WebSphere MQ client” on page 132
v “Accessing CRLs and ARLs using WebSphere MQ Explorer” on page 131
v “Accessing CRLs and ARLs with WebSphere MQ classes for Java and WebSphere
MQ classes for JMS” on page 132
Note that in this section, information about Certificate Revocation Lists (CRLs) also
applies to Authority Revocation Lists (ARLs).
On the following platforms, WebSphere MQ maintains a cache of CRLs and ARLs
that have been accessed in the preceding 12 hours:
v i5/OS from V5R2M0 onwards
v UNIX systems
v Windows systems
v z/OS systems
c = GB
o = IBM
ou = Test
cn = CA1
ou = PKI
cn = CA2
Figure 15. Example of an LDAP Directory Information Tree structure
Chapter 3. Working with WebSphere MQ TLS and SSL support 129

When the queue manager or WebSphere MQ client receives a certificate, it checks
the CRL to confirm that the certificate is still valid. WebSphere MQ first checks in
the cache, if there is a cache. If the CRL is not in the cache, WebSphere MQ
interrogates the LDAP CRL server locations in the order they appear in the
namelist of authentication information objects specified by the SSLCRLNamelist
attribute, until WebSphere MQ finds an available CRL. If the namelist is not
specified, or is specified with a blank value, CRLs are not checked.
Accessing CRLs and ARLs with a queue manager
Note that in this section, information about Certificate Revocation Lists (CRLs) also
applies to Authority Revocation Lists (ARLs).
You tell the queue manager how to access CRLs by supplying the queue manager
with authentication information objects, each of which holds the address of an
LDAP CRL server. The authentication information objects are held in a namelist,
which is specified in the SSLCRLNamelist queue manager attribute.
In the following example, MQSC is used to specify the parameters:
1. Define authentication information objects using the DEFINE AUTHINFO
MQSC command, with the AUTHTYPE parameter set to CRLLDAP. On i5/OS,
you can also use the CRTMQMAUTI CL command.
WebSphere MQ supports only the value CRLLDAP for the AUTHTYPE
parameter, which indicates that CRLs are accessed on LDAP servers. Each
authentication information object with type CRLLDAP that you create holds the
address of an LDAP server. When you have more than one authentication
information object, the LDAP servers to which they point must contain identical
information. This provides continuity of service if one or more LDAP servers
fail.
Additionally, on z/OS only, all LDAP servers must be accessed using the same
user ID and password. The user ID and password used are those specified in
the first AUTHINFO object in the namelist.
2. Using the DEFINE NAMELIST MQSC command, define a namelist for the
names of your authentication information objects. On z/OS, ensure that the
NLTYPE namelist attribute is set to AUTHINFO.
3. Using the ALTER QMGR MQSC command, supply the namelist to the queue
manager. For example:
ALTER QMGR SSLCRLNL(sslcrlnlname)
where sslcrlnlname is your namelist of authentication information objects.
This command sets a queue manager attribute called SSLCRLNamelist. The
queue manager’s initial value for this attribute is blank.
On i5/OS, you can specify authentication information objects, but the queue
manager uses neither authentication information objects nor a namelist of
authentication information objects. Only WebSphere MQ clients that use a client
connection table generated by an i5/OS queue manager use the authentication
information specified for that i5/OS queue manager. The SSLCRLNamelist queue
manager attribute on i5/OS determines what authentication information such
clients use. See “Accessing CRLs and ARLs on i5/OS” on page 131 for information
about telling an i5/OS queue manager how to access CRLs.
You can add up to 10 connections to alternative LDAP servers to the namelist, to
ensure continuity of service if one or more LDAP servers fail. Note that the LDAP
servers must contain identical information.
130 WebSphere MQ: Security
Accessing CRLs and ARLs on i5/OS:
Note that in this section, information about Certificate Revocation Lists (CRLs) also
applies to Authority Revocation Lists (ARLs).
Use the following procedure to set up a CRL location for a specific certificate on
i5/OS:
1. Access the DCM interface, as described in “Accessing DCM” on page 88.
2. In the Manage CRL locations task category in the navigation panel, click Add
CRL location. The Manage CRL Locations page displays in the task frame.
3. In the CRL Location Name field, type a CRL location name, for example LDAP
Server #1
4. In the LDAP Server field, type the LDAP server name.
5. In the Use Secure Sockets Layer (SSL) field, select Yes if you want to connect
to the LDAP server using SSL. Otherwise, select No.
6. In the Port Number field, type a port number for the LDAP server, for
example 389.
7. If your LDAP server does not allow anonymous users to query the directory,
type a login distinguished name for the server in the login distinguished
name field.
8. Click OK. DCM informs you that it has created the CRL location.
9. In the navigation panel, click Select a Certificate Store. The Select a
Certificate Store page displays in the task frame.
10. Select the Other System Certificate Store check box and click Continue. The
Certificate Store and Password page displays.
11. In the Certificate store path and filename field, type the IFS path and
filename you set when “Creating a new certificate store” on page 90.
12. Type a password in the Certificate Store Password field. Click Continue. The
Current Certificate Store page displays in the task frame.
13. In the Manage Certificates task category in the navigation panel, click Update
CRL location assignment. The CRL Location Assignment page displays in the
task frame.
14. Select the radio button for the CA certificate to which you want to assign the
CRL location. Click Update CRL Location Assignment. The Update CRL
Location Assignment page displays in the task frame.
15. Select the radio button for the CRL location which you want to assign to the
certificate. Click Update Assignment. DCM informs you that it has updated
the assignment.
Note that DCM allows you to assign a different LDAP server by Certification
Authority.
Accessing CRLs and ARLs using WebSphere MQ Explorer:
Note that in this section, information about Certificate Revocation Lists (CRLs) also
applies to Authority Revocation Lists (ARLs).
You can use WebSphere MQ Explorer to tell a queue manager how to access CRLs.
Use the following procedure to set up an LDAP connection to a CRL:
1. Ensure that you have started your queue manager.
Chapter 3. Working with WebSphere MQ TLS and SSL support 131

2. In WebSphere MQ Explorer, expand the Advanced folder of your queue
manager.
3. Right-click the Authentication Information folder and click New ->
Authentication Information. In the property sheet that opens:
a. On the first page Create Authentication Information, enter a name for the
CRL(LDAP) object.
b. On the General page of Change Properties, select the connection type.
Optionally you can enter a description.
c. Select the CRL(LDAP) page of Change Properties.
d. Enter the LDAP server name as either the network name or the IP address.
e. If the server requires login details, provide a user ID and if necessary a
password.
f. Click OK.4. Right-click the Namelists folder and click New -> Namelist. In the property
sheet that opens:
a. Type a name for the namelist.
b. Add the name of the CRL(LDAP) object (from step 3a) to the list.
c. Click OK.5. Right-click the queue manager, select Properties, and select the SSL page:
a. Select the Check certificates received by this queue manager against
Certification Revocation Lists check box.
b. Type the name of the namelist (from step 4a) in the CRL Namelist field.
Accessing CRLs and ARLs with a WebSphere MQ client
Note that in this section, information about Certificate Revocation Lists (CRLs) also
applies to Authority Revocation Lists (ARLs).
You have three options for specifying the LDAP servers that hold CRLs for
checking by a WebSphere MQ client:
v Using a channel definition table
v Using the SSL configuration options structure, MQSCO, on an MQCONNX call
v Using the Active Directory (on Windows systems with Active Directory support)
For more information, refer to the WebSphere MQ Clients book, the WebSphere
MQ Application Programming Reference, and the setmqcrl command in the
WebSphere MQ System Administration Guide.
You can include up to 10 connections to alternative LDAP servers to ensure
continuity of service if one or more LDAP servers fail. Note that the LDAP servers
must contain identical information.
You cannot access LDAP CRLs from a WebSphere MQ client channel running on
Linux (zSeries® platform).
Accessing CRLs and ARLs with WebSphere MQ classes for Java
and WebSphere MQ classes for JMS
Refer to WebSphere MQ Using Java for information about working with CRLs and
ARLs with WebSphere MQ classes for Java and WebSphere MQ classes for JMS
132 WebSphere MQ: Security

Checking CRLs and ARLs
After you have configured your LDAP CRL server, check that it is set up correctly.
First, try using a certificate that is not revoked on the channel, and check that the
channel starts correctly. Then use a certificate that is revoked, and check that the
channel fails to start.
Manipulating authentication information objects with PCF
commands
You can manipulate authentication information objects with the following
Programmable Command Format commands:
v Create Authentication Information
v Copy Authentication Information
v Change Authentication Information
v Delete Authentication Information
v Inquire Authentication Information
v Inquire Authentication Information Names
For a complete description of these commands, refer to the WebSphere MQ
Programmable Command Formats and Administration Interface book.
Keeping CRLs and ARLs up to date
Obtain updated CRLs from the Certification Authorities frequently. Consider doing
this on your LDAP servers every 12 hours.
Use the procedure described in “Configuring and updating LDAP servers” on page
129 to include the new CRLs.
Certificate validation and trust policy design on UNIX and
Windows systems
The information in this section applies to the following:
v WebSphere MQ for UNIX systems V7.0 and later
v WebSphere MQ for Windows systems V7.0 and later
This section details the supported certificate validation trust policy for WebSphere
MQ for UNIX and Windows systems. The information is organized first by
specification standard (PKIX), then by policy topic: certificate, CRL, and path
validation.
Some definitions of terms used in this section:
certificate policy
Determines which fields in a certificate are understood and processed.
CRL policy
Determines which fields in a certificate revocation list are understood and
processed.
Chapter 3. Working with WebSphere MQ TLS and SSL support 133

path validation policy
Determines how the certificate and CRL policy types interact with each
other to determine if a certificate chain (a trust point ″RootCA″ to an
end-entry ″EE″) is valid.
The basic and standard policies are described as separate entities because this
reflects the implementation within WebSphere MQ for UNIX and Windows
systems. That is, there are two separate validation classes. To validate a certificate
to standard (RFC 3280) policy, an implementation first needs to validate with the
basic policy and then follow this with standard policy validation.
Note: WebSphere MQ for UNIX and Windows systems apply both the basic policy
validation and the standard policy (RFC 3280) validation in that order.
Basic certificate policy
The supported fields for this policy are:
v OuterSigAlgID
v Signature
v Version
v SerialNumber
v InnerSigAlgID
v Issuer
v Validity
v SubjectName
v SubjectPublicKeyInfo
v IssuerUniqueID
v SubjectUniqueID
The supported extensions for this policy are:
v AuthorityKeyID
v SubjectKeyID
v IssuerAltName
v SubjectAltName
v KeyUsage
v BasicConstraints
v PrivateKeyUsage
v CRLDistributionPoints
– DistributionPoint
- DistributionPointName (X.500 Name and LDAP Format URI only)
- NameRelativeToCRLIssuer (not supported)
- Reasons (ignored)
- CRLIssuer fields (not supported)
Basic CRL policy
v OuterSigAlgID
v Signature
v Version
v InnerSigAlgID
134 WebSphere MQ: Security

v Issuer
v ThisUpdate
v NextUpdate
v RevokedCertificate
– UserCertificate
– RevocationDate
There are no supported CRLEntry extensions. See step 7 of “Basic path validation
policy” for further information.
The supported CRL extensions for this policy are:
v AuthorityKeyID
v IssuerAltName
v CRLNumber
v IssuingDistributionPoint
– DistributionPoint
– DistributionPointName
- FullName (X.500 Name and LDAP Format URI only)
- NameRelativeToCRLIssuer (not supported)v Reasons (ignored)
v CRLIssuer
v OnlyContainsUserCerts (not supported)
v OnlyContainsCACerts (not supported)
v OnlySomeReasons (not supported)
v IndirectCRL1 (rejected)
Basic path validation policy
The validation of a chain is performed in the following manner (but not necessarily
in the following order):
1. Ensure that the name of the certificate’s issuer is equal to the subject name in
the previous certificate, and that there is not an empty issuer name in this
certificate or the previous certificate subject name. If no previous certificate
exists in the path and this is the first certificate in the chain, ensure that the
issuer and subject name are identical and that the trust status is set for the
certificate2.
Note: WebSphere MQ for UNIX and Windows systems will fail path
validation in situations where the previous certificate in a path has the same
subject name as the current certificate.
2. Ensure that the signature algorithm used to actually sign the certificate
matches the signature algorithm indicated within the certificate, by ensuring
1. IndirectCRL extensions will result in CRL validation failing. IndirectCRL extensions must not be used because they cause
identified certificates to not be rejected.
2. Trust status is an administrative setting in the key database file. You can access and alter the trust status of a particular signer
certificate in iKeyman. Select the required certificate from the signer list and click the View/Edit... button. The Set the certificate
as a trusted root check box on the resulting panel indicates the trust status. You can also set Trust status using iKeyCmd or
GSKCapiCmd with the -trust flag on the -cert -modify command. For further information about this command, see Chapter 18,
″Managing keys and certificates″ in the WebSphere MQ System Administration Guide.
Chapter 3. Working with WebSphere MQ TLS and SSL support 135
that the issuer signature algorithm identifier in the certificate matches the
algorithm identifier in the signature data.
3. Ensure that the certificate was signed by the issuer, using the subject public
key from the previous certificate in the path to verify the signature on the
certificate. If no previous certificate exists and this is the first certificate, use
the subject public key of the certificate to verify the signature on it.
4. Ensure that the certificate is a known X509 version, unique IDs are not present
for version 1 certificates, and extensions are not present for version 1 and
version 2 certificates.
5. Ensure that the certificate has not expired, or not been activated yet, and that
its validity period is good3.
6. Ensure that there are no unknown critical extensions or any duplicate
extensions.
7. Ensure that the certificate has not been revoked. The CRLDistributionPoints
extension is checked for a list of X.500 distinguished name
GENERALNAME_directoryname and URI
GENERALNAME_uniformResourceID.
Only LDAP format URIs are supported. If the extension is not present, the
name of the certificate’s issuer is used. A CRL database (LDAP) is then
queried for CRLs. If the certificate is not the last certificate, or if the last
certificate has the basic constraint extension with the ″isCA″ flag turned on,
the database is queried for ARLs and CRLs instead. If CRL checking is
enabled, and no CRL database can be queried, the certificate is treated as
revoked. Currently, the X500 directory name form and the LDAP URI form are
the only supported name forms used to look up CRLs and ARLs4
Note: RelativeDistinguishedNames are not supported.
8. If the issuerAltName extension is marked critical, ensure that the name forms
are recognized. The following general name forms are currently recognized:
v rfc822
v DNS
v directory
v URI
v IPAddress(v4/v6) 9. If the subjectAltName extension is marked critical, ensure that the name forms
are recognized. The following general name forms are currently recognized:
v rfc822
v DNS
v directory
v URI
v IPAddress(v4/v6)10. If the KeyUsage extension is critical on a non-EE certificate, ensure that the
keyCertSign flag is on, and ensure that if the BasicConstraints extension is
present, that the ″isCA″ flag is true.
3. There are no checks to ensure the subject’s validity is within bounds of the issuer’s validity. This is not required, and Verisign
certificates have been shown to not pass such a check.
4. When retrieved from the database, ARLs are evaluated in exactly the same way as CRLs. Many CAs do not issue ARLs at all.
However, WebSphere MQ for UNIX and Windows systems will look for ARLs and CRLs if checking a CA certificate for
revocation status.
136 WebSphere MQ: Security

11. If the BasicConstraints extension is not present the certificate is only valid as
an EE certificate. If the BasicConstraints extension is present, the following
checks are made:
v If the ″isCA″ flag is false, ensure the certificate is the last certificate in the
chain and that the pathLength field is not present.
v If the ″isCA″ flag is true and the certificate is NOT the last certificate in the
chain, ensure that the number of certificates until the last certificate in the
chain is not greater than the pathLength field.12. The AuthorityKeyID extension is not used for path validation, but is used
when building the certificate chain.
13. The SubjectKeyID extension is not used for path validation, but is used when
building the certificate chain.
14. The PrivateKeyUsagePeriod extension is ignored by the validation engine,
because it cannot determine when the CA actually signed the certificate. The
extension is always non-critical and therefore can be safely ignored.
The validation of a CRL is also performed to ensure that the CRL itself is valid,
and is performed in the following manner (but not necessarily the following
order):
1. Ensure that the signature algorithm used to actually sign the CRL matches the
signature algorithm indicated within the CRL, by ensuring that the issuer
signature algorithm identifier in the CRL matches the algorithm identifier in
the signature data.
2. Ensure that the CRL was signed by the issuer of certificate in question,
verifying that the CRL has been signed with key of the certificate issuer.
3. Ensure that the CRL has not expired5, or not been activated yet, and that its
validity period is good.
4. Ensure that if the version field is present, it is version 2. Otherwise the CRL is
version 1 and must not have any extensions. However, WebSphere MQ for
UNIX and Windows systems only verify that no critical extensions are
present.
5. Ensure that the certificate in question is on the revokedCertificates field list
and that the revocation date is not in the future.
6. Ensure that there are no duplicate extensions.
7. If unknown critical extensions, including critical entry extensions, are detected
in the CRL, this will cause identified certificates to be treated as revoked6
(provided the CRL passes all other checks).
5. If no current CRLs are found, WebSphere MQ for UNIX and Windows systems will attempt to use out of date CRLs to determine
the revocation status of a Certificate. It is not clearly specified in RFC 3280 what action to take in the event of no current CRLs.
WebSphere MQ for UNIX and Windows systems attempt to use out of date CRLs so that security will not be adversely reduced.
6. ITU X.509 and RFC 3280 are in conflict in this case because the RFC mandates that CRLs with unknown critical extensions must
fail validation. However, ITU X.509 requires that identified certificates must still be treated as revoked provided the CRL passes
all other checks. WebSphere MQ for UNIX and Windows systems adopt the ITU X.509 guidance so that security will not be
adversely reduced.
A potential scenario exists where the CA who issues a CRL might set an unknown critical extension to indicate that even though
all other validation checks are successful, a certificate which is identified should not be considered revoked and thus not rejected
by the application. In this scenario, following X.509, WebSphere MQ for UNIX and Windows systems will function in a fail-secure
mode of operation. That is, they might reject certificates that the CA did not intend to be rejected and therefore might deny
service to some valid users. A fail-insecure mode ignores a CRL because it has an unknown critical extension and therefore
certificates that the CA intended to be revoked are still accepted. The administrator of the system should then query this behavior
with the issuing CA.
Chapter 3. Working with WebSphere MQ TLS and SSL support 137

8. If the authorityKeyID extension in the CRL and the subjectKeyID in the CA
certificate are present and if the keyIdentifier field is present within the
authorityKeyID of the CRL, match it with the CACertificate’s subjectKeyID.
9. If the issuerAltName extension is marked critical, ensure that the name forms
are recognized. The following general name forms are currently recognized:
v rfc822
v DNS
v directory
v URI
v IPAddress(v4/v6)10. If the issuingDistributionPoint extension is present in the CRL process as
follows:
v If the issuingDistributionPoint specifies an InDirectCRL then fail the CRL
validation.
v If the issuingDistributionPoint indicates that a CRLDistributionPoint is
present but no DistributionPointName is found, fail the CRL validation
v If the issuingDistributionPoint indicates that a CRLDistributionPoint is
present and specifies a DistributionPointName ensure that it is a
GeneralName or LDAP format URI that matches the name given by the
certificate’s CRLDistributionPoint or the certificate’s issuer’s name. If the
DistributionPointName is not a GeneralName then the CRL validation will
fail.
Note: RelativeDistinguishedNames are not supported and will fail CRL
validation if encountered.
Standard policy (RFC-3280)
The supported fields for the standard policy are the same as the basic policy fields.
These fields are listed in “Basic certificate policy” on page 134.
The supported extensions for the standard policy are:
v the basic policy supported extensions as listed in “Basic certificate policy” on
page 134.
v NameConstraints
v CertificatePolicies
– PolicyInformation
- PolicyIdentifier
- PolicyQualifiers (not supported)v PolicyMappings
v PolicyConstraints
Standard CRL policy
The standard CRL policy is the same as the basic CRL policy, which is detailed in
“Basic CRL policy” on page 134.
Standard path validation policy
v A certification path of length n, where the trust point or root certificate is
certificate #1, and the EE is n.
v A set of initial policy identifiers (each comprising a sequence of policy element
identifiers), that identifies one or more certificate policies, any one of which is
138 WebSphere MQ: Security
acceptable for the purposes of certification path processing, or the special value
″any-policy″. Currently this is always set to ″any-policy″.
Note: WebSphere MQ for UNIX and Windows systems only support policy
identifiers that are created by WebSphere MQ for UNIX and Windows systems.
v Acceptable policy set: a set of certificate policy identifiers comprising the policy
or policies recognized by the public key user, together with policies deemed
equivalent through policy mapping. The initial value of the acceptable policy set
is the special value ″any-policy″.
v Constrained subtrees: a set of root names defining a set of subtrees within which
all subject names in subsequent certificates in the certification path can fall. The
initial value is ″unbounded″.
v Excluded subtrees: a set of root names defining a set of subtrees within which
no subject name in subsequent certificates in the certification path can fall. The
initial value is ″empty″.
v Explicit policy: an integer which indicates if an explicit policy identifier is
required. The integer indicates the first certificate in the path where this
requirement is imposed. When set, this variable can be decreased, but can not be
increased. (That is, if a certificate in the path requires explicit policy identifiers, a
later certificate can not remove this requirement.) The initial value is n+1.
v Policy mapping: an integer which indicates if policy mapping is permitted. The
integer indicates the last certificate on which policy mapping may be applied.
When set, this variable can be decreased, but can not be increased. (That is, if a
certificate in the path specifies policy mapping is not permitted, it can not be
overridden by a later certificate.) The initial value is n+1.
The validation of a chain is performed in the following manner (but not necessarily
the following order):
1. The information in the following paragraph is consistent with the basic path
validation policy described in “Basic path validation policy” on page 135:
Ensure that the name of the certificate’s issuer is equal to the subject name in
the previous certificate, and that there is not an empty issuer name in this
certificate or the previous certificate subject name. If no previous certificate
exists in the path and this is the first certificate in the chain, ensure that the
issuer and subject name are identical and that the trust status is set for the
certificate7.
If the certificate does not have a subject name, the subjectAltName extension
must be present and critical.
2. The information in the following paragraph is consistent with the basic path
validation policy described in “Basic path validation policy” on page 135:
Ensure that the signature algorithm used to actually sign the certificate
matches the signature algorithm indicated within the certificate, by ensuring
that the issuer signature algorithm identifier in the certificate matches the
algorithm identifier in the signature data.
If both the certificate’s issuersUniqueID and the issuer’s subjectUniqueID are
present, ensure they match.
3.
7. Trust status is an administrative setting in the key database file. You can access and alter the trust status of a particular signer
certificate in iKeyman. Select the required certificate from the signer list and click the View/Edit... button. The Set the certificate
as a trusted root check box on the resulting panel indicates the trust status. You can also set Trust status using iKeyCmd or
GSKCapiCmd with the -trust flag on the -cert -modify command. For further information about this command, see Chapter 18,
″Managing keys and certificates″ in the WebSphere MQ System Administration Guide.
Chapter 3. Working with WebSphere MQ TLS and SSL support 139

The following information is consistent with the basic path validation policy
described in “Basic path validation policy” on page 135:
Ensure that the certificate was signed by the issuer, using the subject public
key from the previous certificate in the path to verify the signature on the
certificate. If no previous certificate exists and this is the first certificate, use
the subject public key of the certificate to verify the signature on it.
4.
The following information is consistent with the basic path validation policy
described in “Basic path validation policy” on page 135:
Ensure that the certificate is a known X509 version, unique IDs are not present
for version 1 certificates and extensions are not present for version 1 and
version 2 certificates.
5.
The following information is consistent with the basic path validation policy
described in “Basic path validation policy” on page 135:
Ensure that the certificate has not expired, or not been activated yet, and that
its validity period is good8
6.
The following information is consistent with the basic path validation policy
described in “Basic path validation policy” on page 135:
Ensure that there are no unknown critical extensions, nor any duplicate
extensions.
7.
The following information is consistent with the basic path validation policy
described in “Basic path validation policy” on page 135:
Ensure that the certificate has not been revoked. The CRLDistributionPoints
extension is checked for a list of X500 distinguished names. If the extension is
not present, the name of the certificate’s issuer is used. A CRL database
(LDAP) is then queried for CRLs. If the certificate is not the last certificate, or
if the last certificate has the basic constraint extension with the ″isCA″ flag
turned on, the database is queried for ARLs and CRLs instead. If CRL
checking is enabled, and no CRL database can be queried, the certificate is
treated as revoked. Currently, the X500 directory name form is the only
supported name form used to look up CRLs and ARLs9.
8.
The following information is consistent with the basic path validation policy
described in “Basic path validation policy” on page 135:
If the subjectAltName extension is marked critical, ensure that the name forms
are recognized. The following general name forms are currently recognized:
v rfc822
v DNS
v directory
v URI
v IPAddress(v4/v6)
8. There are no checks to ensure the subject’s validity is within bounds of the issuer’s validity. This is not required, and Verisign
certificates have been shown to not pass such a check.
9. When retrieved from the database, ARLs are evaluated in exactly the same way as CRLs. Many CAs do not issue ARLs at all.
However, WebSphere MQ for UNIX and Windows systems will look for ARLs and CRLs if checking a CA certificate for
revocation status.
140 WebSphere MQ: Security

9. Ensure that the subject name and subjectAltName extension (critical or
noncritical) is consistent with the constrained and excluded subtrees state
variables.10.
10. If the EmailAddress OID is present in the subject name field as an IA5 string,
and there is no subjectAltName extension, the EmailAddress must be
consistent with the constrained and excluded subtrees state variable.
11. Ensure that policy information is consistent with the initial policy set11:
a. If the explicit policy state variable is less than or equal to the current
certificate’s numerical sequence value, a policy identifier in the certificate
shall be in the initial policy set.
b. If the policy mapping variable is less than or equal to the current
certificate’s numerical sequence value, the policy identifier can not be
mapped.12. Ensure that policy information is consistent with the acceptable policy set:
a. If the certificate policies extension is marked critical12, the intersection of
the policies extension and the acceptable policy set is non-null.
b. The acceptable policy set is assigned the resulting intersection as its new
value.13. Ensure that the intersection of the acceptable policy set and the initial policy
set is non-null.
14. The following is performed for all certificates except the last one:
a. If the issuerAltName extension is marked critical, ensure that the name
forms are recognized. The following general name forms are currently
recognized:
v rfc822
v DNS
v directory
v URI
v IPAddress(v4/v6)b. If the BasicConstraints extension is present, ensure that the ″isCA″ flag is
true13. If the pathLength field is present, ensure the number of certificates
until the last certificate is not greater than the pathLength field.
c. If the KeyUsage extension is critical on not the last certificate, ensure that
the keyCertSign flag is on, and ensure that if the BasicConstraints
extension is present, that the ″isCA″ flag is true14.
d. If a policy constraints extension is included in the certificate, modify the
explicit policy and policy mapping state variables as follows:
e. If the policyMappings extension is present (see 12(b)), ensure that it is not
critical, and if policy mapping is allowed, these mappings are used to map
between this certificate’s policies and its signee’s policies.
10. WebSphere MQ for UNIX and Windows systems only support nameConstraint Extensions that are created by WebSphere MQ for
UNIX and Windows systems
11. WebSphere MQ for UNIX and Windows systems only support Policy Extensions that are created by WebSphere MQ for UNIX
and Windows systems.
12. This is maintained as a legacy requirement from RFC2459 (6.1 (e)(1))
13. “isCA” is always checked to ensure it is true to be as part of the chain building itself, however this specific test is still made.
14. This check is in fact redundant because of step (b), but the check is still made.
Chapter 3. Working with WebSphere MQ TLS and SSL support 141

f. f. If the nameConstraints extension is present15, ensure that it is critical,
and that the permitted and excluded subtrees adhere to the following
before updating the chain’s subtree’s state in accordance with the algorithm
described in RFC 3280 section 6.1.4 part (g):
1) The minimum field is set to zero.
2) The maximum field is not present.
3) The base field name forms are recognized. The following general name
forms are currently recognized:
v rfc822
v DNS
v directory
v URI
v IPAddress(v4/v6)15.
The following information is consistent with the basic path validation policy
described in “Basic path validation policy” on page 135:
The AuthorityKeyID extension is not used for path validation, but is used
when building the certificate chain.
16.
The following information is consistent with the basic path validation policy
described in “Basic path validation policy” on page 135:
The SubjectKeyID extension is not used for path validation, but is used when
building the certificate chain.
17.
The following information is consistent with the basic path validation policy
described in “Basic path validation policy” on page 135:
The PrivateKeyUsagePeriod extension is ignored by the validation engine,
because it cannot determine when the CA actually signed the certificate. The
extension is always non-critical and therefore can be safely ignored.
Working with CipherSpecs
The CipherSpec identifies the combination of encryption algorithm and hash
function used by an SSL or TLS connection. A CipherSpec forms part of a
CipherSuite, which identifies the key exchange and authentication mechanism as
well as the encryption and hash function algorithms.
Note that WebSphere MQ supports both SSL and TLS CipherSpecs.
WebSphere MQ supports only the RSA key exchange and authentication
algorithms. The size of the key used during the SSL handshake can depend on the
digital certificate you use, but some of the CipherSpecs supported by WebSphere
MQ include a specification of the handshake key size. Note that larger handshake
key sizes provide stronger authentication. With smaller key sizes, the handshake is
faster.
For more information, refer to “CipherSuites and CipherSpecs” on page 22 and
“An overview of the SSL handshake” on page 19.
15. WebSphere MQ for UNIX and Windows systems only support nameConstraint Extensions that are created by WebSphere MQ for
UNIX and Windows systems.
142 WebSphere MQ: Security

Specifying CipherSpecs
Specify the CipherSpec by using the SSLCIPH parameter in either the DEFINE
CHANNEL MQSC command or the ALTER CHANNEL MQSC command.
You can choose from the CipherSpecs listed in Table 3:
Table 3. CipherSpecs that can be used with WebSphere MQ SSL and TLS support
CipherSpec name Protocol
used
Hash
algorithm
Encryption
algorithm
Encryption
bits
FIPS on
Windows
and UNIX
platforms
1
NULL_MD5 SSL MD5 None 0 No
NULL_SHA SSL SHA-1 None 0 No
RC4_MD5_EXPORT SSL MD5 RC4 40 No
RC4_MD5_US SSL MD5 RC4 128 No
RC4_SHA_US SSL SHA-1 RC4 128 No
RC2_MD5_EXPORT SSL MD5 RC2 40 No
DES_SHA_EXPORT SSL SHA-1 DES 56 No
RC4_56_SHA_EXPORT1024
Note:
1. Not available for z/OS or i5/OS
2. Specifies a 1024–bit handshake key size
SSL SHA-1 RC4 56 No
DES_SHA_EXPORT1024
Note:
1. Not available for z/OS or i5/OS
2. Specifies a 1024–bit handshake key size
SSL SHA-1 DES 56 No
TRIPLE_DES_SHA_US SSL SHA-1 3DES 168 No
TLS_RSA_WITH_AES_128_CBC_SHA TLS SHA-1 AES 128 Yes
TLS_RSA_WITH_AES_256_CBC_SHA TLS SHA-1 AES 256 Yes
AES_SHA_US
Note: Available on i5/OS only
SSL SHA-1 AES 128 No
TLS_RSA_WITH_DES_CBC_SHA
Note: Not available for z/OS
TLS SHA-1 DES 56 No2
TLS_RSA_WITH_3DES_EDE_CBC_SHA
Note: Not available for z/OS
TLS SHA-1 3DES 168 Yes
FIPS_WITH_DES_CBC_SHA
Note: Available only on Windows and UNIX
platforms
SSL SHA-1 DES 56 No3
FIPS_WITH_3DES_EDE_CBC_SHA
Note: Available only on Windows and UNIX
platforms
SSL SHA-1 3DES 168 Yes
TLS_RSA_WITH_NULL_MD5
Note: Available on i5/OS only
TLS MD5 None 0 No
TLS_RSA_WITH_NULL_SHA
Note: Available on i5/OS only
TLS SHA-1 None 0 No
TLS_RSA_EXPORT_WITH_RC2_40_MD5
Note: Available on i5/OS only
TLS MD5 RC2 40 No
TLS_RSA_EXPORT_WITH_RC4_40_MD5
Note: Available on i5/OS only
TLS MD5 RC4 40 No
Chapter 3. Working with WebSphere MQ TLS and SSL support 143

Table 3. CipherSpecs that can be used with WebSphere MQ SSL and TLS support (continued)
CipherSpec name Protocol
used
Hash
algorithm
Encryption
algorithm
Encryption
bits
FIPS on
Windows
and UNIX
platforms
1
TLS_RSA_WITH_RC4_128_MD5
Note: Available on i5/OS only
TLS MD5 RC4 128 No
Note:
1. Is the CipherSpec FIPS-certified on a FIPS-certified platform? See “Federal Information Processing Standards
(FIPS)” on page 44 for an explanation of FIPS.
2. This CipherSpec was FIPS 140-2 certified prior to 19th May 2007.
3. This CipherSpec was FIPS 140-2 certified prior to 19th May 2007. The name FIPS_WITH_DES_CBC_SHA is
historical and reflects the fact that this CipherSpec was previously FIPS-compliant.
Note: On i5/OS V5R3, installation of AC3 is a prerequisite for the use of SSL, but
installation of AC3 is not a prerequisite on i5/OS releases later than V5R3.
When you request a personal certificate, you specify a key size for the public and
private key pair. The key size that is used during the SSL handshake can depend
on the size stored in the certificate and on the CipherSpec:
v On UNIX systems, Windows systems, and z/OS, when a CipherSpec name
includes _EXPORT, the maximum handshake key size is 512 bits. If either of the
certificates exchanged during the SSL handshake has a key size greater than 512
bits, a temporary 512-bit key is generated for use during the handshake.
v On UNIX and Windows systems, when a CipherSpec name includes
_EXPORT1024, the handshake key size is 1024 bits.
v Otherwise the handshake key size is the size stored in the certificate.
Obtaining information about CipherSpecs using WebSphere MQ
Explorer
Use the following procedure to obtain information about the CipherSpecs in
Table 3 on page 143:
1. Open WebSphere MQ Explorer and expand the Queue Managers folder.
2. Ensure that you have started your queue manager.
3. Select the queue manager you want to work with and click Advanced –>
Channels.
4. Right–click the channel you want to work with and select Properties.
5. Select the SSL property page.
6. Select from the list the CipherSpec you want to work with. A description
appears in the window below the list.
Alternatives for specifying CipherSpecs
Note: This section does not apply to UNIX or Windows systems, because the
CipherSpecs are provided with the WebSphere MQ product, so new CipherSpecs
do not become available after shipment.
For those platforms where the operating system provides the SSL support, your
system might support new CipherSpecs that are not included in Table 3 on page
143. You can specify a new CipherSpec with the SSLCIPH parameter, but the value
144 WebSphere MQ: Security

you supply depends on your platform. In all cases the specification must
correspond to an SSL CipherSpec that is both valid and supported by the version
of SSL your system is running.
i5/OS A two-character string representing a hexadecimal value.
For more information about the permitted values, refer to the appropriate
information center (search on cipher_spec):
v For V5R3, the iSeries® Information Center at http://publib.boulder.ibm.com/infocenter/iseries/v5r3/index.jsp
v For V5R4, the i5/OS Information Center at http://publib.boulder.ibm.com/infocenter/iseries/v5r4/index.jsp
You can use either the CHGMQMCHL or the CRTMQMCHL command to
specify the value, for example:
CRTMQMCHL CHLNAME(’channnel name’) SSLCIPH(’hexadecimal value’)
You can also use the ALTER QMGR MQSC command to set the SSLCIPH
parameter.
z/OS A two-character string representing a hexadecimal value. The hexadecimal
codes correspond to the SSL protocol values defined at
http://wp.netscape.com/eng/ssl3/ssl-toc.html
For more information, refer to the description of gsk_environment_open()
in the API reference chapter of z/OS System SSL Programming, SC24-5901,
where there is a list of all the supported SSL V3.0 and TLS V1.0 cipher
specifications in the form of 2-digit hexadecimal codes.
Considerations for WebSphere MQ clusters:
With WebSphere MQ clusters you should try to use the CipherSpec names in
Table 3 on page 143. If you use an alternative specification, be aware that the
specification might not be valid on other platforms. For more information, refer to
the WebSphere MQ Queue Manager Clusters book.
Specifying a CipherSpec for a WebSphere MQ client
You have three options for specifying a CipherSpec for a WebSphere MQ client:
v Using a channel definition table
v Using the SSL configuration options structure, MQSCO, on an MQCONNX call
v Using the Active Directory (on Windows systems with Active Directory support)
For more information, refer to the WebSphere MQ Clients book and the WebSphere
MQ Application Programming Reference.
Specifying a CipherSuite with WebSphere MQ classes for Java
and WebSphere MQ classes for JMS
For information about specifying a CipherSuite with WebSphere MQ classes for
Java, refer to Secure Sockets Layer (SSL) support
For information about specifying a CipherSuite with WebSphere MQ classes for
JMS, refer to Using Secure Sockets Layer (SSL) with WebSphere MQ classes for
JMS
Chapter 3. Working with WebSphere MQ TLS and SSL support 145

Understanding CipherSpec mismatches
A CipherSpec identifies the combination of the encryption algorithm and hash
function. Both ends of a WebSphere MQ SSL channel must use the same
CipherSpec, although they can specify that CipherSpec in a different manner.
Mismatches can be detected at two stages:
During the SSL handshake
The SSL handshake fails when the CipherSpec specified by the SSL client is
unacceptable to the SSL support at the SSL server end of the connection. A
CipherSpec failure during the SSL handshake arises when the SSL client
proposes a CipherSpec that is not supported by the SSL provision on the
SSL server. For example, when an SSL client running on AIX proposes the
TLS_RSA_WITH_AES_128_CBC_SHA CipherSpec to an SSL server running on
i5/OS.
During channel startup
Channel startup fails when there is a mismatch between the CipherSpec
defined for the responding end of the channel and the CipherSpec defined
for the calling end of channel. Channel startup also fails when only one
end of the channel defines a CipherSpec.
Refer to “Specifying CipherSpecs” on page 143 for more information.
Note: If Global Server Certificates are used, a mismatch can be detected
during channel startup even if the CipherSpecs specified on both channel
definitions match.
Global Server Certificates are a special type of certificate which require that
a minimum level of encryption is established on all the communications
links with which they are used. If the CipherSpec requested by the
WebSphere MQ channel configuration does not meet this requirement, the
CipherSpec is renegotiated during the SSL handshake. This is detected as a
failure during WebSphere MQ channel startup as the CipherSpec no longer
matches the one specified on the channel.
In this case, change the CipherSpec at both sides of the channel to one
which meets the requirements of the Global Server Certificate. To establish
whether a certificate that has been issued to you is a Global Server
Certificate, contact the certificate authority which issued that certificate.
SSL servers do not detect mismatches when an SSL client channel on UNIX or
Windows specifies the DES_SHA_EXPORT1024 CipherSpec, and the corresponding SSL
server channel on UNIX or Windows is using the DES_SHA_EXPORT CipherSpec. In
this case, the channel runs normally.
WebSphere MQ rules for SSLPEER values
This chapter tells you about the rules you use when specifying SSLPEER values
and which WebSphere MQ uses for matching Distinguished Names in digital
certificates. For a full description of Distinguished Names, refer to “Distinguished
Names” on page 16.
When SSLPEER values are compared with DNs, the rules for specifying and
matching attribute values are:
1. You can use either a comma or a semicolon as a separator.
146 WebSphere MQ: Security

2. Spaces before or after the separator are ignored. For example:
CN=John Smith, O=IBM ,OU=Test , C=GB
3. The values of attribute types CN, T, O, OU, L, ST, SP, S, C are text strings
that usually include only the following:
v Upper and lower case alphabetic characters A through Z and a through z
v Numeric characters 0 through 9
v The space character
v Characters , . ; ’ " ( ) / -
To avoid conversion problems between different platforms, do not use other
characters in an attribute value. Note that the attribute types, for example CN,
must be in upper case.
4. Strings containing the same alphabetical characters match irrespective of case.
5. Spaces are not allowed between the attribute type and the = character.
6. Optionally, you can enclose attribute values in double quotes, for example
CN="John Smith". The quotes are discarded when matching values.
7. Spaces at either end of the string are ignored unless the string is enclosed in
double quotes.
8. The comma and semicolon attribute separator characters are considered to be
part of the string when enclosed in double quotes.
9. The names of attribute types, for example CN or OU, are considered to be part
of the string when enclosed in double quotes.
10. Any of the attribute types ST, SP, and S can be used for the State or Province
name.
11. Any attribute value can have an asterisk (*) as a pattern-matching character at
the beginning, the end, or in both places. The asterisk character substitutes for
any number of characters at the beginning or end of the string to be matched.
This enables your SSLPEER value specification to match a range of
Distinguished Names. For example, OU=IBM* matches every Organizational
Unit beginning with IBM, such as IBM Corporation.
Note that the asterisk character can also be a valid character in a
Distinguished Name. To obtain an exact match with an asterisk at the
beginning or end of the string, the backslash escape character (\) must precede
the asterisk: \*. Asterisks in the middle of the string are considered to be part
of the string and do not require the backslash escape character.
12. When multiple OU attributes are specified, all must exist and be in
descending hierarchical order. For an example of this, see the information on
the DEFINE CHANNEL command in “Chapter 2. The MQSC commands” in
the WebSphere MQ Script (MQSC) Command Reference.
Understanding authentication failures
This chapter explains some common reasons for authentication failures during the
SSL handshake:
A certificate has been found in a Certificate Revocation List or Authority
Revocation List
You have the option to check certificates against the revocation lists
published by the Certification Authorities.
A Certification Authority can revoke a certificate that is no longer trusted
by publishing it in a Certificate Revocation List (CRL) or Authority
Chapter 3. Working with WebSphere MQ TLS and SSL support 147
Revocation List (ARL). For more information, refer to “Working with
Certificate Revocation Lists and Authority Revocation Lists” on page 127.
A certificate has expired or is not yet active
Each digital certificate has a date from which it is valid and a date after
which it is no longer valid, so an attempt to authenticate with a certificate
that is outside its lifetime fails.
A certificate is corrupted
If the information in a digital certificate is incomplete or damaged,
authentication fails.
A certificate is not supported
If the certificate is in a format that is not supported, authentication fails,
even if the certificate is still within its lifetime.
The SSL client does not have a certificate
The SSL server always validates the client certificate if one is sent. If the
SSL client does not send a certificate, authentication fails if the end of the
channel acting as the SSL server is defined:
v With the SSLCAUTH parameter set to REQUIRED or
v With an SSLPEER parameter value
There is no matching CA root certificate or the certificate chain is incomplete
Each digital certificate is issued by a Certification Authority (CA), which
also provides a root certificate that contains the public key for the CA.
Root certificates are signed by the issuing CA itself. If the key repository
on the computer that is performing the authentication does not contain a
valid root certificate for the CA that issued the incoming user certificate,
authentication fails.
Authentication often involves a chain of trusted certificates. The digital
signature on a user certificate is verified with the public key from the
certificate for the issuing CA. If that CA certificate is a root certificate, the
verification process is complete. If that CA certificate was issued by an
intermediate CA, the digital signature on the intermediate CA certificate
must itself be verified. This process continues along a chain of CA
certificates until a root certificate is reached. In such cases, all certificates in
the chain must be verified correctly. If the key repository on the computer
that is performing the authentication does not contain a valid root
certificate for the CA that issued the incoming root certificate,
authentication fails. For more information, refer to “How certificate chains
work” on page 17.
For more information about the terms used in this chapter, refer to:
v “Secure Sockets Layer (SSL) concepts” on page 19
v “Digital certificates” on page 14
148 WebSphere MQ: Security

Chapter 4. Cryptographic hardware
Note:
1. Symmetric cipher operations (see below for a definition of this term) are only
supported on cards where this is explicitly stated.
2. On i5/OS and z/OS, the operating system provides the cryptographic
hardware support.
3. On 64-bit enabled UNIX platforms, testing was carried out using GSKit in
32-bit mode
On i5/OS, when you use DCM to create or renew certificates, you can choose to
store the key directly in the coprocessor or to use the coprocessor master key to
encrypt the private key and store it in a special key store file.
On z/OS, when you use RACF to create certificates, you can choose to store the
key using ICSF (Integrated Cryptographic Service Facility) to obtain improved
performance and more secure key storage.
On UNIX and Windows systems, WebSphere MQ currently provides support for
the following cryptographic hardware:
IBM 4758-002
Interface: PKCS #11
Platforms:
v i5/OS V5R3
IBM e-business Cryptographic Accelerator (#4960)
Interface: PKCS #11
Platforms:
v Linux (zSeries)
IBM PCICA
Interface: PKCS #11
Platforms:
v Linux (zSeries)
nCipher nForce 300
Interface: PKCS #11
Platforms:
v HP11i
If SSL cryptographic hardware symmetric cipher operations are enabled
within WebSphere MQ, the cryptography used on an SSL channel will be
provided by nCipher. This card is currently supported for symmetric
cipher operations using Triple DES encryption.
nCipher netHSM 300, 800 and 1600
Interface: PKCS#11
Platforms:
v AIX V5.3
On all platforms, cryptographic hardware is used at the SSL handshaking stage
and at secret key reset.
© Copyright IBM Corp. 2002, 2008 149

On UNIX and Windows systems, WebSphere MQ support is also provided for SSL
cryptographic hardware symmetric cipher operations. When using SSL
cryptographic hardware symmetric cipher operations, data sent across an SSL or
TLS connection is encrypted/decrypted by the cryptographic hardware product.
On the queue manager, this is switched on by setting the SSLCryptoHardware
queue manager attribute appropriately (see the WebSphere MQ Script (MQSC)
Command Reference and WebSphere MQ Programmable Command Formats and
Administration Interface books). On the WMQ client, equivalent variables are
provided (see the WebSphere MQ Clients book). The default setting is off.
If this attribute is switched on, WebSphere MQ attempts to use symmetric cipher
operations whether the cryptographic hardware product supports them for the
encryption algorithm specified in the current CipherSpec or not. If the
cryptographic hardware product does not provide this support, WebSphere MQ
performs the encryption and decryption of data itself, and no error is reported. If
the cryptographic hardware product supports symmetric cipher operations for the
encryption algorithm specified in the current CipherSpec, this function is activated
and the cryptographic hardware product performs the encryption and decryption
of the data sent.
In a situation of low CPU usage it is generally quicker to perform the
encryption/decryption in software, rather than copying the data on to the card,
encrypting/decrypting it, and copying it back to the SSL protocol software.
Hardware symmetric cipher operations become more useful when the CPU usage
is high.
On z/OS with cryptographic hardware, support is provided for symmetric cipher
operations. This means that the user’s data is encrypted and decrypted by the
hardware if the hardware has this capability for the CipherSpec chosen, and is
configured to support data encryption and decryption.
On i5/OS, cryptographic hardware is not used for encryption and decryption of
the user’s data, even if the hardware has the capability of performing such
encryption for the encryption algorithm specified in the current CipherSpec.
150 WebSphere MQ: Security

Notices
This information was developed for products and services offered in the United
States. IBM may not offer the products, services, or features discussed in this
information in other countries. Consult your local IBM representative for
information on the products and services currently available in your area. Any
reference to an IBM product, program, or service is not intended to state or imply
that only that IBM product, program, or service may be used. Any functionally
equivalent product, program, or service that does not infringe any IBM intellectual
property right may be used instead. However, it is the user’s responsibility to
evaluate and verify the operation of any non-IBM product, program, or service.
IBM may have patents or pending patent applications covering subject matter
described in this information. The furnishing of this information does not give you
any license to these patents. You can send license inquiries, in writing, to:
IBM Director of Licensing,
IBM Corporation,
North Castle Drive,
Armonk, NY 10504-1785,
U.S.A.
For license inquiries regarding double-byte (DBCS) information, contact the IBM
Intellectual Property Department in your country or send inquiries, in writing, to:
IBM World Trade Asia Corporation,
Licensing,
2-31 Roppongi 3-chome, Minato-k,u
Tokyo 106, Japan
The following paragraph does not apply to the United Kingdom or any other
country where such provisions are inconsistent with local law:
INTERNATIONAL BUSINESS MACHINES CORPORATION PROVIDES THIS
PUBLICATION “AS IS” WITHOUT WARRANTY OF ANY KIND, EITHER
EXPRESS OR IMPLIED, INCLUDING, BUT NOT LIMITED TO, THE IMPLIED
WARRANTIES OF NON-INFRINGEMENT, MERCHANTABILITY, OR FITNESS
FOR A PARTICULAR PURPOSE. Some states do not allow disclaimer of express or
implied warranties in certain transactions, therefore this statement may not apply
to you.
This information could include technical inaccuracies or typographical errors.
Changes are periodically made to the information herein; these changes will be
incorporated in new editions of the information. IBM may make improvements
and/or changes in the product(s) and/or the program(s) described in this
information at any time without notice.
Any references in this information to non-IBM Web sites are provided for
convenience only and do not in any manner serve as an endorsement of those Web
sites. The materials at those Web sites are not part of the materials for this IBM
product and use of those Web sites is at your own risk.
IBM may use or distribute any of the information you supply in any way it
believes appropriate without incurring any obligation to you.
© Copyright IBM Corp. 2002, 2008 151

Licensees of this program who wish to have information about it for the purpose
of enabling: (i) the exchange of information between independently created
programs and other programs (including this one) and (ii) the mutual use of the
information which has been exchanged, should contact:
IBM United Kingdom Laboratories,
Mail Point 151,
Hursley Park,
Winchester,
Hampshire,
England
SO21 2JN.
Such information may be available, subject to appropriate terms and conditions,
including in some cases, payment of a fee.
The licensed program described in this information and all licensed material
available for it are provided by IBM under terms of the IBM Customer Agreement,
IBM International Programming License Agreement, or any equivalent agreement
between us.
Information concerning non-IBM products was obtained from the suppliers of
those products, their published announcements or other publicly available sources.
IBM has not tested those products and cannot confirm the accuracy of
performance, compatibility or any other claims related to non-IBM products.
Questions on the capabilities of non-IBM products should be addressed to the
suppliers of those products.
COPYRIGHT LICENSE:
This information contains sample application programs in source language, which
illustrate programming techniques on various operating platforms. You may copy,
modify, and distribute these sample programs in any form without payment to
IBM, for the purposes of developing, using, marketing or distributing application
programs conforming to the application programming interface for the operating
platform for which the sample programs are written. These examples have not
been thoroughly tested under all conditions. IBM, therefore, cannot guarantee or
imply reliability, serviceability, or function of these programs. You may copy,
modify, and distribute these sample programs in any form without payment to
IBM for the purposes of developing, using, marketing, or distributing application
programs conforming to IBM’s application programming interfaces.
The following are trademarks of International Business Machines Corporation in
the United States, or other countries, or both:
AIX AS/400 CICS
DB2 DB2 Universal Database i5/OS
IBM IBMLink IMS
iSeries MQSeries MVS
OS/390 OS/400 RACF
Redbooks Secureway SP
SupportPac Tivoli WebSphere
z/OS zSeries
152 WebSphere MQ: Security

Intel, Intel logo, Intel Inside, Intel Inside logo, Intel Centrino, Intel Centrino logo,
Celeron, Intel Xeon, Intel SpeedStep, Itanium, and Pentium are trademarks or
registered trademarks of Intel Corporation or its subsidiaries in the United States
and other countries.
Java and all Java-based trademarks are trademarks of Sun Microsystems, Inc. in the
United States, other countries, or both.
Lotus and Lotus Notes are registered trademarks of Lotus Development
Corporation in the United States, or other countries, or both.
Microsoft, Windows, Windows NT, and the Windows logo are trademarks of
Microsoft Corporation in the United States, other countries, or both.
Linux is a trademark of Linus Torvalds in the United States, other countries, or
both.
UNIX is a trademark of The Open Group in the United States, other countries, or
both.
Other company, product, or service names may be trademarks or service marks of
others.
Notices 153

154 WebSphere MQ: Security

Index
Aaccess control
Access Manager for Business
Integration 66
API exit 74
authority to administer WebSphere
MQ 25
authority to work with WebSphere
MQ objects 29
channel security 37
introduction 2
user written message exit 61
user written security exit 59
Access Manager for Business
Integration 64
accessing CRLsi5/OS 131
Java client and JMS 132
queue manager 130
WebSphere MQ client 132
Windows 131
alternate user authorityintroduction 32
server application 61
alternate user security 37
AMI 30
API exitintroduction 70
providing your own application level
security 73
API-crossing exitintroduction 72
providing your own application level
security 73
API-resource security 37
application level securityAccess Manager for Business
Integration 64
API exit 70
API-crossing exit 72
comparison with link level security 9
introduction 8
providing your own 70
Application Messaging Interface
(AMI) 30
ARL 127
asymmetric cryptography algorithm 12
authenticationAccess Manager for Business
Integration 67
API exit 73
application level security service,
example 9
digital signature 13
information, SSL 42
introduction 1
link level security service, example 8
obtaining personal certificatesi5/OS 92
UNIX 103
z/OS 122
authentication (continued)obtaining server certificates
i5/OS 92
SNA LU 6.2conversation level
authentication 54
session level authentication 52
SSL 21
SSPI channel exit program 50
understanding failures 147
user written message exit 61
user written security exit 58
authentication information object
(AUTHINFO)accessing CRLs 129
manipulating with PCF
commands 133
SSL 42
authority checksalternate user authority 32
CL command in Group 2 32
command resource security 28
command security 28
message context 33
MQCLOSE call 31
MQCONN call 30
MQCONNX call 30
MQOPEN call 30
MQPUT1 call 30
PCF command 31
z/OS 27
Authority Revocation List (ARL) 127
authority to administer WebSphere
MQ 25
authority to work with WebSphere MQ
objects 29
authorization service 34
Bblock cipher algorithm 13
bootstrap data sets (BSDSs) 29
BSDSs 29
CCA 14
CA certificateadding, UNIX 109
creating for testingi5/OS 92
extracting, UNIX 108, 109
CA-signed certificates 81
certificatechain 17
ensuring availabilityz/OS 121
expiry 18
exporting, i5/OS 94
importing, i5/OS 95
certificate (continued)obtaining personal
i5/OS 92
UNIX 103
z/OS 122
obtaining serveri5/OS 92
role in authentication failure 147
transferringi5/OS 94
UNIX 107
z/OS 125
untrustworthyin CRL 127
introduction 18
when changes are effectivei5/OS 91
UNIX 102
z/OS 122
Certificate Name Filters (CNFs)setting up on z/OS 126
using on z/OS 126
certificate policy 133
basic 134
Certificate Revocation List (CRL)accessing
i5/OS 131
Java client and JMS 132
queue manager 130
WebSphere MQ client 132
WebSphere MQ Explorer 131
keeping up to date 133
role in authentication failure 147
working with 127
certificate storecreating new
i5/OS 90
setting up on i5/OS 89
stashing passwordi5/OS 90
Windows key repository 42
Certification Authoritydigital certificates 14
introduction 15
obtaining personal certificatesi5/OS 92
UNIX 103
z/OS 122
obtaining server certificatesi5/OS 92
public key infrastructure (PKI) 18
working with Certificate Revocation
Lists 127
certification path 17
changing key repositoryi5/OS 91
UNIX 101
channel attributes, SSLSSLCAUTH parameter 40
SSLCIPH parameter 40
SSLPEER parameter 40
© Copyright IBM Corp. 2002, 2008 155

channel definition structure (MQCD) 59
channel exit programsintroduction 48
message exitintroduction 49
providing your own link level
security 61
receive exitintroduction 49
providing your own link level
security 63
security exitintroduction 48
providing your own link level
security 58
SSPI 50
send exitintroduction 49
providing your own link level
security 63
SSPI 50
channel initiatorauthority to access system queues 39
START CHANNEL commands 29
channel protocol flows 7
channel security 37
cipher algorithmblock 13
stream 13
cipher strength 12
CipherSpecalternatives for specifying 144
introduction 22
obtaining information using
WebSphere MQ Explorer 144
specifying for WebSphere MQ
client 145
understanding mismatches 146
using with clusters 145
working with 142
CipherSuiteintroduction 22
specifying for Java client and
JMS 145
ciphertext 11
CL commandsaccessing WebSphere MQ objects 30
Group 2authority checks 32
definition 26
introduction 26
clusters 5
CNF 126
command resource security 28
command security 28
confidentialityAccess Manager for Business
Integration 67
API exit 74
application level security service,
example 9
cryptography 11
introduction 2
link level security service, example 8
SNA LU 6.2 session level
cryptography 52
SSL 22
confidentiality (continued)user written message exit 62
user written security exit 61
user written send and receive
exits 64
configuring LDAP servers 128
connection security 36
context 2
context security 37
control commands 25
creatingnew certificate store on i5/OS 90
CRL 127
CRL policy 133
basic 134
cryptographic hardwareconfiguring on i5/OS 96
configuring on UNIX 116
list of, UNIX 149
support for 47
cryptographyalgorithm 11
cryptographic hardware 47
introduction 11
CSQINP1 data setsauthority to access 29
MQSC commands 29
CSQINP2 data setsauthority to access 29
MQSC commands 29
CSQINPX data setsauthority to access 29
MQSC commands 29
CSQUDLQH utility 30
CSQUTIL utility 28
Ddata conversion
API exit 70
application level security 76
user written message exit 62
Data Encryption Standard (DES)algorithm
Access Manager for Business
Integration 68
SNA LU 6.2 security services 52
Message Authentication Code (MAC)SNA LU 6.2 conversation level
authentication 56
SNA LU 6.2 session level
authentication 54
data integrityAccess Manager for Business
Integration 67
API exit 75
application level security service,
example 9
cryptography 11
introduction 3
link level security service, example 8
message digests 13
SSL 22
user written message exit 62
user written send and receive
exits 64
DCM 87
dead letter queue 10
dead letter queue handler utility
(CSQUDLQH) 30
decipherment 11
decryption 11
DES 52
digital certificatecertificate chain 17
Certification Authority 15
content 15
Distinguished Name (DN) 16
expiry 18
introduction 14
key repository 42
label on i5/OS 89
label on UNIX 98
label on Windows 98
label on z/OS 120
public key infrastructure (PKI) 18
role in authentication failure 147
SSL authentication 21
SSL handshake 23
untrustworthy 18
use of 16
Digital Certificate Manageraccessing 88
i5/OS 87
digital enveloping 75
digital signatureintroduction 13
SSL integrity 22
Distinguished Name (DN)filter on z/OS 126
introduction 16
pattern 146
WebSphere MQ rules 146
dmpmqaut command 35
DN 16
dspmqaut command 35
DSPMQMAUT command 36
Eeavesdropping 11
encipherment 11
encryptionCipherSpecs 142
introduction 11
SSL confidentiality 22
end-to-end security 8
Escape PCF commands 25
ESM 27
expiry of digital certificate 18
external security manager (ESM) 27
FFIPS 44
firewall 7
Ggeneric profile 35
GRTMQMAUT commandexample 35
introduction 26
156 WebSphere MQ: Security
gsk7ikm on UNIX 96
gsk7ikm on Windows 96
Hhandshake, SSL 20
hardware, cryptographic 149
hash functionCipherSpecs 142
overview 13
Iidentification
Access Manager for Business
Integration 67
API exit 73
application level security service,
example 9
introduction 1
link level security service, example 8
SSPI channel exit program 50
user written message exit 61
user written security exit 58
identity context 32
iKeymangenerating certificate requests 16
UNIX 96
Windows 96
impersonation 21
installable service 34
IPT (internet pass-thru) on SSL 47
JJava 30
Java Message Service (JMS) 30
JAVA_HOME on UNIX 96
JMS 30
KKerberos 51
key 11
key database filesetting up 98
UNIX key repository 42
key distribution problema solution 61
symmetric cryptography 12
key repositoryaccess permission
UNIX 100
Windows 100
adding personal certificatei5/OS 94
UNIX 106
z/OS 124
adding server certificatei5/OS 94
changingqueue manager on i5/OS 91
queue manager on UNIX 101
defining 23
introduction 42
key repository (continued)locating
queue manager on i5/OS 91
queue manager on UNIX 101
queue manager on z/OS 121
WebSphere MQ client on
UNIX 102
setting upi5/OS 89
UNIX 98
Windows 98
z/OS 120
specifyingWebSphere MQ client on
UNIX 102
working withi5/OS 91
UNIX 101
Windows 101
z/OS 121
key ringsetting up 120
z/OS key repository 42
KeyRepository field 23
LLDAP server
configuring and updating 129
setting up 128
use of authentication information 42
working with Certificate Revocation
Lists 127
LDIF (LDAP Data Interchange
Format) 128
link level securityavailable services other than
WebSphere MQ SSL support 47
channel exit programsintroduction 48
writing your own 57
comparison with application level
security 9
introduction 7
providing your own 57
SNA LU 6.2 security services 52
SSL 23
SSPI channel exit program 50
locating key repositoryi5/OS
queue manager 91
queue manager on z/OS 121
UNIXqueue manager 101
WebSphere MQ client 102
log data sets 29
MMAC 13
man in the middle attackintroduction 14
SNA LU 6.2 session level
authentication 54
managing digital certificatesi5/OS 94
managing digital certificates (continued)UNIX 107
z/OS 124
mapping DNsi5/OS 96
UNIX 119
MCA 37
MCAUSER parameterinitial value of MCAUserIdentifier
field 59
MCA user ID for authority checks 39
MCAUserIdentifier field 59
Message Authentication Code (MAC)Data Encryption Standard (DES)
SNA LU 6.2 conversation level
authentication 56
SNA LU 6.2 session level
authentication 54
introduction 13
part of CipherSuite 22
message channel agent (MCA)authority to access WebSphere MQ
resources 37
channel exit programs 48
channel security 37
default user IDdefinition 38
role in access control 59
user ID in an SNA LU 6.2 attach
request 56
use in SSL 23
user ID for authority checks 38
message contextintroduction 2
role in access control 32
message digest 13
message exitintroduction 49
providing your own link level
security 61
message level security 8
MQCD structure 59
MQCSP 35
MQI channelcomparing link level security and
application level security 10
mqm group 25
MQSC commandscommand security 28
encapsulated within Escape PCF
commands 25
runmqsc command 25
STRMQMMQSC command 26
system command input queue 28
MQSCO structure 23
MQSeries Publish/Subscribe 6
MQSSLKEYRenvironment variable 23
UNIX 101
Windows 101
MQXQH structure 10
MQZ_AUTHENTICATE_USER 35
MUSER_MQADMIN user ID 38
mutual authenticationcomparing link level security and
application level security 10
definition 2
Index 157

mutual authentication (continued)SSPI channel exit program 51
Nnamelist security 36
non-repudiationAccess Manager for Business
Integration 68
API exit 75
digital signature 14
introduction 3
proof of delivery 4
proof of origin 3
user written message exit 63
NTLM 51
OOAM Authenticate User 35
Object Authority Manager (OAM) 35
operations and control panelsaccessing WebSphere MQ objects 30
MQSC commands 28
origin context 32
Ppage sets 29
PASSWORD parameterSNA LU 6.2 conversation level
authenticationi5/OS, UNIX, Windows 56
z/OS 57
password stashingcertificate store on i5/OS 90
path validation policy 133
PCF commands 26
personal certificateadding to key repository
i5/OS 94
UNIX 106
z/OS 124
creating RACF signed 123
creating self-signedUNIX 103
z/OS 122
deletingi5/OS 95
exporting, UNIX 110
importing, UNIX 112
introduction 14
managingi5/OS 94
UNIX 107
z/OS 124
obtainingi5/OS 92
UNIX 103
z/OS 122
removingz/OS 125
requestingi5/OS 93
UNIX 105
z/OS 123
personal certificate (continued)transferring
i5/OS 94
UNIX 107
z/OS 125
PKCS #11cryptographic hardware cards on
UNIX 43
cryptographic hardware interface 149
PKCS #11 hardwaremanaging certificates on 117
personal certificateimporting 118
requesting 118
PKCS #7Access Manager for Business
Integrationsigned and enveloped data 68
signed data 67
plaintext 11
policycertificate 133
CRL 133
path validation 133
standard 138
privacySSL 22
private keydigital certificate 14
introduction 12
process security 36
Programmable Command Format (PCF)
commandsaccessing channels, channel initiators,
listeners, and clusters 39
accessing WebSphere MQ objects 29
authority checks 31
issued by WebSphere MQ
Explorer 26
manipulating authentication
information objects 133
proof of deliveryAPI exit 75
API-crossing exit 75
introduction 4
proof of originAPI exit 75
API-crossing exit 75
digital signature 14
introduction 3
user written message exit 63
protocolSSL
concepts 19
in WebSphere MQ 23
public keycryptography 12
digital certificate 14
digital signature 13
infrastructure 18
introduction 11
Publish/Subscribe 6
PUTAUT parameter 38
QQMQMADM group 26
queue manager attributes, SSLSSLCRLNL parameter 41
SSLCRYP parameter 41
SSLKEYR parameter 41
SSLRKEYC parameter 41
SSLTASKS parameter 41
when changes are effective 42
queue manager clusters 5
queue manager level security 27
queue security 36
queue-sharing group level security 27
RRACF 27
receive exitintroduction 49
providing your own link level
security 63
Registration Authority 18
RemoteUserIdentifier field 60
RESLEVEL profilechannel security 38
introduction 37
Resource Access Control Facility (RACF)authority checks on z/OS 27
generating certificate requests 16
RFC-3280 138
RSA 22
runmqsc commandintroduction 25
sending MQSC commands to a system
command input queue 29
RVKMQMAUT command 35
SSAF 27
secret key 11
secret keys 44
security exitintroduction 48
providing your own link level
security 58
SSPI channel exit program 50
security mechanisms 1
security messages 48
security servicesaccess control
Access Manager for Business
Integration 66
API exit 74
authority to administer WebSphere
MQ 25
authority to work with WebSphere
MQ objects 29
channel security 37
introduction 2
user written message exit 61
user written security exit 59
application levelAccess Manager for Business
Integration 64
introduction 8
providing your own 70
158 WebSphere MQ: Security

security services (continued)authentication
Access Manager for Business
Integration 67
API exit 73
introduction 1
SNA LU 6.2 conversation level
authentication 54
SNA LU 6.2 session level
authentication 52
SSPI channel exit program 50
user written message exit 61
user written security exit 58
confidentialityAccess Manager for Business
Integration 67
API exit 74
introduction 2
SNA LU 6.2 session level
cryptography 52
user written message exit 62
user written security exit 61
user written send and receive
exits 64
data integrityAccess Manager for Business
Integration 67
API exit 75
introduction 3
user written message exit 62
user written send and receive
exits 64
identificationAccess Manager for Business
Integration 67
API exit 73
introduction 1
SSPI channel exit program 50
user written message exit 61
user written security exit 58
introduction 1
link levelavailable services other than
WebSphere MQ SSL support 47
introduction 7
providing your own 57
non-repudiationAccess Manager for Business
Integration 68
API exit 75
introduction 3
proof of delivery 4
proof of origin 3
user written message exit 63
SNA LU 6.2 52
Security Support Provider Interface (SSPI)channel exit program 50
self-signed certificatecreating
UNIX 103
z/OS 122
introduction 16
self-signed certificates 78
send exitintroduction 49
providing your own link level
security 63
server certificateadding to key repository
i5/OS 94
obtainingi5/OS 92
requestingi5/OS 93
setmqaut commandexamples 35
introduction 25
signer certificateintroduction 14
SNA LU 6.2conversation level authentication
introduction 54
PASSWORD parameter, i5/OS,
UNIX, Windows 56
PASSWORD parameter, z/OS 57
security type, i5/OS, UNIX,
Windows 55
security type, z/OS 56
USERID parameter, i5/OS, UNIX,
Windows 56
USERID parameter, z/OS 57
default user ID for a responder
MCA 38
end user verification 54
LU-LU verification 52
security services 52
session level authentication 52
session level cryptography 52
specifyingCipherSpec
WebSphere MQ client 145
CipherSuiteJava client and JMS 145
key repositoryWebSphere MQ client on
UNIX 102
SSL 42
anonymous queue managers 85
authentication information object 42
channel attributesSSLCAUTH parameter 40
SSLCIPH parameter 40
SSLPEER parameter 40
configuration options 23
handshake 20, 23
i5/OS 87
IPT (internet pass-thru) 47
platforms 39
protocol 19, 23
queue manager attributesSSLCRLNL parameter 41
SSLCRYP parameter 41
SSLKEYR parameter 41
SSLRKEYC parameter 41
SSLTASKS parameter 41
self-signed certificates 78
setting upintroduction 77
testingcommunication 81
UNIX systems 96
using self-signed certificates 78
WebSphere MQ client 46
Windows systems 96
SSL (continued)z/OS 119
SSLCAUTH parameterchannel attribute 40
SSLCIPH parameterchannel attribute 40
specifying CipherSpecs 143
SSLCRLNL parameteraccessing CRLs 129
queue manager attribute 41
SSLCRYP parametercryptographic hardware 47
queue manager attribute 41
SSLKEYR parameteri5/OS 91
queue manager attribute 41
UNIX 101
Windows 101
z/OS 121
SSLKeyRepository field 23
SSLPEER parameterchannel attribute 40
SSLRKEYC parameterqueue manager attribute 41
SSLTASKS parameterqueue manager attribute 41
setting on z/OS 120
SSPI 50
stream cipher algorithm 13
strength of encryption 12
Windows upgrade 146
STRMQMMQSC command 26
subsystem security 27
switch profilesauthority checks associated with MQI
calls 37
introduction 27
symmetric cryptography algorithm 11
System Authorization Facility (SAF) 27
system command input queue 28
Ttampering 13
testingSSL communication 81
TLSplatforms 39
transmission queue header structure
(MQXQH)comparing link level security and
application level security 10
message exit 49
user written message exit 62
transmission segmentintroduction 50
user written send and receive
exits 63
Uuser certificate
introduction 14
User context 33
Index 159

USERID parameterSNA LU 6.2 conversation level
authenticationi5/OS, UNIX, Windows 56
z/OS 57
UserIdentifier fieldauthentication in a user written
message exit 61
authentication in an API exit 74
message containing an MQSC
command 28
message context 33
PCF commandoperating on a WebSphere MQ
object 31
PUTAUT parameter 38
use by a server application 61
Vvalidation policy
basic 135
standard 138
WWebSphere MQ channel protocol flows
comparing link level security and
application level security 10
send and receive exits 49
WebSphere MQ internet pass-thru 7
WebSphere MQ classes for Java 30
WebSphere MQ classes for Java Message
Service (JMS) 30
WebSphere MQ clientSSL 46
WebSphere MQ Explorerauthority to use 26
WebSphere MQ internet pass-thru 7
WebSphere MQ objects 29
WebSphere MQ Script commands 25
WebSphere MQ utility program
(CSQUTIL)accessing WebSphere MQ objects 30
MQSC commands 28
Windows NT LAN Manager (NTLM) 51
WRKMQMAUT command 36
WRKMQMAUTD command 36
XX.509 standard
defines format for CA information 16
digital certificates comply with 15
DN identifies entity 16
public key infrastructure (PKI) 18
160 WebSphere MQ: Security
Sending your comments to IBM
If you especially like or dislike anything about this book, please use one of the
methods listed below to send your comments to IBM.
Feel free to comment on what you regard as specific errors or omissions, and on
the accuracy, organization, subject matter, or completeness of this book.
Please limit your comments to the information in this book and the way in which
the information is presented.
To make comments about the functions of IBM products or systems, talk to your
IBM representative or to your IBM authorized remarketer.
When you send comments to IBM , you grant IBM a nonexclusive right to use or
distribute your comments in any way it believes appropriate, without incurring
any obligation to you.
You can send your comments to IBM in any of the following ways:
v By mail, to this address:
User Technologies Department (MP095)
IBM United Kingdom Laboratories
Hursley Park
WINCHESTER,
Hampshire
SO21 2JN
United Kingdom
v By fax:
– From outside the U.K., after your international access code use 44-1962-816151
– From within the U.K., use 01962-816151v Electronically, use the appropriate network ID:
– IBM Mail Exchange: GBIBM2Q9 at IBMMAIL
– IBMLink™: HURSLEY(IDRCF)
– Internet: [email protected]
Whichever method you use, ensure that you include:
v The publication title and order number
v The topic to which your comment applies
v Your name and address/telephone number/fax number/network ID.
© Copyright IBM Corp. 2002, 2008 161

162 WebSphere MQ: Security


���
SC34-6932-00

Spine information:
��
�
Web
Sphe
re M
Q
Secu
rity
Ve
rsio
n 7.0
Related Documents