http://facebook.com/middlewarelibrary Joseph Amrith Raj VISUAL WALKTHROUGH WEBSPHERE APPLICATION SERVER SECURITY CONFIGURATIONS

Welcome message from author
This document is posted to help you gain knowledge. Please leave a comment to let me know what you think about it! Share it to your friends and learn new things together.
Transcript
http://facebook.com/middlewarelibrary
Joseph Amrith Raj
VISUAL
WALKTHROUGH
WEBSPHERE APPLICATION SERVER SECURITY
CONFIGURATIONS
2
Preface The aim of this book is to help a websphere administrator in understanding how he can secure his
websphere environment. The idea is to provide a simple and short explanation of different security
related settings using screenshots so that an administrator can easily relate them when he is actually
working on setting up the security.
The security aspects covered in this book are : A brief introduction on how security is enforced in
WebSphere Application server, some of the security considerations for before and after product
installation, out of the box security, administrative security, User repositories, federated repositories,
security domains, administrative user roles, users and groups, SSL security, Security auditing and
Security configuration report. Application security has not been covered in this book. If possible later I’ll
share that information on my blog.
I’m not either a professional writer or a full time blogger; hence you may find the explanations in this
book are not long enough or explained with more theory. I like sharing what learned so I choose the
same way how I learned to share what I learned. Every effort has been made in the preparation of this
book to ensure the accuracy of the information presented. However, I request you to cross-check your
learning from this book with IBM Infocenter.
This book should be used as a supplement to IBM WebSphere Application Server Infocenter to
understand the procedures and concepts of the security settings. I tried to cover different version of
websphere releases [v6,7,8] in this book. You can find the version number to which it applies just beside
it or before the procedure is explained.
3
Copyrights
WebSphere Application Server Security - Visual Cookbook by Joseph Amrith Raj is licensed under a
Creative Commons Attribution-NonCommercial-ShareAlike 3.0 Unported License.
Based on a work at www.websphereusergroup.org/josephamrithraj and
www.josephamrithraj.wordpress.com
Published: July 2011
Joseph Amrith Raj Global WebSphere Community www.websphereusergroup.org/josephamrithraj
4
About the Author Joseph Amrith Raj, I’m a WebSphere Consultant with bachelor’s degree in Electronics and
Communications engineering, started my IT career in 2005 as a Middleware Administrator performing
the roles of unix systems administration, web & application servers administration. In 2007, I started
working on Websphere integration products such as MQ and MB. In 2009, I worked on Process Server
other SOA related products. It was during this period I started sharing the knowledge on WebSphere
Technologies including but not limited to WebSphere Application Server, WebSphere MQ, WebSphere
Message Broker, and WebSphere Process Server through social networks such as blogs and forums.
First and foremost, I would like to thank God for providing me with this knowledge and his guidance for
my career and life. Secondly, I would like to thank my parents and sister for their love, support and
encouragement. I was denied a websphere job back in mid 2006 as I am very new to websphere at that
time and that’s a huge change in my career as it gave the inspiration to me to become what I’m today,
so I sincerely thank the person who denied me that job .
5
Table of Contents Preface .......................................................................................................................................................... 2
Copyrights ..................................................................................................................................................... 3
About the Author .......................................................................................................................................... 4
Chapter 1: Introduction to Security in WebSphere Application Server ........................................................ 9
Introduction .............................................................................................................................................. 9
Overview of Security in WAS .................................................................................................................... 9
Chapter 2: Things to consider before and just after installation ................................................................ 12
UMASK .................................................................................................................................................... 12
WAS_ROOT ............................................................................................................................................. 12
OS LEVEL USER Permissions .................................................................................................................... 12
Security Configuration files ..................................................................................................................... 12
Chapter 3: Out of the Box security ............................................................................................................. 15
Installation Time ..................................................................................................................................... 15
Option to Enable Administrative Security ........................................................................................... 15
Option to create SSL certificates ......................................................................................................... 16
Out of the box ......................................................................................................................................... 16
Chapter 4: Administrative Security ............................................................................................................. 19
What is Administrative Security? ............................................................................................................ 19
User registries ......................................................................................................................................... 20
Using Security configuration wizard ....................................................................................................... 21
Configuring Local operating system registry .......................................................................................... 22
Configuring stand-alone LDAP ................................................................................................................ 23
Advanced LDAP settings ...................................................................................................................... 26
Configuring federated repositories ......................................................................................................... 27
Step-A. configure federated repositories ............................................................................................... 28
Option1: single built-in, file based repository .................................................................................... 28
Option2: A single, LDAP repository ..................................................................................................... 29
Option3: Multiple LDAP repositories .................................................................................................. 30
Option4: A single built-in, file based and one or more LDAPs ............................................................ 31
Step-B. Configuring supported entity types in a federated repository configuration ............................ 31
Step-C: Set the federated repositories as current .................................................................................. 33
6
Chapter5: User Management ..................................................................................................................... 35
Creating Users ......................................................................................................................................... 35
Creating groups ....................................................................................................................................... 35
Assigning users to groups ....................................................................................................................... 35
Administrative user roles ........................................................................................................................ 36
Administrative roles to users .................................................................................................................. 37
Administrative roles to groups................................................................................................................ 38
Chapter6: Security Domains ....................................................................................................................... 40
What is a security Domain? .................................................................................................................... 40
Benefits of Security Domains .................................................................................................................. 40
Global Security & Security Domains ....................................................................................................... 40
Understanding Security domains ............................................................................................................ 42
Creating Security domains ...................................................................................................................... 43
Chapter 7: SSL digital certificates and WebSphere Application server ...................................................... 49
Browser Web Server .......................................................................................................................... 49
Creating CSR ........................................................................................................................................ 50
Signing by CA ....................................................................................................................................... 52
Receiving the signed cert .................................................................................................................... 52
Preparing Web Server for SSL: ............................................................................................................ 53
Example SSL virtualhost stanza with SSL: ........................................................................................... 53
WebSphere WebSphere ..................................................................................................................... 53
For WAS 6.x ......................................................................................................................................... 53
Web Server WebSphere [Plug-in] ...................................................................................................... 58
For WAS v7.x and v8.x ............................................................................................................................. 59
Chapter 8: Security auditing ....................................................................................................................... 61
Step-1: Enable Security auditing ............................................................................................................. 61
Step-2 Event type filters .......................................................................................................................... 62
Step-3: audit service provider ................................................................................................................. 63
Step-4: Audit event factory ..................................................................................................................... 64
Step-5: Securing audit data ..................................................................................................................... 65
Encryption: .......................................................................................................................................... 65
Signing ................................................................................................................................................. 66
7
Step-6: audit monitoring ......................................................................................................................... 67
Audit Reader ........................................................................................................................................... 68
binaryAuditLogReader ........................................................................................................................ 68
showAuditLogEncryptionInfo .............................................................................................................. 69
Chapter 9: Security configuration report .................................................................................................... 71
Exercise – 1: check the default security settings ........................................................................................ 73
Exercise – 2: Check all user repository options........................................................................................... 74
Exercise – 3: Working with SSL certs ........................................................................................................... 75
Exercise – 4: Security Domains ................................................................................................................... 76
References .................................................................................................................................................. 78
Contact Joseph ............................................................................................................................................ 79
GWC ................................................................................................................................................ 79
Twitter ............................................................................................................................................. 79
FaceBook ......................................................................................................................................... 79
Email ................................................................................................................................................ 79
8
Overview of Security infrastructure in WebSphere
• Chapter 1
9
Chapter 1: Introduction to Security in WebSphere Application Server
Introduction This section gives you an overview of the security in the websphere application server. WebSphere
Application Server [from here on referred as WAS] is a J2EE based application server. Security in WAS is
based on the standard and open architecture. It provides security infrastructure to protect the J2EE
resources. Also, provides the security requirements of
Authentication
Resources Access control
Data Integrity
Confidentiality
Privacy
Secure Interoperability
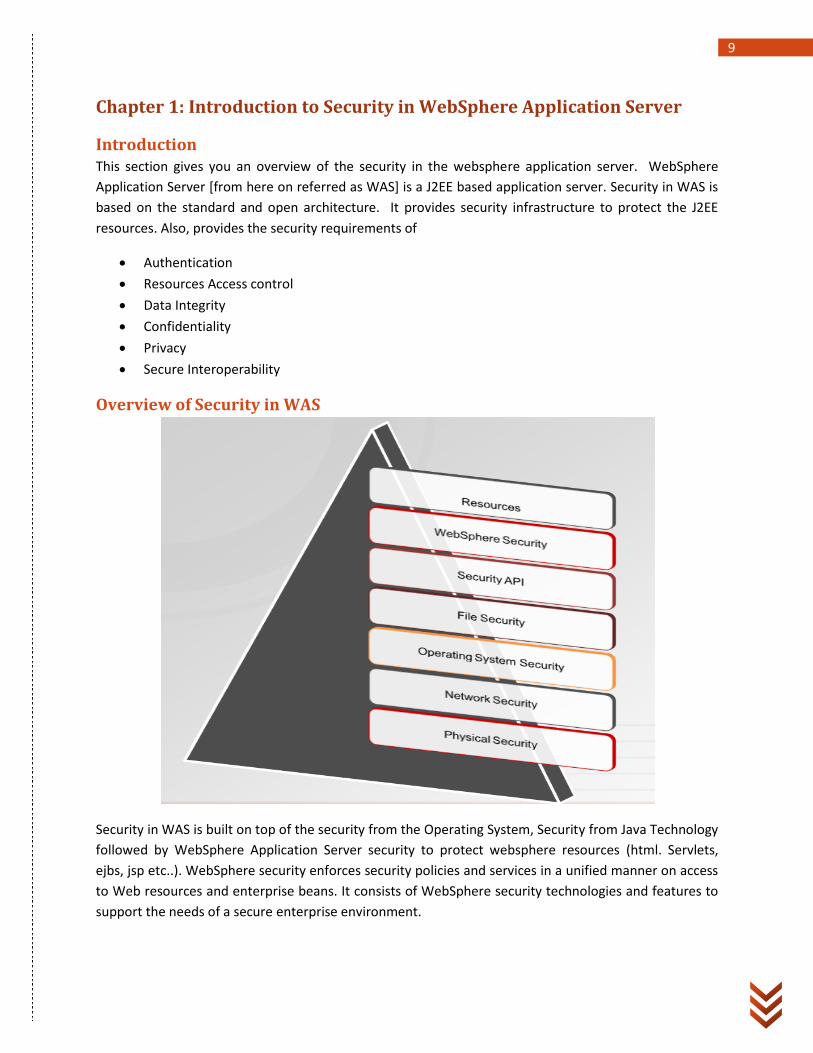
Overview of Security in WAS
Security in WAS is built on top of the security from the Operating System, Security from Java Technology
followed by WebSphere Application Server security to protect websphere resources (html. Servlets,
ejbs, jsp etc..). WebSphere security enforces security policies and services in a unified manner on access
to Web resources and enterprise beans. It consists of WebSphere security technologies and features to
support the needs of a secure enterprise environment.
10
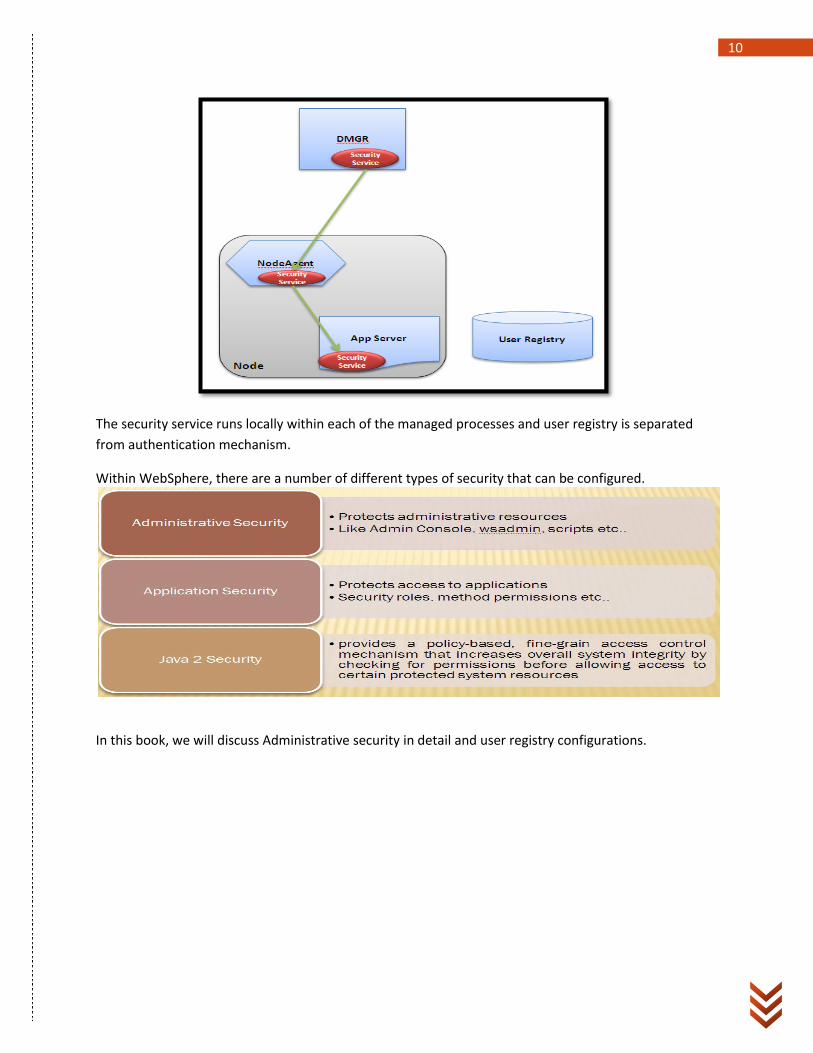
The security service runs locally within each of the managed processes and user registry is separated
from authentication mechanism.
Within WebSphere, there are a number of different types of security that can be configured.
In this book, we will discuss Administrative security in detail and user registry configurations.

11
Before and Just after installation
• Chapter 2
12
Chapter 2: Things to consider before and just after installation As you know, the user permissions on the files in OS are Read, Write, and Execute. Your first task is to
determine who needs what set permission does a user need to operate the WAS. All the OS supports
groups, which are set of users and you, can set the permission for the groups, so that those who part of
a group will have those set of permissions. You need to plan these before starting the installation. The
second part of the planning is to understand what files of the WAS installation holds the security
settings and their locations, so that we can protect them.
First let’s look at the file permissions. On Unix/Linux systems UMASK determines the default file
permissions.
From Wikipedia: umask (abbreviated from user mask) is a command and a function in POSIX
environments that sets the file mode creation mask of the current process. The file mode creation mask
(also known as the umask) limits the permission modes for files and directories subsequently created by
the process.
UMASK : A common umask value is 022. This setting makes sure that only the owner of the file can
write to it. If you look at newly created file, permission will be rwx-r-r. Hence it is recommended that the
default setting of the UMASK is set to 022 before you start the installation of the WAS. So after the
installation, only the owner/user who installed can write to the files, however others can read the files.
WAS_ROOT: As you install WAS as root user, first change the ownership of the installed directory to
the user who actually run WAS. You can use “CHOWN –R user directory “to change the owner of a
directory and all the files inside.
OS LEVEL USER Permissions: Next is to organizing users into groups. Instead of
assigning/modifying permissions for individual users, it is a good idea to organize them into group and
assign permissions at group level. If you have a group of administrators who needs the access to the
files, add all of them to one group and set permissions at group level
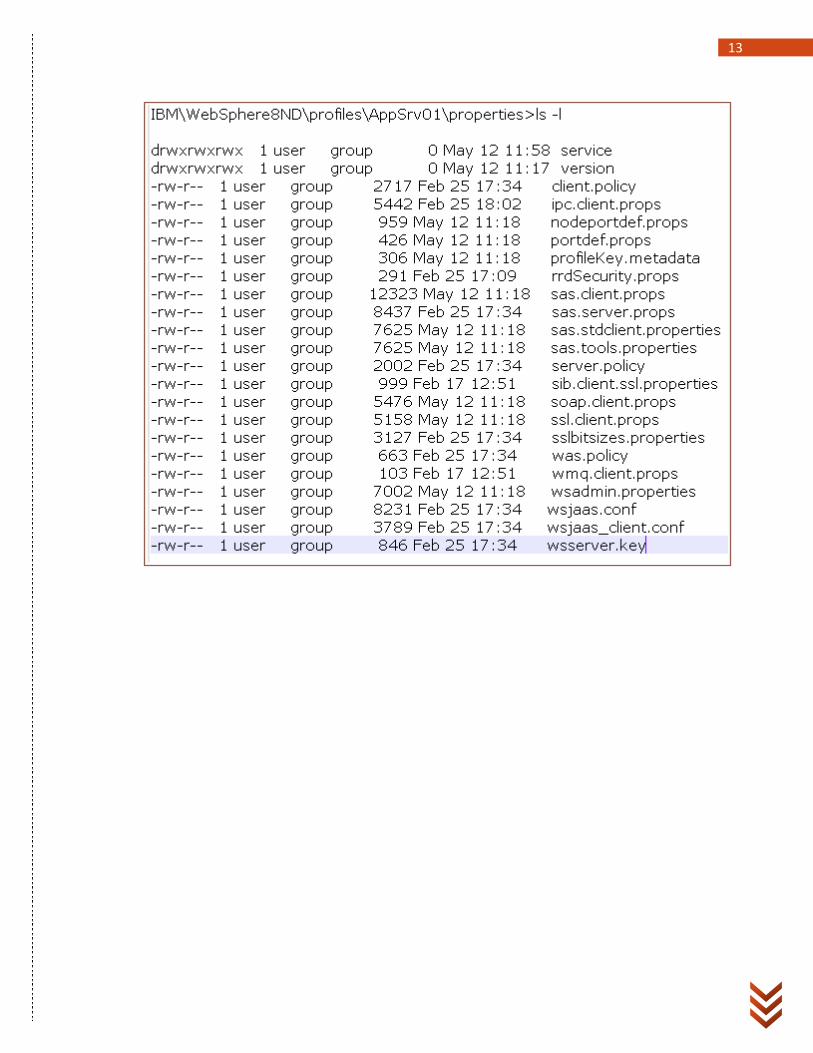
Security Configuration files: Now go to [WAS_Root]/profiles/profile_name/properties. Some of
these files contain the security information like passwords etc… So make sure that these files can be
read only by the owner and the group. Below is the screen of some of the important security
configuration files.
13
14
Ot of the Box Security
• Chapter 3
15
Chapter 3: Out of the Box security
Installation Time
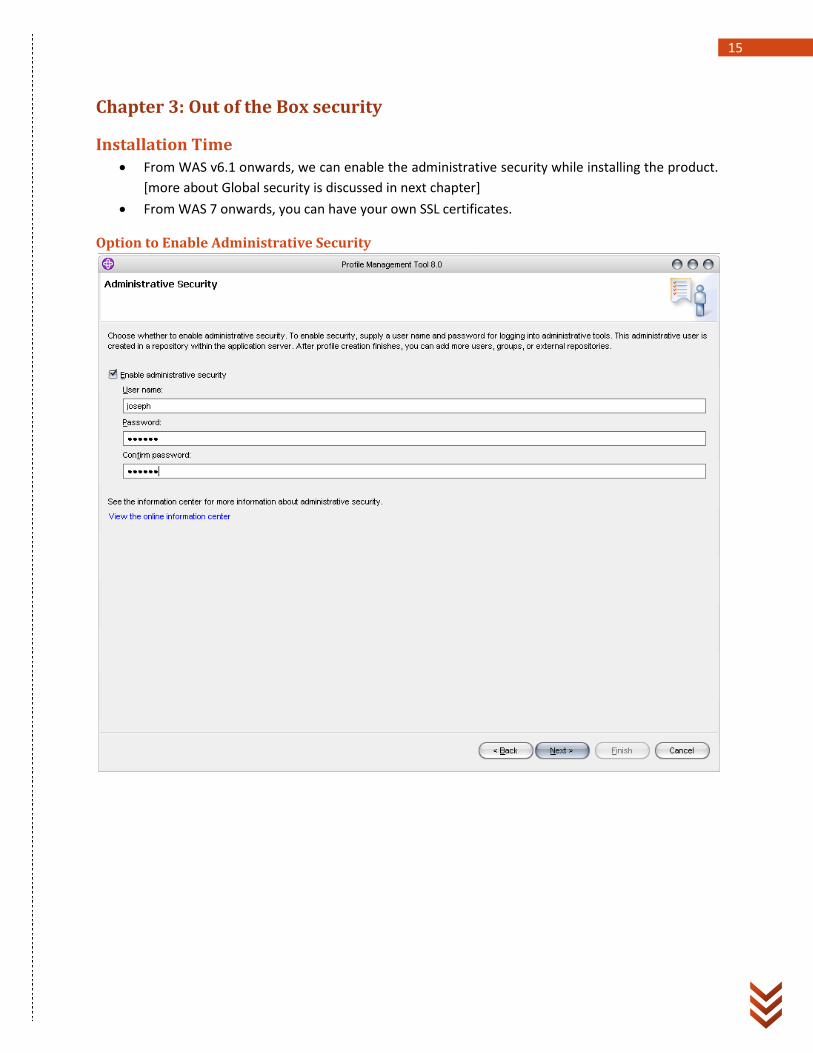
From WAS v6.1 onwards, we can enable the administrative security while installing the product.
[more about Global security is discussed in next chapter]
From WAS 7 onwards, you can have your own SSL certificates.
Option to Enable Administrative Security
16
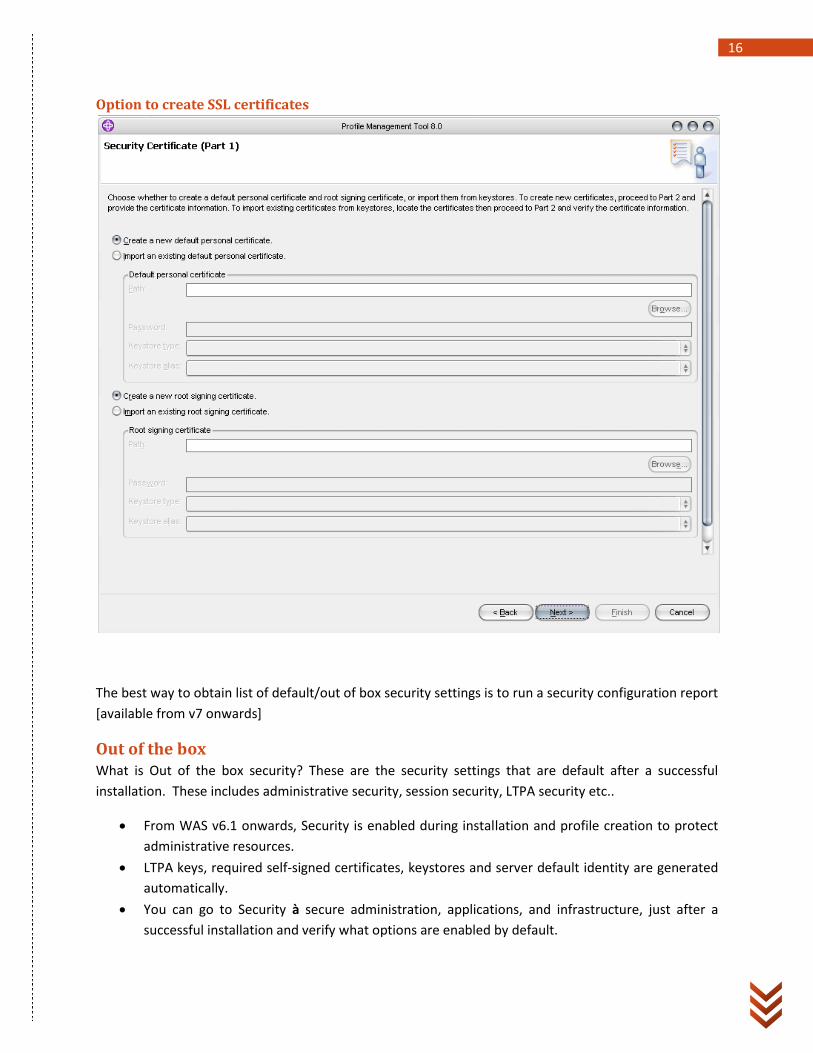
Option to create SSL certificates
The best way to obtain list of default/out of box security settings is to run a security configuration report
[available from v7 onwards]
Out of the box What is Out of the box security? These are the security settings that are default after a successful
installation. These includes administrative security, session security, LTPA security etc..
From WAS v6.1 onwards, Security is enabled during installation and profile creation to protect
administrative resources.
LTPA keys, required self-signed certificates, keystores and server default identity are generated
automatically.
You can go to Security à secure administration, applications, and infrastructure, just after a
successful installation and verify what options are enabled by default.

17
Out of the box security settings are updated for WAS v8 and are listed below.
There are new customizable options available when specifying the default audit log wrapping behavior.
WAS v8 supports the JSR 196: Java Authentication SPI for Containers (JASPI, or sometimes called JASPIC) specification, which enables third-party security providers to handle the Java Platform, Enterprise Edition (Java EE) authentication of HTTP request and response messages destined for web applications
WAS v8 supports all security updates as defined in the Java Servlet 3.0 specification (JSR-315), including the new servlet security annotations, use of new programmatic security APIs and the dynamic updating of the servlet security configuration.
In WAS v8, you can configure a unique instance of a federated repository at the domain level in a multiple security domain environment.
The security configuration report now includes information about session security; web Attributes, and the HttpOnly setting to enable you to get a more complete view of your server security settings.
When you install WAS, it comes with some default security settings which are known as ‘out of box’ security. There were some enhancements/changes made to these out of the box settings Common Security Interoperability Version 2 [CSIv2] connections now require SSL.
inbound and outbound connections to WebSphere Application Server are set to require SSL to provide stronger transport level security
New HttpOnly settings on LTPA and session cookies guard against cross-site scripting attacks.
When HttpOnly settings are enabled, cross-site scripting attacks are mitigated by permitting only HTTP elements in cookies.
Session security is enabled to restrict access to the user who created the session.
When a session is created for a user, only that user can access the session. Web authentication is set to make login information available to unprotected resources.
This enables those resources to access information in a secure session without failing and can also be used to determine the login under which unprotected resources were accessed.
Full details of ‘What’s new in WebSphere 8 Security’ can be found here

18
Administrative Security
• Chapter 4
19
Chapter 4: Administrative Security When you enable security, you are basically doing two things.
1. protecting websphere from unauthorized users
2. Providing application isolation and requirements for authenticating application users.
What is Administrative Security? Administrative security is the main security setting which enables all other security settings for
websphere application server. This means unless Administrative security is enabled, other security
settings like SSL, user registry, application security and authentication & authorizations will not take
effect. As we discussed in chapter 3, administrative security can be enabled while installing product,
creating a profile or later.
Administrative security setting can be found under:
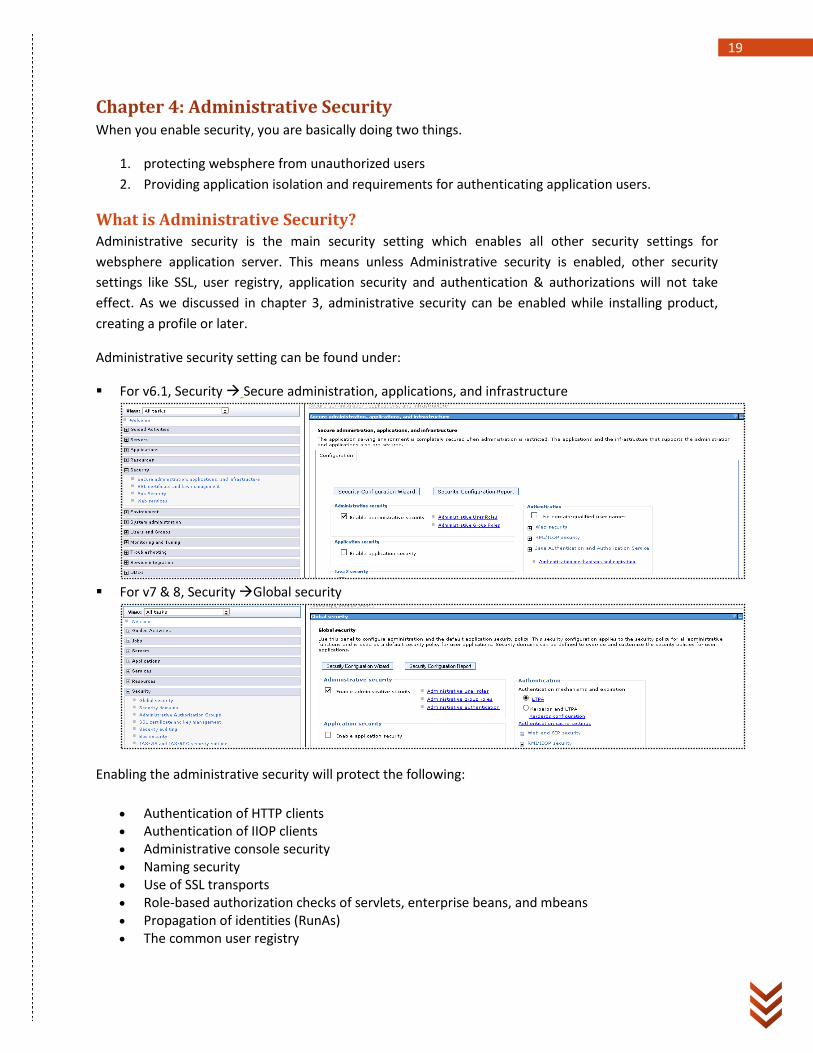
For v6.1, Security Secure administration, applications, and infrastructure
For v7 & 8, Security Global security
Enabling the administrative security will protect the following:
Authentication of HTTP clients Authentication of IIOP clients Administrative console security Naming security Use of SSL transports Role-based authorization checks of servlets, enterprise beans, and mbeans Propagation of identities (RunAs) The common user registry
20
The authentication mechanism Other security information that defines the behavior of a security domain includes:
o The authentication protocol (Remote Method Invocation over the Internet Inter-ORB Protocol (RMI/IIOP) security)
o Other miscellaneous attributes
Enabling administrative security means, those security configurations are effective for the entire
security domain. A security domain is ‘Set of servers that are configured with the same user registry
realm name’. The basic requirement for a security domain is that the access ID that is returned by the
registry or repository from one server within the security domain is the same access ID as that returned
from the registry or repository on any other server within the same security domain. The access ID is the
unique identification of a user and is used during authorization to determine if access is permitted to the
resource.
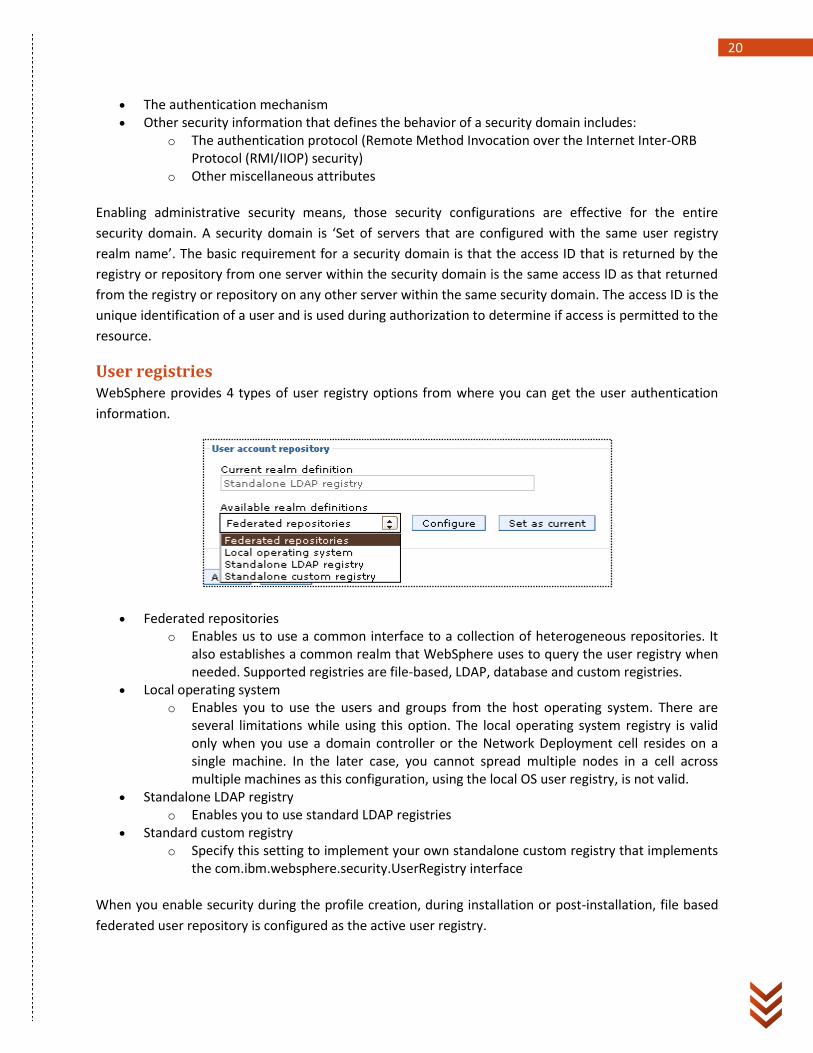
User registries WebSphere provides 4 types of user registry options from where you can get the user authentication
information.
Federated repositories o Enables us to use a common interface to a collection of heterogeneous repositories. It
also establishes a common realm that WebSphere uses to query the user registry when needed. Supported registries are file-based, LDAP, database and custom registries.
Local operating system o Enables you to use the users and groups from the host operating system. There are
several limitations while using this option. The local operating system registry is valid only when you use a domain controller or the Network Deployment cell resides on a single machine. In the later case, you cannot spread multiple nodes in a cell across multiple machines as this configuration, using the local OS user registry, is not valid.
Standalone LDAP registry o Enables you to use standard LDAP registries
Standard custom registry o Specify this setting to implement your own standalone custom registry that implements
the com.ibm.websphere.security.UserRegistry interface
When you enable security during the profile creation, during installation or post-installation, file based
federated user repository is configured as the active user registry.
21
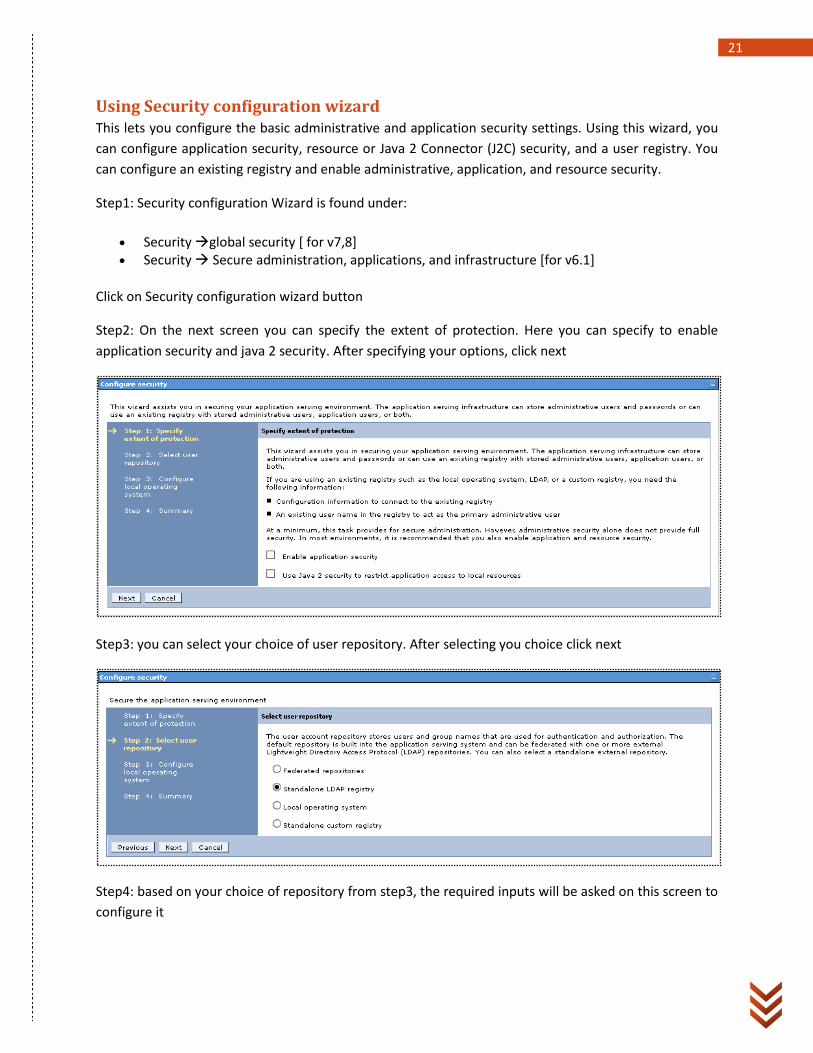
Using Security configuration wizard This lets you configure the basic administrative and application security settings. Using this wizard, you
can configure application security, resource or Java 2 Connector (J2C) security, and a user registry. You
can configure an existing registry and enable administrative, application, and resource security.
Step1: Security configuration Wizard is found under:
Security global security [ for v7,8] Security Secure administration, applications, and infrastructure [for v6.1]
Click on Security configuration wizard button
Step2: On the next screen you can specify the extent of protection. Here you can specify to enable
application security and java 2 security. After specifying your options, click next
Step3: you can select your choice of user repository. After selecting you choice click next
Step4: based on your choice of repository from step3, the required inputs will be asked on this screen to
configure it
22
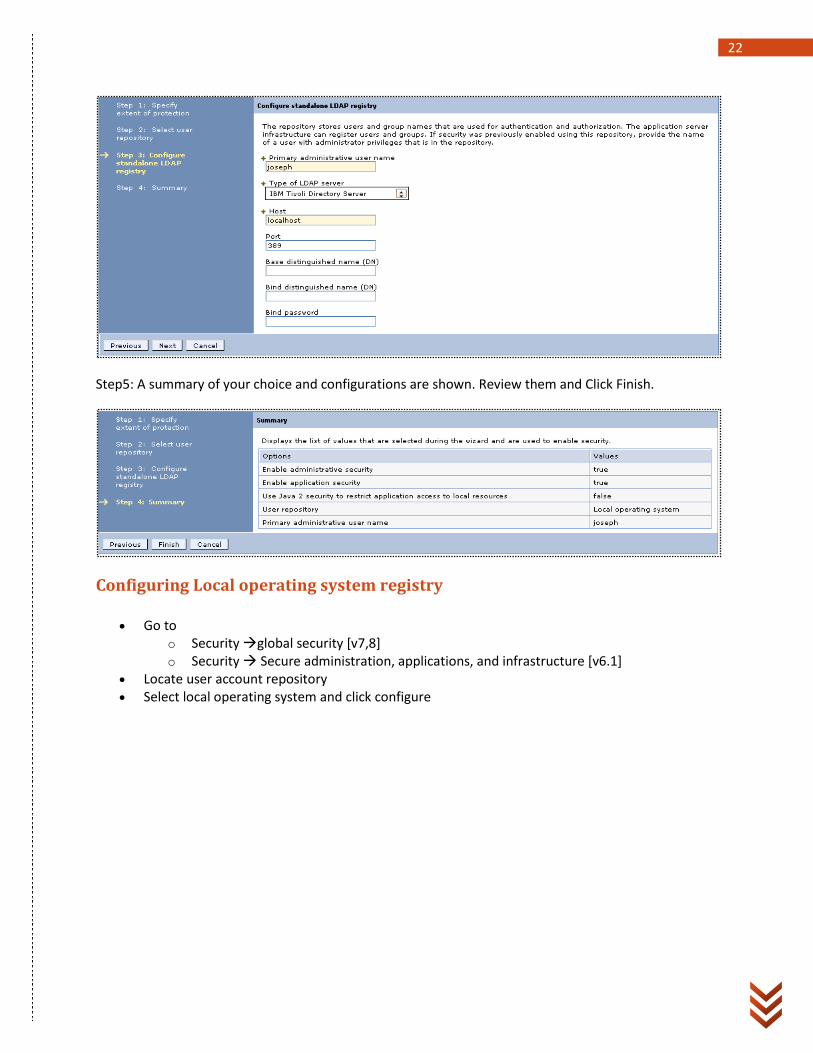
Step5: A summary of your choice and configurations are shown. Review them and Click Finish.
Configuring Local operating system registry
Go to o Security global security [v7,8] o Security Secure administration, applications, and infrastructure [v6.1]
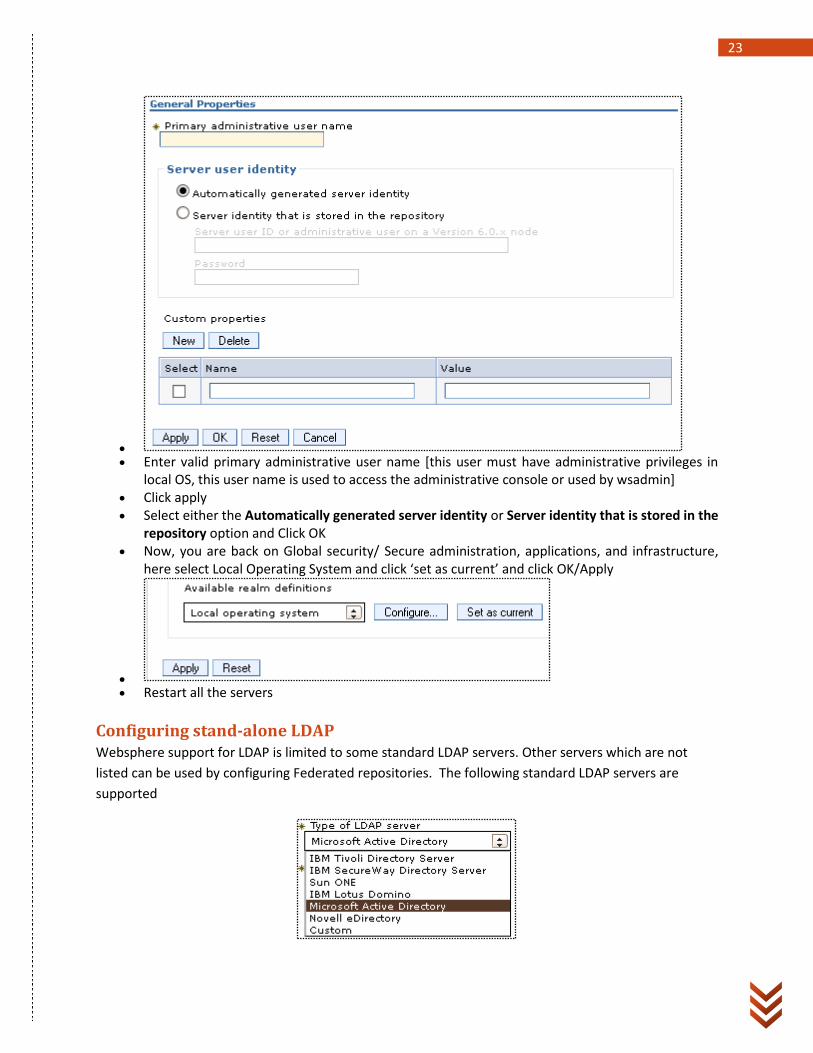
Locate user account repository Select local operating system and click configure
23
Enter valid primary administrative user name [this user must have administrative privileges in
local OS, this user name is used to access the administrative console or used by wsadmin] Click apply Select either the Automatically generated server identity or Server identity that is stored in the
repository option and Click OK Now, you are back on Global security/ Secure administration, applications, and infrastructure,
here select Local Operating System and click ‘set as current’ and click OK/Apply
Restart all the servers
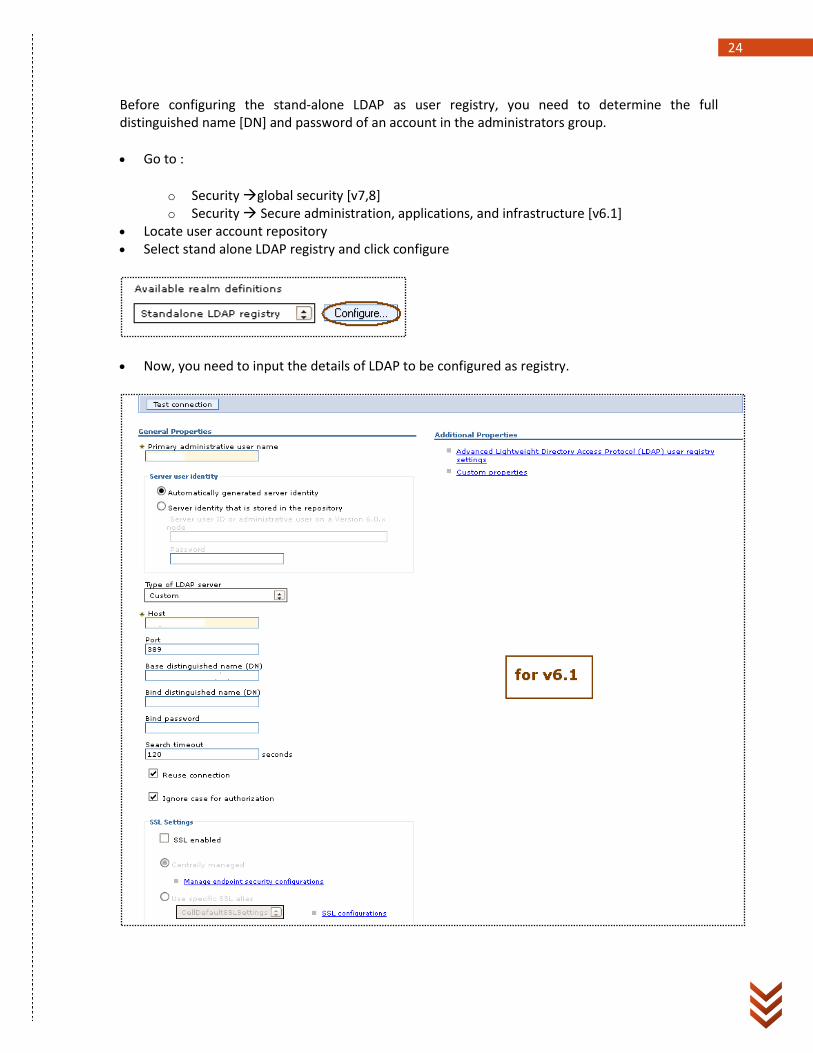
Configuring stand-alone LDAP Websphere support for LDAP is limited to some standard LDAP servers. Other servers which are not
listed can be used by configuring Federated repositories. The following standard LDAP servers are
supported
24
Before configuring the stand-alone LDAP as user registry, you need to determine the full distinguished name [DN] and password of an account in the administrators group.
Go to :
o Security global security [v7,8] o Security Secure administration, applications, and infrastructure [v6.1]
Locate user account repository Select stand alone LDAP registry and click configure
Now, you need to input the details of LDAP to be configured as registry.
25
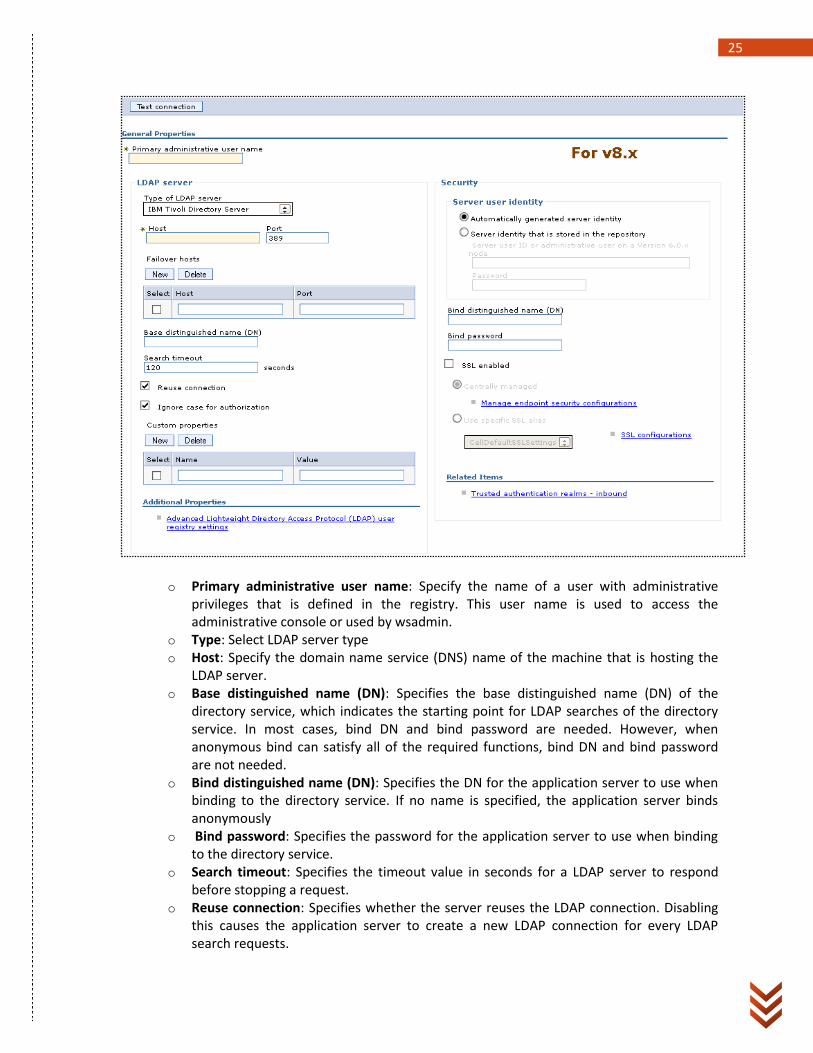
o Primary administrative user name: Specify the name of a user with administrative privileges that is defined in the registry. This user name is used to access the administrative console or used by wsadmin.
o Type: Select LDAP server type o Host: Specify the domain name service (DNS) name of the machine that is hosting the
LDAP server. o Base distinguished name (DN): Specifies the base distinguished name (DN) of the
directory service, which indicates the starting point for LDAP searches of the directory service. In most cases, bind DN and bind password are needed. However, when anonymous bind can satisfy all of the required functions, bind DN and bind password are not needed.
o Bind distinguished name (DN): Specifies the DN for the application server to use when binding to the directory service. If no name is specified, the application server binds anonymously
o Bind password: Specifies the password for the application server to use when binding to the directory service.
o Search timeout: Specifies the timeout value in seconds for a LDAP server to respond before stopping a request.
o Reuse connection: Specifies whether the server reuses the LDAP connection. Disabling this causes the application server to create a new LDAP connection for every LDAP search requests.
26
Click OK and Save the changes Now go back to global security panel Select standalone LDAP under available realm definitions and click ‘configure’ Select either the automatically generated server identity or Server identity that is stored in the
repository option.
o Automatically generated server identity: Enables the application server to generate the
server identity, which is recommended for environments that contain only Version 6.1
or later nodes. Automatically generated server identities are not stored in a user
repository.
o Server identity that is stored in the repository: Specifies a user identity in the
repository that is used for internal process communication. Cells that contain Version
6.1 or later nodes require a server user identity that is defined in the active user
repository.
o Server user ID or administrative user on a Version 6.0.x node: Specifies the user ID that
is used to run the application server for security purposes.
o Password: Specifies the password that corresponds to the server ID. Click OK and save the changes Click on ‘test connection’ to make sure that you can connect to the LDAP server Make sure ‘stand alone LDAP server is ‘set as current’ in the available realm definitions. Restart the administrative server for the changes to take effect.
Note: To improve performance for LDAP searches, the default filters for IBM Tivoli Directory Server, Sun ONE, and Active Directory are defined such that when you search for a user, the result contains all the relevant information about the user (user ID, groups, and so on). As a result, the product does not call the LDAP server multiple times. This definition is possible only in these directory types, which support searches where the complete user information is obtained.
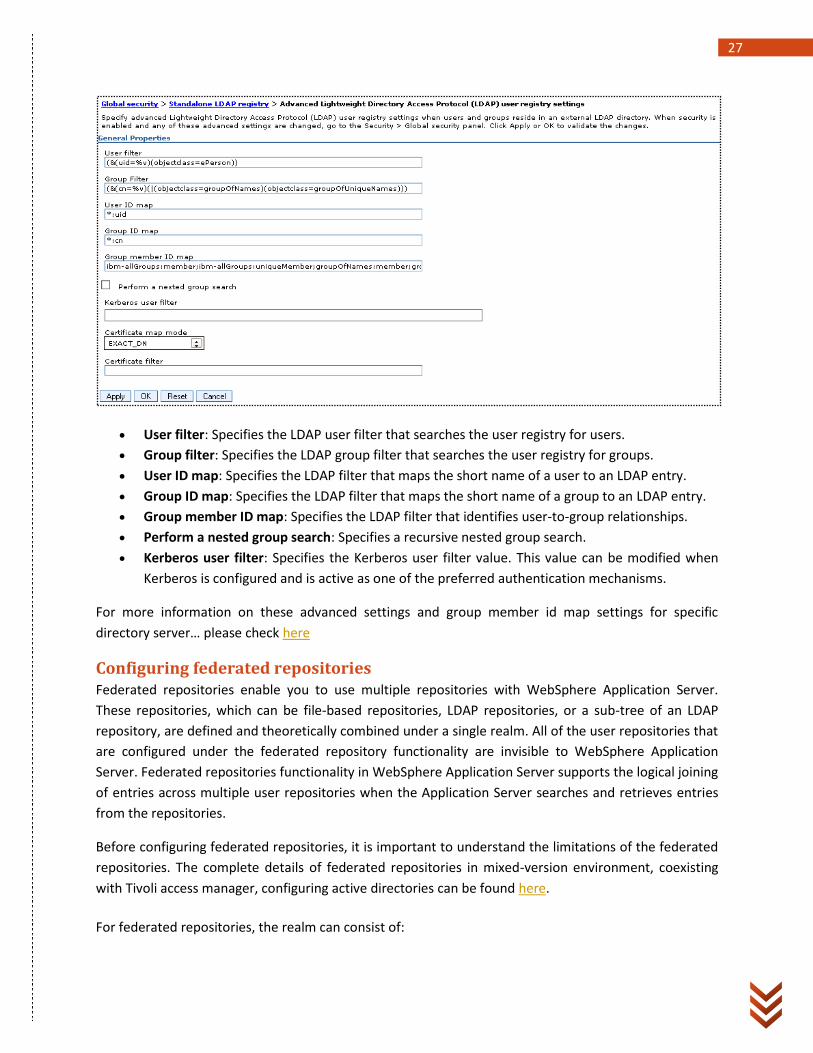
Advanced LDAP settings
Advanced LDAP settings are found under additional properties section in the LDAP configuration panel. Default values for all the user and group related filters are already completed in the appropriate fields. You can change these values depending on your requirements. These default values are based on the type of LDAP server that is selected in the Standalone LDAP registry settings panel. When the default filter values change, the LDAP server type changes to Custom to indicate that custom filters are used.
27
User filter: Specifies the LDAP user filter that searches the user registry for users.
Group filter: Specifies the LDAP group filter that searches the user registry for groups.
User ID map: Specifies the LDAP filter that maps the short name of a user to an LDAP entry.
Group ID map: Specifies the LDAP filter that maps the short name of a group to an LDAP entry.
Group member ID map: Specifies the LDAP filter that identifies user-to-group relationships.
Perform a nested group search: Specifies a recursive nested group search.
Kerberos user filter: Specifies the Kerberos user filter value. This value can be modified when
Kerberos is configured and is active as one of the preferred authentication mechanisms.
For more information on these advanced settings and group member id map settings for specific
directory server… please check here
Configuring federated repositories Federated repositories enable you to use multiple repositories with WebSphere Application Server.
These repositories, which can be file-based repositories, LDAP repositories, or a sub-tree of an LDAP
repository, are defined and theoretically combined under a single realm. All of the user repositories that
are configured under the federated repository functionality are invisible to WebSphere Application
Server. Federated repositories functionality in WebSphere Application Server supports the logical joining
of entries across multiple user repositories when the Application Server searches and retrieves entries
from the repositories.
Before configuring federated repositories, it is important to understand the limitations of the federated
repositories. The complete details of federated repositories in mixed-version environment, coexisting
with Tivoli access manager, configuring active directories can be found here.
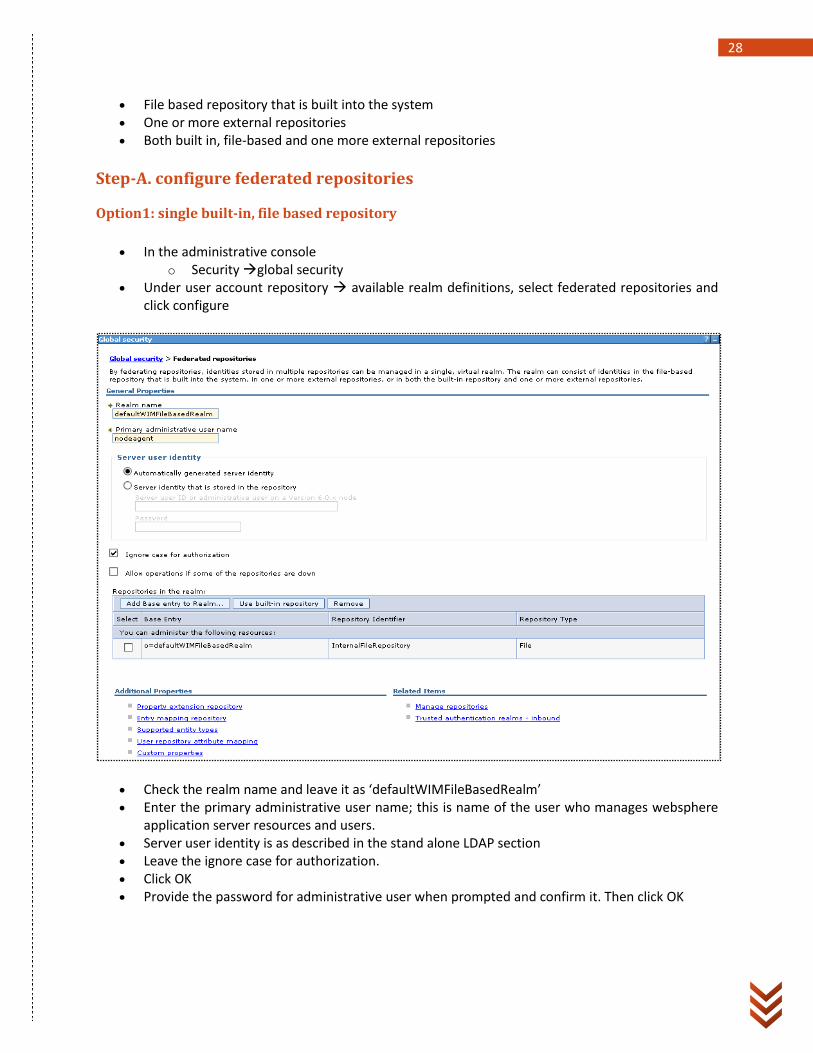
For federated repositories, the realm can consist of:
28
File based repository that is built into the system One or more external repositories Both built in, file-based and one more external repositories
Step-A. configure federated repositories
Option1: single built-in, file based repository
In the administrative console o Security global security
Under user account repository available realm definitions, select federated repositories and click configure
Check the realm name and leave it as ‘defaultWIMFileBasedRealm’ Enter the primary administrative user name; this is name of the user who manages websphere
application server resources and users. Server user identity is as described in the stand alone LDAP section Leave the ignore case for authorization. Click OK Provide the password for administrative user when prompted and confirm it. Then click OK
29
After you complete the above steps, you’ll have a single built-in, file based repository in your federated repository configuration.
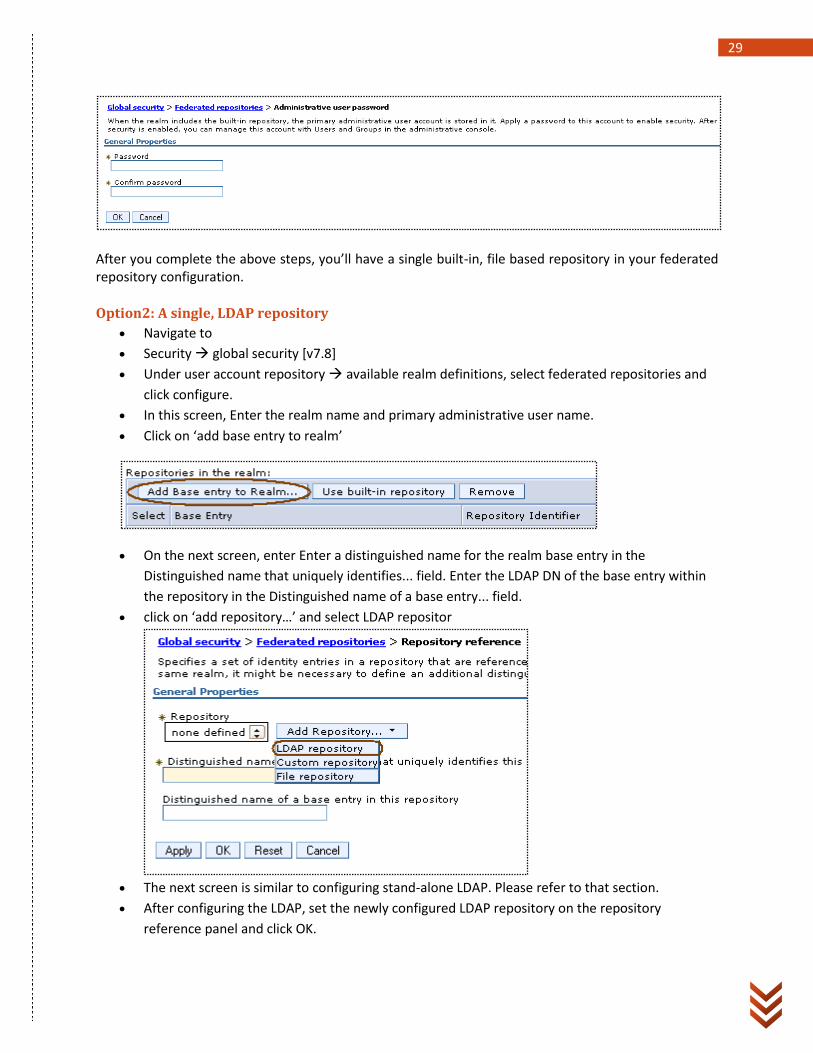
Option2: A single, LDAP repository
Navigate to
Security global security [v7.8]
Under user account repository available realm definitions, select federated repositories and
click configure.
In this screen, Enter the realm name and primary administrative user name.
Click on ‘add base entry to realm’
On the next screen, enter Enter a distinguished name for the realm base entry in the
Distinguished name that uniquely identifies... field. Enter the LDAP DN of the base entry within
the repository in the Distinguished name of a base entry... field.
click on ‘add repository…’ and select LDAP repositor
The next screen is similar to configuring stand-alone LDAP. Please refer to that section.
After configuring the LDAP, set the newly configured LDAP repository on the repository
reference panel and click OK.
30
Now, if you have any built-in, file based repository in repository collection, remove it. Then click
OK and save the changes.
After completing the above steps, you’ll have a single, LDAP in your federated configuration.
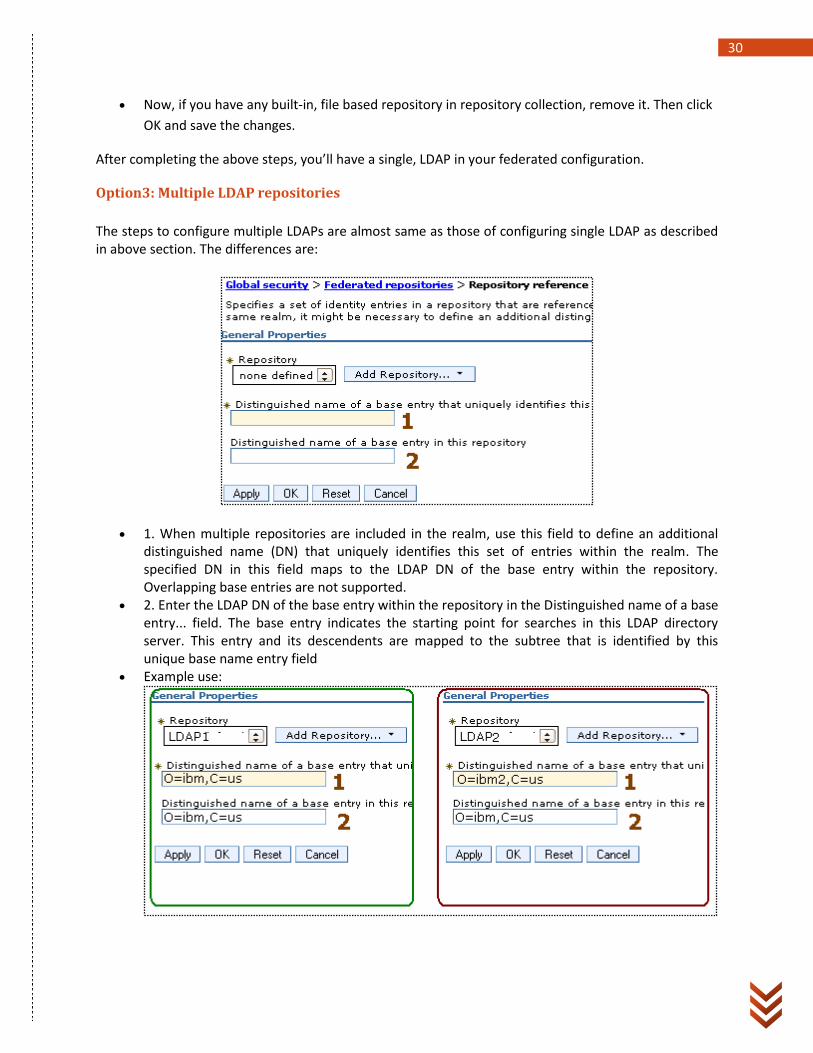
Option3: Multiple LDAP repositories
The steps to configure multiple LDAPs are almost same as those of configuring single LDAP as described in above section. The differences are:
1. When multiple repositories are included in the realm, use this field to define an additional distinguished name (DN) that uniquely identifies this set of entries within the realm. The specified DN in this field maps to the LDAP DN of the base entry within the repository. Overlapping base entries are not supported.
2. Enter the LDAP DN of the base entry within the repository in the Distinguished name of a base entry... field. The base entry indicates the starting point for searches in this LDAP directory server. This entry and its descendents are mapped to the subtree that is identified by this unique base name entry field
Example use:
31
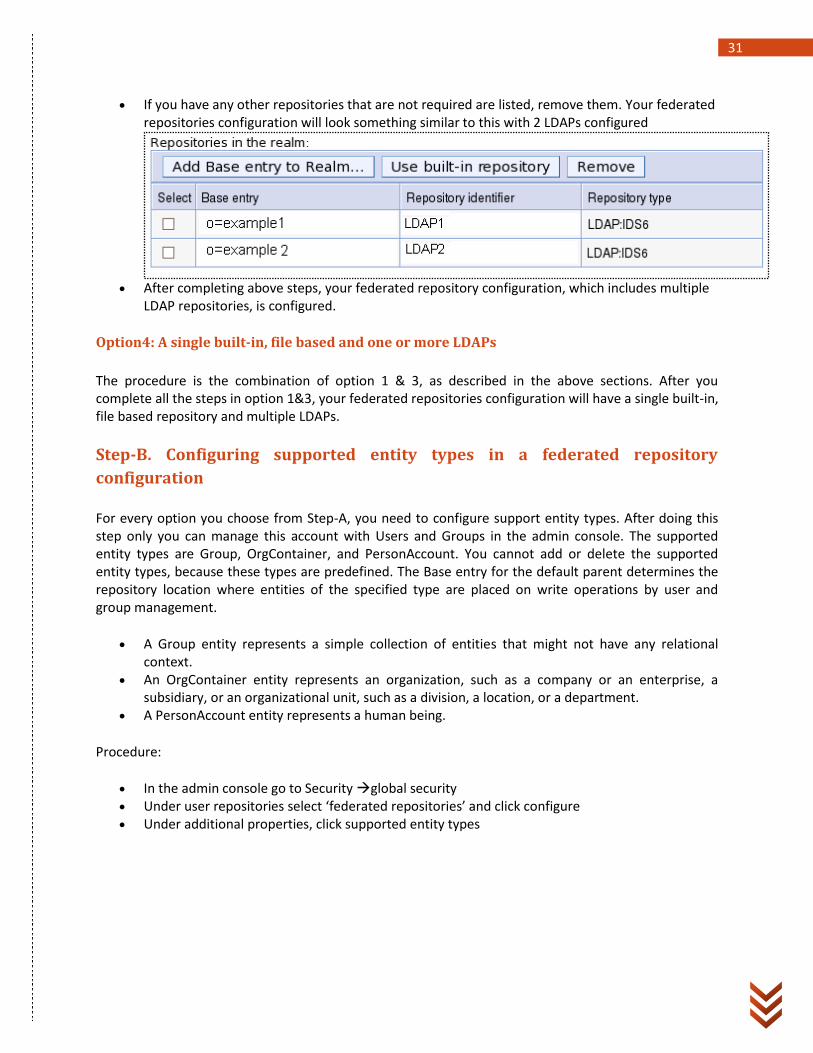
If you have any other repositories that are not required are listed, remove them. Your federated repositories configuration will look something similar to this with 2 LDAPs configured
After completing above steps, your federated repository configuration, which includes multiple
LDAP repositories, is configured.
Option4: A single built-in, file based and one or more LDAPs
The procedure is the combination of option 1 & 3, as described in the above sections. After you complete all the steps in option 1&3, your federated repositories configuration will have a single built-in, file based repository and multiple LDAPs.
Step-B. Configuring supported entity types in a federated repository
configuration
For every option you choose from Step-A, you need to configure support entity types. After doing this step only you can manage this account with Users and Groups in the admin console. The supported entity types are Group, OrgContainer, and PersonAccount. You cannot add or delete the supported entity types, because these types are predefined. The Base entry for the default parent determines the repository location where entities of the specified type are placed on write operations by user and group management.
A Group entity represents a simple collection of entities that might not have any relational context.
An OrgContainer entity represents an organization, such as a company or an enterprise, a subsidiary, or an organizational unit, such as a division, a location, or a department.
A PersonAccount entity represents a human being.
Procedure:
In the admin console go to Security global security Under user repositories select ‘federated repositories’ and click configure Under additional properties, click supported entity types
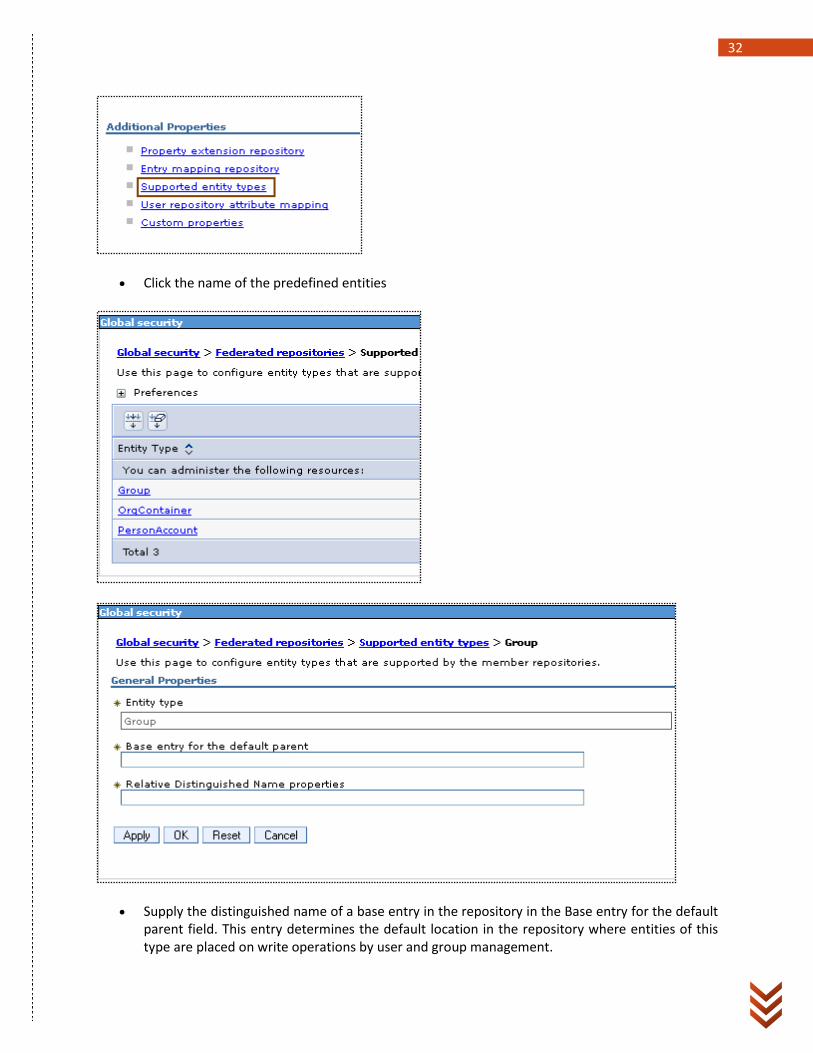
32
Click the name of the predefined entities
Supply the distinguished name of a base entry in the repository in the Base entry for the default parent field. This entry determines the default location in the repository where entities of this type are placed on write operations by user and group management.
33
Supply the relative distinguished name (RDN) properties for the specified entity type in the Relative Distinguished Name properties field. Possible values are cn for Group, uid or cn for PersonAccount, and o, ou, dc, and cn for OrgContainer. Delimit multiple properties for the OrgContainer entity with a semicolon (;).
From IBM Inforcenter: The following list outlines known requirements and limitations that apply to specific Lightweight
Directory Access Protocol (LDAP) servers:
Microsoft AD Unless you modify the LDAP schema to use uid, you must specify cn in the Relative Distinguished Name (RDN) properties field for the PersonAccount entity type.
Secure Sockets Layer communications must be enabled to create users with passwords. To select the Require SSL communications option.
Typically the value of user is specified as the value in the Object classes field for the PersonAccount entity type and the value of group is specified as the value in the Object classes field for the Group entity type.
Lotus Domino Typically, the value of cn is specified in the Relative Distinguished Name (RDN) properties field for the PersonAccount entity type. The value of uid is also acceptable.
Typically, both inetOrgPerson and dominoPerson are used as values in the Object classes field for the PersonAccount entity type.
Sunone Directory server Typically, groupOfUniqueNames is specified as the value in the Object classes field for the Group entity type.
Click OK
Step-C: Set the federated repositories as current Go to security global security
Select federated repositories and click ‘set as current’ and click apply
Save the changes
34
User Management
• Chapter 5
35
Chapter5: User Management
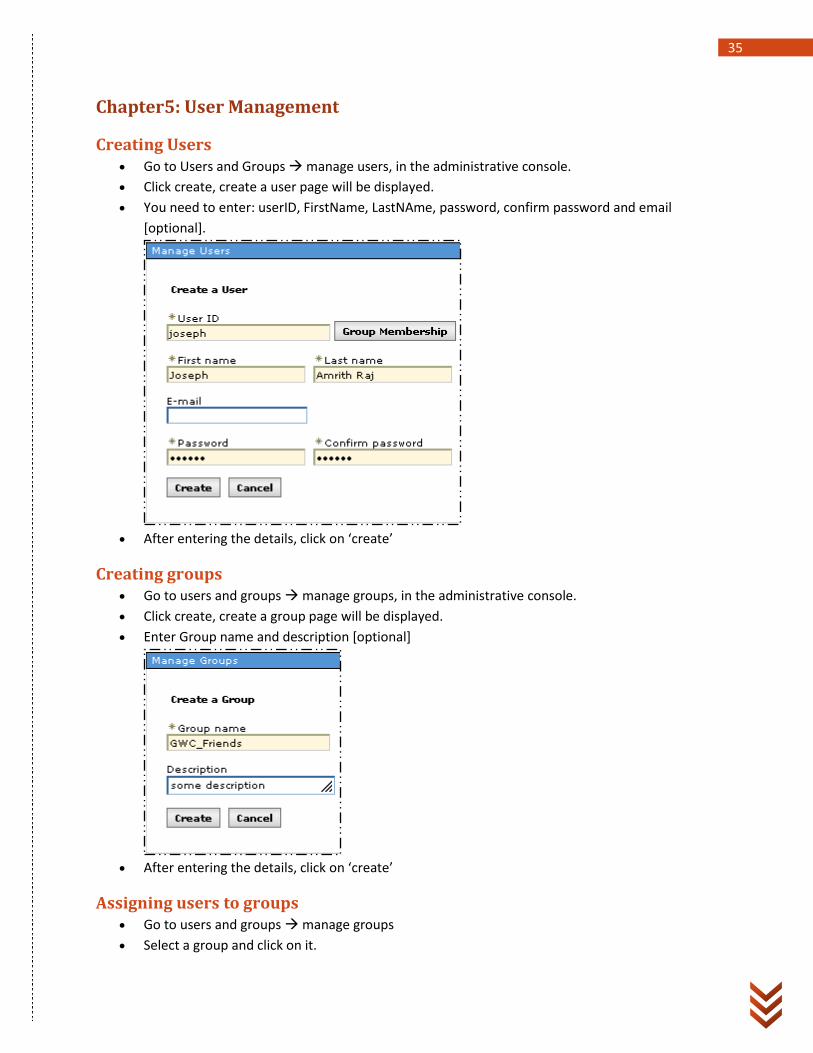
Creating Users Go to Users and Groups manage users, in the administrative console.
Click create, create a user page will be displayed.
You need to enter: userID, FirstName, LastNAme, password, confirm password and email
[optional].
After entering the details, click on ‘create’
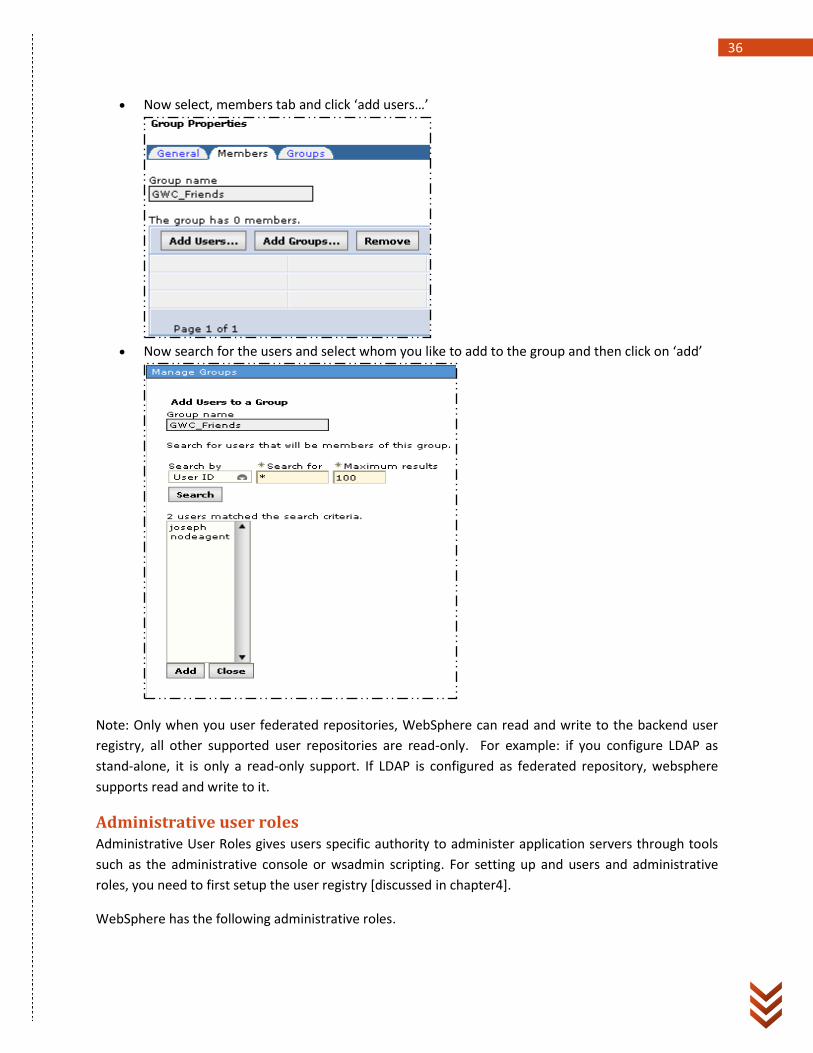
Creating groups Go to users and groups manage groups, in the administrative console.
Click create, create a group page will be displayed.
Enter Group name and description [optional]
After entering the details, click on ‘create’
Assigning users to groups Go to users and groups manage groups
Select a group and click on it.
36
Now select, members tab and click ‘add users…’
Now search for the users and select whom you like to add to the group and then click on ‘add’
Note: Only when you user federated repositories, WebSphere can read and write to the backend user
registry, all other supported user repositories are read-only. For example: if you configure LDAP as
stand-alone, it is only a read-only support. If LDAP is configured as federated repository, websphere
supports read and write to it.
Administrative user roles Administrative User Roles gives users specific authority to administer application servers through tools
such as the administrative console or wsadmin scripting. For setting up and users and administrative
roles, you need to first setup the user registry [discussed in chapter4].
WebSphere has the following administrative roles.
37
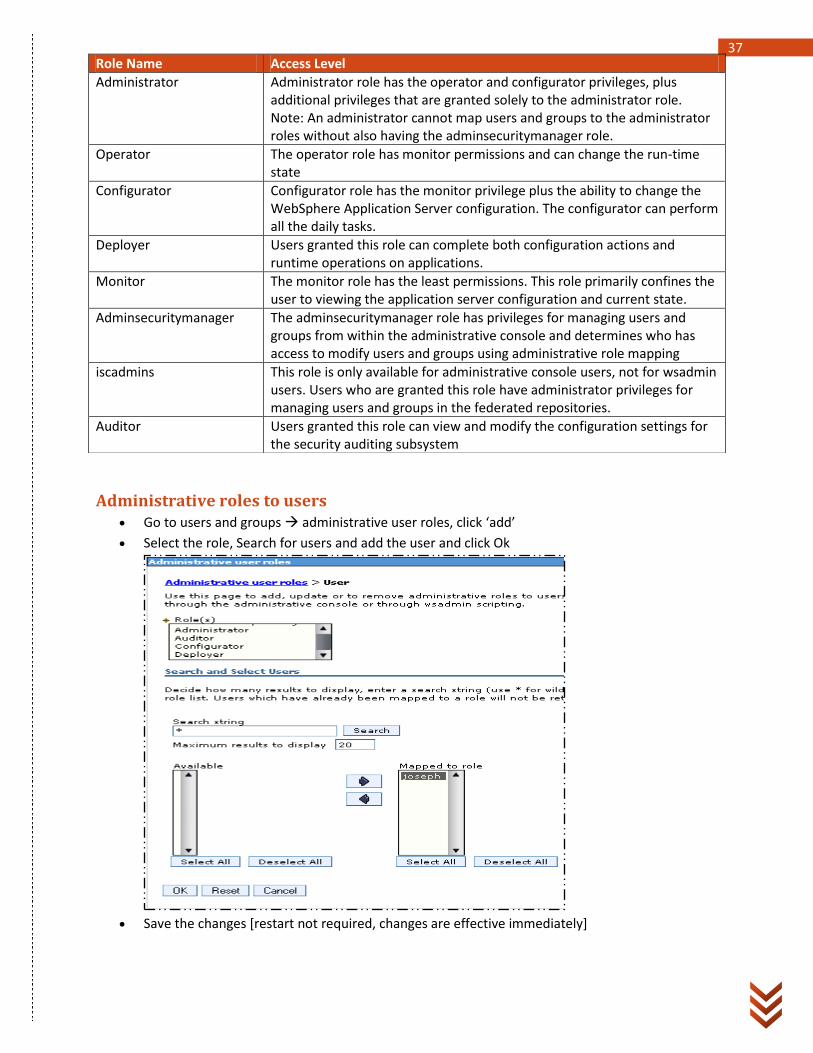
Administrative roles to users Go to users and groups administrative user roles, click ‘add’
Select the role, Search for users and add the user and click Ok
Save the changes [restart not required, changes are effective immediately]
Role Name Access Level
Administrator Administrator role has the operator and configurator privileges, plus additional privileges that are granted solely to the administrator role. Note: An administrator cannot map users and groups to the administrator roles without also having the adminsecuritymanager role.
Operator The operator role has monitor permissions and can change the run-time state
Configurator Configurator role has the monitor privilege plus the ability to change the WebSphere Application Server configuration. The configurator can perform all the daily tasks.
Deployer Users granted this role can complete both configuration actions and runtime operations on applications.
Monitor The monitor role has the least permissions. This role primarily confines the user to viewing the application server configuration and current state.
Adminsecuritymanager The adminsecuritymanager role has privileges for managing users and groups from within the administrative console and determines who has access to modify users and groups using administrative role mapping
iscadmins This role is only available for administrative console users, not for wsadmin users. Users who are granted this role have administrator privileges for managing users and groups in the federated repositories.
Auditor Users granted this role can view and modify the configuration settings for the security auditing subsystem
38
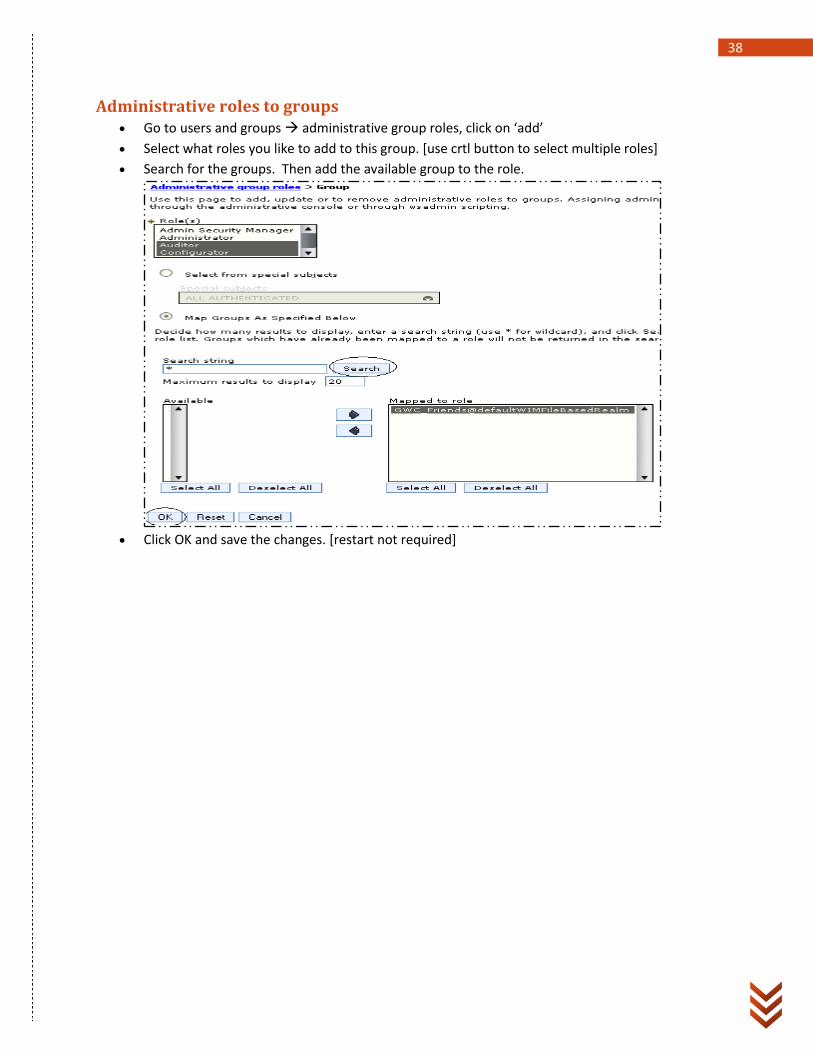
Administrative roles to groups Go to users and groups administrative group roles, click on ‘add’
Select what roles you like to add to this group. [use crtl button to select multiple roles]
Search for the groups. Then add the available group to the role.
Click OK and save the changes. [restart not required]
39
Security Domains
• Chapter 6
40
Chapter6: Security Domains Before we start….
Security Domains were introduced in WebSphere Application Server v7 and this feature is not available
in version prior to v7.0
In v7, the federated repositories user registry can only be configured at the global level and have
only one instance per cell, but any domain can use it by configuring it as the active registry.
In v8, you can configure a unique instance of federated repository at the security domain level.
What is a security Domain?
Security domain is a set of security related setting that effect how a resource is protected at a given scope. Security domains provide the flexibility to use different security configurations in websphere application server. You can configure different security domains and assign them to different applications server processes. You can configure different applications to use different security domains by assigning the server/clusters/service integration bus to the security domains.
Benefits of Security Domains Administrative applications and user applications can be configured with a different set of
security settings.
Application-A can have different security settings compared to Application-B
Global Security & Security Domains You must have global security enabled and before you can create and use security domains.
Global security configuration is used by all of the administrative applications like administration
console, naming resources and Mbeans.
If no security domain is configured, all applications use settings from global security.
When a security domain is associated with a scope, only the user applications in that scope can
use the security configurations defined in that security domain. The administrative applications
and naming in that scope still use the global security configurations.
You will define only the security configurations that are different from global security in security
domain. When the settings are common between global security and security domain or missing
from security domain configuration, they will be obtained from global security.
Security runtime first checks if any security domains are associated with the server or a cluster.
If there is a security domain associated with the server or a cluster, the security attributes
defined in it are used for all of the applications in that server or cluster. Any security attributes
missing from this server or cluster domain are obtained from the global security configuration,
and not from the domain configuration associated with the cell.
41
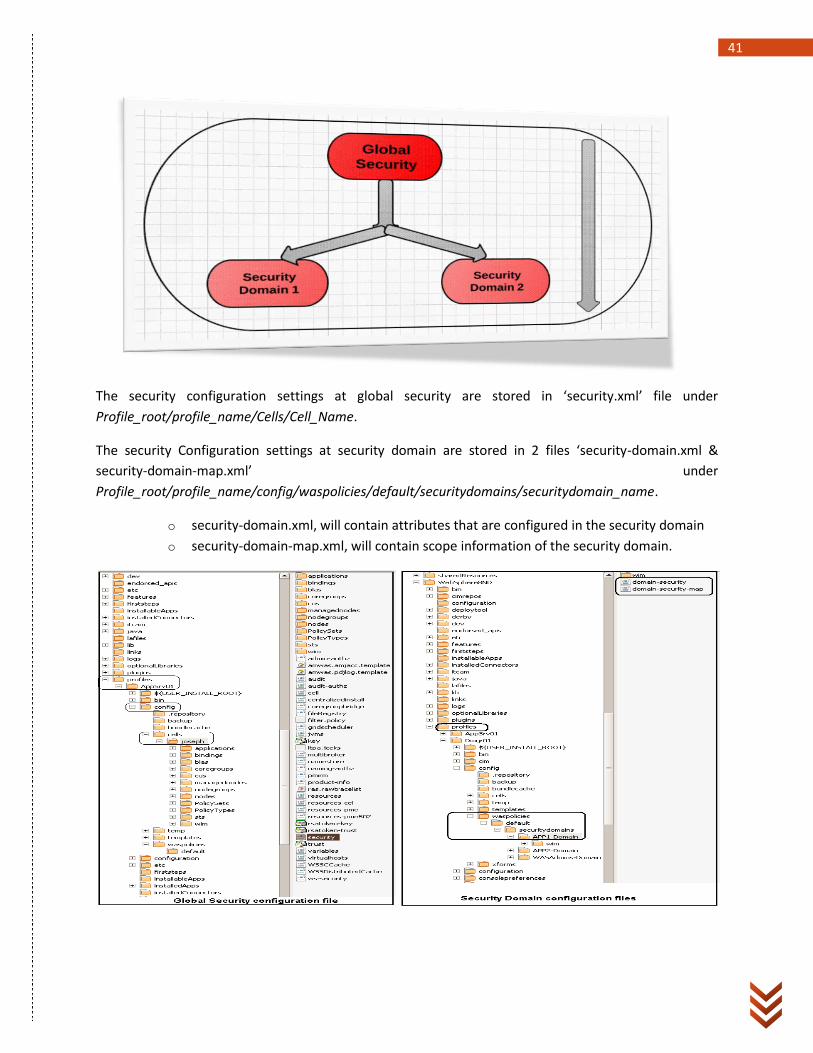
The security configuration settings at global security are stored in ‘security.xml’ file under
Profile_root/profile_name/Cells/Cell_Name.
The security Configuration settings at security domain are stored in 2 files ‘security-domain.xml &
security-domain-map.xml’ under
Profile_root/profile_name/config/waspolicies/default/securitydomains/securitydomain_name.
o security-domain.xml, will contain attributes that are configured in the security domain
o security-domain-map.xml, will contain scope information of the security domain.
42
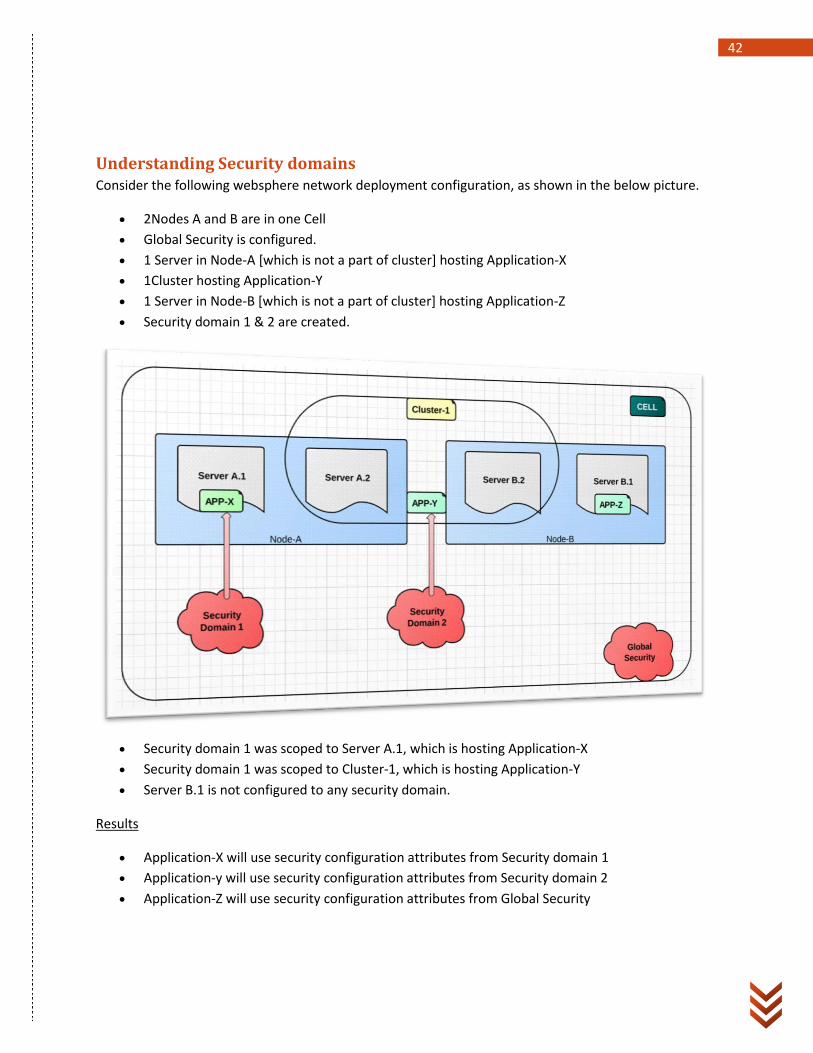
Understanding Security domains Consider the following websphere network deployment configuration, as shown in the below picture.
2Nodes A and B are in one Cell
Global Security is configured.
1 Server in Node-A [which is not a part of cluster] hosting Application-X
1Cluster hosting Application-Y
1 Server in Node-B [which is not a part of cluster] hosting Application-Z
Security domain 1 & 2 are created.
Security domain 1 was scoped to Server A.1, which is hosting Application-X
Security domain 1 was scoped to Cluster-1, which is hosting Application-Y
Server B.1 is not configured to any security domain.
Results
Application-X will use security configuration attributes from Security domain 1
Application-y will use security configuration attributes from Security domain 2
Application-Z will use security configuration attributes from Global Security
43
A security domain can also be scope to a cell. When a security domain is associated to the cell, the result
is all user applications use the configurations from security domain where as all the administrative
applications and naming use settings from global security configuration. In simplicity, If you define a
security with Cell scope, you are separating security configuration settings for administrative and user
applications.
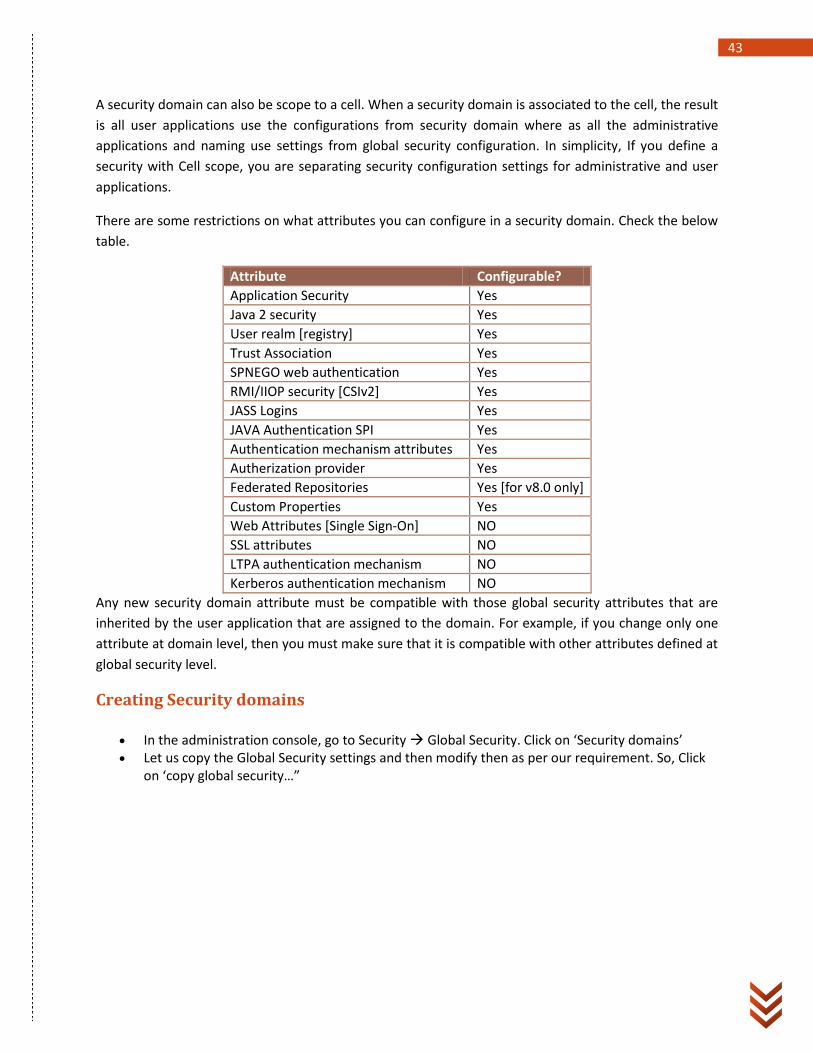
There are some restrictions on what attributes you can configure in a security domain. Check the below
table.
Attribute Configurable?
Application Security Yes
Java 2 security Yes
User realm [registry] Yes
Trust Association Yes
SPNEGO web authentication Yes
RMI/IIOP security [CSIv2] Yes
JASS Logins Yes
JAVA Authentication SPI Yes
Authentication mechanism attributes Yes
Autherization provider Yes
Federated Repositories Yes [for v8.0 only]
Custom Properties Yes
Web Attributes [Single Sign-On] NO
SSL attributes NO
LTPA authentication mechanism NO
Kerberos authentication mechanism NO
Any new security domain attribute must be compatible with those global security attributes that are
inherited by the user application that are assigned to the domain. For example, if you change only one
attribute at domain level, then you must make sure that it is compatible with other attributes defined at
global security level.
Creating Security domains
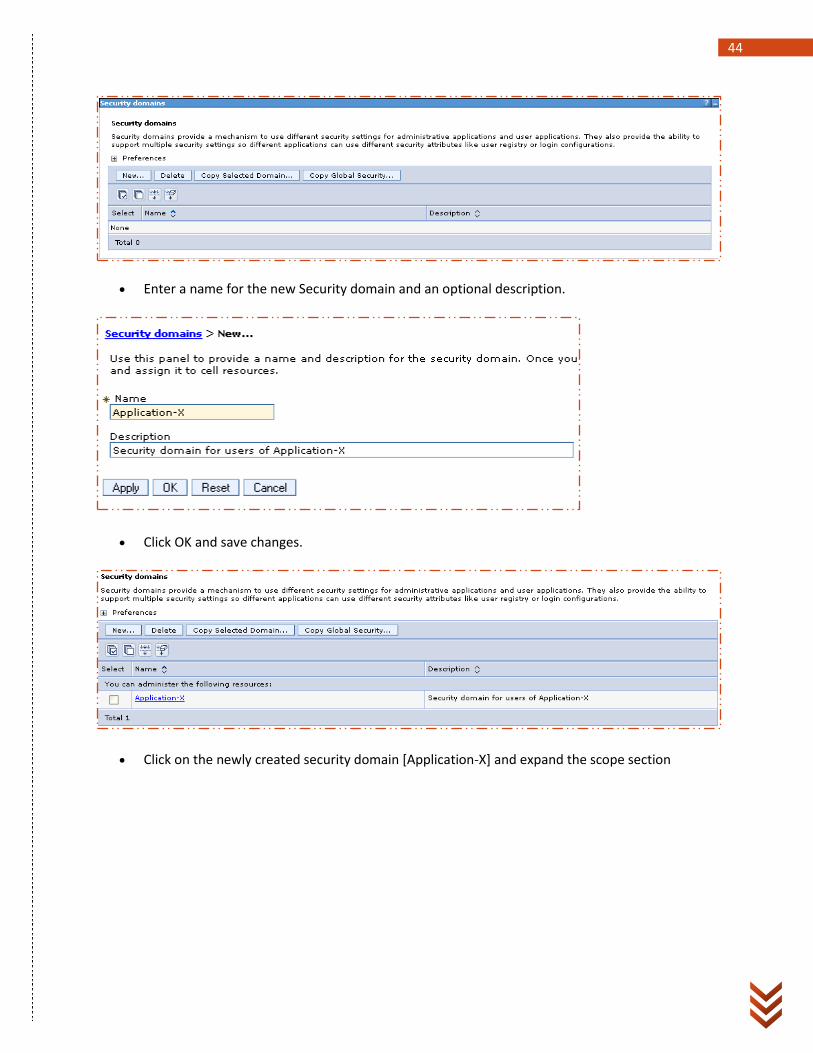
In the administration console, go to Security Global Security. Click on ‘Security domains’ Let us copy the Global Security settings and then modify then as per our requirement. So, Click
on ‘copy global security…”
44
Enter a name for the new Security domain and an optional description.
Click OK and save changes.
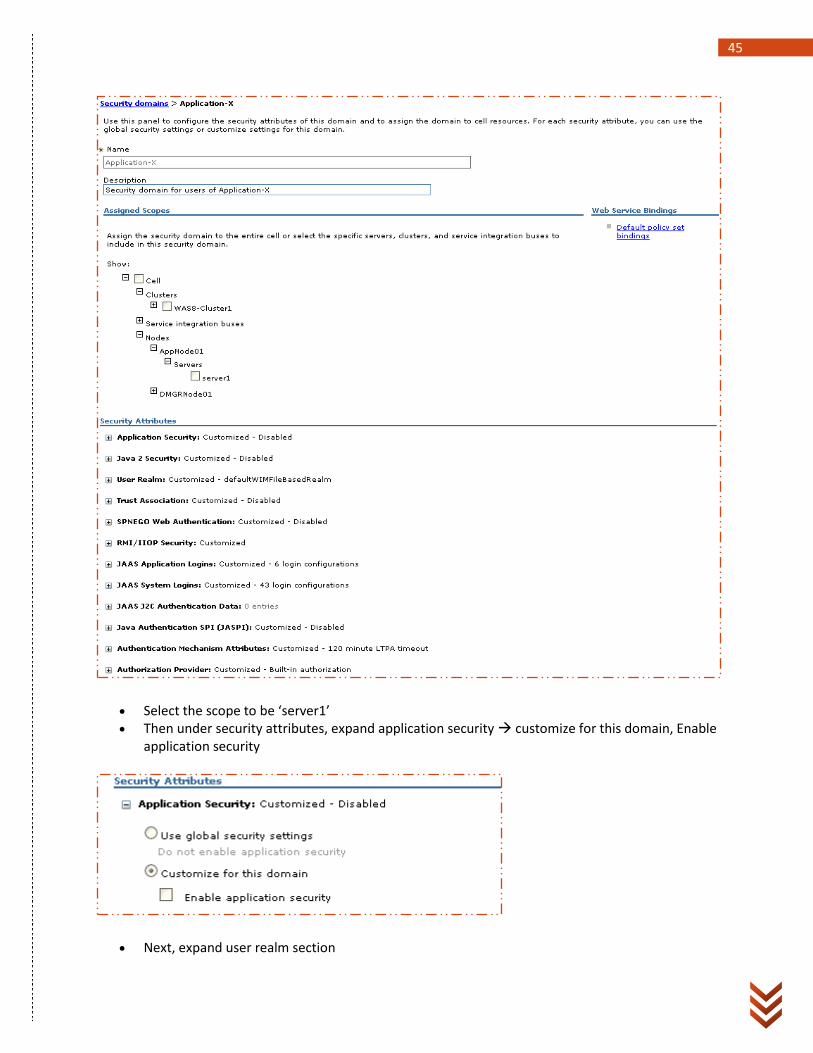
Click on the newly created security domain [Application-X] and expand the scope section
45
Select the scope to be ‘server1’ Then under security attributes, expand application security customize for this domain, Enable
application security
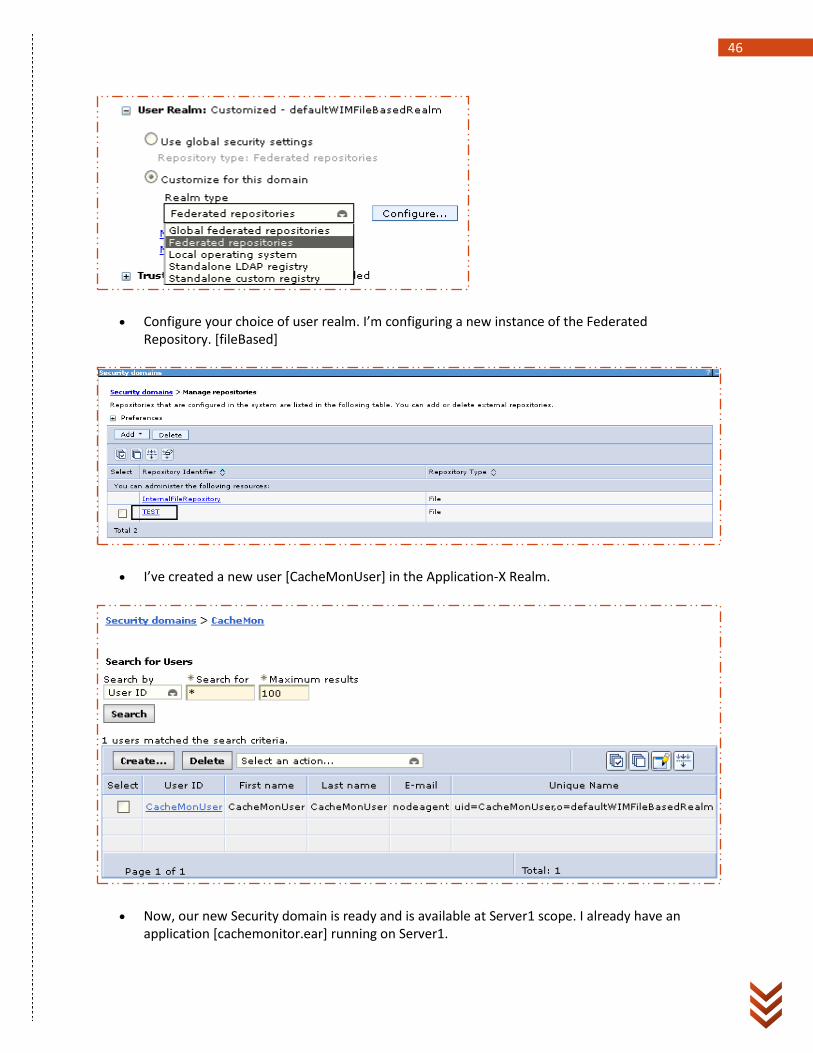
Next, expand user realm section
46
Configure your choice of user realm. I’m configuring a new instance of the Federated Repository. [fileBased]
I’ve created a new user [CacheMonUser] in the Application-X Realm.
Now, our new Security domain is ready and is available at Server1 scope. I already have an application [cachemonitor.ear] running on Server1.
47
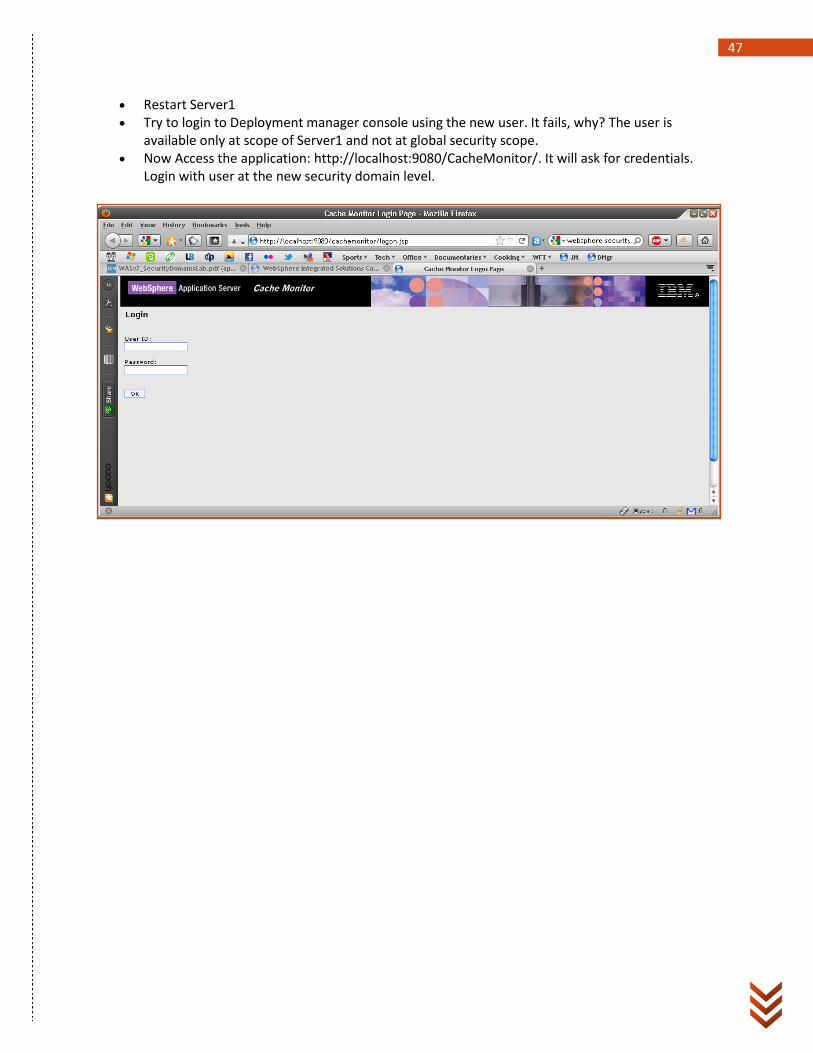
Restart Server1 Try to login to Deployment manager console using the new user. It fails, why? The user is
available only at scope of Server1 and not at global security scope. Now Access the application: http://localhost:9080/CacheMonitor/. It will ask for credentials.
Login with user at the new security domain level.
48
SSL digital certificates & WebSphere
• Chapter 7
49
Chapter 7: SSL digital certificates and WebSphere Application server If you are new to SSL digital certificates or you like to know in detail how they work, please look at this
article posted on my GWC blog. I’m not going to explain how SSL works inside websphere but I’ll just
show how to configure SSL digital certificates.
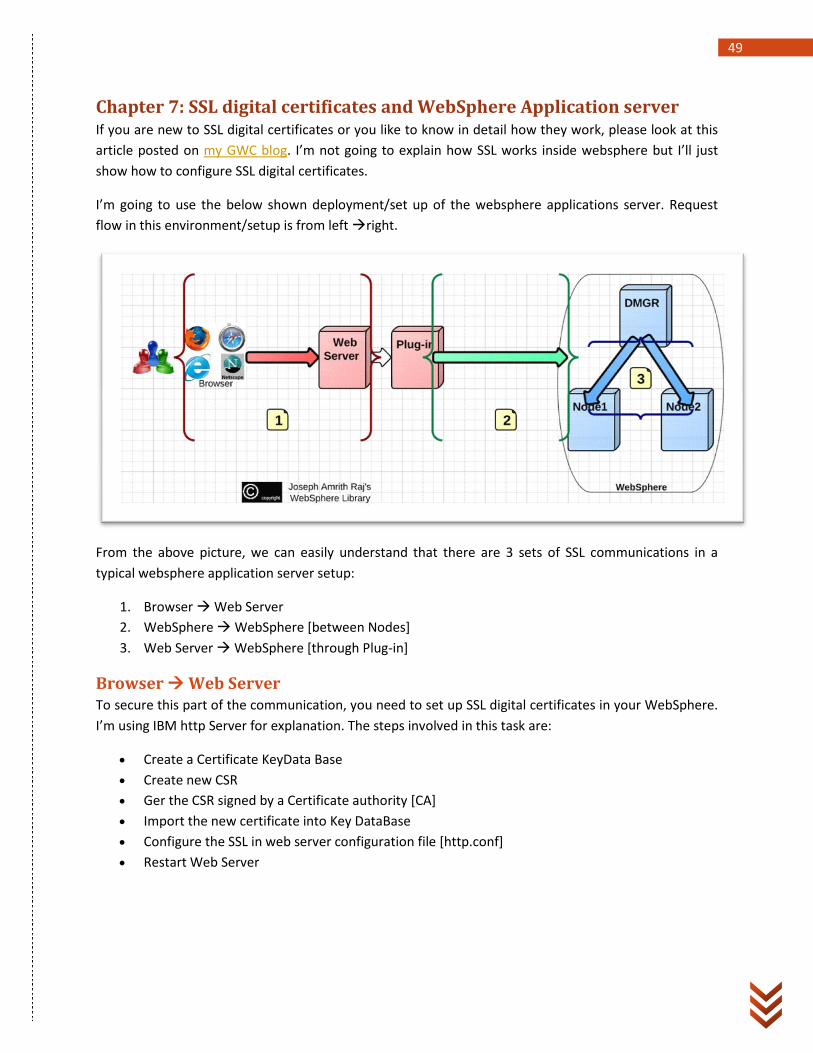
I’m going to use the below shown deployment/set up of the websphere applications server. Request
flow in this environment/setup is from left right.
From the above picture, we can easily understand that there are 3 sets of SSL communications in a
typical websphere application server setup:
1. Browser Web Server
2. WebSphere WebSphere [between Nodes]
3. Web Server WebSphere [through Plug-in]
Browser Web Server To secure this part of the communication, you need to set up SSL digital certificates in your WebSphere.
I’m using IBM http Server for explanation. The steps involved in this task are:
Create a Certificate KeyData Base
Create new CSR
Ger the CSR signed by a Certificate authority [CA]
Import the new certificate into Key DataBase
Configure the SSL in web server configuration file [http.conf]
Restart Web Server
50
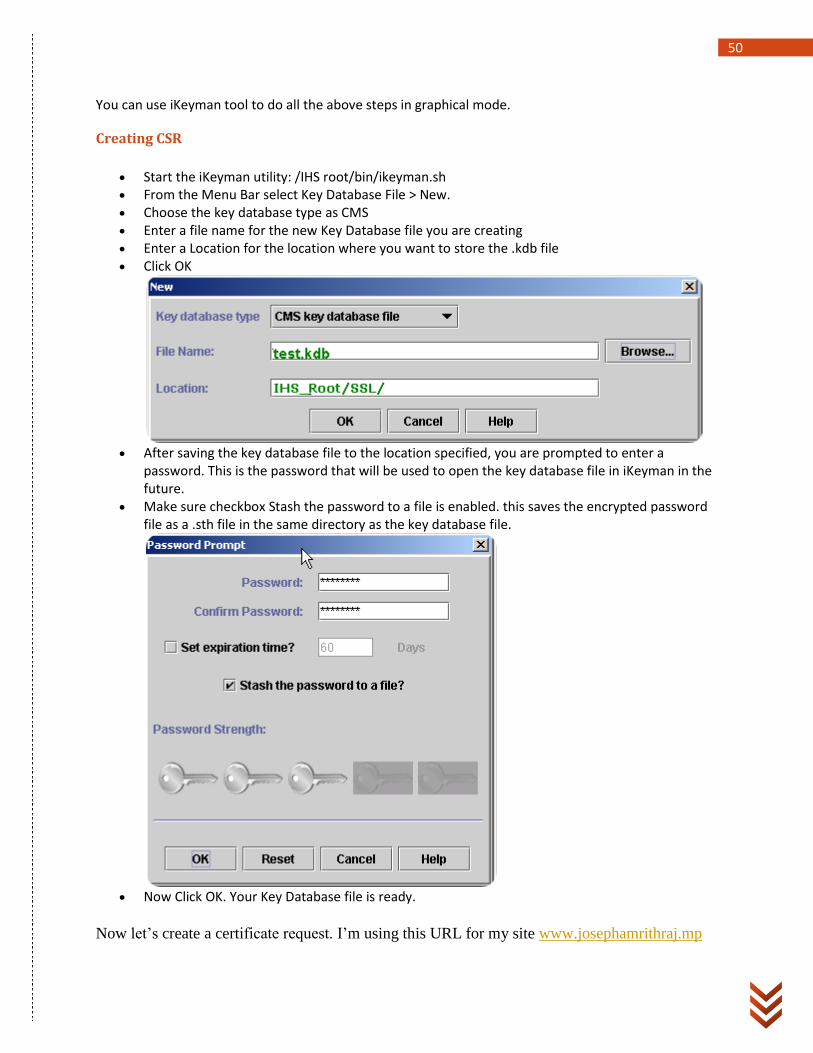
You can use iKeyman tool to do all the above steps in graphical mode.
Creating CSR
Start the iKeyman utility: /IHS root/bin/ikeyman.sh From the Menu Bar select Key Database File > New. Choose the key database type as CMS Enter a file name for the new Key Database file you are creating Enter a Location for the location where you want to store the .kdb file Click OK
After saving the key database file to the location specified, you are prompted to enter a
password. This is the password that will be used to open the key database file in iKeyman in the future.
Make sure checkbox Stash the password to a file is enabled. this saves the encrypted password file as a .sth file in the same directory as the key database file.
Now Click OK. Your Key Database file is ready.
Now let’s create a certificate request. I’m using this URL for my site www.josephamrithraj.mp
51
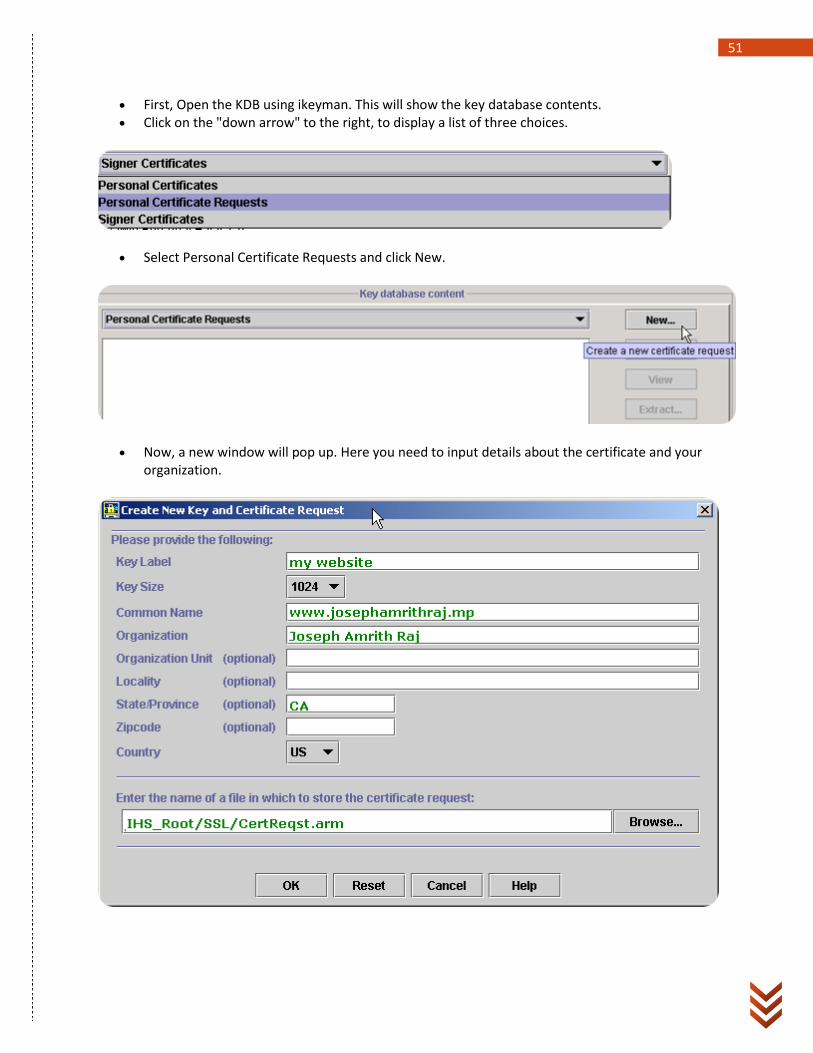
First, Open the KDB using ikeyman. This will show the key database contents. Click on the "down arrow" to the right, to display a list of three choices.
Select Personal Certificate Requests and click New.
Now, a new window will pop up. Here you need to input details about the certificate and your organization.
52
Options:
Key Size= 1024 for 128bit and 512 for 56bit Common Name= SiteName, [This is the name that the CA will register] Organization= Company Name Enter the name of a file in which to store the certificate request = This is the file (.arm) that will
contain your request
Once you save the file (.arm) you are done with creating the request. Now you have your CSR ready.
Signing by CA
Next step is get your CSR signed by a certificate authority, like VeriSign, Thawate etc.. Once the CA has
signed your certificate, generally they send you back the signed certificate through email.
Receiving the signed cert
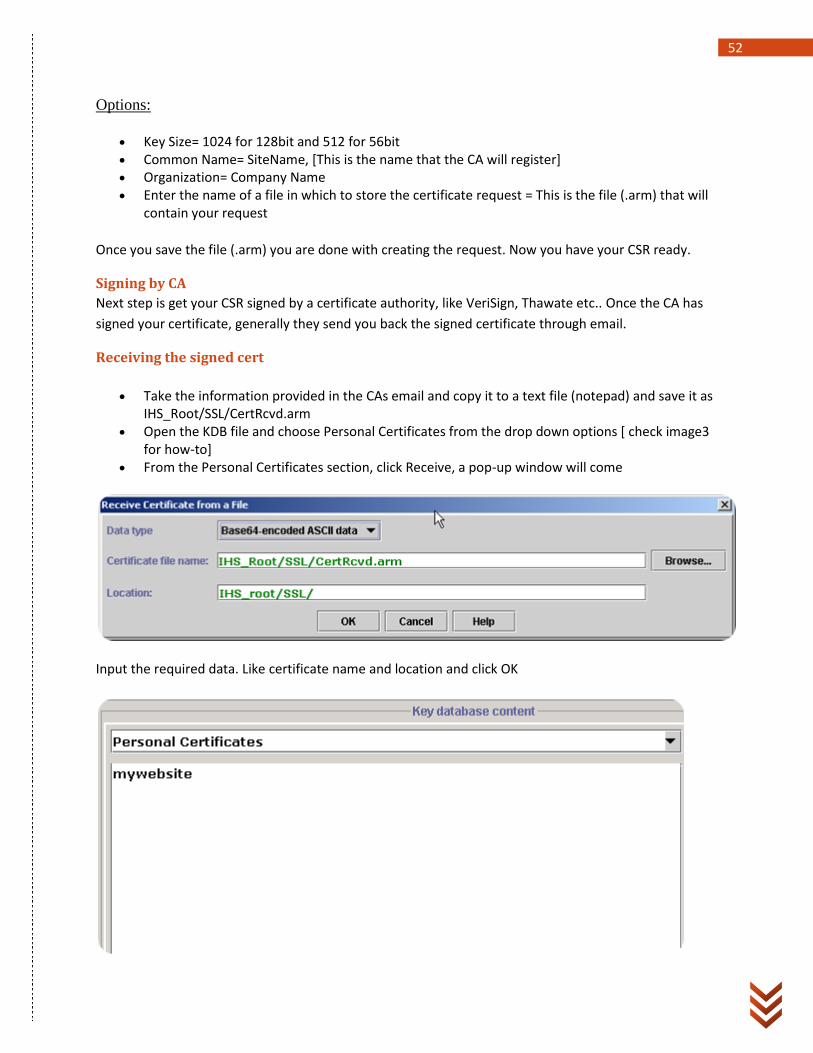
Take the information provided in the CAs email and copy it to a text file (notepad) and save it as IHS_Root/SSL/CertRcvd.arm
Open the KDB file and choose Personal Certificates from the drop down options [ check image3 for how-to]
From the Personal Certificates section, click Receive, a pop-up window will come
Input the required data. Like certificate name and location and click OK
53
Now you’ve imported your certificate into the Key DataBase. The next step is to configure web server to use the certificate.
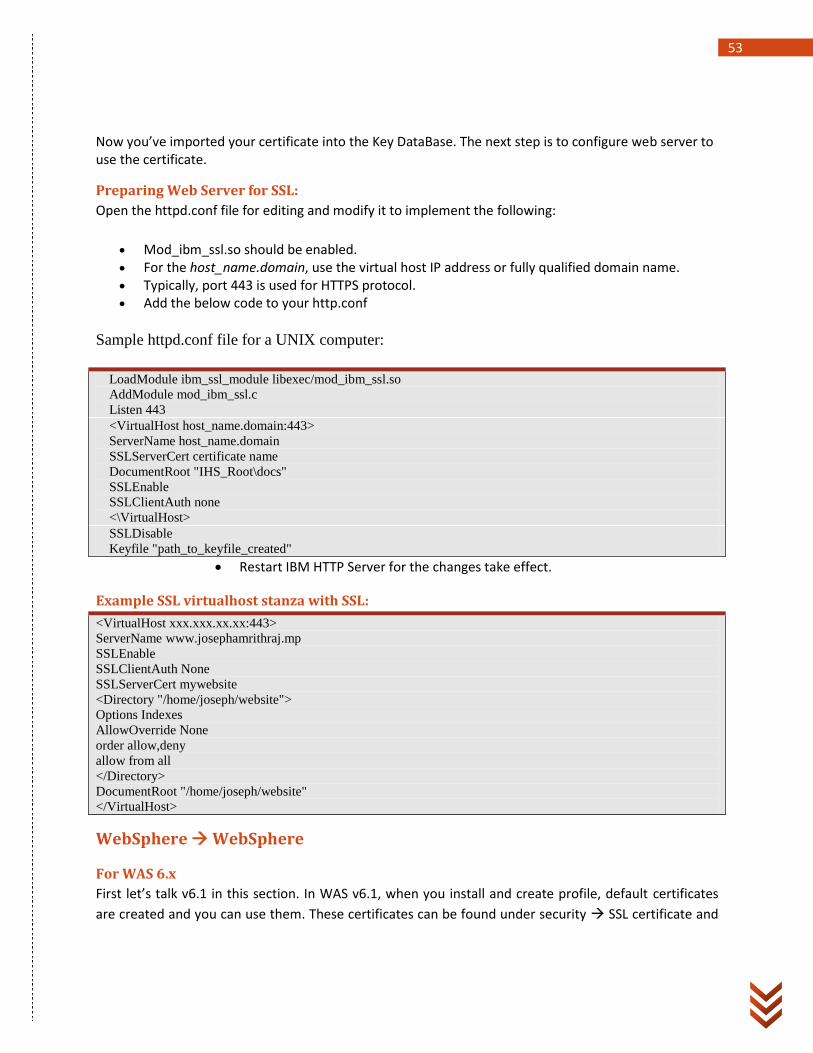
Preparing Web Server for SSL:
Open the httpd.conf file for editing and modify it to implement the following:
Mod_ibm_ssl.so should be enabled. For the host_name.domain, use the virtual host IP address or fully qualified domain name. Typically, port 443 is used for HTTPS protocol. Add the below code to your http.conf
Sample httpd.conf file for a UNIX computer:
LoadModule ibm_ssl_module libexec/mod_ibm_ssl.so
AddModule mod_ibm_ssl.c
Listen 443
<VirtualHost host_name.domain:443>
ServerName host_name.domain
SSLServerCert certificate name
DocumentRoot "IHS_Root\docs"
SSLEnable
SSLClientAuth none
<\VirtualHost>
SSLDisable
Keyfile "path_to_keyfile_created"
Restart IBM HTTP Server for the changes take effect.
Example SSL virtualhost stanza with SSL:
<VirtualHost xxx.xxx.xx.xx:443>
ServerName www.josephamrithraj.mp
SSLEnable
SSLClientAuth None
SSLServerCert mywebsite
<Directory "/home/joseph/website">
Options Indexes
AllowOverride None
order allow,deny
allow from all
</Directory>
DocumentRoot "/home/joseph/website"
</VirtualHost>
WebSphere WebSphere
For WAS 6.x
First let’s talk v6.1 in this section. In WAS v6.1, when you install and create profile, default certificates
are created and you can use them. These certificates can be found under security SSL certificate and

54
key management > Key stores and certificates. These certificates are used for communication between
nodes and between dmgr and browser when use https.
If you want to change these certificates or replace them, you can follow the below steps. The steps
shown below are using self-signed certificates. If you like to use certificates from a Certificate Authority
[CA], then you need to create the Certificate Signing Request [CSR], get it signed a CA and then you can
install them.
A. Replacing the DMGR certificate
In the Administrative Console, go to Security > SSL certificate and key management > Key stores and certificates > CellDefaultKeyStore > Personal certificates > Create a self-signed certificate. Enter the required attributes.
Click OK and Save the changes Go back to Security > SSL certificate and key management > Key stores and certificates >
CellDefaultKeyStore > Personal certificates Select the old DMGR certificate and click Replace. On the next screen, you are able to choose which certificate will replace the old certificate.
Accept your new certificate. Do not select either Delete old certificate after replacement or Delete old signers. Accept your new certificate and any browser prompts.
On the next screen, select the old certificate and click Delete. Click OK and Save the changes.
The certs need to be exchanged for establishing secure communication. So add the DMGR cert to
DefaultCellTrustStore
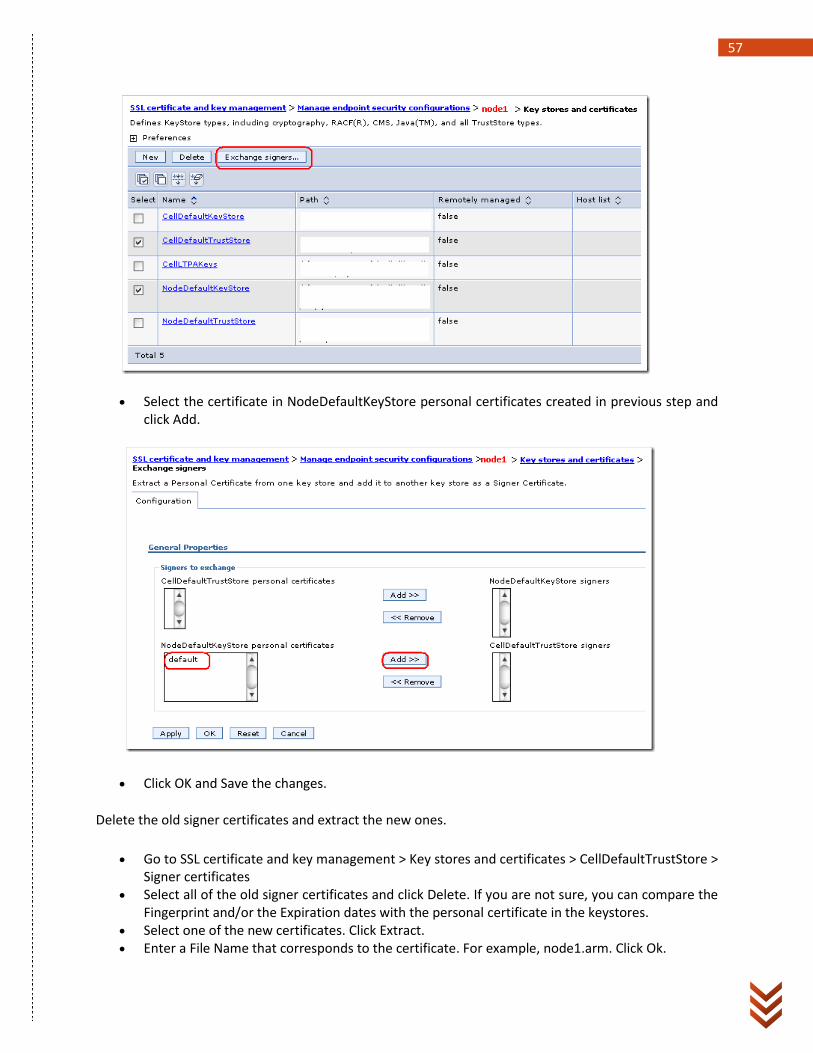
Go to SSL certificate and key management > Key stores and certificates. Select CellDefaultKeyStore and CellDefaultTrustStore and click Exchange signers.
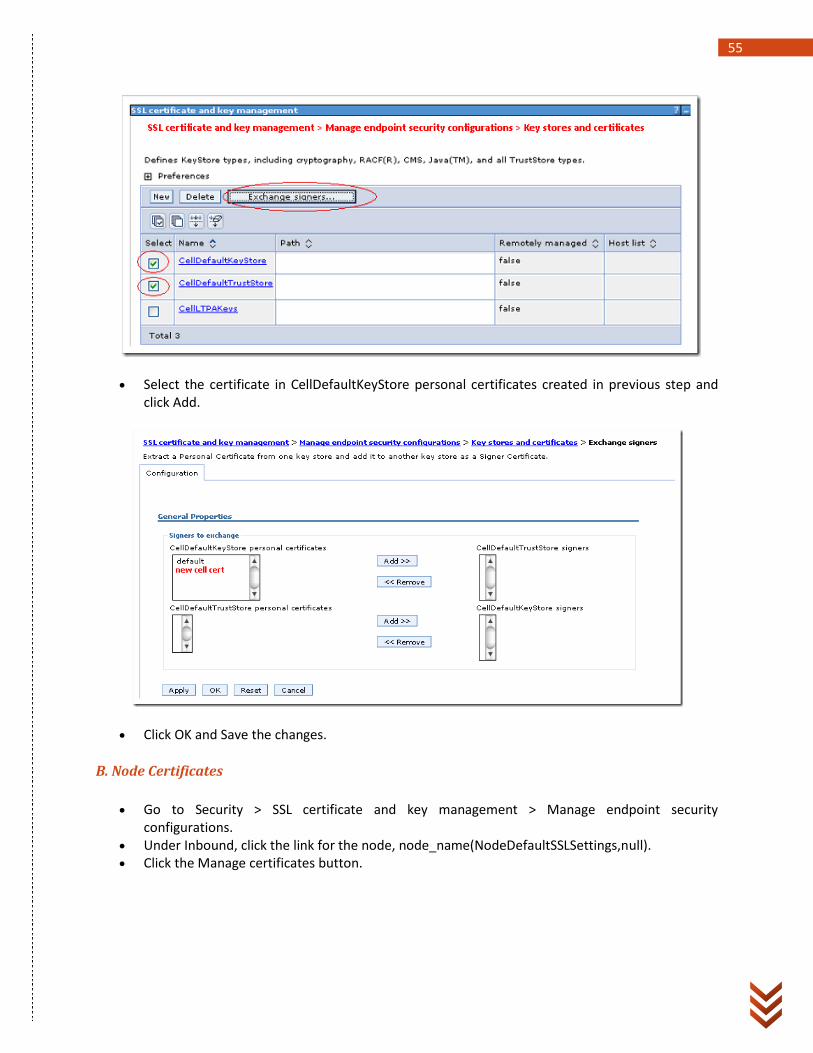
55
Select the certificate in CellDefaultKeyStore personal certificates created in previous step and click Add.
Click OK and Save the changes.
B. Node Certificates
Go to Security > SSL certificate and key management > Manage endpoint security configurations.
Under Inbound, click the link for the node, node_name(NodeDefaultSSLSettings,null). Click the Manage certificates button.

56
Click on create a self-signed certificate and Enter the required attributes. Click OK and Save the changes Go back to Security > SSL certificate and key management > Manage endpoint security
configurations, click node_name(NodeDefaultSSLSettings,null), click Manage certificates. Select the old certificate and click Replace. On the next screen, you are able to choose which certificate will replace the old certificate.
Accept your new certificate. Do not select either Delete old certificate after replacement or Delete old signers.
On the next screen, select the old certificate and click Delete. Click OK and save the changes.
Now Exchange the Node Signer cert with DefaultCellTrustStore
Go to Security > SSL certificate and key management > Manage endpoint security configurations.
Under Inbound, click the link for the node, node_name(NodeDefaultSSLSettings,null) and select Key stores and certificates.
Select NodeDefaultKeyStore and CellDefaultTrustStore and then Click Exchange signers.
57
Select the certificate in NodeDefaultKeyStore personal certificates created in previous step and click Add.
Click OK and Save the changes.
Delete the old signer certificates and extract the new ones.
Go to SSL certificate and key management > Key stores and certificates > CellDefaultTrustStore > Signer certificates
Select all of the old signer certificates and click Delete. If you are not sure, you can compare the Fingerprint and/or the Expiration dates with the personal certificate in the keystores.
Select one of the new certificates. Click Extract. Enter a File Name that corresponds to the certificate. For example, node1.arm. Click Ok.
58
For each of the new certificates making sure you have done this for the cell signer and all of the node signers. These files are saved to the profile_root/Dmgr/etc directory
Manually copy the trust store to each of the /etc directories.
Backup the trust.p12 in profile_root\Dmgr\etc Copy the profile_root\Dmgr\config\cells\cell-name\trust.p12 to profile_root\Dmgr\etc Backup the trust.p12 on each of the nodes profile_root\Appsrv\etc directories. Copy the profile_root\Dmgr\config\cells\cell-name\trust.p12 to profile_root\Appsrv\etc
Note: If you have multiple nodes… You need to do the Node Certificate section for all nodes separately.
Now, Restart the DMGR and sync the nodes using ‘syncnode’ command. Then start Node Agents and
Application Servers.
Web Server WebSphere [Plug-in]
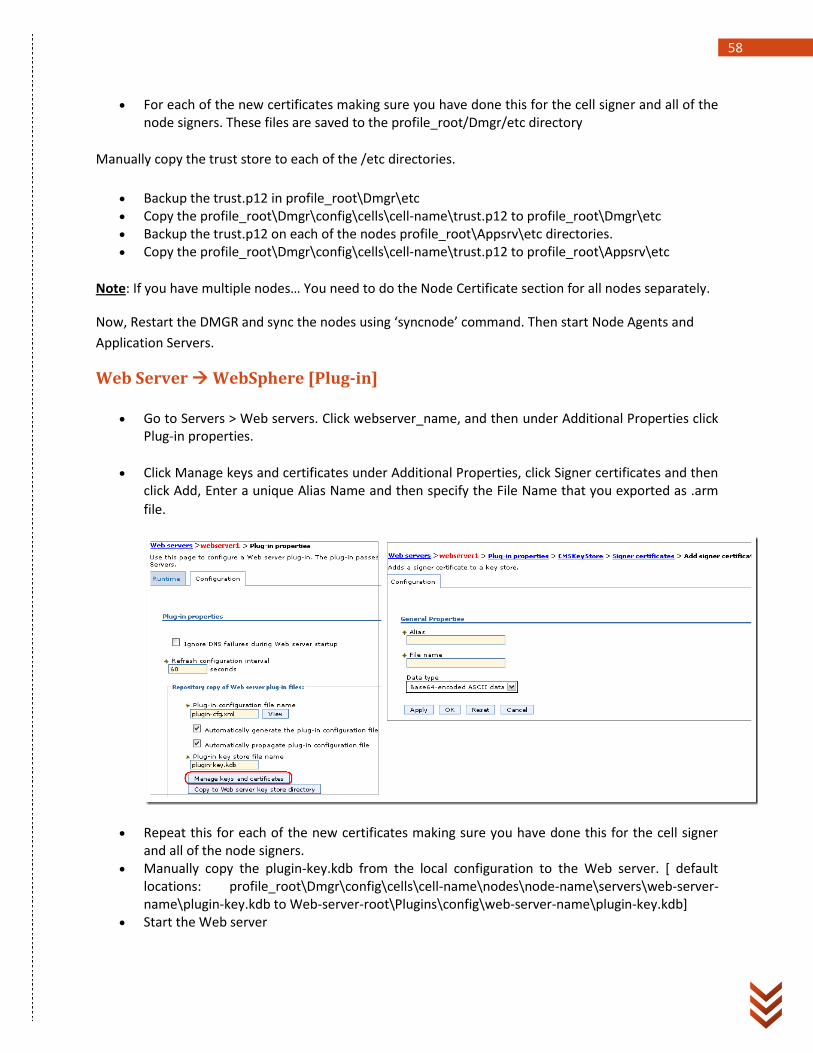
Go to Servers > Web servers. Click webserver_name, and then under Additional Properties click Plug-in properties.
Click Manage keys and certificates under Additional Properties, click Signer certificates and then click Add, Enter a unique Alias Name and then specify the File Name that you exported as .arm
file.
Repeat this for each of the new certificates making sure you have done this for the cell signer and all of the node signers.
Manually copy the plugin-key.kdb from the local configuration to the Web server. [ default locations: profile_root\Dmgr\config\cells\cell-name\nodes\node-name\servers\web-server-name\plugin-key.kdb to Web-server-root\Plugins\config\web-server-name\plugin-key.kdb]
Start the Web server
59
Note: If you have multiple web servers … you need to do the above steps for each web server
separately.
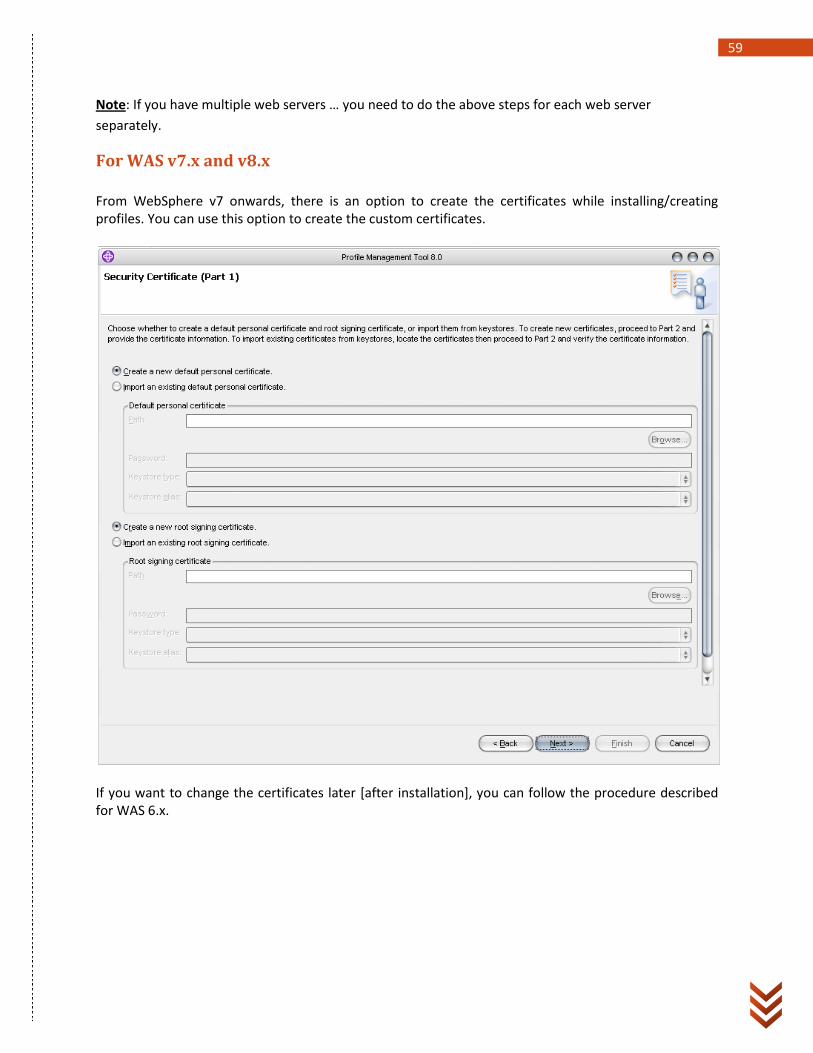
For WAS v7.x and v8.x
From WebSphere v7 onwards, there is an option to create the certificates while installing/creating profiles. You can use this option to create the custom certificates.
If you want to change the certificates later [after installation], you can follow the procedure described for WAS 6.x.
60
Security Auditing
• Chapter 8

61
Chapter 8: Security auditing Security auditing was introduced in WAS v7. The primary goals of the auditing subsystem are:
Confirm the effectiveness and integrity of the existing security configuration.
Identify areas where improvement to the security configuration might be needed.
The security auditing system has the ability to capture the following types of auditable events
• Authentication • Authorization • Principal-credential mapping • Audit policy management • User registry and identity management • Delegation • Administrative configuration management
Here are the steps to configure and use the security auditing subsystem.
Note: Before enabling security auditing, the following steps needs to be completed.
• Global security must be enabled
• A user with the auditor role is required to enable and configure the security auditing subsystem.
Step-1: Enable Security auditing • Go to global security security auditing, in the administration console.
• Select the ‘Enable security auditing’
• Select the action from the Audit subsystem failure action dropdown menu to be perform when
an audit subsystem failure occurs
• Select the Auditor ID from the dropdown menu. The auditor role is needed to make changed to
the security auditing configurations.
• Click Apply.

62
Step-2 Event type filters Event type filters are used to specify the types of auditable security events that are audited. Default
event type filters are included with the product, but you can also configure new event type filters to
specify a subset of auditable event types to be recorded by the security auditing subsystem.
Default filters
Name Eventname Outcomeofevent
DefaultAuditSpecification_1 SECURITY_AUTHN SUCCESS
DefaultAuditSpecification_2 SECURITY_AUTHN DENIED
DefaultAuditSpecification_3 SECURITY_RESOURCE_ACCESS SUCCESS
DefaultAuditSpecification_4 SECURITY_AUTHN REDIRECT
Procedure to create new filters
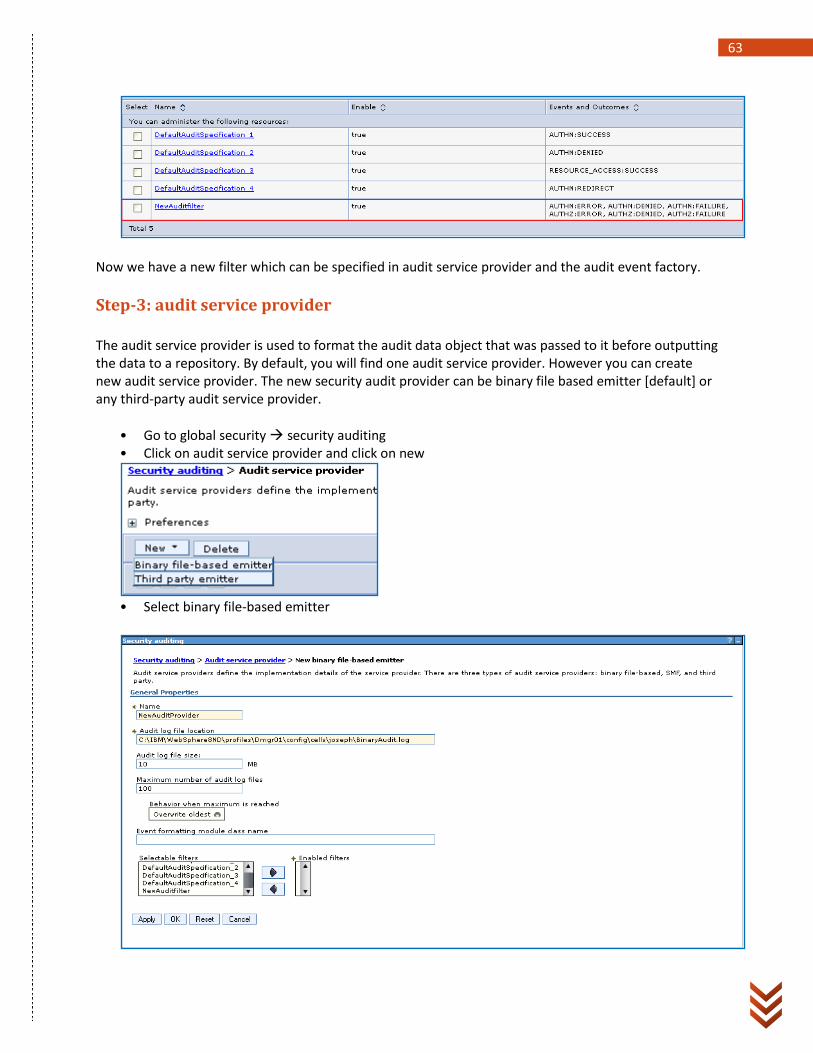
• Click Security > Security Auditing > Event type filters> New.
• Enter aunique name for the new filter. • Select what events should be recorded when this filter is applied:
o Select the events that you want to be audited from the Selectable events list. o Click Add to add the selected events to the Enabled events list. o Select the outcomes that you want to audit from the Selectable event outcomes list. o Click Add to add the selected outcomes to the Enabled event outcomes lists.
• Click OK and save the changes.
63
Now we have a new filter which can be specified in audit service provider and the audit event factory.
Step-3: audit service provider
The audit service provider is used to format the audit data object that was passed to it before outputting the data to a repository. By default, you will find one audit service provider. However you can create new audit service provider. The new security audit provider can be binary file based emitter [default] or any third-party audit service provider.
• Go to global security security auditing • Click on audit service provider and click on new
• Select binary file-based emitter
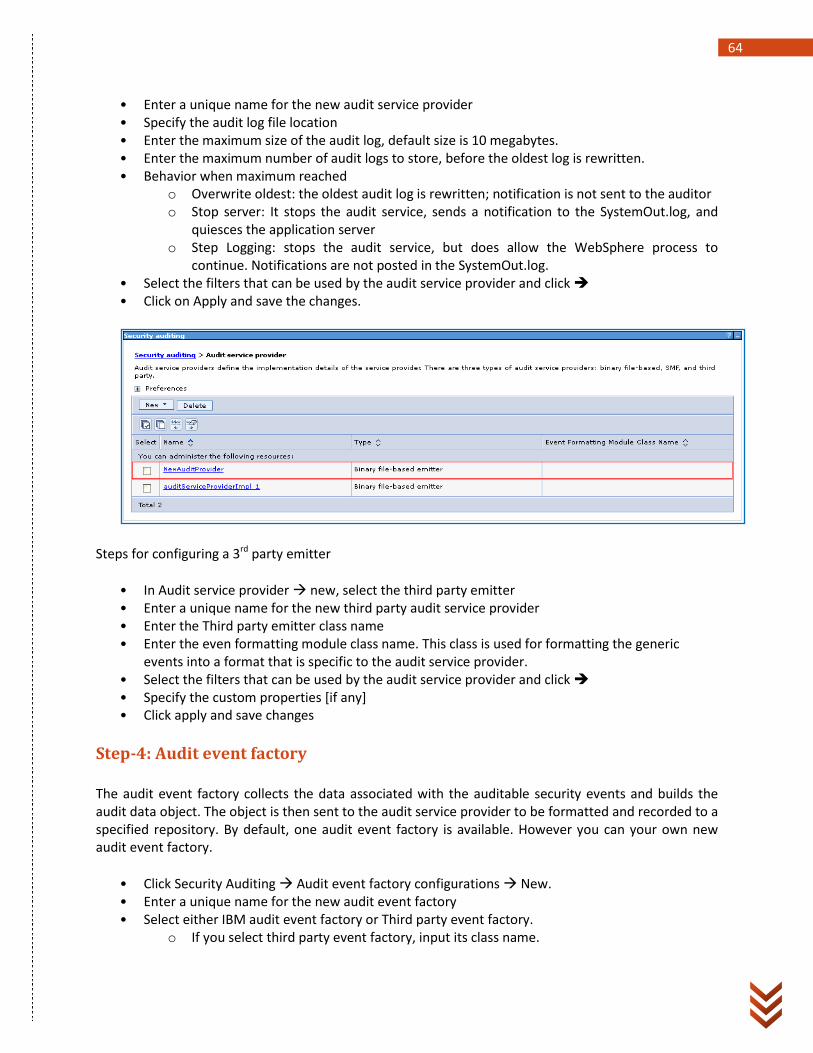
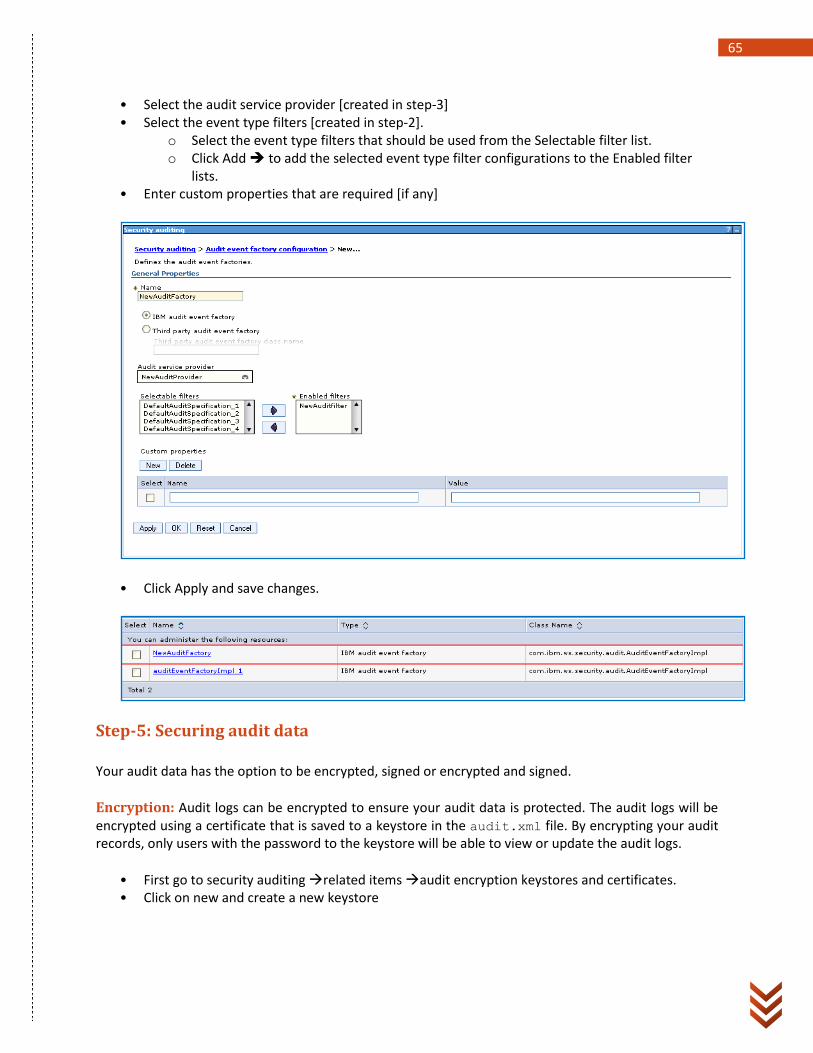
64
• Enter a unique name for the new audit service provider • Specify the audit log file location • Enter the maximum size of the audit log, default size is 10 megabytes. • Enter the maximum number of audit logs to store, before the oldest log is rewritten. • Behavior when maximum reached
o Overwrite oldest: the oldest audit log is rewritten; notification is not sent to the auditor o Stop server: It stops the audit service, sends a notification to the SystemOut.log, and
quiesces the application server o Step Logging: stops the audit service, but does allow the WebSphere process to
continue. Notifications are not posted in the SystemOut.log. • Select the filters that can be used by the audit service provider and click • Click on Apply and save the changes.
Steps for configuring a 3rd party emitter
• In Audit service provider new, select the third party emitter • Enter a unique name for the new third party audit service provider • Enter the Third party emitter class name • Enter the even formatting module class name. This class is used for formatting the generic
events into a format that is specific to the audit service provider. • Select the filters that can be used by the audit service provider and click • Specify the custom properties [if any] • Click apply and save changes
Step-4: Audit event factory
The audit event factory collects the data associated with the auditable security events and builds the audit data object. The object is then sent to the audit service provider to be formatted and recorded to a specified repository. By default, one audit event factory is available. However you can your own new audit event factory.
• Click Security Auditing Audit event factory configurations New. • Enter a unique name for the new audit event factory • Select either IBM audit event factory or Third party event factory.
o If you select third party event factory, input its class name.
65
• Select the audit service provider [created in step-3] • Select the event type filters [created in step-2].
o Select the event type filters that should be used from the Selectable filter list. o Click Add to add the selected event type filter configurations to the Enabled filter
lists. • Enter custom properties that are required [if any]
• Click Apply and save changes.
Step-5: Securing audit data
Your audit data has the option to be encrypted, signed or encrypted and signed.
Encryption: Audit logs can be encrypted to ensure your audit data is protected. The audit logs will be encrypted using a certificate that is saved to a keystore in the audit.xml file. By encrypting your audit records, only users with the password to the keystore will be able to view or update the audit logs.
• First go to security auditing related items audit encryption keystores and certificates. • Click on new and create a new keystore

66
• Click OK and save changes. • Now create a new personal certificate in the keystore • Click on the keystore name personal certificates create self-signed certificate • Create a new seld-signed cert
Now configure the encryption:
• Under Security auditing Related item Select audit record encryption. • Select enable encryption check box • Select the keystore that we created earlier from the dropdown • Select the self-signed certificate that we created earlier from the dropdown. Or you can create a
new personal certificate also. • Click OK and save changes.
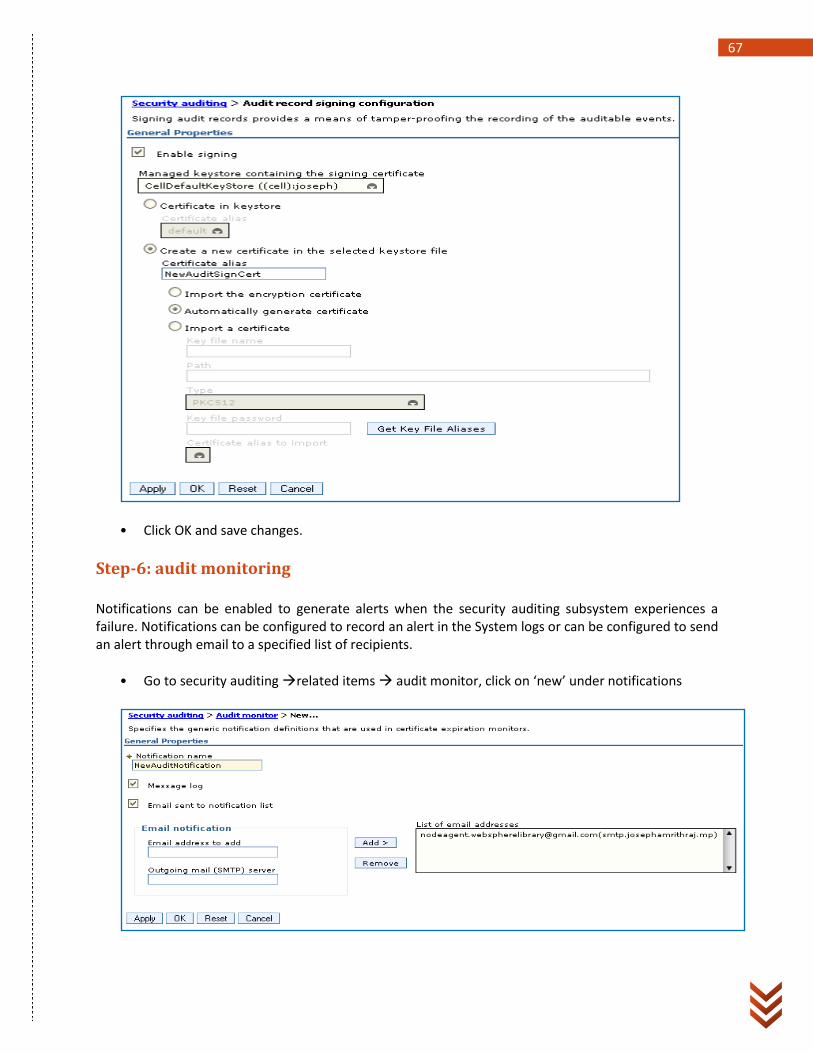
Signing: Audit logs can be signed to ensure the integrity of your audit data. By signing your audit records, modifications of the audit logs can be traced.
• Under security auditing related items audit record signing configuration • Select enable signing check box • Select the keystore that has the signing certificate, from the dropdown • Then select the signing certificate from the dropdown or create a new certificate in the selected
key store. I’m creating a new certificate using ‘automatically generate certificate option’
67
• Click OK and save changes.
Step-6: audit monitoring
Notifications can be enabled to generate alerts when the security auditing subsystem experiences a failure. Notifications can be configured to record an alert in the System logs or can be configured to send an alert through email to a specified list of recipients.
• Go to security auditing related items audit monitor, click on ‘new’ under notifications

68
• Enter a name for the notification • Select the Message log check box to specify the failure notifications are recorded in the audit
log. • Select the email sent to notification list check box to specify that failure notification email
should be sent to the addresses listed in the notification list. • Enter the email address to add and outgoing mail [smtp] server name. • Click Add, to add the email address • Click OK and save changes. • Select ‘enable monitoring’ • Select ‘monitor notification’
• Click OK and save the changes.
After you finished all the steps [1-6], restart the server for the changes to take effect.
Audit Reader
The audit reader is a utility that can be used to read the binary audit logs generated by the default binary emitter implementation. The audit reader parses the audit log to generate an HTML report. The audit reader is invoked using wsadmin commands and is not accessible using the administrative console. Use the commands and parameters in the AuditReaderCommands group to display audit record information from the binary audit log.
binaryAuditLogReader
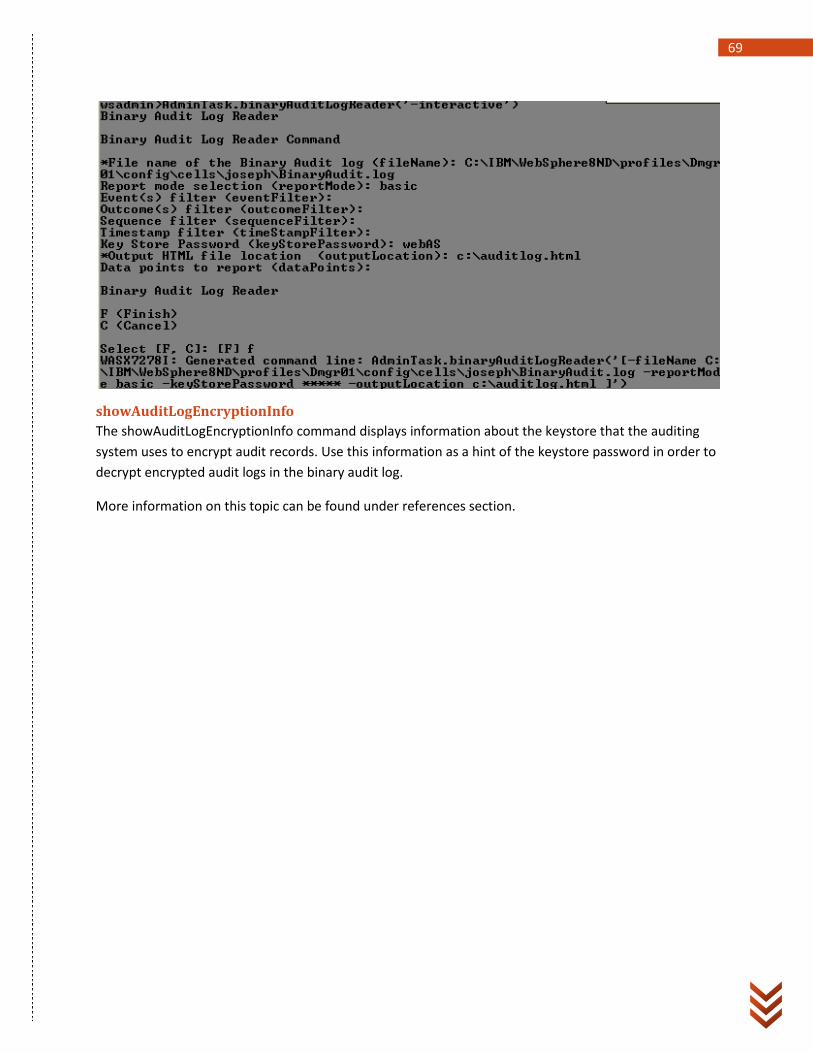
The binaryAuditLogReader command reads the default binary audit log and generates an HTML report
based on the parameters you provide. You must use the auditor security role to use this command.
You can run this command either in interactive mode or batch. Below is a screenshot from interactive
mode.
69
showAuditLogEncryptionInfo
The showAuditLogEncryptionInfo command displays information about the keystore that the auditing
system uses to encrypt audit records. Use this information as a hint of the keystore password in order to
decrypt encrypted audit logs in the binary audit log.
More information on this topic can be found under references section.

70
Security Configuration Report
• Chapter 9
71
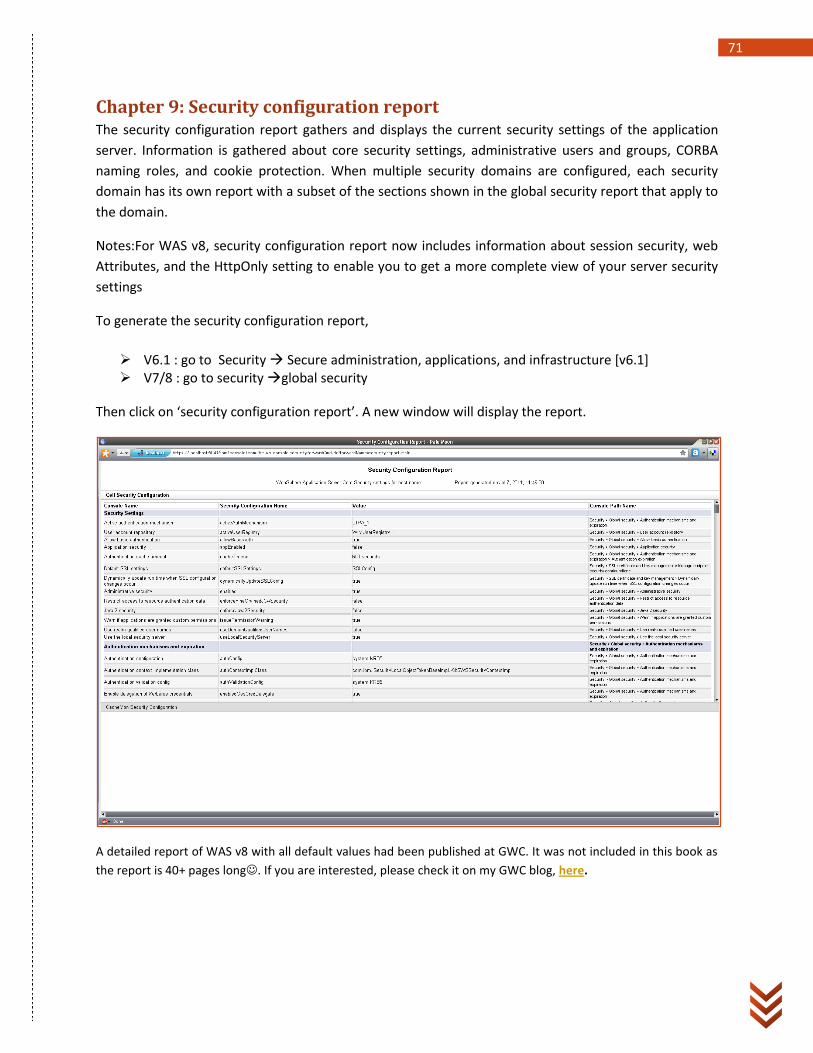
Chapter 9: Security configuration report The security configuration report gathers and displays the current security settings of the application
server. Information is gathered about core security settings, administrative users and groups, CORBA
naming roles, and cookie protection. When multiple security domains are configured, each security
domain has its own report with a subset of the sections shown in the global security report that apply to
the domain.
Notes:For WAS v8, security configuration report now includes information about session security, web
Attributes, and the HttpOnly setting to enable you to get a more complete view of your server security
settings
To generate the security configuration report,
V6.1 : go to Security Secure administration, applications, and infrastructure [v6.1] V7/8 : go to security global security
Then click on ‘security configuration report’. A new window will display the report.
A detailed report of WAS v8 with all default values had been published at GWC. It was not included in this book as
the report is 40+ pages long. If you are interested, please check it on my GWC blog, here.
72
Exercise
• Labs 1-4
73
Exercise – 1: check the default security settings Run a security configuration report, after installing websphere application server.
If you are using v6.1x – go to Security Secure administration, applications, and infrastructure
If you are using v7.x or 8.x global security
Go through the report and find out the default setting and what all contribute to security in a
WebSphere application serving environment. For more details, refer chapter 9
74
Exercise – 2: Check all user repository options If you are using v6.1x – Security Secure administration, applications, and infrastructure
If you are using v7.x or 8.x global security
Under user account repository available realm definitions; Select an option and click on configure...
Just check what data you need to configure that repository.
By default WebSphere will be configured with a file-based federated repository.
Try configuring your Local operating system.
Try configuring a standalone LDAP.
Try Configure the LDAP as Federated repository
Hints: Chapter -4 has more details on this topic. Do not configure anything at this point.
75
Exercise – 3: Working with SSL certs You will be replacing the default certificates in this exercise. Use a self-signed cert for this task
If you are using v6.1x – under SSL certificate and key management > Key stores and certificates >
CellDefaultKeyStore > Personal certificates; create a new self signed certificate
If you are using v7.x or 8.x global security under SSL certificate and key management > Key
stores and certificates > CellDefaultKeyStore > Personal certificates; create a new self signed
certificate
Step-A : replace DMGR cert [ check page 55]
Step-B : Replace a Node certificate [check page 56]
Step-C : Add new certs with plugin KDB [check page 59]
Note: the most important thing in SSL certificate communication is handshake. DMGR communicates
with all the nodes. So when you put a new cert for DMGR , the new cert should be trusted by all other
nodes for the communication to succeed.
76
Exercise – 4: Security Domains You will be creating a new security domain for an application-X installed on Server-A. Refer chapter 6 for
details on security domains
Pre-requisites:
Create a new server which is not part of any clusters [server1]
Deploy a new application on to the new server [App1]
Your global security configuration is using file-based federated repository. [you use admin1 for
logging into administration console]
Step-A
Create a new user in local operating system. [Ex: AppUser]
Configure local operating system user registry to use the new user [AppUser]
Go to global security user account repository available realm definitions
Choose Local operating system and click configure
Enter the primary administrative user as new user [AppUser]
Select ‘automatically generated server identity’ option for server user identity
Click OK and save the changes
Note: DO NOT click set as current button.
Step-B
Go to Security Security domains
Click on ‘copy global security’ to create a new security domain based on the settings from global
security.
Enter Application name as the name of the new security domain
Click OK and Save the changes
Now click on the new security domain
Look for assigned scope and select it as ‘server’ [server1]
Look for security attributes and expand the application security. Here select, customize for this
domain and enable application security.
Look for User Realm and expand it. Select ‘customize for this domain’ and choose Local
operating system as realm type.
Click OK and Save the changes.
Restart the application server [Server1]
Step-C
Now login to Administration console
o admin1 – Will be successful, since available at Global level
o AppUser – will fail, since available only at server scope [new security domain]
77
Access the application. The authentication window will pop-up since the application security
is enabled at the new security domain.
Login using the new user, you created in local operating system [AppUser]
Done … You’ve successfully created a new security domain and mapped it to a user application. And you
learned that the Application user is not available at global level and is available only at the application
scope.
78
References IBM WebSphere Application Server v6.1 infoCenter
IBM WebSphere Application Server v7.x infoCenter
IBM WebSphere Application Server v8.x infoCenter
My Blog on GWC
SSL digital certificates
Audit log viewer
Security Configuration report
WebSphere Application Server v8 Evaluation version
WebSphere Application Server v6.1 Security Handbook
Security presentation series from DeveloperWorks
79
Contact Joseph I can reached at the following coordinates
GWC : You can send me a message [http://www.websphereusergroup.org/josephamrithraj]
Twitter : http://twitter.com/NodeAgent
FaceBook: http://facebook.com/MiddlewareLibrary
Email : mailto:[email protected]?subject=WebSphere%20Security%20-
%20Visual%20walkthrough
Related Documents