10/21/2015 Webmin Configuration Webmin Documentation http://doxfer.webmin.com/Webmin/Webmin_Configuration 1/19 Webmin Configuration From Webmin Documentation The Webmin Configuration module exists to allow Webmin itself to be configured, unlike most other modules that are designed to configure some other server or service. It lets you do things like change the port and Webmin uses, limit the client addresses that can connect, change the theme and language that the user interface uses and install new modules. This chapter explains how to use the module to carry out these tasks. When you click on the module's icon in the Webmin category, the menu of icons shown in the image below will be displayed. Each of the icons can be clicked on to display a configuration page or form on which some of the Webmin settings can be changed. Contents 1 IP Access Control 2 Ports and Addresses 3 Logging 4 Proxy Servers and Downloads 5 User Interface 6 Webmin Modules 7 Operating System and Environment 8 Language 9 Index Page Options 10 Upgrade Webmin 11 Authentication 12 Edit Categories 13 Reassign Modules 14 Module Titles 15 Webmin Themes 16 Trusted Referrers 17 Anonymous Module Access 18 File Locking 19 Mobile Device Options 20 Blocked Hosts and Users 21 Background Status Collection 22 Advanced Options 23 Debugging Log File 24 Web Server Options

Welcome message from author
This document is posted to help you gain knowledge. Please leave a comment to let me know what you think about it! Share it to your friends and learn new things together.
Transcript

10/21/2015 Webmin Configuration Webmin Documentation
http://doxfer.webmin.com/Webmin/Webmin_Configuration 1/19
Webmin ConfigurationFrom Webmin Documentation
The Webmin Configuration module exists to allow Webmin itself to be configured, unlike most other modules that are designed to configure some other server or service.It lets you do things like change the port and Webmin uses, limit the client addresses that can connect, change the theme and language that the user interface uses and installnew modules. This chapter explains how to use the module to carry out these tasks.
When you click on the module's icon in the Webmin category, the menu of icons shown in the image below will be displayed. Each of the icons can be clicked on to displaya configuration page or form on which some of the Webmin settings can be changed.
Contents
1 IP Access Control2 Ports and Addresses3 Logging4 Proxy Servers and Downloads5 User Interface6 Webmin Modules7 Operating System and Environment8 Language9 Index Page Options10 Upgrade Webmin11 Authentication12 Edit Categories13 Reassign Modules14 Module Titles15 Webmin Themes16 Trusted Referrers17 Anonymous Module Access18 File Locking19 Mobile Device Options20 Blocked Hosts and Users21 Background Status Collection22 Advanced Options23 Debugging Log File24 Web Server Options

10/21/2015 Webmin Configuration Webmin Documentation
http://doxfer.webmin.com/Webmin/Webmin_Configuration 2/19
25 Webmin Scheduled Functions26 Sending Email27 SSL Encryption28 Certificate Authority
IP Access Control
By default Webmin will accept connections from any IP address. Even though it is passwordprotected, you should limit access to only legitimate client systems if possible,so that an attacker from outside your network cannot even attempt to login. The steps to follow to do this are:
1. Click on IP Access Control on the module's main page to bring up the access control form.2. Select Only allow from listed addresses and enter a list of hostnames, IP addresses and networks into the adjacent text box. Networks should be entered with a
netmask like 192.168.1.0/255.255.255.0. You can allow access from an entire DNS domain by entering something like *.example.com, but be aware that that is nottotally secure as an attacker can fake reverse DNS results.
3. Normally Webmin will resolve any hostnames that you enter only once, when it first starts up. To change this check the *Resolve hostnames on every reques*t box,and it will convert hostnames to IP addresses for comparison for every request. This can be useful if the system you are running a browser on is frequently changingIP address, but is able to update a DNS record to match. This can happen on a network using DHCP, or if you are connected to an ISP that dynamically assignsaddresses.
4. To have Webmin check the TCPwrappers configuration files /etc/hosts.allow and /etc/hosts.deny as well when deciding whether to allow a client, turn on the *Alsocheck TCPwrappers hosts.allow and hosts.deny files* option. The service name to use when editing those files is webmin.
5. Hit the Save button to activate the new client address restrictions.
Ports and Addresses
Webmin usually listens for connections on port 10000 on all of your system's IP addresses. You may need to change the port though, perhaps because a firewall on yournetwork only allows connections to web servers on the standard ports of 80 and 443. Because port 10000 can be used by servers run by any user, it may be possible for amalicious user on your system to wait for Webmin to be shut down and then start his own fake Webmin server on that part, which could capture the admin or root password.For this reason you may want to use a port below 1024 (which only programs run as root can listen on) instead. Changing the listening IP address can also be useful if yoursystem has multiple network interfaces and you want to only allow connections on the interface connected to the internal LAN.
To change the port or address, do the following :
1. Click on the Port and Address icon on the module's main page.2. To listen on only a specific interface address, select the second option in the Listen on IP address field and enter an IP into the text box next to it. This must be the
address of one of your host's real or virtual interfaces.3. To change the port, enter a number into the Listen on port field.4. Hit the Save button to use the new settings. Your browser will be redirected to the new port and address, and you may need to login again.
Logging
Like most web servers, Webmin can be configured to create a log file in the standard CLF format the records every request it receives. As well, it also creates a log ofactions performed by users, such as the creation of a DNS zone or the deletion of a Unix group. This actions log can even include the details of every file changed andcommand run by each action, so that you can see what Webmin is doing under the hood.
Basic logging is enabled by default, but you can configure it further by following these steps:
1. Click on the Logging icon on the main page.2. If Disable logging is selected then Webmin will write no logs at all. However, you should choose Enable logging to activate it.3. If the Log resolved hostnames box is checked the log file will contain actual client hostnames instead of IP addresses. This can cause problems if reverse DNS
lookups take a long time on your network, as one will need to be done for each request.4. To prevent the log files from becoming too large, Webmin can be configured to truncate them periodically. To enable this feature, select the Clear logfiles every box
and enter a number of hours into the adjacent text field.5. To limit action logging to only specific users, select the Only log actions by option and choose some users from the list next to it. This can be handy if most of your
users can only perform tasks that you don't care much about, and you want to log only actions taken by the more powerful administrators instead.6. To limit action logging to only specific modules, select the Only log actions in option and choose one or more modules from its list.7. To enable the logging of file changes and commands run for each action, check the *Log changes made to files by each action *box. This will take up more disk
space, but provides some very useful and interesting information.8. Hit the Save button to activate the changes.
The Webmin Actions Log module explains how to search for and view actions once you have enabled their recording here. This can be useful for finding out who did whaton your system if you have multiple administrators with access to the server.
Proxy Servers and Downloads
Many Webmin modules are capable of downloading files from other FTP, HTTP and HTTPS servers. For example, the Software Packages module lets you enter a URL tofetch and install a new package from. Normally Webmin will connect directly to the host specified in the URL, but it can be configured to use a proxy server instead. Thismay be necessary if your network does not allow direct access to web and FTP sites, but instead forces clients to connect through a proxy.
Webmin's RPC mechanism (covered in Webmin Servers Index) also makes use of HTTP requests to other Webmin servers. Any proxy configuration will also apply to RPCcalls, although not to direct TCP connections used by the RPC protocol when in fast mode or when transferring large files. Because any other Webmin servers are likely tobe on the same network, you will probably want to disable the user of a proxy for those hosts.

10/21/2015 Webmin Configuration Webmin Documentation
http://doxfer.webmin.com/Webmin/Webmin_Configuration 3/19
To specify HTTP and FTP proxy servers and the hosts for which they will be used, follow these steps:
1. On the Webmin Configuration module's main page, click on the Proxy Servers icon.2. If you want a proxy to be used for HTTP requests, select the second radio button in the HTTP proxy field and enter a full URL like http://proxy.example.com:8080/
into the text box next to it. If None is chosen, no proxy will be used. This specified server will also be used for HTTPS connections by making CONNECT proxyrequests, so make sure that it supports and allows them.
3. Similarly, you can enter a proxy to use for FTP downloads in the FTP proxy field. Usually this will be the same as the HTTP proxy.4. To disable the use of a proxy for certain hosts, fill in the No proxy for field with a spaceseparate list of hostnames, domain names, and full or partial IP addresses.
For example, you might enter .example.com 192.168.1. to have Webmin connect directly to hosts in that domain and network.5. If your proxy requires clients to authenticate themselves, fill in the Username for proxy and Password for proxy fields.6. Hit the Save button to have Webmin start using the new settings.
User Interface
Webmin has several settings that control the color scheme of the user interface (when using the Old Webmin Theme), what server host information is displayed on eachpage, and if the sending of feedback is allowed. You can change them by following these steps :
1. On the module's main page, click on the User Interface icon to bring up the interface options form.2. The first five fields let you choose the colors to be used for various parts of the interface when using the oldstyle theme. For each you can either select Default, or
enter three hexadecimal numbers for the red, green and blue components of a color. For example, FF 88 00 would be a shade of orange. These options have no effecton the new default theme though.
3. In some themes, the title at the top of every page is rendered as an image. Because this can make the page slow to download, you can force the use of plain HTMLtext titles instead by changing the Display titles as text? field to Yes.
4. By default every page in Webmin shows your system's hostname and operating system in the browser status bar. To have it shown elsewhere or turn it off altogether,select one of the following options from the Display login and hostname menu : *At bottom of browser *The information is shown in the browser's status area,which is usually at the bottom of the window. *In browser title *The information is added to the title of each page, which usually appears in the browser window title.*Above page heading *The information is shown above the title of each page. *Nowhere *The hostname and operating system information is not shown anywhere. Ifyou are worried about untrusted users learning too much about your system, this is the option to choose.
5. When using the default theme, every page in Webmin has a link in the topright corner for sending feedback to the developer. However, you may want to configure itso that feedback is sent to the master system administrator instead, so that other users can contact you. To do this, enter your email address in the Send feedback tofield and change the *Allow sending of feedback?* field to Only to address above. The sending of feedback can be completely prevented by selecting No in thelatter field instead.
6. Click on the Save button to activate the new user interface settings.
Webmin Modules
Webmin modules Install/Clone/Delete/Export
As the first chapter of this book explains, Webmin is essentially collection of modules, each of which performs some task such as configuring Apache or managing Unixusers. A module can be added or removed without effecting the operation of others, assuming that they do not depend upon it. Even though the main Webmin distributionincludes 76 modules at the time of writing, over 100 more written by other people are available for download from the website webmin.thirdpartymodules.com. This is asearchable database of modules and themes that perform tasks the core modules do not, such as managing the FreeBSD firewall, displaying system information andconnecting to a VNC server.
Installing
Once you have found a module that you like, it can be installed by following these steps:
1. On the main page, click on the Webmin Modules icon. This will bring to you to a page with forms for installing, cloning and deleting modules.2. If you have already downloaded the module's .wbm file to the system on which Webmin is running, select From local file and enter the full path to the file into the
text field next to it.3. Alternately, if the module file is on the PC that your web browser is running on, select From upload file and use the Browse button to find the file on your computer.
10/21/2015 Webmin Configuration Webmin Documentation
http://doxfer.webmin.com/Webmin/Webmin_Configuration 4/19
4. If instead the module is on a web site somewhere, select *From ftp or http URL* and enter the full URL into the text box next to this option.5. Webmin will normally stop a module from being installed if any other modules that it depends on are not available, or if it is written for a later Webmin release. To
prevent this, check the Ignore module dependencies when installing box. However, this may allow the installation of a module that will not work. It will not allowyou to add modules that do not support the server's operating system though.
6. To control who this new module will be granted to, select the Grant access only to users and groups option and enter a list of Webmin user and group names intothe adjacent text box. By default only the user that you are currently logged in as is listed. Alternately you can give it to every user and group by choosing Grantaccess to all Webmin users.
7. Hit the Install module from file button to download (if necessary) and install the new module. If everything goes OK a page listing the modules installed and thesizes of their directories will be displayed.
Webmin comes with a script called installmodule.pl that can be found in the installation root directory. If you have installed the RPM version, this will be/usr/libexec/webmin otherwise it will be wherever the tar.gz file was extracted. This script can be used to install a module from the command line, by passing the .wbt fileto it as a parameter. It will be granted only to the root or admin user if one exists, or the first account listed in the Webmin Users module otherwise.
Any of the modules currently installed, including those that comes with Webmin by default, can be deleted on the same page as well. Deleting the default modules is not agood idea though, as they will be automatically reinstalled the next time you upgrade. Instead it is better to take away access that you don't want to use with the WebminUsers module. Not all modules can be deleted either, as some are depended upon by other modules (such as Running Processes). Nor is it possible to delete this module.
Deleting
To remove one or more modules, the steps to follow are:
1. Click on the Webmin Modules icon on the main page.2. Scroll down to the last form on the page and select all the modules that you want to remove from the Delete Modules list. Clones (explained later) can be deleted as
well if they are no longer needed. Deleting a module that has clones will automatically remove them as well.3. When you hit the Delete selected modules button a confirmation page will be displayed showing exactly what will be removed. Or if there are some dependency
problems that prevent one or more from being deleted, an error message explaining the problem will be shown instead.4. To have access to the module taken away from all users and all access control settings returned to their defaults, check the Remove from users and reset access
control settings? box. This can be useful if you plan to reinstall the module in future and don't want it to be available to the same people that could use it before.5. Click on Delete to go ahead with the module's removal. A page showing exactly which were modules deleted will be displayed, along with the number of bytes
deleted for each.
Cloning a Webmin module
In some situations you may wish that you had the same Webmin module installed twice, so that each could be configured individually. This can be useful if for example youhave two versions of Apache installed, perhaps one for testing and one for production. The standard Apache module can only be set up to manage one at a time, so it mightappear the only want to configure both servers would be to install Webmin twice.
However, there is a solution module cloning. A clone is a copy of an existing module that shares all of the same code, but can be configured separately, assigned todifferent users and have its user access control set up independently. To create a clone, follow these steps :
1. Click on the Webmin Modules icon on the main page.2. Go to the second form, titled Clone Module, and select the original module from the Module to clone menu.3. In the Cloned module name field enter a new name to be displayed under the clone's icon, such as Testing Apache Server.4. If you want this module to appear in a different category to the original, select it from the Assign to category menu.5. Hit the Clone Module button. The copy will be created and granted to the user you are currently logged in as, and your browser will be returned to the Webmin
Configuration main page.6. You can now go to the new module, which by default will be configured identically to the original. The Module Config link can then be used to set it up to use
different configuration file and program paths if necessary. If you clone a module like Custom Commands or System and Server Status, any existing commands ormonitors will be copied to the clone as well. You can delete them if you wish, without effecting the settings in the original module.
There are quite a few clever tricks that can be performed with cloning, such as making a new copy of the System and Server Status module that runs on a different schedule,making a copy of the Users and Groups module for managing NIS users or having multiple of the Fetchmail module for different configuration files.
Operating System and Environment
Webmin behaves differently depending on the operating system or Linux distribution that you have installed, and the particular version that you are running. The correct OSis always automatically detected at installation time or provided by the installer, but it is quite possible that your system may be upgraded during the lifetime of the system.If this happens, Webmin will not automatically detect the upgrade you must tell it by following these steps:
1. Click on the Operating System and Environment icon on the module's main page.2. Select your Unix vendor and version from the *New operating system* list.3. Hit the Save button to have Webmin start using it.
The operating system and version detected at installation time determines the default values for module configurations, as each flavor of Unix uses different locations andformats for the various config files that Webmin manages. However, changing your OS by following the steps above will not adjust any of these configuration settings.Instead, it will just determine which ones are used for modules installed in future. Usually this is not a problem, as most OS upgrades will not change the locations of filesand programs. However, some modules may need to be manually configured after an upgrade for example, you may need to change the print system used by the PrinterAdministration module if the old OS version used LPRng and the new version uses CUPS.
Editing the program path and environment variables
When you run a command like ls from the Unix shell, the PATH environment variable determines the directories that your shell will search to find the actual executable,such as /bin/ls. Webmin also uses the PATH variable to locate commands that it runs when a full path is not specified, such as webalizer or mysql. By default this list ofdirectories is set to include all of the common locations for programs on your operating system, but may be incorrect if you have installed executables in some nonstandarddirectory such as /usr/local/samba/bin.

10/21/2015 Webmin Configuration Webmin Documentation
http://doxfer.webmin.com/Webmin/Webmin_Configuration 5/19
Similarly, the LD_LIBRARY_PATH environment variable determines where programs look for shared libraries that they need to load when run. Again, Webmin by defaultsets this variable to include all of the common library directories on your operating system, but it may miss some out if you have compiled and installed programs manually.A symptom of this is programs run by Webmin failing with an error message like libmysqlclient.so.6: open failed. A library like this might be found in /usr/local/mysql/lib,which is not in the default search path.
You can edit these paths and define your own environment variables that will be passed to all programs run by Webmin by following these steps:
1. Click on the Operating System and Environment icon.2. Add any additional program directories to the *Program search path* field. Each directory must be separated by a : (colon), just as they are in the PATH environment
variable. Existing directories should not be removed or changed though, as they may stop parts of Webmin from working.3. Add any extra shared library directories to the *Library search path* field, again separated by colons.4. Sometimes it is useful to have Webmin pass other environment variables to programs that it runs. For example, if you had several custom commands that connected to
Oracle you might want ORACLE_HOME to be set appropriately before they are run. The Additional environment variables table allows you to define some. Justenter a name into the first empty field under Variable name, and a value into the field next to it under Value. As with most tables in Webmin, this one only displaysone empty row at a time, so if you want to add more than one variable you will need to save and reopen this page.
5. When you are done setting paths and variables, hit the Save button to activate them.
Any program run by Webmin also has access to several variables set by the webserver itself and passed to the CGI programs that make up Webmin. For example,REMOTE_USER contains the name of the loggedin user, and REMOTE_HOST the client IP address. All HTTP headers are stored in uppercase variables starting withHTTP_, so a program can find information about the user's browser in the HTTP_USER_AGENT variable for example.
Language
Many Webmin modules have been translated into different language, such as German and Japanese. You can change the default language for all users by following the stepsbelow, of for just a single user in the Webmin Users module. Not all of the translations are complete, so some messages and labels will still appear in English though.
1. Click on the Language icon on the module's main page.2. In the form that appears, select your users' preferred language from the Display in language menu.3. Some browsers (such as Opera) can request that the server display pages in a language chosen by the user. To have Webmin honor such requests if possible, change
the *Use language specified by browser?* field to Yes. If a language is sent, it will override both the global and individual users' settings.4. Hit the Save button to have Webmin switch to the new language immediately.
Many languages (such as Chinese, Japanese and Russian) use symbols not found in the standard European alphabet. To display them a special font often needs to beinstalled on the system running the browser that you use to access Webmin. Some Linux distributions include these fonts by default, but others do not and installing themcan be rather complex.
Index Page Options
As well as general user interface settings that apply to all pages, there are some that control the layout of only the main menu on which module icons are displayed. Theycan be used to turn categorization off, control the display of your system's hostname and OS and have users sent directly to a module by default, among other things. Thesesteps explain how to change the main menu settings :
1. Click on the Index Page Options icon on the Webmin Configuration module's main page.2. By default, modules icons are listed four to a row. If you prefer to use a wide browser window this may be too few to make proper use of the available space. Edit the
Number of columns field to change the number of icons in each row.3. When the Categorize modules? option is set to Yes, icons are displayed under categories to reduce the number that appear on any one page in the main menu.
Selecting No instead will put them all on one big page, and remove the list of categories from the top of all pages when using the default theme.4. When a user logs in to Webmin, he will see the modules in the Webmin category by default. If you usually use modules in some other category, select it from the
Default category menu.5. When the Show version, hostname and OS? field is set to Yes as it is by default, the main menu displays your system's Webmin version, hostname and operating
system. If you don't want this information to be made available to users for security reasons, select No instead.6. If a Webmin user has access to only one module it makes no sense for him to see the main menu at all, as it will contain only one icon. To have such users directed
immediately to their only module after logging in, change the Go *direct to module if user only has one?* field to Yes.7. Click on the Save button to activate these new main menu settings.
Some nonstandard themes may not implement all of these features, especially those that have their own main menus.
Upgrade Webmin

10/21/2015 Webmin Configuration Webmin Documentation
http://doxfer.webmin.com/Webmin/Webmin_Configuration 6/19
Upgrade Webmin main screen
Webmin has the ability to upgrade itself when a new version comes out, either from a file that you have already downloaded or from a package that it fetches fromwww.webmin.com for you. Even though it is quite possible to upgrade from the command line by installing the latest RPM or tar.gz package, doing it from within thismodule is even easier and less prone to error.
Webmin can only be upgraded using the same type of package that it was originally installed from. This means that if you used the tar.gz format originally, an upgrade canonly be done from another tar.gz file. Similarly, an RPM install can only be upgraded from a newer RPM package. Of course, when Webmin downloads the newest versionfor you it will always choose the right package format.
Recent releases have the ability to check the GnuPG digital signature on the RPM and tar.gz packages to ensure that they are authentic. This can only be done if you havethe gpg command installed on your system, and when using the tar.gz package only when upgrading directly from the Webmin site. Signature checking protects you frominstalling a fake versions of Webmin that is actually a Trojan horse or some other type of malicious program.
To upgrade Webmin, follow these steps:
1. Click on the Upgrade Webmin icon on the module's main page. This will take you to a page with forms for upgrading, installing updated modules and setting up theautomatic install of updates.
2. The Upgrade Webmin form is very similar to the form for installing modules, explained in the *Installing and deleting Webmin modules* section. Select eitherFrom local file if the new package is already on your server system, *From uploaded file* if it is on the PC your web browser is running on, or *From ftp or httpURL* to have the package downloaded from some URL. The easiest option is to choose Latest version from www.webmin.com to have the appropriate packagedownloaded automatically.
3. If Webmin on your system was installed from the tar.gz file, the Delete old version's directory after upgrade? box can be checked to have the old version removedafter the new one is installed. Unless you want to be able to revert to the old release, this option should be enabled to save on disk space. It does not appear at all forRPM installs, as the RPM package always installs in the same directory.
4. To have the GnuPG signature on the package verified if possible, turn on the Check GnuPG signature on package? option. It is enabled by default if the gpgprogram is installed on your system.
5. Hit the Upgrade Webmin button to begin the upgrade. A page showing the download progress (if necessary) and output from the new version's setup.sh script will bedisplayed. If you are already running a version later than the one selected to install or on www.webmin.com, an error message will be displayed instead.
The upgrade process will preserve all users and module configuration settings, and should not even be noticeable by people currently accessing your Webmin server. If youoriginally installed the program from the tar.gz package and did not specify a target directory like /usr/local/webmin, the new version will be installed in the directory 'nextto' the old one. For example, if Webmin 1.060 was in /usr/local/webmin1.060 and you upgraded to version 1.070, it would be installed in /usr/local/webmin1.070, and theold directory deleted if the *Delete old version's directory after upgrade?* option was checked.
Any modules that the new version includes but the old one does not will be granted to the first user listed in the Webmin Users module, which will typically be root oradmin. You should check after the upgrade is complete to ensure that they have not been given to an untrusted user instead though, as most modules by default can be usedto subvert security on your system.
Installing updates to Webmin
Updated versions of Webmin modules in the latest release are often made available to fix bugs or security problems. Installing these updated modules is always a good idea,as they may fix problems that you have been having or patch security holes that could allow untrusted users to gain root access on your system. Updates are alwaysdesigned to solve problems rather than adding new features which may potentially have problems of their own.
Of course, if you are not having any trouble then you can just wait until the next full release and install it instead. Each version will always include any updates that weremade available for previous versions of Webmin. Updates are only created to solve problems in the latest version, so if you are running an older version do not expect anymore to be released for it.
The page http://www.webmin.com/updates.html lists the downloadable updates for each version of Webmin. You can retrieve any that you need from there to be installedusing this module, as explained in the Installing and deleting Webmin modules section. However, there is an easier method Webmin can be told to check for, downloadand install any updates that it does not already have. This can either be done explicitly using this module, or set up to happen on schedule.
To check for and install updates, follow these steps :
1. Click on the Update Webmin icon on the Webmin Configuration module's main page.2. Scroll down to the second form, headed Upgrade modules now.3. Select the Update from www.webmin.com option. The alternate Update from another source mode is only useful if running your own repository of new modules,

10/21/2015 Webmin Configuration Webmin Documentation
http://doxfer.webmin.com/Webmin/Webmin_Configuration 7/19
which is not covered in this book.4. If you just want to see what updates are needed without actually installing them, check the *Only show which modules would be updated *box. Otherwise, uncheck
it so that updates are actually done.5. If you have deleted some of the standard Webmin modules and don't want them to be reinstalled by the update process, deselect the Install modules that are not
currently installed option.6. Hit the Update Modules button. A page listing all updates for your operating system will be displayed, along with the problems that they fix. As long as the box in
step 4 was not checked, the progress of each needed module's download and the results of its installation will be shown as well. As well, if a new version of Webminis available a message will appear at the end of the page informing you. Because module updates are only released for the latest version, it is advisable to upgrade theentire program as soon as possible.
Every Webmin module has a version number, which the update process uses to keep track of which ones it has already downloaded and installed. A message like Modulecron is already up to date shown next to a potential update indicates that it has already been installed. A message like *Update to module cron is not related to this OS*means that the module does not support your operating system, or that the problem that the update fixes does not occur on your OS.
Scheduled updates
Instead of manually following the steps above every now and then, you can configure Webmin to check for, report on and install new modules on schedule. When neededupdates are found, an email can be sent to you listing the modules that should be or have been installed and the problems that they fix. As well the email will includenotification of the availability of a new Webmin release, if there is one.
To enable automatic updates, follow these steps :
1. Click on the Update Webmin icon and scroll down to the final form on the page, titled Update modules on schedule. \# Check the Scheduled updating currentlyenabled box. # Unless you run your own repository, select Update from www.webmin.com.
2. The Update modules at field specifies the time of day that the scheduled update check is run. Typically you should enter something like _3_ to have updates done at3 am, assuming that your system is turned on at that time. The every field next to it sets the number of days between checks. For example, if you enter _1_ thenupdating will be done only every third day. 1 or 2 days is usually a reasonable period.
3. If the Only show which modules would be updated option is enabled, a reporting only showing which modules need updating will be sent out on schedule. This canbe useful if you want to be reminded of new modules, but install them yourself to control which updates are used.
4. The Install modules that are not currently installed option has exactly the same meaning as in the Update modules now form, and generally does not need to beenabled.
5. If Only report updates is checked, an email report will not be sent if no needed updates are available and no new version of Webmin has been released. This isusually what you want, as it cuts down on the number of unnecessary email messages.
6. In the Email update report to field enter the address to which the update report should be sent. If it is left empty automatic checking will still be done, just notreported. Email is always sent by calling the sendmail program, the path to which is taken from the Sendmail Configuration module's configuration.
7. Hit the Save and Apply button to enable scheduled updating. A Cron job (covered in chapter 10) will be created, which you can see in the Schedule Cron Jobsmodule, but should not touch.
Automatic updating can be turned off at any time by deselecting the Scheduled updating currently enabled box on this form and clicking on Save and Apply.
If webmin was installed using yum or aptget and updating is enabled, yum/aptget will update webmin on similar schedule as other components.
Authentication

10/21/2015 Webmin Configuration Webmin Documentation
http://doxfer.webmin.com/Webmin/Webmin_Configuration 8/19
Authentication
Webmin has several options that control how multiple failed login attempts are handled, how users login and how Unix passwords are checked. The default authenticationmethod uses cookies, but if your browser cannot handle them you may want to switch to basic HTTP authentication instead. The only problem with this method is that thereis no way to properly log out, as there is no support for logging out in the HTTP protocol. However, it sometimes must be used for example, browsers on MacOS X cannotload applets (such as the ones in the File Manager and SSH/Telnet Login modules) from web servers using cookie authentication.
To configure authentication for Webmin, follow these steps:
1. Click on the Authentication icon on the module's main page to bring up the authentication form.2. When Enable password timeouts is selected, Webmin will detect multiple failed login attempts from the same IP address and lock that host out for a configurable
amount of time. This feature should always be turned on, as it stops attackers using millions of login attempts to guess passwords on your system. The Block hostswith more than field specifies the number of login attempts allowed from a single host before blocking is triggered, while the failed logins for field sets the numberof seconds that a host is blocked for. The defaults are reasonable, but you can increase the timeout if you are feeling paranoid.
3. When *Log blocked hosts, logins and authentication failures to syslog* is selected Webmin will send messages to the system logs (covered in chapter 13) when a userlogs in, logs out or enters an incorrect password. All messages are sent with the authpriv facility. You should leave this option turned on, so that suspiciously largenumbers of login failures can be detected.
4. When Enable session authentication is selected, Webmin will use its own login form to ask users for a username and password, and set a cookie after the login iscomplete to identify authenticated clients. To switch to normal HTTP authentication, select Disable session authentication instead.
5. When using session authentication, Webmin can be configured to automatically log users out if they have been inactive for more than a certain amount of time. Toenable this, check the Autologout after box and enter a number of minutes into the text field next to it. This feature and the next three are not available when usingHTTP authentication.
6. When Offer to remember login permanently? is checked (as it is by default), the login form will include a check box for permanently remembering the login. Whenselected, the cookie sent to the user's browser will be marked to indicate that it should be saved even if the browser is shut down and rerun later. This is convenientbecause is means that the user will not have to login to Webmin again, but you may consider it a security risk. If so, unchecking this box will remove the rememberoption from the login form.
7. By default the login page includes the hostname from the URL in the message above the username and password fields. To hide it, deselect the Show hostname onlogin screen? box.

10/21/2015 Webmin Configuration Webmin Documentation
http://doxfer.webmin.com/Webmin/Webmin_Configuration 9/19
8. Some people like to have a welcome message shown on the login page the first time a user accesses it, perhaps giving information about the server or tellingunauthorized people to go away. To enable this on your system, first create an HTML page containing the message that you want to appear. Then select *Show prelogin file* and enter the full path to the HTML file in the text field. After a user reads it he must reload or revisit the page (perhaps by following a link in the pageitself) to force the real login form to appear.
9. Webmin can automatically authenticate connections from localhost by determining which Unix user is making the connection, and checking to see if a Webmin userof the same name exists. To enable this, select *Allow login without password for matching users from localhost*. If you run a browser as root on the same system asWebmin runs on and have a Webmin user called root, this feature allows you to access the URL http://localhost:10000/ and be logged in without needing to enter ausername and password. It is convenient, but potentially insecure if an attacker can trick a program (such as Squid) into connecting to that URL, which would grantaccess to Webmin as the user that the program runs as. For this reason, *Always require username and password* is selected by default.
10. When the Unix authentication option is selected for a user in the Webmin users module, his password can be checked by using PAM or by reading the Unixpassword file directly. If the Use PAM for Unix authentication, if available option is selected and the Authen::PAM Perl module installed, Webmin will attempt touse PAM to validate the user. However, on Linux this will only work if the /etc/pam.d/webmin service file is set up correctly. This file is included in the RPMpackage of Webmin though. If your operating system does not support PAM, if the Perl module is not installed or if the *Never use PAM for Unix authentication*option is selected, Webmin will fall back to directly reading the password file. This is more reliable, but will not prevent the use of passwords that are marked asexpired. The *read users and passwords from file* fields specify the file to get passwords from and the columns to use for the username and password, but shouldrarely need to be changed as they are set by default to match your operating system. Because Webmin will use PAM where it can or read the appropriate password fileif PAM is not available, the fields covered in this step should not need to be changed.
11. The External squidstyle authentication program field can be used to enter the full path and parameters to a program that validates passwords. If it is filled in, theoption *External authentication program* will appear in the Password menu for a user in the Webmin Users module, indicating that the user's password should bechecked using this command. The program must behave exactly like a Squid's external authenticator, covered in the Setting up proxy authentication section of ofSquid Proxy Server.
12. Finally, hit Save at the bottom of the form to activate the new authentication settings for subsequent logins.
Edit Categories
Every Webmin module has a category that controls where it appears on the module's main menu. You can create your own categories and move modules from their defaultlocations into your own or existing categories, which can be useful if you don't like the default arrangement, or want to put everything into one huge category.
To create new categories or rename existing ones, follow these steps:
1. Click on Edit Categories on the module's main page to display the category editing page.2. To add a category, scroll down to the bottom of form. In the first empty field under ID enter a unique internal name for your new category, such as stuff. Then in the
field next to it under Displayed description enter the name that will appear in Webmin, such as Thirdparty. Existing categories that you have added can be edited bychanging the fields in this section as well. However, you should not change the entries in the ID column, as they are used internally to associate modules withcategories. The ID is never visible to users anyway only the displayed description is.
3. To change the name of one of the default categories displayed at the top of the form, select the second radio button next to it and entering a new description into thetext box to the right. If Default is chosen, the standard name determined by the current language will be used.
4. Hit the Save Categories button at the bottom of the form to activate the new categories. You can now move modules into any that you have created.
Edit Categories
Reassign Modules
To change the categories that modules appear in, do the following:
1. Click on the Reassign Modules icon on the main page.2. The page that appears lists every installed Webmin module and the category it is currently in. For each module that you want to move, select a new category from the
menu next to its name.3. Click on the Change Categories button at the bottom of the page to move the modules.

10/21/2015 Webmin Configuration Webmin Documentation
http://doxfer.webmin.com/Webmin/Webmin_Configuration 10/19

10/21/2015 Webmin Configuration Webmin Documentation
http://doxfer.webmin.com/Webmin/Webmin_Configuration 11/19
Reassign Modules
Module Titles
If you dont't like the the titles available (bacause they are too long or find them misleading) you may alter them at wish:
Module Titles
Webmin Themes
A theme is an extension to Webmin (much like a module) that controls how its interface appears. The currently active theme determines if and how the categories at the topof each page are displayed, what page background is used, what icons each module has, how titles appear and how each page ends. By changing themes you cansignificantly change the look of Webmin without effecting its functionality. Several themes are included by default, and you can install more that have been written by otherdevelopers.
Like the language, you can set the theme for all logins in this module, or override it for a specific user in the Webmin Users module. The steps to change the theme foreveryone are :
1. Click on the Webmin Themes icon on the module's main page. This will take you to a page for changing themes, installing a new theme and deleting existing ones.2. Select the theme to use from the Current theme menu. Those included as standard with Webmin are : *Old Webmin Theme *The very simple theme that the first
versions of Webmin used before theming was added. If you find the default too slow, this may be a better alternative as it uses less images. *Caldera Theme *Animproved layout that uses frames to place categories and module icons at the top, and actual forms and pages down the bottom. *MSC.Linux Theme *The currentdefault Webmin theme. *MSC.Linux Mini Theme *A modified version of the default theme, designed for use on smallscreen devices such as PDAs.
3. Hit the Change button to activate the chosen theme.
New themes developed by other people can also be added to Webmin, and several are available for download from www.webmin.com/third.html.
To install a theme, follow these steps :
1. Click on the Webmin Themes icon on the module's main page.2. Select the theme's file using the second form. Just as when installing a module, you can choose to install a theme from a file on the system running Webmin, the PC
your browser is on, or an HTTP or FTP URL.3. Hit the Install Theme button to have it downloaded (if necessary) and installed.
The final thing that you can do on this page in delete one of the installed themes. The Old Webmin Theme cannot be deleted as it is built into the program, and the otherstandard themes should not be as they will be added again if you upgrade to the next version. To delete a theme that you have installed, follow these instructions:
1. Click on the Webmin Themes icon on the module's main page.2. Select the one to remove from the Theme to delete menu at the bottom of the page. If that menu does not appear it means that all installed themes are in use either by
an individual user or for everyone.3. Hit the Delete button to bring up a confirmation page asking if really want to go ahead.4. Click on Delete again to remove the theme.
Trusted Referrers
One danger when using a webbased administration interface like Webmin is that a link from another website may point to a program on your Webmin server. For example,a malicious site could include HTML code like :
<a href="http://localhost:10000/proc/run.cgi?cmd=rm+*">click me</a>
Clicking on this harmlesslooking link would cause Webmin's Running Processes module to run a command that deletes files on your system! Assuming that you havealready logged into Webmin, no password would be required. Worse still, a similar URL could be used in an <img> tag for an image, which is fetched automatically byyour browser as soon as you open a page that seems innocuous.
10/21/2015 Webmin Configuration Webmin Documentation
http://doxfer.webmin.com/Webmin/Webmin_Configuration 12/19
Fortunately, there is a solution most browsers send the full URL of the page that a link came from in their HTTP requests. By default, Webmin compares the hostname inthis URL with the one used to access the current page, and displays a warning if they do not match. This blocks links from other web sites to your Webmin server, exceptfor those that do not specify a program, such as http://localhost:10000/cron/, and are thus harmless.
Sometimes though you will want to allow such links, such as from an internal Intranet webserver that you maintain and trust. For this reason Webmin can be configured toallow links where the referrer is from a list of trusted hosts. These steps explain how :
1. Click on the Trusted Referers icon on the module's main page.2. To turn off referrer checking entirely (which is not a good idea), change the Referer checking enabled? field to No.3. To allow links from certain hosts, fill in the Trusted websites field with a list of hostnames, such intranet.example.com.4. In some cases the browser will not provide any referrer information at all, possibly because it does not support that HTTP feature. When the Trust links from
unknown referers box is checked, Webmin will allow requests in this case. If you are paranoid and know that your browser always does supply referrer information,turn this option off.
5. Hit the Save button to activate the settings.
Webmin does not simply deny links from untrusted sites. Instead, it displays a warning and gives the user a chance to continue with the link. This warning form contains acheckbox labeled *Don't show this warning in future*, which if selected effectively changes the Referer checking enabled? field to No.
Anonymous Module Access
It is possible to set up certain Webmin modules so that they can only be used to view information, or to execute harmless commands. For example, the System and ServerStatus module's access control features can be set to give a user readonly access, letting them see which monitors are up and which are down. Or the Custom Commandsmodule can be configured for some user to let him only run commands that display information.
The anonymous access feature of this module lets you grant access to certain modules to clients without them needing to login at all. Such clients will be treated as aspecified Webmin user, and thus have only the rights that you grant to that user. However, they will never need to supply its username and password when accessingallowed modules on your system. This can be useful for making certain information (such as the server status display) available to everyone on your network, withoutneeding to tell them a username and password. However, it should be used with extreme care, as granting anonymous access as a powerful user could compromise yourentire system.
To set up unauthenticated access to some modules, follow these steps :
1. First, use the Webmin Users module to create a user, called anonymous for example, who has the modules and access control settings that you want to give tounauthenticated clients. Its password can be set to No login allowed, as this user will never login conventionally. The user should be given the Old Webmin Theme,to minimize the number of image directories that you will need to allow access to later.
2. Then in the Webmin Configuration module, click on the *Anonymous Module Access* icon.3. The form that appears contains a table with two columns, and initially two empty rows. Each row specifies a URL path on your server to allow unauthenticated
access to, and a Webmin user* that requests to that path should be treated as. In the first row enter /images for the path and anonymous for the user, so that thedirectory containing Webmin's title images can be accessed by unauthenticated clients. In the second row enter the path for the module that you want to allow (such as/status), and anonymous as the user again. Never enter a path of /, as it will allow unauthorized access to your entire Webmin server! The path to a specific CGIprogram (such as /custom/run.cgi) may make sense in some cases.
4. Hit the Save button to turn on anonymous access. If you want to allow more that two URL paths, click on the icon again so that the table is redisplayed with twomore empty rows.
If a user who has already logged visits a module that has been allowed anonymous access with the steps above, Webmin will still identify him correctly as the loggedinuser.
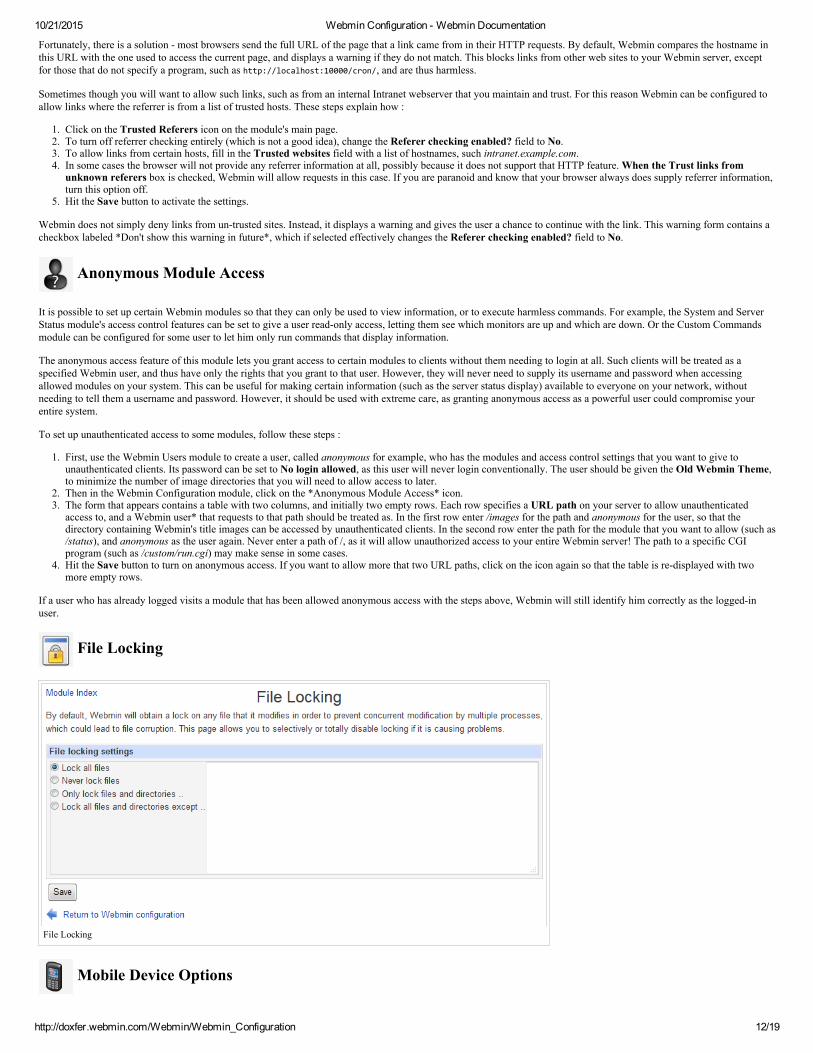
File Locking
File Locking
Mobile Device Options

10/21/2015 Webmin Configuration Webmin Documentation
http://doxfer.webmin.com/Webmin/Webmin_Configuration 13/19
Mobile Device Options
Blocked Hosts and Users
Blocked Hosts and Users
Background Status Collection
Background Status Collection
Advanced Options

10/21/2015 Webmin Configuration Webmin Documentation
http://doxfer.webmin.com/Webmin/Webmin_Configuration 14/19
Advanced Options
Debugging Log File
Debugging Log File
Web Server Options

10/21/2015 Webmin Configuration Webmin Documentation
http://doxfer.webmin.com/Webmin/Webmin_Configuration 15/19
Web Server Options
Webmin Scheduled Functions
Webmin Scheduled Functions
Sending Email

10/21/2015 Webmin Configuration Webmin Documentation
http://doxfer.webmin.com/Webmin/Webmin_Configuration 16/19
Sending Email
SSL Encryption
The SSL Encryption page in this module can be used to turn on or off SSL mode or to generate another new key, all of which is explained in Securing Webmin.

10/21/2015 Webmin Configuration Webmin Documentation
http://doxfer.webmin.com/Webmin/Webmin_Configuration 17/19
SSL Encryption main page
Certificate Authority

10/21/2015 Webmin Configuration Webmin Documentation
http://doxfer.webmin.com/Webmin/Webmin_Configuration 18/19
Webmin Certificate Authority
As the Webmin Users page explains, the Webmin Users module can be used to request a clientside SSL certificate for a user. However, before this is possible you must setup your system as a certificate authority, or CA. An authority is basically just an SSL certificate that can be used to sign other newly issued client certificates, and to verifythat those supplied by clients come from this CA.
Because client SSL authentication can only be used in SSL mode, Webmin must be running in that mode and thus have the openssl command installed before you canprecede. Once these requirements have been satisfied, follow these steps to set up a CA:
1. Click on the Certificate Authority icon on the module's main page to bring up a form for entering the new CAs details.2. In the Authority name field enter the name of the person issuing certificates, such as Network administrator.3. In the Email address field enter the address of the administrator for this server, such as [email protected]. In the Department field enter the subdivision of your organization that the server is in, such as Accounting. This can be left blank if it makes no sense, such as for a
home server.5. In the Organization field enter the name of your company or organization, such as Foo Corporation. Again, this may not make sense in all cases and so can be left
blank.6. Fill in the State field with the name of the state your server is in, such as California.7. Fill in the Country code field with the twoletter uppercase code for your country, such as AU.8. Click on the Setup certificate authority button to generate the CA certificate and configure Webmin to use it. If you have done this before, any existing certificate
will be overwritten.9. Webmin users can now generate personal certificates using the Webmin Users module. Unfortunately, the web server will request that all clients supply a certificate
as soon as one user has one, which can cause annoying dialog boxes to appear to people who are still username and password authentication in some older browsers.
To stop using a CA for validating clients altogether, hit the Shutdown certificate authority button on the same page. All users will be forced to revert to username andpassword authentication instead.
Retrieved from "http://doxfer.webmin.com/mediawiki/index.php?title=Webmin_Configuration&oldid=4086"

10/21/2015 Webmin Configuration Webmin Documentation
http://doxfer.webmin.com/Webmin/Webmin_Configuration 19/19
Category: Webmin
This page was last modified on 22 June 2015, at 01:09.This page has been accessed 73,308 times.
Related Documents