Wear It Right The PAPR (3M Air-Mate®) Respirator Warning This respirator helps protect against certain particulate contaminants but does not eliminate exposure to, or risk of contracting disease or infection. Misuse may result in illness. Conduct a pre-use inspection by examining all parts of the PAPR for potential damage – breathing tube, hood, air filter unit, and air flow indicator. Connect breathing tube to air filter unit by pushing the end of the tube that contains metal clips into the hole in the air filter unit. Twist the tube to secure it to the air filter unit. Turn the unit ON by pressing the black plastic button located on the upper right- hand side of the air filter unit (this same button is pressed to turn the unit off). Each PAPR air unit comes with a bullet-shaped pressure check device. Place your thumb and index finger around the slots at the end of the tube so that you force the air through the top of the tube (and prevent air from leaking out the slots themselves). While holding the tube upright, place the pressure check device in the breathing tube. The device should “float” the indicator lines above the end of the tube if the air pressure is adequate. (If it does not, do NOT use the air filter unit. Remove the unit from service and contact SMS at 4-4427.) After the pressure check is complete, remove the pressure check device and turn the unit OFF. Insert the slotted end of the breathing tube into the hole in the back of the hood. Push the tube until it snaps into place. One end of the breathing tube is now connected to the hood; the other end is connected to the air unit. Remove the protective paper from the front of the hood. (Note: Hoods can be reused after cleaning with Virex.) Place the air filter unit (with the breathing tube on top) against your lower back along your spinal column. Holding it in place, fasten the belt buckle and ensure the unit rests comfortably and securely against your lower back (adjust belt buckle to tighten or loosen). Pull the hood over your head so that the face shield covers your entire face and the bottom elastic comes below your chin. The elastic band around the sides of your head should not cover your ears. The hood should loosely cover your head – if it is too small or too loose, try using a different size (2 sizes are available) Turn air filter unit on by pressing the black plastic button on the back of the unit. You will feel air movement inside the hood. Remember: You MUST plug the air filter unit back into the re-charger after use so that it is ready for the next user. indicator lines should float above the end of the tube if there is adequate pressure Do not charge for more than 30 consecutive days. Refer to Exhibit B of the UMHHC Respirator Protection Policy (05- 01-003) for proper charging guidelines. Safety Mgt Services 764-4427

Welcome message from author
This document is posted to help you gain knowledge. Please leave a comment to let me know what you think about it! Share it to your friends and learn new things together.
Transcript
Wear It Right The PAPR (3M Air-Mate®) Respirator
Warning This respirator helps protect against certain particulate contaminants but
does not eliminate exposure to, or risk of contracting disease or infection.
Misuse may result in illness.
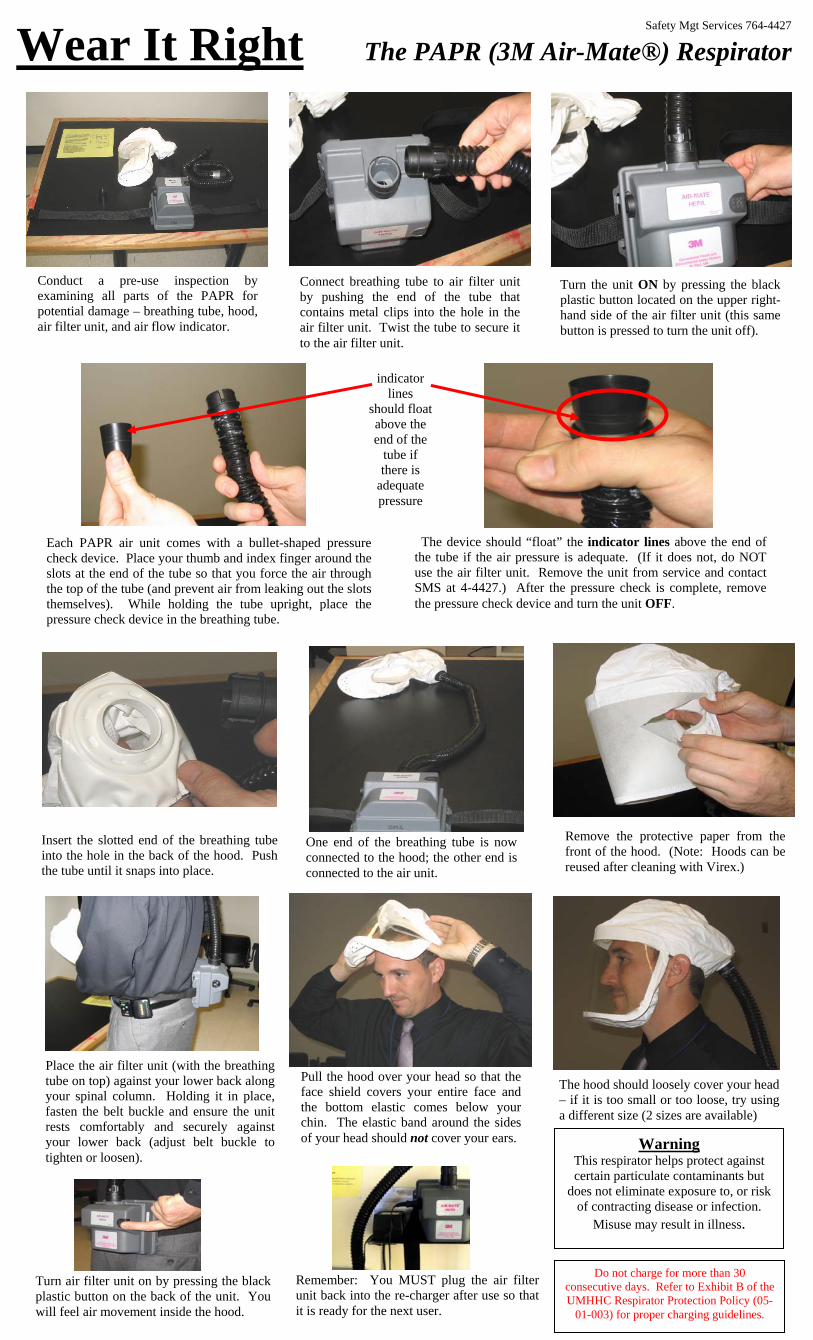
Conduct a pre-use inspection by examining all parts of the PAPR for potential damage – breathing tube, hood, air filter unit, and air flow indicator.
Connect breathing tube to air filter unit by pushing the end of the tube that contains metal clips into the hole in the air filter unit. Twist the tube to secure it to the air filter unit.
Turn the unit ON by pressing the black plastic button located on the upper right-hand side of the air filter unit (this same button is pressed to turn the unit off).
Each PAPR air unit comes with a bullet-shaped pressure check device. Place your thumb and index finger around the slots at the end of the tube so that you force the air through the top of the tube (and prevent air from leaking out the slots themselves). While holding the tube upright, place the pressure check device in the breathing tube.
The device should “float” the indicator lines above the end of the tube if the air pressure is adequate. (If it does not, do NOT use the air filter unit. Remove the unit from service and contact SMS at 4-4427.) After the pressure check is complete, remove the pressure check device and turn the unit OFF.
Insert the slotted end of the breathing tube into the hole in the back of the hood. Push the tube until it snaps into place.
One end of the breathing tube is now connected to the hood; the other end is connected to the air unit.
Remove the protective paper from the front of the hood. (Note: Hoods can be reused after cleaning with Virex.)
Place the air filter unit (with the breathing tube on top) against your lower back along your spinal column. Holding it in place, fasten the belt buckle and ensure the unit rests comfortably and securely against your lower back (adjust belt buckle to tighten or loosen).
Pull the hood over your head so that the face shield covers your entire face and the bottom elastic comes below your chin. The elastic band around the sides of your head should not cover your ears.
The hood should loosely cover your head – if it is too small or too loose, try using a different size (2 sizes are available)
Turn air filter unit on by pressing the black plastic button on the back of the unit. You will feel air movement inside the hood.
Remember: You MUST plug the air filter unit back into the re-charger after use so that it is ready for the next user.
indicator lines
should float above the end of the
tube if there is
adequate pressure
Do not charge for more than 30 consecutive days. Refer to Exhibit B of the UMHHC Respirator Protection Policy (05-
01-003) for proper charging guidelines.
Safety Mgt Services 764-4427
Related Documents