Web Design & Development Lecture- 06 Applying CSS & JavaScript in HTML Hamid Hussain Awan

WDD-Lecture06
Dec 13, 2015
Applying CSS & JavaScript in HTML
Welcome message from author
This document is posted to help you gain knowledge. Please leave a comment to let me know what you think about it! Share it to your friends and learn new things together.
Transcript

Web Design & Development
Lecture- 06 Applying CSS & JavaScript in HTMLHamid Hussain Awan

The following slides contain some scripts that you must practise to get well proficiency in CSS.
You should find images and copy in respective paths where required
Afterwards, we’ll look into selectors and then changing styles using JavaScript
CSS Practice

In-line◦In-line styles are added straight into the HTML tags using the style attribute. They look something like this: <p style="color: red">text</p>
◦This will make that specific paragraph red.
Applying CSS

Internal◦ Embedded, or internal, styles are used for the
whole page. Inside the head element, the style tags surround all of the styles for the page. <!DOCTYPE html> <html>
<head> <title>CSS Example</title> <style> p { color: red; } a { color: blue; } </style> </head>
Applying CSS (2)

<body> <h1>CSS Intro</h1> <p>This is a styled paragraph</p> <a href="www.google.com">Go to Google</a>
</body> </html>
Applying CSS (3)

External◦ Linked or external style sheets are useful when
same styles are to be applied consistently across the website.
◦ The <link> tag is used (usually) inside the <head> tag to link external style sheet to the html elements.
◦ <head> <link href=“<dtylesheetfilename>” rel="stylesheet"
type="text/css" />◦ </head>
Applying CSS (4)

<html> <!– Save as InternalCSS.html -->◦ <head>◦ <title>CSS Lab</title>◦ <style>◦ /*Selectors*/◦ body {◦ background-color: #d0e4fe;◦ }
◦ h1 {◦ color: orange;◦ text-align: center;◦ }◦ p {◦ font-family: "Times New Roman";◦ font-size: 20px;◦ }
Internal CSS Demo

div { font-family: Verdana; font-size:30px; /*background-image:url('images/14mb.jpg');*/ background-image:url('http://crispme.com/wp-
content/uploads/8314.jpg?pass'); height:400px; width:100%; color:white; } table { margin: 0 auto; text-align: right; background-color: #ff00ff; } a:hover { color:white; background-
color:black; } a:visited { color:blue; background-
color:white; } </style> </head>
Internal CSS Demo (2)

<body> <h1>Internal CSS Tutorial</h1> <div>Div Style applied on this div <h2>Table inside div</h2> <table> <tr> <th>Sr. No.</th><th>Bame</th> </tr> <tr> <td>1</td><td>Ali</td> </tr> <tr> <td>2</td><td>Shahid</td> </tr> </table> </div>
Internal CSS Demo (3)

<p> Now, look at this paragraph. You'll find
it easy to work with CSS and HTML. <br /> <a
href="http://www.google.com">Visit Google</a>.
<br /> <a href="http://www.yahoo.com">Visit
Yahoo</a>. </p> </body> </html>
Internal CSS Demo (4)

Internal CSS Demo (5)

Internal CSS Demo (6)

Copy the entire markup inside the style element.
Create a new file and paste the copied text in the file.
Save the file as styles/stylesheet.css Delete the <style> and </style> tags. Save the “InternalCSS.html” file as
ExternalCSS.html Delete the style element from
ExternalCSS.html Your page must like the following:
External CSS Demo

External CSS Demo (2)

Edit the ExternalCSS.html Change the contents according to the
following:
External CSS Demo (3)

<html xmlns="http://www.w3.org/1999/xhtml"> <head> <title>CSS Lab</title> <link href="styles/StyleSheet.css" rel="stylesheet" type="text/css" /> </head> <body> <h1>External CSS Tutorial</h1> <div>Div Style applied on this div <h2>Table inside div</h2> <table> <tr> <th>Sr. No.</th><th>Bame</th> </tr> <tr> <td>1</td><td>Ali</td> </tr> <tr> <td>2</td><td>Shahid</td> </tr> </table>
External CSS Demo (4)

</div> <p> Now, look at this paragraph. You'll find it easy to
work with CSS and HTML. <br /> <a href="http://www.google.com">Visit
Google</a>. <br /> <a href="http://www.yahoo.com">Visit Yahoo</a>. </p> </body> </html>
External CSS Demo (5)

Output of the page must look the same as that of InternalCSS.html w.r.t styles
External CSS Demo (6)

Now create another CSS file and save it as styles/StyleSheet2.css
Write the following styles in the new CSS:
/*Element Selectors*/ body { background-color: #f0f0f0; } h1 { color: blue; text-align: center; }
p { font-family: Arial; font-size: 15px; }
External CSS Demo (7)

div { font-family: Verdana; font-size:30px; /*background-image:url('images/14mb.jpg');*/
background-image:url('http://crispme.com/wp-content/uploads/8315.jpg?pass');
height:400px; width:100%; color:black; } table { margin: auto auto; text-align: right; background-color: #00f00f; } a:hover { color:cyan; background-color:blue; } a:visited { color:white; background-color:blue; }
External CSS Demo (8)

External CSS Demo (9)

CSS Selectors

Element Style Selectors◦ Applied to element types
Class Selectors◦ Applied to elements who have the Class attribute value set to
the selector name Element ID Selectors
◦ Applied to a specific element having ID attribute value set to selector name.
Note that:Element selectors are given names/titles according to predefined HTML elementsClass selectors can have any name preceded by a period symbol e.g. .mystyleID selectors are titled as ID of the element to which to apply the style preseeded by a # symbol e.g. #content
CSS Selectors

<!—ExternalCSS2.html --> <!DOCTYPE html> <html xmlns="http://www.w3.org/1999/xhtml"> <head> <title>CSS Lab</title> <link href="styles/StyleSheet3.css" rel="stylesheet" type="text/css" /> </head> <body> <h1 class="header">External CSS Tutorial (Selectors)</h1> <div id="content">No style applied to this div <h2>Table inside div</h2> <table class="mytable"> <tr class="row“> <th>Sr. No.</th><th>Name</th> </tr> <tr> <td class="cell">1</td><td class="cell">Ali</td> </tr> <tr> <td>2</td><td>Shahid</td> </tr> </table> </div>
CSS Selectors Demo (1)

◦ <p>◦ Now, look at this paragraph. You'll find it easy to work with
CSS and HTML.◦ <br />◦ <a href="http://www.google.com">Visit Google</a>.◦ <br />◦ <a href="http://www.yahoo.com">Visit Yahoo</a>.◦ </p>◦ <div class="redDiv">◦ This is red div◦ </div>◦ <div class="blueDiv">This is blue div</div>◦ <input type="text" id="name" value="Aslam" />◦ </body>◦ </html>
CSS Selector Demo (2)

/*styles/StyleSheet3.css*/ /*Element selectors*/ body { font-family: Arial; font-size: 12px; font-weight: bold; background-color: #660066; color: #00FFFF; } h2 { font-size: large; font-weight: bold; color: #0000FF; }
CSS Selectors Demo (3)

/*Class selectors*/ .header { font-family:'MS Reference Sans
Serif'; font-size:20px; color:white; background-color:#ff00ff; }
div.redDiv { background-color:#ff0000; } div.blueDiv { background-color:#0000ff; } p.mystyle {font-size:10px; font-
family:Sylfaen;} table.mytable { border-color: white; border-
width: medium; color:yellow;} tr.row { border-bottom: 2px; background-
color: black; } td.cell {border-right-width: 2px; }
CSS Selectors Demo (4)

/*Element IDs selectors*/ #content { margin:5px; background-color:green; color:black; } input#name { background-color:yellow; color:blue; }
CSS Selectors Demo (5)

Output of ExternalCSS.html
CSS Selectors Demo (6)

Every element has a default display value depending on what type of element it is
The default for most elements is usually block or inline
A block element is often called a block-level element. An inline element is always just called an inline element.
Style.Display Property (1)

Block-level elements◦ div is the standard block-level element◦ A block-level element starts on a new line and stretches
out to the left and right as far as it can◦ Other common block-level elements are p and form, and
new in HTML5 are header, footer, section and more Inline
◦ span is the standard inline element◦ An inline element can wrap some text inside a paragraph
without disrupting the flow of that paragraph◦ The a element is the most common inline element, since
you use them for links.
Style.Display Property (2)

None◦ It is commonly used with JavaScript to hide and/or
show elements without really deleting and recreating them
Style.Display Property (3)

Visible◦ This value of the visibility property makes the element visible on the
page Hidden
◦ This value hides the element on the page without changing the layout of the page. This means the element is hidden but it takes up the place
Collapse◦ Only for table elements◦ Collapse removes a row or column, but it does not affect the table
layout◦ The space taken up by the row or column will be available for other
content◦ If collapse is used on other elements, it renders as "hidden“◦ IE8 and earlier support visibility:collapse only if a !DOCTYPE is
specified
Style.Visibility Property (1)

<!DOCTYPE html> <html> <head> <style> table, td { border: 1px solid black;} tr.collapse { visibility:collapse; } </style> </head> <body> <table> <tr> <td>Peter</td> <td>Griffin</td> </tr> <tr class="collapse“> <td>Lois</td> <td>Griffin</td> </tr> <tr> <td>P3</td> <td>G3/td> </tr> </table> </body> </html>
Style.Visibility Property (2)

Hidden lets element takes up the space and is applicable to any rendered HTML element
Collapse doesn’t let element to take place and is applicable to only table elements
Hidden vs Collapse

Initially, they look synonyms, are they??? They are not synonyms.
display:none removes the element from the normal flow of the page, allowing other elements to fill invisibility:hidden leaves the element in the normal flow of the page such that is still occupies space
Display.none vs visibility.hidden

JavaScripting styles

<!DOCTYPE html> <html xmlns="http://www.w3.org/1999/xhtml"> <head> <title>Changing styles of elements with JavaScript</title></head> <body onload="addcolors('divcolorselect');"> <form id="form1"> This text is before div1 element. <div id="div"> This text is inside div1 element. Change div color to:<select id="divcolorselect" onchange="changeColor('div');"></select> </div> <input type="button" onclick="changeColor();" value="change body color" /> <br /> Div display: <input type="radio" name="divdisplay" id="divdisplayblock" value="block" checked="checked" />Block <input type="radio" name="divdisplay" id="divdisplayinline" value="inline" />Inline <input type="radio" name="divdisplay" id="divdisplayinline-block" value="inline" />Inline-Block <input type="radio" name="divdisplay" id="divdisplaynone" value="none" />None <input type="button" onclick="changeDivDisplay('div');" value="Change Div Display" /> <br /> Visibility of div: <input type="radio" name="divvisibility" id="divvisibilityvisible" checked="checked" value="visible"
/>Visible <input type="radio" name="divvisibility" id="divvisibilityhidden" value="hidden" />Hidden <input type="button" onclick="changeDivVisibility('div');" value="Change Visibility" /> </form> </body> </html>
Applying Styles with JS (1)

Create a new file and save it as scripts/myscript.js
Applying Styles with JS (2)

function addcolors(ddl) { var select = document.getElementById(ddl); var option; option = document.createElement('option'); option.text = 'green'; option.value = 'green'; select.add(option); option = document.createElement('option'); option.text = 'white'; option.value = option.text; option.selected = 'selected'; select.add(option);
option = document.createElement('option'); option.text = 'orange'; option.value = option.text; select.add(option); }
mystyle.js (1)

function changeColor(id) { var color; if (id) { var select = document.getElementById('divcolorselect'); color = select.value; document.getElementById(id).style.backgroundColor = color; } else { var body = document.getElementsByTagName('body')[0]; var color = body.style.backgroundColor; if (color.toUpperCase() == 'CYAN') { body.style.backgroundColor = 'seagreen'; } else { body.style.backgroundColor = 'cyan'; } } }
mystyle.js (2)

function changeDivDisplay(divId) { var div = document.getElementById(divId); var divDisplay = document.getElementsByName('divdisplay'); var len = divDisplay.length; //Number of elements in the
divDisplay for (var i = 0; i < len; i++) { if (divDisplay[i].checked == true) { div.style.display = divDisplay[i].value; }//if(divDisplay[i].checked }//for var i=0; }//function changeDivDisplay()
mystyle.js (3)

function changeDivVisibility(divId) { var div = document.getElementById(divId); var divVisibility =
document.getElementsByName('divvisibility'); var len = divVisibility.length; //Number of
elements in the divVisibility for (var i = 0; i < len; i++) { if (divVisibility[i].checked == true) { div.style.visibility = divVisibility[i].value; }//if }//for }//function changeDivVisibility
mystyle.js (4)

<head> <title>Changing styles of elements with
JavaScript</title> <script src="scripts/myscript.js"></script> </head>
Modify HTML file
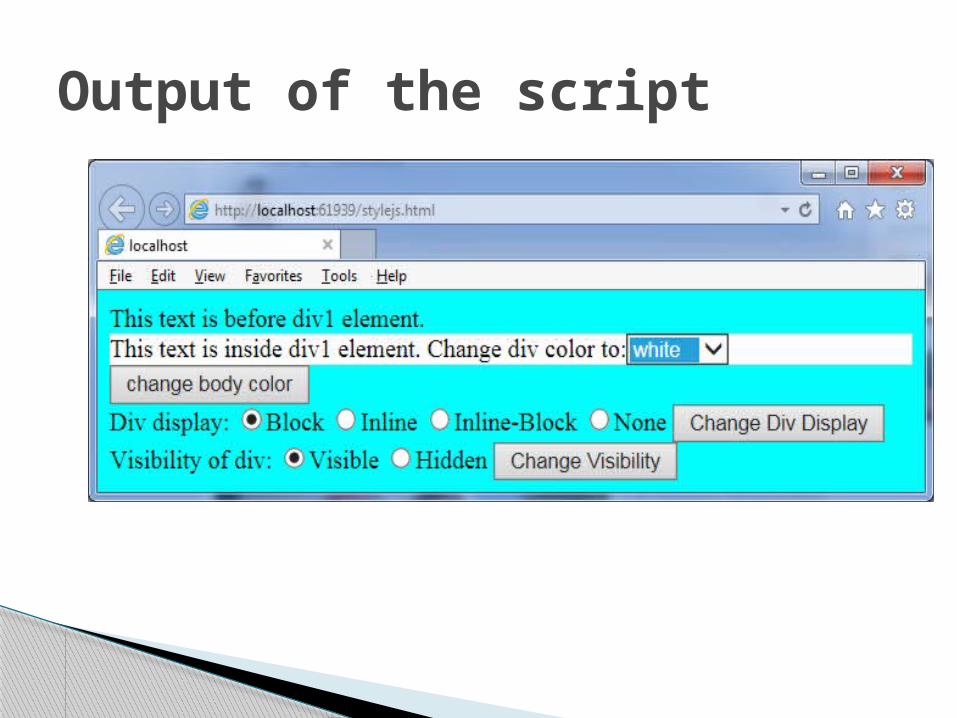
Output of the script

All students aer directed to make sure that they have installed following tools/software as soon as possible:◦ Microsoft Visual Studio 2012/2013 including Visual
Basic .Net and Visual Web Developer In our next class, we’ll be exploring Visual
Studio Environment and some basics of Server-Side development.
Announcement
Related Documents


![Or Lecture06[1]](https://static.cupdf.com/doc/110x72/55cf94a9550346f57ba38ed6/or-lecture061.jpg)


