- 1 - INTERNATIONAL LABOUR ORGANIZATION WCMS Contributor’s Handbook Version 3.2 18/09/2013 The WCMS Contributor’s Handbook has been written to act as a guide to for those who are contributing content for the ILO’s CMS based websites. For further help, the contributor should contact the Web team at ILO HQ, Geneva or send an email to : [email protected]

Welcome message from author
This document is posted to help you gain knowledge. Please leave a comment to let me know what you think about it! Share it to your friends and learn new things together.
Transcript

- 1 -
INTERNATIONAL LABOUR ORGANIZATION
WCMS Contributor’s Handbook
Version 3.2 18/09/2013
The WCMS Contributor’s Handbook has been written to act as a guide to for those who are contributing content for the ILO’s CMS based websites. For further help, the contributor should contact the Web team at ILO HQ, Geneva or send an email to : [email protected]

- 2 -
Contents
1 Introduction to the WCMS......................................................................................... 5
2 The WCMS Structure ................................................................................................ 6
2.1 Checking content into UCM’s Content Server 6
2.1.1 CONTENT SERVER................................................................................... 6
2.2 The Browser Interface 8
2.2.1 THE QUICK SEARCH ............................................................................... 8
2.2.2 THE HOME PAGE SEARCH ..................................................................... 8
2.2.3 THE NAVIGATION MENUS .................................................................... 9
2.2.4 UCM TOP NAVIGATION MENU ........................................................... 10
2.2.5 ADVANCED SEARCH ............................................................................ 11
2.2.6 MY PROFILE ............................................................................................ 13
2.3 Glossary of Metadata Fields for Content Check In 14
2.3.1 METADATA (DATA about DATA) ........................................................ 14
2.3.2 KEY INFORMATION – Explanation of Search as a concept .................. 15
2.4 The Metadata fields 16
2.4.1 TYPE (a.k.a. CONTENT TYPE) ............................................................... 16
2.4.2 TITLE ........................................................................................................ 18
2.4.3 AUTHOR ................................................................................................... 18
2.4.4 SECURITY GROUP ................................................................................. 18
2.4.5 ACCOUNT ................................................................................................ 19
2.4.6 PRIMARY FILE ........................................................................................ 19
2.4.7 CONTENT ID ............................................................................................ 19
2.4.8 ALTERNATIVE TITLE ............................................................................ 20
2.4.9 CONTENT SUBTYPE .............................................................................. 20
2.4.10 SHORT DESCRIPTION (BRIEF DESCRIPTION) ............................... 20
2.4.11 LANGUAGE ........................................................................................... 20
2.4.12 REFERENCE ........................................................................................... 22
2.4.13 SUBJECT ................................................................................................. 24
2.4.14 ADDITIONAL SUBJECT KEYWORDS ............................................... 25
2.4.15 ILO LOCAL CLASSIFICATION ........................................................... 25
2.4.16 ABSTRACT ............................................................................................. 25
2.4.17 LIST OF CONTENT UNITS................................................................... 26
2.4.18 REGION .................................................................................................. 26
2.4.19 BEGINNING OF THE PERIOD COVERED, THE END OF THE PERIOD COVERED ............................................................................................. 27
2.4.20 AVAILABLE FROM, AVAILABLE UNTIL ........................................ 27 2.4.21 VALID FROM, VALID UNTIL ............................................................. 27
2.4.22 TARGET AUDIENCE ............................................................................ 27
2.4.23 DATE OF PUBLICATION ..................................................................... 28
2.4.24 DATE OF CREATION............................................................................ 28
2.4.25 CREATOR ............................................................................................... 28
2.4.26 PUBLISHER ............................................................................................ 28
2.4.27 OWNER ................................................................................................... 28
2.4.28 RIGHTS HELD OVER THE RESOURCE ............................................. 28
2.4.29 SCOPE ..................................................................................................... 28
2.4.30 PUBLISH ................................................................................................. 29
2.4.31 FORMAT ................................................................................................. 29

- 3 -
2.4.32 SIZE ......................................................................................................... 29
2.4.33 WEBSITES .............................................................................................. 29
2.4.34 WEBSITE OBJECT TYPE...................................................................... 29
2.4.35 WEBSITE SECTION .............................................................................. 30
2.4.36 DISPLAY PRIMARY FILE .................................................................... 30
2.5 Regulations concerning the types of files being checked into UCM 30
2.5.1 ADOBE PDF FILES .................................................................................. 30
2.5.2 AUDIO FILES ........................................................................................... 30
2.5.3 IMAGES AND PHOTOS .......................................................................... 30
2.5.4 POWERPOINT PRESENTATIONS ......................................................... 31
2.5.5 URLS ......................................................................................................... 31
2.5.6 VIDEO FILES ........................................................................................... 31
2.5.7 WORD DOCUMENTS ............................................................................. 31
2.6 The Check In Similar 31
2.7 My Content Server 32
2.8 Updating Checked in Content inside UCM 33
2.8.1 Checking Out ............................................................................................. 33
2.8.2 Updating Metadata ..................................................................................... 33
2.8.3 Adding Relationships ................................................................................. 34
2.8.4 Version Control .......................................................................................... 37
2.9 Creating Links in WCMS Sites 39
3 Updating Websites Using Contribution’s Mode in Internet Explorer ..................... 40
3.1 Furniture Elements 44
3.2 UCM Contributor’s Row Controls 46
3.3 Item Edit Controls 47
3.4 Hyperlink Wizard 48
3.5 Understanding and using the Word Document Templates 49
4 Explanation of Furniture Elements and their usage ................................................. 50
4.1 Feature Rich 50
4.1.1 Adding Contents to Feature Rich ............................................................... 53
4.1.2 Adding Image to Feature Rich Row .......................................................... 58
4.1.3 Adding Links to Feature Rich Row ........................................................... 58
4.2 Links 64
4.2.1 Steps to Add “LINKS list” on a page ........................................................ 64
4.3 Freeform 79
4.3.1 Freeform Insert Youtube Video ................................................................. 85
4.4 Quote 96
4.5 Image 99
4.5.1 Adding Contents to IMAGES .................................................................. 101
4.6 New Youtube Video Furniture Implementation 105
4.7 Freeform Template for Secondary/Detail Pages 116

- 4 -
4.7.1 Check-in Similar directly from Secondary/Detail page: .......................... 118
4.7.2 Youtube Video Embedding on Secondary page Freeform: ..................... 119
4.7.3 Possibility of offering Excel (xls, xlsx) and Powerpoint (ppt, pptx) files for download. ............................................................................................................. 123
4.7.4 Introduction of headings on secondary pages .......................................... 123
4.7.5 Possibility to pull and reuse content from other sites on your site .......... 124
4.7.6 Allow choice of language for subtitles in the Youtube video template ... 125
4.7.7 Display Image copyrights in secondary page and dynamic lists ............. 127
4.7.8 Possibility to have multiple formats of the same document .................... 128

- 5 -
1 Introduction to the WCMS The Web Content Management System (aka WCMS) is a computer application
used to create, edit, manage and publish content onto a website in an organized
manner. The ILO mainly uses the WCMS for storing, controlling, versioning and
publishing documents, files, images plus other types of Information in various
forms for its websites which are built upon the Oracle UCM architecture.
By using the WCMS, the ILO is able to simplify the task of maintaining websites,
manage content and standardization of content layout.

- 6 -
2 The WCMS Structure 2.1 Checking content into UCM’s Content Server 2.1.1 CONTENT SERVER A Content Server is akin to set of file cabinets which contains files and
documents organized by Name, Subject, Title, Topic, other groupings and
perhaps arranged alphabetically.
The Content Server used by the ILO is part of a system called Oracle UCM.
UCM is the environment for content contribution and management. Its location
and login point is
http://staging.ilo.org/wcmsp1/ (for contributors who already have a website in
Production)
Logging into UCM is simple, simply open the web browser (i.e. Internet Explorer
or Firefox) and enter the above URL into the address field and click ‘Enter’.
The browser should open a page which looks like Figure 1.
Figure 1 UCM login page on browser
- 7 -
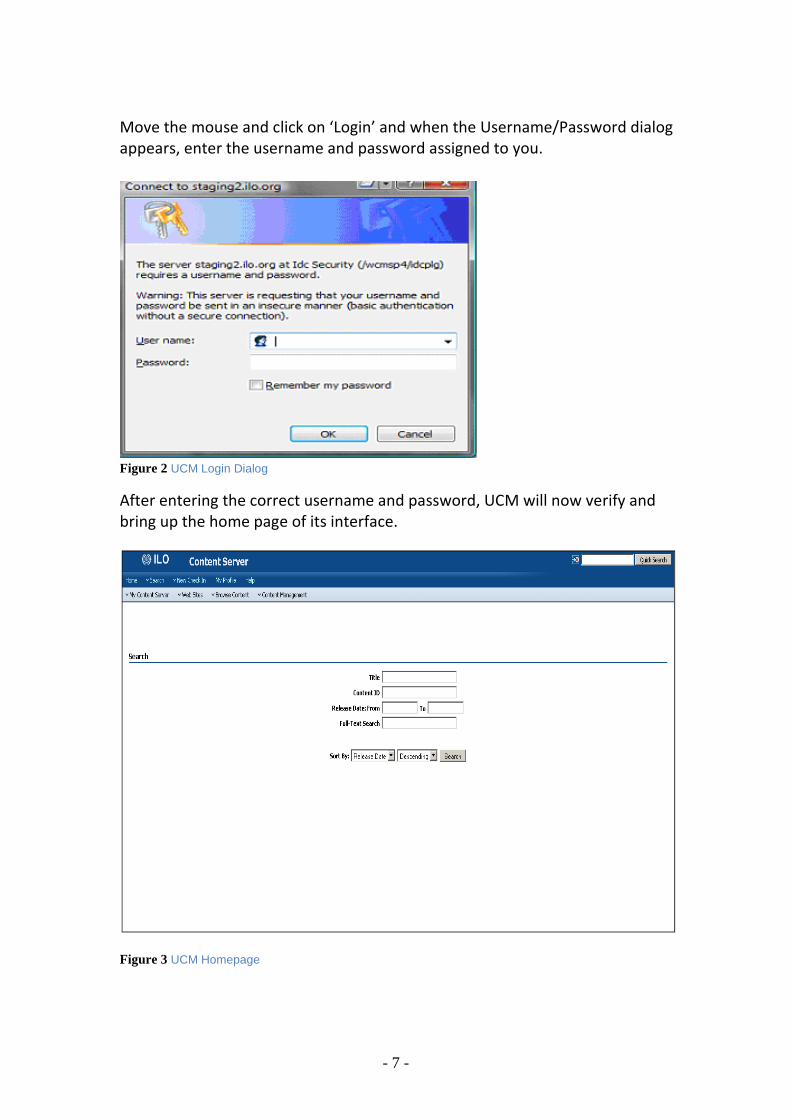
Move the mouse and click on ‘Login’ and when the Username/Password dialog
appears, enter the username and password assigned to you.
Figure 2 UCM Login Dialog
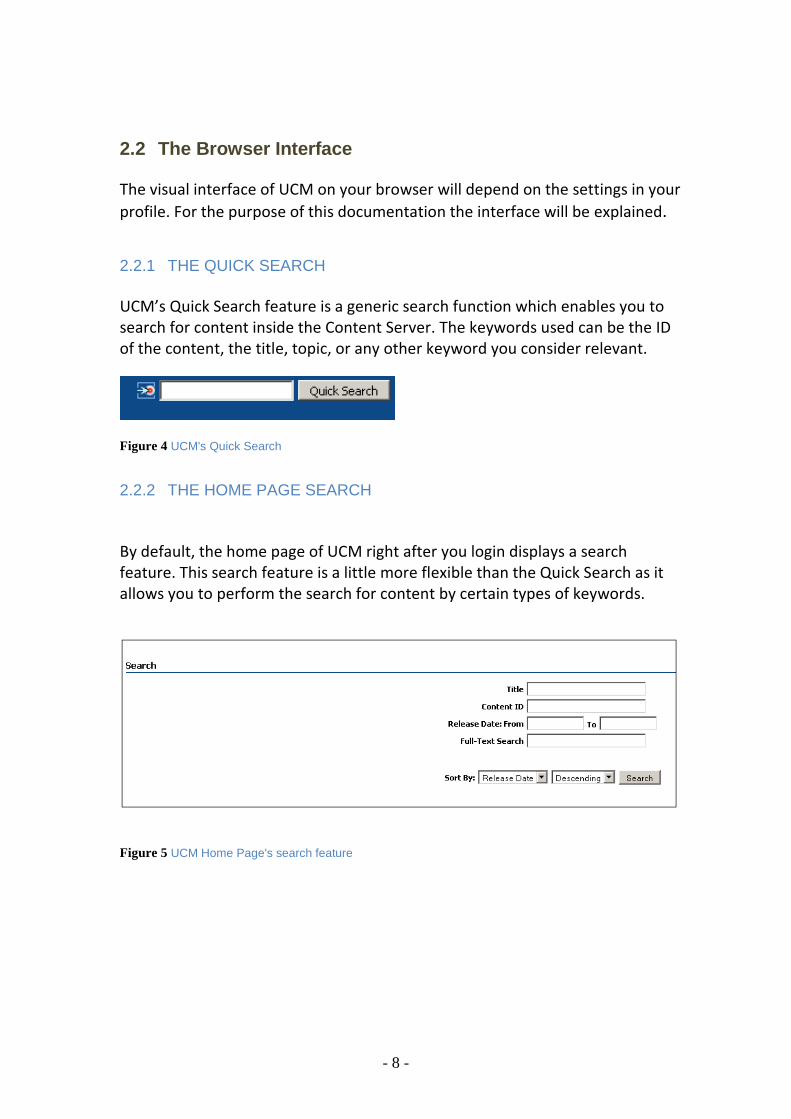
After entering the correct username and password, UCM will now verify and
bring up the home page of its interface.
Figure 3 UCM Homepage
- 8 -
2.2 The Browser Interface The visual interface of UCM on your browser will depend on the settings in your
profile. For the purpose of this documentation the interface will be explained.
2.2.1 THE QUICK SEARCH UCM’s Quick Search feature is a generic search function which enables you to
search for content inside the Content Server. The keywords used can be the ID
of the content, the title, topic, or any other keyword you consider relevant.
Figure 4 UCM's Quick Search 2.2.2 THE HOME PAGE SEARCH By default, the home page of UCM right after you login displays a search
feature. This search feature is a little more flexible than the Quick Search as it
allows you to perform the search for content by certain types of keywords.
Figure 5 UCM Home Page's search feature

- 9 -
2.2.3 THE NAVIGATION MENUS The Navigation Menus on UCM are
Figure 6 UCM's Menu
• Home
o Clicking on this will take you back to the Home Page of UCM
• Search
o Clicking here will take you to a more advanced search feature. You
can also search for particular type of contents. The Advanced
Search will be explained later
• New Check In
o This will allow you to check in new documents. You can select
which type of document you want to check in or you can go for
the standard check in.
• My Profile
o This will allow you to modify your user information such as Full
Name, password, UCM’s display skins.
• Help

- 10 -
2.2.4 UCM TOP NAVIGATION MENU The UCM menu can be aligned on the left side or top depending on you profile
settings. Navigation Menu of UCM gives you a tree structure of what is
available to you in UCM. What is listed in this navigation menu will depend on
your access rights.
Figure 7 UCM TOP Navigation Menu
• My Content Server (My UCM)
o This tree contains items related to your profile and custom saved
features in UCM such as searches you have saved, content you
have checked out, etc
o It also contains standard templates you can use to check in
content which you can use
• Web Sites
o This item displays the list of Websites which are inside the UCM
• Browse Content
o Allows you to browse the folders inside UCM database
• Content Management
o Displays ways to manage content being worked on
• Administration
o Allows you to do the Administration tasks which include managing
websites, managing users etc.

- 11 -
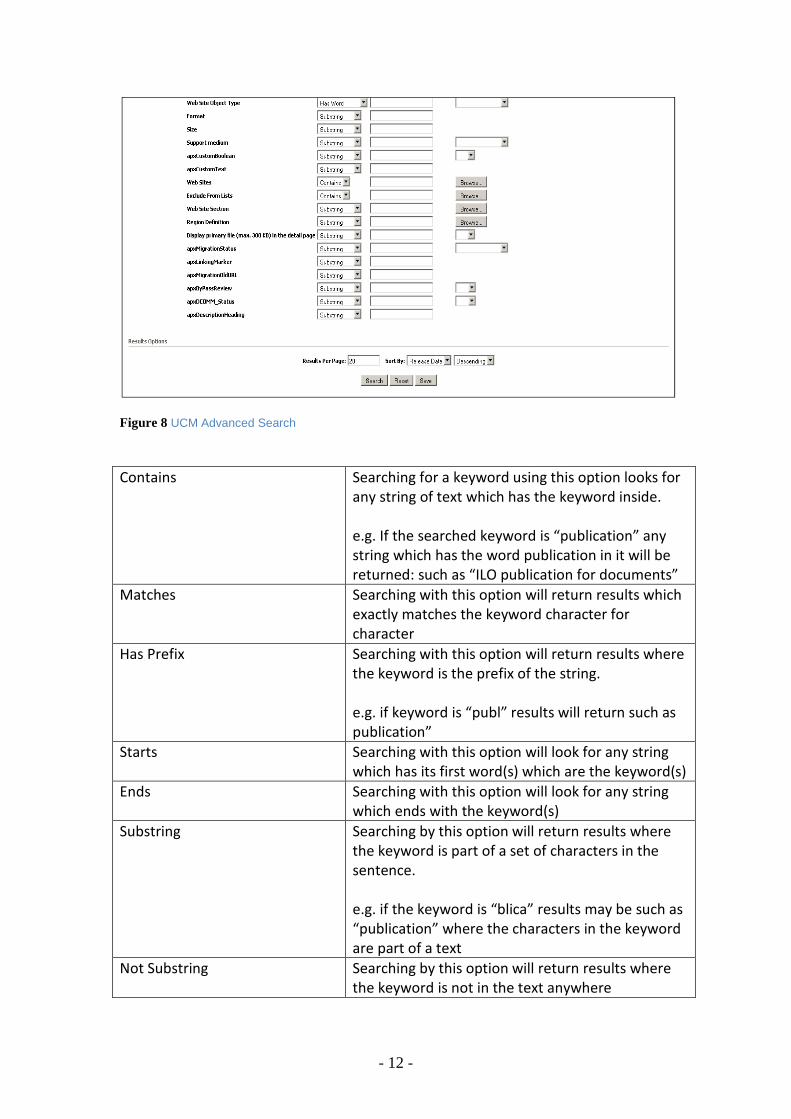
2.2.5 ADVANCED SEARCH
- 12 -
Figure 8 UCM Advanced Search
Contains Searching for a keyword using this option looks for
any string of text which has the keyword inside.
e.g. If the searched keyword is “publication” any
string which has the word publication in it will be
returned: such as “ILO publication for documents”
Matches Searching with this option will return results which
exactly matches the keyword character for
character
Has Prefix Searching with this option will return results where
the keyword is the prefix of the string.
e.g. if keyword is “publ” results will return such as
publication”
Starts Searching with this option will look for any string
which has its first word(s) which are the keyword(s)
Ends Searching with this option will look for any string
which ends with the keyword(s)
Substring Searching by this option will return results where
the keyword is part of a set of characters in the
sentence.
e.g. if the keyword is “blica” results may be such as
“publication” where the characters in the keyword
are part of a text
Not Substring Searching by this option will return results where
the keyword is not in the text anywhere
- 13 -
Not Matches Searching by this option will return results where
the results do not match the keyword
(TIPS: The best way to get good results for file searching is to remember the
Content ID of your documents. Many users of UCM have found this to be very
efficient and time saving.)
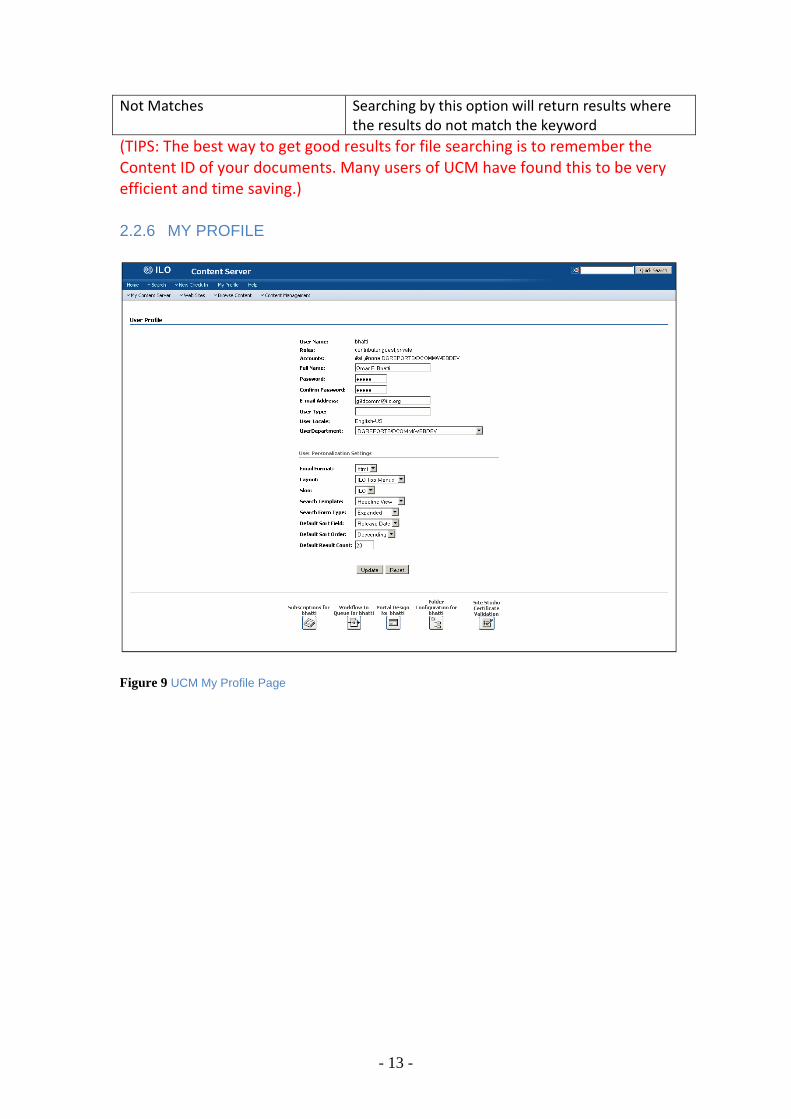
2.2.6 MY PROFILE
Figure 9 UCM My Profile Page
- 14 -
2.3 Glossary of Metadata Fields for Content Check I n
This section of the handbook will provide a detailed explanation of the various
metadata fields which are required to be filled when checking a document or
file into the document repository.
Before explaining the different metadata fields which are used during content
check in, it is important to understand why these fields are necessary and the
roles they play in website accessibility and usability.
No amount of emphasis will ever truly reflect the importance of having a
complete and proper metadata for content.
2.3.1 METADATA (DATA about DATA)
Metadata is used to facilitate the understanding, characteristics, and
management usage of data. The metadata required for effective data
management varies with the type of data and context of use. In a library, where
the data is the content of the titles stocked, metadata about a title would
typically include a description of the content, the author, the publication date
and the physical location.
Imagine yourself in the situation where you are given the task of writing a very
thorough report and the necessary information resources are all available on
the ILO website. However you have no clue as to what those resources are and
where they can be found. Now here you might think to yourself “That’s no
problem, I’ll just use the search feature on the website and look for what I
want.”
True, this solution will work…BUT only if the information resource you seek had
been entered into the database with the appropriate metadata. The person
who entered the document into the database may just have named the file as
“ilomwr2009.pdf” and provided some meaningless title, left the brief
description, subject, keywords, region, etc blank. And this is only just one file,
what if all the files you needed were all checked in by the same person. So how
will you find a document or documents which had been checked into the
database as such?
You can’t. So you will just have to accept the fact that the report you write will
be incomplete.
So how can you, as the Content Contributor, prevent this from happening to
others? By providing good information and carefully checking in your
documents and files. (In the context of this Handbook, the term document and files include various file
types such as MS Word’s *.doc, MS Excel’s *.xls, *.pdf, *.ppt, *.jpg, *.gif, *.mp3, and
website URLs, because all of these items can be checked into UCM.)
- 15 -
2.3.2 KEY INFORMATION – Explanation of Search as a concept Before moving on to the explanation of each metadata field, an understanding
of the Search concept is needed.
The Search feature of any website, including all web based search engines such
as Google, Yahoo, Alta Vista, etc, all originated from the concept of keeping a
crossed referenced card catalog in a library. Cross referencing is a time
consuming task for search engines, every time a new website appears, or a
webpage is updated, automatic crawlers created by these search engines will
have to go through the new site or updated page, looking for keywords which
could help identify the purpose of the site and update their index database so
that when visitors go to Google.com or Yahoo.com and enter a phrase or
keyword in the search box and click enter the most relevant websites and pages
appear first in the long list of results.
The WCMS of the ILO too uses cross indexing and an index database to cross
reference all the content (which are in the tens of thousands) uploaded by
content contributors such as yourself. And the quality of the index is only as
good as the quality of the metadata the contributor has provided. Even with the
capability of computers being a hundred times better than what it was half a
century ago, a computer cannot open a document and read the content to
understand what it talks about, or open an audio file and understand what is
being said, or open a video file and understand what is being shown. So for our
WCMS, the index database relies on the metadata which has been provided.
Metadata which indicates that the title of the document is “ILO against children
being forced into labour in developing countries”, the type of document being a
“official report”, written by “John/Jane Doe”, on this date “99/99/9999” and
covers subjects such as “child labour, forced labour, poverty, safety and health
at work”, etc.
Remember the situation in the previous page when a content contributor
checked in a document with meaningless metadata, how would the index
database of the WCMS enable a visitor to find this document if this official
report on ILO and forced child labour had been checked in by the same
contributor?
- 16 -
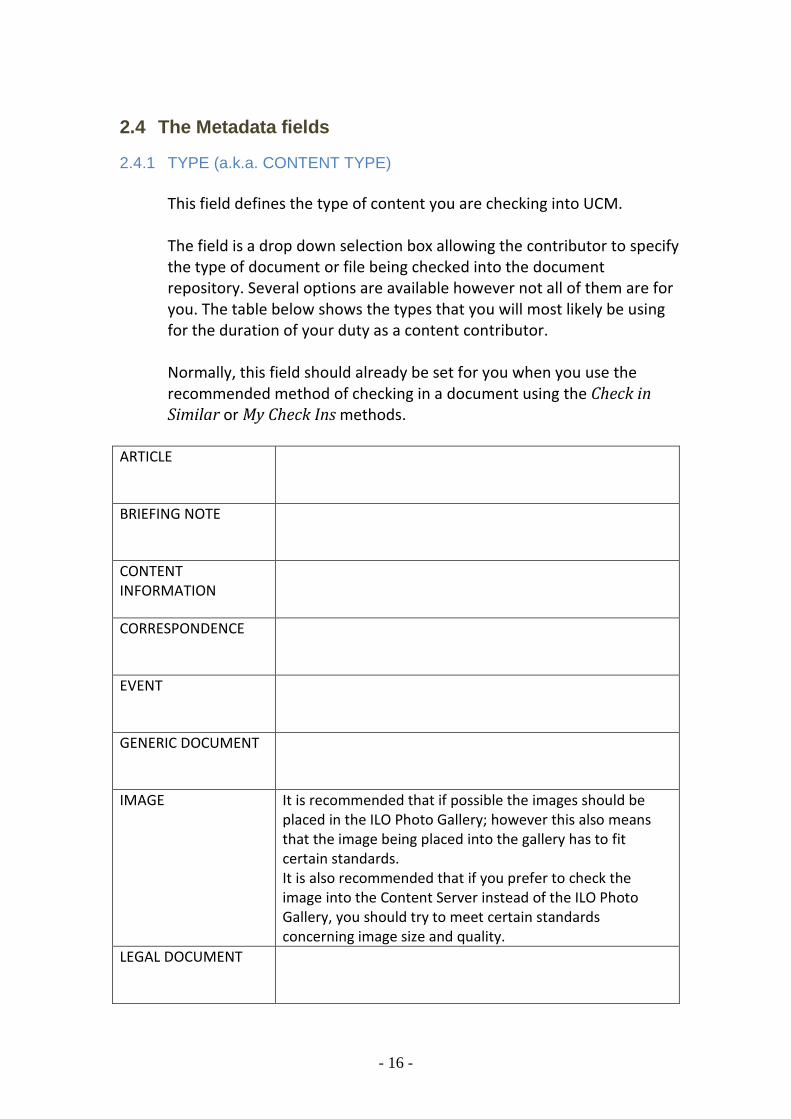
2.4 The Metadata fields 2.4.1 TYPE (a.k.a. CONTENT TYPE)
This field defines the type of content you are checking into UCM.
The field is a drop down selection box allowing the contributor to specify
the type of document or file being checked into the document
repository. Several options are available however not all of them are for
you. The table below shows the types that you will most likely be using
for the duration of your duty as a content contributor.
Normally, this field should already be set for you when you use the
recommended method of checking in a document using the Check in
Similar or My Check Ins methods.
ARTICLE
BRIEFING NOTE
CONTENT
INFORMATION
CORRESPONDENCE
EVENT
GENERIC DOCUMENT
IMAGE It is recommended that if possible the images should be
placed in the ILO Photo Gallery; however this also means
that the image being placed into the gallery has to fit
certain standards.
It is also recommended that if you prefer to check the
image into the Content Server instead of the ILO Photo
Gallery, you should try to meet certain standards
concerning image size and quality.
LEGAL DOCUMENT

- 17 -
MEETING
DOCUMENT
MISSION REPORT
MOVING IMAGE
(VIDEO)
Not the actual video files itself but a profile of the video file
(URL, title, length, description, etc) which is in the
Streaming server.
Sometimes the video file may be on the Streaming server of
another site or may be located in the directory of a web
server. Even then only the profile is entered into UCM,
under no circumstances should you ever check in a video
file into UCM.
MUSIC (AUDIO) MP3 format only, the file size must be as small as possible.
NEWS ITEM
POSTER
PRESENTATION
PRESS RELEASE
PROJECT
PROJECT
DOCUMENTATION
PUBLICATION
STATEMENT
WEB PAGE

- 18 -
2.4.2 TITLE This field is important and necessary. The title of the document or file being
checked in must be provided here. The text entered here must be descriptive
and reflect the content being checked in. It must not be unrelated abstract text
which does not provide the visitor with a clear understanding of the context of
the content. The best text to enter here would be the title of the document file
or a short sentence reflecting the main topic, especially if the content is an
audio or video file.
The best titles are brief and straight to the point, long winded titles can be
confusing and inefficient.
2.4.3 AUTHOR This field is automatically set with the username of the content contributor who
has logged into
UCM and is now checking in a document. The field cannot be modified
manually.
The Author field identifies the Content Contributor who checked in or updated
the content. It is not used to identify the actual Author of the content. If you
wish to mention the person(s) or group(s) responsible for creating/writing the
content, please use the field called Creator.
However this field will change values whenever the file is checked out and
updated by someone other than the original contributor. As UCM maintains
version control of all content, this field has the secondary purpose of displaying
the last user who edited the content.
2.4.4 SECURITY GROUP The Security Group defines the domain of visitors who have access to view the
document. Depending on your access rights to UCM, you may not have the
ability to choose between the three available options.
Public Select this if the document is to be made available for anyone
to view.
Private Select this if the document is to be viewed only by an internal
group of users. (This value can also be used if there is a
document which was for the Public however for certain
reasons needed to be hidden from the Public.)
Secure

- 19 -
2.4.5 ACCOUNT This field is used to define which group of users has the rights to modify the
document being checked in. By default this field is automatically set to the
account group you belong to already.
Depending on your access rights, you may or may not be able to change the
value of this field or only allowed to change to certain values.
2.4.6 PRIMARY FILE This field has two parts. The first part is a check box marked Metadata Only and
the second is a text field and a button beside it called Browse.
Metadata Only Select this if you are entering content which does not contain a
physical document or file.
e.g. you are entering an external URL into UCM as a reference
Browse Click Browse and select the file you need to check into UCM.
2.4.7 CONTENT ID This field is important if you are checking in a document without using the
Check in Similar method. When entering the Content ID it is important to
provide a hierarchical ID format which describes where the content belongs in
the website. The letters in the ID must all be capitalized, if spacing is needed
the underscore must be used (blank spaces are not allowed) and the character
limit is 30.
For example, if you are checking in a word document which should appear in
the About Us section of the ILO Governing Body website, you may perhaps give
the Content ID as:
WCMS_CON_TXT_GB_ABO_EN (which indicates that the document is being
checked into the
WCMS, Content, Text, GB site, About Us section, English language. Sometimes
for certain content All is used instead of the EN, ES, FR, language indicators to
mark that the content is generic).
If you are using the Check in Similar method this field will not be visible to you
and will be automatically filled in for you when click “Submit”.
(By now you have seen the term Check in Similar several times. This is an
important topic which you will read about later in the Handbook.)

- 20 -
2.4.8 ALTERNATIVE TITLE If possible you should provide an alternative title for the document or file being
checked into UCM. An Alternative Title can provide additional information
about the document, especially if there is another title which is applicable to
the document. As Shakespeare once wrote “A rose by any other name…”
The same rules given for Title will also apply for this field.
2.4.9 CONTENT SUBTYPE Certain content Types have an additional subtype available. It is important that
you specify the subtype of a document being checked in if applicable.
Always check whether the content type you have selected has a subtype or not,
and if a selection of subtypes are available then choose the one that is most
appropriate. However sometimes you may be checking in a document of a
certain type which has subtypes but the document is considered too generic to
be assigned a subtype.
Some subtypes: CAMPAIGN When adding a campaign choose 'event' as content type and
'campaign' as subtype. The web site section to use is "what
we do: events and campaigns: campaigns".
A campaign can comprise one or more events. Each of the
individual events should be checked in with 'event' as content
type and an appropriate subtype. If an event is part of a
campaign the relationships can be expressed using 'is part
of/contains' relationship type ‐ that way all events that are
part of the campaign will be displayed along with the
campaign and individual events will point back to the
campaign context.
2.4.10 SHORT DESCRIPTION (BRIEF DESCRIPTION) This field is used to provide a brief summary or short introductory text to the
document or file being checked in. This field is important in order to provide
visitors a clear idea of what the document or file will contain.
If you are checking in a document using the contribution MS Word document
templates, this field is not necessary as long as the appropriate styles have been
applied in the MS Word document file.
2.4.11 LANGUAGE
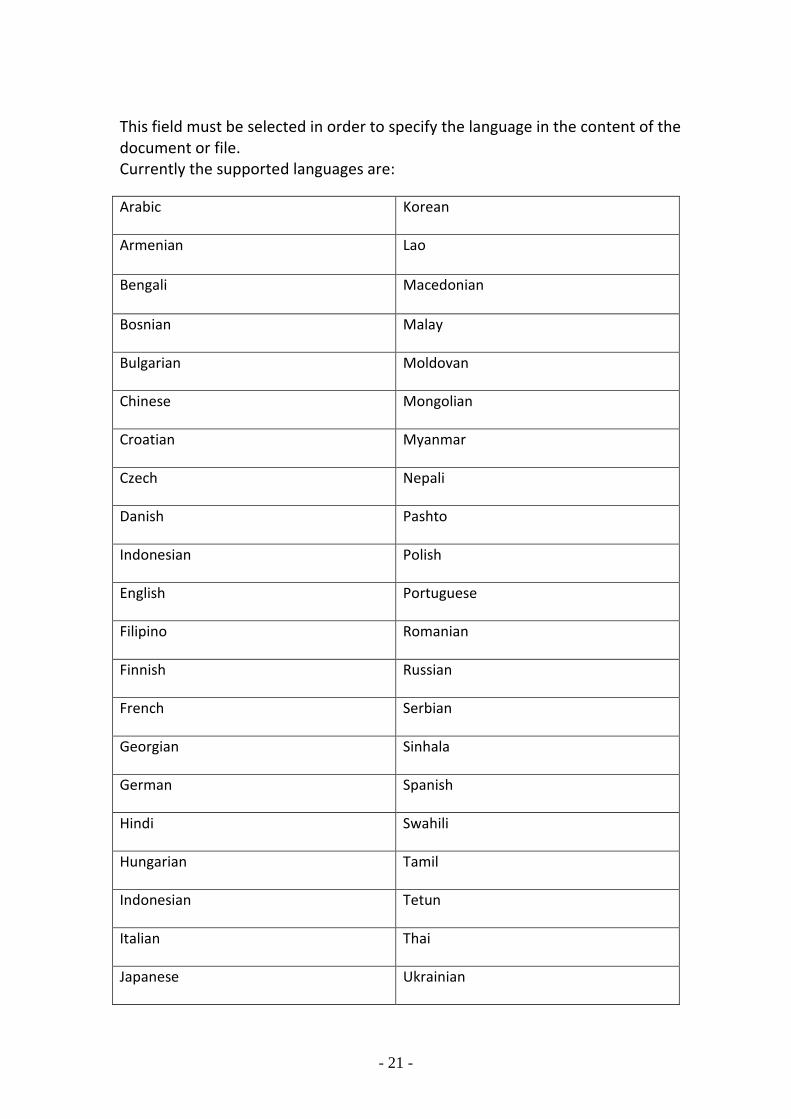
- 21 -
This field must be selected in order to specify the language in the content of the
document or file.
Currently the supported languages are:
Arabic Korean
Armenian Lao
Bengali Macedonian
Bosnian Malay
Bulgarian Moldovan
Chinese Mongolian
Croatian Myanmar
Czech Nepali
Danish Pashto
Indonesian Polish
English Portuguese
Filipino Romanian
Finnish Russian
French Serbian
Georgian Sinhala
German Spanish
Hindi Swahili
Hungarian Tamil
Indonesian Tetun
Italian Thai
Japanese Ukrainian

- 22 -
Khmer Vietnamese
N/A (Only used if the content being checked in is generic for all. E.g. A
photograph of the ILO HQ in Geneva)
(Note: The ILO has three working languages which are English, French and
Spanish and four additional official languages which are Arabic, Chinese,
German and Russian. Almost all documents and files are translated into the
three working languages, a wide selection are translated into the official
languages and a few selected are provided in the other languages depending on
availability and at the discretion of the office or department involved.)
2.4.12 REFERENCE The Reference is a very important field. Contributors must fully understand
where and when to use this field.
ILO_THUMB Indicates that the reference used is a reference number of a
picture from the ILO Photo Library. Reference to the ID of
the image will be appended by the system to the end of ILO
Photo gallery URL in order to link to the image in the ILO
Photo Library that offers additional image information and
additional image sizes for different purposes. If the image
file was checked into the Content Server this field must be
left blank.
Used for the content types:
• Image
URL Reference to external resources that do not reside in the
Content Server. The resource is fetched for display from the
URL specified. We strongly recommend entering absolute
addresses and starting them with “http://”.
Used for the content types:
• Database
• Normative Instruments
• Publication/Report
• Web Pages
ISBN The system accepts both 130 and 13 characters ISBN codes
and they must be in the format: “XXXXXXXXX” without any
spaces or hyphens. When the original ISBN is assigned to a
multiple language publication but one entry is checked‐in for
each language, then it is necessary to specify to add an
additional reference, with the [ISBN_LANG_EXT] qualifier
and set the code of the language in the format “‐X” as the
value of the reference. These two references will be

- 23 -
concatenated to create the link to ARIES database and
provide the visitor with the possibility of buying the
publication, if available (publications for which “mark this
item” field is set to “yes”).
Used for the content types:
• Publication/Report
• Publication/Working Paper
• Publication/Periodical
• Publication/Book
• Publication/Brochure
ISSN Same as ISBN
ILO_REF Indicates that the encoding scheme is one of ILO’s internal
schemas.
Used for the content types:
• Press Release (in general), format ILO/YY/XX,
OIT/YY/XX or BIT/YY/XX
• Press Release (Feature stories), format FTR/YY/XX
• Meeting Document
• Publication/Working Paper
• Vacancy Notice
• Videos (MovingImage) – if a moving image has an
[ILO_REF] type reference, the detail page will be
displayed and a link to the video on the streaming
server will be available on the detail page. The URL is
constructed from the reference by prefixing it with
‘http://audio.ilo.org/ramgen/ilo/dcomm/’ and
appending ‘.rm?usehostname’
NB: This list of usage is not comprehensive.
ISBN_LANG_EXT See ISBN
URL_ON_DETAIL_PAGE Reference to external resources that do not reside in the
Content Server. The resource is fetched for display from the
URL specified. We strongly recommend entering absolute
addressees and starting them with “http://”.
Note: this qualifier is different from [URL]. The external
resources referenced using this qualifier is displayed on a
page which also contains a brief description and some details
about the resource along with some related links (if any).
The brief description and details about the reference will be
contained in a word document which will be loaded onto the
Content Server.
(Please see section concerning Word Document Templates.)

- 24 -
Used for the content types:
• Database
• Normative Instruments
• Publication/Report
• Web Pages
2.4.13 SUBJECT The purpose of assigning subject terms from the ILO Taxonomy (indexing) is to
describe a resource so that it will be found when it is relevant to a query. The
use of controlled vocabulary to represent concepts when describing the subject
matter of the resource helps reduce the variety of words and phrases that can
be used to express a concept.
1. Use the most specific term from the ILO Taxonomy that is available for the
concept. Do no assign the broader terms since these terms are implied
automatically by the structure of the ILO Taxonomy and will be available for
searching either through automatic assignment of the broader terms or
through query expansion in the user interface.
2. When indexing an object with broad coverage of many topics, index at a high
level of specificity. Do not try to enter terms for every topic included. Ask
yourself the question: “Would it be appropriate for a user to retrieve this
resource by this topic?” before assigning a term. If the topic is only covered
briefly, then the answer is usually “no”.
3. You will sometimes have to select either one term (e.g. employment) or
several of this term’s narrower terms (e.g. clandestine employment, precarious
employment, temporary employment). The choice usually depends on the
focus of the resource and on whether you judge that a user might miss
significant information if only the more general term is used. If the more
specific terms are selected, the resource will still be searchable by employment.
If instead only the more general term is selected, then the object will not be
found when the user searches using the more specific terms. A general rule is
that if three or more terms from a set of sub‐terms have to be used to index an
item, then use the more general term instead (i.e., the Broader Term of this
subset).
4. You can look for similar resources in the system by using free‐text search and
then review the indexing used for those resources in order to enhance
consistency. For publications, you might want to review indexing done in
Labordoc and reuse the subject classification from there.

- 25 -
2.4.14 ADDITIONAL SUBJECT KEYWORDS If there are more keywords applicable to the content but are not available in
the list of subjects, you can enter the keywords in this field. These keywords
add value to the subjects selected which would broaden the search capabilities
on the website for the visitor.
2.4.15 ILO LOCAL CLASSIFICATION This field is used when a particular website has its own local taxonomy. These
local taxonomies may sometimes be more specific than the ILO’s standard list
of taxonomies. You are only required to fill this field if the content is for one of
the six websites/sections which use their own taxonomies in addition to the
ILO’s standard list.
ASIA Areas of work
Fundamental Principles and rights
Governing body sessions
ILC Classification
INDIGENOUS local classification
STAT Classification
2.4.16 ABSTRACT The Abstract field is a summary of the document or file being checked into
UCM. It is longer than the short description and provides more information. On
detailed pages, the text in the body of the page is the Abstract.
The Abstract field should be filled in UCM when checking in PDFs or any other
check in where you selected ‘metadata only’ or where the content is not a word
document.
However when using the word templates to check in content, the text for the
Abstract can be extracted from the word document and displayed (if the
document has been formatted with the correct styles.)
Another method for having text for the Abstract field when checking in content
of non MS Word format is to check in a separate MS Word document with the
text for the Abstract field. Then through the use of relationships set the MS

- 26 -
Word document to provide the text for Abstract of the initial checked in
content. (See section on Adding Relationships for more details)
In UCM content check in, the Abstract field has a limit of maximum 2000
characters and only allows line break formatting. With word documents,
applying the proper styles and formatting to sentences and paragraphs will
allow for more elaborate formatted text to be displayed on the detailed page.
Figure 10 Example of a detailed page showing some metadata and Abstract
2.4.17 LIST OF CONTENT UNITS Mainly used when the document to be checked in is of type Publication or
similar where it has chapters, sections, sub‐sections, etc.
2.4.18 REGION This field is used to specify the region and if applicable the country related to
the content of the document or file being checked in. You are required to
specify a thorough selection of regions and countries related to the document,
if the selection is incomplete the availability of the document to visitors may
become restricted.
The Regions available for selection are

- 27 -
• Africa
• Americas
• Asia
• Europe
• Global
2.4.19 BEGINNING OF THE PERIOD COVERED, THE END OF THE PERIOD COVERED
These two fields are date/time fields which are to be filled in if the document or
file being checked in has content relevant to a particular timeframe.
E.g. you may be entering a project document which has a time schedule
between a start and end date.
2.4.20 AVAILABLE FROM, AVAILABLE UNTIL These two date/time fields can be used to specify the duration for the
availability of the document or file.
E.g. the content may be a limited time release of an important press release.
2.4.21 VALID FROM, VALID UNTIL These two date/time fields can be used to specify the duration for the validity
of the content.
E.g. the content may be an event.
(Beginning/End of the Period Covered, Available From/Until and Valid
From/Until are not always used simultaneously during the checking in of the
same content. Depending on the type of content being checked in, one or more
of these metadata fields may not be used.)
2.4.22 TARGET AUDIENCE This field is used to specify for whom the checked in content is aimed at.
All
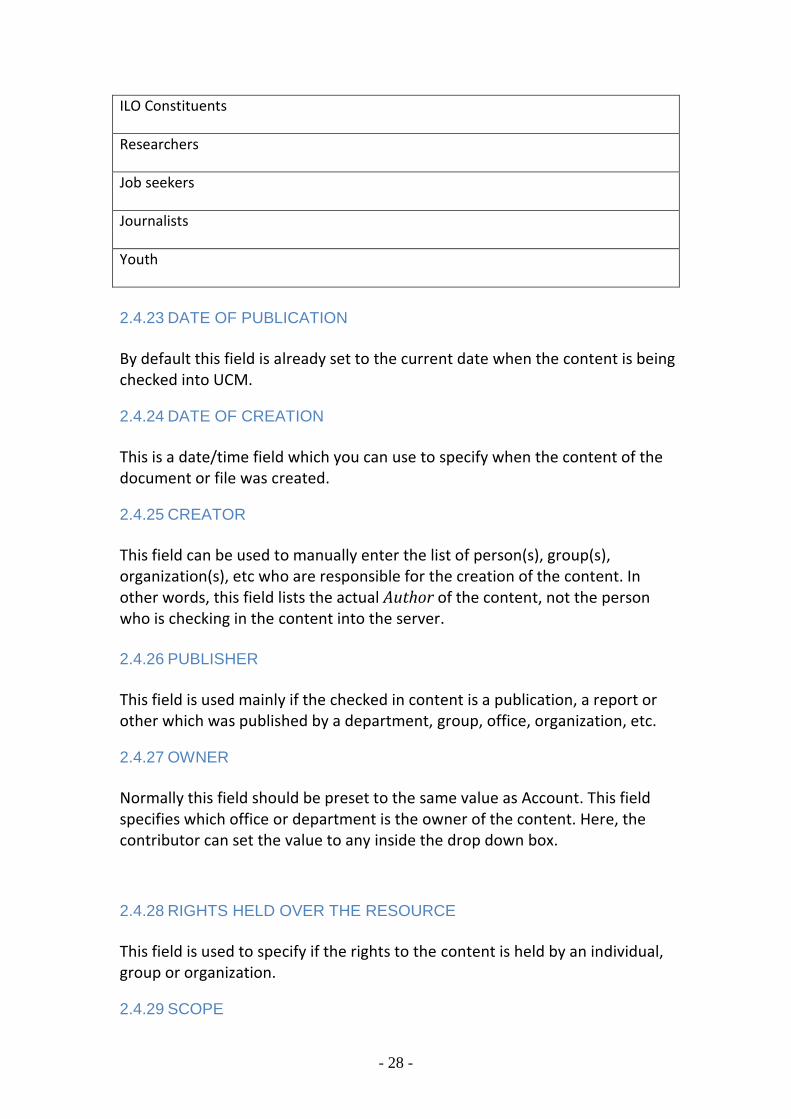
- 28 -
ILO Constituents
Researchers
Job seekers
Journalists
Youth
2.4.23 DATE OF PUBLICATION By default this field is already set to the current date when the content is being
checked into UCM.
2.4.24 DATE OF CREATION This is a date/time field which you can use to specify when the content of the
document or file was created.
2.4.25 CREATOR This field can be used to manually enter the list of person(s), group(s),
organization(s), etc who are responsible for the creation of the content. In
other words, this field lists the actual Author of the content, not the person
who is checking in the content into the server.
2.4.26 PUBLISHER This field is used mainly if the checked in content is a publication, a report or
other which was published by a department, group, office, organization, etc.
2.4.27 OWNER Normally this field should be preset to the same value as Account. This field
specifies which office or department is the owner of the content. Here, the
contributor can set the value to any inside the drop down box.
2.4.28 RIGHTS HELD OVER THE RESOURCE This field is used to specify if the rights to the content is held by an individual,
group or organization.
2.4.29 SCOPE

- 29 -
In UCM, the value entered in this field defines the relevance of the content
pertaining to a certain area.
Local The content of the checked in document or file is relevant
only to a local area.
Regional/Sectorial The content of the checked in document or file is relevant
only to a certain regional or work sector.
Global The content of the checked in document or file is relevant at
a global level.
2.4.30 PUBLISH This field has two options, YES or NO, which is used to specify whether the
content is ready for publishing onto the website or not.
2.4.31 FORMAT To specify the format of the document or file.
2.4.32 SIZE To specify the file size, mainly in Kilobytes (kb), of the document or file.
2.4.33 WEBSITES This field is used to specify in which WCMS websites the document or file being
checked in will appear.
2.4.34 WEBSITE OBJECT TYPE This is an internal field of the UCM system.
This field should be automatically set by UCM when the content is checked in so
the user should not have to worry about what to choose here. However if the
initial check in was Metadata only and later the user updates the content with a
physical primary file then the value for this field may need to be manually
changed.
Native Document For PDFs, DOCs, mp3s
Data File If the content is XML for the regions
Image

- 30 -
Other If the check in is metadata only
Project
Layout File
Fragment
Script
Stylesheet
Custom Element Form
Properties Form
Validation Script
2.4.35 WEBSITE SECTION This field defines in which websites or sections of a website the content will
appear. If the website or section is not set, the catalogue lists of that particular
site or section will not display the content.
2.4.36 DISPLAY PRIMARY FILE 2.5 Regulations concerning the types of files being checked
into UCM 2.5.1 ADOBE PDF FILES Adobe PDF files are one of the most common files to be checked into UCM.
File size limit: As small as possible, if you plan to check in PDF files over 25
megabytes please confirm with the Web Team at ILO HQ, Geneva.
2.5.2 AUDIO FILES MP3 file type, size should be as small as possible.
2.5.3 IMAGES AND PHOTOS

- 31 -
Image files to be checked into UCM must either be JPEG (*.jpg) or GIFF (*.gif)
formats. Their file size generally depends on the resolution of the image or
photo. However if the image or photo being checked in is to be used as a
thumbnail, the ILO has a height/width restriction measured in terms of pixels.
Thumbnail
Blurb image • 115 x 76
Image in feature single • 75 x 75 (Image is a square)
• 130 x 85 (image is horizontally wider)
• 85 x 130 (image is vertically taller)
2.5.4 POWERPOINT PRESENTATIONS Same regulation as PDF files.
2.5.5 URLS All URLs must be profiled into UCM using the regulations defined for the
Metadata field Reference.
2.5.6 VIDEO FILES Video files should be of Real Media video format and placed on the Streaming
Server.
In UCM, when we check in Content Type (Moving images ‐ Videos) we are
actually checking in the profile for the video from the streaming server.
2.5.7 WORD DOCUMENTS Same regulation as PDF files, however if the word document is larger than 300
kilobytes UCM will automatically convert it to PDF and the system will not be
able to automatically extract an abstract from the document itself to be
displayed on a detailed page.
2.6 The Check In Similar The Check In Similar function allows you to check in a new content which
shares similar metadata to content previously existing in the content server.
This saves time in not having to fill in all the metadata fields all over again.

- 32 -
However this does not imply that you should not double check to make sure
that the metadata is correct. Though content may share similar metadata, there
will also be differences such as Title, Short Description, etc.
This function is accessed by selecting an already existing content inside the
server and clicking in the drop down field for Actions.
Figure 11 Check In Similar
2.7 My Content Server This feature is located under My Content Server in the Top UCM Menu of UCM.
My Content Server is a set of content types with standard metadata fields’ pre‐
selected for the content contributor in order to save the time of having to
browse through the entire list of available metadata fields to be filled.
Notice Content Contributors should use Check In Similar and My Content
Server as much as possible.
Figure 12 My Content Server and list of available templates

- 33 -
2.8 Updating Checked in Content inside UCM
Figure 13 Actions which can be performed to a Checked In Content 2.8.1 Checking Out Checking out a content means reserving the right to open and edit the content
and prevent others from making any modifications to the file until you have
checked the content back in/released the content from your control.
There are two ways to check out a document.
CHECK OUT This method allows you to check out the document and hold it for an indefinite
period of time, especially if you plan to be working on the document for an
extended period of time.
With this option the server side connection is lost; UCM marks the content as
being checked out until it has been checked back into the system after an
update. Only an administrator or the person who checked out the document
can either Cancel check out or check in the new version.
CHECK OUT AND OPEN This method is best used if you need to quickly check out the document and
make a quick modification. This method retains the server side connection to
the document while it is checked out.
(This method is mainly used for editing content which are MS Word documents.
Will only retain the server connection for MS Word XP and MS Word 2003
versions)
2.8.2 Updating Metadata Selecting the option Update allows you to update the metadata of the content
which is in the Content Server.

- 34 -
(Depending on your access rights you may not be able to change every
metadata.)
2.8.3 Adding Relationships A set of services implementing a framework that defines the relationship
among content items inside the Content Server. Document relationship can be
defined in terms of relevance (namely Relation) or language versioning (namely
Language Versions).
Figure 14 Adding Relationships and Language Versions
(see “Implementing relationships between items in the WCMS relationship”
id:WCMS_091111 and “WCMS Contributor's Handbook”, id: WEBDEV_TRAINING)
1. Add new Relations
Adding new Relations mean creating a link between different content
items inside the Content Server in order to display the relations as items
on the webpage. Contents that are linked via relations can appear on the
webpage as one of the following items:
• An image (Thumbnail, cover image)
• A related link
• A link which provides further information
• A link which provides essential information
• Caption for an item
• A what’s new item

- 35 -
Figure 15 Content with 2 Relations which are related to the document
In Figure 21 you can see an example of 2 items in the content server which has
been selected as related to a particular content. You can also see options for
sorting the added relationships, the option to delete the relationship
completely, add or remove qualifications and link back the qualification.
‘Link back’ functionality For optionally bidirectional relationships, a facility is offered that allows the
relationship to be established in the other direction once one direction has
been established. In the display above, a one way relationship is displayed with
a ‘>’ indication and a ‘Link back’ link. If a ‘Link back’ is clicked, the relationship is
established in the opposite direction and the indication changes to ‘<>’.
Deleting a relationship ‐ the specified relationship is deleted;
‐ all qualifications for the specified relationship are deleted;
Deleting a qualification ‐ the specified relationship is deleted.
2. Select other Language Version
This allows you to link the content to any other available language
version of the content. An example would be a speech given by an envoy
to a group of delegates which must then be available in more than one
language on a website.
The procedure for adding relationships for both categories is the same.
1) Select whether the relationship you want to add is for another
language version of the content or for other types of relations.
2) When the search page appears, use the available search criteria
for the content you wish to link to.
- 36 -
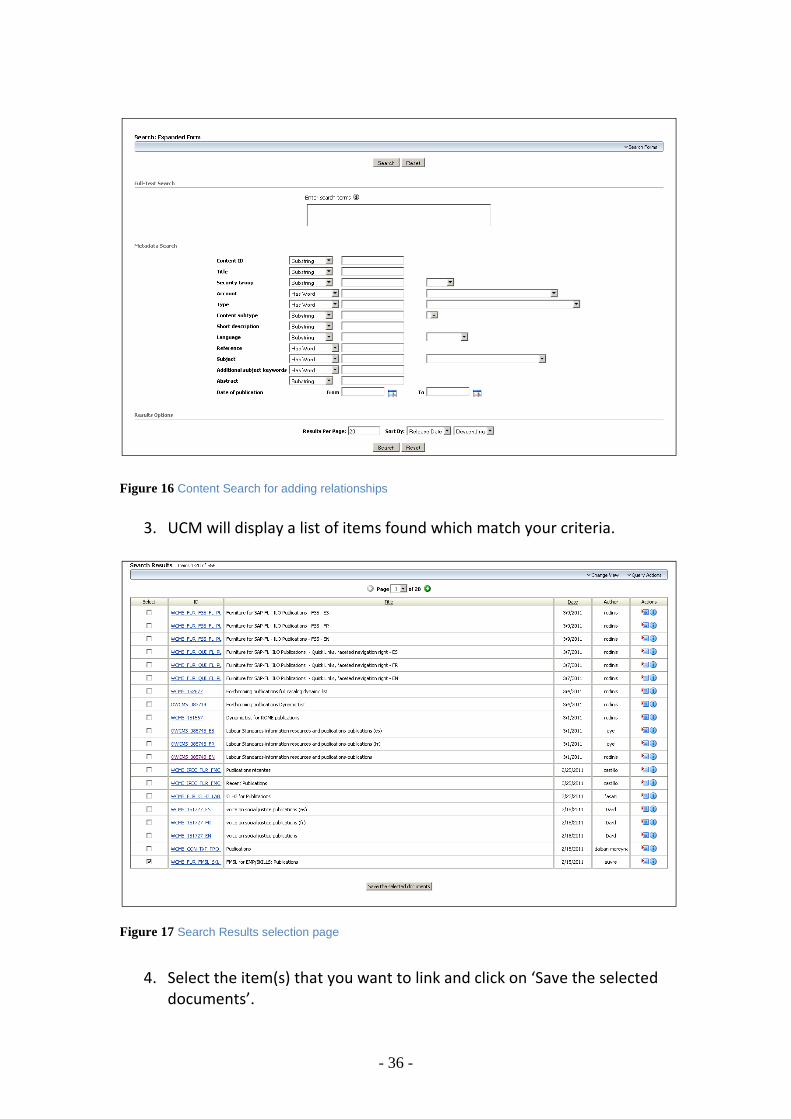
Figure 16 Content Search for adding relationships
3. UCM will display a list of items found which match your criteria.
Figure 17 Search Results selection page
4. Select the item(s) that you want to link and click on ‘Save the selected
documents’.

- 37 -
5. If you are adding an Another Language Version relationship, UCM will
take you back to the metadata page of the content you were updating
and show that the language version relationship has been added.
6. If you are adding a different type of relationship, UCM will take you to a
page where you can select the different qualifications of relations you
can add.
Figure 18 Add Qualifications for Add New Relations
Figure 19 List of Qualifications for Relations 2.8.4 Version Control
Figure 20 Version Control in UCM
UCM allows you to keep track of changes to any content which has been
checked in via Version
- 38 -
Control (Revision History). On the metadata page of any content, you can find
the revision history near the bottom of the page in UCM.
As you can see in Figure 20, UCM keeps track of the revision histories by
Release Date, Expiration Date, Status and Actions which you can perform.
This is especially important when there are major changes to the content. For
example, the content is an Excel spreadsheet containing important information.
You check the content out to make edits and save it back into UCM. Later you
realize that the changes you made to the document are incorrect and you need
to recover the information before the changes. UCM version control will allow
you to move back to previous versions of the content.
(UCM’s version control does not allow you to go back and forth between
different versions of content, it only allows you to roll back to previous versions
and any later version which you selected Delete will be lost forever.)

- 39 -
2.9 Creating Links in WCMS Sites When creating links, it is always recommended to provide descriptive names to
the links instead of using the URL as the link.
e.g. Making a link this way: The ILO Website is much better than The ILO
Website is http://www.ilo.org
In Contribution Mode
The Link Wizard is used in Primary Pages of UCM 10gR4. For Word
Documents in UCM 10gR4 please use the syntax below:
If linking to a section of another WCMS site, select text and then create
HyperLink using the following format:
ss://ssNODELINK/siteID/sectionID as URL
If linking to a checked in item select text and then create HyperLink using
the following format:
ss://ssLINK/contentID as URL
If linking to an external item, provide the full URL starting with http://...
Figure 21 MS Word's Hyperlink Dialog Box
- 40 -
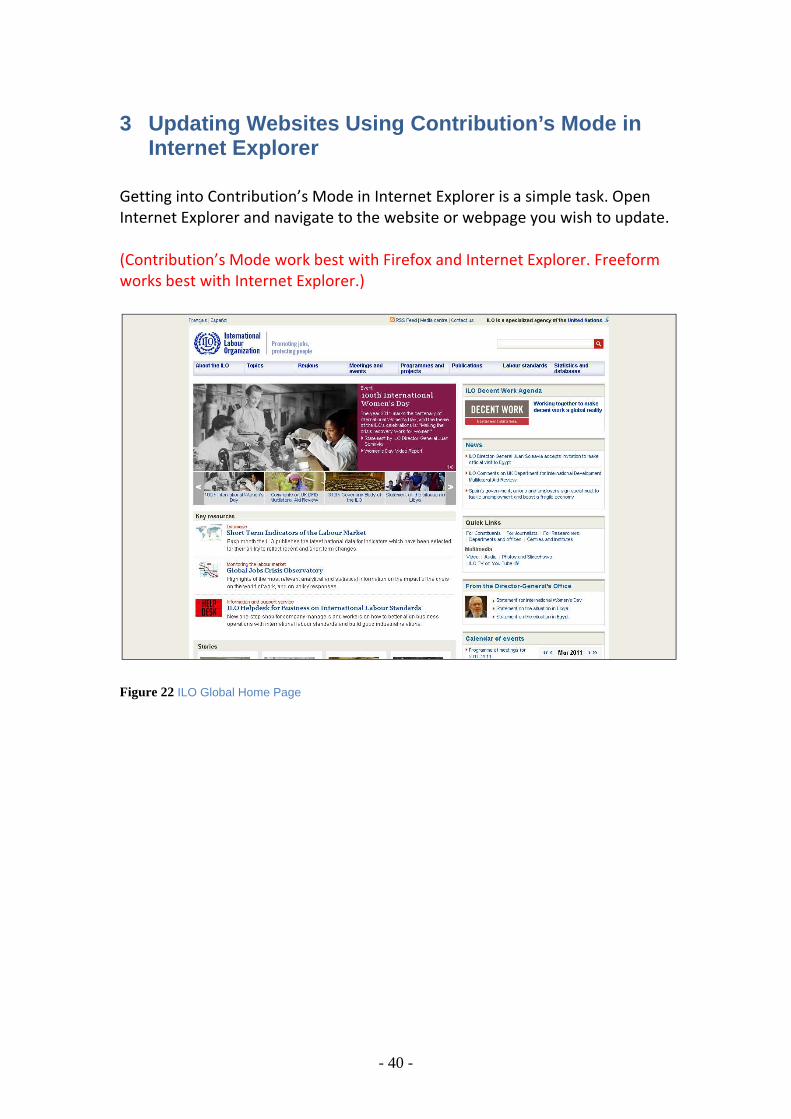
3 Updating Websites Using Contribution’s Mode in Internet Explorer
Getting into Contribution’s Mode in Internet Explorer is a simple task. Open
Internet Explorer and navigate to the website or webpage you wish to update.
(Contribution’s Mode work best with Firefox and Internet Explorer. Freeform
works best with Internet Explorer.)
Figure 22 ILO Global Home Page

- 41 -
Figure 23 Asia Regional Portal Home Page
Notice that the URL is http://staging.ilo.org... Instead of http://www.ilo.org...
The staging prefix is used to access the UCM server where the website is
located so that the contributor will be able to edit the site.
To enter Contribution’s Mode you need to enter a simple key combination on
your keyboard: CTRL+SHIFT+F5. If this is your first time entering Contribution’s
Mode, IE will ask you to install the browser plug‐in for UCM Contribution.
(CTRL+SHIFT+F5 is a toggle that allows you to enter and exit Contribution’s
Mode)
- 42 -
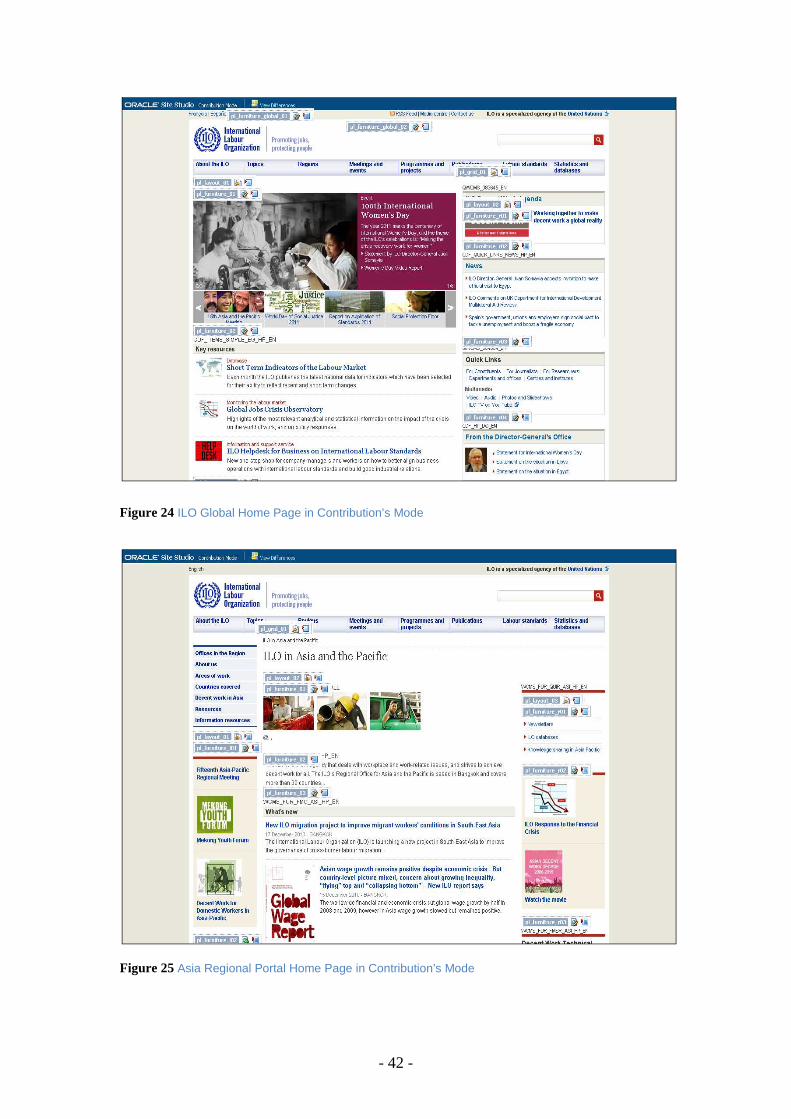
Figure 24 ILO Global Home Page in Contribution’s Mode
Figure 25 Asia Regional Portal Home Page in Contribution’s Mode

- 43 -
Notice that the Global Home Page and the Asia Regional Portal Home Page
appears different when viewed in Contribution’s Mode. The Asia Regional
Portal page displays
Figure 26 Furniture Elements
The small icons and the text which appears are the furniture items and
documents relating to the content being displayed on the website.
When editing this type of element, Contribution’s Mode will open the Word
Document where you will be able to make the change and save the document.
The browser will open the document on the Content Server in MS Word of your
computer. Any saves you made will be directly upon the document in the
Content Server.
(With the current version of Oracle UCM this will only be possible with
Microsoft Office XP and Office 2003 versions. The compatibility with Office
2007 has not been added yet.)
Figure 27 Checking Out the TXT element document to edit

- 44 -
3.1 Furniture Elements
• Feature Rich
• Links
• Freeform
• Calendar
• Quote
• Etc
Figure 28 A Quick Link Side
Figure 29 Editing a Feature rich highlight item
- 45 -
Figure 30 UCM Contributor Dialog for Links
Figure 31 UCM Contributor Dialog for Feature Rich

- 46 -
3.2 UCM Contributor’s Row Controls
Figure 32 UCM Contributor's Row controls
1. Add New Row
2. Remove Row
3. Edit Row (This can also be done by quickly double clicking on
the row you wish to edit)
4. Move Row Up
5. Move Row Down
Figure 33 Editing a row inside UCM Contributor Dialog for Quick Links

- 47 -
Figure 34 editing a row inside UCM Contributor Dialog for feature Rich
3.3 Item Edit Controls
Figure 35 Item Edit Controls
1) View Source
2) Paste
3) Spell Check
4) Find
5) Replace
6) Select All
7) Erase
8) Create Hyperlink
9) Remove Hyperlink
10) Select target
- 48 -
3.4 Hyperlink Wizard
Figure 36 Hyperlink Wizard

- 49 -
3.5 Understanding and using the Word Document Templ ates For the WCMS sites, there are two standard MS Word Templates which have
been designed for use by content contributors.
• Template for detail and editorial pages
• Template for pages containing a list of links
(These two Templates have been designed for use with Microsoft Office XP and
Office 2003 versions. If you have other versions of Office please contact the
Web Team at ILO HQ for assistance.)
The core of these two Templates relies on the usage of Styles in MS Word. By
default the Template files themselves should contain the explanation of where
and when to apply these particular styles.

- 50 -
4 Explanation of Furniture Elements and their usage 4.1 Feature Rich The Feature Rich is used to display boxes containing various elements which can be
linked to items anywhere in the site and to external resources. A feature rich box can
contain the following elements
• Highlight
• Item Heading
• Item Title
• Item text
• Item info
• Image
• Credit
• Caption
• Links
The figure 37 below shows how Feature Rich will appear in the central column of
primary page

- 51 -
Figure 37 Feature Rich in the Central Column
The figure 38 below shows how Feature Rich will appear in the Left or Right column of
a primary page

- 52 -
Figure 38 Feature Rich in Right or Left Column
The figure 39 below shows the difference between a Highlighted and Normal row

- 53 -
Figure 39 Feature Rich Highlighted row and Normal row
The figure 40 below shows the Description of Feature Rich Row
Figure 40 Feature Rich Item (row) Description
4.1.1 Adding Contents to Feature Rich 1. The first step is to assign the Region Content to the empty placeholder.

- 54 -
Figure 41 Assign Region Content to empty Placeholder
2. Next step is to select the region content from the drop down list
Figure 42 Select ‘FEATURE RICH (RGDEF_ITEMS’ from the drop down list
3. Repeat the steps from page 65 to 68.
4. When you click on Edit Content button a new Contributor Dialogue will popup
where you can add/edit the contents of Feature rich. See figure 43 for details

- 55 -
Figure 43 Feature rich Contributor’s Dialogue
4. Next step is to add Rows/Items to the Feature Rich Element. See the figure 44 for
details
Figure 44 Feature rich Adding New Row

- 56 -
5. Next step is to add contents to Row/Item. See the figure 45a and 45b for details
Figure 45 Feature rich Contributor Dialogue for Row

- 57 -
Figure 46 Feature rich Contributor Dialogue for Row

- 58 -
4.1.2 Adding Image to Feature Rich Row There are two ways in which you can add an image to feature rich row
1. Clicking on the red button (See Figure 46 for details) will open a popup window see
the figure 47 below for details
Figure 47 Adding an Image from Photo gallery
In the Image Id textbox you have to give the Image Id which you can get from ILO
Photo gallery, and then you can select the size of the Image. There are two sizes
available Thumbnail and Medium you can select the required size of the image. In the
Image Alt Tag textbox you can enter the text which is the alternate text for an image,
if the image cannot be displayed.
2. Clicking on the Image button (See Figure 61b for details) will open a popup window
where you can search for an image in the content server by giving content ID for the
Image.
4.1.3 Adding Links to Feature Rich Row See page 84 – 87 for details in order to add links.
Region templates for Feature Rich: There are 4 different Region templates for LINKS furniture which you can select.
Following is the list of all the region templates available in UCM 10gR4:
FEATURE RICH, one heading for all (RGTPL_ITEMS_01)
FEATURE RICH, each its own heading (RGTPL_ITEMS_02)
FEATURE RICH, one heading for all, border (RGTPL_ITEMS_04)
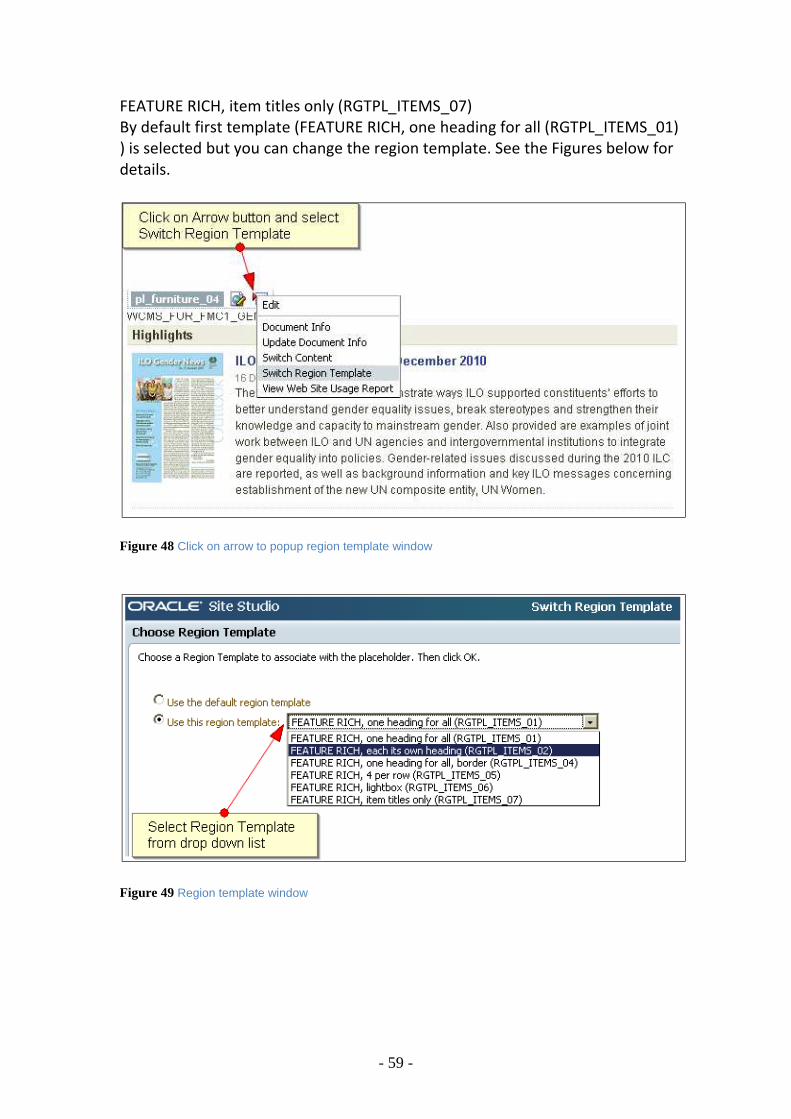
- 59 -
FEATURE RICH, item titles only (RGTPL_ITEMS_07)
By default first template (FEATURE RICH, one heading for all (RGTPL_ITEMS_01)
) is selected but you can change the region template. See the Figures below for
details.
Figure 48 Click on arrow to popup region template window
Figure 49 Region template window

- 60 -
1. FEATURE RICH, one heading for all (RGTPL_ITEMS_01)
Figure 50 Region templates for Feature Rich Example 1

- 61 -
2. FEATURE RICH, each its own heading (RGTPL_ITEMS_02)
Figure 51 Region templates for Feature Rich Example 2
- 62 -
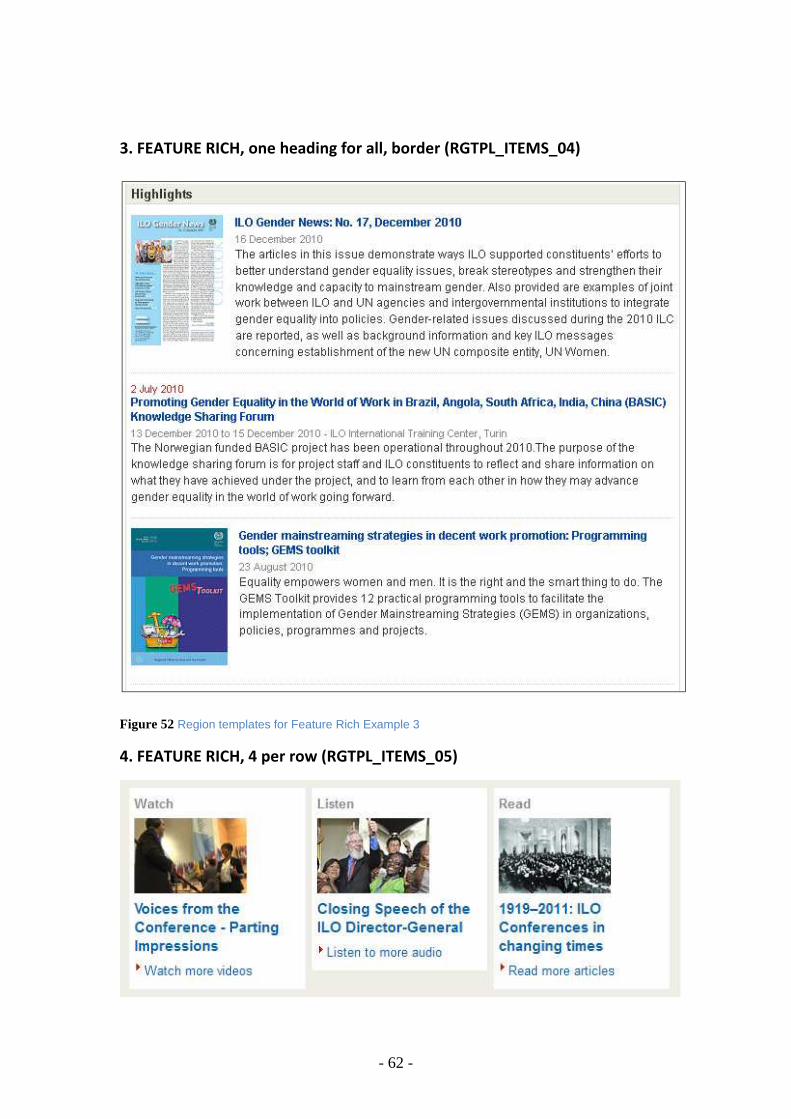
3. FEATURE RICH, one heading for all, border (RGTPL_ITEMS_04)
Figure 52 Region templates for Feature Rich Example 3
4. FEATURE RICH, 4 per row (RGTPL_ITEMS_05)

- 63 -
Figure 53 Region templates for Feature Rich Example 4 5. FEATURE RICH, item titles only (RGTPL_ITEMS_07)
Figure 54 Region templates for Feature Rich Example 5
6. FEATURE RICH, ad boxes, one heading for all (RGTPL_ITEMS_10)

- 64 -
Figure 55 Region templates for Feature Rich Example 6
4.2 Links The LINKS list furniture element on WCMS sites are used do display an item or
list of items which act in the form of fast direct links to important items within
the same site or section or to external sites and sections. This allows for visitors
to quickly navigate vertically down to information resources which may be
several levels below the current content being viewed. LINKS list allows user to
categorise the links under different sections unlike in Feature Rich.
Figure 56 Example of a LINKS list labelled as “Quick Links”
4.2.1 Steps to Add “LINKS list” on a page 1. First step is to assign a placeholder with Region Definition (Furniture
Element).

- 65 -
Figure 57 Example of Assigning content to an empty Placeholder.
2. Next step is to select Region Content form the drop down list, means which
type to content you want to assign to a place holder. In this case it will be “LINKS list, titles only (RGDEF_QUICK_LINKS)”. After selecting the Region
content and click next.
Figure 58 Example of Assigning content from a List of available Content types

- 66 -
3. Next step is to choose a content file. If it’s a new file then select the first
option if the file already exists in the content server then select the second
option. See the figure below.
Figure 59 Example of choosing content file.
If you select the first option which is “New Contributor data file” and click next
then the next window will be like this
Figure 60 Example of Checking-in new data file
- 67 -
Here you have to add the appropriate title of the new data file which is
mandatory field. Choose a title that describes the content bearing in mind that
this box can be reused on another page and in another position. Thus avoid
embedding information about the position of the box in the title.
‘Security Group’ by default is public which means that this data file can be
viewed by everyone. You can change the Security group to private or secure.
‘Account’ by default this field is automatically set to the account group you
belong to already.
‘Create Language Versions’ by default selected value is Yes, this means that the
same data file will be created in different languages depending on the website
languages to which it belongs. For Example if the website exists in three
languages (EN, FR, ES) the data file will also be created in three languages.
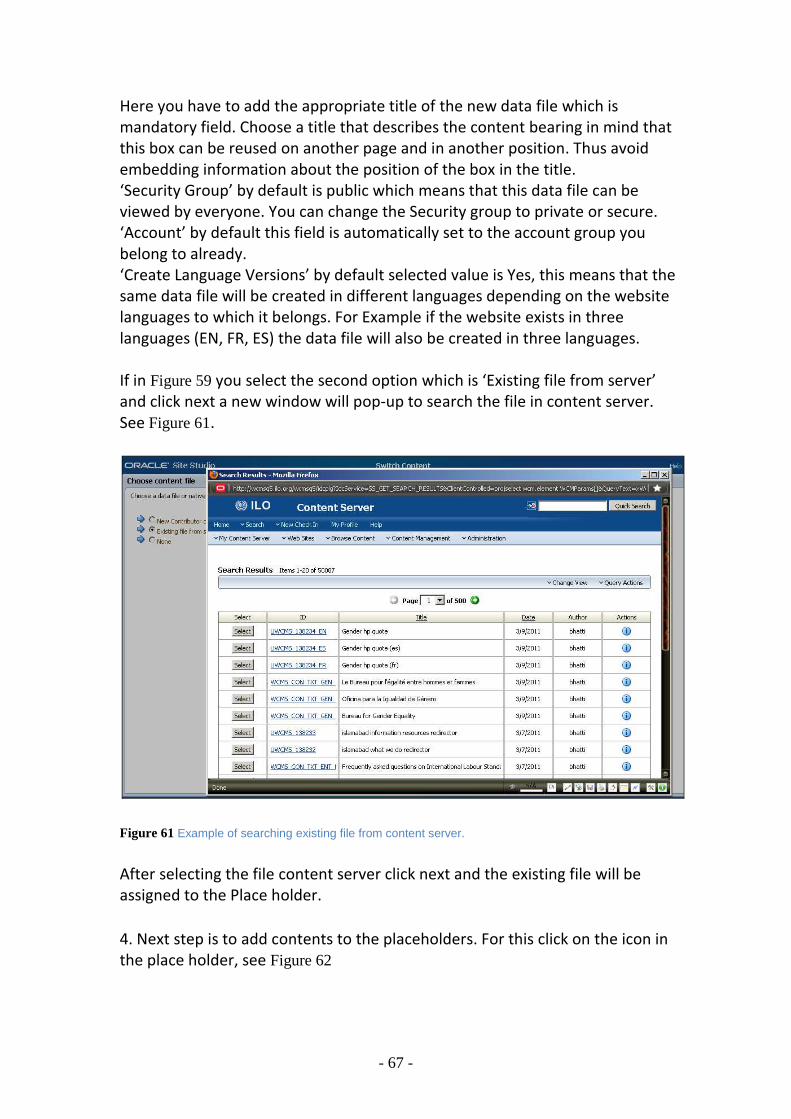
If in Figure 59 you select the second option which is ‘Existing file from server’
and click next a new window will pop‐up to search the file in content server.
See Figure 61.
Figure 61 Example of searching existing file from content server.
After selecting the file content server click next and the existing file will be
assigned to the Place holder.
4. Next step is to add contents to the placeholders. For this click on the icon in
the place holder, see Figure 62
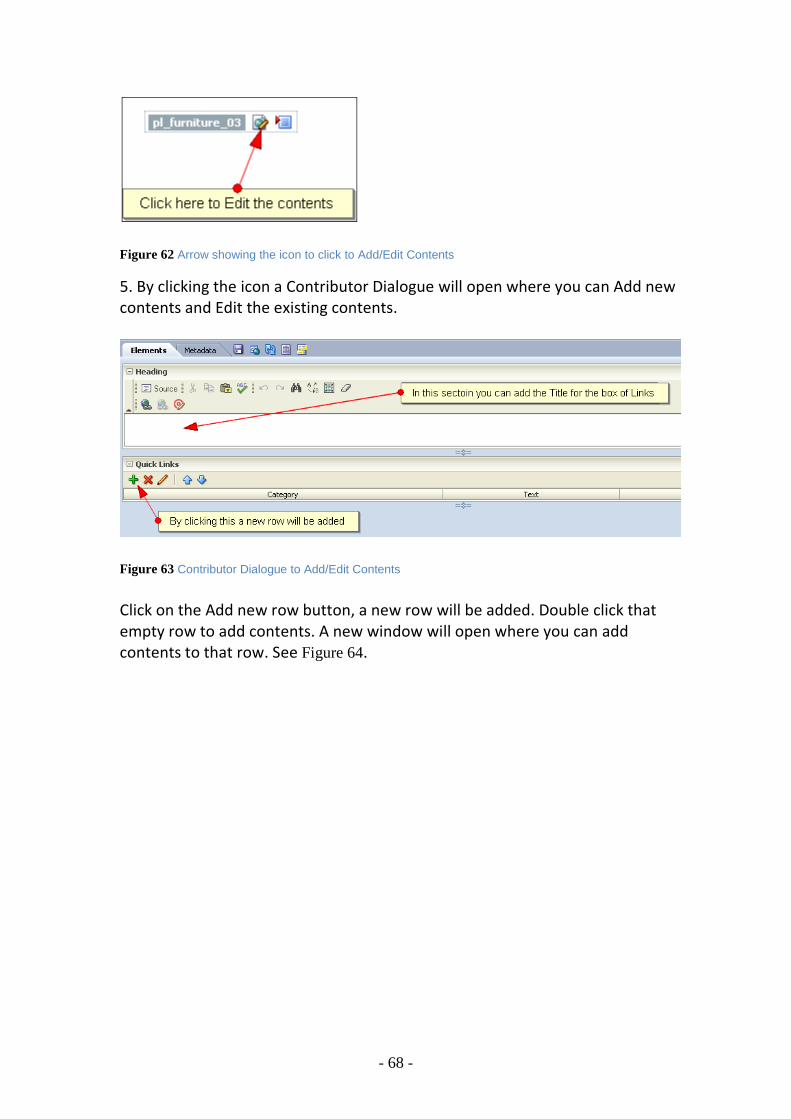
- 68 -
Figure 62 Arrow showing the icon to click to Add/Edit Contents
5. By clicking the icon a Contributor Dialogue will open where you can Add new
contents and Edit the existing contents.
Figure 63 Contributor Dialogue to Add/Edit Contents
Click on the Add new row button, a new row will be added. Double click that
empty row to add contents. A new window will open where you can add
contents to that row. See Figure 64.
- 69 -
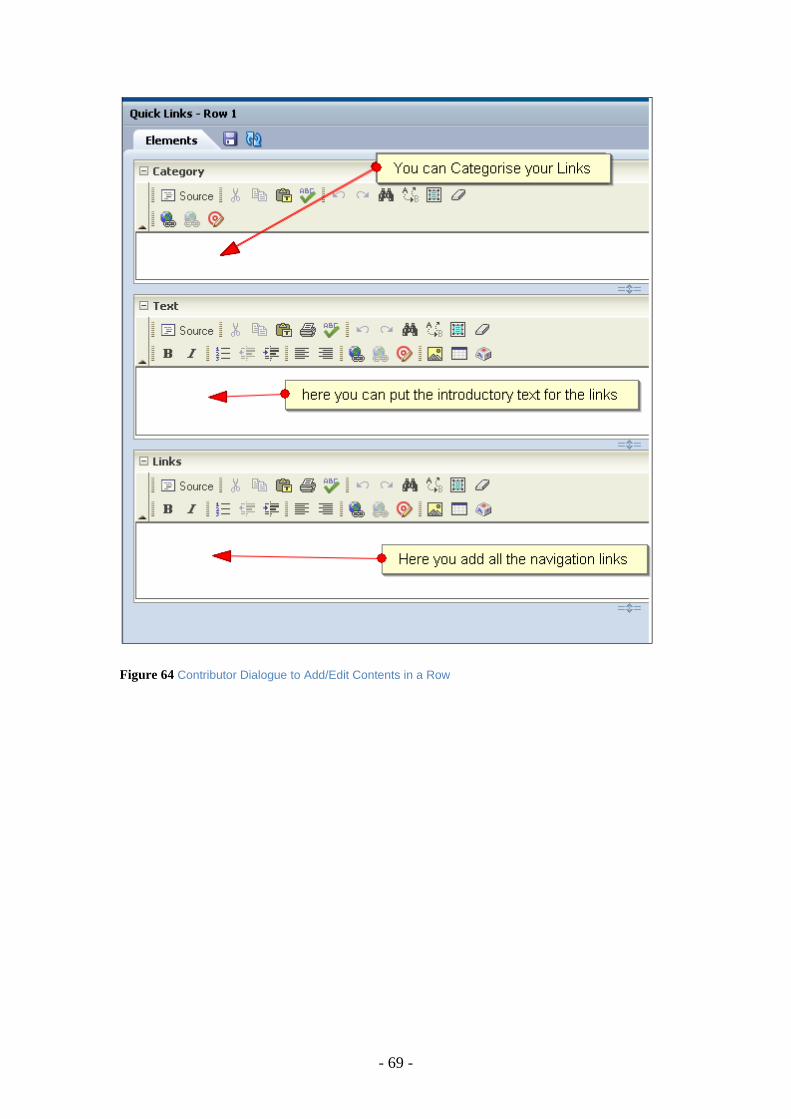
Figure 64 Contributor Dialogue to Add/Edit Contents in a Row

- 70 -
Creating Links:
Write the text for the links in the Links sections, select all the text by pressing Ctrl+A
and then press the button Bullets and numbers in the top to get the bulleted text.
These bullets will appear like small red arrows on the website. See the Figure 65 and
Figure 66 below
Figure 65 Creating Links
Figure 66 Creating Bullets for links

- 71 -
Next step is to create the hyper link for selected text, Select the text for which you
want to add the link and click on Create hyperlink button in the top toolbar. See Figure 67 below.
Figure 67 Creating Hyperlinks
When you click on create Hyperlink button it will open the linking Wizard, in Linking
wizard you can create the link in three ways
Link to a website section
Link to a file Link to the Following URL
See the Figure 68 below for more details
Figure 68 Choose type of link in Linking Wizard

- 72 -
If you select the first option (in Figure 68) and click next it will take you to a new
window where you will be able to see all the website sections of all the websites to
create the link. See the Figure 69 below for details.
Figure 69 Choosing website section to create the link
If you select the second option in Figure 68 and click next it will take you to a new
window where you will search the file in content server (if the file already exists) to
create the link. If you want to link it to a new file (means the file does not exist in the
content server) then you have to select the first option which is ‘New Contributor’s
Data file’ and click next. See the Figure 70 below for details.
Figure 70 Choosing Content file
If you select the First option in the above figure (figure 83) then a new window open
which will be same as when you do a new Check in and if you select the second option
then you have to search the file with the content Id in the content server (Standard
search).

- 73 -
If you select the 3rd option in Figure 68 the textbox next to it will be enabled and you
have to copy the URL in that text box. See the Figure 71 below for more details.
Figure 71 Linking to a URL
You have to follow the same procedure to create all the Hyperlinks. After creating all
the links, adding Heading or Categories click on the save button in the tool bar and
your placeholder will be updated with the contents you added using Contributor’s
dialogue.
Region templates for LINKS: There are 6 different Region templates for LINKS furniture which you can select.
Following is the list of all the region templates available in UCM 10gR4:
LINKS list, standard display (RGTPL_QUICK_LINKS_01)
LINKS list, button‐like display, heading w. background
(RGTPL_QUICK_LINKS_02)
LINKS list, feed icon display (RGTPL_QUICK_LINKS_03)
LINKS list, standard display, heading w. background (RGTPL_QUICK_LINKS_04)
LINKS list,block view (RGTPL_QUICK_LINKS_05)
LINKS list, links on one line (RGTPL_QUICK_LINKS_06) By default first template (LINKS list, standard display (RGTPL_QUICK_LINKS_01)
) is selected but you can change the region template. See the Figures below for
details.

- 74 -
Figure 72 Click on arrow button to popup up region template window
Figure 73 Select Region Template from drop down list
- 75 -
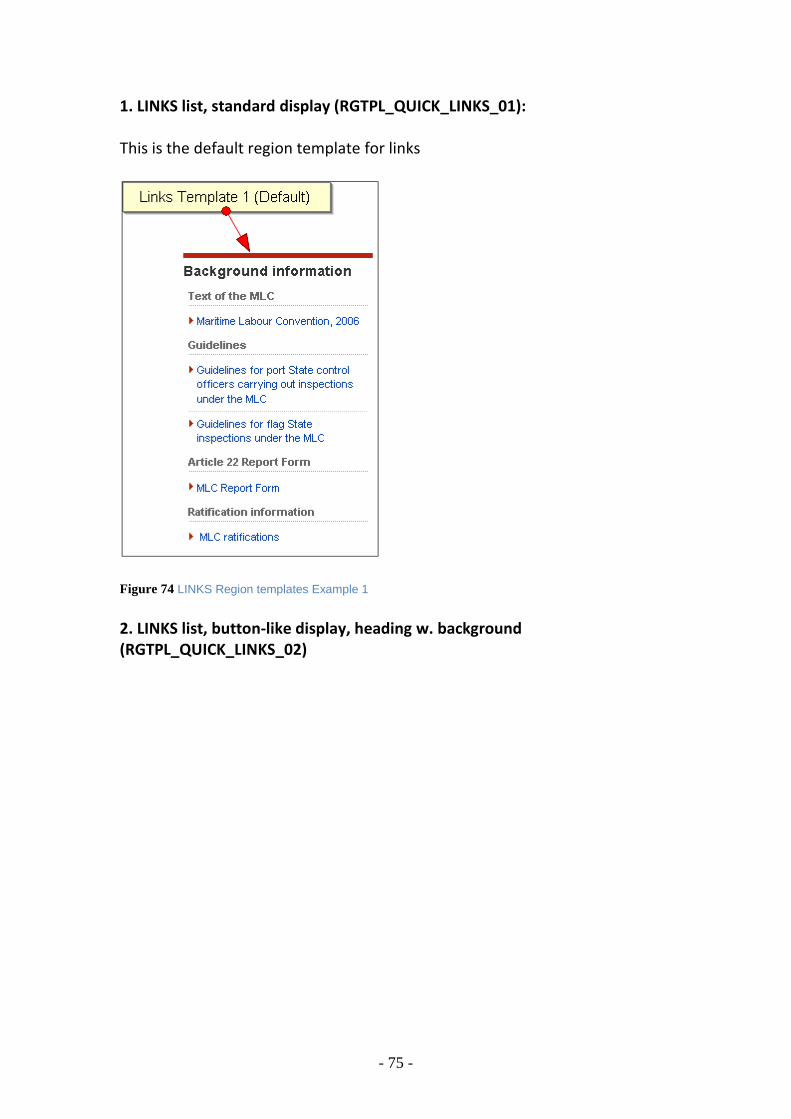
1. LINKS list, standard display (RGTPL_QUICK_LINKS_01):
This is the default region template for links
Figure 74 LINKS Region templates Example 1
2. LINKS list, button-like display, heading w. background
(RGTPL_QUICK_LINKS_02)

- 76 -
Figure 75 LINKS Region templates Example 2 3. LINKS list, feed icon display (RGTPL_QUICK_LINKS_03)
Figure 76 LINKS Region template Example 3
- 77 -
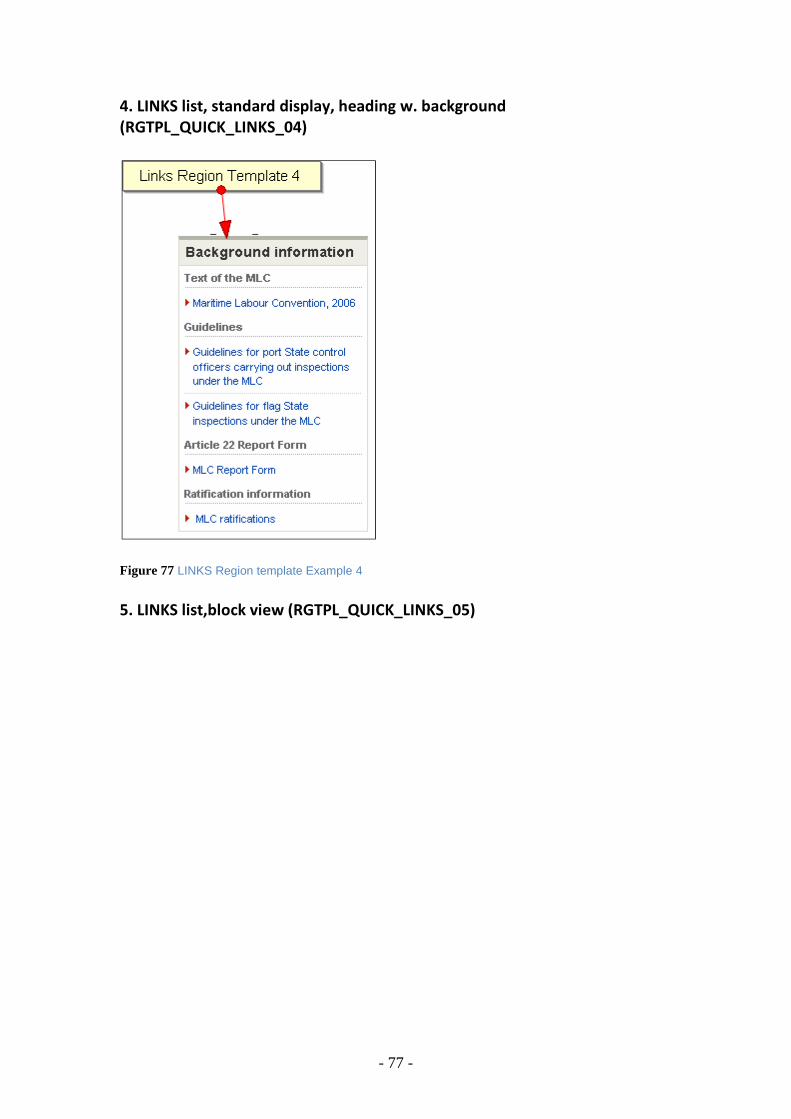
4. LINKS list, standard display, heading w. background
(RGTPL_QUICK_LINKS_04)
Figure 77 LINKS Region template Example 4
5. LINKS list,block view (RGTPL_QUICK_LINKS_05)

- 78 -
Figure 78 LINKS Region template Example 5
6. LINKS list, links on one line (RGTPL_QUICK_LINKS_06)
Figure 79 LINKS Region template Example 6

- 79 -
4.3 Freeform Freeform is an element in which you can design your own layout by using the
table structure similar to table structure in HTML. It is used on primary pages
for complex contents instead of using word files.
FREEFORM Examples:
Figure 80 FREEFORM Example 1
Figure 81 FREEFORM Example 2

- 80 -
Figure 82 FREEFORM Example 3
FREEFORM Description:
In freeform you can add following things
Table
Image
Flash/Youtube Video
Horizontal Line
Adding Contents to FREEFORM 1. The first step is to assign the Region Content to the empty placeholder.
Figure 83 Assign Region Content to empty Placeholder

- 81 -
2. Next step is to select the region content from the drop down list
Figure 84 Select Region Content
3. Repeat the steps from page 65 to 68. 4. When you click on Edit Content button a new Contributor Dialogue will
popup where you can add/edit the contents of Feature rich. See figure 82 for
details

- 82 -
Figure 85 Freeform Contributor’s Dialogue
There are two different toolbars which you can use. See Fig 83 for Details
Figure 86 Freeform Toolbar Overview

- 83 -
Standard Toolbar
See Figure below for details
Figure 87 Freeform Standard Toolbar
Formatting Toolbar
See Figure below for details
Figure 88 Freeform Formatting Toolbar

- 84 -
Details of Formatting Toolbar
In order to understand the formatting toolbar see the pictures below for details
Insert/Edit Table:
Figure 89 Freeform Formatting Toolbar Insert/Edit Table
Figure 90 Freeform Table Inserted

- 85 -
4.3.1 Freeform Insert Youtube Video
Important Terms:
Aspect Ratio: The aspect ratio describes the proportional relationship between
the width of a video image and its height. There are two aspect ratios for
Videos one is 16:9 and other is 4:3. For a video with 16:9 aspect ratios, think of
the dimensions of the screen in HD films or "wide screen". 16:9 is becoming
more and more common, and 4:3, which is more of a square‐ish rectangular
shape, is becoming less common. If you are having trouble identifying whether
a video has a 16:9 or 4:3 aspect ratio please contact [email protected]
Aspect Ratio also depends where you are adding video on the page. If you are
adding video in Right or Left column then you should always use 4:3 ratios while
in central column you can use either 4:3 or 16:9.
Youtube Video Parameters: There is a set of parameters which we can use to
customize the playback experience of the video.
Insert Table:
First you have to insert a table by clicking on table button in freeform tool bar
(see figure 85 above for more details). When you click on table a popup window
appears asking for table properties. Provide attributes as following
Rows = 1 (if you want to add links or text under video then add two rows and in
the 2nd
row you can add links, text etc)
Columns = 1
Header = none
Border Size = 0
Alignment = center
Width = (depends on aspect ratio and size you selected for video)
Height = (depends on aspect ratio and size you selected for video)
Cell spacing = empty
Cell padding = empty
Caption and Summary should be empty
See the image below for more details
- 86 -
Figure 91 Table properties for Youtube Video
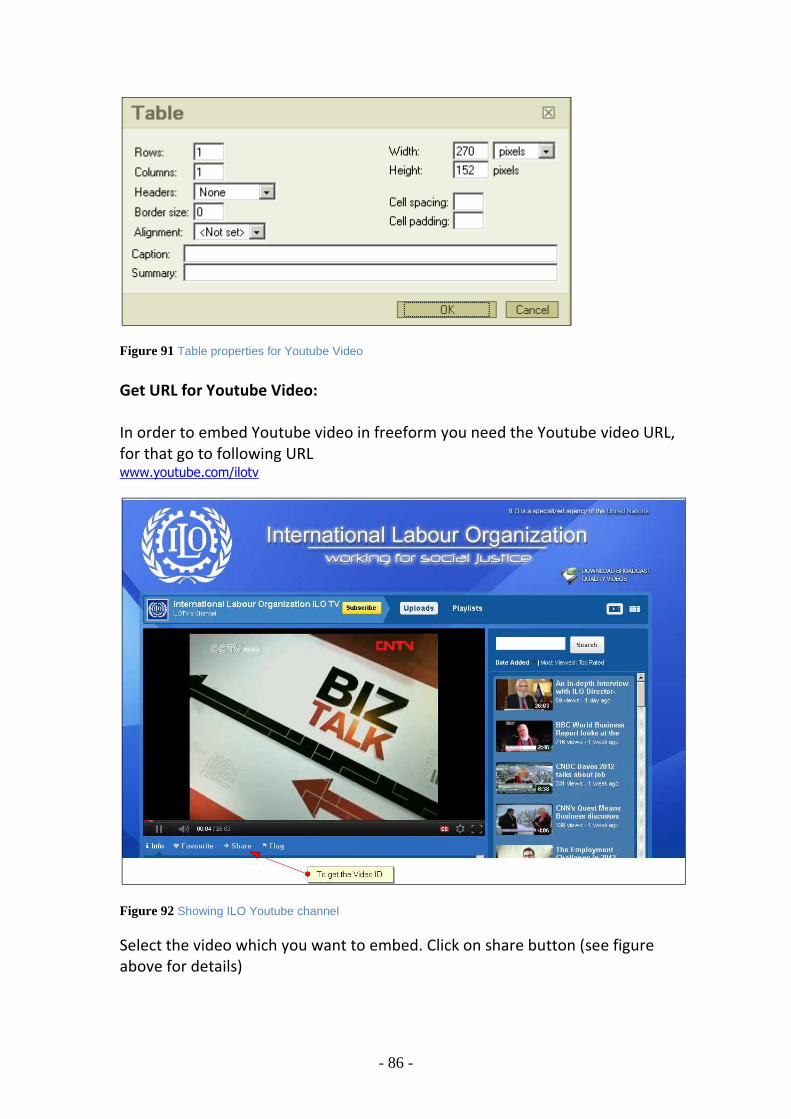
Get URL for Youtube Video:
In order to embed Youtube video in freeform you need the Youtube video URL,
for that go to following URL www.youtube.com/ilotv
Figure 92 Showing ILO Youtube channel
Select the video which you want to embed. Click on share button (see figure
above for details)

- 87 -
When you click on share you will see the following part (see figure below) just
underneath share button
Figure 93 After clicking share button
Copy the URL which you see in the above figure. The last part of the URL is the
youtube video ID.
For example in the following URL
http://youtu.be/TUFswO0HRw8
This is the youtube Video ID
TUFswO0HRw8
Copy this Video Id and paste it at the end of the following URL
http://www.youtube.com/v/
After copying the video ID your URL will become
http://www.youtube.com/v/TUFswO0HRw8
Addition of Youtube Video Parameters:
In order to add the Video parameters you have to use the following code and
attach it at the end of the URL which you get from above step
?hl=en&feature=player_embedded&version=3&showinfo=0&a
mp;cc_load_policy=0&fs=0&autohide=1&rel=0&modestb
randing=1
After adding the parameters your Final URL for video to embed in freeform will
be like this
http://www.youtube.com/v/TUFswO0HRw8
http://www.youtube.com/v/TUFswO0HRw8?hl=en&feature=player_emb
edded&version=3&showinfo=0&cc_load_policy=0&fs=0&
amp;autohide=1&rel=0&modestbranding=1

- 88 -
Paste this URL in the Free form (see image below).
Figure 94 Freeform Formatting Toolbar Insert/Edit Flash/Youtube Video
Embedding Youtube video in Primary page:
If the page layout is of three columns i.e. left navigation, central column and
right column, then follow the following standards to embed youtube video
Total Width Maximum Width
Allowed
Video Ratio
Left Column 145 140 4:3
width = 140
height = 105
16:9
width = 140
height = 79
Centre Column
Central Column
1+1+2+2+2+1+1
layout
575
278
550
272
4:3
width = 550
height = 413
16:9
width = 550
height = 310
4:3
width = 272
height = 204
- 89 -
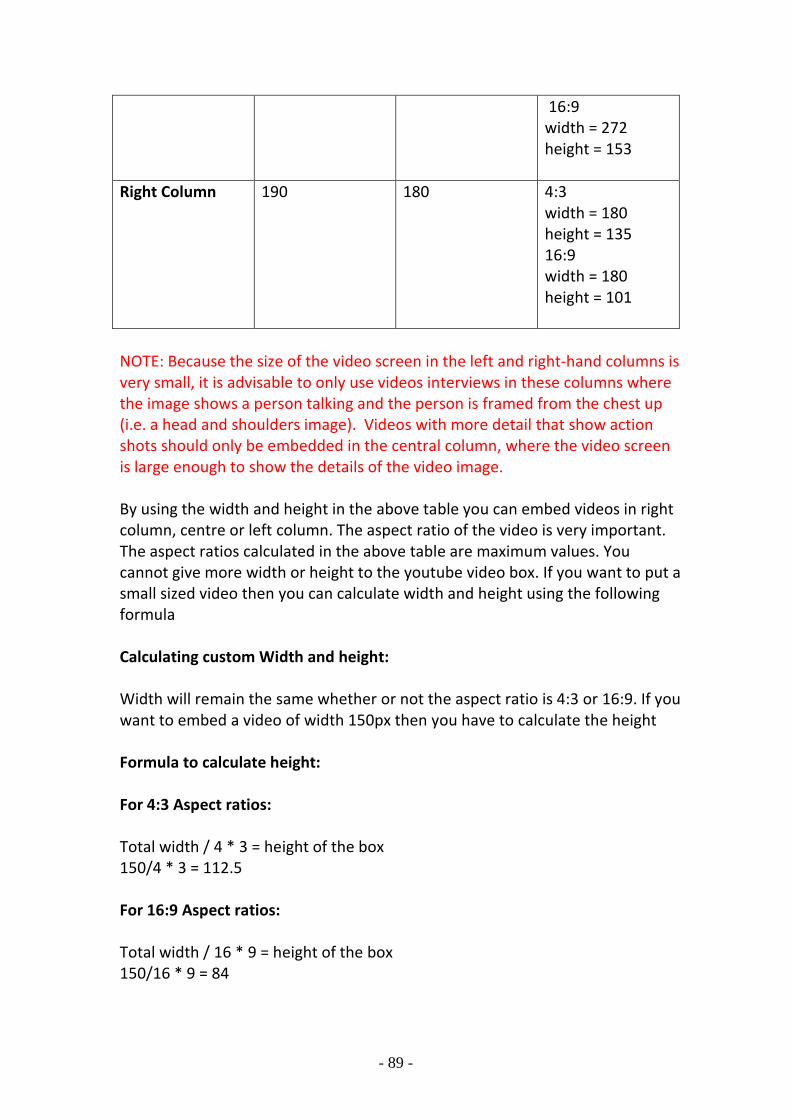
16:9
width = 272
height = 153
Right Column 190 180 4:3
width = 180
height = 135
16:9
width = 180
height = 101
NOTE: Because the size of the video screen in the left and right‐hand columns is
very small, it is advisable to only use videos interviews in these columns where
the image shows a person talking and the person is framed from the chest up
(i.e. a head and shoulders image). Videos with more detail that show action
shots should only be embedded in the central column, where the video screen
is large enough to show the details of the video image.
By using the width and height in the above table you can embed videos in right
column, centre or left column. The aspect ratio of the video is very important.
The aspect ratios calculated in the above table are maximum values. You
cannot give more width or height to the youtube video box. If you want to put a
small sized video then you can calculate width and height using the following
formula
Calculating custom Width and height:
Width will remain the same whether or not the aspect ratio is 4:3 or 16:9. If you
want to embed a video of width 150px then you have to calculate the height
Formula to calculate height:
For 4:3 Aspect ratios:
Total width / 4 * 3 = height of the box
150/4 * 3 = 112.5
For 16:9 Aspect ratios:
Total width / 16 * 9 = height of the box
150/16 * 9 = 84

- 90 -
Embedding Youtube video in Secondary page:
Follow all the steps which are needed to get the Youtube video URL for
embedding (see the pages above for details).
Go to the content server and check in a new item and select Video from as your
check in file. Fill all the required Metadata fields, in the reference field paste
the Youtube URL which you want to embed and choose ILO_REF from the
dropdownlist. See the image below for more details
Figure 95 Youtube embedding on Secondary page
- 91 -
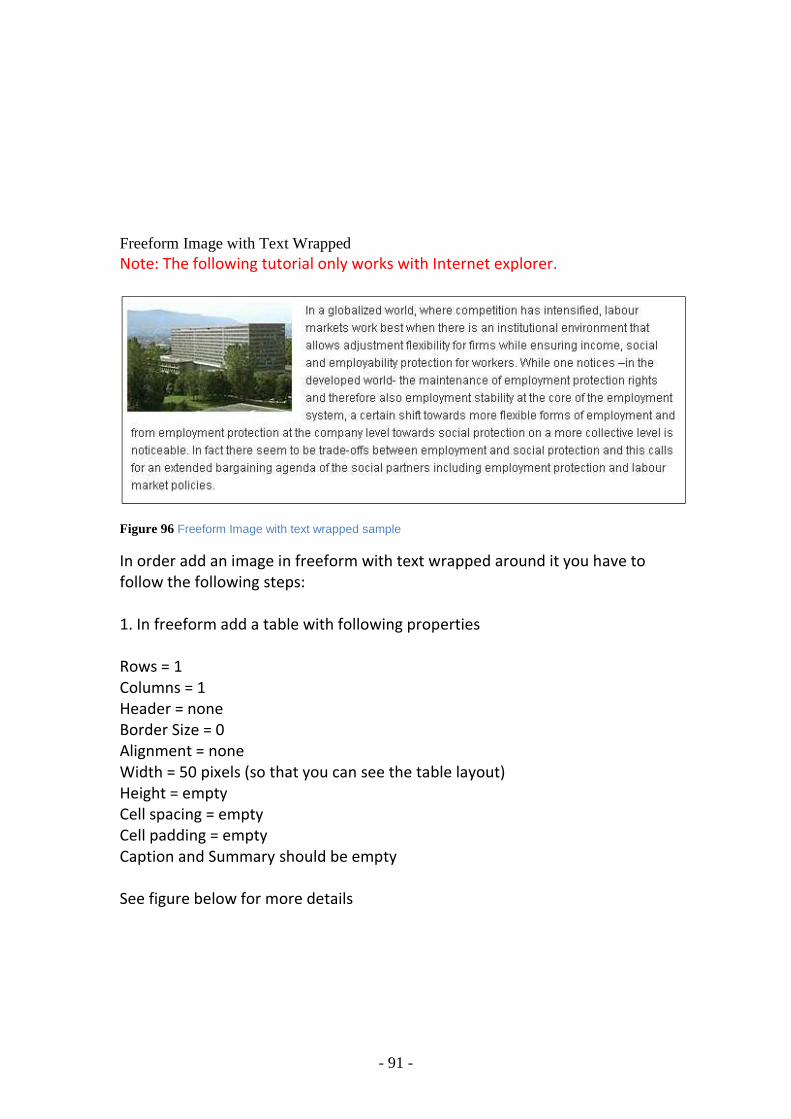
Freeform Image with Text Wrapped Note: The following tutorial only works with Internet explorer.
Figure 96 Freeform Image with text wrapped sample
In order add an image in freeform with text wrapped around it you have to
follow the following steps:
1. In freeform add a table with following properties
Rows = 1
Columns = 1
Header = none
Border Size = 0
Alignment = none
Width = 50 pixels (so that you can see the table layout)
Height = empty
Cell spacing = empty
Cell padding = empty
Caption and Summary should be empty
See figure below for more details
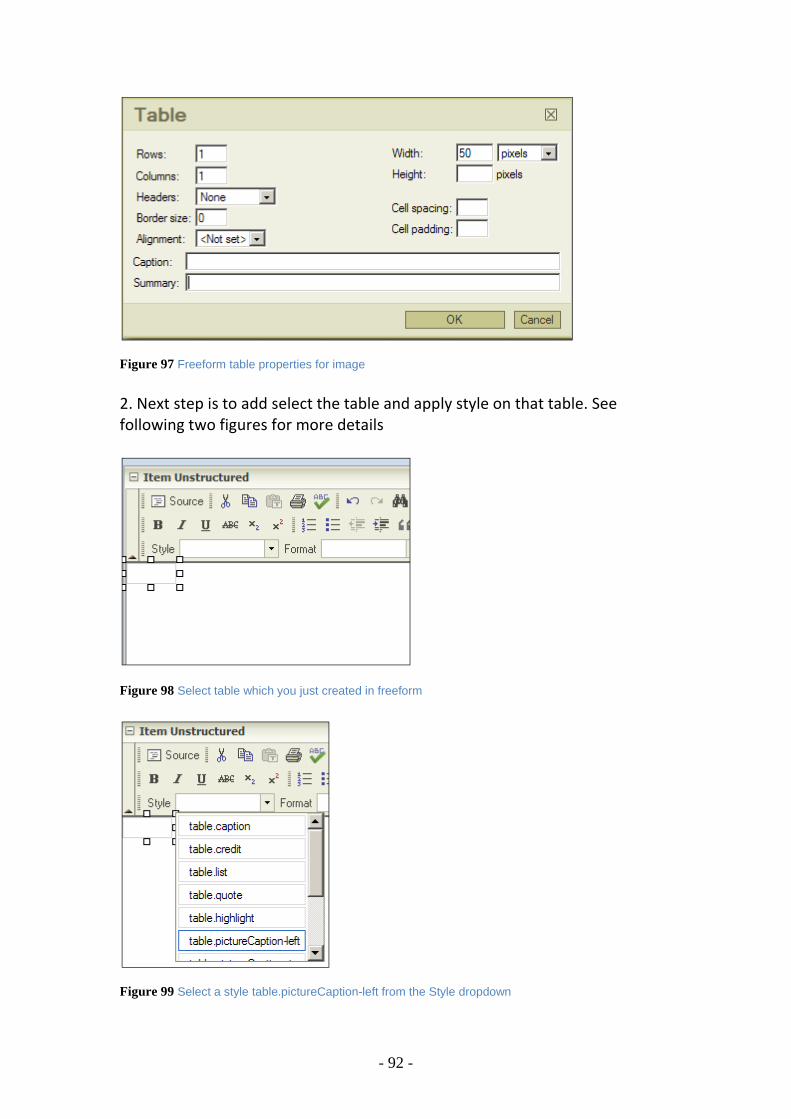
- 92 -
Figure 97 Freeform table properties for image
2. Next step is to add select the table and apply style on that table. See
following two figures for more details
Figure 98 Select table which you just created in freeform
Figure 99 Select a style table.pictureCaption-left from the Style dropdown
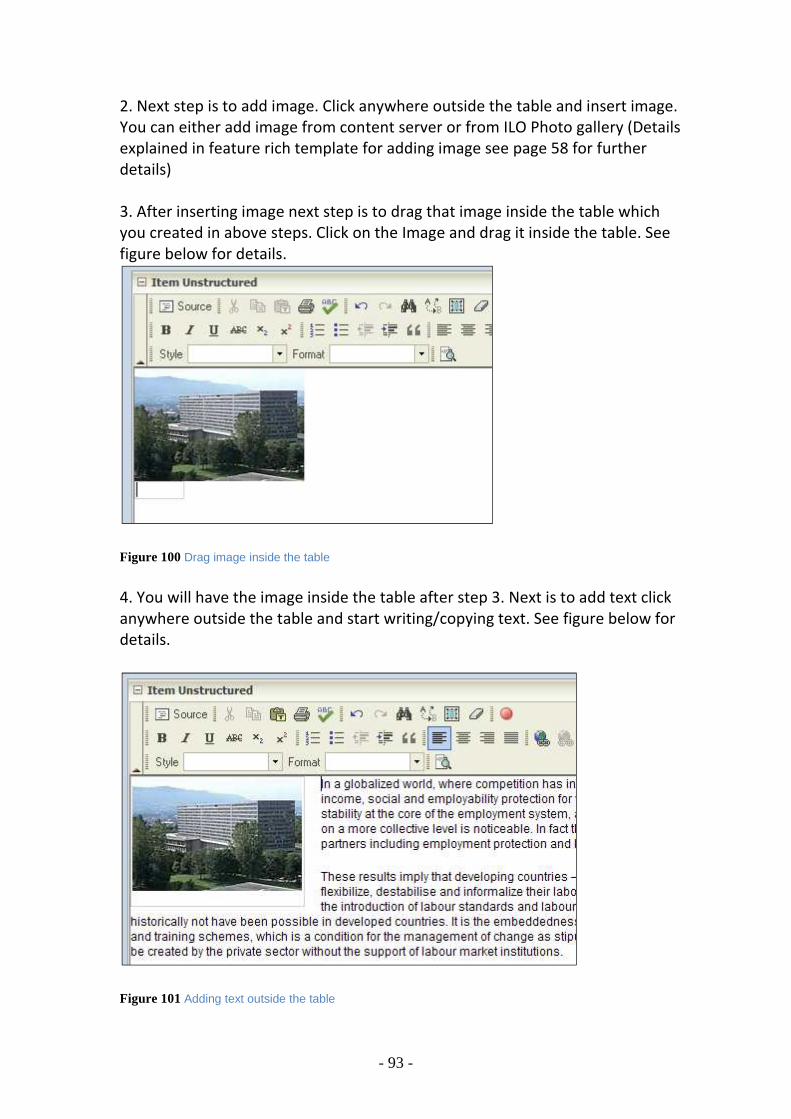
- 93 -
2. Next step is to add image. Click anywhere outside the table and insert image.
You can either add image from content server or from ILO Photo gallery (Details
explained in feature rich template for adding image see page 58 for further
details)
3. After inserting image next step is to drag that image inside the table which
you created in above steps. Click on the Image and drag it inside the table. See
figure below for details.
Figure 100 Drag image inside the table
4. You will have the image inside the table after step 3. Next is to add text click
anywhere outside the table and start writing/copying text. See figure below for
details.
Figure 101 Adding text outside the table
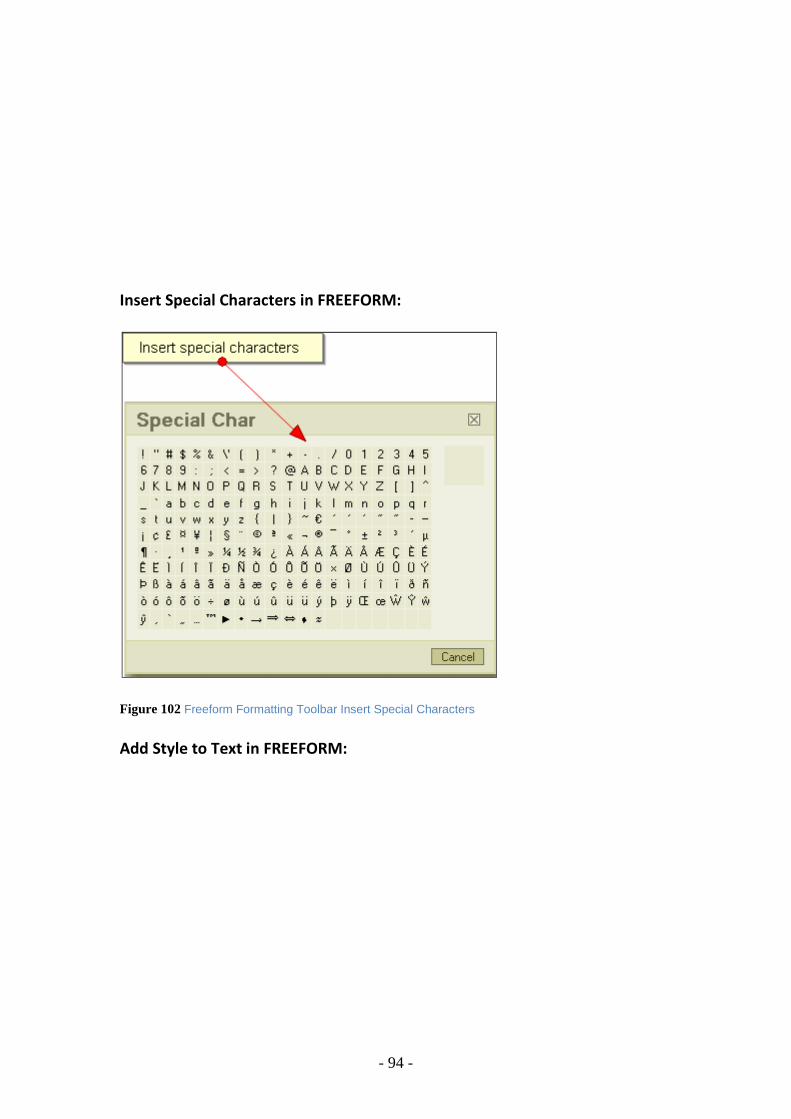
- 94 -
Insert Special Characters in FREEFORM:
Figure 102 Freeform Formatting Toolbar Insert Special Characters
Add Style to Text in FREEFORM:

- 95 -
Figure 103 Freeform Formatting Toolbar Add Style to Text
Add Format to Text in FREEFORM:
Figure 104 Freeform Formatting Toolbar Add Format to Text
Adding Image Freeform: See page 58 for details
Adding Links Freeform: See page 58 for details
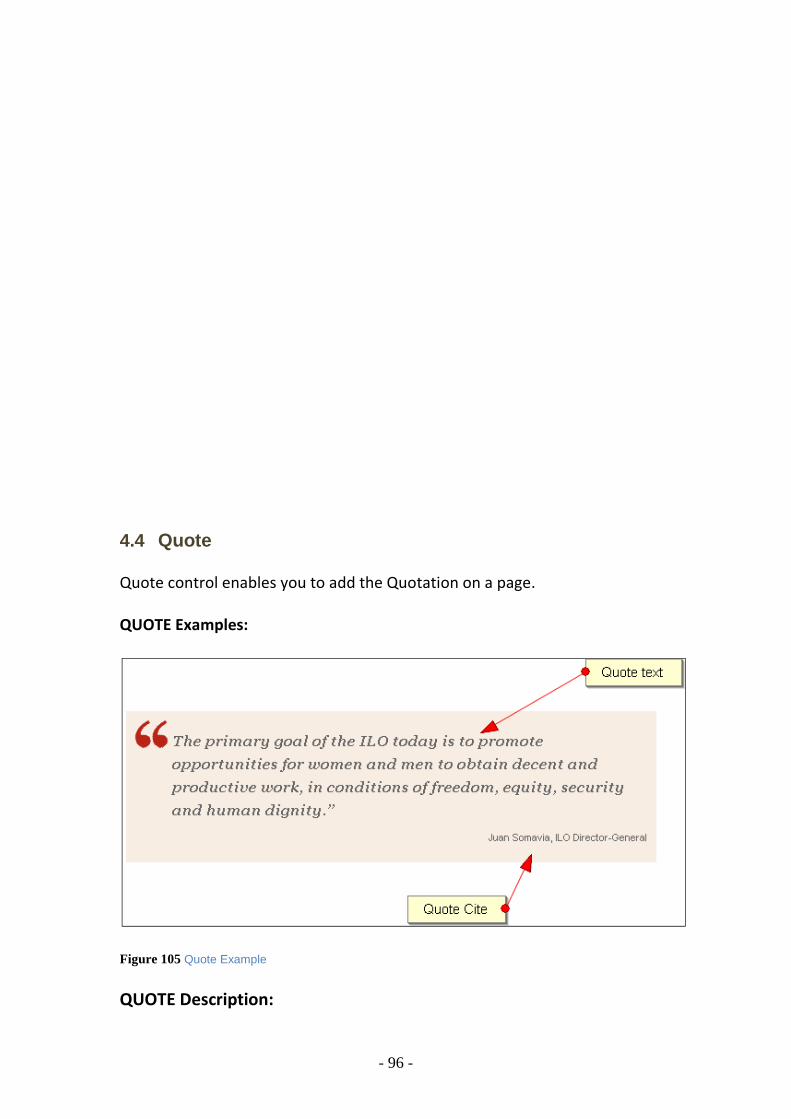
- 96 -
4.4 Quote Quote control enables you to add the Quotation on a page.
QUOTE Examples:
Figure 105 Quote Example
QUOTE Description:

- 97 -
In calendar you can add following things
Quote Text
Quote Cite (Signatures)
Adding Contents to QUOTE 1. The first step is to assign the Region Content to the empty placeholder.
Figure 106 Assign Region Content to empty Placeholder
2. Next step is to select the region content from the drop down list
Figure 107 Assign Region Content to empty Placeholder
3. Repeat the steps from page 65 to 68.
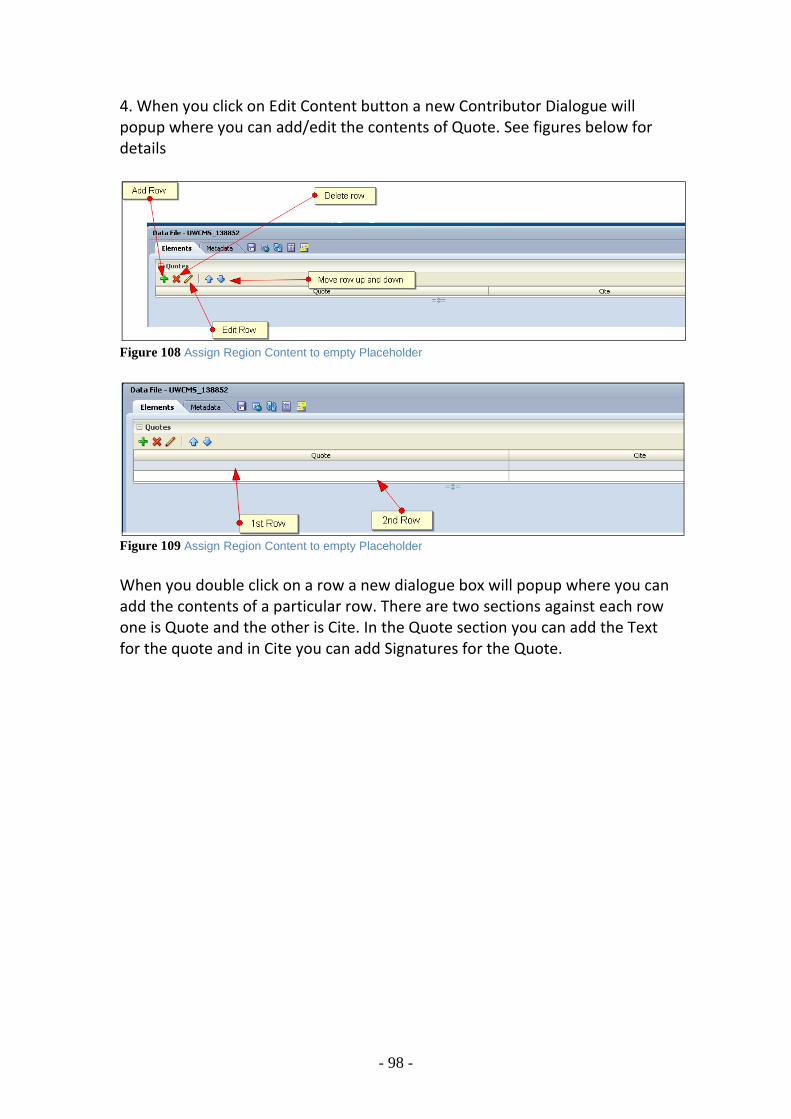
- 98 -
4. When you click on Edit Content button a new Contributor Dialogue will
popup where you can add/edit the contents of Quote. See figures below for
details
Figure 108 Assign Region Content to empty Placeholder
Figure 109 Assign Region Content to empty Placeholder
When you double click on a row a new dialogue box will popup where you can
add the contents of a particular row. There are two sections against each row
one is Quote and the other is Cite. In the Quote section you can add the Text
for the quote and in Cite you can add Signatures for the Quote.

- 99 -
Figure 110 Assign Region Content to empty Placeholder
4.5 Image Image control lets you add images on a page.
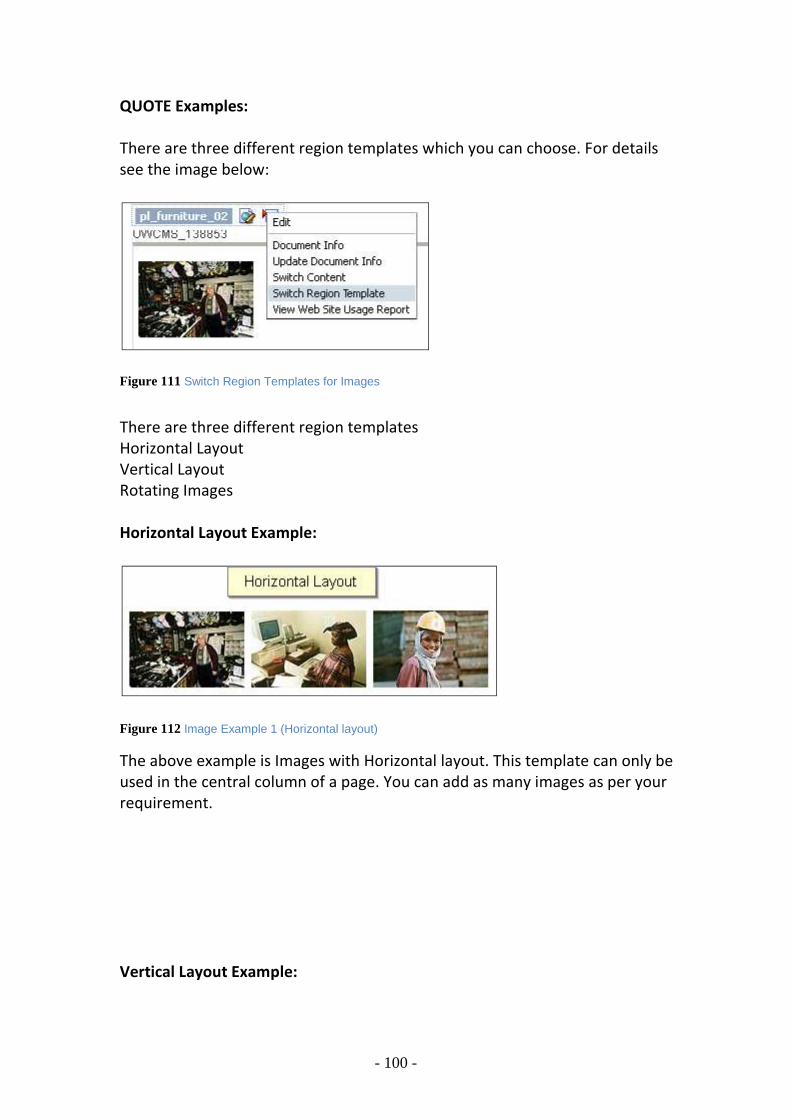
- 100 -
QUOTE Examples:
There are three different region templates which you can choose. For details
see the image below:
Figure 111 Switch Region Templates for Images
There are three different region templates
Horizontal Layout
Vertical Layout
Rotating Images
Horizontal Layout Example:
Figure 112 Image Example 1 (Horizontal layout)
The above example is Images with Horizontal layout. This template can only be
used in the central column of a page. You can add as many images as per your
requirement.
Vertical Layout Example:

- 101 -
Figure 113 Assign Region Content to empty Placeholder
The above example is Images with Vertical layout. This template can only be
used either in the right column or left column of a page. You can add as many
images as per your requirement.
Rotating Image Example:
Figure 114 Assign Region Content to empty Placeholder
The above example is Images with Rotating Images. This template can only be
used either in the right column or left column of a page. This template will
rotate (change) the image after every 4 seconds. You can add as many images
as per your requirement.
4.5.1 Adding Contents to IMAGES

- 102 -
1. The first step is to assign the Region Content to the empty placeholder.
Figure 115 Assign Region Content to empty Placeholder
2. Next step is to select the region content from the drop down list
Figure 116 Assign Region Content to empty Placeholder
3. Repeat the steps from page 65 to 68. 4. When you click on Edit Content button a new Contributor Dialogue will
popup where you can add/edit the contents of IMAGE. See figure below for
details

- 103 -
Figure 117 IMAGE dialogue descriptions
Figure 118 IMAGE dialogue descriptions

- 104 -
Double click on the row will popup a row dialogue where you can add contents
to a particular row.
Figure 119 Row Dialogue descriptions
In the above figure there are three sections in row edit dialogue.
Image: You can add images by searching it in content server or by searching it in
Photo gallery
Credit: Through this option you can add credits to the image.
Caption: through this option you can add caption to the image.

- 105 -
4.6 New Youtube Video Furniture Implementation Contributors were having problems in embedding Youtube videos in the ILO websites. The main problem was the size of the video, which size would be suitable for the central column, the right column, the left column, etc. We have now simplified this and it is super easy for contributors to embed Youtube videos in ILO websites. The following are the necessary steps needed to be followed to embed Youtube videos: Assign a template as FEATURE RICH to an empty place holder
Figure 120 Assign template as feature rich

- 106 -
Next step, change the region template
Figure 121 Change the region template Select region template for Youtube video which is “YOUTUBE FURNITURE - embed youtube videos (RGTPL_ITEMS_13)”
Figure 122 Select the region template
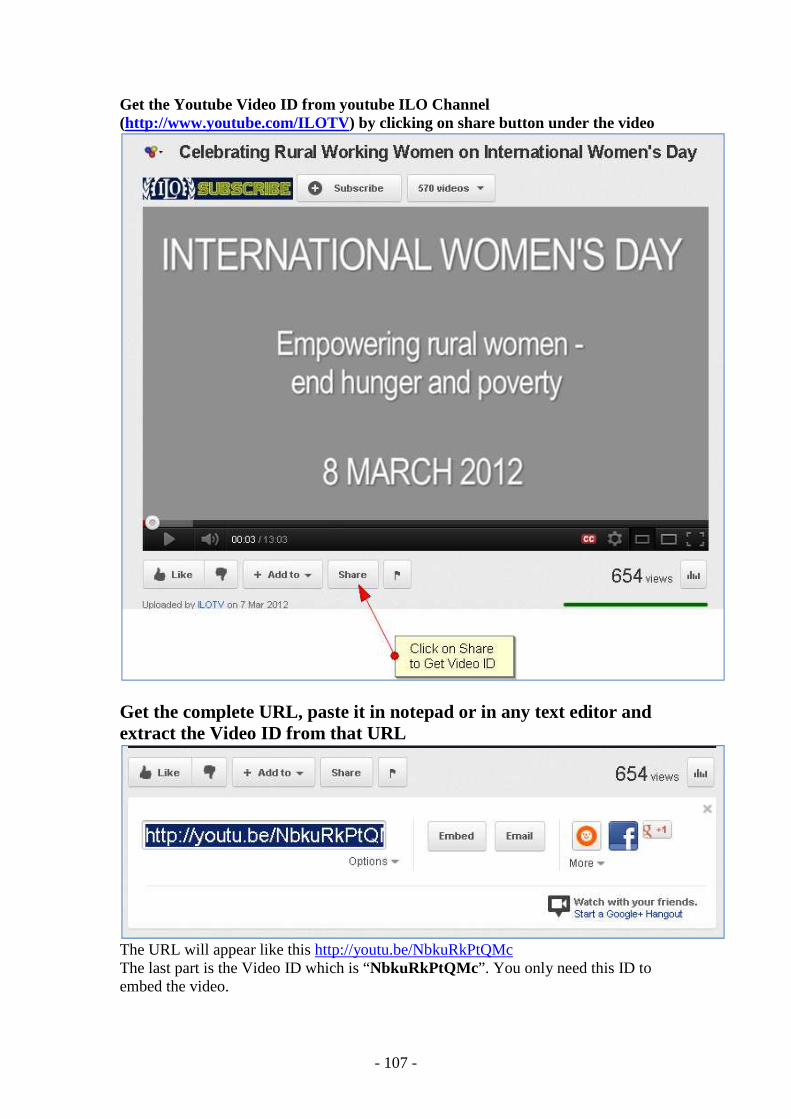
- 107 -
Get the Youtube Video ID from youtube ILO Channel (http://www.youtube.com/ILOTV ) by clicking on share button under the video
Get the complete URL, paste it in notepad or in any text editor and extract the Video ID from that URL
The URL will appear like this http://youtu.be/NbkuRkPtQMc The last part is the Video ID which is “NbkuRkPtQMc ”. You only need this ID to embed the video.

- 108 -
Edit the contents of the template which you assigned to an empty placeholder in the step 1 and Add contents to the row.
Figure 123 Adding contents to feature rich template dialogue box
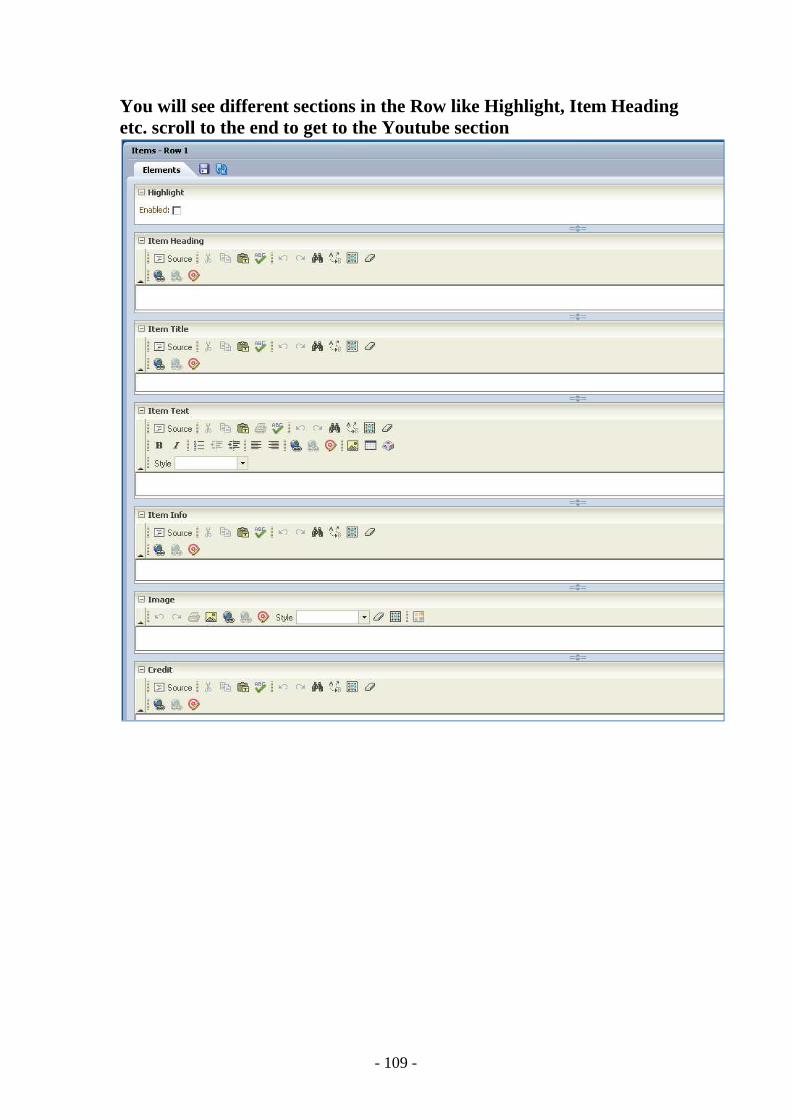
- 109 -
You will see different sections in the Row like Highlight, Item Heading etc. scroll to the end to get to the Youtube section

- 110 -
Paste the Video ID which you got from step 5 in this section

- 111 -
Last step is to select the aspect ratio which depends on the video aspect ratio (to avoid the black portion which appears on the sides or on the top, bottom)

- 112 -
Update the template by clicking save button and the video will appear like this on the page
You don’t have to worry about the size of the video it will be setup automatically depending on the column where you are embedding the video. I added the video in central column that is why it is big. You can also add contents to all other fields in the feature rich row except for the Image.

- 113 -
Examples:
Example 1 showing all the Possible contents which you can add with a Video e.g., Main heading, item heading, Item Title, Item Caption etc.

- 114 -
Example 2 showing all the possibilities of embedding videos on a page using 16:9 Ratios
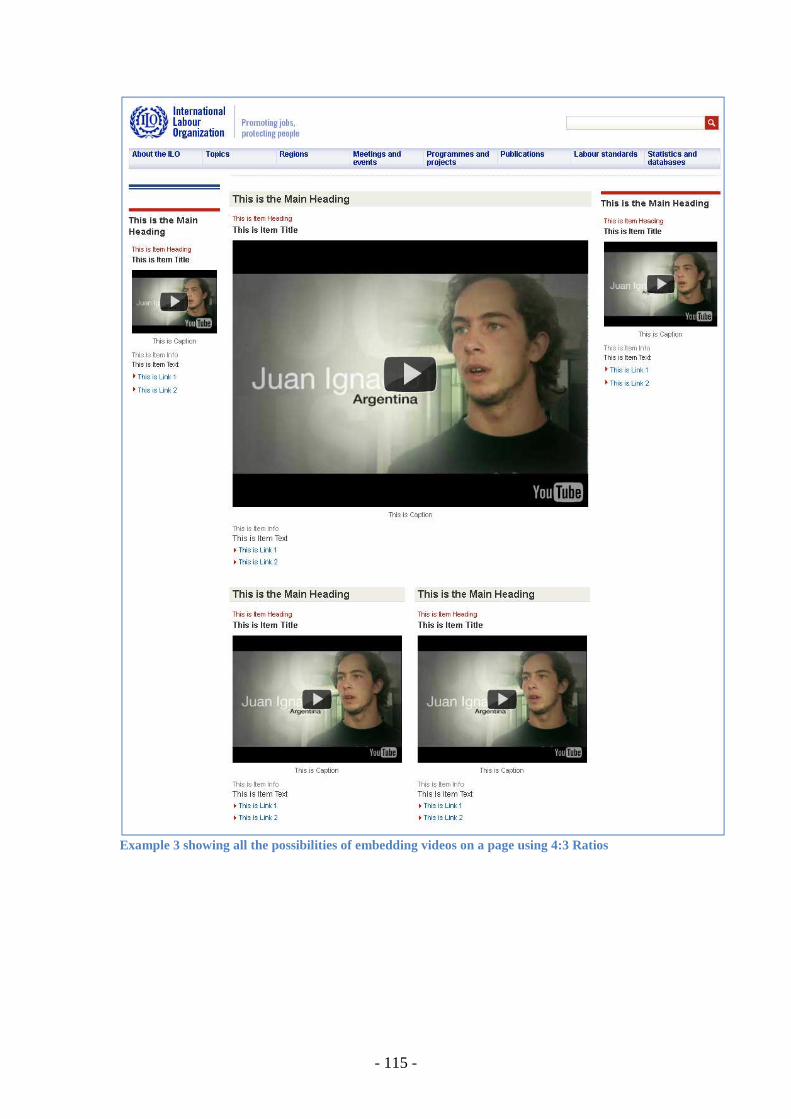
- 115 -
Example 3 showing all the possibilities of embedding videos on a page using 4:3 Ratios
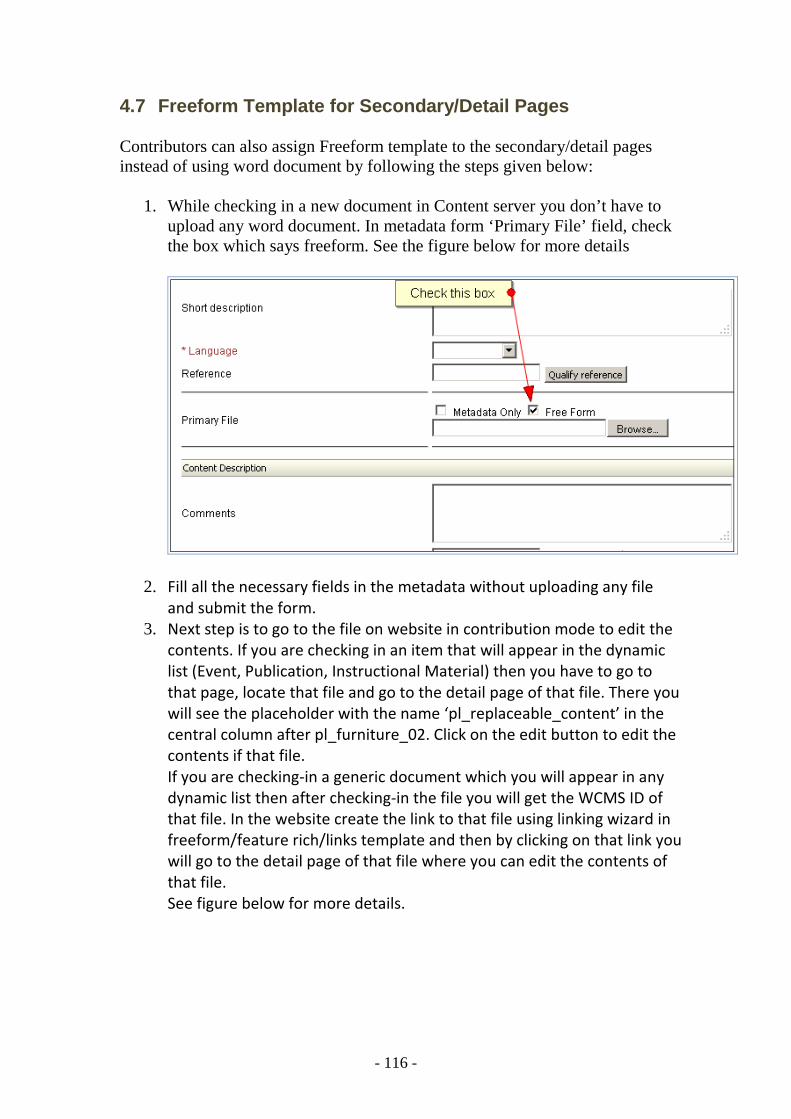
- 116 -
4.7 Freeform Template for Secondary/Detail Pages Contributors can also assign Freeform template to the secondary/detail pages instead of using word document by following the steps given below:
1. While checking in a new document in Content server you don’t have to upload any word document. In metadata form ‘Primary File’ field, check the box which says freeform. See the figure below for more details
2. Fill all the necessary fields in the metadata without uploading any file
and submit the form.
3. Next step is to go to the file on website in contribution mode to edit the
contents. If you are checking in an item that will appear in the dynamic
list (Event, Publication, Instructional Material) then you have to go to
that page, locate that file and go to the detail page of that file. There you
will see the placeholder with the name ‘pl_replaceable_content’ in the
central column after pl_furniture_02. Click on the edit button to edit the
contents if that file.
If you are checking‐in a generic document which you will appear in any
dynamic list then after checking‐in the file you will get the WCMS ID of
that file. In the website create the link to that file using linking wizard in
freeform/feature rich/links template and then by clicking on that link you
will go to the detail page of that file where you can edit the contents of
that file.
See figure below for more details.
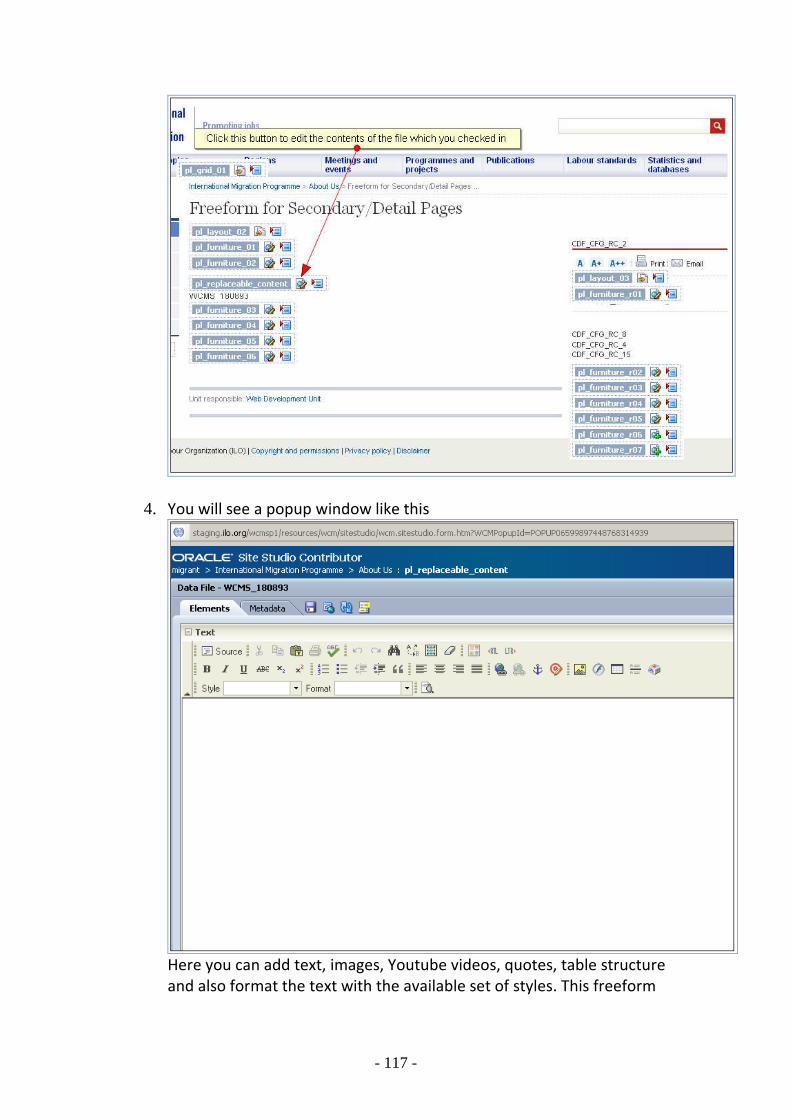
- 117 -
4. You will see a popup window like this
Here you can add text, images, Youtube videos, quotes, table structure
and also format the text with the available set of styles. This freeform

- 118 -
template works in the same way as it works for primary pages. When
you are done editing contents click on update to save the contents.
4.7.1 Check-in Similar directly from Secondary/Detail page: With the freeform functionality added to the WCMS there is a new functionality
which is check‐in similar directly from secondary/detail pages. In order to do a
check in similar from secondary page you have to go to the detail page of that
file in contributions mode. Click on the options button and then select the
option check‐in similar to perform a check.in similar of that file. See the image
below for more details.

- 119 -
4.7.2 Youtube Video Embedding on Secondary page Freeform: In order to embed youtube videos on secondary/detail pages freeform you
have to follow the given steps:
Important Terms:
Aspect Ratio: The aspect ratio describes the proportional relationship between
the width of a video image and its height. There are two aspect ratios for
Videos one is 16:9 and other is 4:3. For a video with 16:9 aspect ratios, think of
the dimensions of the screen in HD films or "wide screen". 16:9 is becoming
more and more common, and 4:3, which is more of a square‐ish rectangular
shape, is becoming less common. If you are having trouble identifying whether
a video has a 16:9 or 4:3 aspect ratio please contact [email protected]
Aspect Ratio also depends where you are adding video on the page. If you are
adding video in Right or Left column then you should always use 4:3 ratios while
in central column you can use either 4:3 or 16:9.
Youtube Video Parameters: There is a set of parameters which we can use to
customize the playback experience of the video.
Insert Table:
First you have to insert a table by clicking on table button in freeform tool bar
(see figure 85 above for more details). When you click on table a popup window
appears asking for table properties. Provide attributes as following
Rows = 1 (if you want to add links or text under video then add two rows and in
the 2nd
row you can add links, text etc)
Columns = 1
Header = none
Border Size = 0
Alignment = center
Width = (depends on aspect ratio and size you selected for video)
Height = (depends on aspect ratio and size you selected for video)
Cell spacing = empty
Cell padding = empty
Caption and Summary should be empty
See the image below for more details

- 120 -
Table properties for Youtube Video
Get URL for Youtube Video:
In order to embed Youtube video in freeform you need the Youtube video URL,
for that go to following URL www.youtube.com/ilotv
Showing ILO Youtube channel
Select the video which you want to embed. Click on share button (see figure
above for details)

- 121 -
When you click on share you will see the following part (see figure below) just
underneath share button
After clicking share button
Copy the URL which you see in the above figure. The last part of the URL is the
youtube video ID.
For example in the following URL
http://youtu.be/TUFswO0HRw8
This is the youtube Video ID
TUFswO0HRw8
Copy this Video Id and paste it at the end of the following URL
http://www.youtube.com/v/
After copying the video ID your URL will become
http://www.youtube.com/v/TUFswO0HRw8
Addition of Youtube Video Parameters:
In order to add the Video parameters you have to use the following code and
attach it at the end of the URL which you get from above step
?hl=en&feature=player_embedded&version=3&showinfo=0&a
mp;cc_load_policy=0&fs=0&autohide=1&rel=0&modestb
randing=1
After adding the parameters your Final URL for video to embed in freeform will
be like this
http://www.youtube.com/v/TUFswO0HRw8
http://www.youtube.com/v/TUFswO0HRw8?hl=en&feature=player_emb
edded&version=3&showinfo=0&cc_load_policy=0&fs=0&
amp;autohide=1&rel=0&modestbranding=1

- 122 -
Paste this URL in the Free form (see image below).
Freeform Formatting Toolbar Insert/Edit Flash/Youtube Video
Calculation of video Sizes (Wdith and Height):
If the page layout is of three columns i.e. left navigation, central column and
right column, then follow the following standards to embed youtube video
Total Width Maximum Width
Allowed
Video Ratio
Centre Column
540
525
4:3
width = 525
height = 394
16:9
width = 525
height = 295
NOTE: Because the size of the video screen in the left and right‐hand columns is
very small, it is advisable to only use videos interviews in these columns where
the image shows a person talking and the person is framed from the chest up
(i.e. a head and shoulders image). Videos with more detail that show action
shots should only be embedded in the central column, where the video screen
is large enough to show the details of the video image.

- 123 -
By using the width and height in the above table you can embed videos in right
column, centre or left column. The aspect ratio of the video is very important.
The aspect ratios calculated in the above table are maximum values. You
cannot give more width or height to the youtube video box. If you want to put a
small sized video then you can calculate width and height using the following
formula
Calculating custom Width and height:
Width will remain the same whether or not the aspect ratio is 4:3 or 16:9. If you
want to embed a video of width 150px then you have to calculate the height
Formula to calculate height:
For 4:3 Aspect ratios:
Total width / 4 * 3 = height of the box
150/4 * 3 = 112.5
For 16:9 Aspect ratios:
Total width / 16 * 9 = height of the box
150/16 * 9 = 84
4.7.3 Possibility of offering Excel (xls, xlsx) and Powerpoint (ppt, pptx) files for download.
If you upload Excel or Powerpoint files as primary files they will now be offered for download in their original format and not converted to PDF any more. If you wish to offer them as PDFs convert them to PDF offline and upload the resulting PDF as a primary file. 4.7.4 Introduction of headings on secondary pages To provide context and clarity for the title you can use a heading that will be displayed above the title on the secondary page and also in the lists. This heading can be entered in the Description Heading metadata of the check-in form. You can also use it when you have multiple content items that are part of a larger collection, e.g. “International Labour Conference 2013”, “9th European Regional Meeting” etc. – the title will be specific to that content but you can use the heading to set it in context.
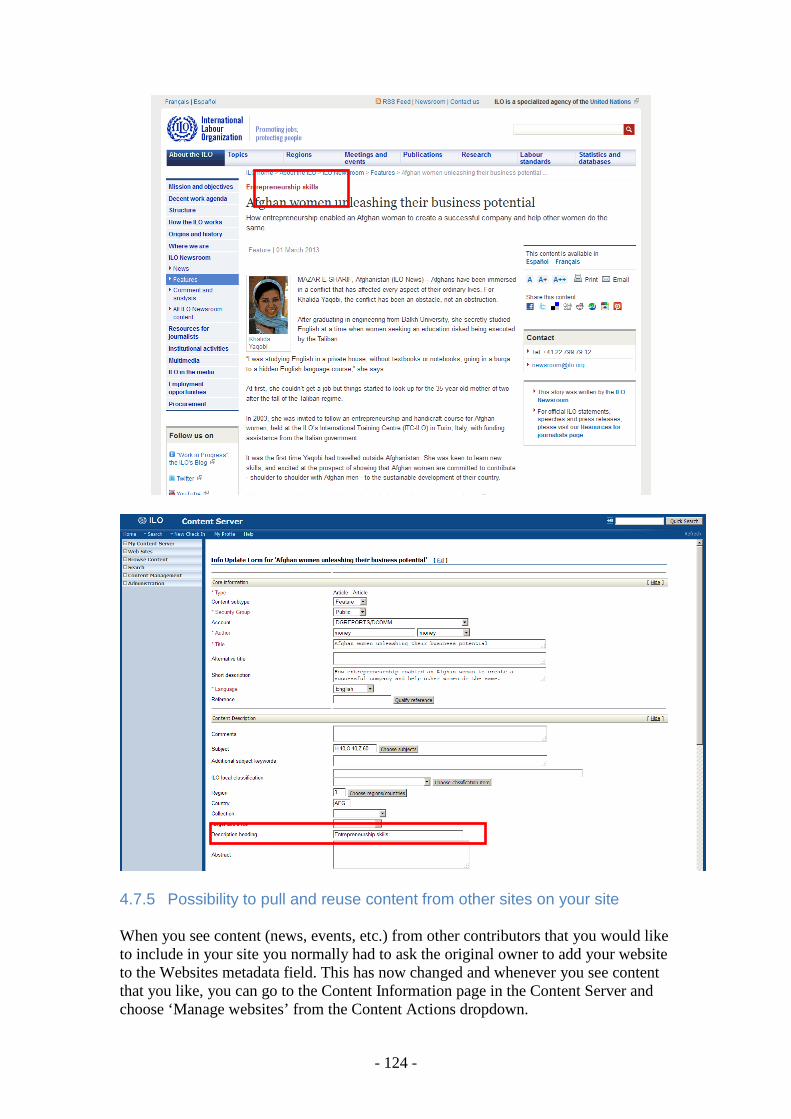
- 124 -
4.7.5 Possibility to pull and reuse content from other sites on your site When you see content (news, events, etc.) from other contributors that you would like to include in your site you normally had to ask the original owner to add your website to the Websites metadata field. This has now changed and whenever you see content that you like, you can go to the Content Information page in the Content Server and choose ‘Manage websites’ from the Content Actions dropdown.

- 125 -
You will then see a pop-up window with a list of websites – a checkbox will be available next to the sites you manage. Check or uncheck your website and click ‘Update website’ – the content will now appear in your site. 4.7.6 Allow choice of language for subtitles in the Youtube video template For YouTube video embeds, you can now choose which sub-title language you want to have displayed when the video plays. You use the Feature Rich furniture: “YOUTUBE FURNITURE – embed youtube videos (RGTPL_ITEMS_13)” and choose the desired language from a dropdown list appearing under 'Subtitles language' in the video furniture form.

- 126 -
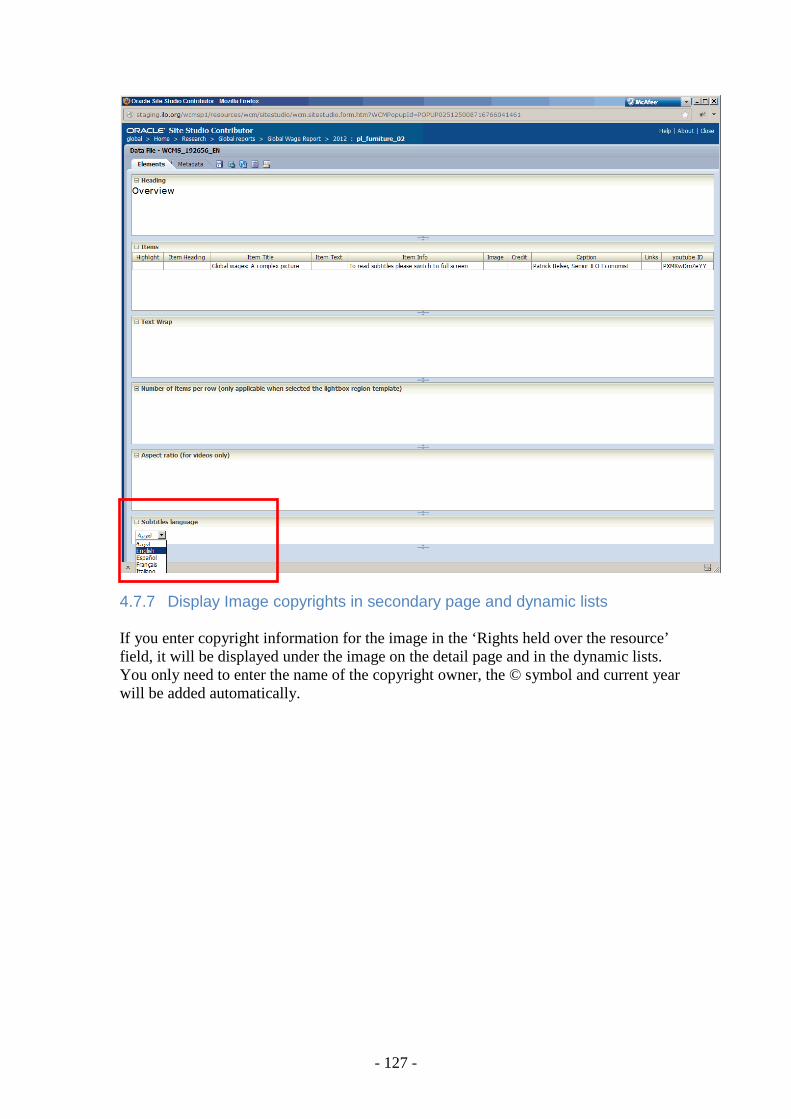
- 127 -
4.7.7 Display Image copyrights in secondary page and dynamic lists If you enter copyright information for the image in the ‘Rights held over the resource’ field, it will be displayed under the image on the detail page and in the dynamic lists. You only need to enter the name of the copyright owner, the © symbol and current year will be added automatically.

- 128 -
4.7.8 Possibility to have multiple formats of the same document It is now possible to offer more than one file format of the same content for download. In practice, it means that you can offer a PDF and an EPUB format of the same publication. The steps to follow are:
1. After checking in the primary format, use Check‐in similar to check the same content
in each of the additional format. You can leave the metadata as it is – the only
difference will be the primary file you are uploading.

- 129 -
2. Before submitting the ‘Check in similar’ form make sure you select ‘Yes’ in the ‘Is
Format’ field on the form. This will prevent this specific item from appearing in the
dynamic lists; otherwise, there would be one entry for each format in your list of
publications.
3. Go back to the original item and establish a relationships to all the additional format
items by using the ‘is format of’ qualification that is now available.
We have also reviewed the display of the Download box to accommodate the new functionalities. The languages are now listed on separate rows, with the available formats for each language, and the filesize is now displayed in megabytes.

- 130 -
Related Documents