Welcome message from author
This document is posted to help you gain knowledge. Please leave a comment to let me know what you think about it! Share it to your friends and learn new things together.
Transcript
WARNING - When using electric products, basic precau-tions should always be followed, including the following.
1. Read all the instructions before using the product.
2. Do not use this product near water - for example, near a bathtub, washbowl, kitchen sink, in a wet basement, or near a swimming pool, or the like.
3. This product, either alone or in combination with an amplifier and headphones or speakers, may becapable of producing sound levels that could cause permanent hearing loss. Do not operate fora long period of time at a high volume level or at alevel that is uncomfortable. If you experience any hearing loss or ringing in the ears, you should consult an audiologist.
4. The product should be located so that its location or position does not interfere with its proper ventilation.
5. The product should be located away from heat sources such as radiators, heat registers, or other products that produce heat.
6. Keep the instrument away from electrical motors, neon signs, fluorescent light fixtures and othersources.
7. This product should be connected to a power supply only of the type described in the operating instructions or as marked on the product.
8. This product may be equipped with a polarized line plug (one blade wider than the other). This is a safety feature. If you are unable to insert the plug into the outlet, contact an electri-cian to replace your obsolete outlet. Do not defeatthe safety purpose of the plug.
9. Always turn the power off when the instrument is not in use. The power supply cord of the product should be unplugged from the outlet when left unused for a long period of time.
10. During an electrical storm, turn off the power and unplug the product.
11. Care should be taken so that objects do not fall and liquids are not spilled into the enclosure through openings.
12. The product should be serviced by qualified personnel when:A. The power supply cord or the plug has been damaged; orB. Objects have fallen, or liquids have been spilled into the product; orC. The product has been exposed to rain; D. The product does not appear to operate nor-mally or exhibits a marked change in performance;orE. The product has been dropped, or the enclosure damaged.
13. Do not attempt to service the product beyond that described in the user-maintenance instruc-tions. All other servicing should be referred to qualified service personnel.
IMPORTANT SAFETY INSTRUCTIONS
SAVE THESE SAFETY INSTRUCTIONS
WARNINGTO REDUCE THE RISK OF FIREOR ELECTRICAL SHOCK, DONOT EXPOSE THIS PRODUCT TORAIN OR MOISTURE.
AVIS: RISQUE DE CHOC ELECTRIQUE - NE PAS OUVRIR
CAUTION - TO REDUCE THE RISK OF ELECTRICAL SHOCK, DO NOT REMOVE COVER (OR BACK). NO-USER SERVICEABLE PARTS INSIDE. REFER SERVICING TO QUALIFIED SERVICE PERSONNEL
The lightning flash with arrowheadsymbol, within an equilateral triangle,is intended to alert the user to thepresence of uninsulated “dangerousvoltage” within the products enclosurethat may be of sufficient magnitude toconstitute a risk of electric shock topersons.
The exclamation point within an equilateral triangle is intended to alert the user to the presence ofimportant operating and maintenance(servicing) instructions in the literatureaccompanying the product.
CAUTIONRISK OF ELECTRIC SHOCK
DO NOT OPEN

Registration Card
o Check the box if you want to receive free Lowrey Music News Email.
Your Full Name (Please Print)
Address
City, State, Zip
Phone Number Email Address
Date of Purchase Lowrey Dealer Name & City
__ __ __ __ __ __-__ __ __ __ __-__ __ __ __ __Serial Number
BUSINESS REPLY MAILFIRST CLASS PERMIT NO. 142 LaGrange Park, Illinois
POSTAGE WILL BE PAID BY ADDRESSEE
LOWREY CUSTOMER SERVICE825 East 26th StreetP.O. Box 1270LaGrange Park, IL. 60526
NO POSTAGENECESSARYIF MAILED INTHE UNITED
STATES
Welcome To The Lowrey Family!The A200 “Encore” delivers an incredible variety of recreational music making opportunities with sounds thatspan the globe and features that open up a world of expressive possibilities. Strikingly authentic sounds canbe enjoyed effortlessly with the touch of a single preset button; or dive into a well-crafted menu of controlsthat gives you the creative power to explore music as you wish, when you wish and how you wish.
Your hobby of making music; the joy and the sense of satisfaction that music making brings to your life, willtruly start all over again with the Encore!
Here are just a few of the exciting, music making features on the Encore:• Record and share your music with the easy-to-use Music Recorder.• A brightly illuminated Information Center display, with contrast adjustment, is easy to see.• 64 Rhythm Styles, fully-orchestrated! 16 styles with 4 dynamic variations each.• 576 Rhythm Presets. 9 for each rhythm style.• 18 Category Presets. 2 Category Preset groups with 9 presets per category.• 9 Bank Presets, plus Memorize so you can save your own creations!• 200 Song Setup Presets!• 101 Genius sounds from which to choose!• Natural wood cabinet in beautiful Cherry Finish.• Padded bench opens for music storage.• Two channel, six speaker audio system delivers room-filling sound.• A six-section Graphic Mixer so you control the sound.• Stereo Headphone output so you can play whenever you want.
The joy of owning and playing the Lowrey Encore is the self-empowering music making capabilities youreceive. So go ahead... press those buttons... discover all the wonderfully intuitive features that will let youreach your music making goals.
Try the numerous PRESETS first. Presets are the fastest and easiest way of getting the best sounds from theEncore.
Take time to read through this book and use it as a reference source as you play. For additional help, visit themusic making professionals at your local Lowrey store.
From all of us at Lowrey...Thank you for choosing the Lowrey Encore for your home!
Encore
Headphones
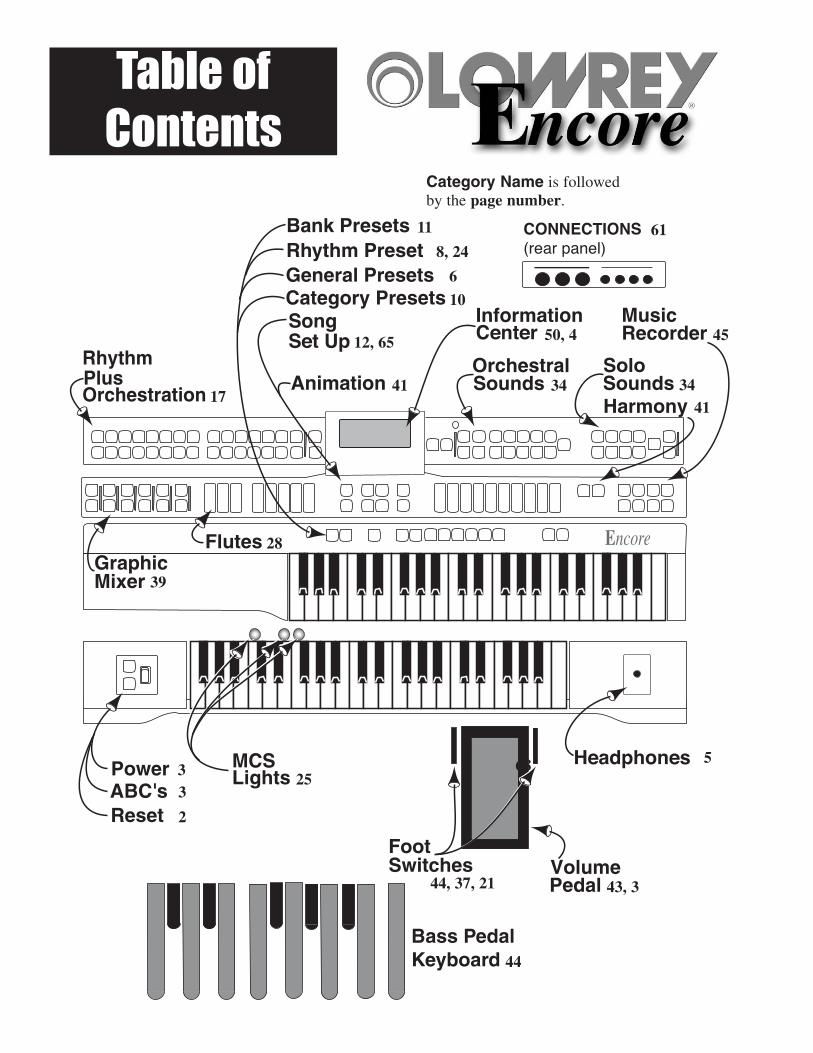
Category Name is followedby the page number.
Table of Contents
11
8, 24
6
10
50, 4
34
4512, 65
41
61
41
28
39
5
43, 3
6825
2
33
44
1734
44, 37, 21
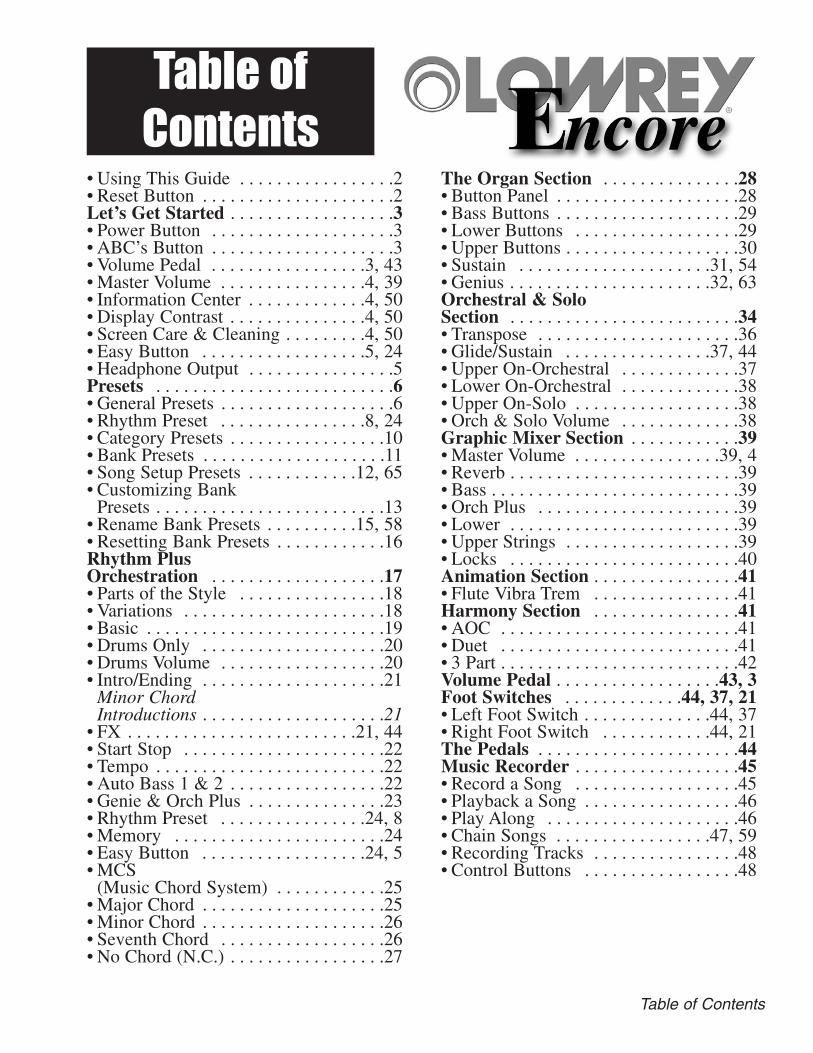
Table of Contents
• Using This Guide . . . . . . . . . . . . . . . . .2• Reset Button . . . . . . . . . . . . . . . . . . . . .2Let’s Get Started . . . . . . . . . . . . . . . . . .3• Power Button . . . . . . . . . . . . . . . . . . . .3• ABC’s Button . . . . . . . . . . . . . . . . . . . .3• Volume Pedal . . . . . . . . . . . . . . . . .3, 43• Master Volume . . . . . . . . . . . . . . . .4, 39• Information Center . . . . . . . . . . . . .4, 50• Display Contrast . . . . . . . . . . . . . . .4, 50• Screen Care & Cleaning . . . . . . . . .4, 50• Easy Button . . . . . . . . . . . . . . . . . .5, 24• Headphone Output . . . . . . . . . . . . . . . .5Presets . . . . . . . . . . . . . . . . . . . . . . . . . .6• General Presets . . . . . . . . . . . . . . . . . . .6• Rhythm Preset . . . . . . . . . . . . . . . .8, 24• Category Presets . . . . . . . . . . . . . . . . .10• Bank Presets . . . . . . . . . . . . . . . . . . . .11• Song Setup Presets . . . . . . . . . . . .12, 65• Customizing Bank
Presets . . . . . . . . . . . . . . . . . . . . . . . . .13• Rename Bank Presets . . . . . . . . . .15, 58• Resetting Bank Presets . . . . . . . . . . . .16Rhythm Plus Orchestration . . . . . . . . . . . . . . . . . . .17• Parts of the Style . . . . . . . . . . . . . . . .18• Variations . . . . . . . . . . . . . . . . . . . . . .18• Basic . . . . . . . . . . . . . . . . . . . . . . . . . .19• Drums Only . . . . . . . . . . . . . . . . . . . .20• Drums Volume . . . . . . . . . . . . . . . . . .20• Intro/Ending . . . . . . . . . . . . . . . . . . . .21
Minor Chord Introductions . . . . . . . . . . . . . . . . . . . .21
• FX . . . . . . . . . . . . . . . . . . . . . . . . .21, 44• Start Stop . . . . . . . . . . . . . . . . . . . . . .22• Tempo . . . . . . . . . . . . . . . . . . . . . . . . .22• Auto Bass 1 & 2 . . . . . . . . . . . . . . . . .22• Genie & Orch Plus . . . . . . . . . . . . . . .23• Rhythm Preset . . . . . . . . . . . . . . . .24, 8• Memory . . . . . . . . . . . . . . . . . . . . . . .24• Easy Button . . . . . . . . . . . . . . . . . .24, 5• MCS
(Music Chord System) . . . . . . . . . . . .25• Major Chord . . . . . . . . . . . . . . . . . . . .25• Minor Chord . . . . . . . . . . . . . . . . . . . .26• Seventh Chord . . . . . . . . . . . . . . . . . .26• No Chord (N.C.) . . . . . . . . . . . . . . . . .27
Table of Contents
The Organ Section . . . . . . . . . . . . . . .28• Button Panel . . . . . . . . . . . . . . . . . . . .28• Bass Buttons . . . . . . . . . . . . . . . . . . . .29• Lower Buttons . . . . . . . . . . . . . . . . . .29• Upper Buttons . . . . . . . . . . . . . . . . . . .30• Sustain . . . . . . . . . . . . . . . . . . . . .31, 54• Genius . . . . . . . . . . . . . . . . . . . . . .32, 63Orchestral & Solo Section . . . . . . . . . . . . . . . . . . . . . . . . .34• Transpose . . . . . . . . . . . . . . . . . . . . . .36• Glide/Sustain . . . . . . . . . . . . . . . .37, 44• Upper On-Orchestral . . . . . . . . . . . . .37• Lower On-Orchestral . . . . . . . . . . . . .38• Upper On-Solo . . . . . . . . . . . . . . . . . .38• Orch & Solo Volume . . . . . . . . . . . . .38Graphic Mixer Section . . . . . . . . . . . .39• Master Volume . . . . . . . . . . . . . . . .39, 4• Reverb . . . . . . . . . . . . . . . . . . . . . . . . .39• Bass . . . . . . . . . . . . . . . . . . . . . . . . . . .39• Orch Plus . . . . . . . . . . . . . . . . . . . . . .39• Lower . . . . . . . . . . . . . . . . . . . . . . . . .39• Upper Strings . . . . . . . . . . . . . . . . . . .39• Locks . . . . . . . . . . . . . . . . . . . . . . . . .40Animation Section . . . . . . . . . . . . . . . .41• Flute Vibra Trem . . . . . . . . . . . . . . . .41Harmony Section . . . . . . . . . . . . . . . .41• AOC . . . . . . . . . . . . . . . . . . . . . . . . . .41• Duet . . . . . . . . . . . . . . . . . . . . . . . . . .41• 3 Part . . . . . . . . . . . . . . . . . . . . . . . . . .42Volume Pedal . . . . . . . . . . . . . . . . . .43, 3Foot Switches . . . . . . . . . . . . .44, 37, 21• Left Foot Switch . . . . . . . . . . . . . .44, 37• Right Foot Switch . . . . . . . . . . . .44, 21The Pedals . . . . . . . . . . . . . . . . . . . . . .44Music Recorder . . . . . . . . . . . . . . . . . .45• Record a Song . . . . . . . . . . . . . . . . . .45• Playback a Song . . . . . . . . . . . . . . . . .46• Play Along . . . . . . . . . . . . . . . . . . . . .46• Chain Songs . . . . . . . . . . . . . . . . .47, 59• Recording Tracks . . . . . . . . . . . . . . . .48• Control Buttons . . . . . . . . . . . . . . . . .48

Encore Owner’s Guide
Information Center . . . . . . . . . . . . .50, 4• Power Up Screen . . . . . . . . . . . . . .50, 4• Display Contrast . . . . . . . . . . . . . . .50, 4Feature Pages . . . . . . . . . . . . . . . . . . .51• Navigation . . . . . . . . . . . . . . . . . . . . .51• Feature (Clear) . . . . . . . . . . . . . . . . . .52• Scroll Buttons . . . . . . . . . . . . . . . . . . .52• Select Button . . . . . . . . . . . . . . . . . . .52• Shortcuts . . . . . . . . . . . . . . . . . . . . . . .53• Feature Page 1
Levels (Balance) . . . . . . . . . . . . . . . .53Lower String/VocalLower GeniusPedal Genius
•Feature Page 2Sustain Lengths . . . . . . . . . . . . . .54, 31Upper FlutesUpper StringsLower FlutesLower Strings/VocalBass Tabs
• Feature Page 3AOC . . . . . . . . . . . . . . . . . . . . . . . . . .55Auto AOCAOC All
• Feature Page 4Edit Genius . . . . . . . . . . . . . . . . . . . .56Orch OctaveOrch SustainLower OctaveLower SustainPedal OctavePedal Sustain
• Feature Page 5Repeat . . . . . . . . . . . . . . . . . . . . . . . .57Repeat On/Off
• Feature Page 6Right Foot Switch . . . . . . . . . . . . . . .58FXStart/Stop
• Feature Page 7Rename Bank Preset . . . . . . . . .58, 15
• Feature Page 8Chain Songs . . . . . . . . . . . . . . . .59, 47
• Feature Page 9MIDI . . . . . . . . . . . . . . . . . . . . . . . . .60
• Feature Page 10Light Show . . . . . . . . . . . . . . . . . . . .61
Connections . . . . . . . . . . . . . . . . . . . . .61Rhythm Styles . . . . . . . . . . . . . . . . . . .62Genius Voice List . . . . . . . . . . . . . . . .63MCS Chord Chart . . . . . . . . . . . . . . .64Song Setup List . . . . . . . . . . . . . . . . . .65Warranty Statement . . . . . . . . . . . . . .68

2Encore Owner’s Guide
USING THIS GUIDEThis Owner’s Guide fully details the performance features of your Lowrey Encore.
The Guide begins with a description of several features you will want to use right away. The Guide thenoutlines all of the PRESET FEATURES: GENERAL PRESETS, RHYTHM PRESETS, CATEGORY PRESETS, andBANK PRESETS. Using the Presets is the easiest, quickest way to get started. Following the introductoryPreset section, the Guide goes into detail about the rest of the instrument.
Many of the features of the Encore are interconnected. Therefore, you may benefit from starting at the begin-ning and proceeding through the book, rather than jumping from section to section. The goal of this Guide isto help you fully enjoy the Encore and have an understanding of all the features you desire to use.
Q: WHAT ARE THE RIGHT SOUNDS TO USE FOR A SONG?A: THE SOUNDS YOU LIKE BEST!
The Encore is designed to appeal to as many musical tastes and preferences as possible. The capabilities ofthis instrument are many. You will have your own preferences and consequently will not be using those capa-bilities that are of no interest to you. This is perfectly normal. Be assured from Lowrey that when you areusing your favorite PRESETS, you will be enjoying what this instrument has to offer.
RESET
ABC’S
POWER
Be sure to try the examples given throughout the book.These examples will provide you with a hands-on explana-tion of a particular feature. You will frequently be instruct-ed to press the RESET button before continuing on with anexample. This button is located to the left of the lower key-board. Pressing the RESET button simply returns the organto the factory original setting, which is used as a startingpoint for the examples given. Wait a few seconds afterpressing this button. Everyday playing does NOT requirefrequent use of the RESET button.

3
3. VOLUME PEDALPlace your right foot on the VOLUME PEDAL while playing. Moving this pedal controls the overall volumelevel of the Encore. Pressing the pedal all the way down is maximum volume. Pressing the pedal all theway back is minimum volume. The VOLUME PEDAL allows the player to add expression (changes in the vol-ume level) to their music.
Pedal Set to Minimum VolumePedal Set to Maximum Volume
RESET
ABC’S
POWER2. ABC’s BUTTONPress the blue ABC’S button. The musical alphabet plus the sharp and flatsymbols will light up, clearly labeling each key. Press the button again toturn the lights off.
RESET
ABC’S
POWER1. POWER SWITCHTurn the Encore on by pressing the red POWER switch. The switch is locat-ed on the lower left end block. The switch will light along with several otherbuttons on the button panel. Without touching another button, the Encoregives you that “Sweet Lowrey Sound” that is called the “Power-Up” sound.No Easy-Play features are on.
When you are ready to turn the Encore off, simply press the red switch.
Let’s GetStarted!
Let’s Get Started

4Encore Owner’s Guide
A TIP FROM LOWREY:The VOLUME PEDAL controls the “overall” volume level of the Encore. The volume level of specific sec-tions is controlled by the individual volume level controls found on the panel and in the GRAPHIC MIXER sec-tion. If the overall maximum volume level is too loud, use the MASTER buttons in the GRAPHIC MIXER toadjust the volume to your liking.
4. INFORMATION CENTERLook at the display in the center of the button panel. This is the INFORMATION CENTER. When you turn theEncore on, and it is fully powered, the display (illustrated below) indicates the instrument is ready to beplayed. This is referred to as the POWER UP SCREEN.
In addition to this information, other Encore features will utilize the INFORMATION CENTER, such as: SongSetup, Genius, and rhythm style names and will be covered in related sections of this guide.
INFORMATION CENTER CARE AND CLEANINGIMPORTANT NOTICE: Do not spray any type of liquid on the Information Center.To clean the screen use a soft cloth slightly dampened with water. Avoid allowing anyliquid to run to the edge of the screen. Do not touch the screen with any sharp objects,such as a pencil point or pen tip.
DISPLAY CONTRAST
There is a DISPLAY CONTRAST dial located just to the right ofthe INFORMATION CENTER. Turn the dial to adjust the displayto a setting that is best for you.
INFORMATION CENTER
TEMPO CHORD KEY134 C C
(Style Name)Sweet Sound!
The POWER UP SCREEN gives you some essential information:
TEMPO: The numbers under the word TEMPO will indicate thetempo (speed) when a rhythm style (Big Band, Country, Waltz,etc) is being used.
CHORD: The letter under the word CHORD indicates the lowerkeyboard chord being played. The bass pedal, if being played,is displayed to the right of the chord display, preceded by a slash(C / Eb).KEY: The letter under the word KEY indicates the key that theinstrument is set to.
MASTER
VOLUME
REVERB
AMOUNT
BASS
VOLUME
LOWER
VOLUME
UPPERSTRINGS
VOLUME
ORCH PLUS
VOLUME

5 Let’s Get Started
5. THE EASY BUTTONLike every Lowrey, there are two ways of playing the Encore:
TRADITIONALNo “Easy-Play” features. You are free to use your hands on the keyboards and your feet on the pedals as youwish. For example, playing one note on the lower keyboard gives you exactly that: one note! You can usethe GENERAL PRESETS, CATEGORY PRESETS, RHYTHM PRESETS and BANK PRESETS for many, manymore sounds.
EASY-PLAYPress the EASY button. This button will light up as well as several others (AUTO BASS 1, MCS & MEMORY).The EASY button makes one finger in the left hand on the lower keyboard sound like you are using all yourfingers, plus your feet on the bass pedals. It makes one finger sound like a full three note chord and playsthe appropriate bass note. You can also use the GENERAL PRESETS, CATEGORY PRESETS, RHYTHMPRESETS and BANK PRESETS for many, many more sounds.
6. HEADPHONES OUTPUTYou can plug a set of stereo headphones into the headphone OUTPUT jack, located to the right of the lowerkeyboard, so you can play in private. When headphones are plugged into the headphone jack the speakersystem is muted. Volume is controlled with the Expression Pedal.
Pedal Set to Minimum VolumePedal Set to Maximum Volume
IMPORTANT: Before plugging headphones (stereo only) into theheadphone OUTPUT jack, be sure the EXPRESSION PEDAL is set tominimum volume. Place the expression pedal in the toe side up, heelside down position. After plugging the headphones in and placingthem on your ears, hold a note or play a rhythm style, and slowlyincrease the volume to a comfortable level.
NOTE: The AUTO BASS 1, MCS and MEMORY buttons are described in more detail in theRHYTHM PLUS ORCHESTRATION SECTION.
SONGSETUP
EASY
SELECTFEATURE(CLEAR)
FLUTE VIBRA TREMSLOW FAST
SCROLL

6Encore Owner’s Guide
PREVIEW: The Presets section demonstrates how to quickly and easily access the many incredibly authentic sounds using the Encore preset features. The name of the Preset active at any one time: GeneralPreset, Rhythm Preset, Bank Preset, Category Preset, will be displayed at the bottom of the Information Center,as illustrated below, along with the name of any Rhythm Style that has been selected.
What It Does:The word PRESET means that a group of sounds, volume settings and effects come on with the touch of asingle button. Each preset button sets up a different sound or registration. Different songs call for differentregistrations.
How It Works:There are eight numbered buttons in the middle of the organ just above the upper keyboard. Pressing anyone of these GENERAL PRESET buttons will cancel the existing preset sound and will create a different musical sound. The preset button will light up, indicating it is on. The 9 GENERAL PRESETS are factoryprogrammed and can not be changed.
How To Use It:Simply press a GENERAL PRESET button. The sounds you hear are described in the following table. Alongthe bottom of your Information Center, the preset name is displayed.
4321
GENERAL PRESETS
65 87
General Presets
INFORMATION CENTER
TEMPO CHORD KEY69 C C
Smokey LoungeBreathy Sax
ActiveRhythm Style Name
ActivePreset Name
PRESETS

7 Presets
As you can see and hear, using a GENERAL PRESET gives you a quick and easy way to access a wide vari-ety of unique and exciting registrations without pressing numerous buttons.
In addition to setting up various sounds, the GENERAL PRESETS will also change appropriate volume settings as well as changing non-sound buttons such as Vibra-Trem.
When using the EASY button with the GENERAL PRESETS, you will notice the Encore continues playing thelast left hand chord played - even though your hands are off the keys. This is the MEMORY feature (shownlater). MEMORY gives you time to get ready for the next chord change or to turn the pages of your music.Simply press the lighted MEMORY button to turn this feature off.
Try the various GENERAL PRESETS with your favorite songs. You will soon discover your favorite presetsto go along with your favorite songs.
PLAYING TIP: Anytime you are using a GENERAL PRESET (or any preset for that matter), you canmake any change you wish. For example, you may wish to adjust volume levels (Graphic Mixer) orselect different sounds (Orchestral, Solo, or Flutes). When NOT using a preset, you will need toselect all the sounds and effects, and set the volume levels.
WHAT IS PRESET 0?There are 8 GENERAL PRESET buttons and 9 GENERAL PRESETS, aslisted to the left. General Preset 0 is the power up sound. Just turn-ing the Encore on gives you that ‘’Sweet Lowrey Sound.’
The same is true, as you will see, for the Bank, Category, and RhythmPresets. For example, pressing the COUNTRY CATEGORY PRESET
button activates COUNTRY CATEGORY PRESET 0 - Dobro, a completepreset sound. Pressing preset buttons 1-8 gives you 8 more CountryPreset sounds.
GENERALUPPER
0 Sweet Sound!1 More Organ2 Pipe Organ3 Theatre Organ4 Strings5 Chimes6 Open Harmony7 Choir8 Piano + Strings

8Encore Owner’s Guide
For convenience, RHYTHM PLUS ORCHESTRATION styles (BIG BAND- COUNTRY- WALTZ, etc.) will bereferred to as RHYTHM STYLES throughout the remainder of this guide.
How It Works:The RHYTHM PRESET button is located directly to the left of the eight GENERAL PRESETS buttons. Eachtime you turn on the Encore, or after pressing the RESET button, the purple RHYTHM PRESET button is illu-minated orange. Orange indicates the feature is “standing-by.”
RHYTHM PRESET performs two functions:1. Provides a registration for the upper keyboard melody and lower tab sounds to complement any rhythm
style chosen. With the RHYTHM PRESET button illuminated orange (stand-by) pressing any RHYTHM STYLE button causes the button to be illuminated red (red indicates the feature is Ready To Go) and creates an appropriate registration for the upper keyboard (Rhythm Preset 0). You need not press another button in order to play.
2. Turns each GENERAL PRESET button into a Rhythm Preset button. With any RHYTHM STYLE button selected and the RHYTHM PRESET button illuminated red, the eight GENERAL PRESET buttons provide eight more dynamic Rhythm Presets for each rhythm style.
How To Use It:RHYTHM PRESETS work only when a blue rhythm style has been selected. Should you desire to press yourown buttons, press the purple RHYTHM PRESET button off (not illuminated).
TRY THIS: Try the following steps to see how the RHYTHM PRESET button works.1. Open your black Lowrey Song Book to page 18 “Aloha, Oe.”2. Press the RESET button. Wait for the ‘Power Up’ screen to appear.3. Press the blue HAWAIIAN rhythm style button. The RHYTHM PRESET button is illuminated red.
This red colored light in the button means that the Rhythm Preset is activated. The entire instrument is setup with a beautiful Hawaiian registration simply by pressing the blue Hawaiian rhythm style button.
4. Press the INTRO/ENDING button.5. Play a “C” chord on the lower keyboard to hear the Hawaiian rhythm style Introduction. Let the
colored stripes in the songbook and the RED, BLUE and GREEN lights above the lower keyboard guide your left hand.
6. While playing the song, reach up and press the GENERAL PRESET 1 button. You will hear a different melody sound. Press the GENERAL PRESET 2 button. The melody sound will change again.Each General Preset button holds a different Rhythm Preset registration.
7. When finished playing the song press the INTRO/ENDING button again and enjoy the Ending.8. When the Ending is finished playing, the light in the RHYTHM PRESET button is illuminated
orange. The orange color indicates that the Rhythm Preset is “Standing By.” 9. To play another song, select a blue rhythm style button.
PRESET
PRESET
RHYTHMWhat It Does:A RHYTHM PRESET provides 9 complete registrations (sounds, volumes,effects, etc.) on the upper keyboard for each of the ENCORE’S 64 RHYTHMSTYLES.
Rhythm Presets
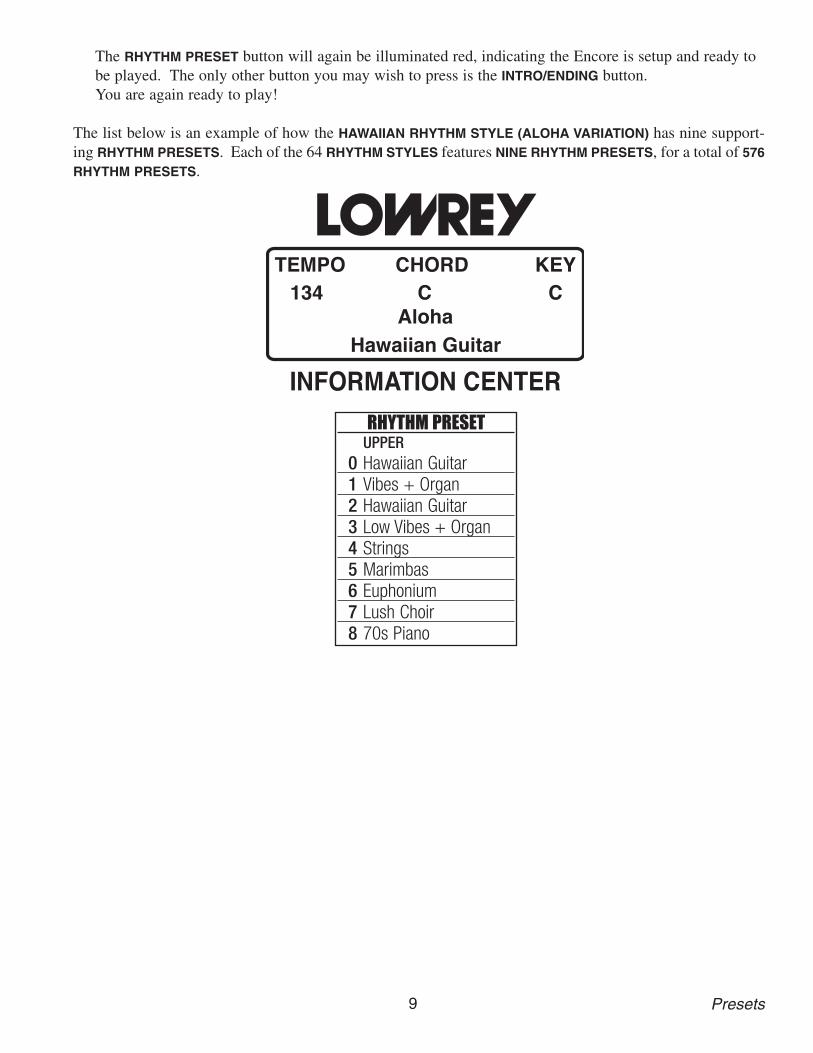
9 Presets
The RHYTHM PRESET button will again be illuminated red, indicating the Encore is setup and ready to be played. The only other button you may wish to press is the INTRO/ENDING button. You are again ready to play!
The list below is an example of how the HAWAIIAN RHYTHM STYLE (ALOHA VARIATION) has nine support-ing RHYTHM PRESETS. Each of the 64 RHYTHM STYLES features NINE RHYTHM PRESETS, for a total of 576RHYTHM PRESETS.
RHYTHM PRESETUPPER
0 Hawaiian Guitar1 Vibes + Organ2 Hawaiian Guitar3 Low Vibes + Organ4 Strings5 Marimbas6 Euphonium7 Lush Choir8 70s Piano
INFORMATION CENTER
TEMPO CHORD KEY134 C C
AlohaHawaiian Guitar
10Encore Owner’s Guide
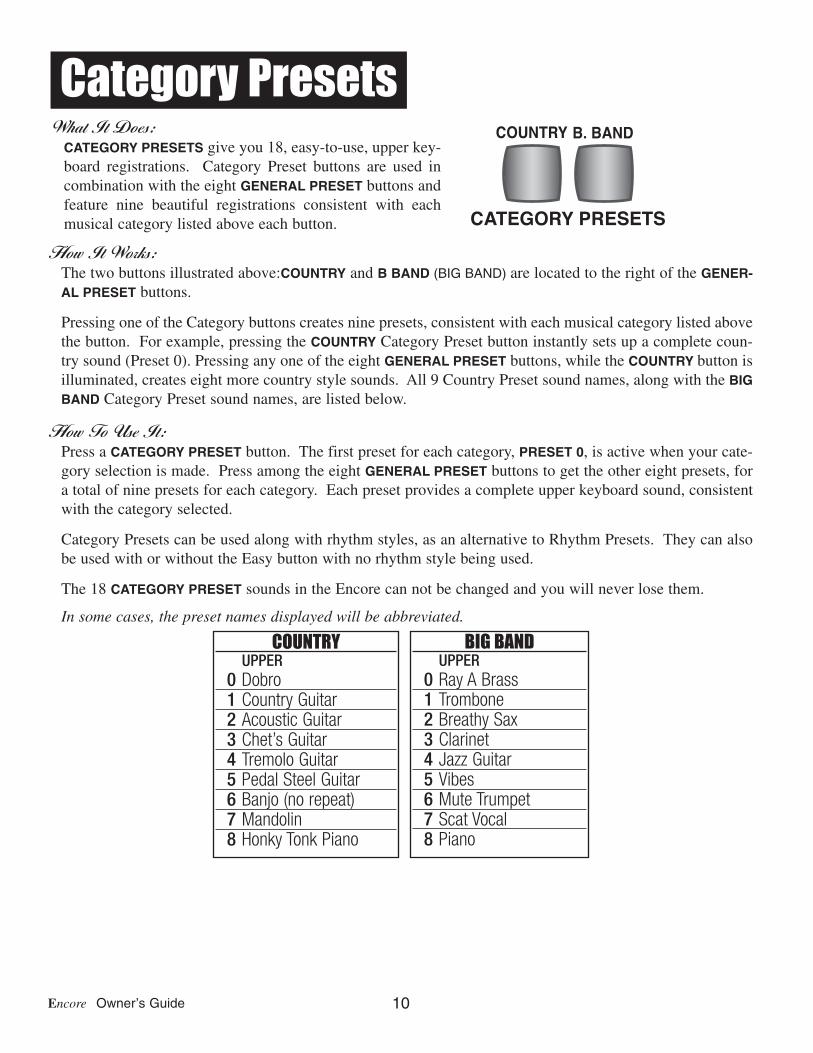
How It Works:The two buttons illustrated above:COUNTRY and B BAND (BIG BAND) are located to the right of the GENER-AL PRESET buttons.
Pressing one of the Category buttons creates nine presets, consistent with each musical category listed abovethe button. For example, pressing the COUNTRY Category Preset button instantly sets up a complete coun-try sound (Preset 0). Pressing any one of the eight GENERAL PRESET buttons, while the COUNTRY button isilluminated, creates eight more country style sounds. All 9 Country Preset sound names, along with the BIGBAND Category Preset sound names, are listed below.
How To Use It:Press a CATEGORY PRESET button. The first preset for each category, PRESET 0, is active when your cate-gory selection is made. Press among the eight GENERAL PRESET buttons to get the other eight presets, fora total of nine presets for each category. Each preset provides a complete upper keyboard sound, consistentwith the category selected.
Category Presets can be used along with rhythm styles, as an alternative to Rhythm Presets. They can alsobe used with or without the Easy button with no rhythm style being used.
The 18 CATEGORY PRESET sounds in the Encore can not be changed and you will never lose them.
In some cases, the preset names displayed will be abbreviated.
BIG BANDUPPER
0 Ray A Brass1 Trombone2 Breathy Sax3 Clarinet4 Jazz Guitar5 Vibes6 Mute Trumpet7 Scat Vocal8 Piano
COUNTRYUPPER
0 Dobro1 Country Guitar2 Acoustic Guitar3 Chet’s Guitar4 Tremolo Guitar5 Pedal Steel Guitar6 Banjo (no repeat)7 Mandolin8 Honky Tonk Piano
COUNTRY B. BAND
CATEGORY PRESETS
What It Does:CATEGORY PRESETS give you 18, easy-to-use, upper key-board registrations. Category Preset buttons are used incombination with the eight GENERAL PRESET buttons andfeature nine beautiful registrations consistent with eachmusical category listed above each button.
Category Presets

11 Presets
How It Works:The lettered button (A) is to the left of the GENERAL PRESET buttons. Pressing the A button accesses nine presets. PRESET 0 is activated when you press the A button. The GENERAL PRESET buttons, 1 through 8,activate the other eight A BANK presets.
In addition to the registrations placed in the BANK PRESET button by Lowrey, you have the option of changing and saving your own registration creations using the MEMORIZE button.
How to save your own registrations using the Memorize button and how to recover the original Bank Presetsis found in the section “Customizing A Bank Preset,” page 13 and “Resetting Bank Presets,” page 16.
How To Use It:Press a BANK PRESET button A . The first preset for the selected bank, PRESET 0, will be activated. Pressthe GENERAL PRESET buttons to activate the other eight presets. The Encore is completely set up and readyto play!
In some cases, the preset names displayed will be abbreviated.
A BANKUPPER
0 F Renaut Organ1 Mellow Organ2 Pretty Organ3 Mellow 2’4 Full Organ5 Open 16+16 Melo Open7 Hollow Organ8 Odds-On
MEMORIZE A
BANK PRESETS
What It Does:BANK PRESETS give you nine more upper keyboard registrations.Just like the Category Presets, the Bank Presets are used in combina-tion with the eight GENERAL PRESET buttons. Bank Presets are alsoprogrammable, so you can save your own sounds.
Bank Presets

12Encore Owner’s Guide
Sometimes selecting a rhythm style and registration for a song is easy. For example, if you are going to playa Country song, you would use one of the Country rhythm styles and Rhythm Preset. If you are going to playa Hawaiian song, you would use one of the Hawaiian rhythm styles and Rhythm Preset. If your song is in3/4 time, you would select one of the Waltz rhythm styles and Rhythm Preset.
How To Use It:SONG SETUP takes the guess work out of what rhythm style button to use, plus it adds a complete regis-tration. The 200 song titles in the SONG SETUP database are listed in the back of the book in alphabeticalorder.
Note: The preset given for a song title can be used for other songs. For example, the preset for Abide WithMe can be used for many hymn titles. Sheet music for the 200 song titles is not provided.
SONG SETUPScroll & Select
Abide With Me
INFORMATION CENTER
SONG SETUPScroll & Select
Kansas City
INFORMATION CENTER
To move more rapidly through the song list press andhold either SCROLL button. When you get near thedesired song title, release the Scroll button and beginpressing it again repeatedly until the desired song titleis displayed.
When the desired song title is highlighted press theSELECT button.
The organ will be set up and ready to play with a styleand registration. To return the screen to the regulardisplay, press the FEATURE (CLEAR) button.
SONG SETUPScroll & Select
Abide With Me
SONGSETUP
EASY
SELECTFEATURE(CLEAR)
SCROLL
FLUTE VIBRA TREMSLOW FAST
INFORMATION CENTER
In the event that you have a song in mind but are notsure what style it falls within, check the SONG SETUPdatabase in your organ. For example, you want toplay Kansas City but there is no style button labeledKansas City. Use the SONG SETUP feature.
What It Does:SONG SETUP gives you a selection of 200 song titlesfrom which to choose. Each title is preset with anappropriate style and a beautiful registration for themelody.
How It Works:Press the SONG SETUP button, located below theINFORMATION CENTER. A song title will appear onthe screen.
Press either SCROLL button repeatedly to movethrough the song list.
Song Setup Presets

13 Presets
What It Does:BANK A presets can be changed from the factory registrations to those of your own creation.
How It Works:A TIP FROM LOWREY: Read through this procedure before doing it. Customizing a Bank Preset involves thelettered BANK PRESET button, the numbered GENERAL PRESET buttons, and the red-colored MEMORIZEbutton.
4. When you are using any of the RHYTHM STYLES and/or the TRANSPOSE feature as part of your registration, you must tell the Encore to include them.
INFORMATION CENTER
Memorizing to:PRESET #1
StyleWith
TransposeNo
At the bottom of the INFORMATION CENTER, you will see the words STYLE NO, with down-pointingtriangles. To include the rhythm style when you save your registration press the bottom SCROLLbutton one time. The word NO will change to WITH. Pressing the bottom Scroll button again selects NO. A natural key (white key) on the upperkeyboard also changes between No and With.
INFORMATION CENTER
Memorizing to:PRESET #1
StyleNo
TransposeNo
3. Decide onto which Preset (0-8) you wish to save your registration.
Press the desired Number button (1-8). The screenwill display the Preset Number you have selected.For example, if you pressed Preset button 1 the INFORMATION CENTER will read, as illustrated to the right.
Pressing Bank Preset button A and no other numbered preset button saves your preset into PRESET 0.
INFORMATION CENTER
Memorizing to:
TRY THIS: Try the following steps to see how to cus-tomize a BANK PRESET button.
1. Press the buttons and set the features for the registration you wish to create and save.
2. Press and release the red-colored MEMORIZEbutton. Watch the INFORMATION CENTER. It will read:
Customizing A Bank Preset

14Encore Owner’s Guide
5. If you are NOT using any of the RHYTHM STYLES and/or the TRANSPOSE feature as part of your registration you may skip step four and simply press the red MEMORIZE button, turning it off, with the word ‘No’ displayed under ‘’Style’ and ‘Transpose.’
You may abort the procedure at any time before completion by pressing the FEATURE (CLEAR) button.
How To Use It:Use the CUSTOMIZE A BANK PRESET feature to save your favorite registrations for future use. The instru-ment has the capability of holding nine separate registrations for you to recall and enjoy at the touch of a but-ton. Your custom registrations will remain, even if you press the RESET button or turn the Encore off.
TIP FROM LOWREY: The Encore has the capacity of holding nine customized presets and it is also funto name your customized presets with a familiar or unique title. See the following page - RENAME BANKPRESETS.
Another fun tip from Lowrey is to customize five presets (0-4) for one favorite song title and four presets (5-8) for another favorite, or some variation of the idea to hold one, two, or even three song setups in Bank A.
INFORMATION CENTER
Memorized to:PRESET #1
StyleWith
TransposeWith
The INFORMATION CENTER will read:
MEMORIZE MEMORIZE MEMORIZE
When the STYLES and/or the TRANSPOSE settings are as you desire, press the red MEMORIZE button, turning it off.
INFORMATION CENTER
Memorizing to:PRESET #1
StyleWith
TransposeWith
At the bottom right of the INFORMATION CENTER,you will see the words TRANSPOSE NO, with up-pointing triangles. To include the Transpose feature when you save your registration press the top SCROLL button one time. The word NO will change to WITH. Pressing the top Scroll button again selects NO . A sharp key (black key) on the upper keyboard also changes between No and With.
15 Presets
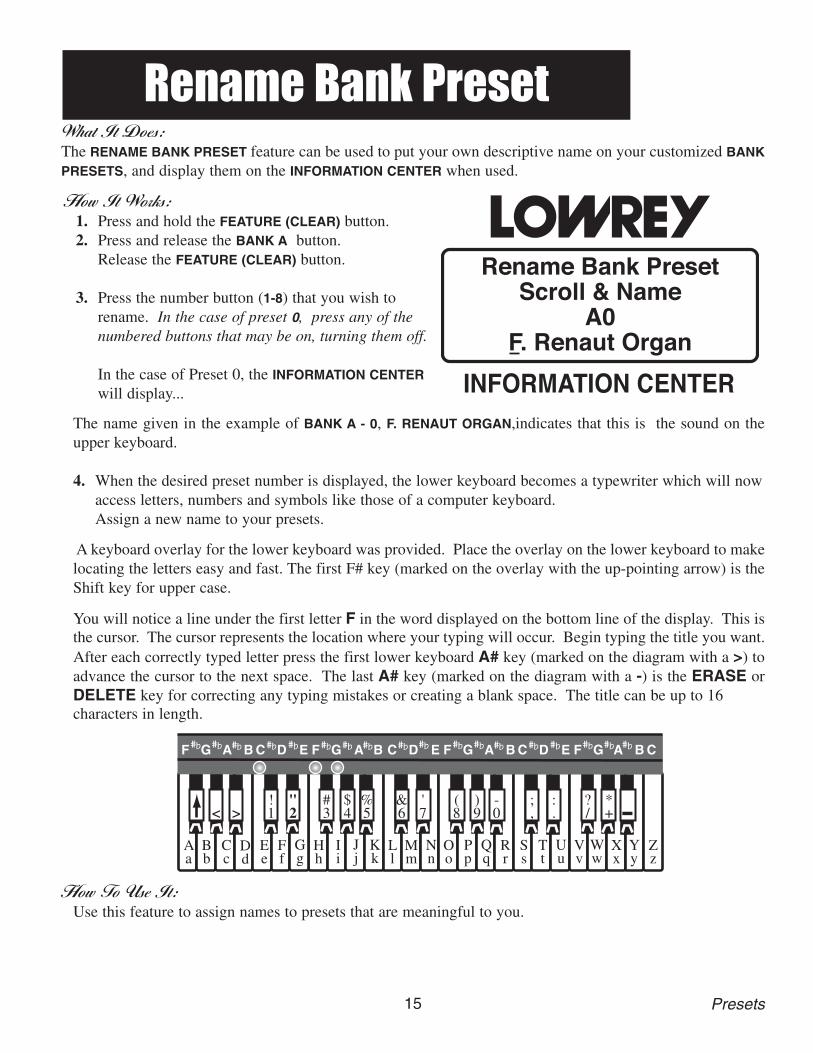
What It Does:The RENAME BANK PRESET feature can be used to put your own descriptive name on your customized BANKPRESETS, and display them on the INFORMATION CENTER when used.
The name given in the example of BANK A - 0, F. RENAUT ORGAN,indicates that this is the sound on theupper keyboard.
4. When the desired preset number is displayed, the lower keyboard becomes a typewriter which will now access letters, numbers and symbols like those of a computer keyboard.Assign a new name to your presets.
A keyboard overlay for the lower keyboard was provided. Place the overlay on the lower keyboard to makelocating the letters easy and fast. The first F# key (marked on the overlay with the up-pointing arrow) is theShift key for upper case.
You will notice a line under the first letter F in the word displayed on the bottom line of the display. This isthe cursor. The cursor represents the location where your typing will occur. Begin typing the title you want.After each correctly typed letter press the first lower keyboard A# key (marked on the diagram with a >) toadvance the cursor to the next space. The last A# key (marked on the diagram with a -) is the ERASE orDELETE key for correcting any typing mistakes or creating a blank space. The title can be up to 16 characters in length.
How To Use It:Use this feature to assign names to presets that are meaningful to you.
><!1
"2
#3
$4
%5
&6
'7
(8
)9
-0
;,
:.
?/
*+ __
Aa
Bb
Cc
Dd
Ee
Ff
Gg
Hh
Ii
Jj
Kk
Ll
Mm
Nn
Oo
Pp
Rr
Ss
Tt
Uu
Vv
Ww
Xx
Yy
Zz
INFORMATION CENTER
Rename Bank PresetScroll & Name
A0F. Renaut Organ
How It Works:1. Press and hold the FEATURE (CLEAR) button.2. Press and release the BANK A button.
Release the FEATURE (CLEAR) button.
3. Press the number button (1-8) that you wish to rename. In the case of preset 0, press any of the numbered buttons that may be on, turning them off.
In the case of Preset 0, the INFORMATION CENTERwill display...
Rename Bank Preset
16Encore Owner’s Guide
What It Does:Resetting the Bank Presets returns them to the original factory settings. Any customized registrations storedin the BANK PRESETS will be erased and replaced with the original factory settings.
How It Works:To Reset all bank of presets, BANK A, presets 0-8,follow these steps.1. Press and hold the MEMORIZE button.2. While holding the MEMORIZE button, press and release the RESET button.3. DO NOT release the MEMORIZE button until the Information Center reads: BANK PRESETS RESET.
To Reset an individual bank preset from among presets 1- 8, follow these steps.1. Press and release the BANK A button, to turn it on.2. Press and hold the numbered PRESET button you wish to reset.3. While holding the PRESET button, press and release the RESET button.4. DO NOT release the PRESET button until the Information Center reads: BANK PRESETS RESET.
How To Use It:Use this function to return the BANK PRESETS back to the original factory registrations.
You will find many more examples of when a factory setting can be changed to one that you may like better.
HERE IS A RECAP OF THE PRESET FEATURESEven if you never press another button, simply turning the organ on gives you a beautiful Lowrey organsound. The Preset features are very powerful and valuable. By simply pressing one or two buttons the entireorgan is set up and ready to play. All the sounds, musical effects, and volume settings are selected and setso you can sit down at the organ and make music right away.
GENERAL PRESETS, CATEGORY PRESETS, and RHYTHM PRESETS can not be changed. You can never “accidentally” lose any of these registrations. BANK PRESETS can be customized and saved in order to create your own favorite registrations. You can always return to the factory-set registrations, which you can never lose.
GENERAL PRESETS: Power Up and buttons 1 through 8CATEGORY PRESETS: 9 for each Category- Country and Big Band. BANK PRESETS: 9 for Bank- A.RHYTHM PRESETS: 9 for each of the 64 styles.SONG SETUP PRESETS: 200 registrations with a style.TOTAL
9189
576 200
812
Resetting Bank PresetsTO THE ORIGINAL LOWREY FACTORY SETTINGS

17 Styles
The RHYTHM PLUS ORCHESTRATION (STYLES) section is one of the most exciting sections on the Encore.For convenience, we will refer to Rhythm Plus Orchestration as simply ‘STYLES.’
Each button and function for the Rhythm Plus Orchestration section is fully detailed in the following pages.You will find that many of the buttons and functions are automatic. For example, pressing any style button,like Gospel, Country, or Rock’N Roll, turns on the features: Rhythm Preset, Genie, Orch Plus, Auto Bass 1,MCS, Memory, Easy, Start/Stop, and Downbeat. Just pressing one style button means the Encore is readyto be played.
What It Does:RHYTHM PLUS ORCHESTRATION provides the player with 64 fully-orchestrated styles. Each style featuresa Bass Player, a Drummer, and the rest of the Band. Imagine having an authentic country band playing alongwith you... or a classical orchestra... or perhaps a rock group. The style table at the back of the book lists all64 styles.
How It Works:All of this happens simply by pressing a style button and playing a chord on the lower keyboard. (It does-n’t matter how you play your left hand chord.)
Pressing a style button automatically activates other Lowrey features. One such feature is MCS - MUSICCHORD SYSTEM - which gives you the option of playing one-finger, easy-play chords or multi-fingered, tra-ditional chords. The pedals play automatically. MCS is also activated when you press the EASY button. Acomplete listing of MCS chord formations is in the back of this book.
Each style has a preset tempo (speed). Use the purple TEMPO buttons to adjust the Tempo to a speed withwhich you are comfortable. The screen will display the tempo.
Pressing a style button sets up the sounds for the lower keyboard and Bass (Pedals). What about sounds onthe upper keyboard (the melody)? Use the RHYTHM PRESETS, GENERAL PRESETS, CATEGORY PRESETS,or BANK PRESETS!
How To Use It:1. Press any STYLE button.2. Press the INTRO/ENDING button. 3. Play the first chord of the song on the lower keyboard.4. Play the song- right hand upper keyboard, left hand lower keyboard.5. At the end of the song, press the INTRO/ENDING button again.
When the style Ending has finished playing the RHYTHM PRESET light will turn orange. When another styleis selected, the Rhythm Preset light turns red and you are ready to play again. Should you wish to select yourown sounds and effects, press the Rhythm Preset button, turning it off.
RHYTHM PLUS ORCHESTRATION
VARI-ATIONS
MEMORYMCS
INTROENDING
1
DRUMSONLY FX
STARTSTOP
2DRUMS
VOLUME
TEMPO
DOWNBEAT
(STYLES)
FOXTROT
COUNTRYBIG
BAND
GOSPEL
SWING MARCHSOFT &EASY
BROADWAY
BALLADHAWAI-
IAN POLKA LATIN
ROCK’NROLL
RHYTHM &BLUES
WALTZ
RAG-TIME BASIC
GENIEORCHPLUS
AUTO BASS
Rhythm Plus Orchestration
18Encore Owner’s Guide
Parts of the style-WHAT YOU ARE HEARING WHEN A STYLE PLAYSThe styles bring many different types of musical groups into your home to play along with you.
EACH STYLE IS MADE UP OF THREE BASIC ELEMENTS:1. A BASS PLAYER (Pedals). The bass is played automatically along with all styles. The orange
colored AUTO BASS 1 button is on (lighted) when any style is selected. The AUTO BASS 2 button provides a different bass sound and pattern for each style.
The Bass volume is preset and may be controlled with two orange-colored buttons in the GRAPHIC MIXER section on the left side of the panel. Bass sounds and controls are found on orange-colored buttons in the bass section.
When you play the pedals, the automatic bass line will stop and you will hear the bass notes you are actually playing. When you stop playing the pedals, the automatic bass begins to play again (on the nextdown beat).
The sounds selected for the bass pedals will be the same, whether you play the pedals or use the auto bass feature. Additional sounds for the pedals are the orange-colored buttons in the BASS section on the left side of the panel. When the AUTO BASS buttons are off, you will need to play the pedals in order to hear a bass sound.
2. A DRUMMER: A huge variety of drum patterns and sounds play along with each style automatically. The drum volume is preset and can be controlled with the two buttons labeled DRUM VOLUME.The DRUMS ONLY button causes the entire band or orchestra of a selected style to be silent with only the drummer left playing.
3. THE REST OF THE BAND: To complete our band or orchestra the GENIE and ORCH PLUS add all the appropriate instruments for the style selected. For example, the BIG BAND style features guitars, trombones, trumpets, and saxophones. The COUNTRY SWING stylefeatures a guitar and steel guitar as the “rest of the band.” A ROCK N’ ROLL style would have guitars, keyboards and vocals as the “rest of the band.” As you will discover in this section, how much of a band or orchestra that is heard in a style is controlled by you and the GENIE and ORCH PLUSbuttons.
The volume for the “rest of the band” is preset and may be controlled with the ORCH PLUS VOLUMEbuttons in the GRAPHIC MIXER section.
VARI-ATIONS
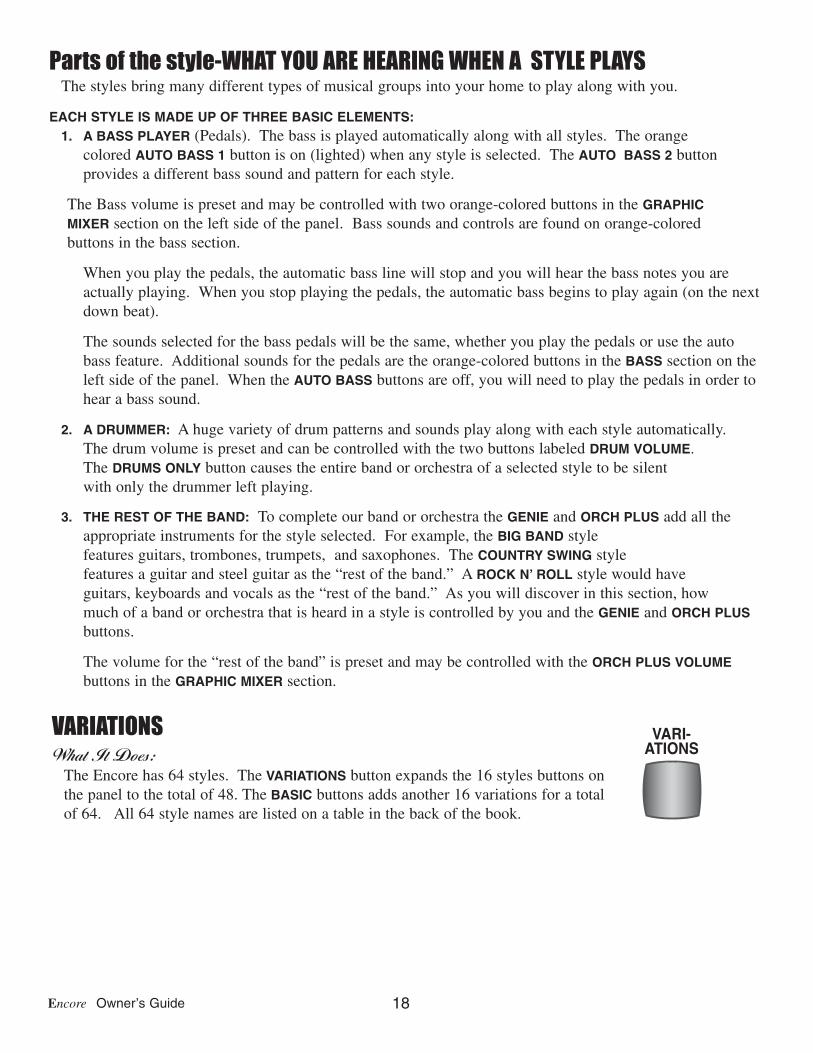
VARIATIONSWhat It Does:
The Encore has 64 styles. The VARIATIONS button expands the 16 styles buttons onthe panel to the total of 48. The BASIC buttons adds another 16 variations for a totalof 64. All 64 style names are listed on a table in the back of the book.

19 Styles
To select VARIATION 2 press the bottom SCROLLbutton one time. To select BASIC press the blue BASIC button.
How To Use It:When the desired variation is highlighted it becomes active immediately. Pressing the Feature (Clear)button returns the display to the power up condition, in which the name of the active style and preset is displayed.
BASICBASICWhat It Does:
The Encore has, in addition to style variations 0, 1 and 2, a BASIC VARIATION foreach of the 16 core styles. BASIC is a simpler style that is very easy to follow.
INFORMATION CENTER
TEMPO CHORD KEY69 C C
Basic Soft & EasySweet Guitar
INFORMATION CENTER
VARIATIONS
Smokey LoungeGuitars
INFORMATION CENTER
VARIATIONS
Smokey LoungeGuitars
VARI-ATIONS
VARI-ATIONS
Pressing the blue VARIATIONS buttoncauses VARIATIONS 1 and 2 of anyselected style to be displayed on theInformation Center.
The example shown to the right is theSOFT & EASY style with VARIATION1: GUITARS selected, as indicated bythe up/down triangles.
INFORMATION CENTER
TEMPO CHORD KEY64 C C
EZ 4/4Piano+Strings
How It Works:Press any one of the 16 style buttons. In the exampleto the right the button SOFT & EASY is used. The firstvariation (0) of that style will be active. The name ofthe first variation, EZ 4/4 appears. Beneath the varia-tion name is the name of the Rhythm Preset,PIANO+STRINGS, for the style.

20Encore Owner’s Guide
How It Works:BASIC styles use fewer musical elements and isolates the drum beat to make it more pronounced.
DRUMS ONLY
Note: The lights in the silenced buttons remain illuminated to show you what will be heard when the DRUMSONLY button is turned off.
You can control the volume with the blue DRUMS VOLUME buttons. You can control the tempo with the purple TEMPO buttons.
How To Use It:Press a blue style button and then press the DRUMs ONLY button. To start the style play a full chord onthe lower keyboard or press the START STOP button. You will only hear the drum beat, no “Easy-play” fea-tures are on. The general, category, and bank presets can be used with this feature.
DRUMS VOLUME
DRUMS
VOLUME
DOWNBEAT
What It Does:DRUMS VOLUME controls the volume of the drum sounds in a style. It also servesas part of the “beat” indicator along with the two tempo buttons. Notice the wordsDOWN BEAT to the left of the bottom button.
How It Works:To raise the volume, press the top button. To lower the volume, press the bottombutton. It may be necessary to press the button several times to achieve the desiredvolume level. You can also hold the button until the desired level is reached. Theoverall amount of volume is indicated by the vertical column of lights to the rightof the buttons. All the lights illuminated (red) indicates maximum volume.
DRUMSONLY
What It Does:DRUMS ONLY eliminates all but the drum portion of any style.
How It Works:Pressing DRUMs ONLY silences the GENIE & ORCH PLUS, AUTO BASS 1 & 2, and all“Easy-Play” features (MCS & MEMORY). It leaves only the drum sounds of the style.
INFORMATION CENTER
TEMPO CHORD KEY69 C C
Basic Soft & EasySweet Guitar
How To Use It:1. Press any one of the 16 style buttons. In the
example to the right the SOFT & EASY button is used.
2. Press the BASIC button. The screen will display thestyle name.
3. Start the style playing by playing a lower keyboard chord, or by pressing the STOP/START button.

21 Styles
How To Use It:The DRUM VOLUME is preset for each style and each rhythm preset. The feature allows you to adjust the volume of the drums to your liking.
How It Works:Press a style button, then press the INTRO/ENDING button. The orange light in the purple RHYTHM PRE-SET button has turned to red indicating the Encore is ready to go. You don’t need to press another button.
Play the first chord of the song to start the introduction playing. At the same time, the INFORMATIONCENTER will display a count down to the final measure of the introduction, prompting you when to beginplaying, with the words: READY... PLAY!
When you are finished playing your song, lift your left hand off the lower keyboard and press the sameINTRO/ENDING button to hear a professional sounding ending. The INFORMATION CENTER will confirm thatthe ending is playing.
MINOR CHORD INTRODUCTIONSThe introductions on the Encore styles are different when the style is started using a minor chord.
FXWhat It Does:
When a style is playing, applying FX adds a professional sounding fill-in or rhythmic break.
How To Use It:There are no set rules for the use of the FX feature. Sometimes in music, the melody note is held for a longtime. This would be one of the times to use the FX feature. FX is designed to be appropriate for each of the64 styles.
FXFXFX
2. By pressing the redFX button in theRhythm PlusOrchestration section.
FX/Golden Harp FXHow It Works:
There are two waysof activating FX:
1. By sliding yourfoot to the right on thevolume pedal, press-ing the RIGHT FOOTSWITCH.
INTROENDINGINTRO / ENDING
What It Does:The INTRO/ENDING button adds a unique and professional sounding introduction andending to each of the 64 styles.
22Encore Owner’s Guide
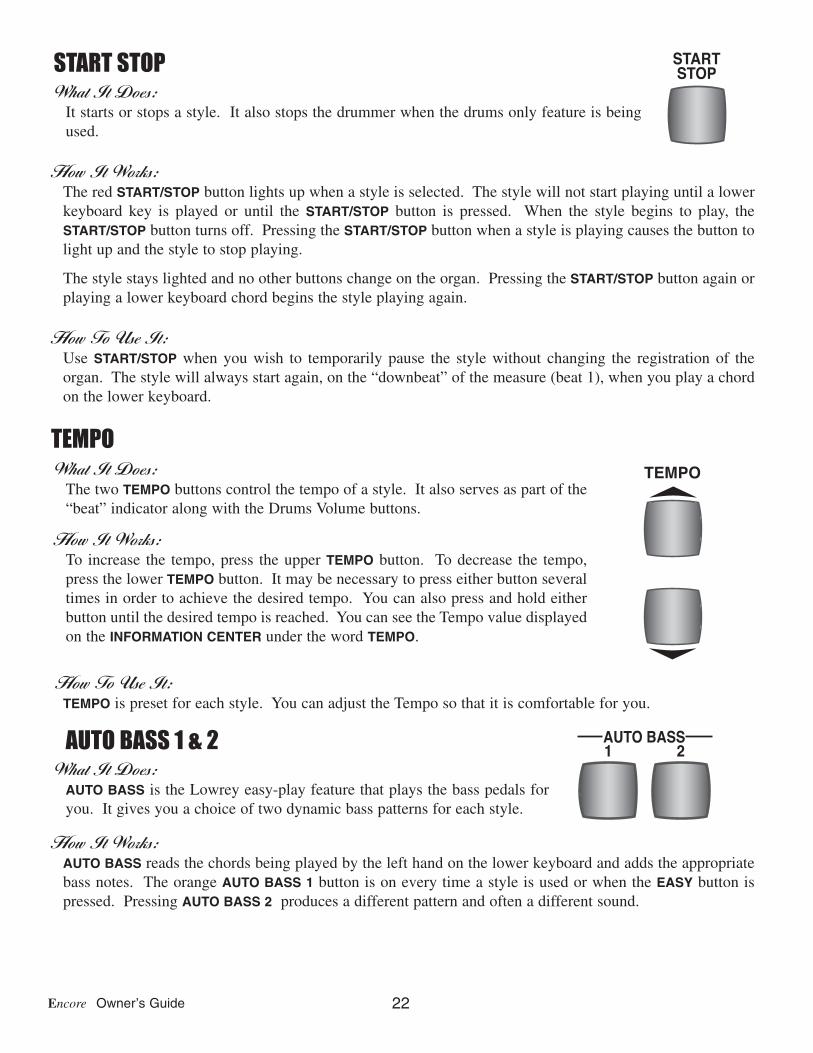
How It Works:The red START/STOP button lights up when a style is selected. The style will not start playing until a lowerkeyboard key is played or until the START/STOP button is pressed. When the style begins to play, theSTART/STOP button turns off. Pressing the START/STOP button when a style is playing causes the button tolight up and the style to stop playing.
The style stays lighted and no other buttons change on the organ. Pressing the START/STOP button again orplaying a lower keyboard chord begins the style playing again.
How To Use It:Use START/STOP when you wish to temporarily pause the style without changing the registration of theorgan. The style will always start again, on the “downbeat” of the measure (beat 1), when you play a chordon the lower keyboard.
TEMPO
How To Use It:TEMPO is preset for each style. You can adjust the Tempo so that it is comfortable for you.
How It Works:AUTO BASS reads the chords being played by the left hand on the lower keyboard and adds the appropriatebass notes. The orange AUTO BASS 1 button is on every time a style is used or when the EASY button ispressed. Pressing AUTO BASS 2 produces a different pattern and often a different sound.
AUTO BASS1 2
AUTO BASS
AUTO BASS 1 & 2What It Does:
AUTO BASS is the Lowrey easy-play feature that plays the bass pedals foryou. It gives you a choice of two dynamic bass patterns for each style.
TEMPOWhat It Does:The two TEMPO buttons control the tempo of a style. It also serves as part of the“beat” indicator along with the Drums Volume buttons.
How It Works:To increase the tempo, press the upper TEMPO button. To decrease the tempo,press the lower TEMPO button. It may be necessary to press either button severaltimes in order to achieve the desired tempo. You can also press and hold eitherbutton until the desired tempo is reached. You can see the Tempo value displayedon the INFORMATION CENTER under the word TEMPO.
STARTSTOPSTART STOP
What It Does:It starts or stops a style. It also stops the drummer when the drums only feature is beingused.

23 Styles
How To Use It:The AUTO BASS buttons add variety and make playing the Encore easy and fun. To play the bass pedals onyour own just go ahead and play them. While you play, the auto bass feature will not play. When you stopplaying the bass pedals yourself, auto bass will again begin playing for you. You may also press the autobass button that is lighted, turning it off.
When a style and MCS are off, AUTO BASS 1 will continue to look at the lower keyboard notes you play(three or more notes) and add the appropriate bass note automatically. AUTO BASS 2 will play the lowestnote pressed when MCS and a style are off.
GENIE & ORCH PLUS
How It Works:When a style button is pressed, the GENIE and ORCH PLUS buttons light up along with the AUTO BASS 1, MCS, MEMORY, EASY and START/STOP buttons. All of these buttons are part of what create thestyle’s control and easy-play function.
GENIE is the simplest portion of a style and has only one or two instruments. Genie plays a continuous rhythmic pattern.
ORCH PLUS is the fuller, fancier portion of a style (the “rest of the band”).
How To Use It:When a style is playing - you can press the GENIE and ORCH PLUS buttons on and off to control how muchof the band or orchestra plays. This flexibility within a style adds even more variety.
TRY THIS: Try the following example to see how GENIE and ORCH PLUS change a style’s sound.1. Press the RESET button.2. Press the BIG BAND style button.3. Play a “C” chord to start the style playing. Listen to a few measures.
You’re hearing a “walking bass” sound, a Drum sound and the rest of the band, which is a guitar player as well as saxophones, trumpets, and slide trombones.
4. Press the ORCH PLUS button - turning it off and leaving the GENIE button lighted. The bass and drummer continue playing while the guitar player strums a “C” chord on a guitar. You are NOThearing the saxophones, trumpets, and slide trombones because the ORCH PLUS button is off.
5. Press the GENIE button - turning it off. Now you are hearing only the bass player and the drummer. The “rest of the band” is not playing because the GENIE and ORCH PLUS buttons are off.
6. Press the orange AUTO BASS 2 button to hear a difference in the bass. 7. Press the ORCH PLUS button - turning it on again. Now you are hearing the saxophones, trumpets, and
slide trombones again, but not the guitar.8. Press the GENIE button again- turning it on. The guitar player is back along with the entire band.9. Press the INTRO/ENDING button to play a big band ending.
The RHYTHM PRESETS automatically select the instruments for the band or orchestra in a style (GENIE andORCH PLUS).
GENIEORCHPLUS
What It Does:The GENIE and ORCH PLUS buttons allow you to determine how much ofthe “rest of the band” you will hear when using a style. The GENIE andORCH PLUS buttons represent specific parts of the band or orchestra with-in a style that can be used separately or together.
24Encore Owner’s Guide
What It Does:A RHYTHM PRESET provides 9 complete registrations (sounds, volumes, effects, etc.) on the upper keyboardfor each of the ENCORE’S 64 STYLES. Rhythm Preset makes it easy to sound good right away.
How It Works:The RHYTHM PRESET button is located directly to the left of the ten GENERAL PRESETS buttons. Each timeyou turn on the Encore or after pressing the RESET button, the purple RHYTHM PRESET button is illuminat-ed orange. Orange indicates the feature is “standing-by.”
How To Use It:RHYTHM PRESETS work only when a blue style has been selected. Should you desire to press your own but-tons, press the purple RHYTHM PRESET button off (not illuminated).
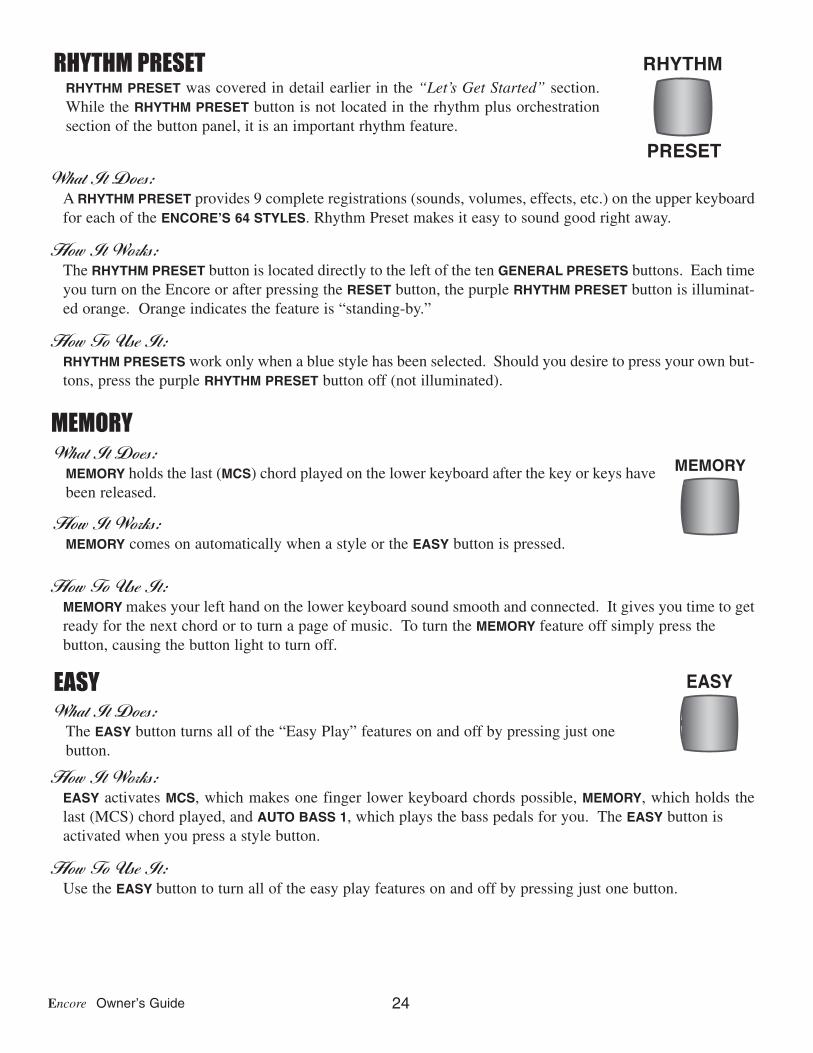
MEMORY
How To Use It:MEMORY makes your left hand on the lower keyboard sound smooth and connected. It gives you time to getready for the next chord or to turn a page of music. To turn the MEMORY feature off simply press the button, causing the button light to turn off.
How It Works:EASY activates MCS, which makes one finger lower keyboard chords possible, MEMORY, which holds thelast (MCS) chord played, and AUTO BASS 1, which plays the bass pedals for you. The EASY button is activated when you press a style button.
How To Use It:Use the EASY button to turn all of the easy play features on and off by pressing just one button.
EASYEASYWhat It Does:
The EASY button turns all of the “Easy Play” features on and off by pressing just one button.
MEMORYWhat It Does:
MEMORY holds the last (MCS) chord played on the lower keyboard after the key or keys havebeen released.
How It Works:MEMORY comes on automatically when a style or the EASY button is pressed.
PRESET
RHYTHM
PRESET
RHYTHM
RHYTHM PRESETRHYTHM PRESET was covered in detail earlier in the “Let’s Get Started” section.While the RHYTHM PRESET button is not located in the rhythm plus orchestrationsection of the button panel, it is an important rhythm feature.

25 Styles
Music Chord System-MCS
How It Works:MCS is Lowrey’s chord recognition system that has the unique ability to respond to different methods offorming lower keyboard chords. MCS will respond whether you form one and two finger MCS chords or ifyou play multi-fingered chords. Pressing a style button activates MCS and lights the red, blue, and greenchord lights.
How To Use It:The MCS CHORD CHART in the back of this book lists the minimum number of notes needed to form certainchords on the Lower Keyboard using MCS. Illustrations of Major, Minor, and Seventh Chords with MCS fol-lows.
MAJOR CHORD: ( C, F, G, Bb, F#, etc.) Any Major chord can be played with the traditional three notes or asingle note. To play a one-finger major chord, simply touch the key on the lower keyboard that matches theletter name of the chord. It is best to release the key before playing the next chord when playing one-fingerchords. The MEMORY feature will connect the two chords.
For example, to play a “C” MAJOR CHORD (usually just called a “C” chord), play a C note with your lefthand on the lower keyboard. Use the RED light as a guide.
MCSWhat It Does:MCS allows easy-play, one-finger, or multi-fingered chords to be played on the lower key-board while the pedals (bass sound) play for you. Additionally, pressing the MCS button illu-minates the Red, Green, and Blue chord lights above the lower keyboard. Red is for C, blueis for F, and green is for G chords.
26Encore Owner’s Guide
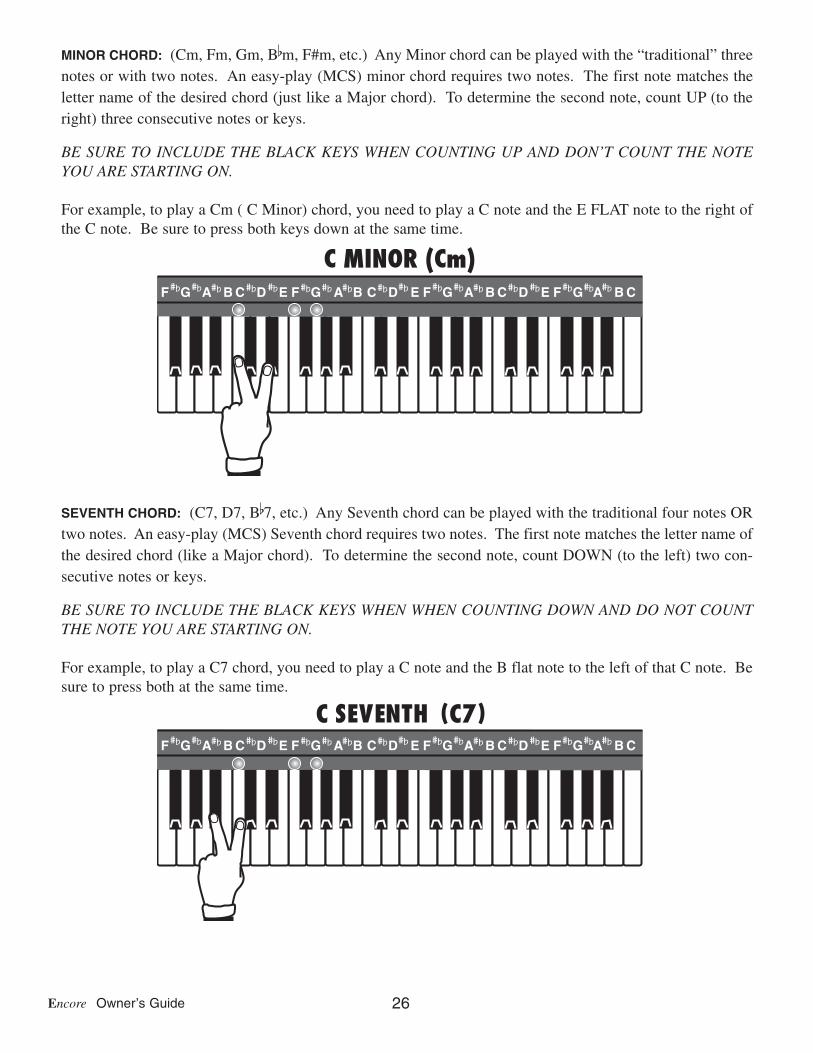
MINOR CHORD: (Cm, Fm, Gm, Bbm, F#m, etc.) Any Minor chord can be played with the “traditional” threenotes or with two notes. An easy-play (MCS) minor chord requires two notes. The first note matches theletter name of the desired chord (just like a Major chord). To determine the second note, count UP (to theright) three consecutive notes or keys.
BE SURE TO INCLUDE THE BLACK KEYS WHEN COUNTING UP AND DON’T COUNT THE NOTEYOU ARE STARTING ON.
For example, to play a Cm ( C Minor) chord, you need to play a C note and the E FLAT note to the right ofthe C note. Be sure to press both keys down at the same time.
SEVENTH CHORD: (C7, D7, Bb7, etc.) Any Seventh chord can be played with the traditional four notes ORtwo notes. An easy-play (MCS) Seventh chord requires two notes. The first note matches the letter name ofthe desired chord (like a Major chord). To determine the second note, count DOWN (to the left) two con-secutive notes or keys.
BE SURE TO INCLUDE THE BLACK KEYS WHEN WHEN COUNTING DOWN AND DO NOT COUNTTHE NOTE YOU ARE STARTING ON.
For example, to play a C7 chord, you need to play a C note and the B flat note to the left of that C note. Besure to press both at the same time.

27 Styles
NO CHORD (N.C.): When a style is playing there are two ways to achieve a No Chord, printed N.C. in music.1. Play a group of three, four, or five consecutive keys at the same time on the lower keyboard, as
illustrated below. For example: C, C#, D or F, F#, G, Ab.2. Press the DRUMS ONLY button, turning the feature on for the duration of the N.C.
When MCS is active, the Information Center will display the lower keyboard chord being played. Look underthe word “Chord” on the screen.
RECAP: MCS forms chords the easy-play way or the traditional way without changing any features.
At this point in the guide, all the easy-play and preset features that make playing a Lowrey easy and fun havebeen reviewed. If you go no further, you will be able to fully utilize the capabilities of the Encore and makean amazingly dynamic variety of music.To play your favorite song is the most important thing you need to remember is this:1. Select a STYLE.2. Press the INTRO/ENDING .3. Play your song. Press different PRESET buttons to get different sounds.4. Press the INTRO/ENDING button to end the song.
PLAYING A SONG AND SOUNDING GREAT IS AS SIMPLE AS THESE FOUR STEPS!
All other chords require three, four, or fivenotes to be played. For most other chords,please refer to the MCS CHORD CHART locat-ed in the back of this book.
Major chords require only ONE note be played.Minor chords require only TWO notes be played.Seventh chords require only TWO notes be played.
28Encore Owner’s Guide
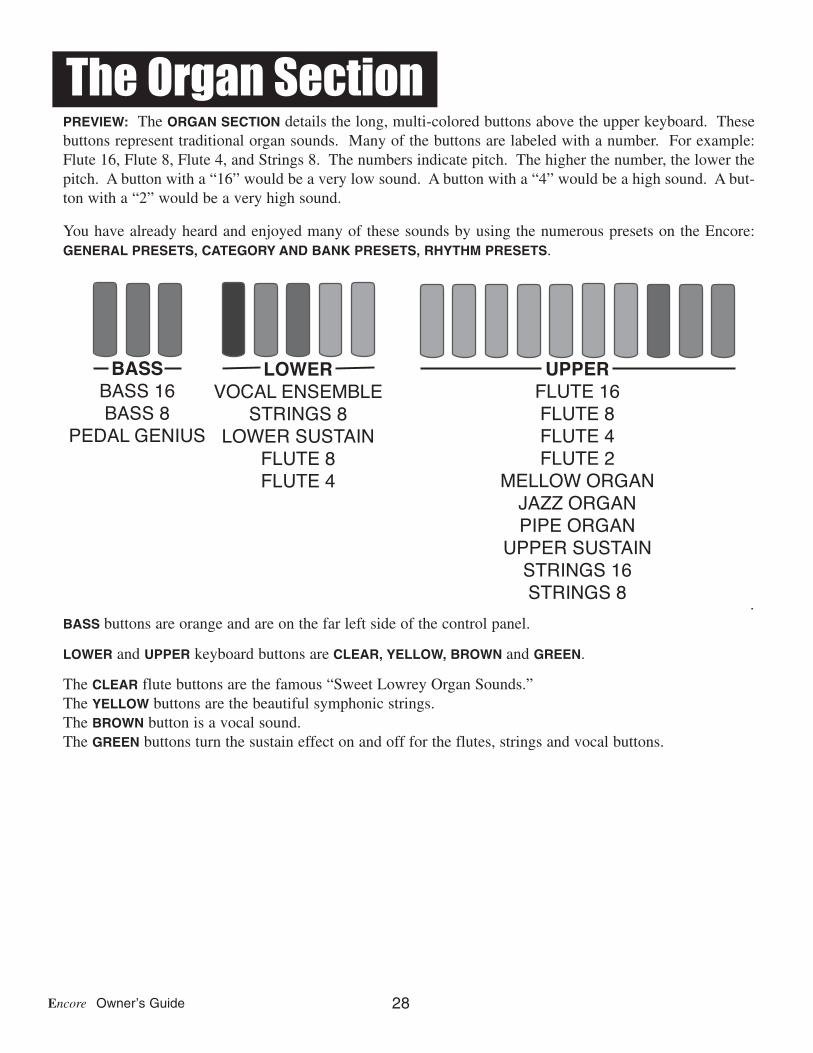
PREVIEW: The ORGAN SECTION details the long, multi-colored buttons above the upper keyboard. Thesebuttons represent traditional organ sounds. Many of the buttons are labeled with a number. For example:Flute 16, Flute 8, Flute 4, and Strings 8. The numbers indicate pitch. The higher the number, the lower thepitch. A button with a “16” would be a very low sound. A button with a “4” would be a high sound. A but-ton with a “2” would be a very high sound.
You have already heard and enjoyed many of these sounds by using the numerous presets on the Encore:GENERAL PRESETS, CATEGORY AND BANK PRESETS, RHYTHM PRESETS.
.BASS buttons are orange and are on the far left side of the control panel.
LOWER and UPPER keyboard buttons are CLEAR, YELLOW, BROWN and GREEN.
The CLEAR flute buttons are the famous “Sweet Lowrey Organ Sounds.”The YELLOW buttons are the beautiful symphonic strings.The BROWN button is a vocal sound.The GREEN buttons turn the sustain effect on and off for the flutes, strings and vocal buttons.
UPPERFLUTE 16FLUTE 8FLUTE 4FLUTE 2
MELLOW ORGANJAZZ ORGANPIPE ORGAN
UPPER SUSTAINSTRINGS 16STRINGS 8
LOWERVOCAL ENSEMBLE
STRINGS 8LOWER SUSTAIN
FLUTE 8FLUTE 4
BASSBASS 16BASS 8
PEDAL GENIUS
The Organ Section
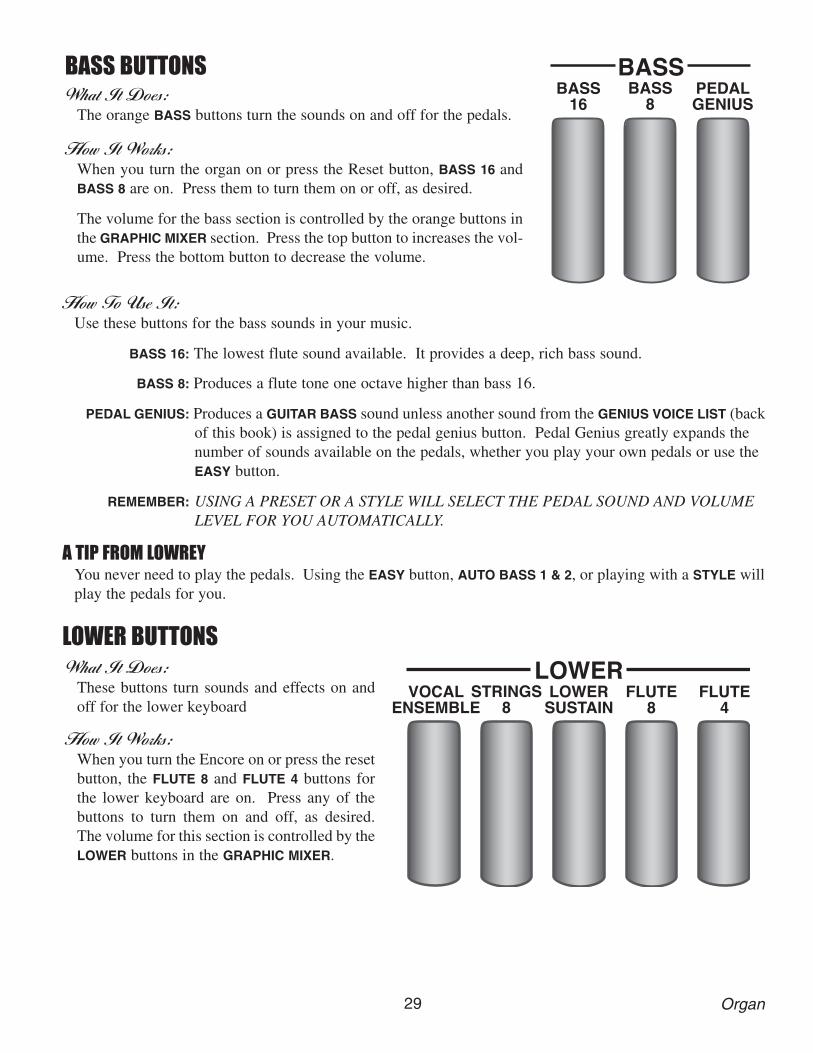
29 Organ
How To Use It:Use these buttons for the bass sounds in your music.
BASS 16: The lowest flute sound available. It provides a deep, rich bass sound.
BASS 8: Produces a flute tone one octave higher than bass 16.
PEDAL GENIUS: Produces a GUITAR BASS sound unless another sound from the GENIUS VOICE LIST (backof this book) is assigned to the pedal genius button. Pedal Genius greatly expands the number of sounds available on the pedals, whether you play your own pedals or use the EASY button.
REMEMBER: USING A PRESET OR A STYLE WILL SELECT THE PEDAL SOUND AND VOLUME LEVEL FOR YOU AUTOMATICALLY.
A TIP FROM LOWREYYou never need to play the pedals. Using the EASY button, AUTO BASS 1 & 2, or playing with a STYLE willplay the pedals for you.
LOWER BUTTONSLOWER
VOCALENSEMBLE
STRINGS8
LOWERSUSTAIN
FLUTE8
FLUTE4
What It Does:These buttons turn sounds and effects on andoff for the lower keyboard
How It Works:When you turn the Encore on or press the resetbutton, the FLUTE 8 and FLUTE 4 buttons forthe lower keyboard are on. Press any of thebuttons to turn them on and off, as desired.The volume for this section is controlled by theLOWER buttons in the GRAPHIC MIXER.
BASSBASS
16BASS
8PEDALGENIUS
BASS BUTTONSWhat It Does:
The orange BASS buttons turn the sounds on and off for the pedals.
How It Works:When you turn the organ on or press the Reset button, BASS 16 andBASS 8 are on. Press them to turn them on or off, as desired.
The volume for the bass section is controlled by the orange buttons inthe GRAPHIC MIXER section. Press the top button to increases the vol-ume. Press the bottom button to decrease the volume.

30Encore Owner’s Guide
How To Use It:These buttons provide you with many beautiful sounds and effects for the lower keyboard. Using the presets will automatically combine these buttons for a variety of sounds. Starting from the far left and working towards the center...
VOCALENSEMBLE: Produces a singing sound. A good choice alone or in combination with other sounds.
STRINGS 8: Produces the lush sounds of the strings of an orchestra. This button can be used alone or in combination with other sounds.
LOWER SUSTAIN: Adds sustain to the clear FLUTE, yellow STRINGS 8 and the brown VOCAL ENSEMBLEbuttons.
FLUTES 8, 4: The traditional organ sounds that produce the “Sweet Lowrey Sound.” These buttons offerFlute (organ) sounds, alone or in combination, with the other sounds.
UPPER BUTTONS
What It Does:The upper buttons turn sounds on and off for the upper keyboard.
How It Works:When you turn the Encore on or press the reset button, the FLUTE 16 & 4 buttons are on. Press any of thesebuttons to turn them on or off, as desired.
The volumes for the STRINGS 16 & 8 and are controlled in the GRAPHIC MIXER with the UPPER STRINGSbuttons.
How To Use It:These buttons provide you with many beautiful sounds for the upper keyboard.
FLUTES 16, 8, The traditional organ sounds that produce the “Sweet Lowrey Sound.” These buttons 4, 2 offer flute (organ) sounds, alone or in combination, with the other sounds.
LOWREY’S RULE Flute 16 plus one or more additional flutes will always sound good. Any combination ofOF FLUTES upper flute buttons with the Flute 16 will give you beautiful organ sounds.
MELLOW ORGAN: An organ preset sound that is made up of a 16’ flute and a very soft 8’ flute sound.JAZZ ORGAN: A great organ preset that can be used to play any upbeat song in a “Jazzy” style.
FLUTE16
UPPERFLUTE
8FLUTE
4FLUTE
2MELLOWORGAN
PIPEORGAN
UPPERSUSTAIN 16 8
STRINGSJAZZORGAN
31 Organ
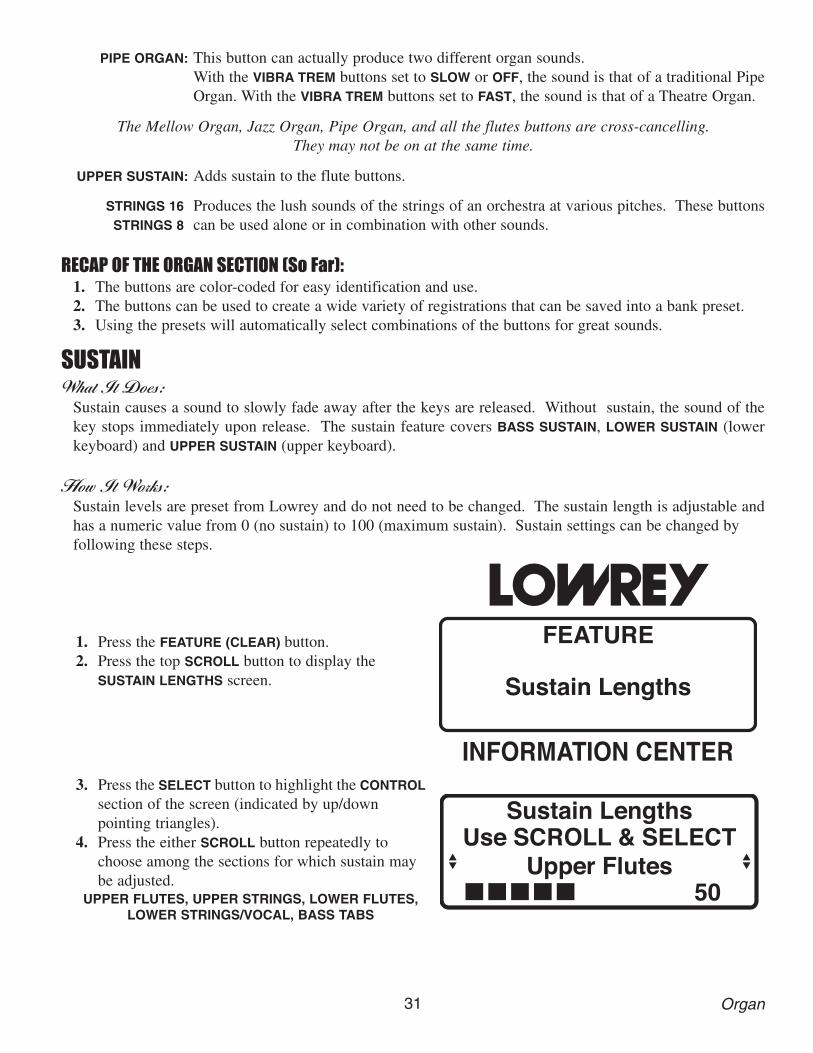
PIPE ORGAN: This button can actually produce two different organ sounds. With the VIBRA TREM buttons set to SLOW or OFF, the sound is that of a traditional PipeOrgan. With the VIBRA TREM buttons set to FAST, the sound is that of a Theatre Organ.
The Mellow Organ, Jazz Organ, Pipe Organ, and all the flutes buttons are cross-cancelling.They may not be on at the same time.
UPPER SUSTAIN: Adds sustain to the flute buttons.
STRINGS 16 Produces the lush sounds of the strings of an orchestra at various pitches. These buttonsSTRINGS 8 can be used alone or in combination with other sounds.
RECAP OF THE ORGAN SECTION (So Far):1. The buttons are color-coded for easy identification and use.2. The buttons can be used to create a wide variety of registrations that can be saved into a bank preset.3. Using the presets will automatically select combinations of the buttons for great sounds.
SUSTAINWhat It Does:
Sustain causes a sound to slowly fade away after the keys are released. Without sustain, the sound of thekey stops immediately upon release. The sustain feature covers BASS SUSTAIN, LOWER SUSTAIN (lowerkeyboard) and UPPER SUSTAIN (upper keyboard).
How It Works:Sustain levels are preset from Lowrey and do not need to be changed. The sustain length is adjustable andhas a numeric value from 0 (no sustain) to 100 (maximum sustain). Sustain settings can be changed by following these steps.
Sustain LengthsUse SCROLL & SELECT
Upper Flutes50nnnnn
3. Press the SELECT button to highlight the CONTROLsection of the screen (indicated by up/down pointing triangles).
4. Press the either SCROLL button repeatedly to choose among the sections for which sustain may be adjusted.
UPPER FLUTES, UPPER STRINGS, LOWER FLUTES,LOWER STRINGS/VOCAL, BASS TABS
INFORMATION CENTER
FEATURE
Sustain Lengths
1. Press the FEATURE (CLEAR) button. 2. Press the top SCROLL button to display the
SUSTAIN LENGTHS screen.

32Encore Owner’s Guide
7. Press the FEATURE (CLEAR) button when the desired amount of sustain has been set.
The Sustain settings can be saved to a BANK PRESET. Turning the Encore off or pressing the Reset button returns the Sustain settings back to factory preset levels.
How To Use It:All sustain levels are preset on the Encore or you can change the amount of sustain to your liking.
GENIUSWhat It Does:
The word GENIUS on a button means that you have the option of assigning a variety of sounds, from theGENIUS VOICE LIST, to that button.
The Genius buttons are: PEDAL GENIUS (orange) and ORCH GENIUS (red). A complete list of the geniusvoices can be found on page 63.
The Presets shown in the “Presets” section use a wide variety of these GENIUS sounds.
How To Use It:Use the GENIUS capability to add a wide variety of sounds and to create new registrations for your music.The easiest way to explore the hundreds of options the GENIUS feature holds is to start with one of the manyGENERAL, CATEGORY, or BANK PRESET sounds and then make genius voice changes. If you find one youreally like, save it in a BANK PRESET.
INFORMATION CENTER
LOWREY ENCORE
PEDAL GENIUSBass: Elect. Deep
How It Works:Each GENIUS button has a preset sound assigned to itfrom the factory. Pressing a genius button, turning iton, will activate the sound and cause the InformationCenter to list the name of the genius sound.
In the example to the right, you see the PEDAL GENIUSdisplay. Pressing either SCROLL button causes thescreen to display a different selection and allows youto change the genius voice in that button.
Sustain LengthsUse SCROLL & SELECT
Upper Flutes50nnnnn
5. When the desired section is displayed press the SELECT button to highlight the AMOUNT section of the screen (indicated by up/down pointing triangles).
6. Increase the amount of sustain by pressing the top SCROLL button. Decrease the amount of sustain bypressing the bottom SCROLL button. The graphic bar will change in length in relation to the amount of sustain as will the display number.

33 Organ
Continue pressing the Scroll button, stopping at different sounds in order to hear them as you play notes onthe upper keyboard.
Pressing the RESET button or turning the Encore off will return the GENIUS VOICE assigned to a genius but-ton back to the factory preset sound. When you find a sound you really like save it in a BANK PRESET.
The beauty of your Lowrey is that when you use the preset features you are utilizing the GENIUS SOUNDS.We at Lowrey created the presets so you can get the benefit of great sounds and features by pressing justone or two buttons.
INFORMATION CENTER
LOWREY ENCORE
ORCH GENIUSFrench Horn
TRY THIS: Try the following example to see how tochange the sound in a GENIUS button.
1. Press the RESET button.2. Press the buttons in the UPPER section FLUTE 16
and FLUTE 4, turning them off.3. Press the red ORCH GENIUS button.
The Information Center will read: ORCH GENIUS FRENCH HORN.
4. Play a few notes on the upper keyboard to hear a beautiful french horn sound.
5. Press the top SCROLL button repeatedly until the screen displays: HARP.
6. Run your hand up and down the black keys on the upper keyboard to hear a beautiful harp arpeggio.

34Encore Owner’s Guide
PREVIEW: In addition to the beautiful organ, strings and vocal sounds, found in the organ section, the Encorefeatures hundreds of authentic instrumental sounds! These sounds can be played alone or in combinationwith the organ sounds.
What It Does:Provides you with additional sounds, primarily for use with the right hand on the upper keyboard. In addi-tion to sounds, this section controls effects such as TRANSPOSE, and VOLUME. The GENIUS button in theORCHESTRAL section adds 101 sounds from the GENIUS VOICE LIST.
How It Works:Pressing a button causes it to light, indicating it is on. Pressing a lighted button turns it off.
How To Use It:These buttons and features will allow you to create your favorite registrations. Remember that many of thepresets shown in the beginning of this book have used combinations of the sounds and features from this sec-tion. Even if you are creating your own registrations, it is best to start with a factory preset and then makechanges to your liking. For example, if you are creating big band registrations, start with the BIG BANDcategory presets and then make changes. Save those changes to a BANK PRESET.
A TIP FROM LOWREY:When you turn on the Encore the upper keyboard FLUTE 16 & FLUTE 4 buttons are on. There may be timeswhen you do not wish to use these flute sounds together with any orchestral and solo sounds. To hear orches-tral and solo sounds alone press off any upper flutes or strings buttons that may be on.
AN OVERVIEW OF THE ORCHESTRAL & SOLO SECTION:1. There are 19 sound buttons: 11 red-colored ORCHESTRAL buttons and 8 blue-colored SOLO buttons.
All the other buttons in this section affect these 19 buttons.2. These 19 buttons can be used alone or in combinations and with the organ sounds. Many of the presets
combine these sounds.3. Among the 11 orchestral buttons is a red-colored GENIUS button.
The GENIUS button operates the same way as the PEDAL GENIUS button.4. The GENIUS buttons will always have sounds in them. In many cases, the Presets assign
different sounds to the genius buttons. The GENIUS VOICE LIST (on page 63) lists all the sounds available for the GENIUS buttons.
5. TRANSPOSE modifies the sounds, while other buttons in this section control from where the sounds are played: upper keyboard and/or lower keyboard. ORCHESTRAL VOLUME and SOLO VOLUME controlsare in this section, as well.
What It Does:Going beyond what the presets will do, you can experiment for an almost unlimited amount of possibilitiesfor “just the right sound.” Remember, if you find a combination you like, save it to a BANK PRESET.
UPPERON
LOWERON
ELEC.PIANO
JAZZGUITARPIANO
COUNTRYGUITAR
HAWAI-IAN STRINGS
BANJOTROM-BONE
MARIMBA
VIBESORCH.
VOLUME
GENIUS
ORCHESTRAL
UPPERON
BELLS
TRUMPETSOCIETY
PIANO SAX
CLARINETCHIMES
VIOLIN SOLO
VOLUMEJAZZ
FLUTE
SOLO
TRANSPOSE
C
DISPLAY CONTRAST
Orchestral & Solo Section
35 Orchestral & Solo
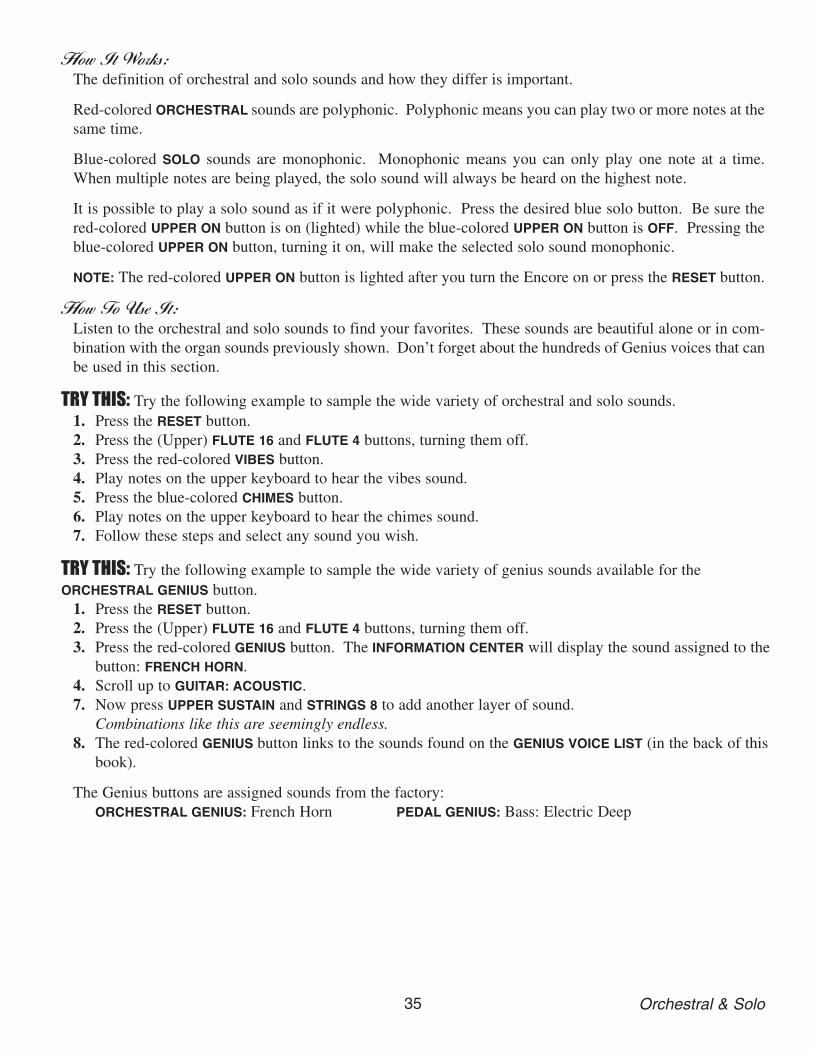
How It Works:The definition of orchestral and solo sounds and how they differ is important.
Red-colored ORCHESTRAL sounds are polyphonic. Polyphonic means you can play two or more notes at thesame time.
Blue-colored SOLO sounds are monophonic. Monophonic means you can only play one note at a time.When multiple notes are being played, the solo sound will always be heard on the highest note.
It is possible to play a solo sound as if it were polyphonic. Press the desired blue solo button. Be sure thered-colored UPPER ON button is on (lighted) while the blue-colored UPPER ON button is OFF. Pressing theblue-colored UPPER ON button, turning it on, will make the selected solo sound monophonic.
NOTE: The red-colored UPPER ON button is lighted after you turn the Encore on or press the RESET button.
How To Use It:Listen to the orchestral and solo sounds to find your favorites. These sounds are beautiful alone or in com-bination with the organ sounds previously shown. Don’t forget about the hundreds of Genius voices that canbe used in this section.
TRY THIS: Try the following example to sample the wide variety of orchestral and solo sounds.1. Press the RESET button.2. Press the (Upper) FLUTE 16 and FLUTE 4 buttons, turning them off.3. Press the red-colored VIBES button.4. Play notes on the upper keyboard to hear the vibes sound.5. Press the blue-colored CHIMES button.6. Play notes on the upper keyboard to hear the chimes sound.7. Follow these steps and select any sound you wish.
TRY THIS: Try the following example to sample the wide variety of genius sounds available for theORCHESTRAL GENIUS button.
1. Press the RESET button.2. Press the (Upper) FLUTE 16 and FLUTE 4 buttons, turning them off.3. Press the red-colored GENIUS button. The INFORMATION CENTER will display the sound assigned to the
button: FRENCH HORN.4. Scroll up to GUITAR: ACOUSTIC.7. Now press UPPER SUSTAIN and STRINGS 8 to add another layer of sound.
Combinations like this are seemingly endless.8. The red-colored GENIUS button links to the sounds found on the GENIUS VOICE LIST (in the back of this
book).
The Genius buttons are assigned sounds from the factory:ORCHESTRAL GENIUS: French Horn PEDAL GENIUS: Bass: Electric Deep

36Encore Owner’s Guide
TRANSPOSE
How It Works:
How To Use It:Use this feature to change the pitch, or key, of the music you are playing. Youcan sound like a pro by playing the song through one time and then pressing theright (#) TRANSPOSE button once and repeating the song. Transpose comes inhandy for a sing along, or playing along with another musician playing aninstrument not pitched in the key of “C.”
The Encore Transposer is cyclical. When you begin at “C” and Transpose up(pressing the button labeled with the Sharp symbol) through all 11 steps to “B”the next step up will return the organ to the key of “C.” This is also true whenyou Transpose down (pressing the button labeled with the Flat symbol) to C#.
Transpose changes can now be saved to a BANK PRESET. See CUSTOMIZINGA BANK PRESET on page 13.
C
TRANSPOSE
C
C
TRANSPOSE
C
TRANSPOSE
C
TRANSPOSE
C
Pressing both TRANSPOSEbuttons at the same timereturns the pitch to thestandard “C.”
The right button, TRANSPOSE UP, islabeled with a right-pointing triangleand a sharp (#) symbol. Pressing thisbutton moves the pitch up one-halfstep each time it is pressed.
The left button, TRANSPOSEDOWN, is labeled with a left-point-ing triangle and a flat (b) symbol.Pressing this button moves thepitch down one-half step each timeit is pressed.
TRANSPOSE
C
TRANSPOSE
C
What It Does:At the touch of a button, TRANSPOSE moves the pitch of the sound up ordown one-half step. The two transposer buttons are located to the right of theInformation Center.
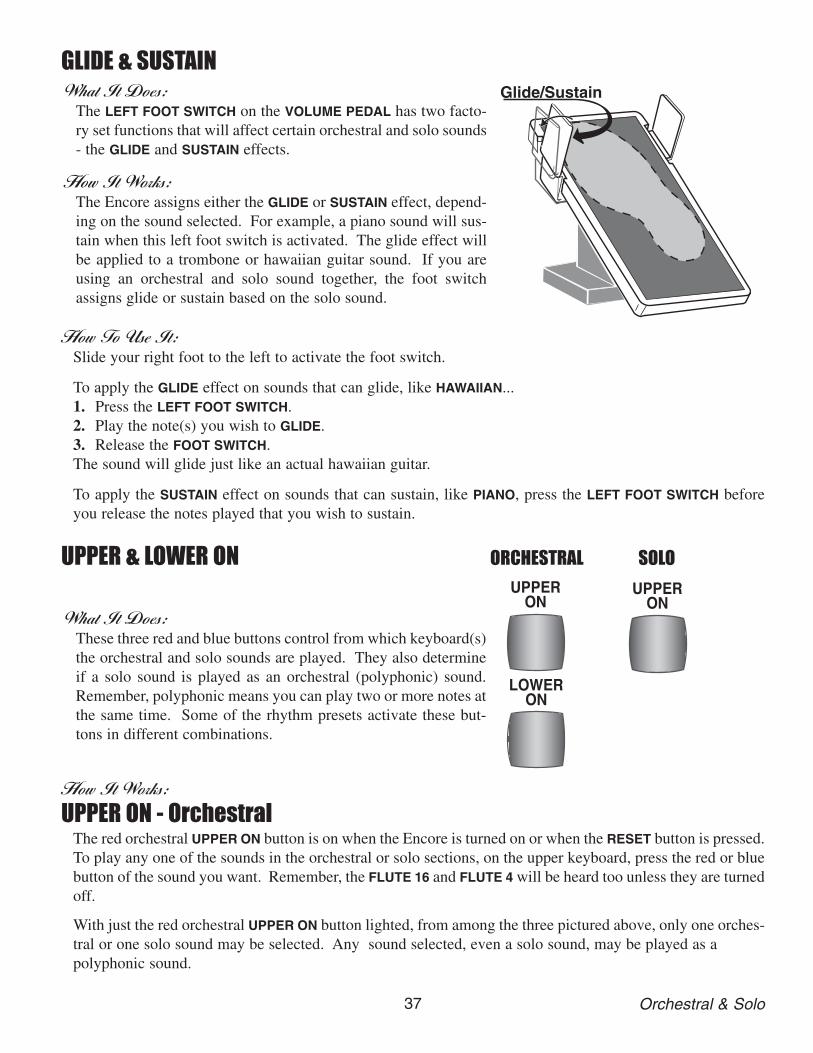
37 Orchestral & Solo
GLIDE & SUSTAIN
How To Use It:Slide your right foot to the left to activate the foot switch.
To apply the GLIDE effect on sounds that can glide, like HAWAIIAN... 1. Press the LEFT FOOT SWITCH.2. Play the note(s) you wish to GLIDE. 3. Release the FOOT SWITCH. The sound will glide just like an actual hawaiian guitar.
To apply the SUSTAIN effect on sounds that can sustain, like PIANO, press the LEFT FOOT SWITCH beforeyou release the notes played that you wish to sustain.
UPPER & LOWER ON ORCHESTRAL SOLO
How It Works:
UPPER ON - OrchestralThe red orchestral UPPER ON button is on when the Encore is turned on or when the RESET button is pressed.To play any one of the sounds in the orchestral or solo sections, on the upper keyboard, press the red or bluebutton of the sound you want. Remember, the FLUTE 16 and FLUTE 4 will be heard too unless they are turnedoff.
With just the red orchestral UPPER ON button lighted, from among the three pictured above, only one orches-tral or one solo sound may be selected. Any sound selected, even a solo sound, may be played as a polyphonic sound.
UPPERON
UPPERON
LOWERON
UPPERON
LOWERON
What It Does:These three red and blue buttons control from which keyboard(s)the orchestral and solo sounds are played. They also determineif a solo sound is played as an orchestral (polyphonic) sound.Remember, polyphonic means you can play two or more notes atthe same time. Some of the rhythm presets activate these but-tons in different combinations.
What It Does:The LEFT FOOT SWITCH on the VOLUME PEDAL has two facto-ry set functions that will affect certain orchestral and solo sounds- the GLIDE and SUSTAIN effects.
How It Works:The Encore assigns either the GLIDE or SUSTAIN effect, depend-ing on the sound selected. For example, a piano sound will sus-tain when this left foot switch is activated. The glide effect willbe applied to a trombone or hawaiian guitar sound. If you areusing an orchestral and solo sound together, the foot switchassigns glide or sustain based on the solo sound.

38Encore Owner’s Guide
LOWER ON - OrchestralPressing the red orchestral LOWER ON button makes any orchestral sound selected playable on the lower keyboard. When both the UPPER ON and LOWER ON buttons are lighted (at the same time) the same soundselected is playable on the upper and lower keyboards.
UPPER ON - SoloPressing the blue solo UPPER ON button, turning it on, enables two sounds - one red orchestral, and one bluesolo, to be playable on the upper keyboard.
How To Use It:Use these three buttons to manipulate the orchestral and solo sounds and to assign the sounds to the upperand/or lower keyboards. Many of the PRESETS automatically utilize these buttons to make setting the organup easy. Pressing the RESET button or turning the organ off will return this section to the factory settings.
ORCH & SOLO VOLUMES
To raise the volume, press the top button. To lower the volume, press the bottom button. It may be neces-sary to tap the button several times to achieve the desired volume. The column of red and green coloredlights next to the volume buttons will visually illustrate the volume levels. All lights illuminated red indi-cates full volume.
How To Use It:These buttons act as the main volume control for the orchestral and solo sounds. Use them to set the desiredvolume levels.
NOTE: When the blue Solo UPPER ON button is off, the ORCH VOLUME controls the volume level of any blueSolo sounds that may be on.
RECAP OF THIS SECTIONThere are three types of buttons in this section:1. Red ORCHESTRAL and blue SOLO buttons that produce sounds.2. Buttons that modify, or change, the sounds - TRANSPOSE, ORCH VOLUME, and SOLO VOLUME.3. Buttons that determine upon which keyboard the sound will be played - red orchestral UPPER ON and
LOWER ON, plus blue solo UPPER ON.
•ORCHESTRAL sounds are polyphonic-many notes can be played.•SOLO sounds are monophonic-one note at a time can be played.•GENIUS VOICE capability greatly expands the number of (orchestral) sounds available.•The FOOT SWITCH on the left side of the volume pedal adds GLIDE or SUSTAIN to certain sounds.•PRESETS automatically utilize these sounds and features for ease of operation.
SOLO
VOLUME
ORCH.
VOLUME
What It Does:The ORCH VOLUME buttons control the overall volume level of the redorchestral sounds. The SOLO VOLUME buttons control the overall volumelevel of the blue solo sounds. The volume level for each sound is presetfrom the Lowrey factory. The numerous presets also set the volume levelsfor you.
How It Works:The ORCHESTRAL VOLUME control is two red-colored buttons located onthe left side of the orchestral section. The SOLO VOLUME control is twoblue-colored buttons located on the right side of the solo section.
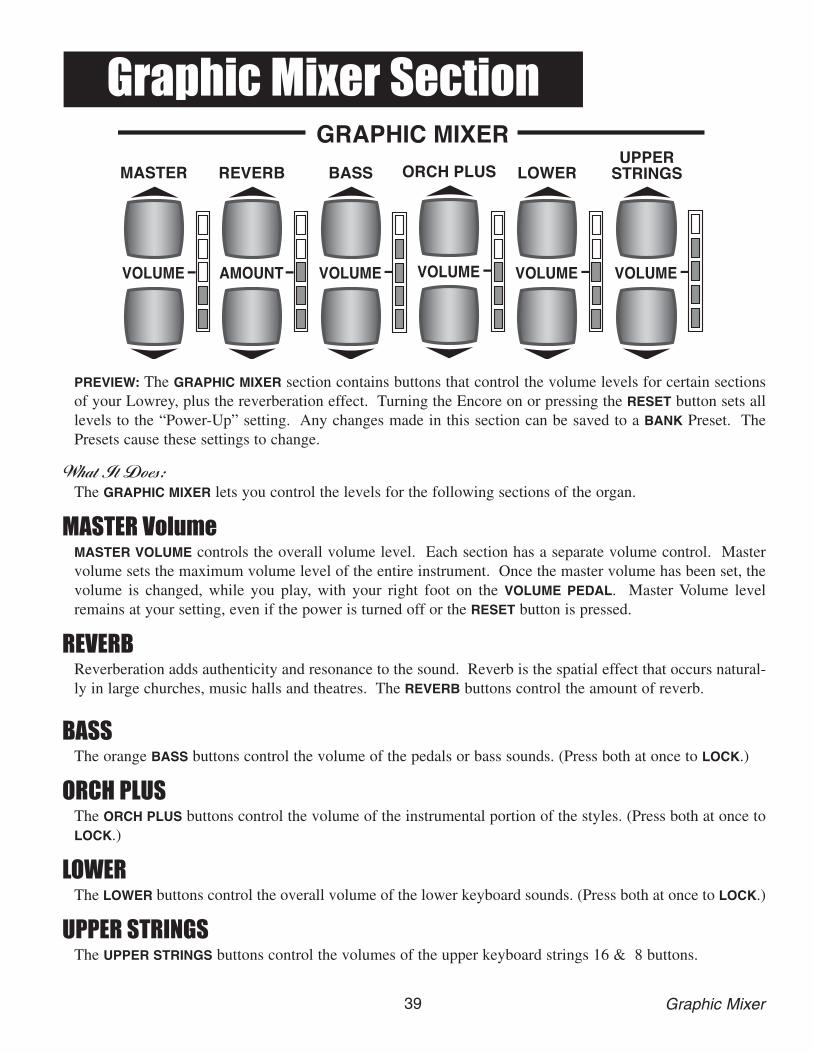
39 Graphic Mixer
PREVIEW: The GRAPHIC MIXER section contains buttons that control the volume levels for certain sectionsof your Lowrey, plus the reverberation effect. Turning the Encore on or pressing the RESET button sets alllevels to the “Power-Up” setting. Any changes made in this section can be saved to a BANK Preset. ThePresets cause these settings to change.
What It Does:The GRAPHIC MIXER lets you control the levels for the following sections of the organ.
MASTER VolumeMASTER VOLUME controls the overall volume level. Each section has a separate volume control. Mastervolume sets the maximum volume level of the entire instrument. Once the master volume has been set, thevolume is changed, while you play, with your right foot on the VOLUME PEDAL. Master Volume levelremains at your setting, even if the power is turned off or the RESET button is pressed.
REVERBReverberation adds authenticity and resonance to the sound. Reverb is the spatial effect that occurs natural-ly in large churches, music halls and theatres. The REVERB buttons control the amount of reverb.
BASSThe orange BASS buttons control the volume of the pedals or bass sounds. (Press both at once to LOCK.)
ORCH PLUSThe ORCH PLUS buttons control the volume of the instrumental portion of the styles. (Press both at once toLOCK.)
LOWERThe LOWER buttons control the overall volume of the lower keyboard sounds. (Press both at once to LOCK.)
UPPER STRINGSThe UPPER STRINGS buttons control the volumes of the upper keyboard strings 16 & 8 buttons.
MASTER
VOLUME
REVERB
AMOUNT
BASS
VOLUME
LOWER
VOLUME
UPPERSTRINGS
VOLUME
GRAPHIC MIXERORCH PLUS
VOLUME
Graphic Mixer Section
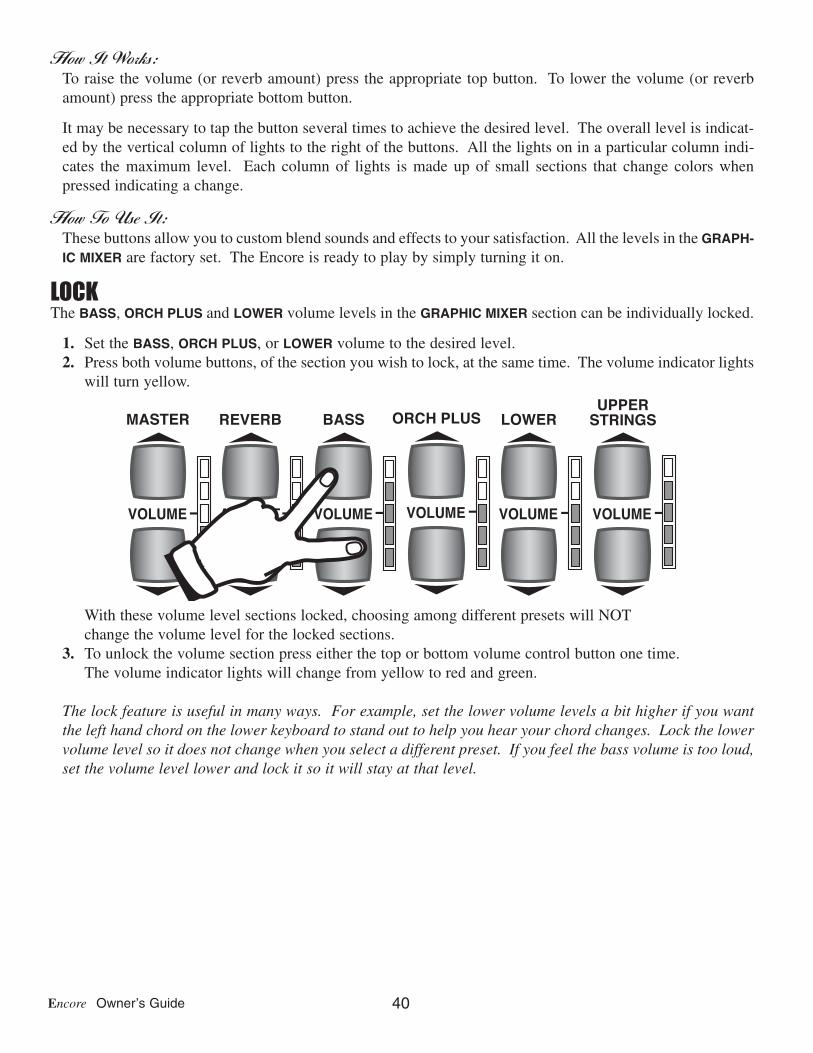
40Encore Owner’s Guide
How It Works:To raise the volume (or reverb amount) press the appropriate top button. To lower the volume (or reverbamount) press the appropriate bottom button.
It may be necessary to tap the button several times to achieve the desired level. The overall level is indicat-ed by the vertical column of lights to the right of the buttons. All the lights on in a particular column indi-cates the maximum level. Each column of lights is made up of small sections that change colors whenpressed indicating a change.
How To Use It:These buttons allow you to custom blend sounds and effects to your satisfaction. All the levels in the GRAPH-IC MIXER are factory set. The Encore is ready to play by simply turning it on.
LOCKThe BASS, ORCH PLUS and LOWER volume levels in the GRAPHIC MIXER section can be individually locked.
1. Set the BASS, ORCH PLUS, or LOWER volume to the desired level.2. Press both volume buttons, of the section you wish to lock, at the same time. The volume indicator lights
will turn yellow.
With these volume level sections locked, choosing among different presets will NOTchange the volume level for the locked sections.
3. To unlock the volume section press either the top or bottom volume control button one time. The volume indicator lights will change from yellow to red and green.
The lock feature is useful in many ways. For example, set the lower volume levels a bit higher if you wantthe left hand chord on the lower keyboard to stand out to help you hear your chord changes. Lock the lowervolume level so it does not change when you select a different preset. If you feel the bass volume is too loud,set the volume level lower and lock it so it will stay at that level.
MASTER
VOLUME
REVERB
AMOUNT
BASS
VOLUME
LOWER
VOLUME
UPPERSTRINGS
VOLUME
GRAPHIC MIXERORCH PLUS
VOLUME

41 Animation & Harmony
How To Use It:Use the FLUTE VIBRA TREM buttons to change the character of the flute/organ sounds. Many of the presetsuse Flute Vibra Trem.
PREVIEW: The buttons in the HARMONY section enhance upper keyboard play by making a single note soundlike you are playing many, in perfect harmony. This is much like the EASY button, which enhances lower
keyboard play by making one-finger chords possible.
How It Works:Each HARMONY selection recognizes the left hand, lower keyboard chord being played (MCS or traditional)and adds the appropriate harmony notes to the single note you are playing (on the upper keyboard) to createa specific type of harmony. Most of the time these additional notes are below the lowest note you are play-ing. Many of the presets on the Encore utilize these harmony features.
Selecting one of the three harmony styles will NOT change the upper keyboard sounds selected. Harmonyuses whatever sounds that are selected to create the additional harmony notes.
AOCAOC is a Lowrey all-time favorite! AOC takes all the (left hand) notes you are playing on the lower keyboard(MCS or Traditional) and adds them below the melody note you are playing on the upper keyboard.
DUETDUET harmony adds one more note to the melody note being played. Duet has a nice, light sound.
HARMONY
3 PART
DUETAOCWhat It Does:
HARMONY is the act of playing two or more notes, at the same time, to cre-ate a pleasant sound. The Encore features three different types of harmonyfrom which to choose. Each Harmony type is playable with just one finger.The Encore plays all the other notes for you. The HARMONY feature makessounding good easy!
Harmony Section
FLUTE VIBRA TREMSLOW FAST
What It Does:FLUTE VIBRA TREM is an ANIMATION feature that adds motion and textureto the FLUTES sounds.
How It Works:FLUTE VIBRA TREM adds an authentic spinning effect, just like themechanical spinning speakers of the past. There is a FAST and SLOWselection.
Animation Section

42Encore Owner’s Guide
How To Use It:Use the HARMONY feature to make a single melody note sound like you are playing with all your fingers.Remember, the harmony feature only works when chords (MCS Easy-Play or traditional) are played on thelower keyboard.
Play single-finger melody notes when using any of the harmony styles. In many instances, you will get bet-ter results when the melody note you play is on the higher end of the upper keyboard. Let your ear guideyou.
The HARMONY feature will create harmonies using sounds from any section, and in any combination: upper,orchestral and solo.
Pressing the RESET button or turning the organ off will return the harmony section to the “Power-Up” set-ting. Harmony settings can be saved to a BANK PRESET.
TRY THIS: Try the following example to hear how the HARMONY buttons can make a one finger note soundlike you are playing with all your fingers.
1. Press the RESET button.2. Open your black LOWREY SONGBOOK to Amazing Grace.3. Press GENERAL PRESET #1 and the EASY button.4. Play a few notes of Amazing Grace using one-finger notes on the upper keyboard and one-finger
chords on the lower keyboard. 5. Press the AOC button and play more of the song.
Listen to the difference!6. Keep playing the song and press the DUET/AOC buttons at the same time to select 3 PART.7. When you are finished playing press the EASY button, turning it off.
Important: AOCThe upper sounds (FLUTES and STRINGS) and the ORCHESTRAL sounds are treated differently whenusing AOC harmony.
1. AOC adds harmony to any of the upper sounds (FLUTES and Strings) that are selected,when no Orchestral sounds are selected.
2. AOC adds harmony to any of the ORCHESTRAL sounds that are selected, when no Upper sounds are selected.
3. AOC only adds harmony to any of the upper sounds (FLUTES and Strings) sounds that are selected, when both Upper sounds and Orchestral sounds are selected. The ORCHESTRAL sounds
will be heard on the single note being played as will any SOLO sound that may be selected.
When using UPPER sounds and ORCHESTRAL sounds together the harmony arrangement, described initem 3, can be changed so that certain Harmony features can be applied to both Upper and Orchestralsounds. See AOC on page 55.
HARMONY
3 PART
DUETAOCHARMONY
3 PART
DUETAOC3 PART3 PART harmony adds two more notes to the upper keyboard melody notebeing played. This is known as OPEN HARMONY, a traditional theatre organharmony. Upper flutes 16 & 4 sound great with 3 PART.
Press the DUET and AOC buttons at the same time to select 3 PART.
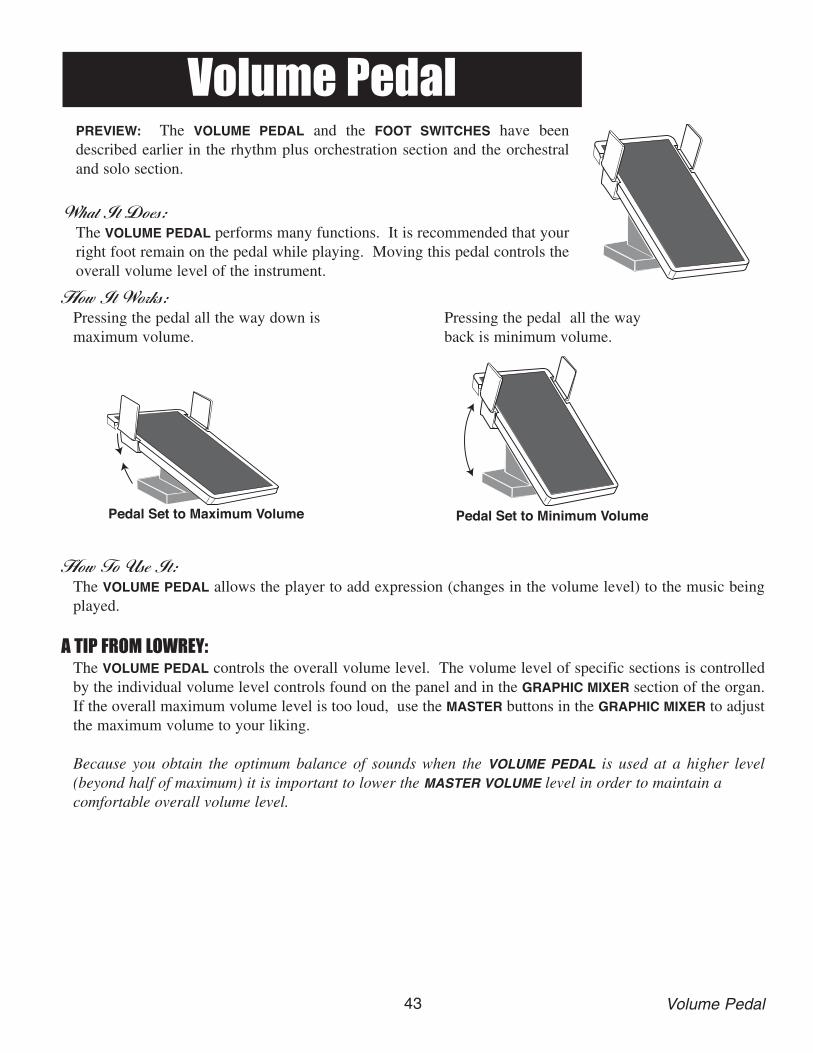
43 Volume Pedal
How It Works:Pressing the pedal all the way down is Pressing the pedal all the waymaximum volume. back is minimum volume.
How To Use It:The VOLUME PEDAL allows the player to add expression (changes in the volume level) to the music beingplayed.
A TIP FROM LOWREY:The VOLUME PEDAL controls the overall volume level. The volume level of specific sections is controlledby the individual volume level controls found on the panel and in the GRAPHIC MIXER section of the organ.If the overall maximum volume level is too loud, use the MASTER buttons in the GRAPHIC MIXER to adjustthe maximum volume to your liking.
Because you obtain the optimum balance of sounds when the VOLUME PEDAL is used at a higher level(beyond half of maximum) it is important to lower the MASTER VOLUME level in order to maintain a comfortable overall volume level.
Pedal Set to Minimum VolumePedal Set to Maximum VolumePedal Set to Minimum VolumePedal Set to Maximum Volume
PREVIEW: The VOLUME PEDAL and the FOOT SWITCHES have beendescribed earlier in the rhythm plus orchestration section and the orchestraland solo section.
What It Does:The VOLUME PEDAL performs many functions. It is recommended that yourright foot remain on the pedal while playing. Moving this pedal controls theoverall volume level of the instrument.
Volume Pedal
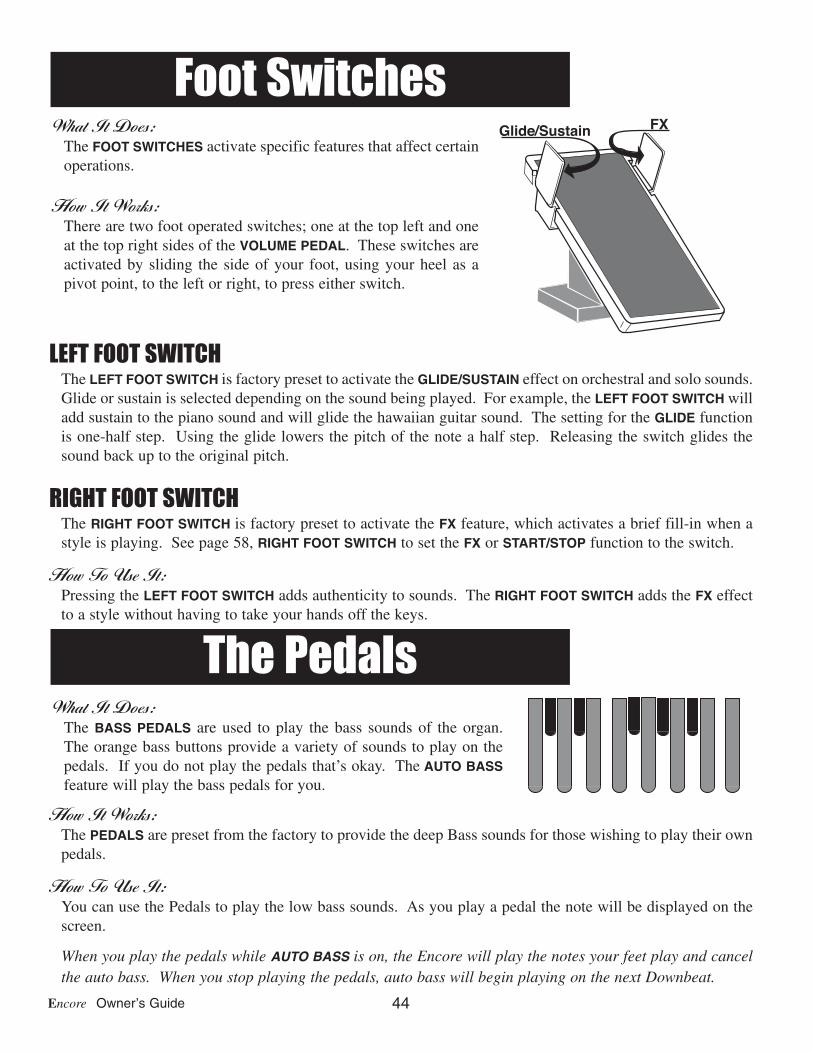
44Encore Owner’s Guide
LEFT FOOT SWITCHThe LEFT FOOT SWITCH is factory preset to activate the GLIDE/SUSTAIN effect on orchestral and solo sounds.Glide or sustain is selected depending on the sound being played. For example, the LEFT FOOT SWITCH willadd sustain to the piano sound and will glide the hawaiian guitar sound. The setting for the GLIDE functionis one-half step. Using the glide lowers the pitch of the note a half step. Releasing the switch glides thesound back up to the original pitch.
RIGHT FOOT SWITCHThe RIGHT FOOT SWITCH is factory preset to activate the FX feature, which activates a brief fill-in when astyle is playing. See page 58, RIGHT FOOT SWITCH to set the FX or START/STOP function to the switch.
How To Use It:Pressing the LEFT FOOT SWITCH adds authenticity to sounds. The RIGHT FOOT SWITCH adds the FX effectto a style without having to take your hands off the keys.
How It Works:The PEDALS are preset from the factory to provide the deep Bass sounds for those wishing to play their ownpedals.
How To Use It:You can use the Pedals to play the low bass sounds. As you play a pedal the note will be displayed on thescreen.
When you play the pedals while AUTO BASS is on, the Encore will play the notes your feet play and cancelthe auto bass. When you stop playing the pedals, auto bass will begin playing on the next Downbeat.
What It Does:The BASS PEDALS are used to play the bass sounds of the organ.The orange bass buttons provide a variety of sounds to play on thepedals. If you do not play the pedals that’s okay. The AUTO BASSfeature will play the bass pedals for you.
The Pedals
Glide/Sustain FXWhat It Does:The FOOT SWITCHES activate specific features that affect certainoperations.
How It Works:There are two foot operated switches; one at the top left and oneat the top right sides of the VOLUME PEDAL. These switches areactivated by sliding the side of your foot, using your heel as apivot point, to the left or right, to press either switch.
Foot Switches

45 Music Recorder
What It Does:1. The MUSIC RECORDER records and stores up to 10 of your own performances, and then can play them
back when you wish.2. The music recorder has a PAUSE feature that allows you to stop during a performance being
recorded or played back.3. The music recorder has a FAST FORWARD (>>) and REWIND (<<) feature that moves quickly
through a recorded song, and is also used to select a song title.
How It Works:When you make a recording, you are storing two basic types of information: the notes (keys) being playedand the buttons being turned on and off during the recording.
How To Use It:
RECORD A SONGSet the Encore up with the sounds and features you wish to play or use the presets, then press the >> and <<buttons to select from which 10 places, displayed as EMPTY SONG in the INFORMATION CENTER, you wishto place your recording. Once you have EMPTY SONG displayed in the INFORMATION CENTER. you are readyto record your song. Now it’s as easy as 1 - 2 - 3 to record a song:
Follow the steps again to record another song. Be sure to use the >> and << buttons to select an EMPTYSONG slot in which to place your new recording, as described above.
NOTE: Allow a few seconds of time to pass after recording a song and pressing the stop button beforeshutting the organ power off. The Music Recorder requires a few seconds to finalize the song storageprocess before the Power is shut off.
RECORD
RECORD STOPPLAY/PAUSE1. Press the RECORD button. (Listen for the metronome to start
ticking.)2. Play your song. When finished, press the STOP button.3. Press the PLAY button to hear YOUR SONG.
MUSIC RECORDER
ERASE
>><<
PLAY/PAUSESTOP
UPPER
RECORD
ACCOMPPREVIEW: The MUSIC RECORDER performs twofunctions: RECORD and PLAYBACK. Record up to 10of your own performances (Your Songs) and thenPlayback those performances. Playback the first 25titles found in the Lowrey Songbook (Lowrey Songs)which have been performed and permanently stored inside the Encore.
Music Recorder
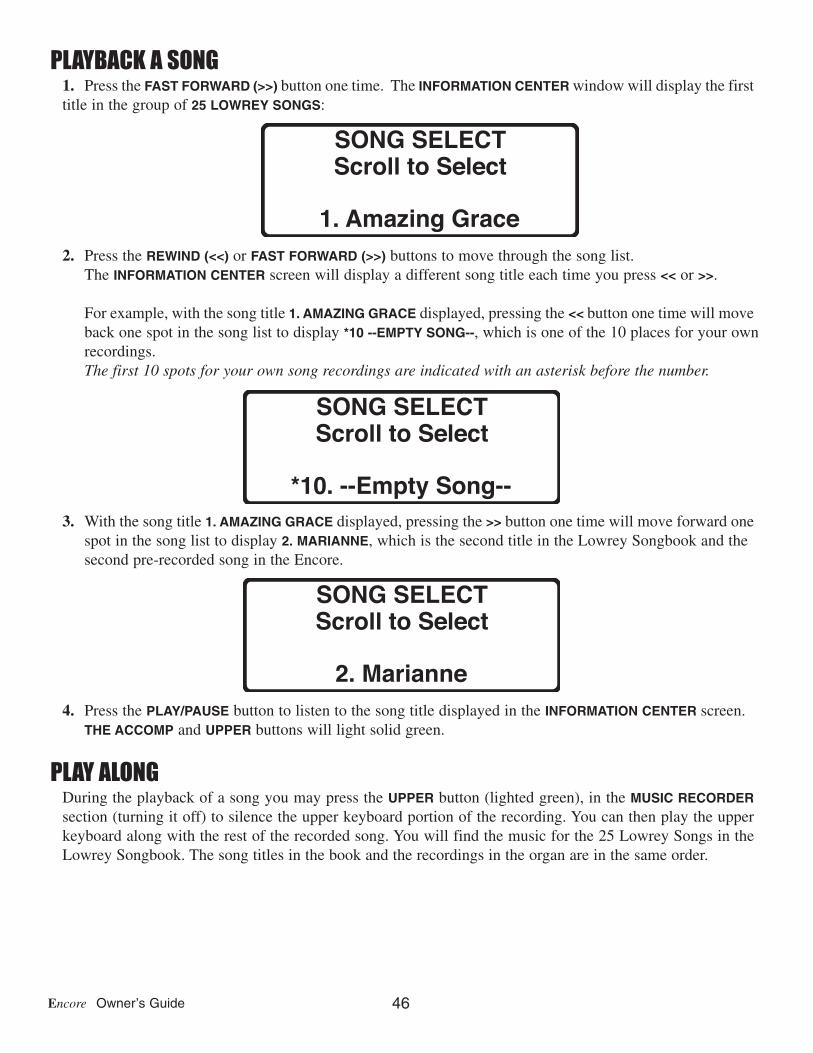
46Encore Owner’s Guide
PLAYBACK A SONG1. Press the FAST FORWARD (>>) button one time. The INFORMATION CENTER window will display the firsttitle in the group of 25 LOWREY SONGS:
2. Press the REWIND (<<) or FAST FORWARD (>>) buttons to move through the song list.The INFORMATION CENTER screen will display a different song title each time you press << or >>.
For example, with the song title 1. AMAZING GRACE displayed, pressing the << button one time will moveback one spot in the song list to display *10 --EMPTY SONG--, which is one of the 10 places for your own recordings. The first 10 spots for your own song recordings are indicated with an asterisk before the number.
3. With the song title 1. AMAZING GRACE displayed, pressing the >> button one time will move forward onespot in the song list to display 2. MARIANNE, which is the second title in the Lowrey Songbook and the second pre-recorded song in the Encore.
4. Press the PLAY/PAUSE button to listen to the song title displayed in the INFORMATION CENTER screen. THE ACCOMP and UPPER buttons will light solid green.
PLAY ALONGDuring the playback of a song you may press the UPPER button (lighted green), in the MUSIC RECORDERsection (turning it off) to silence the upper keyboard portion of the recording. You can then play the upperkeyboard along with the rest of the recorded song. You will find the music for the 25 Lowrey Songs in theLowrey Songbook. The song titles in the book and the recordings in the organ are in the same order.
SONG SELECTScroll to Select
2. Marianne
SONG SELECTScroll to Select
*10. --Empty Song--
SONG SELECTScroll to Select
1. Amazing Grace

47 Music Recorder
CHAIN SONGSAnother playback feature is CHAIN SONGS. Rather than listening to just one song you can set the Encore toplayback all the songs in order, beginning with the song of your choice. You can choose to playback just theLOWREY SONGS (the 25 pre-recorded songs, just YOUR SONGS (the 10 songs you can record and store inthe Music Recorder) or ALL SONGS (Your Songs and the Lowrey Songs).
1. Press the FEATURE/CLEAR button.2. Press either SCROLL button repeatedly until CHAIN SONGS is displayed in the window.
3. Press the SELECT button. The window will display:
4. Press either SCROLL button to display the other CHAIN SONG choices: LOWREY SONGS,YOUR SONGS or ALL SONGS:
5. Press the FEATURE/CLEAR button when the choice want is displayed on the screen. Follow the Playbacksteps to hear the songs played back in the CHAIN SONGS method you selected.
Chain SongsScroll to select
Off
Chain SongsScroll to select
All Songs
Chain SongsScroll to select
Off
Chain SongsScroll to select
All Songs
Chain SongsScroll to select
Your Songs
Chain SongsScroll to select
Lowrey Songs
Chain SongsScroll to select
All Songs
Chain SongsScroll to select
Your Songs
Chain SongsScroll to select
Lowrey Songs
Chain SongsScroll to select
Off
Chain SongsScroll to select
All Songs
Chain SongsScroll to select
Your Songs
INFORMATION CENTER
FEATURE
Chain Songs
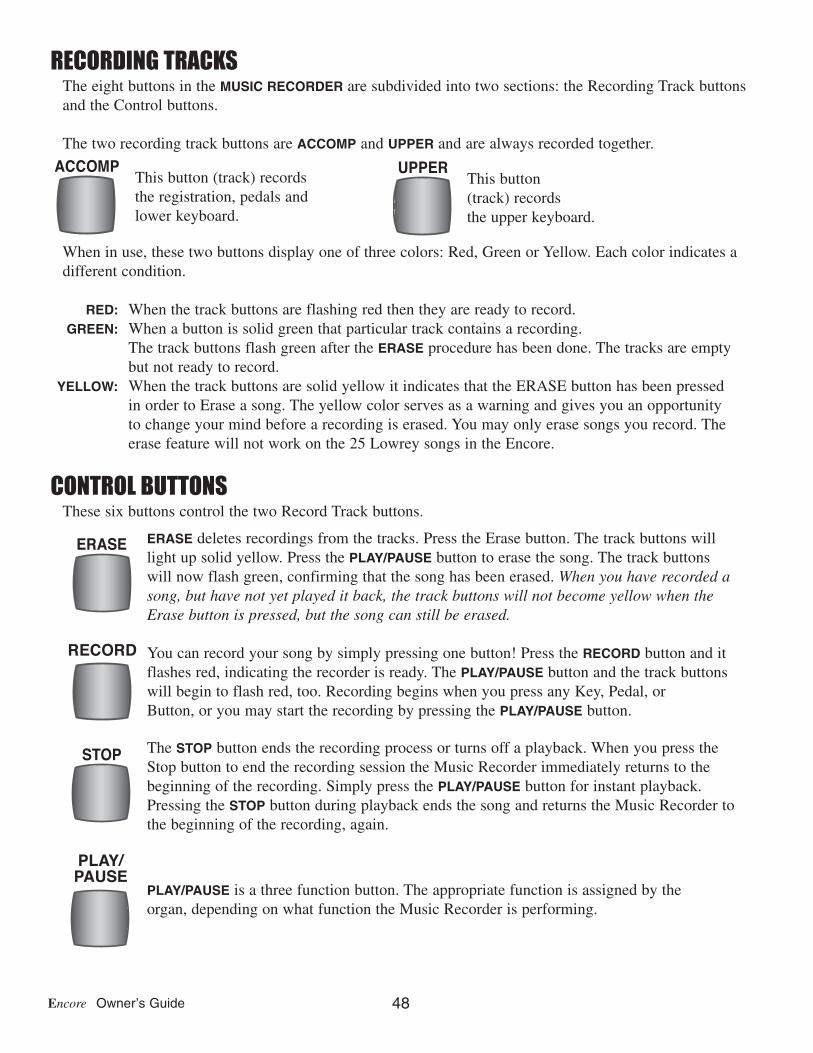
48Encore Owner’s Guide
RECORDING TRACKSThe eight buttons in the MUSIC RECORDER are subdivided into two sections: the Recording Track buttonsand the Control buttons.
The two recording track buttons are ACCOMP and UPPER and are always recorded together.
When in use, these two buttons display one of three colors: Red, Green or Yellow. Each color indicates adifferent condition.
RED: When the track buttons are flashing red then they are ready to record.GREEN: When a button is solid green that particular track contains a recording.
The track buttons flash green after the ERASE procedure has been done. The tracks are emptybut not ready to record.
YELLOW: When the track buttons are solid yellow it indicates that the ERASE button has been pressedin order to Erase a song. The yellow color serves as a warning and gives you an opportunityto change your mind before a recording is erased. You may only erase songs you record. Theerase feature will not work on the 25 Lowrey songs in the Encore.
CONTROL BUTTONSThese six buttons control the two Record Track buttons.
PLAY/PAUSE is a three function button. The appropriate function is assigned by theorgan, depending on what function the Music Recorder is performing.
PLAY/PAUSE
PLAY/PAUSE
The STOP button ends the recording process or turns off a playback. When you press theStop button to end the recording session the Music Recorder immediately returns to thebeginning of the recording. Simply press the PLAY/PAUSE button for instant playback.Pressing the STOP button during playback ends the song and returns the Music Recorder tothe beginning of the recording, again.
STOP STOP
You can record your song by simply pressing one button! Press the RECORD button and itflashes red, indicating the recorder is ready. The PLAY/PAUSE button and the track buttonswill begin to flash red, too. Recording begins when you press any Key, Pedal, orButton, or you may start the recording by pressing the PLAY/PAUSE button.
RECORD RECORD
PLAY/
ERASE deletes recordings from the tracks. Press the Erase button. The track buttons willlight up solid yellow. Press the PLAY/PAUSE button to erase the song. The track buttonswill now flash green, confirming that the song has been erased. When you have recorded asong, but have not yet played it back, the track buttons will not become yellow when theErase button is pressed, but the song can still be erased.
ERASE ERASE
This button(track) recordsthe upper keyboard.
UPPER UPPER
UPPER
This button (track) recordsthe registration, pedals andlower keyboard.
ACCOMP ACCOMP
ACCOMP
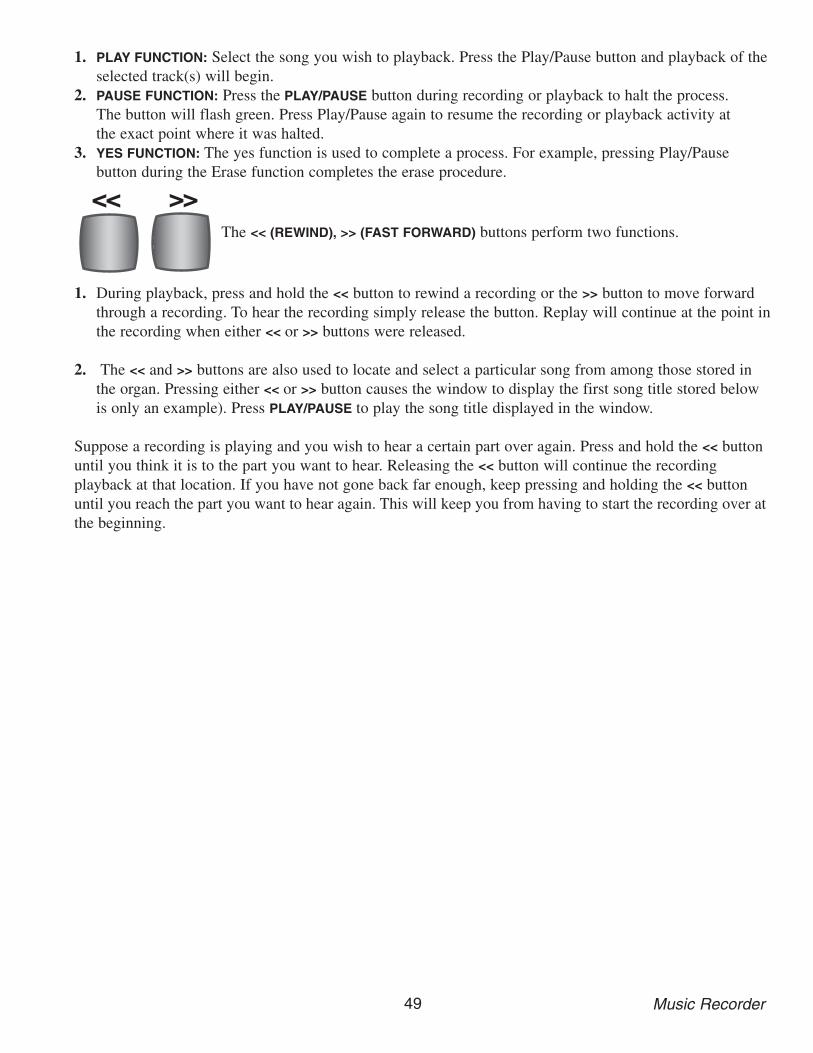
49 Music Recorder
1. PLAY FUNCTION: Select the song you wish to playback. Press the Play/Pause button and playback of the selected track(s) will begin.
2. PAUSE FUNCTION: Press the PLAY/PAUSE button during recording or playback to halt the process.The button will flash green. Press Play/Pause again to resume the recording or playback activity atthe exact point where it was halted.
3. YES FUNCTION: The yes function is used to complete a process. For example, pressing Play/Pause button during the Erase function completes the erase procedure.
1. During playback, press and hold the << button to rewind a recording or the >> button to move forward through a recording. To hear the recording simply release the button. Replay will continue at the point in the recording when either << or >> buttons were released.
2. The << and >> buttons are also used to locate and select a particular song from among those stored in the organ. Pressing either << or >> button causes the window to display the first song title stored below is only an example). Press PLAY/PAUSE to play the song title displayed in the window.
Suppose a recording is playing and you wish to hear a certain part over again. Press and hold the << buttonuntil you think it is to the part you want to hear. Releasing the << button will continue the recording playback at that location. If you have not gone back far enough, keep pressing and holding the << buttonuntil you reach the part you want to hear again. This will keep you from having to start the recording over atthe beginning.
The << (REWIND), >> (FAST FORWARD) buttons perform two functions.
ERASE
>><<
PLAY/PAUSESTOP
UPPER
RECORD
ACCOMP
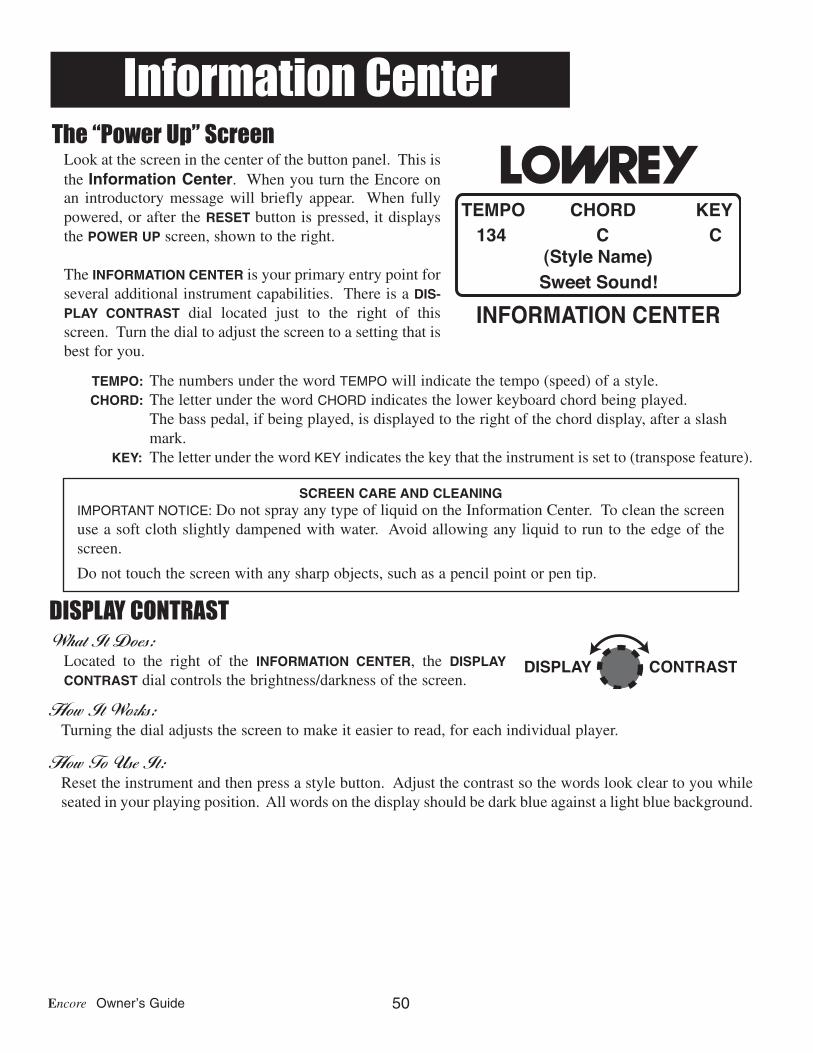
50Encore Owner’s Guide
TEMPO: The numbers under the word TEMPO will indicate the tempo (speed) of a style.CHORD: The letter under the word CHORD indicates the lower keyboard chord being played.
The bass pedal, if being played, is displayed to the right of the chord display, after a slash mark.
KEY: The letter under the word KEY indicates the key that the instrument is set to (transpose feature).
DISPLAY CONTRAST
How It Works:Turning the dial adjusts the screen to make it easier to read, for each individual player.
How To Use It:Reset the instrument and then press a style button. Adjust the contrast so the words look clear to you whileseated in your playing position. All words on the display should be dark blue against a light blue background.
DISPLAY CONTRAST
What It Does:Located to the right of the INFORMATION CENTER, the DISPLAYCONTRAST dial controls the brightness/darkness of the screen.
SCREEN CARE AND CLEANINGIMPORTANT NOTICE: Do not spray any type of liquid on the Information Center. To clean the screenuse a soft cloth slightly dampened with water. Avoid allowing any liquid to run to the edge of thescreen.
Do not touch the screen with any sharp objects, such as a pencil point or pen tip.
INFORMATION CENTER
TEMPO CHORD KEY134 C C
(Style Name)Sweet Sound!
The “Power Up” ScreenLook at the screen in the center of the button panel. This isthe Information Center. When you turn the Encore onan introductory message will briefly appear. When fullypowered, or after the RESET button is pressed, it displaysthe POWER UP screen, shown to the right.
The INFORMATION CENTER is your primary entry point forseveral additional instrument capabilities. There is a DIS-PLAY CONTRAST dial located just to the right of thisscreen. Turn the dial to adjust the screen to a setting that isbest for you.
Information Center

51 Feature Pages
PREVIEW: There are 10 FEATURE PAGES viewable on the INFORMATION CENTER. Each feature page con-tains a different category of features and controls. You may never use all of the features that will be shownin this section. Using the various presets, described at the beginning of this book, will automatically activatemany of them for you. This section fully-details the features and controls accessible from the InformationCenter.
NAVIGATIONThe FEATURE (CLEAR),SCROLL,and SELECT buttons allow you to move through, change and implement thenumerous features found in the INFORMATION CENTER FEATURE PAGES.
FEATURE PAGE TITLES1. LEVELS (BALANCE) - PAGE 532. SUSTAIN LENGTHS - PAGE 543. AOC - PAGE 554. EDIT GENIUS - PAGE 565. REPEAT - PAGE 576. RIGHT FOOT SWITCH - PAGE 587. RENAME BANK PRESET - PAGE 588. CHAIN SONGS - PAGE 599. MIDI - PAGE 60
10. LIGHT SHOW - PAGE 61
SONGSETUP
EASY
SELECTFEATURE(CLEAR)
SCROLL
FLUTE VIBRA TREMSLOW FAST
INFORMATION CENTER
Feature Pages

52Encore Owner’s Guide
FEATURE (CLEAR) BUTTONWhat It Does:
The FEATURE (CLEAR) button enables and initiates numerous features. It can also return the INFORMATIONCENTER to its standard display.
How It Works:There are 10 Feature Pages of controls and features on the Encore. Pressing the FEATURE (CLEAR) buttondisplays the first of these, or the last page you were on before you returned to the POWER UP screen.
The FEATURE (CLEAR) button and the SCROLL buttons are used to access numerous control features. All of these features are preset from the factory and need not be adjusted.
SCROLL BUTTONSWhat It Does:
The SCROLL buttons allow you to move among different choices or change items displayed on theINFORMATION CENTER. The scroll function is used frequently with many features on the Encore.
How It Works:The top button always increases a number or moves up through a list of choices. The bottom button alwaysdecreases a number or moves down through a list of choices.
How To Use It:Use the SCROLL buttons to view options and make changes to features displayed on the INFORMATIONCENTER.
SELECT BUTTONWhat It Does:
The SELECT button allows you to move among items within a feature page. The select function is used frequently with many features.
How It Works:SELECT sets the choices and settings made and then moves to the next step in a process.
How To Use It:Once you have SCROLLED to a desired page, press the SELECT button to move to the SECTION that you wishto change. Each feature page description that follows will specify the use of the SELECT button, as it relatesto a particular setting or feature.
INFORMATION CENTER
FEATURE
Levels (Balance)
How To Use It:Press the FEATURE (CLEAR) button. It will light upand the first FEATURE PAGE will be displayed. Pressthe top SCROLL button one time to view the secondfeature page. Each time you press the top scroll buttonthe next feature page is displayed.
Pressing the FEATURE (CLEAR) button when it islighted turns the button off and returns the screen tothe “Power-Up” screen.

53 Feature Pages
ShortcutsThe FEATURE PAGES have SHORTCUTS. Shortcuts eliminate some of the steps needed to access a particular screen. To implement a shortcut simply press and hold the FEATURE (CLEAR) button, press andrelease a specified button, then release the FEATURE (CLEAR) button. SHORTCUTS are indicated at each fea-ture page heading that follows in this section ‘SHORTCUT =FEATURE + (BUTTON NAME)’. For example, if you want to quickly jump to the AOC screen...1. Press and hold the FEATURE (CLEAR) button.2. Press and release the AOC button.3. Release the FEATURE (CLEAR) button. The AOC screen will be displayed.
What It Does:Levels refers to the volume level for sounds. Balance has to do with the relative volume level between twosounds. For example, changing the level of the Lower Strings and Vocal sounds (LO STRING VOCAL on thescreen) allows you to change the balance of the levels between the strings/vocal sounds and the lower flutesounds. Changing the level of the Pedal Genius sound allows you to change the balance of the levels betweenthe Pedal Genius and Bass sounds. LEVELS range from 0 (off) to 100 (maximum volume).
4. When the desired choice is displayed, press the SELECT button to highlight the level control, which will be indicated by the up/down pointing triangles on the screen. In addition to the numerical value of the level, there is also a horizontal graph which visually illustrates the level.
5. Press the top SCROLL button to increase the level. Press the bottom SCROLL button to decrease the level.When the desired level is set press the FEATURE (CLEAR) button.
Levels (Balance)Use SCROLL & SELECT
Pedal Genius80nnnnnnnn
Levels (Balance)Use SCROLL & SELECT
Pedal Genius80nnnnnnnn
Levels (Balance)Use SCROLL & SELECT
Lo String/Vocal60nnnnnn
Levels (Balance)Use SCROLL & SELECT
Lo String/Vocal60nnnnnn
Levels (Balance)Use SCROLL & SELECT
Pedal Genius80nnnnnnnn
Levels (Balance)Use SCROLL & SELECT
Pedal Genius80nnnnnnnn
Levels (Balance)Use SCROLL & SELECT
Lo String/Vocal60nnnnnn
Levels (Balance)Use SCROLL & SELECT
Lo String/Vocal60nnnnnn
INFORMATION CENTER
FEATURE
Levels (Balance)
How It Works:1. Press the FEATURE (CLEAR) button.2. Press either SCROLL button, if needed, until
LEVELS (BALANCE) is displayed on the screen.3. Press the SELECT button to display the first of two
choices, LOWER STRING AND VOCAL. To display the second choice, press either SCROLL button.
1. Levels (Balance)

54Encore Owner’s Guide
How To Use It:LEVELS (BALANCE) is used to customize the volume levels of the sounds. Settings can be saved to a BANKPRESET. Pressing the RESET button or turning the Encore off returns levels to the factory preset. Many ofthe Presets change Levels (Balance).
The two LEVELS (BALANCE) categories have volume control buttons in the GRAPHIC MIXER - LOWER andBASS. The LOWER buttons in the GRAPHIC MIXER raise and lower the overall volume of the Lower Flutes,Strings and Vocal Ensemble buttons. The LEVELS (BALANCE) feature allows you to adjust these volumesindependent of each other.
The BASS buttons in the GRAPHIC MIXER raise and lower the overall volume of the Pedal sounds. TheLEVELS (BALANCE) allows you to adjust the volume of the Pedal Genius sound independent of the othersounds.
- SHORTCUT=FEATURE + EITHER GREEN SUSTAIN BUTTON PREVIEW:SUSTAIN LENGTH FEATURE PAGE provides five areas in which the sustain effect may be adjusted: a. UPPER FLUTES: Adjust the amount of sustain the on upper flutes.b. UPPER STRINGS: Adjust the amount of sustain on the upper strings and vocal ensemble.c. LOWER FLUTES: Adjust the amount of sustain on the lower flutes.d. LOWER STRINGS/VOCAL: Adjust the amount of sustain on the lower strings.e. BASS TABS: Adjust the amount of sustain on the bass sounds.
Sustain causes a sound to slowly fade away after the keys are released. Without sustain, the sound stopsimmediately upon key release. Sustain allows you to change the sustain lengths in the above listed sections.
•Press the SELECT button to highlight the CONTROL section of the screen, indicated by the up/down triangles.
•Press either SCROLL button repeatedly to display the different sections in which sustain amount may be adjusted.
•Press the SELECT button when the desired section is listed in order to highlight AMOUNT. •Press the top SCROLL button increase sustain length. Press the bottom SCROLL button to decrease sustain length.
Sustain LengthsUse SCROLL & SELECT
Upper Flutes50nnnnn
Sustain LengthsUse SCROLL & SELECT
Upper Flutes50nnnnn
Sustain LengthsUse SCROLL & SELECT
Upper Flutes50nnnnn
INFORMATION CENTER
FEATURE
Sustain Lengths
All sustain lengths are preset from the factory and maynever need to be adjusted to fully enjoy the Encore.When the need arises to adjust sustain length followthese steps.
How To Use It:•Press the Feature (Clear) button and then press the top SCROLL button repeatedly to highlight FEATURE: SUSTAIN LENGTH, as illustrated to the right.
2. Sustain Length
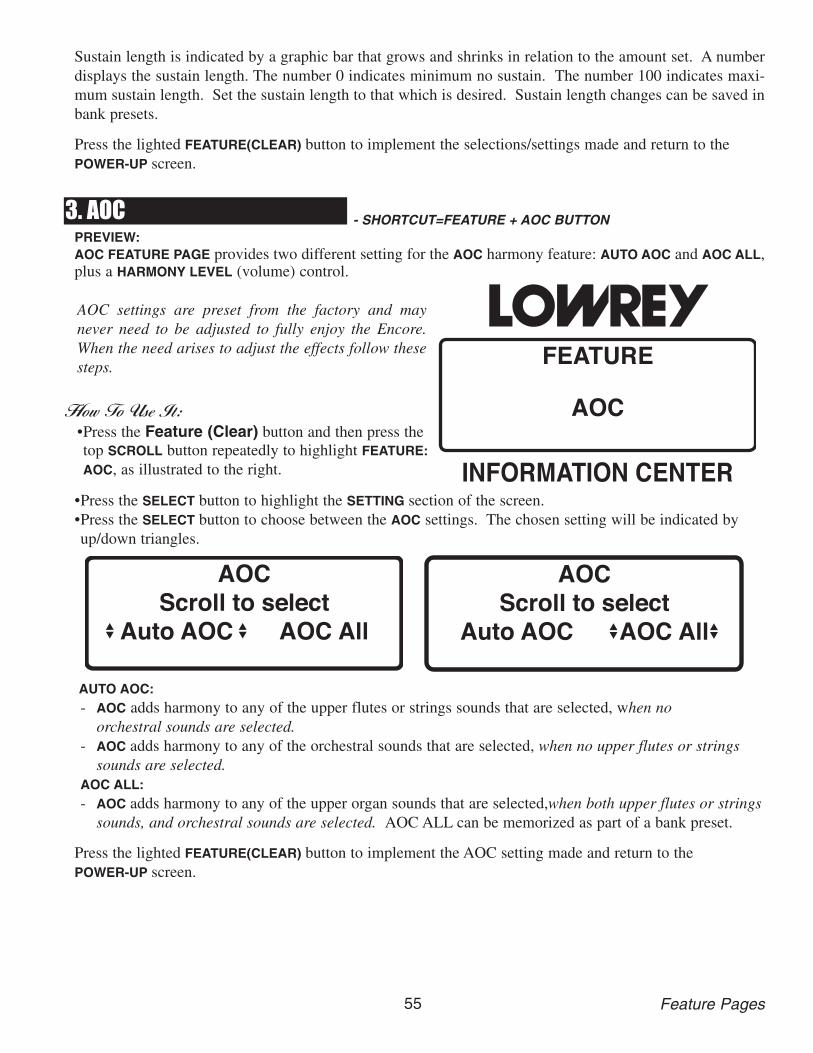
55 Feature Pages
Sustain length is indicated by a graphic bar that grows and shrinks in relation to the amount set. A numberdisplays the sustain length. The number 0 indicates minimum no sustain. The number 100 indicates maxi-mum sustain length. Set the sustain length to that which is desired. Sustain length changes can be saved inbank presets.
Press the lighted FEATURE(CLEAR) button to implement the selections/settings made and return to thePOWER-UP screen.
- SHORTCUT=FEATURE + AOC BUTTONPREVIEW:AOC FEATURE PAGE provides two different setting for the AOC harmony feature: AUTO AOC and AOC ALL,plus a HARMONY LEVEL (volume) control.
•Press the SELECT button to highlight the SETTING section of the screen.•Press the SELECT button to choose between the AOC settings. The chosen setting will be indicated by up/down triangles.
AUTO AOC:- AOC adds harmony to any of the upper flutes or strings sounds that are selected, when no
orchestral sounds are selected.- AOC adds harmony to any of the orchestral sounds that are selected, when no upper flutes or strings
sounds are selected.AOC ALL:- AOC adds harmony to any of the upper organ sounds that are selected,when both upper flutes or strings
sounds, and orchestral sounds are selected. AOC ALL can be memorized as part of a bank preset.
Press the lighted FEATURE(CLEAR) button to implement the AOC setting made and return to thePOWER-UP screen.
AOCScroll to select
Auto AOC AOC All
AOCScroll to select
Auto AOC AOC All
AOCScroll to select
Auto AOC AOC All
AOCScroll to select
Auto AOC AOC All
INFORMATION CENTER
FEATURE
AOC
AOC settings are preset from the factory and maynever need to be adjusted to fully enjoy the Encore.When the need arises to adjust the effects follow thesesteps.
How To Use It:•Press the Feature (Clear) button and then press the top SCROLL button repeatedly to highlight FEATURE: AOC, as illustrated to the right.
3. AOC

56Encore Owner’s Guide
-- SHORTCUT=FEATURE + ANY GENIUS BUTTON
PREVIEW:EDIT GENIUS FEATURE PAGE gives you the ability to change (edit) the GENIUS sounds.
•Press the SELECT button to highlight the CONTROL section of the screen.•Press either SCROLL button to display the settings: ORCH OCTAVE, ORCH SUSTAIN, LOWER OCTAVE, LOWER SUSTAIN, PEDAL OCTAVE, PEDAL SUSTAIN
•Press the SELECT button when the desired setting is listed. The VALUE section of the screen will become highlighted.
•Press the top SCROLL button to increase the value of the selected parameter. Press the bottom SCROLL button to decrease the value.
OCTAVE - Raise or lower the sound by one or two octaves. (Value range -1, -2, 0, 1, 2.)SUSTAIN - How long the sound will linger after the key is released. (Value range 0-100.)
To retain any changes made using EDIT GENIUS be sure to save your settings to a BANK PRESET.
Press the lighted FEATURE(CLEAR) button to implement the selections/settings made and return to thePOWER-UP screen.
Edit GeniusUse SCROLL & SELECT
Orch. Sustain50nnnnn
Edit GeniusUse SCROLL & SELECT
Orch. Sustain50nnnnn
Edit GeniusUse SCROLL & SELECT
Orch. Octave-1
Edit GeniusUse SCROLL & SELECT
Orch. Octave-1
INFORMATION CENTER
FEATURE
Edit Genius
Genius sound settings are preset from the factory andmay never need to be adjusted to fully enjoy theEncore. When the need arises to edit genius soundsfollow these steps.
How To Use It:•Press the Feature (Clear) button and then press the bottom SCROLL button repeatedly to highlight FEATURE: EDIT GENIUS, as illustrated to the right.
4. Edit Genius

57 Feature Pages
PREVIEW:REPEAT FEATURE PAGE allows you to add a repeating effect to orchestral and solo sounds.
ORCHESTRAL REPEAT•Press the SELECT button to highlight the CONTROL section of the screen.•Press either SCROLL button to display the settings: OFF or ON.•With ON displayed, press the SELECT button. The VALUE section of the screen will become highlighted, viathe up/down triangles.
•Press the top SCROLL button to increase the repeat speed. Press the bottom SCROLL button to decrease the repeat speed.
With repeat set to ON play an upper keyboard key (with the orchestral Marimba or Banjo sound selected) tohear the repeat effect while adjusting the speed.
Press the lighted FEATURE(CLEAR) button to implement the selections/settings made and return to thePOWER-UP screen.
RepeatScroll to select
On55nnnnnn
RepeatScroll to select
On55nnnnnn
RepeatScroll to select
Off55nnnnnn
RepeatScroll to select
Off55nnnnnn
INFORMATION CENTER
FEATURE
Repeat
Repeat settings are preset from the factory and maynever need to be changed to fully enjoy the Encore.When the need arises to add repeat follow these steps.
How To Use It:•Press the Feature (Clear) button and then press the bottom SCROLL button repeatedly to highlight FEATURE: REPEAT, as illustrated to the right.
5. Repeat
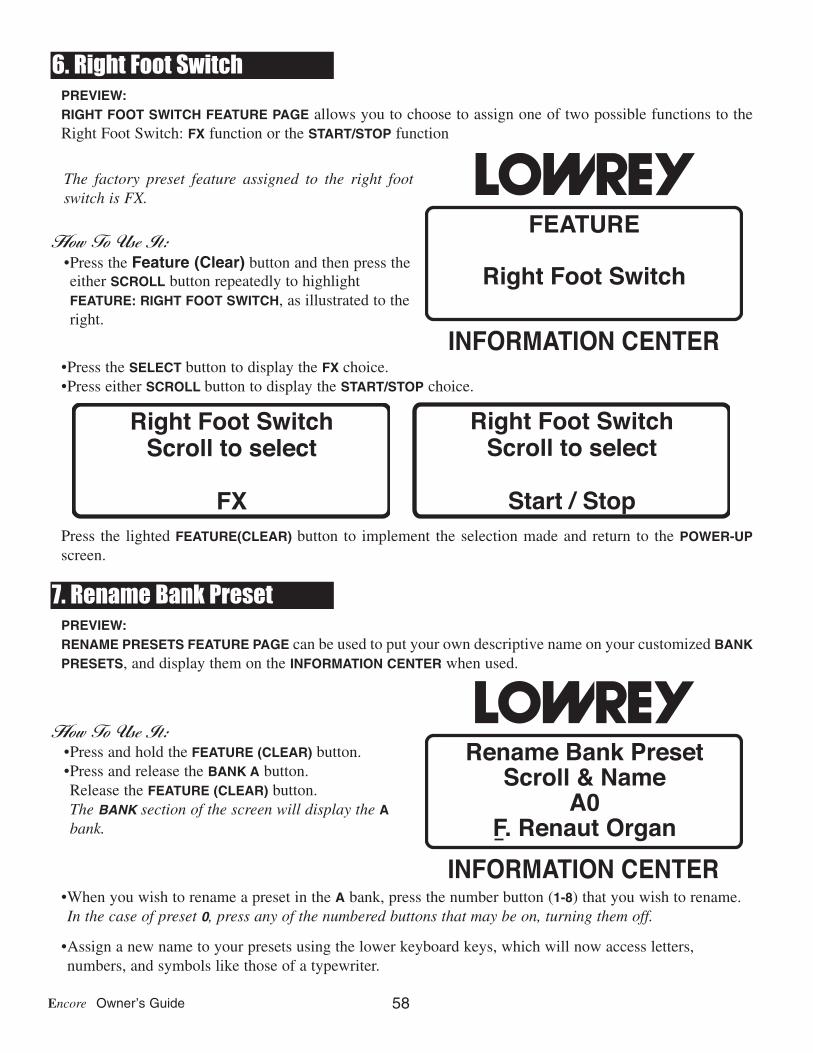
58Encore Owner’s Guide
PREVIEW:RIGHT FOOT SWITCH FEATURE PAGE allows you to choose to assign one of two possible functions to theRight Foot Switch: FX function or the START/STOP function
•Press the SELECT button to display the FX choice.•Press either SCROLL button to display the START/STOP choice.
Press the lighted FEATURE(CLEAR) button to implement the selection made and return to the POWER-UPscreen.
PREVIEW:RENAME PRESETS FEATURE PAGE can be used to put your own descriptive name on your customized BANKPRESETS, and display them on the INFORMATION CENTER when used.
•When you wish to rename a preset in the A bank, press the number button (1-8) that you wish to rename.In the case of preset 0, press any of the numbered buttons that may be on, turning them off.
•Assign a new name to your presets using the lower keyboard keys, which will now access letters, numbers, and symbols like those of a typewriter.
INFORMATION CENTER
Rename Bank PresetScroll & Name
A0F. Renaut Organ
How To Use It:•Press and hold the FEATURE (CLEAR) button.•Press and release the BANK A button. Release the FEATURE (CLEAR) button.The BANK section of the screen will display the Abank.
7. Rename Bank Preset
Right Foot SwitchScroll to select
FX
Right Foot SwitchScroll to select
Start / Stop
Right Foot SwitchScroll to select
FX
Right Foot SwitchScroll to select
Start / Stop
INFORMATION CENTER
FEATURE
Right Foot Switch
The factory preset feature assigned to the right footswitch is FX.
How To Use It:•Press the Feature (Clear) button and then press the either SCROLL button repeatedly to highlight FEATURE: RIGHT FOOT SWITCH, as illustrated to the right.
6. Right Foot Switch
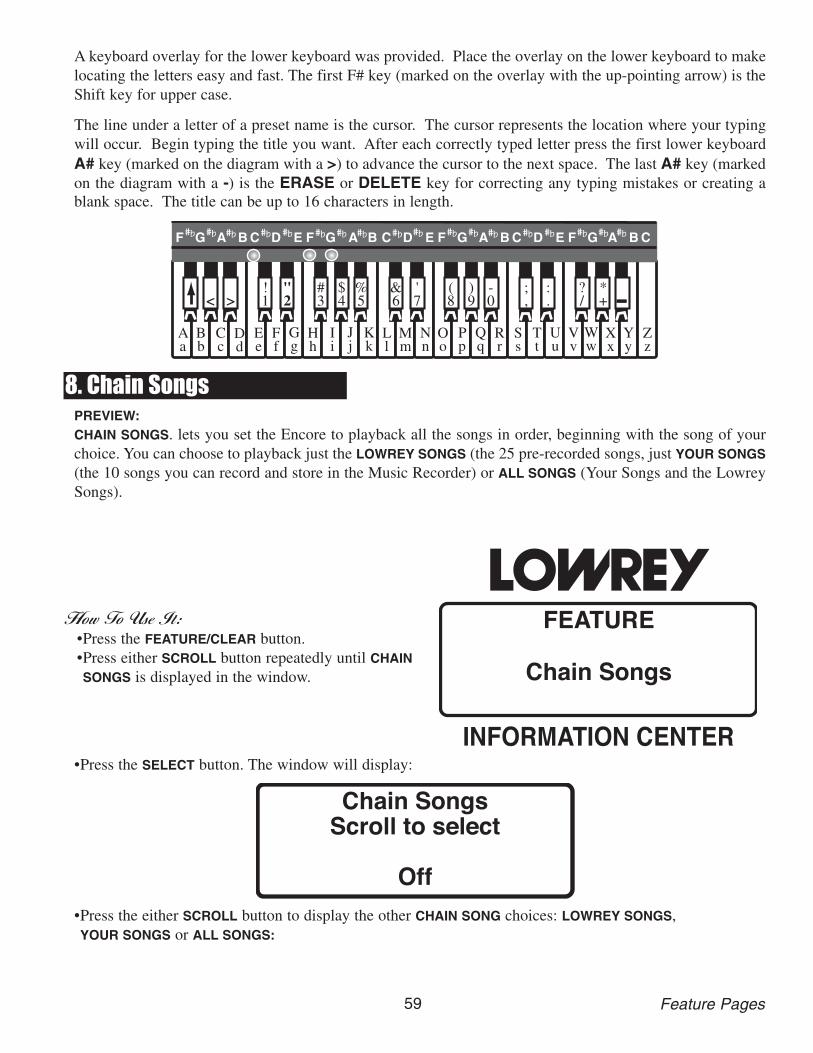
59 Feature Pages
A keyboard overlay for the lower keyboard was provided. Place the overlay on the lower keyboard to makelocating the letters easy and fast. The first F# key (marked on the overlay with the up-pointing arrow) is theShift key for upper case.
The line under a letter of a preset name is the cursor. The cursor represents the location where your typingwill occur. Begin typing the title you want. After each correctly typed letter press the first lower keyboardA# key (marked on the diagram with a >) to advance the cursor to the next space. The last A# key (markedon the diagram with a -) is the ERASE or DELETE key for correcting any typing mistakes or creating ablank space. The title can be up to 16 characters in length.
PREVIEW:CHAIN SONGS. lets you set the Encore to playback all the songs in order, beginning with the song of yourchoice. You can choose to playback just the LOWREY SONGS (the 25 pre-recorded songs, just YOUR SONGS(the 10 songs you can record and store in the Music Recorder) or ALL SONGS (Your Songs and the LowreySongs).
•Press the SELECT button. The window will display:
•Press the either SCROLL button to display the other CHAIN SONG choices: LOWREY SONGS,YOUR SONGS or ALL SONGS:
Chain SongsScroll to select
Off
Chain SongsScroll to select
INFORMATION CENTER
FEATURE
Chain Songs
How To Use It:•Press the FEATURE/CLEAR button.•Press either SCROLL button repeatedly until CHAIN SONGS is displayed in the window.
8. Chain Songs
Aa
Bb
Cc
Dd
Ee
Ff
Gg
Hh
Ii
Jj
Kk
Ll
Mm
Nn
Oo
Pp
Rr
Ss
Tt
Uu
Vv
Ww
Xx
Yy
Zz
><!1
"2
#3
$4
%5
&6
'7
(8
)9
-0
;,
:.
?/
*+ _
><!1
"2
#3
$4
%5
&6
'7
(8
)9
-0
;,
:.
?/
*+ __
Aa
Bb
Cc
Dd
Ee
Ff
Gg
Hh
Ii
Jj
Kk
Ll
Mm
Nn
Oo
Pp
Rr
Ss
Tt
Uu
Vv
Ww
Xx
Yy
Zz
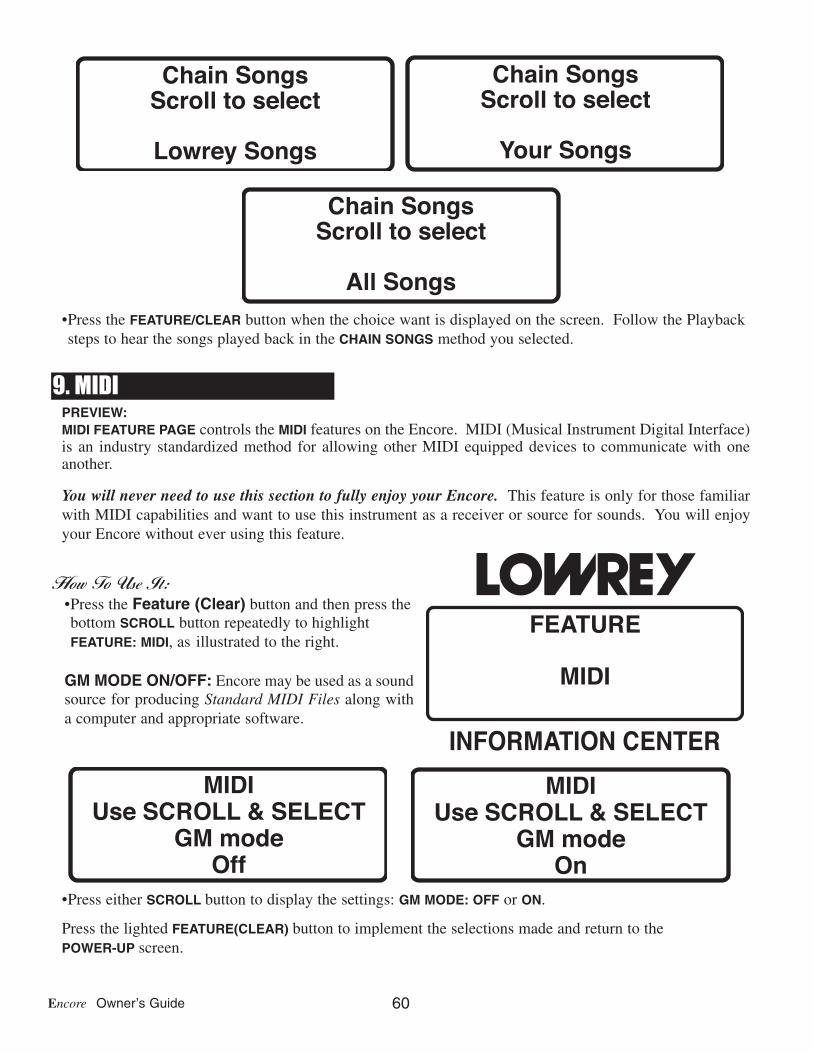
60Encore Owner’s Guide
•Press the FEATURE/CLEAR button when the choice want is displayed on the screen. Follow the Playback steps to hear the songs played back in the CHAIN SONGS method you selected.
PREVIEW:MIDI FEATURE PAGE controls the MIDI features on the Encore. MIDI (Musical Instrument Digital Interface)is an industry standardized method for allowing other MIDI equipped devices to communicate with oneanother.
You will never need to use this section to fully enjoy your Encore. This feature is only for those familiarwith MIDI capabilities and want to use this instrument as a receiver or source for sounds. You will enjoyyour Encore without ever using this feature.
•Press either SCROLL button to display the settings: GM MODE: OFF or ON.
Press the lighted FEATURE(CLEAR) button to implement the selections made and return to thePOWER-UP screen.
MIDIUse SCROLL & SELECT
GM modeOff
MIDIUse SCROLL & SELECT
GM modeOn
MIDIUse SCROLL & SELECT
GM modeOff
MIDI
INFORMATION CENTER
FEATURE
MIDI
How To Use It:•Press the Feature (Clear) button and then press the bottom SCROLL button repeatedly to highlight FEATURE: MIDI, as illustrated to the right.
GM MODE ON/OFF: Encore may be used as a soundsource for producing Standard MIDI Files along witha computer and appropriate software.
9. MIDI
Scroll to select
Off
Chain SongsScroll to select
All Songs
Chain SongsScroll to select
Your Songs
Chain SongsScroll to select
Lowrey Songs
Chain SongsScroll to select
Your Songs
Chain SongsScroll to select
Lowrey Songs
Chain SongsScroll to select
Lowrey Songs

61 Feature Pages
PREVIEW:LIGHT SHOW FEATURE PAGE provides a dazzling button panel light show.
•Press the SELECT button to to activate the light show..•To stop the light show press either SCROLL button or the SELECT button.
Press the lighted FEATURE(CLEAR) button to return to the POWER-UP screen.
CONNECTIONS
MIDI, AUX IN and AUX OUT connections are located on a panel on the back side of the Encore.
MIDI IN, OUT, THRU: You never need to use these connections to fully enjoy playing the Lowrey Encore. Theseare the connections used for connecting other MIDI equipped devices to your organ. Any MIDI equippeddevice’s manual will describe connection and operation.
When connecting MIDI OUT to a sound source and running the audio of that device back into the Encore, setthe external MIDI device to respond to MIDI CONTROLLER #11 (expression). This setting allows the volumepedal on the Encore to control the volume level of the external MIDI device.
AUX OUT, RIGHT-LEFT: These two 1/4” jacks are stereo line level outputs. They are there so you can recordthe organ directly into a tape deck, or connect the organ to an external amplification system. If only the LEFTjack is used, a monaural, (not stereo), signal of the complete organ sound is sent out.
AUX IN, RIGHT-LEFT: These two 1/4” jacks are stereo line level inputs. They are there to let you utilize thepremium sound system on the Encore to listen to other audio sources: tape decks, CD players, MP3 Players,iPods, etc. Use the left input for monaural (not stereo) signals.
When using an external device, be sure to set the volume of that device to minimum and then slowly increasethe volume until you reach a comfortable level.
INFORMATION CENTER
FEATURE
* Light Show *
How To Use It:•Press the Feature (Clear) button and then press the bottom SCROLL button to highlight FEATURE: LIGHT SHOW, as illustrated to the right.
10. Light Show

62Encore Owner’s Guide
Rhythm Styles
Chicago Swing
Spots of Ink
Roadside Cafe’
Shout’n
San Frans
E. Coast Swing/Jive
New York Swing
Gone To Maui
Swing March (6/8)
Can Can
Smokey Lounge
Unforgotten
Disco
Cha Cha
Guitars 3/4
Razz-ma-Tazz
Swing Train
Charleston
The Train
Church Organ
Harmoni-Cats
Slow EZ Blues
Sleigh Bells
Paradise
Grand March
Bavarian Polka
Guitars
Cat Memories
Bandstand
Rhumba/Beguine
Country Waltz
Honky Tonk
VARIATIONSButton Name 0 1 2 Basic
Big Band
Fox Trot
Country
Gospel
Swing
Rhythm & Blues
Broadway
Hawaiian
March
Polka
Soft & Easy
Ballad
Rock ‘N Roll
Latin
Waltz
Ragtime
Swing Band
Champagne
Country Swing
Revival
Serenade
Chicago Blues
Opener
Aloha
Thundering
Happy Polka
EZ 4/4
50s Love Songs
50s Swing Rock
Bossa Nova
EZ Waltz
Joplin Stride
Basic Big Band
Basic Fox Trot
Basic Country
Basic Gospel
Basic Swing (Hop)
Basic R & B
Basic Broadway
Basic Hawaiian
Basic March
Basic Polka
Basic Soft & Easy
Basic Ballad
Basic Rock
Basic Latin
Basic Waltz
Basic Ragtime

63 Genius Voices
AccordionAccordion: LyricBag PipeBanjoBass: AcousticBass: Acoustic 2Bass: Elect. DeepBassoonBellsBells: ChurchBells: CrystalBrass: EnsembleBrass: Section 2CalliopeCelloChimesChoir: Aah (Near)ClarinetEns: Big BandFiddleFlugel HornFlute: JazzFrench HornGuitar: AcousticGuitar: CountryGuitar: DobroGuitar: Elec.SoloGuitar: Elec.StratGuitar: HawaiianGuitar: Jazz 1Guitar: Mute-DynamGuitar: NylonGuitar: SteelHarmonica
Harmonica: Amp’dHarmonica: BluesHarpHarpsichordMandolinMarimbaOboeOrgan: 8’ CelesteOrgan: BaroqueOrgan: Bass PipeOrgan: ChurchOrgan: Princ. 8 - 4Organ: PrincipalOrgan: PumpOrgan: Reed PipesOrgan: StoppedOrgan: Tibia SoftOrgan-Combo: BOrgan-Combo: 60’sOrgan-Jazz: MellowOrgan-Jazz: NiceOrgan-Perc: 2-2/3’Organ-Perc: 4’Pan FlutePiano: 9ft. GrandPiano: Honky-TonkPiano: SocietyPiano: ToyPiano-El: Detune 1Piano-El: DolcePiccoloRecorderSax: AltoSax: Baritone
Sax: New YearsSax: Tenor - 50’sSax: Tenor -GrowlSax: Tenor-BreathyScatSFX: PopSteel DrumsStrings: Ensemble1Strings: Ensemble2Strings: OctaveStrings: PizzicatoTest-SoundTimpaniTimpani: RollingTromboneTrombone: Slide-NTTrombone: TommyTrumpet: LeadTrumpet: LouisTrumpet: MutedTrumpet: Muted-CupTrumpet: Wah-WahTubaVibesViolaViolin: SmoothVocal: BahVocal: DooWhistleXylophoneXtra: Soft-SweepXtra: Solo-SawXtra: Solo-Square
GENIUSVoice List
Genius Voice Name Genius Voice Name Genius Voice Name
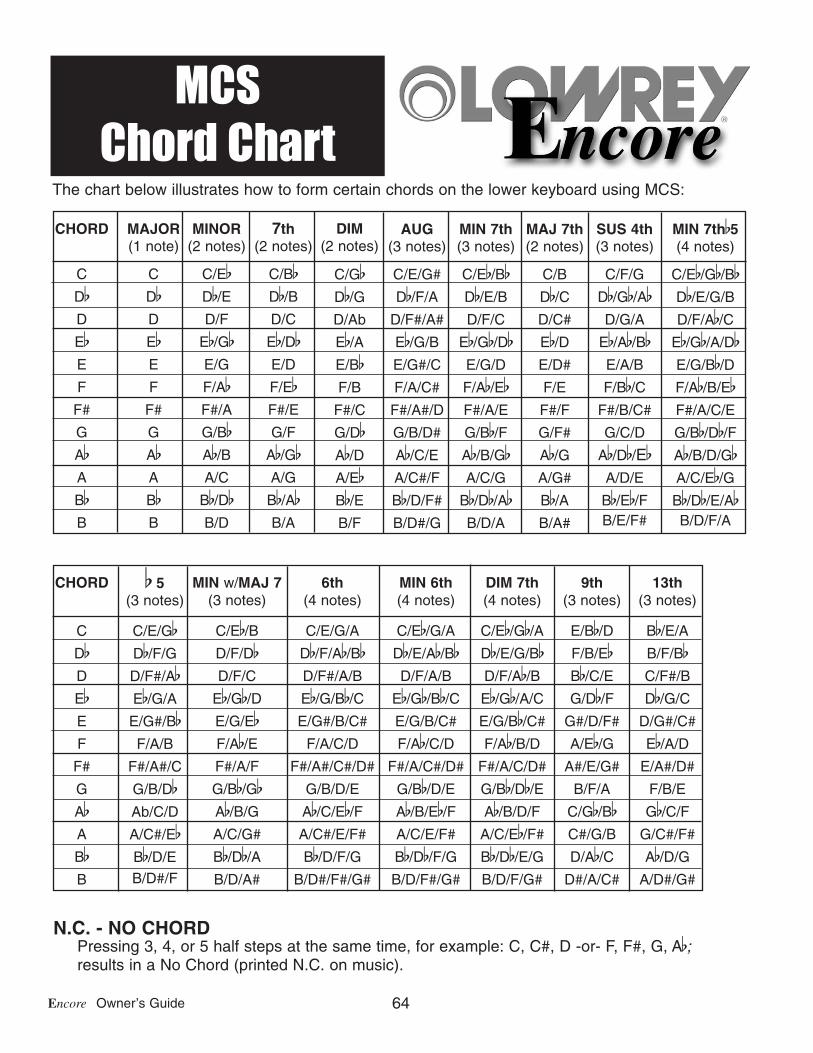
64Encore Owner’s Guide
MCSChord Chart
MAJOR(1 note)
C
DbD
EbE
F
F#
G
AbA
BbB
MINOR(2 notes)
C/EbDb/ED/F
Eb/GbE/G
F/AbF#/A
G/BbAb/BA/C
Bb/DbB/D
7th(2 notes)
C/BbDb/BD/C
Eb/DbE/D
F/EbF#/E
G/F
Ab/GbA/G
Bb/AbB/A
DIM(2 notes)
C/GbDb/GD/Ab
Eb/AE/BbF/B
F#/C
G/DbAb/DA/EbBb/EB/F
AUG(3 notes)
C/E/G#
Db/F/A
D/F#/A#
Eb/G/B
E/G#/C
F/A/C#
F#/A#/D
G/B/D#
Ab/C/E
A/C#/F
Bb/D/F#
B/D#/G
MIN 7th(3 notes)
C/Eb/BbDb/E/B
D/F/C
Eb/Gb/DbE/G/D
F/Ab/EbF#/A/E
G/Bb/FAb/B/GbA/C/G
Bb/Db/AbB/D/A
MAJ 7th(2 notes)
C/B
Db/CD/C#
Eb/DE/D#
F/E
F#/F
G/F#
Ab/GA/G#
Bb/AB/A#
SUS 4th(3 notes)
C/F/G
Db/Gb/AbD/G/A
Eb/Ab/BbE/A/B
F/Bb/CF#/B/C#
G/C/D
Ab/Db/EbA/D/E
Bb/Eb/FB/E/F#
MIN 7thb5(4 notes)
C/Eb/Gb/BbDb/E/G/B
D/F/Ab/CEb/Gb/A/DbE/G/Bb/DF/Ab/B/EbF#/A/C/E
G/Bb/Db/FAb/B/D/GbA/C/Eb/GBb/Db/E/AbB/D/F/A
MIN w/MAJ 7(3 notes)
C/Eb/BD/F/DbD/F/C
Eb/Gb/DE/G/EbF/Ab/EF#/A/F
G/Bb/GbAb/B/G
A/C/G#
Bb/Db/AB/D/A#
b 5(3 notes)
C/E/GbDb/F/G
D/F#/AbEb/G/A
E/G#/BbF/A/B
F#/A#/C
G/B/DbAb/C/D
A/C#/EbBb/D/E
B/D#/F
6th(4 notes)
C/E/G/A
Db/F/Ab/BbD/F#/A/B
Eb/G/Bb/CE/G#/B/C#
F/A/C/D
F#/A#/C#/D#
G/B/D/E
Ab/C/Eb/FA/C#/E/F#
Bb/D/F/G
B/D#/F#/G#
MIN 6th(4 notes)
C/Eb/G/A
Db/E/Ab/BbD/F/A/B
Eb/Gb/Bb/CE/G/B/C#
F/Ab/C/D
F#/A/C#/D#
G/Bb/D/E
Ab/B/Eb/FA/C/E/F#
Bb/Db/F/G
B/D/F#/G#
DIM 7th(4 notes)
C/Eb/Gb/ADb/E/G/BbD/F/Ab/BEb/Gb/A/C
E/G/Bb/C#
F/Ab/B/D
F#/A/C/D#
G/Bb/Db/EAb/B/D/F
A/C/Eb/F#
Bb/Db/E/G
B/D/F/G#
9th(3 notes)
E/Bb/DF/B/EbBb/C/E
G/Db/FG#/D/F#
A/Eb/GA#/E/G#
B/F/A
C/Gb/BbC#/G/B
D/Ab/CD#/A/C#
13th(3 notes)
Bb/E/A
B/F/BbC/F#/B
Db/G/C
D/G#/C#
Eb/A/D
E/A#/D#
F/B/E
Gb/C/F
G/C#/F#
Ab/D/G
A/D#/G#
CHORD
C
DbD
EbE
F
F#
G
AbA
BbB
CHORD
C
DbD
EbE
F
F#
G
AbA
BbB
The chart below illustrates how to form certain chords on the lower keyboard using MCS:
N.C. - NO CHORDPressing 3, 4, or 5 half steps at the same time, for example: C, C#, D -or- F, F#, G, Ab;results in a No Chord (printed N.C. on music).

65 Song Setup
Song Setup ListAbide With Me
Ach, Du Lieber AugustineAchy Breaky HeartAin’t Misbehavin’Ain’t She Sweet?All I Ask Of You
All Of MeAlley CatAloha OeAlways
Always Ready (Semper Paratus) - Coast GuardAmazing Grace
Anchors Aweigh - NavyAnd The Band Played On
Andantino (Moonlight & Roses)Anniversary Waltz
Any TimeApril In Paris
As Time Goes ByAuld Lang SyneAutumn Leaves
Bali Ha’iBattle Hymn Of The Republic
Beautiful DreamerBeer Barrel Polka (Roll Out The Barrel)
Begin The BeguineBehind Closed Doors
Besame MuchoBill Bailey, Won’t You Please Come Home
Birthday Song, TheBlue Bayou
Blue ChristmasBlue HawaiiBlue Velvet
Blueberry HillBridge Over Troubled Water
Bubbles In The Wine (Lawrence Welk)Caissons, The - Army
Canadian SunsetCharleston
Chattanooga Choo ChooCherokee
Cherry Pink And Apple Blossom WhiteChristmas Song (Chestnuts Roasting...)
Climb Ev’ry MountainCold, Cold Heart
CrazyDays Of Wine And Roses, The
Deep In The Heart Of TexasDeep Purple
Don’t Be CruelDon’t Get Around Much Anymore
Down By The RiversideDown In The Valley
DowntownEbb TideEdelweiss
Everybody Loves Somebody (Sometime)Everything’s Coming Up Roses
FeelingsFive Foot Two, Eyes Of Blue
Folsom Prison BluesFor He’s A Jolly Good Fellow
Frosty The SnowmanGeorgia On My Mind
Girl From Ipanema, TheGive Me That Old Time Religion
Glow WormGod Bless AmericaGod Bless The USAGod Save The Queen
Grand Old Flag (Your A)Green Green Grass Of Home
Hark! The Herald Angels SingHave Yourself A Merry Little Christmas
Hawaiian Wedding SongHeartaches
Hello, Dolly!Help Me Make Through The Night
He’s Got The Whole World (InHis Hands)Hey, Good Lookin’

66Encore Owner’s Guide
Hey, Look Me OverHoly, Holy, Holy
Home On The RangeHow Great Thou Art
I Can’t Give You Anything But LoveI Can’t Stop Loving You
I Fall To PiecesI Left My Heart In San Francisco
I Love ParisIce Castles Theme (Through The Eyes Of Love)
I’ll Be Home For ChristmasI’m Looking Over A Four Leaf Clover
I’m So Lonesome I Could CryIn The Good Old Summertime
In The MoodIt Had To Be YouIt’s A Small World
I’ve Been Working On The RailroadJambalay
Jingle Bell RockJingle Bells
Just A Closer Walk With TheeKansas City
King Of The RoadLa Paloma
Lady Is A Tramp, TheLast Date, The
Let Me Call You SweetheartLittle Brown Jug
Londonderry Aire (Oh Danny Boy)Lord’s Prayer, TheLove Me Tender
MarianneMarine’s Hymn
Meet Me In St.Louis, LouisMemory (from Cats)
MistyMoon RiverMoonglow
Moonlight SerenadeMusic Box Dancer
My WayMy Wild Irish Rose
Night And DayOh Lonesome Me
OklahomaOn The Sunny Side Of The Street
Once In A While
Only YouOrange Blossom Special
Peg O’ My HeartPlay A Simple Melody
Pomp And CircumstancePut Your Hand In The Hand Of The Man
Que Sera SeraRaindrops Keep Falling On My Head
Rambling RoseRed Sails In The Sunset
Release MeRockin’ Around The Christmas Tree
Rocky TopRose, The
Rudolph, The Red-Nosed ReindeerSan Antonio Rose
Santa Claus Is Coming To TownSatin Doll
Sentimental JourneySentimental Over You
Seventy-Six TrombonesShe’ll Be Coming ‘Round The Mountain
Silent NightSingin’ In The Rain
Sleigh RideSome Enchanted Evening
Somewhere My LoveSpanish Eyes
St. Louis BluesStand By Your Man
Star DustStars And Stripes Forever
Stranger In Paradise (Polovetzian Dance)Strangers In The Night
Summer Place Theme, ASwanee
Sweet Georgia BrownTake Me Out To The Ball Game
Tea For TwoTennessee Waltz
There Is A Tavern In The TownThere’s No Business Like Show Business
Tie A Yellow Ribbon Round The Old Oak TreeTill There Was You
Tiny BubblesTry To RememberTwelfth Street Rag
Twilight Time

67 Song Setup
Unchained MelodyUnforgettable
Wabash Cannon BallWay We Were, The
We Wish You A Merry ChristmasWe’ve Only Just Begun
What A Friend We Have In JesusWhat Kind Of Fool Am I?
When Johnny Comes Marching Home AgainWhen The Saints Go Marching In
When You’re SmilingWhistle While You Work
White ChristmasWho’s Sorry Now
Wild Blue Yonder (Off We Go Into The)-Air ForceWinter Wonderland
Yankee Doodle Dandy (I’m A)Yellow Bird
Yes Sir! That’s My BabyYou Are My Sunshine
You Needed MeYour Cheatin’ HeartZip-A-De-Doo-Dah

68Encore Owner’s Guide
Two Year Limited WarrantyLowrey Home Organs
FIRST YEAR: Lowrey will provide the original consumer purchaser, through authorized dealers and reg-istered technicians, component parts and authorized labor expense for installation to repair consumer’sLowrey instrument, if required due to component or material failure or workmanship.
SECOND YEAR: Lowrey will provide electronic component parts required for repair, through authorizeddealers or technicians exclusive of labor cost.
This warranty is limited to instruments purchased from and will be administered through authorized Lowreydealers in the United States & Canada and is non-transferable. Consumers are instructed to call a Lowreydealer for service and provide accurate details of faults.
EXCLUSIONS: This warranty does not extend to accessories connected to or damages resulting from suchconnections; any instrument which the serial identification numbers have been altered, removed or tamperedwith; damage caused by abuse, neglect or improper operation; repair expenses required due to unauthorizedalterations, modifications or tampering. Additional expenses of explaining features and organ operation notincluded.
Lowrey shall not be responsible for any warranties offered in addition to this warranty. Lowrey shall not beliable for and excludes incidental or consequential damages which may be incurred. Implied warranties arelimited to the expressed warranty. Some states do not allow these limitations. Therefore, you may have otherlegal rights which vary from state to state.
Lowrey maintains a policy of continuous improvement and upgrading of it’s instruments and thereforereserves the right to change specifications without notice.
IMPORTANT: This warranty becomes effective only upon receipt by the manufacture of the registrationcard filled out and signed by the owner at the time of purchase.
MODEL SERIAL NUMBER PURCHASE DATEA/200 Encore
Limited Warranty

GROUNDING/EARTHING INSTRUCTIONS
This product must be grounded/Earthed. If it should malfunction or breakdown, grounding/earthing provides a path of leastresistance for electric current to reduce the risk of electric shock. This product is equipped with a cord having an equip-ment-grounding/earthing conductor and a grounding/earthing plug. The plug must be plugged into an appropriate outletthat is properly installed and grounded/earthed in accordance with all local codes and ordinance.
“DANGER: Improper connection of the equipment-grounding/earthing conductor can result in risk of electric shock. Checkwith a qualified electrician or serviceman if you are in doubt as to whether the product is properly grounded/earthed. DOnot modify the plug provided with the product-if it will not fit the outlet, have a proper outlet installed by a qualified electri-cian.”
Related Documents