W.A.R. FTS Installation and Software Manual

Welcome message from author
This document is posted to help you gain knowledge. Please leave a comment to let me know what you think about it! Share it to your friends and learn new things together.
Transcript

W.A.R. FTS Installation and Software Manual

2
Table of Contents
1. General Information ........................................................................................................ 5
1.1 Introduction ............................................................................................................... 5
1.2 W.A.R. Gear ............................................................................................................. 5
1.3 Gear Included ............................................................................................................ 6
1.4 Tools Required .......................................................................................................... 6
1.5 Computer Software ................................................................................................... 6
1.6 Safety and Precautions .............................................................................................. 7
2. Wiring Modification to allow Read & Write .................................................................. 8
2.1 Add Jumper to 20 Pin Port wires .............................................................................. 8
3. W.A.R. Flash Tune Software ........................................................................................ 13
3.1 Introduction ............................................................................................................. 13
3.2 Installation .............................................................................................................. 13
3.3 Reading your ECU for the first time. ...................................................................... 14
3.4 Emailing your stock file .......................................................................................... 15
3.5 Writing your tuned file ............................................................................................ 16
4. ECU Selection Table..................................................................................................... 18
4.1 Use to select proper type of ECU for read/write .................................................... 18
5. Troubleshooting ............................................................................................................ 19
5.1 Possible problems ................................................................................................... 19
5.2 Seeking Help ........................................................................................................... 19
NOTES ...................................................................................................................... 19

3
Limited Lifetime Warranty
Miller Performance Ltd. warrants that NON ELECTRONIC products manufactured by Miller Performance
Ltd will be free from defects in materials and workmanship for the life that you own your vehicle. If any such
product proves defective during the applicable warranty period, Miller Performance Ltd., at its option, either will
repair the defective product with charge for parts and labor or will provide a replacement in exchange for the
defective product. NON ELECTRONIC items not manufactured by Miller Performance Ltd. Have a limited
warranty of 30 days past the date of purchase.
In order to obtain service under this warranty, the customer must notify Miller Performance Ltd. of the defect before
the expiration of the warranty period and make suitable arrangements for the performance of service. In all cases the
customer will be responsible for packaging and shipping the defective product back to the service center specified by
Miller Performance Ltd., with shipping charges prepaid. Miller Performance Ltd. shall pay for the return of the product
to the customer if the shipment is within North America, otherwise the customer shall be responsible for all shipping
charges, insurance, duties and taxes, if the product is returned to any other location.
This warranty shall not apply to any defect, failure or damage caused by improper use or failure to observe proper
operating procedures per the product specification or operators manual or improper or inadequate maintenance and
care. Miller Performance Ltd. shall not be obligated to furnish service under this warranty 1) to repair damage resulting
from attempts by personnel other than Miller Performance Ltd’s. representatives to repair or service the product; 2) to
repair damage resulting from improper use or connection to incompatible equipment; 3) to repair damage resulting
from operation outside of the operating or environmental specifications of the product.
MILLER PERFORMANCE LTD. LIABILITY FOR THE MERCHANTABILITY AND USE OF THE PRODUCT IS
EXPRESSLY LIMITED TO ITS WARRANTY SET OUT ABOVE. THIS DISCLAIMER AND LIMITED
WARRANTY IS EXPRESSLY IN LIEU OF ANY AND ALL REPRESENTATIONS AND WARRANTIES
EXPRESS OR IMPLIED, INCLUDING BUT NOT LIMITED TO, ANY IMPLIED WARRANTY OF
MERCHANTABILITY OR OF FITNESS FOR PARTICULAR PURPOSE, WHETHER ARISING FROM
STATUTE, COMMON LAW, CUSTOM OR OTHERWISE. THE REMEDY SET FORTH IN THIS DISCLAIMER
AND LIMITED WARRANTY SHALL BE THE EXCLUSIVE REMEDIES AVAILABLE TO ANY PERSON.
MILLER PERFORMANCE LTD. SHALL NOT BE LIABLE FOR ANY SPECIAL, DIRECT, INDIRECT,
INCIDENTAL OR CONSEQUENTIAL DAMAGES RESULTING FROM THE USE OF THIS PRODUCT OR
CAUSED BY THE DEFECT, FAILURE OR MALFUNCTION OF THIS PRODUCT, NOR ANY OTHER LOSSES
OR INJURIES, WHETHER A CLAIM FOR SUCH DAMAGES, LOSSES OR INJURIES IS BASED UPON
WARRANTY, CONTRACT, NEGLIGENCE, OR OTHERWISE. BY ACCEPTING DELIVERY OF THIS
PRODUCT, THE PURCHASER EXPRESSLY WAIVES ALL OTHER SUCH POSSIBLE WARRANTIES,
LIABILITIES AND REMEDIES. MILLER PERFORMANCE LTD. AND PURCHASER EXPRESSLY AGREE
THAT THE SALE HEREUNDER IS FOR COMMERCIAL OR INDUSTRIAL USE ONLY AND NOT FOR
CONSUMER USES AS DEFINED BY THE MAGNUSOM-MOSS WARRANTY ACT OR SIMILAR STATE
CONSUMER WARRANTY STATUTE

4
W.A.R. Flash Tune System Disclaimer
THIS IS A HIGH PERFORMANCE PRODUCT. USE AT YOUR OWN RISK.
Do not use this product until you have carefully read the following agreement.
This sets forth the terms and conditions for the use of this product. The installation of this product
indicates that the BUYER has read and understands this agreement and accepts its terms and conditions.
DISCLAIMER OF LIABILITY
Miller Performance Ltd. and its distributors, jobbers, and dealers (hereafter SELLER) shall in no way be responsible
for the product's proper use and service. THE BUYER HEREBY WAIVES ALL LIABILITY CLAIMS.
The BUYER acknowledges that he/she is not relying on the SELLER's skill or judgment to select or furnish tunes
suitable for any particular purpose and that there are no liabilities which extend beyond the description on the face
hereof and the BUYER hereby waives all remedies or liabilities, expressed or implied, arising by law or otherwise,
(including without any obligations of the SELLER with respect to fitness, merchantability and consequential damages)
or whether or not occasioned by the SELLER's negligence.
The BUYER is responsible to fully understand the capability and limitations of his/her vehicle according to
manufacturer specifications and agrees to hold the SELLER harmless from any damage resulting from failure to adhere
to such specifications.
The SELLER disclaims any warranty and expressly disclaims any liability for personal injury or damages. The
BUYER acknowledges and agrees that the disclaimer of any liability for personal injury is a material term for this
agreement and the BUYER agrees to indemnify the SELLER and to hold the SELLER harmless from any claim related
to the item of the equipment purchased. Under no circumstances will the SELLER be liable for any damages or
expenses by reason of use or sale of any such equipment.
The BUYER is responsible to obey all applicable federal, state/provincial and local laws, statutes, and ordinances when
operating his/her vehicle, and the BUYER agrees to hold SELLER harmless from any violation thereof.
The SELLER assumes no liability regarding the improper installation or misapplication of its products. It is the
installer's responsibility to check for proper installation and if in doubt, contact the manufacturer.

5
1. General Information
1.1 Introduction
Congratulations on purchasing your Miller W.A.R. Flash Tune System. You are now
ready to flash your ECU in the convenience of your own garage. You can modify your
engine without worrying about what tune to run. We got you covered!
W.A.R. stands for “Write and Remap” and FTS stand for Flash Tune System. Stemming
from our highly popular W.A.R. Chip for OBD1 cars, the W.A.R. FTS is designed to be
used with OBD2 cars (1996 and newer). OBD2 cars do not have removable chips and for
a long time have been inconvenient to flash in the comfort of your own home. Gone are
the days of sending your ECU off to your tuner and having at least 2 days down time.
Now, you can have your new tune loaded in minutes!
1.2 W.A.R. Gear
The Miller W.A.R. Flash Tune System features the following:
Figure 1

6
1.3 Gear Included
Standard Issue:
W.A.R. Flash Cable
Jumper connector for 20pin port
USB Memory Stick
Instruction Manual (On USB Stick)
W.A.R. Flash Software for Windows (On USB Stick)
1.4 Tools Required
The Following tools and supplies (not included) or similar tools and supplies are required
for fast and proper installation of this Miller Performance product:
Minimum requirements:
- Flathead screwdriver
- Adjustable pliers
- Multi-meter
- Laptop computer
- Battery charger or booster pack recommended
1.5 Computer Software
System requirements:
- Windows Based Computer with Windows XP, Windows 7 or Windows 8
- Internet connection
- USB 1.0 or 2.0

7
1.6 Safety and Precautions
Warning:
Ensure vehicle cannot roll when working on the vehicle
Warning:
Do not mix and match ECUs and Tunes. It WILL result in a bricked
ECU that will need to be shipped in for recovery.
Warning:
Never run the engine unless the work area is well ventilated. Carbon
monoxide kills!
Caution:
Before starting each procedure, ensure that you have all the necessary
tools and parts on hand. Read all instructions thoroughly; do not
attempt shortcuts use only parts and materials that are included in this
kit or approved by Miller Performance.
Caution:
Miller Performance does not recommend “street tuning.” The safest
place to tune your car is on a chassis dynamometer.

8
2. Wiring Modification to allow Read & Write
2.1 Add Jumper to 20 Pin Port wires
Before you can read and write with your W.A.R. Flash Tune cable, you must install the
supplied jumper connector to your wiring on your 20 pin, circular diagnostic port in the
engine bay.
1. Locate and detach the round diagnostic connector so it is easy to work with.
There is a tab that will allow the connector body to release and slide out.
Figure 2
Figure 3

9
Figure 4
2. Pull the rubber boot on the bottom of the connector body back and away from
the connector. Use a flat head screw driver to carefully do this.
Figure 5
Figure 6

10
3. Locate pin 14 and 18. Usually a solid red wire and a Blue/Green stripe wire.
The wire colors are only to aid in finding the wires, always go by pin number
REGARDLESS of color. The connector has very small numbers indicating
what pin number each hole is.
Figure 7
4. Push the blue/green wire over to the red one. You will have to weave it
through the other wires. It makes the next step easier.
Figure 8

11
5. Using the supplied jumper insert the wires from pin 14 and 18. This is done
and can be left this way forever. It is easier to put the thicker (red) wire in
first.
Figure 9
6. Clamp the connector lid down using an adjustable pair of pliers. You will hear
the connector click. We recommend squishing it down further after the click
to ensure a proper connection.
Figure 10

12
7. The Clamp should look like this once you have crimped and shut it.
Figure 11
8. Reassemble the 20 pin connector boot. And test the connection. It is important
to test the connection with the boot and plug reassembled to ensure the
connector did not come loose. Make sure you have conductivity between
pin 14 and 18. If you do not have conductivity, pull the boot back and
squish the blue connector down with your pliers some more. Refer to
figure 7 for pin out.
Figure 12
You are now ready to move on to the installation of the W.A.R. Flash communication
suite where you will be able to read and write to your ECU!

13
3. W.A.R. Flash Tune Software
3.1 Introduction
The W.A.R. Chip software for Windows is where all the communication to your car’s
ECU takes place; as well as the file uploading/downloading from remote tuning
assistance. The W.A.R. Software is a powerful tool giving you total access to many
features in the ECU such as control of your fuel and ignition, RPM limit, idle speed etc.
This section is going to explain installation and use of the software.
3.2Installation
The W.A.R. Flash Tune software is on the USB memory stick included with this product.
1. Double click on the W.A.R Flash Tune installer
2. Follow the installation procedure.
a. Agree to terms and conditions, click next
b. Select your installation directory, click next
c. Finish installation
3. Once installed, it is suggested to restart your computer.
4. Once restarted plug your W.A.R. flash cable into your computer. When it detects
the new hardware, it will ask for the driver. Navigate to the directory you
installed your program to and point to the folder named.
“DRIVERS_EOBD2_2K_XP”
You are now ready to communicate to your ECU. In the next section we will detail how
to read and write so you can upload a tune to your vehicle.

14
3.3 Reading your ECU for the first time.
You need to read your ECU and send us the stock file in order for us to send you a tune.
1. Plug in your W.A.R. Flash Cable to your OBD2 port. This is located in the driver
side foot well. Connect the USB plug into your laptop.
Figure 13
2. Open the W.A.R. Flash Tune program
3. Select “BMW” under Manufacturer
Figure 14
4. Under ECU select the appropriate computer your car has by Referring to ECU
Selection Table on page 18
15
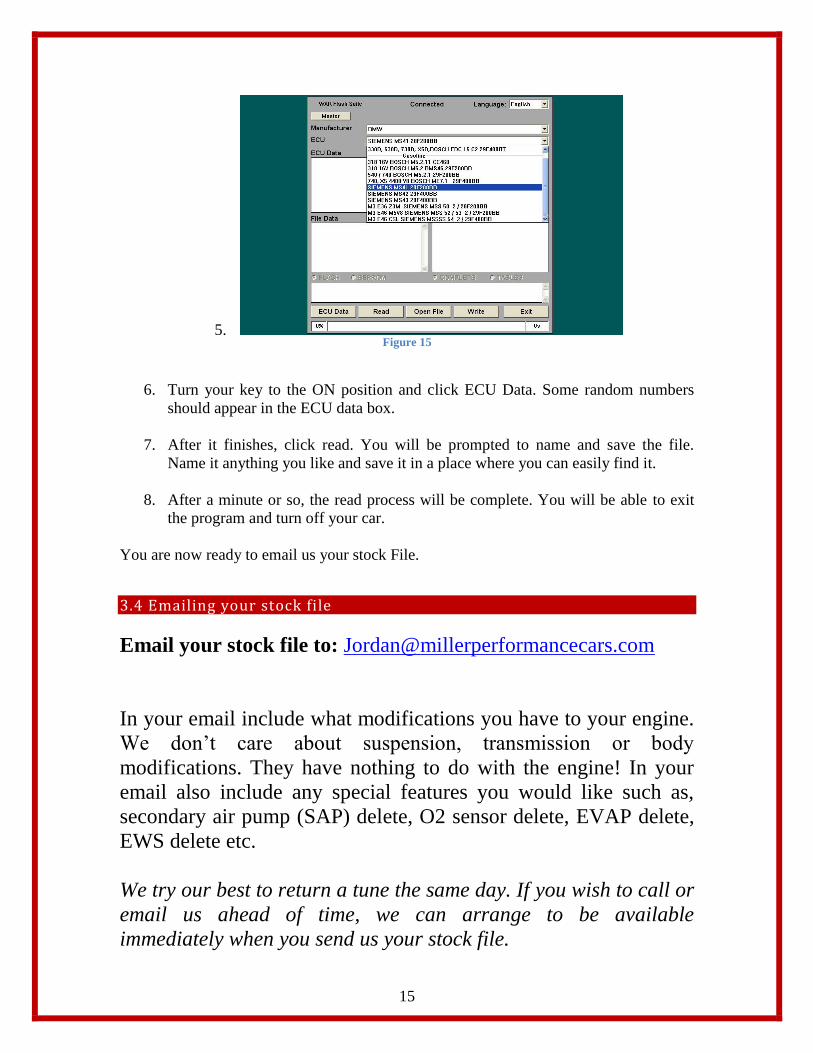
5. Figure 15
6. Turn your key to the ON position and click ECU Data. Some random numbers
should appear in the ECU data box.
7. After it finishes, click read. You will be prompted to name and save the file.
Name it anything you like and save it in a place where you can easily find it.
8. After a minute or so, the read process will be complete. You will be able to exit
the program and turn off your car.
You are now ready to email us your stock File.
3.4 Emailing your stock file
Email your stock file to: [email protected]
In your email include what modifications you have to your engine.
We don’t care about suspension, transmission or body
modifications. They have nothing to do with the engine! In your
email also include any special features you would like such as,
secondary air pump (SAP) delete, O2 sensor delete, EVAP delete,
EWS delete etc.
We try our best to return a tune the same day. If you wish to call or
email us ahead of time, we can arrange to be available
immediately when you send us your stock file.

16
3.5 Writing your tuned file
Shortly after we receive your stock file we will make the necessary changes to the
calibration and email your new tune back. This is usually done in the same day and
usually within the hour. On rare occasions it may take up to 48 hours.
1. Plug in your W.A.R. Flash Cable to your OBD2 port. This is located in the driver
side foot well. Connect the USB plug into your laptop.
Figure 16
2. Open the W.A.R. Flash Tune program
3. Select “BMW” under Manufacturer
Figure 17
4. Under ECU select the appropriate computer your car has by Referring to ECU
Selection Table on page 18

17
Figure 18
5. Turn your key to the ON position and click ECU Data. Some random numbers
should appear in the ECU data box.
6. Click “Open File” and select the tuned file you just received and downloaded
from your email
7. Click “Write.” It will take 1 to 4 minutes depending on the ECU.
8. A box will pop up asking you to “Turn off ignition for 10 seconds” Turn your key
off, click OK and count to 10.
9. Click “OK” and exit the program.
10. You are now ready to enjoy your new tune!
***It is suggested to connect your car to a battery charger, booster pack or something
similar. If the voltage drops below a certain threshold it could result in a bricked ECU
which would need to be sent to us for repair. You do not absolutely have to do this, but
we must warn our customers of the possible consequences.***
Warning:
Do not mix and match ECUs and Tunes. It WILL result in a bricked
ECU that will need to be shipped in for recovery.

18
4. ECU Selection Table
4.1 Use to select proper type of ECU for read/write
1996 to 1998 BMW e36 328 / M3 Siemens MS41 28f200BB
E46 M3 / E39 M5 E46 M3 M5V8 SIEMENS MSS 52/53 2/29F200BB
1999 to 2006 e46 323 / 325 / 328 Siemens MS42 29F400BB
1999 to 2003 e46 330 Siemens MS43 29F400BB
~1998 540/740 (no vanos) 540/740 BOSCH M5.2.1 29F200BB
540 / 740 / X5 (vanos) 740,X5 4400 V8 BOSCH ME7.1 29F400BB
Use the above table to identify and select what ECU to choose from the WAR Flash Tune
software selection list.

19
5. Troubleshooting
5.1 Possible problems
W.A.R. Software does not communicate
Ensure pin 14 and 18 are connected properly. Use a multi meter to ensure
conductivity between pins 14 and 18 as outlined in step 8 of section 2.1
Ensure W.A.R. Flash cable is fully inserted into the OBD2 port
Ensure Flash cable is connected to your USB port on your laptop
Ensure you have selected the proper ECU type
5.2 Seeking Help
If you cannot resolve any of the above problems or you have problems not mentioned
here please use our online forum for assistance located at:
http://forums.millerperformancecars.com/index.php
Email us any time at [email protected]
Call us toll free at 855 269 8863
NOTES
________________________________________________________________________
________________________________________________________________________
________________________________________________________________________
________________________________________________________________________
________________________________________________________________________
________________________________________________________________________
________________________________________________________________________
________________________________________________________________________
________________________________________________________________________
________________________________________________________________________
________________________________________________________________________
Published May 20, 2014 by, Brody Saari; Photos taken by: Brody Saari. Copyright 2014 All rights reserved. Any unauthorized
reproduction of this document or any part of, for use other than that of original owners’ application is prohibited. Miller
Performance Ltd. 2006
209KSHU09.3.ASD93.10
Related Documents