Welcome message from author
This document is posted to help you gain knowledge. Please leave a comment to let me know what you think about it! Share it to your friends and learn new things together.
Transcript
Page 1
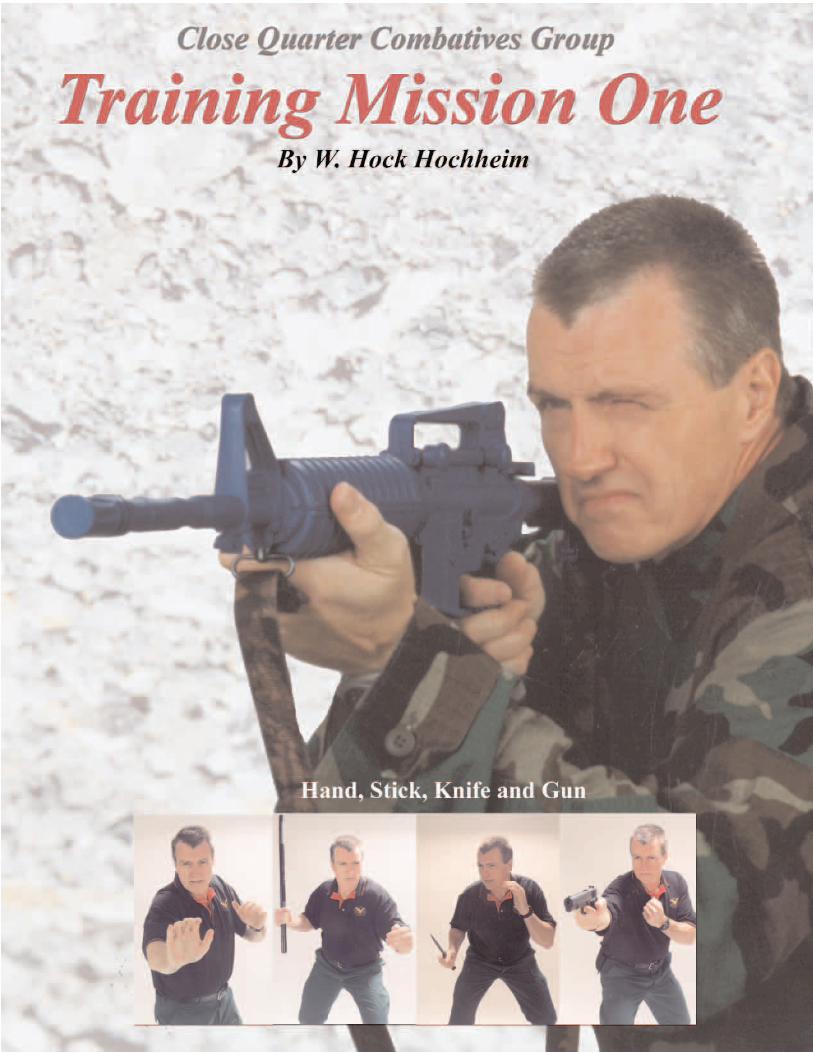
W. HOCK HOCHHEIM’S
HAND, STICK, KNIFE, GUNCLOSE QUARTER COMBATIVES
TRAINING MISSION ONE
CCQQCCGG
Lauric Press
Page 2
CLOSE QUARTER COMBAT GROUPTRAINING MISSION ONE
by W. Hock Hochheim
Also by W. Hock Hochheim
The Foundation: Knife Fighting Encyclopedia Volume 1Military Knife Combat: Knife Fighting Encyclopedia Volume 2
Unarmed Versus the Knife: Knife Fighting Encyclopedia Volume 3Shooting from the Hip
PunchesFind Missing Persons
The Great Escapes of Pancho Villa
Copyright September, 2002All rights reserved.
ISBN Number: 0-9657302-9-8Recorded in the United States Library of Congress
About the Author
W. Hock Hochheim has instructed the U.S. Marines, Army, Navy, Air Force, allied troops, SWATteams and police officers from over 150 police academies and agencies as well as thousands of citi-zens and martial artists around the world. He is a commendated Texas police and U.S. Army militaryvet with three decades of experience, a former private investigator and a graduate of many acade-mies, street survival courses and combat schools. With Black Belts in Filipino, Japanese andHawaiian systems, Hock was inducted into the prestigious Black Belt Magazine Hall of Fame. Hewas awarded the title of Guro in Manila, the Philippines in 1993. Author of the Knife FightingEncyclopedia series, Hock publishes Close Quarter Combat Magazine and has produced over 40acclaimed training videos sold worldwide. Based on this education, research and experience, Hockfounded his international martial Congress and he is the architect of several modern, practical martialcourses culminating in this CQC Group program.
Page 3
WARNING!
This Close Quarter Combat Group (CQCG) course contains the wide spec-trum of less-than-lethal and lethal training. Citizens, law enforcement, mili-tary and security personnel are expected to understand the moral, legal and
ethical use of force continuum, and use the same behavior, maturity andrestraint in unarmed, edged and impact weapon combatives, as they do when
using firearms in their line of professional duty or in the act of defendingthemselves or others.
Page 4
Table of Contents
1) The CQC Group: Epiphany
2) Doctrine: Unarmed Combatives
UC Strike 1 – The Finger Strike Module
UC Kick 1 – The Frontal Snapping Kick Module
UC Invasion Tactic 1 – The Back Hand Contact and Strike Module
UC Takedown 1 – The Finger Attack Takedown Module
3) Gun/Counter – Gun Combatives
Pistol Quick Draws Module
Long Gun Quick Draws Module
Pistol and Long Gun Transition Quick Draws Module
4) Knife/Counter – Knife Combatives
Introduction to Knife Combatives Module
Knife Quick Draw Module
5) SDMS Impact Weapon Combatives
SDMS Impact Weapon Stances, Positions and Strategies Module
SDMS Impact Weapon Quick Draw Module
6) Testing
The Close Quarter Combat Group from Epiphany to Doctrine
EpiphanyI saw it all coming together into the true essence of combat. I came to understand the only rea-son I learned and taught fighting systems was to defeat two targets, the enemy soldier and thecriminal, not to pass on grandmaster dynasties or to preserve art for the sake of tradition. Thereare two ways to defeat the enemy: less-than-lethal means and lethal means. In short, sometimeswe take them prisoner and sometimes we have to kill them. A competent warrior, whether a cit-izen, police officer or soldier, may do each as legally, morally and ethically needed.
No one system, or discipline, such as the military sciences, holds all the answers. Ibegan to forge a course that bridges the gap between the police, the military, the martial artistsand the aware citizenry. To structure it as realistically as possible, I used a reverse-engineeringapproach by starting with the fight first and working backward in probabilities.
In the Year 2000 I began to organize all my fighting tactics and strategies into one com-prehensive, blended program called the Close Quarter Combatives Group. The CQCG is madeup of four primary foundations, my four separate 10 level courses:
– Unarmed Combatives Course – Knife/Counter-Knife Course – SDMS Impact Weapon Course– Gun/Counter-Gun Course
CQCG Training Mission Progression OverviewAll training is expressed in a Modular Concept. A module includes learning the basic executionof a particular tactic, troubleshooting common counters to the tactic, skill and flow drill devel-opment of the tactic, counters, and using the tactic in standing, kneeling and ground positions,fighting against unarmed, stick, knife and gun weaponry.
CQCG Unarmed CombativesThe Strike Modules
Level 1 The Finger Strike ModuleLevel 2 The Palm Strike ModuleLevel 3 The Forearm Strike ModuleLevel 4 The Hammer Fist ModuleLevel 5 The Punch/Counter-Punch Strike ModuleLevel 6 The Elbow Strike ModuleLevel 7 The Body Ram ModuleLevel 8 The Limited Use/Head Butt ModuleLevel 9 The Blocking/Counter-Blocking ModuleLevel 10 The Combat Scenario Performance Module
Page 5
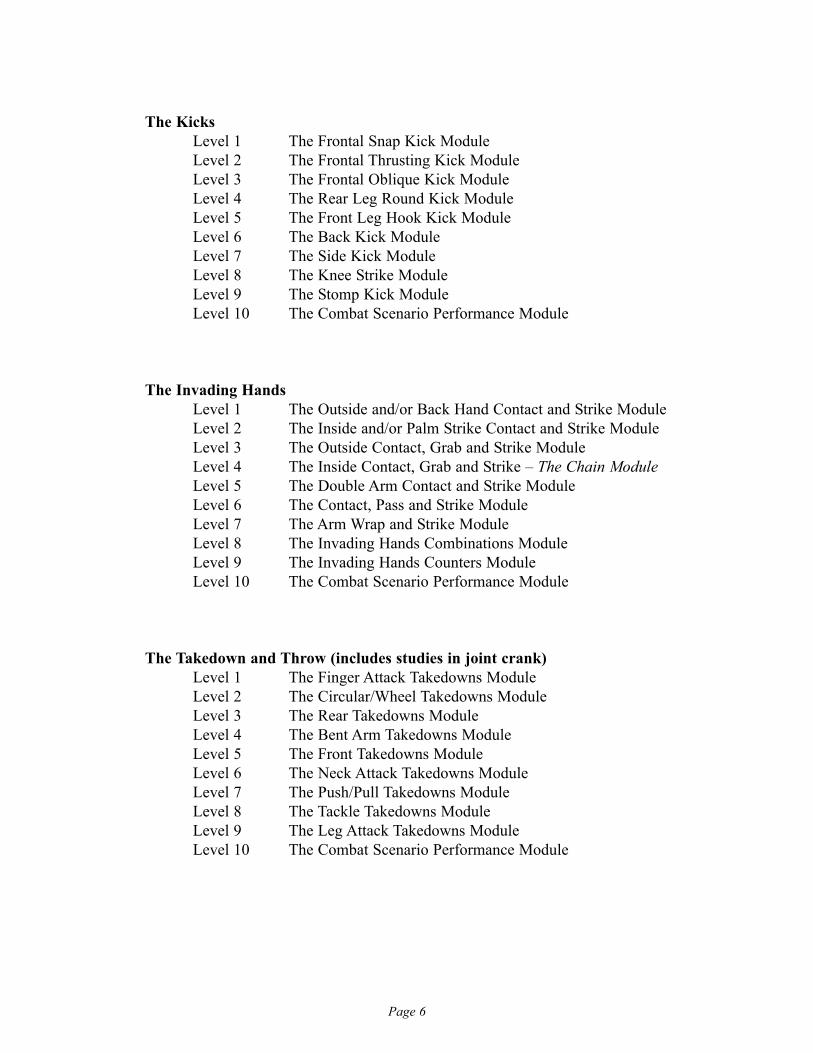
The KicksLevel 1 The Frontal Snap Kick ModuleLevel 2 The Frontal Thrusting Kick ModuleLevel 3 The Frontal Oblique Kick ModuleLevel 4 The Rear Leg Round Kick ModuleLevel 5 The Front Leg Hook Kick ModuleLevel 6 The Back Kick ModuleLevel 7 The Side Kick ModuleLevel 8 The Knee Strike ModuleLevel 9 The Stomp Kick ModuleLevel 10 The Combat Scenario Performance Module
The Invading Hands Level 1 The Outside and/or Back Hand Contact and Strike ModuleLevel 2 The Inside and/or Palm Strike Contact and Strike ModuleLevel 3 The Outside Contact, Grab and Strike Module Level 4 The Inside Contact, Grab and Strike – The Chain ModuleLevel 5 The Double Arm Contact and Strike ModuleLevel 6 The Contact, Pass and Strike ModuleLevel 7 The Arm Wrap and Strike ModuleLevel 8 The Invading Hands Combinations ModuleLevel 9 The Invading Hands Counters ModuleLevel 10 The Combat Scenario Performance Module
The Takedown and Throw (includes studies in joint crank)Level 1 The Finger Attack Takedowns ModuleLevel 2 The Circular/Wheel Takedowns ModuleLevel 3 The Rear Takedowns ModuleLevel 4 The Bent Arm Takedowns ModuleLevel 5 The Front Takedowns ModuleLevel 6 The Neck Attack Takedowns ModuleLevel 7 The Push/Pull Takedowns ModuleLevel 8 The Tackle Takedowns ModuleLevel 9 The Leg Attack Takedowns ModuleLevel 10 The Combat Scenario Performance Module
Page 6
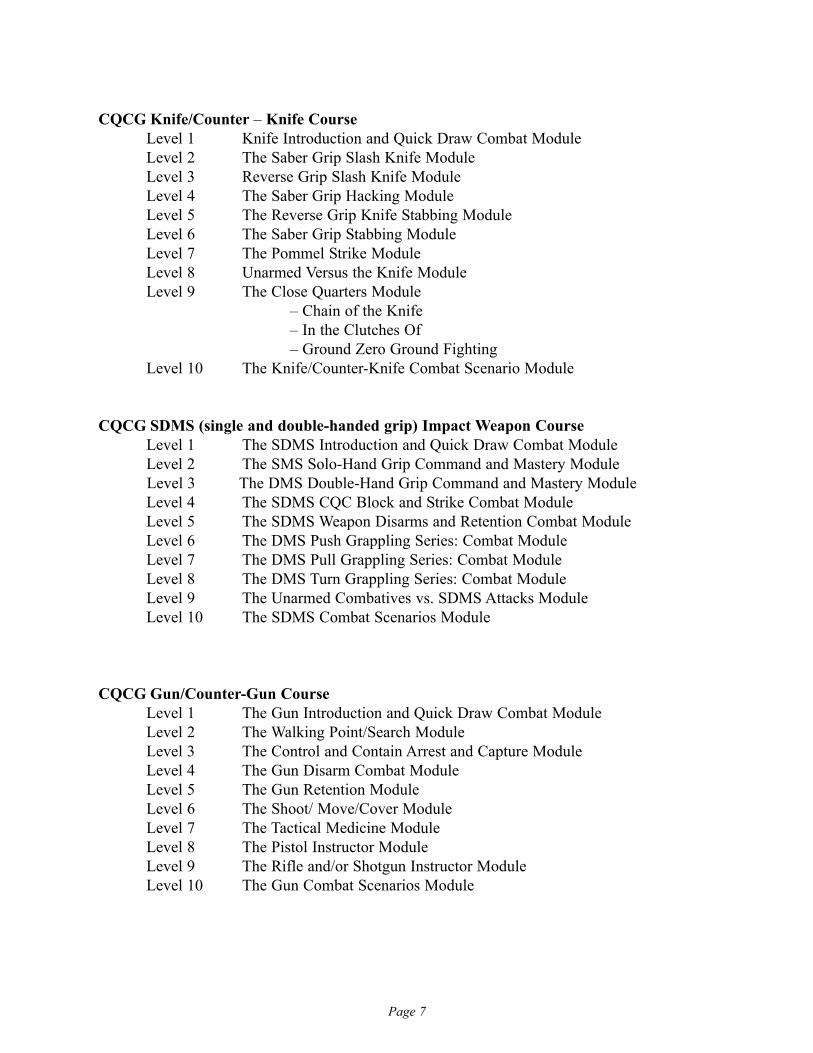
CQCG Knife/Counter – Knife Course Level 1 Knife Introduction and Quick Draw Combat ModuleLevel 2 The Saber Grip Slash Knife ModuleLevel 3 Reverse Grip Slash Knife Module Level 4 The Saber Grip Hacking Module Level 5 The Reverse Grip Knife Stabbing Module Level 6 The Saber Grip Stabbing ModuleLevel 7 The Pommel Strike ModuleLevel 8 Unarmed Versus the Knife ModuleLevel 9 The Close Quarters Module
– Chain of the Knife– In the Clutches Of– Ground Zero Ground Fighting
Level 10 The Knife/Counter-Knife Combat Scenario Module
CQCG SDMS (single and double-handed grip) Impact Weapon CourseLevel 1 The SDMS Introduction and Quick Draw Combat ModuleLevel 2 The SMS Solo-Hand Grip Command and Mastery ModuleLevel 3 The DMS Double-Hand Grip Command and Mastery ModuleLevel 4 The SDMS CQC Block and Strike Combat ModuleLevel 5 The SDMS Weapon Disarms and Retention Combat ModuleLevel 6 The DMS Push Grappling Series: Combat ModuleLevel 7 The DMS Pull Grappling Series: Combat ModuleLevel 8 The DMS Turn Grappling Series: Combat ModuleLevel 9 The Unarmed Combatives vs. SDMS Attacks ModuleLevel 10 The SDMS Combat Scenarios Module
CQCG Gun/Counter-Gun Course Level 1 The Gun Introduction and Quick Draw Combat ModuleLevel 2 The Walking Point/Search ModuleLevel 3 The Control and Contain Arrest and Capture ModuleLevel 4 The Gun Disarm Combat ModuleLevel 5 The Gun Retention ModuleLevel 6 The Shoot/ Move/Cover ModuleLevel 7 The Tactical Medicine ModuleLevel 8 The Pistol Instructor ModuleLevel 9 The Rifle and/or Shotgun Instructor ModuleLevel 10 The Gun Combat Scenarios Module
Page 7
Page 8
CQC Group Level 1Level 1 consists of all the listings in each category. These are the very subject matter ofTraining Mission One.
CQC Group Rank and InstructorshipsVarious rankings in each or all the courses can be achieved in seminars and classes. Train withus and master these levels. CQCG Instructorships involve classroom training, hands-on practiceand both written and physical testing in a designated camp or course.
Basic CQCG Instructor upon completing Level 3Advanced CQCG Instructor upon completing Level 6Expert CQCG Instructor upon completing Level 9Master CQCG Instructor upon completing Level 10
Re-certification As always, you must maintain proper ethical and moral standards. You must not be a criminalnor be attached to any radical or questionable organization of this or any nation. I need to knowthat you continue to work out, teach, learn and grow. I need to see you in a training sessiononce every 12 months minimum. These are the standards I demand.
My Training Promise to YouCivilian and martial arts courses are almost always off-base with real world needs andunplugged into the newest, scientific trends of combatting enemy soldiers, terrorists and crimi-nals. Martial arts dynasties must be perpetuated. Traditions must be upheld. Military and policeacademies must spend their time with political and non-combat related training agendas.SEALS need to swim. Rangers and Reconn need to reconnoiter. Berets must master commo[communications]. Police need to understand traffic accident reporting. The list of non-combattraining subject requirements for these groups is almost endless. There are classes on saluting,organized hazing and harassment, marching, etc. that subtract precious time from specific com-batives study. Even courses designated as combat courses waste time on jumping jacks, march-ing and other steps to develop physical fitness. A true warrior is fit, comes fit and remains fit onhis own time. As a result, 100 hours of training may contain only 40 hours of actual combat tac-tics.
The CQC Group training mission books, with this the first of 10 books, set forth com-prehensive and insightful training doctrine and methodologies unlike any other. We bridge thegap between the military, the police, the martial artist and the aware citizenry. I have interfacedwith many members of these organizations around the world. I am convinced this CQC courseis the most comprehensive, complete, scientific, hand stick knife and gun, close quarter coursein the world, bar none. Anywhere. This is my promise. Best of the best, forged from the bestdisciplines.
Epiphany. It is all here for you already.
Are you ready for the next step?
Page 9
CQCG
DoctrineUnarmed Combatives Strike 1:
The Finger Strike Attack Module
Finger Strike Overview The martial arts raise the visage of ancient, bald supermen ramming straight fingers into bucketsof sand and pebbles to break tiles and boards with thrusting finger attacks. But in reality usingyour fingers as an impact tool for a target other than the eyes or extremely soft, specific bodyspots asks for trouble in the form of sprains and breaks. Average, normal fingers cannot ram intothe bones of the body or break cinder blocks. Instead, they may rake and thrust into the eyes, slapnoses and twist skin with speed and accuracy. The finger-to-eye strike is the essential bread andbutter survival tool. It provides the mainstay of rape prevention and a primer vs. the terrorists,criminals and enemy soldiers.
Finger Strike Studies and Observations 1) Empathy and Combat“I'll poke him right in the eye!” declares both the braggart and/or the housewife, raising the vis-age of this famous self-defense technique. The braggart perches on his stool at the local tavern,talking tough. The woman imagines fighting a rapist. And true, the eye attack is a devastatingtool. Even King Kong raging atop the Empire State Building would suffer if his eyes were hit bythe machine guns mounted on the famous bi-planes attacking him. In fact, finger-to-eye attackshave been successful against sharks and alligators.
We've all seen the movies. The protagonists do battle with their hands smeared all overeach other’s faces, pushing against the heads. Jaws grimace. The necks strain to explosion inresistance. You scream from your couch or from the theater seat with frustration.
“Poke him in the eye, for God’s sakes!” knowing what quick results will befall thisHannibal Lector if blinded. But then the two-hour movie would become a mere 60 minutes witha timely eye attack!
Executing this or any other severe tactic under the stress of combat and against a real per-son however, has psychological implications above and beyond the simple physical act. Thestudy of human violence has many layers, and one is empathy.
The dictionary defines empathy as “the action of understanding, being aware of, beingsensitive to and vicariously experiencing the feelings, thoughts and experience of another.”Normal, psychologically healthy people have empathy. Often we wince at the prospect of peoplehurt in sports, crime, accidents and war. The limb break in football, the body squashed in a carwreck, the pulverized victims of the plane crash – these events hypnotize us and make us gasp.Whether we realize it or not, we have a “feeling” for the person during the seconds of pain,shock and death. We imagine the surviving families and friends. Few truly walk away from afuneral without the passing relief buried deep in our psyches – “at least it wasn't me,” or “at leastI didn’t get that cancer,” …and so on. Empathy and these compassionate roots of empathy con-nect us as human beings.
Page 10
Years ago, before the world became so politically correct, before the science of killingpeople for survival became buried in make-happy-face, pop jargon, some very hard core mili-tary units experimented with various gruesome training methods. Trainers would acquirebushels of grapefruits and pass them out to their troops. The drill? The soldier holds the grape-fruit in the palms of his two hands, and with both thumbs proceeds to gouge two deep holesinto the pulp. This was to simulate an eye gauge and offer the student the real wet feeling of theprocess. Warm grapefruits were better. Some units went so far as to tape the grapefruits to thefaces of half their men, and the remaining soldiers would now attack a life-sized target, ram-ming their thumbs in the same areas as the real eyes. Documents report that even some of thetoughest characters, many veterans of prior wars, winced at this process. Yet, the simple, physi-cal movement is not unlike peeling that grapefruit or orange while sitting on your back porch.
Faced with this CQC encounter, would the men actually do this? Few have. Why domany shutter at the idea of gouging an eye out, cutting a throat or shooting a face? One mainreason is this empathy. We imagine the experience, if even for a split second on a primal level,what it would be like to have our own eyes gauged. To lose a kneecap. A hand. To see ourblood spray from our neck. We hesitate. And in doing so, this empathy can get you killed!
Should trainers ask a person to shed their empathy? NO! In order to become a wholeand complete person, one who builds and supports a world of freedom, safety and justice, youneed empathy and compassion as essential characteristics. Without it, YOU would become thenext Hannibal Lector, Stalin or Herman Goering. All I ask is that you see and understand thisbig picture and park empathy aside when action is needed. Psychologists often call this com-partmentalizing. To live and survive in true lethal combat, we must train our mind and body toovercome these empathetic inhibitions for those horrible, dark moments of worst-case scenar-ios. We have to see the devil for what he is, call the devil a devil, look the devil right in theeyes…and then rip his eyes out.
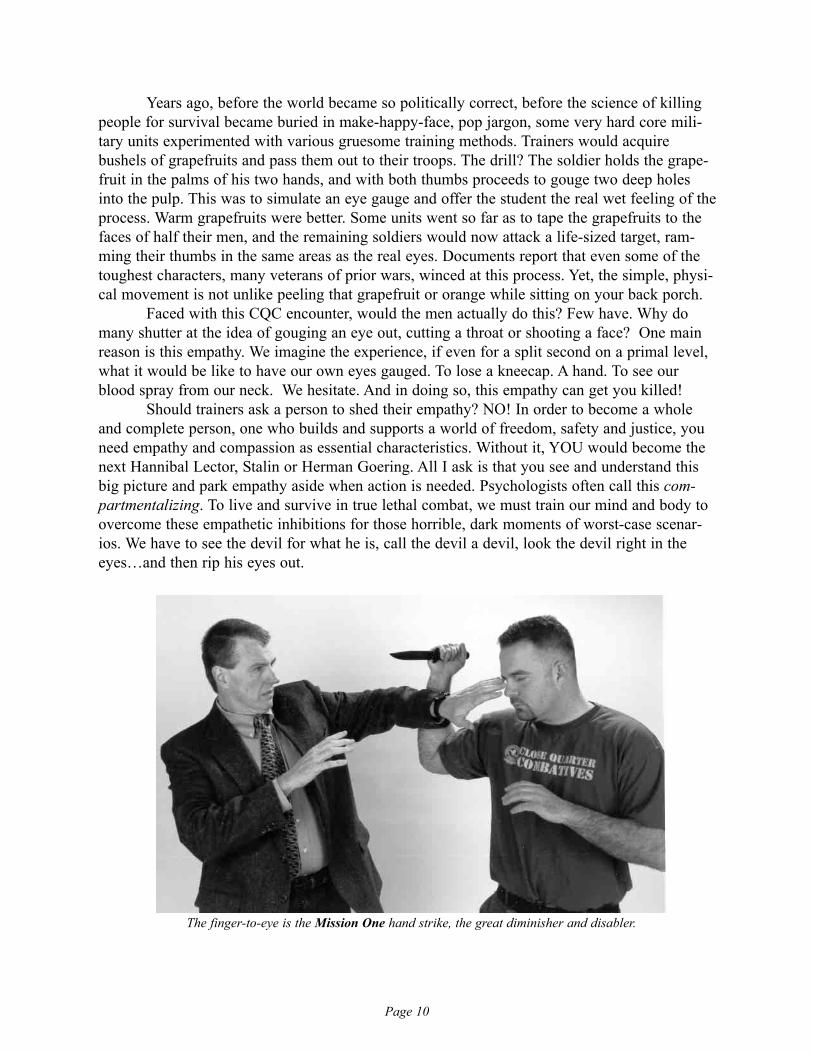
The finger-to-eye is the Mission One hand strike, the great diminisher and disabler.
Page 11
Finger Strike Studies and Observations 2) Finger Strikes – Basic ExecutionThere are three basic kinds of finger positions and three kinds of finger strike attacks. There areraking positions, spear positions and thumb gouge positions and hooking, thrusting and rippingattacks. All will be displayed with training methods.
The Finger PositionsFP 1) Fingers spread in a rake formation
FP 2) Fingers together in a spear formation
FP 3) Thumb or other finger spread from hand
– for gouging– for ripping
The Finger AttacksFA 1) Hooking motions, as in eye jabs and slaps
FA 2) Thrusting
FA 3) Pinching and/or ripping and twisting with the fingers
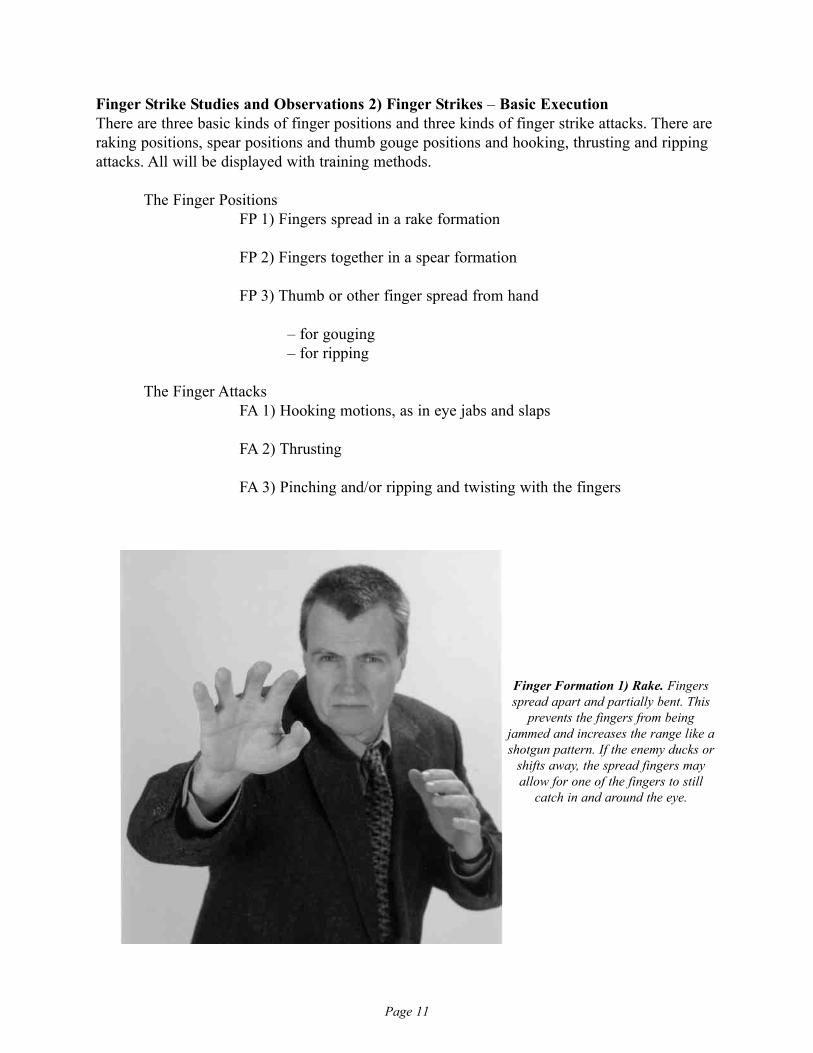
Finger Formation 1) Rake. Fingersspread apart and partially bent. This
prevents the fingers from beingjammed and increases the range like ashotgun pattern. If the enemy ducks or
shifts away, the spread fingers mayallow for one of the fingers to still
catch in and around the eye.
Page 12
Finger Attack 1) The Hooking StrikeHooking finger slaps to the bridge of the nose may cause great diminishment in the enemy.Eyes water. The nose resonates with stunning pain. A finger slap to the face may be effective.Hooking fingers that rake in and around the eyes may be very effective. The range of resultsfrom hitting around the eyes causing distraction to some worst-case histories where pupils arecut open by fingernails. The hooking fingers may also rip the eyeglasses off the face, impairingvision or setting up a direct unobstructed attack to the eyes. They can rip goggles off their prop-er position. Dislodged goggles, depending upon their end position on the enemy’s face may dis-tract and impair vision, and give you a temporary, slight advantage. A harsh, hooking slapacross the bridge of a nose may provide a devastating, stunning strike.
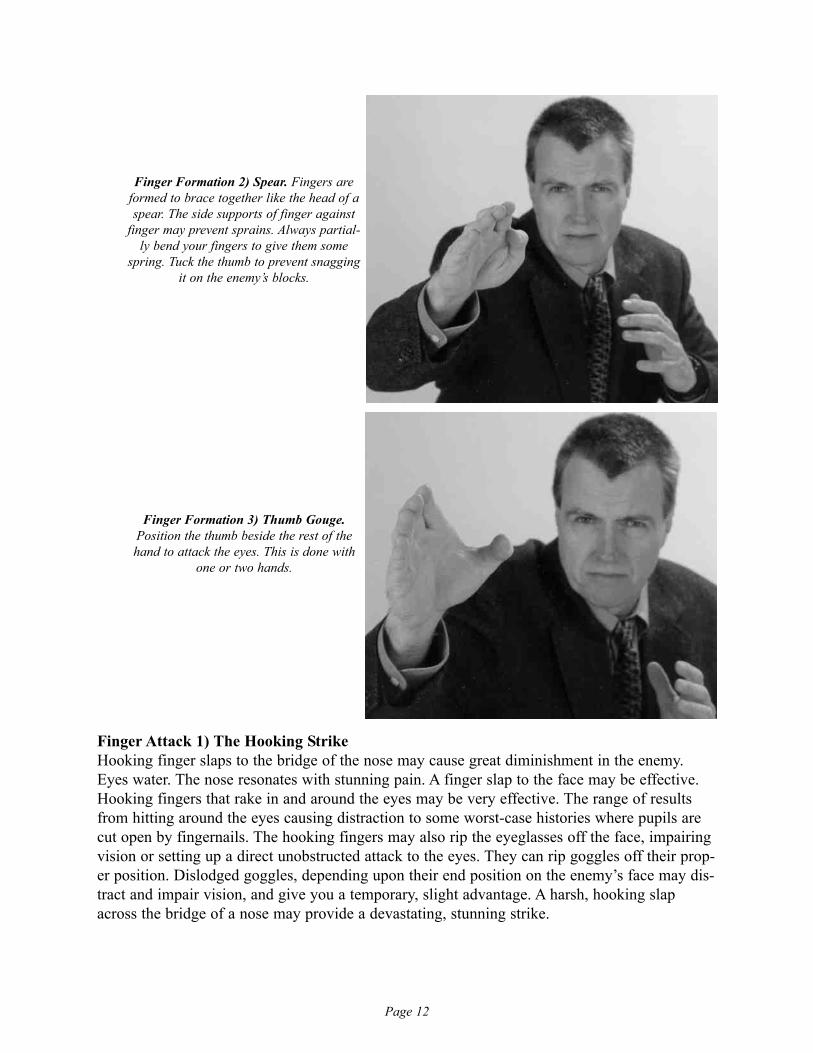
Finger Formation 2) Spear. Fingers areformed to brace together like the head of aspear. The side supports of finger against
finger may prevent sprains. Always partial-ly bend your fingers to give them some
spring. Tuck the thumb to prevent snaggingit on the enemy’s blocks.
Finger Formation 3) Thumb Gouge.Position the thumb beside the rest of thehand to attack the eyes. This is done with
one or two hands.
Page 13
Finger Attack 2) The ThrustThrusting spear hands or thrusting thumbs drive straight to the eyes or throat. Thrusting fingersinto other body targets may sprain your fingers.
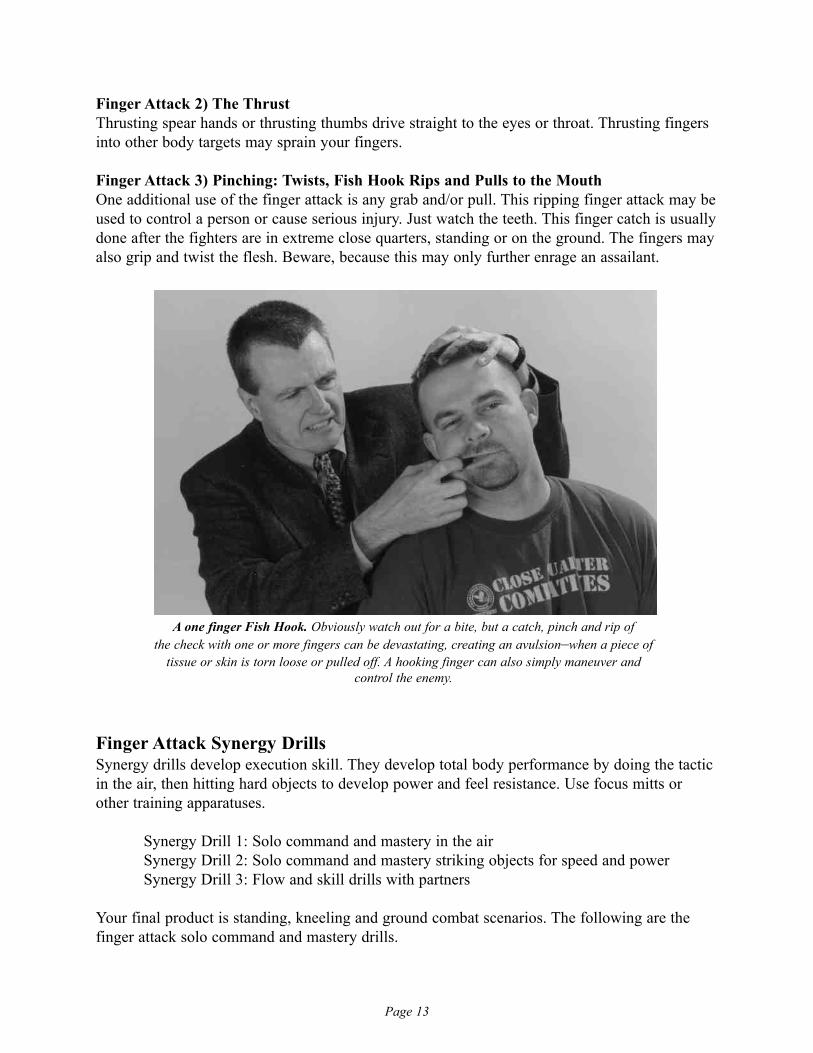
Finger Attack 3) Pinching: Twists, Fish Hook Rips and Pulls to the MouthOne additional use of the finger attack is any grab and/or pull. This ripping finger attack may beused to control a person or cause serious injury. Just watch the teeth. This finger catch is usuallydone after the fighters are in extreme close quarters, standing or on the ground. The fingers mayalso grip and twist the flesh. Beware, because this may only further enrage an assailant.
Finger Attack Synergy DrillsSynergy drills develop execution skill. They develop total body performance by doing the tacticin the air, then hitting hard objects to develop power and feel resistance. Use focus mitts orother training apparatuses.
Synergy Drill 1: Solo command and mastery in the airSynergy Drill 2: Solo command and mastery striking objects for speed and powerSynergy Drill 3: Flow and skill drills with partners
Your final product is standing, kneeling and ground combat scenarios. The following are thefinger attack solo command and mastery drills.
A one finger Fish Hook. Obviously watch out for a bite, but a catch, pinch and rip of the check with one or more fingers can be devastating, creating an avulsion–when a piece of
tissue or skin is torn loose or pulled off. A hooking finger can also simply maneuver and control the enemy.
Page 14
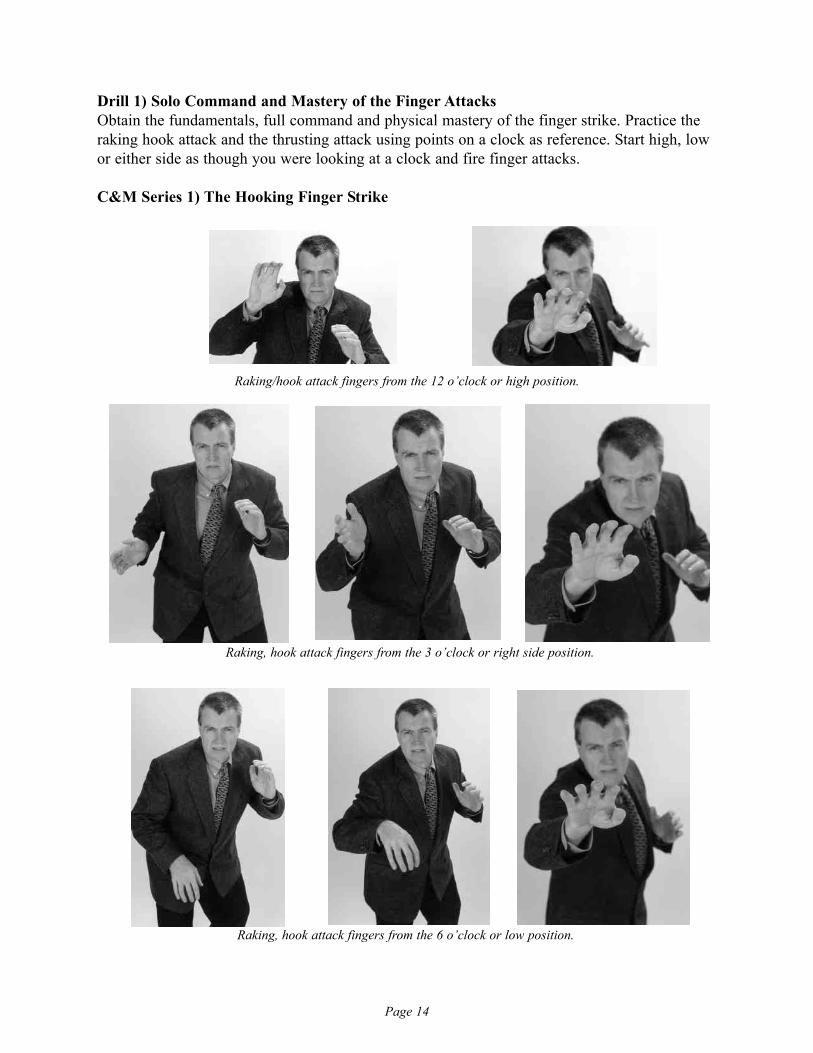
Drill 1) Solo Command and Mastery of the Finger Attacks Obtain the fundamentals, full command and physical mastery of the finger strike. Practice theraking hook attack and the thrusting attack using points on a clock as reference. Start high, lowor either side as though you were looking at a clock and fire finger attacks.
C&M Series 1) The Hooking Finger Strike
Raking, hook attack fingers from the 6 o’clock or low position.
Raking, hook attack fingers from the 3 o’clock or right side position.
Raking/hook attack fingers from the 12 o’clock or high position.
Page 15
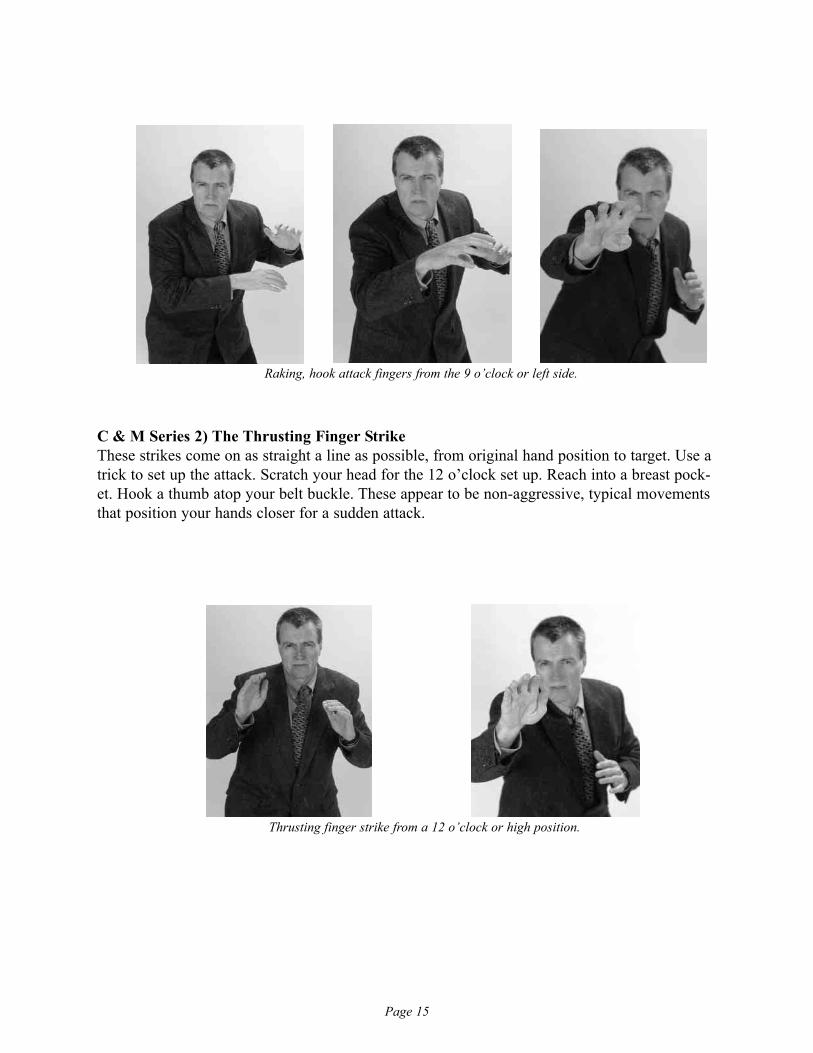
C & M Series 2) The Thrusting Finger StrikeThese strikes come on as straight a line as possible, from original hand position to target. Use atrick to set up the attack. Scratch your head for the 12 o’clock set up. Reach into a breast pock-et. Hook a thumb atop your belt buckle. These appear to be non-aggressive, typical movementsthat position your hands closer for a sudden attack.
Raking, hook attack fingers from the 9 o’clock or left side.
Thrusting finger strike from a 12 o’clock or high position.
Page 16
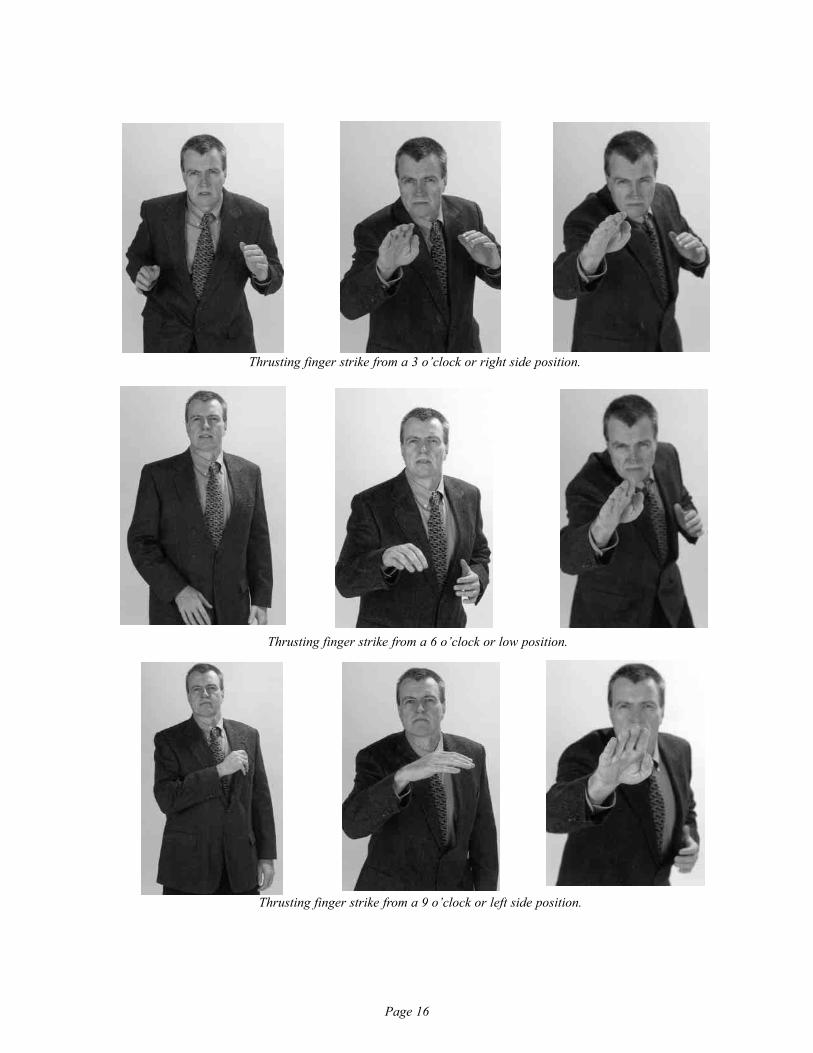
Thrusting finger strike from a 3 o’clock or right side position.
Thrusting finger strike from a 6 o’clock or low position.
Thrusting finger strike from a 9 o’clock or left side position.
Page 17
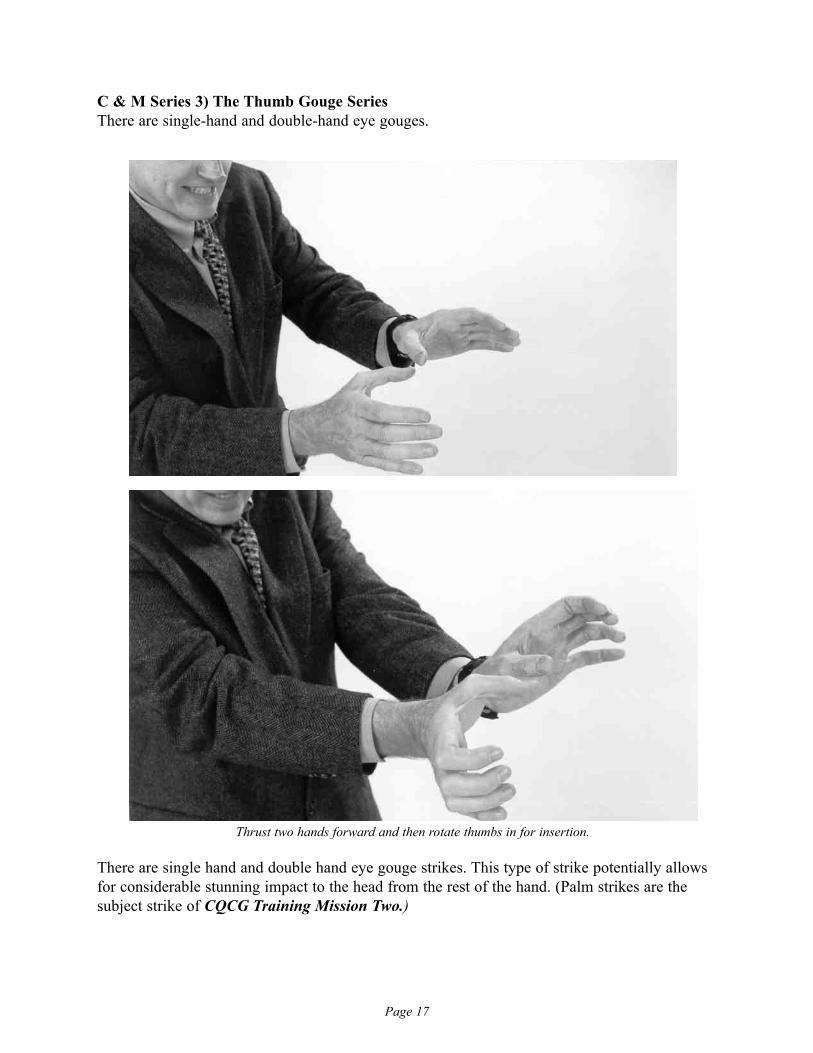
C & M Series 3) The Thumb Gouge SeriesThere are single-hand and double-hand eye gouges.
There are single hand and double hand eye gouge strikes. This type of strike potentially allowsfor considerable stunning impact to the head from the rest of the hand. (Palm strikes are thesubject strike of CQCG Training Mission Two.)
Thrust two hands forward and then rotate thumbs in for insertion.
Page 18
Finger Attack Variation TrainingYou must practice all these with both the left and right hands. Work these formations standing,kneeling and on the ground. Work these finger strikes against a partner flashing a focus mitt.Work these finger strikes against heavy bags or similar items to feel realistic resistance anddevelop goal-specific strength. Working against a face model with eyes would be best.
Drill 2) Partner Finger Attack Power and Speed Drills
Set 1) Focus Mitt DrillsFocus mitts are primarily for speed development. This series of mitt drills develop these speedskills for the eye jab. However, due to the limited nature and force of the finger-to-eye attack,the drill may be done with a trainer simply flashing an open palm instead of a focus mitt.
Focus Mitt Drill Set 1) Mitt StrikesThe trainer holds a mitt up. You practice striking the mitt.
Focus Mitt Drill Set 2) Flashing Mitt StrikesThe trainer flashes the mitt quickly open and shut down upon his chest. The faster he flashes the mitt, the harder it is to strike, and the faster the practitioner will become. Start slowly and increase flashing speed.
Focus Mitt Drill Set 3) Sparring Mitt StrikesThe trainer moves in a sparring manner and flashes the mitt. The trainer may decide to give you some flak by striking and kicking back at you.
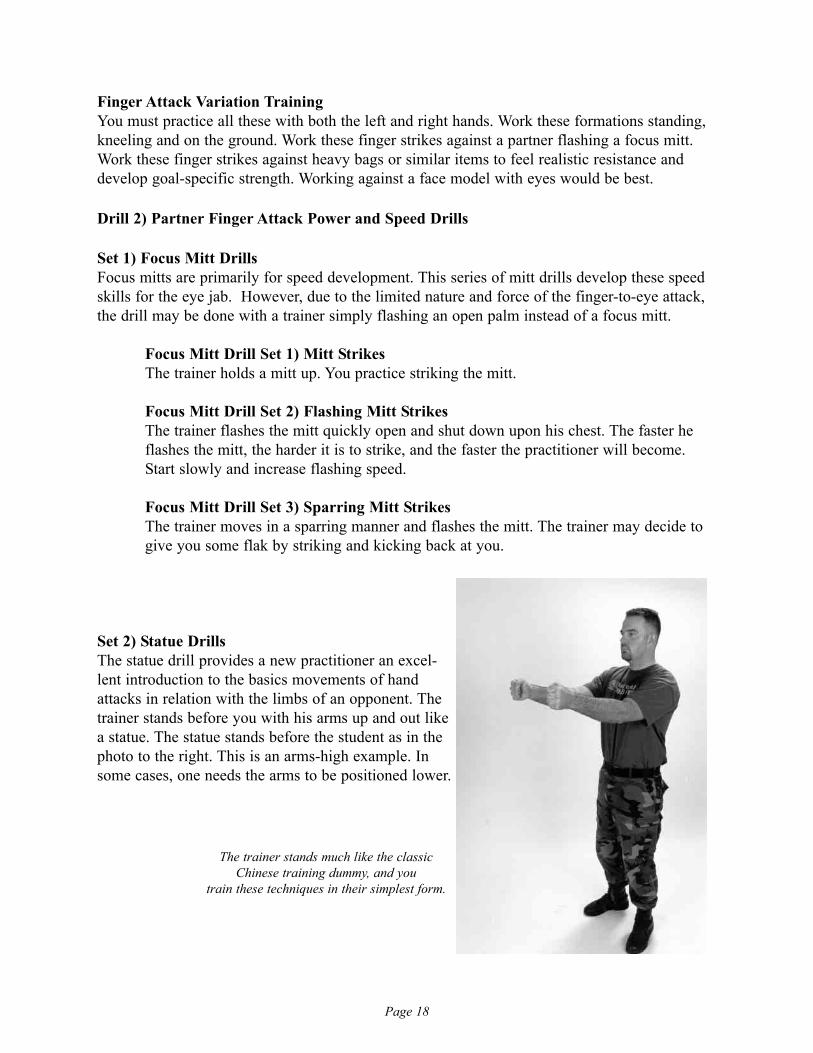
Set 2) Statue DrillsThe statue drill provides a new practitioner an excel-lent introduction to the basics movements of handattacks in relation with the limbs of an opponent. Thetrainer stands before you with his arms up and out likea statue. The statue stands before the student as in thephoto to the right. This is an arms-high example. Insome cases, one needs the arms to be positioned lower.
The trainer stands much like the classicChinese training dummy, and you
train these techniques in their simplest form.
Page 19
You work the arm-to-arm contact and finger strike across the arms in the followinginside and outside practice progression, creating complete lines of familiarity. You may practiceyour arm-to-arm contact two ways: a back-handed style contact or a cross-your-body style con-tact. These may be done aggressively or defensively.
Contact 1) You are outside the right armContact 2) Your are inside the right armContact 3) You are inside the left armContact 4) You are outside the left arm
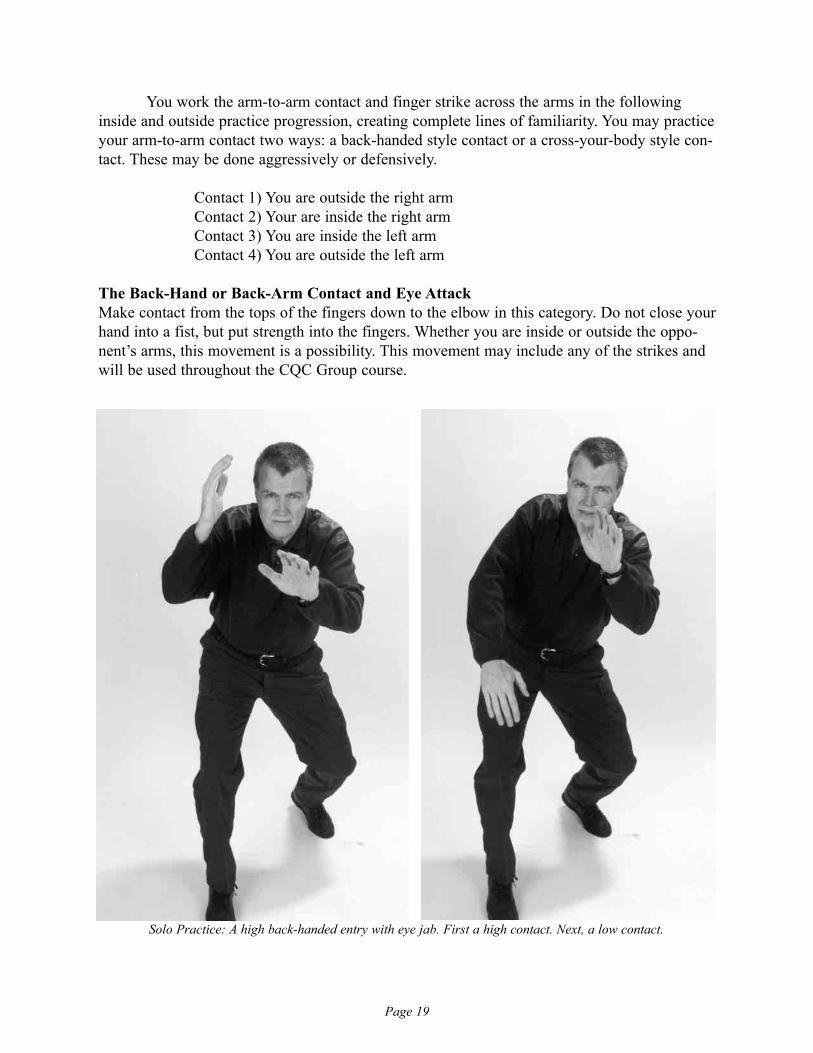
The Back-Hand or Back-Arm Contact and Eye AttackMake contact from the tops of the fingers down to the elbow in this category. Do not close yourhand into a fist, but put strength into the fingers. Whether you are inside or outside the oppo-nent’s arms, this movement is a possibility. This movement may include any of the strikes andwill be used throughout the CQC Group course.
Solo Practice: A high back-handed entry with eye jab. First a high contact. Next, a low contact.
Page 20
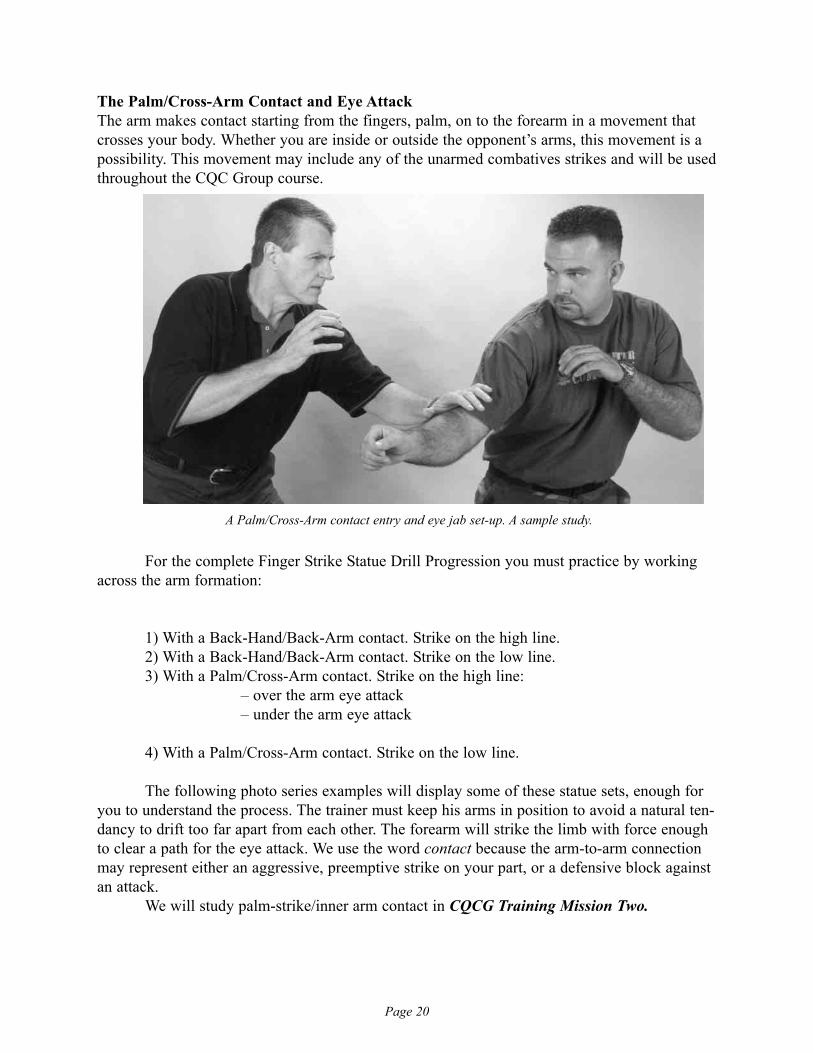
The Palm/Cross-Arm Contact and Eye AttackThe arm makes contact starting from the fingers, palm, on to the forearm in a movement thatcrosses your body. Whether you are inside or outside the opponent’s arms, this movement is apossibility. This movement may include any of the unarmed combatives strikes and will be usedthroughout the CQC Group course.
For the complete Finger Strike Statue Drill Progression you must practice by workingacross the arm formation:
1) With a Back-Hand/Back-Arm contact. Strike on the high line.2) With a Back-Hand/Back-Arm contact. Strike on the low line.3) With a Palm/Cross-Arm contact. Strike on the high line:
– over the arm eye attack– under the arm eye attack
4) With a Palm/Cross-Arm contact. Strike on the low line.
The following photo series examples will display some of these statue sets, enough foryou to understand the process. The trainer must keep his arms in position to avoid a natural ten-dancy to drift too far apart from each other. The forearm will strike the limb with force enoughto clear a path for the eye attack. We use the word contact because the arm-to-arm connectionmay represent either an aggressive, preemptive strike on your part, or a defensive block againstan attack.
We will study palm-strike/inner arm contact in CQCG Training Mission Two.
A Palm/Cross-Arm contact entry and eye jab set-up. A sample study.
Page 21
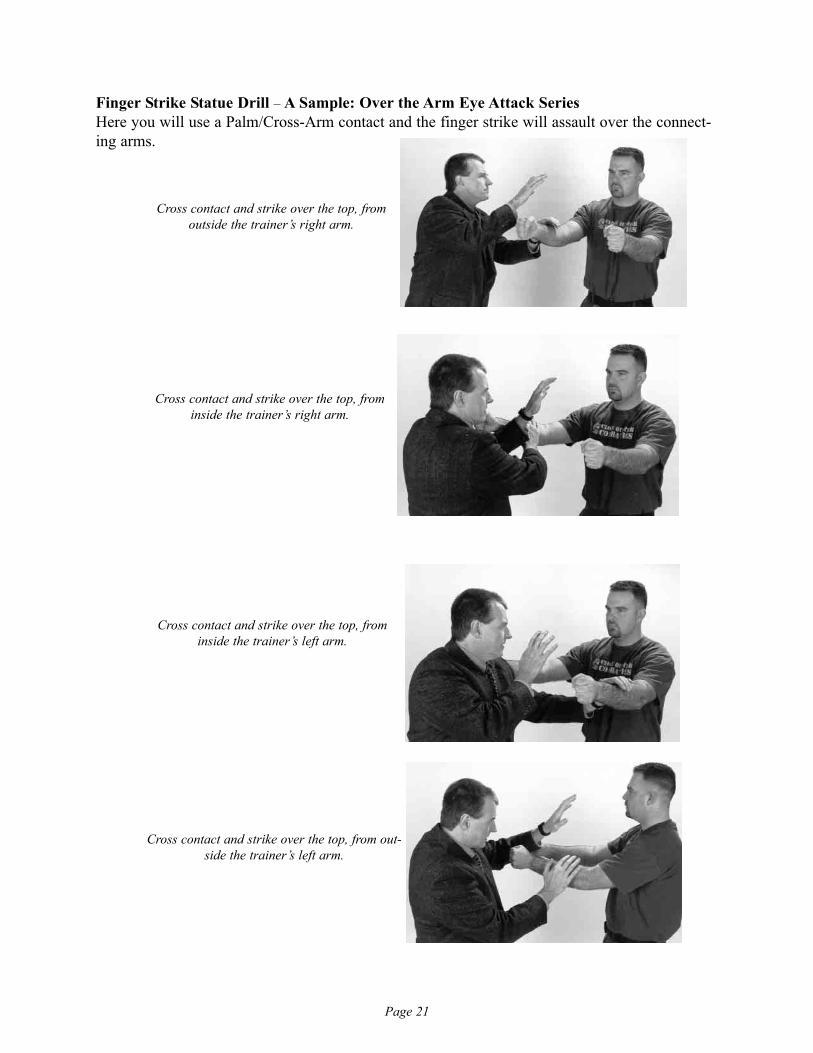
Finger Strike Statue Drill – A Sample: Over the Arm Eye Attack SeriesHere you will use a Palm/Cross-Arm contact and the finger strike will assault over the connect-ing arms.
Cross contact and strike over the top, fromoutside the trainer’s right arm.
Cross contact and strike over the top, frominside the trainer’s right arm.
Cross contact and strike over the top, frominside the trainer’s left arm.
Cross contact and strike over the top, from out-side the trainer’s left arm.
Page 22
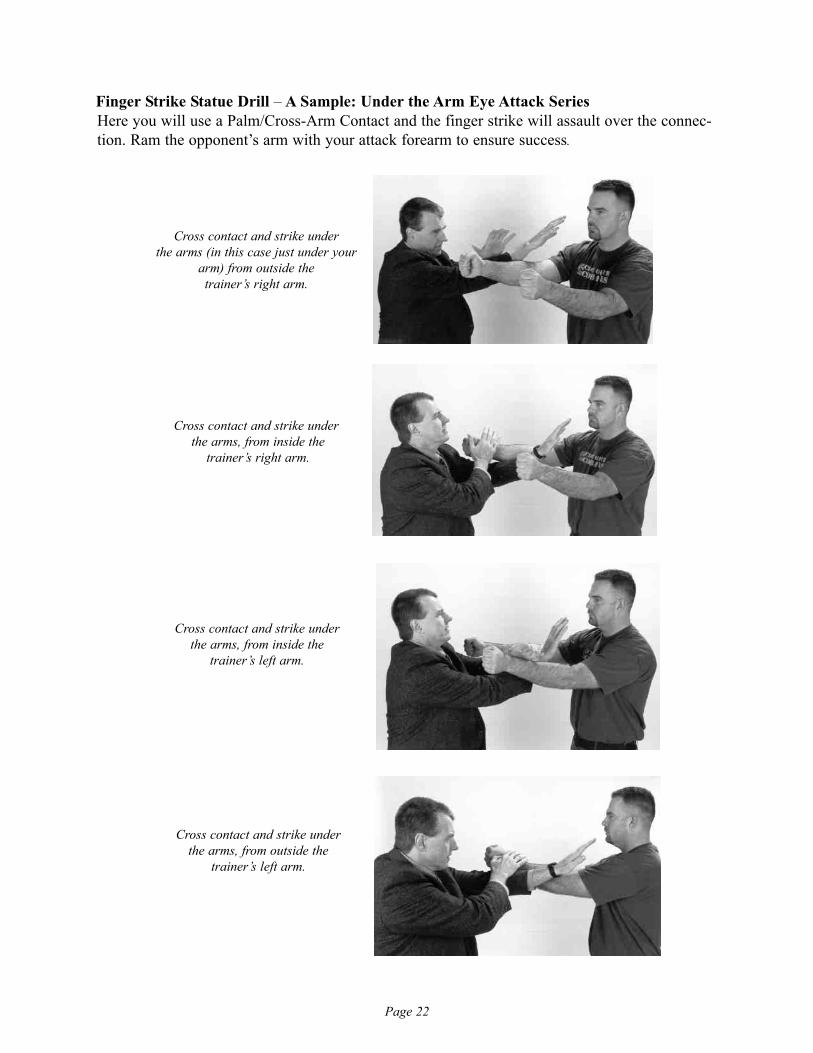
Finger Strike Statue Drill – A Sample: Under the Arm Eye Attack Series
Cross contact and strike under the arms (in this case just under your
arm) from outside the trainer’s right arm.
Cross contact and strike underthe arms, from inside the
trainer’s right arm.
Cross contact and strike under the arms, from inside the
trainer’s left arm.
Cross contact and strike under the arms, from outside the
trainer’s left arm.
Here you will use a Palm/Cross-Arm Contact and the finger strike will assault over the connec-tion. Ram the opponent’s arm with your attack forearm to ensure success.
Page 23
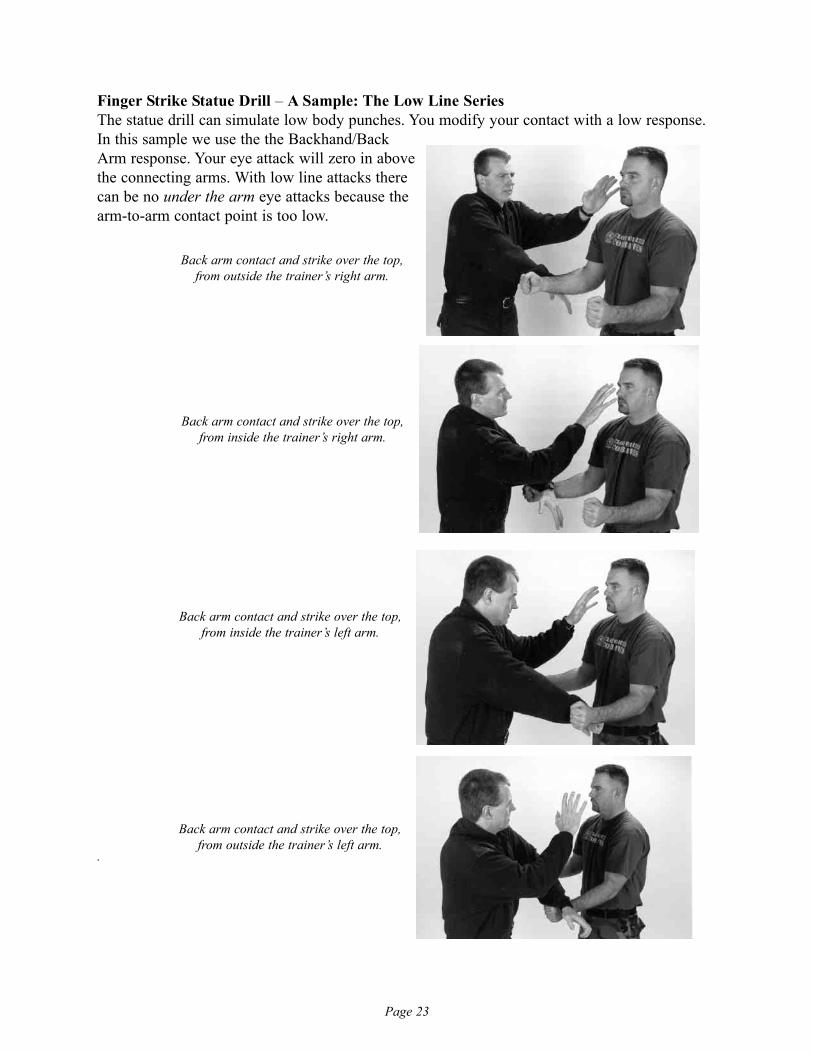
Finger Strike Statue Drill – A Sample: The Low Line SeriesThe statue drill can simulate low body punches. You modify your contact with a low response.In this sample we use the the Backhand/BackArm response. Your eye attack will zero in abovethe connecting arms. With low line attacks therecan be no under the arm eye attacks because thearm-to-arm contact point is too low.
.
Back arm contact and strike over the top,from outside the trainer’s right arm.
Back arm contact and strike over the top,from inside the trainer’s right arm.
Back arm contact and strike over the top,from inside the trainer’s left arm.
Back arm contact and strike over the top,from outside the trainer’s left arm.
Page 24
Set 3) Statue Pumping DrillIn the next skill developing drill, the trainer now pumps the arms, slowly at first, and the traineelearns to work the tactic in real time. As the practitioner improves, have your statue take morerealistic poses that will eventually lead to combat scenarios.
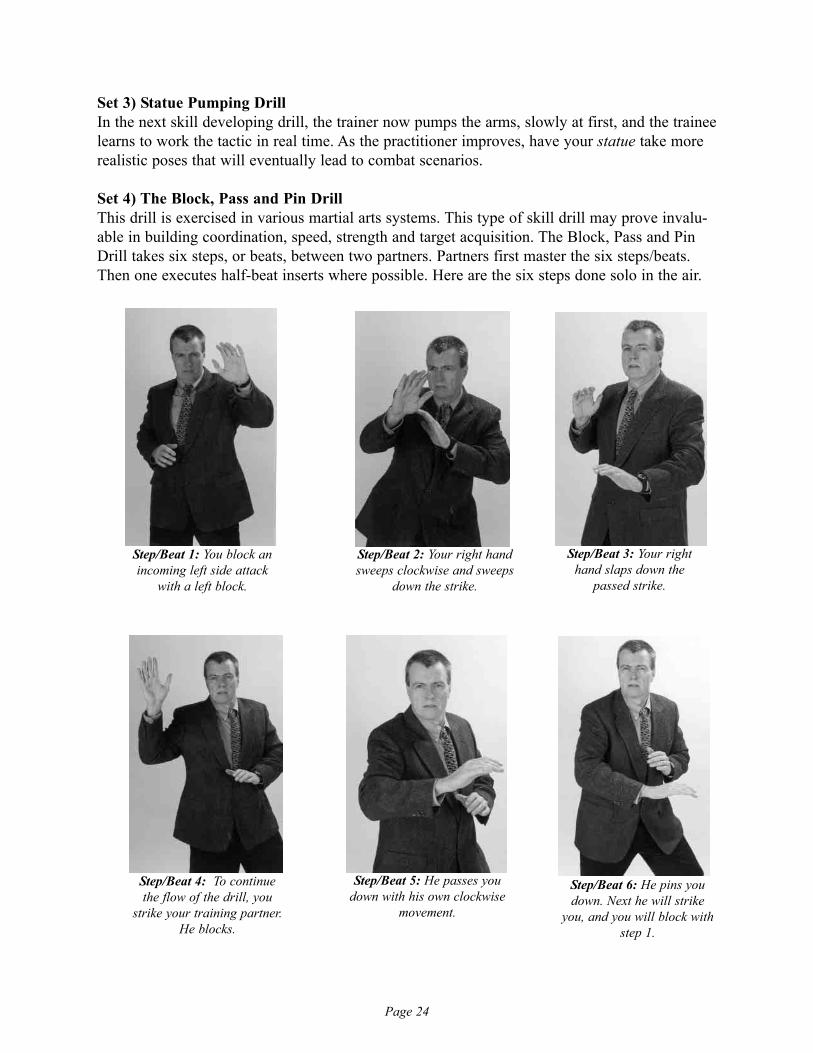
Set 4) The Block, Pass and Pin Drill This drill is exercised in various martial arts systems. This type of skill drill may prove invalu-able in building coordination, speed, strength and target acquisition. The Block, Pass and PinDrill takes six steps, or beats, between two partners. Partners first master the six steps/beats.Then one executes half-beat inserts where possible. Here are the six steps done solo in the air.
Step/Beat 1: You block anincoming left side attack
with a left block.
Step/Beat 2: Your right handsweeps clockwise and sweeps
down the strike.
Step/Beat 3: Your righthand slaps down the
passed strike.
Step/Beat 4: To continuethe flow of the drill, you
strike your training partner.He blocks.
Step/Beat 5: He passes youdown with his own clockwise
movement.
Step/Beat 6: He pins youdown. Next he will strike
you, and you will block withstep 1.
Page 25
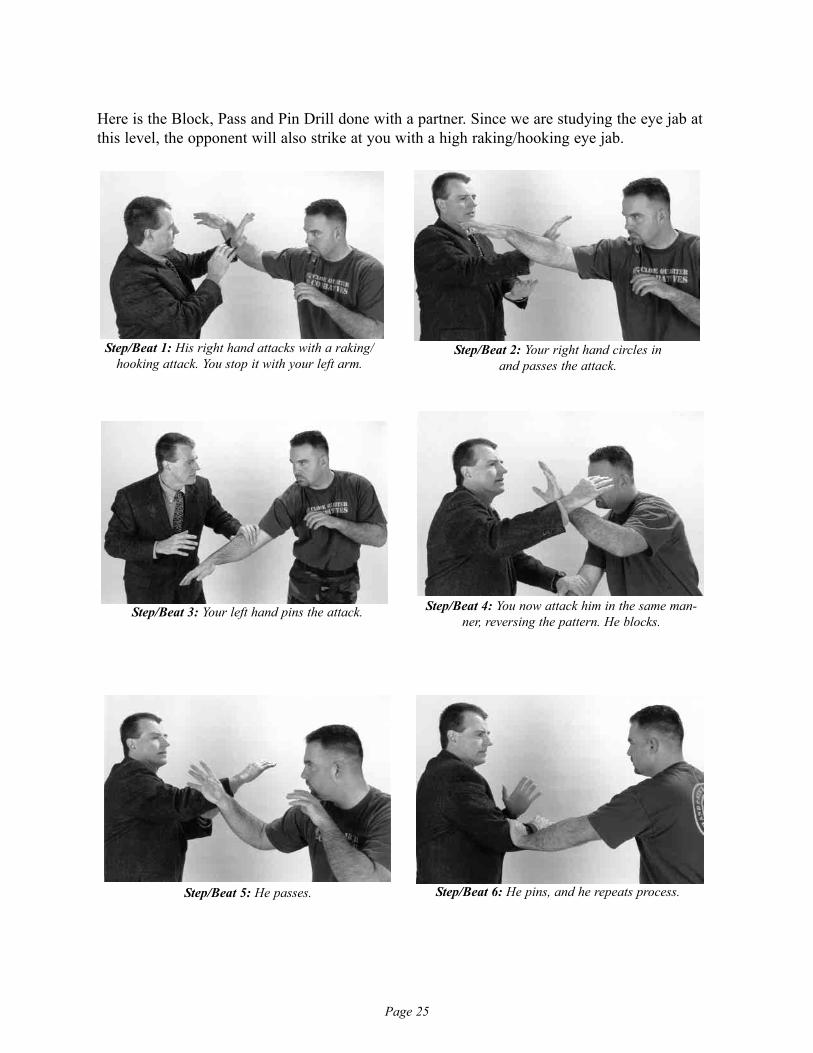
Here is the Block, Pass and Pin Drill done with a partner. Since we are studying the eye jab atthis level, the opponent will also strike at you with a high raking/hooking eye jab.
Step/Beat 1: His right hand attacks with a raking/hooking attack. You stop it with your left arm.
Step/Beat 2: Your right hand circles in and passes the attack.
Step/Beat 3: Your left hand pins the attack. Step/Beat 4: You now attack him in the same man-ner, reversing the pattern. He blocks.
Step/Beat 6: He pins, and he repeats process.Step/Beat 5: He passes.
Page 26
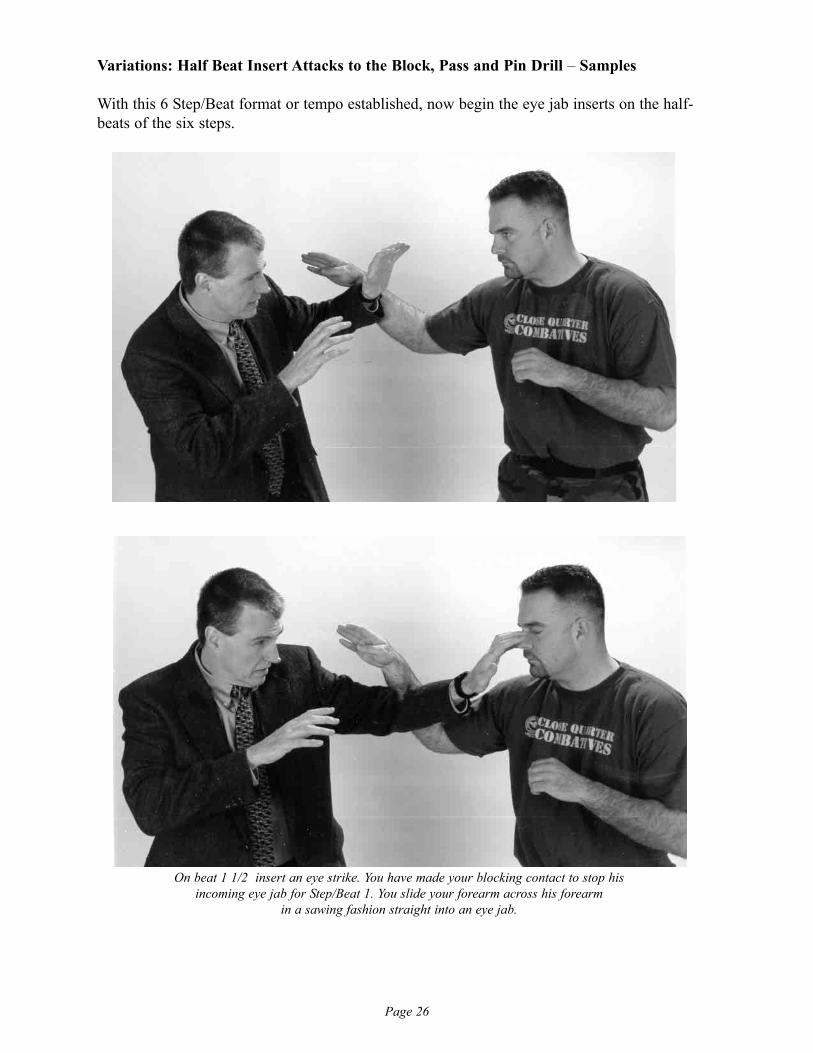
Variations: Half Beat Insert Attacks to the Block, Pass and Pin Drill – Samples
With this 6 Step/Beat format or tempo established, now begin the eye jab inserts on the half-beats of the six steps.
On beat 1 1/2 insert an eye strike. You have made your blocking contact to stop his incoming eye jab for Step/Beat 1. You slide your forearm across his forearm
in a sawing fashion straight into an eye jab.
Page 27
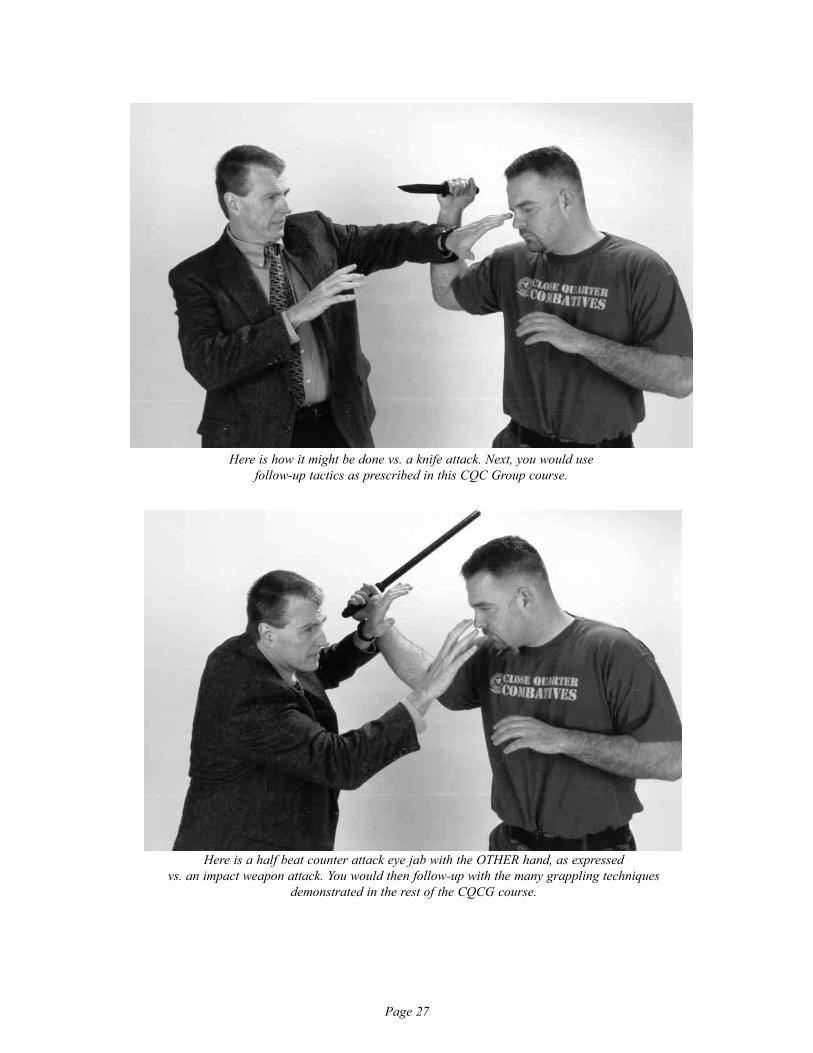
Here is how it might be done vs. a knife attack. Next, you would use follow-up tactics as prescribed in this CQC Group course.
Here is a half beat counter attack eye jab with the OTHER hand, as expressed vs. an impact weapon attack. You would then follow-up with the many grappling techniques
demonstrated in the rest of the CQCG course.

Page 28
On Step/Beat 2 1/2, insert an eye strike. You have blocked and are passing the attack. Your right hand passes and then shoots forward into an eye jab. Try to keep your
forearm in contact with his forearm, almost as though you are sawing up his arm. This may hold his arm in place, or at least alert you that it is moving.
Page 29
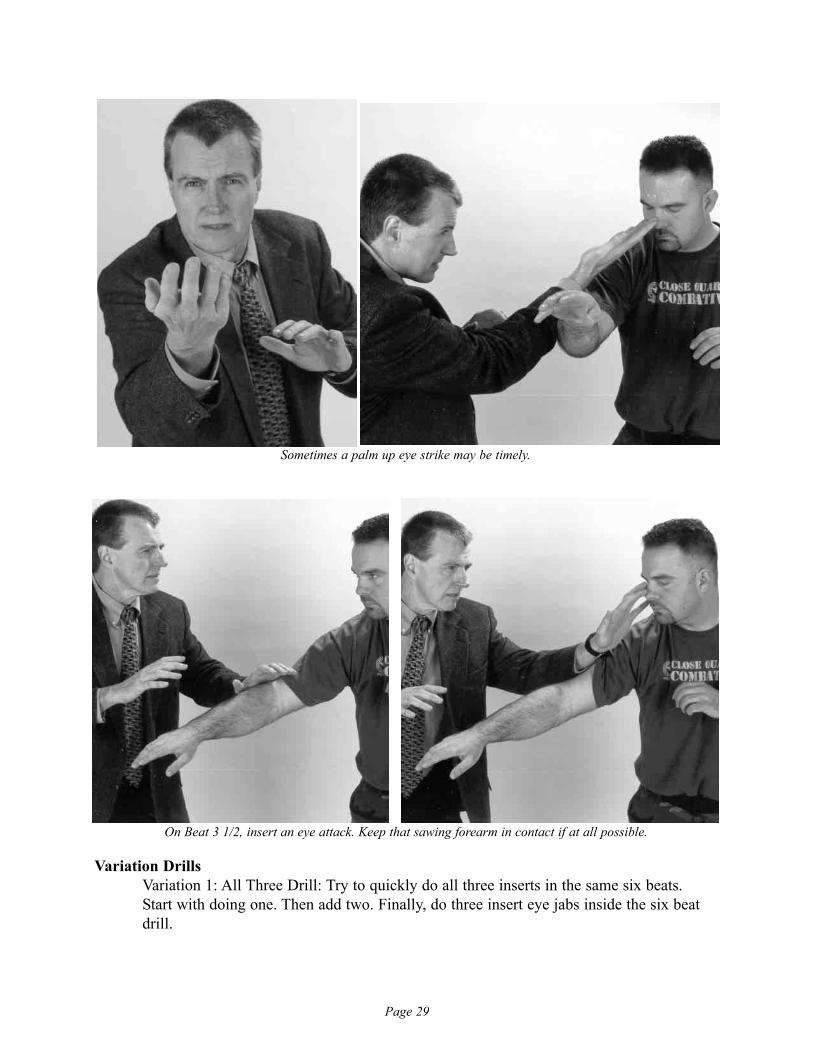
Variation DrillsVariation 1: All Three Drill: Try to quickly do all three inserts in the same six beats. Start with doing one. Then add two. Finally, do three insert eye jabs inside the six beat drill.
Sometimes a palm up eye strike may be timely.
On Beat 3 1/2, insert an eye attack. Keep that sawing forearm in contact if at all possible.
Page 30
Variation 2: Weapons Drill. The trainer holds a knife or stick during the drill.
Variation 3: Remember that this block, pass and pin pattern can and must be practiced from all four corners of the torso.
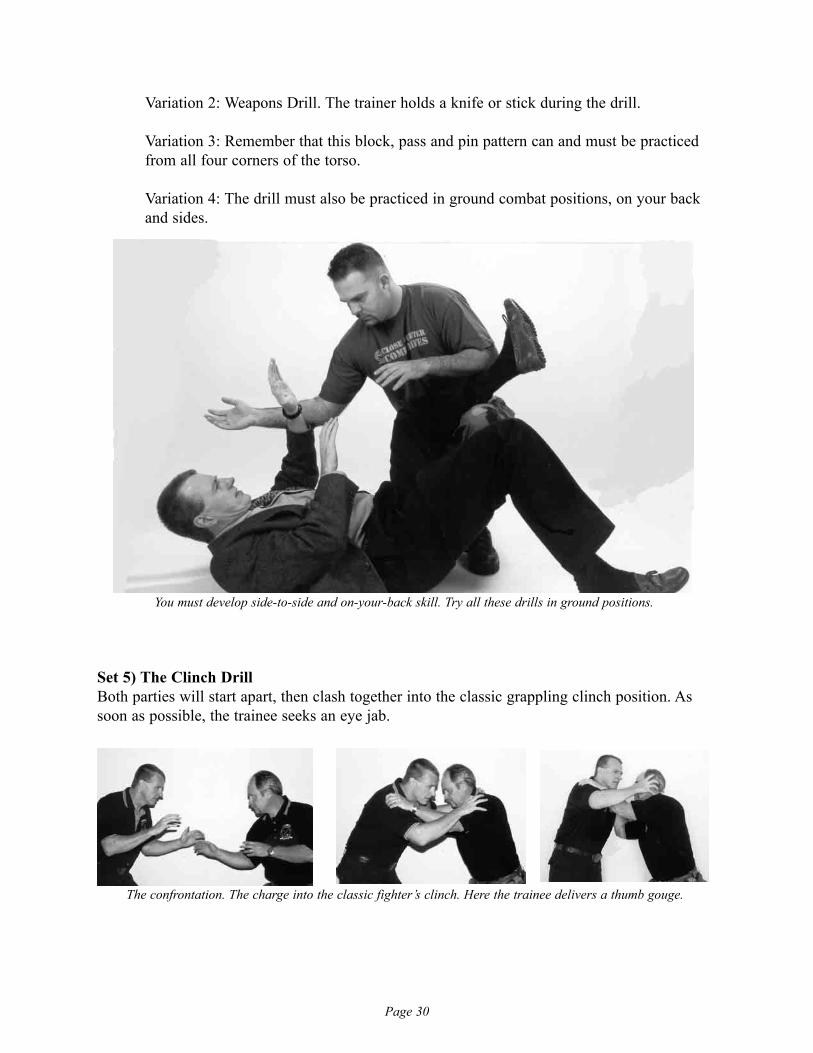
Variation 4: The drill must also be practiced in ground combat positions, on your back and sides.
Set 5) The Clinch DrillBoth parties will start apart, then clash together into the classic grappling clinch position. Assoon as possible, the trainee seeks an eye jab.
You must develop side-to-side and on-your-back skill. Try all these drills in ground positions.
The confrontation. The charge into the classic fighter’s clinch. Here the trainee delivers a thumb gouge.
Page 31
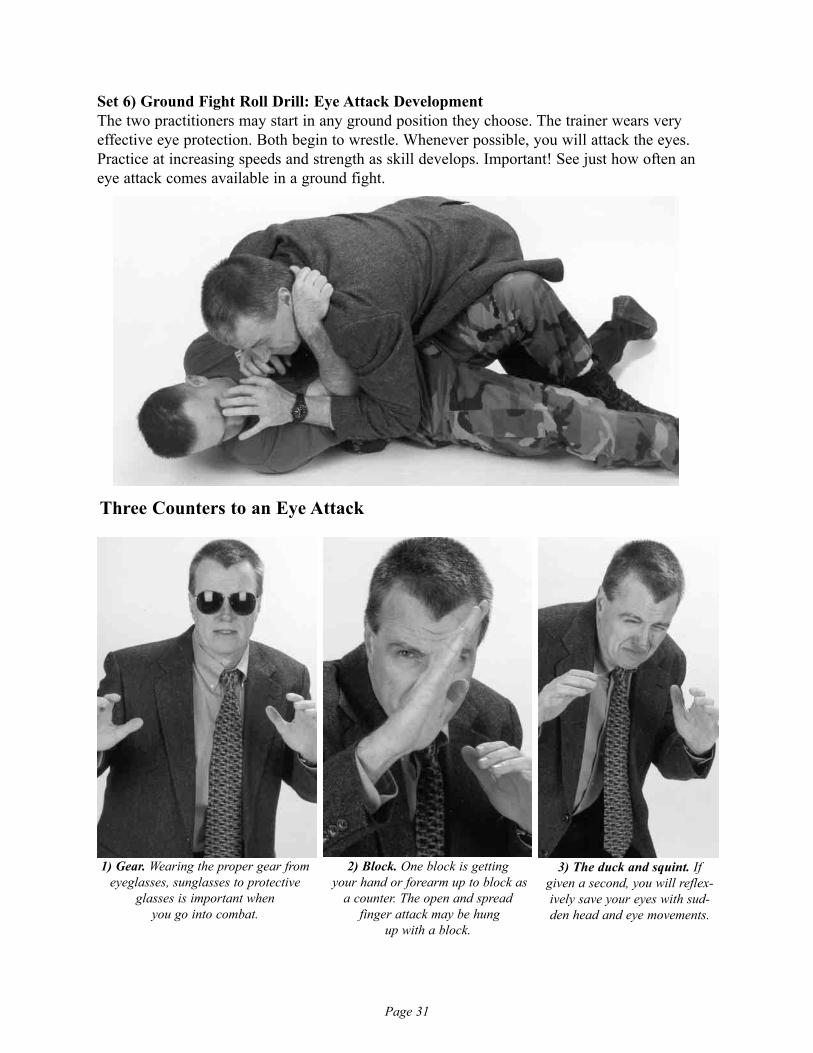
Set 6) Ground Fight Roll Drill: Eye Attack DevelopmentThe two practitioners may start in any ground position they choose. The trainer wears veryeffective eye protection. Both begin to wrestle. Whenever possible, you will attack the eyes.Practice at increasing speeds and strength as skill develops. Important! See just how often aneye attack comes available in a ground fight.
1) Gear. Wearing the proper gear fromeyeglasses, sunglasses to protective
glasses is important when you go into combat.
2) Block. One block is gettingyour hand or forearm up to block as
a counter. The open and spreadfinger attack may be hung
up with a block.
3) The duck and squint. Ifgiven a second, you will reflex-ively save your eyes with sud-den head and eye movements.
Three Counters to an Eye Attack
Page 32
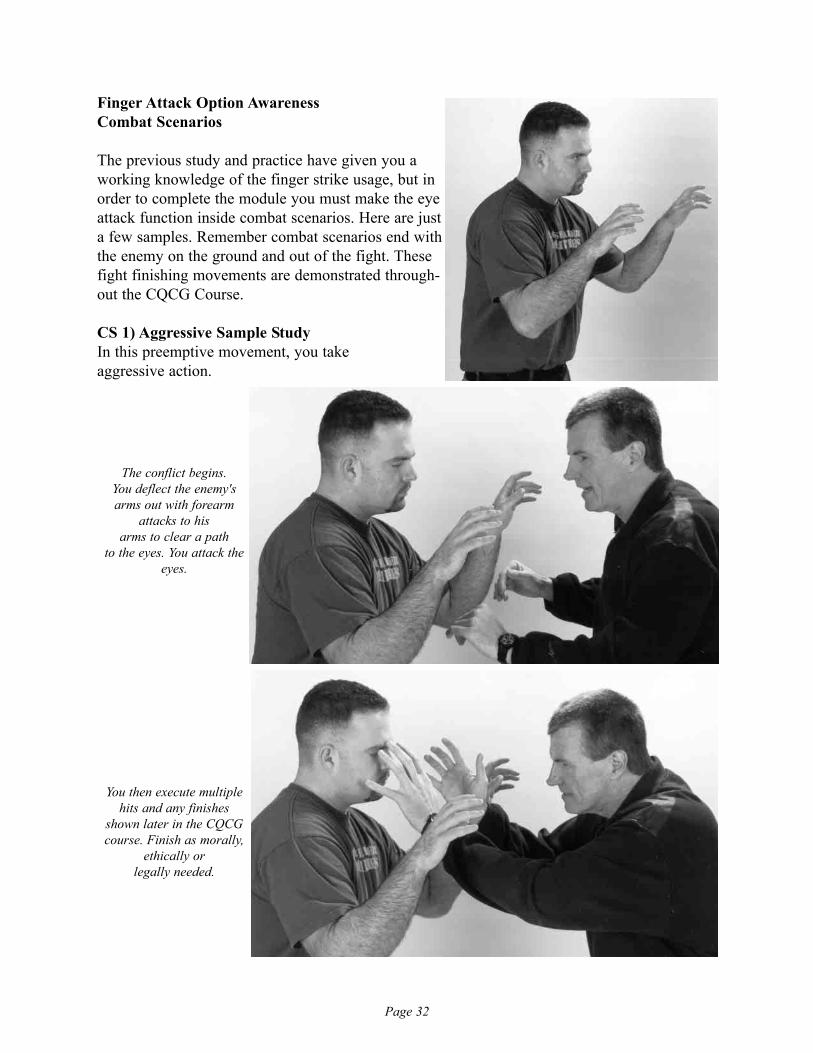
Finger Attack Option Awareness Combat Scenarios
The previous study and practice have given you aworking knowledge of the finger strike usage, but inorder to complete the module you must make the eyeattack function inside combat scenarios. Here are justa few samples. Remember combat scenarios end withthe enemy on the ground and out of the fight. Thesefight finishing movements are demonstrated through-out the CQCG Course.
CS 1) Aggressive Sample StudyIn this preemptive movement, you take aggressive action.
The conflict begins.You deflect the enemy'sarms out with forearm
attacks to his arms to clear a path
to the eyes. You attack theeyes.
You then execute multiplehits and any finishes
shown later in the CQCGcourse. Finish as morally,
ethically or legally needed.
Page 33
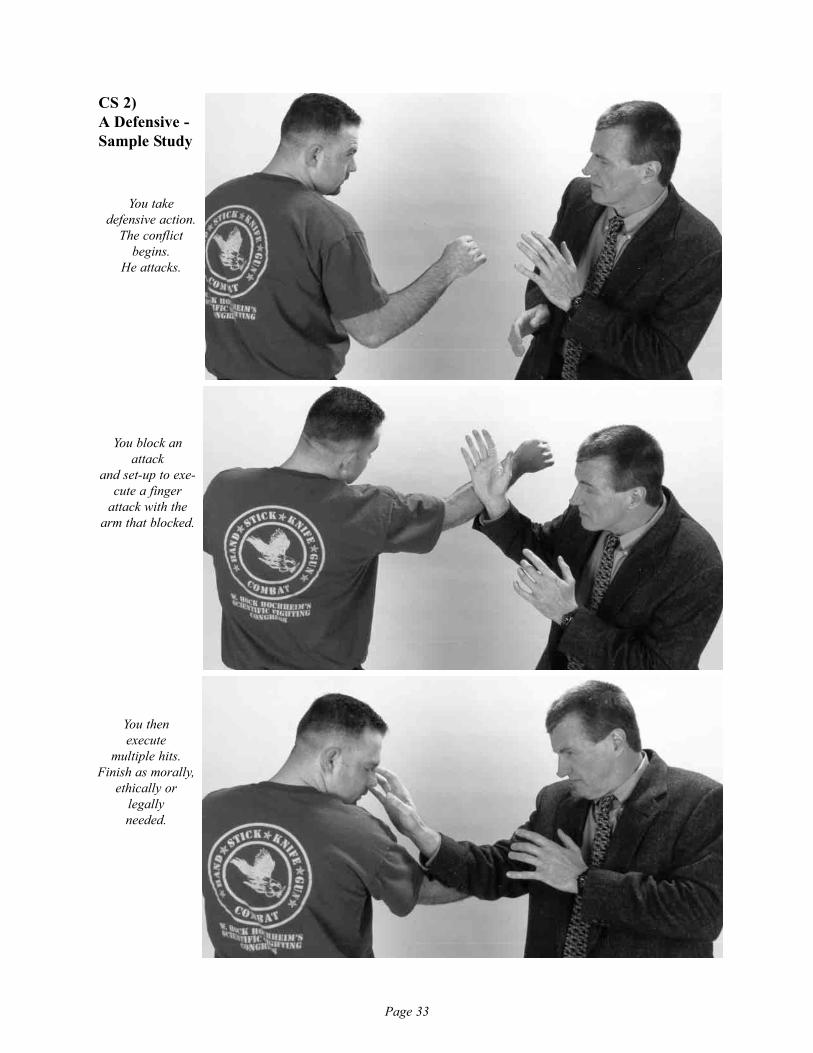
CS 2) A Defensive -Sample Study
You take defensive action.
The conflictbegins.
He attacks.
You block anattack
and set-up to exe-cute a finger
attack with thearm that blocked.
You then execute
multiple hits. Finish as morally,
ethically or legally needed.
Page 34
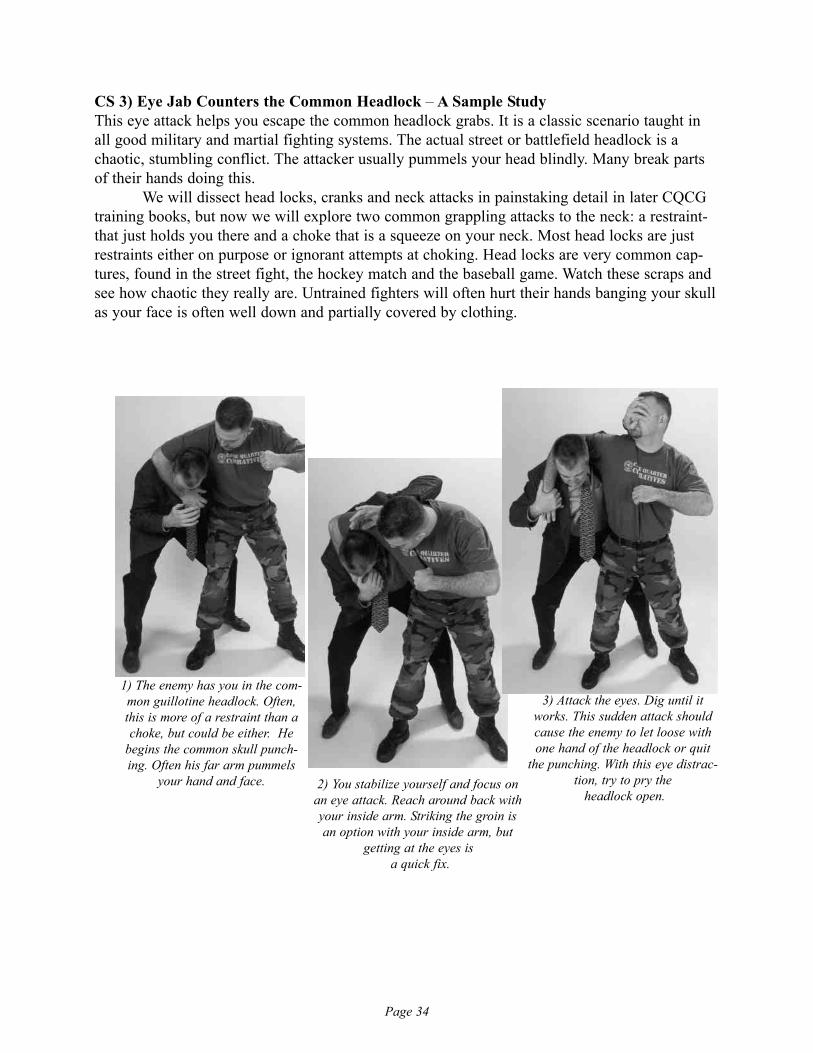
CS 3) Eye Jab Counters the Common Headlock – A Sample StudyThis eye attack helps you escape the common headlock grabs. It is a classic scenario taught inall good military and martial fighting systems. The actual street or battlefield headlock is achaotic, stumbling conflict. The attacker usually pummels your head blindly. Many break partsof their hands doing this.
We will dissect head locks, cranks and neck attacks in painstaking detail in later CQCGtraining books, but now we will explore two common grappling attacks to the neck: a restraint-that just holds you there and a choke that is a squeeze on your neck. Most head locks are justrestraints either on purpose or ignorant attempts at choking. Head locks are very common cap-tures, found in the street fight, the hockey match and the baseball game. Watch these scraps andsee how chaotic they really are. Untrained fighters will often hurt their hands banging your skullas your face is often well down and partially covered by clothing.
1) The enemy has you in the com-mon guillotine headlock. Often,this is more of a restraint than achoke, but could be either. He
begins the common skull punch-ing. Often his far arm pummels
your hand and face. 2) You stabilize yourself and focus onan eye attack. Reach around back withyour inside arm. Striking the groin isan option with your inside arm, but
getting at the eyes isa quick fix.
3) Attack the eyes. Dig until itworks. This sudden attack shouldcause the enemy to let loose withone hand of the headlock or quit
the punching. With this eye distrac-tion, try to pry the
headlock open.
Page 35
CS 4: Escape the Ground Choke – A Sample StudyHere you and your training partner (with eye protection) start in a worst-case situation. You aredowned, and he already has you in a choke. This is your starting point. Try to keep your wind-pipe or at least one carotid open. Then this becomes a neck restraint rather than a choke. Gettingyour chin inside the arm is a good option if the choke has not settled in. Trench your chin in. Ifhis arm is bare, spit down on his forearm to cause a slippery slope for your chin to slip insidehis forearm, all the while dig into the bare forearm with your fingers. Search for the eyes. Whenyour partner feels his eyes have been attacked. He may let loose. You may escape and takeappropriate action. I have done this successfully in real life and multiple times in very hard coretraining session. Surviving the ground eye attack is my litmus test. I do not teach ground fight-ing tactics that may be easily defeated by an opponent’s eye attacks. This removes about 50 per-cent or more of all submission fighting, sport judo and wrestling based tactics.
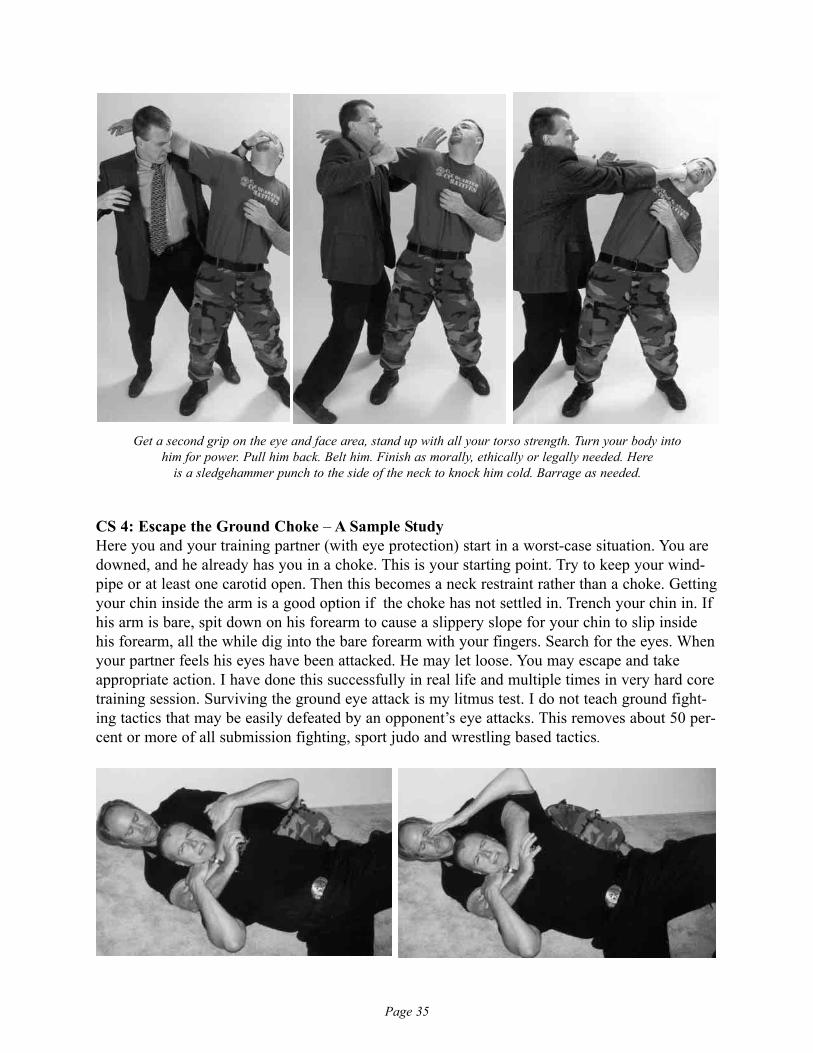
Get a second grip on the eye and face area, stand up with all your torso strength. Turn your body into him for power. Pull him back. Belt him. Finish as morally, ethically or legally needed. Here
is a sledgehammer punch to the side of the neck to knock him cold. Barrage as needed.
Page 36
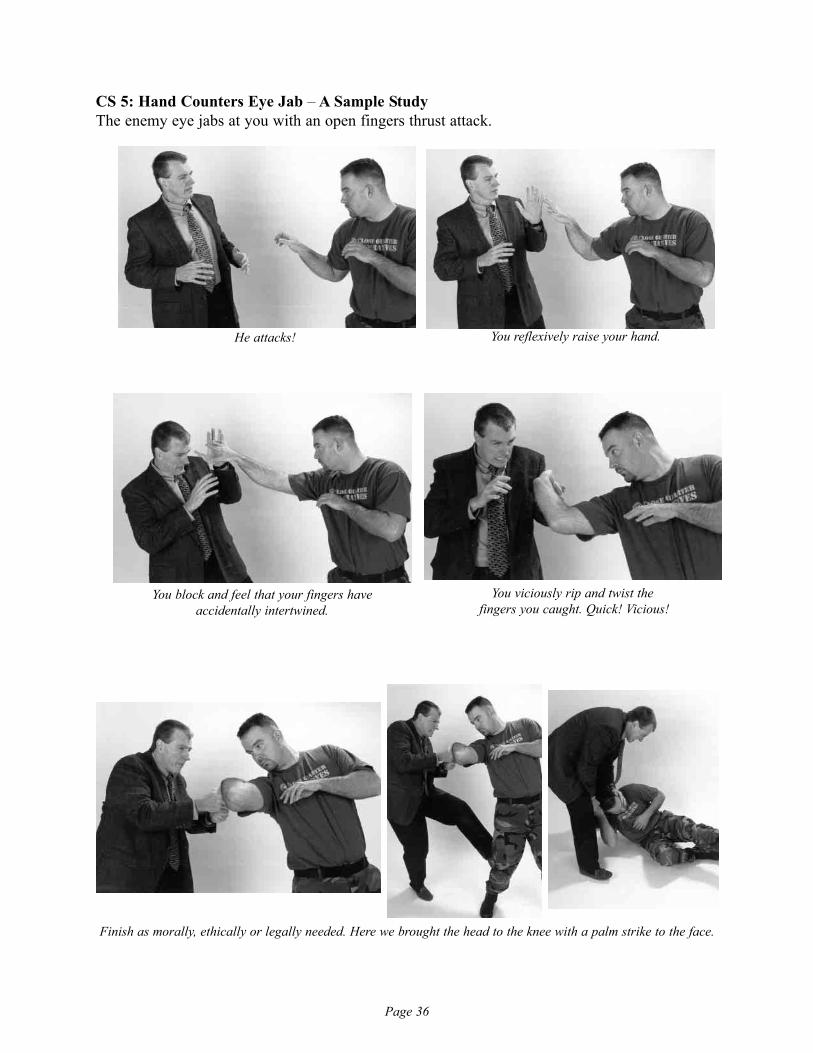
CS 5: Hand Counters Eye Jab – A Sample StudyThe enemy eye jabs at you with an open fingers thrust attack.
He attacks! You reflexively raise your hand.
You block and feel that your fingers have accidentally intertwined.
You viciously rip and twist thefingers you caught. Quick! Vicious!
Finish as morally, ethically or legally needed. Here we brought the head to the knee with a palm strike to the face.
Page 37
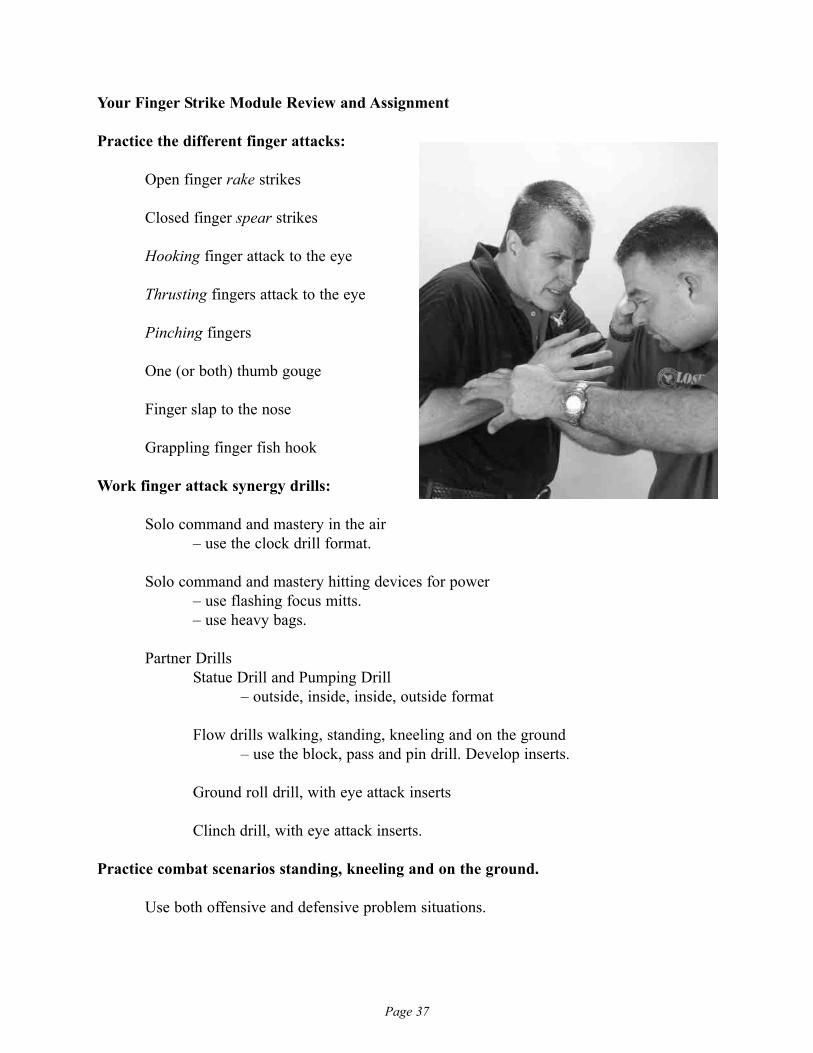
Your Finger Strike Module Review and Assignment
Practice the different finger attacks:
Open finger rake strikes
Closed finger spear strikes
Hooking finger attack to the eye
Thrusting fingers attack to the eye
Pinching fingers
One (or both) thumb gouge
Finger slap to the nose
Grappling finger fish hook
Work finger attack synergy drills:
Solo command and mastery in the air– use the clock drill format.
Solo command and mastery hitting devices for power– use flashing focus mitts.– use heavy bags.
Partner DrillsStatue Drill and Pumping Drill
– outside, inside, inside, outside format
Flow drills walking, standing, kneeling and on the ground– use the block, pass and pin drill. Develop inserts.
Ground roll drill, with eye attack inserts
Clinch drill, with eye attack inserts.
Practice combat scenarios standing, kneeling and on the ground.
Use both offensive and defensive problem situations.
Page 38
CQC Group
Unarmed Combatives Kick Module 1) The Frontal Snapping Kick Module
The front snap kick begins with a snapping motion from the knee joint with synchronized helpfrom the hip joint and proper body support balance. It uses the tip of a shoed foot, the top of thefoot, the shin up to the knee as a striking surface. Using the ball of the foot is not practical inshoes. This kick is often used in close quarter combat when the enemy is not in some type ofmartial fighting stance. This will be demonstrated in the following combat scenarios. In face-off, sparring situations, the front snap kick is often used as a setup or stall. The fact that theopponent is standing somewhat sideways limits the effect of the kick. Many use this kick wiselyas simply a shoe tip to the shin.
FSK Studies and Observations 1) BalanceMuch training effort and detail is directed to the leg that actually strikes. Remember the otherleg. The springy bend of the standing knee, the direction of the standing foot. Each kick is adouble leg study to create balance. Every time you lift your leg to kick, you challenge your bal-ance in close quarter combat.
FSK Studies and Observations 2) ChamberingMany martial artists obsess about chambering the kick and punch. Chambering is typically rear-ing your strike back and then firing it forward, under the assumption that it gains more powerwith this process. Does it? I believe if it were scientifically measured, we would be debating amicro-second and few ounces of a per-pound-strike ratio. I also believe that there is a point ofretraction where a chamber delivers a maximum result and that special point might not be a full,folded, classical chamber. Find a point in your own experimentation where you get maximumresults with minimum movement. Isn’t that the true tenet of modern fighting? In the case of afrontal snap kick, many chamber their leg by raising their knee first and snapping their lowerleg for the kick.
Front Snap Kick Synergy Drills
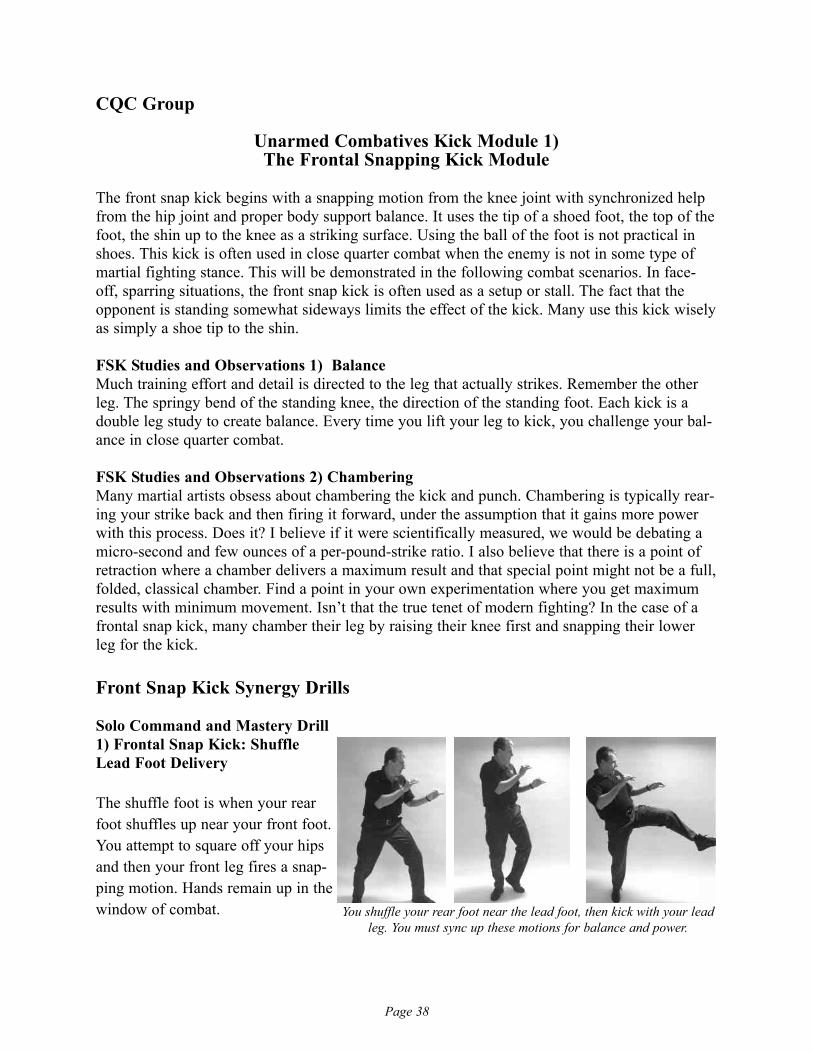
Solo Command and Mastery Drill 1) Frontal Snap Kick: ShuffleLead Foot Delivery
The shuffle foot is when your rearfoot shuffles up near your front foot.You attempt to square off your hipsand then your front leg fires a snap-ping motion. Hands remain up in thewindow of combat. You shuffle your rear foot near the lead foot, then kick with your lead
leg. You must sync up these motions for balance and power.
Page 39
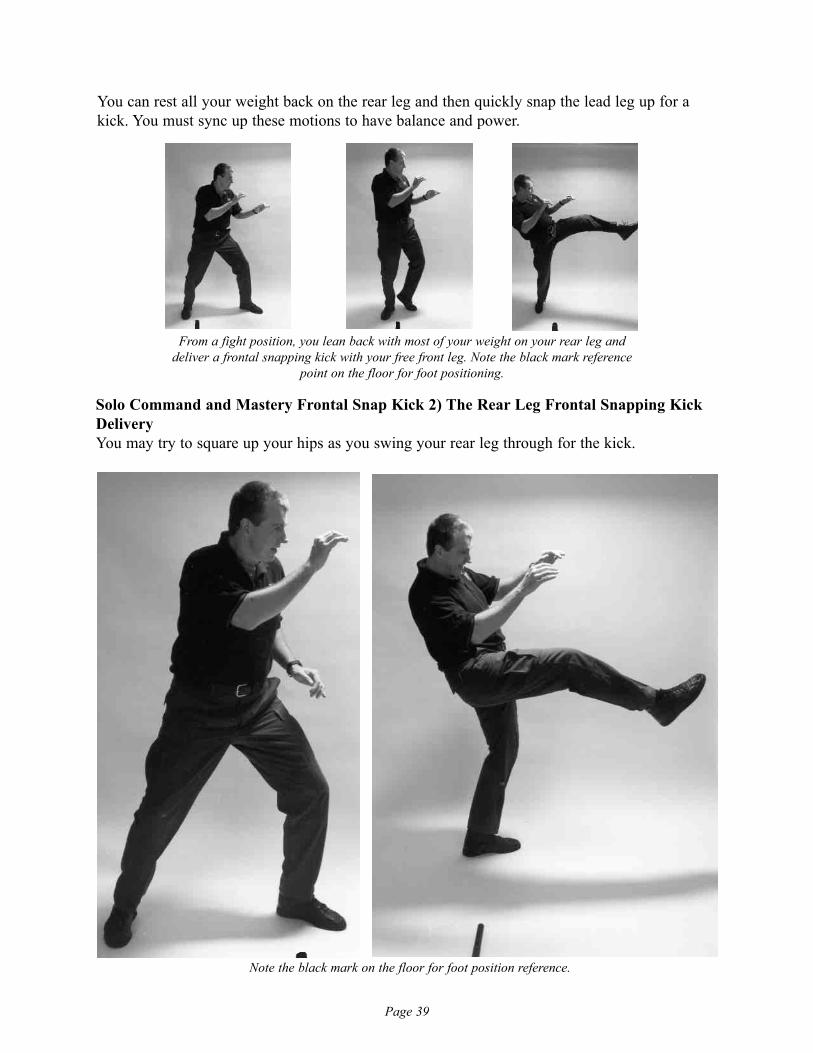
You can rest all your weight back on the rear leg and then quickly snap the lead leg up for akick. You must sync up these motions to have balance and power.
From a fight position, you lean back with most of your weight on your rear leg anddeliver a frontal snapping kick with your free front leg. Note the black mark reference
point on the floor for foot positioning.
Solo Command and Mastery Frontal Snap Kick 2) The Rear Leg Frontal Snapping Kick DeliveryYou may try to square up your hips as you swing your rear leg through for the kick.
Note the black mark on the floor for foot position reference.
Page 40
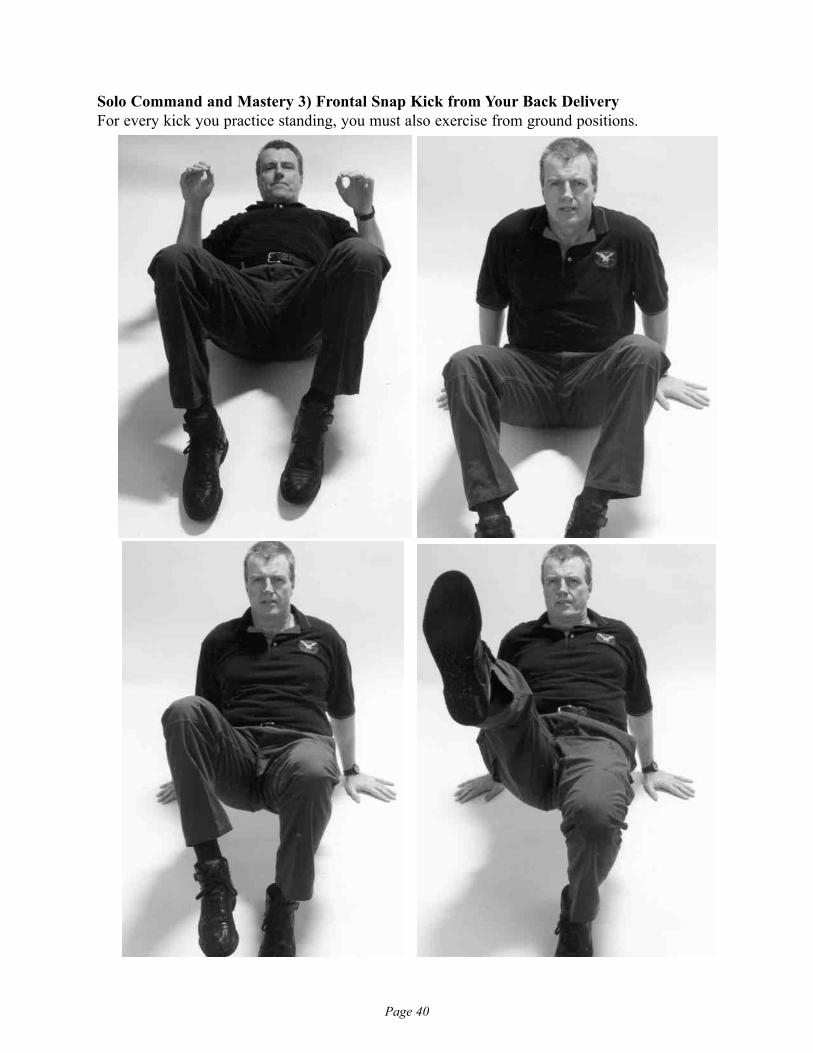
Solo Command and Mastery 3) Frontal Snap Kick from Your Back DeliveryFor every kick you practice standing, you must also exercise from ground positions.
Page 41
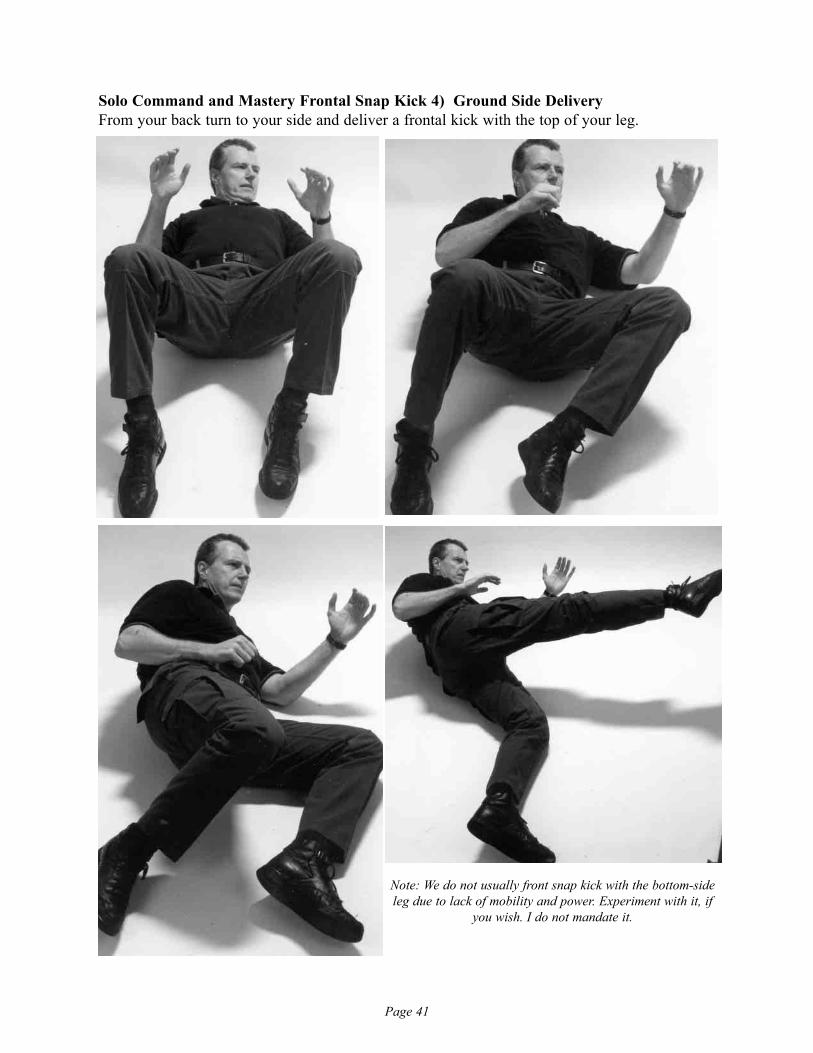
Solo Command and Mastery Frontal Snap Kick 4) Ground Side DeliveryFrom your back turn to your side and deliver a frontal kick with the top of your leg.
Note: We do not usually front snap kick with the bottom-sideleg due to lack of mobility and power. Experiment with it, if
you wish. I do not mandate it.
Page 42
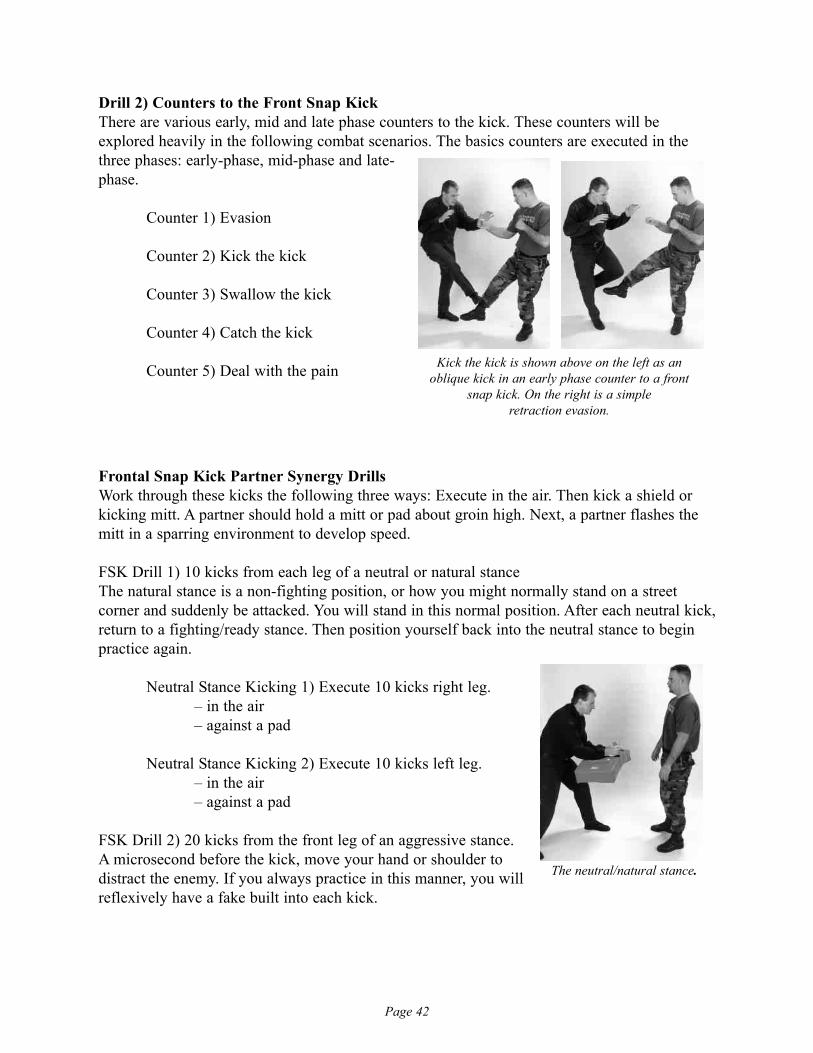
Drill 2) Counters to the Front Snap KickThere are various early, mid and late phase counters to the kick. These counters will beexplored heavily in the following combat scenarios. The basics counters are executed in thethree phases: early-phase, mid-phase and late-phase.
Counter 1) Evasion
Counter 2) Kick the kick
Counter 3) Swallow the kick
Counter 4) Catch the kick
Counter 5) Deal with the pain
Frontal Snap Kick Partner Synergy DrillsWork through these kicks the following three ways: Execute in the air. Then kick a shield orkicking mitt. A partner should hold a mitt or pad about groin high. Next, a partner flashes themitt in a sparring environment to develop speed.
FSK Drill 1) 10 kicks from each leg of a neutral or natural stanceThe natural stance is a non-fighting position, or how you might normally stand on a street corner and suddenly be attacked. You will stand in this normal position. After each neutral kick,return to a fighting/ready stance. Then position yourself back into the neutral stance to beginpractice again.
Neutral Stance Kicking 1) Execute 10 kicks right leg. – in the air– against a pad
Neutral Stance Kicking 2) Execute 10 kicks left leg.– in the air– against a pad
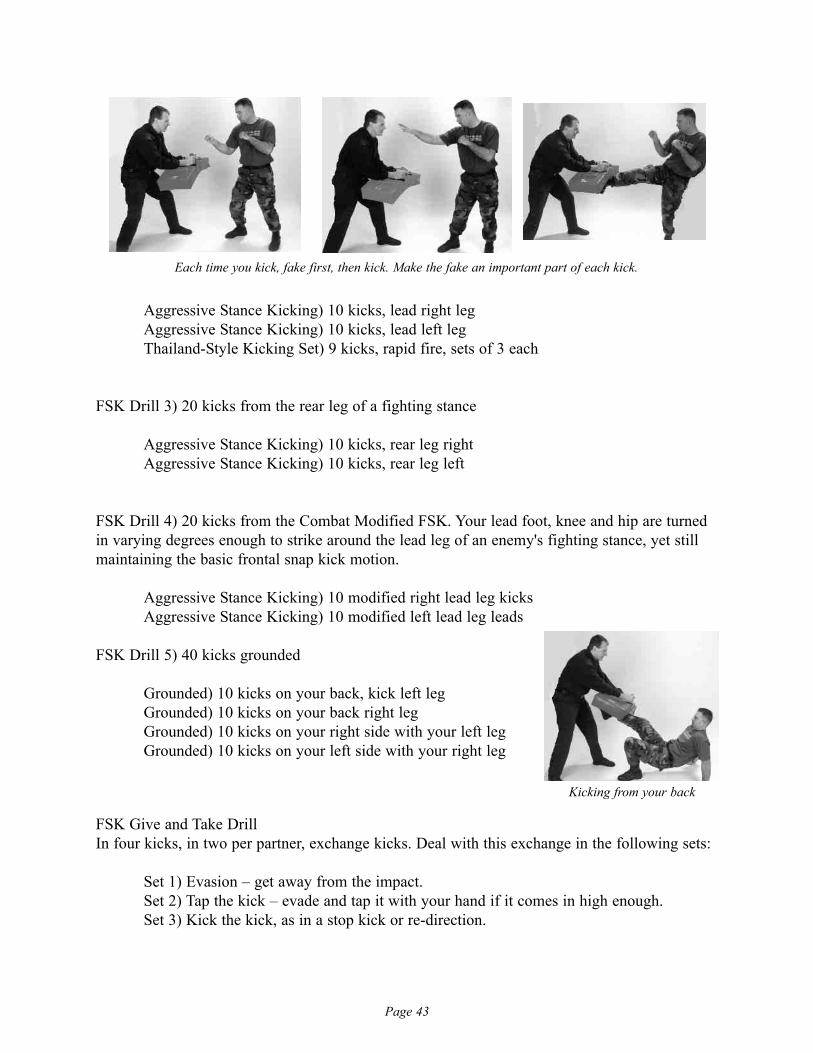
FSK Drill 2) 20 kicks from the front leg of an aggressive stance. A microsecond before the kick, move your hand or shoulder to distract the enemy. If you always practice in this manner, you will reflexively have a fake built into each kick.
Kick the kick is shown above on the left as anoblique kick in an early phase counter to a front
snap kick. On the right is a simple retraction evasion.
The neutral/natural stance.
Page 43
Aggressive Stance Kicking) 10 kicks, lead right legAggressive Stance Kicking) 10 kicks, lead left legThailand-Style Kicking Set) 9 kicks, rapid fire, sets of 3 each
FSK Drill 3) 20 kicks from the rear leg of a fighting stance
Aggressive Stance Kicking) 10 kicks, rear leg rightAggressive Stance Kicking) 10 kicks, rear leg left
FSK Drill 4) 20 kicks from the Combat Modified FSK. Your lead foot, knee and hip are turnedin varying degrees enough to strike around the lead leg of an enemy's fighting stance, yet stillmaintaining the basic frontal snap kick motion.
Aggressive Stance Kicking) 10 modified right lead leg kicksAggressive Stance Kicking) 10 modified left lead leg leads
FSK Drill 5) 40 kicks grounded
Grounded) 10 kicks on your back, kick left legGrounded) 10 kicks on your back right legGrounded) 10 kicks on your right side with your left legGrounded) 10 kicks on your left side with your right leg
FSK Give and Take DrillIn four kicks, in two per partner, exchange kicks. Deal with this exchange in the following sets:
Set 1) Evasion – get away from the impact.Set 2) Tap the kick – evade and tap it with your hand if it comes in high enough.Set 3) Kick the kick, as in a stop kick or re-direction.
Each time you kick, fake first, then kick. Make the fake an important part of each kick.
Kicking from your back
Page 44
Frontal Snap Kick Option Awareness Combat Scenarios
Practice these combat scenarios. They offer great variety in attacking and countering the FSK.
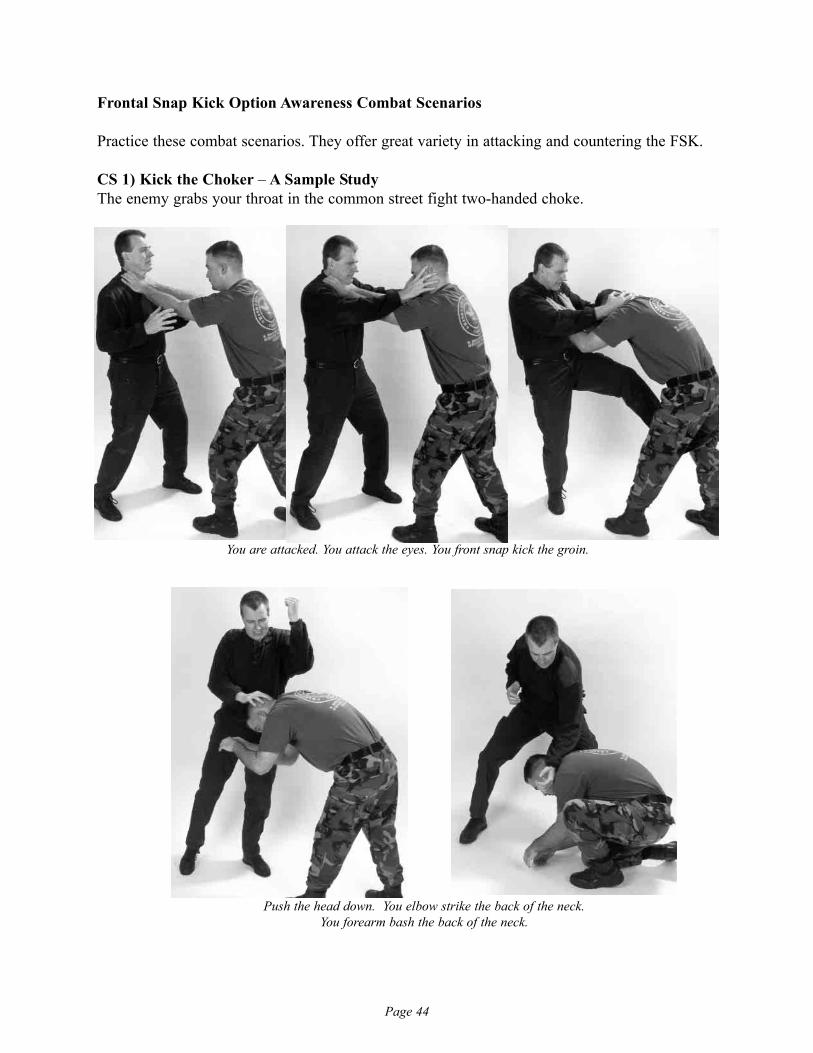
CS 1) Kick the Choker – A Sample StudyThe enemy grabs your throat in the common street fight two-handed choke.
You are attacked. You attack the eyes. You front snap kick the groin.
Push the head down. You elbow strike the back of the neck. You forearm bash the back of the neck.
Page 45
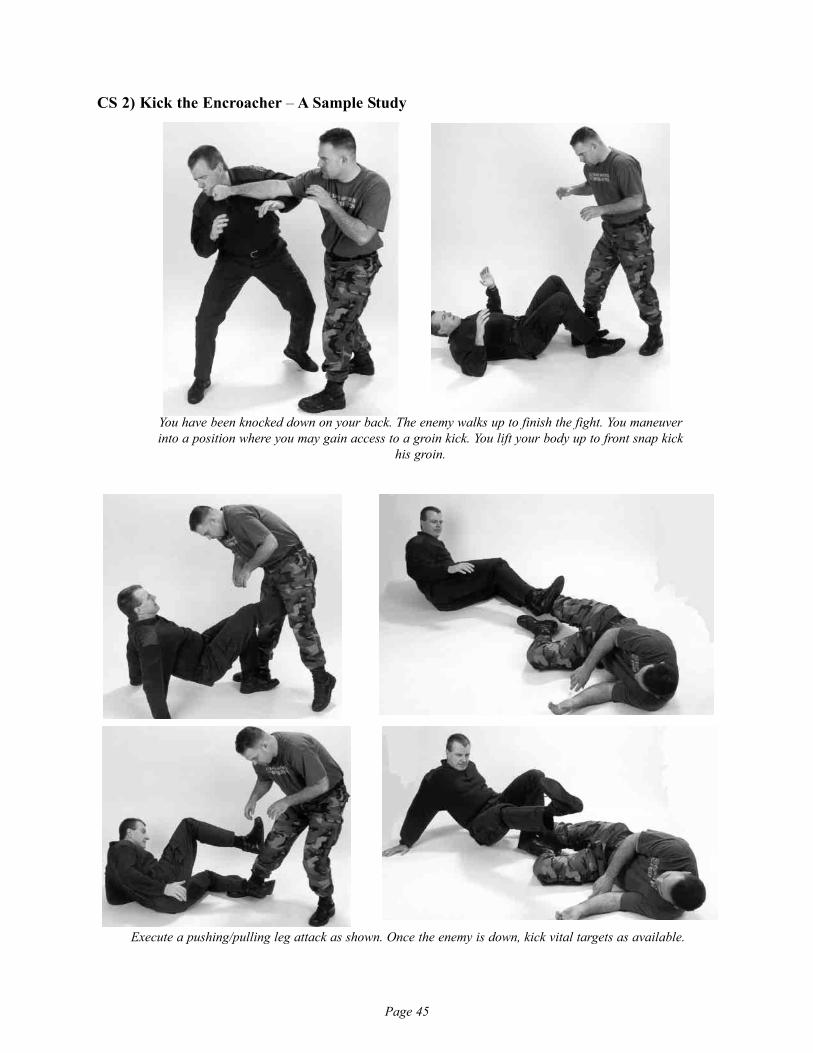
CS 2) Kick the Encroacher – A Sample Study
You have been knocked down on your back. The enemy walks up to finish the fight. You maneuverinto a position where you may gain access to a groin kick. You lift your body up to front snap kick
his groin.
Execute a pushing/pulling leg attack as shown. Once the enemy is down, kick vital targets as available.
Page 46
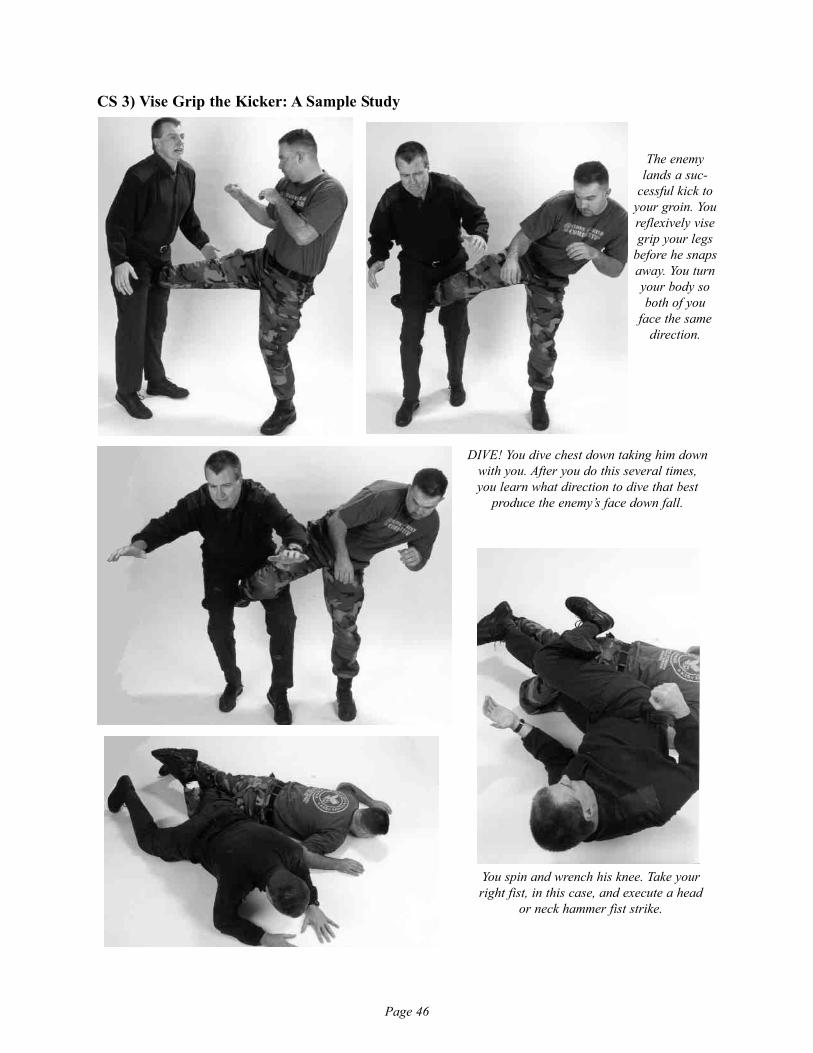
CS 3) Vise Grip the Kicker: A Sample Study
The enemylands a suc-
cessful kick toyour groin. Youreflexively visegrip your legs
before he snapsaway. You turnyour body soboth of you
face the samedirection.
DIVE! You dive chest down taking him downwith you. After you do this several times,you learn what direction to dive that best
produce the enemy’s face down fall.
You spin and wrench his knee. Take yourright fist, in this case, and execute a head
or neck hammer fist strike.
Page 47
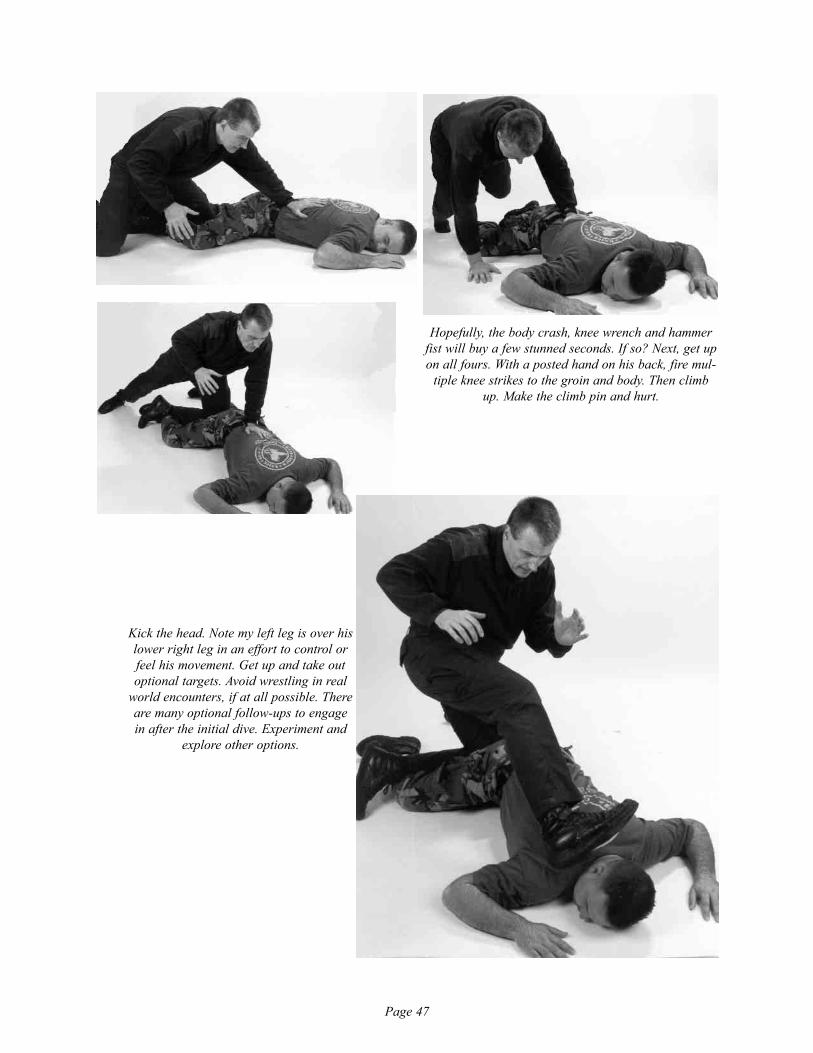
Kick the head. Note my left leg is over hislower right leg in an effort to control orfeel his movement. Get up and take outoptional targets. Avoid wrestling in real
world encounters, if at all possible. Thereare many optional follow-ups to engagein after the initial dive. Experiment and
explore other options.
Hopefully, the body crash, knee wrench and hammerfist will buy a few stunned seconds. If so? Next, get upon all fours. With a posted hand on his back, fire mul-
tiple knee strikes to the groin and body. Then climbup. Make the climb pin and hurt.
Page 48
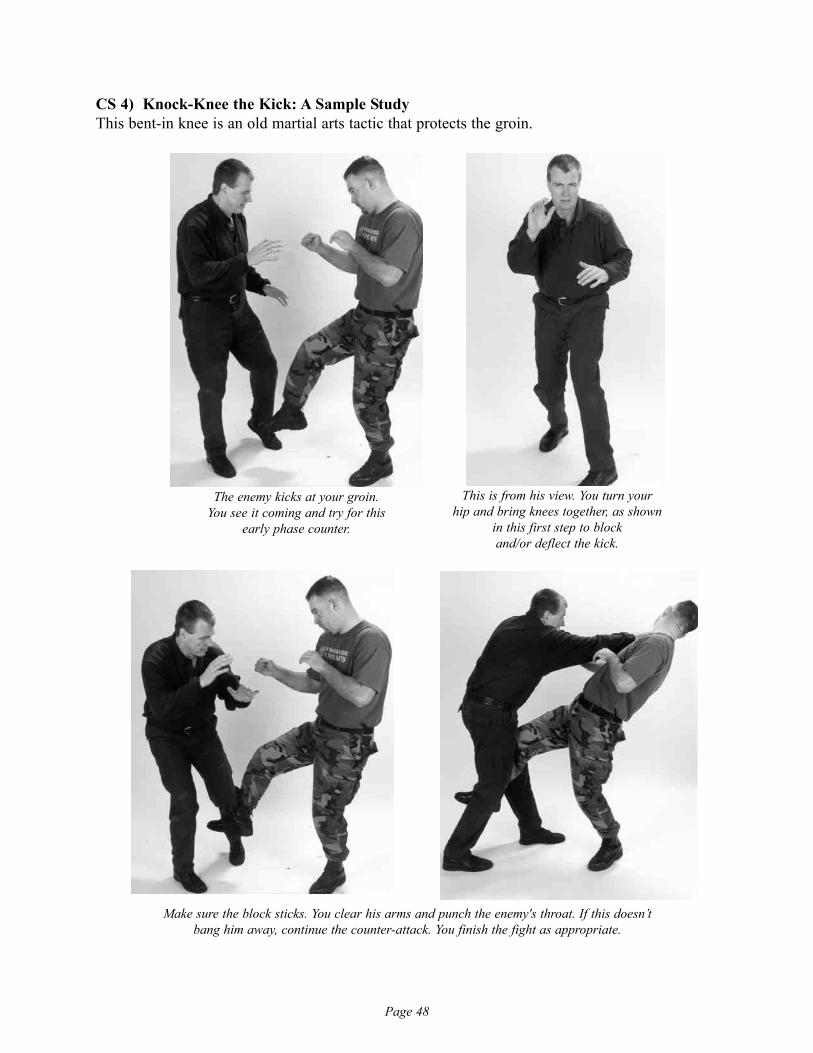
CS 4) Knock-Knee the Kick: A Sample StudyThis bent-in knee is an old martial arts tactic that protects the groin.
The enemy kicks at your groin. You see it coming and try for this
early phase counter.
This is from his view. You turn your hip and bring knees together, as shown
in this first step to block and/or deflect the kick.
Make sure the block sticks. You clear his arms and punch the enemy's throat. If this doesn’t bang him away, continue the counter-attack. You finish the fight as appropriate.
Page 49
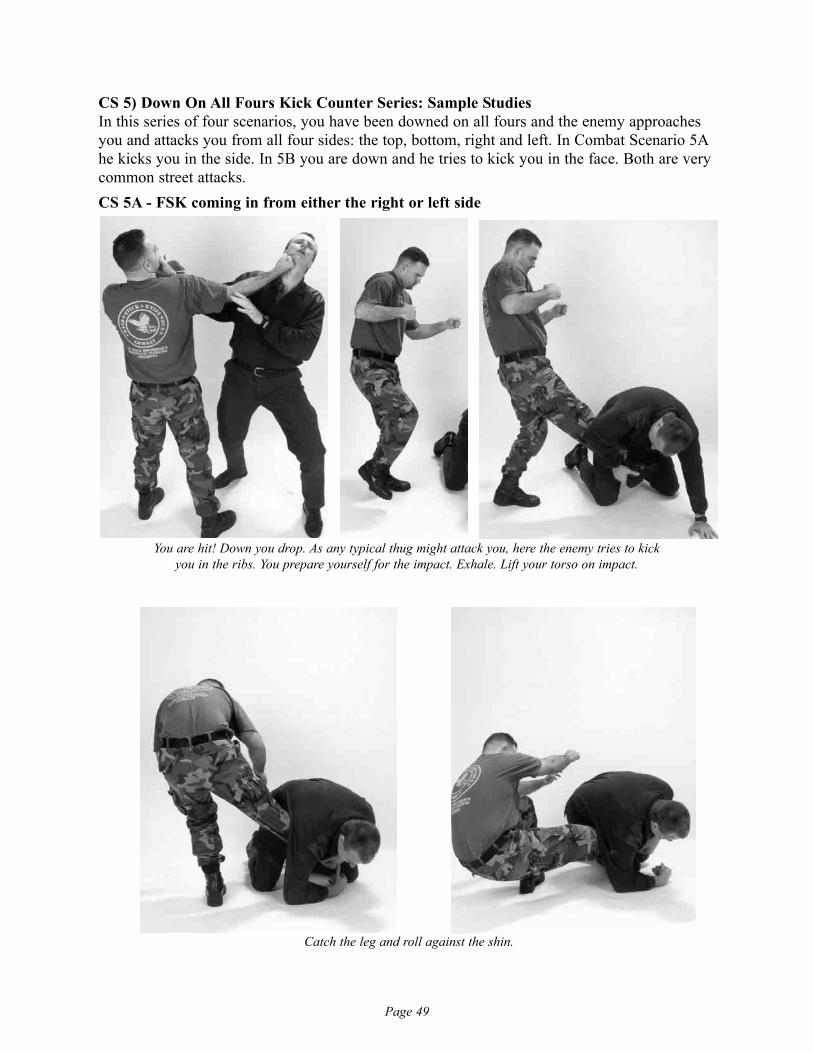
CS 5) Down On All Fours Kick Counter Series: Sample StudiesIn this series of four scenarios, you have been downed on all fours and the enemy approachesyou and attacks you from all four sides: the top, bottom, right and left. In Combat Scenario 5Ahe kicks you in the side. In 5B you are down and he tries to kick you in the face. Both are verycommon street attacks.CS 5A - FSK coming in from either the right or left side
You are hit! Down you drop. As any typical thug might attack you, here the enemy tries to kick you in the ribs. You prepare yourself for the impact. Exhale. Lift your torso on impact.
Catch the leg and roll against the shin.
Page 50
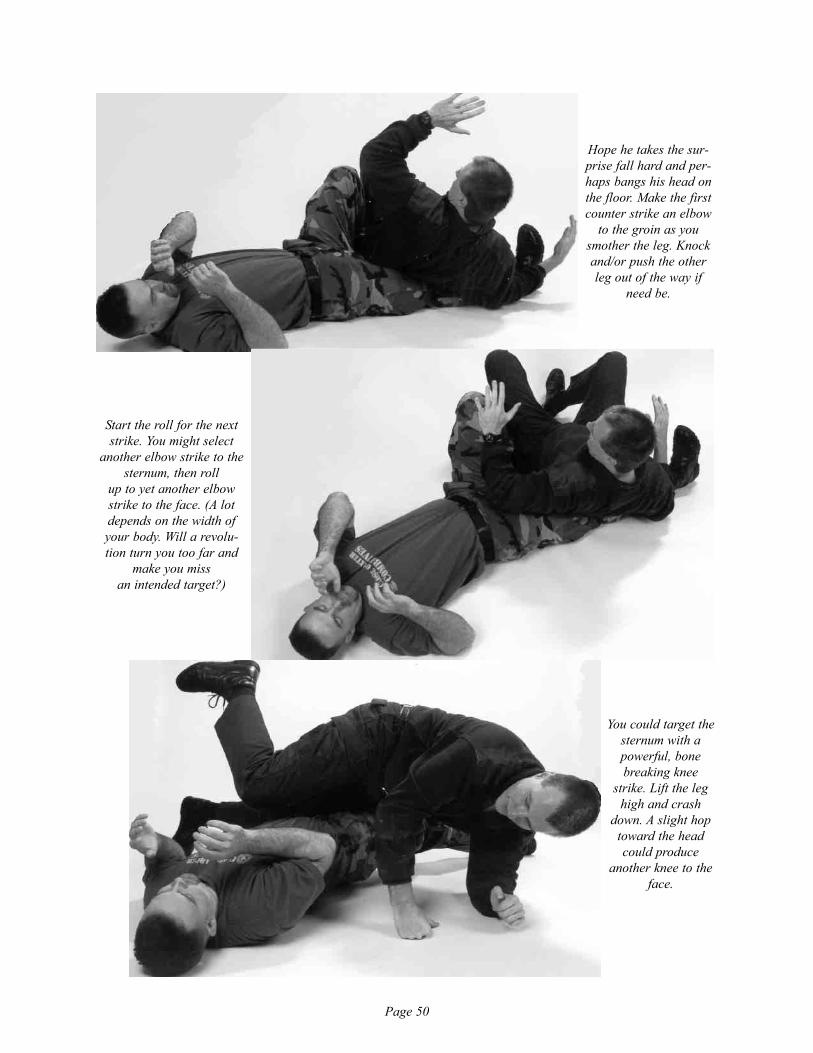
Start the roll for the nextstrike. You might select
another elbow strike to thesternum, then roll
up to yet another elbow strike to the face. (A lotdepends on the width ofyour body. Will a revolu-tion turn you too far and
make you miss an intended target?)
You could target thesternum with apowerful, bonebreaking knee
strike. Lift the leghigh and crash
down. A slight hoptoward the headcould produce
another knee to theface.
Hope he takes the sur-prise fall hard and per-haps bangs his head onthe floor. Make the firstcounter strike an elbow
to the groin as yousmother the leg. Knockand/or push the otherleg out of the way if
need be.
Page 51
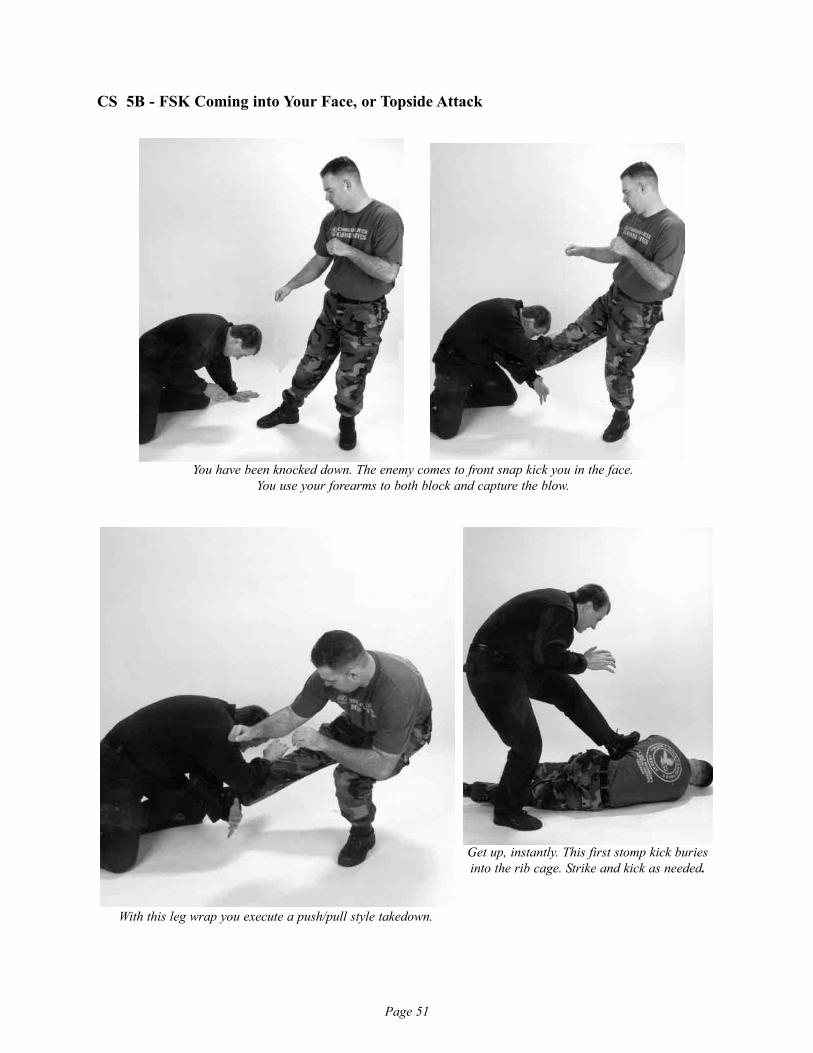
CS 5B - FSK Coming into Your Face, or Topside Attack
You have been knocked down. The enemy comes to front snap kick you in the face. You use your forearms to both block and capture the blow.
Get up, instantly. This first stomp kick buriesinto the rib cage. Strike and kick as needed.
With this leg wrap you execute a push/pull style takedown.
Page 52
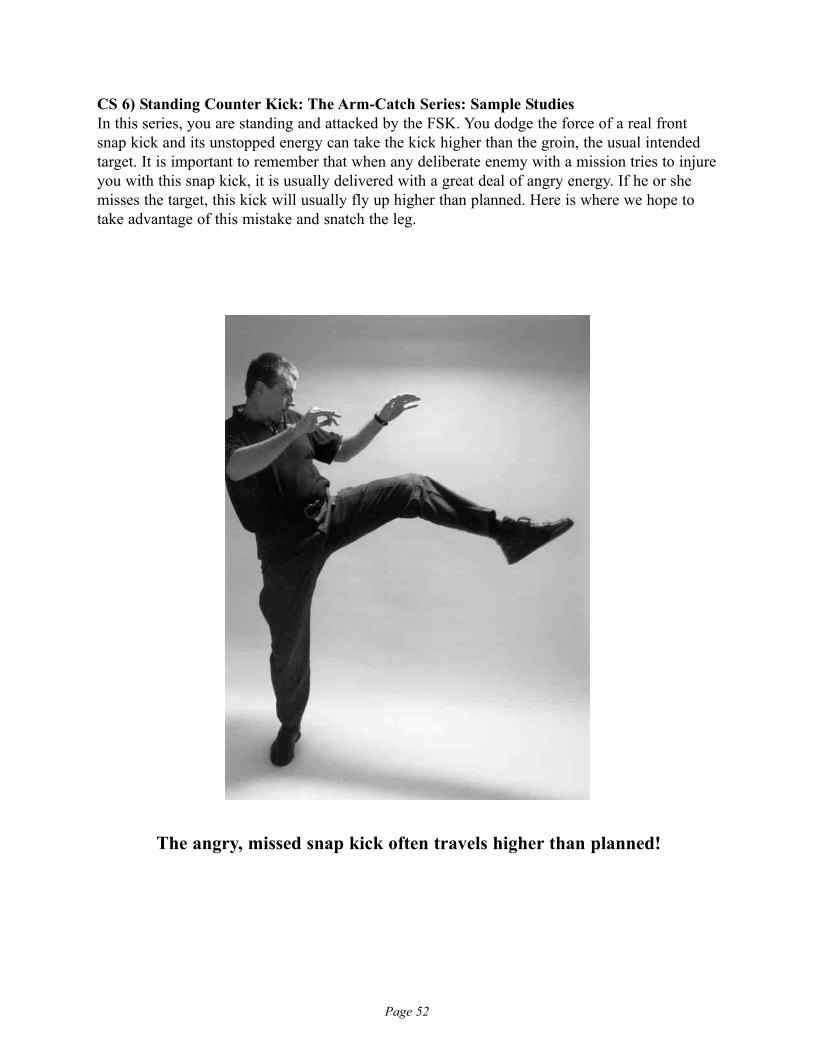
CS 6) Standing Counter Kick: The Arm-Catch Series: Sample StudiesIn this series, you are standing and attacked by the FSK. You dodge the force of a real frontsnap kick and its unstopped energy can take the kick higher than the groin, the usual intendedtarget. It is important to remember that when any deliberate enemy with a mission tries to injureyou with this snap kick, it is usually delivered with a great deal of angry energy. If he or shemisses the target, this kick will usually fly up higher than planned. Here is where we hope totake advantage of this mistake and snatch the leg.
The angry, missed snap kick often travels higher than planned!
Page 53
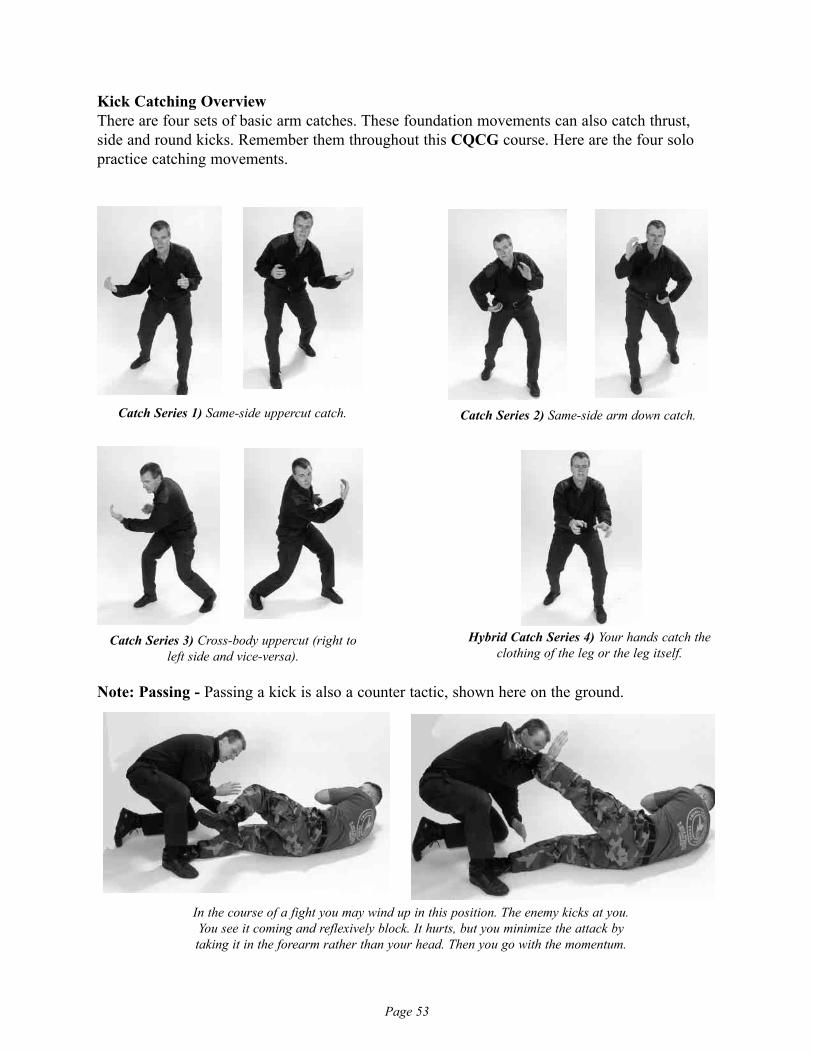
Kick Catching Overview There are four sets of basic arm catches. These foundation movements can also catch thrust,side and round kicks. Remember them throughout this CQCG course. Here are the four solopractice catching movements.
Note: Passing - Passing a kick is also a counter tactic, shown here on the ground.
Catch Series 1) Same-side uppercut catch. Catch Series 2) Same-side arm down catch.
Catch Series 3) Cross-body uppercut (right toleft side and vice-versa).
Hybrid Catch Series 4) Your hands catch theclothing of the leg or the leg itself.
In the course of a fight you may wind up in this position. The enemy kicks at you. You see it coming and reflexively block. It hurts, but you minimize the attack by taking it in the forearm rather than your head. Then you go with the momentum.
Page 54
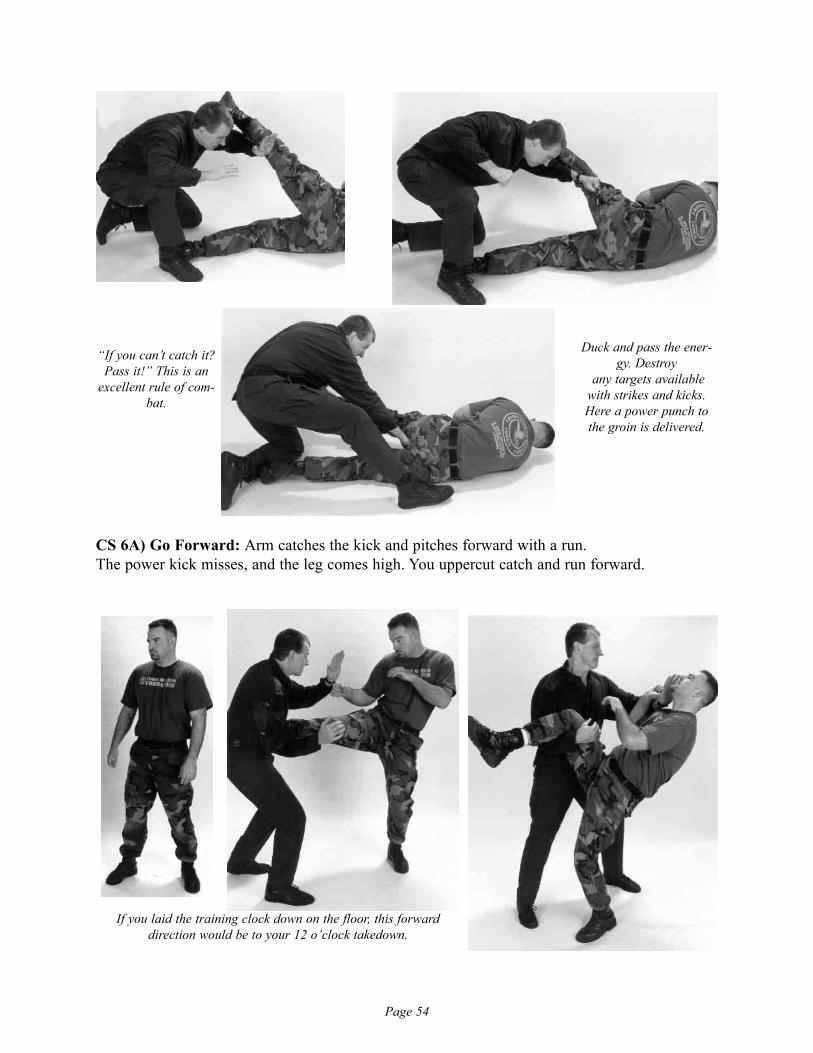
CS 6A) Go Forward: Arm catches the kick and pitches forward with a run.The power kick misses, and the leg comes high. You uppercut catch and run forward.
Duck and pass the ener-gy. Destroy
any targets availablewith strikes and kicks.Here a power punch tothe groin is delivered.
If you laid the training clock down on the floor, this forward direction would be to your 12 o’clock takedown.
“If you can’t catch it?Pass it!” This is an
excellent rule of com-bat.
Page 55
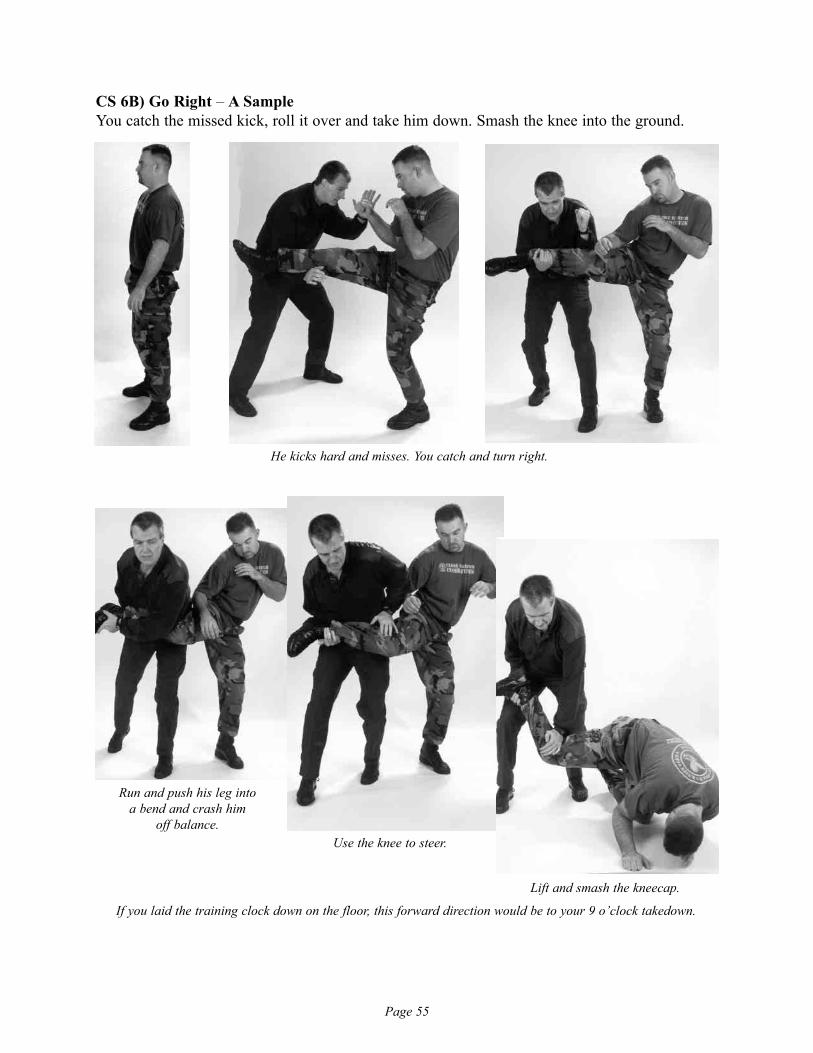
CS 6B) Go Right – A SampleYou catch the missed kick, roll it over and take him down. Smash the knee into the ground.
If you laid the training clock down on the floor, this forward direction would be to your 9 o’clock takedown.
He kicks hard and misses. You catch and turn right.
Run and push his leg into a bend and crash him
off balance.
Lift and smash the kneecap.
Use the knee to steer.
Page 56
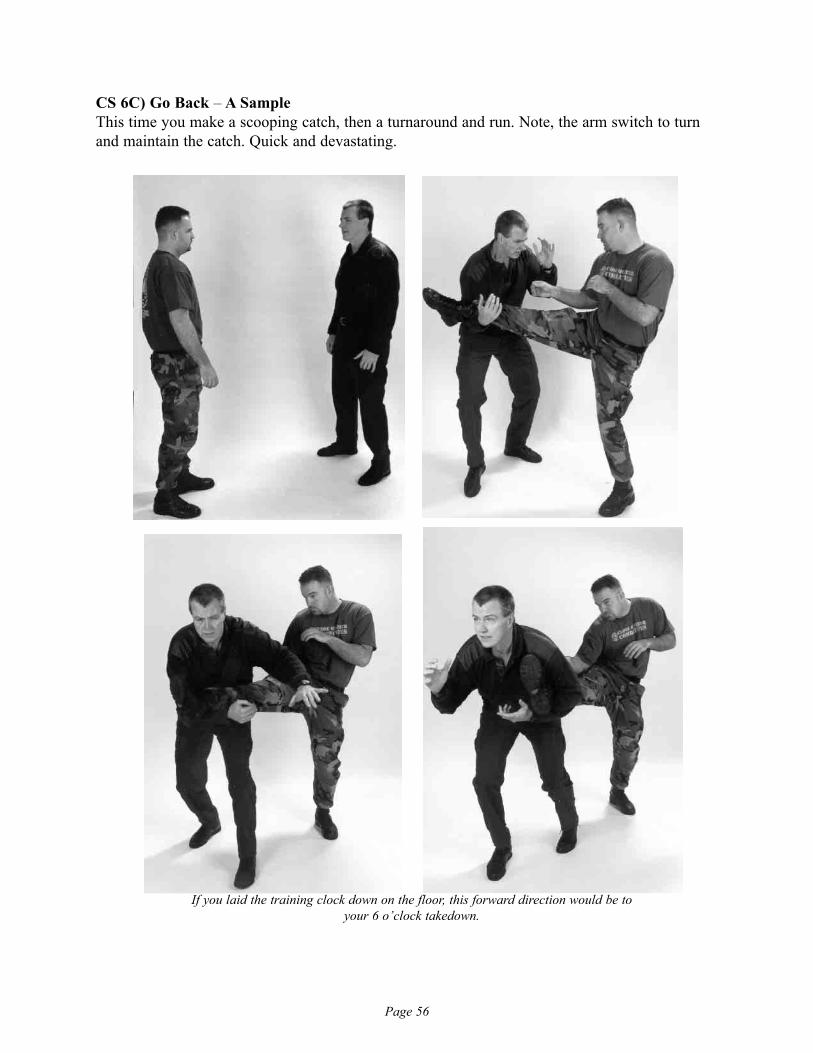
CS 6C) Go Back – A SampleThis time you make a scooping catch, then a turnaround and run. Note, the arm switch to turnand maintain the catch. Quick and devastating.
If you laid the training clock down on the floor, this forward direction would be to your 6 o’clock takedown.
Page 57
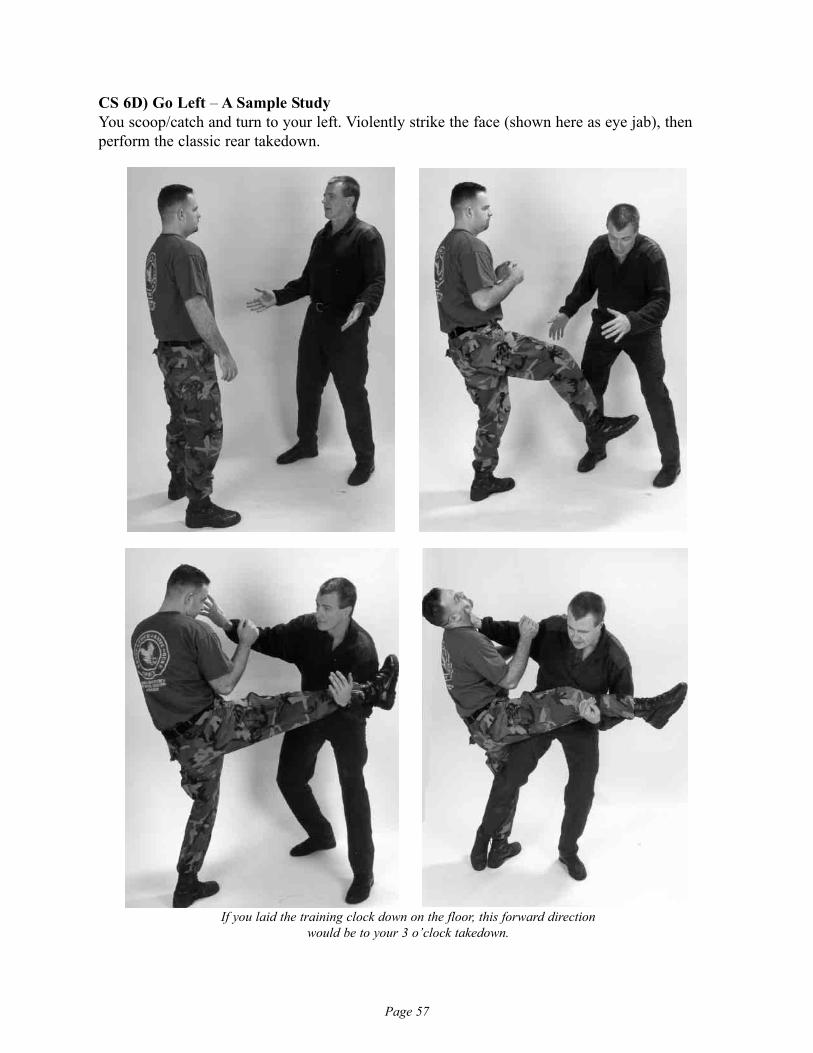
CS 6D) Go Left – A Sample StudyYou scoop/catch and turn to your left. Violently strike the face (shown here as eye jab), thenperform the classic rear takedown.
If you laid the training clock down on the floor, this forward direction would be to your 3 o’clock takedown.

Page 58
Your Frontal Snapping Kick Module Review and Assignment
Practice the 5 different frontal snapping kicks:In the air and against pads and shields
FSK 1) Front leg frontal snapping kicks
FSK 2) Rear leg frontal snapping kicks
FSK 3) Combat modified frontal snapping kicks
FSK 4) On your back frontal snapping kicks
FSK 5) On your right side and left side kicks
Practice the 4 Count Give and Take Frontal Snapping Kicking Drill
FSK Drill Set 1) Body and leg evasion
FSK Drill Set 2) Tap and/or feel the incoming kick
FSK Drill Set 3) Kick the kick. Stop kick it or deflect it
Practice combat scenarios standing, kneeling and on the ground.Use both offensive and defensive problem situations.
Page 59
CQC Group
UC Invading Hands 1: The Outside Arm orThe Backhand Contact Strike
Invading Hands is a term used in our CQC Group meaning arm-to-arm attack methods to getinto extreme close quarter combat range. Some martial arts practitioners call them trappinghands and make an obsessive study of the subject, often at the expense of practice in otherimportant combat ranges. The so-called trapping range between two antagonists is really thosefew inches in which you or he pass in a micro-second charge to escalate the fight. It is anextremely short, transitory range. Mobility is king. When we look at the hard science, here arethe principles.
The DefinitionInvading hands is the immobilization, deflection and/or control of the opponent’s limbs with oneclear mission, to clear a path to a vital target, usually the face, neck or groin. This is done by thefour P’s, pinning, passing, pulling, pushing that grabs that freezes or steers the enemy limbs.Invading hands is absolutely nothing more than simply getting the arms of the enemy out ofyour way. It is that simple. You want to strike a better target, and the guy’s arms are in the way.
The ObstructionsHis arms are usually raised up in a variety of aggressive or defensive positions, and the body isusually, or becomes, naturally bladed from you.
Obstruction 1 – The closest, lead armObstruction 2 – The second armObstruction 3 – The lead arm manages to come around again and get in the way.
In a perfect invasion, you will only deal with one, two invasions, three at the most. If hisarms are still up after four or more times? Kick the knee. Or regroup yourself for another plan.If you are invading in close with your legs and striking properly, you should get results.
The Meeting of the Minds…and ArmsThe meeting of your arm with his arm is best called a contact, because it could be from either anaggressive attack or defensive block. Some people refer to these contact spots as referencepoints to organize their training practice. This contact is done whether he has struck out at you,or you take a pre-emptive strike back at him. A block alone is just a block, a reflex contact with-out counter-attack. A block with strike is an invading hand. These reference points could be witharms high or arms low.
The level one study is the backhanded contact. I use the terms backhand or outside armas they are easily recognized by everyone. It actually suggests the backside of your fingers,hand, forearm and upper arm, and this includes from the edges of your forearms to the so-calledknife edge, or sides of your hand.

Page 60
The StrikesYou invade and trap the arms with powerful palm strikes, hammer fists and forearms, forcefulenough to break bricks! You strike your targets with eye jabs, thrusting and hooking palmstrikes, fists, forearm, elbows and body rams. Kicking may be involved and there are leg inva-sions as well, studied in later levels.
See how the back-handed contact works in the pumping statue drill, outside the enemy’s arms. You use the outside of your arm.
See how the back-handed contact works in the statue drill inside the enemy’s arms. You use the outside of your arm.
The TrainingThere is a good reason the prior invading hands photos look a lot like some of the Finger StrikeModule photos. In this level, the Invading Hand module resembles the very same steps we stud-ied in the finger strike module. In the finger strike workout we had to clear a path to get thestrike in. That path-clearing method? That was this very invading hand method. That is why Icollected the two methods together here for Mission One. The set-up for the strike was anobstruction-clearing invasion. When training and teaching in this Invasion Hand Module, yourepeat the same drills and steps as in the Finger Strike Module, except you emphasize and noticeof the invasion aspects. The strike could be a finger attack, or any attack.
When I instruct CQC Group or Unarmed Combatives Level One, I include the FingerStrike Module in with the Invasion Hand Module, explain the similarities. In later levels thereare no such similarities between the hand strikes and invading hand tactics.
Your Backhand Module Review and Assignment
Practice the movements in the air.Practice the movements against training equipment with a simulated, extended arm.Practice the Statue Drill – using the motions versus a person with their arms extended.Practice the Pumping Drill – using the motions vs. a person punching their arms.Practice the movements inside the Block, Pass and Pin Synergy Drill.Practice these motions in combat scenarios on standing, kneeling and ground positions.
Page 61
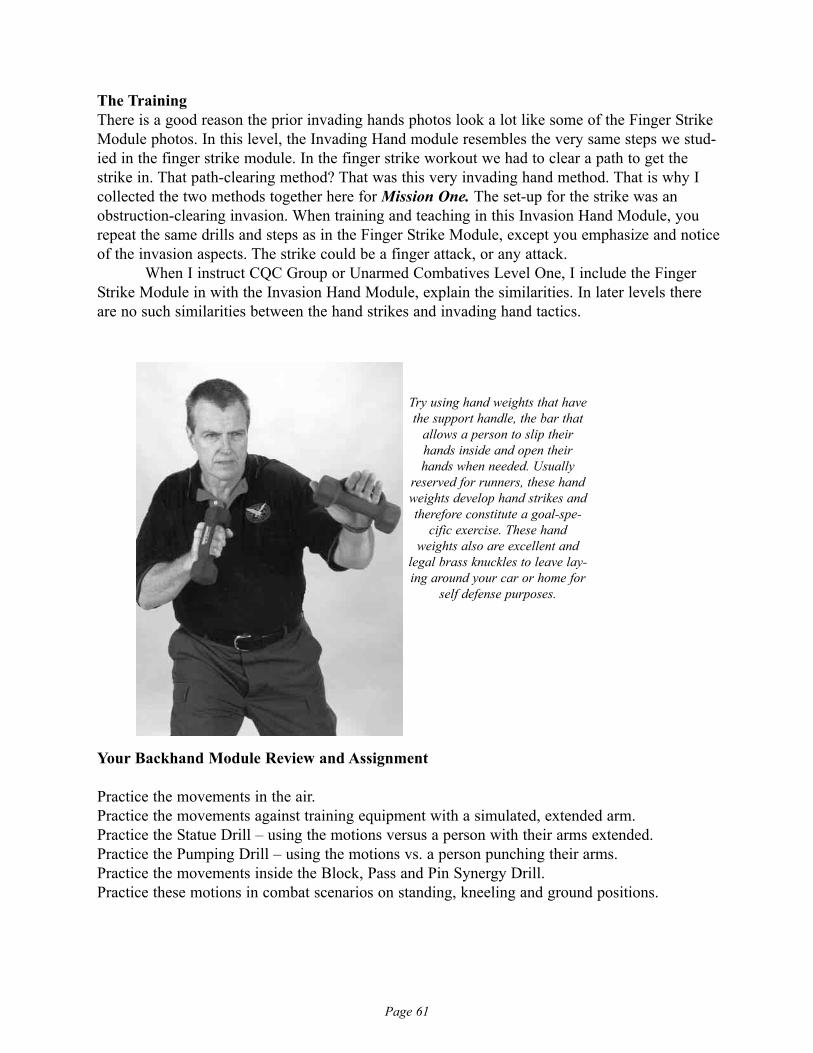
Try using hand weights that havethe support handle, the bar that
allows a person to slip theirhands inside and open theirhands when needed. Usually
reserved for runners, these handweights develop hand strikes andtherefore constitute a goal-spe-
cific exercise. These handweights also are excellent and
legal brass knuckles to leave lay-ing around your car or home for
self defense purposes.

Page 62
Page 63
CQC Group
Unarmed Combatives Takedown 1: The Finger Takedowns Module
Finger Takedowns OverviewOne of the most powerful and efficient tools in fighting are finger cranks and eventual fingerbreaks if necessary. The study of finger cranks, breaks and takedowns is a blended endeavor forthis CQCG Level 1 and it works in conjunction with the use of finger strikes as a theme pro-gression. Finger cranks rarely are a simple end to a fight, but rather a means to an end. After astunning blow to an attacker, they can have a strong influence when transitioned into escapesfrom grabs, takedowns and throws. The fingers are thin bones and unnatural manipulation ofthem may cause great pain, shock, even within some of the highest levels of adrenaline pump-ing through an enemy. The visual shock of someone seeing their own finger broken and askewmay cause a significant, sudden distraction and increase the shock factor. Finger cranks may bedirect links to the manipulation of the wrist, the arm and then body.
It is important that you know you cannot stand before a raging wildman and attempt tosnatch his finger when he charges at you. The finger crank comes after he grabs you in somemanner, and with proper stunning and diminishment, you get a finger or two of the grab. In 30years of police work and martial arts training, usually people react severely to having their fin-gers cranked.
Finger Takedowns Studies and Observations 1) Cranks of 10 Fingers Each of the 10 fingers bend in five directions:
Bend 1 – all the way inBend 2 – all the way back (probably gives you the best results)Bend 3 – side-to-sideBend 4 – twisting inBend 5 – twisting out
Finger Takedowns, Studies and Observations 2) The Thumb’s Range of MotionThe thumb may also be cranked, but it is meatier and more deeply attached to the hand than thefingers. Working on the thumb is much like working on a bridge to the wrist. The thumb may beefficiently bent only four ways due to the positioning on the hand.
Finger Takedowns, Studies and Observations 3) The Finger SqueezeSometimes the individual joints of a finger may be squeezed together to create pain.
Finger Takedowns, Studies and Observations 4) How Many Fingers?Four fingers grabbed and cranked together can offer resistance. Three? Better. Two or one maybe the weakest and best number. One finger might slink free. Two may not escape so easily.
Page 64
Finger Takedowns Studies and Observations 5) HandcuffingFingers cranks may be especially effective in the last steps inmanipulating a prisoner of war, or a criminal, into handcuffsor other ligatures, something I have experienced hundreds andhundreds of times. We study more of these manipulations inthe Control and Contain Module in CQCG Training MissionThree.
The Finger Crank Synergy Drills
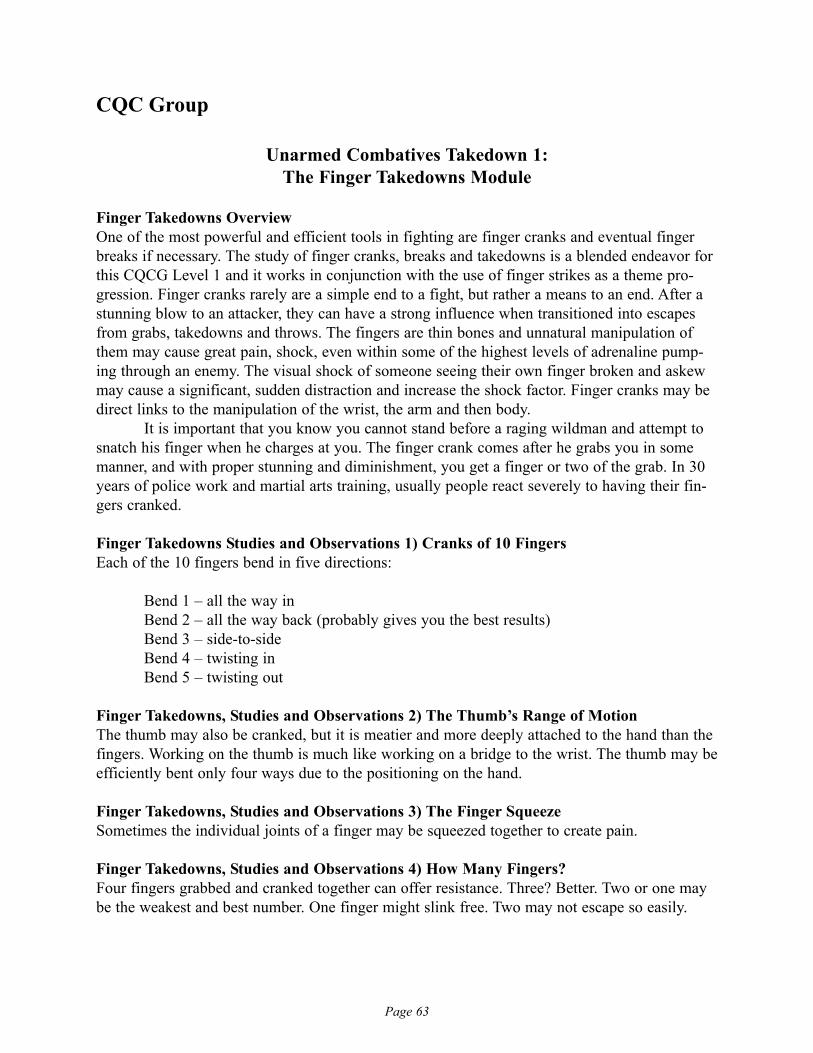
FC Drill 1) Block, Pass and Pin Drill Using the block, pass and pin drill detailed earlier in thisbook, try to obtain some finger snatches and cranks. OnStep/Beat 1 1/2 of the drill catch the fingers from behind andpeel backward for pain and a takedown as demonstrated inthis series.
In this series, the trainee blocks onStep/Beat 1, a very common, instinctive
movement. This is against an openhanded slap or eye jab – the subjectmatter of this level. Of course if this
were a punch, the fingers would not beopen and available for this attack.
IT IS JUST A SKILL DRILL!
On Step/Beat 1 1/2 the trainee hooksunder the stopped, attacking arm, and
gets a grip on some of the fingers.
Page 65
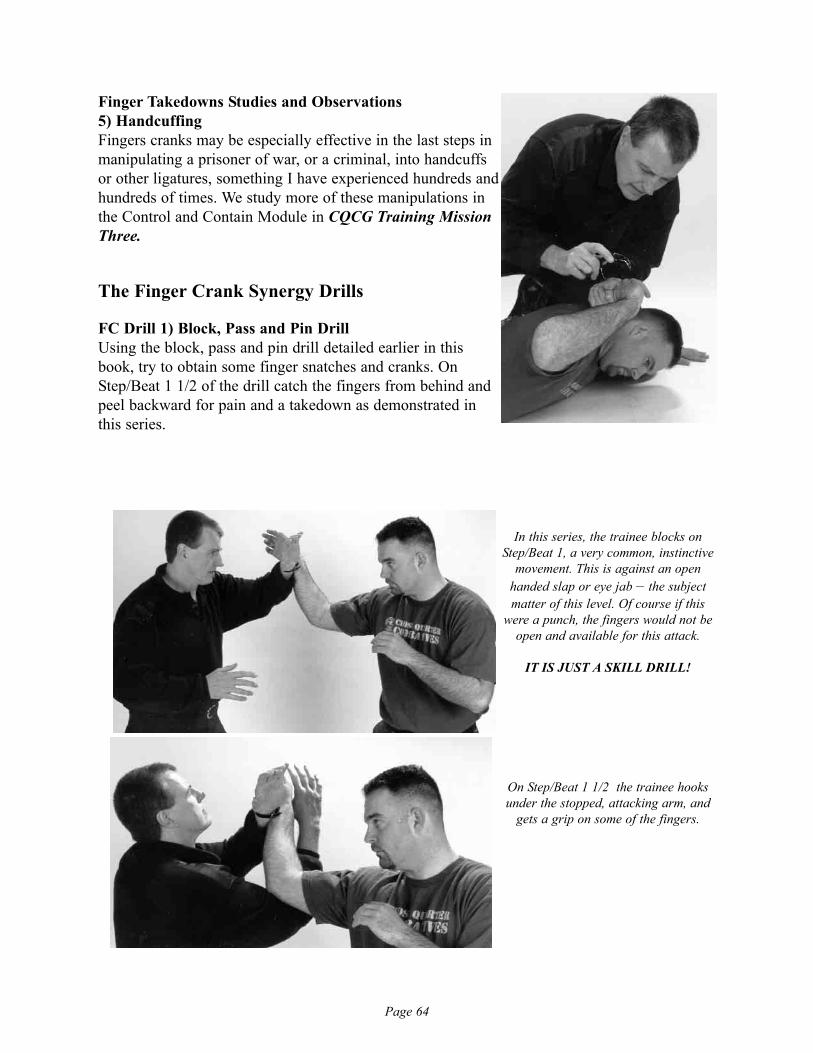
FC Drill 2) Finger Attack Ground Roll Drill for EscapesFinger cranks may interrupt the best of ground attacks. Experiment with catching the fingersduring free style ground fighting. When the enemy grabs you, his fingers are on you, and theymay be subject to a finger crank, dislocation or break. At varying levels of intensity, do somewrestling and see what finger cranks become available. Use a coach with each team of twopractitioners because new trainees tend to miss many obvious opportunities.
The biggest training problem with this endeavor is new participants to the drill will fin-ger chase and not realistically fight on the ground. You seize the finger when it incidentally andaccidentally happens to be catchable. Coaches need to be aware of this recurring problem.Coaches also need to be specifically aware of trained submission fighters. They will routinelycompletely forget the finger attack opportunity. They must be interrupted and reminded that thefinger crank is their objective in this drill.
All ground fighting practice should be overseen by a competent and street-fight enlight-ened coach to guide the participants into maximizing their survival. Too often, ground fighterscannot see options because their vision is blocked by the closeness of the other fighter.
Next, the trainee gets both his hands on the captured hand and fingers. Twistthe fingers and wrist violently outward and downward, all the while stepping
to the outside.
Page 66
Finger Takedown Option Awareness Combat Scenarios
Here are some sample combat scenarios using finger cranks and finger related takedowns.
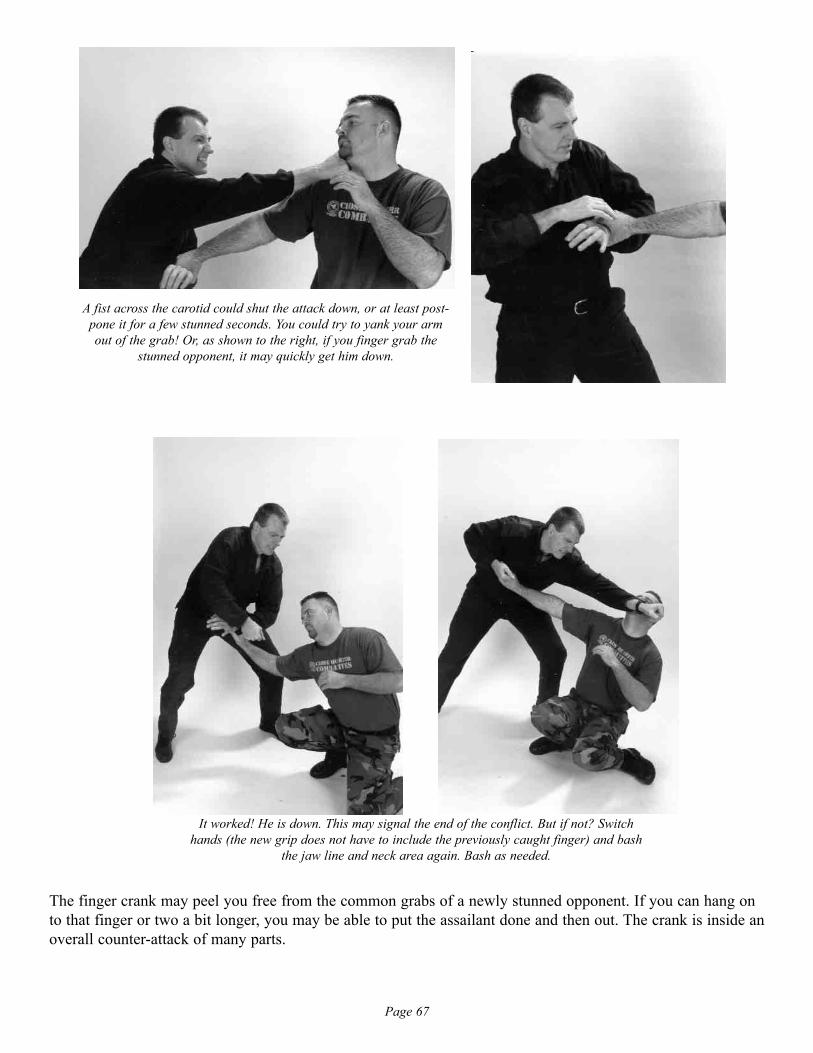
FT CS 1) Counter a Single Grab on Arm – A Sample StudyThis is a control-attempt grab by an enemy, with limited intimidation and threat, and not anattack done in full-blown, madman, extreme combat boxing ring conditions.
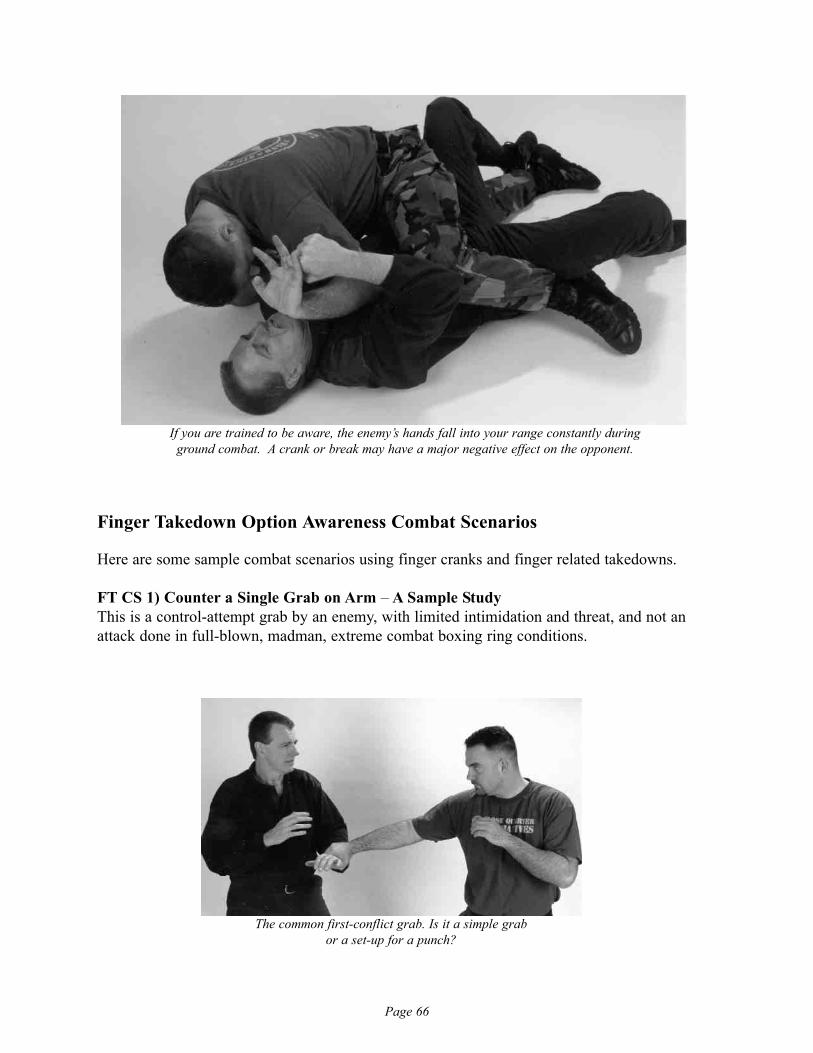
If you are trained to be aware, the enemy’s hands fall into your range constantly during ground combat. A crank or break may have a major negative effect on the opponent.
The common first-conflict grab. Is it a simple grab or a set-up for a punch?
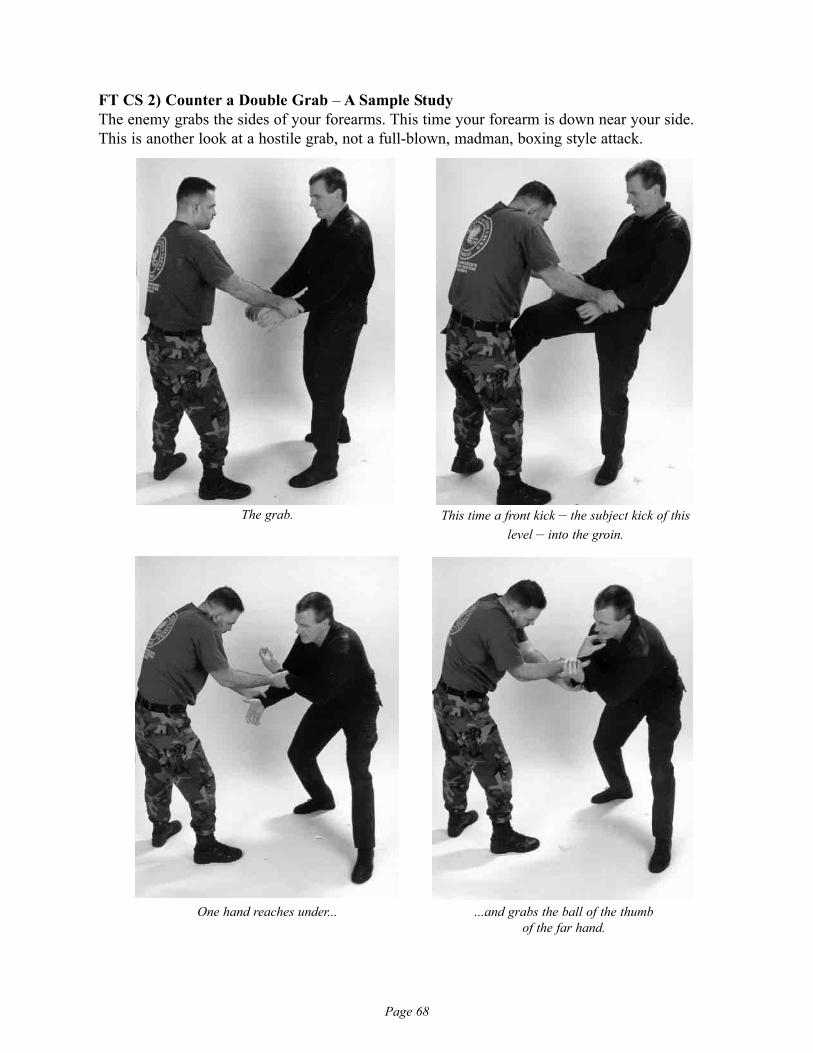
The finger crank may peel you free from the common grabs of a newly stunned opponent. If you can hang onto that finger or two a bit longer, you may be able to put the assailant done and then out. The crank is inside anoverall counter-attack of many parts.
Page 67
A fist across the carotid could shut the attack down, or at least post-pone it for a few stunned seconds. You could try to yank your armout of the grab! Or, as shown to the right, if you finger grab the
stunned opponent, it may quickly get him down.
It worked! He is down. This may signal the end of the conflict. But if not? Switch hands (the new grip does not have to include the previously caught finger) and bash
the jaw line and neck area again. Bash as needed.
Page 68
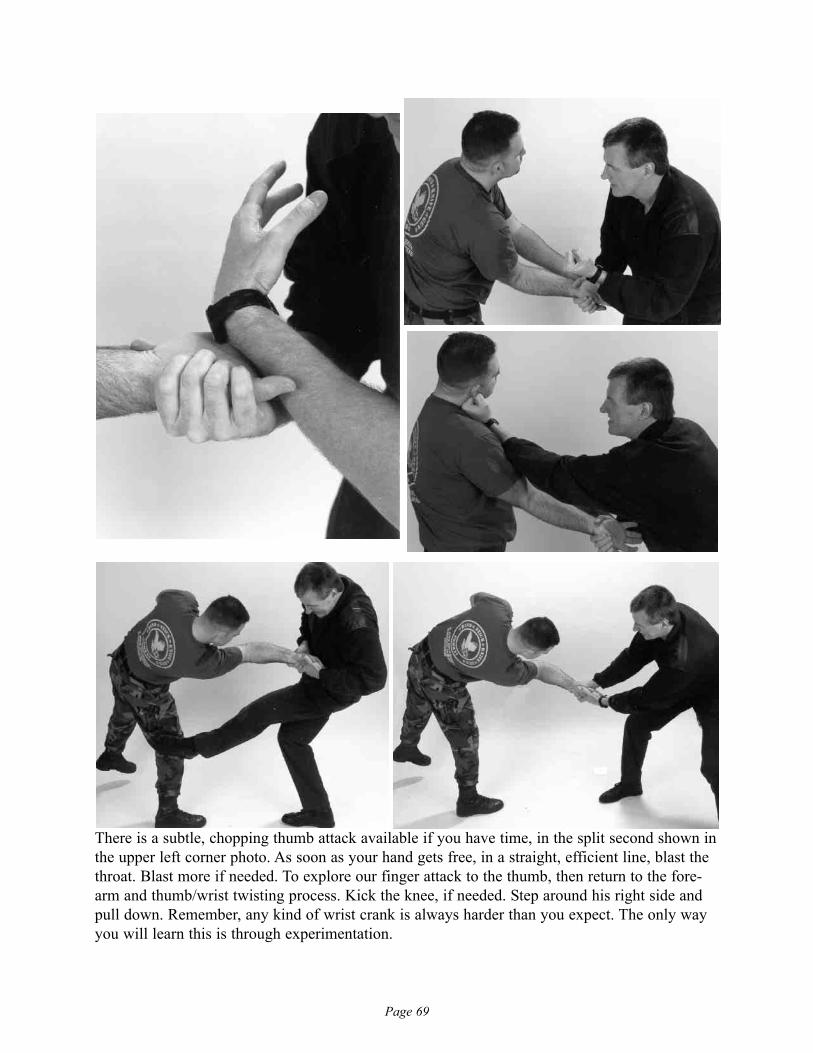
FT CS 2) Counter a Double Grab – A Sample StudyThe enemy grabs the sides of your forearms. This time your forearm is down near your side.This is another look at a hostile grab, not a full-blown, madman, boxing style attack.
The grab. This time a front kick – the subject kick of thislevel – into the groin.
One hand reaches under... ...and grabs the ball of the thumb of the far hand.
Page 69
There is a subtle, chopping thumb attack available if you have time, in the split second shown inthe upper left corner photo. As soon as your hand gets free, in a straight, efficient line, blast thethroat. Blast more if needed. To explore our finger attack to the thumb, then return to the fore-arm and thumb/wrist twisting process. Kick the knee, if needed. Step around his right side andpull down. Remember, any kind of wrist crank is always harder than you expect. The only wayyou will learn this is through experimentation.
Page 70
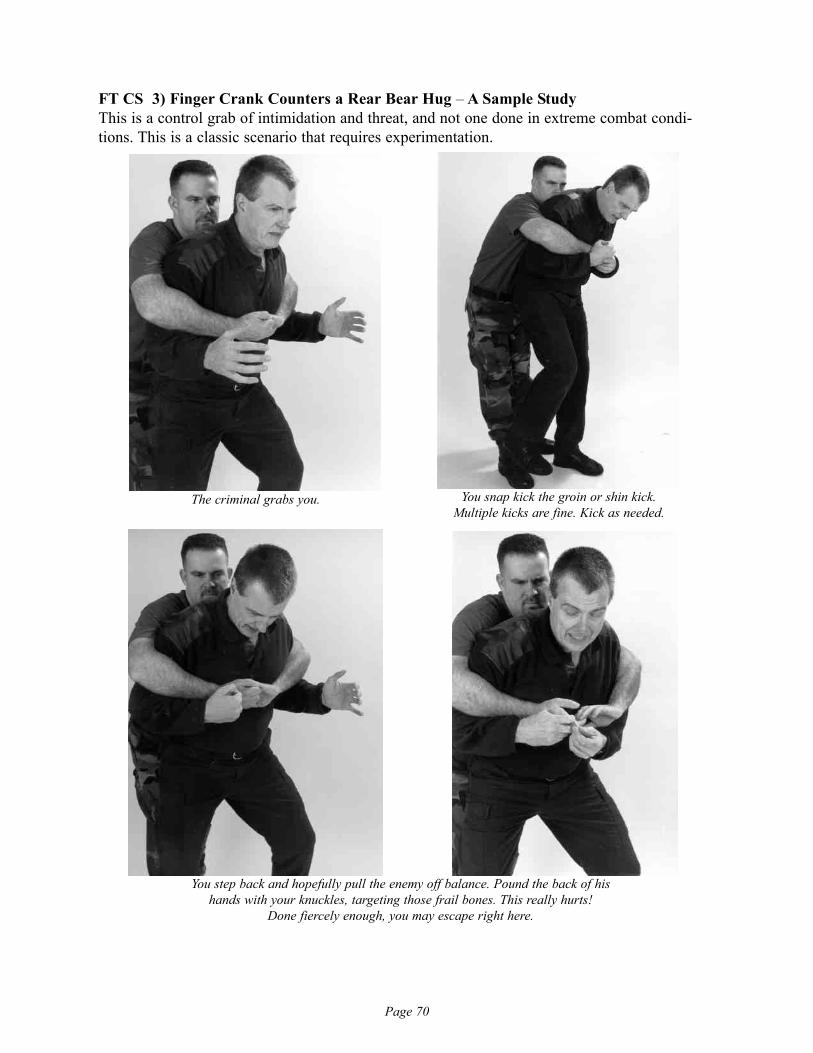
FT CS 3) Finger Crank Counters a Rear Bear Hug – A Sample StudyThis is a control grab of intimidation and threat, and not one done in extreme combat condi-tions. This is a classic scenario that requires experimentation.
The criminal grabs you. You snap kick the groin or shin kick.Multiple kicks are fine. Kick as needed.
You step back and hopefully pull the enemy off balance. Pound the back of his hands with your knuckles, targeting those frail bones. This really hurts!
Done fiercely enough, you may escape right here.
Page 71
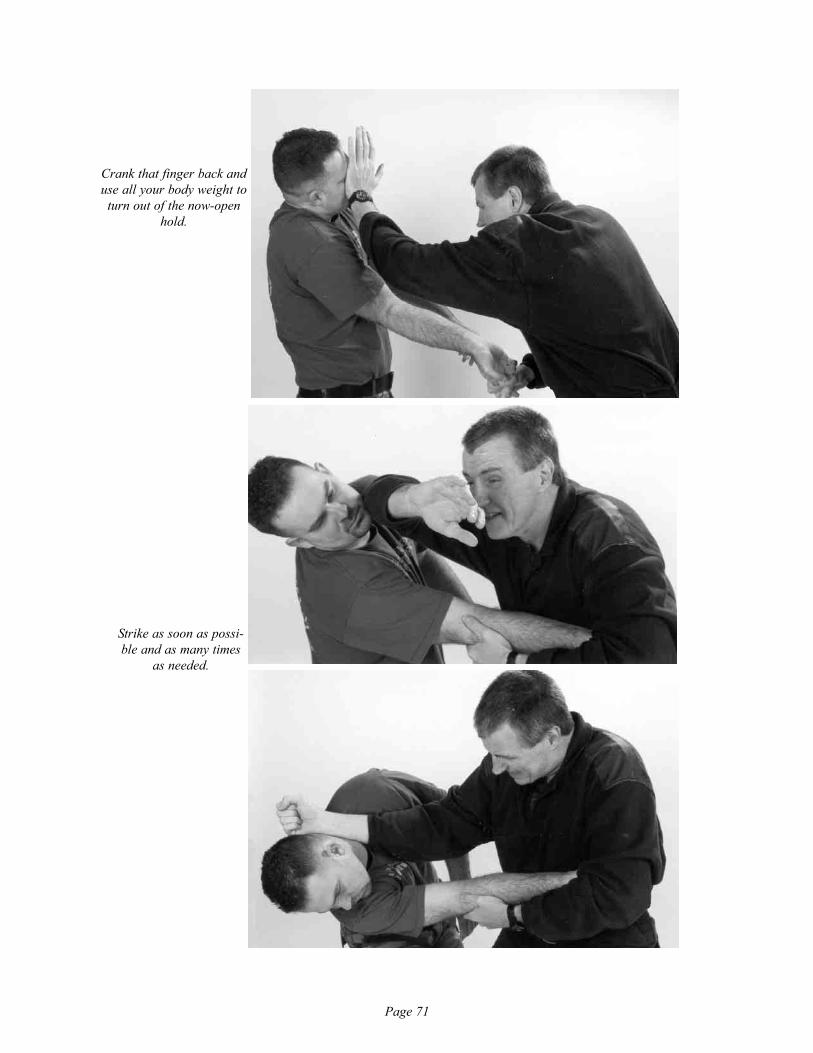
Crank that finger back anduse all your body weight toturn out of the now-open
hold.
Strike as soon as possi-ble and as many times
as needed.
Page 72
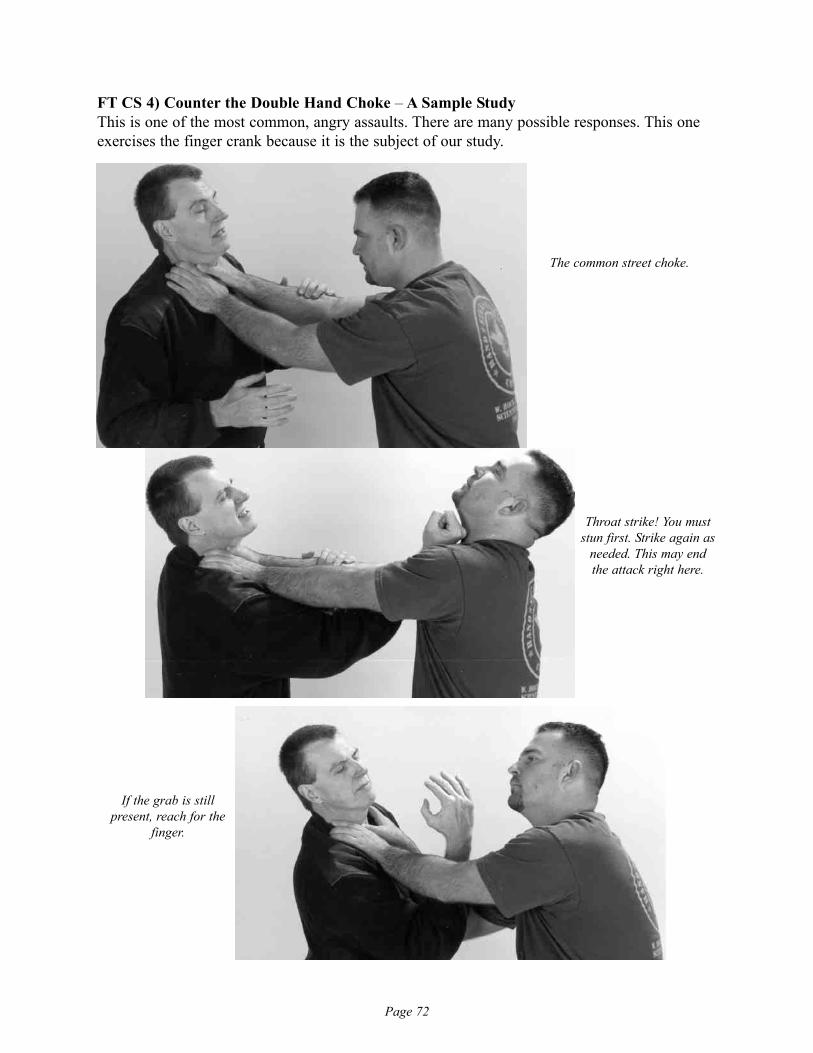
FT CS 4) Counter the Double Hand Choke – A Sample StudyThis is one of the most common, angry assaults. There are many possible responses. This oneexercises the finger crank because it is the subject of our study.
The common street choke.
Throat strike! You muststun first. Strike again as
needed. This may endthe attack right here.
If the grab is still present, reach for the
finger.
Page 73
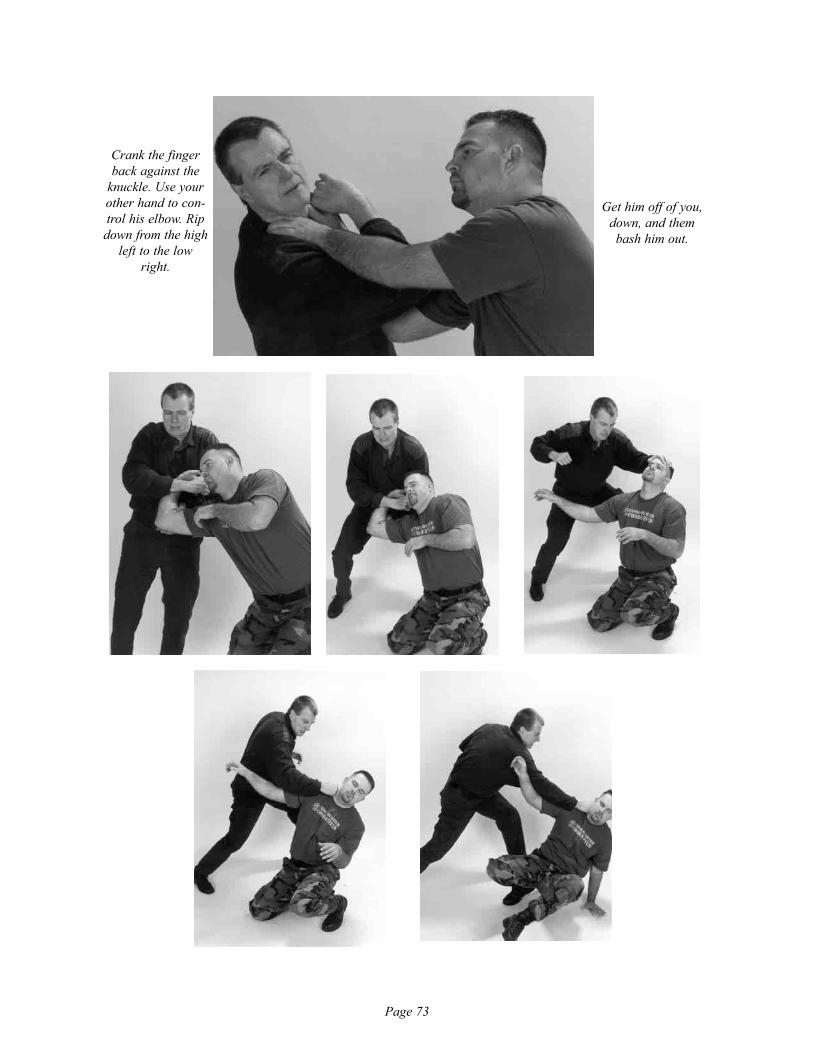
Get him off of you,down, and thembash him out.
Crank the fingerback against the
knuckle. Use yourother hand to con-trol his elbow. Ripdown from the high
left to the lowright.
Page 74
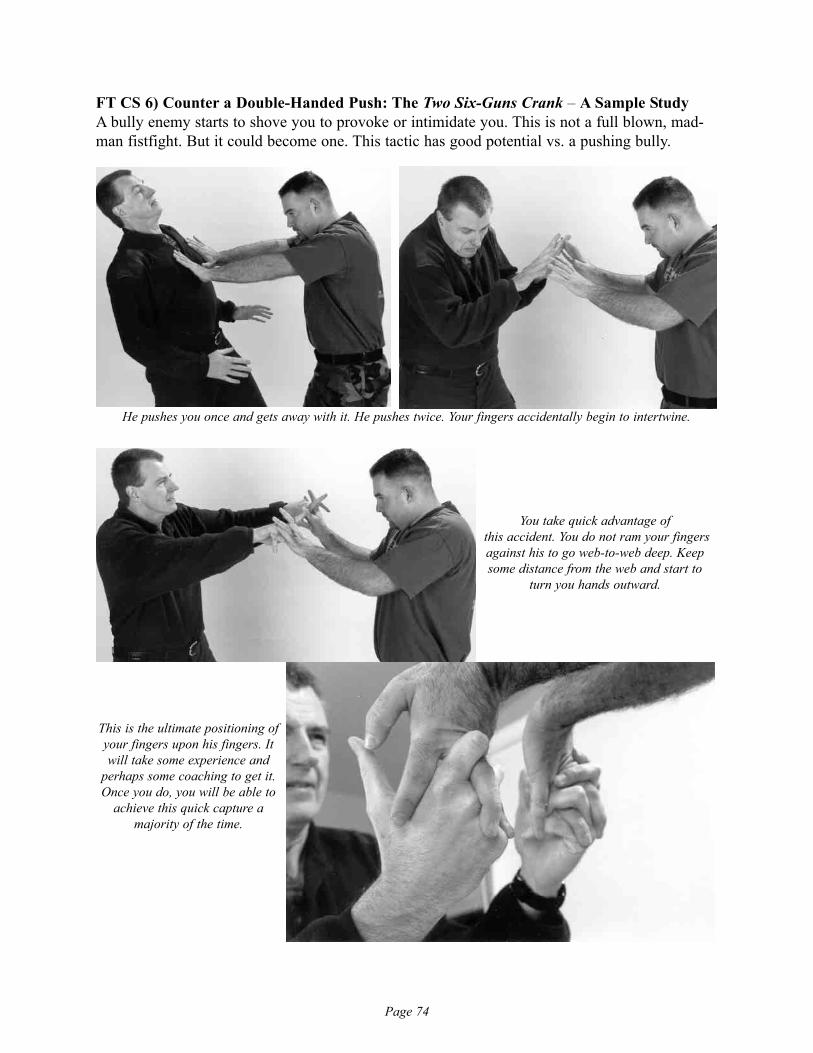
FT CS 6) Counter a Double-Handed Push: The Two Six-Guns Crank – A Sample StudyA bully enemy starts to shove you to provoke or intimidate you. This is not a full blown, mad-man fistfight. But it could become one. This tactic has good potential vs. a pushing bully.
He pushes you once and gets away with it. He pushes twice. Your fingers accidentally begin to intertwine.
You take quick advantage ofthis accident. You do not ram your fingersagainst his to go web-to-web deep. Keepsome distance from the web and start to
turn you hands outward.
This is the ultimate positioning ofyour fingers upon his fingers. Itwill take some experience and
perhaps some coaching to get it.Once you do, you will be able to
achieve this quick capture amajority of the time.
Page 75
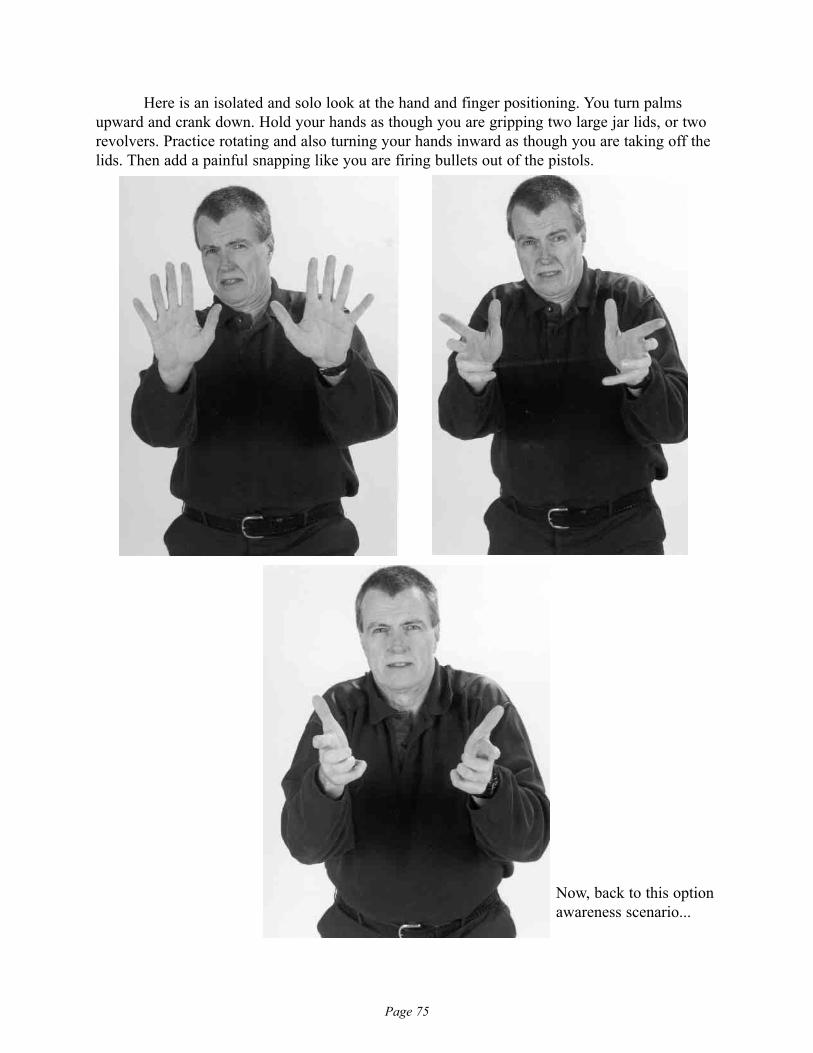
Here is an isolated and solo look at the hand and finger positioning. You turn palmsupward and crank down. Hold your hands as though you are gripping two large jar lids, or tworevolvers. Practice rotating and also turning your hands inward as though you are taking off thelids. Then add a painful snapping like you are firing bullets out of the pistols.
Now, back to this optionawareness scenario...
Page 76
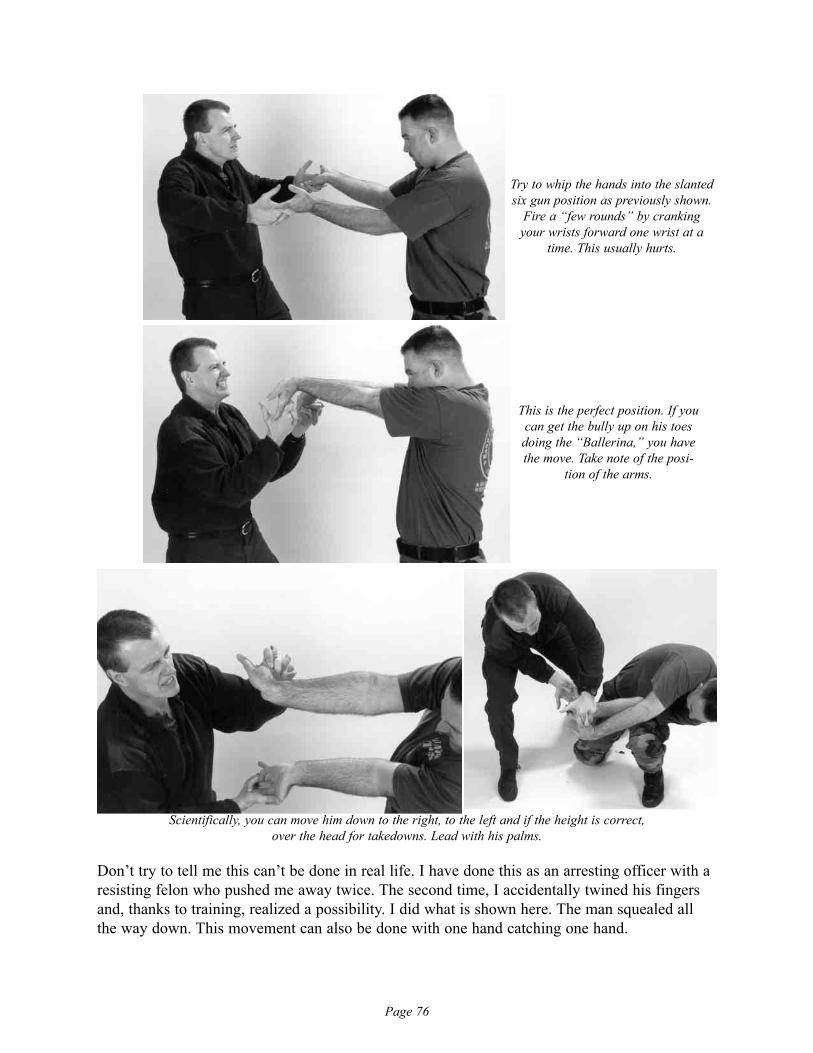
Don’t try to tell me this can’t be done in real life. I have done this as an arresting officer with aresisting felon who pushed me away twice. The second time, I accidentally twined his fingersand, thanks to training, realized a possibility. I did what is shown here. The man squealed allthe way down. This movement can also be done with one hand catching one hand.
Try to whip the hands into the slantedsix gun position as previously shown.
Fire a “few rounds” by crankingyour wrists forward one wrist at a
time. This usually hurts.
This is the perfect position. If youcan get the bully up on his toesdoing the “Ballerina,” you havethe move. Take note of the posi-
tion of the arms.
Scientifically, you can move him down to the right, to the left and if the height is correct, over the head for takedowns. Lead with his palms.

Page 77
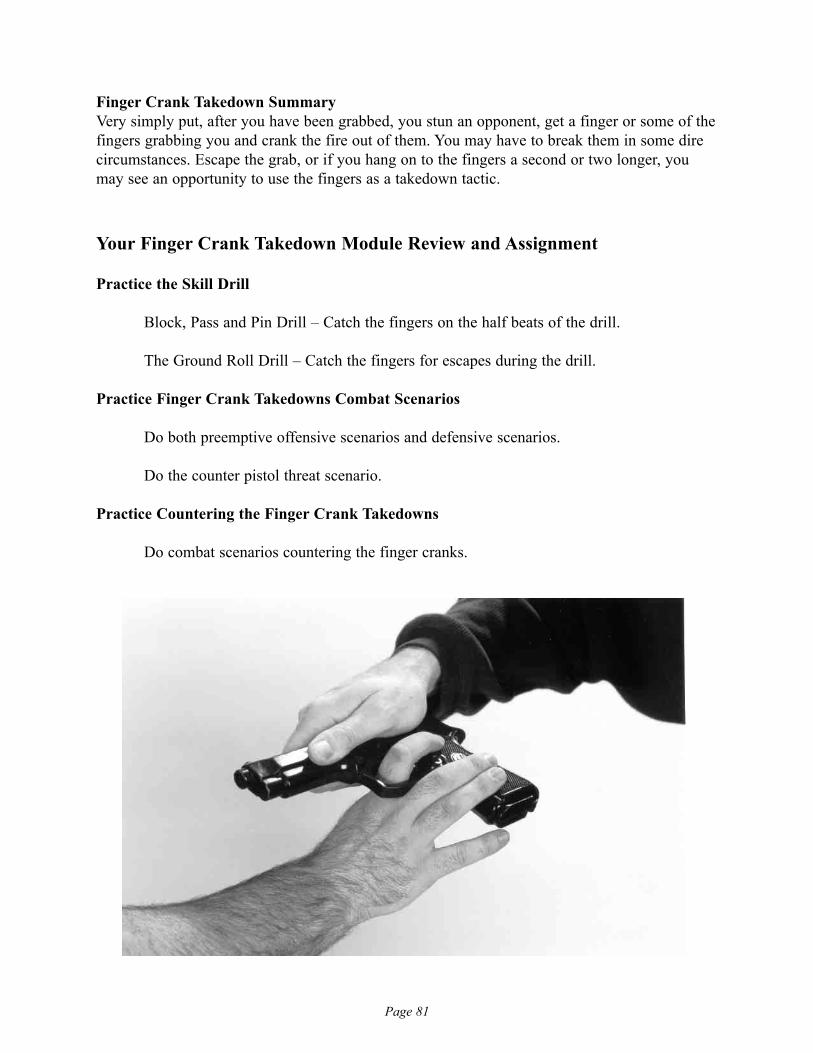
FT CS 7) Counter to a Pistol Threat – A Sample StudyAn entire volume could be written about the psychologies of this moment. Those psychologieswill appear in great detail in the weapon disarm module in CQCG Training Mission Four.Here we are only investigating the mechanics as they relate to attacking the enemy’s finger. Theenemy presents a pistol in close range. This is a common, criminal presentation.
Crank the pistol directly over the back of the hand. Capture the trigger finger inside the trigger guard.
The threat begins. The pistol is within lunge and reach. You raise your hands in the ruse of surrender.Without staring at the pistol, you grab for it. Clear the barrel. Get both hands on the pistol. This can
render it a one-shot, or no shot weapon. More on this in future books.
Here is a clear photo of the finger trapped insidethe guard. You either dislocate or break the finger
as you rip the pistol down. Bash the neck as soon aspossible. Remember, when confiscating the firearm
of another, you do not know if it will function.

Page 78
Counters and Escapes to Finger Cranks and Takedowns
There are basic countering times that apply to almost all tactics in the process of being applied onyou: things you may do early on, things you may try in the middle, and things you attempt late inthe application.
Early-Phase Counters – when the attack tactic first beginsMid-Phase Counters – when the attack tactic is near the middle of formationLate-Phase Counters – when the attack tactic is near completion
As with hardening cement, the escapes usually become harder to achieve as the tactic enfolds. Thegeneral countering and escape tactics that foul locks/cranks joint related takedowns and throwsare:
Countering and Escape 1) Explosive retraction in an early phaseCountering and Escape 2) Striking the attacker in mid to late phaseCountering and Escape 3) Kicking the attacker in the three phases
Countering and Escape 4) Going limp. Much pain originates in the struggle and resistance that you put into fighting the joint lock/attack. There are several joint attacks that can be countered by going loose and limp.
Countering and Escape 5) Going to the ground ahead of the tactic.When caught in this late phase, go where YOU want to go on the ground, not where he plans to put you. Move ahead of the takedown to maximize your next position.
Countering and Escape 6) Hybrid problem.There are some solutions that are unique to that particular attack.
Countering and Escape 7) Pain Tolerance.On the battlefield there is no tap-out. Some 60 percent of the grappling tacticstaught to bring on a sport tap-out surrender, may be fought through with experience, knowledge and pain tolerance.
A counter is used when the opponent has not completed his tactic in swift, split second efficiency.Being human, odds are in your favor the opponent will not be able to attack perfectly due to hisfoibles, his condition, clothing, even the weather! The chaos! This problem goes for you too! Thatis why you must study many options. This subject matter will be presented in a complete thesissummation, as will all major fighting topics in CQCG Training Mission Ten. We will proceedhere outlining only the counters that relate to finger crank attacks and takedowns.
Early phase counter. He gets you, but not quite yet in a tight grip. You explode out. A commondrunk or an untrained child will simply yank back to escape an unwanted grab.
Page 79
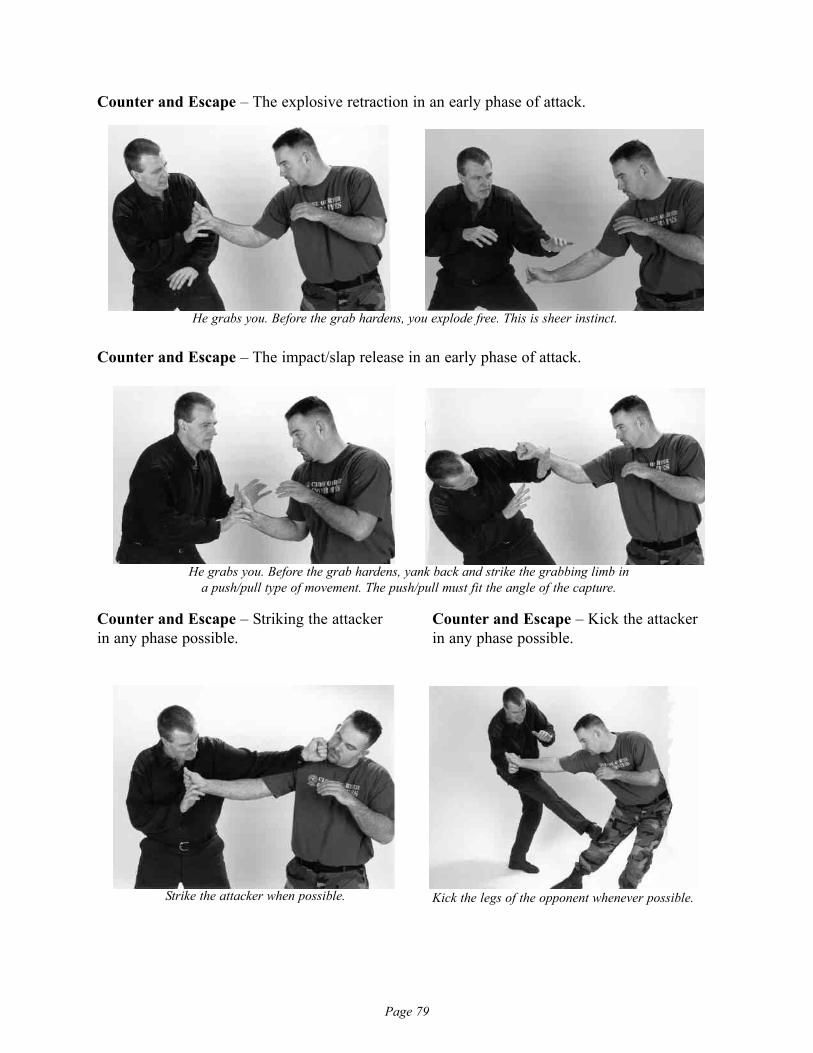
Counter and Escape – The explosive retraction in an early phase of attack.
Counter and Escape – The impact/slap release in an early phase of attack.
Counter and Escape – Striking the attacker Counter and Escape – Kick the attackerin any phase possible. in any phase possible.
He grabs you. Before the grab hardens, you explode free. This is sheer instinct.
He grabs you. Before the grab hardens, yank back and strike the grabbing limb in a push/pull type of movement. The push/pull must fit the angle of the capture.
Strike the attacker when possible. Kick the legs of the opponent whenever possible.
Page 80
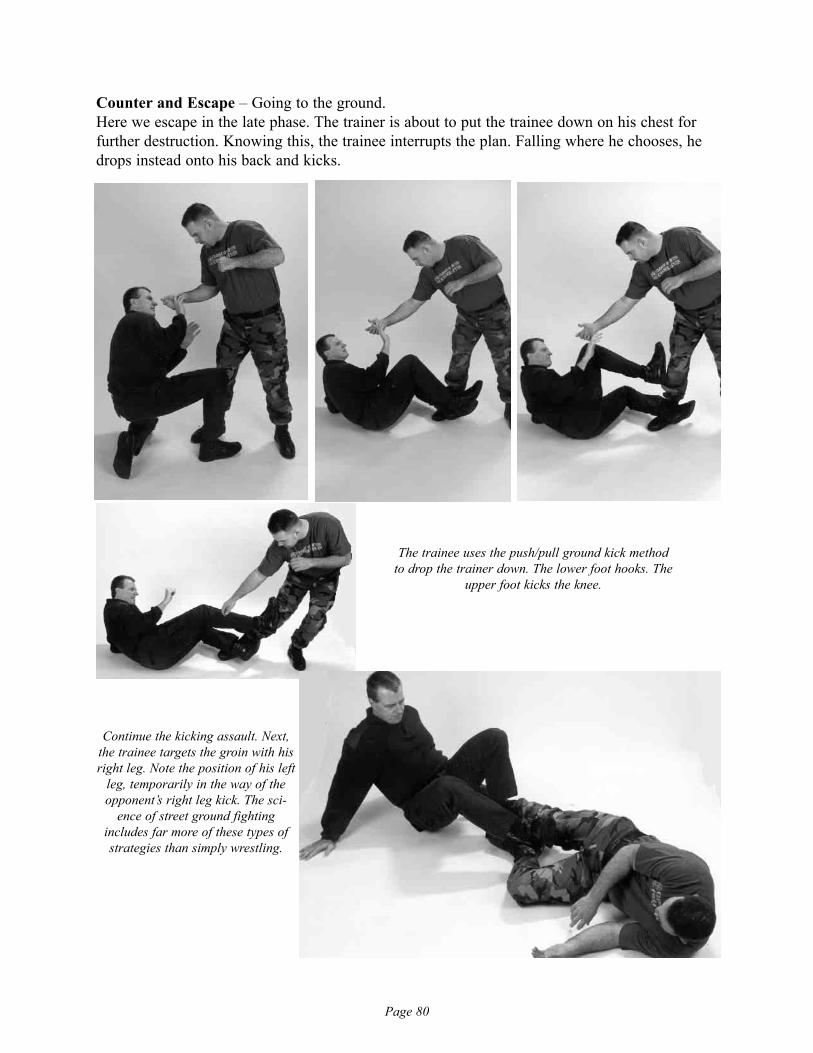
Counter and Escape – Going to the ground.Here we escape in the late phase. The trainer is about to put the trainee down on his chest forfurther destruction. Knowing this, the trainee interrupts the plan. Falling where he chooses, hedrops instead onto his back and kicks.
The trainee uses the push/pull ground kick method to drop the trainer down. The lower foot hooks. The
upper foot kicks the knee.
Continue the kicking assault. Next,the trainee targets the groin with hisright leg. Note the position of his left
leg, temporarily in the way of theopponent’s right leg kick. The sci-
ence of street ground fightingincludes far more of these types ofstrategies than simply wrestling.
Page 81
Finger Crank Takedown SummaryVery simply put, after you have been grabbed, you stun an opponent, get a finger or some of thefingers grabbing you and crank the fire out of them. You may have to break them in some direcircumstances. Escape the grab, or if you hang on to the fingers a second or two longer, youmay see an opportunity to use the fingers as a takedown tactic.
Your Finger Crank Takedown Module Review and Assignment
Practice the Skill Drill
Block, Pass and Pin Drill – Catch the fingers on the half beats of the drill.
The Ground Roll Drill – Catch the fingers for escapes during the drill.
Practice Finger Crank Takedowns Combat Scenarios
Do both preemptive offensive scenarios and defensive scenarios.
Do the counter pistol threat scenario.
Practice Countering the Finger Crank Takedowns
Do combat scenarios countering the finger cranks.
Page 82
CQC Group
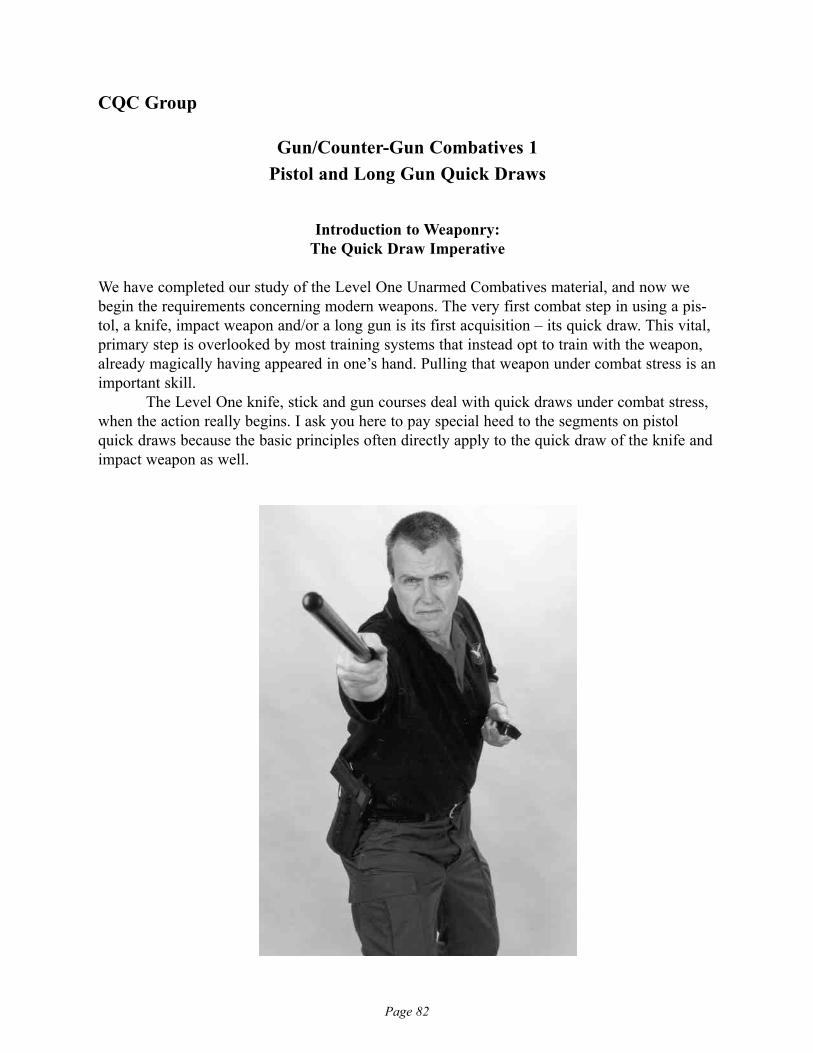
Gun/Counter-Gun Combatives 1Pistol and Long Gun Quick Draws
Introduction to Weaponry:The Quick Draw Imperative
We have completed our study of the Level One Unarmed Combatives material, and now webegin the requirements concerning modern weapons. The very first combat step in using a pis-tol, a knife, impact weapon and/or a long gun is its first acquisition – its quick draw. This vital,primary step is overlooked by most training systems that instead opt to train with the weapon,already magically having appeared in one’s hand. Pulling that weapon under combat stress is animportant skill.
The Level One knife, stick and gun courses deal with quick draws under combat stress,when the action really begins. I ask you here to pay special heed to the segments on pistolquick draws because the basic principles often directly apply to the quick draw of the knife andimpact weapon as well.
Page 83
Studies and Observations 1) Gun/Counter – Gun Fighting Body of KnowledgeThere exists only a very small body of mechanical knowledge about the operation of pistol andlong gun shooting. One may cull through years of the many popular gun manuals, books andmagazines on the market and see the same information rerun dozens and dozens of times.
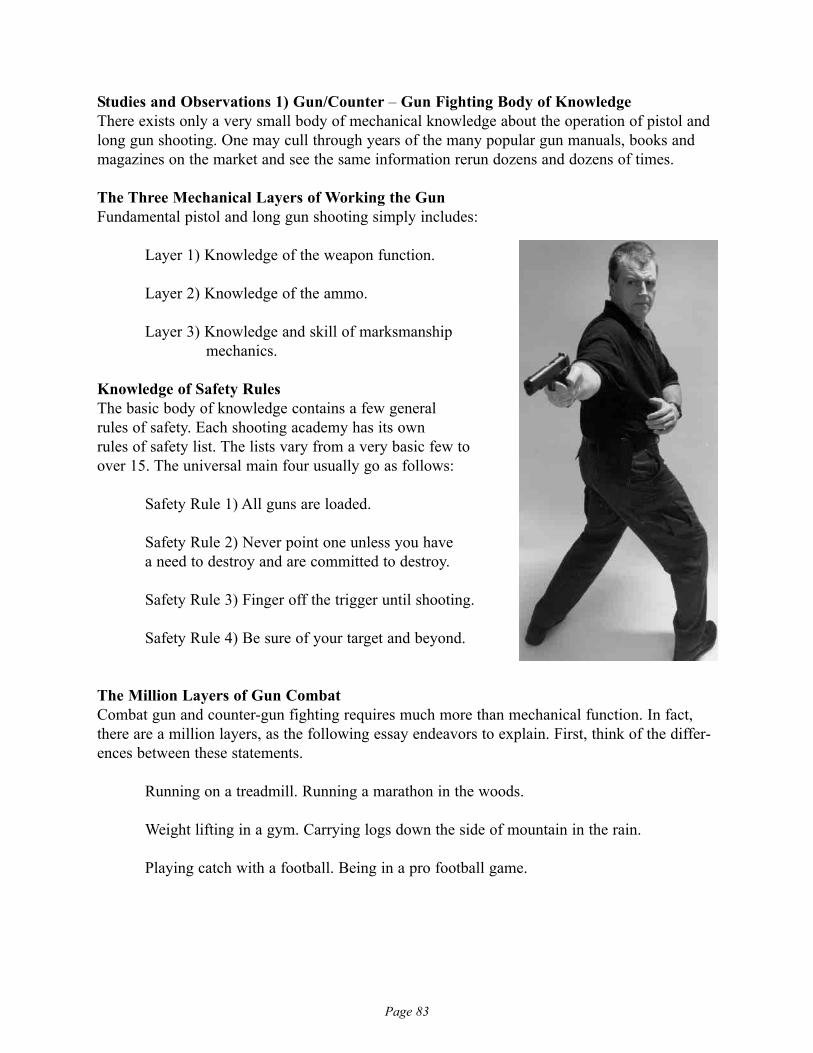
The Three Mechanical Layers of Working the GunFundamental pistol and long gun shooting simply includes:
Layer 1) Knowledge of the weapon function.
Layer 2) Knowledge of the ammo.
Layer 3) Knowledge and skill of marksmanship mechanics.
Knowledge of Safety RulesThe basic body of knowledge contains a few general rules of safety. Each shooting academy has its own rules of safety list. The lists vary from a very basic few to over 15. The universal main four usually go as follows:
Safety Rule 1) All guns are loaded.
Safety Rule 2) Never point one unless you have a need to destroy and are committed to destroy.
Safety Rule 3) Finger off the trigger until shooting.
Safety Rule 4) Be sure of your target and beyond.
The Million Layers of Gun CombatCombat gun and counter-gun fighting requires much more than mechanical function. In fact,there are a million layers, as the following essay endeavors to explain. First, think of the differ-ences between these statements.
Running on a treadmill. Running a marathon in the woods.
Weight lifting in a gym. Carrying logs down the side of mountain in the rain.
Playing catch with a football. Being in a pro football game.
Page 84
Just a few stark differences between the training method and the end goal, performance? Thetreadmill and the gym can help prepare you to do these tasks, but the tasks themselves areinside many layers of diverse and adverse conditions and distractions.
Remember your very first driving lesson? You learned how far to turn the steering wheelbefore the car responded. How the brakes worked! How soft a pedal pressure moved the half-ton monster. Getting down the first empty street was a big adventure. Backing up between thecones a challenge.
Now look at you! Whipping through Manhattan, L.A., Atlanta or Dallas. A million carswhizzing around. Cell phones broadcasting. A burger and fries on your lap. You are daydream-ing and jamming with the radio. Your kids may be fighting in the back seat. After day care, youhave a million chores to do, the bank, post office. Laundry. Traffic jams. Jerks. Rain and slickroads. Pedestrians! Politics on the job. India and Pakistan with nukes! There are a million physi-cal and mental layers involved with driving that car in and through the terrain of your life. That15-year-old you were once, the teen that slid pristine behind the wheel learned only the first thinlayer of driving in the real world…
This is the brake. This is the horn.
This is the seat belt.This is a right turn.
This is how you park.Now get ready for the million layers of driving.
The million layers? They are, the things that happen in and around you while driving. Learningthe mechanics of operating a car and driving today’s streets are vastly different. No, this is not adriver’s safety lecture.This is a message from the bloody clearinghouse of gunfights. Going tothe range and learning the mechanics of shooting your pistol is not like a real gunfight.
Training and experimenting with paintball, simulated ammo, even rubber band guns youlearn many things, the type of enlightenment one gets from the exchange of gunfire, and it canhappen in the first second of training! Easy to read on paper, different to feel and learn. The sin-gle most, powerful, deadly, over-looked mistake in gun training is the fact that in gunfights, bul-lets are EXCHANGED! You are being SHOT AT while you are shooting. Only under the pres-sure of return fire do people really discover just how quickly they are shot while shooting.
This type of reciprocity training can be expensive and rigorous and it truly rocks the guntraining world foundation, a world restricted by regulation, insurance, expensive facilities and asevere lack of creativity. But you don't always find God at a church, and you don't always haveto learn gunfight tactics at a gun range. You can have rigorous gunfight training inside the gymwalls of your local YMCA, or outside your back door.
When you say the words rigorous and YMCA, you suddenly lose a very large popula-tion of shooters. Shooters want to shoot their guns. For many shooters, shooting is really allabout the guns and their love for them. For real survival combat instructors, guns are not a pri-ority and are only one means to an end, truly a tool.

Page 85
To see this, what if you advertised, “For today’s 8 hour block at the range, we are goingto wrestle with each other on the ground, and when you hear the whistle, you will pull andshoot your paintball gun into your training partner before he pulls his and shoots his into you.You can and should try to take his gun away from him if you can.”
Sounds like great training! A real stress quick draw! Happens all the time on the meanstreets. But, how many people are really up for that? How many will report to the paintballrange and suit up for a rigorous day dodging bullets? Look at the attendees at your commonshooting range. Many civilians show up as if they are about to play golf. Or many dress in amilitary shirt and pants, but have the heart of a golfer. Many enforcement officers must shoot intheir uniforms and suits and return right back to work. How many officers or citizens can andwill volunteer to spend a day rolling on the ground and practicing high stress, combat quickdraws? Or low crawl between buildings to get a shot in on a paint baller? How many? Yet, somuch real world combat occurs in this manner.
Entirely too much civilian, police and security shooting training is spent on shooting.Not nearly enough is spent on tactics, strategy, maneuvers, positioning, set-ups and dirty tricks.Conversely, too much military practice is spent searching and maneuvering and not enough timeis spent shooting the various weapons and ordinance issued. The science of gun fighting is moreabout tricky, sneaky savvy than shooting paper targets using two-handed grips. General GeorgeS. Patton, one of the most remarkable men to serve in the United States military, said decadesago:
“It takes a certain mindset and ability to gun fight.Training this mental edge is severely lacking at the time andexpense of standing around a public shooting range and wast-ing ammunition in the name of shooting courses.”
I am committed, and therefore this CQCG course iscommitted, to the principle that from Day One of gun training,the practitioner must be mentally and physically introduced tothe idea and feeling that he or she must perform in a bullet exchanging gun battle. Sure the mechanics of marksmanship, clearing malfunctions and combatreloading must be developed, but even during this solo training, never stray far from this imper-ative! When you start this way, you will have a better eye for the quality of training you receivefor the rest of your life.
Learning to work your gun is but a layer of a gunfight. Being shot at while doing it isanother layer of the million layers in a gunfight. What about the other 999,998 layers? Being inthat driver's seat of a gunfight is different.
This is the trigger.This is the bullet.
This is the sight.Now get ready for the million layers of combat.
Page 86
Here are some sweeping generalizations we can post on the million layers…
1) Combat Stress Quick Draws in standing, kneeling and ground positions
2) Counters to Quick Draws
3) Functionality in all weather conditions
4) Functionality in all lighting conditions
5) Ambidextrous single-hand and double hand shooting
6) Tactical and/or stress combat reloading
7) Close quarter enemy weapon grabs and deflections
8) Close quarter captures and disarms
9) Knowledge and skill in unarmed combatives
10) Foot race to cover or escape
11) Vehicle race to cover or escape
12) Traversing all kinds of indoor and outdoor, urban and rural environments
13) Will to fight on after being shot
14) Will to survive
15) Will to win
16) Will to kill
17) Tremendous tactical, spontaneous problem-solving and trickery skills
18) Etc........
Page 87
Studies and Observations 2) Carry Conditions of Your WeaponMany individuals must carry their firearms under certain restrictions which promote or hinderquick draws. In the continuum of readiness, there are double-action and single-action opera-tions, round chambered and un-chambered carries, and safeties-on and safeties-off choices ormandates.
Quick draws of pistols and long guns come from primary, fast access, carry sites or offthe body or from very near lunge and reach areas. Beltline and thigh carries and shoulder hol-ster are the most popular ways to carry a potential pistol quick draw weapon. Secondary siteslike ankle or boot holsters, or inside bulletproof vests require more time to dig out the weaponfor production. Quick draws of long guns come mostly from what are called shoulder-carrypositions with slings.
Part of your quick draw is getting your weapon ready to fire. Many carry their weaponsin a shoot-ready condition-hammer back and bullet in chamber, with no safeties or one safetyengaged. Some are ordered by their superiors or their conscience to carry their weaponry in lessthan ready modes such as empty chamber or even unloaded.
Pistol Chamber and ShootDespite common sense, many police, security and militaries mandate that their people carrytheir semi-automatic pistols in their holsters with an empty chamber. This means that a bulletmust be chambered, or slid from the top of the magazine into the chamber in front of the gun’sbarrel. Here, upon the trigger pull the firing device strikes and ignites the bullet. Many citizensalso carry their weapons in this manner.
Revolvers are often carried on an empty chamber in their cylinder, but with the firstsqueeze of the trigger, the revolver's cylinder is rotated to produce the next live round in topposition to fall under the firing pin and fire.
There are two common ways to solve this problem with an unchambered semi-auto fora quick draw, the old holster version and the slide pull and shoot version. These techniques arecalled different things in different countries.
I was taught these two quick draw techniques in the mountains of northern South Koreaby military supervisors in a world where the old-fashioned cavalry style flap holsters wererequired issue. The flap holster is still issued in some regions and jurisdictions, and while itdoes offer some inclement weather and hostile environment protection to handguns, it severelyhinders your quick draw.
Pistol Chambering 1) Holster Chambering Quick Draw (QD)This practice works in certain durable, stiff holsters. Many newer holsters, like ones of softer nylons, are too soft to support this mechanical action.
Step 1: Open the flap (if applicable).Step 2: Grab the weapon. Step 3: Extract the weapon a bit more than half way, and turn the handle out.Step 4: Jam the weapon down hard, pushing the top of the gun against your body. This forces the slide back and then pumps the round into the chamber.Step 5: Draw and fire.
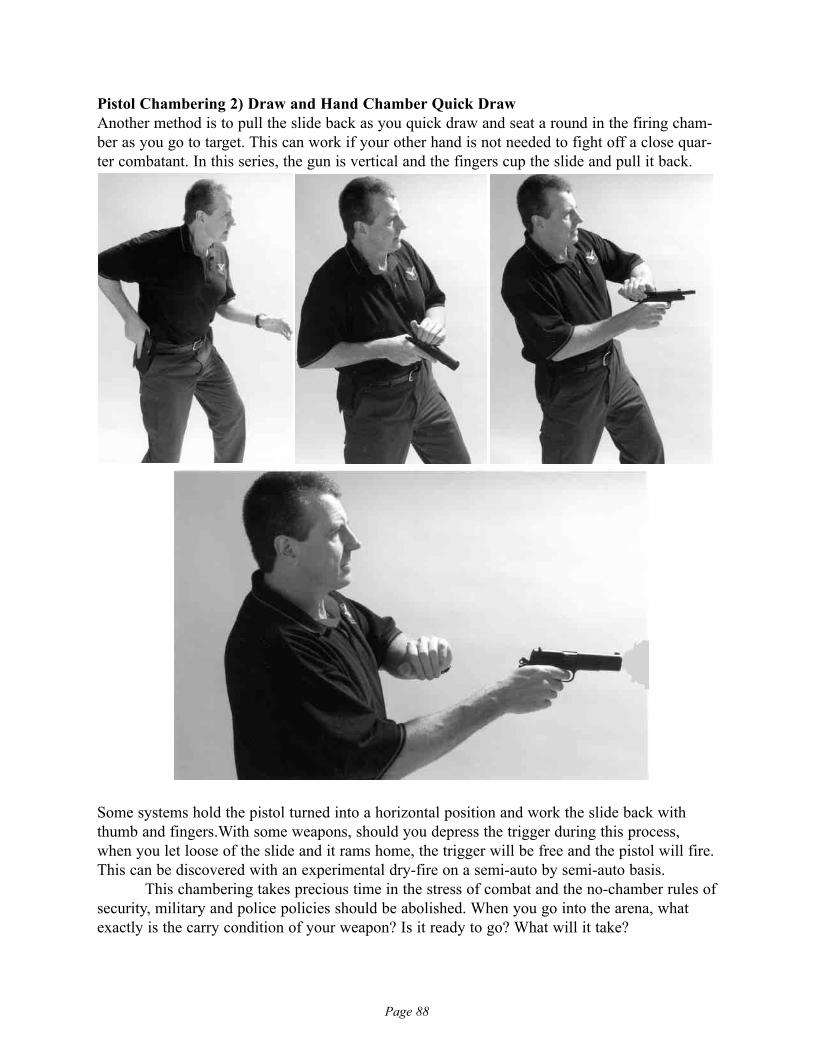
Page 88
Pistol Chambering 2) Draw and Hand Chamber Quick DrawAnother method is to pull the slide back as you quick draw and seat a round in the firing cham-ber as you go to target. This can work if your other hand is not needed to fight off a close quar-ter combatant. In this series, the gun is vertical and the fingers cup the slide and pull it back.
Some systems hold the pistol turned into a horizontal position and work the slide back withthumb and fingers.With some weapons, should you depress the trigger during this process,when you let loose of the slide and it rams home, the trigger will be free and the pistol will fire.This can be discovered with an experimental dry-fire on a semi-auto by semi-auto basis.
This chambering takes precious time in the stress of combat and the no-chamber rules ofsecurity, military and police policies should be abolished. When you go into the arena, whatexactly is the carry condition of your weapon? Is it ready to go? What will it take?
Page 89
Studies and Observations 3) From Race Gun to Combat Gun, Carry Sites and the HolsterContinuumThe artist and the fighter. Quick draws come from primary, fast access, carry sites or off thebody from very near lunge and reach areas. Beltline and thigh carries and shoulder holsters arethe most popular ways to carry a potential quick draw weapon. Secondary sites like ankle orboot holsters, or inside bulletproof vests require more time to dig out the weapon for produc-tion.
We have all seen carnival and circus pistol, quick draw artists and these high-speedshooting competitions. These people have special holsters and rigs that accelerate pre-plannedperformances. This is not the everyday gear of citizen, soldier and enforcement personnel.These quick draw rigs have little to zero weapon retention qualities. Competition rigs are usual-ly bare slips of leather.
Retention holsters are engineered to prevent the enemy from stealing your pistol. This isdone by limiting the angle of the quick draw to that of the carrier, and/or by installing releasemechanisms on the holster not easily known to the enemy. Deviations from this angle can pre-vent quick draws. Law enforcement trainers note they have observed officers at the practicerange having difficulty drawing their weapons from various retention holsters. This is a trainingissue that may be overcome in most cases: however, some retention holsters hinder chaotic posi-tional quick draws such as in some ground fighting scenarios. The more safe and complex theholster, the less speed in the quick draw in less than perfect shooting stances. You must experi-ment with your quick draw from various standing, seated, kneeling and ground positions.
Carry Site Continuum
1) Primary carry sites for quick draws
2) Secondary carry sites for back up
3) Tertiary carry sites for lunge and reach weapon grabs
Holster Continuum
1) No holster (the weapon carted in beltline or pockets)
2) Retention holster with differing threat levels
3) Normal, holster with or without typical thumb break or strap
4) Race gun competition holster.
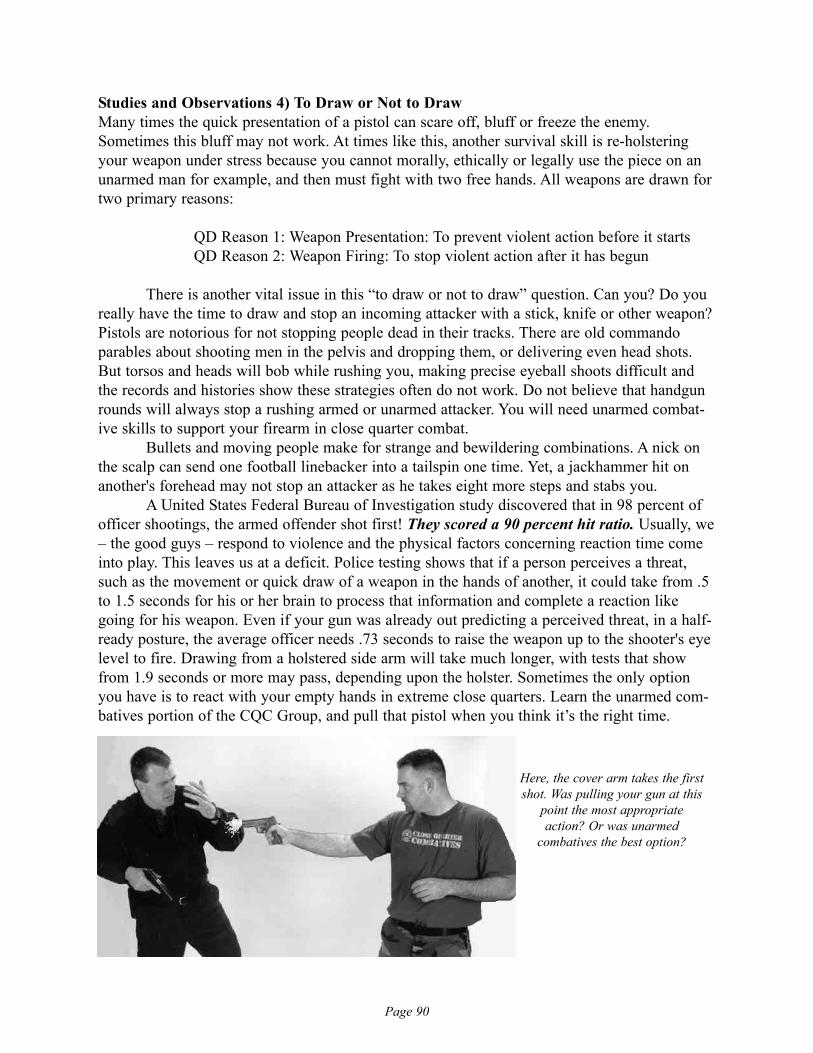
Page 90
Studies and Observations 4) To Draw or Not to DrawMany times the quick presentation of a pistol can scare off, bluff or freeze the enemy.Sometimes this bluff may not work. At times like this, another survival skill is re-holsteringyour weapon under stress because you cannot morally, ethically or legally use the piece on anunarmed man for example, and then must fight with two free hands. All weapons are drawn fortwo primary reasons:
QD Reason 1: Weapon Presentation: To prevent violent action before it startsQD Reason 2: Weapon Firing: To stop violent action after it has begun
There is another vital issue in this “to draw or not to draw” question. Can you? Do youreally have the time to draw and stop an incoming attacker with a stick, knife or other weapon?Pistols are notorious for not stopping people dead in their tracks. There are old commandoparables about shooting men in the pelvis and dropping them, or delivering even head shots.But torsos and heads will bob while rushing you, making precise eyeball shoots difficult andthe records and histories show these strategies often do not work. Do not believe that handgunrounds will always stop a rushing armed or unarmed attacker. You will need unarmed combat-ive skills to support your firearm in close quarter combat.
Bullets and moving people make for strange and bewildering combinations. A nick onthe scalp can send one football linebacker into a tailspin one time. Yet, a jackhammer hit onanother's forehead may not stop an attacker as he takes eight more steps and stabs you.
A United States Federal Bureau of Investigation study discovered that in 98 percent ofofficer shootings, the armed offender shot first! They scored a 90 percent hit ratio. Usually, we– the good guys – respond to violence and the physical factors concerning reaction time comeinto play. This leaves us at a deficit. Police testing shows that if a person perceives a threat,such as the movement or quick draw of a weapon in the hands of another, it could take from .5to 1.5 seconds for his or her brain to process that information and complete a reaction likegoing for his weapon. Even if your gun was already out predicting a perceived threat, in a half-ready posture, the average officer needs .73 seconds to raise the weapon up to the shooter's eyelevel to fire. Drawing from a holstered side arm will take much longer, with tests that showfrom 1.9 seconds or more may pass, depending upon the holster. Sometimes the only optionyou have is to react with your empty hands in extreme close quarters. Learn the unarmed com-batives portion of the CQC Group, and pull that pistol when you think it’s the right time.
Here, the cover arm takes the firstshot. Was pulling your gun at this
point the most appropriateaction? Or was unarmed
combatives the best option?

Page 91
Studies and Observations 5) Pistol Gunfight Rules of 3 Many experts and studies have crunched the pistol combat numbers and have universallyaccepted these rules.
– Many to most pistol gunfights last about 3 seconds.
– Many to most pistol gunfire exchanges involve more than 3 rounds.
– Many gunfighters exchange rounds within 3 yards.
Worldwide studies have shown that 95 percent of enforcement shootings occur at 21 feetor less. Seventy-five percent occur at nine feet or less. This CQCG course is designed aroundthese conditions, starting its training progression in a range where most pistol gunfights occur –within approximately 3 to 4 yards and with a skill where so many pistol and long gun gunfightsstart – a desperate quick draw. Extreme close quarters starts from a zero sternum-to-sternumbase line, to some three yards away from you in any direction. Here, the enemy is within alunge and reach from grabbing you or your pistol with both his hands or with his free hand. Or,he is a short jump, lunge and reach from you. Your study and practice should reflect these cir-cumstances and work accordingly.
Studies and Observations 6) Pistol Quick Draw Basic StepsSmooth first. Speed later. The following four steps are universally accepted. The fifth I haveadded because it is part of the combat quick draw process and vital to survival.
QD Basic Step 1 – Grab the pistol the same way with the same grip.
QD Basic Step 2 – Straight forearm in line with the barrel.
QD Basic Step 3 – Disengage any safeties, and/or perform any tasks unique to your holster and weapon, such as chambering a round.
QD Basic Step 4 – Perform a clean trigger pull that does not pull your barrel off of the enemy.
QD Basic Step 5 – deliver and duck, move to cover or concealment to minimize your visible profile – the outline your enemy sees. Cover stops bullets. Concealment hides you but does not stop bullets. Every gunfight is intrinsically linked with your surround-ings. Military, police and citizen shooting studies prove that over 90 percent of shooters able to reach cover survived the shooting. Shoot and move. Move and shoot. This will be covered extensively in CQCG Training Mission Six.
A slight change from your practiced quick draw pattern may interfere with your under-stress, developed reflex. Clothing can interfere. Holster changes can interfere. Weapon changescan certainly interfere.
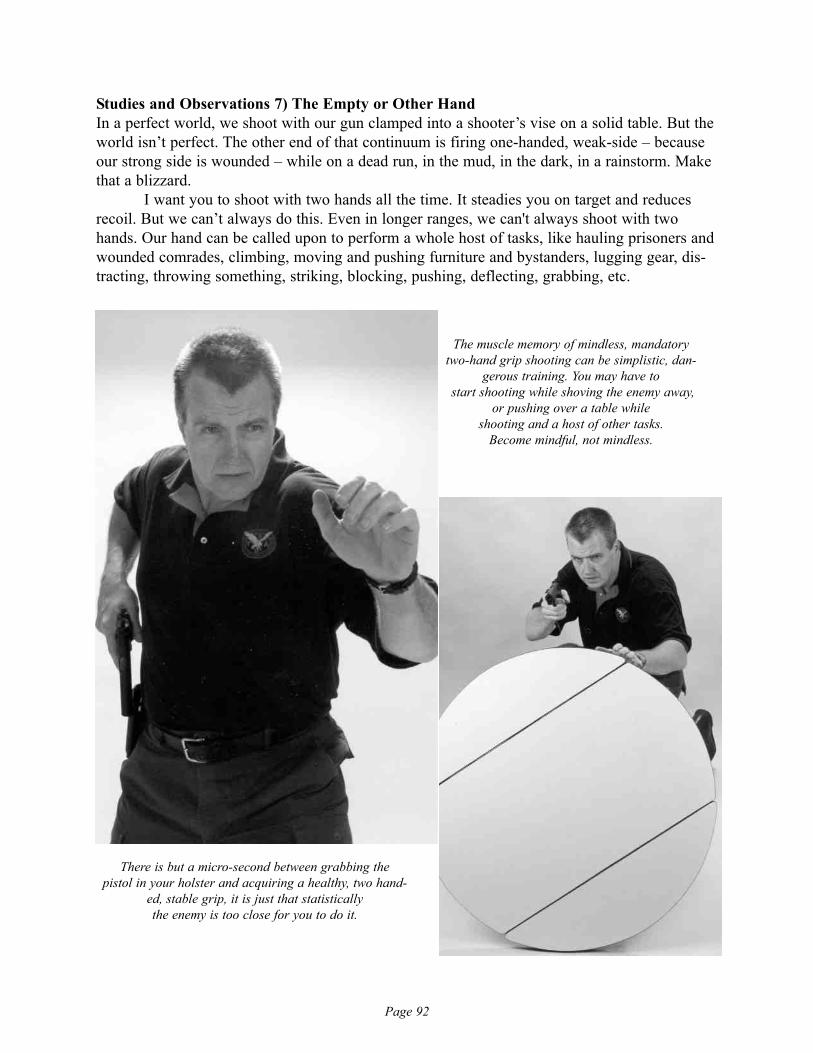
Page 92
Studies and Observations 7) The Empty or Other HandIn a perfect world, we shoot with our gun clamped into a shooter’s vise on a solid table. But theworld isn’t perfect. The other end of that continuum is firing one-handed, weak-side – becauseour strong side is wounded – while on a dead run, in the mud, in the dark, in a rainstorm. Makethat a blizzard.
I want you to shoot with two hands all the time. It steadies you on target and reducesrecoil. But we can’t always do this. Even in longer ranges, we can't always shoot with twohands. Our hand can be called upon to perform a whole host of tasks, like hauling prisoners andwounded comrades, climbing, moving and pushing furniture and bystanders, lugging gear, dis-tracting, throwing something, striking, blocking, pushing, deflecting, grabbing, etc.
The muscle memory of mindless, mandatorytwo-hand grip shooting can be simplistic, dan-
gerous training. You may have tostart shooting while shoving the enemy away,
or pushing over a table while shooting and a host of other tasks.
Become mindful, not mindless.
There is but a micro-second between grabbing the pistol in your holster and acquiring a healthy, two hand-
ed, stable grip, it is just that statistically the enemy is too close for you to do it.
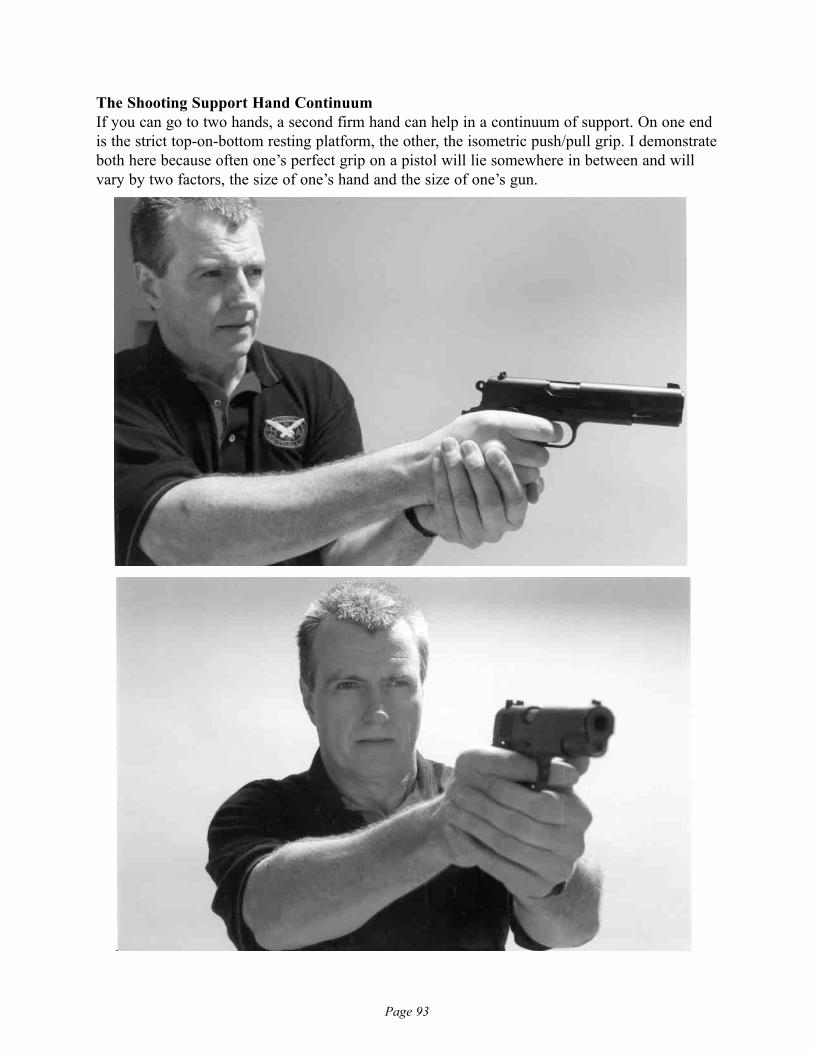
Page 93
The Shooting Support Hand ContinuumIf you can go to two hands, a second firm hand can help in a continuum of support. On one endis the strict top-on-bottom resting platform, the other, the isometric push/pull grip. I demonstrateboth here because often one’s perfect grip on a pistol will lie somewhere in between and willvary by two factors, the size of one’s hand and the size of one’s gun.
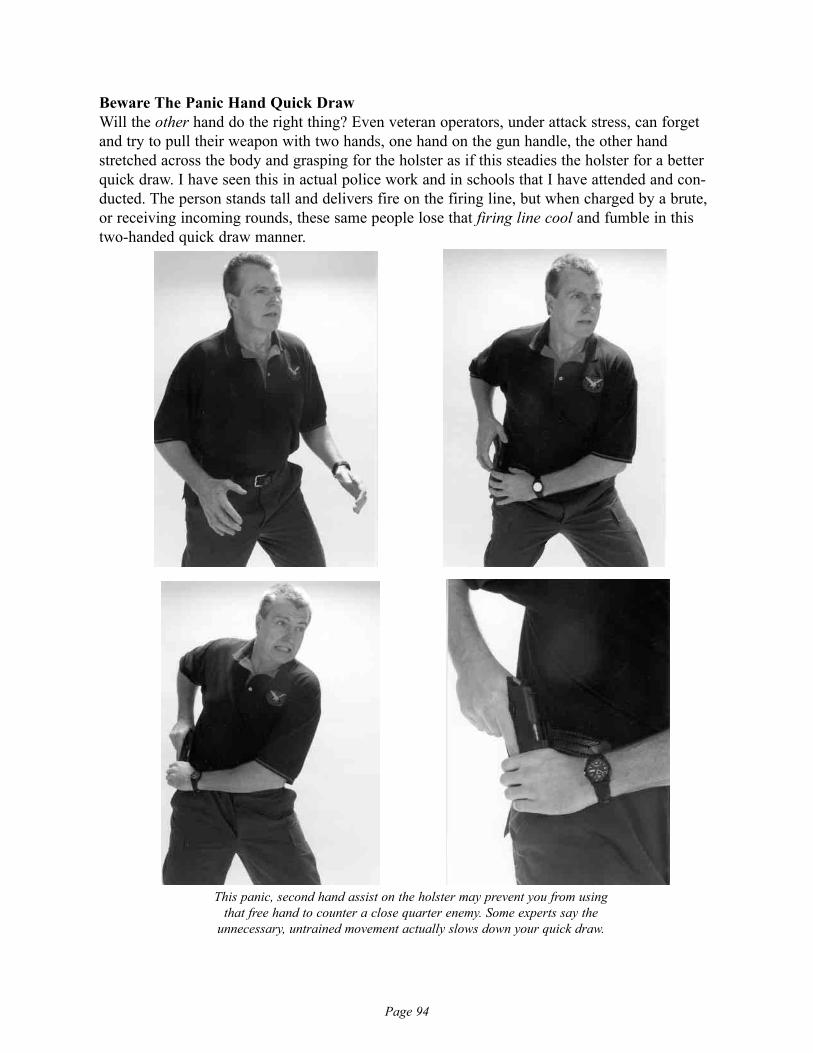
Page 94
Beware The Panic Hand Quick DrawWill the other hand do the right thing? Even veteran operators, under attack stress, can forgetand try to pull their weapon with two hands, one hand on the gun handle, the other handstretched across the body and grasping for the holster as if this steadies the holster for a betterquick draw. I have seen this in actual police work and in schools that I have attended and con-ducted. The person stands tall and delivers fire on the firing line, but when charged by a brute,or receiving incoming rounds, these same people lose that firing line cool and fumble in thistwo-handed quick draw manner.
This panic, second hand assist on the holster may prevent you from using that free hand to counter a close quarter enemy. Some experts say the
unnecessary, untrained movement actually slows down your quick draw.
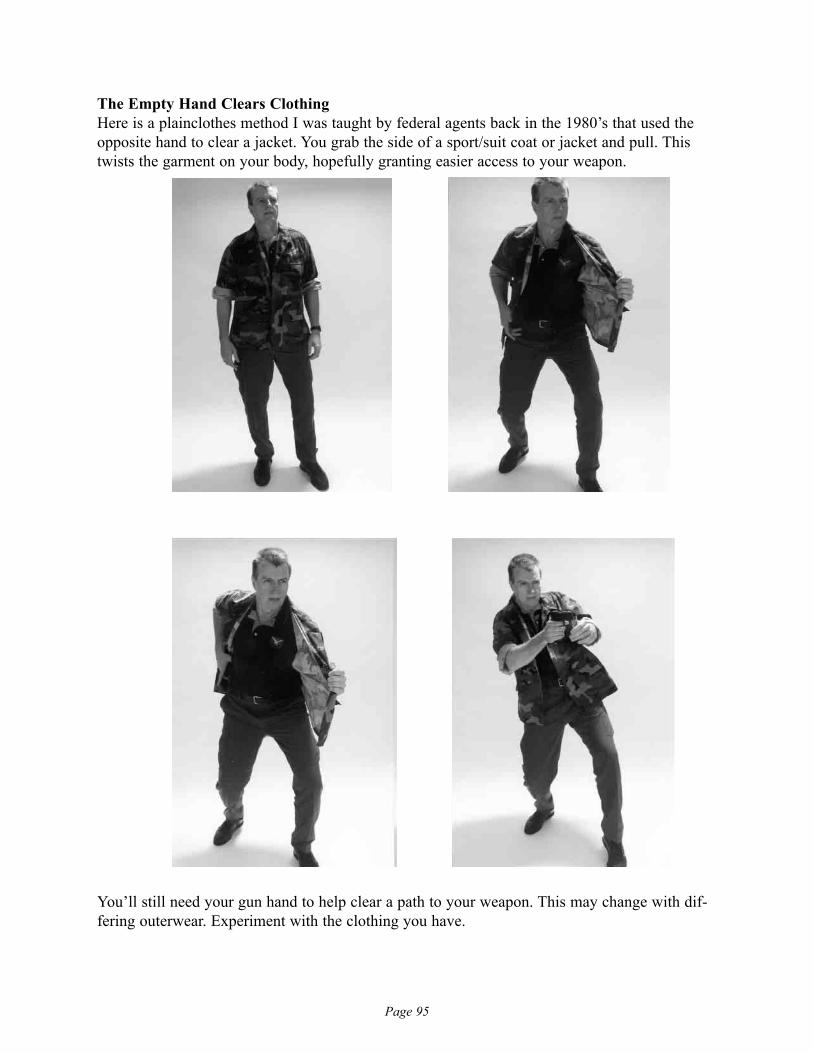
Page 95
The Empty Hand Clears ClothingHere is a plainclothes method I was taught by federal agents back in the 1980’s that used theopposite hand to clear a jacket. You grab the side of a sport/suit coat or jacket and pull. Thistwists the garment on your body, hopefully granting easier access to your weapon.
You’ll still need your gun hand to help clear a path to your weapon. This may change with dif-fering outerwear. Experiment with the clothing you have.
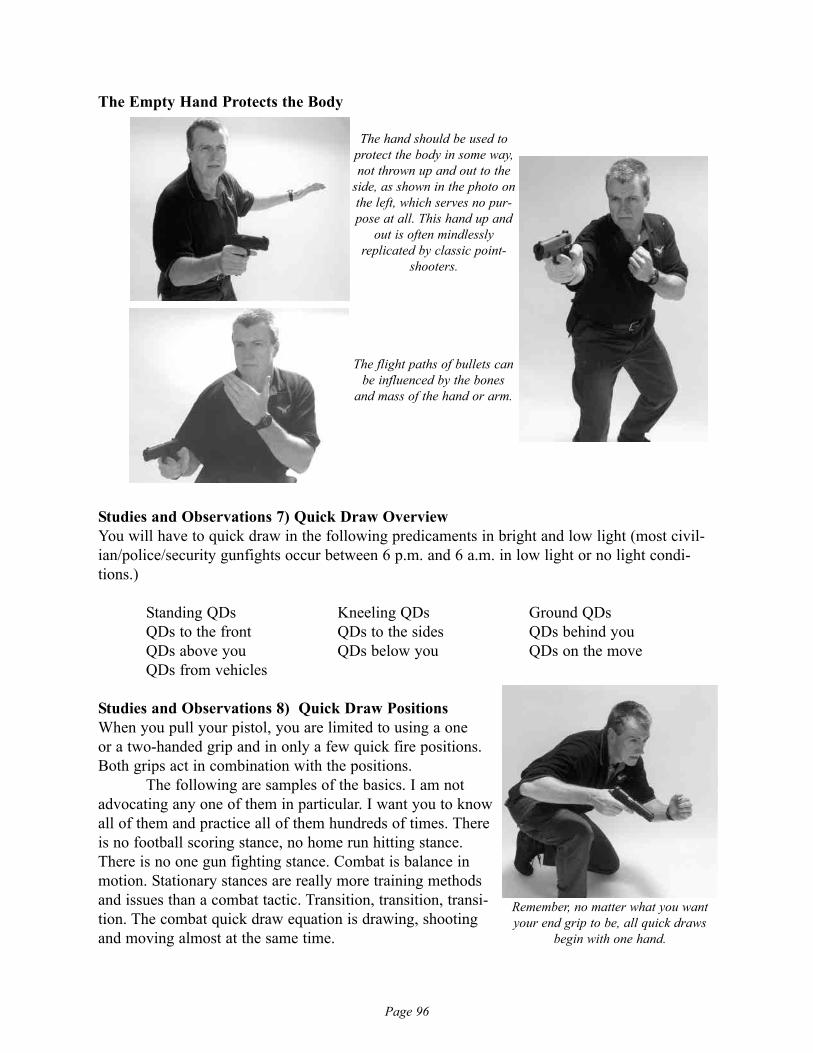
Page 96
The Empty Hand Protects the Body
Studies and Observations 7) Quick Draw OverviewYou will have to quick draw in the following predicaments in bright and low light (most civil-ian/police/security gunfights occur between 6 p.m. and 6 a.m. in low light or no light condi-tions.)
Standing QDs Kneeling QDs Ground QDsQDs to the front QDs to the sides QDs behind youQDs above you QDs below you QDs on the moveQDs from vehicles
Studies and Observations 8) Quick Draw PositionsWhen you pull your pistol, you are limited to using a one or a two-handed grip and in only a few quick fire positions.Both grips act in combination with the positions.
The following are samples of the basics. I am notadvocating any one of them in particular. I want you to knowall of them and practice all of them hundreds of times. Thereis no football scoring stance, no home run hitting stance.There is no one gun fighting stance. Combat is balance inmotion. Stationary stances are really more training methodsand issues than a combat tactic. Transition, transition, transi-tion. The combat quick draw equation is drawing, shootingand moving almost at the same time.
Remember, no matter what you wantyour end grip to be, all quick draws
begin with one hand.
The hand should be used toprotect the body in some way,not thrown up and out to the
side, as shown in the photo onthe left, which serves no pur-pose at all. This hand up and
out is often mindlessly replicated by classic point-
shooters.
The flight paths of bullets canbe influenced by the bones
and mass of the hand or arm.

Page 97
The Standing Triangle Shooting StancesThe basic triangle shooting stances are called many different titles around the world. Rangeshooters often stand erect and proudly while shooting, yet in combat, the reflex in our body'ssympathetic nervous system causes us to crouch down. The triangle also puts our arm bonesacross our chest giving us some level of cover. The standing triangle stances are:
QD High Triangle) Arms extended and body very frontal.
QD Bladed High Triangle)Arms somewhat extended and body
bladed from the enemy.
QD Low Triangle) Arms tucked in orsomewhat extended and body very
frontal.
QD Bladed Low Triangle) Arms tucked in and body bladed from the enemy.
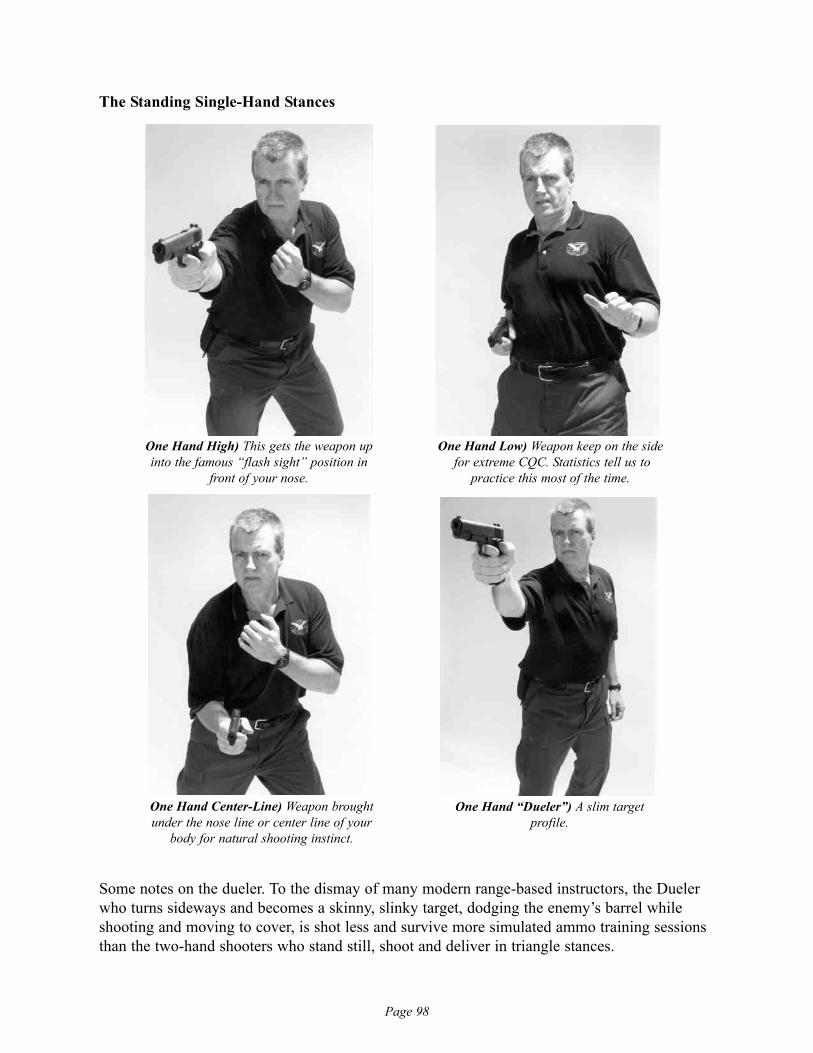
Page 98
The Standing Single-Hand Stances
Some notes on the dueler. To the dismay of many modern range-based instructors, the Duelerwho turns sideways and becomes a skinny, slinky target, dodging the enemy’s barrel whileshooting and moving to cover, is shot less and survive more simulated ammo training sessionsthan the two-hand shooters who stand still, shoot and deliver in triangle stances.
One Hand High) This gets the weapon upinto the famous “flash sight” position in
front of your nose.
One Hand Low) Weapon keep on the sidefor extreme CQC. Statistics tell us to
practice this most of the time.
One Hand Center-Line) Weapon broughtunder the nose line or center line of your
body for natural shooting instinct.
One Hand “Dueler”) A slim target profile.
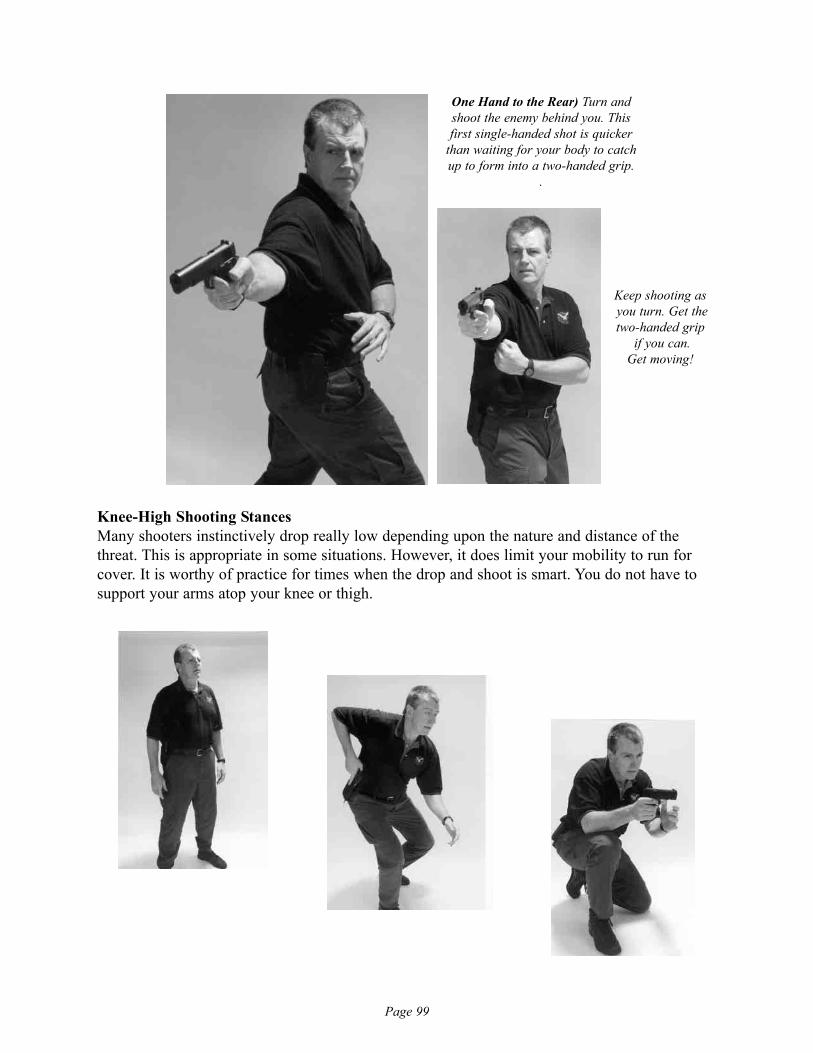
Page 99
Knee-High Shooting StancesMany shooters instinctively drop really low depending upon the nature and distance of thethreat. This is appropriate in some situations. However, it does limit your mobility to run forcover. It is worthy of practice for times when the drop and shoot is smart. You do not have tosupport your arms atop your knee or thigh.
One Hand to the Rear) Turn andshoot the enemy behind you. Thisfirst single-handed shot is quicker
than waiting for your body to catch up to form into a two-handed grip.
.
Keep shooting asyou turn. Get the two-handed grip
if you can. Get moving!
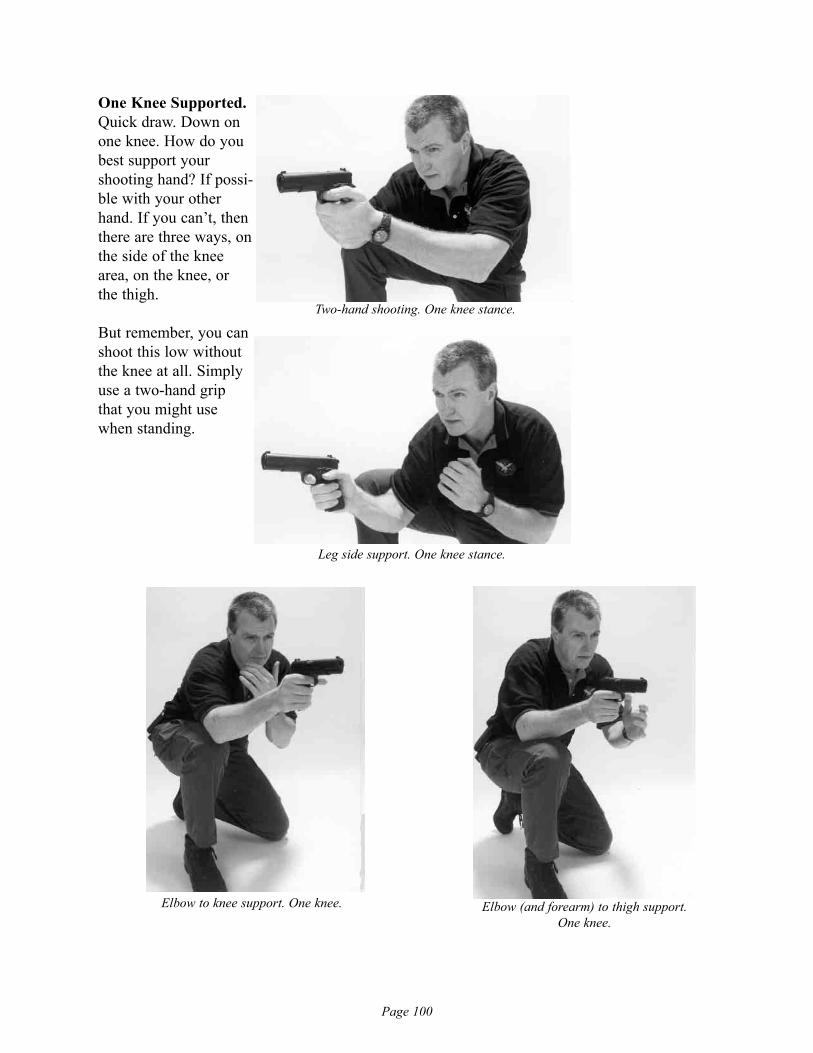
Page 100
One Knee Supported.Quick draw. Down onone knee. How do youbest support your shooting hand? If possi-ble with your otherhand. If you can’t, thenthere are three ways, onthe side of the kneearea, on the knee, orthe thigh.
But remember, you canshoot this low withoutthe knee at all. Simplyuse a two-hand gripthat you might usewhen standing.
Two-hand shooting. One knee stance.
Leg side support. One knee stance.
Elbow to knee support. One knee. Elbow (and forearm) to thigh support. One knee.
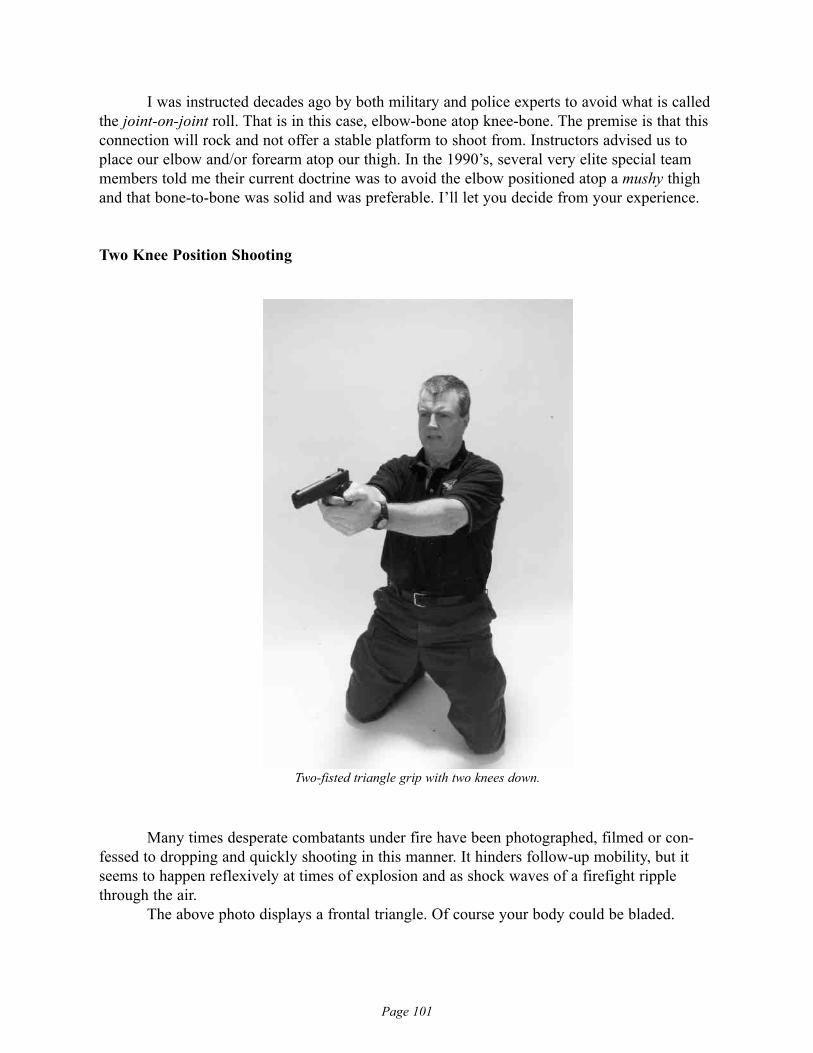
Page 101
I was instructed decades ago by both military and police experts to avoid what is calledthe joint-on-joint roll. That is in this case, elbow-bone atop knee-bone. The premise is that thisconnection will rock and not offer a stable platform to shoot from. Instructors advised us toplace our elbow and/or forearm atop our thigh. In the 1990’s, several very elite special teammembers told me their current doctrine was to avoid the elbow positioned atop a mushy thighand that bone-to-bone was solid and was preferable. I’ll let you decide from your experience.
Two Knee Position Shooting
Many times desperate combatants under fire have been photographed, filmed or con-fessed to dropping and quickly shooting in this manner. It hinders follow-up mobility, but itseems to happen reflexively at times of explosion and as shock waves of a firefight ripplethrough the air.
The above photo displays a frontal triangle. Of course your body could be bladed.
Two-fisted triangle grip with two knees down.
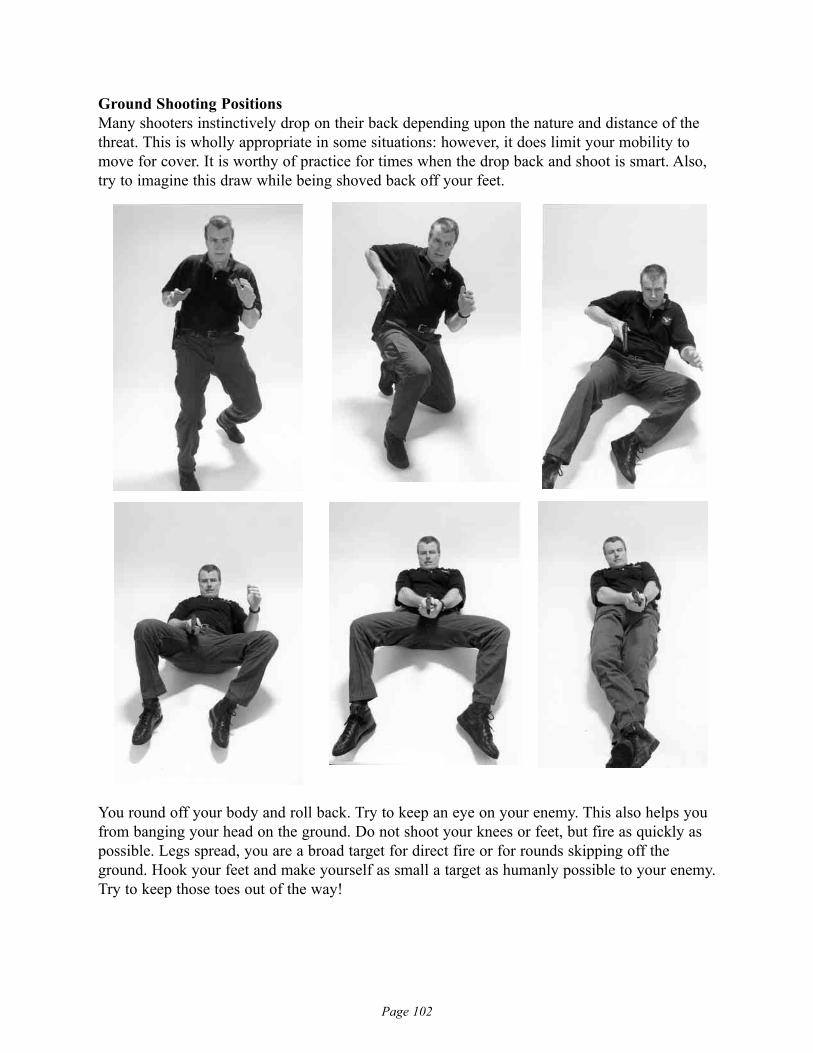
Page 102
Ground Shooting PositionsMany shooters instinctively drop on their back depending upon the nature and distance of thethreat. This is wholly appropriate in some situations: however, it does limit your mobility tomove for cover. It is worthy of practice for times when the drop back and shoot is smart. Also,try to imagine this draw while being shoved back off your feet.
You round off your body and roll back. Try to keep an eye on your enemy. This also helps youfrom banging your head on the ground. Do not shoot your knees or feet, but fire as quickly aspossible. Legs spread, you are a broad target for direct fire or for rounds skipping off theground. Hook your feet and make yourself as small a target as humanly possible to your enemy.Try to keep those toes out of the way!
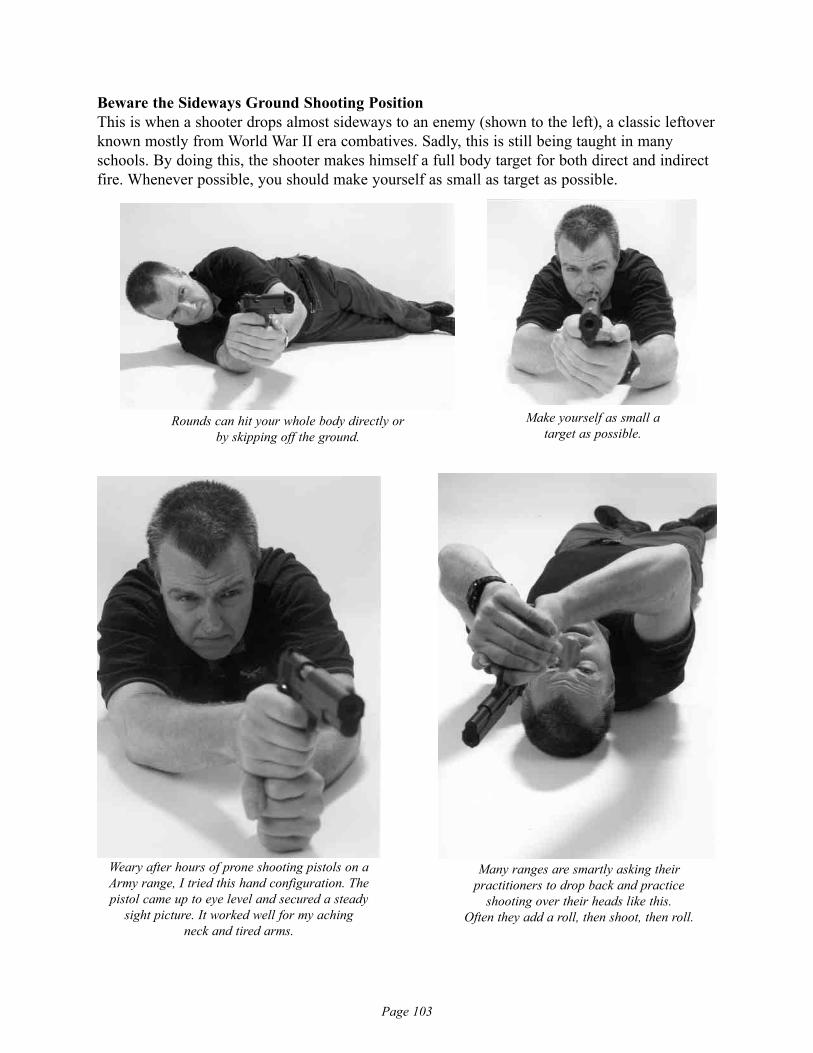
Page 103
Beware the Sideways Ground Shooting PositionThis is when a shooter drops almost sideways to an enemy (shown to the left), a classic leftoverknown mostly from World War II era combatives. Sadly, this is still being taught in manyschools. By doing this, the shooter makes himself a full body target for both direct and indirectfire. Whenever possible, you should make yourself as small as target as possible.
Rounds can hit your whole body directly orby skipping off the ground.
Make yourself as small a target as possible.
Weary after hours of prone shooting pistols on aArmy range, I tried this hand configuration. Thepistol came up to eye level and secured a steady
sight picture. It worked well for my aching neck and tired arms.
Many ranges are smartly asking their practitioners to drop back and practice
shooting over their heads like this. Often they add a roll, then shoot, then roll.
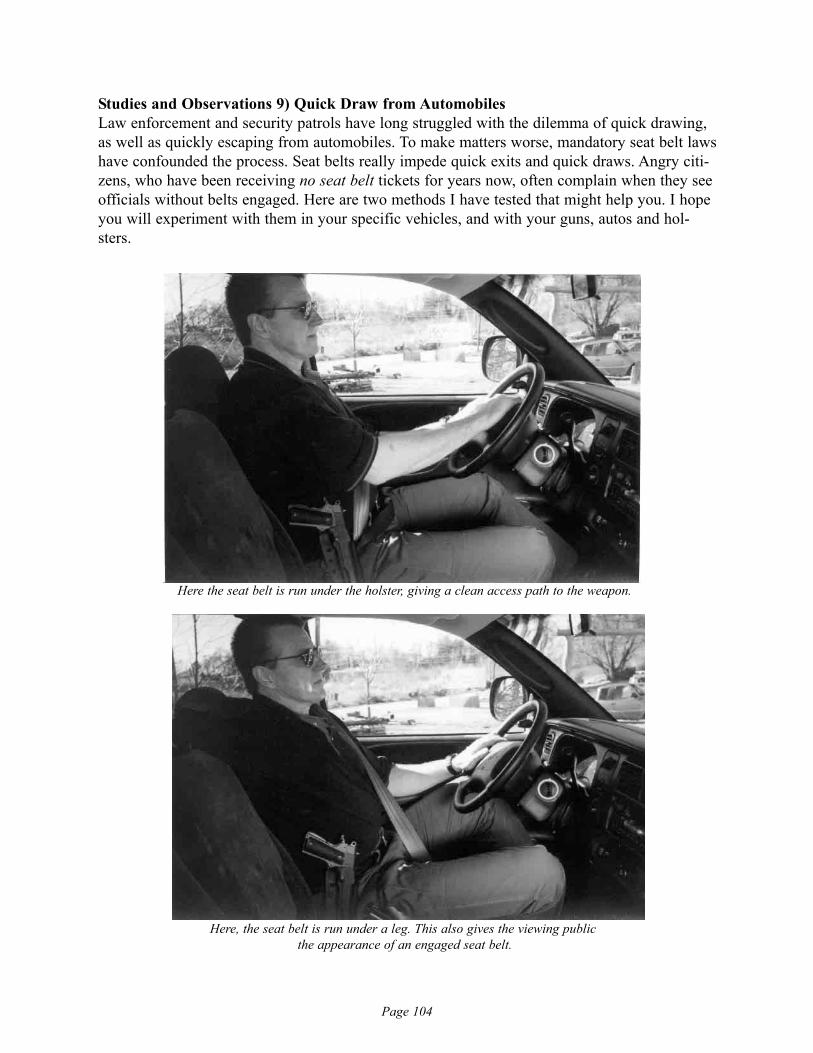
Page 104
Studies and Observations 9) Quick Draw from AutomobilesLaw enforcement and security patrols have long struggled with the dilemma of quick drawing,as well as quickly escaping from automobiles. To make matters worse, mandatory seat belt lawshave confounded the process. Seat belts really impede quick exits and quick draws. Angry citi-zens, who have been receiving no seat belt tickets for years now, often complain when they seeofficials without belts engaged. Here are two methods I have tested that might help you. I hopeyou will experiment with them in your specific vehicles, and with your guns, autos and hol-sters.
Here the seat belt is run under the holster, giving a clean access path to the weapon.
Here, the seat belt is run under a leg. This also gives the viewing publicthe appearance of an engaged seat belt.
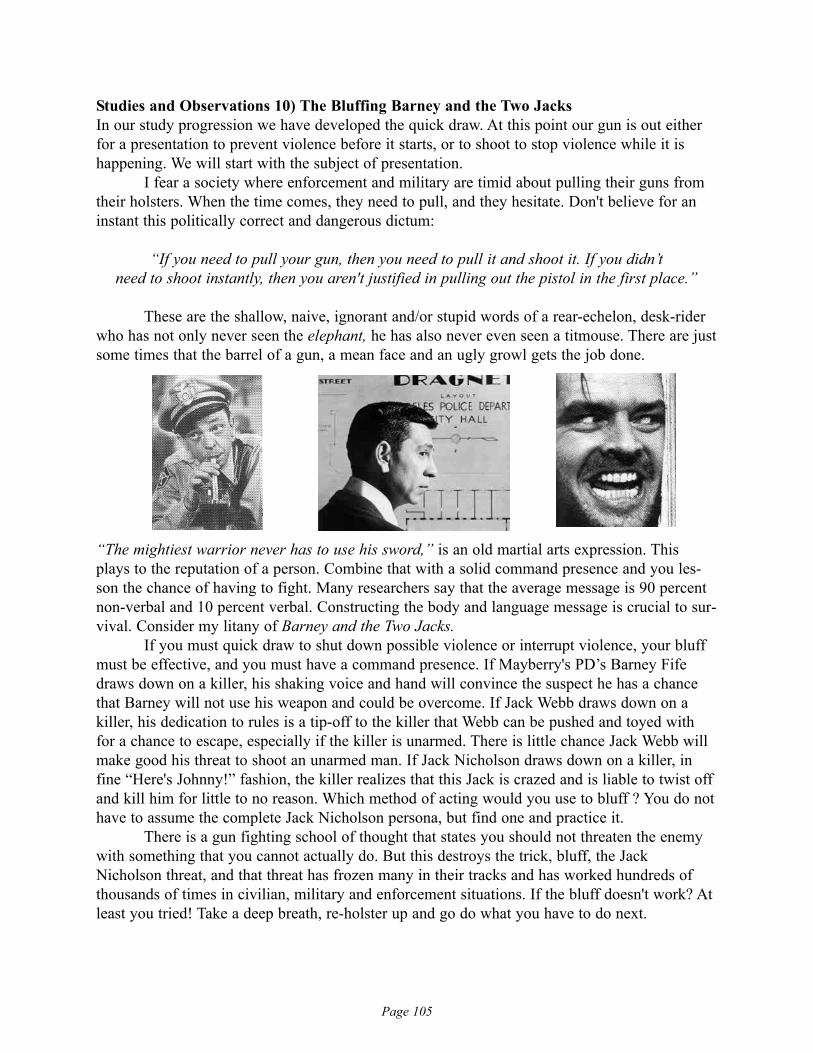
Page 105
Studies and Observations 10) The Bluffing Barney and the Two Jacks In our study progression we have developed the quick draw. At this point our gun is out eitherfor a presentation to prevent violence before it starts, or to shoot to stop violence while it ishappening. We will start with the subject of presentation.
I fear a society where enforcement and military are timid about pulling their guns fromtheir holsters. When the time comes, they need to pull, and they hesitate. Don't believe for aninstant this politically correct and dangerous dictum:
“If you need to pull your gun, then you need to pull it and shoot it. If you didn’tneed to shoot instantly, then you aren't justified in pulling out the pistol in the first place.”
These are the shallow, naive, ignorant and/or stupid words of a rear-echelon, desk-riderwho has not only never seen the elephant, he has also never even seen a titmouse. There are justsome times that the barrel of a gun, a mean face and an ugly growl gets the job done.
“The mightiest warrior never has to use his sword,” is an old martial arts expression. Thisplays to the reputation of a person. Combine that with a solid command presence and you les-son the chance of having to fight. Many researchers say that the average message is 90 percentnon-verbal and 10 percent verbal. Constructing the body and language message is crucial to sur-vival. Consider my litany of Barney and the Two Jacks.
If you must quick draw to shut down possible violence or interrupt violence, your bluffmust be effective, and you must have a command presence. If Mayberry's PD’s Barney Fifedraws down on a killer, his shaking voice and hand will convince the suspect he has a chancethat Barney will not use his weapon and could be overcome. If Jack Webb draws down on akiller, his dedication to rules is a tip-off to the killer that Webb can be pushed and toyed withfor a chance to escape, especially if the killer is unarmed. There is little chance Jack Webb willmake good his threat to shoot an unarmed man. If Jack Nicholson draws down on a killer, infine “Here's Johnny!” fashion, the killer realizes that this Jack is crazed and is liable to twist offand kill him for little to no reason. Which method of acting would you use to bluff ? You do nothave to assume the complete Jack Nicholson persona, but find one and practice it.
There is a gun fighting school of thought that states you should not threaten the enemywith something that you cannot actually do. But this destroys the trick, bluff, the JackNicholson threat, and that threat has frozen many in their tracks and has worked hundreds ofthousands of times in civilian, military and enforcement situations. If the bluff doesn't work? Atleast you tried! Take a deep breath, re-holster up and go do what you have to do next.
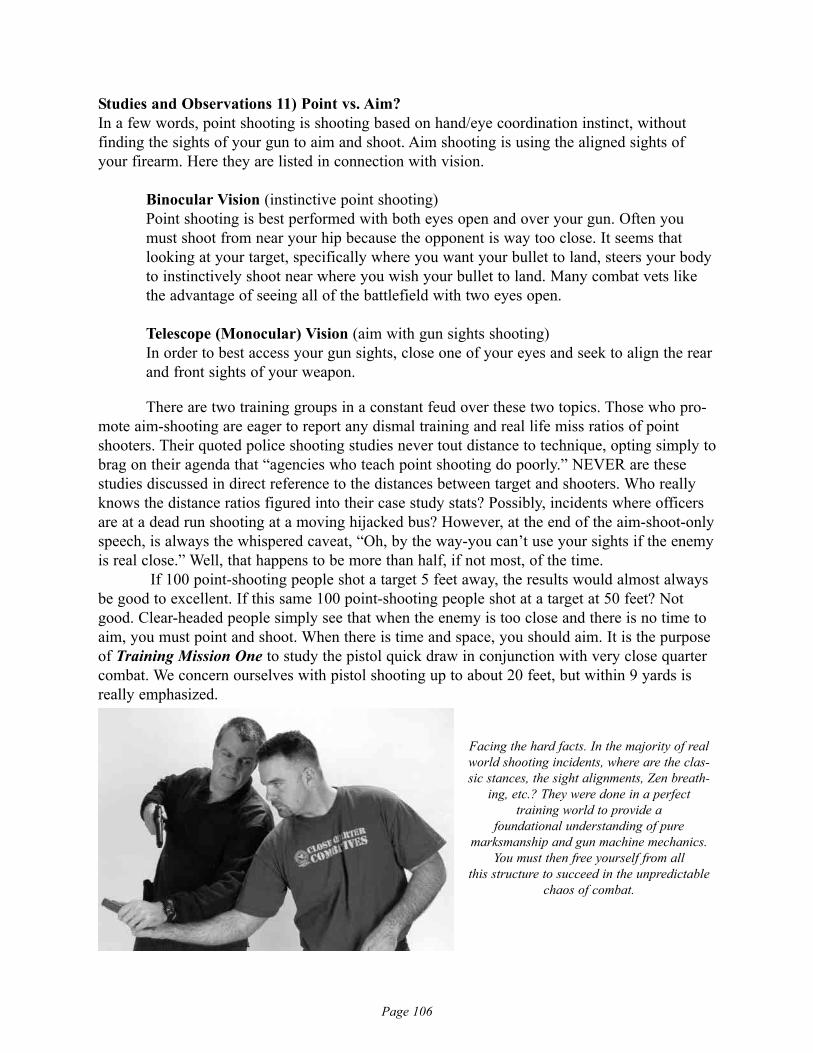
Page 106
Studies and Observations 11) Point vs. Aim? In a few words, point shooting is shooting based on hand/eye coordination instinct, withoutfinding the sights of your gun to aim and shoot. Aim shooting is using the aligned sights ofyour firearm. Here they are listed in connection with vision.
Binocular Vision (instinctive point shooting)Point shooting is best performed with both eyes open and over your gun. Often you must shoot from near your hip because the opponent is way too close. It seems that looking at your target, specifically where you want your bullet to land, steers your body to instinctively shoot near where you wish your bullet to land. Many combat vets like the advantage of seeing all of the battlefield with two eyes open.
Telescope (Monocular) Vision (aim with gun sights shooting)In order to best access your gun sights, close one of your eyes and seek to align the rear and front sights of your weapon.
There are two training groups in a constant feud over these two topics. Those who pro-mote aim-shooting are eager to report any dismal training and real life miss ratios of pointshooters. Their quoted police shooting studies never tout distance to technique, opting simply tobrag on their agenda that “agencies who teach point shooting do poorly.” NEVER are thesestudies discussed in direct reference to the distances between target and shooters. Who reallyknows the distance ratios figured into their case study stats? Possibly, incidents where officersare at a dead run shooting at a moving hijacked bus? However, at the end of the aim-shoot-onlyspeech, is always the whispered caveat, “Oh, by the way-you can’t use your sights if the enemyis real close.” Well, that happens to be more than half, if not most, of the time.
If 100 point-shooting people shot a target 5 feet away, the results would almost alwaysbe good to excellent. If this same 100 point-shooting people shot at a target at 50 feet? Notgood. Clear-headed people simply see that when the enemy is too close and there is no time toaim, you must point and shoot. When there is time and space, you should aim. It is the purposeof Training Mission One to study the pistol quick draw in conjunction with very close quartercombat. We concern ourselves with pistol shooting up to about 20 feet, but within 9 yards isreally emphasized.
Facing the hard facts. In the majority of realworld shooting incidents, where are the clas-sic stances, the sight alignments, Zen breath-
ing, etc.? They were done in a perfect training world to provide a
foundational understanding of pure marksmanship and gun machine mechanics.
You must then free yourself from all this structure to succeed in the unpredictable
chaos of combat.
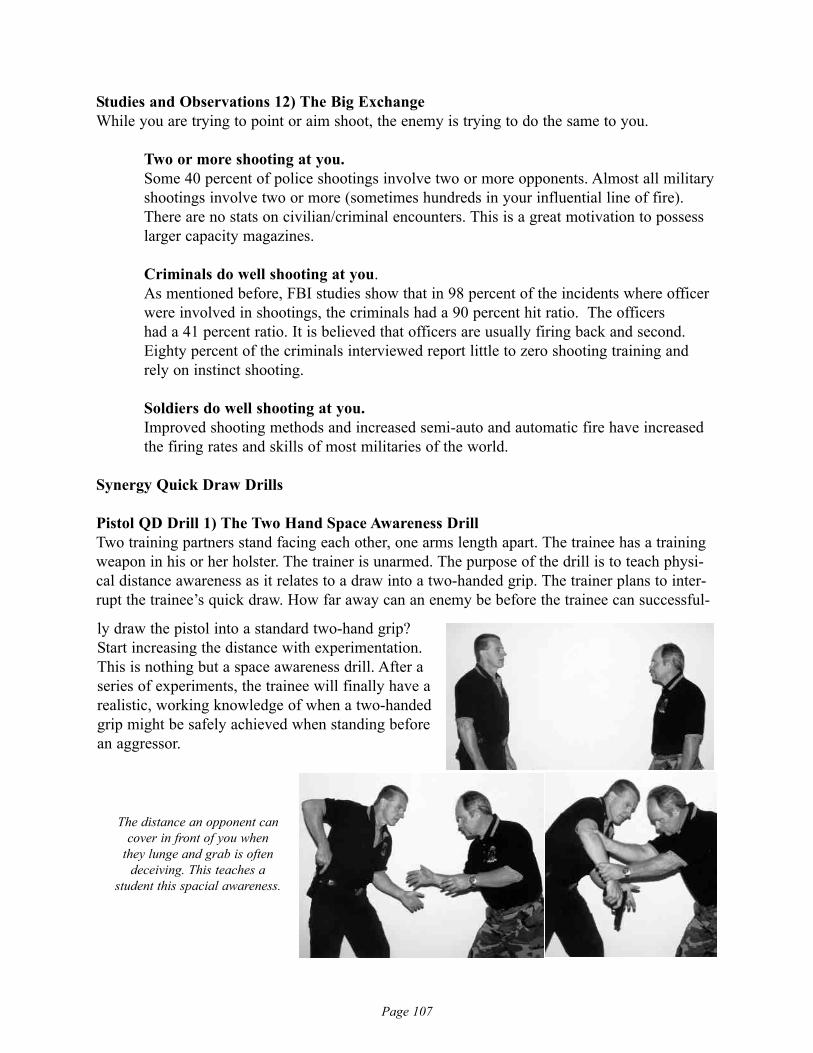
Page 107
Studies and Observations 12) The Big ExchangeWhile you are trying to point or aim shoot, the enemy is trying to do the same to you.
Two or more shooting at you.Some 40 percent of police shootings involve two or more opponents. Almost all militaryshootings involve two or more (sometimes hundreds in your influential line of fire). There are no stats on civilian/criminal encounters. This is a great motivation to possess larger capacity magazines.
Criminals do well shooting at you.As mentioned before, FBI studies show that in 98 percent of the incidents where officer were involved in shootings, the criminals had a 90 percent hit ratio. The officers had a 41 percent ratio. It is believed that officers are usually firing back and second. Eighty percent of the criminals interviewed report little to zero shooting training and rely on instinct shooting.
Soldiers do well shooting at you.Improved shooting methods and increased semi-auto and automatic fire have increased the firing rates and skills of most militaries of the world.
Synergy Quick Draw Drills
Pistol QD Drill 1) The Two Hand Space Awareness DrillTwo training partners stand facing each other, one arms length apart. The trainee has a trainingweapon in his or her holster. The trainer is unarmed. The purpose of the drill is to teach physi-cal distance awareness as it relates to a draw into a two-handed grip. The trainer plans to inter-rupt the trainee’s quick draw. How far away can an enemy be before the trainee can successful-
ly draw the pistol into a standard two-hand grip?Start increasing the distance with experimentation.This is nothing but a space awareness drill. After aseries of experiments, the trainee will finally have arealistic, working knowledge of when a two-handedgrip might be safely achieved when standing beforean aggressor.
The distance an opponent cancover in front of you when
they lunge and grab is oftendeceiving. This teaches a
student this spacial awareness.
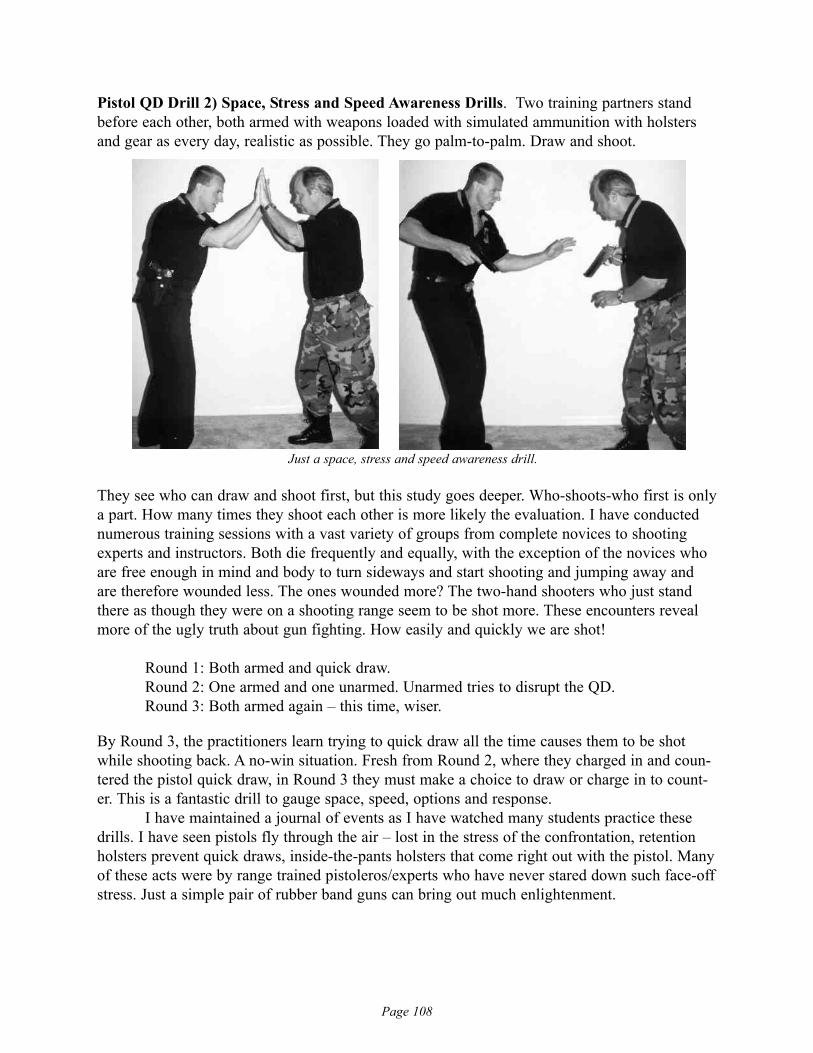
Page 108
Pistol QD Drill 2) Space, Stress and Speed Awareness Drills. Two training partners standbefore each other, both armed with weapons loaded with simulated ammunition with holstersand gear as every day, realistic as possible. They go palm-to-palm. Draw and shoot.
They see who can draw and shoot first, but this study goes deeper. Who-shoots-who first is onlya part. How many times they shoot each other is more likely the evaluation. I have conductednumerous training sessions with a vast variety of groups from complete novices to shootingexperts and instructors. Both die frequently and equally, with the exception of the novices whoare free enough in mind and body to turn sideways and start shooting and jumping away andare therefore wounded less. The ones wounded more? The two-hand shooters who just standthere as though they were on a shooting range seem to be shot more. These encounters revealmore of the ugly truth about gun fighting. How easily and quickly we are shot!
Round 1: Both armed and quick draw.Round 2: One armed and one unarmed. Unarmed tries to disrupt the QD.Round 3: Both armed again – this time, wiser.
By Round 3, the practitioners learn trying to quick draw all the time causes them to be shotwhile shooting back. A no-win situation. Fresh from Round 2, where they charged in and coun-tered the pistol quick draw, in Round 3 they must make a choice to draw or charge in to count-er. This is a fantastic drill to gauge space, speed, options and response.
I have maintained a journal of events as I have watched many students practice thesedrills. I have seen pistols fly through the air – lost in the stress of the confrontation, retentionholsters prevent quick draws, inside-the-pants holsters that come right out with the pistol. Manyof these acts were by range trained pistoleros/experts who have never stared down such face-offstress. Just a simple pair of rubber band guns can bring out much enlightenment.
Just a space, stress and speed awareness drill.
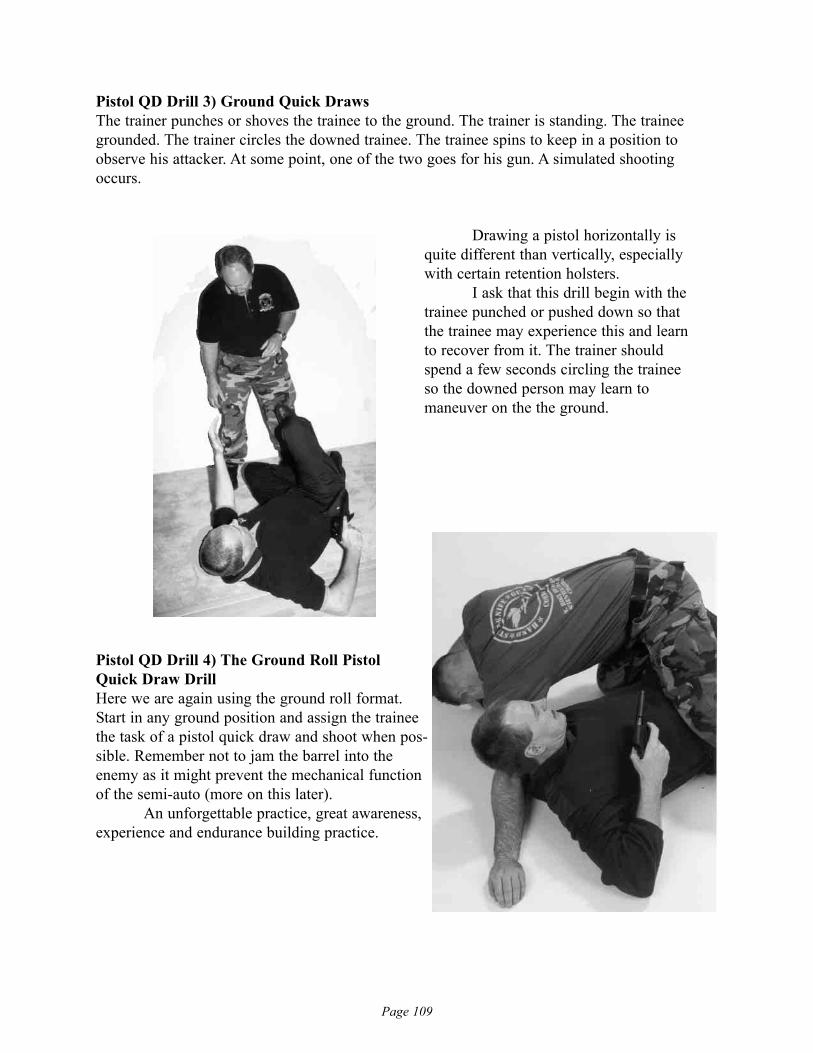
Page 109
Pistol QD Drill 3) Ground Quick DrawsThe trainer punches or shoves the trainee to the ground. The trainer is standing. The traineegrounded. The trainer circles the downed trainee. The trainee spins to keep in a position toobserve his attacker. At some point, one of the two goes for his gun. A simulated shootingoccurs.
Pistol QD Drill 4) The Ground Roll Pistol Quick Draw DrillHere we are again using the ground roll format. Start in any ground position and assign the traineethe task of a pistol quick draw and shoot when pos-sible. Remember not to jam the barrel into theenemy as it might prevent the mechanical functionof the semi-auto (more on this later).
An unforgettable practice, great awareness,experience and endurance building practice.
Drawing a pistol horizontally isquite different than vertically, especiallywith certain retention holsters.
I ask that this drill begin with thetrainee punched or pushed down so thatthe trainee may experience this and learnto recover from it. The trainer shouldspend a few seconds circling the traineeso the downed person may learn tomaneuver on the the ground.
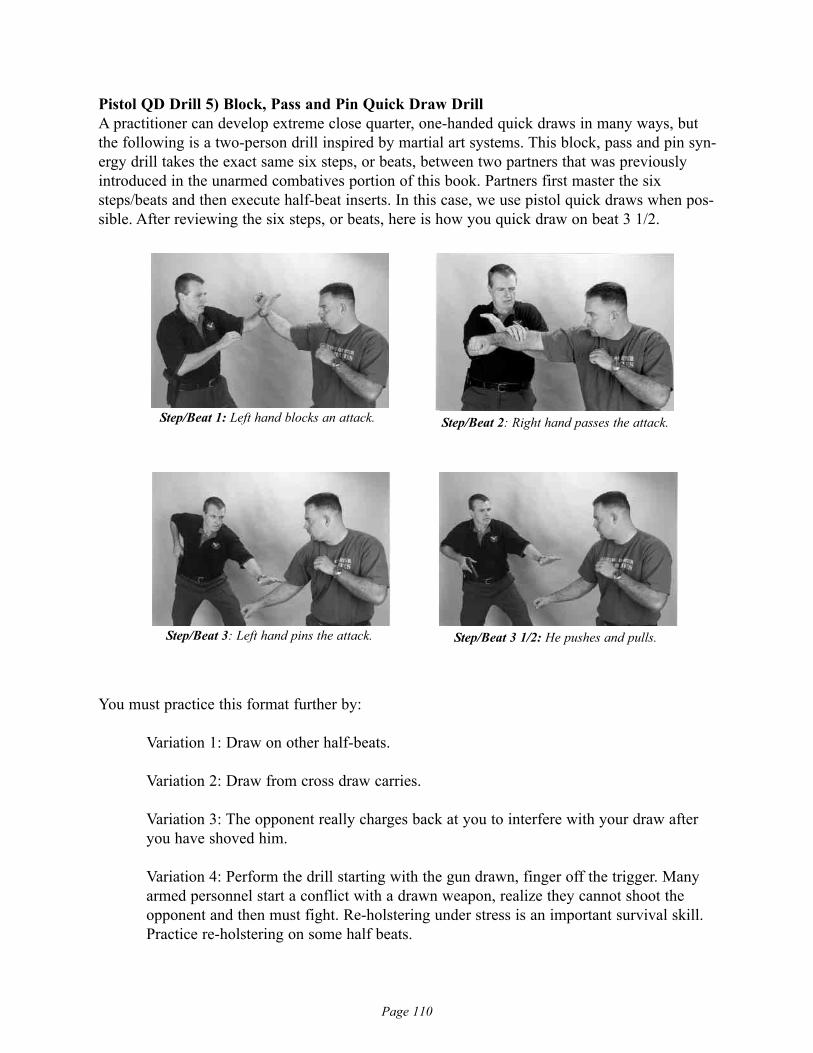
Page 110
Pistol QD Drill 5) Block, Pass and Pin Quick Draw DrillA practitioner can develop extreme close quarter, one-handed quick draws in many ways, butthe following is a two-person drill inspired by martial art systems. This block, pass and pin syn-ergy drill takes the exact same six steps, or beats, between two partners that was previouslyintroduced in the unarmed combatives portion of this book. Partners first master the sixsteps/beats and then execute half-beat inserts. In this case, we use pistol quick draws when pos-sible. After reviewing the six steps, or beats, here is how you quick draw on beat 3 1/2.
You must practice this format further by:
Variation 1: Draw on other half-beats.
Variation 2: Draw from cross draw carries.
Variation 3: The opponent really charges back at you to interfere with your draw after you have shoved him.
Variation 4: Perform the drill starting with the gun drawn, finger off the trigger. Many armed personnel start a conflict with a drawn weapon, realize they cannot shoot the opponent and then must fight. Re-holstering under stress is an important survival skill. Practice re-holstering on some half beats.
Step/Beat 1: Left hand blocks an attack. Step/Beat 2: Right hand passes the attack.
Step/Beat 3: Left hand pins the attack. Step/Beat 3 1/2: He pushes and pulls.
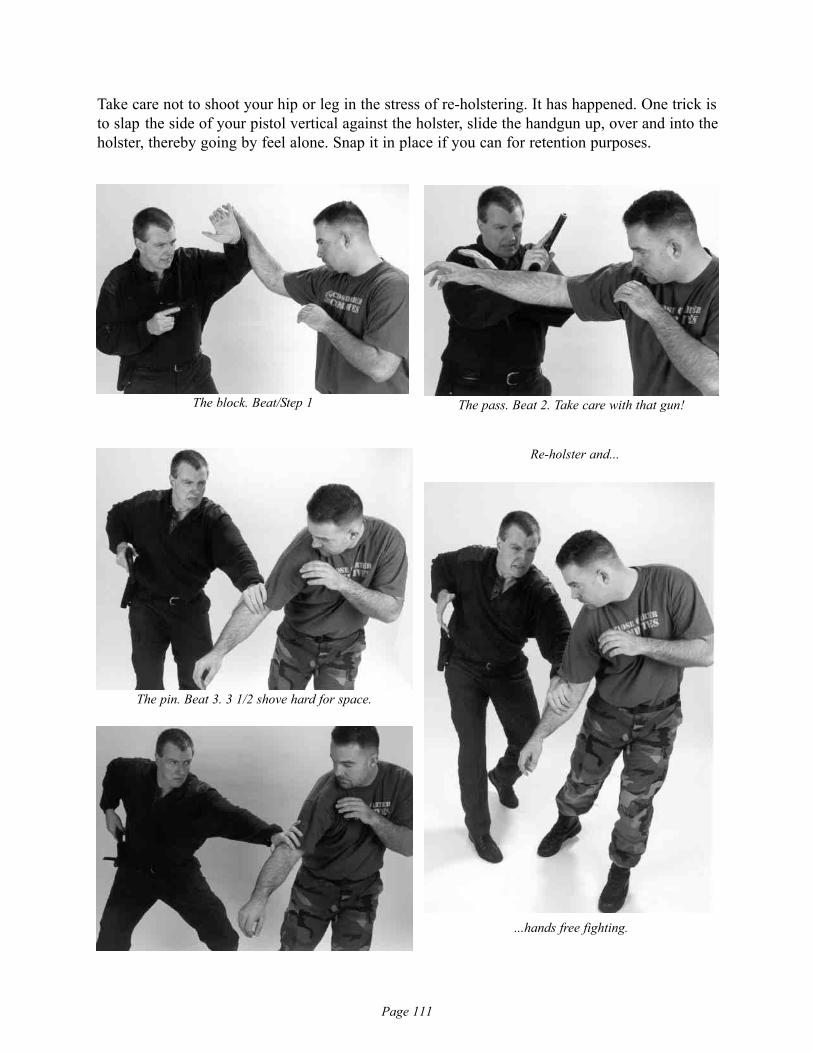
Page 111
Take care not to shoot your hip or leg in the stress of re-holstering. It has happened. One trick isto slap the side of your pistol vertical against the holster, slide the handgun up, over and into theholster, thereby going by feel alone. Snap it in place if you can for retention purposes.
The block. Beat/Step 1 The pass. Beat 2. Take care with that gun!
The pin. Beat 3. 3 1/2 shove hard for space.
...hands free fighting.
Re-holster and...
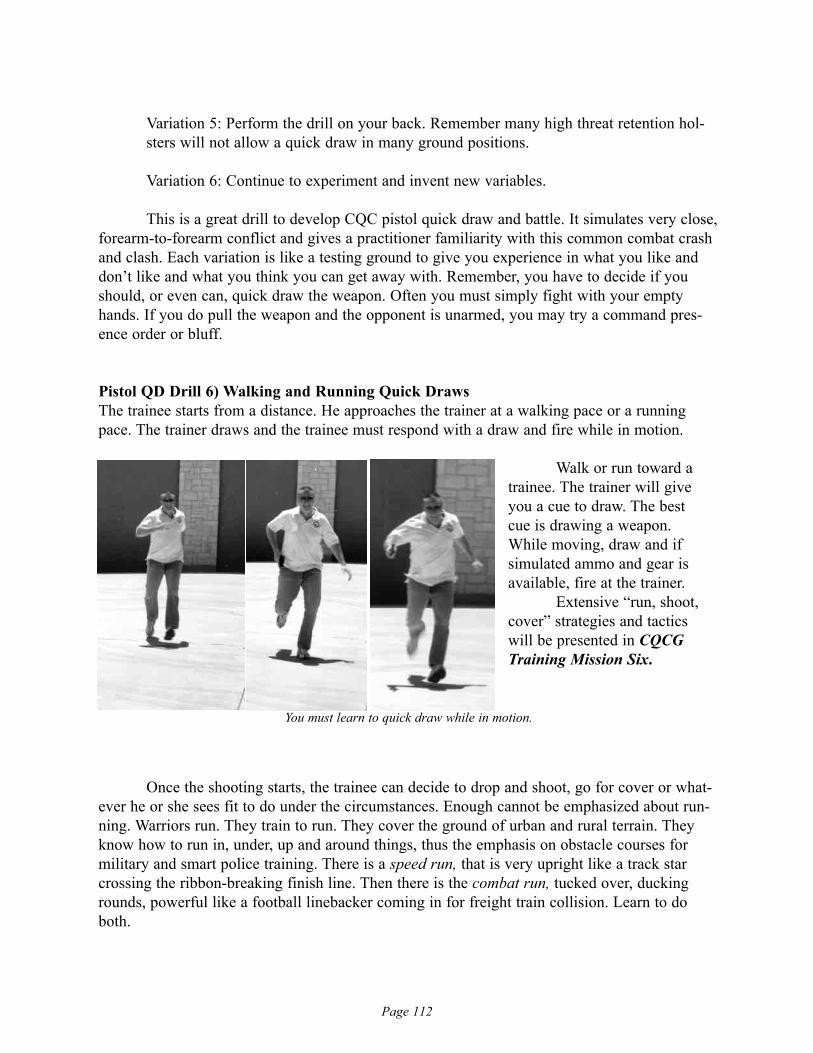
Variation 5: Perform the drill on your back. Remember many high threat retention hol-sters will not allow a quick draw in many ground positions.
Variation 6: Continue to experiment and invent new variables.
This is a great drill to develop CQC pistol quick draw and battle. It simulates very close,forearm-to-forearm conflict and gives a practitioner familiarity with this common combat crashand clash. Each variation is like a testing ground to give you experience in what you like anddon’t like and what you think you can get away with. Remember, you have to decide if youshould, or even can, quick draw the weapon. Often you must simply fight with your emptyhands. If you do pull the weapon and the opponent is unarmed, you may try a command pres-ence order or bluff.
Pistol QD Drill 6) Walking and Running Quick DrawsThe trainee starts from a distance. He approaches the trainer at a walking pace or a runningpace. The trainer draws and the trainee must respond with a draw and fire while in motion.
Once the shooting starts, the trainee can decide to drop and shoot, go for cover or what-ever he or she sees fit to do under the circumstances. Enough cannot be emphasized about run-ning. Warriors run. They train to run. They cover the ground of urban and rural terrain. Theyknow how to run in, under, up and around things, thus the emphasis on obstacle courses formilitary and smart police training. There is a speed run, that is very upright like a track starcrossing the ribbon-breaking finish line. Then there is the combat run, tucked over, duckingrounds, powerful like a football linebacker coming in for freight train collision. Learn to doboth.
Page 112
You must learn to quick draw while in motion.
Walk or run toward atrainee. The trainer will giveyou a cue to draw. The bestcue is drawing a weapon.While moving, draw and ifsimulated ammo and gear isavailable, fire at the trainer.
Extensive “run, shoot,cover” strategies and tacticswill be presented in CQCGTraining Mission Six.
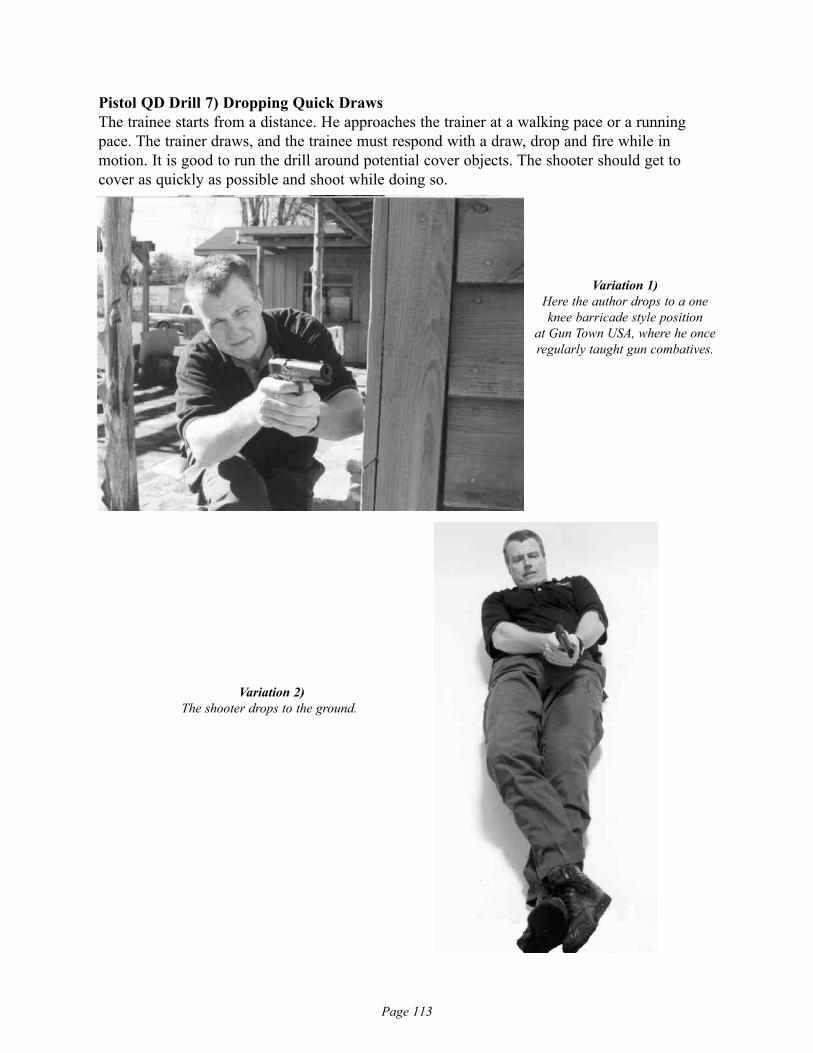
Page 113
Pistol QD Drill 7) Dropping Quick DrawsThe trainee starts from a distance. He approaches the trainer at a walking pace or a runningpace. The trainer draws, and the trainee must respond with a draw, drop and fire while inmotion. It is good to run the drill around potential cover objects. The shooter should get tocover as quickly as possible and shoot while doing so.
Variation 2)The shooter drops to the ground.
Variation 1) Here the author drops to a oneknee barricade style position
at Gun Town USA, where he onceregularly taught gun combatives.
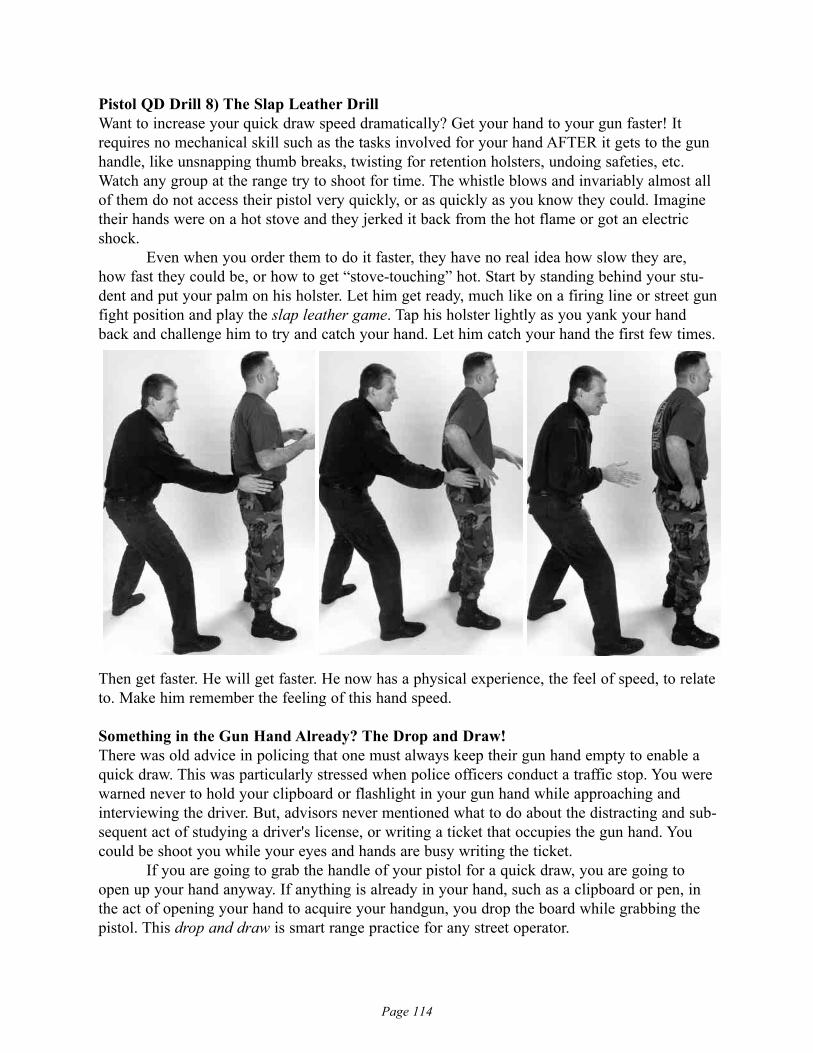
Page 114
Pistol QD Drill 8) The Slap Leather DrillWant to increase your quick draw speed dramatically? Get your hand to your gun faster! Itrequires no mechanical skill such as the tasks involved for your hand AFTER it gets to the gunhandle, like unsnapping thumb breaks, twisting for retention holsters, undoing safeties, etc.Watch any group at the range try to shoot for time. The whistle blows and invariably almost allof them do not access their pistol very quickly, or as quickly as you know they could. Imaginetheir hands were on a hot stove and they jerked it back from the hot flame or got an electricshock.
Even when you order them to do it faster, they have no real idea how slow they are,how fast they could be, or how to get “stove-touching” hot. Start by standing behind your stu-dent and put your palm on his holster. Let him get ready, much like on a firing line or street gunfight position and play the slap leather game. Tap his holster lightly as you yank your handback and challenge him to try and catch your hand. Let him catch your hand the first few times.
Then get faster. He will get faster. He now has a physical experience, the feel of speed, to relateto. Make him remember the feeling of this hand speed.
Something in the Gun Hand Already? The Drop and Draw!There was old advice in policing that one must always keep their gun hand empty to enable aquick draw. This was particularly stressed when police officers conduct a traffic stop. You werewarned never to hold your clipboard or flashlight in your gun hand while approaching andinterviewing the driver. But, advisors never mentioned what to do about the distracting and sub-sequent act of studying a driver's license, or writing a ticket that occupies the gun hand. Youcould be shoot you while your eyes and hands are busy writing the ticket.
If you are going to grab the handle of your pistol for a quick draw, you are going toopen up your hand anyway. If anything is already in your hand, such as a clipboard or pen, inthe act of opening your hand to acquire your handgun, you drop the board while grabbing thepistol. This drop and draw is smart range practice for any street operator.
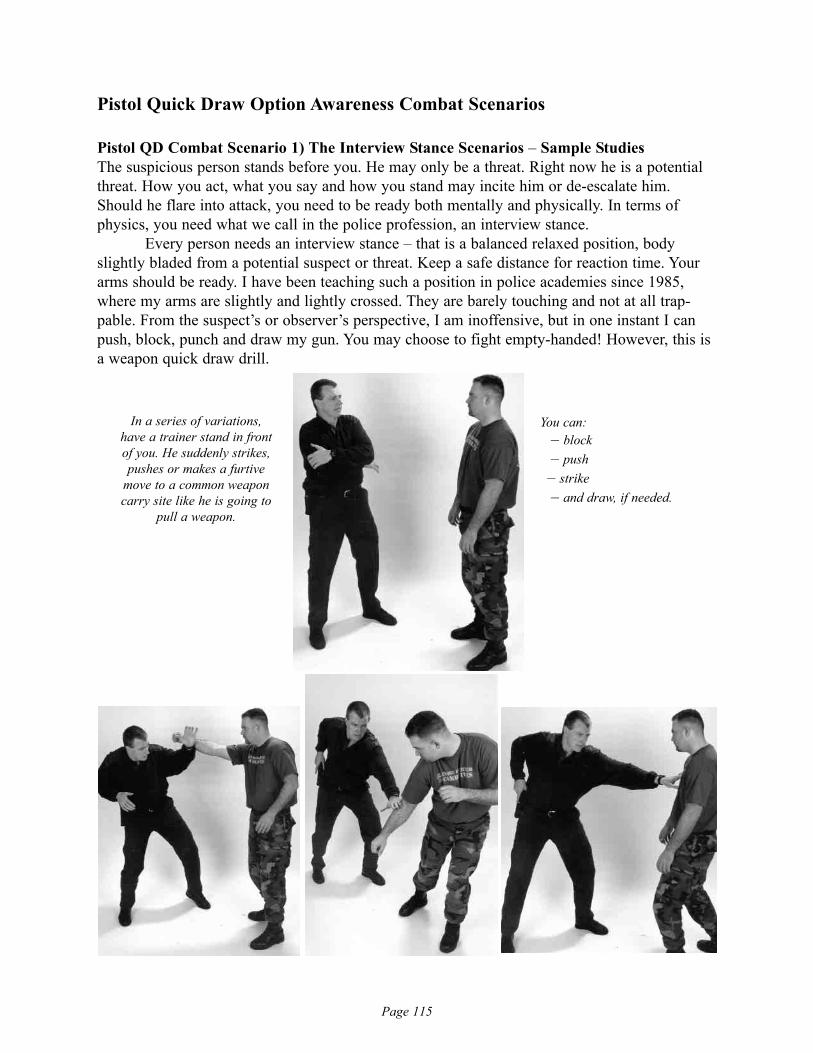
Page 115
Pistol Quick Draw Option Awareness Combat Scenarios
Pistol QD Combat Scenario 1) The Interview Stance Scenarios – Sample StudiesThe suspicious person stands before you. He may only be a threat. Right now he is a potentialthreat. How you act, what you say and how you stand may incite him or de-escalate him.Should he flare into attack, you need to be ready both mentally and physically. In terms ofphysics, you need what we call in the police profession, an interview stance.
Every person needs an interview stance – that is a balanced relaxed position, bodyslightly bladed from a potential suspect or threat. Keep a safe distance for reaction time. Yourarms should be ready. I have been teaching such a position in police academies since 1985,where my arms are slightly and lightly crossed. They are barely touching and not at all trap-pable. From the suspect’s or observer’s perspective, I am inoffensive, but in one instant I canpush, block, punch and draw my gun. You may choose to fight empty-handed! However, this isa weapon quick draw drill.
In a series of variations,have a trainer stand in frontof you. He suddenly strikes,pushes or makes a furtive
move to a common weaponcarry site like he is going to
pull a weapon.
You can:– block– push– strike– and draw, if needed.
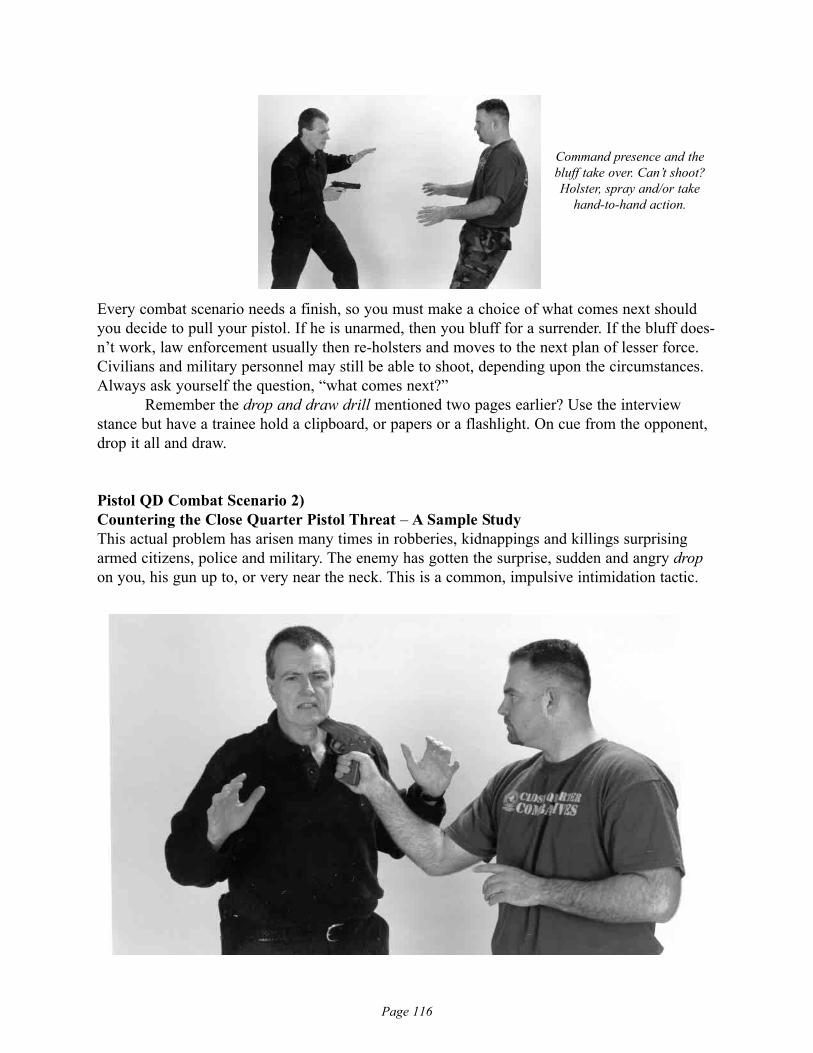
Page 116
Every combat scenario needs a finish, so you must make a choice of what comes next shouldyou decide to pull your pistol. If he is unarmed, then you bluff for a surrender. If the bluff does-n’t work, law enforcement usually then re-holsters and moves to the next plan of lesser force.Civilians and military personnel may still be able to shoot, depending upon the circumstances.Always ask yourself the question, “what comes next?”
Remember the drop and draw drill mentioned two pages earlier? Use the interviewstance but have a trainee hold a clipboard, or papers or a flashlight. On cue from the opponent,drop it all and draw.
Pistol QD Combat Scenario 2) Countering the Close Quarter Pistol Threat – A Sample StudyThis actual problem has arisen many times in robberies, kidnappings and killings surprisingarmed citizens, police and military. The enemy has gotten the surprise, sudden and angry dropon you, his gun up to, or very near the neck. This is a common, impulsive intimidation tactic.
Command presence and thebluff take over. Can’t shoot?Holster, spray and/or take
hand-to-hand action.
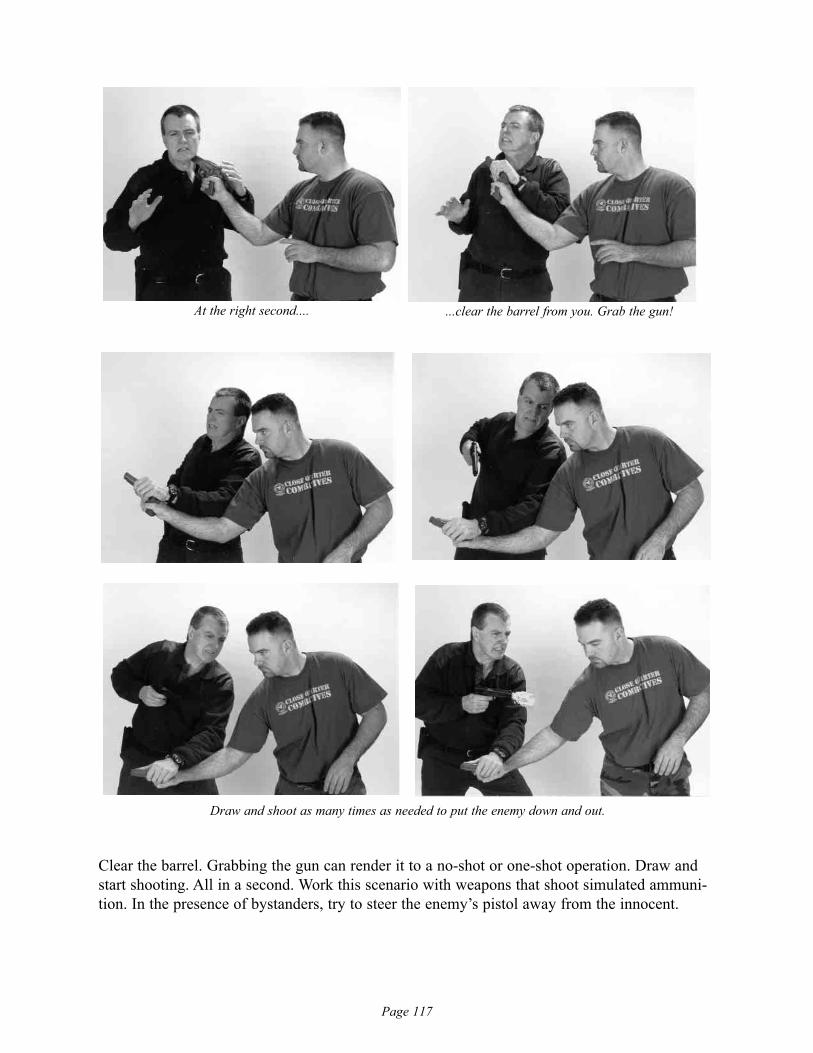
Page 117
Clear the barrel. Grabbing the gun can render it to a no-shot or one-shot operation. Draw andstart shooting. All in a second. Work this scenario with weapons that shoot simulated ammuni-tion. In the presence of bystanders, try to steer the enemy’s pistol away from the innocent.
At the right second.... ...clear the barrel from you. Grab the gun!
Draw and shoot as many times as needed to put the enemy down and out.
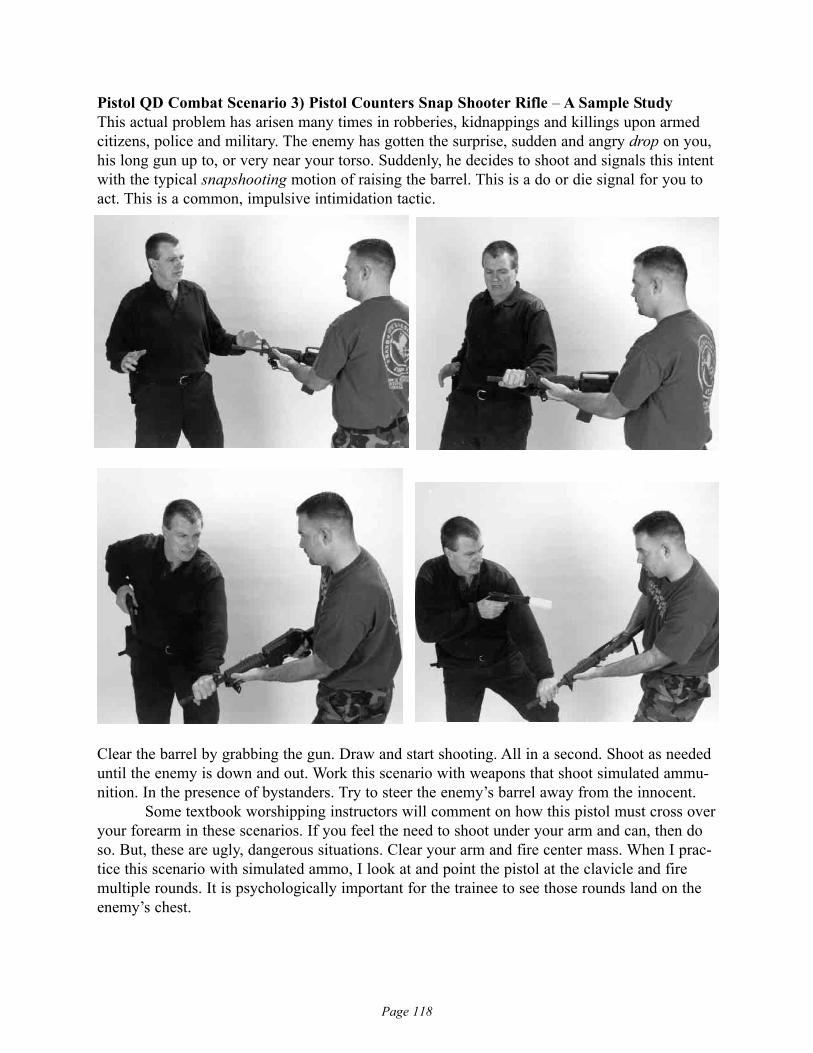
Page 118
Pistol QD Combat Scenario 3) Pistol Counters Snap Shooter Rifle – A Sample StudyThis actual problem has arisen many times in robberies, kidnappings and killings upon armedcitizens, police and military. The enemy has gotten the surprise, sudden and angry drop on you,his long gun up to, or very near your torso. Suddenly, he decides to shoot and signals this intentwith the typical snapshooting motion of raising the barrel. This is a do or die signal for you toact. This is a common, impulsive intimidation tactic.
Clear the barrel by grabbing the gun. Draw and start shooting. All in a second. Shoot as neededuntil the enemy is down and out. Work this scenario with weapons that shoot simulated ammu-nition. In the presence of bystanders. Try to steer the enemy’s barrel away from the innocent.
Some textbook worshipping instructors will comment on how this pistol must cross overyour forearm in these scenarios. If you feel the need to shoot under your arm and can, then doso. But, these are ugly, dangerous situations. Clear your arm and fire center mass. When I prac-tice this scenario with simulated ammo, I look at and point the pistol at the clavicle and firemultiple rounds. It is psychologically important for the trainee to see those rounds land on theenemy’s chest.
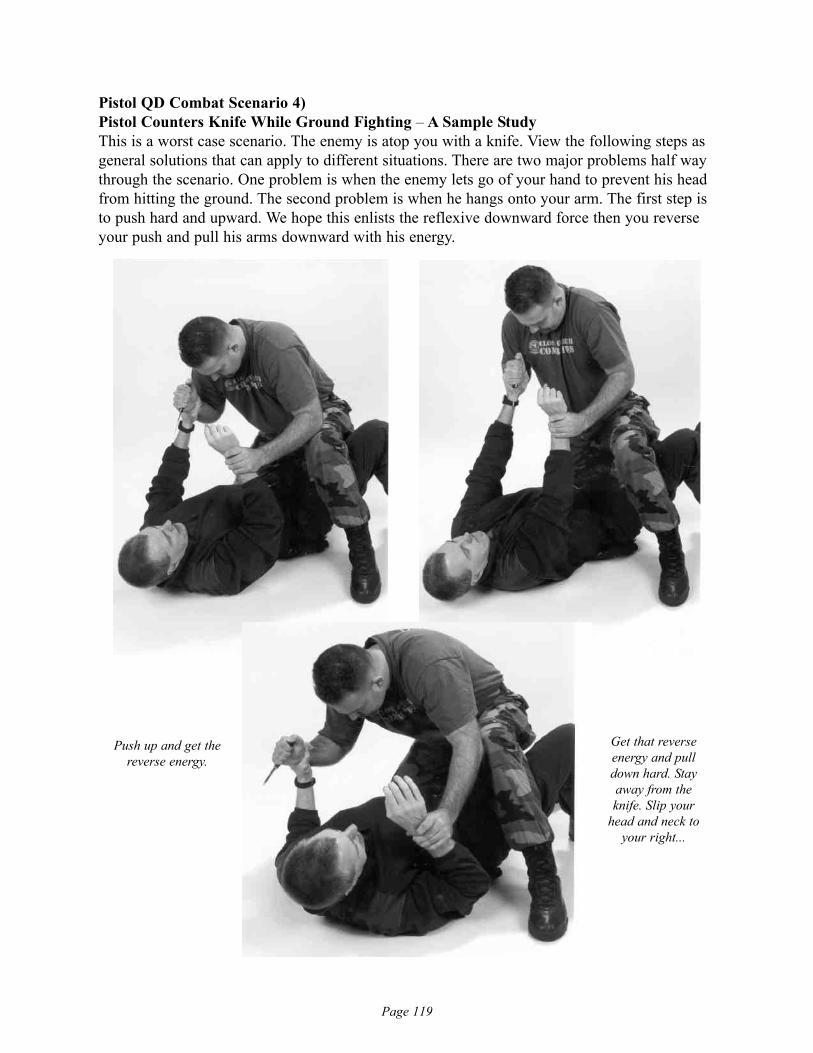
Page 119
Pistol QD Combat Scenario 4) Pistol Counters Knife While Ground Fighting – A Sample StudyThis is a worst case scenario. The enemy is atop you with a knife. View the following steps asgeneral solutions that can apply to different situations. There are two major problems half waythrough the scenario. One problem is when the enemy lets go of your hand to prevent his headfrom hitting the ground. The second problem is when he hangs onto your arm. The first step isto push hard and upward. We hope this enlists the reflexive downward force then you reverseyour push and pull his arms downward with his energy.
Push up and get thereverse energy.
Get that reverseenergy and pulldown hard. Stayaway from theknife. Slip your
head and neck toyour right...
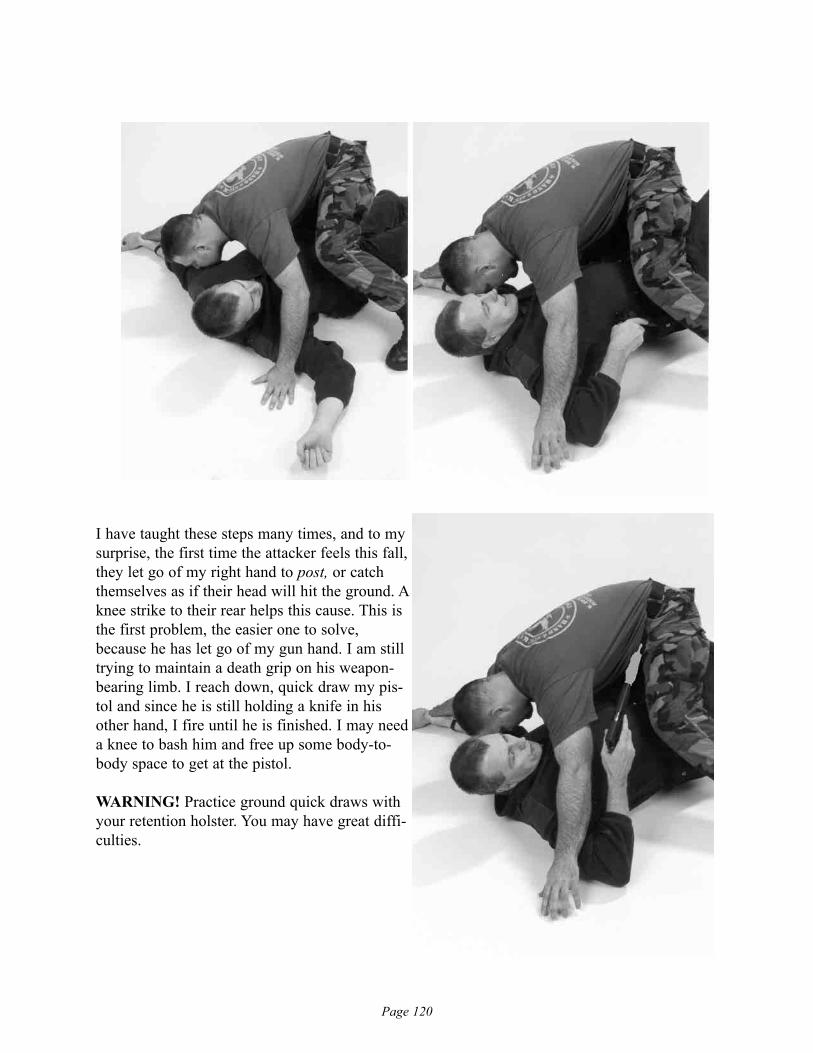
Page 120
I have taught these steps many times, and to mysurprise, the first time the attacker feels this fall,they let go of my right hand to post, or catchthemselves as if their head will hit the ground. Aknee strike to their rear helps this cause. This isthe first problem, the easier one to solve,because he has let go of my gun hand. I am stilltrying to maintain a death grip on his weapon-bearing limb. I reach down, quick draw my pis-tol and since he is still holding a knife in hisother hand, I fire until he is finished. I may needa knee to bash him and free up some body-to-body space to get at the pistol.
WARNING! Practice ground quick draws withyour retention holster. You may have great diffi-culties.
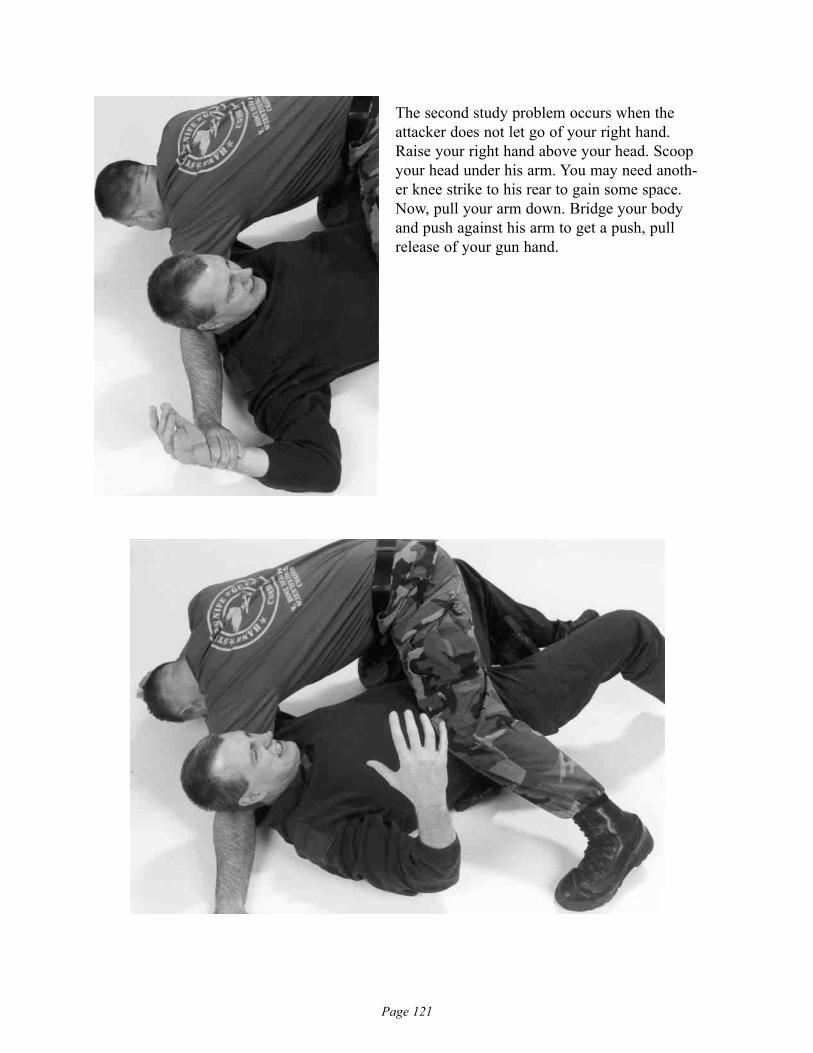
Page 121
The second study problem occurs when theattacker does not let go of your right hand.Raise your right hand above your head. Scoopyour head under his arm. You may need anoth-er knee strike to his rear to gain some space.Now, pull your arm down. Bridge your bodyand push against his arm to get a push, pullrelease of your gun hand.

Page 122
Draw and fire as needed. Since he is still brandish-ing a knife. Prepare yourself for the close concus-sion of the pistol report. Work this scenario withweapons that shoot simulated ammunition.
WARNING! It is not uncommon in the heat of such close quarters fighting for people to jamtheir pistols into the sides of the attacker. Many semi-automatics will not fire in this mannerbecause with the slide pressed against someone and forced back, the weapon will be out of bat-tery. I have seen many experts forget this in the stress of the ground struggle.
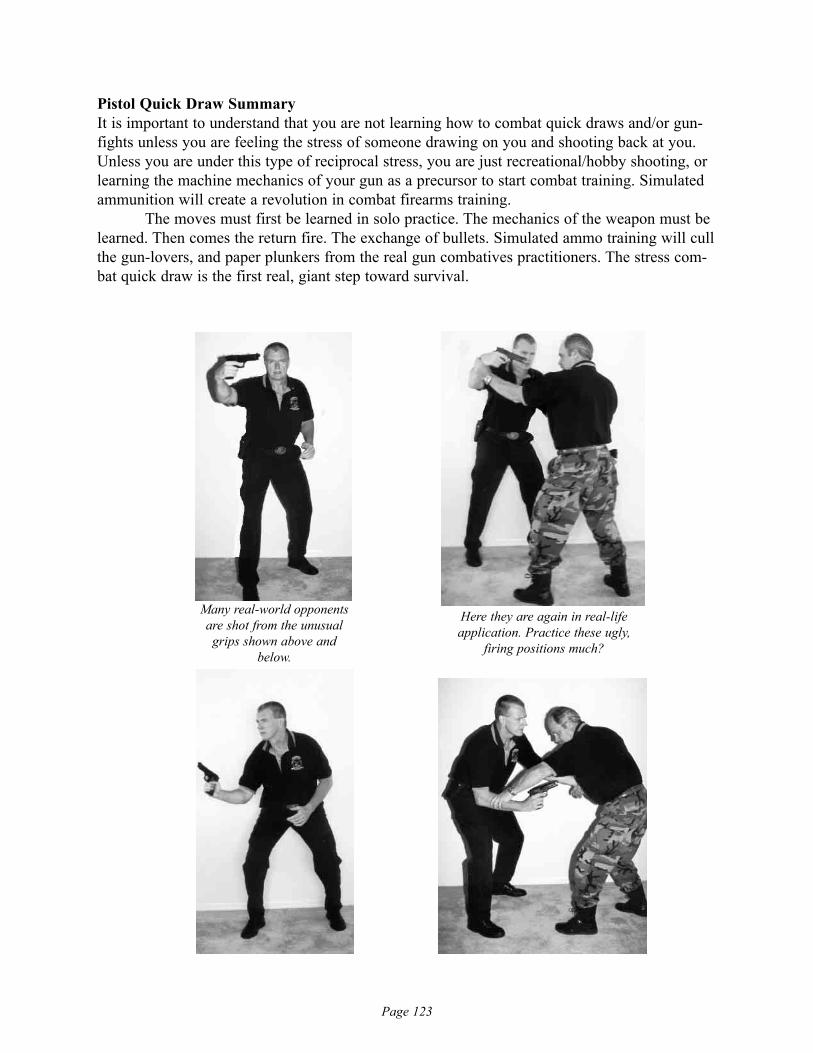
Page 123
Pistol Quick Draw SummaryIt is important to understand that you are not learning how to combat quick draws and/or gun-fights unless you are feeling the stress of someone drawing on you and shooting back at you.Unless you are under this type of reciprocal stress, you are just recreational/hobby shooting, orlearning the machine mechanics of your gun as a precursor to start combat training. Simulatedammunition will create a revolution in combat firearms training.
The moves must first be learned in solo practice. The mechanics of the weapon must belearned. Then comes the return fire. The exchange of bullets. Simulated ammo training will cullthe gun-lovers, and paper plunkers from the real gun combatives practitioners. The stress com-bat quick draw is the first real, giant step toward survival.
Many real-world opponentsare shot from the unusualgrips shown above and
below.
Here they are again in real-life application. Practice these ugly,
firing positions much?
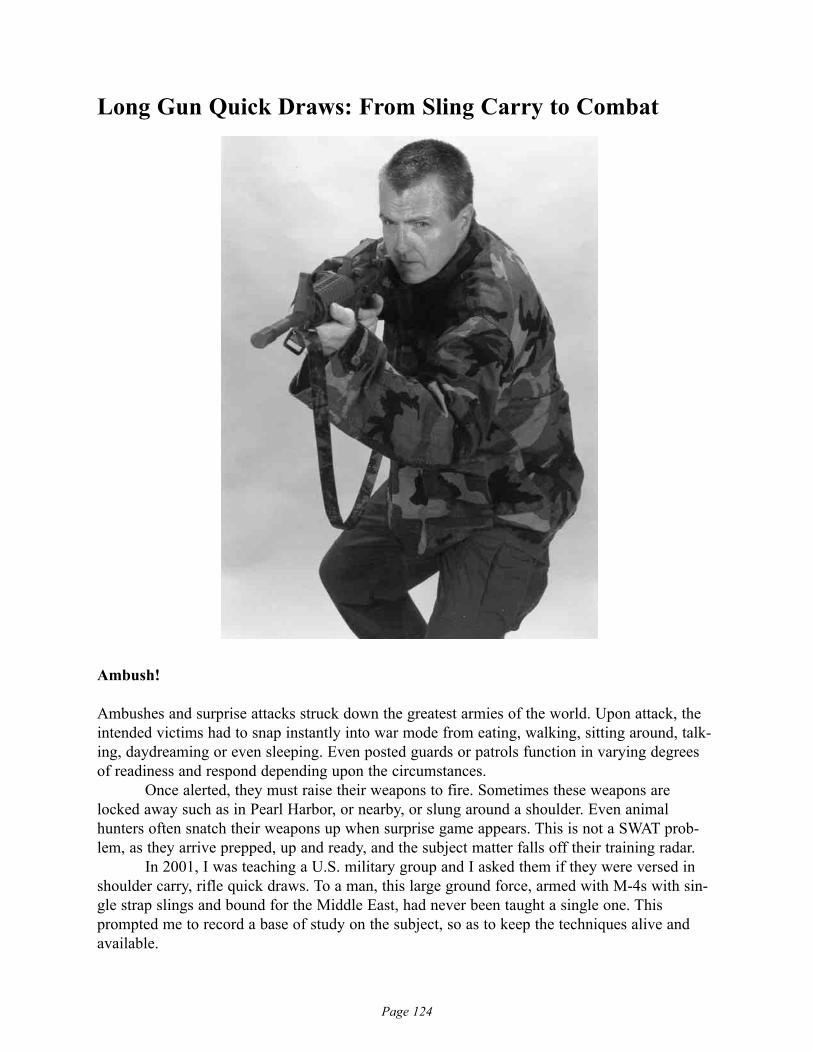
Page 124
Long Gun Quick Draws: From Sling Carry to Combat
Ambush!
Ambushes and surprise attacks struck down the greatest armies of the world. Upon attack, theintended victims had to snap instantly into war mode from eating, walking, sitting around, talk-ing, daydreaming or even sleeping. Even posted guards or patrols function in varying degreesof readiness and respond depending upon the circumstances.
Once alerted, they must raise their weapons to fire. Sometimes these weapons arelocked away such as in Pearl Harbor, or nearby, or slung around a shoulder. Even animalhunters often snatch their weapons up when surprise game appears. This is not a SWAT prob-lem, as they arrive prepped, up and ready, and the subject matter falls off their training radar.
In 2001, I was teaching a U.S. military group and I asked them if they were versed inshoulder carry, rifle quick draws. To a man, this large ground force, armed with M-4s with sin-gle strap slings and bound for the Middle East, had never been taught a single one. Thisprompted me to record a base of study on the subject, so as to keep the techniques alive andavailable.
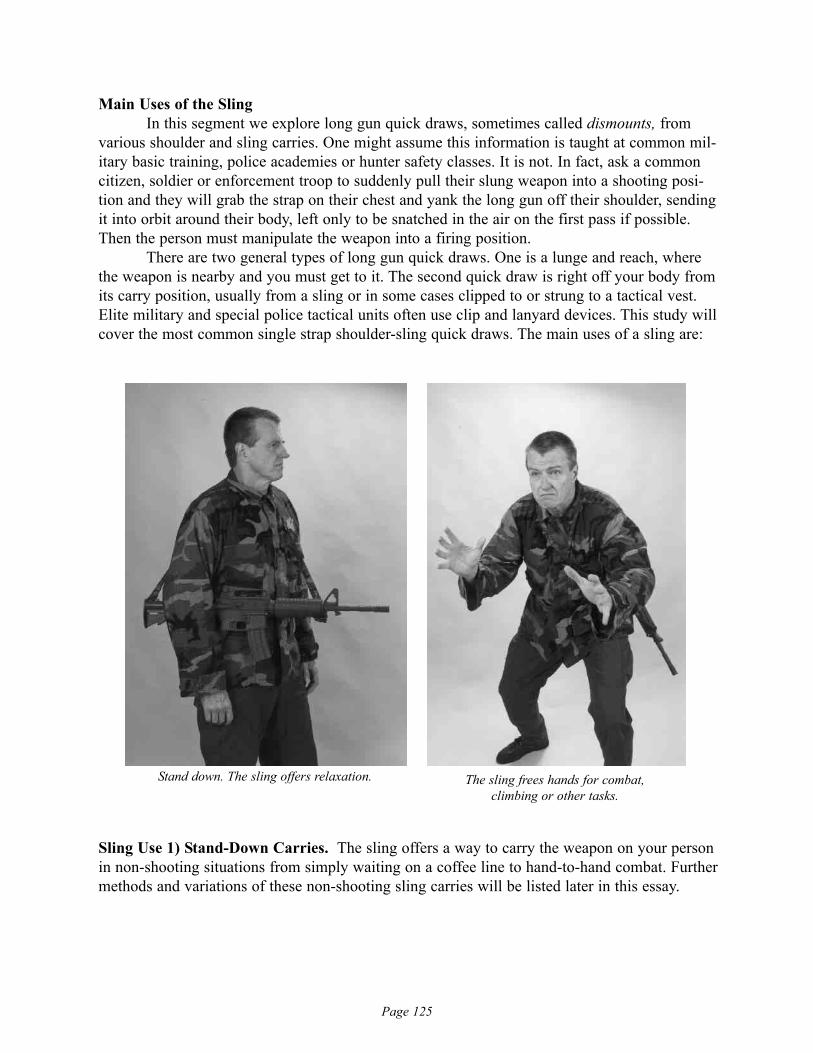
Page 125
Main Uses of the SlingIn this segment we explore long gun quick draws, sometimes called dismounts, from
various shoulder and sling carries. One might assume this information is taught at common mil-itary basic training, police academies or hunter safety classes. It is not. In fact, ask a commoncitizen, soldier or enforcement troop to suddenly pull their slung weapon into a shooting posi-tion and they will grab the strap on their chest and yank the long gun off their shoulder, sendingit into orbit around their body, left only to be snatched in the air on the first pass if possible.Then the person must manipulate the weapon into a firing position.
There are two general types of long gun quick draws. One is a lunge and reach, wherethe weapon is nearby and you must get to it. The second quick draw is right off your body fromits carry position, usually from a sling or in some cases clipped to or strung to a tactical vest.Elite military and special police tactical units often use clip and lanyard devices. This study willcover the most common single strap shoulder-sling quick draws. The main uses of a sling are:
Sling Use 1) Stand-Down Carries. The sling offers a way to carry the weapon on your personin non-shooting situations from simply waiting on a coffee line to hand-to-hand combat. Furthermethods and variations of these non-shooting sling carries will be listed later in this essay.
Stand down. The sling offers relaxation. The sling frees hands for combat, climbing or other tasks.
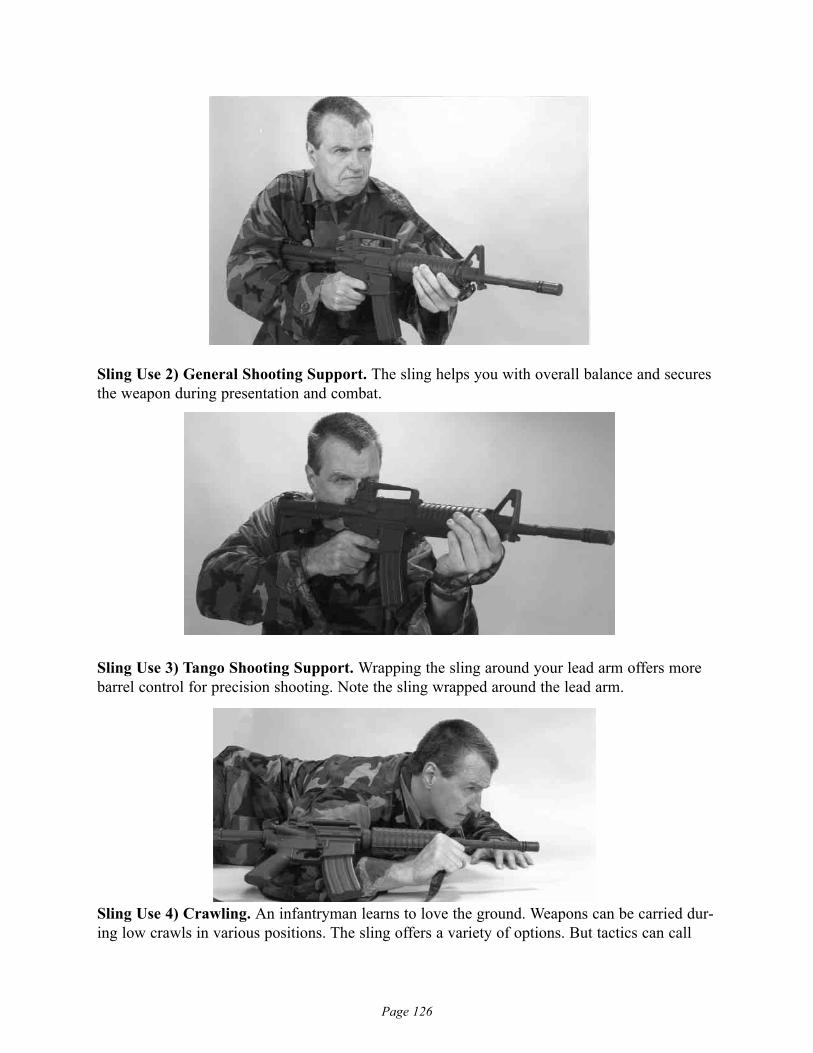
Page 126
Sling Use 2) General Shooting Support. The sling helps you with overall balance and securesthe weapon during presentation and combat.
Sling Use 3) Tango Shooting Support. Wrapping the sling around your lead arm offers morebarrel control for precision shooting. Note the sling wrapped around the lead arm.
Sling Use 4) Crawling. An infantryman learns to love the ground. Weapons can be carried dur-ing low crawls in various positions. The sling offers a variety of options. But tactics can call
Page 127
for crawling and other combat maneuvers that mandate the sling be secured, or wrapped aroundthe weapon in some manner so as not to catch or hook nearby items as you travel.
Sling Use 5) Miscellaneous. In the field, there are some miscellaneous uses for slings, frommakeshift clotheslines to tourniquets for the severely wounded.
The Basic Quick Draws from Sling CarriesMaximize your combat quick draw by taking note of the beginning carry positions in each ofthe following photo series. Reckless and unplanned carries will not allow you a quick draw andadd multiple, unnecessary steps that could cost you your life in combat.
The consummate gunfighter can shoot well from both right and left-handed positions.Work toward that goal, but most people cannot train this extensively. A strong-side carry iswhen the weapon is hanging by your strong and coordinated hand. Right-handed people usuallypull the trigger with their right trigger finger, vice-versa for lefties. A weak-side carry is whenthe weapon is hanging on the weak side and a quick draw must deliver the trigger to the strong-side trigger finger.
The quick draw firing positions will be from the hip to the shoulder. Under gunfire, thehuman sympathetic nervous system usually causes a person to crouch, a movement very con-ducive to raising the weapon up simultaneously to fire. The weapon can be carried on yourbody in these following combinations. Equipment and gear carried along with mission specificswill cause the variances. Here is a list of the main variables:
1) Strong side – weapon hanging down on your strong side.
2) Weak side – weapon hanging down on your weak side. Sometimes elite troops with pistols on their strong side will opt to carry their long weapon on their weak side.
3) Front hang – across the chest, the butt of the weapon should point to the strong side for quick access.
4) Rear hang – cross the back, the barrel of the weapon downward and may point to the strong side or weak side. A proper quick draw can produce a good firing position.
5) Barrel up.
6) Barrel down.
7) Sling wrapped on the same shoulder as weapon.
8) Cross sling – sling wrapped on opposite shoulder of weapon and over your head.
9) Head loop. The sling is looped around the neck, and the weapon is hanging somewhere on the chest.
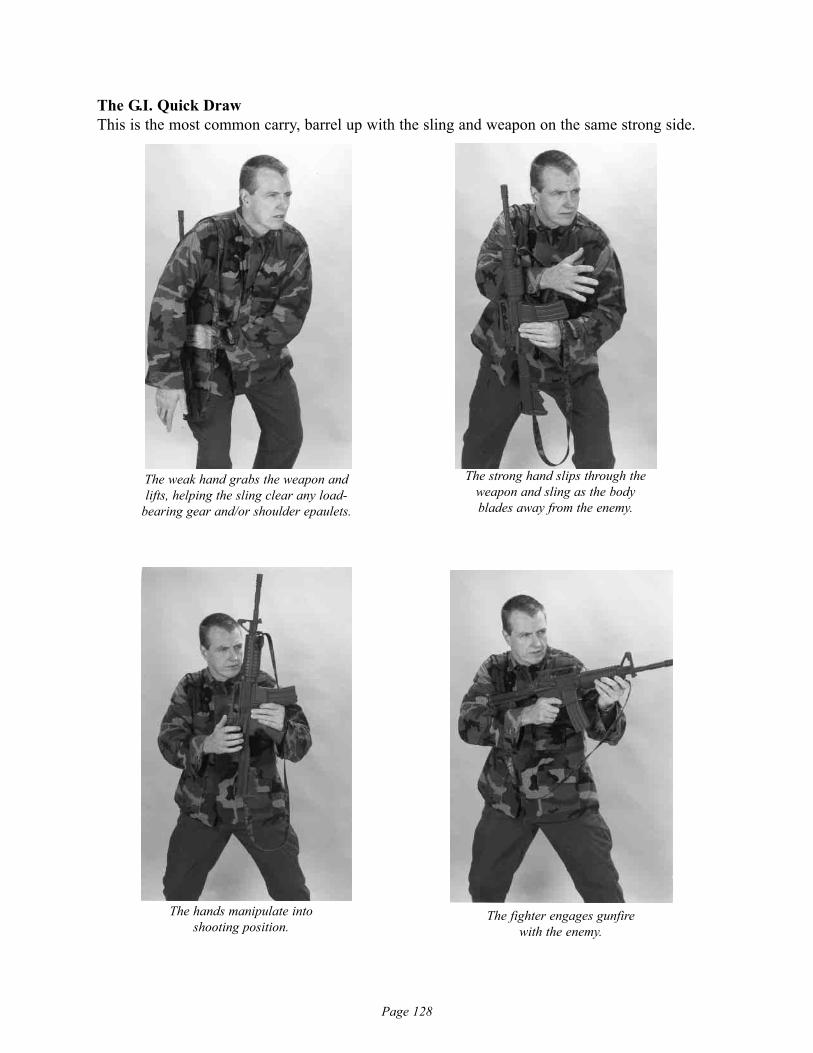
Page 128
The G.I. Quick DrawThis is the most common carry, barrel up with the sling and weapon on the same strong side.
The weak hand grabs the weapon andlifts, helping the sling clear any load-
bearing gear and/or shoulder epaulets.
The strong hand slips through theweapon and sling as the body blades away from the enemy.
The fighter engages gunfire with the enemy.
The hands manipulate into shooting position.
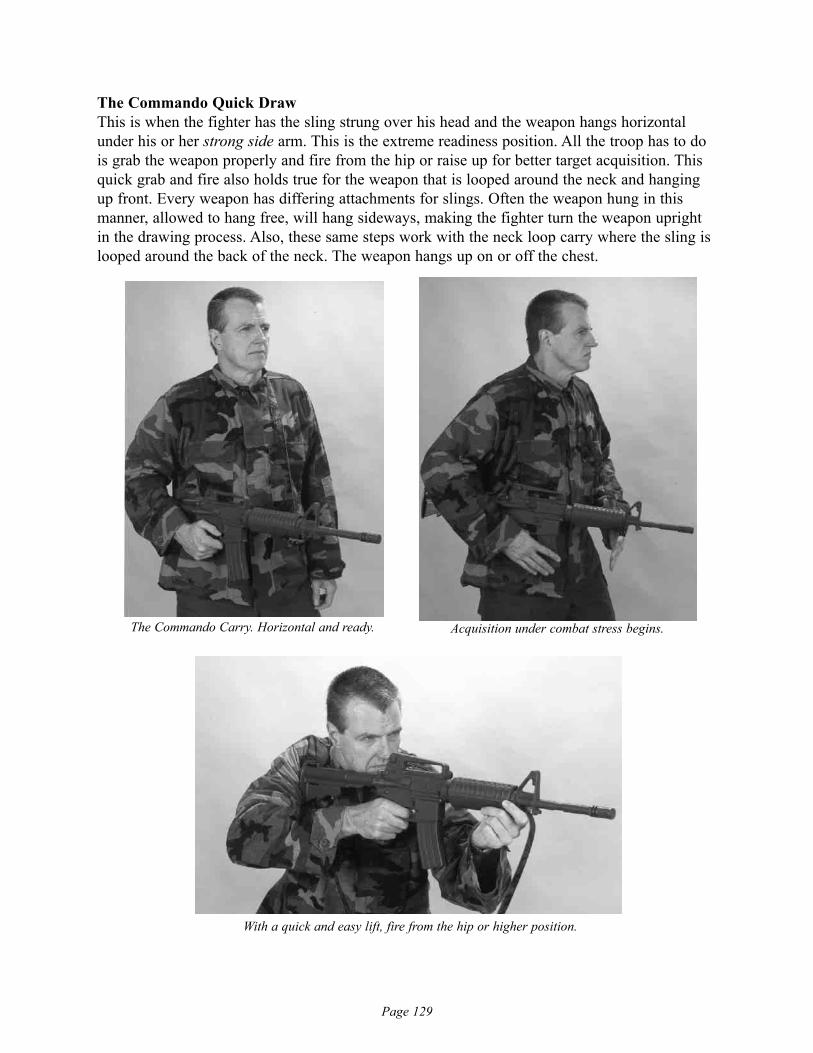
Page 129
The Commando Quick DrawThis is when the fighter has the sling strung over his head and the weapon hangs horizontalunder his or her strong side arm. This is the extreme readiness position. All the troop has to dois grab the weapon properly and fire from the hip or raise up for better target acquisition. Thisquick grab and fire also holds true for the weapon that is looped around the neck and hangingup front. Every weapon has differing attachments for slings. Often the weapon hung in thismanner, allowed to hang free, will hang sideways, making the fighter turn the weapon uprightin the drawing process. Also, these same steps work with the neck loop carry where the sling islooped around the back of the neck. The weapon hangs up on or off the chest.
The Commando Carry. Horizontal and ready. Acquisition under combat stress begins.
With a quick and easy lift, fire from the hip or higher position.
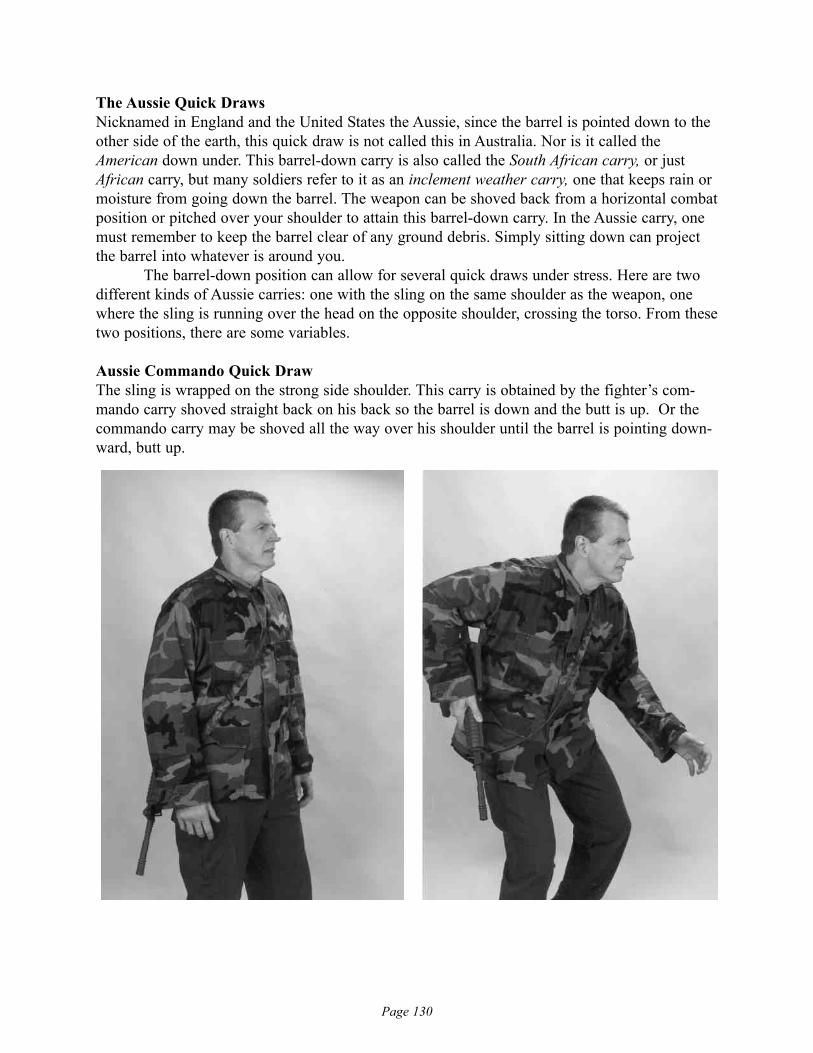
Page 130
The Aussie Quick DrawsNicknamed in England and the United States the Aussie, since the barrel is pointed down to theother side of the earth, this quick draw is not called this in Australia. Nor is it called theAmerican down under. This barrel-down carry is also called the South African carry, or justAfrican carry, but many soldiers refer to it as an inclement weather carry, one that keeps rain ormoisture from going down the barrel. The weapon can be shoved back from a horizontal combatposition or pitched over your shoulder to attain this barrel-down carry. In the Aussie carry, onemust remember to keep the barrel clear of any ground debris. Simply sitting down can projectthe barrel into whatever is around you.
The barrel-down position can allow for several quick draws under stress. Here are twodifferent kinds of Aussie carries: one with the sling on the same shoulder as the weapon, onewhere the sling is running over the head on the opposite shoulder, crossing the torso. From thesetwo positions, there are some variables.
Aussie Commando Quick Draw The sling is wrapped on the strong side shoulder. This carry is obtained by the fighter’s com-mando carry shoved straight back on his back so the barrel is down and the butt is up. Or thecommando carry may be shoved all the way over his shoulder until the barrel is pointing down-ward, butt up.
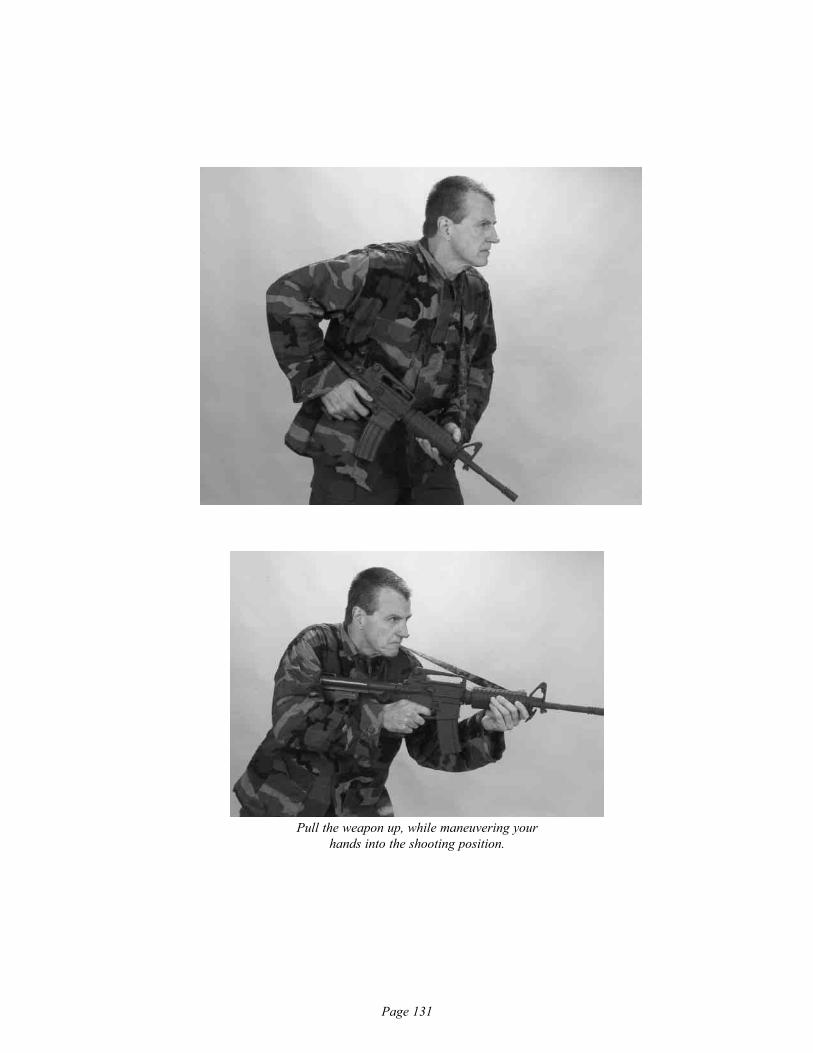
Page 131
Pull the weapon up, while maneuvering your hands into the shooting position.
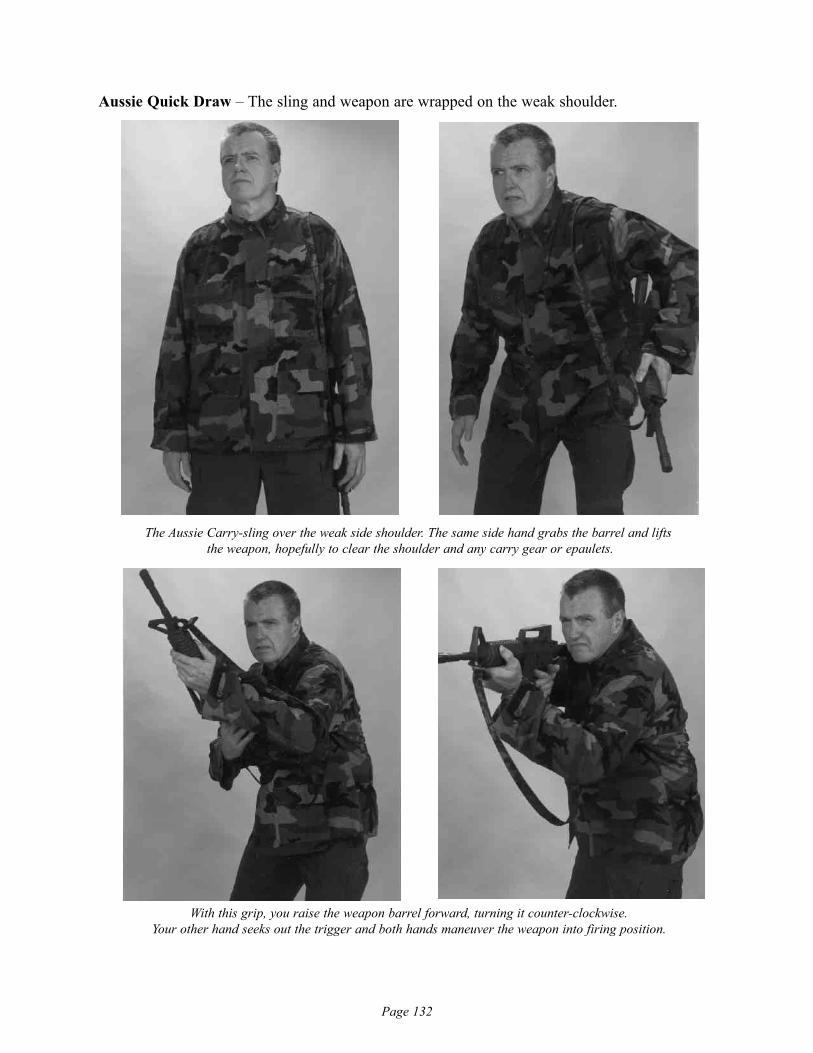
Page 132
Aussie Quick Draw – The sling and weapon are wrapped on the weak shoulder.
The Aussie Carry-sling over the weak side shoulder. The same side hand grabs the barrel and liftsthe weapon, hopefully to clear the shoulder and any carry gear or epaulets.
With this grip, you raise the weapon barrel forward, turning it counter-clockwise.Your other hand seeks out the trigger and both hands maneuver the weapon into firing position.
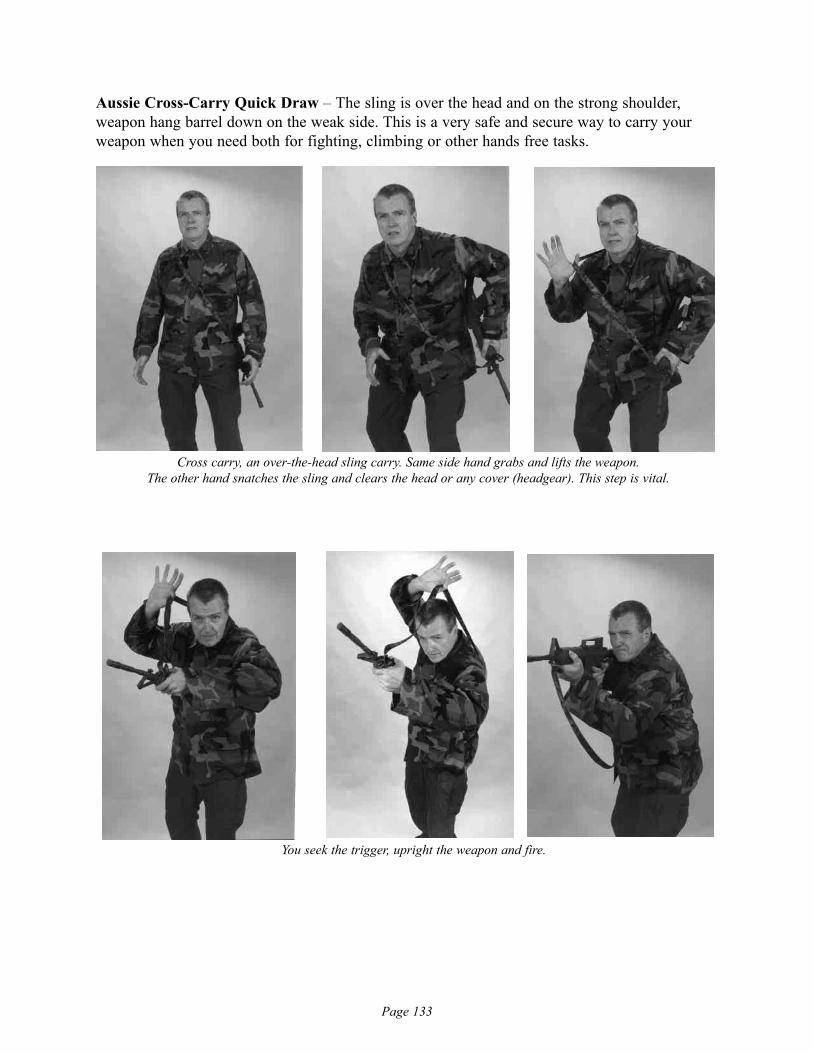
Page 133
Aussie Cross-Carry Quick Draw – The sling is over the head and on the strong shoulder,weapon hang barrel down on the weak side. This is a very safe and secure way to carry yourweapon when you need both for fighting, climbing or other hands free tasks.
Cross carry, an over-the-head sling carry. Same side hand grabs and lifts the weapon. The other hand snatches the sling and clears the head or any cover (headgear). This step is vital.
You seek the trigger, upright the weapon and fire.
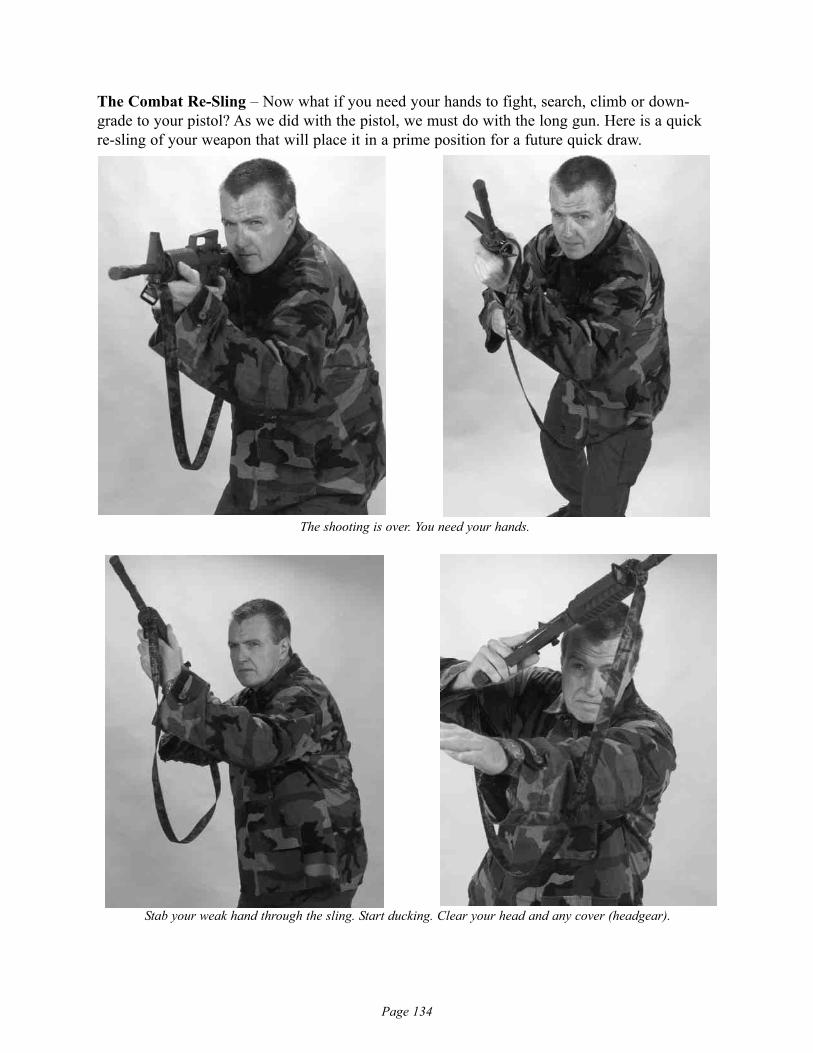
Page 134
The Combat Re-Sling – Now what if you need your hands to fight, search, climb or down-grade to your pistol? As we did with the pistol, we must do with the long gun. Here is a quickre-sling of your weapon that will place it in a prime position for a future quick draw.
The shooting is over. You need your hands.
Stab your weak hand through the sling. Start ducking. Clear your head and any cover (headgear).

Page 135
Long Gun Quick Draw Summary
The exact scientific breakdown of all these positions and probabilities may be grasped veryquickly with just a very short period of practice. Practice these long gun quick draws. See whatyou may use and then modify them with your body size, equipment and mission. You must alsomodify your sling as much as possible. My purpose here is to show you the basics and inspireyou to customize them to suit your needs, each and every time you step into potential combat.All combat veterans modify and position their gear as their comfort, education, experience andmission demand.
Pitch the weapon over your back. Try to keepthe magazine topside for future cross bodyquick draws. Your hands are free
and your weapon is very secure.
Page 136
Advanced Multi-Weapon Quick Draws Transitions
It was 1976. North Koreans killed U.S. Army officers inside the “NO Man’s Land,” of the 49th Parallel.“This is war,” our LT told us after an emergency muster, “the highest alarm has sounded.” Thehighest alerts of war were dispatched to us, and I found myself holding an M-16 along with mymilitary police issue .45 semi-auto in a flap holster. I stood in charge of an M-60 team andscanned over rice patties the Red Guard once swarmed some 20 years earlier. On a clear day,atop our SAM missile-laden mountain, with a pair of binoculars we could look north and seethe NKs doing jumping jacks in the morning. We were that close.
I suddenly felt the pressing need for extra ammo and a design for combat that includedthe wisest methods to use both my .45 and my M-16. When the bullets fly, MPs becomeinfantry and in all my basic and advanced training-still of the hard core Vietnam era, the subjectof using both these weapons never once came up. Still doesn’t. Yet there I was, like so manyMPs and other double-armed soldiers before me, armed with both and staring across a potentialbattlefield. Decades passed, and as a patrolman and a detective all my prowl cars and detectivesedans were issued a shotgun, sometimes rifles, for dire calls and arrests. There I was againwith two guns in the complete absence of training doctrine.
Decades ago, grunts in combat were often gifted a revolver from home for Christmas, orscavenged one from an enemy stockpile or corpse. Then, as today, elite units usually carriedboth pistols and shoulder weapons. Modern law enforcement special teams carry both and offi-cers responding to hot situations may pull a shotgun or a police authorized rifle into the fray. Acitizen fortunate enough to have a variety of weapons available, may need to take action withthem on his home ground or community.
When going armed with both a long gun and a pistol, it is wise to practice quick transi-tions from one to the other and understand when and why such switches are needed. The needto switch weapons may arise from a malfunction, exhausted ammo or an environmental need tochange caliber and/or range. I learned the following movements from various U.S. ArmyMilitary Police NCOs, and some enlightened civilian police officers that have been in this dou-ble-weapon jam before.
Here is some of what I learned from these vets, plus what little I have found in rare doc-trine, along with my improvisations I have come to trust. In each scenario you start with a readyweapon with either your pistol up or your rifle up.
Pistol Ready Switch SituationIf your pistol is up and ready, you transition to the long gun for three basic reasons.
Pistol to Long Gun Transition Reason 1: The pistol is out of ammo.Pistol to Long Gun Transition Reason 2: The pistol malfunctions.Pistol to Long Gun Transition Reason 3: You need heavier firepower or range.Pistol to Long Gun Transition Reason 4: Your pistol is being disarmed from you.
Circumstances like time, ammo and the situation will dictate whether you can keep the pistol onyour person for future use or you abandon it under extreme, desperate circumstances.
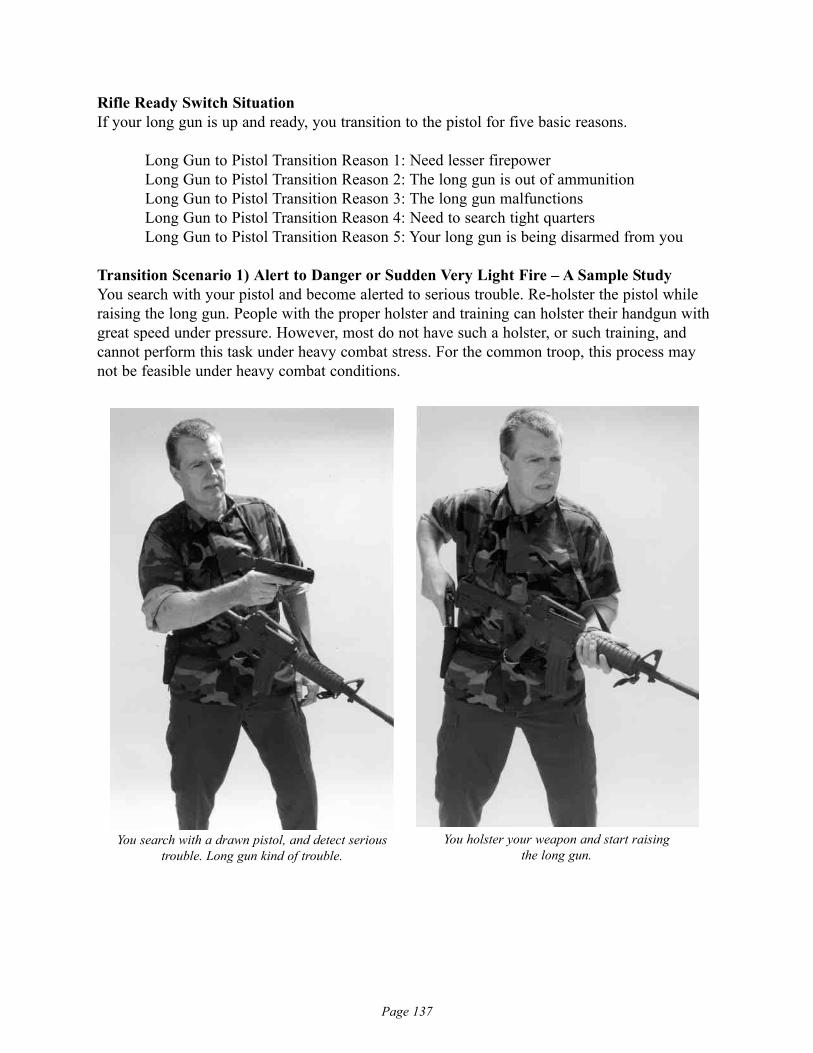
Page 137
Rifle Ready Switch SituationIf your long gun is up and ready, you transition to the pistol for five basic reasons.
Long Gun to Pistol Transition Reason 1: Need lesser firepowerLong Gun to Pistol Transition Reason 2: The long gun is out of ammunition Long Gun to Pistol Transition Reason 3: The long gun malfunctionsLong Gun to Pistol Transition Reason 4: Need to search tight quartersLong Gun to Pistol Transition Reason 5: Your long gun is being disarmed from you
Transition Scenario 1) Alert to Danger or Sudden Very Light Fire – A Sample StudyYou search with your pistol and become alerted to serious trouble. Re-holster the pistol whileraising the long gun. People with the proper holster and training can holster their handgun withgreat speed under pressure. However, most do not have such a holster, or such training, andcannot perform this task under heavy combat stress. For the common troop, this process maynot be feasible under heavy combat conditions.
You search with a drawn pistol, and detect serioustrouble. Long gun kind of trouble.
You holster your weapon and start raising the long gun.
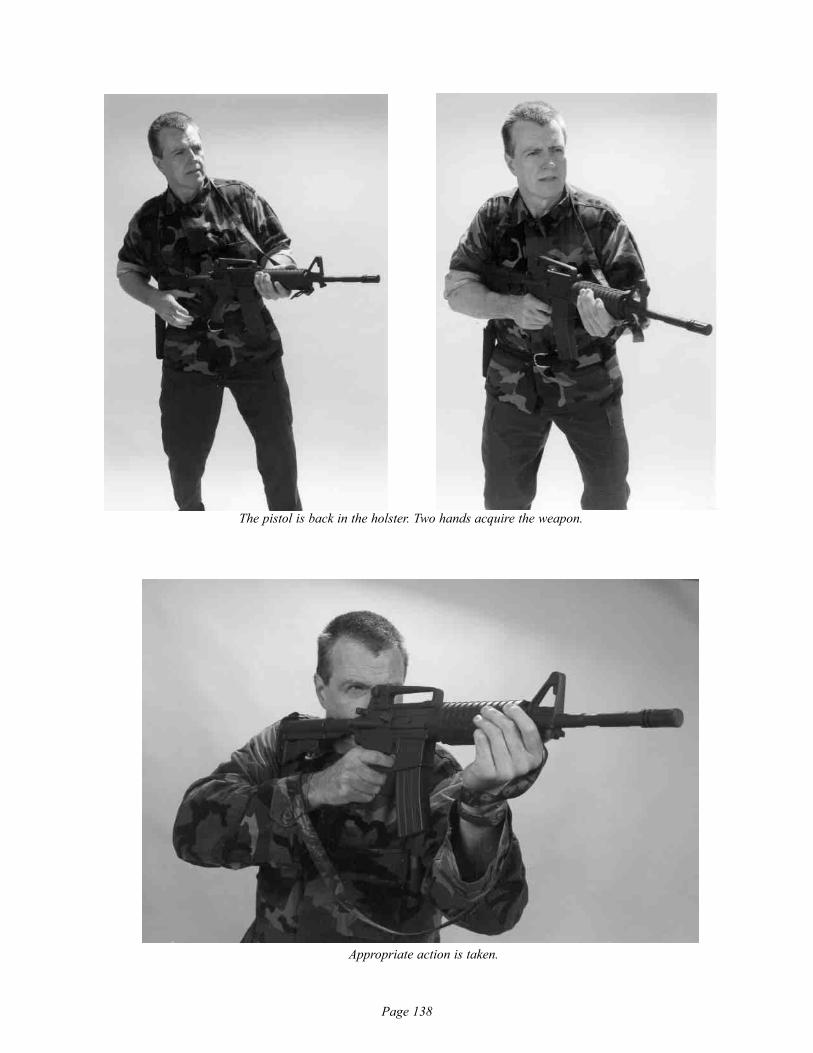
Page 138
The pistol is back in the holster. Two hands acquire the weapon.
Appropriate action is taken.
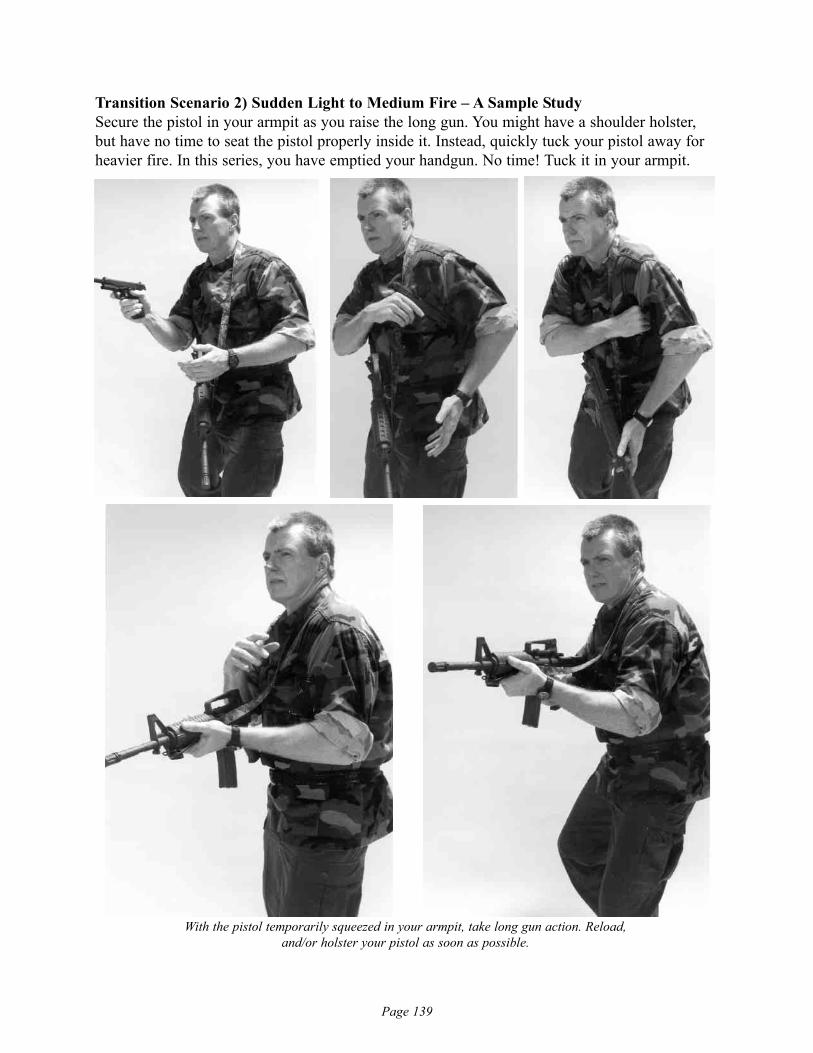
Page 139
Transition Scenario 2) Sudden Light to Medium Fire – A Sample StudySecure the pistol in your armpit as you raise the long gun. You might have a shoulder holster,but have no time to seat the pistol properly inside it. Instead, quickly tuck your pistol away forheavier fire. In this series, you have emptied your handgun. No time! Tuck it in your armpit.
With the pistol temporarily squeezed in your armpit, take long gun action. Reload, and/or holster your pistol as soon as possible.

Page 140
Transition Scenario 3) Sudden Heavy Fire – A Sample StudyYou might simply drop the pistol and pull up your long gun. For training, have a bean bag chairor large pillow at the range and just drop the pistol into it. Those who say they should never,ever discard their weapon under any circumstances? They simply have never been underextreme heavy fire. Like spent magazines, you may live to recover the weapon as soon as
possible.The same discarding can be done with
the long gun. If you have a sling, the weaponwill simply drop to the sling length. Without asling, the precious weapon will strike theground. You will have to decide based on thecircumstances. These are desperate measuresfor very desperate times.
People who instruct you to NEVER, ever discard yourweapon like this, have never felt the stress of enemy
gunfire piercing their earlobes.
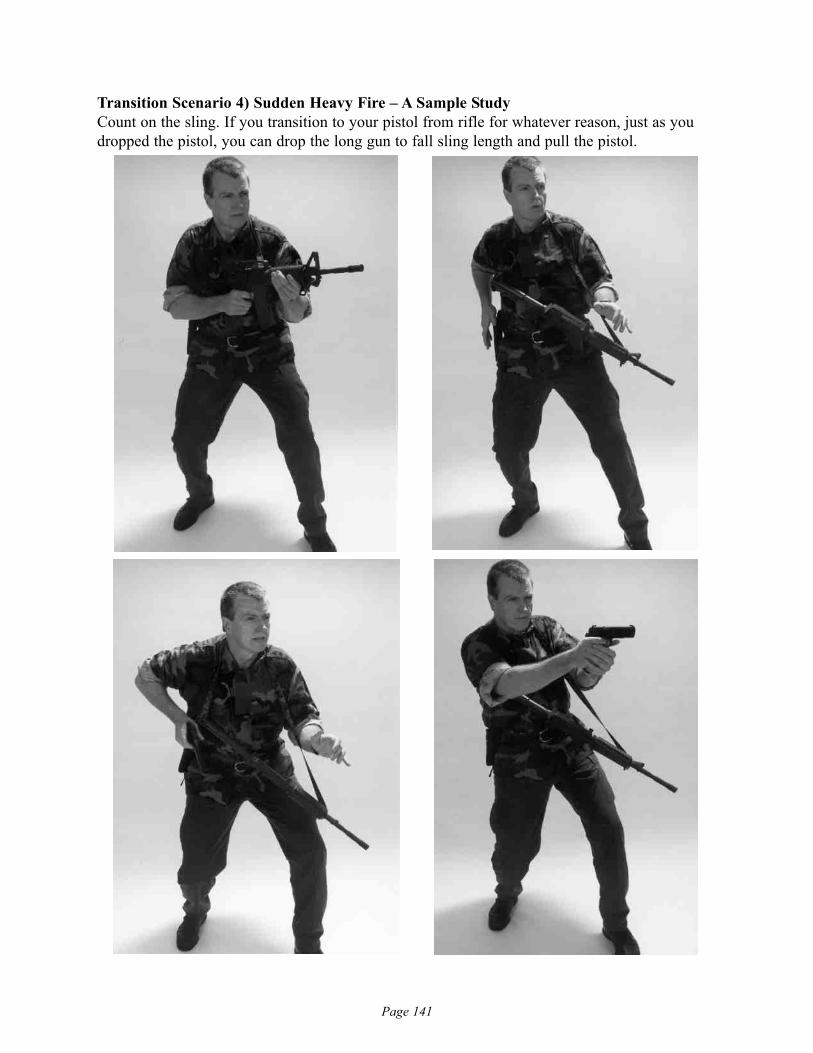
Page 141
Transition Scenario 4) Sudden Heavy Fire – A Sample StudyCount on the sling. If you transition to your pistol from rifle for whatever reason, just as youdropped the pistol, you can drop the long gun to fall sling length and pull the pistol.
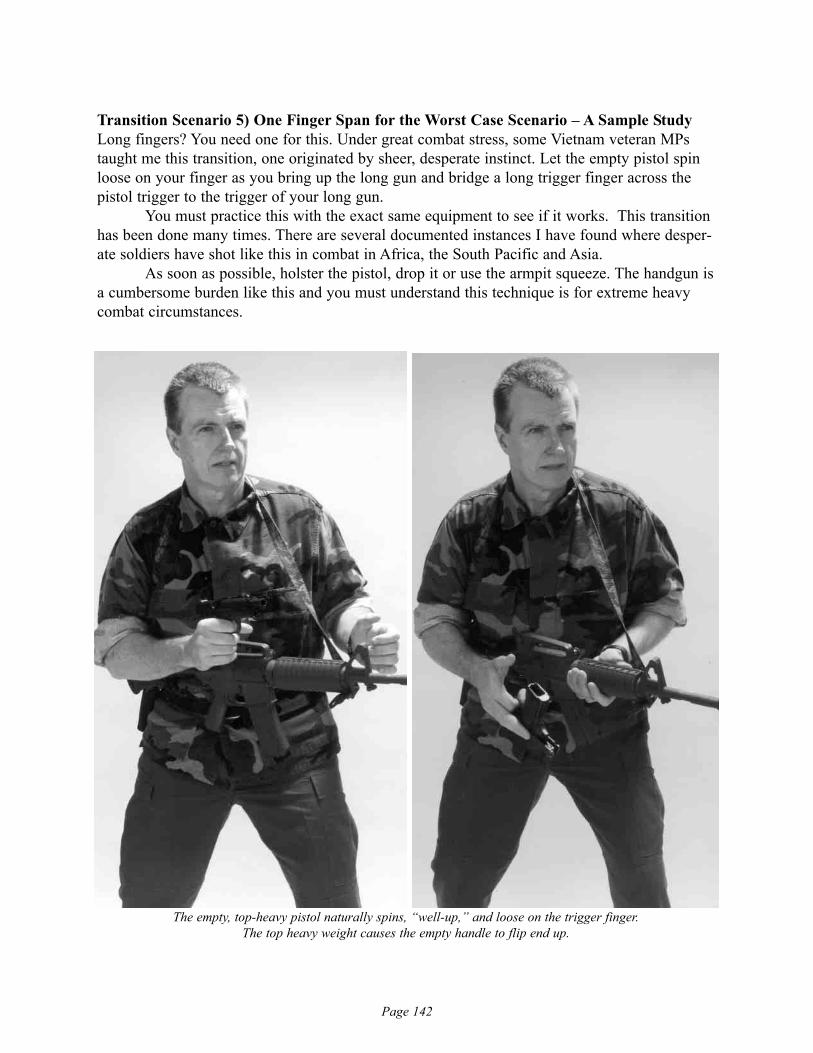
Page 142
Transition Scenario 5) One Finger Span for the Worst Case Scenario – A Sample StudyLong fingers? You need one for this. Under great combat stress, some Vietnam veteran MPstaught me this transition, one originated by sheer, desperate instinct. Let the empty pistol spinloose on your finger as you bring up the long gun and bridge a long trigger finger across thepistol trigger to the trigger of your long gun.
You must practice this with the exact same equipment to see if it works. This transitionhas been done many times. There are several documented instances I have found where desper-ate soldiers have shot like this in combat in Africa, the South Pacific and Asia.
As soon as possible, holster the pistol, drop it or use the armpit squeeze. The handgun isa cumbersome burden like this and you must understand this technique is for extreme heavycombat circumstances.
The empty, top-heavy pistol naturally spins, “well-up,” and loose on the trigger finger. The top heavy weight causes the empty handle to flip end up.
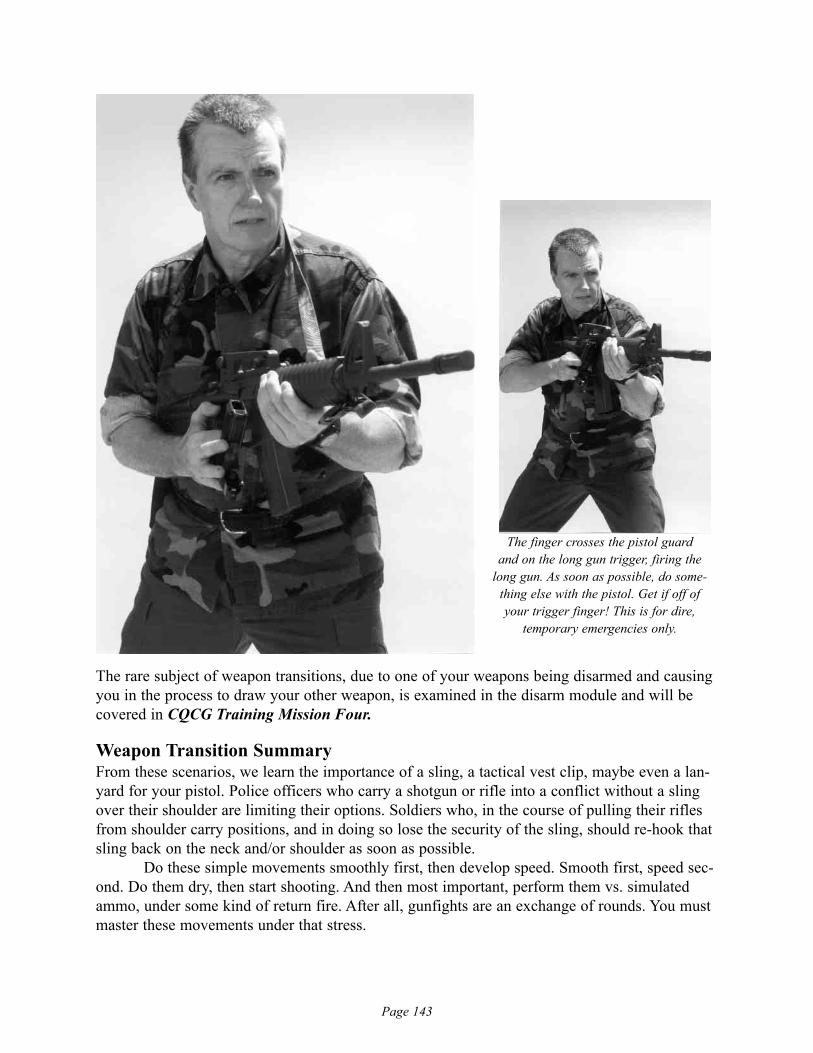
Page 143
The rare subject of weapon transitions, due to one of your weapons being disarmed and causingyou in the process to draw your other weapon, is examined in the disarm module and will becovered in CQCG Training Mission Four.
Weapon Transition SummaryFrom these scenarios, we learn the importance of a sling, a tactical vest clip, maybe even a lan-yard for your pistol. Police officers who carry a shotgun or rifle into a conflict without a slingover their shoulder are limiting their options. Soldiers who, in the course of pulling their riflesfrom shoulder carry positions, and in doing so lose the security of the sling, should re-hook thatsling back on the neck and/or shoulder as soon as possible.
Do these simple movements smoothly first, then develop speed. Smooth first, speed sec-ond. Do them dry, then start shooting. And then most important, perform them vs. simulatedammo, under some kind of return fire. After all, gunfights are an exchange of rounds. You mustmaster these movements under that stress.
The finger crosses the pistol guard and on the long gun trigger, firing the
long gun. As soon as possible, do some-thing else with the pistol. Get if off ofyour trigger finger! This is for dire,
temporary emergencies only.
Page 144
Your Pistol and Long Gun Quick Draw Module Review and Training Assignment
Practice these draws, drills and scenarios in a hostile environment. Use loud gunfire soundtrack, flashing lights and, if in a training room, periods of darkness.
Practice the Quick Draw Positions Solo
QD 1) The Standing QDs
– Draw and shoot from standing triangles grips.– Draw and shoot from single hand.
QD 2) Knee QDs
– Draw and shoot from double hand grips.– Draw and shoot from single hand grips.
QD 3) Ground QDs
– Draw and shoot from a forward prone.– Draw and shoot from a rear prone.
QD 4) Walking Quick Draws
– Draw and shoot from any position.
Practice these responses to attack stimuli with simulated ammunition.
Practice responding to some realistic stimuli with real ammo on a safe range.
Practice the Pistol Quick Draw Drills
Pistol QD Drill 1) Evaluating the two Hand Grip Space Drill– One Counters QD– Both armed, do anything
Pistol QD Drill 2) The Space, Stress and Speed Partner Palm Drill
– One Counters QD– Both armed, do anything
Page 145
Pistol QD Drill 3) Block, Pass and Pin Drill
– Shove and quick draw vs. a charging opponent– Re-holster! Shove and re-holster
Practice the Combat Scenarios
Pistol QD CS 1) The Interview Stance Sets
– push and draw– block and draw– strike and draw
Pistol QD CS 2) Countering the CQC Pistol to Throat Threat
Pistol QD CS 3) Countering the Rifle Snapshooter
Pistol QD CS 4) Countering the Ground Knife Attacker
Pistol QD CS 5) Left Hand Quick Draw
Practice Rifle Quick Draws from Shoulder Sling Carries
Rifle QD 1) From the GI Carry
Rifle QD 2) Commando QD
Rifle QD 3) Aussie QD
– single shoulder carry– cross back carry
Rifle QD 4) Rifle Combat Re-sling
Practice the Weapon Transition Quick Draws
WP 1) Pistol to Rifle
WP 2) Rifle to Pistol
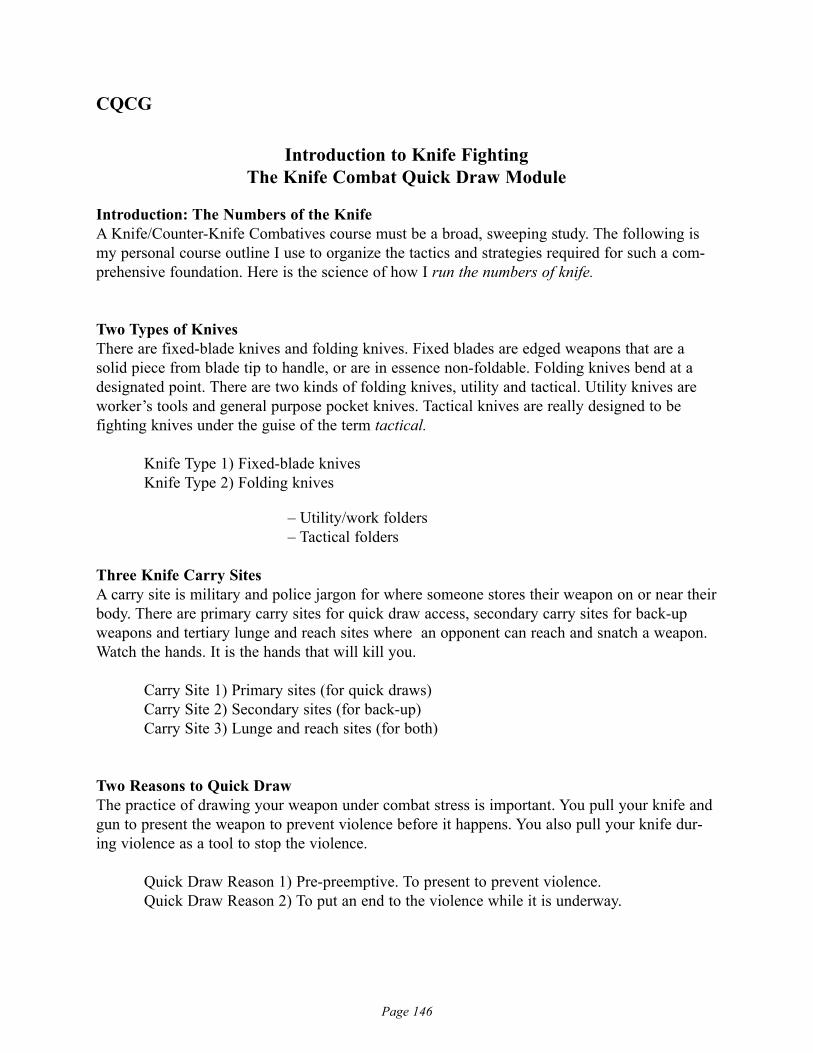
Page 146
CQCG
Introduction to Knife Fighting The Knife Combat Quick Draw Module
Introduction: The Numbers of the KnifeA Knife/Counter-Knife Combatives course must be a broad, sweeping study. The following ismy personal course outline I use to organize the tactics and strategies required for such a com-prehensive foundation. Here is the science of how I run the numbers of knife.
Two Types of KnivesThere are fixed-blade knives and folding knives. Fixed blades are edged weapons that are asolid piece from blade tip to handle, or are in essence non-foldable. Folding knives bend at adesignated point. There are two kinds of folding knives, utility and tactical. Utility knives areworker’s tools and general purpose pocket knives. Tactical knives are really designed to befighting knives under the guise of the term tactical.
Knife Type 1) Fixed-blade knivesKnife Type 2) Folding knives
– Utility/work folders– Tactical folders
Three Knife Carry SitesA carry site is military and police jargon for where someone stores their weapon on or near theirbody. There are primary carry sites for quick draw access, secondary carry sites for back-upweapons and tertiary lunge and reach sites where an opponent can reach and snatch a weapon.Watch the hands. It is the hands that will kill you.
Carry Site 1) Primary sites (for quick draws)Carry Site 2) Secondary sites (for back-up)Carry Site 3) Lunge and reach sites (for both)
Two Reasons to Quick DrawThe practice of drawing your weapon under combat stress is important. You pull your knife andgun to present the weapon to prevent violence before it happens. You also pull your knife dur-ing violence as a tool to stop the violence.
Quick Draw Reason 1) Pre-preemptive. To present to prevent violence.Quick Draw Reason 2) To put an end to the violence while it is underway.
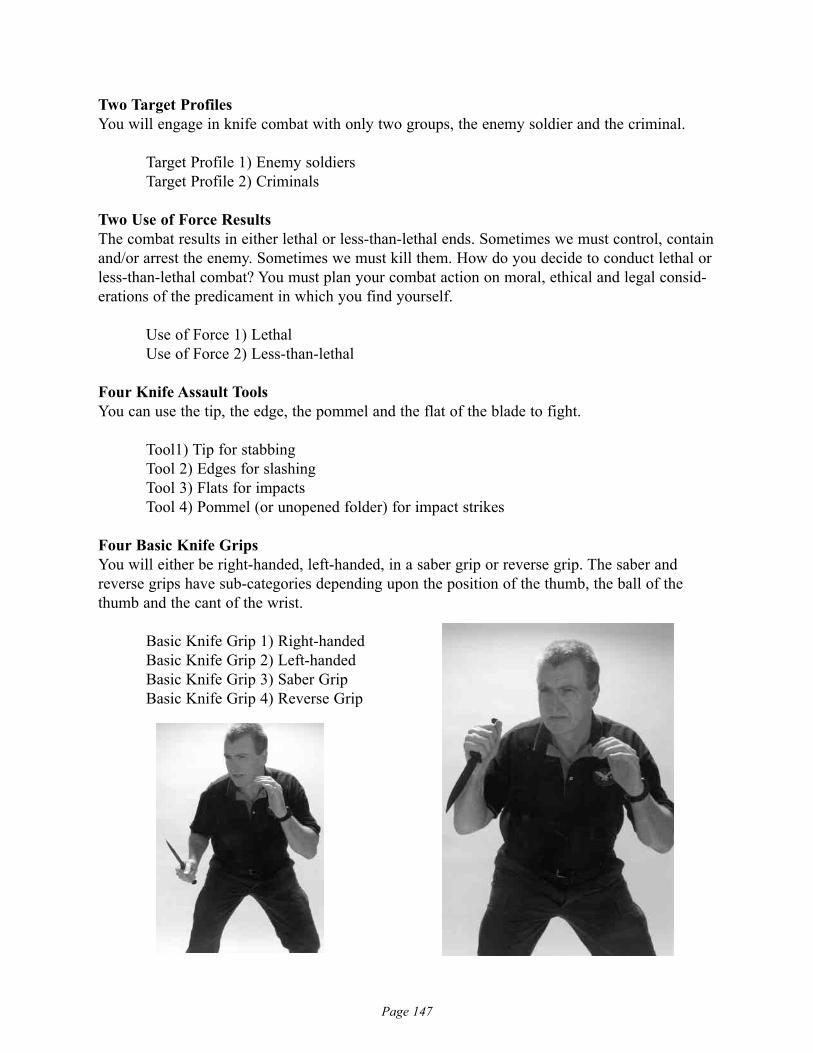
Page 147
Two Target Profiles You will engage in knife combat with only two groups, the enemy soldier and the criminal.
Target Profile 1) Enemy soldiersTarget Profile 2) Criminals
Two Use of Force ResultsThe combat results in either lethal or less-than-lethal ends. Sometimes we must control, containand/or arrest the enemy. Sometimes we must kill them. How do you decide to conduct lethal orless-than-lethal combat? You must plan your combat action on moral, ethical and legal consid-erations of the predicament in which you find yourself.
Use of Force 1) LethalUse of Force 2) Less-than-lethal
Four Knife Assault Tools You can use the tip, the edge, the pommel and the flat of the blade to fight.
Tool1) Tip for stabbingTool 2) Edges for slashingTool 3) Flats for impactsTool 4) Pommel (or unopened folder) for impact strikes
Four Basic Knife GripsYou will either be right-handed, left-handed, in a saber grip or reverse grip. The saber andreverse grips have sub-categories depending upon the position of the thumb, the ball of thethumb and the cant of the wrist.
Basic Knife Grip 1) Right-handedBasic Knife Grip 2) Left-handedBasic Knife Grip 3) Saber GripBasic Knife Grip 4) Reverse Grip
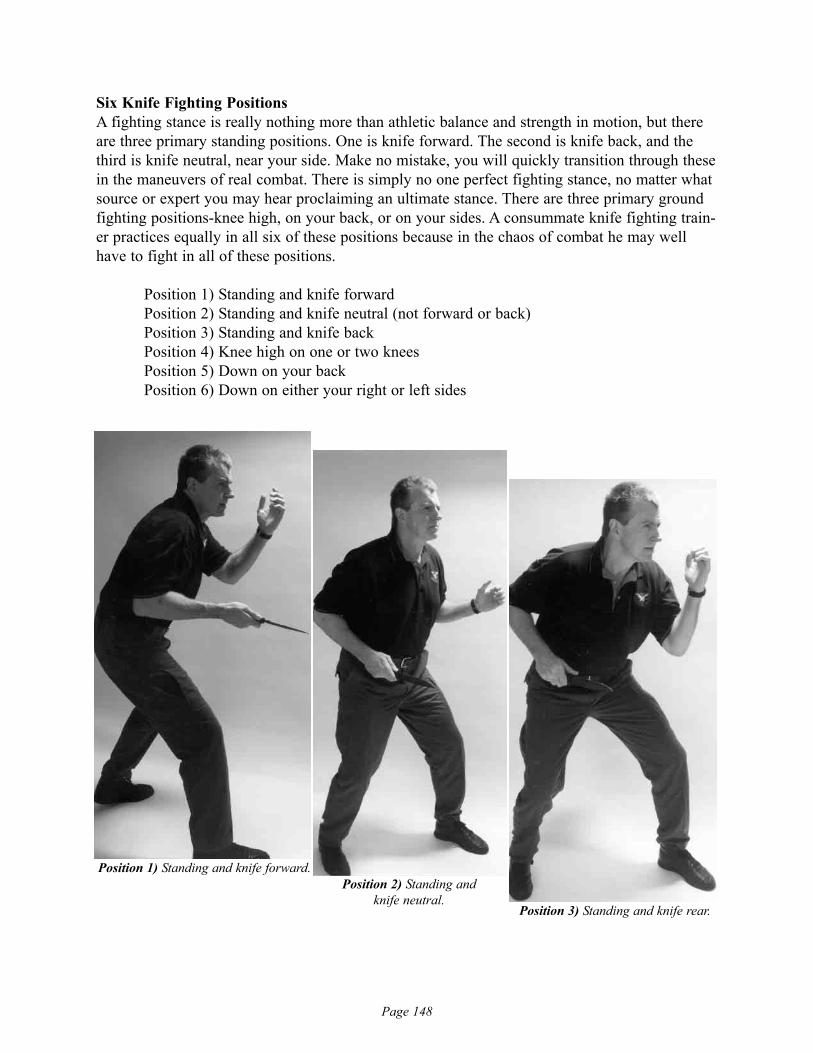
Page 148
Six Knife Fighting PositionsA fighting stance is really nothing more than athletic balance and strength in motion, but thereare three primary standing positions. One is knife forward. The second is knife back, and thethird is knife neutral, near your side. Make no mistake, you will quickly transition through thesein the maneuvers of real combat. There is simply no one perfect fighting stance, no matter whatsource or expert you may hear proclaiming an ultimate stance. There are three primary groundfighting positions-knee high, on your back, or on your sides. A consummate knife fighting train-er practices equally in all six of these positions because in the chaos of combat he may wellhave to fight in all of these positions.
Position 1) Standing and knife forwardPosition 2) Standing and knife neutral (not forward or back)Position 3) Standing and knife backPosition 4) Knee high on one or two kneesPosition 5) Down on your backPosition 6) Down on either your right or left sides
Position 1) Standing and knife forward.Position 2) Standing and
knife neutral.Position 3) Standing and knife rear.
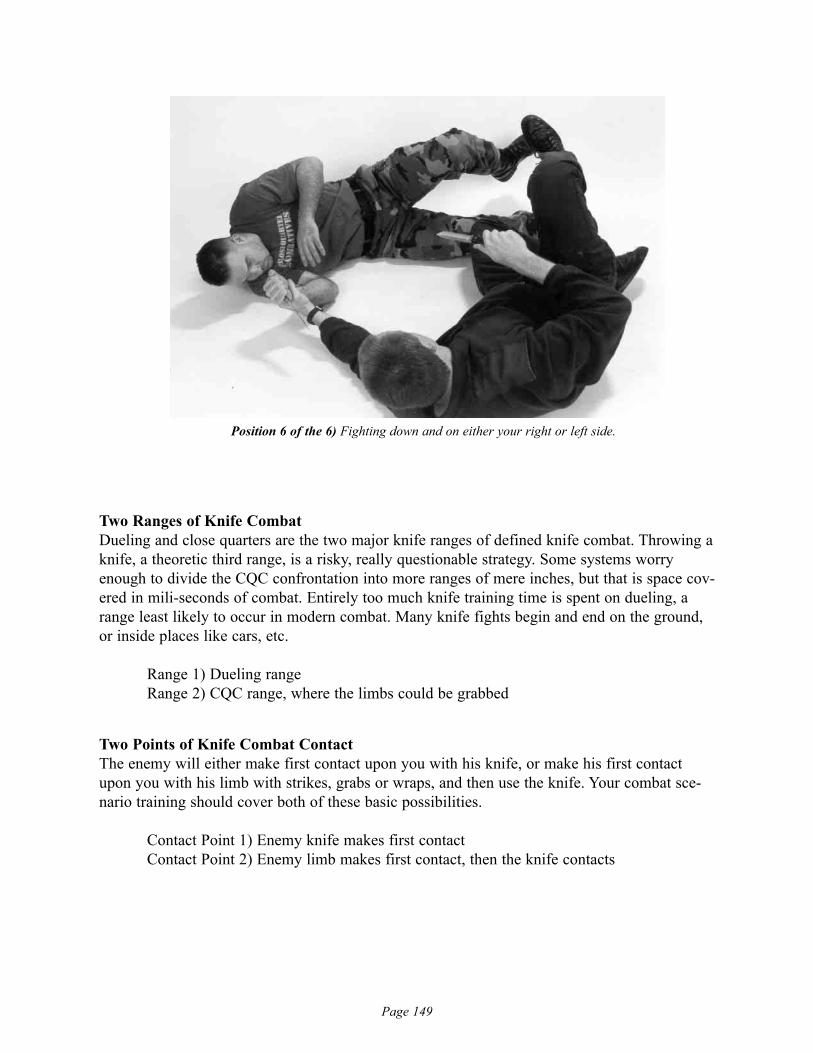
Page 149
Two Ranges of Knife Combat Dueling and close quarters are the two major knife ranges of defined knife combat. Throwing aknife, a theoretic third range, is a risky, really questionable strategy. Some systems worryenough to divide the CQC confrontation into more ranges of mere inches, but that is space cov-ered in mili-seconds of combat. Entirely too much knife training time is spent on dueling, arange least likely to occur in modern combat. Many knife fights begin and end on the ground,or inside places like cars, etc.
Range 1) Dueling rangeRange 2) CQC range, where the limbs could be grabbed
Two Points of Knife Combat ContactThe enemy will either make first contact upon you with his knife, or make his first contactupon you with his limb with strikes, grabs or wraps, and then use the knife. Your combat sce-nario training should cover both of these basic possibilities.
Contact Point 1) Enemy knife makes first contactContact Point 2) Enemy limb makes first contact, then the knife contacts
Position 6 of the 6) Fighting down and on either your right or left side.
Page 150
Six Knife Assault DrillsYou must practice saber grip slashing, reverse grip slashing, hacking, saber grip stabbing,reverse grip stabbing and pommel striking in standing, kneeling and ground positions to be aconsummate practitioner. The pommel striking must also include the use of a folding knife as apalm stick (essentially two pommels). A knife expert is well versed in all six.
Assault 1) Saber slashingAssault 2) Reverse slashingAssault 3) HackingAssault 4) Reverse grip stabbingAssault 5) Saber grip stabbingAssault 6) Pommel strikes
Three Counters to Common BlocksYou attack. He blocks. Interrupted, you can pursue three main strategies. One is cut the block.Or, you can redirect the knife to another line of attack. You can also invade/trap the block.
Counter 1) Cut the block.Counter 2) Redirect your knife onto another line of attack.Counter 3) Invading hands – trap the block.
Four Basic Invading/Trapping HandsGetting into closer quarters, you can use the four P’s. Pin, Pass, Pull or Push the opponent’slimbs to get a better target. This is the simple essence of trapping. The enemy’s arms are mereobstructions to a better target.
Invasion 1) Pin (or wrap) the obstructing arm.Invasion 2) Pass the obstructing arm.Invasion 3) Pull the obstructing arm.Invasion 4) Push the obstructing arm.
Five Obstacles to VictoryYour knife must overcome the opponent’s mental and physical condition, plus the clothing hewears.
Obstacle 1) His size, strength and conditionObstacle 2) His arms up and in the wayObstacle 3) His sudden, explosive and reflexive body movementsObstacle 4) His clothing Obstacle 5) His adrenaline

Page 151
One Unarmed Combatives CourseToo often, naive knife practitioners knife fight as though the conflict were a fencing match.They end their scenarios with a simple stab. A stab or a slash or two, like fists and bullets, arenotorious for not finishing a fight. You must develop unarmed striking, blocking, kicking, take-downs, throws, and ground fighting in a highly combative, non-sport, cheating course to sup-port your knife action. Overuse the knife, but support the knife with your body.
Three Angles of Attack DrillsThese three cover all the essentials of slashing, stabbing, pommel striking and training.
Angle of Attack Drill 1) 8 angles of slashingAngle of Attack Drill 2) 10 angles of stabbingAngle of Attack Drill 3) 12 angles for training a partner’s responses
Nine Combat ModulesThere are nine main combat modules. However, a variety of material may be grouped into mod-ules for specific training as needed.
Do or Die! Unarmed vs. the Knife Combat ModuleQuick Draw Combat ModuleSpartan Combat ModuleChain of the Knife Combat ModuleIn the Clutches of Combat ModuleKillshot Dueling ModuleGround Zero Knife Ground Fighting ModuleCounter-Crime ModuleThe British Bastard Mix Combat Module
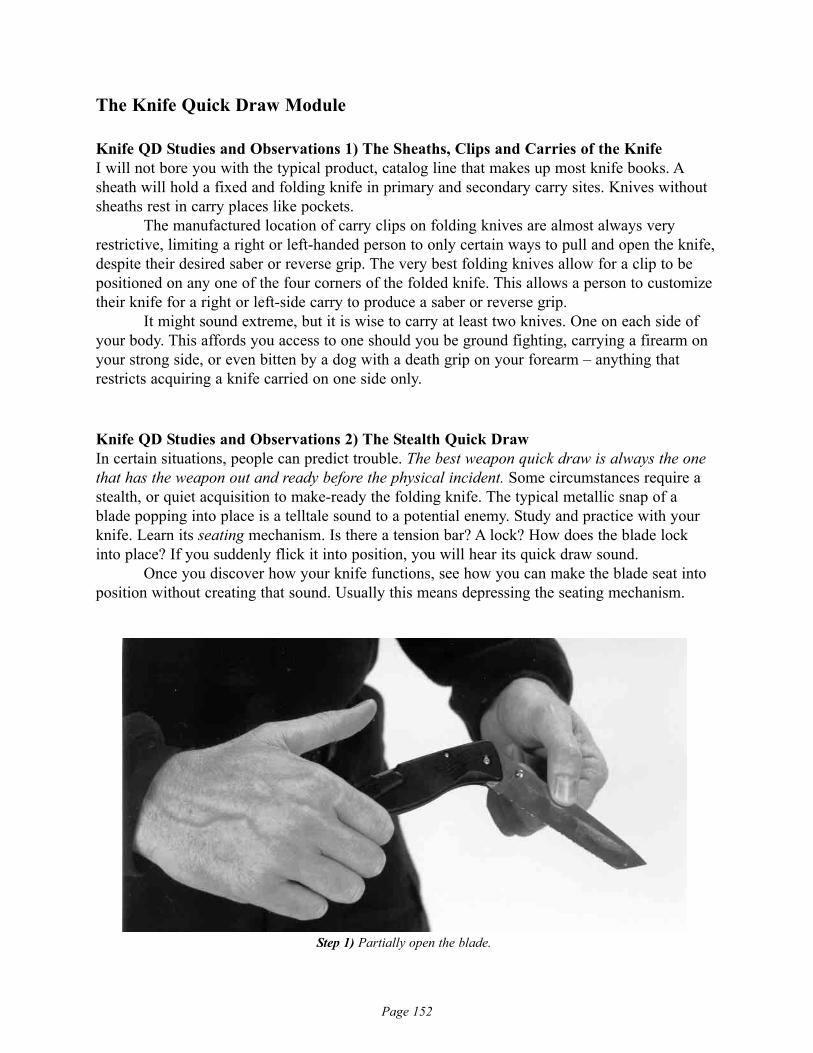
Page 152
The Knife Quick Draw Module
Knife QD Studies and Observations 1) The Sheaths, Clips and Carries of the KnifeI will not bore you with the typical product, catalog line that makes up most knife books. Asheath will hold a fixed and folding knife in primary and secondary carry sites. Knives withoutsheaths rest in carry places like pockets.
The manufactured location of carry clips on folding knives are almost always veryrestrictive, limiting a right or left-handed person to only certain ways to pull and open the knife,despite their desired saber or reverse grip. The very best folding knives allow for a clip to bepositioned on any one of the four corners of the folded knife. This allows a person to customizetheir knife for a right or left-side carry to produce a saber or reverse grip.
It might sound extreme, but it is wise to carry at least two knives. One on each side ofyour body. This affords you access to one should you be ground fighting, carrying a firearm onyour strong side, or even bitten by a dog with a death grip on your forearm – anything thatrestricts acquiring a knife carried on one side only.
Knife QD Studies and Observations 2) The Stealth Quick DrawIn certain situations, people can predict trouble. The best weapon quick draw is always the onethat has the weapon out and ready before the physical incident. Some circumstances require astealth, or quiet acquisition to make-ready the folding knife. The typical metallic snap of ablade popping into place is a telltale sound to a potential enemy. Study and practice with yourknife. Learn its seating mechanism. Is there a tension bar? A lock? How does the blade lockinto place? If you suddenly flick it into position, you will hear its quick draw sound.
Once you discover how your knife functions, see how you can make the blade seat intoposition without creating that sound. Usually this means depressing the seating mechanism.
Step 1) Partially open the blade.
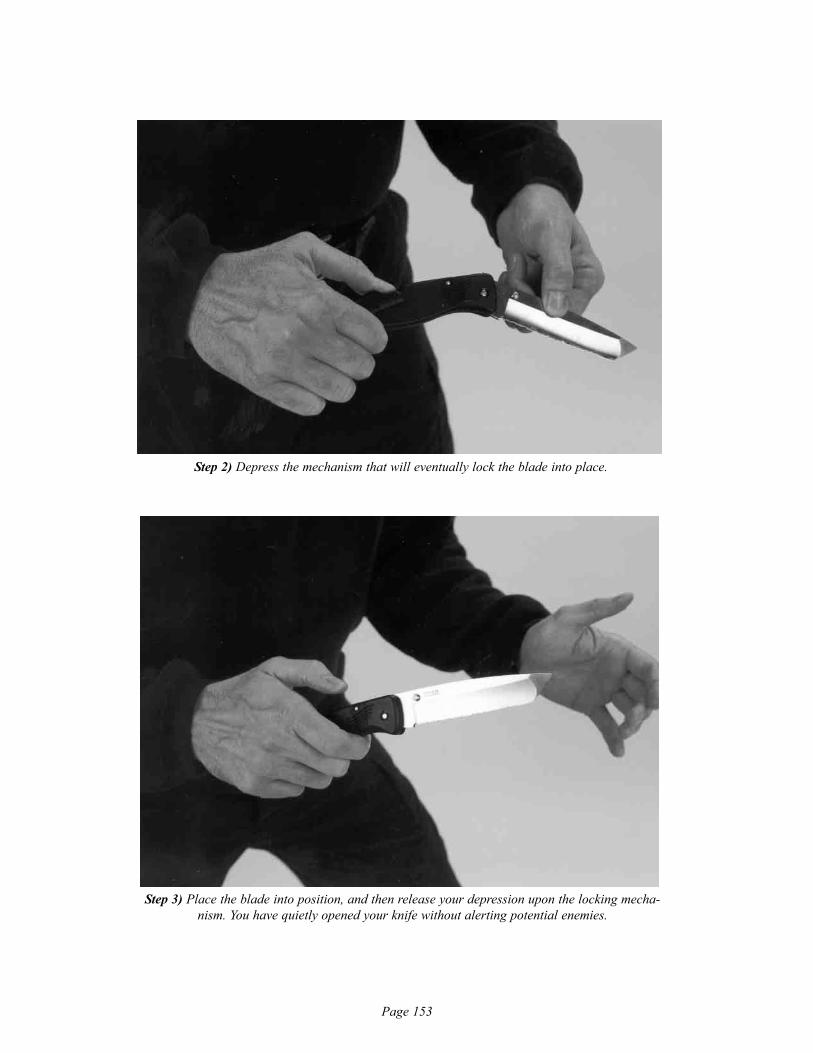
Page 153
Step 2) Depress the mechanism that will eventually lock the blade into place.
Step 3) Place the blade into position, and then release your depression upon the locking mecha-nism. You have quietly opened your knife without alerting potential enemies.
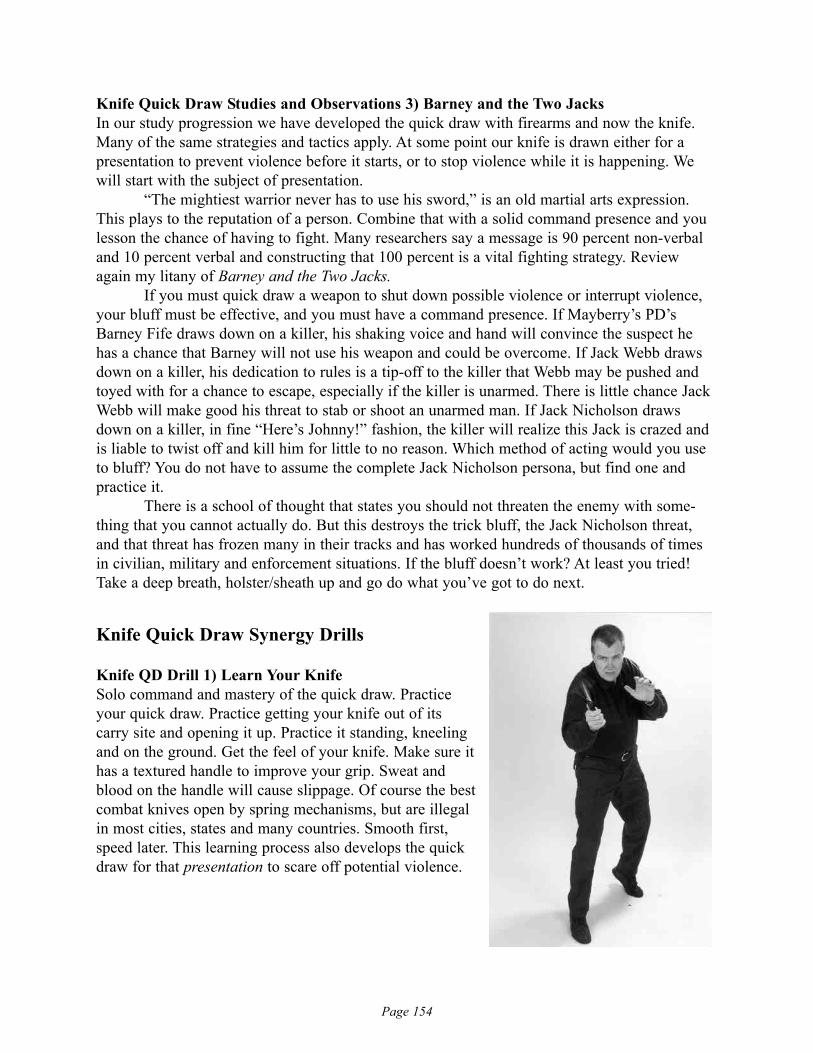
Page 154
Knife Quick Draw Studies and Observations 3) Barney and the Two Jacks In our study progression we have developed the quick draw with firearms and now the knife.Many of the same strategies and tactics apply. At some point our knife is drawn either for apresentation to prevent violence before it starts, or to stop violence while it is happening. Wewill start with the subject of presentation.
“The mightiest warrior never has to use his sword,” is an old martial arts expression.This plays to the reputation of a person. Combine that with a solid command presence and youlesson the chance of having to fight. Many researchers say a message is 90 percent non-verbaland 10 percent verbal and constructing that 100 percent is a vital fighting strategy. Reviewagain my litany of Barney and the Two Jacks.
If you must quick draw a weapon to shut down possible violence or interrupt violence,your bluff must be effective, and you must have a command presence. If Mayberry’s PD’sBarney Fife draws down on a killer, his shaking voice and hand will convince the suspect hehas a chance that Barney will not use his weapon and could be overcome. If Jack Webb drawsdown on a killer, his dedication to rules is a tip-off to the killer that Webb may be pushed andtoyed with for a chance to escape, especially if the killer is unarmed. There is little chance JackWebb will make good his threat to stab or shoot an unarmed man. If Jack Nicholson drawsdown on a killer, in fine “Here’s Johnny!” fashion, the killer will realize this Jack is crazed andis liable to twist off and kill him for little to no reason. Which method of acting would you useto bluff? You do not have to assume the complete Jack Nicholson persona, but find one andpractice it.
There is a school of thought that states you should not threaten the enemy with some-thing that you cannot actually do. But this destroys the trick bluff, the Jack Nicholson threat,and that threat has frozen many in their tracks and has worked hundreds of thousands of timesin civilian, military and enforcement situations. If the bluff doesn’t work? At least you tried!Take a deep breath, holster/sheath up and go do what you’ve got to do next.
Knife Quick Draw Synergy Drills
Knife QD Drill 1) Learn Your KnifeSolo command and mastery of the quick draw. Practiceyour quick draw. Practice getting your knife out of its carry site and opening it up. Practice it standing, kneeling and on the ground. Get the feel of your knife. Make sure ithas a textured handle to improve your grip. Sweat andblood on the handle will cause slippage. Of course the bestcombat knives open by spring mechanisms, but are illegalin most cities, states and many countries. Smooth first,speed later. This learning process also develops the quickdraw for that presentation to scare off potential violence.
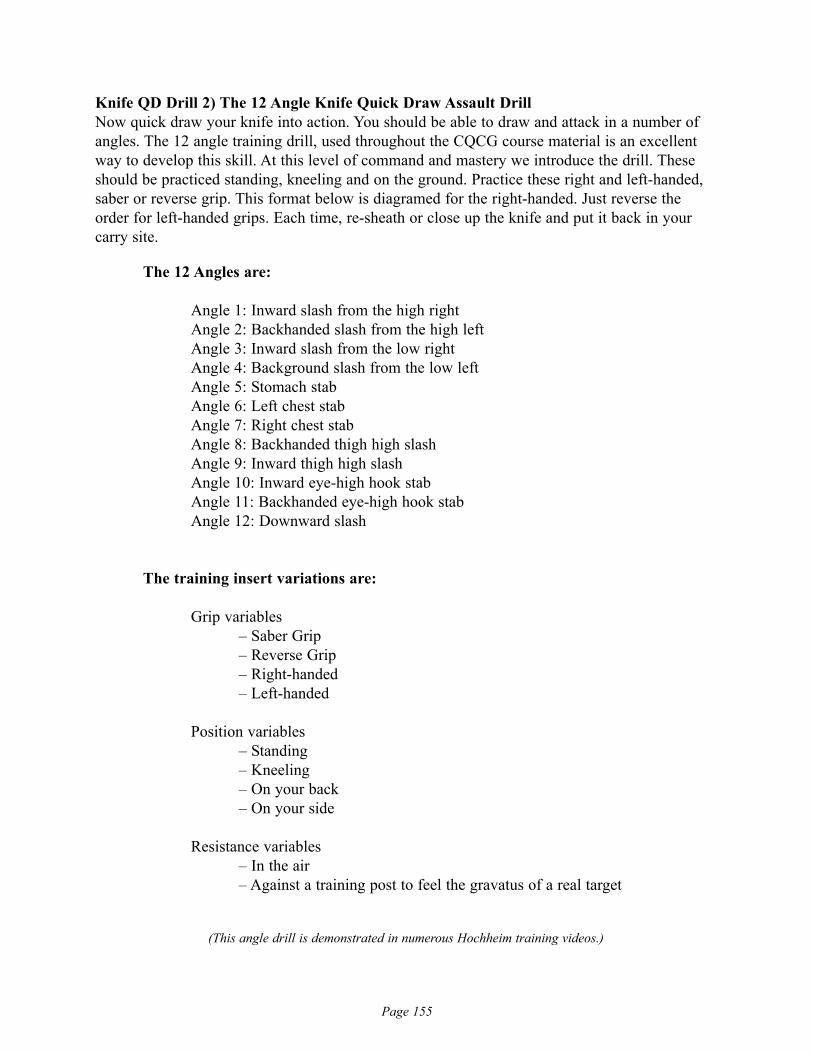
Page 155
Knife QD Drill 2) The 12 Angle Knife Quick Draw Assault DrillNow quick draw your knife into action. You should be able to draw and attack in a number ofangles. The 12 angle training drill, used throughout the CQCG course material is an excellentway to develop this skill. At this level of command and mastery we introduce the drill. Theseshould be practiced standing, kneeling and on the ground. Practice these right and left-handed,saber or reverse grip. This format below is diagramed for the right-handed. Just reverse theorder for left-handed grips. Each time, re-sheath or close up the knife and put it back in yourcarry site.
The 12 Angles are:
Angle 1: Inward slash from the high rightAngle 2: Backhanded slash from the high leftAngle 3: Inward slash from the low rightAngle 4: Background slash from the low leftAngle 5: Stomach stab Angle 6: Left chest stabAngle 7: Right chest stab Angle 8: Backhanded thigh high slashAngle 9: Inward thigh high slashAngle 10: Inward eye-high hook stab Angle 11: Backhanded eye-high hook stabAngle 12: Downward slash
The training insert variations are:
Grip variables– Saber Grip– Reverse Grip– Right-handed– Left-handed
Position variables– Standing– Kneeling– On your back– On your side
Resistance variables– In the air– Against a training post to feel the gravatus of a real target
(This angle drill is demonstrated in numerous Hochheim training videos.)
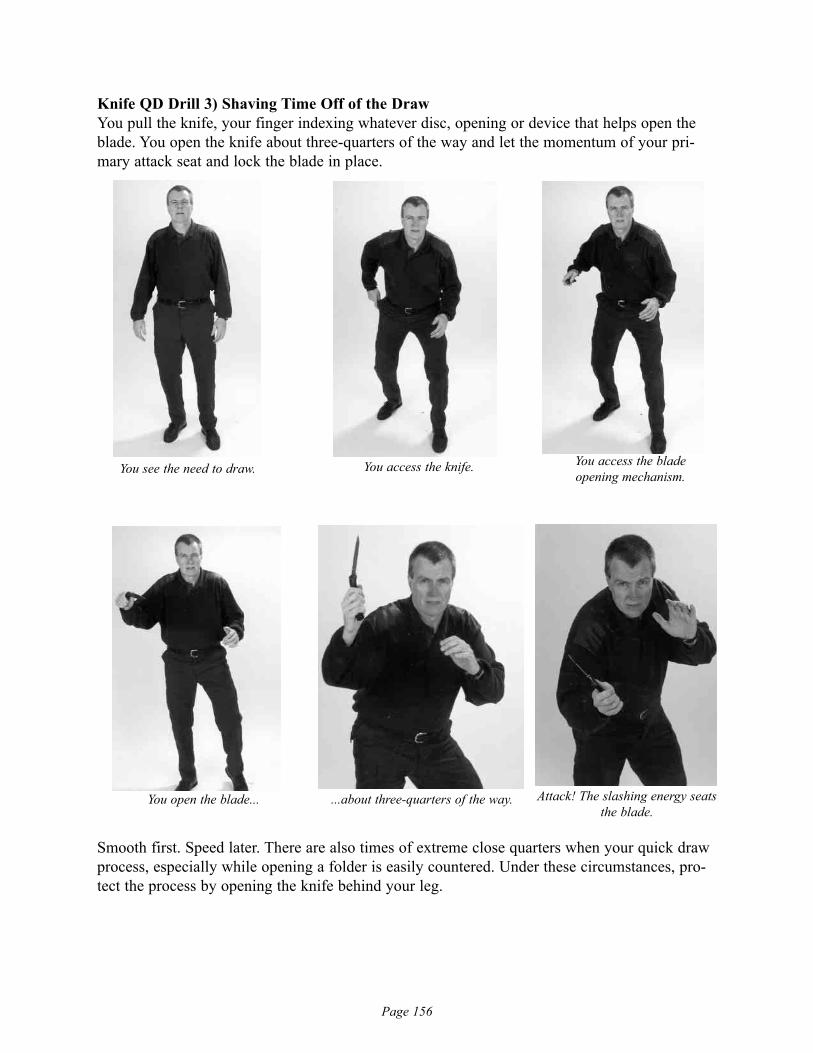
Page 156
Knife QD Drill 3) Shaving Time Off of the DrawYou pull the knife, your finger indexing whatever disc, opening or device that helps open theblade. You open the knife about three-quarters of the way and let the momentum of your pri-mary attack seat and lock the blade in place.
Smooth first. Speed later. There are also times of extreme close quarters when your quick drawprocess, especially while opening a folder is easily countered. Under these circumstances, pro-tect the process by opening the knife behind your leg.
You see the need to draw. You access the knife. You access the blade opening mechanism.
You open the blade... ...about three-quarters of the way. Attack! The slashing energy seatsthe blade.
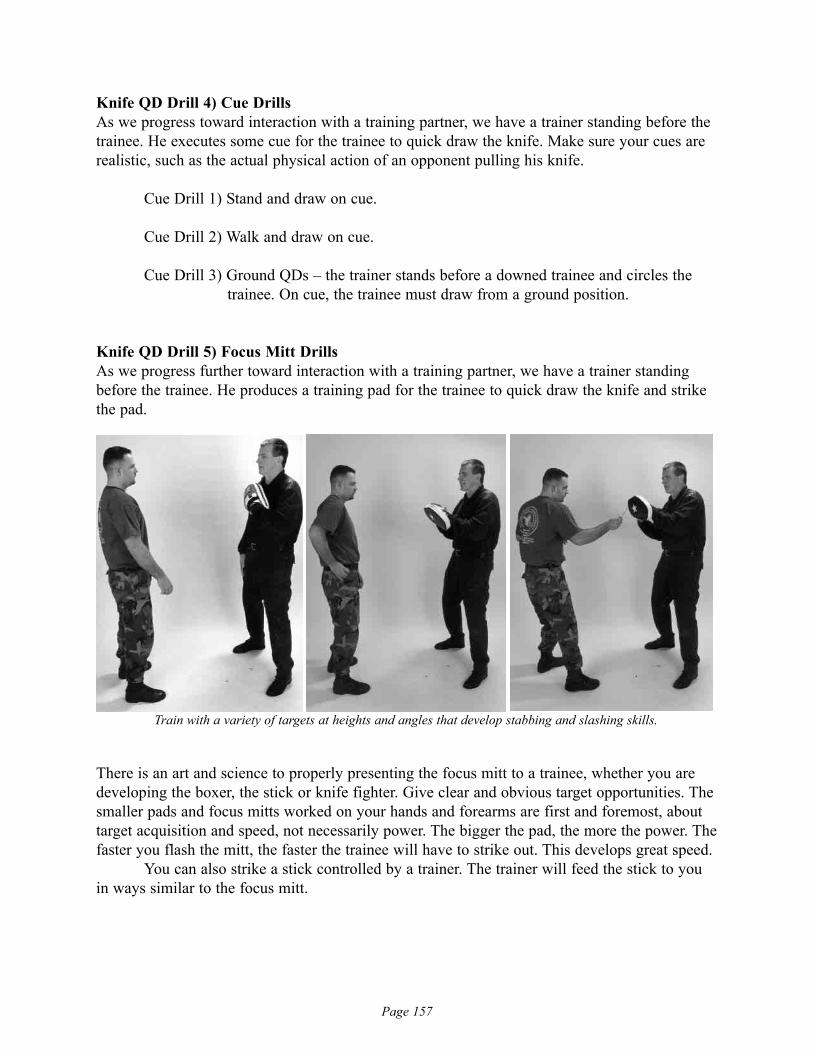
Page 157
Knife QD Drill 4) Cue DrillsAs we progress toward interaction with a training partner, we have a trainer standing before thetrainee. He executes some cue for the trainee to quick draw the knife. Make sure your cues arerealistic, such as the actual physical action of an opponent pulling his knife.
Cue Drill 1) Stand and draw on cue.
Cue Drill 2) Walk and draw on cue.
Cue Drill 3) Ground QDs – the trainer stands before a downed trainee and circles the trainee. On cue, the trainee must draw from a ground position.
Knife QD Drill 5) Focus Mitt DrillsAs we progress further toward interaction with a training partner, we have a trainer standingbefore the trainee. He produces a training pad for the trainee to quick draw the knife and strikethe pad.
There is an art and science to properly presenting the focus mitt to a trainee, whether you aredeveloping the boxer, the stick or knife fighter. Give clear and obvious target opportunities. Thesmaller pads and focus mitts worked on your hands and forearms are first and foremost, abouttarget acquisition and speed, not necessarily power. The bigger the pad, the more the power. Thefaster you flash the mitt, the faster the trainee will have to strike out. This develops great speed.
You can also strike a stick controlled by a trainer. The trainer will feed the stick to youin ways similar to the focus mitt.
Train with a variety of targets at heights and angles that develop stabbing and slashing skills.
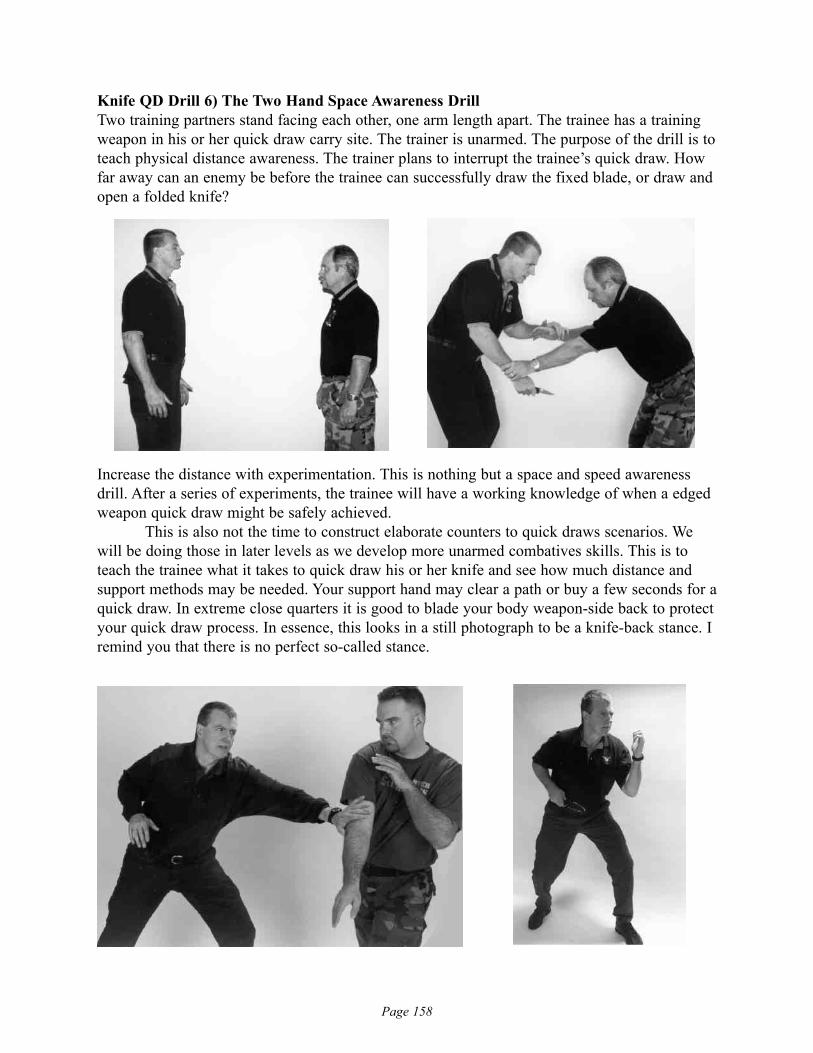
Page 158
Knife QD Drill 6) The Two Hand Space Awareness DrillTwo training partners stand facing each other, one arm length apart. The trainee has a trainingweapon in his or her quick draw carry site. The trainer is unarmed. The purpose of the drill is toteach physical distance awareness. The trainer plans to interrupt the trainee’s quick draw. Howfar away can an enemy be before the trainee can successfully draw the fixed blade, or draw andopen a folded knife?
Increase the distance with experimentation. This is nothing but a space and speed awarenessdrill. After a series of experiments, the trainee will have a working knowledge of when a edgedweapon quick draw might be safely achieved.
This is also not the time to construct elaborate counters to quick draws scenarios. Wewill be doing those in later levels as we develop more unarmed combatives skills. This is toteach the trainee what it takes to quick draw his or her knife and see how much distance andsupport methods may be needed. Your support hand may clear a path or buy a few seconds for aquick draw. In extreme close quarters it is good to blade your body weapon-side back to protectyour quick draw process. In essence, this looks in a still photograph to be a knife-back stance. Iremind you that there is no perfect so-called stance.

Page 159
Knife QD Drill 7) Basic Stand-Off Quick Draw This drill is strictly for awareness and experience. Two training partners, both armed withknives in carry sites, stand a few feet apart. They press palm to palm. Either one suddenly triesto quick draw their knife. The process is enlightening. They see who can draw first, but thisstudy goes deeper.
Round 1: Both armed and quick draw.Round 2: One armed and one unarmed. Unarmed tries to disrupt the QD.Round 3: Both armed again-this time wiser.
By Round 3, fresh from the results from Round 2 where they charged in and counteredthe draw, they must make an educated choice to draw or charge in to counter their opponent’squick draw. This is a fantastic drill to gauge space, speed, options and response.
Sometimes the support armmay be injured in this quickdraw drill. There is much to
learn in this practice session.
Strictly for speed and space awareness, this drill forces aperson to understand the mechanical process involved
with opening a folding knife under attack stress.
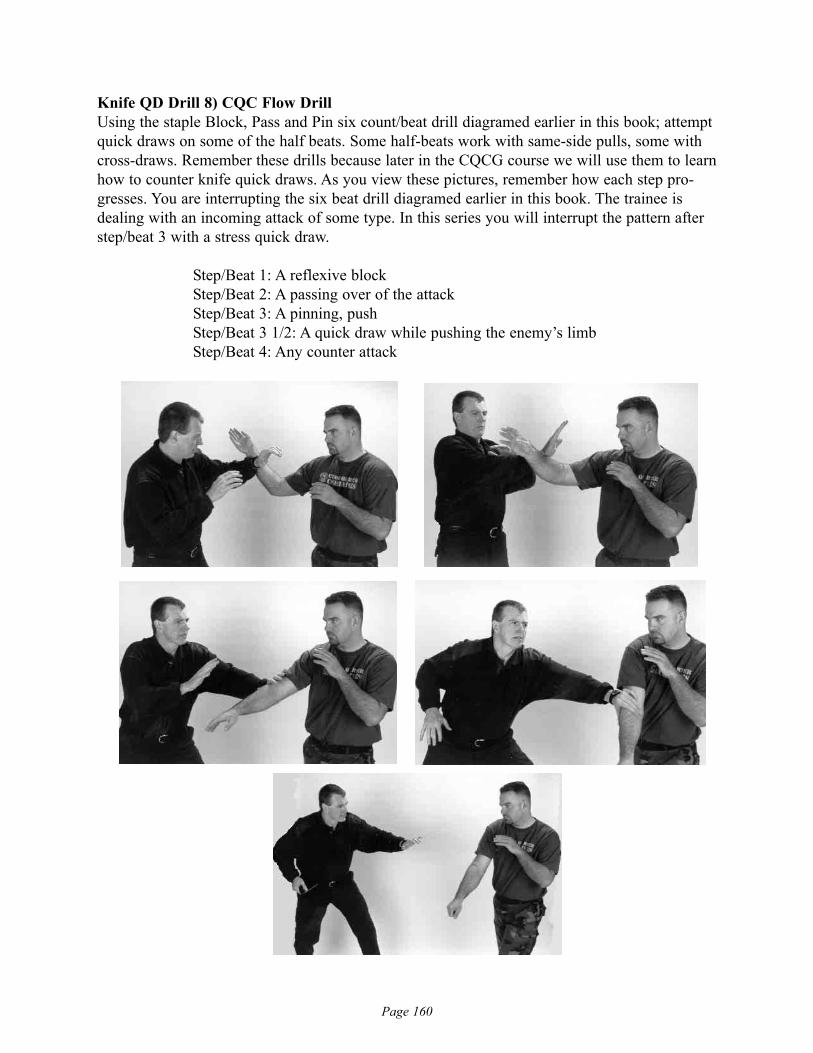
Page 160
Knife QD Drill 8) CQC Flow DrillUsing the staple Block, Pass and Pin six count/beat drill diagramed earlier in this book; attemptquick draws on some of the half beats. Some half-beats work with same-side pulls, some withcross-draws. Remember these drills because later in the CQCG course we will use them to learnhow to counter knife quick draws. As you view these pictures, remember how each step pro-gresses. You are interrupting the six beat drill diagramed earlier in this book. The trainee isdealing with an incoming attack of some type. In this series you will interrupt the pattern afterstep/beat 3 with a stress quick draw.
Step/Beat 1: A reflexive blockStep/Beat 2: A passing over of the attackStep/Beat 3: A pinning, pushStep/Beat 3 1/2: A quick draw while pushing the enemy’s limbStep/Beat 4: Any counter attack
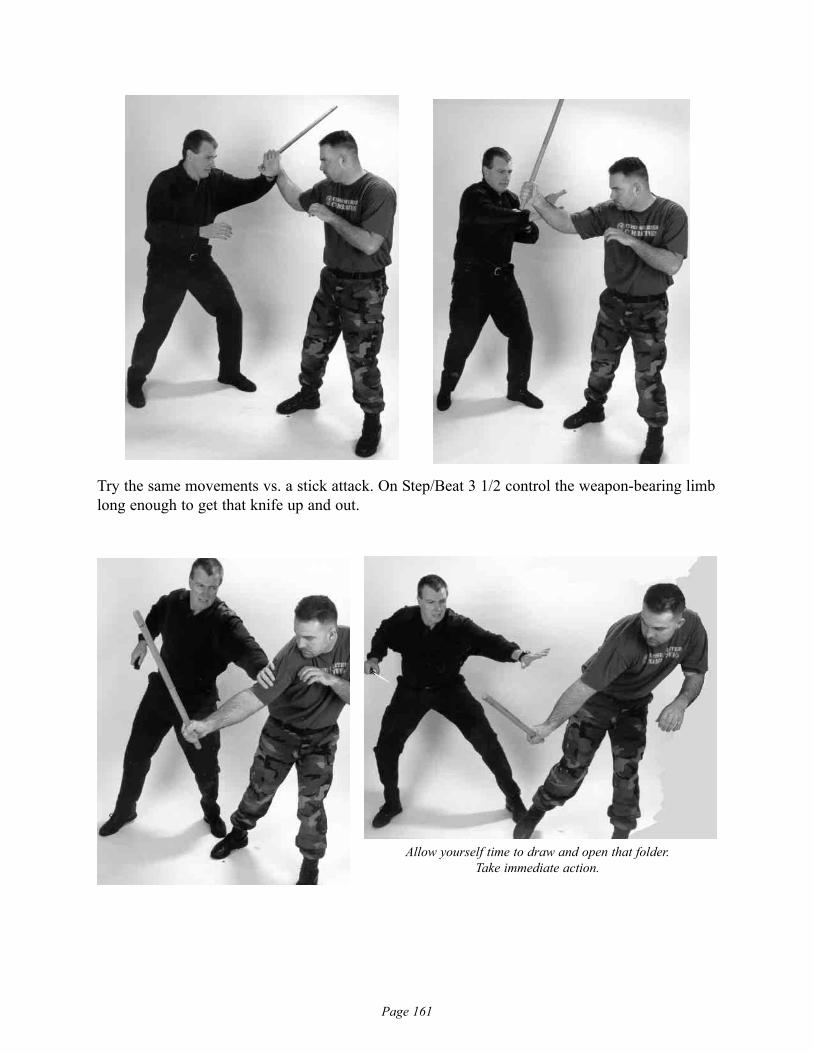
Page 161
Try the same movements vs. a stick attack. On Step/Beat 3 1/2 control the weapon-bearing limblong enough to get that knife up and out.
Allow yourself time to draw and open that folder. Take immediate action.
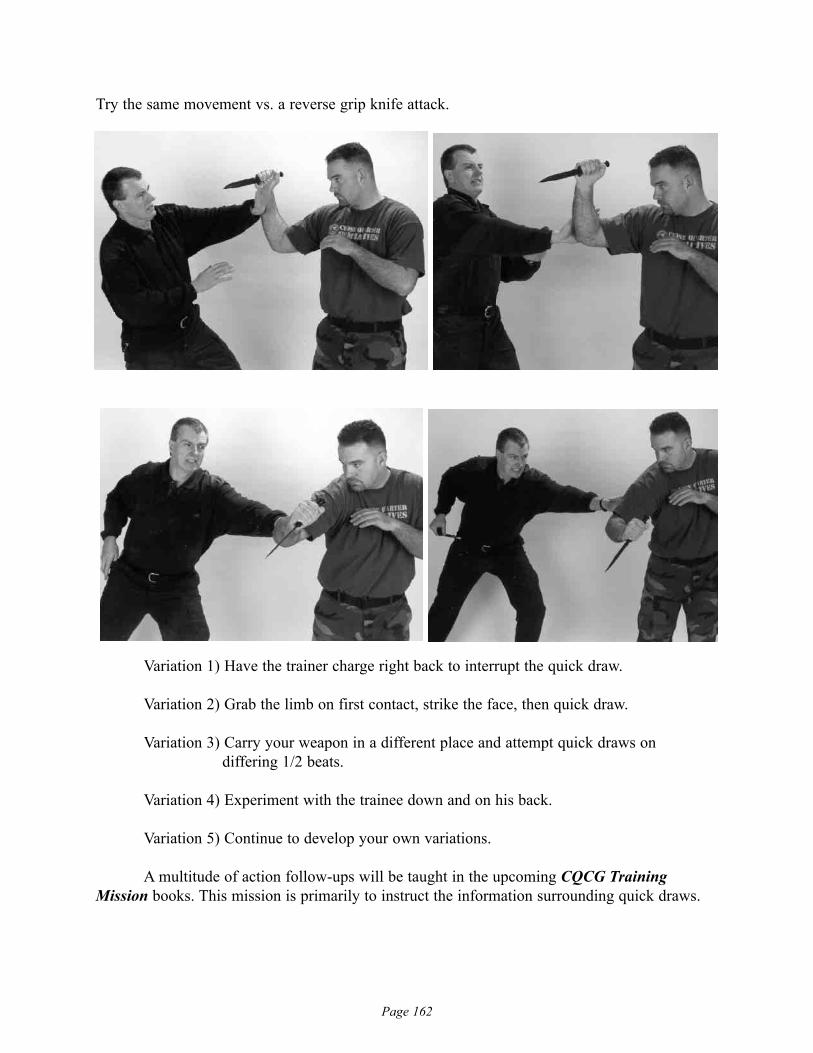
Page 162
Try the same movement vs. a reverse grip knife attack.
Variation 1) Have the trainer charge right back to interrupt the quick draw.
Variation 2) Grab the limb on first contact, strike the face, then quick draw.
Variation 3) Carry your weapon in a different place and attempt quick draws ondiffering 1/2 beats.
Variation 4) Experiment with the trainee down and on his back.
Variation 5) Continue to develop your own variations.
A multitude of action follow-ups will be taught in the upcoming CQCG TrainingMission books. This mission is primarily to instruct the information surrounding quick draws.
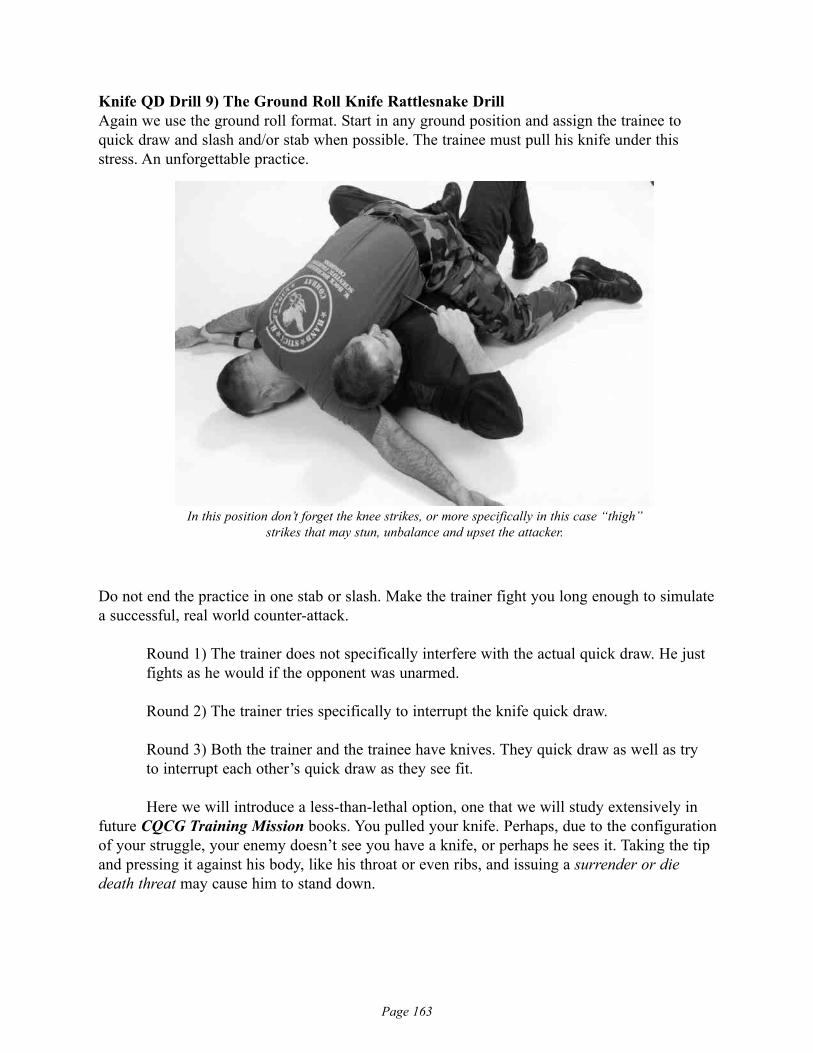
Page 163
Knife QD Drill 9) The Ground Roll Knife Rattlesnake Drill Again we use the ground roll format. Start in any ground position and assign the trainee toquick draw and slash and/or stab when possible. The trainee must pull his knife under thisstress. An unforgettable practice.
Do not end the practice in one stab or slash. Make the trainer fight you long enough to simulatea successful, real world counter-attack.
Round 1) The trainer does not specifically interfere with the actual quick draw. He just fights as he would if the opponent was unarmed.
Round 2) The trainer tries specifically to interrupt the knife quick draw.
Round 3) Both the trainer and the trainee have knives. They quick draw as well as tryto interrupt each other’s quick draw as they see fit.
Here we will introduce a less-than-lethal option, one that we will study extensively infuture CQCG Training Mission books. You pulled your knife. Perhaps, due to the configurationof your struggle, your enemy doesn’t see you have a knife, or perhaps he sees it. Taking the tipand pressing it against his body, like his throat or even ribs, and issuing a surrender or diedeath threat may cause him to stand down.
In this position don’t forget the knee strikes, or more specifically in this case “thigh”strikes that may stun, unbalance and upset the attacker.
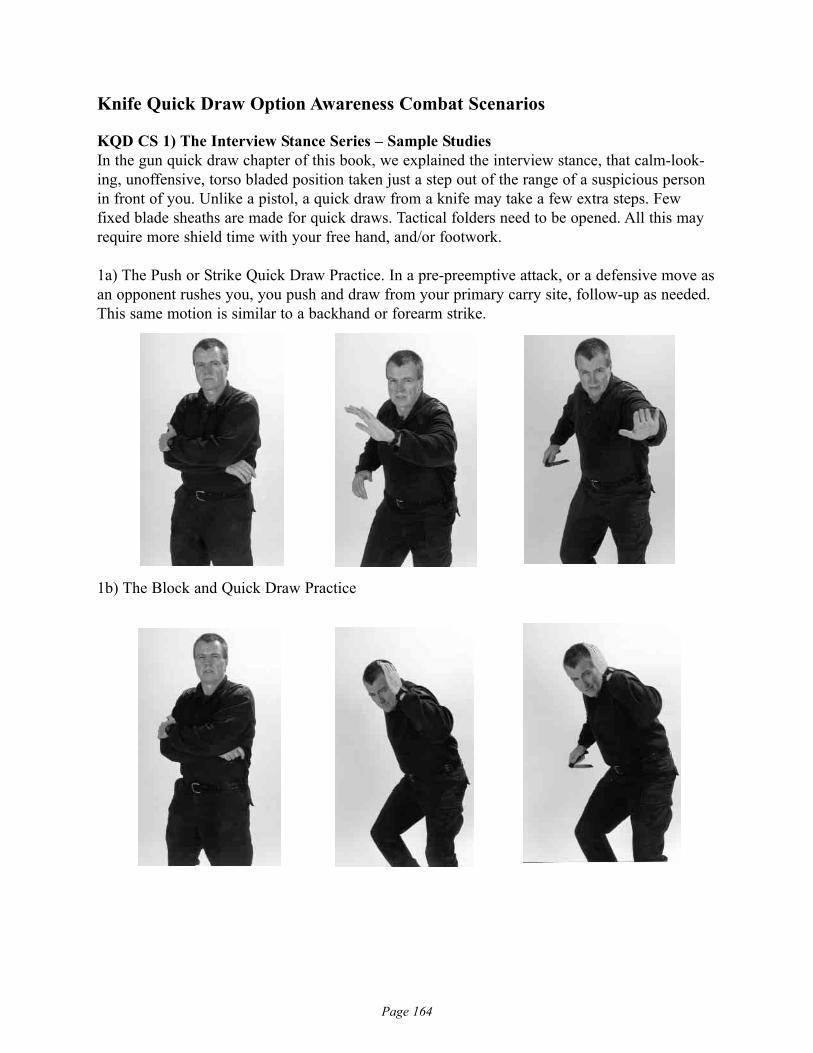
Page 164
Knife Quick Draw Option Awareness Combat Scenarios
KQD CS 1) The Interview Stance Series – Sample StudiesIn the gun quick draw chapter of this book, we explained the interview stance, that calm-look-ing, unoffensive, torso bladed position taken just a step out of the range of a suspicious personin front of you. Unlike a pistol, a quick draw from a knife may take a few extra steps. Fewfixed blade sheaths are made for quick draws. Tactical folders need to be opened. All this mayrequire more shield time with your free hand, and/or footwork.
1a) The Push or Strike Quick Draw Practice. In a pre-preemptive attack, or a defensive move asan opponent rushes you, you push and draw from your primary carry site, follow-up as needed.This same motion is similar to a backhand or forearm strike.
1b) The Block and Quick Draw Practice
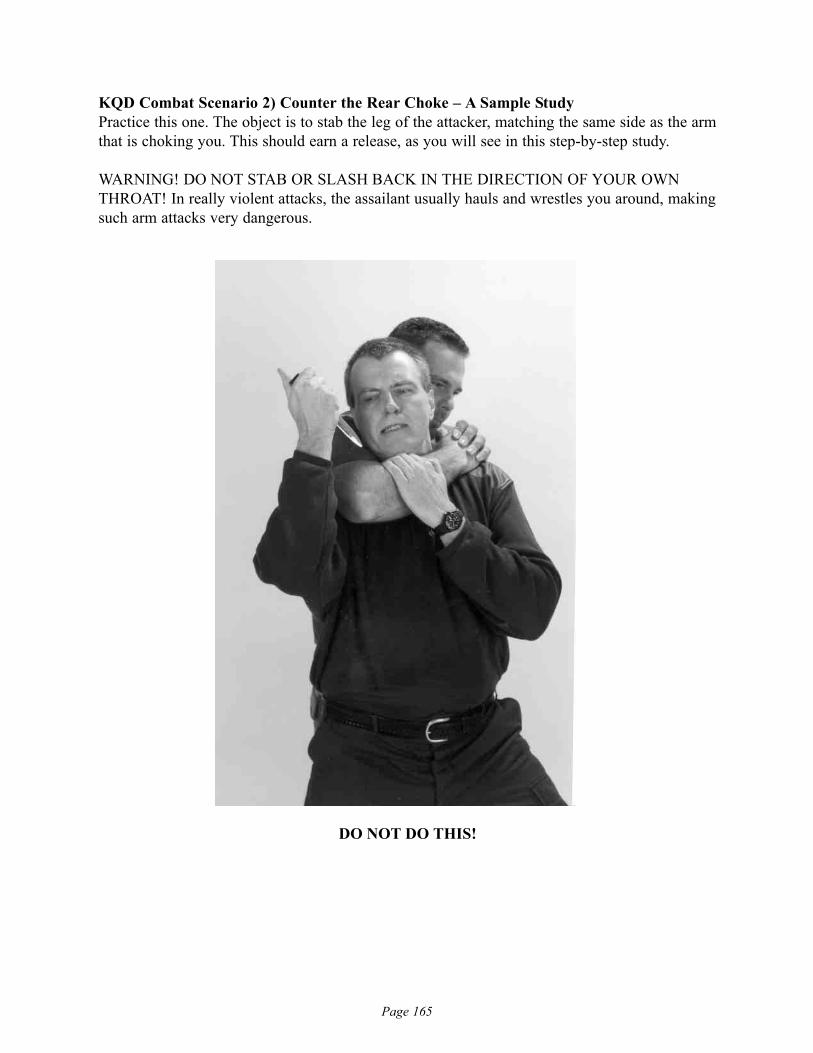
Page 165
KQD Combat Scenario 2) Counter the Rear Choke – A Sample StudyPractice this one. The object is to stab the leg of the attacker, matching the same side as the armthat is choking you. This should earn a release, as you will see in this step-by-step study.
WARNING! DO NOT STAB OR SLASH BACK IN THE DIRECTION OF YOUR OWNTHROAT! In really violent attacks, the assailant usually hauls and wrestles you around, makingsuch arm attacks very dangerous.
DO NOT DO THIS!
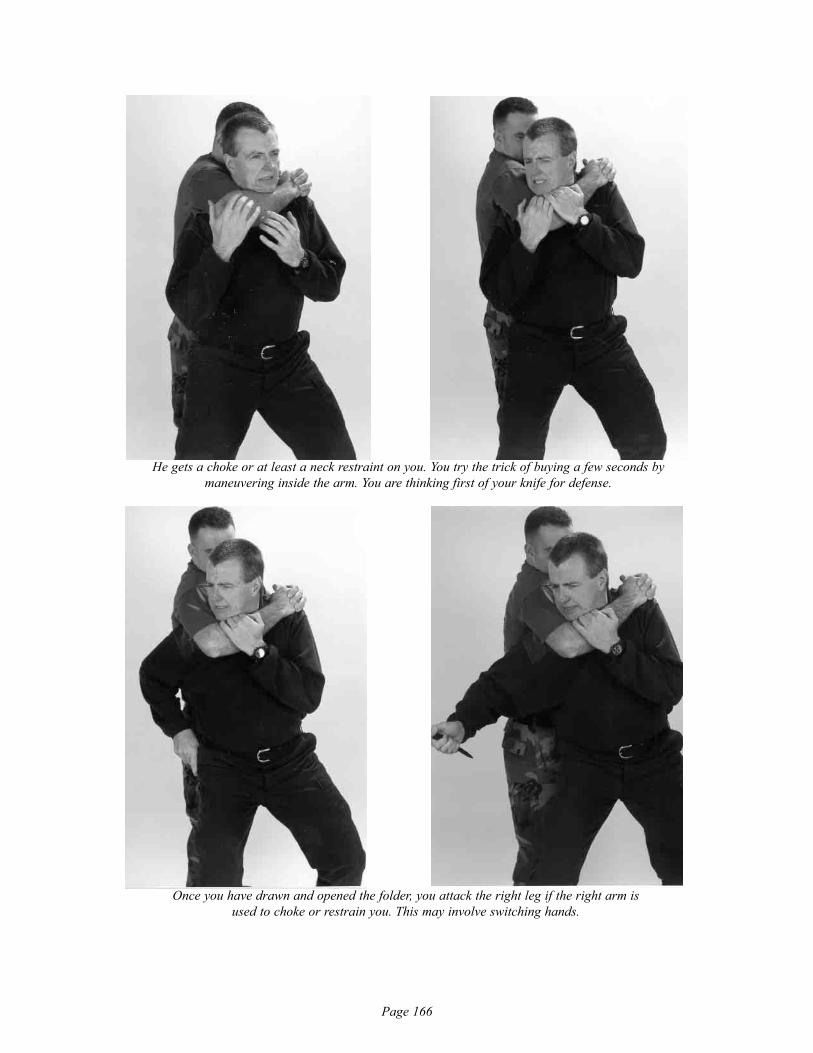
Page 166
He gets a choke or at least a neck restraint on you. You try the trick of buying a few seconds by maneuvering inside the arm. You are thinking first of your knife for defense.
Once you have drawn and opened the folder, you attack the right leg if the right arm is used to choke or restrain you. This may involve switching hands.
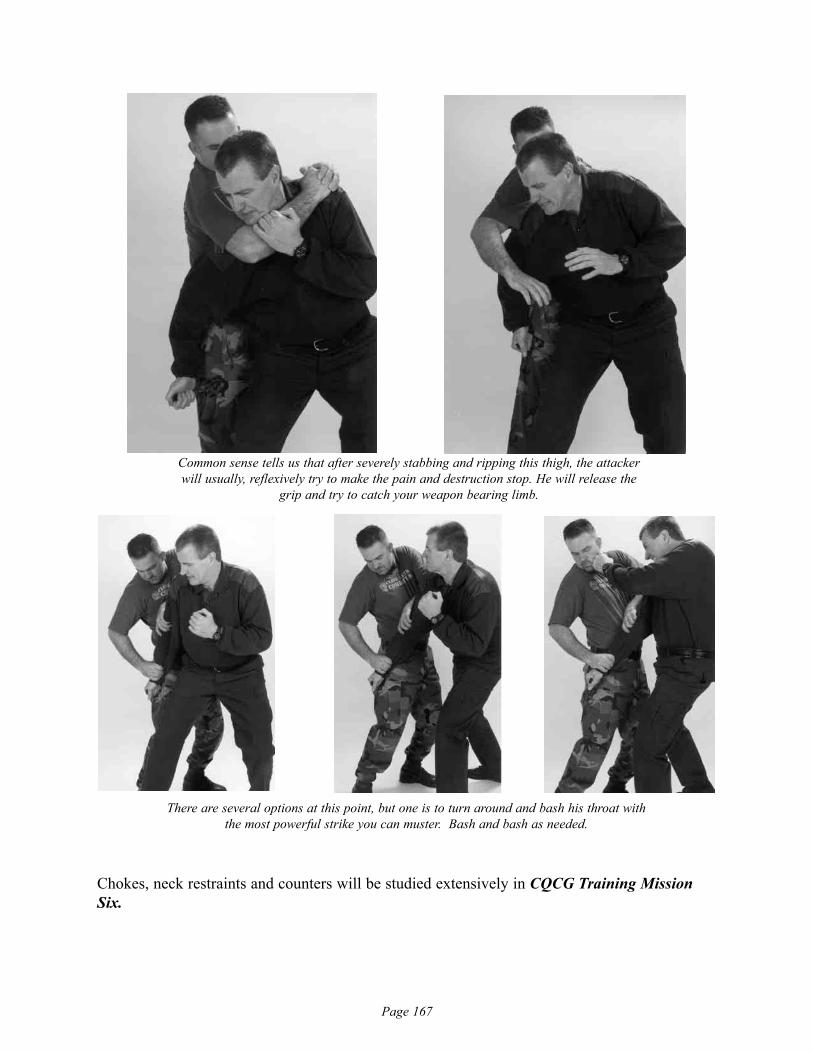
Page 167
Chokes, neck restraints and counters will be studied extensively in CQCG Training MissionSix.
Common sense tells us that after severely stabbing and ripping this thigh, the attacker will usually, reflexively try to make the pain and destruction stop. He will release the
grip and try to catch your weapon bearing limb.
There are several options at this point, but one is to turn around and bash his throat with the most powerful strike you can muster. Bash and bash as needed.
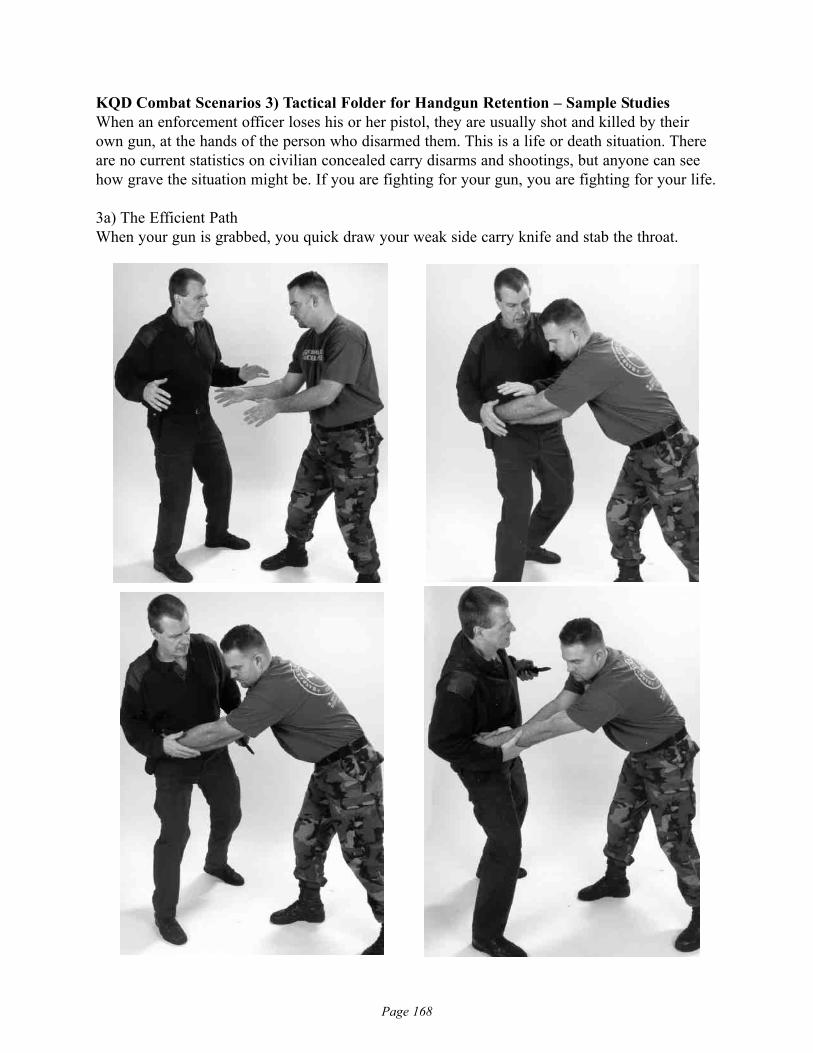
Page 168
KQD Combat Scenarios 3) Tactical Folder for Handgun Retention – Sample StudiesWhen an enforcement officer loses his or her pistol, they are usually shot and killed by theirown gun, at the hands of the person who disarmed them. This is a life or death situation. Thereare no current statistics on civilian concealed carry disarms and shootings, but anyone can seehow grave the situation might be. If you are fighting for your gun, you are fighting for your life.
3a) The Efficient PathWhen your gun is grabbed, you quick draw your weak side carry knife and stab the throat.
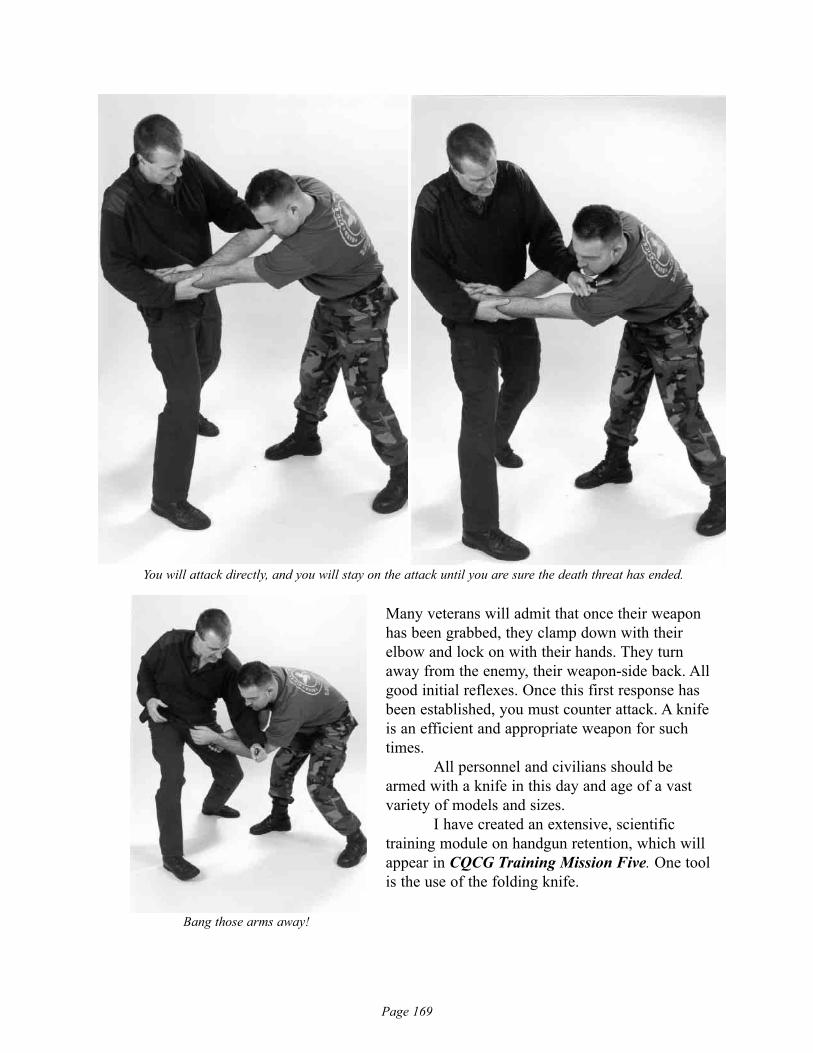
Page 169
You will attack directly, and you will stay on the attack until you are sure the death threat has ended.
Many veterans will admit that once their weaponhas been grabbed, they clamp down with theirelbow and lock on with their hands. They turnaway from the enemy, their weapon-side back. Allgood initial reflexes. Once this first response hasbeen established, you must counter attack. A knifeis an efficient and appropriate weapon for suchtimes.
All personnel and civilians should bearmed with a knife in this day and age of a vastvariety of models and sizes.
I have created an extensive, scientifictraining module on handgun retention, which willappear in CQCG Training Mission Five. One toolis the use of the folding knife.
Bang those arms away!
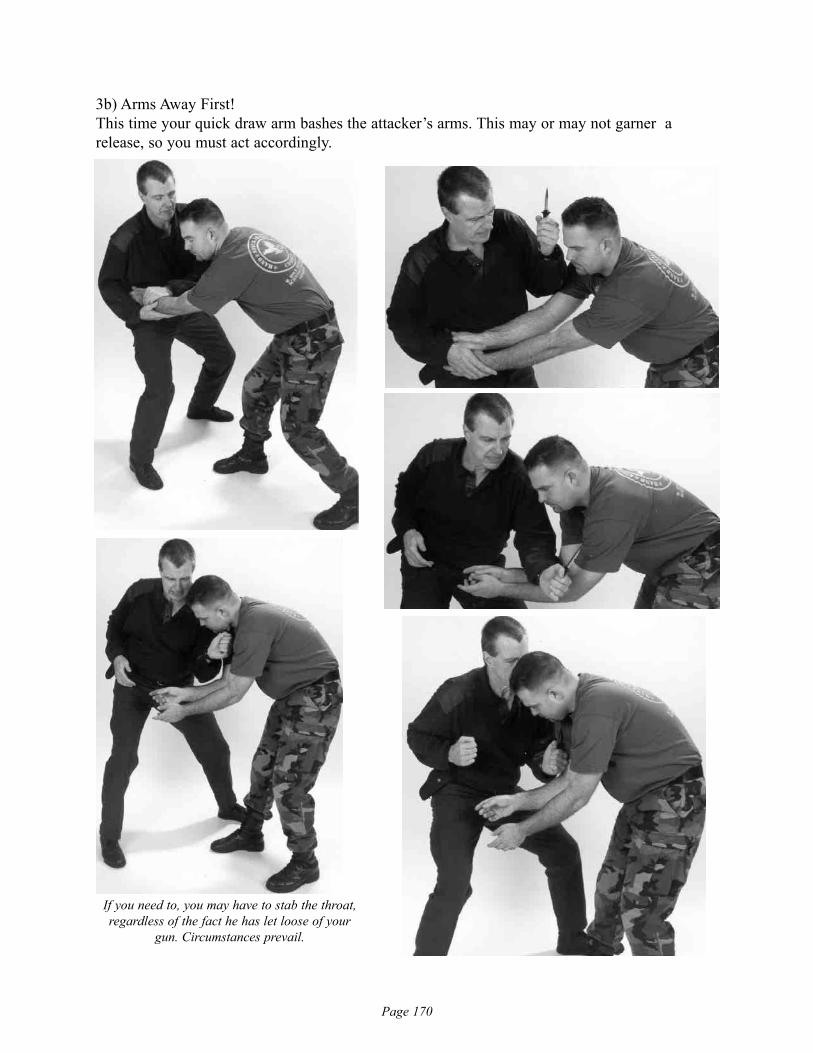
Page 170
3b) Arms Away First!This time your quick draw arm bashes the attacker’s arms. This may or may not garner arelease, so you must act accordingly.
If you need to, you may have to stab the throat,regardless of the fact he has let loose of your
gun. Circumstances prevail.
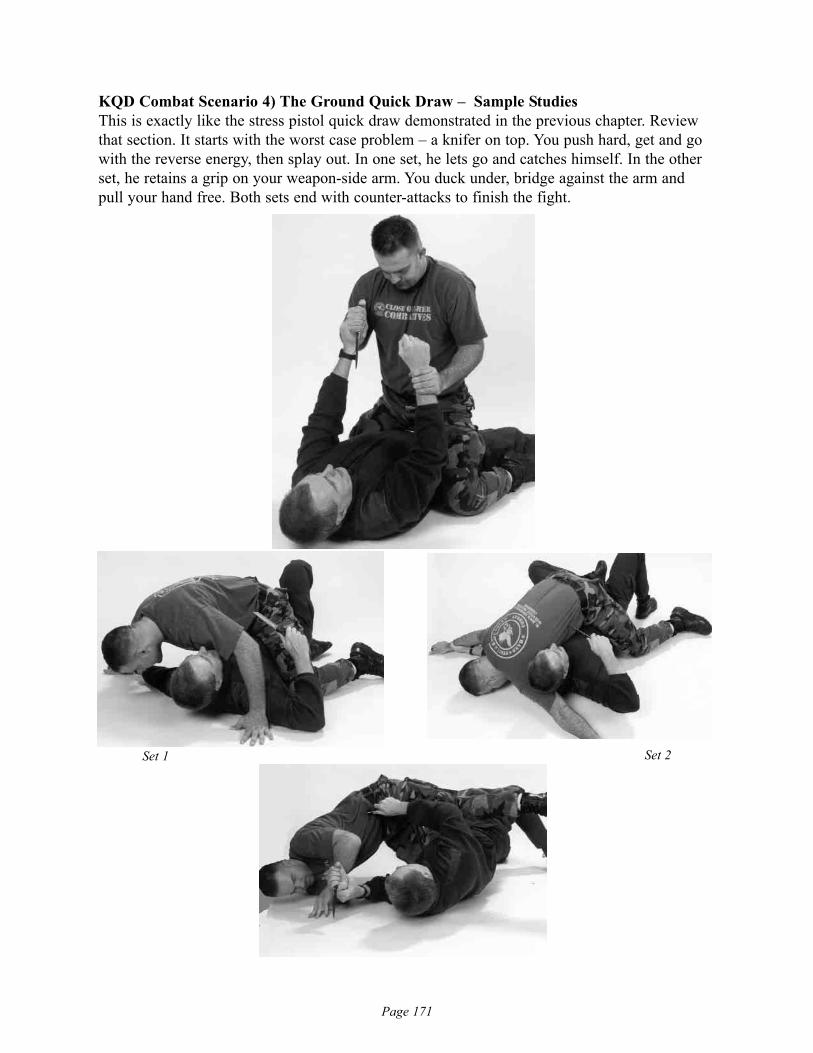
Page 171
KQD Combat Scenario 4) The Ground Quick Draw – Sample StudiesThis is exactly like the stress pistol quick draw demonstrated in the previous chapter. Reviewthat section. It starts with the worst case problem – a knifer on top. You push hard, get and gowith the reverse energy, then splay out. In one set, he lets go and catches himself. In the otherset, he retains a grip on your weapon-side arm. You duck under, bridge against the arm andpull your hand free. Both sets end with counter-attacks to finish the fight.
Set 1 Set 2
Page 172
ALWAYSAlways use your environment, trickery and deception. Always!
Cheat first! Cheat last!Cheat in the middle.
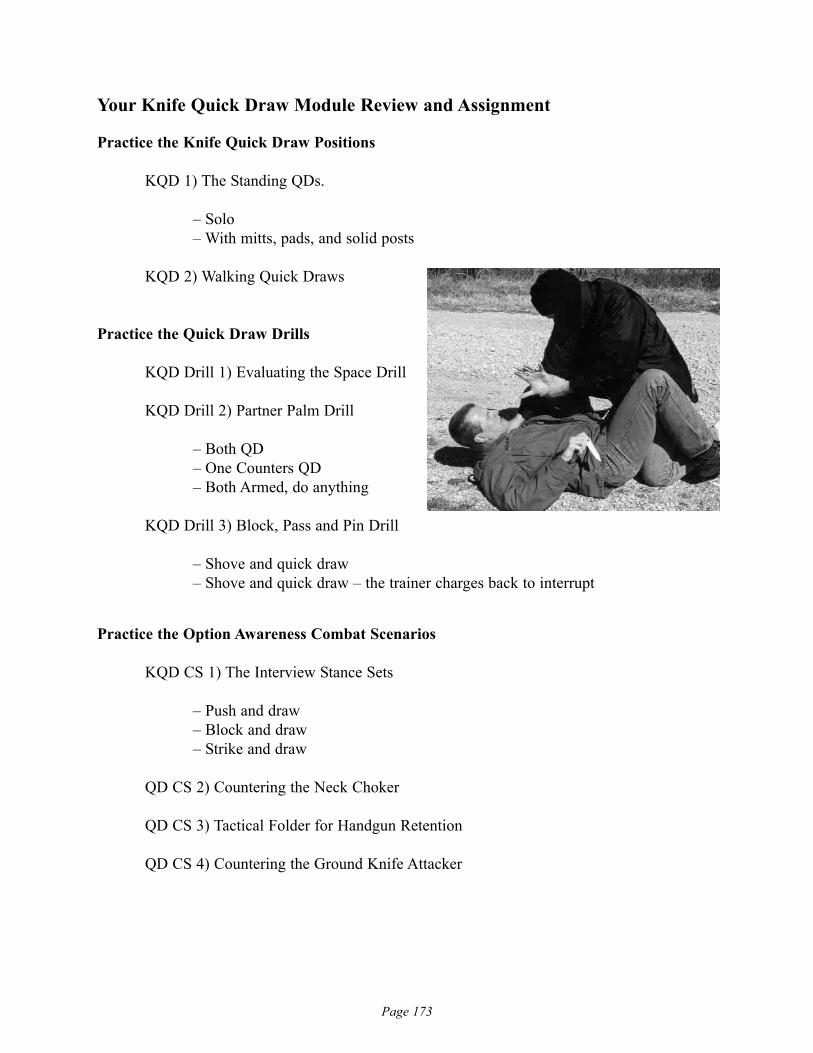
Page 173
Your Knife Quick Draw Module Review and Assignment
Practice the Knife Quick Draw Positions
KQD 1) The Standing QDs.
– Solo– With mitts, pads, and solid posts
KQD 2) Walking Quick Draws
Practice the Quick Draw Drills
KQD Drill 1) Evaluating the Space Drill
KQD Drill 2) Partner Palm Drill
– Both QD– One Counters QD– Both Armed, do anything
KQD Drill 3) Block, Pass and Pin Drill
– Shove and quick draw– Shove and quick draw – the trainer charges back to interrupt
Practice the Option Awareness Combat Scenarios
KQD CS 1) The Interview Stance Sets
– Push and draw– Block and draw– Strike and draw
QD CS 2) Countering the Neck Choker
QD CS 3) Tactical Folder for Handgun Retention
QD CS 4) Countering the Ground Knife Attacker
Page 174
CQCG
Introduction to SDMS The Impact Weapon Quick Draw Module
SDMS is both a single-handed and double-handed tactical impact weapon conflict system bro-ken down in two reference/study categories of SMS and DMS. DMS is double-handed grip tac-tics and strategies. Together they comprise SDMS. These two parts are interchangeable while inconflict. SMS is a single-handed or solo hand grip tactics and strategies. They are largely taughtin an integrated format because the practitioner must be able to transition to both hand grips asneeded while in conflict. Several of the tactics are inspired from Spanish and Filipino maneu-vers, thus the Spanish word for hand manos is used in the course title.
SMS: Solo Manos (hand) System – single-hand grip tactics.DMS: Double or Dos Manos (hand) System – double-hand grip tactics.
SDMS is developed for the seamless application of all single-handed and double-handedgrip, impact weapon tactics in all ranges of standing, kneeling and ground fighting close quartercombat.
SDMS instructs the entire spectrum of conflict from visual presence to deadly force aslegally needed. SDMS is structured to educate the practitioner in visual, audible and physicalimpact weapon tactics and strategies through the following process.
Concealed impact weapon strategies
Impact weapon presentations and verbal commands to quell conflicts
Impact weapon tactics and strategies to move opposing personnel
Impact weapon tactics and strategies to control and contain opposing personnel
Impact weapon and bayonet tactics and strategies to fight against deadly threats
Impact weapon retention to prevent disarming
Impact weapon tactics that relate to long guns
Unarmed tactics and strategies vs. SDMS attackers
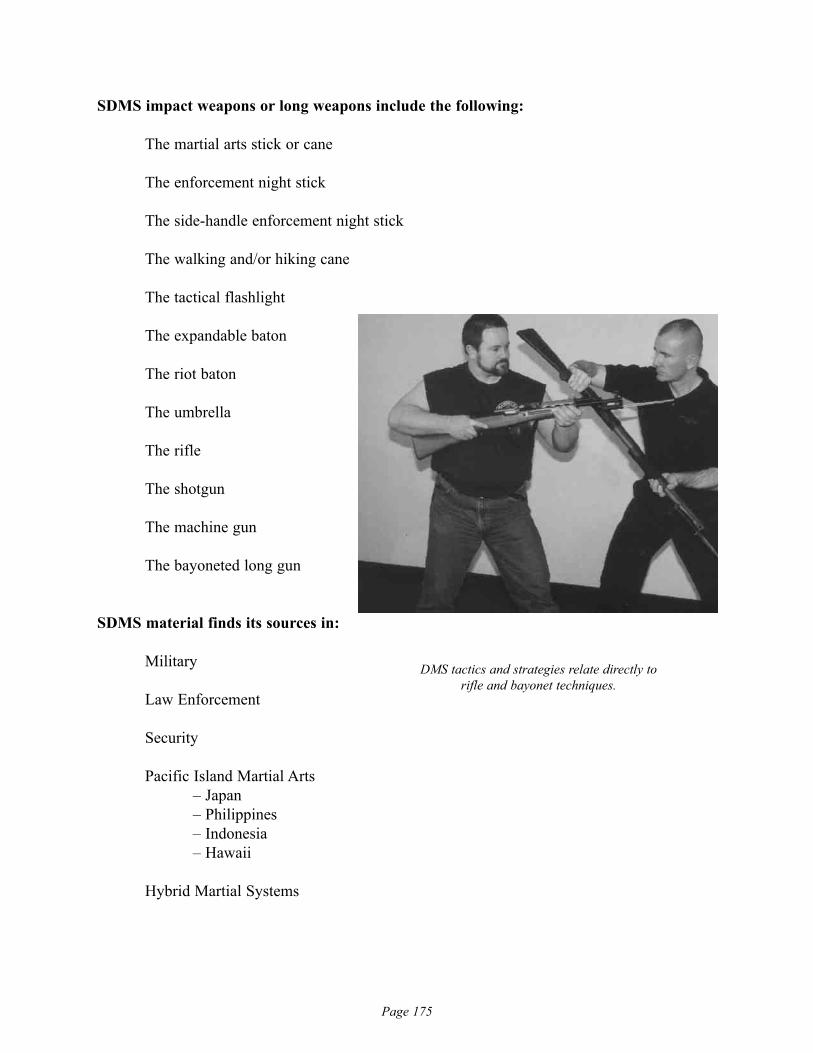
Page 175
SDMS impact weapons or long weapons include the following:
The martial arts stick or cane
The enforcement night stick
The side-handle enforcement night stick
The walking and/or hiking cane
The tactical flashlight
The expandable baton
The riot baton
The umbrella
The rifle
The shotgun
The machine gun
The bayoneted long gun
SDMS material finds its sources in:
Military
Law Enforcement
Security
Pacific Island Martial Arts– Japan– Philippines– Indonesia– Hawaii
Hybrid Martial Systems
DMS tactics and strategies relate directly to rifle and bayonet techniques.
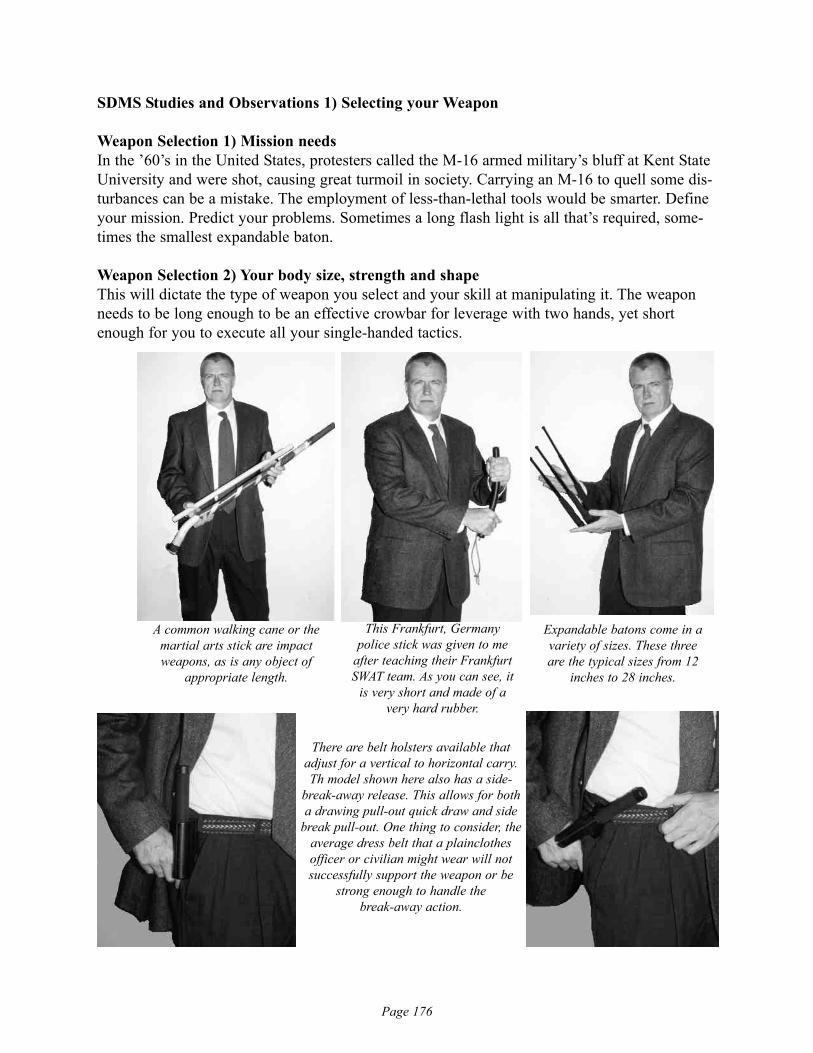
Page 176
SDMS Studies and Observations 1) Selecting your Weapon
Weapon Selection 1) Mission needsIn the ’60’s in the United States, protesters called the M-16 armed military’s bluff at Kent StateUniversity and were shot, causing great turmoil in society. Carrying an M-16 to quell some dis-turbances can be a mistake. The employment of less-than-lethal tools would be smarter. Defineyour mission. Predict your problems. Sometimes a long flash light is all that’s required, some-times the smallest expandable baton.
Weapon Selection 2) Your body size, strength and shape This will dictate the type of weapon you select and your skill at manipulating it. The weaponneeds to be long enough to be an effective crowbar for leverage with two hands, yet shortenough for you to execute all your single-handed tactics.
A common walking cane or themartial arts stick are impactweapons, as is any object of
appropriate length.
This Frankfurt, Germanypolice stick was given to me
after teaching their FrankfurtSWAT team. As you can see, it
is very short and made of avery hard rubber.
Expandable batons come in avariety of sizes. These threeare the typical sizes from 12
inches to 28 inches.
There are belt holsters available thatadjust for a vertical to horizontal carry.Th model shown here also has a side-
break-away release. This allows for botha drawing pull-out quick draw and side
break pull-out. One thing to consider, theaverage dress belt that a plainclothesofficer or civilian might wear will notsuccessfully support the weapon or be
strong enough to handle the break-away action.
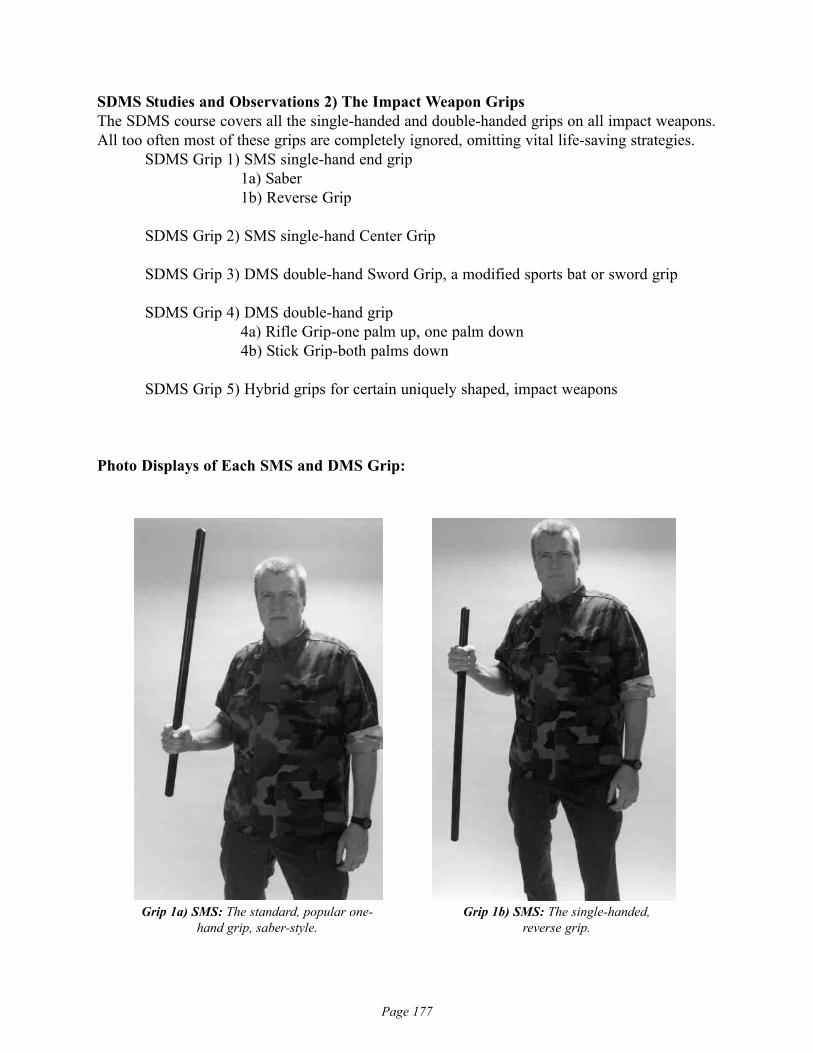
Page 177
SDMS Studies and Observations 2) The Impact Weapon GripsThe SDMS course covers all the single-handed and double-handed grips on all impact weapons.All too often most of these grips are completely ignored, omitting vital life-saving strategies.
SDMS Grip 1) SMS single-hand end grip 1a) Saber1b) Reverse Grip
SDMS Grip 2) SMS single-hand Center Grip
SDMS Grip 3) DMS double-hand Sword Grip, a modified sports bat or sword grip
SDMS Grip 4) DMS double-hand grip 4a) Rifle Grip-one palm up, one palm down 4b) Stick Grip-both palms down
SDMS Grip 5) Hybrid grips for certain uniquely shaped, impact weapons
Photo Displays of Each SMS and DMS Grip:
Grip 1a) SMS: The standard, popular one-hand grip, saber-style.
Grip 1b) SMS: The single-handed,reverse grip.
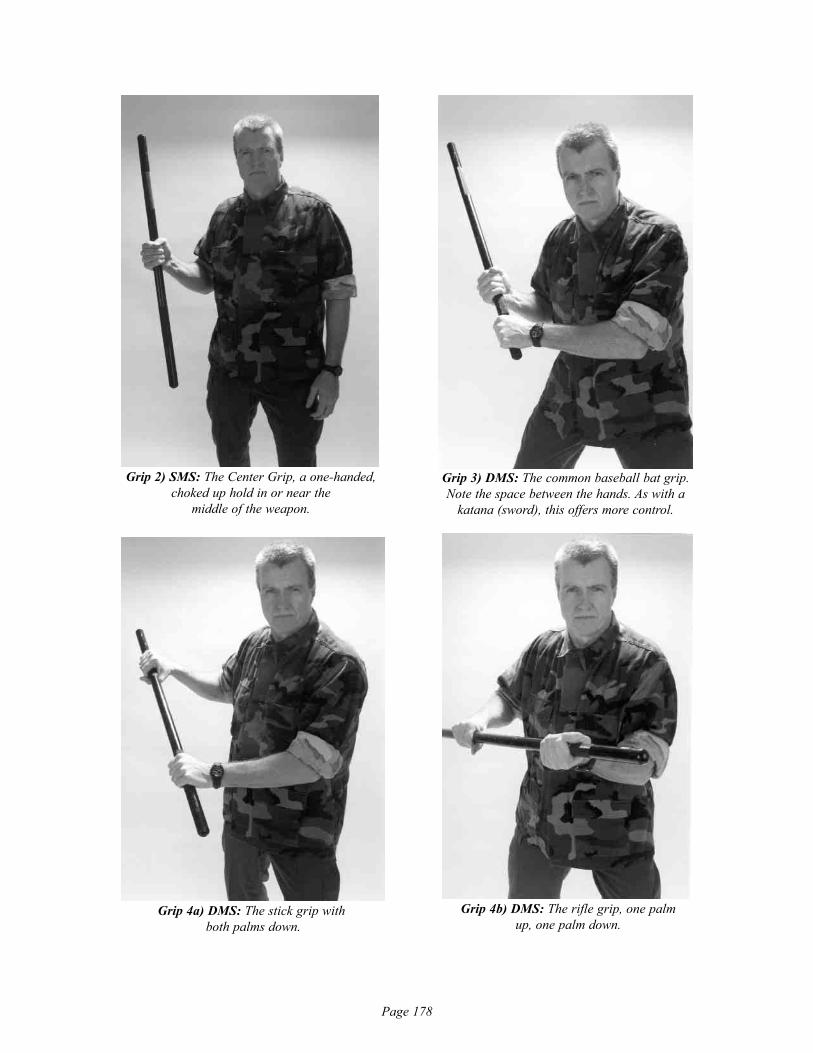
Page 178
Grip 2) SMS: The Center Grip, a one-handed,choked up hold in or near the
middle of the weapon.
Grip 3) DMS: The common baseball bat grip.Note the space between the hands. As with a
katana (sword), this offers more control.
Grip 4a) DMS: The stick grip withboth palms down.
Grip 4b) DMS: The rifle grip, one palm up, one palm down.
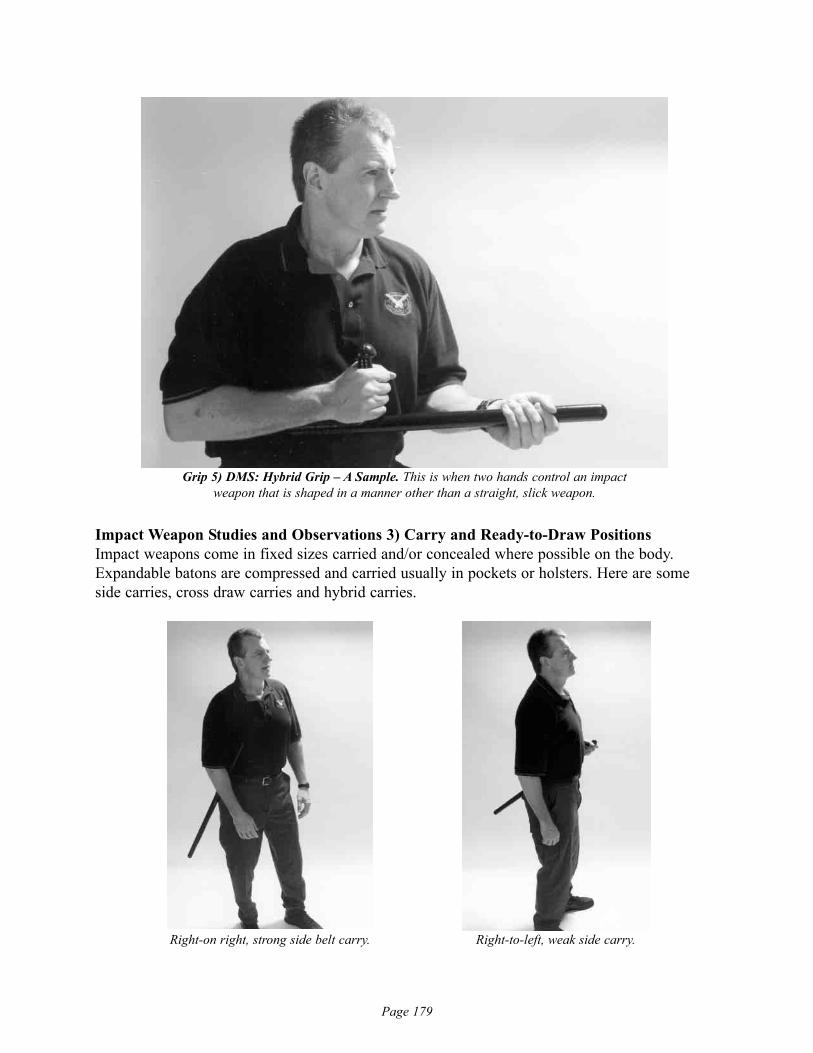
Page 179
Impact Weapon Studies and Observations 3) Carry and Ready-to-Draw PositionsImpact weapons come in fixed sizes carried and/or concealed where possible on the body.Expandable batons are compressed and carried usually in pockets or holsters. Here are someside carries, cross draw carries and hybrid carries.
Grip 5) DMS: Hybrid Grip – A Sample. This is when two hands control an impact weapon that is shaped in a manner other than a straight, slick weapon.
Right-on right, strong side belt carry. Right-to-left, weak side carry.
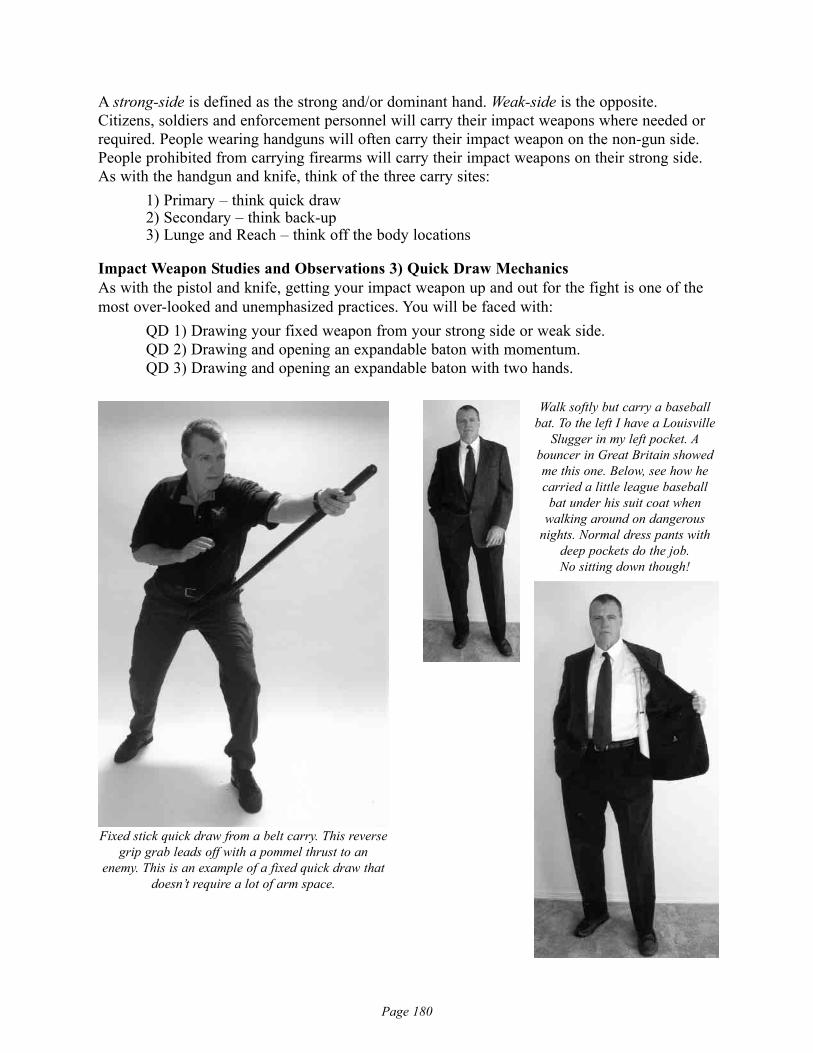
Page 180
A strong-side is defined as the strong and/or dominant hand. Weak-side is the opposite.Citizens, soldiers and enforcement personnel will carry their impact weapons where needed orrequired. People wearing handguns will often carry their impact weapon on the non-gun side.People prohibited from carrying firearms will carry their impact weapons on their strong side.As with the handgun and knife, think of the three carry sites:
1) Primary – think quick draw2) Secondary – think back-up3) Lunge and Reach – think off the body locations
Impact Weapon Studies and Observations 3) Quick Draw MechanicsAs with the pistol and knife, getting your impact weapon up and out for the fight is one of themost over-looked and unemphasized practices. You will be faced with:
QD 1) Drawing your fixed weapon from your strong side or weak side.QD 2) Drawing and opening an expandable baton with momentum.QD 3) Drawing and opening an expandable baton with two hands.
Fixed stick quick draw from a belt carry. This reversegrip grab leads off with a pommel thrust to an
enemy. This is an example of a fixed quick draw thatdoesn’t require a lot of arm space.
Walk softly but carry a baseballbat. To the left I have a Louisville
Slugger in my left pocket. Abouncer in Great Britain showedme this one. Below, see how hecarried a little league baseball
bat under his suit coat whenwalking around on dangerous
nights. Normal dress pants withdeep pockets do the job. No sitting down though!

Page 181
Here is a momentum quick draw of an expandable baton. This one needs whipping strengthand enough space for the telescopic action to lock into place. As with the knife quick draw pre-viously shown, you may sometimes get the lock in place as you deliver the first strike.
Draw and extend the expandable baton. The momentum expansion: One sample.
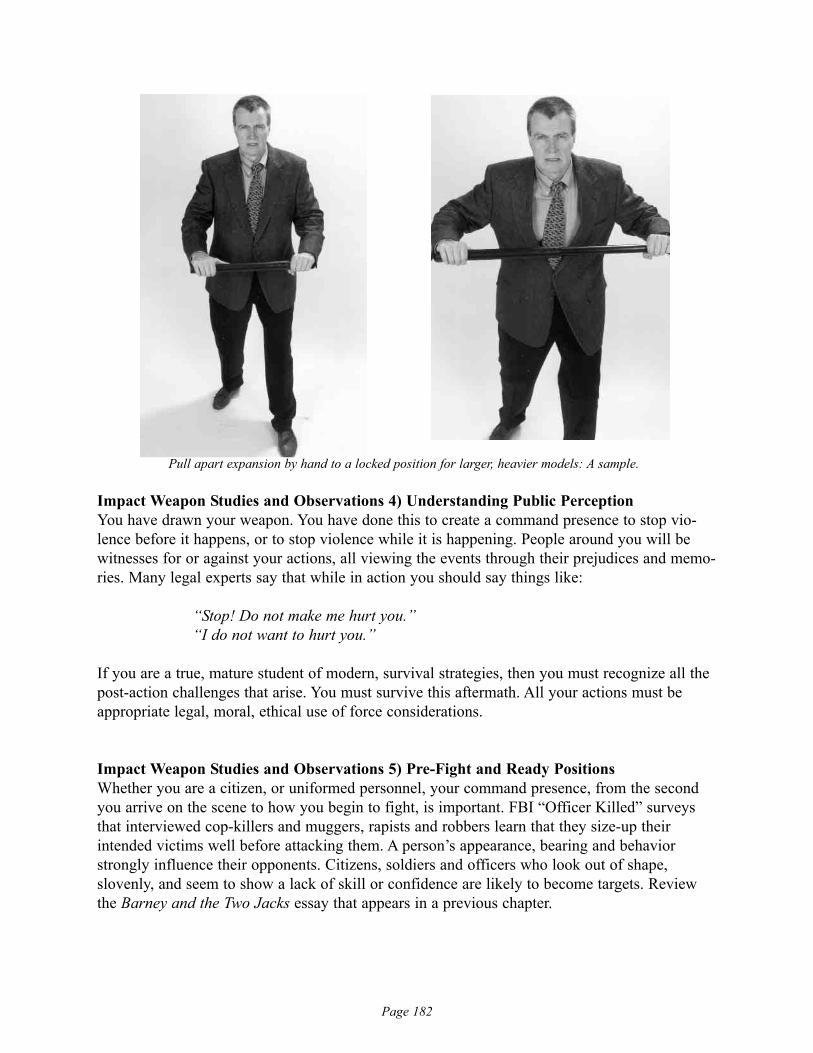
Page 182
Impact Weapon Studies and Observations 4) Understanding Public PerceptionYou have drawn your weapon. You have done this to create a command presence to stop vio-lence before it happens, or to stop violence while it is happening. People around you will bewitnesses for or against your actions, all viewing the events through their prejudices and memo-ries. Many legal experts say that while in action you should say things like:
“Stop! Do not make me hurt you.”“I do not want to hurt you.”
If you are a true, mature student of modern, survival strategies, then you must recognize all thepost-action challenges that arise. You must survive this aftermath. All your actions must beappropriate legal, moral, ethical use of force considerations.
Impact Weapon Studies and Observations 5) Pre-Fight and Ready PositionsWhether you are a citizen, or uniformed personnel, your command presence, from the secondyou arrive on the scene to how you begin to fight, is important. FBI “Officer Killed” surveysthat interviewed cop-killers and muggers, rapists and robbers learn that they size-up theirintended victims well before attacking them. A person’s appearance, bearing and behaviorstrongly influence their opponents. Citizens, soldiers and officers who look out of shape,slovenly, and seem to show a lack of skill or confidence are likely to become targets. Reviewthe Barney and the Two Jacks essay that appears in a previous chapter.
Pull apart expansion by hand to a locked position for larger, heavier models: A sample.
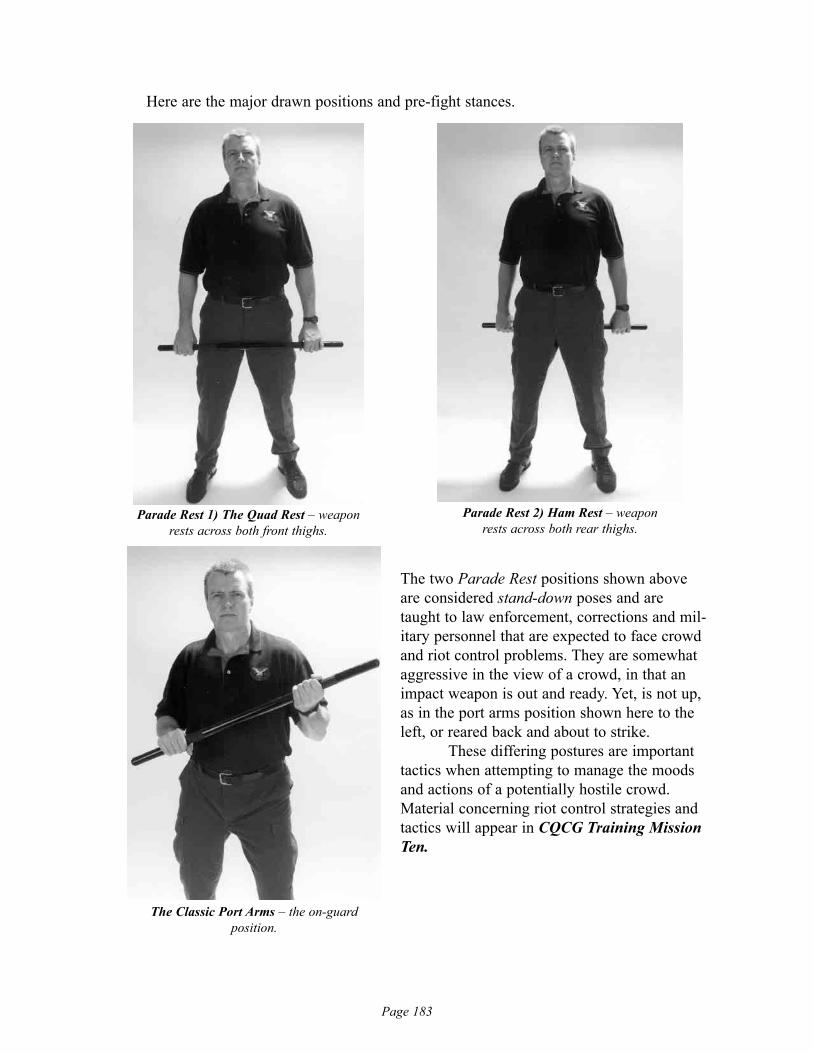
Page 183
Here are the major drawn positions and pre-fight stances.
Parade Rest 1) The Quad Rest – weapon rests across both front thighs.
Parade Rest 2) Ham Rest – weaponrests across both rear thighs.
The Classic Port Arms – the on-guard position.
The two Parade Rest positions shown aboveare considered stand-down poses and aretaught to law enforcement, corrections and mil-itary personnel that are expected to face crowdand riot control problems. They are somewhataggressive in the view of a crowd, in that animpact weapon is out and ready. Yet, is not up,as in the port arms position shown here to theleft, or reared back and about to strike.
These differing postures are importanttactics when attempting to manage the moodsand actions of a potentially hostile crowd.Material concerning riot control strategies andtactics will appear in CQCG Training MissionTen.
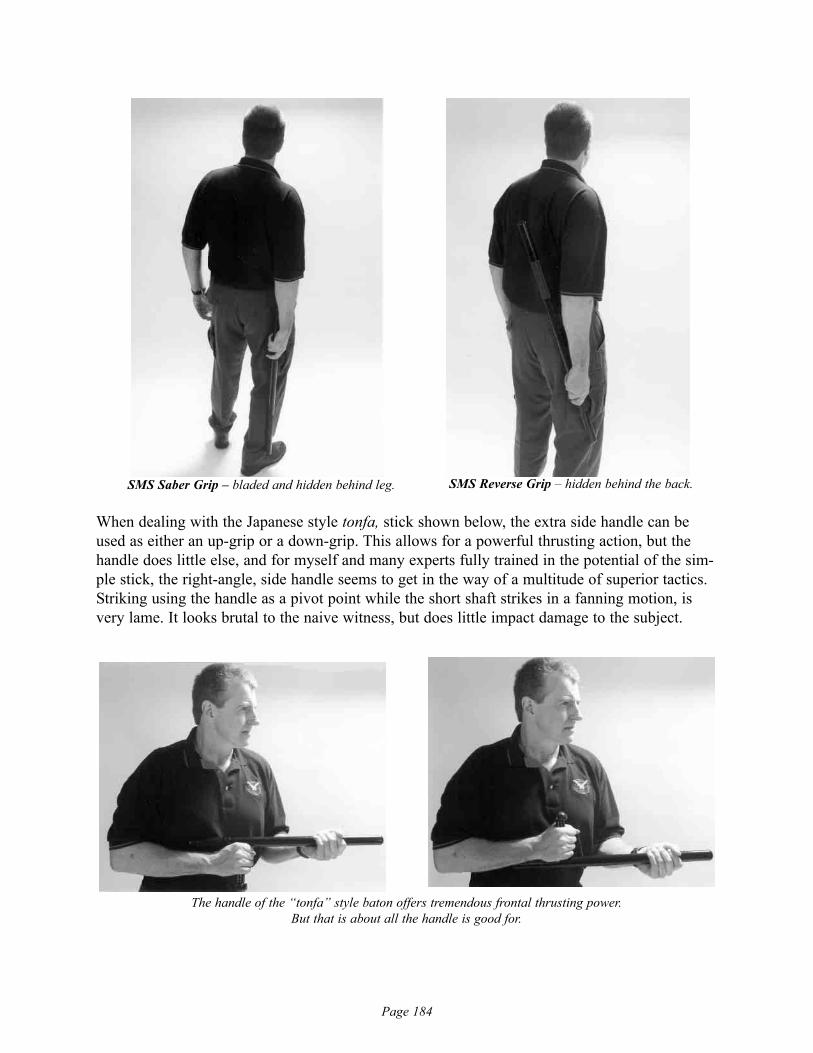
Page 184
When dealing with the Japanese style tonfa, stick shown below, the extra side handle can beused as either an up-grip or a down-grip. This allows for a powerful thrusting action, but thehandle does little else, and for myself and many experts fully trained in the potential of the sim-ple stick, the right-angle, side handle seems to get in the way of a multitude of superior tactics.Striking using the handle as a pivot point while the short shaft strikes in a fanning motion, isvery lame. It looks brutal to the naive witness, but does little impact damage to the subject.
SMS Saber Grip – bladed and hidden behind leg. SMS Reverse Grip – hidden behind the back.
The handle of the “tonfa” style baton offers tremendous frontal thrusting power. But that is about all the handle is good for.
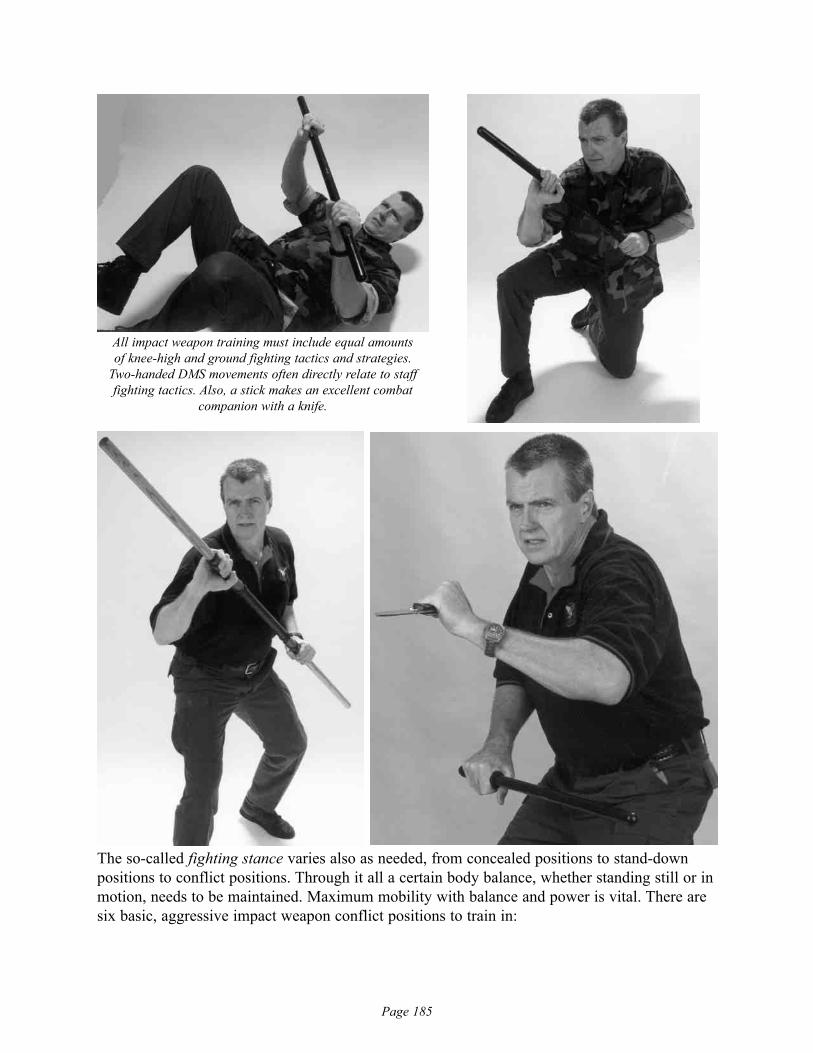
Page 185
The so-called fighting stance varies also as needed, from concealed positions to stand-downpositions to conflict positions. Through it all a certain body balance, whether standing still or inmotion, needs to be maintained. Maximum mobility with balance and power is vital. There aresix basic, aggressive impact weapon conflict positions to train in:
All impact weapon training must include equal amounts of knee-high and ground fighting tactics and strategies.
Two-handed DMS movements often directly relate to staff fighting tactics. Also, a stick makes an excellent combat
companion with a knife.
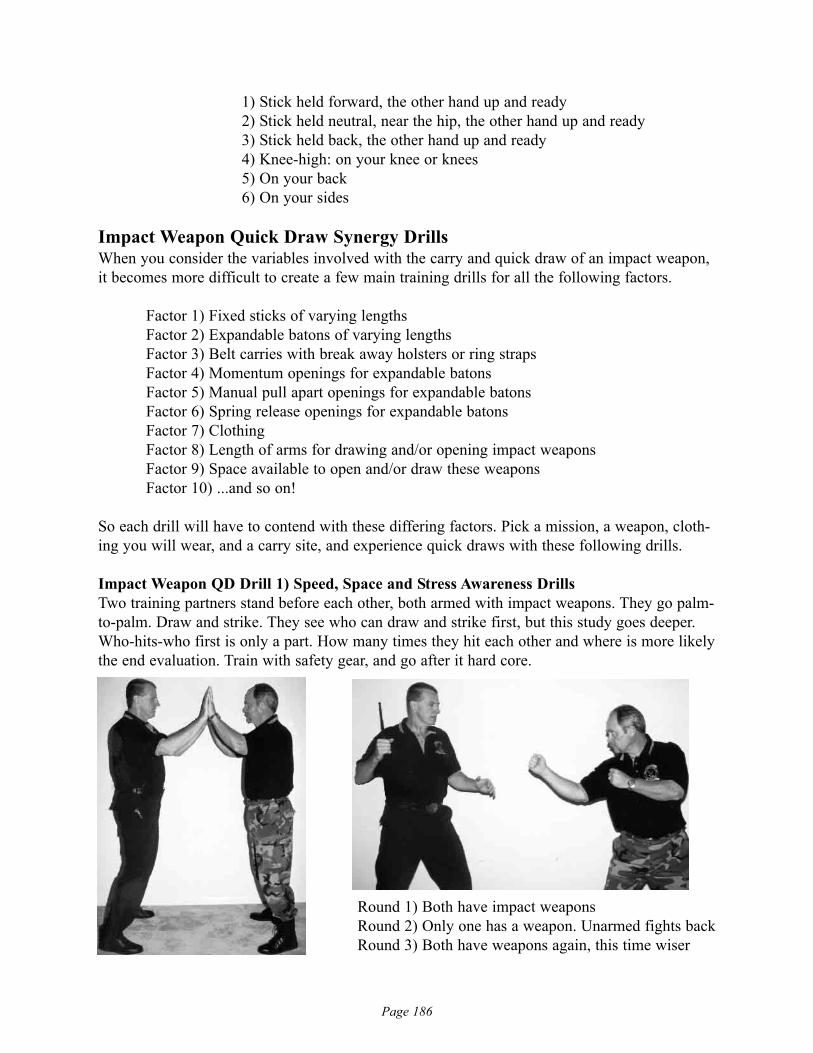
Page 186
1) Stick held forward, the other hand up and ready2) Stick held neutral, near the hip, the other hand up and ready3) Stick held back, the other hand up and ready4) Knee-high: on your knee or knees5) On your back6) On your sides
Impact Weapon Quick Draw Synergy DrillsWhen you consider the variables involved with the carry and quick draw of an impact weapon,it becomes more difficult to create a few main training drills for all the following factors.
Factor 1) Fixed sticks of varying lengthsFactor 2) Expandable batons of varying lengthsFactor 3) Belt carries with break away holsters or ring strapsFactor 4) Momentum openings for expandable batonsFactor 5) Manual pull apart openings for expandable batonsFactor 6) Spring release openings for expandable batonsFactor 7) ClothingFactor 8) Length of arms for drawing and/or opening impact weaponsFactor 9) Space available to open and/or draw these weaponsFactor 10) ...and so on!
So each drill will have to contend with these differing factors. Pick a mission, a weapon, cloth-ing you will wear, and a carry site, and experience quick draws with these following drills.
Impact Weapon QD Drill 1) Speed, Space and Stress Awareness DrillsTwo training partners stand before each other, both armed with impact weapons. They go palm-to-palm. Draw and strike. They see who can draw and strike first, but this study goes deeper.Who-hits-who first is only a part. How many times they hit each other and where is more likelythe end evaluation. Train with safety gear, and go after it hard core.
Round 1) Both have impact weaponsRound 2) Only one has a weapon. Unarmed fights backRound 3) Both have weapons again, this time wiser
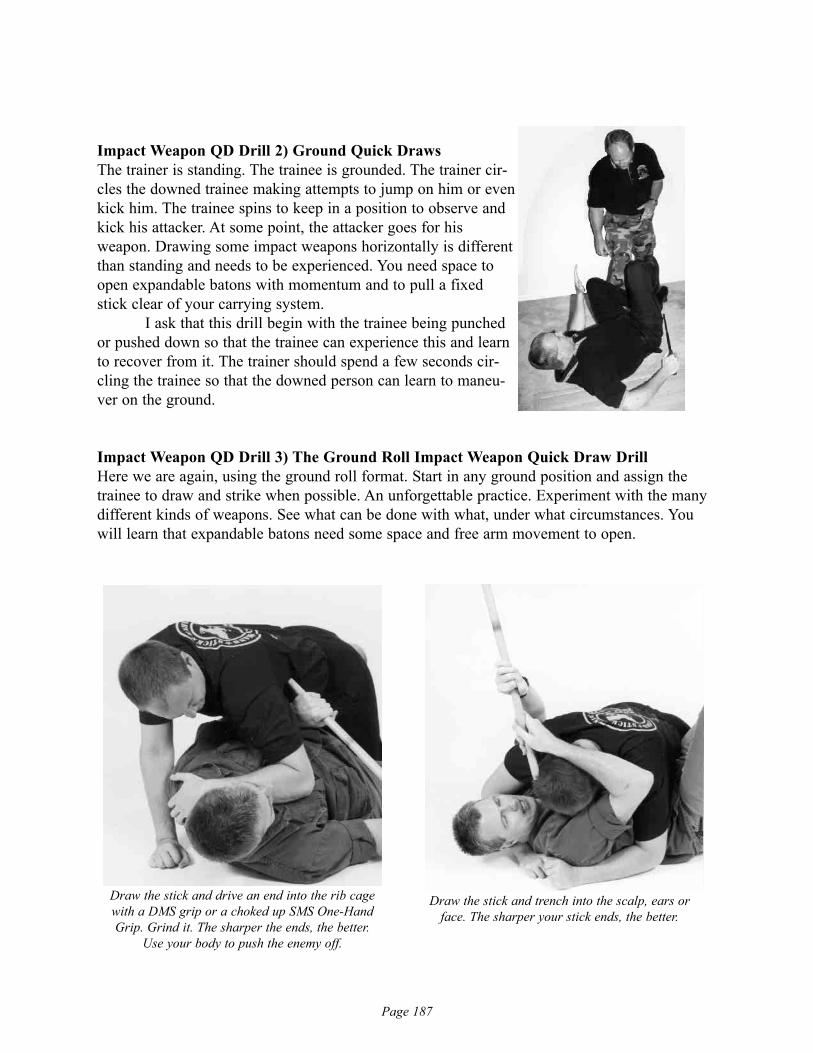
Page 187
Impact Weapon QD Drill 2) Ground Quick DrawsThe trainer is standing. The trainee is grounded. The trainer cir-cles the downed trainee making attempts to jump on him or evenkick him. The trainee spins to keep in a position to observe andkick his attacker. At some point, the attacker goes for hisweapon. Drawing some impact weapons horizontally is differentthan standing and needs to be experienced. You need space toopen expandable batons with momentum and to pull a fixedstick clear of your carrying system.
I ask that this drill begin with the trainee being punchedor pushed down so that the trainee can experience this and learnto recover from it. The trainer should spend a few seconds cir-cling the trainee so that the downed person can learn to maneu-ver on the ground.
Impact Weapon QD Drill 3) The Ground Roll Impact Weapon Quick Draw DrillHere we are again, using the ground roll format. Start in any ground position and assign thetrainee to draw and strike when possible. An unforgettable practice. Experiment with the manydifferent kinds of weapons. See what can be done with what, under what circumstances. Youwill learn that expandable batons need some space and free arm movement to open.
Draw the stick and drive an end into the rib cagewith a DMS grip or a choked up SMS One-HandGrip. Grind it. The sharper the ends, the better.
Use your body to push the enemy off.
Draw the stick and trench into the scalp, ears orface. The sharper your stick ends, the better.
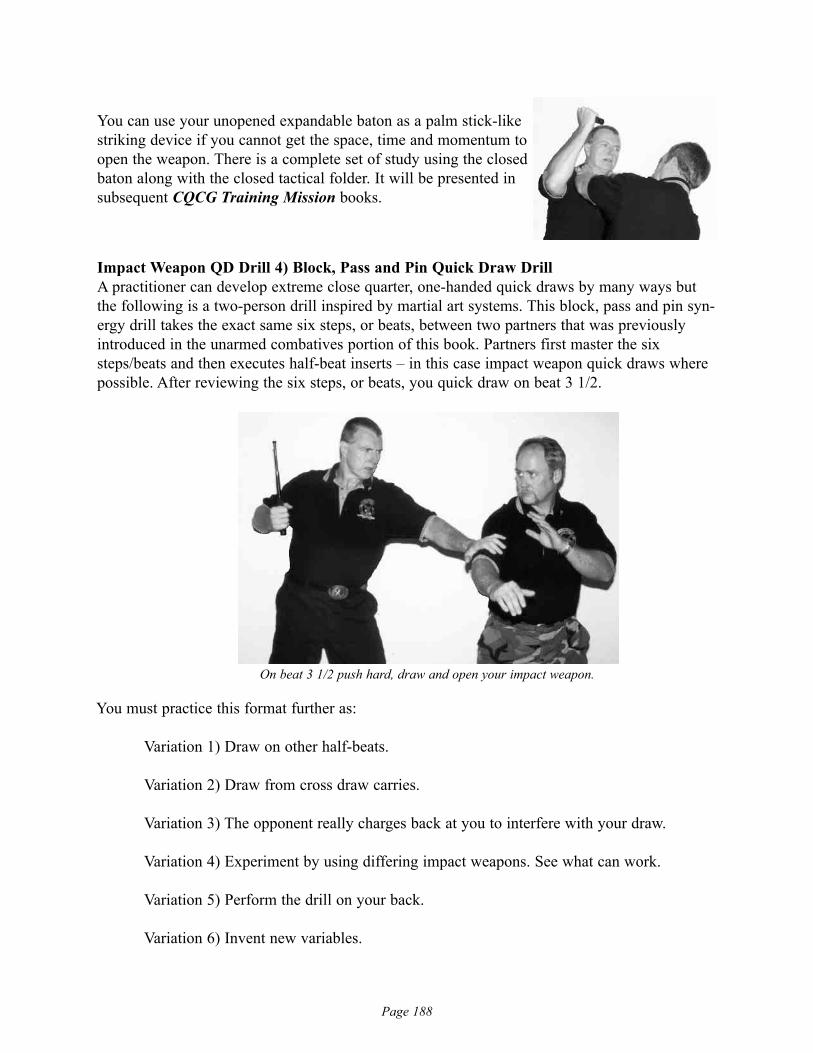
Page 188
You can use your unopened expandable baton as a palm stick-likestriking device if you cannot get the space, time and momentum toopen the weapon. There is a complete set of study using the closedbaton along with the closed tactical folder. It will be presented insubsequent CQCG Training Mission books.
Impact Weapon QD Drill 4) Block, Pass and Pin Quick Draw DrillA practitioner can develop extreme close quarter, one-handed quick draws by many ways butthe following is a two-person drill inspired by martial art systems. This block, pass and pin syn-ergy drill takes the exact same six steps, or beats, between two partners that was previouslyintroduced in the unarmed combatives portion of this book. Partners first master the sixsteps/beats and then executes half-beat inserts – in this case impact weapon quick draws wherepossible. After reviewing the six steps, or beats, you quick draw on beat 3 1/2.
On beat 3 1/2 push hard, draw and open your impact weapon.
You must practice this format further as:
Variation 1) Draw on other half-beats.
Variation 2) Draw from cross draw carries.
Variation 3) The opponent really charges back at you to interfere with your draw.
Variation 4) Experiment by using differing impact weapons. See what can work.
Variation 5) Perform the drill on your back.
Variation 6) Invent new variables.

Page 189
This is a great drill to experiment and develop impact weapon quick draws. It simulates veryclose, forearm-to-forearm conflict and gives a practitioner familiarity with this common combatcrash and clash. Each variation is like a testing ground to give you experience in what you likeand don’t like and what you think you can get away with. Remember, you have to decide if youshould, or even can, quick draw the weapon. Often you must simply fight with your emptyhands. If you do pull the weapon and the opponent is unarmed, you may try a command pres-ence order or bluff.
Impact Weapon QD Drill 5) Walking and Running Quick DrawsThe trainee starts from a distance. He approaches the trainer at a walking pace or a runningpace. The trainer draws, and the trainee must respond with a draw and fire while in motion.
As previously described in the pistol quick draw section, this drill covers the ability to draw afixed or expandable baton while moving. Walk or run toward a trainer. The trainer will give youa cue to draw your weapon. The best cue is drawing his weapon. While moving, draw and pre-pare to fight. For advanced training, run straight to the trainer and engage in a combat scenarioor freestyle sparring.
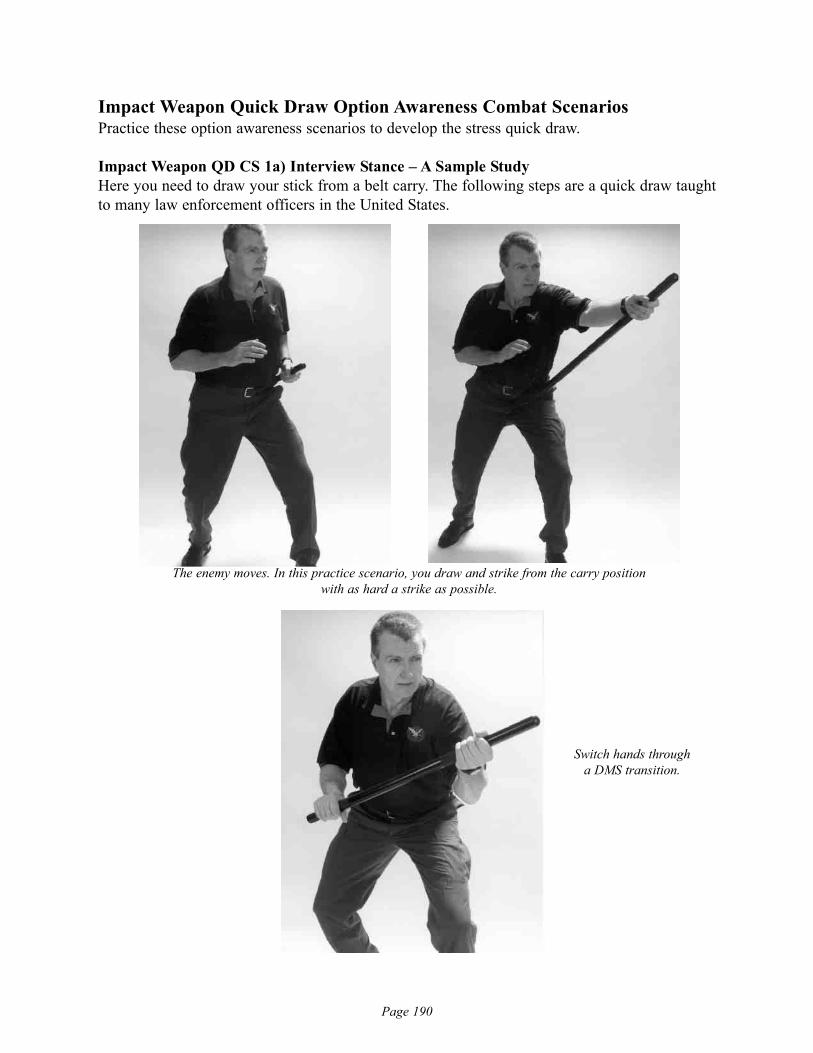
Page 190
Impact Weapon Quick Draw Option Awareness Combat ScenariosPractice these option awareness scenarios to develop the stress quick draw.
Impact Weapon QD CS 1a) Interview Stance – A Sample StudyHere you need to draw your stick from a belt carry. The following steps are a quick draw taughtto many law enforcement officers in the United States.
The enemy moves. In this practice scenario, you draw and strike from the carry position with as hard a strike as possible.
Switch hands through a DMS transition.
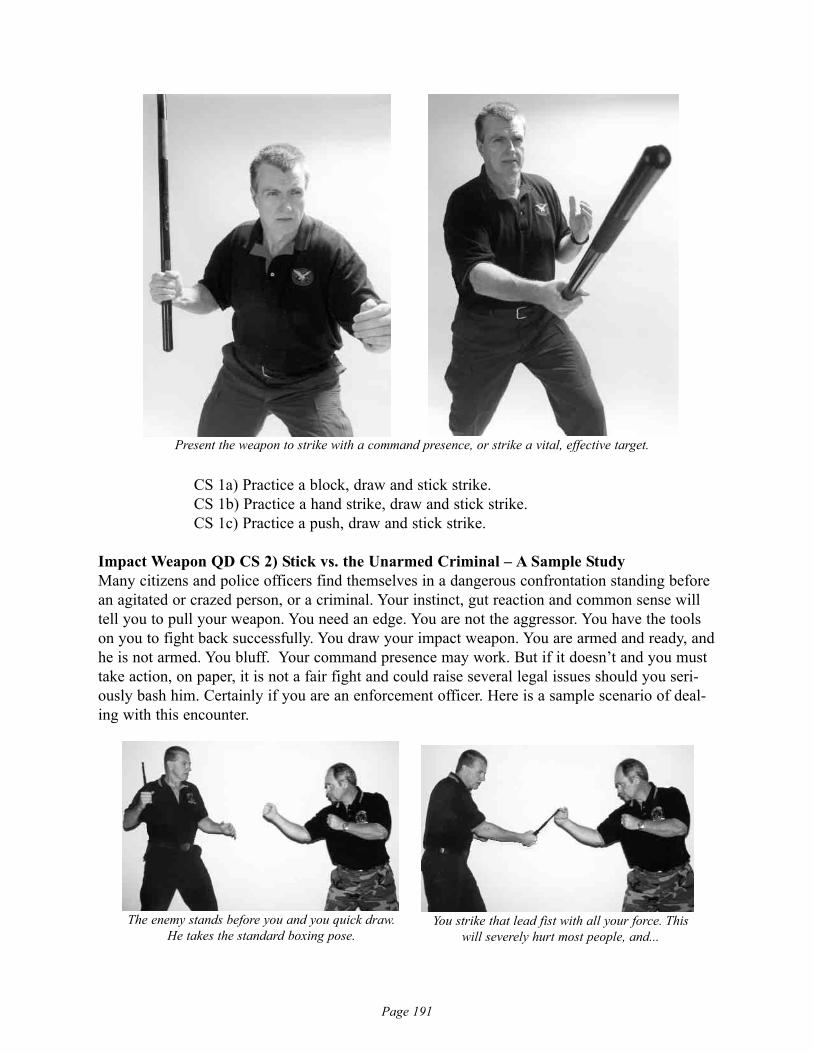
Page 191
CS 1a) Practice a block, draw and stick strike.CS 1b) Practice a hand strike, draw and stick strike.CS 1c) Practice a push, draw and stick strike.
Impact Weapon QD CS 2) Stick vs. the Unarmed Criminal – A Sample StudyMany citizens and police officers find themselves in a dangerous confrontation standing beforean agitated or crazed person, or a criminal. Your instinct, gut reaction and common sense willtell you to pull your weapon. You need an edge. You are not the aggressor. You have the toolson you to fight back successfully. You draw your impact weapon. You are armed and ready, andhe is not armed. You bluff. Your command presence may work. But if it doesn’t and you musttake action, on paper, it is not a fair fight and could raise several legal issues should you seri-ously bash him. Certainly if you are an enforcement officer. Here is a sample scenario of deal-ing with this encounter.
Present the weapon to strike with a command presence, or strike a vital, effective target.
The enemy stands before you and you quick draw.He takes the standard boxing pose.
You strike that lead fist with all your force. Thiswill severely hurt most people, and...
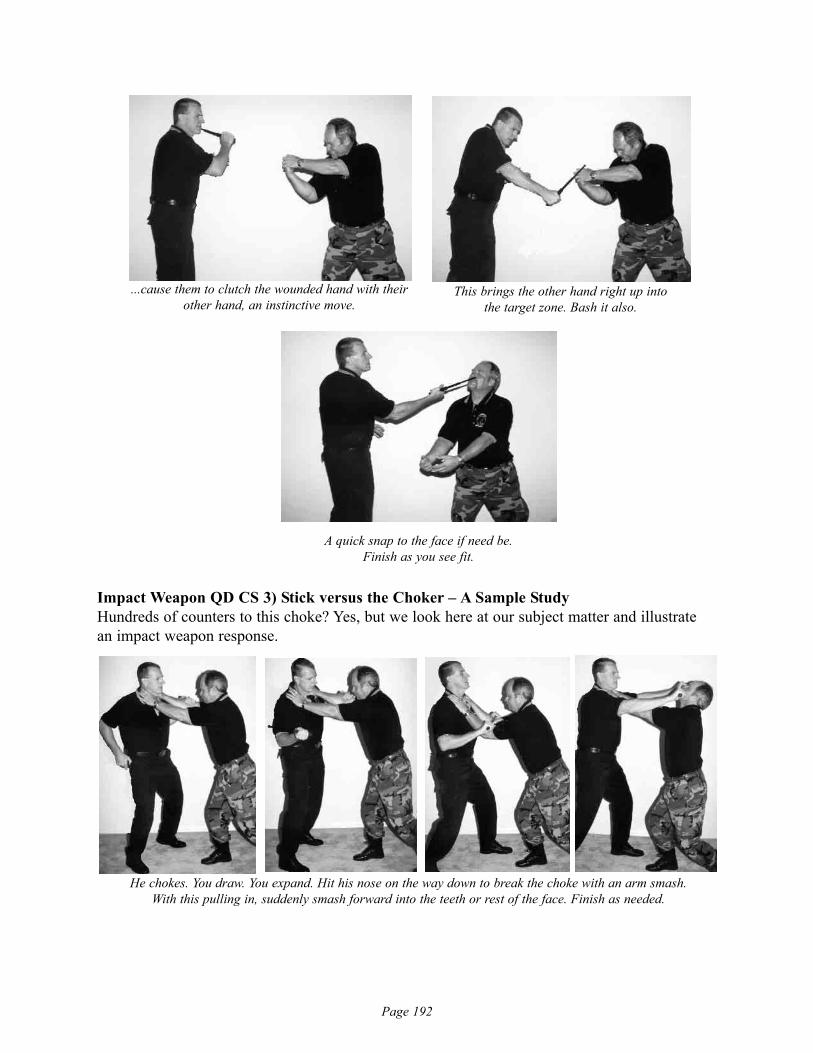
Page 192
Impact Weapon QD CS 3) Stick versus the Choker – A Sample StudyHundreds of counters to this choke? Yes, but we look here at our subject matter and illustratean impact weapon response.
...cause them to clutch the wounded hand with theirother hand, an instinctive move.
This brings the other hand right up into the target zone. Bash it also.
A quick snap to the face if need be. Finish as you see fit.
He chokes. You draw. You expand. Hit his nose on the way down to break the choke with an arm smash. With this pulling in, suddenly smash forward into the teeth or rest of the face. Finish as needed.
CQCGLEVEL ONE TESTING AND QUALIFICATIONS
FOR INSTRUCTORSHIP
Requirement 1) ExperienceExperience and perform the levels 1, 2, 3 material as many times as necessary to display sufficient understand-ing and mastery. Rated on a Pass/Fail performance.
Requirement 2) WrittenPass the written test with a score of at least 80 percent proficiency.
Requirement 3) PhysicalPerform combat scenarios with a partner as realistic as possible. Rated on a Pass/Fail performance.
_____Demonstrate any 5 combat scenarios using eye attacks.– 3 standing– 2 must be ground related
_____Demonstrate any 5 combat scenarios using a frontal snap kick.– 3 standing– 2 must be ground related
_____Demonstrate any 5 combat scenarios countering front snap kicks.– 2 standing– 3 must be ground related
_____Demonstrate any 5 combat scenarios using finger cranking takedowns.
_____Demonstrate any 3 counters to finger cranking takedowns.
_____Demonstrate any 3 combat scenarios using pistol quick draws.– 2 standing– 1 must be ground related
_____Demonstrate any 3 combat scenarios using knife quick draws.– 2 standing– 1 must be ground related
_____Demonstrate any 3 combat scenarios using an impact weapon.– 2 standing– 1 must be ground related
Page 193
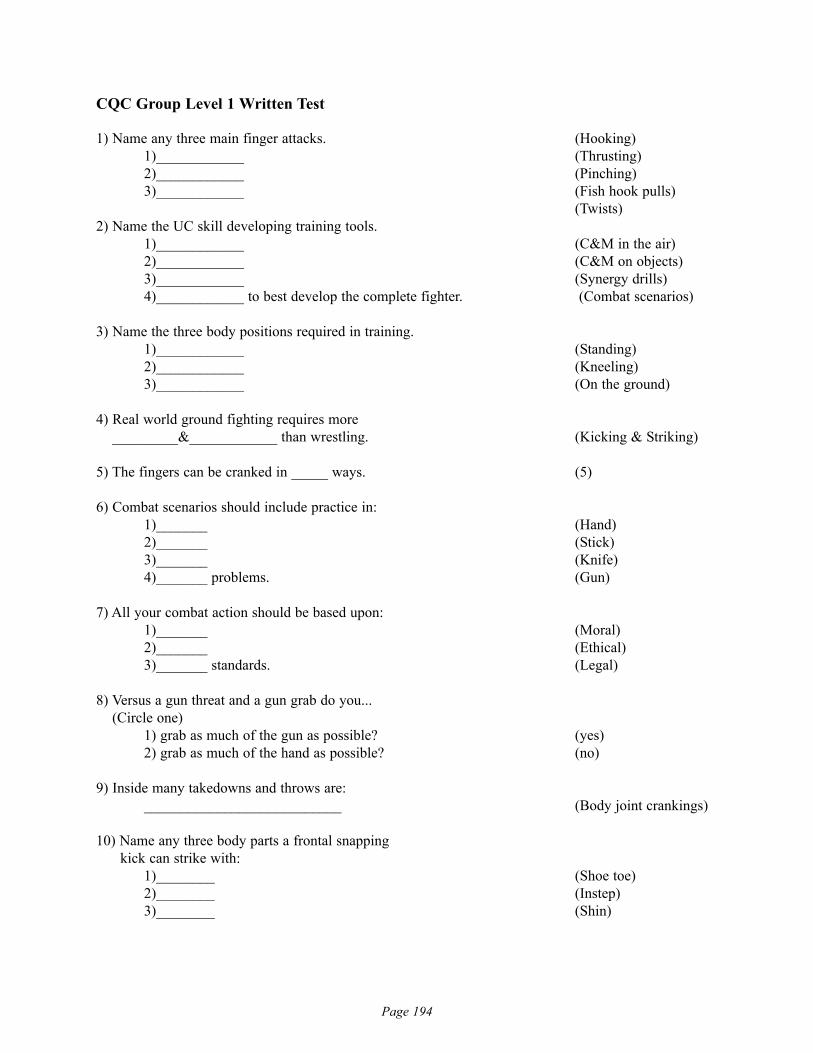
Page 194
CQC Group Level 1 Written Test
1) Name any three main finger attacks. (Hooking)1)____________ (Thrusting)2)____________ (Pinching)3)____________ (Fish hook pulls)
(Twists)2) Name the UC skill developing training tools.
1)____________ (C&M in the air)2)____________ (C&M on objects)3)____________ (Synergy drills)4)____________ to best develop the complete fighter. (Combat scenarios)
3) Name the three body positions required in training.1)____________ (Standing)2)____________ (Kneeling)3)____________ (On the ground)
4) Real world ground fighting requires more_________&____________ than wrestling. (Kicking & Striking)
5) The fingers can be cranked in _____ ways. (5)
6) Combat scenarios should include practice in:1)_______ (Hand)2)_______ (Stick)3)_______ (Knife)4)_______ problems. (Gun)
7) All your combat action should be based upon:1)_______ (Moral)2)_______ (Ethical)3)_______ standards. (Legal)
8) Versus a gun threat and a gun grab do you...(Circle one)
1) grab as much of the gun as possible? (yes)2) grab as much of the hand as possible? (no)
9) Inside many takedowns and throws are:___________________________ (Body joint crankings)
10) Name any three body parts a frontal snapping kick can strike with:
1)________ (Shoe toe)2)________ (Instep)3)________ (Shin)
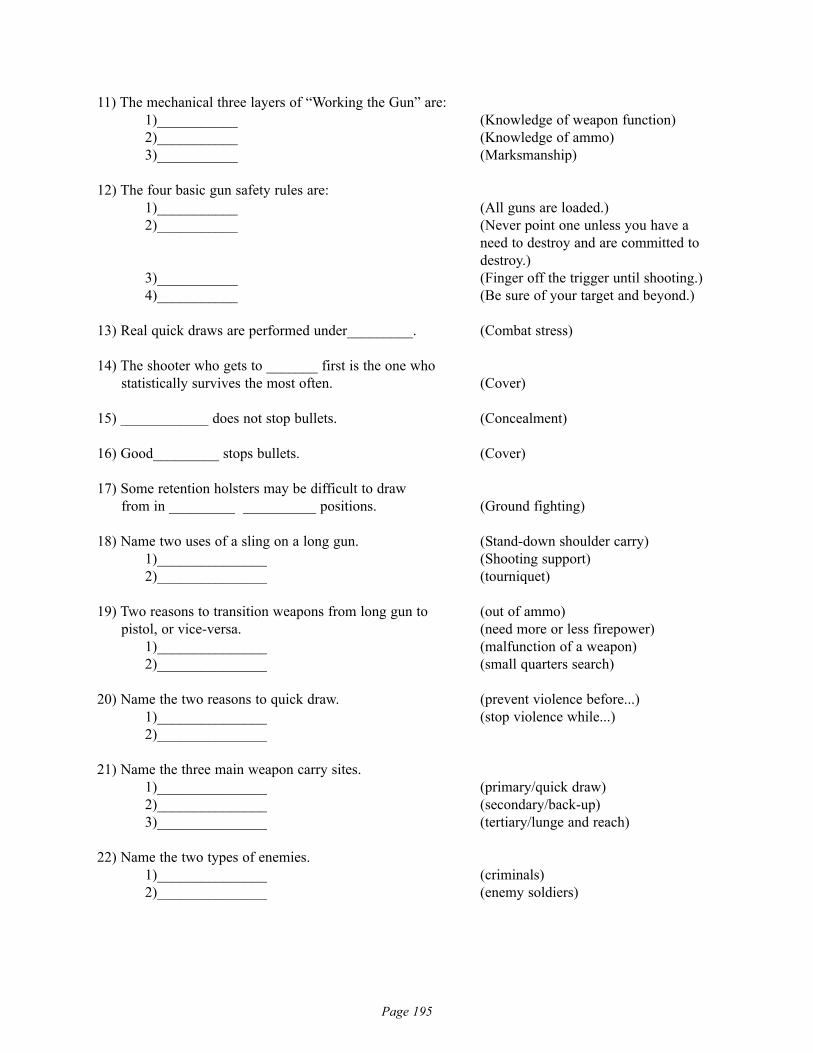
Page 195
11) The mechanical three layers of “Working the Gun” are:1)___________ (Knowledge of weapon function) 2)___________ (Knowledge of ammo)3)___________ (Marksmanship)
12) The four basic gun safety rules are:1)___________ (All guns are loaded.)2)___________ (Never point one unless you have a
need to destroy and are committed to destroy.)
3)___________ (Finger off the trigger until shooting.)4)___________ (Be sure of your target and beyond.)
13) Real quick draws are performed under_________. (Combat stress)
14) The shooter who gets to _______ first is the one whostatistically survives the most often. (Cover)
15) ____________ does not stop bullets. (Concealment)
16) Good_________ stops bullets. (Cover)
17) Some retention holsters may be difficult to drawfrom in _________ __________ positions. (Ground fighting)
18) Name two uses of a sling on a long gun. (Stand-down shoulder carry)1)_______________ (Shooting support)2)_______________ (tourniquet)
19) Two reasons to transition weapons from long gun to (out of ammo)pistol, or vice-versa. (need more or less firepower)
1)_______________ (malfunction of a weapon)2)_______________ (small quarters search)
20) Name the two reasons to quick draw. (prevent violence before...)1)_______________ (stop violence while...)2)_______________
21) Name the three main weapon carry sites.1)_______________ (primary/quick draw)2)_______________ (secondary/back-up)3)_______________ (tertiary/lunge and reach)
22) Name the two types of enemies.1)_______________ (criminals)2)_______________ (enemy soldiers)
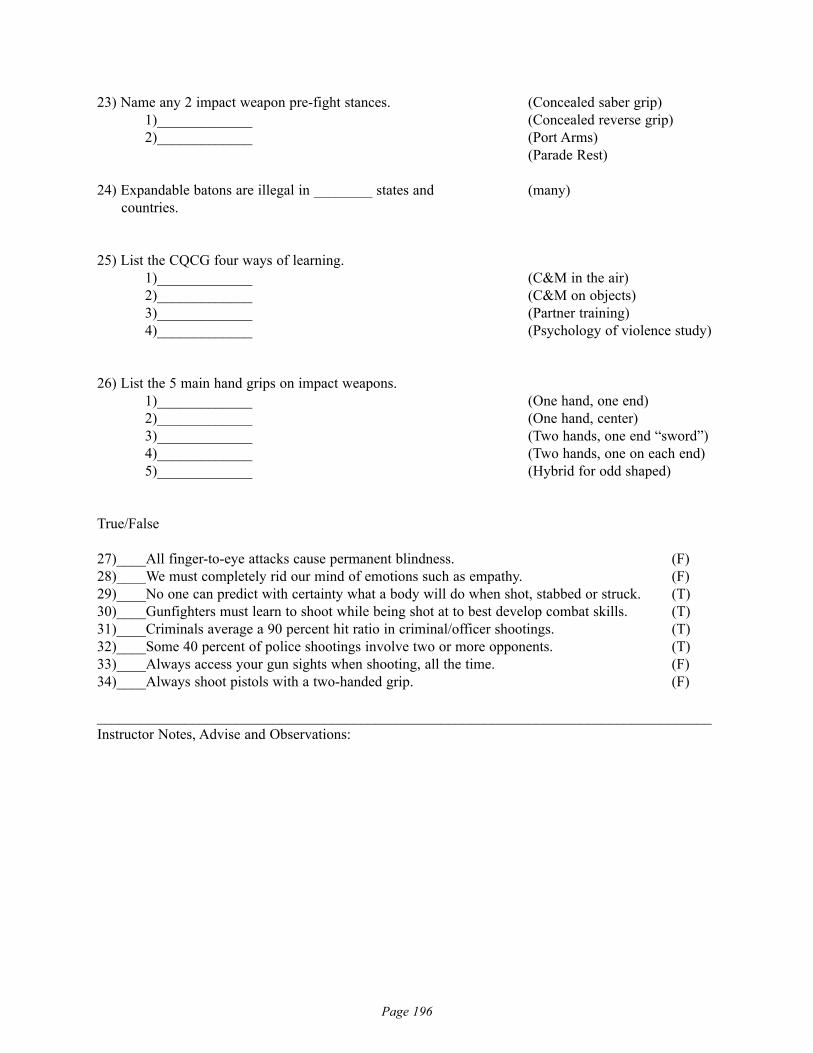
Page 196
23) Name any 2 impact weapon pre-fight stances. (Concealed saber grip)1)_____________ (Concealed reverse grip)2)_____________ (Port Arms)
(Parade Rest)
24) Expandable batons are illegal in ________ states and (many)countries.
25) List the CQCG four ways of learning.1)_____________ (C&M in the air)2)_____________ (C&M on objects)3)_____________ (Partner training)4)_____________ (Psychology of violence study)
26) List the 5 main hand grips on impact weapons.1)_____________ (One hand, one end)2)_____________ (One hand, center)3)_____________ (Two hands, one end “sword”)4)_____________ (Two hands, one on each end)5)_____________ (Hybrid for odd shaped)
True/False
27)____All finger-to-eye attacks cause permanent blindness. (F)28)____We must completely rid our mind of emotions such as empathy. (F)29)____No one can predict with certainty what a body will do when shot, stabbed or struck. (T)30)____Gunfighters must learn to shoot while being shot at to best develop combat skills. (T)31)____Criminals average a 90 percent hit ratio in criminal/officer shootings. (T)32)____Some 40 percent of police shootings involve two or more opponents. (T)33)____Always access your gun sights when shooting, all the time. (F)34)____Always shoot pistols with a two-handed grip. (F)
____________________________________________________________________________________Instructor Notes, Advise and Observations:

Page 197
DEDICADEDICATIONTION
This book is dedicated to Staff Sergeant Thomas Gaston, (U.S. Army, RET.),combat veteran of both the Korean and Vietnam Wars, whom I served under in
South Korea in the mid 1970’s. His experience, sense of humor and unique NCO leadership skills were a major influence in my personal and professional life.
...and to...
“The girl with the golden hair, she is my inspiration. She helps to set the mood.”Leslie West, Mountain
Special Special ThanksThanks
Thanks to Photographer Rick Owens, Editors Jane Eden and Beverly McHaffey, Stuntmen Ronny Young, Tom Pierce, Darren Bogner, Keith Terry,
Mike Gillette and Tom Barnhart.

Page 198
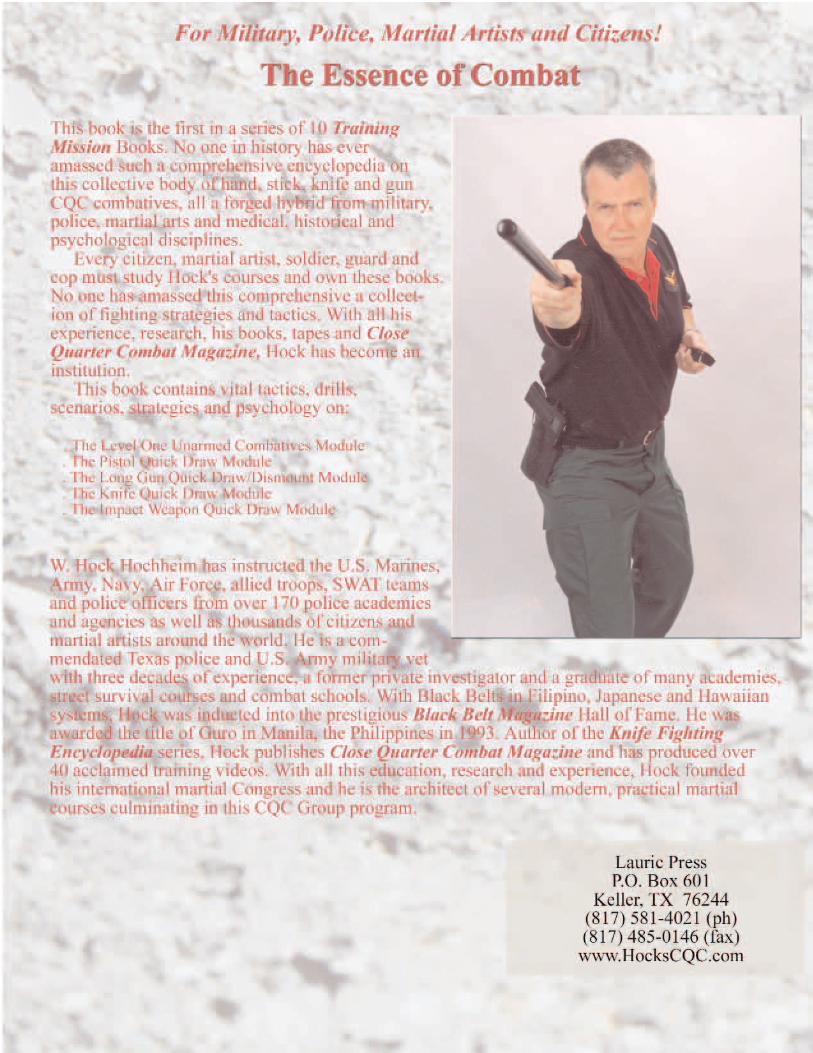
Related Documents